ES
FR
EN
English
Français
Español
Merci d'avoir choisi ce Clavier Arrangeur Professionnel Yamaha !
Nous vous conseillons de lire attentivement ce mode d'emploi afin de tirer pleinement profit des
fonctions avancées et très utiles de votre instrument. Nous vous recommandons également de
garder ce manuel à portée de main pour toute référence ultérieure.
Avant d'utiliser l'instrument, lisez attentivement la section « PRÉCAUTIONS D'USAGE »
aux pages 4 et 5.
Le damos las gracias por adquirir esta Estación de Trabajo Digital de Yamaha.
La lectura detenida de este manual le permitirá disfrutar de las útiles y avanzadas funciones del
instrumento. Recomendamos guardar el manual en un lugar seguro y accesible, para futuras
consultas.
Antes de utilizar el instrumento, lea las “PRECAUCIONES”, en las páginas 4 y 5.
Owner’s Manual
Mode d'emploi
Manual de instrucciones
Thank you for purchasing this Yamaha Arranger Workstation!
This instrument provides powerful performance features including versatile effects and sounds. We recommend that
you read this manual carefully so that you can fully take advantage of the advanced and convenient functions of the
instrument. We also recommend that you keep this manual in a safe and handy place for future reference.
Before using the instrument, be sure to read “PRECAUTIONS” on pages 4 – 5.
2 PSR-SX620 Owner’s Manual
(1003-M06 plate bottom en 01)
The model number, serial number, power requirements, etc., may be found on or near the name plate, which is at the
bottom of the unit. You should note this serial number in the space provided below and retain this manual as a permanent
record of your purchase to aid identification in the event of theft.
Model No.
Serial No.
(1003-M06 plate bottom fr 01)
Le numéro de modèle, le numéro de série, l'alimentation requise, etc., se trouvent sur ou près de la plaque signalétique du
produit, située dans la partie inférieure de l'unité. Notez le numéro de série dans l'espace fourni cidessous et conservez ce
manuel en tant que preuve permanente de votre achat afin de faciliter l'identification du produit en cas de vol.
N° de modèle
N° de série
(1003-M06 plate bottom es 01)
El número de modelo, el número de serie, los requisitos de alimentación, etc. pueden encontrarse en la placa de
identificación o cerca de ella. Esta placa se encuentra en la parte inferior de la unidad. Debe anotar dicho número en el
espacio proporcionado a continuación y conservar este manual como comprobante permanente de su compra para
facilitar la identificación en caso de robo.
Nº de modelo
Nº de serie

PSR-SX620 Owner’s Manual 3
1. IMPORTANT NOTICE: DO NOT MODIFY THIS UNIT!
This product, when installed as indicated in the instructions contained in this manual, meets FCC requirements.
Modifications not expressly approved by Yamaha may void your authority, granted by the FCC, to use the product.
2. IMPORTANT:
When connecting this product to accessories and/or another product use only high quality shielded cables. Cable/s
supplied with this product MUST be used. Follow all installation instructions. Failure to follow instructions could void your
FCC authorization to use this product in the USA.
3. NOTE:
This product has been tested and found to comply with the requirements listed in FCC Regulations, Part 15 for Class “B”
digital devices. Compliance with these requirements provides a reasonable level of assurance that your use of this product
in a residential environment will not result in harmful interference with other electronic devices. This equipment generates/
uses radio frequencies and, if not installed and used according to the instructions found in the users manual, may cause
interference harmful to the operation of other electronic devices. Compliance with FCC regulations does not guarantee that
interference will not occur in all installations. If this product is found to be the source of interference, which can be
determined by turning the unit “OFF” and “ON”, please try to eliminate the problem by using one of the following measures:
- Relocate either this product or the device that is being affected by the interference.
- Utilize power outlets that are on different branch (circuit breaker or fuse) circuits or install AC line filter/s.
- In the case of radio or TV interference, relocate/reorient the antenna. If the antenna lead-in is 300 ohm ribbon lead,
change the lead-in to co-axial type cable.
If these corrective measures do not produce satisfactory results, please contact the local retailer authorized to distribute
this type of product. If you cannot locate the appropriate retailer, please contact Yamaha Corporation of America, 6600
Orangethorpe Avenue, Buena Park, CA 90620, U.S.A.
The above statements apply ONLY to those products distributed by Yamaha Corporation of America or its subsidiaries.
(529-M04 FCC class B YCA 02)
FCC INFORMATION (U.S.A.)
COMPLIANCE INFORMATION STATEMENT
(Supplier’s declaration of conformity procedure)
Responsible Party : Yamaha Corporation of America
Address : 6600 Orangethorpe Avenue, Buena Park, CA 90620, U.S.A.
Telephone : 714-522-9011
Type of Equipment : Digital Keyboard
Model Name : PSR-SX620
(529-M02 FCC sdoc YCA 03)
This device complies with Part 15 of the FCC Rules.
Operation is subject to the following two conditions:
1) this device may not cause harmful interference, and
2) this device must accept any interference received including interference that may cause undesired operation.
4 PSR-SX620 Owner’s Manual
PRECAUTIONS
PLEASE READ CAREFULLY BEFORE PROCEEDING
Especially in the case of children, a guardian should provide guidance
on how to properly use and handle the product before actual use.
Please keep this manual in a safe and handy place for future reference.
WARNING
Always follow the basic precautions listed below to avoid the possibility of serious injury or even death from electrical
shock, short-circuiting, damages, fire or other hazards. These precautions include, but are not limited to, the
following:
• Do not place the power cord near heat sources such as heaters or
radiators. Also, do not excessively bend or otherwise damage the
cord, or place heavy objects on it.
• Do not touch the product or the power plug during an electrical
storm.
• Use only the correct voltage specified for the product. The required
voltage is printed on the name plate of the product
• Use only the supplied or the specified AC adaptor (page 119)/
power cord.
• Do not use the supplied AC adaptor/power cord for other devices.
• Check the power plug periodically and remove any dirt or dust
which may have accumulated on it.
• Insert the power plug firmly all the way into the AC outlet. Using
the product when it is not plugged in sufficiently can cause dust to
accumulate on the plug, possibly resulting in fire or skin burns.
• When setting up the product, make sure that the AC outlet you are
using is easily accessible. If some trouble or malfunction occurs,
immediately turn off the power switch and disconnect the plug
from the outlet. Even when the power switch is turned off, as long
as the power cord is not unplugged from the wall AC outlet, the
product will not be disconnected from the power source.
• Do not connect the product to an electrical outlet using a multi-
plug outlet extender. Doing so can result in lower sound quality, or
possibly cause fire at or around the outlet.
• When disconnecting the power plug, always hold the plug itself
and not the cord. Pulling by the cord can damage it and cause
electric shock or fire.
• If not using the product for long periods of time, be sure to pull the
power plug from the AC outlet.
• This product contains no user-serviceable parts. Do not attempt to
disassemble the internal parts or modify them in any way.
• Do not expose the product to rain, use it near water or in damp or
wet conditions, or place on it any containers (such as vases,
bottles or glasses) containing liquids which might spill into any
openings or places where water may drop. A liquid such as water
getting into the product may cause fire, electric shock, or
malfunctions.
• Use the AC adaptor indoors only. Do not use it in any wet
environments.
• Never insert or remove a power plug with wet hands.
• Do not place any burning items or open flames near the product,
since they may cause fire.
• Radio waves from this product may affect electro-medical devices,
such as a heart pacemaker implant or defibrillator implant.
- Do not use the product near medical devices or inside medical
facilities. Radio waves from this product may affect electro-
medical devices.
- Do not use the product within 15 cm (6 in.) of persons with a
heart pacemaker implant or a defibrillator implant.
• Be sure to read the manual of the device to be connected, and
follow the instructions. Failure to observe this may cause fire,
overheating, rupture, or malfunction.
• If any of the following problems occur, immediately turn off the
power switch and disconnect the power plug from the outlet.
Finally have the device inspected by Yamaha service personnel.
- The power cord or plug becomes frayed or damaged.
- Unusual smells or smoke are emitted.
- Some object, or water has been dropped into the product.
- There is a sudden loss of sound during use of the product.
- Cracks or other visible damage appear on the product.
Power supply
Do not disassemble
Water warning
Fire warning
Wireless unit
Connections
If you notice any abnormality
DMI-12 1/2
PSR-SX620 Owner’s Manual 5
CAUTION
Always follow the basic precautions listed below to avoid the possibility of physical injury to you or others, or damage
to the product or other property. These precautions include, but are not limited to, the following:
• Do not place the product in an unstable position or a location with
excessive vibration, where it might accidentally fall over, resulting
in malfunction and even injury.
• Before moving the product, remove all connected cables, to
prevent damage to the cables or injury to anyone who might trip
over them.
• Use only the stand specified for the product. When attaching it, use
the included screws only. Failure to do so could result in the
product falling over, causing damage to the product or injury.
• Before connecting the product to other devices, turn off the power
for all devices. Before turning the power on or off for all devices,
set all volume levels to minimum.
• Be sure to set the volumes of all devices at their minimum levels
and gradually raise the volume controls while playing the product
to set the desired listening level.
• Do not insert your finger or hand in any gaps on the product.
• Do not insert foreign materials such as metal or paper into any
openings or gaps of the product. Failure to observe this may cause
fire, electric shock, or malfunctions.
• Do not rest your weight on, or place heavy objects on the product,
and do not use excessive force on the buttons, switches or
connectors.
• Do not use the product or headphones for a long period of time at a
high or uncomfortable volume level, since this can cause
permanent hearing loss. If you experience any hearing loss or
ringing in the ears, consult a physician.
• Remove the power plug from the AC outlet before cleaning the unit.
Failure to observe this may cause electric shock.
Always turn the power off when the instrument is not in use.
Even when the [ ] (Standby/On) switch is in standby status (display is off), electricity is still flowing to the instrument at the minimum level.
When you are not using the instrument for a long time, make sure you unplug the power cord from the wall AC outlet.
Location
Connections
Handling
Yamaha cannot be held responsible for damage caused by improper use or modifications to the instrument, or data that is lost or destroyed.
DMI-12 2/2

6 PSR-SX620 Owner’s Manual
NOTICE
To avoid the possibility of malfunction/ damage to the product, damage to data, or damage to other property, follow the notices below.
Handling
• Do not connect this product to a public Wi-Fi and/or Internet service
directly. Only connect this product to the Internet through a router with
strong password protections. Consult your router manufacturer for
information on optimum security practices.
• Do not use this product in the vicinity of a TV, radio, stereo equipment,
mobile phone, or other electric devices. Otherwise, this product or the
other device may generate noise.
• When you use the product along with an app on your smart device,
such as a smartphone or tablet, we recommend that you enable
“Airplane Mode” on the device to avoid noise caused by
communication. When turning on airplane mode, Wi-Fi or Bluetooth®
settings may be turned off. Make sure that the setting is turned on
before use.
• Do not expose the product to excessive dust or vibrations, or extreme
cold or heat (such as in direct sunlight, near a heater, or in a car during
the day) to prevent the possibility of disfiguration, damage to the
internal components or unstable operation. (Verified operating
temperature range: 5° – 40°C, or 41° – 104°F.)
• Do not place vinyl, plastic or rubber objects on the product, since this
might discolor the product.
Maintenance
• When cleaning the product, use a soft and dry (or slightly damp) cloth.
Do not use paint thinners, solvents, alcohol, cleaning fluids, or
chemical-impregnated wiping cloths.
Saving data
• Edited Song/Style/Voice/MIDI setup data, etc. are lost when you turn
off the power to the product. This also occurs when the power is turned
off by the Auto Power Off function (
page 17
). Save the data to the
product, or to a USB flash drive/an external device such as a computer
(
page 28
). However, the data saved to the product may be lost due to
some failure, an operational mistake, etc. Save your important data
onto USB flash drive/an external device such as a computer (
page 28
).
Before using a USB flash drive, make sure to refer to
page 101
.
• To protect against data loss through USB flash drive damage, we
recommend that you save your important data onto spare USB flash
drive or an external device such as a computer as backup data.
Copyright notice
The followings are the title, credits and copyright notices for the song pre-installed in this instrument.
Blinding Lights
Words and Music by Abel Tesfaye, Jason Quenneville, Max Martin, Oscar Holter and Ahmad Balshe
Copyright © 2019 UNIVERSAL MUSIC WORKS, XO MUSIC PUBLISHING LLC, HI-FI ASSET ACQUSITION CO, L.P. GMR,
UNIVERSAL MUSIC CORP., SAL AND CO LP, MXM, WC MUSIC CORP., SONGS OF WOLF COUSINS and BOTA MUSIC
PUBLISHING
All Rights for XO MUSIC PUBLISHING LLC and HI-FI ASSET ACQUSITION CO, L.P. GMR Administered by UNIVERSAL
MUSIC WORKS
All Rights for SAL AND CO LP Administered by UNIVERSAL MUSIC CORP.
All Rights for MXM Administered by KOBALT SONGS MUSIC PUBLISHING
All Rights for SONGS OF WOLF COUSINS and BOTA MUSIC PUBLISHING Administered by WC MUSIC CORP.
All Rights Reserved Used by Permission
PSR-SX620 Owner’s Manual 7
Included Accessories
Included Accessories
• Owner’s Manual (this book)
• Online Member Product Registration
•Music rest
• AC adaptor*, Power cord*
*May not be included depending on your area. Check with your Yamaha
dealer.
About the Manuals
This instrument has the following documents and instructional materials.
Included Document
• Owner’s Manual (this book)
Provides overall explanations of the PSR-SX620 basic functions.
Online Materials
• Reference Manual (only in English, French, German, Spanish, Portuguese, Chinese, and Indonesian)
Explains advanced features of the instrument, not explained in the Owner’s Manual. For example, you can learn how to create
original Styles, Songs or Multi Pads, or find detailed explanations of specific parameters.
• Data List
Contains various important preset content lists such as Voices, Styles, Effects, as well as MIDI-related information.
• Computer-related Operations
Includes instructions on connecting this instrument to a computer, and operations related to transmitting/receiving MIDI data.
• Smart Device Connection Manual (only in English, French, German, Spanish, Portuguese, Chinese, and
Indonesian)
Explains how to connect the instrument to smart devices, such as smartphone or tablet, etc.
• MIDI Basics (only in English, French, German and Spanish)
If you want to know more about MIDI and how to use it, refer to this introductory book.
To obtain these materials, access the Yamaha Downloads website.
PSR-SX620 related downloads https://manual.yamaha.com/mi/rt/psrsx620/downloads/
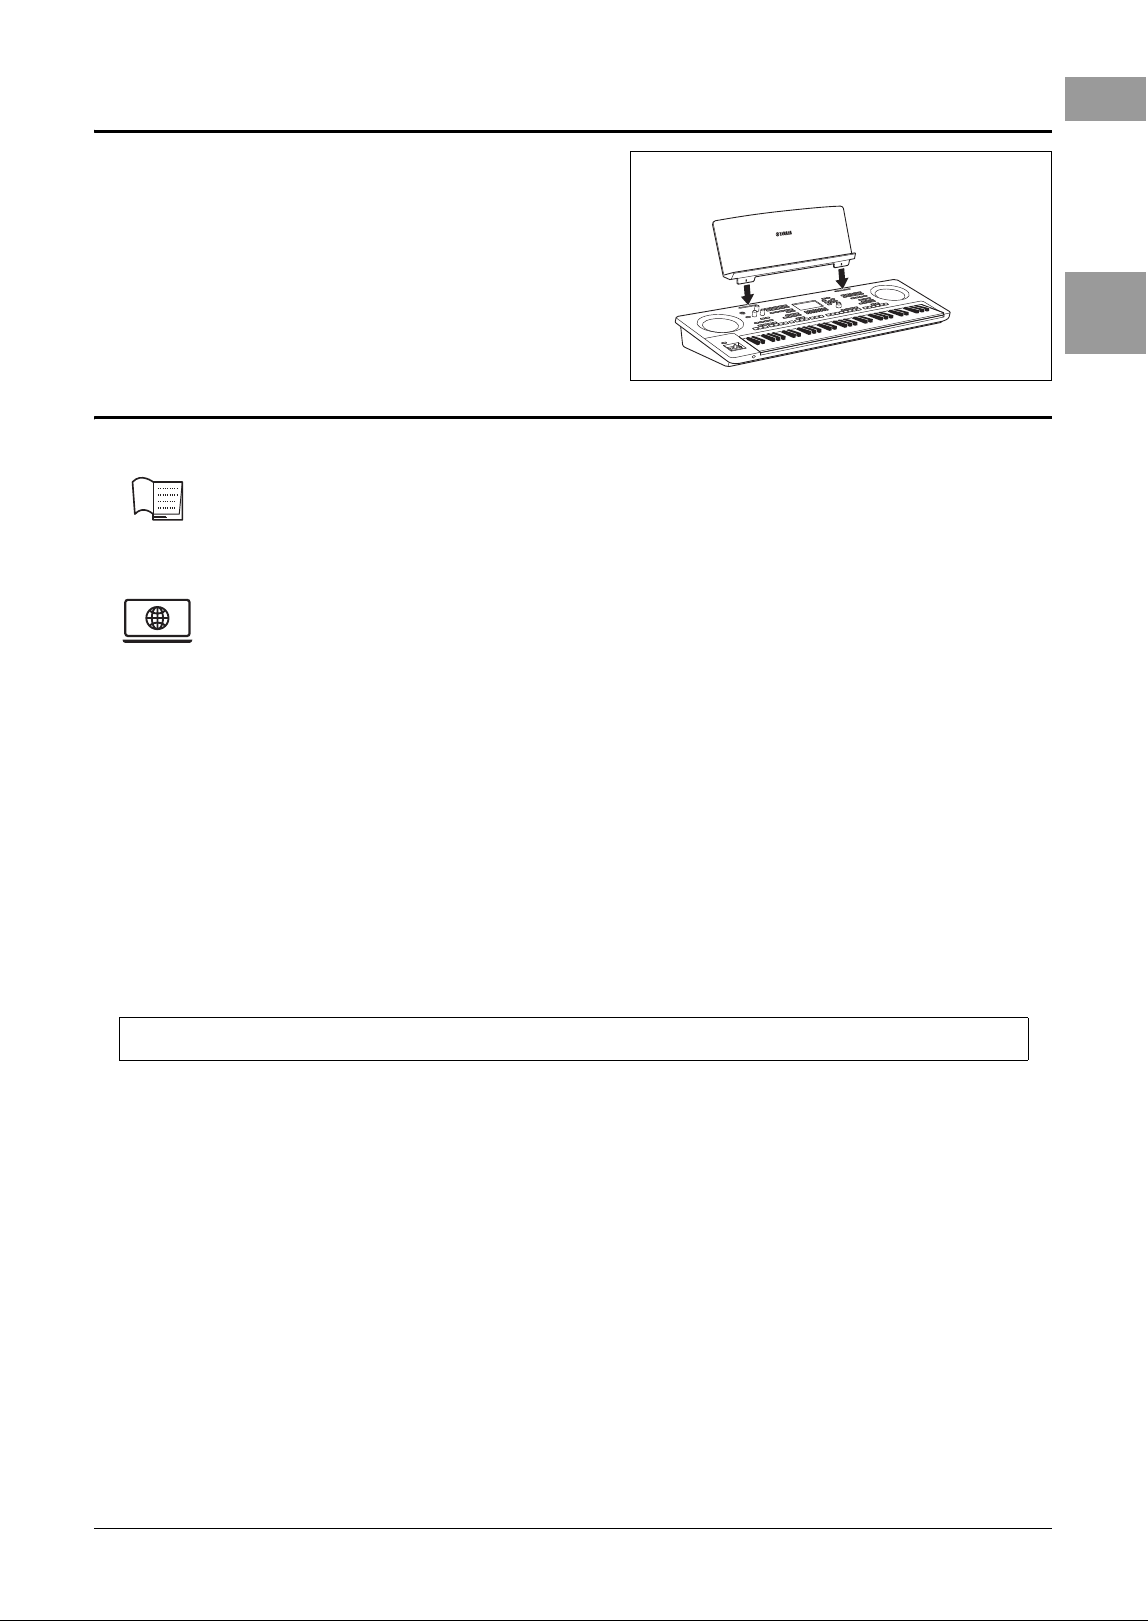
Insert the music rest into
the slots as shown.
Attaching the Music Rest
8 PSR-SX620 Owner’s Manual
Formats
“GM (General MIDI)” is one of the most common Voice allocation formats. “GM System Level 2” is a standard specification
that enhances the original “GM” and improves Song data compatibility. It provides for increased polyphony, greater Voice
selection, expanded Voice parameters, and integrated effect processing.
XG is a major enhancement of the GM System Level 1 format, and was developed by Yamaha specifically to provide more
Voices and variations, as well as greater expressive control over Voices and effects, and to ensure compatibility of data well
into the future.
The Yamaha XF format enhances the SMF (Standard MIDI File) standard with greater functionality and open-ended expand-
ability for the future. This instrument is capable of displaying lyrics when an XF file containing lyric data is played.
“SFF (Style File Format)” is an original Style file format by Yamaha which uses a unique conversion system to provide high-
quality automatic accompaniment based on a wide range of chord types. “SFF GE (Guitar Edition)” is an enhanced format of
SFF, which features improved note transposition for guitar tracks.
Information
About copyrights
• The copyright of the “content”
*1
installed in this product belongs to Yamaha Corporation or its copyright holder. Except as permitted
by copyright laws and other relevant laws, such as copying for personal use, it is prohibited to “reproduce or divert”
*2
without the
permission of the copyright holder. When using the content, consult with a copyright expert.
• If you create music or perform with the contents through the original use of the product, and then record and distribute them, the
permission of Yamaha Corporation is not required regardless of whether the distribution method is paid or free of charge.
*1: The word “content” includes a computer program, audio data, Accompaniment Style data, MIDI data, waveform data, voice
recording data, music score, and score data, etc.
*2: The phrase “reproduce or divert” includes taking out the content itself in this product, or recording and distributing it without
changes in a similar manner.
About functions/data bundled with the instrument
• Some of the preset Songs have been edited for length or arrangement, and may not be exactly the same as the original.
• This device is capable of using various types/formats of music data by optimizing them to the proper format music data for use with
the device in advance. As a result, this device may not play them back precisely as their producers or composers originally intended.
• The bitmap fonts used in this product have been provided by and are the property of Ricoh Co., Ltd.
About this manual
• The illustrations and LCD screens as shown in this manual are for instructional purposes only.
• Windows is a registered trademark of Microsoft(R) Corporation in the United States and other countries.
• Wi-Fi is a registered trademark of Wi-Fi Alliance®.
• The Bluetooth® word mark and logos are registered trademarks owned by Bluetooth SIG, Inc. and any use of such marks by Yamaha
Corporation is under license.
• USB Type-C ™ and USB-C ™ are registered trademarks of USB Implementers Forum.
• The company names and product names in this manual are the trademarks or registered trademarks of their respective companies.
About disposal
• When disposing of this product, please contact the appropriate local authorities.
PSR-SX620 Owner’s Manual 9
Table of Contents
Table of Contents
Included Accessories............................................................7
About the Manuals................................................................7
Formats ................................................................................8
Information...........................................................................8
Welcome to PSR-SX620 10
Using the PSR-SX620—A Broad Overview 12
Panel Controls and Terminals 14
Setting Up 16
Power Requirements ..........................................................16
Turning the Power On/Off...................................................16
Adjusting the Master Volume .............................................17
Using the Headphones........................................................18
Changing the Display Language .........................................18
Playing the Demo ...............................................................19
Basic Operations 20
Main Display Configuration ................................................20
Display-based Controls.......................................................22
Calling Up the Desired Display Instantly — Direct Access
...25
Messages Shown in the Display .........................................25
File Selection Display Configuration ...................................26
File Management ................................................................27
Entering Characters ............................................................33
Resetting to the Factory-programmed Settings ..................34
Data Backup .......................................................................35
Workflow Guide—For Performing on the PSR-SX620 36
1 Voices– Playing the keyboard – 38
Playing Voices ....................................................................38
Playing Super Articulation Voices.......................................40
Selecting Voices for the Keyboard Parts.............................41
Using the Metronome.........................................................42
Changing the Pitch of the Keyboard ...................................43
Using the joystick ...............................................................44
Using the LIVE CONTROL Knobs........................................45
Applying Voice Effects ........................................................47
Setting the Touch Response of the Keyboard.....................50
Adding New Contents — Expansion Packs.........................51
2 Styles– Playing Rhythm and Accompaniment – 52
Playing a Style with the Auto Accompaniment....................52
Operating Style Playback ....................................................54
Recording and Playing Back a Chord Sequence
— Chord Looper ................................................................57
Changing the Chord Fingering Type....................................59
Turning Each Part of the Style On/Off.................................60
Calling up Appropriate Panel Settings for the Current
Style (One Touch Setting)...................................................61
Adjusting the Volume Balance Among the Parts.................62
Setting the Split Point.........................................................63
Specifying Chords with Your Right Hand while Playing
Bass with Your Left Hand ...................................................64
Creating/Editing Styles (Style Creator) ...............................65
3 Songs– Playing, Practicing and Recording Songs – 67
Playback of Songs ............................................................. 67
Displaying Music Notation (Score) .................................... 69
Displaying Lyrics/Text........................................................ 70
Turning Each Channel of the Song On/Off.......................... 71
One-handed Practice with the Guide Function ................... 71
Repeat Playback................................................................. 72
Recording Your Performance ............................................ 74
4 USB Audio Player/Recorder
– Recording and Playing Audio Files –78
Playing Back Audio Files .................................................... 78
Recording Your Performance as Audio.............................. 81
5 Microphone– Sing Along with Song Playback or Your
Own Performance – 83
Connecting a Microphone .................................................. 83
Applying DSP Effects to Your Vocals................................. 84
Using the Talk Function ..................................................... 85
6 Multi Pads– Adding Musical Phrases to Your
Performance – 86
Playing the Multi Pads ....................................................... 86
Using Chord Match............................................................ 87
Using the Multi Pad Synchro Start Function ...................... 87
Creating a Multi Pad with Audio Files (WAV)
(Audio Link Multi Pad) ....................................................... 88
7 Registration Memory/Playlist
– Saving and Recalling Custom Panel Setups – 90
Registering Your Panel Setups .......................................... 91
Saving the Registration Memory as a Bank file.................. 92
Recalling a Registered Panel Setup.................................... 93
Using Playlists to Manage a Large Repertoire of Panel
Setups................................................................................ 94
8 Mixer– Editing the Volume and Tonal Balance – 98
Basic Procedure................................................................. 98
9 Connections
– Using Your Instrument with Other Devices – 100
Rear Panel ....................................................................... 100
Connecting USB Devices (USB [TO DEVICE] terminal) .... 101
Connecting to a Computer (USB [TO HOST] terminal)..... 103
Connecting to a Smart Device ([AUX IN] jack,
USB [TO HOST] terminal, Wireless LAN)......................... 105
Listening to Audio Playback by an External Device
through the Instrument’s Speaker ([AUX IN] jack) .......... 106
Connecting an External Stereo System
(OUTPUT [L/L+R]/[R] jacks)............................................ 109
Connecting a Foot Pedal (FOOT PEDAL jacks) ................. 110
10 Function– Making Global Settings and Using Advanced
Features – 111
Basic Procedure............................................................... 111
Function List .................................................................... 112
Direct Access Chart 113
Troubleshooting 115
Specifications 118
Index 120
10 PSR-SX620 Owner’s Manual
Welcome to PSR-SX620
The PSR-SX620 has a comprehensive and sonically stunning set of
authentic Voices, and gives you the tools to play these Voices more
naturally and with greater expressiveness.
Also, you can add new Voices by installing the Expansion Packs to fit your
music.
The Styles of the PSR-SX620 make it possible to perform in a wide variety
of music genres with full instrumental accompaniment. Simply playing
chords automatically triggers and controls the auto accompaniment
backing, and puts an entire backing band behind you!
You can change arrangements on the fly, instantly selecting different
rhythm variations and breaks in real time — including Intro, Ending, and
Fill-in — during your performance.
Moreover, with the convenient Chord Looper function, you can record a
sequence of the chords, and play it back in a loop to free your left hand.
By connecting a microphone to the [MIC INPUT]
jack, the instrument outputs your vocals through the
built-in speakers, and you can record your own
performance with high sound quality. Moreover, since
song lyrics or music scores can be shown on the
display, you can also enjoy singing along with your
keyboard performance or along with Song playback.
DSP (Digital Signal Processor) features built into the PSR-SX620 provide
high-quality effect types, including Real Distortion and Real Reverb. You
can also apply the DSP effects independently to specified parts, such
as guitar, allowing you to play the keyboard dynamically with a distorted
guitar sound, or sound like you are playing in a concert hall.
Extraordinarily expressive and realistic Voices page 38
Play along with a backing band page 52
Sing along with song playback or your own performance
page 83
Powerful DSP effects for enhancing the sound page 47
PSR-SX620 Owner’s Manual 11
Welcome to PSR-SX620
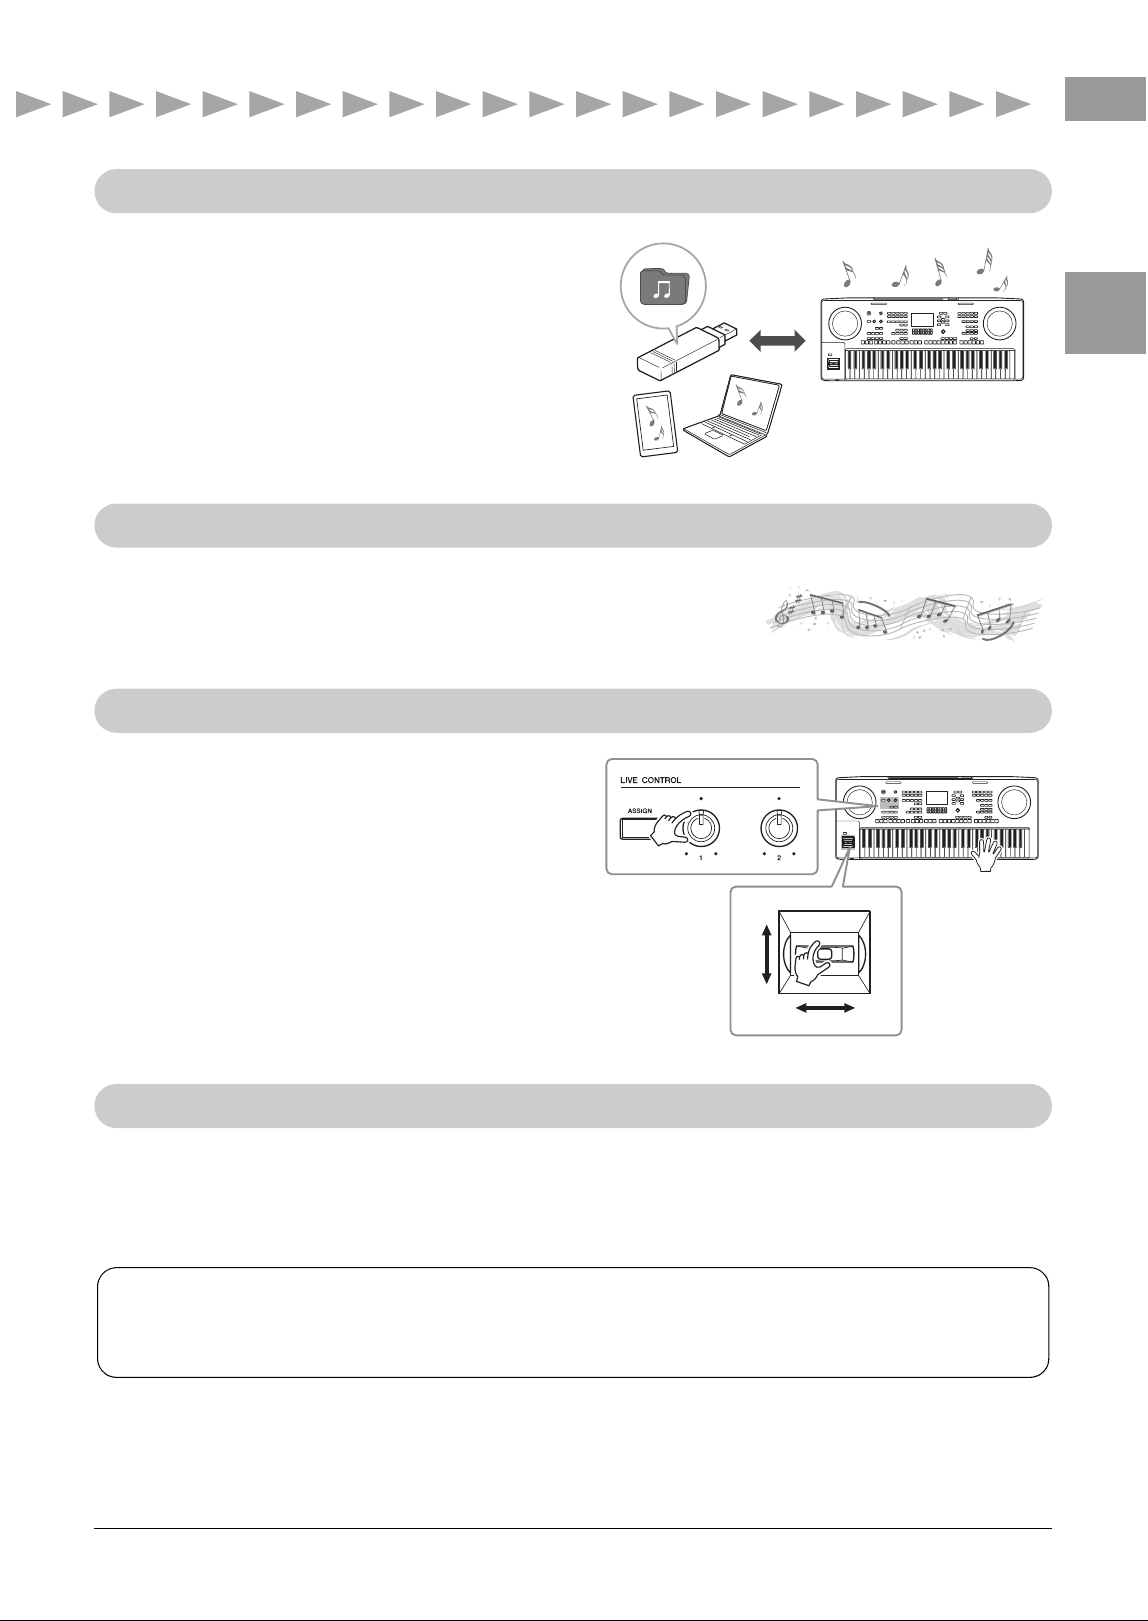
Audio files (WAV format) saved to a USB flash drive (or a
computer or smart device) can be played back on the
instrument. You can also record your performance as
audio files (WAV format) with high sound quality to these
devices — making it easy to edit your recordings on
computer as desired, and share them over the Internet,
or burn your own original CDs.
The Multi Pads can be used to play a number of short pre-recorded
rhythmic and melodic sequences. Playing the Multi Pads during playback
of Styles, etc. can add impact and variety to your performance, and make it
more dynamic.
The two LIVE CONTROL knobs can be assigned to
various different functions, letting you intuitively control
your performance in real-time. For example, you can
use the knobs to control the brightness (cutoff
frequency) of the sound being played or to correct the
tone or timbre of the sound with EQ — letting you easily
add variations to the sound without interrupting your
performance.
You can also control your performance easily by using
the joystick. Moving horizontal direction (Pitch Bend)
can bend the notes up or down like bending a guitar
string, and moving vertical direction (Modulation) can
apply a vibrato effect to notes played on the keyboard.
With Bluetooth connection, you can listen to the playback sound of a Bluetooth-equipped device, such as a
smartphone or portable audio player, through the built-in speaker of this instrument. Also, you can play the
keyboard with that sounds.
Audio playing and recording page 78
Make your performance more dynamic using Multi Pads
page 86
Versatile real-time controllers page 45
Bluetooth Connectivity page 107
Explore the Demos to learn more about the PSR-SX620’s functions and features! page 19
The Demos showcase the high-quality sounds, variety of advanced functions, and provide helpful information for
learning about your new keyboard.
12 PSR-SX620 Owner’s Manual
Using the PSR-SX620—A Broad
Overview
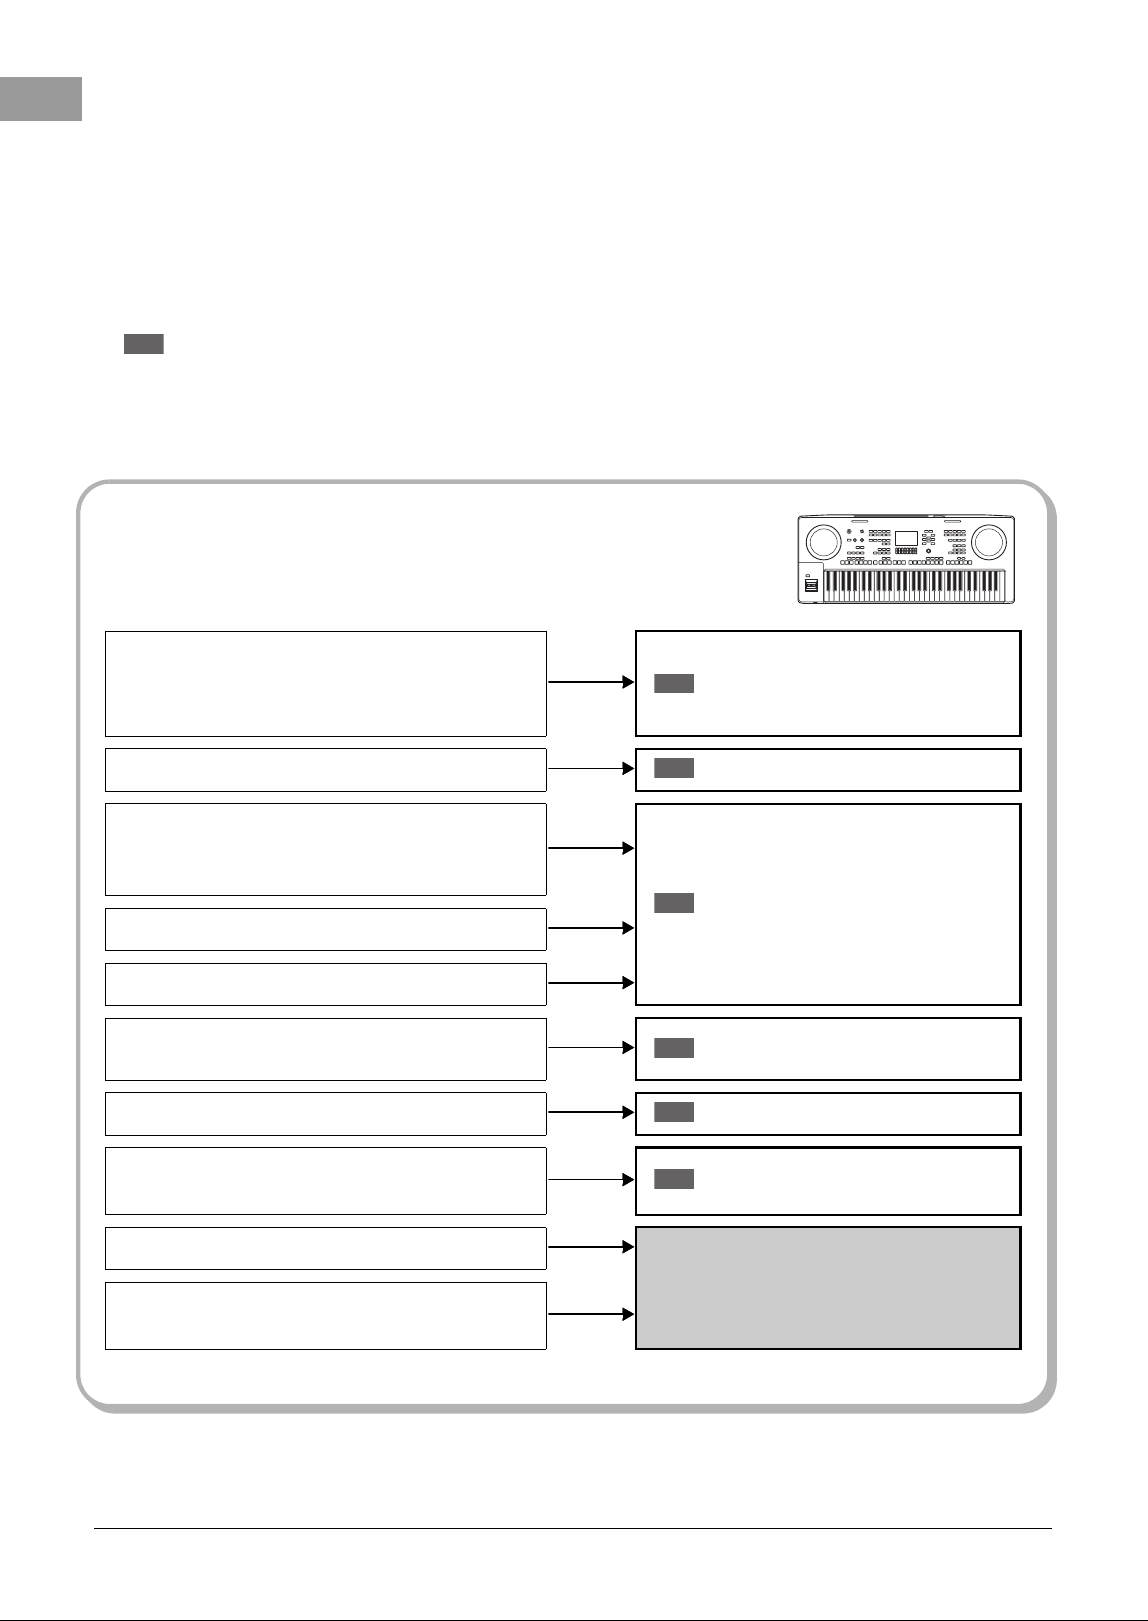
This section provides a helpful overview of the wide range of functions available in this instrument, and places you
can find necessary information on those topics. If you need help in understanding a feature, function or
operation—or need to have a general understanding of what the instrument can do and how to effectively use it—
look through this section.
: PSR-SX620 Owner’s Manual (this book). The relevant chapter names are shown after this symbol. For
detailed information on each chapter, see “Table of Contents” (page 9).
* : This material can be obtained from the Yamaha website (see “PSR-SX620 related downloads,”
page 7).
Understanding the basic features and workflow of this
instrument
Welcome to PSR-SX620
Panel Controls and Terminals
Basic Operations
Workflow Guide
Making basic connections and setting
Setting Up
Setting and playing for a single song
• Playing the keyboard with Styles
• Singing with Song playback
Workflow Guide
Storing and calling up your original setups
Easily managing a large repertoire of Songs
Recording a performance
Songs
USB Audio Player/Recorder
Using functions in the Menu display (summary)
Function List
Connecting devices
(a microphone or guitar, USB flash drive, etc.)
Connections
Using applications in the Menu display (detailed)
Reference Manual (*)
Creating your own original contents
(Styles, Voices by editing presets, Multi Pads)
OM
Using the PSR-SX620 by itself
OM
OM
OM
OM
OM
OM
PSR-SX620 Owner’s Manual 13
Using the PSR-SX620—A Broad Overview
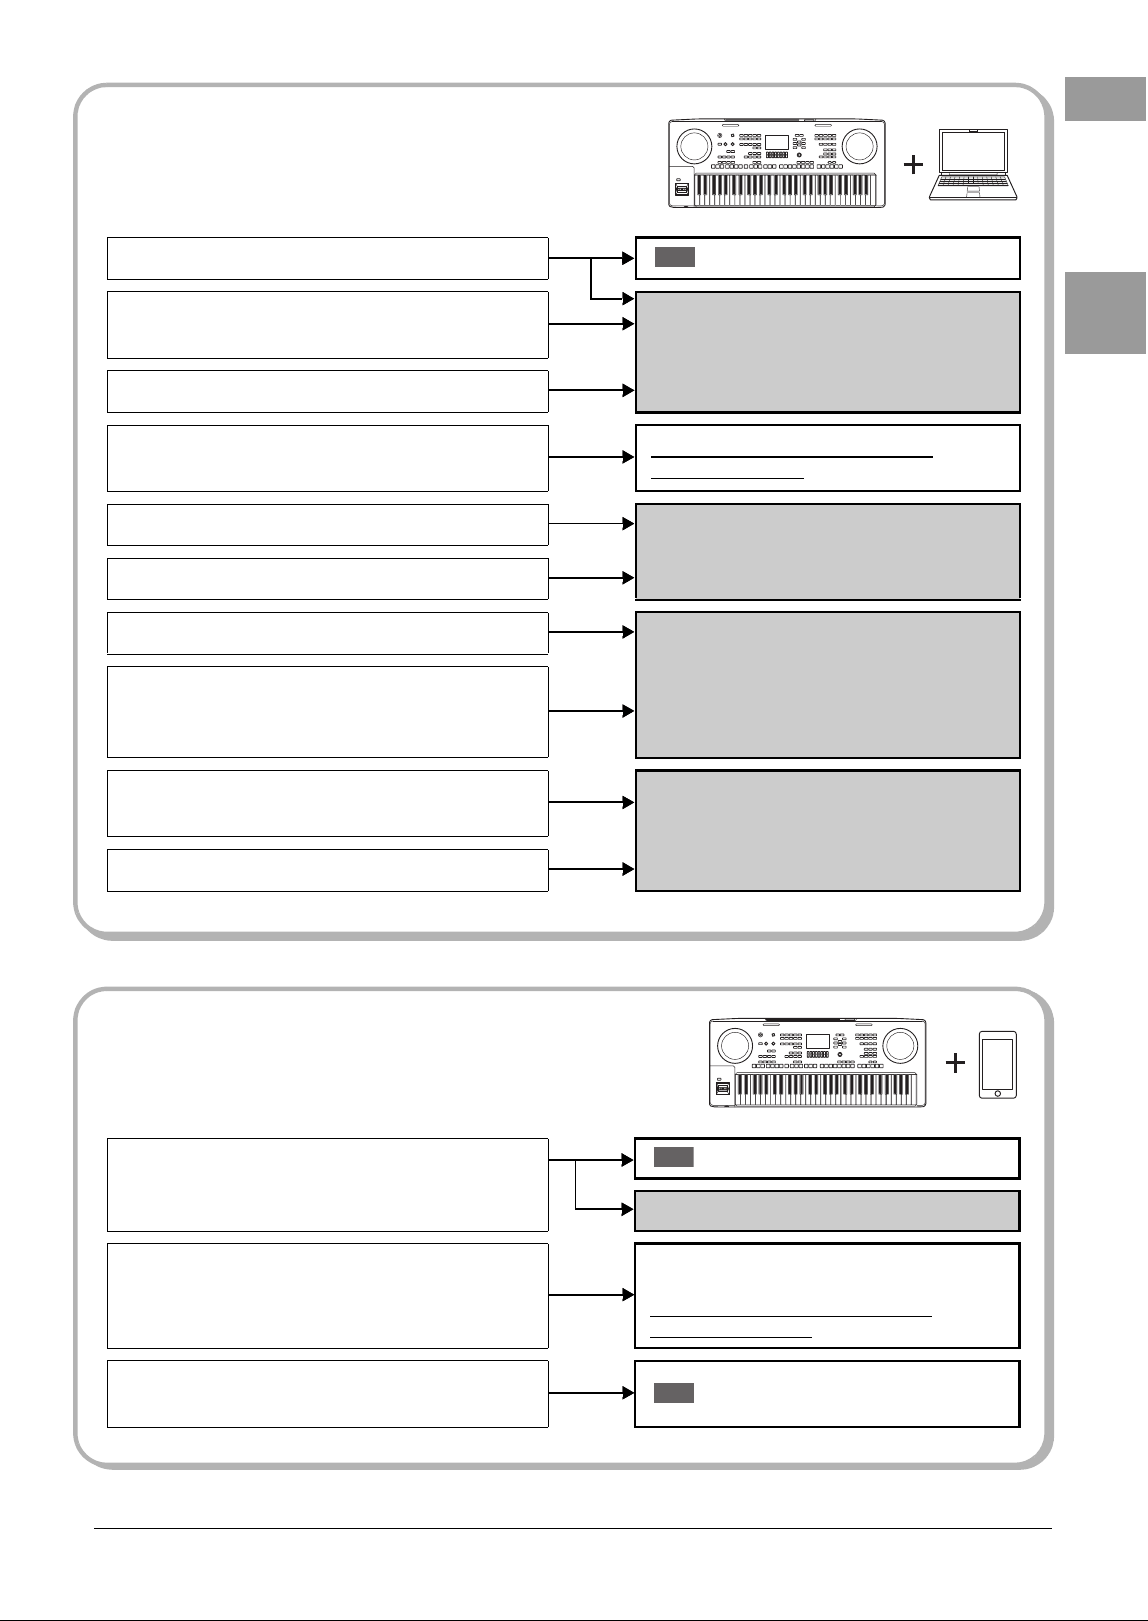
Connecting a computer to the instrument
Connections
Playing back MIDI Song files on a computer using the
Voices of the instrument
Computer-related Operations (*)
Recording your keyboard performance to a computer
Obtaining the Expansion Packs made by Yamaha (also
called “Premium Packs”)
https://manual.yamaha.com/mi/rt/
psrsx620/product/
Managing Expansion Pack data
EXPANSION EXPLORER (*) Owner’s Manual
Yamaha Expansion Manager (*) Owner’s
Manual
Installing Expansion Pack data to the instrument
Creating your own original Expansion Packs
Yamaha Expansion Manager (*) Owner’s
Manual
Creating your own original contents:
Creating new Voices from scratch (using your own
recorded waveform files)
Installing Expansion Pack data to the instrument
(additional instructions)
Reference Manual (*)
Transferring files (Songs, Styles, Backup files, etc)
Connecting a smartphone/tablet to the instrument
Connections
Smart Device Connection Manual (*)
Obtaining smart device apps and using them together
with the instrument
Refer to explanations of each application
page on the website below.
https://manual.yamaha.com/mi/rt/
psrsx620/overview/
Connecting an audio device to the instrument with
Bluetooth connection
Connections
Using the PSR-SX620 with a computer
OM
Using the PSR-SX620 with other devices
OM
OM
14 PSR-SX620 Owner’s Manual
Panel Controls and Terminals
Top Panel
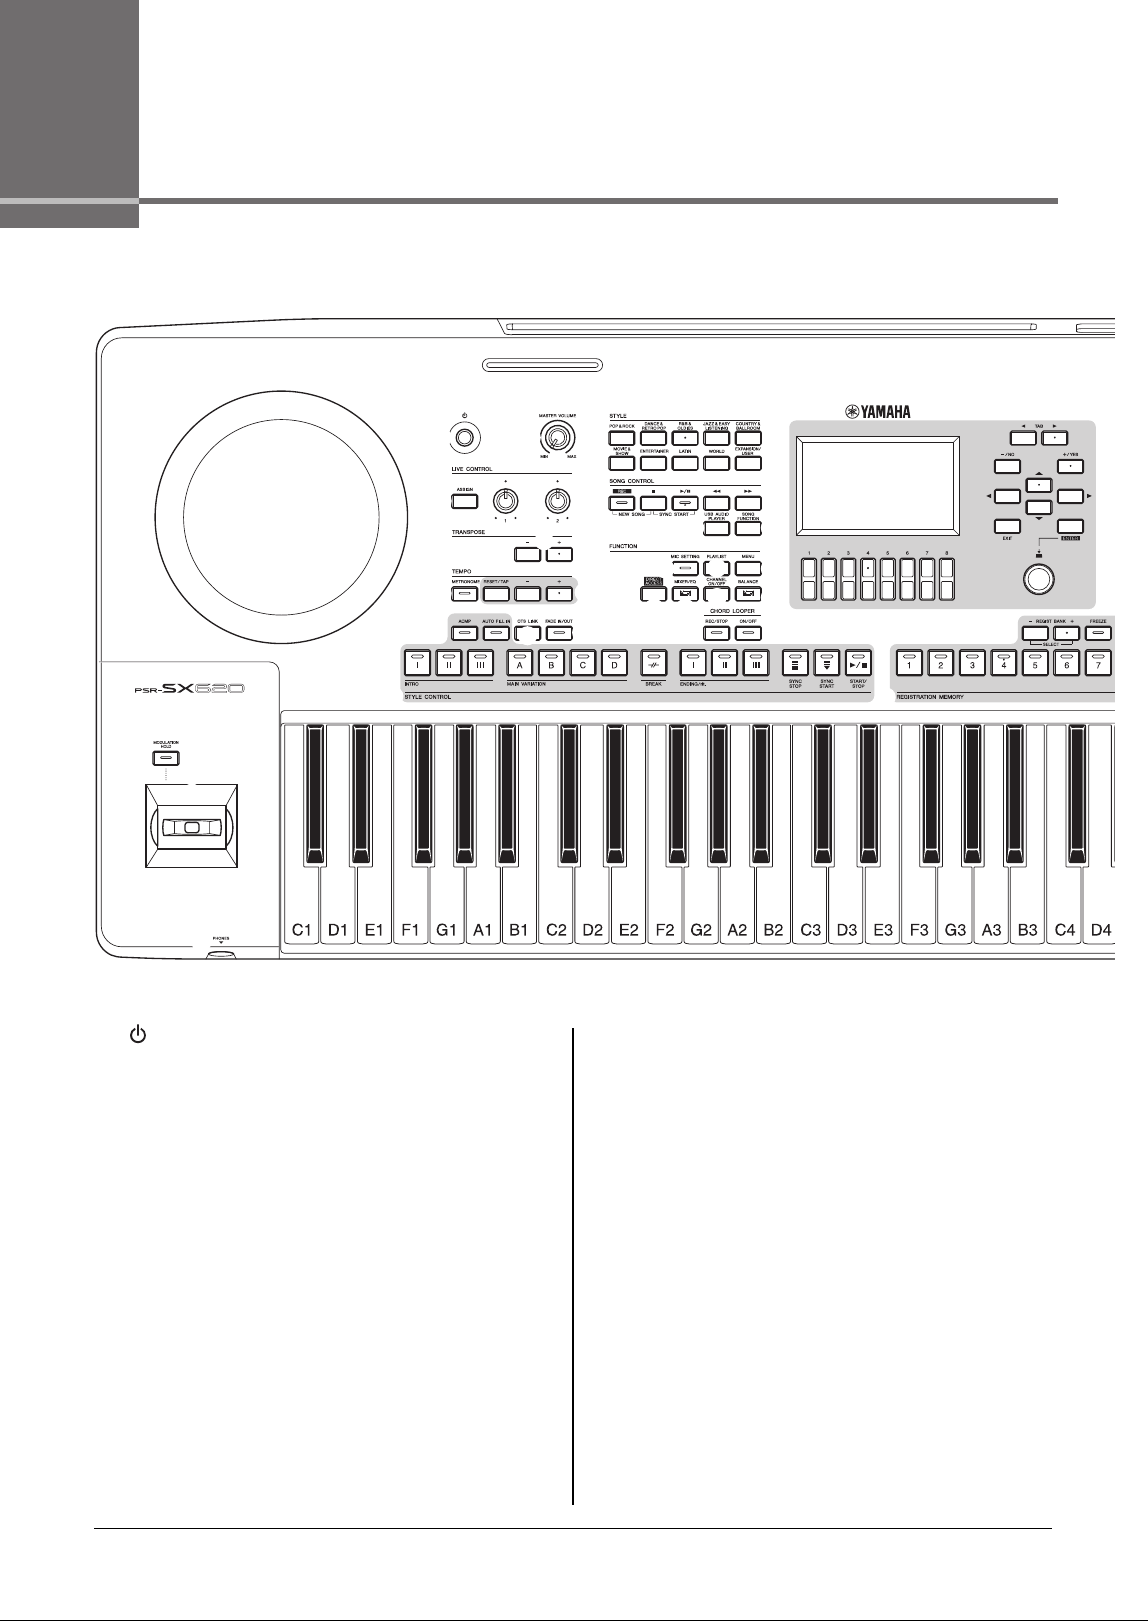
1 [ ] (Standby/On) switch ..............................Page 16
Turns on the instrument’s power or sets to standby.
2 [MASTER VOLUME] dial ................................Page 17
Adjusts the overall volume.
3 [ASSIGN] button, LIVE CONTROL knobs.....Page 45
Assigns functions and controls sounds in real time.
4 TRANSPOSE [-]/[+] buttons ...........................Page 43
Transposes the entire pitch of the instrument in semitone
steps.
5 [METRONOME] button ...................................Page 42
Turns the metronome on or off.
6 [RESET/TAP]/TEMPO [-]/[+] buttons .............Page 56
Controls the tempo for Style, Song and Metronome
playback.
7 STYLE category selection buttons ...............Page 52
For selecting a Style category.
8 SONG CONTROL buttons ..............................Page 68
For controlling Song playback.
9 STYLE CONTROL buttons .............................Page 54
For controlling Style playback.
) [CHORD LOOPER buttons............................. Page 57
Controls recording and loop playback of the Chord Looper
function.
! [USB AUDIO PLAYER] button ....................... Page 78
Calls up the display for playing back audio files and
recording your performance in audio format.
@ [SONG FUNCTION] button ....................Pages 26, 67
Calls up the Song Function Menu display for selecting
Songs etc.
#
Joystick, [MODULATION HOLD] button
.............. Page 44
For using pitch bend or modulation functions.
$ [FADE IN/OUT] button.................................... Page 56
Controls fade in/out of Style/Song playback.
% [MIC SETTING] button ................................... Page 83
Calls up the display from which you can make settings for
the microphone.
^ [PLAYLIST] button.......................................... Page 94
Lets you create custom performance lists.
& [MENU] button ...............................................Page 111
Lets you make advanced settings and create your original
Styles, Songs and Multi Pads.
$
%
^
)
! @
#
(
A
B
C
rL
E
&
1
3
4
7
8
9
5
6
2
*
*
PSR-SX620 Owner’s Manual 15
Panel Controls and Terminals
* LCD and related controls...............................Page 22
( [MIXER/EQ] button .........................................Page 98
Calls up various settings for the keyboard, Style and Song
parts.
A [CHANNEL ON/OFF] button...................Pages 60, 71
Calls up settings for turning Style/Song channels on or off.
B [BALANCE] button .........................................Page 62
Calls up settings for the volume balance among the parts.
C REGISTRATION MEMORY buttons................Page 90
For registering and recalling panel setups.
D VOICE category selection buttons................Page 38
For selecting a Voice category.
E [OTS LINK] button ..........................................Page 61
Turns on/off the OTS Link function.
F ONE TOUCH SETTING buttons .....................Page 61
Calls up the appropriate panel settings for the Style.
G VOICE EFFECT buttons .................................Page 47
For applying various effects to the keyboard performance.
H PART SELECT buttons .................................. Page 41
For selecting a keyboard part.
I PART ON/OFF buttons ................................... Page 41
For turning the keyboard part on or off.
J UPPER OCTAVE [-]/[+] buttons ..................... Page 43
For applying the pitch of the keyboard in octave steps.
K MULTI PAD CONTROL buttons ..................... Page 86
For selecting and playing rhythmic or melodic Multi Pad
phrases.
L [PHONES] jack ............................................... Page 18
For connecting headphones.
Panel Setup (Panel Settings)
By using the controls on the panel, you can make various settings as described
here. These settings of the instrument are together referred to as “panel setup”
or “panel settings” in this manual.
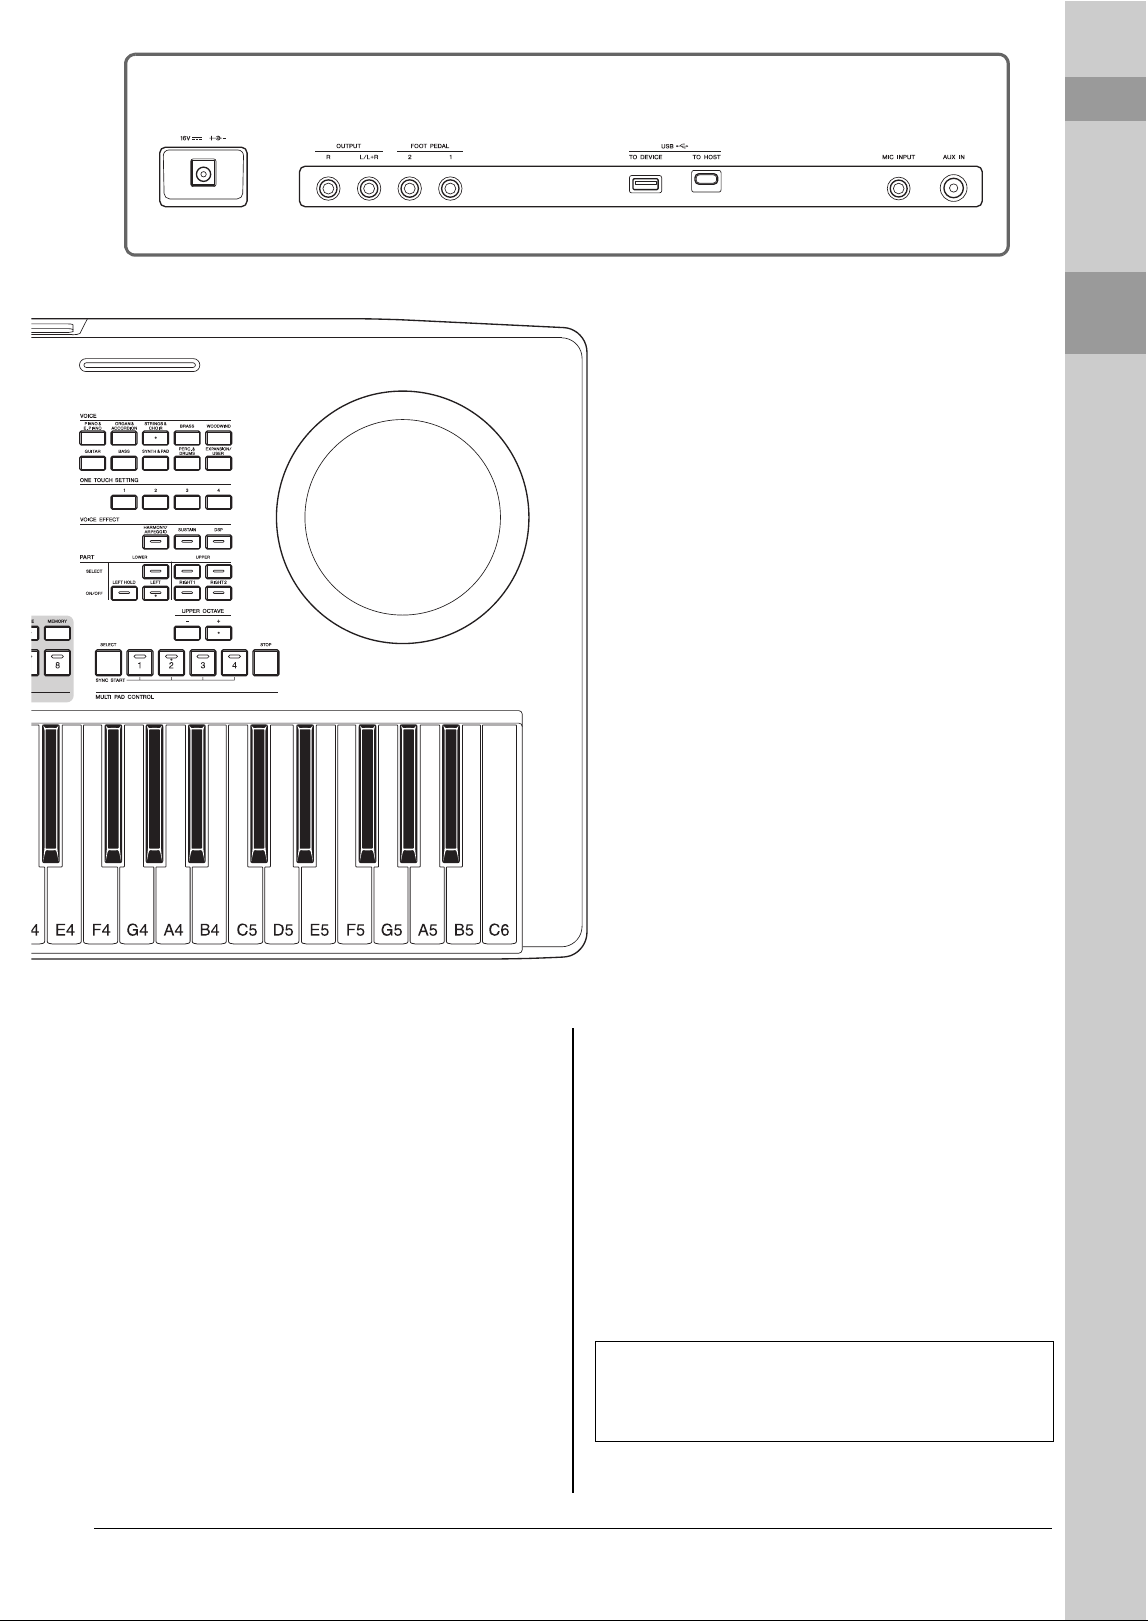
For details on the Rear Panel, refer to page 100.
Rear Panel
D
F
G
H
I
J
K
16 PSR-SX620 Owner’s Manual
Setting Up
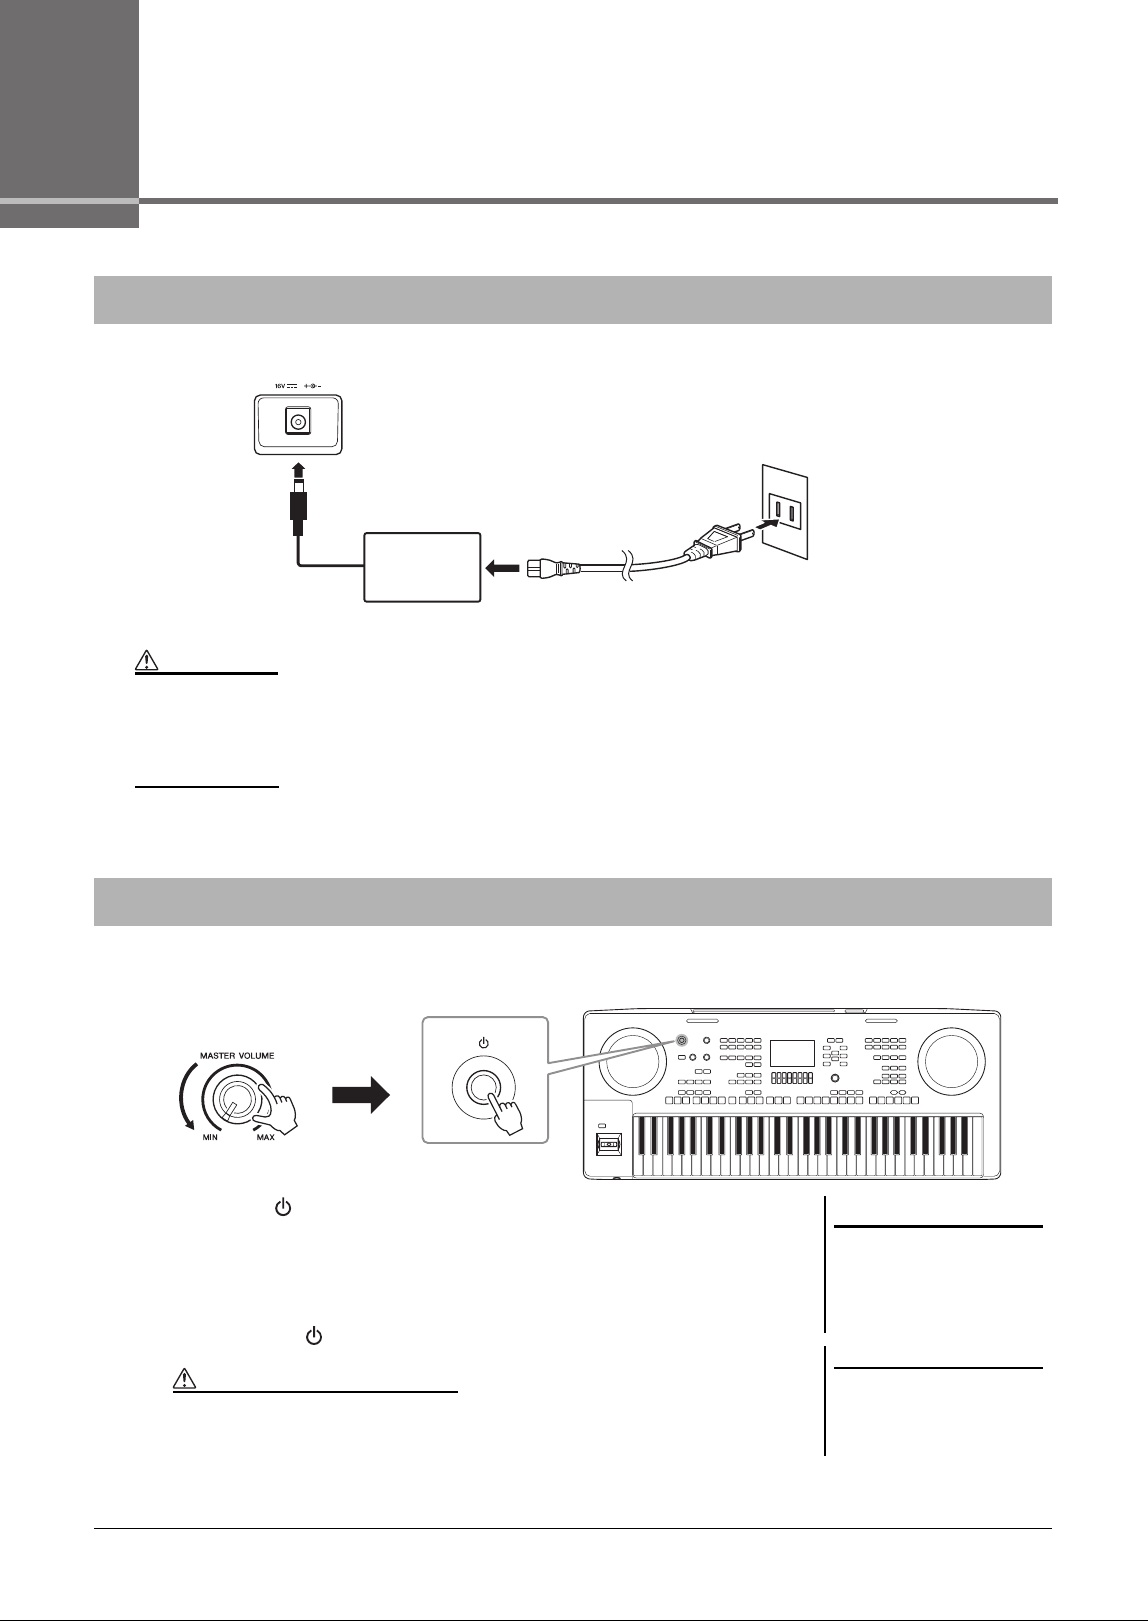
Connect the AC adaptor in the order shown in the illustration.
1 Turn down the [MASTER VOLUME] dial to “MIN.”
2 Press the [ ] (Standby/On) switch to turn on the power.
After the Main display appears, adjust the volume as desired while playing the
keyboard.
3 After you finish using the instrument, turn off the power by
pressing the [ ] (Standby/On) switch for about a second.
Power Requirements
WARNING
• Use the specified AC adaptor (page 119) only. Using the wrong AC adaptor can result in damage to the instrument or overheating.
• When setting up the product, make sure that the AC outlet you are using is easily accessible. If some trouble or malfunction occurs, immedi-
ately turn the power off and disconnect the plug from the outlet.
NOTE
Follow this procedure in reverse order when disconnecting the AC adaptor.
w
q
e
DC IN jack
(page 100)
AC adaptor
AC Outlet
Power cord
The shape of the plug and outlet differs
depending on your area.
Turning the Power On/Off
2
NOTICE
Do not press the foot pedal or
move the joystick, etc. when
turning the power on. Doing so
may cause the instrument to
malfunction.
NOTE
Until the Main display appears, no
operations can be carried out, includ-
ing power-off and keyboard perfor-
mance.
WARNING
Even when the power switch is turned off, electricity is still flowing to the product at the minimum
level. When you are not using the product for a long time, make sure to unplug the power cord from
the wall AC outlet.
PSR-SX620 Owner’s Manual 17
Setting Up
To prevent unnecessary power consumption, this instrument features an Auto Power
Off function that automatically turns the power off if the instrument is not operated
for a specified period of time. The amount of time that elapses before the power is
automatically turned off is approximately 15 minutes by default; however, you can
change the setting at the Common tab of the System page. For details, refer to
page 112.
To adjust the volume of the entire keyboard sound, use the [MASTER VOLUME] dial while playing the keyboard.
NOTICE
While recording or editing, or while a message is displayed, the power cannot be turned off even if you press the [ ] (Standby/On)
switch. If you want to turn off the power, press the [ ] (Standby/On) switch after recording, editing, or after the message has disap-
peared. If you need to force-quit the instrument, hold down the [ ] (Standby/On) switch for longer than three seconds. Note that the
force-quit operation might cause data loss and damage to the instrument.
Setting the Auto Power Off function
NOTICE
The data which is not saved to
the User or USB drive will be lost
if the power automatically turns
off. Make sure to save your data
before the power turns off
(page 28).
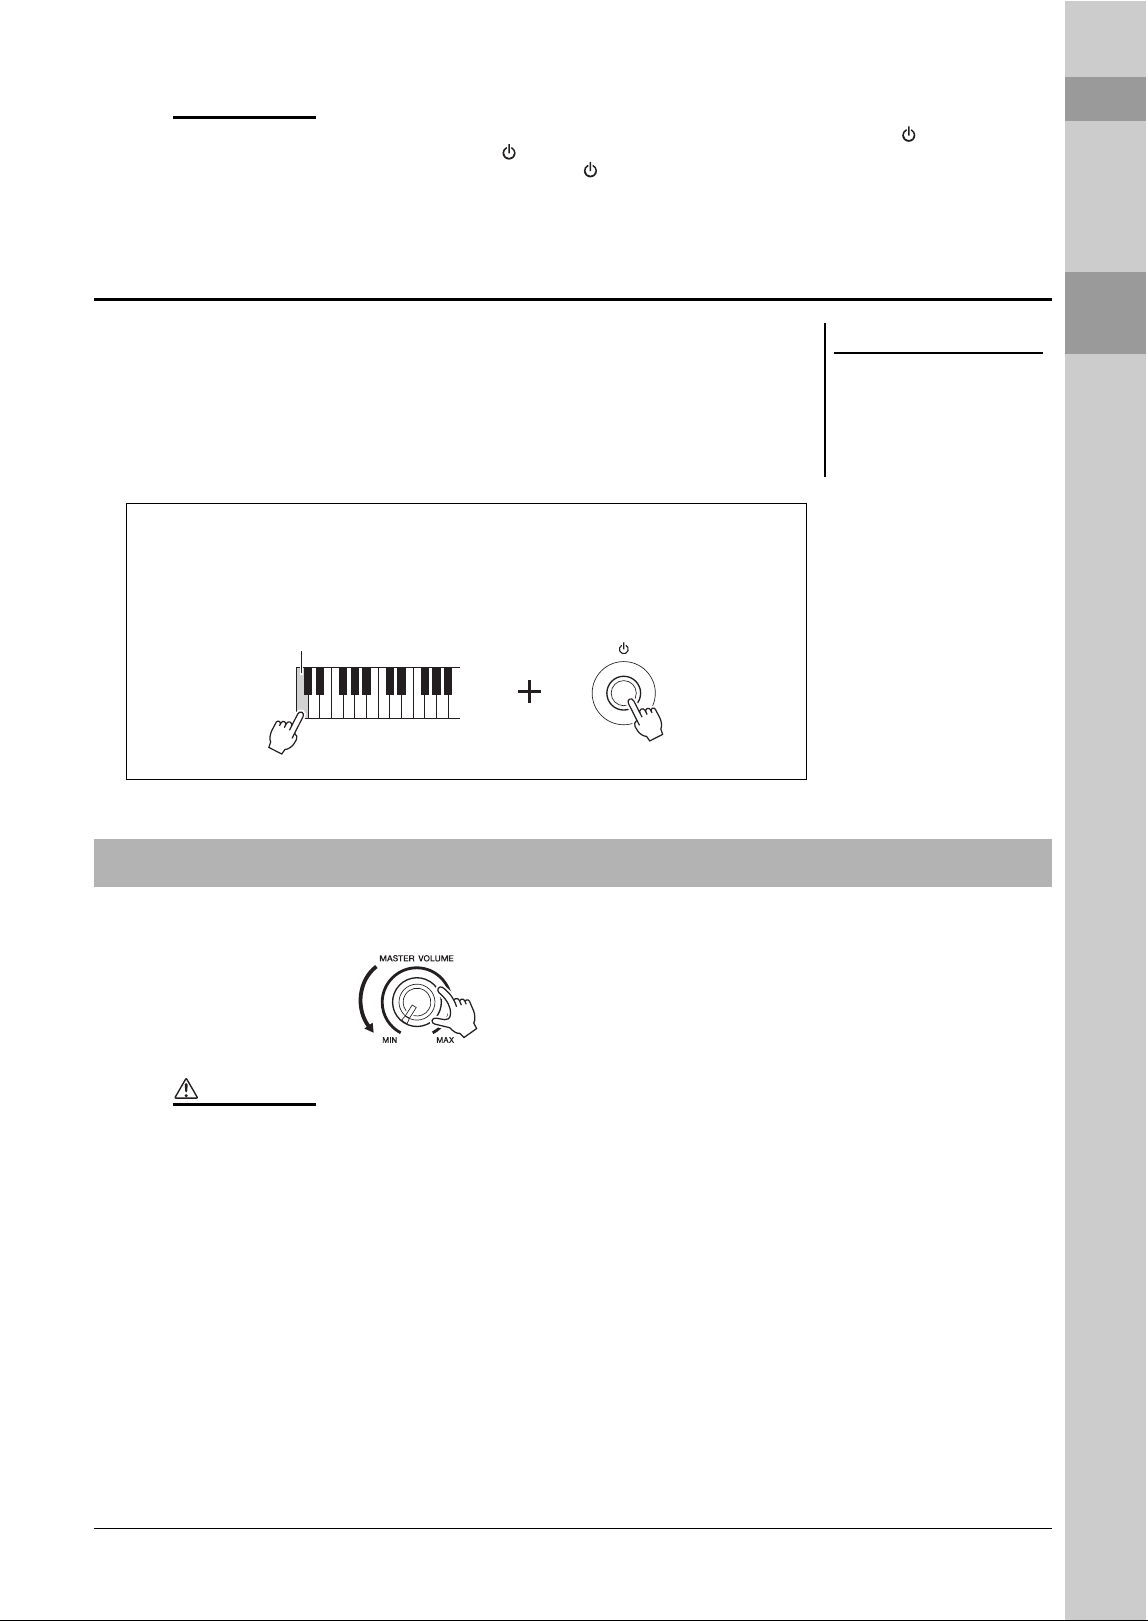
Disabling Auto Power Off (simple method)
Turn the power on while holding down the lowest key on the keyboard. A mes-
sage appears briefly, and then the instrument starts up with the Auto Power Off
function disabled.
C1
Adjusting the Master Volume
CAUTION
Do not use the instrument at high volume for long periods of time. Doing so may cause hearing loss.
18 PSR-SX620 Owner’s Manual
Connect a pair of headphones to the [PHONES] jack on the rear panel.
This determines the language (English, Chinese, German, French, Spanish and Italian are available) used in the
display for messages.
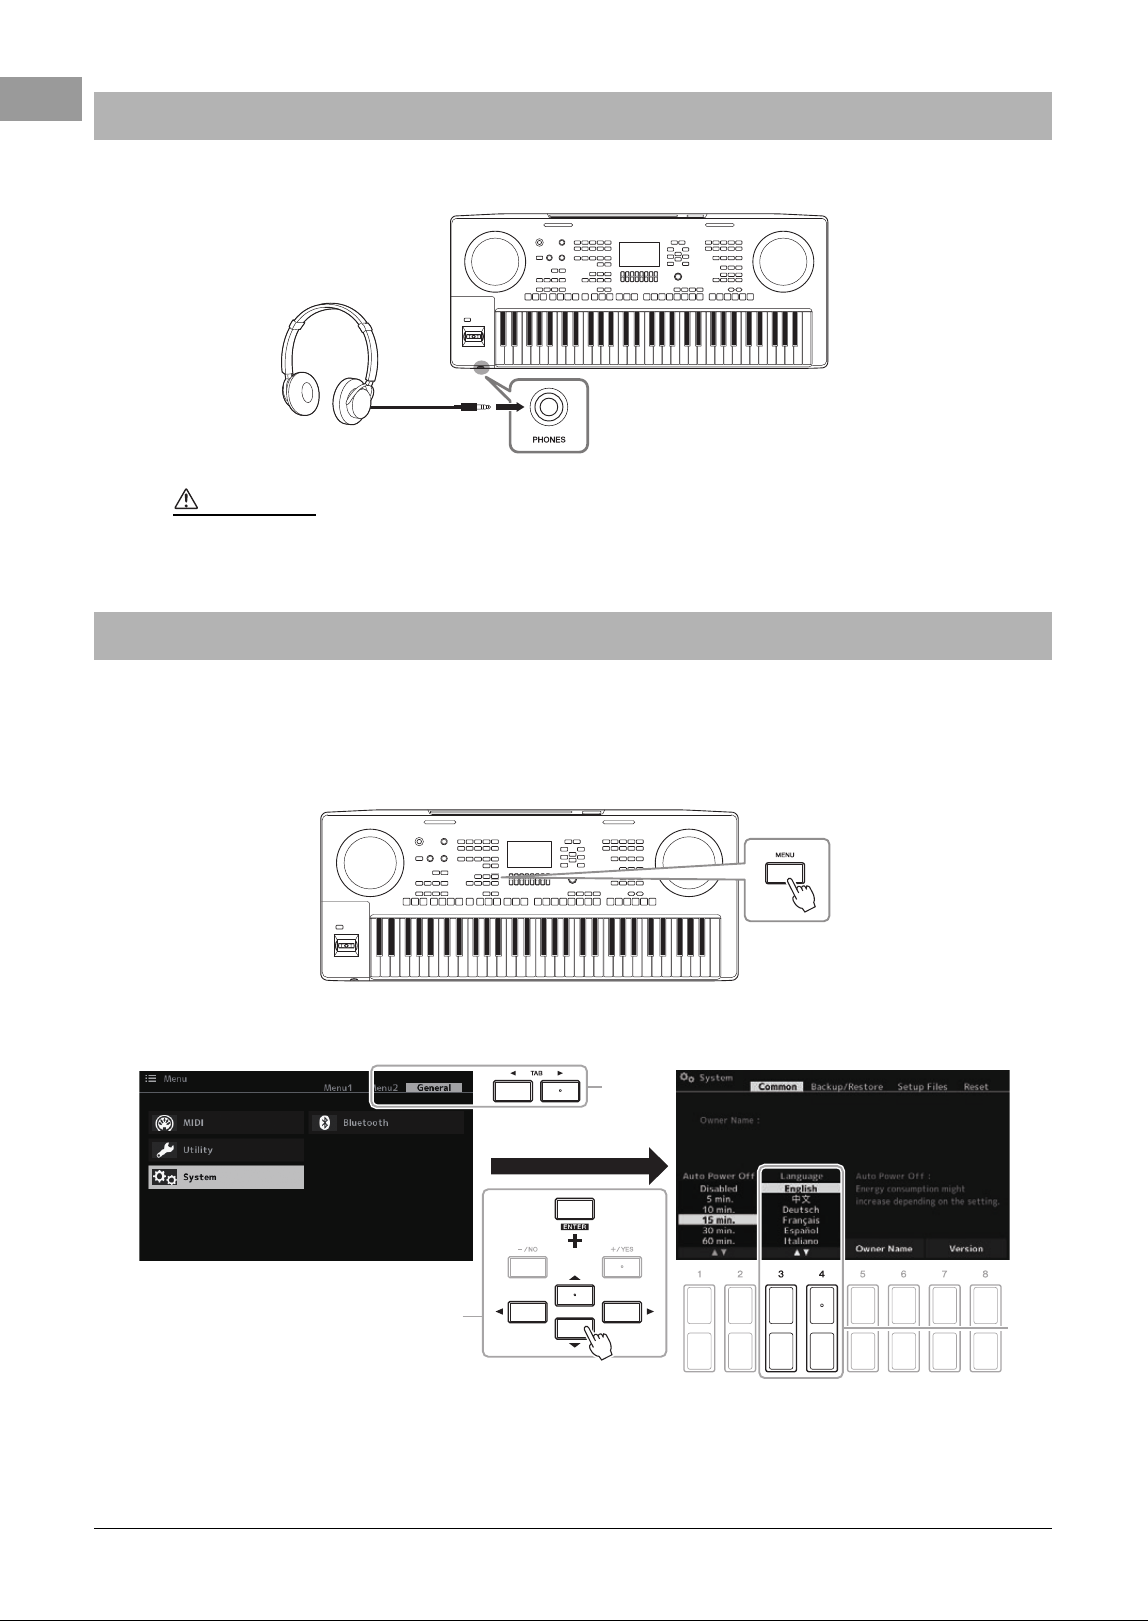
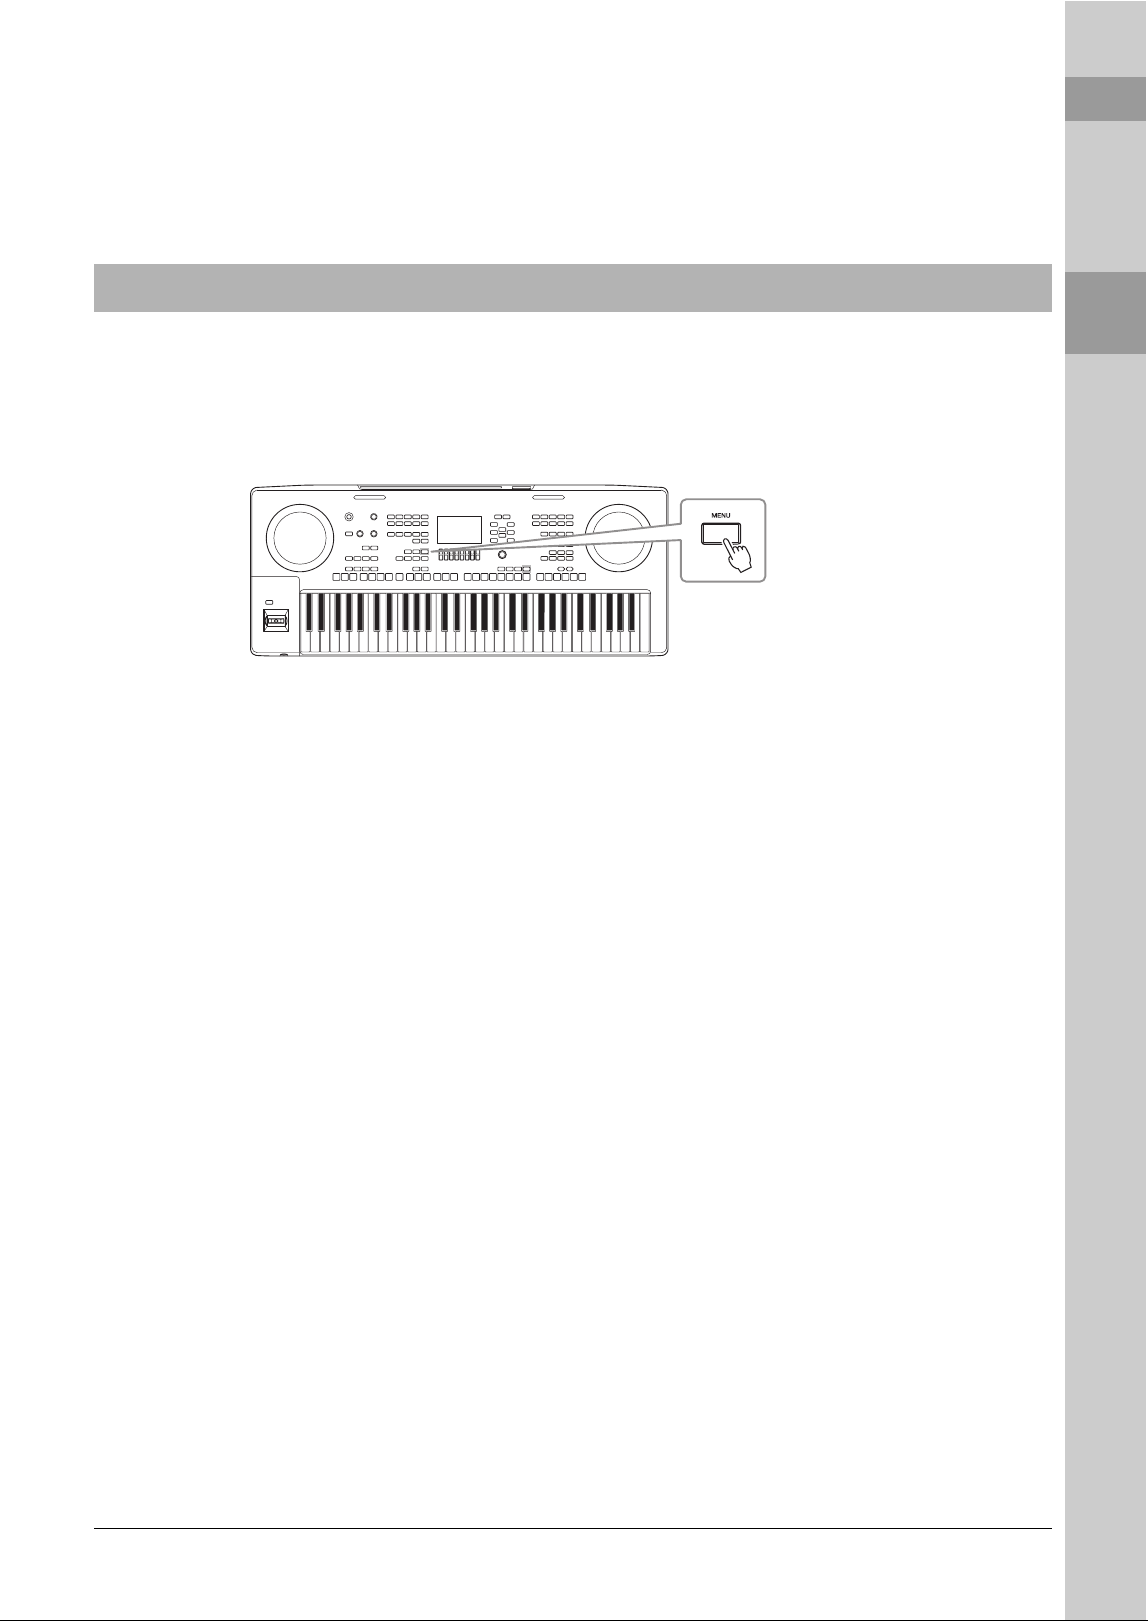
1 Press the [MENU] button to call up the operation display.
2 Use the TAB [F] button to call up General.
3 Use the Cursor buttons [][][E][F] to select System, and
then press the [ENTER] button.
Using the Headphones
CAUTION
Do not listen with the headphones at high volume for long periods of time. Doing so may cause hearing loss.
Standard stereo
phone plug
Changing the Display Language
5
2
3
PSR-SX620 Owner’s Manual 19
Setting Up
4 Press the TAB [E] button to select the Common tab.
5 Use the [3 ]/[4 ] buttons to select and change the
desired language.
Press the [EXIT] button several times to return to the Main display.
The Demo provide helpful, easy-to-understand introductions to the features and functions as well as dynamic
demonstrations of the high-quality sounds.
1 Press the [MENU] button to call up the operation display
(Menu1).
2 Use the Cursor buttons [][][E][F]to select Demo, and then
press the [ENTER] button.
The Demo will be played.
To stop playback, press the [EXIT] button.
Playing the Demo
20 PSR-SX620 Owner’s Manual
Basic Operations
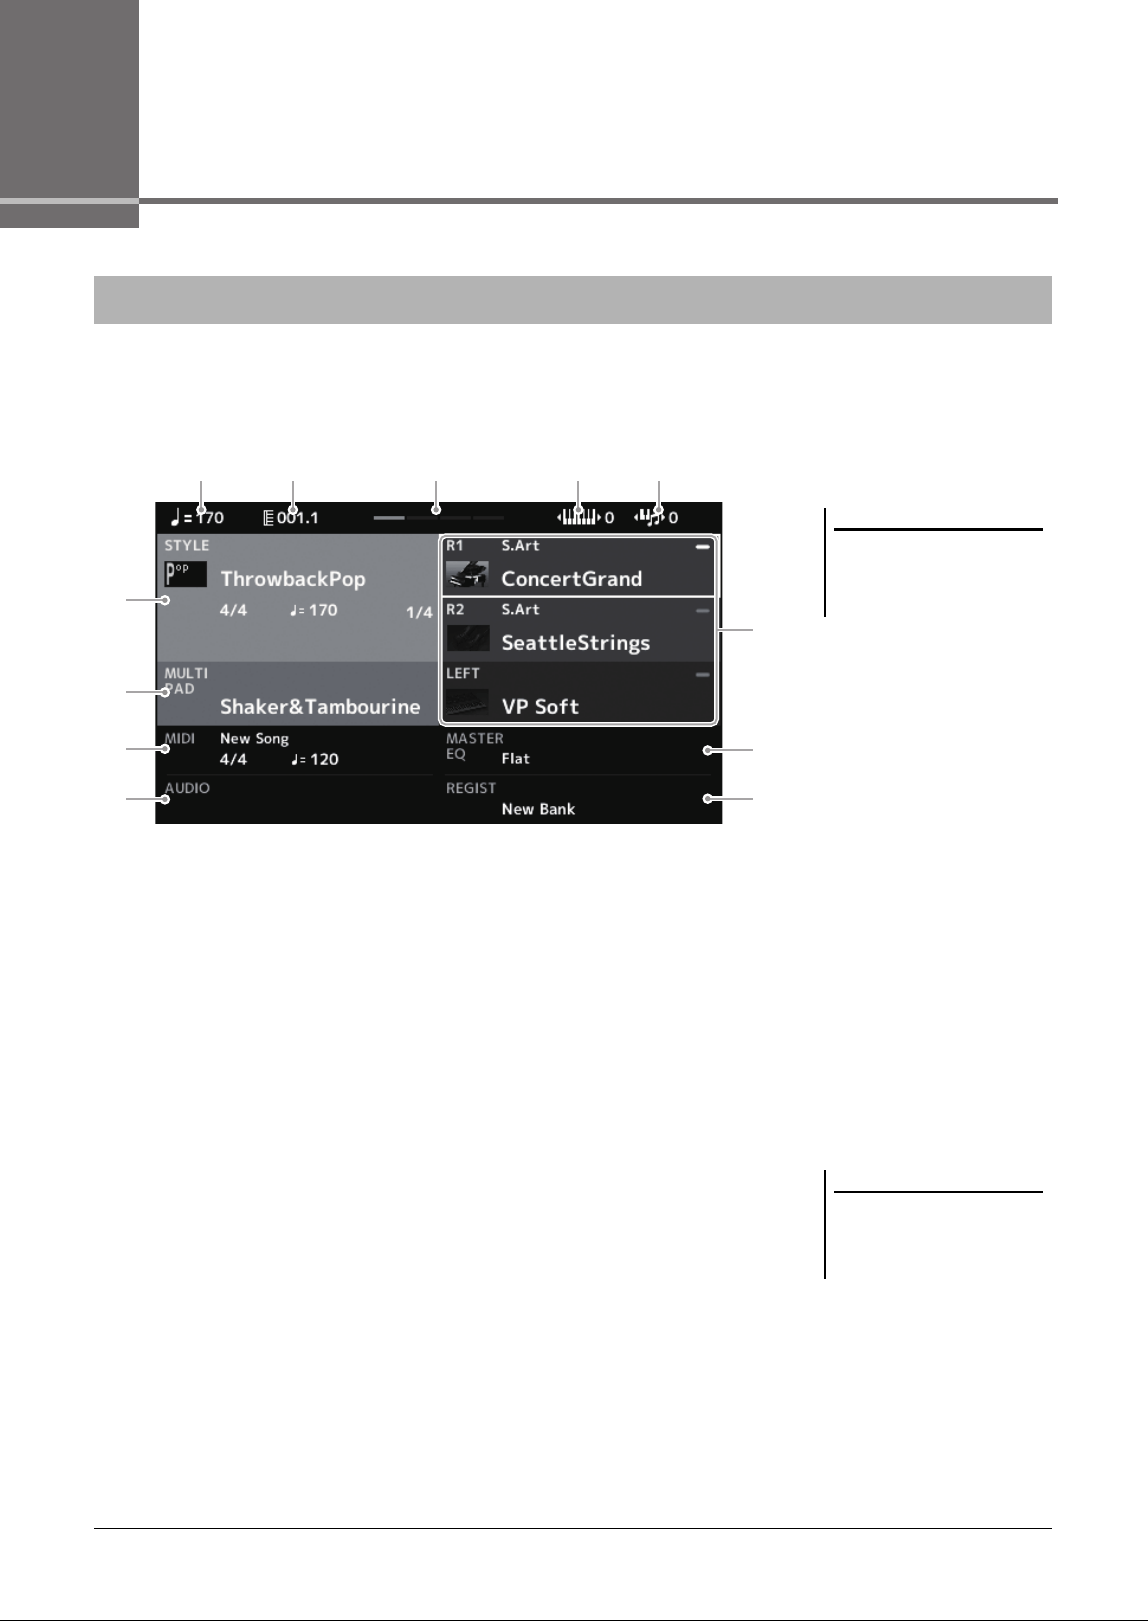
The display that appears when the power is turned on is the Main display. This display shows the current basic
settings such as the currently selected Voice and Style, allowing you to see them at a single glance. The Main
display is the one you’ll usually see when you play the keyboard.
1 Style name and related information
Displays the currently selected Style name, time signature and tempo
(page 52). When the [ACMP] button is set to on, the chord specified in the
chord section of the keyboard will be displayed.
2 Voice name
Displays the Voice names currently selected for the Right1, Right2 and Left
parts (page 41), and the Part Name appears when currently selected by pressing
the PART SELECT button.
3 Multi Pad Bank name
Displays the names of the selected Multi Pad Bank (page 86).
4 Song name and related information
Displays the currently selected Song name, time signature, tempo and bar
(page 67).
5 Audio file information
Displays information for the selected audio file in the connected USB flash
drive (page 78), including the elapsed playback time, file name and Repeat
mode icon. During recording, a “Rec” indication appears. When Audio
recording is in standby, the “Rec” indication flashes.
Main Display Configuration
NOTE
You can quickly call up the Main dis-
play by pressing the [DIRECT
ACCESS] button, followed by the
[EXIT] button.
2
6
78
4
5
3
@
1
9 ) ! #
NOTE
For the PSR-SX620, “Song” refers to
the MIDI data file which contains data
of your keyboard performances
(page 67).

PSR-SX620 Owner’s Manual 21
Basic Operations
6 Master Equalizer Type
Indicates the current Master EQ Type.
7 Registration Memory Bank name
Displays the currently selected Registration Memory Bank name and
Registration Memory number (page 92).
8 Registration Sequence
Appears when the Registration Sequence is active. For instructions on
programming the sequence, refer to the Reference Manual on the website,
Chapter 7.
9 Tempo
Displays the current tempo in Style playback or Song playback.
) Bar/Beat
Displays the current position (bar/beat) in Style playback or Song playback.
! Beat
Indicates the current beat of playback.
@ Upper Octave
Displays the amount that the octave value is shifted (page 43).
# Transpose
Displays the amount of transposition in semitone units (page 43).
Instruction conventions in this manual
Throughout this manual, instructions with multiple steps are given in convenient shorthand, with arrows indicating the
proper sequence.
Example: [MENU] → TAB [F] General → Cursor buttons [][][E][F] System → [ENTER] → TAB [ E][F]
Backup/Restore
The example above describes a five step operation:
1) Press the [MENU] button.
2) Press the TAB [F] button to select the General tab.
3) Use the Cursor buttons [][][E][F] to select “System.”
4) Press the [ENTER] button.
5) Use the TAB [E][F] buttons to select the Backup/Restore tab.
22 PSR-SX620 Owner’s Manual
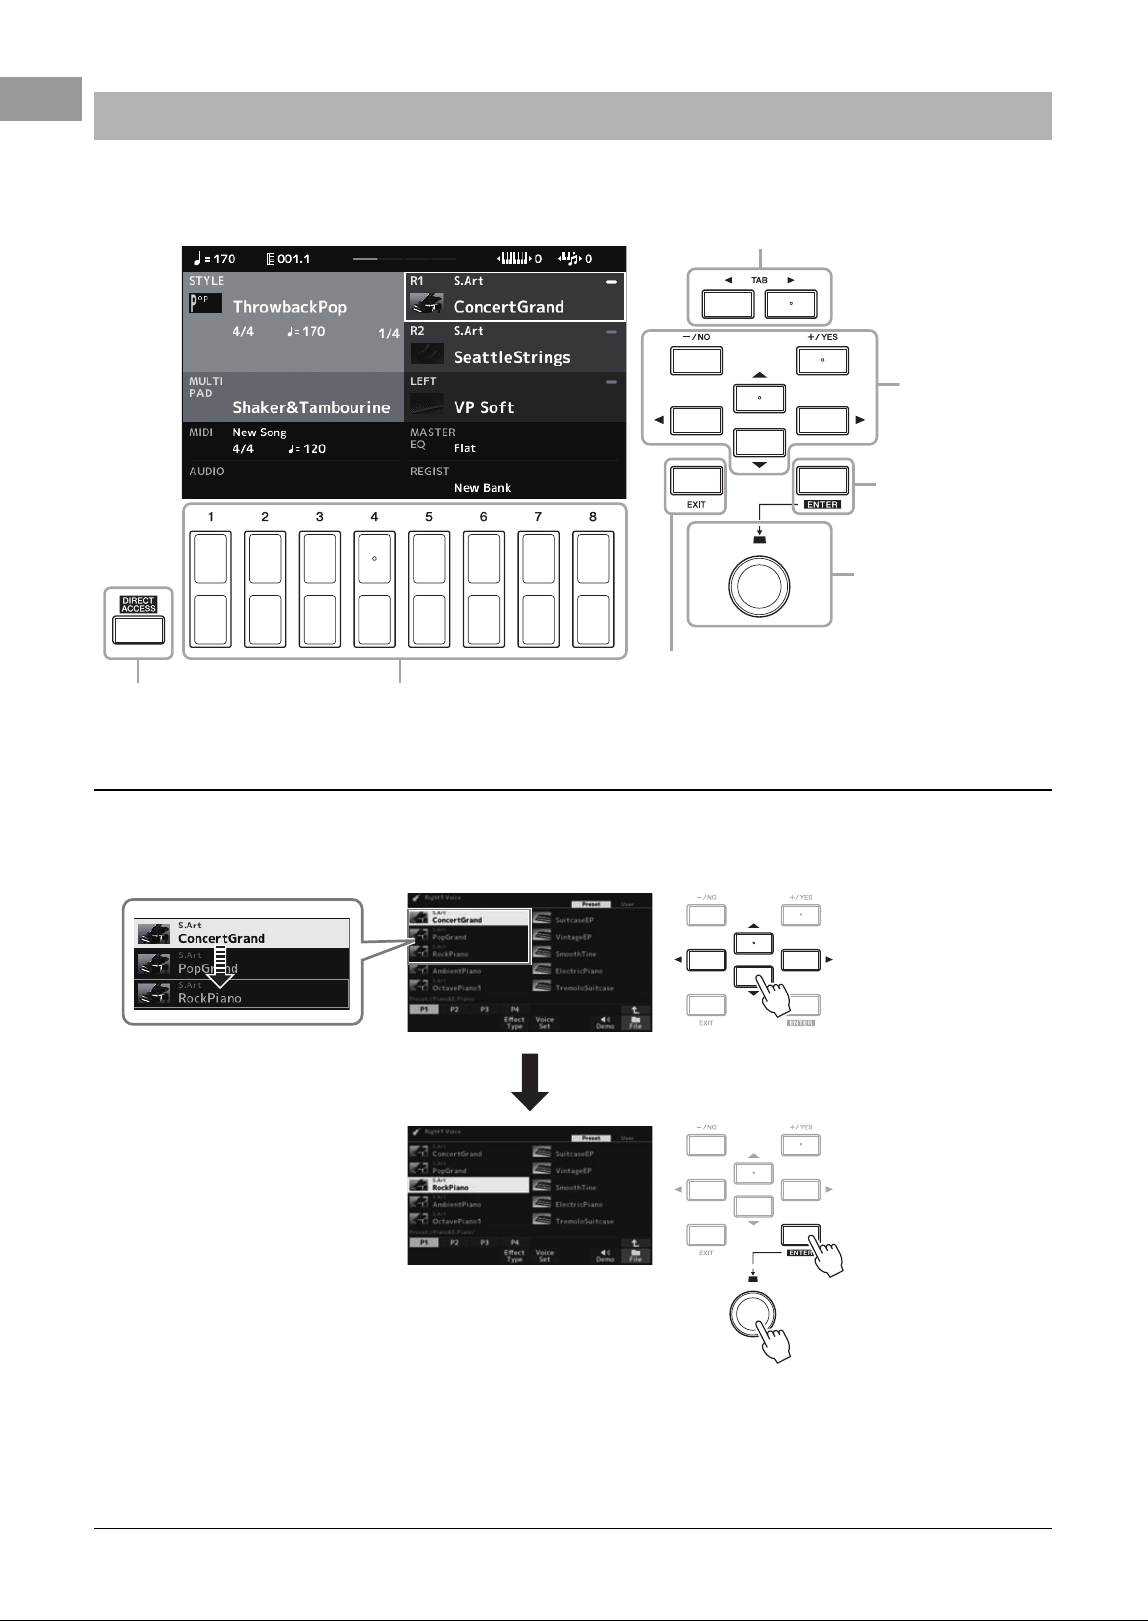
The LCD provides comprehensive at-a-glance information on all current settings. The displayed menu can be
selected or changed by the controls around the LCD.
These buttons are used to move the on-screen cursor.
In the File Selection display (page 26), these buttons are used to move the cursor up, down, left, and right to the
desired item. To actually select the item, press the [ENTER] button.
Display-based Controls
[+/YES][-/NO] buttons
(page 23)
Cursor buttons
[][][E][F]
(see below)/
TA B [E][F] buttons
(page 24)
Data dial
(page 23)
[1 ] – [8 ] buttons
(page 24)
[EXIT] button
(page 24)
[DIRECT ACCESS]
button (page 25)
[ENTER] button
(see below)
Cursor buttons [
][
][
E
][
F
]
Move the cursor to the
desired item by using
these Cursor buttons.
Press the [ENTER] but-
ton to actually select the
item. The selected item
will be highlighted.
Clicking the Data dial also
can be used as same as the
[ENTER] button.
PSR-SX620 Owner’s Manual 23
Basic Operations
Depending on the selected display, the Data dial can be used in the following two ways.
• Adjusting parameter values
You can conveniently use the Data dial in tandem with the [1 ] – [8 ] buttons to adjust parameters
indicated in the display.
This convenient technique also works well with pop-up parameters such as Tempo and Transpose. Simply press the
appropriate button (ex., TEMPO [+]), and then rotate the Data dial to set the value.
• Selecting content files (Voice, Style, Song, and so on)
The operation by using the Data dial is almost same as that of the Cursor buttons. On the File Selection displays
(page 26) or the Registration Memory displays (page 90), rotate the Data dial to move the cursor, and then press the
[ENTER] button to actually select the file.
These buttons are used to adjust the value or select “Yes” or “No” in the message
shown in the display, etc.
To reset the desired value to its default, press these buttons simultaneously.
Data dial
Rotate the Data dial to adjust
the selected parameter.
Select the desired parameter with the appropriate
[1 ] – [8 ] button.
In most procedures when selecting the file or item described throughout this Owner’s manual, the Cursor buttons
[][][E][F] are used for simple selection, though other methods may also be used.
[+/YES] [-/NO] buttons
NOTE
You can also use these to select
Voices, Styles, etc. without pressing
the [ENTER] button. This is convenient
when you want to temporarily check
the sound of some Voices or Styles.
Use these buttons to adjust the
value or change the setting of
the selected item.
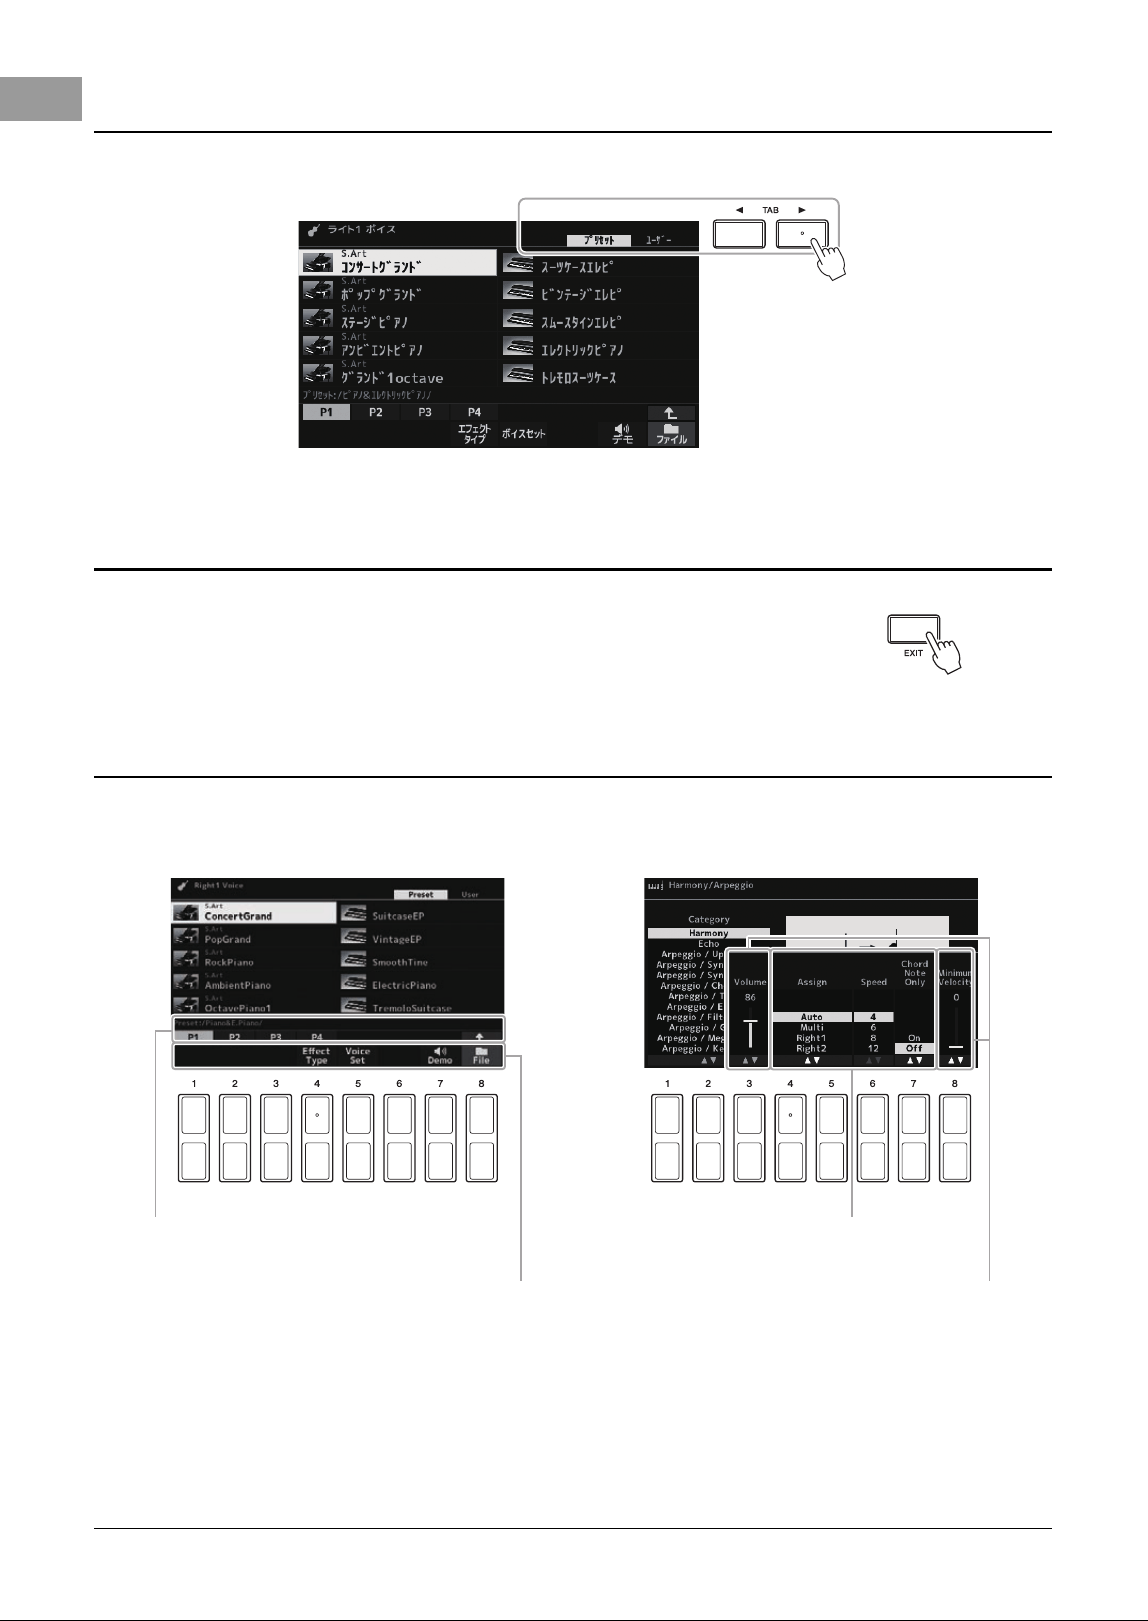
24 PSR-SX620 Owner’s Manual
These buttons are used mainly to change the pages of displays that have “tabs” at the top.
Pressing the [EXIT] button returns to the previously indicated display.
Pressing the [EXIT] button several times returns to the default Main display
(page 20).
The [1 ] – [8 ] buttons are used to make selections or adjust settings (up or down correspondingly) for
functions shown directly above them. The buttons above the numbers 1 – 8 are described as [] and those below
the numbers are described as [] throughout this manual.
To reset the desired value to its default, press the [] buttons and the [] buttons simultaneously.
TAB [
E
][
F
] buttons
[EXIT] button
[1
] – [8
] buttons
For menus that appear in this section of
the display, use the [1 ] – [8 ] buttons.
For menus that appear in this section of
the display, use the [1 ] – [8 ] buttons.
For list menus that appear, use the [1 ] –
[8 ] buttons to select the desired item.
For parameters that appear in slider (or knob)
form, use the [1 ] – [8 ] buttons to
adjust the value.
PSR-SX620 Owner’s Manual 25
Basic Operations
With the convenient Direct Access function, you can instantly call up the desired display — with just a single
additional button press. Refer to the “Direct Access Chart” on page 113 for a list of the displays that can be called
up with the Direct Access function.
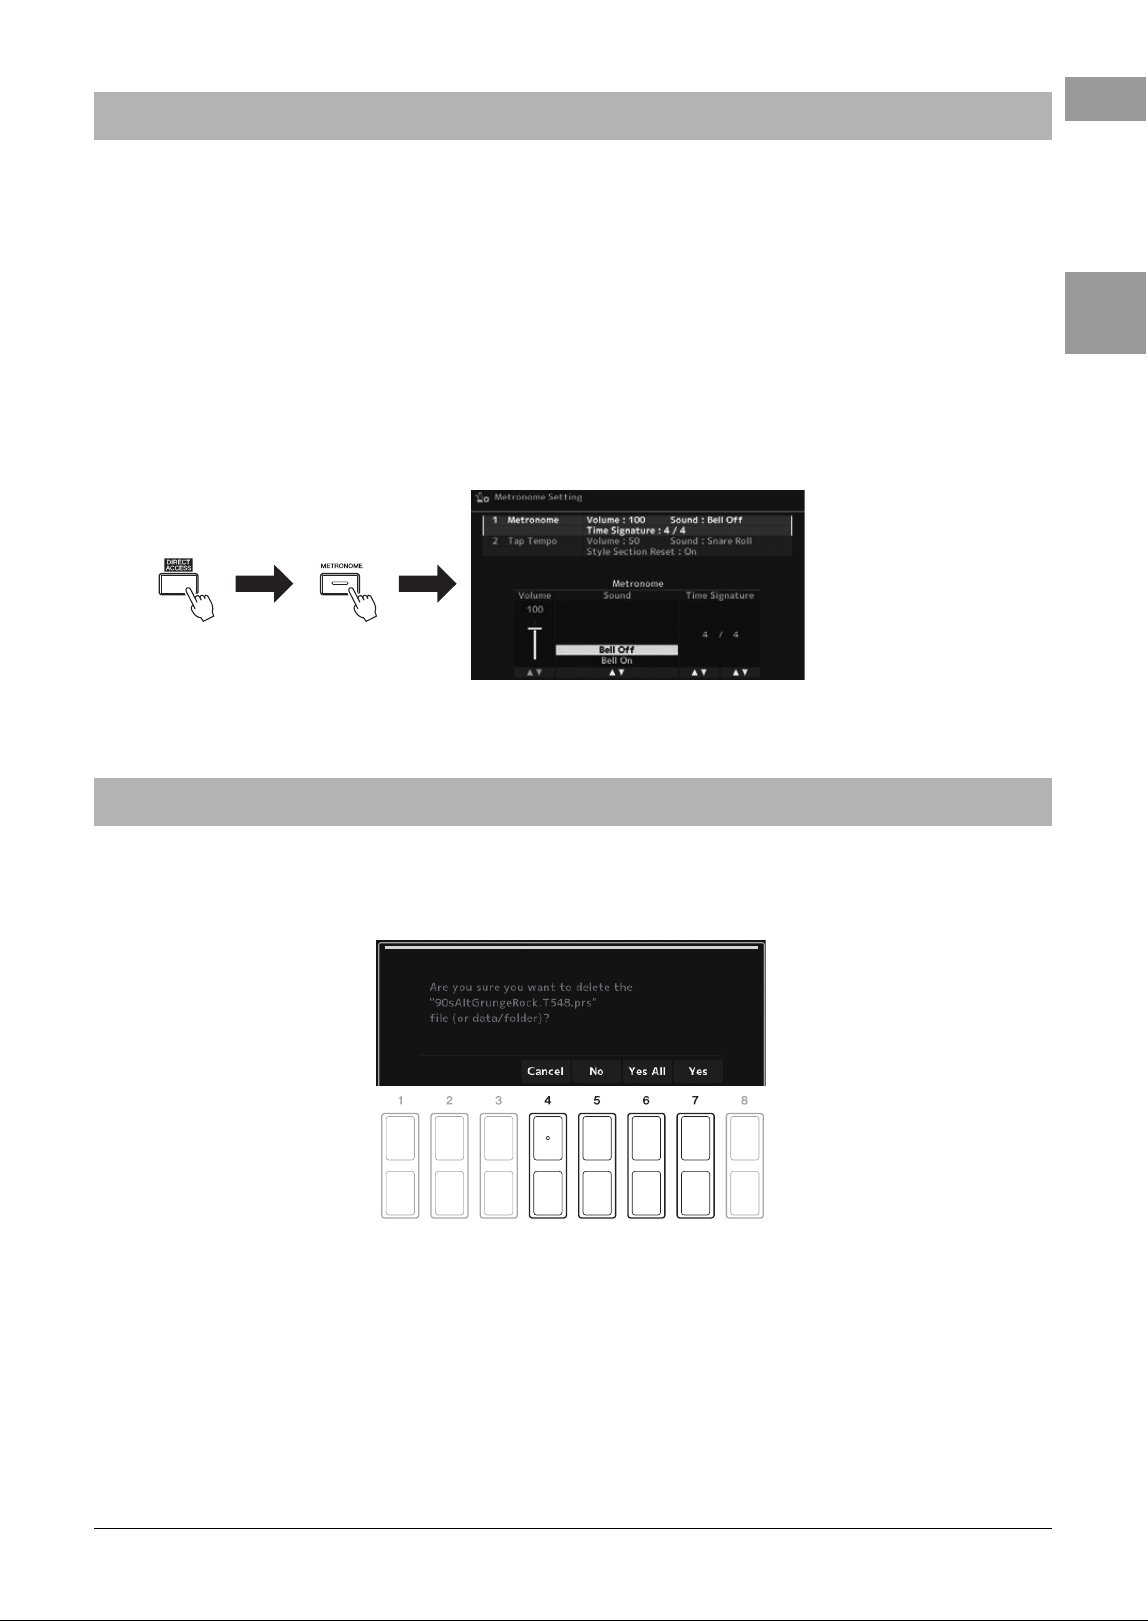
1 Press the [DIRECT ACCESS] button.
A message appears in the display prompting you to press the appropriate button.
2 Press the button (or move the knob, joystick or connected
pedal) corresponding to the desired setting display to instantly
call up that display.
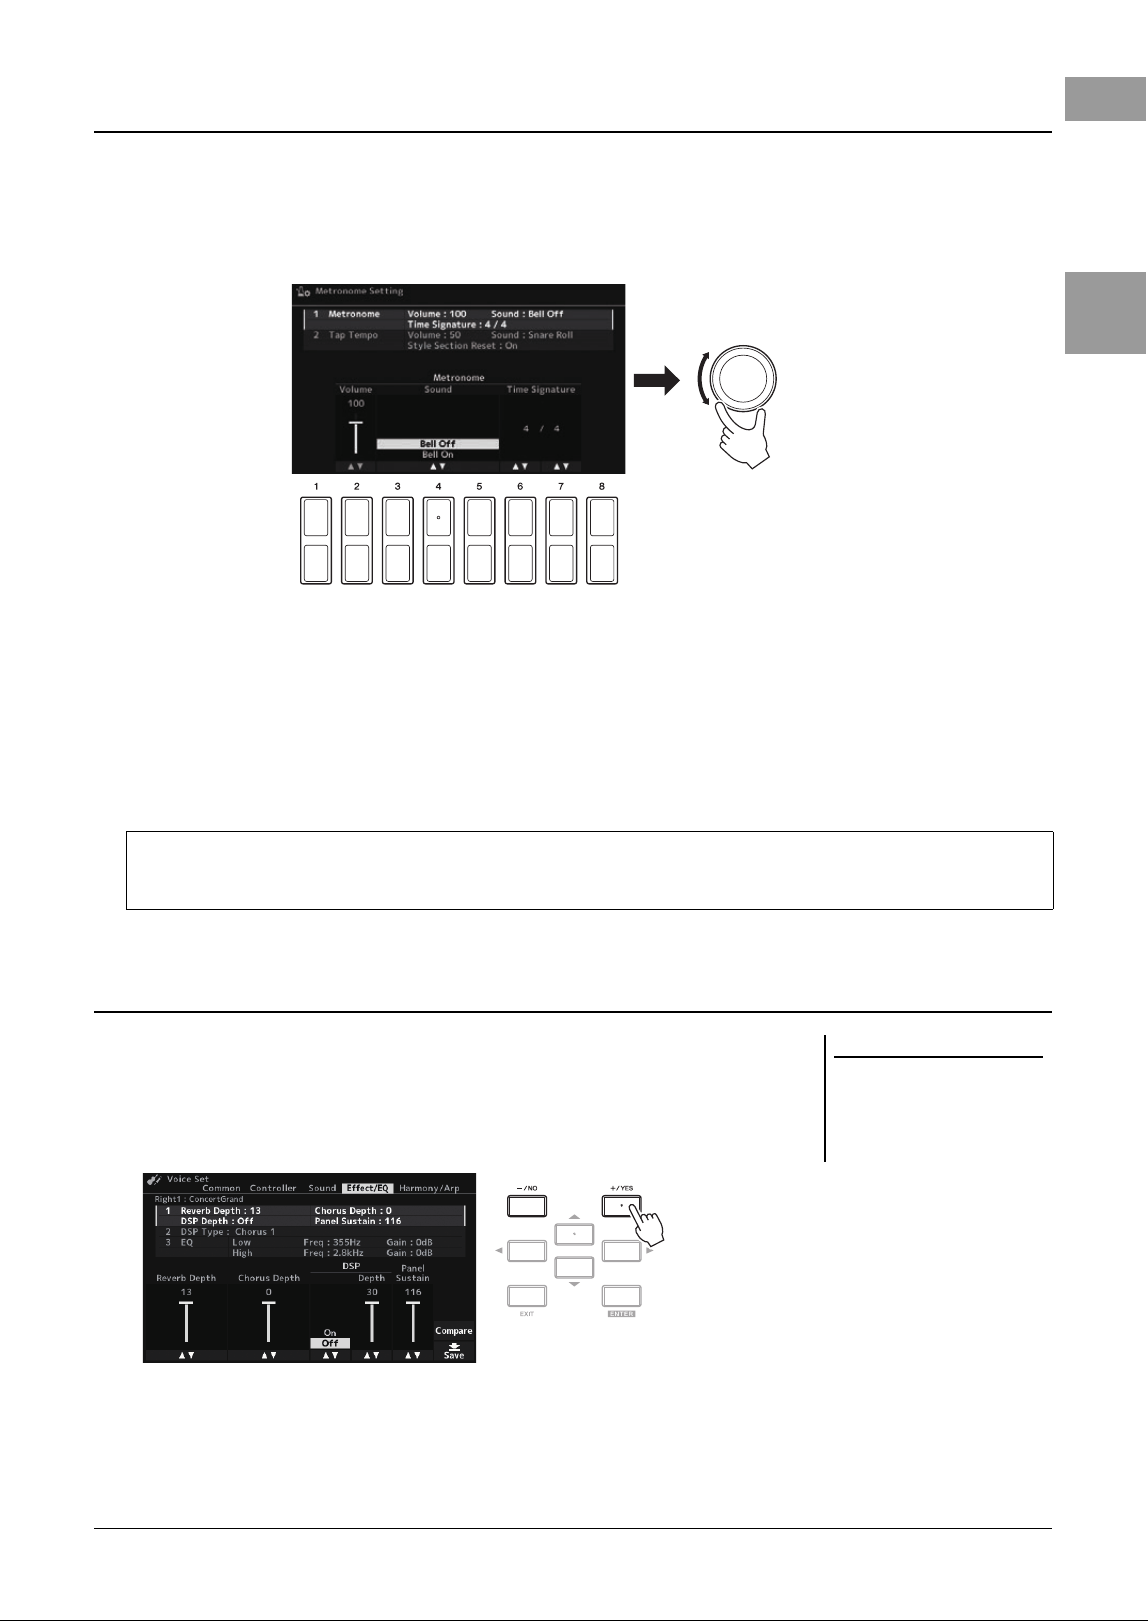
For example, pressing the [METRONOME] button calls up the display in which
the time signature, volume and sound of the metronome can be set.
A message (information or confirmation dialog) sometimes appears on the screen to facilitate operation. When the
message appears, press the [+/YES] or [-/NO] button or one of the [1 ] – [8 ] buttons corresponding to the
message.
Calling Up the Desired Display Instantly — Direct Access
Messages Shown in the Display
26 PSR-SX620 Owner’s Manual
The File Selection display is for selecting contents (Voice, Styles, and other data) saved as files in the instrument.
Calling up the File Selection display
The File Selection displays for contents (Voice, Style or Song, etc.) can be called up on the Main display. In
general, use the Cursor buttons [][][E][F] to select the desired item, and then press the [ENTER] button.
Otherwise, the displays can be called up in the following ways.
• Voice or Style File Selection display
Press one of the VOICE or STYLE category selection buttons to call up the display.
• Song File Selection display
Press the [SONG FUNCTION] button to call up the Song Function Menu at the
bottom of the display. Then, press one of the [1 ] (Select) buttons to call up the
display.
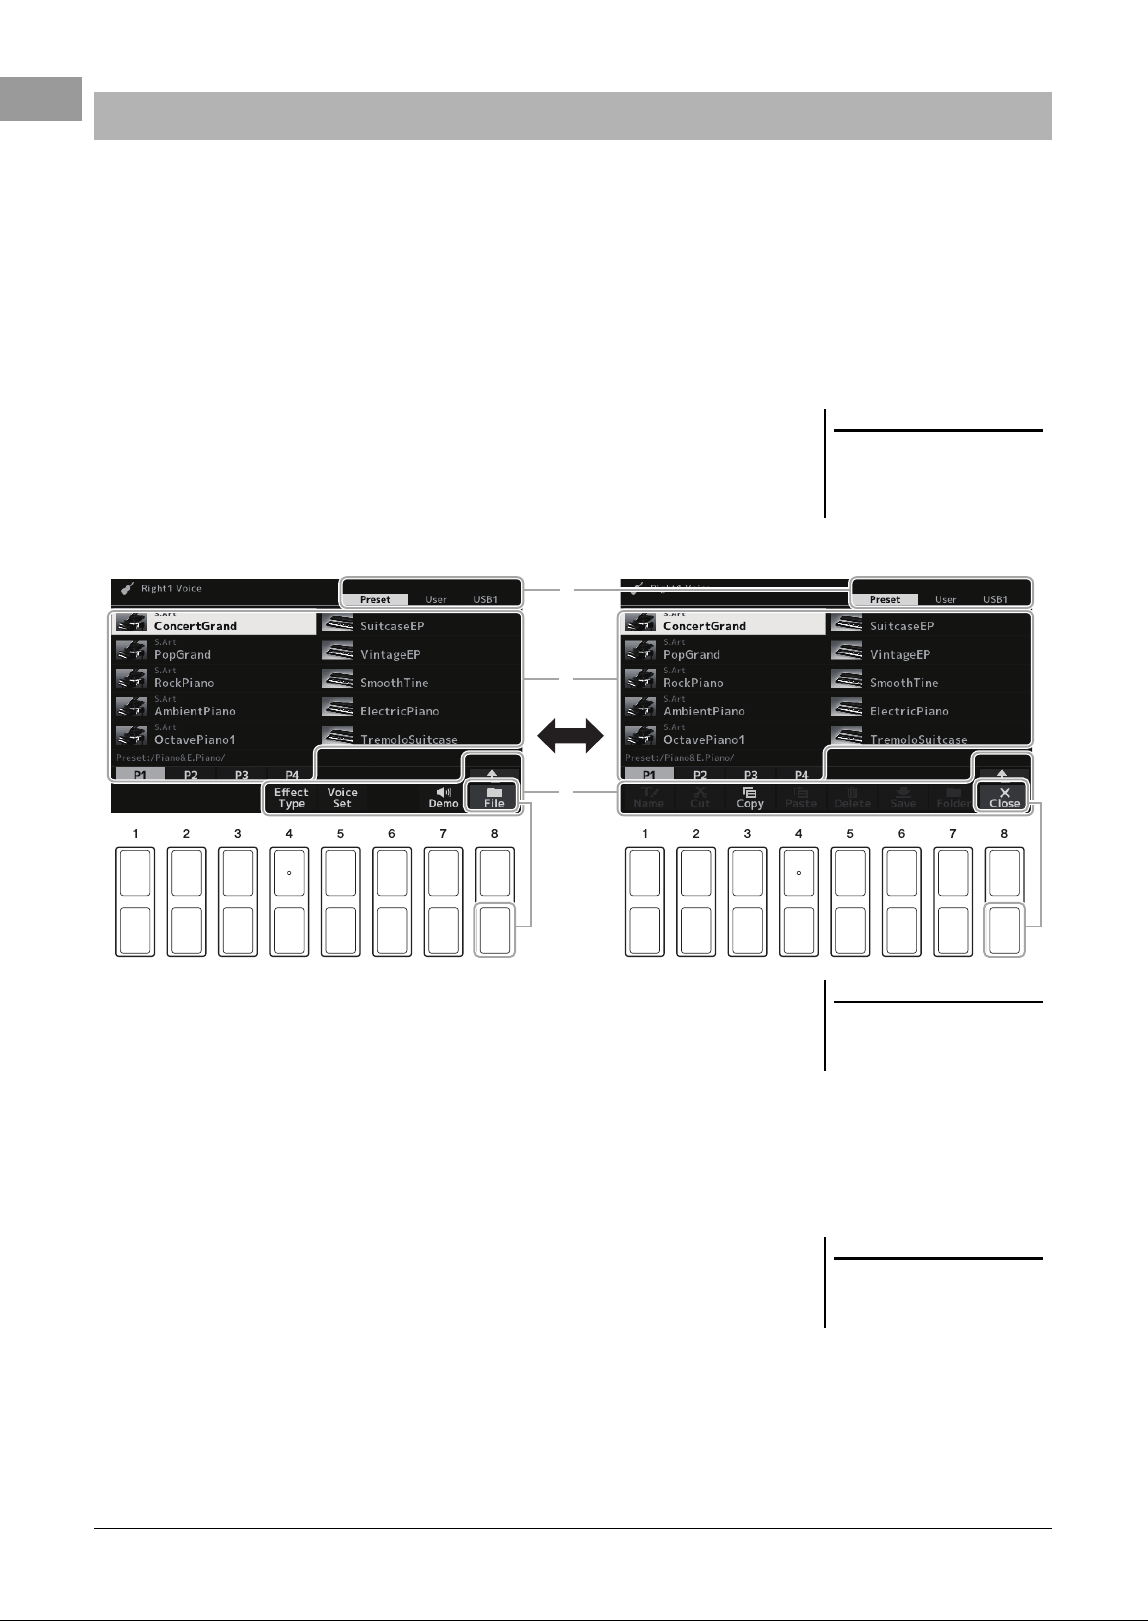
File Selection display configuration
1 Location (drive) of content files
•Preset..............Location where pre-programmed (preset) content files are
stored.
•User.................Location where recorded or edited content files are saved.
Installed Expansion Voices or Styles are also saved here in
the Expansion folder.
•USB.................Location where content files on USB flash drive are saved.
This appears only when a USB flash drive is connected to the
USB [TO DEVICE] terminal.
2 Selectable data (files)
The files that can be selected on this display are shown. If more than 10 files
exist, pressing the [1 ] or [2 ] button etc. corresponding to the page
numbers (P1, P2...) below the files changes the display page. When other pages
follow, the “→” button appears, and for the previous page, the “
←” button
appears.
3 File/Close
At the bottom of the File Selection display, you can toggle the indication between File and Close by pressing
the [8 ] button. Selecting File shows the file/folder management function names (page 27).
File Selection Display Configuration
NOTE
The Song file selection display can be
called up by pressing the [DIRECT
ACCESS] button, followed by the
[SONG FUNCTION] button.
1
2
3
NOTE
Before using a USB flash drive, be sure
to read “Connecting USB Devices” on
page 101.
NOTE
The contents, both pre-programmed
and your own original, are saved as
“files.”
PSR-SX620 Owner’s Manual 27
Basic Operations
You can save, name, copy, move, delete files, and you can create folders to manage
the files with the buttons located lower area in the File Selection display. For
information on the File Selection display, refer to page 26.
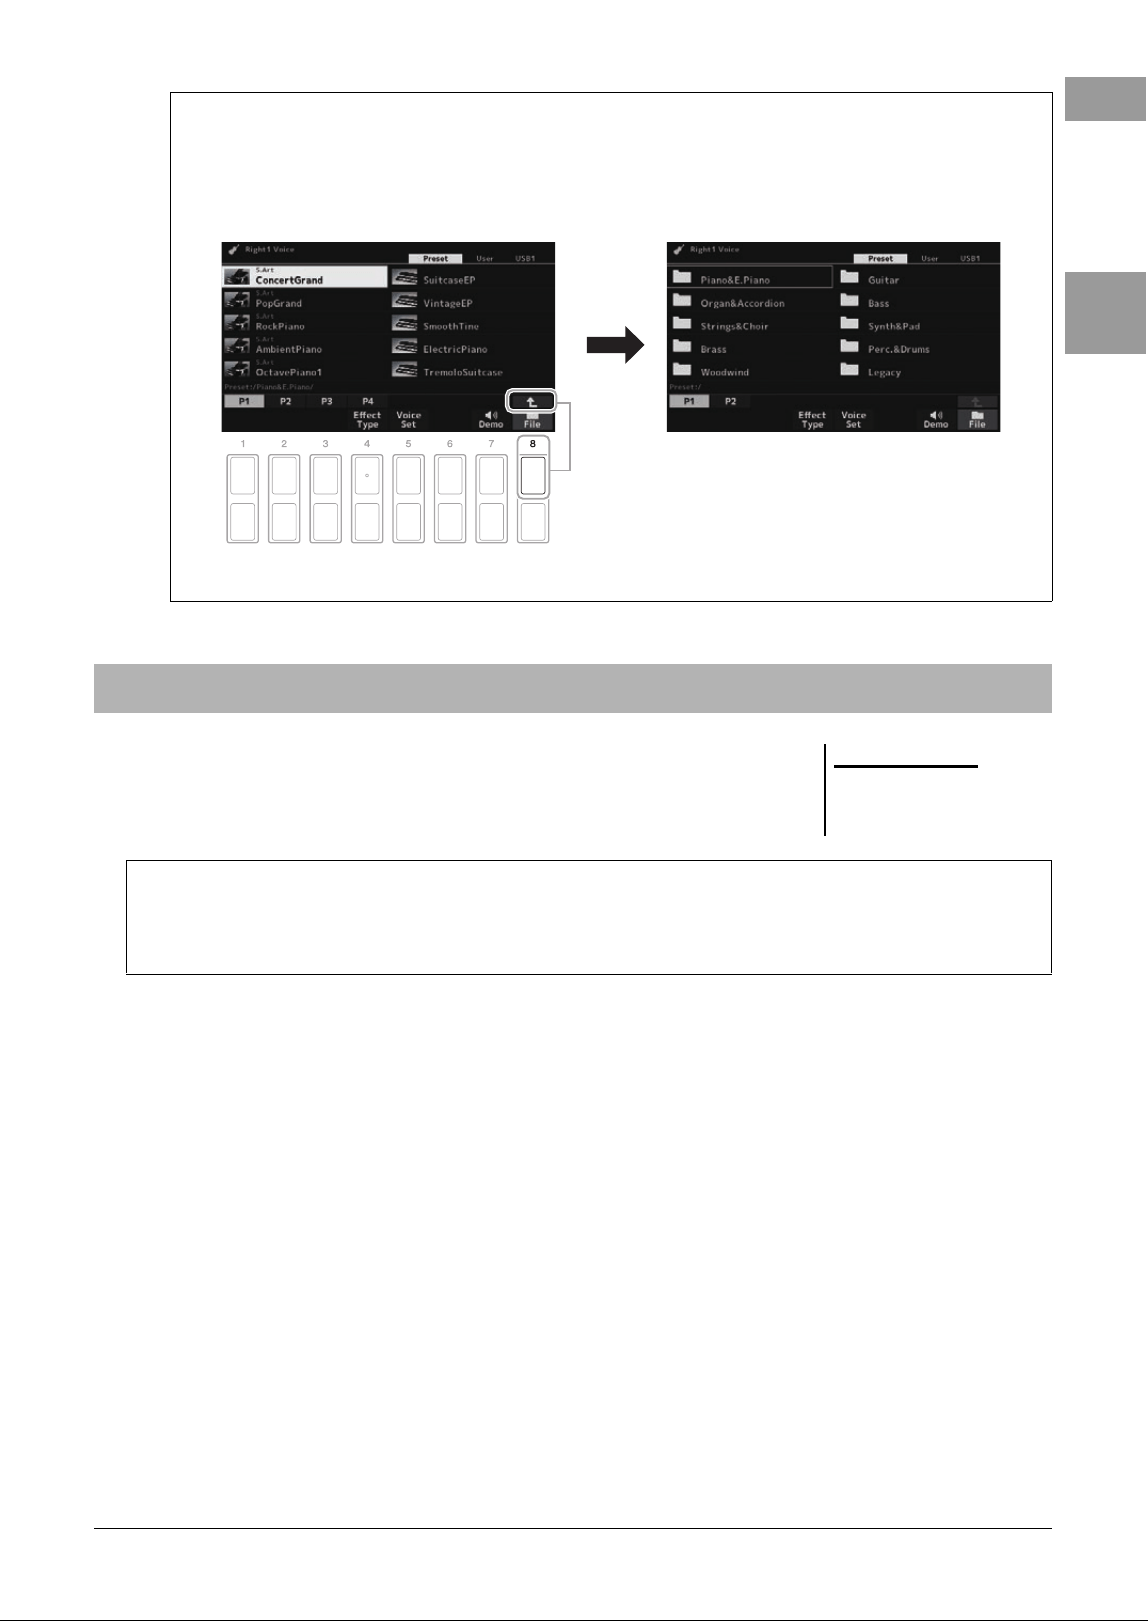
Calling up a higher level folder
When the files of a folder are displayed, “” is shown above the [8 ] button.
Example of the Preset Voice Selection display
The Preset Voices are categorized and contained in appropriate folders.
This display shows the Voices in a folder. Pressing
[8 ] button calls up the next higher level folder.
The next highest level (in this case, folder) is
shown. Each folder shown in this display contains
appropriately categorized Voices.
File Management
NOTE
Before using a USB flash drive, be sure
to read “Connecting USB Devices” on
page 101.
Restrictions for protected Songs
Preset Songs and most commercially available songs are copy protected to prevent illegal copying or accidental
erasure. For example, when preset songs are copied to the User drive, “Prot.1” is marked by the indications at the
upper left side of the file names. Those only can be copied/moved/deleted in the User drive.
28 PSR-SX620 Owner’s Manual
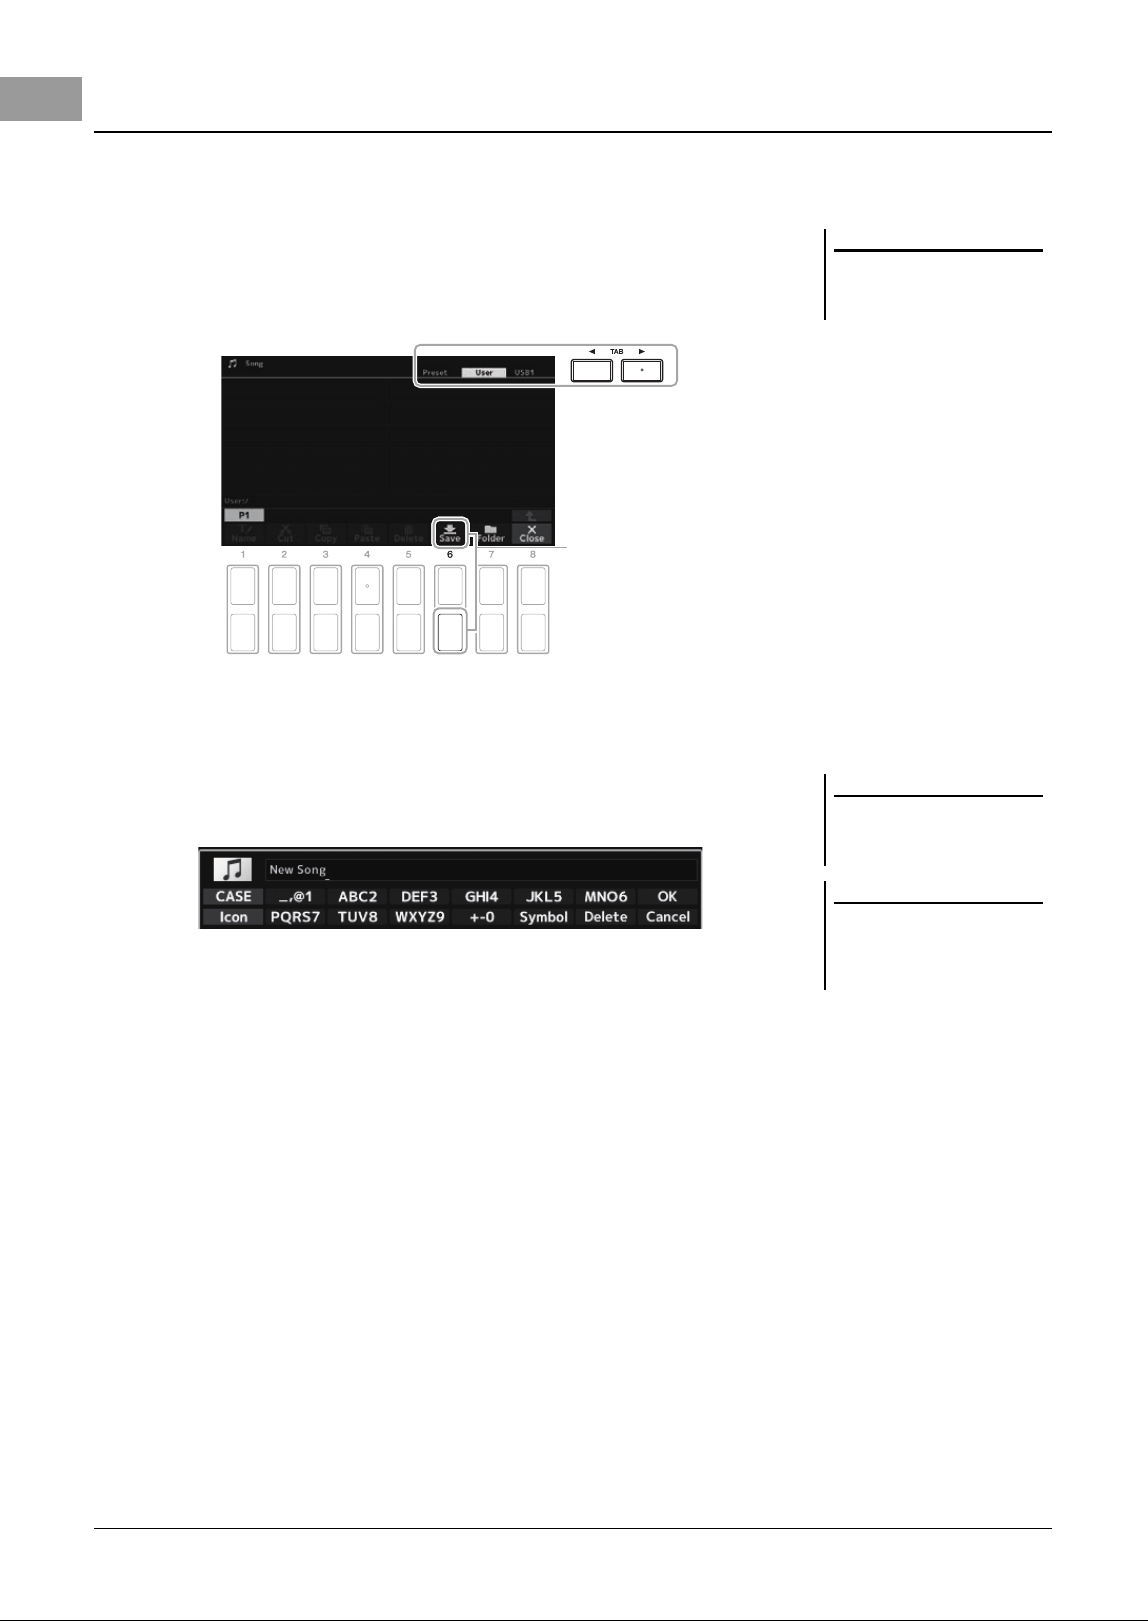
You can save your original data (such as Songs you've recorded) as a file to User or the USB drive in the File
Selection display (page 26).
1 In the File Selection display, select the appropriate tab (User or
USB) to which you want to save the data by using the TAB
[E][F] buttons.
If you want to save the data within an existing folder, also select the folder here.
2 Make sure that Save is shown at the bottom of the display.
If it is not shown on the display, press the [8 ] (File) button to call it up.
3 Press the [6 ] (Save) button.
The Character Entry window is called up.
4 Enter the file name (page 33).
Even if you skip this step, you can rename the file at any time after saving it
(page 30).
5 Press the [8 ] (OK) button to actually save the file.
If the file name already exists, a message appears asking you if you want to
overwrite or not. If not, press one of the [6 ] (No) buttons and enter another
name.
The saved file will be automatically located at the appropriate position among
the files in alphabetical order.
Saving a File
NOTE
Files cannot be saved to the Preset tab
or the “Expansion” folder (page 51) in
the User tab.
3
NOTE
To cancel the Save operation, press the
[8 ] (Cancel) button before step 5
below.
NOTE
In the User tab, the maximum total
number of files which can be stored
differs depending on the file size and
the length of the file names.
PSR-SX620 Owner’s Manual 29
Basic Operations
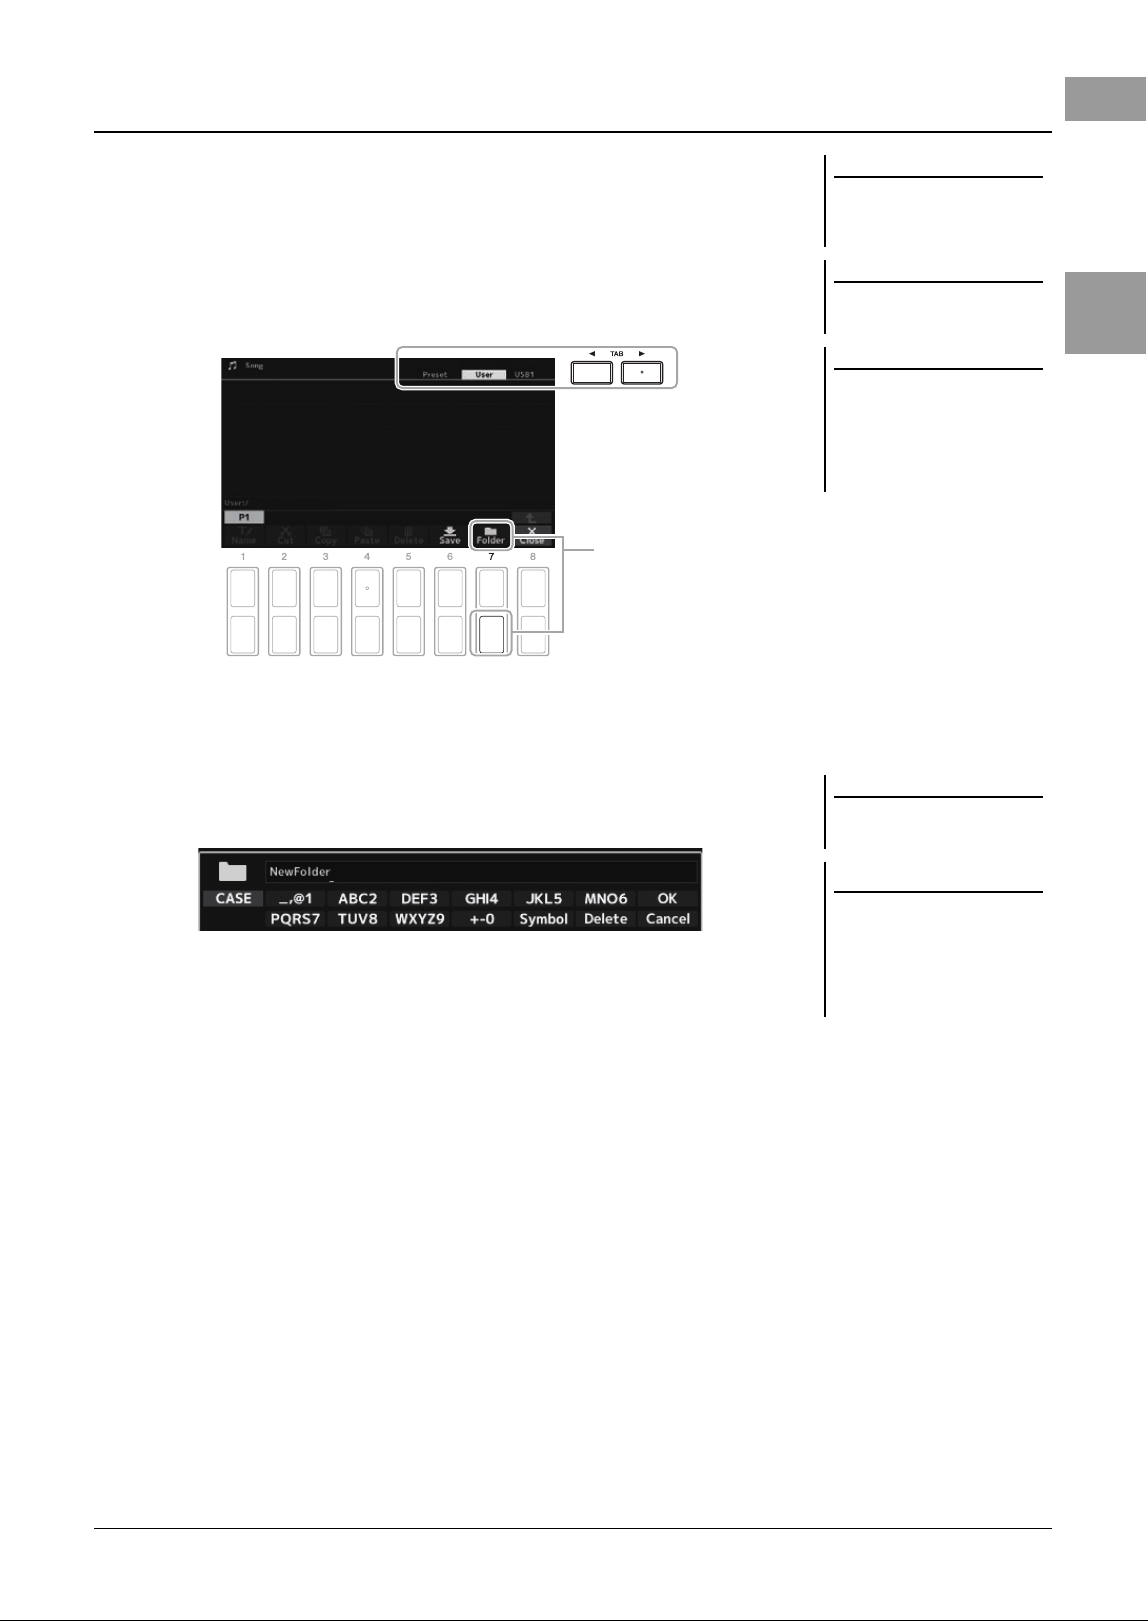
You can create folders to make it easier to find your original data.
1 In the File Selection display, select the appropriate tab (User or
USB) to which you want to create a new folder by using the TAB
[E][F] buttons.
If you want to create a new folder within an existing folder, select the desired
folder here.
2 Make sure that Folder is shown at the bottom of the display.
If it is not shown on the display, press the [8 ] (File) button to call it up.
3 Press the [7 ] (Folder) button.
The Character Entry window is called up.
4 Enter the name of the new folder (page 33).
If the folder name already exists, a message appears asking you to rename.
Press one of the [7 ] (OK) buttons and enter another name.
The created folder will be automatically located at the appropriate position
among the folders in alphabetical order.
Creating a New Folder
NOTE
A new folder cannot be made in the
Preset tab or the “Expansion” folder
(page 51) in the User tab.
NOTE
The maximum number of files/folders
which can be saved in a folder is 500.
NOTE
In the User tab, no more than three
folder levels can be created. The maxi-
mum total number of files/folders
which can be saved differs depending
on the file size and the length of the
file/folder names.
3
NOTE
To cancel creating a new folder, press
the [8 ] (Cancel) button.
NOTICE
Do not use “Expansion” for the
folder name. Otherwise, all data
contained in the “Expansion”
folder will be lost when an
Expansion Pack (page 51) is
installed.
30 PSR-SX620 Owner’s Manual
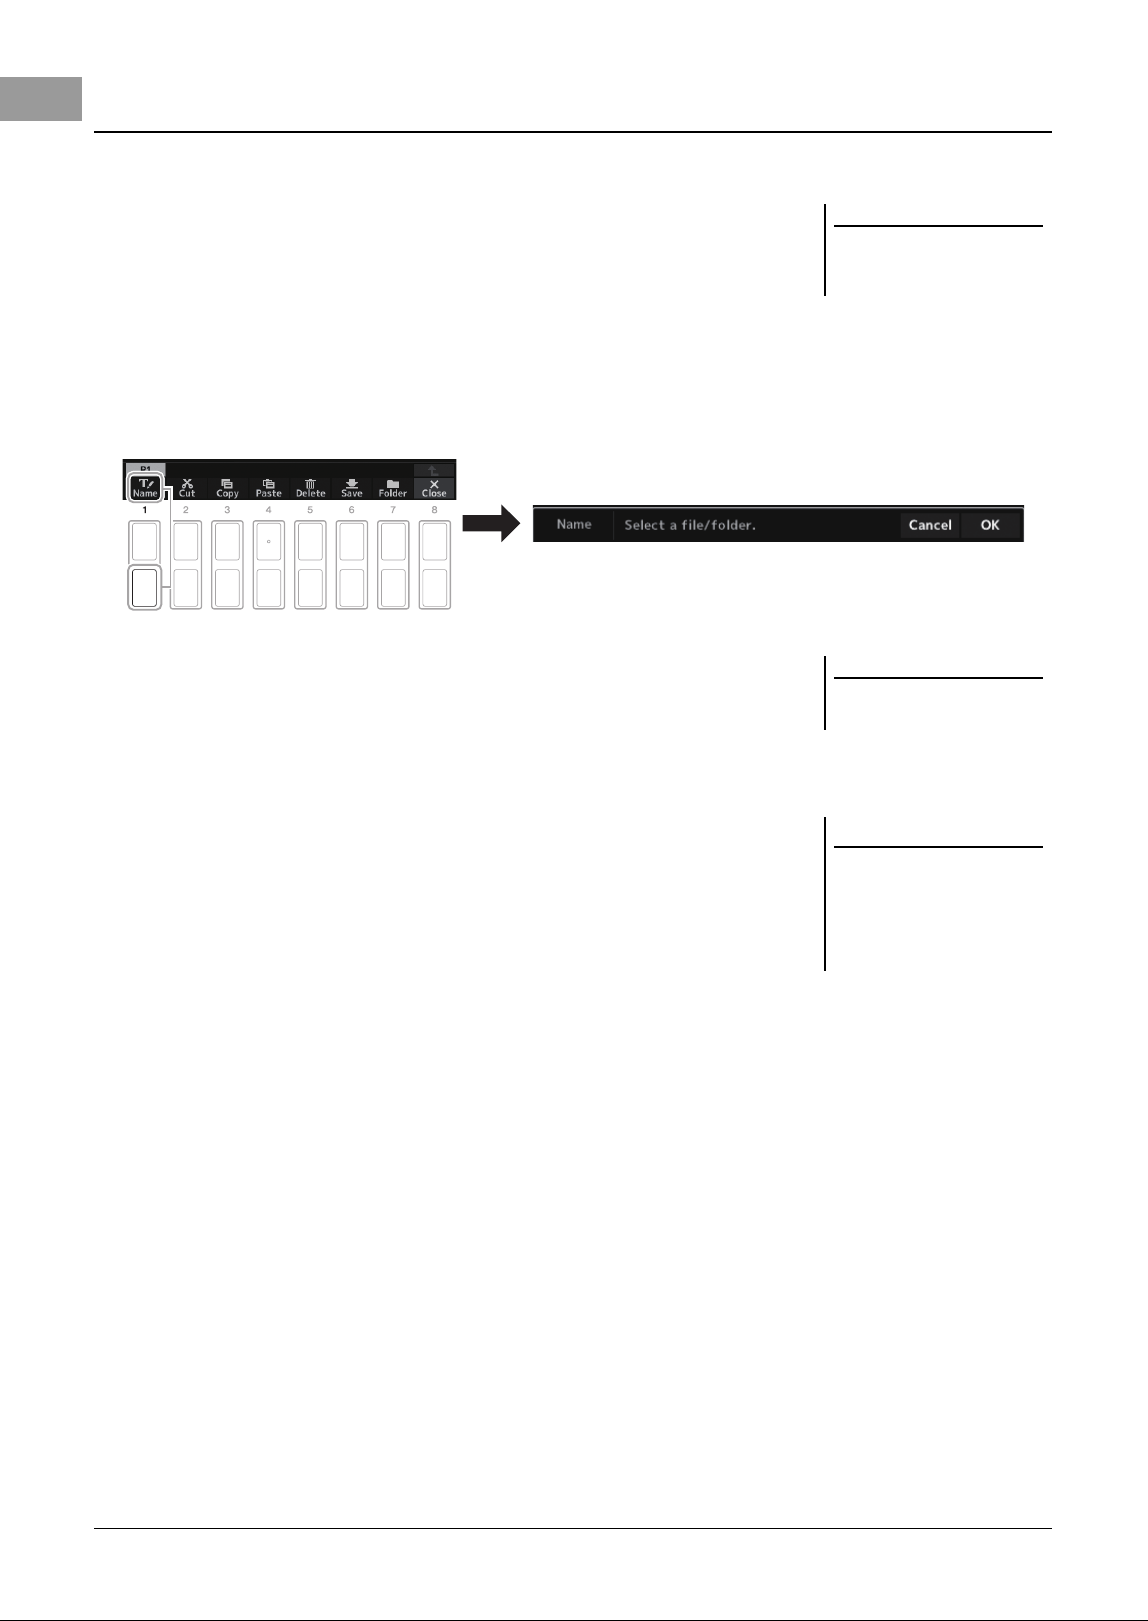
You can rename files/folders.
1 In the File Selection display, select the appropriate tab (User or
USB) which contains the file/folder you want to rename by using
the TAB [E][F] buttons.
2 Make sure that Name is shown at the bottom of the display.
If it is not shown on the display, press the [8 ] (File) button to call it up.
3 Press the [1 ] (Name) button.
The window for the Rename operation appears at the bottom of the display.
4 Move the cursor to the desired file/folder by using the Cursor
buttons
[
][
][
E
][
F
]
, and then press the [ENTER] button.
5 Press the [8 ] (OK) button to confirm the file/folder selection.
The Character Entry window is called up.
6 Enter the name of the selected file or folder (page 33).
If the file/folder name already exists, a message appears asking you if you want
to overwrite or not. If not, press one of the [6 ] (No) buttons and enter
another name.
The renamed file/folder appears on the display at the appropriate position
among the files in alphabetical order.
Renaming a File/Folder
NOTE
Files and folders in the Preset tab or
the “Expansion” folder (page 51) in the
User tab cannot be renamed.
NOTE
To cancel the Rename operation, press
the [7 ] (Cancel) button.
NOTICE
Do not use “Expansion” for the
folder name. Otherwise, all data
contained in the “Expansion”
folder will be lost when an
Expansion Pack (page 51) is
installed.
PSR-SX620 Owner’s Manual 31
Basic Operations
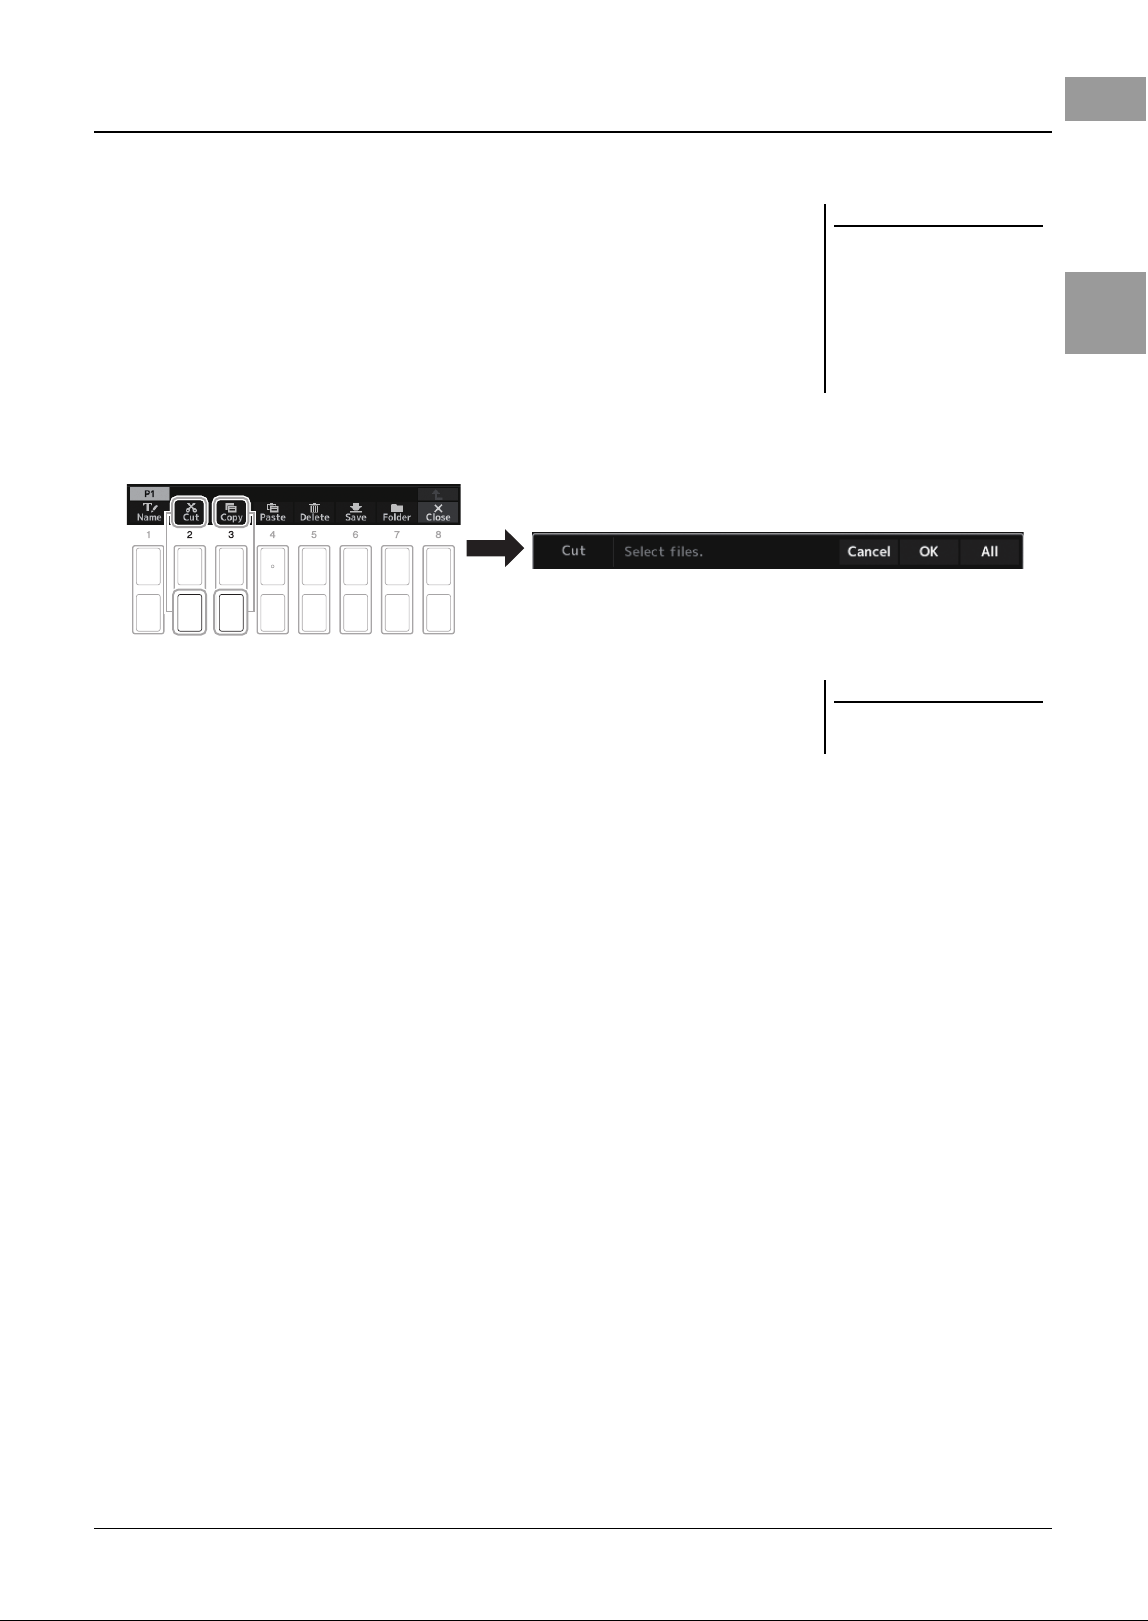
You can copy or cut files and paste them to another location (folder).
1 In the File Selection display, select the appropriate tab (Preset,
User or USB) which contains the file/folder you want to copy by
using the TAB [E][F] buttons.
2 Make sure that Copy or Cut is shown at the bottom of the
display.
If those are not shown on the display, press the [8 ] (File) button to call it up.
3 Press the [3 ] (Copy) button to copy or [2 ] (Cut) to move.
The window for the Copy/Cut operation appears at the bottom of the display.
4 Move the cursor to the desired file/folder by using the Cursor
buttons
[
][
][
E
][
F
]
, and then press the [ENTER] button.
Pressing the [ENTER] button selects (highlights) the file/folder. To cancel the
selection, press the [ENTER] button again.
Press the [8 ] (All) button to select all files/folders indicated on the current
display including the other pages. To cancel the selection, press the [8 ] (All
Off) button again.
5 Press the [7 ] (OK) button to confirm the file/folder selection.
6 Select the destination tab (User or USB) to paste the file/folder,
by using the TAB [E][F] buttons.
If necessary, select the destination folder by using the Cursor buttons
[][][E][F], and then press the [ENTER] button.
7 Press the [4 ] (Paste) button to paste the file/folder selected in
step 4.
If the file/folder name already exists, a message appears asking you if you want
to overwrite or not. If not, press one of the [6 ] (No) buttons and enter
another name.
The pasted file/folder appears on the display at the appropriate position among
the files in alphabetical order.
Copying or Moving Files
NOTE
• Files in the Preset tab cannot be
moved. They can only be copied.
• Files in the “Expansion” folder
(page 51) in the User tab cannot be
copied/moved.
• Commercially available song data
may be copy protected to prevent
illegal copying.
NOTE
To cancel the Copy/Move operation,
press the [6 ] (Cancel) button.
32 PSR-SX620 Owner’s Manual
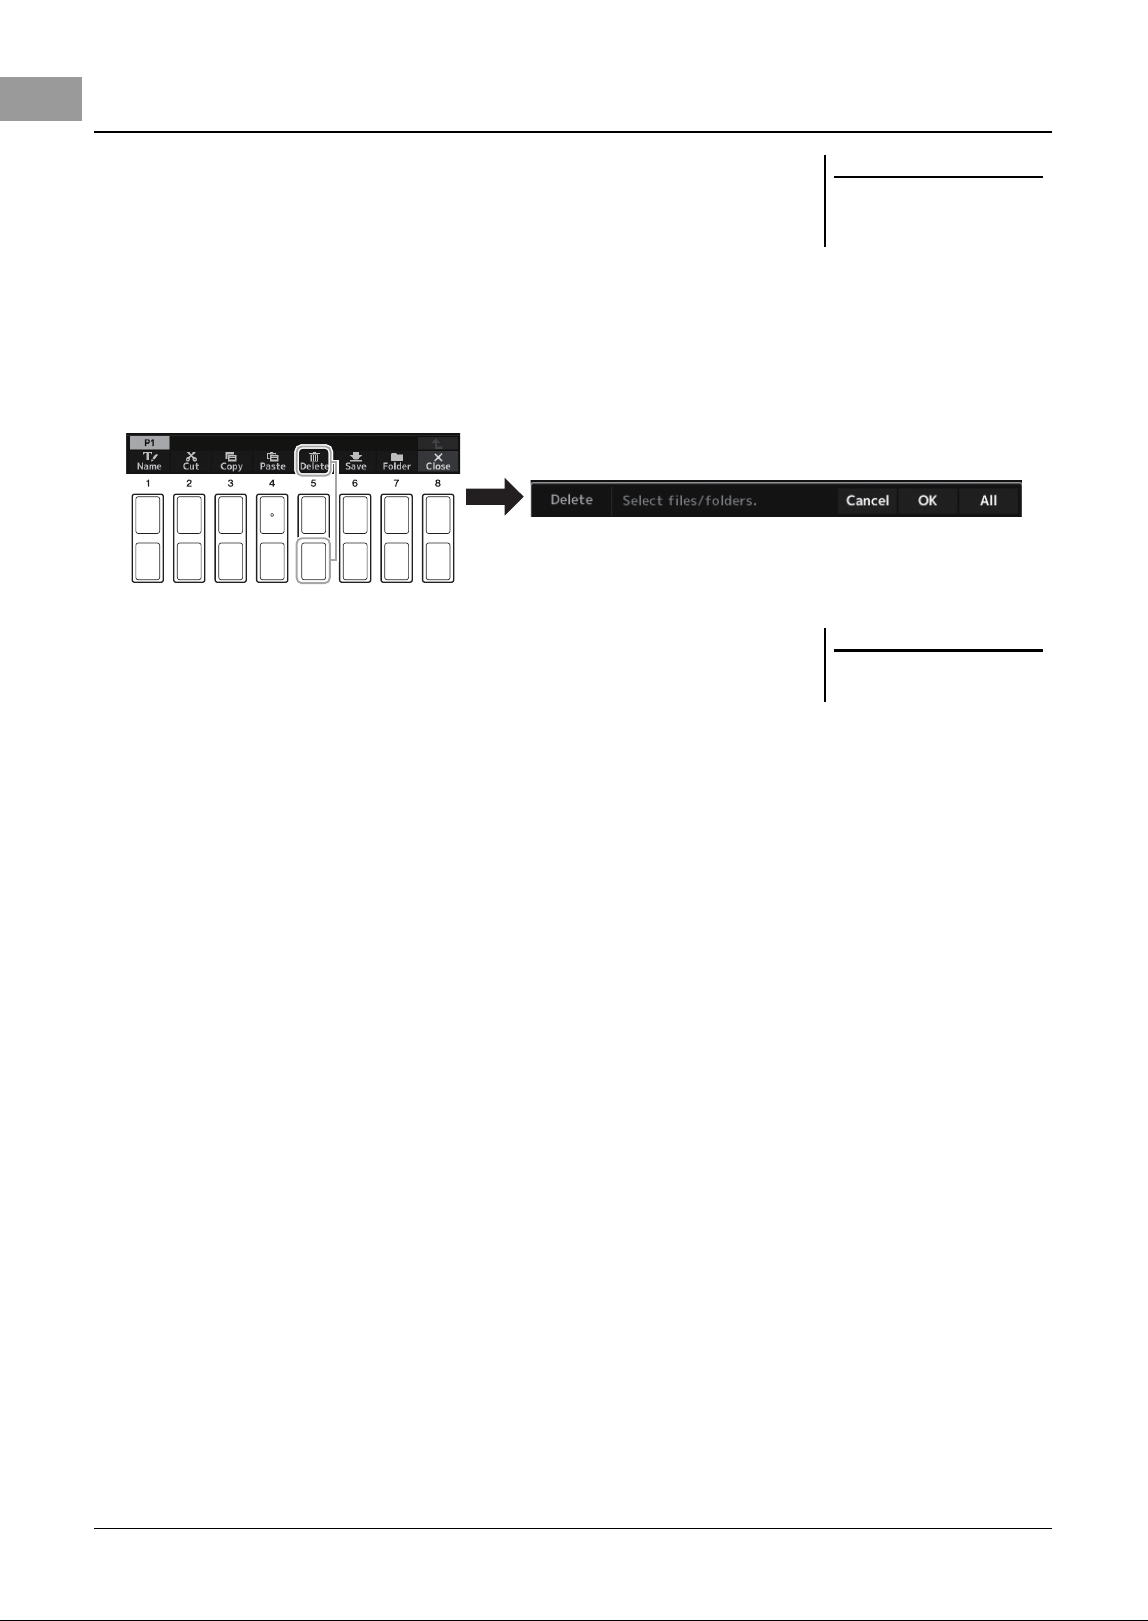
You can delete individual or multiple files/folders.
1 In the File Selection display, select the appropriate tab (User or
USB) which contains the file/folder you want to delete by using
the TAB [E][F] buttons.
2 Make sure that Delete is shown at the bottom of the display.
If it is not shown on the display, press the [8 ] (File) button to call it up.
3 Press the [5 ] (Delete) button.
The window for the Delete operation appears at the bottom of the display.
4 Move the cursor to the desired file/folder by using the Cursor
buttons
[
][
][
E
][
F
]
, and then press the [ENTER] button.
Pressing the [ENTER] button selects (highlights) the file/folder. To cancel the
selection, press the [ENTER] button again.
Press the [8 ] (All) button to select all files/folders indicated on the current
display including the other pages. To cancel the selection, press the [8 ] (All
Off) button again.
5 Press the [7 ] (OK) button to confirm the file/folder selection.
6 Follow the on-display instructions.
•Yes...................Deletes the file/folder
• Yes All .............Deletes all selected files/folders
•No.....................Leaves the file/folder as is without deleting
• Cancel.............Cancels the Delete operation
Deleting Files/Folders
NOTE
Files and folders in the Preset tab or
the “Expansion” folder (page 51) in the
User tab cannot be deleted.
NOTE
To cancel the Delete operation, press
the [6 ] (Cancel) button.
PSR-SX620 Owner’s Manual 33
Basic Operations
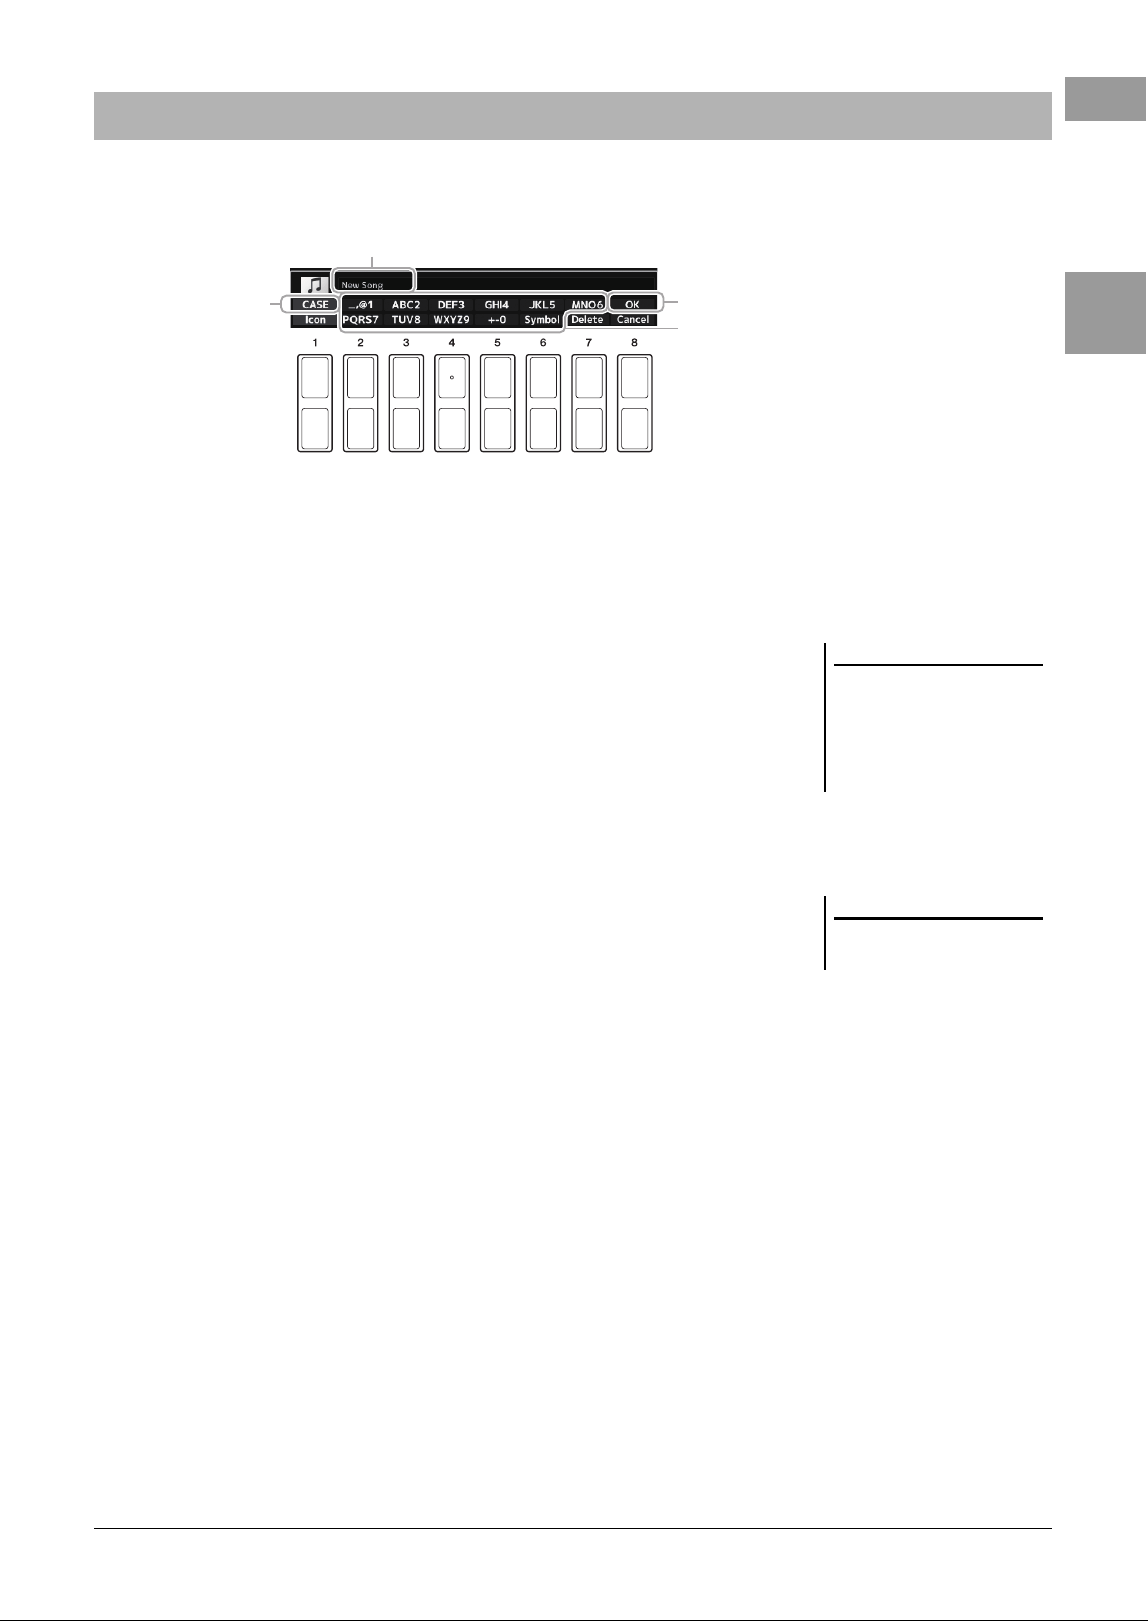
This section covers how to enter characters for naming your files/folders. Entering characters is done in the display
shown below.
1 Change the type of character by pressing the [1 ] button.
•CASE...............Capital letters, numbers, marks
• case .................Lowercase letters, numbers, marks
2 Use the Data dial to move the cursor to the desired position.
3 Press the [2 ] – [6 ] and [7 ] buttons, corresponding to
the character you wish to enter.
Several different characters are assigned to each button, and the characters
change each time you press the button.
To actually enter the selected character, move the cursor or press another
character-input button. Alternately, you can wait for a short time and the
character will be entered automatically.
For more information on entering characters, refer to “Other character-entry
operations” on the page 34.
4 Press the [8 ] (OK) button to actually enter the new name and
return to the previous display.
Entering Characters
2
1
4
3
NOTE
• The following marks cannot be
entered for a file/folder name.
\ / : * ? " < > |
• File names can contain up to 41
characters and folder names can
contain up to 50 characters.
NOTE
To cancel the character-entering oper-
ation, press the [8 ] (Cancel) button.
34 PSR-SX620 Owner’s Manual
• Deleting characters
Move the cursor to the character you wish to delete by using the Data dial, and press
the [7 ] (Delete) button. To delete all characters on the line at once, press and hold
the [7 ] (Delete) button.
• Entering marks or space
1. Press the [6 ] (Symbol) button to call up the mark list.
2. Use the Data dial to move the cursor to the desired mark or space, and then press
the [8 ] (OK) button.
• Selecting custom icons for files (shown at left of file name)
1. Press the [1 ] (Icon) button to call up the Icon Select display.
2. Select the icon by using the Cursor buttons [][][E][F] or Data dial. The
display includes several pages. Press the TAB [E][F] buttons to select the
desired pages.
3. Press the [8 ] (OK) button to apply the selected icon.
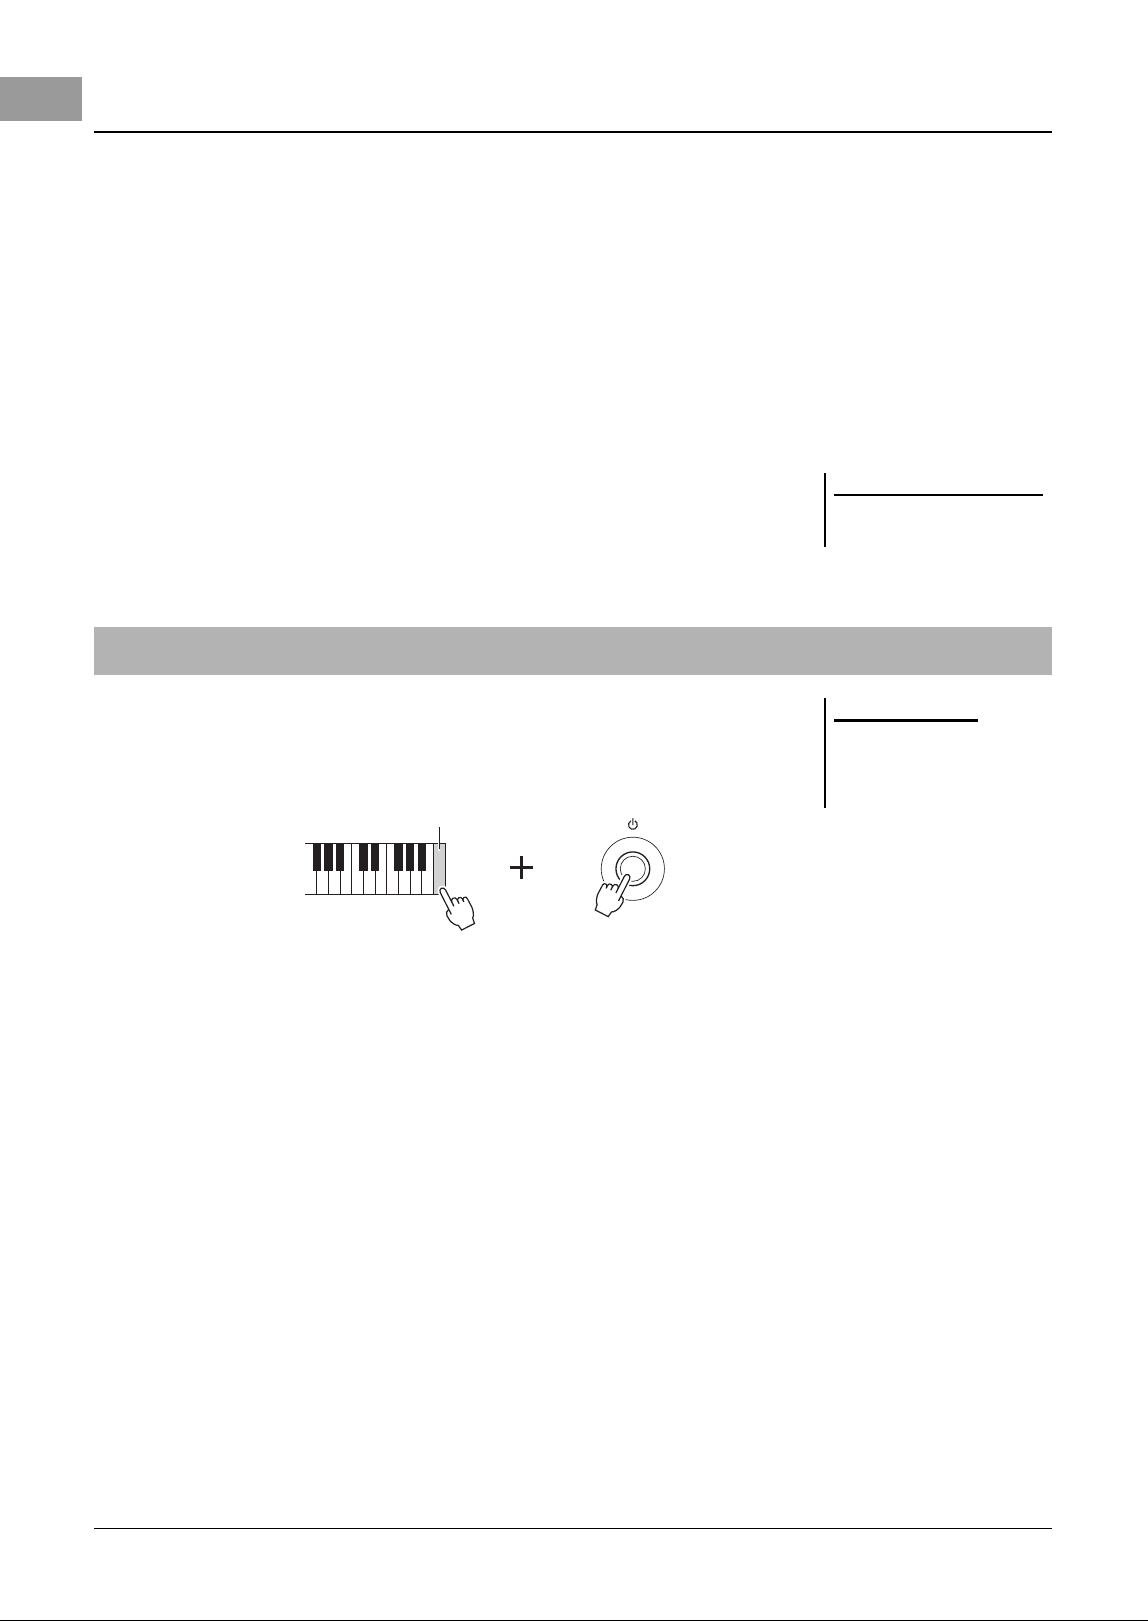
While holding the right-most key (C6) on the keyboard, turn the power on. This resets
the settings of the entire instrument (referred to as the System Setup parameters) to their
factory default settings. Refer to the “Parameter Chart” in the Data List on the website for
details about which parameters belong to System Setup.
You can also reset specified settings to the factory default value or delete all files/folders in the User drive. Call up
the operation display: [MENU] → TAB [F] General → Cursor buttons [][][E][F] System → [ENTER] →
TAB [E][F] Reset. For details, refer to the Reference Manual on the website, Chapter 10.
Other character-entry operations
NOTE
To cancel the operation, press the
[8 ] (Cancel) button.
Resetting to the Factory-programmed Settings
NOTE
The recorded Songs (page 74), Expan-
sion Packs (page 51), and other files
saved to this instrument are not reset
by this operation.
C6
PSR-SX620 Owner’s Manual 35
Basic Operations
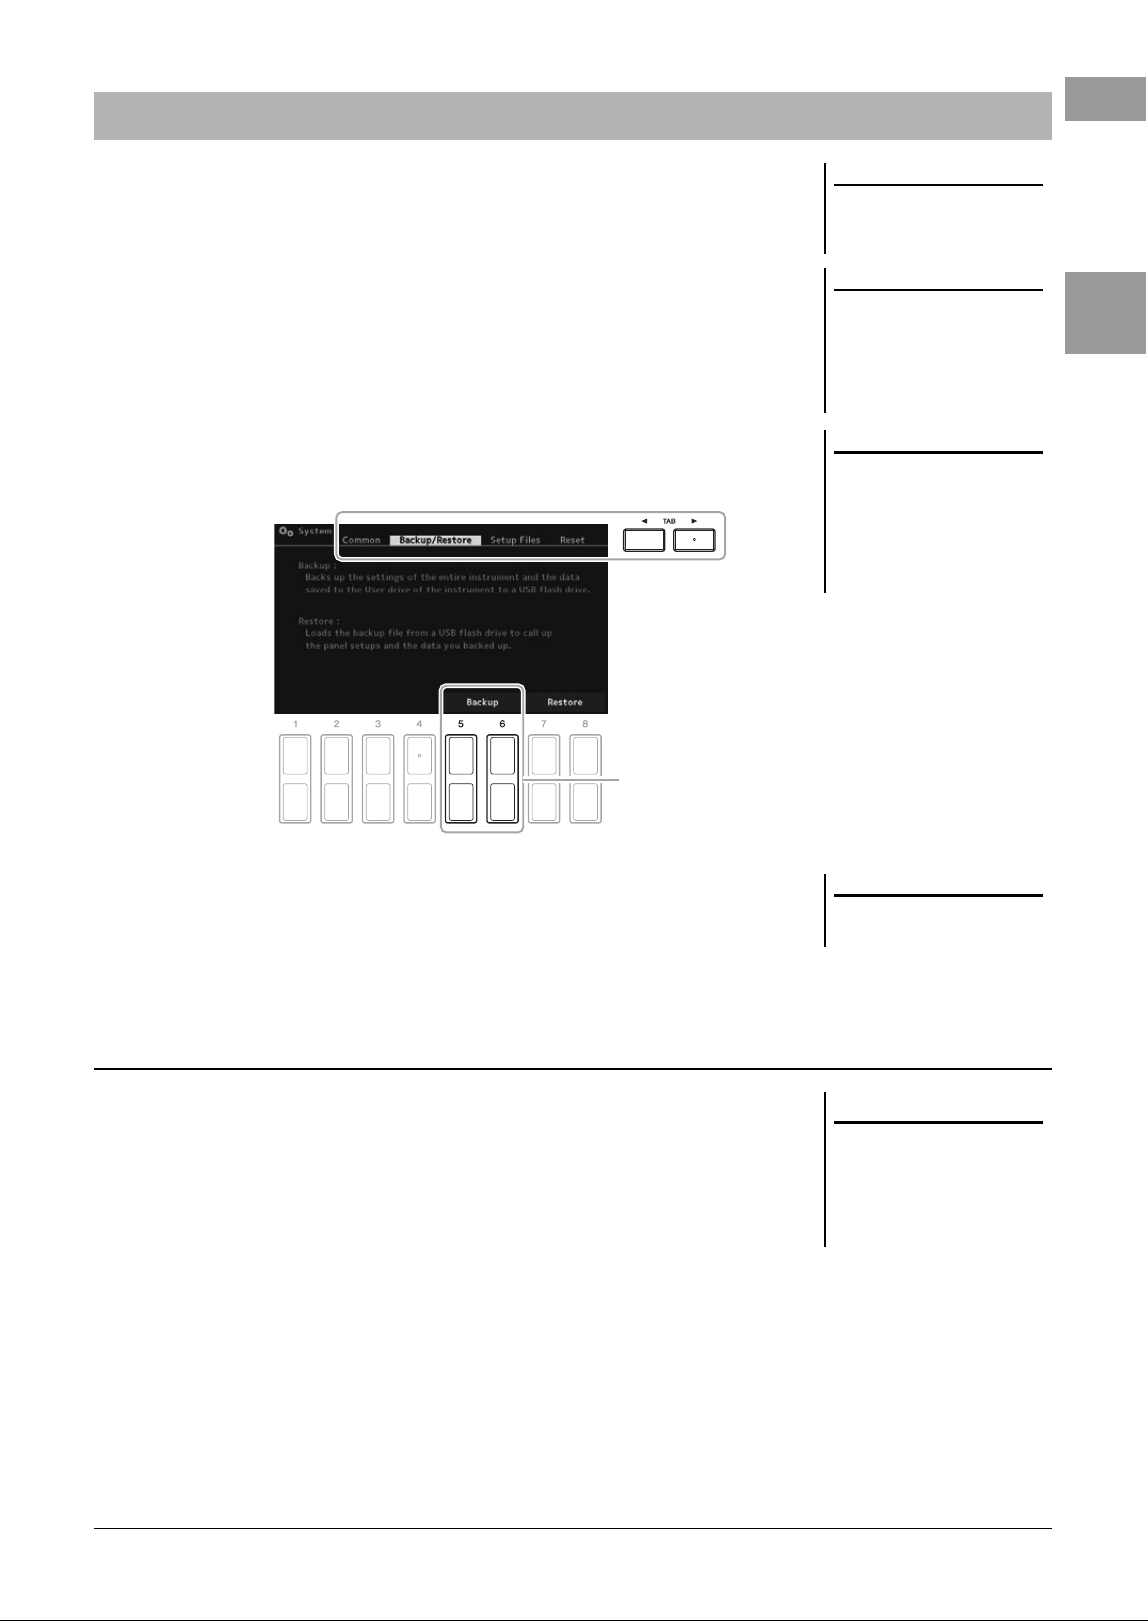
You can back up all data saved in the User drive (except Protected Songs and
Expansion Voices/Styles) and all settings of the instrument to a USB flash drive as a
single file.
1 Connect a USB flash drive to the USB [TO DEVICE] terminal for
the backup destination.
2 Call up the operation display.
[MENU] → TAB [F] General → Cursor buttons [][][E][F] System →
[ENTER] → TAB [E][F] Backup/Restore
3 Use the [5 ]/[6 ] (Backup) buttons to save the data to the
USB flash drive.
When confirmation messages appear, follow the on-display instructions.
To do this, press the [7 ]/[8 ] (Restore) buttons in the Backup/Restore page
(see above). When confirmation messages appear, follow the on-display instructions.
When the operation is completed, the instrument will be restarted automatically.
Data Backup
NOTE
Before using a USB flash drive, be sure
to read “Connecting USB Devices” on
page 101.
NOTE
You can also back up files in the User
drive such as Voice, Song, Style, Multi
Pad and Registration Memory by
copying them individually to a USB
flash drive as desired. For instructions,
refer to page 31.
NOTE
You can also back up System settings
and MIDI settings individually as
desired. Call up the operation display:
[MENU] → General → System →
Setup Files. For more information,
refer to the Reference Manual on the
website, Chapter 10.
3
NOTE
Completing the backup/restore opera-
tion may take a few minutes.
Restoring the Backup File
NOTICE
Move the Protected Songs
(saved to the User drive) to USB
flash drive before restoring. If
the Songs are not moved, the
operation deletes the data. For
instructions, refer to page 31.
36 PSR-SX620 Owner’s Manual
Workflow Guide—For
Performing on the PSR-SX620
Creating panel settings manually and performing a single song
Playing the keyboard with Styles (Auto Accompaniment)
Singing with Song playback
Storing the song’s panel settings for easy recall
Calling up the stored panel settings for your performance
Recording your keyboard performance
Setting up the
Style
... p. 52
Optimum panel settings for the current Style (One
Touch Setting)
... p. 61
Calling up the most appropriate panel settings (Keyboard Parts,
Harmony/Arpeggio, or Multi Pads) for the selected Style.
Setting up the Voices
... p. 38
(Setting up keyboard parts)
Making Song playback settings ...
p. 67
Setting up Harmony/
Arpeggio
...
p. 47
Storing the song’s panel settings to Registration Memory ... p. 91
For details about Registration Memory and Registration Banks, refer to page 90.
Selecting the desired Registration Bank file
Calling up the Registration Memories 1–8 for the Bank file. (p. 92)
Calling up the desired song’s panel settings from the Playlist in a single step
Selecting the desired Playlist Record for calling up the corresponding linked Registration Memory. (p. 96)
Recording setup: Calling up a Registration Memory from the Playlist,
etc.
or
or
Workflow Guide
PSR-SX620 Owner’s Manual 37
Workflow Guide—For Performing on the PSR-SX620
Assigning
functions to
controllers
... p. 45
Setting up Multi
Pads
... p. 86
Setting up
Microphone
... p. 83
Assigning
functions to
controllers
... p. 45
Setting up
Microphone
... p. 83
Singing with Song
playback
Operations during perfor-
mance:
p. 67
Playing with Styles
Operations during per-
formance: p. 54
Registering the Registration Memory to
a Playlist
... p. 94
Creating a Playlist Record as a shortcut to the Reg-
istration Memory.
Editing the Playlist for your live
performance set list
Creating a new Playlist for your live performance by
selecting Songs from a preset Playlist.
Selecting the desired Registration Memory
Calling up the desired panel settings by pressing the Registration Memory 1–8. (p. 93)
Playing with Styles
or singing with
Song playback
Further recording setup
MIDI Recording ... p. 74
Audio Recording ... p. 81
Recording your
performance
Recording your playing
and/or singing.
38 PSR-SX620 Owner’s Manual
1
Voices
– Playing the keyboard –
The PSR-SX620 features a wide variety of exceptionally
realistic instrumental Voices, including piano, organ,
guitar, strings, brass, wind instruments and more.
Moreover, it gives you the tools to play these Voices more
naturally and with greater expressiveness.
1 Press one of the VOICE category selection buttons to select a
Voice category and call up the Voice Selection display.
The preset Voices are categorized and contained in appropriate folders. Voice
category selection buttons correspond to the categories of the preset Voices. For
example, press the [GUITAR] button to display various guitar Voices.
2 Move the cursor to the desired Voice by using the Cursor
buttons
[
][
][
][
]
, and then press the [ENTER] button.
You can call up the other pages by pressing the buttons ([1 ] – [7 ]) that
correspond to the page numbers (P1, P2 ...), or by pressing the same VOICE
category selection button repeatedly.
Pressing the [8 ] (↑) button calls up other VOICE categories (folders).
Playing Voices
NOTE
For a list of preset Voices of this
instrument, refer to the “Voice List” in
the Data List on the website.
Preset Voices
• Expansion Voices
Voices additionally installed (page 51).
• User Voices
Voices created with the Voice Set function (refer to
the Reference Manual on the website), or Voices
copied to the User drive (page 31).
NOTE
The Voice characteristics are indicated
above the Preset Voice name. For
details on the characteristics, see
page 39.
NEXT PAGE
PSR-SX620 Owner’s Manual 39
Voices – Playing the keyboard –
1
3 Play the keyboard.
The particular type of a Voice is classified into nine kinds. The defining characteristics of these Voices and their
performance advantages are described below.
For a list of preset Voices of this instrument, refer to the “Voice List” in the Data List on the website.
NOTE
The Voice name for each part can be
confirmed on the Main display
(page 20).
Voice Types (Characteristics)
S.Art Voice
(Super Articulation Voices)
The S.Art Voices enable you to create subtle, very realistic musical expressions, simply by how you
play the keyboard or use the foot controller in real-time. “S.Art” is indicated at the upper left of the
Voice name in the Voice Selection display when selected. To confirm what playing techniques are
effective with specific S.Art Voices, press the [6 ] (Info) button shown in the display of the
selected S.Art Voice. For details, refer to page 40.
NOTE
For some S.Art Voices of the Piano & E.Piano category, “Info” is not shown even when selected, because those Voices rec-
reate detailed sounds of the Piano, but not particular playing techniques.
Live These acoustic instrument sounds were sampled in stereo, to produce a truly authentic, rich sound
— full of atmosphere and ambience.
Cool These Voices use sophisticated programming to capture the dynamic textures and subtle nuances of
electric instruments.
Sweet These acoustic instrument sounds also benefit from Yamaha’s sophisticated technology — and fea-
ture a finely detailed and natural sound.
Drums Various drum and percussion sounds are assigned to individual keys, letting you play the sounds
from the keyboard. For information about what sound is assigned to each key, refer to the “Drum/
SFX Kit List” in the Data List on the website.
SFX Various special effect sounds and percussion sounds are assigned to individual keys, letting you
play the sounds from the keyboard. For information about what sound is assigned to each key, refer
to the “Drum/SFX Kit List” in the Data List on the website.
Live Drums These are high-quality drum sounds that take full advantage of Stereo Sampling and Dynamic Sam-
pling.
Live SFX These are various high-quality special effect sounds and percussion sounds that take full advantage
of Stereo Sampling and Dynamic Sampling.
MegaVoice MegaVoice is a special Voice format designed for use in styles and songs, not for live performance.
Different velocity ranges are used to select dramatically different playing styles simultaneously,
and without changing the voice.
Actual sound maps for the MegaVoices are provided in the “MegaVoices Map” in the Data List on
the website.
NOTE
• The MegaVoices are not compatible with other kinds of Voices. For this reason, any Song or Style you’ve created on this
instrument using these Voices will not sound properly when played back on the instruments which do not have these
types of Voices.
• MegaVoices sound differently depending on keyboard range, velocity, touch, etc. Hence, if you turn on the [HARMONY/
ARPEGGIO] button or change the Voice Set parameters, unexpected or undesired sounds may result.
To listen to the demo phrases for each Voice
Press the [7 ] (Demo) button to start the Demo for the selected Voice. To stop the demo, press the [7 ] button
again.
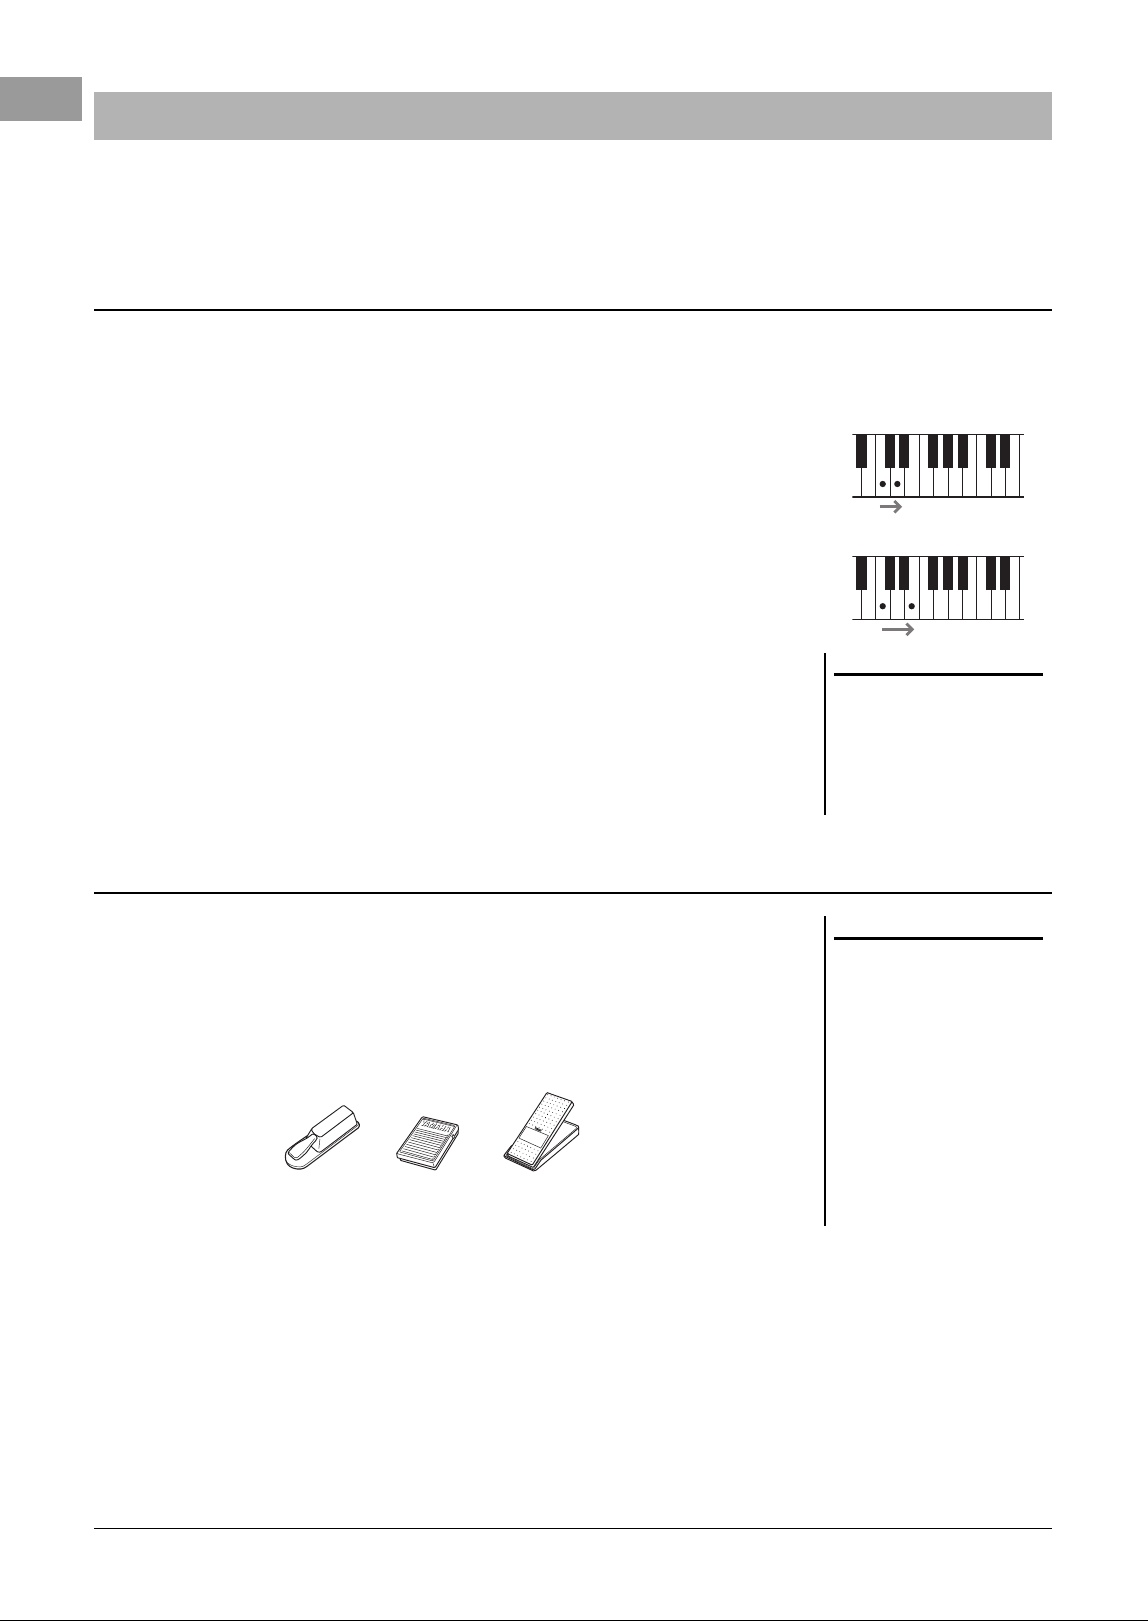
40 PSR-SX620 Owner’s Manual
The Super Articulation Voices (S.Art Voices) enable you to create subtle, very realistic musical expressions, simply
by how you play. The [S.Art] icon is shown beside the Voice name of Super Articulation Voices (S.Art) on the
Voice Selection display or the Main display.
By playing notes in a very legato way (i.e., a note is played while the preceding note is still held), the S.Art Voices
provide many benefits with great playability and expressive control in real time — remarkably reproducing the
sound and performance of actual musical instruments.
Example: Saxophone Voice
With the Saxophone Voice, if you play a C note and then an adjacent D in a very
legato way, you will hear the note change seamlessly, as though a saxophone player
played it in a single breath.
Example: Guitar Voice
With the ConcertGuitar Voice, if you play a C note and then the E just above in a very
legato but firm way, the pitch slides up from C to E.
To control articulation effects, you can assign the function to the pedal. Pressing a
pedal triggers different playing effects, separate from your keyboard playing. For
example, pressing a pedal for a saxophone Voice can produce breath noises or key
noises, while doing the same for a guitar Voice can produce fret noises or body-
tapping sounds. You can effectively intersperse these into the notes as you play.
To assign the function of articulation to the pedal, call up the display via the
following operations.
[MENU] → TAB [] Menu1 → Cursor buttons [][][][] Controller →
[ENTER] → TAB [] Foot Pedal
For details, refer to the Reference Manual on the website, Chapter 9.
Playing Super Articulation Voices
Adding Articulation Effects by Playing the Keyboard
NOTE
Since the S.Art Voices have various
effects, not all of the S.Art Voices cor-
respond to legato play. To confirm
what playing techniques are effective
with specific S.Art Voices, press the [6
] (Info) button shown in the display
of the selected S.Art Voice.
Adding Articulation Effects by Using the Pedal
NOTE
• S.Art Voices are compatible with
other models which have those
types of Voices installed; however,
some Song or Style data you’ve cre-
ated on the instrument using these
Voices may not sound properly
when played back on other instru-
ments.
• S.Art Voices sound differently
depending on the keyboard range,
velocity, touch, etc. Hence, if you
turn on a Keyboard Harmony effect,
or change the Voice Settings, unex-
pected or undesired sounds may
result.
Foot Pedals (sold separately)
FC4A FC7FC5
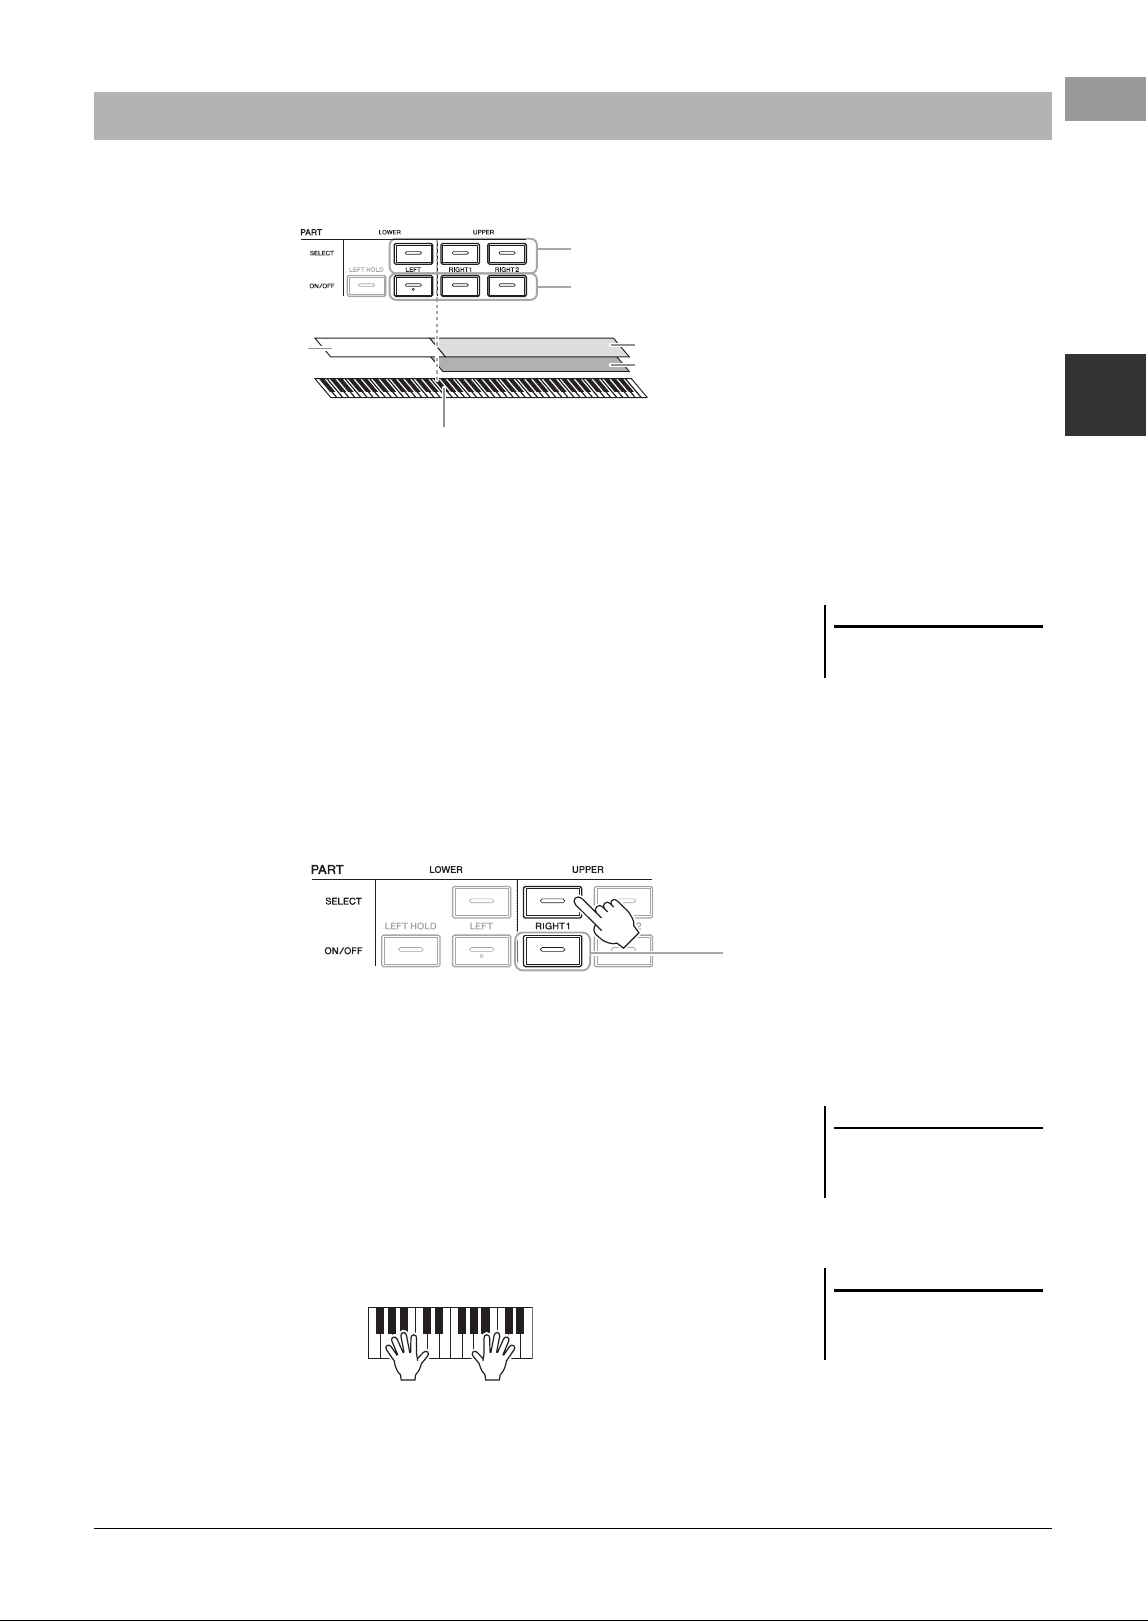
PSR-SX620 Owner’s Manual 41
Voices – Playing the keyboard –
1
The Voices can be played via three keyboard parts: LEFT, RIGHT 1 and 2. You can combine these parts by using
the PART ON/OFF buttons to create luscious instrument textures and convenient performance combinations.
• To play one single Voice on the entire keyboard:
Turn on the RIGHT 1 or 2 part.
• To play two different Voices in layer on the entire keyboard (Layer):
Turn on the RIGHT 1 and 2 parts.
• To play different Voices in the right- and left-hand sections of the key-
board (Split):
Turn on the LEFT and RIGHT (1 and/or 2) parts. The F#2 and lower keys are used
for the LEFT part while the upper keys (excluding F#2) are used for the RIGHT 1
and 2 parts. The key which divides the keyboard into the left-hand and right-hand
sections is referred to as the “Split Point.”
1 Turn on the PART SELECT button corresponding to the part you
want to use.
2 Select the Voice for the selected part.
For instructions on selecting Voices, refer to page 38.
3 If necessary, repeat steps 1 and 2 on page 38 to select the Voice
for the other part.
4 Turn on the PART ON/OFF button corresponding to the part(s)
you want to use.
5 Play the keyboard.
Selecting Voices for the Keyboard Parts
RIGHT 2 part
RIGHT 1 part
LEFT part
For selecting the keyboard part to change the Voice
For turning on/off the keyboard parts
Right-hand (UPPER) sectionLeft-hand (LOWER) section
Split Point (F#2 by default)
NOTE
The Split Point can be changed
(page 63).
4
NOTE
You can save the Voice selection and
on/off setting for each part to Registra-
tion Memory (page 91).
NOTE
The Voice name for each part can be
confirmed on the Main display
(page 20).
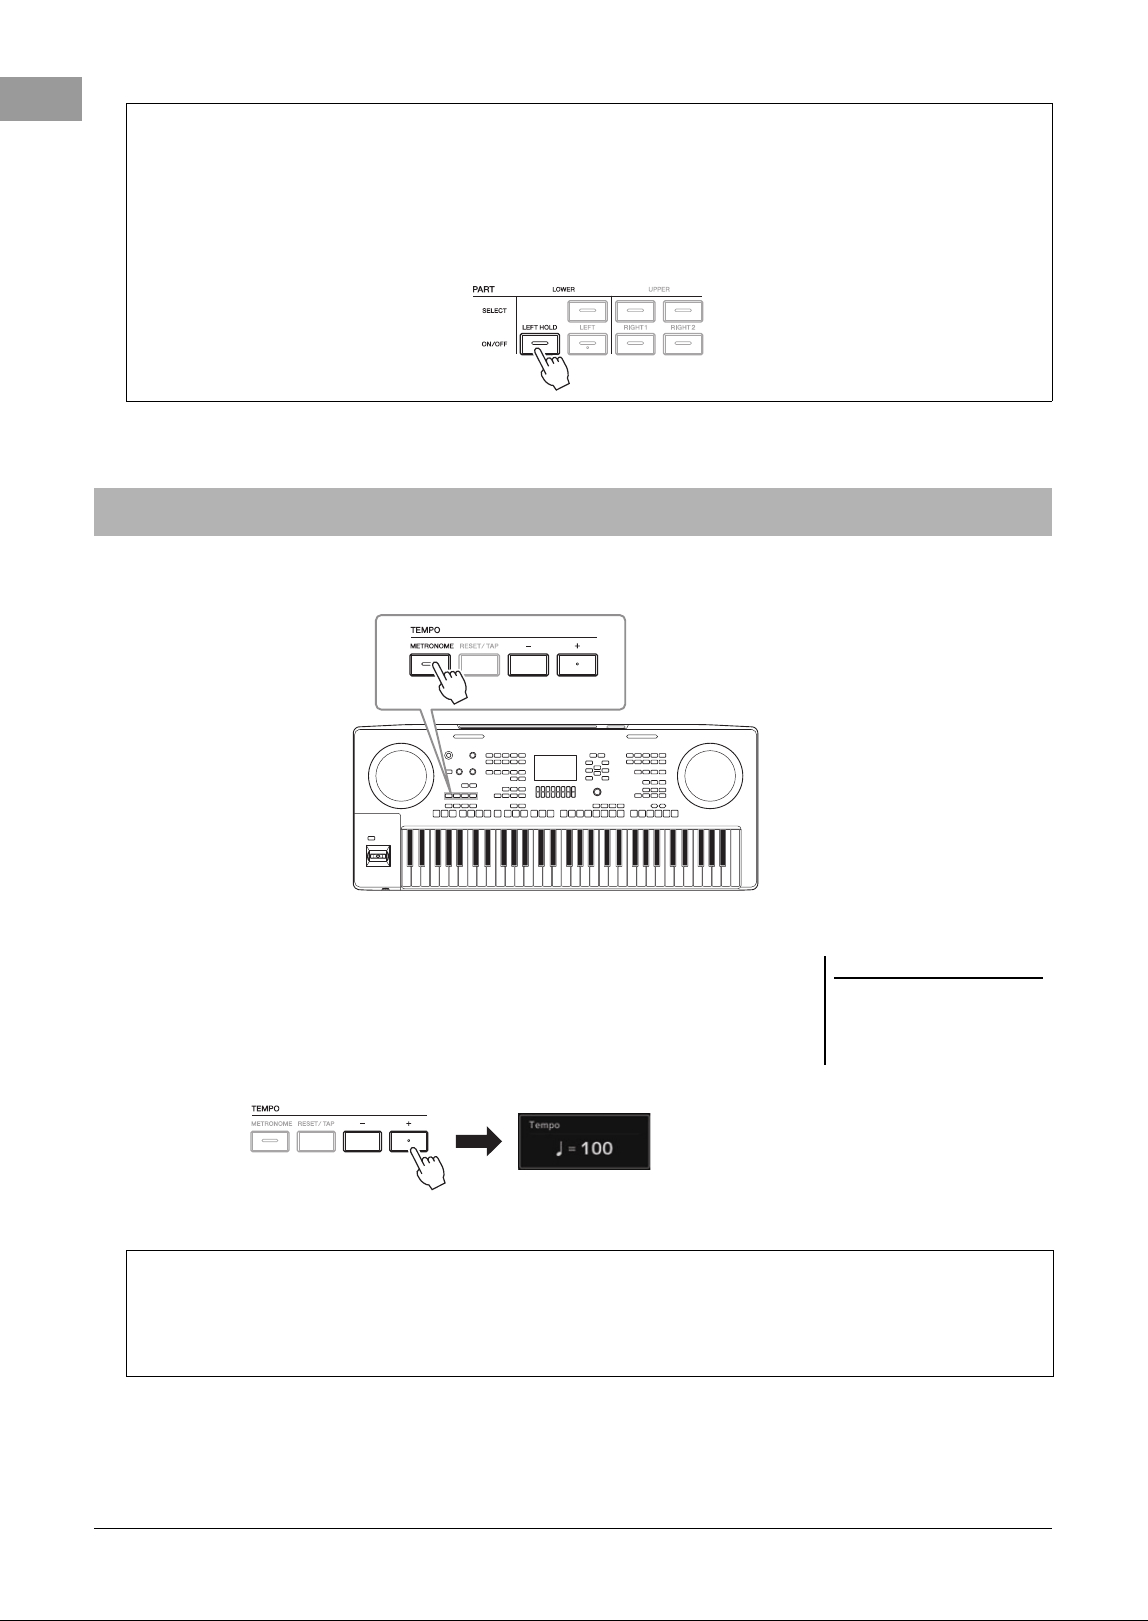
42 PSR-SX620 Owner’s Manual
You can start or stop the metronome by pressing the [METRONOME] button.
• TEMPO [-]/[+] buttons
Press the TEMPO [-] or [+] button to call up the Tempo pop-up display. Use the
TEMPO [-]/[+] buttons to decrease or increase the tempo over a range of 5 – 500
beats per minute. Holding down either button can change the value continuously.
Pressing both TEMPO [-] and [+] buttons simultaneously can call up the default
tempo of the last selected Style or Song.
Holding the LEFT part Voice (Left Hold)
By turning on the PART ON/OFF [LEFT HOLD] button when the LEFT part is ON, the LEFT part Voice is held even
when the keys are released. Non-decaying Voices such as strings are held continuously, while decay-type Voices such
as piano decay more slowly (as if the sustain pedal has been pressed).
This function is convenient when used along with Style playback since the sound of the chord matching Style
playback is maintained. To stop the LEFT part Voice which is sounding, stop Style or Song playback, or turn the
[LEFT HOLD] off.
Using the Metronome
NOTE
You can also control the tempo by
using the LIVE CONTROL knobs. For
instructions on how to assign the
function to the knobs, refer to page 45.
Changing the Metronome Settings
You can also change the time signature, volume and sound of the metronome: [MENU] → TAB [] Menu1 → Cursor
buttons [][][][] → Metronome Setting
For more information, refer to the Reference Manual on the website.
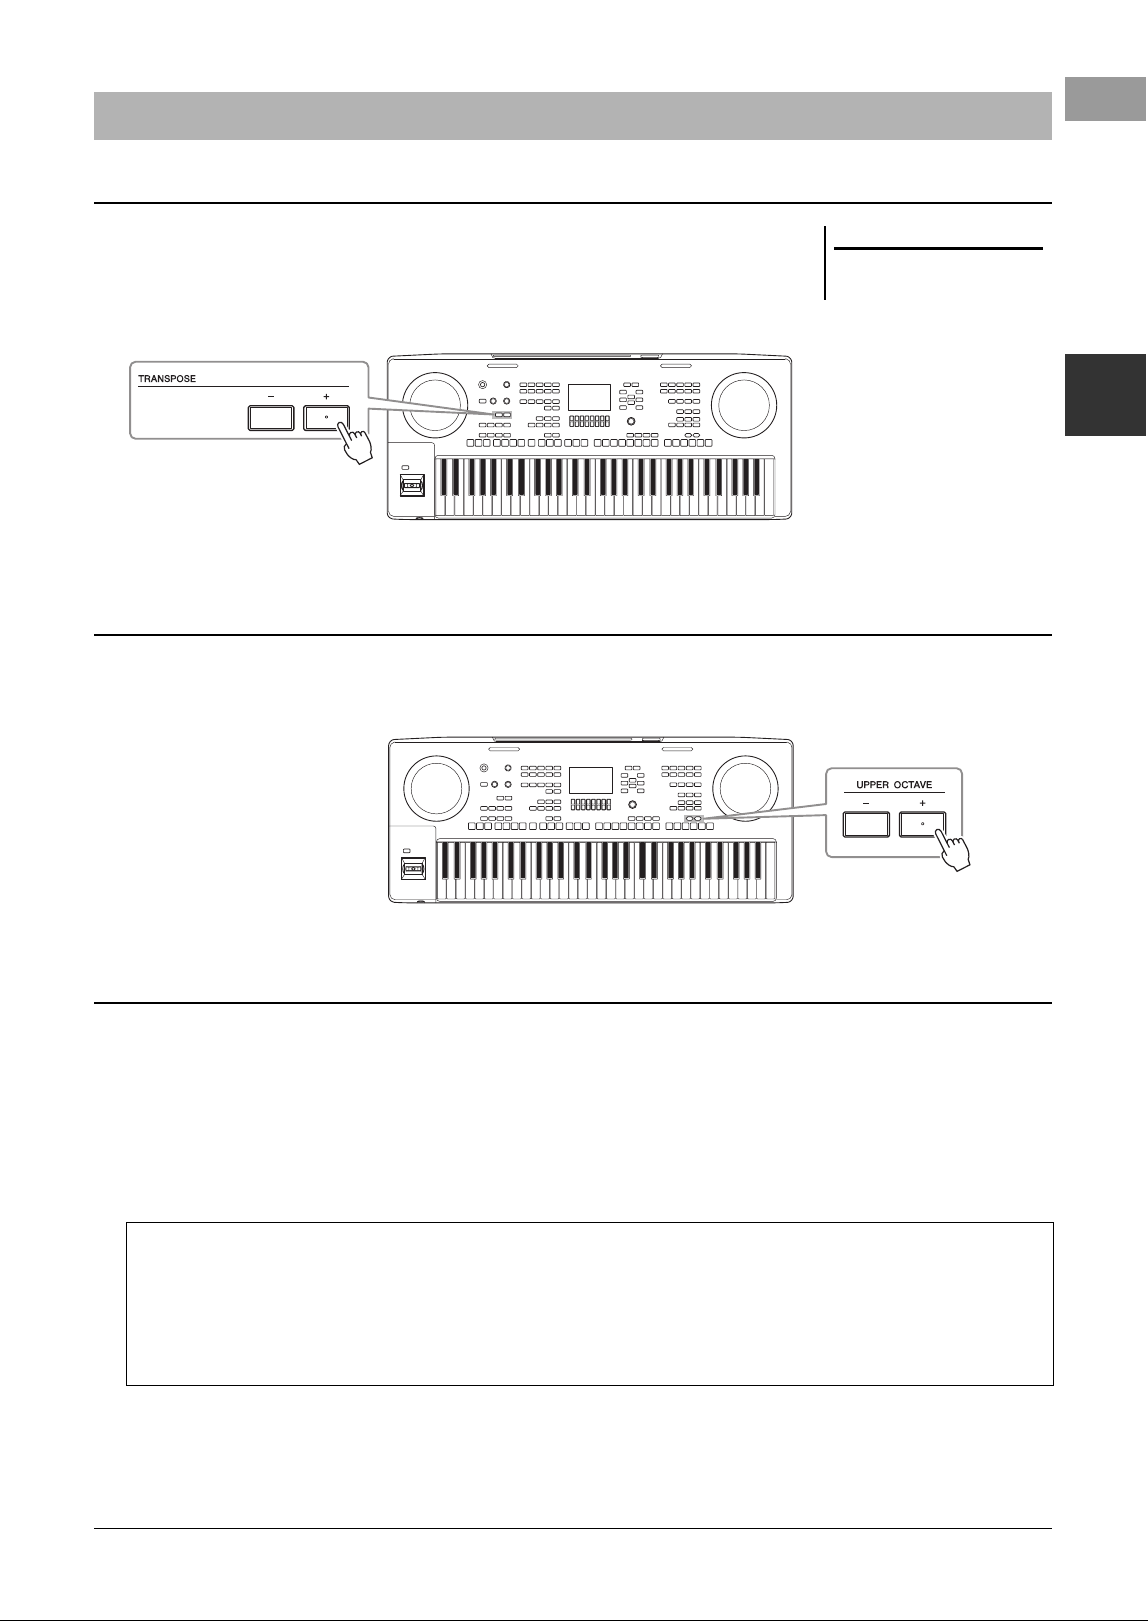
PSR-SX620 Owner’s Manual 43
Voices – Playing the keyboard –
1
The TRANSPOSE [-]/[+] buttons transpose the overall pitch of the instrument (the
keyboard sound, Style playback, Song playback, and so on) between -12 and 12 in
semitone steps. To instantly reset the transpose value to 0, press the [+] and [-]
buttons simultaneously.
The UPPER OCTAVE [-]/[+] buttons allow you to shift the pitch of the RIGHT 1
and 2 parts up or down by one octave (-3 – 0 – 3).
By default, the pitch of the entire instrument is set to 440.0 Hz according to equal
temperament. This basic tuning can be changed in the display called up via [MENU]
→ TAB [
] Menu2 → Cursor buttons [][][][] Master Tune/Scale Tune →
[ENTER]. The pitch can be shifted up or down between 414.8Hz and 466.8Hz in
approximately 0.2 Hz increments. For details, refer to the Reference Manual on the
website.
Changing the Pitch of the Keyboard
Adjusting the Pitch in Semitones (Transpose)
NOTE
The Transpose functions do not affect
the Drum Kit or SFX Kit Voices.
Adjusting the Pitch in Octaves
Fine tuning the Pitch
Transposing the pitch in the Voice Setting display
You can also make detailed pitch settings (octave and tune) for each of the keyboard parts in the Voice Setting display
called up via the following operations.
[MENU] → TAB [] Menu1 → Cursor buttons [][][][] Voice Setting → [ENTER] → TAB [] Tune
For more information, refer to the Reference Manual on the website.
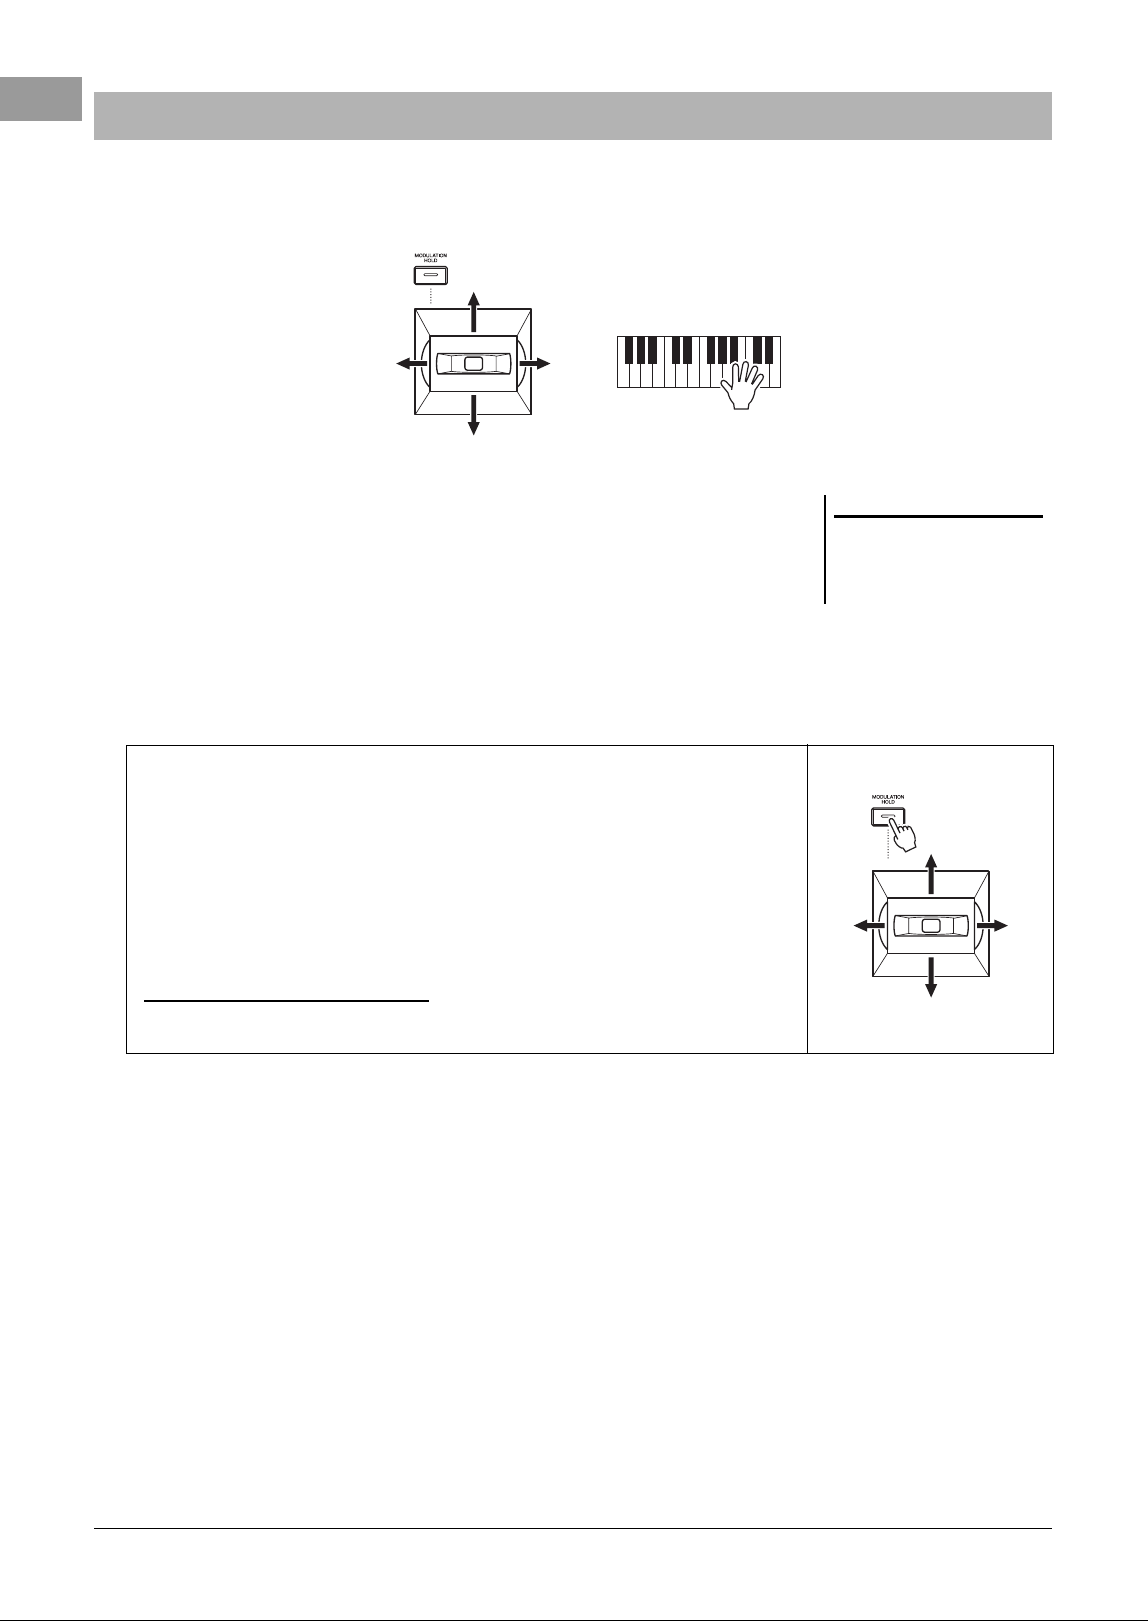
44 PSR-SX620 Owner’s Manual
By moving the joystick in a horizontal (X) or vertical (Y) direction, you can bend the
pitches up or down, or apply modulation effects. Move the joystick to control the
sound while playing the keyboard.
•X: Pitch Bend
Bends pitches up (by moving the joystick to the right) or down (by moving the
joystick to
the left) while playing the keyboard. By default, this is applied to all keyboard parts
(RIGHT 1–2 and LEFT).
•Y: Modulation
The Modulation function applies a vibrato effect to notes played on the keyboard. By
default, this is applied to the keyboard parts RIGHT 1–2.
Using the joystick
−X +X
+Y
−Y
NOTE
The maximum pitch bend range for
each keyboard parts can be changed
on the display called up via [MENU]
→ Menu1 → Controller → Setting.
Holding the Modulation value (MODULATION HOLD)
The Joystick is self-centering when released. However, you can hold the current
Modulation value by pressing the [MODULATION HOLD] button.
• If the [MODULATION HOLD] button is turned on while the Joystick is moved,
the Modulation value (Y-axis value) is fixed and held even after the Joystick is
released.
• If the [MODULATION HOLD] button is turned off, the Modulation value returns
to the default value for the Voice of each Part. (The position of the Joystick at that
time is ignored.)
NOTE
When the Voice of one of the keyboard parts is set, the [MODULATION HOLD] button will be turned off automatically, and
then the Modulation (+) and Modulation (-) parameters will be reset.
−X +X
+Y
−Y
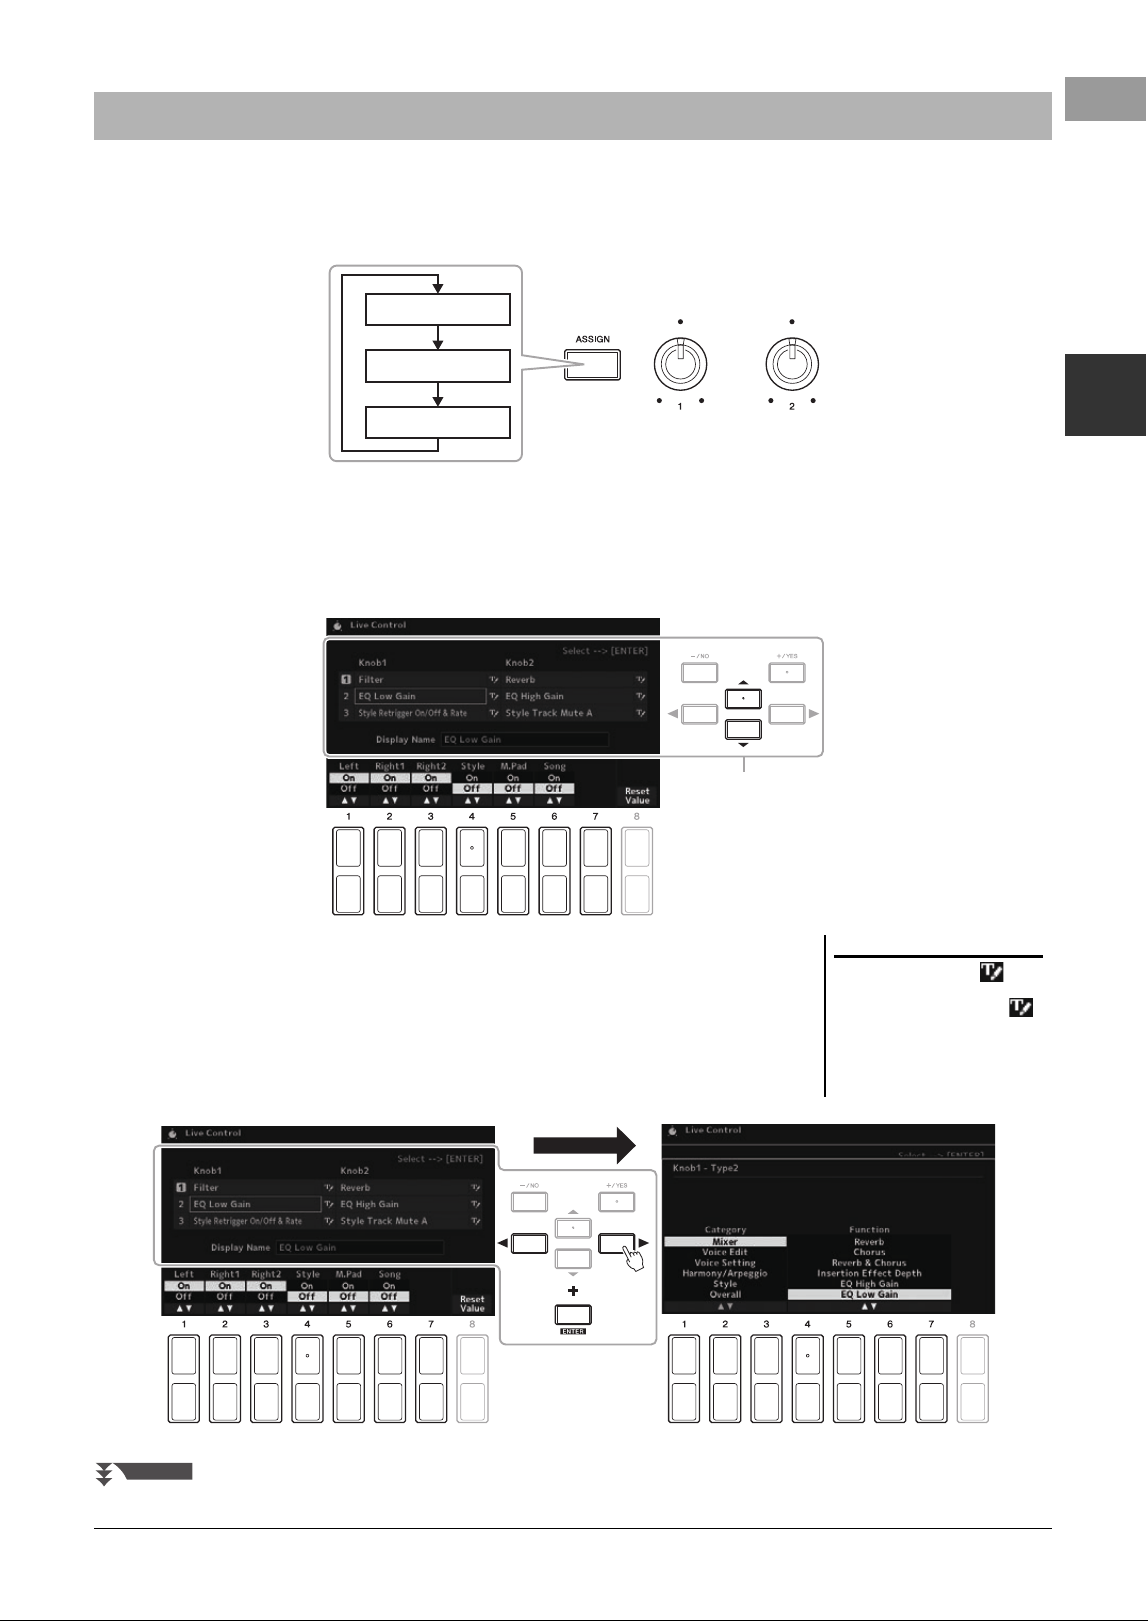
PSR-SX620 Owner’s Manual 45
Voices – Playing the keyboard –
1
You can add dynamic variations to your performance intuitively in real time by assigning various functions to the
LIVE CONTROL [1] and [2] knobs. Each setup of assigned parameters for knobs is called a “Knob Assign Type.”
There are three Knob Assign Types (1–3) and they can be switched in sequence by pressing the LIVE CONTROL
[ASSIGN] button.
To edit a Knob Assign Type, perform the following operations.
1 Call up the Live Control display.
[MENU] → TAB [] Menu1 → Cursor buttons [][][][] Live Control
→ [ENTER]
2 Use the Cursor buttons [][] to select the desired Knob
Assign Type to change.
3 Use the Cursor buttons [][] to select the desired Knob to
change, and then press the [ENTER] button to call up the
Assign pop-up display.
Using the LIVE CONTROL Knobs
1: Assign Type 1
2: Assign Type 2
3: Assign Type 3
2
NOTE
To rename the Type, select
(RENAME) at the right of the name of
Knob Assign Type. To select the
(RENAME), use the cursor buttons
[][][][], and then press the
[ENTER] button. For entering charac-
ters, refer to page 33.
NEXT PAGE
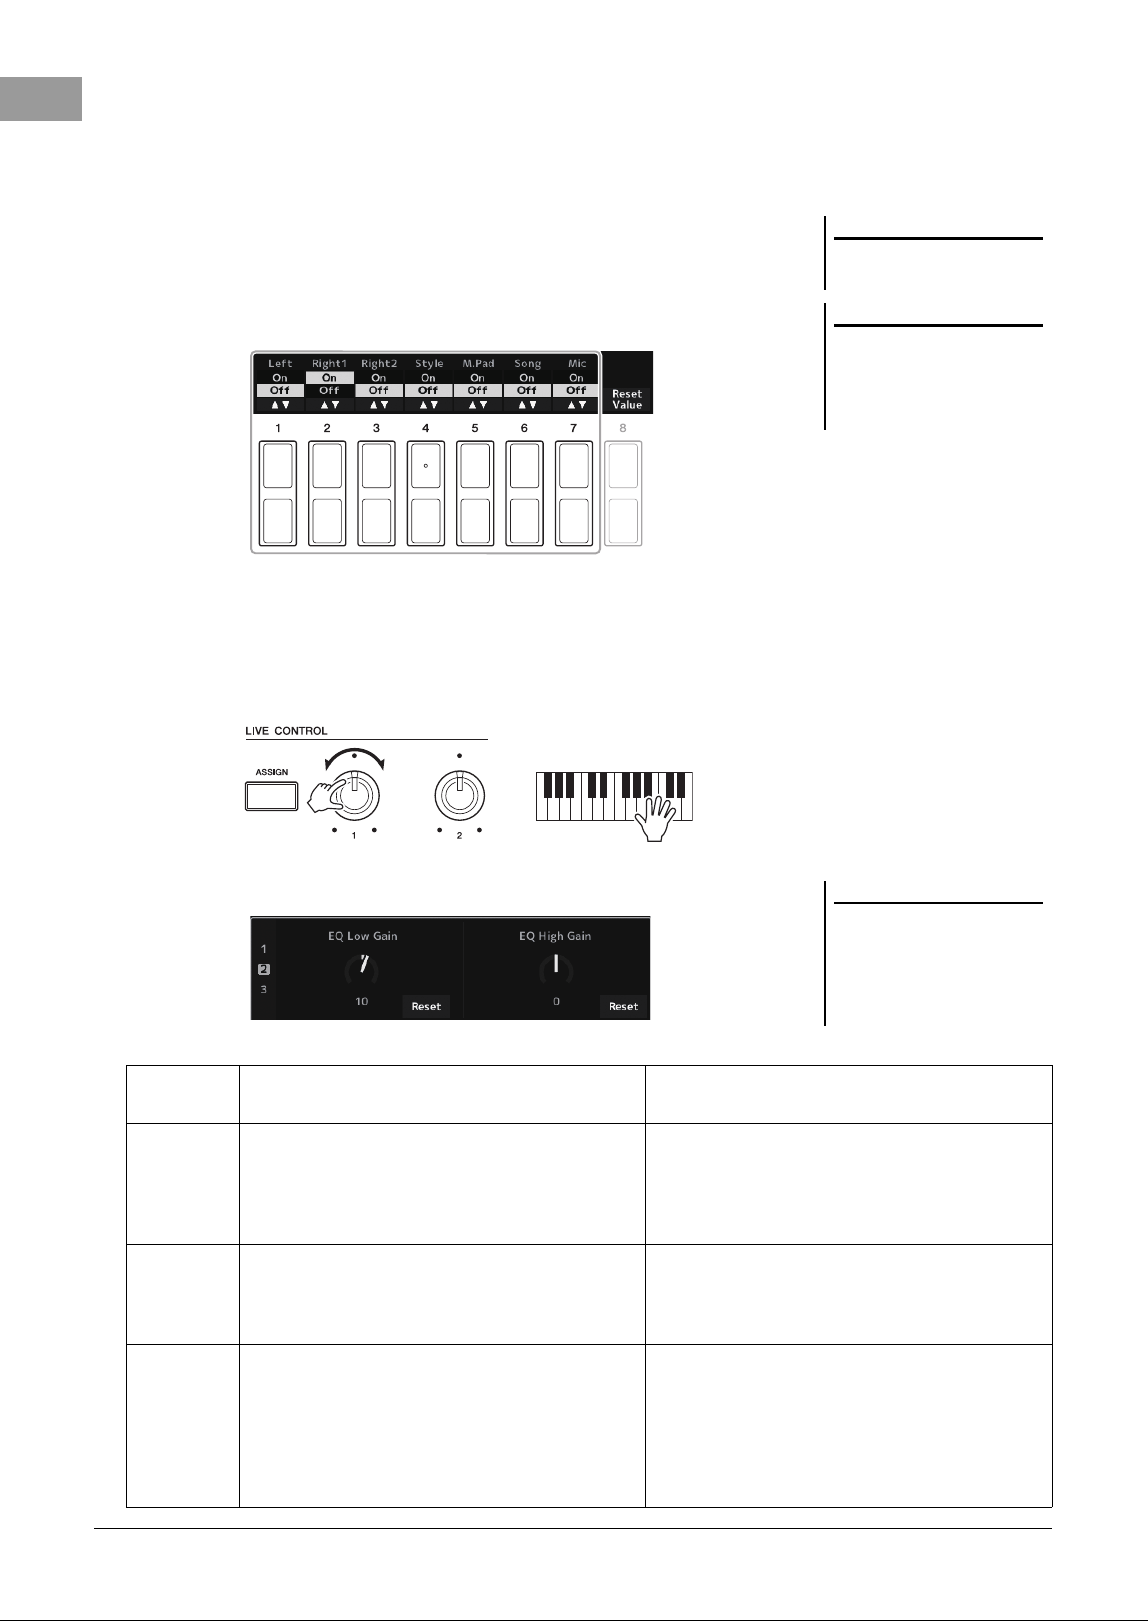
46 PSR-SX620 Owner’s Manual
4 Use the [1 ] – [7 ] buttons to select the desired function.
For information about the assignable functions, refer to the Reference Manual
on the website.
5 Press the [EXIT] button to close the Assign pop-up display.
6 To select the part to which the assigned function will be
applied, use the [1 ] – [7 ] buttons.
When the function (such as Volume or Balance) which can do detailed setting
individually is selected, Detail Setting appears at the bottom left corner of the
display. For details, refer to the Reference Manual on the website.
7 Set up the other Knob Assign Type by repeating steps 2 – 6.
The selected Assign Types for knobs will be reset when the power is turned off;
however, these can be conveniently saved to Registration Memory (page 90).
8 Rotate the LIVE CONTROL knobs to control the sound while
playing the keyboard, or playing back the Style, etc.
When you rotate the knobs, the current status of the knobs is shown on the
notice pop-up display. For details, refer to the Reference Manual on the website.
Samples for combinations of functions
NOTE
The Style Retrigger function is applied
only to the Main section of the Style.
NOTE
Depending on the panel settings or
how you move the knob, you may not
notice any change to the parameter
value or the knob may not work prop-
erly, even if you rotate it.
NOTE
Using the [4 ]/[8 ] (Reset)
buttons resets the selected function’s
parameter value to the default, while
using the [8 ] (Reset Value) but-
tons reset all assignable functions’
parameter values.
ASSIGN
TYPE
Knob 1 Knob 2
1
(Filter +
Reverb)
Filter
Adjusts the cutoff frequency of the filter and the
resonance for the RIGHT 1 and 2 parts to change
the timbre or tone of the sound. For details, refer
to the Reference Manual on the website.
Reverb
Adjusts the Reverb depth.
You can also apply this only to a specified target.
Rotating the knob to the right makes it deeper.
2
(Attack +
Release)
Attack
Adjusts the length of time until the RIGHT 1 and
2 parts reach their maximum level after the key is
played. Rotating the knob to the right, it increases.
Release
Adjusts the length of time until the RIGHT 1 and
2 parts decay to silence after the key is released.
Rotating the knob to the right increases it.
3
(Master
Tempo +
Balance)
Master Tempo
Changes the tempo of the currently selected Style
or Song. Setting range is from 50% of the default
tempo value to 150%. Rotating the knob to the left
makes the tempo slower, while rotating the knob
to the right makes it faster.
Balance
Adjusts the volume balance between the specified
parts and other parts. For example, you can con-
trol the input volume from the [MIC INPUT] /
[AUX IN] jack for adjusting the volume balance
with the other parts. For details, refer to the Refer-
ence Manual on the website.
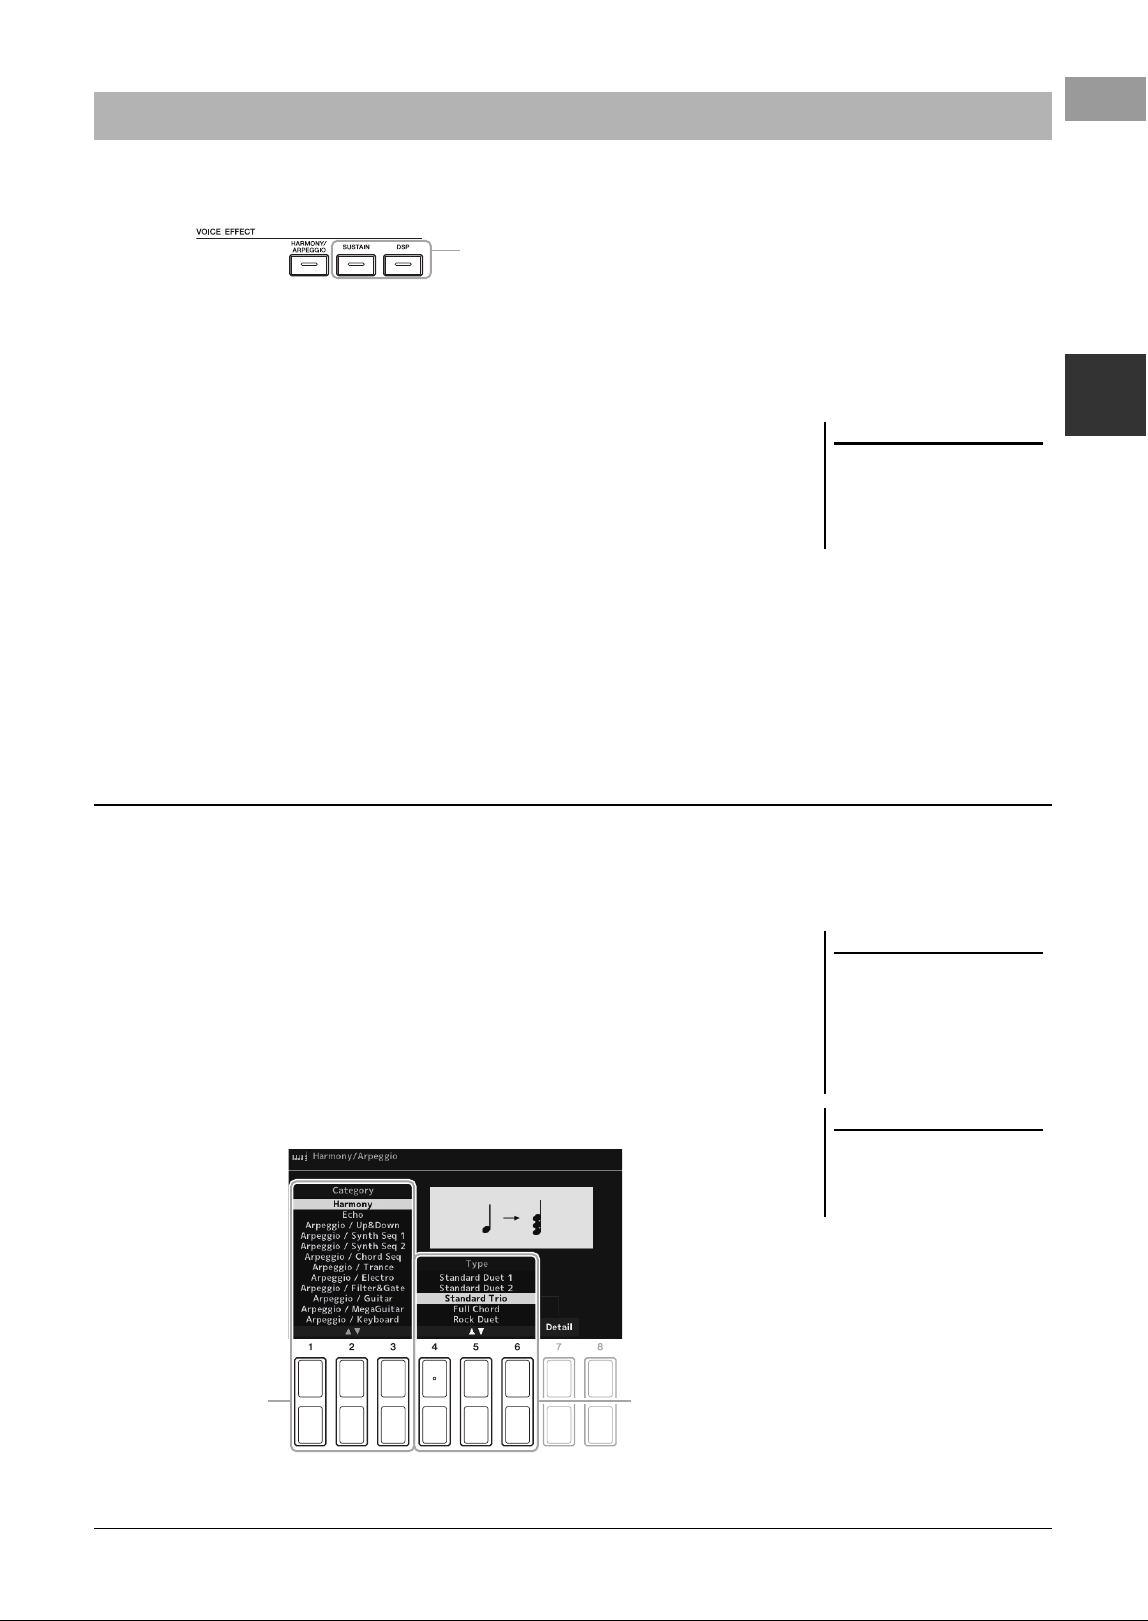
PSR-SX620 Owner’s Manual 47
Voices – Playing the keyboard –
1
You can apply various effects to enhance or change the sound of the keyboard parts (LEFT, RIGHT 1 and 2). The
effects can be turned on or off by using the following buttons.
• HARMONY/ARPEGGIO
The Harmony or Arpeggio is applied to the right-hand Voices. Refer to “Applying
Harmony/Echo to Your Right-hand Melody” (see below) or “Triggering Arpeggios
with Your Right Hand” (page 49).
•SUSTAIN
When SUSTAIN is on, all notes played on the keyboard have a longer sustain
without pedal control (Panel Sustain). Turning SUSTAIN off immediately stops
(damps) any sustained notes.
•DSP
DSP (Digital Signal Processor) features built into the instrument provide high-
quality effects (including real distortion and real reverb) for the currently selected
keyboard part.
With the DSP effects, you can add ambience and depth to your music in a variety of
ways — such as adding reverb that makes you sound like you are playing in a
concert hall — as well as other dynamic enhancements.
Performance effects such as harmony (duet, trio, etc.), echo, tremolo and trill can be applied to notes played.
1 Turn the [HARMONY/ARPEGGIO] button on.
2 Select the desired Harmony or Echo type.
2-1 Call up the operation display.
[MENU] → TAB [ ] Menu1 → Cursor buttons [][][][]
Harmony/Arpeggio → [ENTER]
2-2 Use the [1 ] – [3 ] buttons to select “Harmony” or “Echo.”
2-3 Use the [4 ] – [6 ] buttons to select the desired type.
Applying Voice Effects
These effects only apply to the selected part
(the PART SELECT button is on).
NOTE
The effect type can be changed. On the
Voice Selection display, select [5 ]
(Voice Set) → Effect/EQ → 2 DSP
Type. For details, refer to the Reference
Manual on the website.
Applying Harmony/Echo to Your Right-hand Melody
NOTE
When you select another Voice, the
Harmony/Echo/Arpeggio type is auto-
matically set to the default which is
memorized as the Voice Set. For
details on the Voice Set function, refer
to the Reference Manual on the web-
site.
NOTE
Press one of the [7
] (Detail) but-
tons to call up the detail setting dis-
play. For information, refer to the
Reference Manual on the website.
2-32-2
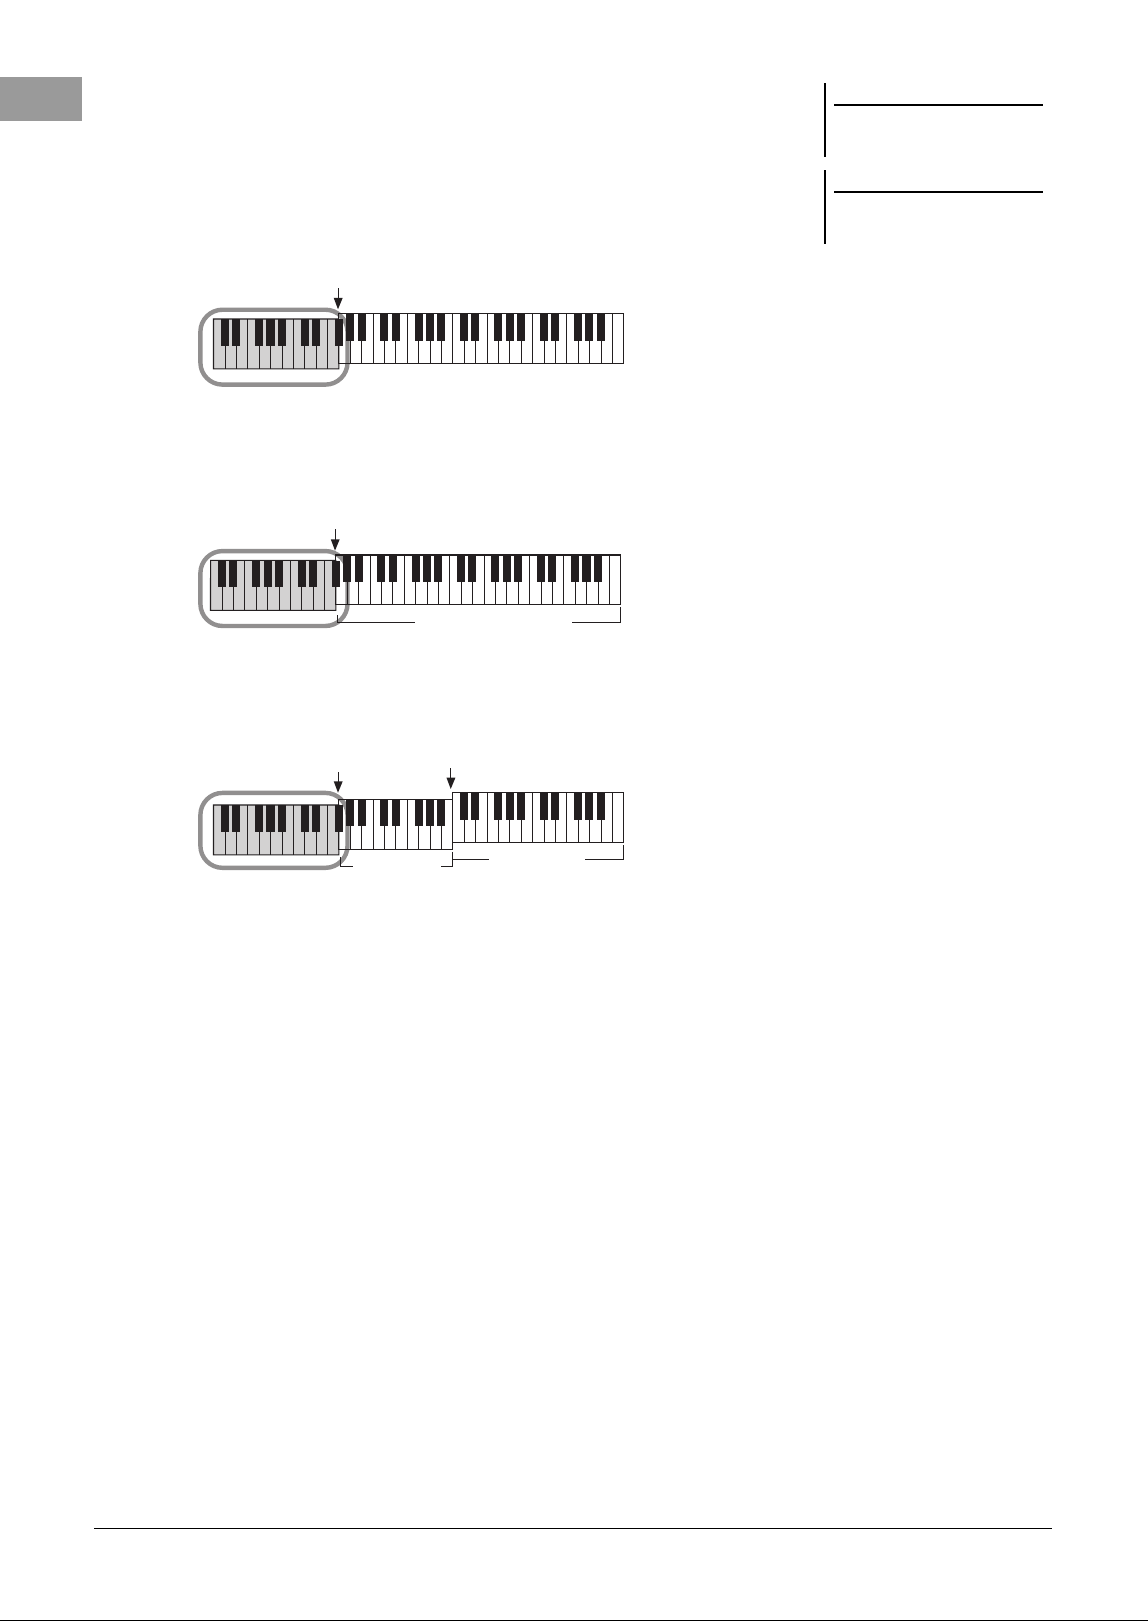
48 PSR-SX620 Owner’s Manual
Harmony Category
• Standard Duet — Strum.
The Harmony effect is applied to the note played in the right-hand section
of the keyboard according to the chord specified in the chord or left-hand
section shown below.
When the [ACMP] button is on and the LEFT part is off:
When the [ACMP] button is off and the LEFT part is on:
When both the [ACMP] button and the LEFT part are on:
•Multi Assign
The Multi Assign effect automatically assigns notes played simultaneously
on the right-hand section of the keyboard to separate parts (Voices). Both
of the [RIGHT 1] and [RIGHT 2] keyboard parts should be turned on when
using the Multi Assign effect. The RIGHT 1 and RIGHT 2 Voices are
alternately assigned to the notes in the order you play.
Echo Category (Echo, Tremolo, Trill)
The Echo, Tremolo or Trill effect is applied to the note played in the right-hand
section of the keyboard in time with the currently set tempo, regardless of the
[ACMP] and the LEFT part on/off status. Keep in mind that Trill works when
you hold down two notes on the keyboard simultaneously (or the last two notes,
if more than two notes are held), and it plays those notes alternately.
3 Play the keyboard.
The effect selected in step 2 is applied to the right-hand melody.
To turn off the effect, turn the [HARMONY/ARPEGGIO] button off.
NOTE
The “1+5” and “Octave” settings are
not affected by the chord.
NOTE
For details on the Split Point, refer to
page 63.
Split Point
Chord section for Style
playback and Harmony
effect
Split Point
LEFT Voice and
chord section for
Harmony effect
RIGHT 1 and 2 Voices
Split Point (STYLE) Split Point (LEFT)
RIGHT 1 and
2 Voices
LEFT Voice
Chord section for
Style playback and
Harmony effect
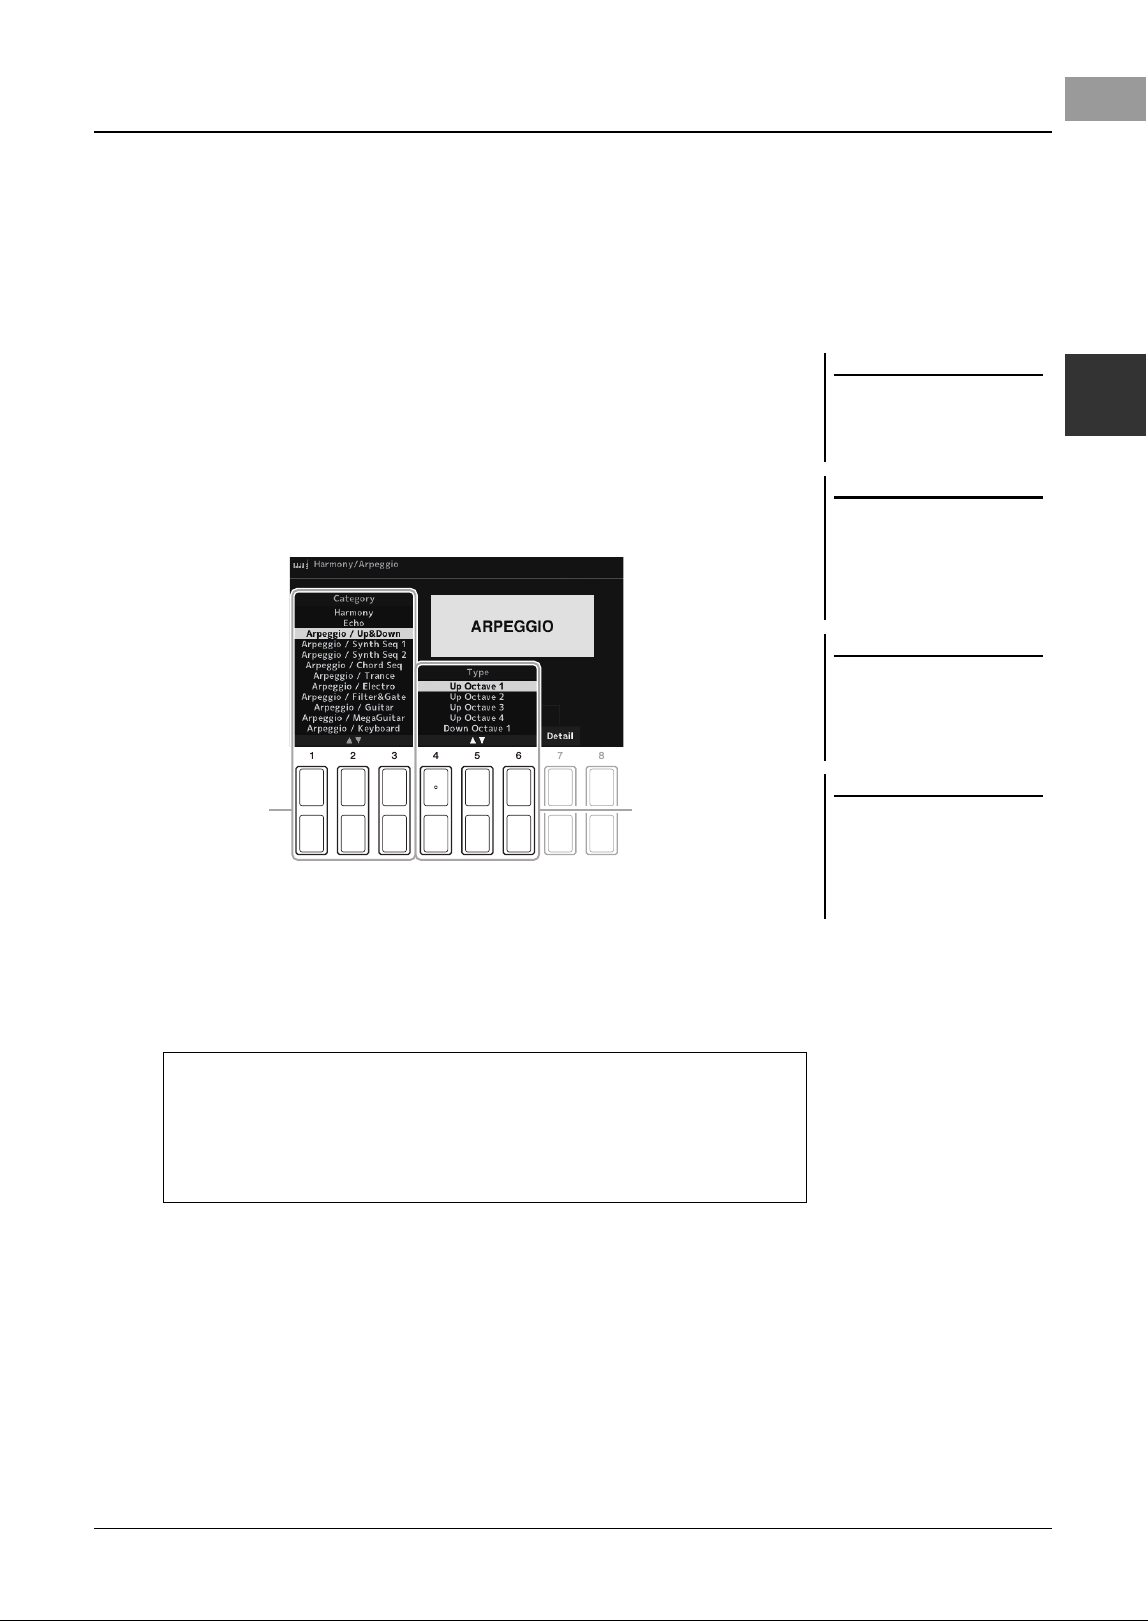
PSR-SX620 Owner’s Manual 49
Voices – Playing the keyboard –
1
The Arpeggio function lets you play arpeggios (broken chords) by simply pressing the notes of the chord. For
example, you could play the notes C, E and G to trigger interesting phrases. This feature can be used for music
production as well as performance.
1 Turn the [HARMONY/ARPEGGIO] button on.
2 Select the desired Arpeggio type.
2-1 Call up the operation display.
[MENU] → TAB [ ] Menu1 → Cursor buttons [][][][]
Harmony/Arpeggio → [ENTER]
2-2 Use the [1 ] – [3 ] buttons to select a Category other than
“Harmony” and “Echo.”
2-3 Use the [4 ] – [6 ] buttons to select the desired Type.
3 Play a note or notes to trigger the Arpeggio.
The arpeggiated phrase differs depending on the notes played.
To turn off the effect, turn the [HARMONY/ARPEGGIO] button off.
Triggering Arpeggios
NOTE
When you select another Voice, the
Harmony/Echo/Arpeggio type is auto-
matically set to the default which is
memorized as the Voice Set.
NOTE
You can set the Arpeggio volume and
select the part for playing the
Arpeggio
in the display called up via one of the [7
] (
Detail
) buttons. For informa-
tion, refer to the Reference Manual on
the website.
NOTE
Arpeggio playback can be continued
even after the note has been released,
by assigning the Arpeggio Hold func-
tion to the foot switch. For details, refer
to page 110.
NOTE
You can control the Arpeggio volume
and the length of each note by using
the LIVE CONTROL knobs. For
instructions on how to assign the
functions to the knobs, refer to
page 45.
Using the Arpeggio Quantize function
By using the Arpeggio Quantize function, Arpeggio playback can be
synchronized with Song/Style playback allowing any slight imperfections in the
timing to be corrected. This can be set in the display:
[MENU] → Menu1 → Voice Setting → Setting/Arpeggio
2-32-2
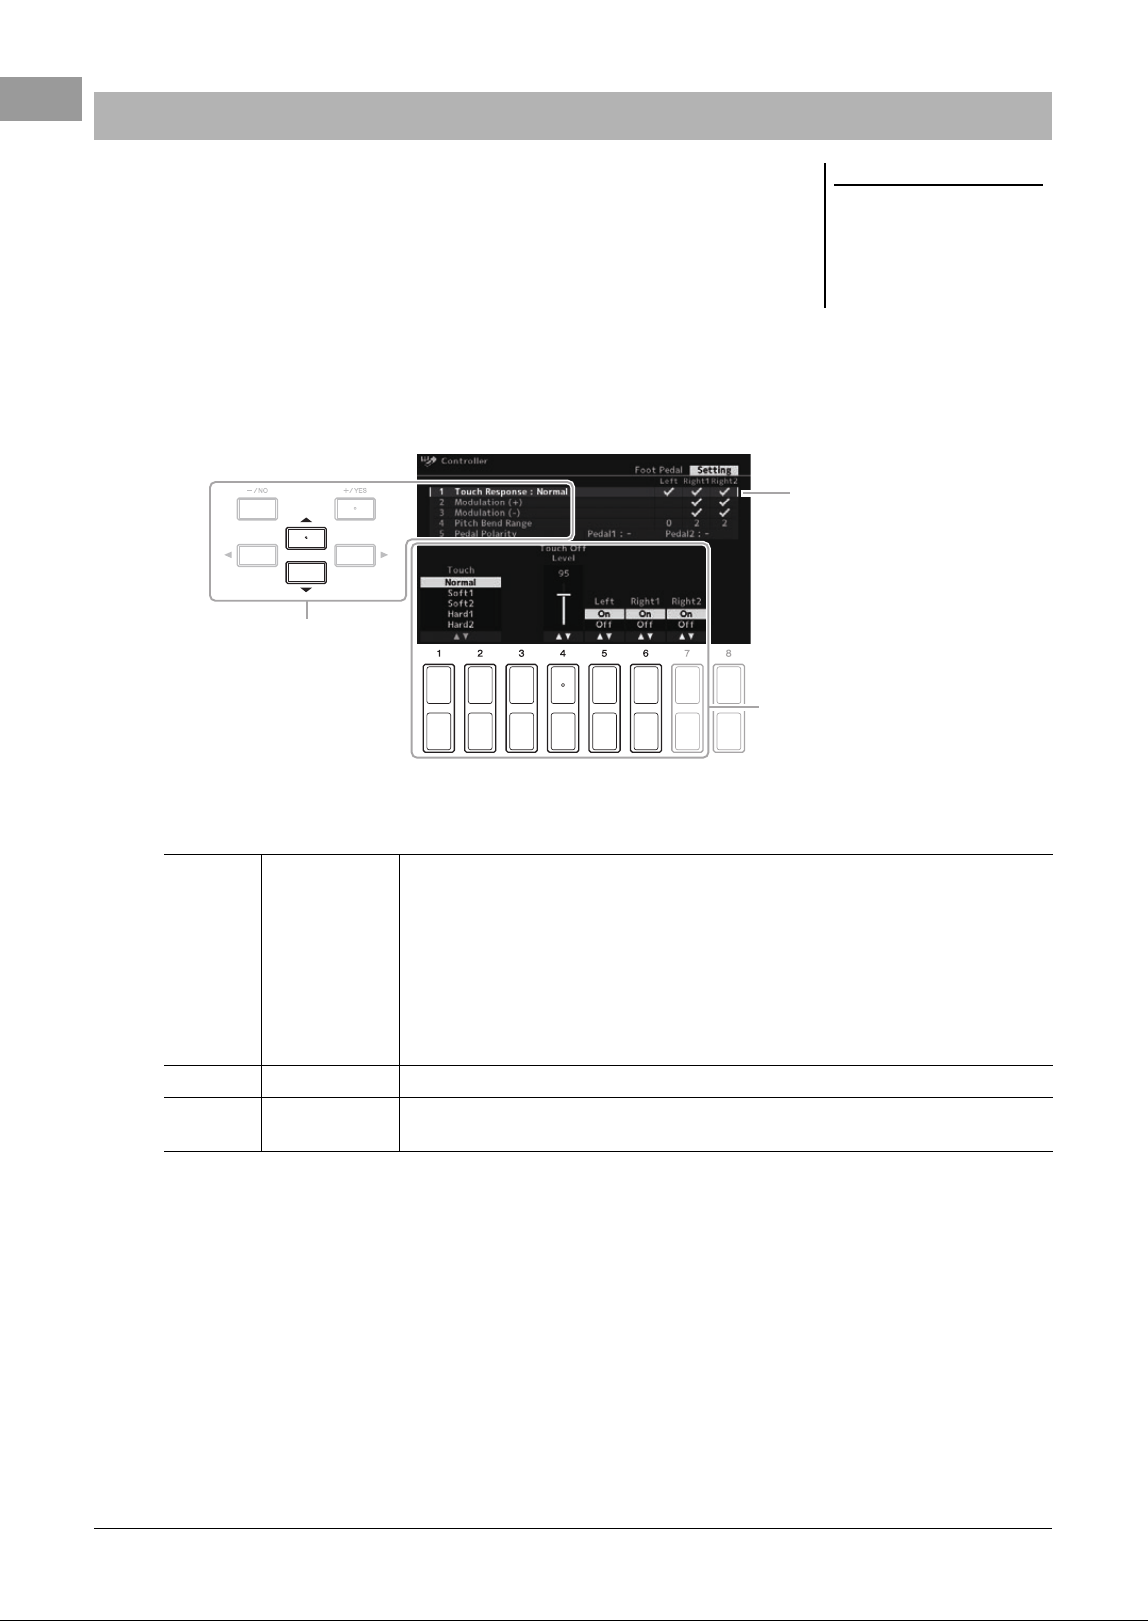
50 PSR-SX620 Owner’s Manual
The instrument has a Touch Response function that lets you control the volume of
notes according to how strongly or softly you play the keys. The Touch setting (one
of the parameters of the Touch Response) determines how the sound responds to
your playing strength.
The Touch type becomes the common setting for all Voices.
1 Call up the operation display.
[MENU] → TAB [] Menu1 → Cursor buttons [][][][] → Controller
→ [ENTER] → TA B [] Setting
2 Use the Cursor button [] to select “1 Touch Response.”
3 Use the [1 ] – [7 ] buttons to set each of the parameters.
Setting the Touch Response of the Keyboard
NOTE
Some Voices are purposely designed
without Touch Response, in order to
emulate the true characteristics of the
actual instrument (for example, con-
ventional organs, which have no touch
response).
2
3
Touch Response is applied to the
checkmarked parts.
[1 ]/
[2 ]
Touch Determines how the sound responds to your playing strength. The following Touch types are
available.
Normal: Standard Touch Response.
Soft1: Produces high volume with moderate playing strength.
Soft2: Produces relatively high volume even with light playing strength. Best for players with
a light touch.
Hard1: Requires moderately strong playing for higher volume.
Hard2: Requires strong playing to produce high volume. Best for players with a heavy touch.
[4 ] Touch Off Level Determines the fixed velocity level when Touch is set to “Off.”
[5 ] –
[7 ]
Left – Right2 Turns Touch on or off for each keyboard part.
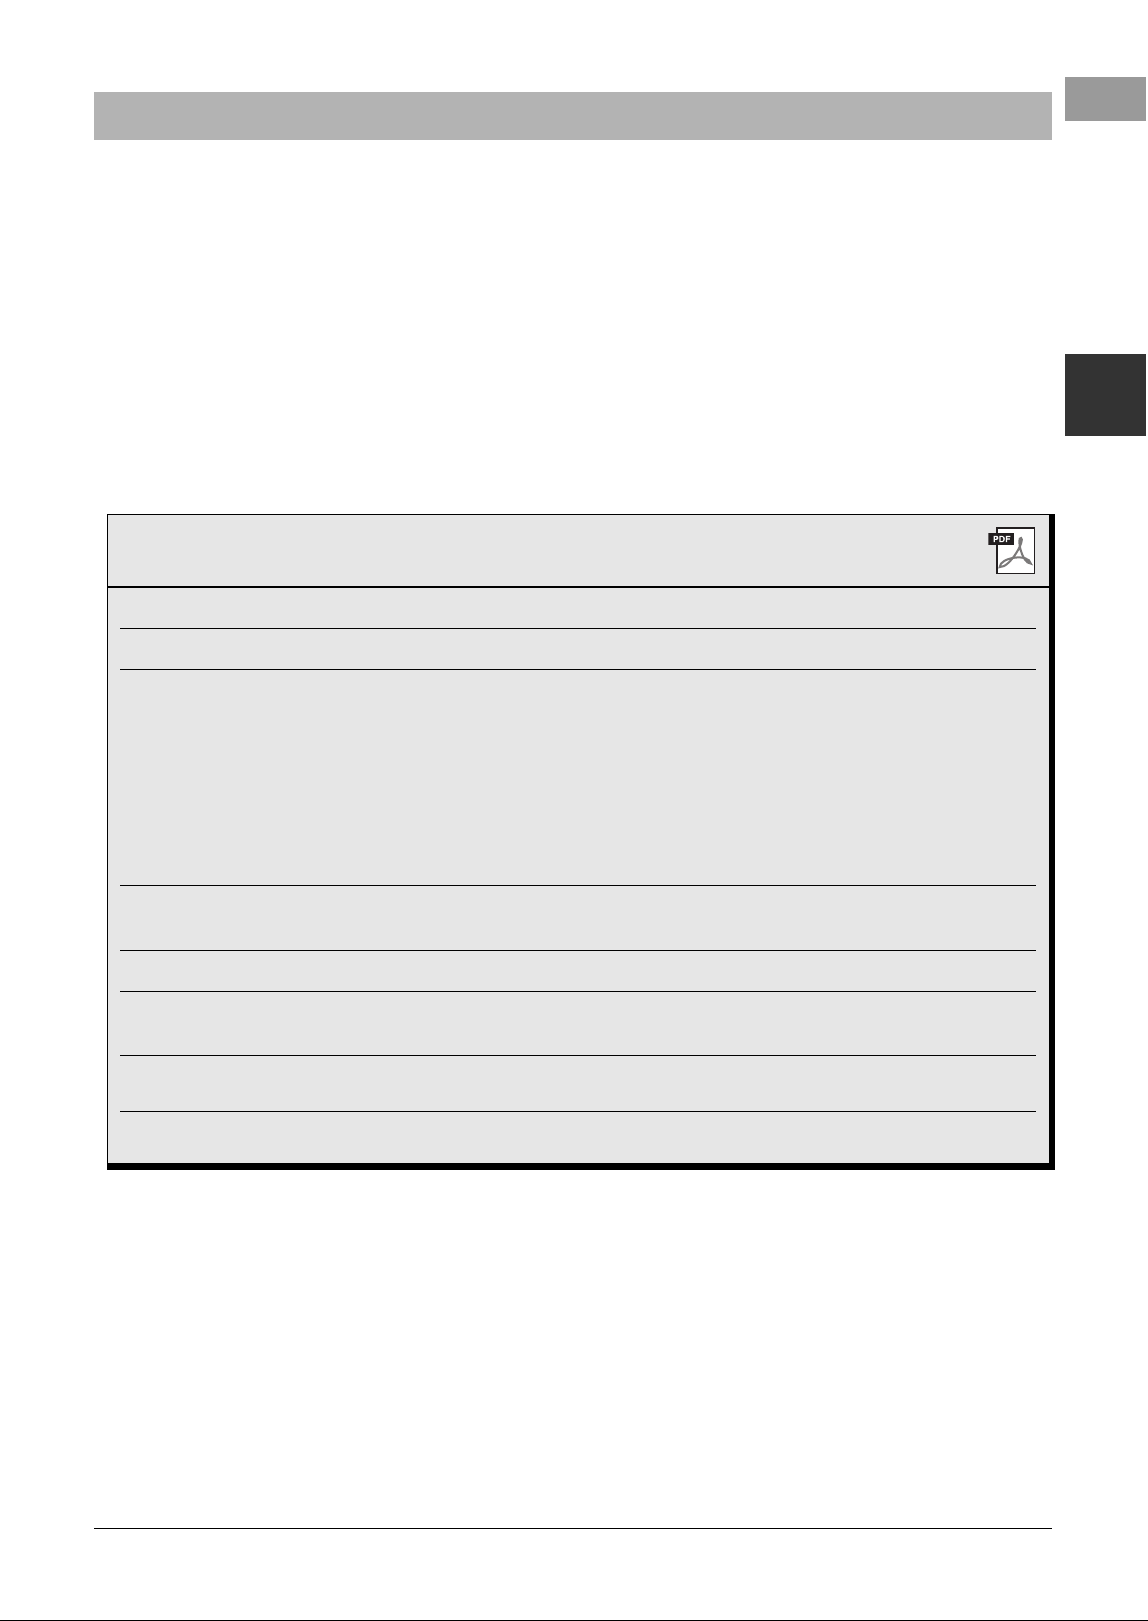
PSR-SX620 Owner’s Manual 51
Voices – Playing the keyboard –
1
By installing Expansion Packs, you can add a variety of optional Voices and Styles to the “Expansion” folder in the
User drive. The installed Voices and Styles can be selected via the [EXPANSION/USER] button in the VOICE or
STYLE category selection buttons, allowing you to expand your music performance and creation possibilities. You
can purchase high quality Expansion Pack data created by Yamaha, or create your own original Expansion Pack
data by using the “Yamaha Expansion Manager” software on your computer. Alternatively, you can use the
EXPANSION EXPLORER app, which allows you to install each element of the Expansion Pack individually. For
instructions on how to install the Expansion Packs, refer to the Reference Manual on the website.
For more information about Expansion Packs, and to obtain the Yamaha Expansion Manager or the EXPANSION
EXPLORER software and its manuals, access the Yamaha Downloads website:
https://manual.yamaha.com/mi/rt/psrsx620/downloads/
Adding New Contents — Expansion Packs
Advanced Features
Refer to the Reference Manual on the website, Chapter 1.
Selecting MegaVoice or Legacy Voices:
Voice Selection display → [8 ] (↑)
Harmony/Arpeggio settings
[MENU] → Menu1 → Harmony/Arpeggio
Pitch-related settings
• Fine-tuning the pitch of the entire instrument:
[MENU] → Menu2 → Master Tune/Scale Tune → [ENTER] →
Master Tune
•Scale Tuning:
[MENU] → Menu2 → Master Tune/Scale Tune → [ENTER] →
Scale Tune
• Changing the part assignment of the TRANS-
POSE buttons:
TRANSPOSE [-]/[+] → Cursor [][] buttons
Editing parameters assigned to the LIVE CON-
TROL knobs:
[MENU]
→
Menu1
→
Live Control
→
[ENTER]
Editing Voices (Voice Set):
Voice Selection display
→
[5
] (
Voice Set
)
Disabling automatic selection of Voice Sets
(effects, etc.):
[MENU] → Menu1 → Voice Setting → [ENTER] → TAB []
Voice Set Filter
Changing the detailed Voice setting:
[MENU] → Menu1 → Voice Setting → [ENTER] → Setting/
Arpeggio
Installing Expansion Pack data:
[MENU] → Menu2 → Expansion → [ENTER] →
Pack Installation → [ENTER] → USB
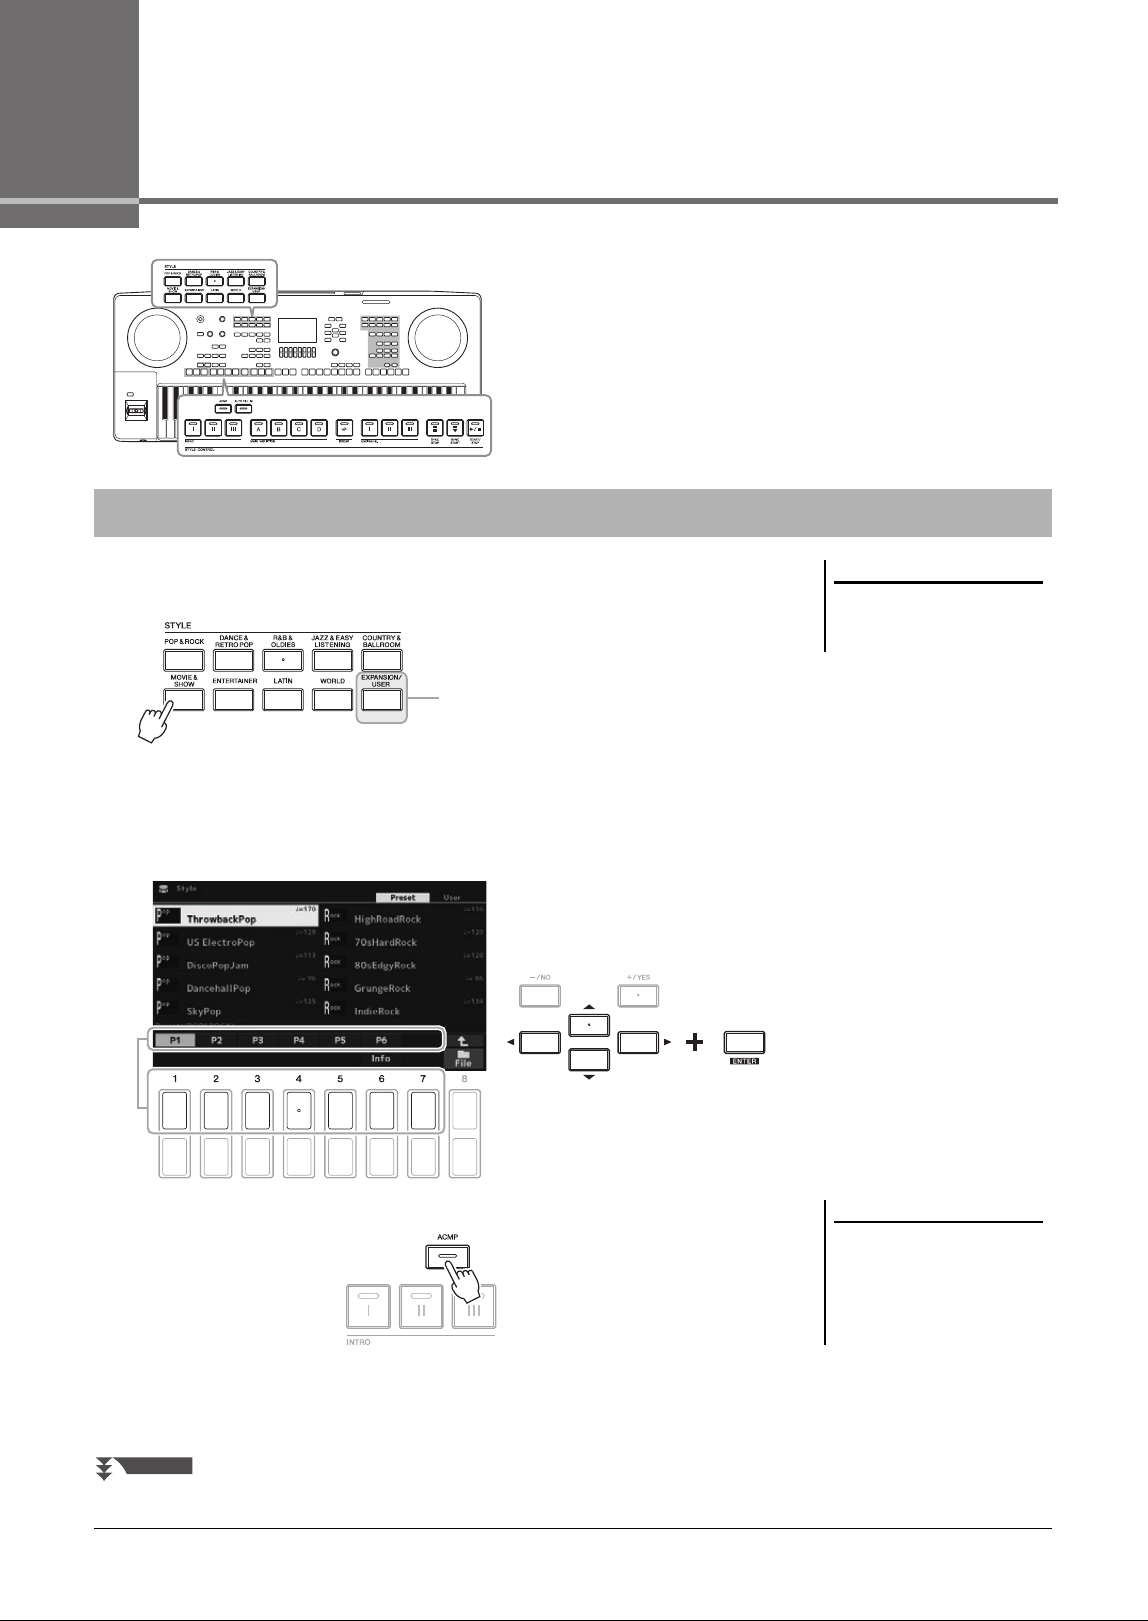
52 PSR-SX620 Owner’s Manual
2
Styles
– Playing Rhythm and Accompaniment –
The instrument features various accompaniment and rhythmic
backing patterns (called “Styles”) in a variety of different musical
genres including pop, jazz, and many others. The Style features
Auto Accompaniment, letting you produce automatic
accompaniment playback simply by playing “chords” with your
left hand. This lets you automatically recreate the sound of a full
band or orchestra
—
even if you’re playing by yourself.
1 Press one of the STYLE category selection buttons to call up
the Style Selection display.
2 Move the cursor to the desired Style by using the Cursor buttons
[
][
][
E
][
F
]
, and then
press the [ENTER] button.
You can call up the other pages by pressing the buttons that correspond to the page numbers (P1, P2 ...) or by
pressing the same STYLE category selection button several times.
3 Press the [ACMP] button to turn on the Auto Accompaniment.
The specific left-hand section of the keyboard (page 63) becomes the chord
section, and chords played in this section are automatically detected and used as
a basis for fully automatic accompaniment with the selected Style.
Playing a Style with the Auto Accompaniment
NOTE
For a list of preset Styles of this instru-
ment, refer to the “Style List” in the
Data List on the website.
• Expansion Styles
Styles additionally installed (page 51).
• User Styles
Styles created with the Style Creator function (refer to
the Reference Manual on the website), or Styles copied
to the User drive (page 31).
NOTE
Although the chords will be detected
according to the notes you play in the
left hand section by default, you can
change the chord detection area from
the left hand section to the right hand
section. For details, refer to page 64.
NEXT PAGE
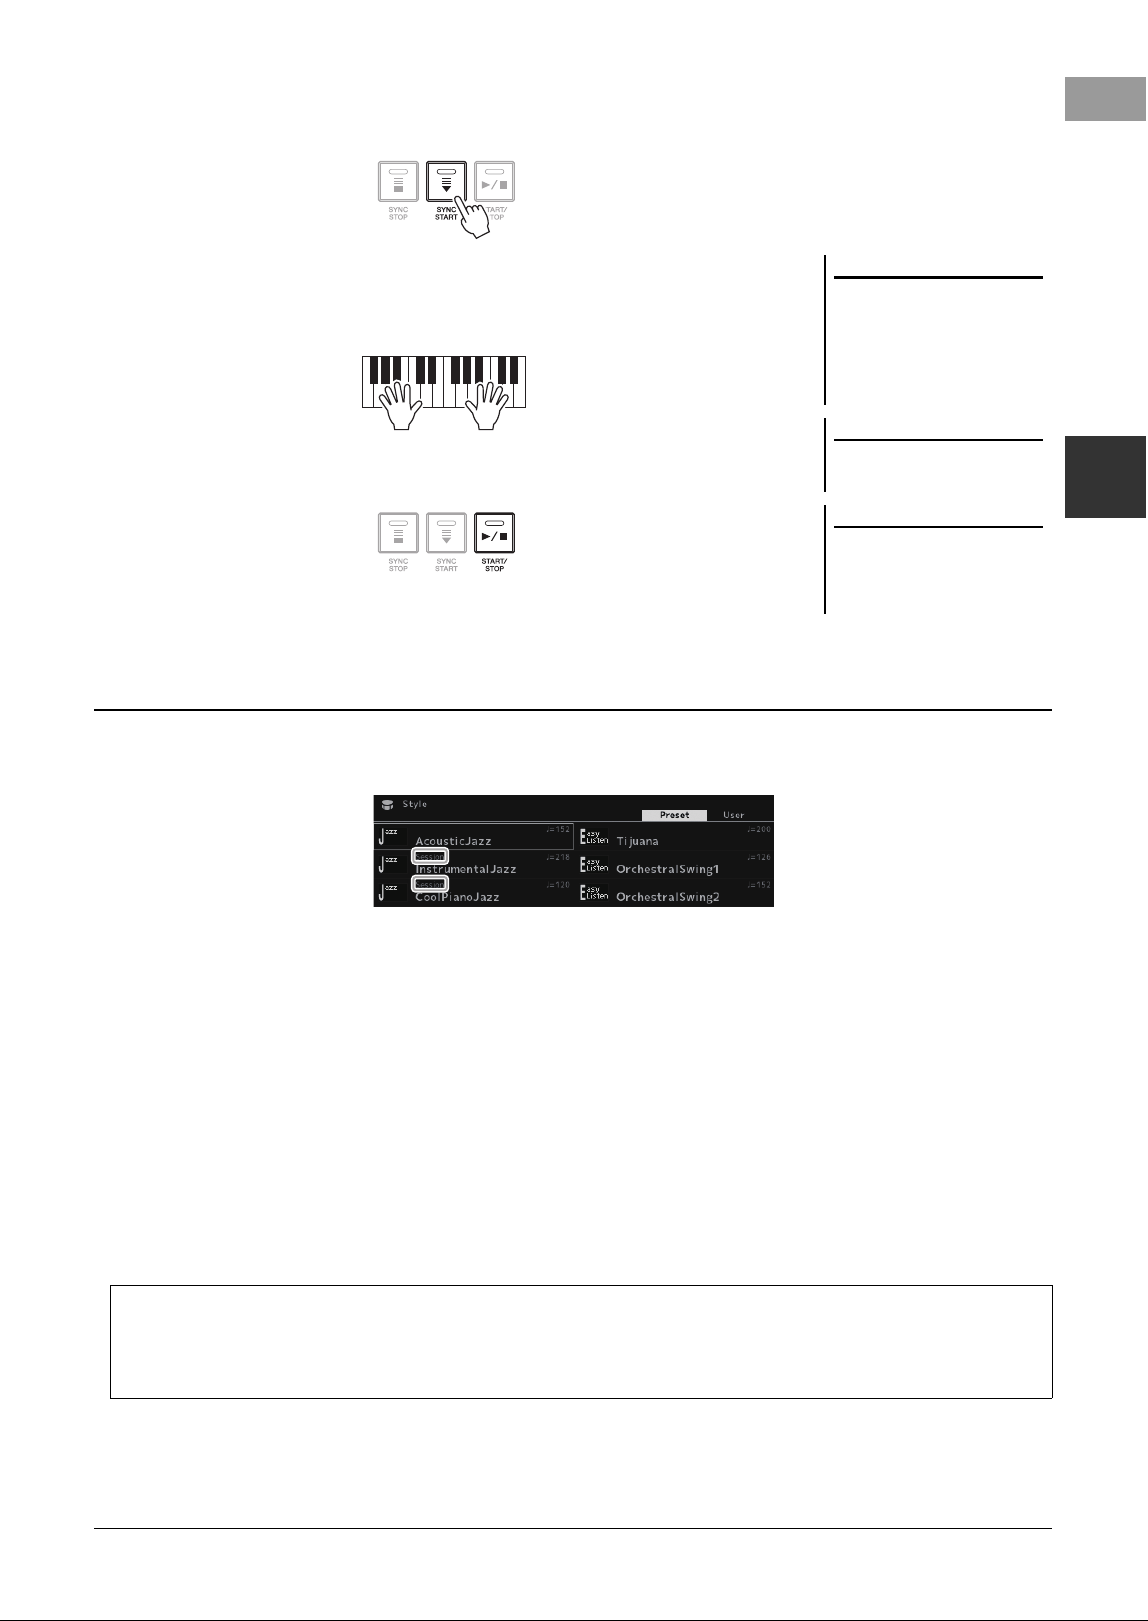
PSR-SX620 Owner’s Manual 53
Styles – Playing Rhythm and Accompaniment –
2
4 Press the [SYNC START] button to enable synchronized start
(page 54).
5 As soon as you play a chord with your left hand, the selected
Style starts.
Try playing chords with your left hand and play a melody with your right hand.
6 Press the [START/STOP] button to stop Style playback.
The particular type of Style is indicated on the upper left of the Style name in the Style Selection display. The
defining characteristics of these Styles and their performance advantages are described below.
• Session:
These Styles provide even greater realism and authentic backing by mixing in original chord types and changes, as
well as special riffs with chord changes, with the Main sections. These have been programmed to add “spice” and a
professional touch to your performances of certain songs and in certain genres. Keep in mind, however, that the
Styles may not necessarily be appropriate—or even harmonically correct—for all songs and for all chord playing.
In some cases for example, playing a simple major triad for a country song may result in a “jazzy” seventh chord, or
playing an on-bass chord may result in inappropriate or unexpected accompaniment.
•Free Play:
These Styles are characterized by rubato performance. You can perform freely with remarkably expressive
accompaniment, without being constrained by a strict tempo.
For the Preset Style List, refer to the Data List on the website.
NOTE
• For information on chords and
Chord Fingering types, refer to
page 59.
• The chord specified in the chord
section is shown on the Main dis-
play (page 20).
NOTE
You can transpose the Style playback
(page 43).
NOTE
You can use the Style Retrigger func-
tion by assigning it to the LIVE CON-
TROL knob. For details, refer to
page 45.
Style Characteristics
Style file compatibility
This instrument uses the SFF GE file format (page 8). This instrument can play back existing SFF files, but they will be
saved in the SFF GE format when the file is saved (or pasted) in this instrument. Please keep in mind that the saved file
can only be played back on instruments that are compatible with the SFF GE format.
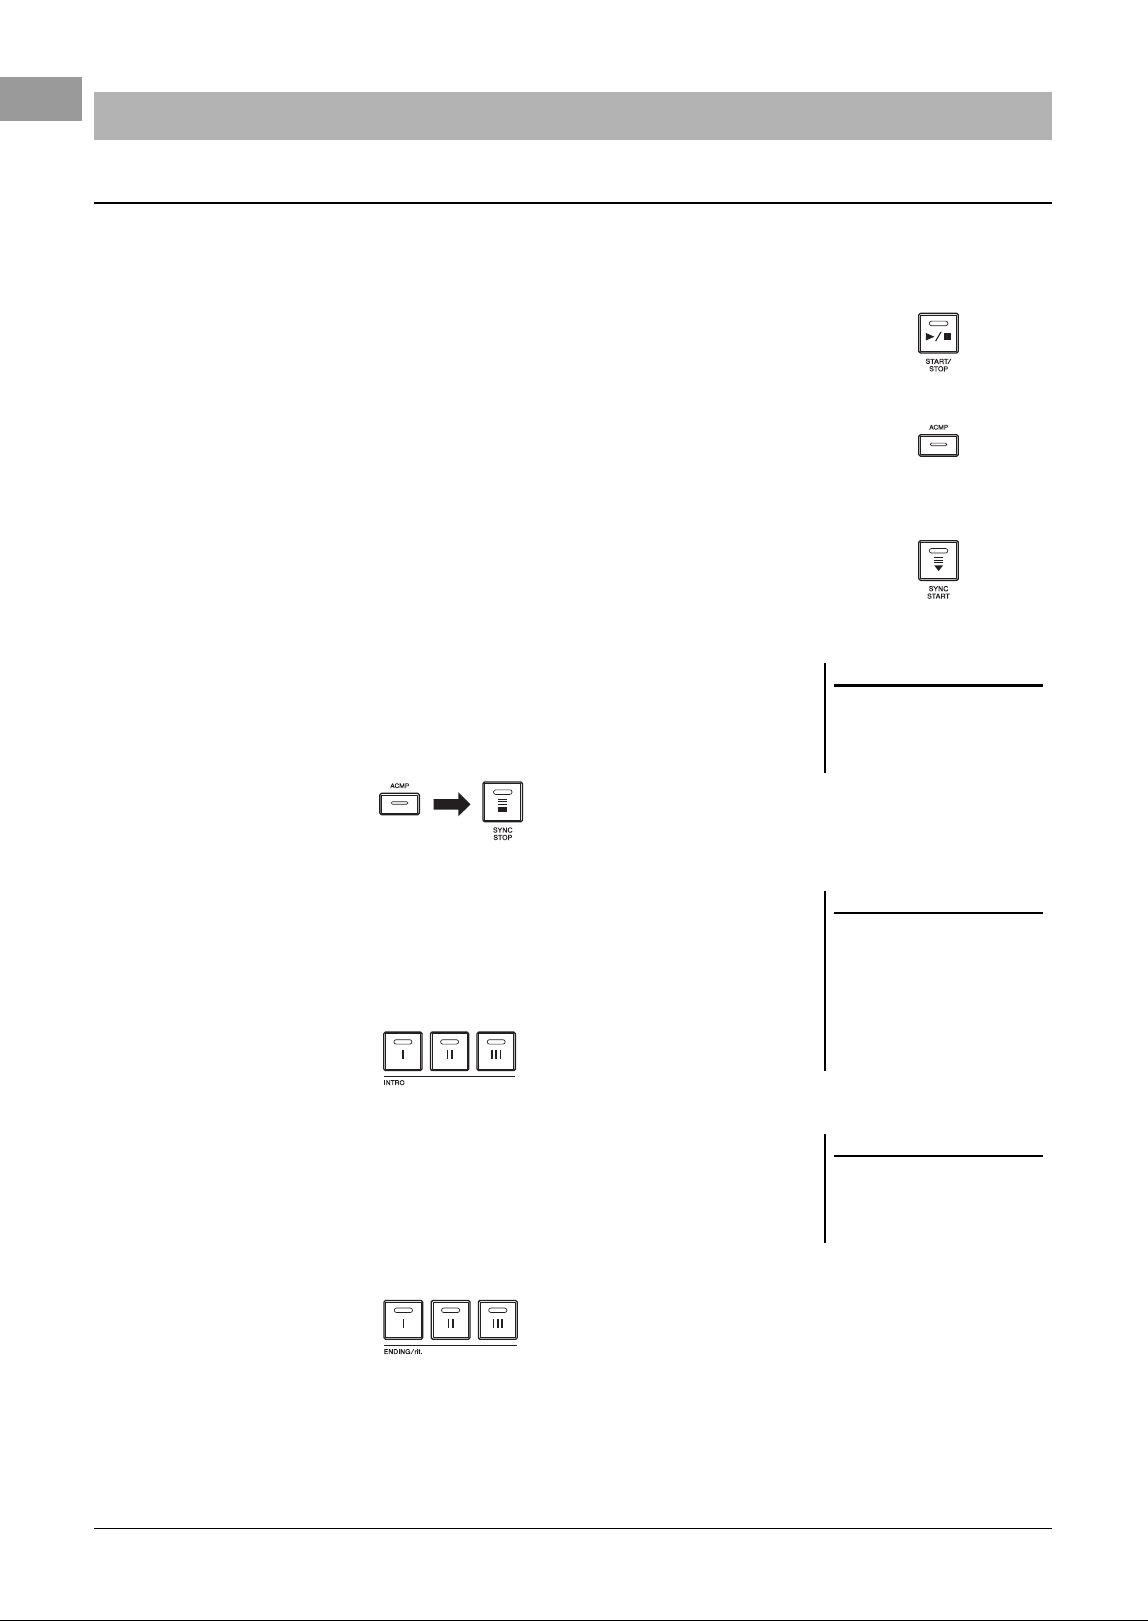
54 PSR-SX620 Owner’s Manual
A Style consists of rhythm and accompaniment (chords, etc.) parts. The buttons for Style playback are covered
here.
• [START/STOP] button
Turns on/off Style playback. However, only the rhythm part is played back.
• [ACMP] button
Turns the Auto Accompaniment on/off. After activating this button, both the rhythm
part and Auto Accompaniment can be played back when playing chords in the chord
section during Style playback.
• [SYNC START] button
This puts the Style playback in “standby.” The Style starts playing back when you
press any note on the keyboard (when [ACMP] is off) or you play a chord with your
left hand (when [ACMP] is on). While a Style is playing back, pressing this button
stops the Style and puts playback in standby.
• [SYNC STOP] button
Make sure that the [ACMP] button is on, and then press the [SYNC STOP] button,
and play the keyboard. You can start and stop the Style anytime you want by simply
playing or releasing the keys in the chord section of the keyboard.
• INTRO [I] – [III] buttons
The instrument features three different Intro sections to add an introduction before
starting Style playback. After pressing one of the INTRO [I] – [III] buttons, start
playback of the Style. When the Intro finishes playing, Style playback automatically
shifts to the Main section.
• ENDING/rit. [I] – [III] buttons
The instrument features three different Ending sections to add an ending before
stopping Style playback. When you press one of the ENDING/rit. [I] – [III] buttons
while Style is playing back, the Style will automatically stop after the ending is
played. You can have the ending gradually slow down (ritardando) by pressing the
same ENDING/rit. button once again, while the ending is playing.
Operating Style Playback
To Start/Stop Playing
NOTE
When the Chord Fingering type
(page 59) is set to “Full Keyboard” or
“AI Full Keyboard,” Sync Stop cannot
be turned on.
NOTE
The INTRO [I] section consists of only
the Rhythm part while INTRO [II] and
[III] consist of all the parts as well as
the Rhythm part. When you play
INTRO [II] or [III], in order to have the
complete Intro section sound properly,
you need to play chords in the chord
section with the [ACMP] turned on.
NOTE
If you press the ENDING/rit. [I] button
when the Style is playing, a fill-in
automatically plays before the END-
ING/rit [I].
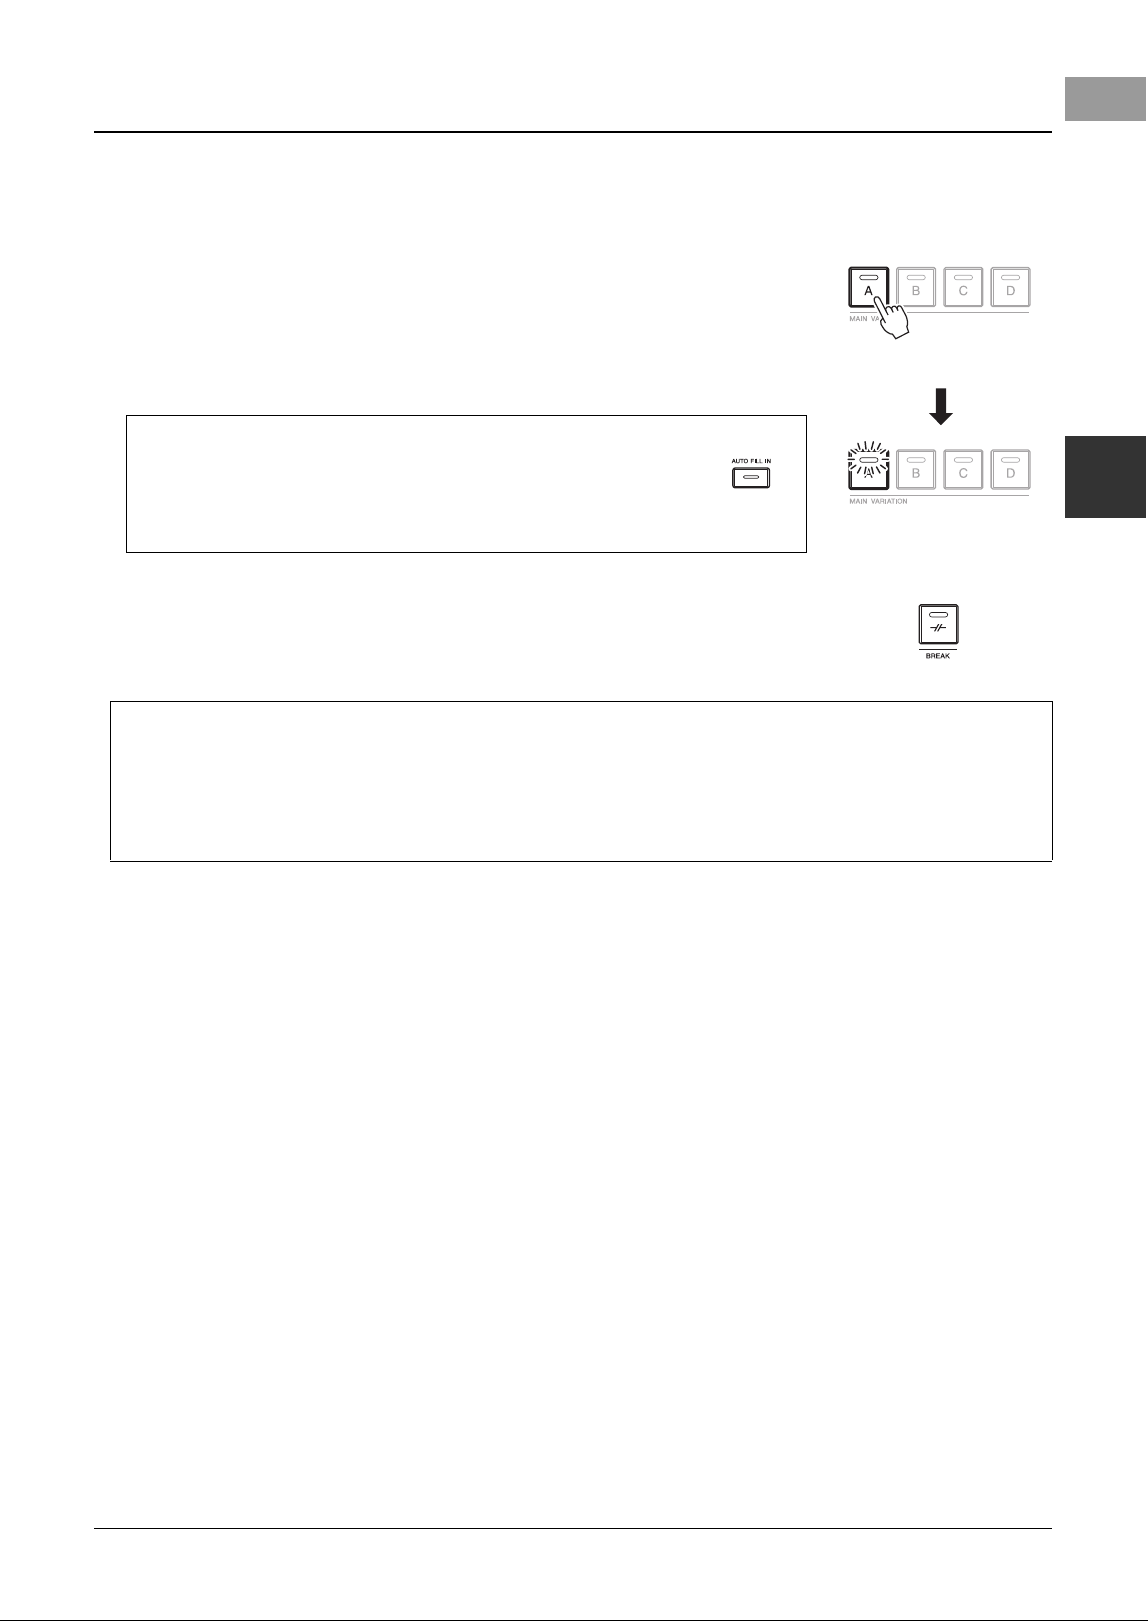
PSR-SX620 Owner’s Manual 55
Styles – Playing Rhythm and Accompaniment –
2
Each Style features four different Main sections, four Fill-in sections and a Break section. By using these sections
effectively, you can easily make your performance sound more dynamic and professional. The section can be freely
changed while the Style is playing back.
• MAIN VARIATION [A] – [D] buttons
Press one of the MAIN VARIATION [A] – [D] buttons to select the desired Main
section (the button lights in red). Each is an accompaniment pattern of a few
measures and it plays indefinitely. Pressing the selected MAIN VARIATION button
again maintains the same section, but plays an appropriate fill-in pattern to spice up
the rhythm and break the repetition.
• [BREAK] button
This lets you add dynamic breaks in the rhythm of the accompaniment. Press the
[BREAK] button during Style playback. When the one-measure Break pattern
finishes playing, the Style playback automatically shifts to the Main section.
Changing Pattern Variation (Sections) During Style Playback
Press the selected Main
section (lit in red) again.
The fill-in of the selected
Main section plays
(flashes in red).
AUTO FILL function
When the [AUTO FILL IN] button is turned on, pressing any of the
MAIN VARIATION [A] – [D] buttons as you play automatically plays
a fill-in section for a smooth, dynamic transition into the next (or same)
section.
About the lamp status of the section buttons (INTRO/MAIN VARIATION/BREAK/ENDING)
•Red: The section is currently selected.
• Red (flashing): The section will be played next, following the currently selected section.
* The MAIN VARIATION [A] – [D] buttons also flash red during fill-in playback.
•Blue: The section contains data but is not currently selected.
• Off: The section contains no data and cannot be played.
56 PSR-SX620 Owner’s Manual
• [FADE IN/OUT] button
This produces smooth fade-ins and fade-outs when starting/stopping the playback of
Style and Song. Press the [FADE IN/OUT] button when playback is stopped and
press the [START/STOP] button for Style (or the [PLAY/PAUSE] button for Song)
to start playback with a fade in. To stop the playback with a fade out, press the
[FADE IN/OUT] button during playback.
The TEMPO [-] and [+] buttons (page 42) let you change the playback tempo of Style, Song and Metronome. The
tempo of the Style and Song can also be adjusted via the [RESET/TAP] button.
• [RESET/TAP] button
When Style and MIDI Song are stopped, tapping the [RESET/TAP] button (four
times for a 4/4 time signature) starts playback of the rhythm part of the Style at the
tempo you tapped.
During playback of a MIDI Song, you can change the tempo by tapping the
[RESET/TAP] button twice at the desired tempo.
During playback of a Style, you can rewind to the top of the section (“reset” the
playback position, for stutter repeat effects) by tapping the [RESET/TAP] button.
This is called “Style Section Reset.”
Fading In/Out
Adjusting the Tempo
NOTE
You can set the button behavior so that
it changes the tempo instead of Sec-
tion Reset, even when tapping the but-
ton during playback of a Style. The
setting is made on the display called
up via [MENU] → MENU1 →
Metronome Setting → 2 Tap Tempo.
For details, refer to the Reference Man-
ual on the website.
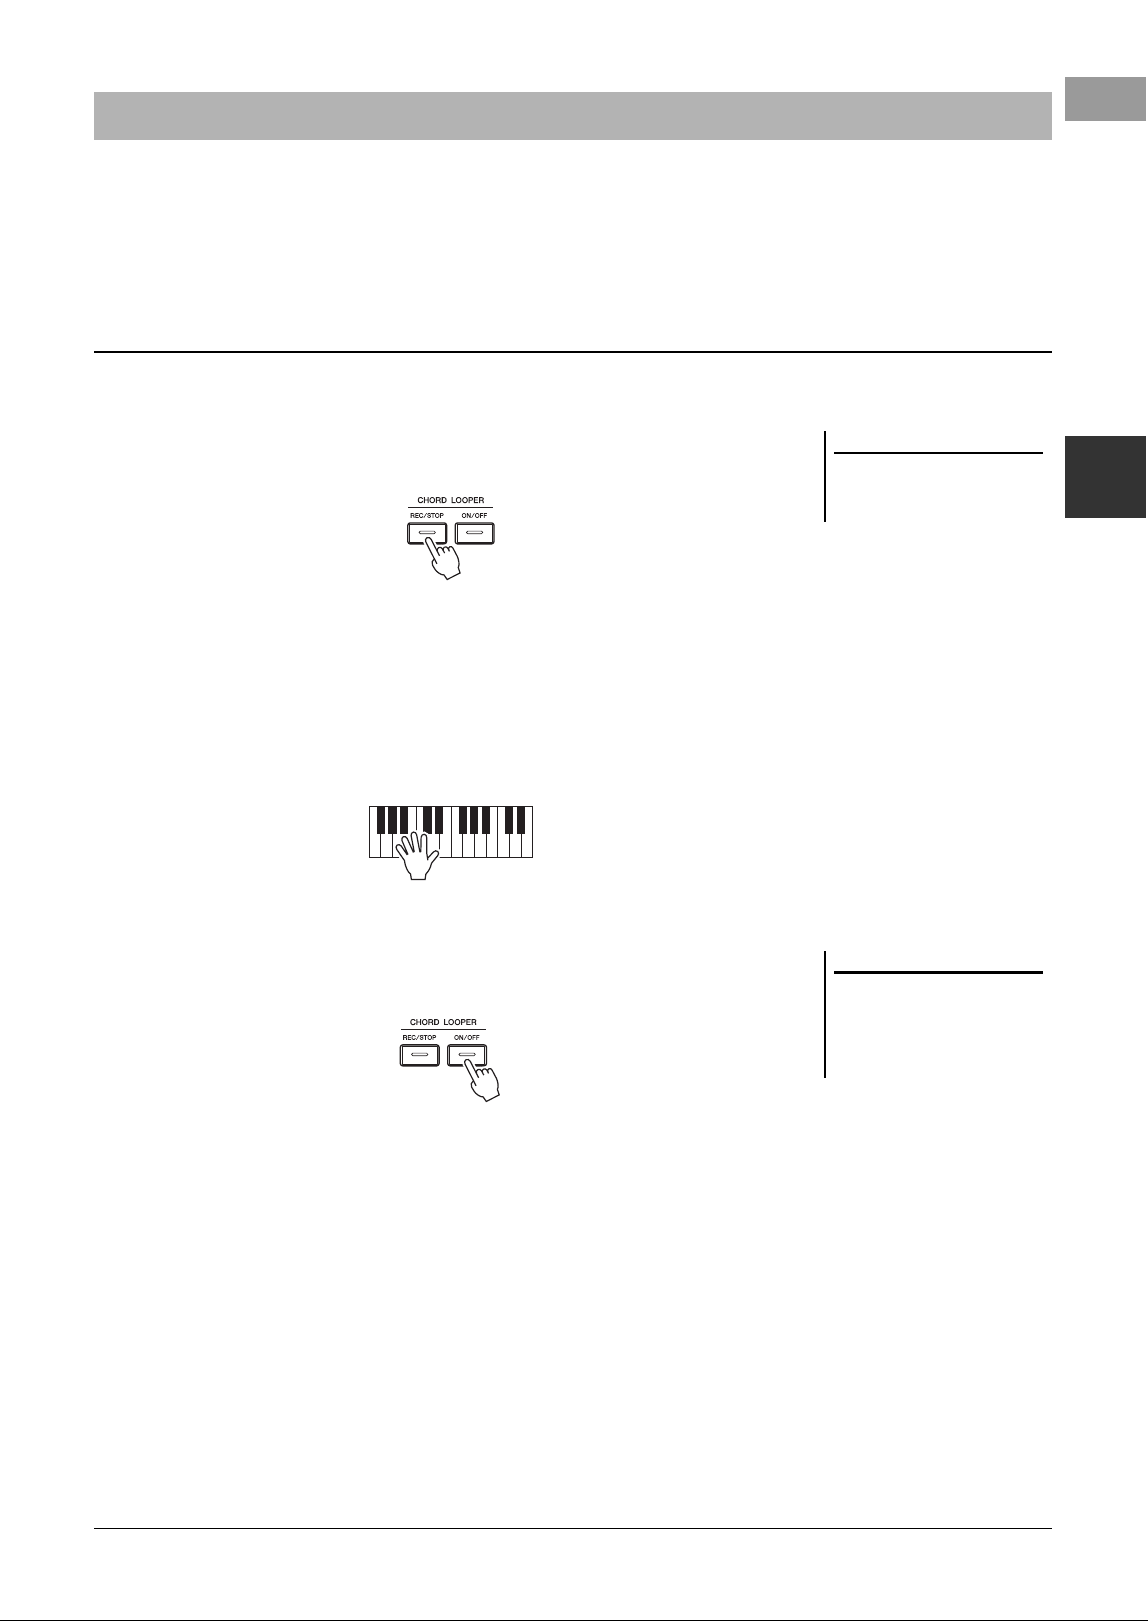
PSR-SX620 Owner’s Manual 57
Styles – Playing Rhythm and Accompaniment –
2
While playing back a Style, you usually specify chords with your left hand. However, with the convenient Chord
Looper function, you can record a sequence of the chords and play it back in a loop. For example, if you record a “C
→ F → G → C” chord progression, Style playback will continue automatically with the chords “C → F → G → C
→ C → F → G → C →...” Since the chords play back in a loop, you don’t need to repeat the chord pattern manually
anymore—letting you focus on your performance and other operations.
You can record desired chord sequence instantly and loop it.
1 While playing back a Style, press the CHORD LOOPER [REC/
STOP] button.
The [REC/STOP] button flashes to indicate the Chord Looper function is
standby to record.
On the next measure of the Style, the [REC/STOP] button is turned on and the
recording starts.
2 Enter the chords on the keyboard, according to the playback
tempo of the Style.
Chord sequence is recorded until you stop recording in step 3.
3 Press the CHORD LOOPER [ON/OFF] button to stop recording
and start loop playback of the chord sequence.
Recording stops, and the [ON/OFF] button flashes in red, and loop playback
standby is entered.
On the next measure of the Style, the [ON/OFF] button lights in red, and the
chord sequence recorded on step 2 will be played back in loop.
Recording and Playing Back a Chord Sequence — Chord Looper
Loop playback a chord sequence while playing back the Style
NOTE
When the [REC/STOP] is turned on,
the [ACMP] button is turned on auto-
matically.
NOTE
While the chord sequence is played
back, the [ACMP] button flashes,
chord input from the keyboard is dis-
abled, and the whole keyboard is only
used for performance.
58 PSR-SX620 Owner’s Manual
4
Press the CHORD LOOPER [ON/OFF] button to stop loop playback.
The playback of the chord sequence is stopped, and the Style will return to
normal playback.
NOTE
• The [ON/OFF] button lights blue to
indicate the chord sequence has
been recorded and loop playback
stops.
• Pressing the [ON/OFF] button starts
again loop playback of the chord
sequence recorded on steps 1–3.
• The CHORD LOOPER automatically
turns OFF for Intros and Endings
which contain their own chord pro-
gressions.
Advanced features of the Chord Looper function
You can start recording the chord sequence when Style playback is stopped, using SYNC START.
Also, you can save recorded chord sequences from the display called up via [MENU] → TA B [
F] Menu2 → Cursor
buttons
[][][E][F] Chord Looper → [ENTER].
• Up to eight chord sequences can be memorized.
• You can save each chord sequence as a file individually for future recall.
For details, refer to the Reference Manual on the website (page 7).
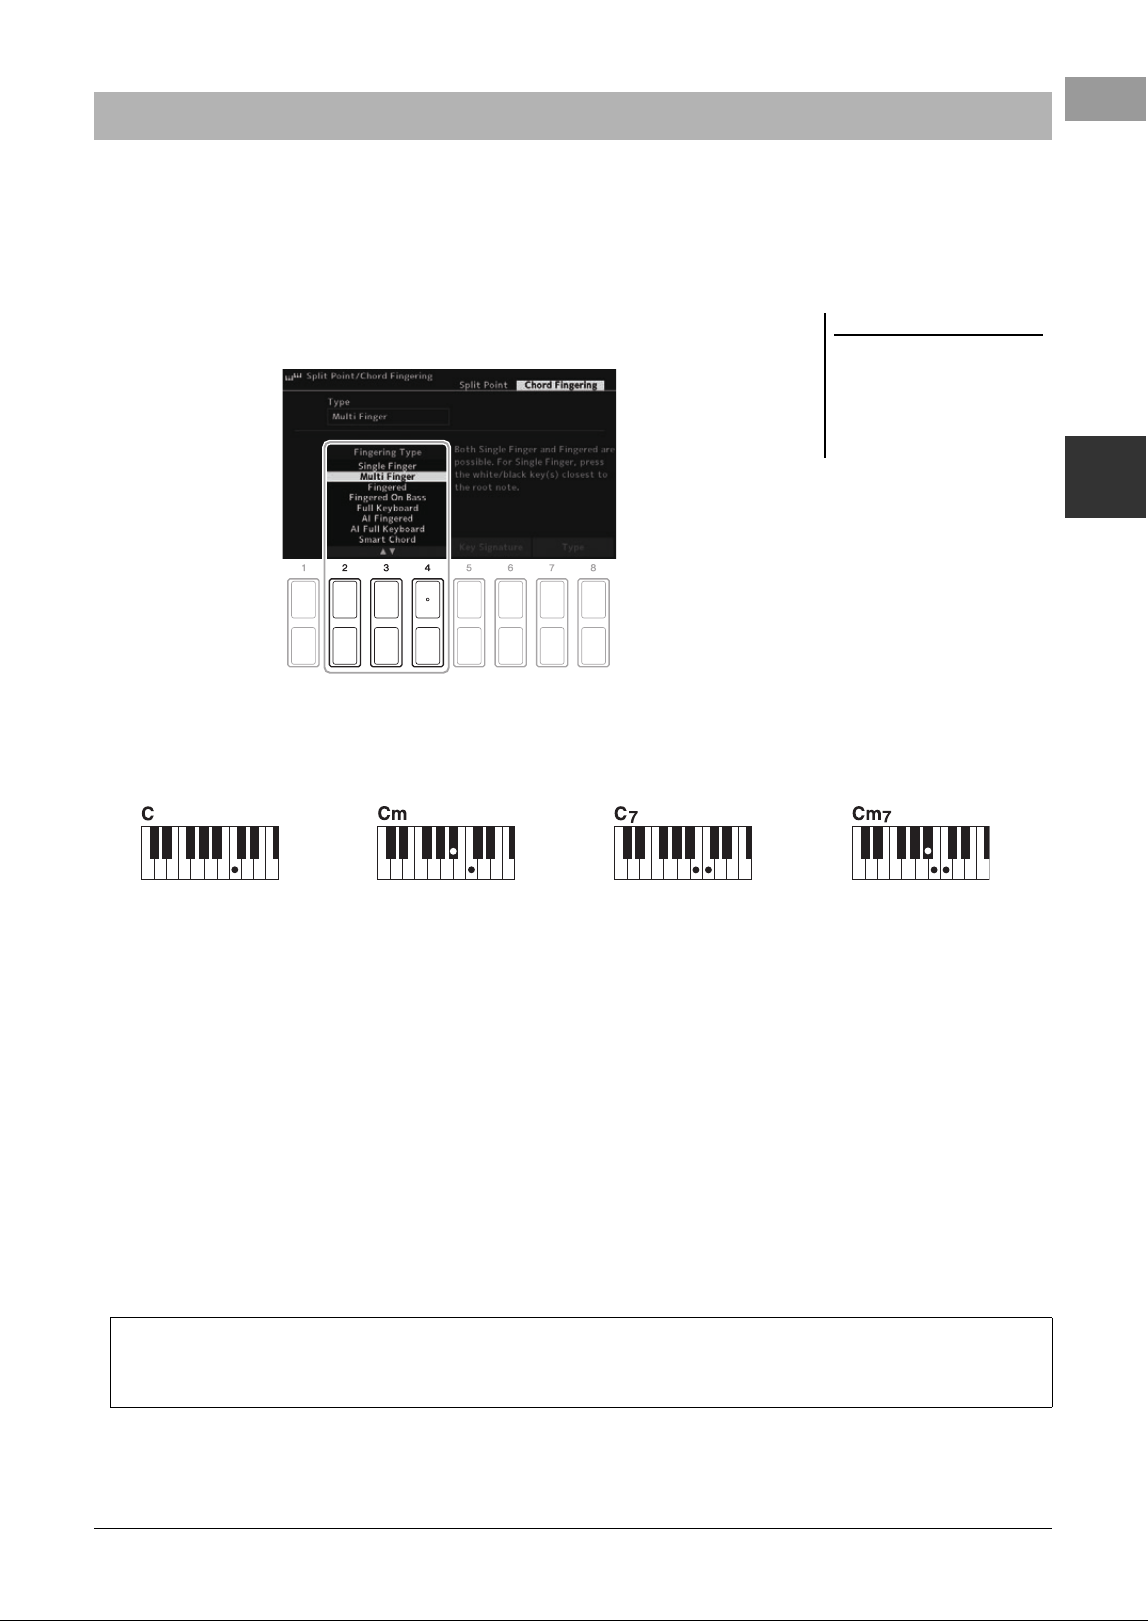
PSR-SX620 Owner’s Manual 59
Styles – Playing Rhythm and Accompaniment –
2
By changing the Chord Fingering type, you can automatically produce appropriate accompaniment even if you
don’t press all of the notes which comprise a chord.
1 Call up the operation display.
[MENU] → TAB [ E] Menu1 → Cursor buttons [][][E][F] Split Point/Chord Fingering → [ENTER] →
TAB [F] Chord Fingering
2 Press the [2
] – [4
] buttons to select a Chord Fingering
type.
The following types can be selected, for example.
•Single Finger
This method lets you easily play chords in the accompaniment range of the keyboard using only one, two or three
fingers.
• Fingered
This lets you specify the chord by pressing the notes making up a chord in the left hand section of the keyboard
when [ACMP] is turned on or the LEFT part is turned on. For information on which notes to press for each chord,
use the Chord Tutor function (see below) or refer to the Reference Manual on the website.
• Multi Finger
This automatically detects Single Finger or Fingered chord fingerings, so you can use either type of fingering
without having to switch fingering types. By default, the Chord Fingering type is set to Multi Finger.
• AI Full Keyboard
This lets you play just about anything, anywhere on the keyboard using both hands — like conventional playing of
a piano — and still have appropriate accompaniment. You don’t have to worry about specifying the chords.
(Depending on the song arrangement, AI Full Keyboard may not always produce appropriate accompaniment.)
For other types, refer to the Reference Manual on the website.
Changing the Chord Fingering Type
NOTE
When the chord detection area is set to
“Upper” (page 64), only the “Fin-
gered*” type is available. This type is
basically same as “Fingered,” except
that “1+5,” “1+8” and Chord Cancel
are not available.
Using the Chord Tutor Function
With this function shown in the display, you can see which notes to press for specifying the chord. If you know a chord
name but don’t know how to play it, use this function. For instructions, refer to the Reference Manual on the website.
Major chord
Press the root key only.
Minor chord
Simultaneously press the
root key and a black key to
its left.
Seventh chord
Simultaneously press the
root key and a white key to
its left.
Minor seventh chord
Simultaneously press the root
key and both a white and
black key to its left.
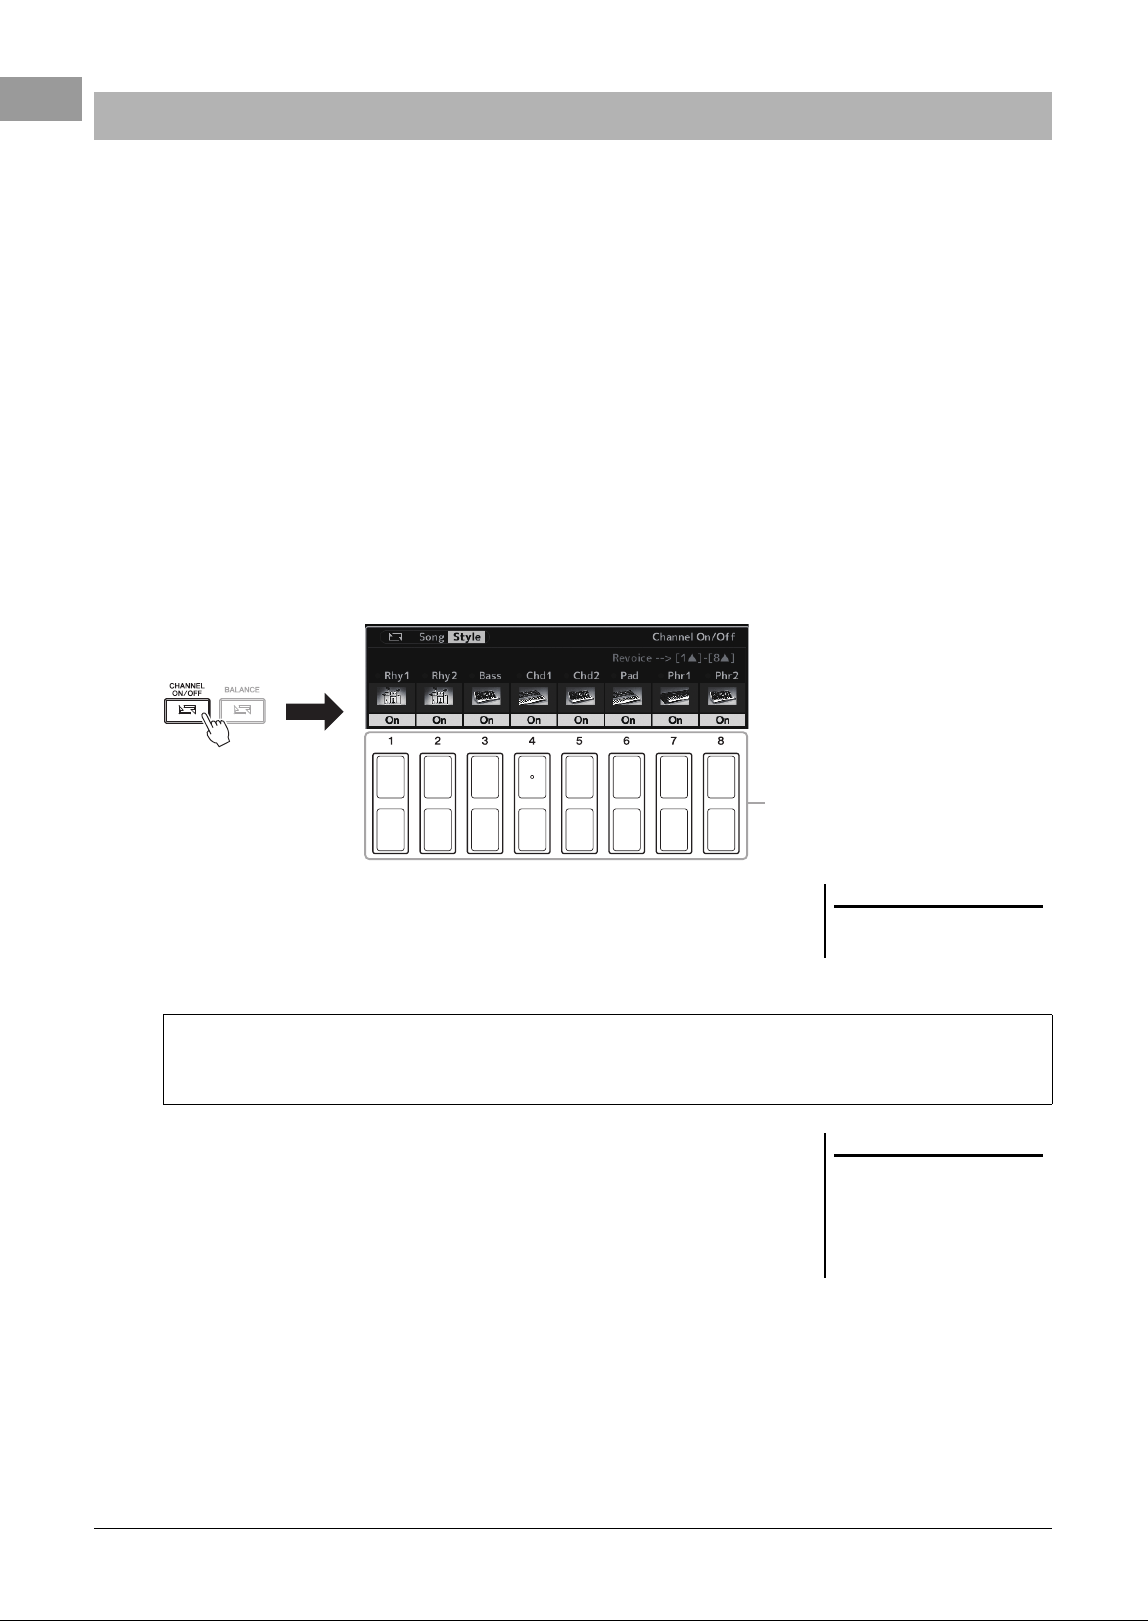
60 PSR-SX620 Owner’s Manual
Each Style contains eight parts listed below. You can add variations and change the feeling of a Style by selectively
turning parts on/off as the Style plays. To turn particular parts on/off, use the [CHANNEL ON/OFF] buttons.
Parts of the Style
• Rhy1, 2 (Rhythm 1, 2): These are the basic parts of the Style, containing the drum and percussion rhythm patterns.
•Bass: The bass part uses various appropriate instrument sounds to match the Style.
• Chd1, 2 (Chord 1, 2): These are rhythmic chord backing parts, commonly used with piano or guitar Voices.
•Pad: This part is used for sustained instruments such as strings, organ, choir, etc.
• Phr1, 2 (Phrase1, 2): These parts are used for punchy brass stabs, arpeggiated chords, and other extras that make the
accompaniment more interesting.
1 Press the [CHANNEL ON/OFF] button repeatedly if necessary to
call up the Channel On/Off (Style) display which contains the
desired channel.
If the Channel On/Off (Style) display is not shown, press the [CHANNEL ON/
OFF] button again.
2 Use the [1 ] – [8 ] buttons to turn the parts on or off.
To play only one part by itself, hold down the appropriate button for the channel
to set the channel to Solo. To cancel Solo, simply press the appropriate channel
button again.
3 Press the [EXIT] button to close the Channel On/Off (Style)
display.
Turning Each Part of the Style On/Off
2
NOTE
You can save the settings here to Reg-
istration Memory (page 91).
To change the Voice for each channel
Press one of the [1 ] – [8 ] buttons of the corresponding to the desired channel to call up the Voice Selection
display (page 38), and then select the desired Voice.
NOTE
You can also control the parts of the
Style on/off for dynamic effect by
using the LIVE CONTROL knobs. For
instructions on how to assign the
functions to the knobs, refer to
page 45.
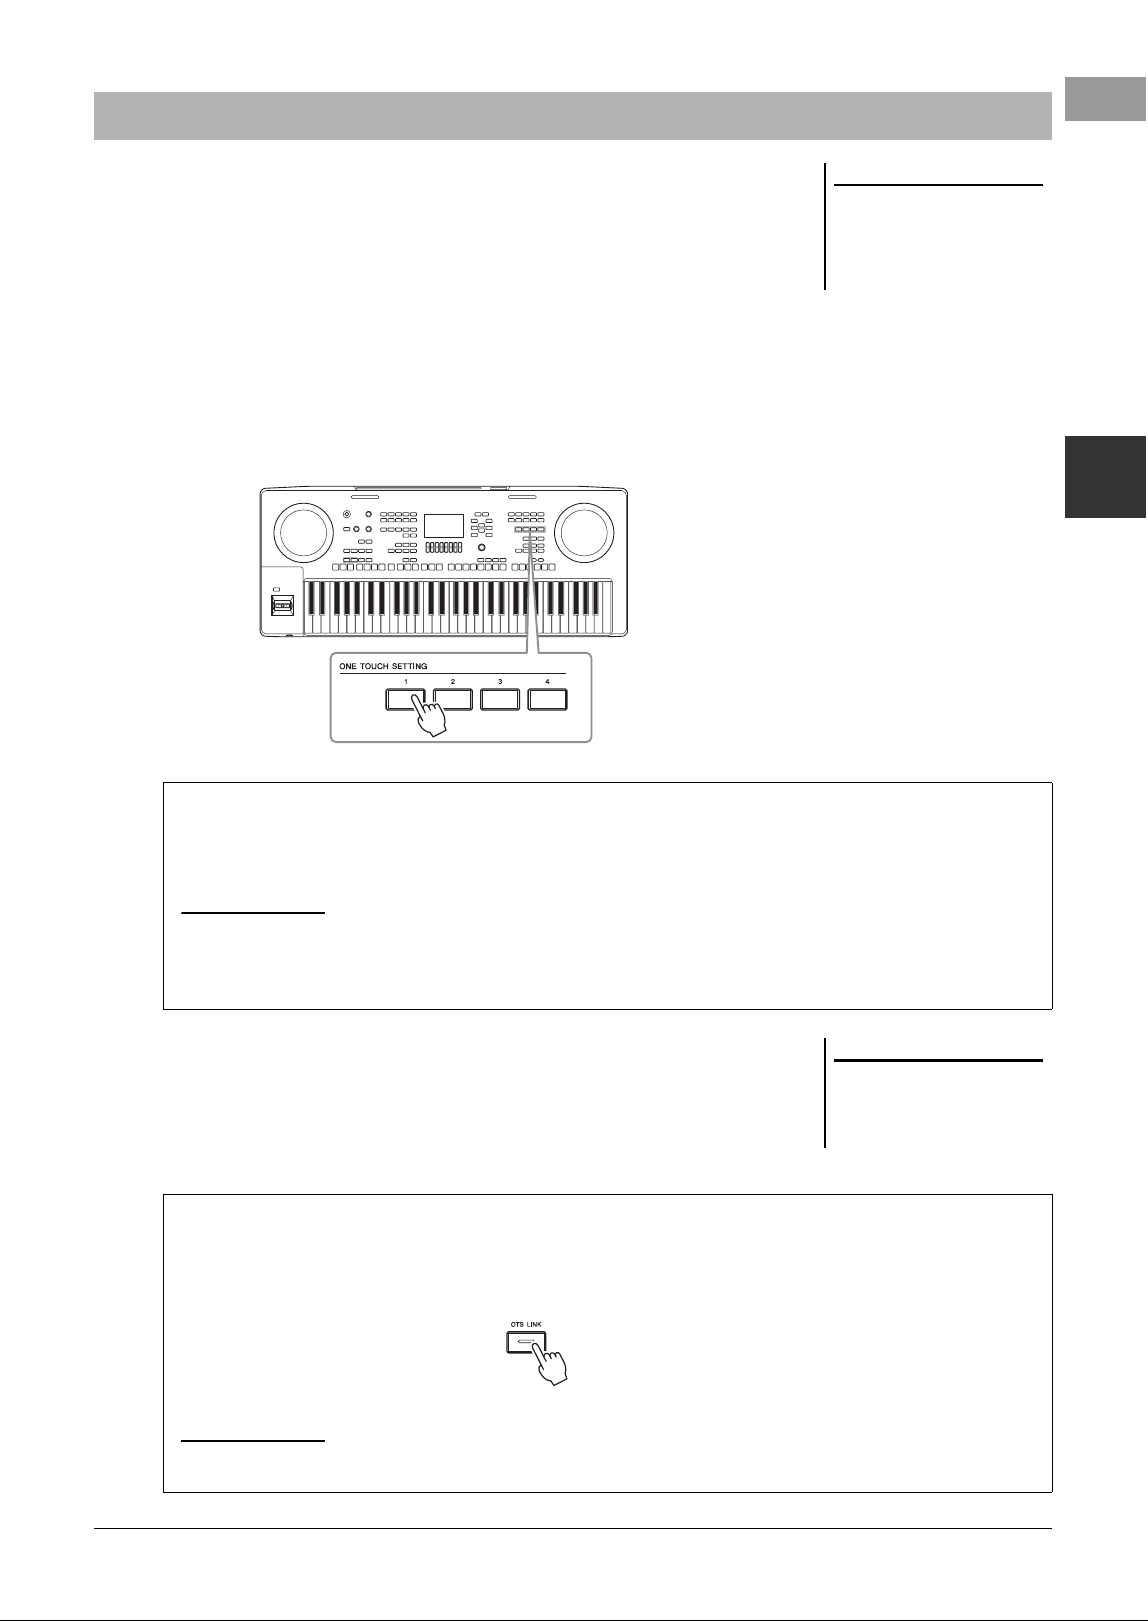
PSR-SX620 Owner’s Manual 61
Styles – Playing Rhythm and Accompaniment –
2
One Touch Setting (OTS) is a powerful and convenient feature that automatically
calls up the most appropriate panel settings (Voices or effects, etc.) for the currently
selected Style, with the touch of a single button. If you’ve already decided which
Style you wish to use, you can have One Touch Setting automatically select the
appropriate Voice for you.
1 Select a Style (steps 1 – 2 on page 52).
2 Press one of the ONE TOUCH SETTING [1] – [4] buttons.
Not only does this instantly call up all the settings (Voices, effects, etc.) that
match the current Style, it also automatically turns on [ACMP] and [SYNC
START], so that you can immediately start playing the Style.
3 As soon as you play a chord in the chord section, the selected
Style starts.
Each Style has four One Touch Setting setups. Press other ONE TOUCH
SETTING [1] – [4] buttons to try out other setups.
Calling up Appropriate Panel Settings for the Current Style (One Touch Setting)
NOTE
For information on the panel settings
that are called up by One Touch Set-
ting, refer to the OTS section of
“Parameter Chart” in the Data List on
the website.
Confirming the One Touch Setting contents
In the Style Selection display, press the [6 ] (Info) button (when File is shown at the bottom right corner of the
display) to call up the Information window that shows what Voices are assigned to the ONE TOUCH SETTING
[1] – [4] buttons for the current Style.
NOTE
If a Voice part name (R1/R2/L) is grayed out, this indicates that the corresponding Voice part is turned off when pressing the ONE TOUCH SETTING [1] – [4]
buttons.
To close the window, press one of the [7 ]/[8 ] (Close) buttons.
NOTE
You can memorize original settings to
One Touch Setting. For instructions,
refer to the Reference Manual on the
website.
Automatically changing One Touch Settings with the Main sections (OTS Link)
The convenient OTS (One Touch Setting) Link function lets you automatically have One Touch Settings change
when you select a different Main section (A – D). The Main sections A, B, C and D correspond to One Touch
Settings 1, 2, 3 and 4 respectively. To use the OTS Link function, turn the [OTS LINK] button on.
NOTE
You can change the timing in which the One Touch Settings change along with MAIN VARIATION [A] – [D] changes. For instructions, refer to the Reference
Manual on the website.
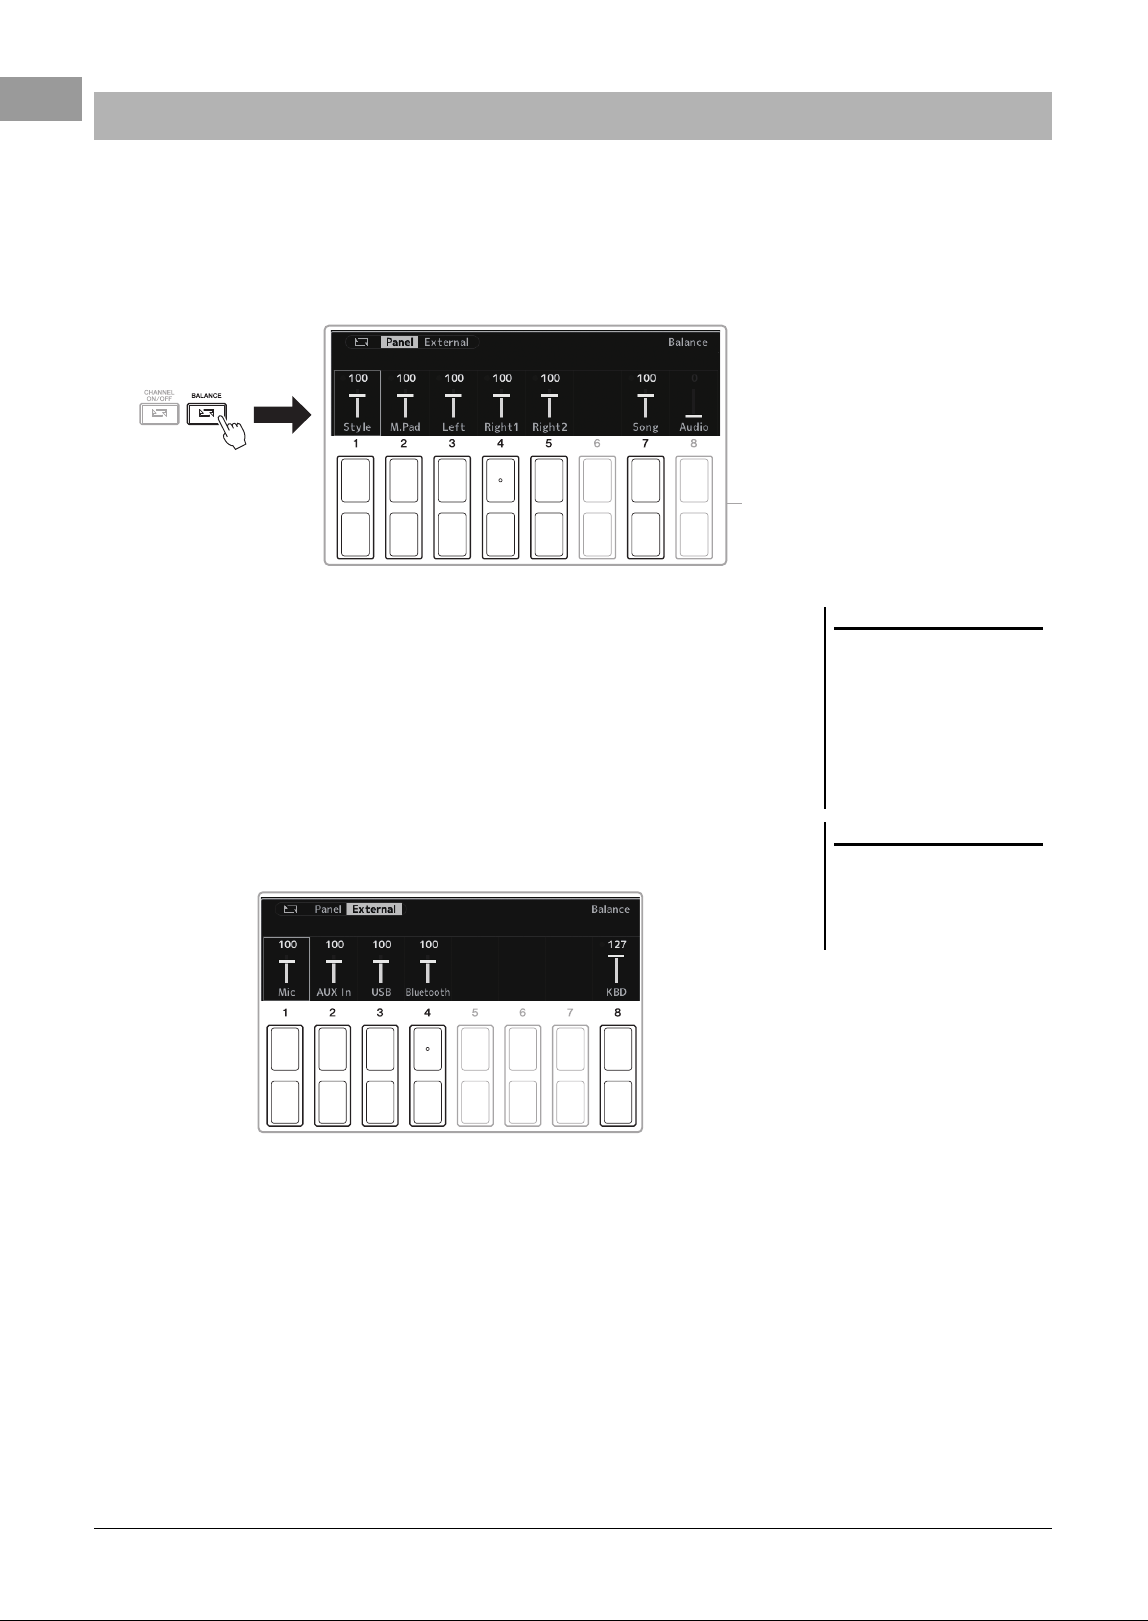
62 PSR-SX620 Owner’s Manual
You can adjust the volume balance among the parts (Song, Style, Left, Right1/2, Audio playback, Mic, etc.).
1 Press the [BALANCE] button once or twice to call up the
desired page of the Balance display which contains the desired
channel.
There are two pages, Panel and External.
2 Use the [1 ] – [8 ] buttons to adjust the volume of the
desired parts.
In the Panel page, you can adjust the volume balance between the Song (MIDI
Song, page 67), Style, M.Pad (Multi Pad, page 86), keyboard parts (Left, Right1
and Right2), and Audio via a USB Audio Player (page 78).
In the External page, you can adjust the volume balance between the sound
input from the [MIC INPUT] jack (page 83), sound input from the [AUX IN]
jack (page 106), USB (sound via USB cable, page 103), Bluetooth (sound via
Bluetooth communication, page 107), WLAN (sound via USB wireless LAN
adaptor, page 105), and all keyboard parts (KBD).
3 Press the [EXIT] button to close the Balance display.
Adjusting the Volume Balance Among the Parts
2
NOTE
• You can also control the volume bal-
ance between the parts by using the
LIVE CONTROL knobs. For instruc-
tions on how to assign the functions
to the knobs, refer to page 45.
• On the Volume/Pan page of the
Mixer display (page 98), you can
adjust the volume for the Song and
Style parts independently.
NOTE
When the UD-WL01 USB Wireless
LAN adaptor (sold separately,
page 105) is connected to the instru-
ment, “WLAN” appears in the External
page.
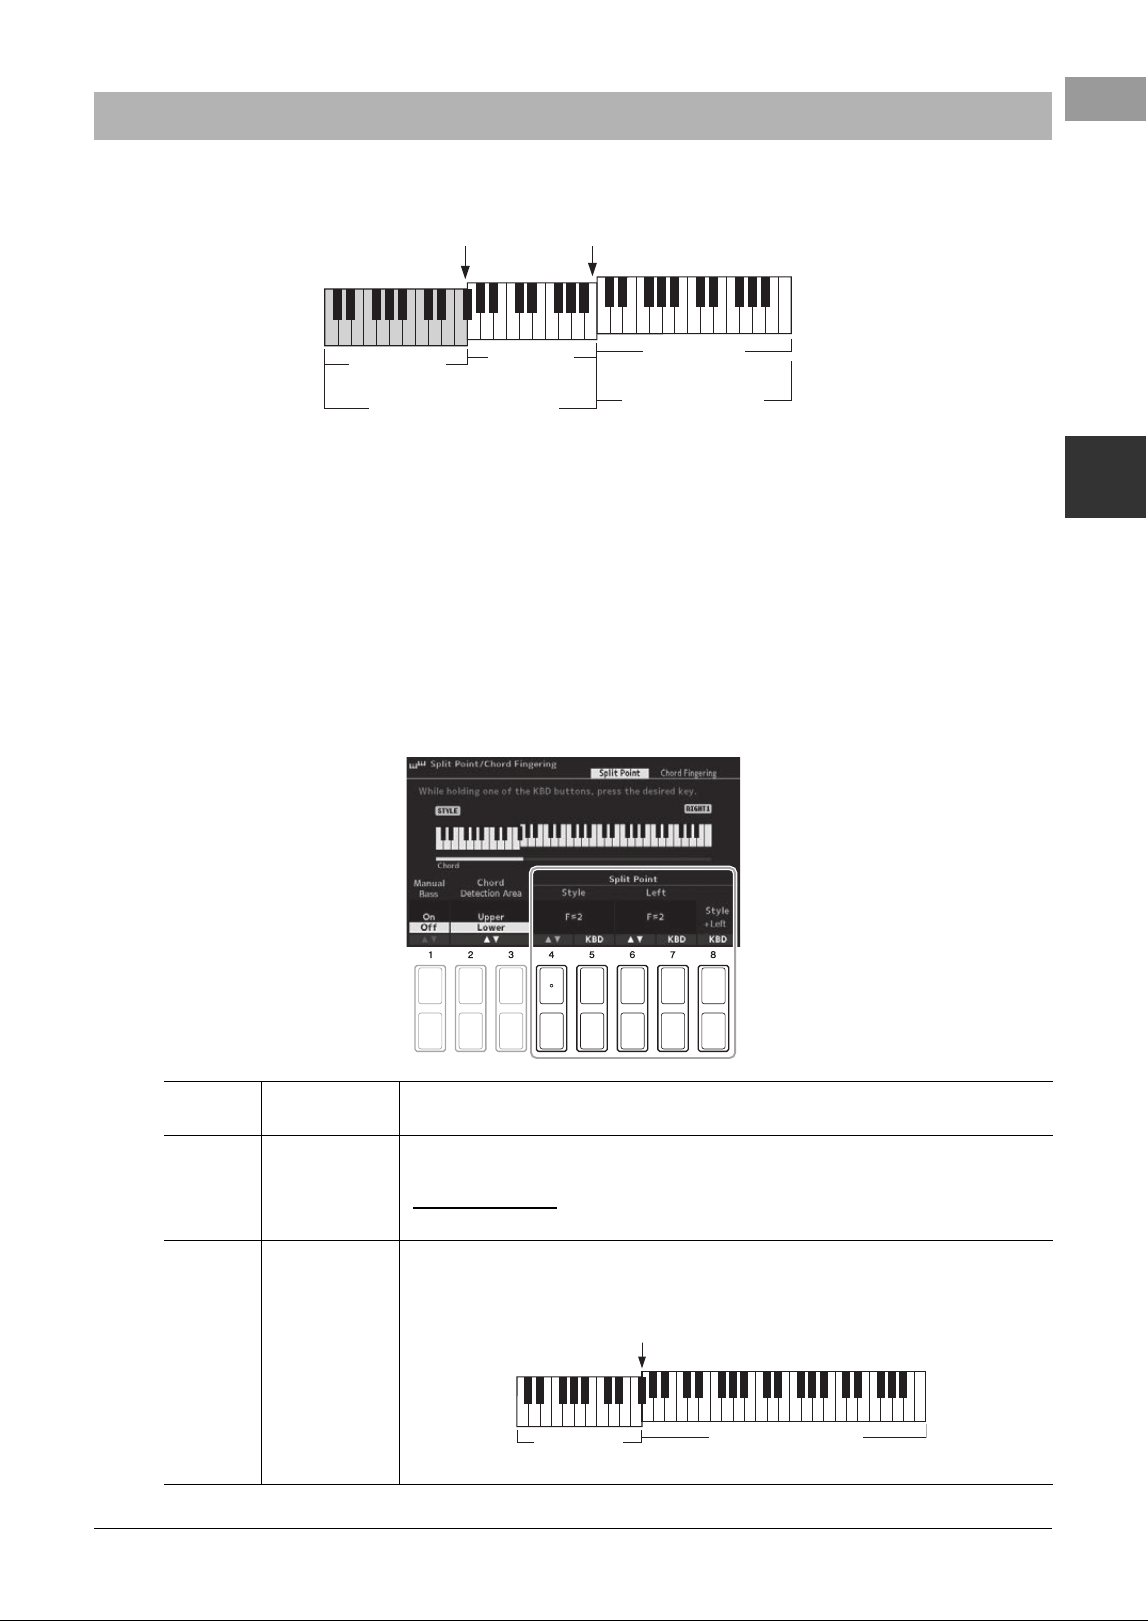
PSR-SX620 Owner’s Manual 63
Styles – Playing Rhythm and Accompaniment –
2
The key which divides the keyboard into two sections is referred to as “Split Point.” There are two Split Points:
Split Point (Left) and Split Point (Style).
• Split Point (Left):
Divides the keyboard into the left-hand (LOWER) section and the right-hand
(UPPER) section.
• Split Point (Style):
Divides the left-hand (LOWER) section into the Chord section and the LEFT Voice
section.
1 Call up the Split Point display.
[MENU] → TAB [E] Menu1 → Cursor buttons [][][E][F] Split Point/
Chord Fingering → [ENTER] → TAB [E] Split Point
2 Set the Split Point.
Setting the Split Point
Chord section
Left-hand (LOWER) section
Split Point
(Style)
LEFT Voice
section
Right-hand (UPPER)
section
Split Point
(Left)
RIGHT 1, 2
Voices section
[4 ]/
[5 ]
Split Point
(Style)
Sets the Split Point (Style). Press the [4 ] button or press the desired key on the keyboard
while holding the [5 ] (KBD) button to specify the Split Point.
[6 ]/
[7 ]
Split Point
(Left)
Sets the Split Point (Left). Press the [6 ] button or press the desired key on the keyboard
while holding the [7 ] (KBD) button to specify the Split Point.
NOTE
Split Point (Left) cannot be set lower than Split Point (Style).
[8 ] Split Point
(Style + Left)
Sets Split Point (Style) and Split Point (Left) to the same note. Rotate the Data dial or press the
desired key on the keyboard while holding the [8 ] (KBD) button to specify the Split
Point.
Split Point
(Style + Left)
RIGHT 1, 2 Voices
(Right-hand) section
Chord + LEFT
Voice (Left-
hand) section
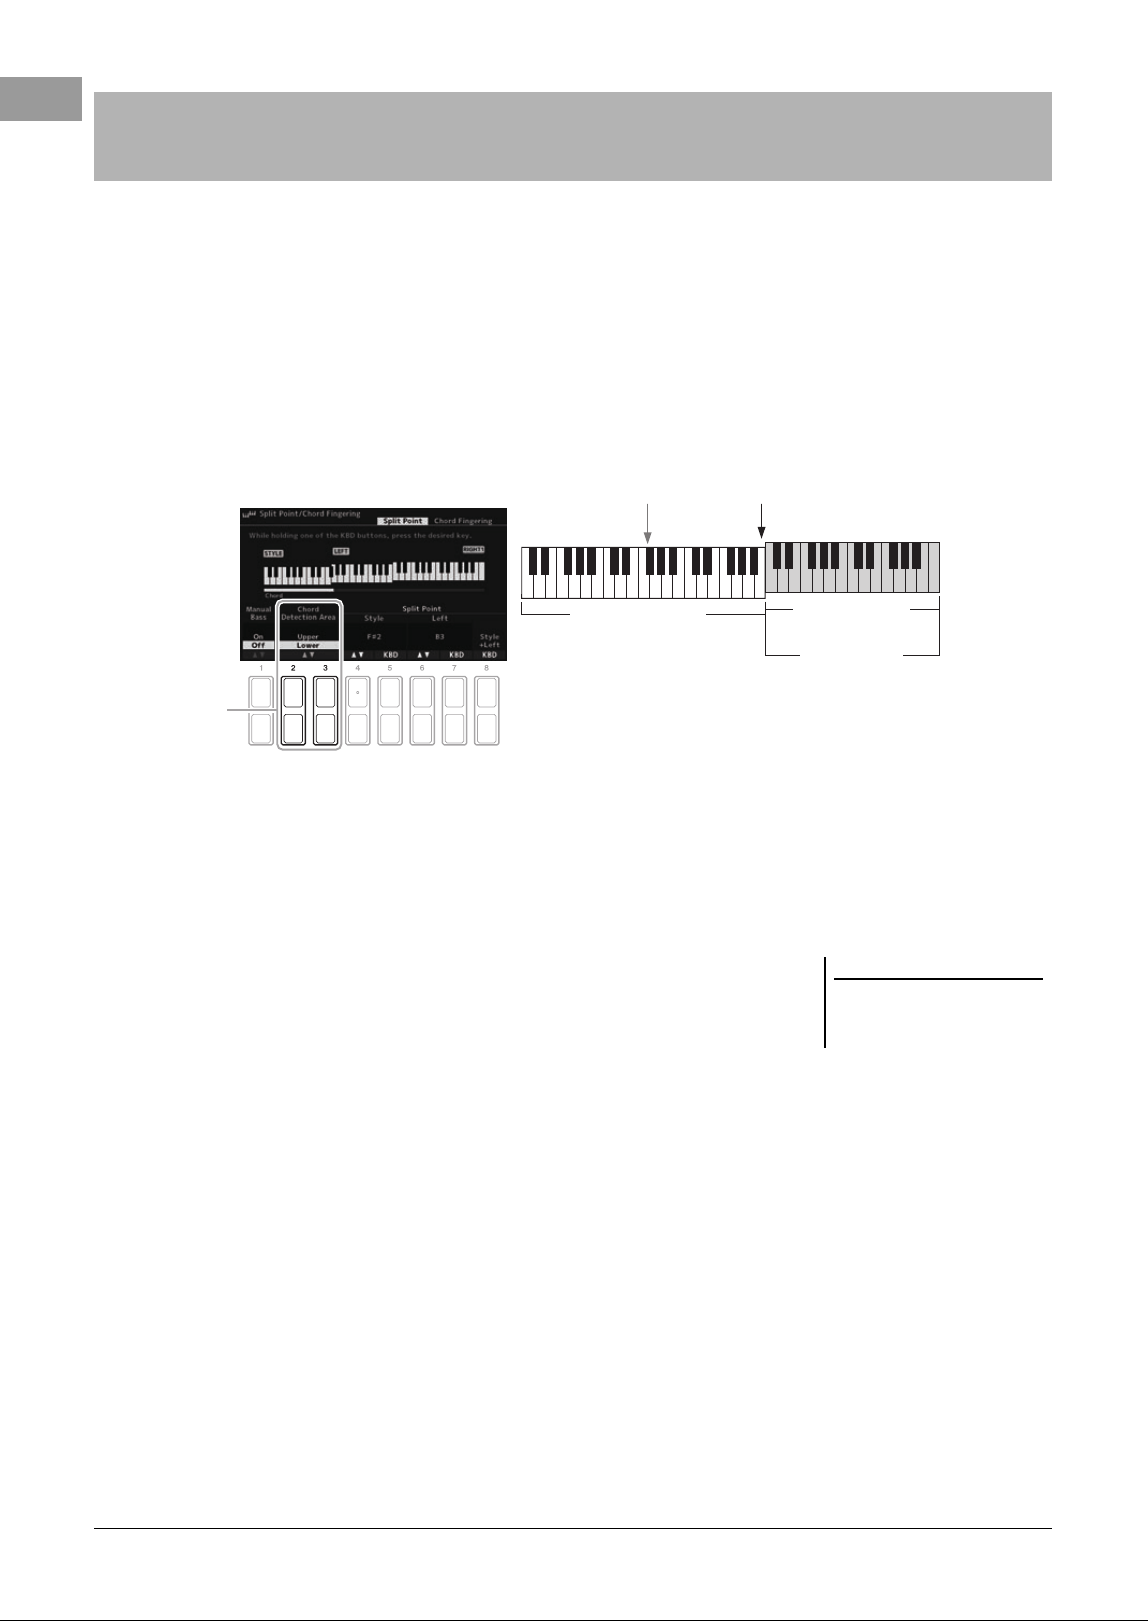
64 PSR-SX620 Owner’s Manual
By changing the chord detection area from the left-hand section to the right-hand section, you can play a bass line
with your left hand while using your right hand to control Style playback.
1 Call up the Split Point display.
[MENU] → TAB [E] Menu1 → Cursor buttons [][][E][F] → Split Point/
Chord Fingering → [ENTER] → TAB [E] Split Point
2 Use the [2 ]/[3 ] buttons to set the Chord Detection Area
value to “Upper.”
With this setting, the whole right-hand (Upper) section functions as the Chord section as well as for melody
performance. In this condition, note the following points:
• In the right-hand (Upper) section, you can specify the chord type as you play the
melody.
• When the Manual Bass function is On, the Voice for the Bass part of the current
Style is muted and assigned to the left-hand (LOWER) section. To turn this func-
tion on/off, use the [1 ] buttons.
• The Chord Fingering setting (page 59) will be set to a specific type (“Fin-
gered*”) automatically, in which case you should press three or more notes
simultaneously for specifying the chord. Pressing two or less notes does not
change the chord type.
• Split Point (Style) is unavailable.
Specifying Chords with Your Right Hand while Playing Bass with
Your Left Hand
2
Split Point
(Style)
LEFT Voice section
(LOWER section)
Chord section
Split Point
(Left)
RIGHT 1, 2
Voices section
(UPPER section)
NOTE
“Fingered*” is basically same as “Fin-
gered”, except that “1+5”, “1+8” and
Chord Cancel are not available.
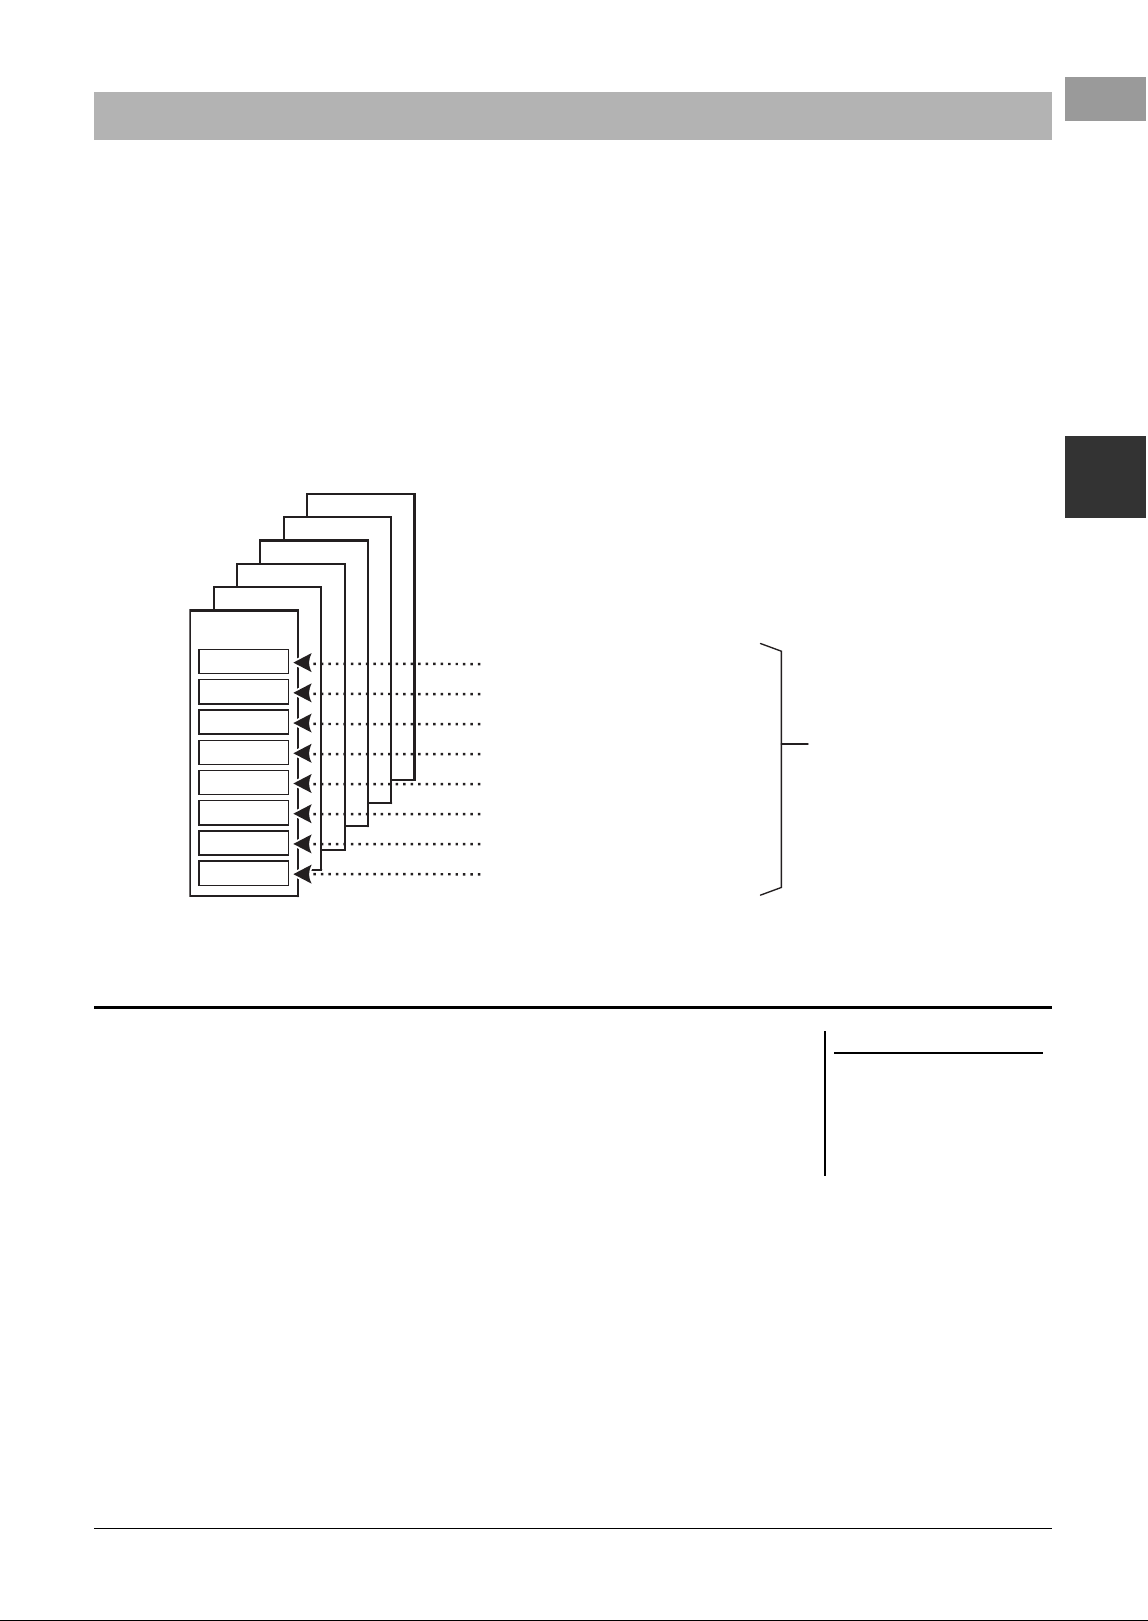
PSR-SX620 Owner’s Manual 65
Styles – Playing Rhythm and Accompaniment –
2
The Style Creator function lets you create original Styles by recording rhythm patterns from the keyboard and using
already-recorded Style data. Basically, select a preset Style that is closest to the type you want to create, and then
record each part (the rhythm pattern, bass line, chord backing, or phrase) for each Section.
This section gives you a brief introduction of the Style Creator function. For instructions on how to use the function,
refer to the Reference Manual on the website.
Style Data Structure — Source Patterns
A Style is made up of different Sections (Intro, Main, Ending, etc.), and each Section has eight separate parts, each
with recorded data (channel data), and which are referred to as “Source Patterns.” With the Style Creator feature,
you can create a Style by separately recording the Source Pattern for each channel, or by importing pattern data
from other existing Styles.
The Rhythm parts of a preset Style consist of a preset Drum Kit, and each drum
sound is assigned to a separate note. You may want to change the sounds and the
note assignments, or make more detailed settings such as volume balance, effect, etc.
By using the Drum Setup function of the Style Creator, you can edit the Rhythm part
of a Style and save it as an original Style. For details, refer to the Reference Manual
on the website.
Creating/Editing Styles (Style Creator)
Phrase 2
Phrase 1
Pad
Chord 2
Chord 1
Bass
Rhythm 2
Rhythm 1
Recording or copying from another Style
Recording or copying from another Style
Recording or copying from another Style
Recording or copying from another Style
Recording or copying from another Style
Recording or copying from another Style
Recording or copying from another Style
Recording or copying from another Style
Main A
Main B
Fill In
Intro
Ending 2
Ending 3
Creating a Source Pattern
(channel data) for each part
separately
Editing the Rhythm Part of a Style (Drum Setup)
NOTE
For information on the preset Drum Kit
and the Voices, refer to the “Drum/SFX
Kit List” in the Data List on the web-
site. This list provides information on
the specific sound-to-note assign-
ments.
66 PSR-SX620 Owner’s Manual
Advanced Features
Refer to the Reference Manual on the website, Chapter 2.
Style playback related settings:
[MENU] → Menu1 → Style Setting → [ENTER]
Saving and calling up your custom chord
sequences (Chord Looper):
[MENU] → Menu2 → Chord Looper → [ENTER]
Memorizing original One Touch Settings:
[MEMORY] + ONE TOUCH SETTING [1] – [4]
Creating/editing Styles (Style Creator):
[MENU] → Menu2 → Style Creator → [ENTER]
• Realtime Recording:
→ Basic
• Style Assembly:
→ Assembly
• Editing the rhythmic feel:
→ Groove
• Editing data for each channel:
→ Channel
• Making Style File Format settings:
→ Parameter
• Editing the rhythm part of a Style (Drum Setup)
→ Basic → 3 Rhythm Clear/ Channel Delete/ Drum Setup
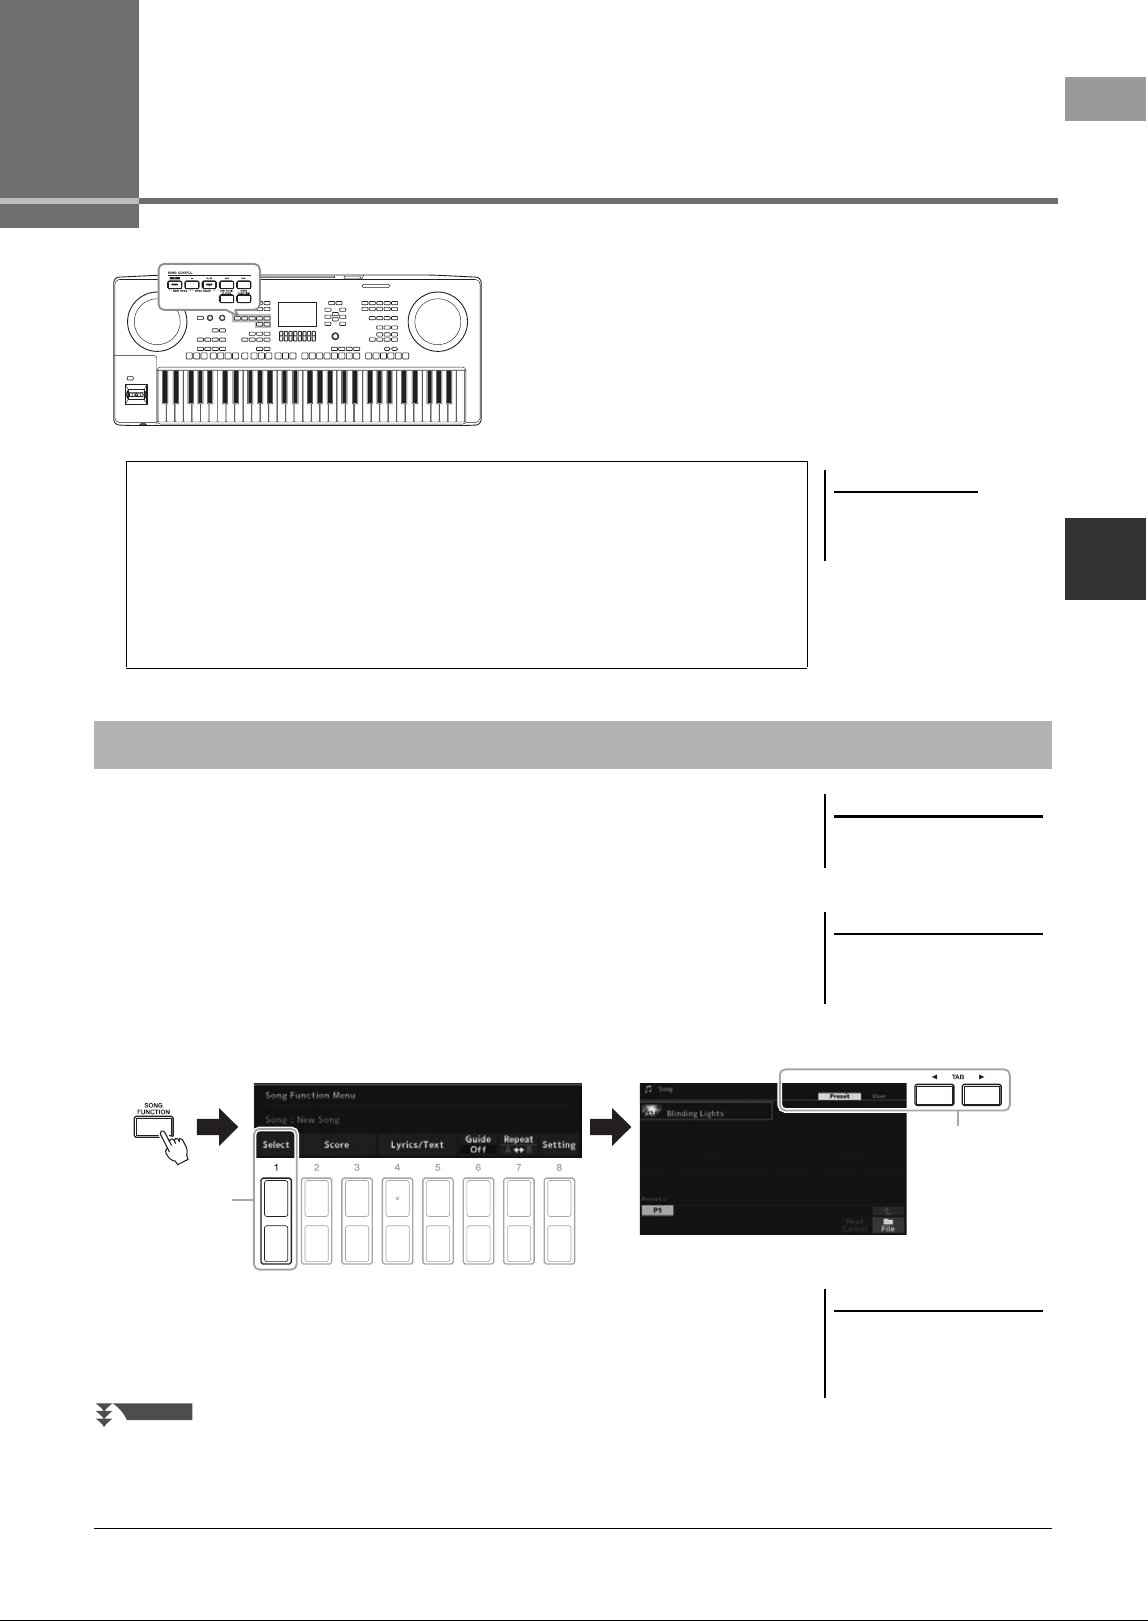
PSR-SX620 Owner’s Manual 67
Songs – Playing, Practicing and Recording Songs –
3
3
Songs
– Playing, Practicing and Recording Songs –
For the PSR-SX620, “Song” refers to the MIDI Songs which
include preset songs, commercially available MIDI format files,
etc. Not only can you play back a Song and listen to it, but you
can also play the keyboard along with Song playback and record
your own performance as a Song.
You can play back the following types of Songs.
• Preset Songs (in the Preset tab of the Song Selection display)
• Your own recorded Songs (page 74)
• Commercially available Song data: SMF (Standard MIDI File)
If you want to play back a Song in a USB flash drive, connect the USB flash drive
containing the Song data to the USB [TO DEVICE] terminal beforehand.
1 Press the [SONG FUNCTION] button to call up the Song
Function Menu display.
2 Press one of the [1
] (Select) buttons in the Song Function
Menu to call up the Song Selection display.
NOTE
For instructions on playback and
recording of audio files, refer to
page 78.
MIDI Song
A MIDI Song is comprised of your keyboard performance information and is not a
recording of the actual sound itself. The performance information refers to which
keys are played, at what timing, and at what strength — just as in a musical score.
Based on the recorded performance information, the tone generator outputs the
corresponding sound. Since MIDI Song data contains the information such as
keyboard part and Voice, you can practice effectively by viewing the score, turning
the particular part on or off, or changing Voices.
Playback of Songs
NOTE
For information on compatible data
formats, refer to page 8.
NOTE
Before using a USB flash drive, be sure
to read “Connecting USB Devices” on
page 101.
2
3
NOTE
You can quickly call up the Song
Selection display by pressing the
[DIRECT ACCESS] button, followed by
the [SONG FUNCTION] button.
NEXT PAGE
Songs
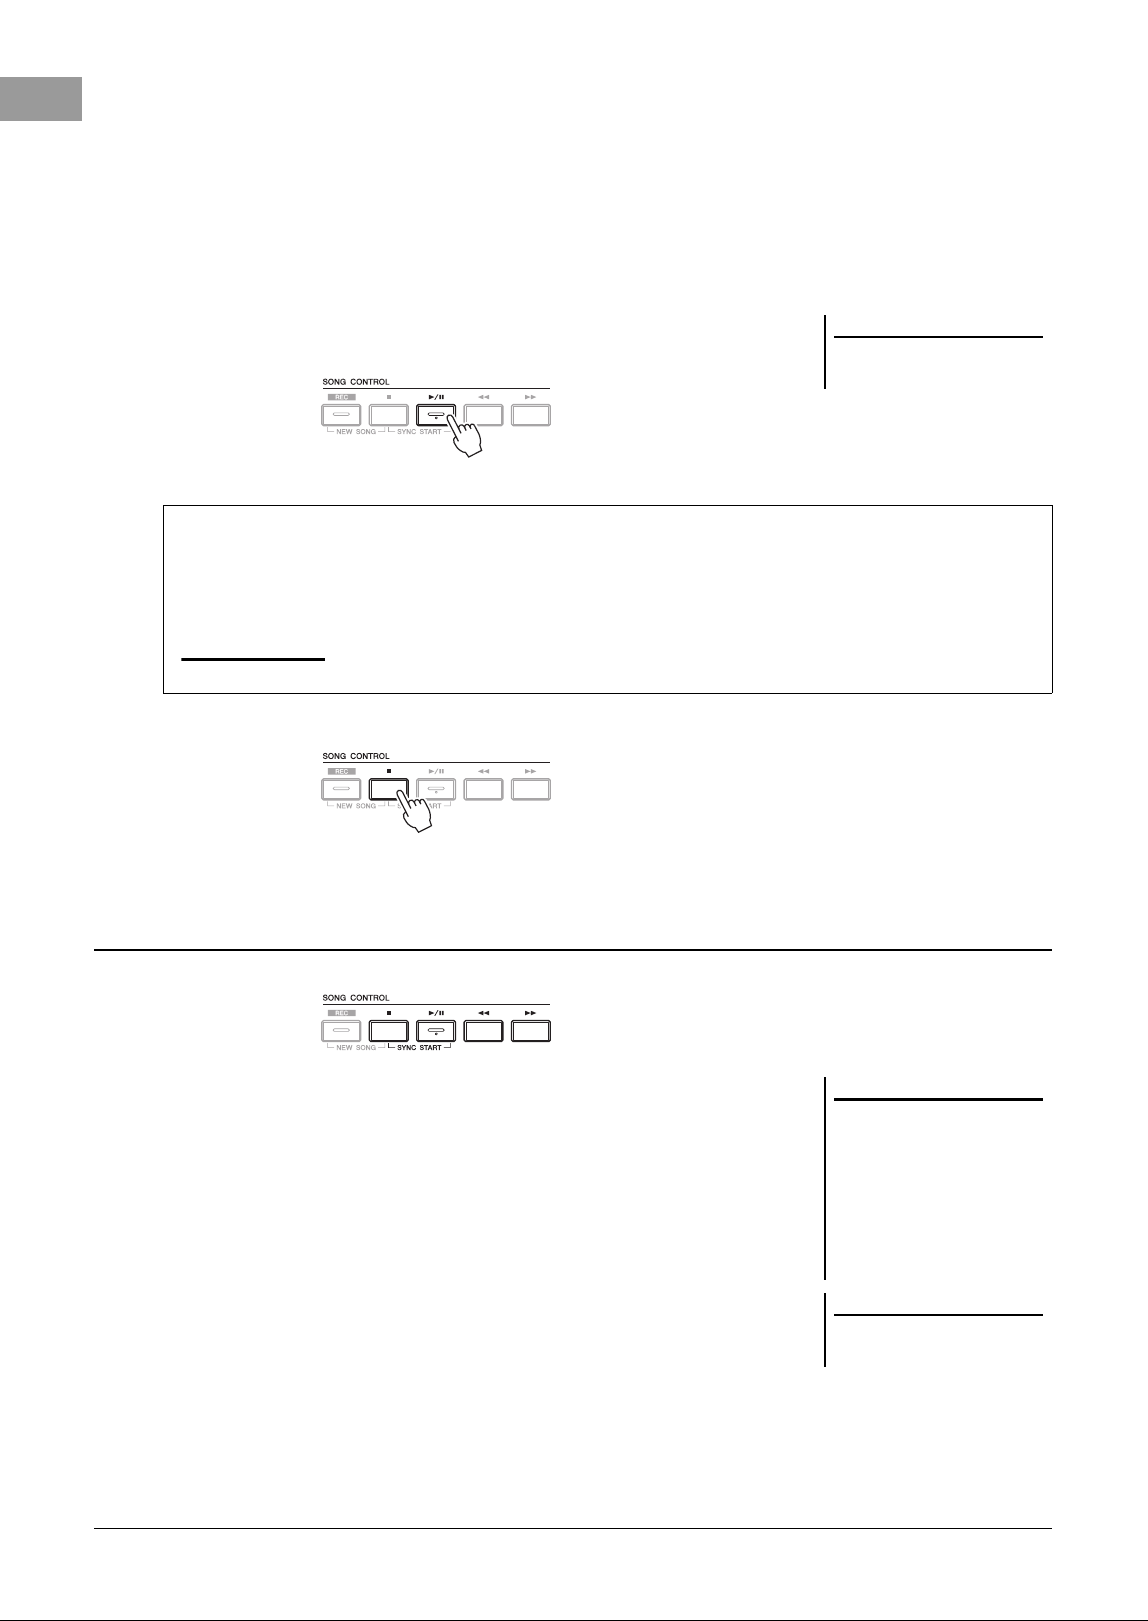
68 PSR-SX620 Owner’s Manual
3 Use the TAB [E][F] buttons to select the location of the desired Song.
• Preset tab .........Preset Songs are shown.
• User tab.............Recorded or edited Songs which are saved on the User drive are shown.
• USB tab .............Songs which are saved on the USB flash drive are shown. This appears only when a USB
flash drive is connected to the USB [TO DEVICE] terminal.
4 Move the cursor to the desired Song by using the Cursor buttons
[
][
][
E
][
F
]
, and then
press the [ENTER] button.
5 Press the SONG CONTROL [F/ K] (PLAY/PAUSE) button to start
playback.
6 Press the SONG CONTROL [J] (STOP) button to stop playback.
• Synchro Start .........You can start playback as soon as you play the keyboard.
While playback is stopped, hold down the SONG CONTROL
[J] (STOP) button and press the [F/ K] (PLAY/PAUSE)
button. The [
F/ K] (PLAY/PAUSE) button flashes, indicat-
ing standby status. You can start playback as soon as you play
the keyboard. To cancel the Synchro Start function, press the
[
J] (STOP) button.
• Pause........................Press the [F/ K] (PLAY/PAUSE) button during playback.
Pressing it again resumes Song playback from the current
position.
• Rewind/Fast Forward
...............................Press the [G] (REW) or [H] (FF) button during playback
or while the Song is stopped. Pressing either of them once
moves back/forward one measure. Holding either of them
scrolls backward/forward continuously.
NOTE
You can transpose the Song playback
(page 43).
Queuing the next Song for playback
While a Song is playing back, you can queue up the next Song for playback. This is convenient for chaining it to
the next Song smoothly during live performance. Select the Song you want to play next in the Song Selection
display, while a Song is playing back. The “Next” indication appears at the upper right of the corresponding Song
name. To cancel this setting, press the [7 ] (Next Cancel) button.
NOTE
Make sure that File is shown at the bottom right corner of the display (page 26).
Playback-related Operations
NOTE
• You can adjust the volume balance
between the Song and keyboard
(page 62). On the Volume/Pan page
of the Mixer display (page 98), you
can adjust the volume for each Song
channel.
• You can also adjust the volume bal-
ance between the Song and an audio
file (page 62).
NOTE
You can also turn specific part(s) on or
off (page 71).
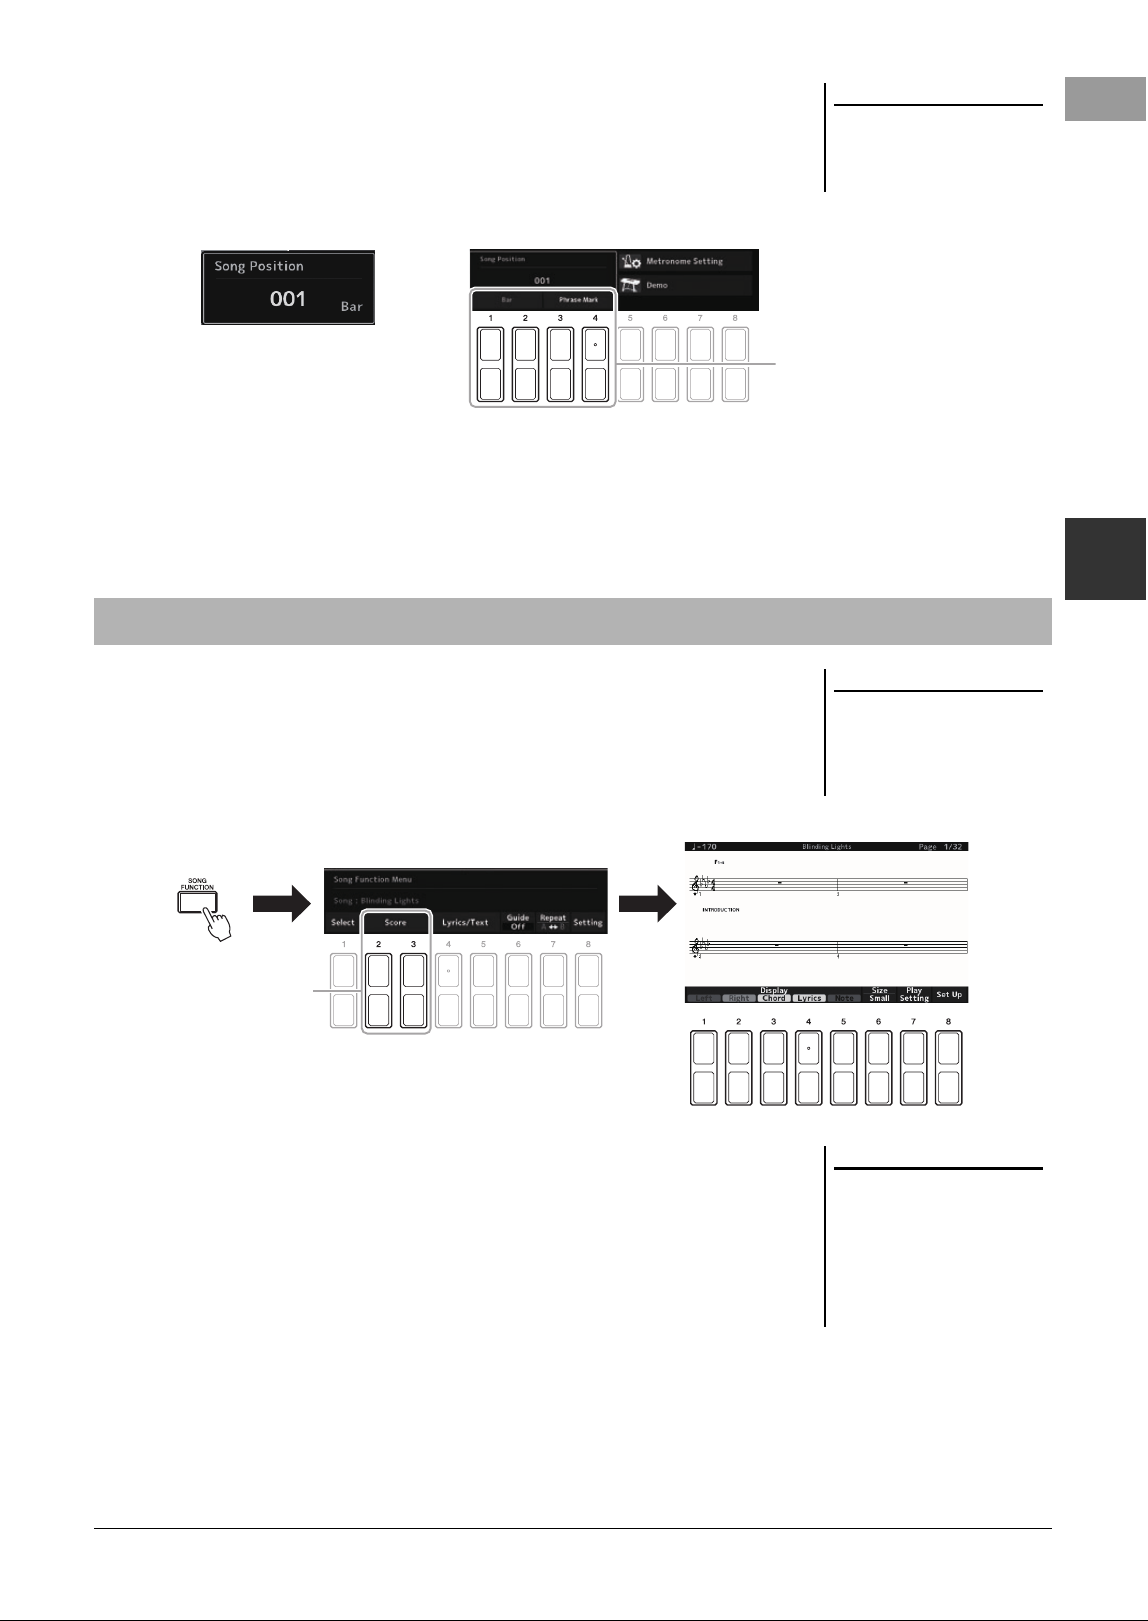
PSR-SX620 Owner’s Manual 69
Songs – Playing, Practicing and Recording Songs –
3
Pressing the [G] (REW) or [H] (FF) button calls up a pop-up display showing
the current measure number (or Phrase Mark number).
While the Song Position pop-up is shown on the display, you can also use the Data
dial to adjust the value.
• Fading In/Out ..........Same procedure as with Style. See page 56.
• Adjusting the Tempo
...............................Same procedure as with Style tempo. See page 56.
You can view the music notation (score) of the selected Song.
1 Select a Song (steps 1 – 4 on page 67).
2 Press the [SONG FUNCTION] button to call up the Song
Function Menu display.
3 Press one of the [2
]/[3
] (Score) buttons to call up the
Score display.
You can look through the entire notation by using the TAB [E][F] buttons
when the Song playback is stopped. When playback is started, the “ball”
bounces along through the score, indicating the current position.
You can change the displayed notation style by using the [1 ] – [8 ]
buttons. For details, refer to the Reference Manual on the website.
NOTE
Phrase Mark is a pre-programmed
marker in certain Song data, which
indicates a specific location in the
Song.
For Songs not containing Phrase Marks For Songs containing Phrase Marks
To change the units used in rewinding/
fast-forwarding the Song from “Bar” to
“Phrase Mark”, press one of the [3 ]/
[4 ] buttons. To rewind/fast forward it in
“Bar” units again, press one of the [1 ]/
[2 ] buttons.
Displaying Music Notation (Score)
NOTE
This instrument can display the music
notation of your recorded Song, or
commercially available MIDI files
(only those which allow devices to
indicate notation).
3
NOTE
The displayed notation is generated by
the instrument based on the Song
data. As a result, it may not be exactly
the same as commercially available
sheet music of the same song —
especially when displaying notation of
complicated passages or many short
notes.
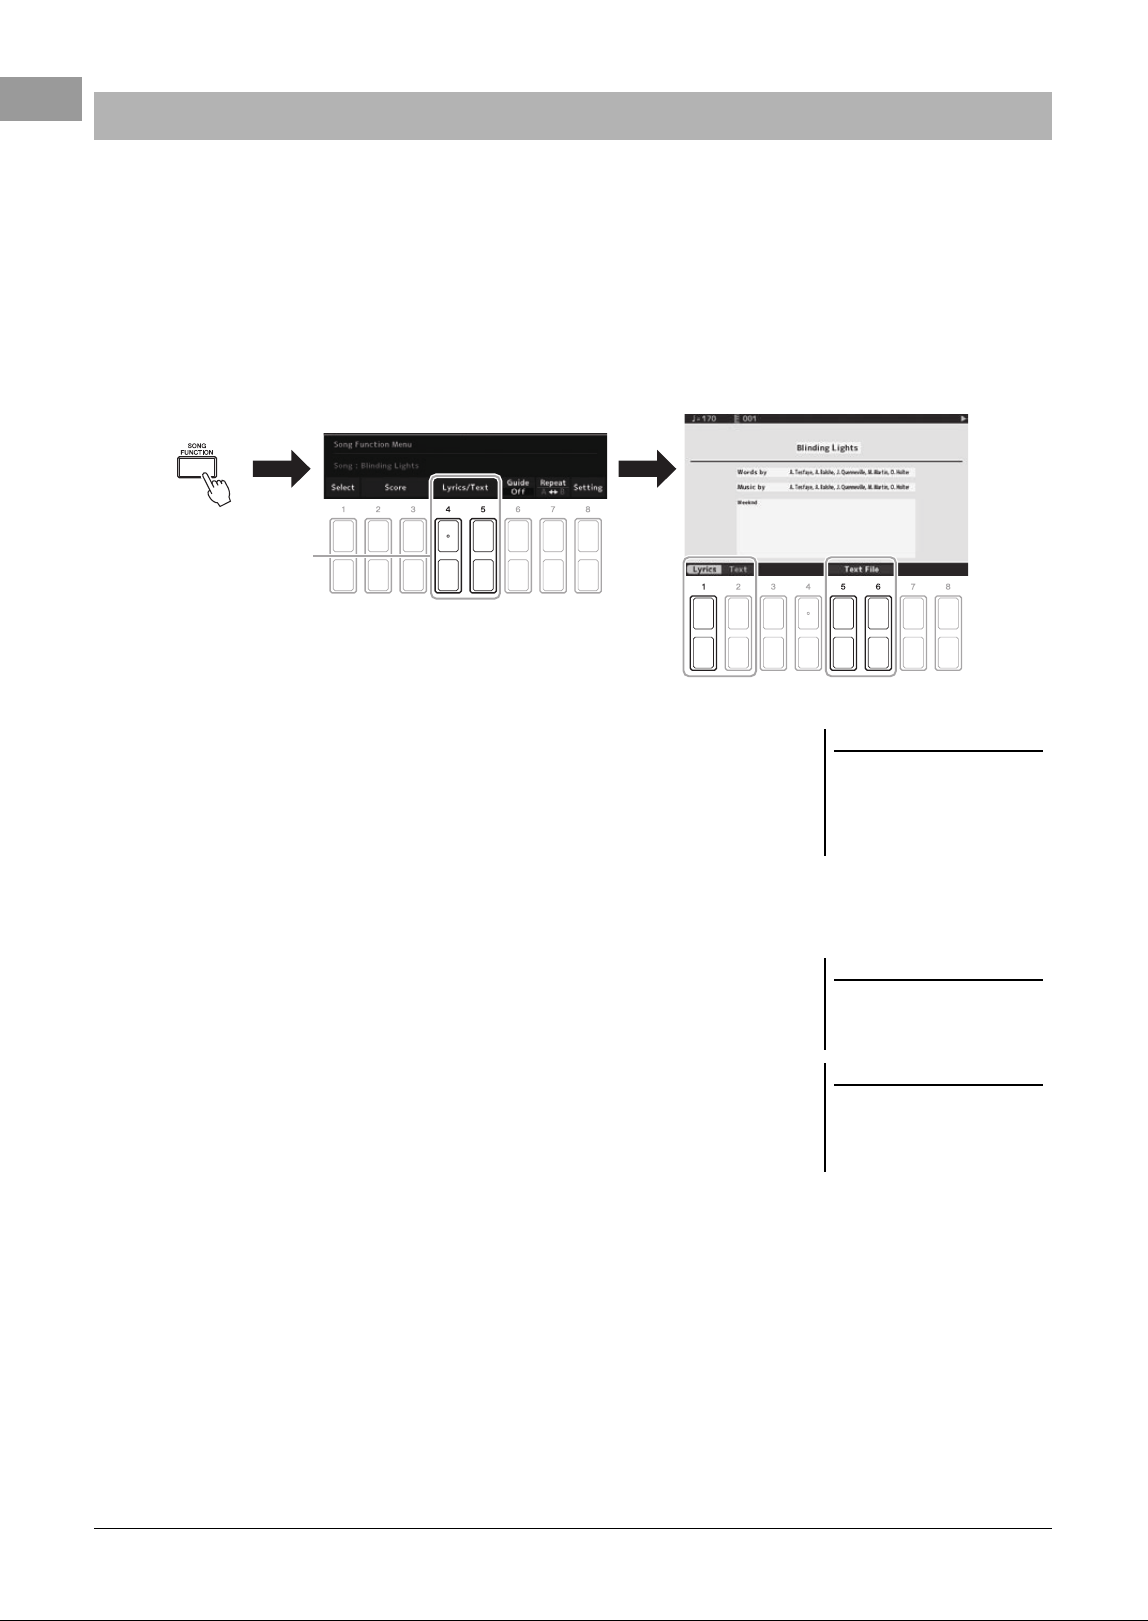
70 PSR-SX620 Owner’s Manual
When the selected Song contains lyrics data, you can view it on the instrument’s display. Even if the Song does not
contain lyrics data, you can view the lyrics on the display by loading the text file (.txt) created on a computer via
USB flash drive. Text display allows for a variety of useful and convenient possibilities, such as the showing of
lyrics, chord charts, and performance notes.
1 Select a Song (steps 1 – 4 on page 67).
2 Press the [SONG FUNCTION] button to call up the Song
Function Menu display.
3 Press the [4
]/[5
] (Lyrics/Text) button to call up the
Lyrics/Text display.
You can switch between the Lyrics display and the Text display by using the [1
]/[2 ] buttons.
When the Song data contains lyrics data, the lyrics are shown on the Lyrics
display. You can look through the entire lyrics by using the TAB [E][F]
buttons when Song playback is stopped. When playback is started, the color of
the lyrics changes, indicating the current position.
To view the text file on the Text display, press one of the [5 ]/[6 ] (Text
File) buttons to call up the File Selection display and select the desired file
created on your computer.
For more information about the Lyrics (Text) display, refer to the Reference
Manual on the website.
Displaying Lyrics/Text
3
NOTE
When the lyrics are garbled or unread-
able, you may need to change the Lyr-
ics Language setting: [MENU] →
Menu1 → Song Setting → [ENTER]
→ Setting → 2 Lyrics Language.
NOTE
Information about Text File selection
can be memorized to the Registration
Memory (page 91).
NOTE
You can turn to the next/previous text
page by assigning the function to the
foot pedal: [MENU] → Menu1 →
Controller → [ENTER] → Foot Pedal
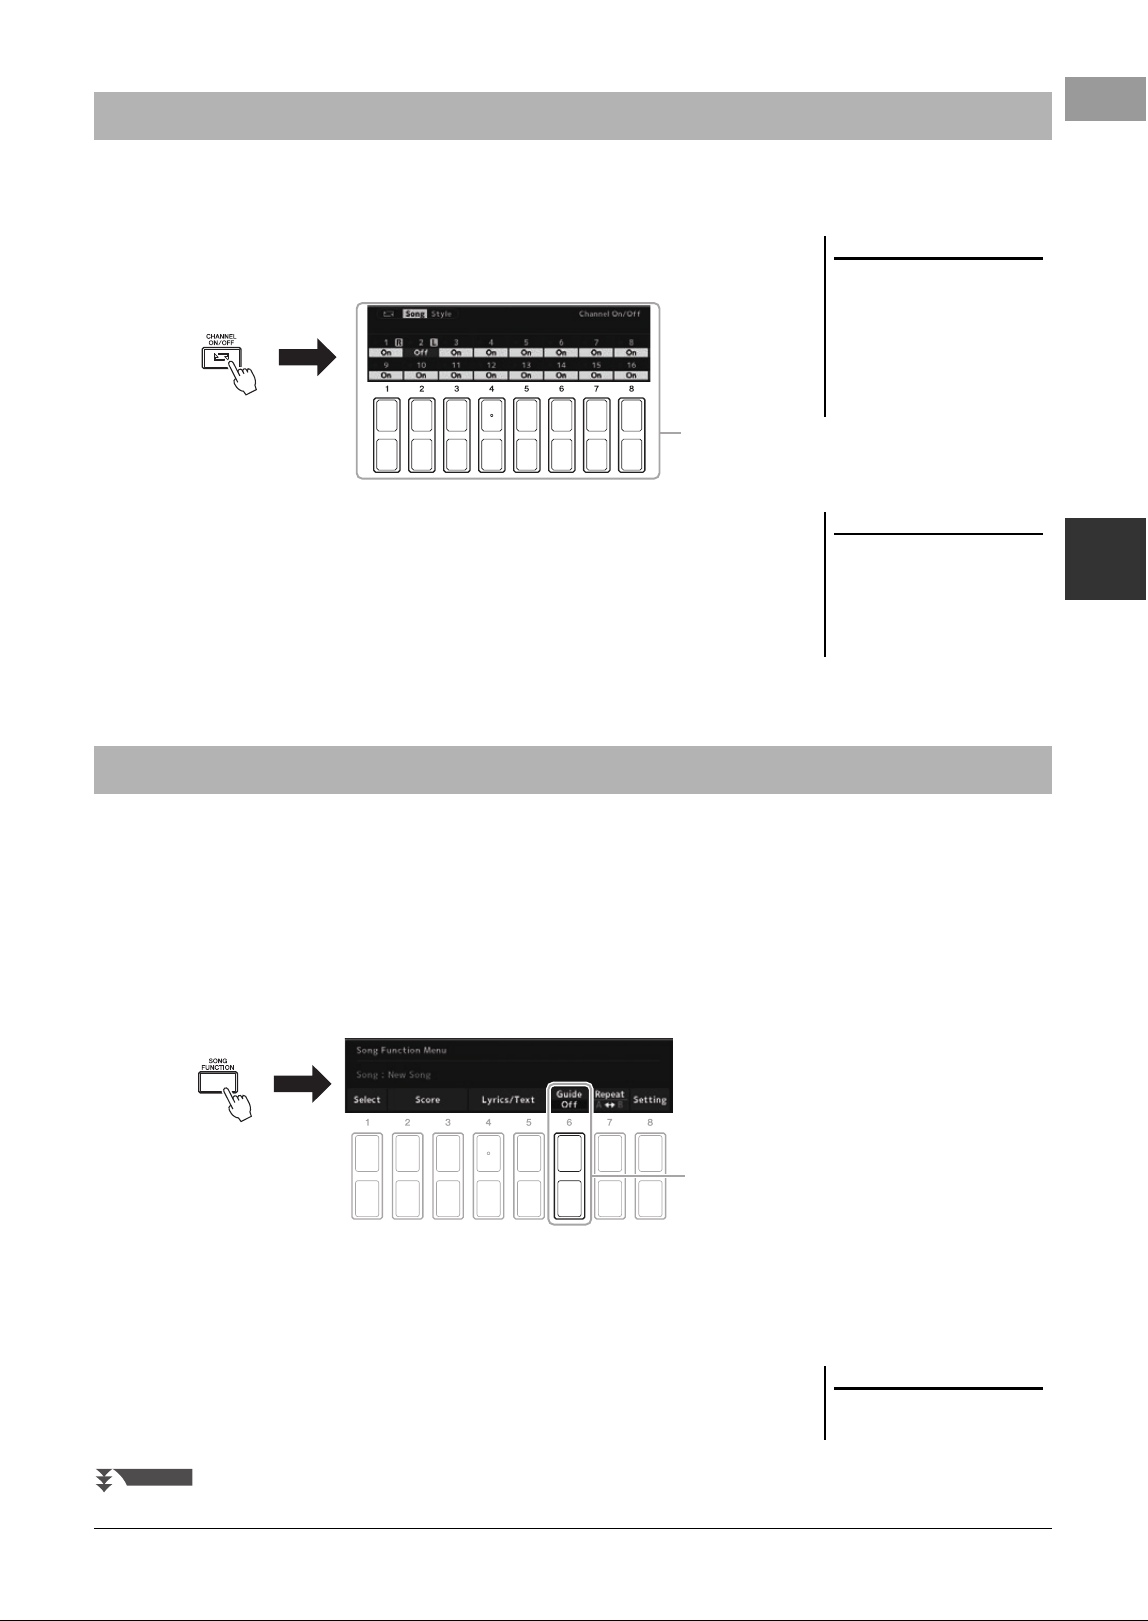
PSR-SX620 Owner’s Manual 71
Songs – Playing, Practicing and Recording Songs –
3
A Song consists of 16 separate parts (16 separate channels). You can independently turn each channel of the
selected Song playback on or off.
1 Press the [CHANNEL ON/OFF] button several times to call up
the Channel On/Off (Song) display.
2 Use the [1 ] – [8 ] buttons to turn each channel on or off.
If you want to play back only one particular channel (solo playback), hold down
one of the [1 ] – [8 ] buttons to set the desired channel to Solo. Only
the selected channel is turned on and others are off. To cancel solo playback,
press the same button again.
3 Press the [EXIT] button to close the Channel On/Off (Song)
display.
You can mute the right-hand part for practicing that part on your own. The explanations here apply when you
practice the right-hand part with “Follow Lights” of the Guide functions. You can also practice at your own pace —
since the accompaniment waits for you to play the notes correctly. In the Score display, you can see the note to play
and the current position.
1 Select a Song and call up the Score display (page 69).
2 Press the [SONG FUNCTION] button to call up the Song
Function Menu display.
3 Use the [6
] (Guide) buttons to turn the Guide function on.
4 Press the [CHANNEL ON/OFF] button several times to call up
the Channel On/Off (Song) display.
5 Press the [1 ] button to turn Channel 1 (RIGHT 1 part) off.
If necessary, press the [3 ] button to turn the Channel 3 (RIGHT 2 part) off.
You can now play that part by yourself.
Turning Each Channel of the Song On/Off
NOTE
Each part of a MIDI Song can be
recorded with a different channel num-
ber (Ch. 1 – Ch. 16). Because of this
format, the performance information of
each part remains separate and is not
mixed — even though all parts will be
saved as one track. This channel num-
ber is referred to as “MIDI Channel.”
2
NOTE
Usually, each part is assigned to the
following channels.
Channel 1 − 3: keyboard parts (RIGHT
1, LEFT, RIGHT 2)
Channel 5 − 8: Multi Pad parts
Channel 9 − 16: Style parts
One-handed Practice with the Guide Function
3
NOTE
Usually, the LEFT part is assigned to
Channel 2.
NEXT PAGE
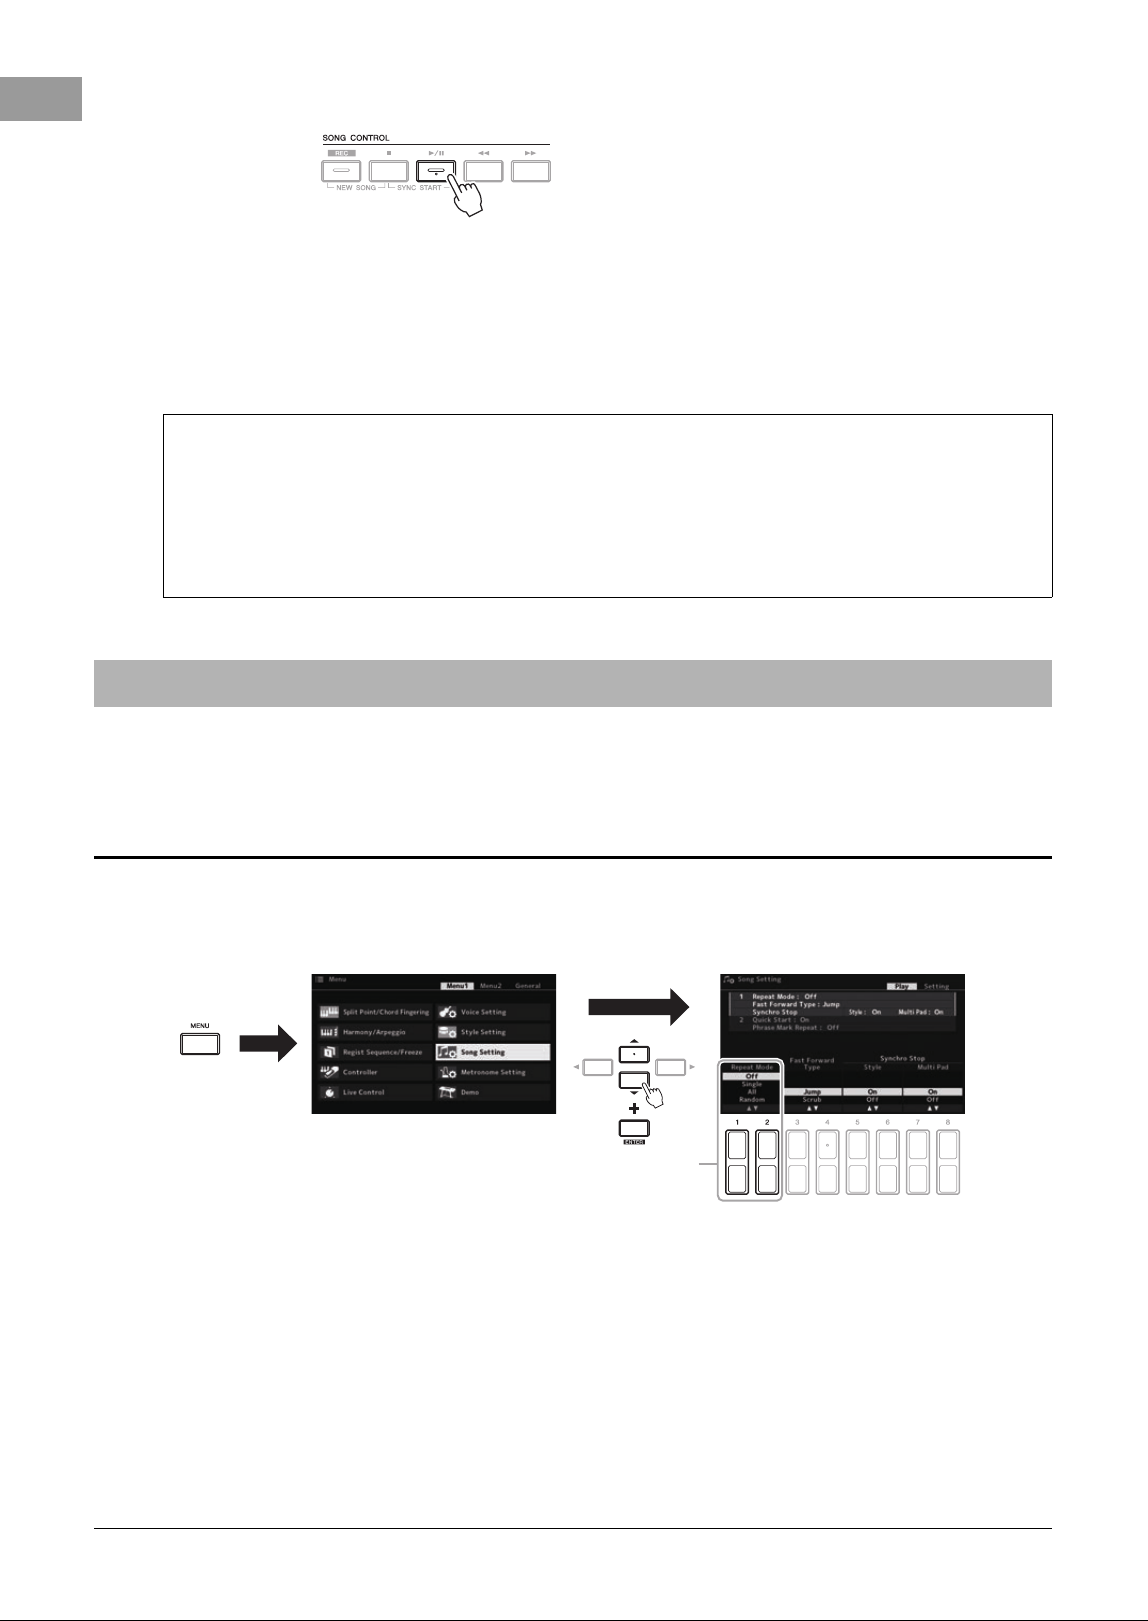
72 PSR-SX620 Owner’s Manual
6 Press the SONG CONTROL [F/ K] (PLAY/PAUSE) button to start
playback.
Practice the muted part while viewing the Score display. The playback of the
left and extra parts will wait for you to play the notes correctly.
7 Press the [SONG FUNCTION] button to call up the Song
Function Menu display, and then press the [6
] (Guide)
button to turn the Guide function off after your practice.
The Song Repeat functions can be used to repeatedly play back a Song, multiple Songs, or a specific range of
measures in a Song.
1 Call up the operation display.
[MENU] → TAB [E] Menu1 → Cursor buttons [][][E][F] Song Setting
→ [ENTER] → TA B [E] Play → Cursor button [] 1 Repeat Mode
2 Use the [1 ]/[2 ] (Repeat Mode) buttons to determine the
method of repeat playback.
• Off....................Plays through the selected Song, and then stops.
• Single ...............Plays through the selected Song repeatedly.
• All.....................Continues playback through all the Songs in the specified folder repeatedly.
• Random ...........Continues playback at random through all the Songs in the specified folder repeatedly.
Other Guide functions
In addition to the “Follow Lights” function explained above, there are more functions in the Guide features, for
practicing the timing of playing the keys (Any Key), for Karaoke or for practicing a song at your own pace (Your
Tempo).
[MENU] → TAB [E] Menu1 → Cursor buttons [][][E][F] Song Setting → [ENTER] → TA B [ F] Setting
→ Cursor button [] 1 Guide Mode
For more information, refer to the Reference Manual on the website.
Repeat Playback
Selecting the Repeat Mode for Song playback
2
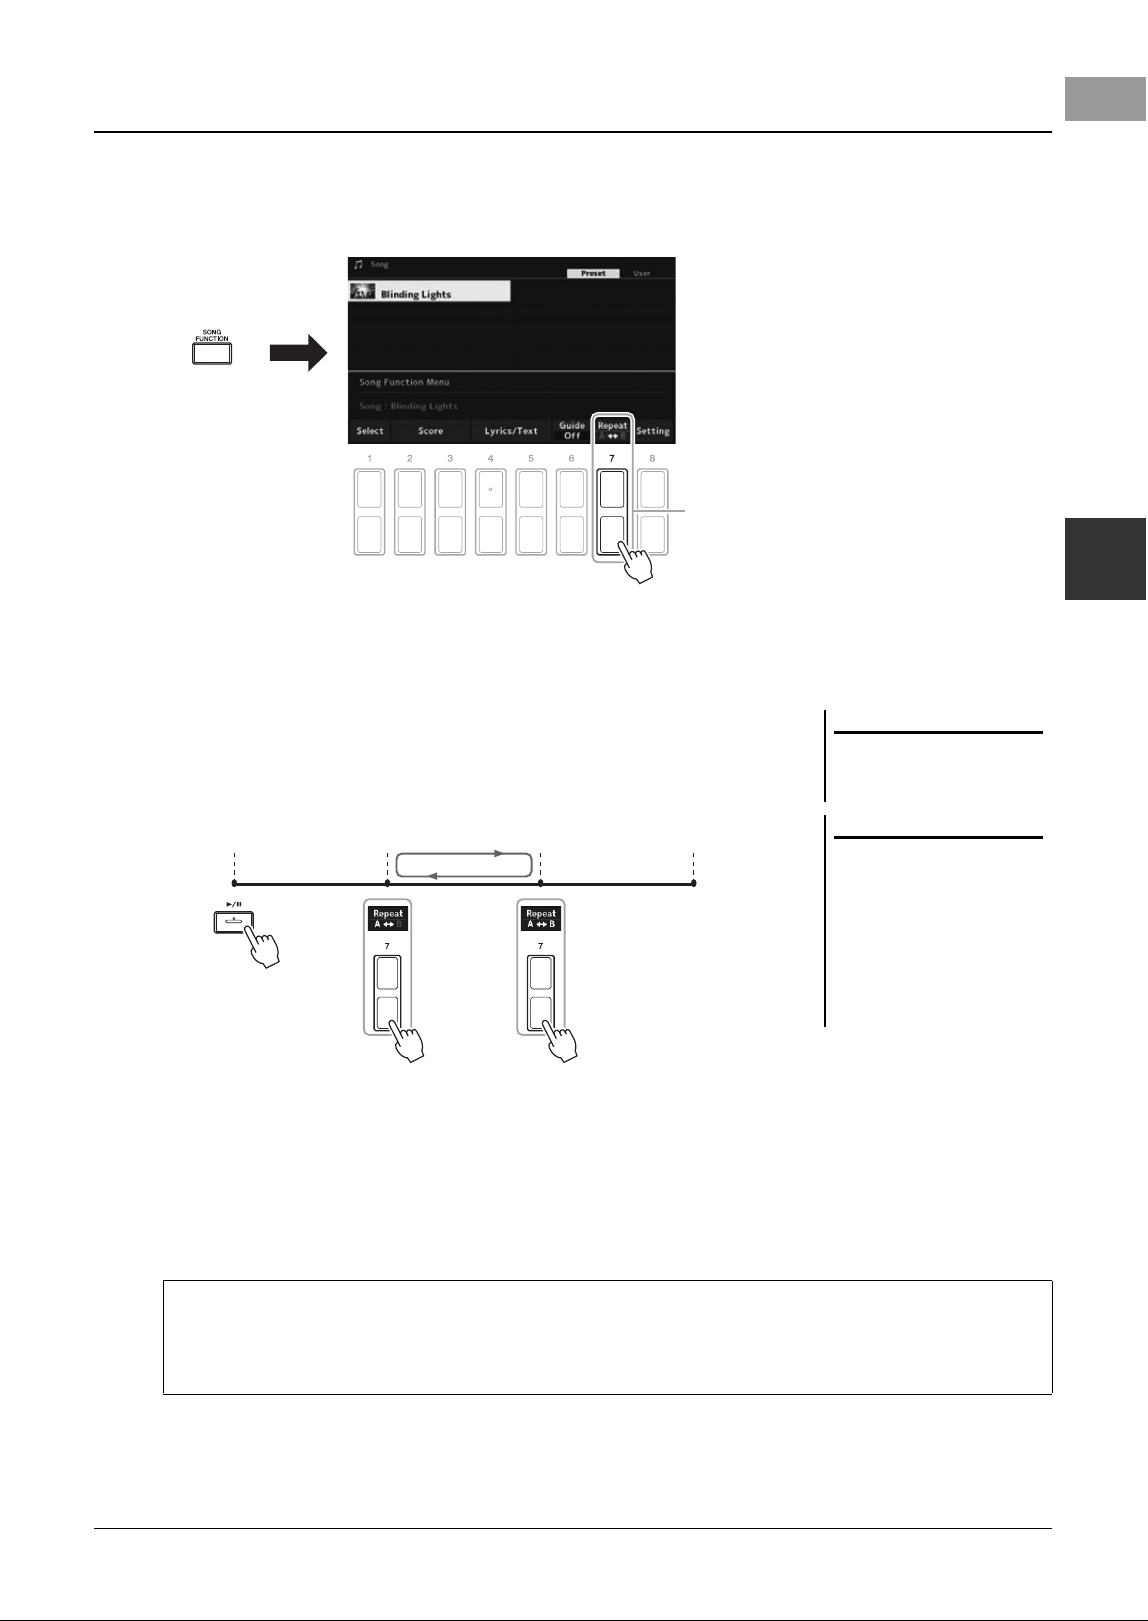
PSR-SX620 Owner’s Manual 73
Songs – Playing, Practicing and Recording Songs –
3
1 Select a Song (steps 1 – 4 on page 67).
2 Press the [SONG FUNCTION] button to call up the Song
Function Menu display.
3 Press the SONG CONTROL [F/ K] (PLAY/PAUSE) button to start
playback.
4 Specify the repeat range.
Press one of the [7 ] (A-B) buttons at the starting point (A) of the range to
be repeated. Press one of the [7 ] (A-B) buttons again at the ending point
(B). After an automatic lead-in (to help guide you into the phrase), the range
from Point A to Point B is played back repeatedly.
5 To stop playback, press the SONG CONTROL [J] (STOP)
button.
The Song position returns to Point A and pressing the [F/ K] (PLAY/PAUSE)
button lets you start from that point.
After you’ve finished practicing, press one of the [7 ] (A-B) buttons to turn
off Repeat playback.
Specifying a Range of Measures and Playing them Back Repeatedly (A-B Repeat)
4
NOTE
Specifying only Point A results in
repeat playback between Point A and
the end of the Song.
NOTE
When you want to repeat from the top
of the Song to a specified point in the
middle:
1 Press one of the [7 ] (A-B)
buttons, and then start Song play-
back.
2 Press one of the [7 ] (A-B)
buttons again at the ending point
(B).
ABTop of the Song End of the Song
Specifying the repeat range while Songs are stopped
1. Fast-forward the Song to Point A by using the SONG CONTROL [H] (FF) button, and then press one of the
[7 ] (A-B) buttons.
2. Fast-forward the Song to Point B, and then press one of the [7 ] (A-B) buttons again.
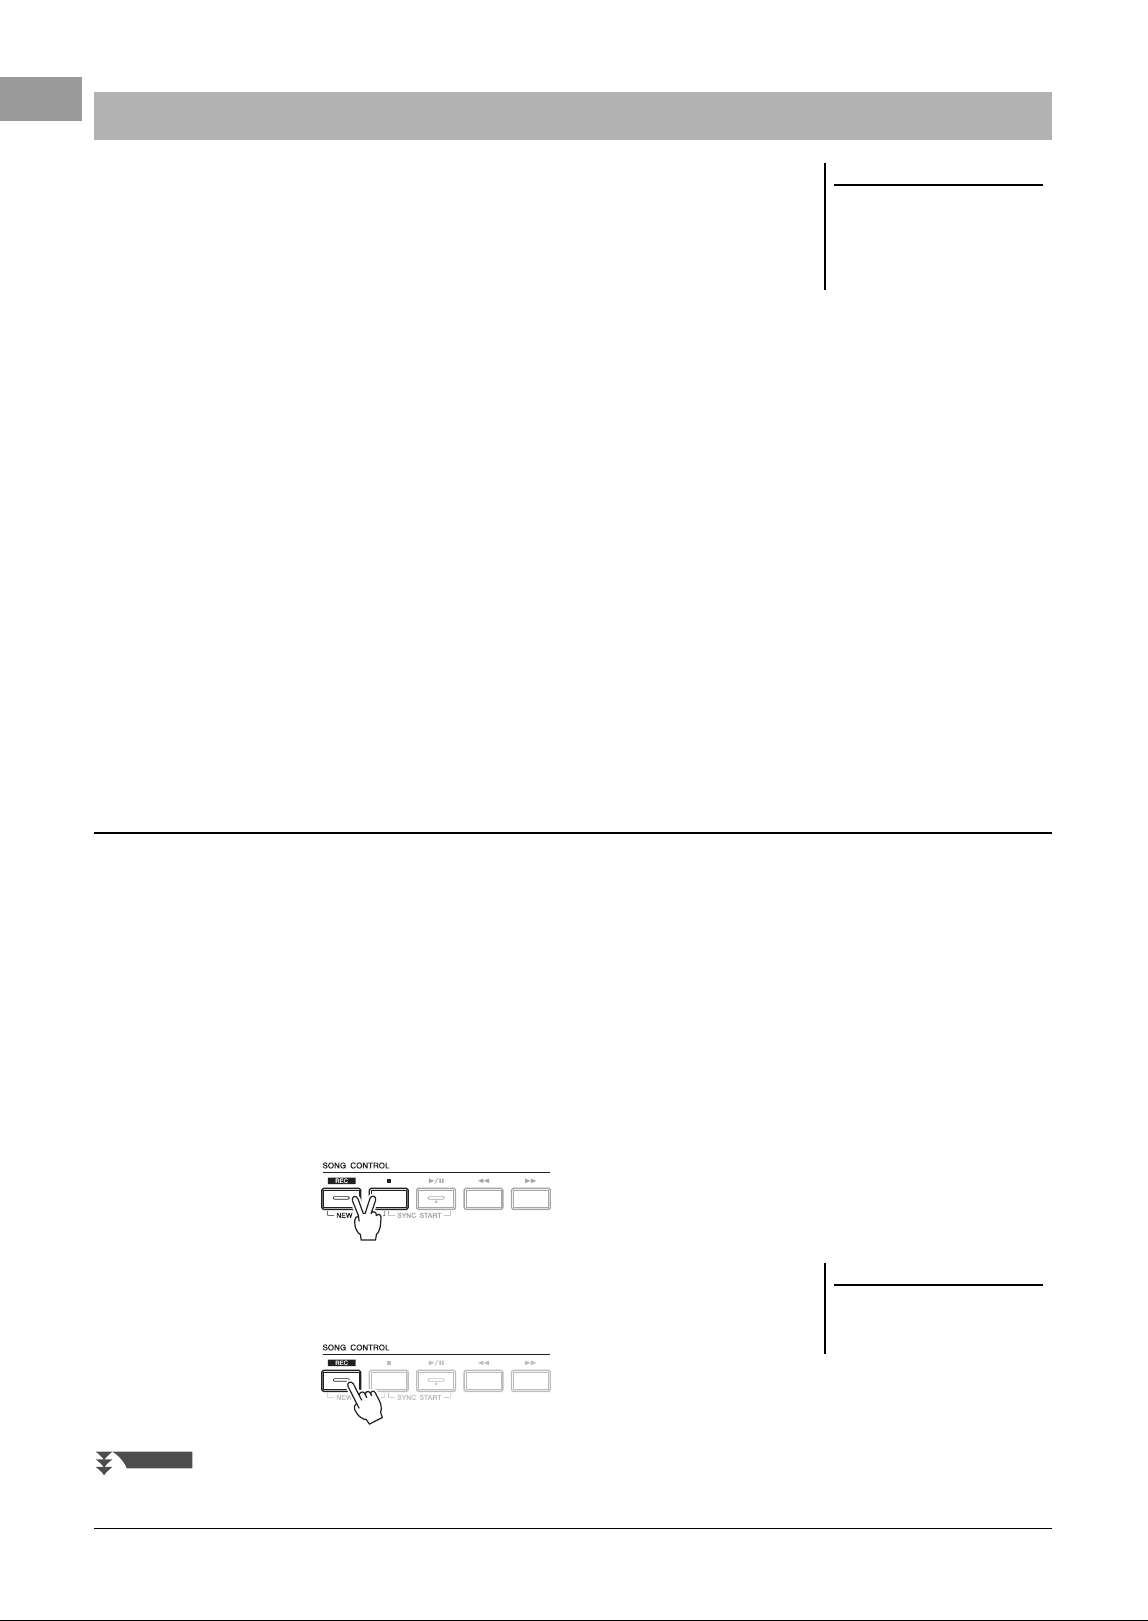
74 PSR-SX620 Owner’s Manual
You can record your performance and save it as a MIDI file (SMF format 0) to the
User drive or USB flash drive. Since the recorded data is MIDI, you can easily edit
your Songs.
MIDI recording
With this method, recorded performances are saved to the User memory of the
instrument or a USB flash drive as an SMF (format 0) MIDI file. If you want to re-
record a specific section or change Voices and edit other parameters, use this
method. Also, if you want to record your performance to each channel one by one,
execute Multi Track Recording of the MIDI recording method. Since a MIDI
Song can be re-recorded as an audio file after recording (page 81), you may want
to use MIDI recording (with overdubbing and multiple parts) to first create a
complex arrangement you would not otherwise be able to play live. This
instrument allows you to record approximately 1MB per Song.
Two recording methods are available:
• Quick Recording .................See section below.
You can record all parts of your performance at once without changing the channel/part assignment. Or you
can record a particular part separately (right-hand, left-hand or Style playback).
• Multi Track Recording .......page 76
You can record data to each part one-by-one over a different channel number, to create a single, multi-part
Song. The channel/part assignments can be freely changed.
Audio recording
With this method, recorded performances are saved to a USB flash drive as Audio files (WAV format/44.1kHz/
16-bit/stereo). For instructions on Audio recording, refer to page 81.
With this recording, each part will be recorded as the following channels.
• Keyboard parts: channels 1 – 3
• Multi Pad parts: channels 5 – 8
• Style parts: channels 9 – 16
1 Before recording, make the necessary settings, such as Voice/
Style selection.
2 Press the SONG CONTROL [REC] button and the [J] (STOP)
button simultaneously.
A blank Song for recording is automatically set, and the Song name on the Main
display (page 20) is set to “NewSong.”
3 Press the [REC] button.
The [REC] and [F/ K] (PLAY/PAUSE) buttons flash, indicating the standby
status.
Recording Your Performance
NOTE
Audio data such as the rhythm chan-
nels created via the audio data of
Audio Link Multi Pad (page 88) and
audio files (page 78) cannot be
recorded to the MIDI Songs.
Quick Recording
NOTE
To cancel the recording, press the [J]
(STOP) button before going on to step
4.
NEXT PAGE
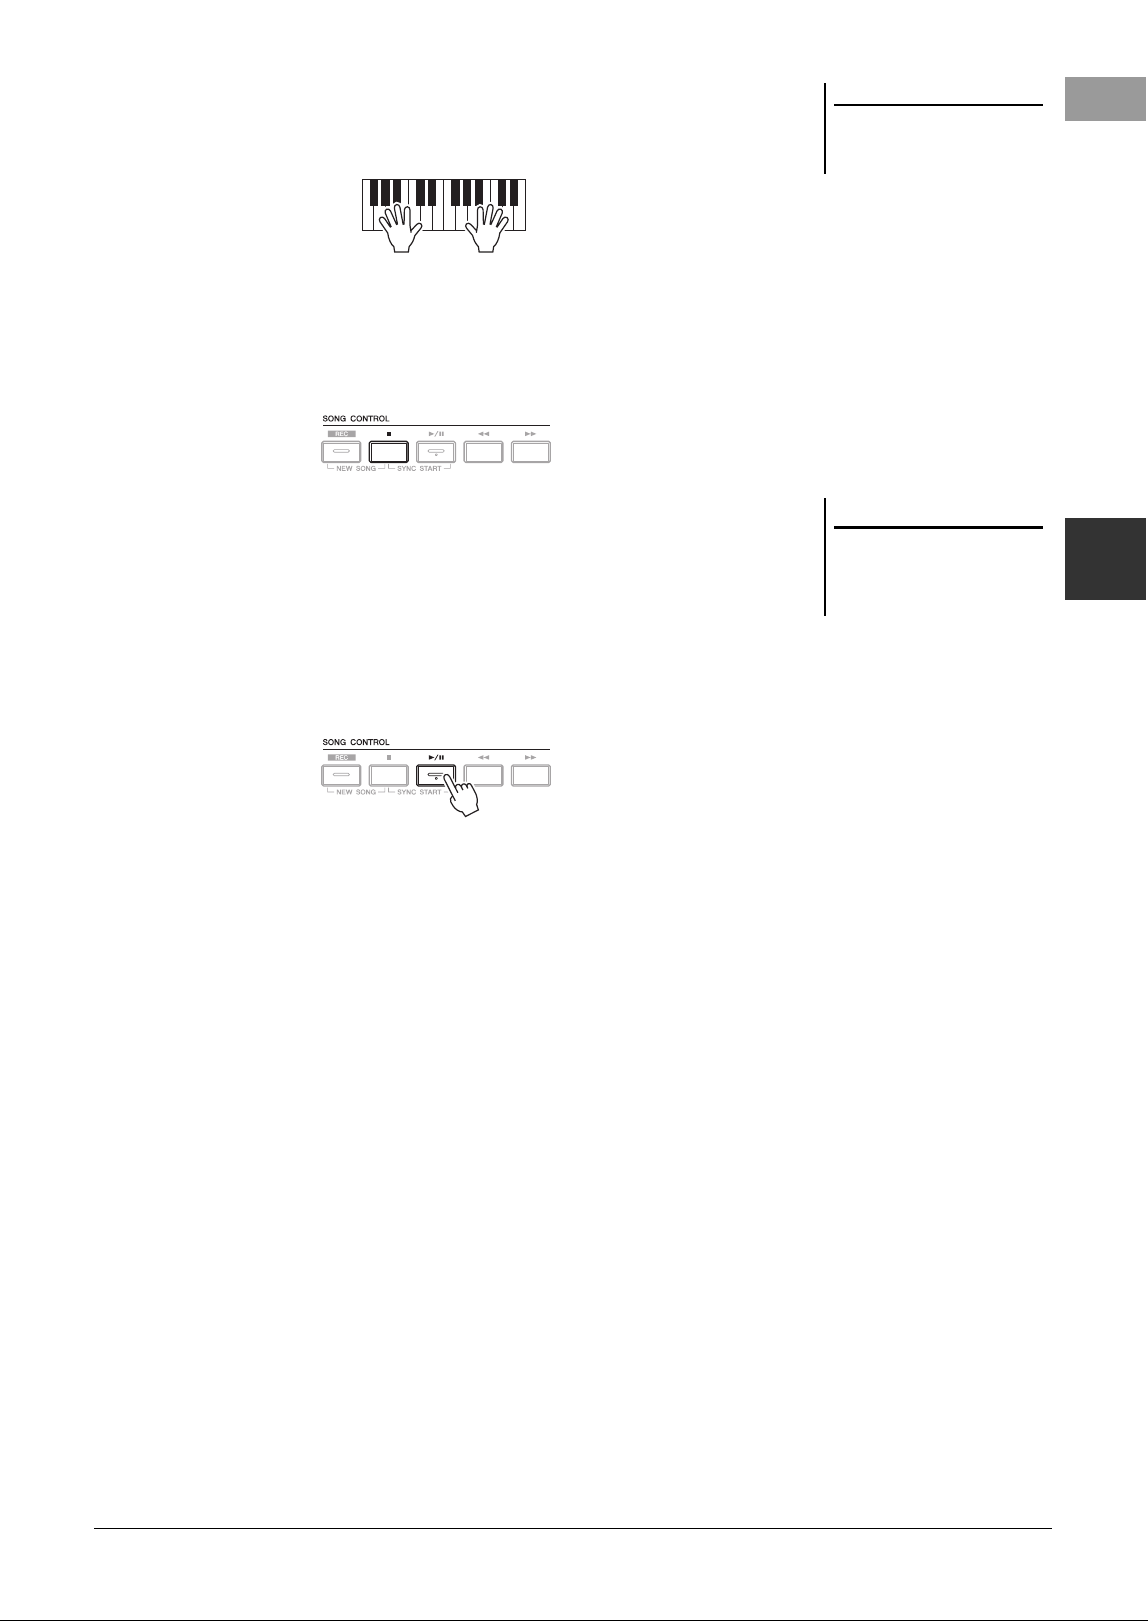
PSR-SX620 Owner’s Manual 75
Songs – Playing, Practicing and Recording Songs –
3
4 Start recording.
You can start recording by playing the keyboard, starting a Style, playing a
Multi Pad or pressing the SONG CONTROL [F/ K] (PLAY/PAUSE) button.
5 After you finish your performance, press the [J] (STOP) or
[REC] button to stop recording.
A message may appear prompting you to save the recorded data. Press the
[EXIT] button to close the message.
6 Save the recorded performance as a Song.
6-1 Press the [SONG FUNCTION] button to call up the Song Function Menu
display, and then press one of the [1 ] (Select) buttons to call up the
Song Selection display.
6-2 Save the recorded data as a file by following the instructions on page 28.
7 Press the [F/ K] (PLAY/PAUSE) button to play back the recorded
performance.
NOTE
You can use the metronome (page 42)
while recording; however, the metro-
nome sound will not be recorded.
NOTICE
The recorded Song will be lost if
you change to another Song or
you turn the power off without
carrying out the Save operation.
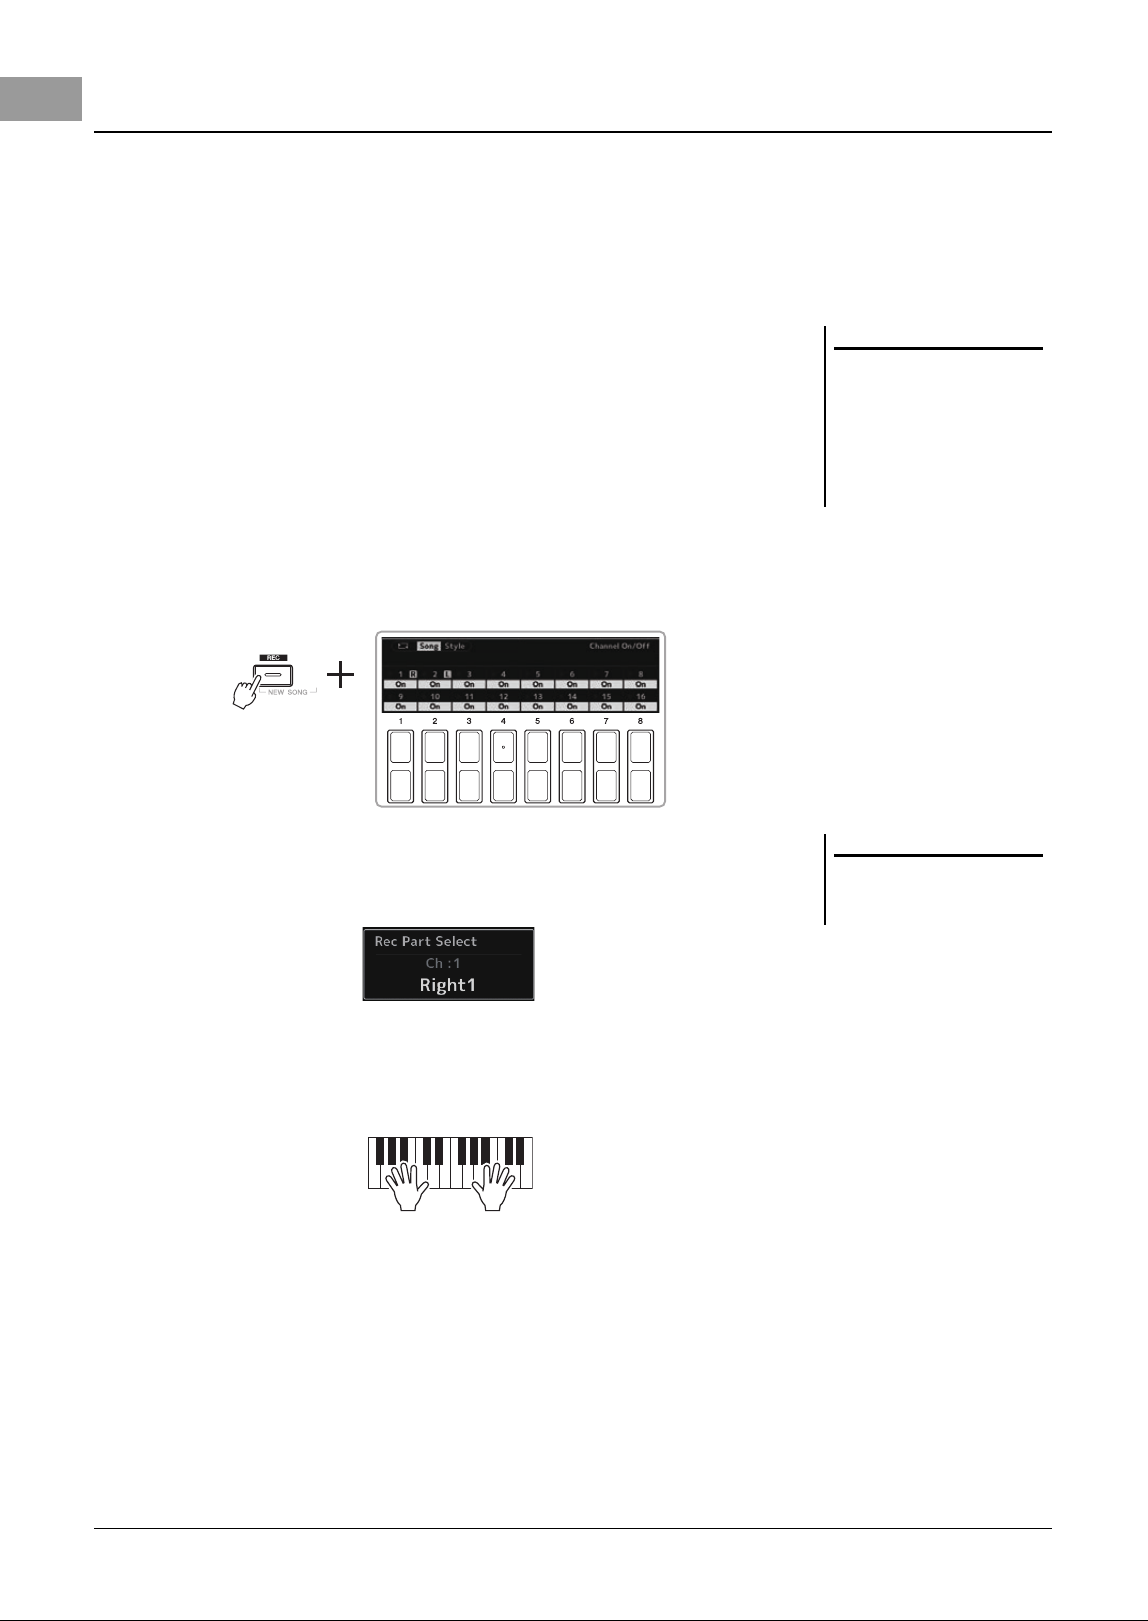
76 PSR-SX620 Owner’s Manual
You can create a Song consisting of 16 channels by recording your performance to each part one-by-one over a different
channel number. In recording a piano piece, for example, you can record the right-hand part as channel 1 then record the
left-hand part as channel 2, allowing you to create a complete piece which may be difficult to play live with both hands
together. To record a performance with Style playback, for example, record the Style playback as channels 9 – 16, and
then record melodies as channel 1 while listening to the already recorded Style playback. In this way, you can create an
entire Song which would otherwise be difficult, or even impossible, to play live.
1 Before recording, make the necessary settings, such as Voice/
Style selection.
2 Press the SONG CONTROL [REC] button and the [J] (STOP)
button simultaneously.
A blank Song for recording is automatically set, and the Song name on the Main
display (page 20) is set to “NewSong.”
3 While holding down the [REC] button, press the appropriate [1
] – [8 ] buttons to set the desired channels to “Rec.”
To cancel the REC status of the channel, press the desired channel button.
4 While the following window is shown, use the Data dial or
[+/YES]/[-/NO] button to change the part assignment for the
channel to be recorded.
5 Start recording.
You can start recording by playing the keyboard, starting a Style, playing a
Multi Pad or pressing the SONG CONTROL [F/ K] (PLAY/PAUSE) button.
6 After you finish your performance, press the [J] (STOP) button
to stop recording.
A message may appear prompting you to save the recorded data. Press the
[EXIT] button to close the message.
7 Press the [F/ K] (PLAY/PAUSE) button to play back the recorded
performance.
Recording each part individually (Multi Track Recording)
NOTE
Each part of a MIDI Song can be
recorded with a different channel num-
ber (Ch. 1 – Ch. 16). Because of this
format, the performance information of
each part remains separate and is not
mixed — even though all parts will be
saved as one track. This channel num-
ber is referred to as “MIDI Channel.”
NOTE
To cancel the recording, press the [J]
(STOP) button before going on to step
5.
PSR-SX620 Owner’s Manual 77
Songs – Playing, Practicing and Recording Songs –
3
8 Record your performance to another channel by repeating steps
3 to 6 above.
9 Save the recorded performance as a Song.
9-1 Press the [SONG FUNCTION] button to call up the Song Function Menu
display, and then press the [1 ] (Select) button to call up the Song
Selection display.
9-2 Save the recorded data as a file by following the instructions on page 28,
steps 1 – 5.
NOTE
The Style Retrigger function (page 45)
cannot be used when you are overdub-
bing to a recorded Song.
NOTICE
The recorded Song will be lost if
you change to another Song or
you turn the power off without
carrying out the Save operation.
Advanced Features
Refer to the Reference Manual on the website, Chapter 3.
Editing Music Notation settings:
[SONG FUNCTION] → [2 ]/[3 ] (Score) → [1 ] –
[8 ] buttons
Editing Lyrics/Text display settings:
[SONG FUNCTION] → [4 ]/[5 ] (Lyrics/Text) → [1
] – [8 ] buttons
Using the Auto Accompaniment features with
Song Playback:
[ACMP] → STYLE CONTROL [SYNC START] → SONG
CONTROL [J] + [F/K] → STYLE CONTROL [START/STOP]
Song Playback related parameters:
[MENU] → Menu1 → Song Setting → [ENTER]
• Keyboard and vocal practice using the Guide
function:
→ TAB [F] Setting → Cursor buttons [] 1 Guide Mode
Editing Songs (Song Creator):
[MENU] → Menu2 → Song Creator → [ENTER]
• Selecting the setup parameters recorded to the
top position of the Song
→ Setup
• Re-recording a specific section — Punch In/Out:
→ Rec Mode
• Editing channel events:
→ Channel
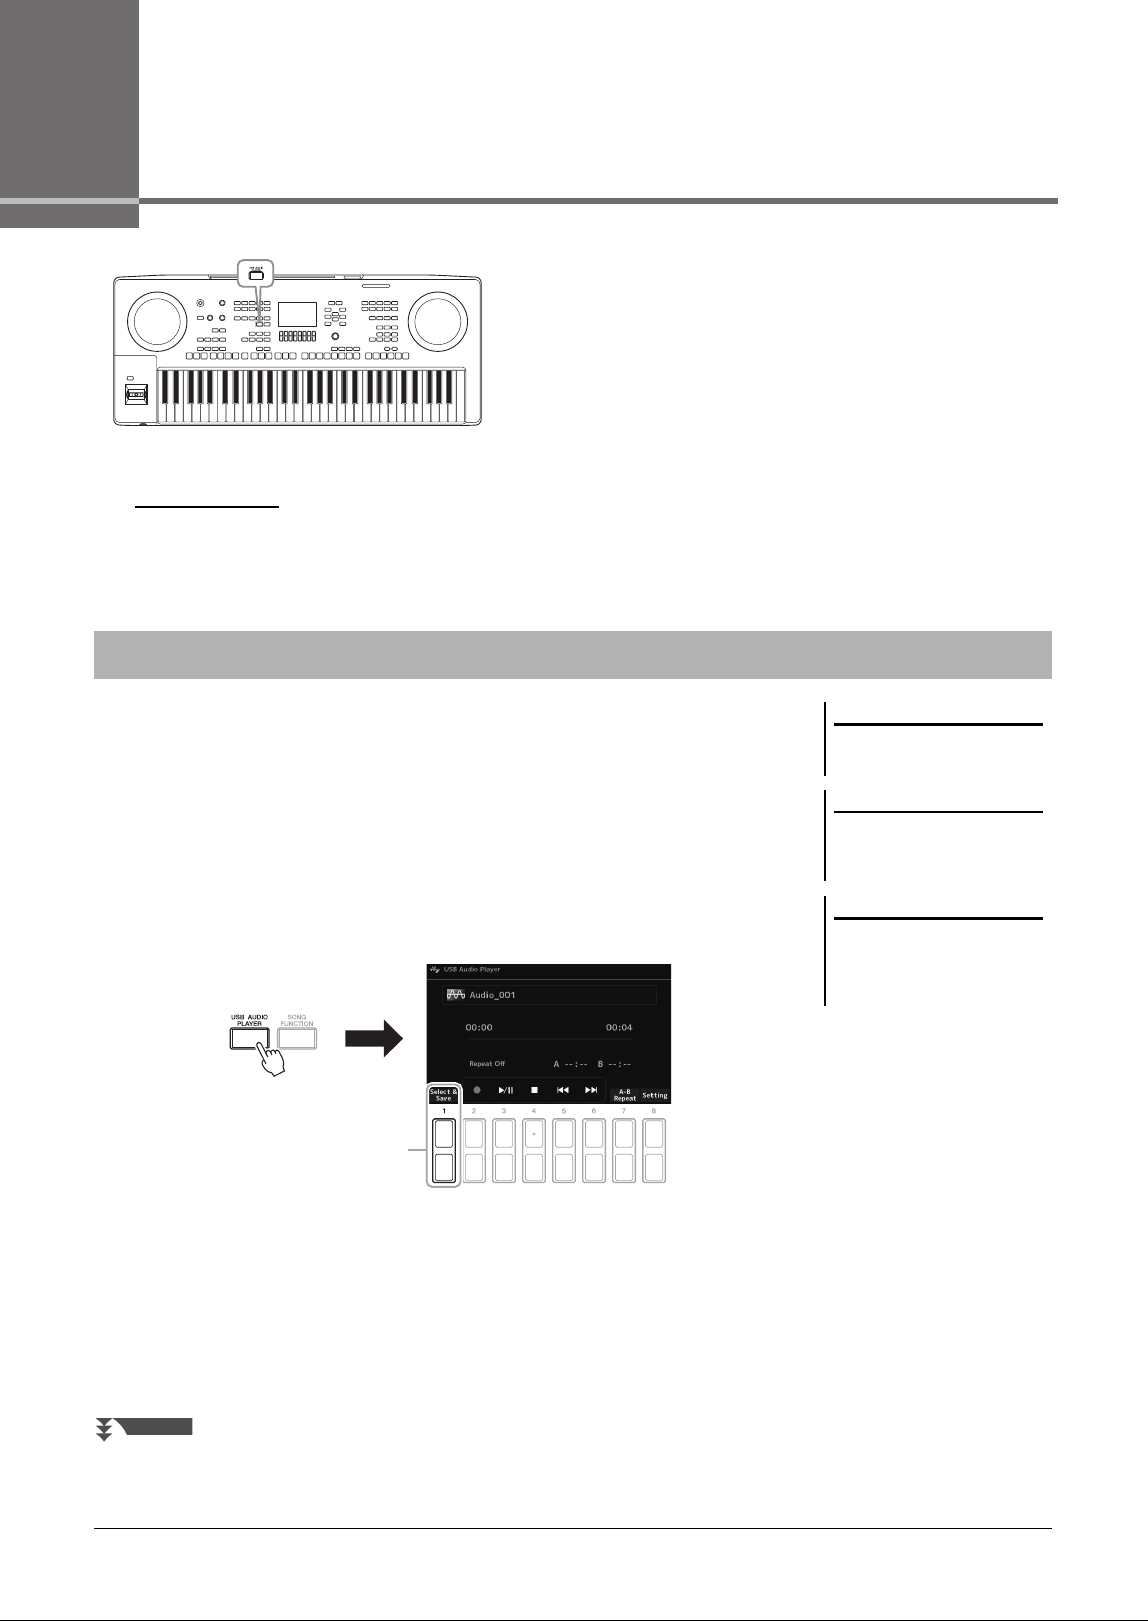
78 PSR-SX620 Owner’s Manual
4
USB Audio Player/Recorder
– Recording and Playing Audio Files –
The convenient USB Audio Player/Recorder function allows
you to play back audio files (WAV) saved to a USB flash drive
— directly from the instrument. Moreover, since you can record
your performances and recordings as audio files (WAV) to a
USB flash drive, it is possible to play back the files on computer,
share them with your friends, and record your own CDs to enjoy
as well.
You can play back audio files of WAV format (44.1 kHz sample rate, 16 bit
resolution, stereo) that have been saved to the USB flash drive.
1 Connect the USB flash drive containing the audio files to the
USB [TO DEVICE] terminal.
2 Press the [USB AUDIO PLAYER] button to call up the USB Audio
Player display.
3 Press one of the [1
] (Select&Save) buttons to call up the
Audio File Selection display.
NOTE
• For instructions on playback and recording of MIDI files, refer to page 67.
• If you want to record various parts separately or edit the data after recording on this instrument, record as MIDI files (page 74).
Playing Back Audio Files
NOTE
DRM (Digital Rights Management)
protected files cannot be played back.
NOTE
Before using a USB flash drive, be sure
to read “Connecting USB Devices” on
page 101.
NOTE
While selecting the desired audio file
in the Audio Link Multi Pad function
(step 5 on page 88), the [USB AUDIO
PLAYER] button does not function.
3
NEXT PAGE
USB Audio Player/Recorder
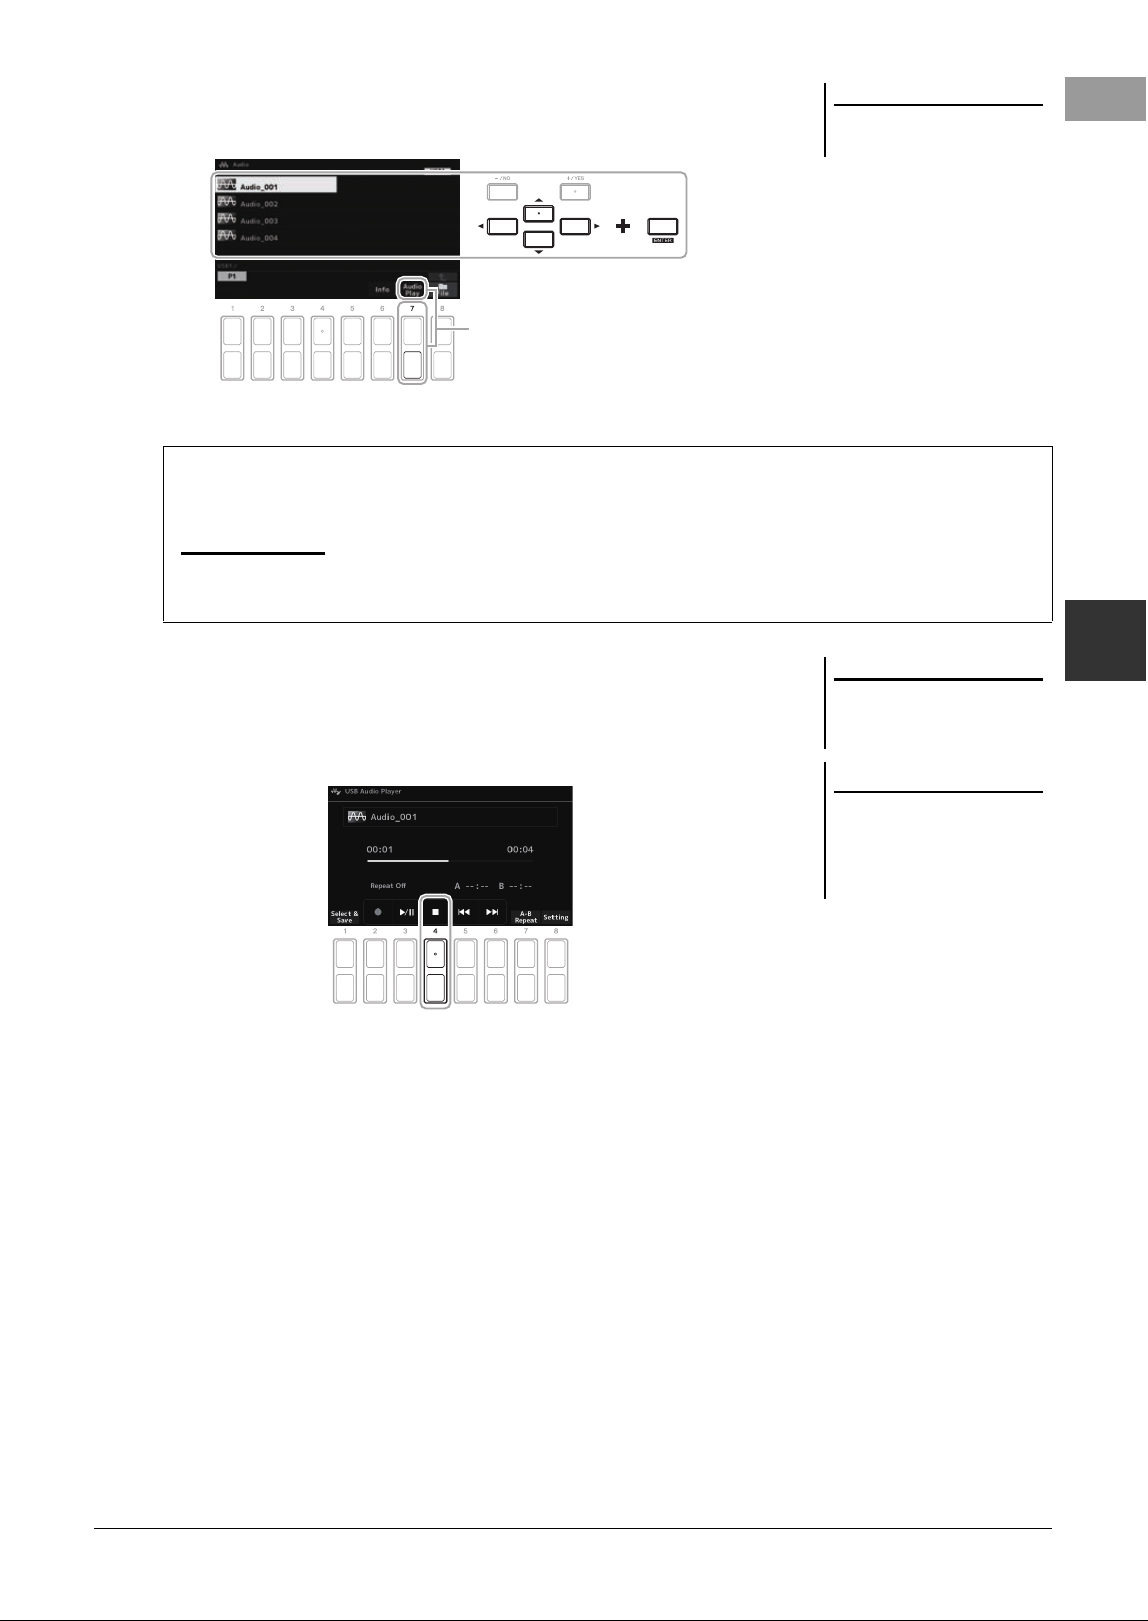
PSR-SX620 Owner’s Manual 79
USB Audio Player/Recorder – Recording and Playing Audio Files –
4
4 Move the cursor to the desired file by using the Cursor buttons
[
][
][
E
][
F
]
, and then press the [ENTER] button.
5 Press the [7 ] (AUDIO PLAY) button to start playback.
The display automatically returns to the USB Audio Player display.
6 To stop playback, press the [4 ] (Stop) button.
NOTE
Audio files take a slightly longer time
to load than other files.
5
Viewing Audio file information
Pressing the [6 ] (Info) button calls up the Information window from which you can view the file name, sample
rate etc. of the selected file.
NOTE
Make sure that File is shown at the bottom right corner of the display (page 26).
To close the window, use the [7 ]/[8 ] (OK) buttons.
NOTE
Make sure that File is shown at the
bottom right corner of the display
(page 26).
NOTICE
Never attempt to disconnect the
USB flash drive or turn the power
off during playback. Doing so
may corrupt the USB flash drive
data.
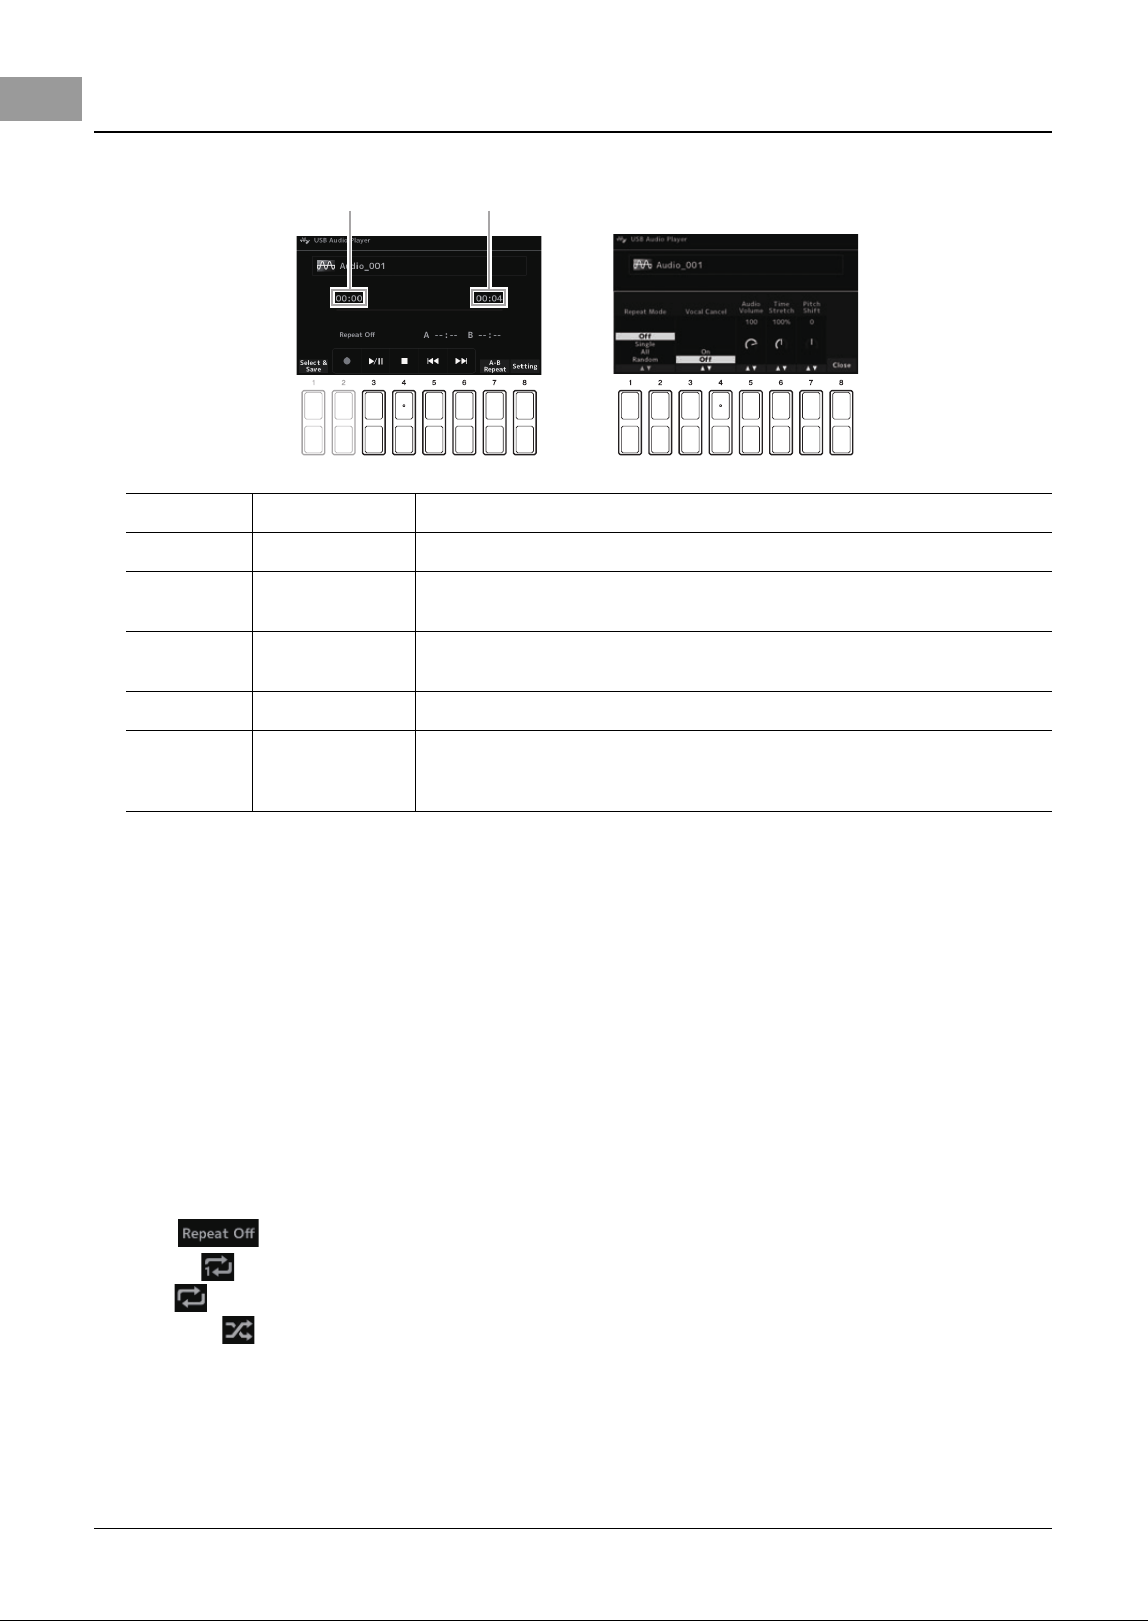
80 PSR-SX620 Owner’s Manual
A-B Repeat Playback
The specified section (between the A and B points) can be played back repeatedly.
1. To set the A point, press the [7 ] (A B) buttons when playback reaches to the desired point.
The time set as the A point is shown at “A [--:--]” in the display, and is indicated by the first wedge mark in the
playback progress bar.
2. To set the B point, press the [7 ] (A B) buttons again when playback reaches to the desired point.
The time set as the B point is shown at “B [--:--]” in the display, and is indicated by the second wedge mark in
the playback progress bar.
The specified A-B section of the audio file will now play back repeatedly.
3. To cancel Repeat playback, press the [7 ] (A B) buttons again.
Repeat Playback mode
Press the [8 ] (Setting) buttons to call up the pop-up display for audio setting, and then use the [1 ]/[2
] buttons to select the REPEAT MODE.
• Off ( )...............Plays through the selected file, and then stops.
• Single ( )....................Plays through the selected file repeatedly.
• All ( ) ......................... Continues playback through all the files in the current folder repeatedly.
• Random ( )................Randomly and repeatedly plays back all files in the current folder.
Adjusting the volume of audio playback
To adjust the volume, press the [8 ] (Setting) buttons to call up the pop-up display for audio settings, and then
use the [5 ] (Audio Volume) buttons.
Playback-related Operations
Pop-up display for audio settings
Total playback timeElapsed playback time
[3 ] Play/Pause Starts or pauses playback at the current position.
[4 ] Stop Stops playback.
[5 ] Prev Pressing this changes the file to the previous one; holding it moves continuously back
through the current file (in seconds).
[6 ] Next Pressing this changes the file to the next one; holding it moves continuously forward
through the current file (in seconds).
[7 ] A-B Repeat See below.
[8 ] Setting Pressing this calls up the pop-up display for audio settings. You can set detailed parameters
for audio playback here, such as Volume, Vocal Cancel, Time Stretch, and Pitch Shift. To
close this, press the [8 ] (Close) buttons.
PSR-SX620 Owner’s Manual 81
USB Audio Player/Recorder – Recording and Playing Audio Files –
4
Adjusting the Volume Balance Between the Song (MIDI) and Audio
playback
You can set this from the balance setting display (page 62).
Canceling the Vocal Part and Playing the Part with Backing (Vocal
Cancel)
This lets you cancel or attenuate the center position of the stereo sound. This lets you
sing “karaoke” style with just instrumental backing, since the vocal sound is usually
at the center of the stereo image in most recordings.
To turn Vocal Cancel on, after selecting an Audio file, press the [8 ] (Setting)
buttons, and then use the [3 ]/[4 ] (Vocal Cancel) buttons. If you select
another audio file, this setting will be switched to off.
Adjusting the Playback Speed (Time Stretch)
These let you adjust the playback speed of an Audio file by stretching or
compressing it. The value can be adjusted from 75% to 125% and the default value is
100%. Higher values result in a faster tempo.
To adjust the playback speed, press the [8 ] (Setting) buttons to call up the pop-
up display for audio settings, and then use the [6 ] (Time Stretch) buttons. If you
select another audio file, this setting will be restored to the default value.
Adjusting the Pitch in semitones (Pitch Shift)
These let you shift the pitch of an Audio file in semitones.
To shift the pitch, press the [8 ] (Setting) buttons to call up the pop-up display
for audio settings, and then use the [7 ] (Pitch Shift) buttons.
If you select another audio file, this setting will be restored to the default value.
You can record your performance as an audio file (WAV format — 44.1 kHz sample
rate, 16-bit resolution, stereo) directly to a USB flash drive.
Sounds that can be recorded:
• Sounds that are generated via all the keyboard parts (LEFT, RIGHT 1, 2), Song
parts, Style parts, and Multi Pad (page 86) parts.
• Sounds of a vocal part that are input via the [MIC INPUT] jack (page 83).
• Sounds of a portable audio player that are input via the [AUX IN] jack (page 106).
• Sounds of the Audio File, etc. that are input via the USB [TO HOST] terminal
(page 103).
• Sounds of a external audio player that are input via Wireless LAN, and Bluetooth
communication (page 105, 107).
Maximum amount of recording time:
• 80 minutes per recording, though this may differ depending on the capacity of the
USB flash drive.
1 Connect the USB flash drive to the USB [TO DEVICE] terminal.
2 Make the necessary settings such as Voice/Style selection.
3 Press the [USB AUDIO PLAYER] button to call up the USB Audio
Player display.
NOTE
• Though the Vocal Cancel function is
highly effective on most audio
recordings, the vocal sound on
some songs may not be completely
cancelled.
• Vocal cancel does not affect the
Audio Input Sound (page 103 –
106) from external devices.
NOTE
Changing the playback speed of an
Audio file may change its tonal charac-
teristics.
Recording Your Performance as Audio
NOTE
Before using a USB flash drive, be sure
to read “Connecting USB Devices” on
page 101.
NOTE
If you want to record various parts sep-
arately or edit the data after recording
on this instrument, record as MIDI
files (page 74).
NOTE
Data that cannot be recorded includes:
Audio Link Multi Pads and the metro-
nome sound.
NEXT PAGE
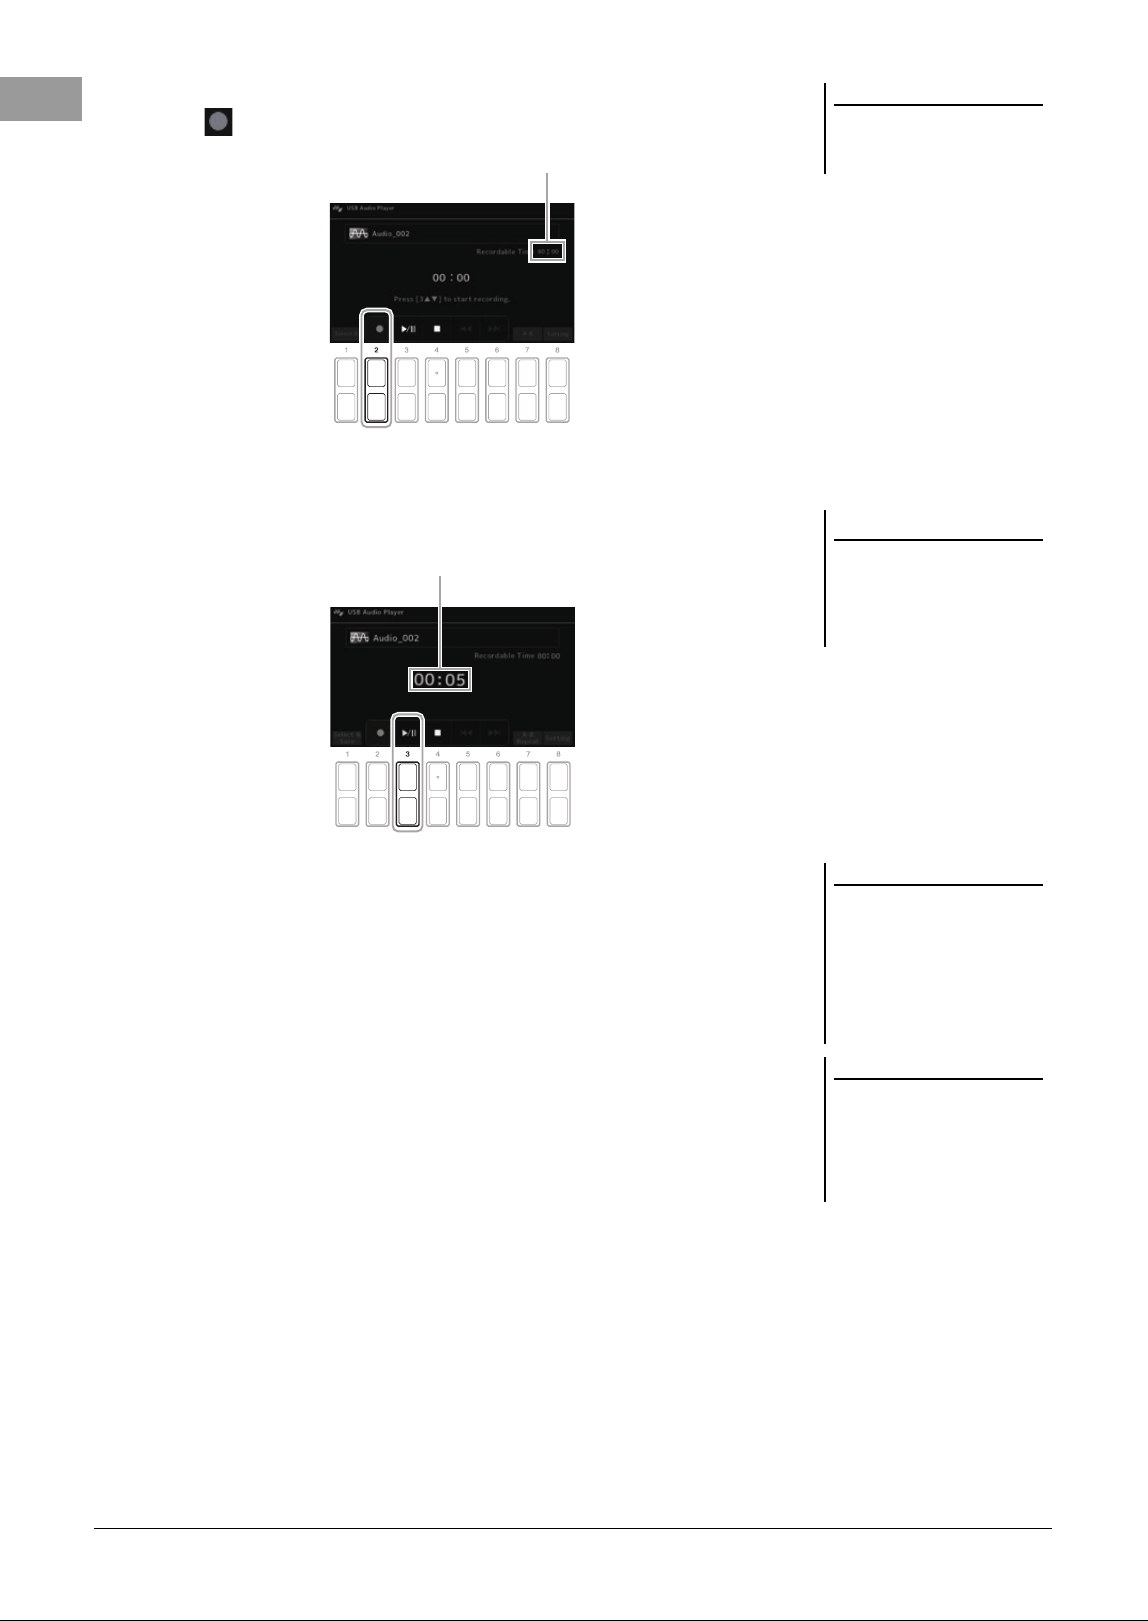
82 PSR-SX620 Owner’s Manual
4 Use the [2 ] (Rec) buttons to enter recording standby.
The (Rec) indication button in the display flashes.
5 Start recording by using the [3 ] (Play/Pause) buttons, and
then start your performance.
The elapsed recording time is shown in the display while recording.
6 After you finish your performance, use the [4 ] (Stop)
buttons to stop recording.
Recorded data is automatically saved to the USB flash drive as a file with the
name automatically set.
7 Use the [3 ] (Play/Pause) buttons to play back the recorded
performance.
To see the file of the recorded performance in the File Selection display, use the
[1 ] (Select&Save) buttons.
NOTE
You can use the metronome (page 42)
while recording; however, the metro-
nome sound will not be recorded.
Recordable time
NOTICE
Never attempt to disconnect the
USB flash drive or turn the power
off during recording. Doing so
may corrupt the USB flash drive
data or the recording data.
Elapsed recording time
NOTE
The recording operation continues,
even if you close the USB Audio Player
display by pushing the [EXIT] button.
Press the [USB AUDIO PLAYER] but-
ton to call up the USB Audio Player
display again, and then stop the
recording by pressing the [4 ]
(Stop) button.
NOTE
Keep in mind that if you make a mis-
take in your performance, you cannot
correct it by overwriting an existing
file. Delete the recorded file on the File
Selection display, and then record your
performance again.
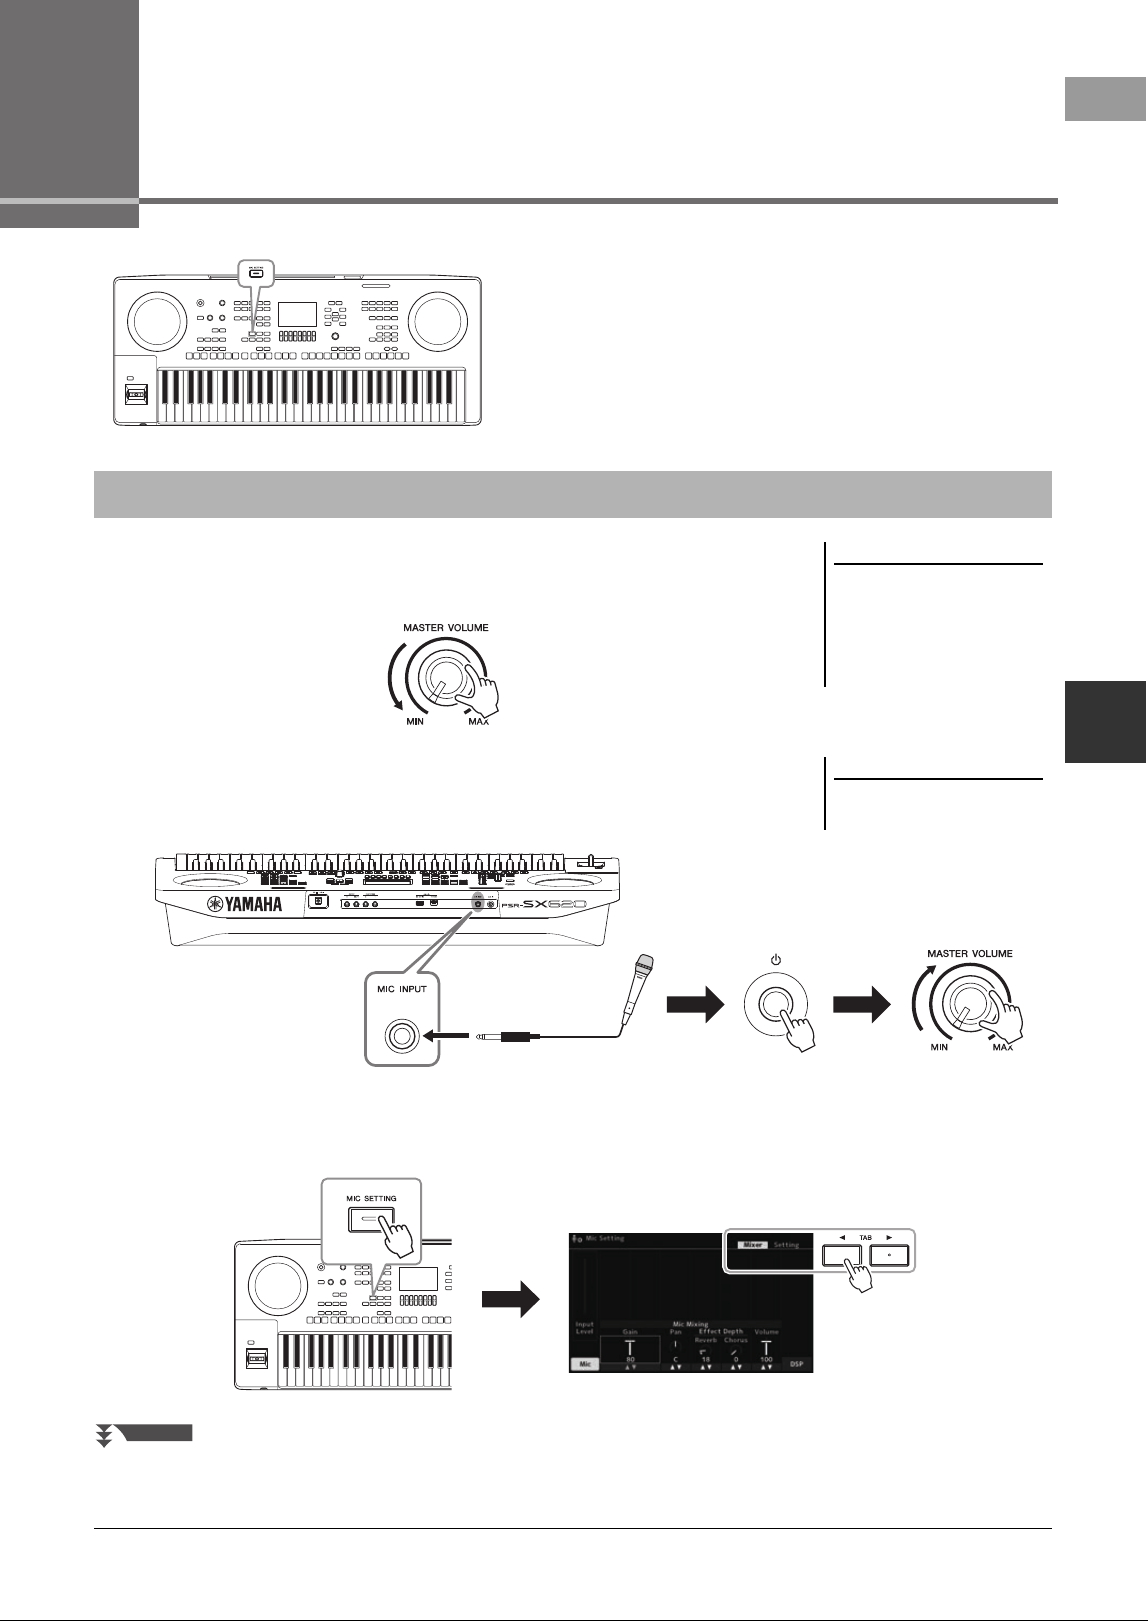
PSR-SX620 Owner’s Manual 83
5
5
Microphone – Sing Along with Song Playback or Your Own Performance –
Microphone
– Sing Along with Song Playback or Your Own Performance –
By connecting a microphone to the [MIC INPUT] jack, you can
enjoy singing along with your keyboard performance or with
Song playback. The instrument outputs your vocals through the
built-in speakers. You add ambience and depth to your vocals by
using the DSP effects (e.g., Reverb and Chorus), as well as
correct the tone or timbre of the sound by using EQ.
1 Before turning on the power of the instrument, set the [MASTER
VOLUME] dial to the minimum position.
2 Connect the microphone to the [MIC INPUT] jack on rear panel,
and then turn on the power of the instrument and set the
[MASTER VOLUME] dial to the former position.
3 Call up the Mic Setting display.
[MIC SETTING] → TAB [E] Mixer
Connecting a Microphone
NOTE
To avoid damage to the devices or to
the built-in speakers by an excessive
signal when connecting (or discon-
necting) the microphone, first set the
[MASTER VOLUME] dial to the mini-
mum position.
NOTE
Make sure you have a conventional
dynamic microphone.
Standard mono phone
plug (1/4”)
NEXT PAGE
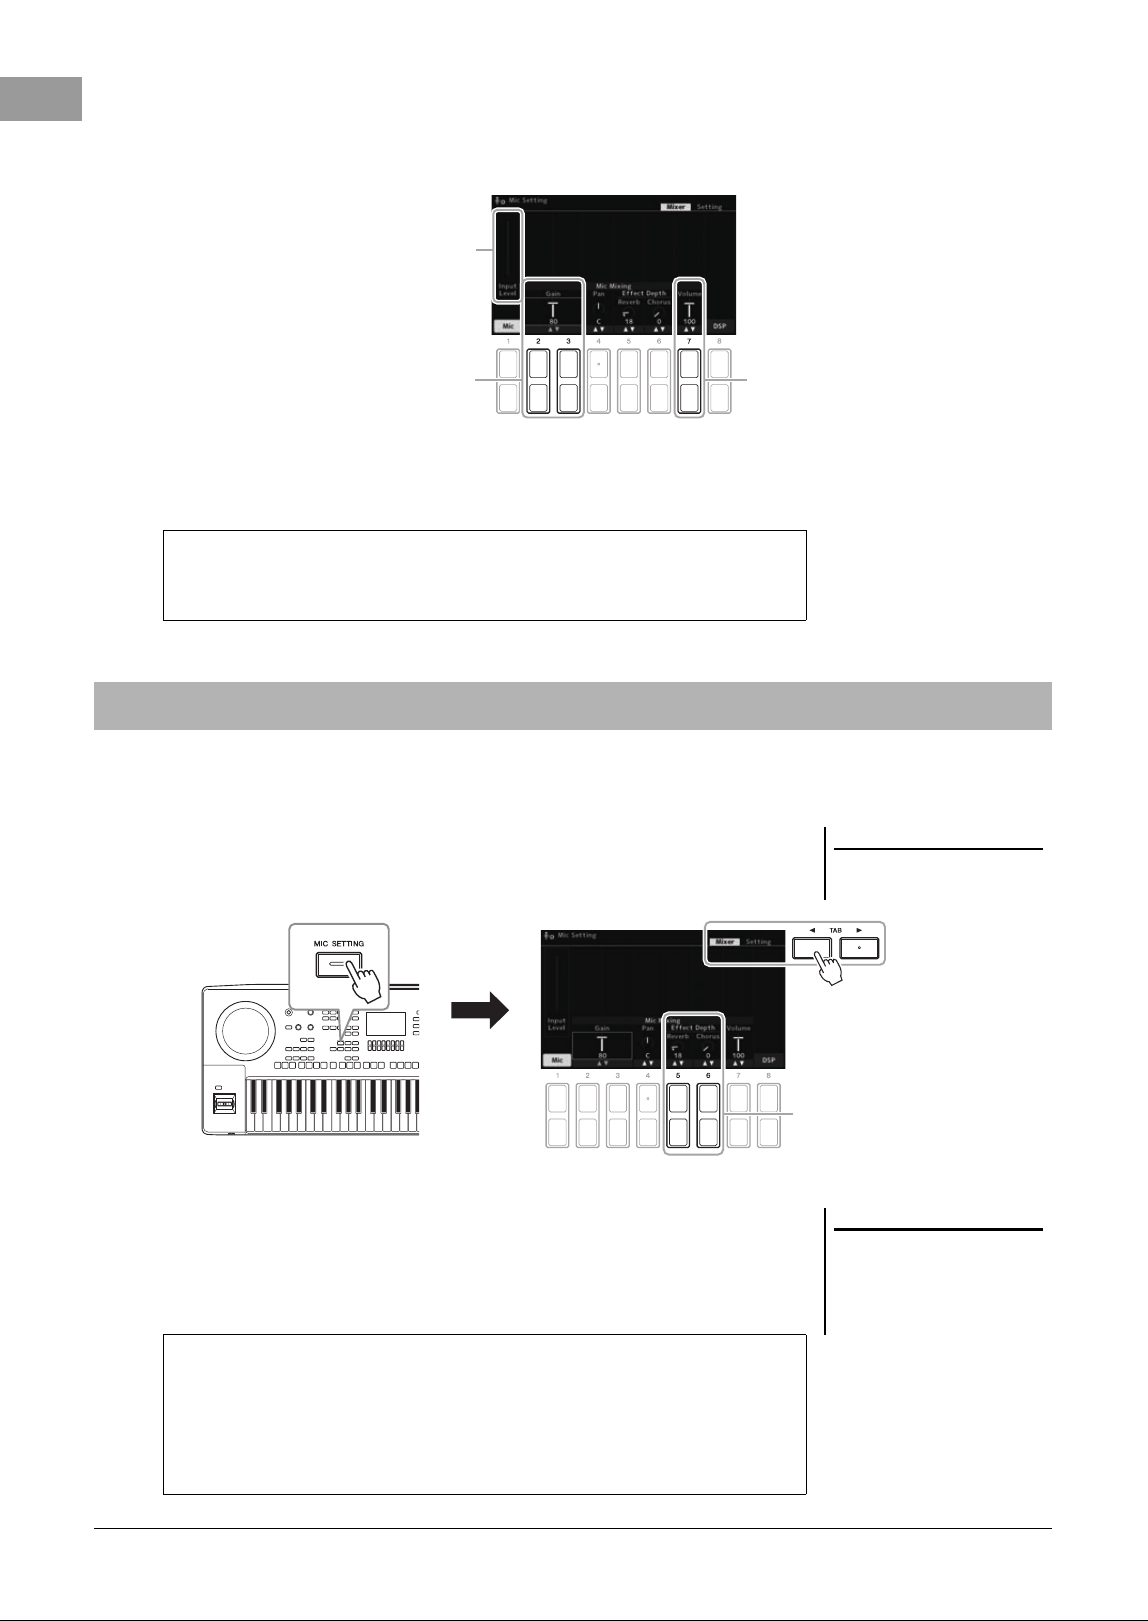
84 PSR-SX620 Owner’s Manual
4 Make sure that Mic (the [1 ] button) is turned on.
5 (If necessary, turn on the microphone.) Use the [2 ]/[3 ] (Gain) buttons to adjust
the Input Level while singing into the microphone.
6 Use the [7 ] (Volume) buttons to adjust the volume balance between the microphone
sound and the instrument sound.
You can add ambience and depth of singing in a concert hall to your vocals by using Reverb, as well as giving your
vocals a rich, “fat” sound by using Chorus.
1 Call up the Mic Setting display.
[MIC SETTING] → TAB [E] Mixer
2 Use the [5 ] (Reverb) / [6 ] (Chorus) buttons to adjust the
depth of Reverb (or Chorus) while singing into the microphone.
The higher the depth value, the deeper the effect becomes.
6
5
Adjust the Input Level while checking
the INPUT LEVEL INDICATOR on the
left of the display. Make sure to adjust
the Input Level so that the indicator
lights in green or yellow. Also, make
sure that the indicator does not light in
red, since this indicates that the input
level is too high.
Disconnecting the microphone
1. Set the [MASTER VOLUME] dial to the minimum position.
2. Disconnect the microphone from the [MIC INPUT] jack.
Applying DSP Effects to Your Vocals
NOTE
For details on connecting a micro-
phone, refer to page 83.
2
NOTE
The effects of Reverb and Chorus are
applied to all of the parts input to the
Mixer (page 98). You can adjust only
the depth of Reverb (or Chorus) on this
display.
Select Insertion Effect from Various Types
DSP (Digital Signal Processor) features built into the instrument provide high-
quality effect types, including Echo and Delay. You can also apply the DSP
effects only to a specified target. To apply the DSP effects only to a vocal part,
for example, press the [8 ] buttons to select the part and the effect types. For
details, refer to the Reference Manual on the website, Chapter 5.
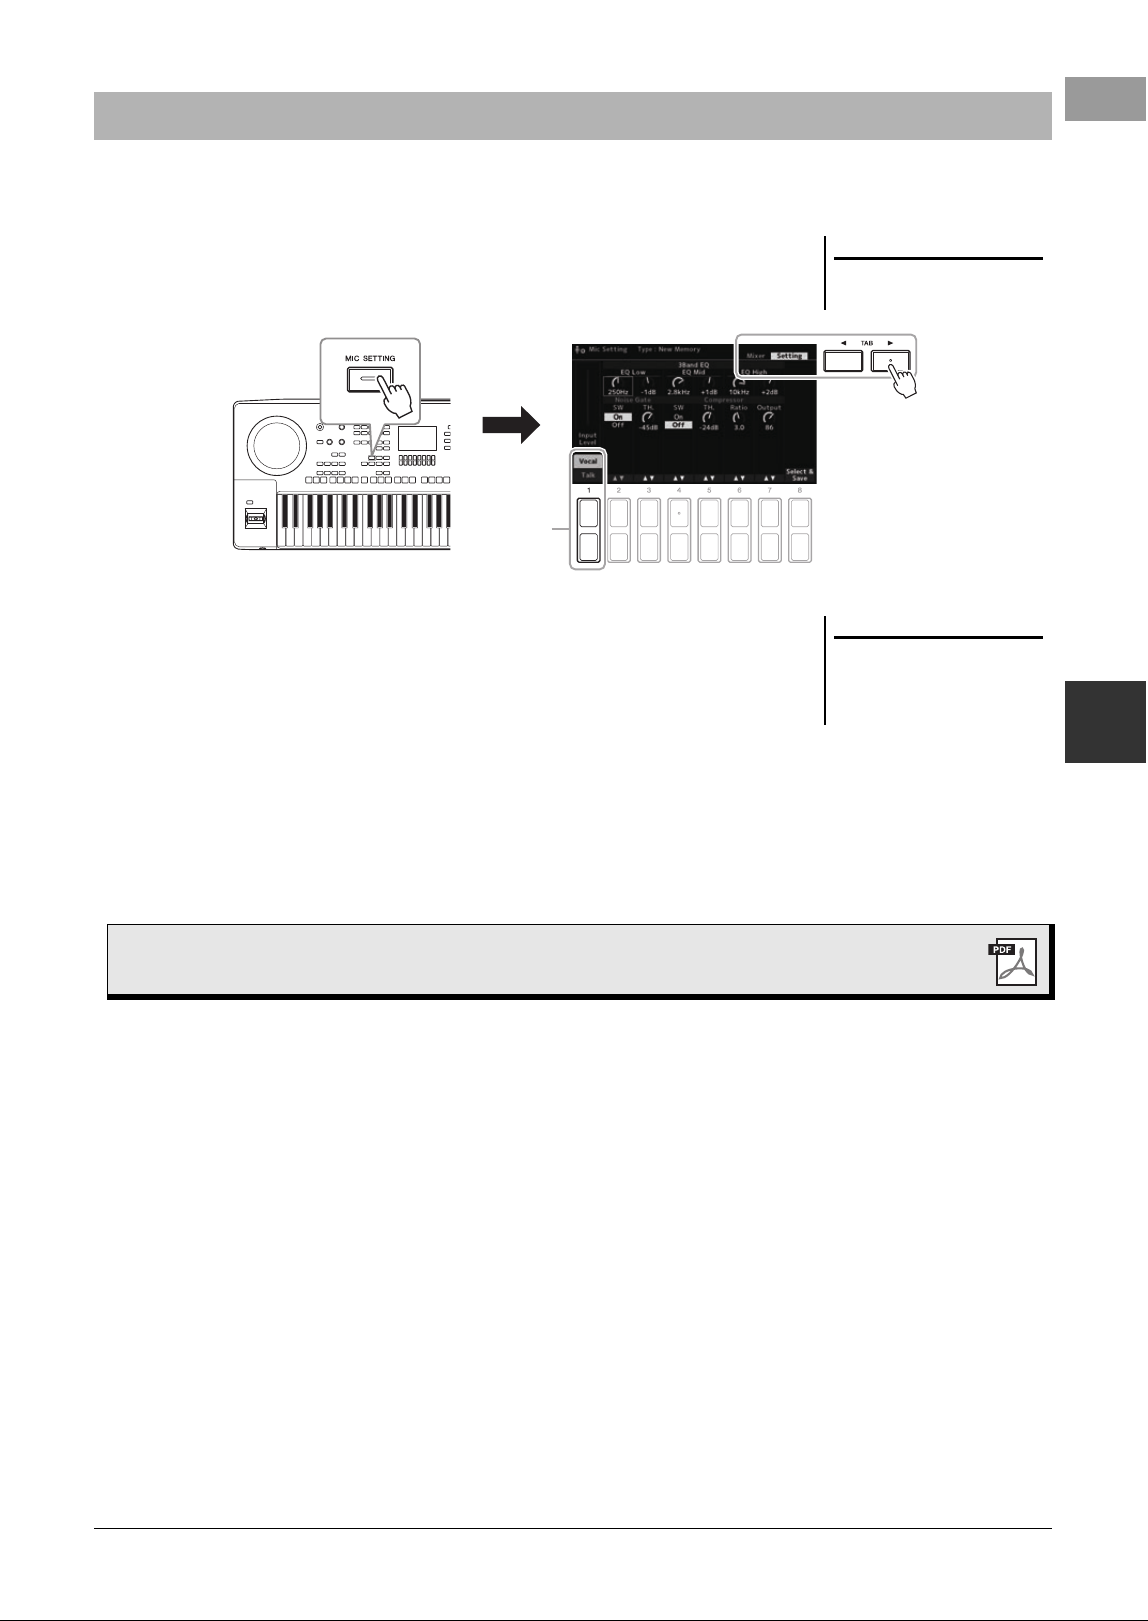
PSR-SX620 Owner’s Manual 85
5
Microphone – Sing Along with Song Playback or Your Own Performance –
This function lets you instantly change the microphone settings for talking or making announcements between song
performances.
1 Call up the Mic Setting display.
[MIC SETTING] → TAB [F] Setting
2 Press the [1 ] button, to switch the setting display for vocals
or for talking.
You can set detailed parameters (such as EQ, Noise Gate, and Compressor)
from each setting display.
For more information, refer to the Reference Manual on the website, Chapter 5.
Using the Talk Function
NOTE
For details on connecting a micro-
phone, refer to page 83.
2
NOTE
By using the pedal, you can switch the
setting display for vocals or for talking.
For details, refer to the Reference Man-
ual on the website.
Advanced Features
Refer to the Reference Manual on the website, Chapter 5.
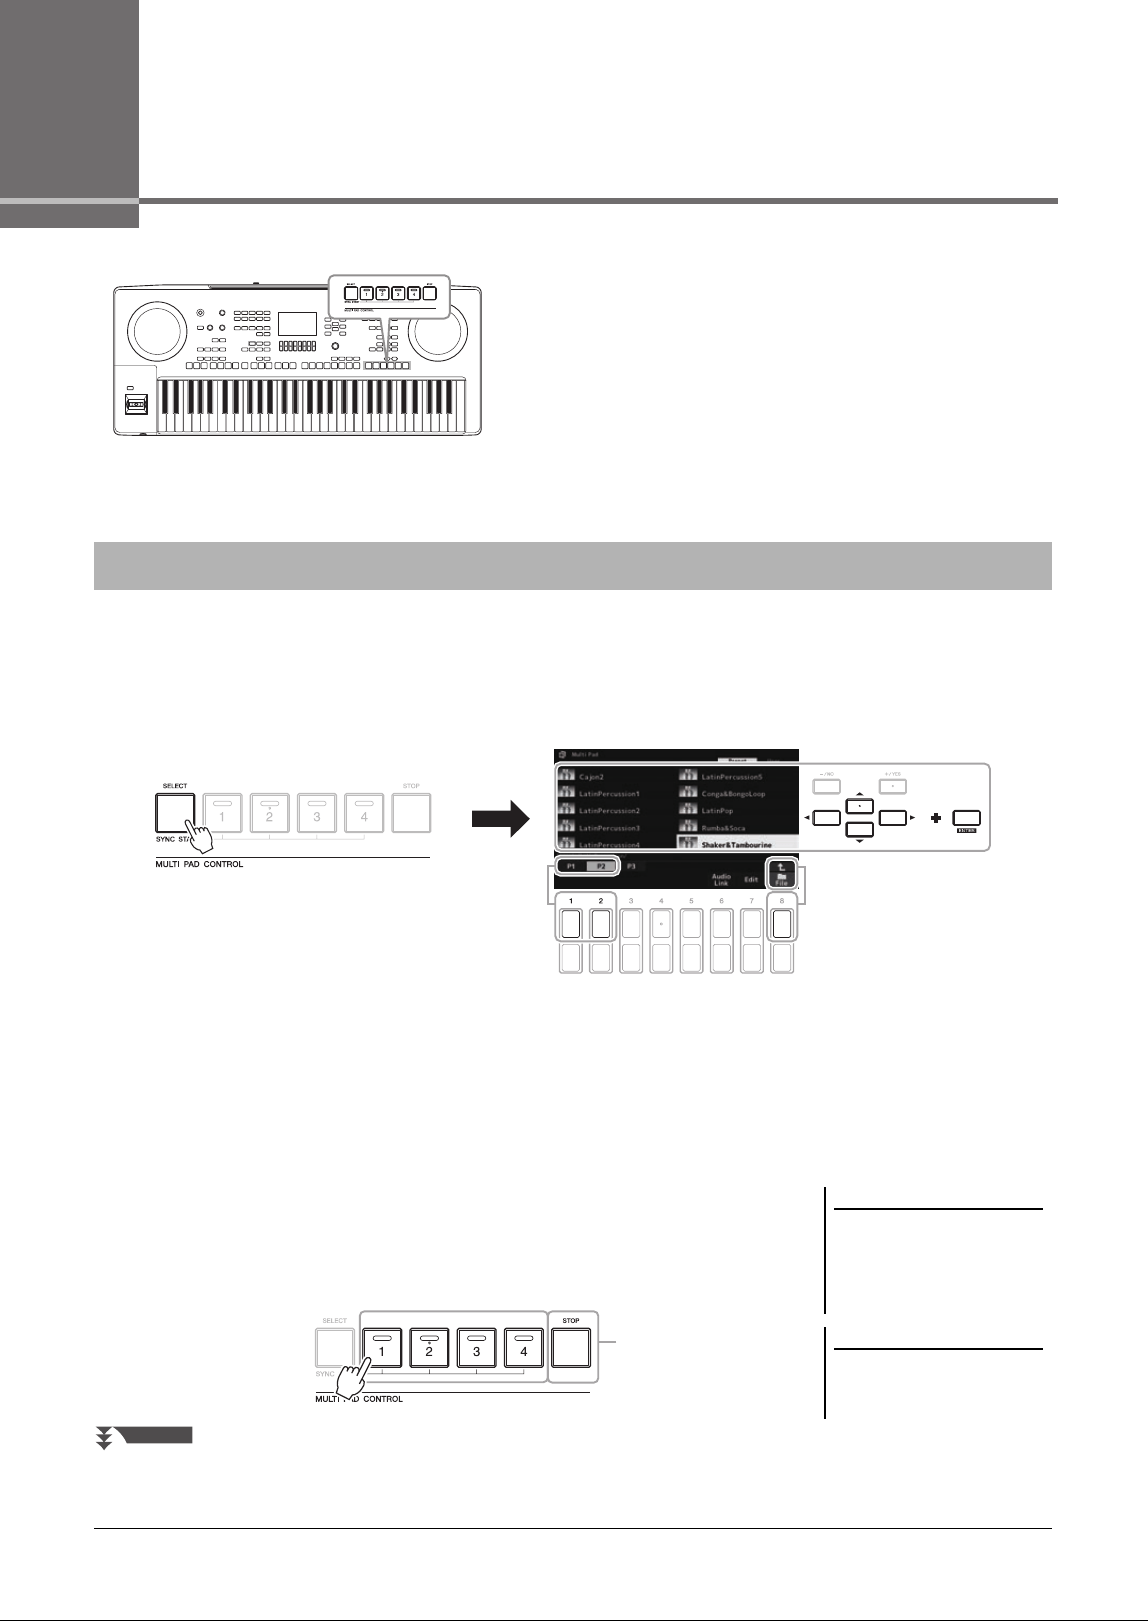
86 PSR-SX620 Owner’s Manual
6
Multi Pads
– Adding Musical Phrases to Your Performance –
The Multi Pads can be used to play a number of short pre-
recorded rhythmic and melodic sequences adding impact and
variety to your keyboard performances.
Multi Pads are grouped in Banks of four each. The instrument
features a variety of Multi Pad Banks in a variety of different
musical genres.
Moreover, the Audio Link Multi Pad function allows you to
create a new pad with your Audio File (WAV) to play back
during your performance.
This section covers how to play back Multi Pads by themselves. However, you can also play the Multi Pads during
playback of a Style/Song to make your performance more interesting.
1 Press the MULTI PAD CONTROL [SELECT] button to call up the
Multi Pad Bank Selection display.
2 Move the cursor to the desired bank by using the Cursor
buttons [
][
][
E
][
F], and then press the [ENTER] button.
You can call up other pages by using the [1 ] – [7 ] buttons that correspond
to “P1, P2...” in the display or by pressing the MULTI PAD CONTROL
[SELECT] button repeatedly.
Press the [8 ] (↑) button to call up the next higher level folder to which the
Multi Pads are categorized.
3 Press any of the MULTI PAD CONTROL [1] – [4] buttons to play a
Multi Pad phrase.
The corresponding phrase for the button starts playing back in its entirety at the
currently set tempo. You can play up to four Multi Pads at the same time.
Playing the Multi Pads
Shows the Multi Pad
category folders.
NOTE
There are two types of Multi Pad data.
Some types will play back once and
stop when they reach to the end. Oth-
ers will be played back repeatedly
(loop).
NOTE
Pressing the pad during its playback
will stop playing and begin playing
from the top again.
4
NEXT PAGE
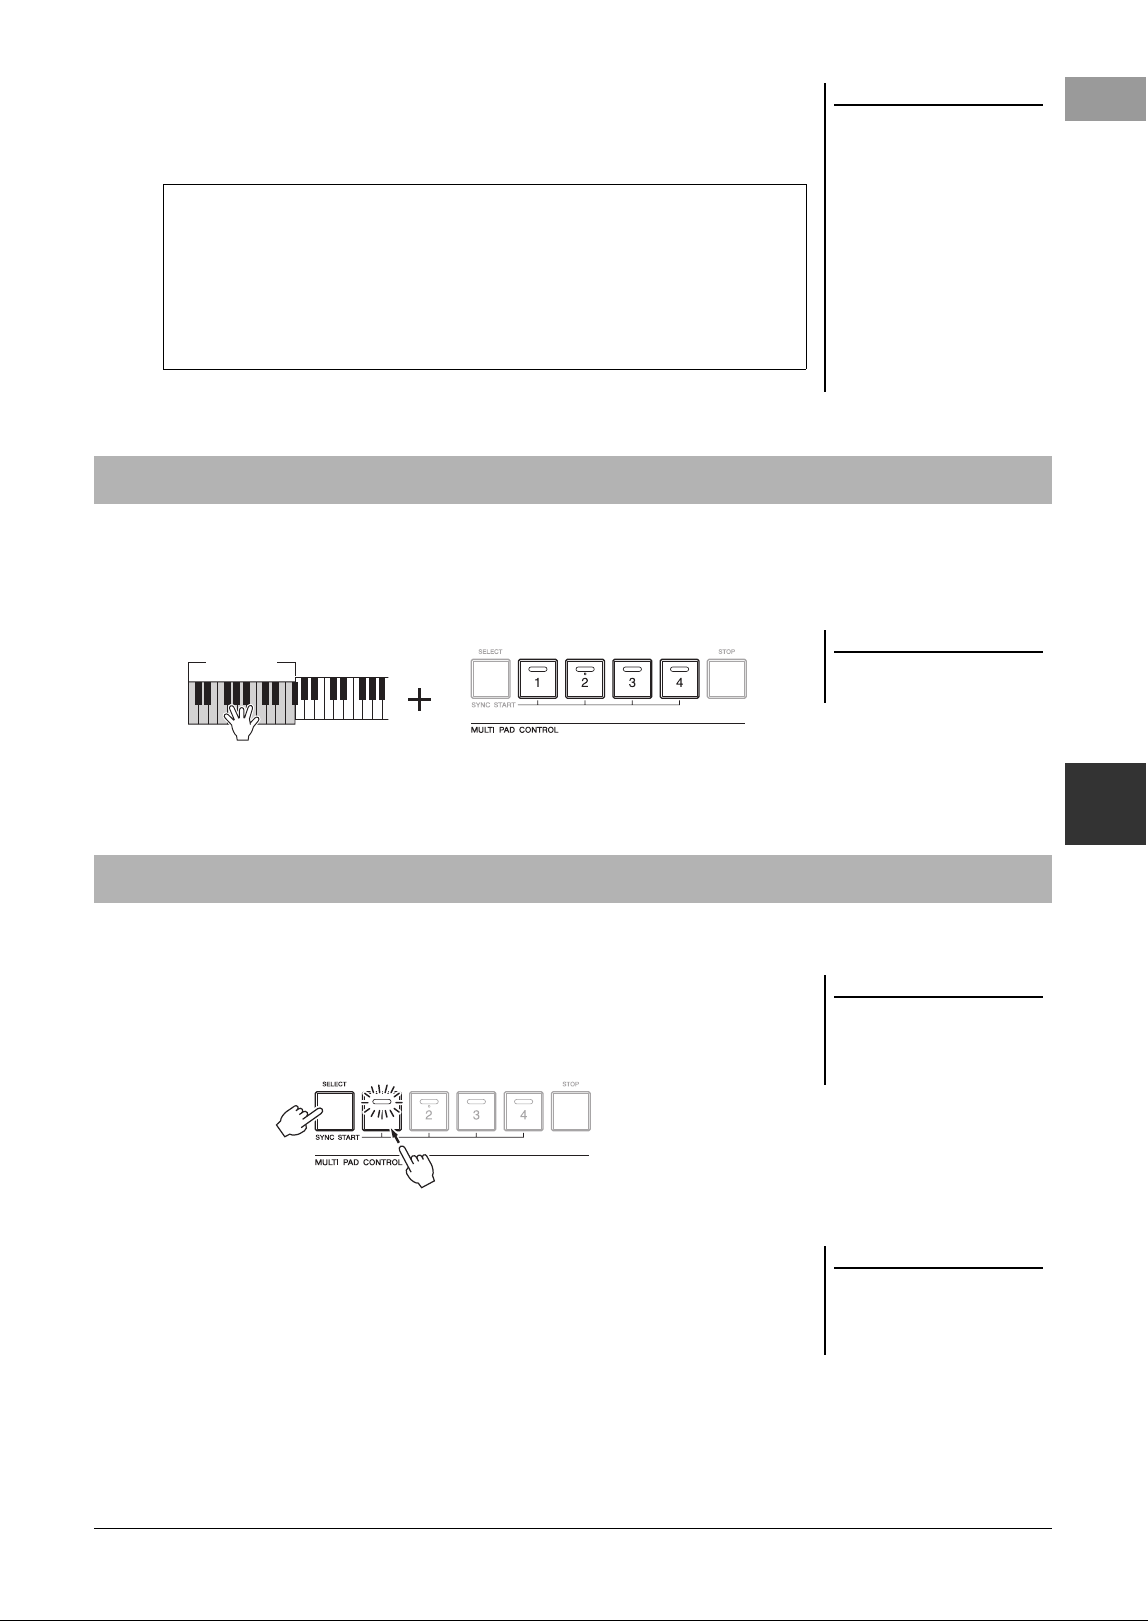
PSR-SX620 Owner’s Manual 87
6
Multi Pads – Adding Musical Phrases to Your Performance –
4 Press the [STOP] button to stop playback of the Multi Pad(s).
If you want to stop specific pads, simultaneously hold down the [STOP] button
and press the pad(s) you wish to stop.
When the [ACMP] or LEFT part is on, Multi Pad phrases automatically change the pitch to match the chord you
play in the chord section.
Play the chord in the chord section before/after pressing one of the Multi Pads.
You can start Multi Pad playback by playing the keyboard or by starting Style playback.
1 While holding the MULTI PAD CONTROL [SELECT] button,
press the desired button or buttons from [1] – [4].
The corresponding buttons flash in red, indicating the standby status.
2 Start playback of the Multi Pad.
• When [ACMP] is off, press any note, or play back a Style.
• When [ACMP] is on, play a chord in the chord section, or play back a Style.
If you put a Multi Pad in standby during Style or Song playback, pressing any
note (when [ACMP] is off) or playing a chord in the chord section (when
[ACMP] is on) will start Multi Pad playback at the top of the next measure.
NOTE
• While the Style or Song is playing
back, pressing the Multi Pad button
starts playback at the top of the next
measure. When the Style or Song is
stopped, pressing the Multi Pad
button starts playback immediately.
• While the Style or Song is playing
back, pressing the STYLE CONTROL
[START/STOP] or SONG [J]
(STOP) button also stops playback
of the Multi Pad(s). While both the
Style and Song is playing back,
pressing the SONG [J] (STOP)
button stops playback of the Song,
Style and Multi Pad(s).
About the lamp status of the MULTI PAD CONTROL [1] – [4]
buttons
• Blue: Indicates that the corresponding pad contains data (phrase).
• Red: Indicates that the corresponding pad is playing back.
•
Red (flashing):
Indicates that the corresponding pad is in standby (Synchro Start;
see below).
•
Off:
Indicates the corresponding pad contains no data and cannot be played.
Using Chord Match
NOTE
Some Multi Pads are not affected by
Chord Match.
Chord
Section
Using the Multi Pad Synchro Start Function
NOTE
To cancel the standby status of the
selected Pad, carry out the same oper-
ation, or simply press the [STOP] but-
ton to cancel the status of all Pads.
NOTE
When two or more Multi Pads are in
the standby status, pressing any one of
them starts simultaneous playback of
all of them.
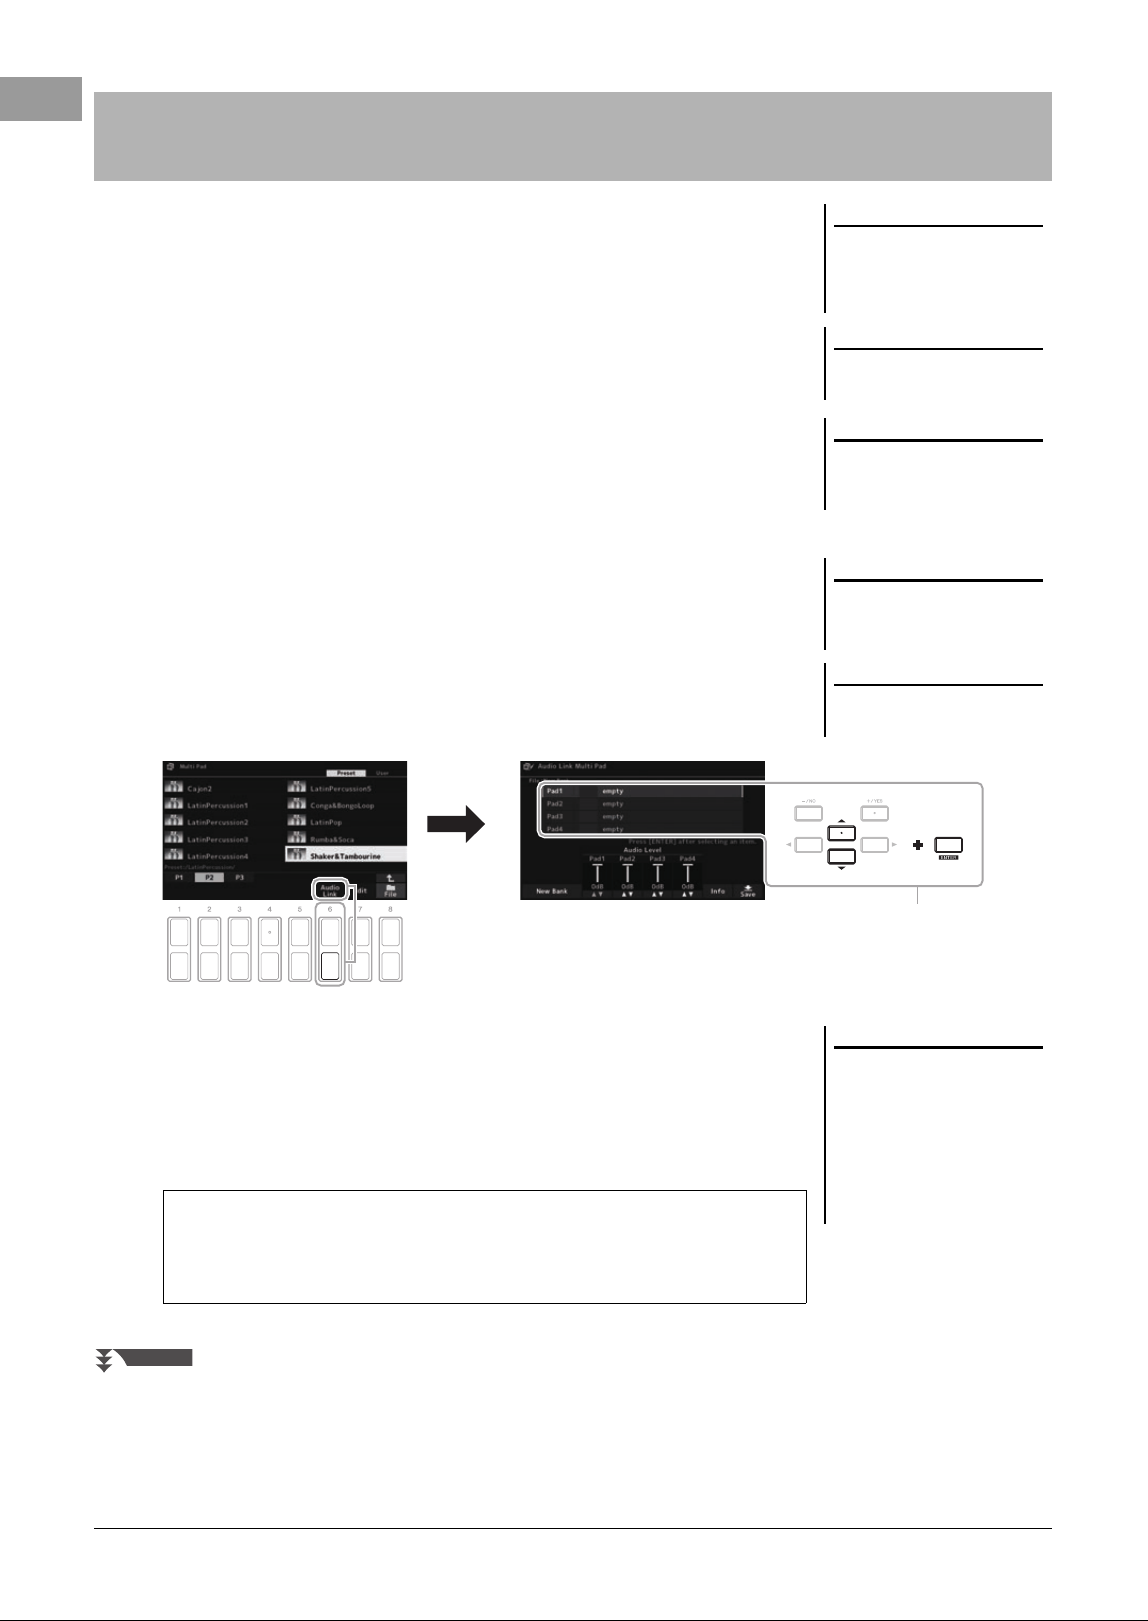
88 PSR-SX620 Owner’s Manual
You can create a new Multi Pad by making links with Audio Files (WAV) in the USB
flash drive to each of the Multi Pad. The Audio Files (WAV) can be data you’ve
recorded on this instrument (page 78) as well as commercially available ones
(44.1kHz, 16-bit, stereo). Multi Pads to which Audio Files (WAV) have been linked
are called Audio Link Multi Pads. The new Audio Link Multi Pads can be saved to
the User drive or USB flash drive.
1 Connect the USB flash drive containing the Audio Files (WAV) to
the USB [TO DEVICE] terminal.
2 Press the MULTI PAD CONTROL [SELECT] button to call up the
Multi Pad Bank Selection display.
3 Press the [6 ] (Audio Link) button to call up the Audio Link
Multi Pad display.
A confirmation message may appear here. If so, follow the on-display
instructions.
4 Select the desired Pad by using the Cursor buttons [][], and
then press the [ENTER] button.
The audio file Selection display appears.
5 Move the cursor to the desired audio file by using the Cursor
buttons
[
][
][
E
][
F
]
, and then press the [ENTER] button.
Creating a Multi Pad with Audio Files (WAV) (Audio Link Multi
Pad)
NOTE
Audio Link Multi Pads can neither be
created nor played back during play-
back, recording standby or recording
of audio files.
NOTE
Audio files (WAV) cannot be saved to
the User drive.
NOTE
Before using a USB flash drive, be sure
to read “Connecting USB Devices” on
page 101.
NOTE
Make sure that File is shown at the
bottom right corner of the display
(page 26).
NOTE
An audio file cannot be linked to a
MIDI Multi Pad.
4
NOTE
If an Audio Link Multi Pad has been
selected when you press the [6 ]
(Audio Link) button in step 3, the links
made for the selected Pad appear. In
order to create a new Pad, make sure
to press one of the [1 ]/[2 ]
(New Bank) buttons. Otherwise, you
are simply re-selecting the link in the
selected Pad.
To confirm the information of the selected audio file
By pressing [6 ] (Info) button in the audio file Selection display, you can
confirm the information (title name, bit rate and sample rate, etc.). Press one of
the [7 ]/[8 ] (OK) buttons to close it.
NEXT PAGE
PSR-SX620 Owner’s Manual 89
6
Multi Pads – Adding Musical Phrases to Your Performance –
6 Press the [EXIT] button to return to the Audio Link Multi Pad
display.
7 If you want to link other Audio Files (WAV) to other pads, repeat
steps 4 to 6.
8 If desired, adjust the volume of each audio file by using the
[3 ] – [6 ] buttons.
By pressing the desired MULTI PAD CONTROL [1] – [4] button, you can
adjust the volume while playing the Multi Pad phrase.
9 Save the settings as a Multi Pad Bank.
9-1 Press one of the [8 ] (Save) buttons in the Audio Link Multi Pad
display to call up the Multi Pad Bank Selection display.
9-2 Save the settings as a bank file by following the instructions on page 28.
10 Press the [EXIT] button to check the new Audio Link Multi Pad in
the Multi Pad Bank Selection display.
The newly created Audio Link Multi Pad is marked with “Audio Link” at the
upper left of the file name.
If you want to change the Link setting:
Select the desired Audio Link Multi Pad, and then carry out the same operations
as in steps 3 to 10.
You can play the Multi Pad to which the audio file is assigned by selecting them in
the User or USB tab of the Multi Pad Bank Selection display. Although you can play
them via the same operations in page 86, note the following limitations.
• Make sure to connect the USB flash drive including the corresponding Audio Files
(WAV).
• Automatic repeat playback is not available.
• Only one Pad can be played back at once.
• Chord Match cannot be applied.
To confirm the path of the selected audio file
By using the [7 ] (Info) buttons in the Audio Link Multi Pad display, you
can confirm the path. Use the [7 ]/[8 ] (OK) buttons to close it.
NOTICE
The setting will be lost if you
select another Audio Link Multi
Pad or turn the power to the
instrument off without carrying
out the Save operation.
Playing the Audio Link Multi Pads
NOTE
Audio Files (WAV) take a slightly lon-
ger time than MIDI files to load.
NOTE
When the link to the audio file is cut
(for example, when the USB flash drive
which includes the corresponding
Audio Files (WAV) is not connected,
etc.), the Pad icon changes to “?” to
indicate the file is not accessible.
Advanced Features
Refer to the Reference Manual on the website, Chapter 6.
Creating Multi Pads (Multi Pad Creator):
[MENU] → Menu2 → Multi Pad Creator → [ENTER]
Editing Multi Pads:
Multi Pad Bank Selection display → [7 ] (Edit)
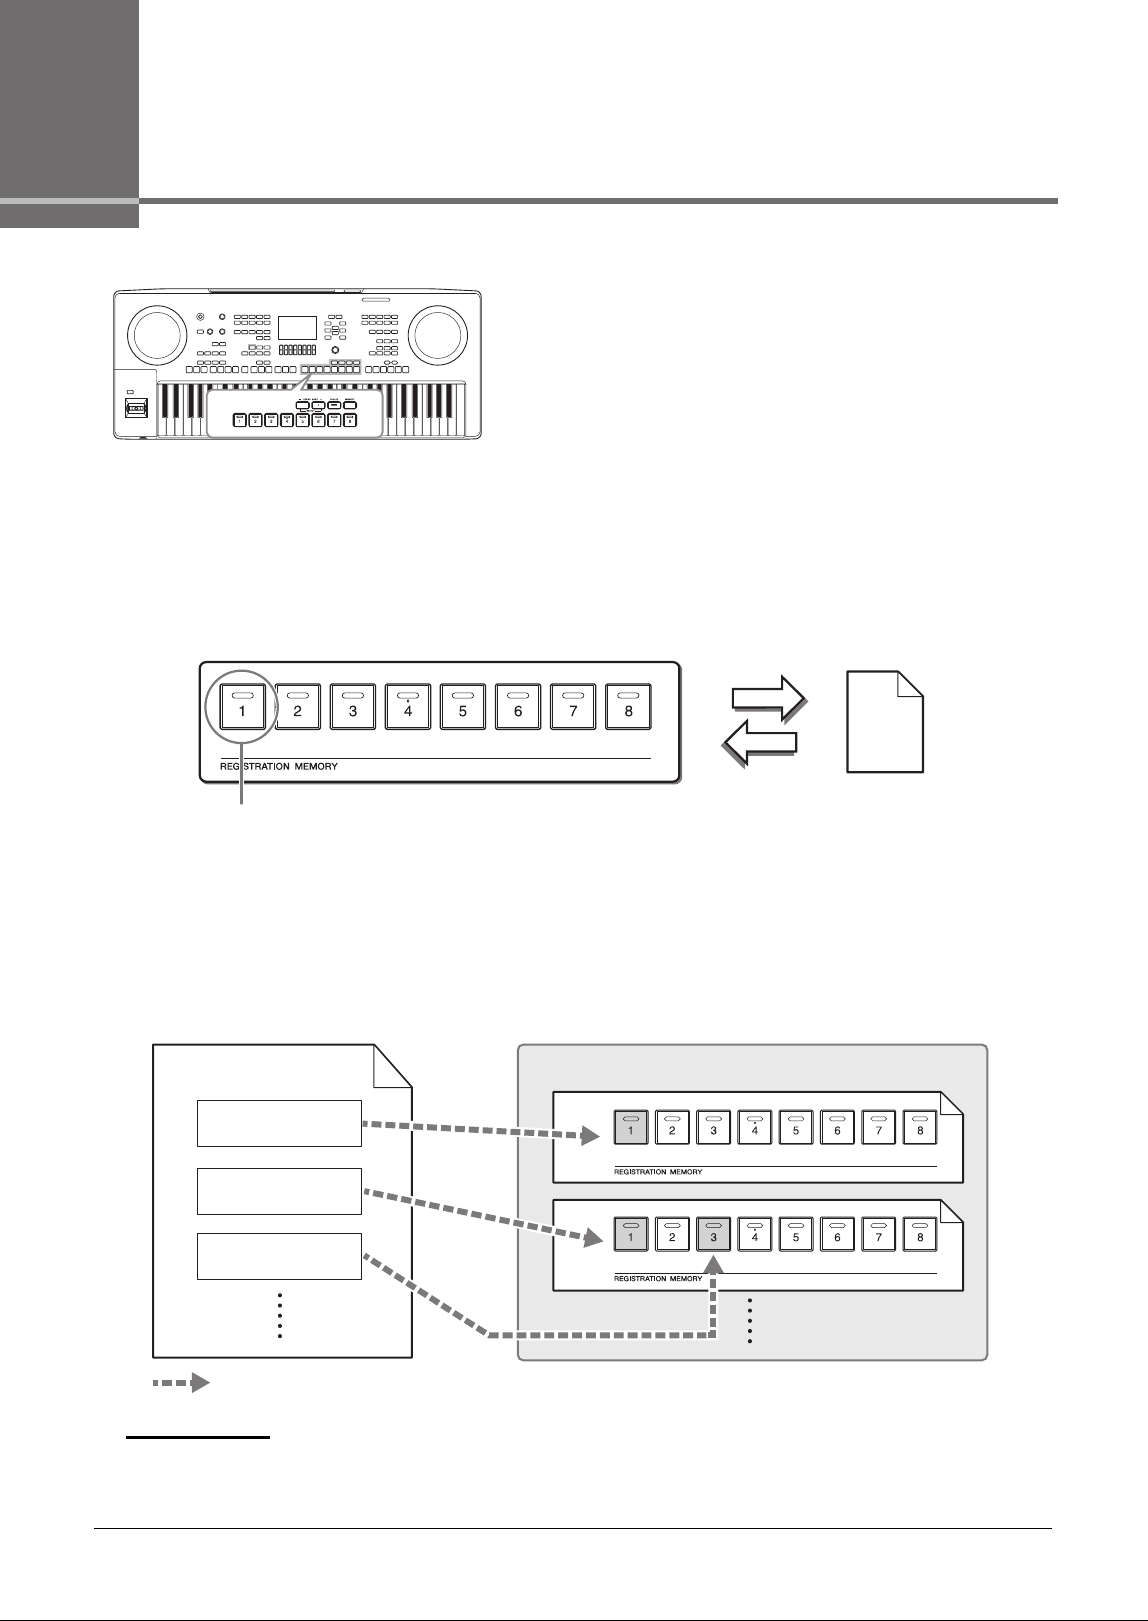
90 PSR-SX620 Owner’s Manual
7
Registration Memory/Playlist
– Saving and Recalling Custom Panel Setups –
The Registration Memory function allows you to save (or
“register”) panel settings, such as those of Voices and Styles, to
a Registration Memory button, and then instantly recall your
custom panel settings by simply pressing a single button. When
you’ve saved a lot of data to the Registration Memory, use the
Playlist to manage your repertoire so that you can quickly call
up the desired Registration Memory for each piece of music.
Registration Memory (page 91)
You can register your custom panel settings to each of the Registration Memory [1] – [8] buttons. You can also save
all eight registered panel setups as a single Registration Memory Bank file. If you select a Registration Memory
Bank file beforehand, you can easily call up the registered settings simply by pressing a button during your
performance.
Playlist (page 94)
The Playlist function allows you to create custom performance lists. A Playlist contains links to call up Registration
Memory Bank files for each piece you play. Each link to the Registration Memory is called a “Record,” and you can
collectively store the Playlist Records as a single Playlist file. Each Playlist Record can directly recall a specified
Registration Memory number in the selected Registration Memory Bank file. By using the Playlist, you can select
only the desired files from the huge number of the Registration Memory Bank files without changing the bank file
configuration.
NOTE
By importing Music Finder Records (.mfd) used on previous Yamaha digital keyboards (such as the PSR-S670, etc.), you can use the Records on the Playlist of this instru-
ment, just like using the Music Finder function on those other instruments. For details, refer to the “Playlist” section in the Reference Manual on the website. For details on
using Music Finder, refer to the Owner’s Manual of the Yamaha digital piano which contains your desired Music Finder Records.
Panel settings can be saved to a single button.
Save
Recall
Bank 01
Registration
Bank file
Registration Memory Bank files
Bank 01
Bank 02
Playlist file 01
Record 01
Record 02
Record 03
: Link to call up
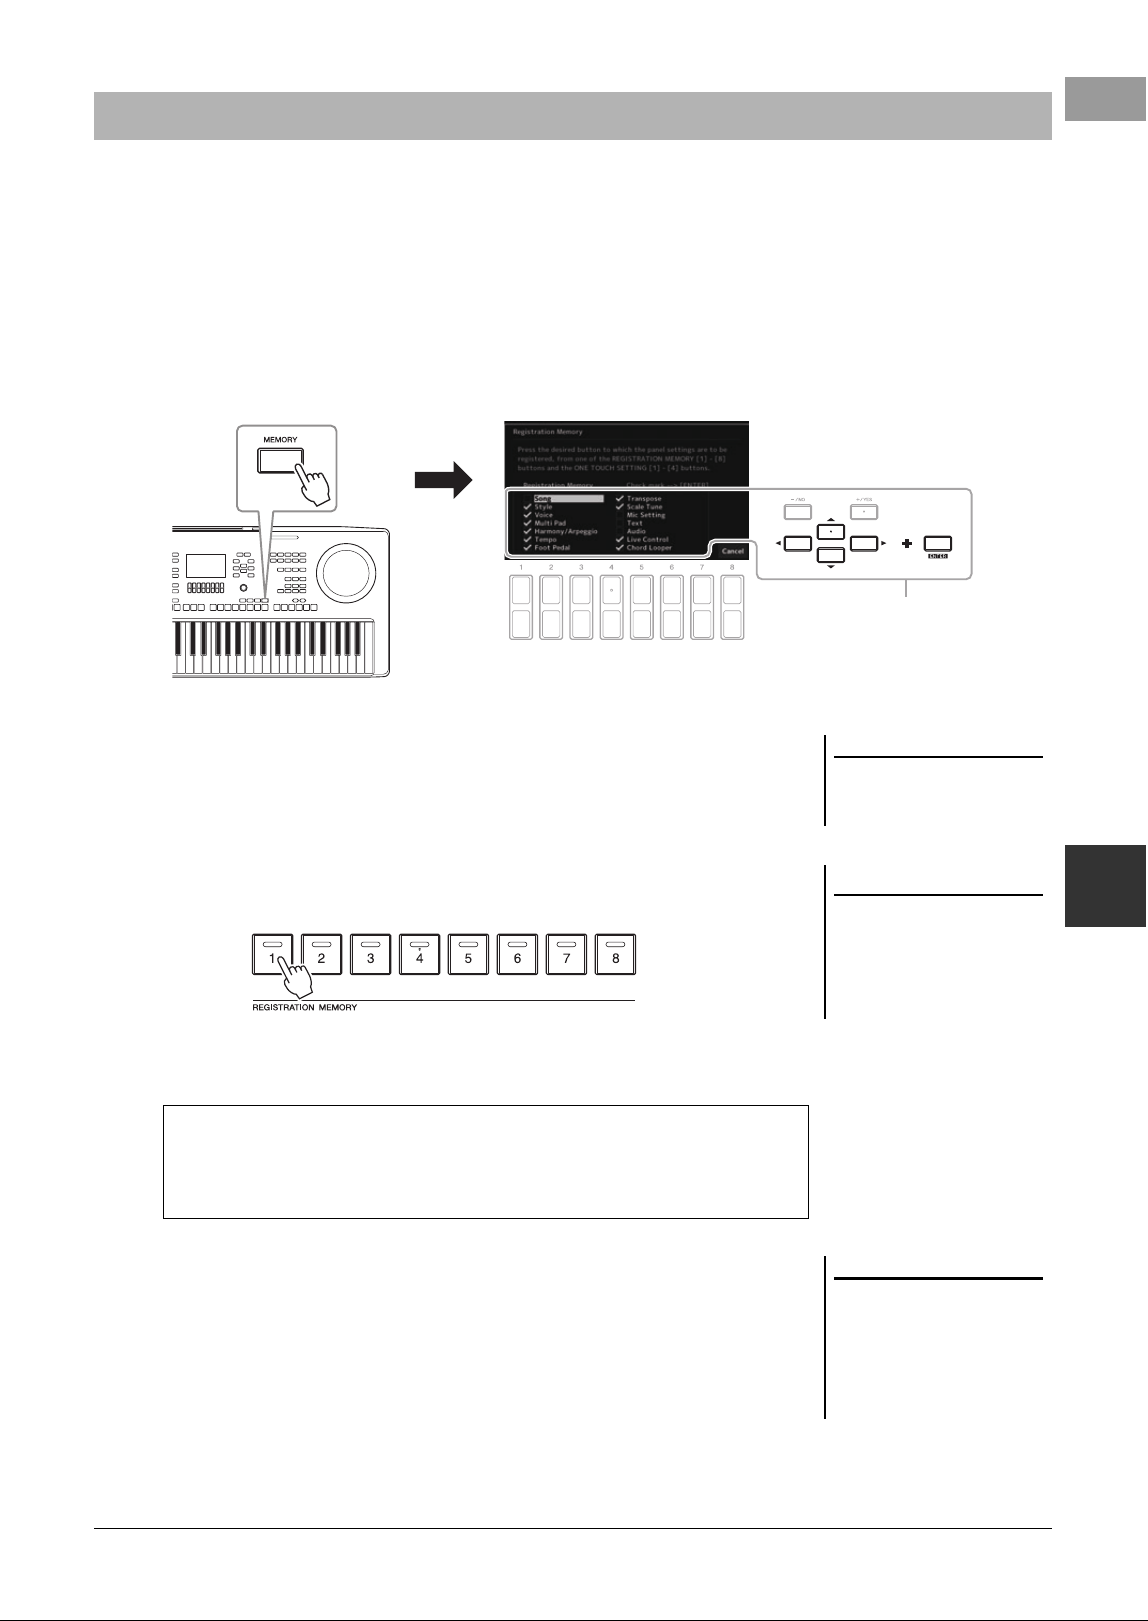
PSR-SX620 Owner’s Manual 91
Registration Memory/Playlist – Saving and Recalling Custom Panel Setups
7
1 Make the desired panel settings, such as those for Voices,
Styles and Effects.
For information on the panel settings that can be registered with the
Registration Memory function, refer to the Registration section of the
“Parameter Chart” in the Data List on the website.
2 Press the [MEMORY] button in the REGISTRATION MEMORY
section.
The display for selecting the groups to be registered appears.
3 Determine the groups you want to register.
Select the desired item by using the Cursor buttons [][][E][F], and then
press the [ENTER] button to enter a checkmark for the item.
To cancel the operation, press one of the [8 ] (Cancel) buttons.
4 Press one of the REGISTRATION MEMORY [1] – [8] buttons to
which you wish to memorize the panel setup.
The memorized button becomes red, which indicates the number button
contains data and its number is selected.
5 Register various panel setups to other buttons by repeating
steps 1 – 4.
The registered panel setups can be recalled by simply pressing the desired
number button.
Registering Your Panel Setups
3
NOTE
You can also use the Data dial to
select, and the [-/NO]/[+/YES] buttons
to enter or remove checkmarks.
NOTICE
If you select the button whose
lamp is lit in red or blue here,
the panel setup previously mem-
orized to the button will be
erased and replaced by the new
settings.
About the lamp status
• Red: Data registered and currently selected
• Blue: Data registered but not currently selected
• Off: No data registered
NOTE
The panel setups registered in the
numbered buttons are maintained even
when you turn off the power. If you
want to delete all the eight current
panel setups, turn the power on while
holding the B5 key (right-most B key
on the keyboard).
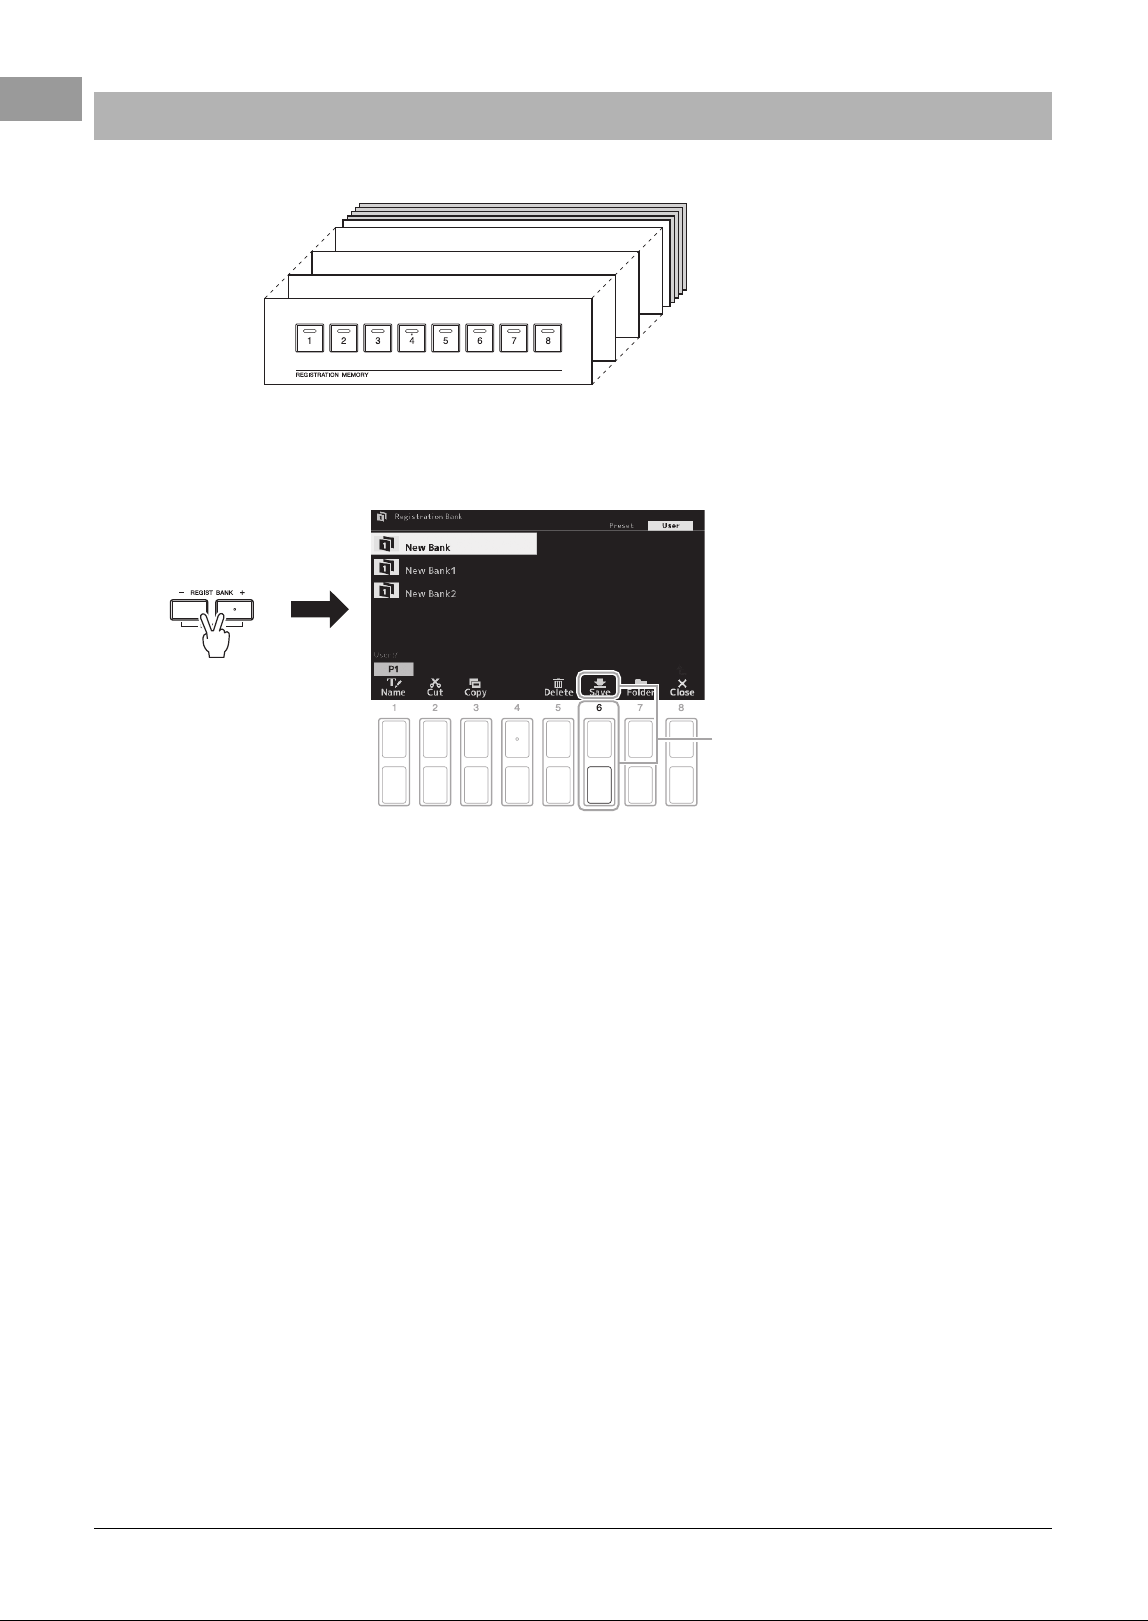
92 PSR-SX620 Owner’s Manual
You can save all eight registered panel setups as a single Registration Memory Bank file.
1 Press the REGIST BANK [+] and [-] buttons simultaneously to
call up the Registration Bank Selection Display.
2 Save the Bank file.
For instructions on saving in this display, refer to page 28.
Saving the Registration Memory as a Bank file
Bank 01
Bank 02
Bank 03
Bank 04
2
PSR-SX620 Owner’s Manual 93
Registration Memory/Playlist – Saving and Recalling Custom Panel Setups
7
The saved Registration Memory Bank files can be recalled by using the REGIST
BANK [-]/[+] buttons or the following procedure.
1 Press the REGIST BANK [+] and [-] buttons simultaneously to
call up the Registration Bank Selection display.
2 Move the cursor to the desired Bank by the Cursor buttons
[
][
][
E
][
F
]
, and then press the [ENTER] button.
3 Press one of the blue-lit numbered buttons ([1] – [8]) in the
Registration Memory section.
Recalling a Registered Panel Setup
NOTE
• When recalling the setups including
file selection of Song, Style, text,
etc. from a USB flash drive, make
sure that the appropriate USB flash
drive including the registered Song/
Style is connected into the USB [TO
DEVICE] terminal.
• Before using a USB flash drive, be
sure to read “Connecting USB
Devices” on page 101.
NOTE
Turning the [FREEZE] button on can
disable recall of specific item(s). For
instructions, refer to the Reference
Manual on the website.
Confirming the Registration Memory Information
In the Registration Bank Selection display, press the [6 ] (Info) button to call
up the Information window, showing which Voices and Style are memorized to
the [1] – [8] buttons of a Registration Memory Bank.
NOTE
If the Info indication is not shown at the bottom of the display, press the [8 ] button (page 26).
To close the window, press the [7 ]/[8 ] (Close) button.
Advanced Features
Refer to the Reference Manual on the website, Chapter 7.
Disabling recall of specific items (Freeze):
[MENU] → Menu1 → Regist Sequence/Freeze → [ENTER] →
Freeze
Calling up Registration
Memory numbers in order (Registration
Sequence):
[MENU] → Menu1 → Regist Sequence/Freeze → [ENTER] →
Registration Sequence
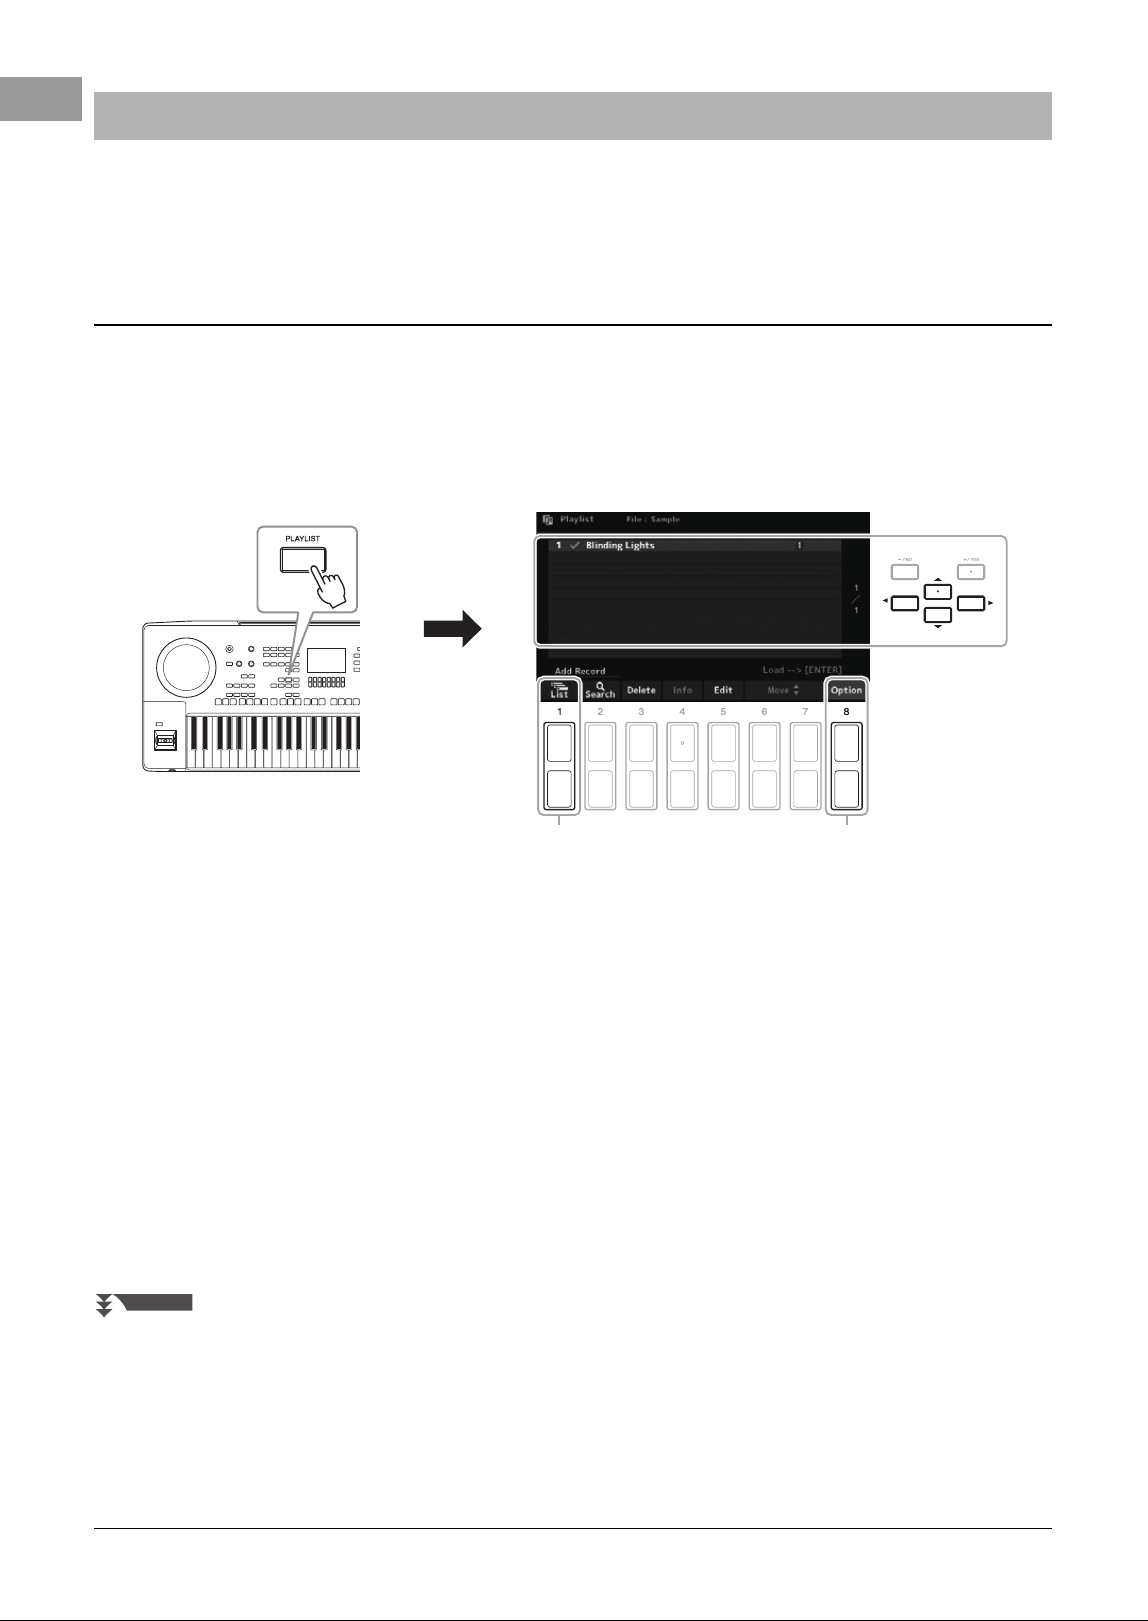
94 PSR-SX620 Owner’s Manual
The Playlist is useful for managing multiple set lists for your performances. You can select only the desired files
from a large repertoire (the huge number of the Registration Memory Bank files) and create a new set list for each
performance.
By adding Records to a Playlist, you can directly recall desired Registration Memory Bank files from the Playlist
for each performance.
1 Press the [PLAYLIST] button to call up the Playlist display.
The Playlist file which was selected the last time appears. (The sample preset Playlist will appear for the first
time.)
2 If you want to create a new Playlist, press the [8 ] buttons to call up the pop-up
display. Then press the [3 ]/[4 ](Create New Playlist) buttons.
3 Add a Record to the Playlist.
To add a Record via the Registration Bank Selection display:
3-1 Press the [1 ] (List) buttons to call up the Registration Bank Selection display.
3-2 Select the desired Bank file to register as a Playlist Record by using the Cursor buttons [][][E][F],
and then press the [ENTER] button.
If you want to select two or more files, repeat step 3-2.
If you want to select all files, press the [8 ] (All) buttons.
3-3 Pressing the [7 ] (OK) buttons closes the display, and the new Record is added to the bottom of the
Playlist.
Using Playlists to Manage a Large Repertoire of Panel Setups
Adding a Record (Link to a Bank file) to a Playlist
2, 5
3-1
NEXT PAGE
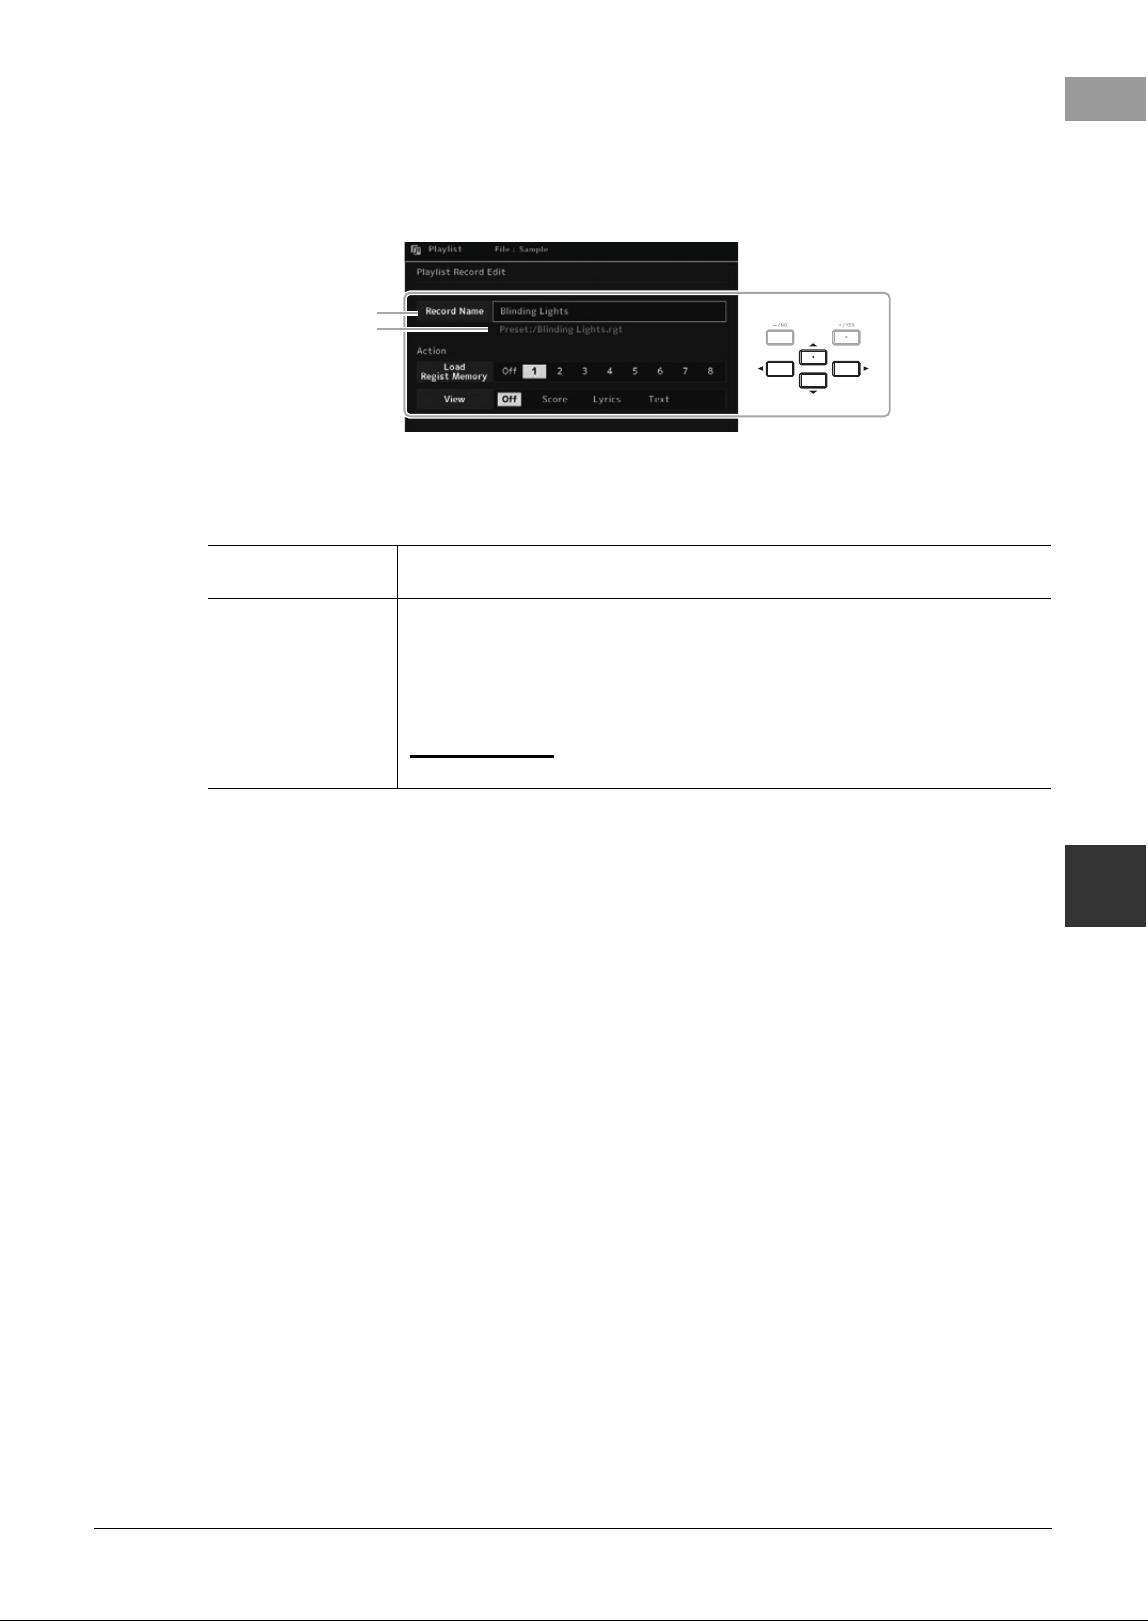
PSR-SX620 Owner’s Manual 95
Registration Memory/Playlist – Saving and Recalling Custom Panel Setups
7
4 If necessary, edit the added Record.
The newly added Playlist Record not only simply lets you recall the selected registration Bank file, but also
gives you tools for editing, if you want to set more detailed settings (such as directly recalling a specified
Registration Memory number).
4-1 Press [5 ](Edit) button on the Playlist display to call up the Playlist Record Edit window.
4-2 Select the desired parameter to edit by using the Cursor buttons [][], and then use the [+/YES][-/NO]
buttons or the Data dial.
4-3 Press the [EXIT] button to close the Playlist Record Edit display.
5 Save all the added Records as a Playlist file.
5-1 Press the [8 ] (Option) buttons to call up the pop-up display, and then press the [7 ]
(Select&Save) buttons.
5-2 Select the appropriate tab (User or USB) to which you want to save the data by using the TAB [E][F]
buttons.
If you want to save the data within an existing folder, also select the folder here.
5-3 Make sure that Save is shown at the bottom of the display.
If it is not shown on the display, press the [8 ] (File) button to call it up.
5-4 Press the[6 ] (Save) button.
The Character Entry window is called up.
5-5 Enter the file name (page 33).
Even if you skip this step, you can rename the file at any time after saving it (page 30).
5-6 Press the [8 ] (OK) button to actually save the file.
If the file name already exists, a message appears asking you if you want to overwrite or not.
If not, press one of the [6 ] (No) buttons and enter another name.
Record Name Determines the name of the Record. Pressing the [ENTER] button calls up the Character Entry
window, letting you change the RECORD NAME.
Action Select additional actions after recalling the Record, by using the [+/YES][-/NO] buttons or the
Data dial.
• Load Regist Memory: Recalls the Registration Memory corresponding to the number
selected here. When OFF is selected, no Registration Memory is recalled.
• View: Displays the view (score, lyrics or text) selected here. When OFF is selected, no view
is displayed.
NOTE
This setting is shown at right of the Record name on the Playlist display.
Record name
File path of the Registration
Bank file linked to the Record.
This file will be recalled by
selecting the Record.
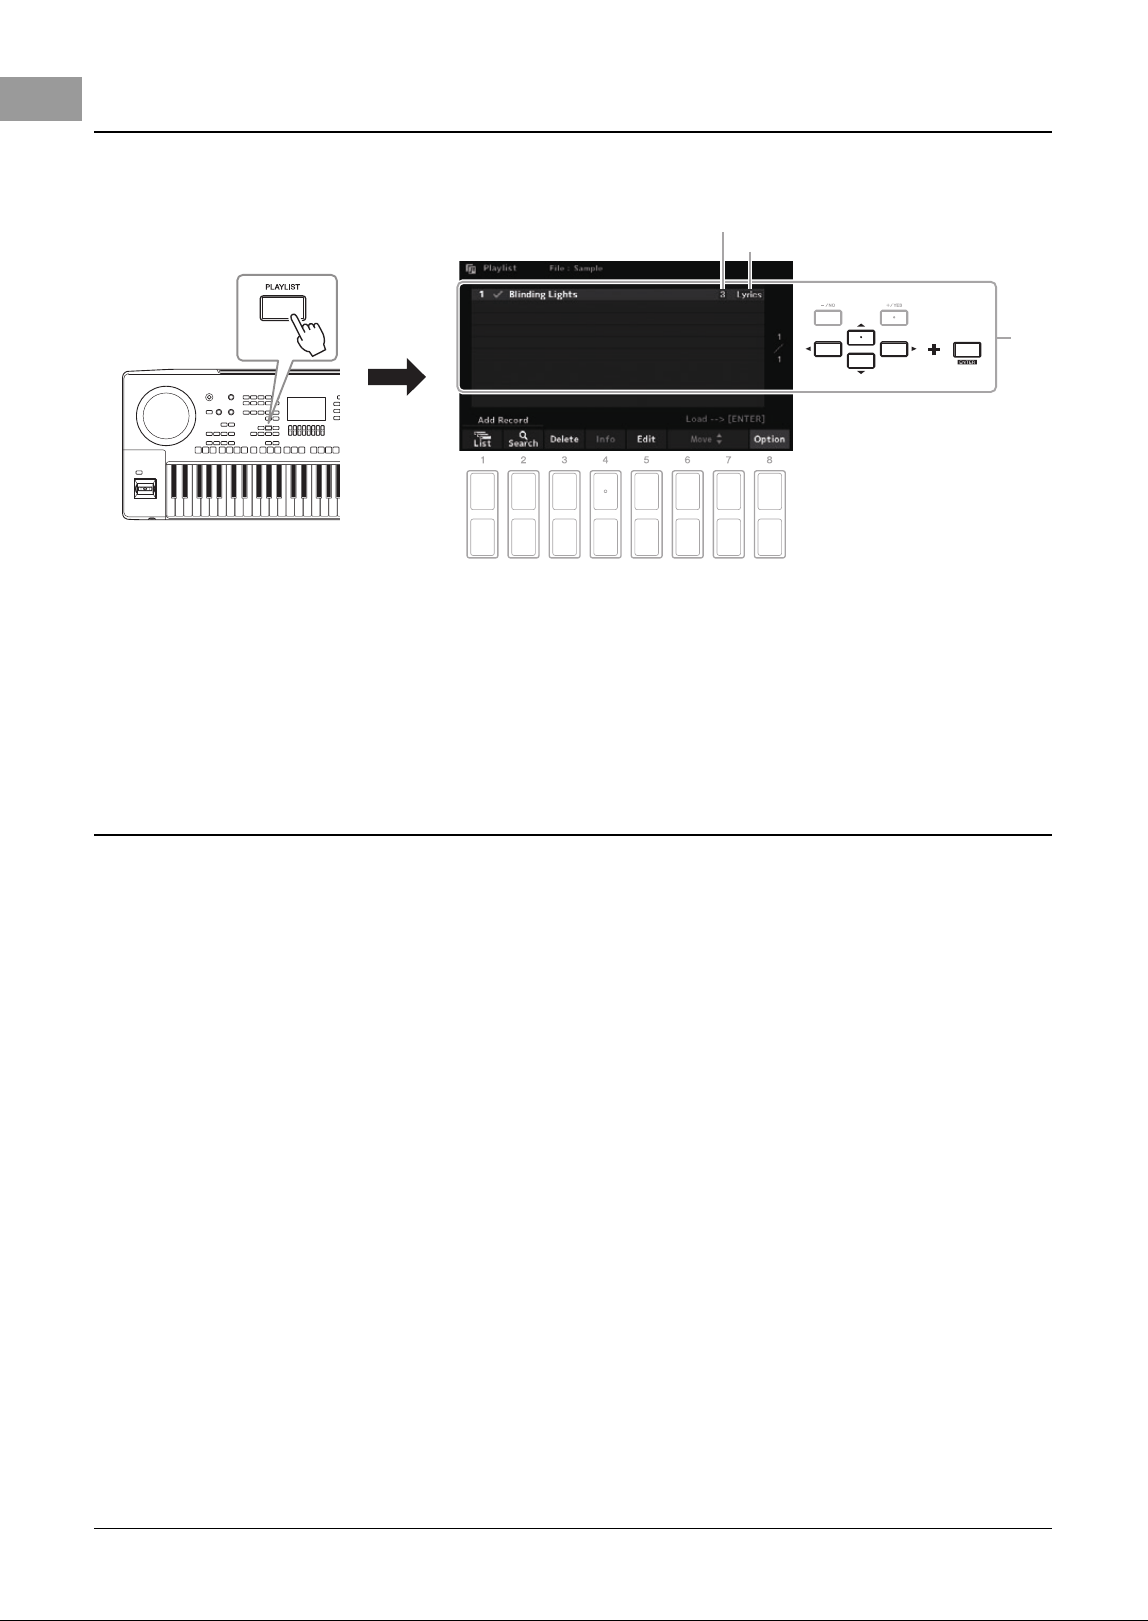
96 PSR-SX620 Owner’s Manual
1 Press the [PLAYLIST] button.
2 Select the Record name on the Playlist display by using the Cursor buttons [
][
], and
then press the [ENTER] button.
The Registration Memory Bank registered as the Playlist Record is recalled and the Action you’ve made
(page 95) is executed.
Pressing the [4 ] (Info) buttons calls up the Registration Bank Information window (page 93).
1 Press the [PLAYLIST] button, and then select the desired Record to delete by using the
Cursor buttons [][].
2 Press the [3 ] (Delete) buttons.
A confirmation message appears. If you want to cancel the operation, press the [6 ] (No) buttons here.
3 Press the [7 ] (Yes) buttons to delete the Record.
4 Press the [8 ] (Option) buttons to call up the pop-up display, and then press the [7
] (Select&Save) buttons to save the edited Playlist.
For instructions on how to save, refer to step 5-2 and following (page 95).
Recalling Custom Panel Setups via the Playlist
2
Display called up after loading the Record.
Registration Memory number called up
when the Record is loaded.
Deleting the Record from the Playlist
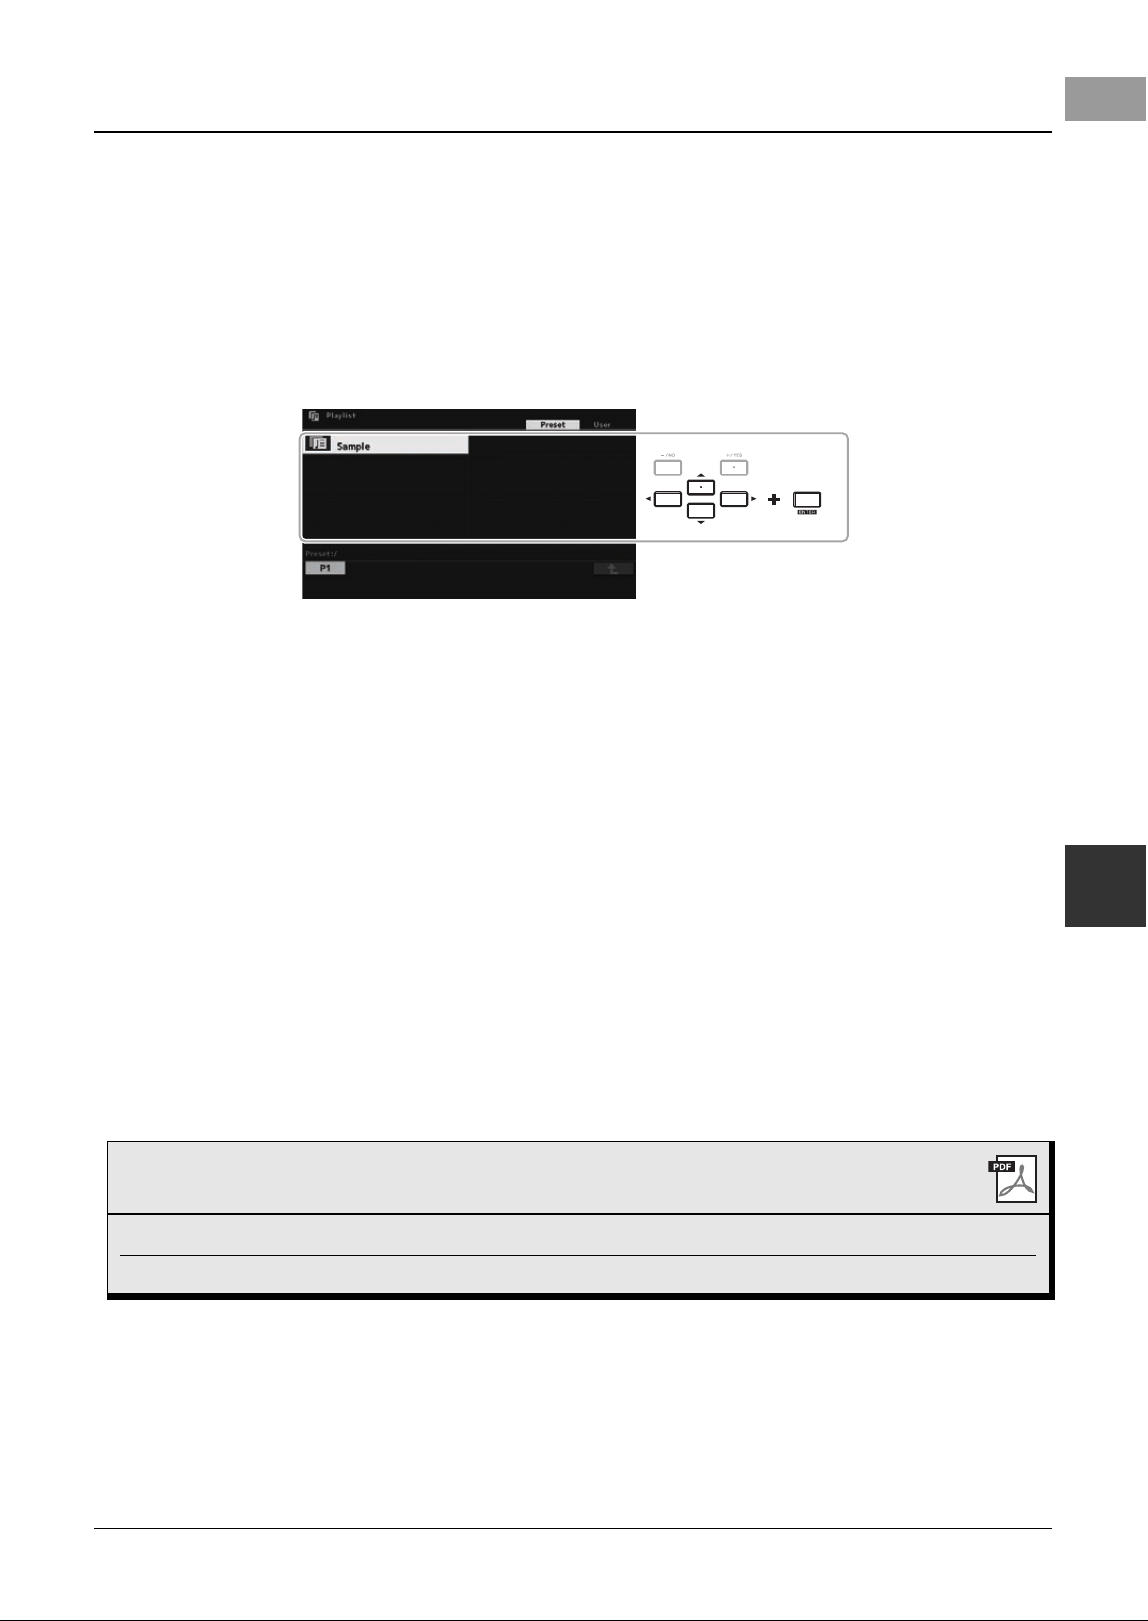
PSR-SX620 Owner’s Manual 97
Registration Memory/Playlist – Saving and Recalling Custom Panel Setups
7
“Append Playlist” allows you to copy the existing Playlist file and add it to the current Playlist file.
1 After pressing the [PLAYLIST] button, press the [8 ] (Option) buttons to call up the
pop-up display, and then press the [5 ]/[6 ] (Append Playlist) buttons to call up
the Playlist Selection display.
2 Select the desired Playlist file to append by using the Cursor buttons [
][
][
E
][
F], and
then press the [ENTER] buttons.
A confirmation message appears.
3 Press the [7 ] (Yes) buttons to add the Records.
All Records in the selected Playlist file are added at the bottom of the current Playlist.
If you want to cancel the operation, press the [6 ] (No) buttons here.
4 Press the [EXIT] buttons to call up the Playlist display.
5 Press the [8 ] (Option) buttons to call up the pop-up display, and then press the [7
] (Select&Save) buttons to save the edited Playlist.
For instructions on how to save, refer to step 5-2 and following (page 95).
Copying the Playlist Records from Another Playlist (Append Playlist)
Advanced Features
Refer to the Reference Manual on the website, Chapter 7.
Changing the Order of the Records in the Playlist
Importing Music Finder Records to the Playlist
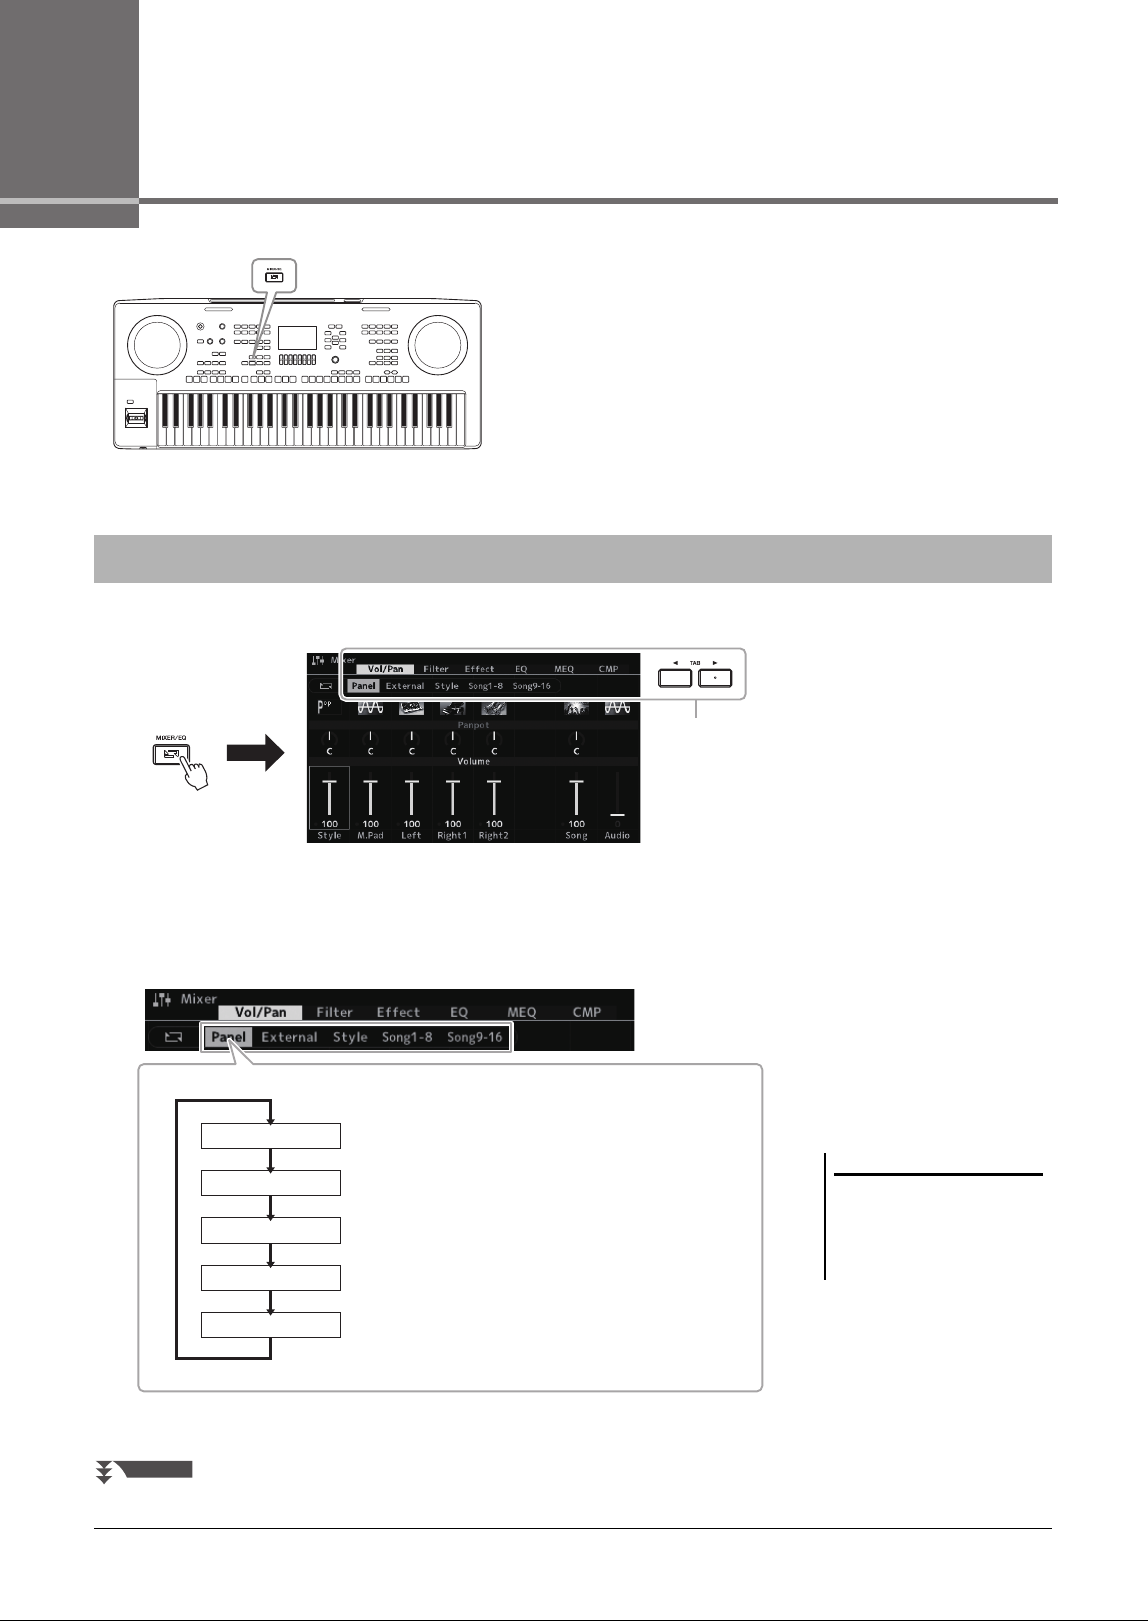
98 PSR-SX620 Owner’s Manual
8
Mixer
– Editing the Volume and Tonal Balance –
The Mixer gives you intuitive control over aspects of the
keyboard parts and Style/Song channels, including volume
balance and the timbre of the sounds. It lets you adjust the levels
and stereo position (pan) of each Voice to set the optimum
balance and stereo image, and lets you set how the effects are
applied.
1 Press the [MIXER/EQ] button to call up the Mixer display.
2 Press the [MIXER/EQ] button repeatedly to call up the Mixer
display for the relevant parts.
The part name is indicated at the top of the display.
Basic Procedure
3
NOTE
When the UD-WL01 USB Wireless
LAN adaptor (sold separately,
page 105) is connected to the instru-
ment, “WLAN” appears in the External
page.
Rhythm 1, 2, Bass, Chord 1, 2, Pad, Phrase 1, 2
Song channels 1 – 8
Style
Song1-8
Song channels 9 – 16
Song9-16
Entire Song part, entire Style part, Multi Pad part, LEFT
and RIGHT 1/2 parts, USB Audio Player
Panel
Mic, AUX In, USB (sound via USB cable), Bluetooth (sound via
Bluetooth communication), WLAN (sound via USB wireless LAN
adaptor)
External
NEXT PAGE
PSR-SX620 Owner’s Manual 99
Mixer – Editing the Volume and Tonal Balance –
8
3 Use the TAB [E][F] buttons to call up the desired page.
For details about each page, refer to the Reference Manual on the website.
• Vol/Pan.............Changes the Voice for each part and adjusts panning and vol-
ume for each part.
• Filter..................Adjusts Resonance, and Cutoff (sound brightness).
• Effect ................Selects effect type and adjusts its depth for each part.
• EQ .....................For adjusting equalization parameters to correct the tone or
timbre of the sound for each part.
• MEQ ..................Selects the master equalizer type applied to the entire sound
and edits the related parameters.
• CMP ..................This is the Master Compressor setting which determines the
dynamics of the overall sound.
4 Use the Cursor buttons
[
][
][
E
][
F
]
to select a parameter, and
then use the [1 ] – [8 ] buttons to set the value for each
part.
5 Save your Mixer settings.
NOTE
The Master EQ and Compressor set-
tings are not applied to the metronome
sound, audio playback, sound via USB
cable, or sound via USB wireless LAN
adaptor.
NOTE
Except for the microphone settings, the
External display settings (AUX In,
USB, WLAN) are maintained even
when you turn off the power.
• To save the Panel display settings and the microphone settings in the Exter-
nal display:
Register them to Registration Memory (page 91).
• To save the Style display settings:
Save them as Style data. If you want to recall the settings for future use, select the
Style file saved here.
1. Call up the operation display.
[MENU] → TAB [F] Menu2 → Cursor buttons [][][E][F] Style
Creator
→ [ENTER]
2. After the message asking whether you want to edit the existing Style or
create a new Style appears, press one of the [5 ]/[6 ] (Current
Style) buttons.
3. Press the [EXIT] button to close the Rec Channel display.
4. Press one of the [8 ] (Save) buttons to call up the Style Selection dis-
play, and then save it (page 28).
• To save the Song display settings:
First register the edited settings as part of the Song data (Setup), and then save the
Song. If you want to recall the settings for future use, select the Song file saved
here.
1. Call up the operation display.
[MENU] → TAB [F] Menu2 → Cursor buttons [][][E][F] Song
Creator → [ENTER]
2. Use the TAB [E][F] buttons to select the
Setup tab.
3. Use the cursor buttons [][][E][F] and the [ENTER] button to check
the items you want to store, and then press the [6 ]/[7 ] (Apply)
button.
4. Press one of the [8 ] (Save) buttons to call up the Song Selection dis-
play, and then save it (page 28).
Advanced Features
Refer to the Reference Manual on the website, Chapter 8.
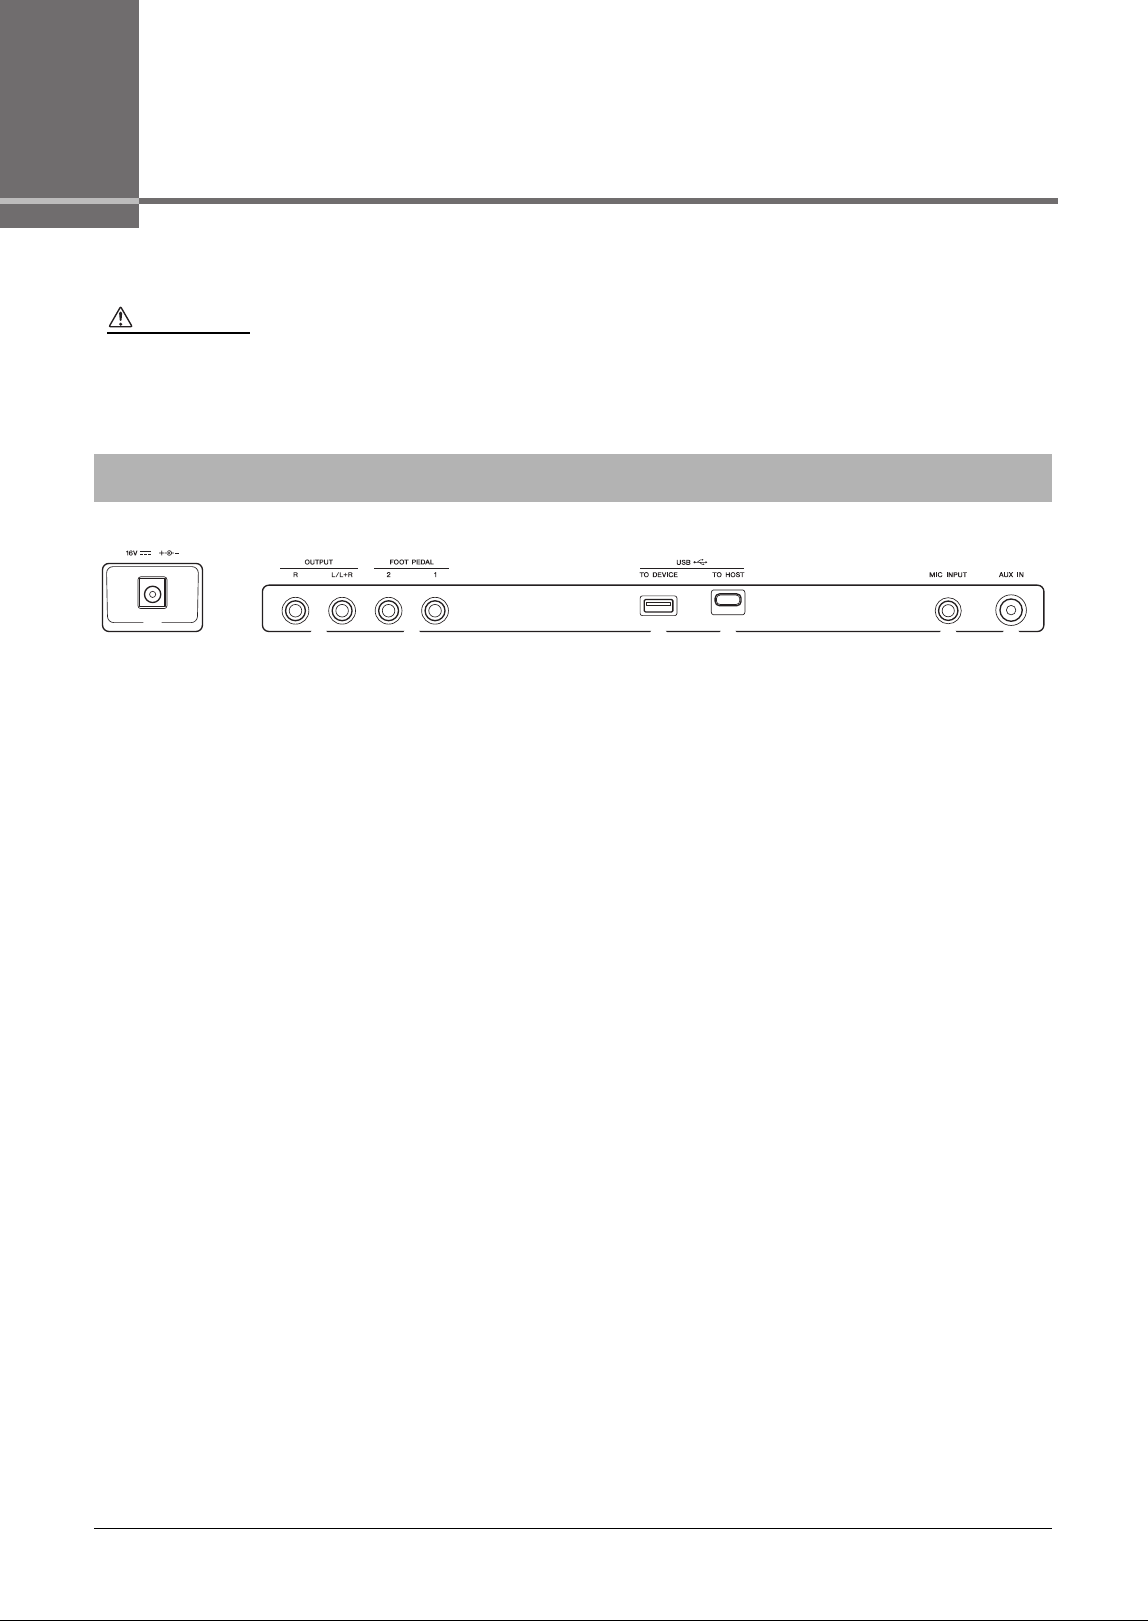
100 PSR-SX620 Owner’s Manual
9
Connections
– Using Your Instrument with Other Devices –
This chapter covers the connectors on the rear panel of this instrument.
1 DC IN jack........................................................................................................... Page 16
For connecting the AC adaptor (page 119).
2 OUTPUT [L/L+R]/[R] jacks .............................................................................. Page 109
For connecting to external powered speaker systems.
3 FOOT PEDAL [1]/[2] jacks................................................................................Page 110
For connecting a separately sold foot controller or footswitch.
4 USB [TO DEVICE] terminal ..............................................................................Page 101
For connecting a USB flash drive (page 101), or USB wireless LAN adaptor (page 105).
Before using the USB [TO DEVICE] terminal, be sure to read “Precautions when using the USB
[TO DEVICE] terminal” on page 101.
5 USB [TO HOST] terminal (USB Type-C
TM
)..................................................... Page 103
For connecting to a computer or smart device such as smartphone or tablet.
6 [MIC INPUT] jack................................................................................................ Page 83
For connecting a microphone.
7 [AUX IN] jack .................................................................................................... Page 106
For connecting an audio player.
CAUTION
Before connecting the instrument to other electronic components, turn off the power of all the components. Also, before turning any components on
or off, make sure to set all volume levels to minimum (0). Otherwise, damage to the components, electrical shock, or even permanent hearing loss
may occur.
Rear Panel
1
2 3 4 5 6 7
Connections
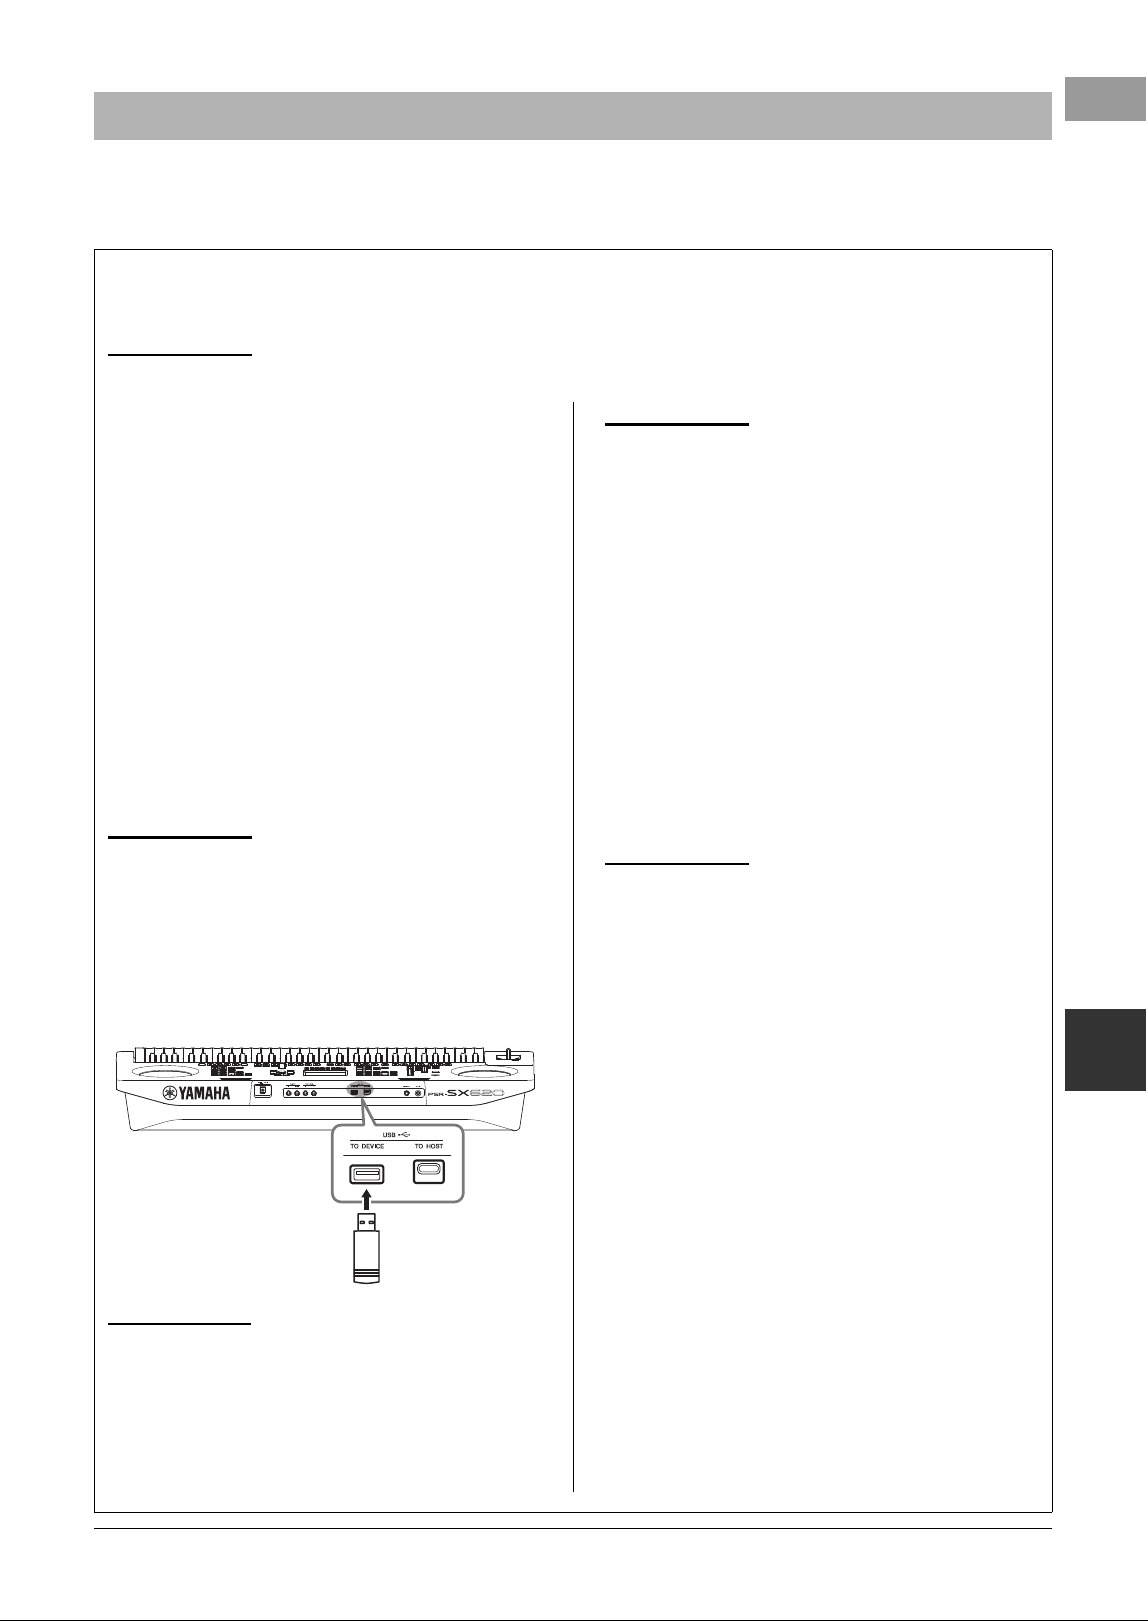
PSR-SX620 Owner’s Manual 101
Connections – Using Your Instrument with Other Devices –
9
You can connect a USB flash drive or a USB wireless LAN adaptor (sold separately) to the USB [TO DEVICE]
terminal. This lets you save data you’ve created on the instrument to the USB flash drive (page 28). You can also
connect the instrument to a smart device via wireless LAN (page 105).
Connecting USB Devices (USB [TO DEVICE] terminal)
Precautions when using the USB [TO DEVICE] terminal
This instrument features a built-in USB [TO DEVICE] terminal. When connecting a USB device to the terminal, be sure to
handle the USB device with care. Follow the important precautions below.
NOTE
For more information about the handling of USB devices, refer to the owner’s manual of the USB device.
Compatible USB devices
• USB flash drive
• USB wireless LAN adaptor (UD-WL01; may not be
available depending on your area)
Other USB devices such as a USB hub, computer key-
board or mouse cannot be used.
The instrument does not necessarily support all commer-
cially available USB devices. Yamaha cannot guarantee
operation of USB devices that you purchase. Before pur-
chasing a USB device for use with this instrument, please
visit the following web page:
https://manual.yamaha.com/mi/rt/psrsx620/downloads/
Although USB devices 2.0 to 3.0 can be used on this
instrument, the amount of time for saving to or loading
from the USB device may differ depending on the type of
data or the status of the instrument. USB devices 1.1 can-
not be used on this instrument.
NOTE
The rating of the USB [TO DEVICE] terminal is a maximum of 5V/500mA. Do not
connect USB devices having a rating above this, since this can cause damage to
the instrument itself.
Connecting a USB device
When connecting a USB device to the USB [TO
DEVICE] terminal, make sure that the connector on the
device is appropriate and that it is connected in the proper
direction.
NOTICE
• Avoid connecting or disconnecting the USB device while executing
playback/recording and file management operations (such as Save,
Copy, Delete and Format), or when accessing the USB device. Fail-
ure to observe this may result in “freezing” of the operation of the
instrument or corruption of the USB device and the data.
• When connecting then disconnecting the USB device (and vice
versa), make sure to wait a few seconds between the two opera-
tions.
• Do not use an extension cable when connecting a USB device.
NOTE
• When connecting a USB cable, make sure that the length is less than 3 meters.
Using a USB Flash Drive
By connecting the instrument to a USB flash drive, you
can save data you’ve created to the connected device, as
well as read data from the connected device.
Number of USB flash drives that can be
used
Only one USB flash drive can be connected to the USB
[TO DEVICE] terminal.
Formatting a USB flash drive
You should format the USB flash drive only with this
instrument (page 102). A USB flash drive formatted on
another device may not operate properly.
NOTICE
The format operation overwrites any previously existing data. Make
sure that the USB flash drive you are formatting does not contain
important data.
To protect your data (write-protect)
To prevent important data from being inadvertently
erased, apply the write-protect provided with each USB
flash drive. If you are saving data to the USB flash drive,
make sure to disable write-protect.
Turning off the instrument
When turning off the instrument, make sure that the
instrument is NOT accessing the USB flash drive by
playback/recording or file management (such as during
Save, Copy, Delete and Format operations). Failure to do
so may corrupt the USB flash drive and the data.
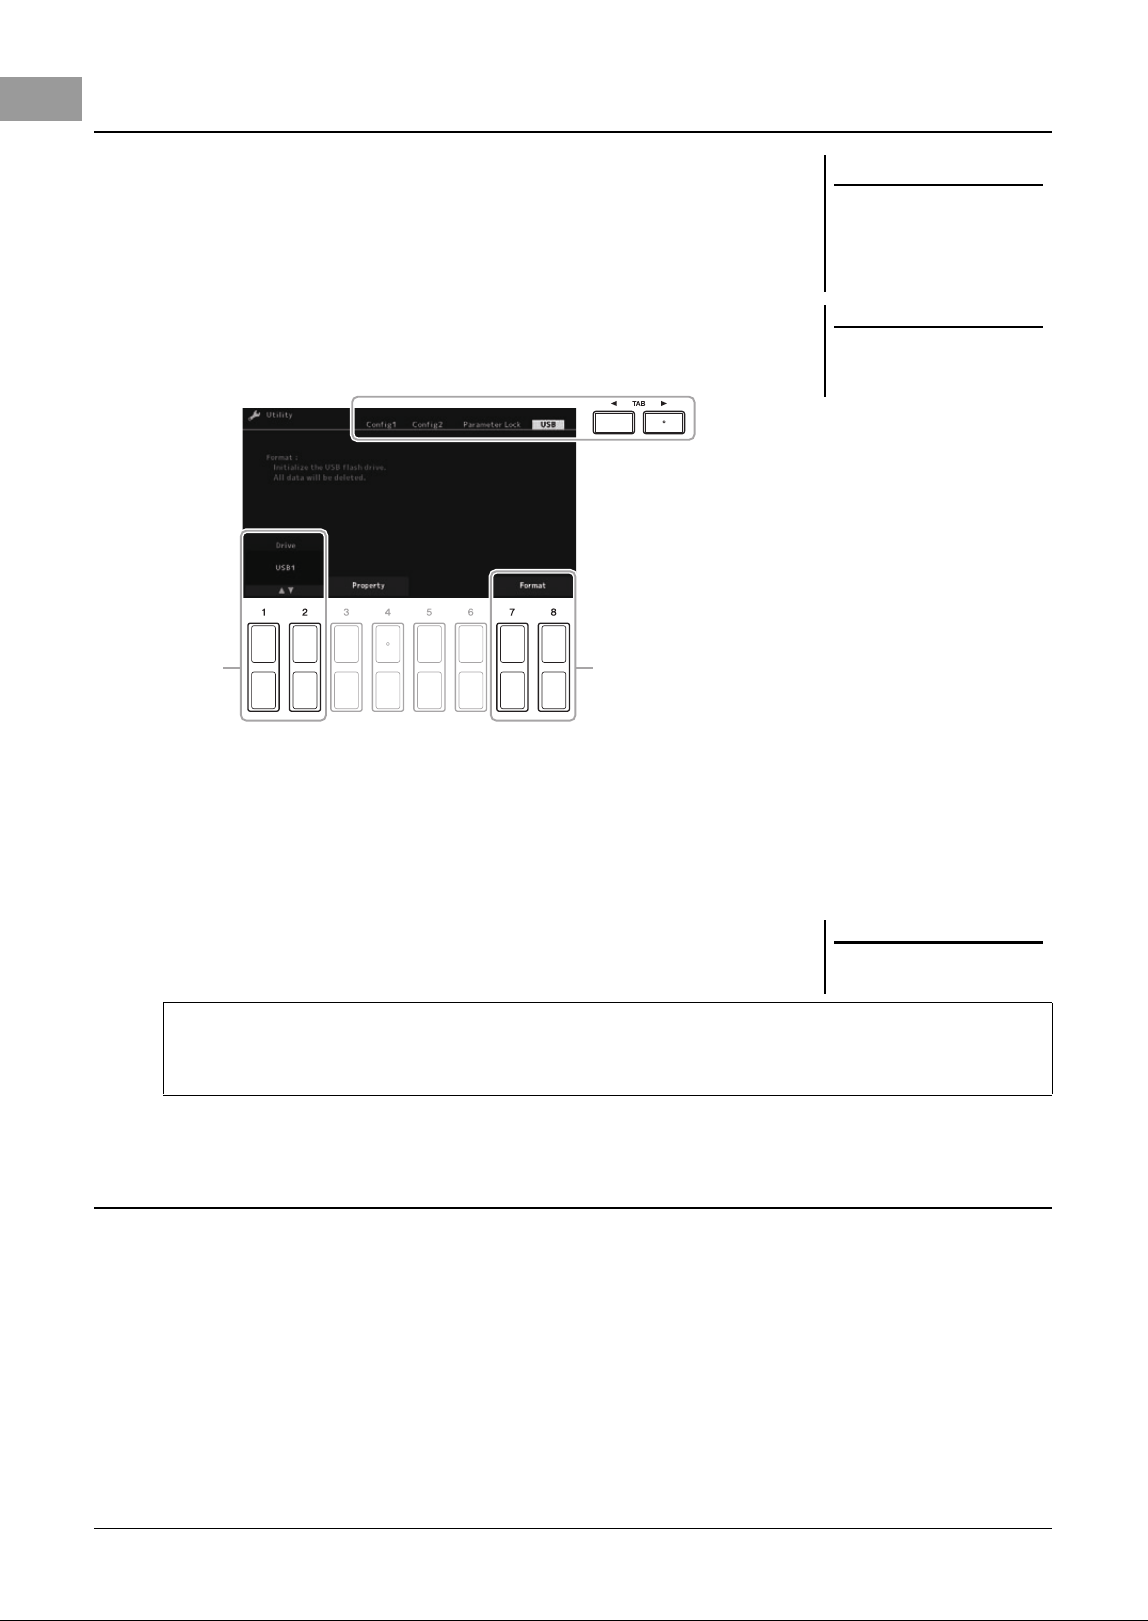
102 PSR-SX620 Owner’s Manual
When a USB flash drive is connected, a message may appear prompting you to
format the USB flash drive. If so, carry out the format operation.
1 Connect a USB flash drive for formatting into the USB [TO
DEVICE].
2 Call up the operation display.
[MENU] → TAB [F] General → Cursor buttons [][][E][F] Utility →
[ENTER] → TAB [F] USB
3 If necessary, use the [1
]/[2
] buttons to select the
desired drive (partition) in the USB flash drive to be formatted.
4 Press one of the [7
]/[8
] (Format) buttons to format the
USB flash drive.
5 Press the [+/YES] button to actually carry out the Format
operation.
You can access files which are saved in the USB flash drive with the following operation.
Select the desired category by using the Cursor [][][E][F] buttons from TAB [F] USB on the File Selection
displays (page 26), and then press the [ENTER] button.
Formatting a USB Flash Drive
NOTICE
The format operation deletes any
previously existing data. Make
sure that the USB flash drive you
are formatting does not contain
important data.
NOTE
Playback of Style, Song and Multi
Pads will stop when formatting is
started.
3 4
NOTE
To cancel the Format operation, press
the [-/NO] button.
Confirming the remaining memory
You can check the remaining memory of the connected USB flash drive by pressing one of the [3 ]/[4
] (Property) buttons.
Selecting Files in the USB Flash Drive
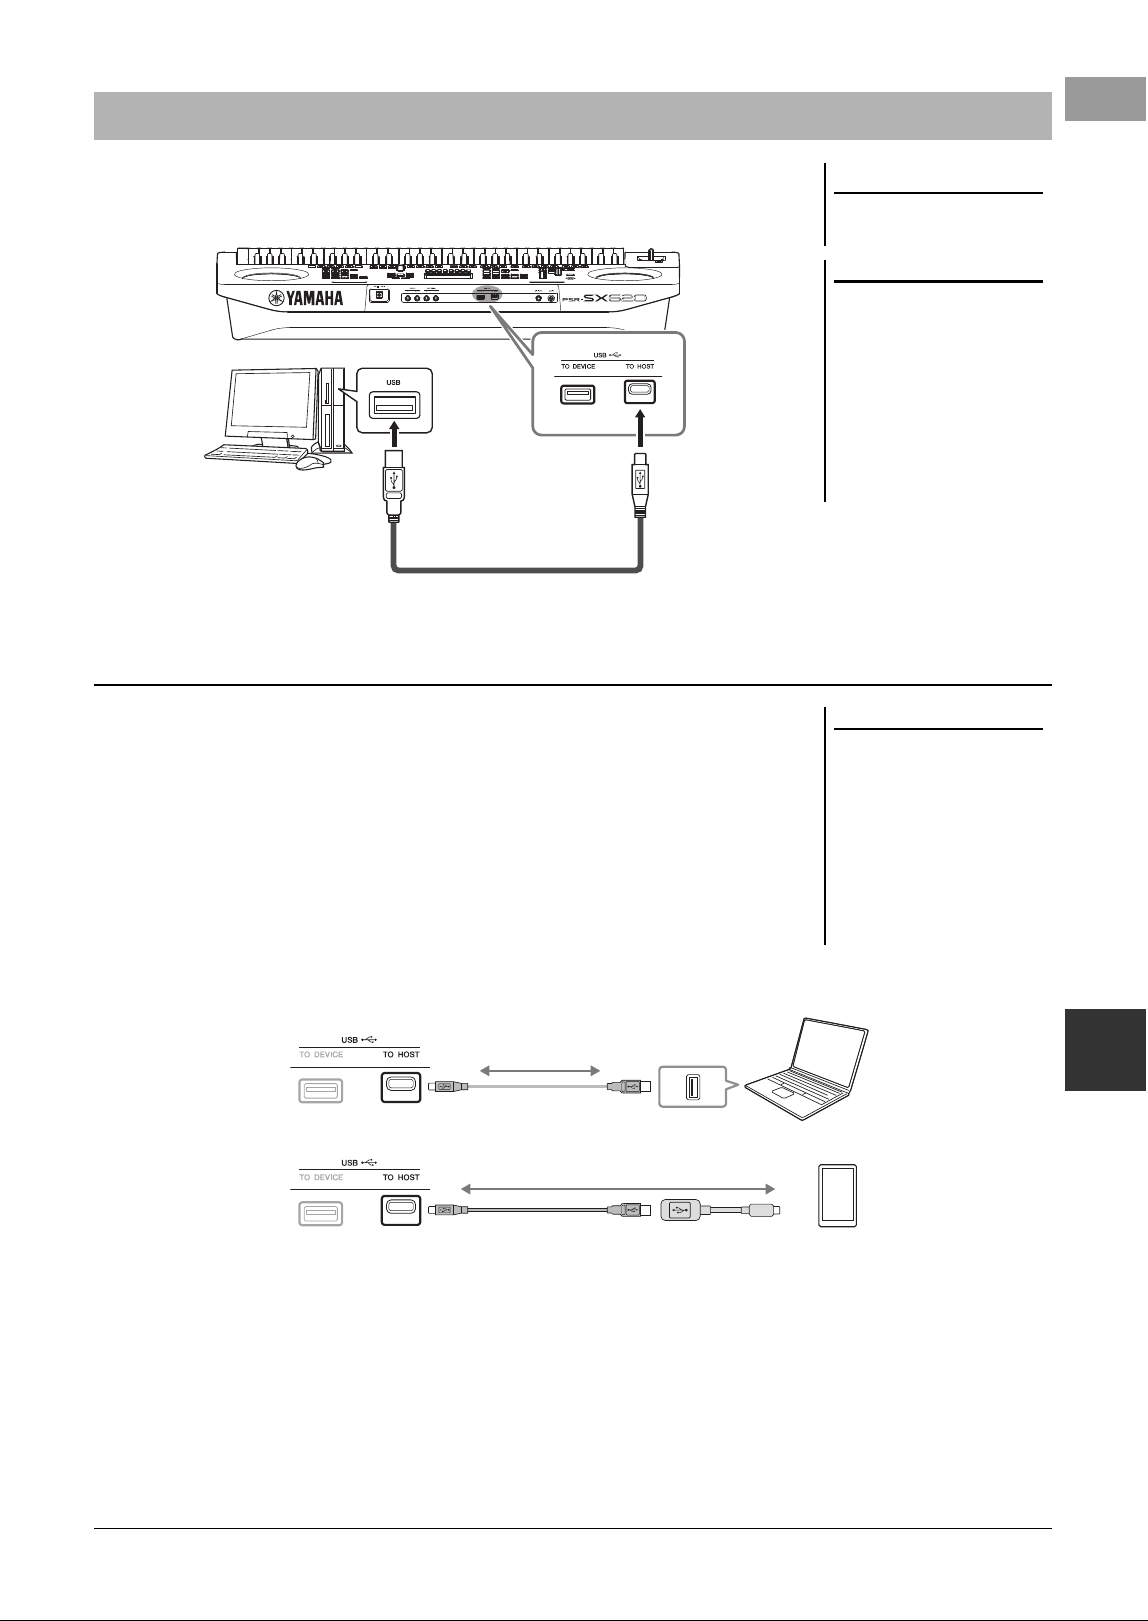
PSR-SX620 Owner’s Manual 103
Connections – Using Your Instrument with Other Devices –
9
By connecting a computer to the USB [TO HOST] terminal, you can transfer data
between the instrument and the computer via MIDI. For details on using a computer
with this instrument, refer to the “Computer-related Operations” on the website.
By connecting a computer or a smart device to the USB [TO HOST] terminal via a
USB cable, digital audio data can be transmitted/received. This USB Audio Interface
function provides the following advantages:
Playing back audio data with high sound quality
This gives you direct, clear sound in which the sound quality has less noise and
deterioration than that from the [AUX IN] jack.
Recording your performance on the instrument as audio data by using
recording software or music production software
The recorded audio data can be played back on the computer or smart device.
Connecting to a Computer (USB [TO HOST] terminal)
NOTICE
Use an AC or CC type USB cable
of less than 3 meters.
NOTE
• When using a USB cable to connect
the instrument to your computer,
make the connection directly without
passing through a USB hub.
• The instrument will begin transmis-
sion a short time after the USB con-
nection is made.
• For information on setting up your
sequence software, refer to the
owner’s manual of the relevant soft-
ware.
USB cable
Transmitting/Receiving Audio Data (USB Audio Interface function)
NOTE
• When transmitting or receiving
audio signals by using a computer
running Windows, the Yamaha
Steinberg USB Driver should be
installed to the computer. For
details, refer to the “Computer-
related Operations” on the website.
• For instructions on connecting to a
smart device, refer to the “Smart
Device Connection Manual” on the
website.
Instrument
USB cable
USB conversion
adaptor
Smart device
Computer
USB terminal
Instrument
USB cable
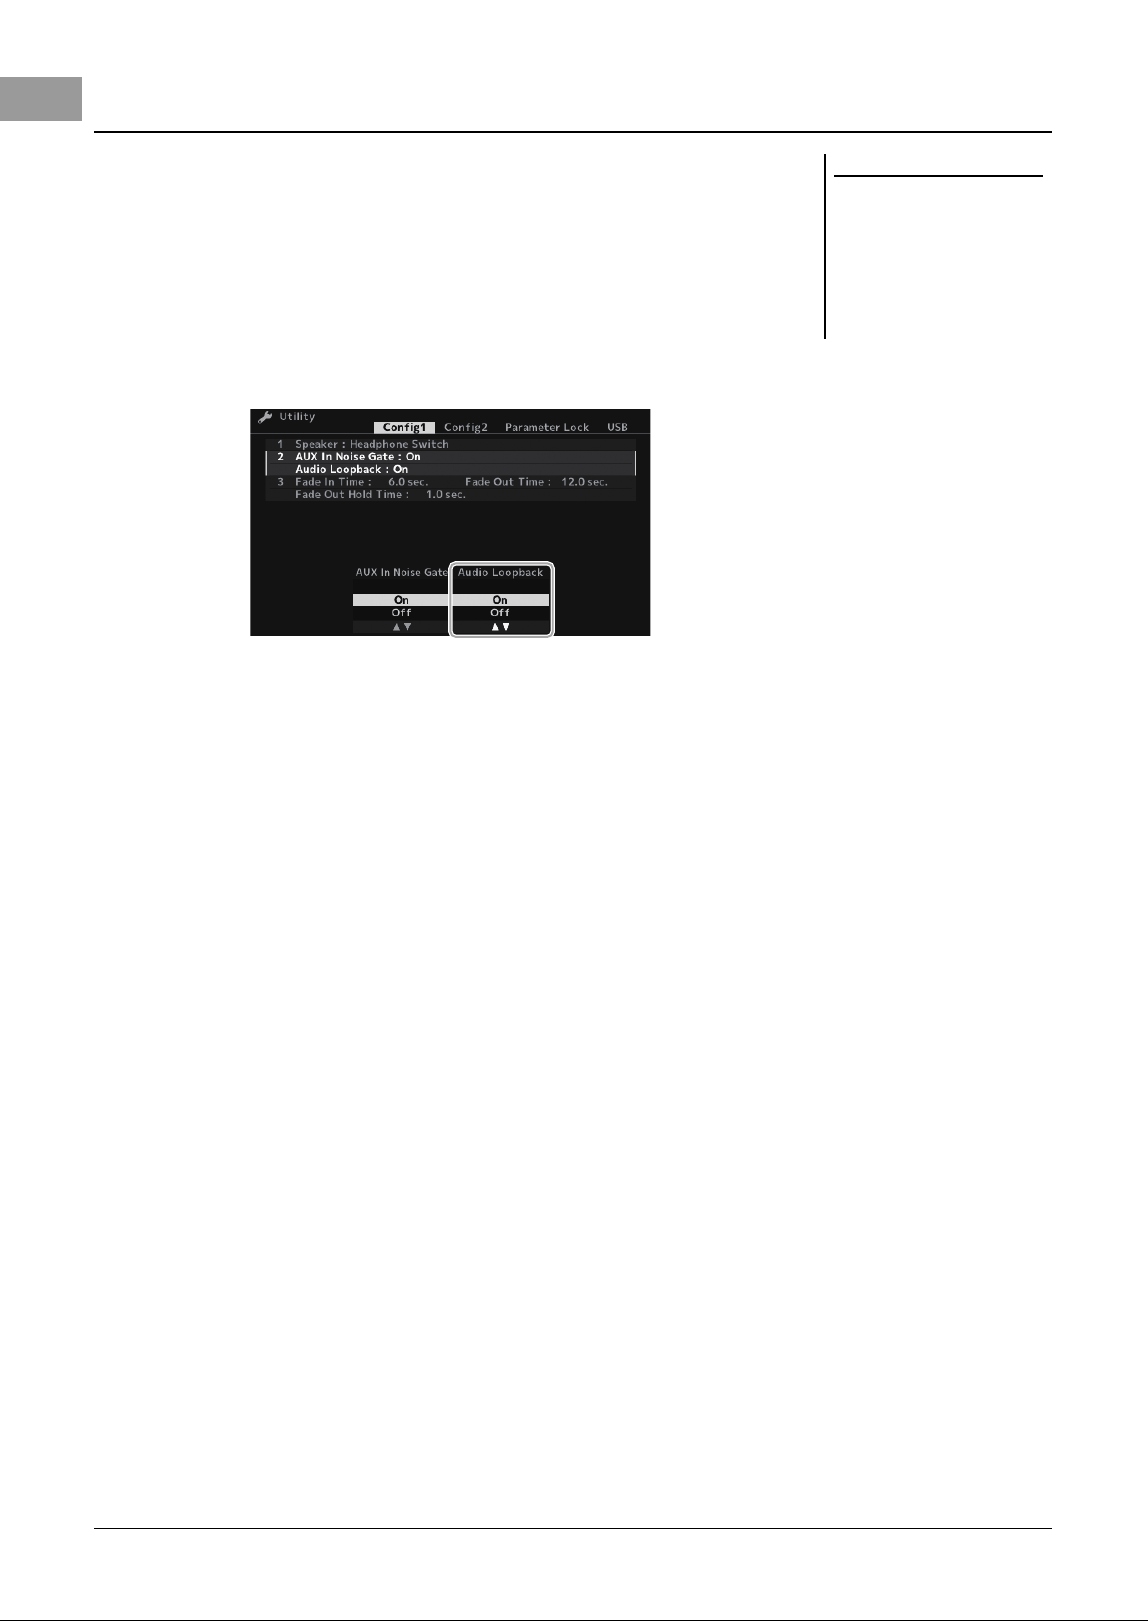
104 PSR-SX620 Owner’s Manual
This allows you to set whether Audio Input Sound (page 106) from the external
device is output to a computer or a smart device or not along with the performance
played on the instrument. To output the Audio Input Sound, set the Audio Loopback
to “On.”
For example, if you want to record the Audio Input Sound as well as the sound
played on the instrument by using the connected computer or smart device, set this
to “On.” If you intend to record only the sound played on the instrument by using the
computer or smart device, set this to “Off.”
The setting can be made via [MENU] → Utility → Config1 → Audio Loopback.
Turning Audio Loopback On/Off
NOTE
• With Audio Recording (page 81), the
Audio Input Sound from the external
device is recorded when this is set
to “On,” and not recorded when set
to “Off.”
• The sound cannot be output to a
device connected by the [AUX IN]
jack.
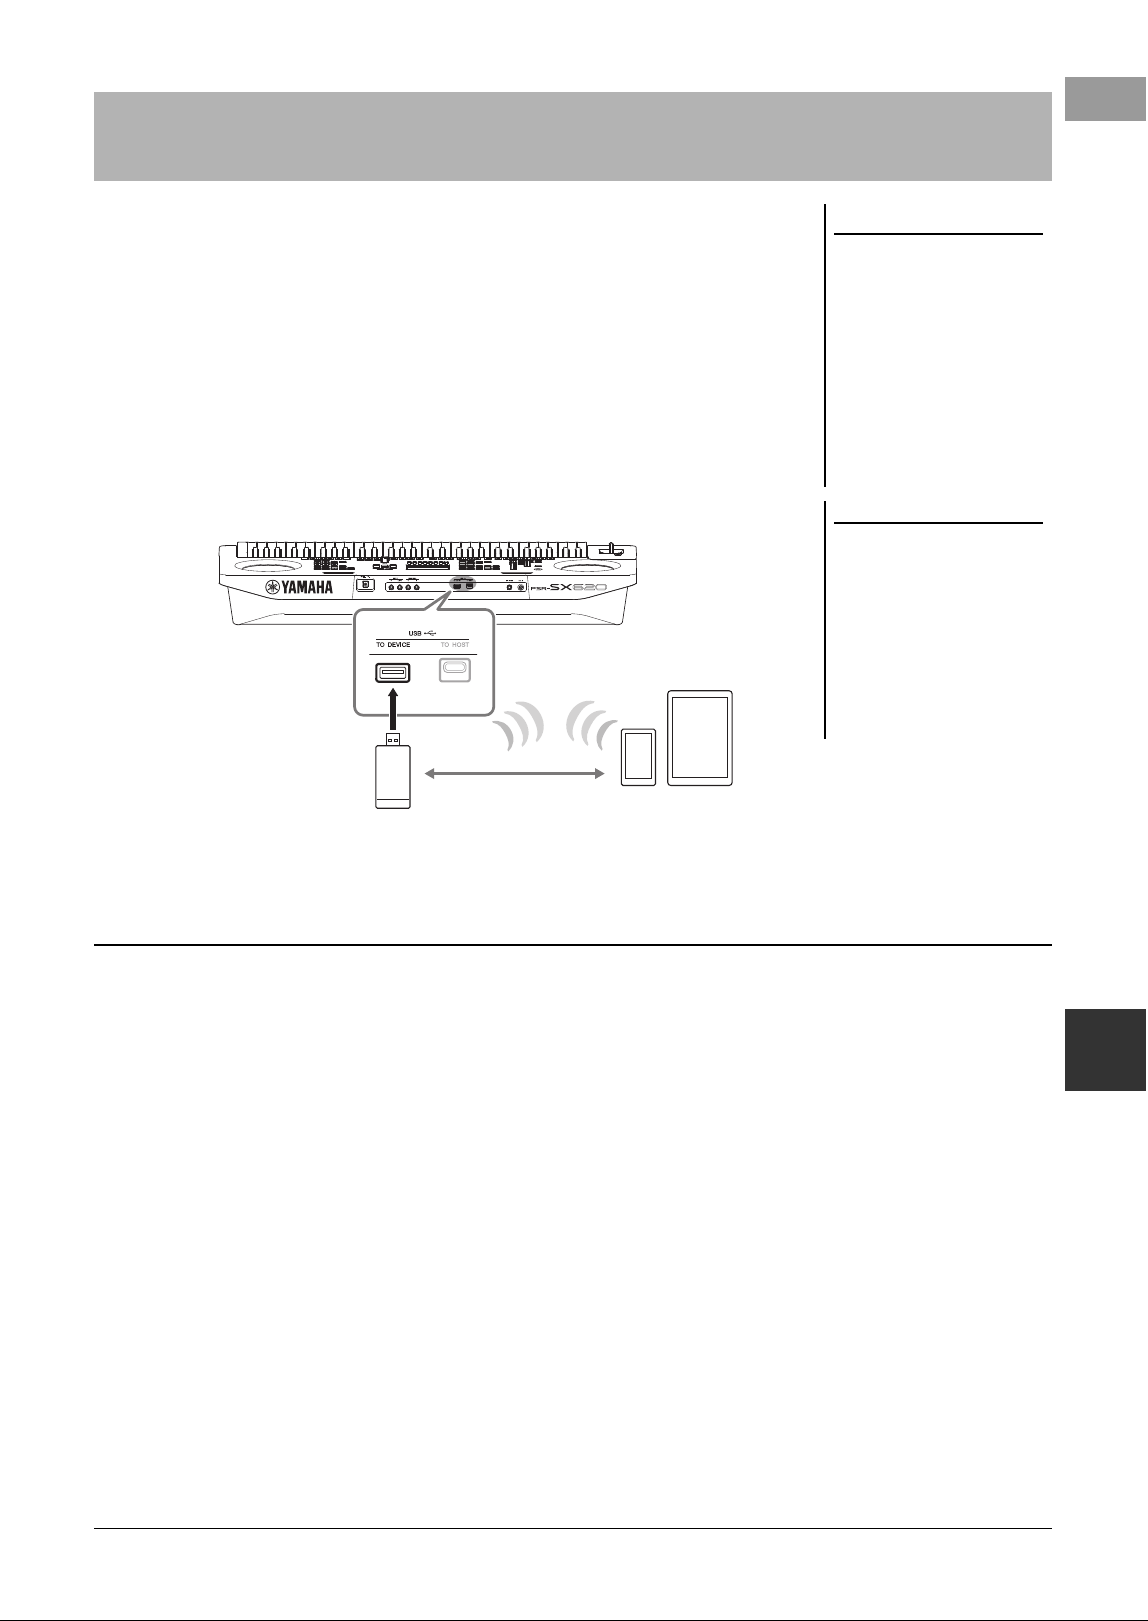
PSR-SX620 Owner’s Manual 105
Connections – Using Your Instrument with Other Devices –
9
You can use a smart device, with the instrument for a variety of musical purposes by
connecting it to the instrument. By using application tools on your smart device, you
can take advantage of convenient functions and get more enjoyment out of this
instrument.
Use one of the following methods to make connections.
• Connect to the [AUX IN] jack by using an audio cable (page 106).
• Connect to the USB [TO HOST] terminal via a USB cable (page 103).
• Connect to the USB [TO DEVICE] terminal via the USB wireless LAN adaptor:
UD-WL01 (*).
*This accessory is sold separately, but may not be available depending on your area.
For details on connections, refer to the “Smart Device Connection Manual” and the
Reference Manual on the website.
By connecting to a smart device and using the compatible smart device app, you can
get more enjoyment out of this instrument. Find apps that suit your purpose such as
viewing notation of audio files, or keeping record of your keyboard performances.
The following are examples of apps you can use with the instrument.
Rec'n'Share
This lets you both record your performances and share performance data.
Chord Tracker
This app helps you practice and perform songs by analyzing the audio file stored in
your smart device and automatically displaying the chord symbols for you.
For information about compatible smart devices and application tools, access the
following page:
https://www.yamaha.com/2/kbdapps/
Connecting to a Smart Device ([AUX IN] jack, USB [TO HOST] ter-
minal, Wireless LAN)
NOTICE
• Do not place your smart device
in an unstable position. Doing
so may cause the device to fall
and result in damage.
• Do not connect this product to
public Wi-Fi and/or Internet
directly. Only connect this
product to the Internet through
a router with strong password-
protections. Consult your
router manufacturer for infor-
mation on security best prac-
tices.
NOTE
• Before using the USB [TO DEVICE]
terminal, be sure to read “Precau-
tions when using the USB [TO
DEVICE] terminal” on page 101.
• When you use the instrument along
with an application on your smart
device, we recommend that you first
set “Airplane Mode” to “ON” then
set “Wi-Fi” to “ON” on your smart
device in order to avoid noise
caused by communication.
Wireless LAN
USB wireless LAN
adaptor (UD-WL01)
Example
Smart device
Using a Smart Device App
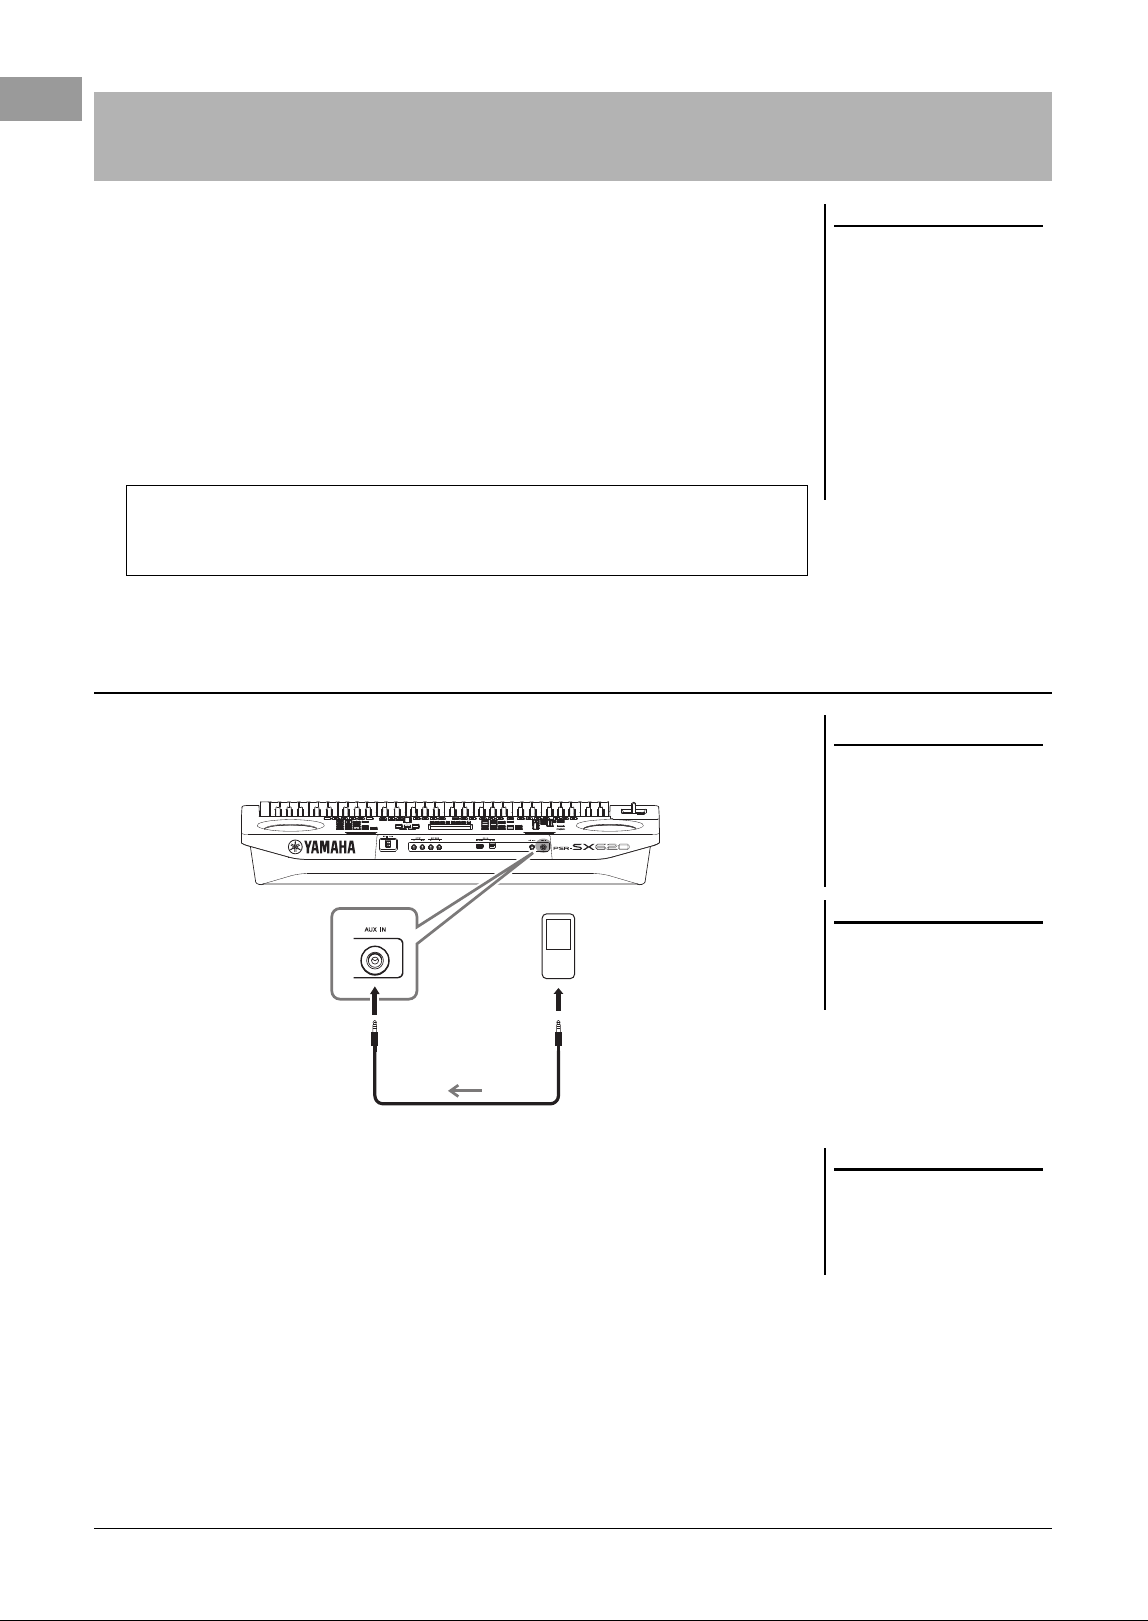
106 PSR-SX620 Owner’s Manual
Audio playback by the connected device can be output from the instrument’s
speaker. To input audio, connect an external device by one of the following methods.
• Connecting to the [AUX IN] jack by using an audio cable
• Connecting to the USB [TO HOST] terminal by using a USB cable (USB Audio
Interface function; page 103)
• Connecting by Bluetooth (Bluetooth Audio function; page 107)
When connecting to a smart device, you can also connect by using a USB wireless
LAN adaptor (UD-WL01; sold separately). For information about connection with a
smart device, refer to page 105.
You can connect the headphone jack of a portable audio player to the instrument’s
[AUX IN] jack, letting you hear the sound of that portable audio player through the
built-in speakers of the instrument.
The input signal from the [AUX IN] jack is affected by the setting of the
instrument’s [MASTER VOLUME] dial, and the volume balance with other sounds
played on this keyboard can be adjusted from the Balance display (page 62).
Listening to Audio Playback by an External Device through the
Instrument’s Speaker ([AUX IN] jack)
NOTE
• The volume of the Audio Input
Sound can be adjusted from the
external device.
• You can adjust the volume balance
among the sounds of the instrument
and the Audio Input Sound in the
Balance display (page 62).
• You can set whether Audio Input
Sound from the external device is
output to a computer or a smart
device or not along with the perfor-
mance played on the instrument. For
details, refer to “Turning Audio
Loopback On/Off” on page 104.
Audio Input Sound:
In this manual, “Audio Input Sound” refers to audio input to the instrument from the
external devices connected by these methods.
Playing a Portable Audio Player with the Built-in Speakers
NOTICE
To avoid damage to the devices,
first turn on the power to the
external device, and then to the
instrument. When turning off the
power, first turn off the power to
the instrument, and then to the
external device.
NOTE
When connecting to computer or a
smart device, you can also connect via
the USB [TO HOST] terminal
(page 103).
Phone plug
(stereo mini)
Audio cable
Phone plug
(stereo mini)
Headphone jack
Portable audio
player
Audio signal
NOTE
You can control the input volume from
the [AUX IN] jack by using the LIVE
CONTROL knobs. For instructions on
how to assign the functions to the
knobs, refer to page 45.
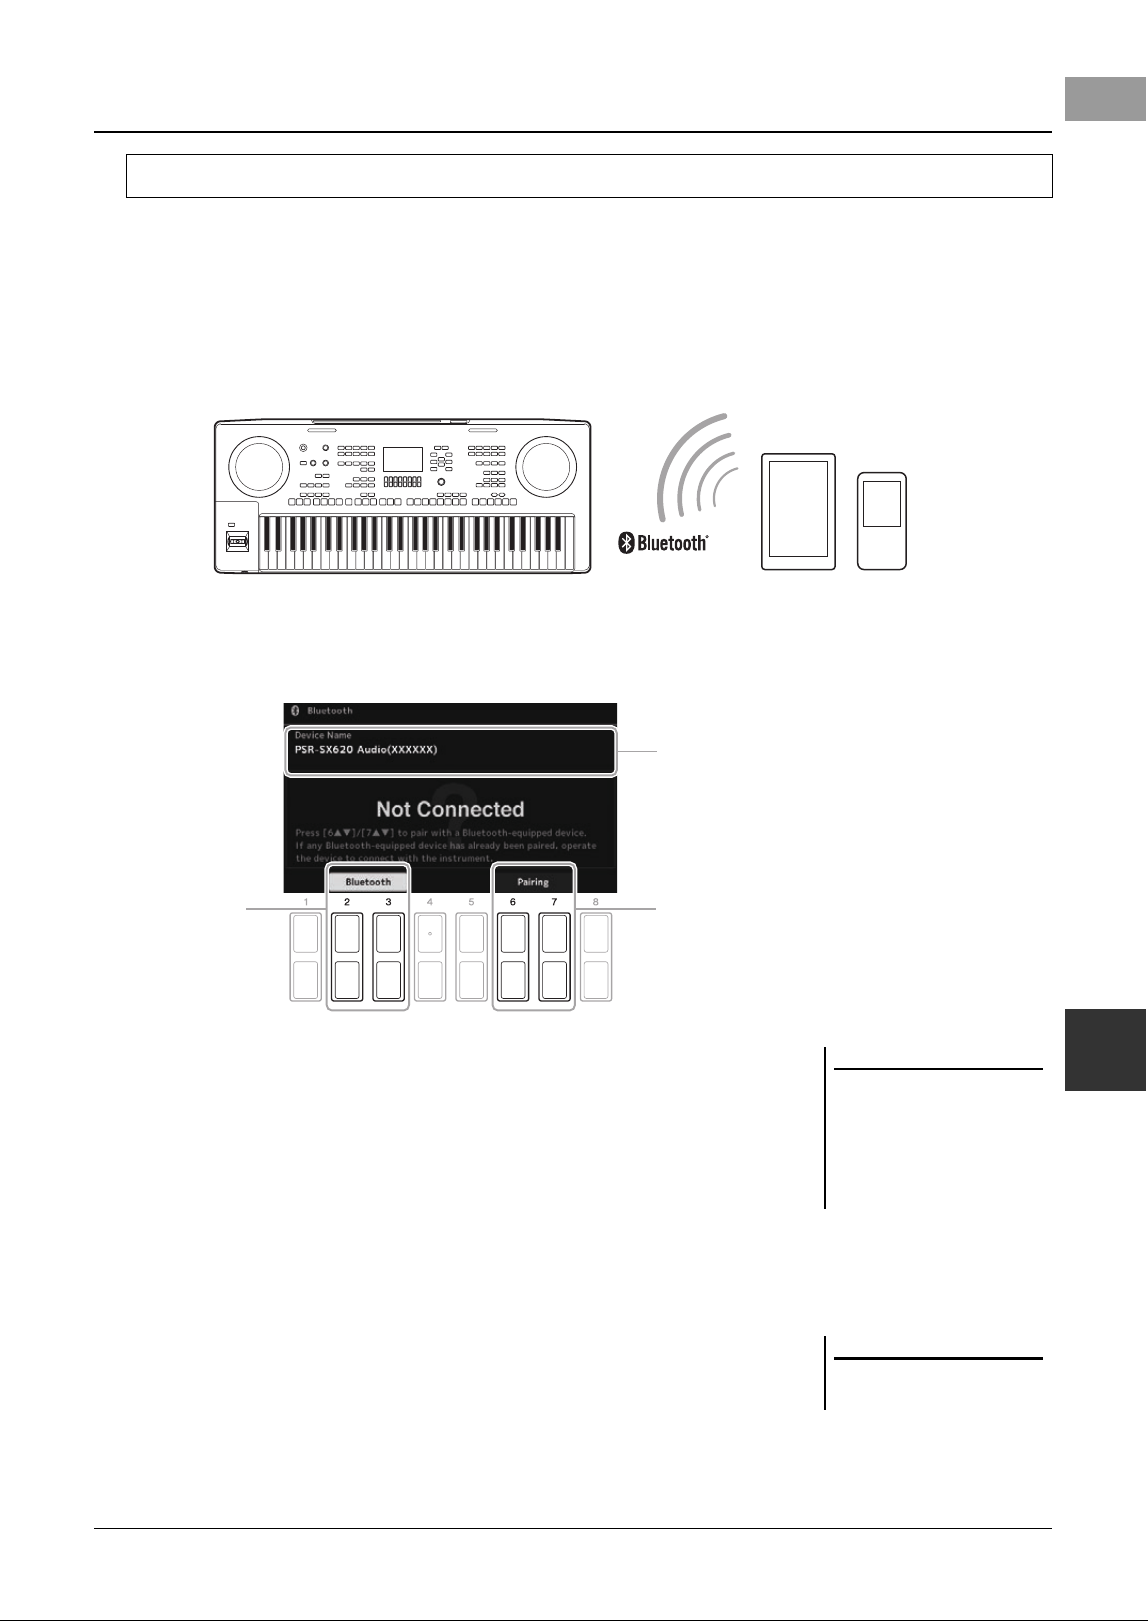
PSR-SX620 Owner’s Manual 107
Connections – Using Your Instrument with Other Devices –
9
You can play the sound of the audio data saved in a Bluetooth-equipped device, such as a smartphone or portable
audio player, on that device and then listen to it through the built-in speaker of the instrument.
• Bluetooth-equipped device:
In this manual, “Bluetooth-equipped device” refers to a device that can transmit audio data to the instrument via
Bluetooth wireless communication. For proper operation, the device must be compatible with A2DP (Advanced
Audio Distribution Profile).
1 Call up the Bluetooth display via [MENU] → TAB [F] General →
Cursor buttons [][][E][F] Bluetooth → [ENTER].
2 Make sure that “Bluetooth” is lighting (the Bluetooth function is
enabled).
If you wish to connect your Bluetooth-equipped device to the instrument, the
device needs to be paired with the instrument. If the device and the instrument
have already been paired, go to step 4.
3 Press one of the [6 ] – [7 ] (Pairing) buttons to enter the
paring standby state.
Popup window is shown that means the instrument is waiting for paring
process.
4 On your Bluetooth-equipped device, set the Bluetooth function
to on and select this instrument (the device name is shown on
the display in step 1) from the connection list.
After pairing is completed, the name of the Bluetooth-equipped device and
“Connected” are shown in the display.
Connecting to an Audio Player via Bluetooth communication
Before using the Bluetooth function, be sure to read “About Bluetooth” on page 108.
Instrument Bluetooth-equipped
device
32
Device name
NOTE
• “Pairing” means to register Blue-
tooth-equipped devices on this
instrument, and establish the mutual
recognition for wireless communi-
cation between the two.
• Bluetooth headphones or speakers
cannot be paired.
NOTE
If you are required to enter a password,
enter the numerals “0000.”

108 PSR-SX620 Owner’s Manual
5 Play back audio data on the Bluetooth-equipped device to
confirm that the built-in speakers of the instrument can output
the audio sound.
Once the device has been paired with the instrument, there is no need to
perform pairing again.
When you turn on the instrument the next time, the last-connected Bluetooth
equipped device will be connected to this instrument automatically, if the
Bluetooth function of the Bluetooth-equipped device and the instrument is set to
on. If it is not connected automatically, select this instrument from the
connection list on the Bluetooth-equipped device.
NOTE
Only one device can be connected to
this instrument at a time (although up
to eight devices can be paired to this
instrument). When pairing with the 9th
device has succeeded, pairing data for
the device with the oldest connection
date will be deleted.
About Bluetooth
Bluetooth is a technology for wireless communication between devices within an area of about 10 meters (33 ft.)
employing the 2.4 GHz frequency band.
Handling Bluetooth communications
• The 2.4 GHz band used by Bluetooth compatible devices is a radio band shared by many types of equipment. While
Bluetooth compatible devices use a technology minimizing the influence of other components using the same radio
band, such influence may reduce the speed or distance of communications and in some cases interrupt
communications.
• The speed of signal transfer and the distance at which communication is possible differs according to the distance
between the communicating devices, the presence of obstacles, radio wave conditions and the type of equipment.
• Yamaha does not guarantee all wireless connections between this unit and devices compatible with Bluetooth
function.
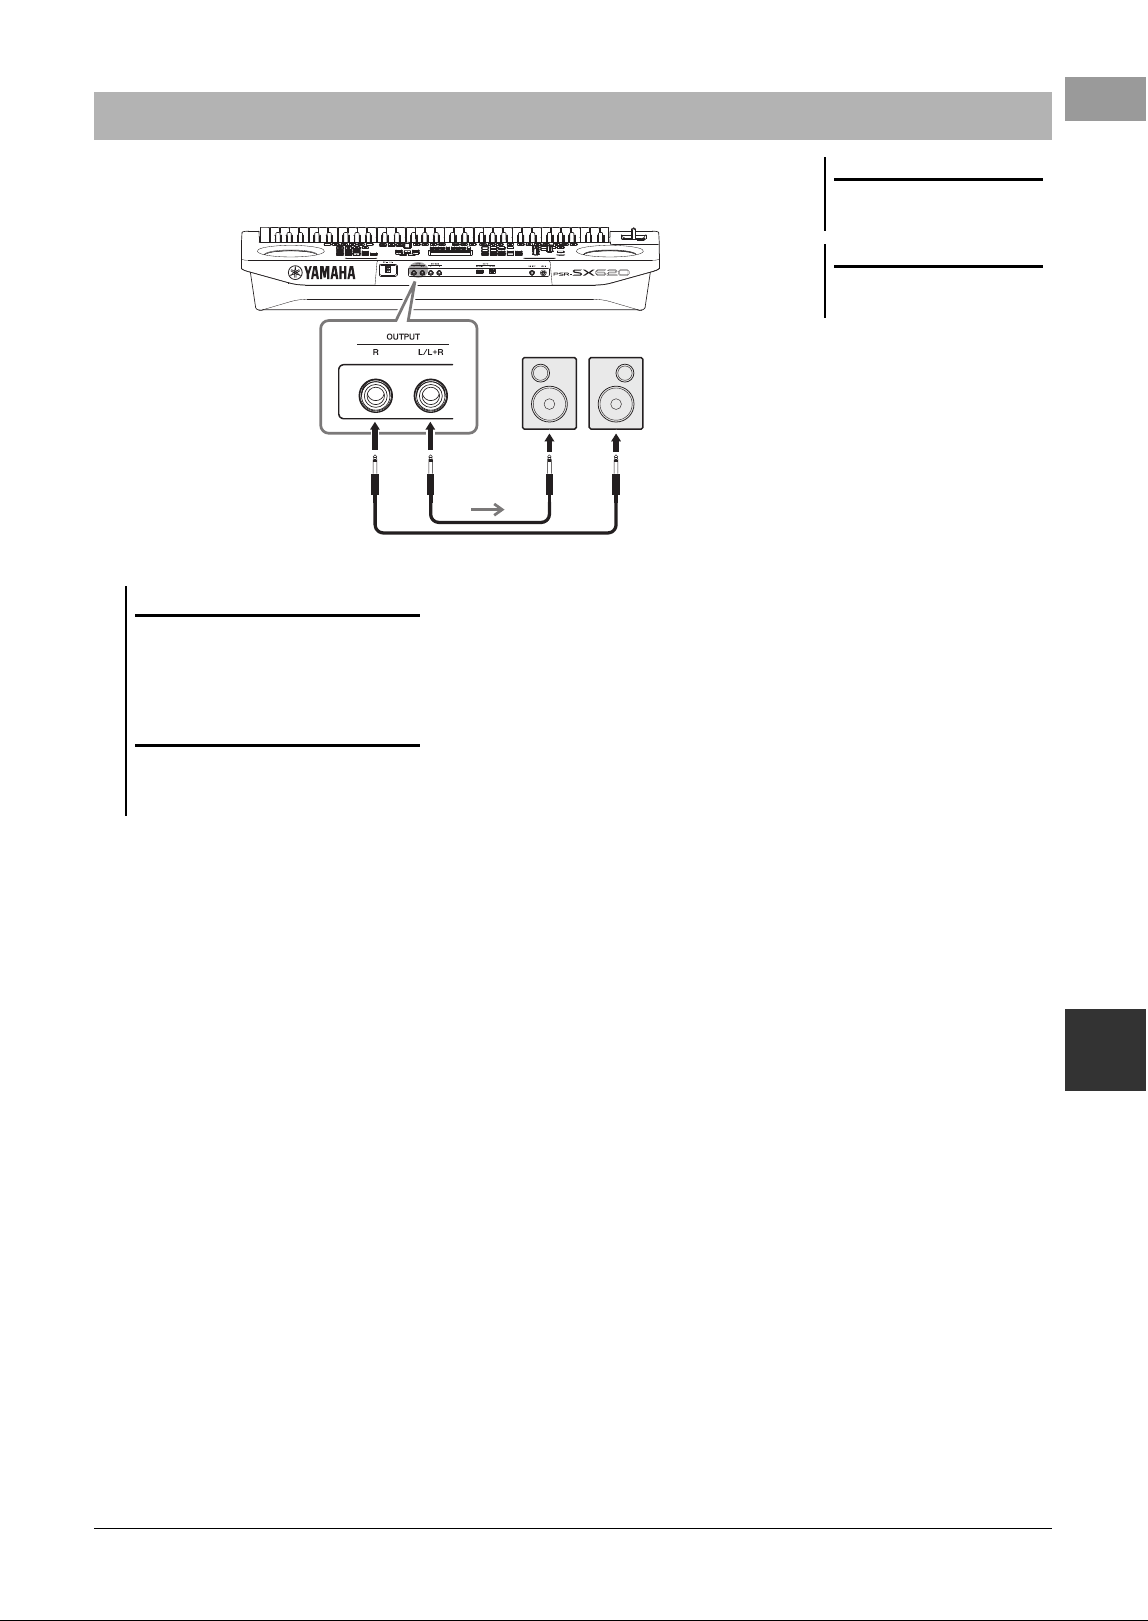
PSR-SX620 Owner’s Manual 109
Connections – Using Your Instrument with Other Devices –
9
You can connect a stereo system to amplify the instrument’s sound by using the
OUTPUT [L/L+R]/[R] jacks.
You can use the instrument’s [MASTER VOLUME] dial to adjust the volume of the
sound output to the external device.
Connecting an External Stereo System (OUTPUT [L/L+R]/[R] jacks)
NOTE
Use audio cables and adaptor plugs
having no (zero) resistance.
NOTE
Use only the [L/L+R] jack for connec-
tion with a monaural device.
NOTICE
To avoid possible damage, first turn on the power to the instrument, and then to the external device.
When turning off the power, first turn off the power to the external device, and then to the instrument.
Since this instrument’s power may automatically be turned off due to the Auto Power Off function
(page 17), turn off the power to the external device, or disable Auto Power Off when you do not intend to
operate the instrument.
NOTICE
Do not route the output from the OUTPUT jacks to the [AUX IN] jack. If you make this connection, the sig-
nal input at the [AUX IN] jack is output from the [OUTPUT] jacks and then back again, creating a feedback
loop that could make normal performance impossible, and may even damage the equipment.
Phone plug
(standard)
Phone plug
(standard)
Input jack
Powered speaker
Audio signal
Audio cable
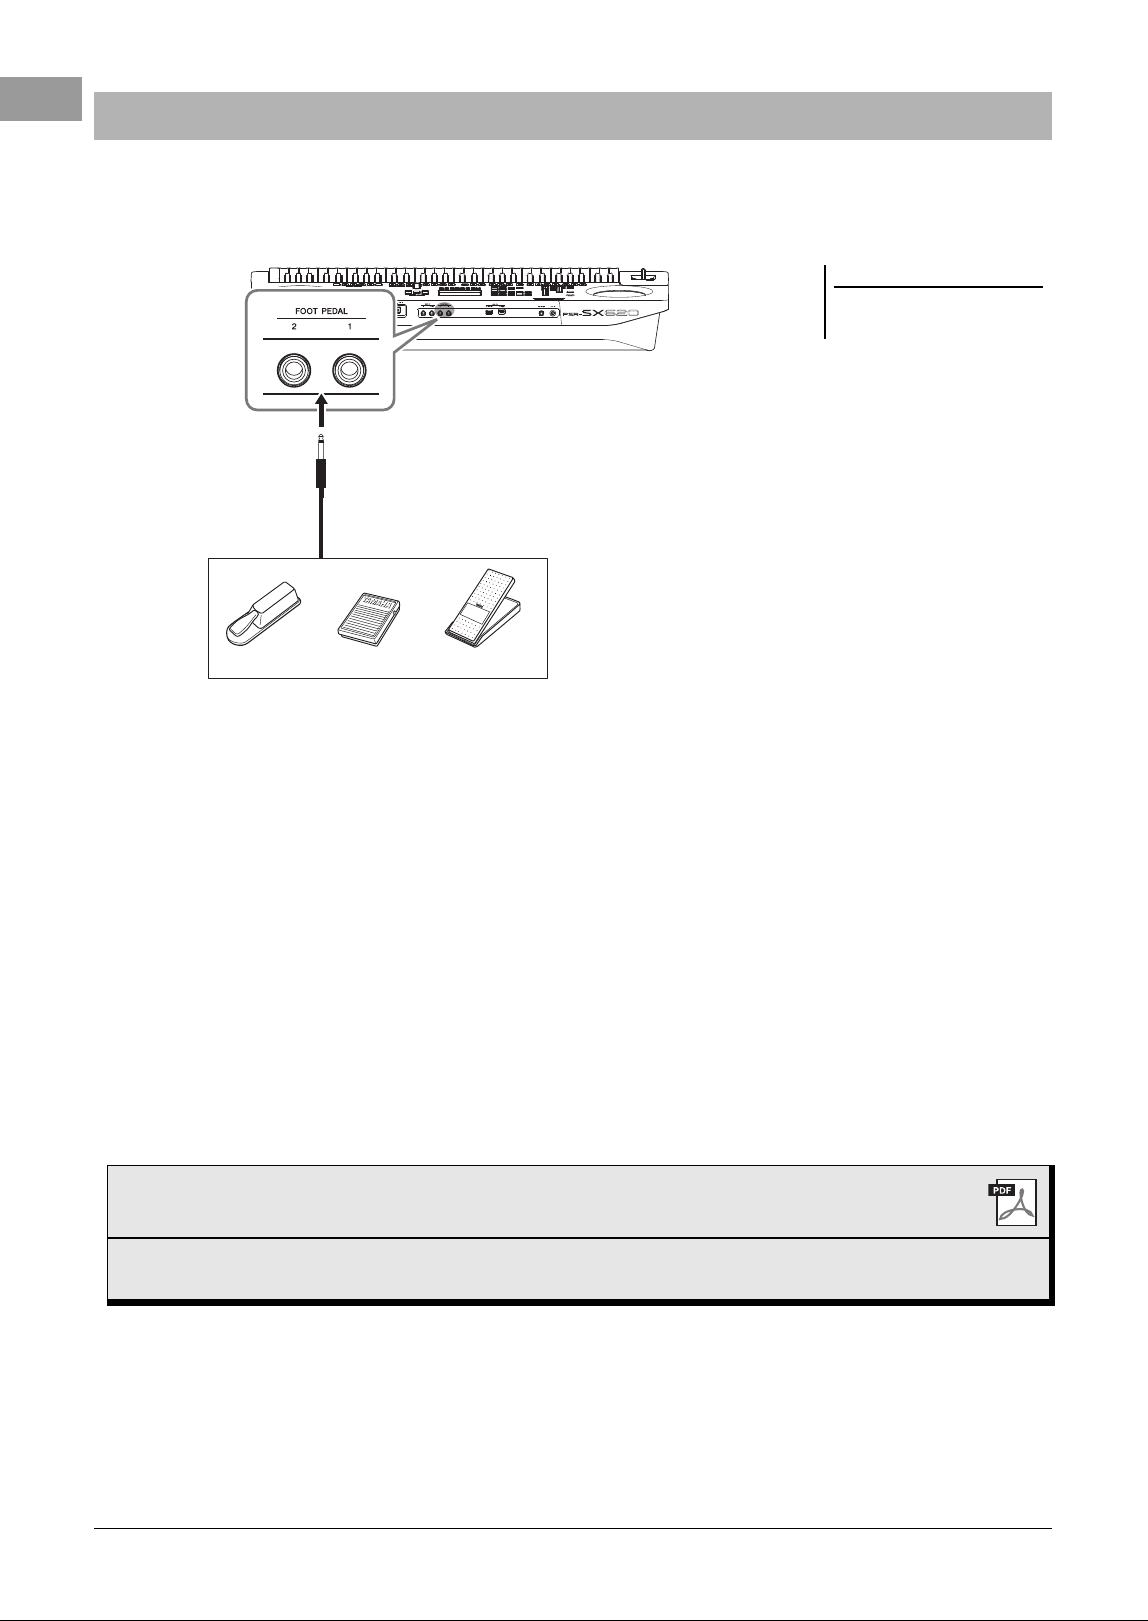
110 PSR-SX620 Owner’s Manual
The FC4A or FC5 footswitches and the FC7 foot controller (sold separately) can be connected to one of the FOOT
PEDAL jacks. A footswitch can be used for switching functions on and off, while a foot controller controls
continuous parameters such as volume.
By default, each jack features the following functions.
• FOOT PEDAL [1] .... Switches Sustain on or off. Connect an FC4A or FC5
footswitch to this jack.
• FOOT PEDAL [2] .... Switches Articulation1 on or off. Connect an FC4A or FC5
footswitch to this jack.
You can also change the function assignments to the pedals as desired.
For information on functions that can be assigned to the pedals, refer to the
Reference Manual on the website.
• Example: Controlling Song Start/Stop by footswitch
Connect a footswitch (FC4A or FC5) to one of the FOOT PEDAL jacks.
To assign the function to the connected pedal, press the [1 ] (Song Play/Pause)
button in the operation display: [MENU] → TAB [E] Menu1 → Cursor buttons
[][][E][F] Controller → [ENTER] → TAB [E] Foot Pedal.
Connecting a Foot Pedal (FOOT PEDAL jacks)
NOTE
Do not connect or disconnect the
pedal when the power is on.
Foot Pedals
FC4A FC7FC5
Advanced Features
Refer to the Reference Manual on the website, Chapter 9.
Assigning specific functions to each foot
pedal:
[MENU] → Menu1 → Controller → [ENTER] → Foot Pedal
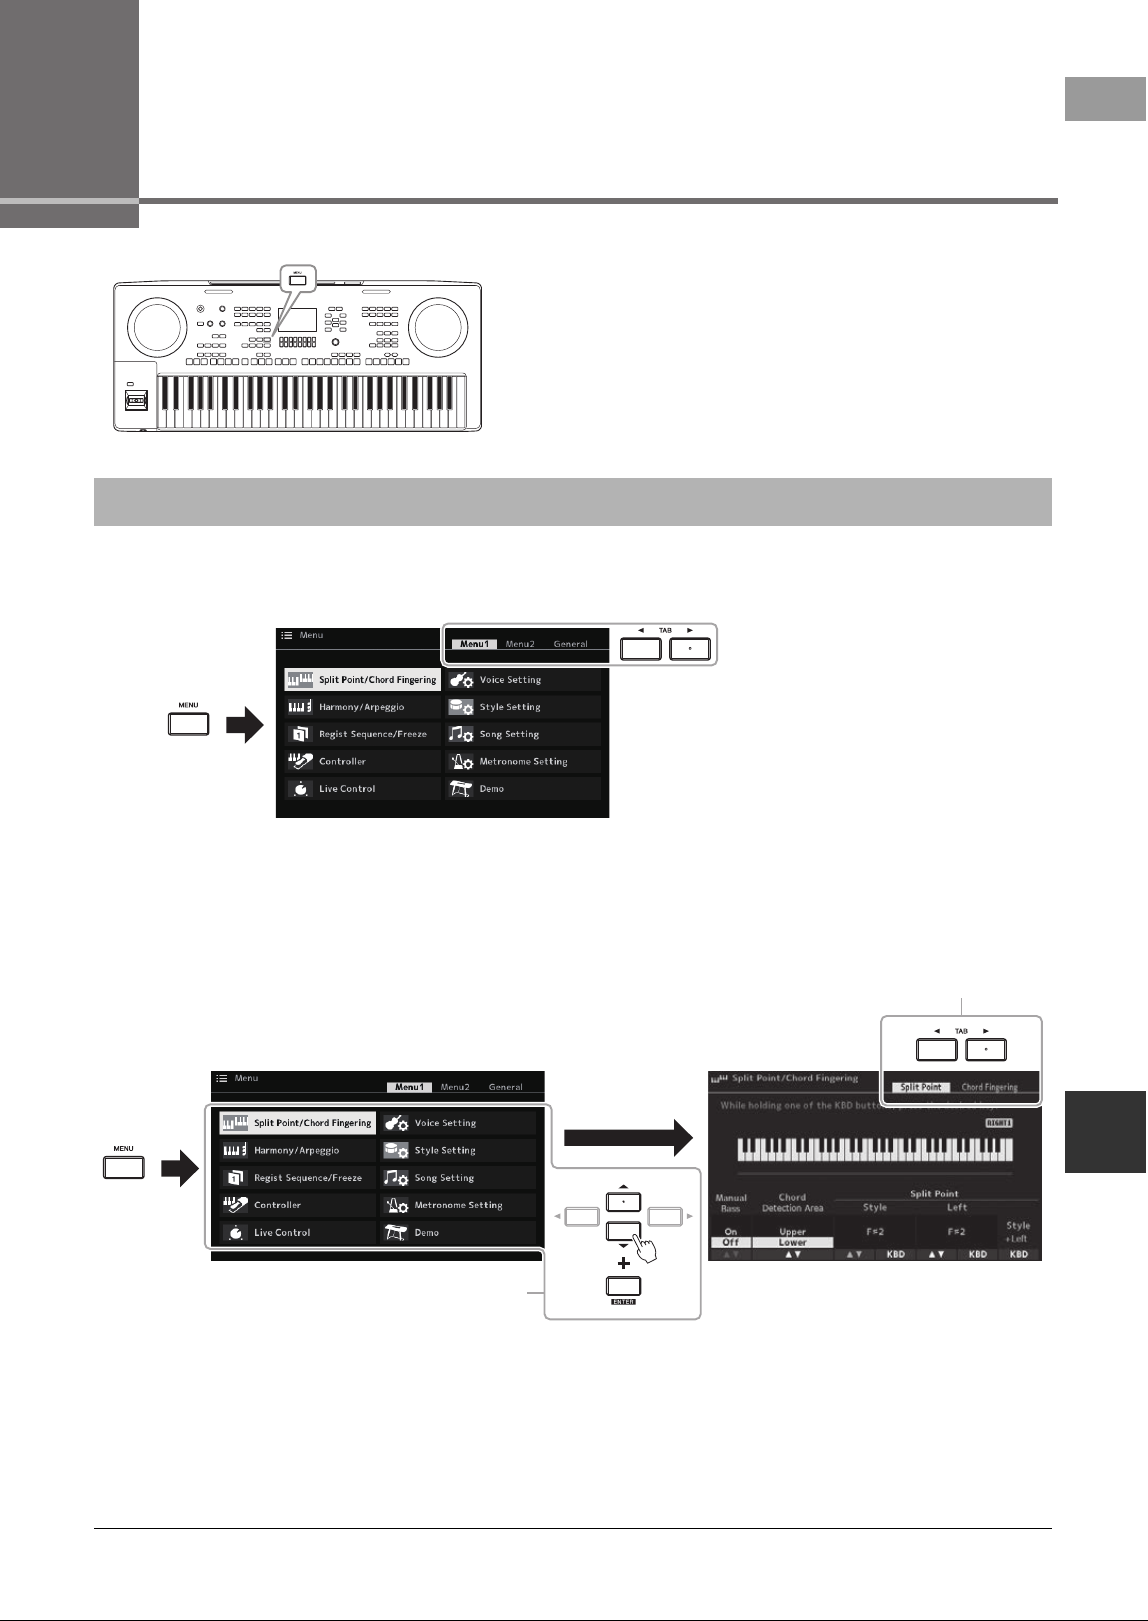
PSR-SX620 Owner’s Manual 111
10
Function – Making Global Settings and Using Advanced Features –
10
Function
– Making Global Settings and Using Advanced Features –
The Function menu provides a variety of convenient settings and
tools for the instrument. These include general settings that
affect the entire instrument, as well as detailed settings for
specific functions. Also included are advanced Creator features,
such as for Styles, Songs and Multi Pads.
1 Call up the operation display.
[MENU] → TAB [E][F] Menu1/Menu2/General
2 Move the cursor to the desired page by using the Cursor
buttons
[
][
][
E
][
F
]
, and then press the [ENTER] button.
For information on what you can do on each page, refer to the Function List on
page 112.
3 Use the TAB [E][F] buttons to call up the desired page.
4 Change the settings or carry out the operation.
Refer to the Function List on page 112 for detailed information.
Basic Procedure
2
3
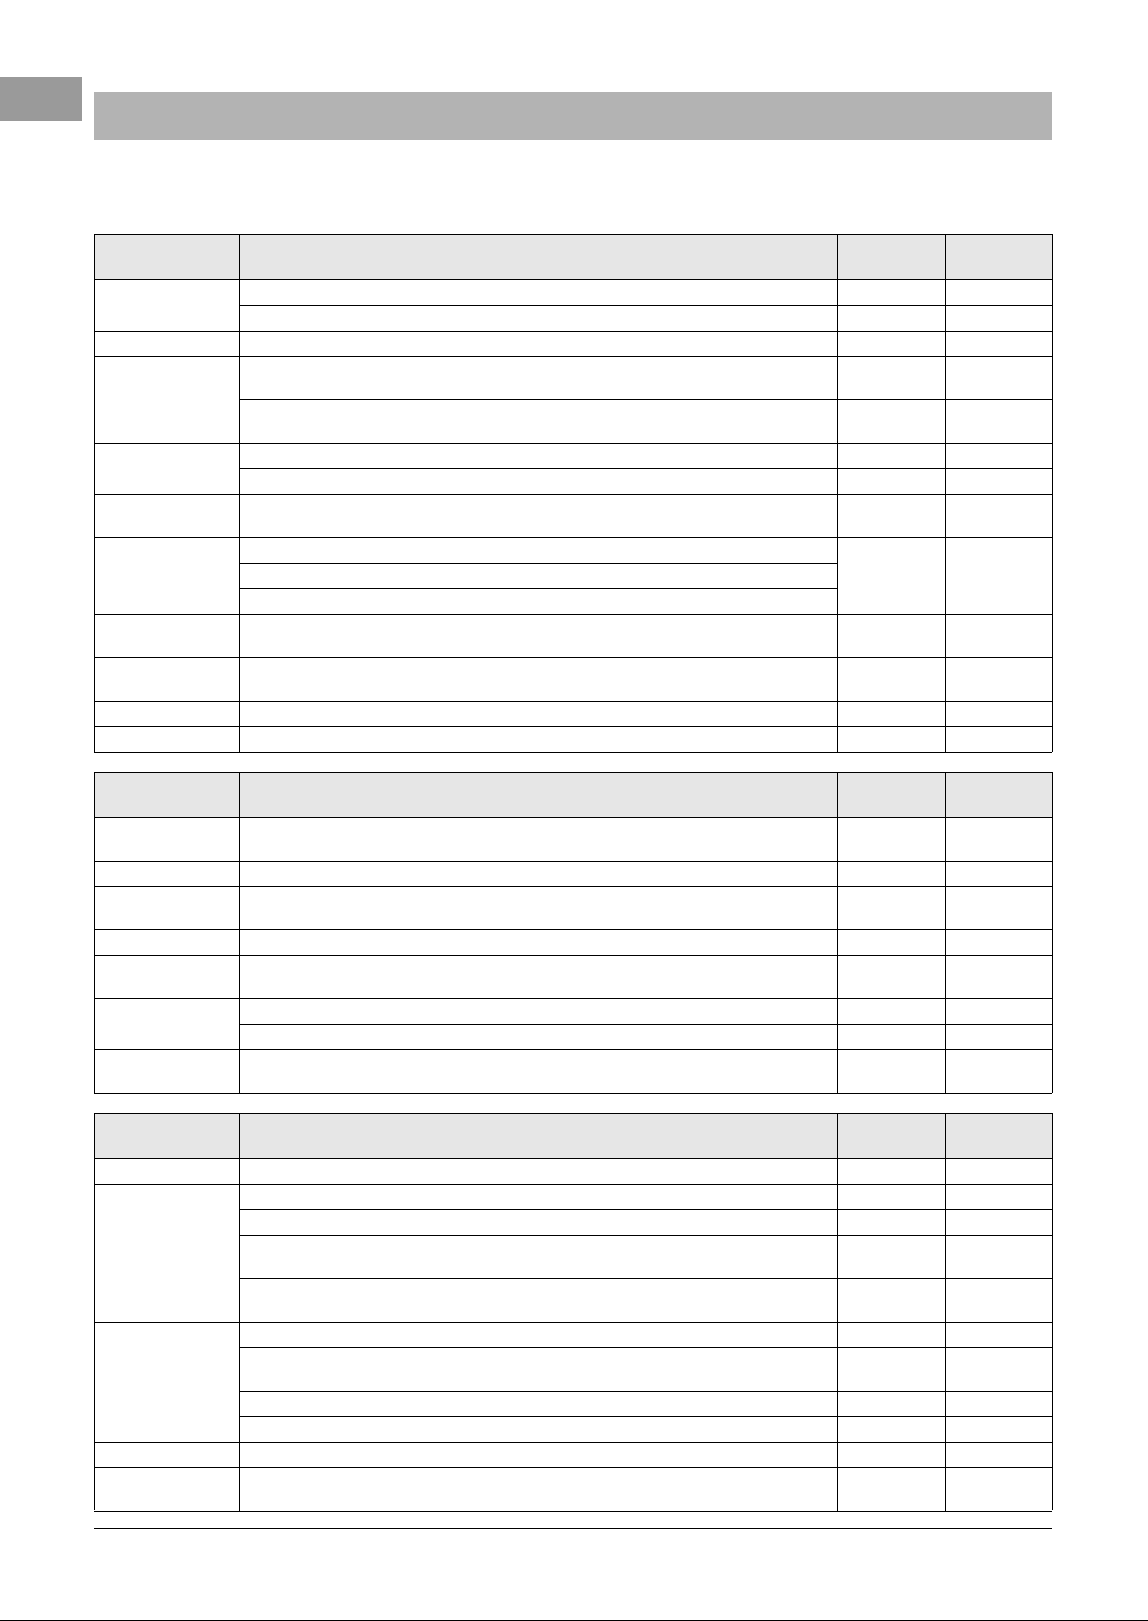
112 PSR-SX620 Owner’s Manual
This list briefly explains what you can do in the displays which are called up via the [MENU] button. For more
information, refer to the page and chapter references indicated below.
Function List
Menu1 Description
Owner’s
Manual
Reference
Manual
Split Point/Chord
Fingering
Split Point Determines the Split Point. page 63 -
Chord Fingering Determines the Chord Fingering type. page 59 Chapter 2
Harmony/Arpeggio For selecting the Harmony type or the Arpeggio type. page 47 Chapter 1
Regist Sequence/Freeze
Registration
Sequence
Determines the order for calling up Registration Memory settings when using the
TAB [E][F] buttons or the pedal.
- Chapter 7
Freeze
Determines the setting groups (Voice, Style, etc.) that are to remain unchanged even
when you call up panel setups via Registration Memory.
- Chapter 7
Controller
Foot Pedal Determines the functions assigned to the pedals. - Chapter 9
Setting For setting the Touch Response of the keyboard, etc. page 44, 50 Chapter 1
Live Control
Gives you dynamic, intuitive real-time control of your performance, by assigning
various functions to the LIVE CONTROL [1] and [2] knobs.
page 45 -
Voice Setting
Setting/Arpeggio For changing common settings for a Voice.
- Chapter 1Tune For adjusting the pitch-related parameters for each part.
Voice Set Filter For disabling selection of Voice Sets (effects, etc.).
Style Setting
For making Style playback related settings such as OTS Link timing, Dynamics
Control, etc.
- Chapter 2
Song Setting
For making Song playback related settings such as Channel settings, Guide mode,
Repeat mode, etc.
- Chapter 3
Metronome Setting For changing the time signature, volume and sound of the metronome. - Chapter 2
Demo For calling up the Demo. page 19 Chapter 2
Menu2 Description
Owner’s
Manual
Reference
Manual
Style Creator
For creating a Style by editing the preset Style, or by recording Style channels one
by one.
- Chapter 2
Song Creator For creating a Song by editing the recorded Song or by entering events one by one. - Chapter 3
Multi Pad Creator
For creating a Multi Pad by editing an existing preset Multi Pad, or by recording a
new one.
- Chapter 5
Chord Looper For recording a sequence of the chords and playing it back in a loop. page 57 Chapter 2
Chord Tutor
For learning chords. With this function shown in the display, you can see which
notes to press for specifying the chord.
page 59 Chapter 2
Master Tune/Scale Tune
Master Tune For fine-tuning the pitch of the entire instrument in approx. 0.2 Hz steps. page 43 Chapter 1
Scale Tune Determines the scale type and tuning of the pitch of the desired note (key) in cents. page 43 Chapter 1
Expansion
For installing Expansion Packs for adding extra content downloaded from the
website or created on your own by using the Yamaha Expansion Manager.
- Chapter 1
General Description
Owner’s
Manual
Reference
Manual
MIDI For making MIDI-related settings. - Chapter 9
Utility
Config1 For making general settings such as speaker output, Audio Loopback, etc. page 104 Chapter 10
Config2 For making general settings such as pop-up display time, etc. - Chapter 10
Parameter Lock
Determines the parameters (effect, Split Point, etc.) that are to remain unchanged
when the panel setups are changed via Registration Memory, One Touch Setting, etc.
- Chapter 10
USB
For making settings related to a connected USB flash drive, such as formatting and
confirmation of memory size.
page 102 Chapter 10
System
Common For setting the Owner name, Message language, Auto Power Off, etc. page 17, 18 Chapter 10
Backup/Restore
For backing up and restoring the settings and data saved in the User drive of the
instrument.
page 35 -
Setup Files For saving and recalling the specified settings of the instrument. - Chapter 10
Reset For restoring the instrument settings to their factory defaults. - Chapter 10
Bluetooth For making settings for connecting the instrument to a Bluetooth-equipped device. page 107 -
Wireless LAN
For making settings for connecting the instrument to a smart device, via wireless
LAN. This appears only when a USB wireless LAN adaptor is connected.
- Chapter 9
PSR-SX620 Owner’s Manual 113
Direct Access Chart
Direct Access Chart
Press the [DIRECT ACCESS] button, and then press one of the buttons (or move the appropriate knob, joystick or
pedal) listed below to call up the desired display.
Control Display called up with the Direct Access function
STYLE CONTROL
[ACMP]
Menu
Split Point/Chord Fingering Chord Fingering
[AUTO FILL IN]
[OTS LINK]
Style Setting
[BREAK]
INTRO [I], [II], [III]
MAIN VARIATION [A], [B], [C],
[D]
ENDING/rit. [I], [II], [III]
[SYNC START] Split Point/Chord Fingering Split Point
[SYNC STOP]
Style Setting
[START/STOP]
STYLE
STYLE category selection
buttons
CHORD LOOPER
[REC/STOP]
Menu Chord Looper
[ON/OFF]
SONG CONTROL
[REC]
Menu Song Setting
[J] (STOP)
[F/ K] (PLAY/PAUSE)
[G] (RW)
[H] (FF)
[USB AUDIO PLAYER] Audio File Selection display*
[SONG FUNCTION] Song Selection display
TEMPO
[RESET/TAP]
Menu
Metronome Setting
[+], [−] Style Setting
[METRONOME] Metronome Setting
[FADE IN/OUT] Utility Config1 Fade In/Out
TRANSPOSE [+], [−] Menu Controller Setting Touch Response
UPPER OCTAVE [+], [−] Menu Voice Setting Tune
MULTI PAD
CONTROL
[SELECT]
Multi Pad Selection display Multi Pad Edit[STOP]
[1], [2], [3], [4]
[MIC SETTING] Mic Setting Mixer
[PLAYLIST] Playlist Selection display
[MENU] Menu MIDI Setting
[MIXER/EQ]
Mixer
MEQ
[CHANNEL ON/OFF]
Vol/Pan
[BALANCE]
TAB [E], [F] -
[ENTER] -
[EXIT] Main
Data dial -
[], [], [E], [F] -
[−/NO], [+/YES] -
114 PSR-SX620 Owner’s Manual
3
* This display is called up only when the USB flash drive is being connected to USB [TO DEVICE] terminal of this instrument.
VOICE
PART SELECT [LEFT]
Menu
Voice Setting
Voice Set Filter
Left
PART SELECT [RIGHT 1] Right1
PART SELECT [RIGHT 2] Right2
PART ON/OFF [LEFT]
Voice Set Filter
Left
PART ON/OFF [RIGHT 1] Right1
PART ON/OFF [RIGHT 2] Right2
[LEFT HOLD] Split Point/Chord Fingering Split Point
VOICE category: others Voice Setting
VOICE category:
[EXPANSION/USER]
Expansion
VOICE EFFECT
[HARMONY/ARPEGGIO] Menu Harmony/Arpeggio
[SUSTAIN] Voice Set - Effect/EQ Panel Sustain
[DSP] Mixer Effect
ONE TOUCH
SETTING
[1], [2], [3], [4] Style Information
REGISTRATION
MEMORY
REGIST BANK [+], [−]
Menu Regist Sequence/Freeze
Registration Sequence
[FREEZE] Freeze
[MEMORY] Registration Sequence
[1], [2], [3], [4]
Regist Bank Information
[5], [6], [7], [8]
FOOT PEDAL [1], [2] Menu Controller Foot Pedal 1, 2
Joystick
[MODULATION HOLD]
Menu Controller Setting
Modulation (+)
X(+)
Pitch Bend Range
X(−)
Y(+) Modulation (+)
Y(−) Modulation (−)
LIVE CONTROL
[1], [2]
Menu Live Control
[ASSIGN]
Control Display called up with the Direct Access function
PSR-SX620 Owner’s Manual 115
Troubleshooting
Troubleshooting
Overall
A click or pop is heard when the power is turned on or off. This is normal. Electrical current is being applied to the instrument.
The power is automatically turned off. This is normal and due to the Auto Power Off function. If necessary,
set the parameter of the Auto Power Off function (page 17).
Noise is heard from the instrument’s speakers. Noise may be heard if a mobile phone is used near the instrument
or if the phone is ringing. Turn off the mobile phone, or use it further
away from the instrument.
Noise is heard from the instrument’s speakers or headphones
when using the instrument with the application on smart device.
When you use the instrument along with the application on your
smart device, we recommend that you set “Airplane Mode” to “ON”
on your smart device in order to avoid noise caused by communi-
cation.
In the LCD, there are some specific points that are always lit or
unlit.
These are the result of defective pixels and occasionally occur in
TFT-LCDs; they do not indicate a problem in operation.
There is a slight difference in sound quality among different notes
played on the keyboard.
This is normal and is a result of the instrument’s sampling system.
Some Voices have a looping sound.
Some noise or vibrato is noticeable at higher pitches, depending
upon the Voice.
The overall volume is too low or no sound is heard. The master volume may be set too low. Set it to an appropriate
level with the [MASTER VOLUME] dial.
All keyboard parts are set to off. Use the PART ON/OFF [RIGHT 1]/
[RIGHT 2]/[LEFT] button to turn it on.
The volume of the individual parts may be set too low. Raise the
volume in the Balance display (page 62).
Make sure the desired channel is set to On (pages 60, 71).
Headphones are connected, disabling the speaker output. Unplug
the headphones.
Make sure that the Speaker setting is set to On:
[MENU] → General → Utility → [ENTER] → Config1.
The [FADE IN/OUT] button is on, muting the sound. Press the
[FADE IN/OUT] button to turn the function off.
The sound is distorted or noisy. The volume may be turned up too high. Make sure all relevant vol-
ume settings are appropriate.
This may be caused by certain effects or filter settings. Check the
effect or filter settings and change them accordingly, referring to
the Reference Manual.
Not all simultaneously played notes sound. You are probably exceeding the maximum polyphony (page 118)
of the instrument. When the maximum polyphony is exceeded, the
earliest played notes will stop sounding, letting the latest played
notes sound.
The keyboard volume is lower than the Song/Style playback vol-
ume.
The volume of the keyboard parts may be set too low. Raise the
volume in the Balance display (page 62).
The Main display does not appear even when turning the power
on.
This may occur if a USB flash drive has been installed to the instru-
ment. Installation of some USB flash drives may result a long inter-
val between turning the power on and appearance of the Main
display. To avoid this, turn the power on after disconnecting the
device.
Some characters of the file/folder name are garbled. The language settings have been changed. Set the appropriate
language for the file/folder name (page 18).
116 PSR-SX620 Owner’s Manual
3
An existing file is not shown. The file extension (.MID, etc.) may have been changed or deleted.
Manually rename the file, adding the appropriate extension, on a
computer.
Data files with names of more than 50 characters cannot be han-
dled by the instrument. Rename the file, reducing the number of
characters to 50 or less.
Voice
The Voice selected from the Voice Selection display does not
sound.
Check whether or not the selected part is turned on (page 41). If
necessary, press the appropriate PART ON/OFF button to turn the
part on.
A strange “flanging” or “doubling” sound occurs. The sound is
slightly different each time the keys are played.
The RIGHT 1 and RIGHT 2 parts are set to “ON,” and both parts
are set to play the same Voice. Turn off the RIGHT 2 part or change
the Voice of one of the parts.
Some Voices will jump an octave in pitch when played in the
upper or lower registers.
This is normal. Some Voices have a pitch limit which, when
reached, causes this type of pitch shift.
MegaVoice does not sound when playing the keyboard. This is normal. The MegaVoice function makes special use of
velocity switching to express the sounds of various performance
techniques. MegaVoice does not sound in the area only for
expressing “Mute” or “empty” sound when playing the keyboard.
For more information, refer to page 39.
Style
The Style does not start even when the [START/STOP] button is
pressed.
The Rhythm channel of the selected Style may not contain any
data. Turn the [ACMP] button on and play left-hand section on the
keyboard to sound the accompaniment part of the Style.
Only the rhythm channel plays. Make sure the Auto Accompaniment function is turned on; press
the [ACMP] button.
Make sure to play keys in the chord section of the keyboard
(page 63, 64).
Styles in a USB flash drive cannot be selected. If the size of the Style data is large (about 120 KB or greater), the
Style cannot be selected because the data is too large to be han-
dled by the instrument.
Song
Songs cannot be selected. This may be because the language settings have been changed.
Set the appropriate language for the Song file name.
If the size of the Song data is large (about 300 KB or greater), the
Song cannot be selected because the data is too large to be han-
dled by the instrument.
Song playback does not start. The Song has been stopped at the end of the Song data. Return to
the beginning of the Song by pressing the SONG [J] (STOP) but-
ton.
In the case of a Song to which write-protect has been applied,
there are some restrictions and playback may not be possible. For
details, refer to page 27.
Song playback stops before the Song is finished. The Guide function is turned on. (In this case, playback is “waiting”
for the correct key to be played.) Press the [SONG FUNCTION]
button to call up the Song Function Menu display, and then press
one of the [6 ] (Guide) buttons to turn off the Guide function.
The measure number is different from that of the score in the
Song Position display, shown by pressing the [G] (REW)/[H]
(FF) buttons.
This happens when playing back music data for which a specific,
fixed tempo is set.
When playing back a Song, some channels do not play. Playback of these channels may be set to “Off.” Turn playback on
for those channels that are set to “Off” (page 71).
The tempo, beat, measure and music notation is not displayed
correctly.
Some Song data for the instrument has been recorded with special
“free tempo” settings. For such Song data, the tempo, beat, mea-
sure and music notation will not be displayed correctly.
PSR-SX620 Owner’s Manual 117
3
Troubleshooting
USB Audio Player/Recorder
A message indicating the drive is busy appears, and the record-
ing is aborted.
Make sure to use a compatible USB flash drive (page 101).
The USB flash drive may not have enough memory. Check the
Recordable Time on the display (page 82).
If you are using a USB flash drive to which data has already been
recorded, check first that no important data remains on the device,
and then format it (page 102) and try recording again.
Audio files cannot be selected. The file format may not be compatible with the instrument. The
compatible format is only WAV. The DRM protected files cannot be
played back.
Recorded file is played back at a different volume compared to
when it was recorded.
The audio playback volume has been changed. Setting the volume
value to 100 plays back the file at the same volume as when it was
recorded (page 80).
Mixer
The sound seems strange or different than expected when
changing a rhythm Voice (Drum kit, etc.) of the Style or Song from
the Mixer.
When changing the rhythm/percussion Voices (Drum kits, etc.) of
the Style and Song from the VOICE parameter, the detailed settings
related to the drum voice are reset, and in some cases you may be
unable to restore the original sound. In the case of Song playback,
you can restore the original sound by returning to the beginning of
the Song and playing back from that point. In the case of Style
play, you can restore the original sound by selecting the same Style
again.
Foot Pedal
The on/off setting of the footswitch connected to the FOOT
PEDAL jack is reversed.
Change the polarity settings: [MENU] → Menu1 → Controller →
[ENTER] → Setting → 5 Pedal Polarity.
Connections
The speakers do not switch off when a pair of headphones is
connected to the [PHONES] jack.
The Speaker setting is “On.” Change the speaker setting to “Head-
phone Switch” via [MENU] → General → Utility → [ENTER] → Con-
fig1 → 1 Speaker.
The Wireless LAN icon is not shown in the Menu display even
though the USB wireless LAN adaptor is connected.
Disconnect the USB wireless LAN adaptor and connect it again.
The Bluetooth-equipped device cannot be paired with nor con-
nected to the instrument.
Check that the Bluetooth function of the Bluetooth-equipped
device is activated. To connect the Bluetooth-equipped device and
the instrument, Bluetooth function of both devices need to be
turned on.
The Bluetooth-equipped device and the instrument need to be
paired to connect each other via Bluetooth (page 107).
In case there is a device (microwave oven, wireless LAN device,
etc.) that outputs signals in the 2.4 GHz frequency band nearby,
move this instrument away from the device that is emitting radio-
frequency signals.
118 PSR-SX620 Owner’s Manual
Specifications
Product Name Digital Keyboard
Size/Weight
Dimensions (W x H x D)
993 mm x 143 mm x 404 mm
(39-1/8" x 5-5/8" x 15-7/8")
Weight 8.1kg (17lb, 14 oz)
Control Interface
Keyboard
Number of Keys 61
Type Organ, Initial Touch
Touch Response Normal, Soft1, Soft2, Hard1, Hard2
Other Controllers
Joystick Yes
Knobs 2 (Assignable)
Display
Type TFT Color WQVGA LCD
Size 480 x 272 dots (4.3 inch)
Language English, Chinese, German, French, Spanish, Italian
Panel Language English
Voices
Tone Generator AWM Stereo Sampling
Polyphony (max.) 128
Preset
Number of Voices 1002 Voices + 51 Drum/SFX Kits + 480 XG Voices
Featured Voices 137 S.Articulation!, 34 MegaVoice
Compatibility (for Song playback) XG, GM, GM2
Keyboard Parts Right 1, Right 2, Left
Effects Types
DSP Block
DSP1 (Variation): 322 Preset + 30 User
DSP2-9 (Insertion): 322 Preset + 30 User
Reverb Block 59 Preset + 30 User
Chorus Block 106 Preset + 30 User
Master Compressor 5 Preset + 30 User
Master EQ 5 Preset + 30 User
Part EQ 27 Parts
Mic Effects Noise Gate x 1, Compressor x 1, 3-Band EQ x 1
Style
Preset
Number of Styles 450
Featured Styles Pro: 416, Session:33, Free Play: 1
Fingering
Single Finger, Fingered, Fingered On Bass, Multi Finger, AI Fingered,
Full Keyboard, AI Full Keyboard, Smart Chord
Style Control INTRO x 3, MAIN VARIATION x 4, FILL x 4, BREAK, ENDING x 3
Other Features
One Touch Setting (OTS) 4 for each Style
Chord Looper Yes
Style Section Reset Yes
Compatibility Style File Format (SFF), Style File Format GE (SFF GE)
Expandability
Expansion Voice Yes (approx. 380MB)
Expansion Style Yes (Internal Memory)
Songs (MIDI)
Preset Number of Preset Songs 1 Demo Song, 1 Preset Song
Recording
Number of Tracks 16
Data Capacity approx. 1 MB/Song
Function Quick Recording, Multi Track Recording
Format
Playback SMF (Format 0 & 1), XF
Recording SMF (Format 0)
Multi Pads
Number of Multi Pad Banks
226 Banks x 4 Pads
Audio Link Yes
Functions
Voices
Harmony Yes
Arpeggio Yes
Panel Sustain Yes
Mono/Poly Yes
Voice Information Yes
Styles
Style Creator Yes
OTS Information Yes
Songs
Song Creator Yes
Score Display Function Yes
Lyrics Display Function Yes
Guide Follow Lights, Any Key, Karao-Key, Your Tempo
PSR-SX620 Owner’s Manual 119
Specifications
* The contents of this manual apply to the latest specifications as of the printing date. To obtain the latest manual, access the Yamaha website then download the
manual file. Since specifications, equipment or separately sold accessories may not be the same in every locale, please check with your Yamaha dealer.
Functions
Multi Pads Multi Pad Creator Yes
Registration Memory
Number of Buttons 8
Control Registration Sequence, Freeze
Playlist 500 (max.) Records per Playlist file
USB Audio Player/
Recorder
Recording Time (max.) 80 minutes/Song
Recording WAV (44.1 kHz, 16-bit, stereo)
Playback WAV (44.1 kHz, 16-bit, stereo)
Time Stretch Yes
Pitch Shift Yes
Vocal Cancel Yes
Overall Controls
Metronome Yes
Tempo Range 5 – 500, Tap Tempo
Transpose −12 – 0 – +12
Tuning 414.8 – 440.0 – 466.8 Hz (approx. 0.2 Hz increments)
Octave Button Yes
Scale Type 9 Types
Miscellaneous
Demo Yes
USB audio interface 44.1 kHz, 16-bit, stereo
Direct Access Yes
Text Display Function Yes
Storage and
Connectivity
Storage
Internal Memory Yes (approx. 20 MB)
External Drives USB flash drive
Connectivity
DC IN 16 V
Headphones Standard stereo phone jack
Microphone Standard mono phone jack
FOOT PEDAL 1 (Sustain), 2 (Articulation1), Function Assignable
AUX IN Stereo mini jack
OUTPUT L/L+R, R
USB TO DEVICE USB Type-A
USB TO HOST USB Type-C™
Bluetooth
Yes
• Bluetooth version: 5.0
• Supported profile: A2DP
• Compatible codec: SBC
• Wireless output: Bluetooth class 2
• Maximum communication distance: about 10 m
• Radio Frequency: 2401.5–2480.5 MHz
• Maximum output power (EIRP): +6.94 dBm
• Type of modulation: GFSK, π/4 DQPSK, 8DPSK
Sound System
Amplifiers 15 W x 2
Speakers 12 cm x 2
Power Supply
AC Adaptor PA-300C (Output: DC 16 V, 2.4 A )
Power Consumption 18 W (When using PA-300C AC adaptor)
Standby Power Consumption 0.3 W
Auto Power Off Yes
Included Accessories
• Owner’s Manual (this book)
• Online Member Product Registration
•Music rest
• AC Adaptor (PA-300C)*, Power cord*
* May not be included depending on your area. Check with your Yamaha
dealer.
Separately Sold Accessories
(May not be available depending on your locale.)
• AC adaptor: PA-300C
• Headphones: HPH-50/HPH-100/HPH-150
• Keyboard Bag: SC-KB650
• Footswitches: FC4A/FC5
• Foot controller: FC7
• USB wireless LAN adaptor: UD-WL01
• Subwoofer: KS-SW100
• Keyboard stand: L-6/L-7B
(The exterior size of the PSR-SX620 is beyond the limits as described in
the L-6 Assembly Instructions. However, we have determined through
tests that the stand can be safely used for the instrument.)

120 PSR-SX620 Owner’s Manual
Symbols
[+/YES] [-/NO] buttons ....................23
[1 ] – [8 ] buttons...............24
A
A-B Repeat................................ 73, 80
AC adaptor...................................... 16
Accessories.......................................7
ACMP ..............................................54
Arpeggio ...........................47, 49, 112
Audio File ..................................20, 78
Audio Link Multi Pad .......................88
Audio Player/Recorder ..............78, 81
Auto Accompaniment......................52
Auto Fill............................................55
Auto Power Off ................................17
B
Backup ....................................35, 112
Balance ...........................................62
Bar................................................... 21
Beat .................................................21
Bluetooth .......................................107
Break (Style).................................... 55
C
Channel ...........................................71
Character-entry ...............................33
Chord ..............................................59
Chord Fingering ...................... 59, 112
Chord Looper .................................. 57
Chord Match ...................................87
Chord Tutor ..................................... 59
Chorus.............................................84
Compressor.....................................99
Computer ................................13, 103
Computer-related Operations .....7, 13
Config1..........................................112
Config2..........................................112
Connection ....................................100
Copy (File) ...................................... 31
Cursor buttons ................................ 22
Cut (File) ......................................... 31
D
Data dial.......................................... 23
Data List............................................ 7
Delete.............................................. 32
Demo ........................................ 19, 39
Direct Access ................................. 25
Direct Access Chart...................... 113
Display ............................................ 20
Drum Setup..................................... 65
DSP (Digital Signal Processor)
.................................................. 47, 84
E
Echo................................................ 47
Effect......................................... 47, 99
Ending section ................................ 54
EQ ................................................... 99
EXIT................................................. 24
Expansion Pack .............................. 51
External ........................................... 98
F
Factory Reset.................................. 34
Fade In/Out ............................... 56, 69
Fast Forward ................................... 68
File Management ............................ 27
File Selection Display...................... 26
Fill-in section ................................... 55
Filter ................................................ 99
Fingering Type ................................ 59
Folder.............................................. 29
Foot Pedal............................. 110, 112
Format............................................... 8
Format (USB Flash Drive) ............. 102
Freeze ..................................... 93, 112
Function ........................................ 111
Function List.................................. 112
G
General ......................................... 112
GM .................................................... 8
Guide .............................................. 71
H
Harmony ................................. 47, 112
Headphones ................................... 18
I
Insertion .......................................... 84
Intro section .................................... 54
J
Joystick........................................... 44
K
Knob ............................................... 45
L
Lamp Status........................ 55, 87, 91
Language ....................................... 18
Layer............................................... 41
Left Hold ......................................... 42
LIVE CONTROL Knob..................... 45
Lyrics .............................................. 70
M
Main Display ................................... 20
Master EQ....................................... 99
Master Tune............................ 43, 112
Menu1/Menu2............................... 112
Message ......................................... 25
Metronome...................................... 42
MIC INPUT.................................... 100
Mic Setting...................................... 83
Mixer ............................................... 98
Multi Pad................................... 20, 86
Index

PSR-SX620 Owner’s Manual 121
Index
Multi Pad Creator ....................89, 112
Multi Track Recording .....................76
Music Notation ................................69
N
Name (File ......................................)30
Next (Song Playback) .....................68
O
One Touch Setting (OTS) ................ 61
OTS Link..........................................61
Output ...........................................109
P
Panel Control................................... 14
Panel Setup (Panel Settings).....15, 36
Panel Sustain...................................47
Parameter Lock ............................. 112
Part Select (Voice)...........................41
Pause ........................................68, 80
Phrase Mark ....................................69
Pitch ................................................43
Pitch Shift ........................................81
Playlist .............................................90
Portable Audio Player....................106
Power ..............................................16
Preset ........................................26, 68
Protected Song ...............................27
Q
Quick Recording .............................74
R
Rear Panel............................... 15, 100
Recording (Audio)...........................81
Recording (MIDI).............................74
Reference Manual .......................7, 12
REGIST BANK ................................. 92
Registration Memory ................. 21, 90
Registration Sequence......21, 93, 112
Repeat....................................... 72, 80
Reset .............................................112
Restore ............................................35
Reverb............................................. 84
Rewind ............................................68
S
S.Art Voice ...................................... 39
Save (File) ....................................... 28
Scale Tune ........................ 43, 51, 112
Score............................................... 69
Section (Style) ................................. 55
SFF/SFF GE....................................... 8
Smart Device Connection Manual
.................................................... 7, 13
Song.......................................... 20, 67
Song Creator........................... 77, 112
Song Setting ................................. 112
Specifications ............................... 118
Split Point ................................ 63, 112
START/STOP................................... 54
Style .......................................... 20, 52
Style Creator ........................... 65, 112
Style File Format (SFF)...................... 8
Style Setting .................................. 112
Super Articulation Voices................ 39
Synchro Start ................ 53, 54, 68, 87
Synchro Stop .................................. 54
System .......................................... 112
T
TAB [
E
][
F
] buttons ........................ 24
Talk ................................................. 85
Tempo................................. 21, 56, 69
Text ................................................. 70
Time Stretch.................................... 81
Top Panel........................................ 14
Touch Response............................. 50
Transpose ................................. 21, 43
Troubleshooting ............................ 115
Tuning ............................................. 43
U
UP (File) .......................................... 27
Upper Octave ........................... 21, 43
USB................................... 26, 67, 101
USB Audio Interface ..................... 103
USB Audio Player/Recorder ........... 78
USB flash drive ............................. 101
USB wireless LAN adaptor ... 101, 105
User .......................................... 26, 68
Utility ............................................. 112
V
Vocal Cancel .................................. 81
Voice......................................... 20, 38
Voice Setting................................. 112
Volume (Master Volume) ................ 17
Volume Balance.............................. 62
W
Wireless LAN ........................ 101, 105
WLAN........................................ 62, 98
X
XF...................................................... 8
XG..................................................... 8
Y
Yamaha Expansion Manager ......... 13

(1) Apache License 2.0
- CMSIS5.3.0
Copyright (c) 2009-2018 Arm Limited. All rights reserved.
- CMSIS 5.9.0
Copyright (c) 2009-2019 Arm Limited. All rights reserved.
- CMSIS-RTOS2 2.1.3
Copyright (c) 2013-2018 Arm Limited. All rights reserved.
SPDX-License-Identifier: Apache-2.0
Licensed under the Apache License, Version 2.0 (the License); you may not use this file except in compliance with the
License. You may obtain a copy of the License at
www.apache.org/licenses/LICENSE-2.0
Unless required by applicable law or agreed to in writing, software distributed under the License is distributed on an AS IS
BASIS, WITHOUT WARRANTIES OR CONDITIONS OF ANY KIND, either express or implied. See the License for the
specific language governing permissions and limitations under the License.
(2) The Clear BSD license
- LPC844_DFP10.0.3 LPC800_DFP1.9.0
Copyright 1997-2016 Freescale Semiconductor, Inc.
Copyright 2016-2018 NXP. All rights reserved.
Redistribution and use in source and binary forms, with or without modification, are permitted (subject to the limitations in
the disclaimer below) provided that the following conditions are met:
Redistributions of source code must retain the above copyright notice, this list of conditions and the following disclaimer.
Redistributions in binary form must reproduce the above copyright notice, this list of conditions and the following disclaimer
in the documentation and/or other materials provided with the distribution.
Neither the name of the copyright holder nor the names of its contributors may be used to endorse or promote products
derived from this software without specific prior written permission.
NO EXPRESS OR IMPLIED LICENSES TO ANY PARTY'S PATENT RIGHTS ARE GRANTED BY THIS LICENSE. THIS
SOFTWARE IS PROVIDED BY THE COPYRIGHT HOLDERS AND CONTRIBUTORS "AS IS" AND ANY EXPRESS OR
IMPLIED WARRANTIES, INCLUDING, BUT NOT LIMITED TO, THE IMPLIED WARRANTIES OF MERCHANTABILITY
AND FITNESS FOR A PARTICULAR PURPOSE ARE DISCLAIMED. IN NO EVENT SHALL THE COPYRIGHT HOLDER
OR CONTRIBUTORS BE LIABLE FOR ANY DIRECT, INDIRECT, INCIDENTAL, SPECIAL, EXEMPLARY, OR
CONSEQUENTIAL DAMAGES (INCLUDING, BUT NOT LIMITED TO, PROCUREMENT OF SUBSTITUTE GOODS OR
SERVICES; LOSS OF USE, DATA, OR PROFITS; OR BUSINESS INTERRUPTION) HOWEVER CAUSED AND ON ANY
THEORY OF LIABILITY, WHETHER IN CONTRACT, STRICT LIABILITY, OR TORT (INCLUDING NEGLIGENCE OR
OTHERWISE) ARISING IN ANY WAY OUT OF THE USE OF THIS SOFTWARE, EVEN IF ADVISED OF THE
POSSIBILITY OF SUCH DAMAGE.
(3) BSD-3-Clause
- STM32G0xx_DFP 1.4.0
Copyright <2018>
<STMicroelectronics>
Redistribution and use in source and binary forms, with or without modification, are permitted provided that the following
conditions are met:
1. Redistributions of source code must retain the above copyright notice, this list of conditions and the following disclaimer.
2. Redistributions in binary form must reproduce the above copyright notice, this list of conditions and the following
disclaimer in the documentation and/or other materials provided with the distribution.
3. Neither the name of the copyright holder nor the names of its contributors may be used to endorse or promote products
derived from this software without specific prior written permission.
THIS SOFTWARE IS PROVIDED BY THE COPYRIGHT HOLDERS AND CONTRIBUTORS “AS IS” AND ANY EXPRESS
OR IMPLIED WARRANTIES, INCLUDING, BUT NOT LIMITED TO, THE IMPLIED WARRANTIES OF
MERCHANTABILITY AND FITNESS FOR A PARTICULAR PURPOSE ARE DISCLAIMED. IN NO EVENT SHALL THE
COPYRIGHT HOLDER OR CONTRIBUTORS BE LIABLE FOR ANY DIRECT, INDIRECT, INCIDENTAL, SPECIAL,
EXEMPLARY, OR CONSEQUENTIAL DAMAGES (INCLUDING, BUT NOT LIMITED TO, PROCUREMENT OF
SUBSTITUTE GOODS OR SERVICES; LOSS OF USE, DATA, OR PROFITS; OR BUSINESS INTERRUPTION)
HOWEVER CAUSED AND ON ANY THEORY OF LIABILITY, WHETHER IN CONTRACT, STRICT LIABILITY, OR TORT
(INCLUDING NEGLIGENCE OR OTHERWISE) ARISING IN ANY WAY OUT OF THE USE OF THIS SOFTWARE, EVEN
IF ADVISED OF THE POSSIBILITY OF SUCH DAMAGE.

(4) stb is available under 2 licenses
------------------------------------------------------------------------------
MIT License
Copyright (c) 2017 Sean Barrett
Permission is hereby granted, free of charge, to any person obtaining a copy of this software and associated documentation
files (the "Software"), to deal in the Software without restriction, including without limitation the rights to use, copy, modify,
merge, publish, distribute, sublicense, and/or sell copies of the Software, and to permit persons to whom the Software is
furnished to do so, subject to the following conditions:
The above copyright notice and this permission notice shall be included in all copies or substantial portions of the Software.
THE SOFTWARE IS PROVIDED "AS IS", WITHOUT WARRANTY OF ANY KIND, EXPRESS OR IMPLIED, INCLUDING
BUT NOT LIMITED TO THE WARRANTIES OF MERCHANTABILITY, FITNESS FOR A PARTICULAR PURPOSE AND
NONINFRINGEMENT. IN NO EVENT SHALL THE AUTHORS OR COPYRIGHT HOLDERS BE LIABLE FOR ANY CLAIM,
DAMAGES OR OTHER LIABILITY, WHETHER IN AN ACTION OF CONTRACT, TORT OR OTHERWISE, ARISING
FROM, OUT OF OR IN CONNECTION WITH THE SOFTWARE OR THE USE OR OTHER DEALINGS IN THE
SOFTWARE. -
------------------------------------------------------------------------------
Public Domain (www.unlicense.org)
This is free and unencumbered software released into the public domain. Anyone is free to copy, modify, publish, use,
compile, sell, or distribute this software, either in source code form or as a compiled binary, for any purpose, commercial or
non-commercial, and by any means. In jurisdictions that recognize copyright laws, the author or authors of this software
dedicate any and all copyright interest in the software to the public domain. We make this dedication for the benefit of the
public at large and to the detriment of our heirs and successors. We intend this dedication to be an overt act of
relinquishment in perpetuity of all present and future rights to this software under copyright law.
THE SOFTWARE IS PROVIDED "AS IS", WITHOUT WARRANTY OF ANY KIND, EXPRESS OR IMPLIED, INCLUDING
BUT NOT LIMITED TO THE WARRANTIES OF MERCHANTABILITY, FITNESS FOR A PARTICULAR PURPOSE AND
NONINFRINGEMENT. IN NO EVENT SHALL THE AUTHORS BE LIABLE FOR ANY CLAIM, DAMAGES OR OTHER
LIABILITY, WHETHER IN AN ACTION OF CONTRACT, TORT OR OTHERWISE, ARISING FROM, OUT OF OR IN
CONNECTION WITH THE SOFTWARE OR THE USE OR OTHER DEALINGS IN THE SOFTWARE.
(5) "Mgen+" and "M+"
This product includes the following open source font:
"Mgen+" and "M+",
Copyright (c) <2002-2014>, <M+ FONTS PROJECT>
This Font Software is licensed under the SIL Open Font License, Version 1.1.
This license is available with a FAQ at:
https://openfontlicense.org
(6) DynaFont
The typefaces included herein are solely developed by DynaComware Taiwan Inc.

124 PSR-SX620 Owner’s Manual
Memo
Informations concernant la collecte et le traitement des déchets d’équipements électriques et électroniques
Le symbole sur les produits, l'emballage et/ou les documents joints signifie que les produits électriques ou électroniques usagés ne doivent
pas être mélangés avec les déchets domestiques habituels.
Pour un traitement, une récupération et un recyclage appropriés des déchets d’équipements électriques et électroniques, veuillez les
déposer aux points de collecte prévus à cet effet, conformément à la réglementation nationale.
En vous débarrassant correctement des déchets d’équipements électriques et électroniques, vous contribuerez à la sauvegarde de
précieuses ressources et à la prévention de potentiels effets négatifs sur la santé humaine qui pourraient advenir lors d'un traitement
inapproprié des déchets.
Pour plus d'informations à propos de la collecte et du recyclage des déchets d’équipements électriques et électroniques, veuillez contacter
votre municipalité, votre service de traitement des déchets ou le point de vente où vous avez acheté les produits.
Pour les professionnels dans l'Union européenne :
Si vous souhaitez vous débarrasser des déchets d’équipements électriques et électroniques, veuillez contacter votre vendeur ou
fournisseur pour plus d'informations.
Informations sur la mise au rebut dans d'autres pays en dehors de l'Union européenne :
Ce symbole est seulement valable dans l'Union européenne. Si vous souhaitez vous débarrasser de déchets d’équipements électriques et
électroniques, veuillez contacter les autorités locales ou votre fournisseur et demander la méthode de traitement appropriée.
(weee_eu_fr_02)
Información para usuarios sobre la recogida y eliminación de los equipos antiguos
Este símbolo en los productos, embalajes y documentos anexos significa que los productos eléctricos y electrónicos no deben mezclarse
con los desperdicios domésticos normales.
Para el tratamiento, recuperación y reciclaje apropiados de los productos antiguos, llévelos a puntos de reciclaje correspondientes, de
acuerdo con la legislación nacional.
Al deshacerse de estos productos de forma correcta, ayudará a ahorrar recursos valiosos y a impedir los posibles efectos desfavorables
en la salud humana y en el entorno que de otro modo se producirían si se trataran los desperdicios de modo inapropiado.
Para obtener más información acerca de la recogida y el reciclaje de los productos antiguos, póngase en contacto con las autoridades
locales, con el servicio de eliminación de basuras o con el punto de venta donde adquirió los artículos.
Para los usuarios empresariales de la Unión Europea:
Si desea desechar equipos eléctricos y electrónicos, póngase en contacto con su vendedor o proveedor para obtener más información.
Información sobre la eliminación en otros países fuera de la Unión Europea:
Este símbolo solo es válido en la Unión Europea. Si desea desechar estos artículos, póngase en contacto con las autoridades locales o
con el vendedor y pregúnteles el método correcto.
(weee_eu_es_02)
SIMPLIFIED UK DECLARATION OF CONFORMITY
Hereby, Yamaha Corporation declares that the [PSR-SX620] is in compliance with the Product Security and Telecommunications Infrastructure Regula-
tions. The full text of the UK Declaration of Conformity is available at the following internet address:
https://europe.yamaha.com/en/support/compliance/doc.html
(657-M01 UK cybersecurity 01)
For United Kingdom
Information for users on collection and disposal of old equipment:
This symbol on the products, packaging, and/or accompanying documents means that used electrical and electronic products should not
be mixed with general household waste.
For proper treatment, recovery and recycling of old products, please take them to applicable collection points, in accordance with your
national legislation.
By disposing of these products correctly, you will help to save valuable resources and prevent any potential negative effects on human
health and the environment which could otherwise arise from inappropriate waste handling.
For more information about collection and recycling of old products, please contact your local municipality, your waste disposal service or
the point of sale where you purchased the items.
For business users in the European Union:
If you wish to discard electrical and electronic equipment, please contact your dealer or supplier for further information.
Information on Disposal in other Countries outside the European Union:
This symbol is only valid in the European Union. If you wish to discard these items, please contact your local authorities or dealer and ask
for the correct method of disposal.
(weee_eu_en_02)
FCC, IC and MX Information
For U.S.A.
(554-M01 FCC transmitter 01)
.
(554-M03 FCC mobile SAR 01)
For CANADA
(555-M04 ISED mobile SAR 01)
(555-M13 ISED RSS en 01)
(555-M13 ISED RSS fr 01)
For MEXICO
(556-M02 MX operating condition 01)
This transmitter must not be co-located or operated in conjunction with any other antenna or transmitter.
This equipment complies with FCC radiation exposure limits set forth for an uncontrolled environment and meets the FCC
radio frequency (RF) Exposure Guidelines. This equipment should be installed and operated keeping the radiator at least
20 cm or more away from person’s body.
This equipment complies with ISED radiation exposure limits set forth for an uncontrolled environment and meets RSS-
102 of the ISED radio frequency (RF) Exposure rules. This equipment should be installed and operated keeping the
radiator at least 20 cm or more away from person’s body.
Cet équipement est conforme aux limites d’exposition aux rayonnements énoncées pour un environnement non contrôlé
et respecte les règles d’exposition aux fréquences radioélectriques (RF) CNR-102 de I’SDE. Cet équipement doit être
installé et utilisé en gardant une distance de 20 cm ou plus entre le radiateur et le corps humain.
This device contains licence-exempt transmitter(s)/receiver(s) that comply with Innovation, Science and Economic
Development Canada’s licence-exempt RSS(s). Operation is subject to the following two conditions:
1. his device may not cause interference.
2. his device must accept any interference, including interference that may cause undesired operation of the device.
L’émetteur/récepteur exempt de licence contenu dans le présent appareil est conforme aux CNR d’Innovation, Sciences
et Développement économique Canada applicables aux appareils radio exempts de licence.
L’exploitation est autorisée aux deux conditions suivantes :
1. ’appareil ne doit pas produire de brouillage;
2. ’appareil doit accepter tout brouillage radioélectrique subi, même si le brouillage est susceptible d’en compromettre le
fonctionnement.
La operación de este equipo está sujeta a las siguientes dos condiciones: (1) es posible que este equipo o dispositivo no
cause interferencia perjudicial y (2) este equipo o dispositivo debe aceptar cualquier interferencia, incluyendo la que
pueda causar su operación no deseada.
.3&%%P$63-
&/
6,03/,),('(8'(&/$5$7,212)&21)250,7<
6,03/,),('8.'(&/$5$7,212)&21)250,7<
)FSFCZ:BNBIB$PSQPSBUJPOEFDMBSFTUIBUUIFSBEJPFRVJQNFOUUZQF
<14349>JTJODPNQMJBODFXJUI%JSFDUJWF&6BOEUIF
SBEJPFRVJQNFOUSFHVMBUJPOTPG6,5IFGVMMUFYUTPGUIF&6
EFDMBSBUJPOPGDPOGPSNJUZBOEUIF6,EFDMBSBUJPOPGDPOGPSNJUZBSF
BWBJMBCMFBUUIFGPMMPXJOHJOUFSOFUBEESFTT
KWWSVHXURSH\DPDKDFRPHQVXSSRUWFRPSOLDQFHGRFKWPO
SS\ SSS
'3 '(&/$5$7,218('(&21)250,7(6,03/,),((
/HVRXVVLJQp<DPDKD&RUSRUDWLRQGpFODUHTXHOpTXLSHPHQW
UDGLRpOHFWULTXHGXW\SH>3656;@HVWFRQIRUPHjODGLUHFWLYH
8(/HWH[WHFRPSOHWGHODGpFODUDWLRQ8(GHFRQIRUPLWp
HVWGLVSRQLEOHjODGUHVVHLQWHUQHWVXLYDQWH
KWWSVHXURSH\DPDKDFRPHQVXSSRUWFRPSOLDQFHGRFKWPO
SS\ SSS
%& 9(5(,1)$&+7((8.21)250,7b76(5./b581*
+LHUPLWHUNOlUW<DPDKD&RUSRUDWLRQGDVVGHU)XQNDQODJHQW\S
>3656;@GHU5LFKWOLQLH(8HQWVSULFKW'HUYROOVWlQGLJH
7H[WGHU(8.RQIRUPLWlWVHUNOlUXQJLVWXQWHUGHUIROJHQGHQ
,QWHUQHWDGUHVVHYHUIJEDU
KWWSVHXURSH\DPDKDFRPHQVXSSRUWFRPSOLDQFHGRFKWPO
SS\ SSS
47
)g5(1./$'(8)g56b.5$120g9(5(1667b00(/6(
+lUPHGI|UVlNUDU<DPDKD&RUSRUDWLRQDWWGHQQDW\SDY
UDGLRXWUXVWQLQJ>3656;@|YHUHQVVWlPPHUPHGGLUHNWLY
(8'HQIXOOVWlQGLJDWH[WHQWLOO(8I|UVlNUDQRP
|YHUHQVVWlPPHOVHILQQVSnI|OMDQGHZHEEDGUHVV
KWWSVHXURSH\DPDKDFRPHQVXSSRUWFRPSOLDQFHGRFKWPO
SS\ SSS
*5 ',&+,$5$=,21(',&21)250,7¬8(6(03/,),&$7$
,OIDEEULFDQWH<DPDKD&RUSRUDWLRQGLFKLDUDFKHLOWLSRGL
DSSDUHFFKLDWXUDUDGLR>3656;@qFRQIRUPHDOODGLUHWWLYD
8(,OWHVWRFRPSOHWRGHOODGLFKLDUD]LRQHGLFRQIRUPLWj
8(qGLVSRQLELOHDOVHJXHQWHLQGLUL]]R,QWHUQHW
KWWSVHXURSH\DPDKDFRPHQVXSSRUWFRPSOLDQFHGRFKWPO
S
S\ SS S
&4 '(&/$5$&,Ï18('(&21)250,'$'6,03/,),&$'$
3RUODSUHVHQWH<DPDKD&RUSRUDWLRQGHFODUDTXHHOWLSRGH
HTXLSRUDGLRHOpFWULFR>3656;@HVFRQIRUPHFRQOD'LUHFWLYD
8((OWH[WRFRPSOHWRGHODGHFODUDFLyQ8(GH
FRQIRUPLGDGHVWiGLVSRQLEOHHQODGLUHFFLyQ,QWHUQHWVLJXLHQWH
KWWSVHXURSH\DPDKDFRPHQVXSSRUWFRPSOLDQFHGRFKWPO
SS\ SSS
15 '(&/$5$d28('(&21)250,'$'(6,03/,),&$'$
2DDEDL[RDVVLQDGRD<DPDKD&RUSRUDWLRQGHFODUDTXHRSUHVHQWHWLSR
GHHTXLSDPHQWRGHUiGLR>3656;@HVWiHPFRQIRUPLGDGHFRPD
'LUHWLYD8(2WH[WRLQWHJUDOGDGHFODUDomRGHFRQIRUPLGDGHHVWi
GLVSRQtYHOQRVHJXLQWHHQGHUHoRGH,QWHUQHW
KWWSVHXURSH\DPDKDFRPHQVXSSRUWFRPSOLDQFHGRFKWPO
SS\ SSS
/- 9(5((1928',*'((8&21)250,7(,769(5./$5,1*
+LHUELMYHUNODDULN<DPDKD&RUSRUDWLRQGDWKHWW\SH
UDGLRDSSDUDWXXU>3656;@FRQIRUPLVPHW5LFKWOLMQ(8
'HYROOHGLJHWHNVWYDQGH(8FRQIRUPLWHLWVYHUNODULQJNDQZRUGHQ
JHUDDGSOHHJGRSKHWYROJHQGHLQWHUQHWDGUHV
KWWSVHXURSH\DPDKDFRPHQVXSSRUWFRPSOLDQFHGRFKWPO
SS\ SSS
#( ɈɉɊɈɋɌȿɇȺȿɋȾȿɄɅȺɊȺɐɂəɁȺɋɔɈɌȼȿɌɋɌȼɂȿ
ɋɧɚɫɬɨɹɳɨɬɨ<DPDKD&RUSRUDWLRQɞɟɤɥɚɪɢɪɚɱɟɬɨɡɢɬɢɩ
ɪɚɞɢɨɫɴɨɪɴɠɟɧɢɟ>3656;@ɟɜɫɴɨɬɜɟɬɫɬɜɢɟɫȾɢɪɟɤɬɢɜɚ
ȿɋɐɹɥɨɫɬɧɢɹɬɬɟɤɫɬɧɚȿɋɞɟɤɥɚɪɚɰɢɹɬɚɡɚ
ɫɴɨɬɜɟɬɫɬɜɢɟɦɨɠɟɞɚɫɟɧɚɦɟɪɢɧɚɫɥɟɞɧɢɹɢɧɬɟɪɧɟɬɚɞɪɟɫ
KWWSVHXURSH\DPDKDFRPHQVXSSRUWFRPSOLDQFHGRFKWPO
SS\ SSS
$4 =-('12'8â(1e(8352+/Èâ(1Ë26+2'ċ
7tPWR<DPDKD&RUSRUDWLRQSURKODãXMHåHW\SUiGLRYpKR]DĜt]HQt
>3656;@MHYVRXODGXVHVPČUQLFt(8ÒSOQp]QČQt(8
SURKOiãHQtRVKRGČMHNGLVSR]LFLQDWpWRLQWHUQHWRYpDGUHVH
KWWSVHXURSH\DPDKDFRPHQVXSSRUWFRPSOLDQFHGRFKWPO
%" )25(1./(7(829(5(1667(00(/6(6(5./5,1*
+HUPHGHUNOUHU<DPDKD&RUSRUDWLRQDWUDGLRXGVW\UVW\SHQ>365
6;@HULRYHUHQVVWHPPHOVHPHGGLUHNWLY(8(8
RYHUHQVVWHPPHOVHVHUNOULQJHQVIXOGHWHNVWNDQILQGHVSnI¡OJHQGH
LQWHUQHWDGUHVVH
KWWSVHXURSH\DPDKDFRPHQVXSSRUWFRPSOLDQFHGRFKWPO
SS\ SSS
&5 /,+76867$78'(/,9$67$986'(./$5$76,221
.lHVROHYDJDGHNODUHHULE<DPDKD&RUSRUDWLRQHWNlHVROHY
UDDGLRVHDGPHWS>3656;@YDVWDEGLUHNWLLYL (/
Q}XHWHOH(/LYDVWDYXVGHNODUDWVLRRQLWlLHOLNWHNVWRQNlWWHVDDGDY
MlUJPLVHOLQWHUQHWLDDGUHVVLO
KWWSVHXURSH\DPDKDFRPHQVXSSRUWFRPSOLDQFHGRFKWPO
SS\ SSS
&- ǹȆȁȅȊȈȉǼȊȂǼȃǾǻǾȁȍȈǾȈȊȂȂȅȇĭȍȈǾȈǼǼ
ȂİIJȘȞʌĮȡȠȪıĮȠȘ<DPDKD&RUSRUDWLRQįȘȜȫȞİȚȩIJȚȠ
ȡĮįȚȠİȟȠʌȜȚıȝȩȢ>3656;@ʌȜȘȡȠȓIJȘȞȠįȘȖȓĮ ǼǼȉȠ
ʌȜȒȡİȢțİȓȝİȞȠIJȘȢįȒȜȦıȘȢıȣȝȝȩȡijȦıȘȢǼǼįȚĮIJȓșİIJĮȚıIJȘȞ
ĮțȩȜȠȣșȘȚıIJȠıİȜȓįĮıIJȠįȚĮįȓțIJȣȠ
KWWSVHXURSH\DPDKDFRPHQVXSSRUWFRPSOLDQFHGRFKWPO
SS\ SSS
)3 32-('1267$9/-(1$(8,=-$9$268./$'1267,
<DPDKD&RUSRUDWLRQRYLPHL]MDYOMXMHGDMHUDGLMVNDRSUHPDWLSD
>3656;@XVNODGXV'LUHNWLYRP(8&MHORYLWLWHNVW(8
L]MDYHRVXNODGQRVWLGRVWXSDQMHQDVOMHGHüRMLQWHUQHWVNRMDGUHVL
KWWSVHXURSH\DPDKDFRPHQVXSSRUWFRPSOLDQFHGRFKWPO
SS\ SSS
-7 9,(1.Ɩ5â27$(6$7%,/67Ʈ%$6'(./$5Ɩ&,-$
$UãR<DPDKD&RUSRUDWLRQGHNODUƝNDUDGLRLHNƗUWD>3656;@
DWELOVW'LUHNWƯYDL(63LOQV(6DWELOVWƯEDVGHNODUƗFLMDVWHNVWV
LUSLHHMDPVãƗGƗLQWHUQHWDYLHWQƝ
KWWSVHXURSH\DPDKDFRPHQVXSSRUWFRPSOLDQFHGRFKWPO
SS\ SSS
-5 683$35$67,17$(6$7,7,.7,(6'(./$5$&,-$
$ã<DPDKD&RUSRUDWLRQSDWYLUWLQXNDGUDGLMRƳUHQJLQLǐWLSDV
>3656;@DWLWLQND'LUHNW\Yą(69LVDV(6DWLWLNWLHV
GHNODUDFLMRVWHNVWDVSULHLQDPDVãLXRLQWHUQHWRDGUHVX
KWWSVHXURSH\DPDKDFRPHQVXSSRUWFRPSOLDQFHGRFKWPO
SS\ SSS
)6 (*<6=(5ĥ6Ë7(77(80(*)(/(/ė6e*,1<,/$7.2=$7
<DPDKD&RUSRUDWLRQLJD]ROMDKRJ\D>3656;@WtSXV~
UiGLyEHUHQGH]pVPHJIHOHOD(8LUiQ\HOYQHN$](8
PHJIHOHOĘVpJLQ\LODWNR]DWWHOMHVV]|YHJHHOpUKHWĘDN|YHWNH]Ę
LQWHUQHWHVFtPHQ
KWWSVHXURSH\DPDKDFRPHQVXSSRUWFRPSOLDQFHGRFKWPO
SS\ SSS
1- 83526=&=21$'(./$5$&-$=*2'12ĝ&,8(
<DPDKD&RUSRUDWLRQQLQLHMV]\PRĞZLDGF]DĪHW\SXU]ąG]HQLD
UDGLRZHJR>3656;@MHVW]JRGQ\]G\UHNW\Zą 8(3HáQ\
WHNVWGHNODUDFML]JRGQRĞFL8(MHVWGRVWĊSQ\SRGQDVWĊSXMąF\P
DGUHVHPLQWHUQHWRZ\P
KWWSVHXURSH\DPDKDFRPHQVXSSRUWFRPSOLDQFHGRFKWPO
SS\ SSS
30 '(&/$5$܉,$8('(&21)250,7$7(6,03/,),&$7Ă
3ULQSUH]HQWD<DPDKD&RUSRUDWLRQGHFODUăFăWLSXOGH
HFKLSDPHQWHUDGLR>3656;@HVWHvQFRQIRUPLWDWHFX'LUHFWLYD
8(7H[WXOLQWHJUDODOGHFODUD܊LHL8(GHFRQIRUPLWDWHHVWH
GLVSRQLELOODXUPăWRDUHDDGUHVăLQWHUQHW
KWWSVHXURSH\DPDKDFRPHQVXSSRUWFRPSOLDQFHGRFKWPO
SS\ SSS
4, =-('12'8â(1e(Ò9<+/È6(1,(2=+2'(
<DPDKD&RUSRUDWLRQWêPWRY\KODVXMHåHUiGLRYp]DULDGHQLHW\SX
>3656;@MHYV~ODGHVRVPHUQLFRX(ÒÒSOQp(Ò
Y\KOiVHQLHR]KRGHMHNGLVSR]tFLLQDWHMWRLQWHUQHWRYHMDGUHVH
KWWSVHXURSH\DPDKDFRPHQVXSSRUWFRPSOLDQFHGRFKWPO
4- 32(1267$9/-(1$,=-$9$(826./$'1267,
<DPDKD &RUSRUDWLRQ SRWUMXMH GD MH WLS UDGLMVNH RSUHPH >365
6;@VNODGHQ]'LUHNWLYR(8&HORWQREHVHGLORL]MDYH(8
RVNODGQRVWLMHQDYROMRQDQDVOHGQMHPVSOHWQHPQDVORYX
KWWSVHXURSH\DPDKDFRPHQVXSSRUWFRPSOLDQFHGRFKWPO
SS\ SSS
'*
<.6,1.(57$,67(778(89$$7,0867(108.$,68869$.88786
<DPDKD&RUSRUDWLRQYDNXXWWDDHWWlUDGLRODLWHW\\SSL>3656;@
RQGLUHNWLLYLQ(8PXNDLQHQ(8
YDDWLPXVWHQPXNDLVXXVYDNXXWXNVHQWl\VLPLWWDLQHQWHNVWLRQVDDWDYLOOD
VHXUDDYDVVDLQWHUQHWRVRLWWHHVVD
KWWSVHXURSH\DPDKDFRPHQVXSSRUWFRPSOLDQFHGRFKWPO
SS\ SSS
53
%$6ø7/(ù7ø5ø/0øù$9583$%ø5/øöø8<*81/8.%ø/'ø5ø0ø
øúEXEHOJHLOH<DPDKD&RUSRUDWLRQUDG\RFLKD]WLSLQLQ>3656;@
'LUHNWLI$%\HX\JXQOX÷XQXEH\DQHGHU$%X\XPX
EH\DQÕQÕQWDPPHWQLDúD÷ÕGDNLLQWHUQHWDGUHVLQGHQHGLQLOHELOLU
KWWSVHXURSH\DPDKDFRPHQVXSSRUWFRPSOLDQFHGRFKWPO
SS\ SSS
'PS&VSPQFBO6OJPOBOE6OJUFE,JOHEPN
Deutsch
Français
Nederlands
Español
Italiano
Português
ǼȜȜȘȞȚțȐ
Svenska
Norsk
Dansk
Suomi
Polski
ýHãWLQD
Magyar
Eesti
/DWYLHãX
/LHWXYLǐ
6ORYHQþLQD
6ORYHQãþLQD
Ȼɴɥɝɚɪɫɤɢ
5RPkQă
English
Hrvatski
Türkçe
Important Notice: Power management information for customers in European Economic Area (EEA),
Switzerland and Turkey
Remarque importante : Informations sur la gestion de l'alimentation pour les clients de l'Espace
économique européen (EEE), de Suisse et de Turquie
Yamaha-Produkte sind mit einer Power-Management-Funktion ausgestattet. Bei einigen Produkten können Sie diese Funktion ausschalten oder
die Zeitdauer, die verstreicht, bis das Instrument ausgeschaltet oder in Bereitschaft versetzt wird, verlängern. In diesen Fällen erhöht sich der
Energieverbrauch.
Les produits Yamaha sont équipés d’une fonction de gestion de l’alimentation. Certains produits vous permettent de désactiver cette fonction ou
d'allonger le délai avant la mise hors tension ou la mise en veille. Dans ces cas, la consommation d’énergie augmente.
Yamaha-producten zijn uitgerust met een energiebeheerfunctie. Bij sommige producten kunt u die functie uitschakelen of de tijd verlengen die
verstrijkt voordat de stroom wordt uitgeschakeld of in stand-by wordt gezet. In deze gevallen zal het energieverbruik toenemen.
Los productos Yamaha están equipados con una función de administración de energía. Algunos productos permiten desactivar esa función o
ampliar el tiempo que transcurre antes de apagar la alimentación o poner el producto en modo de espera. En estos casos, el consumo de energía
aumentará.
I prodotti Yamaha sono dotati di una funzione di gestione dell'alimentazione. Alcuni prodotti consentono di disattivare tale funzione o di
estendere il periodo di tempo che trascorre prima che l'alimentazione venga spenta o impostata in standby. In questi casi, il consumo energetico
aumenterà.
Yamaha products are equipped with a power management function. Some products allow you to disable that function, or to extend the amount of
time that elapses before the power is turned off or set to standby. In these cases, energy consumption will increase.
Os produtos Yamaha são equipados com uma função de gerenciamento de energia. Alguns produtos permitem desativar essa função ou
estender o tempo decorrido antes de se desligar ou entrar em standby. Nesses casos, o consumo de energia aumentará.
ȉĮʌȡȠȧȩȞIJĮIJȘȢ<DPDKDİȓȞĮȚİȟȠʌȜȚıȝȑȞĮȝİȝȚĮȜİȚIJȠȣȡȖȓĮįȚĮȤİȓȡȚıȘȢȚıȤȪȠȢȅȡȚıȝȑȞĮʌȡȠȧȩȞIJĮıȐȢįȓȞȠȣȞIJȘįȣȞĮIJȩIJȘIJĮȞĮ
ĮʌİȞİȡȖȠʌȠȚİȓIJİĮȣIJȒIJȘȜİȚIJȠȣȡȖȓĮȒȞĮİʌİțIJİȓȞİIJİIJȠȤȡȠȞȚțȩįȚȐıIJȘȝĮȝȑȤȡȚIJȘȞĮʌİȞİȡȖȠʌȠȓȘıȘȒIJȘșȑıȘıİțĮIJȐıIJĮıȘĮȞĮȝȠȞȒȢȈİ
ĮȣIJȑȢIJȚȢʌİȡȚʌIJȫıİȚȢȘțĮIJĮȞȐȜȦıȘİȞȑȡȖİȚĮȢșĮĮȣȟȘșİȓ
Yamaha-produkterna är utrustade med en energihanteringsfunktion. För vissa produkter kan du inaktivera den funktionen eller för att förlänga
tiden som förflutit innan strömmen stängs av eller ställs i vänteläge. I dessa fall ökar energiförbrukningen.
Yamahas produkter har en strømstyringsfunktion. På nogle produkter er det muligt at deaktivere denne funktion eller at forlænge den tid, der går,
før der slukkes for strømmen, eller sættes på standby. I disse tilfælde vil strømforbruget stige.
Yamaha-tuotteet on varustettu virranhallintatoiminnolla. Joissakin tuotteissa voit poistaa toiminnon käytöstä tai pidentää aikaa, joka kuluu ennen
virran katkaisemista tai valmiustilaan asettamista. Näissä tapauksissa energiankulutus kasvaa.
3URGXNW\<DPDKDVąZ\SRVDĪRQHZIXQNFMĊ]DU]ąG]DQLDHQHUJLą1LHNWyUHSURGXNW\XPRĪOLZLDMąZ\áąF]HQLHWHMIXQNFMLOXEZ\GáXĪHQLHF]DVX
MDNLXSá\ZDGRZ\áąF]HQLD]DVLODQLDOXESU]HMĞFLDZWU\EJRWRZRĞFL:WDNLFKSU]\SDGNDFK]XĪ\FLHHQHUJLLZ]URĞQLH
3URGXNW\<DPDKDMVRXY\EDYHQ\IXQNFtVSUiY\QDSiMHQt1ČNWHUpSURGXNW\XPRåĖXMtWXWRIXQNFL]DNi]DWQHERSURGORXåLWGREXNWHUiPi
XEČKQRXWSĜHGY\SQXWtPQDSiMHQtQHERSRKRWRYRVWQtPUHåLPHP9WČFKWRSĜtSDGHFKVH]YêãtVSRWĜHEDHOHNWĜLQ\
$<DPDKDWHUPpNHNHQHUJLDPHQHG]VPHQWIXQNFLyYDOYDQQDNHOOiWYD(J\HVWHUPpNHNOHKHWĘYpWHV]LNKRJ\OHWLOWVDH]WDIXQNFLyWYDJ\
PHJKRVV]DEEtWVDDNLNDSFVROiVYDJ\NpV]HQOpWLiOODSRWEDKHO\H]pVHOĘWWHOWHOWLGĘW(]HNEHQD]HVHWHNEHQD]HQHUJLDIRJ\DV]WiVQ|YHNHGQLIRJ
Yamaha tooted on varustatud toitehalduse funktsiooniga. Mõned tooted võimaldavad teil selle funktsiooni keelata või pikendada aega, mis
P||GXEHQQHWRLWHYlOMDOOLWDPLVWY}LRRWHUHåLLPLVHDGPLVW6HOOLVWHOMXKWXGHOVXXUHQHEHQHUJLDWWDUELPLQH
<DPDKDL]VWUƗGƗMXPLLUDSUƯNRWLDUEDURãDQDVSƗUYDOGƯEDVIXQNFLMX'DåLHPL]VWUƗGƗMXPLHPãRIXQNFLMXYDUDWVSƝMRWYDLSDLOG]LQƗWODLNXNDP
MƗSDLHWSLUPVEDURãDQDVDWVOƝJãDQDVYDLSƗULHãDQDVJDLGVWƗYHVUHåƯPƗâƗGƗJDGƯMXPƗSDOLHOLQƗVLHVHQHUƧLMDVSDWƝULƼã
Ä<DPDKD³JDPLQLXRVH\UDHQHUJLMRVVąQDXGǐYDOG\PRIXQNFLMD.DLNXULHJDPLQLDLOHLGåLDLãMXQJWLãLąIXQNFLMąDUEDSUDWĊVWLODLNąSUDơMXVƳSULHã
LãMXQJLDQWPDLWLQLPąDUEDƳMXQJLDQWEXGơMLPRUHåLPą7RNLDLVDWYHMDLVHQHUJLMRVVXYDUWRMLPDVSDGLGơV
3URGXNW\VSRORþQRVWL<DPDKDV~Y\EDYHQpIXQNFLRXVSUiY\QDSiMDQLD1LHNWRUpSURGXNW\YiPXPRåĖXM~W~WRIXQNFLXY\SQ~ĢDOHERSUHGĎåLĢþDV
SRXSO\QXWtNWRUêFKVDQDSiMDQLHY\SQHDOHERQDVWDYtGRSRKRWRYRVWQpKRUHåLPX9WDNêFKWRSUtSDGRFKVD]YêãLVSRWUHEDHQHUJLH
<DPDKLQLL]GHONLLPDMRIXQNFLMRXSUDYOMDQMD]QDSDMDQMHP1HNDWHULL]GHONLYDPRPRJRþDMRGDRQHPRJRþLWHWRIXQNFLMRDOLSRGDOMãDWHþDVNLPRUD
SUHWHþLSUHGHQVHQDSDMDQMHL]NORSLDOLQDVWDYLYVWDQMHSULSUDYOMHQRVWL9WHKSULPHULKVHERSRUDEDHQHUJLMHSRYHþDOD
ɉɪɨɞɭɤɬɢɬɟɧɚ<DPDKDɫɚɫɧɚɛɞɟɧɢɫɮɭɧɤɰɢɹɡɚɭɩɪɚɜɥɟɧɢɟɧɚɡɚɯɪɚɧɜɚɧɟɬɨɇɹɤɨɢɩɪɨɞɭɤɬɢɜɢɩɨɡɜɨɥɹɜɚɬɞɚɡɚɛɪɚɧɢɬɟɬɚɡɢ
ɮɭɧɤɰɢɹɢɥɢɞɚɭɞɴɥɠɢɬɟɜɪɟɦɟɬɨɤɨɟɬɨɳɟɢɡɬɟɱɟɩɪɟɞɢɡɚɯɪɚɧɜɚɧɟɬɨɞɚɫɟɢɡɤɥɸɱɢɢɥɢɞɚɫɟɧɚɫɬɪɨɢɜɪɟɠɢɦɧɚɝɨɬɨɜɧɨɫɬ
ȼɬɟɡɢɫɥɭɱɚɢɤɨɧɫɭɦɚɰɢɹɬɚɧɚɟɧɟɪɝɢɹɳɟɫɟɭɜɟɥɢɱɢ
3URGXVHOH<DPDKDVXQWHFKLSDWHFXRIXQF܊LHGHJHVWLRQDUHDHQHUJLHL8QHOHSURGXVHYăSHUPLWVăGH]DFWLYD܊LDFHDVWăIXQF܊LHVDXVăSUHOXQJL܊L
SHULRDGDGHWLPSFDUHWUHFHvQDLQWHFDDOLPHQWDUHDVăILHRSULWăVDXVHWDWăvQVWDQGE\ÌQDFHVWHFD]XULFRQVXPXOGHHQHUJLHYDFUH܈WH
<DPDKDSURL]YRGLRSUHPOMHQLVXIXQNFLMRPXSUDYOMDQMDSRWURãQMRPHQHUJLMH1HNLYDPSURL]YRGLRPRJXüXMXRQHPRJXüDYDQMHWHIXQNFLMHLOL
SURGXOMHQMHYUHPHQDNRMHSURWHNQHSULMHLVNOMXþLYDQMDQDSDMDQMDLOLSRVWDYOMDQMDXVWDQMHSULSUDYQRVWL8WLPüHVHVOXþDMHYLPDSRYHü
DWLSRWURãQMD
energije.
<DPDKDUQOHULQGHJo\|QHWLPLLúOHYLYDUGÕU%D]ÕUQOHUEXLúOHYLGHYUHGÕúÕEÕUDNPDQÕ]DYH\DJoNDSDWÕOPDGDQ\DGDEHNOHPHPRGXQD
DOÕQPDGDQ|QFHJHoHQVUH\LX]DWPDQÕ]DRODQDNWDQÕU%XJLELGXUXPODUGDHQHUMLWNHWLPLDUWDFDNWÕU
(574-M06EUerp01)
Yamaha Corporation of America
Attn: Customer Service
6600 Orangethorpe Avenue, Buena Park, California 90620
Telephone: 800-854-1569
LIMITED WARRANTY FOR CUSTOMERS IN THE UNITED STATES
For a copy of your YAMAHA® Limited Warranty, please visit the website identified below. For assistance,
additional product information, or to request a copy of your warranty, you may also visit and complete the
Customer Service & Support form at www.usa.yamaha.com/support/contacts/form.html, or contact Customer
Service & Support at the below address or telephone number.
Website
www.usa.yamaha.com/support/warranty/keyboards/
Customer Service & Support
Yamaha Worldwide Representative Offices
For details on the product(s), contact your nearest Yamaha
representative or the authorized distributor, found by accessing
the 2D barcode below.
English
Wenden Sie sich für nähere Informationen zu Produkten an eine
Yamaha-Vertretung oder einen autorisierten Händler in Ihrer Nähe.
Diese finden Sie mithilfe des unten abgebildeten 2D-Strichodes.
Deutsch
Pour obtenir des informations sur le ou les produits, contactez
votre représentant ou revendeur agréé Yamaha le plus proche.
Vous le trouverez à l'aide du code-barres 2D ci-dessous.
Français
Para ver información detallada sobre el producto, contacte con
su representante o distribuidor autorizado Yamaha más cercano.
Lo encontrará escaneando el siguiente código de barras 2D.
Español
Neem voor meer informatie over de producten contact op met uw
dichtstbijzijnde Yamaha-vertegenwoordiger of de geautoriseerde
distributeur, te vinden via de onderstaande 2D-barcode.
Nederlands
Para mais informações sobre o(s) produto(s), fale com seu
representante da Yamaha mais próximo ou com o distribuidor
autorizado acessando o código de barras 2D abaixo.
Português
$E\X]\VNDüV]F]HJyáRZHLQIRUPDFMHQDWHPDWSURGXNWyZ
VNRQWDNWXMVLĊ]QDMEOLĪV]\PSU]HGVWDZLFLHOHPILUP\<DPDKDOXE
autoryzowanym dystrybutorem, którego znajdziesz za
SRĞUHGQLFWZHPSRQLĪV]HJRNRGXNUHVNRZHJR'
Polski
ɑɬɨɛɵɭɡɧɚɬɶɩɨɞɪɨɛɧɟɟɨɩɪɨɞɭɤɬɟɩɪɨɞɭɤɬɚɯɫɜɹɠɢɬɟɫɶ
ɫɛɥɢɠɚɣɲɢɦɩɪɟɞɫɬɚɜɢɬɟɥɟɦɢɥɢɚɜɬɨɪɢɡɨɜɚɧɧɵɦ
ɞɢɫɬɪɢɛɶɸɬɨɪɨɦ<DPDKDɜɨɫɩɨɥɶɡɨɜɚɜɲɢɫɶɞɜɭɯɦɟɪɧɵɦ
ɲɬɪɢɯɤɨɞɨɦɧɢɠɟ
Ɋɭɫɫɤɢɣ
Om du vill ha mer information om produkterna kan du kontakta
närmaste Yamaha-representant eller auktoriserade distributör
med hjälp av 2D-streckkoden nedan.
Svenska
Hvis du vil have detaljer om produktet/produkterne, kan du kontakte den
nærmeste Yamaha-repræsentant eller autoriserede Yamaha-distributør,
som du finder ved at scanne 2D-stregkode nedenfor.
Dansk
https://manual.yamaha.com/mi/address_list/
Head Office/Manufacturer: Yamaha Corporation 10-1, Nakazawa-cho, Chuo-ku, Hamamatsu, 430-8650, Japan
Importer (European Union): Yamaha Music Europe GmbH Siemensstrasse 22-34, 25462 Rellingen, Germany
Importer (United Kingdom): Yamaha Music Europe GmbH (UK) Sherbourne Drive, Tilbrook, Milton Keynes, MK7 8BL, United Kingdom
DMI37_22m
Per dettagli sui prodotti, contattare il rappresentante Yamaha o
il distributore autorizzato più vicino, che è possibile trovare
tramite il codice a barre 2D in basso.
Italiano
3RGUREQRVWLRSURGXNWXHFK]tVNiWHRGQHMEOLåãtKR]iVWXSFH
VSROHþQRVWL<DPDKDQHERDXWRUL]RYDQpKRGLVWULEXWRUDNWHUêE\O
QDOH]HQSĜLSRXåLWt'þiURYpKRNyGXQtåH
ýHãWLQD
3RGUREQpLQIRUPiFLHRSURGXNWHRFKYiPSRVN\WQHQDMEOLåãt
]iVWXSFDVSRORþQRVWL<DPDKDDOHERDXWRUL]RYDQêGLVWULE~WRU
NWRUpKRQiMGHWHSRPRFRXQLåãLHXYHGHQpKR'þLDURYpKRNyGX
6ORYHQþLQD
A termék(ek)re vonatkozó részletekért forduljon a legközelebbi
Yamaha képviselethez vagy a hivatalos forgalmazóhoz, amelyet
az alábbi 2D vonalkód segítségével találhat meg.
Magyar
ýHåHOLWHSRGUREQHMãHLQIRUPDFLMHRL]GHONLKVHREUQLWHQD
QDMEOLåMHJD<DPDKLQHJDSUHGVWDYQLNDDOLSRREODãþHQHJD
distributerja, ki ga najdete prek 2D-kode v nadaljevanju.
6ORYHQãþLQD
/DLLHJnjWXSODãƗNXLQIRUPƗFLMXSDUL]VWUƗGƗMXPLHPVD]LQLHWLHV
DUWXYƗNR<DPDKDSƗUVWƗYLYDLSLOQYDURWRL]SODWƯWƗMXNXUX
DWUDGƯVLHWL]PDQWRMRWWƗOƗNSLHHMDPR'VYƯWUNRGX
/DWYLHãX
Ɂɚɩɨɞɪɨɛɧɨɫɬɢɨɬɧɨɫɧɨɩɪɨɞɭɤɬɚɢɬɟɫɟɫɜɴɪɠɟɬɟɫɧɚɣɛɥɢɡɤɢɹ
ɩɪɟɞɫɬɚɜɢɬɟɥɧɚ<DPDKDɢɥɢɨɬɨɪɢɡɢɪɚɧɞɢɫɬɪɢɛɭɬɨɪɤɨɣɬɨ
ɦɨɠɟɬɟɞɚɨɬɤɪɢɟɬɟɤɚɬɨɢɡɩɨɥɡɜɚɬɟ'ɛɚɪɤɨɞɚɩɨɞɨɥɭ
Ȼɴɥɝɚɪɫɤɢ
1RUơGDPLJDXWLGDXJLDXLQIRUPDFLMRVDSLHJDPLQƳLXV
NUHLSNLWơVƳDUWLPLDXVLąÄ<DPDKD³DWVWRYąDUEDƳJDOLRWąMƳ
SODWLQWRMąNXUƳUDVLWHQXVNDLWĊWROLDXSDWHLNWą'EUnjNãQLQƳNRGą
/LHWXYLǐ
Toodete kohta täpsema teabe saamiseks võtke ühendust lähima
Yamaha esindaja või autoriseeritud levitajaga, kelle leiate
allpool asuva 2D-vöötkoodi kaudu.
Eesti
hUQOHUKDNNÕQGDD\UÕQWÕODULoLQDúD÷ÕGDNL'NRGOXPRWRUD
HULúHUHNEXOXQDQVL]HHQ\DNÕQ<DPDKDWHPVLOFLVLQHYH\D\HWNLOL
ED\L\HEDúYXUXQ
Türkçe
Za detalje o proizvodima obratite se lokalnom predstavku ili
RYODãWHQRPGLVWULEXWHUXWYUWNH<DPDKDNRMHJPRåHWHSURQDüL
VNHQLUDQMHP'FUWLþQRJNRGDXQDVWDYNX
Hrvatski
3HQWUXGHWDOLLSULYLQGSURGXVHOHFRQWDFWD܊LFHOPDLDSURSLDW
reprezentant Yamaha sau distribuitorul autorizat, pe care îl
SXWH܊LJăVLDFFHVkQGFRGXOGHEDUH'GHPDLMRV
5RPkQă

Yamaha Global Site
https://www.yamaha.com/
Yamaha Downloads
https://download.yamaha.com/
VJJ3630
© 2026 Yamaha Corporation
Published 03/2026
IPTY-A0