
EN
MTX
-MRX Migrator Operation Guide

MTX-MRX Migrator Operation Guide
2
Contents
Introduction __________________________________________________ 3
About this manual ....................................................................................................................... 3
MTX-MRX Migrator operating requirements ................................................................................ 3
Software installation ___________________________________________ 4
Installing MTX-MRX Migrator ...................................................................................................... 4
Data migration process _________________________________________ 5
Parameters that can be migrated _________________________________ 6
Operating instructions and screen descriptions for MTX-MRX Migrator __ 7
Operating instructions ................................................................................................................ 7
Screen descriptions ..................................................................................................................... 9
Introduction
MTX-MRX Migrator Operation Guide
3
Introduction
The application software MTX-MRX Migrator is a tool for migrating the settings of MTX and MRX series
devices from project files in MTX-MRX Editor to configuration data for ProVisionaire Design.
This Operation Guide provides details on the functions of and operating instructions for MTX-MRX
Migrator.
About this manual
This software and Operation Guide are the exclusive copyrights of Yamaha Corporation (“Yamaha”).
Copying of the software or reproduction of this Operation Guide in whole or in part by any means is
expressly forbidden without the written consent of the manufacturer.
Yamaha Corporation assumes no responsibility whatsoever for results or effects arising from the use
of this software or Operation Guide.
For the purpose of improvement, this software and Operation Guide are subject to change without
notice.
This software is not guaranteed to work with a touchscreen.
The illustrations and screens in this Operation Guide are for instructional purposes only.
Windows is a registered trademark of Microsoft Corporation in the United States and other countries.
The company names and product names in this Operation Guide are trademarks or registered
trademarks of their respective companies.
The explanations in this Operation Guide are based on the latest specifications at the time of
publication.
MTX-MRX Migrator operating requirements
This software runs on Windows 11.
Note
Some computers may have requirements that exceed the recommended environment.
Refer to the Yamaha website for up-to-date information on the latest software versions and
operating requirements.
Yamaha Pro Audio global website
https://www.yamahaproaudio.com/
Software installation
MTX-MRX Migrator Operation Guide
4
Software installation
Installing MTX-MRX Migrator
Download the MTX-MRX Migrator installer file onto the computer, and then install the software.
1. Download the MTX-MRX Migrator installer file (latest version) from the Yamaha website.
Yamaha Pro Audio global website
https://www.yamahaproaudio.com/
2. Unzip the compressed file, and then install the application software.
1. Save the ZIP file to an appropriate location, and then extract the data.
2. Double-click the Install_MTX-MRX_Migrator.exe file in the folder.
3. Follow the installer instructions to install the application software.
Note
In addition to MTX-MRX Migrator, MTX-MRX Editor (version 4.0.1) and ProVisionaire Design
(version 3.1 or later) must be installed.
For details on MTX-MRX Editor and ProVisionaire Design, refer to the Yamaha website.
Yamaha Pro Audio global website
https://www.yamahaproaudio.com/
Data migration process
MTX-MRX Migrator Operation Guide
5
Data migration process
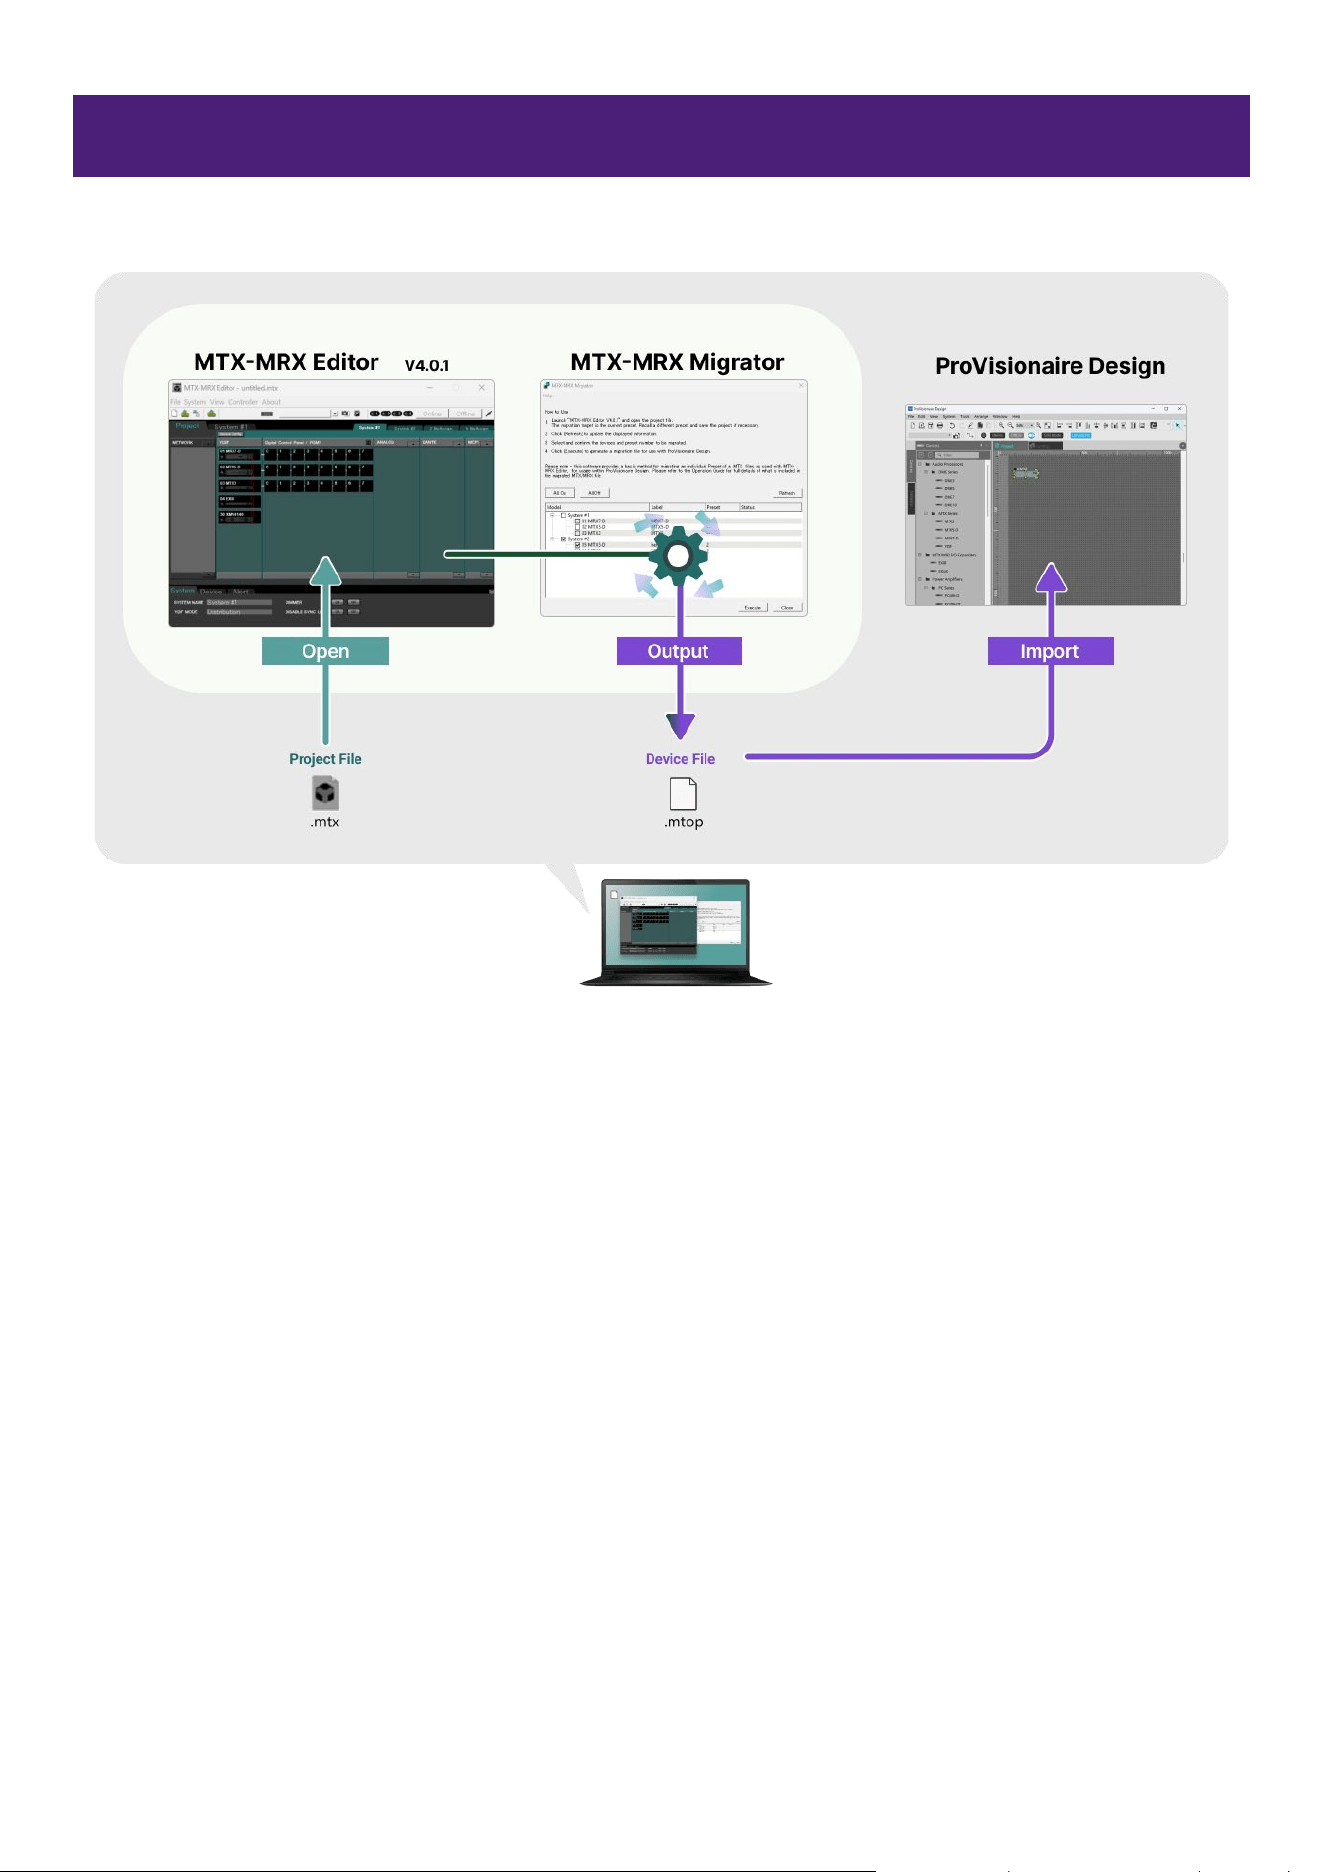
A conceptual diagram of data migration using MTX-MRX Migrator is shown below.
MTX-MRX Migrator retrieves the current information from MTX-MRX Editor. To ensure that current
information is up to date, before performing data migration, recall into MTX-MRX Editor the presets
to be migrated, and then save the project.
Before performing data migration, refresh the MTX-MRX Migrator screen and make sure that the
preset numbers have been correctly updated.
Parameters that can be migrated
MTX-MRX Migrator Operation Guide
6
Parameters that can be migrated
Data from the three models compatible with MTX-MRX Editor (MTX3, MTX5-D and MRX7-D) can be
migrated.
Note
Data created with a version of MTX-MRX Editor earlier than 4.0.0 should be saved using the
latest version (4.0.1) of MTX-MRX Editor before continuing with the migration process.
MTX-MRX Editor does not support data migration for models not mentioned above (such as
XMV series, EXio series and DCP series).
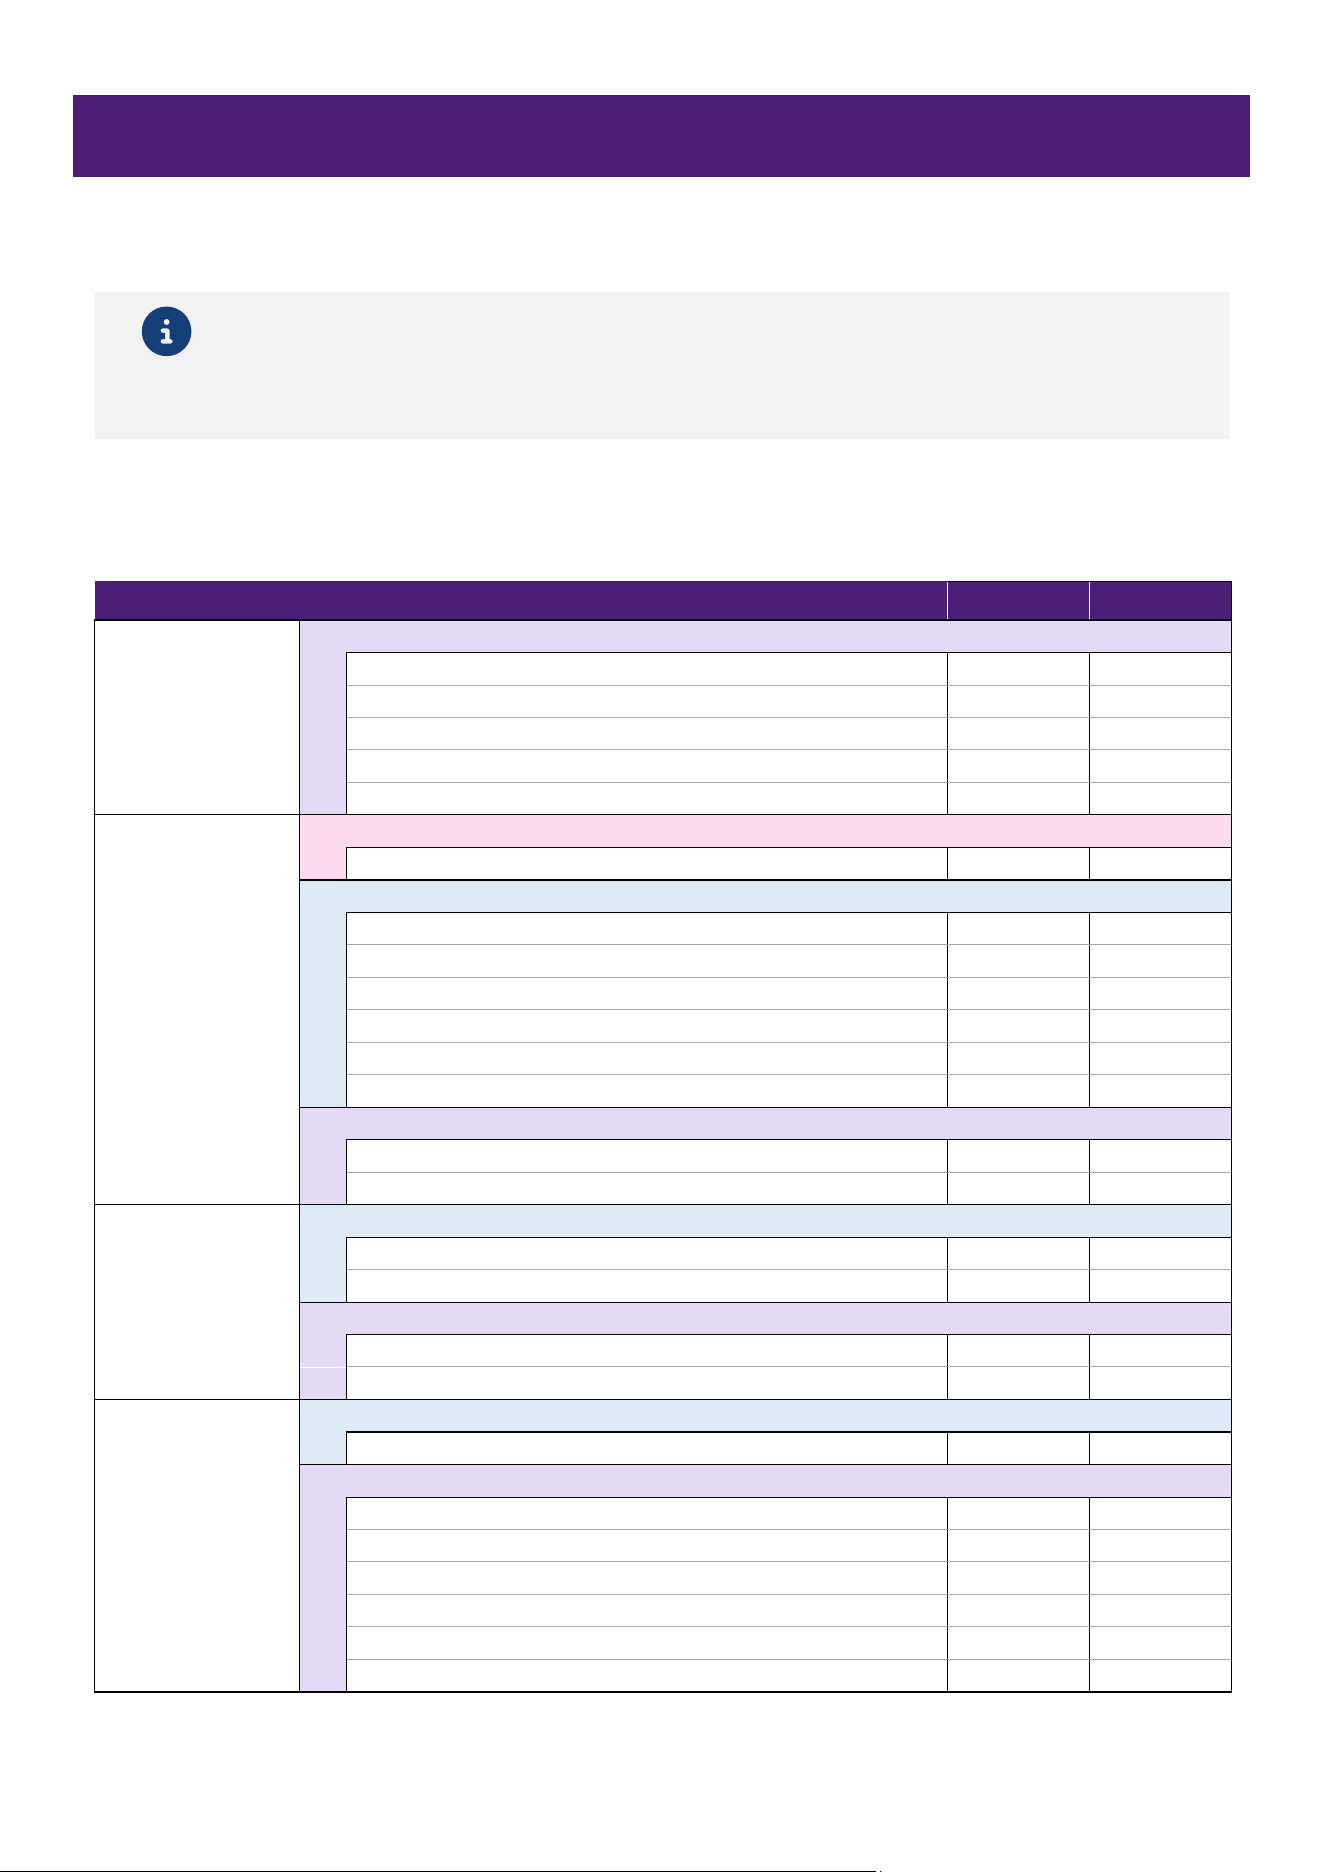
Refer to the following for details on whether or not specific parameters can be migrated from MTX-MRX
Editor to ProVisionaire Design.
✓: Supported (can be migrated) ×: Not Supported (cannot be migrated) ―: Not Applicable (feature not available)
Item MTX Series MRX Series
Device Information Common
DEVICE NAME
✓
✓
UNIT ID
✓
✓
Settings from “Word Clock” dialog box
✓
✓
Settings from “Match Device by IP Address” dialog box
✕
✕
Settings from “Remote Control” dialog box
✓
✓
Current Parameter MTX Series
Settings from “MTX Configuration” dialog box
✓
—
MRX Series
Component assignments* —
✓
Port connections —
✓
Settings for [Transmitters]/[Receivers] components —
✓
Settings for [User Defined Block] components —
✓
User Defined Block protection —
✓
Text boxes on design sheet —
✓
Common
Current parameters
✓
✓
Selection of Mini-YGDAI card
✓
✓
Preset/Snapshot MRX Series
Parameter set —
✕
Snapshot —
✕
Common
Preset
✕
✕
Settings for assignments to other presets
✕
✕
Other Settings MRX Series
Settings from “Remote Control Setup List” dialog box
✕
✕
Common
System configuration
✕
✕
Settings from “Scheduler” dialog box
✕
✕
Settings from “GPI” dialog box
✕
✕
Settings from “External Events” dialog box
✕
✕
Settings from “Digital Control Panel” dialog box
✕
✕
Settings from “Wireless DCP” dialog box
✕
✕
* Assignments that include the “Revolabs Control” component are not supported.
Operating instructions and screen descriptions for MTX-MRX Migrator
MTX-MRX Migrator Operation Guide
7
Operating instructions and screen descriptions for MTX-
MRX Migrator
Operating instructions
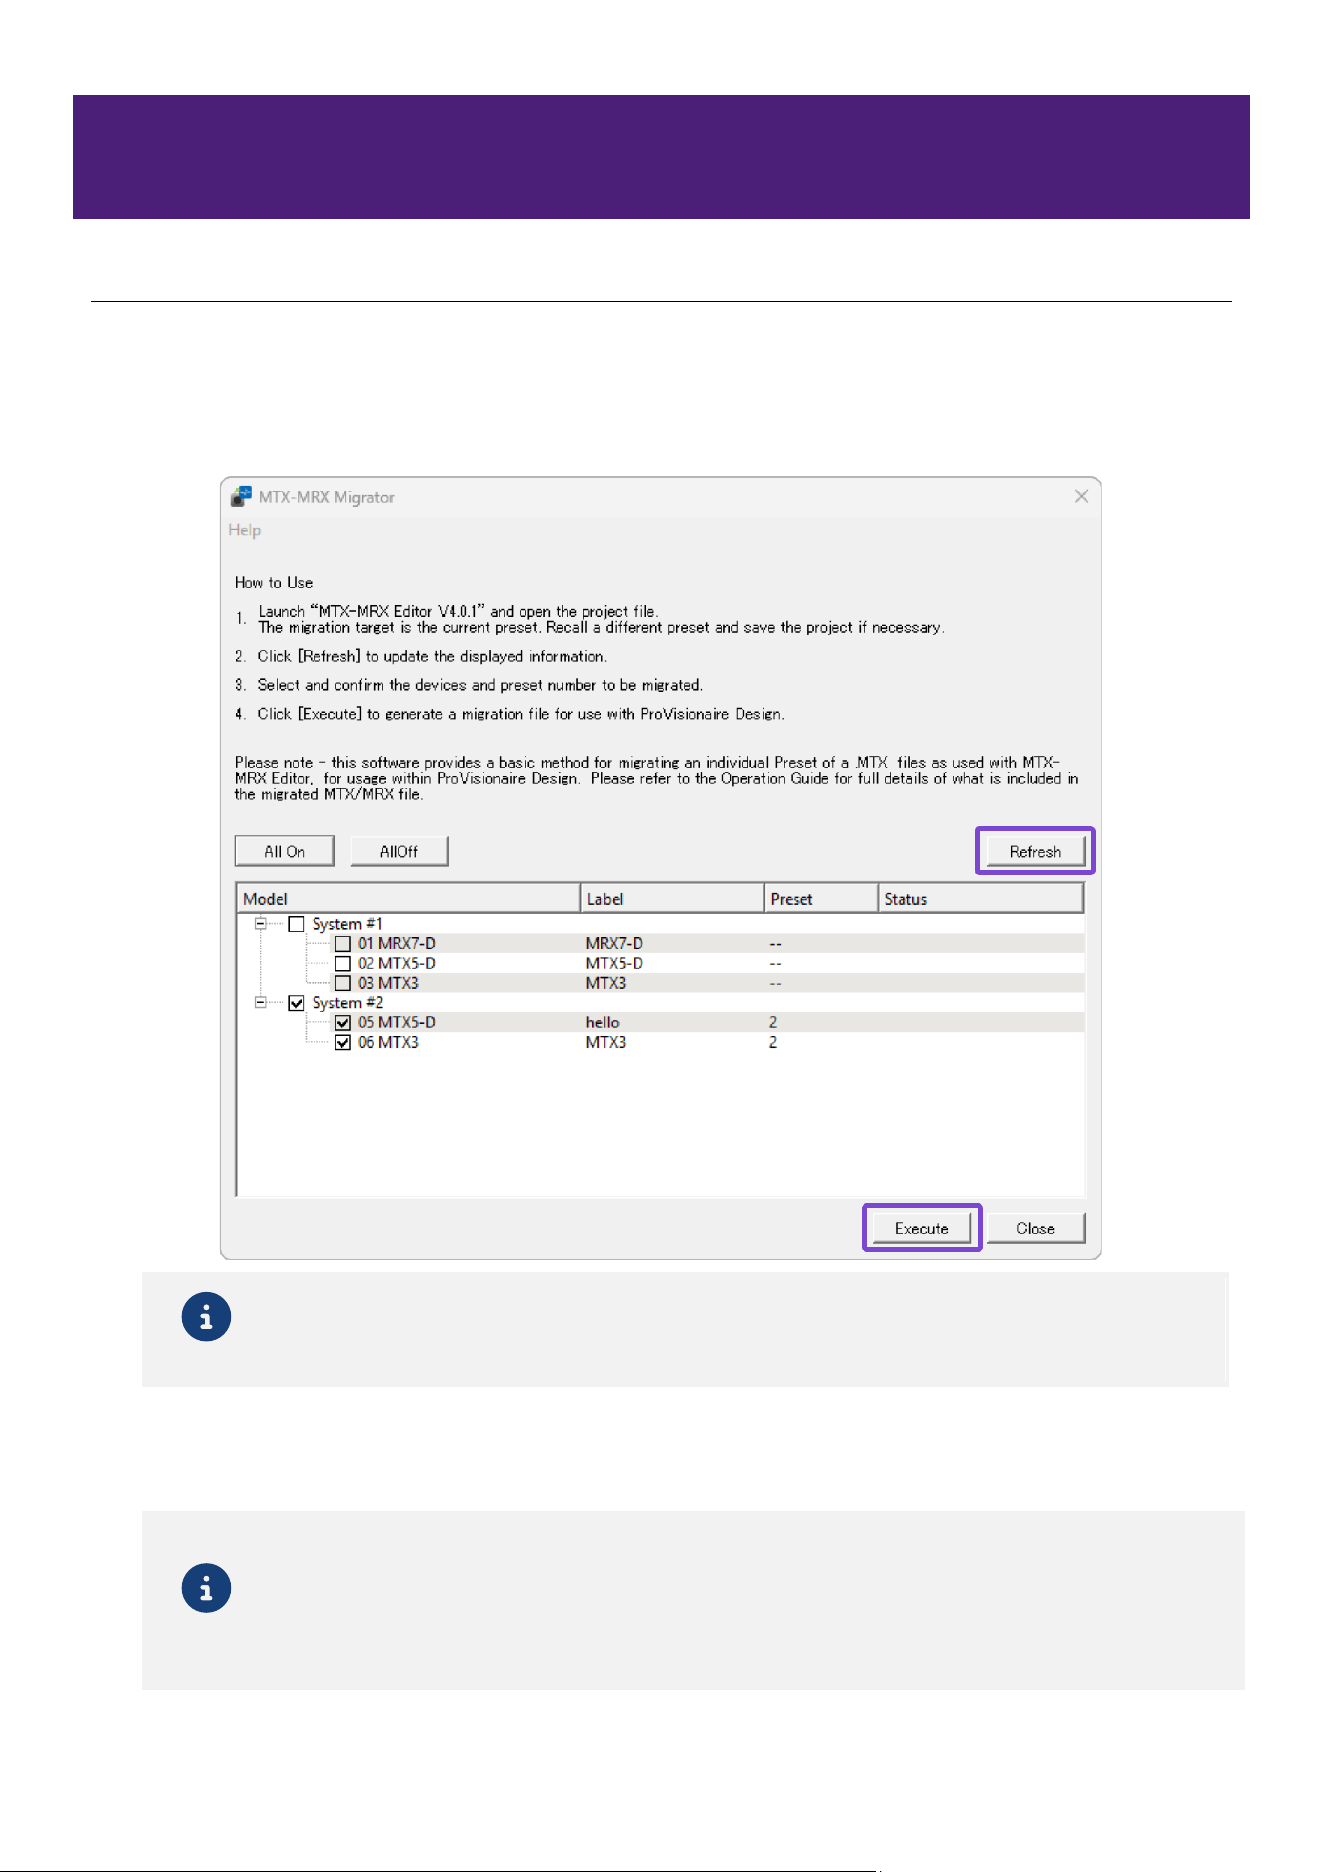
1. Start MTX-MRX Editor (version 4.0.1), and then open a project file.
2. Start MTX-MRX Migrator.
Make sure that the systems (MTX or MRX) in the MTX-MRX Editor screen appear in the MTX-MRX
Migrator screen. Otherwise, click the [Refresh] button.
Note
Do not run multiple instances of MTX-MRX Migrator and MTX-MRX Editor simultaneously. If
multiple instances are running simultaneously, data migration may not be performed
properly.
3. Select the check box for each model to be migrated, and then click the [Execute] button.
Each selected model preset is output to an MTOP file that can be imported into ProVisionaire Design.
If necessary, data migration can be performed for each preset.
Note
MTX-MRX Migrator retrieves the current information from MTX-MRX Editor. To ensure that
the current information is up to date, before performing data migration, recall into MTX-MRX
Editor the presets to be migrated, and then save the project.
Before performing data migration, refresh the MTX-MRX Migrator screen and make sure that
the preset numbers have been correctly updated.
Operating instructions and screen descriptions for MTX-MRX Migrator
MTX-MRX Migrator Operation Guide
8
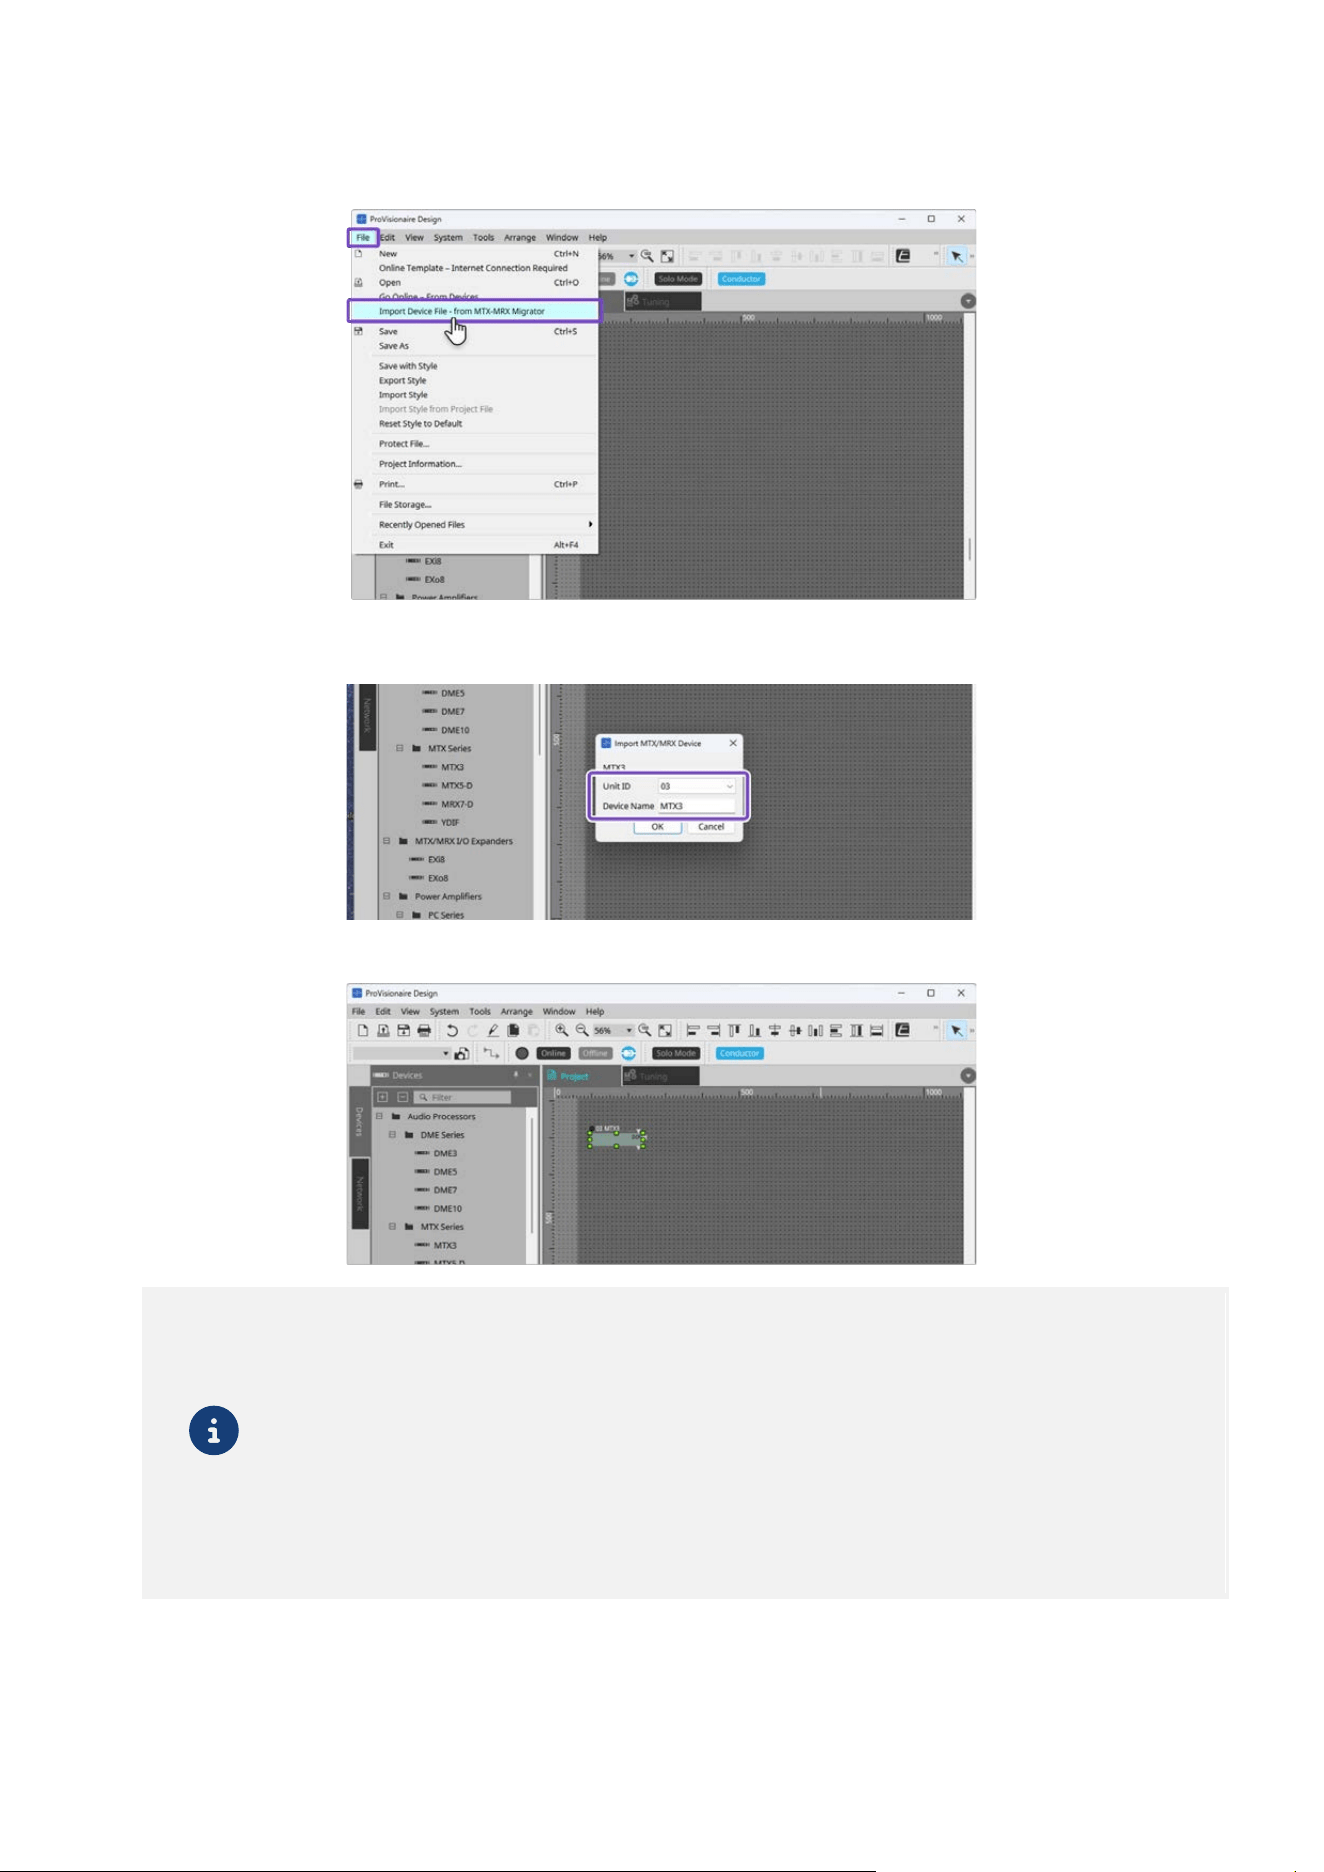
4. Start ProVisionaire Design (version 3.1 or later), and then import the output file.
Select [Import Device File - from MTX-MRX Migrator] from the [File] menu, and then import the
MTOP file output by Migrator.
When a pop-up window for adding a device appears, change the settings for “Unit ID” and “Device
Name” as necessary.
The device is added to the “Project” sheet.
Note
When migrating multiple presets, import the multiple output MTOP files into ProVisionaire
Design, and then use the Copy and Paste functions to consolidate them into a single device
preset.
In an MRX7-D design sheet, component assignment and port connections may overlap, or
the layout may not be displayed properly. In that case, select the components, and then
reassign them. Otherwise, use [Edit] menu → [Select All] → [All Wires], and then set [Wire
Routing] (in the “Properties” area) to [Automatic] in order to adjust the display of the
connections.
Operating instructions and screen descriptions for MTX-MRX Migrator
MTX-MRX Migrator Operation Guide
9
Screen descriptions
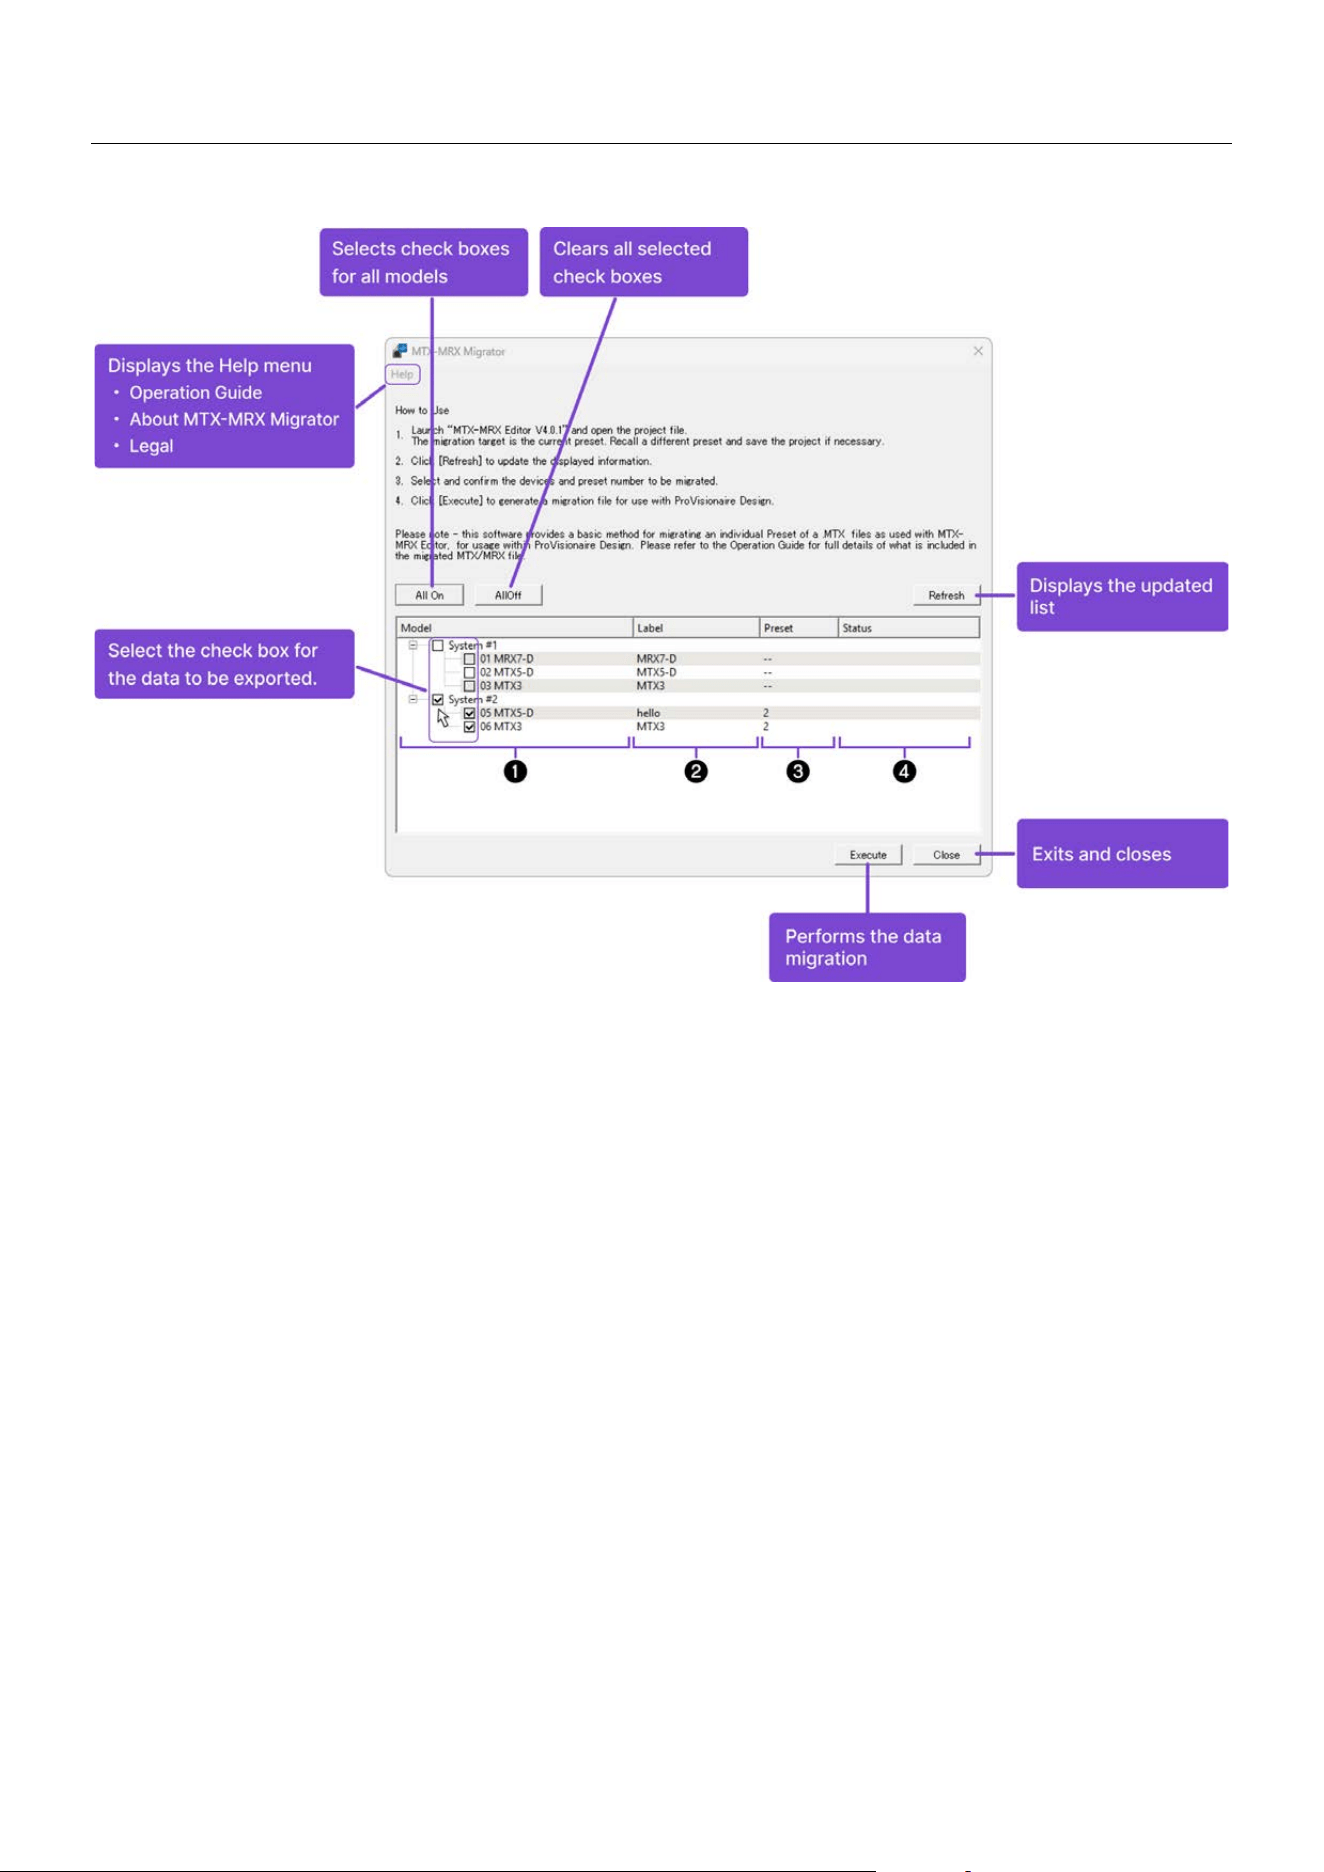
Supplementary information regarding the MTX-MRX Migrator screen is shown below.
a Unit ID and model name
b Label
c Current preset number
d Results of data migration

©2026 Yamaha Corporation
Published 06/2026
YJ-A0