Current ............................................................ 10 A
Electrolux reserves the right to amend design and technical specifications.
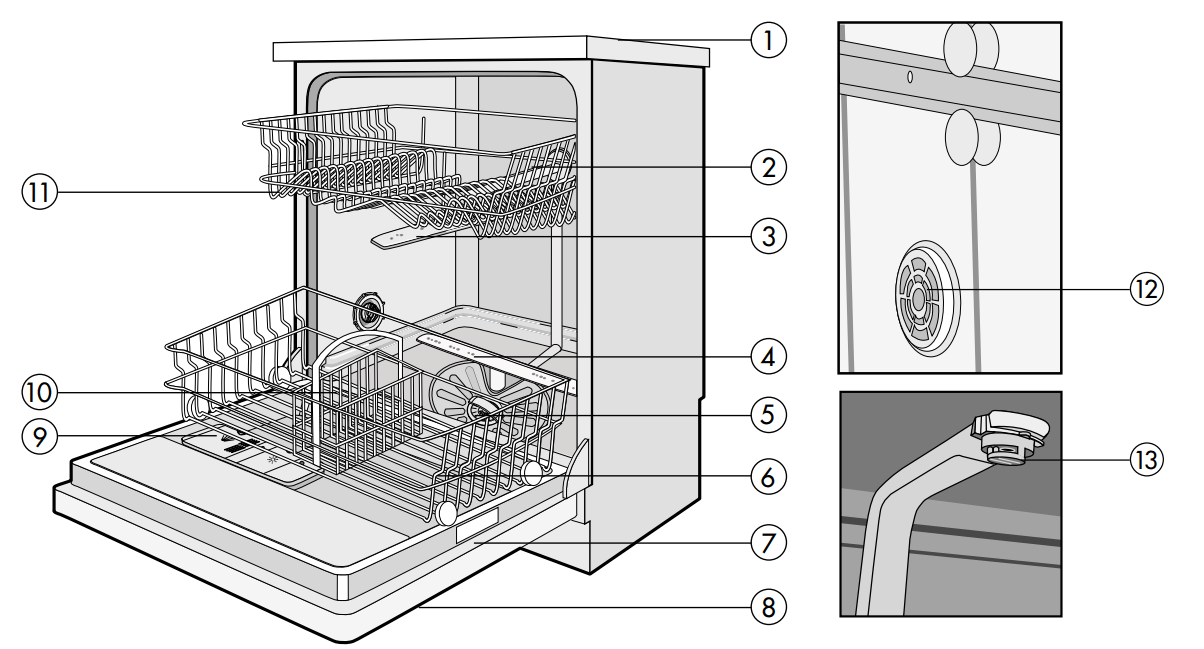
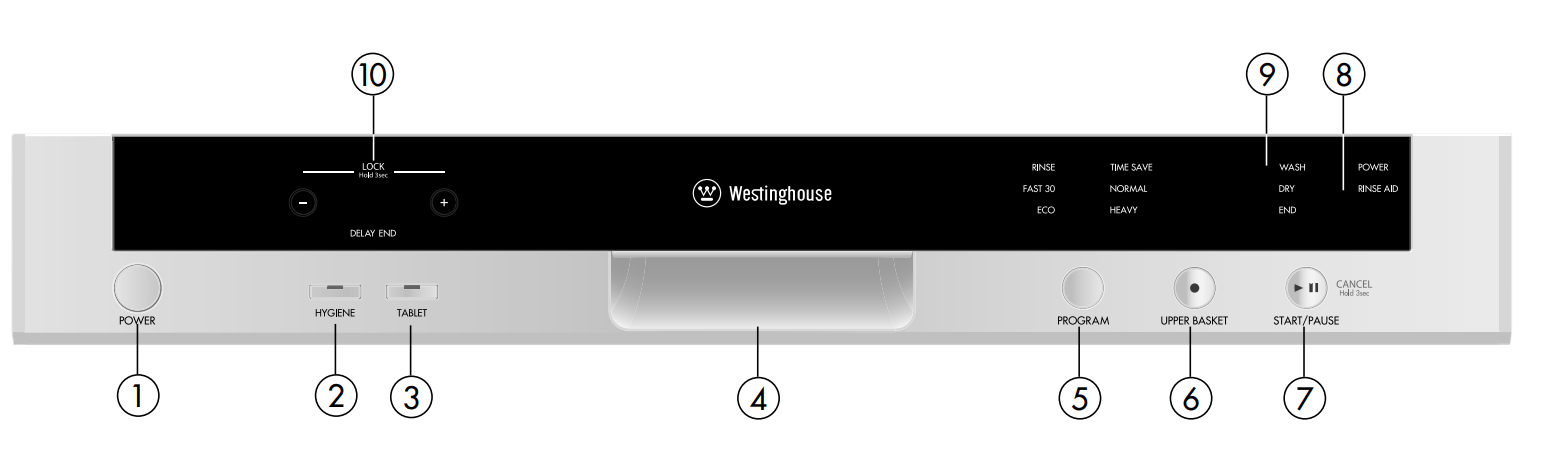
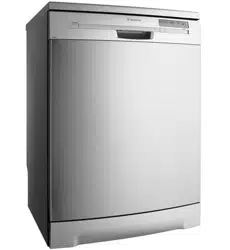
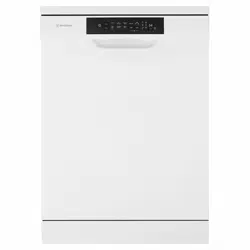
Description of your appliance
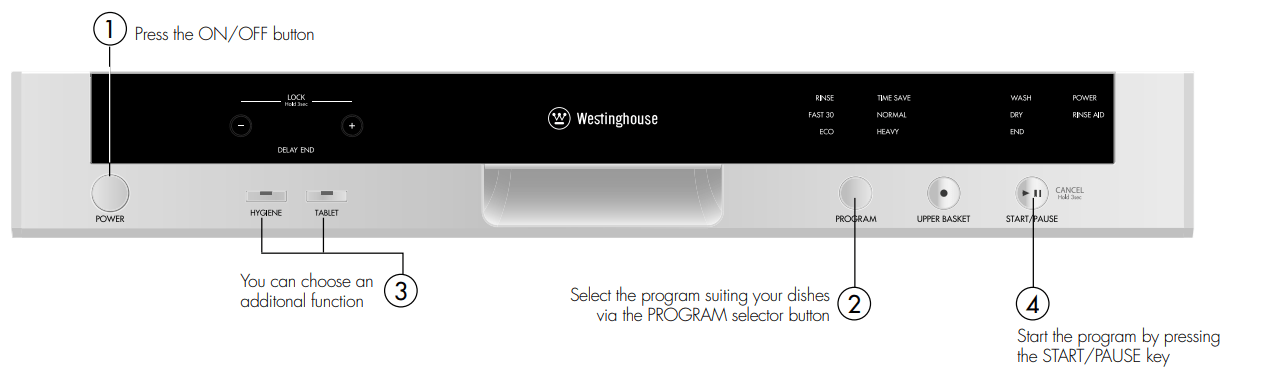
1. POWER Button
When pressed on ON/OFF button, the machine is energized and the power light illuminates.
2. Hygiene Button
By using this option, washing temperature and periods during respective cycles may be changed, which ensures more hygienic washing.
3. Tablet Detergent Button
Use this option when using combined detergent that contains rinse aid and extra functions.
4. Door Handle
Use door handle to open-close the door of the machine.
5. Program selection Button
With the program selector button, you can select a suitable program for your dishes.
6. Upper Basket button
By using the ‘Upper Basket Wash ‘ feature, you can wash the dishes only on upper basket, reducing the duration of your selected programs, and decreasing your power and water consumption.
7. Start/Pause Button
The Start/Pause button will start the selected program. In the Pause condition while wash led is on, Start/Pause led will blink.
8. Rinse aid power indicator
When the rinse aid light illuminates, fill the rinse aid chamber. The power light indicates power is available to the appliance.
Note: If you have used an extra option on the last washing program, this feature will remain active also on the next washing program. To deselct an option on the newly selected washing program, press the selected option button again, and check that the indicator lamp on the button goes off.
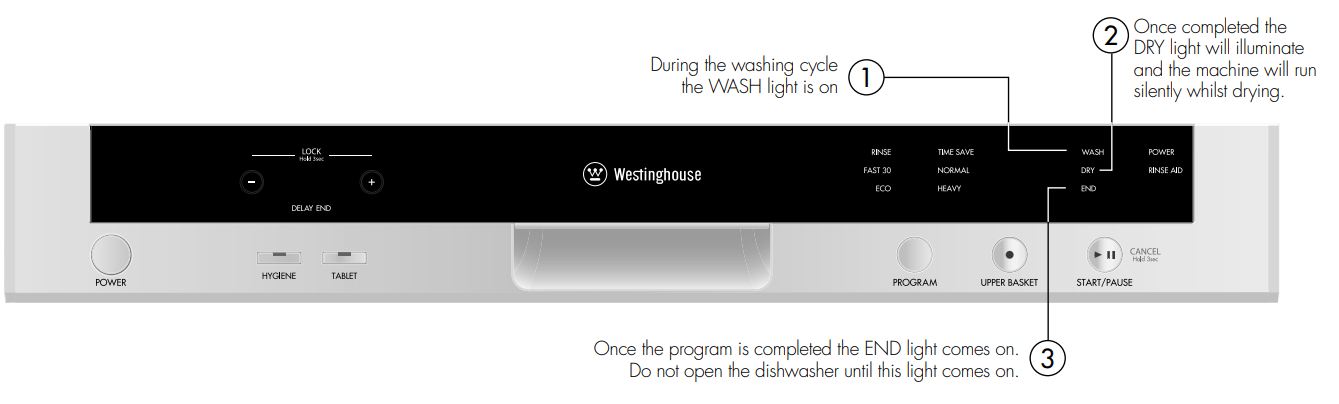
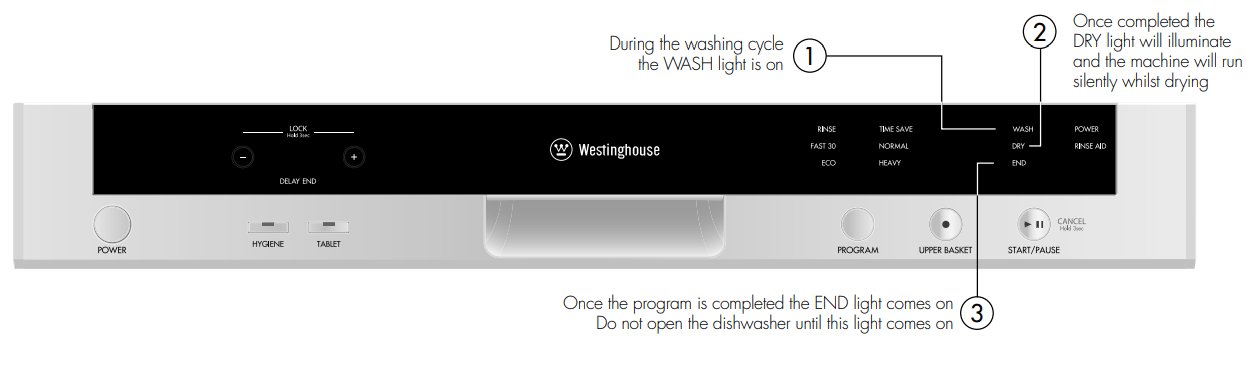
9. progress indicator Lights
Program status can be monitored via the progress indicator lights on control panel.
Wash
Dry
End
10. TimeIndicator display
Time Indicator displays the program times and remaining time for the program in operation. In addition, you can adjust program delay time by pressing the buttons on the indicator before program starts. If you want to change delay time, you can set the time by pressing Start/Pause button and using buttons on the indicator. Press Start/Pause button again in order to activate.
Child Lock Operation
In order to activate child lock, press “+” and “–” buttons simultaneously for 3 seconds. At this time, “CL” appears for 2 seconds on remaining time indicator. To inactive child lock, press “+” and “–” buttons again simultaneously for 3 seconds. “CL” will blink once.
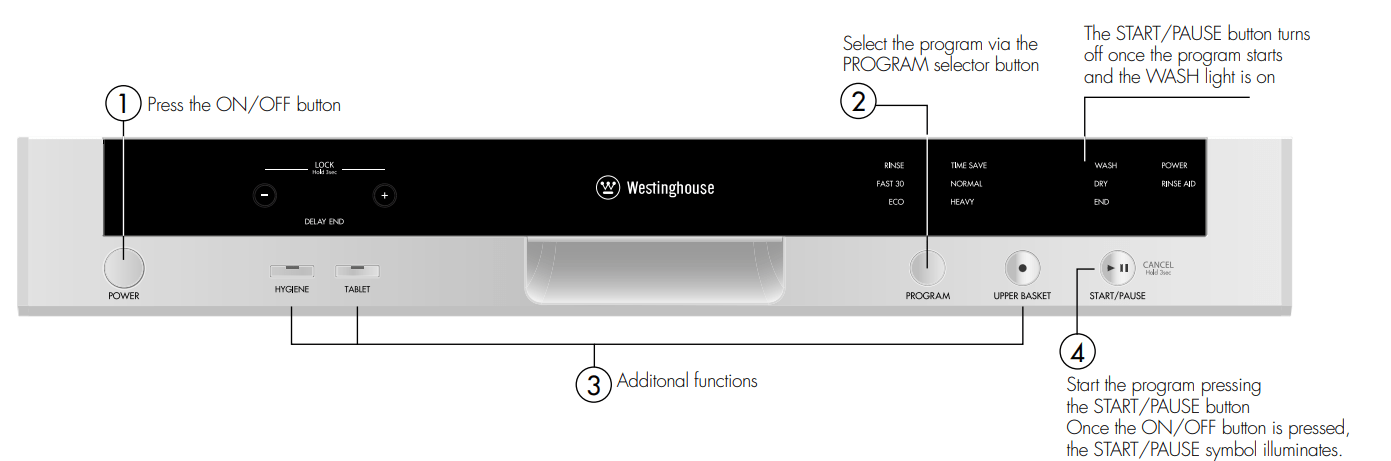
Quick Start Guide
switching on the machine
program follow-up
You can follow the program flow using the program followup lamps located on the control panel.
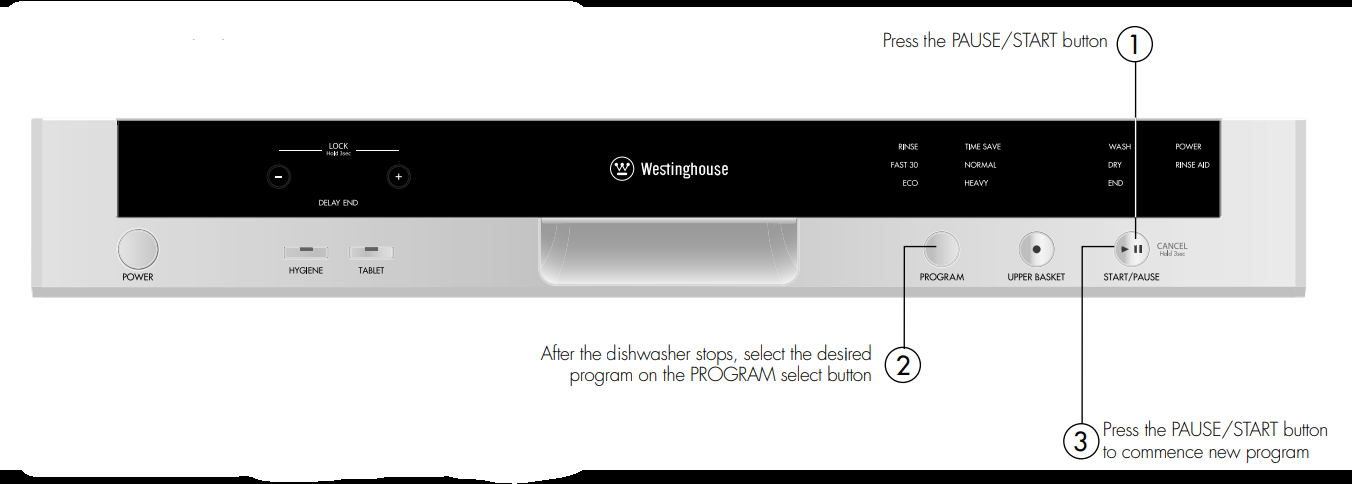
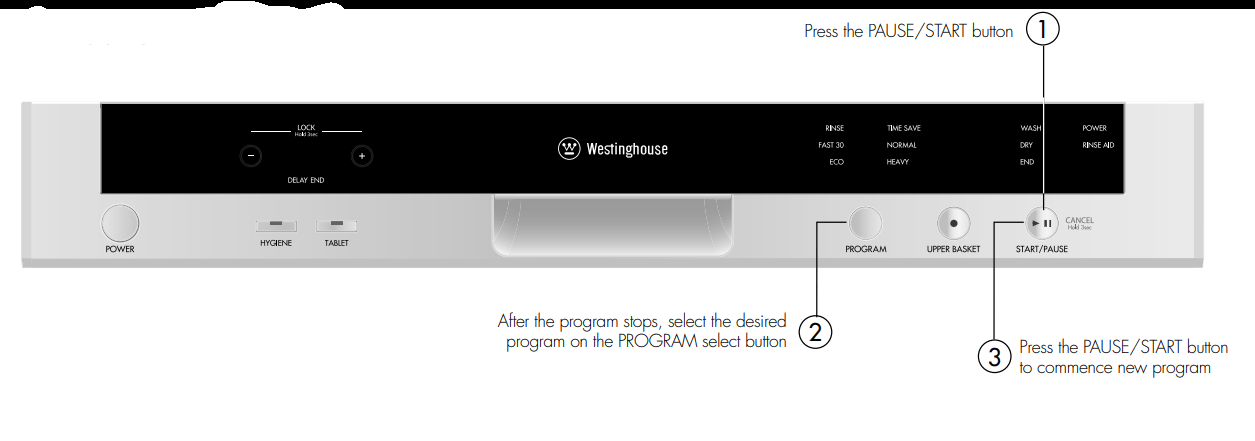
changing a program
If you would like to change programs while a washing program is continuing.
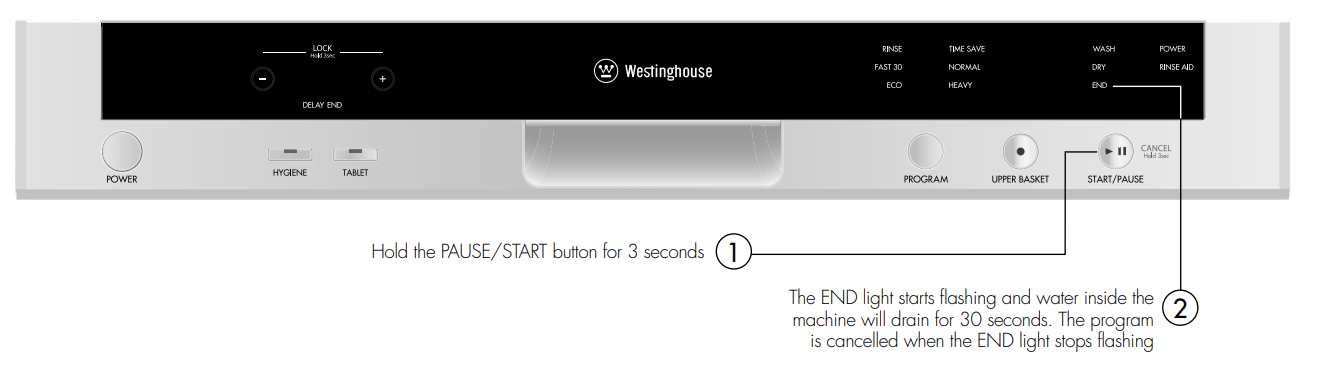
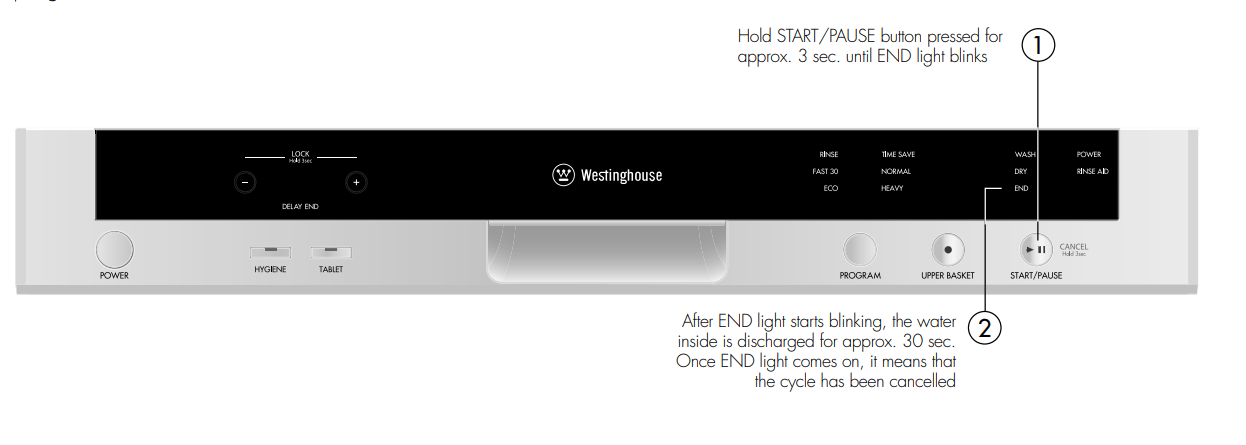
cancelling a program
If you want to cancel current program for any reason.
PREPARING THE MACHINE FOR USE
Prior to using the machine for the first time
Check whether the electricity and water supply specifications match the values indicated by the installation instructions for the machine.
Remove all packaging materials inside the machine.
Fill the rinse aid compartment
Detergent usage
Use a detergent specifically designed for use in domestic dishwashers. You can find powder, gel, and tablet detergents in the market that have been designed for household dishwashers. Detergent should be put into the compartment prior to starting the machine. Keep your detergents in cool, dry places out of reach of your children. Do not fill detergent into the detergent compartment more than required; otherwise it may etch your glasses as well as leaving undissolved detergent in the dishwasher. Should you need more information concerning the detergent you will use, contact detergent manufacturers directly.
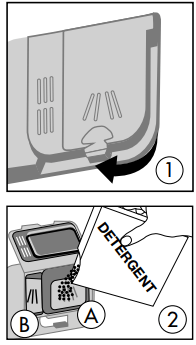
Filling the detergent compartment
Push the latch to open the detergent container as shown in image 1.
Detergent compartment has level lines inside. It is possible to measure the right detergent amount using these lines. Detergent compartment (A) can take 40 gm of detergent. Open the dishwasher detergent and pour into the larger compartment 25 gm if your dishes are heavily soiled or 15 gm if they are less soiled.
If your dishes have been kept dirty for a very long time, if there are dried food wastes on them, and if you have fully loaded the dishwasher, pour 5 gm detergent into the prewash compartment (B) and start your machine.
You may have to add more detergent into your machine, depending on the degree of soil and on the water hardness level in your area.
Combined detergent
Detergent manufacturers also produce combined detergents called “2 in 1”, “3 in 1” or “5 in 1” etc.
“2 in 1” detergents contain detergent or rinse aid. When using “2 in 1” detergent make sure to check the specifications of the tablet.
Other tablet detergents contain detergent + rinse aid + various extra functions/additives.
Generally, combined detergents produce acceptable results under certain usage conditions only. Such detergents contain rinse aid in preset amounts.
Points to consider when using these type of products:
Always make sure to check the specifications of the detergent you will use or whether or not it is a combined detergent.
Check if the detergent used is appropriate for the hardness of mains water.
Observe the instructions on packaging when using such products.
If detergents are in the form of tablets, never put them into the interior section or the cutlery basket of the dishwasher. Always put the tablets into the detergent compartment in the detergent dispenser.
Tablets produce good results for certain types of usage only. If you are using this type of detergent, you need to contact the manufacturer and find out about the suitable conditions of use.
When the conditions of use of such products and the machine settings are appropriate, they ensure savings in rinse aid consumption.
Contact the detergent manufacturers if you are not obtaining good wash results (if your dishes have limescale and stay wet) after having used 2 in 1 or 3 in 1 detergents. The scope of warranty for your machine does not cover any complaints caused by the use of these types of detergents.
Recommended usage: If you want to obtain better results while using combined detergents, add rinse aid into your machine and adjust the water softener setting and the rinse aid setting to the lowest position.
Solubility of the tablet detergents produced by different companies can vary depending on the temperature and time. Therefore, it is not recommended to use these detergents in short programs. It is more suitable to use powder detergents in short programs.
WARNING: Should any problem occur which you have not encountered before, with the use of these type of detergents, contact the detergent manufacturers directly.
When you STOP using combined detergents
Fill the rinse aid compartments.
Select a suitable rinse aid setting.
Filling with rinse aid and making the setting
Rinse aid is used to improve the drying of the wash load and reduce the deposit of cloudy drops and streaks on glasses and dishware. For this reason, care should be taken that there is adequate amount of rinse aid in the rinse aid compartment and only rinse aid produced for use in dishwashers should be used.
If the rinse aid lamp on the control panel illuminates, fill the rinse aid compartment with rinse aid.
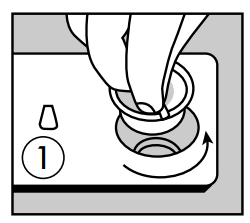
1. To put in rinse aid, remove the rinse aid compartment cap by turning it.
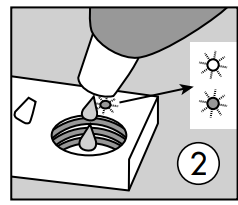
2. Fill the rinse aid compartment with rinse aid until the rinse aid level indicator becomes dark; refit the cap by locating the locking pins and close it by turning in the opposite direction. By checking the rinse aid level indicator on the detergent dispenser, you can understand whether or not your machine needs rinse aid. A dark indicator means that there is rinse aid in the compartment, while a light indicator shows that you need to fill the compartment with rinse aid.
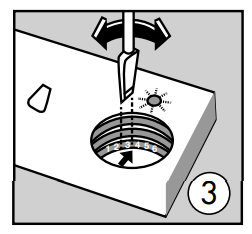
3. The rinse aid level adjuster can be set to a position between 1 and 6. Factory setting for rinse aid is position 3. You need to increase the setting of the adjuster if water stains form on your dishes after a wash, whereas you need to decrease the setting if a blue stain is left when wiped by hand. (3)
TIPS and INFORMATION: Only use rinse aid suitable for automatic dishwashers. As rinse aid residues left as a result of overflowing will create extremely high amounts of foam and reduce the washing performance, remove the excess amount of rinse aid by wiping it with a rag. Remove all excess rinse aid if spilt while filling,
LOADING YOUR DISHWASHER
Correctly loaded dishes will result in the best energy consumption, washing and drying performance. There are two separate baskets for you to load your dishes into your machine. You can load into the lower basket round and deep items as pots with long handles, pot lids, plates, salad plates, and cutlery sets.
The upper basket has been designed for tea plates, dessert plates, salad bowls, cups and glasses. When placing long-stem glasses and goblets, lean them against the basket edge, rack or glass support wire and not against other items. Do not lean long glasses against one another if they are unsupported, they may break. It is more appropriate to locate the thin narrow parts into the middle sections of baskets. You can place spoons among the other cutlery sets in order to prevent them from sticking to one another. You are recommended to use the cutlery grid in order to obtain the best result. To avoid any possible injuries, always place such long-handle and sharp-pointed items such as serving forks, bread knives etc. with their sharp points facing down or horizontally on the baskets.
TIPS and INFORMATION: Ensure the position of the dishware does not prevent the upper or lower spray arm from turning
Top basket CUPRACK
These racks are designed to increase the capacity of the top basket. You can place your glasses and cups on the racks. You can adjust the height of these racks. Thanks to this feature, you can place different sizes of glasses under these racks. The cup racks can be adjusted to 3 height positions. In addition, you can place long forks, knives and spoons on these racks laterally, so that they do not block the revolution of the spray arm.
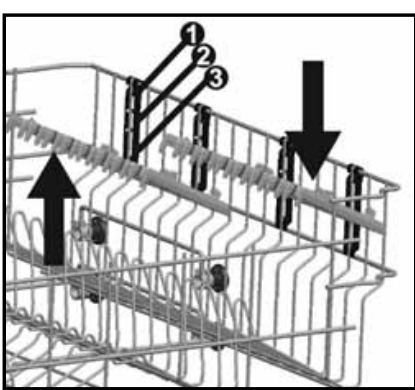
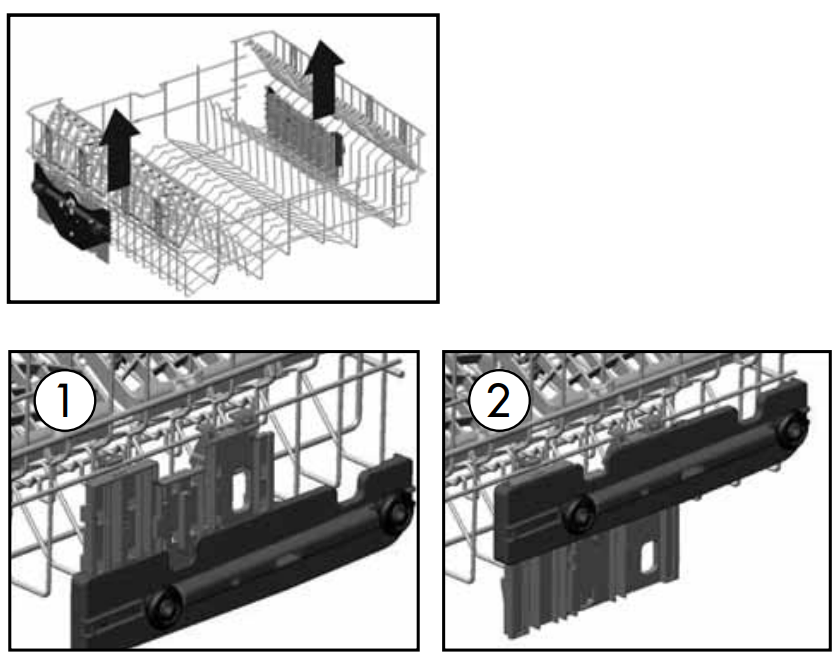
Top basket height adjustment while it is full
Basket height adjustment mechanism on the top basket of your machine is designed to let you adjust the height of your top basket (ref to diagram 1 ) upwards or (refer to diagram 2 ) downwards, without removing it from your machine when it is full, and create large spaces at the top or bottom area of your machine as needed. Basket of your machine is set to upper position in factory settings.
In order to raise your basket, hold it from both sides and pull it upwards. In order to lower it, hold it from both sides again, pull upwards and lower carefully.
Make sure that both sides are in the same position (up or down)
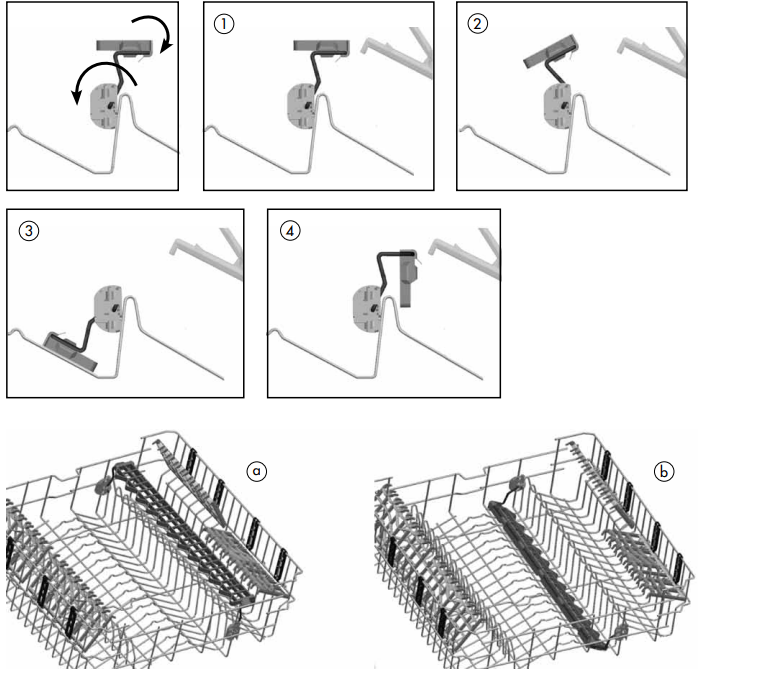
Spoon rack
It allows your long-stemmed glasses to be washed safely as well as providing a convenient alternative location to wash spoons and forks. Do not lean your long-stemmed goblets and glasses against each other but spoon rack, thus during the washing it is ensured your glasses and goblets stay in place and a safe washing by preventing contact each other.
There are 4 different positions for your spoon rack. According to the type of long stemmed glasses, you can set your spoon rack to the positions number 1 and 2.
Use it for your spoons and forks while it was in position 1.
If you do not want to use the spoon rack positions 3 or 4 are available.
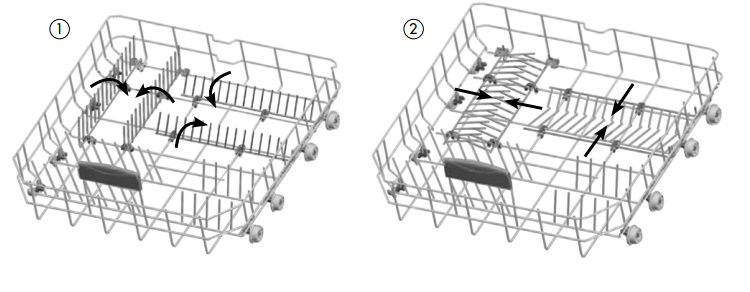
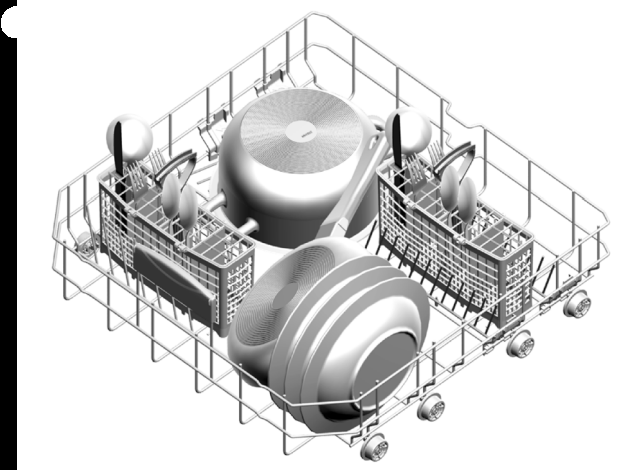
Lower Basket Folding Racks
Folding racks consisting of four parts that are located on the lower basket of your machine are designed in order to let you place big items easier such as pots, pans, etc. If requested, each part can be folded separately, or all of them can be folded and larger spaces can be obtained. You can use folding racks by raising them upwards, or by folding.
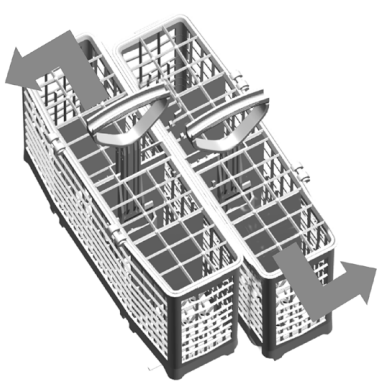
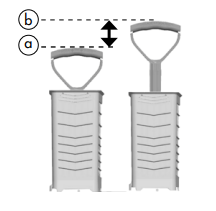
Modular cutlery basket
Depending upon the amount of soiled cutlery, the basket can be separated into two parts. Hold the basket from both sides and move each side in opposite directions. To combine the baskets reverse the procedure.
The cutlery basket handles are adjustable, position (a) or (b). When separated, the baskets can be used in the upper or lower dishwasher basket as required.
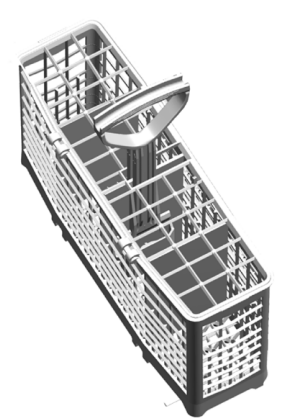
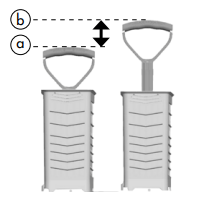
Alternate cutlery basket
An alternate cutlery basket has been provided for convenience. The cutlery basket handle is adjustable - position (a) or (b). The basket can be used in the upper or lower dishwasher basket as required.
Alternative cutlery basket positions
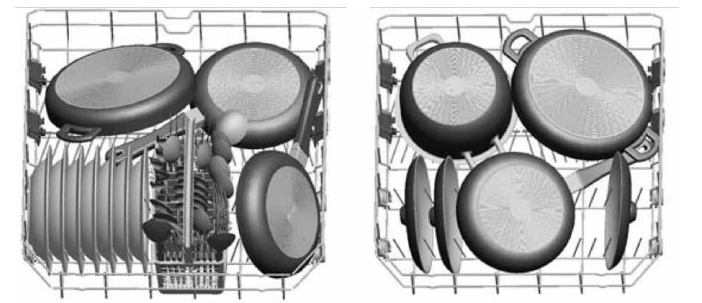
By placing your modular cutlery basket in different places of the upper or lower basket, you can create suitable locations for your other dishes.
Below you can see several recommended options.
Alternative modular basket position
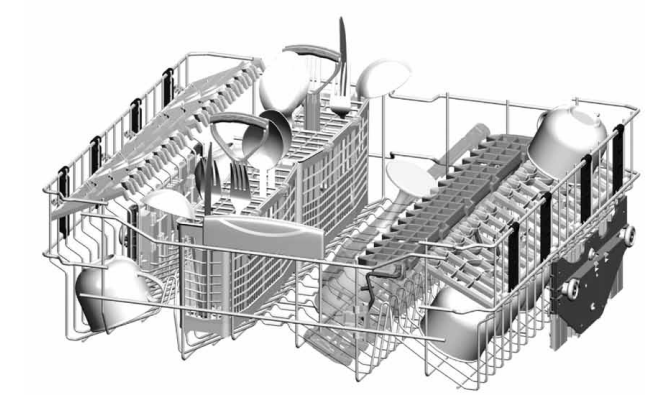
Alternative basket loads
Lower Basket
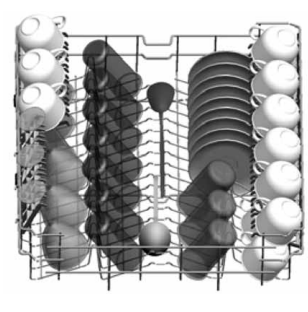
Top Basket
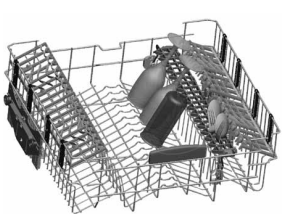
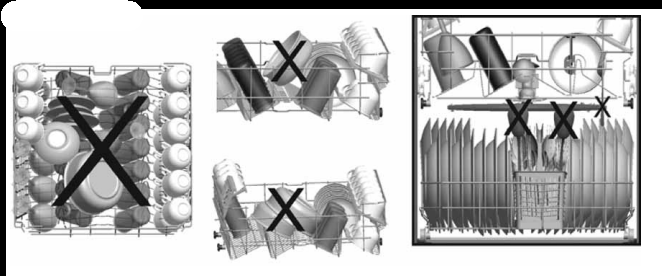
TIPS & INFORMATION: Examples of incorrect loading
SWITCHING ON THE MACHINE AND SELECTING A PROGRAM
Switching on the machine
Program follow-up
You can follow the program flow using the program follow-up lamps located on the control panel.
Changing a program
If you would like to change programs while a washing program is continuing
Changing a program with resetting
If you would like to cancel a program while a washing program is resumed.
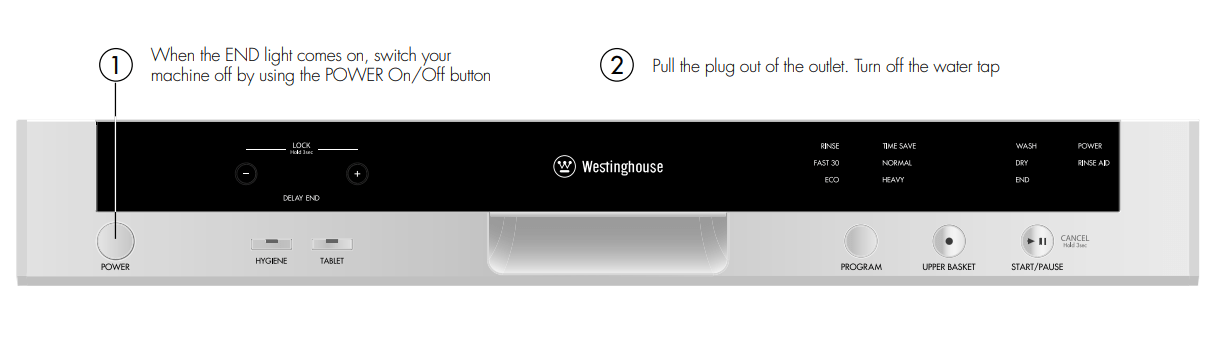
Switching the machine off
TIPS & INFORMATION:
Note: If the machine door is opened during washing or the power is cut off, the machine resumes the program when the door is shut or the power comes back.
Note: For better drying results when the program has finished, keep the door ajar for some minutes before you remove the dishes.
MAINTENANCE AND CLEANING
Cleaning the machine in regular intervals prolongs the machine’s service life.
Oil and lime may accumulate in the machine’s washing section. In case of such accumulation:
Fill the detergent compartment with detergent without loading any dishes into the machine, select a program that runs at high temperature, and start the machine. Alternatively, use descaling material available in the market. (Dishwasher cleaners produced by detergent manufacturers.)
Cleaning the seals in the machine door
To clean any accumulated residues in the door seals, wipe the seals regularly by using a dampened cloth.
Cleaning the machine
Clean the filters and spray arms at least once a week. Unplug your machine and turn off its tap before starting the cleaning. Do not use abrasive materials when cleaning your machine. Wipe with a fine cleaning material and a dampened cloth.
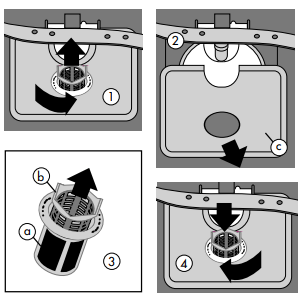
Filters
Check if any food wastes have remained on the coarse and fine filters. If any food wastes are left, remove the filters and clean them thoroughly under the water tap.
a. Micro Filter
b. Coarse Filter
c. Metal/Plastic Filter
To remove and clean the filter combination, turn it counter clockwise and take it out by lifting upwards.
Pull and remove the metal/plastic filter.
Then pull the coarse filter out of the micro filter. Rinse it with water under the tap. Refit the metal/plastic filter. Insert the coarse filter into the micro filter in a way that the marks will correspond to one another.
Attach micro filter into the metal/plastic filter and turn to the direction of arrow and it is locked when the arrow on micro filter can be seen from across.
Never use your dishwasher without any filter.
Incorrect fitting of the filter will reduce the washing effectiveness.
Clean filters are very important in terms of the proper running of the machine.
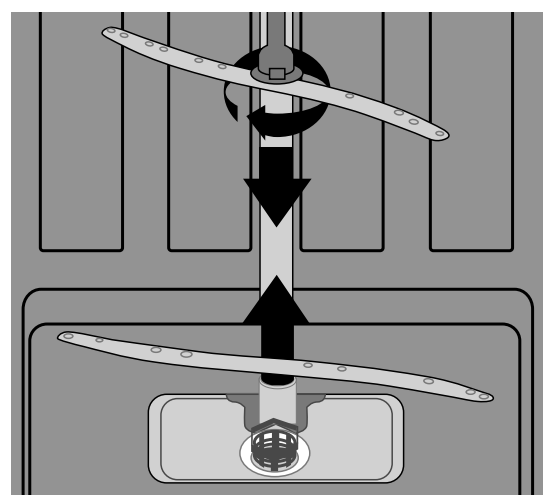
Spray arms
Check whether or not the holes for the upper and lower spray arms are clogged. If there is any clogging, remove the spray arms and clean them under water.
You can remove the lower spray arm by pulling it upwards, while the upper spray arm nut can be removed by turning the nut to the left. Be sure that the nut is perfectly tightened when refitting the upper spray arm.
Hose filter
The inlet hose filter reduces contamination (sand, clay, rust etc.) that might be occasionally carried in through the main’s water supply or the indoor plumbing, and avoids damage to dishwasher components. Check the filter and the hose from time to time and clean them if necessary. To clean the filter, first turn off your tap and then remove the hose. After removing the filter from the hose, clean it under the tap. Insert the cleaned filter back into its place inside the hose. Refit the hose and check that there are no leaks.
FAILURE CODES AND WHAT TO DO IN CASE OFFAILURE
Error code
Error Description
CONTROL
F5
Inadequate water supply
Make sure the water tap is open and that main water supply is on.
Close the water tap,separate the water inlet hose from the tap and clean the filter at the connection end of the hose.
Restart your machine, contact the service centre if the error resumes.
F3
Error of continuous water input
Close the tap.
Contact the service centre.
F2
The waste water in the machine cannot be discharged
Water drain hose is clogged.
Spigot on sink tap is blocked.
The filters of your machine might be clogged.
Power off your machine and activate the program cancellation command.
Check the drain spigot’s membrane has been removed or blocked.
If the error continues, contact the service centre.
F8
Heater error
Contact the service centre.
F1
Alarm is active against water overflow
Power off your machine and close the tap.
Contact the service centre.
FE
Faulty electronic card
Contact the service center.
F7
Overheating error (temperature in the machine is too high)
Contact the service centre.
F9
Flow Control Valve position error
Contact the service center.
F6
Faulty heater sensor
Contact the service centre.
Practical and useful information
Whenever you will not be operating your machine:
Unplug the machine and then turn the water off.
Leave the door slightly ajar in order to prevent the formation of unpleasant odours.
Keep the machine interior clean.
Eliminating water droplets:
Wash the dishes with the intensive program.
Increase the rinse aid setting.
If plastic items are washed, water drops on these items will be unavoidable. Programs with higher temperatures and increased rinse aid settings may reduce the water drops. Check that the plastic items are suitable for dishwasher use.
Correctly loaded dishes will give the best energy consumption, washing and drying performance.
Clean all rough waste before you place dirty dishes in the machine.
Operate the machine after it is completely full.
Use pre-washing program only when necessary.
Observe program information and average consumption values table when selecting a program.
Since the machine will reach high temperatures, it should not be installed near a refrigerator.
If the appliance is located in a place where the risk of freezing exists, you must completely drain the water that has remained in the machine. Turn off the water tap, disconnect the water inlet hose from the tap and allow the interior water to drain.
Troubleshooting
PROBLEM
SOLUTION
If one of program monitor lights is on and start/pause light is flashing
• Your machine’s door is open, shut the door.
If the program won’t start
Check if the plug is connected.
Check your indoor fuses.
Be sure that the water inlet tap is turned on.
Be sure that you have closed the machine door.
Be sure that you switched off the machine by pressing the Power On/Off button.
Be sure that the water inlet filter and the machine filters are not clogged.
First time use: Check if the drain spigot’s membrane has been removed or spigot blocked.
If the control lamps won’t go out after a wash operation
The Power On/Off button is released yet.
If detergent residues are left in the detergent compartment
Detergent has been added when the detergent compartment was wet.
If water is left inside the machine at the end of the program
The water drain hose is clogged or twisted.
The filters are clogged.
The program is not finished yet.
If the machine stops during a wash operation
Power failure.
Water inlet failure.
Program can be on standby mode.
If shaking and hitting noises are heard during a wash operation
Dishes placed incorrectly.
Spray arm hitting the dishes.
If there are partial food wastes left on the dishes
Dishes placed incorrectly into the machine, sprayed water did not reach related places.
Basket overly loaded.
Dishes leaning against one another.
Very small amount of detergent added.
An unsuitable, rather weak wash program selected.
Spray arm clogged with food wastes.
Filters clogged.
Filters incorrectly fitted.
Water drain pump clogged.
If there are whitish stains on the dishes
A very small amount of detergent is being used.
Rinse aid dosage setting at a very low level.
If the dishes won’t dry up
A programme without a dry operation selected.
Rinse aid dosage set too low.
Dishes unloaded too fast.
If there are rust stains on the dishes
Stainless-steel quality of the dishes washed is insufficient.