Make sure that all the packing materials are removed from the inside of the door.
WARNING: Check the microwave for any damage, such as misaligned or bent door, damaged door seals and sealing surface, broken or loose door hinges and latches and dents inside the cavity or on the door. If there is any damage, do not operate the microwave and contact qualified service personnel.
This microwave must be placed on a flat, stable surface to hold its weight and the heaviest food likely to be cooked in the microwave.
Do not place the microwave where heat, moisture, or high humidity are generated, or near combustible materials.
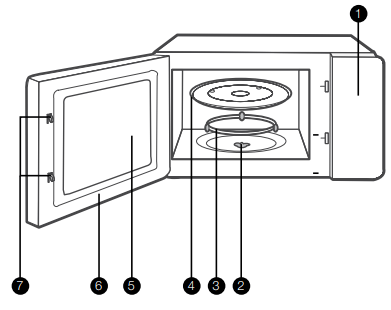
Do not operate the microwave without glass tray, roller support, and shaft in their proper positions.
Make sure that the power supply cord is undamaged and does not run under the microwave or over any hot or sharp surface.
The socket must be readily accessible so that it can be easily unplugged in an emergency.
Do not use the microwave outdoors.
Radio Interference
Operation of the microwave can cause interference to your radio, TV or similar equipment.
When there is interference, it may be reduced or eliminated by taking the following measures:
Clean door and sealing surface of the microwave.
Reorient the receiving antenna of radio or television.
Relocate the microwave with respect to the receiver.
Move the microwave away from the receiver.
Plug the microwave into a different outlet so that microwave and receiver are on different branch circuits.
Grounding Instructions
This appliance must be grounded. This microwave is equipped with a cord having a grounding wire with a grounding plug. It must be plugged into a wall receptacle that is properly installed and grounded. In the event of an electrical short circuit, grounding reduces risk of electric shock by providing an escape wire for the electric current. It is recommended that a separate circuit serving only the microwave be provided. Using a high voltage is dangerous and may result in a fire or other accident causing microwave damage.
WARNING: Improper use of the grounding plug can result in a risk of electric shock.
NOTE:
If you have any questions about the grounding or electrical instructions, consult a qualified electrician or service person.
Neither the manufacturer nor the dealer can accept any liability for damage to the microwave or personal injury resulting from failure to observe the electrical connection procedures.
The wires in this mains cable are colored in accordance with the following code:
Green and Yellow = EARTH
Blue = NEUTRAL
Brown = LIVE
Microwave cooking principles
Arrange food carefully. Place thickest areas towards outside of dish.
Watch cooking time. Cook for the shortest amount of time indicated and add more as needed. Food severely overcooked can smoke or ignite.
Cover foods while cooking. Covers prevent spattering and help foods to cook evenly.
Turn foods over once during microwaving to speed cooking of such foods as chicken and hamburgers. Large items like roasts must be turned over at least once.
Rearrange foods such as meatballs halfway through cooking both from top to bottom and from the center of the dish to the outside.
Before you call for service
If the microwave fails to operate:
Check to ensure that the microwave is plugged in securely. If it is not, remove the plug from the outlet, wait 10 seconds and plug it in again securely.
Check for a blown circuit fuse or a tripped main circuit breaker. If these seem to be operating properly, test the outlet with another appliance.
Check to ensure that the control panel is programmed correctly and the timer is set.
Check to ensure that the door is securely closed engaging the door safety lock system. Otherwise, the microwave energy will not flow into the microwave.
If none of the above rectifies the situation, then contact a qualified technician. Do not try to adjust or repair the microwave yourself.
Utensils guide
Only use utensils that are suitable for use in microwave ovens.
Microwave can not penetrate metal, so metal utensils or dishes with metallic trim should not be used.
Do not use recycled paper products when microwave cooking, as they may contain small metal fragments which may cause sparks and/or fires.
Round/oval dishes rather than square/oblong ones are recommend, as food in corners tends to overcook.
Narrow strips of aluminum foil may be used to prevent overcooking of exposed areas. But be careful don’t use too much and keep a distance of 1 inch (2.54cm) between foil and cavity.
COOKWARE
MICROWAVE
Heat-resistant glass
Yes
Non heat-resistant glass
No
Heat-resistant ceramics
Yes
Microwave-safe plastic dish
Yes
Kitchen paper
Yes
Metal tray
No
Metal rack
No
Aluminum foil & foil containers
No
Initial cleaning
Remove all parts from the appliance.
Clean the appliance before first use.
Setting the time
IMPORTANT When you connect the appliance to the electrical supply or after a power cut, the display shows 0:00.
Setting the clock
When the microwave oven is plugged into an outlet, “0:00” will display.
Press Clock, “00:00” and “Clock” will appear in the display. The first figure will flash; “:” and “0” will be lighted.
Press the number pads and enter the current clock time. For example, if the time is now 10:12, press “ 1, 0, 1, 2 “ in order.
Press Clock to finish clock setting, “:” will flash and the numbers will appear as a clock time in the display.
NOTE:
If the numbers entered are not within the range between 1:00 to 12:59, the setting will not be accepted until valid numbers are entered.
In the process of setting clock, if Stop is pressed or if there is no operation within 1 minute, the display will automatically return to the previous clock setting
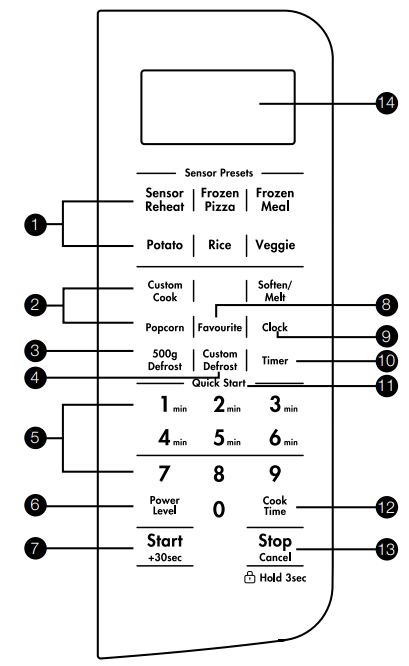
Custom Defrost: Defrost time calculated by entered weight and category of item
Number Pad
Power Level
START + 30 SEC
Favourite
Clock
Timer
ONE TOUCH START Pads (1- 6)
Cook time
STOP: Cancel Hold 3 seconds: Before cooking starts, press to clear all previous settings. During cooking, press once to stop oven; press twice to stop oven and clear all settings. Hold for 3 seconds to lock the appliance.
Display Window
USING THE ACCESSORIES
CAUTION: Do not cool food without the turntable set. Use only the turntable provided with the appliance.
IMPORTANT: Never cook food directly on the glass cooking tray.
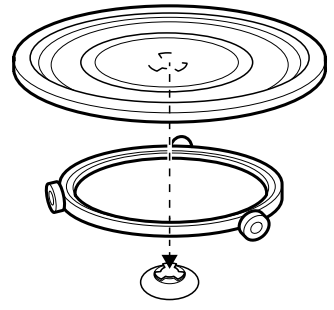
Inserting the turntable set
Place the roller guide around the turntable shaft.
Before first use remove the tape from the centre of the turntable shaft.
Place the glass cooking tray on the roller guide
ADDITIONAL FUNCTIONS
Timer
Press Timer, “00:00” and “Timer” will appear in the display.
Press the number pads to enter the time amount. The maximum amount of time that can be entered is 99 minutes, 99 seconds.
Press Start to confirm setting, timer indicator will flash, timer counts down.
When the time amount elapses, the oven will beep 5 times. “End” will display. The time of day will display by opening the door or pressing Stop pad.
NOTE:
The Timer setting is different from the Clock setting; it is simply a timer.
During the Timer function, no cooking function can be set into operation.
Timer amount cannot be increased by pressing Start.
Pressing Stop will cancel the Timer countdown.
CARE AND CLEANING
Notes on cleaning:
To clean front panel fingerprint-resistant stainless steel simply wipe with a soft cloth using warm water and a mild detergent. DO NOT use stainless steel cleaners, abrasive cleaners or harsh solvents.
Clean the appliance interior after each use. Then you can remove dirt more easily and it does not burn on.
Clean stubborn dirt with a special cleaner.
Clean all accessories regularly and let them dry. Use a soft cloth with warm water and a cleaning agent.
To soften hard to remove remains, boil a glass of water at full microwave power for 2 to 3 minutes.
To remove odours, mix a glass of water with 2 tsp of lemon juice and boil at full microwave power for 5 minutes.
TROUBLESHOOTING
PROBLEM
POSSIBLE CAUSE
REMEDY
Oven will not start
Electrical cord for oven is not plugged in.
Plug into the outlet.
Door is open.
Close the door and try again.
Wrong operation is set.
Check instructions.
Arcing or sparking
Materials to be avoided in microwave oven were used
Use microwave-safe cookware only.
The oven is operated when empty
Do not operate with oven empty
Spilled food remains in the cavity.
Clean cavity with wet towel.
Unevenly cooked foods
Materials to be avoided in microwave oven were used
Use microwave-safe cookware only
Food is not defrosted completely.
Completely defrost food.
Cooking time, power level is not suitable.
Use correct cooking time, power level.
Food is not turned or stirred.
Turn or stir food.
Overcooked foods
Cooking time, power level is not suitable.
Use correct cooking time, power level.
Undercooked foods
Materials to be avoided in microwave ovwn were used.
Use microwave-safe cookware only.
Food is not defrosted completely.
Completely defrost food.
Oven ventilation ports are restricted
Check to see that oven ventilation ports are not restricted.
Cooking time, power level is not suitable.
Use correct cooking time, power level.
Improper defrosting
Materials to be avoided in microwave oven were used.
Use microwave-safe cookware only.
Cooking time, power level is not suitable.
Use correct cooking time, power level.
Food is not turned or stirred
Turn or stir food.
Sensor cooked foods not properly cooked.
Cover or lid on food not vented.
Cover or lid over food must contain vent hole for escaping steam.
Door opened before sensor-detected cooking time appears in display.
Do not open door to stir or turn food before sensor-detected cooking time appears in display.
“COOL” appears on the display and the cooling fan continues to run after the cooking or heating time is over
For 31L models, the cooling fan continues to run after the end of the cycle to help cool down and protect the microwave components
This is not a product fault or malfunction, it is part of the microwave self protection system.