User manual Dishwasher
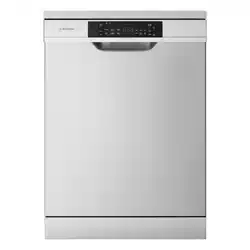
PRODUCT DESCRIPTION
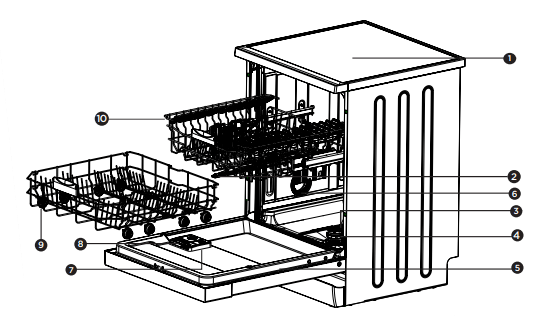
1 Worktop
2 Upper spray arm
3 Lower spray arm
4 Filters
5 Rating plate
6 Air vent
7 Rinse aid dispenser
8 Detergent dispenser
9 Lower basket
10 Upper basket
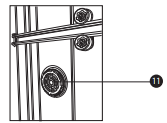
11 Super Active Drying
CONTROL PANEL
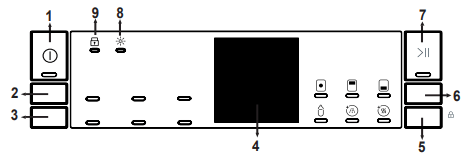
1. On/Off Button
Switch the machine on by pressing the On/Off button. The On/Off lamp lights as long as the machine is on.
2. Program Selection Button
Select a suitable program by pressing the program button.
3. Delay Button
You can delay the start time of the program for 1-2...24 hours by pressing the delay button (3) before the program starts. If you want to change the delay time,first press the Start/Pause button and then the delay button to select a new delay time. To activate the new delay time, press the Start/Pause button. To cancel the delay, you need to switch to 0 hour by using the delay when the machine is paused.
4. Remaining Time Indicator
Program flow can be monitored via the Wash,Rinse, Dry, End lamps and Remaining Time Indicator. The machine remains silent for about 40-50 minutes with respect to the flow of the program you have selected.
5. Select Button
Options can be selected by pressing the Options button repeatedly. The chosen option will be indicated by a blinking LED. Select the option by pressing the Select button. The LED for the chosen option will then remain lit.
6. Options Button
If you have used an extra feature on the latest washing program this feature will remain active on the next washing program If you want to cancel this feature on the newly selected washing program press the options button to browse the options and press the select button to deactivate the related option or turn the machine off with the on/off button. If you would like to use an extra feature with a newly selected program select the desired function.
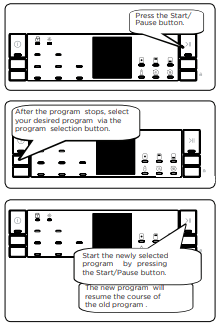
7. Start/Pause Button
Press the Start/Pause button to start the program The wash lamp turns on and the Remaining Time Indicator shows the program duration. It also indicates the remaining time during the program flow. If you open the door of your mac-hine when the program is running the duration of the program pauses,and the Start/ Pause led blinks.
8. Rinse Aid Indicator 
When the rinse aid level is low, the rinse aid lack warning indicator turns on and you should fill the rinse aid chamber.
9. Child lock 
Child lock is activated/deactiva-ted by pressing select button for about 3 seconds. When it is activated, all leds blink and “CL” is shown on Remaning Time Indicator (4) once. When it is deactivated, all lamps and “CL” blink twice.
NOTE: By selecting the half load option ,three sorts of washing can be executed: both baskets, upper basket and lower basket. These options are ideal for smaller loads, allowing the dishwasher to perform smaller washes with reduced consumption.
NOTE: Select the Tablet option when using combined detergent that contains rinse aid and extra functions.
NOTE: You may select Hygiene in order to obtain a more hygienic and a cleaner washing process by altering the water temperature and washing time of the program you have selected.
NOTE: If the Rinse option is selected, washing-rinsing steps will be added into the selected program so you can ensure that your dishes will be extra clean and shiny.
NOTE: If the Drying lamp is on, extra heating and drying steps will be added into the selected program so your dis-hes will be dried more thoroughly
NOTE: Child lock is activated/deactivated by pressing the select button (5) for about 3 seconds. When it is activated, all leds blink and “CL” is shown on the Re.
NOTE: If you switch the machine to off position after selecting the delay time and the program has started, the delayed time is cancelled.
Changing a program
If you would like to change the program when the machine is already running.
Cancelling a program
If you would like to cancel a program when it is running.
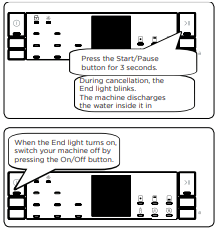
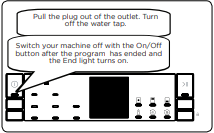
Switching the Machine Off
NOTE: Do not open the door before the program ends.
NOTE: At the end of washing program you can leave the door of your machine ajar to hasten the drying.
NOTE: If the door of machine is opened or power is cut off during washing, the program will continue when the door is closed or the power is restored.
HINTS AND TIPS
If one of program monitor lights is on and start/pause light is flashing
- Your machine’s door is open, shut the door to continue.
If the program won’t start
- Check if the plug is connected.
- Check your indoor fuses.
- Check that the water inlet tap is turned on.
- Check that you have closed the machine door.
- Check that you switched off the machine by pressing the power on/off button.
- Check that the water inlet filter and the machine filters are not clogged.
If the control light is off after a wash operation
- The power on/off button isn’t released yet.
If detergent residues are left in the detergent compartment
- Detergent has been added when the detergent compartment was wet.
- Large dishes have blocked the dispenser door.
If water is left inside the machine at the end of the program
- The water drain hose is clogged or twisted.
- The filters are clogged.
- The program is not finished yet.
INFORMATION At the end of the program, water may still remain on the sides and door of the appliance.
If the machine stops during a wash operation
- Power failure.
- Water inlet failure.
- Program is on standby mode.
If shaking and hitting noises are heard during a wash operation
- Dishes are placed incorrectly.
- The spray arm is hitting the dishes.
If there are partial food wastes left on the dishes
- Dishes are placed incorrectly into the machine, sprayed water did not reach related places.
- Basket overloaded.
- Dishes leaning against one another.
- Very small amount of detergent added.
- An unsuitable, rather weak wash program selected.
- Spray arm clogged with food waste.
- Filters clogged.
- Filters incorrectly fitted.
- Water drain pump clogged.
If there are white stains on the dishes
- A very small amount of detergent is being used.
- Rinse aid dosage setting at a very low level.
- Water hardness is very high.
If the dishes won’t dry
- A program without a dry operation selected.
- Rinse aid dosage set too low.
- Dishes unloaded too fast.
- Use a hotter program.
If there is rust on the dishes
- Stainless-steel quality of the dishes washed is insufficient.
- High level of salt in the wash water.
- Unhealthy mains grounding.
Unloading the baskets
- For improved drying results with the most effective use of energy, open the door approximately 10cm at the end of the program.
- Allow the tableware to cool for 30-40 minutes as hot items can easily be damaged.
- First remove items from the lower basket before removing the items from the upper basket.
Call an authorised service if the problem still persists after the controls or in case of any malfunction not described above.
Useful Information
- Whenever you will not be operating your machine:
- Unplug the machine and then turn water off.
- Leave the door slightly ajar in order to prevent the formation of unpleasant smells.
- Keep the machine interior clean.
- Correct loading of dishes in the machine, enables reduced energy consumption and improved washing and drying performance.
- Remove all large food remnants before you placing dirty dishes into the machine.
- Operate the machine after it is completely full.
- If the appliance is located in a place where the risk of freezing exists, you must completely drain the water that has remained in the machine. Turn off the water tap, disconnected the water inlet hose from the tap and allow the interior water to drain.
INSTALLATION
Positioning the machine
When considering the location for the dishwasher, ensure that there is adequate space to enable loading and unloading of the dishes.
- Do not put your machine in any location where the ambient temperature can fall below 0°C.
- Before positioning, take the machine out of its packaging by following the warnings located on the package.
- Position the machine close to a water tap and drain. You need to position your machine, taking into consideration that its connections will not be altered once they are made.
- Do not grip the machine by its door or panel in order to move it.
- Take care to leave a certain clearance from all sides of the machine so that you can comfortably move it back and forth during cleaning.
- Make sure that the water inlet and outlet hoses do not get squeezed while positioning the machine. Also, make sure that the machine does not stand on the electrical cable. Adjust the machine’s feet so that it is level and stable. Proper positioning of the machine ensures problem-free opening and closing of its door.
- If the door of your machine does not close properly, check if the machine is stable on the floor; if not, adjust the feet and ensure it is level and stable.
Water connection
Ensure that the indoor plumbing is suitable for installing a dishwasher and complies with AS/NZS 3500.1. Also, we recommend that you fit a filter at the entrance of your place or apartment so as to avoid any damage to your machine because of any contamination (sand, clay, rust etc) that might be occasionally carried in through the main’s water supply or the indoor plumbing, and to avoid problems of staining and formation of deposits after washing.
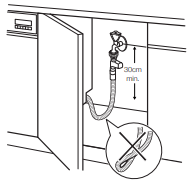
Water inlet hose
Do not use the water inlet hose of your old machine, you must use the new water inlet hose supplied with your machine. Before connecting the water inlet hose to the water tap, ensure clean water is flowing from the tap before making the connection. Connect the water inlet hose directly to the water inlet tap. The pressure supplied by the tap should be at a minimum of 0.03 MPa and at a maximum of 1 MPa. If the water pressure is above 1 MPa, a pressure-relief valve should be installed.
WARNING Only turn the locking nut to secure hose – do not turn the hose.
- The first time you use the appliance, make sure that there is no leakage.
- The water inlet hose has a safety valve and a sheath with an inner mains cable.
- After the connections are made, the tap should be turned on fully and checked for water tightness. For the safety of your machine, make sure to always turn off the water inlet tap after each wash program is finished.
WARNING NOTE: A water tempering valve is required if the water temperature is over 60°C.
CAUTION
Always use new hoses when you connect the appliance to the water supply. Old hoses must not be used. The water inlet hose must be examined at an interval of twelve months for deterioration and replaced if necessary.
In order to pass the safety valve through the kitchen cabinets, an opening of at least 45mm x 90mm is needed.
Water drain hose
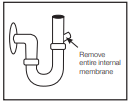
If you connect the water drain hose to a trap spigot under the sink, remove the plastic membrane. If you do not remove the entire membrane, remaining food can cause blockage in the drain hose spigot. Ensure a hose clamp is used to secure the hose to the spigot.
Water drain hose
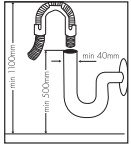
The water drain hose can be connected either directly to the water drain hole or to the sink outlet spigot. Using a hose hook (if available), the water can be drained directly into the sink by positioning the hose hook over the edge of the sink.
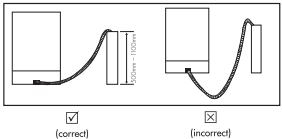
This connection should be at a minimum of 50cm and at a maximum of 110cm above the base of the dishwasher.
WARNING Maximum drain hose length is 4m. Longer hose length will prevent correct draining, and result in poor wash performance.
Electrical Connection
The plug of your machine should be connected to an earthed outlet that supplies suitable voltage and current. If there is no earthing installation, have a competent electrician carry out an earthing installation. In case of usage without earthing installed, our company will not be responsible for any loss of usage that might occur.
The indoor fuse current value should be 10-16 A.
Your machine is designed for 220-240 V. The machine should not be plugged in during installation.
- Always use the molded plug supplied with your machine.
- Running in low voltage will cause a decline in washing quality.
- The machine’s electrical cable should be replaced by an authorised service or an authorised electrician only. Failure to do so may lead to accidents.
- For safety purposes, always make sure to disconnect the plug when a wash program is finished.
- In order not to cause an electric shock, do not unplug when your hands are wet.
- When disconnecting your machine from the mains supply, always pull from the plug. Never pull the cord itself.
Fitting the machine undercounter
If you wish to fit your machine undercounter, check whether you have sufficient space under your countertop and whether the wiring-plumbing is suitable to do so.
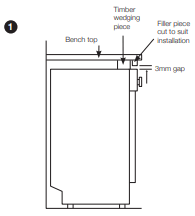
1. To ensure the stability of the dishwasher for an underbench installation, if the underbench dimension is greater than 820mm, any gap between the dishwasher and the underside of the benchtop should be bridged with a packing piece. This may be achieved by wedging a piece of timber between the dishwasher and the benchtop as shown.
2. If required, remove the worktop as shown in the illustration.
3. To remove the worktop, remove the screws that hold the worktop which are located at the rear of the machine; then push the front panel 1cm from the front
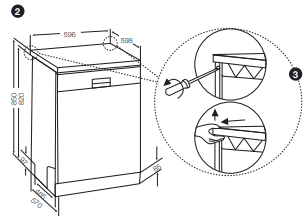
1. towards the rear and lift it.
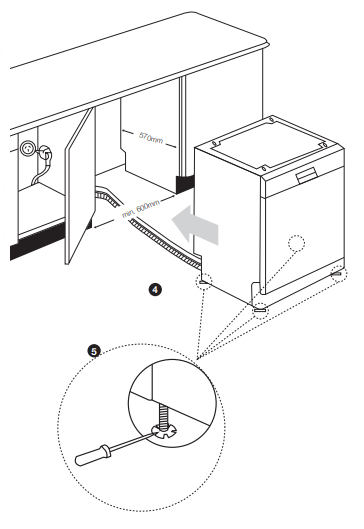
2. Adjust the machine feet according to the slope of the floor.
3. Fit your machine by pushing it undercounter without letting the hoses get crushed or bent.
WARNING After removal of worktop, ensure the opening for the dishwasher is according to the following dimensions.
PREPARING FOR USE
Detergent usage
Use a detergent specifically designed for use in domestic dishwashers. You can find powder, gel and tablet detergents in the market that have been designed for household dishwashers. Detergent should be put into the compartment prior to starting the machine. Keep your detergents in cool, dry places out of reach of children. Do not fill detergent into the detergent compartment more than required; otherwise it may cause scratches on your glasses as well as lead to a poorly dissolved detergent. Should you need more information concerning the detergent you will use, contact detergent manufacturers directly.
Filling the detergent compartment
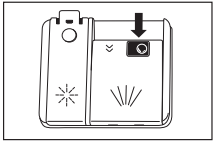
Push the latch to open the detergent container as shown in the image.
The Detergent pod has level lines inside� It is possible to measure the right detergent amount using these lines.
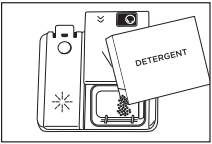
The detergent pod can take a maximum of 40cm3 detergent
Open the dishwasher detergent pod and pour 25cm3 if your dishes are heavily soiled or 15cm3 if they are less soiled.
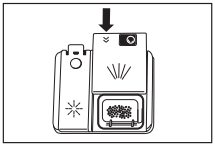
To close the detergent container, push the cover as shown until it locks.
You may have to add more detergent into your machine, depending on the degree of soil and the water hardness in your area.
If your dishes are from the previous day and there is dried food waste on them, or if you have fully loaded the dishwasher, pour 5cm3 detergent onto the base of the door and start your machine.
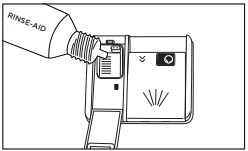
Filling with rinse aid and making the setting
To fill the rinse aid compartment, open the rinse-aid compartment cap.

Fill the compartment with rinse aid until MAX level and then close the cap.
Be careful not to overfill the rinse aid compartment and wipe up any spills.
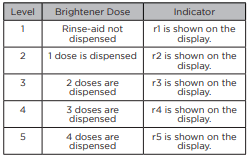
In order to set rinse aid level, follow below steps:
- Turn on the machine by pressing On/ Off button.
- Press Program button at least for 5” immediately after machine is turned on.
- Release Program button when “rA” is shown. Rinse aid level setting follows water hardness level setting. Next, the last setting level is viewed.
- Set the level by pushing the program button.
- Switch off the machine to save the setting.
- The factory setting is “4”.
If the dishes are not drying properly or are spotted, increase the level. If blue stains form on your dishes, decrease level.
CAUTION Use only those rinse aid materials which are allowed for use in the machine. As rinse aid residues left as a result of overflowing will create extremely high amounts of foam and thus reduce the washing performance, remove the excess amount of rinse aid by wiping it with a paper towel or cloth.
LOADING YOUR DISHWASHER
If your dishes are correctly placed in the dishwasher, you will be using it in the best way in terms of energy consumption, washing and drying performance.
There are two separate baskets for you to load your dishes into your machine. You can load into the lower basket such round and deep items as pots with long handles, pot lids, plates, salad plates, cutlery sets.
The upper basket has been designed for tea plates, dessert plates, salad bowls, cups and glasses. When placing long-stem glasses and goblets, lean them against the basket edge, rack or glass supporter wire and not against other items. Do not lean long glasses against one another or they wont remain steady and can be damaged.
It is recommended that thin narrow items be placed into the middle sections of baskets. You can place spoons among the other cutlery sets in order to prevent them from sticking to one another, use the cutlery grid in order to obtain the best result.
To avoid any possible injuries, always place long-handle and sharp-pointed dishes such as serving fork or bread knife with their sharp points facing down or horizontally on the baskets.
CAUTION Place your dishes into your machine in a way that they will not prevent the upper and lower spray arms from spinning.
Top basket cup rack
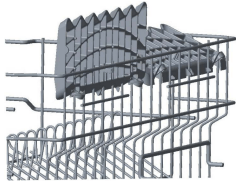
Height Adjustable Rack
These racks are designed to increase the capacity of the top basket. You can place your glasses and cups on the racks. You can adjust the height of these racks. Thanks to this feature, you can place different sizes of glasses under these racks.
Thanks to height adjustment plastics mounted on the basket, you can use your racks in two different heights. In addition, you can place long forks, knives and spoons on these racks laterally, so that they do not block the revolution of propeller.
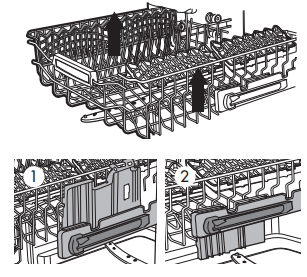
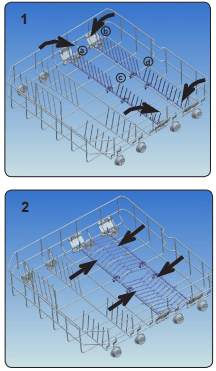
Upper basket height adjustment while it is full
Basket height adjustment mechanism on the upper basket of your machine is designed to let you adjust the height of your upper basket (refer to diagram 1) upwards or (refer to diagram 2) downwards, without removing it from your machine when it is full, to create large spaces at the upper or bottom area of your machine as needed.
The basket of your machine is set to the upper position from the factory
In order to raise your basket, hold it from both sides and pull it upwards. In order to lower it, hold it from both sides again, pull upwards and then lower carefully.
Make sure that both sides are in the same position (up or down).
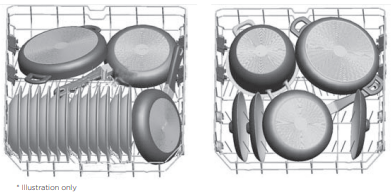
Alternative basket loads
Lower Basket
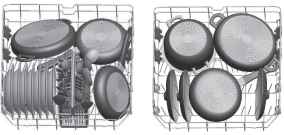
Top Basket
Four Folding Racks
The folding racks are designed so that large items, such as pots and pans, can be easily placed in the dishwasher. Each section can be folded separately. The racks can be folded down or raised up, as shown in the images below.
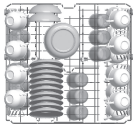
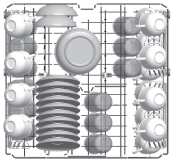
Alternative basket loads Lower Basket
Top Basket
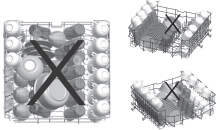
IMPORTANT Examples of incorrect loading
MAINTENANCE AND CLEANING
Oil and lime may accumulate in the machine’s washing section. In case of such accumulation;
- Fill the detergent compartment without loading any dishes into the machine, select a program that runs at high temperature, and start the machine. If this is ineffective, use a specialty dishwasher cleaner available from most supermarkets.
Cleaning the seals in the machine door
- To clean any accumulated residues in the door seals, wipe the seals regularly by using a dampened cloth.
Cleaning the machine
- Clean the filters and spray arms at least once a week.
- Unplug your machine and turn off its tap before starting the cleaning.
- Do not use hard materials when cleaning your machine. Wipe with a fine cleaning material and a dampened cloth.
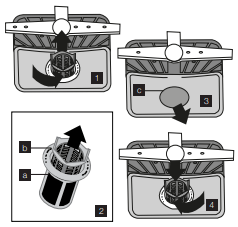
Filters
- Check if any food wastes have remained on the coarse and fine filters.
- If any food wastes are left, remove the filters and clean them thoroughly under the water tap.
a. Micro Filter
b. Coarse Filter
c. Metal/Plastic Filter
To remove and clean the filter combination, turn it counter clockwise and take it out by lifting upwards (1)
Pull and remove the metal/plastic filter. (3)
Then pull the coarse filter out of the micro filter. (2) Rinse it with lots of water under the tap. Refit the metal/plastic filter. Insert the coarse filter into the micro filter in away that the marks will correspond to one another. Attach micro filter into the metal/plastic filter and turn to the direction of arrow and it is locked when the arrow on micro filter can be seen from across. (4)
- Never use your dishwasher without any filter.
- Incorrect fitting of the filter will reduce the washing effectiveness.
- Clean filters are very important in terms of the proper running of the machine.
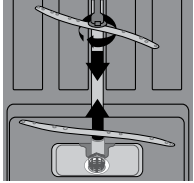
Spray arms
Check whether or not the holes for the upper and lower spray arms are clogged. If there is any clogging, remove the spray arms and clean them under water.
You can remove the lower spray arm by pulling it upwards, while the upper spray arm nut can be removed by turning the nut to the left.
Be sure that the nut is perfectly tightened when refitting the upper spray arm.
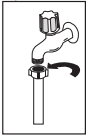
Hose filter
Water is stopped by the inlet hose filter to avoid any damage to your machine because of any contamination (sand, clay, rust etc.) that might be occasionally carried in through the mains water supply or the indoor plumbing, and to forestall such issues as yellowing and formation of deposits after washing. Check the filter and the hose from time to time and clean them if necessary. To clean the filter, first turn off your tap and then remove the hose. After removing the filter from the hose, clean it under the tap. Insert the cleaned filter back into its place inside the hose. Refit the hose.
TROUBLESHOOTING
F1
Power off your machine and close the tap.
Contact the customers services centre.
F2
Water discharge hose is clogged.
Water drainage hose kinked, check installation.
The filters of your machine might be clogged.
Power off–on your machine and activate the program cancellation command.
If the error continues, contact the Customer Care Centre.
F3
Close the tap.
Contact the Customer Care Centre.
F5
Make sure the water tap is fully open and that there is mains water available.
Water inlet hose kinked, check installation.
Close the water tap, disconnect the hose from the tap and clean the filter at the connection.
Restart your machine, contact the service if the error resumes.
F6
Contact the Customer Care Centre.
F7
Contact the Customer Care Centre.
F8
Contact the Customer Care Centre.
F9
Contact the Customer Care Centre.
FE
Contact the Customer Care Centre.