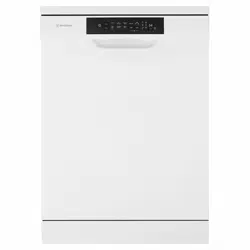
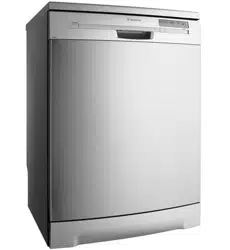
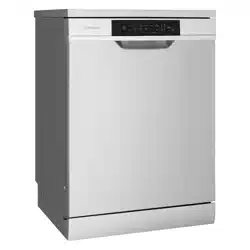
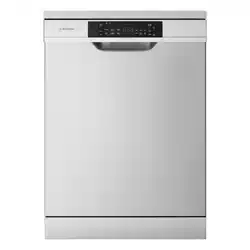
USER MANUAL for Dishwasher
PRODUCT DESCRIPTION
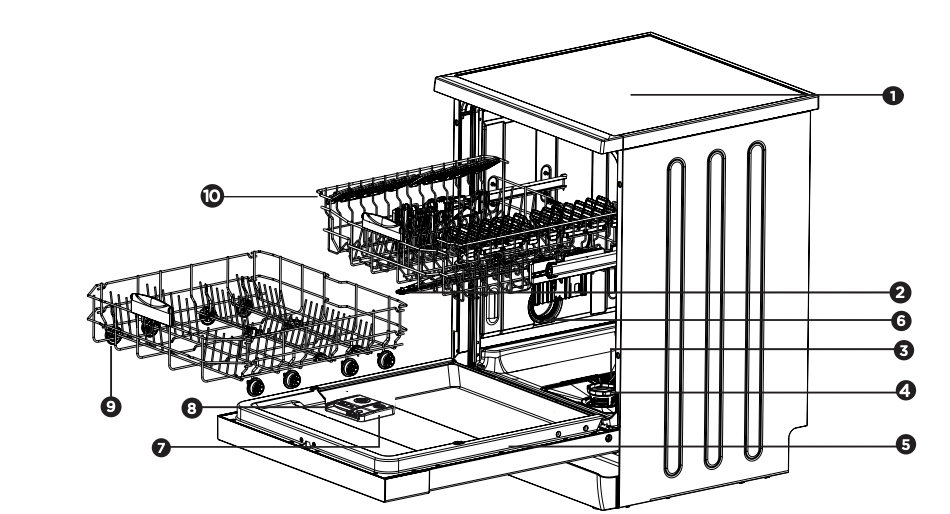
1 Worktop
2 Upper spray arm
3 Lower spray arm
4 Filters
5 Rating plate
6 Air vent
7 Rinse aid dispenser
8 Detergent dispenser
9 Lower basket
10 Upper basket
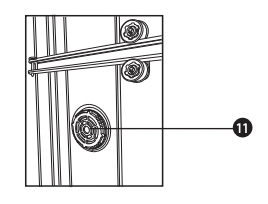
11 Super Active Drying
CONTROL PANEL
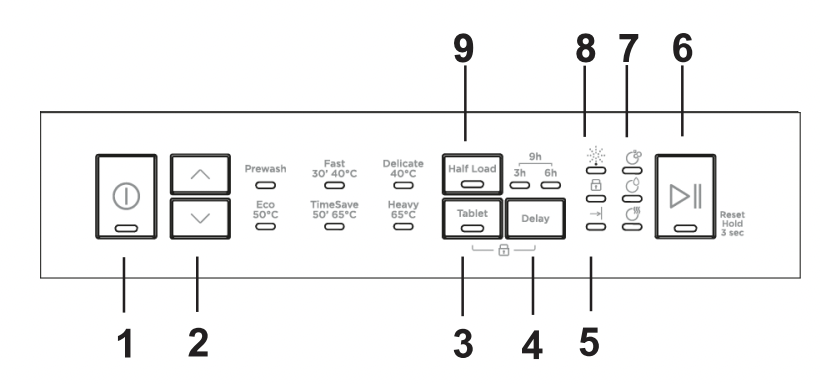
1. On/Off Button
It turns on/off the energy of the machine when it is pushed, The On-Off lamp lights as long as the machine is on.
2. Program Selection Buttons
It is used for program selection with up/ down buttons.
3. Tablet Option Button
It is used for selection for tablet option. If tablet option is activated, tablet lamp turns on. Select the Tablet Detergent option when using a combined detergent that contains salt, rinse aid or other extras. The Tablet Detergent Indicator will remain on for as long as it is selected.
4. Delay Button
It is used for activation of delay timer. When it is pushed once, 3h timer is activated. 6h and 9h delay timer is activated during consecutive pushes, respectively. If both delay leds are active, it means that 9h delay timer is active.
5. Child Lock Feature Led
This feature is activated by pressing both tablet and delay timer buttons at the same time during 3 seconds. If any button is pushed when the child lock feature is active, all leds blink.
6. Start/Pause Key
When you press the Start/Pause key, the program you have selected with the program selection button will start operating and the washing light will be on. After the program has started, the Start/Pause light will go off. In the Stop (Hold) position, the Start/Pause light blinks while the washing light is lit.
7. Program Monitoring Lights
You can monitor the program flow with the program lights on the control panel.
8. Rinse Aid Indicator
Check the rinse aid missing warning indicator light on the display to have an idea whether the amount of the rinse aid in your machine is enough. When the rinse aid missing warning indicator is lit, fill the rinse aid compartment.
9. Half Load Button
Thanks to the half load function in your machine, you can shorten the durations of the programs that you have selected and reduce the energy and water consumption by using half load electricity and water.
Switch the machine on by pressing the On/Off button. The On/Off lamp remains lit as long as the machine is on.
Press the Start/Pause button to start the selected program. The Start/Pause light will switch off and the Wash light will illuminate. If the door of your machine is opened while a program is in operation, the Start/Pause light will flash.
NOTE: Press the half load button to activate the Half Load function, which shortens the duration of a program. Press the button again to cancel it.
NOTE: If an extra feature is used, such as the Delay, Tablet or Half Load, on the most recent wash program, this feature will remain active on the next selected program. To cancel this feature on the newly selected wash program, turn the machine off and on. Extra features can be activated with the newly selected program.
Delaying the Program
Press the Delay button to delay the start time of a program for 3, 6 or 9 hours. Pressing the button once will delay the start time for 3 hours, pressing twice will delay for 6 hours, and pressing a third time will delay the start time for 9 hours. If the button is pressed for a fourth time, there will be no delay. Press the Start/ Pause button to activate the delay. The program can be selected first and the delay time after, or vice versa. To cancel or change the delay time, press the Start/ Pause button first, then select a new delay time. The delay time can be cancelled by turning off the machine. During a delay, the light corresponding to the remaining time is switched on.
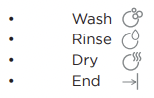
Changing a Program
Follow the steps below to change a program while in operation.
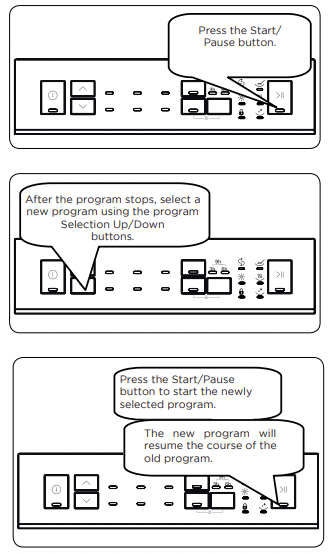
Cancelling a Program
Follow the steps below to cancel a program while in operation.
Saving a Favourite Program
You can add the programs and options that you consider are best for your dishes and you frequently use. To set your favourite program;
- Select the program that you want to select using the program button .
- Add the suitable options for the wash using the option buttons if you want to add additional options to this program.
- When you press “up” and “down”
 buttons together after completing your program and option selection, your favourite program and option will be saved.
Selecting a Favourite Program
Press to “Up” button for 3 seconds to select your favourite program
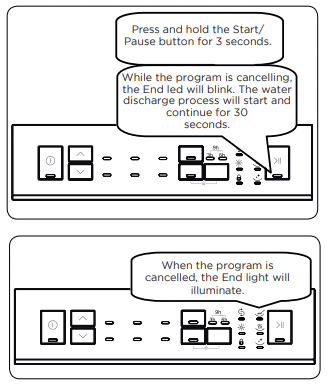
Switching the Machine Off
NOTE: Do not open the door before the program is complete.
NOTE: Leave the door slightly open at the end of a wash program to speed up the drying process.
NOTE: If the door of the machine is opened or the power is cut off during a wash program, the program will continue when the door is closed or when the power returns.
NOTE: If the power is interrupted or if the machine door is opened during the drying process, the program will terminate and your machine will now be ready for a new program selection.
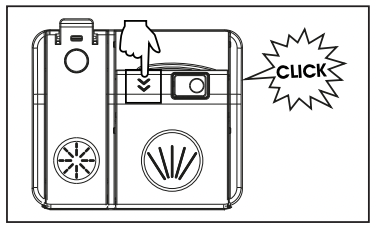
PROGRAM TABLE
NOTE: PROGRAM DURATION MAY CHANGE ACCORDING TO THE AMOUNT OF DISHES, TAP WATER, AMBIENT TEMPERATURE AND SELECTED ADDITIONAL FUNCTIONS.
- Only use powder detergent in short programs.
- Short programs do not include a drying step.
- To assist drying, we recommend partially opening the door after the program has finished.
- Eco 50°C program is the Energy Labelling Program and recommended for normally soiled load at the rated capacity.
HINTS AND TIPS
If one of program monitor lights is on and start/pause light is flashing
- Your machine’s door is open, shut the door to continue.
If the program won’t start
- Check if the plug is connected.
- Check your indoor fuses.
- Check that the water inlet tap is turned on.
- Check that you have closed the machine door.
- Check that you switched off the machine by pressing the power on/off button.
- Check that the water inlet filter and the machine filters are not clogged.
If the control light is off after a wash operation
- The power on/off button isn’t released yet.
If detergent residues are left in the detergent compartment
- Detergent has been added when the detergent compartment was wet.
- Large dishes have blocked the dispenser door.
If water is left inside the machine at the end of the program
- The water drain hose is clogged or twisted.
- The filters are clogged.
- The program is not finished yet.
IMPORTANT
At the end of the program, water may still remain on the sides and door of the appliance.
If the machine stops during a wash operation
- Power failure.
- Water inlet failure.
- Program is on standby mode.
If shaking and hitting noises are heard during a wash operation
- Dishes are placed incorrectly.
- The spray arm is hitting the dishes.
If there are partial food wastes left on the dishes
- Dishes are placed incorrectly into the machine, sprayed water did not reach related places.
- Basket overloaded.
- Dishes leaning against one another.
- Very small amount of detergent added.
- An unsuitable, rather weak wash program selected.
- Spray arm clogged with food waste.
- Filters clogged.
- Filters incorrectly fitted.
- Water drain pump clogged.
If there are white stains on the dishes
- A very small amount of detergent is being used.
- Rinse aid dosage setting at a very low level.
- Water hardness is very high.
If the dishes won’t dry
- A program without a dry operation selected.
- Rinse aid dosage set too low.
- Dishes unloaded too fast.
- Use a hotter program.
If there is rust on the dishes
- Stainless-steel quality of the dishes washed is insufficient.
- High level of salt in the wash water.
- Unhealthy mains grounding.
Unloading the baskets
- For improved drying results with the most effective use of energy, open the door approximately 10cm at the end of the program.
- Allow the tableware to cool for 30-40 minutes as hot items can easily be damaged.
- First remove items from the lower basket before removing the items from the upper basket.
Call an authorised service if the problem still persists after the controls or in case of any malfunction not described above.
Useful Information
- Whenever you will not be operating your machine:
- Unplug the machine and then turn water off.
- Leave the door slightly ajar in order to prevent the formation of unpleasant smells.
- Keep the machine interior clean.
- Correct loading of dishes in the machine, enables reduced energy consumption and improved washing and drying performance.
- Remove all large food remnants before you placing dirty dishes into the machine.
- Operate the machine after it is completely full.
- If the appliance is located in a place where the risk of freezing exists, you must completely drain the water that has remained in the machine. Turn off the water tap, disconnected the water inlet hose from the tap and allow the interior water to drain.
PREPARING FOR USE
Detergent usage
Use a detergent specifically designed for use in domestic dishwashers. You can find powder, gel and tablet detergents in the market that have been designed for household dishwashers. Detergent should be put into the compartment prior to starting the machine. Keep your detergents in cool, dry places out of reach of children. Do not fill detergent into the detergent compartment more than required; otherwise it may cause scratches on your glasses as well as lead to a poorly dissolved detergent. Should you need more information concerning the detergent you will use, contact detergent manufacturers directly
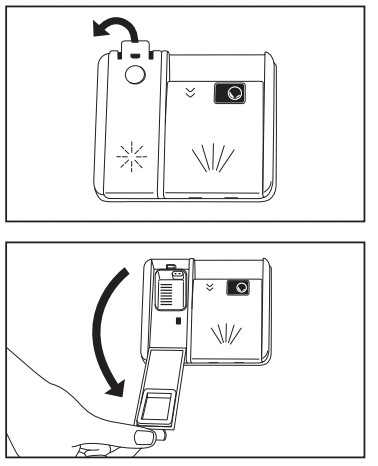
Filling the detergent compartment
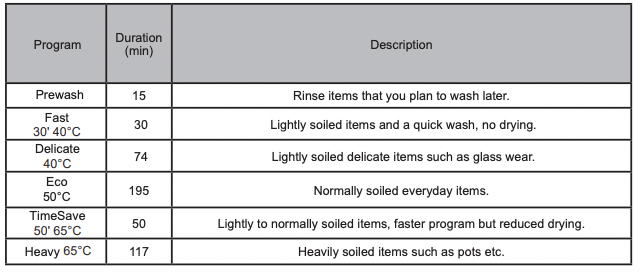
Push the button to open the detergent compartment as shown above.
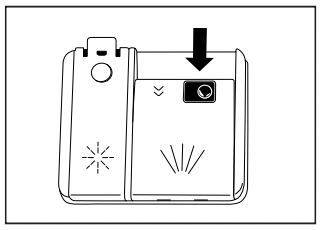
The detergent compartment has level lines inside to make it possible to dose the correct amount of detergent.
The capacity of the detergent compartment is 40cm3. Follow detergent manufacturer’s instructions to add correct amount of detergent depending on the type and soil level of the dishes.
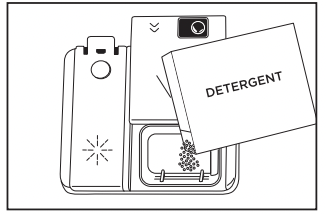
To close the detergent compartment push the cover as shown until you hear a click and the cover locks.
PREPARING FOR USE
You may have to add more detergent into your machine, depending on the degree of soil and the water hardness in your area
If your dishes are from the previous day and there is dried food waste on them, or if you have fully loaded the dishwasher, pour 5cm3 detergent onto the base of the door and start your machine
Combined detergent
Detergent manufacturers also produce combined detergents called “2 in 1”, “3 in 1” or “5 in 1” etc “2 in 1” detergents contain detergent + rinse aid. When using “2 in 1” detergents make sure to check the specifications of the tablet.
Other tablet detergents contain detergent + rinse aid + various extra functions
Generally, combined detergents produce suitable results under certain usage conditions only
These detergents contain rinse aid and/or other additives in preset amounts
Points to consider when using these type of products:
- Always make sure to check the specifications of the product you will use or whether or not it is a combined product
- Check if the detergent used is appropriate for the hardness of mains water that machine relates to
- Observe the instructions on packaging when using such products
- If such detergents are in the form of tablets, never put them into the interior section or the cutlery basket of the dishwasher. Always put the tablets into the detergent compartment in the detergent dispenser
- They produce good results for certain types of usage only. If you are using this type of detergent, you need to contact the manufacturers and find out about the suitable conditions of use
- When the conditions of use of such products and the machine settings are appropriate, they ensure savings in salt and/or rinse aid consumption
- Contact the detergent manufacturer if you are not obtaining good wash results (if your dishes stay calcareous and wet) after having used 2 in 1 or 3 in 1 detergents. The scope of warranty for your machine does not cover any complaints caused by the use of these types of detergents
Recommended usage:
For better results while using combined detergents, add rinse aid into your machine and adjust the rinse aid setting to the lowest position
CAUTION
Solubility of the tablet detergents produced by different companies can vary depending on the temperature and time. Therefore, it is not recommended to use such detergents in short programs. It is more suitable to use powder detergents in such programs.
Should any problem, which you have not encountered before, arise with the use of this type of detergents, contact the detergent manufacturers directly.
When you give up using combined detergents
- Fill the rinse aid compartment.
- Set the suitable rinse aid setting.
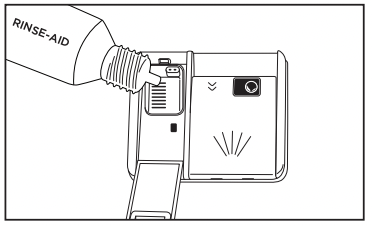
Filling with rinse aid and making the setting
To fill the rinse aid compartment, open the rinse-aid compartment cap.
Fill the compartment with rinse aid until MAX level and then close the cap.
Be careful not to overfill the rinse aid compartment and wipe up any spills.
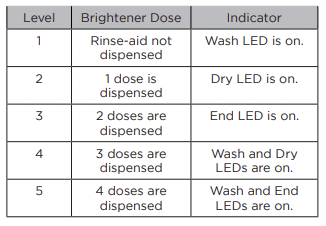
In order to set rinse aid level, follow below steps:
Use only those rinse aid materials which are allowed for use in the machine. As rinse aid residues left as a result of overflowing will create extremely high amounts of foam and thus reduce the washing performance, remove the excess amount of rinse aid by wiping it with a paper towel or cloth.
- Turn on the machine by pressing the On/Off button.
- Press the Up button for at least seconds immediately after the machine is turned on.
- Release the Up button when all leds blinks twice. The last setting level is displayed.
- Press Up or Down button to increase or decrease the hardness level.
- Turn off the machine to save the setting.
The factory setting is “4”.
If the dishes are not drying properly or are spotted, increase the level. If blue stains form on your dishes, decrease the level.
CAUTION
Use only those rinse aid materials which are allowed for use in the machine. As rinse aid residues left as a result of overflowing will create extremely high amounts of foam and thus reduce the washing performance, remove the excess amount of rinse aid by wiping it with a paper towel or cloth.
LOADING YOUR DISHWASHER
If your dishes are correctly placed in the dishwasher, you will be using it in the best way in terms of energy consumption, washing and drying performance
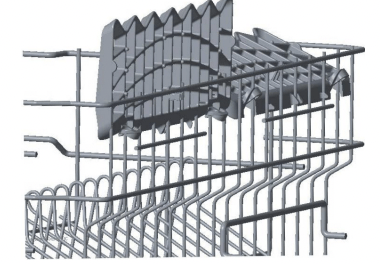
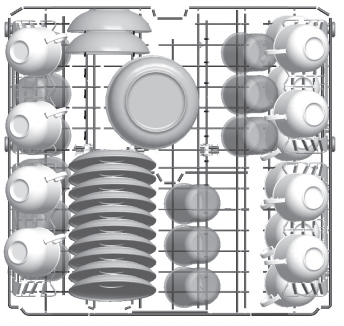
There are two separate baskets for you to load your dishes into your machine. You can load into the lower basket such round and deep items as pots with long handles, pot lids, plates, salad plates, cutlery sets
The upper basket has been designed for tea plates, dessert plates, salad bowls, cups and glasses. When placing long-stem glasses and goblets, lean them against the basket edge, rack or glass supporter wire and not against other items. Do not lean long glasses against one another or they wont remain steady and can be damaged
It is recommended that thin narrow items be placed into the middle sections of baskets. You can place spoons among the other cutlery sets in order to prevent them from sticking to one another, use the cutlery grid in order to obtain the best result
To avoid any possible injuries, always place long-handle and sharp-pointed dishes such as serving fork or bread knife with their sharp points facing down or horizontally on the baskets
CAUTION Place your dishes into your machine in a way that they will not prevent the upper and lower spray arms from spinning
Top basket cup rack
Height Adjustable Rack
These racks are designed to increase the capacity of the top basket. You can place your glasses and cups on the racks. You can adjust the height of these racks. Thanks to this feature, you can place different sizes of glasses under these racks
Thanks to height adjustment plastics mounted on the basket, you can use your racks in two different heights .In addition, you can place long forks, knives and spoons on these racks laterally, so that they do not block the revolution of propeller
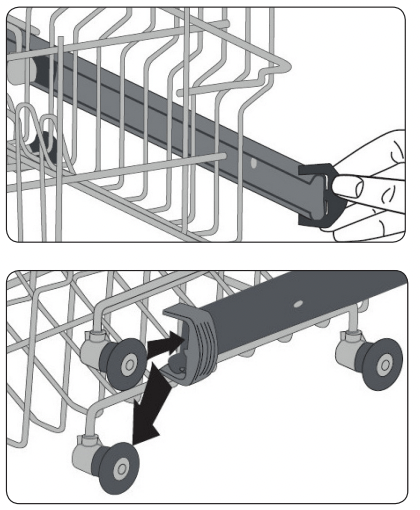
Top basket height adjustment while it is empty
Turn the Rail Stop Clips, at the ends of the rails, to the sides to open them (as shown in the image below), then pull out and remove the basket. Change the position of the wheels, then reinstall the basket to the rail, making sure to close the Rail Stop Clips. When the upper basket is in the higher position, large items such as pans can be placed on the lower basket
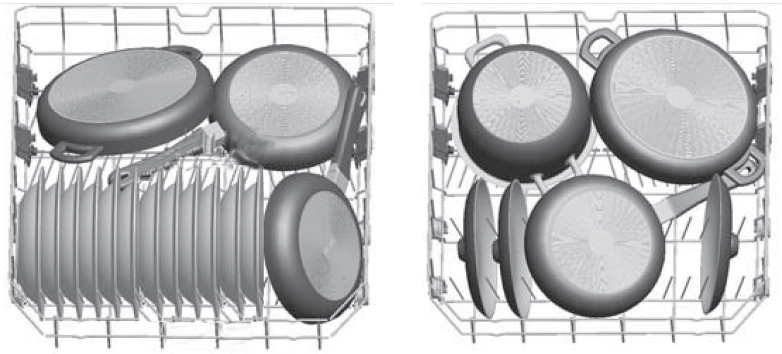
Alternative basket loads
Lower Basket
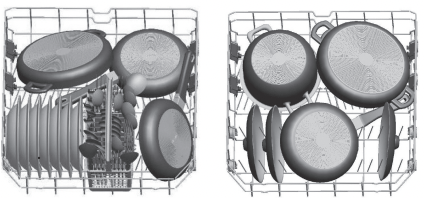
Top Basket

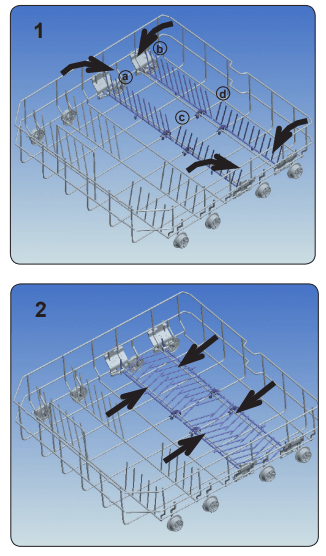
Folding Racks
The folding racks are designed so that large items, such as pots and pans, can be easily placed in the dishwasher. Each section can be folded separately. The racks can be folded down or raised up, as shown in the images below.
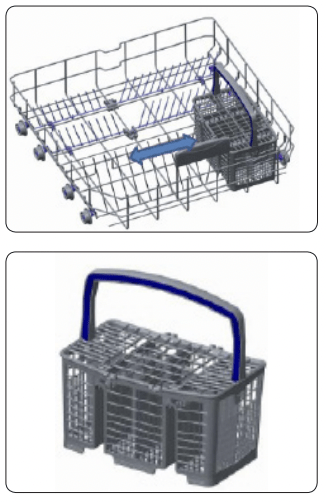
Slide Basket
The movable cutlery basket can slide between the front and rear wires of the bottom basket.
Alternative basket loads Lower Basket
* Illustration only
Top Basket
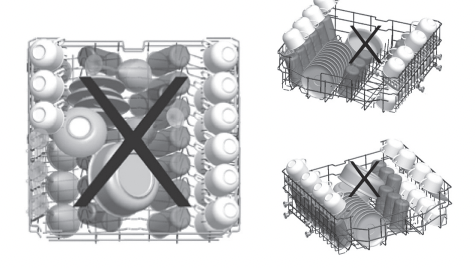
IMPORTANT Examples of incorrect loading
MAINTENANCE AND CLEANING
IMPORTANT Cleaning the machine in regular intervals prolongs the machine’s service life
Oil and lime may accumulate in the machine’s washing section. In case of such accumulation;
- Fill the detergent compartment without loading any dishes into the machine, select a program that runs at high temperature, and start the machine. If this is ineffective, use a specialty dishwasher cleaner available from most supermarkets
Cleaning the seals in the machine door
- To clean any accumulated residues in the door seals, wipe the seals regularly by using a dampened cloth
Cleaning the machine
- Clean the filters and spray arms at least once a week
- Unplug your machine and turn off its tap before starting the cleaning
- Do not use hard materials when cleaning your machine
- Wipe with a fine cleaning material and a dampened cloth
Cleaning the filters
- Check if any food wastes have remained on the coarse and fine filters
- If any food wastes are left, remove the filters and clean them thoroughly under the water tap
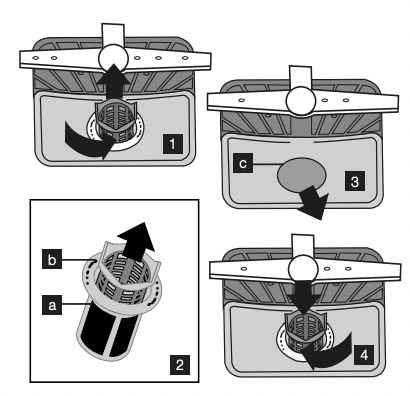
a Micro Filter
b Coarse Filter
c Metal/Plastic Filter
To remove and clean the filter combination, turn it counter clockwise and take it out by lifting upwards 1
Pull and remove the metal/plastic filter 3
Then pull the coarse filter out of the micro filter 2 .
Rinse it with lots of water under the tap. Refit the metal/plastic filter . Insert the coarse filter into the micro filter in away that the marks will correspond to one another. Attach micro filter into the metal/plastic filter and turn to the direction of arrow and it is locked when the arrow on micro filter can be seen from across 4
- Never use your dishwasher without any filter
- Incorrect fitting of the filter will reduce the washing effectiveness
- Clean filters are very important in terms of the proper running of the machine
- Check the bottom area of the dishwasher for any pieces of broken glass or other hard objects before any filters are removed.
Spray arms
Check whether or not the holes for the upper and lower spray arms are clogged. If there is any clogging, remove the spray arms and clean them under water
You can remove the lower spray arm by pulling it upwards, while the upper spray arm nut can be removed by turning the nut to the left
Be sure that the nut is perfectly tightened when refitting the upper spray arm

Hose filter
Water is stopped by the inlet hose filter to avoid any damage to your machine because of any contamination (sand, clay, rust etc) that might be occasionally carried in through the mains water supply or the indoor plumbing, and to forestall such issues as yellowing and formation of deposits after washing. Check the filter and the hose from time to time and clean them if necessary. To clean the filter, first turn off your tap and then remove the hose. After removing the filter from the hose, clean it under the tap. Insert the cleaned filter back into its place inside the hose. Refit the hose
TROUBLESHOOTING
| TROUBLE CODE |
POSSIBLE FAULT |
WHAT TO DO |
| Start/ Pause |
Wash |
Dry |
End |
 |
|
|
|
Insufficient water |
Make sure the water inlet tap is open and water is flowing. |
| Separate the inlet hose from the tap and clean the filter of the hose. |
| Contact for service if the error continues. |
| |
|
|
|
Continuous water input |
Close the tap and contact for service. |
|
|
|
|
Inability to discharge water |
Water discharge hose and filters may be clogged. |
| Cancel the program. |
| If the error continues, contact for service. |
| Contact for service. |
|
|
|
|
Faulty heater and heater sensor |
Contact for service. |
| |
|
|
|
Overflow |
Unplug the machine and close the tap. |
| Contact for service. |
|
|
|
|
Faulty electronic card |
Contact for service. |