USER MANUAL
Dishwasher
WSF6608

2
Important safety instructions . . . . . . . . . . . . . . . . . . . . 3
Recycling . . . . . . . . . . . . . . . . . . . . . . . . . . . . 3
Safety information . . . . . . . . . . . . . . . . . . . . . . . 3
Recommendations . . . . . . . . . . . . . . . . . . . . . . . 4
Items not suitable for dishwashing . . . . . . . . . . . . . . . 4
Technical specifications . . . . . . . . . . . . . . . . . . . . . . 5
Conformity with the standards and Test data . . . . . . . . . . 5
Description of your appliance . . . . . . . . . . . . . . . . . . . 6
Quick Start Guide . . . . . . . . . . . . . . . . . . . . . . . . . . 8
Installing the machine . . . . . . . . . . . . . . . . . . . . . . . 9
Positioning the machine . . . . . . . . . . . . . . . . . . . . 9
Water connections . . . . . . . . . . . . . . . . . . . . . . . 9
Water inlet hose . . . . . . . . . . . . . . . . . . . . . . . . 9
Water outlet hose . . . . . . . . . . . . . . . . . . . . . . . 9
Electrical connection . . . . . . . . . . . . . . . . . . . . . .10
Fitting the machine undercounter . . . . . . . . . . . . . . .11
Preparing the machine for use . . . . . . . . . . . . . . . . . . .12
Prior to using the machine . . . . . . . . . . . . . . . . . . .12
Detergent usage . . . . . . . . . . . . . . . . . . . . . . . .12
Filling the detergent compartment . . . . . . . . . . . . . . .12
Combined detergent . . . . . . . . . . . . . . . . . . . . . . . .13
Filling with rinse aid and making the setting . . . . . . . . . . . .13
Loading your dishwasher . . . . . . . . . . . . . . . . . . . . . .14
Alternative basket loads . . . . . . . . . . . . . . . . . . . .17
Standard loading and Test data . . . . . . . . . . . . . . . . .18
Program descriptions . . . . . . . . . . . . . . . . . . . . . . . .19
Program items . . . . . . . . . . . . . . . . . . . . . . . . .19
Switching on the machine and selecting a program . . . . . . . . .20
Switching on the machine . . . . . . . . . . . . . . . . . . .20
Program follow-up . . . . . . . . . . . . . . . . . . . . . . . . .20
Changing a program . . . . . . . . . . . . . . . . . . . . . .20
Changing a program with resetting . . . . . . . . . . . . . .21
Switching the machine off . . . . . . . . . . . . . . . . . . .21
Maintenance and Cleaning . . . . . . . . . . . . . . . . . . . . .22
Filters . . . . . . . . . . . . . . . . . . . . . . . . . . . . .22
Spray arms . . . . . . . . . . . . . . . . . . . . . . . . . . .23
Hose filter . . . . . . . . . . . . . . . . . . . . . . . . . . . . .23
Failure codes and what to do in case of failure . . . . . . . . . . .24
Practical and useful information . . . . . . . . . . . . . . . . . .24
Troubleshooting . . . . . . . . . . . . . . . . . . . . . . . . . .25
Notes . . . . . . . . . . . . . . . . . . . . . . . . . . . . . . .26
Warranty. . . . . . . . . . . . . . . . . . . . . . . . . . . . . . .27
ENVIRONMENTAL TIPS
ENVIRONMENTAL TIPS
INFORMATION ON DISPOSAL FOR USERS
• Mostofthepackagingmaterialsarerecyclable.
Pleasedisposeofthosematerialsthroughyourlocal
recyclingdepotorbyplacingtheminappropriate
collectioncontainers.
• Ifyouwishtodiscardthisproduct,pleasecontact
yourlocalauthoritiesandaskforthecorrectmethod
ofdisposal.
Congratulationsandthankyouforchoosingourproduct.
Wearesureyouwillfindyournewapplianceapleasure
touseandagreatassettoyourcooking.Beforeyouuse
theappliance,werecommendyoureadthroughthewhole
usermanualwhichprovidesadescriptionoftheproduct
anditsfunctions.
Toavoidtherisksthatarealwayspresentwhenyouuse
anappliance,itisimportantthattheapplianceisinstalled
correctlyandthatyoureadthesafetyinstructionscarefully
toavoidmisuseandhazards.Werecommendthatyou
keepthisinstructionbookletforfuturereferenceandpassit
ontoanyfutureowners.Thisappliancecomplieswiththe
requirementsofAustralianStandardAS/NZ60335.2.6.
Gasappliancesalsocomplywiththerequirements
ofAS4551.
CONDITIONS OF USE
Thisapplianceisintendedtobeusedinhouseholdand
similarapplicationssuchas:
• Staffkitchenareasinshops,officesandotherworking
environments
• Farmhouses
• Byclientsinhotels,motelsandotherresidentialtype
environments
• Bedandbreakfasttypeenvironments.
Record model and serial number here:
Model: ...................................................................................
Serial number: .......................................................................
ENVIRONMENTAL TIPS
ENVIRONMENTAL TIPS
IMPORTANT –CHECK FOR ANY DAMAGE OR MARKS
Ifyoufindthedishwasherisdamagedormarked,youmust
reportitwithin7daysifyouwishtoclaimfordamage/
marksunderthemanufacturerswarranty.Thisdoesnot
affectyourstatutoryrights.
CONTENTSCONGRATULATIONS
CONTENTS
3
IMPORTANT SAFETY INSTRUCTIONS
SAFETY
Thesewarningshavebeenprovidedintheinterestofsafety.
YouMUSTreadthemcarefullybeforeinstallingorusing
theappliance.
Thesymbolsyouwillseeinthisbooklethavethesemeanings:
WARNING
WARNING
This symbol indicates information concerning your personal safety
TIPS & INFORMATION
TIPS AND INFORMATION
This symbol indicates tips and information about use of the appliance
ENVIRONMENTAL TIPS
ENVIRONMENTAL TIPS
This symbol indicates tips and information about economical and
ecological use of the appliance
RECYCLING
• Certaincomponentsandthepackagingofyour
machinehavebeenproducedfrom
recyclablematerials.
• Plasticpartsaremarkedwithinternational
abbreviations:(>PE<,>PS<,>POM<,>PP<,....)
• Cardboardpartshavebeenproducedfromrecycled
paperandtheyshouldbedisposedofintowaste
papercollectioncontainersforrecycling.
• Suchmaterialsarenotsuitableforbeingdisposed
ofintogarbagebins.Theyshouldbedeliveredto
recyclingcentresinstead.
• Contactrelevantcentresinordertoobtaininformation
onmethodsandpointsofdisposal.
SAFETY INFORMATION
When you take delivery of your machine
• Checkforanydamagetoyourmachineortoits
packaging.Neverstartamachinedamagedinany
way,makesuretocontactanauthorisedtechnician.
• Unwrapthepackagingmaterialsasindicatedand
disposeoftheminaccordancewiththerules.
The points to pay attention during machine installation
• Chooseasuitable,safeandlevelplacetoinstall
yourmachine.
• Carryouttheinstallationandconnectionofyour
machinebyfollowingtheinstructions.
• Thismachineshouldbeinstalledandrepairedbyan
authorisedtechnicianonly.
• Onlyoriginalsparepartsshouldbeusedwith
themachine.
• Beforeinstalling,besurethatthemachine
isunplugged.
• Checkwhethertheindoorelectricalfusesystemis
connectedaccordingtotheregulations.
• Payspecialattentionandbesurethatthemachine
doesnotstandontheelectricitysupplycable.
• Neveruseanextensioncordoramultiplesocket
formakingaconnection.Theplugshouldbeeasily
accessibleafterthemachinehasbeeninstalled.
• Afterinstallingthemachinetoasuitableplace,runit
unloadedforthefirsttime.
IN DAILY USE
• Donotgetup,sitorplacealoadontheopendoorof
thedishwasher,itmayfallover.
• Neverputintothedetergentandrinseaiddispensers
ofyourmachineanythingotherthanthosedetergents
andrinseaidswhichareproducedspecificallyfor
dishwashers.Ourcompanywillnotberesponsiblef
oranydamagethatmightoccurinyour
machineotherwise.
WARNING
WARNING
The water in the machine’s washing section is not drinking water, do
not drink it.
• Duetodangerofexplosion,donotputintothe
machine’swashingsectionanychemicalagentssuch
assolvents.
• Checkwhetherplasticitemsareheat-resistantbefore
washingtheminthemachine.
• Donotputintoyourmachinethoseitemswhichare
notsuitablefordishwashing.Also,donot
overloadbasket.
• Themachinedoorshouldnotbeopenedwhilethe
machineisinoperation,toavoidtheriskofhotwater
sprayingout.Asafetydeviceensuresthatthemachine
stopsifthedoorisopened.
WARNING
WARNING
Do not leave your dishwasher’s door open, this may lead to accidents
and injury.
WARNING
WARNING
Place knives and other sharp ended objects in the cutlery basket in
the point down position.
• Thisapplianceisnotintendedforusebypersons
(includingchildren)withreducedphysical,sensory
ormentalcapabilities,orlackofexperienceand
knowledge,unlesstheyhavebeengivensupervision
orinstructionconcerninguseoftheappliancebya
personresponsiblefortheirsafety.

4
SAFETY
SAFETY INFORMATION AND RECOMMENDATIONS
FOR YOUR CHILDREN’S SAFETY
• Afterremovingthemachine’spackaging,makesure
thatthepackagingmaterialisoutofreachofchildren.
• Donotallowchildrentoplaywithorstartthemachine.
• Keepyourchildrenawayfromdetergentsandrinse
aids.
• Keepchildrenawayfromthemachinewhileitis
openbecausetheremaystillberesiduesofcleaning
substancesinsidethemachine.
• Besurethatyouroldmachinedoesnotposeany
threattochildren.Removethedishwasherdoorlock
andpowersupplycord.
IN CASE OF MALFUNCTIONING
• Anymalfunctioninthemachineshouldberepaired
byqualifiedpersons.Anyrepairworkperformedby
anyoneotherthantheauthorisedservicepersonnel
willcauseyourmachinetobeleftoutsidethescopeof
warranty.
• Priortoanyrepairworkonthemachine,besureto
unplugthedishwasherfromthepowersupply.Donot
pullbythecablewhenunplugging.Makesuretoturn
offthewatertap.
RECOMMENDATIONS
• Forenergyandwatersaving,removecoarseresidues
onyourdishesbeforeplacingthedishesintothe
machine.Startyourmachineafterhavingfully
loadedit.
• Usethepre-washprogramonlywhenevernecessary.
• Placeitemssuchasbowls,glassesandpotsintothe
machinesotheywillfacedown.
Items not suitable for dishwashing:
• Cigaretteashes,candleleftovers,polish,paint,
chemicalsubstances,iron-alloymaterials;
• Forks,spoonsandkniveswithwoodenorbone,ivory
ornacre-coatedhandles;glueditems,itemssoiled
withabrasive,acidicorbasechemicals;
• Plasticitemsthatarenotheat-resistant,copperor
tincoatedcontainers;
• Aluminiumandsilverobjects(theymaydiscolour,
becomedull);
• Certaindelicateglasstypes,porcelainswith
ornamentalprintedpatterns(mayfadeevenafter
thefirstwash);certaincrystalitems(maylosetheir
transparencyovertime),laminatedcutlerythatisnot
heat-resistant,leadcrystalglasses,cuttingboards,
itemsmanufacturedwithsyntheticfibre;
• Absorbentitemssuchasspongesorkitchenragsare
notsuitablefordishwashing.
WARNING
WARNING
Some dishwasher detergents are strongly alkaline. They can
be extremely dangerous if swallowed. Avoid contact with the
skin and eyes and keep children away from the dishwasher
when the door is open. Check that the detergent compartment
is empty after completion of wash cycle.
5
DESCRIPTION
13
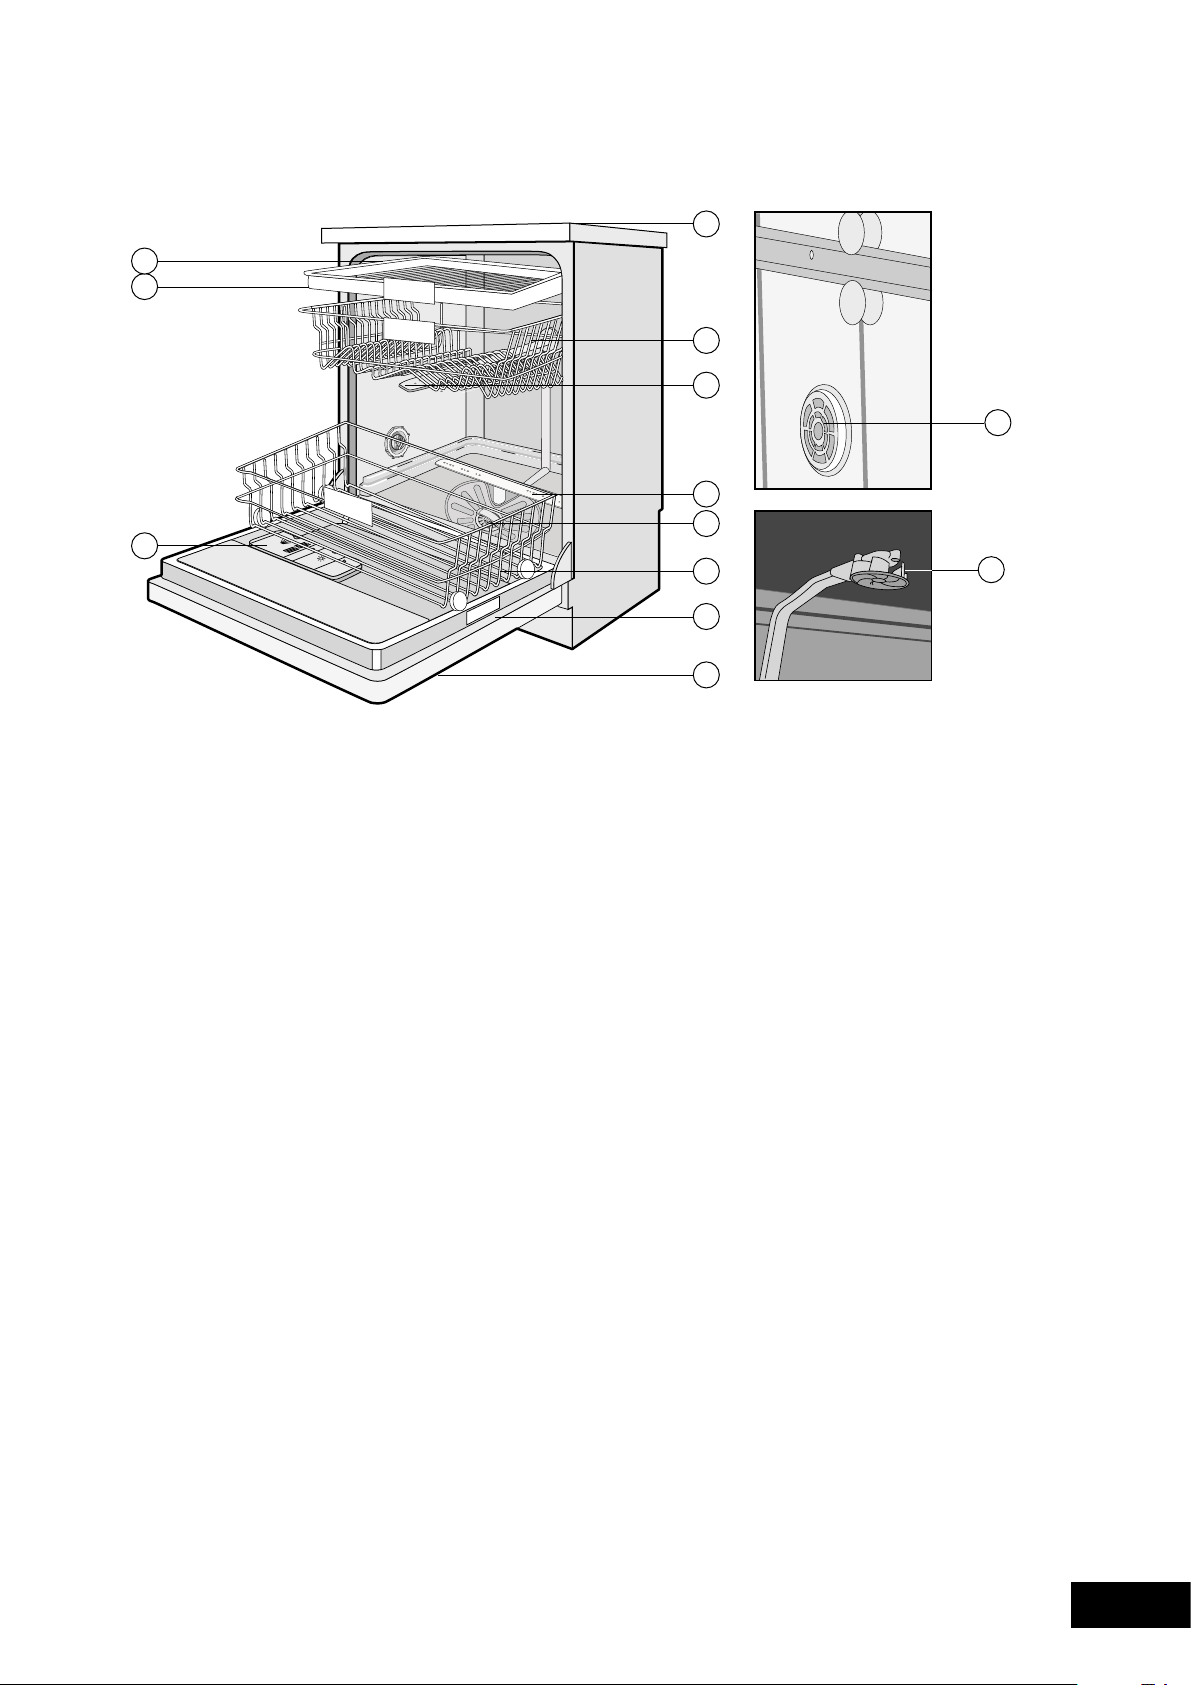
DESCRIPTION OF YOUR APPLIANCE
TECHNICAL SPECIFICATIONS
Capacity..........................................15placesettings
Height.........................................................845mm
Height(withoutworktop)................................ 815mm
Width.........................................................596mm
Depth.........................................................598mm
NetWeight..................................................... 56kg
Electricityinput................................220-240V,50Hz
TotalPower.................................................2200W
HeatingPower.............................................2000W
PumpPower................................................... 100W
DrainPumpPower............................................30W
Watersupplypressure.... 0.03MPa(0,3bar)-1MPa(10bar)
Current........................................................... 10A
1. Worktop
2. Upperbasketwithracks
3. Uppersprayarm
4. Lowersprayarm
5. Filters
6. Lowerbasket
7. Ratingplate
8. Controlpanel
2
3
4
6
5
7
8
9
10
11
1
9. Detergentandrinse-aiddispenser
10. Upperbaskettracklatch
11. Uppercutlerybasket
12. Turbodryingunit:Thissystemprovidesbetterdrying
performanceforyourdishes.
13. Ceilingsprayimpeller:Itprovidesbetterwashingforthe
dishesatupperbasket.
12
• Electroluxreservestherighttoamenddesignand
technicalspecifications.
6
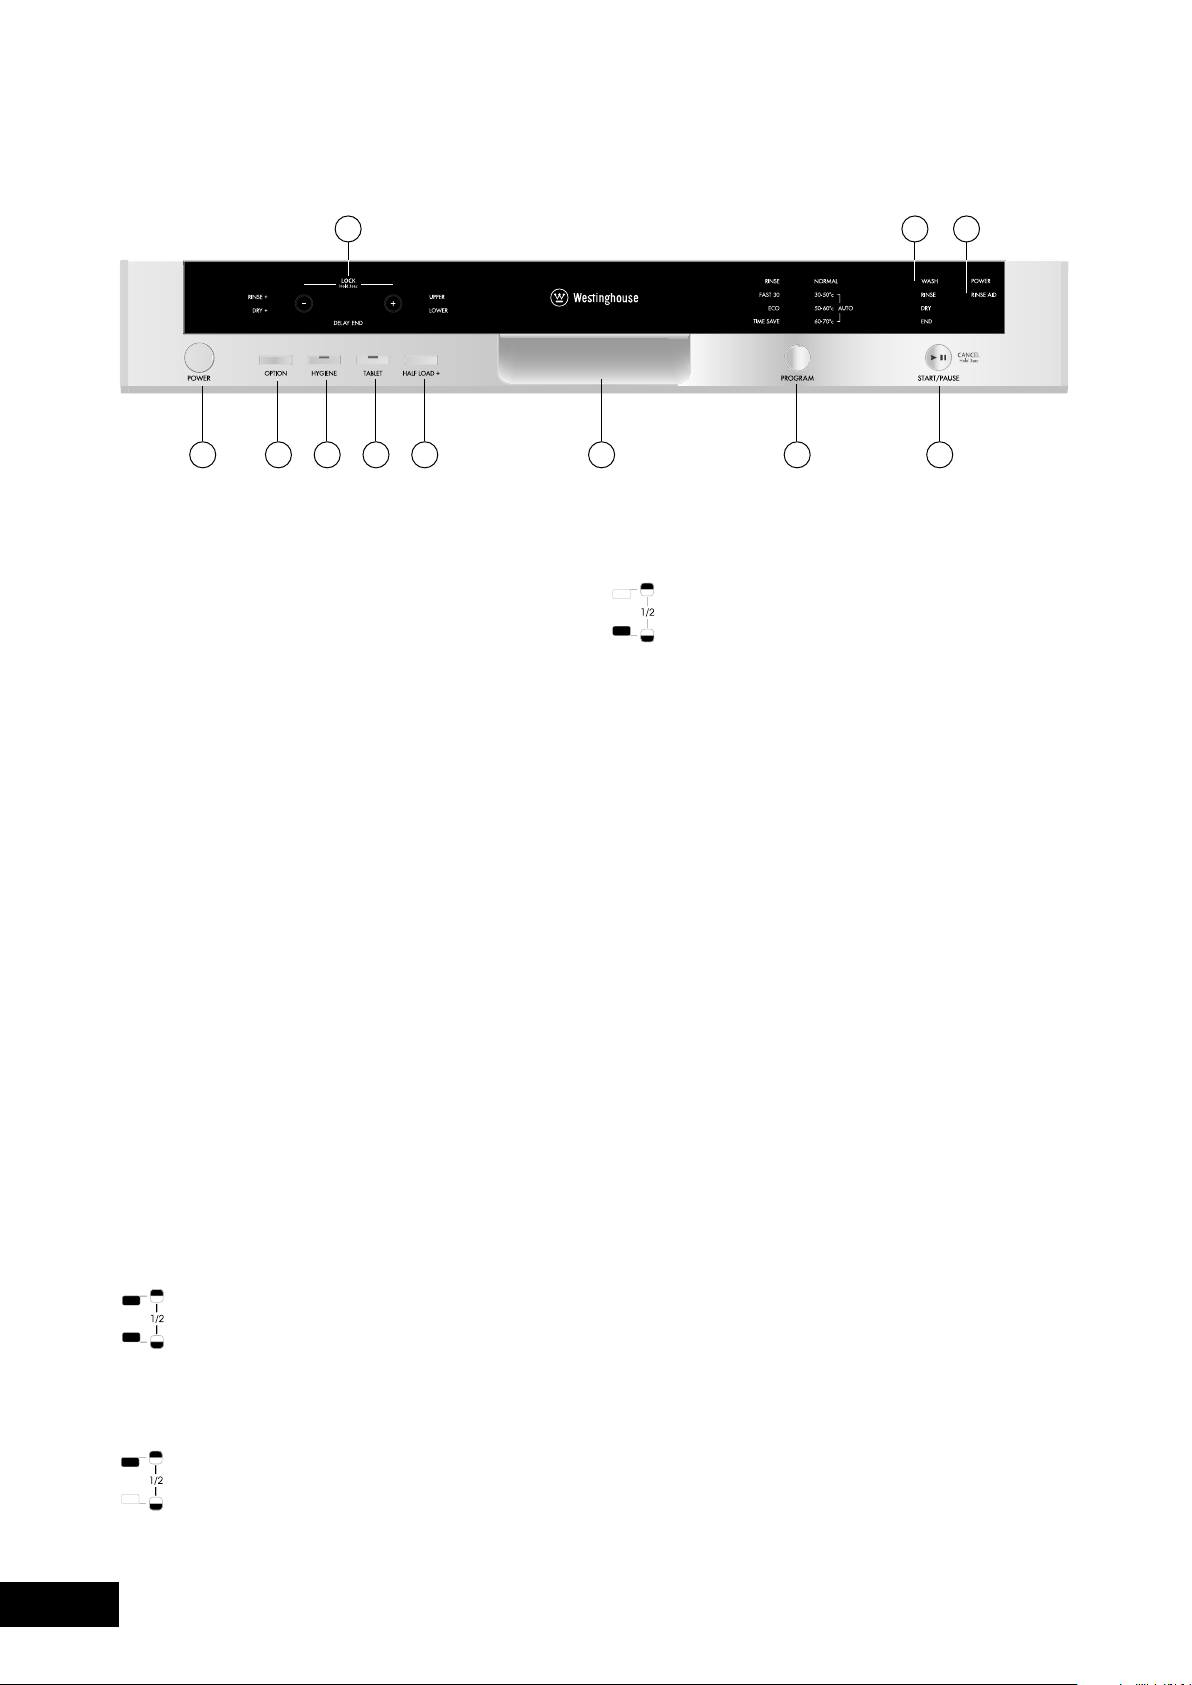
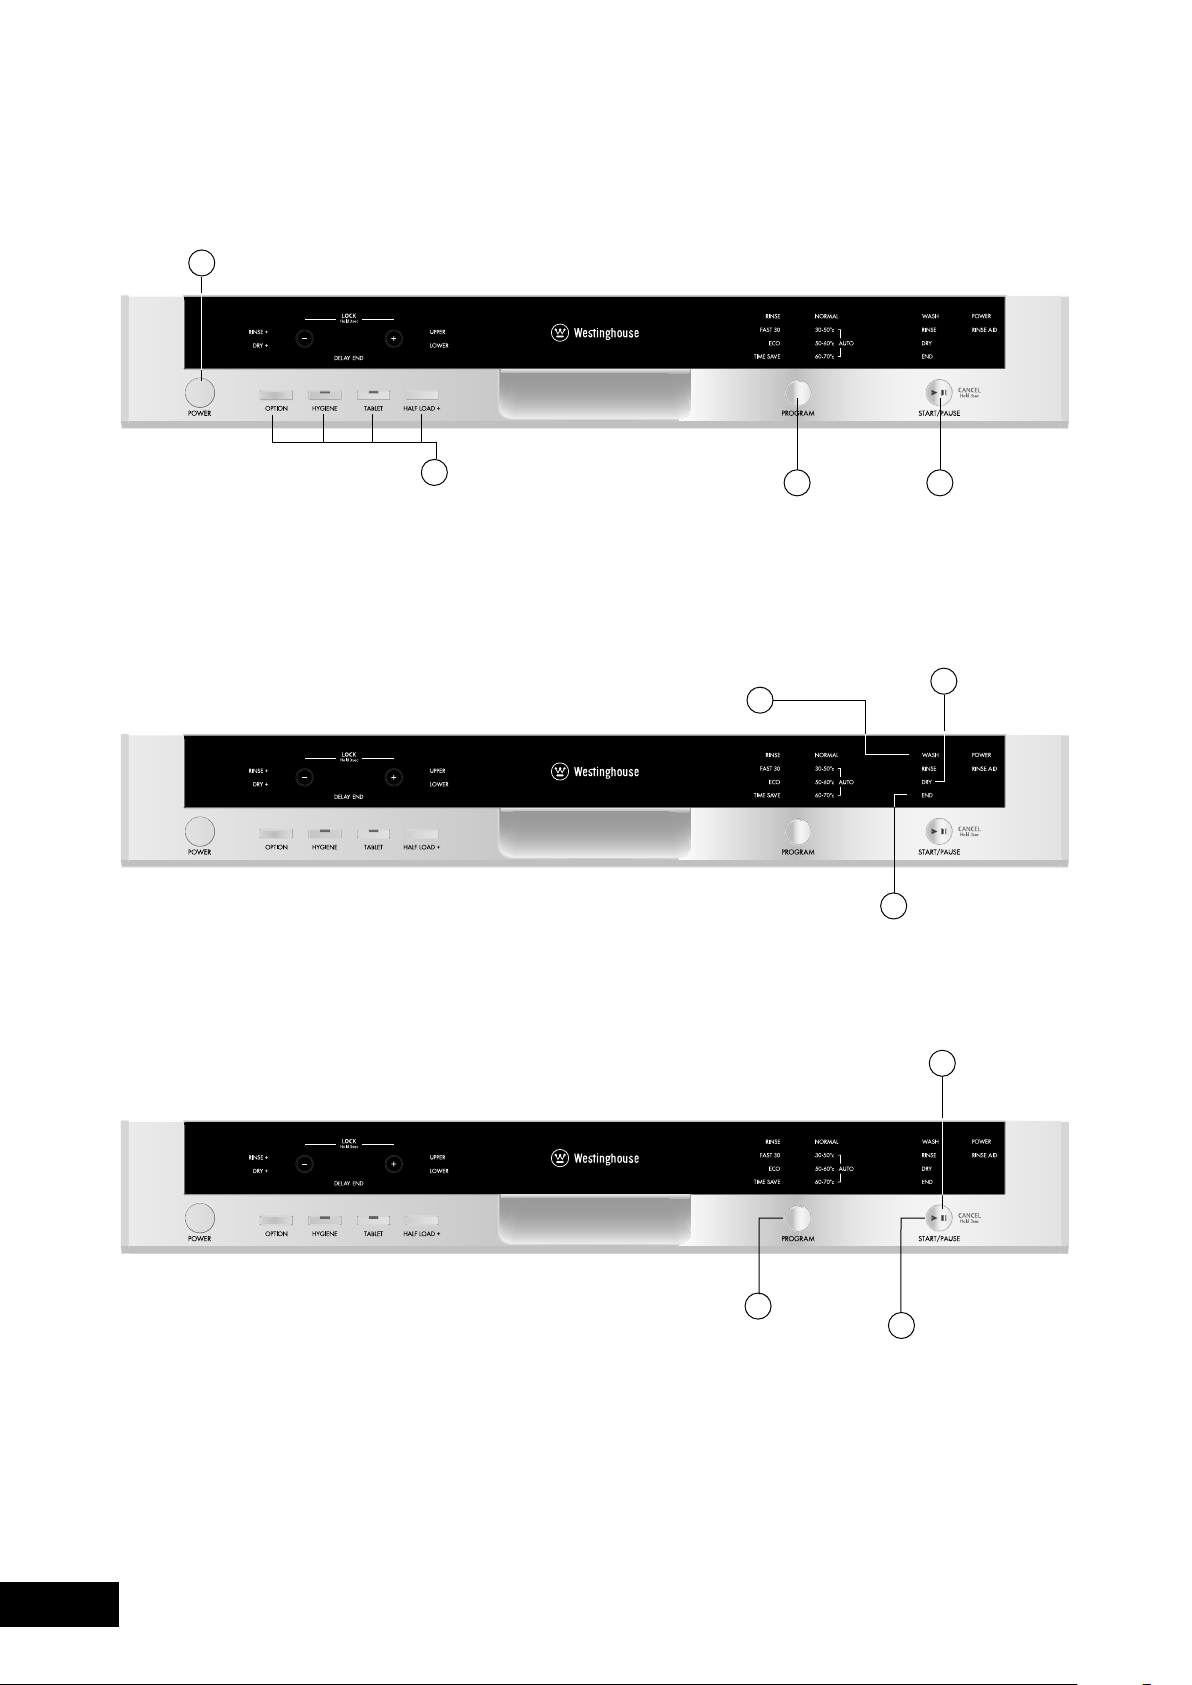
1 2 3 4 5 6 7 8
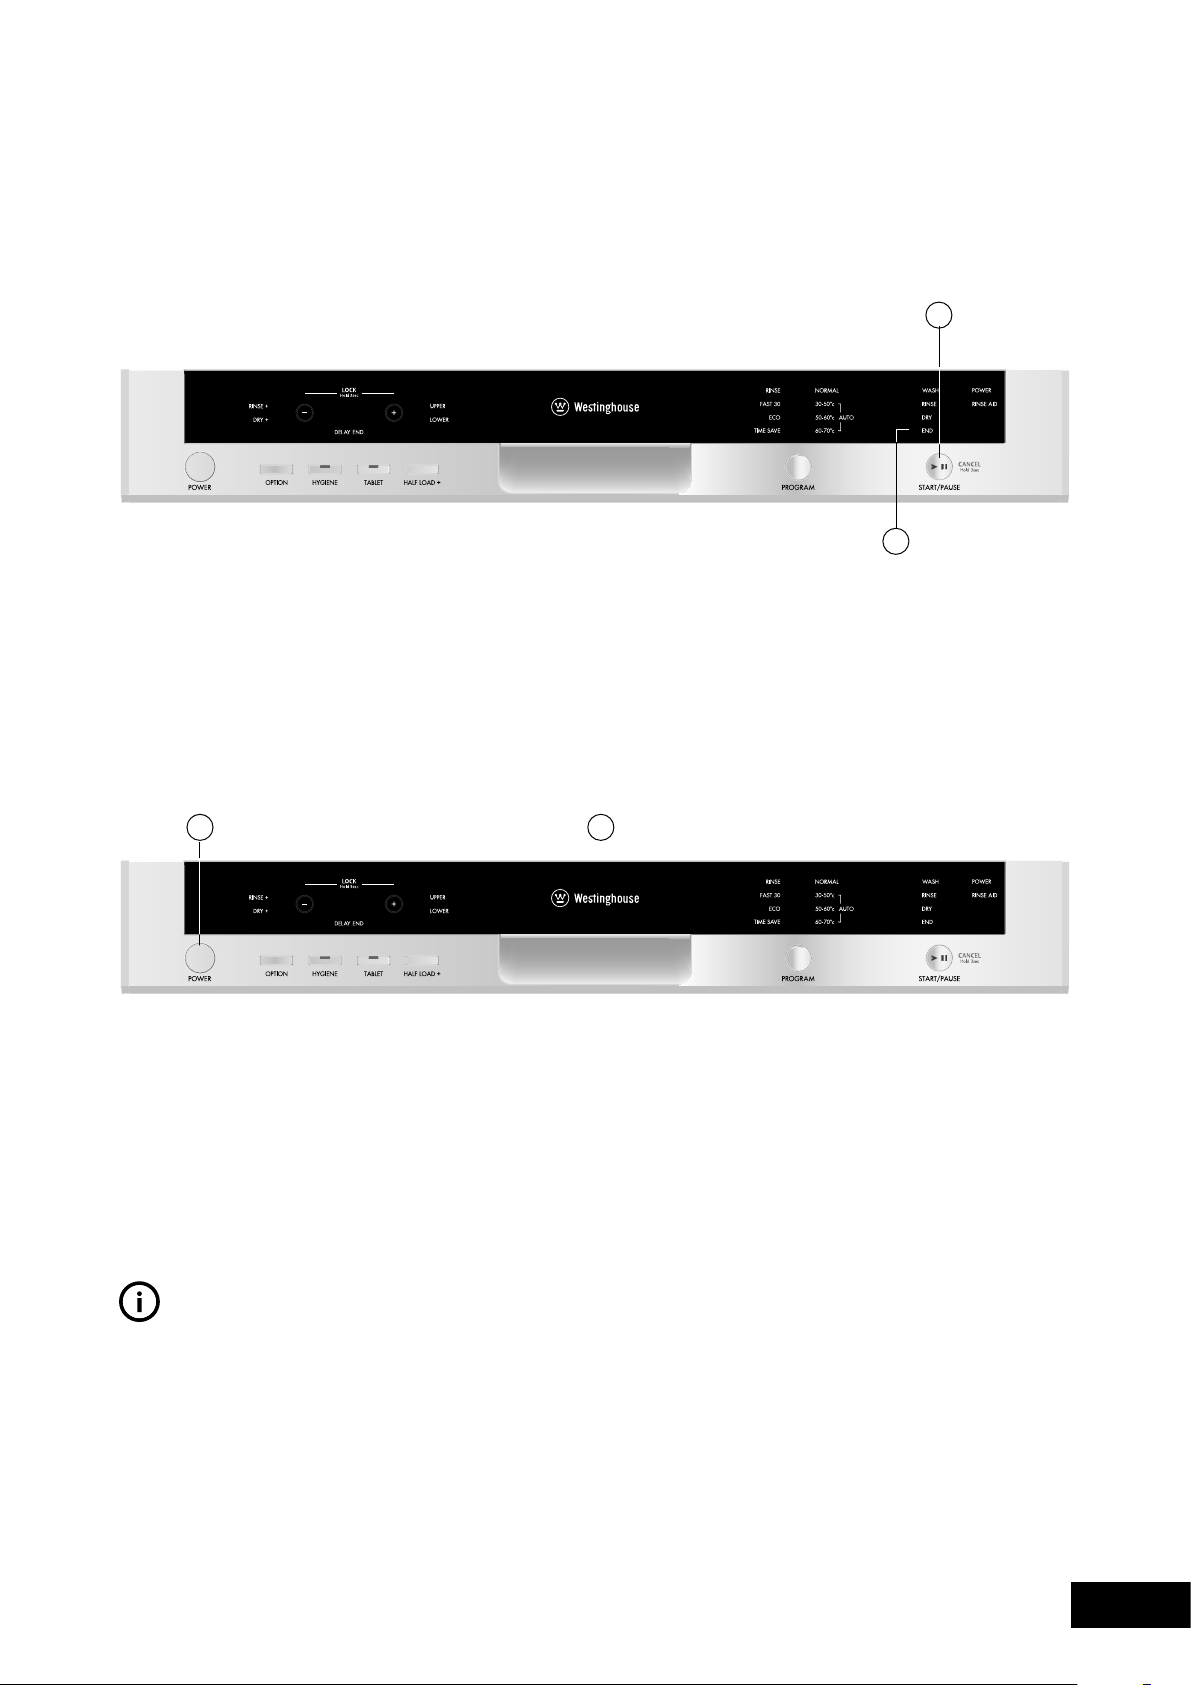
1. POWER BUTTON
Whenpressedon,themachineisenergisedandthe
powerlightilluminates.
2. OPTION BUTTON RINSE+ / DRY+
Youcanaddextrarinsingordryingfunctionsintothe
selectedprogrambyusingthisbutton.
Onceyouselectextrarinsingfunction,thelightforextra
rinsingontheleftupper-handsideoftheindicatorwill
comeon,andthuswashing-rinsingstepswillbeadded
intotheselectedprogram,soyoucanensurethatyour
disheswillbeextractedcleanerandglossier.
Onceyouselectextradryingfunction,thelightforextra
dryingontheleftlower-handsideoftheindicatorwill
comeon,andthustheextraheatinganddryingstepswill
beaddedintotheselectedprogram,soyoucanensure
thatyourdisheswillbeextracteddryer.
3. HYGIENE BUTTON
Byusingthisoption,washingtemperatureandperiods
duringrespectivecyclesmaybechanged,whichensures
morehygienicwashing.
4. TABLET BUTTON
Usethisoptionwhenusingcombineddetergentthat
containsrinseaidandextrafunctions.
5. HALF LOAD + BUTTON
Usingthefunction1⁄2,threesortsofwashingupcanbe
done,thosebeinglowerbasket,upperbasketandboth
baskets.
Ifyouhavelittleamountofdishesinyourmachine
andifyouhavetowashthem,youcanalso
activatethesemi-fillingfunctioninsomeofthe
programsadditionally.Ifyouhavedishesinbothbaskets,
pressthekey1⁄2andselectthepositioninwhichboth
lampsarehighlighted.
Ifyouhavedishesonlyintheupperbasket,press
thekey1⁄2andselectthepositioninwhichthe
upperlampisilluminated.Thus,washingupshall
bedoneonlyontheupperbasketofyourmachine.
Nodishesshouldcertainlybeavailableinthelower
basketwhileusingthisfeature.
Ifyouhavedishesonlyinthelowerbasket,press
thekey1⁄2andselectthepositioninwhichthe
lowerlampisilluminated.
Thus,washingupshallbedoneonlyonthelowerbasket
ofyourmachine.Inusingthisfeature,makesurethatthere
arenodishesintheupperbasket.Note:Ifyouhaveused
anextrafeatureonthelatestwashingprogram,thisfeature
willremainactivealsoonthenextwashingprogram.If
youdonotwanttousethisfeatureonthenewlyselected
washingprogram,presstheselectedfeaturebuttonagain,
andcheckthatthelamponthebuttongoesoff.
6. DOOR HANDLE
Thedoorhandleisusedtoopen/closethedoorofyour
machine.
7. PROGRAM SELECTOR BUTTON
Withtheprogramselectorbutton,youcanselectasuitable
programforyourdishes.
8. START/PAUSE BUTTON
TheStart/Pausebuttonwillstarttheselectedprogram.In
thePauseconditionwhilewashLEDison,Start/PauseLED
willblink.
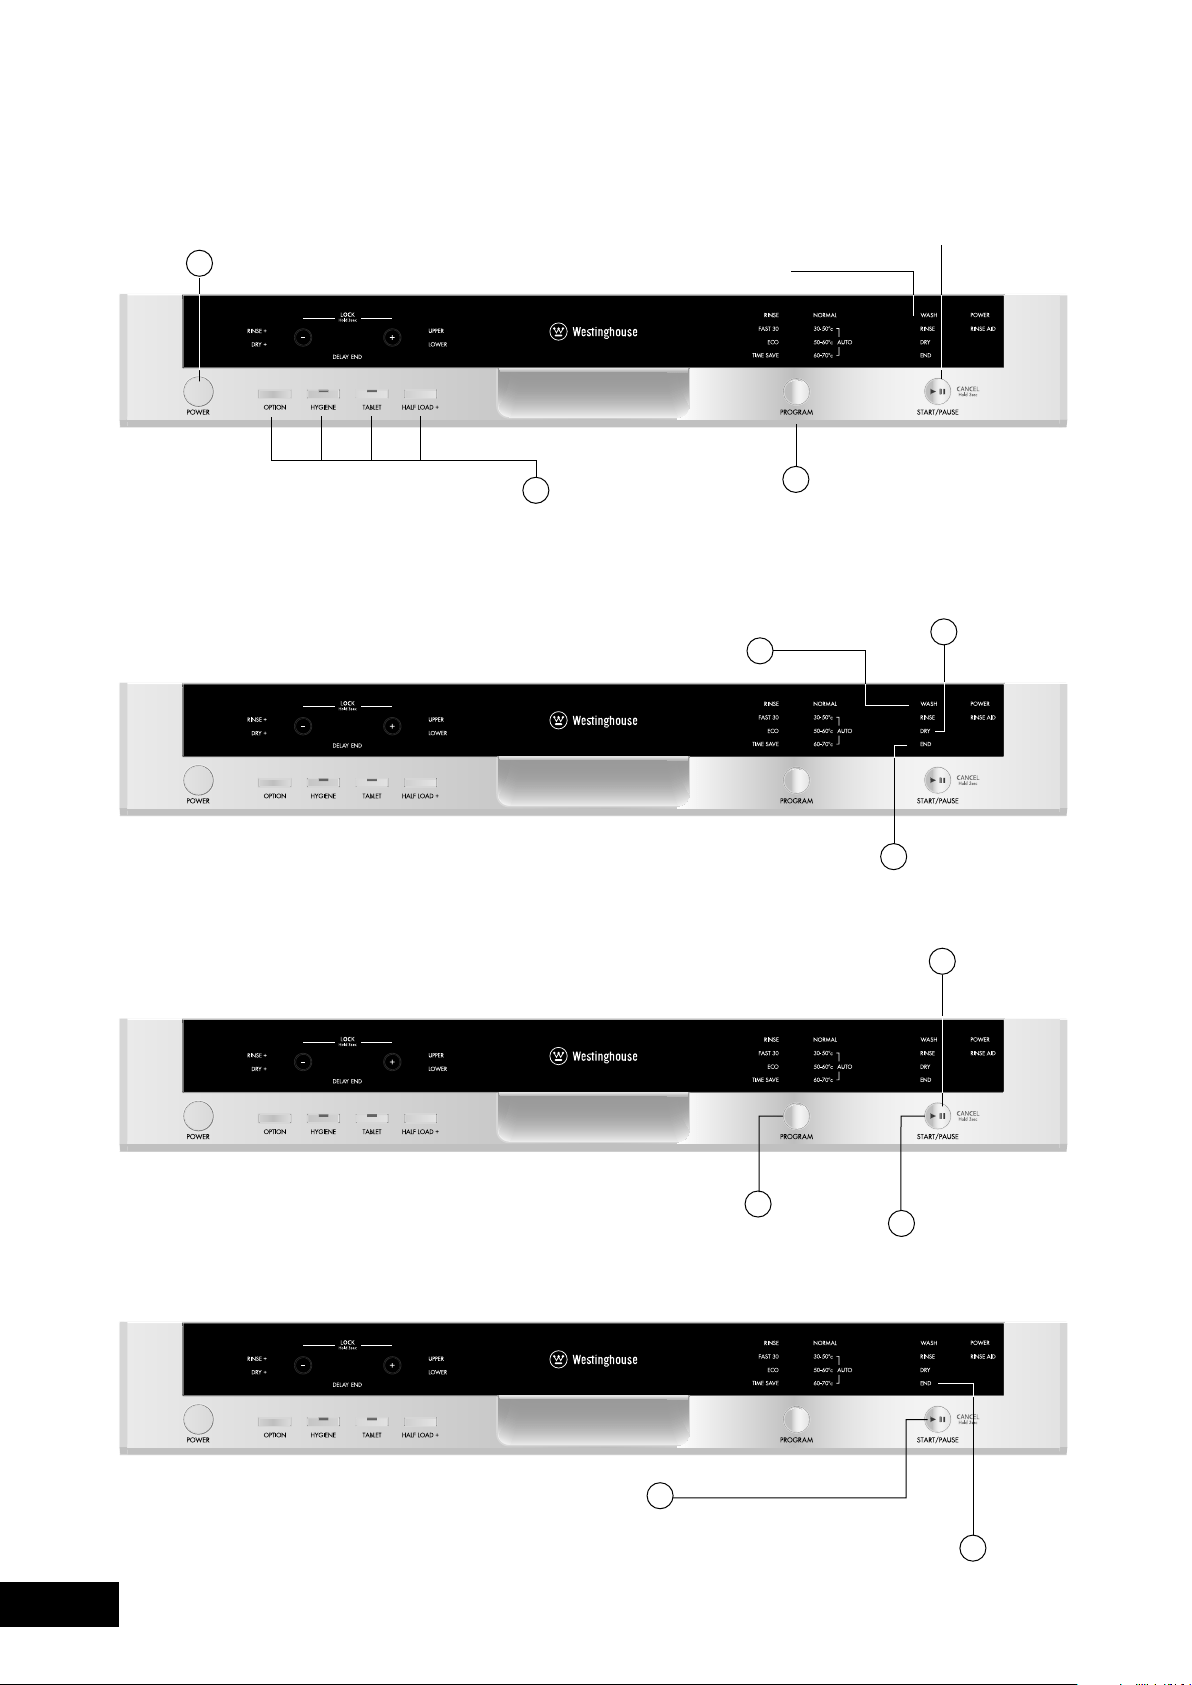
9. RINSE AID / POWER INDICATORS
Whentherinseaidlightilluminates,fillinrinseaid
chamber.
Thepowerlightindicatespowerisavailabletothe
appliance.
NOTE: If you have used an extra option on the last
washing program, this feature will remain active also on
the next washing program. To deselect an option on the
newly selected washing program, press the selected option
910
DESCRIPTION OF YOUR APPLIANCE
DESCRIPTION
11

7
DESCRIPTION
button again, and check that the indicator lamp on the
button goes off.
10. PROGRESS INDICATOR LIGHTS
Programstatuscanbemonitoredviatheprogressindicator
lightsoncontrolpanel:
• Wash
• Rinse
• Dry
• End
11. TIME INDICATOR DISPLAY
TimeIndicatordisplaystheprogramtimesandremaining
timefortheprograminoperation.Inaddition,youcan
adjustprogramdelaytimebypressingthebuttonsonthe
indicatorbeforeprogramstarts.Ifyouwanttochange
delaytime,youcansetthetimebypressingStart/Pause
buttonandusingbuttonsontheindicator.PressStart/Pause
buttonagaininordertoactivate.
CHILD LOCK OPERATION
Inordertoactivatechildlock,press“+”and“–”buttons
simultaneouslyfor3seconds.Atthistime,“CL”appearsfor2
secondsonremainingtimeindicator.Todeactivatechildlock,
press“+”and“–”buttonsagainsimultaneouslyfor3seconds.
“CL”willblinkonce.
8
QUICKSTART
QUICK START GUIDE
SWITCHING ON THE MACHINE
PROGRAM FOLLOW-UP
CHANGING A PROGRAM
CANCELLING A PROGRAM
Youcanfollowtheprogramflowusingtheprogram
follow-uplampslocatedonthecontrolpanel.
Ifyouwouldliketochangeprogramswhileawashing
programiscontinuing.
Ifyouwanttocancelcurrentprogramforanyreason.
2
PresstheON/OFFbutton
Selecttheprogramviathe
PROGRAMselectorbutton
OncetheON/OFFbuttonispressed,
theSTART/PAUSEsymbolilluminates
Additonalfunctions
3
1
TheSTART/PAUSEbuttonlight
turnsoffoncetheprogramstarts
andtheWASHlightison
1
3
Duringthewashingcycle
theWASHlightison
OncetheprogramiscompletedtheENDlightcomeson
Donotopenthedishwasheruntilthislightcomeson
2
Oncecompletedthe
DRYlightwillilluminate
andthemachinewillrun
silentlywhilstdrying
1
2
3
PressthePAUSE/STARTbutton
Afterthedishwasherstops,selectthedesired
programonthePROGRAMselectbutton
PressthePAUSE/STARTbutton
tocommencenewprogram
1
2
HoldthePAUSE/STARTbuttonfor3seconds
TheENDlightstartsflashingandwaterinsidethemachine
willdrainfor30seconds.
TheprogramiscancelledwhentheENDlightstopsflashing
9
INSTALLATION
INSTALLING THE MACHINE
POSITIONING THE MACHINE
Whenconsideringthelocationforthedishwasher,ensure
thatthereisadequatespacetoenableloadingand
unloadingofthedishes.
• Donotputyourmachineinanylocationwherethe
ambienttemperaturecanfallbelow5°C.
• Beforepositioning,takethemachineoutofits
packagingbyfollowingthewarningslocatedon
thepackage.
• Positionthemachineclosetoawatertapand
drain.Youneedtositeyourmachine,takinginto
considerationthatitsconnectionswillnotbealtered
oncetheyaremade.
• Donotgripthemachinebyitsdoororpanelinorder
tomoveit.
• Takecaretoleaveacertainclearancefromallsides
ofthemachinesothatyoucancomfortablymoveit
backandforthduringcleaning.
• Makesurethatthewaterinletandoutlethosesdo
notgetsqueezedwhilepositioningthemachine.
Also,makesurethatthemachinedoesnotstandon
theelectricalcable.Adjustthemachine’sadjustable
feetsothatitcanstandlevelandbalanced.Proper
positioningofthemachineensuresproblem-free
openingandclosingofitsdoor.
• Ifthedoorofyourmachinedoesnotcloseproperly,
checkifthemachineisstableontheflooritstandson;
ifnot,adjusttheadjustablefeetandensureits
stableposition.
WATER CONNECTION
Besurethattheindoorplumbingissuitableforinstallinga
dishwasher.Also,werecommendthatyoufitafilteratthe
entranceofyourplaceorapartmentsoastoavoidany
damagetoyourmachinebecauseofanycontamination
(sand,clay,rustetc)thatmightbeoccasionallycarriedin
throughthemain’swatersupplyortheindoorplumbing,
andtoforestallsuchcomplaintsasyellowingandformation
ofdepositsafterwashing.
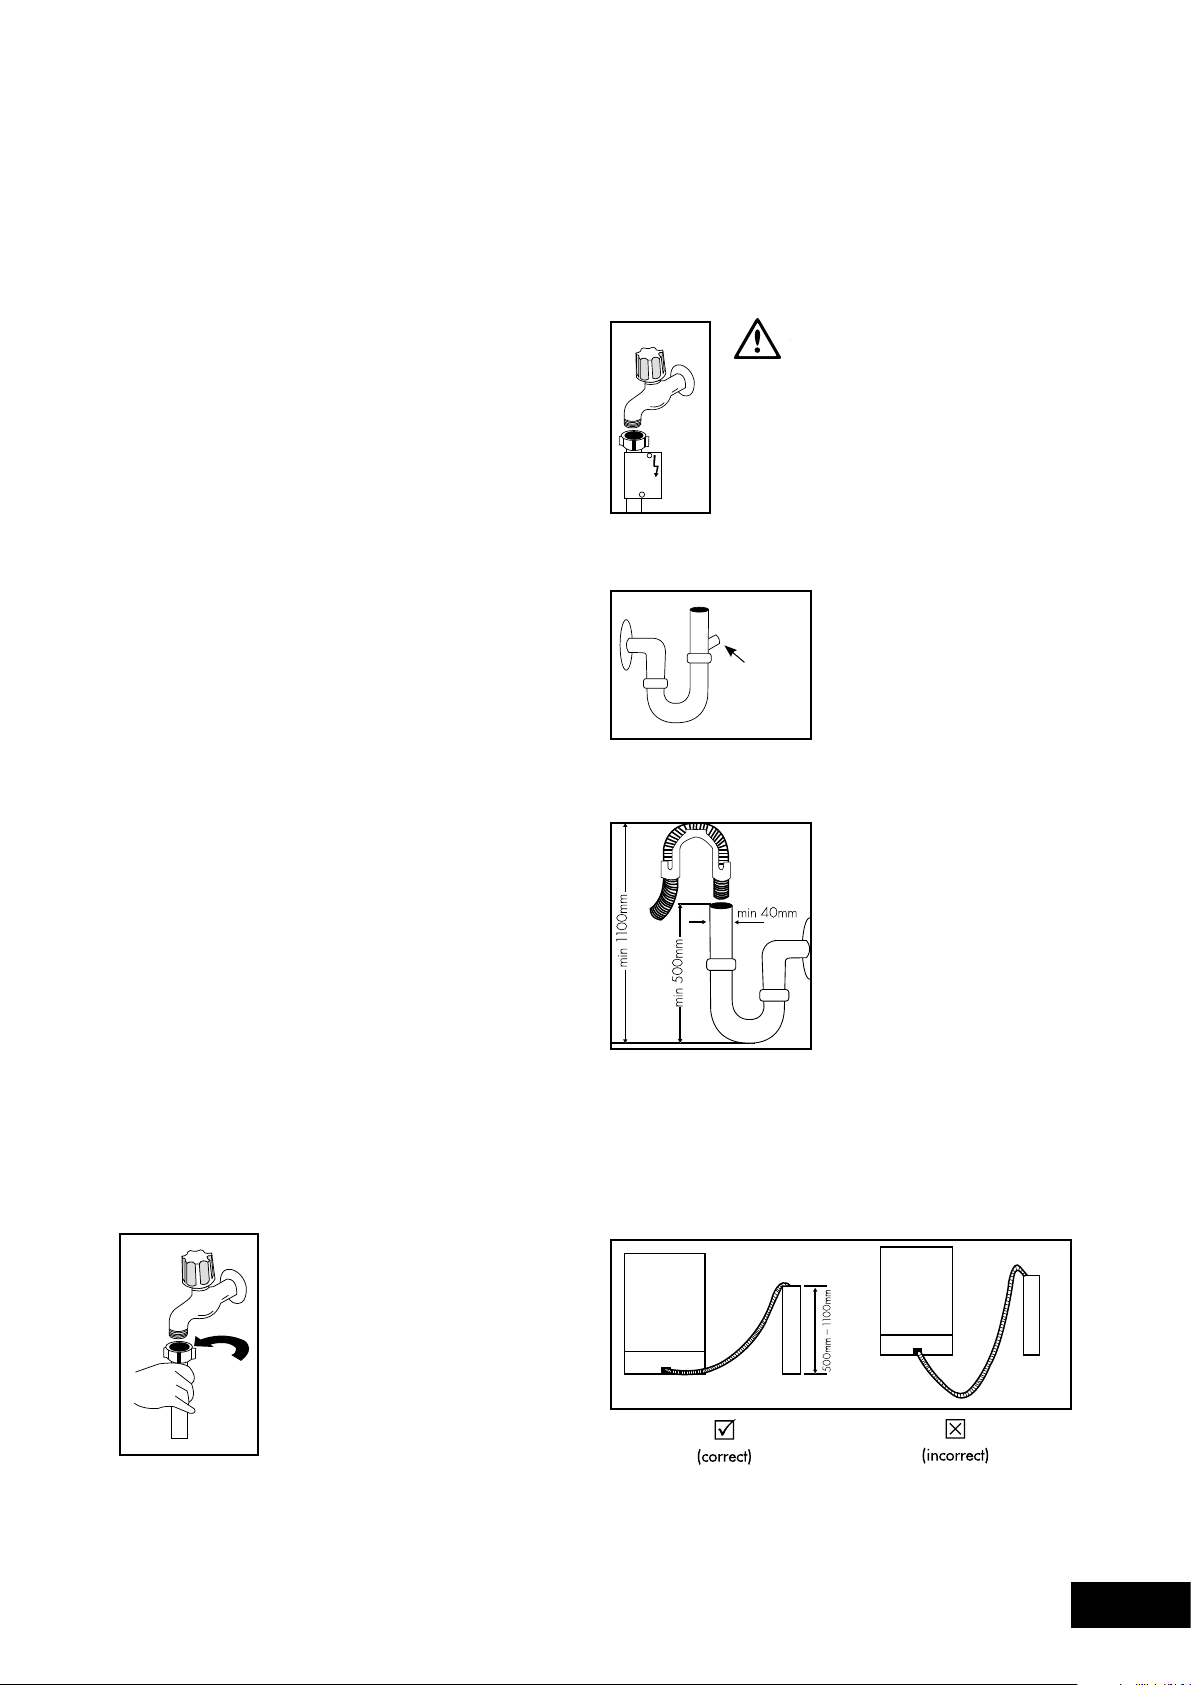
WATER INLET HOSE
Donotusethewaterinlethoseof
youroldmachine,youmustuse
thenewwaterinlethosesupplied
withyourmachineinstead.Before
connectingthewaterinlethoseto
thewatertap,ensurecleanwateris
flowingfromthetapbeforemaking
theconnection.Connectthewater
inlethosedirectlytothewaterinlet
tap.Thepressuresuppliedbythetap
shouldbeataminimumof0.03MPaandatamaximum
of1MPa.Ifthewaterpressureisabove1MPa,a
pressure-reliefvalveshouldbefittedinbetween.
Aftertheconnectionsaremade,thetapshouldbeturned
onfullyandcheckedforwatertightness.Forthesafetyof
yourmachine,makesuretoalwaysturnoffthewaterinlet
tapaftereachwashprogramisfinished.
WARNING
WARNING
NOTE: Aquastop inlet hose has
components using 240V. Do not cut
Aquastop inlet hose. Do not let it get
folded or twisted.
WATER DRAIN HOSE
Ifyouconnectthewaterdrain
hosetoatrapspigotunder
thesink,removetheplastic
membrane.Ifyoudonot
removetheentiremembrane,
remainingfoodcancause
blockageinthedrainhose
spigot.Ensureahoseclamp
isusedtosecurethehoseto
thespigot.
Thewaterdrainhosecan
beconnectedeitherdirectly
tothewaterdrainholeorto
thesinkoutletspigot.Usinga
hosehook(ifavailable),the
watercanbedraineddirectly
intothesinkbypositioningthe
hosehookovertheedgeof
thesink.
Thisconnectionshouldbeataminimumof50cmandat
amaximumof110cmabovethebaseofthedishwasher.
WARNING: Maximum drain hose length is 4m. Longer hose
length will prevent correct drainingand result in poor wash
performance.
Remove
entire
internal
membrane
10
INSTALLATION
INSTALLING THE MACHINE
WARNING
WARNING
ELECTRICAL CONNECTION
Theearthedplugofyourmachineshouldbeconnectedtoan
earthedoutletsuppliedbysuitablevoltageandcurrent.Ifthere
isnoearthinginstallation,haveacompetentelectriciancarry
outanearthinginstallation.Incaseofusagewithoutearthing
installed,ourcompanywillnotberesponsibleforanylossof
usagethatmightoccur.
Theindoorfusecurrentvalueshouldbe10-16A.
Yourmachineisdesignedfor220-240V.Themachineshould
notbepluggedinduringinstallation.
• Alwaysusethemoldedplugsuppliedwithyourmachine.
• Runninginlowvoltagewillcauseadeclinein
washingquality.
• Themachine’selectricalcableshouldbereplacedbyan
authorisedserviceoranauthorisedelectricianonly.Failure
todosomayleadtoaccidents.
• Forsafetypurposes,alwaysmakesuretodisconnectthe
plugwhenawashprogramisfinished.
• Inordernottocauseanelectricshock,donotunplug
whenyourhandsarewet.
• Whendisconnectingyourmachinefromthemainssupply,
alwayspullfromtheplug.Neverpullthecorditself.
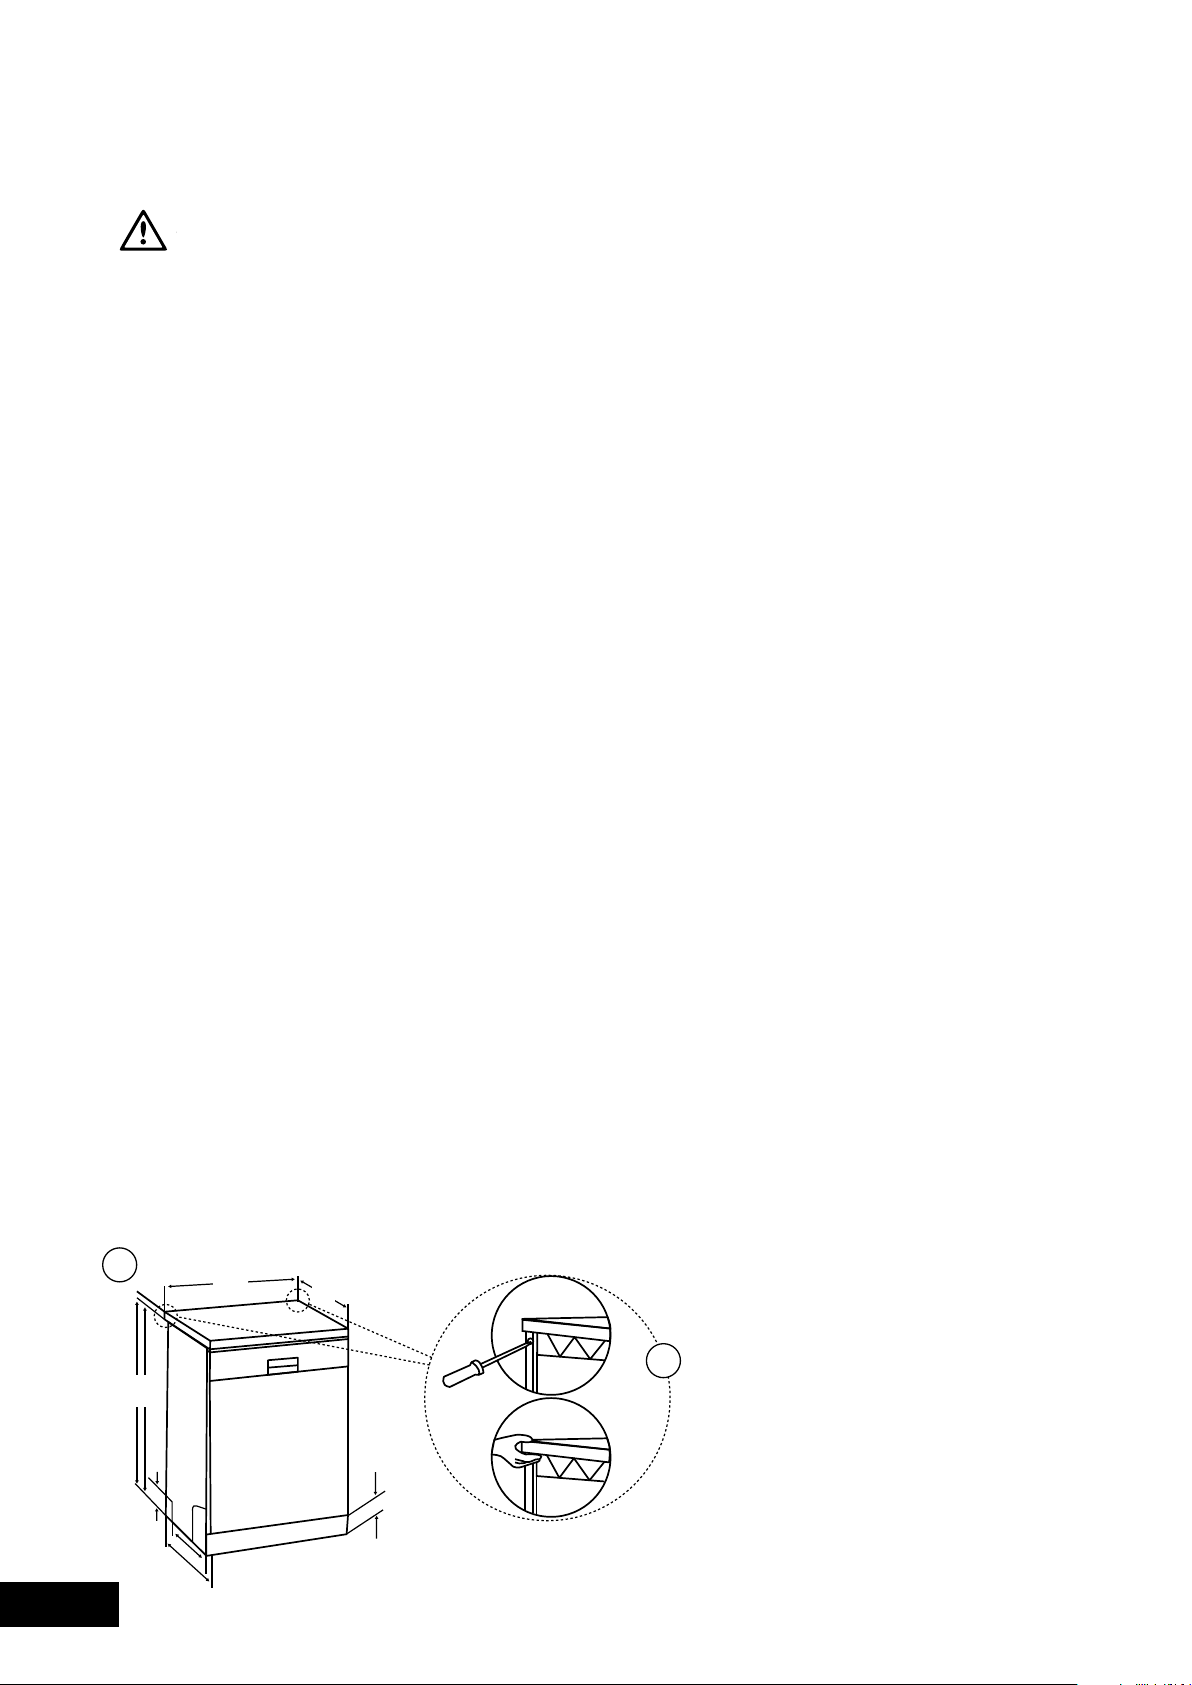
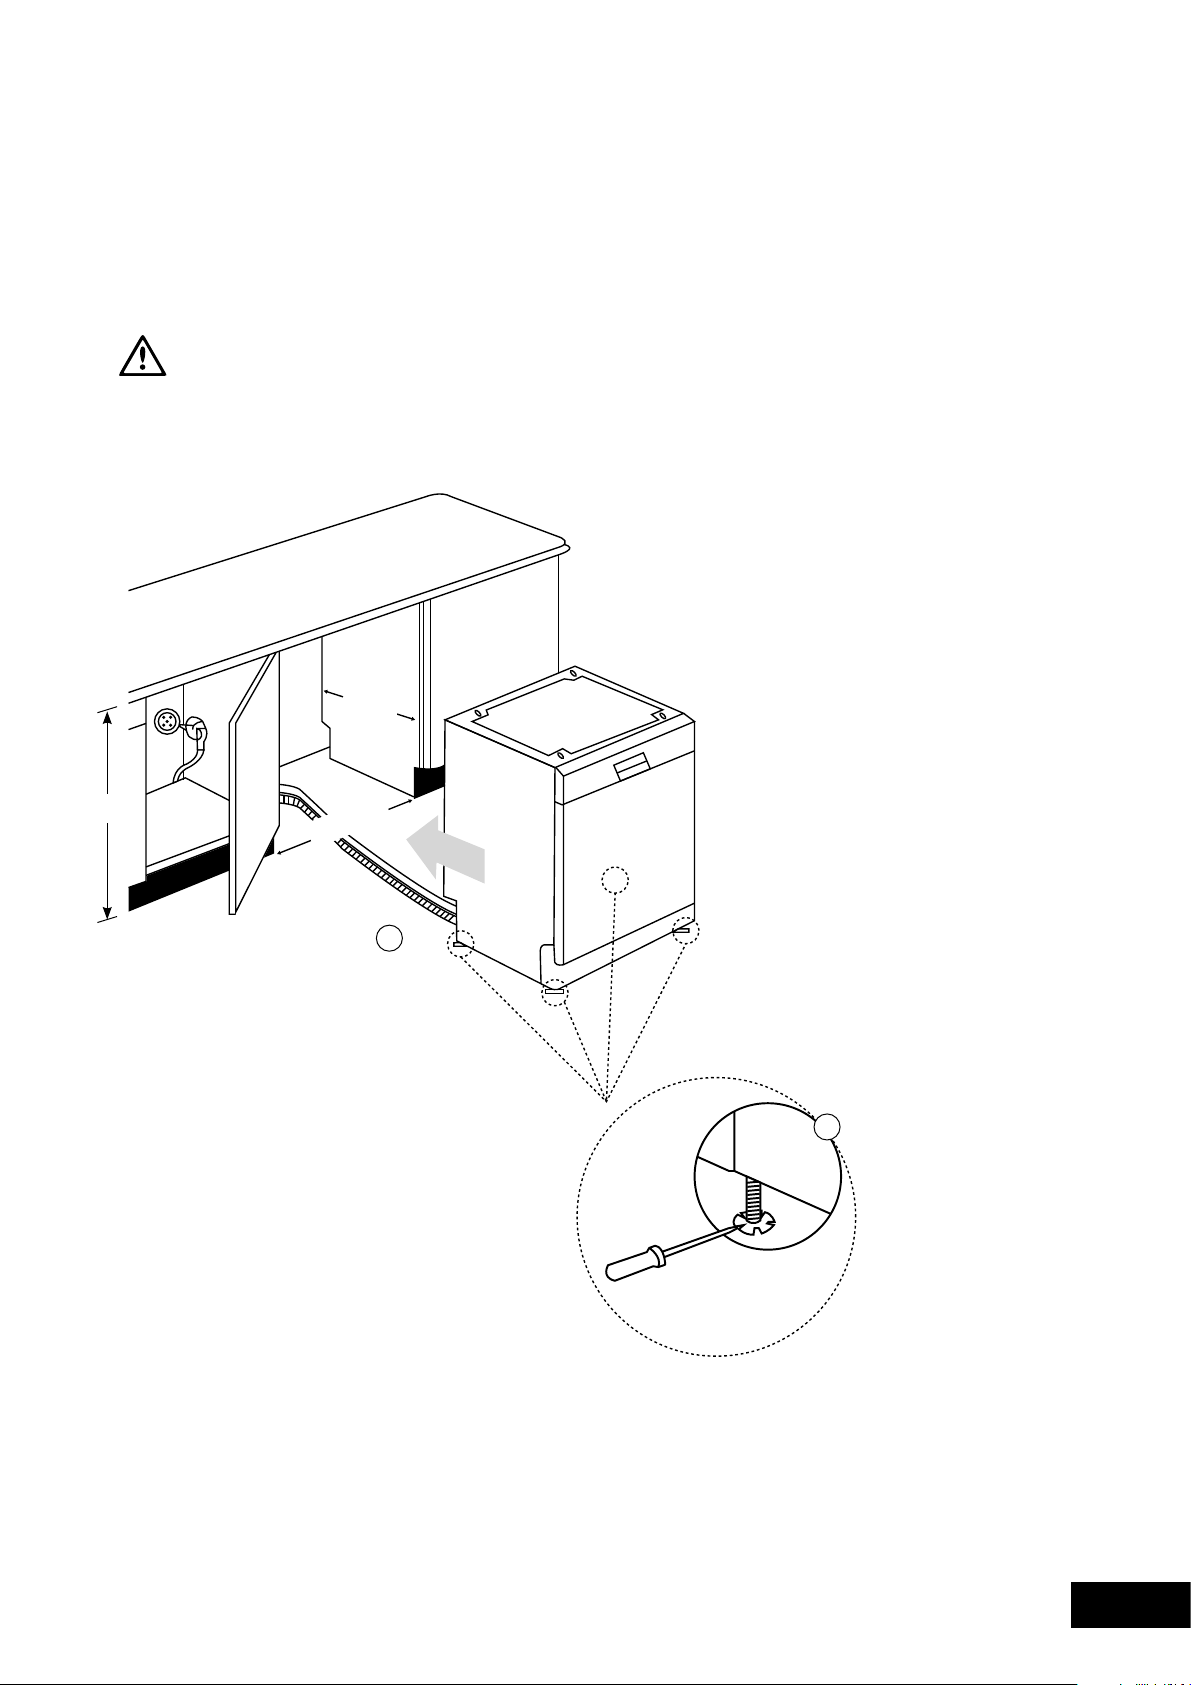
FITTING THE MACHINE UNDERCOUNTER
Ifyouwishtofityourmachineundercounter,checkwhether
youhavesufficientspaceunderyourcountertopandwhether
thewiring-plumbingissuitabletodoso.
1. Ifyoudecidethatthespaceunderthecountertopis
suitableforfittingyourmachine,removetheworktopas
shownintheillustration.
2. Toremovetheworktop,removethescrewsthatholdthe
worktopwhicharelocatedattherearofthemachine;
thenpushthefrontpanel1cmfromthefronttowardsthe
rearandliftit.
598
596
845
570
465
97
815
85
1
2
11
INSTALLING THE MACHINE
3. Adjustthemachinefeetaccordingtotheslopeof
thefloor.
4. Fityourmachinebypushingitundercounterwithout
lettingthehosesgetcrushedorbent.
WARNING
WARNING
After removal of worktop, ensure the opening for the
dishwasher is according to the following dimensions.
4
3
min.600mm
820mm
570mm
INSTALLATION

12
PREPARATION
PREPARING THE MACHINE FOR USE
PRIOR TO USING THE MACHINE FOR THE FIRST TIME
• Checkwhethertheelectricityandwatersupply
specificationsmatchthevaluesindicatedbythe
installationinstructionsforthemachine.
• Removeallpackagingmaterialsinsidethemachine.
• Filltherinseaidcompartment.
DETERGENT USAGE
Useadetergentspecificallydesignedforuseindomestic
dishwashers.Youcanfindpowder,gel,andtablet
detergentsinthemarketthathavebeendesignedfor
householddishwashers.Detergentshouldbeputintothe
compartmentpriortostartingthemachine.Keepyour
detergentsincool,dryplacesoutofreachofyourchildren.
Donotfilldetergentintothedetergentcompartmentmore
thanrequired;otherwiseitmayetchyourglassesaswell
asleavingundissolveddetergentinthedishwasher.Should
youneedmoreinformationconcerningthedetergentyou
willuse,contactdetergentmanufacturersdirectly.
FILLING THE DETERGENT COMPARTMENT
1.Pushthelatchtoopen
thedetergentcontainer
asshowninimage1.
2.Detergentcompartment
haslevellinesinside.It
ispossibletomeasure
therightdetergent
amountusingtheselines.
Detergentcompartment
(A)cantake40gmof
detergent.Openthe
dishwasherdetergent
andpourintothelarger
compartment25gmif
yourdishesareheavily
soiledor15gmifthey
arelesssoiled.
Ifyourdisheshavebeenkeptdirtyforaverylongtime,if
therearedriedfoodwastesonthem,andifyouhavefully
loadedthedishwasher,pour5gmdetergentintothepre-
washcompartment(B)andstartyourmachine.
Youmayhavetoaddmoredetergentintoyourmachine,
dependingonthedegreeofsoilandonthewater
hardnesslevelinyourarea.
COMBINED DETERGENT
Detergentmanufacturersalsoproducecombined
detergentscalled“2in1”,“3in1”or“5in1”etc.
“2in1”detergentscontaindetergentorrinseaid.
Whenusing“2in1”detergentmakesuretocheckthe
specificationsofthetablet.
Othertabletdetergentscontaindetergent+rinseaid+
variousextrafunctions/additives.
Generally,combineddetergentsproduceacceptable
resultsundercertainusageconditionsonly.Suchdetergents
containrinseaidinpresetamounts.
Pointstoconsiderwhenusingthesetypeofproducts:
• Alwaysmakesuretocheckthespecificationsof
thedetergentyouwilluseorwhetherornotitisa
combineddetergent.
• Checkifthedetergentusedisappropriateforthe
hardnessofmainswater.
• Observetheinstructionsonpackagingwhenusing
suchproducts.
• Ifdetergentsareintheformoftablets,neverputthem
intotheinteriorsectionorthecutlerybasketofthe
dishwasher.Alwaysputthetabletsintothedetergent
compartmentinthedetergentdispenser.
• Tabletsproducegoodresultsforcertaintypesofusage
only.Ifyouareusingthistypeofdetergent,youneed
tocontactthemanufacturerandfindoutaboutthe
suitableconditionsofuse.
• Whentheconditionsofuseofsuchproductsandthe
machinesettingsareappropriate,theyensuresavings
inrinseaidconsumption.
• Contactthedetergentmanufacturersifyouarenot
obtaininggoodwashresults(ifyourdisheshave
limescaleandstaywet)afterhavingused2in1or
3in1detergents.Thescopeofwarrantyforyour
machinedoesnotcoveranycomplaintscausedbythe
useofthesetypesofdetergents.
Recommendedusage:Ifyouwanttoobtainbetterresults
whileusingcombineddetergents,addrinseaidintoyour
machineandadjustthewatersoftenersettingandtherinse
aidsettingtothelowestposition.
Solubility of the tablet detergents produced by different
companies can vary depending on the temperature and time.
Therefore, it is not recommended to use these detergents in
short programs. It is more suitable to use powder detergents in
short programs.
WARNING
WARNING
Should any problem, which you have not encountered before,
occur with the use of these type of detergents, contact the
detergent manufacturers directly.
1
DETERGENT
2
A
B
13
PREPARATION
PREPARING THE MACHINE FOR USE
WHEN YOU STOP USING COMBINED DETERGENTS
• Filltherinseaidcompartments.
• Selectasuitablerinseaidsetting.
FILLING WITH RINSE AID AND MAKING THE SETTING
Rinseaidisusedtoimprovethedryingofthewashload
andreducethedepositofcloudydropsandstreakson
glassesanddishware.Forthisreason,careshouldbe
takenthatthereisadequateamountofrinseaidintherinse
aidcompartmentandonlyrinseaidproducedforusein
dishwashersshouldbeused.
Iftherinseaidlamponthecontrolpanelilluminates,fillthe
rinseaidcompartmentwithrinseaid.
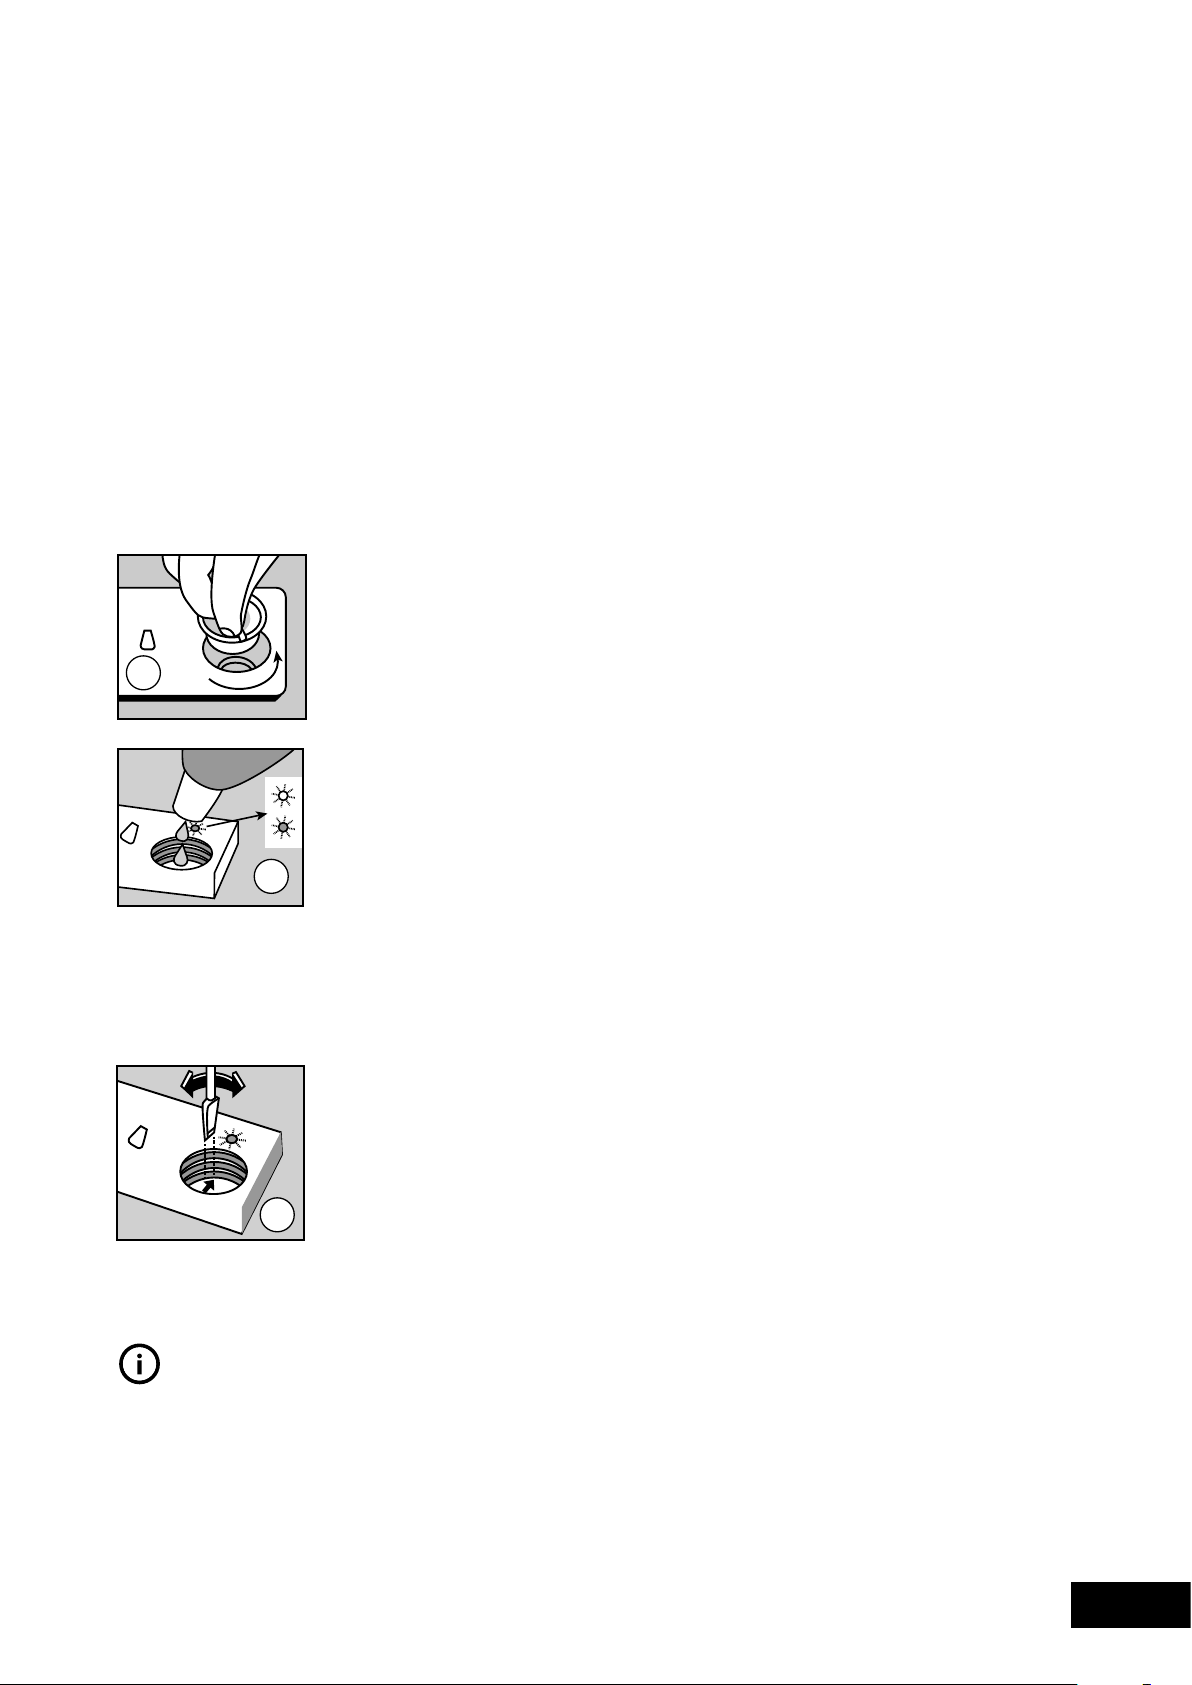
1.Toputinrinseaid,remove
therinseaidcompartment
capbyturningit.
2.Filltherinseaidcompartment
withrinseaiduntiltherinse
aidlevelindicatorbecomes
dark;refitthecapbylocating
thelockingpinsandclose
itbyturningintheopposite
direction.Bycheckingthe
rinseaidlevelindicatoron
thedetergentdispenser,you
canunderstandwhetheror
notyourmachineneedsrinse
aid.Adarkindicatormeans
thatthereisrinseaidinthe
compartment,whilealight
indicatorshowsthatyou
needtofillthecompartment
withrinseaid.
3.Therinseaidleveladjuster
canbesettoaposition
between1and6.Factory
settingforrinseaidisposition
3.Youneedtoincreasethe
settingoftheadjusterifwater
stainsformonyourdishes
afterawash,whereasyou
needtodecreasethesetting
ifabluestainisleftwhen
wipedbyhand.(3)
TIPS & INFORMATION
TIPS AND INFORMATION
ONLY USE RINSE AID SUITABLE FOR AUTOMATIC
DISHWASHERS. As rinse aid residues left as a result of
overflowing will create extremely high amounts of foam and
reduce the washing performance, remove the excess amount
of rinse aid by wiping it with a rag. Remove all excess rinse aid
if spilt while filling,
1
2
1
2
3 4
5
6
3
14
LOADING LOADING
1 2
LOADING YOUR DISHWASHER
Correctlyloadeddisheswillresultinthebestenergy
consumption,washinganddryingperformance.There
aretwoseparatebasketsforyoutoloadyourdishesinto
yourmachine.Youcanloadintothelowerbasketround
anddeepitemsaspotswithlonghandles,potlids,plates,
saladplatesandcutlerysets.
Theupperbaskethasbeendesignedforteaplates,
dessertplates,saladbowls,cupsandglasses.When
placinglong-stemglassesandgoblets,leanthemagainst
thebasketedge,rackorglasssupportwireandnot
againstotheritems.Donotleanlongglassesagainstone
anotheriftheyareunsupported,theymaybreak.Itismore
appropriatetolocatethethinnarrowpartsintothemiddle
sectionsofbaskets.Youcanplacespoonsamongthe
othercutlerysetsinordertopreventthemfromstickingto
oneanother.Youarerecommendedtousethecutlerygrid
inordertoobtainthebestresult.Toavoidanypossible
injuries,alwaysplacesuchlong-handleandsharp-pointed
itemssuchasservingforks,breadknivesetc.withtheir
sharppointsfacingdownorhorizontallyonthebaskets.
TIPS & INFORMATION
TIPS AND INFORMATION
Ensure the position of the dishware does not prevent the upper
or lower spray arm from turning.
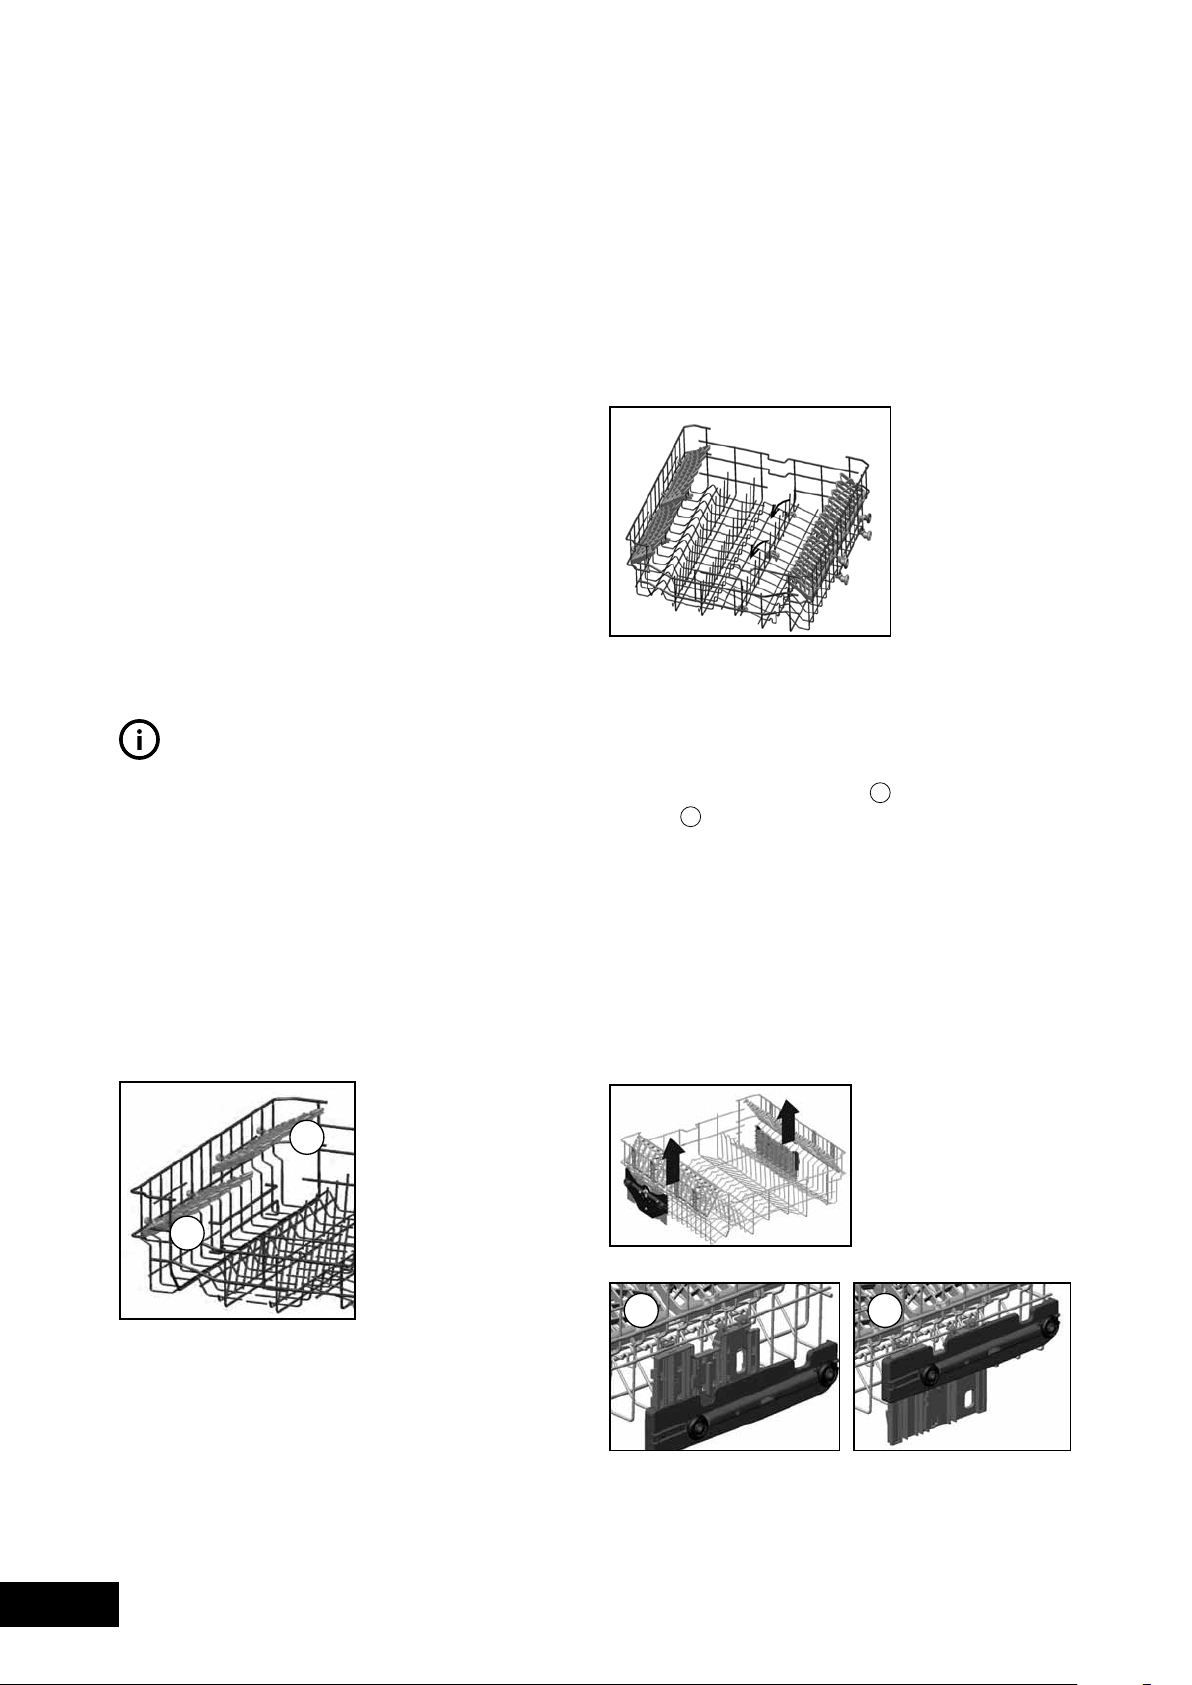
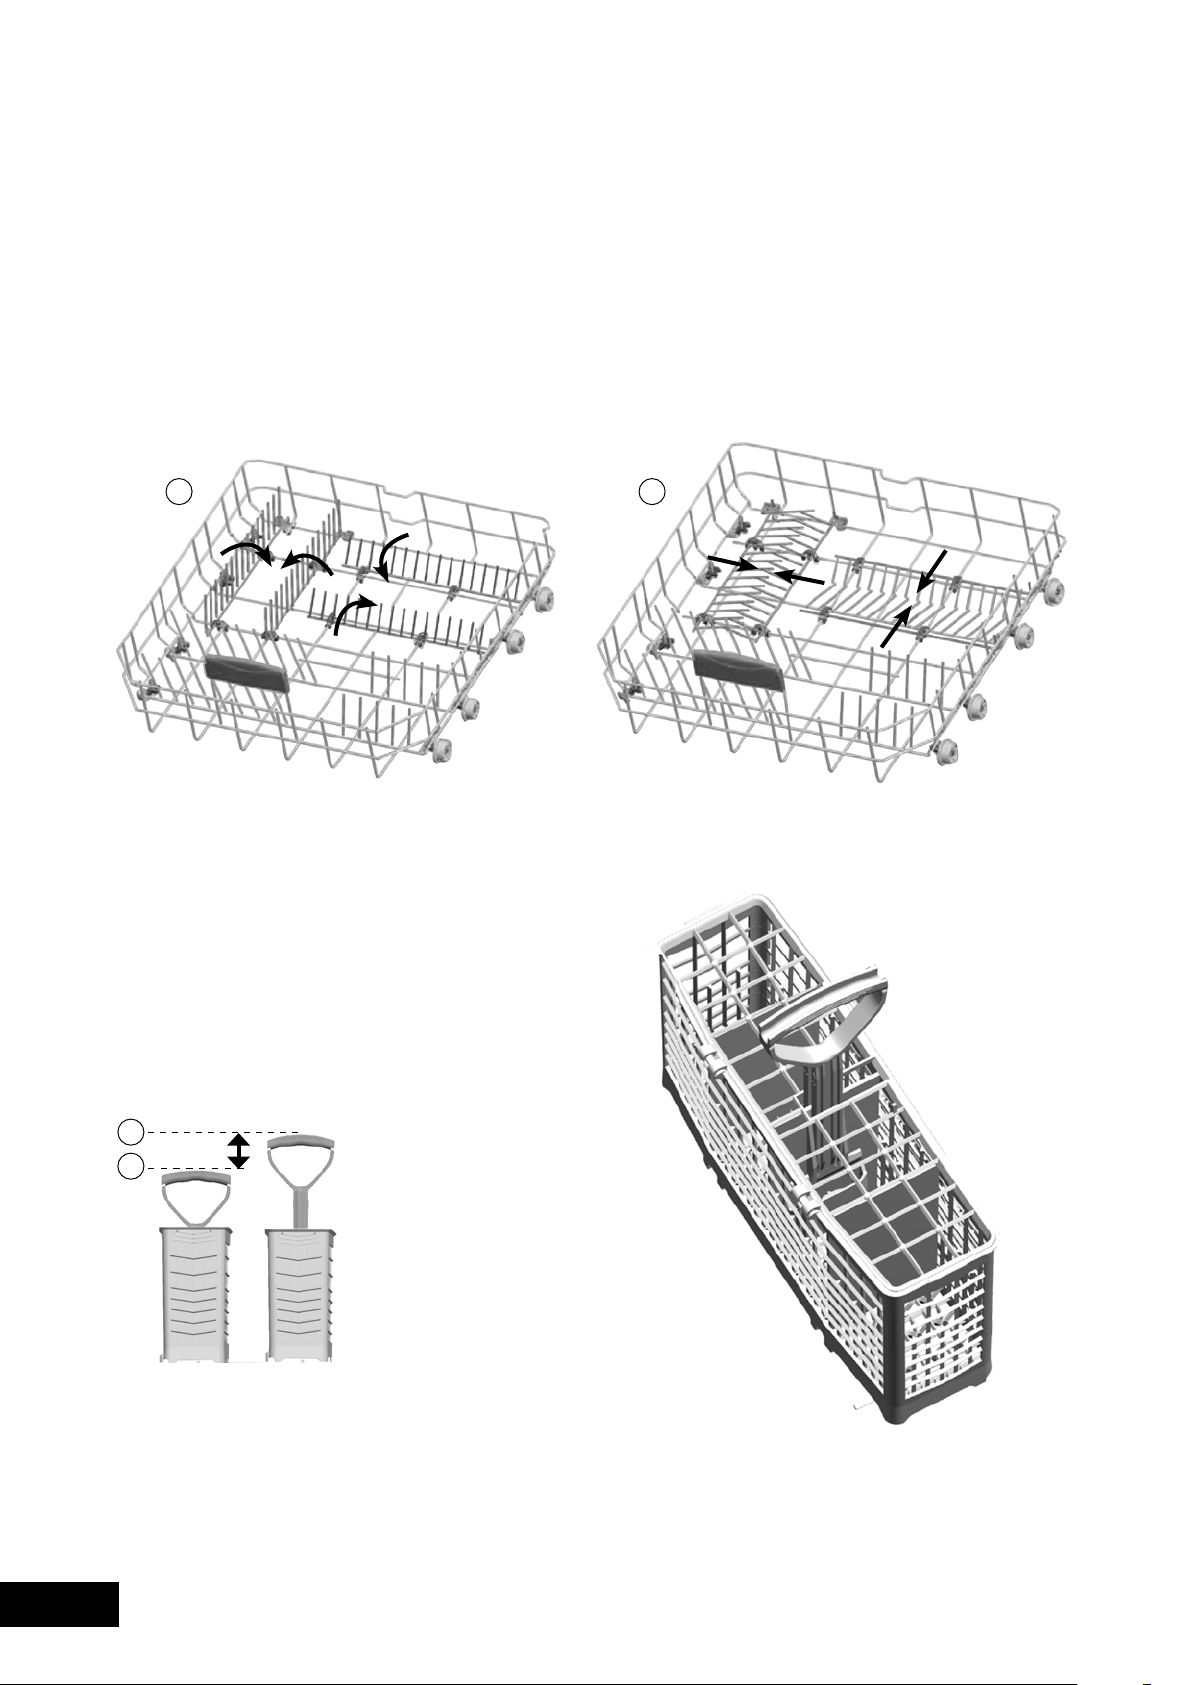
TOP BASKET CUP RACK
Theseracksaredesignedtoincreasethecapacityofthe
topbasket.Youcanplaceyourglassesandcupsonthe
racks.Youcanadjusttheheightoftheseracks.Thanksto
thisfeature,youcanplacedifferentsizesofglassesunder
theseracks.Thecuprackscanbeadjustedto3height
positions.Inaddition,youcanplacelongforks,knivesand
spoonsontheserackslaterally,sothattheydonotblock
therevolutionofthesprayarm.
TOP BASKET FOLDING SUPPORTS
Foldableracksontheupperbasketaredesignedinorder
toletyouplacebigitemseasiersuchaspots,pans,etc.
Ifrequested,eachpartcanbefoldedseparately,orallof
themcanbefoldedandlargerspacescanbeobtained.
Youcanusefoldableracksbyraisingthemupwards,orby
foldingdown.
TOP BASKET HEIGHT ADJUSTMENT WHILE IT IS FULL
Basketheightadjustmentmechanismonthetopbasketof
yourmachineisdesignedtoletyouadjusttheheightof
yourtopbasket(refertodiagram
1
)upwardsor(referto
diagram
2
)downwards,withoutremovingitfromyour
machinewhenitisfull,andcreatelargespacesatthetop
orbottomareaofyourmachineasneeded.Basketofyour
machineissettoupperpositioninfactorysettings.
Inordertoraiseyourbasket,holditfrombothsidesand
pullitupwards.Inordertolowerit,holditfrombothsides
again,pullupwardsandlowercarefully.
Makesurethatbothsidesareinthesameposition
(upordown).
1
2
15
UPPER CUTLERY BASKET
Theuppercutlerybasketisdesignedforyoutoplaceforks,
spoonsandknives,longdippersandsmallitems.
Becauseitcaneasilybetakenoutofthemachine,it
allowsyourdishestobetakenoutofthemachinealong
withthebasketafterwashing.
Theuppercutlerybasketiscomposedoftwopieces.Ifyou
needtomakespaceforthedishesintheupperbasket,
youcantakeouttheleftorrightpartoftheuppercutlery
basketinordertoobtainmorespace.
WARNING
WARNING
Knives and other sharp objects must be placed horizontally in
the cutlery basket.
LOADING YOUR DISHWASHER
LOADINGLOADING
16
LOADING
LOWER BASKET FOLDING RACKS
Foldingracksconsistingoffourpartsthatarelocatedon
thelowerbasketofyourmachinearedesignedinorder
toletyouplacebigitemseasiersuchaspots,pans,etc.
Ifrequired,eachpartcanbefoldedseparately,orallof
themcanbefoldedandlargerspacescanbeobtained.
Youcanusefoldingracksbyraisingthemupwards,
orbyfoldingdown.
LOADING YOUR DISHWASHER
1 2
ALTERNATE CUTLERY BASKET
Analternatecutlerybaskethasbeenprovidedfor
convenience.Thecutlerybaskethandleisadjustable-
position(a)or(b).Thebasketcanbeusedintheupperor
lowerdishwasherbasketasrequired.
a
b
17
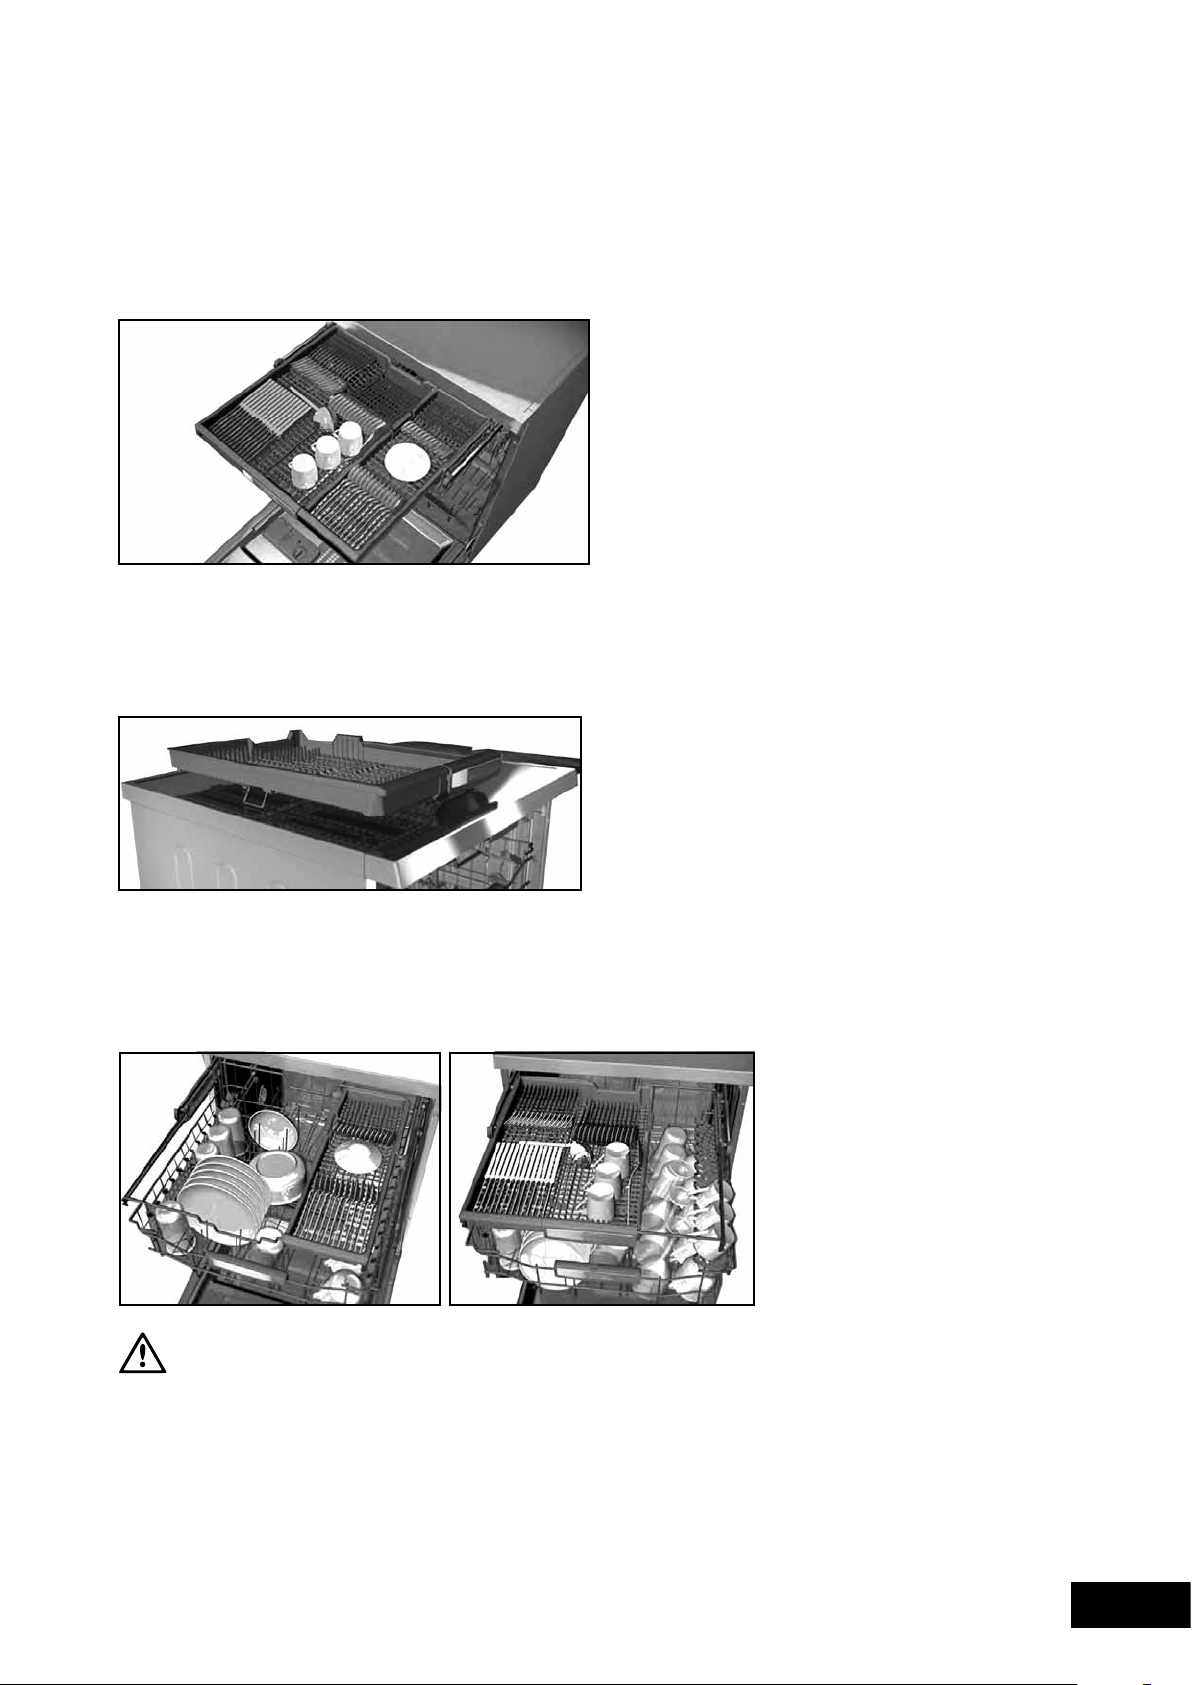
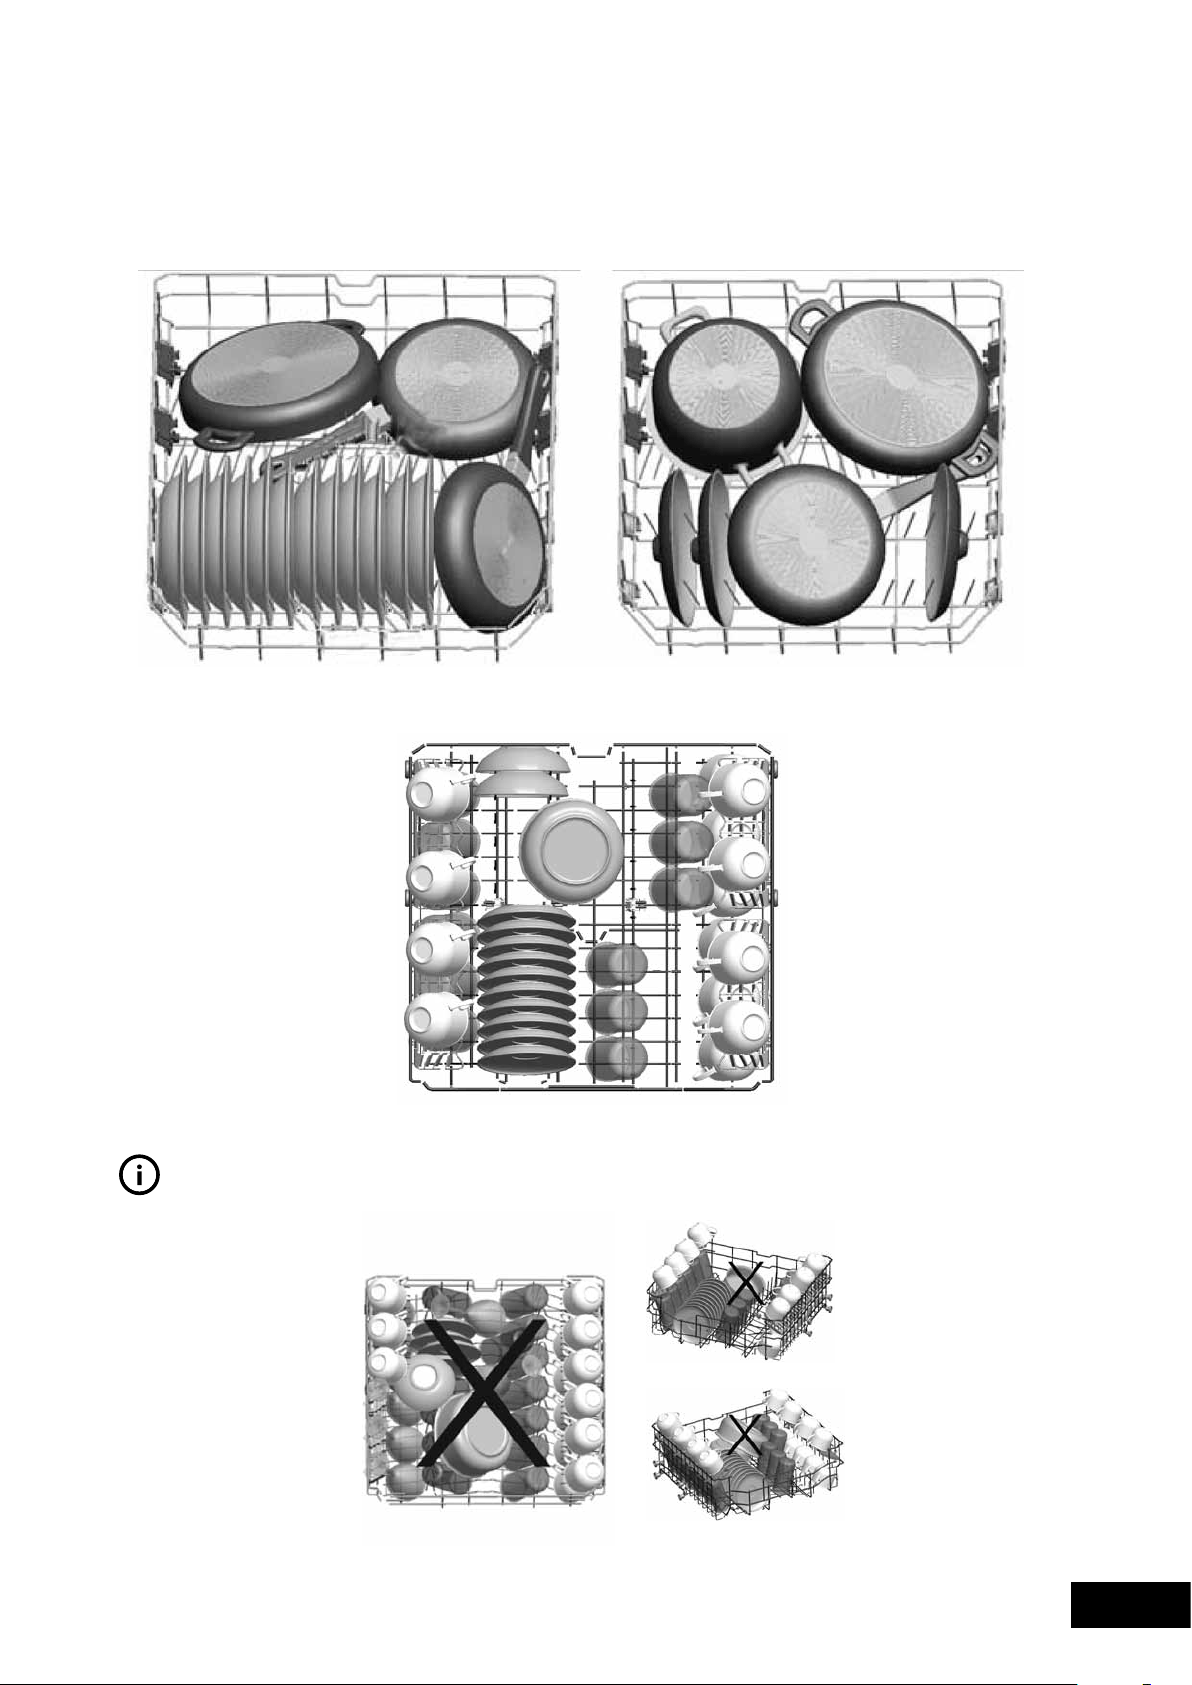
TIPS & INFORMATION
TIPS AND INFORMATION
Examples of incorrect loading
LOADING YOUR DISHWASHER
Top Basket
ALTERNATIVE BASKET LOADS
Lower Basket
LOADING
*Illustrationonly

18
INFORMATION FOR TEST LABORATORIES
Forallthenecessaryinformationforperformancetesting,
sendanemailto
dishwasher@standardtest.com
Inyourmailpleaseprovidethemodelnumberand
PNCnumber(9digits)thatisontheratingplateonthe
appliancedoor.
AS/NZS STANDARD LOADING AND TEST DATA
LOADING

19
PROGRAM DESCRIPTIONS
PROGRAM ITEMS
**Onlypowderdetergentshouldbeusedincycleofprewashprogram.
WARNING
WARNING
Short programs do not include a drying step. The values declared above are the values obtained under laboratory
conditions according to relevant standards. These values can change depending on conditions of product’s use
and environment (network tension, water pressure, water input temperature and environment temperature).
PROGRAMS
NAME OF
PROGRAM
RINSE FAST 30 ECO TIME SAVE HEAVY AUTO 30-50 AUTO 50-60 AUTO 60-70
WASHING
TEMPERATURE
- 40ºC 50ºC 65ºC 60ºC 30-50ºC 50-60ºC 60-70ºC
TYPE OF FOOD
SOILS
Fresh,
lessdirty,
coffee,milk,
tea
Fresh
coffee,
milk,tea,
coldmeat,
vegetables
Fresh
coffee,
milk,tea,
coldmeat,
vegetables
Baked
onsoup,
sauce,
pastry,egg,
rice,potato
andmeats
cookedin
oven,fried
food
Fresh
coffee,
milk,tea,
coldmeat,
vegetables
Detectscontaminationlevelofdishesand
setstemperatureandamountofwashing
waterandwashingperiodautomatically
LEVEL OF
FOOD SOILS
Small Small Medium Medium Medium Small High High
AMOUNT OF
DETERGENT
A: 25gm/ 15gm
B: 5gm
- A:15
A:25
B:5
A:25
B:5
A:25
B:5
A:25
A:40
B:5
A:40
B:5
NA
Pre-wash
40ºC
Wash
30ºC
Wash
65ºC
Wash
Pre-wash
Detectscontaminationlevelofdishesand
setstemperatureandamountofwashing
waterandwashingperiodautomatically
Finish
ColdRinse
50ºC
Wash
Intermediate
Rinse
60ºC
Wash
HotRinse ColdRinse HotRinse ColdRinse
End HotRinse End HotRinse
Dry Dry
End End
PROGRAM
TIME (mins)
15
30 159 50 90 64-92 100-127 111-183
POWER
CONSUMPTION
(kW hour)
0.02
0.78 0.95 1.21 1.34 0.76-0.95 1.09-1.40 1.22-1.85
WATER
CONSUMPTION
(Litres)
4.2
10.9 13.5 10.7 14.4 10.6-17.7 10.9-18.5 12.3-24.6
20
SWITCHING ON THE MACHINE AND SELECTING A PROGRAM
Starttheprogrambypressing
theSTART/PAUSEkey
CHANGING A PROGRAM
Ifyouwouldliketochangeprogramswhilea
washingprogramiscontinuing.
SWITCHING ON THE MACHINE
PROGRAM FOLLOW-UP
Youcanfollowtheprogramflowusingtheprogram
follow-uplampslocatedonthecontrolpanel.
SWITCHING ON
PresstheON/OFFbutton
Selecttheprogramsuitingyourdishes
viathePROGRAMselectorbutton
1
2 4
Youcanchoosean
additonalfunction
3
1
3
Duringthewashingcycle
theWASHlightison
OncetheprogramiscompletedtheENDlightcomeson
Donotopenthedishwasheruntilthislightcomeson
2
Oncecompletedthe
DRYlightwillilluminate
andthemachinewillrun
silentlywhilstdrying
1
2
3
PressthePAUSE/STARTbutton
Aftertheprogramstops,selectthedesired
programonthePROGRAMselectbutton
PressthePAUSE/STARTbutton
tocommencenewprogram
21
HoldSTART/PAUSEbuttonpressedfor
approx.3sec.untilENDlightblinks
CHANGING A PROGRAM WITH RESETTING
Ifyouwouldliketocancelaprogramwhileawashing
programisresumed.
1
2
AfterENDlightstartsblinking,thewater
insideisdischargedforapprox.30sec.
OnceENDlightcomeson,itmeansthat
thecyclehasbeencancelled
SWITCHING THE MACHINE OFF
WhentheENDlightcomeson,switchyour
machineoffbyusingthePOWEROn/Offbutton
1
Pulltheplugoutoftheoutlet.Turnoffthewatertap
2
SWITCHING ON
TIPS & INFORMATION
TIPS AND INFORMATION
NOTE: If the machine door is opened during washing or
the power is cut off, the machine resumes the program
when the door is shut or the power comes back.
NOTE: For better drying results, when the program has
finished keep the door ajar for some minutes before you
remove the dishes.
22
MAINTENANCE AND CLEANING
Cleaningthemachineinregularintervalsprolongsthe
machine’sservicelife.
Oilandlimemayaccumulateinthemachine’swashing
section.Incaseofsuchaccumulation:
Fillthedetergentcompartmentwithdetergentwithout
loadinganydishesintothemachine,selectaprogram
thatrunsathightemperature,andstartthemachine.
Alternatively,usedescalingmaterialavailableinthe
market.(Dishwashercleanersproducedbydetergent
manufacturers.)
CLEANING THE SEALS IN THE MACHINE DOOR
Tocleananyaccumulatedresiduesinthedoorseals,wipe
thesealsregularlybyusingadampenedcloth.
CLEANING THE MACHINE
Cleanthefiltersandsprayarmsatleastonceaweek.
Unplugyourmachineandturnoffitstapbeforestarting
thecleaning.Donotuseabrasivematerialswhencleaning
yourmachine.Wipewithafinecleaningmaterialanda
dampenedcloth.
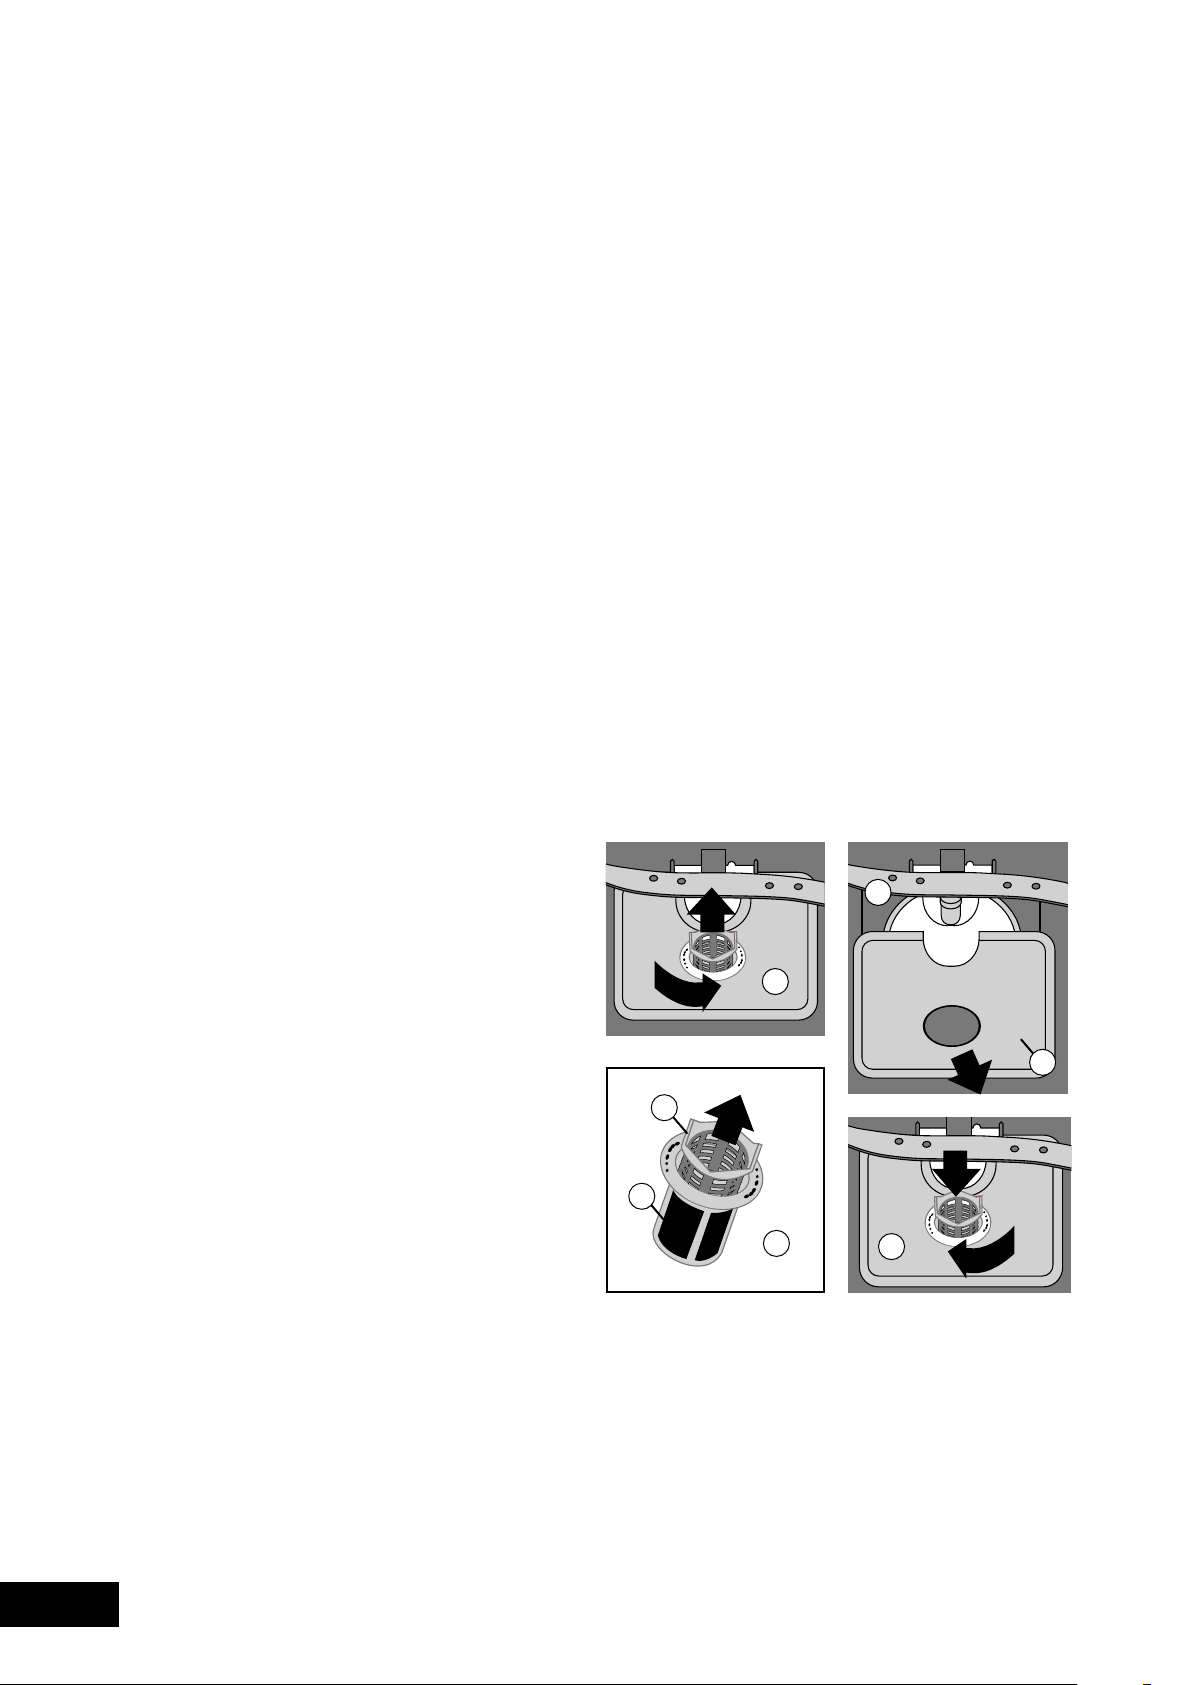
FILTERS
Checkifanyfoodwasteshaveremainedonthecoarse
andfinefilters.Ifanyfoodwastesareleft,removethefilters
andcleanthemthoroughlyunderthewatertap.
a. MicroFilter
b. CoarseFilter
c. Metal/PlasticFilter
1 Toremoveandcleanthefiltercombination,turnit
counterclockwiseandtakeitoutbyliftingupwards.
2 Pullandremovethemetal/plasticfilter.
3 Thenpullthecoarsefilteroutofthemicrofilter.Rinseit
withwaterunderthetap.Refitthemetal/plasticfilter.
Insertthecoarsefilterintothemicrofilterinawaythat
themarkswillcorrespondtooneanother.
4 Attachmicrofilterintothemetal/plasticfilterandturn
tothedirectionofarrowanditislockedwhenthe
arrowonmicrofiltercanbeseenfromacross.
5 Neveruseyourdishwasherwithoutanyfilter.
6 Incorrectfittingofthefilterwillreducethewashing
effectiveness.
7 Cleanfiltersareveryimportantintermsoftheproper
runningofthemachine.
1
2
c
3
b
a
4
MAINTENANCE
23
MAINTENANCE AND CLEANING
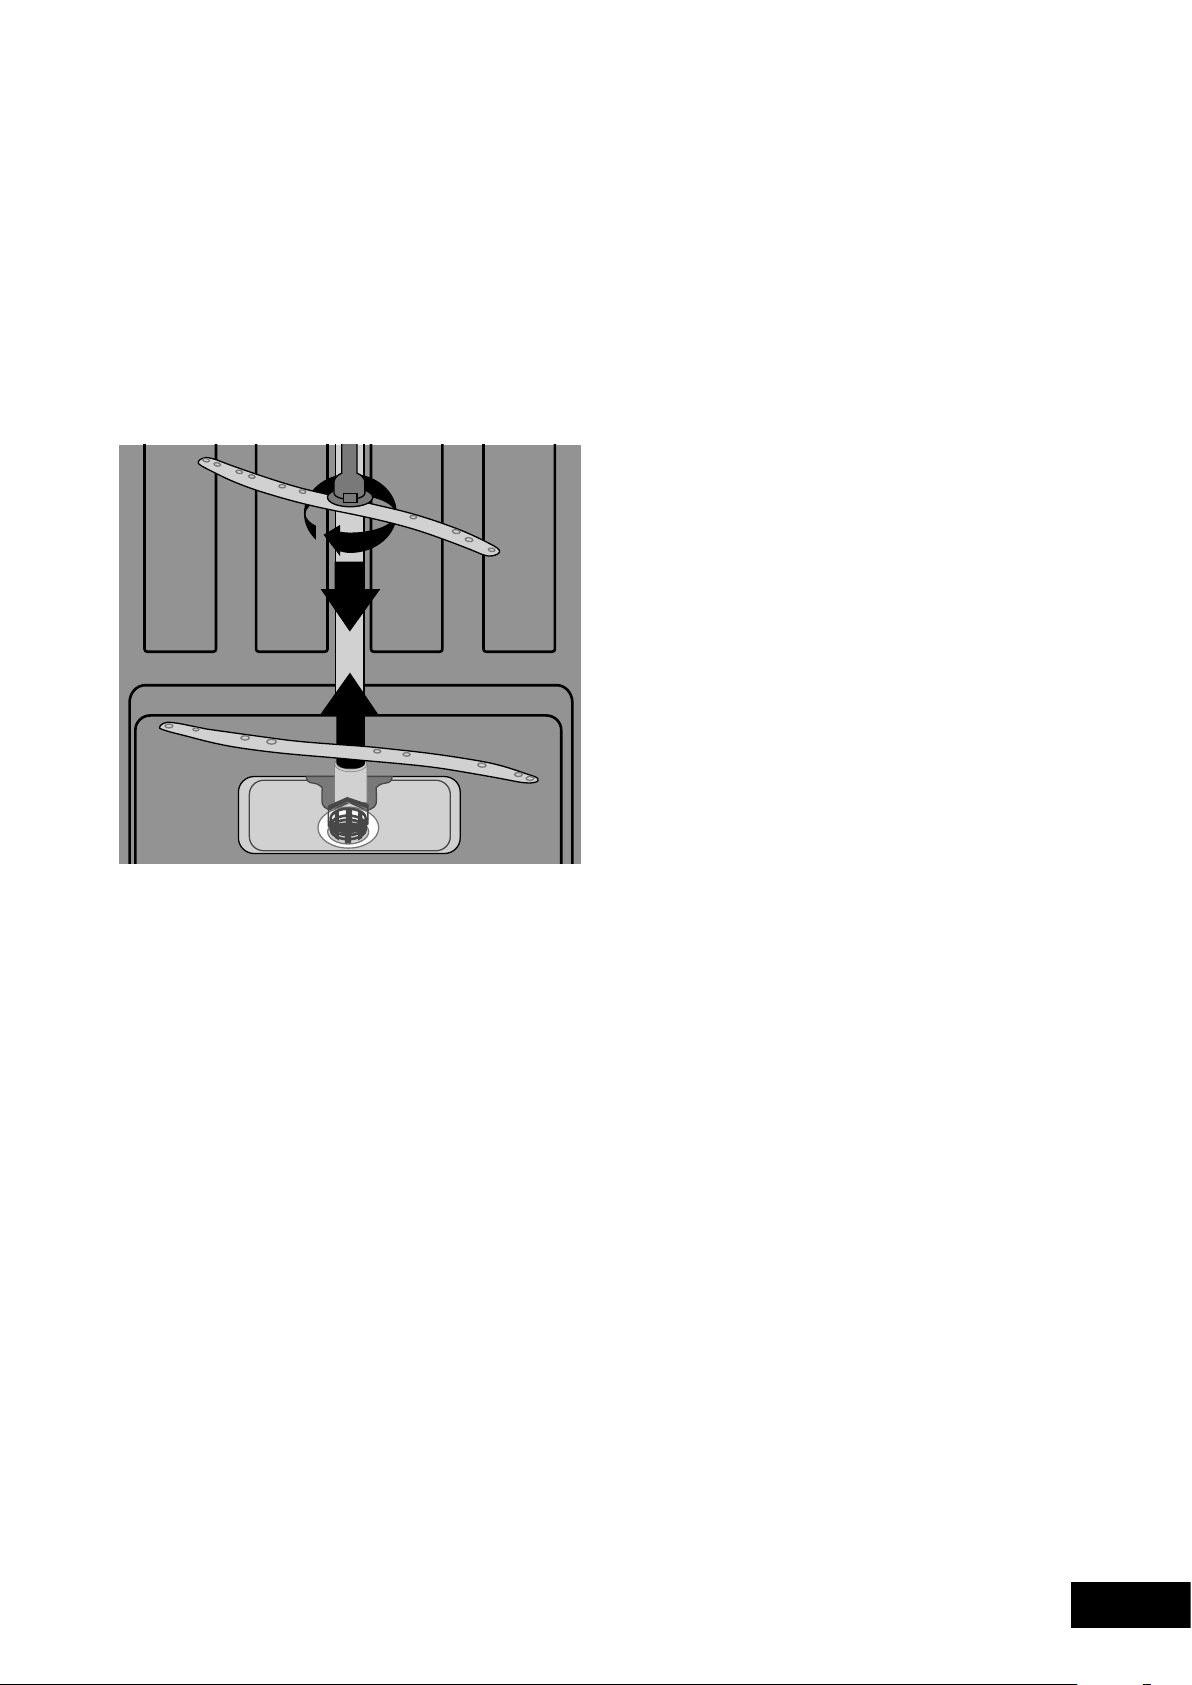
SPRAY ARMS
Checkwhetherornottheholesfortheupperandlower
sprayarmsareclogged.Ifthereisanyclogging,remove
thesprayarmsandcleanthemunderwater.
Youcanremovethelowersprayarmbypullingitupwards,
whiletheuppersprayarmnutcanberemovedbyturning
thenuttotheleft.Besurethatthenutisperfectlytightened
whenrefittingtheuppersprayarm.
HOSE FILTER
Theinlethosefilterreducescontamination(sand,clay,
rustetc.)thatmightbeoccasionallycarriedinthroughthe
main’swatersupplyortheindoorplumbing,andavoids
damagetodishwashercomponents.Checkthefilterand
thehosefromtimetotimeandcleanthemifnecessary.To
cleanthefilter,firstturnoffyourtapandthenremovethe
hose.Afterremovingthefilterfromthehose,cleanitunder
thetap.Insertthecleanedfilterbackintoitsplaceinside
thehose.Refitthehoseandcheckthattherearenoleaks.
MAINTENANCE

24
FAILURE CODESFAILURE CODES
FAILURE CODES AND WHAT TO DO IN CASE OF FAILURE
PRACTICAL AND USEFUL INFORMATION
1 Wheneveryouwillnotbeoperatingyourmachine:
• Unplugthemachineandthenturnthewateroff.
• Leavethedoorslightlyajarinordertopreventthe
formationofunpleasantodours.
• Keepthemachineinteriorclean.
2 Eliminatingwaterdroplets:
• Washthedisheswiththeintensiveprogram.
• Increasetherinseaidsetting.
• Ifplasticitemsarewashed,waterdropsonthese
itemswillbeunavoidable.Programswithhigher
temperaturesandincreasedrinseaidsettingsmay
reducethewaterdrops.Checkthattheplastic
itemsaresuitablefordishwasheruse.
3 Correctlyloadeddisheswillgivethebestenergy
consumption,washinganddryingperformance.
4 Cleanallroughwastebeforeyouplacedirtydishesin
themachine.
5 Operatethemachineafteritiscompletelyfull.
6 Usepre-washingprogramonlywhennecessary.
7 Observeprograminformationandaverage
consumptionvaluestablewhenselectingaprogram.
8 Sincethemachinewillreachhightemperatures,it
shouldnotbeinstalledneararefrigerator.
9 Iftheapplianceislocatedinaplacewheretherisk
offreezingexists,youmustcompletelydrainthewater
thathasremainedinthemachine.Turnoffthewater
tap,disconnectthewaterinlethosefromthetapand
allowtheinteriorwatertodrain.
ERROR CODE ERROR DESCRIPTION CONTROL
F5 Inadequatewatersupply
•Makesurethewatertapisopenandthatmainwatersupplyis
on.
•Closethewatertap,separatethewaterinlethosefromthetap
andcleanthefilterattheconnectionendofthehose.
•Restartyourmachine,contacttheservicecentreiftheerror
resumes.
F3 Errorofcontinuouswaterinput
•Closethetap.
•Contacttheservicecentre.
F2 Thewastewaterinthemachinecannotbe
discharged
•Waterdrainhoseisclogged.
•Spigotonsinktapisblocked.
•Thefiltersofyourmachinemightbeclogged.
•Poweroffyourmachineandactivatetheprogramcancellation
command.
•Checkthedrainspigot’smembranehasbeenremovedor
blocked.
•Iftheerrorcontinues,contacttheservicecentre.
F8 Heatererror Contacttheservicecentre.
F1 Alarmisactiveagainstwateroverflow
•Poweroffyourmachineandclosethetap.
•Contacttheservice
centre.
FE Faultyelectroniccard •Contacttheservicecentre.
F7 Overheatingerror(temperatureinthe
machineistoohigh)
•Contacttheservicecentre.
F9 FlowControlValvepositionerror •Contacttheservicecentre.
F6 Faultyheatersensor •Contacttheservicecentre.

25
INFORMATION TROUBLESHOOTING
TROUBLESHOOTING
Call an authorised service centre if the problem still persists after
the controls or in case of any malfunction not described above.
PROBLEM SOLUTION
Ifoneofprogrammonitorlightsison
andstart/pauselightisflashing
•Yourmachine’sdoorisopen,shutthedoor.
Iftheprogramwon’tstart •Checkiftheplugisconnected.
•Checkyourindoorfuses.
•Besurethatthewaterinlettapisturnedon.
•Besurethatyouhaveclosedthemachinedoor.
•BesurethatyouswitchedoffthemachinebypressingthePowerOn/Offbutton.
•Besurethatthewaterinletfilterandthemachinefiltersarenotclogged.
•Firsttimeuse:Checkifthedrainspigot’smembranehasbeenremovedorspigot
blocked.
Ifthecontrollampswon’tgooutaftera
washoperation
•ThePowerOn/Offbuttonisreleasedyet.
Ifdetergentresiduesareleftinthe
detergentcompartment
•Detergenthasbeenaddedwhenthedetergentcompartmentwaswet.
Ifwaterisleftinsidethemachineatthe
endoftheprogram
•Thewaterdrainhoseiscloggedortwisted.
•Thefiltersareclogged.
•Theprogramisnotfinishedyet.
Ifthemachinestopsduringawash
operation
•Powerfailure.
•Waterinletfailure.
•Programcanbeonstandbymode.
Ifshakingandhittingnoisesareheard
duringawashoperation
•Dishesplacedincorrectly.
•Sprayarmhittingthedishes.
Iftherearepartialfoodwasteslefton
thedishes
•Dishesplacedincorrectlyintothemachine,sprayedwaterdidnotreachrelatedplaces.
•Basketoverlyloaded.
•Dishesleaningagainstoneanother.
•Verysmallamountofdetergentadded.
•Anunsuitable,ratherweakwashprogramselected.
•Sprayarmcloggedwithfoodwastes.
•Filtersclogged.
•Filtersincorrectlyfitted.
•Waterdrainpumpclogged.
Iftherearewhitishstainsonthedishes •Averysmallamountofdetergentisbeingused.
•Rinseaiddosagesettingataverylowlevel.
Ifthedisheswon’tdryup •Aprogrammewithoutadryoperationselected.
•Rinseaiddosagesettoolow.
•Dishesunloadedtoofast.
Ifthereareruststainsonthedishes •Stainless-steelqualityofthedisheswashedisinsufficient.
•Unhealthymainsgrounding.

26
NOTES
NOTES

27
WARRANTY
This document sets out the terms and conditions of the product
warranties for Electrolux Appliances. It is an important document.
Please keep it with your proof of purchase documents in a safe place
for future reference should you require service for your Appliance.
1. In this warranty:
(a) ‘acceptable quality’ as referred to in clause 10 of this warranty has
the same meaning referred to in the ACL;
(b) ‘ACL’ means Schedule 2 of the Competition and Consumer Act 2010;
(c) ‘Appliance’ means any Electrolux product purchased by you and
accompanied by this document;
(d) ‘ASC’ means Electrolux authorised service centres;
(e) ‘Electrolux’ means Electrolux Home Products Pty Ltd of 163
O’Riordan Street, Mascot NSW 2020, ABN 51 004 762 341 in
respect of Appliances purchased in Australia and Electrolux (NZ)
Limited (collectively ‘Electrolux’) of 3-5 Niall Burgess Road, Mount
Wellington, in respect of Appliances purchased in New Zealand;
(f) ‘major failure’ as referred to in clause 10 of this warranty has the
same meaning referred to in the ACL and includes a situation when
an Appliance cannot be repaired or it is uneconomic for Electrolux,
at its discretion, to repair an Appliance during the Warranty Period;
(g) ‘Warranty Period’ means the Appliance is warranted against
manufacturing defects in Australia for 24 months and in New Zealand
for 24 months, following the date of original purchase of the Appliance;
(h) ‘you’ means the purchaser of the Appliance not having purchased the
Appliance for re-sale, and ‘your’ has a corresponding meaning.
2. This warranty only applies to Appliances purchased and used in Australia
or New Zealand and used in normal domestic applications and is in
addition to (and does not exclude, restrict, or modify in any way) any
non-excludable statutory warranties in Australia or New Zealand.
3. During the Warranty Period Electrolux or its ASC will, at no extra charge
if your Appliance is readily accessible for service, without special
equipment and subject to these terms and conditions, repair or replace
any parts which it considers to be defective. Electrolux or its ASC may use
remanufactured parts to repair your Appliance. You agree that any replaced
Appliances or parts become the property of Electrolux. This warranty does
not apply to light globes, batteries, filters or similar perishable parts.
4. Parts and Appliances not supplied by Electrolux are not covered by
this warranty.
5. To the extent permitted by law, you will bear the cost of transportation,
travel and delivery of the Appliance to and from Electrolux or its ASC. If you
reside outside of the service area, you will bear the cost of:
(a) travel of an authorised representative;
(b) transportation and delivery of the Appliance to and from Electrolux or
its ASC.
In all instances, unless the Appliance is transported by Electrolux or an
Electrolux authorised representative, the Appliance is transported at the
owner’s cost and risk while in transit to and from Electrolux or its ASC.
6. Proof of purchase is required before you can make a claim under
this warranty.
7. You may not make a claim under this warranty unless the defect claimed
is due to faulty or defective parts or workmanship. Electrolux is not liable in
the following situations (which are not exhaustive):
(a) the Appliance is damaged by:
(i) accident
(ii) misuse or abuse, including failure to properly maintain or service
(iii) normal wear and tear
(iv) power surges, electrical storm damage or incorrect power supply
(v) incomplete or improper installation
(vi) incorrect, improper or inappropriate operation
(vii) insect or vermin infestation
(viii) failure to comply with any additional instructions supplied with the
Appliance;
(b) the Appliance is modified without authority from Electrolux in writing;
(c) the Appliance’s serial number or warranty seal has been removed
or defaced;
(d) the Appliance was serviced or repaired by anyone other than
Electrolux, an authorised repairer or ASC.
8. This warranty, the contract to which it relates and the relationship between
you and Electrolux are governed by the law applicable where the Appliance
was purchased. Where the Appliance was purchased in New Zealand for
commercial purposes the Consumer Guarantee Act does not apply.
9. To the extent permitted by law and subject to your non-excludable statutory
rights and warranties, Electrolux excludes all warranties and liabilities
(other than as contained in this document) including liability for any loss or
damage whether direct or indirect arising from your purchase, use or non
use of the Appliance.
10. For Appliances and services provided by Electrolux in Australia, the
Appliances come with a guarantee by Electrolux that cannot be excluded
under the ACL. You are entitled to a replacement or refund for a major
failure and for compensation for any other reasonably foreseeable loss or
damage. You are also entitled to have the Appliance repaired or replaced if
the Appliance fails to be of acceptable quality and
the failure does not amount to a major failure. The benefits to you given by
this warranty are in addition to your other rights and remedies under a law
in relation to the Appliances or services to which the warranty relates.
11. At all times during the Warranty Period, Electrolux shall, at its discretion,
determine whether repair, replacement or refund will apply if an Appliance
has a valid warranty claim applicable to it.
12. For Appliances and services provided by Electrolux in New Zealand, the
Appliances come with a guarantee by Electrolux pursuant to the provisions
of the Consumer Guarantees Act, the Sale of Goods Act and the Fair
Trading Act.
13. To enquire about claiming under this warranty, please follow these steps:
(a) carefully check the operating instructions, user manual and the terms
of this warranty;
(b) have the model and serial number of the Appliance available;
(c) have the proof of purchase (e.g. an invoice) available;
(d) telephone the numbers shown below.
14. You accept that if you make a warranty claim, Electrolux and its ASC may
exchange information in relation to you to enable Electrolux to meet its
obligations under this warranty.
Warranty
FOR SALES IN AUSTRALIA AND NEW ZEALAND
APPLIANCE: DISHWASHER
Important Notice
Before calling for service, please ensure that the steps listed in clause 13 above have been followed.
FOR SERVICE
or to find the address of your nearest
state service centre in Australia
PLEASE CALL 13 13 49
For the cost of a local call (Australia only)
SERVICE AUSTRALIA
ELECTROLUX HOME PRODUCTS
www.electrolux.com.au
FOR SPARE PARTS
or to find the address of your nearest
state spare parts centre in Australia
PLEASE CALL 13 13 50
For the cost of a local call (Australia only)
FOR SERVICE
or to find the address of your nearest
authorised service centre in New Zealand
FREE CALL 0800 10 66 10
(New Zealand only)
SERVICE NEW ZEALAND
ELECTROLUX (NZ) Limited
www.electrolux.co.nz
FOR SPARE PARTS
or to find the address of your nearest
state spare parts centre in New Zealand
FREE CALL 0800 10 66 20
(New Zealand only)
GDW_Warr_Aug13

AUSTRALIA
phone: 1300363640
fax: 1800350067
email: [email protected]
web: www.westinghouse.com.au
NEW ZEALAND
phone: 095732384
fax: 0800363600
email: [email protected]
web: www.westinghouse.co.nz
For more information on all Westinghouse appliances,
or for dimension and installation information, call into your retailer,
phone or email our customer care team or visit our website:
TOP SERVICE
TopServiceencompassestheaftersalesservice
providedbyTheElectroluxGrouptoconsumers
includingdelivery,homeserviceandspareparts.
Westinghouse. We are part of the Electrolux family.
Share more of our thinking at www.electrolux.com
P/No: 5208 2734 Issue: B
©2013ElectroluxHomeProductsPtyLtd
ABN51004762341
WMAN_WSF6608_Oct13