INSTRUCTION MANUAL
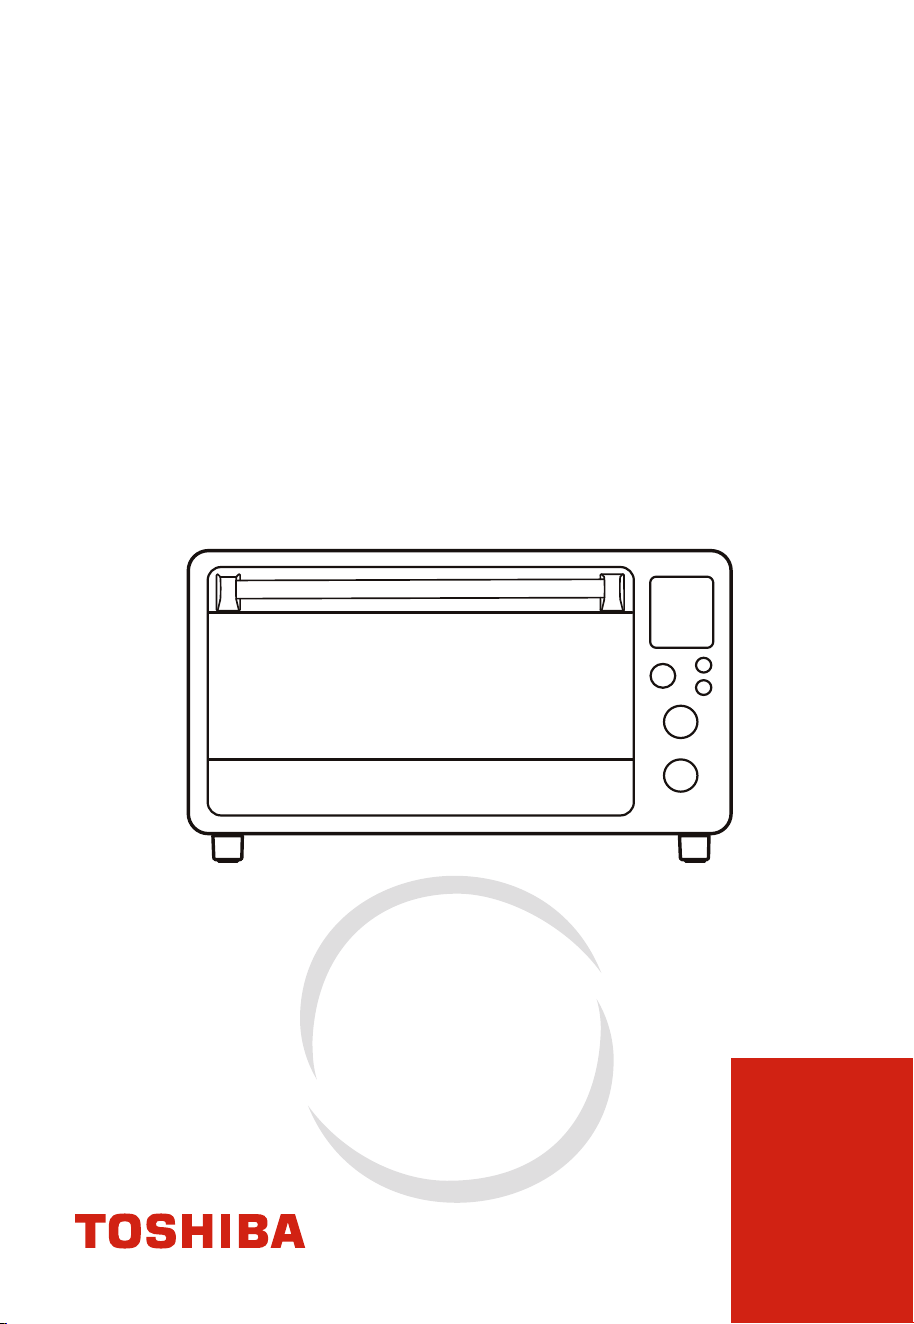
AIR FRY TOASTER OVEN
TL-AC264CZA(SS)/CA
Please review this instruction manual before operating.
Fre
e 3 months
extension of the
original limited warranty
period!* Simply text a
picture of your proof of
purchase to:
1-844-224-1614
*The warranty extension is for the three months
immediate
l
y following
the completion of the product’s original warranty
period. Individuals do not need to register the
product in order to get all the rights and remedies
of registered owners under the original limited
warranty.


CONTENTS
IMPORTANT SAFEGUARDS
Specifications
Before using for the first time
Basic safety precautions
Short cord instruction
..........................................................................................................................................
PRODUCT INSTRUCTION
Names of parts ................................................................................................................
....................
...........................................................................................................................................
01
...........................................................................................................................................
04
04
...............................................................................................................
05
06
...........................................................................................................................
07
..........................................................................................................................................
08
..........................................................................................................................................
09
.................................................................................................................................
10
..........................................................................................................................................
11
..........................................................................................................................................
11
.................................................................................................................................
12
....................................................................................................................................
12
..........................................................................................................................................
12
..........................................................................................................................................
13
...............................................................................................................................
.........
14
..........................................................................................................................................
15
OPERATION
Cooking guidelines
Control panel
Cooking
Function instruction
Mute function
Eco function
Memory function
Factory data reset
Air fry function
Toast function
Pizza function
Bake function

Cookie function
...........................................................................................................................................
16
Roast function
Reheat function
Bagel function
Broil function
Warm function
Proof function
Dehydrate function
..........................................................................................................................................
17
..........................................................................................................................................
18
..........................................................................................................................................
19
..........................................................................................................................................
20
..........................................................................................................................................
21
..........................................................................................................................................
22
..........................................................................................................................................
23
BEFORE OPERATING THIS PRODUCT, READ,
UNDERSTAND, AND FOLLOW THESE INSTRUCTIONS.
BE SURE TO SAVE THIS BOOKLIST FOR FUTURE
REFERENCE.
NOTE
MAINTENANCE
One year limited warranty
...................................................................................................................
25
..........................................................................................................................................
24
CLEANING AND CARE
cleaning and care
IMPORTANT SAFEGUARDS
BASIC SAFETY PRECAUTIONS
When using electrical appliances, basic safety precautions should always
be followed including the following :
01
Read all instructions.
Close supervision is
necessary when any
appliance is used by
or near children.
Unplug from the outlet
when not in use and
before cleaning. Allow
to cool before
putting on or taking off
parts.
The use of accessory
attachments is not
recommended by the
appliance
manufacturer. This may
cause injuries.
Extreme caution must be
used when you move an
appliance containing
hot oil or other hot
liquids.
Avoid contacting
moving parts.
For household use only.
Remove the plug from
the outlet when the
appliance is not in use,
before putting on or
taking off parts, and
before cleaning. Allow
to cool before handling.
Always attach the plug to
the appliance first, then
plug the cord into the
wall outlet.
To disconnect, turn any
control to “off”, then
remove the plug from the
wall outlet.
Use extreme caution
when removing tray or
disposing of hot grease.
Extreme caution should
be exercised when
you use containers
constructed of materials
other than metal or glass.
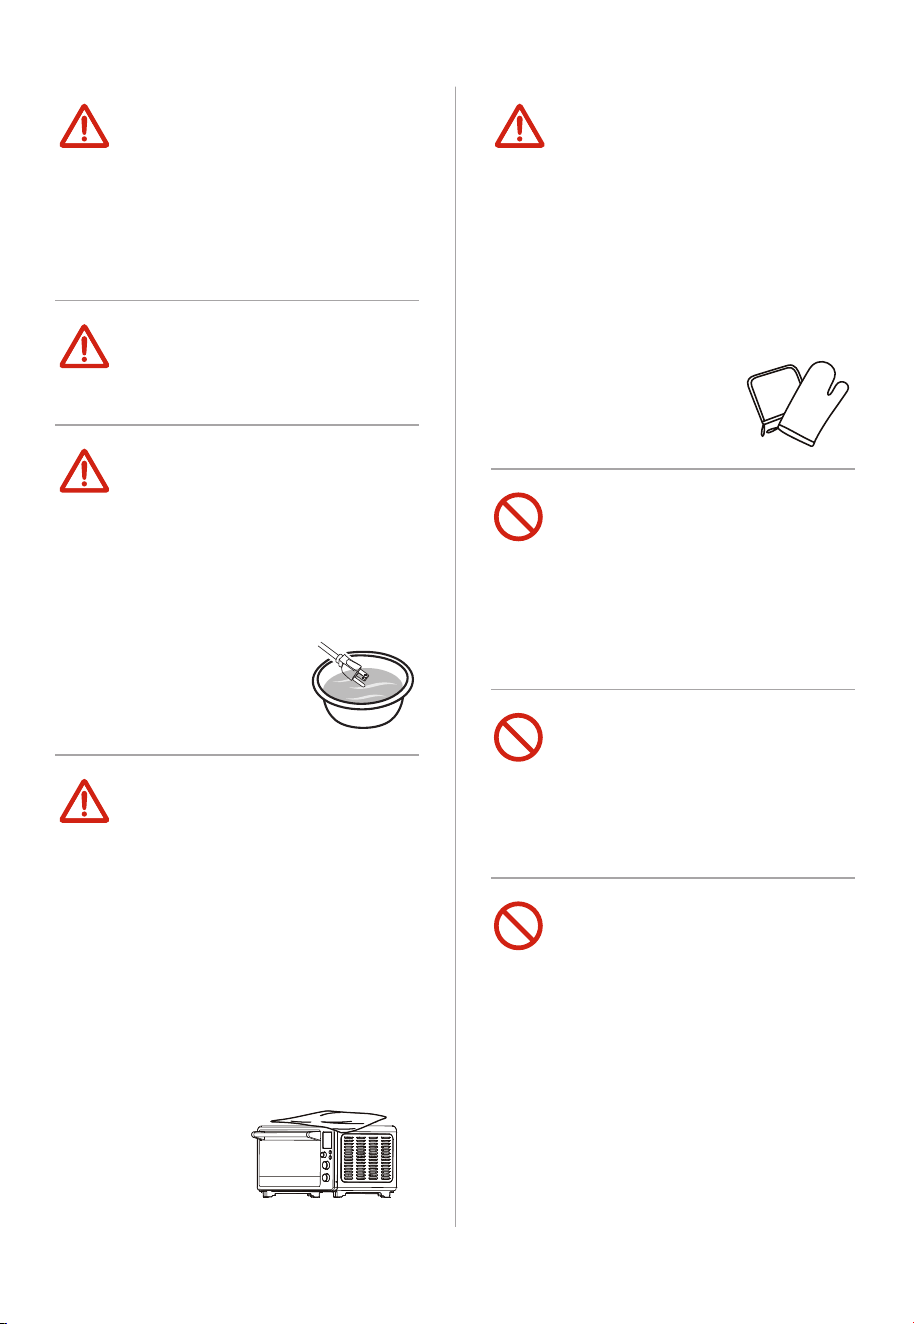
02
To ensure continuous
protection against risks
of electric shock,
connect the appliance
to the properly
grounded outlets only.
The outside of the oven,
including the door, is
hot during and after use.
To protect against
electrical shock, do not
immerse the cord,
plugs, or (state specific
part or parts in
question) in water or
other liquid.
A fire may occur if the
toaster-oven is covered
or touching flammable
material, including
curtains, draperies,
walls, etc., when in
operation. Do not store
any flammable
materials on top of the
appliance when in
operation.
Always use heat-resistant
gloves, pads, or oven mitts
when handling
hot materials, and when
placing items in or
removing items from the
oven, including trays,
racks, accessories, or
containers
.
Do not clean with metal
scouring pads. Pieces can
break off the pad and
touch electrical parts,
creating parts, or
creating a risk of electric
shock.
Oversize foods or metal
utensils must not be
inserted in a toaster-oven
as they may create a fire
or risk of electric shock.
Do not store any
materials, other
than manufacturers
recommended
accessories, in this
oven when not in use.
.
03
Do not place on or near a
hot gas or electric
burner, or in a heated
oven.
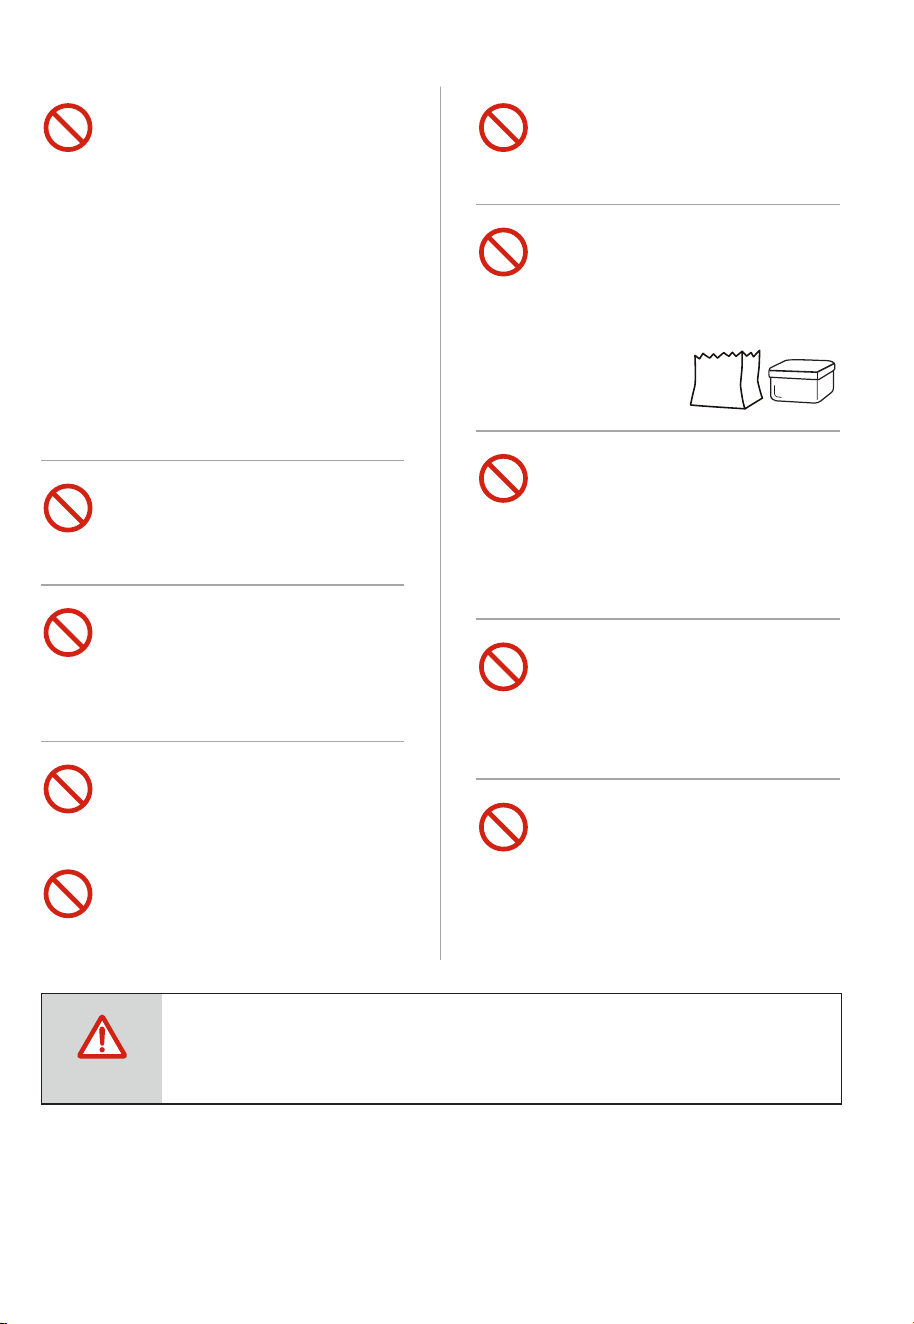
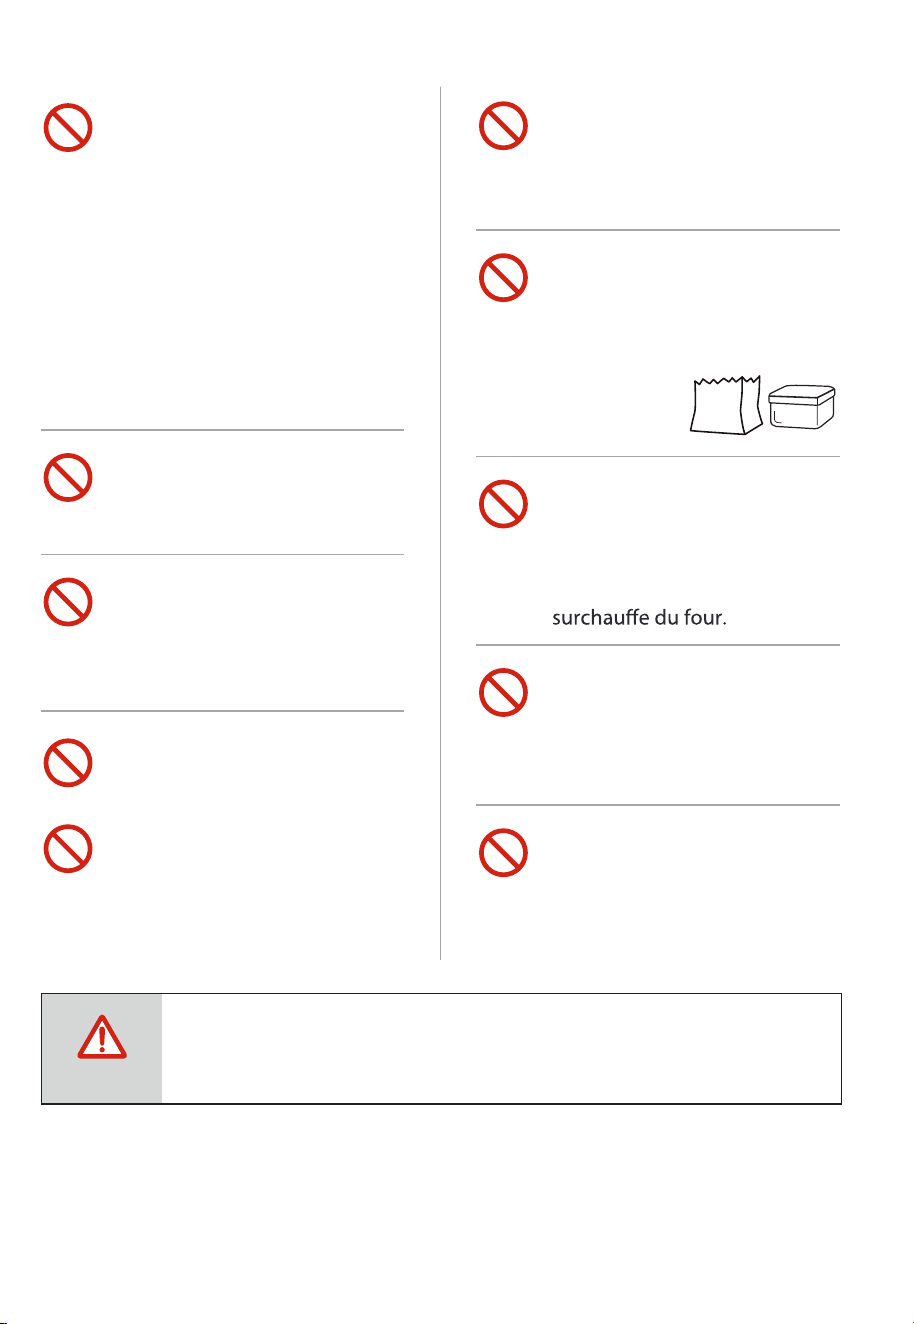
Do not place any of the
following materials in
the oven: (that is, paper,
cardboard, plastic, etc.).
Do not cover crumb tray
or any part of the oven
with a metal foil.
This will cause
over-heating of the
oven.
Do not use the
appliance for other
usages that are not
described in this manual.
During operation, press
pots nac " esuaP/tratS "
cooking.
Do not operate
any appliance with
a damaged cord or plug,
or after the appliance
malfunctions or has been
damaged in any manner.
Return appliance to the
nearest authorized
service facility for
examination, repair, or
adjustment.
Do not touch hot
surfaces.
Use handles or knobs.
Do not hang the cord
over the edge of a
table or counter, or
touch hot surfaces.
Do not use the appliance
outdoors.
For cooking only
(e.g., heating food).
Do not use for other purposes.
SAVE THESE INSTRUCTIONS
HOUSEHOLD INDOOR USE ONLY
Do not insert your fingers into any gaps or holes.
This may cause injuries.
CAUTION

04
SHORT CORD INSTRUCTION
(DETACHABLE POWER-SUPPLY CORD)
1. A short power-supply cord (or detachable power-supply cord)
should be used to reduce the risk resulting from becoming
entangled in or tripping over a longer cord.
2. Longer detachable power-supply cords or extension cords are
available and may be used if care is exercised in their use.
3. If a longer detachable power-supply cord or extension cord is used:
• The marked electrical rating of the cord set or extension cord should
be at least as great as the electrical rating of the appliance.
• The cord should be arranged so that it will not drape over the
countertop or tabletop where it can be pulled on by children or
tripped over unintentionally.
• If the appliance is of the grounded type, the extension cord should
be a grounding-type 3-wire cord.
MODEL
POWER SUPPLY
POWER CONSUMPTION
BEFORE USING FOR THE FIRST TIME
1. Remove all accessories and shipping materials packed inside the Oven.
2.
3.
4.
CAUTION
The oven may smoke inside during process. This is normal for
a new oven and will not last more than 10-15 minutes
.
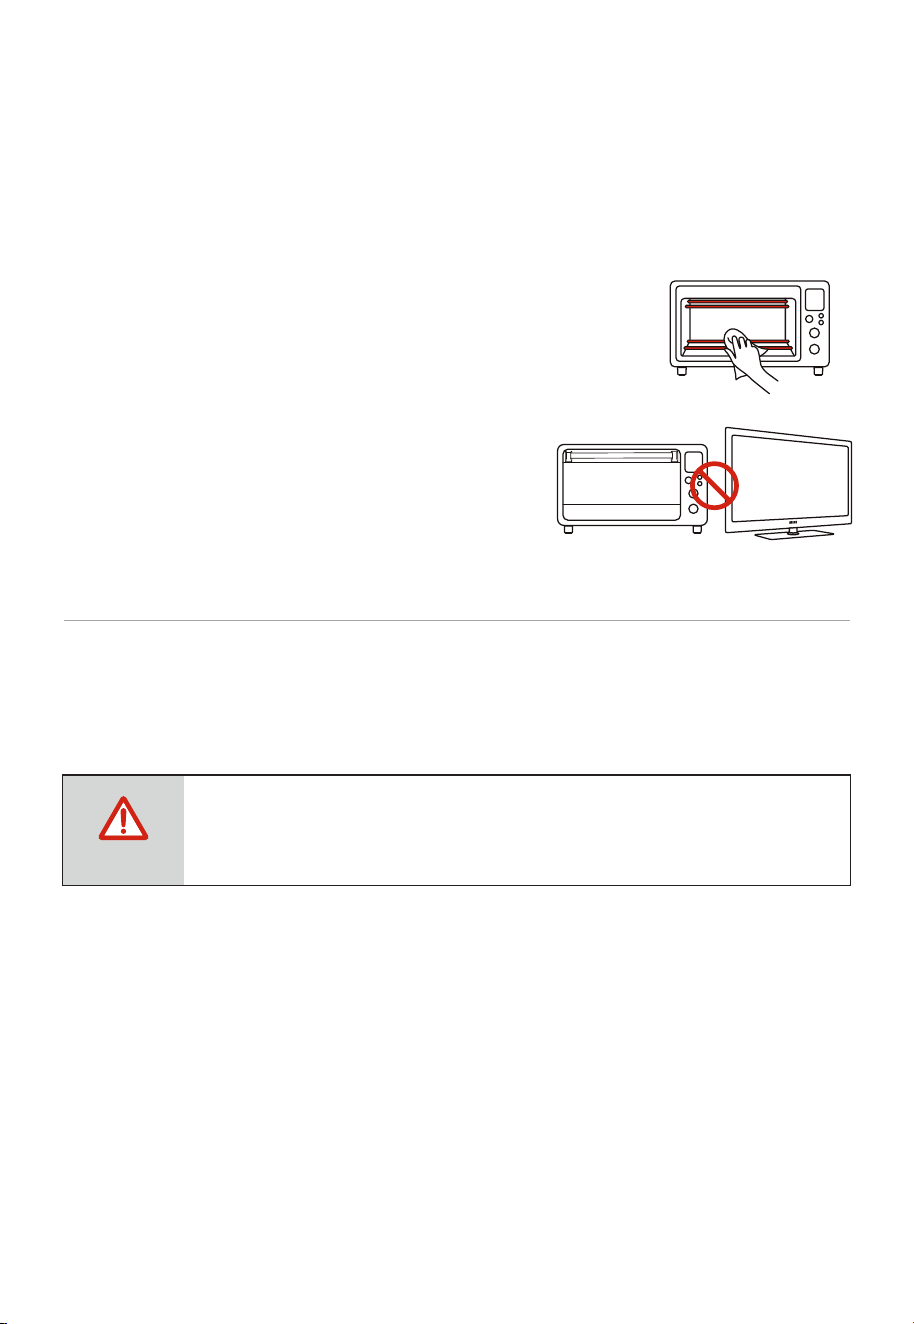
Wash the oven fittings with a dab of washing-up liquid and warm
water. Wipe the unit and the oven fittings dry before using with
paper towels or a dry cloth.
Place the oven on a flat counter or other stable surface.
DO NOT OPERATE ON THE SAME CIRCUIT WITH
ANOTHER APPLIANCE.
Make sure the crumb tray is properly fitted before using the oven.
It is recommended to operate the oven empty on Air Fry mode for 15 minutes at 400°F.
This will ensure that any protective film on the heating elements are removed. When using
the oven for the first time, the oven may emit visible and/or a slight odor. The vapors and
odor are normal, safe and not detrimental to the oven. Ensure that the room is well ventilated.
05
PRODUCT INSTRUCTION
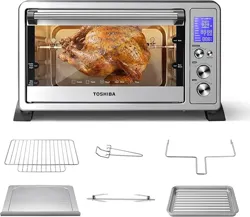
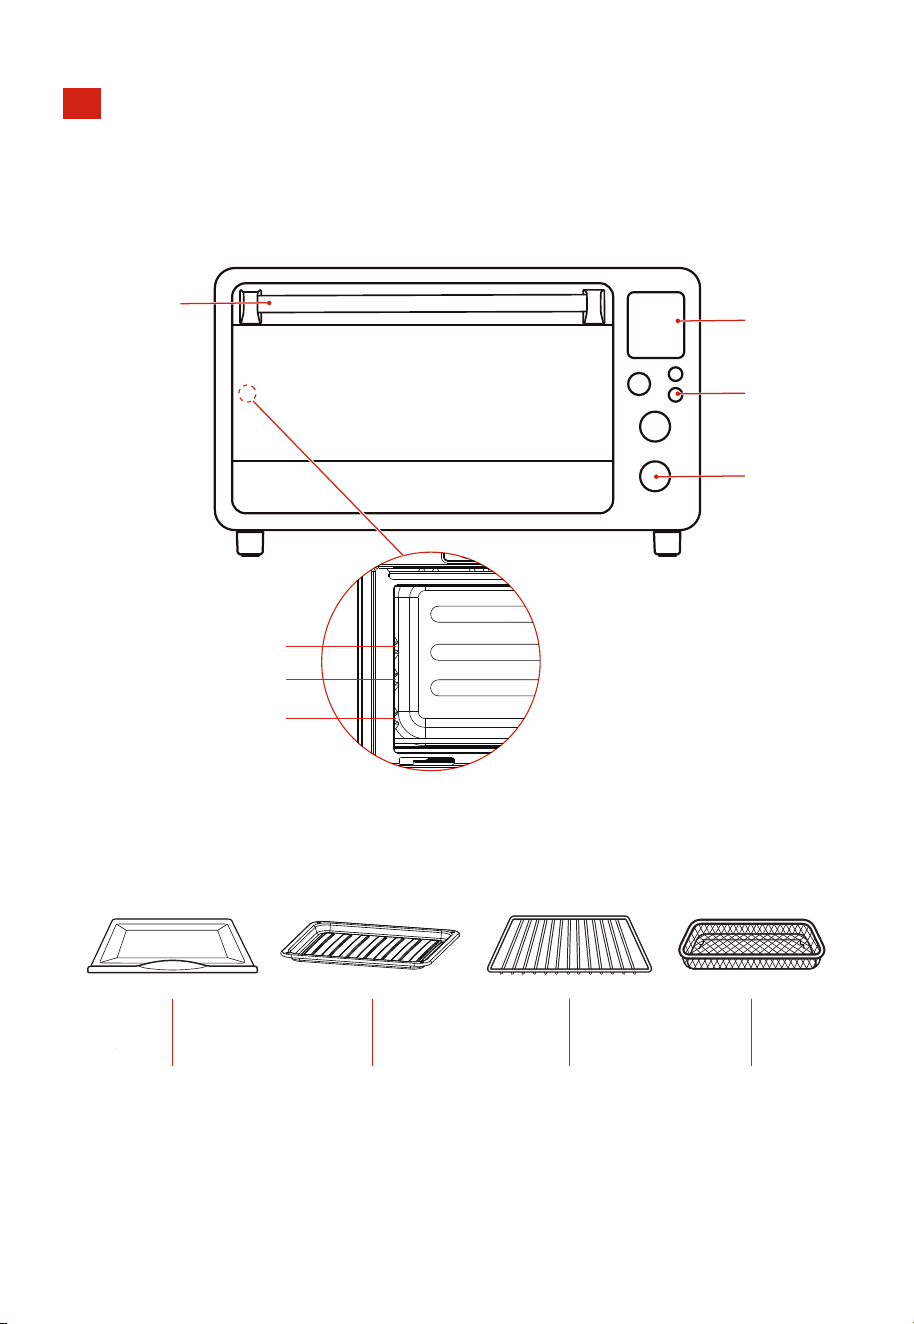
NAMES OF PARTS
Knob
Button
Display
Handle
06
Crumb tray
Hot Dip Galvanized
Baking tray
Aluminum-plated
Baking rack
Chrome-plated
Air fry basket
Chrome-plated
Layer 3
Layer 2
Layer 1
OPERATION
INSTRUCTIONS
CAUTION
COOKING GUIDELINES
THE OVEN SURFACES ARE HOT DURING AND AFTER USE.
07
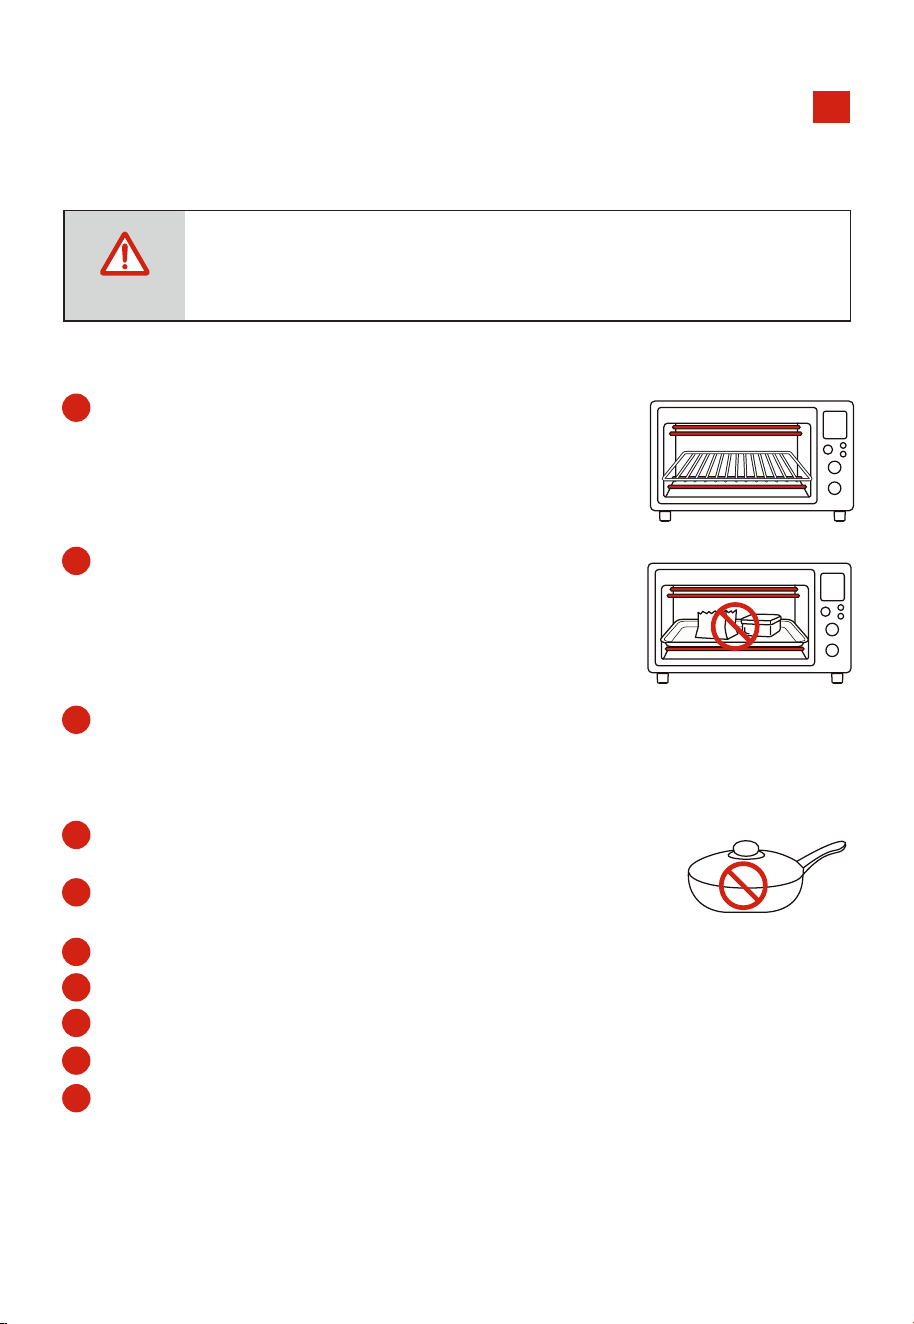
1
Place the Baking rack in position that will accommodate
the height of the food to be cooked.
2
4
Clean the heating pipes periodically.
5
Never use glass or ceramic pans or lids
6
7
8
9
10
Please don’t unplug the power cord when the oven finish working. The fan
will stop delay working 1 min.
NEVER let oil or other liquids from the food to drip down to the bottom of the oven.
Set the temperature as suggested by the recipe or as desired.
Securely shut the door and set the cooking time to begin cooking.
The air fry basket needs to be used on the baking rack.
The food should be put onto the baking tray to avoid catching
fire by an accumulation of food leftovers on the heating
pipes. Make sure that you always use an ovenproof container
in the oven, never use plastic or cardboard containers in the
oven.
3
Energy-saving Design: The oven light will automatically turn
off after three minutes of no operation during cooking, and turn
on one minute prior to cooking completes as a cooking status reminder.
08
CONTROL PANEL
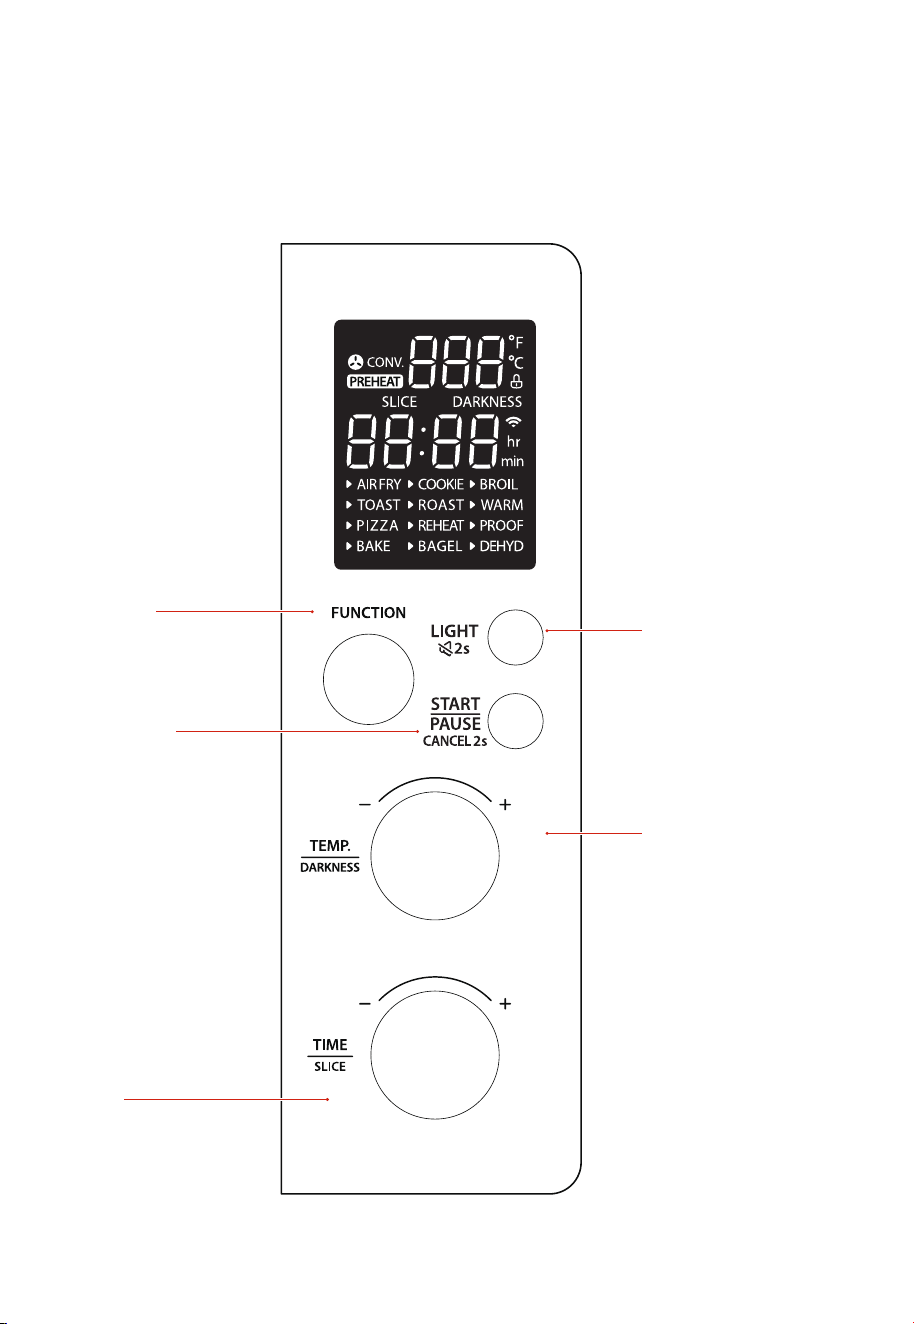
Light
Switching an internal light on/off.
In standby mode, press this
button for 2 seconds to enter
the mute mode.
Temperature
Rotate this knob to
adjust temperature.
Darkness
Adjust the darkness on toast
and bagel.
Function
Rotate this knob to
select function.
Start/Pause
Press this button to start
or pause cooking.
Press this button for 2 seconds
to enter the standby mode. In
standby mode, press this
button for 2 seconds to enter
the eco mode.
Time
Rotate this knob to adjust time.
Slice
Adjust the amount of toast
and bagel.

09
COOKING
FUNCTION
AIR FRY
TOAST
PIZZA
BAKE
COOKIE
ROAST
BAGEL
REHEAT
WARM
PROOF
DEHYD
RACK POSITION
Layer 2 or 3
Layer 2 or 3
Layer 2
Layer 2
Layer 3
Layer 2
Layer 1
Layer 2
Layer 2
Layer 1 or 2
Layer 1 or 2
DESCRIPTIONS
Evenly toast to your perfect
level of darkness
Achieve a crispy outside and
perfectly cooked inside for a variety
of meats, poultry and veggies
Evenly toast bagel slices when
they are placed cut-side up
Heat leftovers without over cooking
Keep food warm and
prevent bacterial growth
Precisely hold low temperature
to provide an ideal
environment for proofing
Evenly dry out food without cooking
ACCESSORIES
Air Fry Basket
Baking Rack
Baking Tray
Baking Rack
Baking Rack or
Baking Tray
Baking Tray
Baking Tray
Baking Rack
Baking Rack or
Baking Tray
Baking Tray
Air Fry Basket
COOKING
PRODUCT FUNCTIONS
BROIL Layer 2
Baking Rack or
Baking Tray
Make fast, extra-crispy foods
with little or no added oil
Melt and brown cheese and
toppings, with crispy crust
Bake and evenly brown cookies
and other baked treats
Bake and evenly brown cookies
and other baked treats
Broil meat and fish and evenly
brown the tops of casseroles

10
COOKING
FUNCTION
AIR FRY
TOAST
PIZZA
BAKE
COOKIE
ROAST
REHEAT
BAGEL
BROIL
WARM
PROOF
DEHYD
400°F 15min
450°F 11min
350°F 30min
450°F 10min
180°F 1hour
375°F 10min
400°F 1hour
350°F 10min
DEFAULT SETTING
4 Slices 4 Darkness
4 Slices 4 Darkness
100°F 50min
150°F 4hours
FAN FOR
CONVECTION
ON
ON
OFF
ON
OFF
OFF
OFF
OFF
OFF
OFF
OFF
OFF
NO
YES
YES
NO
NO
NO
YES
YES
NO
NO
NO
NO
PREHEAT
200~450°F 1min~2hours
150~450°F 1min~30min
400~450°F 1min~2hours
100~300°F 1min~4hours
150~450°F 1min~2hours
200~450°F 1min~2hours
150~450°F 1min~1hours
150~450°F 1min~2hours
80~110°F 1min~9hours
90°F~200°F 1min~24hours
SETTING RANGE
1-6 Slices 1-7 Darkness
1min~30min
2
,
4
,
6 Slices 1-7 Darkness
1min~30min
PRODUCT
SETTINGS
1. In the process of cooking, you can press " START/PAUSE " to pause cooking.
2. In the end of cooking, the product will beep 3 times and “End” will display.
3. When preheat temperature is reached, the buzzer will sound 5 times, the
oven starts cooking automatically.
FUNCTION INSTRUCTION
Note
11
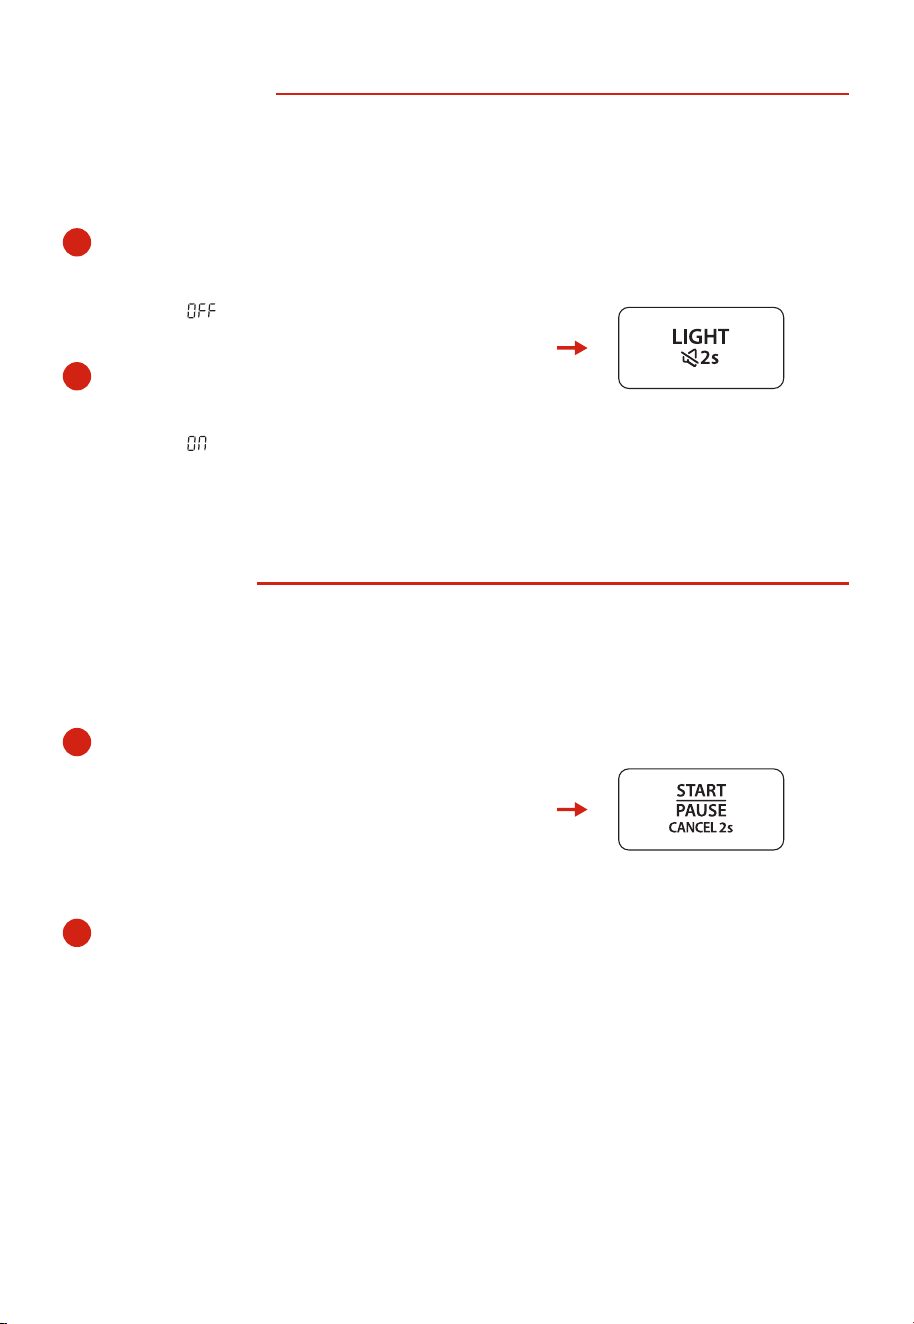
MUTE FUNCTION
In mute mode, when you press any button, it does not make a sound. When the oven is
plugged into an outlet and in standby mode, the defaute mode is sound on.
To activate the mute mode:
In standby mode, press and hold ‘’ LIGHT ‘’ for 2
seconds, ‘’ ‘’ diaplays.
To deactivate the mute mode:
In mute mode, press and hold ‘’ LIGHT ‘’ for 2
seconds, ‘’ ‘’ diaplays.
ECO FUNCTION
When the oven is plugged into an outlet and in standby mode, the defaute mode
will not enter ECO mode.
To enter eco mode:
In standby mode, press and hold ‘’ START/PAUSE ‘’
for 2 seconds, the screen will turn off.
or
In standby mode, if there is not any operation in 5 minutes.
To cancel eco mode:
In eco mode, you can press any button or rotate any knob to cancel it.
2
1
2
1
12
2
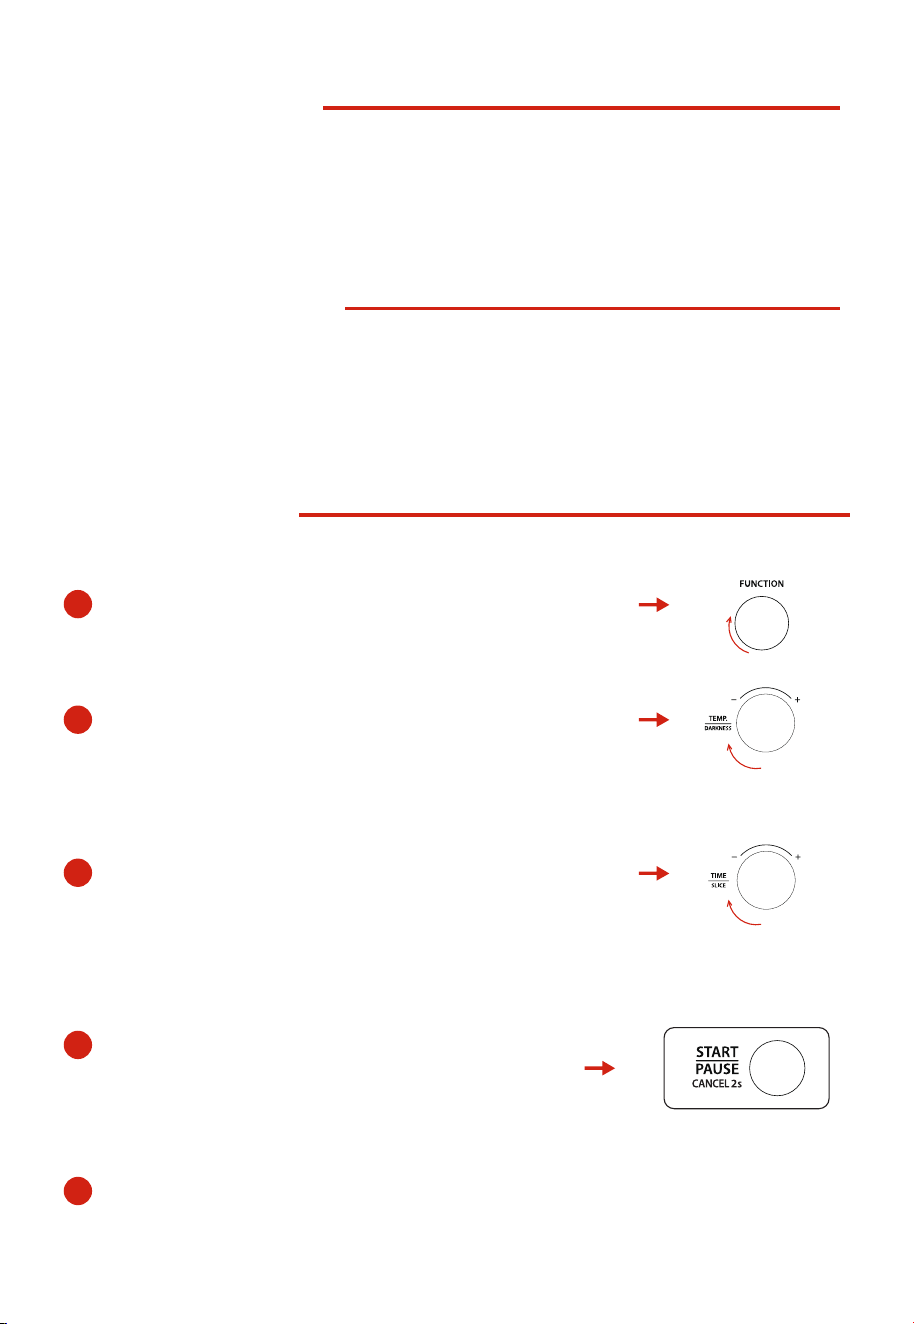
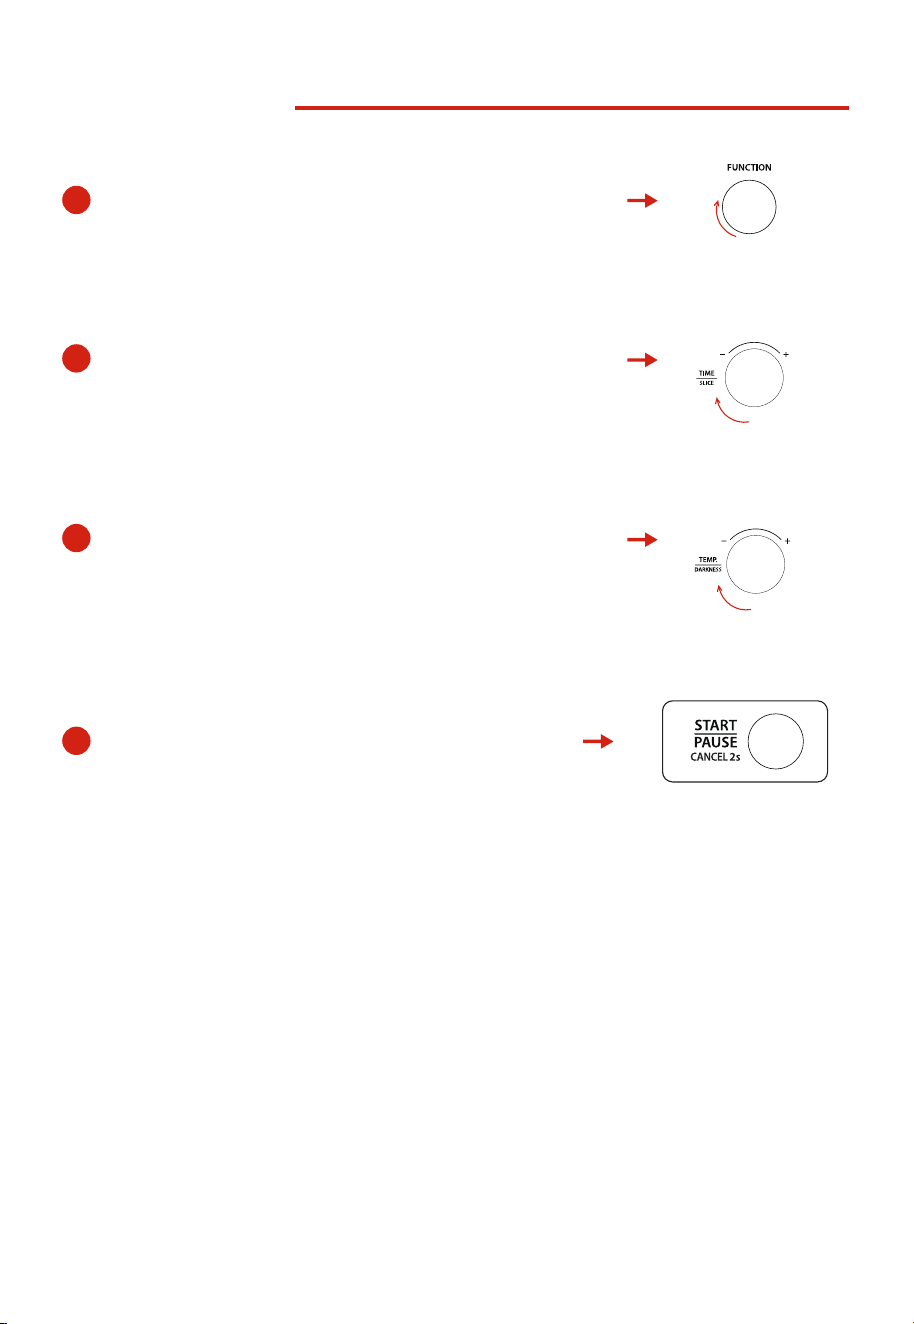
Rotate the " TEMPERATURE/DARKNESS " knob to select
cooking temperature.
3
Rotate the " TIME/SLICE " knob to select cooking time.
1
Rotate the “ FUNCTION ” knob to select AIR FRY function.
4
5
Put the food into the oven and close the door,
the oven starts cooking automatically.
MEMORY FUNCTION
The settings are automatically saved when cooking is complete. When you select the same
function next time, press " START/PAUSE " to start cooking, it will cook with the previous setting.
Toast and bagel only memorize the
number of slices
and
darkness lev
el.
FACTORY DATA RESET
Within one minute of power on, press and hold " START/PAUSE " and " LIGHT " button for 3 seconds,
clear used data. If it succeeds, the screen will display " 1 " and then return to the standby mode after
3 seconds. If it fails, " 0 " will display and the oven will return to the standby mode after 3 seconds.
AIR FRY FUNCTION
Press the " START/PAUSE " button to start
preheating. When preheat temperature is
reached, the buzzer will sound 5 times.
13
4
Press " START/PAUSE " to start cooking.
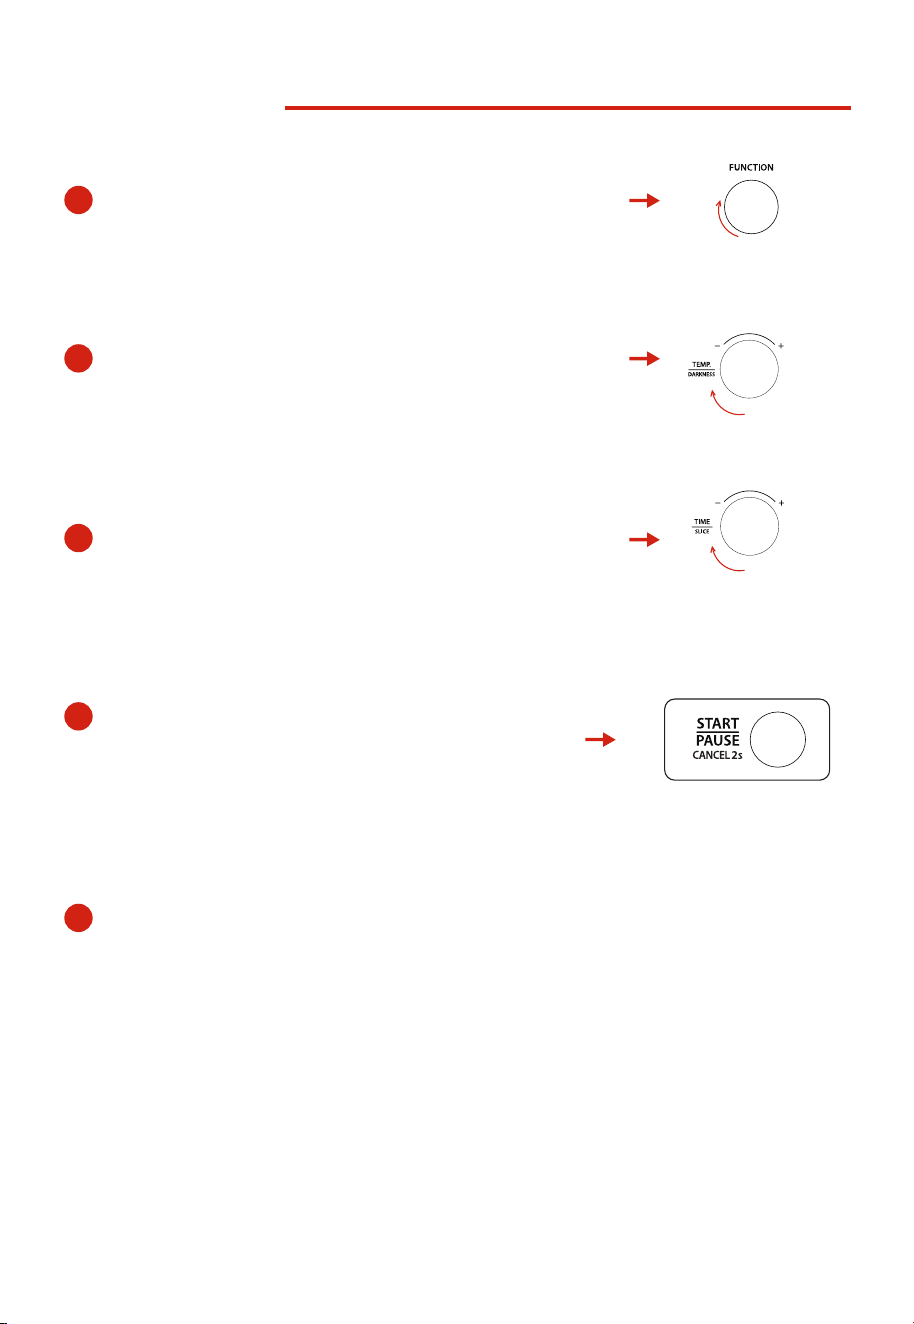
TOAST FUNCTION
1
2
Rotate the “ FUNCTION ” knob to select TOAST function.
Rotate the " TIME/SLICE " knob to select the desired
number of slices.
3
Rotate the " TEMPERATURE/DARKNESS " knob to
select the desired darkness level.
14
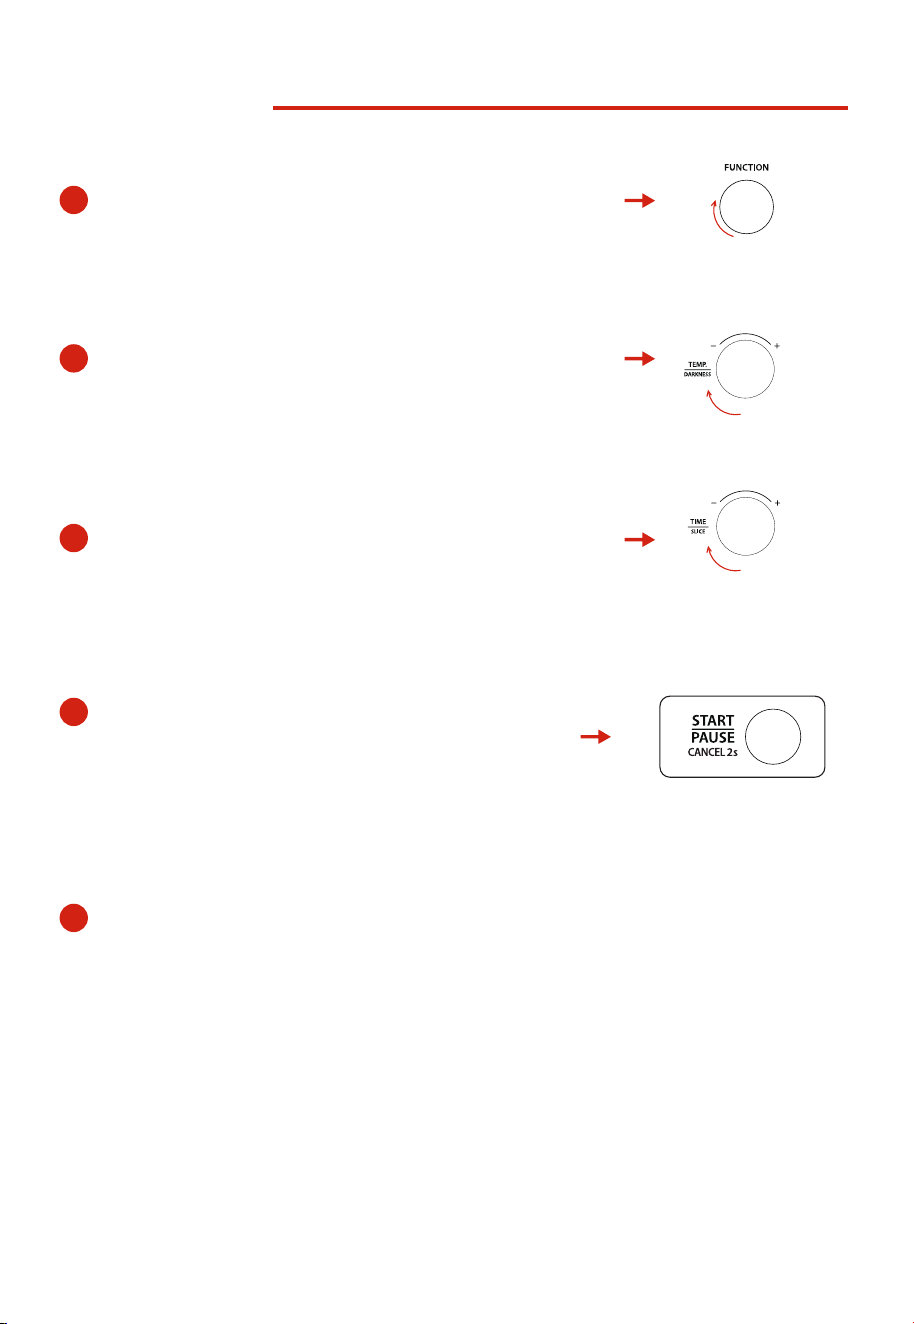
PIZZA FUNCTION
1
2
Rotate the “ FUNCTION ” knob to select PIZZA function.
Rotate the " TEMPERATURE/DARKNESS " knob to
select temperature.
3
Rotate the " TIME/SLICE " knob to select cooking time.
4
5
Put the food into the oven and close the door,
the oven starts cooking automatically.
Press the " START/PAUSE " button to start
preheating. When preheat temperature is
reached, the buzzer will sound 5 times.
BAKE FUNCTION
15
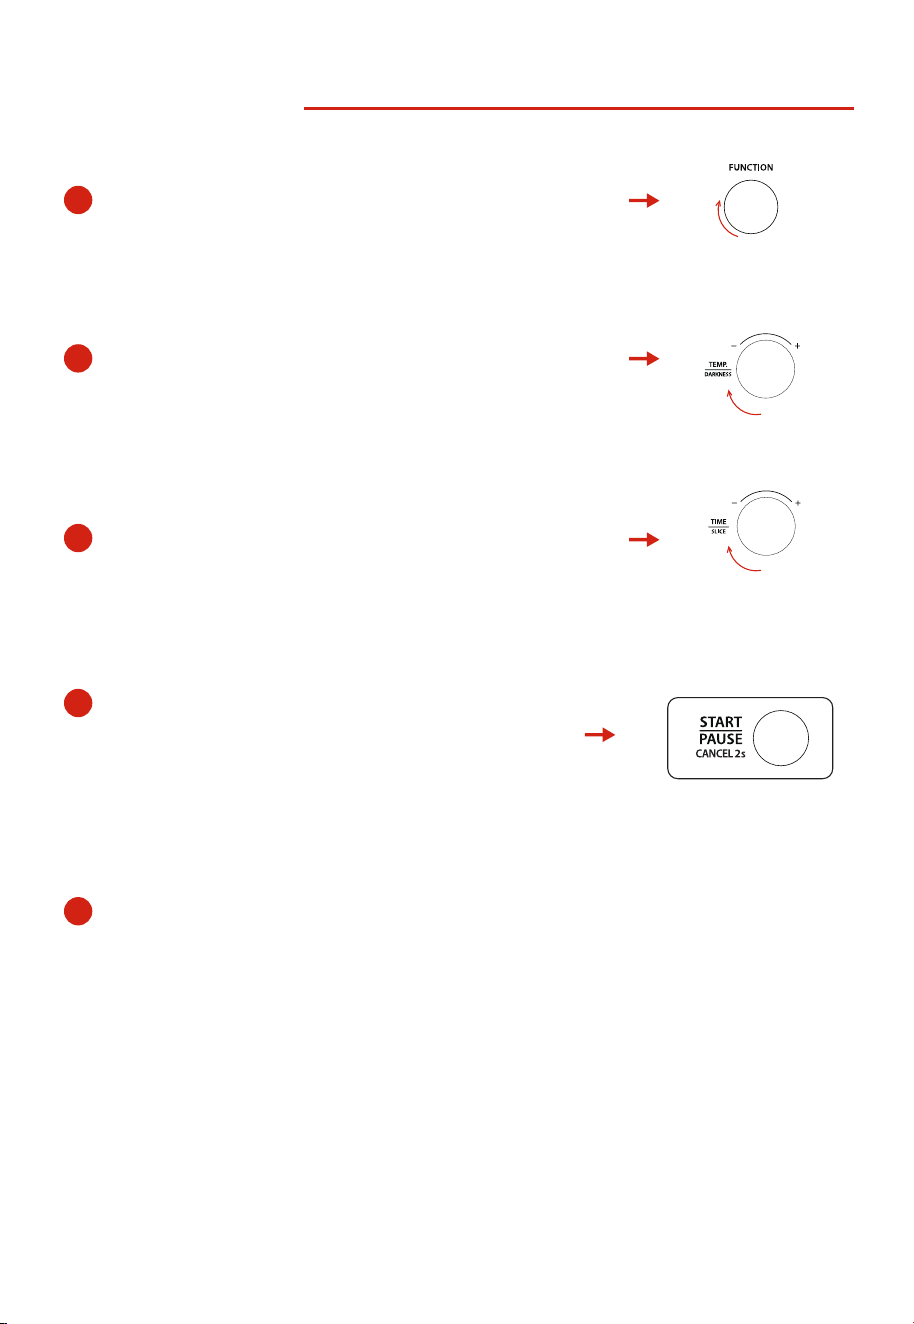
4
5
Put the food into the oven and close the door,
the oven starts cooking automatically.
1
2
Rotate the “ FUNCTION ” knob to select BAKE function.
Rotate the " TEMPERATURE/DARKNESS " knob to
select temperature.
3
Rotate the " TIME/SLICE " knob to select cooking time.
Press the " START/PAUSE " button to start
preheating. When preheat temperature is
reached, the buzzer will sound 5 times.
16
COOKIE FUNCTION
4
5
Put the food into the oven and close the door,
the oven starts cooking automatically.
1
2
Rotate the “ FUNCTION ” knob to select COOKIE function.
Rotate the " TEMPERATURE/DARKNESS " knob to
select temperature.
3
Rotate the " TIME/SLICE " knob to select cooking time.
Press the " START/PAUSE " button to start
preheating. When preheat temperature is
reached, the buzzer will sound 5 times.
17
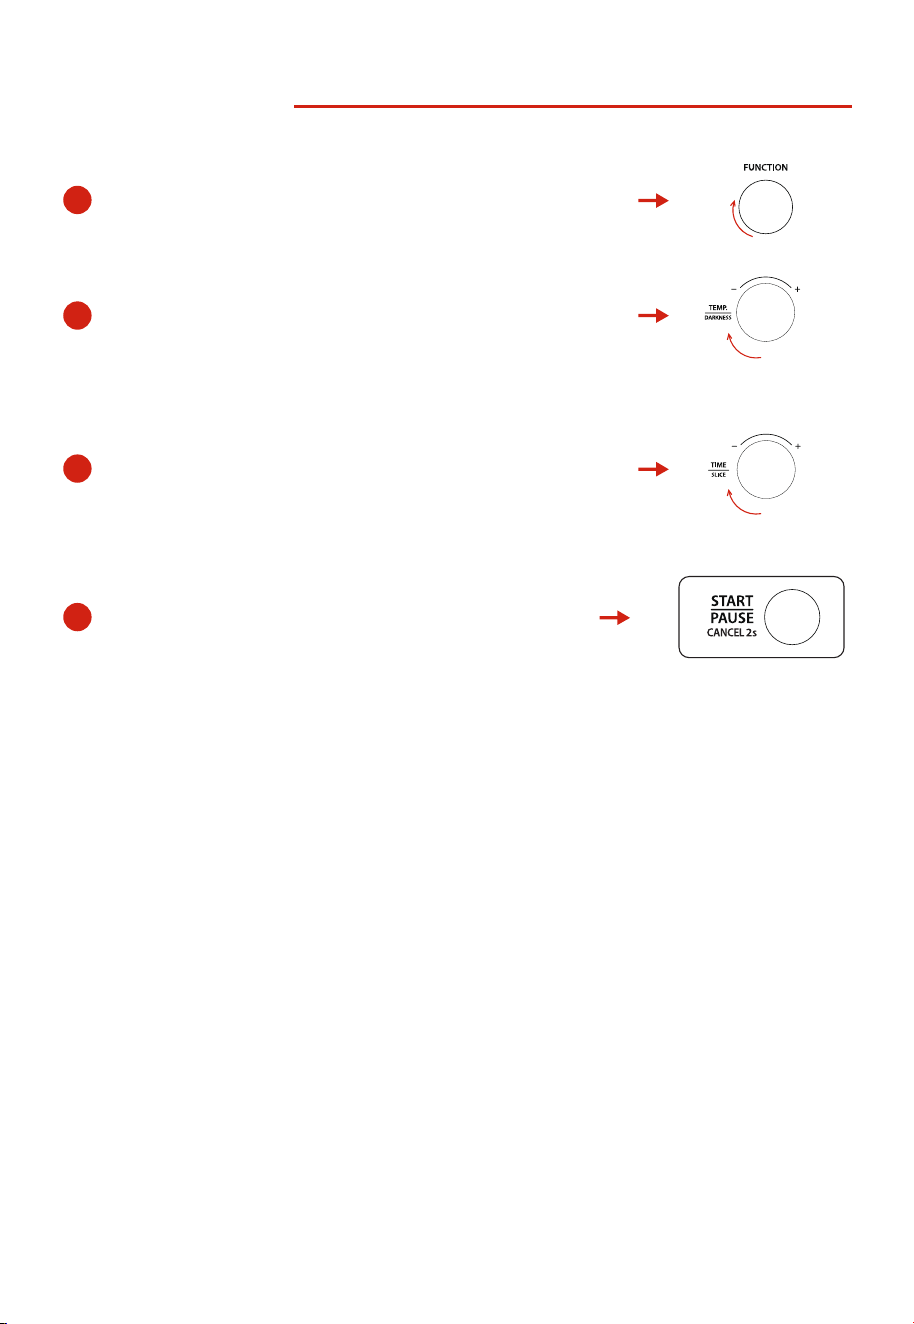
ROAST FUNCTION
2
Rotate the " TEMPERATURE/DARKNESS " knob to select
cooking temperature.
3
4
Rotate the " TIME/SLICE " knob to select cooking time.
1
Rotate the “ FUNCTION ” knob to select ROAST function.
Press " START/PAUSE " to start cooking.
18
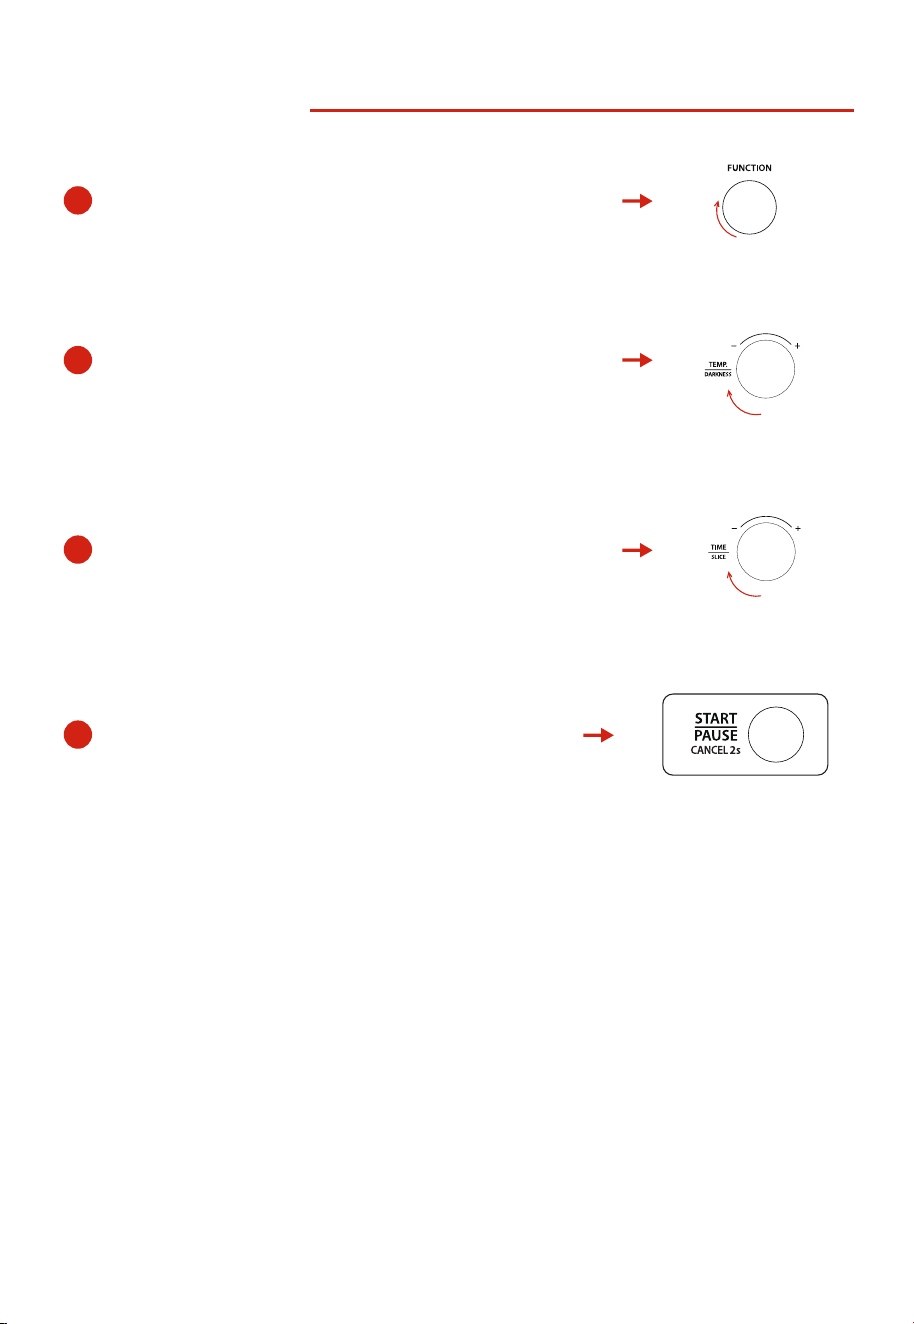
REHEAT FUNCTION
1
Rotate the “ FUNCTION ” knob to select REHEAT function.
2
Rotate the " TEMPERATURE/DARKNESS " knob to select
cooking temperature.
3
Rotate the " TIME/SLICE " knob to select cooking time.
4
Press " START/PAUSE " to start cooking.
19
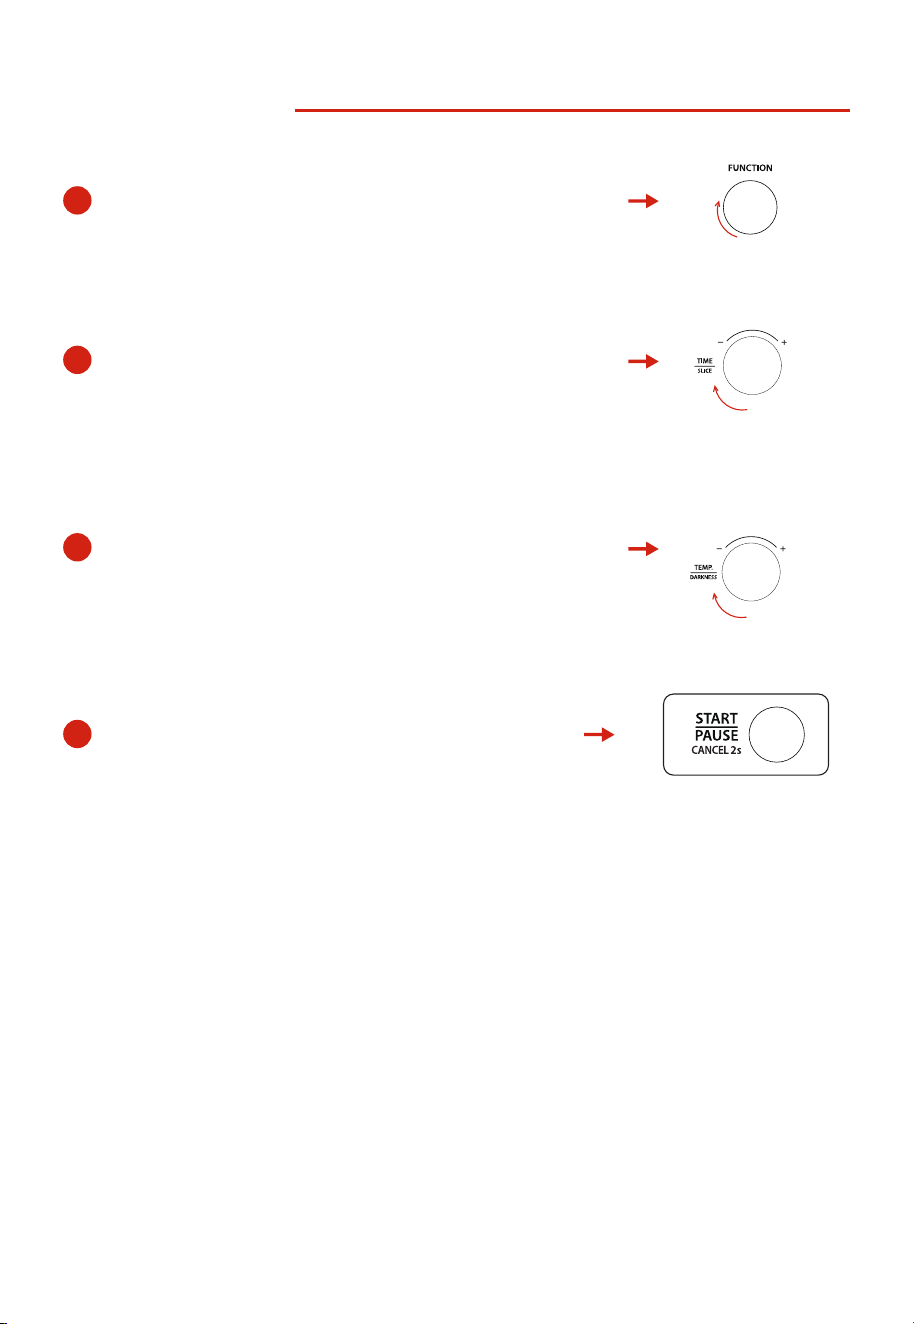
BAGEL FUNCTION
1
Rotate the “ FUNCTION ” knob to select BAGEL function.
3
Rotate the " TEMPERATURE/DARKNESS " knob to
select the desired darkness level.
2
Rotate the " TIME/SLICE " knob to select the desired
number of slices.
4
Press " START/PAUSE " to start cooking.
20
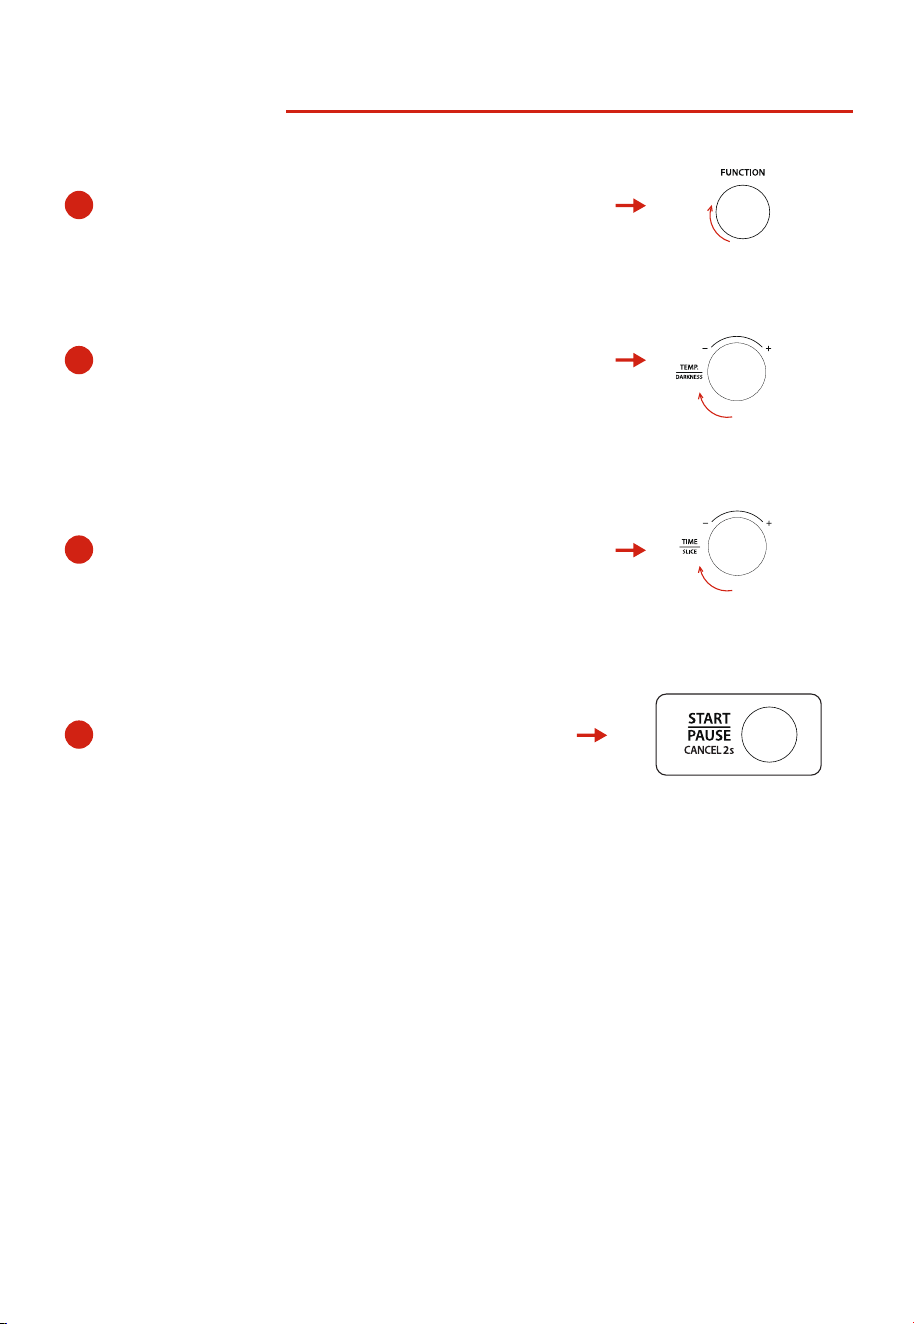
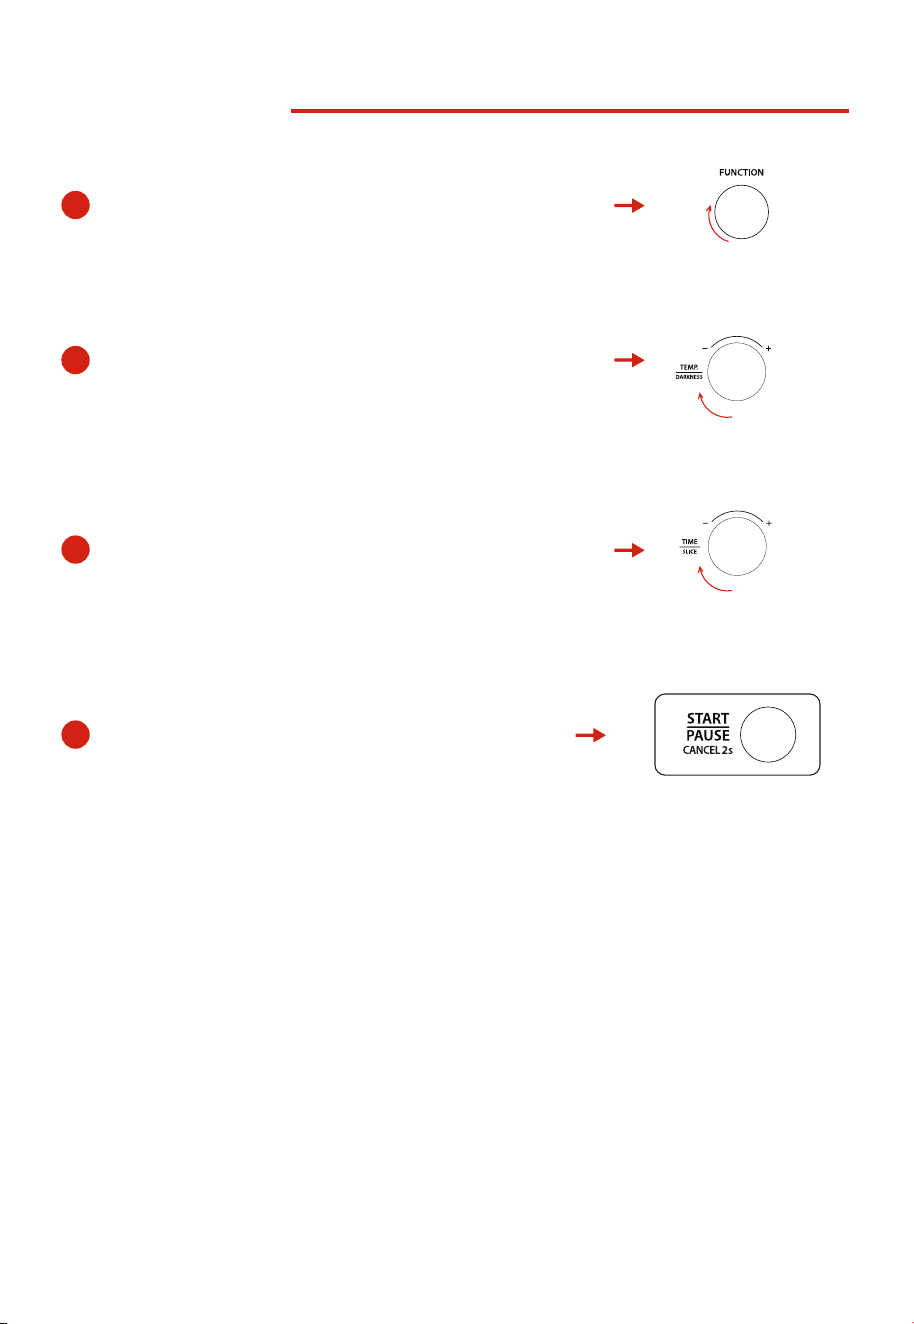
BROIL FUNCTION
1
Rotate the “ FUNCTION ” knob to select BROIL function.
2
Rotate the " TEMPERATURE/DARKNESS " knob to select
cooking temperature.
3
Rotate the " TIME/SLICE " knob to select cooking time.
4
Press " START/PAUSE " to start cooking.
21
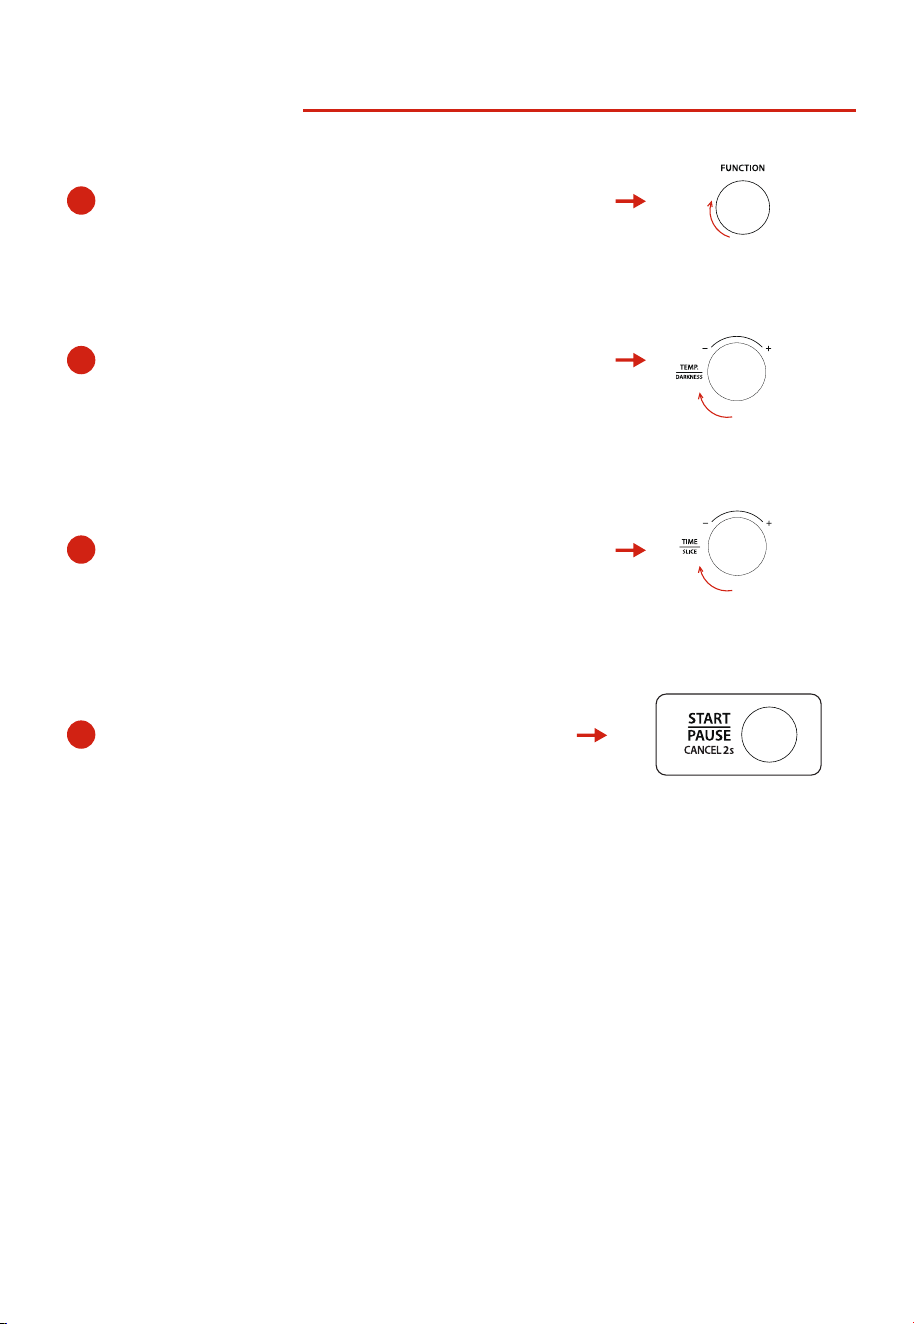
WARM FUNCTION
1
Rotate the “ FUNCTION ” knob to select WARM function.
2
Rotate the " TEMPERATURE/DARKNESS " knob to select
cooking temperature.
3
Rotate the " TIME/SLICE " knob to select cooking time.
4
Press " START/PAUSE " to start cooking.
22
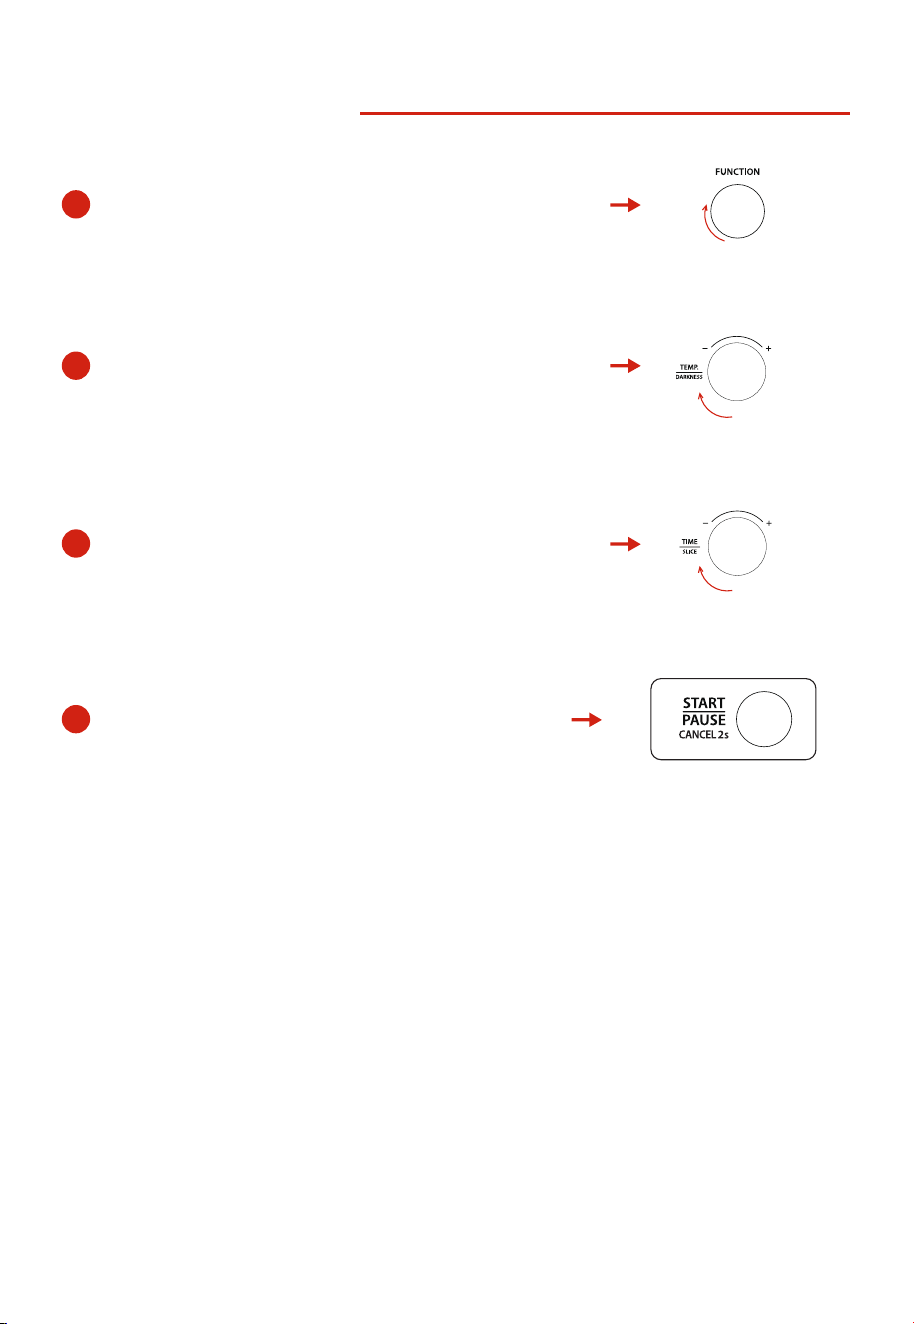
PROOF FUNCTION
1
Rotate the “ FUNCTION ” knob to select PROOF function.
2
Rotate the " TEMPERATURE/DARKNESS " knob to select
cooking temperature.
3
Rotate the " TIME/SLICE " knob to select cooking time.
4
Press " START/PAUSE " to start cooking.
23
DEHYDRATE FUNCTION
2
Rotate the " TEMPERATURE/DARKNESS " knob to select
cooking temperature.
3
4
Rotate the " TIME/SLICE " knob to select cooking time.
1
Rotate the “ FUNCTION ” knob to select DEHYD function.
Press " START/PAUSE " to start cooking.
24
CAUTION
Warning: Hot Surface!
1
2
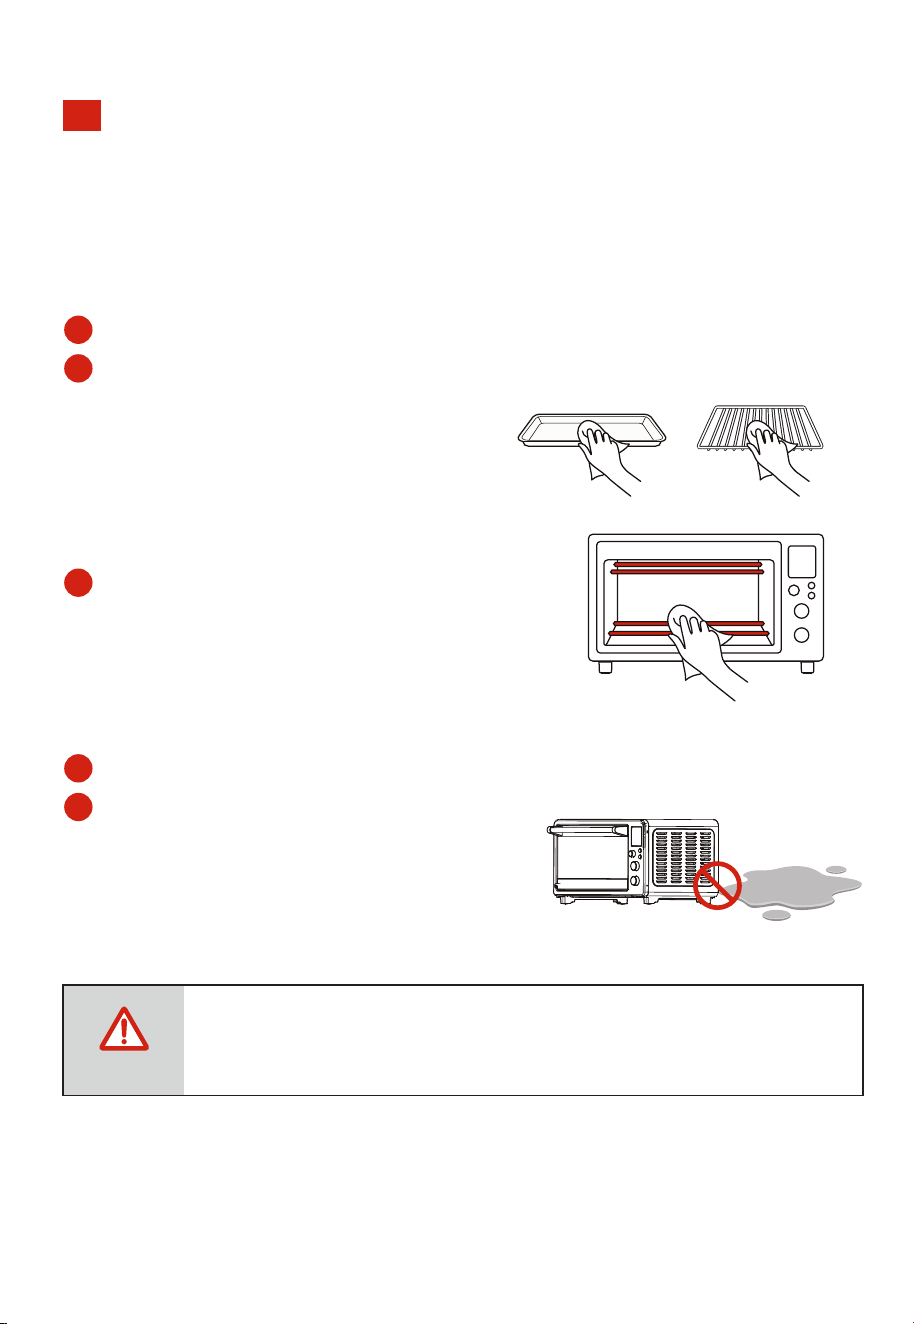
Wash all the accessories with mild and
3
Using a wet cloth to wipe the inner of the oven.
To clean the door, use a wet cloth saturated
with detergent or soap.
4 Never immerse the unit in water or other liquid.
5 Any other servicing should be performed by an
authorized service representative.
soaped water including the baking rack
and the baking tray.
Do not use abrasive cleansers, scrubbing
brushes, or chemical cleaner. This will
cause damage to the baking tray.
CLEANING AND CARE
CLEANING AND CARE
With proper care and cleaning, your appliance will retain its appearance and remain fully
functional for a long time. We will explain here how you should correctly care for and
clean your appliance. Do not use glass cleaners or metal/glass scrapers for cleaning.
Before cleaning, unplug the oven and allow it to cool completely.
ONE YEAR LIMITED WARRANTY
This product carries a warranty stating that it will be free from defects in material and workmansh
for a period of one year from the date of purchase. This warranty is valid for the original reta
purchaser from the date of initial retail purchase and is not transferable. Keep your original sal
receipt.
IMPORTANT:
1.
This warranty does not cover damages resulting from accident, misuse or abuse, lack of reasonab
the appliance to any but the specified voltage. ( Read directions carefully. )
2. This warranty is void if this product is ever used for other than private household purposes.
3. This warranty is void if this product is ever used outside of Canada.
If service is required during the warranty period, properly pack your unit. We recommend usi
the original carton and packing materials.
If additional assistance is needed, please contact customer assistance at:
Midea America (Canada) Corp.
Unit 108, 15 Allstate Parkway Markham ON L3R 5B4
25
SAVE THIS FOR YOUR RECORDS
not diminish the consumer' s warranty rights.
Product registration is not mandatory. Failure to complete and return the card or form does
Serial Number : _____________________
Model Number : ____________________
of your unit in the space below for future reference
The serial number can be found on the back cabinet. We suggest that you record theserial numb
from state to state.
limitation of incidental or conse quential losses so the foregoing disclaimer may not apply to you.
or incidental losses caused by use of the appliance. Some states do not allow this exclusion or
Midea America (Canada) Corp. expressly disclaims all responsibility for consequential damages
1-855-238-5607

#
Details
Matter
MANUEL D'INSTRUCTIONS
1-844-224-1614
par message texte au :
photo de votre preuve d’achat
Envoyez simplement une
de garantie limitée initiale!*
de 3 mois de la période
Prolongation gratuite
*
La prolongation de la période de
garantie porte sur les trois mois suivant
la fin de la période de garantie initiale de
l'appareil. Il n'est pas nécessaire
d'enregistrer le produit pour bénéficier
de tous les droits et recours accordés
aux propriétaires enregistrés dans le
cadre de la garantie limitée initiale.
Veuillez lire attentivement ce manuel d'instructions avant de l'utiliser.
TL-AC264CZA(SS)/CA
FOUR GRILLE-PAIN À AIR CHAUD


CONTENU
MESURES DE SÉCURITÉ IMPORTANTES
Précautions de sécurité de base
Instructions de cordon court
Avant la première utilisation
..........................................................................................................................................
DESCRIPTION DE L'APPAREIL
Composants
01
04
04
...............................................................................................................
05
06
...............................................................................................................
...............................................................................................................
FONCTIONNEMENT
Directives de cuisson
Panneau de commande
Cuisson
Fonctionnement
Mise en sourdine
Fonction eco
Fonction de mémoi
Réinitialisation des données d'usine
Friture à air chaud
Grilla
Pizza
Pâtisserie
...........................................................................................................................
07
..........................................................................................................................................
08
..........................................................................................................................................
09
.................................................................................................................................
10
..........................................................................................................................................
11
..........................................................................................................................................
11
re
.........................................................................................................................
..
12
...................................................................................................................
12
..........................................................................................................................................
12
ge
..........................................................................................................................................
13
.........................................................................................................................................
14
..........................................................................................................................................
15
..........................................................................................................................................

AVANT D'UTILISER CET APPAREIL, VEUILLEZ
LIRE, COMPRENDRE ET SUIVRE CES
INSTRUCTIONS. CONSERVEZ CE LIVRET POUR
CONSULTATION ULTÉRIEURE.
REMARQUE
Biscuits
...........................................................................................................................................
16
Rôtissage
..........................................................................................................................................
17
..........................................................................................................................................
18
Bagel
..........................................................................................................................................
19
Grill
..........................................................................................................................................
20
Maintien au chaud
Fermentation
Déshydratation
..........................................................................................................................................
21
..........................................................................................................................................
22
.....................................................................................................................
23
NETTOYAGE ET ENTRETIEN
Nettoyage et entretien
..........................................................................................................................................
24
SERVICE
Garantie limitée d'un an
..............................................................................................................................
25
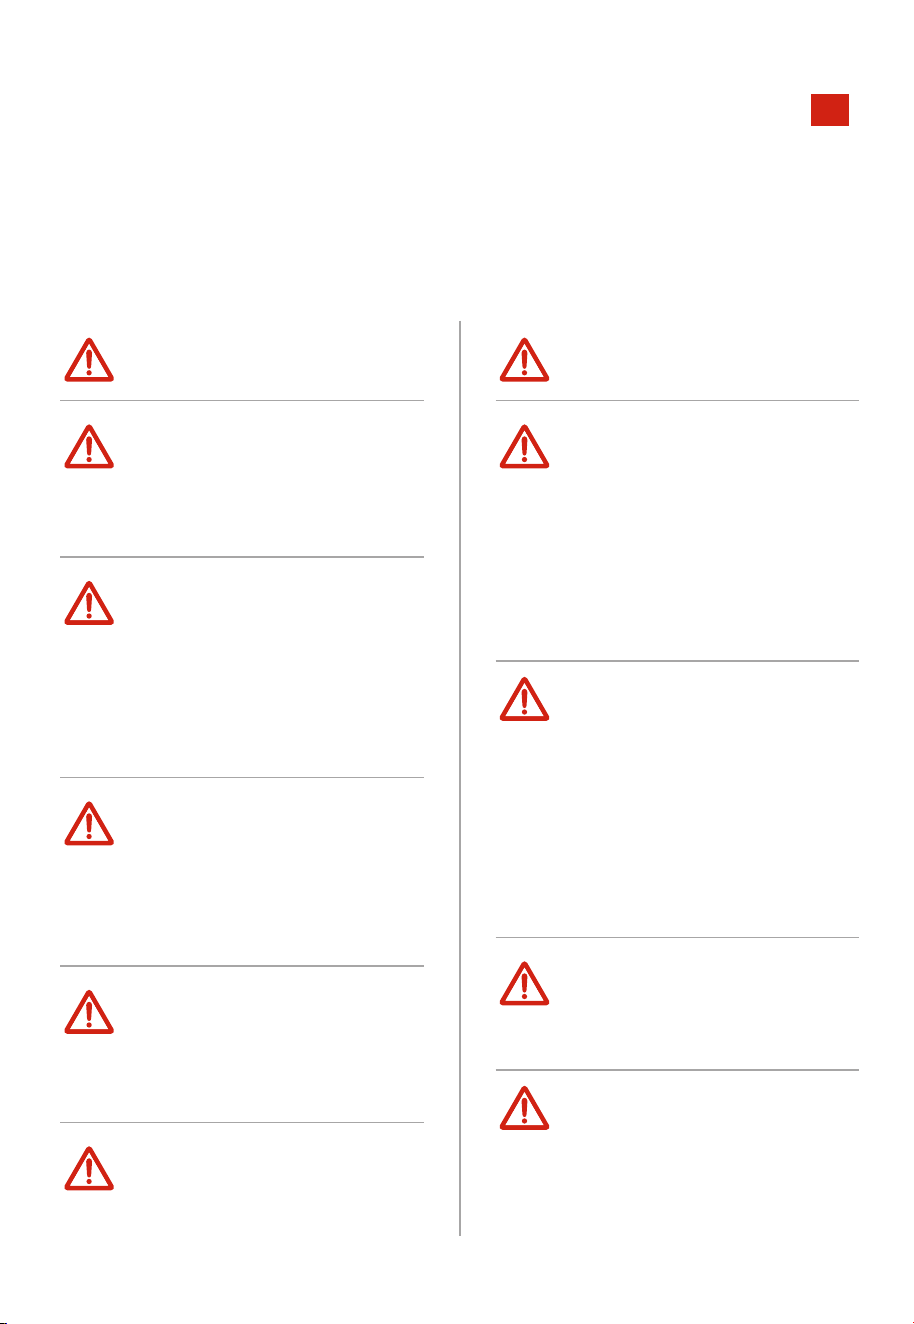
MESURES DE SÉCURITÉ IMPORTANTES
PRÉCAUTIONS DE SÉCURITÉ DE BASE
Lors de l'utilisation d'appareils électriques, des précautions de sécurité de base
doivent toujours être suivies, y compris les suivantes :
01
Lire toutes les instructions.
Une surveillance étroite est
nécessaire lorsque tout
appareil est utilisé par ou à
proximité des enfants.
Débrancher de la prise
lorsqu'il n'est pas utilisé et
avant le nettoyage.
Laisser refroidir avant de
mettre ou d'enlever des
pièces .
L'utilisation d'accessoires n'est
pas recommandée par le
fabricant de l'appareil.
Cela peut causer des blessures.
Une extrême prudence doit être
exercée lorsque vous déplacez un
appareil contenant de l'huile
chaude ou d'autres liquides chauds
.
Évitez de toucher les pièces
en mouvement.
Pour un usage domestique
uniquement.
Débrancher la fiche de la
prise murale lorsque
l'appareil n'est pas utilisé ,
avant de mettre ou de
retirer des pièces, et avant
de nettoyer. Laisser refroidir
avant de manipuler.
Toujours attacher la fiche à
l'appareil en premier, puis
brancher le cordon dans la
prise murale.
Pour débrancher , mettre
tout contrôle sur “off”, puis
retirer la fiche de la prise
murale.
Faire preuve d'une extrême
prudence lors du retrait du
plateau ou de l'élimination de la
graisse chaude.
Une extrême prudence doit
être exercée lorsque vous
utilisez des contenants
fabriqués à partir de matériaux
autres que le métal ou le verre.
02
Pour garantir une protection
continue contre les risques de
décharge électrique, brancher
l' appareil uniquement aux
prises correctement mises à la
terre.
L'extérieur du four, y compris
la porte, est chaud pendant et
après utilisation.
Pour vous protéger contre les
décharges électriques, ne
plongez pas le cordon, les
fiches dans l'eau ou tout autre
liquide.
Un incendie peut se produire si
l'appareil est recouvert ou en
contact avec un matériau
inflammable, y compris des
rideaux, des draperies, des
murs, etc., lorsqu'il fonctionne.
Ne stockez aucun matériau
inflammable sur le dessus de
l'appareil lorsqu'il fonctionne.
Utilisez toujours des gants
résistants à la chaleur, des sous-
plats ou des maniques lorsque
vous manipulez des matériaux
chauds, et lorsque vous placez ou
retirez des articles
,
y compris des
plateaux
,
des grilles ou des
récipients.
Ne pas nettoyer avec des
tampons métalliques. Des
morceaux peuvent se
détacher du tampon et
toucher des pièces électriques,
créant ainsi un risque de
décharge électrique.
Ne stockez aucun matériau,
autre que les accessoires
recommandés par le
fabricant, dans ce four
lorsqu'il n'est pas utilisé.
Les aliments surdimensionnés ou
les ustensiles en métal ne doivent
pas être insérés dans un four
grille-pain car ils pourraient
provoquer un incendie ou un
risque de décharge électrique.
03
Ne placez pas l'appareil sur ou
près d'une plaque chauffante à
gaz ou électrique, ou dans un
four chaud.
Ne placez aucun des
matériaux suivants dans
le four : (c'est-à-dire, papier,
carton, plastique, etc.).
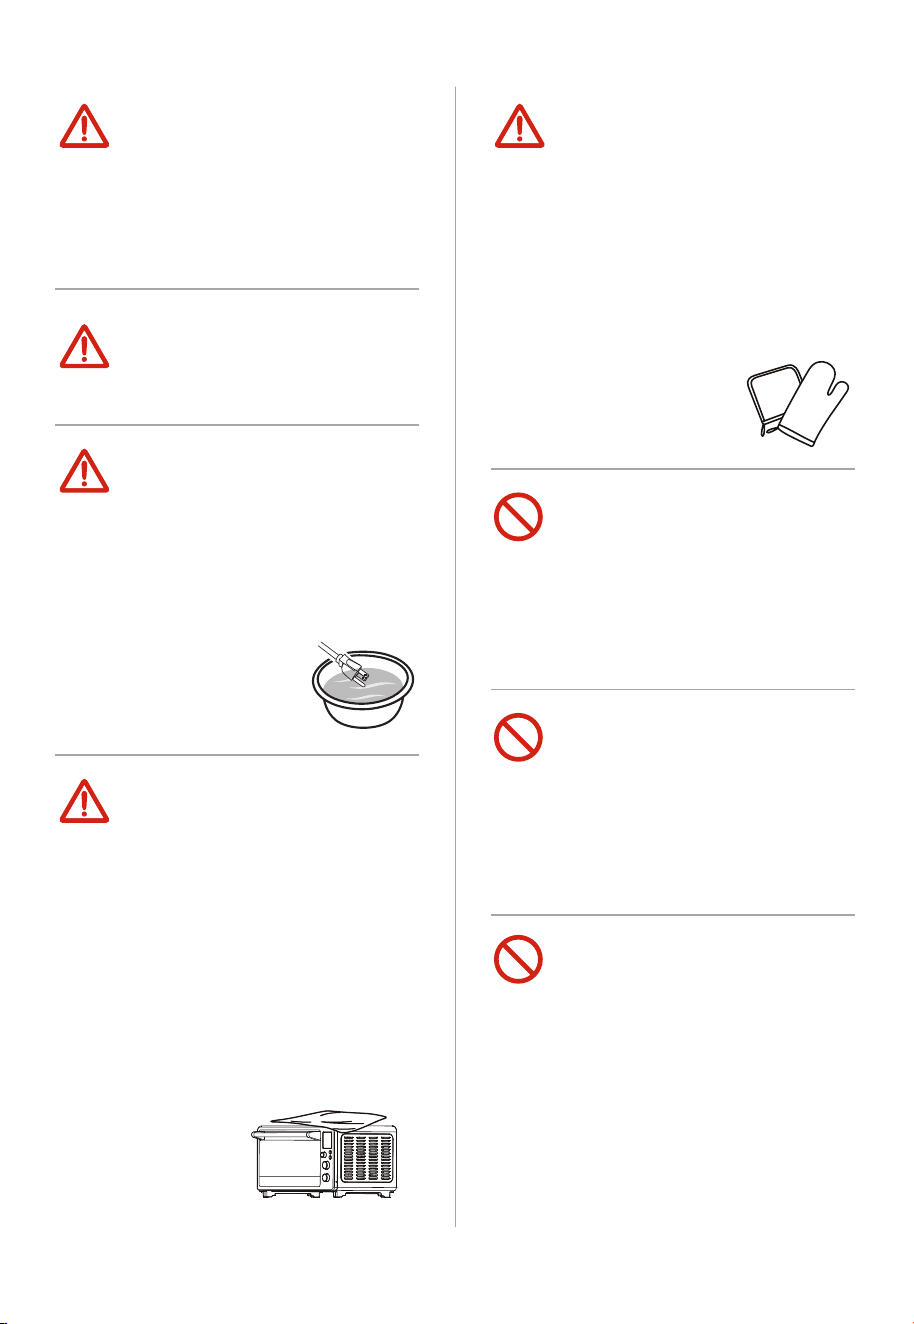
Ne couvrez pas le bac à miettes
ou une partie du four
avec du papier aluminium.
Cela provoquera une
N'utilisez pas l'appareil pour
d 'autres utilisations qui ne
sont pas décrites dans ce
manuel.
Pendant le fonctionnement,
appuyer sur « Départ/Pause »
peut arrêter la cuisson.
Ne pas utiliser un appareil
avec une fiche ou un cordon
endommagé, ou après qu'il ait
mal fonctionné ou ait été
endommagé de quelque
manière que ce soit. Retournez
l'appareil au centre de service
autorisé le plus proche pour
examen, réparation ou
ajustement.
Ne touchez pas les
surfaces chaudes .
Utilisez les poignées ou boutons.
Ne suspendez pas le cordon
sur le bord d'une table ou d'un
comptoir, et ne le mettez pas
contact avec des surfaces
chaudes.
Ne pas utiliser l'appareil à
l'extérieur.
Pour la cuisson uniquement
(par exemple, réchauffer de la
nourriture).
Ne pas utiliser à d'autres fins.
CONSERVEZ CES INSTRUCTIONS
RÉSERVÉ À UN USAGE DOMESTIQUE INTÉRIEUR
Ne pas insérer vos doigts dans les espaces ou trous.
Cela peut causer des blessures.
ATTENTION

04
INSTRUCTION DE CORDON COURT
(CORDON D'ALIMENTATION AMOVIBLE)
1. Un cordon d'alimentation court (ou cordon d'alimentation
amovible) doit être utilisé pour réduire le risque de s'emmêler ou
de trébucher sur un cordon plus long.
2.
Des cordons d'alimentation amovibles plus longs ou des rallonges sont
disponibles et peuvent être utilisés si l'on fait preuve de prudence dans
leur utilisation.
Si un cordon d'alimentation amovible plus long ou une
rallonge est utilisé :
• La puissance électrique indiquée sur le cordon ou la rallonge doit être
au moins aussi grande que la puissance électrique de l'appareil.
•
Le cordon doit être disposé de manière à ne pas pendre sur
le plan de travail ou la table où il pourrait être tiré par des
enfants ou provoquer des chutes involontaires.
•
Si l'appareil est de type mis à la terre, la rallonge doit être un
cordon à 3 fils de type mise à la terre.
DONNÉES
MODÈLE
TL-AC264CZA(SS)/CA
ALIMENTATION ÉLECTRIQUE
120VAC 60Hz
CONSOMMATION ÉLECTRIQUE
1500 W
SPÉCIFICATIONS
SPÉCIFICATIONS
3.
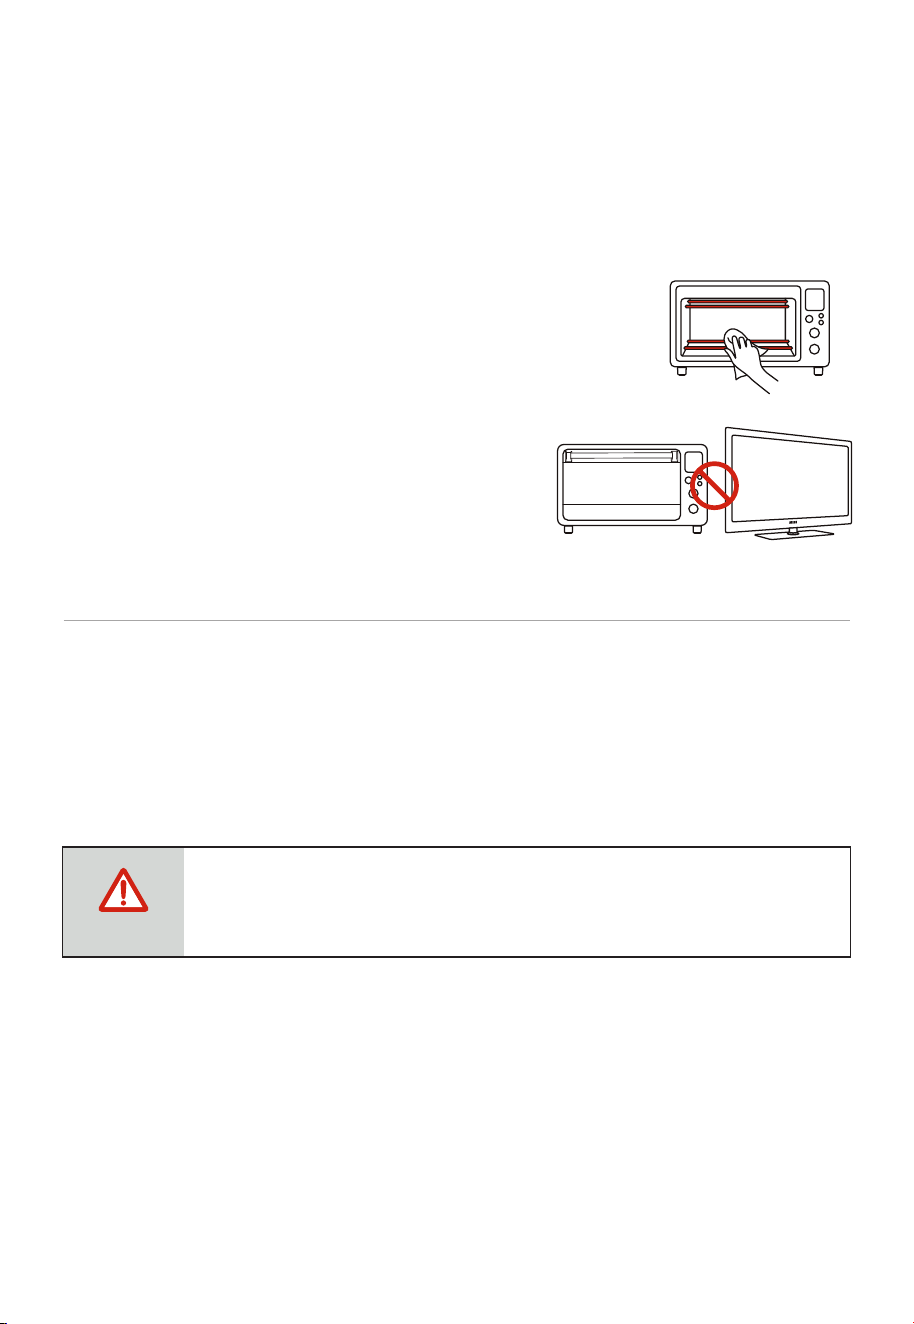
AVANT LA PREMIÈRE UTILISATION
1. Retirez tous les accessoires et matériaux d'emballage à l'intérieur du four.
2.
3.
4.
ATTENTION
05
Lavez les accessoires du four avec une goutte de savon à
vaisselle et de l'eau tiède. Avec du papier absorbant ou un
chiffon sec, essuyez l'appareil et ses accessoires avant
utilisation.
Placez le four sur un comptoir plat ou une autre
surface stable. NE PAS UTILISER SUR LE MÊME
CIRCUIT QU'UN AUTRE APPAREIL.
Assurez-vous que le bac à miettes est correctement installé avant d'utiliser le four.
Il pourrait y avoir de la fumée à l'intérieur pendant le processus.
C'est normal pour un nouveau four et cela ne durera pas plus de
10 à 15 minutes
.
Il est recommandé de faire fonctionner le four à vide en mode Air Fry pendant 15
minutes à 400°F.
Cela garantira que tout film protecteur sur les éléments chauffants est retiré. Lors de
l'utilisation du four pour la première fois, une légère odeur peut émaner du four.
Les
vapeurs et les odeurs sont normales, sans danger et ne nuisent pas au
fonctionnement. Assurez-vous que la pièce est bien aérée.
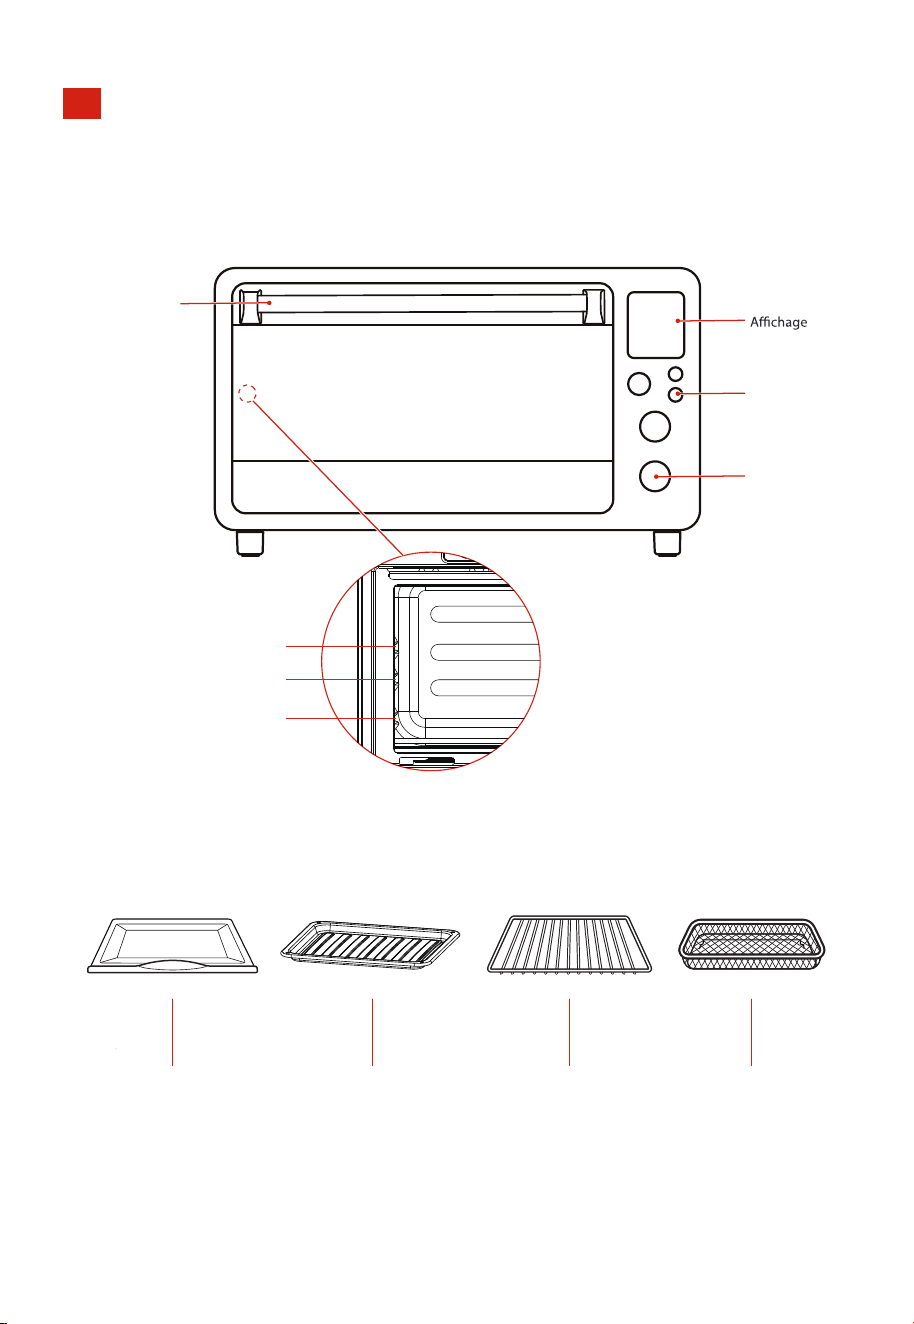
DESCRIPTION DE L'APPAREIL
COMPOSANTS
Bouton
Bouton
Poignée
06
Bac à miettes
galvanisé à chaud
Grille de cuisson
plaquée chrome
Panier de friture
plaqué chrome
Niveau 3
Niveau 2
Niveau 1
Plaque de cuisson
plaquée d'aluminium
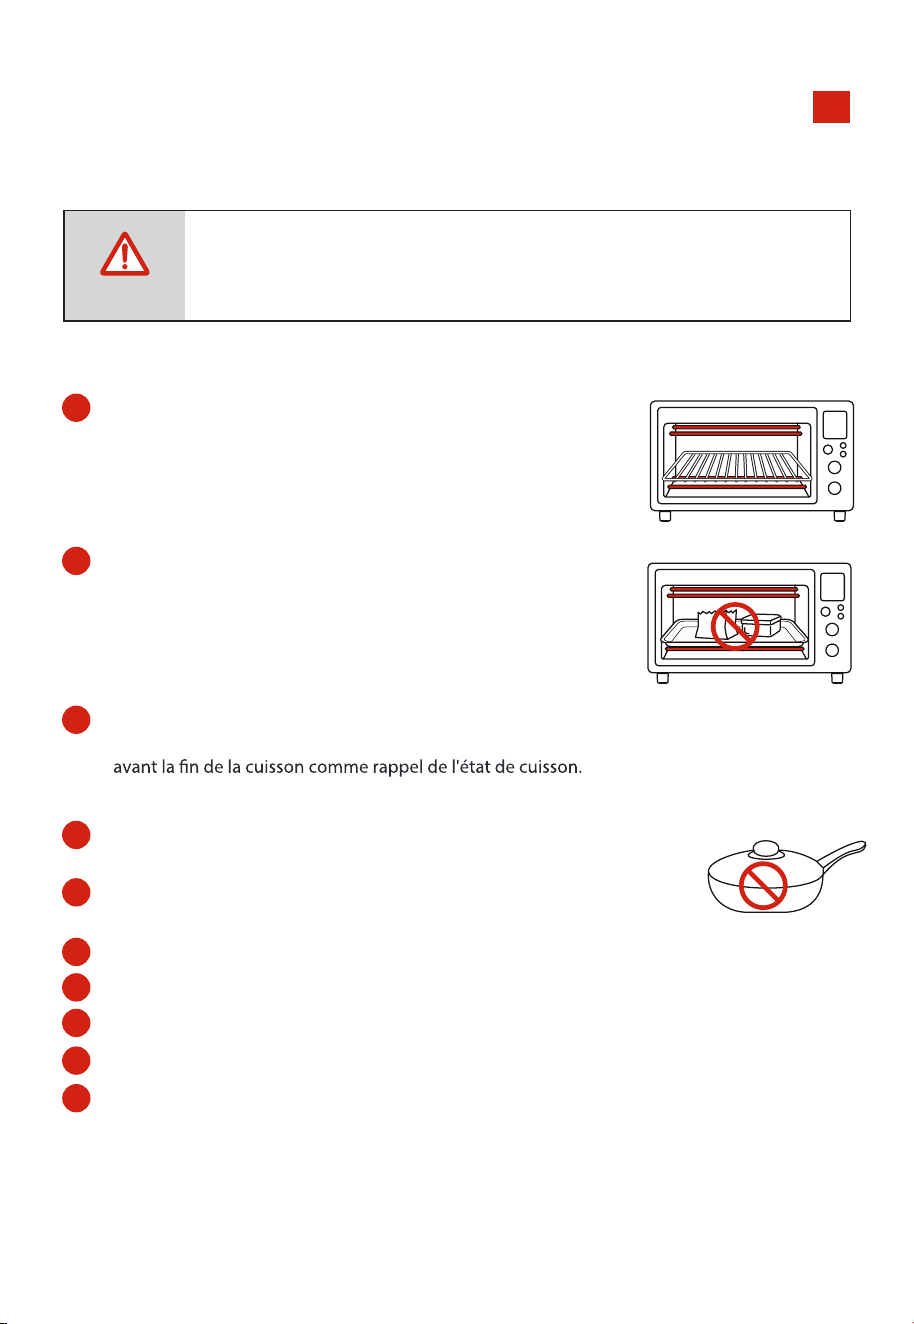
FONCTIONNEMENT
IN
STRUCTIONS
ATTENTION
DIRECTIVES DE CUISSON
LES SURFACES DU FOUR SONT CHAUDES PENDANT ET APRÈS L'UTILISATION.
07
1
2
4
Nettoyez régulièrement les éléments.
5
6
7
8
9
10
Veuillez ne pas débrancher le cordon d'alimentation lorsque le four a fini de fonctionner.
Le ventilateur s'arrêtera de fonctionner avec un délai de 1 minute.
Ne jamais utiliser de casseroles ou de couvercles en verre ou en céramique.
NE laissez JAMAIS l'huile ou d'autres liquides provenant des aliments couler au fond du four.
Réglez la température comme suggéré par la recette ou selon vos préférences .
Fermez fermement la porte et réglez le temps de cuisson pour commencer la cuisson.
Le panier de friture doit être utilisé sur la grille de cuisson.
3
Conception économe en énergie : la lumière du four s'éteindra automatiquement
après trois minutes sans activité pendant la cuisson, et s'allumera une minute
Positionnez la grille de cuisson de manière à ce qu'elle s'adapte à la
hauteur des aliments à cuire.
Les aliments doivent être placés sur la plaque de cuisson pour éviter
tout risque d'incendie dû à l'accumulation de restes alimentaires sur
les éléments. Assurez-vous d'utiliser toujours un récipient allant au
four dans le four, n'utilisez jamais de contenants en plastique ou en
carton dans le four.
08
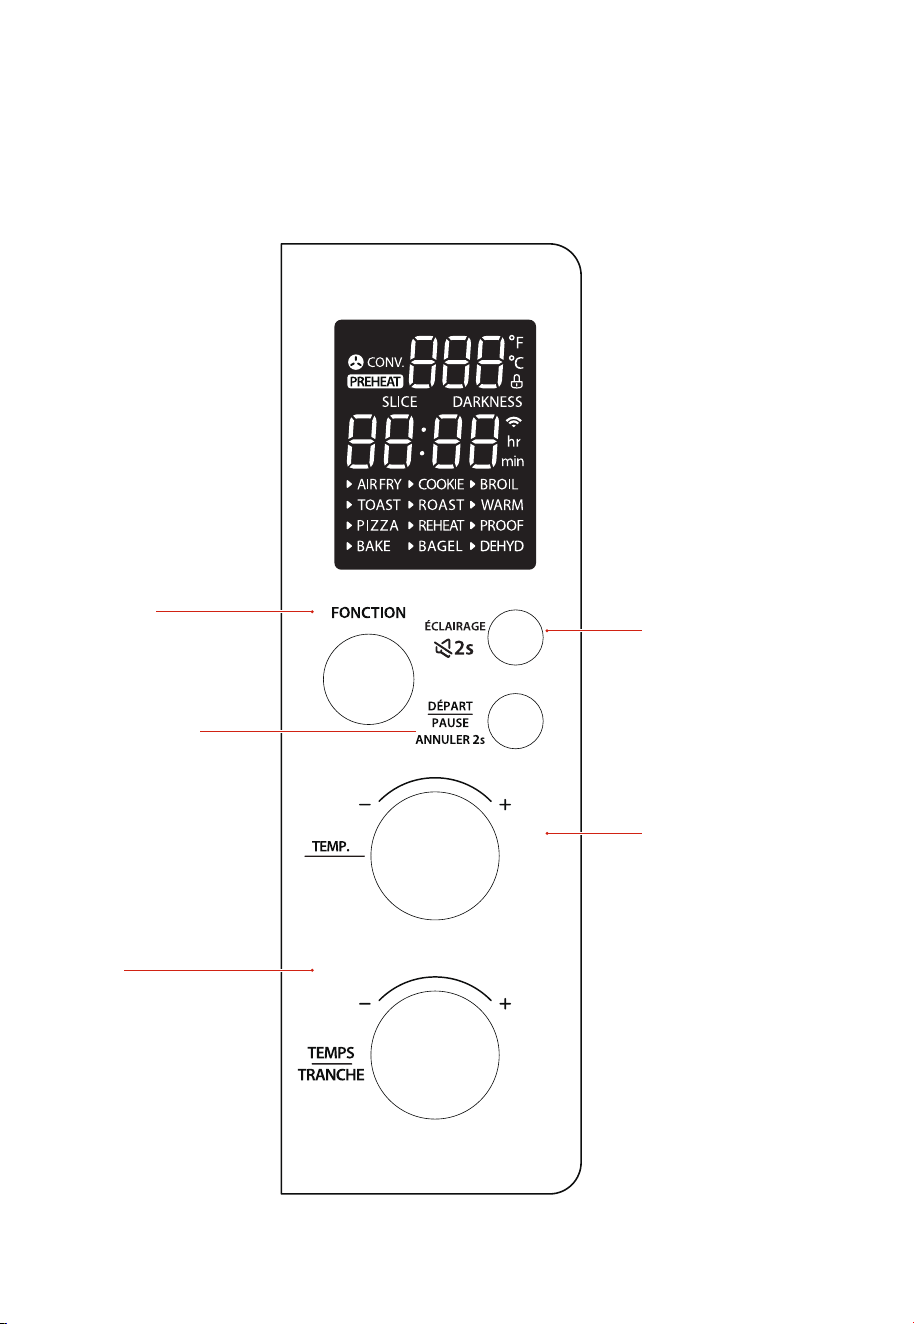
PANNEAU DE COMMANDE
Température
Tournez ce bouton pour régler
la température.
Intensité
Réglez l'intensité de cuisson du
pain grillé
et du bagel.
FONCTION
Tournez ce bouton pour
sélectionner la fonction.
DÉPART/PAUSE
Appuyez sur ce bouton pour démarrer
ou mettre en pause la cuisson.
Appuyez sur ce bouton pendant 2
secondes pour entrer en mode veille.
En mode veille, appuyez sur ce
bouton pendant 2 secondes pour
entrer en mode économie.
Temps
Tournez ce bouton pour régler le
temps de cuisson.
Tranche
Indiquez le nombre de tranches
de pain
et de bagel.
INTENSITÉ
ÉCLAIRAGE
Allumer/éteindre l'éclairage intérieur.
En mode veille, appuyez sur ce
bouton pendant 2 secondes
pour entrer en mode sourdine.

09
FONCTION
DE CUISSON
POSITION DE
LA GRILLE
Niveau 2 ou 3
Niveau 2 ou 3
Niveau 2
Niveau 2
Niveau 3
Niveau 2
Niveau 1
Niveau 2
Niveau 2
Niveau 1 ou 2
Niveau 1 ou 2
DESCRIPTIONS
Préparation d'aliments rapides et extra
croustillants avec peu ou pas d'huile ajoutée.
Griller uniformément jusqu'au degré de
brunissement parfait.
Fondre et dorer le fromage et les
garnitures, tout en croustillant la croûte.
Cuire et dorer uniformément les
biscuits et autres pâtisseries.
Cuire et dorer uniformément les
biscuits et autres pâtisseries.
Obtenir un extérieur croustillant et un
intérieur parfaitement cuit pour une
variété de viandes, volailles et légumes.
Réchauffer les restes sans les cuire
excessivement.
Maintenir les aliments au chaud et
empêcher la prolifération bactérienne.
Maintenir précisément une température
basse pour offrir un environnement idéal
pour la fermentation.
ACCESSOIRES
Panier de friture
Grille de cuisson
Plaque de cuisson
Grille de cuisson
Grille de cuisson ou
plaque de cuisson
Plaque de cuisson
Plaque de cuisson
Grille de cuisson
Grille de cuisson ou
plaque de cuisson
Plaque de cuisson
Panier de friture
CUISSON
FONCTIONS DU PRODUIT
Niveau 2
Griller la viande et faire dorer uniformément le
dessus des plats à gratin.
Grille de cuisson ou
plaque de cuisson
Grillage
Pizza
Pâtisserie
Biscuits
Rôtissage
Réchauffage
Bagel
Grill
Maintien
au chaud
Fermentation
Déshydratation
Faire griller uniformément des tranches de
bagel en les plaçant côté coupé vers le
haut.
Déshydrater uniformément les
aliments sans les cuire.
Friture à air

10
FONCTIONNEMENT
Remarque
1.
Pendant la cuisson, vous pouvez appuyer sur « DÉPART/PAUSE » pour mettre en pause la
cuisson.
2.
À la fin de la cuisson, l'appareil émettra 3 bips et affichera « END ».
3.
Lorsque la température de préchauffage est atteinte, et l'alarme retentira 5
fois, le four commencera automatiquement la cuisson.
FONCTION
DE CUISSON
400°F 15min
450°F 11min
175°C 30min
230°C 10min
80°C 1heure
190°C 10min
200°C 1heure
175°C 10min
RÉGLAGE PAR
DÉFAUT
4 Tranches
4 Intensité
Tranche 4
Intensité 4
38°C 50min
65°C 4heures
VENTILATION
POUR CONVECTION
EN MARCHE
EN MARCHE
ÉTEINT
EN MARCHE
ÉTEINT
ÉTEINT
ÉTEINT
ÉTEINT
ÉTEINT
ÉTEINT
ÉTEINT
ÉTEINT
NON
OUI
OUI
OUI
OUI
NON
PRÉCHAUFFAGE
93~230°C 1min~2heures
65~230°C 1min~30min
200~230°C 1min~2heures
38~150°C 1min~4heures
65~230°C 1min~2heures
93~230°C 1min~2heures
65~230°C 1min~1heure
65~230°C 1min~2heures
27~43°C 1min~9heures
32°C~93°C 1min~24heures
PLAGE DE RÉGLAGE
1 ~ 6 tranches - Intensité 1 ~ 7
1min~30min
2, 4, 6 Tranches 1-7 Intensité
1min~30min
PARAMÈTRES DE L'APPAREIL
NON
NON
NON
NON
NON
NON
Grillage
Pizza
Pâtisserie
Biscuits
Rôtissage
Réchauffage
Bagel
Grill
Maintien
au chaud
Fermentation
Déshydratation
Friture à air
11
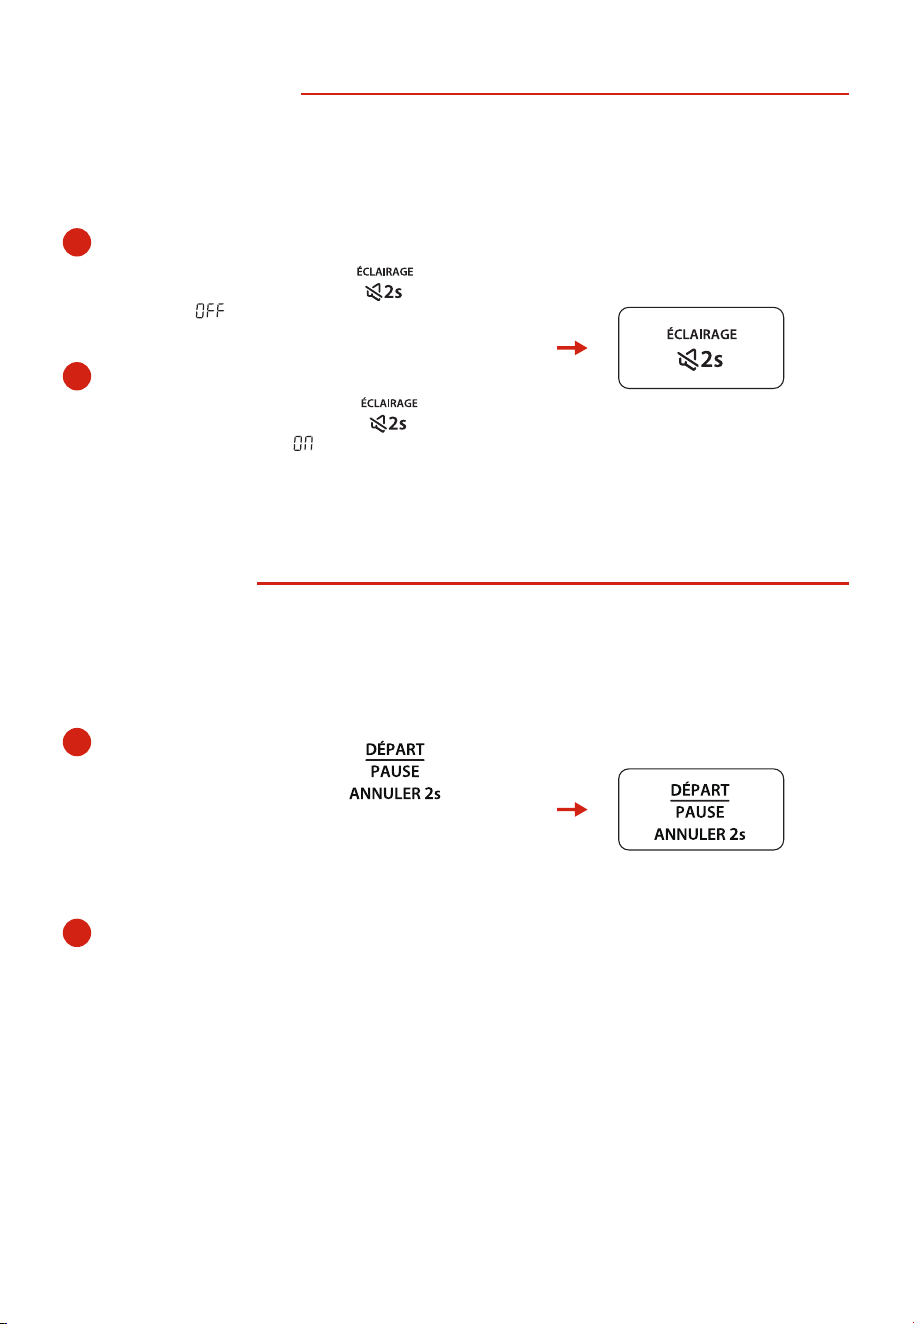
MISE EN SOURDINE
En mode sourdine, lorsque vous appuyez sur un bouton, aucun son n'est émis.
Lorsque le four est branché sur une prise et en mode veille, le mode son est activé
par défaut.
Pour activer la mise en sourdine
:
En mode veille, appuyez sur pendant 2
secondes, ‘’ ‘’ s'affiche.
Pour désactiver la mise en sourdine :
En mode muet, appuyez sur
pendant 2 secondes, ‘’ ‘’ s'affiche.
FONCTION ECO
Lorsque le four est branché sur une prise et en mode veille, le mode par défaut
ne passera pas en mode ECO.
Pour entrer en mode ECO :
En mode veille, appuyez sur
pendant 2 secondes, l'écran s'éteindra.
ou
en mode veille, s'il n'y a aucune opération en 5 minutes.
Pour annuler le mode ECO:
En mode ECO, vous pouvez appuyer sur n'importe quel bouton ou tourner
n'importe quel bouton pour l'annuler.
2
1
2
1
«
»
«
»
«
»
12
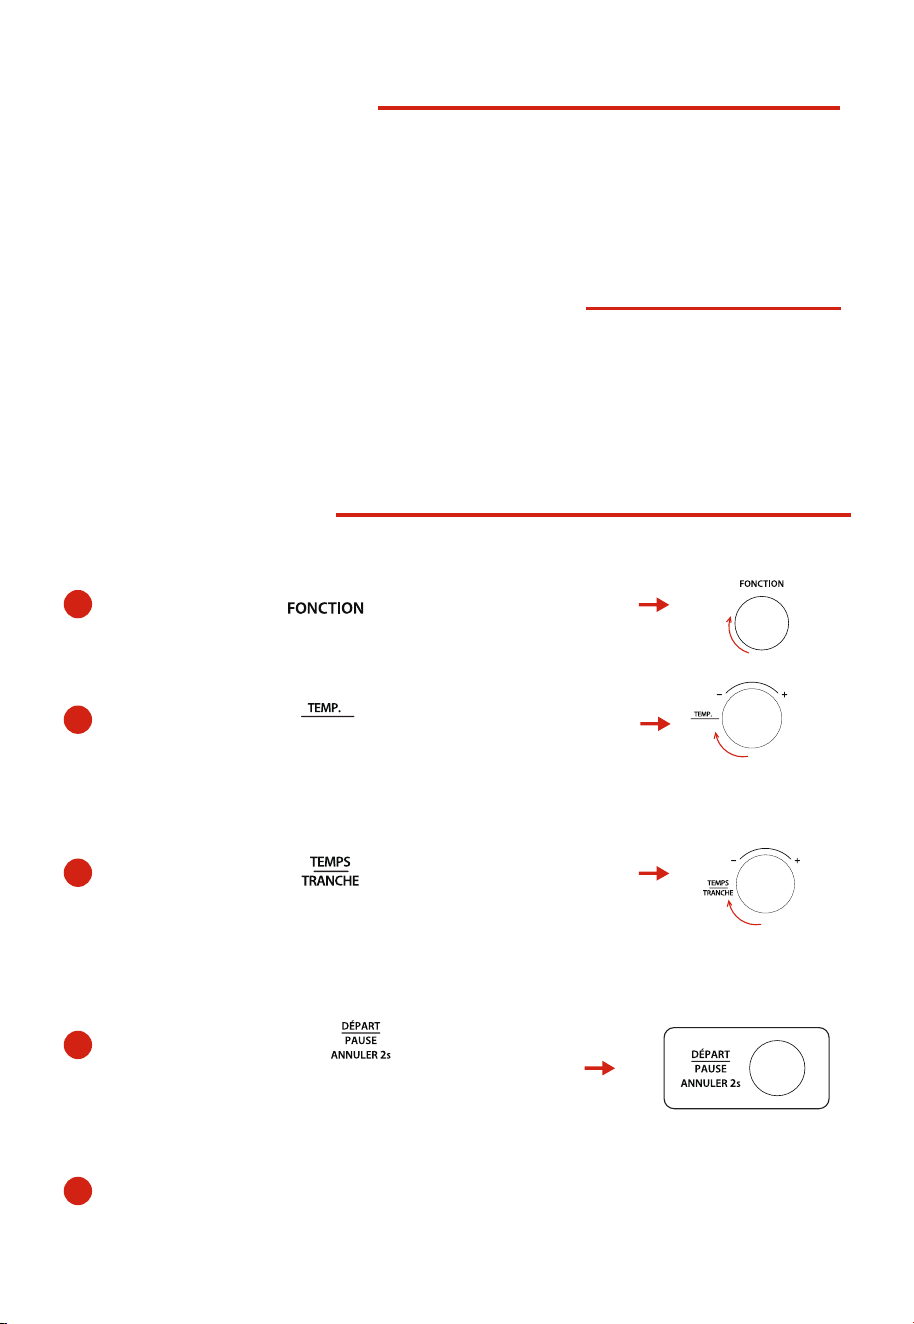
2
Tournez le bouton pour sélectionner la
température de cuisson.
3
Tournez le bouton pour sélectionner
le temps de cuisson.
4
5
Appuyez sur le bouton pour commencer
la préchauffage. Lorsque la température de
préchauffage est atteinte, l'alarme retentira 5 fois.
Placez les aliments dans le four, fermez la porte, le
four commence à cuire automatiquement.
fonction de FRITURE À AIR.
1
Tournez le bouton pour sélectionner la
«
»
«
»
«
»
FONCTION DE MÉMOIRE
Les réglages sont automatiquement enregistrés lorsque la cuisson est terminée.
Lorsque vous sélectionnez la même fonction la prochaine fois, appuyez sur
«
DÉPART/PAUSE
»
pour commencer la cuisson, elle se fera avec le réglage précédent.
Les modes Pain grillé et Bagel ne mémorisent que le nombre de tranches et le niveau d'intensité.
RÉINITIALISATION DES DONNÉES D'USINE
Dans la minute qui suit la mise sous tension, appuyez sur les boutons
«
DÉPART/PAUSE
»
et
«
ÉCLAIRAGE
»
et maintenez-les enfoncés pendant 3 secondes pour effacer les données utilisées.
Si cela réussit, l'écran affichera
«
1
»
puis reviendra en mode veille après 3 secondes. En cas d'échec,
«
0
»
s'affichera et le four reviendra en mode veille après 3 secondes.
FRITURE À AIR CHAUD
«
»
INTENSITÉ
INTENSITÉ
13
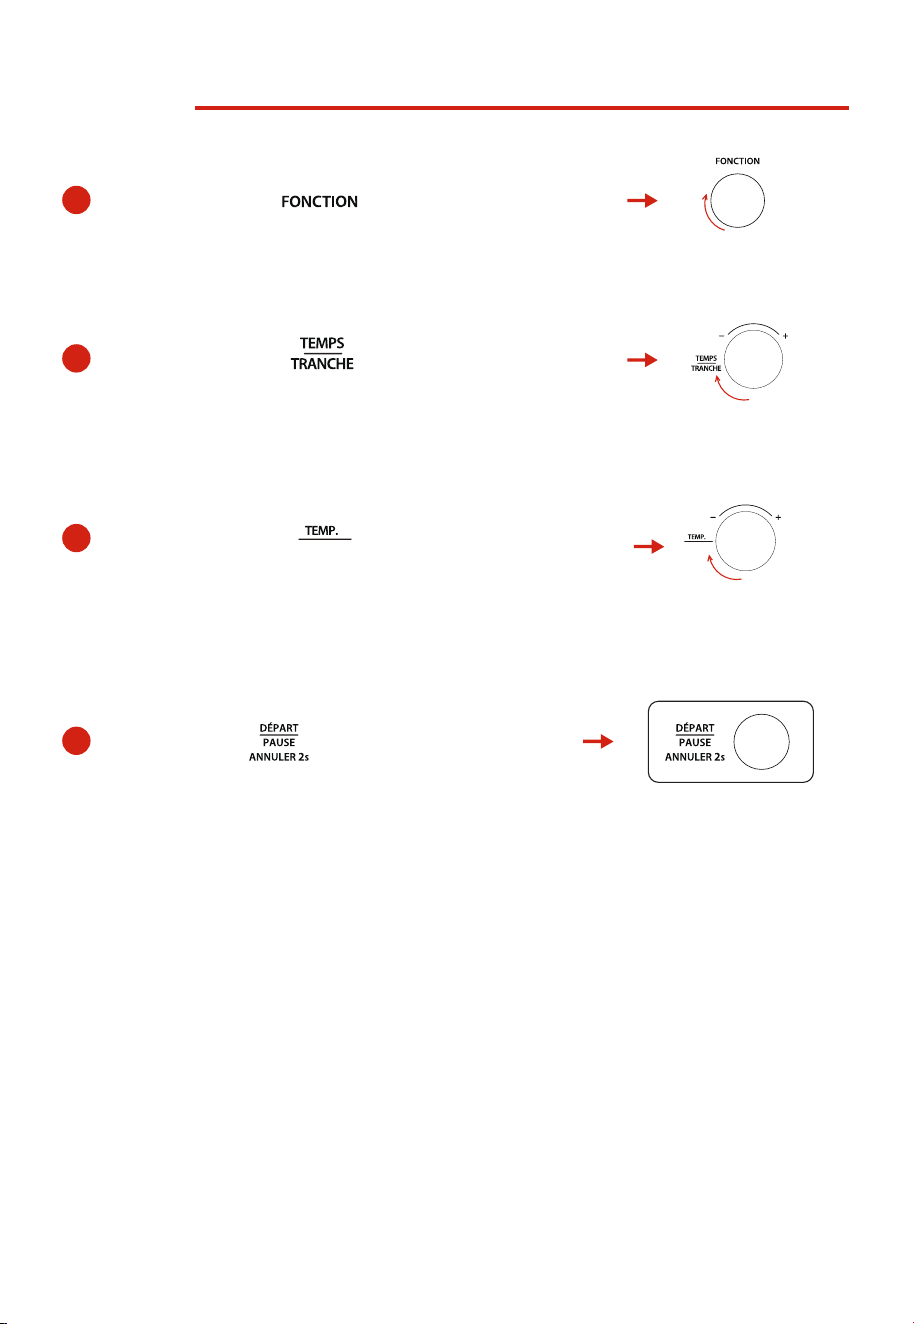
4
Appuyez sur pour commencer la cuisson.
GRILLAGE
1
2
Tournez le bouton pour sélectionner
la fonction GRILLAGE.
Tournez le bouton
pour
sélectionner le nombre de tranches souhaité.
3
Tournez le bouton pour sélectionner
le brunissement souhaité.
«
»
«
»
«
»
«
»
INTENSITÉ
INTENSITÉ
14
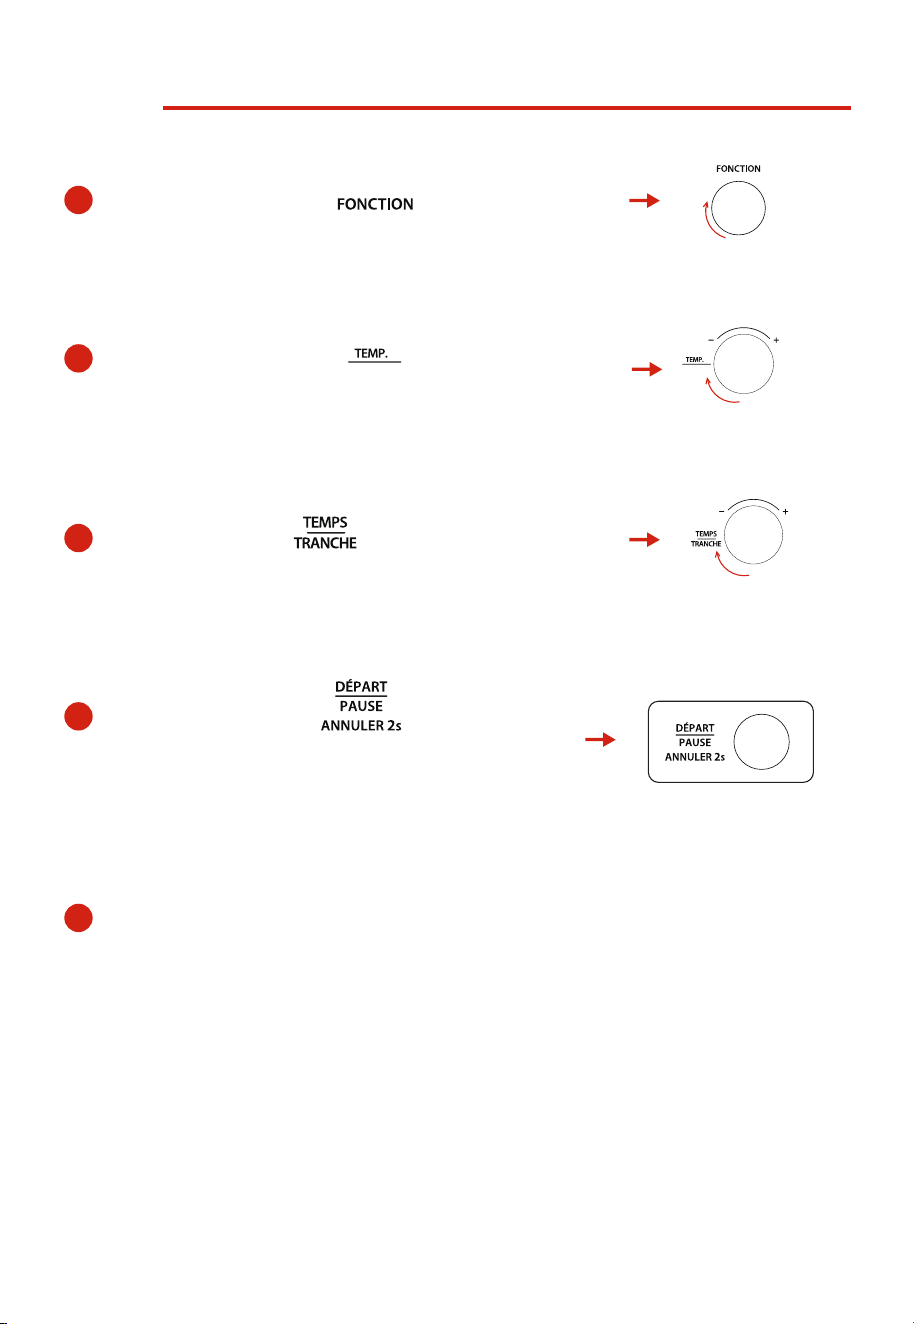
PIZZA
1
2
Tournez le bouton de la pour
sélectionner la fonction PIZZA.
Tournez le bouton de la pour
sélectionner la température.
3
Tournez le bouton pour
sélectionner le temps de cuisson.
4
5
Appuyez sur le bouton pour commencer
la préchauffage. Lorsque la température de
préchauffage est atteinte, l'alarme retentira 5 fois.
Placez les aliments dans le four, fermez la porte, le
four commence à cuire automatiquement.
«
»
«
»
«
»
»
«
INTENSITÉ
INTENSITÉ
PÂTISSERIE
15
4
5
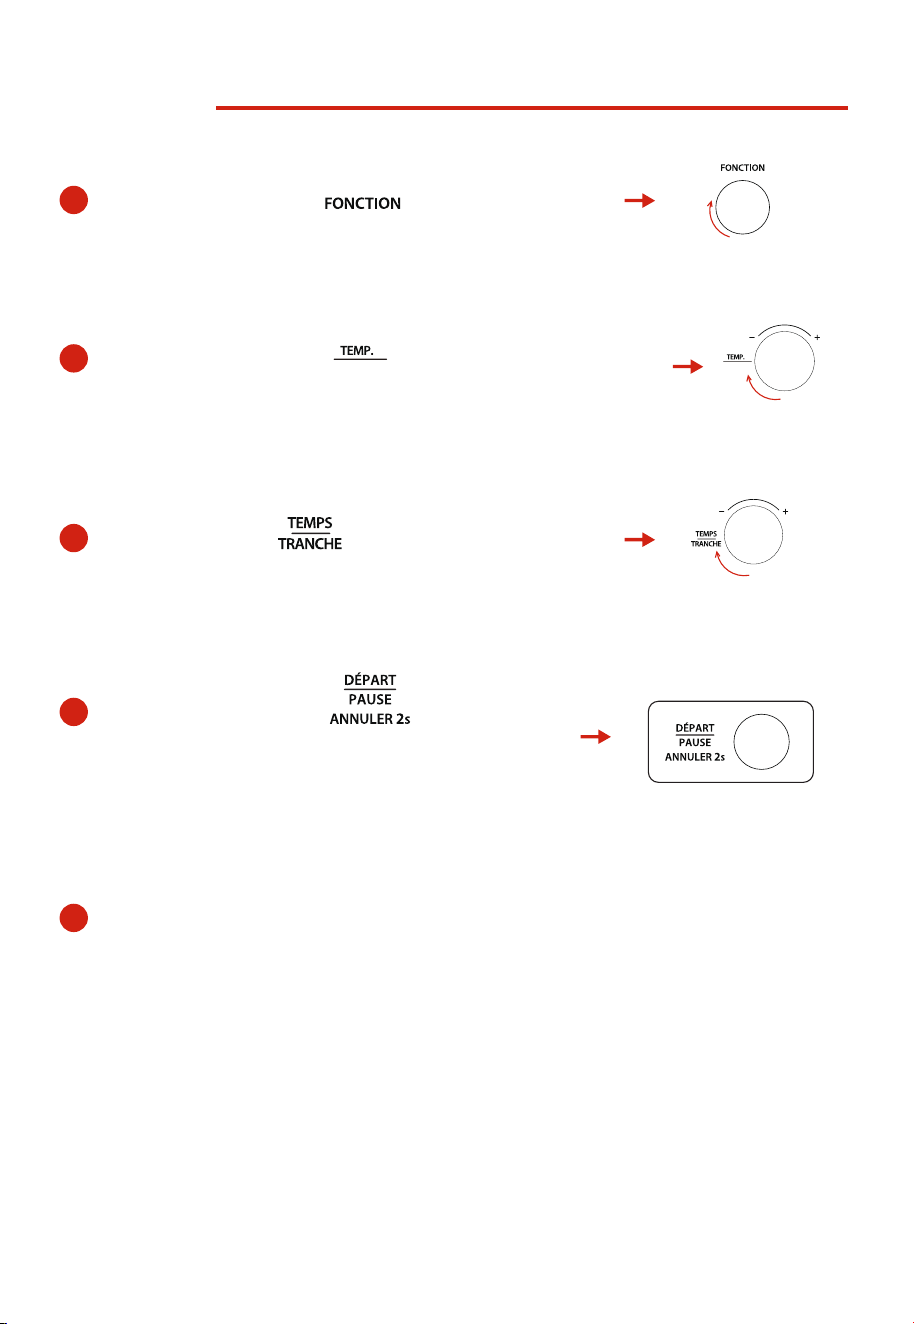
Appuyez sur le bouton pour
commencer la préchauffage. Lorsque la température
de préchauffage est atteinte, l'alarme retentira 5 fois.
Placez les aliments dans le four, fermez la porte, le
four commence à cuire automatiquement.
1
2
Tournez le bouton de la pour
sélectionner la fonction PÂTISSERIE.
Tournez le bouton de la pour
sélectionner la température.
3
Tournez le bouton pour
sélectionner le temps de cuisson.
»
«
»
«
«
»
«
»
INTENSITÉ
INTENSITÉ
16
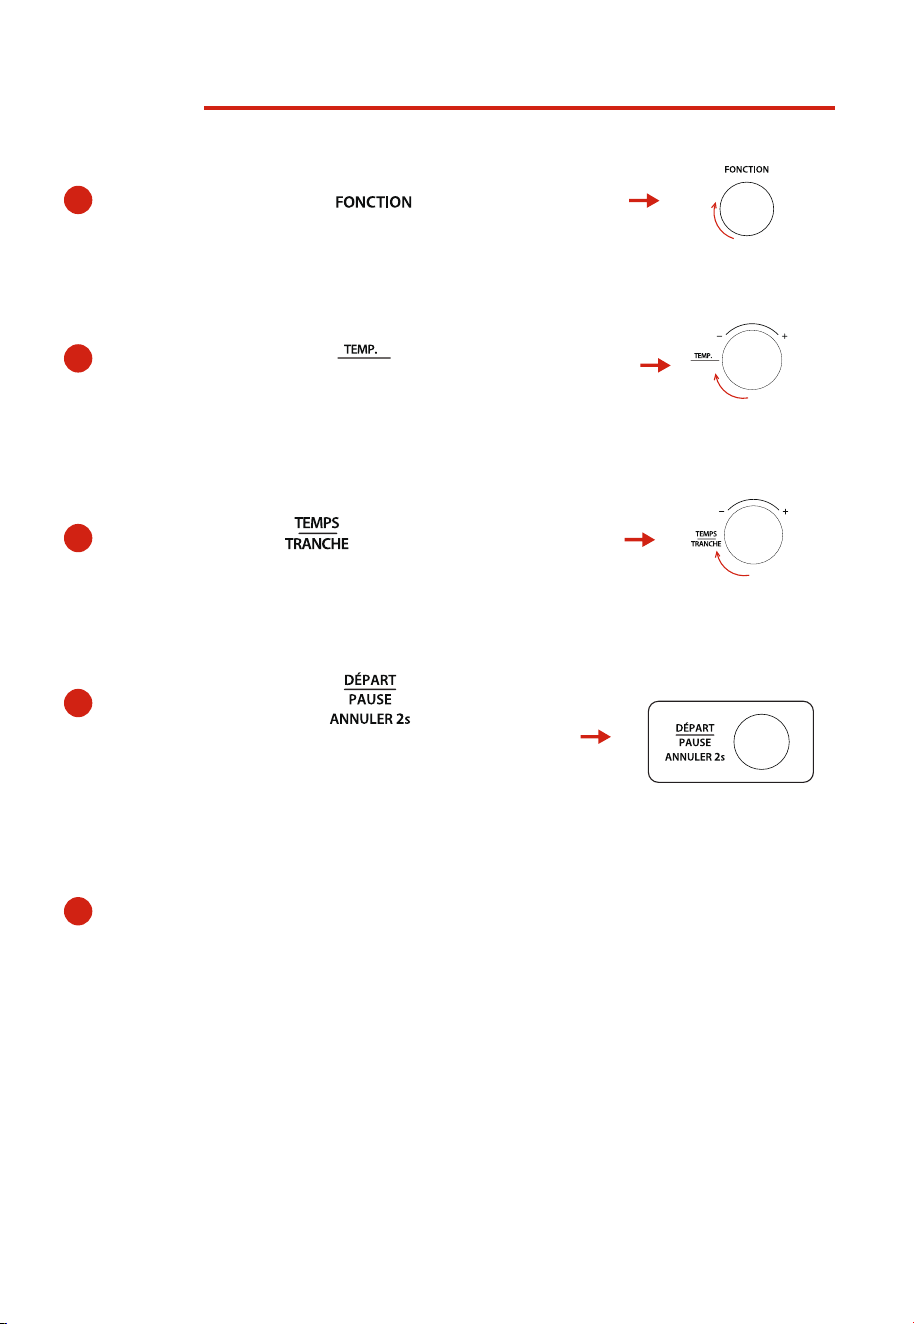
BISCUITS
4
5
Appuyez sur le bouton pour
commencer la préchauffage. Lorsque la température
de
préchauffage est atteinte, l'alarme retentira 5 fois.
Placez les aliments dans le four, fermez la porte, le
four commence à cuire automatiquement.
1
2
Tournez le bouton de la pour
sélectionner la fonction BISCUITS.
Tournez le bouton de la pour
sélectionner la température.
3
Tournez le bouton pour
sélectionner le temps de cuisson.
»
«
»
«
«
»
«
»
INTENSITÉ
INTENSITÉ
17
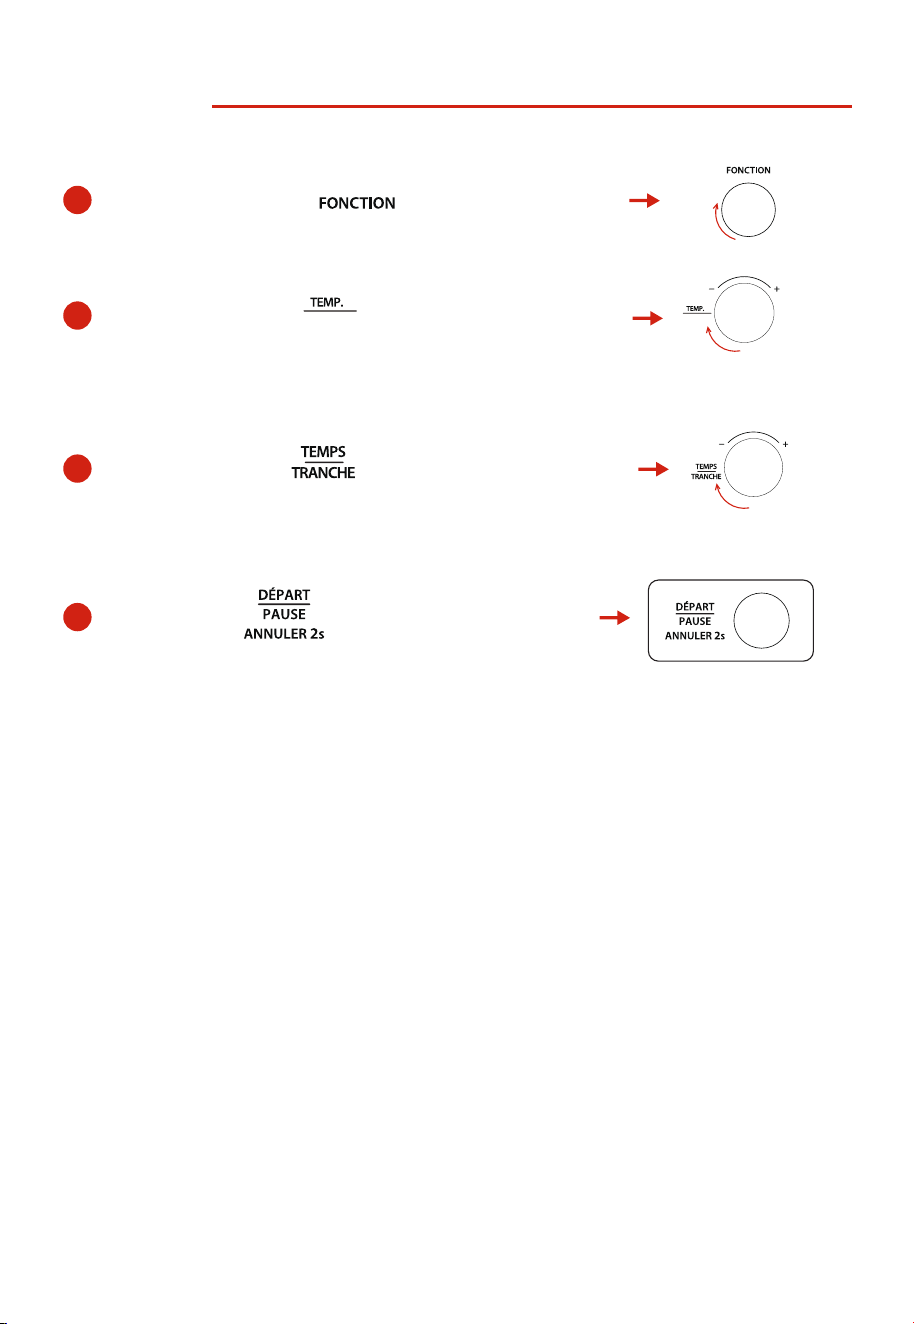
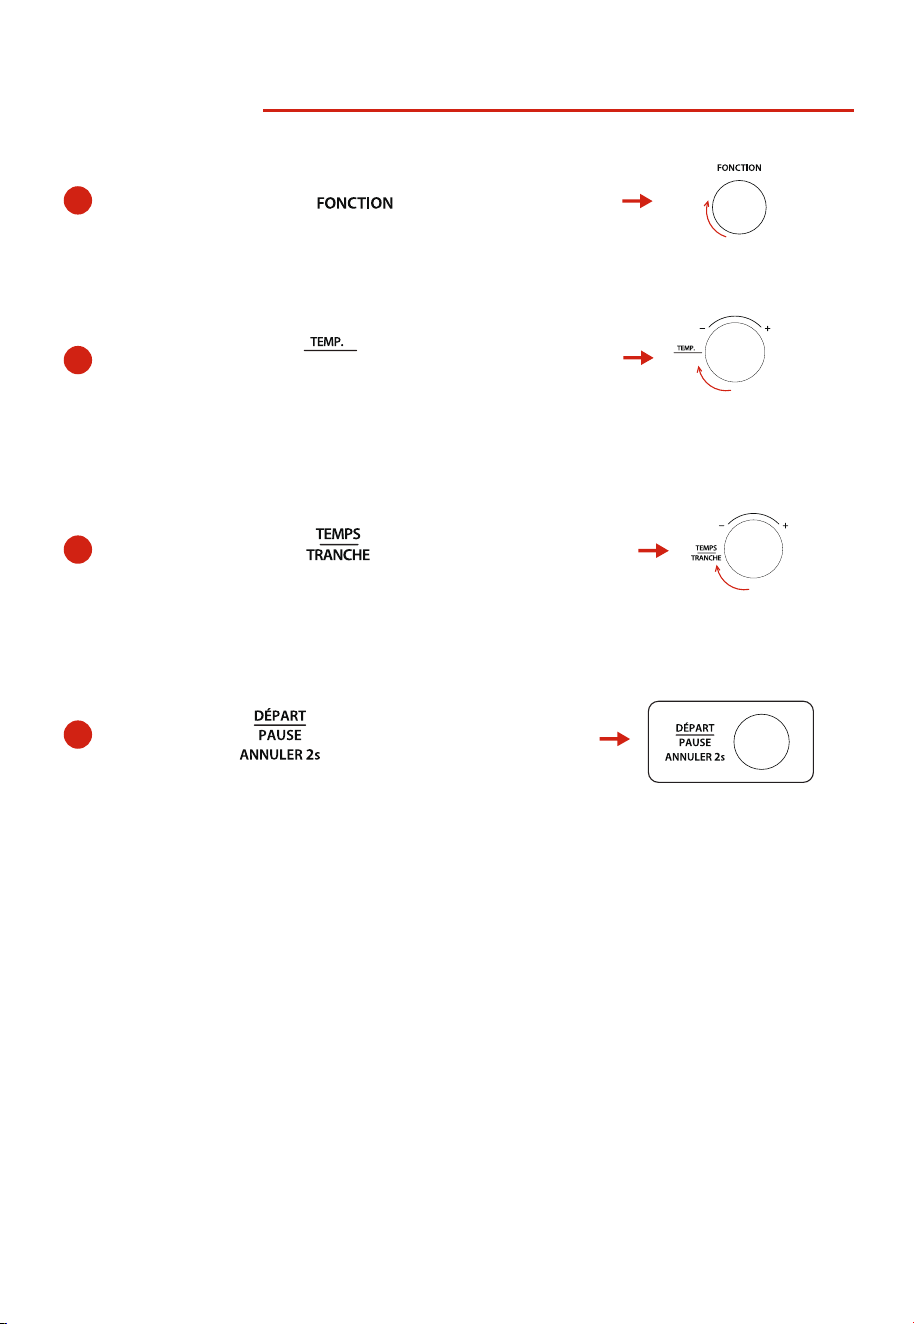
RÔTISSAGE
2
Tournez le bouton pour sélectionner
la température de cuisson.
3
4
Tournez le bouton pour
sélectionner le temps de cuisson.
1
Tournez le bouton de la pour
sélectionner la fonction RÔTISSAGE.
Appuyez sur pour commencer la cuisson.
»
«
»
«
»
«
»
«
INTENSITÉ
INTENSITÉ
18
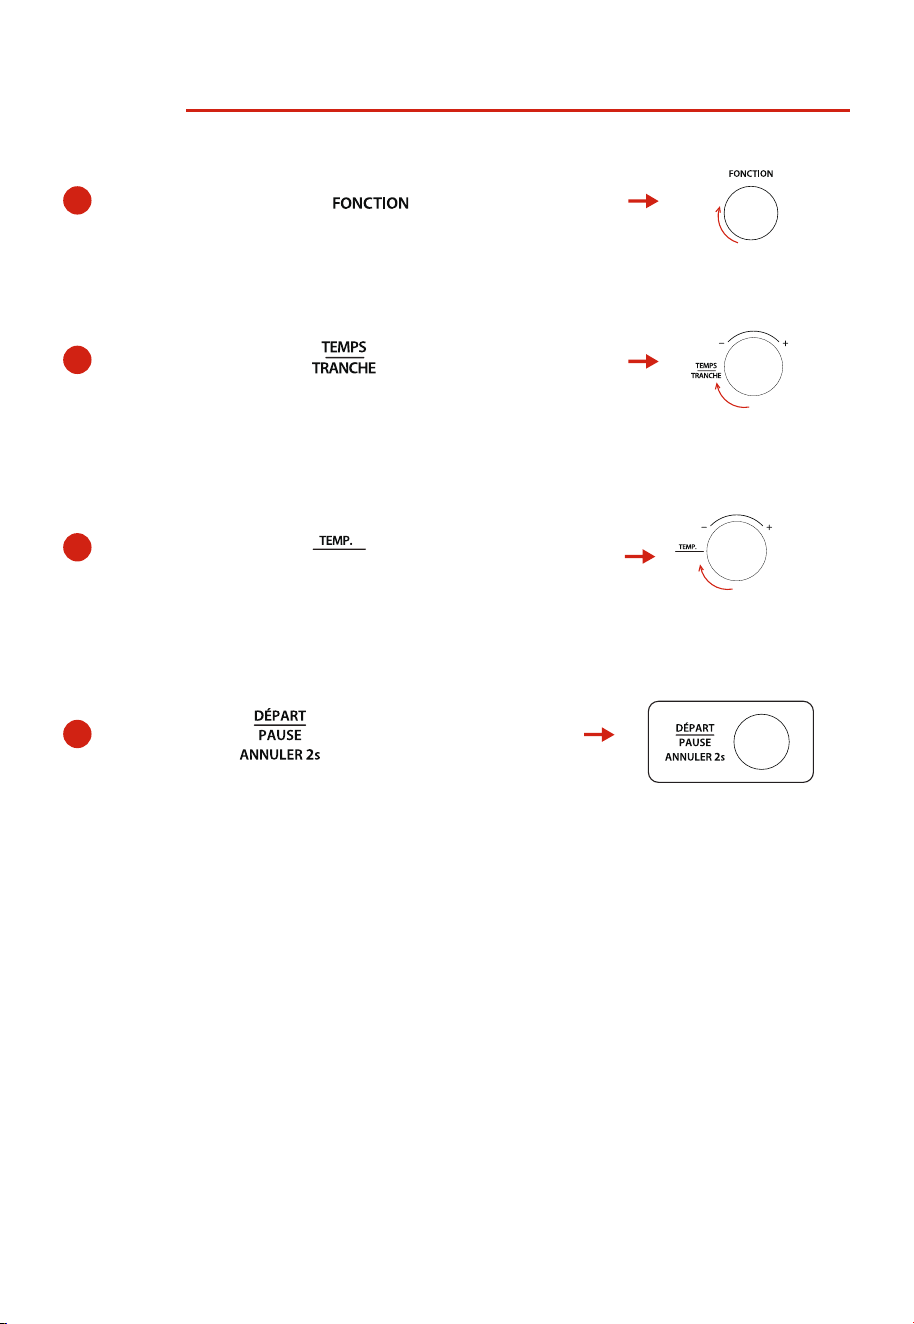
RÉCHAUFFAGE
1
Tournez le bouton de la pour
sélectionner la fonction RÉCHAUFFAGE.
2
Tournez le bouton pour
sélectionner la température de cuisson.
3
Tournez le bouton pour
sélectionner le temps de cuisson.
4
Appuyez sur pour commencer la cuisson.
»
«
»
«
»
«
»
«
INTENSITÉ
INTENSITÉ
19
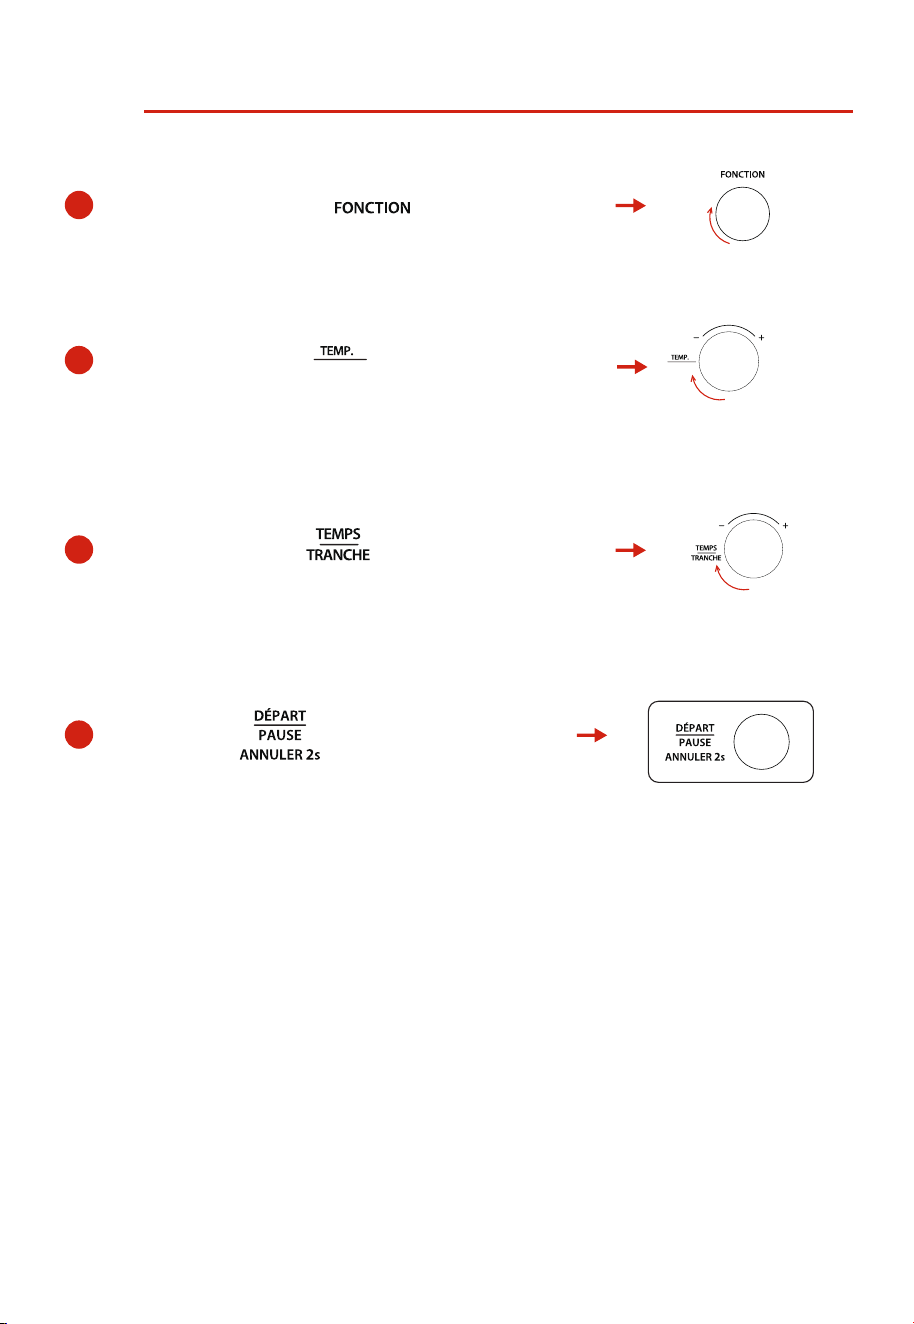
BAGEL
1
Tournez le bouton de la pour
sélectionner la fonction BAGEL.
3
Tournez le bouton pour
sélectionner le niveau de brunissement souhaité.
2
Tournez le bouton pour
sélectionner le nombre de tranches souhaité.
4
Appuyez sur pour commencer la cuisson.
»
«
»
«
»
«
»
«
INTENSITÉ
INTENSITÉ
20
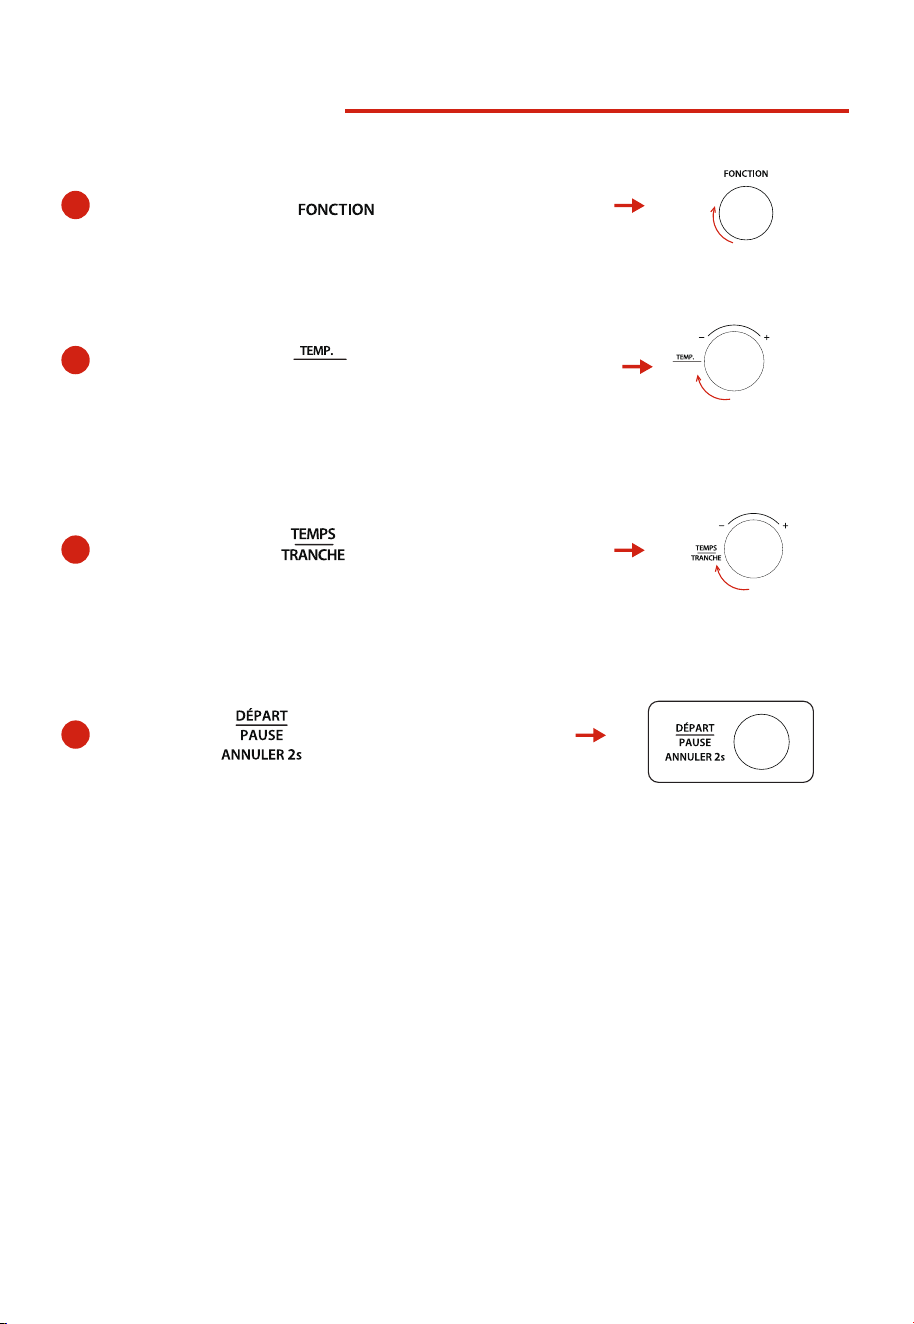
GRILL
1
Tournez le bouton de la pour
sélectionner la fonction GRILL.
2
Tournez le bouton pour
sélectionner la température de cuisson.
3
Tournez le bouton pour
sélectionner le temps de cuisson.
4
Appuyez sur pour commencer la cuisson.
»
«
«
»
«
»
«
»
INTENSITÉ
INTENSITÉ
21
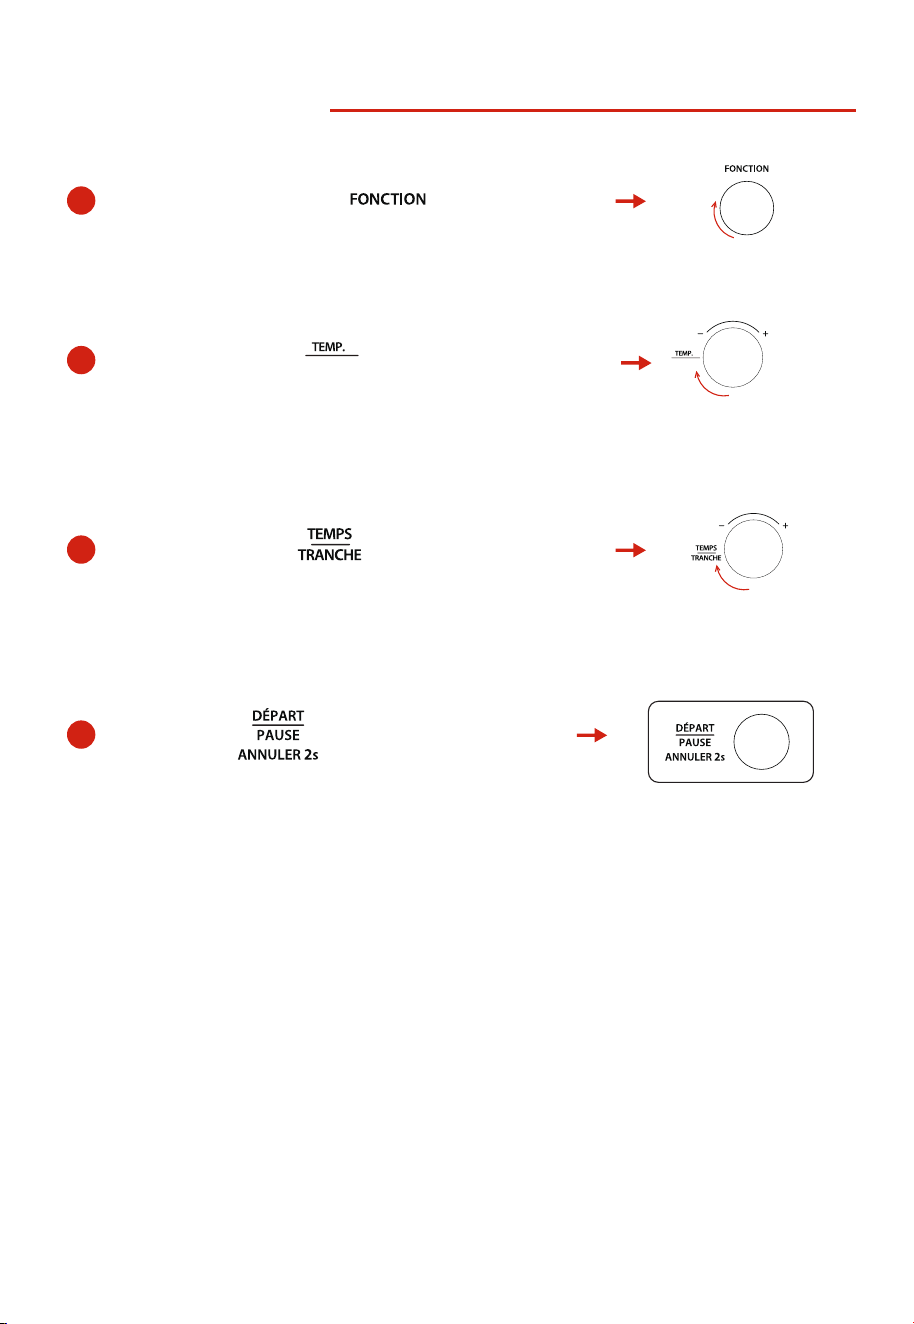
MAINTIEN AU CHAUD
1
Tournez le bouton de la pour
sélectionner la fonction MAINTIEN AU CHAUD.
2
Tournez le bouton pour sélectionner la
température de cuisson.
3
Tournez le bouton pour
sélectionner le temps de cuisson.
4
Appuyez sur pour commencer la cuisson.
»
«
«
»
«
»
«
»
INTENSITÉ
INTENSITÉ
22
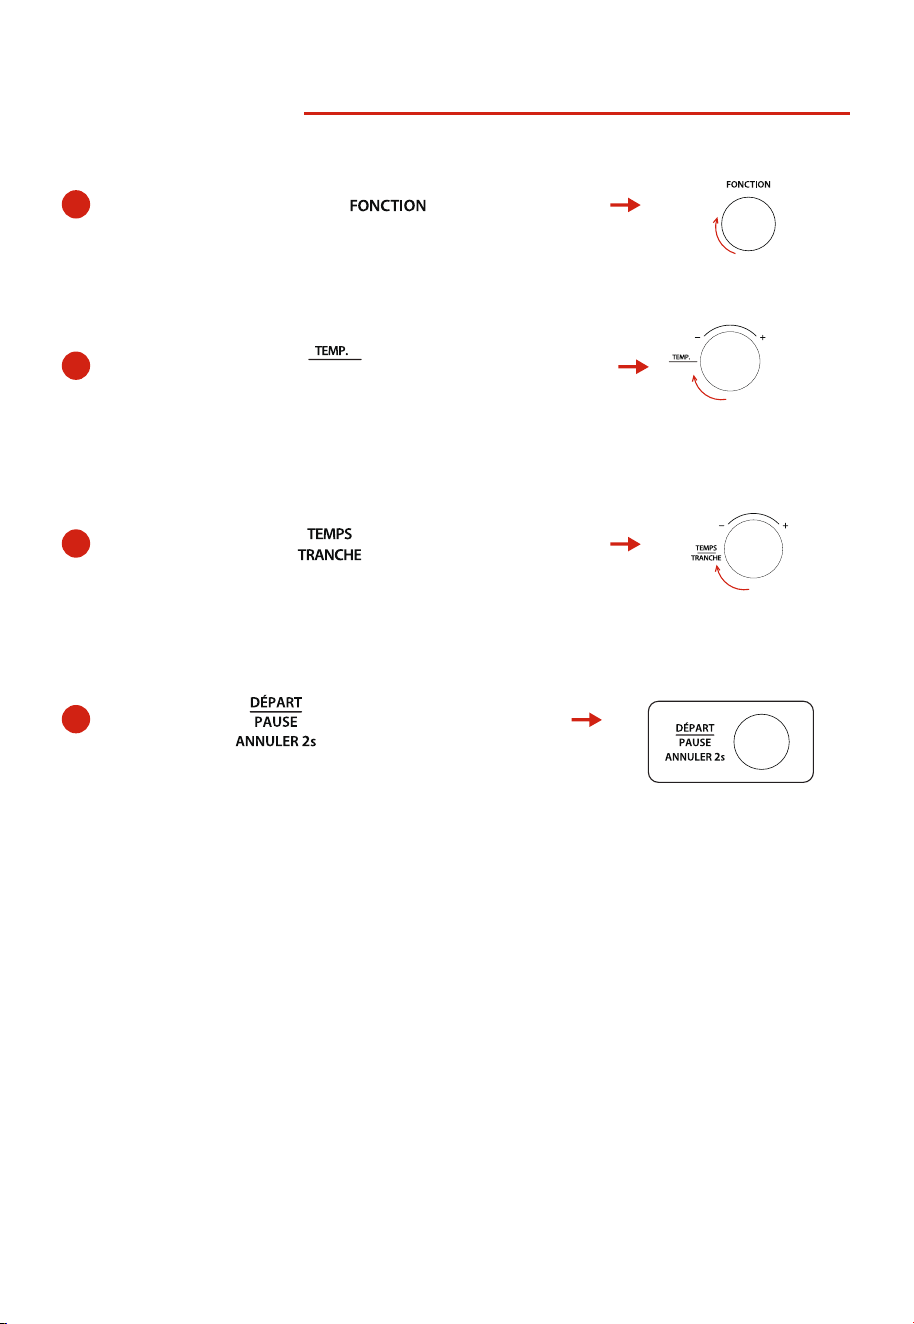
FERMENTATION
1
2
Tournez le bouton pour sélectionner
la température de cuisson.
3
Tournez le bouton pour
sélectionner le temps de cuisson.
4
Appuyez sur pour commencer la cuisson.
»
«
»
«
»
«
INTENSITÉ
INTENSITÉ
Tournez le bouton de la
pour
sélectionner la fonction FERMENTATION.
«
»
23
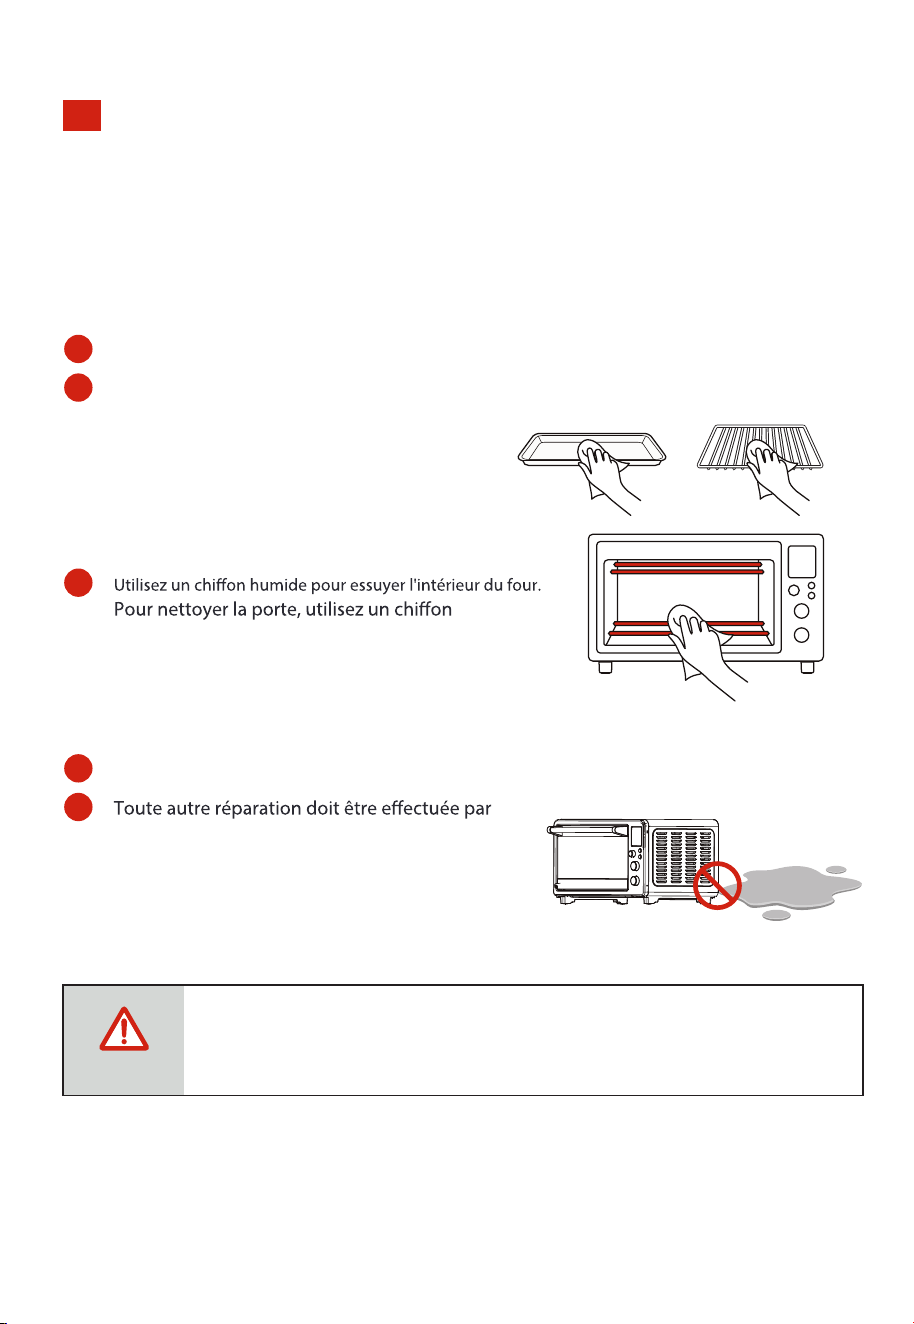
DÉSHYDRATATION
2
Tournez le bouton pour
sélectionner la température de cuisson.
3
4
Tournez le bouton pour sélectionner
le temps de cuisson.
1
Appuyez sur pour commencer la cuisson.
»
«
«
»
«
»
INTENSITÉ
INTENSITÉ
Tournez le bouton de la
pour
sélectionner la fonction DÉSHYDRATATION.
«
»
24
NETTOYAGE ET ENTRETIEN
ATTENTION
Avertissement : surface chaude!
1
2
Lavez tous les accessoires avec de l'eau tiède
savonneuse, y compris la grille de cuisson et le
plateau de cuisson.
N'utilisez pas de nettoyants abrasifs, de
brosses à récurer ou de produits chimiques.
Cela endommagera le plateau de cuisson.
3
humide imprégné de détergent ou de savon.
4
Ne plongez jamais l'appareil dans l'eau ou tout autre liquide.
5
un représentant de service autorisé.
NETTOYAGE ET ENTRETIEN
Avec les soins et le nettoyage appropriés, votre appareil conservera son apparence et restera pleinement
fonctionnel pendant longtemps. Nous expliquerons ici comment vous devez correctement entretenir et
nettoyer votre appareil. N'utilisez pas de nettoyants pour vitres ou de grattoirs en métal
/verre pour le nettoyage.
Avant de nettoyer, débranchez le four et laissez-le refroidir complètement.

25
GARANTIE LIMITÉE D’UN AN
Cet appareil est garanti contre les défauts de matériaux et de fabrication pendant une période d’un
an à compter de la date d’achat. Cette garantie est valable pour le premier acheteur particulier à
compter de la date de l’achat initial au détail et n’est pas transférable. Conservez le coupon de caisse
original.
1. Cette garantie ne couvre pas les dommages résultant d’un accident, d’une mauvaise utilisation
ou d’un abus, d’un manque de soin raisonnable, de la pose d’accessoires non fournis avec
l'appareil, de la perte de pièces ou de l’utilisation de l’appareil à une tension autre que celle
spécifiée. (Lire attentivement les instructions.)
2. Cette garantie est nulle si cet appareil est utilisé à des fins autres que domestiques.
3. Cette garantie est nulle si cet appareil est utilisé en dehors du Canada.
Si une intervention est nécessaire pendant la période de garantie, emballez correctement votre
appareil. Nous recommandons d’utiliser la boîte et le matériel d’emballage d’origine.
Si vous avez besoin d’une aide supplémentaire, veuillez contacter le service d’assistance à la
1-855-238-5607
Midea America (Canada) Corp. décline expressément toute responsabilité pour les dommages
consécutifs ou les pertes accidentelles causés par l’utilisation de l’appareil. Certains pays
n’autorisent pas l’exclusion ou la limitation des pertes accessoires ou consécutives, de sorte que la
clause de non-responsabilité qui précède peut ne pas s’appliquer à vous. Cette garantie vous donne
des droits légaux spécifiques, et vous pouvez également avoir d’autres droits qui peuvent varier
d’un pays à l’autre.
Le numéro de série se trouve à l'arrière de l’appareil. Nous vous suggérons de noter le numéro de série
de votre appareil dans l’espace ci-dessous pour référence ultérieure.
Numéro de modèle :
Numéro de série :
L’enregistrement des produits n’est pas obligatoire. Le fait de ne pas remplir et renvoyer la carte ou
le formulaire ne diminue pas les droits à la garantie du consommateur.
À CONSERVER POUR VOS DOSSIERS
Midea America (Canada) Corp.
Unit 108, 15 Allstate Parkway Markham ON L3R 5B4

#Les détails comptent