
Technical Support and E-Warranty Certificate www.vevor.com/support
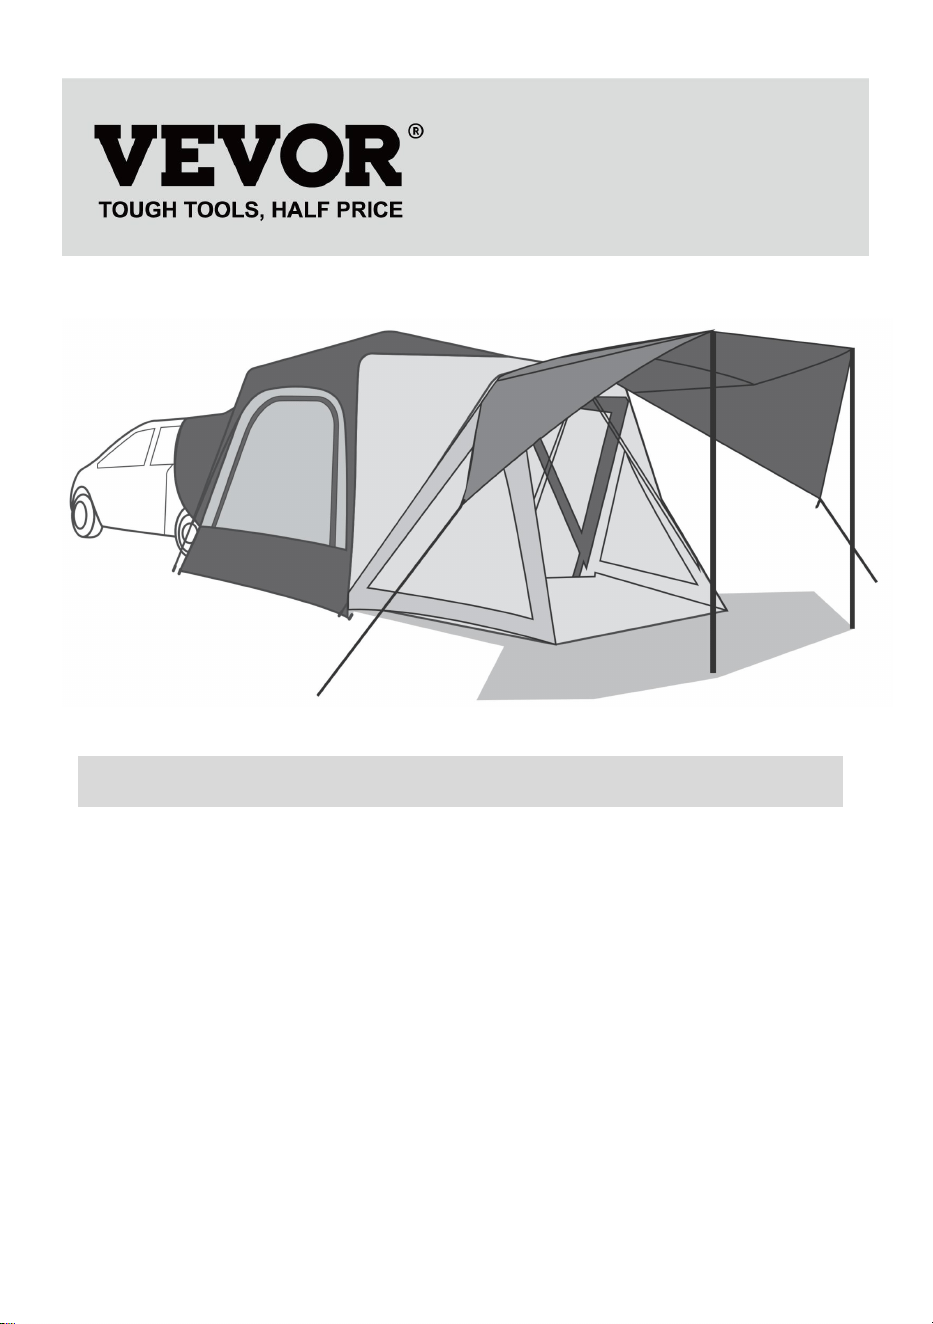
TRUCK TENT
MODEL: 2240606
We continue to be committed to provide you tools with competitive price.
"Save Half", "Half Price" or any other similar expressions used by us only
represents an estimate of savings you might benefit from buying certain tools
with us compared to the major top brands and does not necessarily mean to cover
all categories of tools offered by us. You are kindly reminded to verify carefully
when you are placing an order with us if you are actually Saving
Half in comparison with the top major brands.

- 1 -
MODEL: 2240606
NEED HELP? CONTACT US!
Have product questions? Need technical support? Please feel free to
contact us:
Technical Support and E-Warranty Certificate
www.vevor.com/support
This is the original instruction, please read all manual instructions
carefully before operating. VEVOR reserves a clear interpretation of our
user manual. The appearance of the product shall be subject to the
product you received. Please forgive us that we won't inform you again if
there are any technology or software updates on our product.
TRUCK TENT

- 2 -
IMPORTANT SAFEGUARDS
WARNING: Read and understand this entire manual before
operating or servicing this product. Failure to follow these warnings and
instructions can cause personal injury or damage to valuable property.
Avoid children using the product. And this product is not a toy. Do not allow
children to play.
Keep all flame and heat sources away from the tent fabric. The fabric will
burn if left in contact with any flame source. The application of any foreign
substance to the tent fabric may render the flame-resistant properties
ineffective.
Avoid injury, children should not play around inside the product or to rely on.
This product is not recommended during thunderstorms.
SETUP PRECAUTIONS
1. Do not use candles, matches, or open flames of any kind in or near the
tent.
2. Do not cook inside the tent.
3. Build campfires downwind and several meters away from the tent. Be
sure to fully extinguish fires before leaving a campsite or before retiring for
the night.
4. Exercise extreme caution when using fuel-powered lanterns or heaters
inside or around the tent. Use battery-operated lanterns whenever
possible.
5. Do not refuel lamps, heaters, or stoves inside the tent.
6. Extinguish or turn off all lanterns before going to sleep.
7. Do not smoke inside the tent Do not store flammable liquids inside the
tent.
8. NEVER run the vehicle engine when the tent is attached.
9. Do not install the tent when the temperature is below 0ºC/32ºF or when

- 3 -
your vehicle is wet, it may cause damage.
10. Allow adequate ventilation inside the tent at all times.
11. Do not attempt to drive the vehicle with the tent attached.
12. To prevent carbon monoxide from entering the vehicle and tent area,
do not run the engine, do not cook inside the tent, and do not use a gas
heater in the tent. Carbon monoxide is dangerous to your health.
13. Engine must be off and exhaust must be fully cooled before tent
installation and use.
SAVE THESE INSTRUCTIONS
CAMPSITE SELECTION
1. Select a smooth, level campsite clear of rocks, branches, and other
hard or sharp objects.
2. Avoid areas with overhead power lines and tree limbs.
3. Park the vehicle in the chosen campsite.
4. Turn the engine off and engage the parking brake.
HOW TO STORE
1. Clean and dry the tent.
2. Fold all of the components into the tent.
3. Roll the tent, using the pole bag as a guide.
4. Secure with the tent tie straps and insert into the carrying bag.
5. Store in a cool, dry place.
SPECIFICATION
Tent Style
10*10ft (Rear model of the car,)
Awning
Yes
Colour
Grey
Seasons
3 Season, Summer, Fall, Spring
Material
Body:Polyester fabric 210T/PU2000
Bottom:PE;
- 4 -
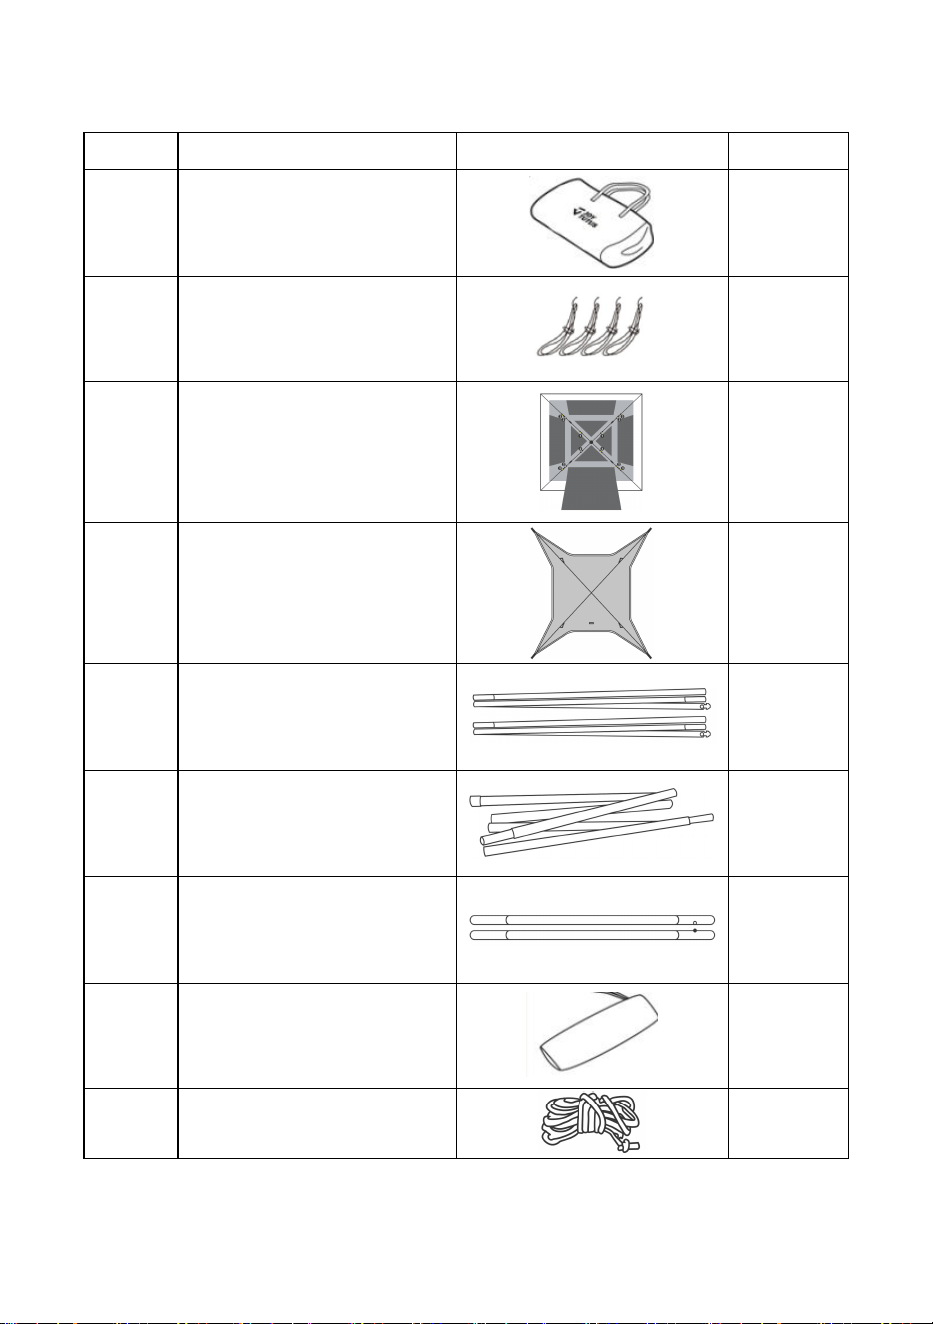
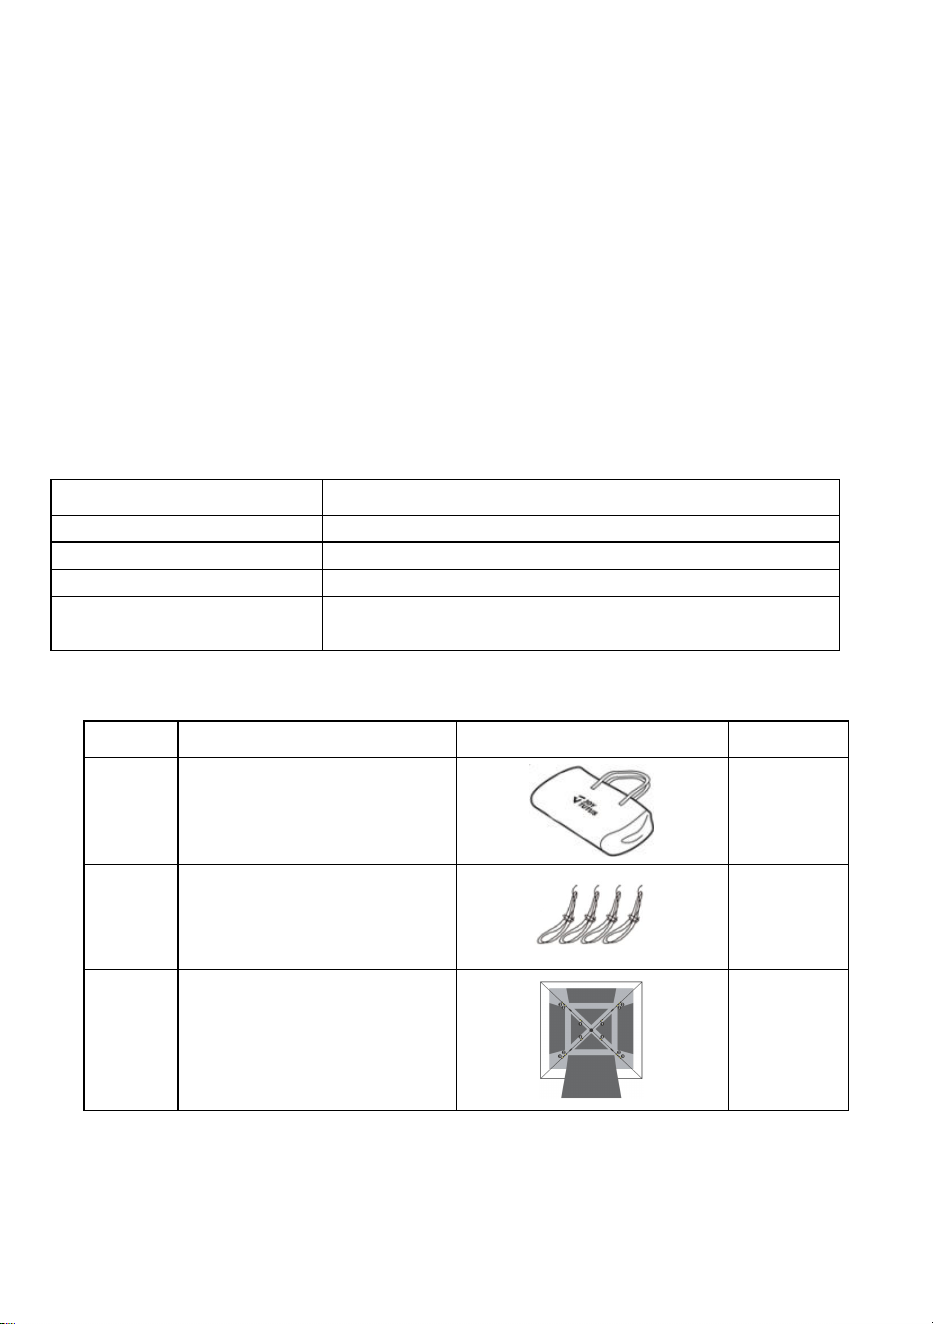
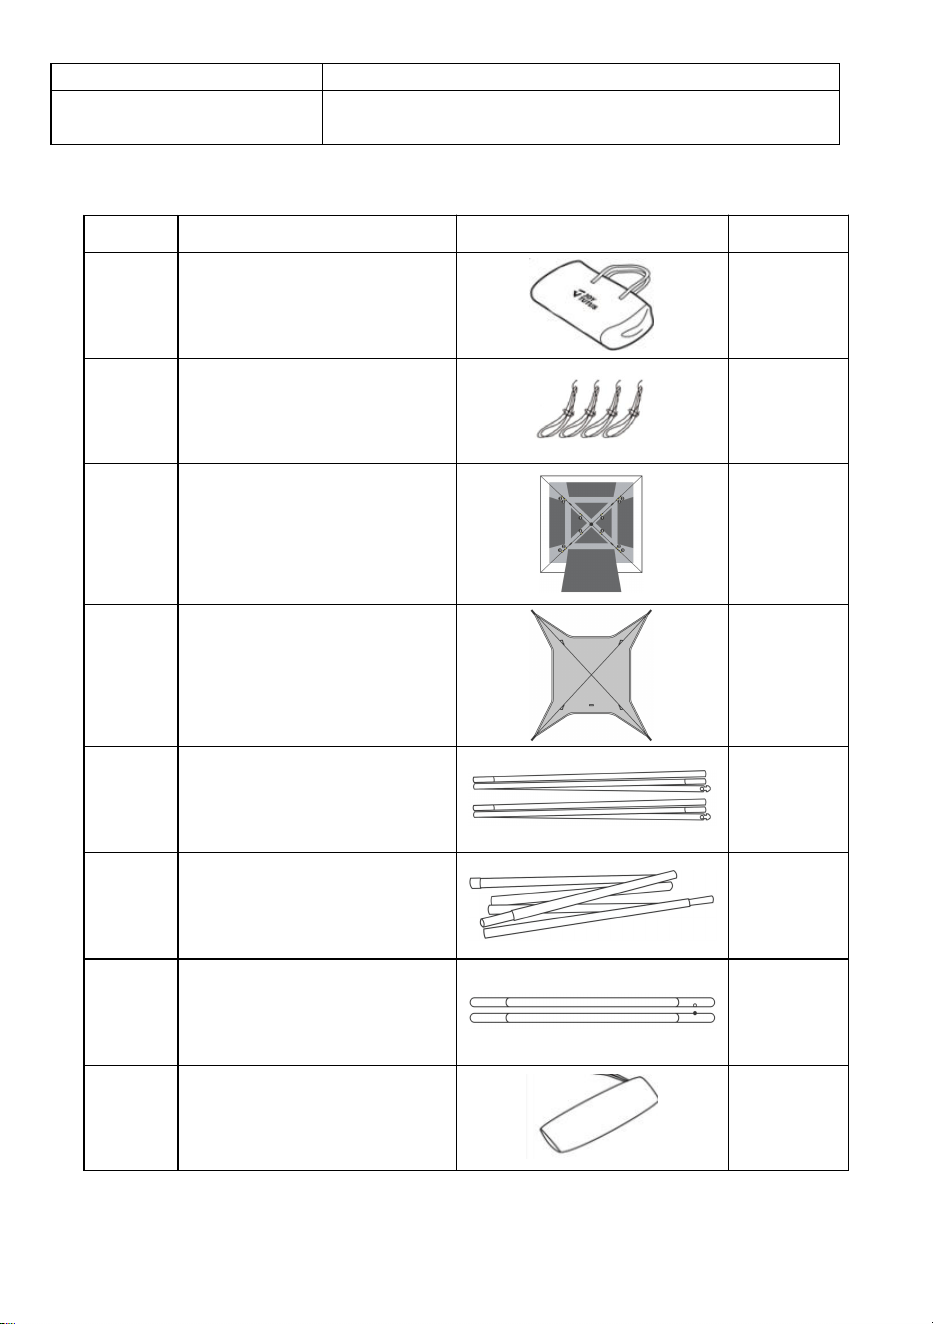
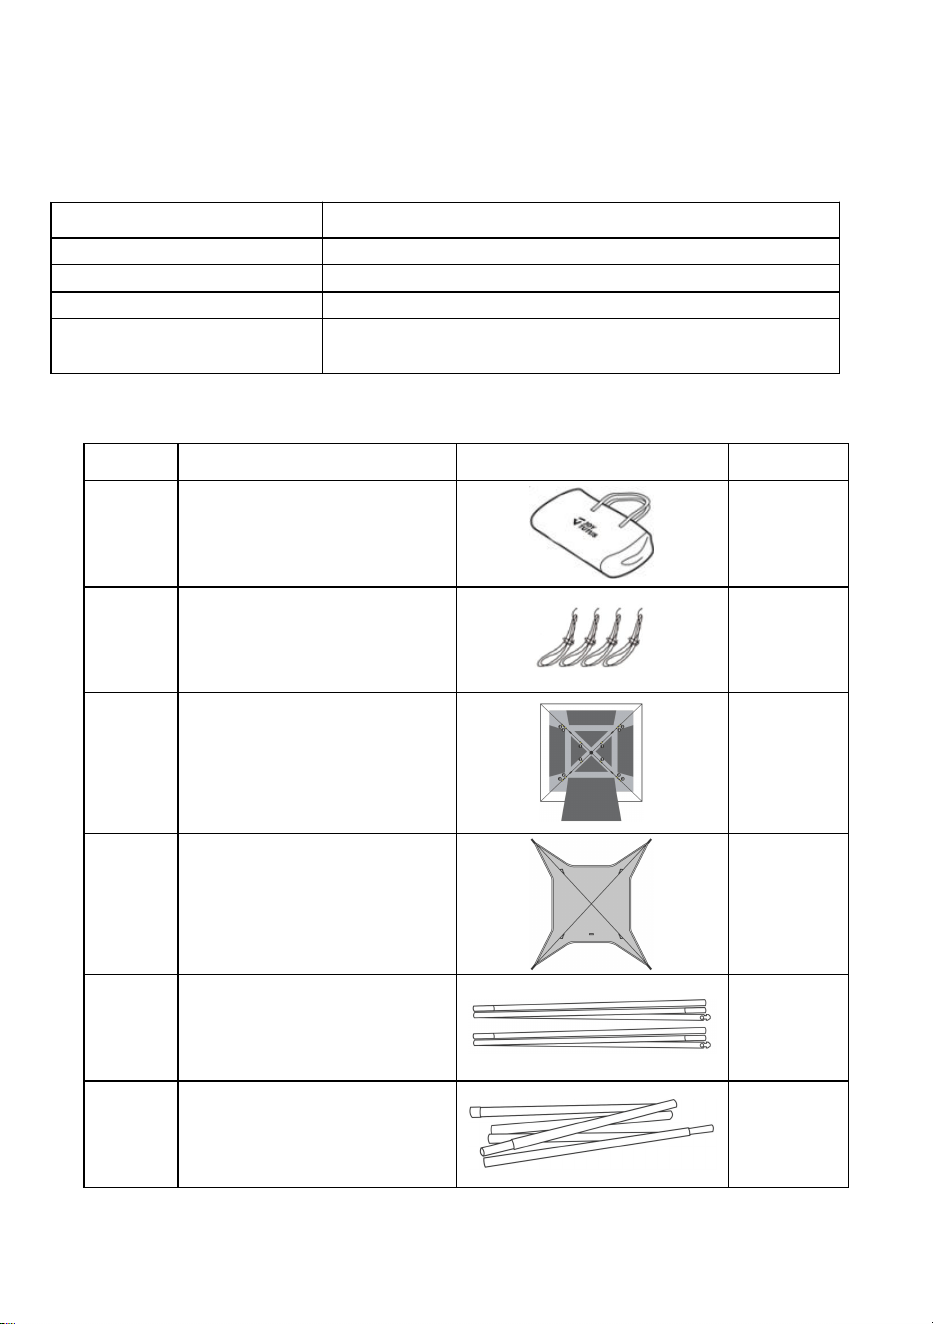
PART LIST
No.
Name
Picture
QTY
1
Tent Bag
1
2
Hook
6
3
Tent Body
1
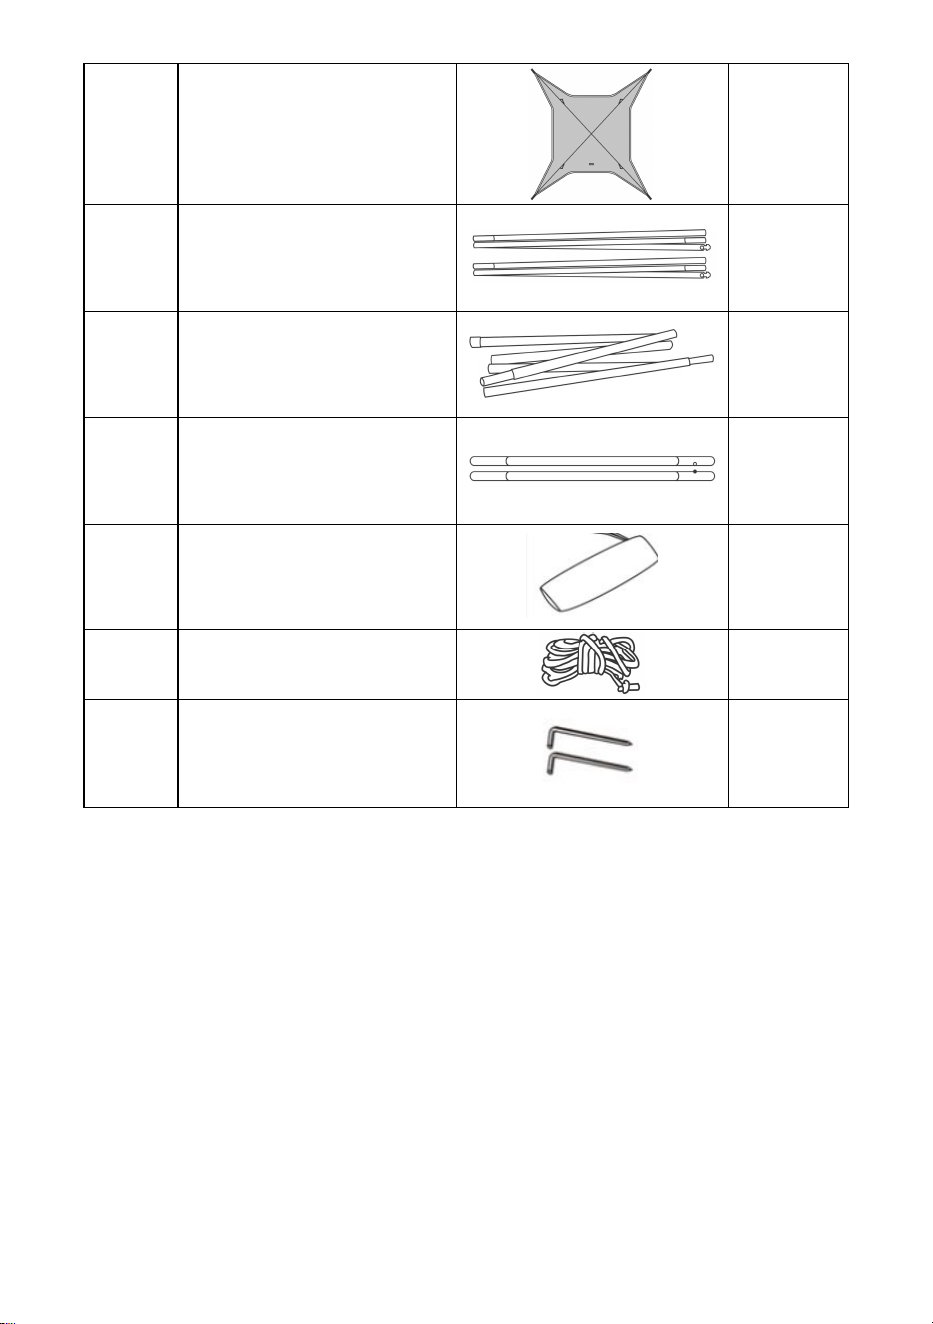
4
Rain fly
1
5
Poles for the porch both
sides
2
6
Support poles for the
awning canopy
2
7
Pole for the porch's top
1
8
Pole Bag
1
9
Wind Rope
8
- 5 -
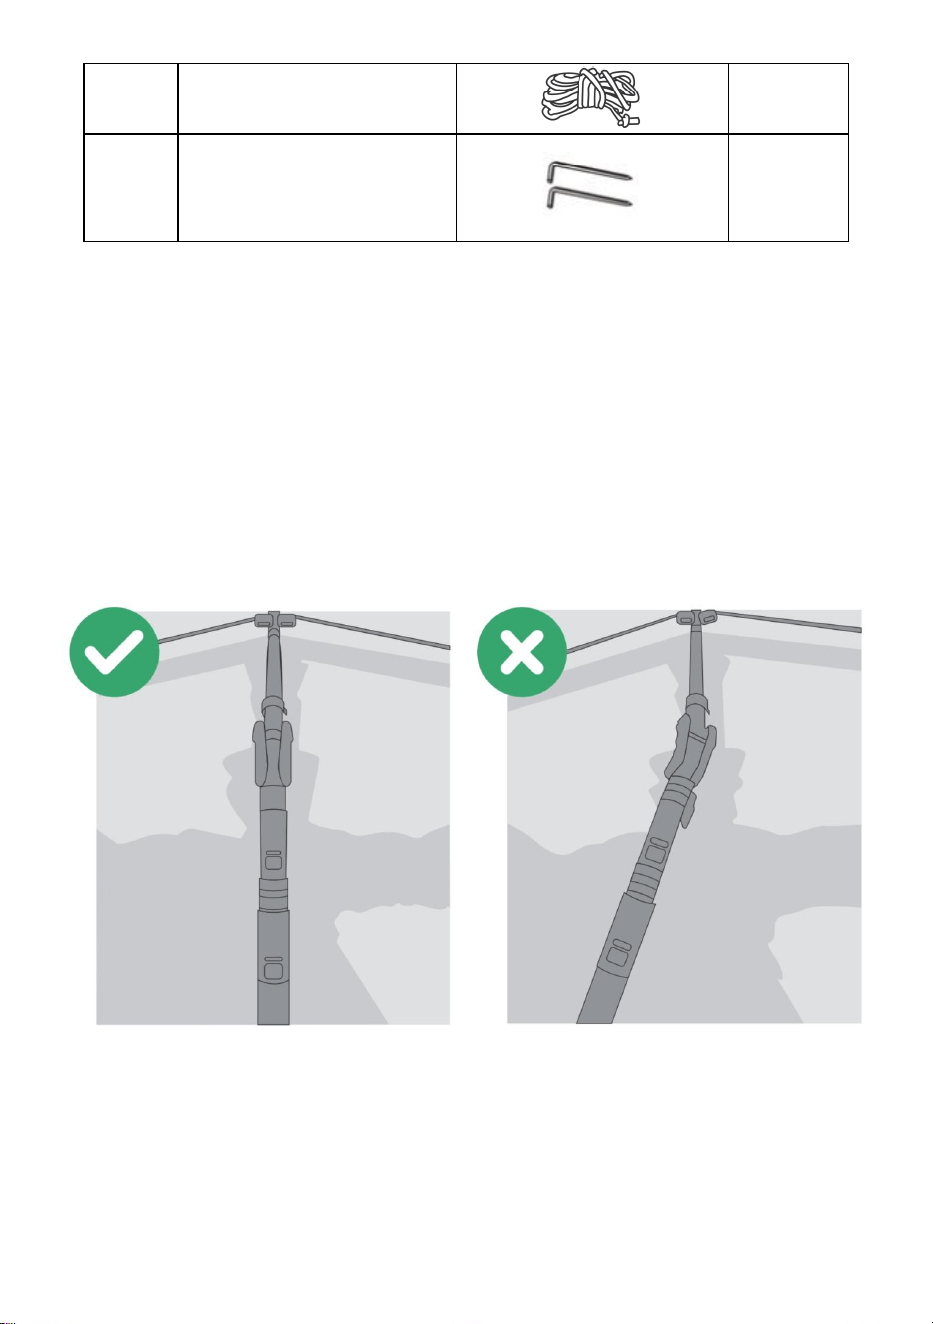
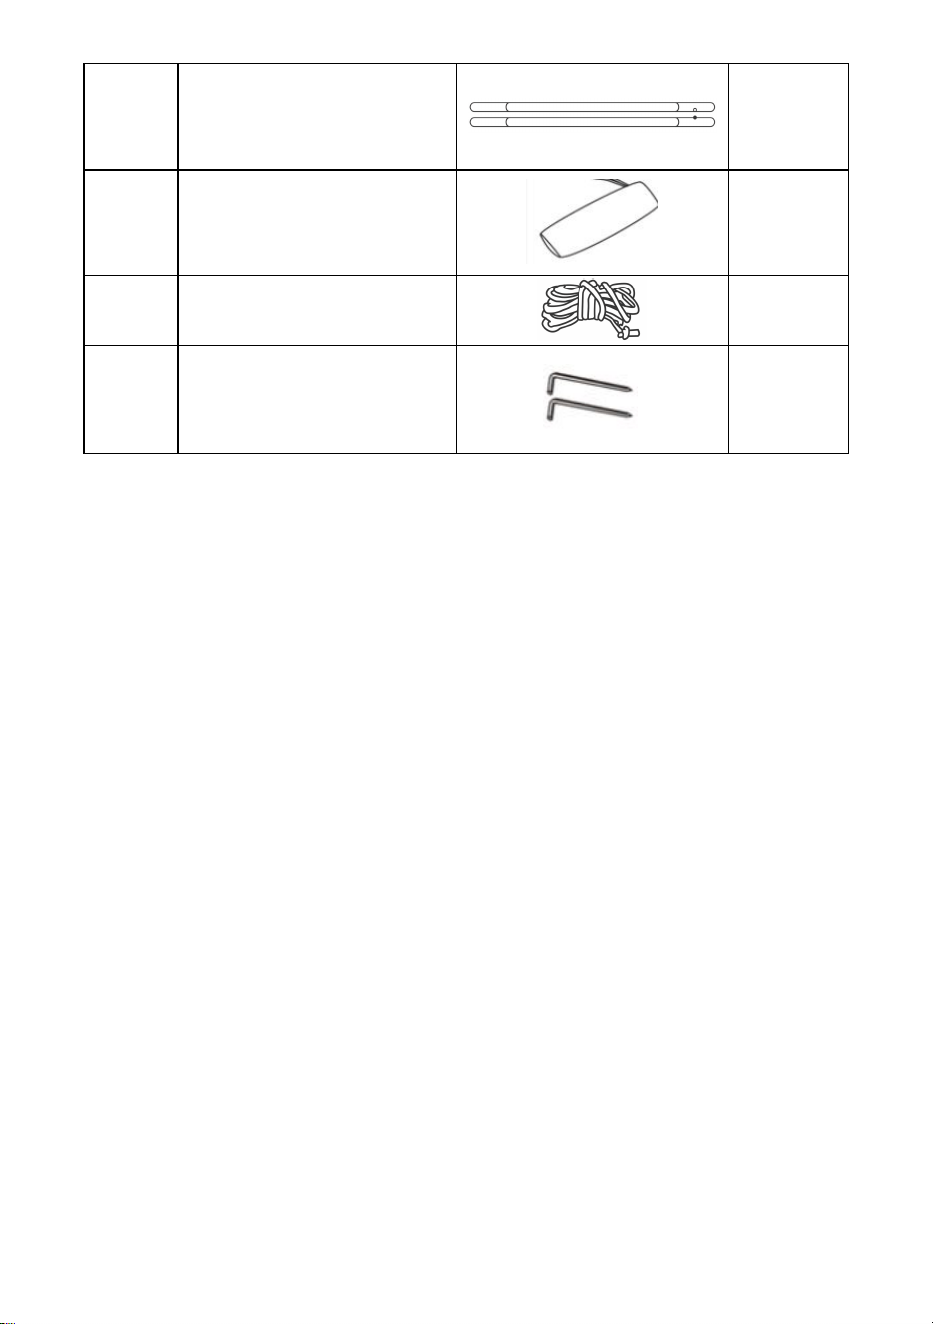
10
Ground Nail
15
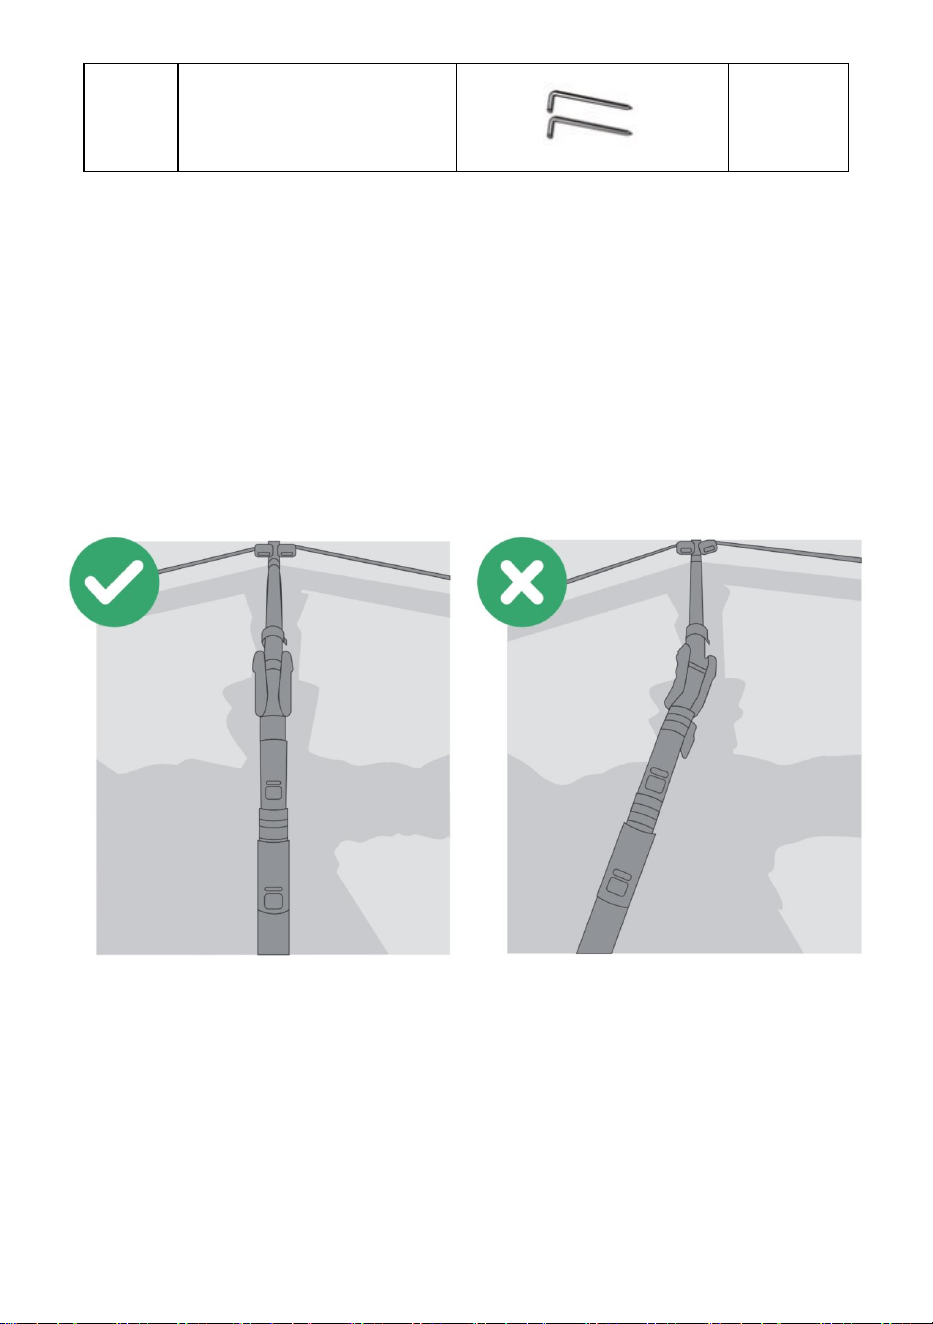
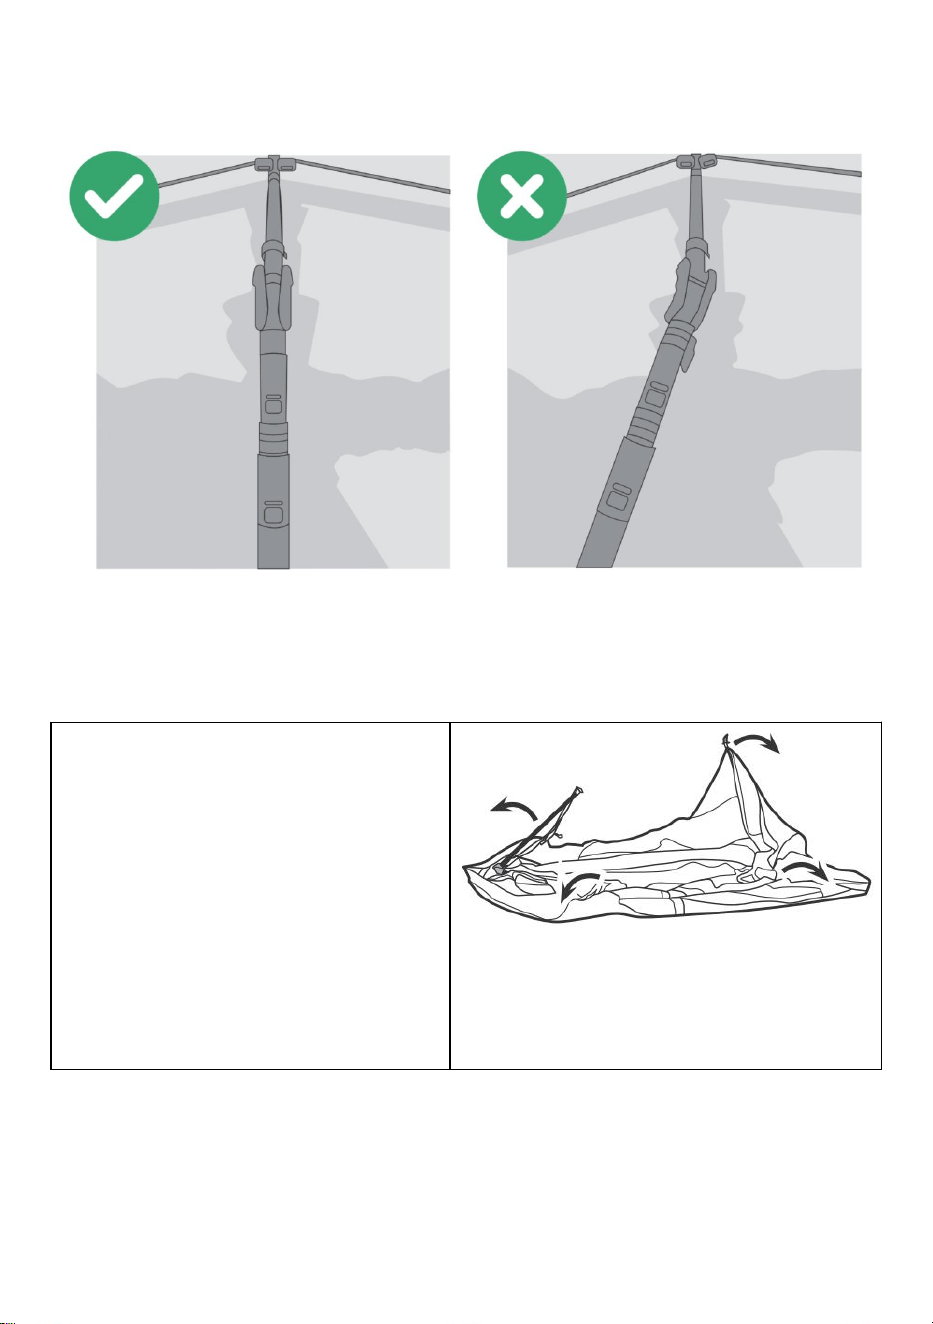
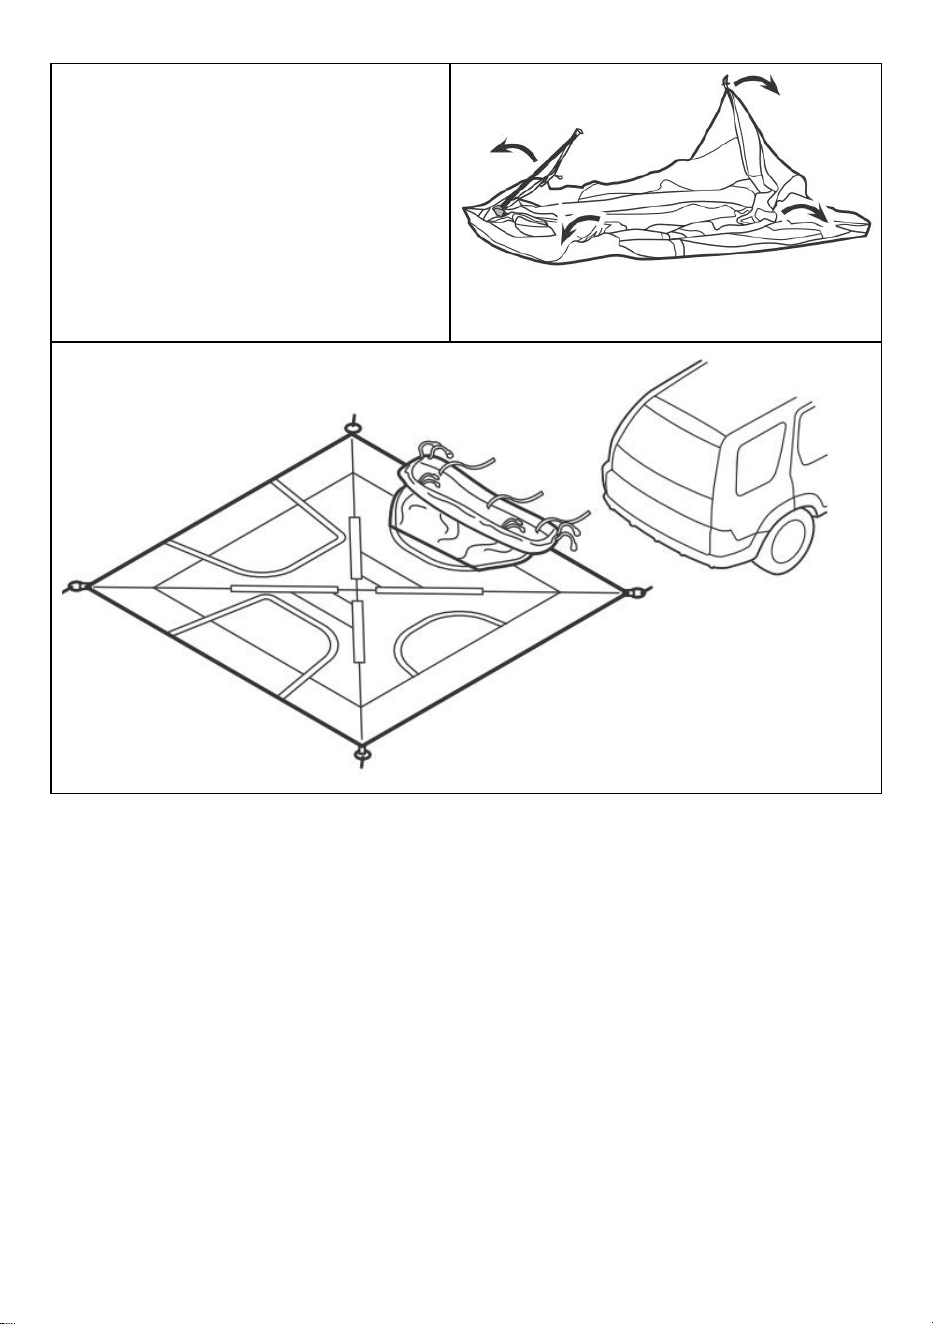
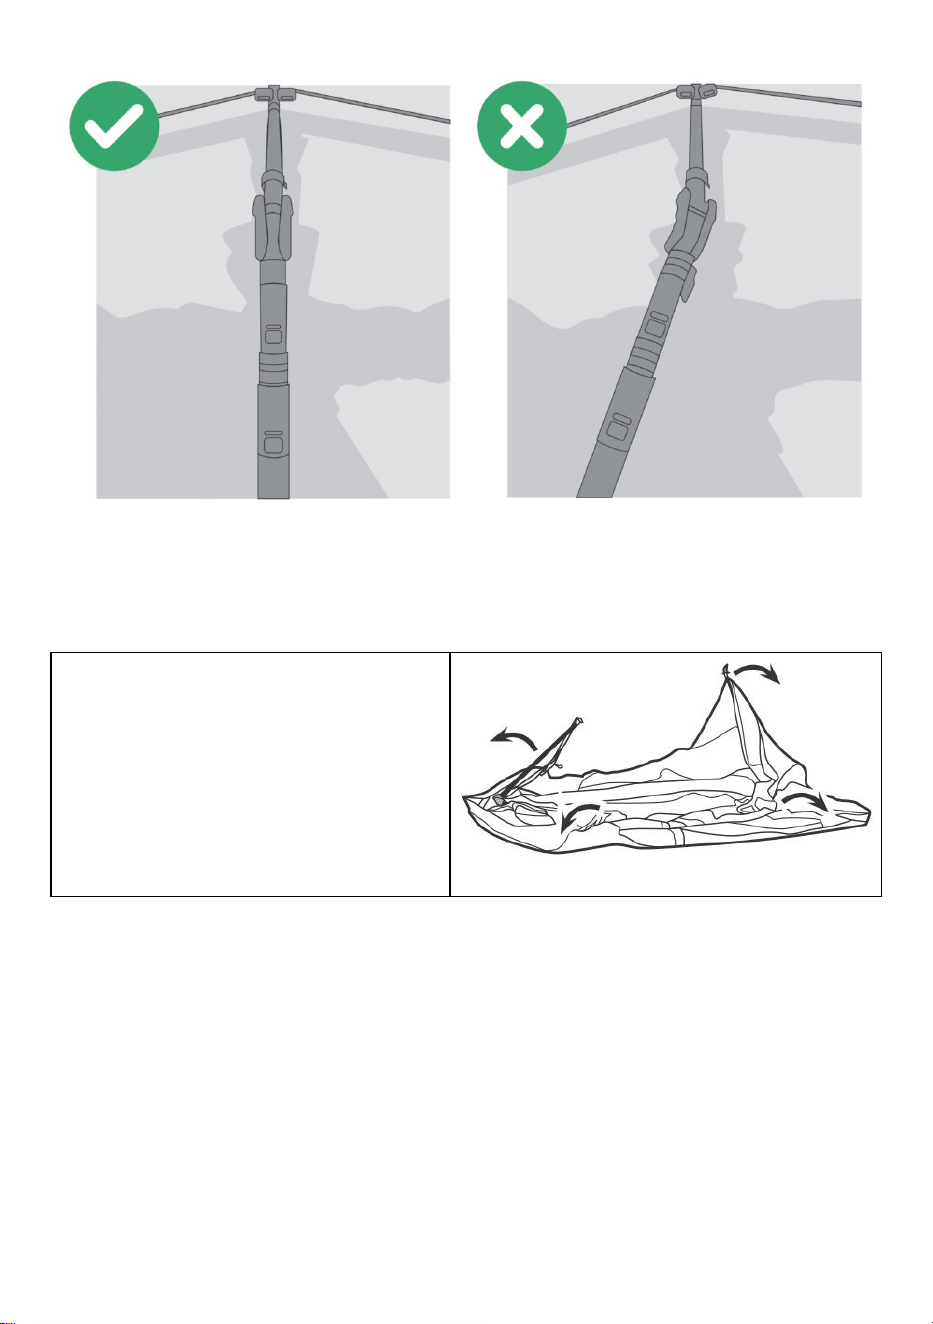
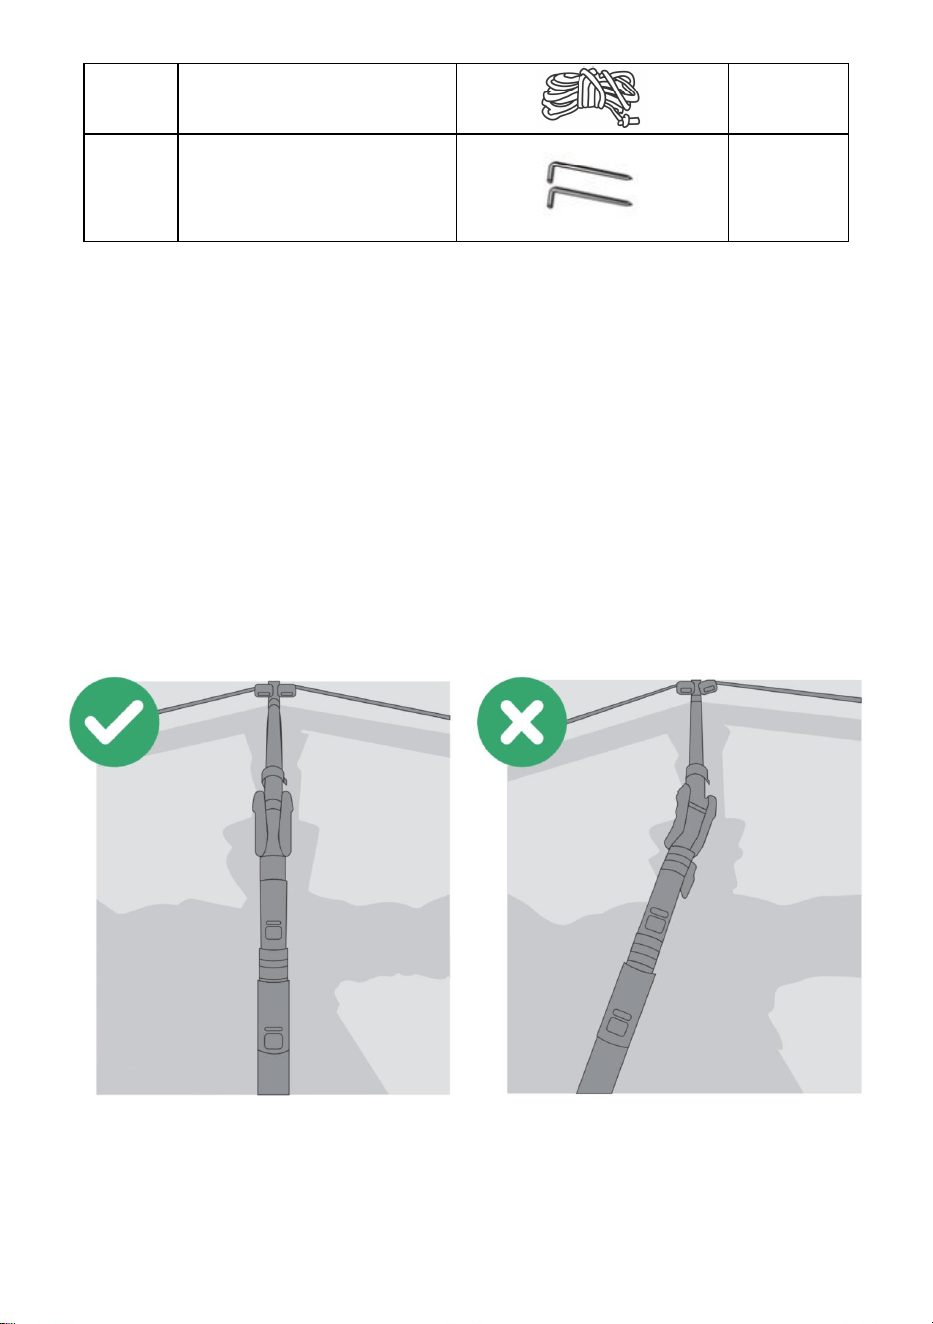
TIPS BEFORE ASSEBMLE
1. Ensure that the stretchable poles are kept in the same horizontal
direction while you pull awards the top pole's section.
2. Make sure to pull up all the retractable parts of the tent pole in all four
directions until the yellow button pops up!
3. The poles will get stuck if they are crooked, so please keep them
straight when pulling up, please handle with care.
5. Secure the tent stakes at each corner of the tent to ensure greater
stability.
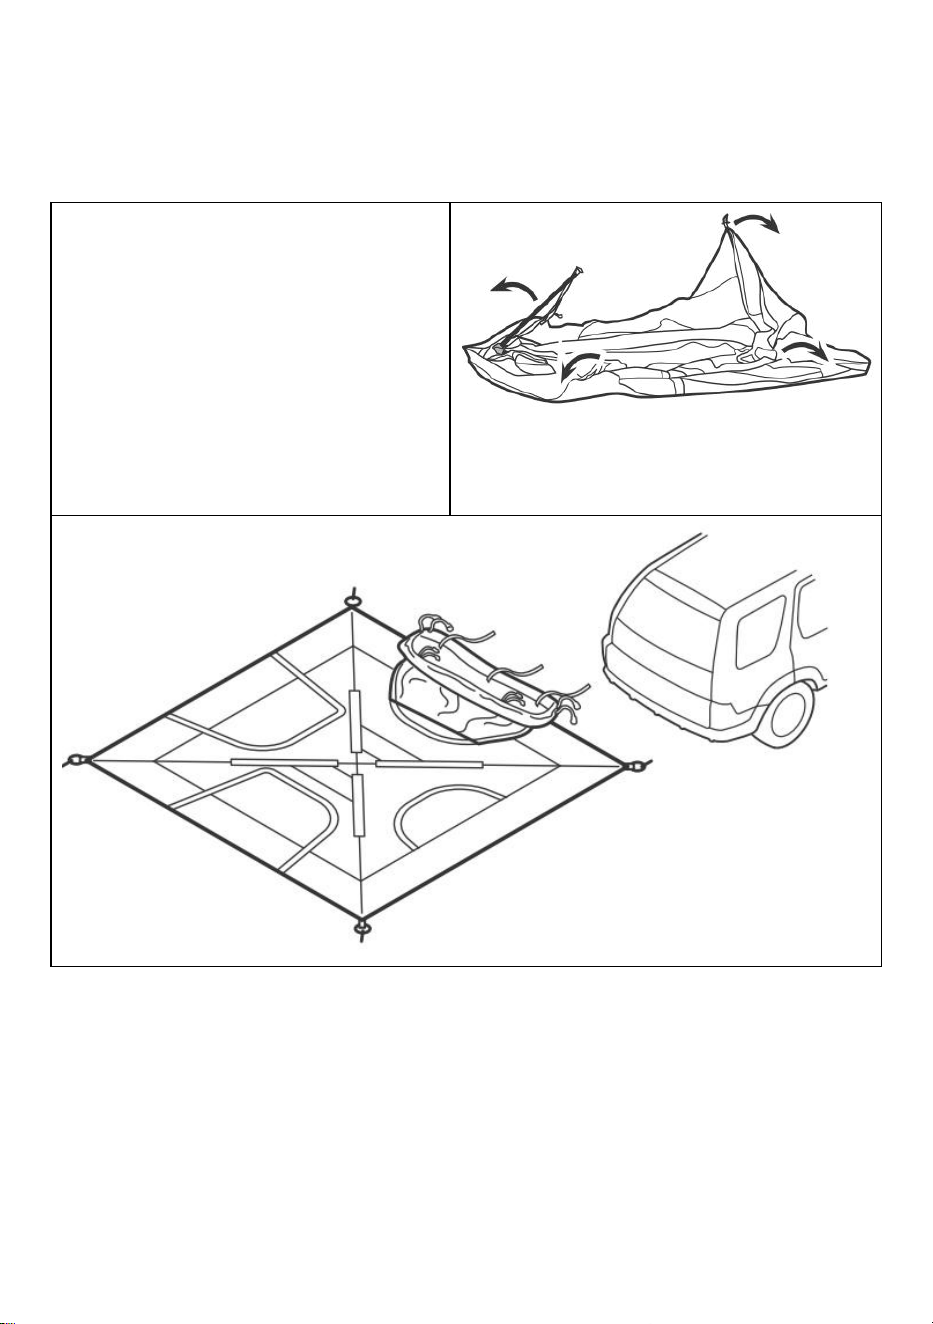
TRUCK TENT ASSEMBLE
STEP1. STRETCH THE TOP POLES PART
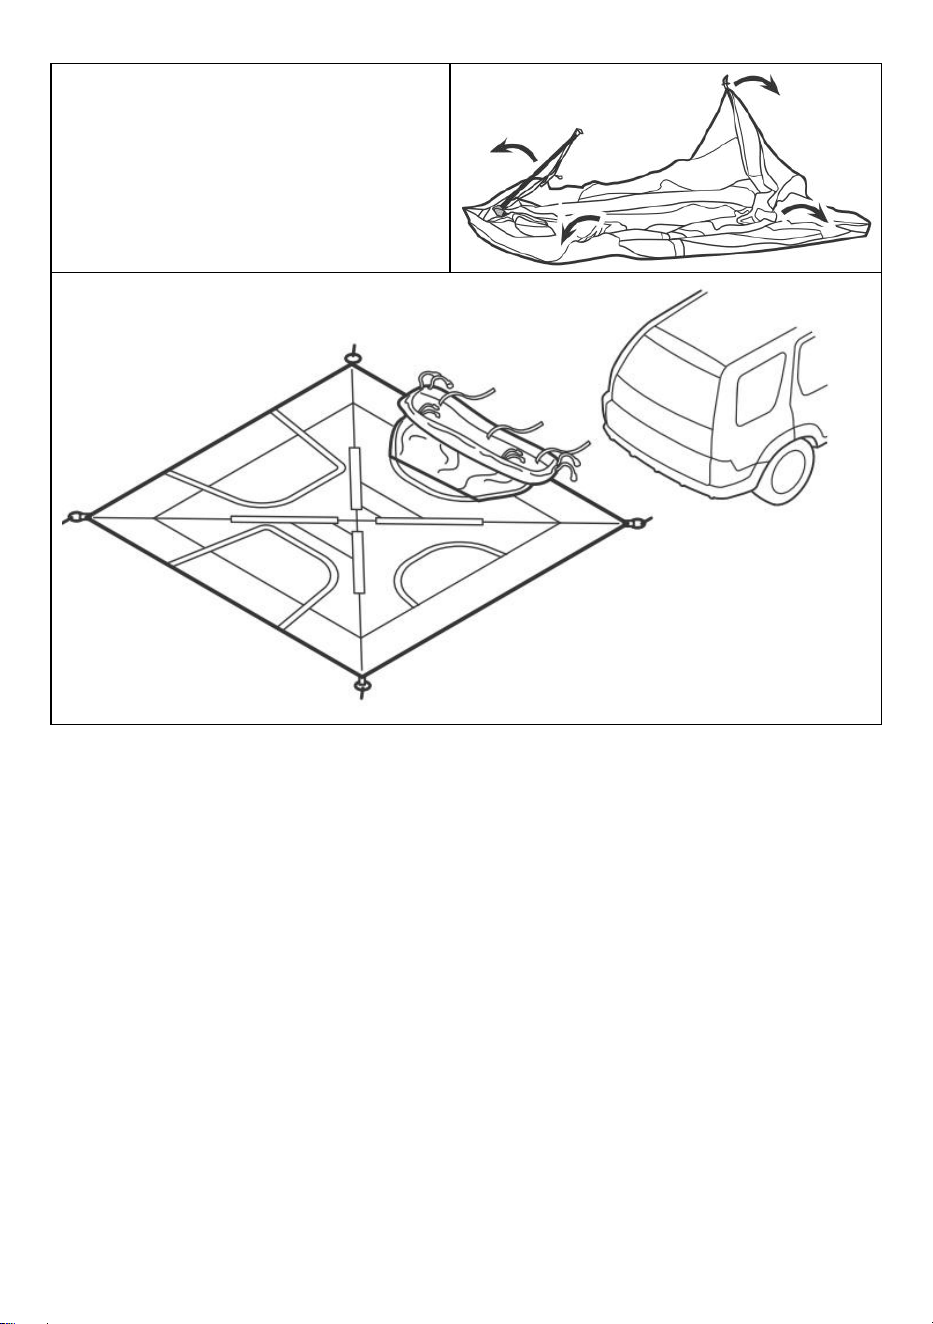
- 6 -
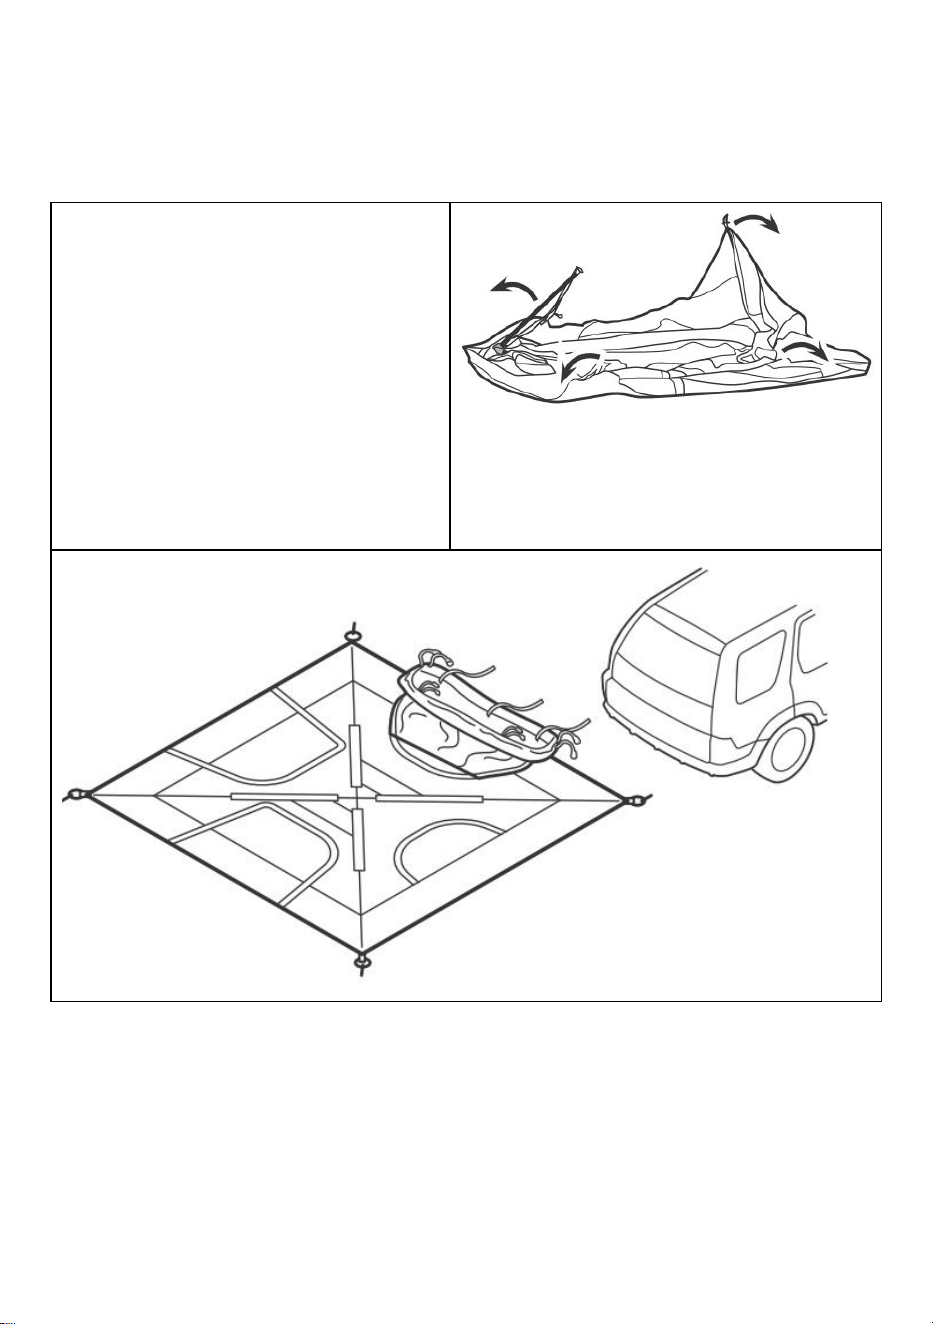
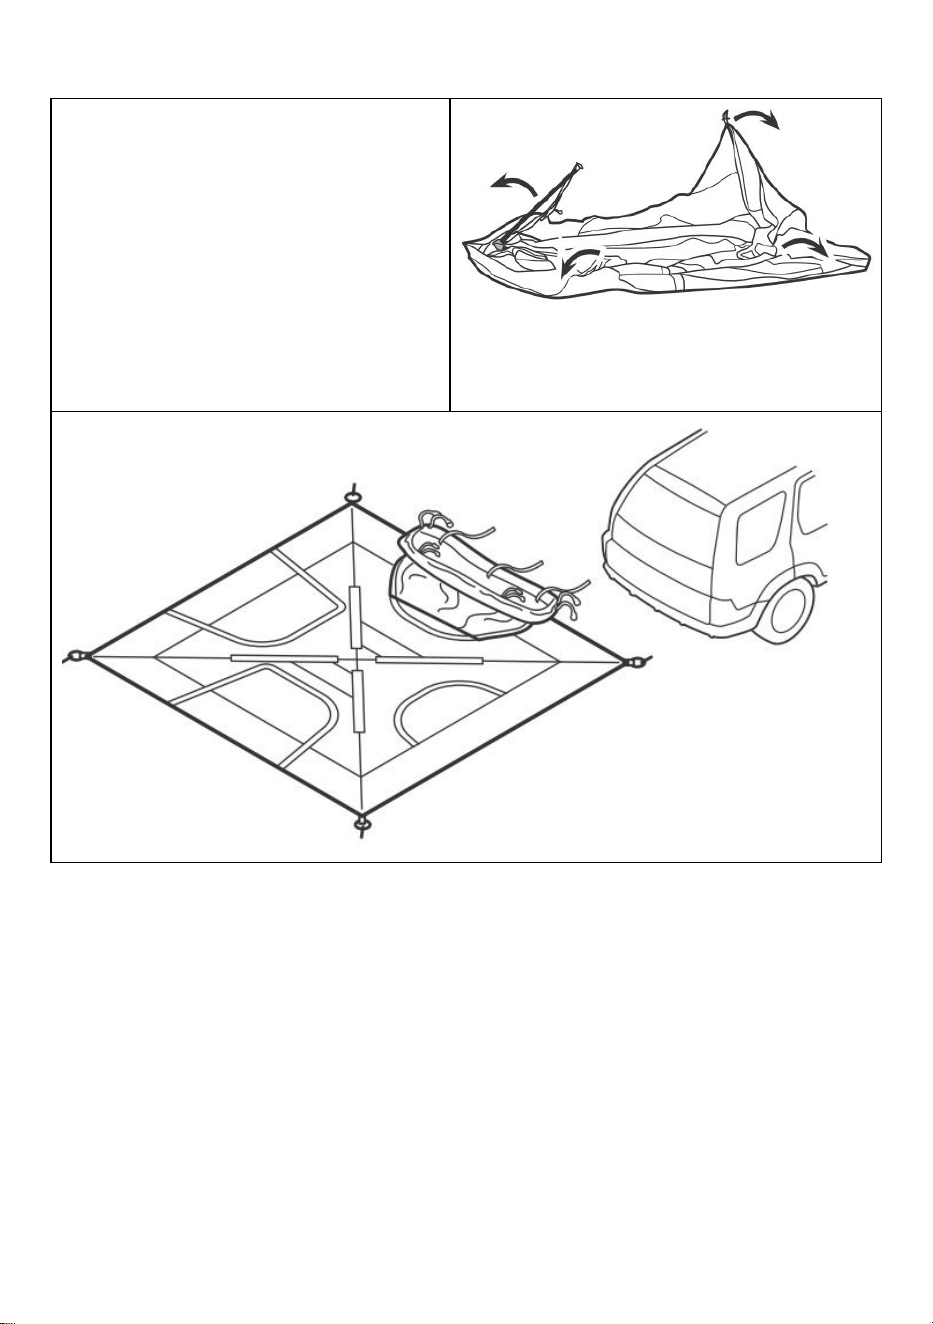
① Prepare for Setup.
Select a level site clear of rocks,
branches, and other hard or sharp
objects, to set up your tent.
Remove all contents from bag.
Unfold 4 leg poles at the joints.

- 7 -
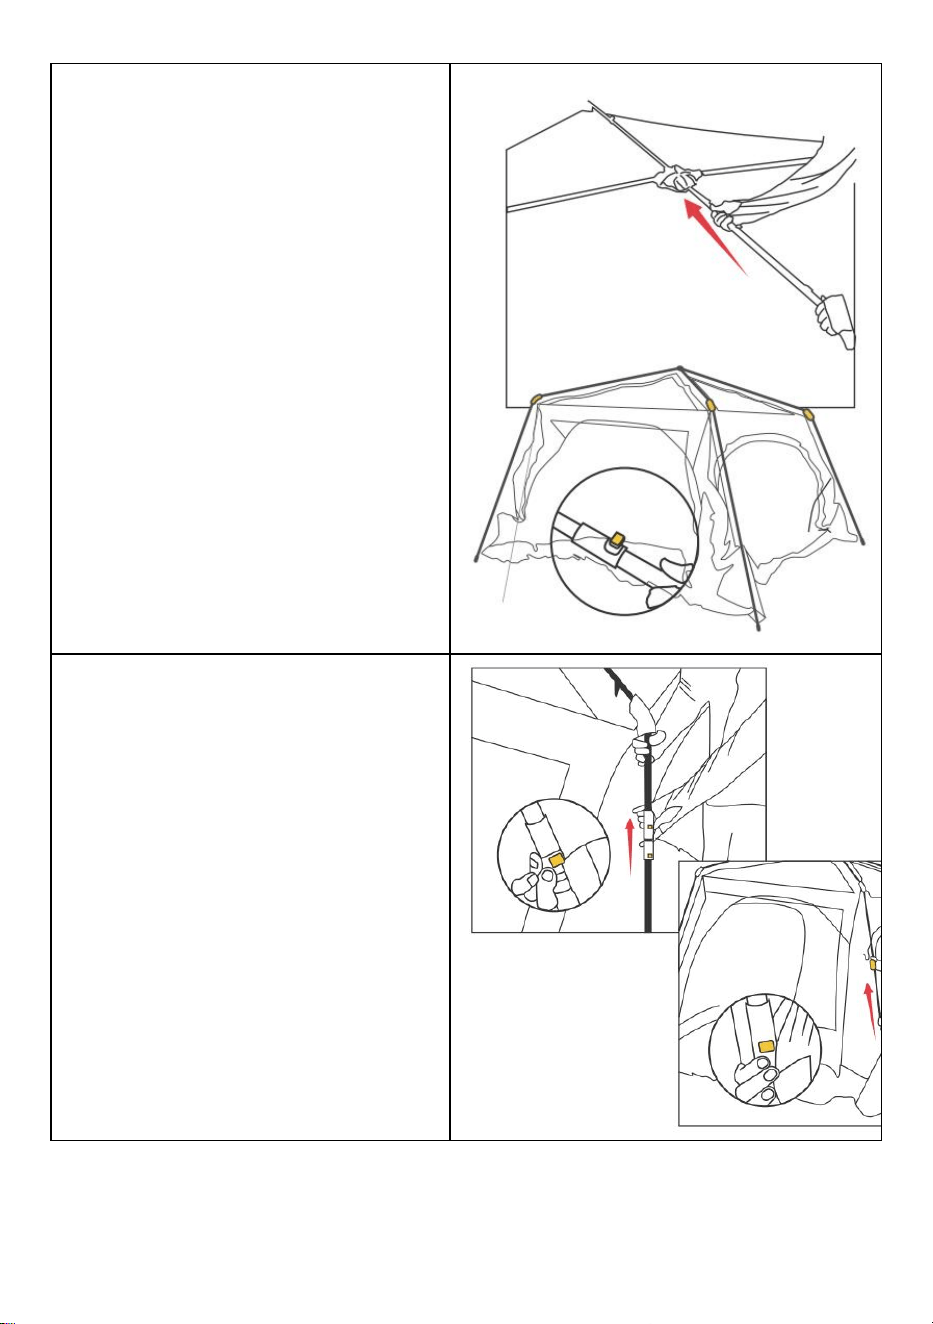
② Lift Up Arm Joints.
Note: 2 people will be needed to
erect and extend the tent poles
stretch the poles in each of the top
four directions until each "yellow"
button pops up.
③ Extend Leg Poles.
Note: There are 2 strechable
sections of each leg poles. Extend
each pole's strechable section in
turn from middle to bottom until
each yellow button pops up.
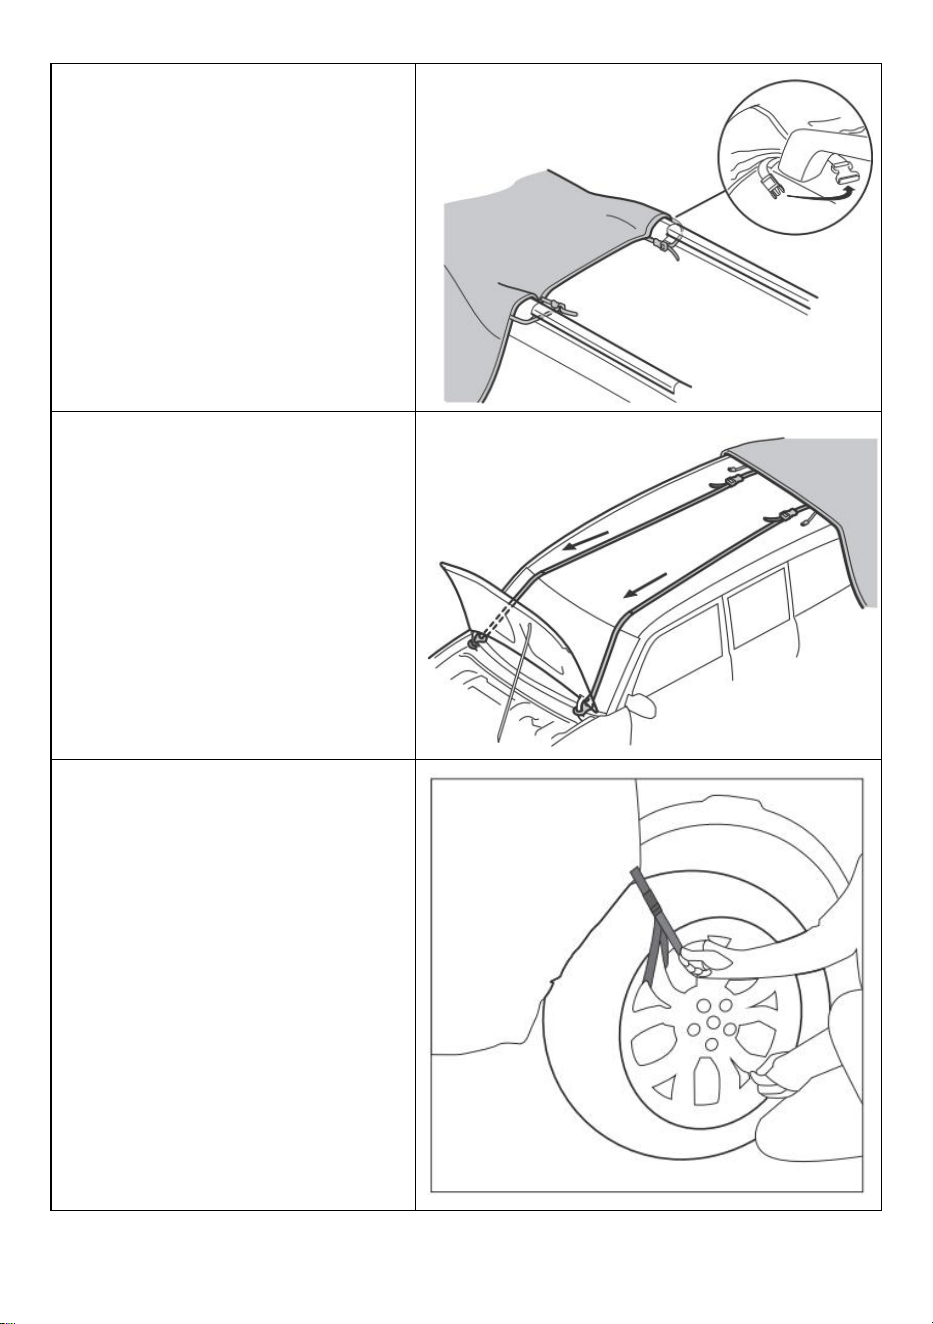
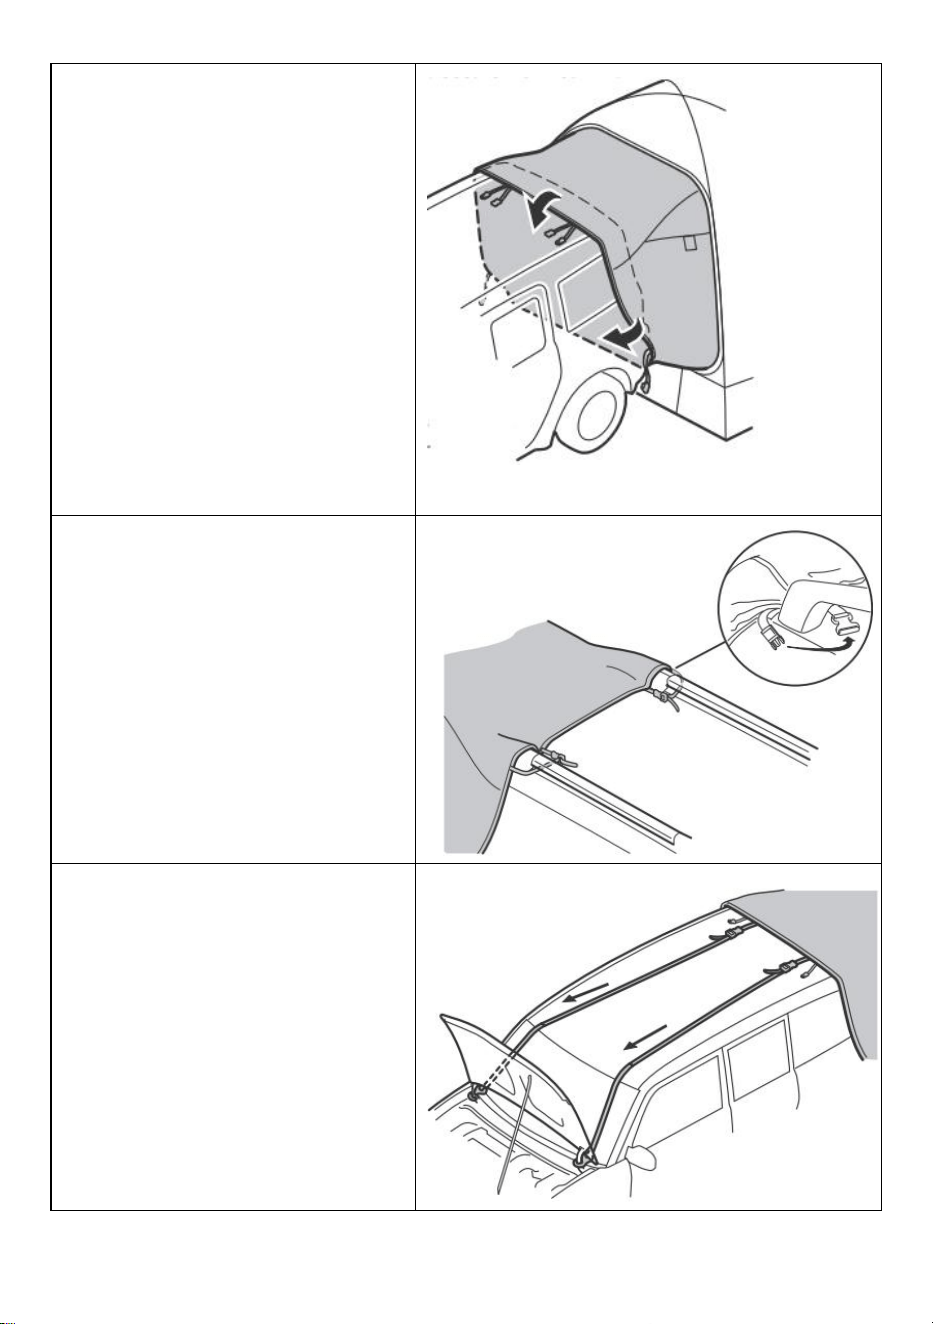
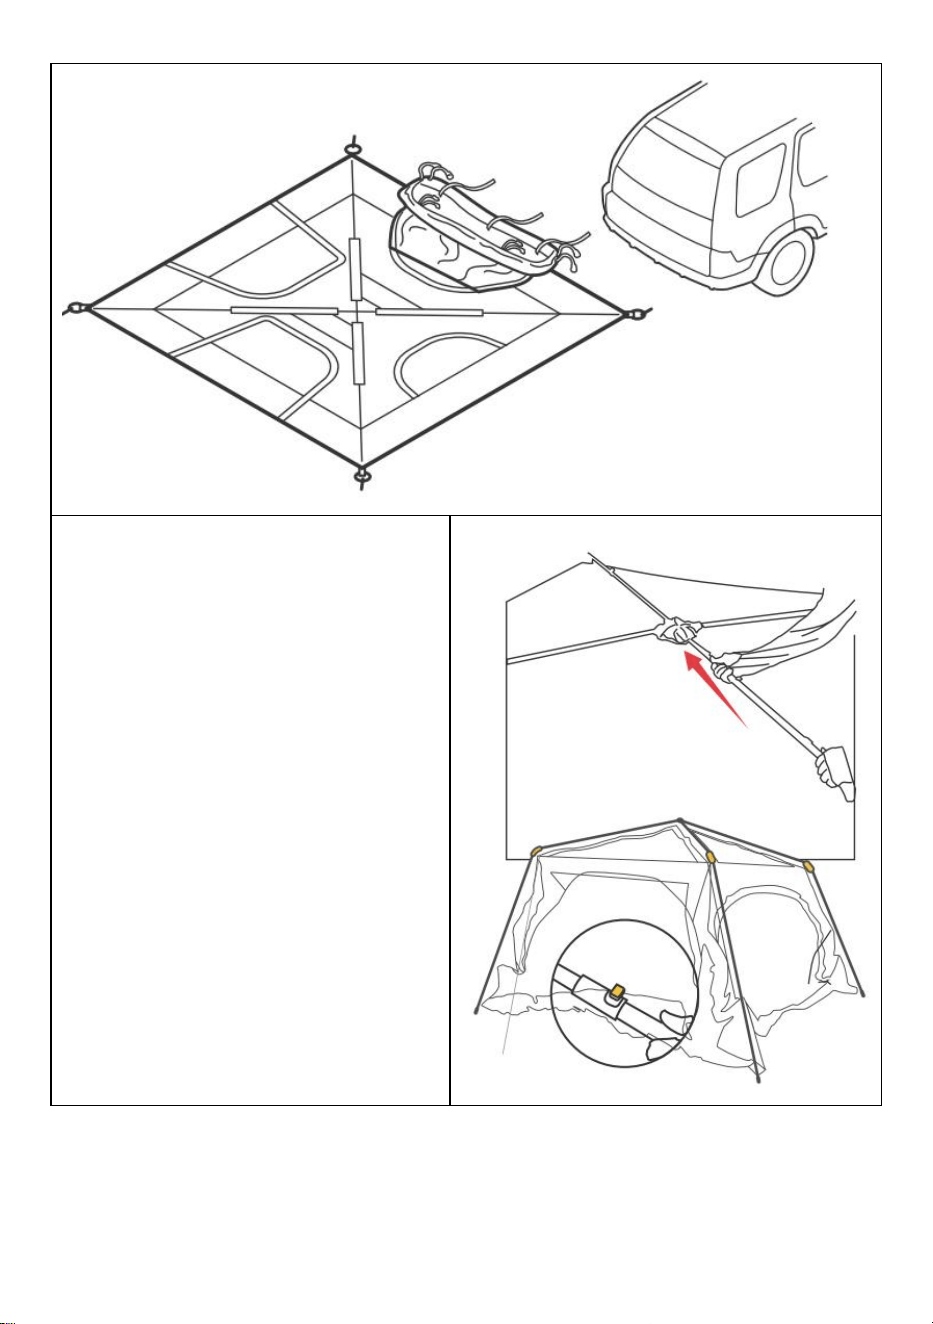
STEP2. CONNECT THE VECHILE
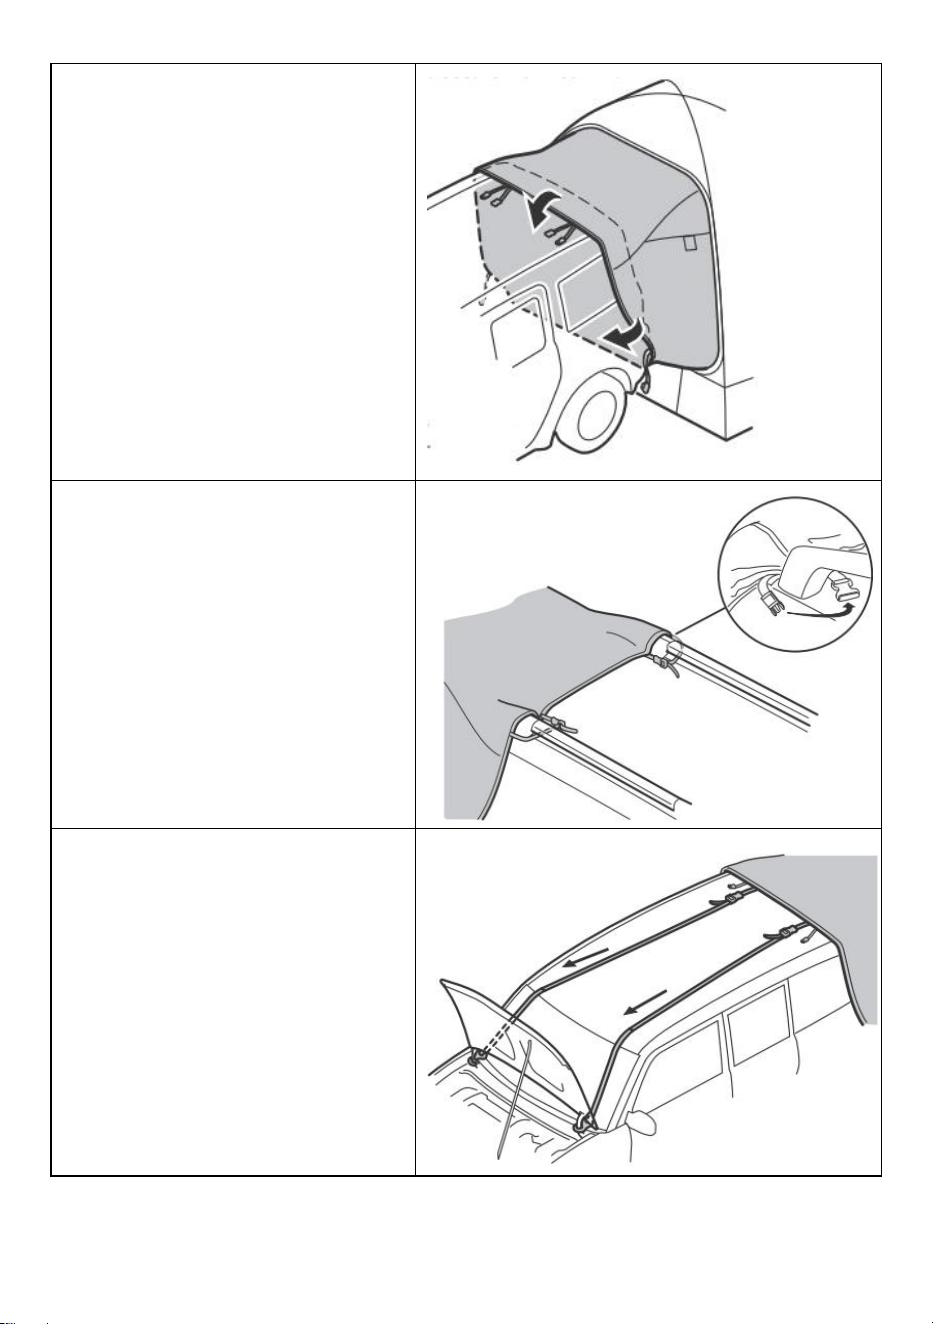
- 8 -
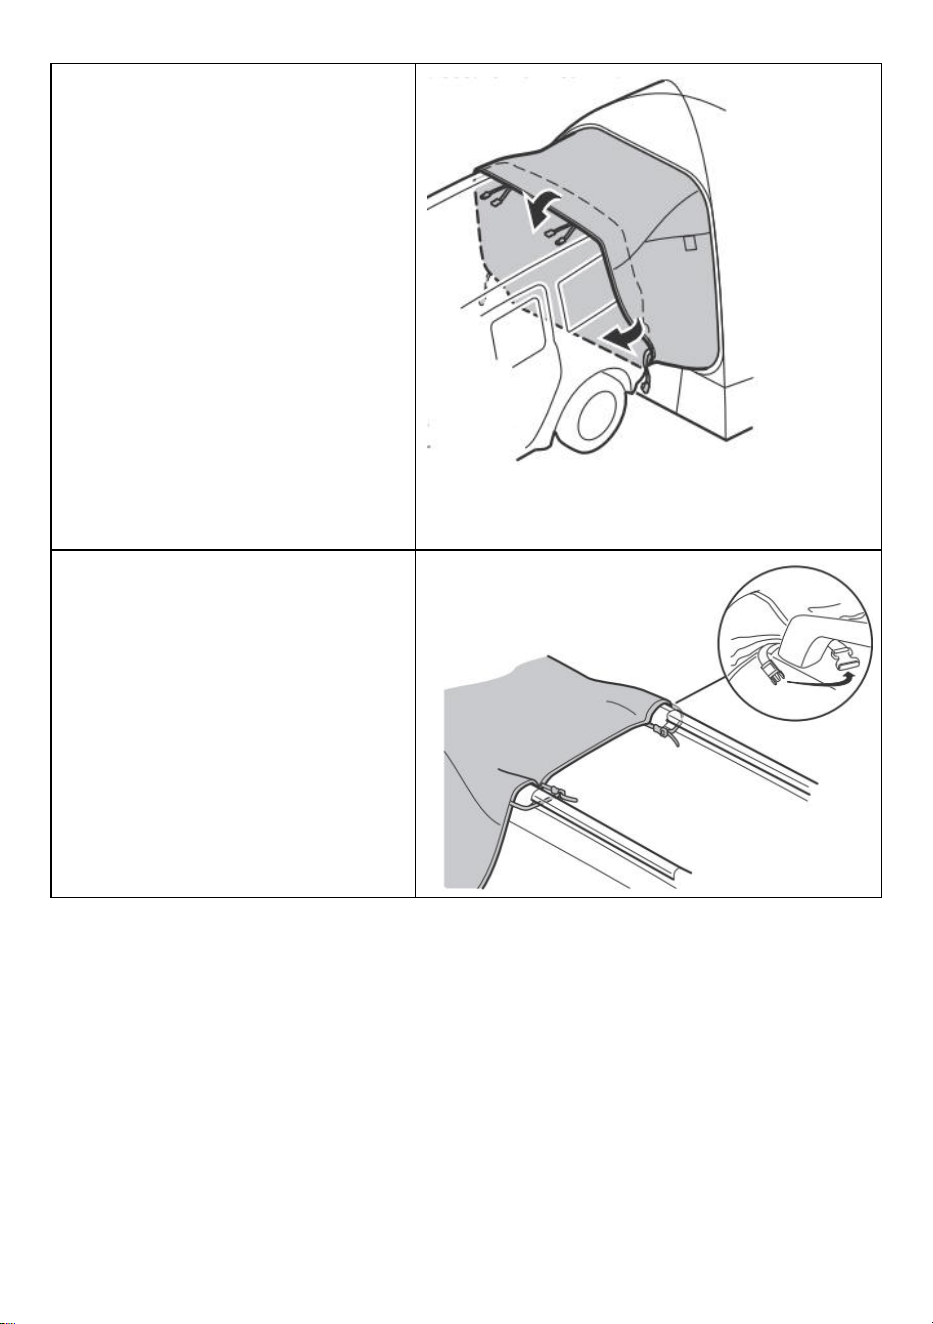
① From inside the tent, unzip
the door and mesh that faces
the vehicle cargo area. Roll up
the mesh and door and secure
with T-straps.
② Open the back hatch of your
vehicle.
③ Move the tent towards the
cargo area of your vehicle.Slip
the sleeve under the bumper
and over the hatch and roof.
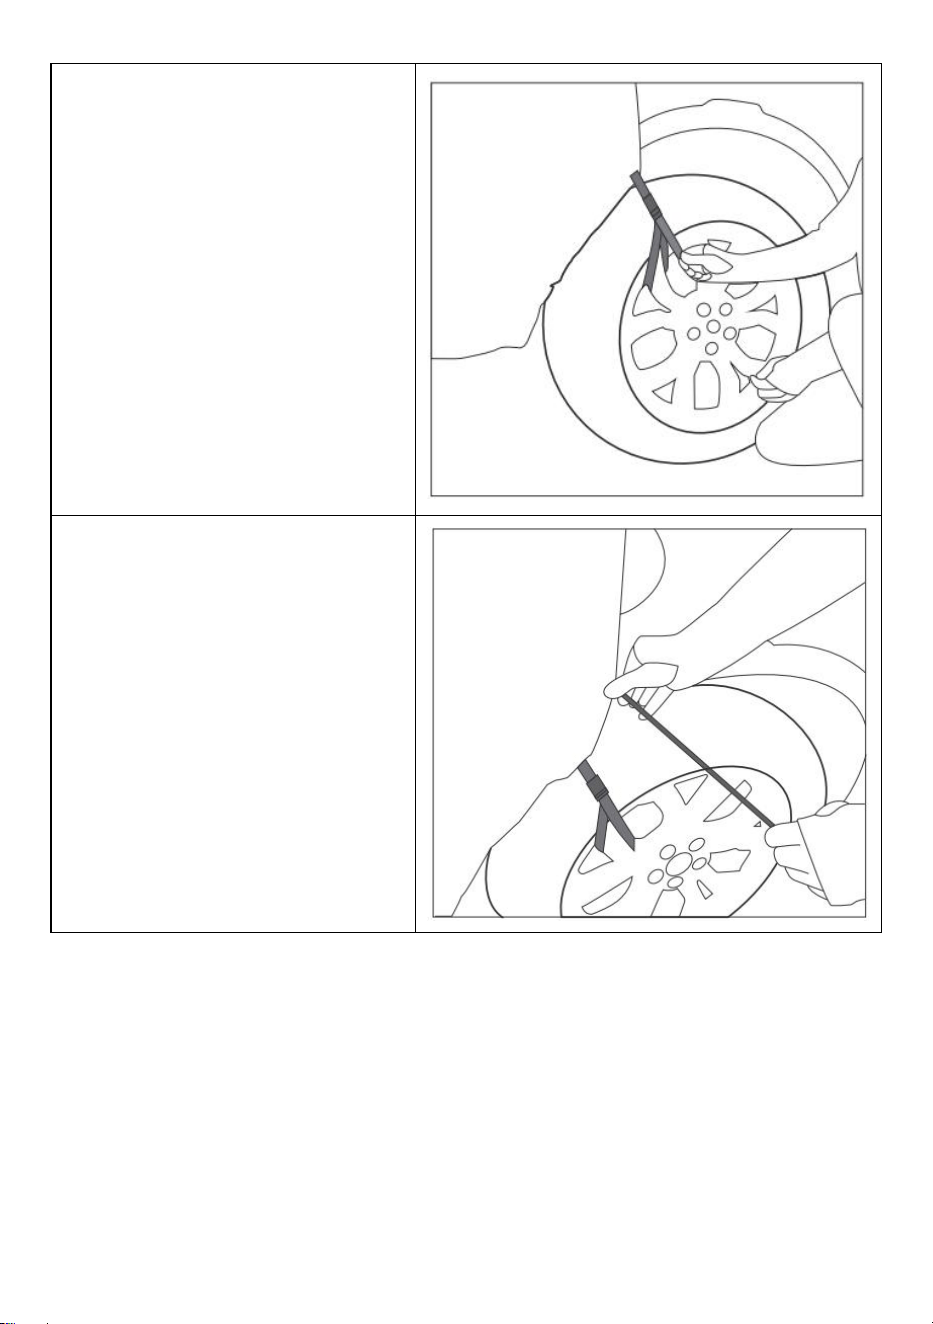
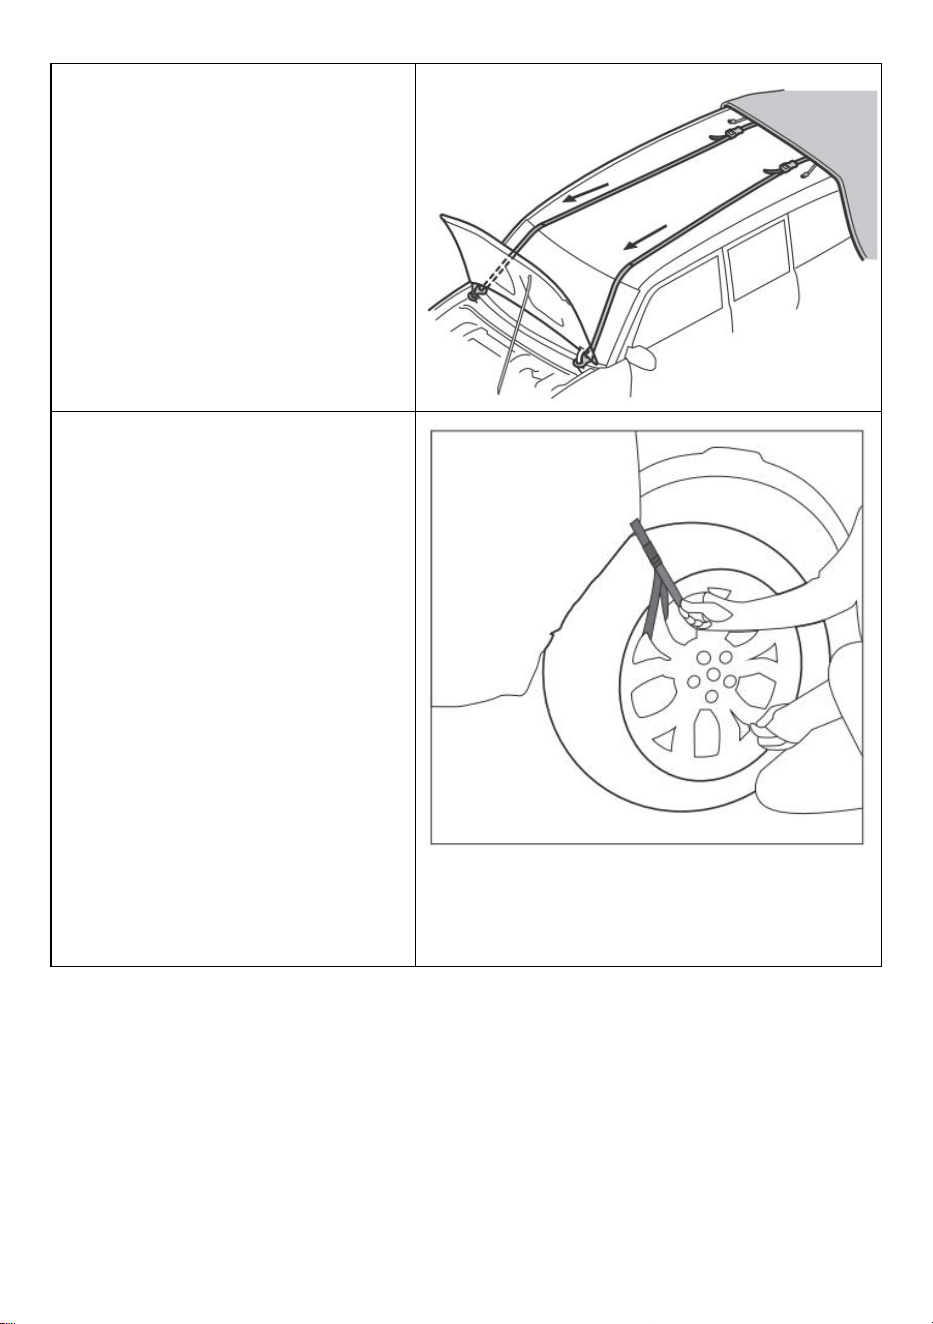
④ A.WITHAROOFRACK
Remove the long strap
(attached to the vehicle sleeve)
from the clip. Attach the 2 short
straps around the roof rack and
tighten. Repeat on the opposite
side.
⑤
B.WITHOUTAROOFRACK
Extend the long straps to the
front of the vehicle.Open the
hood and attach the strap
hooks to the hood hinge or
frame.Tighten the straps.
- 9 -
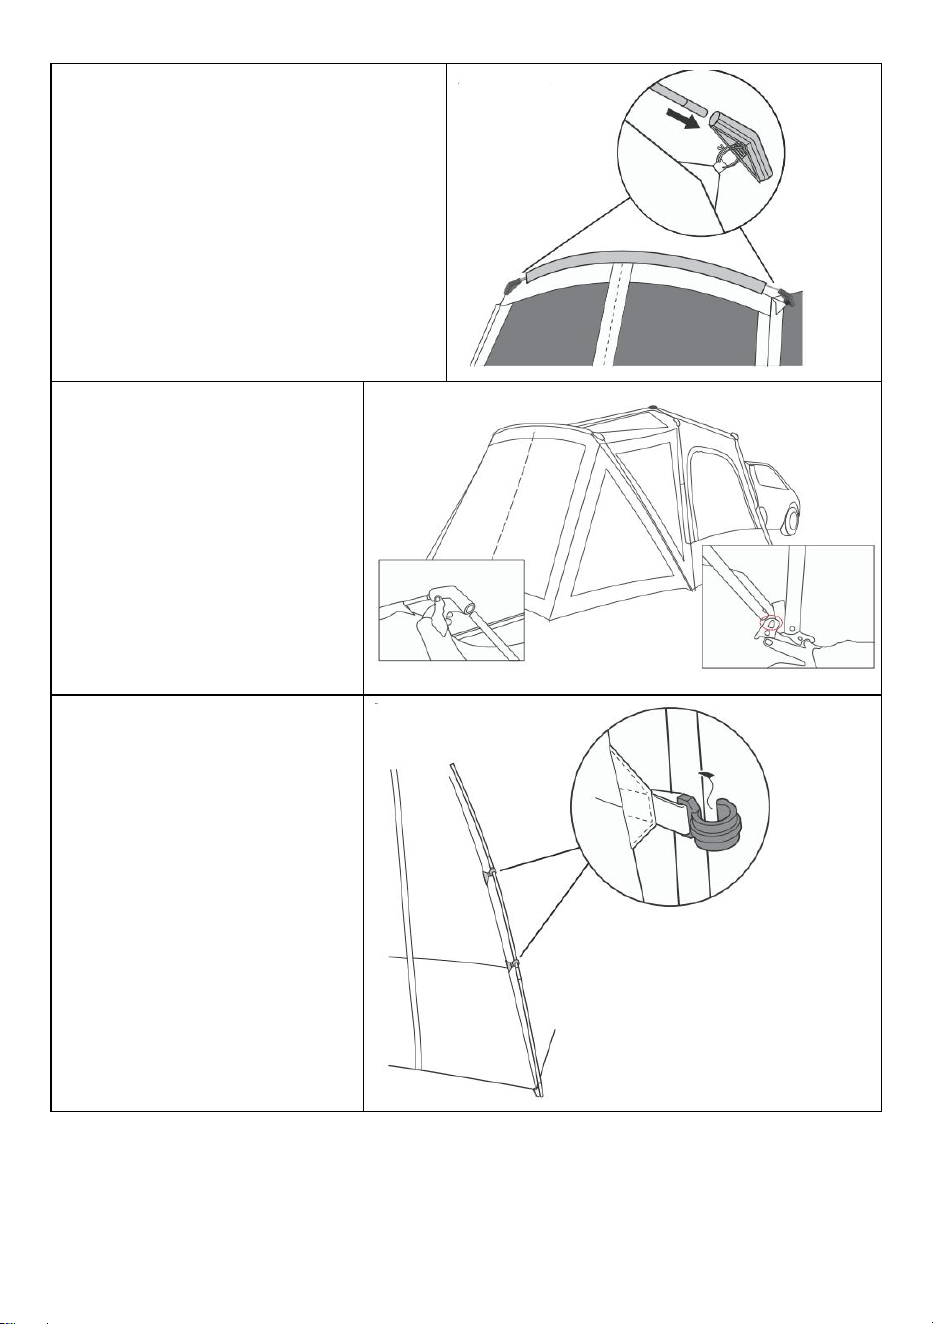
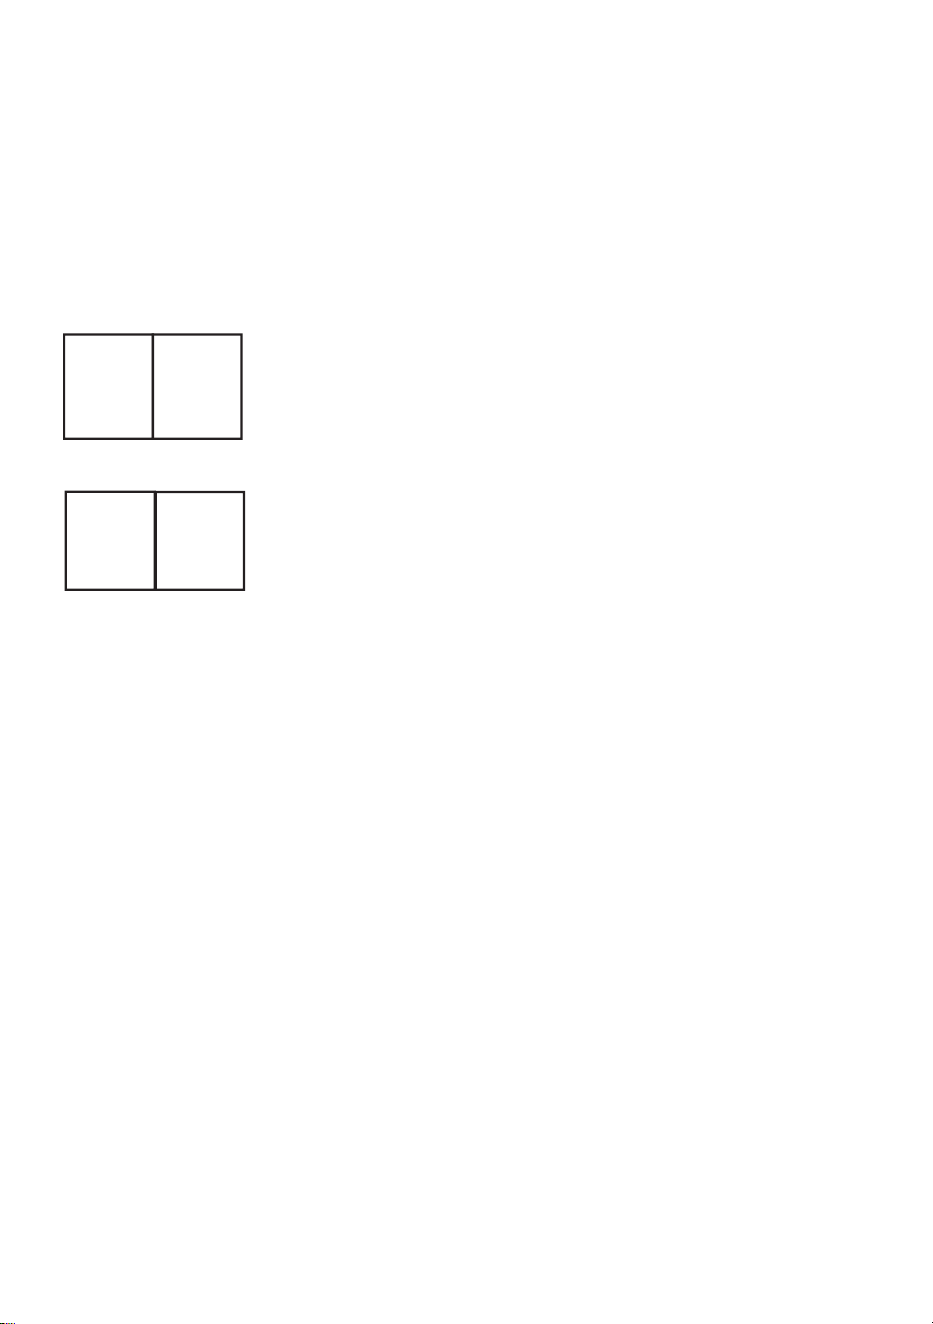
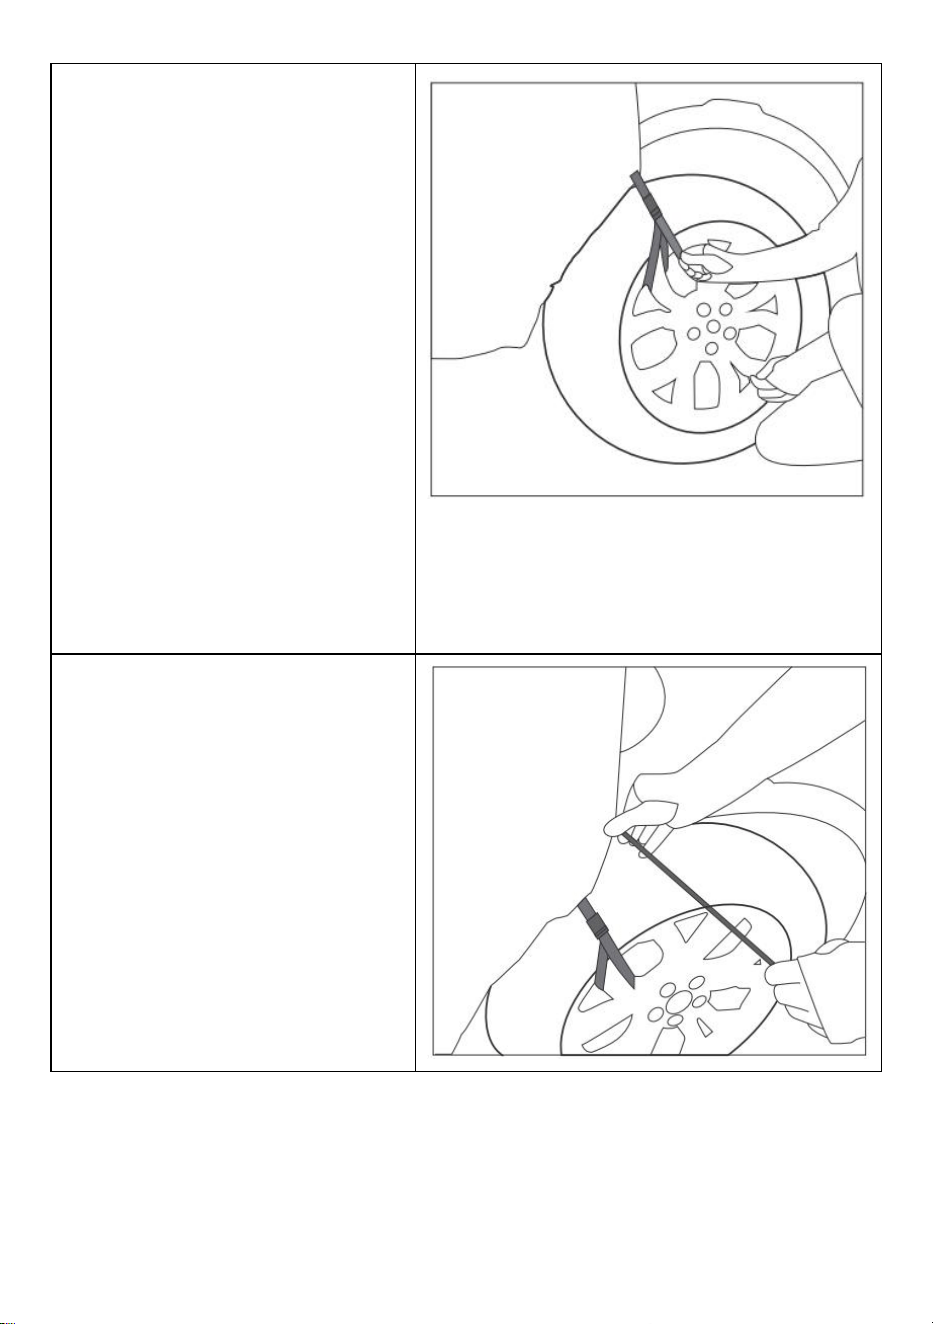
⑥ Secure the straps of sleeve
to the vehicle wheels:
A. Insert a blue screen room
pole with the metal hook into
the corner joint located at the
top corner of the screen room.
B. Insert the opposite pin end
of the pole into the grommet
hole diagonally at the bottom
corner of the tent. Repeat on
the other side of the screen
room.
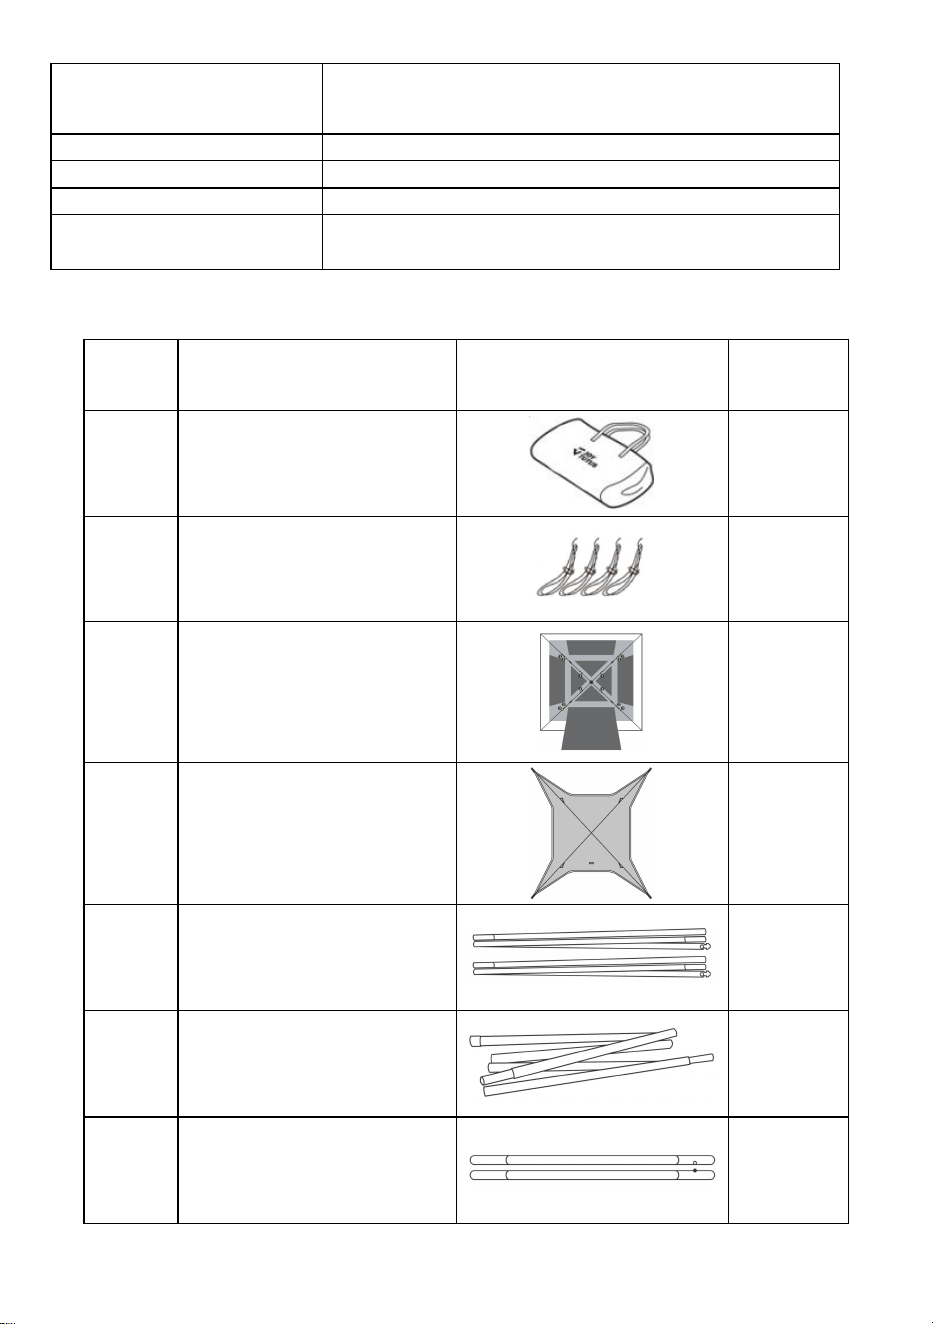
⑦ Tighten the elastic cord of
the tent sleeve.
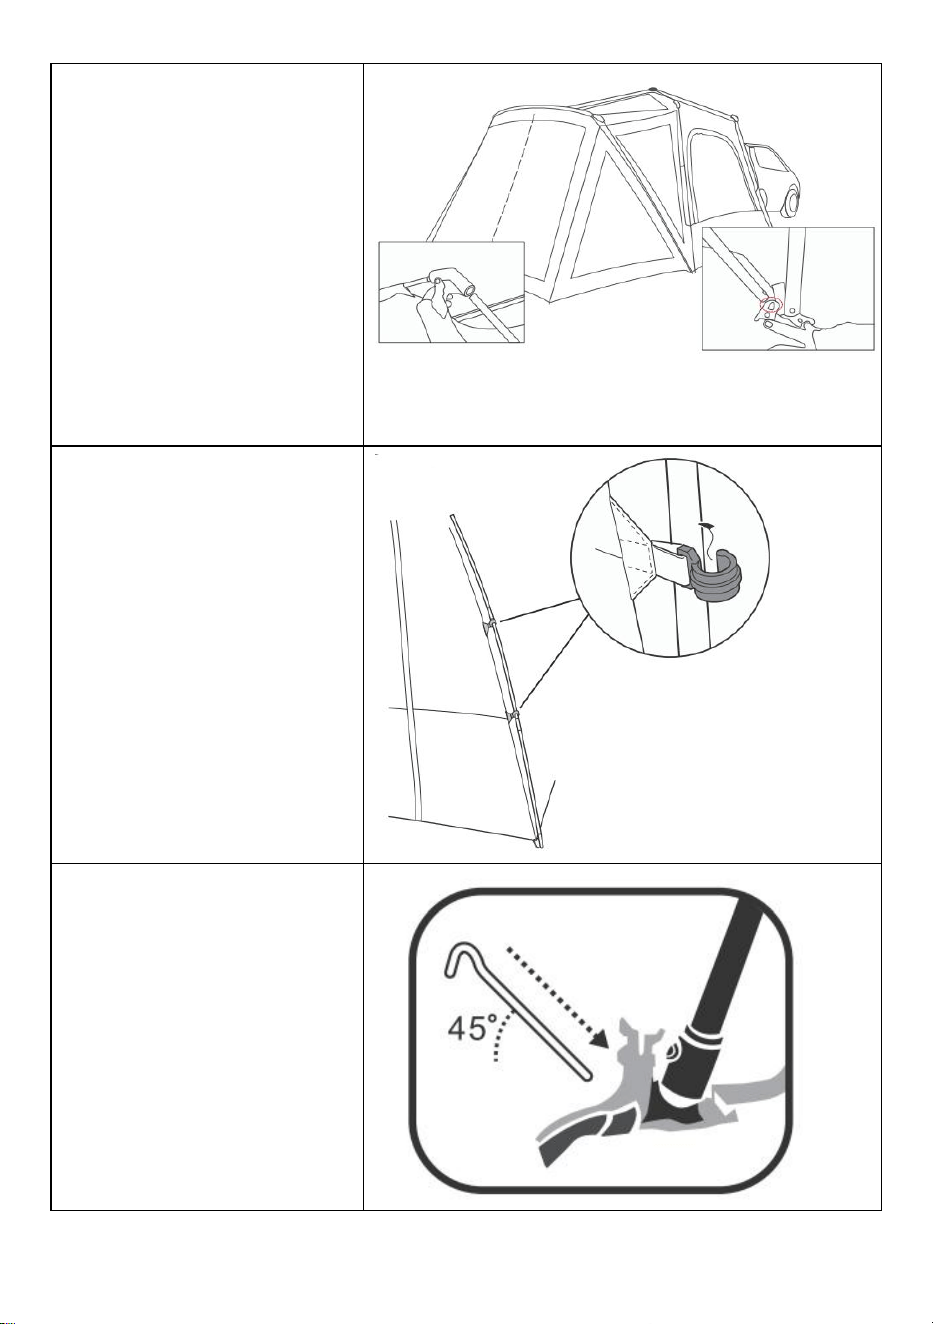
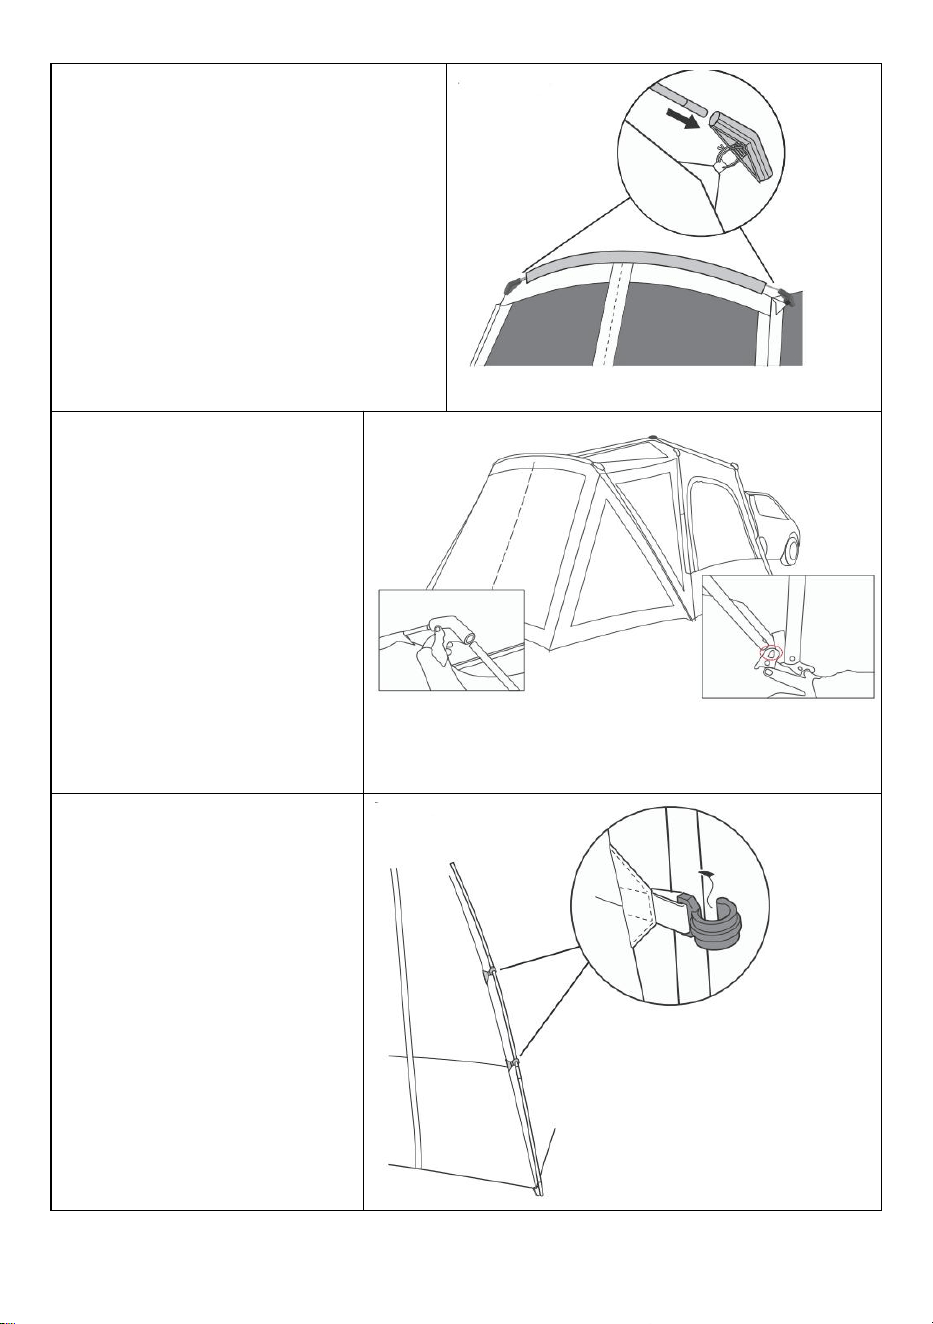
STEP3. SET UP THE PORCH
- 10 -
①
Slide the fiber glass Pole
through the sleeve above the
screen room door.
Insert both side end of the pole
into the stared end of the corner
joint located at the top corner of
the screen room.
② Insert the tapered end
of the open hollow of the
porch poles into the corner
joint at the top corner of
the screen.
Insert the opposite end of
the pole into the plates
hole diagonally at the
bottom corner of the tent.
③ Attach the clips.

- 11 -
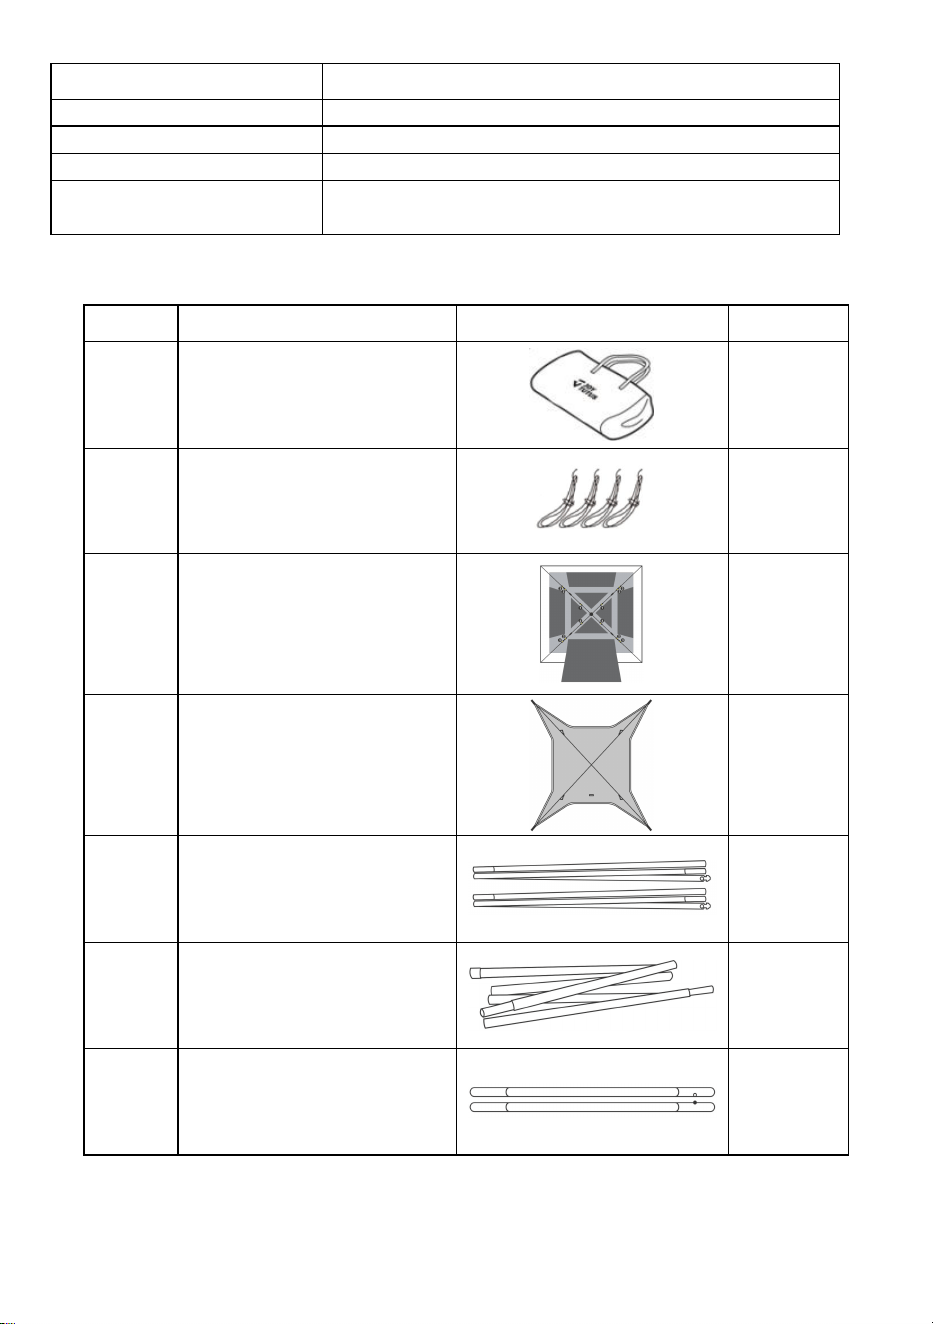
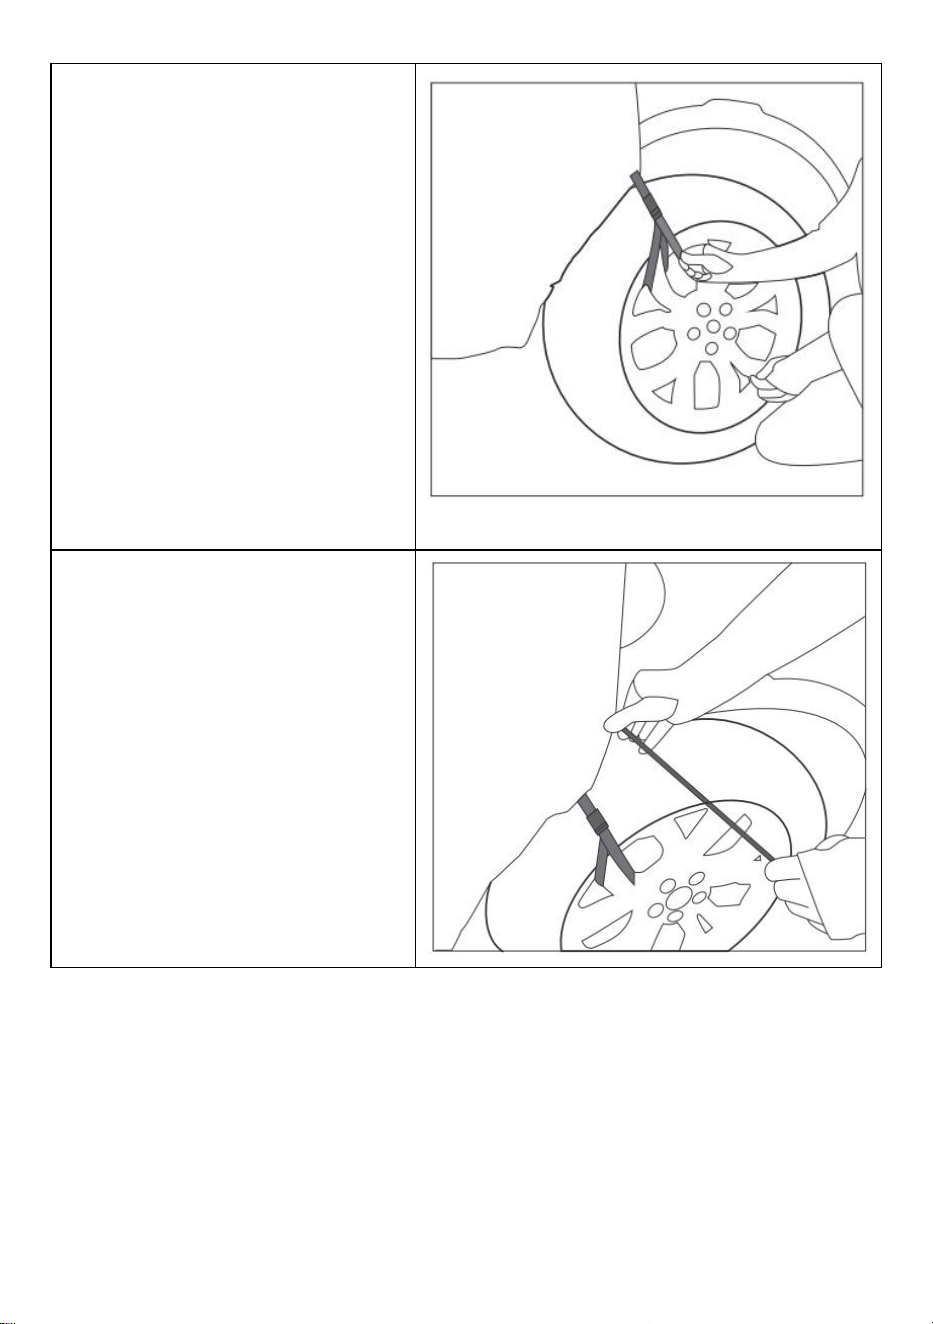
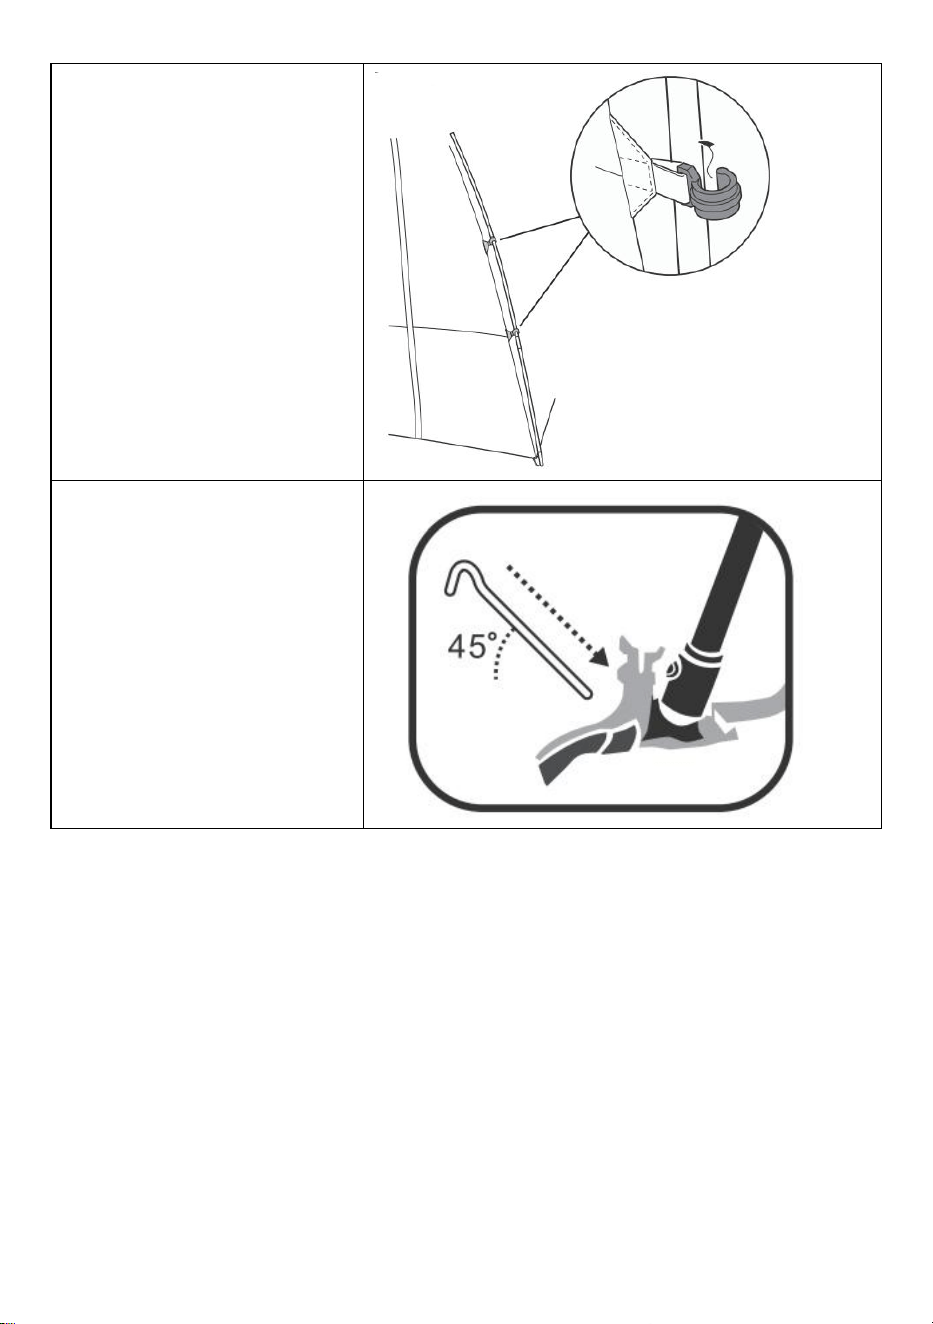
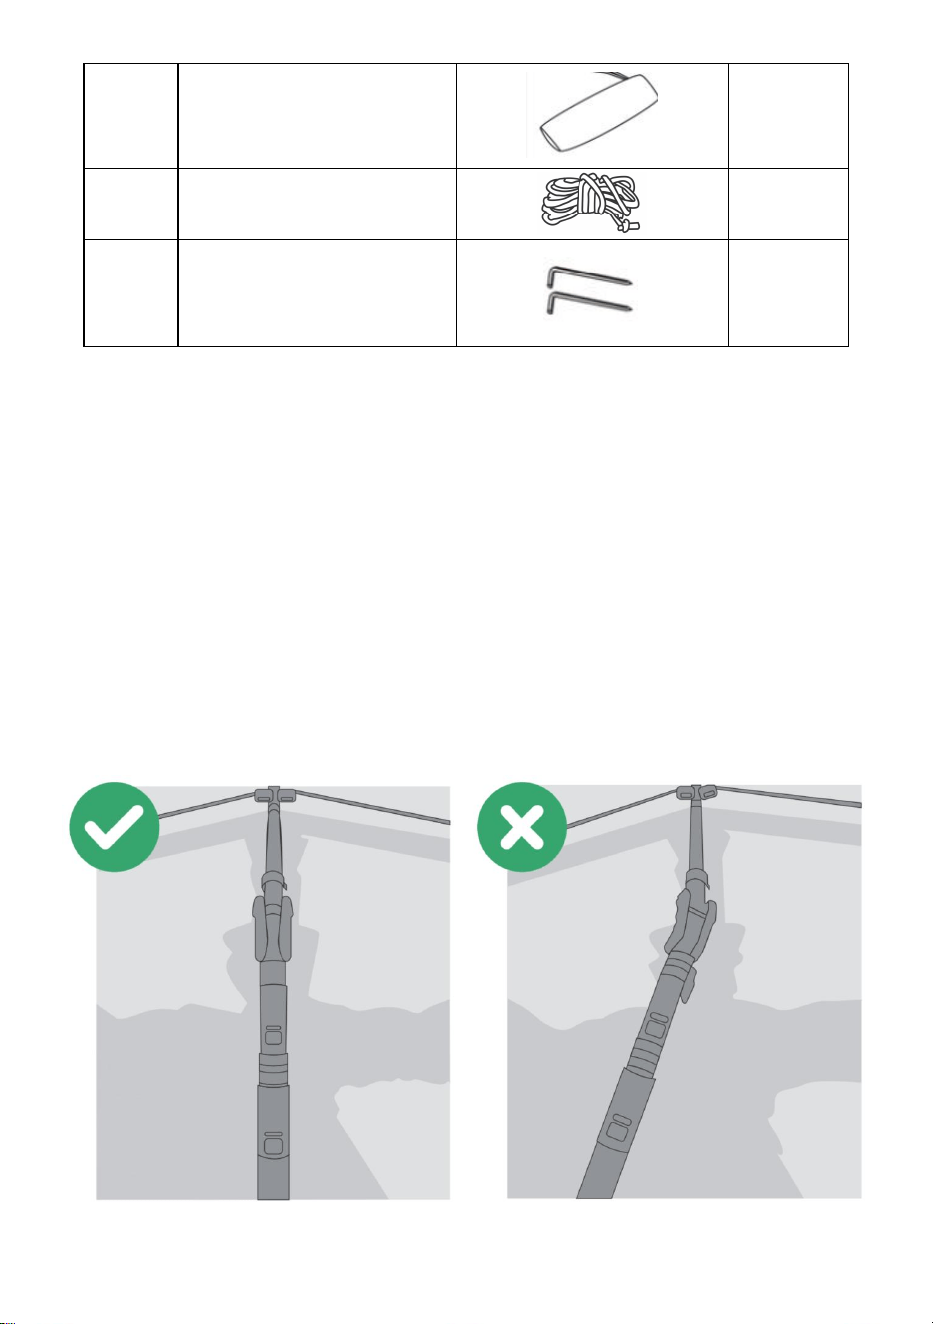
④ Stake Tent: Drive
stakes at a45°angle
through web loop at base
of tent to secure to the
ground.

- 12 -
STEP4. ATTACHING THE RAINFLY
① Drape the rain fly cover the tent lit could be assisted with the canopy
poles to attach)
② Attach the rain fly by hanging the elasti-cropes to the stakes
③ Attach the straps of rain fly to the poles
④ To secure it with the tent stakes and guy lines.
- 13 -
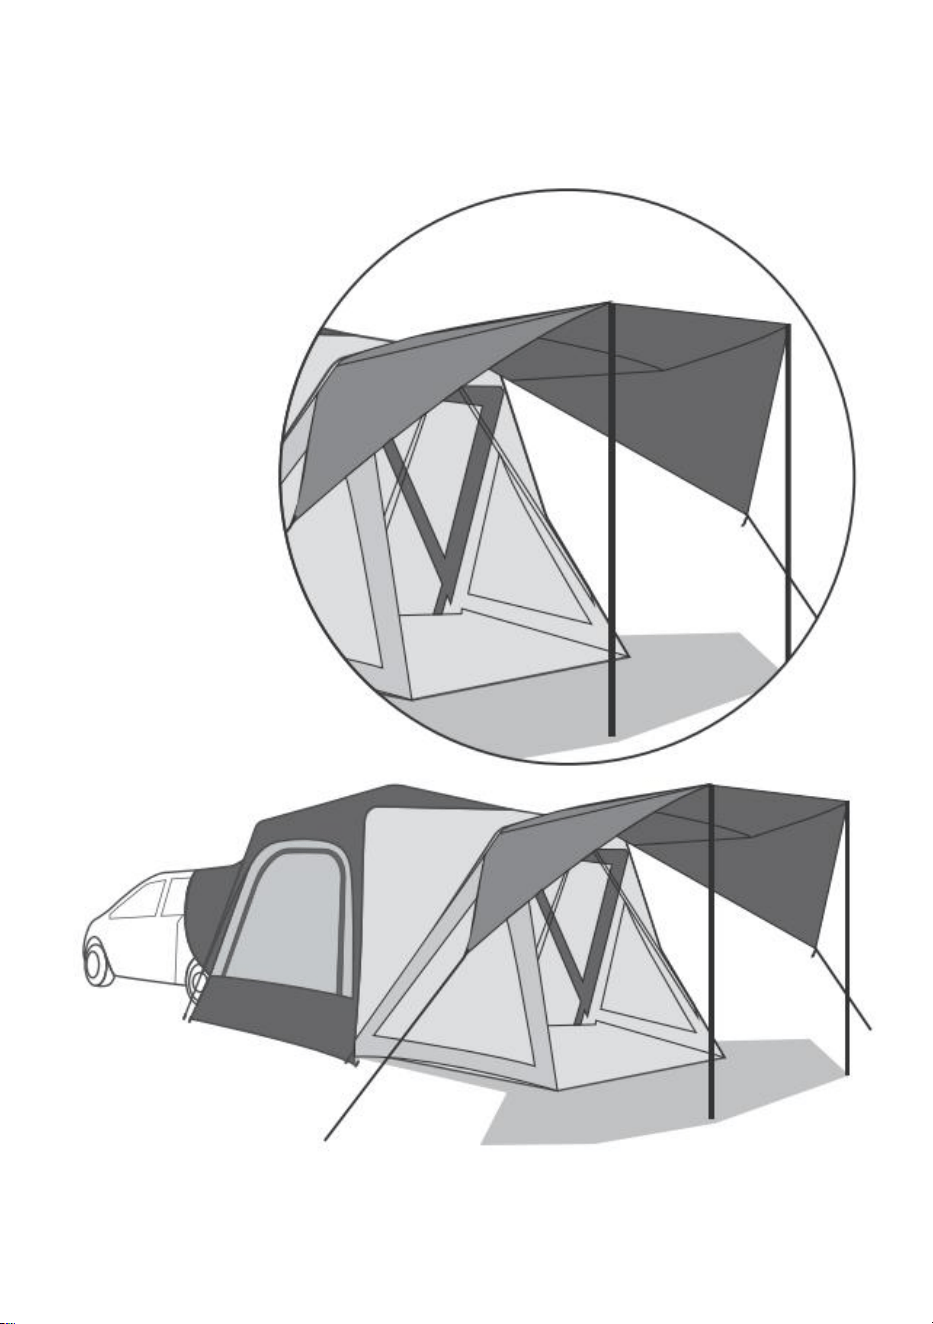
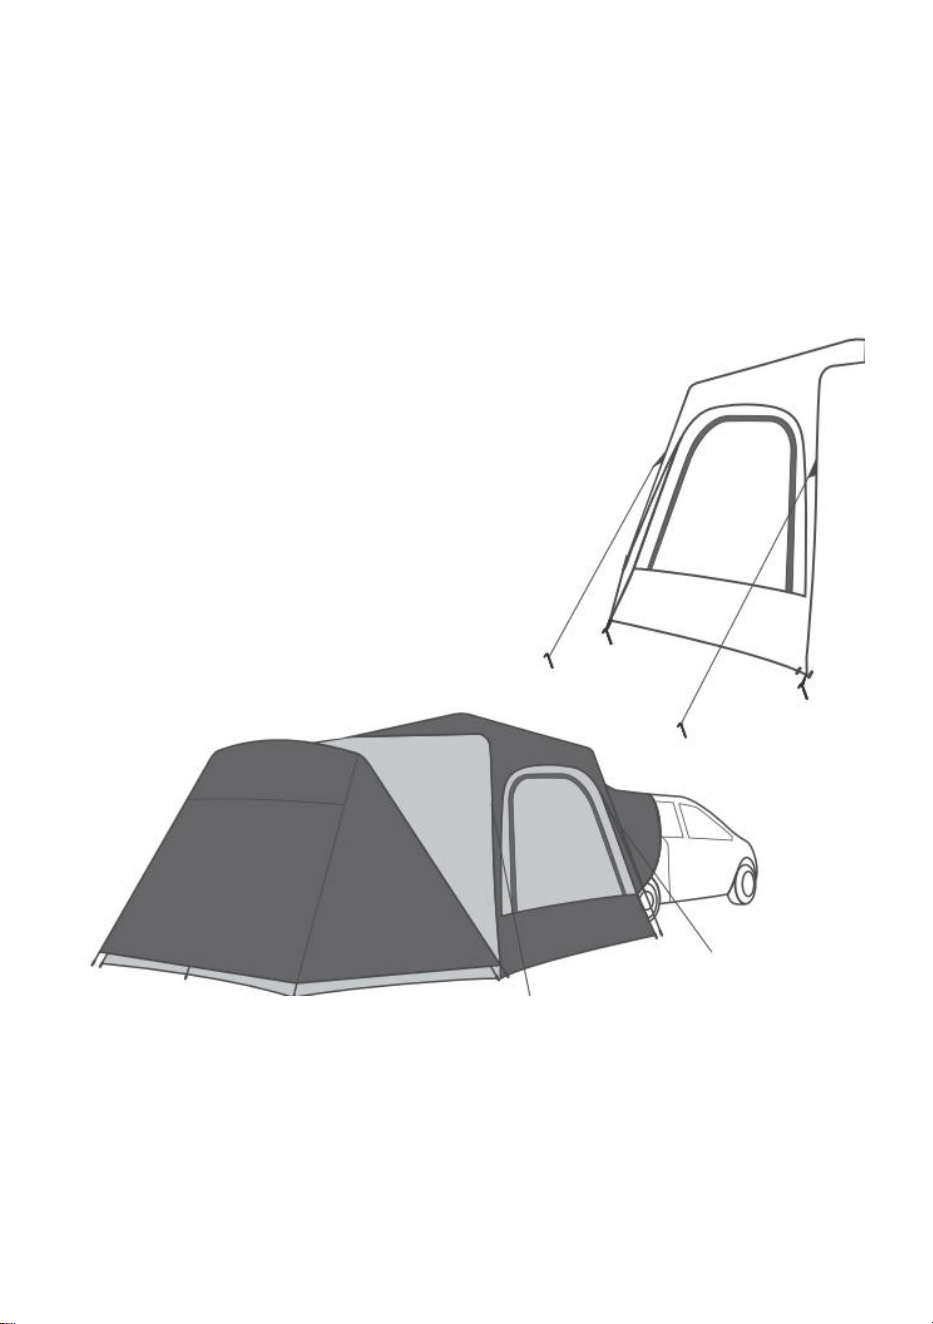
STEP5. SETTING UPTHE AWNING
Insert the support poles with silver pin end to the awning, correct the
position and fix with the guy lines and stakes.

- 14 -
TENT CARE TIPS
1) We highly recommend seam sealing your tent prior to camping as
water may penetrate the needle holes in the fabric. This is common with
tents and is not a defect.
2) Condensation maybe formed at the interior surface of your tent. It is
caused by water vapor from your breath, perspiration, or any wet items in
the tent. Water in the tent is no leakage through the tent fabric.
3) The water-resistant coating may wear down overtime.It is suggested to
spray a water-resistant coating on to the tent and rain fly every few years.
4) Avoid spraying insect repellent, hairspray, etc., inside or near your tent,
as they may be harmful to the tent fabric and cause leakage.
5) Do not leave your tent set up in direct sunlight longer than necessary. lf
left in sunlight for prolonged periods of time, the fabric will fade and
weaken.
6) If zippers stick, lubricate with silicon. Never force a zipper as this will
bend and prevent the zipper from closing.
7) NEVER roll up or pack away a wet/damp tent. This will cause mildew.
Make sure your tent is completely dry before storing. Store your tent in a
dry place.
8) To clean, hand wash with a sponge using mild soap. Never use a
washing machine or detergent.
Manufacturer: Shanghaimuxinmuyeyouxiangongsi
Address: Shuangchenglu 803nong11hao1602A-1609shi, baoshanqu,
shanghai 200000 CN.
Imported to AUS: SIHAO PTY LTD. 1 ROKEVA STREETEASTWOOD
NSW 2122 Australia
Imported to USA: Sanven Technology Ltd. Suite 250, 9166 Anaheim
Place, Rancho Cucamonga, CA 91730
REP
UK
YH CONSULTING LIMITED.
C/O YH Consulting Limited Office 147,
Centurion House, London Road,
Staines-upon-Thames, Surrey, TW18 4AX
REP
EC
E-CrossStu GmbH
Mainzer Landstr.69,
60329 Frankfurt am Main.


Technique Certificat d'assistance et de garantie électronique
www.vevor.com/support
TENTE POUR CAMION
MODÈLE: 2240606
Nous continuons à nous engager à vous fournir des outils à des prix compétitifs.
« Économisez la moitié », « Moitié prix » ou toute autre expression similaire utilisée par
nous uniquement
représente une estimation des économies dont vous pourriez bénéficier en achetant
certains outils
avec nous par rapport aux grandes marques et ne signifie pas nécessairement couverture
toutes les catégories d'outils que nous proposons. Nous vous rappelons de bien vouloir
vérifier soigneusement
lorsque vous passez une commande chez nous si vous êtes réellement Économie
Moitié par rapport aux plus grandes marques.


- 1 -
MODÈLE: 2240606
BESOIN D'AIDE? CONTACTEZ-NOUS!
Vous avez des questions sur nos produits ? Vous avez besoin d'une
assistance technique ? N'hésitez pas à nous contacter :
Assistance technique et certificat de garantie électronique
www.vevor.com/support
Il s'agit de la notice d'utilisation d'origine. Veuillez lire attentivement toutes
les instructions du manuel avant de l'utiliser. VEVOR se réserve le droit
d'interpréter clairement notre manuel d'utilisation. L'apparence du produit
dépend du produit que vous avez reçu. Veuillez nous excuser, nous ne
vous informerons plus si des mises à jour technologiques ou logicielles
sont disponibles sur notre produit.
TRUCK TENT

- 2 -
MESURES DE SÉCURITÉ IMPORTANTES
AVERTISSEMENT : Lisez attentivement et assimilez l'intégralité de
ce manuel avant d'utiliser ou d'entretenir ce produit. Le non-respect de ces
avertissements et instructions peut entraîner des blessures corporelles ou
des dommages matériels.
Évitez que les enfants n'utilisent ce produit. Ce produit n'est pas un jouet.
Ne laissez pas les enfants jouer avec .
Tenez la toile de la tente à l'écart de toute source de flamme ou de chaleur.
La toile brûlera si elle est laissée en contact avec une source de flamme.
L'application de toute substance étrangère sur la toile de la tente peut
rendre ses propriétés ignifuges inefficaces.
Évitez les blessures, les enfants ne doivent pas jouer à l'intérieur du
produit ni s'y fier.
Ce produit n'est pas recommandé en cas d'orage.
PRÉCAUTIONS D'INSTALLATION
14.N'utilisez pas de bougies, d'allumettes ou de flammes nues de quelque
sorte que ce soit dans ou à proximité de la tente.
15.Ne pas cuisiner à l’intérieur de la tente.
16.Allumez les feux de camp dans le sens du vent et à plusieurs mètres de
la tente. Assurez-vous d'éteindre complètement les feux avant de quitter le
site de camping ou avant de vous coucher.
17.Soyez extrêmement prudent lorsque vous utilisez des lanternes ou des
radiateurs à combustible à l'intérieur ou autour de la tente. Utilisez autant
que possible des lanternes à piles.
18.Ne pas recharger les lampes, les radiateurs ou les poêles à l’intérieur
de la tente.
19.Éteignez ou éteignez toutes les lanternes avant d’aller dormir.

- 3 -
20.Ne pas fumer à l’intérieur de la tente. Ne pas stocker de liquides
inflammables à l’intérieur de la tente.
21.NE JAMAIS faire tourner le moteur du véhicule lorsque la tente est
attachée.
22.N'installez pas la tente lorsque la température est inférieure à 0ºC/32ºF
ou lorsque votre véhicule est mouillé, cela pourrait causer des dommages.
23.Prévoyez une ventilation adéquate à l’intérieur de la tente à tout
moment.
24.N'essayez pas de conduire le véhicule avec la tente attachée.
25.Pour éviter que du monoxyde de carbone ne pénètre dans le véhicule
et dans la tente, ne faites pas tourner le moteur, ne cuisinez pas à
l'intérieur de la tente et n'utilisez pas de chauffage au gaz dans la tente. Le
monoxyde de carbone est dangereux pour la santé.
26.Le moteur doit être éteint et le système d’échappement doit être
complètement refroidi avant l’installation et l’utilisation de la tente.
CONSERVEZ CES INSTRUCTIONS
SÉLECTION D'EMPLACEMENTS DE CAMPING
6. Choisissez un emplacement de camping lisse et plat, exempt de
rochers, de branches et d’autres objets durs ou tranchants.
7. Évitez les zones avec des lignes électriques aériennes et des branches
d’arbres.
8. Garer le véhicule dans l'emplacement de camping choisi.
- 4 -
9. Coupez le moteur et serrez le frein de stationnement.
COMMENT CONSERVER
6. Nettoyer et sécher la tente.
7. Pliez tous les composants dans la tente.
8. Enroulez la tente en utilisant le sac pour poteaux comme guide.
9. Fixez avec les sangles de fixation de la tente et insérez-la dans le sac
de transport.
10.Conserver dans un endroit frais et sec.
SPÉCIFICATION
Style de tente
10*10 pieds (modèle arrière de la voiture)
Store
Oui
Couleur
Gris
Saisons
3 saisons, été, automne, printemps
Matériel
Corps : tissu en polyester 210T/PU2000
Bas :PE;
LISTE DES PIÈCES
Non.
Nom
Image
Qté
1
Tente Sac
1
2
Crochet
6
3
Corps de tente
1
- 5 -
4
Moustiquaire
1
5
Poteaux pour le porche
des deux côtés
2
6
Poteaux de support pour
la toile du store
2
7
Poteau pour le haut du
porche
1
8
Pôle Sac
1
9
Corde à vent
8
10
Sol Clou
15
CONSEILS AVANT L'ASSEMBLAGE
4. Assurez-vous que les poteaux extensibles sont conservé dans le même
direction horizontale alors que toi récompenses de tirage le haut pôles
section .
5. Assurez-vous de tirer vers le haut toutes les parties rétractables du mât
de la tente dans tous les sens. quatre directions jusqu'à ce que jaune
bouton pops en haut!
6. Les poteaux resteront coincés s'ils sont tordus, alors veuillez les
conserver
restez droit lorsque vous tirez vers le haut, s'il vous plaît manipuler avec
précaution .
- 6 -
10.Sécuriser le tente enjeux à chaque coin de la tente à assurer plus grand
stabilité .
ASSEMBLAGE DE TENTE POUR CAMION
ÉTAPE 1. ÉTIREZ LA PARTIE SUPÉRIEURE DES PÔLES
① Préparez l'installation.
Choisissez un site plat, exempt
de rochers, de branches et d’
autres objets durs ou tranchants,
pour installer votre tente.
Retirez tout le contenu du sac.
Dépliez les 4 poteaux des
jambes au niveau des
articulations.

- 7 -
② Soulevez les articulations des
bras.
Remarque : 2 personnes seront
nécessaires pour monter et
étendre les poteaux de la tente.
Étirez les poteaux dans chacune
des quatre directions supérieures
jusqu'à ce que chaque bouton
« jaune » apparaisse.

- 8 -
③ Étendez les poteaux des
jambes.
Remarque : il y a 2 sections
extensibles sur chaque poteau de
jambe. Étendez la section
extensible de chaque poteau à
tour de rôle du milieu vers le bas
jusqu'à ce que chaque bouton
jaune apparaisse.
ÉTAPE 2. CONNECTER LE VÉHICULE
①
Depuis l'intérieur de la tente,
ouvrez la porte et le filet qui fait
face à la zone de chargement
du véhicule. Enroulez le filet et
la porte et fixez-les avec des
sangles en T.
②
Ouvrez le hayon arrière de
votre véhicule.
③
Déplacez la tente vers la
zone de chargement de votre
véhicule. Glissez le manchon
sous le pare-chocs et sur le
hayon et le toit.
- 9 -
④ A.AVEC FRACK
Retirer la longue sangle
(attaché au manchon du
véhicule) du clip. Attachez les 2
sangles courtes autour de la
galerie de toit et serrez.
Répétez l'opération de l'autre
côté.
⑤ B.SANS FRACKAGE
Prolongez le longues sangles à
la devant le véhicule.Ouvrez
le capot et fixez la sangle
crochets à la charnière du
capot ou cadre.Serrez les
sangles.
⑥
Fixez les sangles du
manchon aux roues du
véhicule :
A. Insérez un poteau de
moustiquaire bleu avec le
crochet métallique dans le joint
d'angle situé dans le coin
supérieur de la moustiquaire.
B. Insérez l'extrémité opposée
de la tige du poteau dans le
trou de l'œillet en diagonale
dans le coin inférieur de la
tente. Répétez l'opération de

- 10 -
l'autre côté de la moustiquaire .
⑦ Serrez le cordon élastique
du manchon de la tente.
ÉTAPE 3. INSTALLER LE PORCHE
①
Faites glisser le poteau en fibre
de verre à travers le manchon au -
dessus de la porte de la salle
grillagée .
Insérez les deux extrémités
latérales du poteau dans l'
extrémité fixe du joint d' angle
situé dans le coin supérieur de la
salle d' écran .
- 11 -
② Insérez l'extrémité
conique du creux ouvert
des poteaux du porche
dans le joint d'angle au
coin supérieur de l'écran.
Insérez l’extrémité
opposée du poteau dans
le trou des plaques en
diagonale dans le coin
inférieur de la tente.
③ Attachez les clips.
④ Miser Tente: Enfoncez
des piquets à un angle de
45° via le Web boucle à
base de tente pour
sécuriser à le sol .

- 12 -

- 13 -
ÉTAPE 4. FIXATION DU MANTEAU ANTI-PLUIE
① Drapez la couverture anti-pluie sur la tente allumée (vous pouvez être
aidé par les poteaux de la verrière pour la fixer)
② Fixez le double toit en accrochant les élastiques aux piquets
③ Attachez les sangles du double toit aux poteaux
④ Pour le fixer avec les piquets de tente et les haubans.

- 14 -
ÉTAPE 5. INSTALLATION DE L'AUVENT
Insérez les poteaux de support avec l' extrémité de la goupille argentée
dans l' auvent , corrigez la position et fixez - les avec le hauban
lignes et s prend .

- 15 -
TENTE SOINS CONSEILS
1) Nous vous recommandons fortement de sceller les coutures de votre
tente avant de camper, car l'eau peut pénétrer l'aiguille des trous dans le
tissu. C'est courant avec des tentes et est pas un défaut.
2) Condensation peut être formé à la intérieur surface de ton tente. Je t est
causé par eau vapeur depuis ton haleine, transpiration, ou n'importe lequel
mouillé objets dans la tente. L' eau dans la tente ne fuit pas à travers le
tissu de la tente.
3) Le revêtement résistant à l'eau peut porter heures supplémentaires.Il
est suggéré de pulvérisation un revêtement résistant à l'eau sur à la tente
et pluie voler chaque peu années.
4) Éviter pulvérisation insecte repoussant, laque pour cheveux, etc., à
l'intérieur ou près ton tente, comme ils peut être nocif à le tente tissu et
cause fuite.
5) Faire ne pas partir ton ensemble de tente en haut dans exposition
directe au soleil plus longtemps que nécessaire. Si on le laisse au soleil
pendant périodes prolongées du temps, le tissu volonté disparaître et
affaiblir.
6) Si les fermetures à glissière collent, lubrifier avec du silicone. Jamais
forcer une fermeture éclair comme cela va plier et empêcher la fermeture
éclair de la fermeture.
7) NE JAMAIS rouler en haut ou ranger une tente mouillée/humide. Cela
provoquera moisissure. Assurez-vous que votre tente est complètement
sèche avant de la ranger. Magasin ta tente dans un sec lieu.
9) Pour nettoyer, lavage à la main avec une éponge en utilisant savon
doux. Ne jamais utiliser une machine à laver ou un détergent.
Fabricant : Shanghaimuxinmuyeyouxiangongsi
Adresse : Shuangchenglu 803nong11hao1602A-1609shi, baoshanqu,
Shanghai 200000 CN.
Importé en Australie : SIHAO PTY LTD. 1 ROKEVA
STREETEASTWOOD NSW 2122 Australie
Importé aux États-Unis : Sanven Technology Ltd. Suite 250, 9166
Anaheim Place, Rancho Cucamonga, CA 91730
REP
UK
YH CONSULTING LIMITED.
C/O YH Consulting Limited Office 147,
Centurion House, London Road,
Staines-upon-Thames, Surrey, TW18 4AX
REP
EC
E-CrossStu GmbH
Mainzer Landstr.69,
60329 Frankfurt am Main.


Technisch Support und E-Garantie-Zertifikat www.vevor.com/support
LKW-ZELT
MODELL: 2240606
Wir sind weiterhin bestrebt, Ihnen Werkzeuge zu wettbewerbsfähigen Preisen anzubieten.
"Sparen Sie die Hälfte", "Halber Preis" oder andere ähnliche Ausdrücke, die wir nur
verwenden
stellt eine Schätzung der Einsparungen dar, die Sie durch den Kauf bestimmter Werkzeuge
erzielen können
mit uns im Vergleich zu den großen Top-Marken und bedeutet nicht unbedingt, Abdeckung
alle von uns angebotenen Werkzeugkategorien. Wir möchten Sie bitten, zu überprüfen
sorgfältig
wenn Sie bei uns eine Bestellung aufgeben, wenn Sie tatsächlich Speichern
Hälfte im Vergleich mit den Top-Großmarken.

- 1 -
MODELL: 2240606
Brauchen Sie Hilfe? Kontaktieren Sie uns!
Sie haben Fragen zu unseren Produkten? Sie benötigen technischen
Support? Dann kontaktieren Sie uns gerne:
Technischer Support und E-Garantie-Zertifikat
www.vevor.com/support
Dies ist die Originalanleitung. Bitte lesen Sie alle Anweisungen sorgfältig
durch, bevor Sie das Gerät in Betrieb nehmen. VEVOR behält sich eine
klare Auslegung unserer Bedienungsanleitung vor. Das Erscheinungsbild
des Produkts richtet sich nach dem Produkt, das Sie erhalten haben. Bitte
verzeihen Sie uns, dass wir Sie nicht erneut informieren, wenn es
Technologie- oder Software-Updates für unser Produkt gibt .
TRUCK TENT

- 2 -
WICHTIGE SICHERHEITSHINWEISE
WARNUNG: Lesen Sie das gesamte Handbuch, bevor Sie dieses
Produkt bedienen oder warten. Die Nichtbeachtung dieser Warnungen und
Anweisungen kann zu Verletzungen oder Schäden an wertvollem
Eigentum führen.
des Produkts durch Kinder . Dieses Produkt ist kein Spielzeug. Erlauben
Sie Kindern nicht, damit zu spielen .
Halten Sie Flammen und Wärmequellen vom Zeltstoff fern. Der Stoff
brennt, wenn er mit einer Flammenquelle in Berührung kommt. Das
Auftragen von Fremdstoffen auf den Zeltstoff kann die flammhemmenden
Eigenschaften unwirksam machen.
Um Verletzungen zu vermeiden, sollten Kinder nicht im Inneren des
Produkts herumspielen oder sich darauf verlassen.
Dieses Produkt wird bei Gewittern nicht empfohlen.
SETUP- VORSICHTSMAßNAHMEN
27.Verwenden Sie im Zelt oder in dessen Nähe keine Kerzen,
Streichhölzer oder offene Flammen jeglicher Art.
28.Kochen Sie nicht im Zelt.
29.Machen Sie Lagerfeuer in Windrichtung und mehrere Meter vom Zelt
entfernt. Vergessen Sie nicht, das Feuer vollständig zu löschen, bevor Sie
den Campingplatz verlassen oder sich für die Nacht zurückziehen.
30.Seien Sie äußerst vorsichtig, wenn Sie im Zelt oder in dessen Nähe
brennstoffbetriebene Laternen oder Heizgeräte verwenden. Verwenden
Sie nach Möglichkeit batteriebetriebene Laternen.
31.Das Auffüllen von Lampen, Heizgeräten oder Öfen im Zelt ist nicht
gestattet.
32.Löschen oder schalten Sie vor dem Schlafengehen alle Laternen aus.
33.Rauchen Sie nicht im Zelt. Lagern Sie keine brennbaren Flüssigkeiten
im Zelt.

- 3 -
34.Lassen Sie den Fahrzeugmotor NIEMALS laufen, wenn das Zelt
montiert ist.
35.Bauen Sie das Zelt nicht bei Temperaturen unter 0 °C/32 °F auf
oder wenn Ihr Fahrzeug nass ist, da es sonst zu Schäden kommen kann.
36.Sorgen Sie jederzeit für ausreichende Belüftung im Zelt.
37.Versuchen Sie nicht, das Fahrzeug mit montiertem Zelt zu fahren.
38.Um zu verhindern, dass Kohlenmonoxid in das Fahrzeug und den
Zeltbereich gelangt, lassen Sie den Motor nicht laufen, kochen Sie nicht im
Zelt und verwenden Sie keinen Gasheizer im Zelt. Kohlenmonoxid ist
gesundheitsschädlich.
39.Vor dem Aufbau und der Verwendung des Zelts muss der Motor
ausgeschaltet und der Auspuff vollständig abgekühlt sein.
BEWAHREN SIE DIESE ANWEISUNGEN AUF
CAMPINGPLATZAUSWAHL
11.Wählen Sie einen glatten, ebenen Zeltplatz ohne Steine, Äste und
andere harte oder scharfe Gegenstände.
12.Vermeiden Sie Bereiche mit Freileitungen und Ästen.
13.Parken Sie das Fahrzeug auf dem gewählten Campingplatz.
14.Schalten Sie den Motor ab und ziehen Sie die Feststellbremse an.
WIE AUFBEWAHREN?
11.Reinigen und trocknen Sie das Zelt.
12.Falten Sie alle Bestandteile in das Zelt.
13.Rollen Sie das Zelt auf und verwenden Sie dabei die Stangentasche als
Führung.
14.Mit den Zeltspanngurten sichern und in die Tragetasche stecken.
15.Kühl und trocken aufbewahren.
SPEZIFIKATION
- 4 -
Zeltstil
10 x 10 Fuß (Heckmodell des Autos)
Markise
Ja
Farbe
Grau
Jahreszeiten
3 Jahreszeiten, Sommer, Herbst, Frühling
Material
Körper : Polyestergewebe 210T/PU2000
Unten : PE;
STÜCKLISTE
NEIN.
Name
Bild
Menge
1
Zelt Tasche
1
2
Haken
6
3
Zeltkörper
1
4
Regenfliege
1
5
Stangen für die Veranda
beidseitig
2
6
Stützstangen für das
Markisendach
2
7
Stange für die
Verandaspitze
1

- 5 -
8
Pole Tasche
1
9
Windseil
8
10
Boden Nagel
15
TIPPS VOR DER MONTAGE
7. Stellen Sie sicher, dass die dehnbaren Stangen im gleichen horizontale
Richtung während Du Auszeichnungen ziehen Die Spitze Stangen
Abschnitt .
8. Achten Sie darauf, alle einziehbaren Teile der Zeltstange in allen vier
Richtungen bis zum Gelb Taste Knallt hoch!
9. Die Stangen bleiben hängen, wenn sie krumm sind. Bewahren Sie sie
daher bitte
beim Hochfahren bitte gerade mit Vorsicht handhaben .
15.Sichern Sie die Zelt Einsätze bei jede Ecke der Zelt Zu sicherstellen
größer Stabilität .
- 6 -
LKW-ZELT MONTIEREN
SCHRITT 1. DEHNEN SIE DEN OBEREN STANGENTEIL
① Bereiten Sie die Einrichtung
vor.
Wählen Sie zum Aufstellen Ihres
Zeltes einen ebenen Standort
ohne Steine, Äste und andere
harte oder scharfe Gegenstände.
Entfernen Sie den gesamten
Inhalt aus der Tasche.
Die 4 Beinstangen an den
Gelenken ausklappen.

- 7 -
② Armgelenke anheben.
Hinweis: Zum Aufstellen und
Ausfahren der Zeltstangen werden
2 Personen benötigt. Strecken Sie
die Stangen in jede der vier
oberen Richtungen, bis jeder
„gelbe“ Knopf herausspringt.
③ Beinstangen ausfahren.
Hinweis: Jede Beinstange hat
zwei dehnbare Abschnitte. Ziehen
Sie den dehnbaren Abschnitt jeder
Stange nacheinander von der
Mitte nach unten heraus, bis die
gelben Knöpfe nach oben
springen.
SCHRITT 2. DAS FAHRZEUG VERBINDEN
- 8 -
① Öffnen Sie im Zeltinneren
den Reißverschluss der Tür
und des Netzes, die zum
Laderaum des Fahrzeugs
zeigen. Rollen Sie das Netz
und die Tür auf und befestigen
Sie sie mit T-Riemen.
② Öffnen Sie die Heckklappe
Ihres Fahrzeugs.
③ Bewegen Sie das Zelt zum
Laderaum Ihres Fahrzeugs.
Schieben Sie die Hülle unter
die Stoßstange und über die
Luke und das Dach.
④ A. MIT AROOFRACK
Den langen Riemen entfernen
(an der Fahrzeugmanschette
befestigt) vom Clip. Befestigen
Sie die 2 kurzen Riemen um
den Dachträger und ziehen Sie
sie fest. Wiederholen Sie dies
auf der anderen Seite.
- 9 -
⑤ B.OHNEDACHGEPÄCK
Erweitern Sie die langen
Riemen an der vor dem
Fahrzeug.Öffnen Sie die
Haube und befestigen Sie der
Gurt Haken am
Haubenscharnier oder
Rahmen. Ziehen Sie die Gurte
fest.
⑥ Befestigen Sie die Riemen
der Hülle an den
Fahrzeugrädern :
A. Stecken Sie eine blaue
Leinwandraumstange mit dem
Metallhaken in die
Eckverbindung an der oberen
Ecke des Leinwandraums.
B. Stecken Sie das
gegenüberliegende Stiftende
der Stange diagonal in die
Ösenöffnung an der unteren
Ecke des Zelts. Wiederholen
Sie dies auf der anderen Seite
des Zeltraums .

- 10 -
⑦ Ziehen Sie die elastische
Kordel der Zelthülle fest.
SCHRITT 3. DIE VERANDA EINRICHTEN
①
Schieben Sie die
Fiberglasstange durch die Hülse
über der Bildschirmraumtür .
Stecken Sie beide Seitenenden
der Stange in das vordere Ende
der Eckverbindung in der oberen
Ecke des Bildschirmraums .
②
Stecken Sie das
konische Ende der offenen
Höhlung der
Verandastangen in die
Eckverbindung an der
oberen Ecke des Schirms.
Stecken Sie das andere
Ende der Stange diagonal
in das Loch der Platte an

- 11 -
der unteren Ecke des
Zelts.
③ Befestigen Sie die
Clips.
④ Einsatz Zelt: Setzen
Sie Einsätze bei ein
45°-Winkel über das Web
Schleife bei Base des
Zeltes sichern Zu der
Boden .

- 12 -
- 13 -
SCHRITT 4. BEFESTIGEN DES REGENSCHUTZES
① Das Überziehen der Regenplane über dem beleuchteten Zelt kann
mithilfe der Baldachinstangen erleichtert werden.)
② Befestigen Sie das Regendach, indem Sie die Gummibänder an den
Pfählen befestigen.
③ Befestigen Sie die Gurte des Regendachs an den Stangen
④ Mit Zeltheringen und Abspannleinen sichern.

- 14 -
SCHRITT 5. AUFBAU DER MARKISE
Die Stützstangen mit dem silbernen Stiftende in die Markise einstecken ,
die Position korrigieren und mit der Abspannleine fixieren .
Zeilen und Takes .

- 15 -
ZELT PFLEGE TIPPS
1) Wir empfehlen Ihnen dringend, die Nähte Ihres Zeltes vor dem Campen
abzudichten, da Wasser in die Nadel eindringen kann. Löcher in der Stoff.
Das ist üblich mit Zelten und ist kein Defekt.
2) Kondensation Vielleicht gebildet am Innere Oberfläche von dein Zelt. Ich
t Ist verursacht von Wasser Dampf aus dein Atem, Schweiß, oder beliebig
nass Gegenstände im Zelt. Wasser im Zelt kann nicht durch das
Zeltgewebe sickern .
3) Die wasserabweisende Beschichtung kann tragen Überstunden zu
machen.Es wird empfohlen, Spray eine wasserabweisende Beschichtung
auf Zu das Zelt und Regen fliegen jeder wenige Jahre.
4) Vermeiden Sprühen Insekt abstoßend, Haarspray, usw., innen oder
nahe dein Zelt, als Sie Mai Sei schädlich Zu Die Zelt Stoff Und Ursache
Leckage.
5) Tun nicht verlassen dein Zeltset hoch In direkte Sonneneinstrahlung
länger als notwendig. Wenn es im Sonnenlicht liegt längere Zeiträume der
Zeit, Die Stoff Wille verblassen Und schwächen.
6) Wenn Reißverschlüsse klemmen, mit Silikon schmieren. Niemals
zwingen Sie einen Reißverschluss als Dies wird biegen und verhindern,
dass die Reißverschluss vom Schließen.
7) Rollen Sie NIEMALS nach oben oder ein nasses/feuchtes Zelt
wegpacken. Dies führt dazu Mehltau. Stellen Sie sicher, dass Ihr Zelt
vollständig trocken ist, bevor Sie es verstauen. Speichern Ihr Zelt In A
trocken Ort.
10) Zum Reinigen Handwäsche mit einem Schwamm milde Seife.
Verwenden Sie niemals eine Waschmaschine oder Waschmittel.

Hersteller: Shanghaimuxinmuyeyouxiangongsi
Adresse: Shuangchenglu 803nong11hao1602A-1609shi, baoshanqu,
Shanghai 200000 CN.
Nach AUS importiert: SIHAO PTY LTD. 1 ROKEVA
STREETEASTWOOD NSW 2122 Australien
Importiert in die USA: Sanven Technology Ltd. Suite 250, 9166 Anaheim
Place, Rancho Cucamonga, CA 91730
REP
UK
YH CONSULTING LIMITED.
C/O YH Consulting Limited Office 147,
Centurion House, London Road,
Staines-upon-Thames, Surrey, TW18 4AX
REP
EC
E-CrossStu GmbH
Mainzer Landstr.69,
60329 Frankfurt am Main.


Tecnico Supporto e certificato di garanzia elettronica www.vevor.com/support
TENDA PER CAMION
MODELLO: 2240606
Continuiamo a impegnarci per fornirvi strumenti a prezzi competitivi.
"Risparmia la metà", "Metà prezzo" o altre espressioni simili utilizzate solo da noi
rappresenta una stima dei risparmi che potresti ottenere acquistando determinati strumenti
con noi rispetto ai principali marchi top e non significa necessariamente copertina
tutte le categorie di strumenti da noi offerti. Ti ricordiamo cortesemente di verificare
accuratamente
quando effettui un ordine con noi se sei effettivamente Risparmio
Metà rispetto ai marchi più importanti.
- 1 -
MODELLO: 2240606
HAI BISOGNO DI AIUTO? CONTATTACI!
Hai domande sui prodotti? Hai bisogno di supporto tecnico? Non
esitare a contattarci:
Supporto tecnico e certificato di garanzia elettronica
www.vevor.com/support
Questa è l'istruzione originale, si prega di leggere attentamente tutte le
istruzioni del manuale prima di utilizzare. VEVOR si riserva una chiara
interpretazione del nostro manuale utente. L'aspetto del prodotto sarà
soggetto al prodotto ricevuto. Vi preghiamo di perdonarci se non vi
informeremo di nuovo se ci sono aggiornamenti tecnologici o software sul
nostro prodotto.
TRUCK TENT

- 2 -
IMPORTANTI MISURE DI SICUREZZA
ATTENZIONE: leggere e comprendere l'intero manuale prima di
utilizzare o riparare questo prodotto. La mancata osservanza di queste
avvertenze e istruzioni può causare lesioni personali o danni a beni di
valore.
Evitare che i bambini utilizzino il prodotto. E questo prodotto non è un
giocattolo. Non permettere ai bambini di giocare .
Tenere tutte le fiamme e le fonti di calore lontane dal tessuto della tenda. Il
tessuto brucerà se lasciato a contatto con qualsiasi fonte di fiamma.
L'applicazione di qualsiasi sostanza estranea al tessuto della tenda
potrebbe rendere inefficaci le proprietà ignifughe.
Evitare lesioni, i bambini non devono giocare all'interno del prodotto o
affidarsi ad esso.
Questo prodotto non è consigliato durante i temporali.
PRECAUZIONI DI CONFIGURAZIONE
40.Non usare candele, fiammiferi o fiamme libere di alcun tipo all'interno o
nelle vicinanze della tenda.
41.Non cucinare all'interno della tenda.
42.Accendete i fuochi da campo sottovento e a diversi metri di distanza
dalla tenda. Assicuratevi di spegnere completamente gli incendi prima di
lasciare un campeggio o prima di ritirarvi per la notte.
43.Prestare estrema cautela quando si utilizzano lanterne o riscaldatori
alimentati a combustibile all'interno o attorno alla tenda. Utilizzare lanterne
a batteria quando possibile.
44.Non ricaricare lampade, stufe o fornelli all'interno della tenda.
45.Spegnere o spegnere tutte le lanterne prima di andare a dormire.
46.Non fumare all'interno della tenda. Non conservare liquidi infiammabili
all'interno della tenda.
47.NON accendere MAI il motore del veicolo quando la tenda è montata.

- 3 -
48.Non installare la tenda quando la temperatura è inferiore a 0ºC/32ºF o
quando il veicolo è bagnato, poiché potrebbe danneggiarsi.
49.Garantire sempre un'adeguata ventilazione all'interno della tenda.
50.Non tentare di guidare il veicolo con la tenda attaccata.
51.Per evitare che il monossido di carbonio entri nel veicolo e nell'area
della tenda, non accendere il motore, non cucinare all'interno della tenda e
non usare una stufa a gas nella tenda. Il monossido di carbonio è
pericoloso per la salute.
52.Prima di montare e utilizzare la tenda, il motore deve essere spento e lo
scarico deve essere completamente raffreddato.
SALVA QUESTE ISTRUZIONI
SELEZIONE DEL CAMPEGGIO
16.Scegli un campeggio pianeggiante e privo di rocce, rami e altri oggetti
duri o taglienti.
17.Evitare le aree con linee elettriche aeree e rami di alberi.
18.Parcheggiare il veicolo nel campeggio prescelto.
19.Spegnere il motore e inserire il freno di stazionamento.
COME CONSERVARE
16.Pulisci e asciuga la tenda.
17.Ripiegare tutti i componenti nella tenda.
18.Arrotolare la tenda, utilizzando la sacca porta-pali come guida.
19.Fissare con le cinghie della tenda e inserire nella borsa per il trasporto.
20.Conservare in luogo fresco e asciutto.
SPECIFICHE
Stile tenda
10*10 piedi (Modello posteriore dell'auto)
Tenda da sole
SÌ
Colore
Grigio
- 4 -
Stagioni
3 stagioni, estate, autunno, primavera
Materiale
Corpo : Tessuto in poliestere 210T/PU2000
In basso : PE;
ELENCO DELLE PARTI
NO.
Nome
Immagine
Quantità
1
Tenda Borsa
1
2
Gancio
6
3
Corpo della tenda
1
4
Telo antipioggia
1
5
Pali per il portico su
entrambi i lati
2
6
Pali di sostegno per il
tettuccio della tenda da
sole
2
7
Palo per la sommità del
portico
1
8
Palo Borsa
1
- 5 -
9
Corda del vento
8
10
Terra Chiodo
15
SUGGERIMENTI PRIMA DEL MONTAGGIO
10. Assicurarsi che i pali estensibili siano mantenuto nello stesso
direzione orizzontale Mentre Voi tirare i premi IL superiore palo sezione .
11. Assicurati di tirare su tutte le parti retrattili del palo della tenda in ogni
quattro direzioni fino a quando giallo pulsante scoppiettare su!
12. I pali si incastreranno se sono storti, quindi tienili
dritto quando tiri su, per favore maneggiare con cura .
20.Mettere in sicurezza il tenda posta in gioco a ogni angolo del tenda A
garantire maggiore stabilità .
MONTAGGIO TENDA CAMION
PASSO 1. ALLUNGARE LA PARTE SUPERIORE DEI PALI
- 6 -
① Prepararsi per l'installazione.
Per montare la tenda, scegli un
luogo pianeggiante, privo di rocce,
rami e altri oggetti duri o taglienti.
Togliere tutto il contenuto dalla
borsa.
Dispiegare i 4 pali delle gambe
all'altezza delle giunture.

- 7 -
② Sollevare le articolazioni del
braccio.
Nota: saranno necessarie 2
persone per montare ed estendere
i pali della tenda in ciascuna delle
quattro direzioni superiori finché
non salta fuori ciascun pulsante
"giallo".
③ Estendere i pali delle gambe.
Nota: ci sono 2 sezioni estensibili
di ogni palo per le gambe. Estendi
la sezione estensibile di ogni palo
a turno dal centro verso il basso
finché non spunta ogni pulsante
giallo.
PASSO 2. COLLEGARE IL VEICOLO

- 8 -
① Dall'interno della tenda, apri
la cerniera della porta e della
rete che si affacciano sull'area
di carico del veicolo. Arrotolare
la rete e la porta e fissarle con
le cinghie a T.
② Aprire il portellone posteriore
del veicolo.
③ Spostare la tenda verso
l'area di carico del veicolo. Far
passare la guaina sotto il
paraurti e sopra il portello e il
tetto.
④ A.CON IL FRACK
Togliere la cinghia lunga
(fissato al manicotto del
veicolo) dalla clip. Fissare le 2
cinghie corte attorno al
portapacchi e stringere.
Ripetere sul lato opposto.
⑤
B.SENZAAROOFRACK
Estendi il lunghe cinghie al
davanti al veicolo.Aprire il
cofano e agganciare la cinghia
ganci alla cerniera del cofano o
telaio.Stringere le cinghie.
- 9 -
⑥ Fissare le cinghie della
manica alle ruote del veicolo :
A. Inserire un palo per stanza
con schermo blu con il gancio
metallico nel giunto angolare
situato nell'angolo superiore
della stanza con schermo.
B. Inserire l'estremità opposta
del perno del palo nel foro
dell'occhiello in diagonale
nell'angolo inferiore della
tenda. Ripetere sull'altro lato
della stanza con zanzariera.
⑦ Tendere il cordino elastico
della manica della tenda.
PASSO 3. PREPARARE IL PORTICO

- 10 -
① Far scorrere il palo in fibra di
vetro attraverso la guaina sopra la
porta della stanza della
zanzariera .
Inserire entrambe le estremità
laterali del palo nell'estremità
tarata del giunto angolare situato
nell'angolo superiore della stanza
con zanzariera .
② Inserire l'estremità
rastremata della cavità
aperta dei pali del portico
nel giunto angolare
nell'angolo superiore della
zanzariera.
Inserire l'estremità
opposta del palo nel foro
delle piastre in diagonale,
nell'angolo inferiore della
tenda.
- 11 -
③ Attaccare le clip.
④ Palo Tenda: Guidare i
picchetti a angolo a45°
attraverso il web ciclo
continuo A base di tenda
per proteggere A il
terreno .

- 12 -
PASSO 4. FISSAGGIO DEL TELO ANTIPIOGGIA
① Stendere la copertura antipioggia sulla tenda accesa (potrebbe essere
necessario fissare i pali del baldacchino)
② Fissare il telo antipioggia appendendo gli elastici ai picchetti
③ Fissare le cinghie del telo antipioggia ai pali
④ Per fissarlo con i picchetti della tenda e i tiranti.

- 13 -
PASSO 5. MONTAGGIO DELLA TENDA DA SOLE
Inserire i pali di supporto con l' estremità del perno argentato nella tenda ,
correggere la posizione e fissare con il tirante
linee e s prende .

- 14 -
TENDA CURA SUGGERIMENTI
1) Consigliamo vivamente di sigillare le cuciture della tenda prima di
andare in campeggio poiché l'acqua potrebbe penetrare nell'ago buchi nel
tessuto. Questo è comune con tende ed è non un difetto.
2) Condensazione Forse formato al interno superficie Di tuo tenda. Io t È
causato di acqua vapore da tuo respiro, sudore, O Qualunque Bagnato
oggetti nella tenda. L' acqua nella tenda non penetra attraverso il tessuto
della tenda.
3) Il rivestimento resistente all'acqua può Indossare straordinario. Si
suggerisce di spray un rivestimento resistente all'acqua su A la tenda e
piovere volare ogni pochi anni.
4) Evitare spruzzatura insetto repellente, lacca per capelli, ecc., dentro o
vicino tuo tenda, COME Essi Maggio Essere dannoso A IL tenda tessuto E
causa perdita.
5) Fare non lasciare tuo set tenda su In luce solare diretta più a lungo di
necessario. Se lasciato alla luce del sole per periodi prolungati del tempo,
IL tessuto Volere dissolvenza E indebolire.
6) Se le cerniere si incastrano, lubrificare con silicone. Mai forzare una
cerniera come questo sarà piegare e impedire il cerniera dalla chiusura.
7) NON rotolare MAI su o riporre una tenda bagnata/umida. Ciò causerà
muffa. Assicuratevi che la tenda sia completamente asciutta prima di
riporla. Negozio la tua tenda In UN Asciutto posto.
11) Per pulire, lavaggio a mano con una spugna usando sapone delicato.
Non usare mai una lavatrice o un detersivo.

Produttore: Shanghaimuxinmuyeyouxiangongsi
Indirizzo: Shuangchenglu 803nong11hao1602A-1609shi, baoshanqu,
shanghai 200000 CN.
Importato in AUS: SIHAO PTY LTD. 1 ROKEVA STREETEASTWOOD
NSW 2122 Australia
Importato negli USA: Sanven Technology Ltd. Suite 250, 9166 Anaheim
Place, Rancho Cucamonga, CA 91730
REP
UK
YH CONSULTING LIMITED.
C/O YH Consulting Limited Office 147,
Centurion House, London Road,
Staines-upon-Thames, Surrey, TW18 4AX
REP
EC
E-CrossStu GmbH
Mainzer Landstr.69,
60329 Frankfurt am Main.


Técnico Soporte y certificado de garantía electrónica www.vevor.com/support
CARPA PARA CAMIONES
MODELO: 2240606
Seguimos comprometidos a brindarle herramientas a precios competitivos.
"Ahorra la mitad", "mitad de precio" o cualquier otra expresión similar utilizada únicamente
por nosotros
Representa una estimación de los ahorros que podría obtener al comprar ciertas
herramientas.
con nosotros en comparación con las principales marcas líderes y no significa
necesariamente cubrir
Todas las categorías de herramientas que ofrecemos. Le recordamos que debe verificar
con cuidado
Cuando realiza un pedido con nosotros, si realmente está Ahorro
Medio en comparación con las principales marcas líderes.


- 1 -
MODELO: 2240606
¿NECESITAS AYUDA? ¡CONTÁCTANOS!
¿Tiene preguntas sobre el producto? ¿Necesita asistencia técnica? No
dude en ponerse en contacto con nosotros:
Soporte técnico y certificado de garantía electrónica
www.vevor.com/support
Estas son las instrucciones originales, lea atentamente todas las
instrucciones del manual antes de utilizar el producto. VEVOR se reserva
una interpretación clara de nuestro manual de usuario. La apariencia del
producto estará sujeta al producto que recibió. Perdónenos por no
informarle nuevamente si hay actualizaciones de tecnología o software
en nuestro producto.
TRUCK TENT

- 2 -
MEDIDAS DE SEGURIDAD IMPORTANTES
ADVERTENCIA: Lea y comprenda todo este manual antes de
operar o realizar tareas de mantenimiento en este producto. No seguir
estas advertencias e instrucciones puede causar lesiones personales o
daños a bienes valiosos.
Evite que los niños utilicen el producto. Este producto no es un juguete. No
permita que los niños jueguen con él .
Mantenga todas las fuentes de llama y calor alejadas de la tela de la carpa.
La tela se quemará si se deja en contacto con cualquier fuente de llama.
La aplicación de cualquier sustancia extraña a la tela de la carpa puede
hacer que las propiedades ignífugas pierdan su eficacia.
Evite lesiones. Los niños no deben jugar dentro del producto ni apoyarse
en él.
No se recomienda utilizar este producto durante tormentas eléctricas.
PRECAUCIONES DE CONFIGURACIÓN
53.No utilice velas, fósforos ni llamas abiertas de ningún tipo dentro o
cerca de la tienda.
54.No cocine dentro de la tienda.
55.Haga fogatas a sotavento y a varios metros de la tienda. Asegúrese de
apagar completamente las fogatas antes de abandonar el campamento o
antes de retirarse a pasar la noche.
56.Tenga mucho cuidado al utilizar linternas o calentadores que funcionen
con combustible dentro o alrededor de la tienda. Utilice linternas que
funcionen con baterías siempre que sea posible.
57.No repostar lámparas, calentadores ni estufas dentro de la tienda.
58.Apague o apague todas las linternas antes de ir a dormir.
59.No fume dentro de la tienda. No guarde líquidos inflamables dentro de
la tienda.
60.NUNCA haga funcionar el motor del vehículo cuando la carpa esté

- 3 -
instalada.
61.No instale la carpa cuando la temperatura sea inferior a 0ºC/32ºF o
cuando su vehículo esté mojado, podría causar daños.
62.Permita una ventilación adecuada dentro de la tienda en todo
momento.
63.No intente conducir el vehículo con la carpa instalada.
64.Para evitar que el monóxido de carbono entre en el vehículo y en la
zona de la tienda, no haga funcionar el motor, no cocine dentro de la
tienda y no utilice un calentador de gas en la tienda. El monóxido de
carbono es peligroso para la salud.
65.El motor debe estar apagado y el escape debe estar completamente
enfriado antes de instalar y usar la carpa.
GUARDE ESTAS INSTRUCCIONES
SELECCIÓN DEL CAMPING
21.Seleccione un sitio para acampar liso y nivelado, libre de rocas, ramas
y otros objetos duros o afilados.
22.Evite áreas con líneas eléctricas aéreas y ramas de árboles.
23.Estacione el vehículo en el camping elegido.
24.Apague el motor y active el freno de estacionamiento.
CÓMO ALMACENAR
21.Limpie y seque la tienda.
22.Dobla todos los componentes dentro de la tienda.
23.Enrolle la tienda de campaña, utilizando la bolsa de postes como guía.
24.Asegúrelo con las correas de amarre de la tienda e introdúzcalo en la
bolsa de transporte.
25.Conservar en un lugar fresco y seco.
ESPECIFICACIÓN
- 4 -
Estilo tienda de
campaña
10*10 pies (modelo trasero del automóvil)
Toldo
Sí
Color
Gris
Estaciones
3 estaciones, verano, otoño, primavera
Material
Cuerpo : Tejido de poliéster. 210T/PU2000
Abajo : PE;
LISTA DE PIEZAS
No.
Nombre
Imagen
CANTID
AD
1
Carpa Bolsa
1
2
Gancho
6
3
Cuerpo de la tienda
1
4
Mosca de lluvia
1
5
Postes para el porche de
ambos lados
2
6
Postes de soporte para la
cubierta del toldo
2
7
Poste para la parte
superior del porche
1
- 5 -
8
Polo Bolsa
1
9
Cuerda de viento
8
10
Suelo Clavo
15
CONSEJOS ANTES DEL MONTAJE
13. Asegúrese de que los postes extensibles estén Mantenido en el
mismo dirección horizontal mientras tú sacar premios el arriba polos
sección .
14. Asegúrese de levantar todas las partes retráctiles del poste de la
tienda en su totalidad. cuatro direcciones hasta que el amarillo botón
estallidos ¡arriba!
15. Los postes se atascarán si están torcidos, así que manténgalos
recto al tirar hacia arriba, por favor Manipular con cuidado .
25.Asegurar el carpa apuestas en cada esquina del carpa a asegurar
mayor que estabilidad .
- 6 -
MONTAJE DE CARPA PARA CAMIÓN
PASO 1. ESTIRA LA PARTE SUPERIOR DE LOS POSTES
① Prepárese para la instalación.
Seleccione un sitio nivelado,
libre de rocas, ramas y otros
objetos duros o afilados, para
montar su tienda de campaña.
Retire todo el contenido de la
bolsa.
Despliegue los 4 postes de las
patas en las uniones.

- 7 -
② Levante las articulaciones del
brazo.
Nota: Se necesitarán 2 personas
para erigir y extender los postes
de la carpa; estire los postes en
cada una de las cuatro direcciones
superiores hasta que aparezca
cada botón "amarillo".
③ Extiende los postes de las
piernas.
Nota: Hay dos secciones
extensibles en cada pata de los
postes. Extiende la sección
extensible de cada poste, una por
una, desde el medio hasta abajo,
hasta que aparezca cada botón
amarillo.
PASO 2. CONECTA EL VEHICULO
- 8 -
① Desde el interior de la
tienda, abra la cremallera de la
puerta y la malla que dan al
área de carga del vehículo.
Enrolle la malla y la puerta y
sujételas con correas en T.
② Abra la puerta trasera de su
vehículo.
③ Mueva la carpa hacia el
área de carga de su vehículo.
Deslice la funda debajo del
parachoques y sobre la
escotilla y el techo.
④ A. CON PORTAEQUIPAJE
Retire la correa larga (adherido
a la funda del vehículo) del clip.
Coloque las 2 correas cortas
alrededor del portaequipaje y
ajústelas. Repita en el lado
opuesto.
⑤
B.SIN PORTABASTILLA
Extender el correas largas para
el frente a el vehículo.Abra el
capó y coloque La correa
ganchos a la bisagra del capó
o Marco.Apriete las correas.
- 9 -
⑥ Asegure las correas de la
manga a las ruedas del
vehículo :
A. Inserte un poste de la sala
de protección azul con el
gancho de metal en la junta de
la esquina ubicada en la
esquina superior de la sala de
protección.
B. Inserte el extremo opuesto
del poste en el orificio del ojal
en diagonal en la esquina
inferior de la carpa. Repita el
procedimiento en el otro lado
de la habitación con
mosquitero.
⑦ Apriete el cordón elástico de
la manga de la tienda.
PASO 3. PREPARA EL PORCHE
- 10 -
① Deslice el poste de fibra de
vidrio a través de la funda encima
de la puerta de la sala de
protección .
Inserte ambos extremos laterales
del poste en el extremo marcado
de la junta de esquina ubicada en
la esquina superior de la sala de
la pantalla .
② Inserte el extremo
cónico del hueco abierto
de los postes del porche
en la junta de la esquina
en la esquina superior de
la pantalla.
Inserte el extremo opuesto
del poste en el orificio de
las placas en diagonal en
la esquina inferior de la
tienda.
③ Coloque los clips.

- 11 -
④ Apostar Carpa: Clavar
estacas en un ángulo de
45° A través de la web
bucle en base de tienda
de campaña Para
asegurar a La tierra
redonda .

- 12 -
PASO 4. COLOCACIÓN DEL TAPIZ
① Coloque la cubierta contra la lluvia sobre la carpa iluminada (se puede
ayudar con los postes del dosel para colocarla)
② Fije la cubierta de lluvia colgando las correas elásticas a las estacas.
③ Fije las correas de la cubierta contra la lluvia a los postes.
④ Para asegurarlo con las estacas de la tienda y los vientos.

- 13 -
PASO 5. MONTAJE DEL TOLDO
Inserte los postes de soporte con el extremo de la clavija plateada en el
toldo , corrija la posición y fíjelos con el tensor .
líneas y tomas .

- 14 -
CARPA CUIDADO CONSEJOS
1) Recomendamos encarecidamente sellar las costuras de su tienda de
campaña antes de acampar, ya que el agua puede penetrar la aguja.
agujeros en el tela. Esto es común con carpas y es No es un defecto.
2) Condensación tal vez formado al interior superficie de su Tienda de
campaña. Yo t es causado por agua vapor de su aliento, transpiración, o
cualquier húmedo Artículos en la tienda. El agua en la tienda no tiene
fugas a través de la tela de la tienda.
3) El revestimiento resistente al agua puede tener puesto bajar horas
extras.Se sugiere pulverización un revestimiento resistente al agua en a
La tienda y lluvia volar cada pocos años.
4) Evitar pulverización insecto repelente, laca para el cabello, etc., dentro
o cerca su carpa, como ellos puede ser dañino a el carpa tela y causa
fuga.
5) Hacer No dejar su conjunto de carpa arriba en luz solar directa por más
tiempo que necesario. Si se deja a la luz del sol durante períodos
prolongados del tiempo, el tela voluntad desteñir y debilitar.
6) Si las cremalleras se atascan, Lubricar con silicona. Nunca Forzar una
cremallera como Esto será doblar y evitar la cremallera desde el cierre.
7) NUNCA ruedes arriba o Guarde una tienda de campaña mojada o
húmeda. Esto causará moho. Asegúrese de que su tienda de campaña
esté completamente seca antes de guardarla. Almacenar Tu tienda en a
seco lugar.
12) Para limpiar, Lavado a mano con una esponja usando jabón suave.
Nunca lo uses una lavadora o detergente.

Fabricante: Shanghaimuxinmuyeyouxiangongsi
Dirección: Shuangchenglu 803nong11hao1602A-1609shi, baoshanqu,
shanghai 200000 CN.
Importado a AUS: SIHAO PTY LTD. 1 ROKEVA STREETEASTWOOD
NSW 2122 Australia
Importado a EE. UU.: Sanven Technology Ltd. Suite 250, 9166 Anaheim
Place, Rancho Cucamonga, CA 91730
REP
UK
YH CONSULTING LIMITED.
C/O YH Consulting Limited Office 147,
Centurion House, London Road,
Staines-upon-Thames, Surrey, TW18 4AX
REP
EC
E-CrossStu GmbH
Mainzer Landstr.69,
60329 Frankfurt am Main.


Techniczny Wsparcie i certyfikat gwarancji elektronicznej www.vevor.com/support
NAMIOT NA CIĘŻARÓWKĘ
MODEL: 2240606
Nadal staramy się oferować Państwu narzędzia w konkurencyjnych cenach.
„Oszczędź połowę”, „Połowa ceny” lub jakiekolwiek inne podobne wyrażenia używane
wyłącznie przez nas
przedstawia szacunkowe oszczędności, jakie możesz uzyskać kupując określone
narzędzia
z nami w porównaniu do głównych, najlepszych marek i niekoniecznie oznacza to okładka
wszystkie kategorie narzędzi oferowanych przez nas. Przypominamy o sprawdzeniu
ostrożnie
gdy składasz u nas zamówienie, jeśli faktycznie Oszczędność
Połowa w porównaniu z wiodącymi markami.

- 1 -
MODEL: 2240606
POTRZEBUJESZ POMOCY? SKONTAKTUJ SIĘ Z NAMI!
Masz pytania dotyczące produktu? Potrzebujesz wsparcia
technicznego? Skontaktuj się z nami:
Wsparcie techniczne i certyfikat e-gwarancji
www.vevor.com/support
To jest oryginalna instrukcja, przed użyciem należy uważnie przeczytać
wszystkie instrukcje. VEVOR zastrzega sobie jasną interpretację naszej
instrukcji obsługi. Wygląd produktu będzie zależał od produktu, który
otrzymałeś. Prosimy o wybaczenie, że nie poinformujemy Cię ponownie,
jeśli w naszym produkcie pojawią się jakiekolwiek aktualizacje
technologiczne lub oprogramowania.
TRUCK TENT

- 2 -
WAŻNE ZABEZPIECZENIA
OSTRZEŻENIE: Przed rozpoczęciem obsługi lub serwisowania tego
produktu należy przeczytać i zrozumieć całą instrukcję. Nieprzestrzeganie
tych ostrzeżeń i instrukcji może spowodować obrażenia ciała lub
uszkodzenie cennego mienia.
Unikaj używania produktu przez dzieci. Produkt ten nie jest zabawką. Nie
pozwalaj dzieciom się nim bawić .
Trzymaj wszystkie źródła ognia i ciepła z dala od tkaniny namiotu. Tkanina
spali się, jeśli pozostanie w kontakcie z jakimkolwiek źródłem ognia.
Zastosowanie jakiejkolwiek obcej substancji na tkaninie namiotu może
sprawić, że właściwości ognioodporne staną się nieskuteczne.
Unikaj obrażeń, dzieci nie powinny bawić się wewnątrz produktu ani
polegać na nim.
Ten produkt nie jest zalecany podczas burz.
ŚRODKI OSTROŻNOŚCI DOTYCZĄCE
INSTALACJI
66.Nie używaj świec, zapałek ani żadnego rodzaju otwartego ognia w
namiocie lub w jego pobliżu.
67.Nie gotuj wewnątrz namiotu.
68.Rozpalaj ogniska z wiatrem i kilka metrów od namiotu. Pamiętaj, aby
całkowicie ugasić ogień przed opuszczeniem kempingu lub przed
położeniem się spać.
69.Zachowaj szczególną ostrożność podczas używania lampionów lub
grzejników zasilanych paliwem wewnątrz lub wokół namiotu. Używaj
lampionów zasilanych bateriami, kiedy tylko jest to możliwe.
70.Nie uzupełniaj paliwa do lamp, grzejników ani piecyków wewnątrz

- 3 -
namiotu.
71.Przed pójściem spać zgaś lub wyłącz wszystkie latarnie.
72.Nie palić tytoniu wewnątrz namiotu. Nie przechowywać łatwopalnych
płynów wewnątrz namiotu.
73.NIGDY nie uruchamiaj silnika pojazdu, gdy namiot jest rozłożony.
74.Nie należy rozkładać namiotu, gdy temperatura spada poniżej 0ºC/32º
F lub gdy pojazd jest mokry, gdyż może to spowodować uszkodzenia.
75.Zawsze należy zapewnić odpowiednią wentylację wnętrza namiotu.
76.Nie próbuj prowadzić pojazdu z przymocowanym namiotem.
77.Aby zapobiec przedostaniu się tlenku węgla do pojazdu i namiotu, nie
uruchamiaj silnika, nie gotuj w namiocie i nie używaj w nim grzejnika
gazowego. Tlenek węgla jest niebezpieczny dla zdrowia.
78.Przed rozstawieniem namiotu i jego użyciem silnik musi być wyłączony,
a układ wydechowy musi być całkowicie schłodzony.
ZAPISZ TE INSTRUKCJE
WYBÓR KEMPINGU
26.Wybierz gładkie, równe miejsce na kemping, wolne od kamieni, gałęzi i
innych twardych lub ostrych przedmiotów.
27.Unikaj obszarów, w których znajdują się napowietrzne linie
energetyczne i gałęzie drzew.
28.Zaparkuj pojazd na wybranym polu kempingowym.
29.Wyłącz silnik i zaciągnij hamulec postojowy.
JAK PRZECHOWYWAĆ
26.Wyczyść i osusz namiot.
27.Złóż wszystkie elementy namiotu.
28.Zwiń namiot, używając torby na kije jako prowadnicy.
- 4 -
29.Zabezpiecz paskiem mocującym namiot i włóż do torby transportowej.
30.Przechowywać w chłodnym i suchym miejscu.
SPECYFIKACJA
Styl namiotu
10*10 stóp (Tylny model samochodu)
Markiza
Tak
Kolor
Szary
Pory roku
3 pory roku, lato, jesień, wiosna
Tworzywo
Korpus : tkanina poliestrowa 210T/PU2000
Dół : PE;
LISTA CZĘŚCI
NIE.
Nazwa
Zdjęcie
ILOŚĆ
1
Namiot Torba
1
2
Hak
6
3
Korpus namiotu
1
4
Tropik przeciwdeszczowy
1
5
Słupki do ganku po obu
stronach
2
6
Słupy podporowe do
markizy
2
- 5 -
7
Słupek do górnej części
ganku
1
8
Polak Torba
1
9
Lina wiatrowa
8
10
Grunt Gwóźdź
15
WSKAZÓWKI PRZED MONTAŻEM
16. Upewnij się, że rozciągliwe kije są utrzymany w tym samym stanie
kierunek poziomy chwila Ty wyciągnij nagrody ten szczyt biegun sekcja .
17. Upewnij się, że wszystkie chowane części masztu namiotu są
podniesione. cztery kierunki aż do żółty przycisk trzaski w górę!
18. Kijki mogą się zaciąć, jeśli będą krzywe, dlatego prosimy o ich
zachowanie
proszę zachować prostotę podczas podciągania obchodzić się ostrożnie .
30.Zabezpiecz namiot stawki w każdy narożnik z namiot Do zapewnić
większy stabilność .
- 6 -
MONTAŻ NAMIOTU SAMOCHODOWEGO
KROK 1. ROZCIĄGNIJ GÓRNĄ CZĘŚĆ DRĄŻKÓW
① Przygotuj się do konfiguracji.
Wybierz równe miejsce, wolne
od skał, gałęzi i innych twardych
lub ostrych przedmiotów, aby
rozstawić namiot.
Wyjmij całą zawartość torby.
Rozłóż 4 nogi kijów w stawach.
- 7 -
② Podnieś stawy ramion.
Uwaga: Do rozstawienia i
rozłożenia masztów namiotu
potrzebne będą 2 osoby.
Rozciągnij maszty w każdym z
czterech górnych kierunków, aż
wyskoczą wszystkie „żółte”
przyciski.
- 8 -
③ Rozłóż drążki do nóg.
Uwaga: W każdym kiju nożnym
znajdują się 2 rozciągliwe sekcje.
Rozciągnij rozciągliwą sekcję
każdego kija po kolei od środka do
dołu, aż każdy żółty przycisk
wyskoczy.
KROK 2. PODŁĄCZ POJAZD
①
Z wnętrza namiotu rozsuń
drzwi i siatkę, które są
skierowane w stronę
przestrzeni ładunkowej
pojazdu. Zwiń siatkę i drzwi i
zabezpiecz paskami T.
②
Otwórz tylną klapę pojazdu.
③
Przesuń namiot w kierunku
przestrzeni ładunkowej
pojazdu. Wsuń rękaw pod
zderzak i nad klapę i dach.

- 9 -
④ A. Z FRAKCJI
Zdejmij długi pasek
(przymocowany do pokrowca
pojazdu) z klipsa. Przymocuj 2
krótkie paski wokół bagażnika
dachowego i dokręć. Powtórz
po przeciwnej stronie.
⑤ B. BEZ SZCZELIN
Rozszerz długie paski do przód
tego pojazdu.Otwórz maskę i
zamontuj pasek haki do
zawiasu maski lub
rama.Zaciśnij paski.
⑥
Przymocuj paski rękawa do
kół pojazdu :
A. Włóż słupek z niebieskim
ekranem do pomieszczenia z
metalowym hakiem w złącze
narożne znajdujące się w
górnym rogu pomieszczenia z
ekranem.
B. Włóż przeciwległy koniec
trzpienia drążka do otworu
przelotowego po przekątnej w
dolnym rogu namiotu. Powtórz
po drugiej stronie pokoju z
- 10 -
ekranem.
⑦ Naciągnij gumkę rękawa
namiotu.
KROK 3. PRZYGOTUJ GANEK
①
Przesuń drążek z włókna
szklanego przez tuleję nad
drzwiami pomieszczenia z
moskitierą .
Włóż oba boczne końce słupka do
początku złącza narożnego
znajdującego się w górnym
narożniku pomieszczenia z
ekranem .
- 11 -
② Włóż stożkowy koniec
otwartego otworu słupków
ganku do złącza
narożnego w górnym rogu
ekranu.
Włóż przeciwległy koniec
drążka do otworu na
płytkę, po przekątnej, w
dolnym rogu namiotu.
③ Następnie zapiąć
klipsy.
④ Stawka Namiot: Wbijaj
paliki w kąt 45° przez sieć
pętla Na opierać
namiotowy zabezpieczyć
Do ziemia .

- 12 -

- 13 -
KROK 4. MOCOWANIE TROPIKU
① Załóż osłonę przeciwdeszczową na namiot, można to zrobić za pomocą
drążków do mocowania baldachimu)
② Przymocuj tropik, zawieszając gumki na palikach
③ Przymocuj paski tropiku do słupków
④ Zabezpieczyć namiot śledziami i linkami odciągowymi.

- 14 -
KROK 5. ROZKŁADANIE MARKIZY
Włóż słupki podporowe ze srebrnym trzpieniem na końcu do markizy ,
popraw położenie i zamocuj za pomocą odciągu
linie i s biorą .

- 15 -
NAMIOT PIELĘGNACJA PORADY
1) Zdecydowanie zalecamy uszczelnienie szwów namiotu przed
biwakowaniem, ponieważ woda może przedostać się przez igłę dziury w
tkanina. To jest powszechne z namiotami i jest ani wada.
2) Kondensacja Może uformowany w wnętrze powierzchnia z twój namiot .
ja Jest spowodowany przez woda para z twój oddech, pot, Lub każdy
mokry przedmioty w namiocie. Woda w namiocie nie przedostaje się przez
tkaninę.
3) Powłoka wodoodporna może nosić w godzinach nadliczbowych.
Zaleca się, aby rozpylać powłoka wodoodporna na Do namiot i deszcz
latać każdy kilka lat.
4) Unikać rozpylający owad odpychający, lakier do włosów, itp., wewnątrz
lub w pobliżu twój namiot, Jak Oni móc Być szkodliwy Do ten namiot
tkanina I przyczyna przeciek.
5) Do nie opuszczać twój zestaw namiotowy w górę W bezpośrednie
światło słoneczne dłużej niż niezbędny. Jeśli pozostawiono na słońcu
przedłużone okresy czasu, ten tkanina będzie znikać I osłabiać.
6) Jeśli zamki się zacinają, nasmarować silikonem. Nigdy wymusić zamek
błyskawiczny jako to będzie zginać i zapobiegać zamek błyskawiczny od
zamknięcia.
7) NIGDY nie tocz w górę lub schowaj mokry/wilgotny namiot. To
spowoduje pleśń. Przed schowaniem namiotu upewnij się, że jest on
całkowicie suchy. Sklep Twój namiot W A suchy miejsce.
13) Do czyszczenia, mycie ręczne za pomocą gąbki łagodne mydło. Nigdy
nie używaj pralka lub detergent.

Producent: Shanghaimuxinmuyeyouxiangongsi
Adres: Shuangchenglu 803nong11hao1602A-1609shi, baoshanqu,
szanghaj 200000 CN.
Importowane do AUS: SIHAO PTY LTD. 1 ROKEVA
STREETEASTWOOD NSW 2122 Australia
Importowane do USA: Sanven Technology Ltd. Suite 250, 9166 Anaheim
Place, Rancho Cucamonga, CA 91730
REP
UK
YH CONSULTING LIMITED.
C/O YH Consulting Limited Office 147,
Centurion House, London Road,
Staines-upon-Thames, Surrey, TW18 4AX
REP
EC
E-CrossStu GmbH
Mainzer Landstr.69,
60329 Frankfurt am Main.


Technisch Ondersteuning en E-garantiecertificaat www.vevor.com/support
VRACHTWAGENTENT
MODEL: 2240606
Wij streven er voortdurend naar om u gereedschappen tegen concurrerende prijzen te
leveren.
"Bespaar de helft", "halve prijs" of andere soortgelijke uitdrukkingen die alleen door ons
worden gebruikt
geeft een schatting van de besparingen die u kunt behalen door bepaalde gereedschappen
te kopen
bij ons vergeleken met de grote topmerken en betekent niet per se dat omslag
alle categorieën van tools die wij aanbieden. U wordt vriendelijk verzocht om te verifiëren
voorzichtig
wanneer u een bestelling bij ons plaatst, als u daadwerkelijk Besparing
Half in vergelijking met de grote topmerken.


- 1 -
MODEL: 2240606
HULP NODIG? NEEM CONTACT MET ONS OP!
Heeft u vragen over het product? Heeft u technische ondersteuning
nodig? Neem dan gerust contact met ons op:
Technische ondersteuning en e-garantiecertificaat
www.vevor.com/support
Dit is de originele instructie, lees alle handleidingen zorgvuldig door
voordat u het product gebruikt. VEVOR behoudt zich een duidelijke
interpretatie van onze gebruikershandleiding voor. Het uiterlijk van het
product is afhankelijk van het product dat u hebt ontvangen. Vergeef ons
dat we u niet opnieuw zullen informeren als er technologie- of
software-updates voor ons product zijn .
TRUCK TENT

- 2 -
BELANGRIJKE VEILIGHEIDSMAATREGELEN
WAARSCHUWING: Lees en begrijp deze volledige handleiding
voordat u dit product bedient of onderhoudt. Het niet opvolgen van deze
waarschuwingen en instructies kan leiden tot persoonlijk letsel of schade
aan waardevolle eigendommen.
Laat kinderen het product niet gebruiken. En dit product is geen speelgoed.
Laat kinderen er niet mee spelen .
Houd alle vlammen en warmtebronnen uit de buurt van het tentdoek. Het
doek zal verbranden als het in contact komt met een vlambron. Het
aanbrengen van een vreemde substantie op het tentdoek kan de
vlamwerende eigenschappen ineffectief maken.
Voorkom letsel, kinderen mogen niet in het product spelen of erop
vertrouwen.
Dit product wordt niet aanbevolen tijdens onweersbuien.
INSTELLINGSVOORZORGSMAATREGELEN
79.Gebruik geen kaarsen, lucifers of open vuur in of nabij de tent.
80.Kook niet in de tent.
81.Bouw kampvuren in de windrichting en op enkele meters afstand van
de tent. Zorg ervoor dat u het vuur volledig dooft voordat u een
kampeerterrein verlaat of voordat u gaat slapen.
82.Wees uiterst voorzichtig bij het gebruik van brandstof-aangedreven
lantaarns of kachels in of rond de tent. Gebruik indien mogelijk
batterij-aangedreven lantaarns.
83.Vul geen lampen, kachels of kooktoestellen bij in de tent.
84.Doof of doof alle lantaarns voordat u gaat slapen.
85.Roken is niet toegestaan in de tent. Bewaar geen ontvlambare
vloeistoffen in de tent.
86.Laat de motor van het voertuig NOOIT draaien als de tent bevestigd is.
87.Installeer de tent niet als de temperatuur lager is dan 0ºC/32ºF of als

- 3 -
uw voertuig nat is. Dit kan schade veroorzaken.
88.Zorg te allen tijde voor voldoende ventilatie in de tent.
89.Probeer niet met het voertuig te rijden terwijl de tent erop zit.
90.Om te voorkomen dat koolmonoxide in het voertuig en de tent
terechtkomt, mag u de motor niet laten draaien, niet koken in de tent en
geen gaskachel in de tent gebruiken. Koolmonoxide is gevaarlijk voor uw
gezondheid.
91.De motor moet uit zijn en de uitlaat moet volledig zijn afgekoeld voordat
de tent wordt opgezet en gebruikt.
BEWAAR DEZE INSTRUCTIES
KEUZE VAN EEN CAMPING
31.Kies een vlakke, vlakke kampeerplek uit, vrij van rotsen, takken en
andere harde of scherpe voorwerpen.
32.Vermijd gebieden met bovengrondse elektriciteitskabels en
boomtakken.
33.Parkeer het voertuig op de gekozen camping.
34.Zet de motor af en trek de parkeerrem aan.
HOE TE BEWAREN
31.Maak de tent schoon en droog.
32.Vouw alle onderdelen in de tent.
33.Rol de tent op en gebruik daarbij de tentstokzak als hulpmiddel.
34.Maak het geheel vast met de tentriemen en doe het in de draagtas.
35.Bewaren op een koele, droge plaats.
SPECIFICATIE
Tentstijl
10*10ft (Achtermodel van de auto)
Luifel
Ja
Kleur
Grijs
Seizoenen
3 Seizoen, Zomer, Herfst, Lente
- 4 -
Materiaal
Lichaam : Polyesterstof 210T/PU2000
Onderkant : PE
ONDERDELENLIJST
Nee.
Naam
Afbeelding
Hoeveel
heid
1
Tent Tas
1
2
Haak
6
3
Tentlichaam
1
4
Regenvlieg
1
5
Palen voor de veranda
aan beide kanten
2
6
Steunpalen voor de luifel
2
7
Paal voor de bovenkant
van de veranda
1
8
Pool Tas
1
- 5 -
9
Windtouw
8
10
Grond Nagel
15
TIPS VOOR DE MONTAGE
19. Zorg ervoor dat de rekbare stokken op dezelfde plaats gehouden
horizontale richting terwijl Jij prijzen trekken de bovenkant paal sectie .
20. Zorg ervoor dat alle uitschuifbare delen van de tentstok helemaal
omhoog worden getrokken vier richtingen totdat de geel knop knalt
omhoog!
21. De palen blijven vastzitten als ze scheef staan, dus houd ze alsjeblieft
rechtop.
rechtdoor bij het optrekken, alstublieft voorzichtig behandelen .
35.Beveilig de tent inzet bij elk hoek van de tent naar ervoor zorgen groter
stabiliteit .
MONTAGE VAN VRACHTWAGENTENT
- 6 -
STAP 1. REK HET BOVENSTE STANGDEEL UIT
① Voorbereiding op de installatie.
Kies een vlakke plek uit, vrij van
rotsen, takken en andere harde of
scherpe voorwerpen, waar u uw
tent opzet.
Haal de volledige inhoud uit de
tas.
Vouw de 4 pootstokken bij de
gewrichten uit.
- 7 -
② Til de armgewrichten omhoog.
Let op: er zijn 2 personen nodig
om de tentstokken op te zetten en
uit te rekken. Trek de stokken in
elk van de vier bovenste richtingen
uit totdat de "gele" knop omhoog
springt.
③ Strek de beenstokken uit.
Let op: Er zijn 2 rekbare delen van
elke pootstok. Trek de rekbare
delen van elke stok om de beurt
van het midden naar beneden
totdat elke gele knop omhoog
springt.
STAP 2. VERBIND HET VOERTUIG

- 8 -
① Open vanuit de tent de rits
van de deur en het gaas dat
naar de laadruimte van het
voertuig is gericht. Rol het gaas
en de deur op en zet vast met
T-riemen.
② Open de achterklep van uw
voertuig.
③ Verplaats de tent naar de
laadruimte van uw voertuig.
Schuif de hoes onder de
bumper en over het luik en het
dak.
④ A.METHAROOFRACK
Verwijder de lange riem
(bevestigd aan de
voertuighoes) van de clip.
Bevestig de 2 korte banden om
de dakdrager en trek ze strak.
Herhaal aan de andere kant.
⑤
B.ZONDER EEN
ROOFRACK
Verleng de lange banden aan
de voorkant van de voertuig.
Open de motorkap en bevestig
de riem haken aan het
scharnier van de motorkap of
frame. Trek de banden strak.
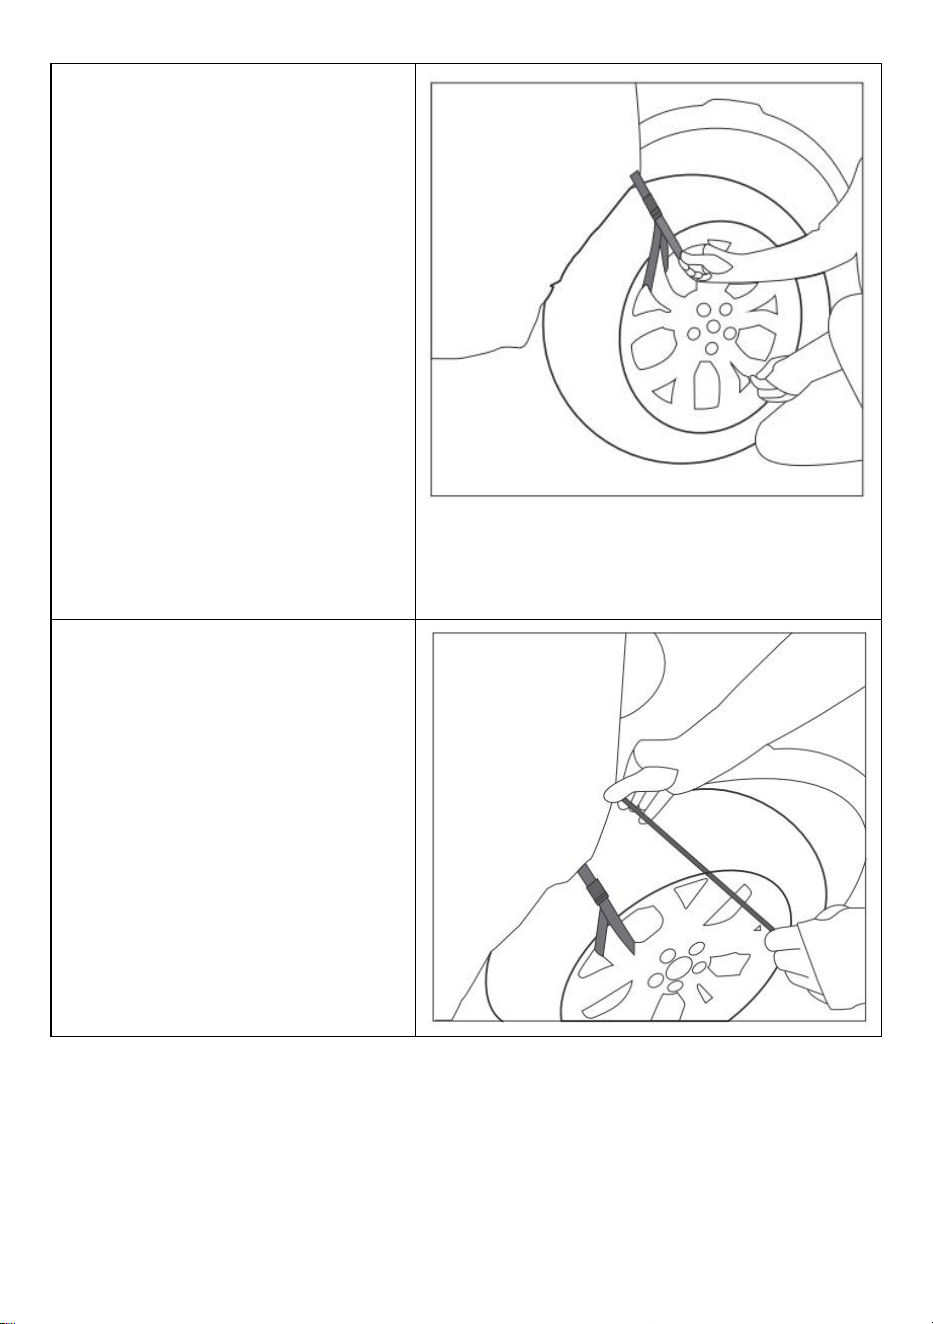
- 9 -
⑥ Bevestig de banden van de
hoes aan de wielen van het
voertuig :
A. Plaats een blauwe paal voor
de afschermkamer met de
metalen haak in de
hoekverbinding aan de
bovenhoek van de
afschermkamer.
B. Steek het tegenovergestelde
pin-uiteinde van de paal in het
ringgat diagonaal aan de
onderste hoek van de tent.
Herhaal dit aan de andere kant
van de schermruimte .
⑦ Trek het elastische koord
van de tenthoes strak.
STAP 3. DE VERANDA INRICHTINGEN

- 10 -
① Schuif de glasvezelpaal door
de mouw boven de deur van de
horkamer .
Plaats beide uiteinden van de paal
in het rechte uiteinde van de
hoekverbinding die zich aan de
bovenhoek van de
projectieschermruimte bevindt .
② Steek het taps
toelopende uiteinde van
de open holte van de
verandapalen in de
hoekverbinding aan de
bovenhoek van het
scherm.
Steek het andere uiteinde
van de stok diagonaal in
het gat in de onderste
hoek van de tent.

- 11 -
③ Bevestig de clips.
④ Inzet Tent: Zet in op
een hoek van 45° via het
web lus bij baseren van
tent beveiligen naar de g
-ronde .
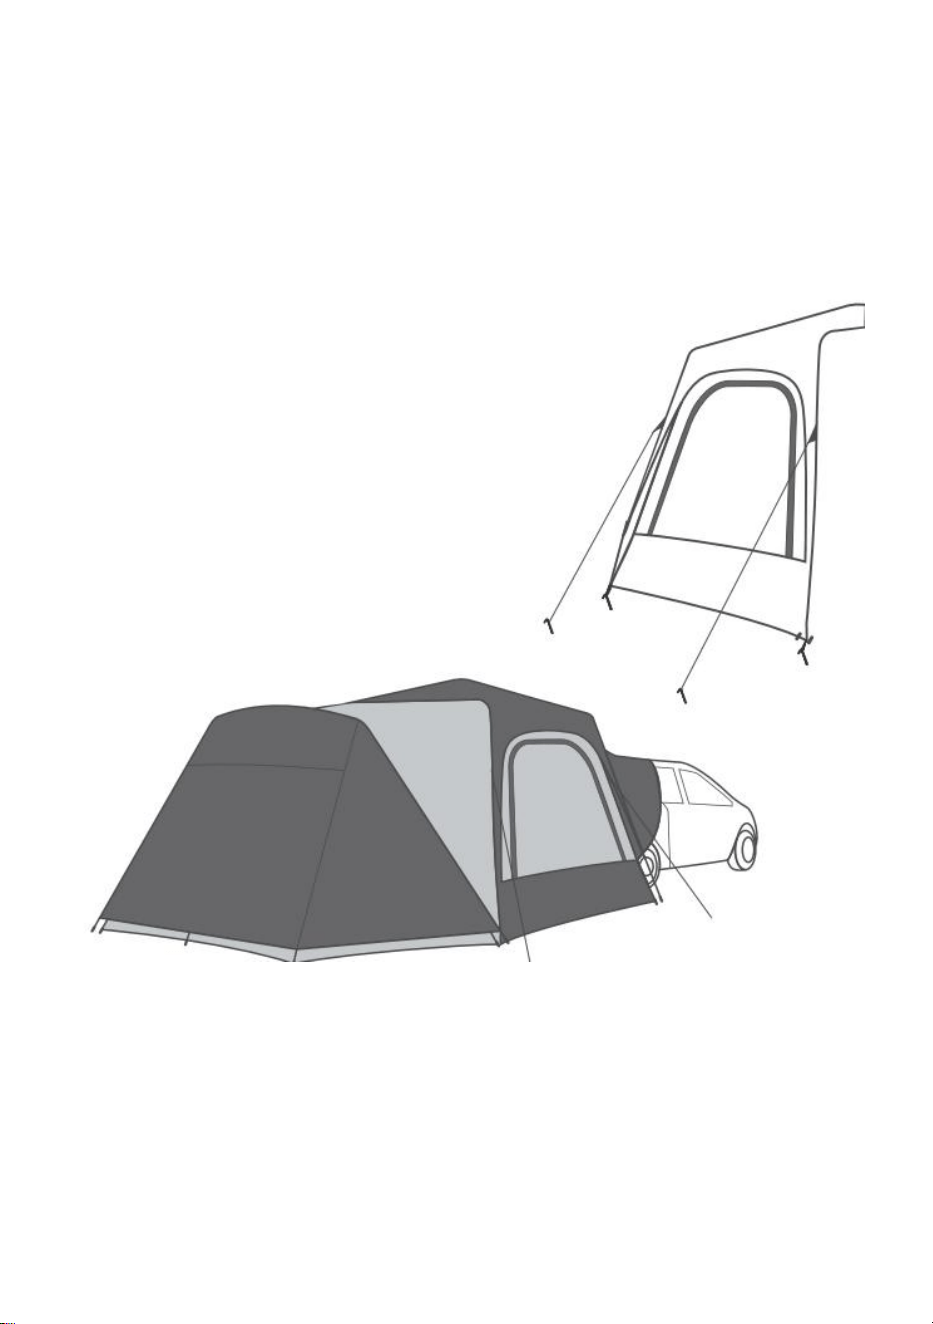
- 12 -
STAP 4. DE RAINFLY BEVESTIGEN
① Drapeer de regenhoes over de verlichte tent. (Je kunt hierbij helpen met
de luifelstokken om deze te bevestigen)
② Bevestig de regenvlieg door de elastieken aan de palen te hangen
③ Bevestig de banden van de regenvlieg aan de stokken
④ Bevestig het met haringen en scheerlijnen.
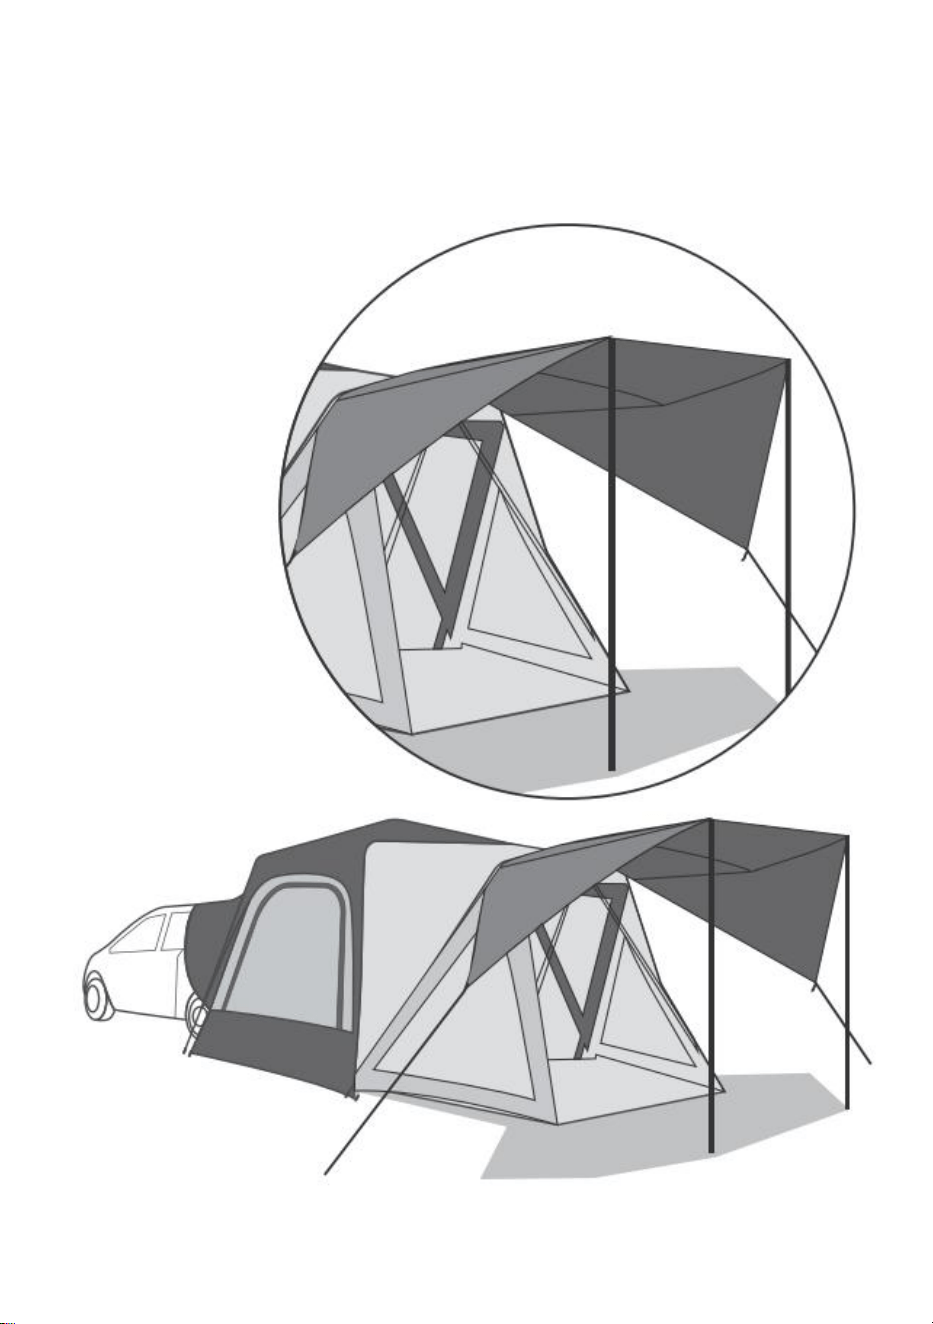
- 13 -
STAP 5. HET OPZETTEN VAN DE LUIFEL
Plaats de steunpalen met zilveren penuiteinde in de luifel , corrigeer de
positie en bevestig met de geleider .
lijnen en s nemen .

- 14 -
TENT ZORG TIPS
1) Wij raden u ten zeerste aan om de naden van uw tent af te dichten
voordat u gaat kamperen, omdat er water in de naald kan dringen gaten in
de stof. Dit is gebruikelijk met tenten en is geen defect.
2) Condensatie misschien gevormd bij de interieur oppervlak van jouw tent.
Ik t is veroorzaakt door water damp van jouw adem, transpiratie, of elk nat
spullen in de tent. Water in de tent is geen lekkage door het tentdoek.
3) De waterbestendige coating kan dragen overuren maken. Het wordt
voorgesteld om spuiten een waterafstotende coating op naar de tent en
regen vlieg elk weinig jaren.
4) Voorkomen spuiten insect afstotend, haarlak, enz., binnen of in de buurt
van jouw tent, als zij kunnen zijn schadelijk naar de tent stof En oorzaak
lekkage.
5) Doen niet verlaten jouw tentset omhoog in direct zonlicht langer dan
nodig. Als het in zonlicht wordt gelaten langdurige periodes van tijd, de stof
zullen vervagen En verzwakken.
6) Als ritsen blijven plakken, Smeren met siliconen. Nooit forceer een rits
als dit zal buigen en voorkomen dat de rits van sluiten.
7) NOOIT rollen omhoog of een natte/vochtige tent inpakken. Dit zal
veroorzaken meeldauw. Zorg ervoor dat uw tent volledig droog is voordat u
deze opbergt. Winkel jouw t ent in A droog plaats.
14) Schoonmaken, handwas met een spons met behulp van milde zeep.
Nooit gebruiken een wasmachine of wasmiddel.

Fabrikant: Shanghaimuxinmuyeyouxiangongsi
Adres: Shuangchenglu 803nong11hao1602A-1609shi, baoshanqu,
shanghai 200000 CN.
Geïmporteerd naar AUS: SIHAO PTY LTD. 1 ROKEVA
STREETEASTWOOD NSW 2122 Australië
Geïmporteerd naar de VS: Sanven Technology Ltd. Suite 250, 9166
Anaheim Place, Rancho Cucamonga, CA 91730
REP
UK
YH CONSULTING LIMITED.
C/O YH Consulting Limited Office 147,
Centurion House, London Road,
Staines-upon-Thames, Surrey, TW18 4AX
REP
EC
E-CrossStu GmbH
Mainzer Landstr.69,
60329 Frankfurt am Main.


Teknisk Support och e-garanticertifikat www.vevor.com/support
LASTBILTÄLT
MODELL: 2240606
Vi fortsätter att vara engagerade i att ge dig verktyg till konkurrenskraftiga priser.
"Spara hälften", "Halva priset" eller andra liknande uttryck som endast används av oss
representerar en uppskattning av besparingar du kan dra nytta av att köpa vissa verktyg
med oss jämfört med de stora toppmärkena och betyder inte nödvändigtvis att täcka
alla kategorier av verktyg som erbjuds av oss. Du påminns vänligen om att verifiera
försiktigt
när du gör en beställning hos oss om du faktiskt gör det Sparande
Halv i jämförelse med de främsta varumärkena.

- 1 -
MODELL: 2240606
BEHÖVER HJÄLP? KONTAKTA OSS!
Har du produktfrågor? Behöver du teknisk support? Kontakta oss
gärna:
Teknisk support och e-garanticertifikat
www.vevor.com/support
Detta är den ursprungliga instruktionen, läs alla instruktioner noggrant
innan du använder den. VEVOR reserverar sig för en tydlig tolkning av vår
användarmanual. Utseendet på produkten är beroende av den produkt du
fått. Ursäkta oss att vi inte kommer att informera dig igen om det finns
någon teknik eller mjukvaruuppdateringar på vår produkt.
TRUCK TENT

- 2 -
VIKTIGA SÄKERHETSÅTGÄRDER
VARNING: Läs och förstå hela denna manual innan du använder
eller servar denna produkt. Underlåtenhet att följa dessa varningar och
instruktioner kan orsaka personskada eller skada på värdefull egendom.
Undvik att barn använder produkten. Och hans produkt är inte en leksak.
Låt inte barn leka .
Håll alla lågor och värmekällor borta från tälttyget. Tyget kommer att brinna
om det lämnas i kontakt med någon eldkälla. Appliceringen av främmande
ämnen på tälttyget kan göra de flambeständiga egenskaperna ineffektiva.
Undvik skador, barn ska inte leka inuti produkten eller att lita på.
Denna produkt rekommenderas inte under åskväder.
SETUP FÖRSIKTIGHETSÅTGÄRDER
92.Använd inte ljus, tändstickor eller öppna lågor av något slag i eller nära
tältet.
93.Laga inte mat inne i tältet.
94.Bygg lägereldar i vinden och flera meter bort från tältet. Se till att helt
släcka bränder innan du lämnar en campingplats eller innan du går i
pension för natten.
95.Iaktta extrem försiktighet när du använder bränsledrivna lyktor eller
värmare inuti eller runt tältet. Använd batteridrivna lyktor när det är möjligt.
96.Tanka inte lampor, värmare eller spisar inne i tältet.
97.Släck eller stäng av alla lyktor innan du går och lägger dig.
98.Rök inte inne i tältet Förvara inte brandfarliga vätskor inuti tältet.
99.Kör ALDRIG fordonsmotorn när tältet är monterat.
100. Installera inte tältet när temperaturen är under 0ºC/32ºF eller när
ditt fordon är blött, det kan orsaka skada.
101. Tillåt alltid tillräcklig ventilation inne i tältet.
102. Försök inte att köra fordonet med tältet påsatt.

- 3 -
103. För att förhindra att kolmonoxid kommer in i fordonet och
tältområdet, kör inte motorn, laga inte mat inne i tältet och använd inte en
gasolvärmare i tältet. Kolmonoxid är farligt för din hälsa.
104. Motorn måste vara avstängd och avgaserna måste vara helt kylda
innan tältet installeras och används.
SPARA DESSA INSTRUKTIONER
VAL AV CAMPING
36.Välj en jämn, jämn campingplats fri från stenar, grenar och andra hårda
eller vassa föremål.
37.Undvik områden med luftledningar och trädgrenar.
38.Parkera fordonet på vald campingplats.
39.Stäng av motorn och dra åt parkeringsbromsen.
HUR MAN FÖRVARAR
36.Rengör och torka tältet.
37.Vik in alla komponenter i tältet.
38.Rulla tältet, använd påsen som en guide.
39.Fäst med tältets knytband och sätt in i väskan.
40.Förvara på en sval, torr plats.
SPECIFIKATION
Tält stil
10*10ft (bakmodell av bilen,)
Markis
Ja
Färg
Grå
Årstider
3 säsong, sommar, höst, vår
Material
Kropp : Polyestertyg 210T/PU2000
Nederst : PE;
DELLISTA
Inga.
Namn
Bild
ANTAL

- 4 -
1
Tält Väska
1
2
Krok
6
3
Tältkropp
1
4
Regnfluga
1
5
Stolpar för verandan
båda sidor
2
6
Stödstolpar för markisens
tak
2
7
Stång för verandans topp
1
8
Pole Väska
1
9
Vindrep
8
10
Jord Spika
15
TIPS INNAN MONTERAS
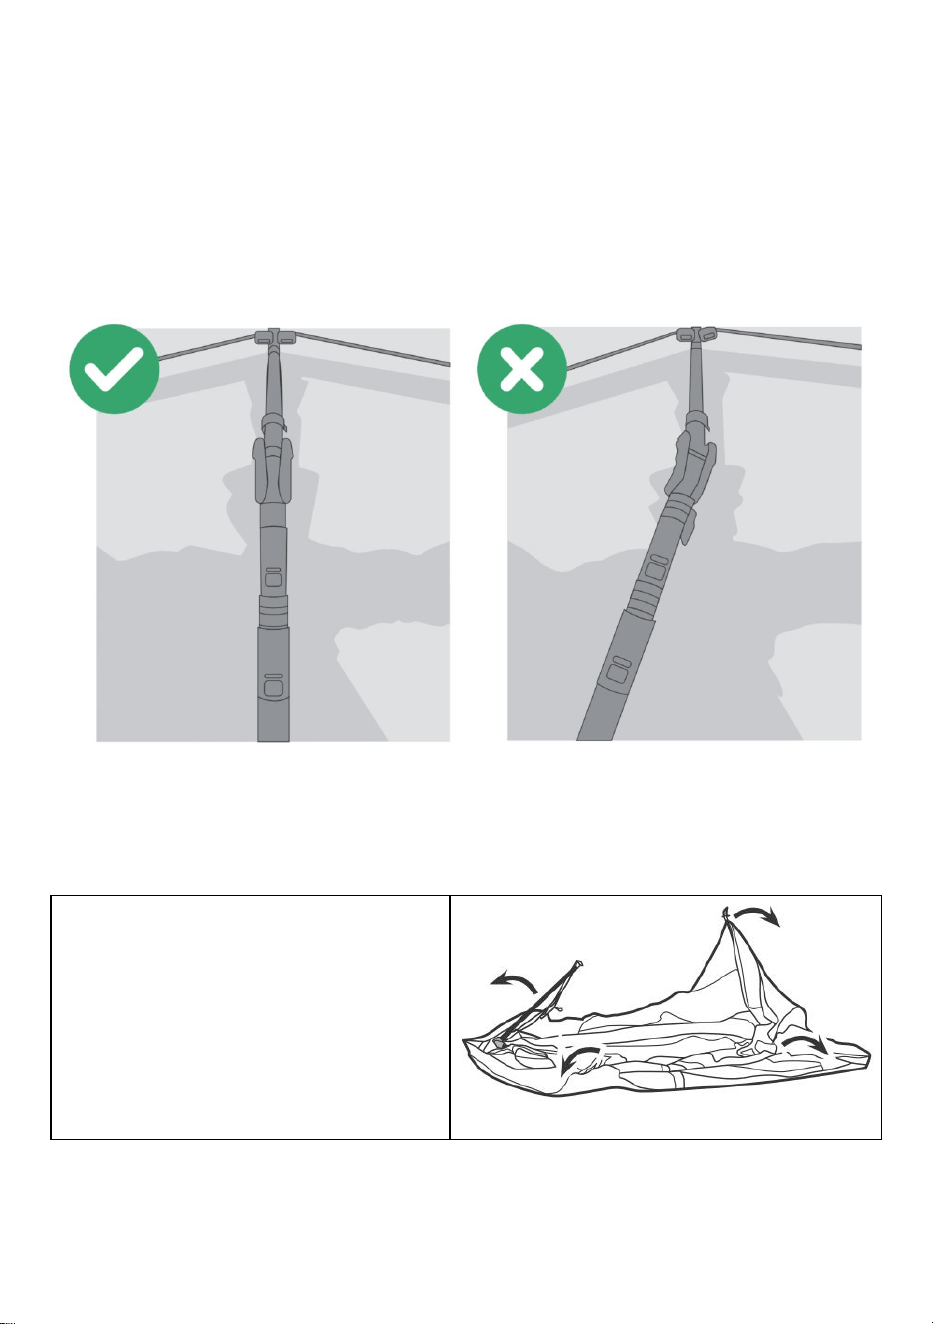
- 5 -
22. Se till att de töjbara stängerna är hålls i samma horisontell riktning
medan du dra utmärkelser de bästa stolpens avsnitt .
23. Se till att dra upp alla infällbara delar av tältstången totalt fyra
riktningar tills han gul knapp poppar upp!
24. Stolparna kommer att fastna om de är sneda, så behåll dem
rakt när du drar upp, tack hantera med försiktighet .
40.Säkra tält insatser vid varje hörn av tält till säkerställa större stabilitet .
LASTBIL TÄLTMONTERING
STEG1. STRÄCK DEN ÖVERSTA STÅNGEN
① Förbered för installation.
Välj en plan plats fri från stenar,
grenar och andra hårda eller
vassa föremål för att sätta upp ditt
tält.
Ta bort allt innehåll från påsen.
Vik ut 4 benstolpar vid lederna.

- 6 -
② Lyft upp armlederna.
Obs: 2 personer kommer att
behövas för att resa och förlänga
tältstängerna sträcka stängerna i
var och en av de fyra översta
riktningarna tills varje "gul" knapp
dyker upp.

- 7 -
③ Förläng benstängerna.
Obs: Det finns 2 töjbara sektioner
av varje benstång. Förläng varje
stavs sträckbara sektion i tur och
ordning från mitten till botten tills
varje gul knapp dyker upp.
STEG 2. ANSLUT FORDON
①
Inifrån tältet, öppna
dragkedjan på dörren och nätet
som är vänd mot fordonets
lastutrymme. Rulla ihop nätet
och dörren och fäst med
T-band.
②
Öppna bakluckan på ditt
fordon.
③
Flytta tältet mot ditt fordons
lastutrymme. Skjut in hylsan
under stötfångaren och över
luckan och taket.
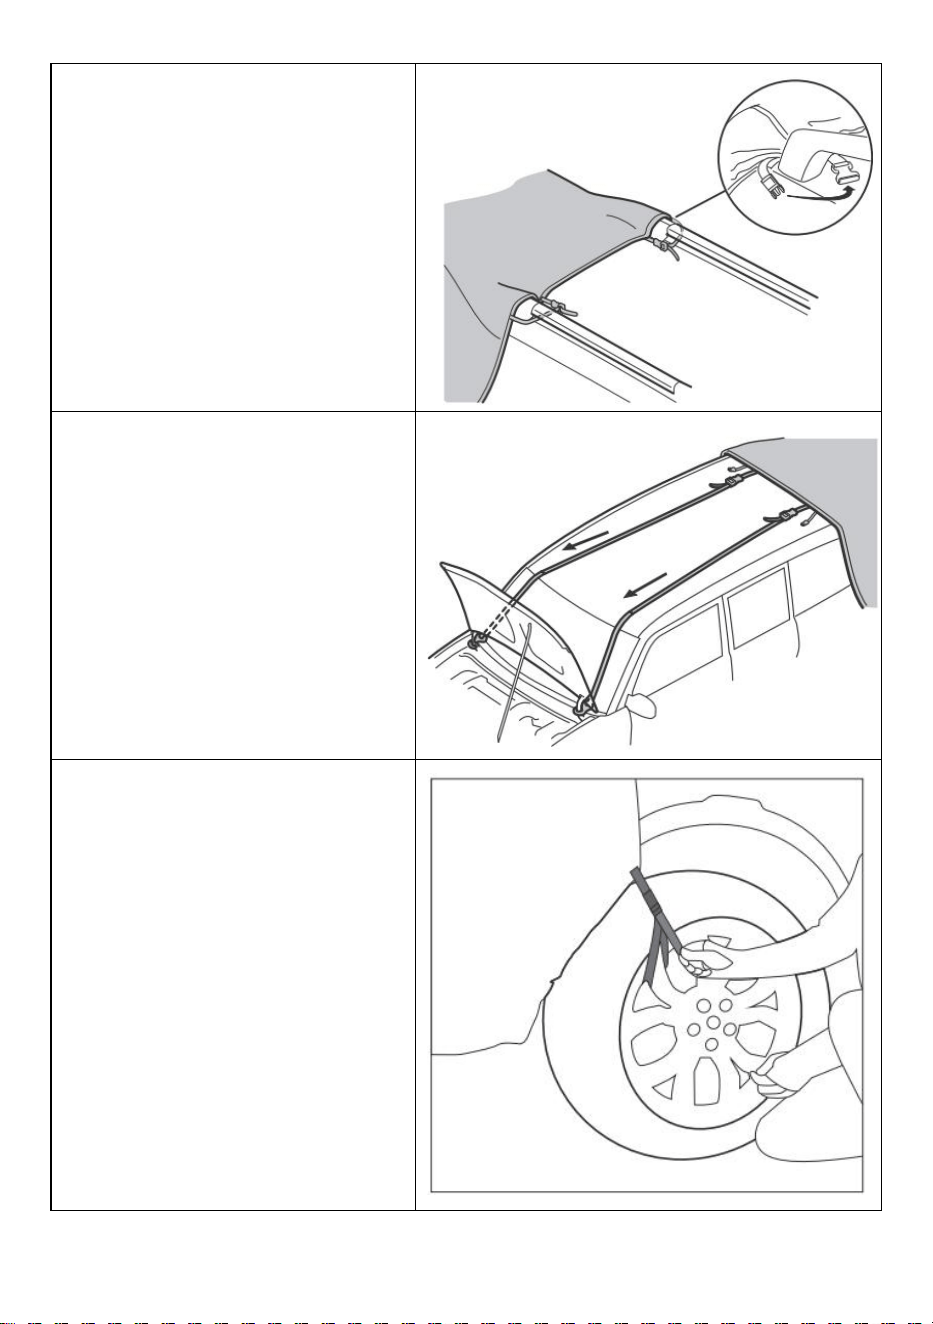
- 8 -
④ A.WITHAROOFRACK
Ta bort den långa remmen (fäst
på fordonshylsan) från klippet.
Fäst de 2 korta remmarna runt
takräcket och dra åt. Upprepa
på motsatt sida.
⑤ B.UTANAROOFRACK
Förläng långa remmar till
framför han fordon. Öppna
motorhuven och fäst den
remmen hakar på huvens
gångjärn eller ram. Dra åt
remmarna.
⑥
Fäst remmarna på hylsan på
fordonets hjul :
A. Sätt in en blå skärmstolpe
med metallkroken i
hörnskarven som är placerad i
det övre hörnet av
skärmrummet.
B. Sätt in den motsatta
stiftänden av staven i
genomföringshålet diagonalt i
tältets nedre hörn. Upprepa på
andra sidan av skärmrummet .
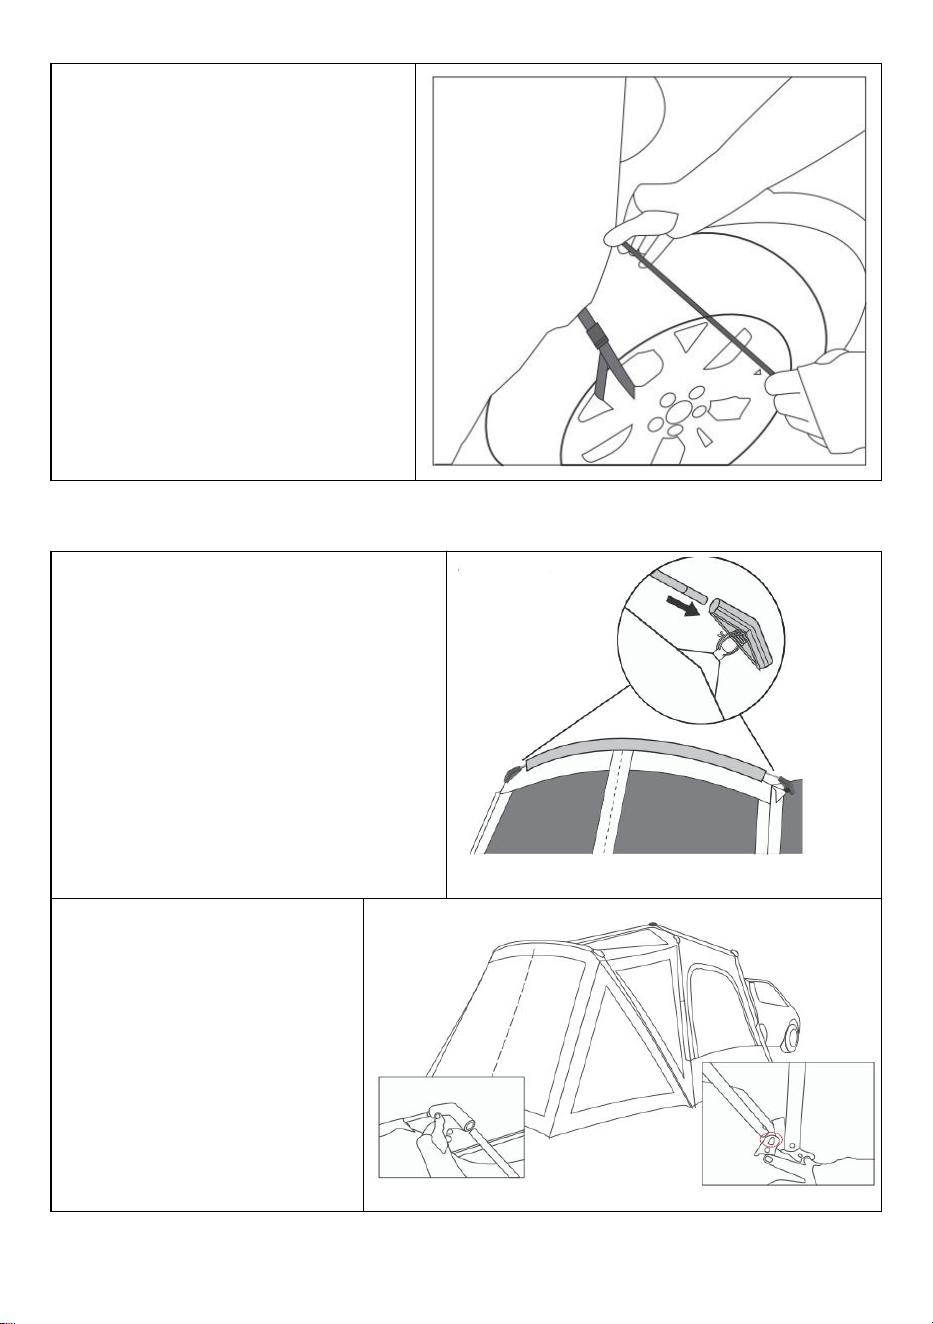
- 9 -
⑦ Dra åt det elastiska snöret
på tälthylsan.
STEG 3. SÄTT UPP VERANDAN
①
Skjut glasfiberstången genom
hylsan ovanför skärmens
rumsdörr .
Sätt in båda sidorna av stolpen i
den startade änden av hörnfogen
som är belägen på övre hörnet av
skärmens rum .
②
Sätt in den
avsmalnande änden av
den öppna fördjupningen
av verandastolparna i
hörnskarven i skärmens
övre hörn.
Sätt in den motsatta
änden av stången i
plåthålet diagonalt i tältets
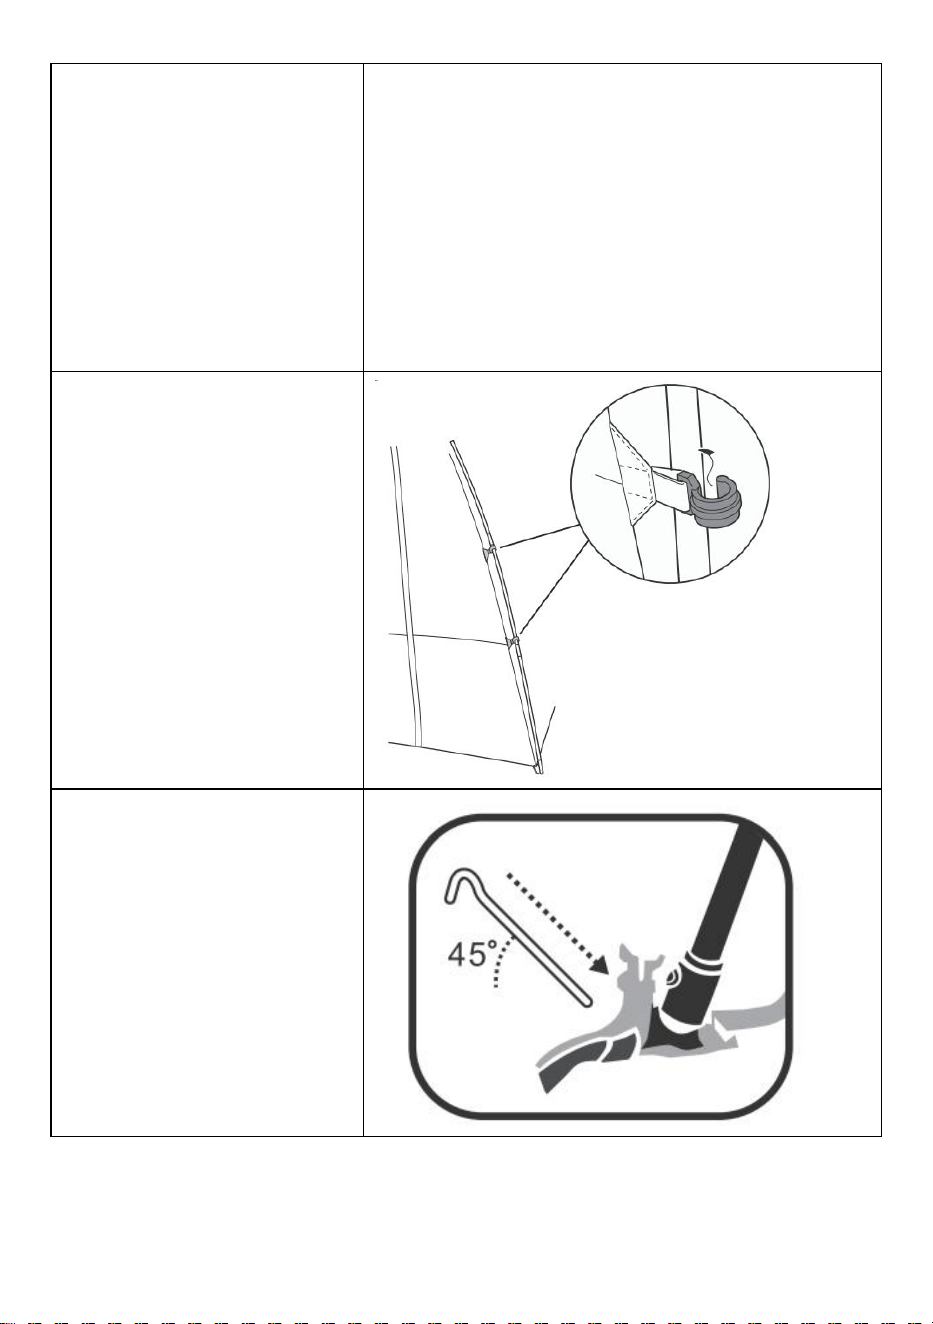
- 10 -
nedre hörn.
③ Vid fäste klippen.
④ Insats Tält: Driv
insatser kl en 45° vinkel
via webben slinga på bas
av tält att säkra till jorden
runt .

- 11 -

- 12 -
STEG 4. ATT FÄSTA REGNFLUGAN
① Drapera regnflugsskyddet tältet tänds kan hjälpas åt med kapellstänger
att fästa)
② Fäst regnflugan genom att hänga upp elastiktopparna på pålarna
③ Fäst remmarna av regnfluga på stängerna
④ För att säkra den med tältpålarna och grenlinorna.

- 13 -
STEG 5. UPPSTÄLLNING AV MARKISEN
Sätt in stödstolparna med silverp i e nd till en vinge , korrigera positionen
och fixa med gujen linjer och s
tar .

- 14 -
TÄLT VÅRD TIPS
1) Vi rekommenderar starkt att du försluter ditt tält innan du campar
eftersom vatten kan tränga in i nålen hål i tyg. Detta är vanligt med tält och
är inte a defekt.
2) Kondensation kanske bildas vid interiör yta av din tält. Jag t är orsakade
av vatten ånga från din andetag, svett, eller några våt föremål i tältet.
Vatten i tältet läcker inte genom tälttyget.
3) Den vattentäta beläggningen kan bära ner övertid.Det föreslås att spray
en vattenavvisande beläggning på till tältet och regn flyga varje få år.
4) Undvika besprutning insekt frånstötande, hårspray, etc., inuti eller nära
din tält, som de maj vara skadlig till de tält tyg och orsaka läckage.
5) Do inte lämna din tältset upp i direkt solljus längre än nödvändig. Om
lämnas i solljus för långa perioder av tid, de tyg vilja blekna och försvagas.
6) Om blixtlås fastnar, smörj med kisel. Aldrig tvinga en dragkedja som
detta kommer böja och förhindra dragkedja från stängning.
7) rulla ALDRIG upp eller packa undan ett blött/fuktigt tält. Detta kommer
att orsaka mögel. Se till att ditt tält är helt torrt innan du förvarar det. Lagra
din t ent i a torka plats.
15) För att städa, handtvätt med en svamp med hjälp av mild tvål. Använd
aldrig en tvättmaskin eller tvättmedel.

Tillverkare: Shanghaimuxinmuyeyouxiangongsi
Adress: Shuangchenglu 803nong11hao1602A-1609shi, baoshanqu,
shanghai 200000 CN.
Importerad till AUS: SIHAO PTY LTD. 1 ROKEVA STREETEASTWOOD
NSW 2122 Australien
Importerad till USA: Sanven Technology Ltd. Suite 250, 9166 Anaheim
Place, Rancho Cucamonga, CA 91730
REP
UK
YH CONSULTING LIMITED.
C/O YH Consulting Limited Office 147,
Centurion House, London Road,
Staines-upon-Thames, Surrey, TW18 4AX
REP
EC
E-CrossStu GmbH
Mainzer Landstr.69,
60329 Frankfurt am Main.


