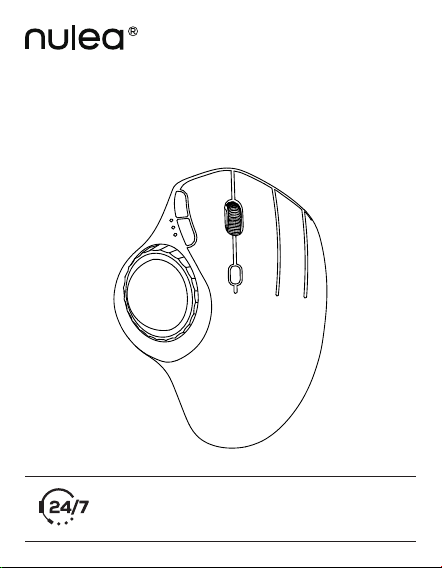
M
508
W
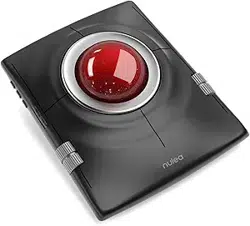
ireless Illuminated Trackball Mouse
U
ser Manual
Visit www
.nulea.com to chat with a live
representative, or email [email protected]om for
technical support or inquiries.

C
ontents
E
nglish
· · · · · · · · · · · · · · · · · · · · · · · · · · · · · · · · · · · · · · · · · · · · · · · 0
1-09
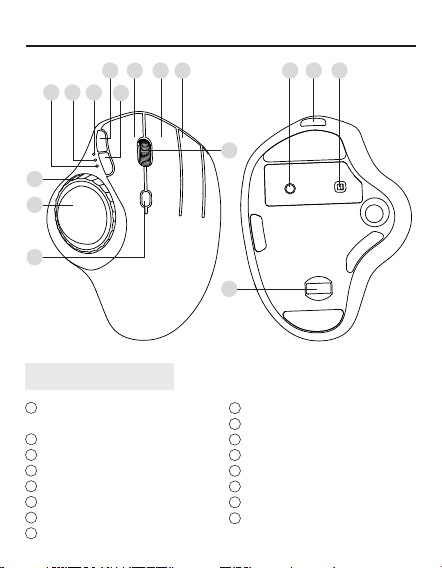
P
roduct Features
T
rackball
Trackball RGB Lighting
Lighting Control Knob
2.4GHz Mode
BT Mode 1
BT Mode 2
Forward Button
Back Button
Left Button
US/UK/
CA
1
11
10
12 13 14
16
15
2
3
6 8 9
7
4
5
1
2
3
4
R
ight Button
Scroll Wheel
DPI Button
Window Switch Button
Channel Switch Button
On/Off Toggle Switch
Type-C Charging Port
USB Receiver
9
10
11
12
13
14
15
16
5
6
7
8
01
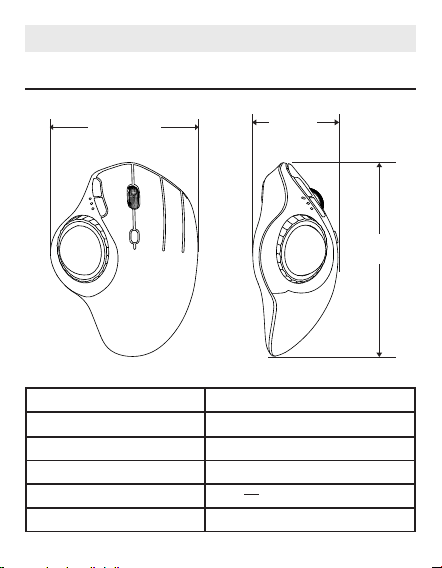
S
pecifications
US/UK/CA
M
odel M508
Dimensions 49.3 × 136.6 × 103.4 mm
Weight 150g
Material ABS
Power Rating DC 5V---0.3A
DPI 400 - 800 (default) - 1200 - 1600
10
3.4 mm
49.3 mm
136
.6 mm

02
3
'' - 5''
P
ackage Content
W
ireless Connection (BT Mode)
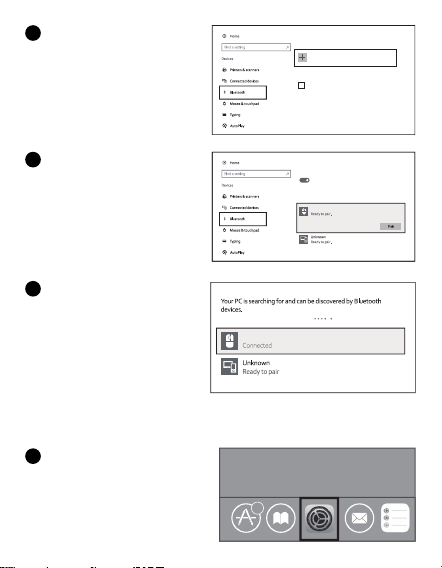
Windo
ws System (Windows 10 as an example)
T
urn on the mouse.
1
P
ress the channel switch button to switch to BT mode.
2
P
ress and hold the switch button for 3-5 seconds. The LED indicator
will flash rapidly, indicating the mouse has entered BT pairing mode.
3
C
lick the "Devices" button on
your computer.
4
1 × W
ireless Illuminated Trackball Mouse
1 × User Manual
1 × After-sales Service Card
1 × Type-C Charging Cable
1 2 3
03
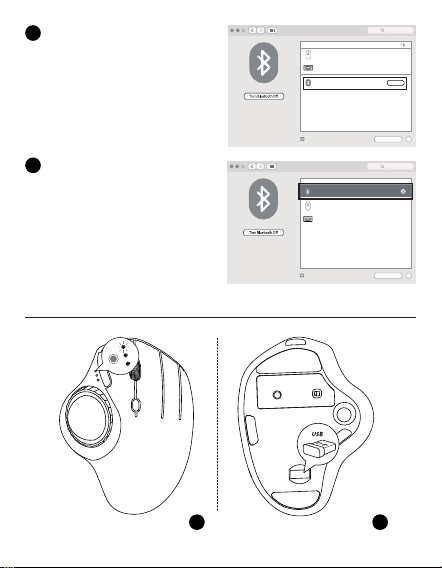
m
acOS System
P
lease complete wireless connection installation steps (1-3) before
pairing.
6
N
ulea M508
M
anage Bluetooth devices
Bluetooth
On
Your PC is se arching for a nd can be disc overed by
Bluetooth devices.
N
ulea M508
B
luetooth & other devices
D
ownloa d over metere d connec tions
To help preve nt extra cha rges, keep th is off so devic e
soft ware (drivers, i nfo, and apps) fo r new devices wo n’t
downl oad while you ’re on metered I nternet con nections .
A
dd Blu etooth o r other dev ice
C
lick the "Add Wireless
Connection or other device"
button.
Click "Continue" to begin
installation.
Search for the device "Nulea
M508" and then click the Pair
button.
If pairing is successful, the
LED indicator will light up for
3 seconds and then turn off.
5
1
6
7
04
Bluetooth
Not Connected
Not Connected
Show Bluetooth in menu bar
”foete
r”
Pair
IK6650
Bluetooth: On
Now discoverable as
”forter
的
iMac”
Devices
Advanced...
?
Search
forter’s iMac
Nulea M508
2
.4G Connection
Bluetooth
Show Bluetooth in menu bar
Bluetooth: On
Now discoverable as
”forter
的
iMac”
Devices
Advanced...
?
Search
connected
Not Connected
Not Connected
”foete
r”
IK6650
forter’s iMac
Nulea M508
C
lick the wireless connection
button in the System
Preferences folder.
Search for the device "Nulea
M508" and then click the
pair button. If installation
is complete, the mouse will
function normally.
2
3
1 2
05
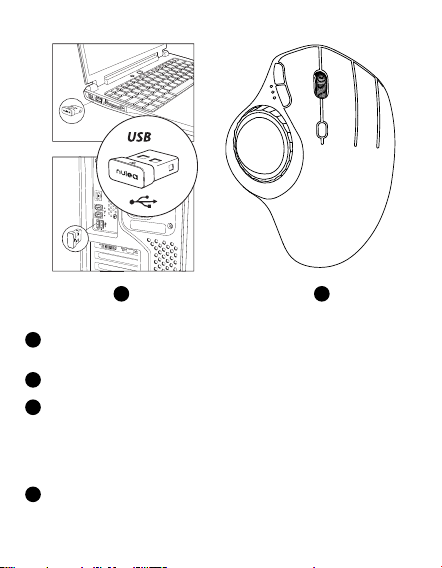
3 4
T
urn on the mouse and briefly press the mode switch button to switch
to 2.4G Mode. The LED indicator will flash slowly.
Remove the USB receiver from the bottom of the mouse.
Insert the USB receiver into the computer's USB port.
Note: Carefully check the connector orientation and insertion position.
If you feel significant resistance when inserting the USB connector,
check the connector's shape and orientation. Using excessive force
may damage the connector.
The mouse is now ready to use.
1
2
3
4
06
USB
BT
2
BT1
USB
BT
2
BT1
USB
BT
2
BT1
USB
BT
2
BT1
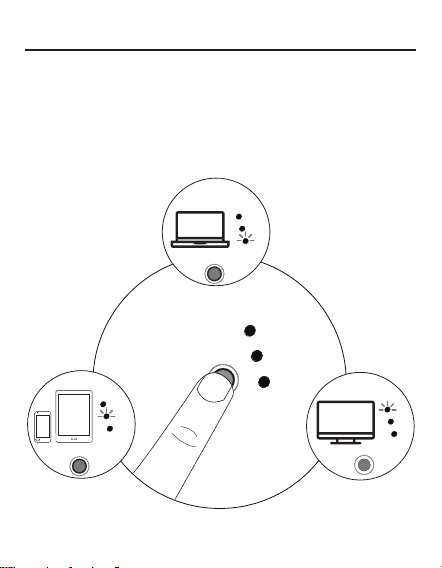
M
ode Switching
T
his mouse supports three connection channels: 2.4G, BT1, and BT2. After
connecting the mouse to devices via 2.4G and the two BT channels (BT1,
BT2), you can switch between connected devices by pressing the mode
switch button. The LED indicator will turn off after successful pairing.
BT 1 Mode
BT 2 Mode
USB
07
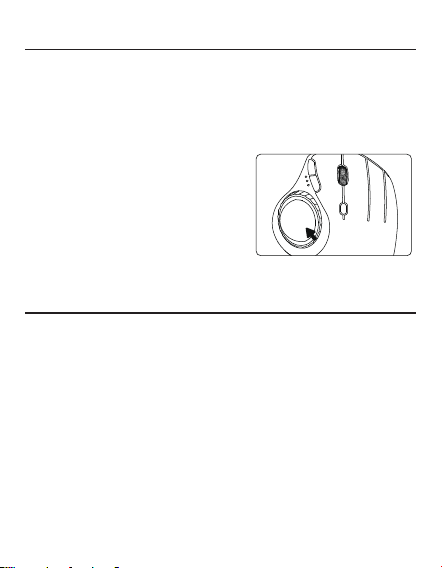
T
rackball RGB Lighting Features
2
. DPI Settings: 400 (Red) / 800 (Blue,
Default) / 1200 (Green) / 1600 (Purple).
When switching DPI levels, the indicator
light will flash the corresponding color.
3. Low Battery: The trackball light will flash
red.
4. Charging: The trackball light will glow
green.
1. Adjust the trackball lighting effect: Simply rotate the lighting effect
adjustment knob. The lighting modes are: flowing water/breathing/
constant red/constant blue/constant purple/neon/off. The light will remain
on while the trackball is scrolled. If the trackball is not scrolled for more
than 3 minutes, the light will automatically turn off. The light will turn on
again when the trackball is scrolled again.
C
harging
1
. When the battery power is low, the red light on the trackball will flash. To
avoid affecting the usage experience and functions of the mouse, please
charge it in time.
2. When charging, the trackball light is green.
Note:
1. Please use the included charging cable to charge the mouse.
2. Do not use a fast charger to charge the mouse. Using a high-power
adapter may damage the mouse's chip. (Please charge the mouse
directly using a computer's USB port or a 5V charger.)
3. For the best user experience, please fully charge the mouse before first
use.
4. The included USB cable is for charging only and should not be used as
a wired mouse. The mouse will not work even if the USB charging cable
is plugged directly into the computer port when it is not connected to the
computer via a 2.4G USB receiver or wireless connection.
0
8
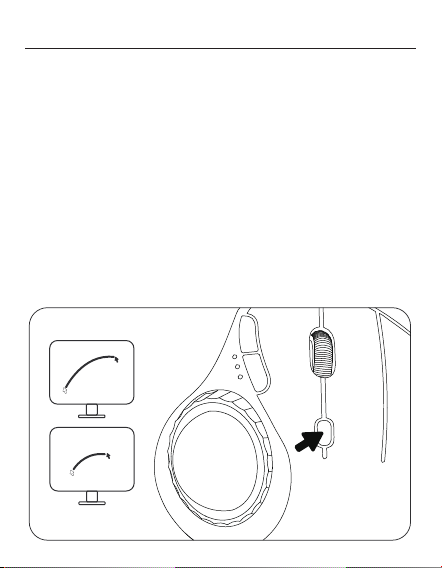
D
PI Mode
T
here are 4 DPI settings available. Please press the DPI button to adjust
the setting according to your preference. When switching DPI levels, the
trackball light will flash the corresponding color: 400 (Red) / 800 (Blue,
Default) / 1200 (Green) / 1600 (Purple).
If the highest DPI still does not meet your needs, you can also manually
adjust the DPI on your computer.
Windows: Open "Microsoft Mouse and Keyboard Center", select the
mouse you are using, click "Basic Settings", find "Sensitivity", and adjust it
accordingly.
macOS: Open the "System Settings" menu, click "Mouse", and drag the
"Tracking Speed" slider to adjust the DPI.

09
I
mportant Safety Instructions
P
lease note: Repetitive use of the keyboard and mouse over a prolonged
period may result in injury. We recommend that users avoid excessive use
of this product or any keyboard and mouse.
• Avoid drops.
• Do not disassemble.
• Do not allow contact with liquids.
• This product is only suitable for use in mild climates.
• The ambient temperature should not exceed 40 degrees Celsius when
using this product.
• Never place an open flame (such as a candle) on this product.
• Clean this product only with a dry cloth or brush.
� Ensure the mouse battery is fully charged;
• The pairing mode is on the channel paired with the mouse;
• BT functionality on your device is working properly;
• If your computer is in sleep mode, please wake the computer first, then
move the trackball to wake the mouse.
S
leep Mode & Wake Up
T
he Nulea M508 mouse features a smart sleep mode to extend battery
life. When wirelessly connected, the M508 mouse will automatically enter
sleep mode 30 minutes after your last use. To use the mouse, you need to
move the trackball to wake it.
Note: If moving the trackball still does not wake the mouse, please check
the following:

F
CC Statement
A
ny changes or modifications not expressly approved by the party
responsible for compliance could void the user's authority to operate the
equipment.
This device complies with part 15 of the FCC Rules. Operation is subject
to the following two conditions: (1) this device may not cause harmful
interference, and (2) this device must accept any interference received,
including interference that may cause undesired operation.
F
CC Radiation Exposure Statement
T
his equipment complies with FCC radiation exposure limits set forth for
an uncontrolled environment.

C
orrect Disposal of This Product
(W
aste Electrical & Electronic Equipment)
This marking shown on the product or its literature, indicate that it
should not be disposed with other household wastes at the end of its
working life.
To prevent possible harm to the environment or human health from
uncontrolled waste disposal, please separate this from other types of
wastes and recycle it responsibly to promote the sustainable reuse of
material resources. Household user should contact either the retailer where
they purchased this product or their local government ofce, for details of
where and how they can take this item for environmentally safe recycling.
Business users should contact their supplier and check the terms and
conditions of the purchase contact. This product should not be mixed with
other commercial wastes for disposal.
M
anufacturer: Dongguan Togran Electronics Technology Co., Ltd.
Address: No. 110, Shijie Shidan Mid Rd, Shijie Town, Dongguan City,
Guangdong Province, China
WORK WITH YOUR FAVORITE
E
U
UK
REP
REP
H
UMISS TRADING S.L
Calle Luis Bañuel 12-3A, Madrid, 28018, Spain
Email: eugpsres@outlook.com
Tel: +34 613 177 772
CET Product Service Ltd.
Beacon House Stokenchurch Business Park,
Ibstone Rd, Stokenchurch
High Wycombe HP14 3FE UK
Email: [email protected]
Phone: +44 741 932 5266
F
ABRIQUÉ EN CHINE
MADE IN CHINA

This device complies with part 15 of the FCC Rules. Operation is subject to the
following two conditions: (1) This device may not cause harmful interference, and (2)
this device must accept any interference received, including interference that may cause
undesired operation.
Any Changes or modifications not expressly approved by the party responsible for
compliance could void the user's authority to operate the equipment.
Note: This equipment has been tested and found to comply with the limits for a Class B
digital device, pursuant to part 15 of the FCC Rules. These limits are designed to
provide reasonable protection against harmful interference in a residential installation.
This equipment generates uses and can radiate radio frequency energy and, if not
installed and used in accordance with the instructions, may cause harmful interference
to radio communications. However, there is no guarantee that interference will not
occur in a particular installation. If this equipment does cause harmful interference to
radio or television reception, which can be determined by turning the equipment off and
on, the user is encouraged to try to correct the interference by one or more of the
following measures:
-Reorient or relocate the receiving antenna.
-Increase the separation between the equipment and receiver.
-Connect the equipment into an outlet on a circuit different from that to which the
receiver is connected.
-Consult the dealer or an experienced radio/TV technician for help.
FCC Radiation Exposure statement
The device has been evaluatec to meel general RF exposure requirement. The device
can be used in portable exposure condition without restriction.