OWNER'S MANUAL
(FOR MODELS MANUFACTURED SINCE 11/16)
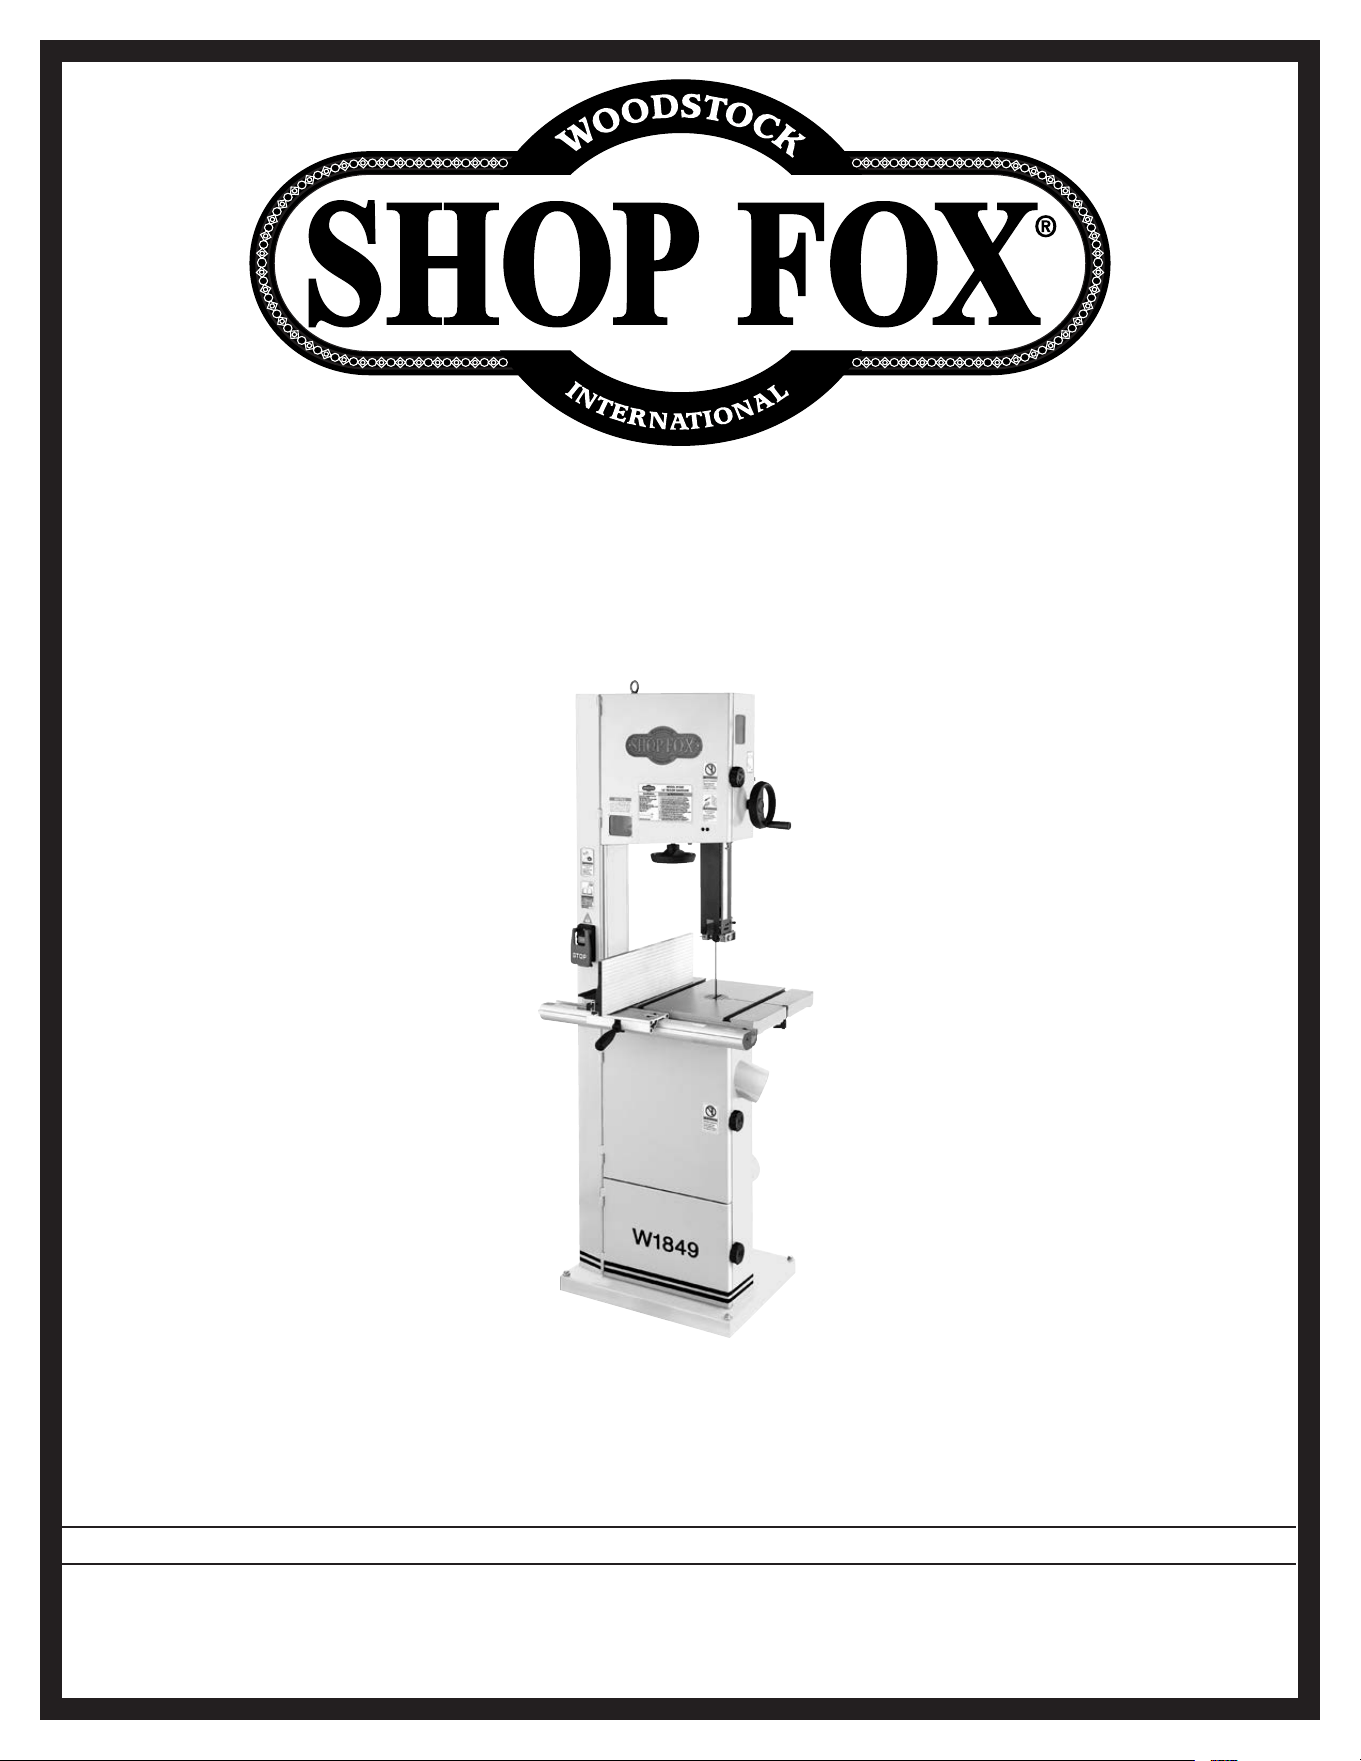
MODEL W1849
14" RESAW BANDSAW
Phone: (360) 734-3482 • Online Technical Support: [email protected]
COPYRIGHT © JANUARY, 2017 BY WOODSTOCK INTERNATIONAL, INC.
WARNING: NO PORTION OF THIS MANUAL MAY BE REPRODUCED IN ANY SHAPE OR FORM WITHOUT
THE WRITTEN APPROVAL OF WOODSTOCK INTERNATIONAL, INC.
#18655KB Printed in Taiwan
V1.02.17
This manual provides critical safety instructions on the proper setup,
operation, maintenance, and service of this machine/tool. Save this
document, refer to it often, and use it to instruct other operators.
Failure to read, understand and follow the instructions in this manual
may result in fire or serious personal injury—including amputation,
electrocution, or death.
The owner of this machine/tool is solely responsible for its safe use.
This responsibility includes but is not limited to proper installation in
a safe environment, personnel training and usage authorization,
proper inspection and maintenance, manual availability and compre-
hension, application of safety devices, cutting/sanding/grinding tool
integrity, and the usage of personal protective equipment.
The manufacturer will not be held liable for injury or property
damage from negligence, improper training, machine modifications or
misuse.
Some dust created by power sanding, sawing, grinding, drilling, and
other construction activities contains chemicals known to the State of
California to cause cancer, birth defects or other reproductive harm.
Some examples of these chemicals are:
• Lead from lead-based paints.
• Crystalline silica from bricks, cement and other masonry products.
• Arsenic and chromium from chemically-treated lumber.
Your risk from these exposures varies, depending on how often you
do this type of work. To reduce your exposure to these chemicals:
Work in a well ventilated area, and work with approved safety equip-
ment, such as those dust masks that are specially designed to filter
out microscopic particles.

SET UPELECTRICAL MAINTENANCE
SERVICE PARTS
OPERATIONS
SAFETYINTRODUCTION
USE THE QUICK GUIDE PAGE LABELS TO SEARCH OUT INFORMATION FAST!
INTRODUCTION......................................2
Contact Info ....................................... 2
Manual Accuracy .................................. 2
Machine Specifications .......................... 3
Identification ..................................... 5
Controls & Components ......................... 6
SAFETY................................................9
Standard Machinery Safety Instructions ...... 9
Additional Safety for Bandsaws .............. 11
ELECTRICAL........................................ 12
Circuit Requirements .......................... 12
Grounding Requirements ...................... 13
Extension Cords ................................ 13
Converting Voltage to 220V .................. 14
SETUP............................................... 15
Unpacking ....................................... 15
Items Needed for Setup ....................... 15
Inventory ........................................ 16
Hardware Recognition Chart ................. 17
Cleaning Machine ............................... 18
Machine Placement ............................ 19
Lifting & Moving ................................ 20
Anchoring to Floor ............................. 21
Assembly ......................................... 22
Dust Collection ................................. 26
Adjustment Overview.......................... 27
Initial Blade Tracking .......................... 27
Test Run .......................................... 29
Tensioning Blade ............................... 30
Fine-Tune Tracking ............................. 32
Adjusting Blade Support Bearings ........... 33
Adjusting "Euro-Style" Roller-Disc Guides .. 34
Installing Blade Guide Roller Bearings ...... 36
Adjusting Blade Guide Roller Bearings ...... 37
Aligning Table ................................... 39
Aligning Fence .................................. 41
OPERATIONS....................................... 42
General .......................................... 42
Workpiece Inspection .......................... 43
Setting Upper Blade Guide Height .......... 44
Blade Selection ................................. 44
Blade Selection Chart ......................... 48
Blade Care & Break-In ......................... 49
Blade Breakage ................................. 49
Changing Blade ................................. 50
Tilting Table ..................................... 51
Ripping ........................................... 52
Crosscutting ..................................... 52
Resawing ......................................... 53
Cutting Curves .................................. 53
Stacked Cuts .................................... 54
ACCESSORIES....................................... 55
Bandsaw Accessories ........................... 55
MAINTENANCE..................................... 57
Schedule ......................................... 57
Wheel Brushes .................................. 57
Cleaning & Protecting ......................... 57
Lubrication ...................................... 58
SERVICE............................................. 60
Troubleshooting ................................. 60
Tensioning/Replacing V-Belt .................. 63
Blade Lead ...................................... 65
Adjusting Wheel Brushes ...................... 66
Adjusting Quick-Release Lever ............... 66
Adjusting Guide Post Parallelism ............ 67
Aligning Wheels ................................. 70
Calibrating Table Tilt Scale Pointer ......... 74
Electrical Safety Instructions ................. 75
Wiring Diagram ................................. 76
PARTS............................................... 77
Main .............................................. 77
Main Parts List .................................. 78
Table, Trunnion, & Blade Guides ............ 79
Table, Trunnion, & Blade Guides Parts List 80
Fence ............................................. 81
Labels & Cosmetics ............................ 82
WARRANTY......................................... 85
Contents
USE THE QUICK GUIDE PAGE LABELS TO SEARCH OUT INFORMATION FAST!
SET UP ELECTRICALMAINTENANCE
SERVICEPARTS
OPERATIONS SAFETY INTRODUCTION
INTRODUCTION
We are proud to provide a high-quality owner’s
manual with your new machine!
We
made every effort to be exact with
the
instructions, specifications, drawings, and pho-
tographs contained inside. Sometimes we make
mistakes, but our policy of continuous improve-
ment
also means that sometimes. the
. machine.
you.receive.will.be.slightly.different.than.what.
is.shown.in.the.manual
.
If you find this to be the case, and the difference
between the manual and machine leaves you
confused about a procedure
,
check our website
for an updated version. W
e post current
manuals
and
manual updates for free
on our website at
www.
woodstockint.com.
Alternatively, you can call our Technical Support
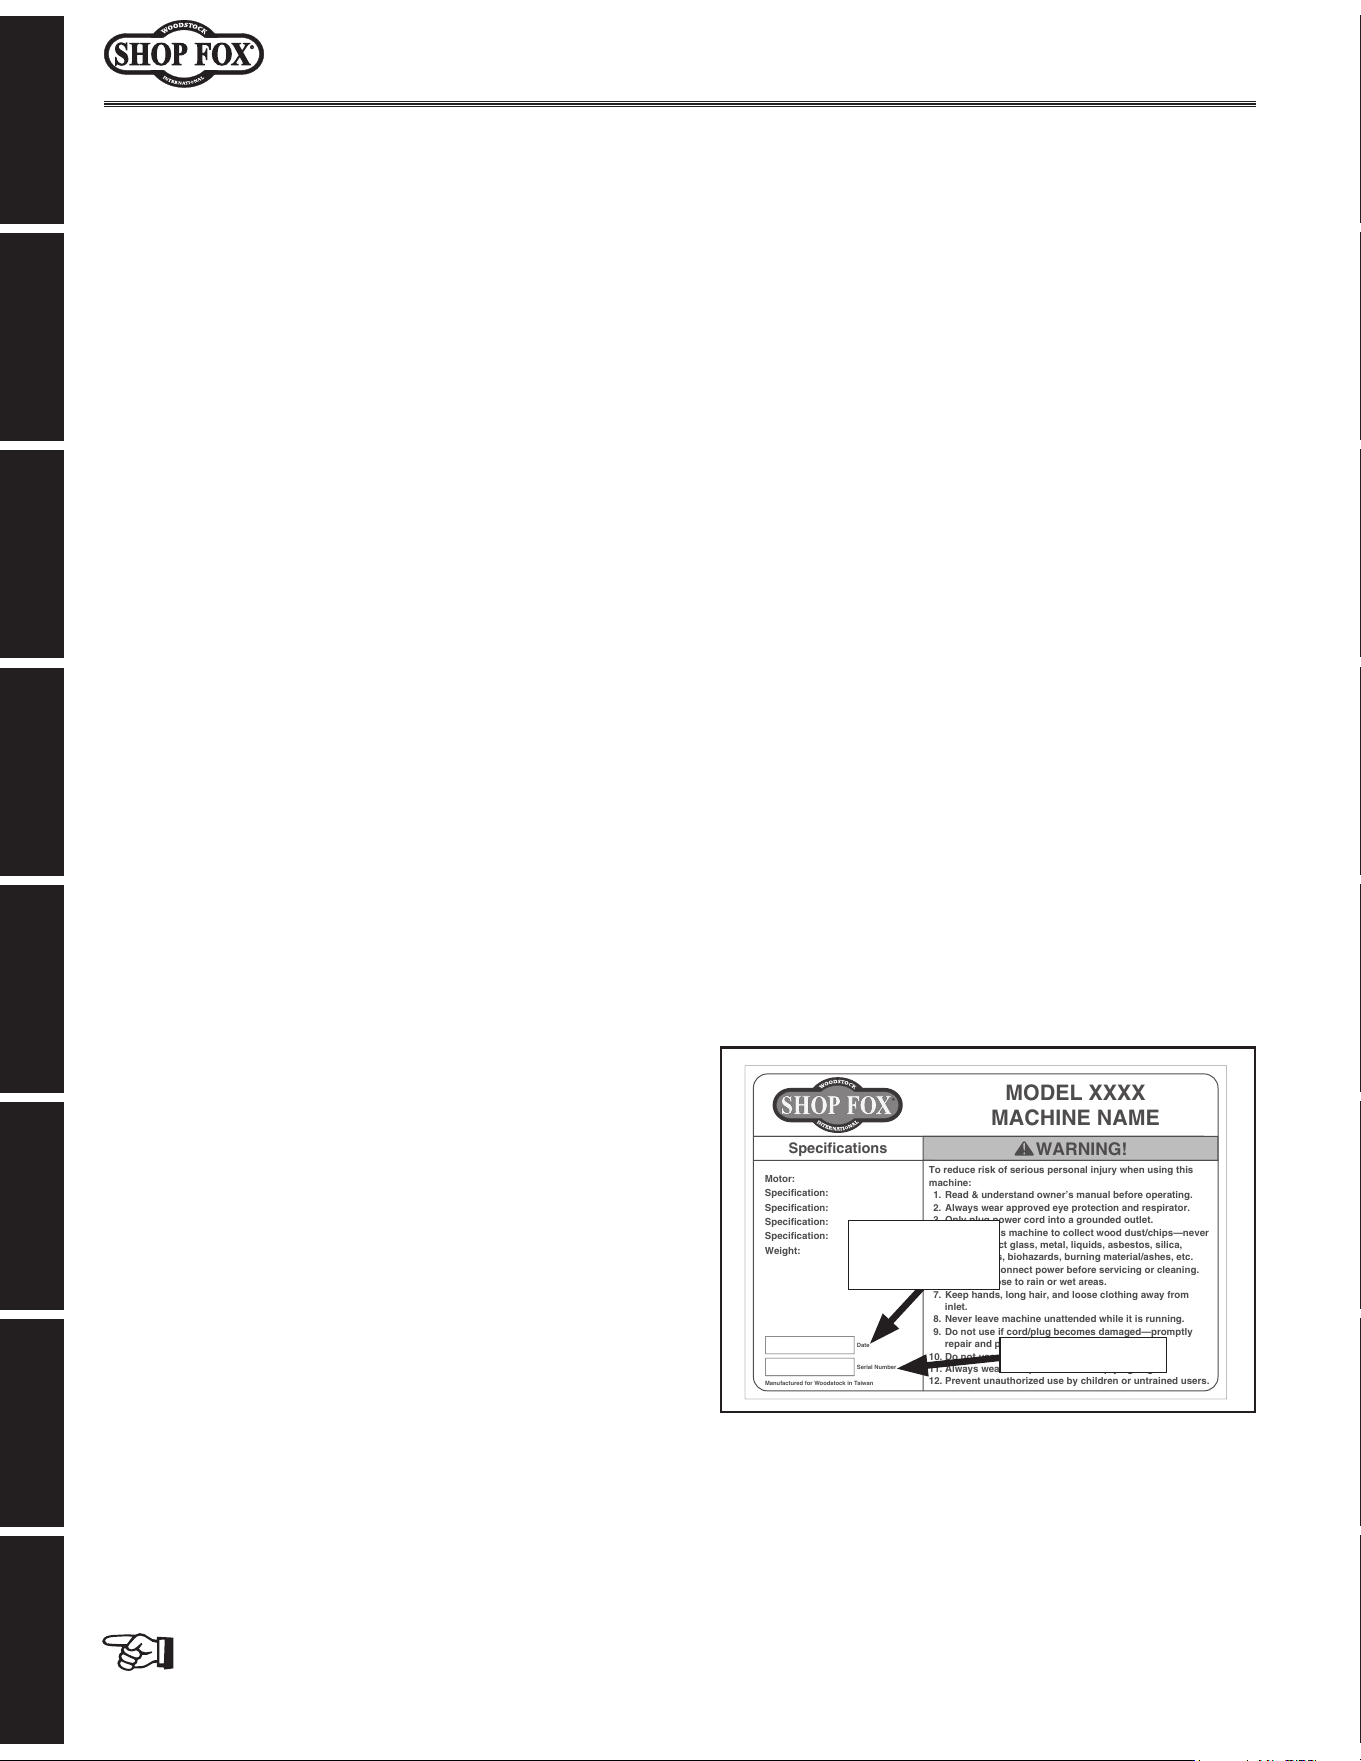
for help. Before calling, make sure you write
down the
Manufacture.Date and Serial.Number
from the machine ID label (see below). Also, if
available, have a copy of your original.purchase.
receipt on hand. This information is required for
all Tech Support calls.
MODEL XXXX
MACHINE NAME
Motor:
Specification:
Specification:
Specification:
Specification:
Weight:
Specifications
To reduce risk of serious personal injury when using this
machine:
1. Read & understand owner’s manual before operating.
2. Always wear approved eye protection and respirator.
3. Only plug power cord into a grounded outlet.
4. Only use this machine to collect wood dust/chips—never
use to collect glass, metal, liquids, asbestos, silica,
animal parts, biohazards, burning material/ashes, etc.
5. Always disconnect power before servicing or cleaning.
6. Do not expose to rain or wet areas.
7. Keep hands, long hair, and loose clothing away from
inlet.
8. Never leave machine unattended while it is running.
9. Do not use if cord/plug becomes damaged—promptly
repair and protect cord from future damage.
10. Do not use without dust bag or filters in place.
11. Always wear a respirator when emptying bags.
12. Prevent unauthorized use by children or untrained users.
Date
Serial Number
Manufactured for Woodstock in Taiwan
WARNING!
Manufacture
Date
Serial Number
Ma n ual.Accuracy
We are committed to customer satisfaction. If
you have any questions or need help, use the
information below to contact us.
IMPORTANT:.Before.contacting,.please.get.the.
original.purchase. receipt,. serial.number,. and.
manufacture.date.of.your.machine..This.infor-
mation. is. required. for. all. Technical. Support.
calls.and.it.will.help.us.help.you.faster..
Woodstock International Technical Support
Phone: (360) 734-3482
Email: [email protected]
We want your feedback on this manual. What did
you like about it? Where could it be improved?
Please take a few minutes to give us feedback.
Technical Documentation Manager
P.O. Box 2309
Bellingham, WA 98227
Email: [email protected]
Contact.Info

-3-
Model W1849 (For Machines Mfd. Since 11/16)
INTRODUCTION
Model W1849 Machine Specifications, Page 1 of 2
MODEL W1849
14" RESAW BANDSAW
Product Dimensions
Weight.......................................................................................................... 261 lbs.
Width (side‐to‐side) x Depth (front‐to‐back) x Height................................... 27‐1/2 x 32 x 76 in.
Footprint (Length x Width).............................................................................. 23 x 18 in.
Shipping Dimensions
Type....................................................................................................... Wood Crate
Content........................................................................................................ Machine
Weight.......................................................................................................... 332 lbs.
Length x Width x Height........................................................................... 30 x 24 x 79 in.
Must Ship Upright.................................................................................................. Yes
Electrical
Power Requirement.......................................................... 110V or 220V, Single‐Phase, 60 Hz
Prewired Voltage................................................................................................. 110V
Full‐Load Current Rating.............................................................. 15A at 110V, 7.5A at 220V
Minimum Circuit Size................................................................... 20A at 110V, 15A at 220V
Connection Type......................................................................................... Cord & Plug
Power Cord Included.............................................................................................. Yes
Power Cord Length............................................................................................... 6 ft.
Power Cord Gauge............................................................................................ 14 AWG
Plug Included....................................................................................................... Yes
Included Plug Type............................................................................................... 5‐15
Recommended Plug Type............................................................................. 6‐15 for 220V
Switch Type.......................................... ON/OFF Push Button Switch w/Emergency Stop Paddle
Motors
Main
Type......................................................................... TEFC Capacitor‐Start Induction
Horsepower................................................................................................. 2 HP
Phase.............................................................................................. Single‐Phase
Amps................................................................................................... 15A/7.5A
Speed.................................................................................................. 1720 RPM
Power Transfer ..................................................................................... Belt Drive
Bearings............................................................... Shielded & Permanently Lubricated
Main Specifications
Main Specifications
Bandsaw Size.............................................................................................. 14 in.
Max Cutting Width (Left of Blade)............................................................... 13‐1/2 in.
Max Cutting Width (Left of Blade) w/Fence......................................................... 12 in.
Max Cutting Height (Resaw Height)................................................................... 14 in.
Blade Speeds......................................................................................... 2820 FPM

-4-
Model W1849 (For Machines Mfd. Since 11/16)
INTRODUCTION
Model W1849 Machine Specifications, Page 2 of 2
Blade Information
Standard Blade Length................................................................................. 120 in.
Blade Width Range.............................................................................. 1/8 – 3/4 in.
Type of Blade Guides...................................................... "Euro Style" Roller‐Disc Guides
Guide Post Adjustment Type.............................................................. Rack‐and‐Pinion
Has Quick‐Release.......................................................................................... Yes
Table Information
Table Length......................................................................................... 21‐3/4 in.
Table Width.......................................................................................... 16‐1/8 in.
Table Thickness....................................................................................... 1‐1/2 in.
Table Tilt............................................................................... Left 5, Right 45 Deg.
Table Tilt Adjustment Type............................................................... Rack‐and‐Pinion
Floor‐to‐Table Height................................................................................... 37 in.
Fence Locking Position.................................................................................. Front
Fence is Adjustable for Blade Lead...................................................................... Yes
Resaw Fence Attachment Included......................................................................
Yes
Miter Gauge Included.......................................................................................
No
Construction Materials
Table................................................................................................... Cast Iron
Trunnion.................................................................................................... Steel
Fence..................................................................................... Extruded Aluminum
Base/Stand................................................................................................. Steel
Frame/Body................................................................................................ Steel
Wheels................................................................................................. Cast Iron
Tire................................................................................................ Polyurethane
Wheel Cover .............................................................................................. Steel
Paint Type/Finish............................................................................. Powder Coated
Other Related Information
Wheel Diameter.......................................................................................... 14 in.
Wheel Width.......................................................................................... 1‐1/8 in.
Number of Dust Ports......................................................................................... 2
Dust Port Size.............................................................................................. 4 in.
Compatible Mobile Base............................................................................... D2057A
Other
Country of Origin ............................................................................................. Taiwan
Warranty ....................................................................................................... 2 Years
Approximate Assembly & Setup Time ...................................................................... 1 Hour
Serial Number Location .......................................................................... Machine ID Label
ISO 9001 Factory .................................................................................................. Yes
Features
14" Resaw Capacity
Equipped with Roller‐Disc ("Euro Style") Blade Guides
Optional Ball‐Bearing Blade Guides Available
Modular Blade Guide Design for Easy Changeovers Between Styles
Rack‐and‐Pinion Table Tilt Adjustments
Cast‐Iron Fence Base with 2‐Position Extruded‐Aluminum Fence
Storage Area for Extra Blades, Miter Gauge, and Blade Guide Assemblies When Not In Use
Cast‐Iron Wheels and Steel Table Trunnion
Blade Tension Indicator with Window in Wheel Cover
-5-
Model W1849 (For Machines Mfd. Since 11/16)
INTRODUCTION
I dentification
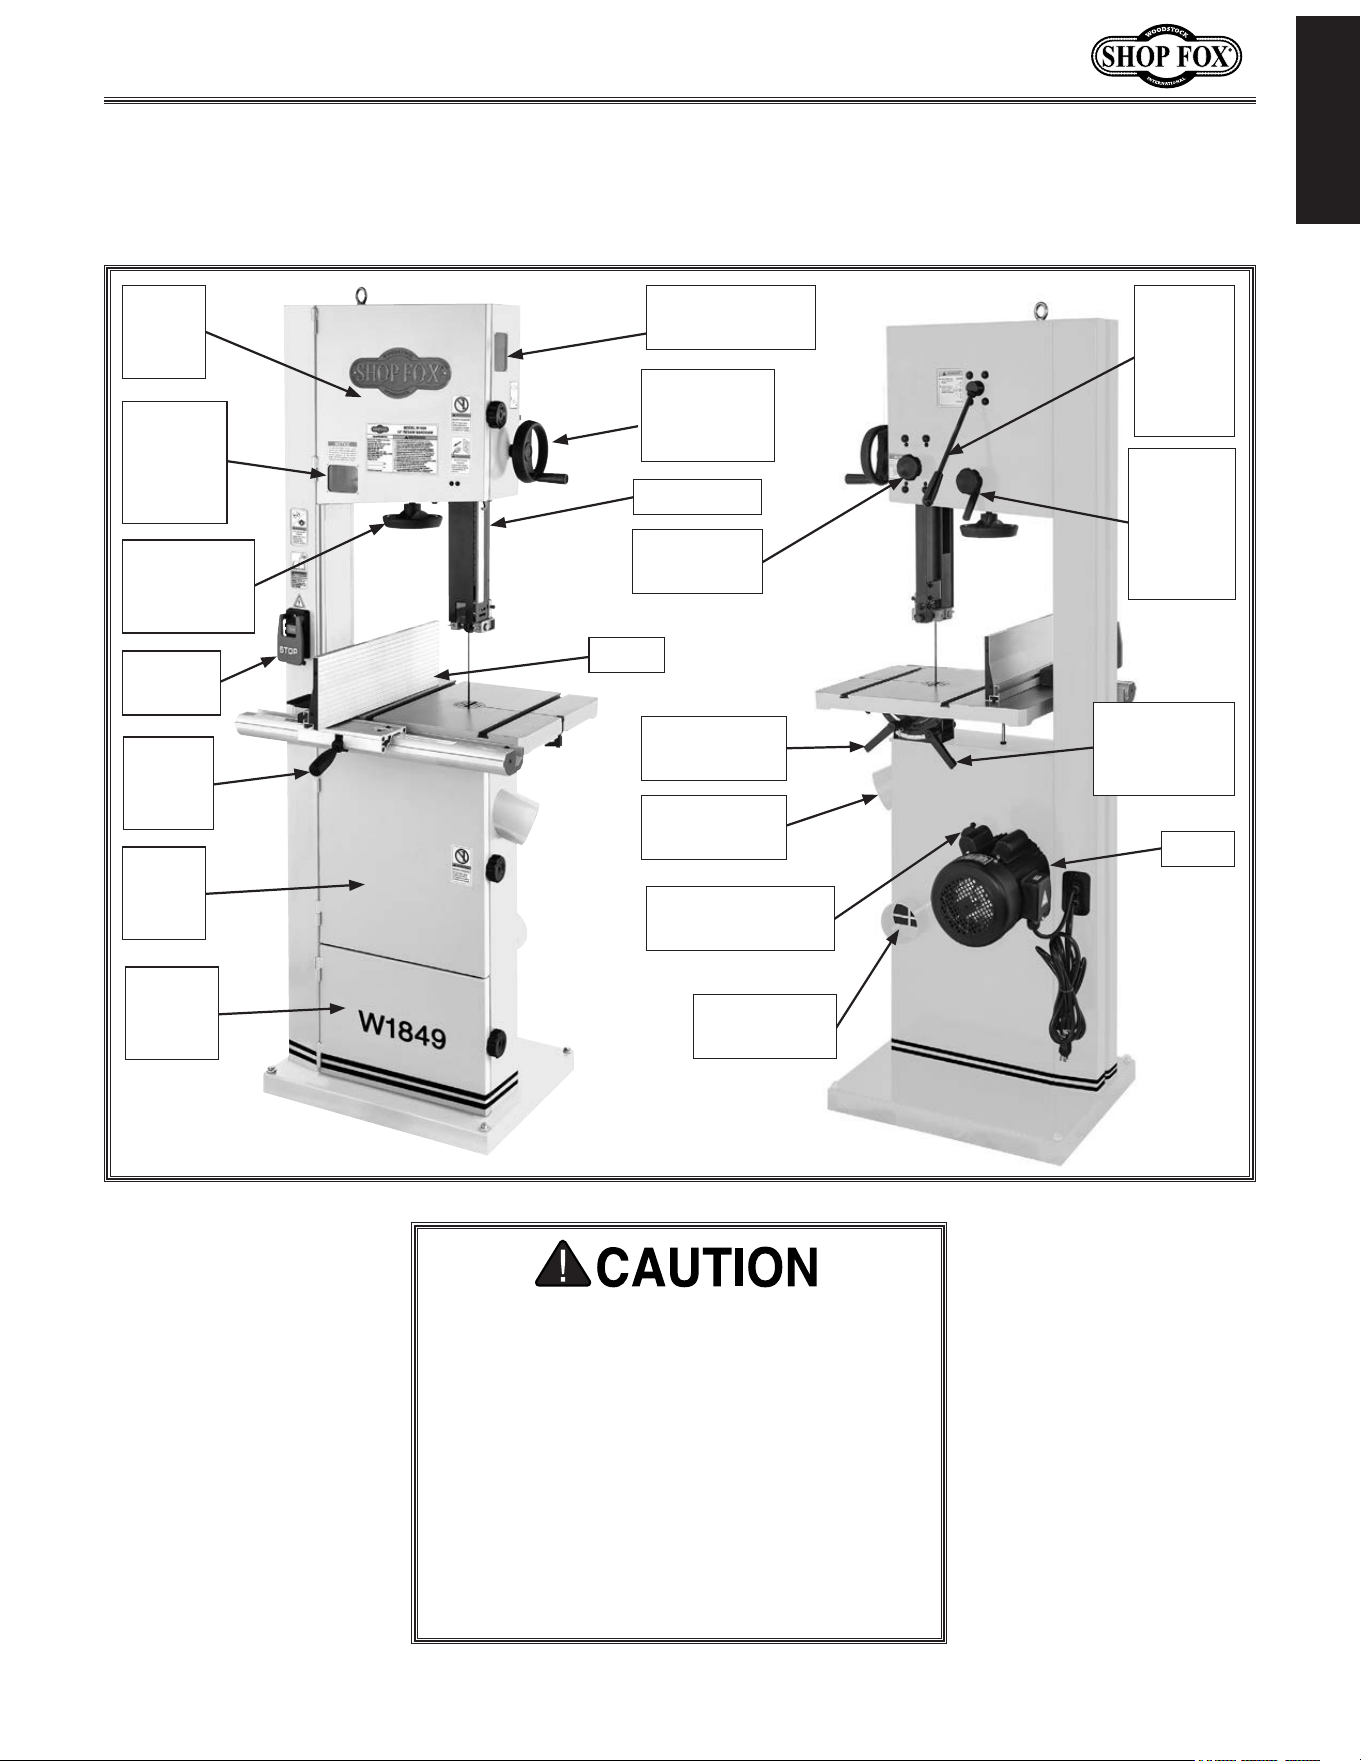
Become familiar with the names and locations of the controls and features shown below to better
understand the instructions in this manual.
For Your Own Safety, Read Instruction
Manual Before Operating Saw.
a) Wear eye protection.
b) Do not remove jammed cutoff pieces
until blade has stopped.
c) Maintain proper adjustment of blade
tension, blade guides, and thrust
bearings.
d) Adjust upper guide to just clear
workpiece.
e) Hold workpiece firmly against table.
Upper
Wheel
Cover
Lower
Wheel
Cover
Blade
Tension
Window
& Scale
Blade
Tension
Handwheel
Fence
Table Tilt
Lock Lever
4" Dust Port
(Upper)
Table Tilt
Adjustment
Lever
Motor
Tracking
Control
Knob
w/Lock
Lever
4" Dust Port
(Lower)
Blade
Tension
Quick-
Release
Lever
ON/OFF
Switch
Guide Post
Elevation
Handwheel
Lower Wheel
Adjustment Hub
Fence
Lock
Handle
Guide Post
Guide Post
Lock Knob
Blade
Storage
Area
Blade Tracking
Window
-6-
Model W1849 (For Machines Mfd. Since 11/16)
INTRODUCTION
Controls.&.Components
To. reduce. your. risk. of. serious. injury.
or. damage. to. the. machine,. read. this.
entire.manual.BEFORE.using.machine.
Refer to Figures 1–8 and the following descriptions to
become familiar with the basic controls and components
of this machine. Understanding these items and how they
work will help you understand the rest of the manual and
stay safe when operating this machine.
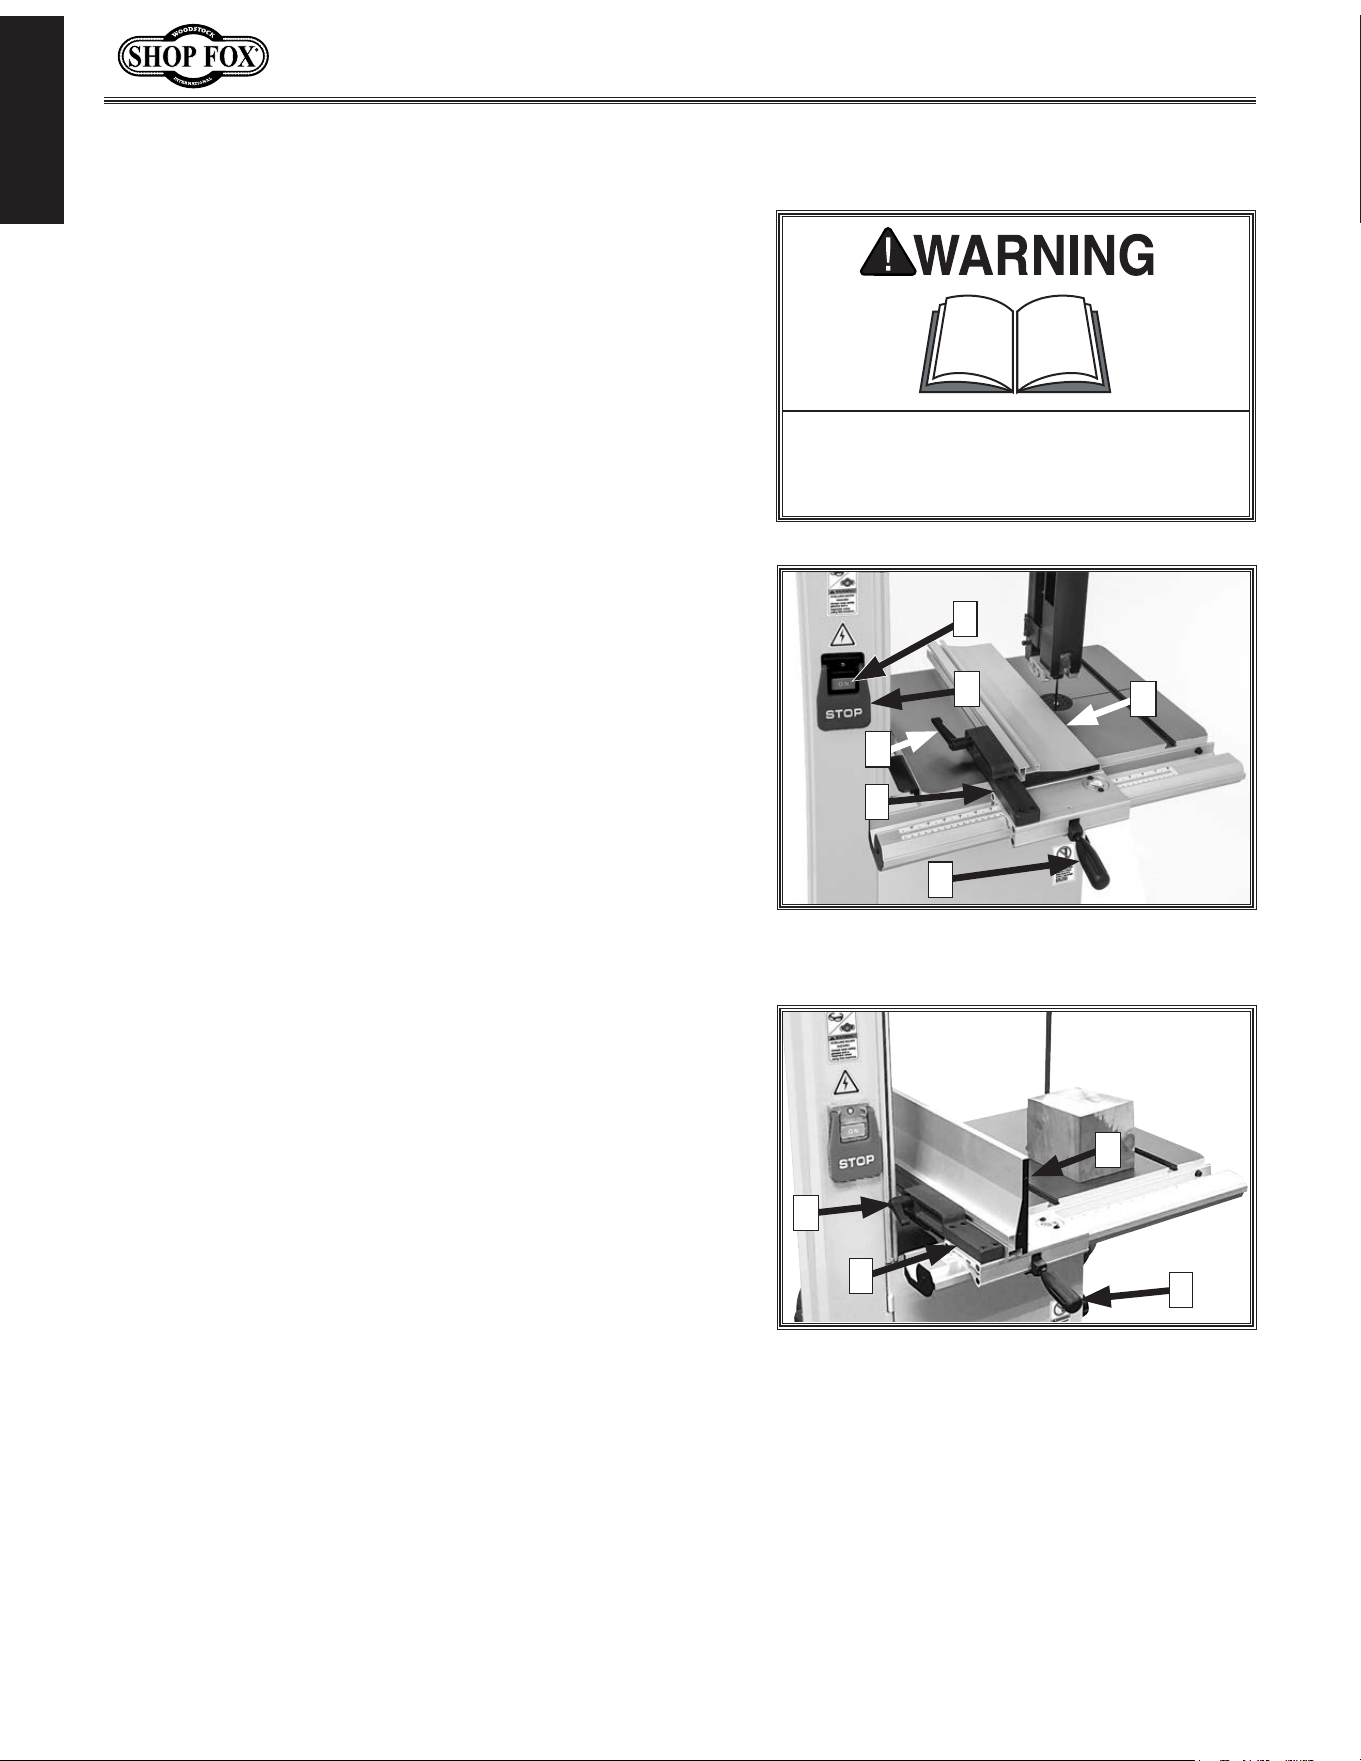
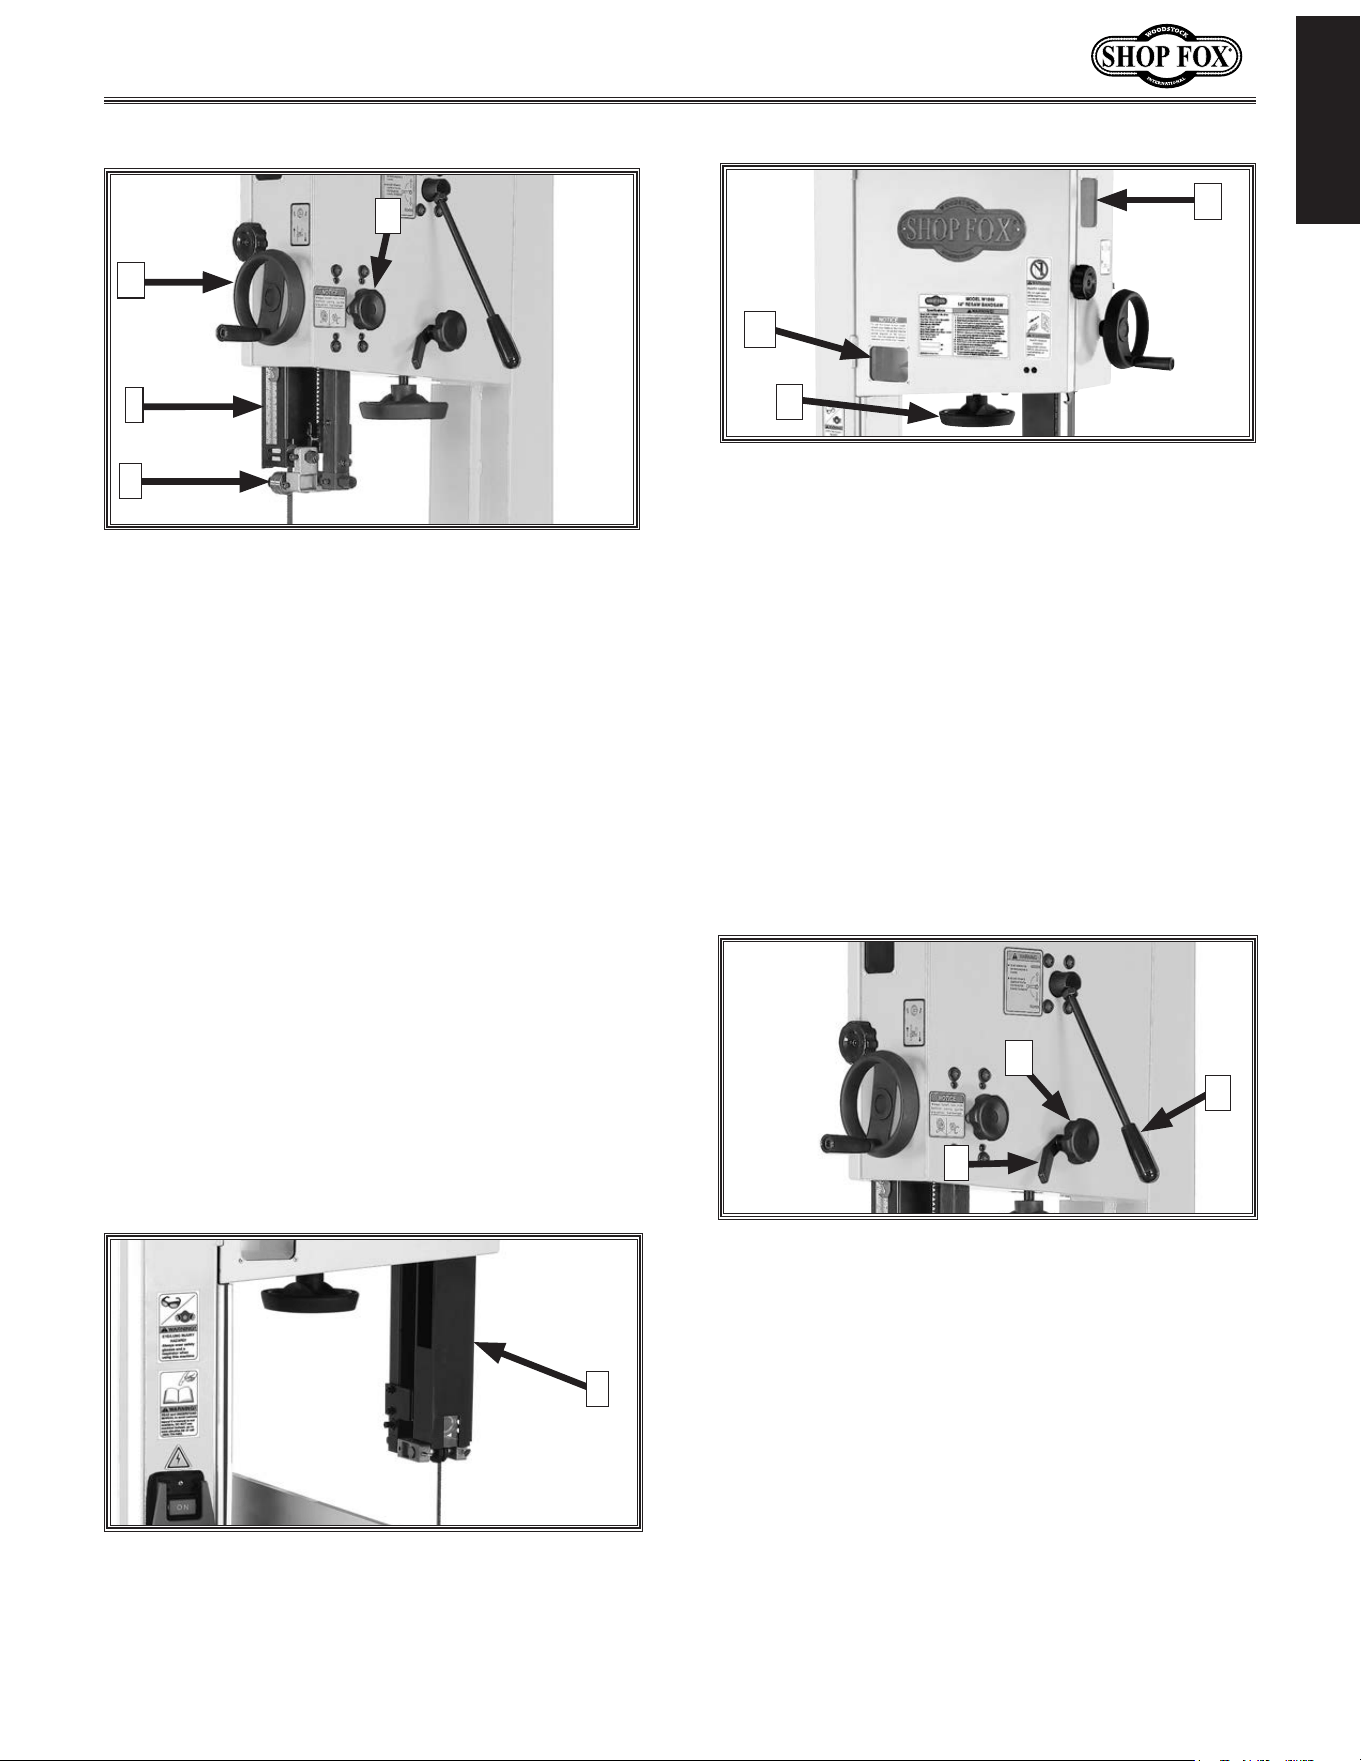
ON/OFF.Switch.&.Fence
A. ON Button: Turns motor ON when pressed.
B. Stop Paddle: Turns motor OFF when pressed.
C. Fence: Used for ripping or resawing. Distance
from blade determines width of cut. Can be used
in horizontal position (as shown in Figure 1) for
thin workpieces or in vertical position (as shown in
Figure 2) for normal workpieces.
D. Fence Lock Lever: Secures fence to fence base
when mounted horizontally or vertically.
E. Fence Base: Mounts fence to rail, and allows fence
to be switched between horizontal or vertical
positions.
F. Fence Lock Handle: Secures fence position along
fence rail.
Figure 2. Fence mounted vertically.
D
C
F
E
Figure 1. ON/OFF switch and fence
mounted in horizontal position.
B
D
C
F
E
A
-7-
Model W1849 (For Machines Mfd. Since 11/16)
INTRODUCTION
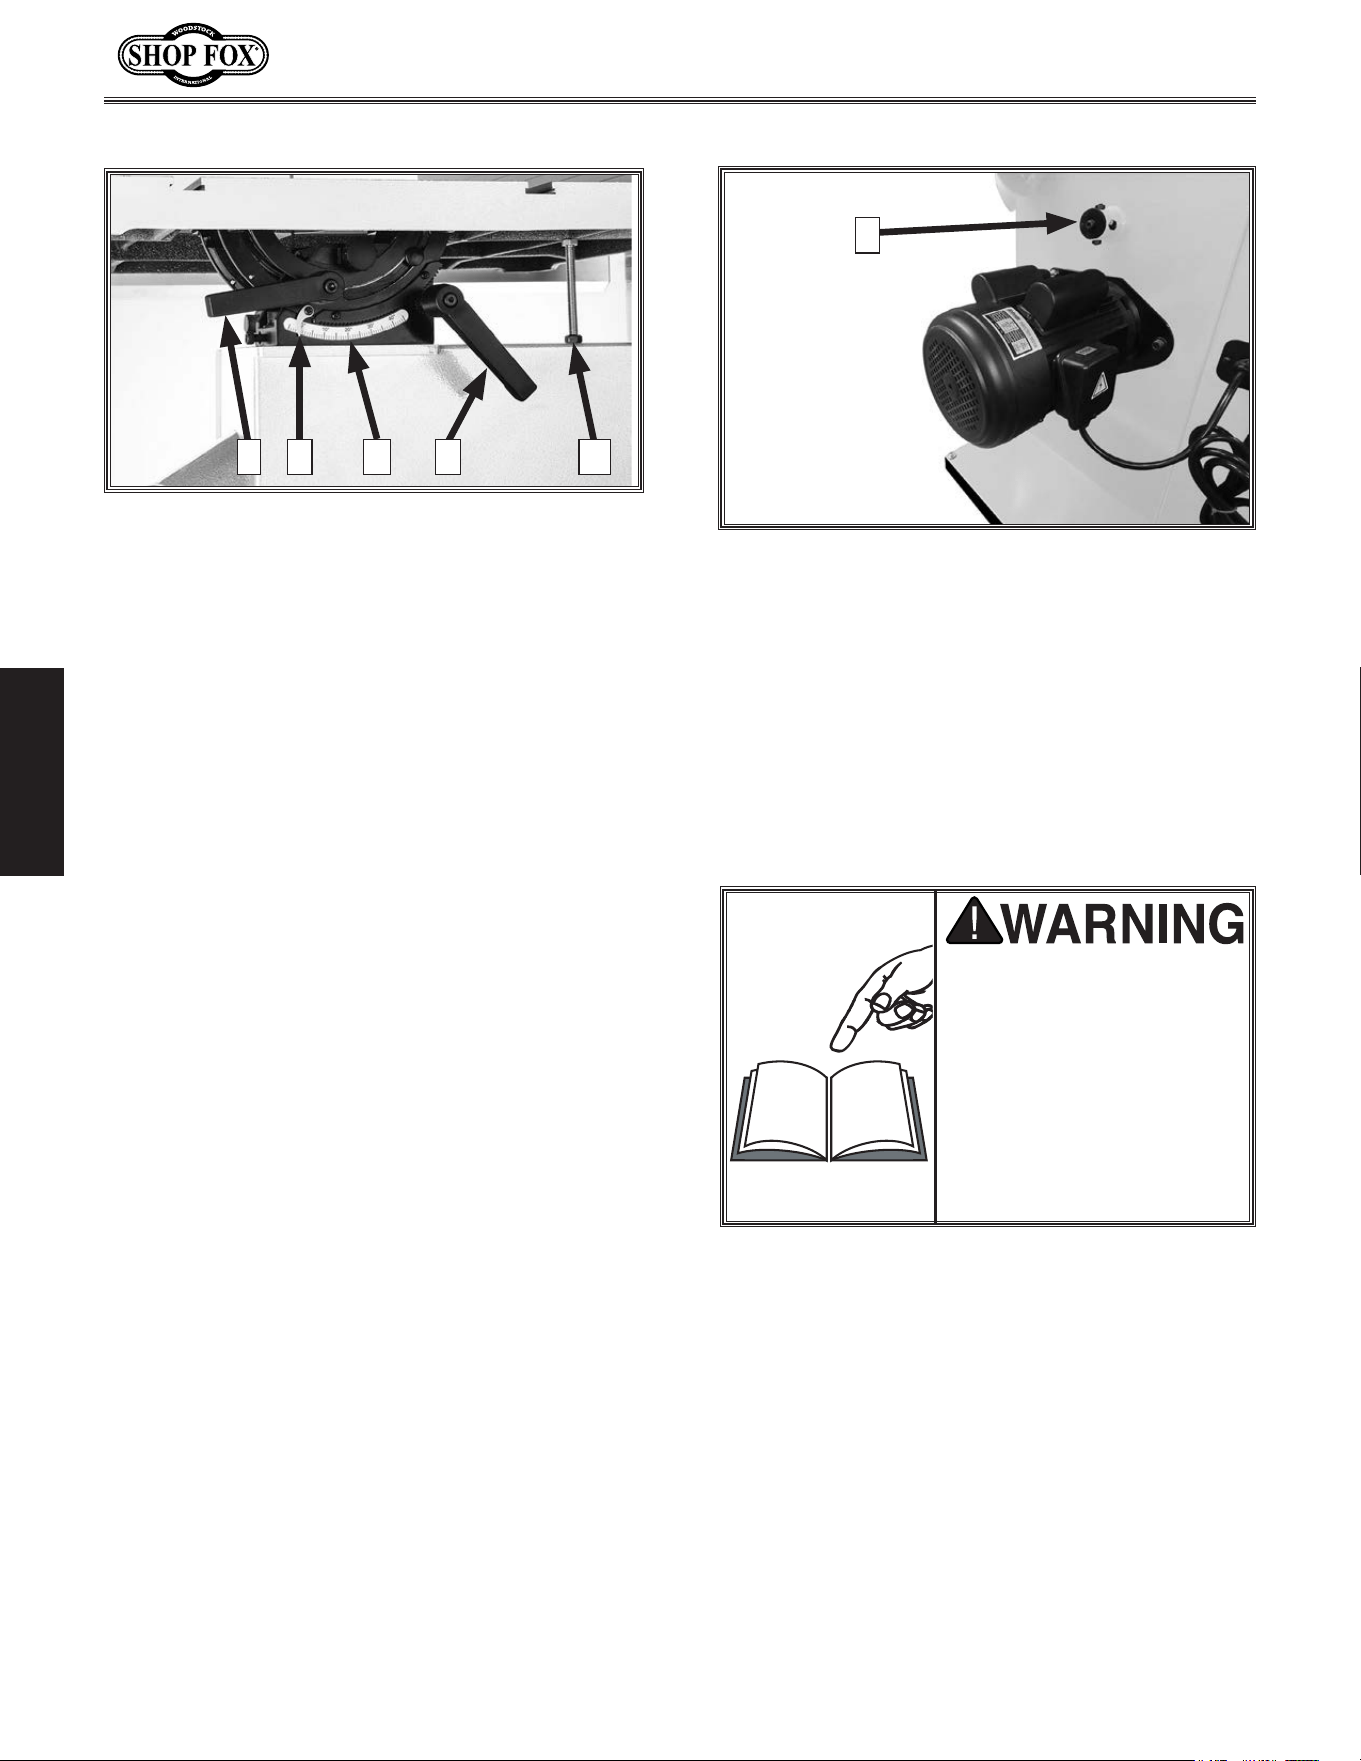
Guide.Post
H. Guide Post Handwheel: Adjusts height of
guide post above workpiece, using a rack-
and-pinion system.
I. Guide Post w/Scale: Houses upper blade
guides and support bearing, and shields
operator from upper portion of blade.
Adjusts up or down as necessary to position
upper blade guides/support bearing as
close as possible to workpiece for maximum
cutting accuracy and minimum blade
exposure to operator. Scale on side of guide
post indicates height of upper blade guide
above table.
J. "Euro-Style" Upper Blade Guides &
Support Bearing: Supports blade above
workpiece during operations.
K. Guide Post Lock Knob: Secures guide post
in position after adjustment.
Blade.Tension.&.Tracking
M
Figure 5. Blade tension scale, blade tension
handwheel, and tracking window.
M. Blade Tension Scale: Displays blade tension
using numbers 1–8. For reference purposes
only—after you have found the proper
tension for the particular blade installed.
N. Blade Tension Handwheel: Increases/
decreases blade tension (refer to Page 30
for more information).
O. Blade Tracking Window: Allows
monitoring/adjustment of blade tracking
without requiring w heel cover to be open
(refer to Page 27 for more information).
P. Tracking Control Lock Lever: Secures
position of blade tracking control knob.
Q. Tracking Control Knob: Sets tilt position of
upper wheel to set/control blade tracking
(refer to Page 27 for more information).
R. Blade Tension Quick-Release Lever:
Quickly releases blade tension to speed up
blade changes and prevent unnecessary
wear on blade and saw components when
not in use. Move UP to release blade
tension. Move DOWN to re-tension blade.
Figure 6. Blade tracking controls and blade
tension quick-release lever.
P
Q
R
N
L. Hinge-Open Blade Cover: Opens for blade
changes and upper blade guide adjustments
(refer to Page 50).
Figure 4. Hinge-open blade cover.
L
Figure 3. Guide post controls.
K
H
I
J
O
-8-
Model W1849 (For Machines Mfd. Since 11/16)
SETUP
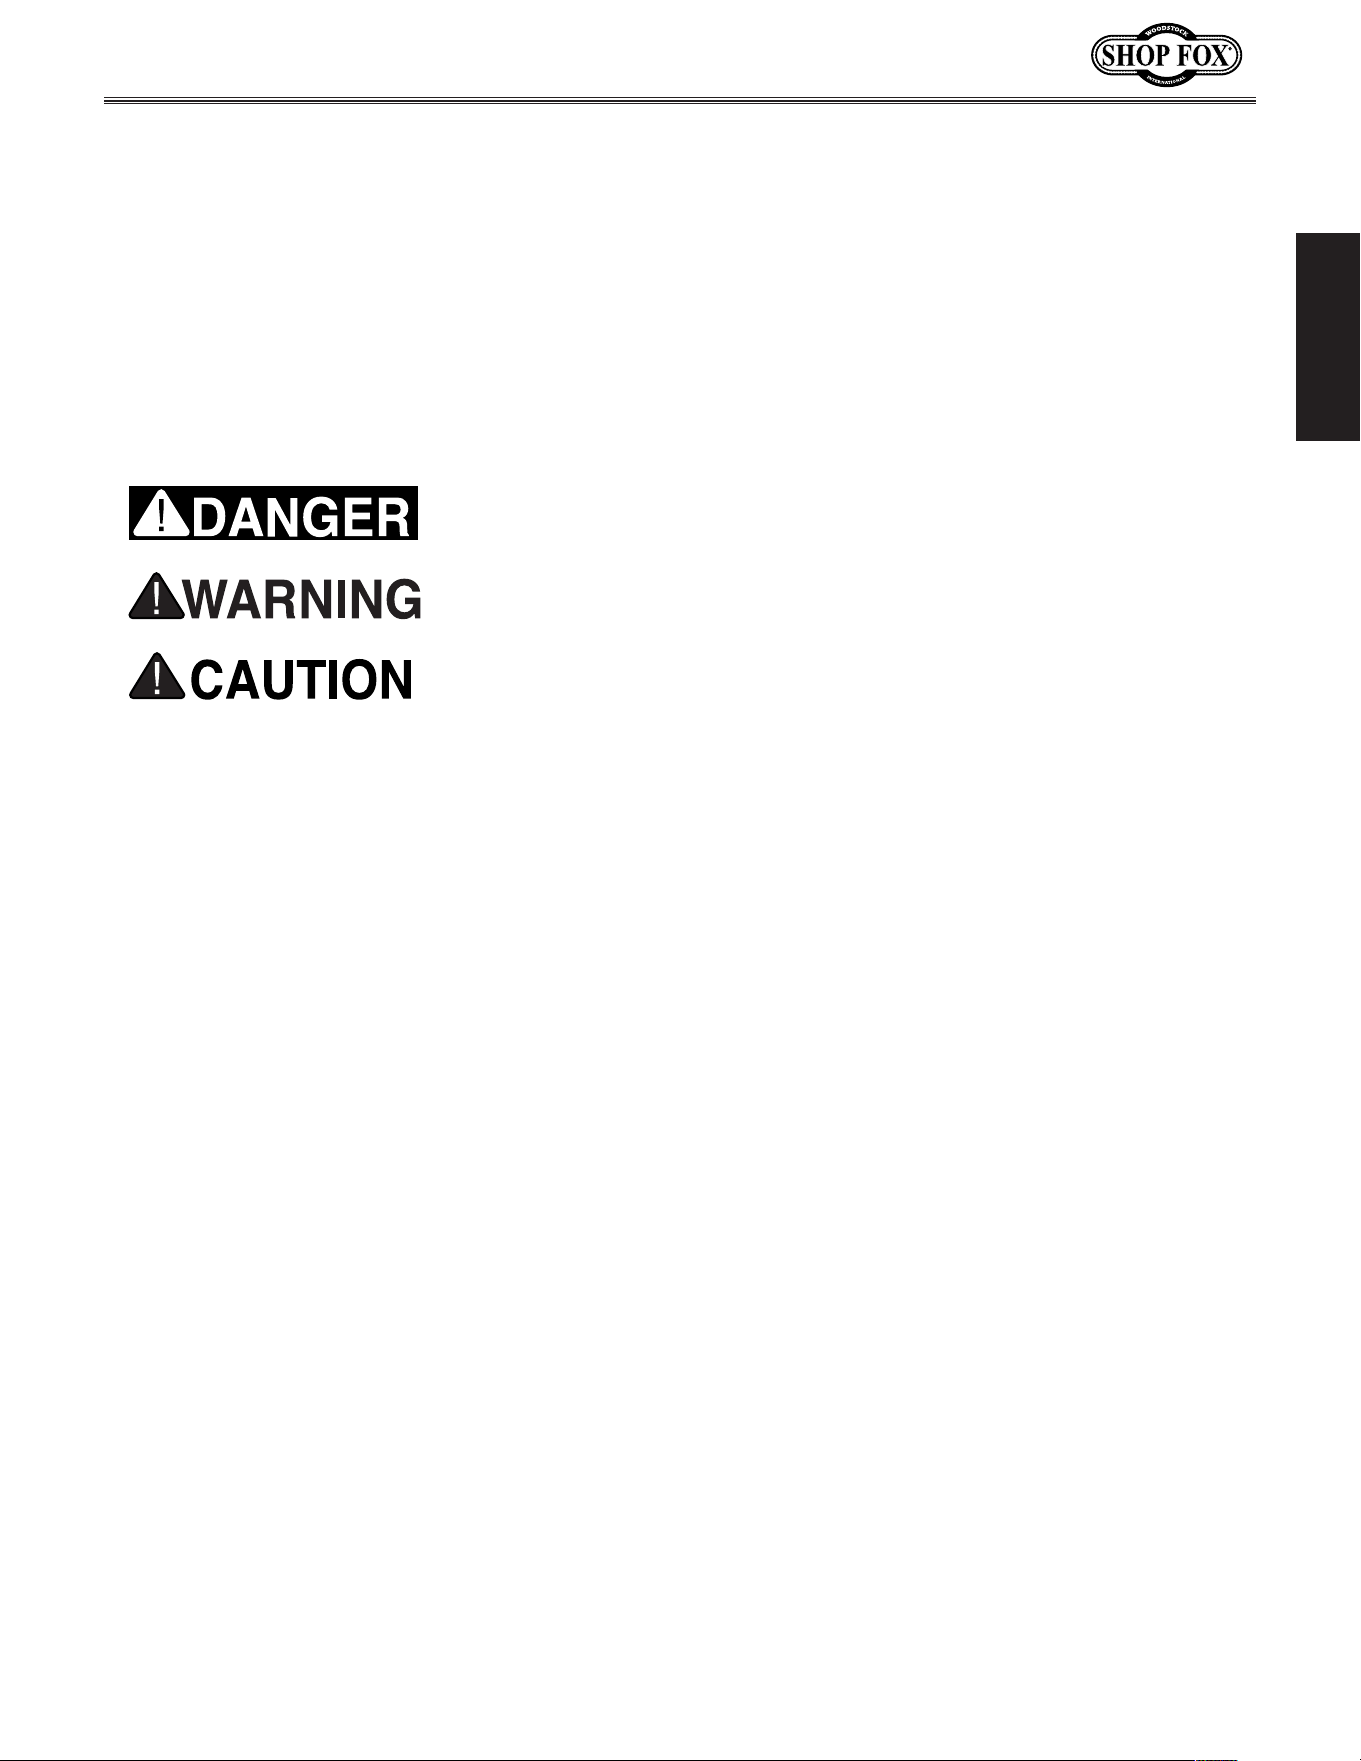
Table.Tilt
S. Table Tilt Lock Lever: Secures table tilt
position on trunnion. Must be loosened
before table tilt can be adjusted.
T. Table Angle Indicator: Shows table tilt
angle.
U. Trunnion w/Table Tilt Scale: Functions as a
tilting base for table. Graduated in degrees
from 5° left—45° right for setting bevel
angle.
V. Table Tilt Adjustment Lever: Adjusts angle
of table tilt using a rack-and-pinion system.
W. Positive Stop: Allows for quickly returning
table to a calibrated 0° setting after it has
been tilted to the right (refer to Page 51
for more information).
Lower.Wheel.Adjustment
Figure 8. Lower wheel adjustment controls.
X. Lower Wheel Adjustment Hub: Adjusts
position of lower wheel to upper wheel if
coplanar adjustments become necessary
(refer to Page 73 for more information).
Note: The wheels are factory-set to be
coplanar, so we strongly recommend that
you avoid making adjustments here unless
it becomes absolutely necessary.
X
READ.and.understand.this.
entire.manual.before.using.
this.machine..Serious.per-
sonal. injury. may. occur.
if. safety. and. operational.
information. is. not. under-
stood. and. followed.. DO.
NOT. risk. your. safety. by.
not.reading!
Figure 7. Table tilt controls.
W
S
VUT
-9-
Model W1849 (For Machines Mfd. Since 11/16)
SAFETY
Indicates.a.potentially.hazardous.situation.which,.if.not.avoided,.
MAY.result.in.minor.or.moderate.injury.
Indicates.an.imminently.hazardous.situation.which,.if.not.avoided,.
WILL.result.in.death.or.serious.injury.
Indicates.a.potentially.hazardous.situation.which,.if.not.avoided,.
COULD.result.in.death.or.serious.injury.
This.symbol.is.used.to.alert.the.user.to.useful.information.about.
proper.operation.of.the.equipment.or.a.situation.that.may.cause.
damage.to.the.machinery.
NOTICE
SAFETY
OWNER’S.MANUAL..
Read and understand this
owner’s manual BEFORE using machine.
TRAINED.OPERATORS.ONLY..
Untrained operators
have a higher risk of being hurt or killed. Only
allow trained/supervised people to use this
machine. When machine is not being used,
disconnect power, remove switch keys, or
lock-out machine to prevent unauthorized
use—especially around children. Make
workshop kid proof!
DANGEROUS.ENVIRONMENTS..
Do not use
machinery in areas that are wet, cluttered,
or have poor lighting. Operating machinery
in these areas greatly increases the risk of
accidents and injury.
MENTAL.ALERTNESS.REQUIRED..
Full mental
alertness is required for safe operation of
machinery. Never operate under the influence
of drugs or alcohol, when tired, or when
distracted.
ELECTRICAL.EQUIPMENT.INJURY.RISKS..You can
be shocked, burned, or killed by touching live
electrical components or improperly grounded
machinery. To reduce this risk, only allow an
electrician or qualified service personnel to
do electrical installation or repair work, and
always disconnect power before accessing or
exposing electrical equipment.
DISCONNECT.POWER.FIRST..Always disconnect
machine from power supply BEFORE making
adjustments, changing tooling, or servicing
machine. This eliminates the risk of injury
from unintended startup or contact with live
electrical components.
EYE.PROTECTION..Always wear ANSI-approved
safety glasses or a face shield when operating
or observing machinery to reduce the risk of
eye injury or blindness from flying particles.
Everyday eyeglasses are not approved safety
glasses.
St and ard .Machinery.Safety.Instruc tions
For.Your.Own.Safety,
Read.Manual.Before.Operating.Machine
The. purpose. of. safety. symbols. is. to. attract. your. attention. to. possible. hazardous. conditions.. This.
manual.uses.a.series.of.symbols.and.signal.words.intended.to.convey.the.level.of.importance.of.the.
safety. messages..The.progression.of.symbols.is.described.below..Remember.that.safety.messages.by.
themselves. do. not.eliminate.danger.and.are.not.a. substitute.for.proper.accident.prevention.mea-
sures—this. responsibility.is.ultimately.up.to.the. operator!
SAFETY
St and ard.Machinery.Safety.Instruc tions

-10-
Model W1849 (For Machines Mfd. Since 11/16)
SAFETY
WEARING.PROPER.APPAREL..Do not wear
clothing, apparel, or jewelry that can become
entangled in moving parts. Always tie back
or cover long hair. Wear non-slip footwear to
avoid accidental slips, which could cause loss
of workpiece control.
HAZARDOUS
.DUST..Dust created while using
machinery may cause cancer, birth defects,
or long-term respiratory damage. Be aware of
dust hazards associated with each workpiece
material, and always wear a NIOSH-approved
respirator to reduce your risk.
HEARING.PROTECTION..
Always wear hearing
protection when operating or observing
loud machinery. Extended exposure to this
noise without hearing protection can cause
permanent hearing loss.
REMOVE.ADJUSTING.TOOLS..
Tools left on
machinery can become dangerous projectiles
upon startup. Never leave chuck keys,
wrenches, or any other tools on machine.
Always verify removal before starting!
INTENDED.USAGE..
Only use machine for its
intended purpose—never make modifications
without prior approval from Woodstock
International. Modifying machine or using
it differently than intended will void the
warranty and may result in malfunction or
mechanical failure that leads to serious
personal injury or death!
AWKWARD.POSITIONS..
Keep proper footing and
balance at all times when operating machine.
Do not overreach! Avoid awkward hand
positions that make workpiece control difficult
or increase the risk of accidental injury.
CHILDREN.&.BYSTANDERS..
Keep children and
bystanders at a safe distance from the work
area. Stop using machine if they become a
distraction.
GUARDS.&.COVERS..
Guards and covers reduce
accidental contact with moving parts or flying
debris—make sure they are properly installed,
undamaged, and working correctly.
FORCING.MACHINERY..Do not force machine. It
will do the job safer and better at the rate for
which it was designed.
NEVER.STAND.ON.MACHINE..Serious injury may
occur if machine is tipped or if the cutting
tool is unintentionally contacted.
STABLE.MACHINE..Unexpected movement during
operation greatly increases risk of injury or
loss of control. Before starting, verify machine
is stable and mobile base (if used) is locked.
USE.RECOMMENDED.ACCESSORIES..Consult
this owner’s manual or the manufacturer for
recommended accessories. Using improper
accessories will increase risk of serious injury.
UNATTENDED.OPERATION..To reduce the risk
of accidental injury, turn machine OFF and
ensure all moving parts completely stop
before walking away. Never leave machine
running while unattended.
MAINTAIN.WITH.CARE..Follow all maintenance
instructions and lubrication schedules to
keep machine in good working condition. A
machine that is improperly maintained could
malfunction, leading to serious personal injury
or death.
CHECK.DAMAGED.PARTS..Regularly inspect
machine for any condition that may affect
safe operation. Immediately repair or replace
damaged or mis-adjusted parts before
operating machine.
MAINTAIN.POWER.CORDS..When disconnecting
cord-connected machines from power, grab
and pull the plug—NOT the cord. Pulling the
cord may damage the wires inside, resulting
in a short. Do not handle cord/plug with wet
hands. Avoid cord damage by keeping it away
from heated surfaces, high traffic areas, harsh
chemicals, and wet/damp locations.
EXPERIENCING.DIFFICULTIES..If at any time
you experience difficulties performing the
intended operation, stop using the machine!
Contact Technical Support at (360) 734-3482.

-11-
Model W1849 (For Machines Mfd. Since 11/16)
SAFETY
Additional.Safety.for.Bandsaws
Serious cuts, amputation, or death can occur from contact with the moving saw blade during
operation or if blade breakage occurs. To reduce this risk, anyone operating this machine MUST
completely heed the hazards and warnings below.
GUARDS/COVERS. Blade guards and covers
protect operator from the moving bandsaw
blade. The wheel covers protect operator
from getting entangled with rotating wheels
or other moving parts. ONLY operate this
bandsaw with blade guard in proper position
and wheel covers completely closed.
BLADE REPLACEMENT. To avoid mishaps that
could result in operator injury, make sure
blade teeth face down toward table and
blade is properly tensioned and tracked
before operating.
UPPER BLADE GUIDE SUPPORT. To reduce
exposure of operator to blade and provide
maximum blade support while cutting, keep
upper blade guides adjusted to just clear
workpiece.
CUTTING TECHNIQUES. To avoid blade getting
pulled off wheels or accidentally breaking
and striking operator, always turn bandsaw
OFF and wait for blade to come to a
complete stop before backing workpiece out
of blade. DO NOT back workpiece away from
blade while bandsaw is running. DO NOT
force or twist blade while cutting, especially
when sawing small curves. This could result
in blade damage or breakage.
WORKPIECE SUPPORT. To maintain maximum
control and reduce risk of blade contact/
breakage, always ensure adequate support
of long/large workpieces. Always keep
workpiece flat and firm against table/fence
when cutting to avoid loss of control. If
necessary, use a jig or other work-holding
device.
WORKPIECE MATERIAL. This machine is
intended for cutting natural and man-made
wood products, and laminate covered wood
products. This machine is NOT designed to
cut metal, glass, stone, tile, etc.
HAND PLACEMENT. Placing hands or fingers in
line with blade during operation may result
in serious injury if hands slip or workpiece
moves unexpectedly. Do not position fingers
or hands in line with blade, and never reach
under table while blade is moving.
SMALL/NARROW WORKPIECES. If hands slip
during a cut while holding small workpieces
with fingers, serious personal injury could
occur. Always support/feed small or narrow
workpieces with push sticks, push blocks,
jig, vise, or some type of clamping fixture.
BLADE SPEED. Cutting workpiece before blade
is at full speed could cause blade to grab
workpiece and pull hands into blade. Allow
blade to reach full speed before starting
cut. DO NOT start machine with workpiece
contacting blade.
FEED RATE. To avoid risk of workpiece slipping
and causing operator injury, always feed
stock evenly and smoothly.
BLADE CONDITION. Dull blades require more
effort to perform cut, increasing risk of
accidents. Do not operate with dirty, dull,
cracked or badly worn blades. Inspect blades
for cracks and missing teeth before each
use. Always maintain proper blade tension
and tracking while operating.
CLEARING JAMS AND CUTOFFS. Always stop
bandsaw and disconnect power before
clearing scrap pieces that get stuck between
blade and table insert. Use brush or push
stick, not hands, to clean chips/cutoff scraps
from table.
BLADE CONTROL. To avoid risk of injury due
to blade contact, always allow blade to stop
on its own. DO NOT try to stop or slow blade
with your hand or the workpiece.
-12-
Model W1849 (For Machines Mfd. Since 11/16)
ELECTRICAL
Circuit.Requirements
This machine must be connected to the correct size and
type of power supply circuit, or fire or electrical damage
may occur. Read through this section to determine if an
adequate power supply circuit is available. If a correct
circuit is not available, a qualified electrician MUST install
one before you can connect the machine to power.
A power supply circuit includes all electrical equipment
between the breaker box or fuse panel in the building
and the machine. The power supply circuit used for
this machine must be sized to safely handle the full-
load current drawn from the machine for an extended
period of time. (If this machine is connected to a circuit
protected by fuses, use a time delay fuse marked D.)
Circuit.Requirements.for.220V
This machine can be converted to operate on a power
supply circuit that has a verified ground and meets the
requirements listed below. (Refer to
Voltage Conversion
instructions for details.)
Circuit Type ...............220V/240V, 60 Hz, Single-Phase
Circuit Size ............................................. 15 Amps
Plug/Receptacle .................................... NEM A 6-15
Circuit.Requirements.for.110V.(Prewired)
This machine is prewired to operate on a power supply
circuit that has a verified ground and meets the following
requirements:
Circuit Type ............... 110V/120V, 60 Hz, Single-Phase
Circuit Size ............................................. 20 Amps
Plug/Receptacle .................................... NEMA 5-15
Full-Load.Current.Rating
The full-load current rating is the amperage a machine
draws at 100% of the rated output power. On machines
with multiple motors, this is the amperage drawn by the
largest motor or sum of all motors and electrical devices
that might operate at one time during normal operations.
Full-Load Current Rating at 110V .................. 15 Amps
Full-Load Current Rating at 220V ................. 7.5 Amps
ELECTRICAL
The. machine. must. be. properly. set. up.
before. it. is. safe. to. operate.. DO. NOT.
connect. this. machine. to. the. power.
source.until.instructed.to.do.so.later.in.
this.manual.
Incorrectly. wiring. or. grounding. this.
machine.can.cause.electrocution,.fire,.
or.machine.damage..To.reduce.this.risk,.
only.an.electrician.or.qualified.service.
personnel. should. do. any. required.
electrical.work.on.this.machine.
NOTICE
The.circuit.requirements.listed.in.this.
manual. apply. to
.a.dedicated.circuit—
where.only.one.machine.will.be.running.
at. a. time.. If. this. machine. will. be.
connected. to. a. shared. c ircuit. where.
multiple.machines.will.be.running.at.the.
same.time,.consult.with.an.electrician.
to. ensure. that. the. circuit. is. properly.
sized.for.safe.operation.
-13-
Model W1849 (For Machines Mfd. Since 11/16)
ELECTRICAL
Grounding.Requirements
This machine MUST be grounded. In the event of certain
types of
malfunctions or breakdowns, grounding provides
a path of least resistance for electric current
to travel—in
order
to reduce the risk of electric shock.
Improper connection of the equipment-grounding
wire
will
increase
the risk of electric shock. The wire with green
insulation
(with/without yellow stripes) is the equipment-
grounding
wire. If repair or replacement of the power
cord or plug is necessary, do not connect the equipment-
grounding
wire to a live (current carrying) terminal.
Check with a qualified electrician or service personnel
if
you do not understand these grounding requirements,
or if
you are in doubt about whether the tool is
properly grounded.
If you ever notice that a cord or
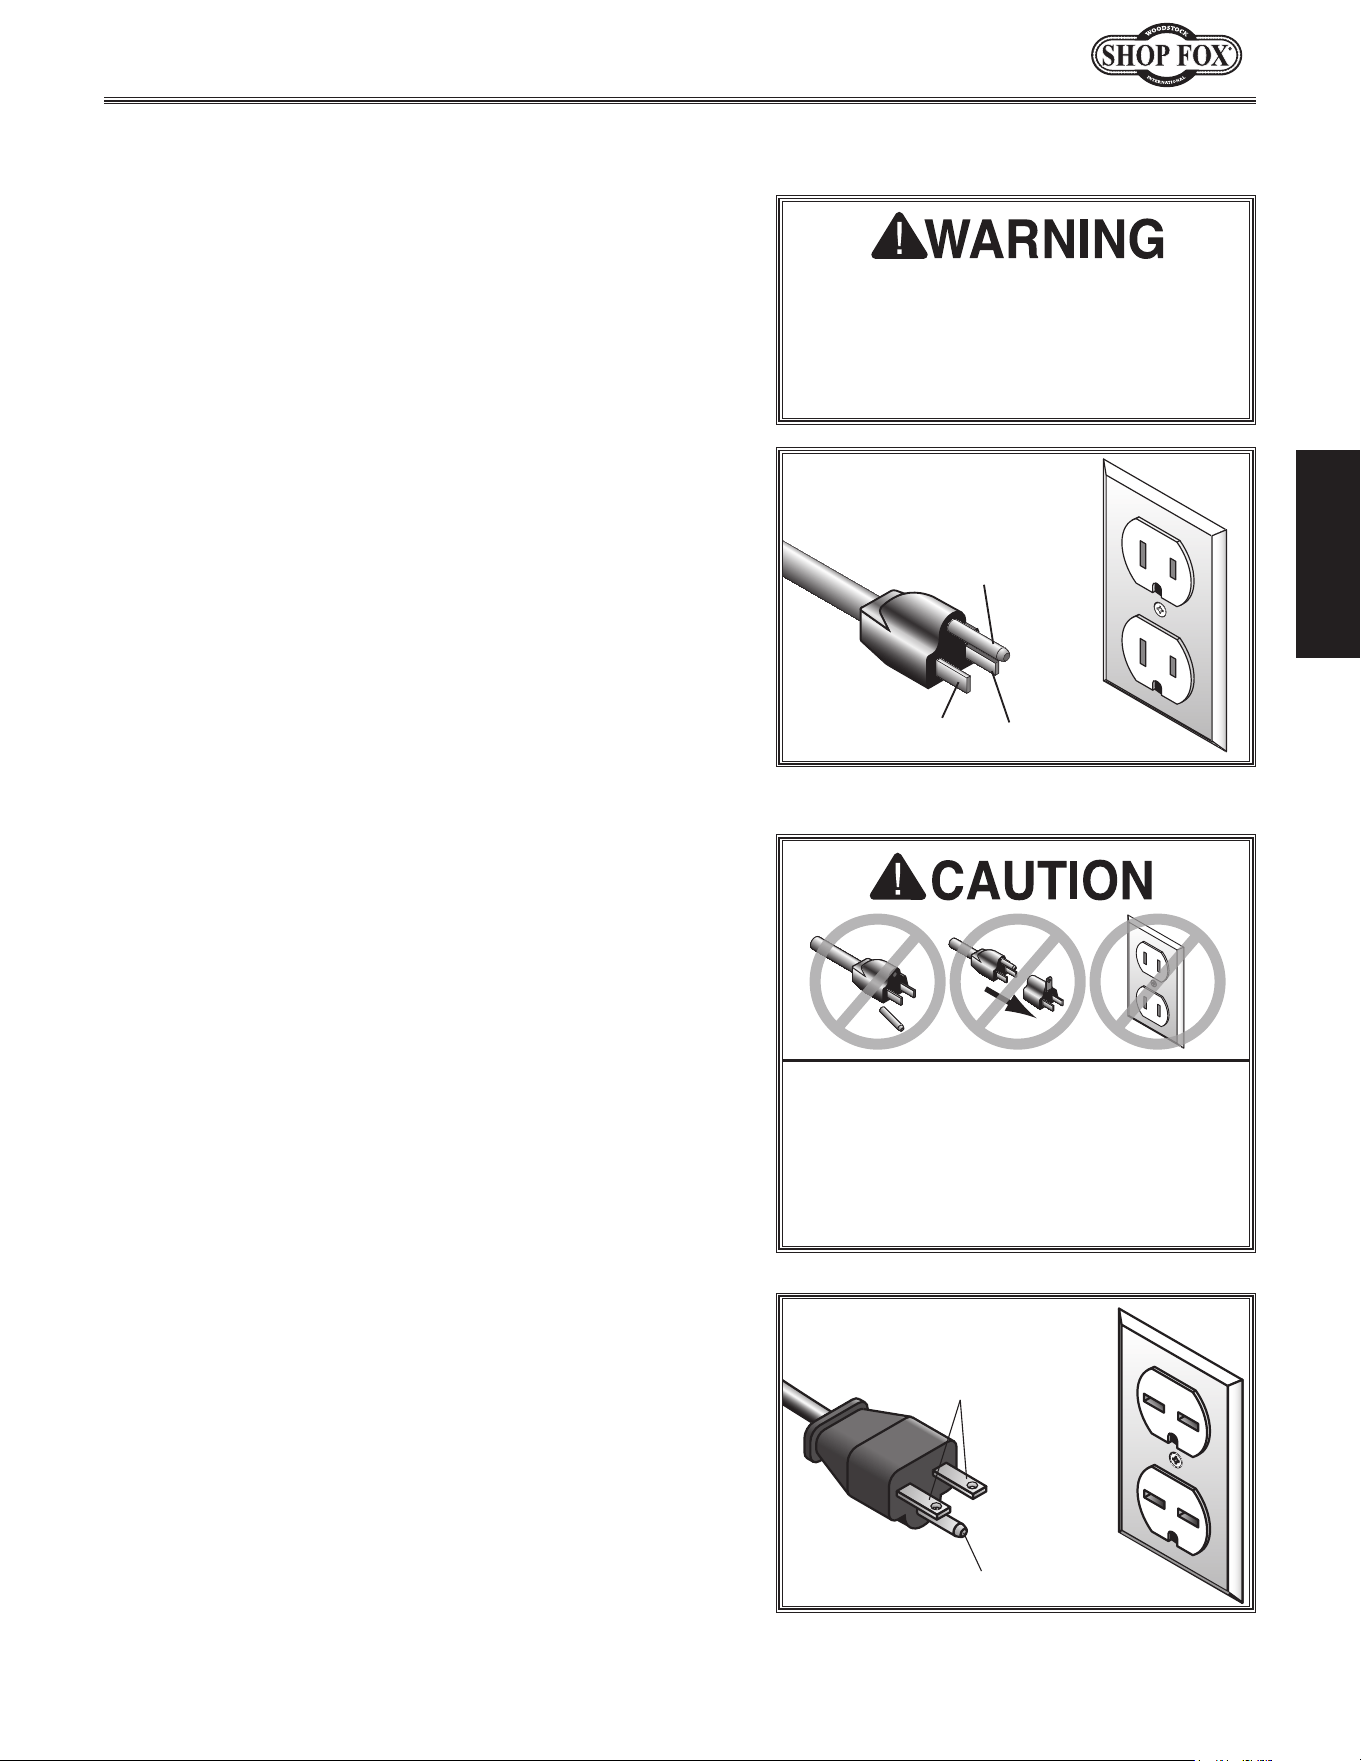
plug is damaged or worn, disconnect it from power, and
immediately replace it with a new one.
Grounding Prong
Current Carrying Prongs
6-15 PLUG
GROUNDED
6-15 RECEPTACLE
220V
Figure 10. NEMA 6-15 plug & receptacle.
Grounding Prong
Neutral Hot
5-15 PLUG
GROUNDED
5-15 RECEPTACLE
110V
Figure 9. NEMA 5-15 plug & receptacle.
A NEMA 6-15 plug (see figure) has a grounding prong that
must be attached to the equipment-grounding wire inside
the included power cord.
The plug must only be inserted
into a matching
receptacle that is properly installed
and grounded in accordance with all local codes and
ordinances.
For.220V.Connection
This machine is equipped with a power cord with an
equipment-grounding
wire and NE M A 5-15 grounding
plug
(see figure). The plug must only be inserted into
a matching
receptacle that is properly installed and
grounded in accordance with local codes and ordinances.
For.110V.Connection.(Prewired)
Extension.Cords
We do not recommend using an extension cord with
this machine. Extension cords cause voltage drop, which
may damage electrical components and shorten motor
life. Voltage drop increases with longer extension cords
and smaller gauge sizes (higher gauge numbers indicate
smaller sizes).
Any extension cord used with this machine must contain a
ground wire, match the required
plug and receptacle, and
meet the following requirements:
Minimum Gauge Size .................................. 12 AWG
Maximum Length (Shorter is Better)..................50 ft.
DO. NOT. modify. the. provided. plug. or.
use. an. adapter. if. the. plug. will. not.
fit . the. receptacle.. Instead,. have. an.
electrician.install.the.proper.receptacle.
on. a. power. supply. circuit. that. meets.
the.requirements.for.this.machine.
The. machine. must. be. properly. set. up.
before. it. is. safe. to. operate.. DO. NOT.
connect. this. machine. to. the. power.
source.until.instructed.to.do.so.later.in.
this.manual.
-14-
Model W1849 (For Machines Mfd. Since 11/16)
SETUP
The voltage conversion MUST be performed by an
electrician or qualified service personnel. The voltage
conversion procedure requires rewiring the motor and
installing the correct plug. The necessary wiring diagrams
are provided in the Wiring section, beginning on Page 75
for your reference.
IMPORTANT: If the diagram on the motor conflicts with
the diagrams in the Wiring section, the motor may have
changed since the manual was printed. Use the diagram
on the motor instead.
Items Needed Qty
• Phillips Head Screwdriver #2 ............................1
• Electrical Tape ................................. As Needed
• Wire Nut (14 AWG x 3) ....................................1
• Plug 6-15 ....................................................1
• Wire Cutters/Stripper.....................................1
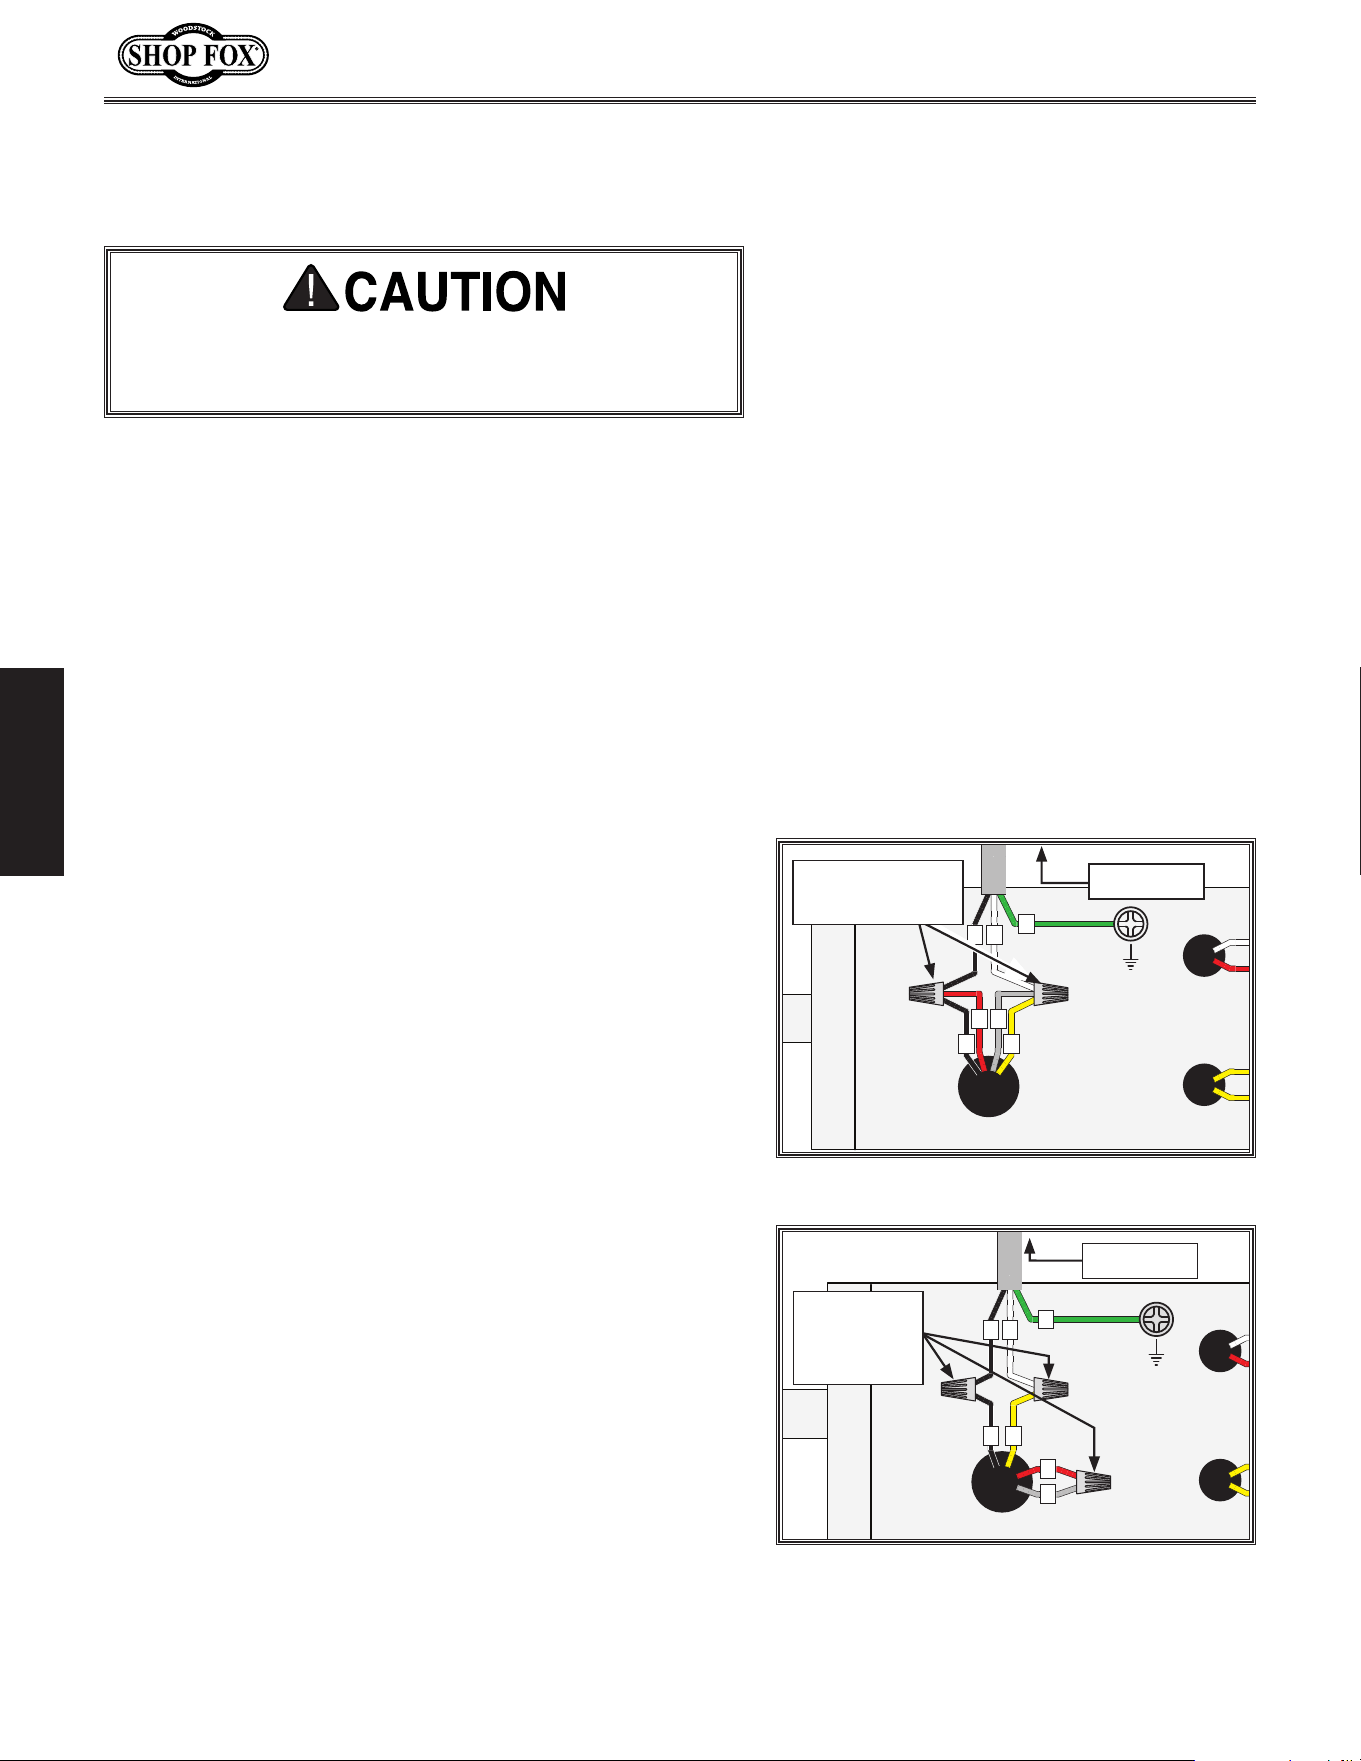
Converting.Voltage.
to.22 0V
To convert Model W1849 to 220V, do these steps:
1. DISCONNECT MACHINE FROM POWER!
2. Cut off existing 5-15 plug.
3. Open motor junction box, then remove two wire
nuts indicated in Figure 11.
4. Connect wires as indicated in Figure 12. Secure wire
connections with wire nuts, and wrap them with
electrical tape so they will not vibrate loose during
operation.
5. Close and secure motor junction box.
6. Install a 6-15 plug on power cord, according to plug
manufacturer's instructions. If plug manufacturer's
instructions are not available, NEMA standard 6-15
plug wiring is provided on Page 76. Figure 12. Motor rewired to 220V.
MOTOR
220V
U
V
E
3
1
2
4
START
CAPACITOR
200MFD
250VAC
RUN
CAPACITOR
50MFD
250VAC
Ground
Connect
Wires with
Nuts Here
To Switch
Figure 11. Inside motor junction box.
MOTOR
110V
U
V
3
1
2
4
START
CAPACITOR
200MFD
250VAC
RUN
CAPACITOR
50MFD
250VAC
Ground
E
Remove These
Wire Nuts
To Switch
For your own safety and protection of property,
consult an electrician if you are unsure about wiring
practices or electrical codes in your area.
-15-
Model W1849 (For Machines Mfd. Since 11/16)
SETUP
SET UP
Unpacking
This machine has been carefully packaged for safe
transportation. If you notice the machine has been
damaged during shipping, please contact your authorized
Shop Fox dealer immediately.
Description Qty
• Safety Glasses for Each Person ..........................1
• Degreaser or Solvent for Cleaning ................Varies
• Disposable Rags for Cleaning ......................Varies
• Lifting Strap/Chain (rated for at least 400 lbs.) .....1
• Lifting Equipment (rated for at least 400 lbs.) .......1
• Dust Collection System ...................................1
• 4" Dust Hose ................................................1
• 4" Hose Clamp ..............................................1
• Assistant for Lifting .......................................1
• 1 X 4 Block 12" .............................................1
• 2 x 4 Block 12" .............................................1
Items.Needed.for.Setup
The following items are needed, but not included, to set
up your machine.
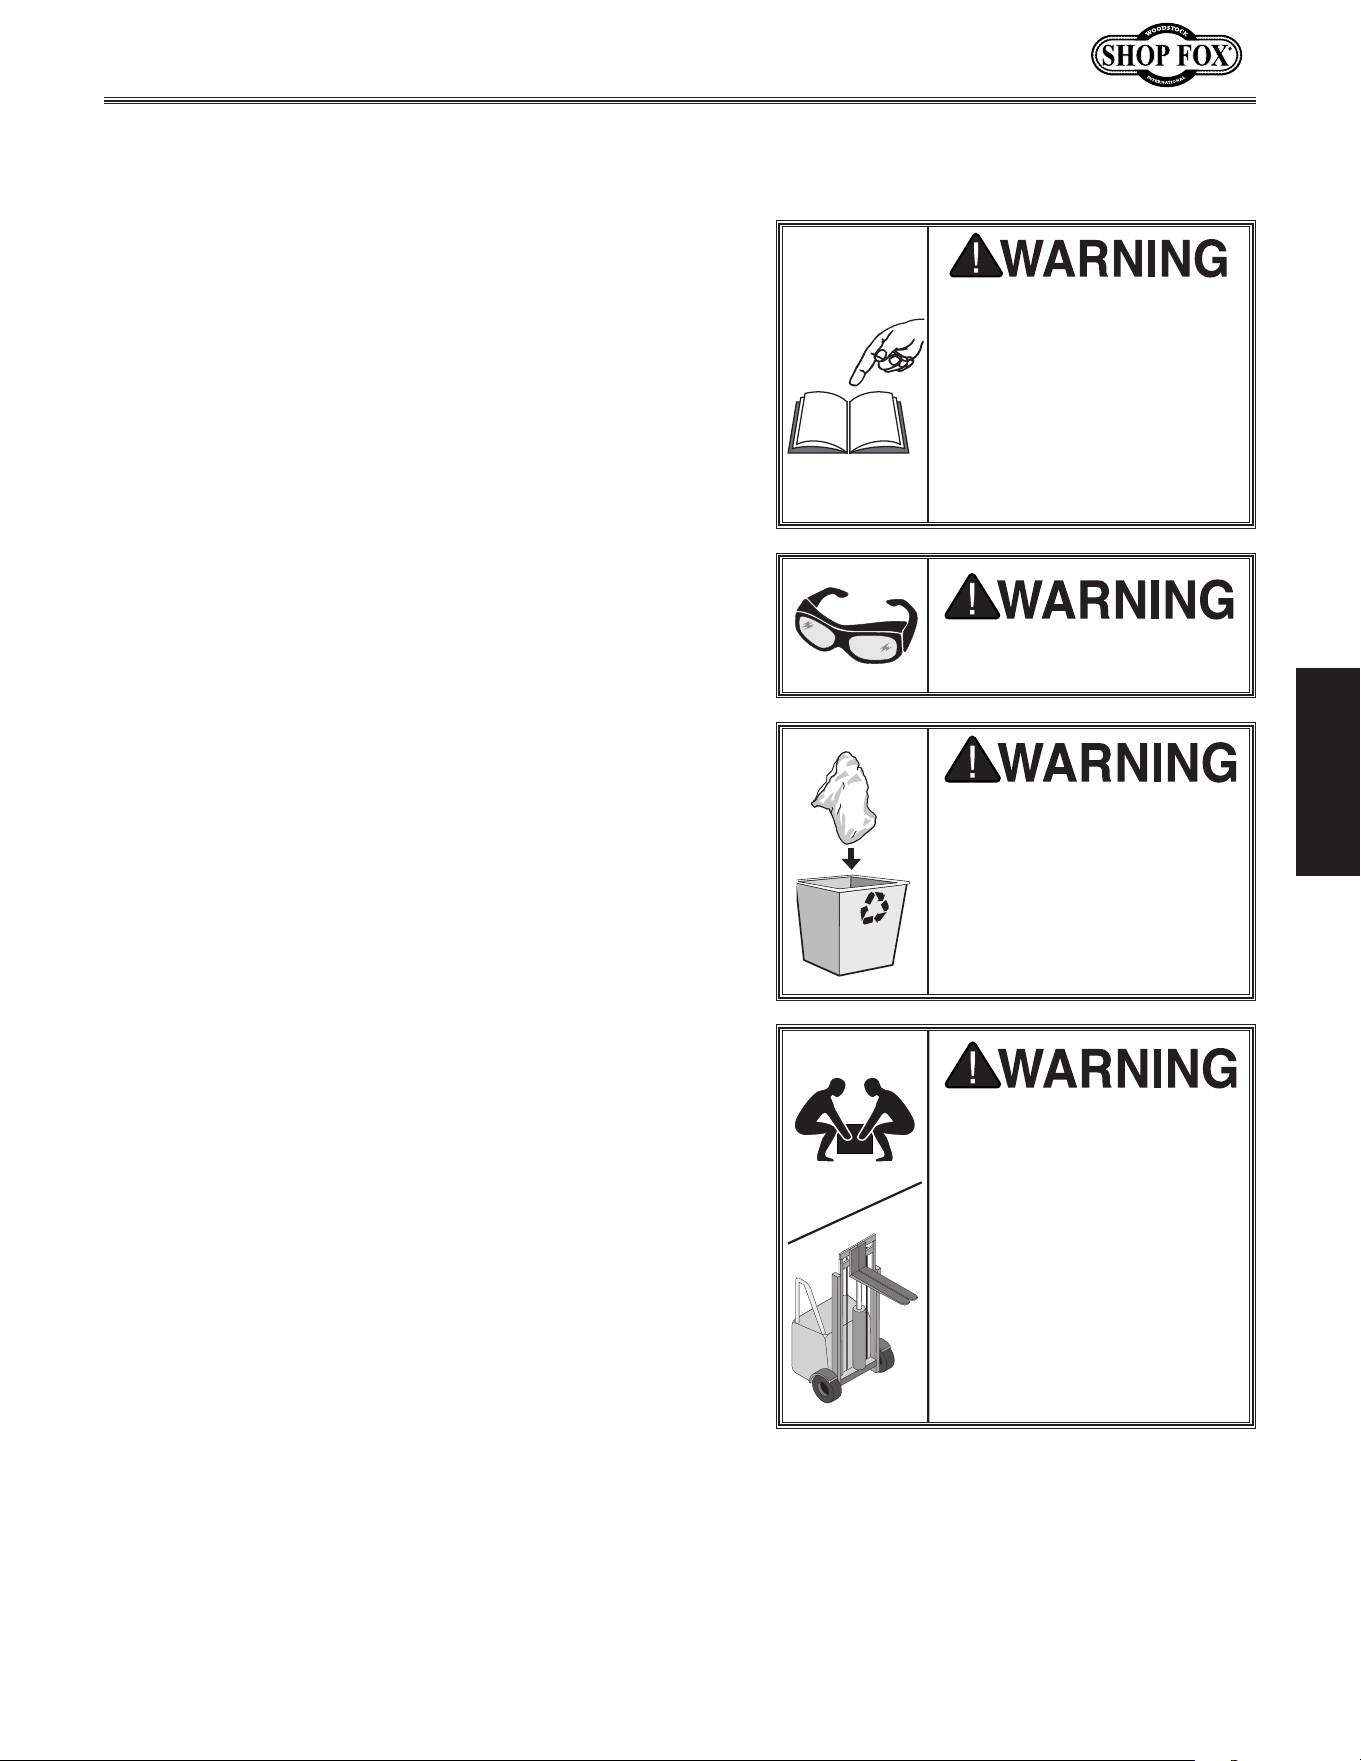
SUFFOCATION HAZARD!
Immediately discard all
plastic bags and packing
materials to eliminate
choking/suffocation
hazards for children and
animals.
Wear safety glasses during
entire setup process!
This machine presents
serious injury hazards
to untrained users. Read
through this entire manual
to become familiar with
the controls and opera-
tions before starting the
machine!
HEAVY LIFT!
Straining or crushing
injury may occur from
improperly lifting the
machine or some of its
parts. To reduce this
risk, get help from other
people and use a forklift
(or other lifting equip-
ment) rated for weight of
this machine.
-16-
Model W1849 (For Machines Mfd. Since 11/16)
SETUP
Inventory
The following is a list of items shipped with your machine.
Before beginning setup, lay these items out and inventory
them.
Note:
If you cannot find an item on this list, carefully
check around/inside the machine and packaging materials.
Often, these items get lost in packaging materials while
unpacking or they are pre-installed at the factory.
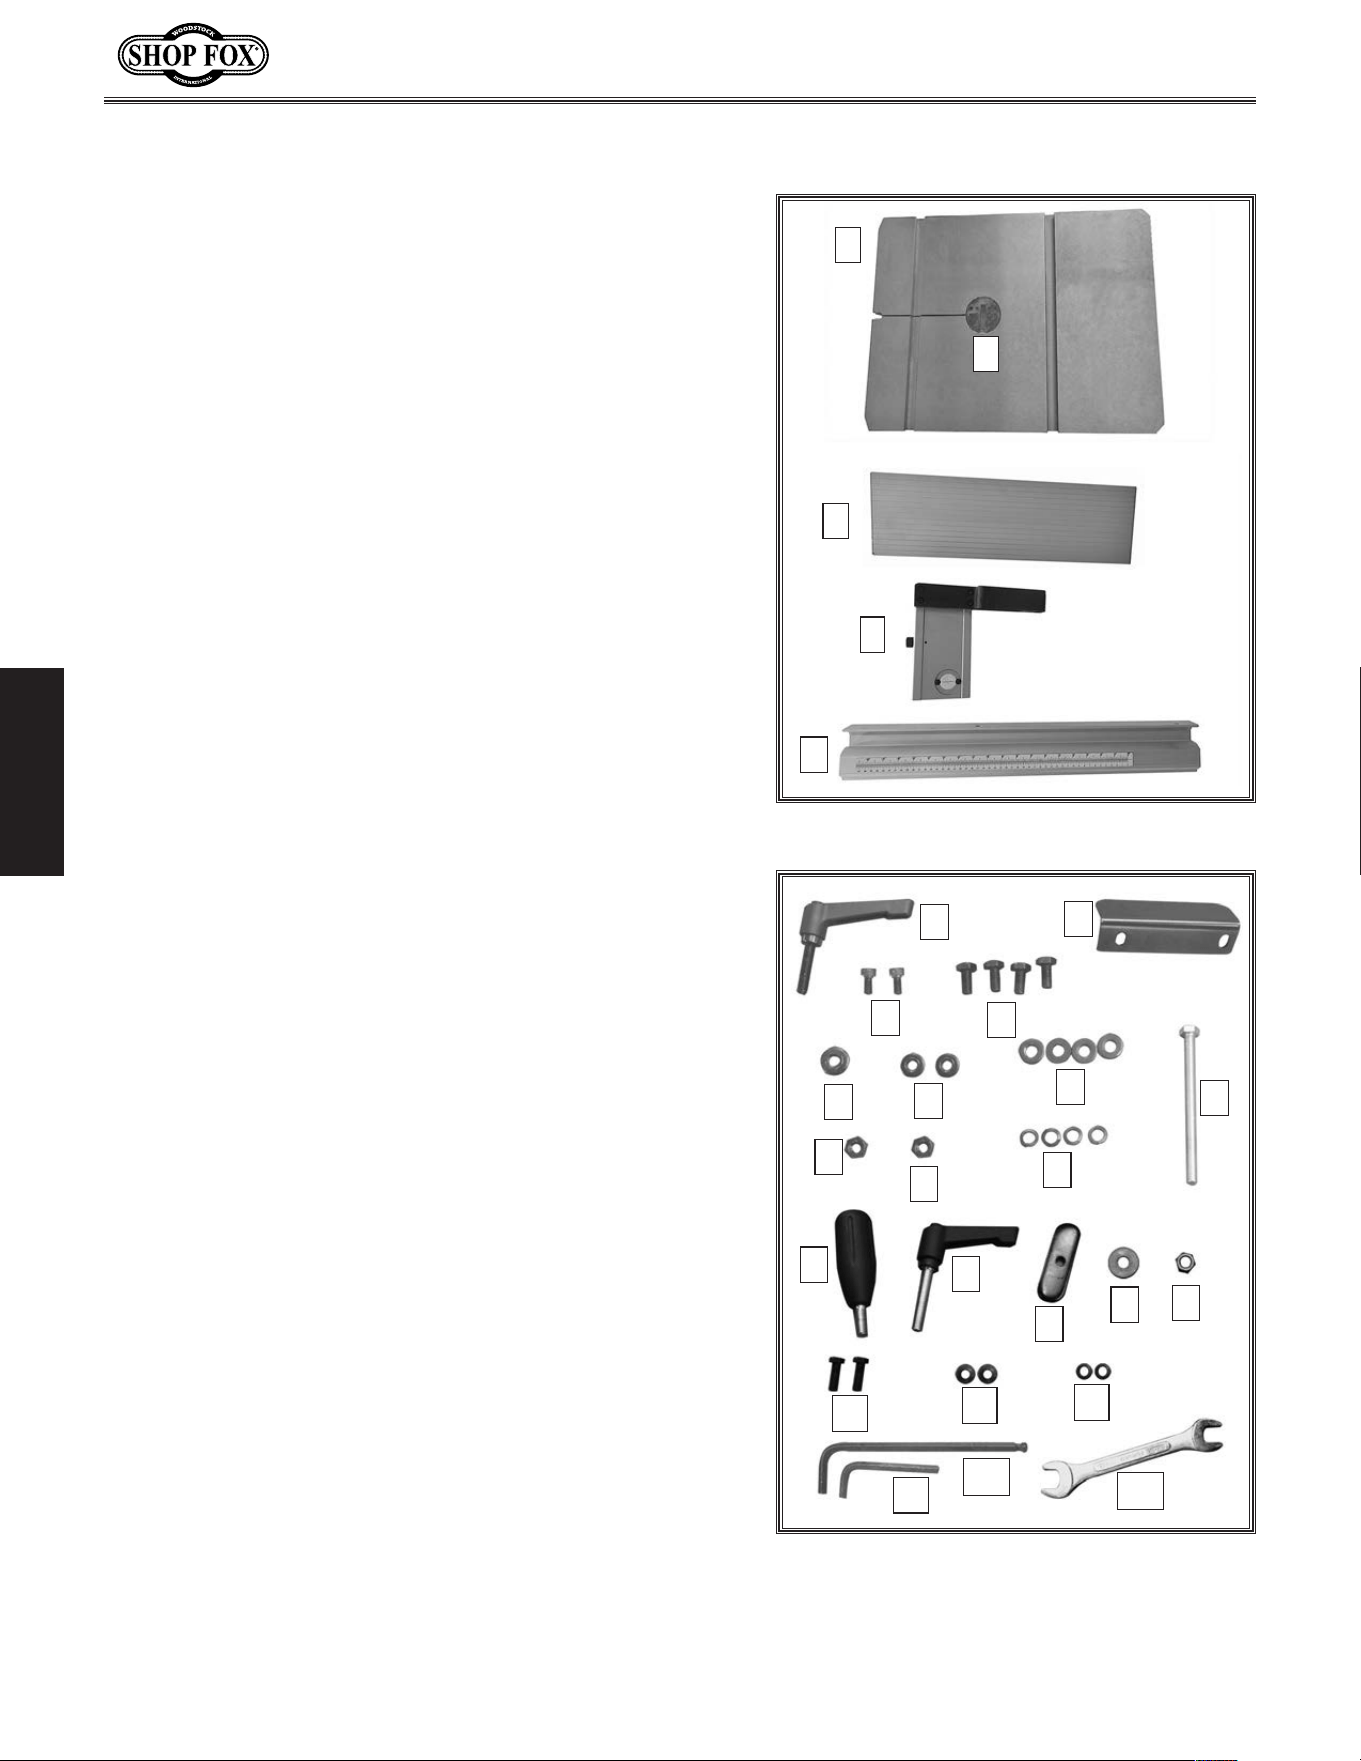
Inventory (Figures 13-14) Qty
A. Main Bandsaw Body (not shown) ........................1
B. Table .........................................................1
C. Table Insert .................................................1
D. Fence Face .................................................1
E. Fence Base Guide Assembly .............................1
F. Fence Rail ..................................................1
G. Gap Screw Lock Lever M8-1.25 x 35 ....................1
H. Fence Support Bracket ...................................1
I. Cap Screws M6-1 x 12 (Fence Support) ................2
J. Hex Bolts M8-1.25 x 16 (Table/Trunnion) ..............4
K. Flat Washer 8 x 20 (Table/Gap Screw) .................1
L. Flat Washers 6mm (Fence Support) ....................2
M. Flat Washers 8mm (Table/Trunnion)....................4
N. Hex Bolt M8-1.25 x 110 (Positive Stop/Saw Body) ...1
O. Hex Nut M8-1.25 Thin (Table/Trunnion) ...............1
P. Hex Nut M8-1.25 (Positive Stop/Saw Body) ...........1
Q. Lock Washers 8mm (Table/Trunnion) ...................4
R. Fence Base Lock Lever ...................................1
S. Fence Face Lock Lever M8-1.25 x 50 ...................1
T. Fence Guide Plate .........................................1
U. Flat Washer 8mm (Fence Base) .........................1
V. Hex Nut M8-1.25 (Fence Base) ..........................1
W. Hex Bolts M6-1 x 20 (Fence Rail) .......................2
X. Flat Washers 6mm (Fence Rail) .........................2
Y. Lock Washers 6mm (Fence Rail) ........................2
Z. Hex Wrench 5mm ..........................................1
AA. Hex Wrench 6mm ..........................................1
AB. Open-End Wrench 10/13mm .............................1
D
E
F
Figure 13. Box 1 inventory.
C
B
Figure.14. Box 2 hardware inventory.
L
M
N
G
H
I
J
K
O
Q
R
S
T
U
V
W
X
Y
Z
AA
AB
P
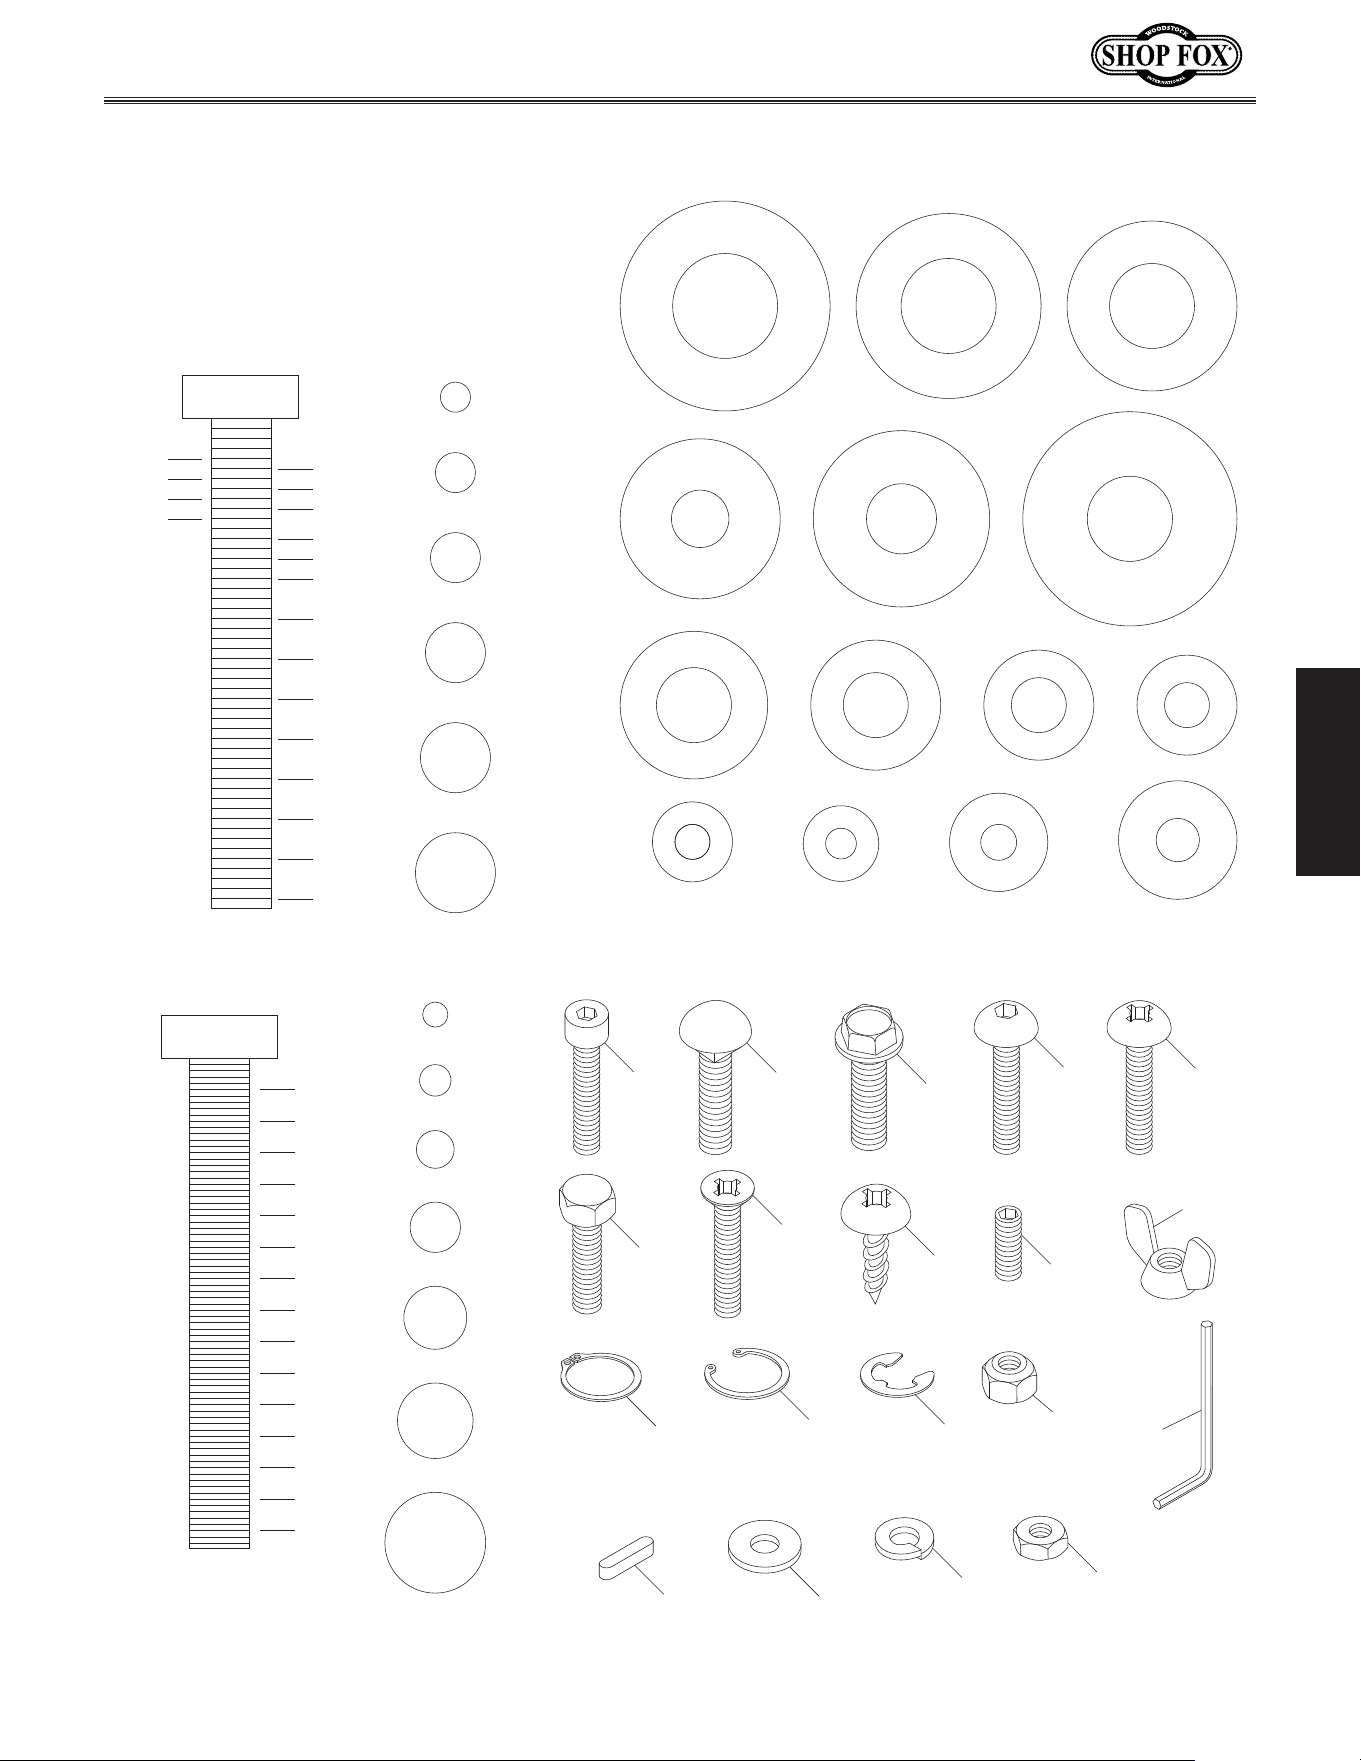
-17-
Model W1849 (For Machines Mfd. Since 11/16)
SETUP
Hex
Wrench
16mm
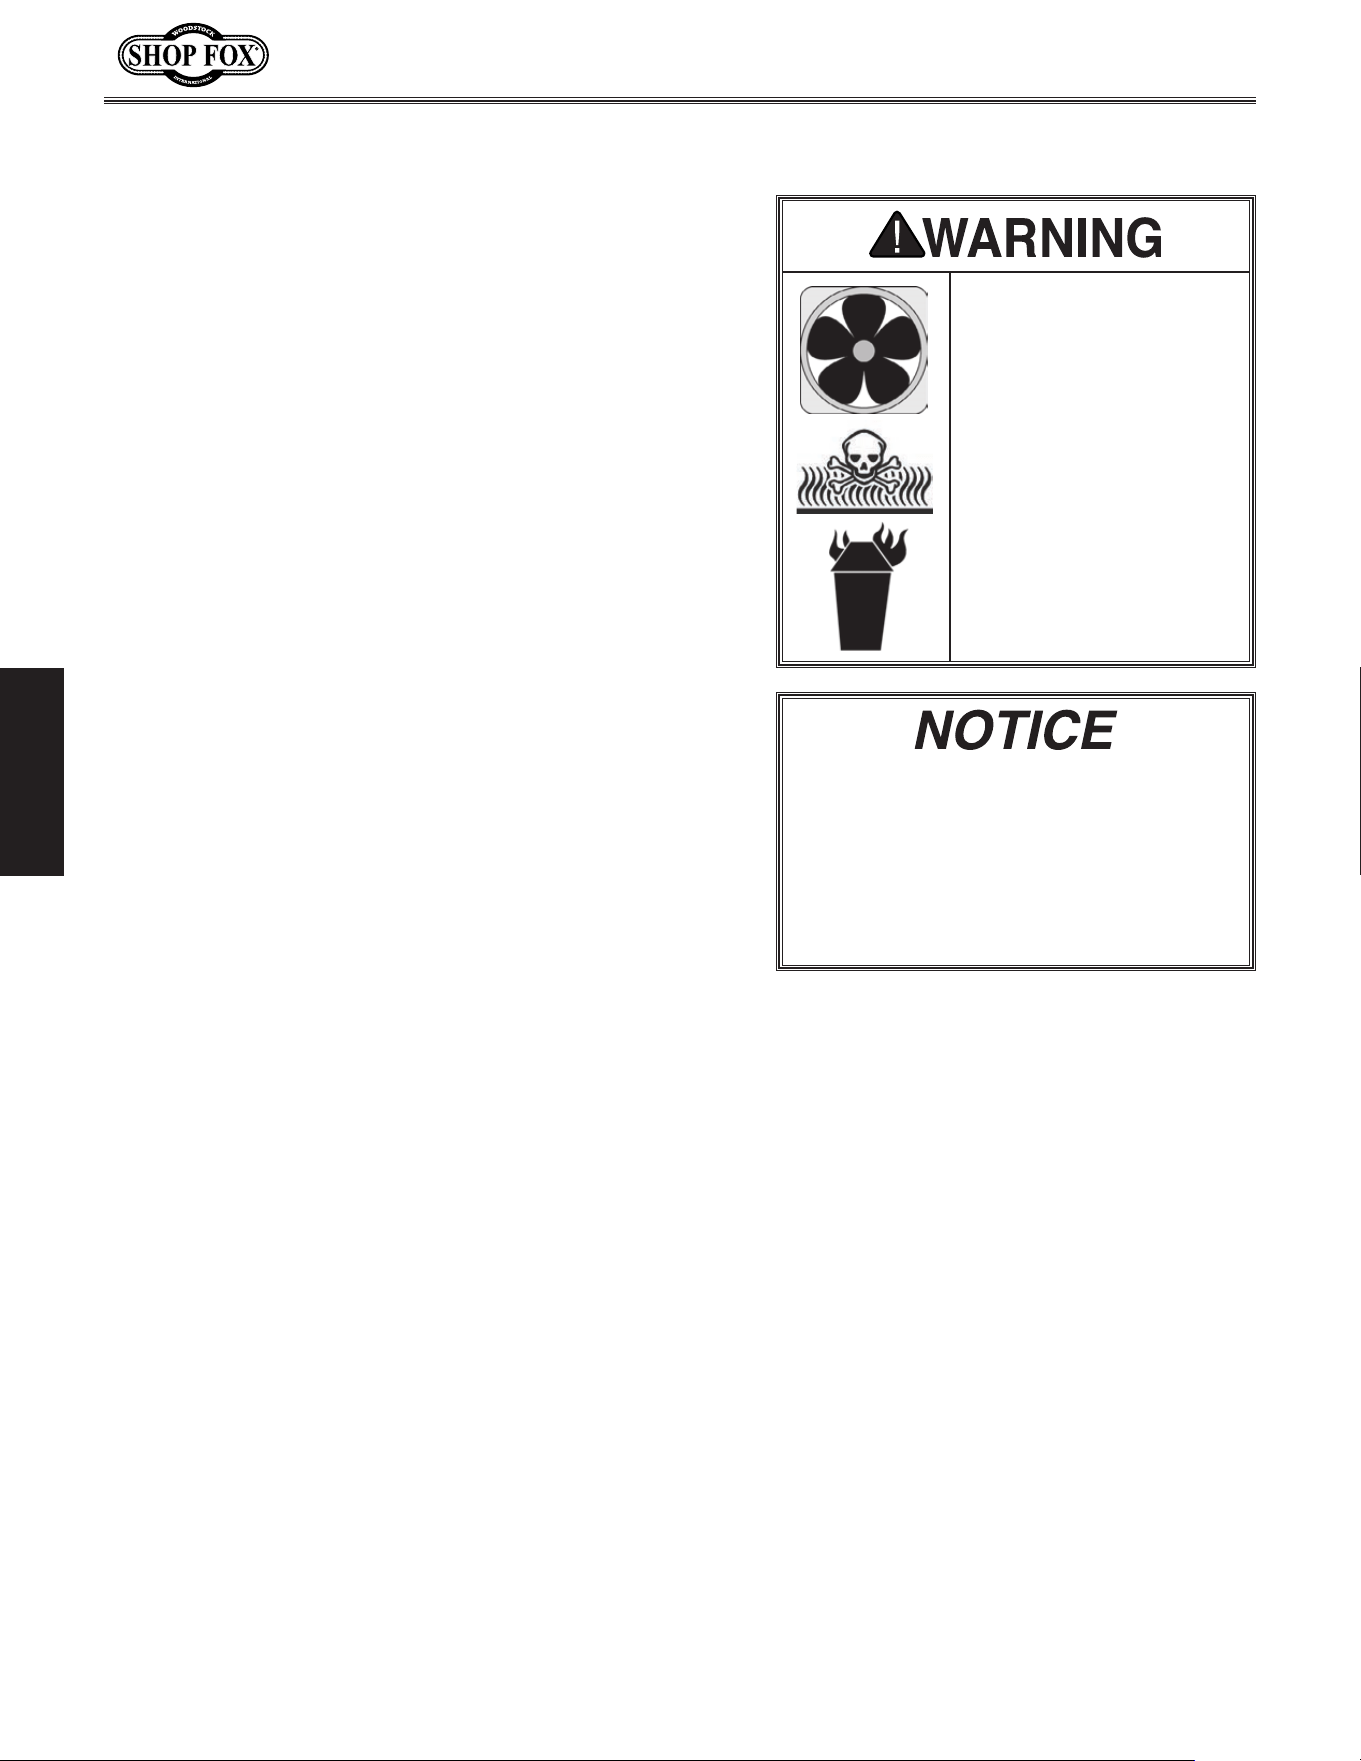
MEASURE BOLT DIAMETER BY PLACING INSIDE CIRCLE
7
⁄16"
3
⁄8"
1
⁄4"
5
⁄16"
#10
1
⁄2"
WASHERS ARE MEASURED BY THE INSIDE DIAMETER
USE THIS CHART TO IDENTIFY
HARDWARE DURING THE
INVENTORY/ASSEMBLY
PROCESS.
Flat Washer
Lock
Washer
Hex
Nut
Wing
Nut
Set
Screw
Cap
Screw
Carriage
Bolt
Hex
Bolt
Button
Head
Screw
Flange
Bolt
LINES ARE
1
⁄16" INCH APART
1
⁄4"
3
⁄8"
1
⁄2"
5
⁄8"
5
⁄16"
7
⁄16"
9
⁄16"
3
⁄4"
7
⁄8"
3
2
1
⁄4"
2
1
⁄2"
2
3
⁄4"
2
1
3
⁄4"
1
1
⁄2"
1
1
⁄4"
1
LINES ARE 1MM APART
5mm
10mm
20mm
15mm
25mm
40mm
30mm
35mm
45mm
50mm
60mm
55mm
70mm
65mm
75mm
W
A
S
H
E
R
D
I
A
M
E
T
E
R
5
⁄8"
W
A
S
H
E
R
D
I
A
M
E
T
E
R
9
⁄16"
1
⁄2"
W
A
S
H
E
R
D
I
A
M
E
T
E
R
W
A
S
H
E
R
D
I
A
M
E
T
E
R
12mm
W
A
S
H
E
R
D
I
A
M
E
T
E
R
10mm
7
⁄16"
W
A
S
H
E
R
D
I
A
M
E
T
E
R
W
A
S
H
E
R
D
I
A
M
E
T
E
R
8mm
3
⁄8"
W
A
S
H
E
R
D
I
A
M
E
T
E
R
5
⁄16"
W
A
S
H
E
R
D
I
A
M
E
T
E
R
1
⁄4"
W
A
S
H
E
R
D
I
A
M
E
T
E
R
#10
W
A
S
H
E
R
D
I
A
M
E
T
E
R
W
A
S
H
E
R
D
I
A
M
E
T
E
R
4mm
W
A
S
H
E
R
D
I
A
M
E
T
E
R
6mm
W
A
S
H
E
R
D
I
A
M
E
T
E
R
5mm
4mm
6mm
5mm
8mm
10mm
12mm
Tap
Screw
Phillips
Head
Screw
Flat
Head
Screw
E-Clip
External
Retaining
Ring
Internal
Retaining
Ring
Key
Lock
Nut
Hardware.Recognition.Chart
-18-
Model W1849 (For Machines Mfd. Since 11/16)
SETUP
To prevent
corrosion during shipment and storage of your
machine, the factory has coated t
he bare metal surfaces
of your machine
with a heavy-duty rust prevention
compound
.
I
f you are unprepared or impatient, this compound can
be difficult to
remove. To ensure that the removal of this
coating is as easy as possible, please gather the correct
cleaner, lubricant, and tools listed below:
• Cleaner/degreaser
designed to remove storage wax
and grease
• Safety glasses & disposable gloves
•
Solvent brush or paint brush
• Disposable Rags
To
.remove.rust.preventative.coating,.do.these.steps:
1.
DISCONNECT MACHINE FROM POWER!
2.
Put on safety glasses and disposable gloves.
3
. Coat the rust preventative with a liberal amount of
cleaner/degreaser, then let it soak for 5–10 minutes.
4
. Wipe off surfaces. If your cleaner/degreaser is
effective, the coating will wipe off easily.
Tip: An easier way to clean off thick coats of rust
preventative from flat surfaces is to use a PLASTIC
paint scraper to scrape off the majority of the
coating before wiping it off with your rag. (Do
not use a metal scraper or you may scratch your
machine.)
5
. Repeat cleaning steps as necessary until all of the
compound is removed.
6
. To prevent rust on freshly cleaned surfaces,
immediately coat with a quality metal protectant.
Gasoline.an d.petroleum.
products.have.low.flash.
points.and.can.explode.
or.cause.fire.if.used.to.
clean.machiner y..Avoid.
using. these. products.
to. clean. machinery..
Many. cleaning. solvents.
are. toxic. if. inhaled..
Minimize. your. risk.
by. only. using. these.
products. in. a. well.
ventilated.area.
In. a. pinch,. automotive. degreasers,.
mineral. spirits. or. WD•40. can. be. used.
to. remove. rust. preventative. coating..
Before. using. these. products,. though,.
test.them.on.an.inconspicuous.area.of.
your. paint. to. make. sure. they. will. not.
damage.it.
Cleani ng.Machi ne
-19-
Model W1849 (For Machines Mfd. Since 11/16)
SETUP
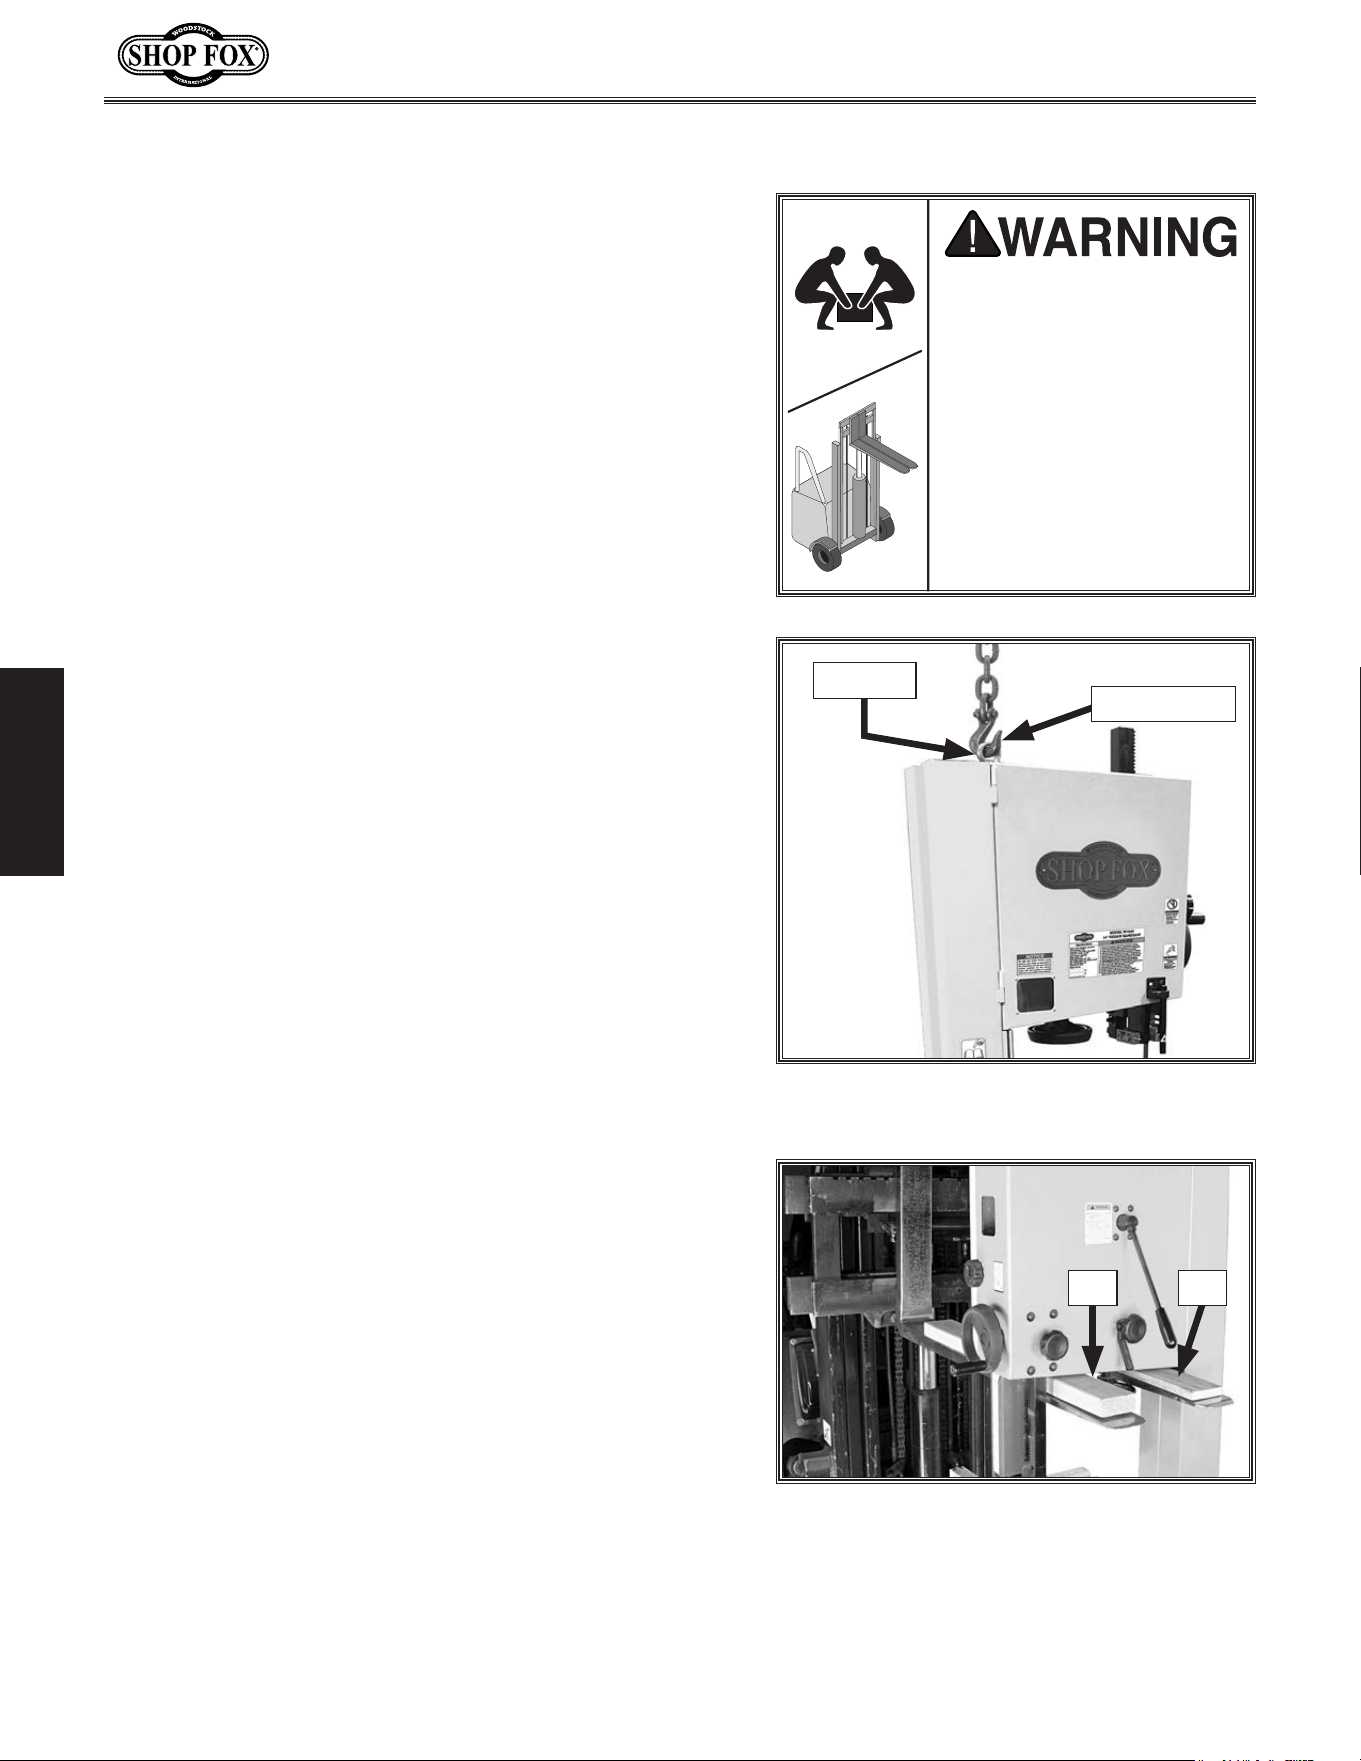
Figure.15. W1849 working clearances.
Machine.Placement
Keep Workpiece
Unloading Area
Unobstructed
Keep Workpiece
Loading Area
Unobstructed
= Electrical
Connection
27½"
32"
Weight.Load
Refer to the
Machine.Specifications for the
weight of your machine. Make sure that the
surface upon which the machine is placed will
bear the weight of the machine, additional
equipment that may be installed on the
machine, and the heaviest workpiece that will
be used. Additionally, consider the weight of
the operator and any dynamic loading that may
occur when operating the machine.
Space.Allocation
Consider the largest size of workpiece that
will be processed through this machine and
provide enough space around the machine
for adequate operator material handling or
the installation of auxiliary equipment. With
permanent installations, leave enough space
around the machine to open or remove doors/
covers as required by the maintenance and
service described in this manual.
See.below.for.
required .space.allocation.
Physical.Environment
The physical environment where your machine is
operated is important for safe operation and the
longevity of its components. For best results,
operate this machine in a dry environment
that is free from excessive moisture, hazardous
chemicals, airborne abrasives, or extreme
conditions. Extreme conditions for this type
of machinery are generally those where the
ambient temperature range exceeds 41°–104°F;
the relative humidity range exceeds 20–95%
(non-condensing); or the environment is subject
to vibration, shocks, or bumps.
Electrical.Installation
Place this machine near an existing power
source. Make sure all power cords are protected
from traffic, material handling, moisture,
chemicals, or other hazards. Make sure to leave
access to a means of disconnecting the power
source or engaging a lockout/tagout device.
Lighting
Lighting around the machine must be adequate
enough that operations can be performed
safely. Shadows, glare, or strobe effects that
may distract or impede the operator must be
eliminated.
Children. or. untrained. people.
may.be. seriously.injured.by.this.
machine..Only.install.in.an.access.
restric t ed.location.
-20-
Model W1849 (For Machines Mfd. Since 11/16)
SETUP
Lifting.&.Movin g
HEAVY LIFT!
Straining or crushing
injury may occur from
improperly lifting the
machine or some of its
parts. To reduce this
risk, get help from other
people and use a forklift
(or other lifting equip-
ment) rated for weight of
this machine.
Special care should be taken when moving this bandsaw.
To reduce your risk of injury or accidental damage,
use one of the following methods to lift or move this
bandsaw.
Using.Forklift.&.Eye.Bolt
1. Use forklift to move crate to prepared location, then
remove crate from shipping pallet.
2. Unbolt bandsaw from pallet.
3. Make sure eye bolt is securely threaded, then place
lifting hook through eye bolt (see Figure 16) and lift
bandsaw slowly with forklift enough to clear pallet.
4. Remove pallet and slowly set bandsaw into position.
Using.Forklift.&.Wood.Blocks
1. Use forklift to move crate to prepared location, then
remove crate from shipping pallet.
2. Unbolt bandsaw from pallet.
3. Carefully place forklift forks under bandsaw head.
Insert a 1x4 block between head and left fork, and a
2x4 block between head and right fork so bandsaw is
level, as shown in Figure 17.
4. Lift bandsaw off of pallet, remove pallet, then
slowly lower bandsaw into position.
Note: If you are concerned about your forklift forks
hitting the tension handwheel, remove handwheel
before positioning forks, then re-install it after
placing bandsaw in final location.
Using.Pallet.Jack.&.Furniture.Dolly
1. Use pallet jack to move crate to prepared location,
then remove crate from shipping pallet.
2. Unbolt bandsaw from pallet.
3. With help of another person, carefully "walk"
bandsaw (or use furniture dolly to move bandsaw)
off of pallet and into position.
Figure 16. Lifting bandsaw with eye bolt
and chain.
Eye Bolt
Lifting Hook
Figure 17. Example of lifting bandsaw
with forklift using wood shims.
2x4 1x4
-21-
Model W1849 (For Machines Mfd. Since 11/16)
SETUP
Anchoring.to.Floor
Number of Mounting Holes ....................................4
Diameter of Mounting Hardware ..........................
3
⁄8"
Anchoring machinery to the floor prevents tipping or
shifting and reduces vibration that may occur during
operation, resulting in a machine that runs slightly quieter
and feels more solid.
If the machine will be installed in a commercial or
workplace setting, or if it is permanently connected
(hardwired) to the power supply, local codes may require
that it be anchored to the floor.
If not required by any local codes, fastening the machine
to the floor is an optional step. If you choose not to do
this with your machine, we recommend placing it on
machine mounts, as these provide an easy method for
leveling and they have vibration-absorbing pads.
Anchoring.to.Concrete.Floors
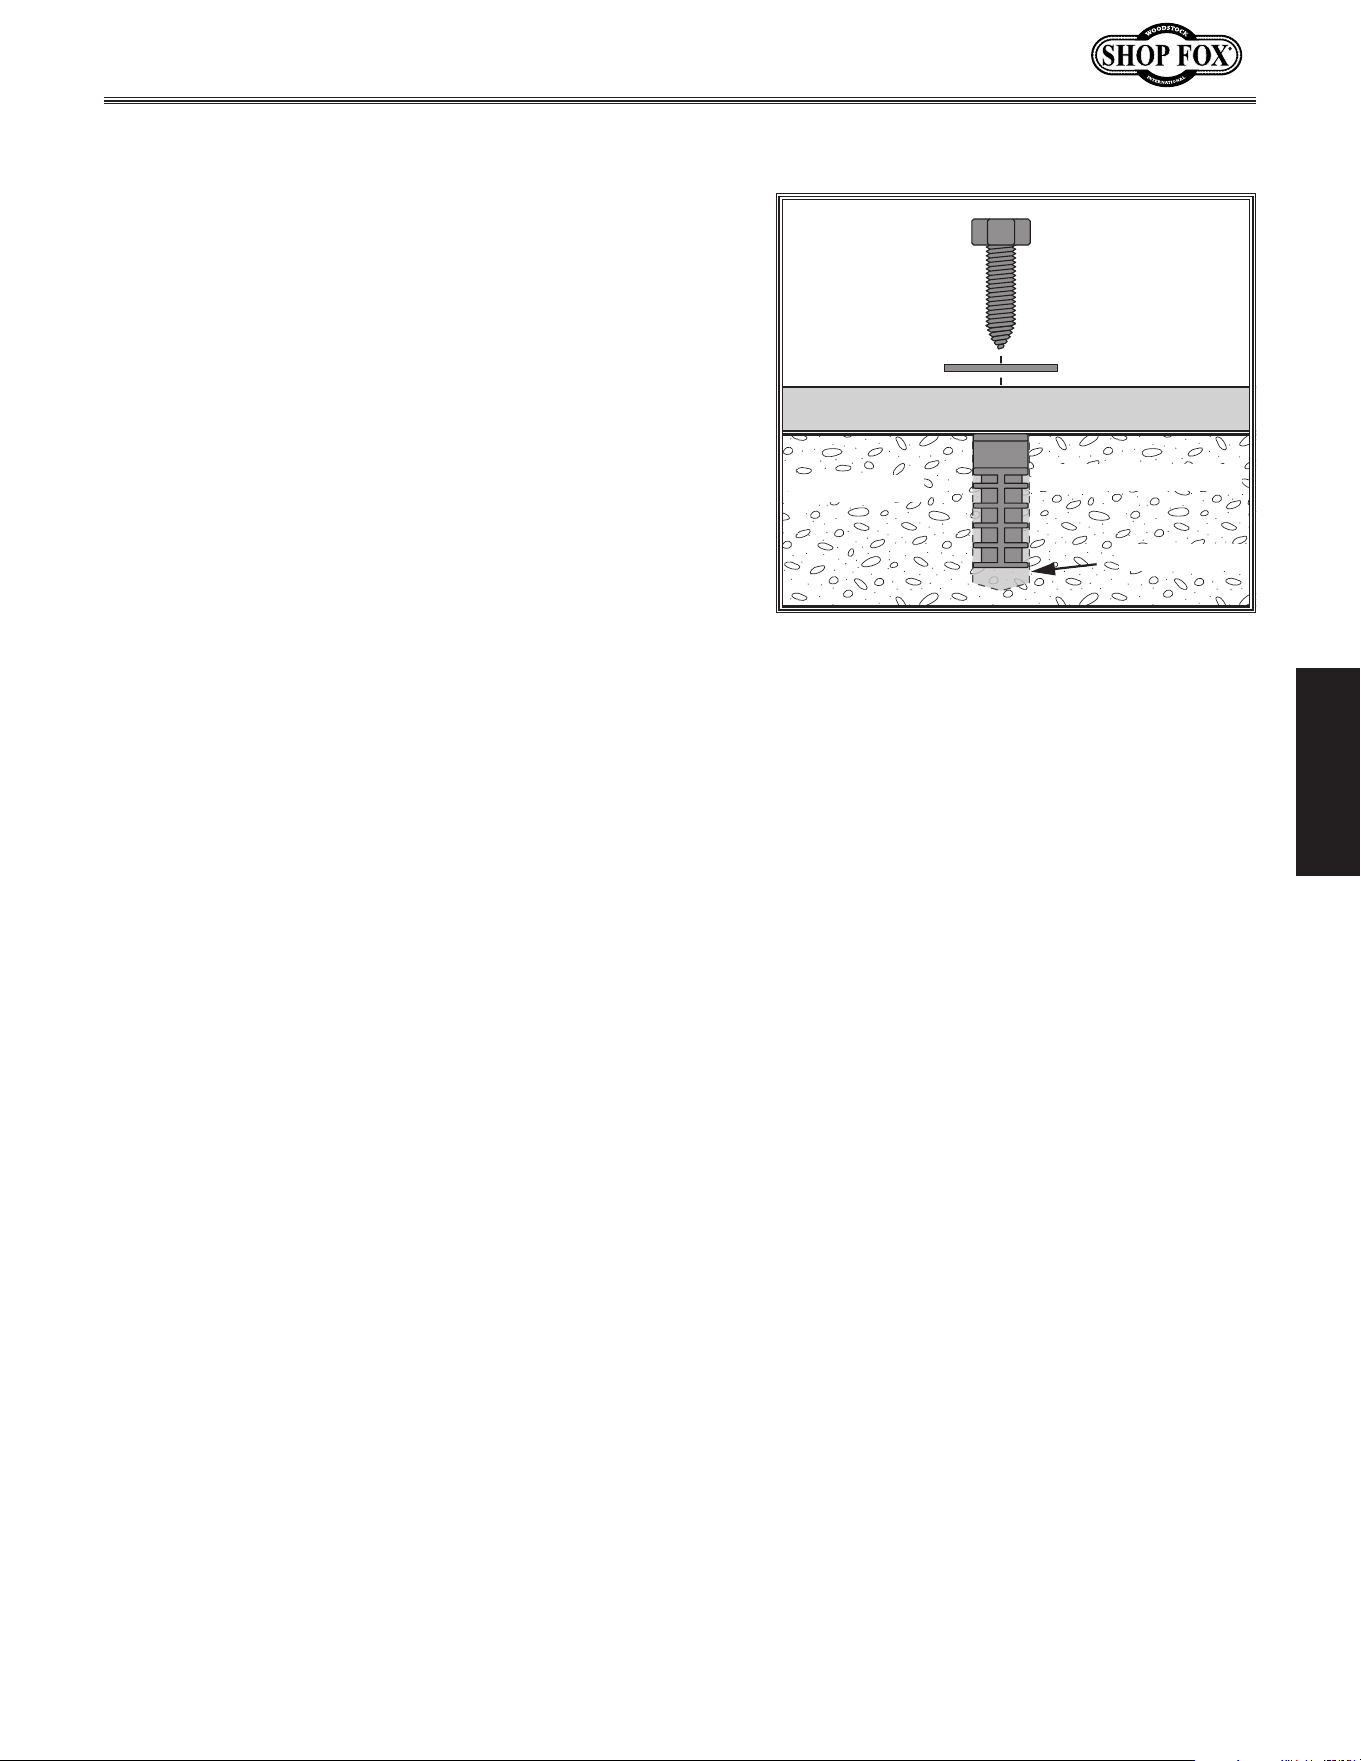
Lag shield anchors with lag screws (see Figure 18) are
a popular way to anchor machinery to a concrete floor,
because the anchors sit flush with the floor surface,
making it easy to unbolt and move the machine later, if
needed. However, anytime local codes apply, you MUST
follow the anchoring methodology specified by the code.
Figure 18. Popular method for anchoring
machinery to a concrete floor.
Machine Base
Concrete
Lag Screw
Lag Shield Anchor
Flat Washer
Drilled Hole
-22-
Model W1849 (For Machines Mfd. Since 11/16)
SETUP
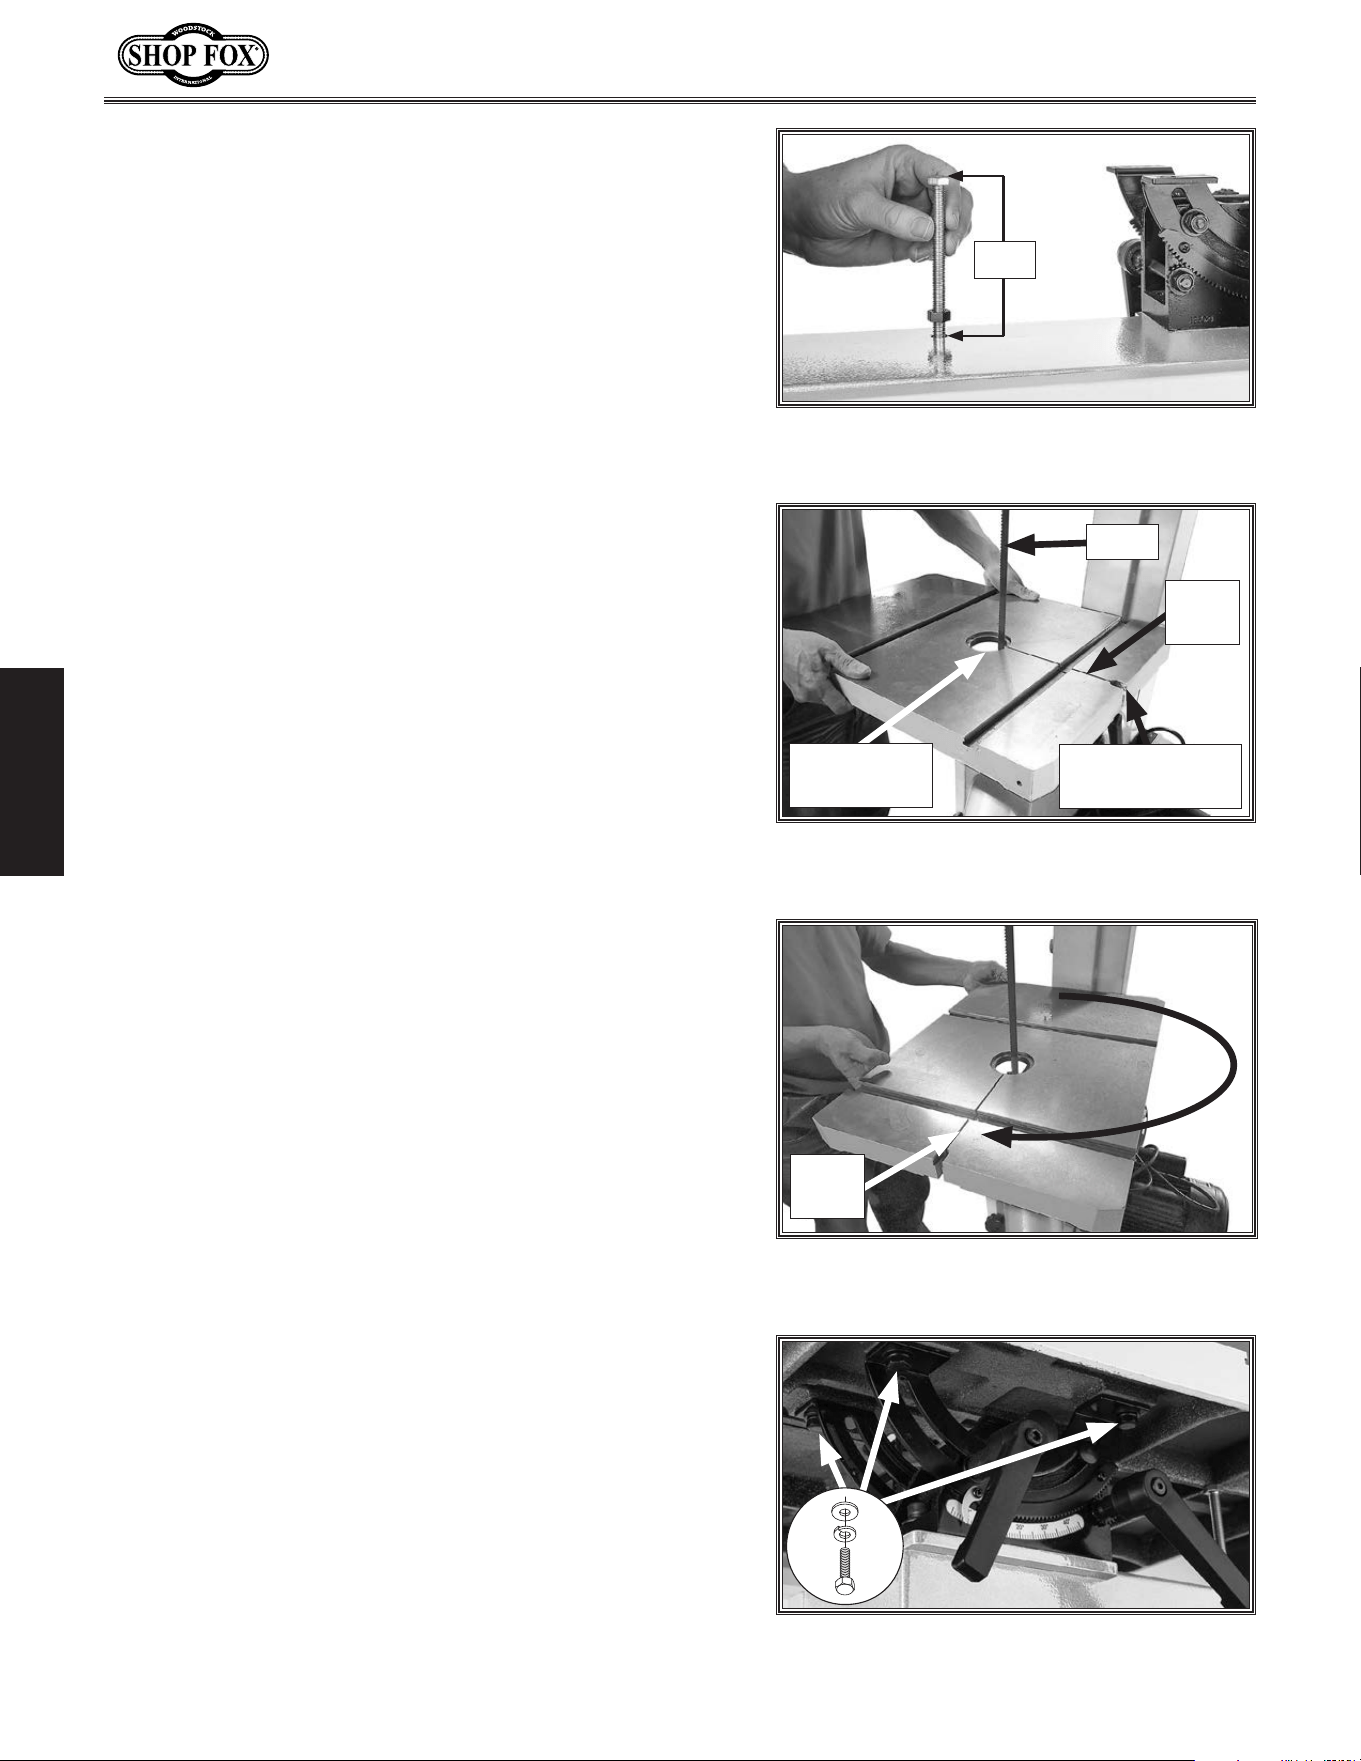
Figure 19. Installing hex bolt to set
positive stop.
3
1
/2"
To assemble bandsaw, do these steps:
1. Thread (1) M8-1.25 hex nut partially onto M8-1.25
x 110 hex bolt, as shown in Figure 19, then thread
bolt into panel above lower wheel until top of bolt is
approximately 3
1
/2" above panel. Finger-tighten hex
nut for now. (Refer to Adjusting Positive Stop on
Page 40.)
2. Remove protective shipping cover from blade, then
remove table insert and shipping screw from table
(see Figure 20).
4. Carefully position table so gap faces to right (see
Figure 21).
Before beginning the assembly process, refer to Items
Needed for Setup and gather everything you need.
Ensure all parts have been properly cleaned of the
heavy-duty rust-preventative applied at the factory, if
applicable. Be sure to complete all steps in the assembly
procedure prior to performing the Test Run.
Assembly
3. Place table on saw, sliding table gap around blade
(see Figure 20).
5. Secure table to trunnion using (4) M8-1.25 x 16
hex bolts, (4) 8mm lock washers, and (4) 8mm flat
washers (see Figure 22).
Figure 22. Table-to-trunnion mounting
hardware installed.
x 4
Figure 21. Table rotated with gap facing
to the right.
Table
Gap
Figure 20. Placing table on saw with gap
positioned around blade.
Blade
Table Insert
Removed
Table
Gap
Shipping Screw
Removed
-23-
Model W1849 (For Machines Mfd. Since 11/16)
SETUP
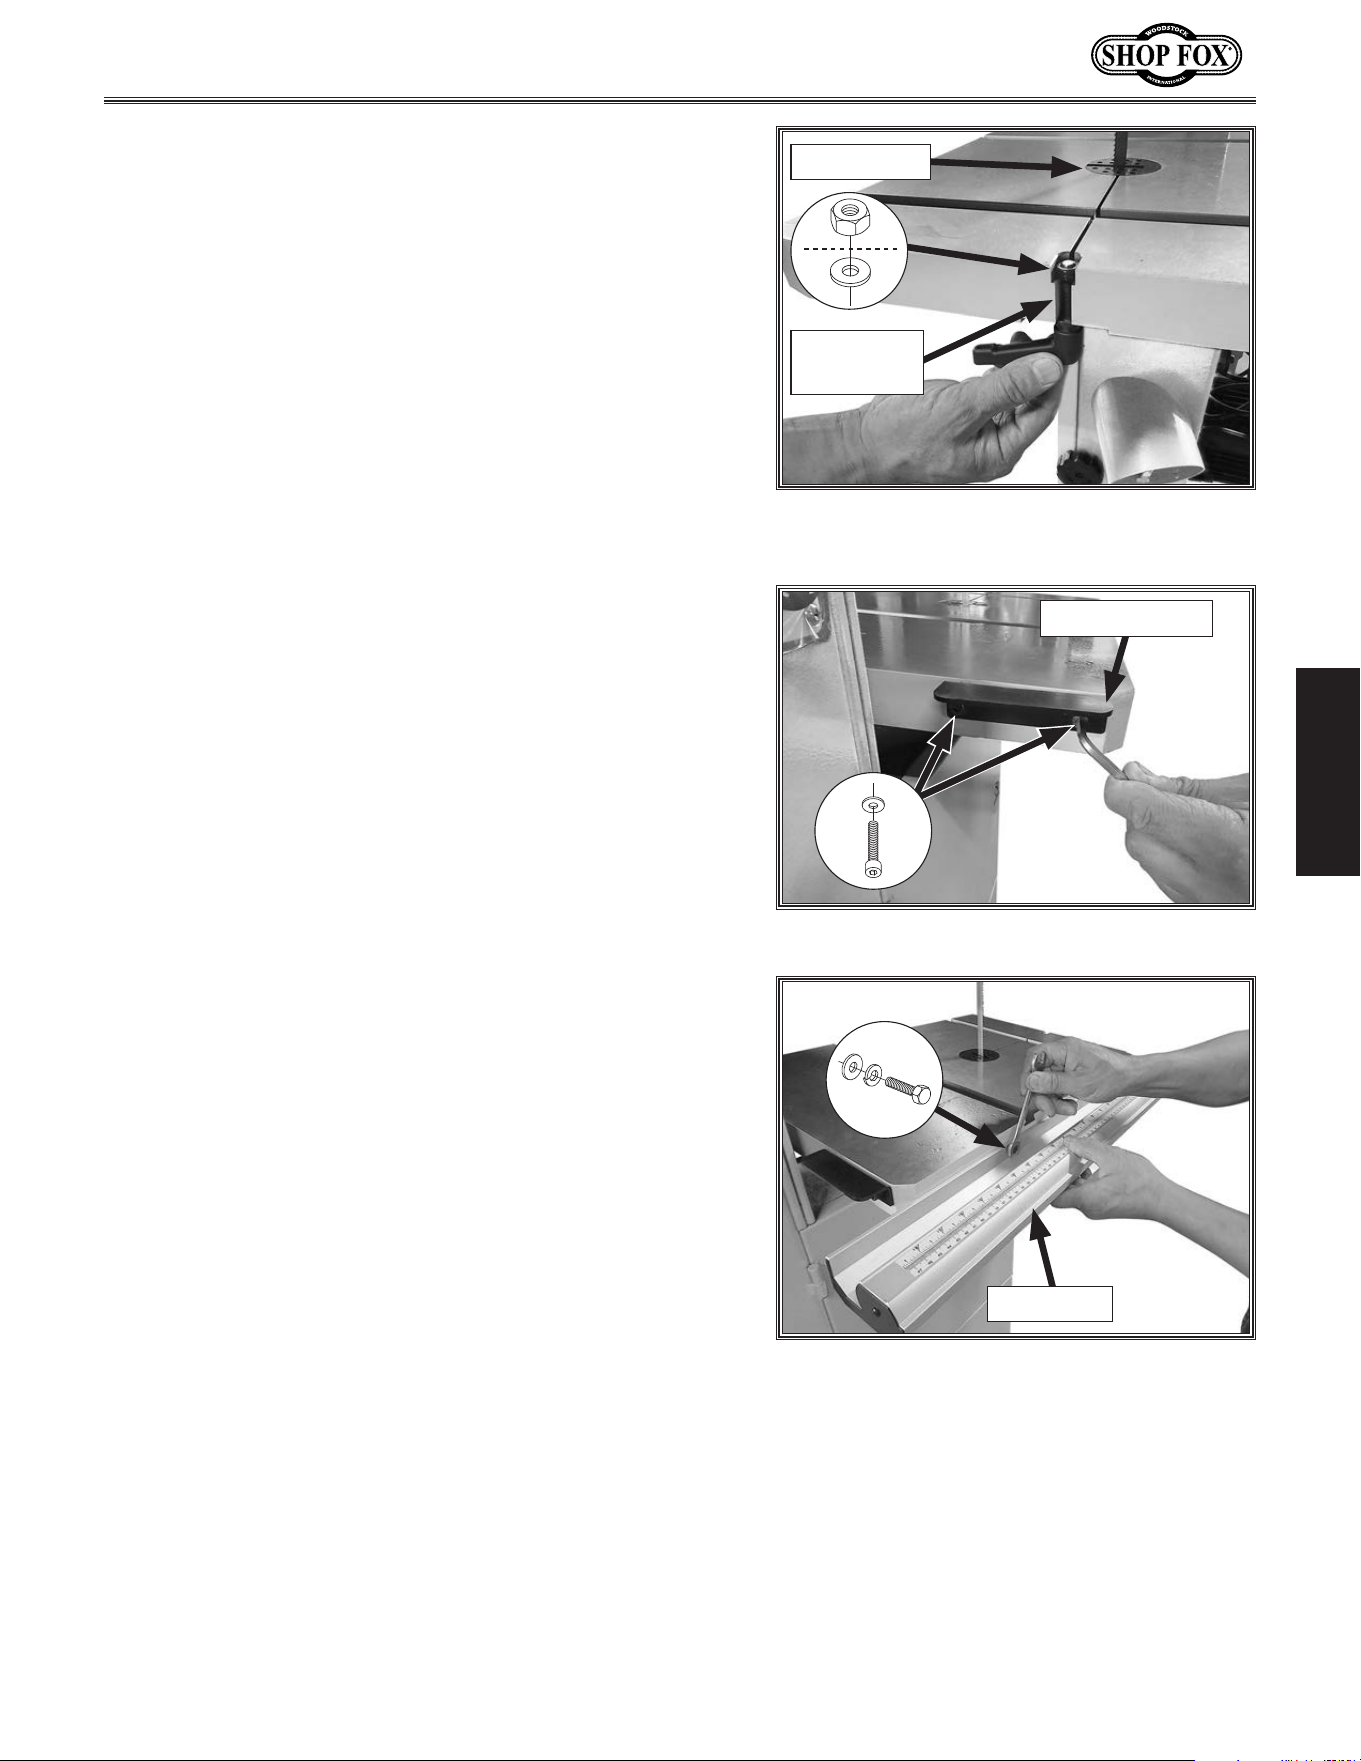
6. Install table insert (see Figure 23).
7. Install table gap screw lock lever, secure with (1)
M8-1.25 thin hex nut and (1) 8 x 20mm flat washer
(see Figure 23), then tighten gap screw to ensure
table surface is flush across gap.
9. Install fence rail using (2) M6-1 x 20 hex bolts, (2)
6mm flat washers, and (2) 6mm lock washers (see
Figure 25).
x 2
Figure 25. Installing fence rail.
Fence Rail
8. Install fence support using (2) M6-1 x 12 cap screws
and (2) 6mm flat washers (see Figure 24).
Figure 24. Installing fence support.
x 2
Fence Support
Figure 23. Table insert and gap screw
installed.
Table Insert
Gap Screw
Assembly
-24-
Model W1849 (For Machines Mfd. Since 11/16)
SETUP
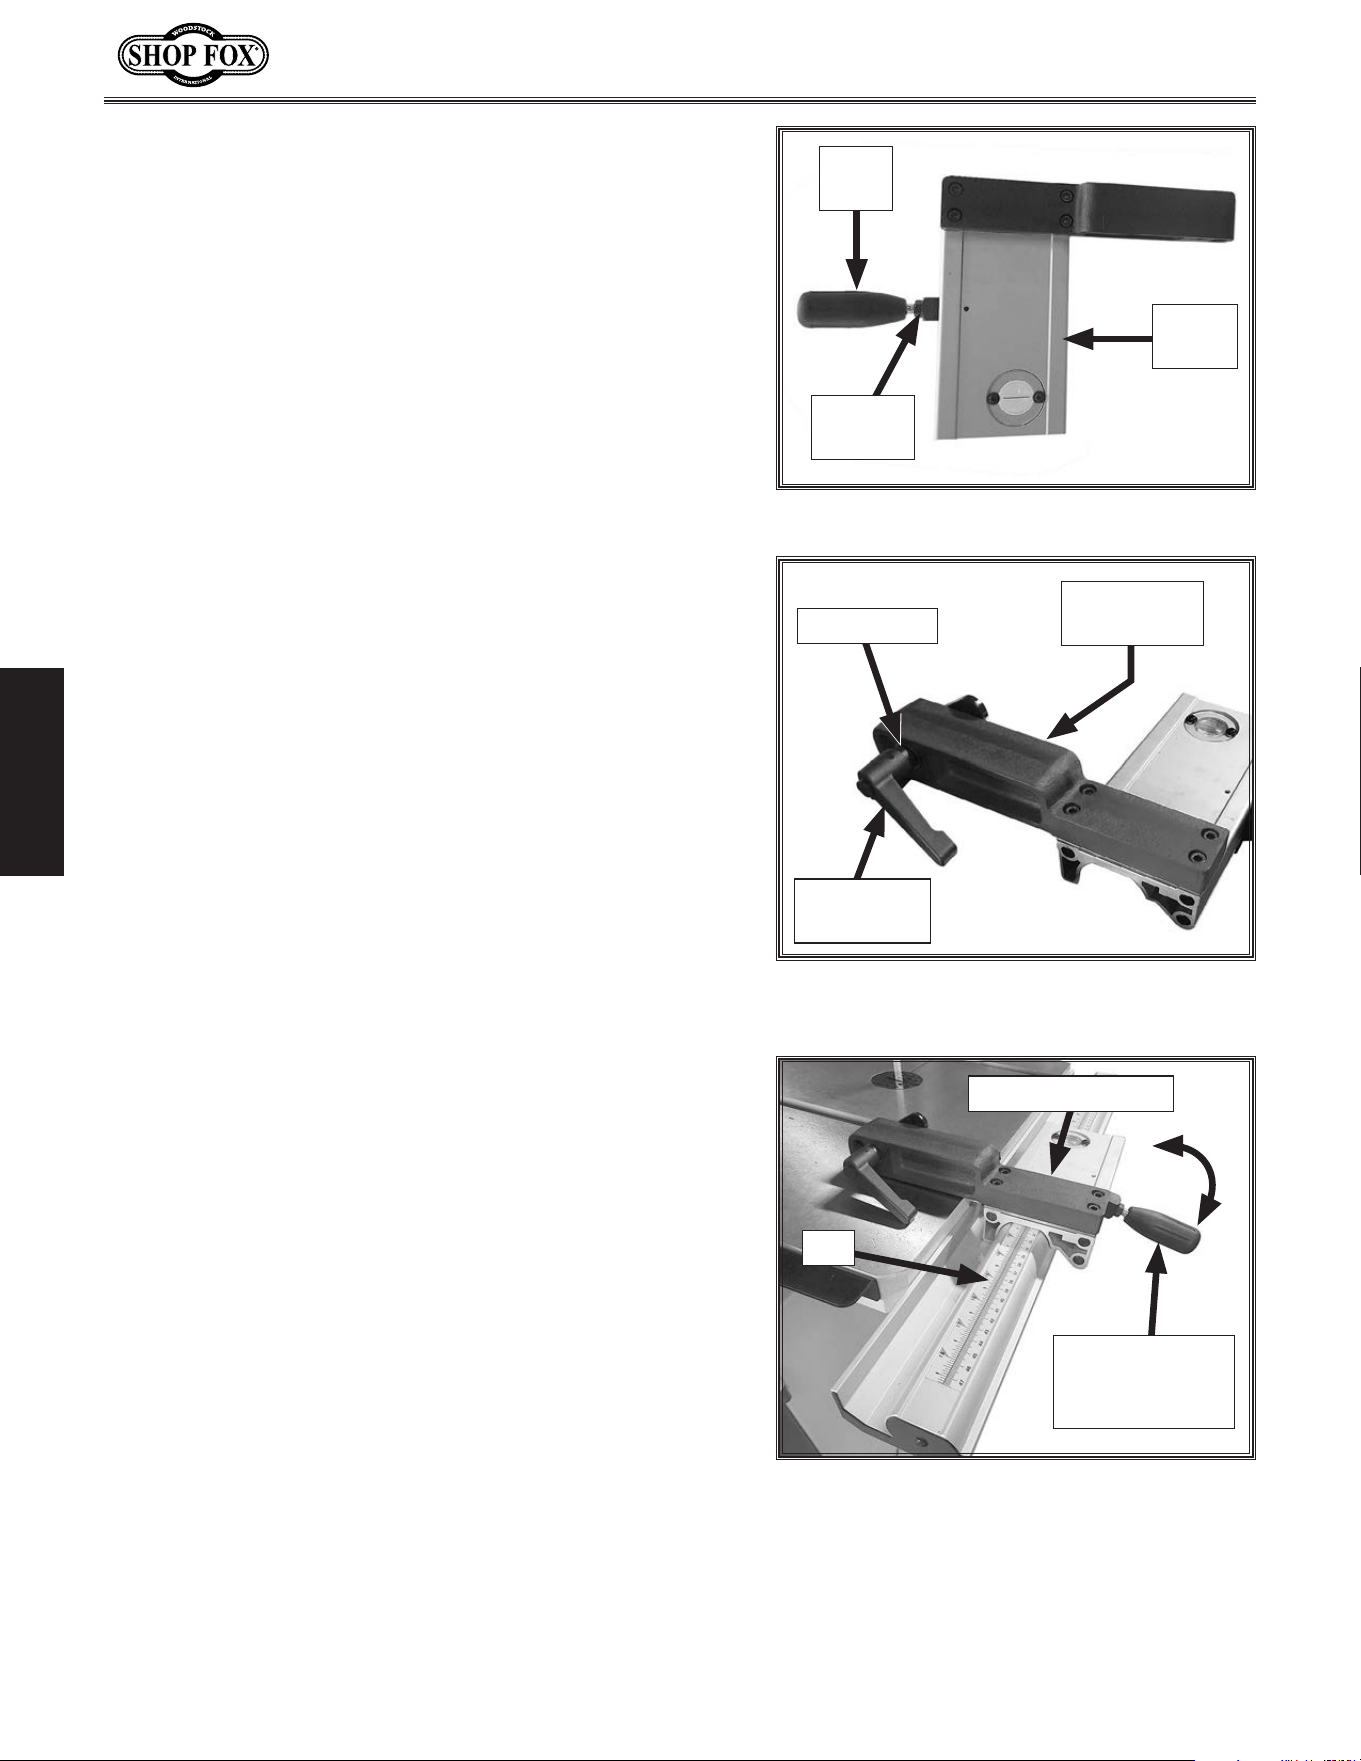
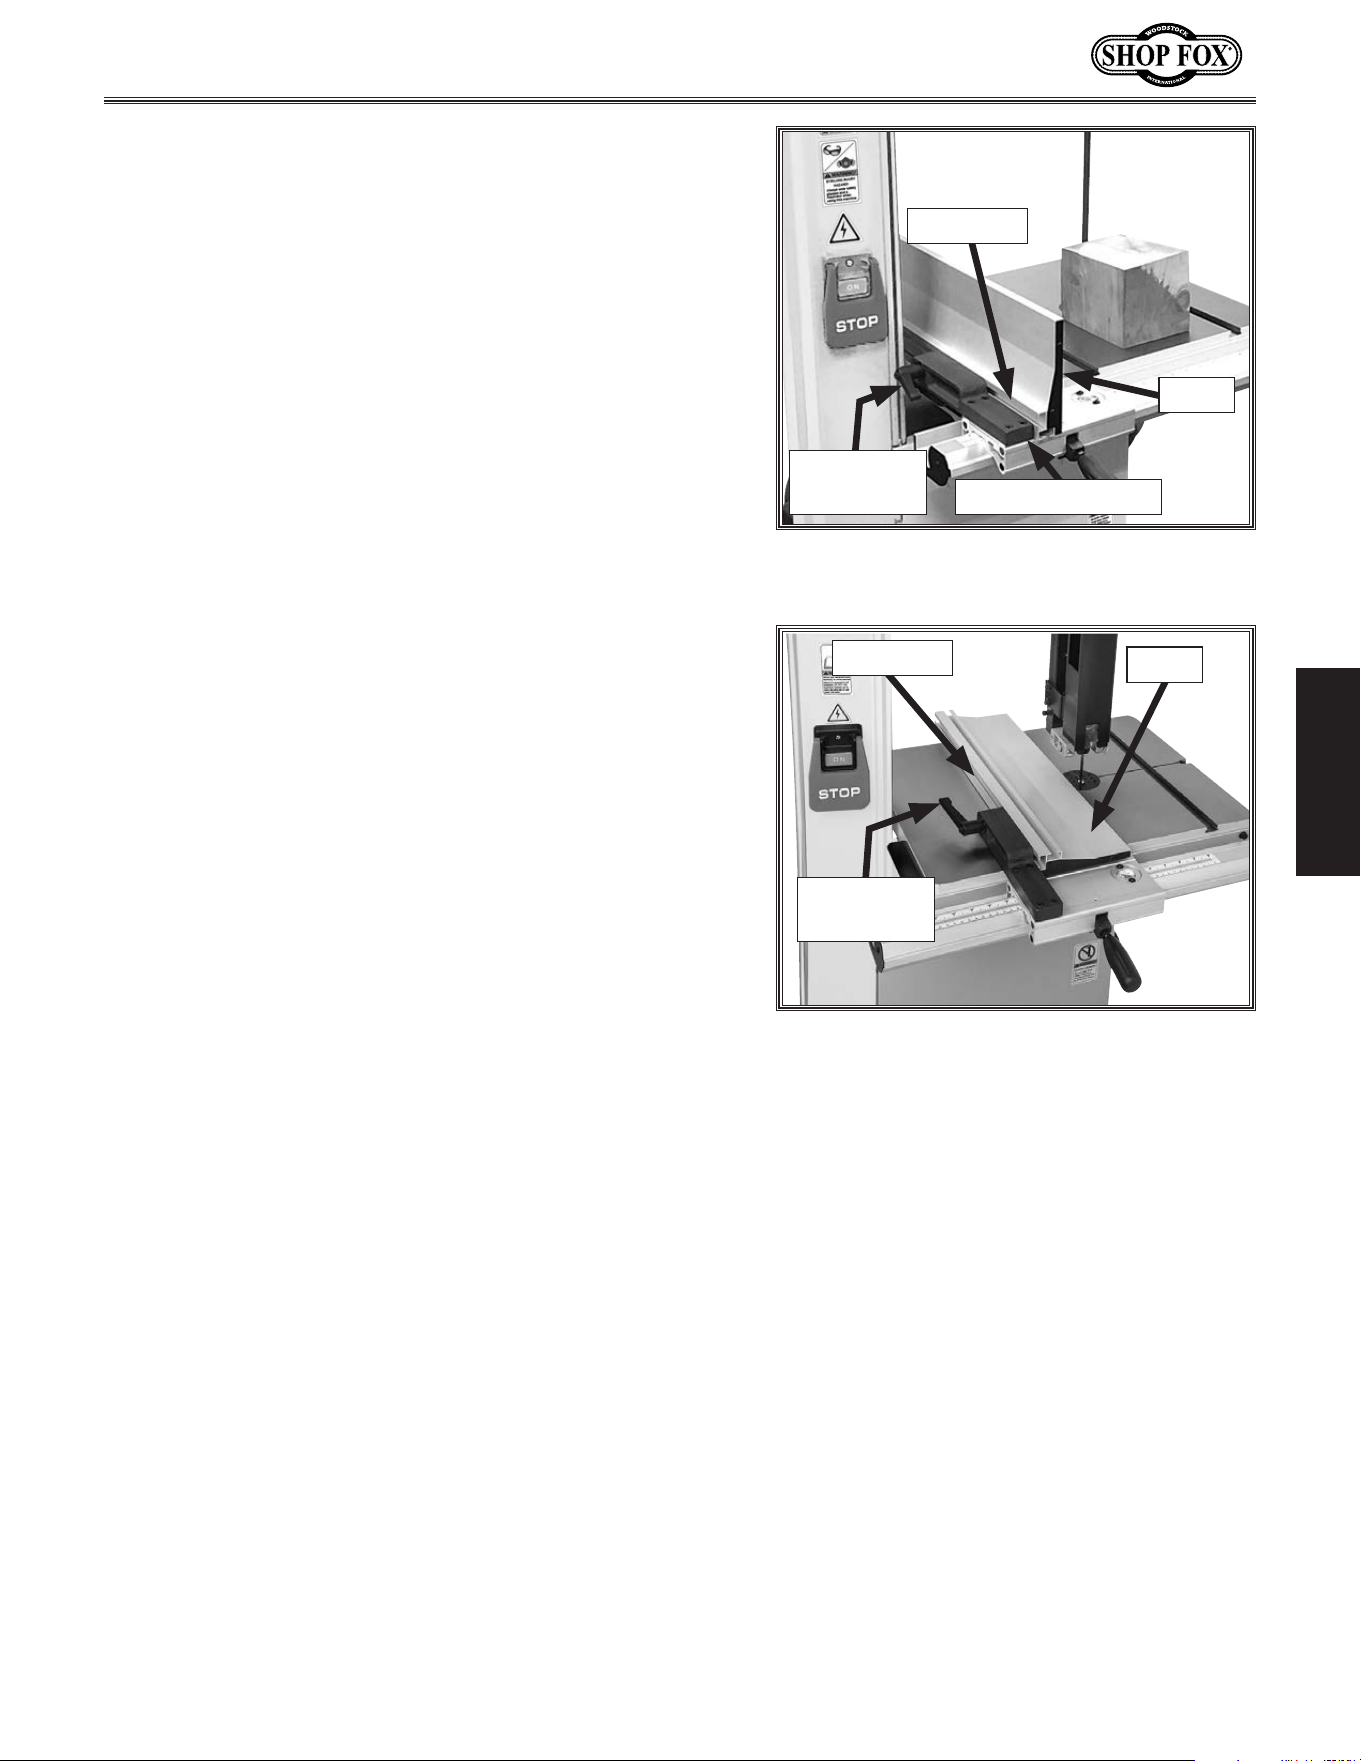
10. Thread (1) M8-1.25 hex nut onto lock lever, install
lock lever onto fence base, then tighten hex nut to
secure (see Figure 26).
Figure 26. Fence base lock lever installed.
Lock
Lever
Hex Nut
M8-1.25
Fence
Base
11. Install adjustable handle onto fence base with (1)
8mm flat washer, and thread into fence base guide
plate (see Figure 27).
Figure 28. Fence base installed on fence
rail.
Rail
Lock Lever in
Down (Locked)
Position
Fence Base Guide
12. Place fence base guide on fence rail with lock lever
raised up. Push lock lever down to secure fence in
place (see Figure 28).
Figure 27. Fence base adjustable handle
and guide plate installed.
Fence Base
Guide Plate
Adjustable
Handle
Flat Washer
-25-
Model W1849 (For Machines Mfd. Since 11/16)
SETUP
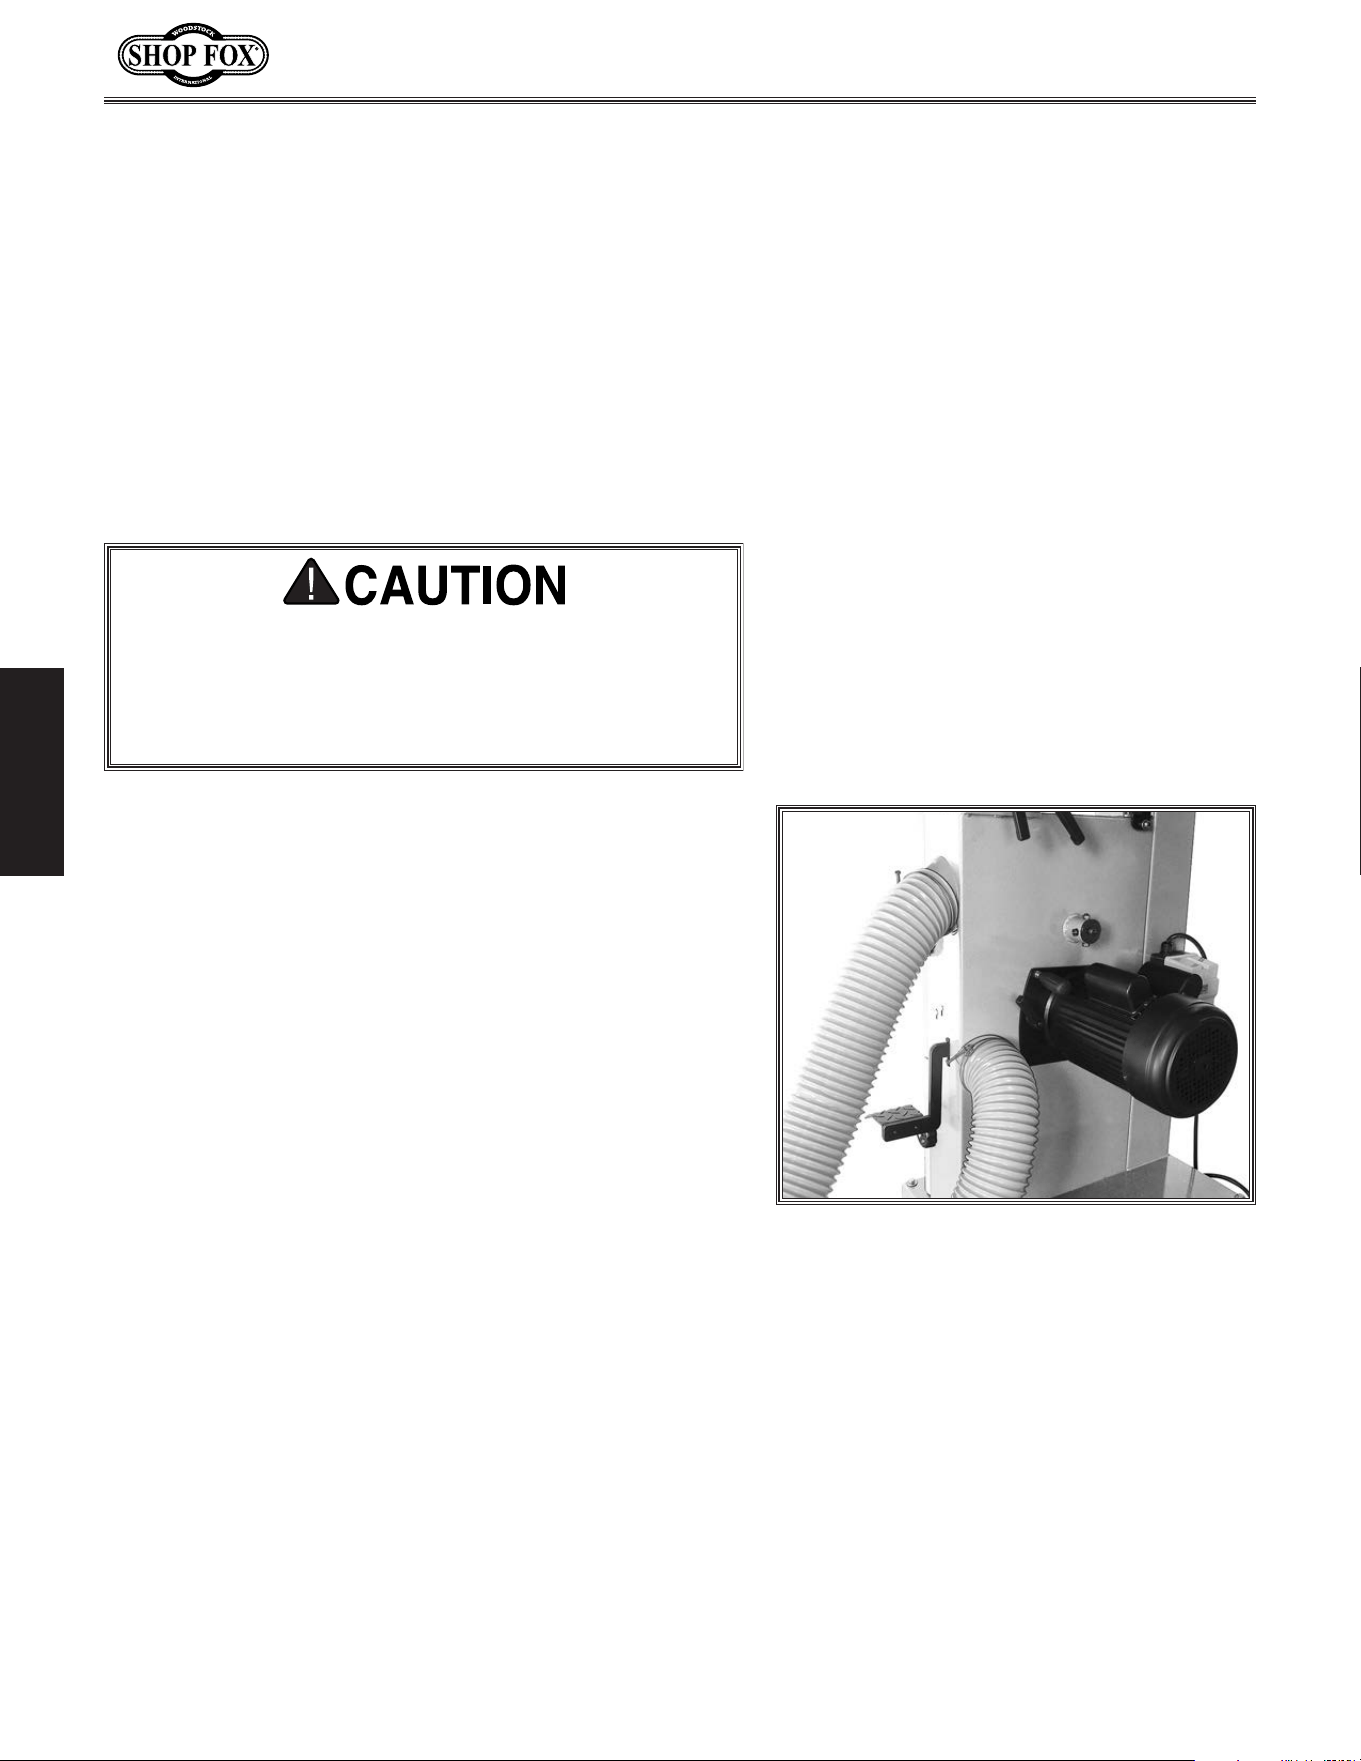
13. Mount fence to fence base guide, sliding T-channel
around fence base guide plate (see Figure 29).
— For normal workpieces or resawing, mount fence
in vertical position, as shown in Figure 29, then
rotate fence base lock lever to secure.
Figure 30. Fence installed in horizontal
position.
T-Channel
Fence
Fence Lock
Lever
Figure 29. Installing fence in vertical
position.
Fence Base Guide
T-Channel
Fence
Fence Lock
Lever
— For thin workpieces, mount fence in horizontal
position, as shown in Figure 30, then rotate fence
base lock lever to secure.
-26-
Model W1849 (For Machines Mfd. Since 11/16)
SETUP
Recommended CFM at Each Dust Port: .......... 400 CFM
Dust.Collection
Tools Needed Qty
Dust Collection System ........................................1
Dust Hose 4" .....................................................2
Hose Clamps 4" ..................................................2
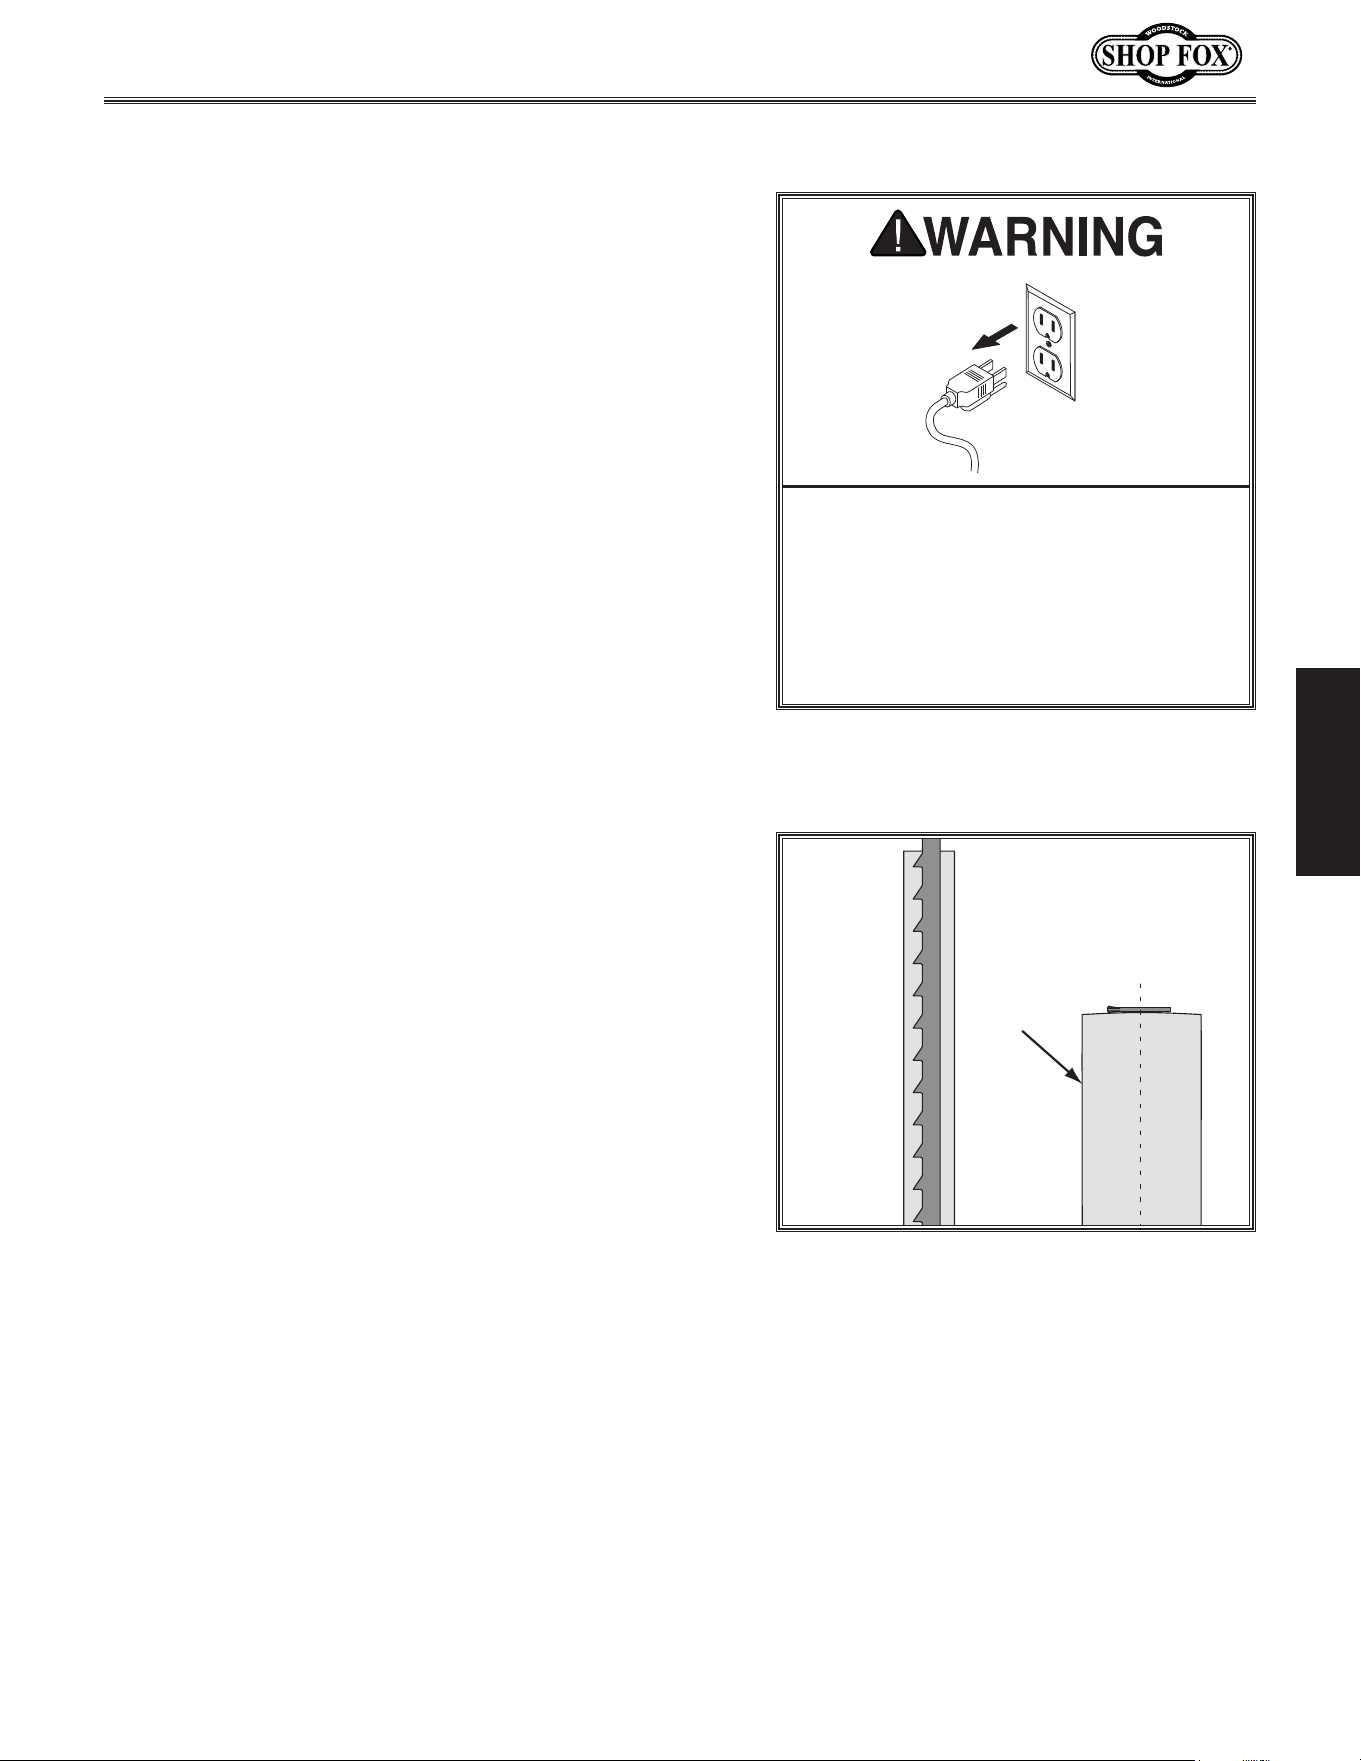
To connect a dust collection hose, do these steps:
1. Fit 4" dust hose over each dust port, as shown in
Figure 31, and secure it in place with hose clamp.
Note: For best results, connect free ends of hoses
to a 4" Y fitting and secure with hose clamps, then
connect fitting to your dust collection system.
See Accessories, beginning on Page 55, for more
information.
2. Tug hose to make sure it does not come off.
Note: A tight fit is necessary for proper
performance.
Do not confuse this CFM recommendation with the rating
of the dust collector. To determine the CFM at the dust
port, you must consider these variables: (1) CFM rating of
the dust collector, (2) hose type and length between the
dust collector and the machine, (3) number of branches
or wyes, and (4) amount of other open lines throughout
the system. Explaining how to calculate these variables
is beyond the scope of this manual. Consult an expert or
purchase a good dust collection “how-to” book.
This. machine. creates. substantial. amounts. of. dust.
during.operation..Breathing.airborne.dust.on.a.regu-
lar.basis.can.result.in.permanent.respiratory.illness..
Reduce.your. risk.by.wearing.a.respirator.and.captur-
ing.the.dust. with.a.dust.collection.system.
Figure 31. Example of dust hoses attached
to upper and lower dust ports.
-27-
Model W1849 (For Machines Mfd. Since 11/16)
SETUP
Adjustment.Overview
The bandsaw is one of the most versatile woodworking
machines. However, it has multiple components that must
be properly adjusted for the best cutting results.
For practical and safety reasons, some adjustments and
test operations must be performed before performing
other necessary adjustments. Below is an overview of all
the adjustments and the order in which they should be
performed:
1. Initial Blade Tracking (This Page)
2. Test Run (Page 29)
3. Tension Blade (Page 30)
4. Adjusting Blade Support Bearings (Page 33)
5. Adjusting Euro-Style Roller Disc Guides (Page 34)
6. Table Tilt Calibration (Page 51)
7. Aligning Table (Page 39)
8. Aligning Fence (Page 41)
Initial.Blade.Tracking
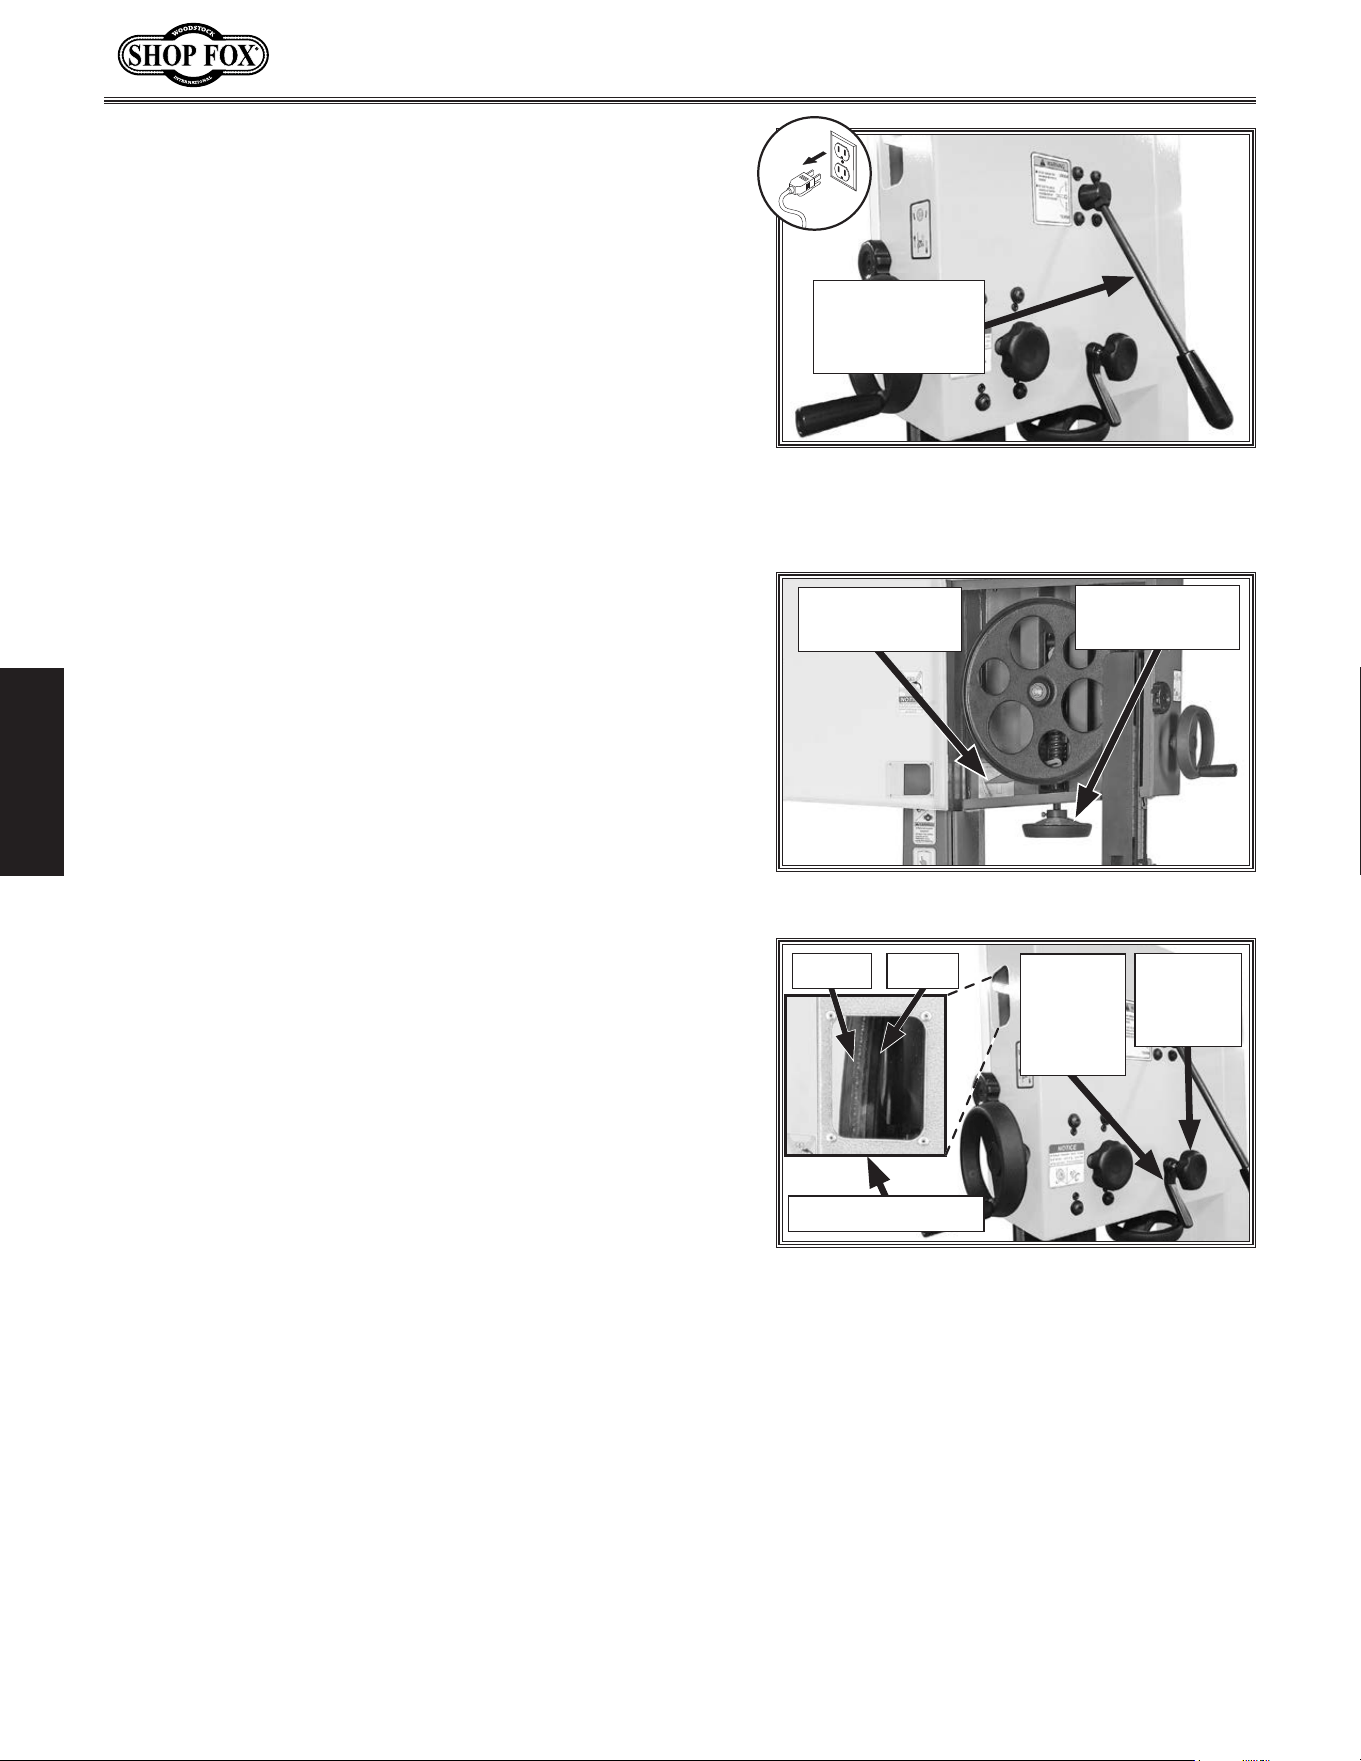
Blade Centered
on Wheel
Blade
Centered
on Wheel
PROPER TRACKING
Wheel
Figure 32. Blade centered on crown of
wheel.
"Tracking" refers to how the blade rides on the bandsaw
wheels. Proper tracking is important for maintaining
bandsaw adjustments, achieving correct blade tension,
and cutting accurately. Improper tracking reduces cutting
accuracy, causes excess vibrations, and places stress on
the blade and other bandsaw components. The shape of
the wheels and the orientation of the wheels in relation
to each other determine how the blade tracks.
Bandsaw wheels are either flat or crowned and both
shapes track differently. This bandsaw has crowned
wheels. As the wheels spin, a properly tracking blade
naturally tracks at the center of the wheel (see
Figure 32).
Blade tracking is primarily affected by the tilt of the
upper wheel, known as “center tracking.” Howe ver, the
alignment of both wheels plays an important part as well
(see Aligning Wheels on Page 70 for more details).
The wheels on this bandsaw were aligned at the factory,
so center tracking is the only adjustment that needs to be
checked/performed when the saw is new.
Serious personal injury can occur
if the machine starts while your
hand is touching the bandsaw
wheel during tracking adjustments.
Disconnect power from the bandsaw
before performing blade tracking
adjustments.
-28-
Model W1849 (For Machines Mfd. Since 11/16)
SETUP
To adjust blade tracking, do these steps:
1. DISCONNECT MACHINE FROM POWER!
2. Adjust upper and lower blade guides away from
blade, and raise upper guides approximately
2
⁄3 of
the way up (refer to Adjusting "Euro-Style" Roller
Disc Guides on Page 35 for detailed instructions).
Note: When adjusting the blade tracking for the
test run in this procedure, the blade must have
approximately the same amount of tension as when
under operating conditions. After the test run
is successfully completed, you will be instructed
on how to more accurately tension the blade for
optimum results.
3. Move blade tension quick-release lever down to
apply tension to blade (see Figure 33).
Figure 33. Quick-release blade tension
lever in down position, applying tension to
blade.
4. Open upper wheel cover (see Figure 34).
5. Rotate blade tension handwheel until tension
scale (see Figure 34) is between 4 and 6. Rotate
handwheel clockwise to increase blade tension.
Rotate handwheel counterclockwise to decrease
blade tension.
Note: If using a narrower blade than the one
included with the saw, use less tension to avoid
breakage.
Blade Tension
Quick-Release
Lever
6. Loosen tracking control lock lever on back of
bandsaw (see Figure 35).
7. Rotate upper wheel by hand several times and watch
how blade rides on wheel (see inset Figure 35).
— If the blade does consistently rides in the center
of the upper wheel, it is tracking properly and no
adjustments are necessary; proceed to Step 9.
— If the blade does not consistently ride in the
center of the upper wheel, it is not tracking
properly; proceed to Step 8.
Figure 34. Blade tensioning controls.
Blade Tension
Scale
Blade Tension
Handwheel
8. Adjust tracking control knob (see Figure 35) in small
amounts and continue to rotate upper wheel by hand
at the same time until blade consistently rides in
center of bandsaw tire.
9. Tighten tracking control lock lever, and close and
secure upper wheel cover.
Figure 35. Blade tracking controls.
Tracking
Control
Lock
Lever
Tracking
Control
Knob
Blade
Wheel
Tracking Window
Note: For the best performance
from your saw, regularly maintain
proper tracking of the blade. Fine
tune tracking must be done with the
bandsaw turned ON. Refer to Page 32
for more information.
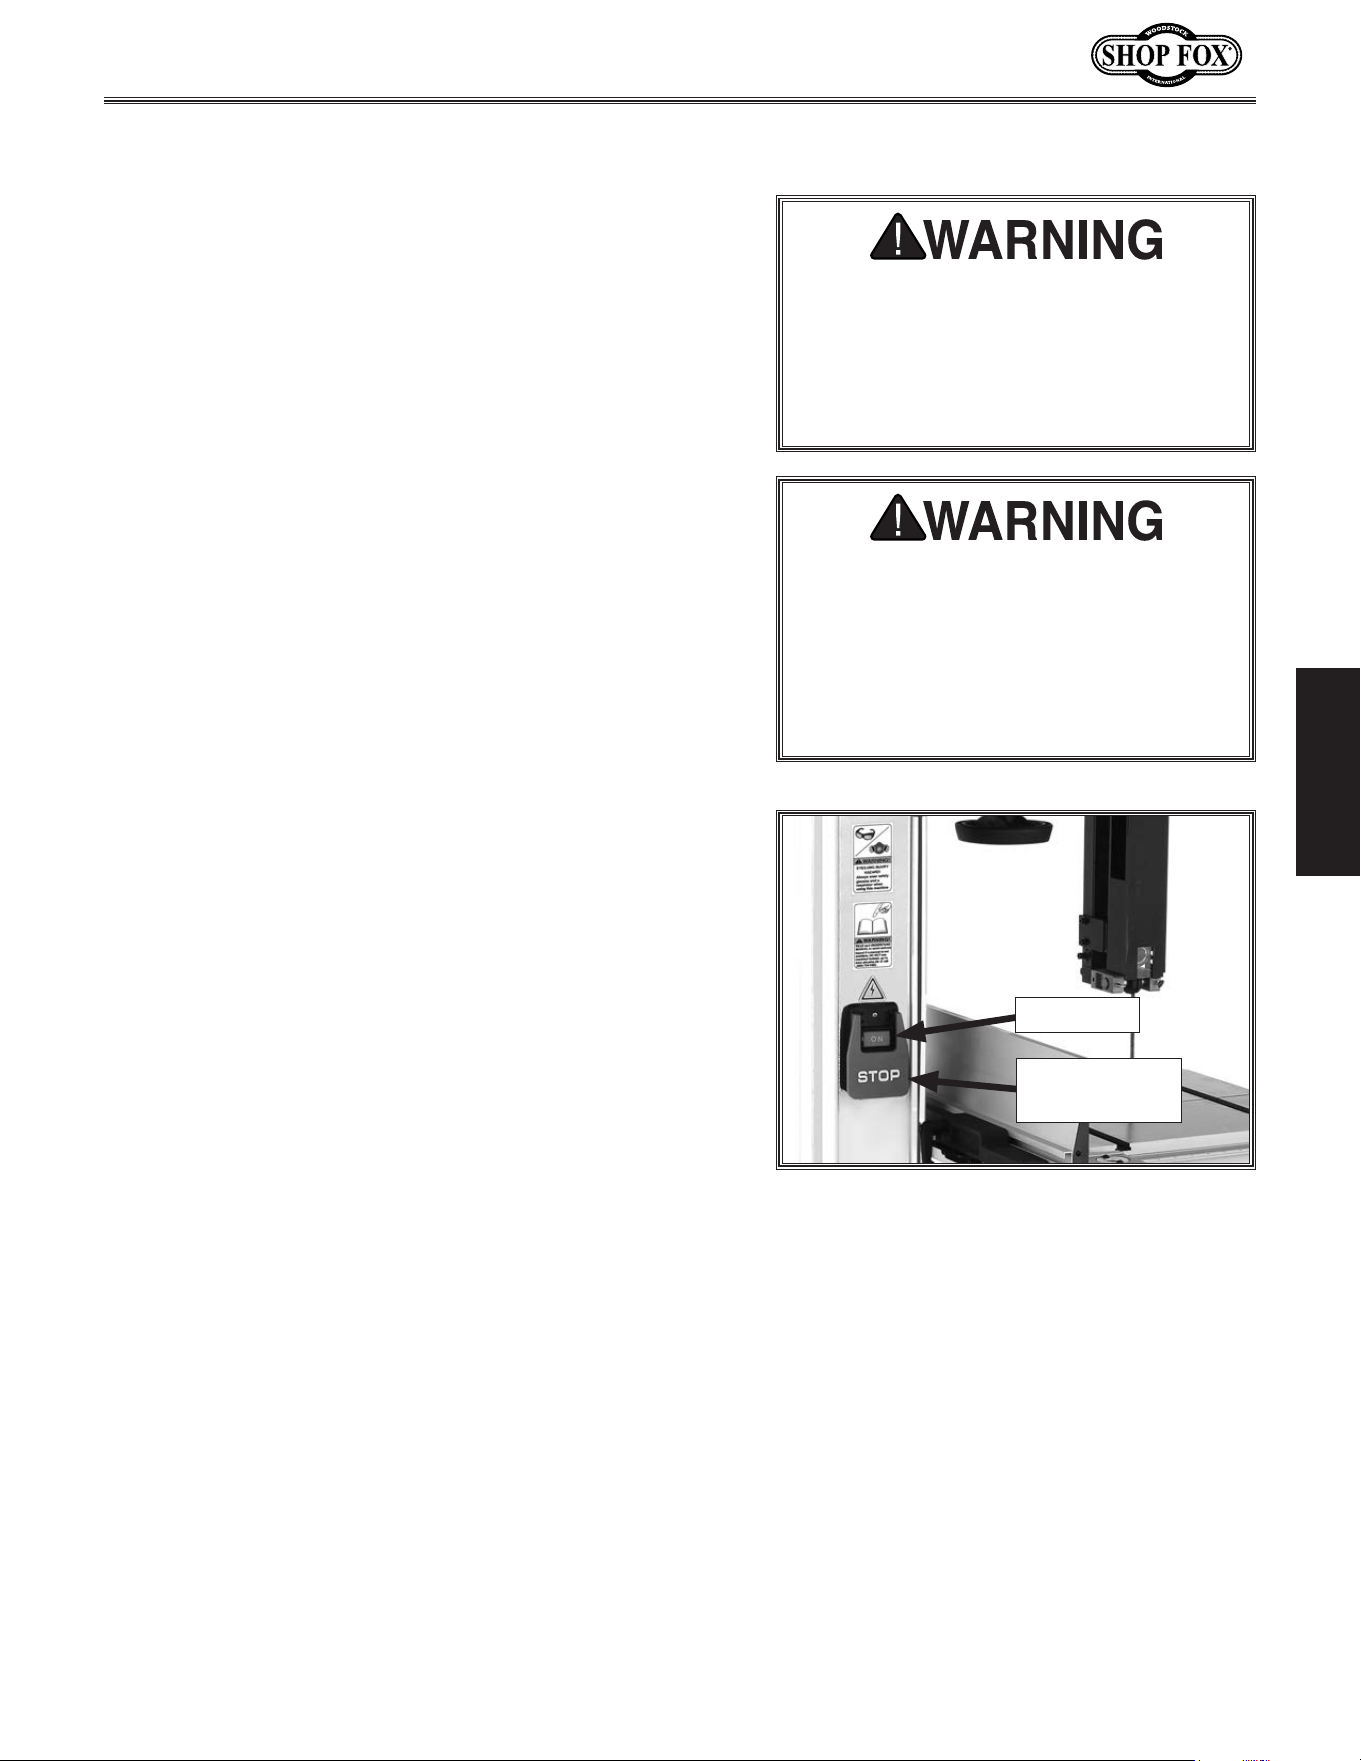
-29-
Model W1849 (For Machines Mfd. Since 11/16)
SETUP
Test. Run
Serious. injury. or. death. can. result.
from. using. this. machine. BEFORE.
understanding. its. controls. and. related.
safety.information..DO.NOT.operate,.or.
allow.others.to.operate,.machine.until.
the.information.is.understood..
DO. NOT. start. machine. until. all.
preceding.setup.instructions.have.been.
performed..Operating.an.improperly.set.
up. machine. may. result. in. malfunction.
or. unexpected. results. that. can. lead.
to. serious. injury,. death,. or. machine/
property.damage.
Once assembly is complete, test run the machine to
ensure it is properly connected to power and safety
components are functioning properly.
If you find an unusual problem during the test run,
immediately stop the machine, disconnect it from power,
and fix the problem BEFORE operating the machine again.
The
Troubleshooting table in the SERVI CE
section of this
manual can help.
To test run machine, do these steps:
1. Clear all setup tools away from machine.
2. Connect machine to power supply.
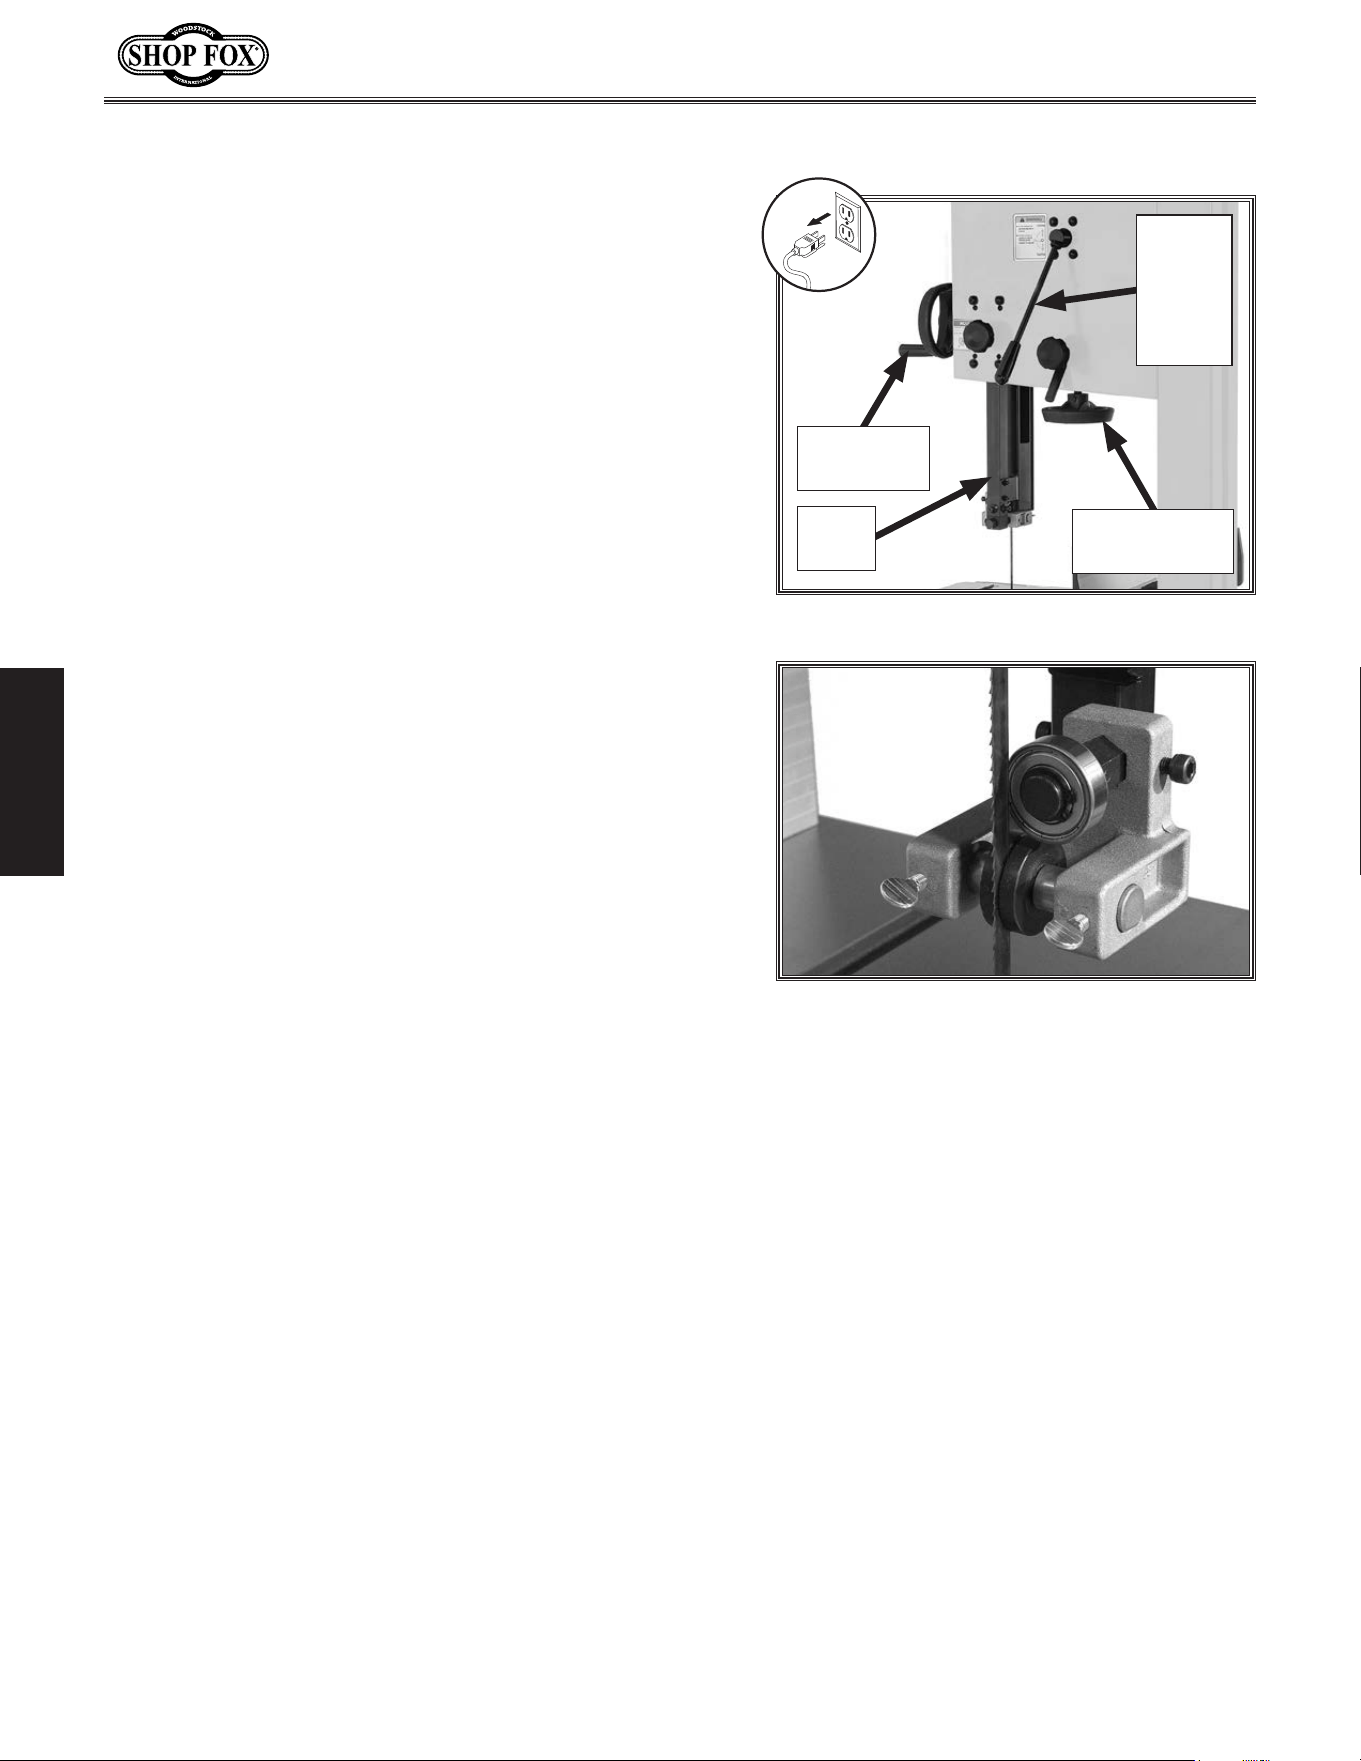
3. Turn machine ON (see Figure 36) and verify motor
operation. Motor should run smoothly and without
unusual noises.
4. Turn machine OFF by pressing in STOP paddle. Motor
should turn off immediately.
— If machine does stop, the STOP paddle is working
as designed.
— If machine does not stop, immediately disconnect
power to the machine. The STOP paddle is not
working correctly. This safety feature must
work properly before proceeding with regular
operations. Call Tech Support for help.
Figure 36. Location of ON/OFF switch.
STOP Paddle/
OFF Switch
ON Button
-30-
Model W1849 (For Machines Mfd. Since 11/16)
SETUP
A properly tensioned blade is essential for making
accurate cuts, maximizing blade life, and making other
bandsaw adjustments. However, a properly tensioned
blade will not compensate for cutting problems caused
by excessive feed rate, hardness variations between
workpieces, and improper blade selection.
Optimal cutting results for any type of workpiece
are achieved through a combination of correct blade
selection, proper blade tension, properly adjusted blade
guides and other bandsaw components, and using an
appropriate feed rate.
Improper blade tension is unsafe, produces inaccurate and
inconsistent results, and introduces unnecessary wear on
bandsaw components. Over-tensioning the blade increases
the chance of the blade breaking or wheel misalignment.
Under-tensioned blades wander excessively while cutting
and will not track properly during operation.
The method used to tension the blade is often a matter
of preference. This manual describes two methods: the
flutter method and the deflection method. Either method
will help you properly tension the blade. Experience and
personal preference will help you decide which method
you prefer.
Note: Tensioning the blade before the Test Ru n was an
approximate tension. The following procedures fine-tune
the blade tension.
Tensioning.Blade
Using the flutter method, you intentionally loosen the
blade until it just passes the point of being too loose
(when it begins to flutter). Then you gradually tighten the
blade until proper tension is reached.
To tension bandsaw blade using flutter method, do
these steps:
1. DISCONNECT MACHINE FROM POWER!
2. Make sure blade is properly tracking as instructed in
Initial Blade Tracking subsection on Page 27.
3. Use handwheel to fully raise guide post (see Figure
37), and move upper and lower support bearings and
roller discs (see Figure 38) away from blade. Refer
to Pages 33–34 for more information.
The.Flutter.Method
4. Engage blade tension quick-release
lever to apply tension to blade.
5. Connect bandsaw to power, then turn
it ON.
6. Use blade tension handwheel to slowly
decrease blade tension until you see
blade start to flutter.
7. Slowly increase tension until blade
stops fluttering, then tighten blade
tension adjustment knob an additional
1
⁄8- to
1
⁄4-turn.
8. DISCONNECT MACHINE FROM POWER!
9. Adjust blade guides as described in
Adjusting Blade Support Bearings and
Adjusting "Euro-Style" Roller Disc
Guides on Pages 33–34.
Figure 37. Blade tensioning controls.
Guide
Post
Blade Tension
Handwheel
Guide Post
Handwheel
Blade
Tension
Quick-
Release
Lever
Figure 38. Upper guide roller discs.
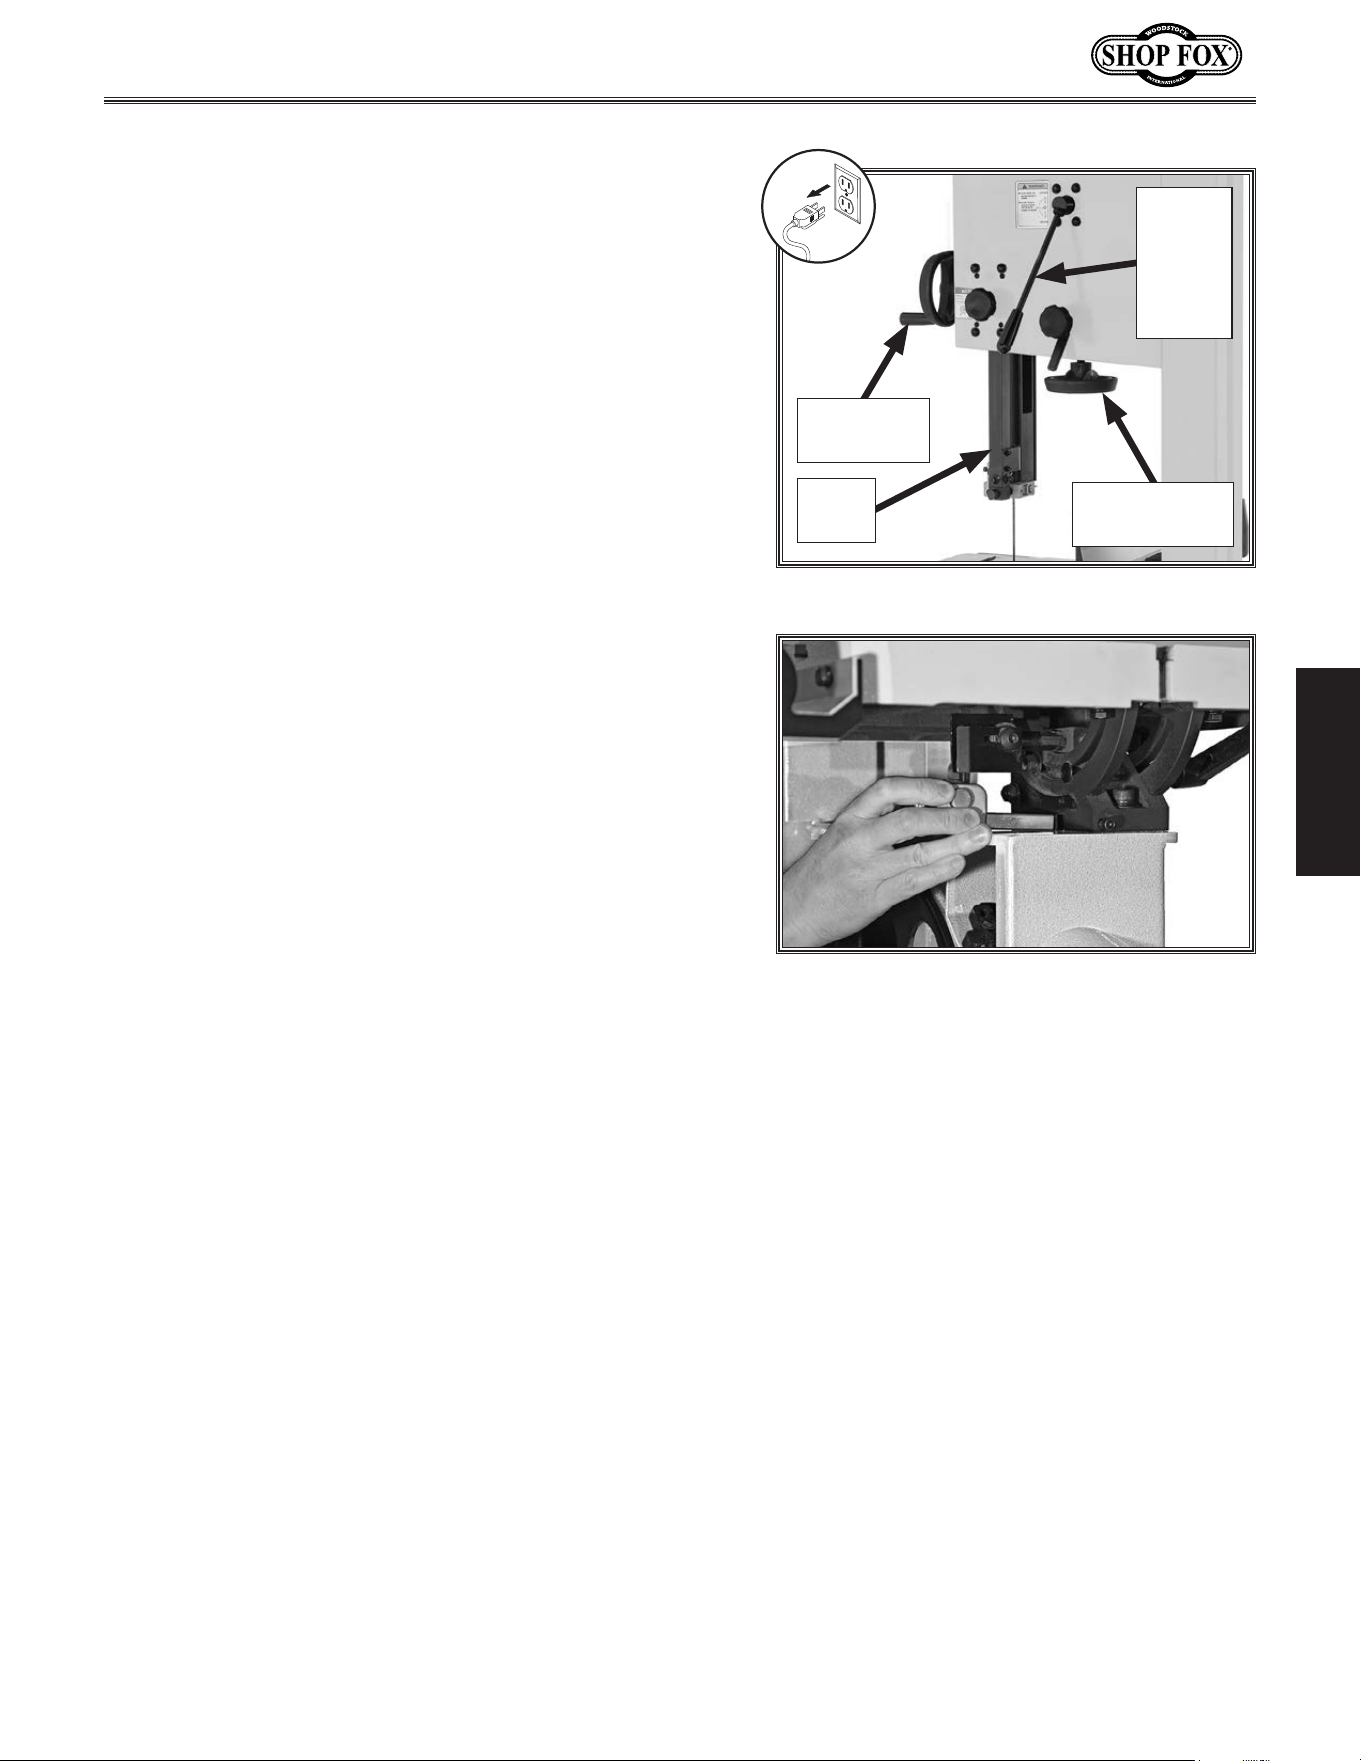
-31-
Model W1849 (For Machines Mfd. Since 11/16)
SETUP
The deflection method is much more subjective than
the flutter method. Each blade will deflect differently
and every user will determine what "moderate pressure"
means. The following are general guidelines for tensioning
the blade with this method.
To tension bandsaw blade using deflection method, do
these steps:
1. DISCONNECT MACHINE FROM POWER!
2. Make sure blade is properly tracking as instructed in
Initial Blade Tracking subsection on Page 27.
3. Use handwheel to fully raise guide post (see Figure
39), and move upper and lower roller-disc guides
and support bearings away from blade (see Figure
40). Refer to Page 33 for more information.
4. Engage blade tension quick-release lever to apply
tension to blade.
5. Using moderate pressure, push center of blade
sideways.
— If blade deflects approximately
1
⁄4", it is properly
tensioned. Proceed to Step 6.
— If blade deflects less than
1
⁄4", it is over-
tensioned. Rotate blade tension handwheel
counterclockwise two full turns and repeat Step 5.
— If blade deflects
1
⁄4" or more, blade is not properly
tensioned. Rotate blade tension handwheel
clockwise to incrementally tension blade, and
repeat Step 5 until blade is properly tensioned.
6. Adjust blade guides as described in Adjusting Blade
Support Bearings and Adjusting "Euro-Style" Roller
Disc Guides on Pages 33–34.
The.Deflection.Method
Figure 39. Blade tensioning controls.
Guide
Post
Blade Tension
Handwheel
Guide Post
Handwheel
Blade
Tension
Quick-
Release
Lever
Figure 40. Location of lower roller discs.
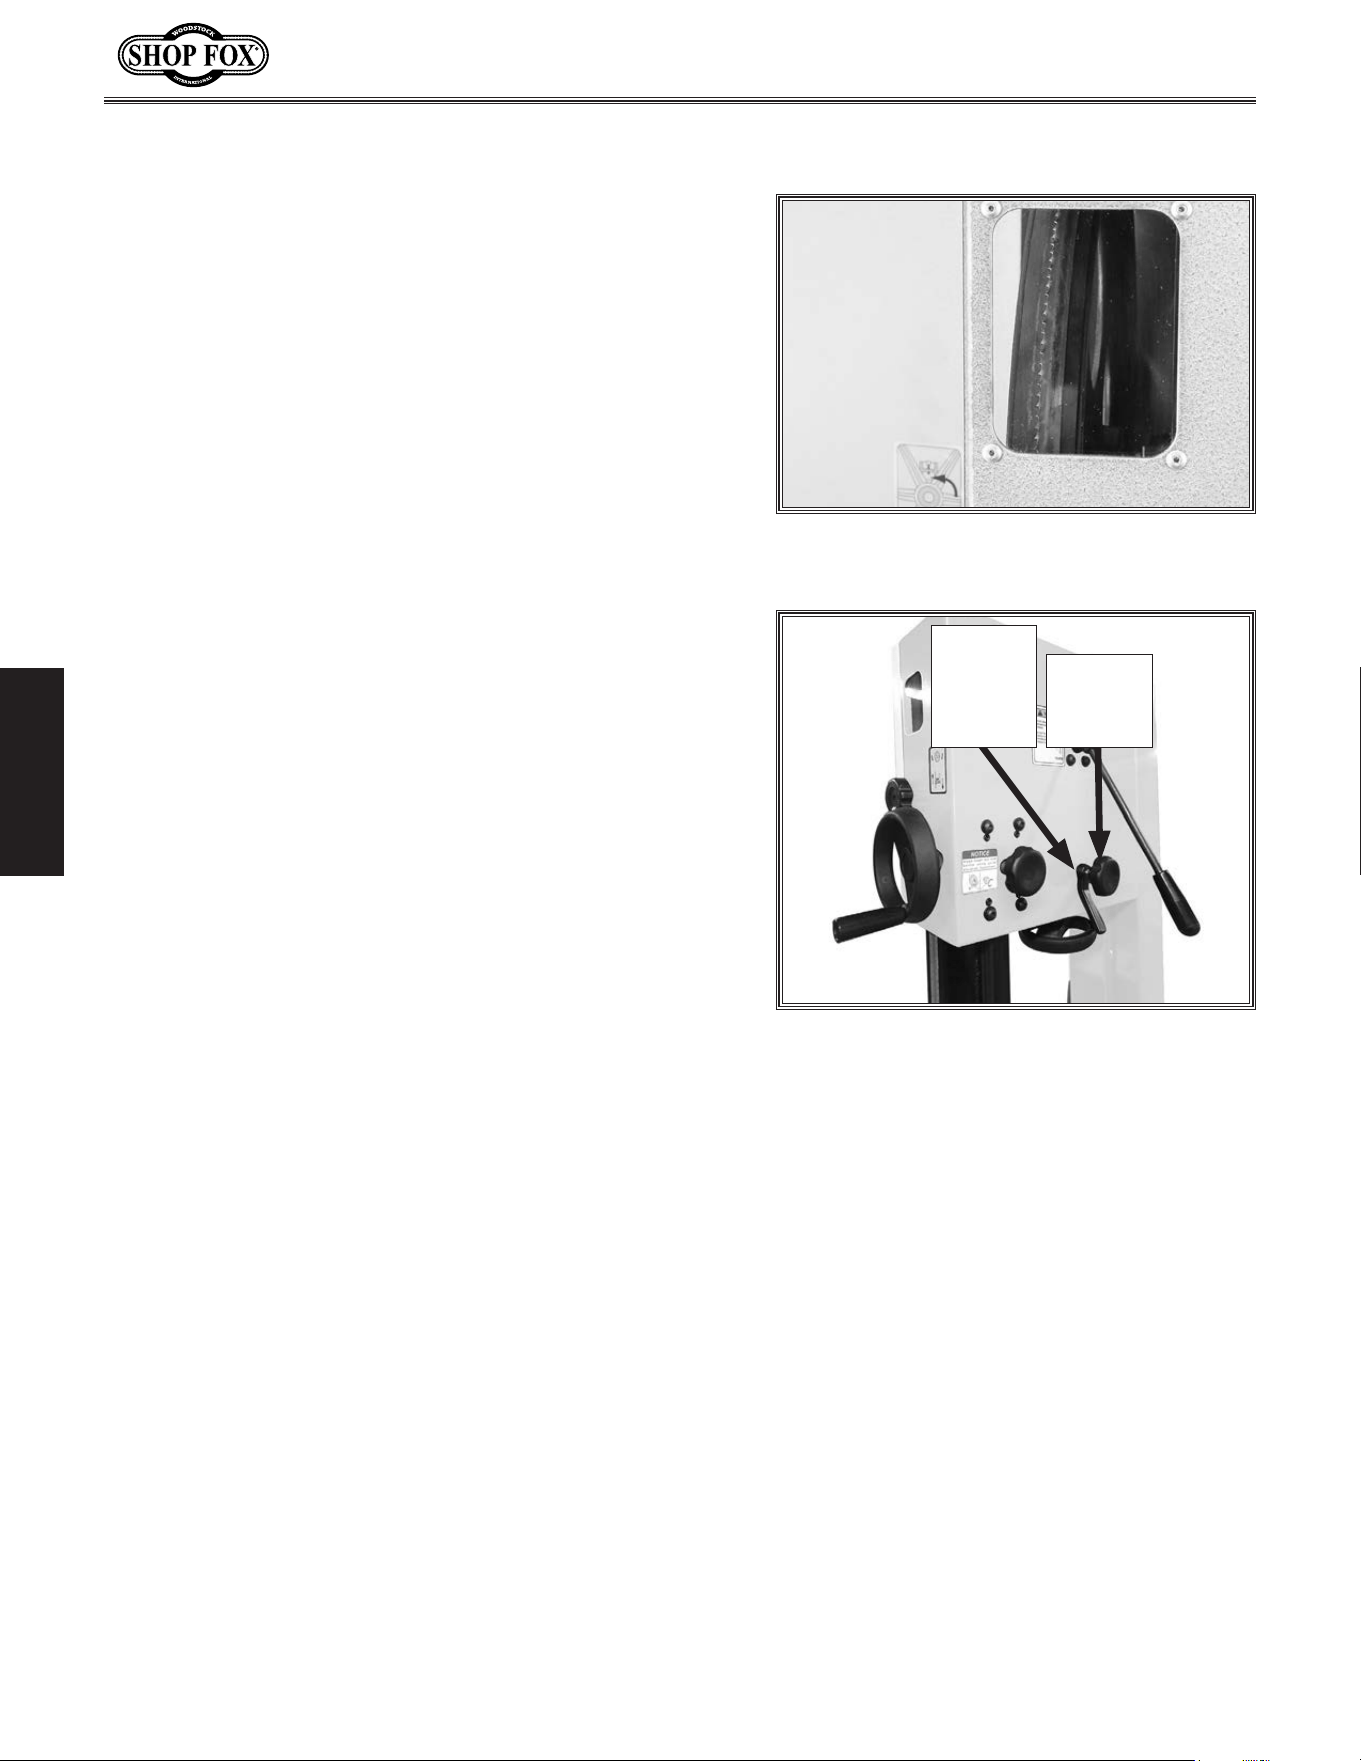
-32-
Model W1849 (For Machines Mfd. Since 11/16)
SETUP
Fine-Tune.Tracking
During setup, the blade was tracked without the machine
connected to power (refer to Page 27). In this procedure,
the bandsaw is turned ON to perform fine-tuning of the
tracking. Make small changes with the blade tracking knob
as you monitor the effect on the blade tracking.
To fine-tune blade tracking, do these steps:
1. Close wheel covers and turn bandsaw ON.
2. Observe blade tracking path through clear tracking
window on right edge of bandsaw (see Figure 41).
3. If necessary, loosen tracking control lock lever and
use tracking control knob (see Figure 42) to adjust
the blade so it tracks on the center of the wheel.
4. Tighten tracking control lock lever (see Figure 42)
to secure setting, then turn machine OFF.
Trackin
Control
Lock
Lever
Tracking
Control
Knob
Figure 42. Blade tracking controls.
Figure 41. View of blade through tracking
window.
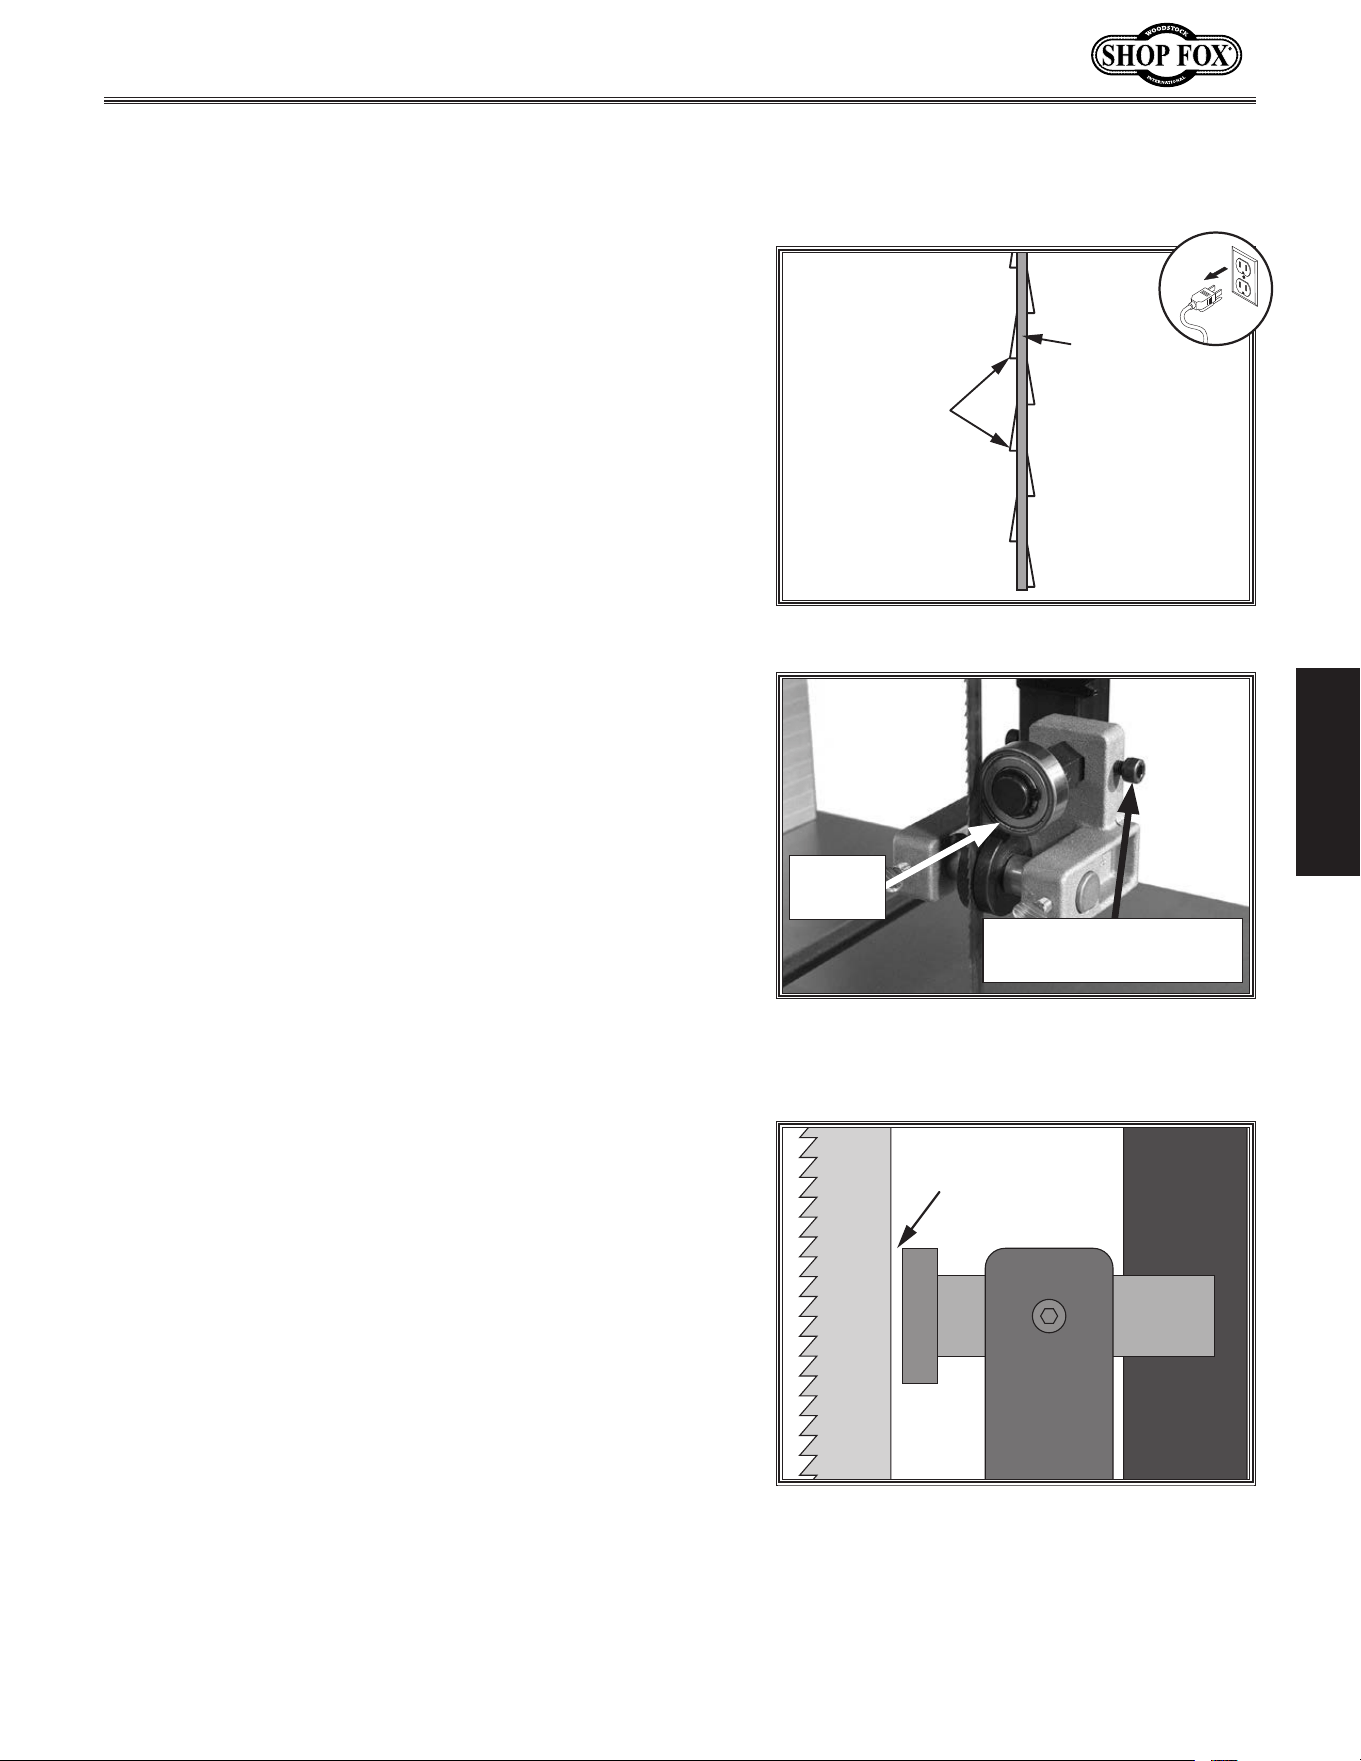
-33-
Model W1849 (For Machines Mfd. Since 11/16)
SETUP
Adjusting.Blade.Support.
Bea rings
The support bearings are positioned behind the blade
near the blade guides and prevent the blade from pushing
backward during cutting operations. Proper adjustment
of the support bearings helps you make accurate cuts and
prevents the blade teeth from coming in contact with
the blade guides while cutting. If this happens, the blade
"tooth set" (see Figure 43) can be ruined, which will
greatly reduce the blade's ability to make good cuts.
There are support bearings on the upper and lower blade
guide assemblies. Both adjust in the same manner. The
following instructions refer to the upper support bearings.
IMPORTANT: To ensure best results while cutting, make
sure the blade is tracking and tensioned correctly before
performing this procedure.
Tool Needed Qty
Hex Wrench 5mm ...............................................1
To adjust support bearing, do these steps:
1. DISCONNECT MACHINE FROM POWER!
2. Loosen support bearing adjustment cap screw (see
Figure 44).
3. Position support bearing approximately 0.016" away
from back of blade, as illustrated in Figure 45.
Note: The main purpose of this adjustment is to
prevent the blade from being pushed backward
far enough that the blade guides will contact (and
ruin) the "tooth set" of the blade during cutting
operations.
4. Tighten adjustment cap screw to lock support
bearing in place.
0.016''
Figure 45. Bearing positioned
approximately 0.016" away from back of
blade.
Figure 44. Upper support bearing assembly
and controls (guide post cover removed for
clarity).
Support Bearing
Adjustment Cap Screw
Support
Bearing
“Tooth Set”
Wider Than
Blade Thickness
BladeThickness
Figure 43. Illustration of blade "tooth set."
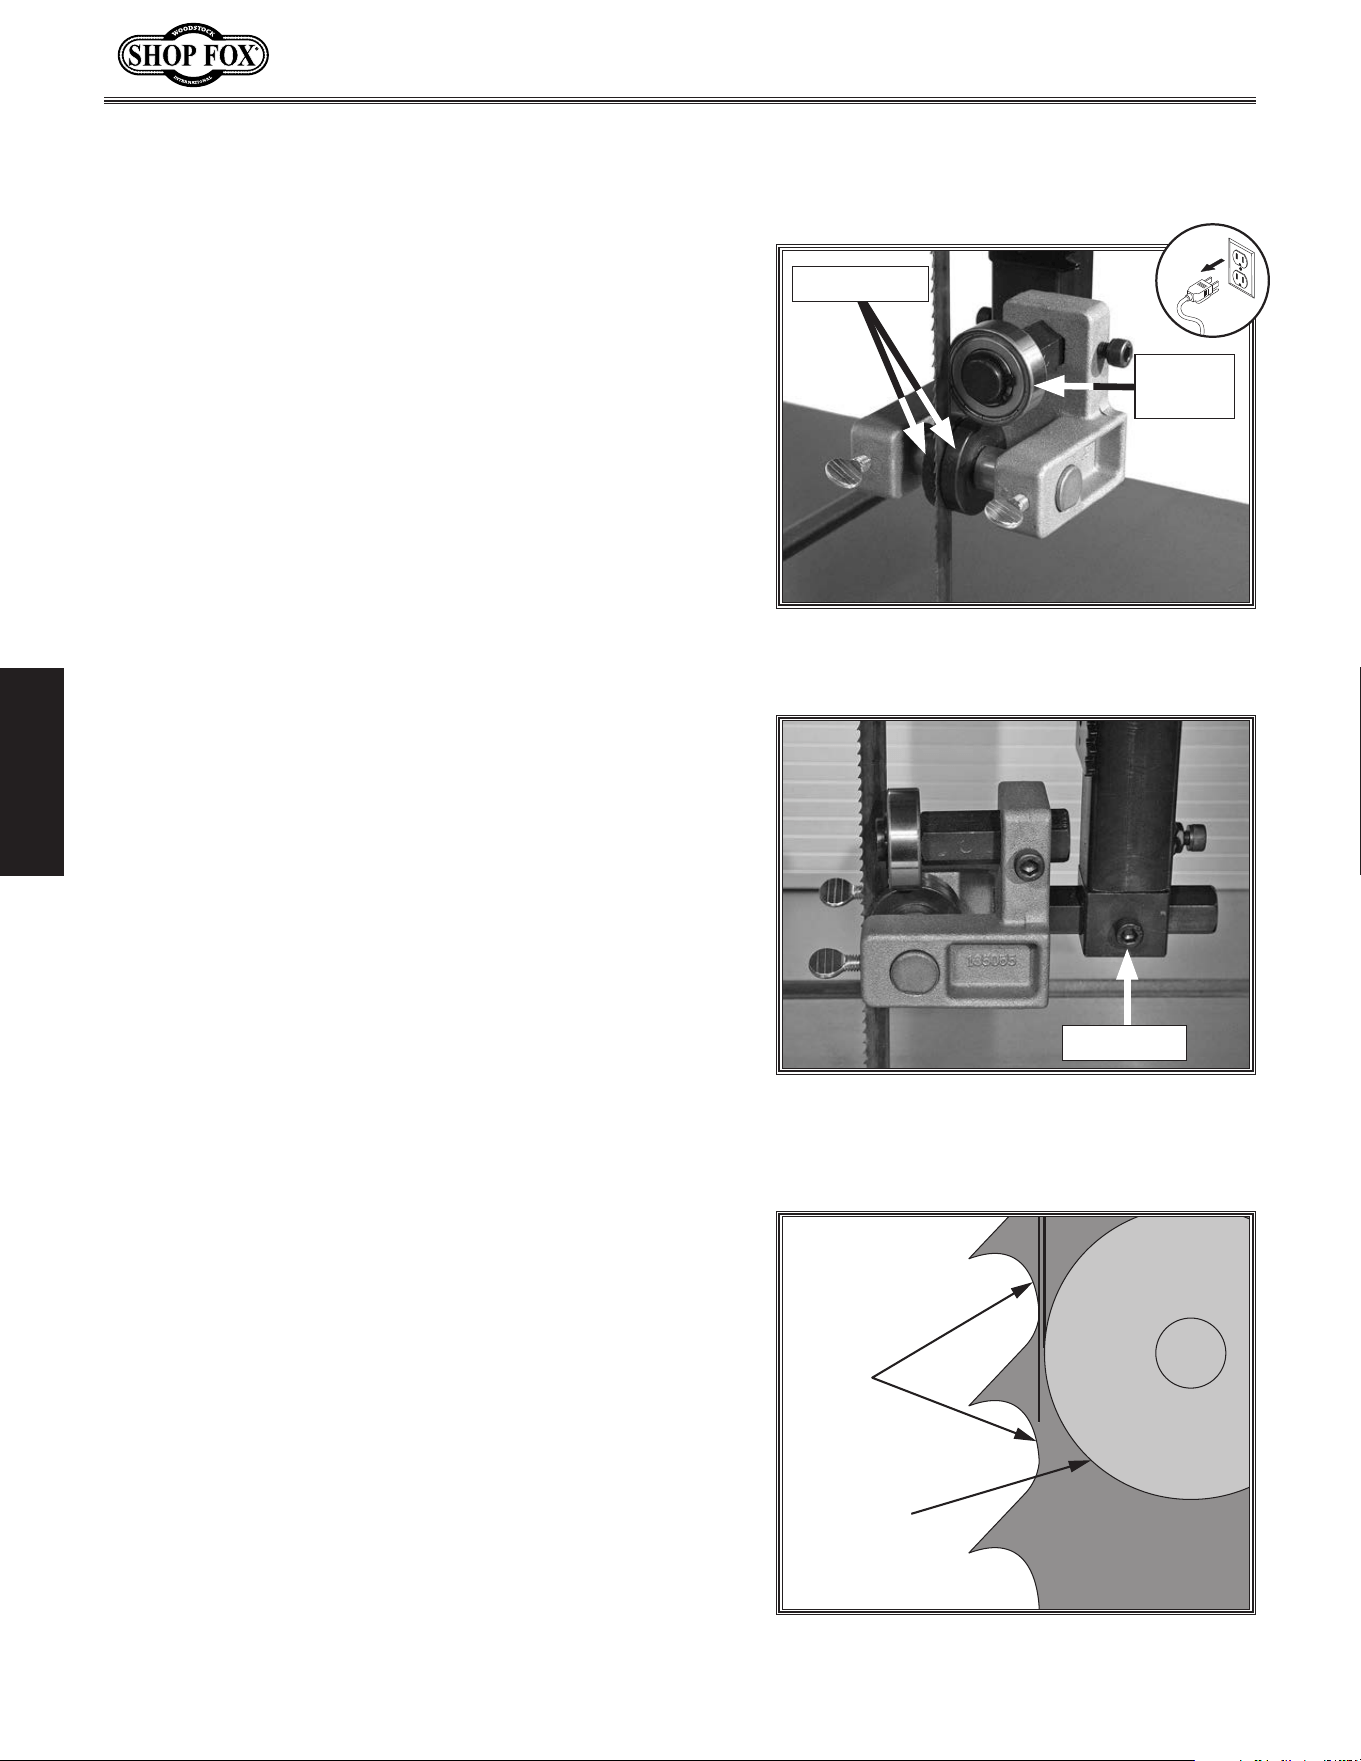
-34-
Model W1849 (For Machines Mfd. Since 11/16)
SETUP
Adjusting."Euro-Style".
Roller-Disc.Guides
The "Euro-style" roller discs (see Figure 46) can be
adjusted left to right, as well as front to back, relative to
the blade. Properly adjusted roller discs provide side-to-
side support, from just behind the gullets to the back of
the blade, to help keep the blade straight while cutting.
There are roller discs on the upper and lower "Euro-style"
roller-disc guide assemblies. Both adjust in the same
manner.
IMPORTANT: Make sure the blade is tracking and
tensioned correctly before adjusting roller disc guides (see
Tensioning Blade on Page 30).
The "Euro-style" roller-disc guide support bearing (see
Figure 46) is positioned behind the blade near the roller-
discs and prevents the blade from pushing backward
during cutting operations. To adjust the support bearings,
refer to Page 33 for more detailed instructions.
Important: Always adjust roller discs before adjusting
roller-disc guide support bearing.
Tool Needed Qty
Hex Wrench 5mm ...............................................1
Figure 46. Upper "Euro-style" roller-disc
guide assembly.
Roller Discs
Support
Bearing
Roller-Disc
Blade
Gullets
Approximately
0.016"
Figure 48. Roller disc positioned just
behind blade gullets.
Note: With wider blades, it may not be possible to
bring the roller discs just behind the blade gullets.
Position them as far forward as possible without
allowing the roller-disc housing to touch the back of
the blade.
Figure 47. Location of guide block
adjustment cap screw (guide post cover
removed for clarity).
To adjust "Euro-style" roller discs, do these steps:
1. DISCONNECT MACHINE FROM POWER!
2. Loosen guide block adjustment cap screw shown
in Figure 47, then position roller discs just behind
blade gullets, as illustrated in Figure 48. Retighten
cap screw to secure setting.
Note: The roller discs should be positioned behind
the gullets at a distance equal to that of the
support bearing behind the blade (see Figure 45 on
Page 34).
Cap Screw
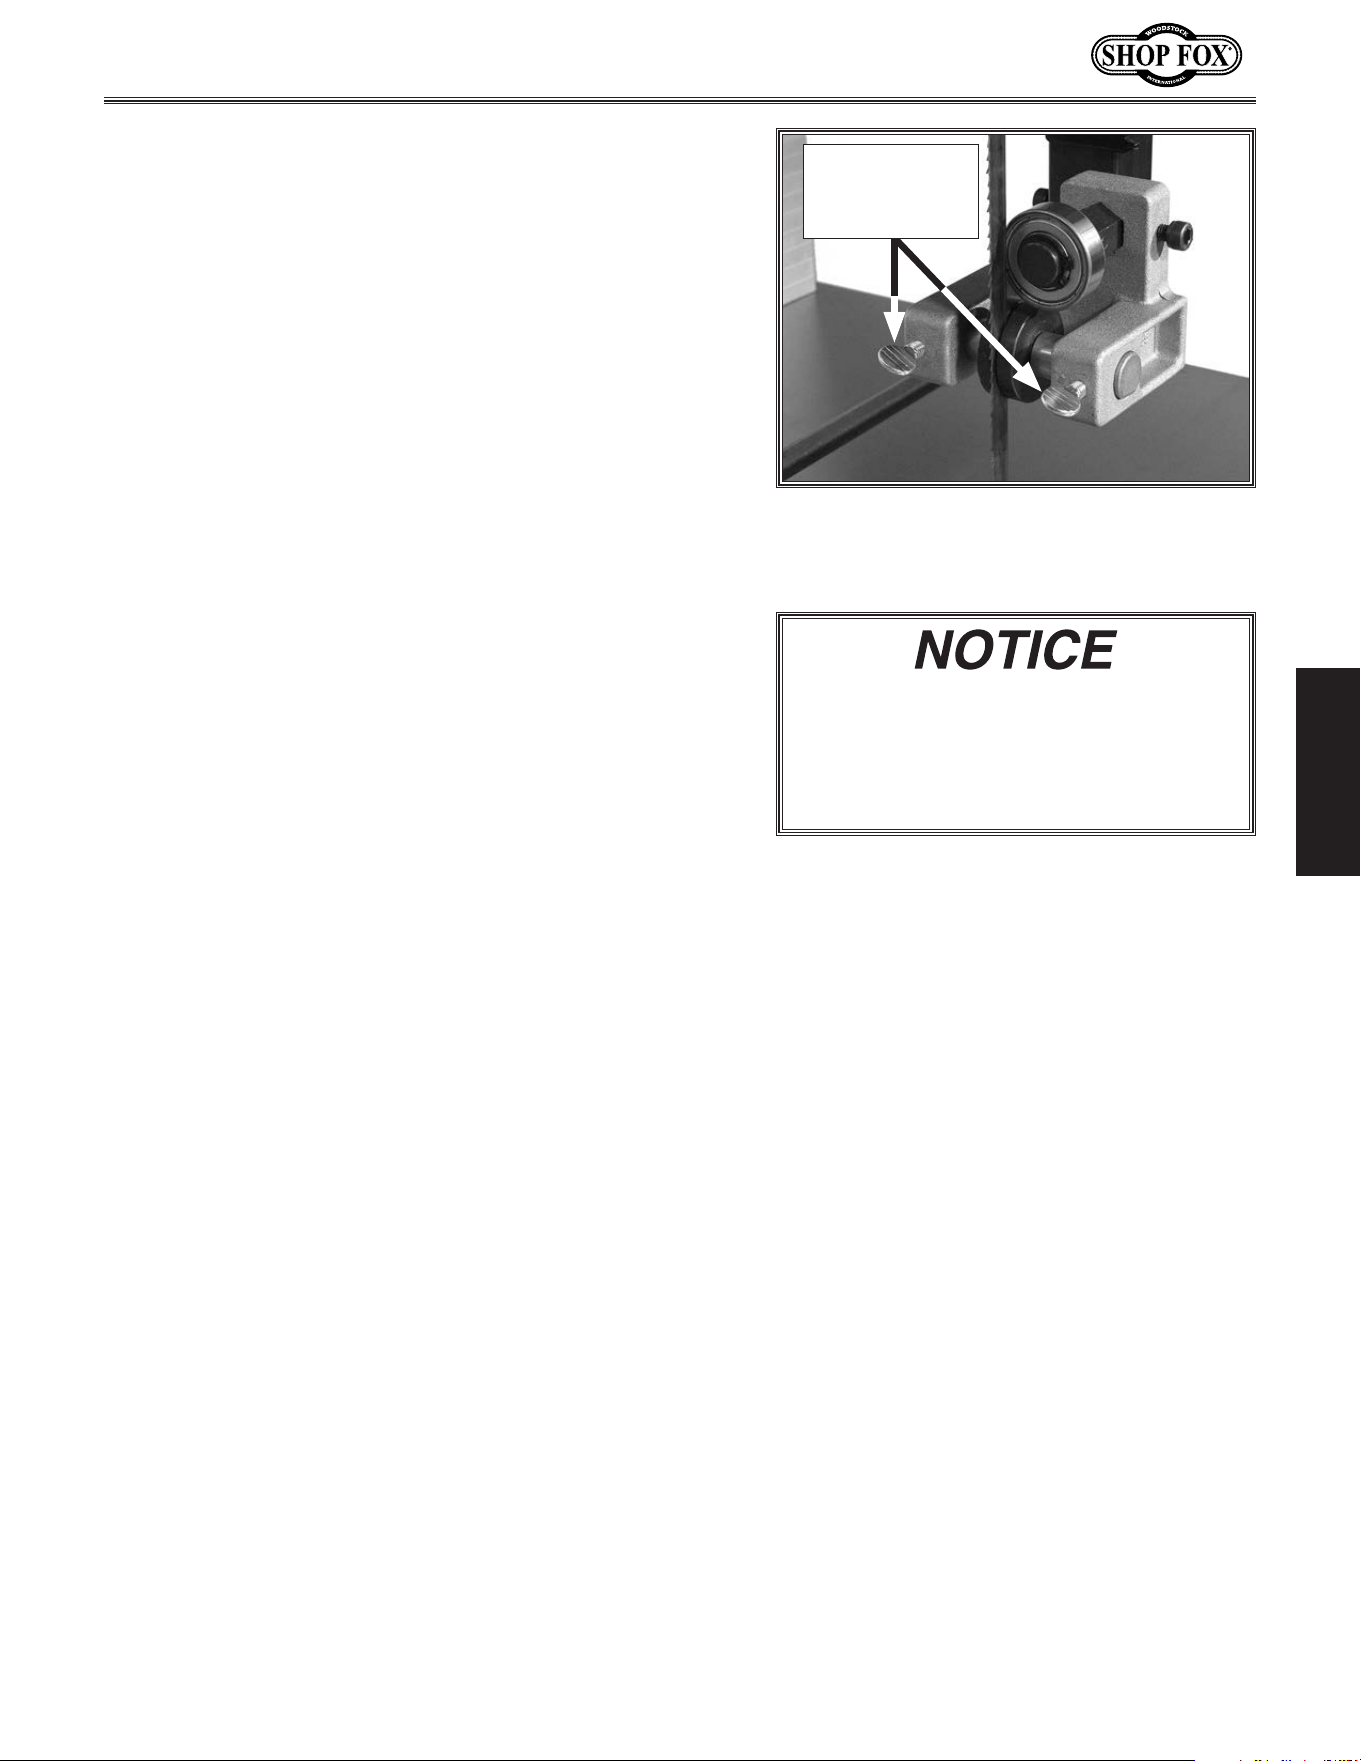
-35-
Model W1849 (For Machines Mfd. Since 11/16)
SETUP
3. Loosen both roller-disc adjustment thumb screws
(see Figure 49), then position roller discs so they
are close to —but not quite touching—sides of blade.
Note: When the roller discs are properly adjusted,
they should only contact the blade during cutting
operations, or when the blade is deflected to the
left or right. The discs may or may not rotate during
operations.
Whenever changing blade or adjusting
blade tension or tracking, the roller-
discs and support bearings must be
re-adjusted before resuming operation
to ensure proper blade support.
4. Retighten thumb screws to secure settings. Rotate
blade by hand to check setting, and if necessary,
repeat Steps 3–4.
Figure 49. Location of upper roller-disc
adjustment thumb screws (guide post
cover removed for clarity).
Roller-Disc
Adjustment
Thumb Screws
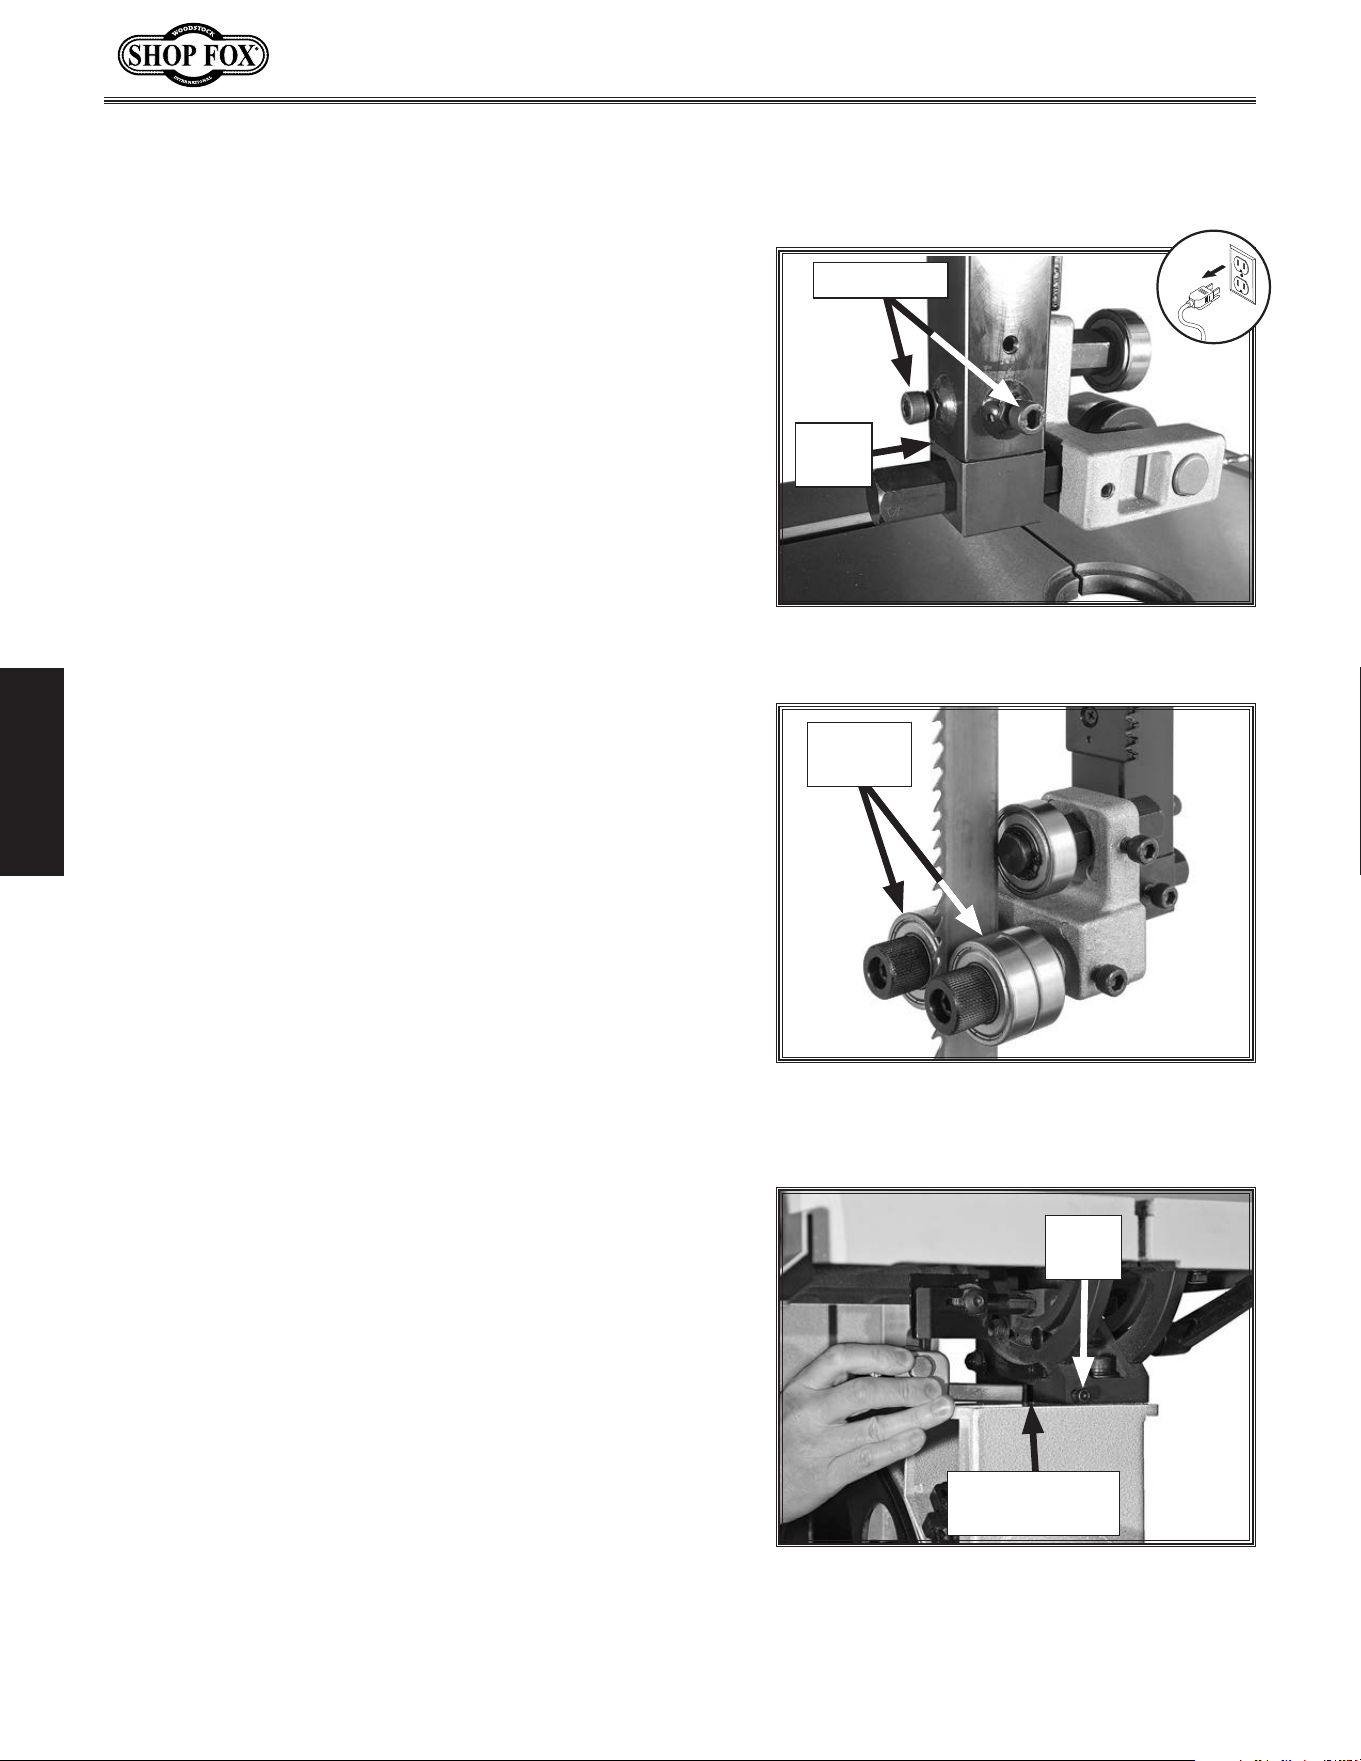
-36-
Model W1849 (For Machines Mfd. Since 11/16)
SETUP
Installing.Blade.Guide.
Roller.Bearings
Figure 50. Location of cap screws for
removing "Euro-style" roller discs.
As an option to replace the standard "Euro-Style" roller-
disc guides, Woodstock offers optional D4688 Blade Guide
Roller Bearings specially designed to fit Model W1849 (see
Accessories on Page 55). Installing these blade guides is
relatively easy, though it requires first removing the blade
and existing blade guide assemblies.
Tool Needed Qty
Hex Wrench 5mm ...............................................1
To install blade guide roller bearings, do these steps:
1. DISCONNECT MACHINE FROM POWER!
2. Remove blade (refer to Page 50).
3. Loosen two cap screws on guide post that secure
upper blade guide assembly, as shown in Figure
50, and remove upper "Euro-Style" roller-disc guide
assembly.
4. Install upper blade guide bearing assembly on guide
post (see Figure 51). Finger-tighten cap screws.
5. Loosen cap screw shown in Figure 52, remove lower
"Euro-Style" roller-disc guide assembly, and replace it
with lower blade guide bearing assembly.
6. Re-install blade (refer to Page 50).
7. Proceed to Adjusting Blade Guide Roller Bearings in
next section.
Figure 51. Upper blade guide roller
bearing assembly installed (guide post
cover removed for clarity).
Guide
Bearings
Cap Screws
Guide
Post
Figure 52. Installing lower roller bearing
guide bearing assembly.
Cap
Screw
Install Guide
Assembly Here
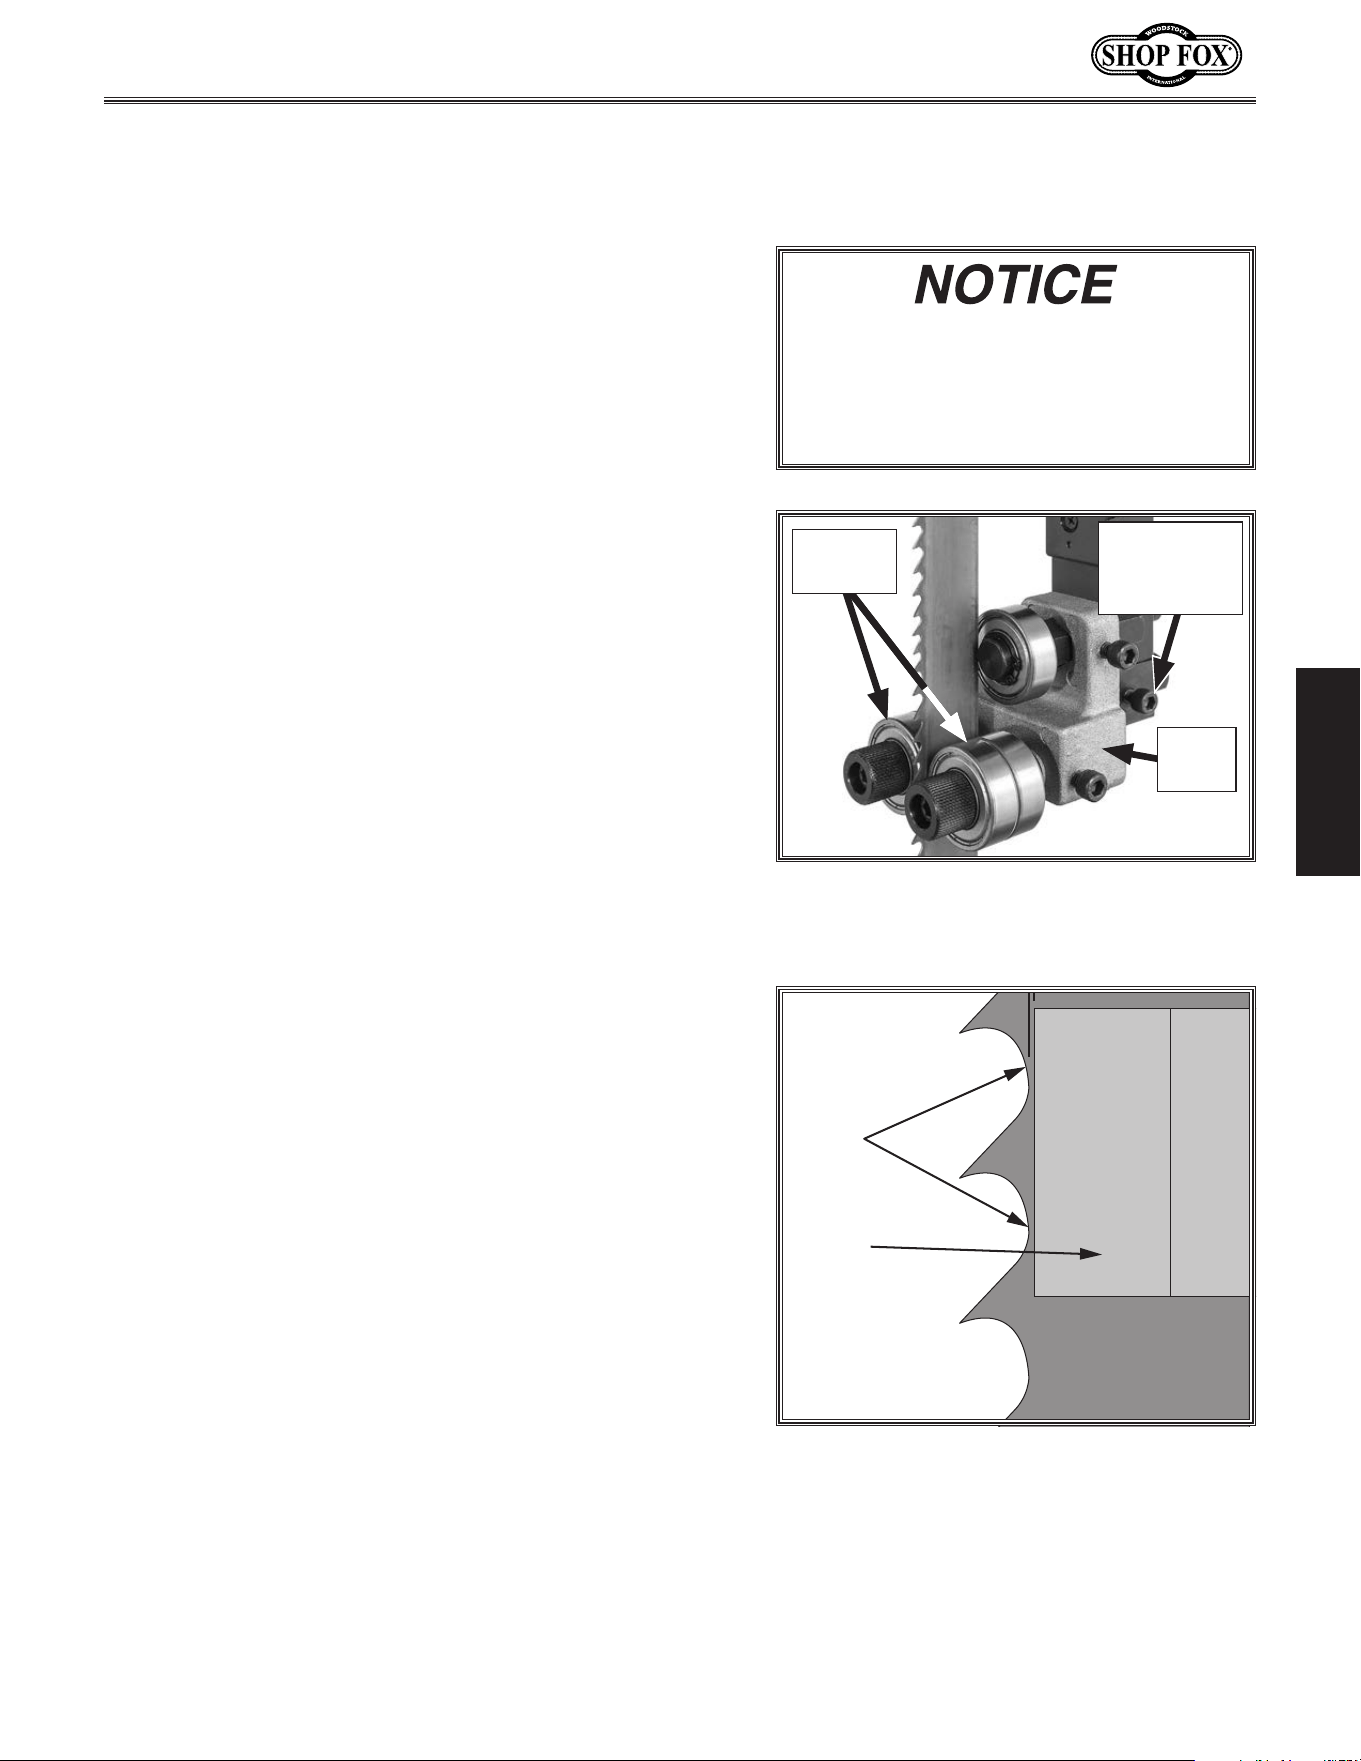
-37-
Model W1849 (For Machines Mfd. Since 11/16)
SETUP
Adjusting.Blade.Guide.
Roller.Bearings
The optional blade guide roller bearings can be adjusted
left-to-right, as well as front-to-back, relative to the
blade. Properly adjusted blade guide bearings provide
side-to-side support, from just behind the gullets to the
back of the blade, to help keep the blade straight while
cutting.
There are blade guide bearings on the optional upper and
lower blade guide assemblies. Both adjust in the same
manner. The following instructions refer to the upper
guide bearings.
Important: Make sure the blade is tracking and
tensioned correctly before performing this procedure (see
Tensioning Blade on Page 30).
Tool Needed Qty
Hex Wrench 5mm ...............................................1
To adjust blade guides do these steps:
1. DISCONNECT MACHINE FROM POWER!
2. Loosen guide block adjustment cap screw shown in
Figure 53, then position guide bearings just behind
blade gullets, as illustrated in Figure 54. Retighten
cap screw to secure setting.
Note: The guide bearings should be positioned
behind the blade gullets a distance equal to that of
the support bearing behind the blade (see Figure 46
on Page 33).
Blade
Guide
Bearing
Blade
Gullets
Approximately
0.016"
Figure 54. Blade guide bearing positioned
just behind blade gullets.
Note: With wider blades, it may not be possible
to bring the guide bearings just behind the blade
gullets. Position them as far forward as possible
without allowing the guide bearing housing to touch
the back of the blade.
Figure 53. Upper guide bearing
components (guide post cover removed for
clarity).
Guide
Block
Guide Block
Adjustment
Cap Screw
Guide
Bearings
Whenever changing blade or adjusting
blade tension or tracking, the support
and guide bearings must be re-adjusted
before resuming operation to ensure
proper blade support.
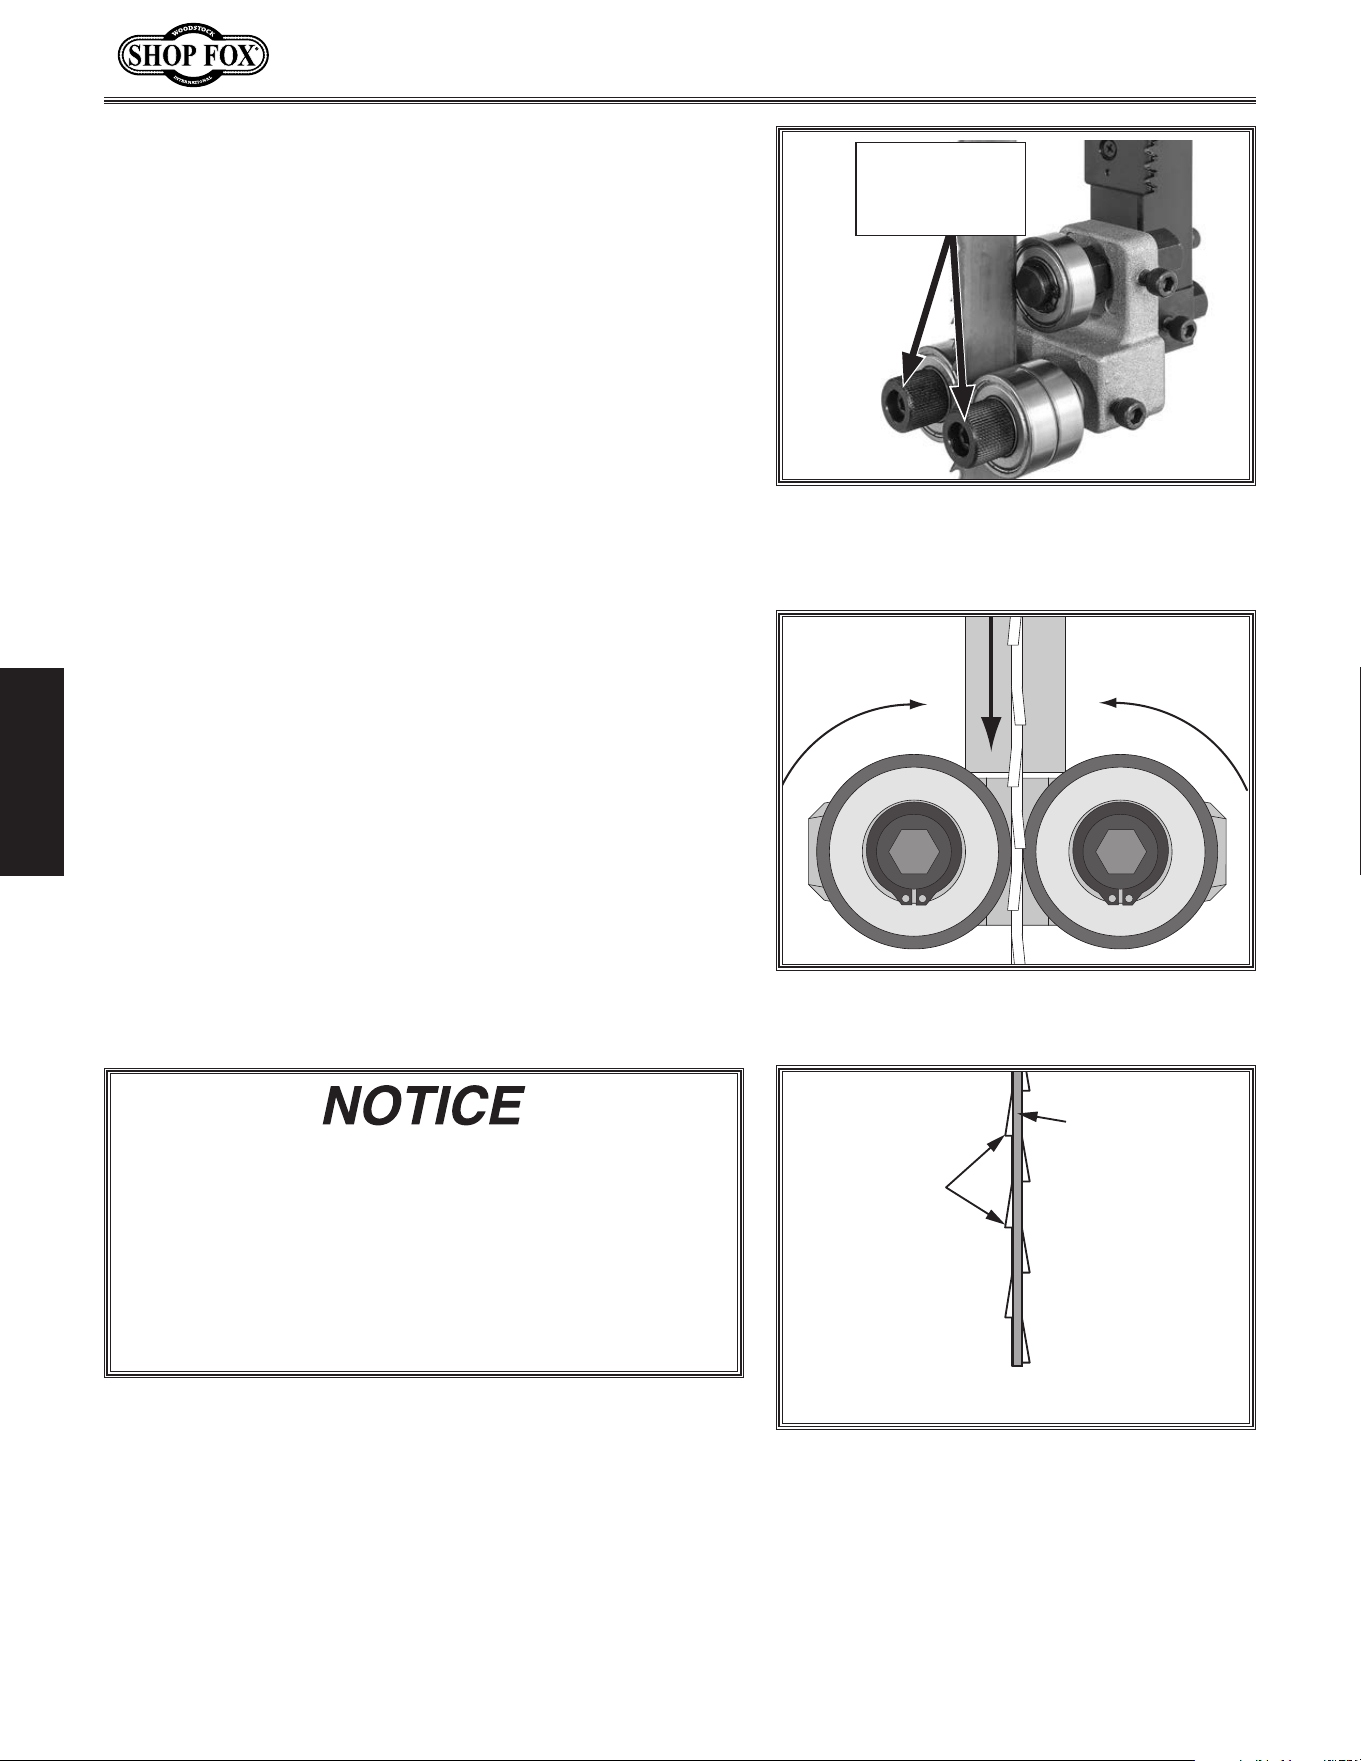
-38-
Model W1849 (For Machines Mfd. Since 11/16)
SETUP
3. Loosen both guide bearing adjustment cap screws
(see Figure 55), then position guide bearings so they
are close to —but not quite touching—sides of blade.
Note: When the blade guide bearings are properly
adjusted, they should only rotate during cutting
operations, or when the blade is deflected to the
left or right (see Figure 56).
4. Retighten cap screws to secure settings. Rotate
blade by hand to check the setting, and, if
necessary, repeat Steps 3–4.
Figure 56. Blade guide bearings rotating
during cutting operation.
Figure 55. Location of upper guide bearing
adjustment cap screws (guide post cover
removed for clarity).
Guide Bearing
Adjustment
Cap Screws
Blade teeth are angled out slightly, protruding wider
than the blade thickness; this is known as blade
"tooth set" (see Figure 57). If angled out parts of
the teeth contact guide bearings during operation,
they will get bent inward, ruining the tooth set.
Therefore, the support bearing must be set to
prevent teeth from contacting guide bearings during
operation (refer to Page 37 for details).
“Tooth Set”
Wider Than
Blade Thickness
BladeThickness
Figure 57. Illustration of blade "tooth set."
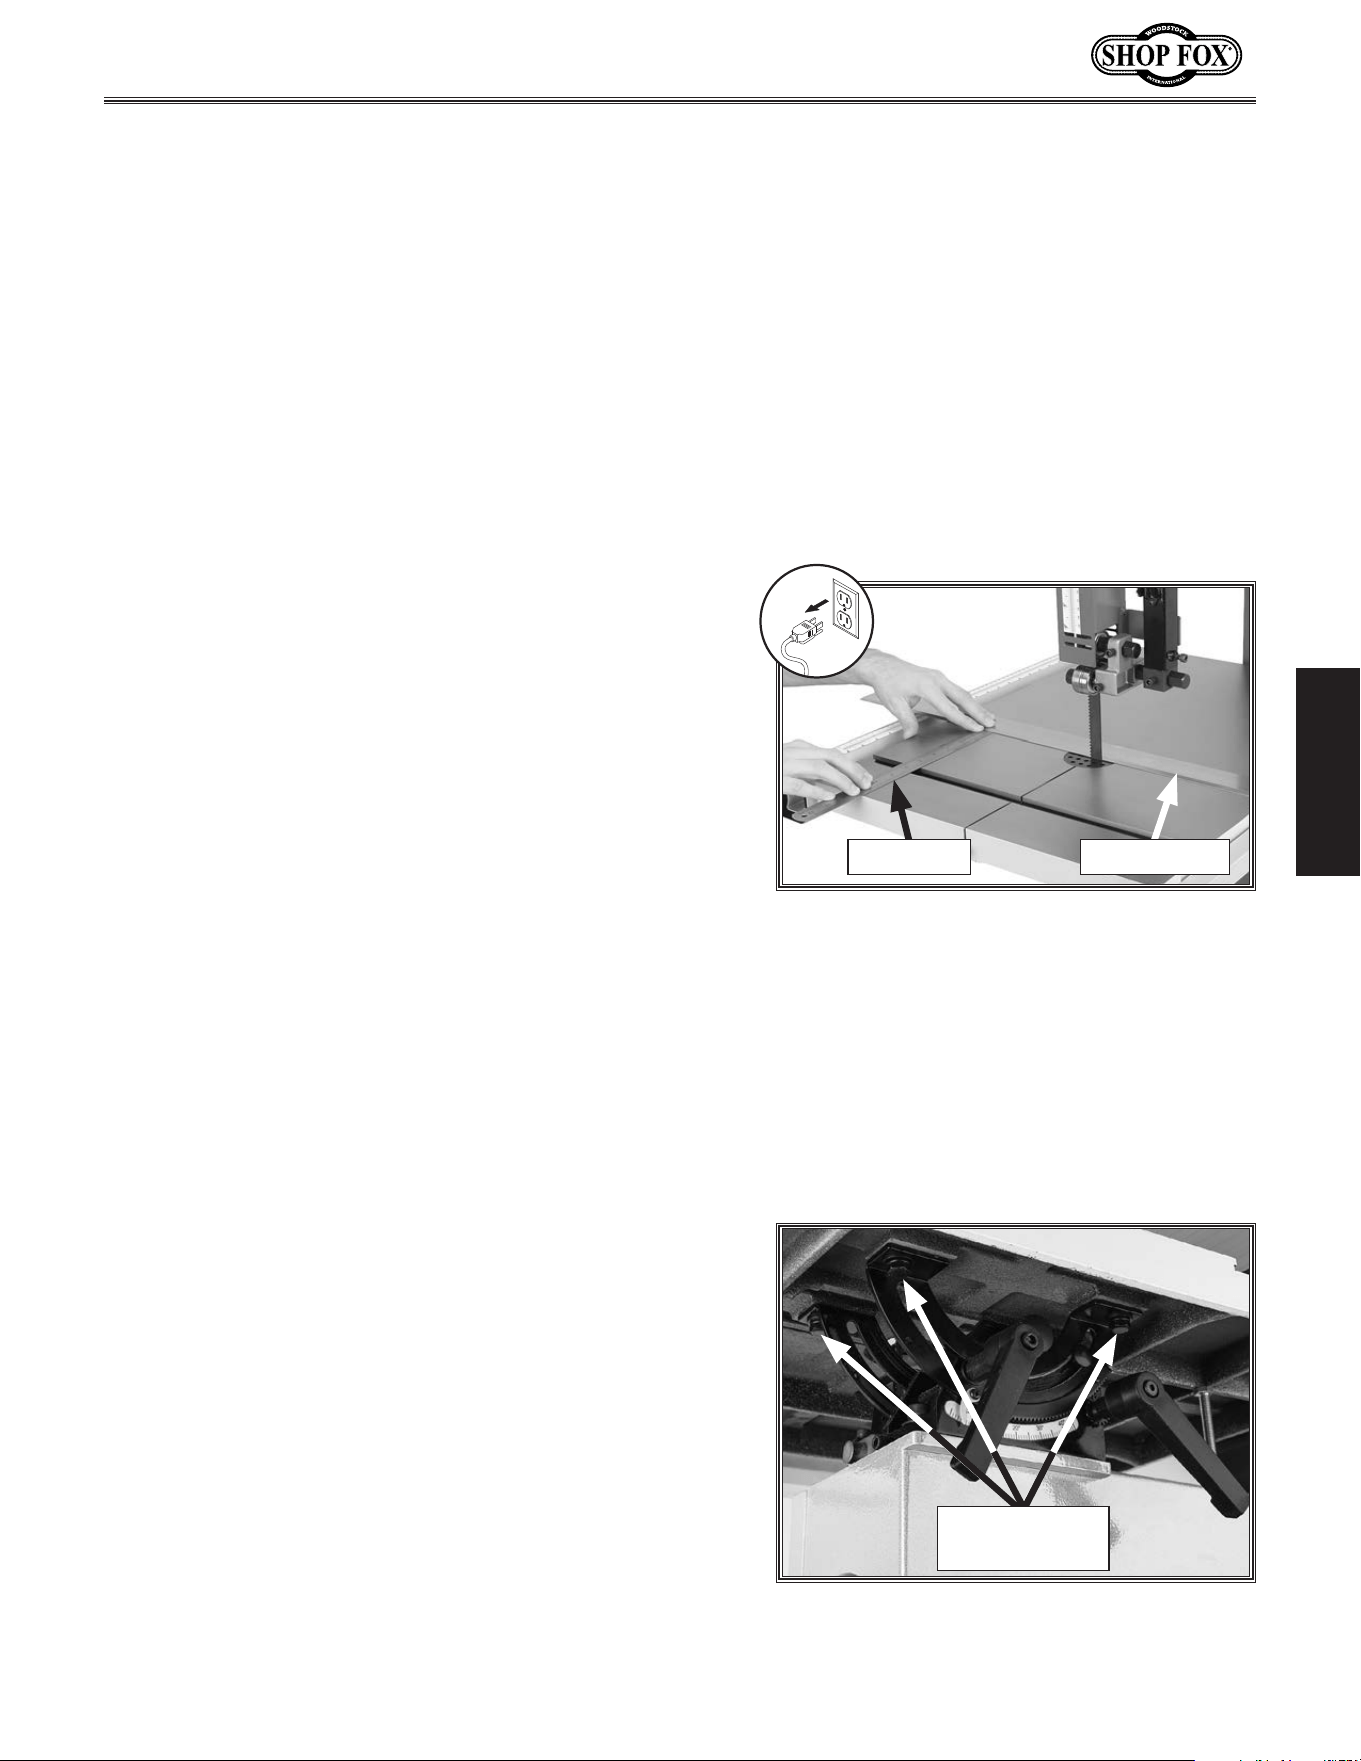
-39-
Model W1849 (For Machines Mfd. Since 11/16)
SETUP
Aligning.Table
To ensure cutting accuracy, the table should be aligned
so that the miter slot is parallel to the bandsaw blade,
and that the table is perpendicular (front to back) to
the blade. These procedures work best with a wide (
3
⁄4")
blade installed.
Tools Needed Qty
Straightedge .....................................................1
Fine Ruler ........................................................1
Square ............................................................1
Open-End Wrench or Socket 13mm ..........................1
Adjusting.Miter.Slot.Parallelism
1. Make sure blade is tracking properly and that it is
correctly tensioned (refer to Pages 27–28).
2. DISCONNECT MACHINE FROM POWER!
3. Place an accurate straightedge along blade so that it
lightly touches both front and back of blade without
going across a tooth (see Figure 58).
4. Use a fine ruler to measure distance between
straightedge and miter slot (see Figure 58). Distance
should be the same at front and back of table.
— If the distance is the same at the front and back
of the table, no adjustment is necessary; proceed
to Adjusting Table Perpendicular to Blade on
Page 40.
— If the distance is not the same at the front and
back of the table, it must be adjusted; proceed to
Step 5.
5. Loosen trunnion bolts that secure table (see
Figure 59).
Figure 58. Checking miter slot parallelism.
Straightedge
Fine Ruler
6. Adjust table until distance between straightedge and
miter slot is the same at front and back of table.
7. Retighten trunnion bolts, then repeat Step 4 to
verify adjustment.
Figure 59. Location of trunnion bolts.
Trunnion Bolts
(3 of 4)
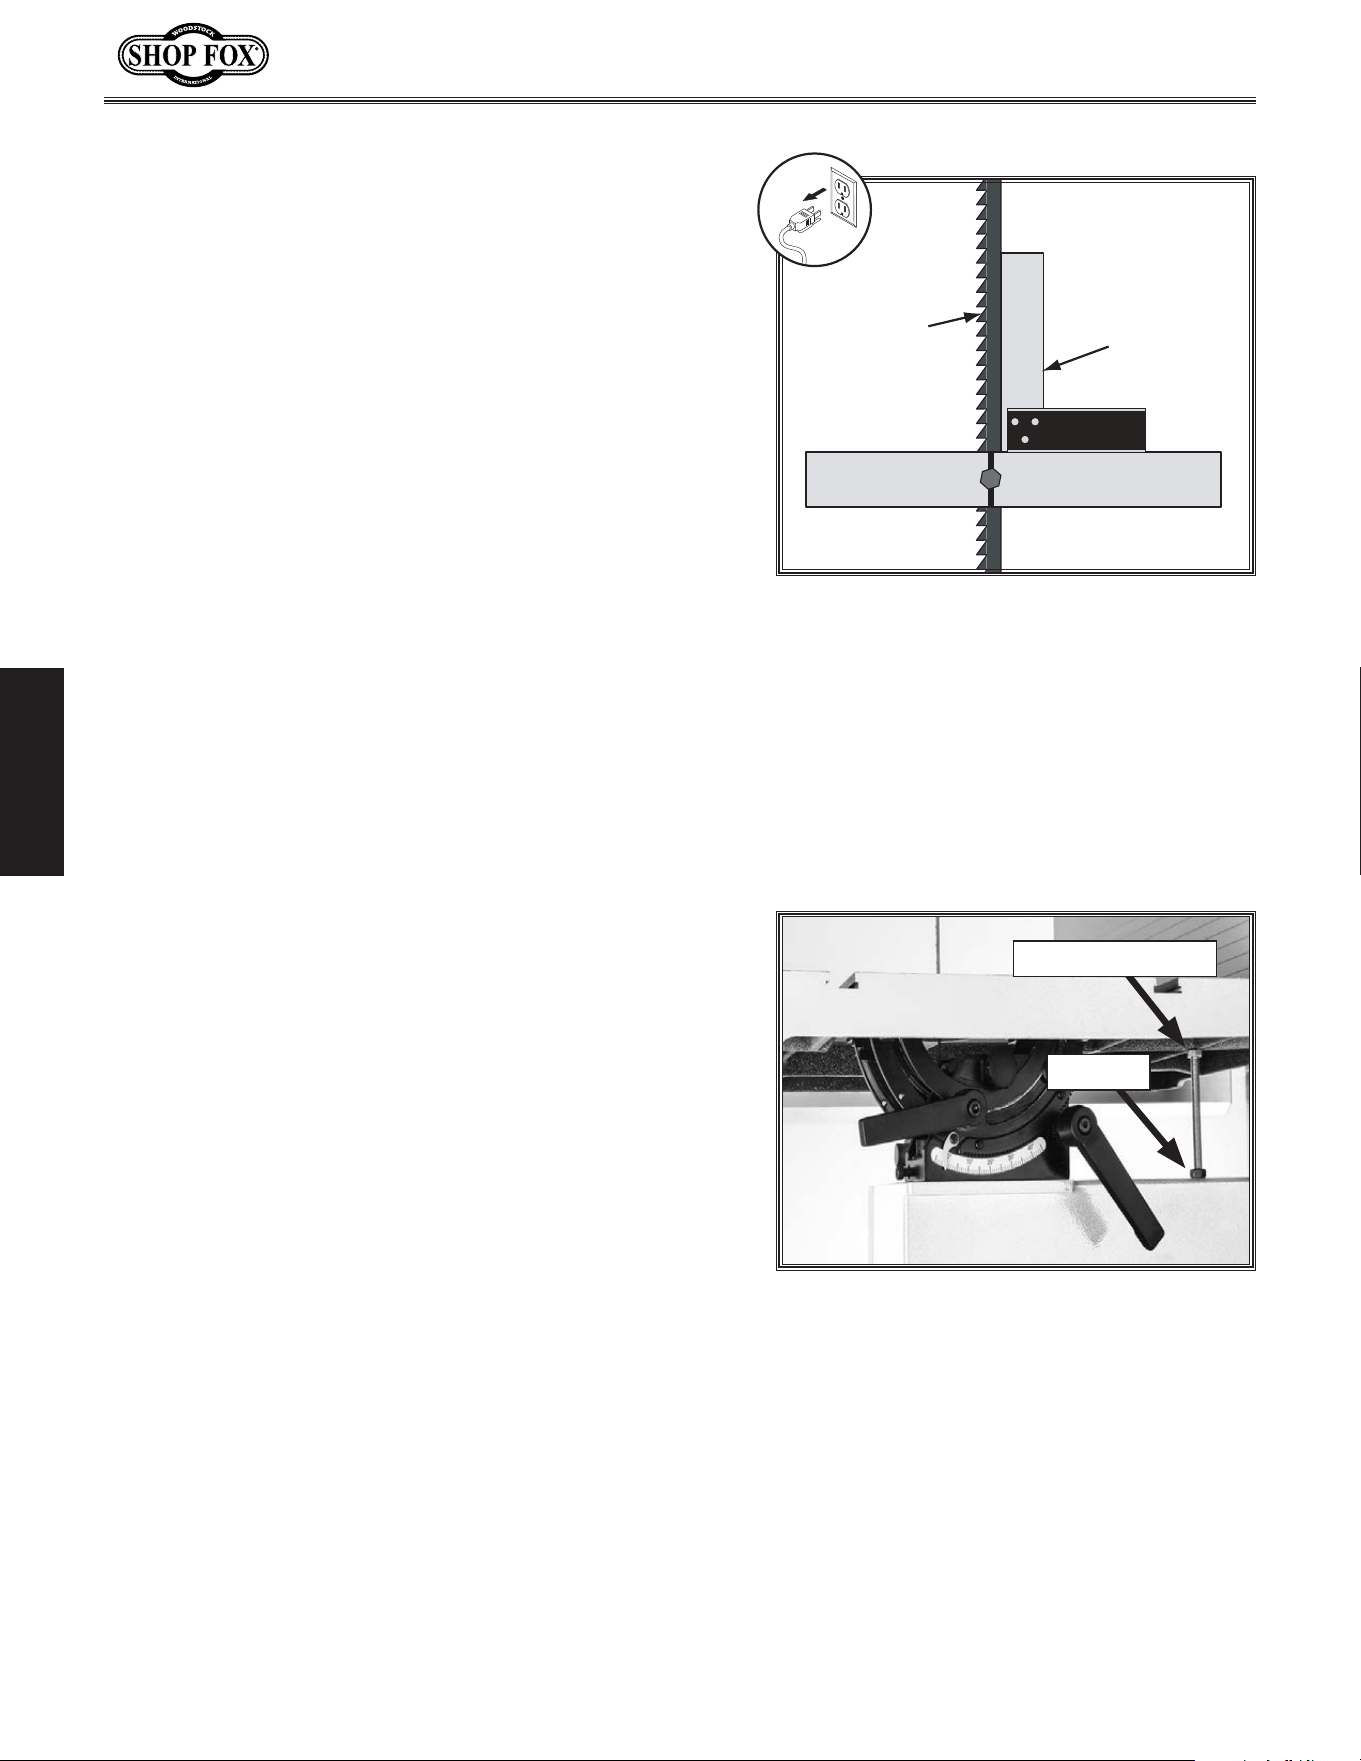
-40-
Model W1849 (For Machines Mfd. Since 11/16)
SETUP
3. Determine which trunnion is on low side of table,
then remove two trunnion bolts (see Figure 59) from
low trunnion.
4. Insert a shim, such as a thin washer, between table
and low trunnion at each mounting location.
5. Re-install and tighten trunnion bolts, then repeat
Step 2 to verify adjustment.
Figure 60. Squaring back of blade and
table.
Blade
Square
Table
Adjusting.Table.Perpendicular.to.Blade
1. DISCONNECT MACHINE FROM POWER!
2. Place a square on table and against back of
blade, as illustrated in Figure 60. Table should be
perpendicular to back of blade.
— If the table is perpendicular to the back of the
blade, no adjustment is necessary; proceed to
Aligning Fence on Page41.
— If the table is not perpendicular to the back of
the blade, you must shim the table; proceed to
Step 3.
The positive stop allows the table to be quickly and
accurately returned to the horizontal (0˚) position after
being adjusted to a different angle.
To position positive stop, do these steps:
1. DISCONNECT MACHINE FROM POWER!
2. Adjust blade tension appropriate to blade size.
3. Loosen hex nut (see Figure 61) that locks the
positive stop bolt in place.
4. Raise guide post and place a machinist’s square on
table next to side of blade, as illustrated in Figure
61. Adjust table square with blade, then secure it
with table tilt lock lever.
Adjusting.Positive.Stop
Hex Nut
Positive Stop Bolt
Figure 61. Location of positive stop bolt
and hex nut.
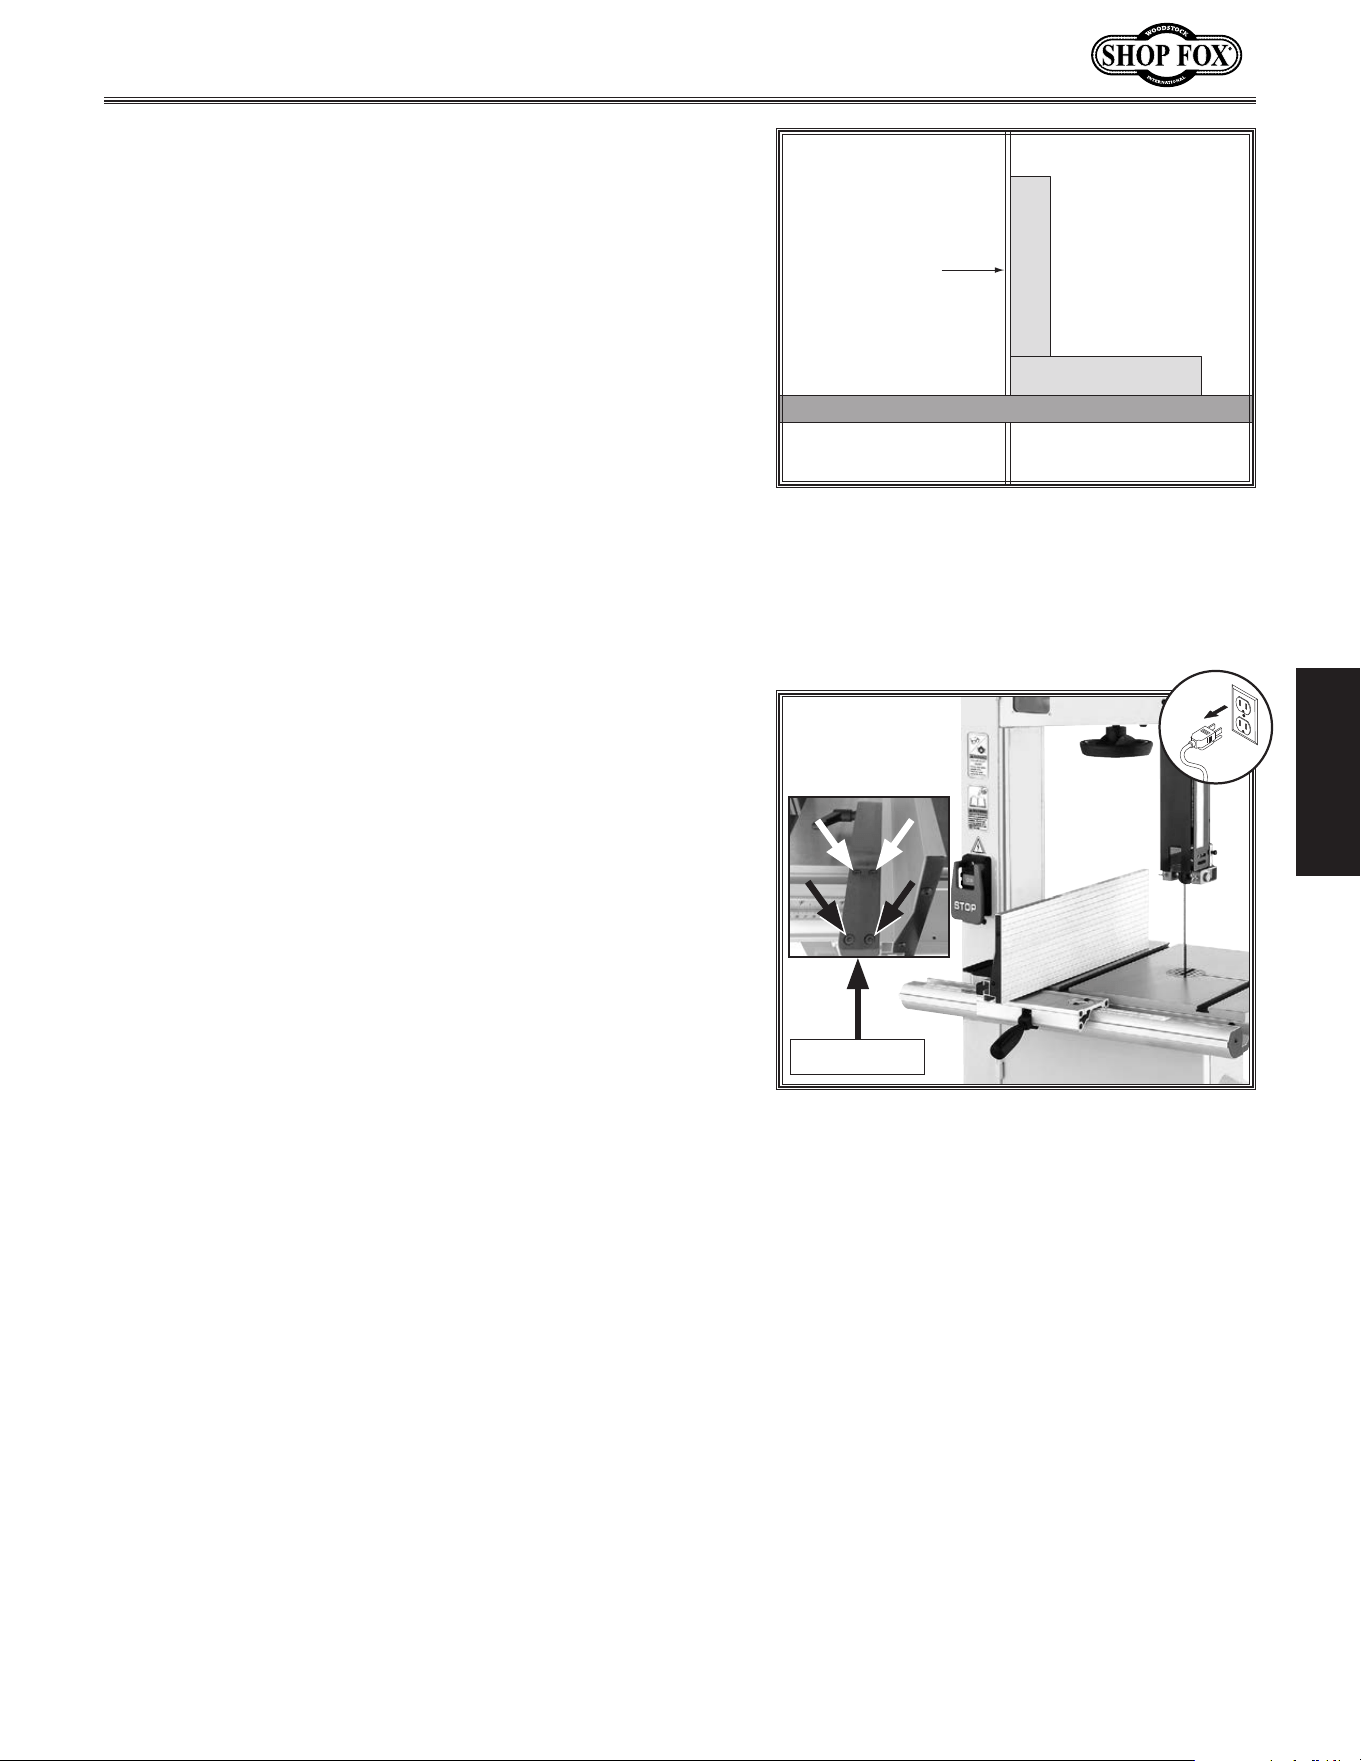
-41-
Model W1849 (For Machines Mfd. Since 11/16)
SETUP
Aligning.Fence
To ensure cutting accuracy, the fence should be aligned
parallel with the blade. This is achieved by aligning the
fence to the miter slot after miter slot parallelism is
properly adjusted, as instructed on Page 39.
Note: Occasionally, even after aligning the fence, a
symptom known as "blade lead" will develop, requiring
the fence to be skewed slightly to compensate for the
blade lead problem. Refer to Blade Lead, beginning on
Page 65 for more information on blade lead and skewing
the fence.
Tool Needed Qty
Hex Wrench 5mm ...............................................1
To align fence, do these steps:
1. DISCONNECT MACHINE FROM POWER!
2. Make sure table is aligned with blade (see Adjusting
Miter Slot Parallelism on Page 39 for detailed
instructions).
5. Adjust fence face parallel with edge of miter slot,
then retighten the four cap screws, being careful not
to move fence.
6. Re-check fence alignment and, if necessary, repeat
Steps 4–5.
3. Install fence next to miter slot (see Figure 63).
4. Loosen four cap screws located to the left of fence
face (see Figure 63).
Figure 63. Fence installed next to miter
slot for alignment adjustment.
Cap Screws
5. Adjust positive stop bolt against bottom of table
and secure it by tightening hex nut against trunnion
bracket.
6. Check adjustment for accuracy once you have
tightened hex nut.
7. Loosen screw on pointer, but do not remove it.
8. Align tip of pointer with 0˚ mark on table tilt scale,
then re-tighten screw to secure setting.
Figure 62. Squaring side of blade and
table.
Blade
Table
Square
-42-
Model W1849 (For Machines Mfd. Since 11/16)
OPERATIONS
OPERATIONS
To. reduce. your. risk. of. serious. injury.
or. damage. to. the. machine,. read. this.
entire.manual.BEFORE.using.machine.
To. reduce. the. risk. of. eye. injury. and.
long-term. respiratory. damage,. always.
wear. s afety. glasses. and. a. respirator.
while.operating.this.machine.
General
To complete a typical operation, the operator does the
following:
1. Examines workpiece to make sure it is suitable for
cutting.
2. Adjusts table tilt, if necessary, to correct angle of
desired cut.
3. If using fence, adjusts it for width of cut and then
locks it in place. If using miter gauge, adjusts angle
and locks it in place.
4. Loosens guide post lock knob, adjusts upper blade
guide height to just clear the workpiece (no more
than
1
⁄4"), then retightens guide post lock knob.
5. Checks to make sure workpiece can safely pass all
the way through blade without interference from
other objects.
6. Puts on safety glasses and respirator.
7. Starts dust collector and turns machine ON.
8. Holds workpiece firmly and flat against both table
and fence (or miter gauge), and then pushes
workpiece into blade at a steady and controlled rate
until cut is complete.
This machine will perform many types of operations
that are beyond the scope of this manual. Many of these
operations can be dangerous or deadly if performed
incorrectly.
The instructions in this section are written with the
understanding that the operator has the necessary
knowledge and skills to operate this machine. If at any
time you are experiencing difficulties performing any
operation, stop using the machine!
The overview below provides the novice machine operator
with a basic understanding of how the machine is used
during operation, so the machine controls/components
discussed later in this manual are easier to understand.
Due to its generic nature, this overview is NOT intended
to be an instructional guide.
9. Is very careful to keep fingers away
from blade and uses a push stick to
feed narrow workpieces.
10. Turns machine OFF.
If you are an inexperienced operator, we
strongly recommend that you read books
or trade articles, or seek training from
an experienced operator of this type of
machinery before performing unfamiliar
operations. Above.all,.safety.must.come.
firs t!

-43-
Model W1849 (For Machines Mfd. Since 11/16)
OPERATIONS
Basic.Functions.of.a.Bandsaw.
A properly adjusted bandsaw can be safer to
operate than most other saws and performs
many types of cuts with ease and accuracy. It
is capable of performing the following types of
cuts:
Straight.Cuts
• Miters
• Angles
• Compound Angles
• Resawing
• Ripping
• Crosscutting
Irregular.Cuts
• Simple and Complex Curves
• Duplicate Parts
• Circles
• Beveled Curves
Basic.Cutting.Tips
Here are some basic tips to follow when
operating the bandsaw:
• Replace, sharpen, and clean blades often
for best performance. Check guides,
tension, and alignment settings periodically
and adjust when necessary to keep the saw
running in top condition.
• Use light and even pressure while cutting.
Light feeding pressure makes it easier to
cut straight and prevents undue friction or
strain on the bandsaw components and the
blade.
• Avoid twisting the blade when cutting
around tight corners. Allow the blade to
saw its way around the corners. Always use
relief cuts when possible.
• Misusing the saw or using incorrect
techniques (e.g. twisting the blade with
the workpiece, incorrect feed rate, etc.) is
unsafe and results in poor cuts.
Workpiece.Inspection
Some workpieces are not safe to cut or may
require modification before they can be made
safe to cut. Before cutting, get in the habit of
inspecting all workpieces for the following:
• Material Type: This machine is intended
for cutting natural and man-made wood
products, laminate covered wood products,
and some plastics. Cutting drywall or
cementitious backer board creates
extremely fine dust and may reduce
the life of the bearings. This machine is
NOT designed to cut metal, glass, stone,
tile, etc.; cutting these materials with a
bandsaw may lead to injury.
• Foreign Objects: Nails, staples, dirt,
rocks and other foreign objects are often
embedded in wood. While cutting, these
objects can become dislodged and hit the
operator, cause kickback, or break the
blade, which might then fly apart. Always
visually inspect your workpiece for these
items. If they can't be removed, DO NOT
cut the workpiece.
• Large/Loose Knots: Loose knots can
become dislodged during the cutting
operation. Large knots can cause kickback
and machine damage. Choose workpieces
that do not have large/loose knots or plan
ahead to avoid cutting through them.
• Wet or "Green" Stock: Cutting wood
with a moisture content over 20% causes
unnecessary wear on the blades, increases
the risk of kickback, yields poor results.
• Excessive Warping: Workpieces with
excessive cupping, bowing, or twisting are
dangerous to cut because they are unstable
and often unpredictable when being
cut. DO NOT use workpieces with these
characteristics!
• Minor Warping: Workpieces with slight
cupping can be safely supported if the
cupped side faces the table or the fence.
On the contrary, a workpiece supported on
the bowed side will rock during a cut and
could cause kickback or severe injury.
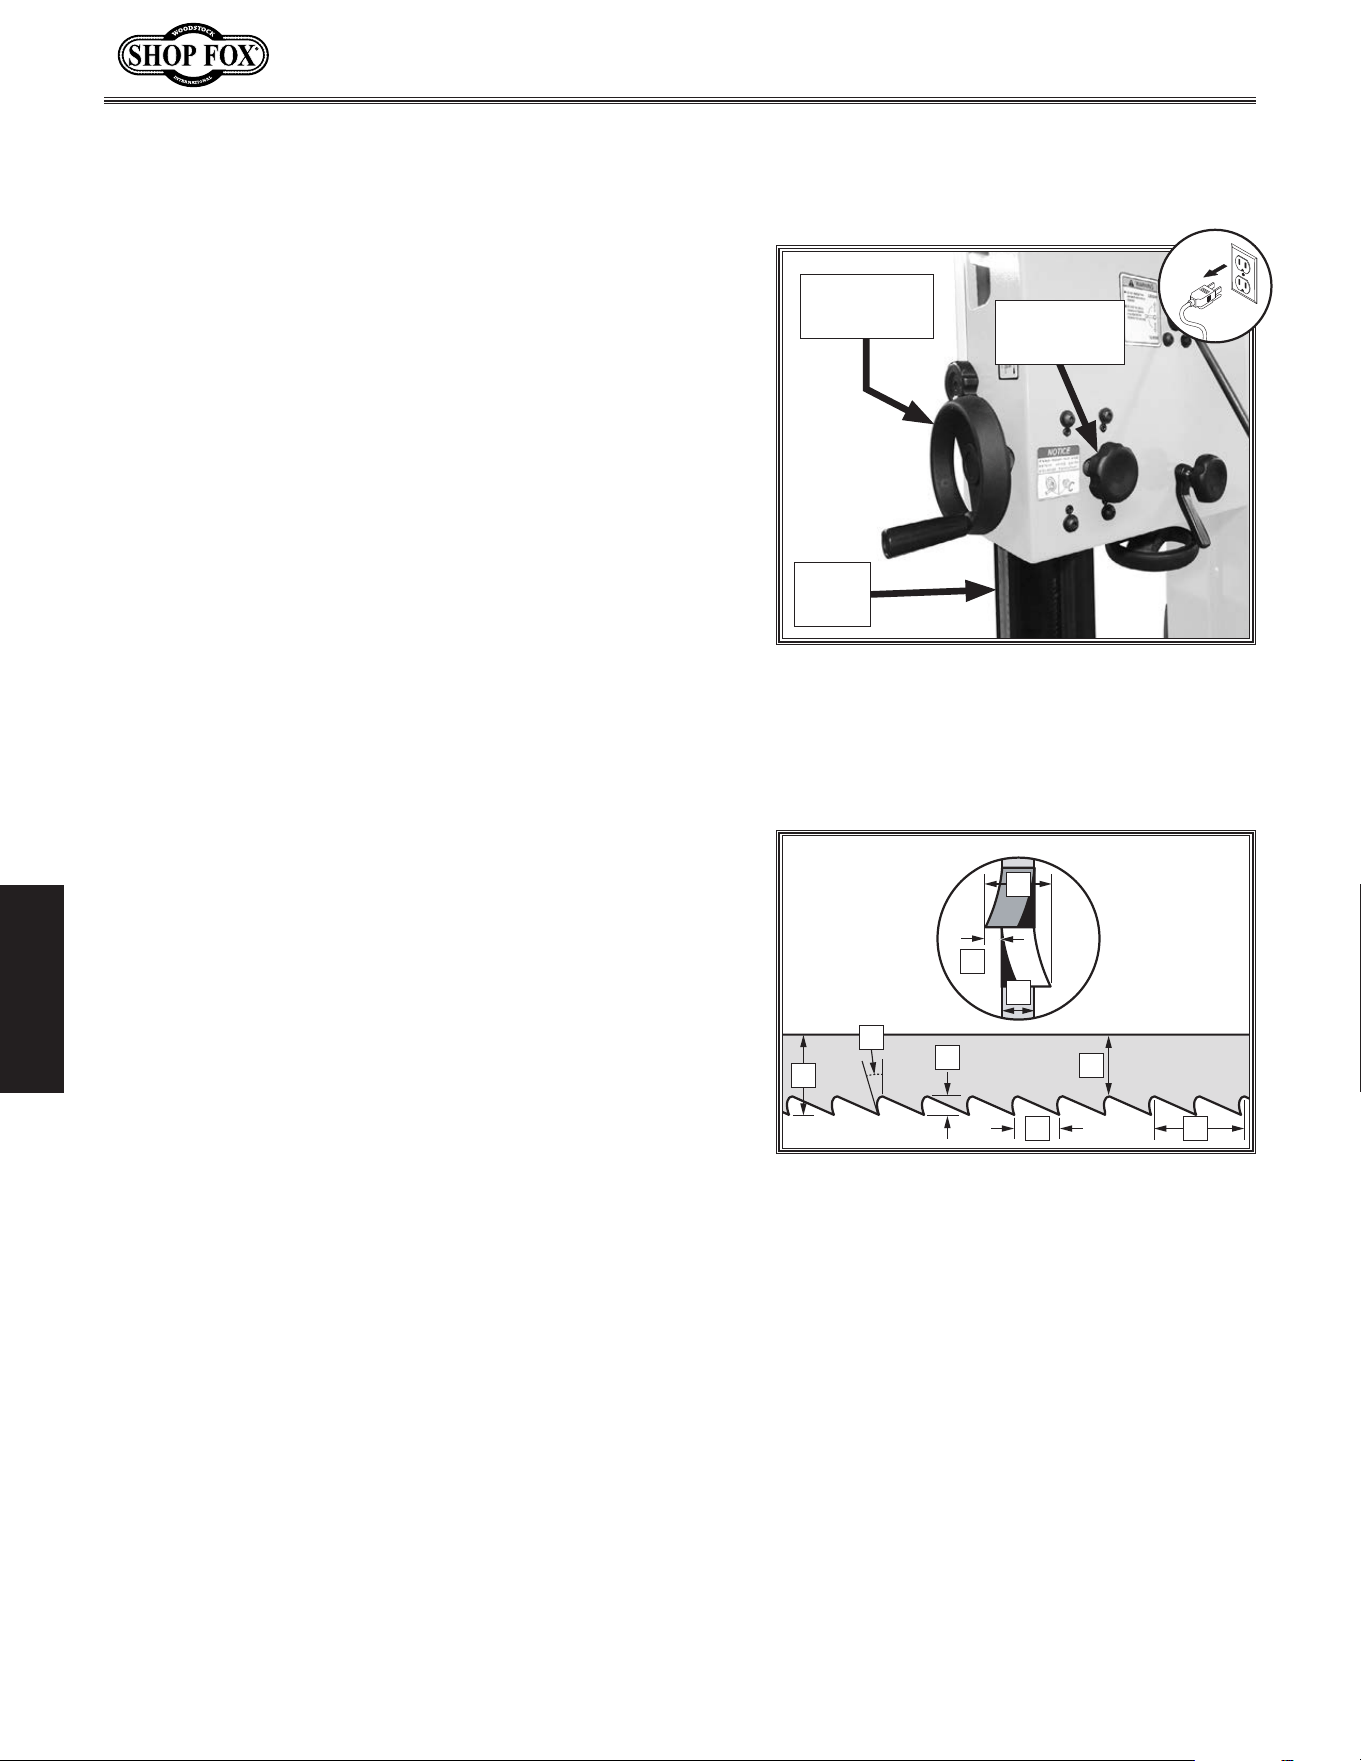
-44-
Model W1849 (For Machines Mfd. Since 11/16)
OPERATIONS
Setting.Upper.Blade.
Guide.Height
When cutting, the blade guides must always be positioned
so they just clear (no more than
1
⁄4") the workpiece. The
guide post, shown in Figure 64, allows the upper blade
guide assembly to be quickly adjusted for height.
To adjust height of upper blade guides, do these steps:
1. DISCONNECT MACHINE FROM POWER!
2. Loosen guide post lock knob.
3. Use guide post handwheel to adjust height of guide
post so that blade guide assembly just clears (no
more than
1
⁄4") workpiece.
4. Retighten lock knob to secure setting.
Blade.Selection
Blade.Terminology
B
C
G
H
D
E
F
I
A
Figure 65. Bandsaw blade components.
A. Kerf: The amount of material removed by the blade
during cutting.
B. Tooth Set: The amount each tooth is bent left or
right along the blade.
C. Gauge: The thickness of the blade.
D. Blade Width: The widest point of the blade between
the tip of the tooth to the back edge of the blade.
E. Tooth Rake: The angle of the tooth face from a line
perpendicular to the length of the blade.
F. Gullet Depth: The distance from the tooth tip to the
bottom of the curved area (gullet).
G. Tooth Pitch: The distance between tooth tips.
H. Blade Back: The distance between the bottom of the
gullet and the back edge of the blade.
I. TPI: The number of teeth per inch measured from
gullet to gullet.
Selecting the right blade requires a knowledge of the
various blade characteristics to match the blade with the
particular cutting operation, as shown in Figure 65.
Figure 64. Location of guide post,
elevation handwheel, and lock knob.
Guide
Post
Guide Post
Lock Knob
Guide Post
Handwheel
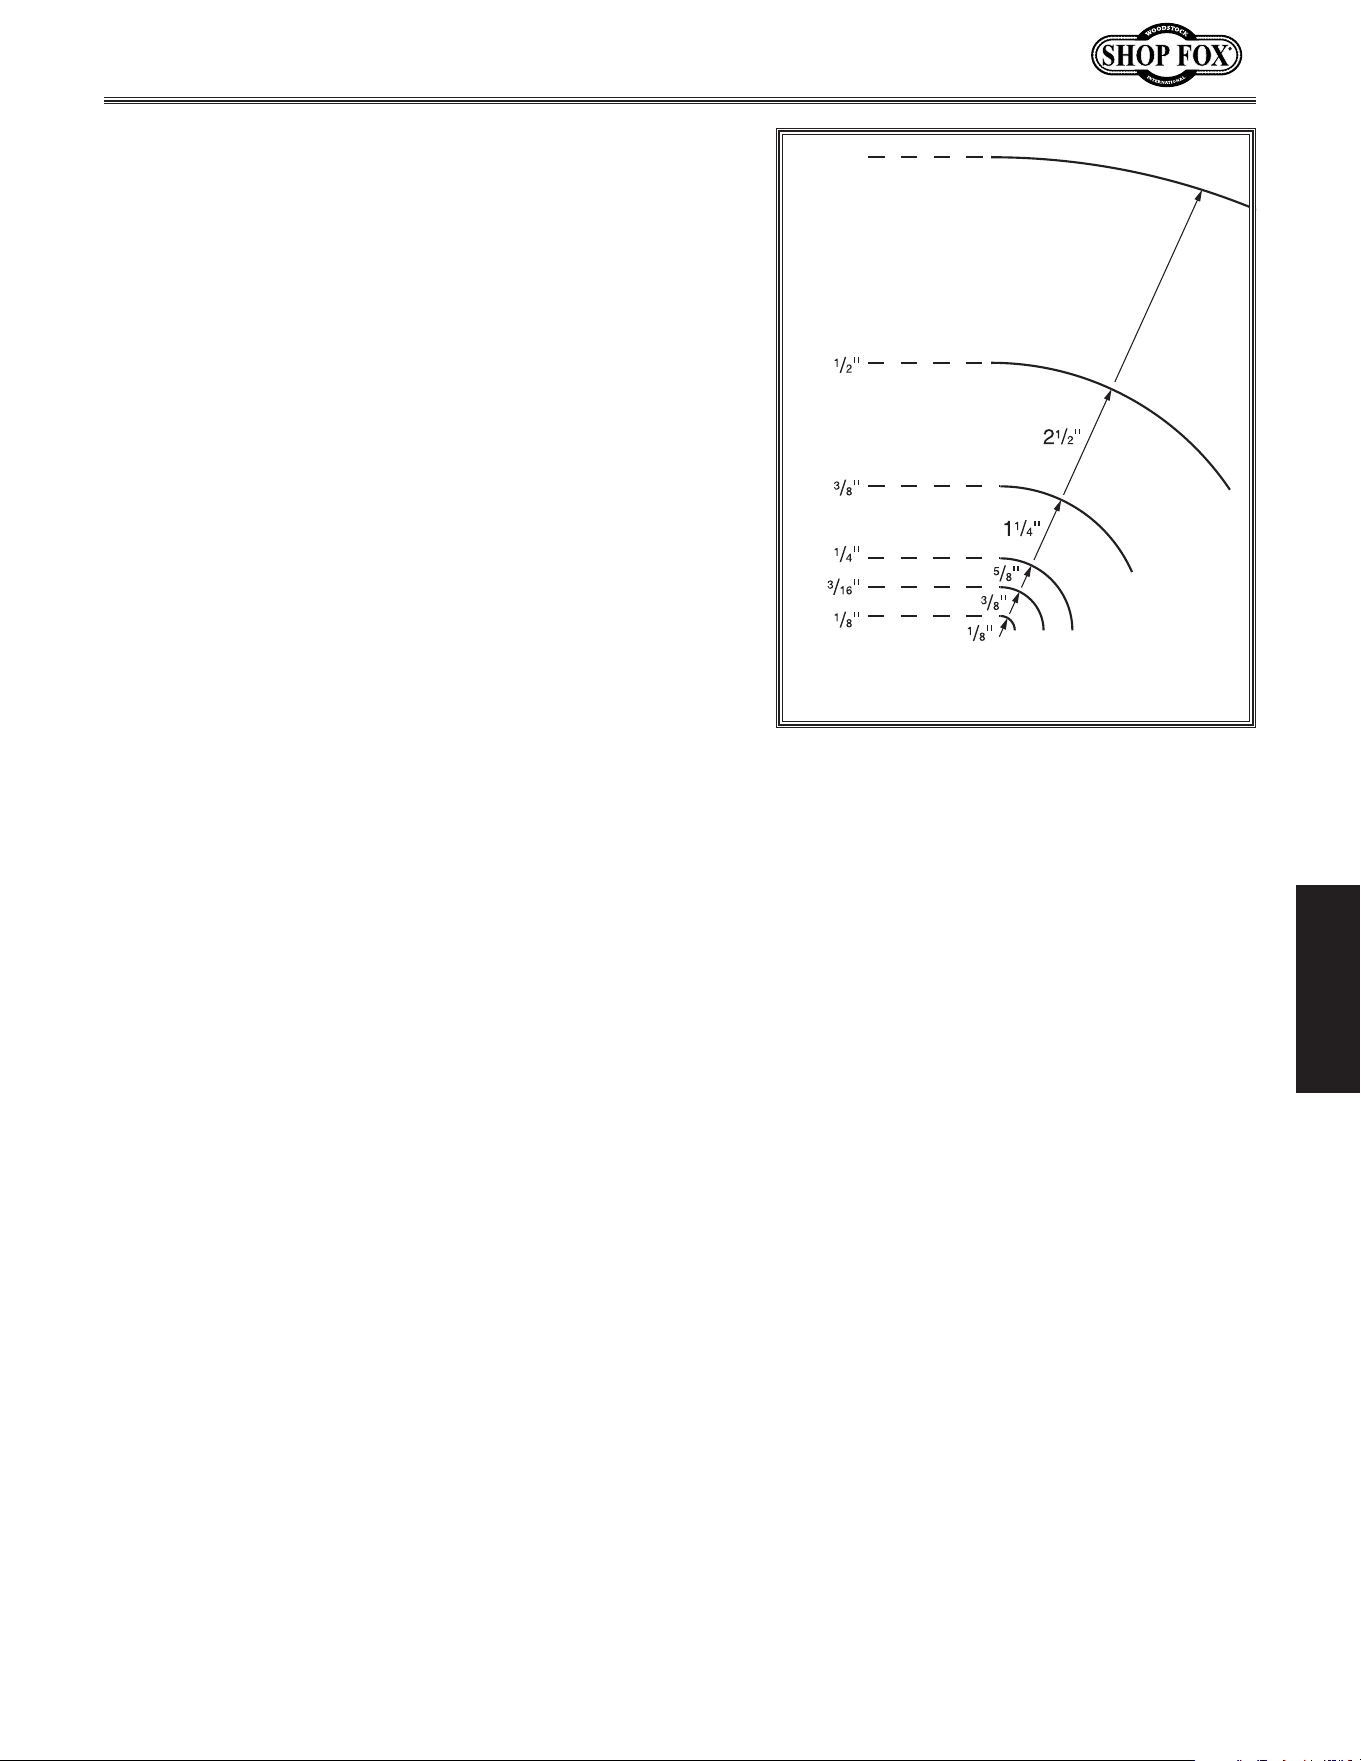
-45-
Model W1849 (For Machines Mfd. Since 11/16)
OPERATIONS
Blade.Dimensions
Length Range ...................................... 120"–120
1
⁄2"
Width Range ............................................
1
⁄8"–
3
⁄4"
Blade.Length
Measured by the blade circumference, blade lengths are
specific to each bandsaw. They are determined by the
wheel diameter and distance between the wheels. Blades
will vary slightly even in the same length because of how
they are welded. Refer to the Accessories section later in
this manual for blade replacements from Woodstock.
Blade.Width
Measured from the back of the blade to the tip of the
blade tooth (the widest point), blade width is often the
first consideration given to blade selection. Blade width
dictates the largest and smallest curve that can be cut, as
well as how accurately it can cut a straight line.
• Curve Cutting: Use the chart in Figure 66 to
determine the correct blade for curve cutting.
Determine the smallest radius curve that will be cut
on your workpiece and use the corresponding blade
width (refer to Cutting Curves on Page 53 for more
information).
• Straight Cutting: Use the largest width blade that
you own. Large blades excel at cutting straight
lines and are less prone to wander (known as blade
lead —refer to Page 65 for more information on blade
lead).
Blade Width
Cutting Radius
5
1
/2"
3
/4"
Figure 66. Recommended cutting radius
per blade width.
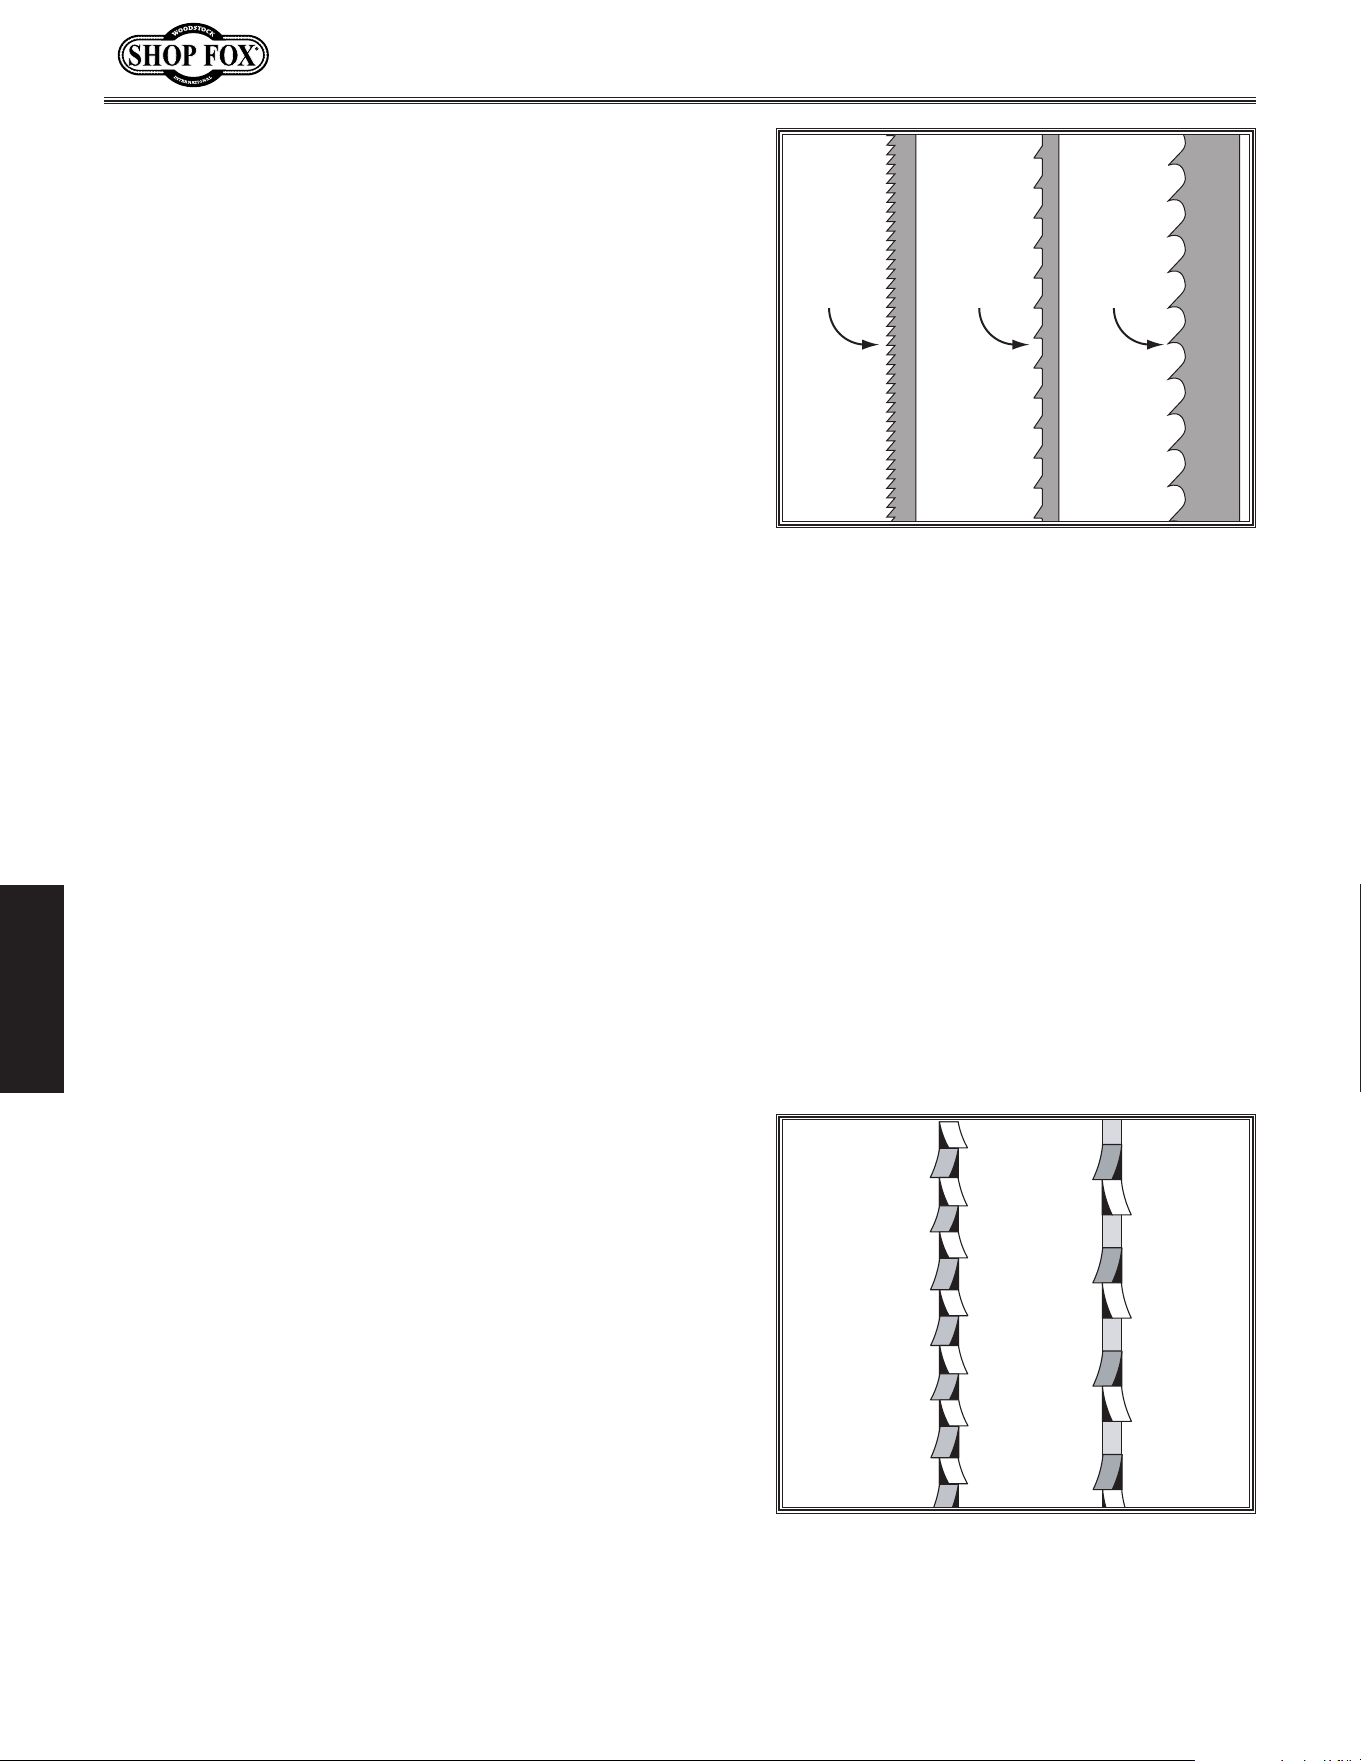
-46-
Model W1849 (For Machines Mfd. Since 11/16)
OPERATIONS
Tooth.Style
Figure 67 illustrates the three main blade tooth styles:
• Raker: Considered to be the standard because the
tooth size and shape are the same as the tooth
gullet. The teeth on raker blades usually are very
numerous, have no angle, and produce cuts by
scraping the material. As a result, smooth cuts can
be achieved without cutting fast or generating more
heat than other tooth types.
• Skip: Similar to a raker blade that is missing every
other tooth. Because of the design, skip toothed
blades have a much larger gullet than raker blades,
and therefore, cut faster and generate less heat.
However, these blades also leave a rougher cut than
raker blades.
• Hook: The teeth have a positive angle (downward)
which makes them dig into the material, and the
gullets are usually rounded for easier waste removal.
These blades are excellent for the tough demands of
resawing and ripping thick material.
Raker Skip Hook
Figure 67. Main blade tooth styles.
Tooth.Set
Two common tooth sets for wood bandsaw blades are
alternate and raker. Each different type of tooth set
removes material in a different manner, leaving cuts with
different characteristics (see Figure 68).
• Alternate: An all-purpose arrangement where the
teeth are bent evenly left and right of the blade.
• Raker: Three teeth in a recurring group—one bent
left, one bent right, and then one that is not bent.
The raker set is ideal for most contour cuts.
Tooth.Pitch
Measured as TPI (teeth per inch), tooth pitch determines
the number of teeth. More teeth per inch (fine pitch)
will cut slower, but smoother; while fewer teeth per inch
(coarse pitch) will cut rougher, but faster. As a general
rule, choose blades that will have at least three teeth
in the material at all times. Use fine-pitched blades on
harder woods and coarse-pitched blades on softer woods.
Alternate Raker
Figure 68. Common woodcutting bandsaw
blade tooth sets.
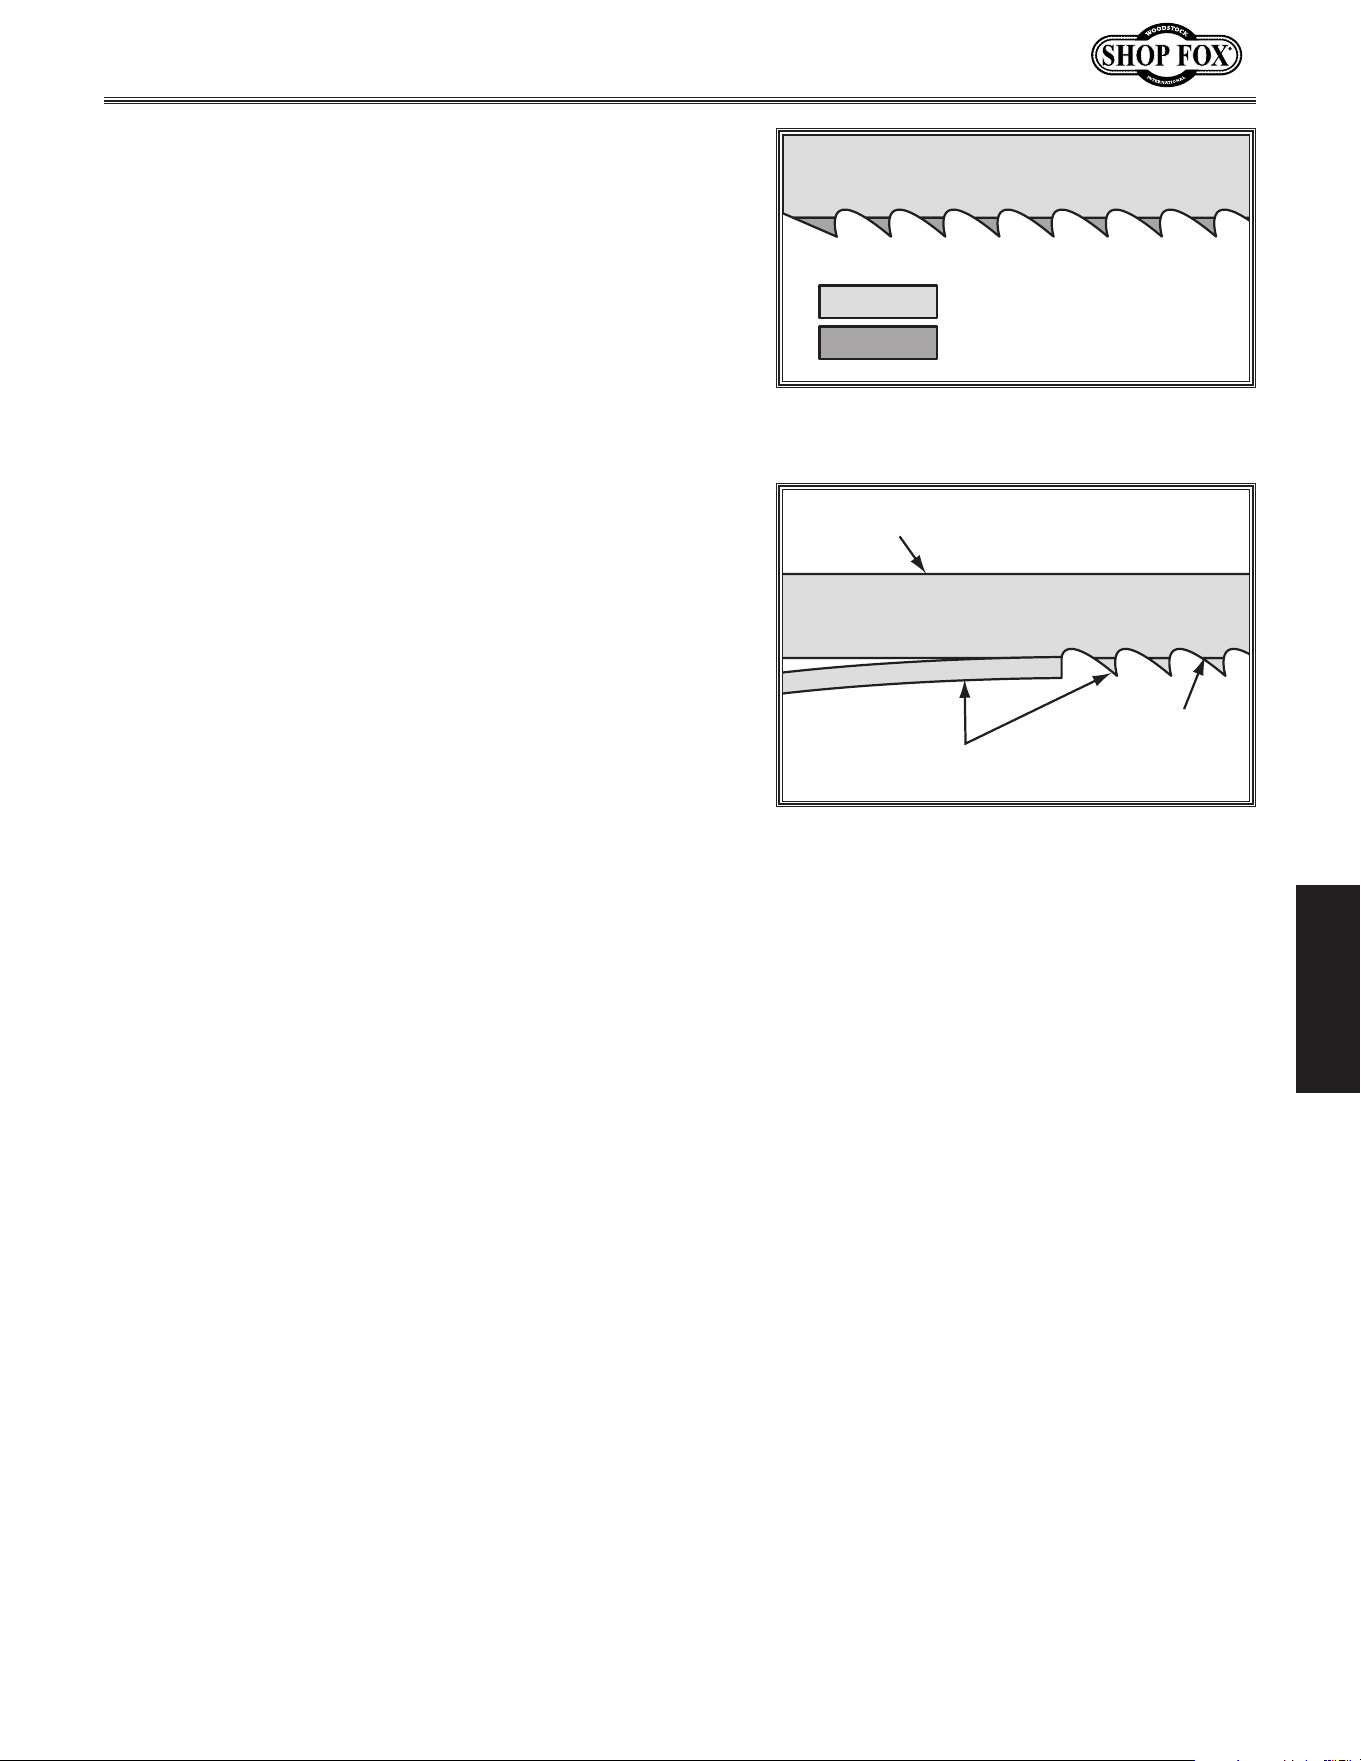
-47-
Model W1849 (For Machines Mfd. Since 11/16)
OPERATIONS
Bi-Metal Blade: A strip of high-speed tool steel is
precision welded to a flexible carbon blade, then teeth
are ground into the blade to provide good edge-holding
qualities for blades taking a lot of abuse (see Figure 70).
Carbon Steel Blade
Weld
High-Speed Steel
Figure 70. Bi-metal blade composition.
Carbon Steel
Carbide Impregnated Steel
Figure 69. Carbide-tooth blade
composition.
Blade.Material
Bandsaw blades must meet two requirements: flexibility
and hardness. The flexibility of a blade allows it to travel
on the wheel as a band, while hardness allows the teeth
to cut and hold an edge. Modern materials technology has
allowed bandsaw blades to meet these requirements in
various ways.
Carbon Steel: These blades are differentially heat treated
to provide hard teeth that will hold an edge, and yet be
flexible in the back.
Carbide-Tooth: Extremely hard carbide is either welded
onto or impregnated into the carbon steel blades,
providing superior edge-holding characteristics (see
Figure 69).
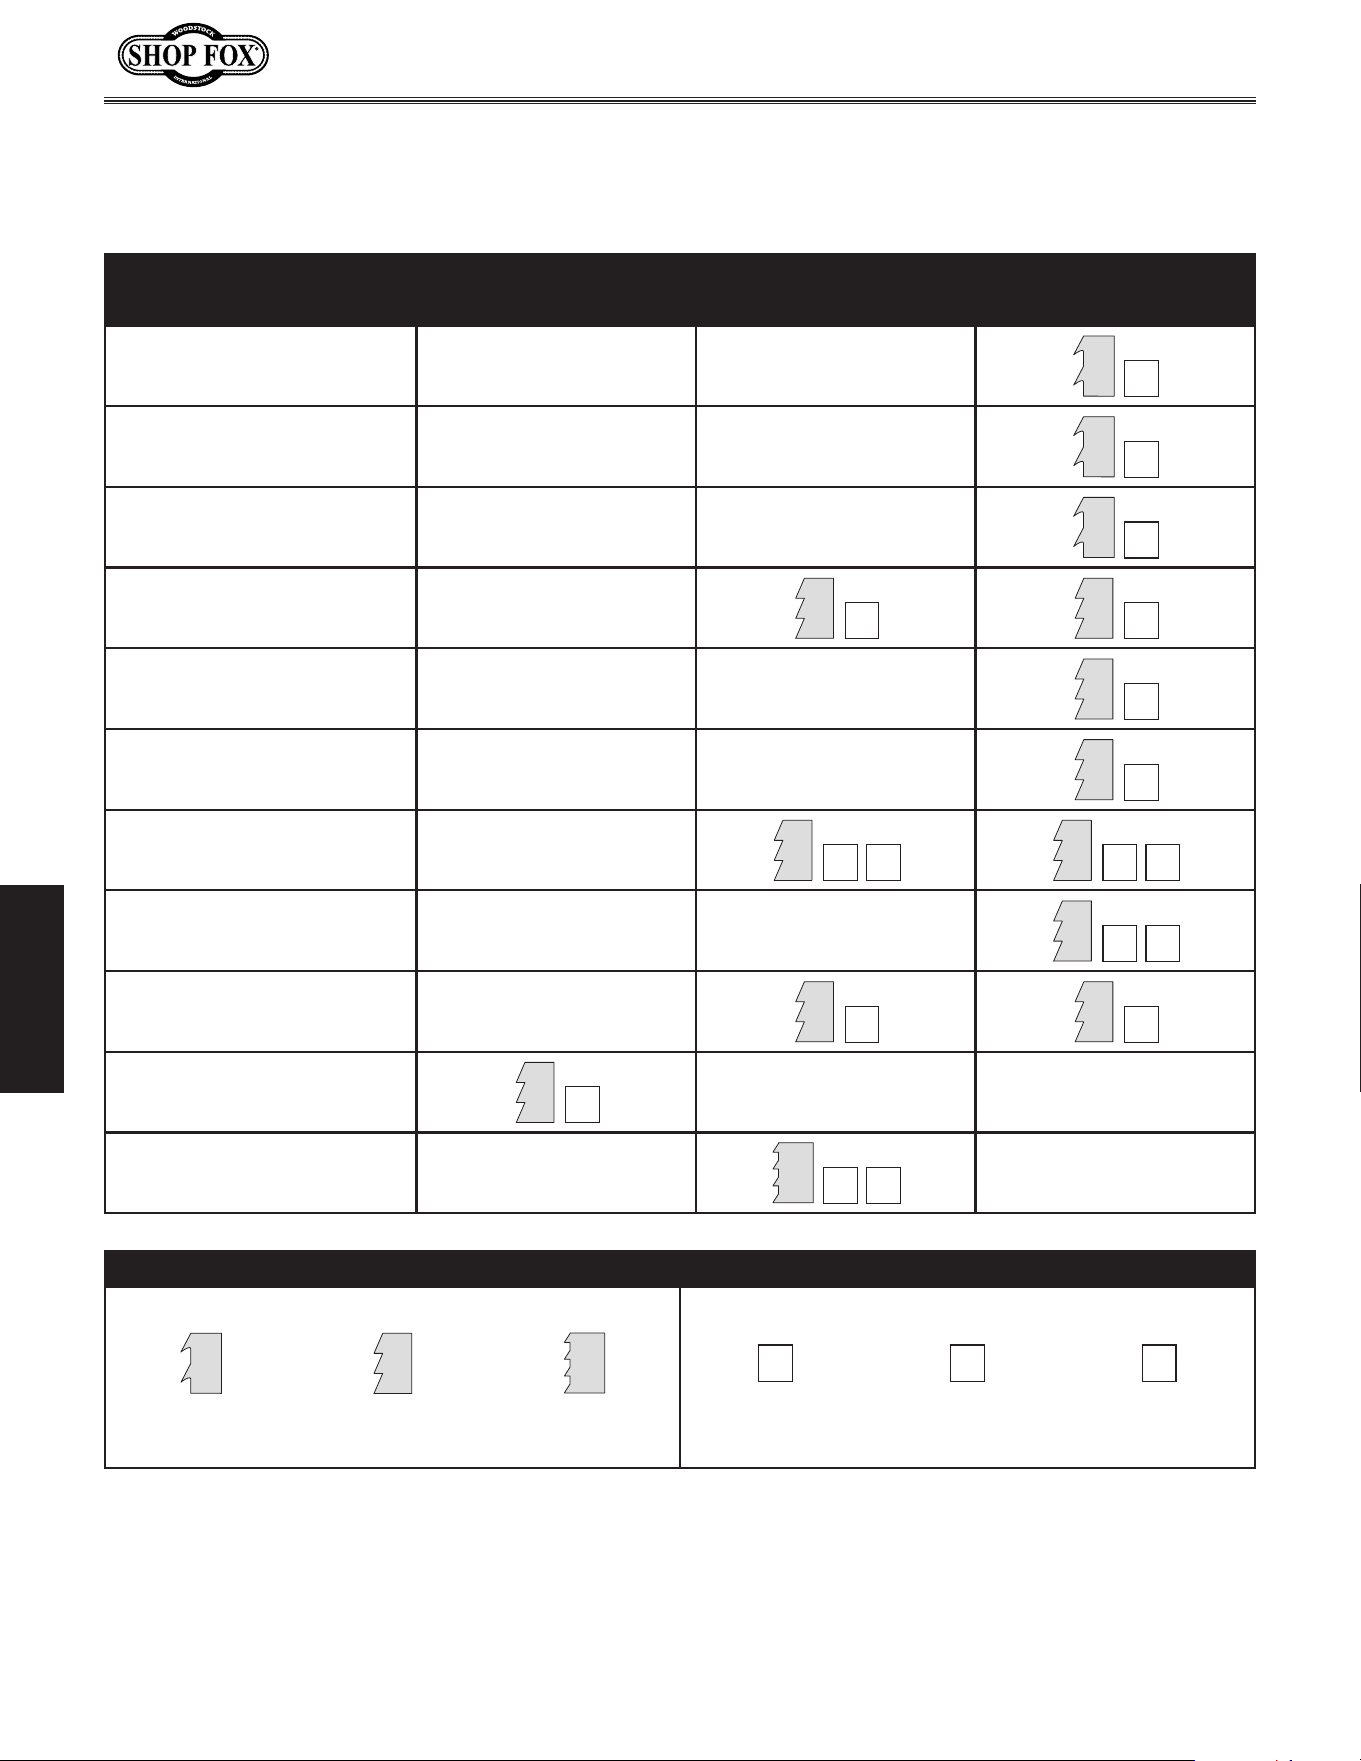
-48-
Model W1849 (For Machines Mfd. Since 11/16)
OPERATIONS
Blade.Selection.Ch art
Cutting Operation
Blade Width
NaNarrow (
1
⁄8" —
1
⁄4") MMedium (
3
⁄16"—
1
⁄2") Wide (
1
⁄2"—
3
⁄4")
Resawing
R
H
S
C
Ripping Thin Stock
R
H
S
M
Ripping Thick Stock
R
H
S
C
Ripping Round Stock
R
H
S
M
R
H
S
M
Crosscutting Thin Stock
R
H
S
F
Crosscutting Thick Stock
R
H
S
M
Crosscutting Round Stock
R
H
S
F
M
R
H
S
F
M
Miter Cut
R
H
S
F
M
Tenons
R
H
S
M
R
H
S
M
Sharp Curves
R
H
S
F
Gradual Curves
R
H
S
F
M
Key
Tooth Type Tooth Pitch (Teeth Per Inch or TPI)
R
H
S
R
H
S
R
H
S
F M C
Hook Raker Skip
Fine
(14—32 TPI)
Medium
(4—12 TPI)
Coarse
(2—4 TPI)
Use the blade selection chart below as a general guide when selecting a blade for your operation.

-49-
Model W1849 (For Machines Mfd. Since 11/16)
OPERATIONS
Blade.Breakag e
Many conditions may cause a bandsaw blade
to break. Blade breakage is unavoidable in
some cases, since it is the natural result of
the peculiar stresses that bandsaw blades are
subjected to.
Blade breakage is also due to avoidable
circumstances. Avoidable blade breakage is
most often the result of poor care or judgement
on the part of the operator when mounting or
adjusting the blade or support guides.
The most common causes of blade breakage
are:
• Faulty alignment or adjustment of the
blade guides.
• Forcing or twisting a wide blade around a
short radius.
• Feeding the workpiece too fast.
• Dull or damaged teeth.
• Over-tensioned blade.
• Upper blade guide assembly set too
high above the workpiece. Adjust the
top blade guide assembly so that there
is approximately
1
⁄8"—
1
⁄4" between the
bottom of the assembly and the workpiece.
• Using a blade with a lumpy or improperly
finished braze or weld.
• Leaving the blade tensioned when not in
use.
• Using the wrong pitch (TPI) for the
workpiece thickness. The general rule of
thumb is to have no less than two teeth
in contact with the workpiece at all times
during cutting.
• Using an improperly sized blade for
the machine. See Machine Data Sheet on
Page 3.
Blade.Care.&.Break-In
Blade.Care
A bandsaw blade is a thin piece of steel that is
subjected to tremendous strain. You can obtain
longer use from a bandsaw blade if you give it
fair treatment and always use the appropriate
feed rate for your operation.
Be sure to select blades with the proper width,
set, type, and pitch for each application. Using
the wrong blade will produce unnecessary heat
and shorten the life of the blade.
A clean blade will perform much better than
a dirty blade. Dirty or gummed up blades
pass through the cutting material with much
more resistance than clean blades. This extra
resistance also causes unnecessary heat.
Blade.Break-In
The tooth tips and edges of a new blade are
extremely sharp, and cutting at too fast of a
feed rate fractures the beveled edges of the
teeth and causes premature blade wear.
To properly break in a new blade, do these
steps:
1. Choose correct speed for blade and
material of operation.
2. Reduce feed pressure by half for first
50—100 square inches of material cut.
3. To avoid twisting blade when cutting,
adjust feed pressure when total width of
blade is in cut.
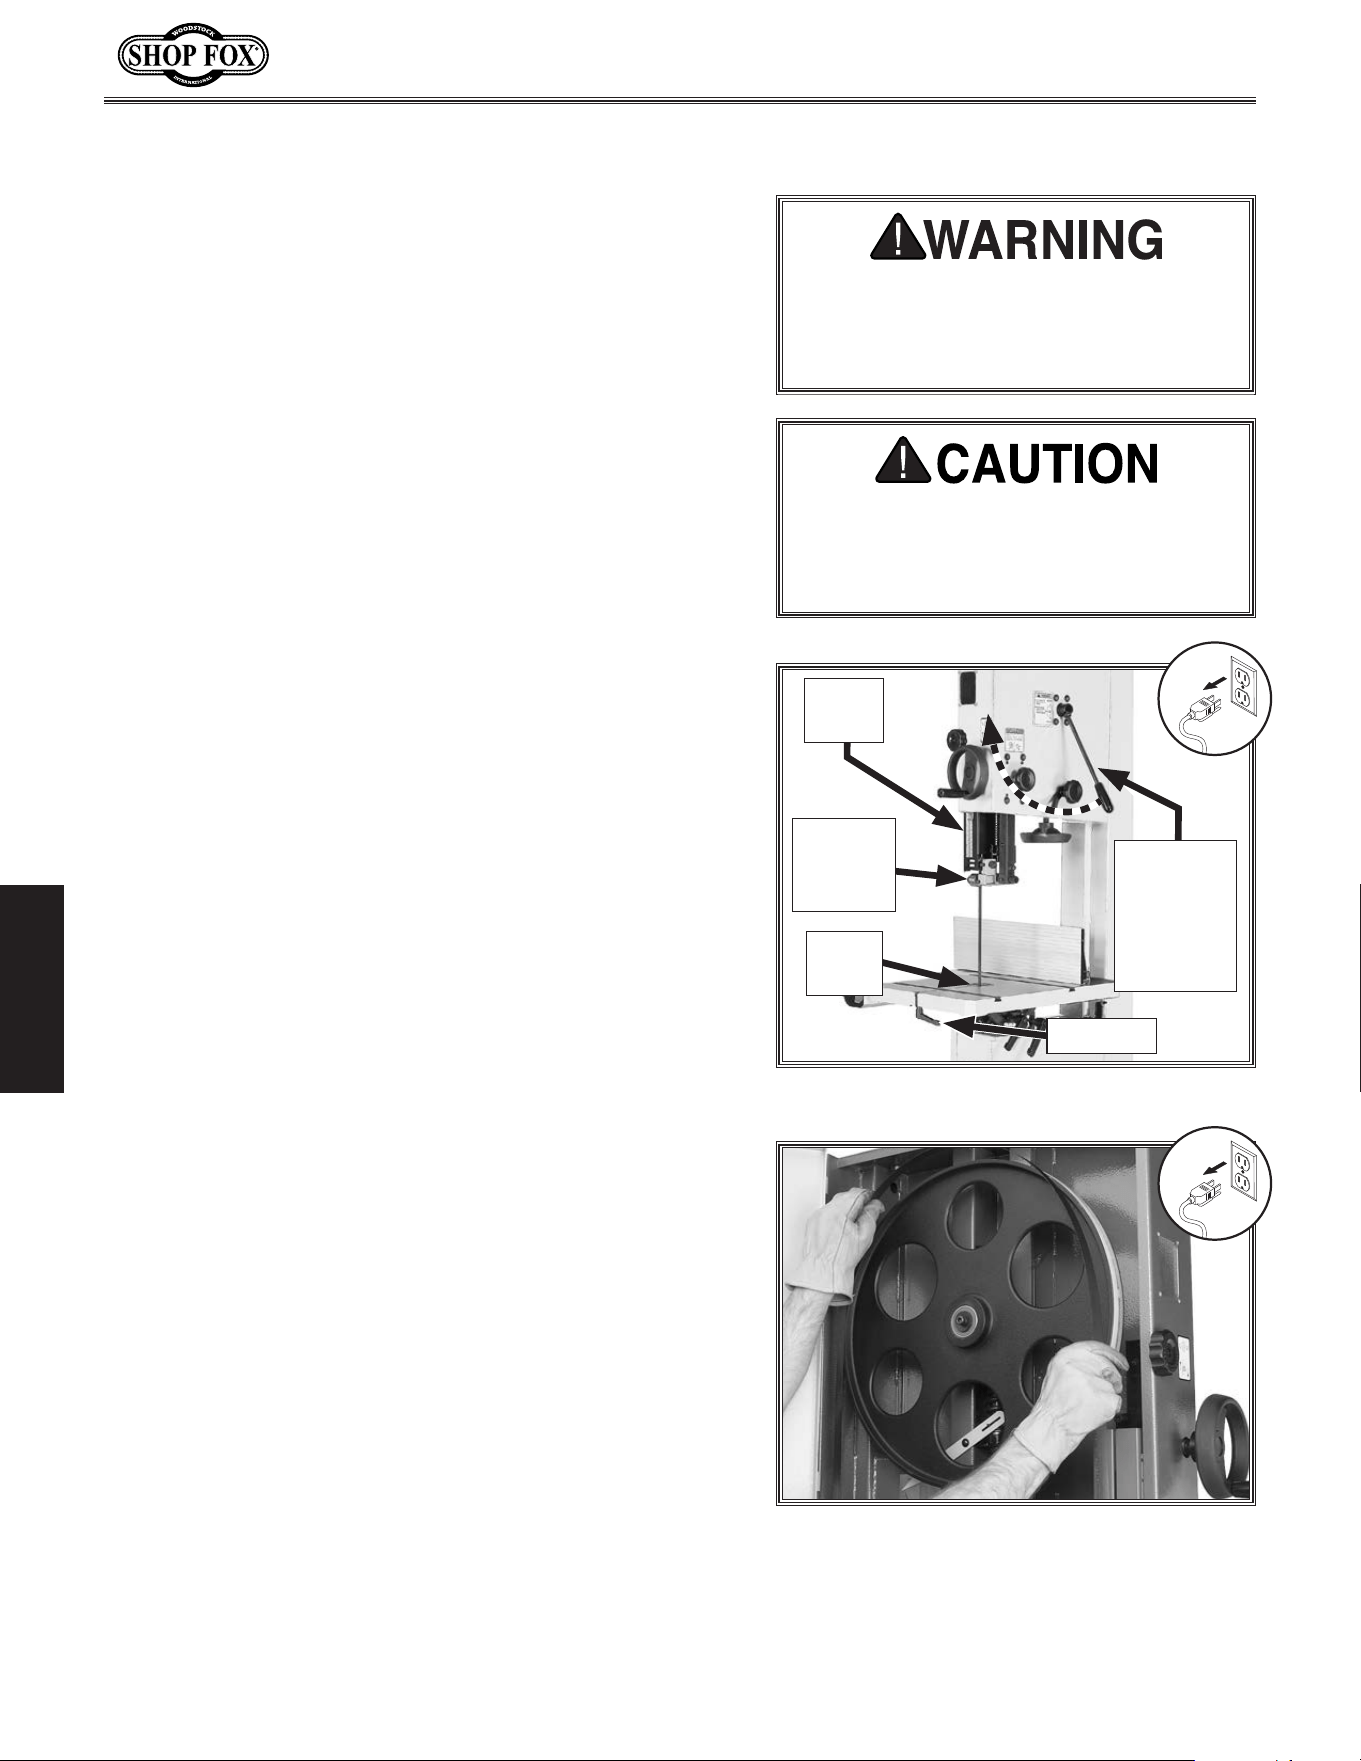
-50-
Model W1849 (For Machines Mfd. Since 11/16)
OPERATIONS
Changing.Blade
Installing.Blade
1. DISCONNECT MACHINE FROM POWER!
2. Slide blade through table slot, ensuring that teeth
are pointing down toward front of table.
Note: If the teeth will not point downward in any
orientation, the blade is inside-out. Remove the
blade, and twist it right-side-out.
3. Slip blade through blade guides, and mount it on
upper and lower wheels (see Figure 72).
4. Rotate blade tension quick-release lever
counterclockwise to down position.
5. Adjust blade tension (refer to Page 30) and blade
tracking (refer to Page 28).
6. Adjust upper/lower guide bearings and support
bearings (refer to instructions beginning on
Page 34).
7. Close and secure wheel covers and guide post blade
cover, and re-install table insert and table pin.
8. If necessary, adjust blade tension quick-release lever
(refer to Page 66 for more information).
Figure 72. Example of placing blade on
upper wheel.
4. Open upper and lower wheel covers and blade cover
on guide post, then with gloved hands, slide blade
off of both wheels.
5. Rotate blade 90˚ and slide it through slot in table to
remove it.
Blade changes entail removing the existing blade,
installing the new blade, then properly adjusting the
blade tension, tracking, and guides.
Removing.Blade
1. DISCONNECT MACHINE FROM POWER!
2. Release blade tension by rotating blade tension
quick-release lever (see Figure 71) clockwise to up
position.
3. Remove table insert and table pin. Adjust upper and
lower guide bearings as far away as possible from
blade (see Figure 71).
Disconnect bandsaw from power
BEFORE changing blade. Serious
personal injury could occur if machine
is started during this procedure.
LACERATION HAZARD! Bandsaw blades
are sharp and difficult to handle. Wear
heavy leather gloves while handling to
reduce the risk of being cut.
Figure 71. Blade changing controls.
Guide
Post
Upper
Guide
Bearings
Table
Insert
Table Pin
Rotate
Lever
Clockwise
to "Up"
Position
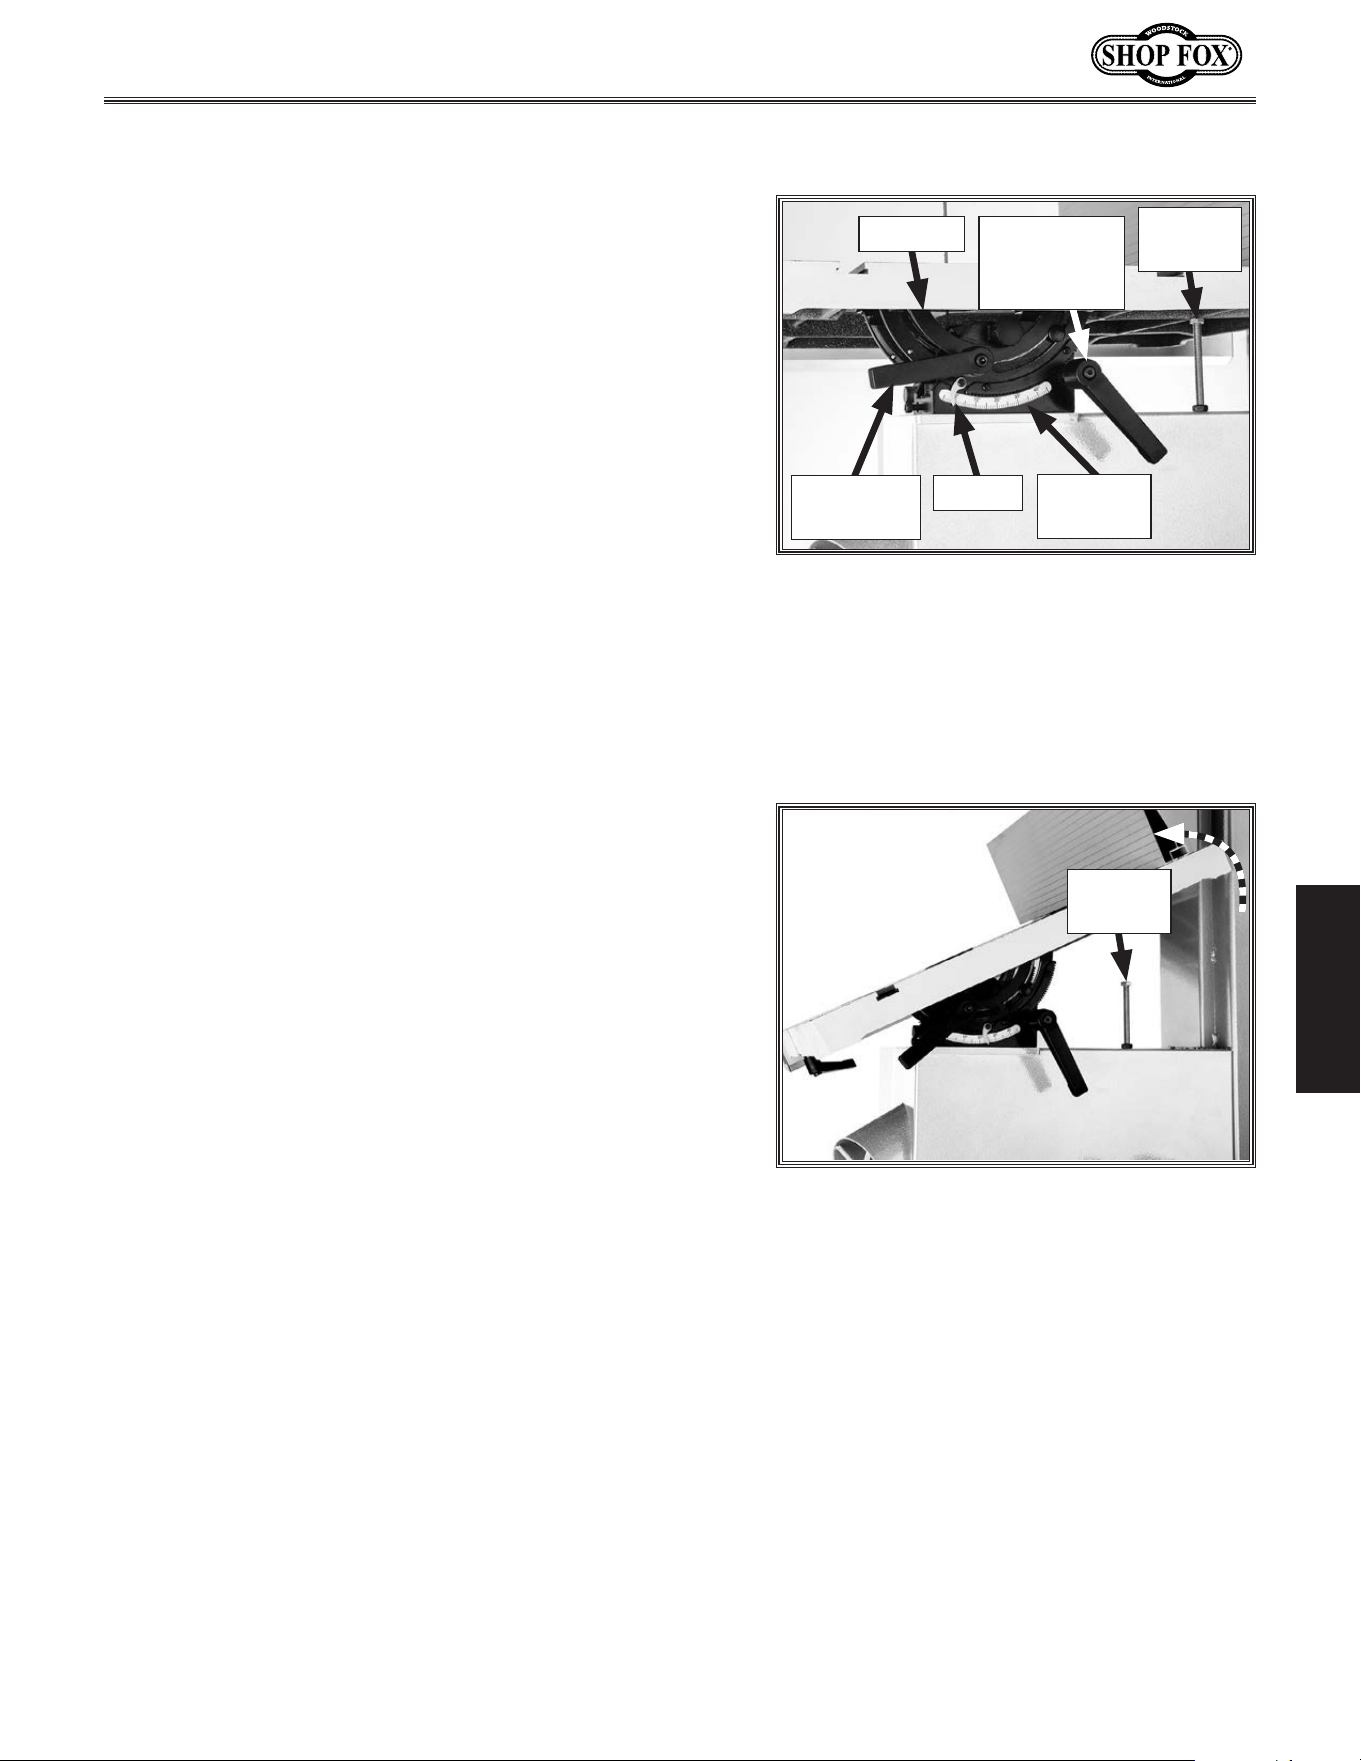
-51-
Model W1849 (For Machines Mfd. Since 11/16)
OPERATIONS
Tilting.Table
The table can be tilted from 5° left–45° right to make
beveled cuts. A table tilt scale with pointer is provided
on the trunnion, and a hex bolt serves as a positive stop
for quickly returning the table back to 0° from a right-tilt
setting (see Figure 73).
Note: The tilt scale on the trunnion serves as a guide
only. For more accurate results, use a bevel gauge or
protractor to set the desired table tilt relative to the
blade.
1. DISCONNECT MACHINE FROM POWER!
2. Loosen table tilt lock lever (see Figure 73).
3. Rotate table tilt adjustment lever until table reaches
desired angle, then tighten lock lever.
Tilting.Table
Positive.Stop
The positive stop (see Figure 74) allows you to quickly
return the table to 0° from a right-tilt setting. The hex
bolt height can be adjusted for table calibration, or it can
be lowered to allow a left-tilt setting of up to 5°.
Note: It is always a good idea to check the table tilt scale
and make sure the positive stop is calibrated.
Figure 74. Table tilted to approximately
10° right to adjust positive stop.
To check/calibrate positive stop, do these steps:
1. Test positive stop setting by tilting table fully left.
— If table stops at 0°, no further adjustments are
necessary.
— If table does not stop at 0°, proceed to Step 2.
2. Loosen hex nut, then rotate adjustment bolt until
table contacts bolt when at 0° (see Figure 74).
3. Repeat Step 2 to test adjustment. If necessary,
repeat Step 3.
Note: If you wish to set the positive stop to an
angle other than 0°, follow Steps 1–3 for the
desired angle.
Tool Needed Qty
Open-End Wrench 13mm.......................................1
Figure 73. Table tilt controls.
Trunnion
Table Tilt
Scale
Table Tilt
Lock Lever
Table Tilt
Adjustment
Lever
Positive
Stop
Positive
Stop
Pointer
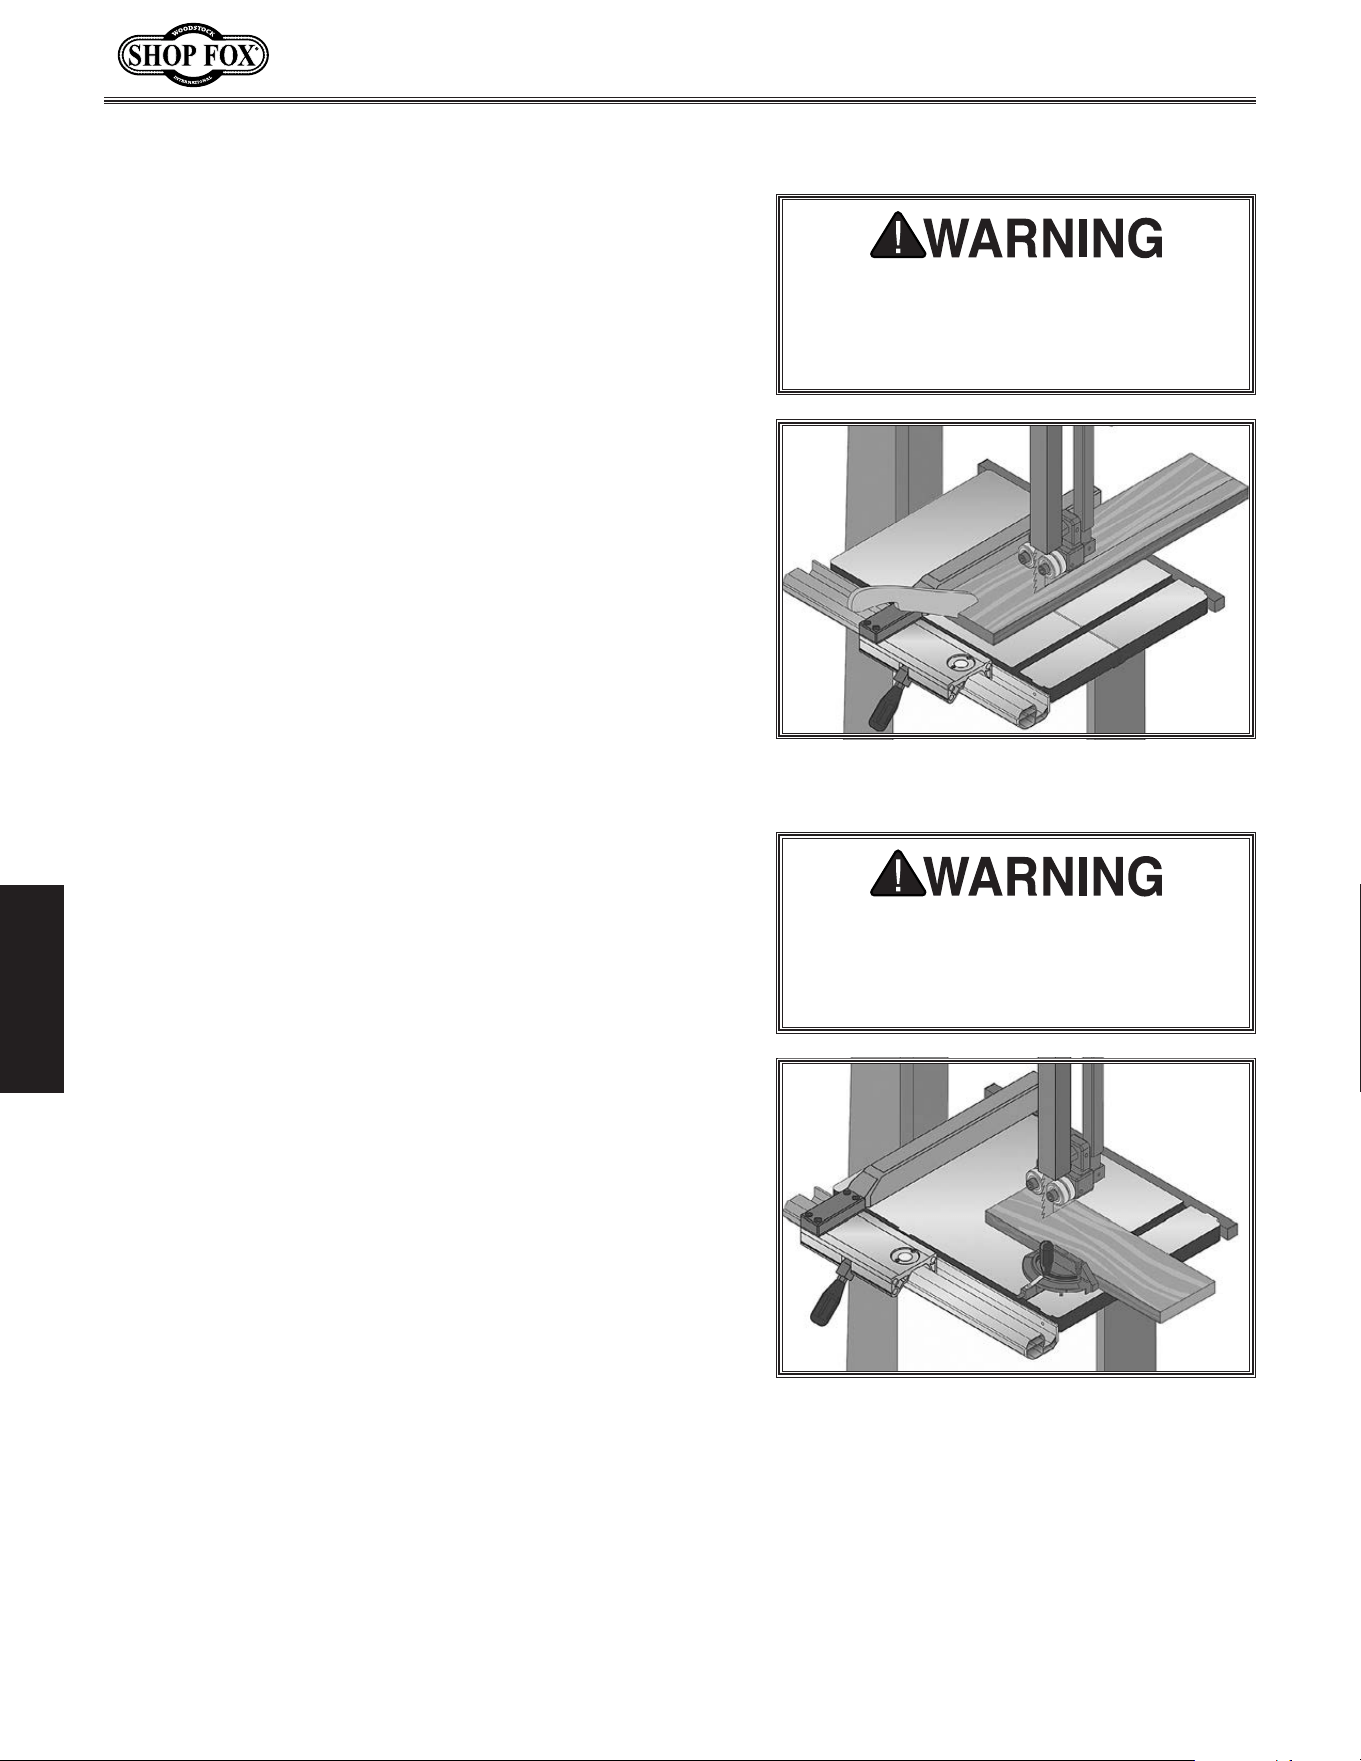
-52-
Model W1849 (For Machines Mfd. Since 11/16)
OPERATIONS
Figure 75. Example of a ripping operation.
NEVER place fingers or hands in the
line of cut. If you slip, your hands or
fingers may go into the blade and may
be cut.
ALWAYS use a push stick when ripping
narrow pieces. Failure to follow these
warnings may result in amputation or
laceration injuries!
Ripping
"Ripping" means cutting with the grain of the wood stock.
For plywood and other processed wood, ripping simply
means cutting down the length of the workpiece. Beveled
rip cuts may be performed by tilting the table.
To make a rip cut, do these steps:
1. Adjust fence to match width of cut on your
workpiece, then lock fence in place.
2. Adjust blade guide assembly to proper height above
workpiece.
3. After all safety precautions have been met, turn
bandsaw ON and wait for it to come to full speed.
Slowly feed workpiece into blade until blade is
completely through workpiece. Figure 75 shows an
example of a ripping operation.
Crosscutting
Crosscutting is the process of cutting across the grain
of wood. For plywood and other processed wood,
crosscutting simply means cutting across the width of
the material. Crosscuts can be 90° or angled using the
miter gauge (not included). Compound crosscuts are those
where the miter is angled and the table tilted.
Note: See Accessories on Page 55 to order a miter gauge.
To make a crosscut, do these steps:
1. Mark workpiece on edge where you want to begin
cut.
2. Adjust blade guide assembly to proper height above
workpiece.
3. Adjust miter gauge to correct angle needed for cut.
4. Move fence out of the way. Place workpiece evenly
against miter gauge, then line up mark with blade.
5. After all safety precautions have been met, turn
bandsaw ON and wait for it to come to full speed.
Slowly feed workpiece into blade until blade is all
the way through workpiece. Figure 76 shows an
example of a crosscutting operation.
Figure 76. Example of a crosscutting
operation with optional miter gauge.
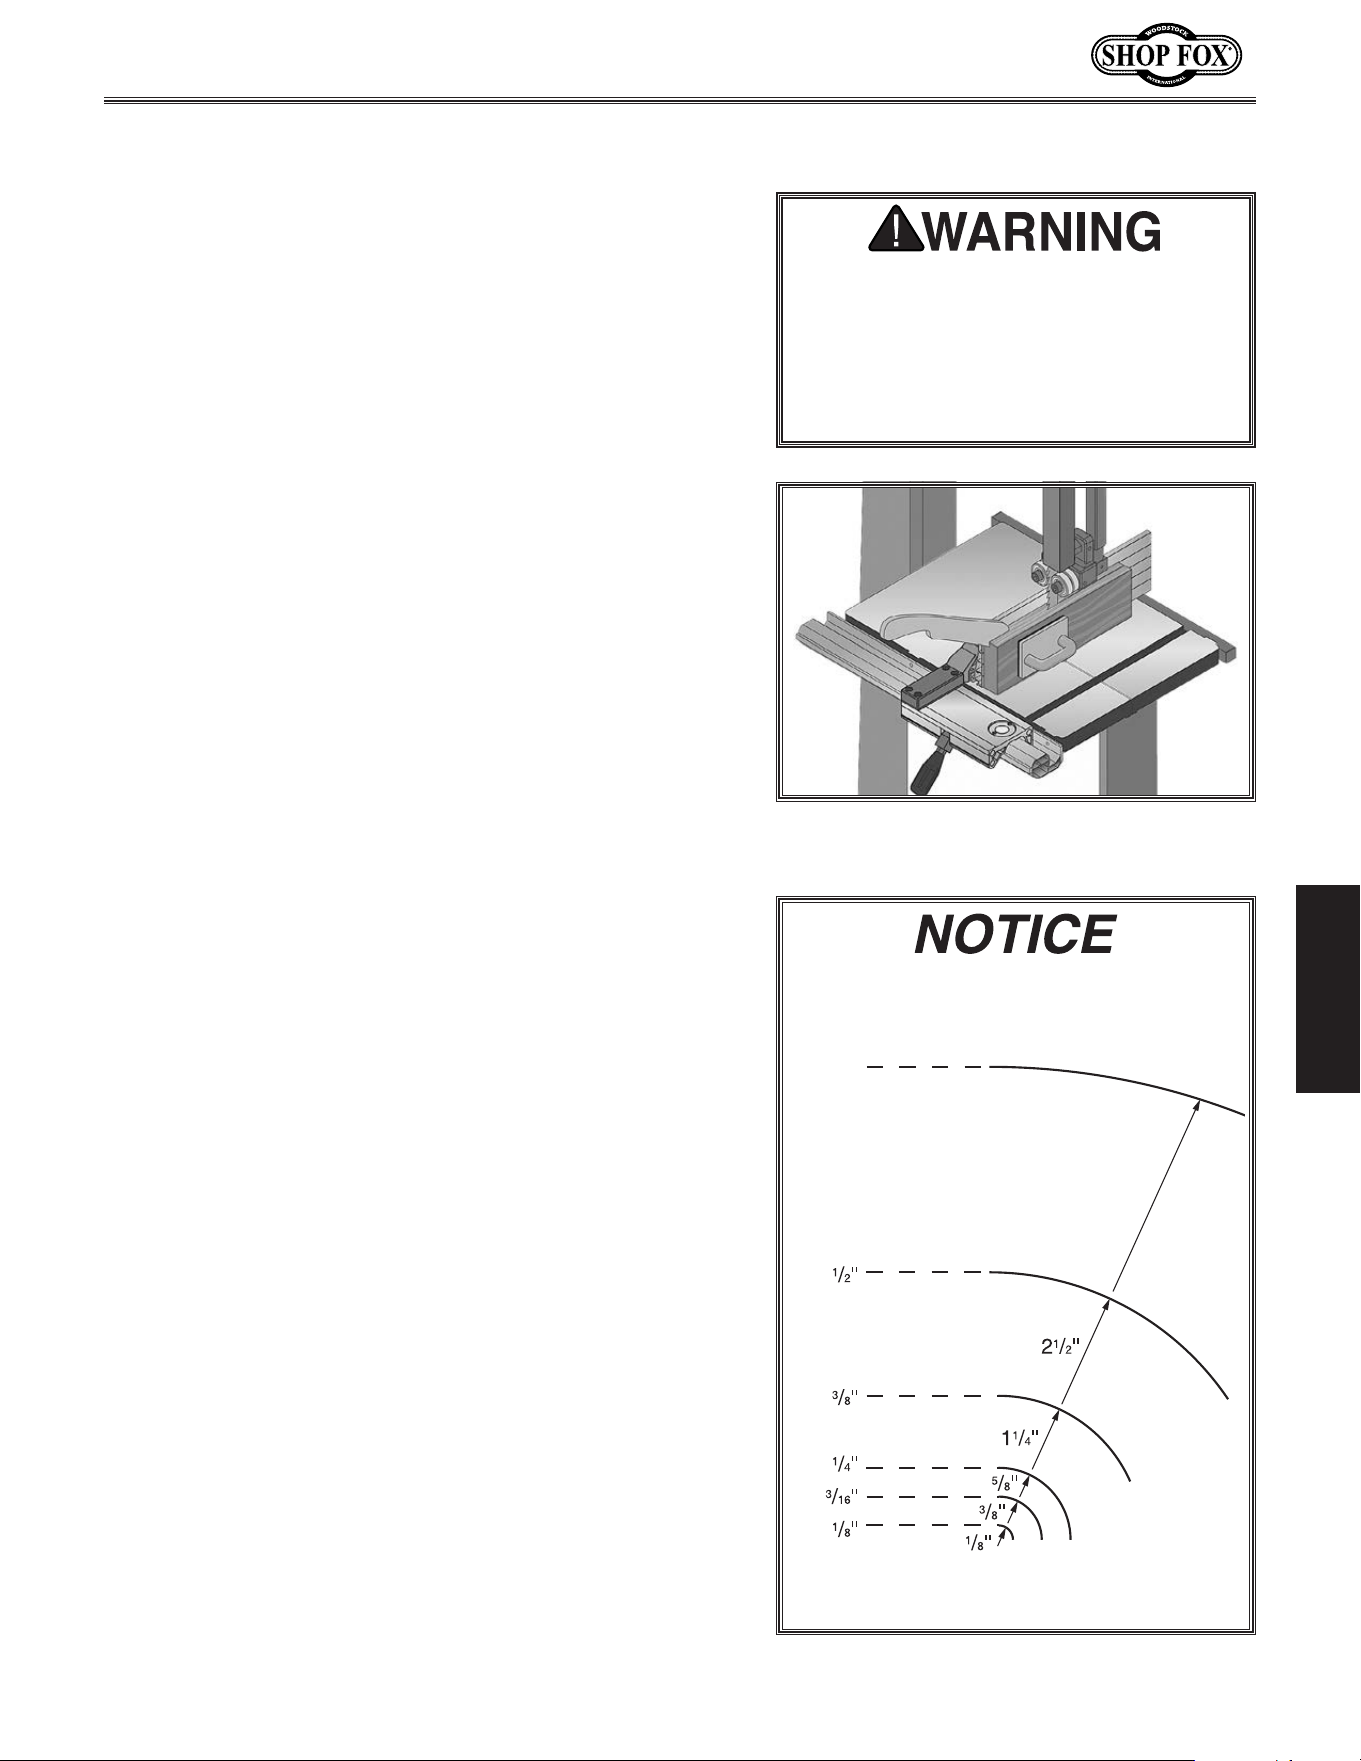
-53-
Model W1849 (For Machines Mfd. Since 11/16)
OPERATIONS
Resawing
Figure 77. Example of a resawing
operation.
When resawing thin pieces, a wandering
blade (blade lead) can tear through the
side of the workpiece, exposing your
hands to the blade teeth. Always use
push blocks when resawing and keep
your hands clear of the blade.
"Resawing" means cutting the thickness of a board
into two or more thinner boards (see Figure 77 for an
example). The maximum height of a board that can be
resawn is limited by the maximum cutting height of the
bandsaw.
One of the most important considerations for resawing is
blade selection—a wide blade cuts straighter and is less
prone to blade lead (see the Blade Lead subsection later
in this manual for more information).
For most applications, use a blade with a hook or a
skip tooth style. Choose blades with fewer teeth-per-
inch (from 3 to 6 TPI), because they offer larger gullet
capacities for clearing sawdust, which reduces heat
buildup and strain on the motor.
Cu tting.Curves
When cutting curves, simultaneously feed and turn
the stock carefully so the blade follows the layout line
without twisting. If curves are sharp or tight, use a
narrower blade with more TPI (teeth per inch) and make
relief cuts to avoid having to back the workpiece away
from the blade.
Always make short cuts first, then proceed to the longer
cuts. Relief cuts reduce the chance of the blade being
pinched or twisted. Relief cuts are cuts made through the
waste portion of the workpiece and are stopped at the
layout line, so when you're cutting along the layout line,
waste wood is released from the workpiece, alleviating
any pressure on the back of the blade. Relief cuts also
make it easier to back the workpiece out once the saw
blade has come to a stop, if needed.
The graphic below displays blade
widths and the corresponding
minimum radii for those blade widths.
Width Min. Radius
1
⁄8" ................................
1
⁄8"
3
⁄16" ................................
3
⁄8"
1
⁄4'' ................................
5
⁄8''
3
⁄8'' ............................... 1
1
⁄4''
1
⁄2'' ............................... 2
1
⁄2''
5
⁄8'' ............................... 3
3
⁄4''
3
⁄4'' ............................... 5
1
⁄2''
Blade Width
Cutting Radius
5
1
/2"
3
/
4
"
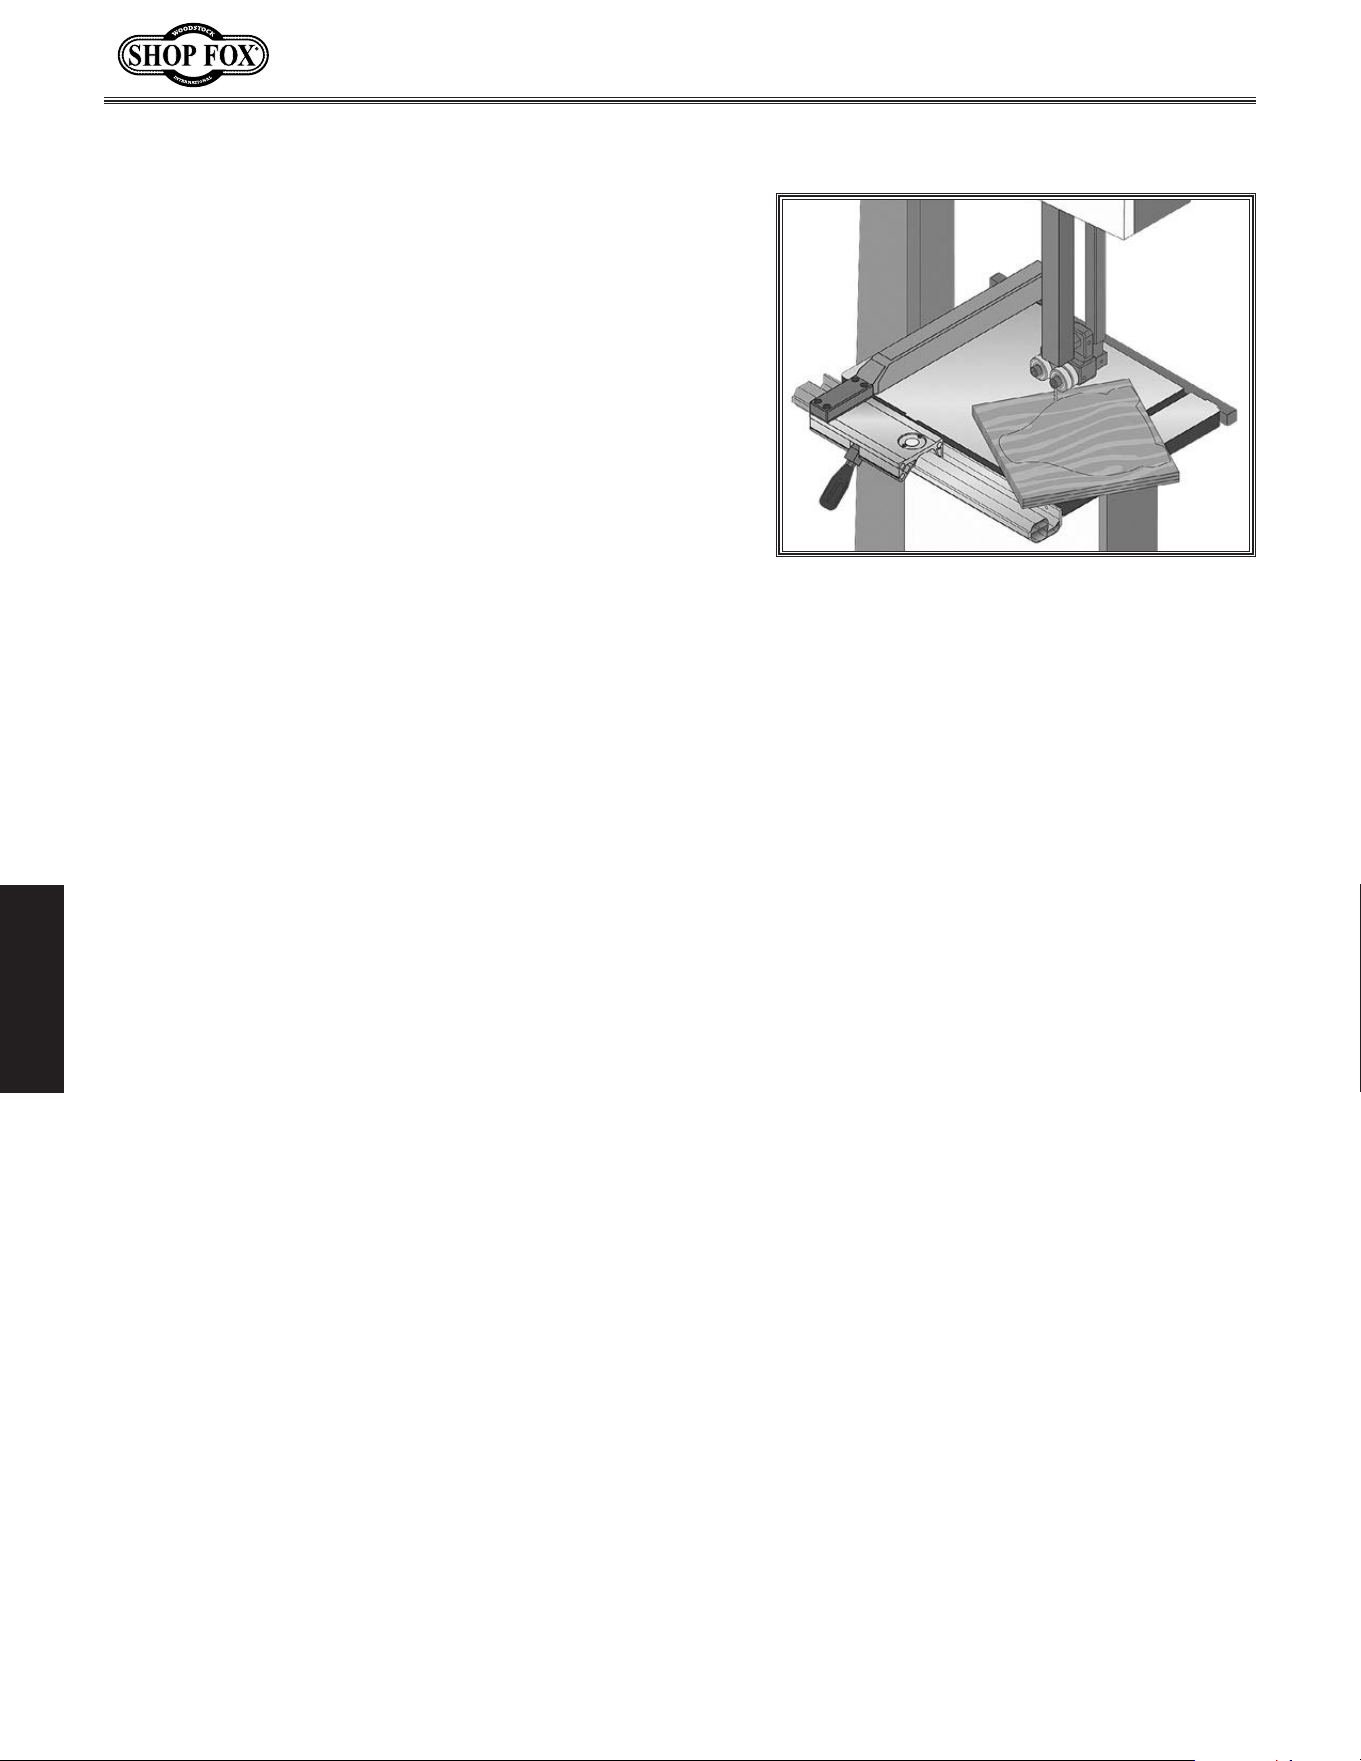
-54-
Model W1849 (For Machines Mfd. Since 11/16)
OPERATIONS
One of the benefits of a bandsaw is its ability to cut
multiple copies of a particular shape by stacking a
number of workpieces together. However, before making
stacked cuts, ensure that the table is perpendicular (90°)
to the blade—otherwise, any error in this setting will be
compounded in the workpieces.
To complete a stacked cut, do these steps:
1. Align workpieces from top to bottom.
2. Secure all pieces together in a manner that will not
interfere with cutting. Hot gluing along edges works
well, as does brad nailing through waste portion.
(Be careful not to cut into brads or you may break
blade!)
3. Lay out shape you intend to cut on face of top
piece.
4. Make relief cuts perpendicular to outline of your
intended shape in areas where changes in blade
direction could strain wood grain or cause blade to
bind.
5. Cut stack of pieces along your layout line as though
you were cutting a single piece (see Figure 78 for an
example of a stacked cut setup).
Figure 78. Example of a stacked cut
setup.
Stacked.Cuts
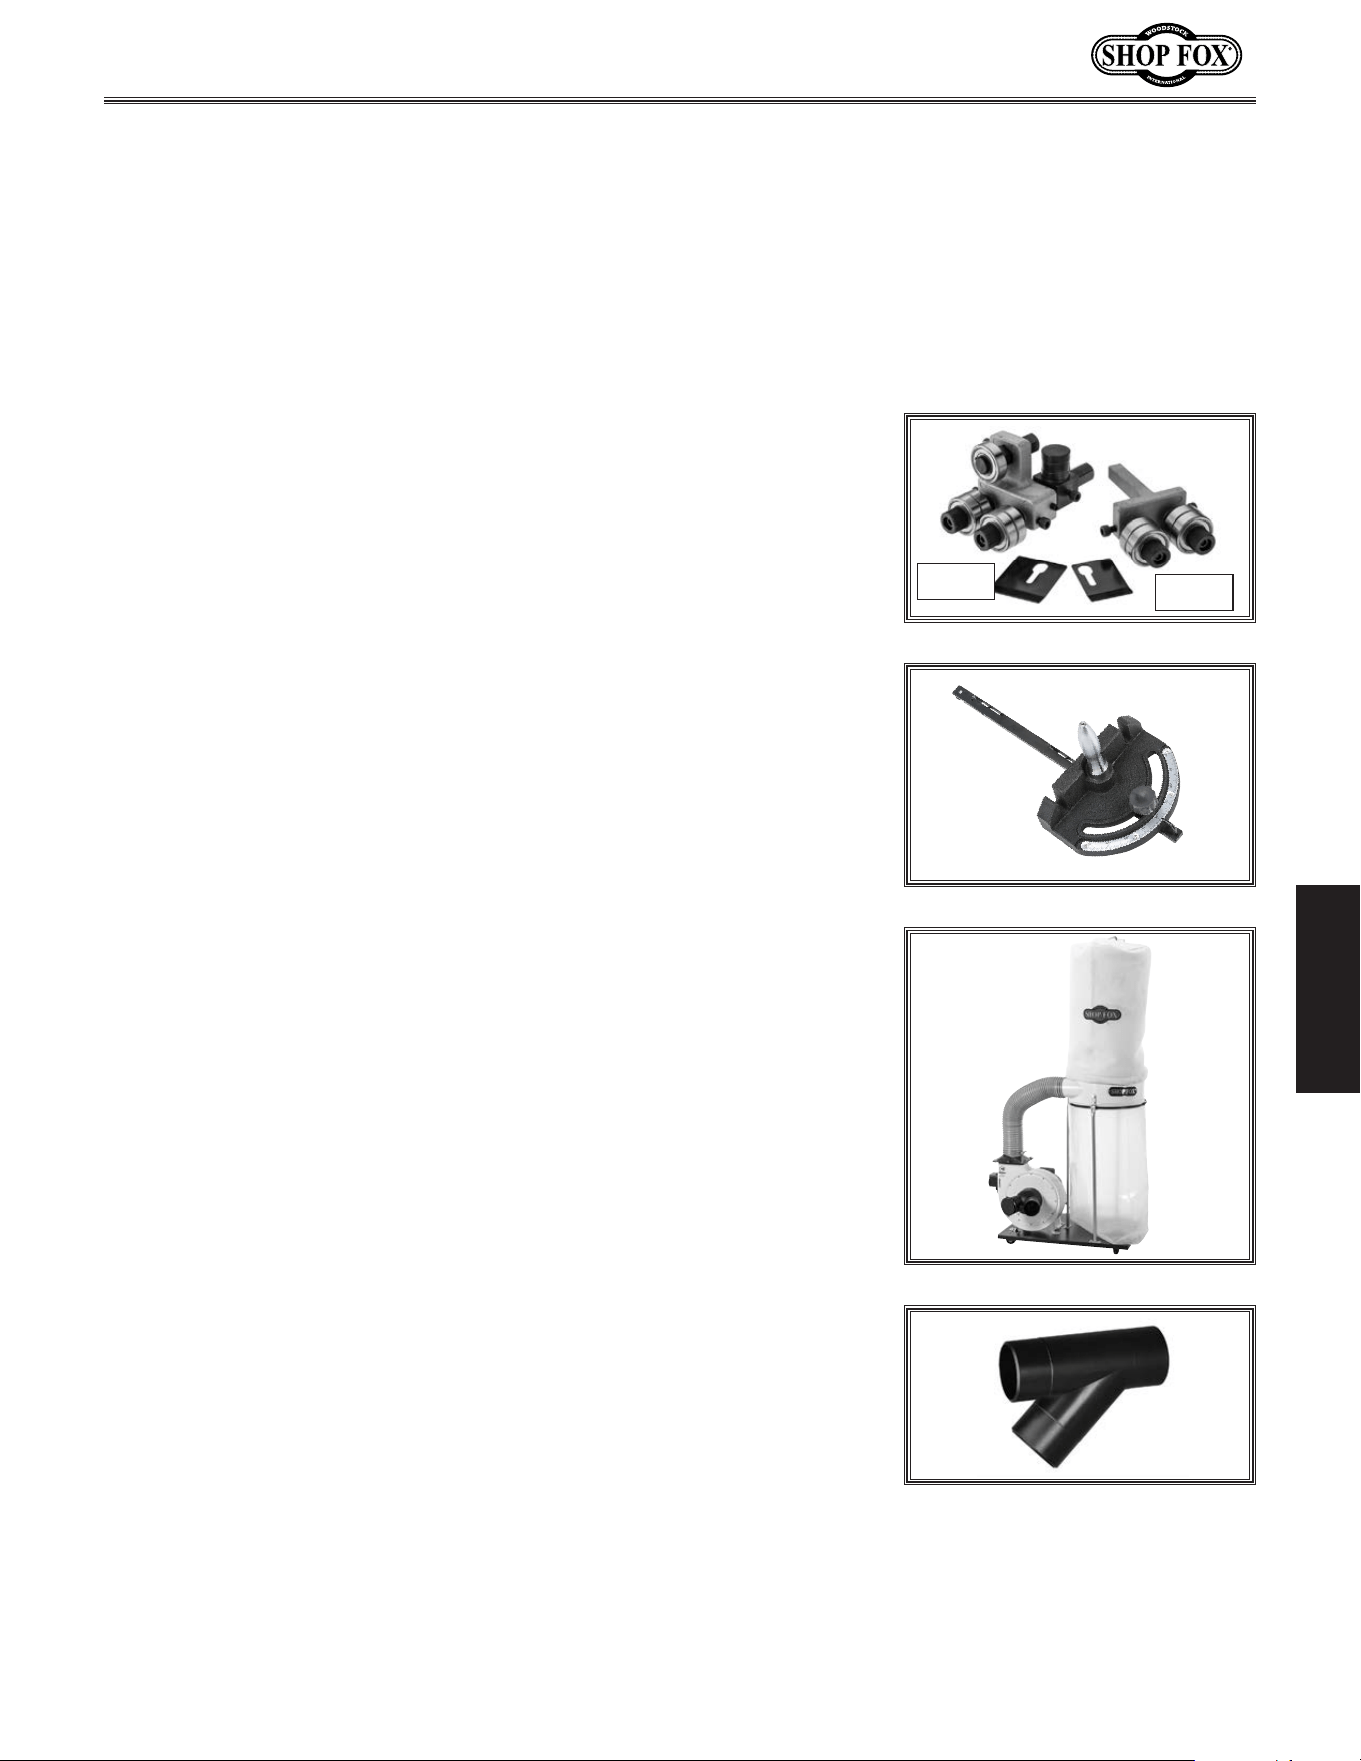
-55-
Model W1849 (For Machines Mfd. Since 11/16)
OPERATIONS
ACCESSORIES
Bandsaw.Accessories
The following bandsaw accessories may be available through your local Woodstock International Inc.
Dealer. If you do not have a dealer in your area, these products are also available through online dealers.
Please call or e-mail Woodstock International Inc. Customer Service to get a current listing of dealers at:
1-800-840-8420 or at sales@woodstockint.com.
Upper
Lower
The D4688 Bandsaw Ball Bearing Guides allow you to convert your
Euro-style roller disc guides to these Ball Bearing Guides. Set includes
both upper and lower guides. Just loosen the screws that hold the old
assemblies in place and swap them out with these replacements.
The W1666 2 HP Dust Collector is a great combination of price and
performance, making it one of the most popular dust collectors we
sell. Perfect for use as a central dust collector in a small shop, or as
a "dedicated" dust collector next to an industrial machine. Features
220V single-phase power, 1550 CFM, 2.5 micron filtration, and a 6"
main inlet w/included 4" x 4" x 2 "Y" fitting.
The W1015 4" Y Fitting is used to attach branch lines to service more
than one dust port. This design provides increased lateral air flow
and efficiency over other types of fittings. These popular fittings are
made with an anti-static additive. Size: 4" x 4" x 4" OD.
This D3123.Heavy-Duty.Miter.Gauge.is made of cast-iron, weighs 7-lb.
miter gauge, and includes a 5" tall chromed handle. With a 2-
3
/8" x 8"
miter face, it is the largest and strongest miter gauge on the market.
The easy-to-read scale allows cutting up to 60° left and right, and the
3
/8" x
3
/4" miter bar adjusts to remove any side play for the ultimate in
accuracy.
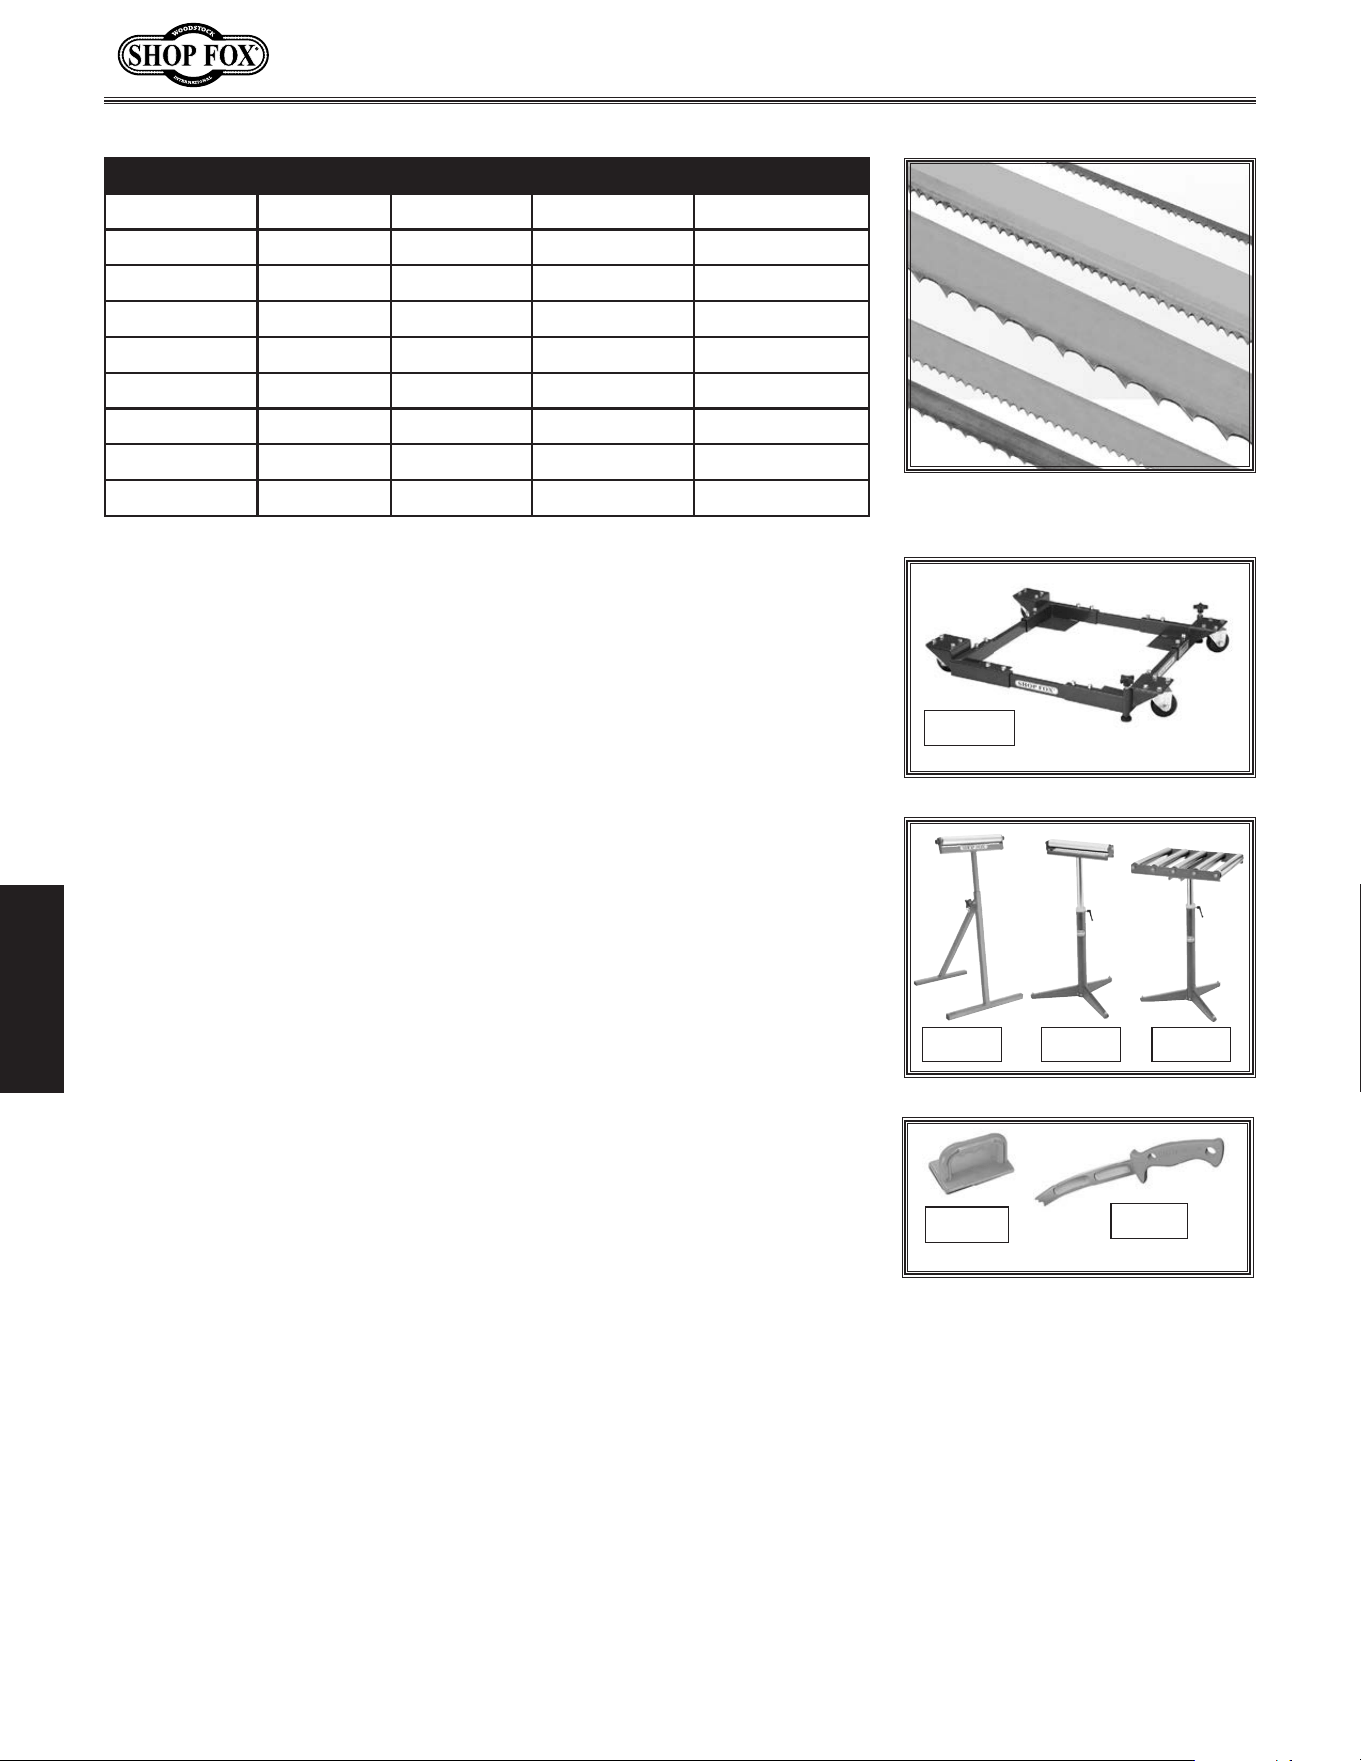
-56-
Model W1849 (For Machines Mfd. Since 11/16)
OPERATIONS
120" Replacement Blades
Model Width TPI Type Gauge
D4689
1
⁄8" 14 Raker 0.025
D4690
1
⁄8" 18 Raker 0.025
D4691
3
⁄16" 4 Skip 0.025
D4692
3
⁄16" 10 Raker 0.025
D4693
3
⁄16" 14 Raker 0.025
D4694
1
⁄4" 4 Hook 0.025
D4695
1
⁄4" 6 Hook 0.025
D4696
1
⁄4" 10 Raker 0.025
D4697
1
⁄4" 14 Raker 0.025
The D3122 Push Stick keeps hands away from blades while still
maintaining control of the workpiece against machine fence. The
W1400 Push Block is made from high-impact molded plastic with a
natural rubber friction pad that grips the workpiece firmly. Work
with confidence knowing that this block is between your fingers and
the blade.
D2054 D2273 D2274
The Heavy-Duty Roller Stands and Roller Tables make your
bandsaw safer and easier to use. All models feature convenient hand
knobs for fast height adjustment and offer rigid steel construction.
These stands are invaluable for supporting work on bandsaws to
help reduce blade bend and pinch on long boards due to infeed and
outfeed alignment issues. Go to http://www.woodstockint.com to
view all of the available roller tables and stands.
The D2057A Super Heavy-Duty Mobile Base supports your bandsaw
so you can move it easily and lock it in place. Designed for long term
and frequent moving of heavy machinery. All Shop Fox Adjustable
Mobile Bases are strong enough to move heavy machines up to 700
lbs. on a continual basis. The stands are adjustable to fit a variety of
machines and can be leveled without the use of shims or tools.
D2057A
W1400
D3122
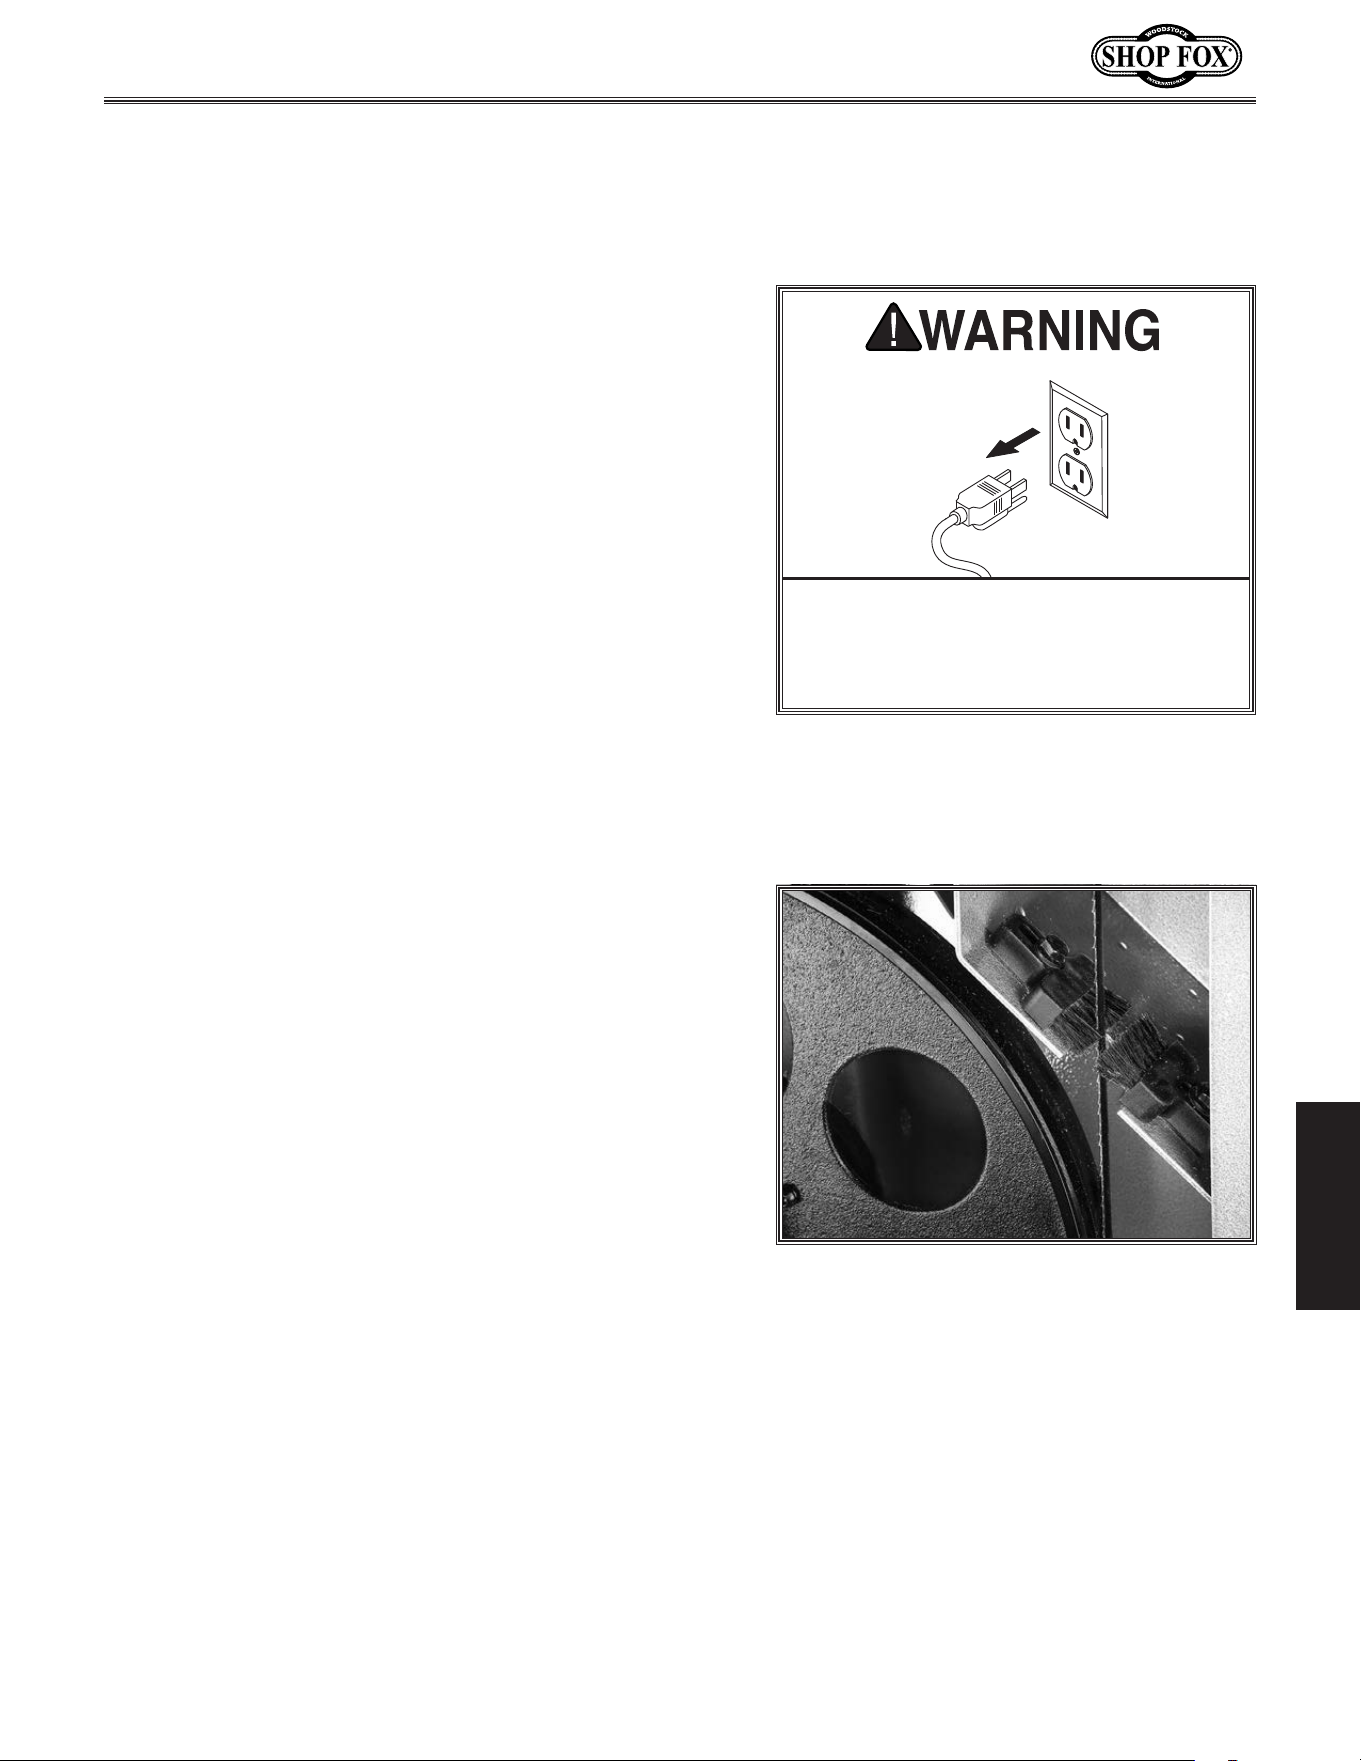
-57-
Model W1849 (For Machines Mfd. Since 11/16)
MAINTENANCE
MAINTENANCE
MAKE. SURE. that. your. machine. is.
unplugged. during. all. maintenance.
procedures!. If. this. warning. is. ignored,.
serious.personal.injury.may.occur.
Schedule
For optimum performance from your machine, follow
this maintenance schedule and refer to any specific
instructions given in this section.
Daily
• Tighten loose mounting bolts.
• Check/replace worn or damaged saw blade.
• Check/replace worn or damaged wires.
• Check/clean wheel brush.
• Clean/protect table surface.
• Check lubrication points and lube if necessary.
• Fix/resolve any other unsafe condition.
Monthly Check
• V-belt tension, damage, or wear.
• Clean/vacuum dust build-up from inside cabinet and
off motor.
• Remove blade and clean tires of all built-up dust/
pitch.
Figure 79. Lower wheel brushes.
Wheel.Brushes
The bandsaw is equipped with lower wheel brushes to
keep saw dust from building up on the wheel and rubber
tire. The brushes should be checked daily and cleaned
when they become dirty (see Figure 79).
There are adjustment brackets that allow the brushes to
be adjusted for bristle wear (refer to Adjusting Wheel
Brushes on Page 66 for detailed instructions).
Cleani ng.&.P rotecti ng
Cleaning the bandsaw is relatively easy. Vacuum excess
wood chips and sawdust, and wipe off the remaining dust
with a dry cloth. If any resin has built up, use a resin-
dissolving cleaner to remove it.
Protect the unpainted cast-iron surfaces on the table by
wiping it clean after every use—this ensures moisture from
wood dust does not remain on bare metal surfaces. Keep
the table rust-free with regular applications of quality
lubricants.
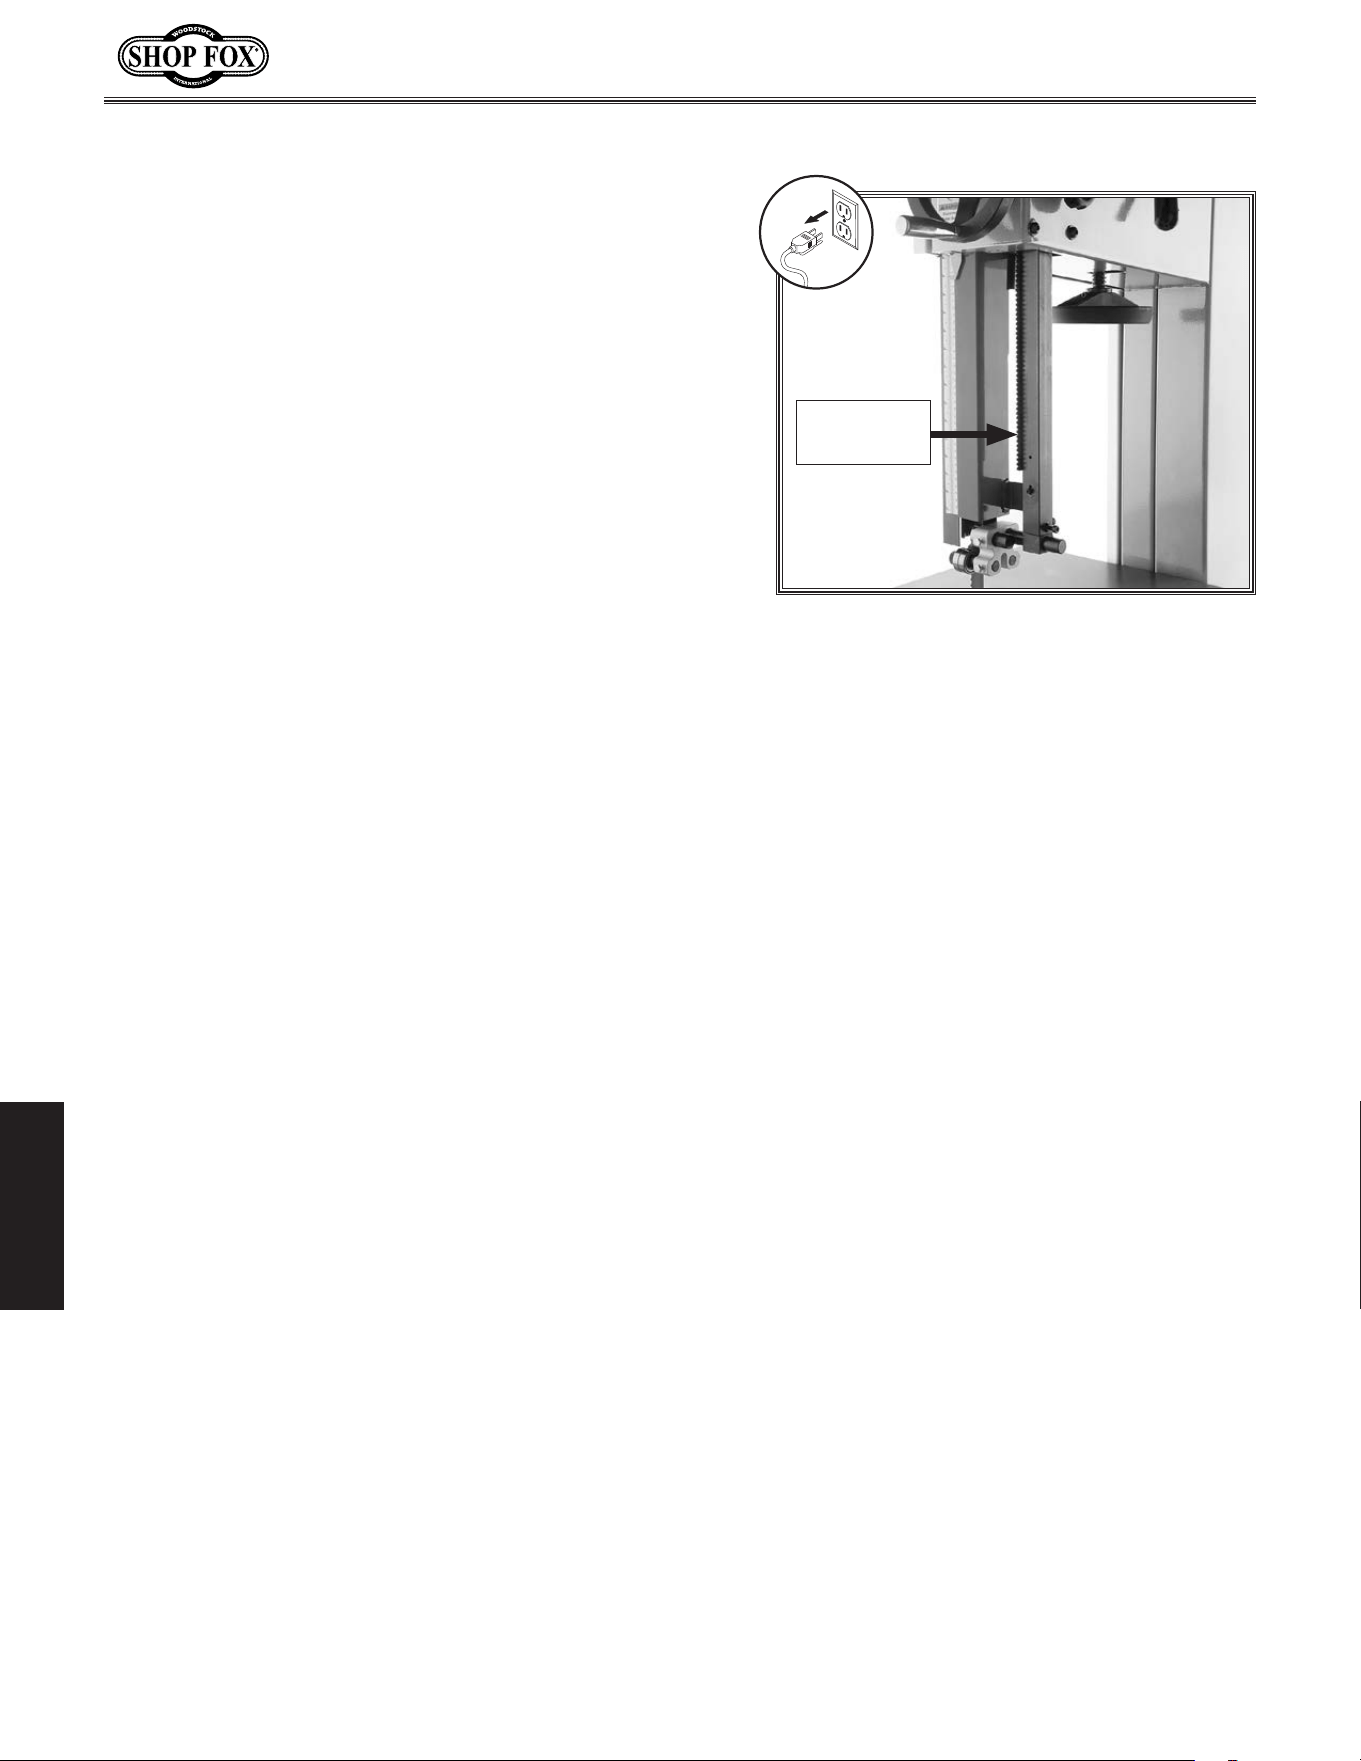
-58-
Model W1849 (For Machines Mfd. Since 11/16)
MAINTENANCE
Lubrication
An essential part of lubrication is cleaning the
components before lubricating them. This step is
critical because dust and chips build up on lubricated
components, which makes them hard to move. Simply
adding more grease to built-up grime will not result
in smooth moving parts. Clean the components in this
section with an oil/grease solvent cleaner or mineral
spirits before applying lubrication.
All bearings are sealed and permanently lubricated. Leave
them alone until they need to be replaced.
Guide.Post.Rack
Lubrication Type ..................GL2 Grease or Equivalent
Amount ................................................ Thin Coat
Frequency ............................................ As Needed
To lubricate guide post rack and pinion, do these steps:
1. DISCONNECT MACHINE FROM POWER!
2. Lower guide post all the way.
3. Use a rag and mineral spirits to wipe off any grease
and sawdust build-up on rack (see Figure 80).
4. Apply a thin coat of lubricant to rack.
5. Move guide post up and down several times to
distribute lubricant, then remove any excess grease
to help reduce potential sawdust build-up.
Figure 80. Guide post rack exposed for
lubrication (roller bearing guides shown).
Guide Post
Rack
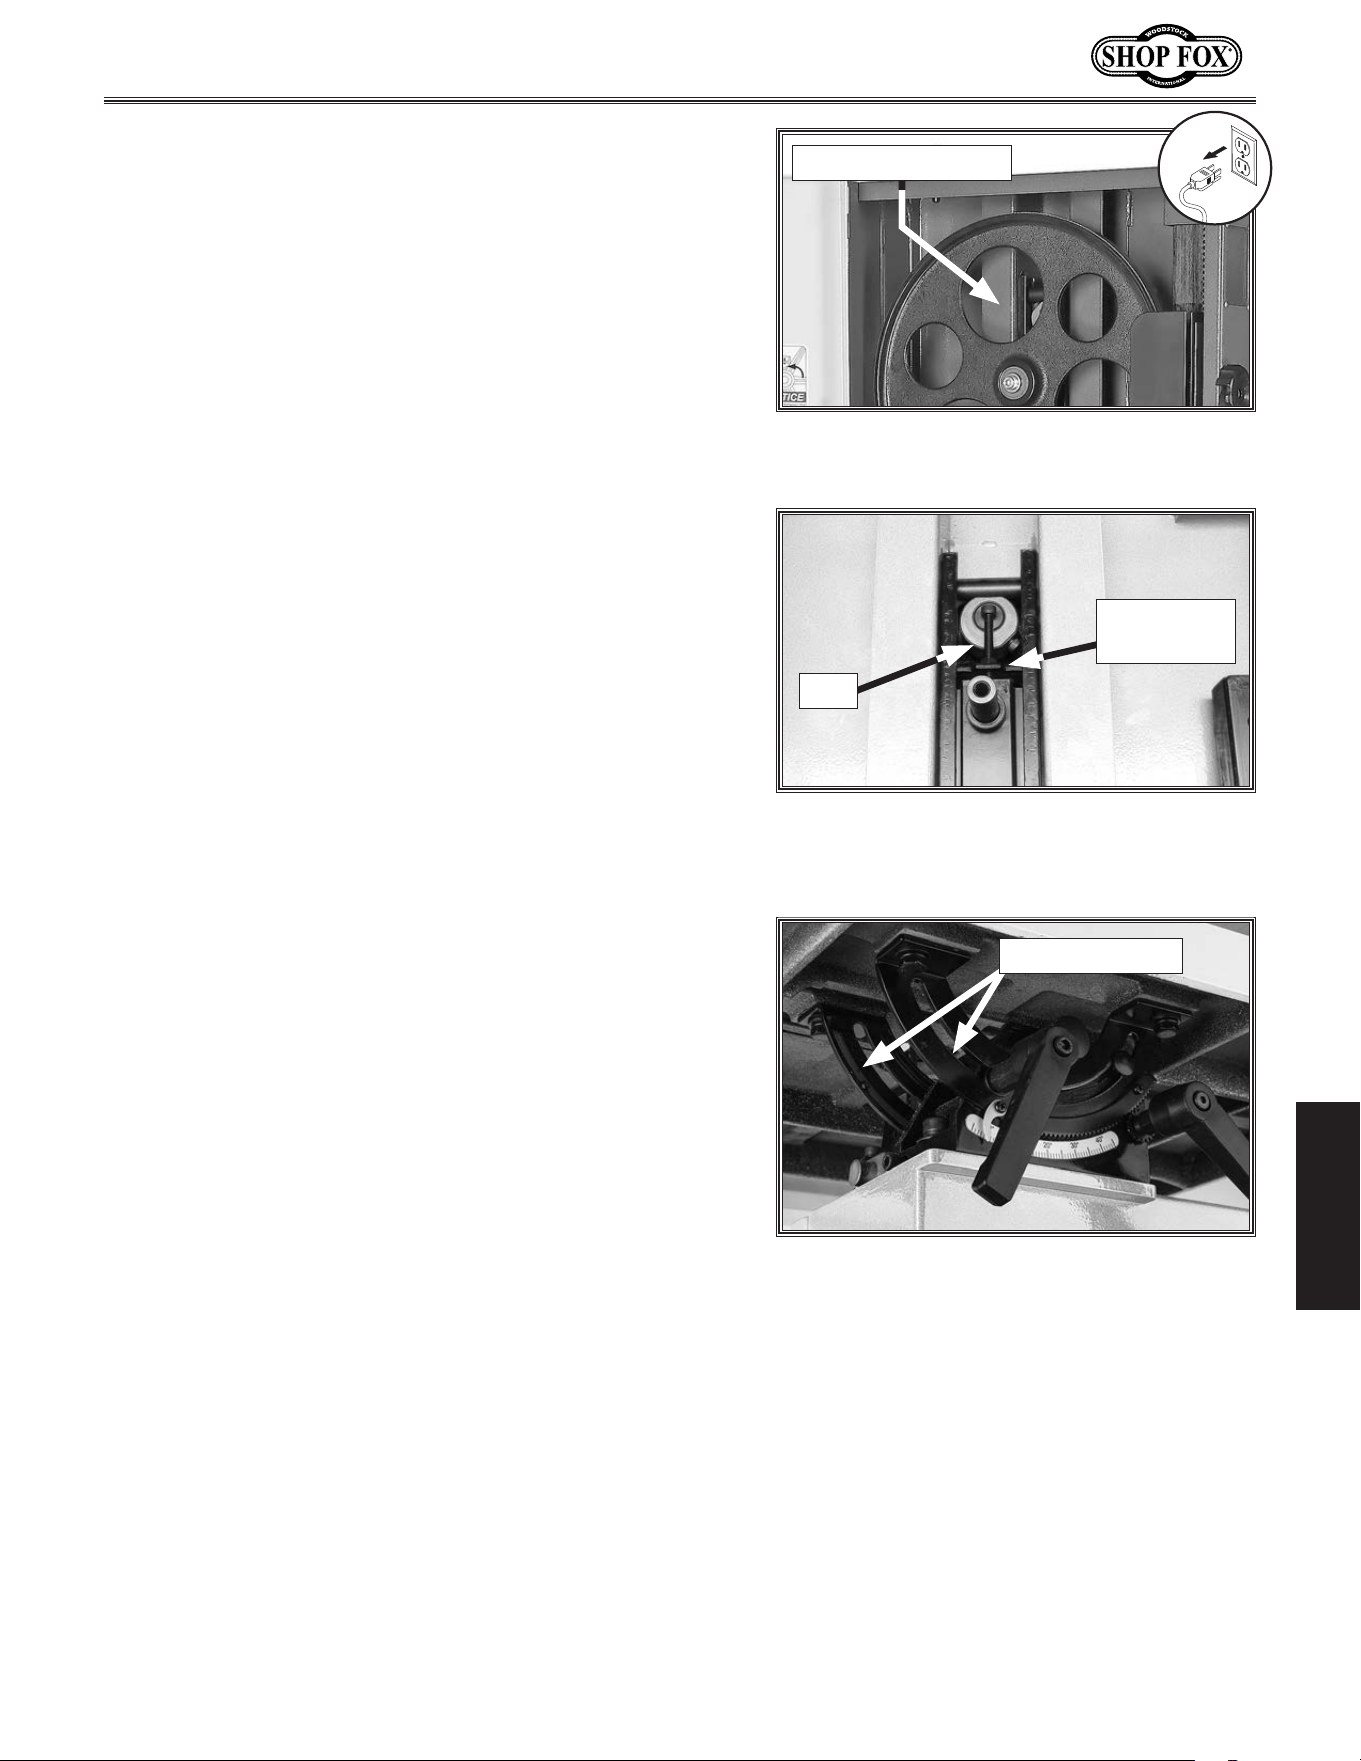
-59-
Model W1849 (For Machines Mfd. Since 11/16)
MAINTENANCE
Trunnions
The steel trunnions (see Figure 83) should be regularly
wiped clean with mineral spirits and lubricated with a
thin coat of GL2 grease on the sliding surfaces.
Figure 83. Lubrication areas on the
trunnion.
Blade.Tension.Adjustment.Assembly
Lubrication Type ..................GL2 Grease or Equivalent
Amount ................................................ Thin Coat
Frequency ............................................ As Needed
To lubricate tension adjustment assembly, do these
steps:
1. DISCONNECT MACHINE FROM POWER!
2. Open upper wheel cover and look through top of
wheel (see Figure 81).
3. Use a rag and mineral spirits to wipe off any grease
and sawdust build-up on blade tension adjustment
assembly and tension lever cam (see Figure 82),
then apply thin coat of lubricant to these areas.
Figure 81. Location of blade tension
adjustment assembly.
Look Through Here
Sliding Surfaces
Figure 82. Lubrication locations for
tension adjustment assembly (wheel
removed for clarity).
Adjustment
Assembly
Cam
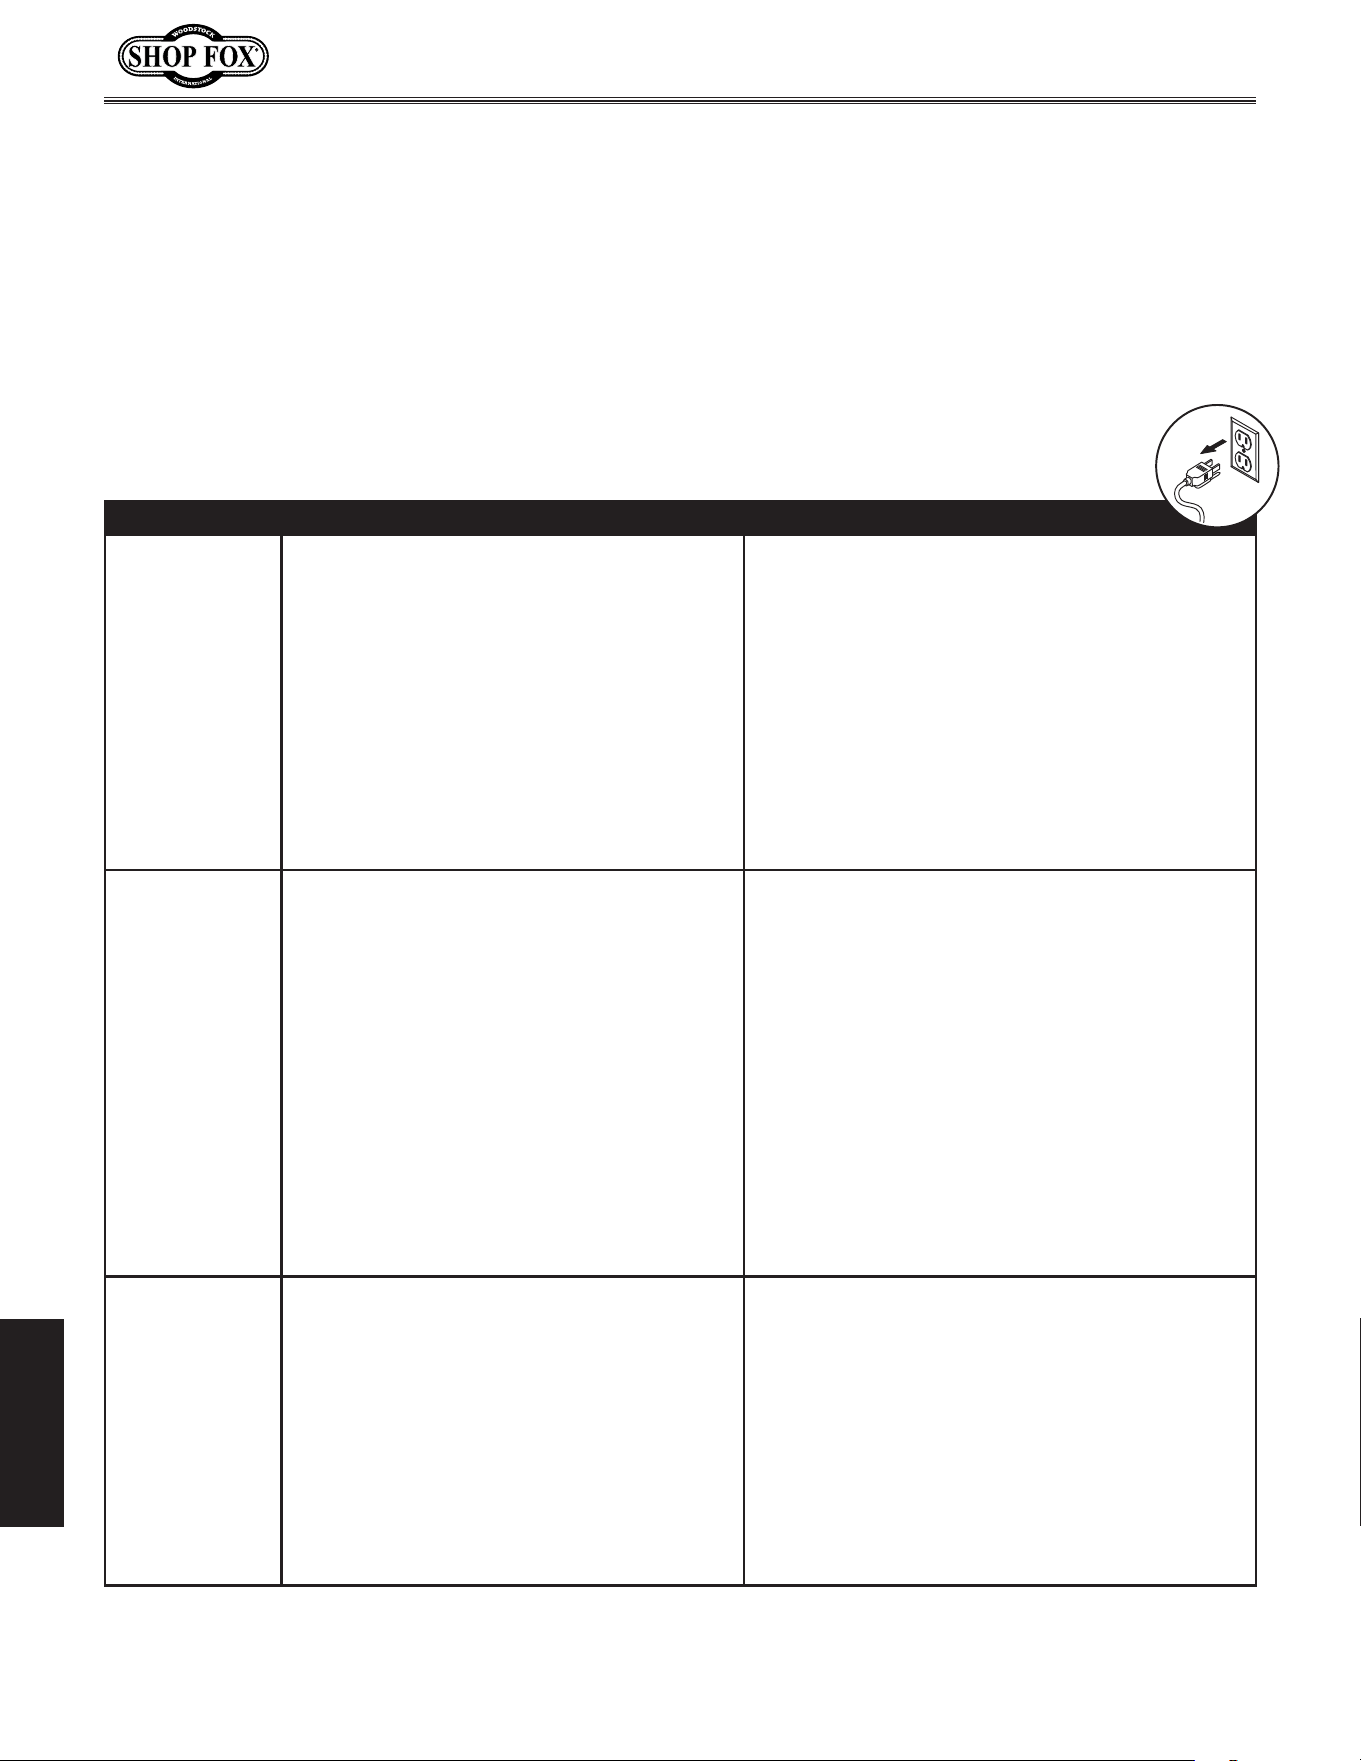
-60-
Model W1849 (For Machines Mfd. Since 11/16)
SERVICE
SERVICE
Troubleshooting
Motor.and.Electrical
The following troubleshooting tables cover common problems that may occur with this machine. If you
need replacement parts or additional troubleshooting help, contact our Technical Support.
Note:
Before contacting Tech Support, find the machine serial number and manufacture date, and if
available, your original purchase receipt. This information is required to properly assist you.
PROBLEM POSSIBLE CAUSE CORRECTIVE ACTION
Machine does not
start or a breaker
trips immediately
upon startup.
1. Incorrect power supply voltage or circuit size.
2. Power supply circuit breaker tripped or fuse
blown.
3. Motor wires connected incorrectly.
4. Wiring open/has high resistance.
5. ON/OFF switch at fault.
6. Start capacitor at fault.
7. Thermal overload relay has tripped.
8. Contactor not energized/has poor contacts.
9. Centrifugal switch at fault.
10. Motor at fault.
1. Ensure correct power supply voltage and circuit
size.
2. Ensure circuit is sized correctly and free of shorts.
Reset circuit breaker or replace fuse.
3. Correct motor wiring connections (Page 75).
4. Check/fix broken, disconnected, or corroded wires.
5. Replace switch.
6. Test/replace.
7. Reset; contact tech support if relay frequently
trips.
8. Test all legs for power/replace.
9. Adjust/replace centrifugal switch if available.
10. Test/repair/replace.
Machine stalls or
is underpowered.
1. Dull blade.
2. Workpiece material not suitable for machine,
or machine undersized.
3. Belt slipping; oil/grease on belt.
4. Feed rate/cutting speed too fast.
5. Blade slipping on wheels.
6. Motor overheated.
7. Motor wired incorrectly.
8. Plug/receptacle at fault.
9. Run capacitor at fault.
10. Pulley/sprocket slipping on shaft.
11. Contactor not energized/has poor contacts.
12. Centrifugal switch at fault.
13. Motor bearings at fault.
1. Sharpen/replace blade (Page 50).
2. Only cut wood—ensure moisture is below 20%. Use
correct blade/reduce feed rate or depth of cut.
3. Clean/tension/replace belt (Page 63).
4. Decrease feed rate/cutting speed.
5. Increase blade tension (Page 30); ensure proper
blade size.
6. Allow motor to cool and reduce depth of cut.
7. Wire motor correctly (Page 75).
8. Test for good contacts/correct wiring.
9. Test/repair/replace.
10. Replace loose pulley/shaft.
11. Test all legs for power/replace.
12. Replace.
13. Test by rotating shaft; rotational grinding/loose
shaft requires bearing replacement.
Machine has
vibration or noisy
operation.
1. Motor or component loose.
2. Blade at fault.
3. V-belt worn or loose.
4. Motor fan rubbing on fan cover.
5. Motor mount loose/broken.
6. Pulley loose.
7. Machine incorrectly mounted.
8. Motor bearings at fault.
9. Centrifugal switch is at fault.
1. Inspect/replace damaged bolts/nuts, and retighten
with thread-locking fluid.
2. Replace warped/bent/broken blade; replace/
resharpen dull blade (Page 50).
3. Inspect/replace belt (Page 63).
4. Fix/replace fan cover; replace loose/damaged fan.
5. Tighten/replace.
6. Re-align/replace shaft, pulley set screw, and key.
7. Tighten mounting bolts; relocate/shim machine.
8. Test by rotating shaft; rotational grinding/loose
shaft requires bearing replacement.
9. Replace.
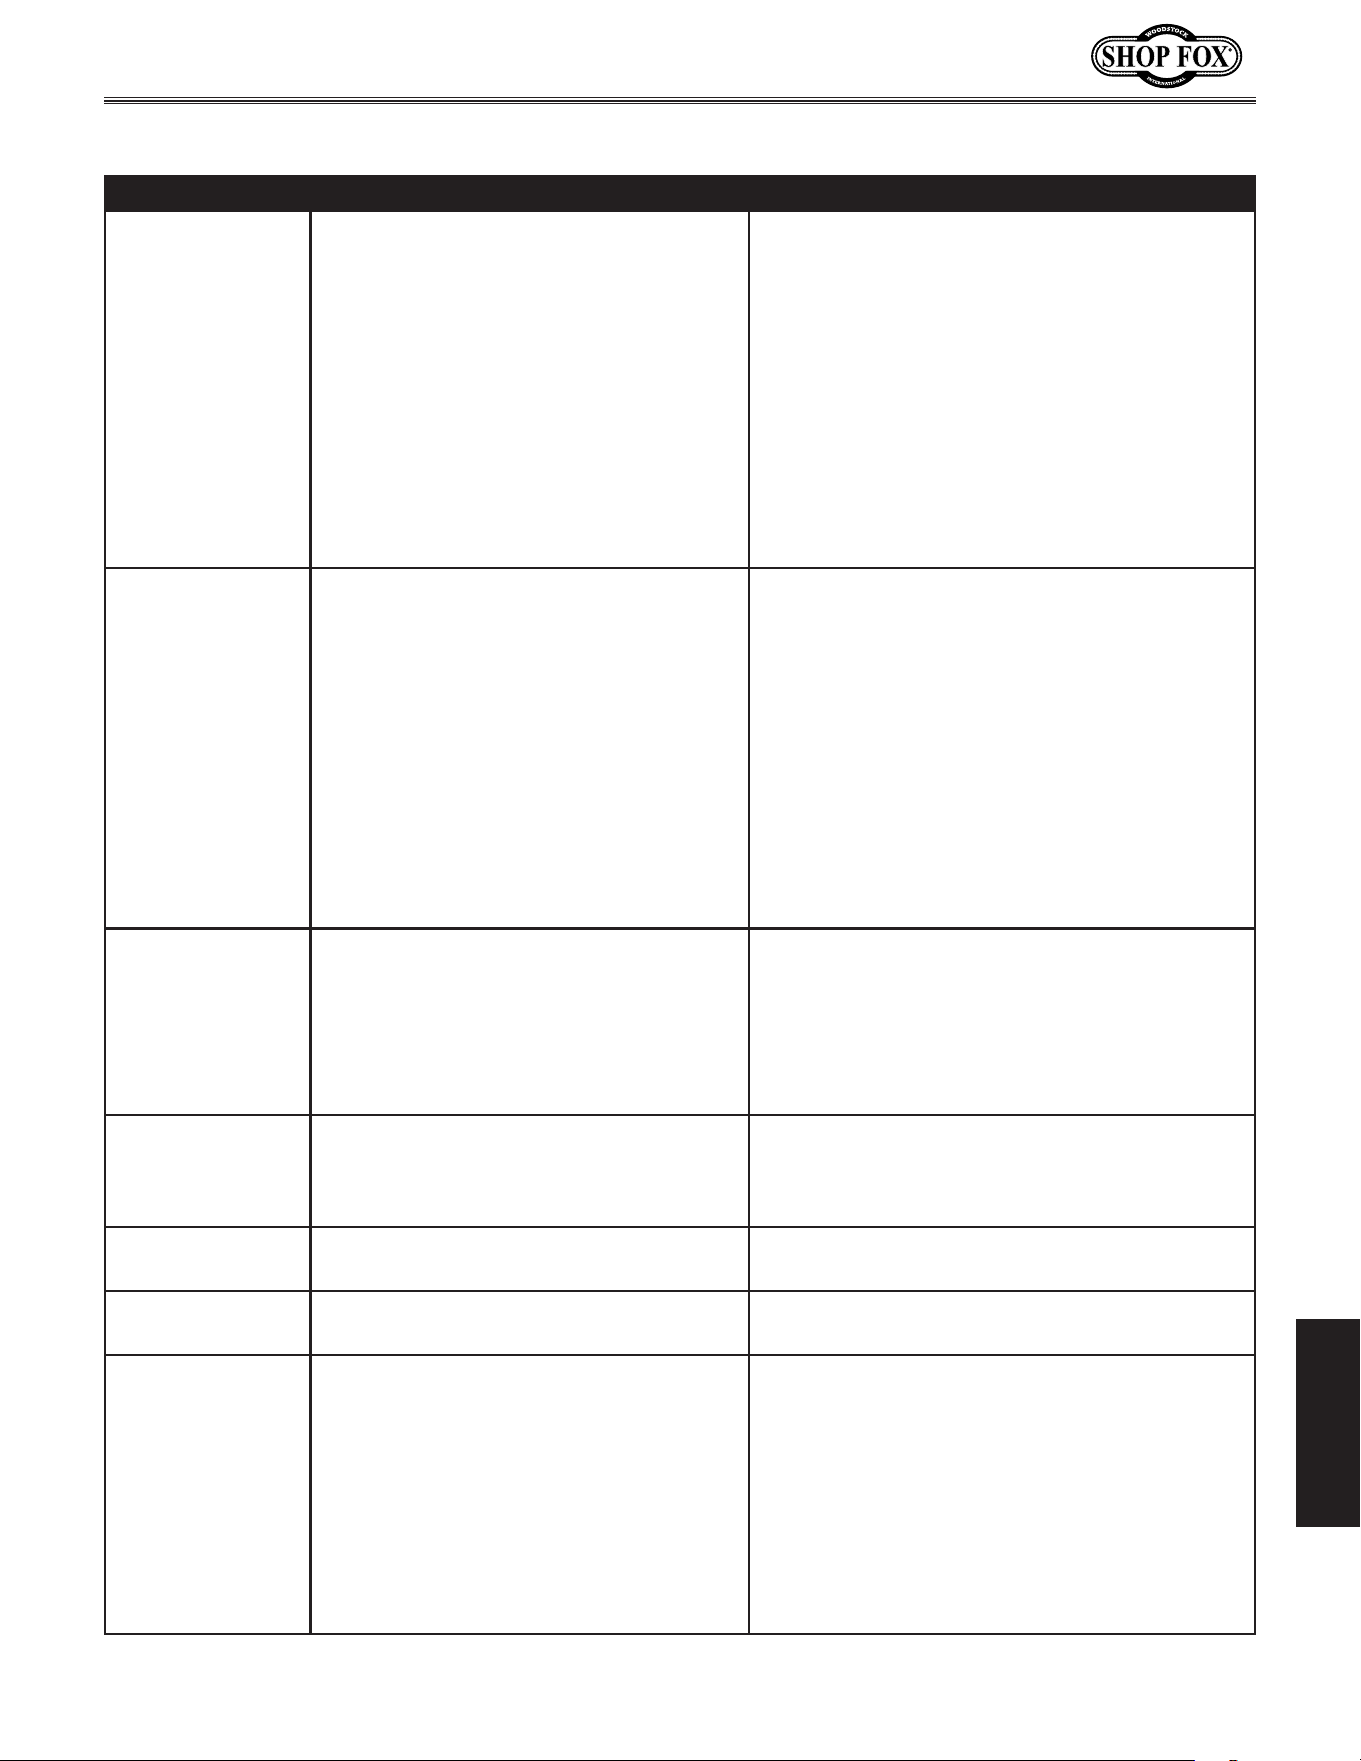
-61-
Model W1849 (For Machines Mfd. Since 11/16)
SERVICE
Operating.Machine
PROBLEM POSSIBLE CAUSE CORRECTIVE ACTION
Blade or teeth
break/crack.
1. Blade tension is incorrect.
2. Blade is incorrect for application.
3. Excessive feed rate/pressure.
4. Cutting corners too sharply.
5. Blade is dull/weld at fault.
6. Blade is tracking incorrectly.
7. Blade guides/support bearings not adjusted
properly, allowing guides to hit blade teeth.
8. Wheel tires worn or incorrectly installed.
9. Fence or miter slot out of alignment with
blade.
10. Bad blade-guide bearings.
1. Adjust blade tension (Page 30).
2. Use correct blade for application (Page 44).
3. Reduce feed rate/pressure.
4. Use a wider arc on outside cuts, or use relief cuts
to make tight inside cuts (Page 53).
5. Replace blade (Page 50).
6. Adjust blade tracking (Page 32).
7. Adjust support bearings/blade guide discs proper-
ly, so guides cannot contact teeth during operation
(Pages 33 & 34).
8. Replace or re-install tire.
9. Align table miter slot and fence with blade
(Page 39).
10. Replace blade-guide bearings.
Blade slows, smokes,
shows overheating or
wears on one side.
1. Blade contacting table insert.
2. Blade guides are worn or misadjusted.
3. Blade installed backwards.
4. Too much side pressure when feeding
workpiece.
5. Wheels are out of alignment.
6. Dull, bell-mouthed, or incorrect blade.
7. Fence not parallel with blade.
8. Table top surface is not parallel or square
to blade.
9. V-belt loose or slipping.
1. Adjust blade roller disc guides (Page 34). Properly
align table (Page 40).
2. Adjust upper blade guides as close to workpiece as
possible.
3. Check blade rotation. Re-install blade if necessary
(Page 50).
4. Feed workpiece straight into blade.
5. Adjust wheels to be coplanar (Page 70).
6. Replace blade (Page 50).
7. Adjust fence parallelism with blade (Page 41).
8. Adjust/shim table/trunnion position until blade
and table are parallel and square (Page 40).
9. Tighten V-belt. Replace if worn or oily (Page 64).
Finished workpieces
are rough or show
scoring.
1. Blade is overloaded and twists.
2. Blade TPI is too coarse.
3. Blade is loose and fluttering.
4. Blade tracking is incorrect.
5. Blade has missing/bent teeth, or faulty
weld.
1. Decrease feed rate; ensure proper TPI (Page 48).
2. Use correct blade for material and speed of cut
(Page 44).
3. Adjust blade tension as required (Page 30).
4. Adjust blade tracking (Page 27).
5. Replace blade (Page 50).
Table is hard to tilt. 1. Table tilt lock lever is engaged.
2. Sawdust or pitch trapped between trunnion
and base.
3. Metal burrs on trunnion.
1. Disengage table tilt lock lever (Page 51).
2. Remove table and clean trunnion sliding surfaces
free of sawdust or pitch.
3. Remove burrs.
Table does not tilt to
45 or 0 degrees.
1. Table tilt scale pointer not calibrated.
2. Positive stop not set correctly.
1. Calibrate table tilt scale pointer (Page 74).
2. Adjust positive stop (Page 51).
Miter bar binds in
miter slot.
1. Miter slot dirty or gummed up.
2. Miter bar is bent.
1. Carefully clean miter slot.
2. Replace.
Blade tracks incor-
rectly, or comes off
wheels.
1. Tracking is not adjusted properly.
2. Wheels are not coplanar.
3. Blade tension too loose.
4. Blade guides/support bearings improperly
adjusted.
5. Feeding workpiece too fast.
6. Incorrect blade for operation.
7. Blade is bell-mouthed, worn, or dull.
8. Rubber tire or wheel is damaged or worn.
1. Adjust tracking (Page 27).
2. Adjust wheels to be coplanar (Page 70).
3. Increase blade tension (Page 30).
4. Properly adjust support bearings/blade disc guides
(Pages 33–34).
5. Feed workpiece slower.
6. Install correct blade (Page 44).
7. Install new blade and remove tension from blade
when not in use.
8. Replace rubber tires or wheel.

-62-
Model W1849 (For Machines Mfd. Since 11/16)
SERVICE
Operating.Machine.(Continued)
PROBLEM POSSIBLE CAUSE CORRECTIVE ACTION
Cut is crooked or
blade wanders
(blade lead).
1. Excessive feed rate/pressure.
2. Blade tension too loose.
3. Blade is too narrow or tooth type/TPI is incor-
rect for the cut.
4. Inadequate blade support.
5. Blade dull or has damaged tooth set from
improper guides/support bearing adjustment.
6. Blade tracking is incorrect.
7. Table is loose.
8. Fence or miter slot out of alignment with
blade.
9. Blade guides/support bearings improperly
adjusted.
10. Tooth set is uneven or teeth are more sharp on
one side than the other.
1. Reduce feed rate/pressure.
2. Increase blade tension (Page 30).
3. Use wider blade. Ensure tooth type & TPI is cor-
rect (Page 44).
4. Position upper blade guides to just clear
workpiece. Properly adjust support bearings/
blade disc guides (Pages 33–34).
5. Replace blade (Page 50).
6. Adjust blade tracking (Page 27).
7. Tighten table trunnion mounting bolts or tilt lock
lever.
8. Align table miter slot and fence with blade
(Pages 39).
9. Properly adjust blade guides/support bearings
(Pages 37).
10. Replace blade (Page 50).
Blade dulls prema-
turely.
1. Excessive feed rate/pressure.
2. Wrong blade tooth type or TPI.
3. Blade is twisted.
4. Blade is slipping on wheel.
5. Blade guides hitting teeth and ruining tooth
set.
1. Reduce feed rate/pressure.
2. Use blade with correct tooth type and TPI
(Page 44).
3. Re-install blade; replace (Page 50).
4. Adjust blade tension (Page 30).
5. Properly adjust blade disc guides (Page 34) or
optional roller bearing guides (Page 37).
Gullets loaded
with chips.
1. Excessive feed rate/pressure.
2. Blade TPI is too fine.
1. Reduce feed rate/pressure.
2. Install correct blade (Page 44).
Backside of blade
deformation/
cracking.
1. Excessive feed rate/pressure.
2. Blade tension too high.
3. Blade support bearing improperly adjusted.
1. Reduce feed rate/pressure.
2. Adjust blade tension (Page 30).
3. Properly adjust blade support bearing (Page 33).
Sawdust buildup
inside cabinet.
1. Blade brushes under table are worn or mis-
adjusted.
2. Clogged dust port.
3. Low CFM (airflow) from dust collection system.
1. Properly adjust brushes; replace if necessary
(Page 666).
2. Clean dust port.
3. Inspect ducting for leaks/clogs and repair as nec-
essary; move dust collector closer to machine;
install a stronger dust collector.
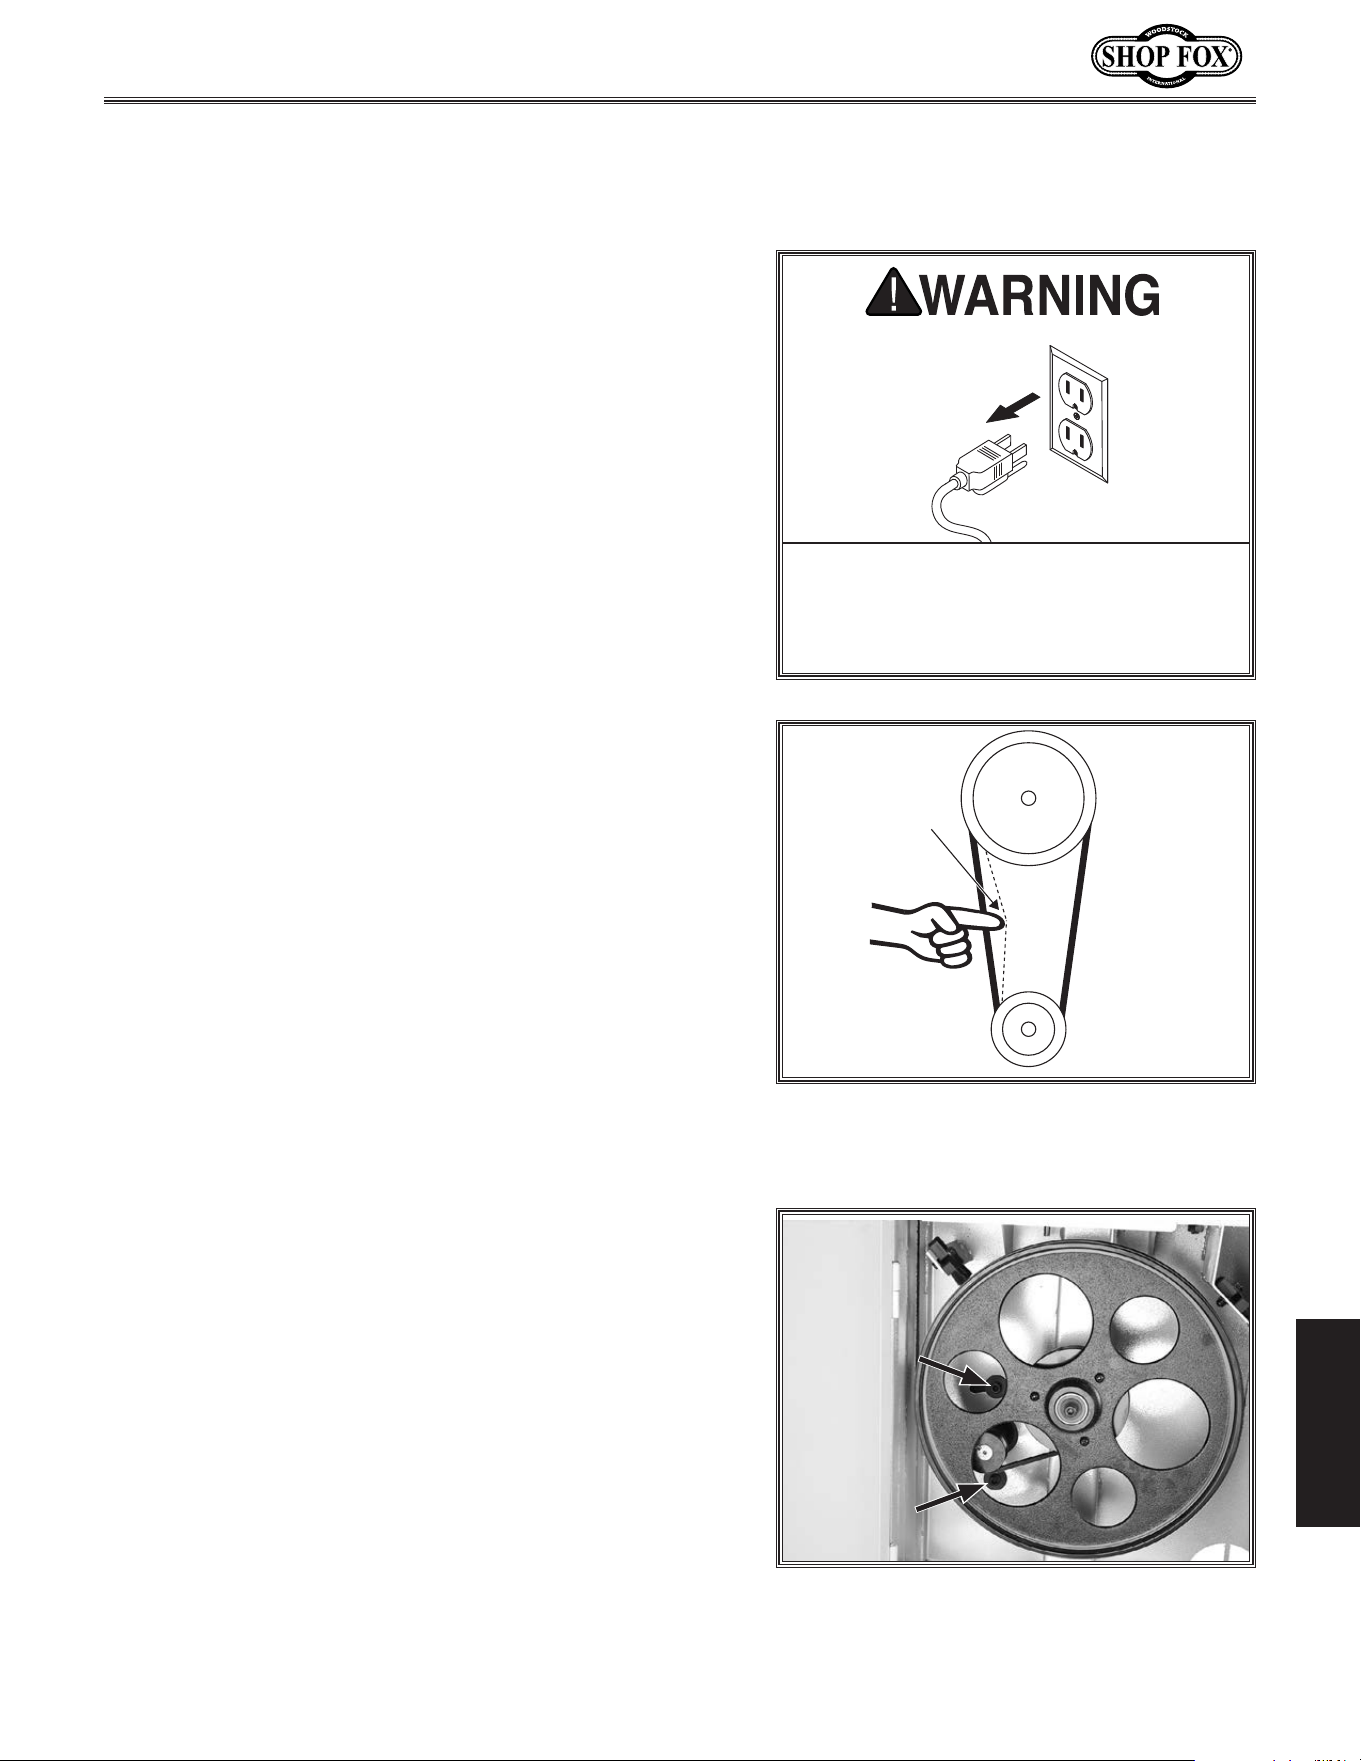
-63-
Model W1849 (For Machines Mfd. Since 11/16)
SERVICE
Tensioning/Replacing.
V-Belt
4. Check V-belt tension by applying moderate pressure
between pulleys (see Figure 84).
— If V-belt deflection is approximately
1
⁄4", belt
is correctly tensioned and no adjustment is
necessary.
— If deflection is not approximately
1
⁄4", V-belt is not
correctly tensioned. Proceed to Step 5.
To ensure optimum power transmission from the motor
to the blade, the V-belt must be properly tensioned,
and free of cracks, fraying, and wear. Belt tension and
condition should be checked at least every 3 months—
more often if the bandsaw is used daily.
Tool Needed Qty
Hex Wrench 8mm ...............................................1
To check/adjust V-belt tension, do these steps:
1. DISCONNECT MACHINE FROM POWER!
2. Open lower wheel cover.
3. Inspect V-belt; if it is cracked, frayed, or glazed,
replace it (refer to Replacing V-Belt on Page 64).
Pulley
Deflection
Pulley
Figure 84. Measuring V-belt deflection
between lower wheel pulley (top) and
motor pulley (bottom).
5. Loosen both motor mount cap screws (see
Figure 85).
6. Apply pressure against motor to tension belt.
7. While applying pressure, retighten motor cap screws
to secure adjustment.
8. Re-check belt tension.
MAKE. SURE. that. your. machine. is.
unplugged. during. all. maintenance.
procedures!. If. this. warning. is. ignored,.
serious.personal.injury.may.occur.
Figure 85. Motor mount cap screws and
V-belt tension controls (behind wheel).
1
/4"
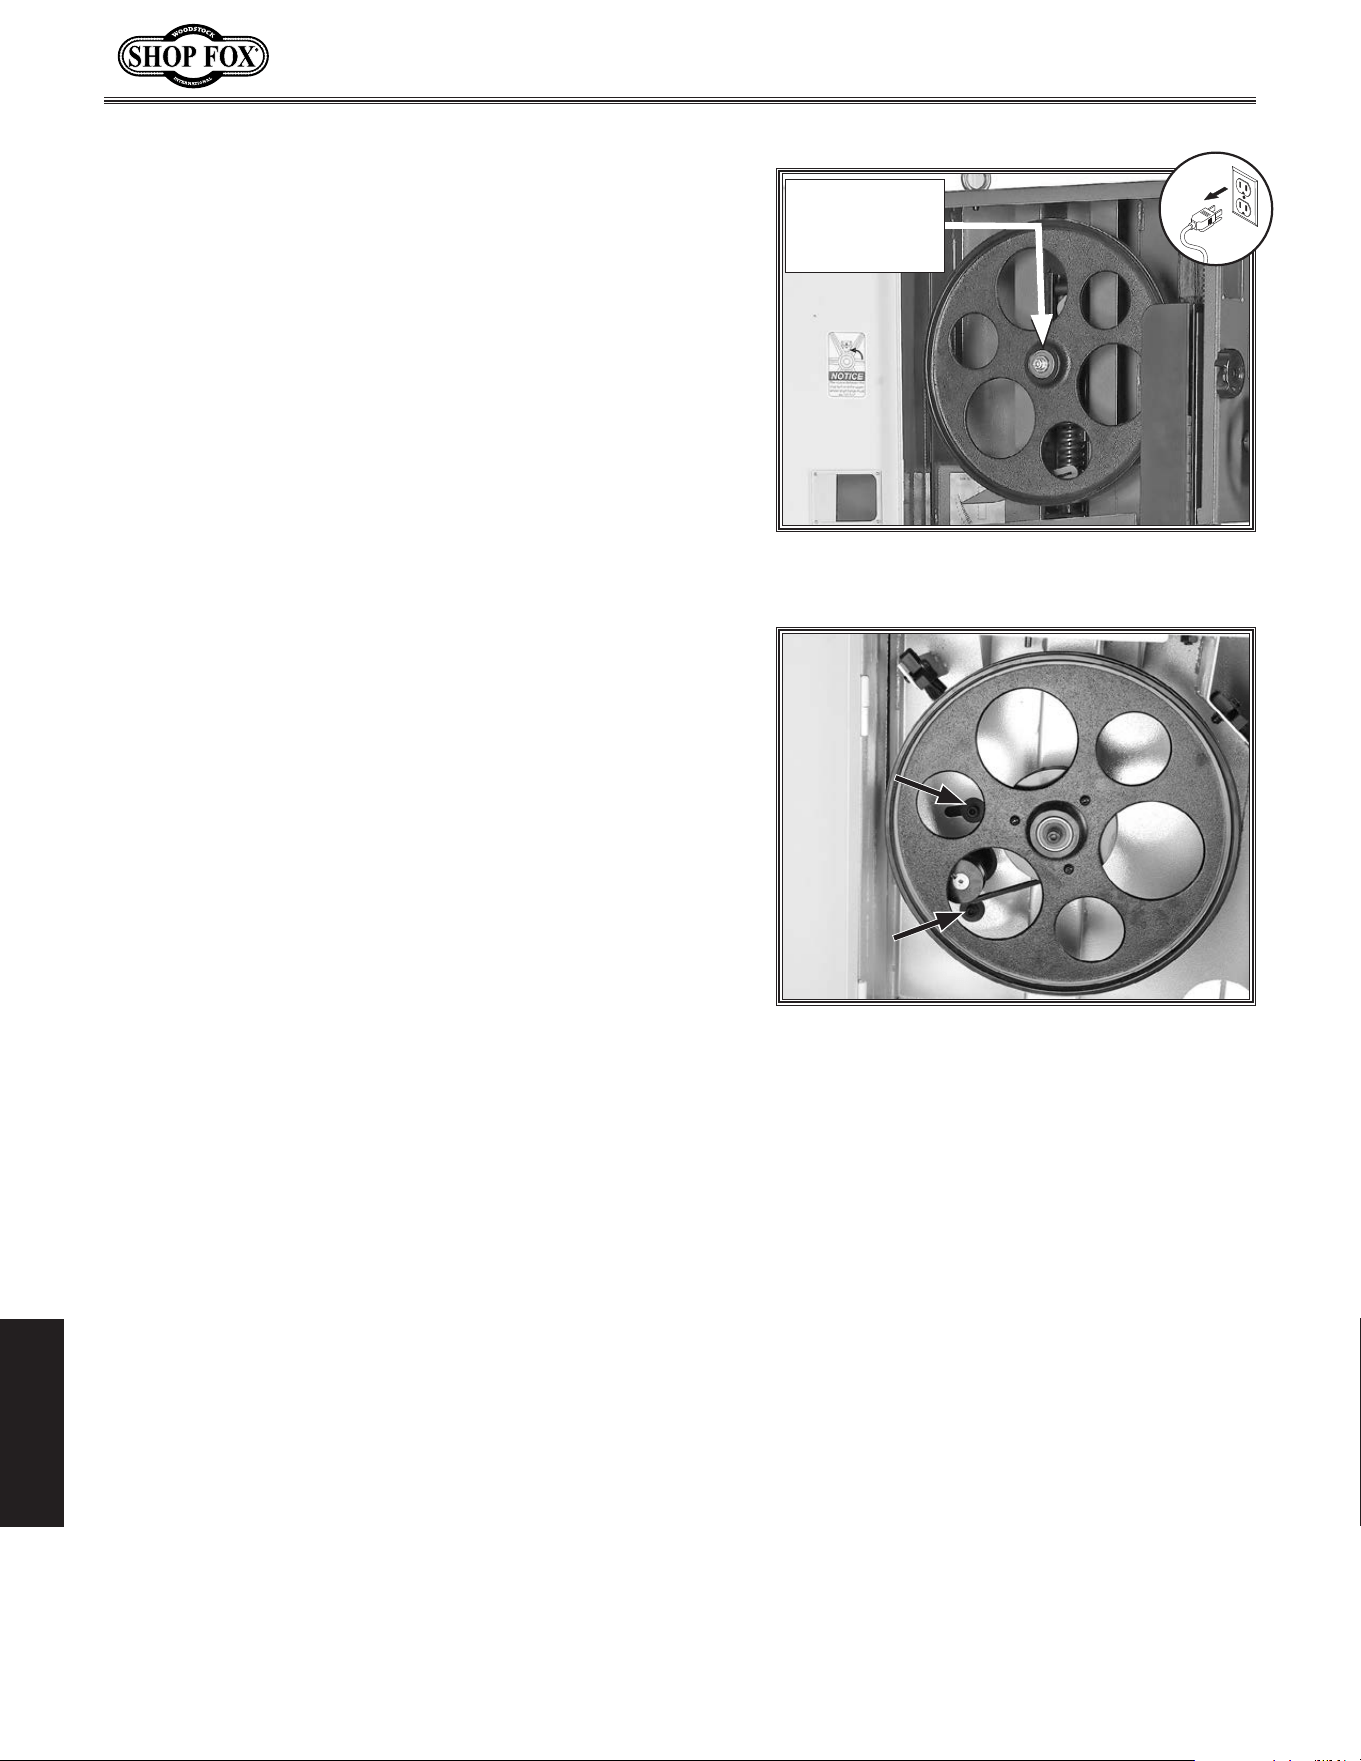
-64-
Model W1849 (For Machines Mfd. Since 11/16)
SERVICE
Replacing.V-Belt
To replace the V-belt, you must remove the blade and
the lower wheel. After re-installation, you must properly
re-tension the V-belt.
Tools Needed: Qty
Hex Wrench 6mm ...............................................1
Hex Wrench 8mm ...............................................1
To replace V-belt, do these steps:
1. DISCONNECT MACHINE FROM POWER!
2. Open both wheel covers, and remove blade (refer to
Changing Blade on Page 50).
3. Remove lower wheel mount cap screw and washer
shown in Figure 86, then slide lower wheel with
bearing off of shaft.
6. Slip old V-belt off of lower wheel and motor pulleys,
then install new V-belt in its place.
7. Properly tension V-belt (refer to Tensioning/
Replacing V-belt on Page 63 for detailed
instructions).
8. Re-install lower wheel with bearing and secure it
with wheel mount cap screw and washer removed in
Step 3.
9. Re-install blade, and close and secure wheel covers.
4. Loosen both motor mount cap screws (see
Figure 87).
5. Lower motor all the way to completely de-tension
V-belt, then retighten one cap screw to temporarily
secure motor.
Figure 86. Location of wheel mount cap
screw and washer.
Wheel Mount
Cap Screw &
Washer
Figure 87. Location of motor mount cap
screws.
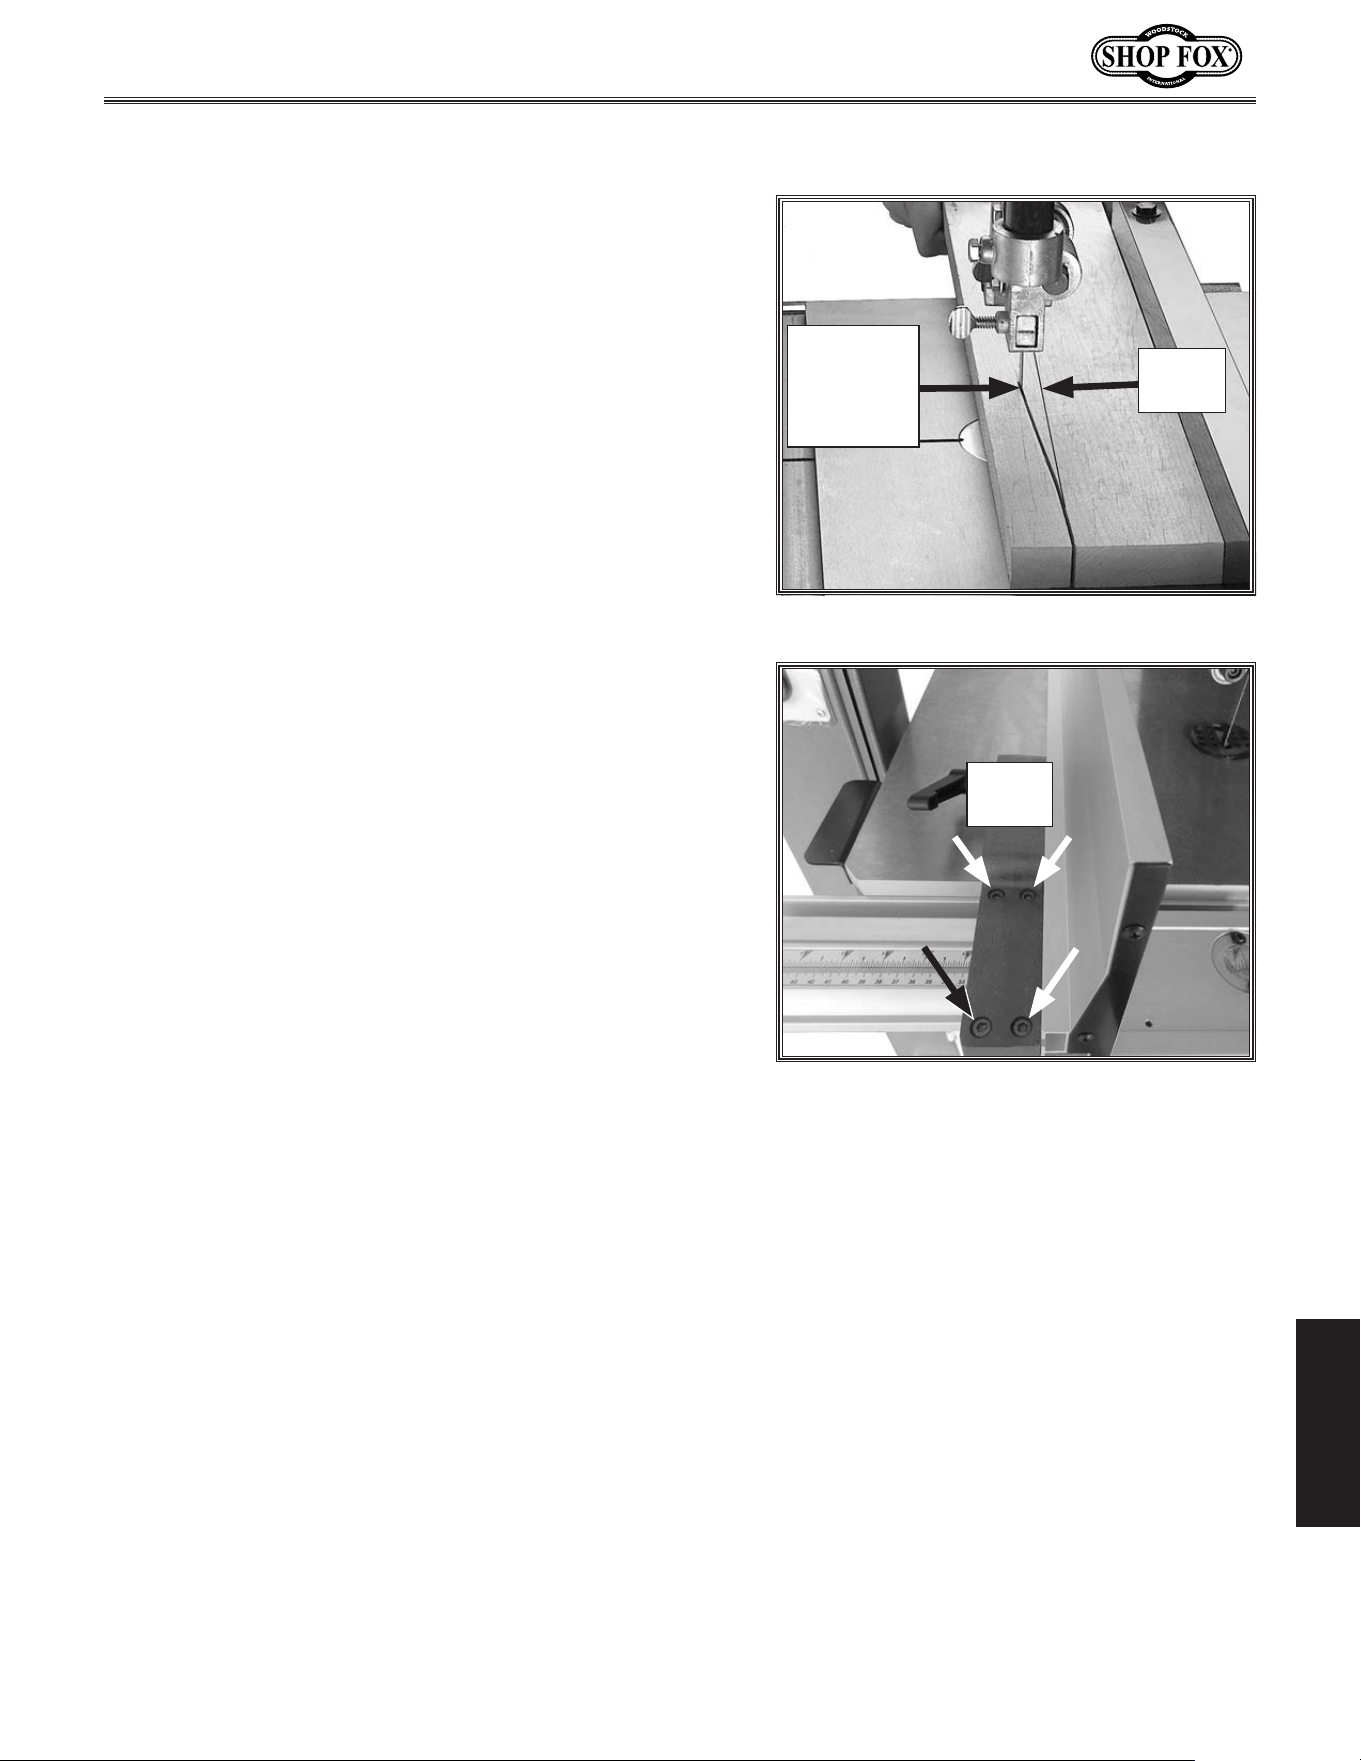
-65-
Model W1849 (For Machines Mfd. Since 11/16)
SERVICE
To correct blade lead, do these steps:
1. Make sure blade is properly tensioned and blade
guides are adjusted correctly.
2. Make sure miter slot and fence are parallel to
blade line (see Aligning Table and Aligning Fence
procedures for detailed information).
3. Perform test cut with bandsaw, using less pressure
when feeding workpiece through cut.
— If there is still blade lead present, compensate for
this condition by skewing the fence, as instructed
in the following procedure.
Items Needed Qty
Wood Board
3
⁄4" x 3" x 16" .....................................1
Hex Wrench 5mm ...............................................1
5. Loosen the four fence adjustment cap
screws to the left of fence face (see
Figure 89), skew fence so that it is
parallel with wood board, contacting
it evenly along its length, then
retighten cap screws.
6. Finish cut using fence.
— If blade lead is still present, repeat
Steps 1–5 until cutting results are
satisfactory.
Blade.L ead
Bandsaw blades may wander off of the layout line when
sawing, as shown in Figure 88. This is called blade lead.
Blade lead is usually caused by excessive feed rate/
pressure, a dull or abused blade, or improper blade
tension. If your blade is sharp/undamaged, properly
tensioned, and you still have blade lead, perform the
following procedures.
To skew fence, do these steps:
1. Cut a straight and parallel wood board approximately
3
⁄4" thick x 3" wide x 16" long.
Tip: Cut your board out of a new piece of
3
⁄4"
plywood, using a table saw. The straight "factory
edge" of the plywood will ensure accuracy during
the following steps. Alternatively, you can use a
jointer and table saw to straighten a piece of solid
scrap wood.
2. On wide face of board, draw a straight line parallel
to long edge, similar to layout line shown in Figure
88.
3. Slide fence out of the way and cut along layout line
halfway through board. Turn bandsaw OFF and wait
for blade to stop. Do not move board.
4. Clamp board to bandsaw table, then slide fence over
to board so it barely touches one edge of board.
Figure 88. Example of blade lead.
Blade
Wandering
Off Layout
Line
Layout
Line
Figure 89. Location of fence adjustment
cap screws.
Cap
Screws
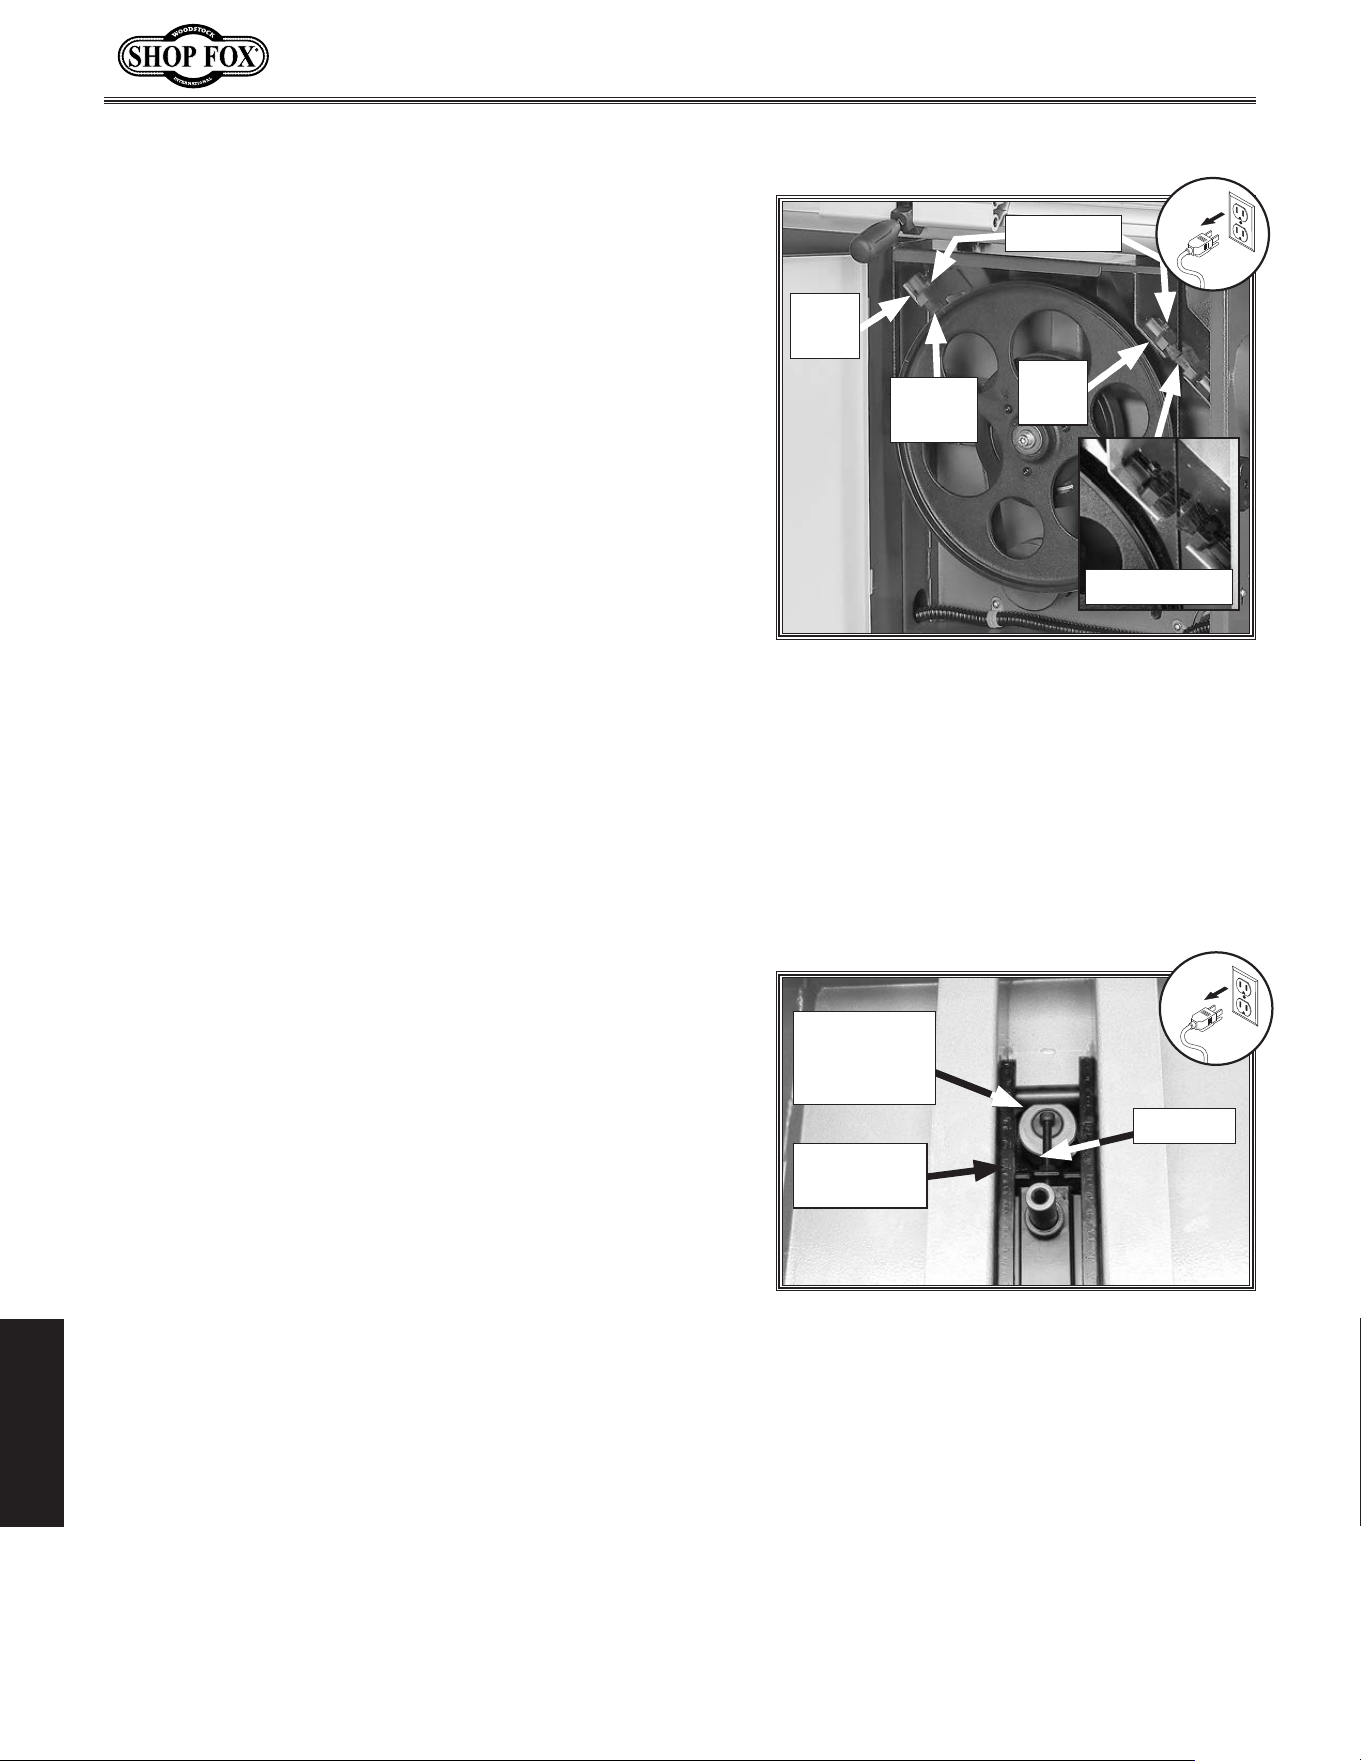
-66-
Model W1849 (For Machines Mfd. Since 11/16)
SERVICE
Adjusting.Wheel .Brushes
The lower wheel has brushes (see Figure 90) that are
designed to sweep sawdust off the wheel and blade
during operation. In order to work properly, the brushes
must make firm contact with the wheel.
Adjusting.Quick-Release.
Lever
The blade tension quick-release lever was adjusted at the
factory for use with the pre-installed blade. However,
because actual blade lengths may vary slightly by
manufacturer, whenever you install a new blade, you may
need to adjust the quick-release adjustment screw so that
the blade tension quick-release lever works correctly.
Tools Needed: Qty
Hex Wrench 5mm ...............................................1
Open-End Wrench 10mm.......................................1
To adjust quick-release lever, do these steps:
1. Tension blade (refer to Tensioning Blade, beginning
on Page 30 for more information).
2. DISCONNECT MACHINE FROM POWER!
3. Rotate blade tension quick-release lever clockwise to
up position to release blade tension.
4. Loosen jam nut on tension adjustment screw, then
loosen screw 7-10 turns (see Figure 91).
Tools Needed: Qty
Open-End Wrench/Socket 10mm .............................2
To adjust wheel brushes, do these steps
1. DISCONNECT MACHINE FROM POWER!
2. Open lower wheel cover.
3. Loosen hex bolts and lock nuts that secure wheel
brushes in place (see Figure 90).
4. Adjust wheel brushes so they make firm, even
contact with the wheel without bending the bristles,
then retighten hex bolts and cap screws to secure
wheel brushes in place.
5. Rotate blade tension quick-release
lever counterclockwise to down
position to apply tension to blade.
6. Tighten tension adjustment screw (see
Figure 91) until it contacts wheel
block plate, then back it off 1-2 turns.
7. Retighten jam nut.
Figure 90. Location of wheel and blade
brushes.
Wheel
Brush
Hex Bolts
Lock
Nut
Lock
Nut
Blade Brush
Figure 91. Location of tension adjustment
screw, jam nut, and wheel block plate.
Wheel
Block Plate
Tension
Adjustment
Screw
Jam Nut
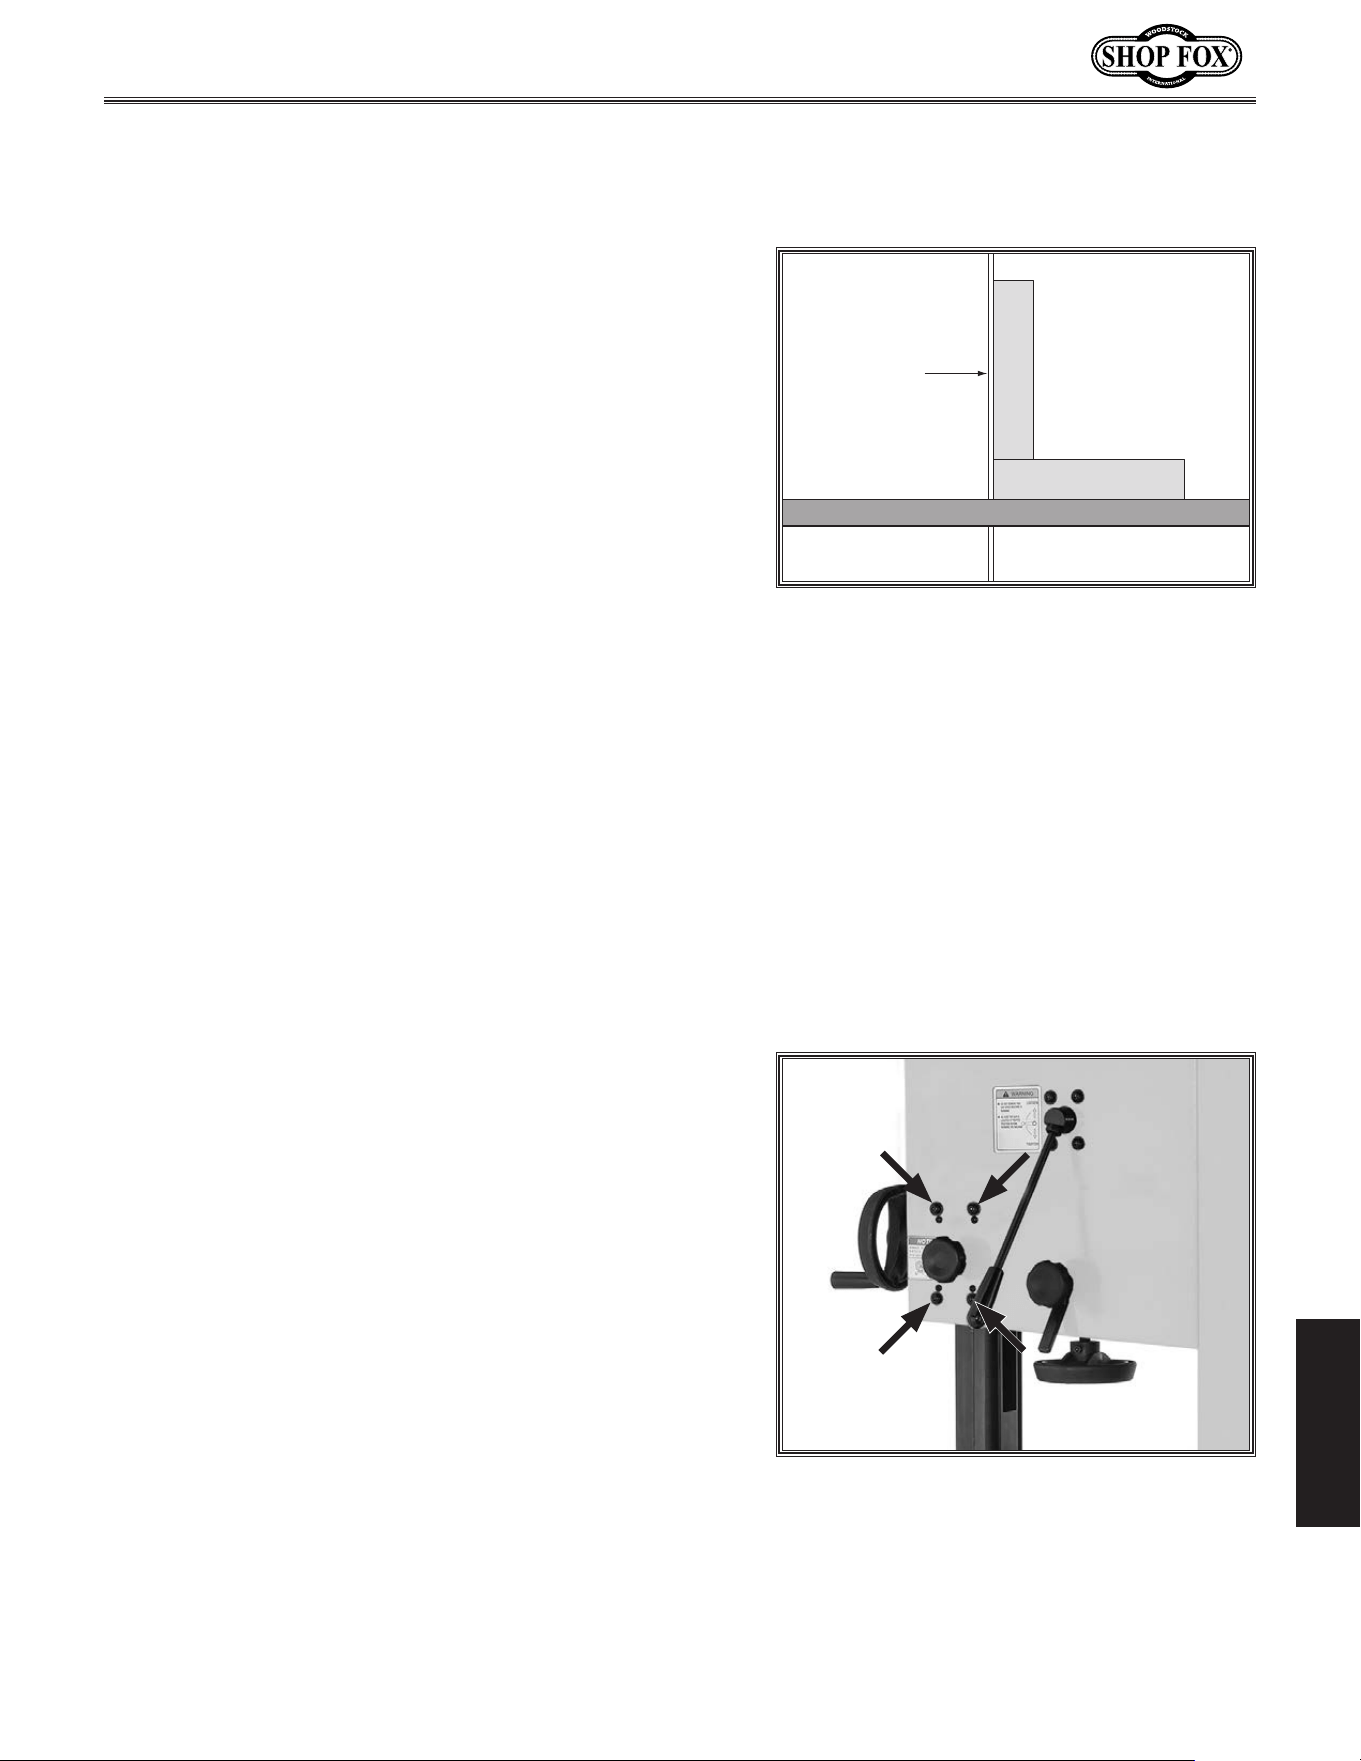
-67-
Model W1849 (For Machines Mfd. Since 11/16)
SERVICE
Adjusting.Guide.Post.
Parallelism
The guide post assembly should remain parallel with the
blade front to back and side to side along its length of
travel. If it does not, follow these instructions to adjust
it.
IMPORTANT: Make sure the table is aligned with the
blade from side to side and front to back before beginning
these procedures (refer to Aligning Table on Page 39 for
detailed instructions).
Tools Needed:
Machinist's Square ..............................................1
Small Ruler .......................................................1
Hex Wrench 4mm ...............................................1
Hex Wrench 5mm ...............................................1
Hex Wrench 8mm ...............................................1
Checking/Adjusting.Guide. Post. Parallel. with.
Blade.Side.to.Side
1. DISCONNECT MACHINE FROM POWER!
2. Loosen guide post lock knob, lower guide post to
within 1" of table top, then tighten knob.
Blade
Table
Square
Figure 92. Example of checking guide post
squareness.
3. Place machinist's square on table next to right-hand
side of guide post, as shown in Figure 92.
— If there is no gap between square and guide post
along its full length, no adjustments need to be
made. Proceed to next procedure.
— If there is a gap between square and the guide
post, guide post is not parallel to blade. Go to
Step 4.
4. Loosen each of the four guide post adjustment cap
screws shown in Figure 93 by
1
⁄4 turn.
5. Gently tap lower part of guide post in appropriate
direction until there is no gap between square and
guide post.
6. Tighten cap screws shown in Figure 93.
Figure 93. Guide post adjustment cap
screws.
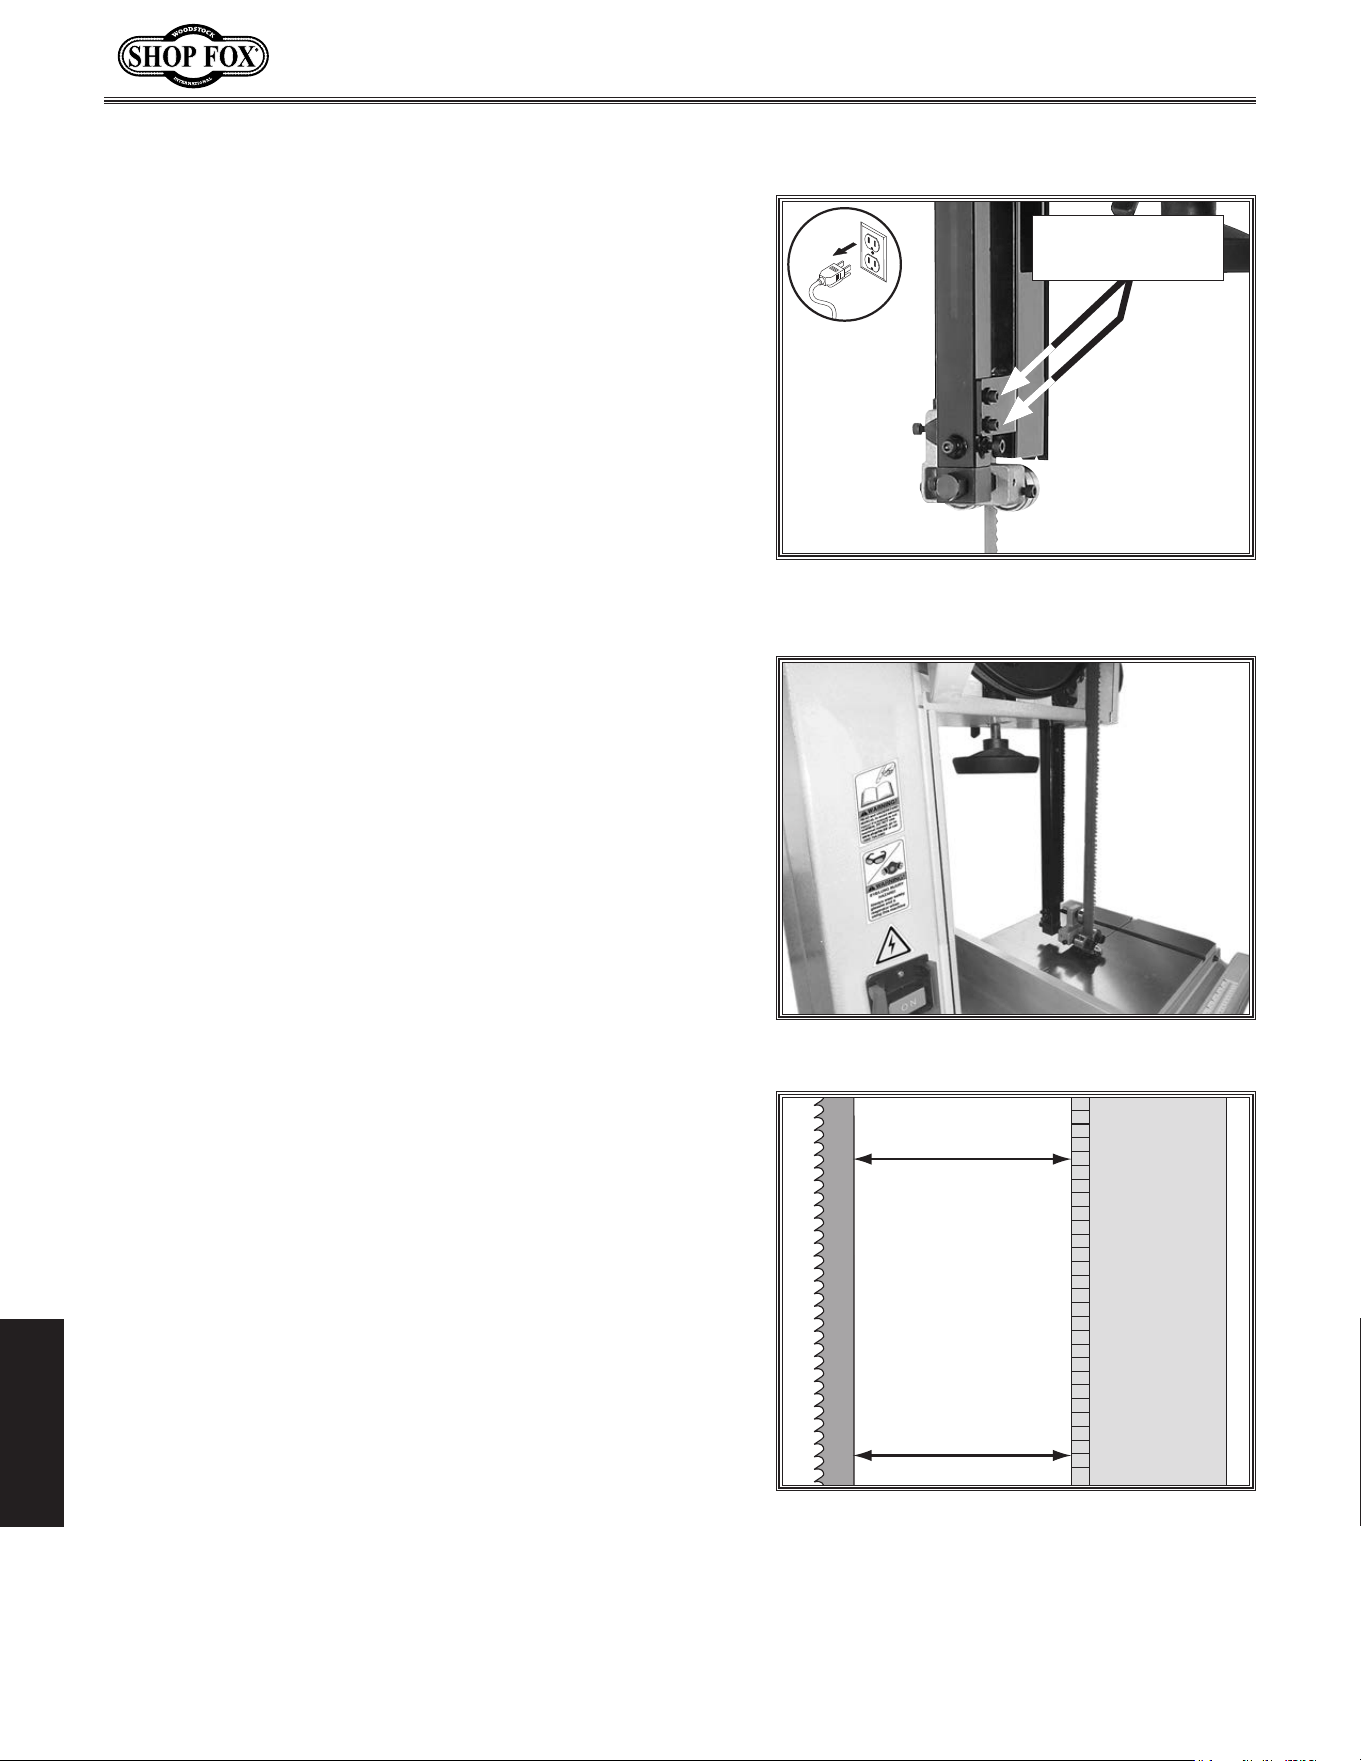
-68-
Model W1849 (For Machines Mfd. Since 11/16)
SERVICE
Checking/Adjusting.Guide. Post. Parallel. with.
Blade.Front-to-Back
1. DISCONNECT MACHINE FROM POWER!
2. Loosen guide post lock knob, lower blade guide
assembly all the way, then tighten lock knob.
3. Remove (2) M5-.8 x 10 cap screws and 5mm flat
washers that secure guide post guard, then carefully
remove guard (see Figures 94–95).
Note: It helps to rotate guard counterclockwise
while removing it.
Distance "A"
Distance "B"
(Right Side View)
Guide Post
Blade
Figure 96. Example of measuring distance
between guide post rack and blade.
4. Measure distance "A" between upper front face of
guide post rack and back of blade (see Figure 96).
5. Measure distance "B" between bottom front face of
guide post rack and back of blade (see Figure 96).
— If measurements taken in Steps 4–5 are equal, no
adjustments need to be made. Go to Step 9.
— If measurements taken in Steps 4–5 are not equal,
proceed to Step 6.
Figure 95. Guide post guard removed.
Figure 94. Location of cap screws and flat
washers that secure guide post guard.
Cap Screws and
Flat Washers
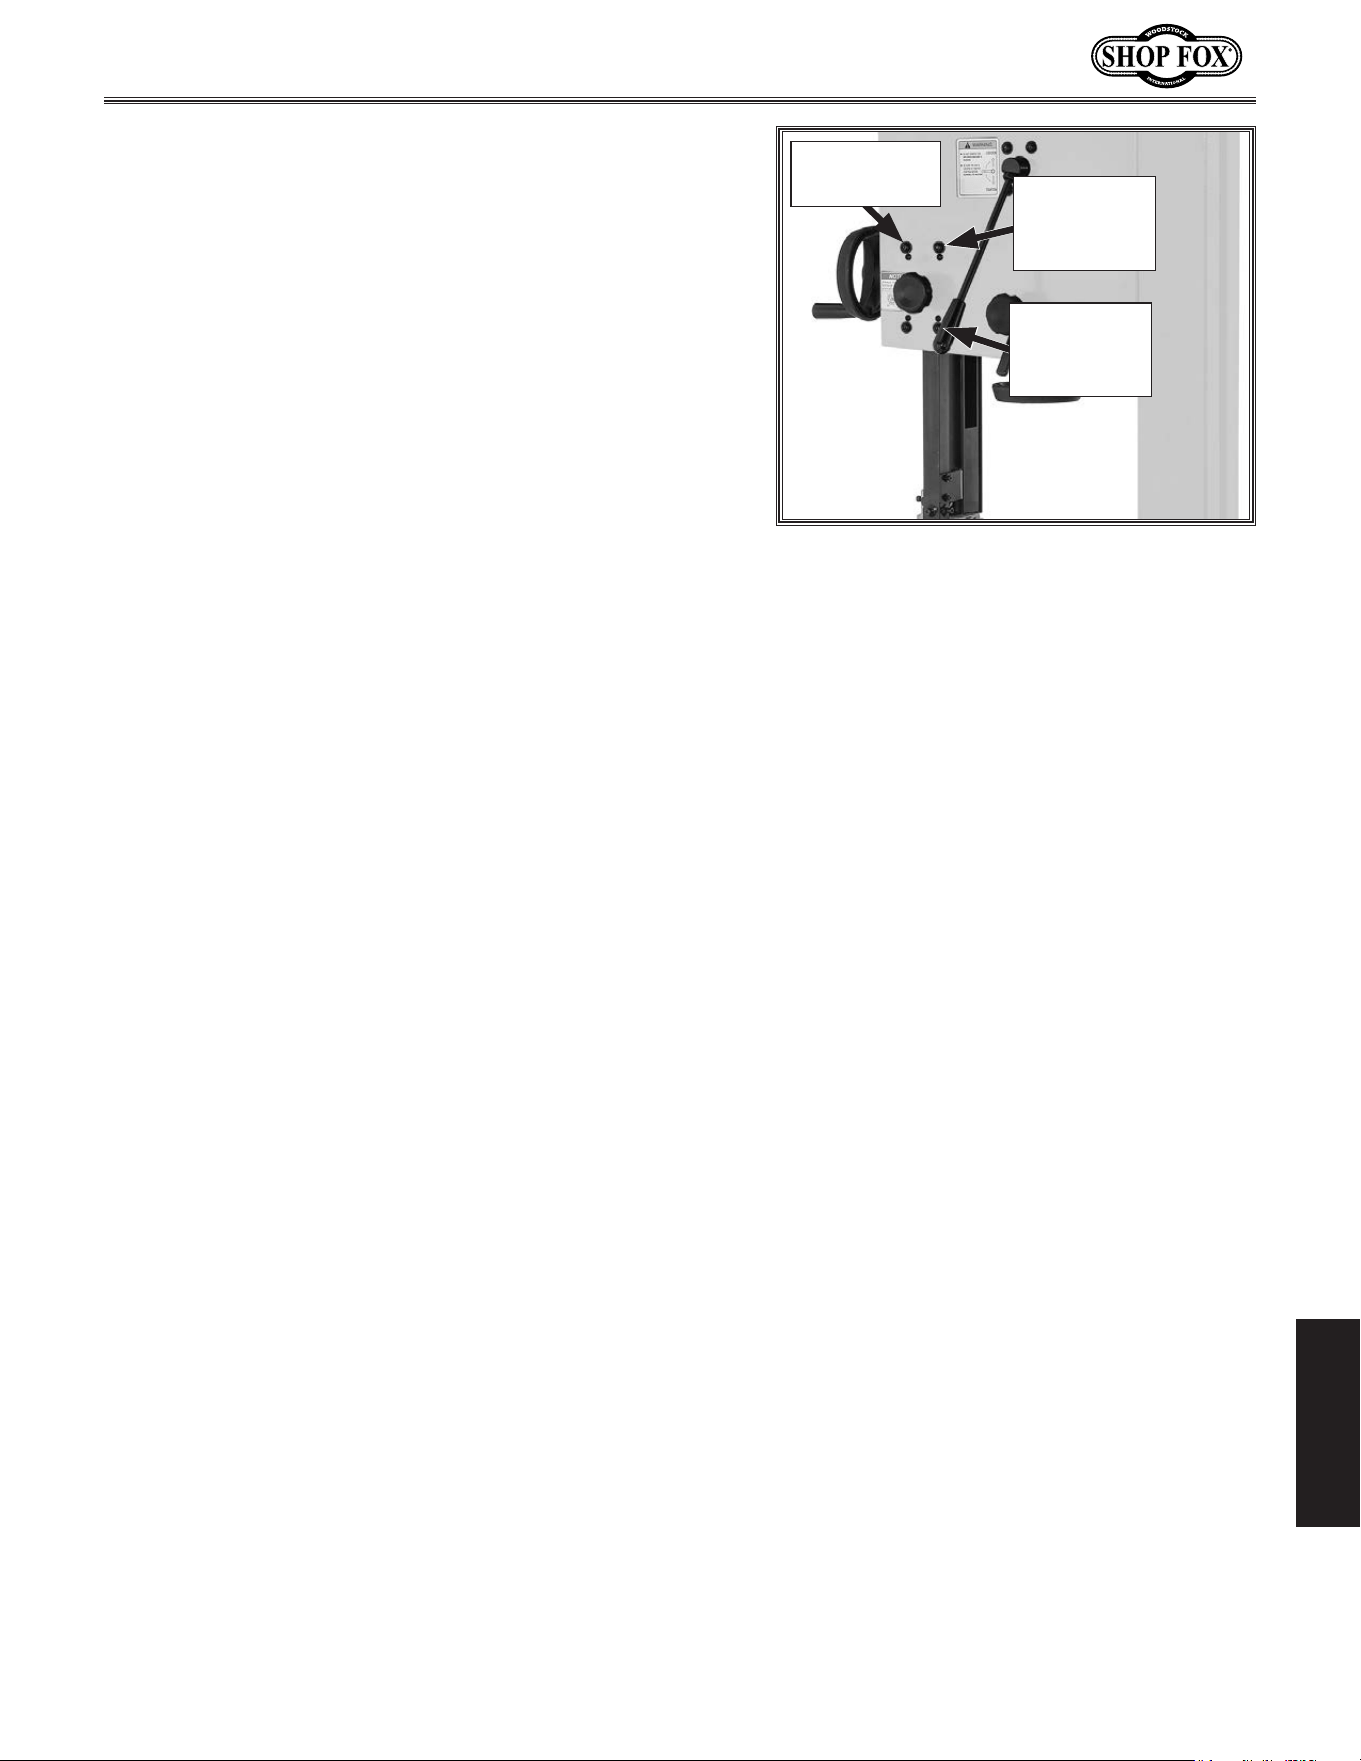
-69-
Model W1849 (For Machines Mfd. Since 11/16)
SERVICE
6. Loosen four cap screws shown in Figure 97.
— If guide post to blade distance is greater at
bottom than at top, tighten two upper set screws
shown in Figure 97 an equal amount until guide
post is parallel with blade.
— If guide post to blade distance is greater at top
than at bottom, tighten two lower set screws
shown in Figure 97 an equal amount until guide
post is parallel with blade.
7. Tighten four cap screws shown in Figure 97, then
repeat Steps 4–5.
— If measurements are equal, proceed to Step 9.
— If measurements are not equal, repeat Steps 6–7
until guide post is parallel with blade.
8. Re-install guide post guard using screws removed in
Step 3.
9. Rotate upper wheel by hand and make sure blade
does not contact guide post guard. If it does, loosen
cap screws from Step 3, adjust guard so that blade
will not make contact with it, then retighten screws.
Figure 97. Guide post parallelism
adjustment screws.
Cap Screws
(1 of 4)
Lower
Set Screws
(1 of 2)
Upper
Set Screws
(1 of 2)
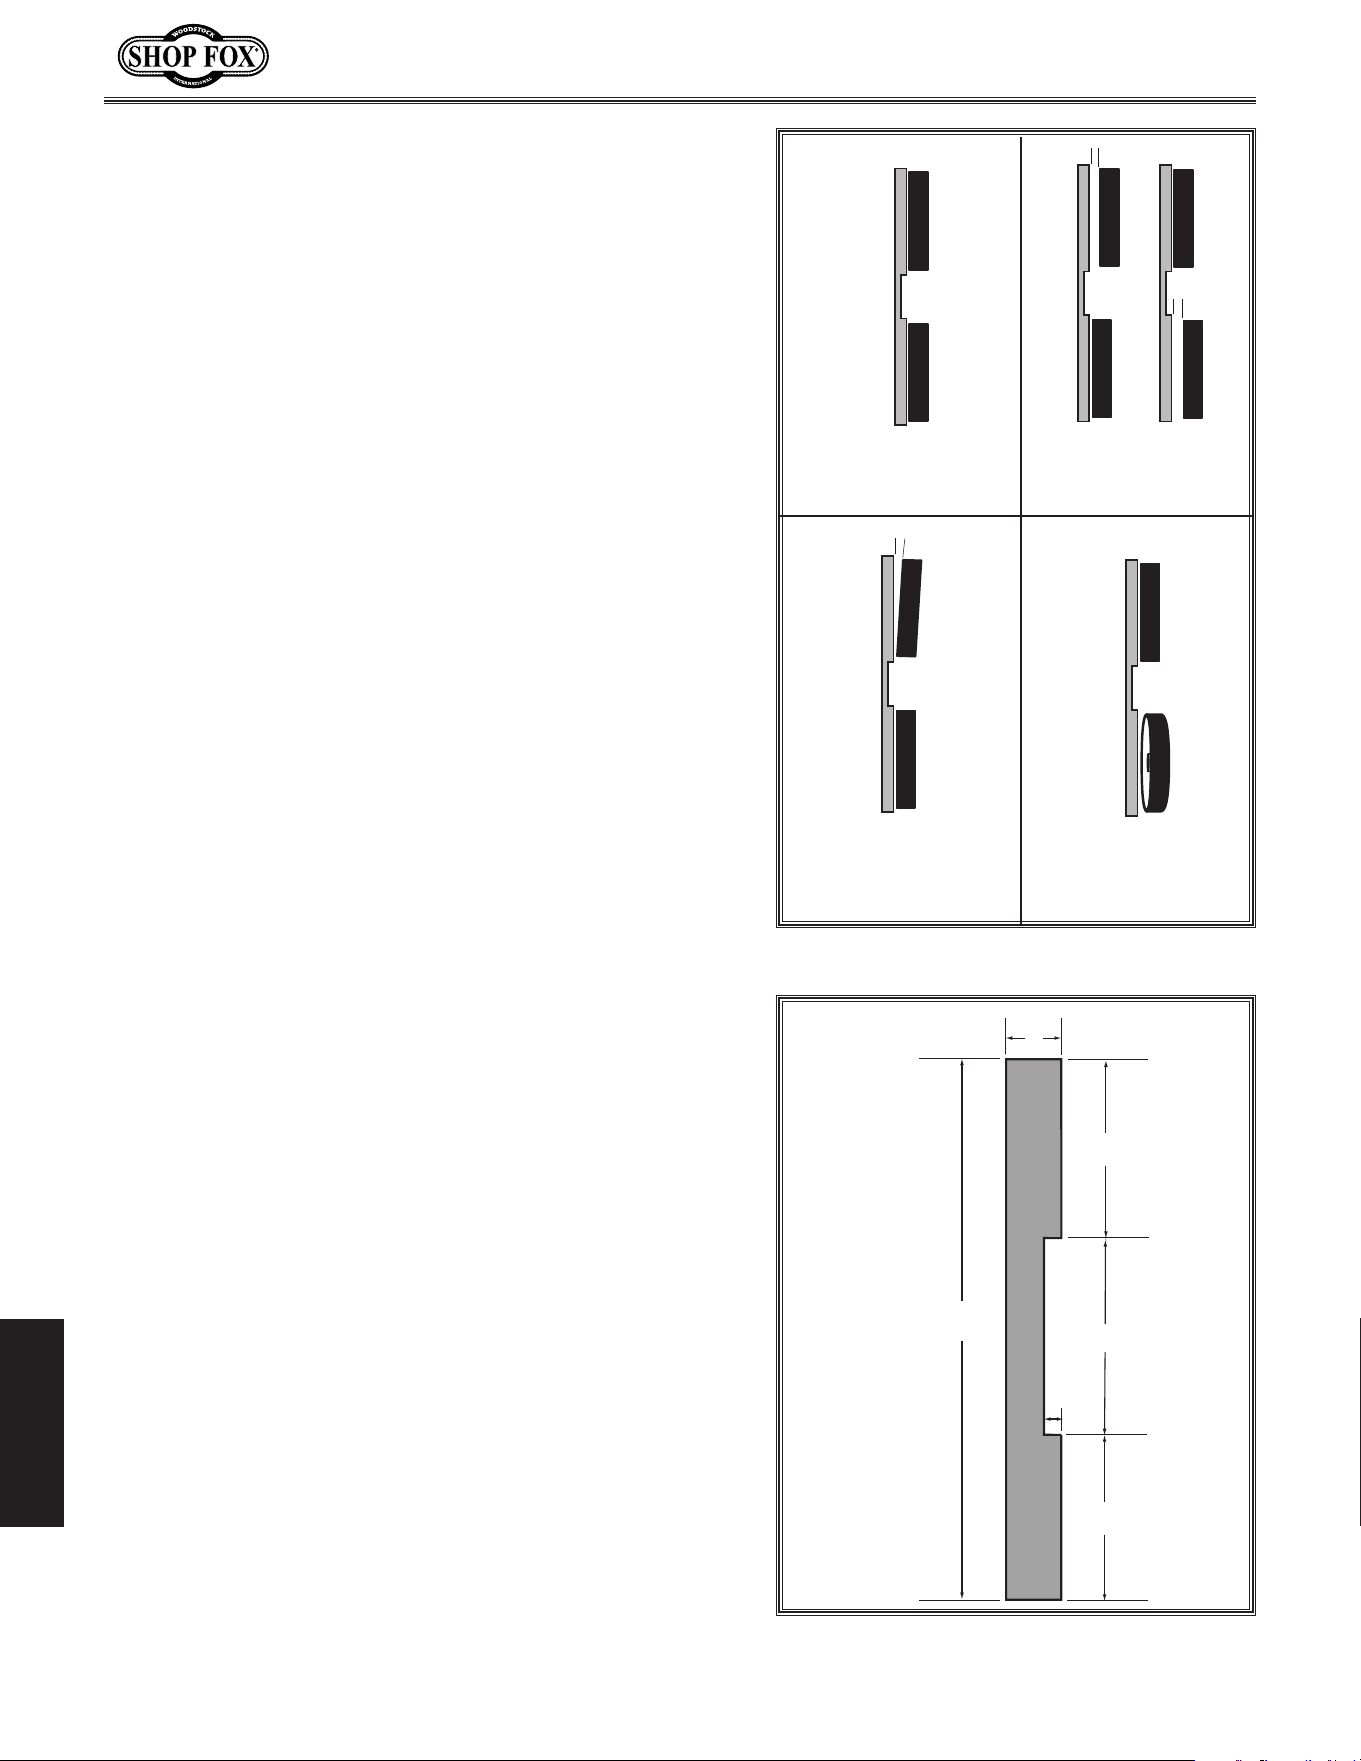
-70-
Model W1849 (For Machines Mfd. Since 11/16)
SERVICE
Aligning.Wheels
The following adjustment was performed at the factory
and should not need to be performed again unless there
is a wheel alignment problem, or one or more wheels are
replaced.
When wheels are coplanar (see Figure 98), the bandsaw
is more likely to cut straight without wandering; and
vibration, heat, and blade wear are considerably
decreased because the blade is automatically balanced on
the wheel.
Bringing the wheel into alignment may require a
combination of shimming a wheel and adjusting the
position of the lower wheel shaft.
Items Needed Qty
53" Long 2x4 .....................................................1
Hex Wrenches 4 & 6 mm ..................................1 Ea
Wrench 13mm ...................................................1
Tape Measure ....................................................1
Fine Ruler ........................................................1
Figure 98. Wheel alignment illustration.
or
Wheels parallel and
coplanar.
Wheels parallel, but
not coplanar.
Upper wheel is not
vertically aligned with
lower wheel.
Lower wheel is not
laterally aligned with
upper wheel.
Coplanarity Gauge
WHEEL
WHEEL
Figure 99. Dimensions of coplanarity
gauge.
Side View
53"
3
1
⁄2"
15"
15"
23"
1
1
⁄2"
Checking.Wheel.Alignment
1. Make "Coplanarity Gauge" shown in Figures 98–99.
Note: For best results, straighten the 2x4 with a
jointer before cutting. Alternatively, you can cut
the gauge out of a new sheet of
1
⁄2"—
3
⁄4" plywood
using a table saw. The "factory edge" of the plywood
will ensure a straight and parallel gauge.
2. DISCONNECT MACHINE FROM POWER!
3. Remove blade (refer to Changing Blade on Page 50),
remove table, then re-install and properly tension
blade (refer to Tensioning Blade on Page 30).
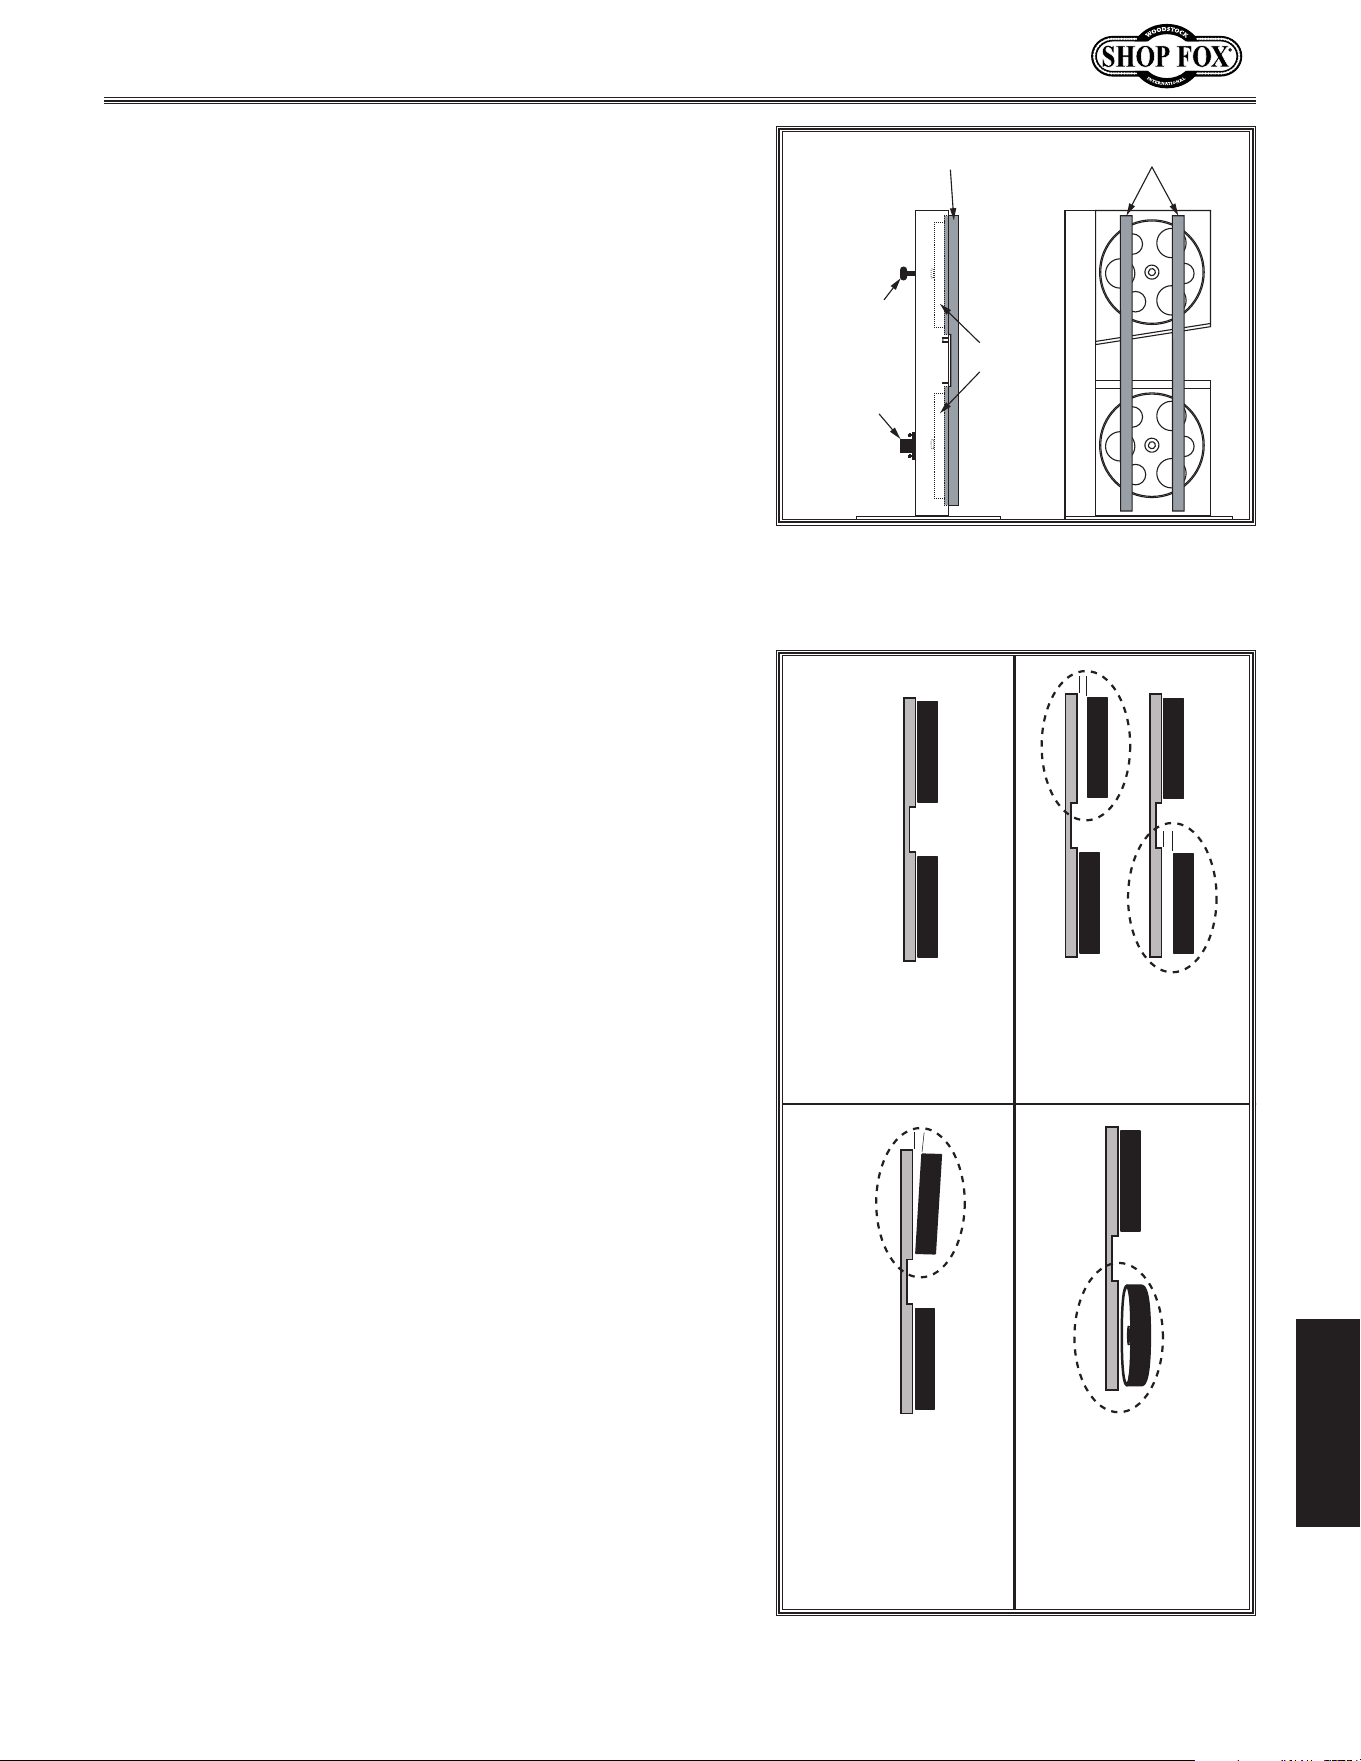
-71-
Model W1849 (For Machines Mfd. Since 11/16)
SERVICE
4. Place coplanarity gauge up against both wheels in
positions shown in Figure 100. Make sure gauge fully
extends across rims of both wheels.
5. Check wheel alignment and adjust tracking knob
to bring both wheels into alignment as much as
possible. If wheels cannot be adjusted coplanar,
use Figure 101 to determine how to proceed with
alignment adjustments.
or
Wheels parallel
and aligned: No
adjustment
needed.
Wheels parallel, but
not coplanar with
each other: Shim
upper or lower wheel.
Upper wheel not
vertically aligned
with lower wheel:
Use blade tracking
knob to tilt upper
wheel.
Lower wheel not
laterally aligned
with upper wheel:
Adjust rear set
bolts to tilt lower
wheel left/right.
Coplanarity Gauge
WHEEL WHEEL
Figure 101. Wheel alignment illustration
with solutions to misalignment problems.
Coplanarity Gauge
Gauge Positions
Tracking
Knob
Adjustment
Hub
Wheels
Figure 100. Illustration of using
coplanarity gauge to check wheel
alignment.
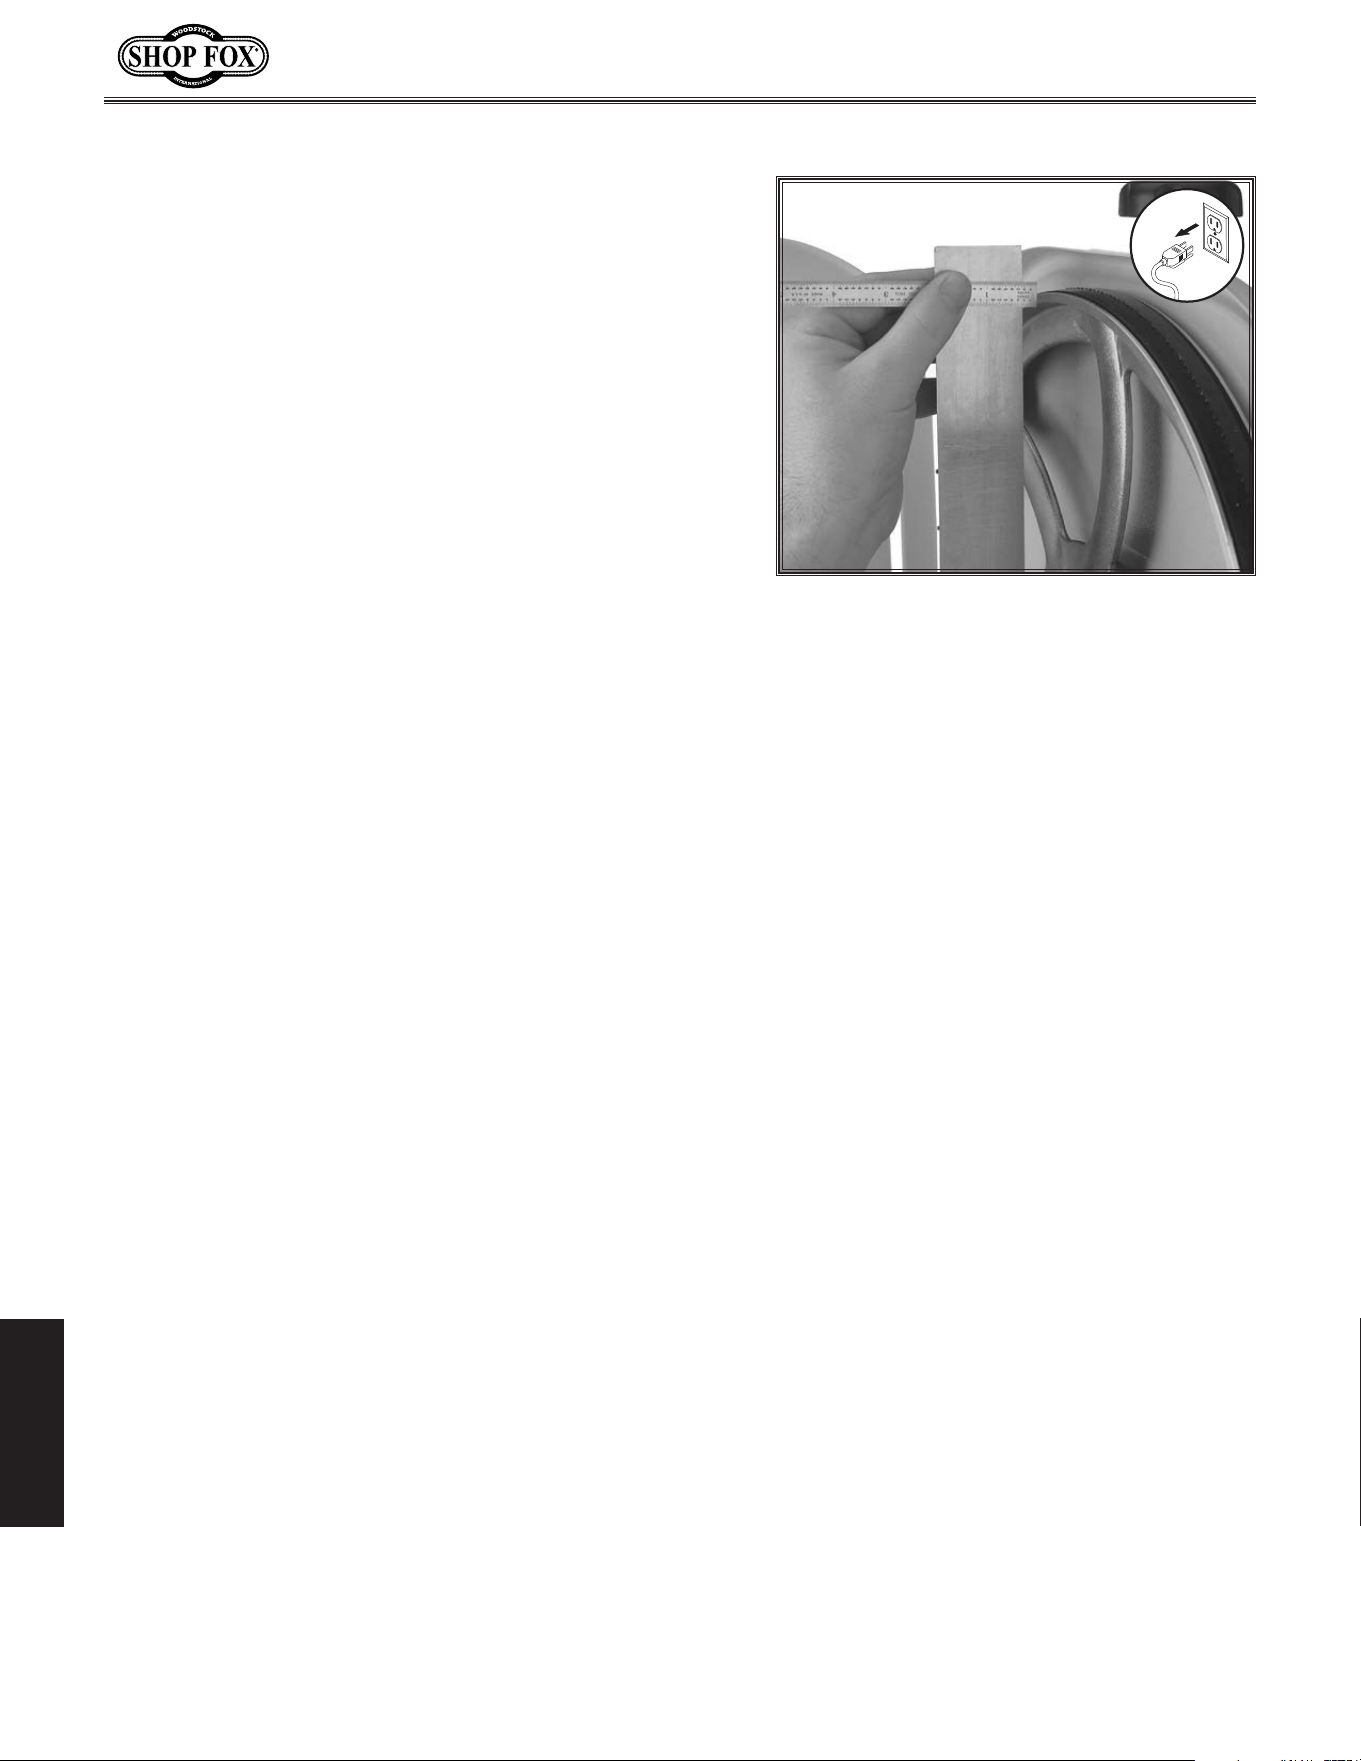
-72-
Model W1849 (For Machines Mfd. Since 11/16)
SERVICE
8. Perform previous Checking Wheel Alignment
procedure, beginning on Page 70, and adjust wheels
as necessary make them parallel and coplanar.
Tip: The first time you get the wheels coplanar,
place a mark on each wheel where you held the
coplanarity gauge, then use this position again in
the future if you need to repeat the procedure. This
assures repeated accuracy every time you adjust the
wheels.
— If no further adjustments are necessary, remove
blade, re-install table, and then re-install blade.
— If the lower wheel is tilted in relation to the upper
wheel, proceed to Adjusting Lower Wheel Shaft
Position on Page 73.
Shimming.a.Wheel
When the wheels are parallel but not coplanar, one of the
wheels must be shimmed out to bring it into the same
plane as the other wheel.
Tip: Standard washers work well for shimming the wheel
because they can easily be stacked to get the desired
height.
To shim a wheel, do these steps:
1. DISCONNECT MACHINE FROM POWER!
2. Adjust upper wheel tracking so that it is parallel
with lower wheel.
3. With coplanarity gauge touching both rims of wheel
that does not need to be shimmed out, measure
distance away from other wheel with a fine ruler
(see Figure 102). The distance measured with ruler
is distance this wheel must be shimmed.
4. Remove blade.
5. Remove wheel to be shimmed. Place as many shims
as necessary to correct gap measured in Step 3 onto
wheel shaft.
6. Re-install and secure wheel.
7. Re-install and properly tension blade.
Figure 102. Example of measuring the
distance to shim the wheel to be coplanar.
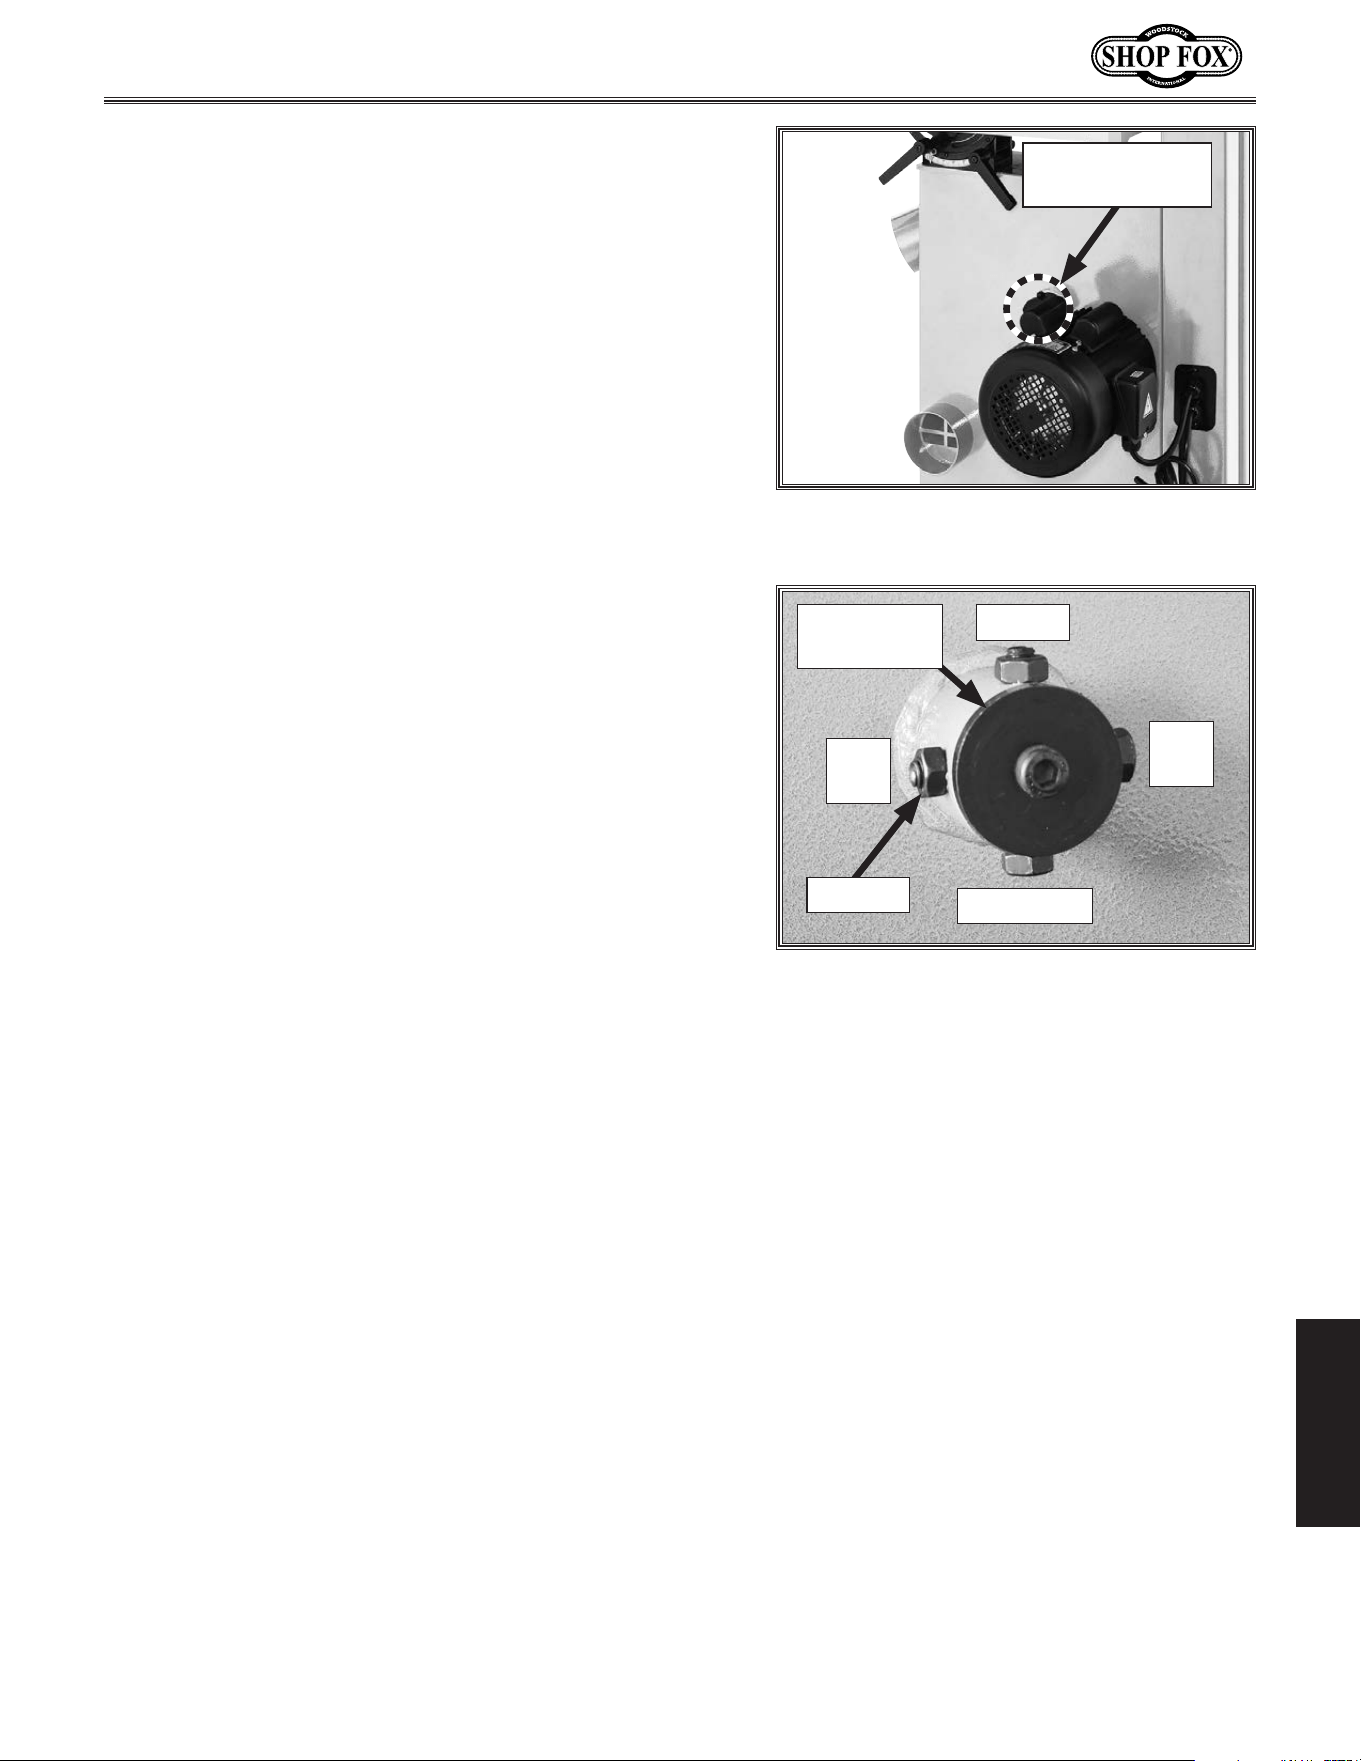
-73-
Model W1849 (For Machines Mfd. Since 11/16)
SERVICE
To adjust lower wheel shaft position, do these steps:
1. DISCONNECT MACHINE FROM POWER!
2. Loosen jam nuts on lower wheel adjustment hub
(see Figure 104).
3. Loosen one tilt adjustment set screw, then tighten
opposing set screw approximately an equal amount.
4. Check wheels with coplanarity gauge, and repeat
Step 3 as needed until lower wheel is parallel and
coplanar with upper wheel.
5. Tighten jam nuts to lock tilt adjustment set screws
in position.
6. Perform previous Checking Wheel Alignment
procedure, beginning on Page 70, and adjust wheels
as necessary to make them parallel and coplanar.
7. When wheels are parallel and coplanar, remove
blade, re-install table, and then re-install blade.
Adjusting.Lower.Wheel.Shaft.Position
If the lower wheel is tilted in relation to the upper wheel,
perform the following procedure to make it coplanar with
the upper wheel.
There are four adjustment bolts with hex nuts in the
lower wheel adjustment hub, shown in Figure 103. These
adjust the wheel tilt from side to side and up and down.
Note: If you make a mistake during the following
procedure, it can be very difficult to correct. Therefore, it
is important to double-check wheel alignment (see Page
70), and troubleshoot all other possible solutions (see
Troubleshooting on Page 60) prior to adjusting the lower
wheel shaft position.
Figure 104. Lower wheel adjustment
controls.
Top Tilt
Side
Tilt
Side
Tilt
Adjustment
Hub
Bottom Tilt
Figure 103. Location of rear lateral
adjustment components.
Jam Nut
Lower Wheel
Adjustment Hub
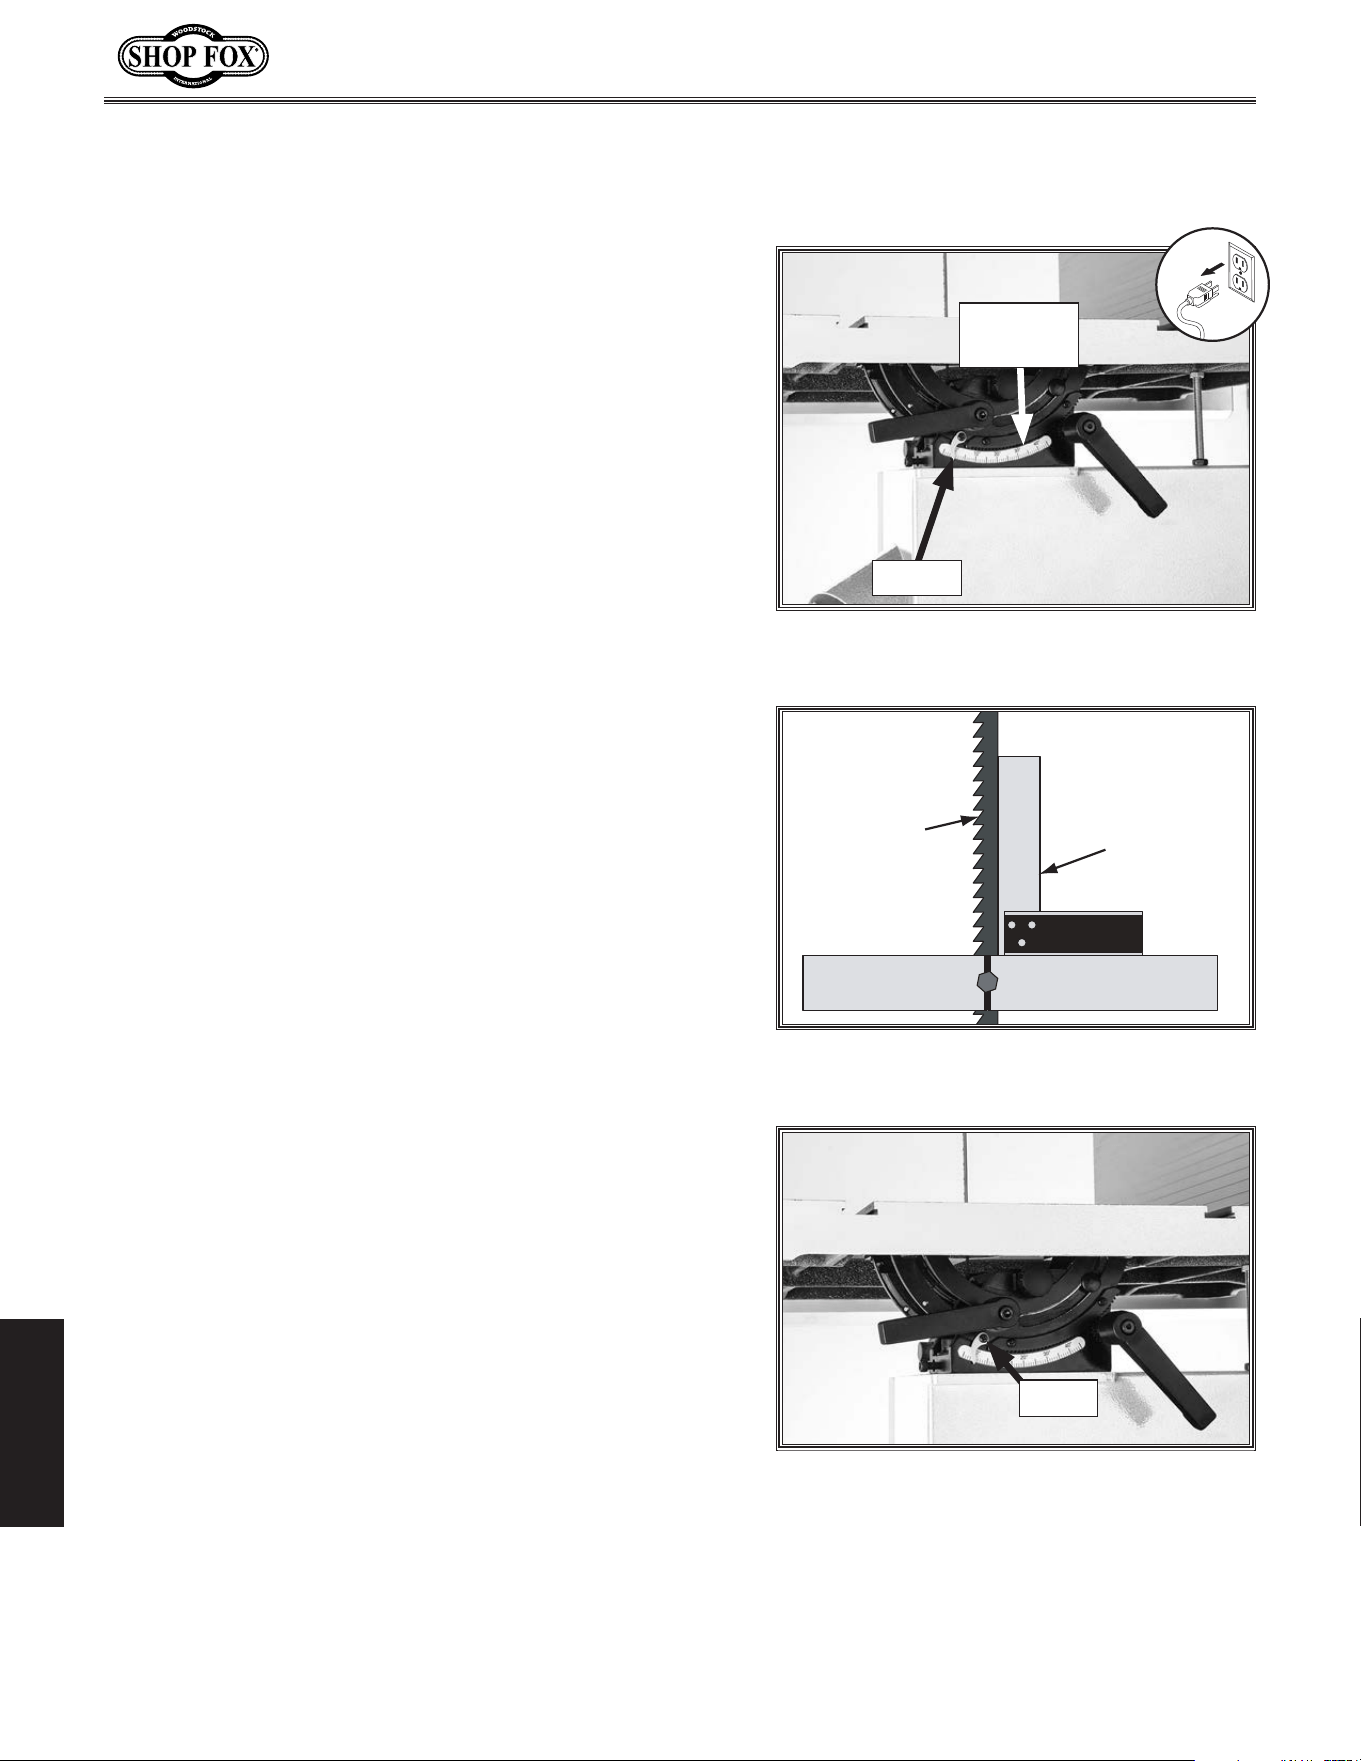
-74-
Model W1849 (For Machines Mfd. Since 11/16)
SERVICE
Calibrat ing.Table .Tilt .
Scale.Pointer
The table tilt scale pointer (see Figure 105) was
calibrated at the factory. However, after prolonged use
the pointer may shift, requiring adjustment.
Note: The table tilt scale functions as a basic guide only.
For high-precision cuts, use a protractor or bevel gauge to
set the angle of table tilt.
Tools Needed Qty
Machinist's Square ..............................................1
Phillips Screwdriver #2 .........................................1
To calibrate table tilt scale pointer, do these steps:
1. DISCONNECT MACHINE FROM POWER!
2. Place one edge of square on table and other edge of
square against blade side, as shown in Figure 106.
3. Adjust table tilt (refer to Tilting Table, beginning on
Page 51 for more information) until square rests flush
and evenly against both table and blade side.
Note: Make sure square does not go across a blade
tooth when performing this step.
4. Loosen Phillips head screw that secures table tilt
pointer (see Figure 107), adjust pointer to "0" on
scale, then retighten screw.
Blade
Square
Table
Figure 106. Adjusting table perpendicular
to blade (side to side).
Figure 107. Location of screw that secures
table tilt pointer.
Screw
Figure 105. Location of table tilt scale
and angle indicator.
Table Tilt
Scale
Pointer
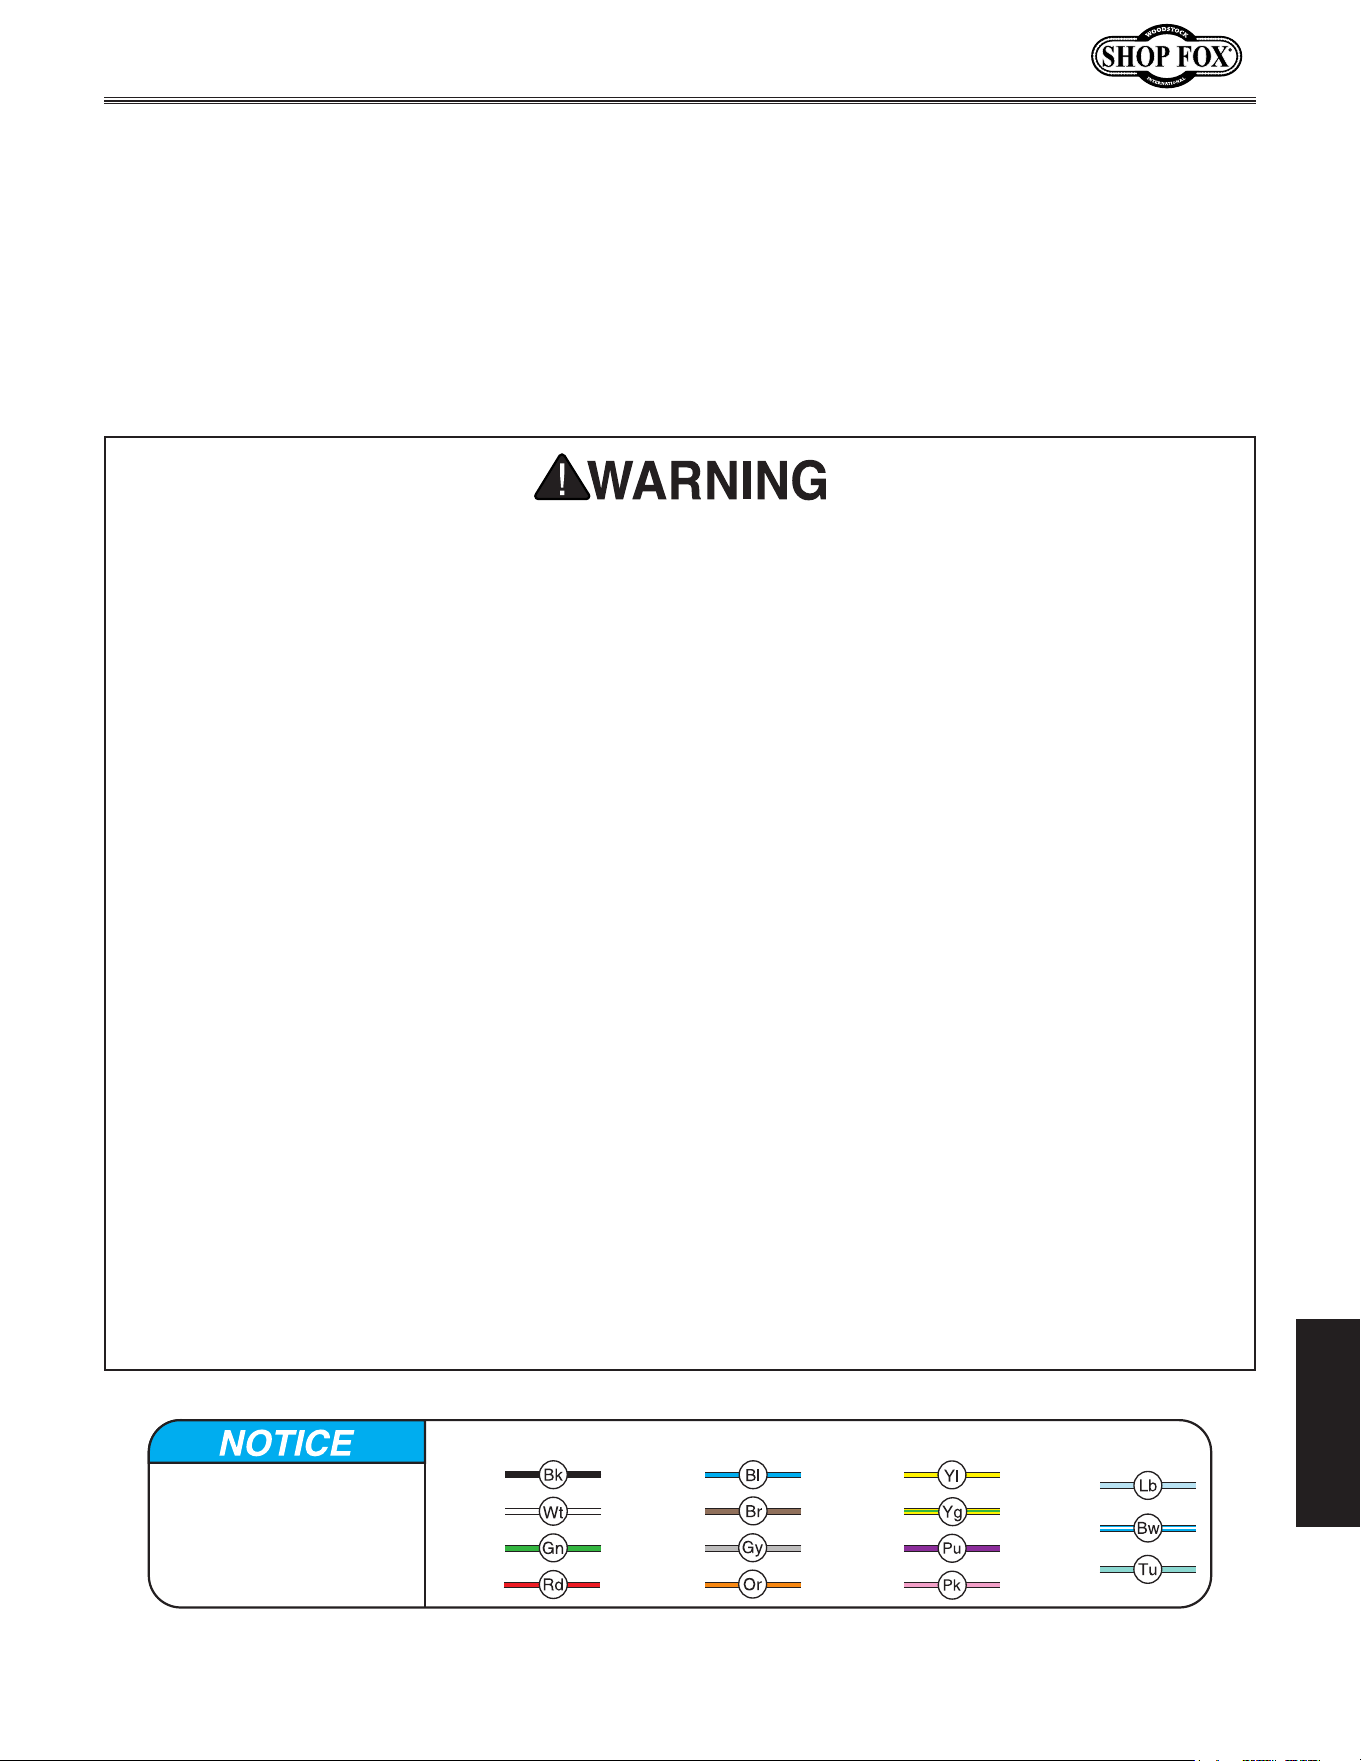
-75-
Model W1849 (For Machines Mfd. Since 11/16)
SERVICE
Elec trical.Safe ty.Instructions
SHOCK.HAZARD. Working on wiring that is
connected to a power source is extremely
dangerous. Touching electrified parts will
result in personal injury including but not
limited to severe burns, electrocution,
or death. Disconnect the power from
the machine before servicing electrical
components!
QUALIFIED.ELECTRICIAN. Due to the inherent
hazards of electricity, only a qualified
electrician should perform wiring tasks on
this machine. If you are not a qualified
electrician, get help from one before
attempting any kind of wiring job.
WIRE.CONNECTIONS. All connections must
be tight to prevent wires from loosening
during machine operation. Double-check all
wires disconnected or connected during any
wiring task to ensure tight connections.
WIRE/COMPONENT.DAMAGE..Damaged wires
or components increase the risk of serious
personal injury, fire, or machine damage. If
you notice that any wires or components are
damaged while performing a wiring task,
replace those wires or components before
completing the task.
MODIFICATIONS. Using aftermarket parts or
modifying the wiring beyond what is shown
in the diagram may lead to unpredictable
results, including serious injury or fire.
MOTOR.WIRING. The motor wiring shown
in these diagrams is current at the time
of printing, but it may not match your
machine. Always use the wiring diagram
inside the motor junction box.
CAPACITORS/INVERTERS. Some capacitors
and power inverters store an electrical
charge for up to 10 minutes after being
disconnected from the power source.
To reduce the risk of being shocked,
wait at least this long before working on
capacitors.
CIRCUIT.REQUIREMENTS. You MUST follow
the requirements at the beginning of this
manual when connecting your machine to a
power source.
EXPERIENCING.DIFFICULTIES. If you are
experiencing difficulties understanding
the information included in this section,
contact our Technical Support at
(360) 734-3482.
The photos and diagrams
included in this section are
best viewed in color. You
can view these pages in
color at www.shopfox.biz.
BLACK
WHITE
GREEN
RED
BLUE
BROWN
GRAY
ORANGE
YELLOW
YELLOW
GREEN
PURPLE
PINK
LIGHT
BLUE
BLUE
WHITE
TUR-
QUOISE
WIRING DIAGRAM COLOR KEY
These pages are current at the time of printing. However, in the spirit of improvement, we may make
changes to the electrical systems of future machines. Compare the manufacture date of your machine to
the one stated in this manual, and study this section carefully.
If there are differences between your machine and what is shown in this section, call Technical Support
at (360) 734-3482
for assistance BEFORE making any changes to the wiring on your machine. An updated
wiring diagram may be available. Note: Please gather the serial number and manufacture date of your
machine before calling. This information can be found on the main machine label.
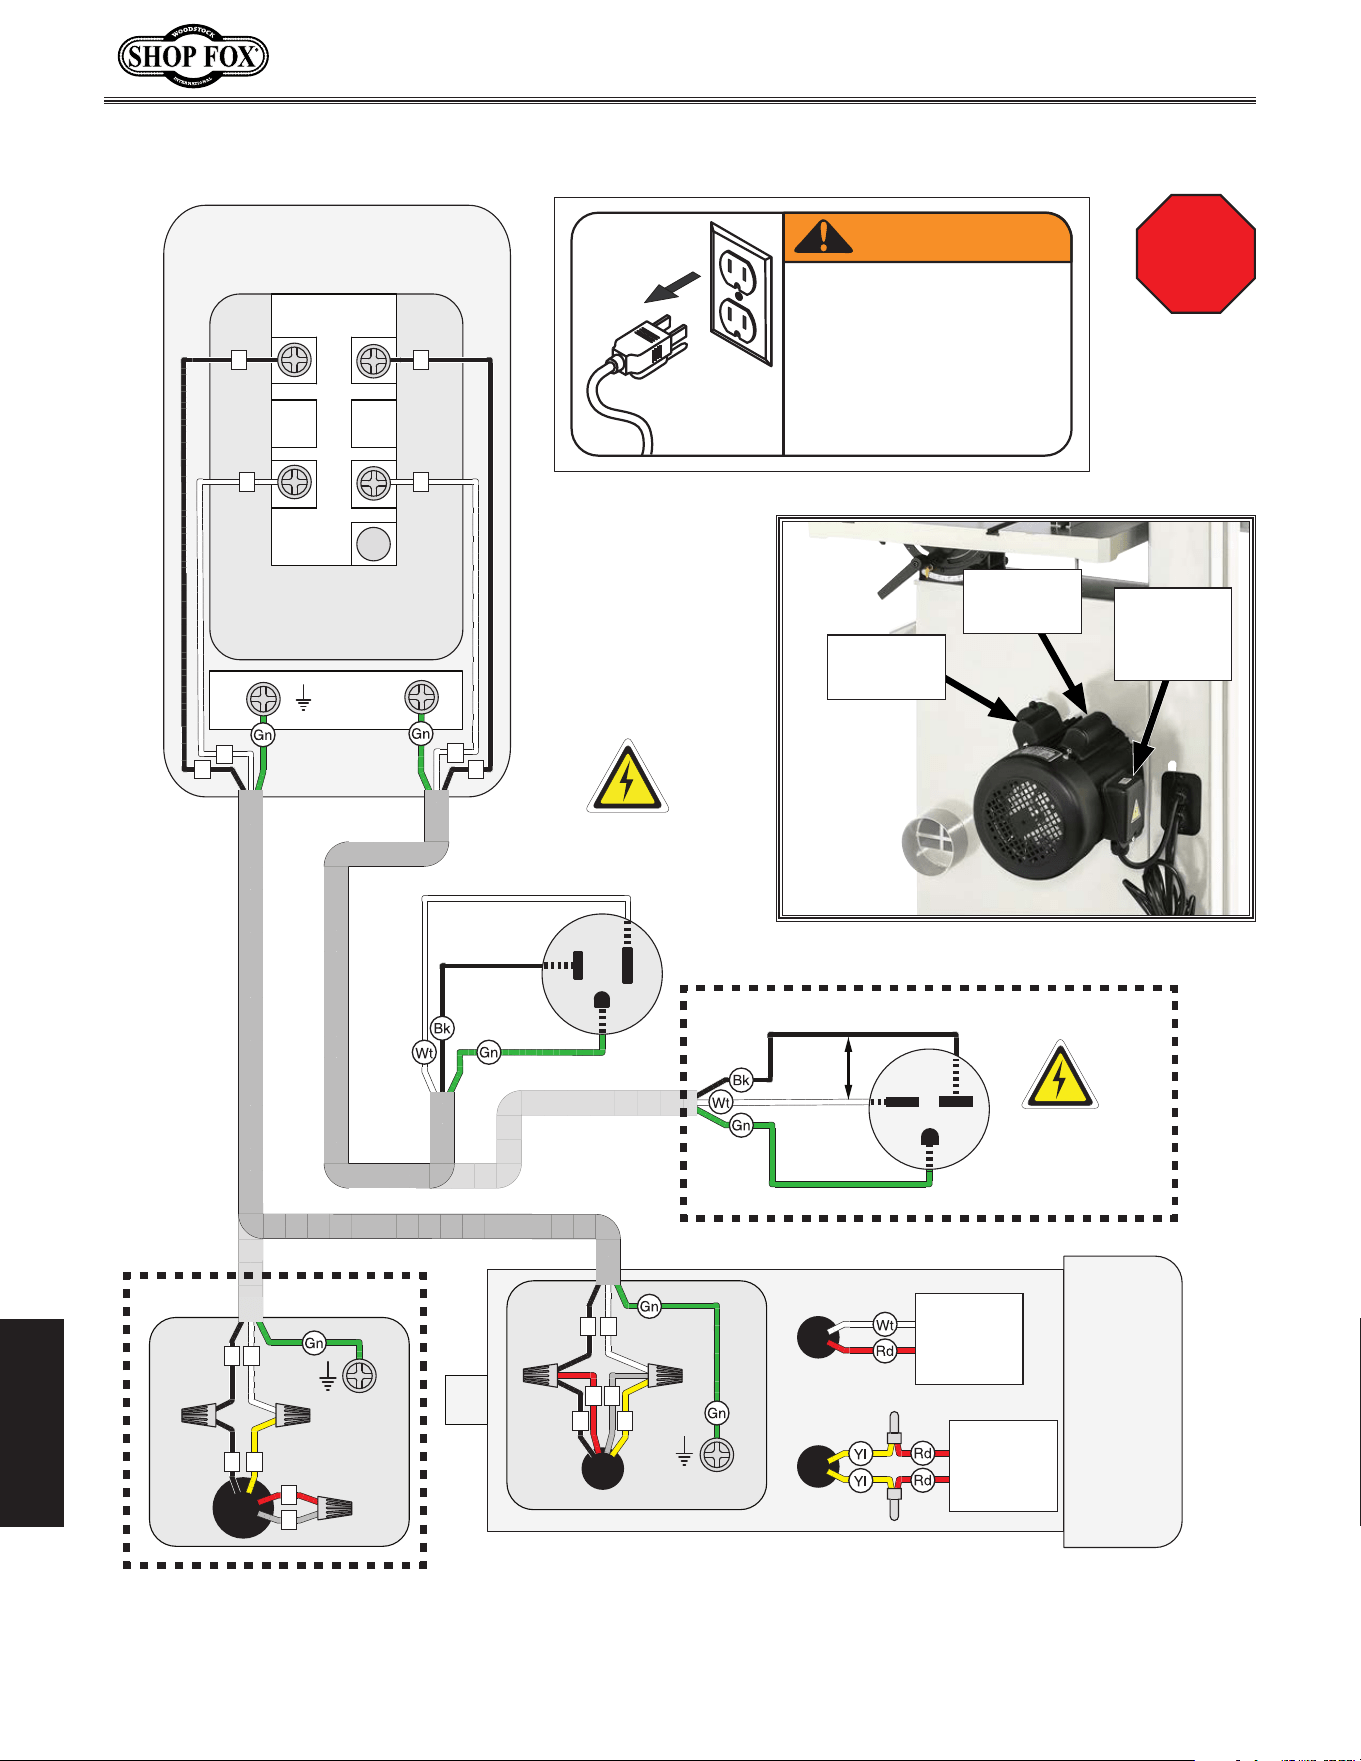
-76-
Model W1849 (For Machines Mfd. Since 11/16)
SERVICE
Wiring.Diagram
MOTOR
Neutral
Hot
Ground
110 VAC
5-15 Plug
6-15 Plug
(As Recommended)
Hot
Hot
Ground
220
VAC
G
220 VAC
Rewired for 220V
Ground
U
V
3
1
2
4
Rewired for 220V
ON/OFF Switch
(viewed from behind)
STOP
Ground
ON/OFF Switch
KEDU HY56
START
CAPACITOR
200 MFD
250 VAC
RUN
CAPACITOR
50 MFD
250 VAC
U
R
U
V
V
R
S
S
3
1
2
4
U
V
Ground
STOP
Read
Page 75
Before
Wiring
Figure 113. Motor electrical components.
Start
Capacitor
Run
Capacitor
Motor
Junction
Box
˚
UNEXPECTED INJURY ˚
HAZARD!
Disconnect machine from
power before changing
cutting tools or perform-
ing maintenance.
WARNING!
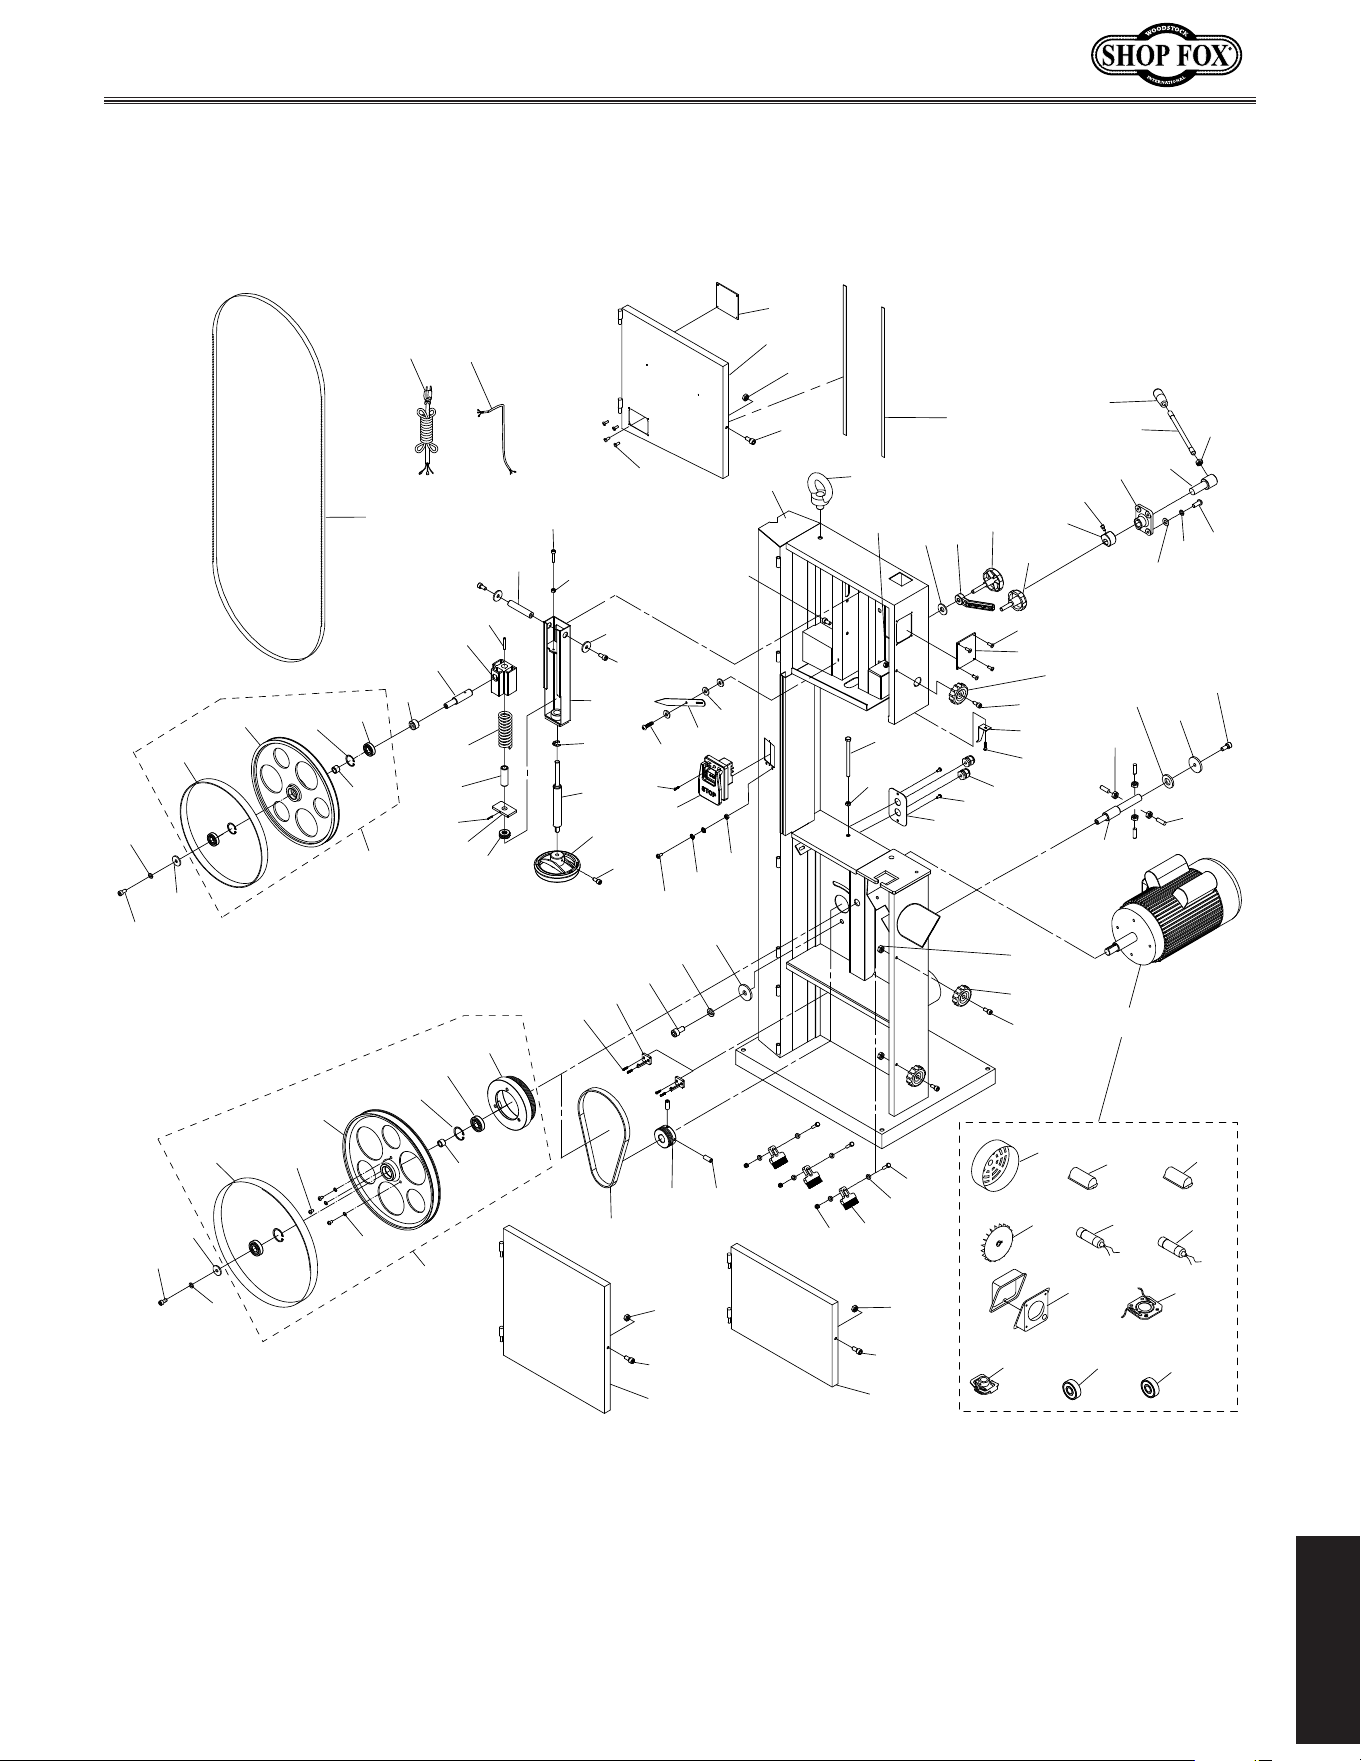
-77-
Model W1849 (For Machines Mfd. Since 11/16)
PARTS
PARTS
Main
1
2
3
4
5
6
7
9
10
8
11
12
23
13
14
15
16
17
18
20
25
26
28
29
31
32
33
34
35
36
37
38
39
40
41
42
43
44
45
46
47
54
56
57
58
59
60
62
63
64
65
66
67
68
69
70
71
72
73
74
75
76
78
79
80
81
82
86
87
92
93
111
119
61
115
48
50
61
60
111
61
88
82-2
82-1
82-3
82-4
82-8
82-7
82-5
82-6
82-10
82-9
82-11
19
22
21
24
19-1
19-2
19-3
19-4
19-5
30
49
61
61
49
95
48
49
55
61
50
21
22
27
24
27-1
27-8
27-7
27-2
27-4
27-3
27-5
27-6
-78-
Model W1849 (For Machines Mfd. Since 11/16)
PARTS
Main.Parts.List
REF PART # DESCRIPTION REF PART # DESCRIPTION
1 XP1849001 DOOR SEAL 10 X 760 X 1MM 44 X1849044 CAP SCREW M8-1.25 X 16
2 X1849002 CAP SCREW M6-1 X 20 45 X1849045 FENDER WASHER 8MM
3 X1849003 BUSHING 46 X1849046 UPPER WHEEL SLIDING BRACKET
4 X1849004 EYE BOLT M10-1.5 X 18 47 X1849047 CAP SCREW M6-1 X 50
5 X1849005 MACHINE BODY 48 X1849048 RIVET 3.2 X 10 BLIND
6 X1849006 E-CLIP 15MM 49 X1849049 CAP SCREW M6-1 X 10
7 X1849007 POWER CORD 14G 3W 118" 5-15P 50 X1849050 CLEAR WINDOW 90 X 70 X 3MM
8 X1849008 FLAT WASHER 6MM 54 X1849054 FENDER WASHER 8MM
9 X1849009 PHLP HD SCR M4-.7 X 25 55 X1849055 UPPER WHEEL COVER
10 X1849010 HEX NUT M6-1 56 X1849056 HEX BOLT M6-1 X 25
11 X1849011 POINTER 57 X1849057 FLAT WASHER 6MM
12 X1849012 SHOULDER SCREW M4-.7 X 5, 6 X 3 58 X1849058 WHEEL BRUSH 1-3/4"
13 X1849013 UPPER BLADE PIVOT SHAFT 59 X1849059 CAP SCREW M6-1 X 25
14 X1849014 ROLL PIN 5 X 36 60 X1849060 LOCK KNOB 60MM DIA
15 X1849015 UPPER WHEEL SHAFT BLOCK 61 X1849061 LOCK NUT M6-1
16 X1849016 UPPER WHEEL SHAFT 62 X1849062 STRAIN RELIEF TYPE-3 PG13.5
17 X1849017 MOTOR CORD 14G 3W 43" 63 X1849063 GUIDE POST HEIGHT INDICATOR
18 X1849018 CAP SCREW M6-1 X 12 64 X1849064 FLAT WASHER 10MM
19 X1849019 UPPER WHEEL ASSEMBLY 65 X1849065 BUSHING
19-1 X1849019-1 UPPER WHEEL 14" 66 X1849066 KNOB BOLT 6-LOBE M10-1.5 X 20
19-2 X1849019-2 WHEEL TIRE 67 X1849067 KNOB BOLT 6-LOBE M10-1.5 X 55
19-3 X1849019-3 BALL BEARING 6202-2RS 68 X1849068 LOCK LEVER M10-1.5
19-4 X1849019-4 INT RETAINING RING 35MM 69 X1849069 ECCENTRIC BLOCK
19-5 X1849019-5 BUSHING 70 X1849070 BLADE TENSION PILLOW BLOCK
20 X1849020 HEX BOLT M8-1.25 X 110 71 X1849071 HANDLE M12-1.75, 26 X 85
21 X1849021 FENDER WASHER 8MM 72 X1849072 STUD-DE M12-1.75 X 240, 30
22 X1849022 CAP SCREW M8-1.25 X 16 73 X1849073 HEX NUT M12-1.75
23 X1849023 SAW BLADE 120" X 3/8" 6-TPI HOOK 74 X1849074 LEVER HUB
24 X1849024 LOCK WASHER 8MM 75 X1849075 BUTTON HD CAP SCR M8-1.25 X 20
25 X1849025 SPARE BLADE HOLDER 76 X1849076 LOCK WASHER 8MM
26 X1849026 HEX NUT M8-1.25 78 X1849078 DOCK WASHER 8 X 45 X 5
27 X1849027 LOWER WHEEL ASSEMBLY 79 X1849079 SET SCREW M8-1.25 X 20
27-1 X1849027-1 LOWER WHEEL 14" 80 X1849080 HEX NUT M8-1.25
27-2 X1849027-2 WHEEL TIRE 81 X1849081 LOWER WHEEL SHAFT
27-3 X1849027-3 BALL BEARING 6202-2RS 82 X1849082 MOTOR 2HP 110V/220V 1-PH
27-4 X1849027-4 INT RETAINING RING 35MM 82-1 X1849082-1 MOTOR FAN COVER
27-5 X1849027-5 BUSHING 82-2 X1849082-2 MOTOR FAN
27-6 X1849027-6 WHEEL PULLEY 82-3 X1849082-3 S CAPACITOR COVER
27-7 X1849027-7 BUTTON HD CAP SCR M6-1 X 25 82-4 X1849082-4 S CAPACITOR 200M 250V 1-1/2 X 3-1/2
27-8 X1849027-8 LOCK WASHER 6MM 82-5 X1849082-5 R CAPACITOR COVER
28 X1849028 PHLP HD SCR M4-.7 X 8 82-6 X1849082-6 R CAPACITOR 50M 250V 1-1/2 X 3-1/2
29 X1849029 SPACER 82-7 X1849082-7 MOTOR JUNCTION BOX
30 X1849030 LOWER WHEEL COVER 82-8 X1849082-8 CONTACT PLATE
31 X1849031 CAP SCREW M8-1.25 X 20 82-9 X1849082-9 CENTRIFUGAL SWITCH 1720 RPM
32 X1849032 COMPRESSION SPRING 7 X 34 X 90 82-10 X1849082-10 BALL BEARING 6205ZZ (FRONT)
33 X1849033 ROLL PIN 3 X 16 82-11 X1849082-11 BALL BEARING 6203ZZ (REAR)
34 X1849034 ALIGNMENT PLATE 86 X1849086 FLAT WASHER 8MM
35 X1849035 THRUST BEARING 51201 87 X1849087 STRAIN RELIEF PLATE
36 X1849036 LOCK WASHER 8MM 88 X1849088 TAP SCREW M4 X 8
37 X1849037 HANDWHEEL TYPE-4 140D X 10B-S 92 X1849092 MOTOR PULLEY
38 X1849038 BLADE TENSION ADJUSTING ROD 93 X1849093 POLY-V BELT 5V X 8.3L
39 X1849039 FLANGE SCREW M5-.8 X 8 95 X1849095 BLADE STORAGE COVER
40 X1849040 ON/OFF SWITCH KEDU HY56 111 X1849111 CAP SCREW M6-1 X 20
41 X1849041 BUTTON HD CAP SCR M5-.8 X 8 115 X1849115 CAP SCREW M8-1.25 X 16
42 X1849042 FLAT WASHER 5MM 119 X1849119 SET SCREW M6-1 X 10
43 X1849043 HEX NUT M5-.8
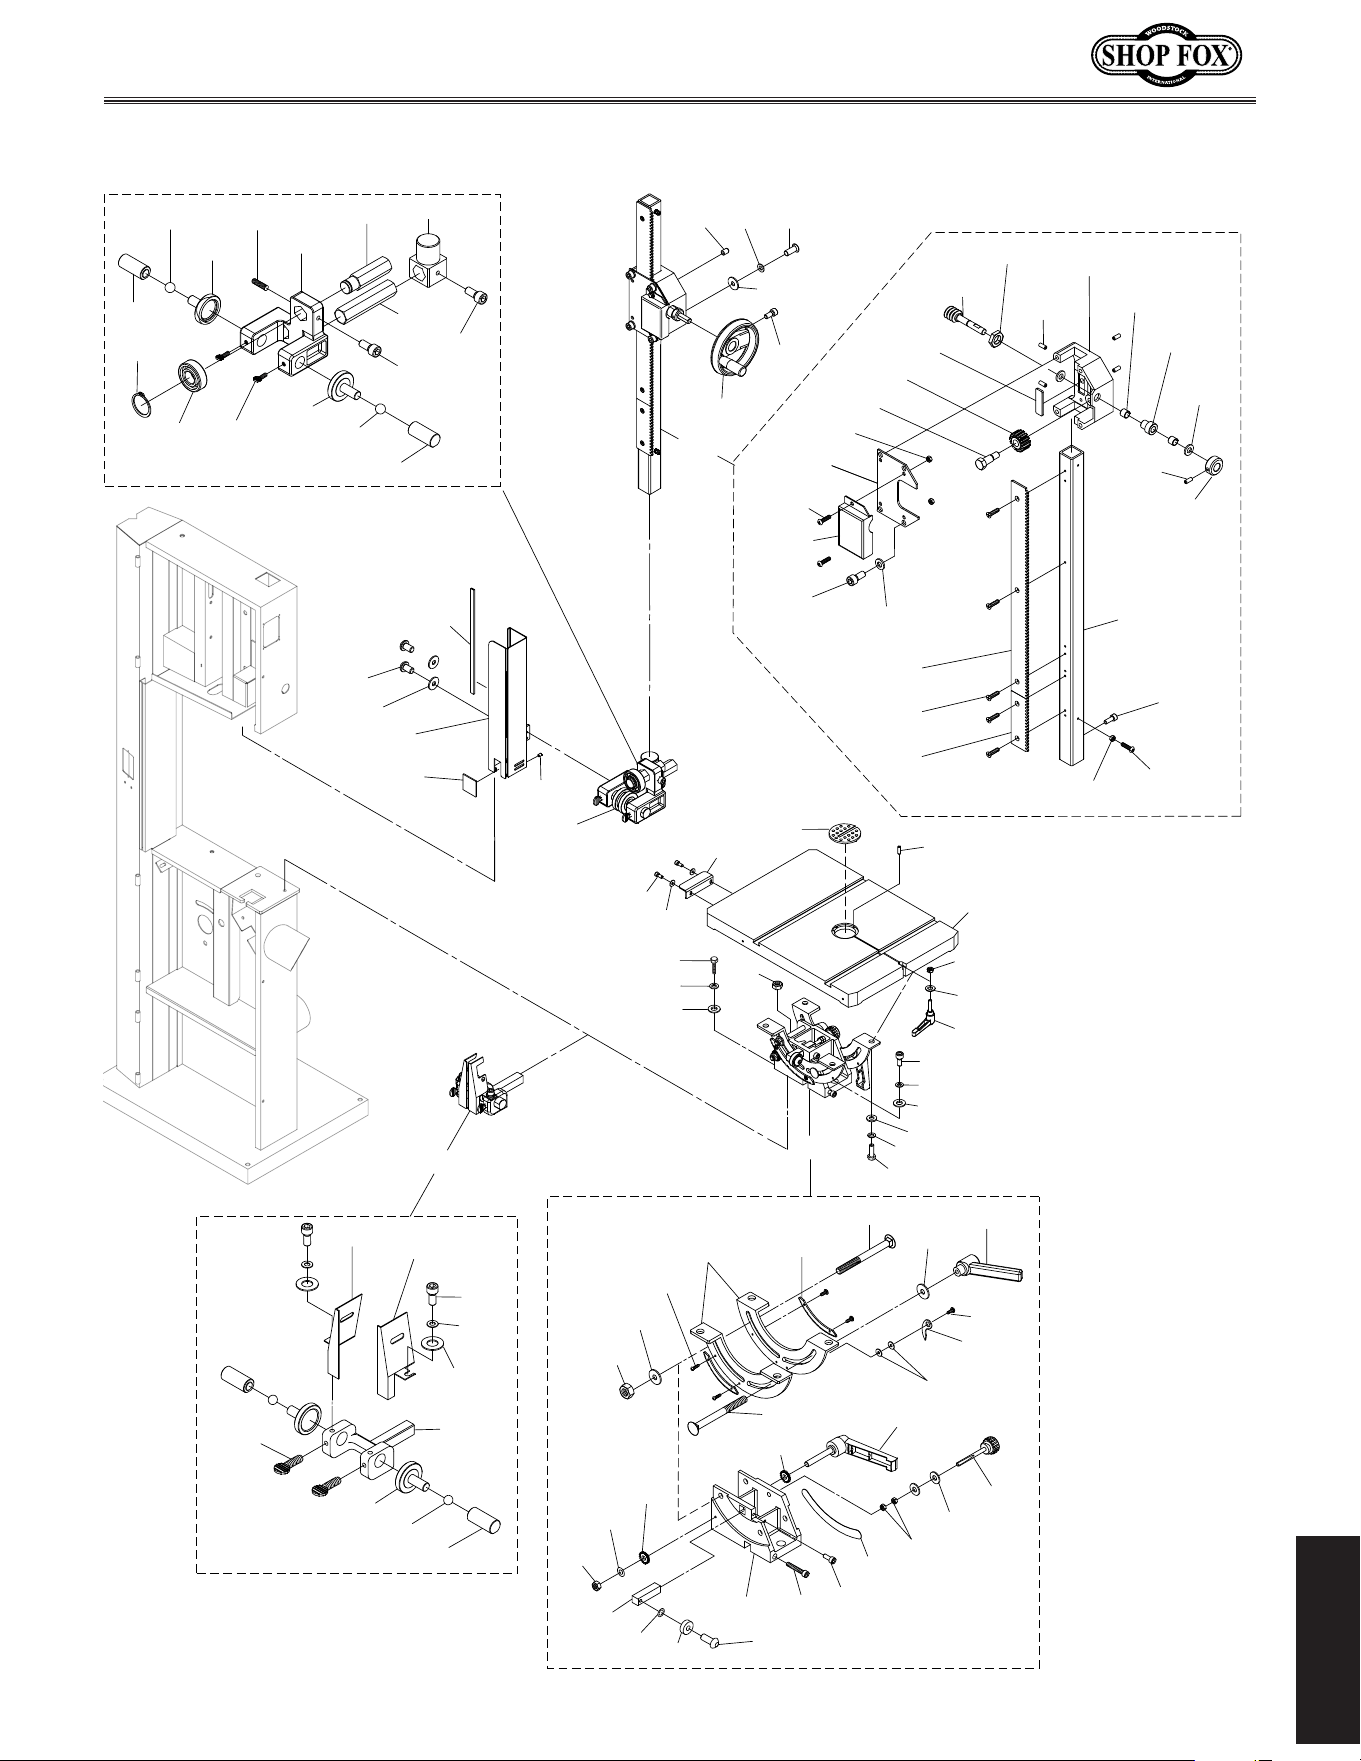
-79-
Model W1849 (For Machines Mfd. Since 11/16)
PARTS
Table,.Trunnion,.&.Blade.Guides
91
91-1
91-2
91-3
91-4
91-5
91-6
91-7
91-8
91-9
91-10
91-11
91-12
91-13
91-14
91-15
91-16
91-17
91-18
91-19
91-20
91-21
91-22
91-23
91-24
91-2
91-15
91-16
91-18
96-1
96-2
96-3
96-4
96-5
96-6
96-7
96-8
96-9
96-10
96-11
96-12
96-13
96-1
96-12
96-5
98
103
104
107
96
110
108
109
99
100
101
112
113
114
90
94
99-1
99-2
99-3
99-4
99-5
99-6
99-7
99-8
99-9
99-10
114-1
114-2
114-3
114-4
114-5
114-6
114-7
114-8
114-9
114-10
114-11
114-12
114-13
114-14
114-15
114-16
114-17
114-18
114-19
114-20
114-21
114-22
114-23
114-24
114-25
83
97
117
120
84
118
116
85
89
106
105
104
103
77
121
51
53
52
-80-
Model W1849 (For Machines Mfd. Since 11/16)
PARTS
REF PART # DESCRIPTION REF PART # DESCRIPTION
51 X1849051 MAGNET STRIP 7 X 340MM 99-2 X1849099-2 FLAT WASHER 6MM
52 X1849052 GUARD CLEAR WINDOW 52 X 47 X 3MM 99-3 X1849099-3 CAP SCREW M6-1 X 8
53 X1849053 SET SCREW M4-.7 X 4 99-4 X1849099-4 LEFT COVER
77 X1849077 HEX BOLT M10-1.5 X 35 99-5 X1849099-5 THUMB SCREW M6-1 X 16
83 X1849083 FLAT WASHER 8 X 20 99-6 X1849099-6 LOWER BLADE GUIDE MOUNTING BLOCK
84 X1849084 HEX NUT M8-1.25 THIN 99-7 X1849099-7 GUIDE RING
85 X1849085 CAP SCREW M6-1 X 12 99-8 X1849099-8 ADJUST SHAFT
89 X1849089 FLAT WASHER 6MM 99-9 X1849099-9 RIGHT COVER
90 X1849090 FLAT WASHER 8MM 99-10 X1849099-10 STEEL BALL 5MM
91 X1849091 TRUNNION SUPPORT ASSEMBLY 100 X1849100 HANDWHEEL TYPE-4 140D X 10B-S
91-1 X1849091-1 ANGLE SCALE 101 X1849101 CAP SCREW M6-1 X 20
91-2 X1849091-2 TRUNNION GEAR 103 X1849103 LOCK WASHER 10MM
91-3 X1849091-3 ADJ HANDLE 100L, M8-1.25 X 85 104 X1849104 FLAT WASHER 10MM
91-4 X1849091-4 TRUNNION SUPPORT BRACKET 105 X1849105 HEX BOLT M8-1.25 X 16
91-5 X1849091-5 FLAT WASHER 10MM 106 X1849106 LOCK WASHER 8MM
91-6 X1849091-6 FLAT WASHER 6MM 107 X1849107 FLAT WASHER 8MM
91-7 X1849091-7 CAP SCREW M6-1 X 20 108 X1849108 CAP SCREW M5-.8 X 12
91-8 X1849091-8 CAP SCREW M6-1 X 50 109 X1849109 FLAT WASHER 5MM
91-9 X1849091-9 ADJUST BLOCK 110 X1849110 BLADE GUARD COVER
91-10 X1849091-10 HEX NUT M6-1 112 X1849112 BUTTON HD CAP SCR M8-1.25 X 20
91-11 X1849091-11 STAR KNOB BOLT M6-1 X 50 113 X1849113 LOCK WASHER 8MM
91-12 X1849091-12 BALL BEARING 6000ZZ 114 X1849114 GUIDE BRACKET ASSEMBLY
91-13 X1849091-13 BUTTON HD CAP SCR M10-1.5 X 20 114-1 X1849114-1 UPPER GUIDE TUBE
91-14 X1849091-14 LOCK WASHER 8MM 114-2 X1849114-2 CAP SCREW M6-1 X 10
91-15 X1849091-15 FLAT WASHER 8MM 114-3 X1849114-3 PHLP HD SCR M4-.7 X 10
91-16 X1849091-16 PHLP HD SCR M4-.7 X 6 114-4 X1849114-4 HEX NUT M4-.7
91-17 X1849091-17 GEAR PLATE 114-5 X1849114-5 EXTENSION GEAR
91-18 X1849091-18 LOCK NUT M8-1.25 114-6 X1849114-6 FLAT HD SCR M4-.7 X 8
91-19 X1849091-19 ADJ HANDLE 100L, M8-1.25 X 25 114-7 X1849114-7 RACK
91-20 X1849091-20 FLAT WASHER 4MM 114-8 X1849114-8 LOCK WASHER 8MM
91-21 X1849091-21 POINTER 114-9 X1849114-9 CAP SCREW M8-1.25 X 16
91-22 X1849091-22 TRUNNION PLATE 114-10 X1849114-10 COVER
91-23 X1849091-23 CARRIAGE BOLT M8-1.25 X 80 114-11 X1849114-11 BUTTON HD CAP SCR M5-.8 X 10
91-24 X1849091-24 CARRIAGE BOLT M8-1.25 X 85 114-12 X1849114-12 COVER
94 X1849094 SET SCREW M8-1.25 X 6 114-13 X1849114-13 HEX NUT M5-.8
96 X1849096 UPPER BLADE GUIDE ASSY 114-14 X1849114-14 FIXED SCREW
96-1 X1849096-1 ADJUST SHAFT 114-15 X1849114-15 GEAR
96-2 X1849096-2 EXT RETAINING RING 15MM 114-16 X1849114-16 FIXED PLATE
96-3 X1849096-3 BALL BEARING 6202ZZ 114-17 X1849114-17 WORM CYLINDER
96-4 X1849096-4 UPPER BLADE GUIDE SUPPORT 114-18 X1849114-18 NUT
96-5 X1849096-5 GUIDE RING 114-19 X1849114-19 GUIDE BRACKET
96-6 X1849096-6 THUMB SCREW M6-1 X 16 114-20 X1849114-20 BUSHING
96-7 X1849096-7 CAP SCREW M6-1 X 16 114-21 X1849114-21 FIBER WASHER
96-8 X1849096-8 UPPER GUIDE ADJUSTMENT SHAFT 114-22 X1849114-22 FIXED BUSHING
96-9 X1849096-9 SUPPORT BEARING ADJ SHAFT 114-23 X1849114-23 SET SCREW M5-.8 X 5
96-10 X1849096-10 UPPER BLADE GUIDE SUPPORT BLOCK 114-24 X1849114-24 BUSHING DU 10 X 12
96-11 X1849096-11 SET SCREW M6-1 X 16 114-25 X1849114-25 SET SCREW M7-1 X 10 NYLON
96-12 X1849096-12 STEEL BALL 5MM 116 X1849116 TABLE 21-3/4" X 16"
96-13 X1849096-13 CAP SCREW M6-1 X 12 117 X1849117 TABLE INSERT
97 X1849097 FENCE SUPPORT 118 X1849118 ADJ HANDLE 315L, M12-1.75 X 30
98 X1849098 CAP SCREW M10-1.5 X 35 120 X1849120 SET SCREW M5-.8 X 5
99 X1849099 LOWER BLADE GUIDE ASSY 121 X1849121 HEX NUT M10-1.5
99-1 X1849099-1 LOCK WASHER 6MM
Table,.Trunnion,.&.Blade.Guides.Par ts.List
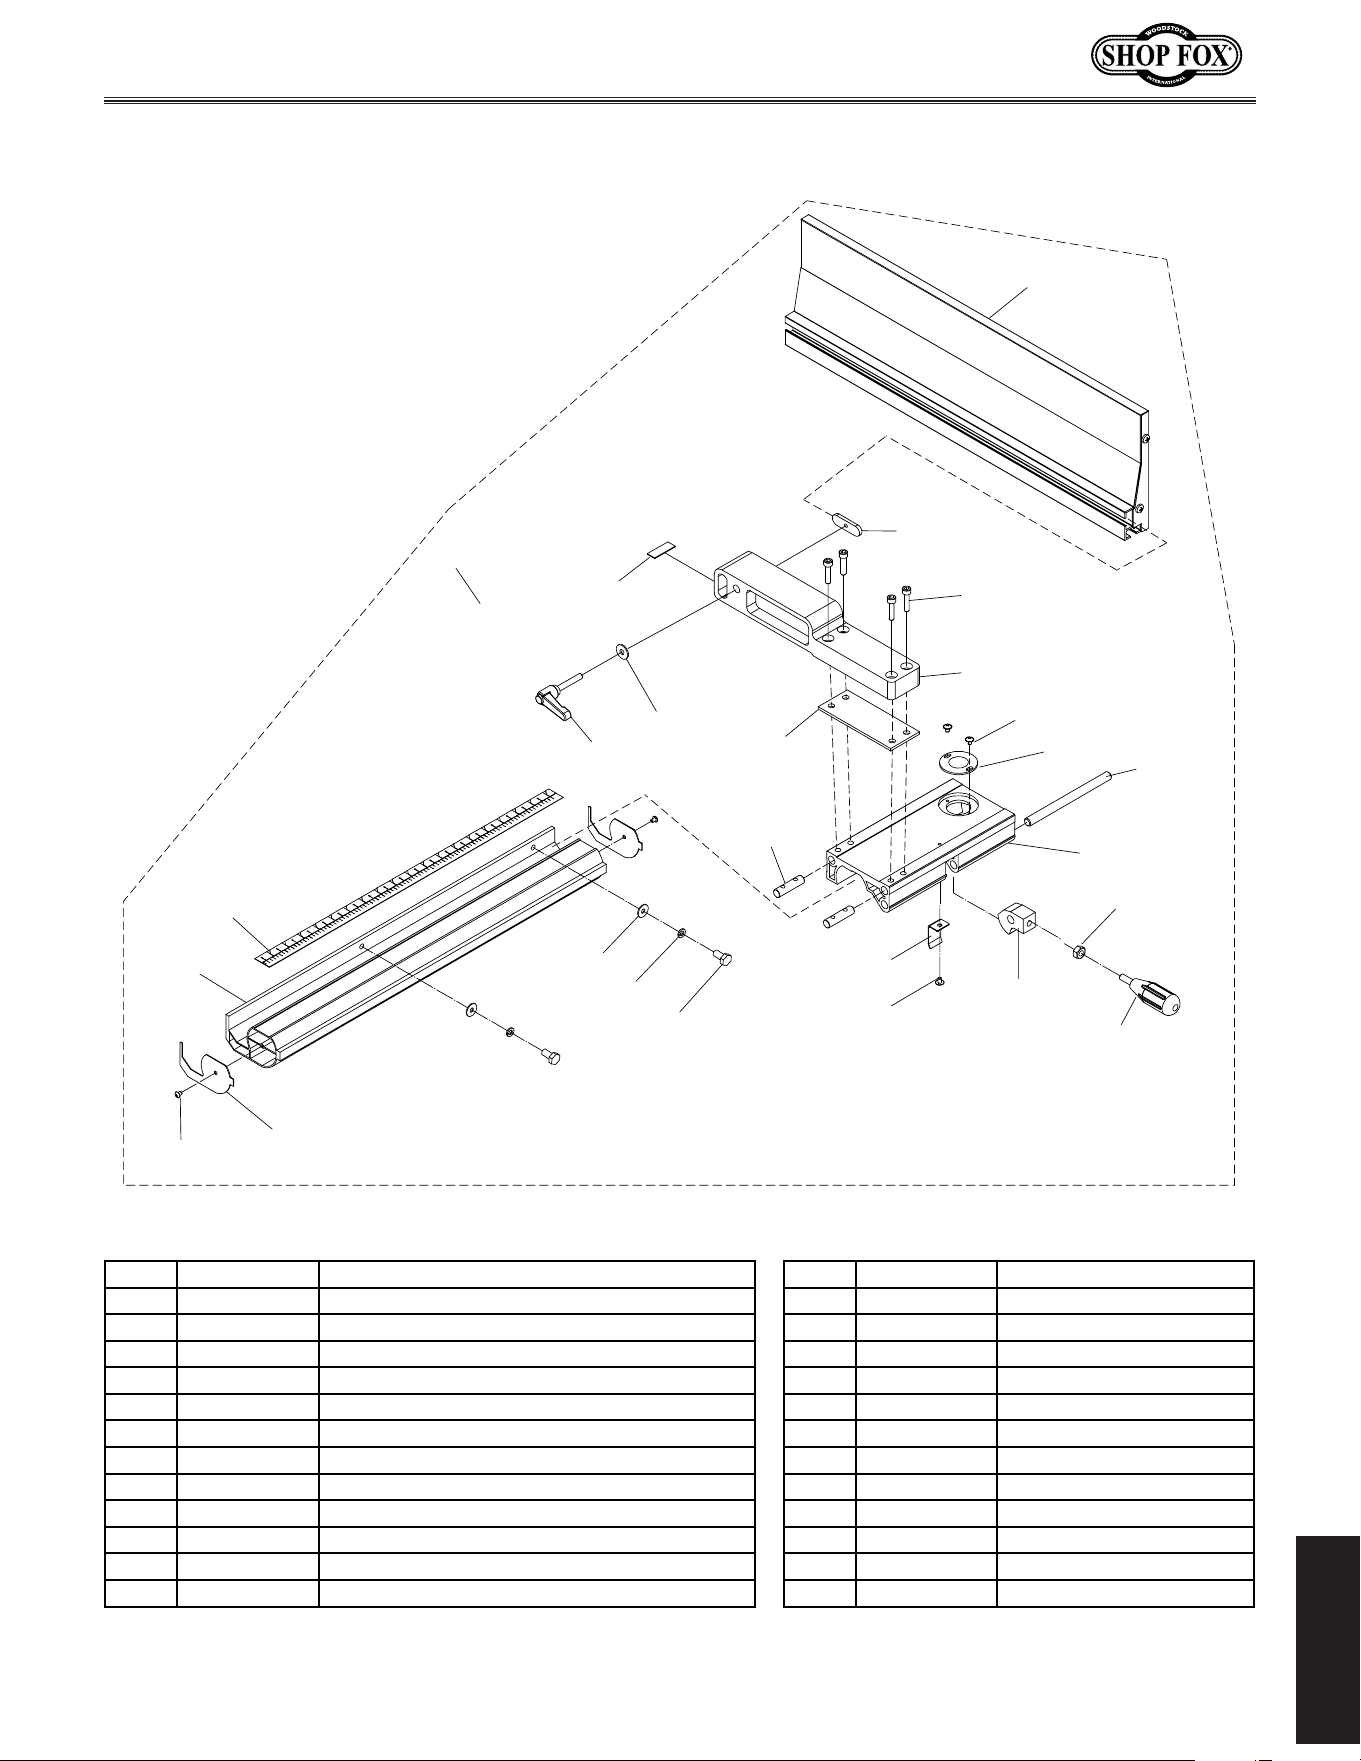
-81-
Model W1849 (For Machines Mfd. Since 11/16)
PARTS
Fence
REF PART # DESCRIPTION REF PART # DESCRIPTION
102 X1849102 FENCE ASSEMBLY 102-13 X1849102-13 LOCK CAM
102-1 X1849102-1 FENCE RAIL 102-15 X1849102-15 HEX NUT M8-1.25
102-2 X1849102-2 FENCE BASE 102-16 X1849102-16 FLANGE SCREW M4-.7 X 6
102-3 X1849102-3 ALIGNMENT PIN 102-17 X1849102-17 FENCE RAIL END CAP
102-4 X1849102-4 LOCK CAM SHAFT 102-18 X1849102-18 FENCE GUIDE PLATE
102-5 X1849102-5 SPRING PLATE 102-20 X1849102-20 TAP SCREW M3.5 X 12
102-6 X1849102-6 ADJ HANDLE 78L, M8-1.25 X 50 102-21 X1849102-21 FENCE SCALE
102-7 X1849102-7 FENCE MOUNT BRACKET 102-22 X1849102-22 LOCK WASHER 6MM
102-8 X1849102-8 FLAT WASHER 8MM 102-24 X1849102-24 HEX BOLT M6-1 X 20
102-9 X1849102-9 LOCK HANDLE M8-1.25 X 22, 30 X 77 102-25 X1849102-25 FLANGE SCREW M4-.7 X 8
102-10 X1849102-10 SLIDE (NYLON) 102-26 X1849102-26 FLAT WASHER 6MM
102-11 X1849102-11 SCALE WINDOW 102-27 X1849102-27 FENCE MOUNTING PLATE
102-12 X1849102-12 CAP SCREW M6-1 X 25 102-28 X1849102-28 RESAW FENCE
102-6
102-7
102-8
102-18
102-12
102-10
102-16
102-2
102-3
102-4
102-5
102-9
102-11
102-13
102-15
102-25
102-1
102-17
102-20
102-21
102-22
102-24
102-26
102-27
102-28
102
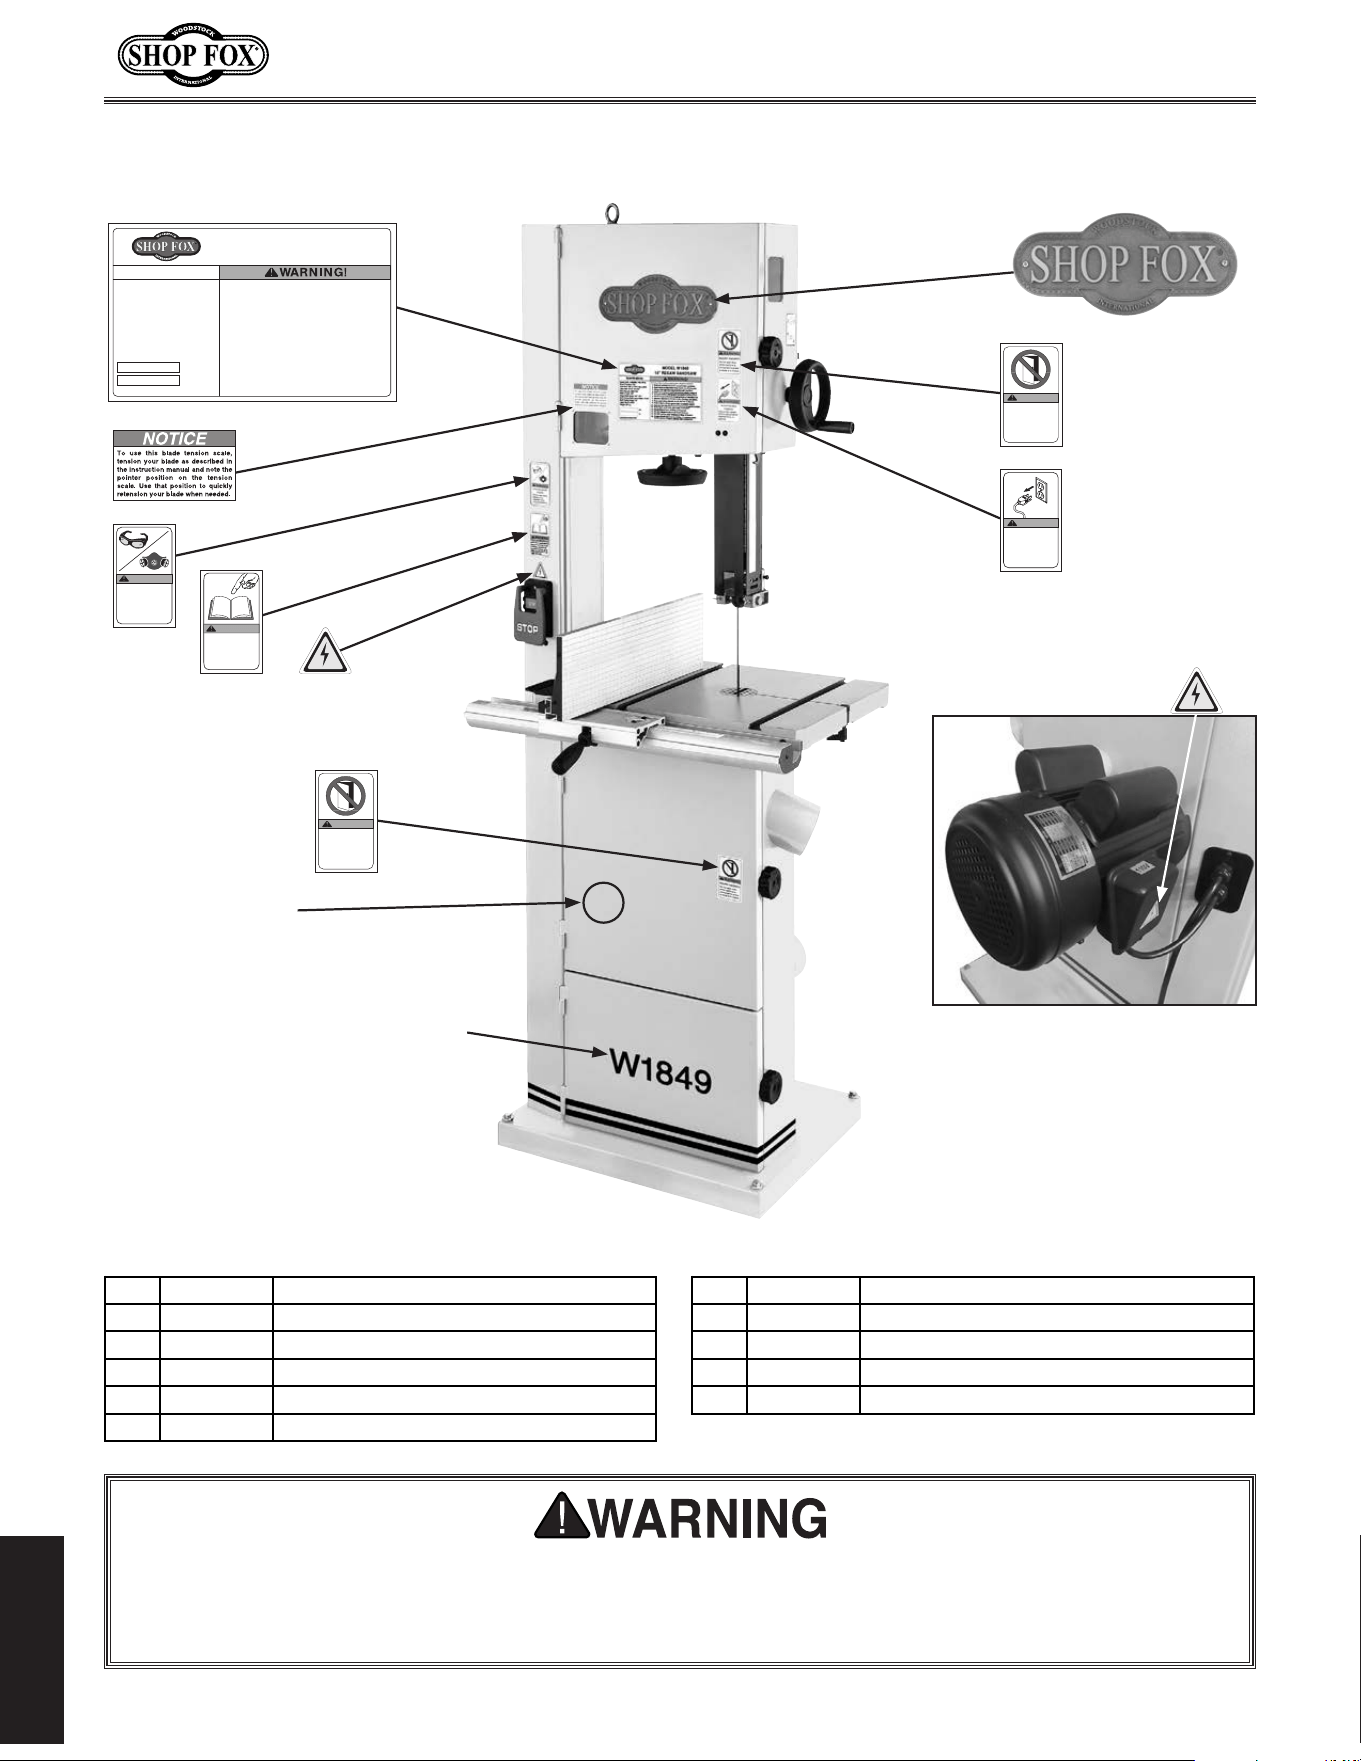
-82-
Model W1849 (For Machines Mfd. Since 11/16)
PARTS
Labels.&.Cosmetics
Safety.labels.warn.about.machine.hazards.and.how.to.prevent.serious.personal.injury..The.owner.
of.this.machine.MUST.maintain.the.original.location.and.readability.of.all.labels.on.this. machine..
If.any.label.is.removed.or.becomes.unreadable,.REPLACE.that.label.before.allowing.machine.to.
be.operated.again..Contact.us.at.(360).734-3482.or.www.woodstockint.com.to.order.new.labels..
REF PART # DESCRIPTION REF PART # DESCRIPTION
201 X1849201 MACHINE ID LABEL 207 X1849205 ELECTRICITY LABEL 1.4" W X 1.2" H
202 X1849207 SHOP FOX NAMEPLATE (D3377) 208 X1849203 READ MANUAL 1.5" W X 2.5" H
203 X1849208 CLOSE DOOR BANDSAW 1.5" W X 2.5" H 209 X1849204 RESPIRATOR/GLASSES 1.5" W X 2.5" H
204 X1849209 DISCONNECT 110V 1.5" W X 2.5" H 210 X1849202 BLADE TENSION LABEL
205 X1849210 ELECTRICITY LABEL 0.7" W X 0.6" H 211 X1849211 TOUCH-UP PAINT, WHITE
206 X1849206 MODEL # LABEL (W1849)
Motor: 2 HP, 110V/220V, 1-Ph, 60 Hz
Motor Prewired: 110V
Amp Draw: 15A at 110V, 7.5A at 220V
Table Size: 16-1/8" x 21-3/4"
Blade Speeds: 2820 FPM
Blade Length: 120"
Blade Width Range: 1/8" – 3/4"
Max. Cutting Width Left of Blade: 13-1/2"
Max. Cutting Height: 14"
Table Tilt: 5˚L ⁄ 45˚R
Weight: 261 lbs.
Specifications
Date
S/N
Mfd. for Woodstock in Taiwan
To reduce risk of serious injury when using this machine:
1. Read and understand owner’s manual before operating.
2. Never touch moving blade—keep hands out of blade path.
3. Always wear approved eye protection and respirator.
4. Only remove jammed cutoff pieces when blade is stopped.
5. Use push stick or holding jig to cut small or narrow pieces.
6. Disconnect power before changing blades or adjusting saw.
7. Maintain adjustment of blade tension, tracking, and guides.
8. Keep upper guide adjusted to just clear the workpiece.
9. Hold workpiece firmly against table to maintain control.
10. Only run saw with wheel covers closed and all guards in place.
11. Never reach under table while blade is in motion.
12. Secure/remove loose clothing and long hair.
13. DO NOT expose to rain or use in wet locations.
14. DO NOT operate under influence of drugs or alcohol.
15. Prevent unauthorized use by children or untrained users;
restrict access or disable machine when unattended.
MODEL W1849
14" RESAW BANDSAW
WARNING
Keep door closed
while blade is in
motion. Disconnect
power before
opening door.
INJURY HAZARD
WARNING!
EYE/LUNG INJURY
HAZARD!
Always wear safety
glasses and a
respirator when
using this machine
READ and UNDERSTAND
MANUAL to avoid serious
injury! If a manual is not
available, DO NOT use
machine! Instead, go to
www.shopfox.biz or call
(
360
)
734-3482.
WARNING!
WARNING
ACCIDENTAL INJURY
HAZARD!
Disconnect power
supply before
adjustments, setup
or maintenance!
W1849
201
203
204
205
206
207
211
209
210
208
Motor: 2 HP, 110V/220V, 1-Ph, 60 Hz
Motor Prewired: 110V
Amp Draw: 15A at 110V, 7.5A at 220V
Table Size: 16-1/8" x 21-3/4"
Blade Speeds: 2820 FPM
Blade Length: 120"
Blade Width Range: 1/8" – 3/4"
Max. Cutting Width Left of Blade: 13-1/2"
Max. Cutting Height: 14"
Table Tilt: 5˚L ⁄ 45˚R
Weight: 261 lbs.
Specifications
Date
S/N
Mfd. for Woodstock in Taiwan
To reduce risk of serious injury when using this machine:
1. Read and understand owner’s manual before operating.
2. Never touch moving blade—keep hands out of blade path.
3. Always wear approved eye protection and respirator.
4. Only remove jammed cutoff pieces when blade is stopped.
5. Use push stick or holding jig to cut small or narrow pieces.
6. Disconnect power before changing blades or adjusting saw.
7. Maintain adjustment of blade tension, tracking, and guides.
8. Keep upper guide adjusted to just clear the workpiece.
9. Hold workpiece firmly against table to maintain control.
10. Only run saw with wheel covers closed and all guards in place.
11. Never reach under table while blade is in motion.
12. Secure/remove loose clothing and long hair.
13. DO NOT expose to rain or use in wet locations.
14. DO NOT operate under influence of drugs or alcohol.
15. Prevent unauthorized use by children or untrained users;
restrict access or disable machine when unattended.
MODEL W1849
14" RESAW BANDSAW
WARNING
Keep door closed
while blade is in
motion. Disconnect
power before
opening door.
INJURY HAZARD
WARNING!
EYE/LUNG INJURY
HAZARD!
Always wear safety
glasses and a
respirator when
using this machine
READ and UNDERSTAND
MANUAL to avoid serious
injury! If a manual is not
available, DO NOT use
machine! Instead, go to
www.shopfox.biz or call
(
360
)
734-3482.
WARNING!
WARNING
ACCIDENTAL INJURY
HAZARD!
Disconnect power
supply before
adjustments, setup
or maintenance!
W1849
Motor: 2 HP, 110V/220V, 1-Ph, 60 Hz
Motor Prewired: 110V
Amp Draw: 15A at 110V, 7.5A at 220V
Table Size: 16-1/8" x 21-3/4"
Blade Speeds: 2820 FPM
Blade Length: 120"
Blade Width Range: 1/8" – 3/4"
Max. Cutting Width Left of Blade: 13-1/2"
Max. Cutting Height: 14"
Table Tilt: 5˚L ⁄ 45˚R
Weight: 261 lbs.
Specifications
Date
S/N
Mfd. for Woodstock in Taiwan
To reduce risk of serious injury when using this machine:
1. Read and understand owner’s manual before operating.
2. Never touch moving blade—keep hands out of blade path.
3. Always wear approved eye protection and respirator.
4. Only remove jammed cutoff pieces when blade is stopped.
5. Use push stick or holding jig to cut small or narrow pieces.
6. Disconnect power before changing blades or adjusting saw.
7. Maintain adjustment of blade tension, tracking, and guides.
8. Keep upper guide adjusted to just clear the workpiece.
9. Hold workpiece firmly against table to maintain control.
10. Only run saw with wheel covers closed and all guards in place.
11. Never reach under table while blade is in motion.
12. Secure/remove loose clothing and long hair.
13. DO NOT expose to rain or use in wet locations.
14. DO NOT operate under influence of drugs or alcohol.
15. Prevent unauthorized use by children or untrained users;
restrict access or disable machine when unattended.
MODEL W1849
14" RESAW BANDSAW
WARNING
Keep door closed
while blade is in
motion. Disconnect
power before
opening door.
INJURY HAZARD
WARNING!
EYE/LUNG INJURY
HAZARD!
Always wear safety
glasses and a
respirator when
using this machine
READ and UNDERSTAND
MANUAL to avoid serious
injury! If a manual is not
available, DO NOT use
machine! Instead, go to
www.shopfox.biz or call
(
360
)
734-3482.
WARNING!
WARNING
ACCIDENTAL INJURY
HAZARD!
Disconnect power
supply before
adjustments, setup
or maintenance!
W1849
Motor: 2 HP, 110V/220V, 1-Ph, 60 Hz
Motor Prewired: 110V
Amp Draw: 15A at 110V, 7.5A at 220V
Table Size: 16-1/8" x 21-3/4"
Blade Speeds: 2820 FPM
Blade Length: 120"
Blade Width Range: 1/8" – 3/4"
Max. Cutting Width Left of Blade: 13-1/2"
Max. Cutting Height: 14"
Table Tilt: 5˚L ⁄ 45˚R
Weight: 261 lbs.
Specifications
Date
S/N
Mfd. for Woodstock in Taiwan
To reduce risk of serious injury when using this machine:
1. Read and understand owner’s manual before operating.
2. Never touch moving blade—keep hands out of blade path.
3. Always wear approved eye protection and respirator.
4. Only remove jammed cutoff pieces when blade is stopped.
5. Use push stick or holding jig to cut small or narrow pieces.
6. Disconnect power before changing blades or adjusting saw.
7. Maintain adjustment of blade tension, tracking, and guides.
8. Keep upper guide adjusted to just clear the workpiece.
9. Hold workpiece firmly against table to maintain control.
10. Only run saw with wheel covers closed and all guards in place.
11. Never reach under table while blade is in motion.
12. Secure/remove loose clothing and long hair.
13. DO NOT expose to rain or use in wet locations.
14. DO NOT operate under influence of drugs or alcohol.
15. Prevent unauthorized use by children or untrained users;
restrict access or disable machine when unattended.
MODEL W1849
14" RESAW BANDSAW
WARNING
Keep door closed
while blade is in
motion. Disconnect
power before
opening door.
INJURY HAZARD
WARNING!
EYE/LUNG INJURY
HAZARD!
Always wear safety
glasses and a
respirator when
using this machine
READ and UNDERSTAND
MANUAL to avoid serious
injury! If a manual is not
available, DO NOT use
machine! Instead, go to
www.shopfox.biz or call
(
360
)
734-3482.
WARNING!
WARNING
ACCIDENTAL INJURY
HAZARD!
Disconnect power
supply before
adjustments, setup
or maintenance!
W1849
Motor: 2 HP, 110V/220V, 1-Ph, 60 Hz
Motor Prewired: 110V
Amp Draw: 15A at 110V, 7.5A at 220V
Table Size: 16-1/8" x 21-3/4"
Blade Speeds: 2820 FPM
Blade Length: 120"
Blade Width Range: 1/8" – 3/4"
Max. Cutting Width Left of Blade: 13-1/2"
Max. Cutting Height: 14"
Table Tilt: 5˚L ⁄ 45˚R
Weight: 261 lbs.
Specifications
Date
S/N
Mfd. for Woodstock in Taiwan
To reduce risk of serious injury when using this machine:
1. Read and understand owner’s manual before operating.
2. Never touch moving blade—keep hands out of blade path.
3. Always wear approved eye protection and respirator.
4. Only remove jammed cutoff pieces when blade is stopped.
5. Use push stick or holding jig to cut small or narrow pieces.
6. Disconnect power before changing blades or adjusting saw.
7. Maintain adjustment of blade tension, tracking, and guides.
8. Keep upper guide adjusted to just clear the workpiece.
9. Hold workpiece firmly against table to maintain control.
10. Only run saw with wheel covers closed and all guards in place.
11. Never reach under table while blade is in motion.
12. Secure/remove loose clothing and long hair.
13. DO NOT expose to rain or use in wet locations.
14. DO NOT operate under influence of drugs or alcohol.
15. Prevent unauthorized use by children or untrained users;
restrict access or disable machine when unattended.
MODEL W1849
14" RESAW BANDSAW
WARNING
Keep door closed
while blade is in
motion. Disconnect
power before
opening door.
INJURY HAZARD
WARNING!
EYE/LUNG INJURY
HAZARD!
Always wear safety
glasses and a
respirator when
using this machine
READ and UNDERSTAND
MANUAL to avoid serious
injury! If a manual is not
available, DO NOT use
machine! Instead, go to
www.shopfox.biz or call
(
360
)
734-3482.
WARNING!
WARNING
ACCIDENTAL INJURY
HAZARD!
Disconnect power
supply before
adjustments, setup
or maintenance!
W1849
Motor: 2 HP, 110V/220V, 1-Ph, 60 Hz
Motor Prewired: 110V
Amp Draw: 15A at 110V, 7.5A at 220V
Table Size: 16-1/8" x 21-3/4"
Blade Speeds: 2820 FPM
Blade Length: 120"
Blade Width Range: 1/8" – 3/4"
Max. Cutting Width Left of Blade: 13-1/2"
Max. Cutting Height: 14"
Table Tilt: 5˚L ⁄ 45˚R
Weight: 261 lbs.
Specifications
Date
S/N
Mfd. for Woodstock in Taiwan
To reduce risk of serious injury when using this machine:
1. Read and understand owner’s manual before operating.
2. Never touch moving blade—keep hands out of blade path.
3. Always wear approved eye protection and respirator.
4. Only remove jammed cutoff pieces when blade is stopped.
5. Use push stick or holding jig to cut small or narrow pieces.
6. Disconnect power before changing blades or adjusting saw.
7. Maintain adjustment of blade tension, tracking, and guides.
8. Keep upper guide adjusted to just clear the workpiece.
9. Hold workpiece firmly against table to maintain control.
10. Only run saw with wheel covers closed and all guards in place.
11. Never reach under table while blade is in motion.
12. Secure/remove loose clothing and long hair.
13. DO NOT expose to rain or use in wet locations.
14. DO NOT operate under influence of drugs or alcohol.
15. Prevent unauthorized use by children or untrained users;
restrict access or disable machine when unattended.
MODEL W1849
14" RESAW BANDSAW
WARNING
Keep door closed
while blade is in
motion. Disconnect
power before
opening door.
INJURY HAZARD
WARNING!
EYE/LUNG INJURY
HAZARD!
Always wear safety
glasses and a
respirator when
using this machine
READ and UNDERSTAND
MANUAL to avoid serious
injury! If a manual is not
available, DO NOT use
machine! Instead, go to
www.shopfox.biz or call
(
360
)
734-3482.
WARNING!
WARNING
ACCIDENTAL INJURY
HAZARD!
Disconnect power
supply before
adjustments, setup
or maintenance!
W1849
Motor: 2 HP, 110V/220V, 1-Ph, 60 Hz
Motor Prewired: 110V
Amp Draw: 15A at 110V, 7.5A at 220V
Table Size: 16-1/8" x 21-3/4"
Blade Speeds: 2820 FPM
Blade Length: 120"
Blade Width Range: 1/8" – 3/4"
Max. Cutting Width Left of Blade: 13-1/2"
Max. Cutting Height: 14"
Table Tilt: 5˚L ⁄ 45˚R
Weight: 261 lbs.
Specifications
Date
S/N
Mfd. for Woodstock in Taiwan
To reduce risk of serious injury when using this machine:
1. Read and understand owner’s manual before operating.
2. Never touch moving blade—keep hands out of blade path.
3. Always wear approved eye protection and respirator.
4. Only remove jammed cutoff pieces when blade is stopped.
5. Use push stick or holding jig to cut small or narrow pieces.
6. Disconnect power before changing blades or adjusting saw.
7. Maintain adjustment of blade tension, tracking, and guides.
8. Keep upper guide adjusted to just clear the workpiece.
9. Hold workpiece firmly against table to maintain control.
10. Only run saw with wheel covers closed and all guards in place.
11. Never reach under table while blade is in motion.
12. Secure/remove loose clothing and long hair.
13. DO NOT expose to rain or use in wet locations.
14. DO NOT operate under influence of drugs or alcohol.
15. Prevent unauthorized use by children or untrained users;
restrict access or disable machine when unattended.
MODEL W1849
14" RESAW BANDSAW
WARNING
Keep door closed
while blade is in
motion. Disconnect
power before
opening door.
INJURY HAZARD
WARNING!
EYE/LUNG INJURY
HAZARD!
Always wear safety
glasses and a
respirator when
using this machine
READ and UNDERSTAND
MANUAL to avoid serious
injury! If a manual is not
available, DO NOT use
machine! Instead, go to
www.shopfox.biz or call
(
360
)
734-3482.
WARNING!
WARNING
ACCIDENTAL INJURY
HAZARD!
Disconnect power
supply before
adjustments, setup
or maintenance!
W1849
Motor: 2 HP, 110V/220V, 1-Ph, 60 Hz
Motor Prewired: 110V
Amp Draw: 15A at 110V, 7.5A at 220V
Table Size: 16-1/8" x 21-3/4"
Blade Speeds: 2820 FPM
Blade Length: 120"
Blade Width Range: 1/8" – 3/4"
Max. Cutting Width Left of Blade: 13-1/2"
Max. Cutting Height: 14"
Table Tilt: 5˚L ⁄ 45˚R
Weight: 261 lbs.
Specifications
Date
S/N
Mfd. for Woodstock in Taiwan
To reduce risk of serious injury when using this machine:
1. Read and understand owner’s manual before operating.
2. Never touch moving blade—keep hands out of blade path.
3. Always wear approved eye protection and respirator.
4. Only remove jammed cutoff pieces when blade is stopped.
5. Use push stick or holding jig to cut small or narrow pieces.
6. Disconnect power before changing blades or adjusting saw.
7. Maintain adjustment of blade tension, tracking, and guides.
8. Keep upper guide adjusted to just clear the workpiece.
9. Hold workpiece firmly against table to maintain control.
10. Only run saw with wheel covers closed and all guards in place.
11. Never reach under table while blade is in motion.
12. Secure/remove loose clothing and long hair.
13. DO NOT expose to rain or use in wet locations.
14. DO NOT operate under influence of drugs or alcohol.
15. Prevent unauthorized use by children or untrained users;
restrict access or disable machine when unattended.
MODEL W1849
14" RESAW BANDSAW
WARNING
Keep door closed
while blade is in
motion. Disconnect
power before
opening door.
INJURY HAZARD
WARNING!
EYE/LUNG INJURY
HAZARD!
Always wear safety
glasses and a
respirator when
using this machine
READ and UNDERSTAND
MANUAL to avoid serious
injury! If a manual is not
available, DO NOT use
machine! Instead, go to
www.shopfox.biz or call
(
360
)
734-3482.
WARNING!
WARNING
ACCIDENTAL INJURY
HAZARD!
Disconnect power
supply before
adjustments, setup
or maintenance!
W1849
Motor: 2 HP, 110V/220V, 1-Ph, 60 Hz
Motor Prewired: 110V
Amp Draw: 15A at 110V, 7.5A at 220V
Table Size: 16-1/8" x 21-3/4"
Blade Speeds: 2820 FPM
Blade Length: 120"
Blade Width Range: 1/8" – 3/4"
Max. Cutting Width Left of Blade: 13-1/2"
Max. Cutting Height: 14"
Table Tilt: 5˚L ⁄ 45˚R
Weight: 261 lbs.
Specifications
Date
S/N
Mfd. for Woodstock in Taiwan
To reduce risk of serious injury when using this machine:
1. Read and understand owner’s manual before operating.
2. Never touch moving blade—keep hands out of blade path.
3. Always wear approved eye protection and respirator.
4. Only remove jammed cutoff pieces when blade is stopped.
5. Use push stick or holding jig to cut small or narrow pieces.
6. Disconnect power before changing blades or adjusting saw.
7. Maintain adjustment of blade tension, tracking, and guides.
8. Keep upper guide adjusted to just clear the workpiece.
9. Hold workpiece firmly against table to maintain control.
10. Only run saw with wheel covers closed and all guards in place.
11. Never reach under table while blade is in motion.
12. Secure/remove loose clothing and long hair.
13. DO NOT expose to rain or use in wet locations.
14. DO NOT operate under influence of drugs or alcohol.
15. Prevent unauthorized use by children or untrained users;
restrict access or disable machine when unattended.
MODEL W1849
14" RESAW BANDSAW
WARNING
Keep door closed
while blade is in
motion. Disconnect
power before
opening door.
INJURY HAZARD
WARNING!
EYE/LUNG INJURY
HAZARD!
Always wear safety
glasses and a
respirator when
using this machine
READ and UNDERSTAND
MANUAL to avoid serious
injury! If a manual is not
available, DO NOT use
machine! Instead, go to
www.shopfox.biz or call
(
360
)
734-3482.
WARNING!
WARNING
ACCIDENTAL INJURY
HAZARD!
Disconnect power
supply before
adjustments, setup
or maintenance!
W1849
202
203
Motor: 2 HP, 110V/220V, 1-Ph, 60 Hz
Motor Prewired: 110V
Amp Draw: 15A at 110V, 7.5A at 220V
Table Size: 16-1/8" x 21-3/4"
Blade Speeds: 2820 FPM
Blade Length: 120"
Blade Width Range: 1/8" – 3/4"
Max. Cutting Width Left of Blade: 13-1/2"
Max. Cutting Height: 14"
Table Tilt: 5˚L ⁄ 45˚R
Weight: 261 lbs.
Specifications
Date
S/N
Mfd. for Woodstock in Taiwan
To reduce risk of serious injury when using this machine:
1. Read and understand owner’s manual before operating.
2. Never touch moving blade—keep hands out of blade path.
3. Always wear approved eye protection and respirator.
4. Only remove jammed cutoff pieces when blade is stopped.
5. Use push stick or holding jig to cut small or narrow pieces.
6. Disconnect power before changing blades or adjusting saw.
7. Maintain adjustment of blade tension, tracking, and guides.
8. Keep upper guide adjusted to just clear the workpiece.
9. Hold workpiece firmly against table to maintain control.
10. Only run saw with wheel covers closed and all guards in place.
11. Never reach under table while blade is in motion.
12. Secure/remove loose clothing and long hair.
13. DO NOT expose to rain or use in wet locations.
14. DO NOT operate under influence of drugs or alcohol.
15. Prevent unauthorized use by children or untrained users;
restrict access or disable machine when unattended.
MODEL W1849
14" RESAW BANDSAW
WARNING
Keep door closed
while blade is in
motion. Disconnect
power before
opening door.
INJURY HAZARD
WARNING!
EYE/LUNG INJURY
HAZARD!
Always wear safety
glasses and a
respirator when
using this machine
READ and UNDERSTAND
MANUAL to avoid serious
injury! If a manual is not
available, DO NOT use
machine! Instead, go to
www.shopfox.biz or call
(
360
)
734-3482.
WARNING!
WARNING
ACCIDENTAL INJURY
HAZARD!
Disconnect power
supply before
adjustments, setup
or maintenance!
W1849

Model W1849 (For Machines Mfd. Since 11/16)

tape along edges--please do not staple
Fold along dotted lIne
Fold along dotted lIne
Woodstock international inc.
p.o. box 2309
bellingham, Wa 98227-2309
place
stamp
Here

WARRANTY
Woodstock International, Inc. warrants all Shop Fox machinery to be free of defects from workmanship
and materials for a period of two years from the date of original purchase by the original owner.
This warranty does not apply to defects due directly or indirectly to misuse, abuse, negligence or
accidents, lack of maintenance, or reimbursement of third party expenses incurred.
Woodstock International, Inc. will repair, replace, or arrange for a dealer refund, at its expense and
option, the Shop Fox machine or machine part proven to be defective for its designed and intended
use, provided that the original owner returns the product prepaid to an authorized warranty or repair
facility as designated by our Bellingham, Washington office with proof of their purchase of the product
within two years, and provides Woodstock International, Inc. reasonable opportunity to verify the
alleged defect through inspection. If it is determined there is no defect, or that the defect resulted
from causes not within the scope of Woodstock International Inc.'s warranty, then the original owner
must bear the cost of storing and returning the product.
This is Woodstock International, Inc.’s sole written warranty and any and all warranties that may be
implied by law, including any merchantability or fitness, for any particular purpose, are hereby limited
to the duration of this written warranty. We do not warrant that Shop Fox machinery complies with
the provisions of any law, acts or electrical codes. We do not reimburse for third party repairs. In no
event shall Woodstock International, Inc.’s liability under this limited warranty exceed the purchase
price paid for the product, and any legal actions brought against Woodstock International, Inc. shall be
tried in the State of Washington, County of Whatcom. We shall in no event be liable for death, injuries
to persons or property or for incidental, contingent, special or consequential damages arising from the
use of our products.
Every effort has been made to ensure that all Shop Fox machinery meets high quality and durability
standards. We are commited to continuously improving the quality of our products, and
reserve the
right to change specifications at any time
.
WARRANTY

High Quality Machines and Tools
Woodstock International, Inc. carries thousands of products designed
to meet the needs of today's woodworkers and metalworkers.
Ask your dealer about these fine products: