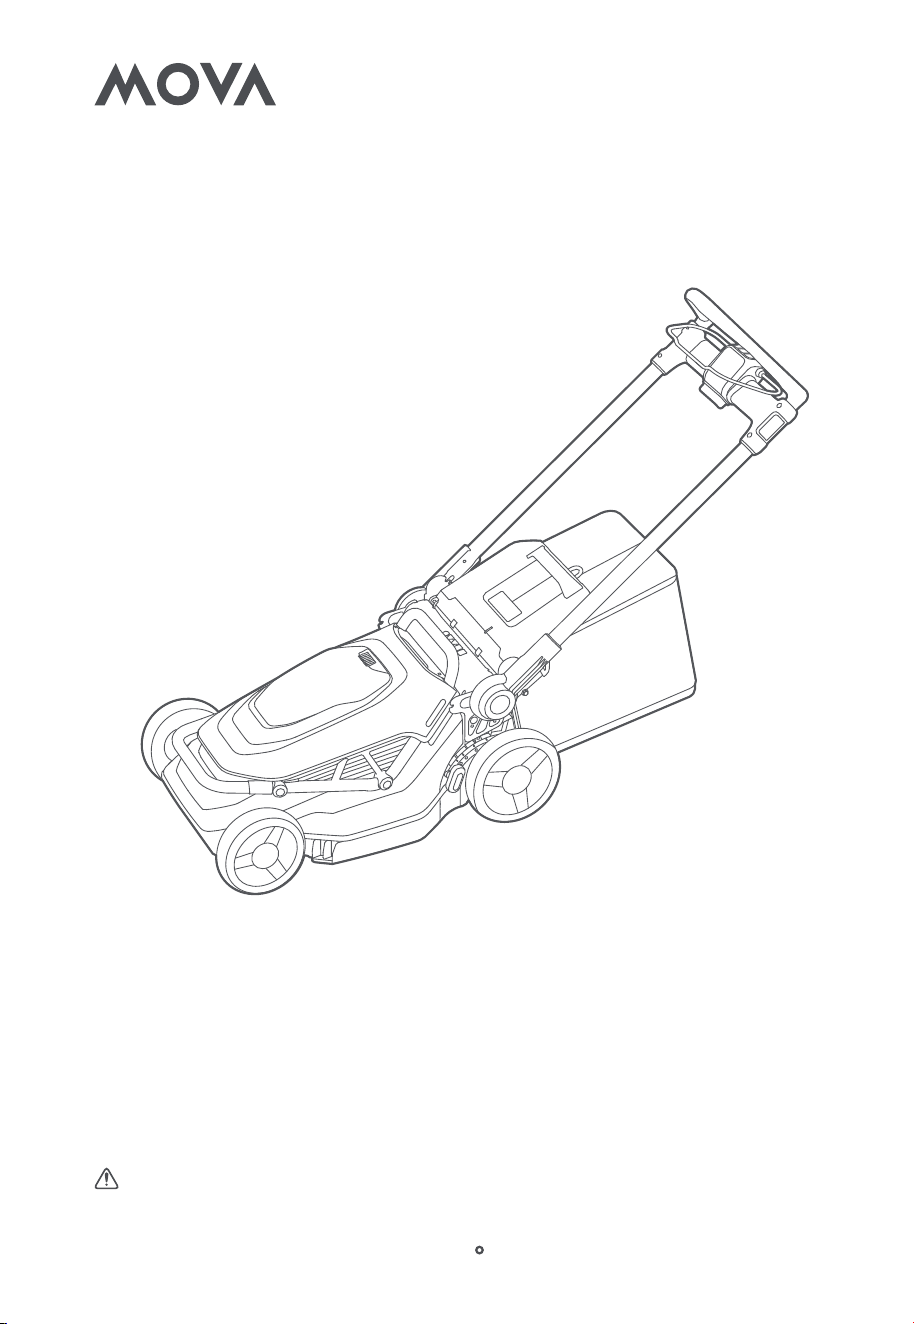
Model Number: GL620 / GL620X
47cm Brushless
Self-Propelled Lawn Mower
User Manual
WARNING:
Thoroughly read and understand the manual before using
this product. Save this user manual for future reference.
Images are for reference only. Actual appearance may vary.


Table of Contents
1 Introduction .................................................................................................4
2 Safety Instruction ........................................................................................4
3 Product Introduction .................................................................................. 11
4 Assembly .................................................................................................... 16
5 MOVAhome APP .........................................................................................21
6 Operation ...................................................................................................22
7 Maintenance ............................................................................................... 28
8 Transporting ...............................................................................................30
9 Storing ........................................................................................................30
10 Disposal .....................................................................................................31
11 Troubleshooting ........................................................................................32
12 Specifications ...........................................................................................35

4
EN
1 Introduction
1.1 Intended Use
The machine is intended solely for domestic lawn mowing. Do not
repurpose the lawn mower for tasks other than its designated use, as
doing so could pose safety risks and could damage the machine.
WARNING:
The lawn mower is a high-speed cutting tool and is
powered by battery. Special safety precautions must be observed to
reduce the risk of hazards and personal injuries.
WARNING:
Thoroughly read and understand the user manual before
use and periodically thereafter.
1.2 Lend / Rent Instructions
Ensure that this user manual accompanies the lawn mower at all times,
whether it is being lent, rented, or used. Only individuals who have
received proper training and have a complete understanding of all the
instructions and information contained in this manual should operate the
lawn mower.
2 Safety Instruction
2.1 General Power Tool Safety Warnings
WARNING: Read all safety warnings, instructions, illustrations
and specifications provided with this power tool.
Failure to follow all
instructions listed below may result in electric shock, fire and/or serious
injury.
SAVE ALL WARNINGS AND INSTRUCTIONS FOR FUTURE
REFERENCE.
The term "power tool" in the warnings refers to your mains-operated
(corded) power tool or battery-operated (cordless) power tool.
READ & UNDERSTAND ALL INSTRUCTIONS!
DANGER:
This machine has the potential to amputate hands and feet
and to throw objects forcefully. Failure to follow all safety instructions in
this manual may lead to severe injury or even fatality.
WARNING:
Carefully read the safety instructions below and
understand them before use to minimize injury risks.
WARNING:
Using unapproved or non-MOVA accessories can lead to
overheating, device damage and safety hazards.

5
EN
2.2 Work Area Safety
•Keep work area clean and well lit.
Cluttered or dark areas invite
accidents.
•Do not operate power tools in explosive atmospheres, such as in
the presence of flammable liquids, gases or dust.
Power tools create
sparks which may ignite the dust or fumes.
•Keep children and bystanders away while operating a power tool.
Distractions can cause you to lose control.
•Power tool plugs must match the outlet. Never modify the plug in
any way. Do not use any adapter plugs with earthed (grounded)
power tools.
Unmodified plugs and matching outlets will reduce risk of
electric shock.
•Avoid body contact with earthed or grounded surfaces, such as
pipes, radiators, ranges and refrigerators.
There is an increased risk of
electric shock if your body is earthed or grounded.
•Do not operate the lawn mower in rain or wet conditions.
This may
increase the risk of electric shock.
•Do not abuse the cord. Never use the cord for carrying, pulling or
unplugging the power tool. Keep cord away from heat, oil, sharp
edges or moving parts.
Damaged or entangled cords increase the risk
of electric shock.
•When operating a power tool outdoors, use an extension cord
suitable for outdoor use.
Use of a cord suitable for outdoor use
reduces the risk of electric shock.
•If operating a power tool in a damp location is unavoidable, use
a residual current device (RCD) protected supply.
Use of an RCD
reduces the risk of electric shock.
2.3 Electrical Safety
2.4 Personal Safety
•Stay alert, watch what you are doing and use common sense when
operating a power tool. Do not use a power tool while you are tired
or under the influence of drugs, alcohol or medication.
A moment of
inattention while operating power tools may result in serious personal
injury.
•Use personal protective equipment. Always wear eye protection.
Protective equipment such as a dust mask, non-skid safety shoes, hard
hat or hearing protection used for appropriate conditions will reduce
personal injuries.
•Prevent unintentional starting. Ensure the switch is in the off-
position before connecting to power source and/or battery pack,
picking up or carrying the tool.
Carrying power tools with your finger

6
EN
•Do not force the power tool. Use the correct power tool for your
application.
The correct power tool will do the job better and safer at
the rate for which it was designed.
•Do not use the power tool if the switch does not turn it on and off.
Any power tool that cannot be controlled with the switch is dangerous
and must be repaired.
•Disconnect the plug from the power source and/or remove the
battery pack, if detachable, from the power tool before making any
adjustments, changing accessories, or storing power tools.
Such
preventive safety measures reduce the risk of starting the power tool
accidentally.
•Store idle power tools out of the reach of children and do not allow
persons unfamiliar with the power tool or these instructions to
operate the power tool.
Power tools are dangerous in the hands of
untrained users.
•Maintain power tools and accessories. Check for misalignment or
binding of moving parts, breakage of parts and any other condition
that may affect the power tool’s operation. If damaged, have the
power tool repaired before use.
Many accidents are caused by poorly
maintained power tools.
•Keep cutting tools sharp and clean.
Properly maintained cutting tools
with sharp cutting edges are less likely to bind and are easier to control.
•Use the power tool, accessories and tool bits etc. in accordance
with these instructions, taking into account the working conditions
and the work to be performed.
Use of the power tool for operations
different from those intended could result in a hazardous situation.
2.5 Power Tool Use and Care
on the switch or energising power tools that have the switch on invites
accidents.
•Remove any adjusting key or wrench before turning the power tool
on.
A wrench or a key left attached to a rotating part of the power tool
may result in personal injury.
•Do not overreach. Keep proper footing and balance at all times.
This
enables better control of the power tool in unexpected situations.
•Dress properly. Do not wear loose clothing or jewellery. Keep your
hair and clothing away from moving parts.
Loose clothes, jewellery or
long hair can be caught in moving parts.
•If devices are provided for the connection of dust extraction and
collection facilities, ensure these are connected and properly used.
Use of dust collection can reduce dust-related hazards.
•Do not let familiarity gained from frequent use of tools allow you
to become complacent and ignore tool safety principles.
A careless
action can cause severe injury within a fraction of a second.

7
EN
•Keep handles and grasping surfaces dry, clean and free from oil and
grease.
Slippery handles and grasping surfaces do not allow for safe
handling and control of the tool in unexpected situations.
•Recharge only with the charger specified by the manufacturer.
A
charger that is suitable for one type of battery pack may create a risk of
fire when used with another battery pack.
•Use power tools only with specifically designated battery packs.
Use
of any other battery packs may create a risk of injury and fire.
•When battery pack is not in use, keep it away from other metal
objects, like paper clips, coins, keys, nails, screws or other small
metal objects, that can make a connection from one terminal to
another.
Shorting the battery terminals together may cause burns or a
fire.
•Under abusive conditions, liquid may be ejected from the battery;
avoid contact. If contact accidentally occurs, flush with water. If
liquid contacts eyes, additionally seek medical help.
Liquid ejected
from the battery may cause irritation or burns.
•Do not use a battery pack or tool that is damaged or modified.
Damaged or modified batteries may exhibit unpredictable behaviour
resulting in fire, explosion or risk of injury.
•Do not expose a battery pack or tool to fire or excessive
temperature.
Exposure to fire or temperature above 130 °C (265 °F)
may cause explosion.
•Follow all charging instructions and do not charge the battery pack
or tool outside the temperature range specified in the instructions.
Charging improperly or at temperatures outside the specified range
may damage the battery and increase the risk of fire.
2.6 Battery Tool Use and Care
•Have your power tool serviced by a qualified repair person using
only identical replacement parts.
This will ensure that the safety of the
power tool is maintained.
•Never service damaged battery packs.
Service of battery packs should
only be performed by the manufacturer or authorized service providers.
•Do not use the lawn mower in bad weather conditions, especially
when there is a risk of lightning.
This decreases the risk of being
struck by lightning.
•Thoroughly inspect the area for wildlife where the lawn mower is to
be used.
Wildlife may be injured by the lawnmower during operation.
•Thoroughly inspect the area where the lawnmower is to be used and
2.7 Service
2.8 Lawn Mower Safety Warnings

8
EN
remove all stones, sticks, wires, bones, and other foreign objects.
Thrown objects can cause personal injury.
•Before using the lawn mower, always visually inspect to see that
the blade and the blade assembly are not worn or damaged.
Worn or
damaged parts increase the risk of injury.
•Check the grass bag frequently for wear or deterioration.
A worn or
damaged grass bag may increase the risk of personal injury.
•Keep guards in place. Guards must be in working order and be
properly mounted.
A guard that is loose, damaged, or is not functioning
correctly may result in personal injury.
•Keep all cooling air inlets clear of debris.
Blocked air inlets and debris
may result in overheating or risk of fire.
•While operating the lawn mower, always wear non-slip and
protective footwear. Do not operate the lawn mower when barefoot
or wearing open sandals.
This reduces the chance of injury to the feet
from contact with the moving blade.
•While operating the lawn mower, always wear long trousers.
Exposed
skin increases the likelihood of injury from thrown objects.
•Do not operate the lawn mower in wet grass. Walk, never run.
This
reduces the risk of slipping and falling which may result in personal
injury.
•Do not operate the lawn mower on excessively steep slopes.
This
reduces the risk of loss of control, slipping and falling which may result
in personal injury.
•When working on slopes, always be sure of your footing, always
work across the face of slopes, never up or down and exercise
extreme caution when changing direction.
This reduces the risk of loss
of control, slipping and falling which may result in personal injury.
•Use extreme caution when reversing or pulling the lawn mower
towards you. Always be aware of your surroundings.
This reduces the
risk of tripping during operation.
•Do not touch blades and other hazardous moving parts while they
are still in motion.
This reduces the risk of injury from moving parts.
•When clearing jammed material or cleaning the lawnmower, make
sure all power switches are off and the battery pack is disconnected.
Unexpected operation of the lawnmower may result in serious personal
injury.
•
The lawn mower has only one intended use: to mow grass. Do not use
the machine for any job except that for which it is intended.
•
Objects may be struck by the lawn mower blade during use. Carefully
check, examine, and clear all objects before each use.
•
While moving the lawn mower forward and backward, carefully look
2.9 Important Safety Instruction

9
EN
around for small children and animals.
•
While operating the lawn mower, keep children, pets, bystanders and
helpers at least 100 feet (30 meters) away from the machine. Stop the
machine immediately if anyone steps into the operating zone.
•
Schedule your mowing area ahead to avoid discharge of material
toward roads, sidewalks, bystanders and the like. Avoid discharging
against walls or obstructions, which may cause discharged material to
ricochet back toward the user.
•
Plan your mowing path in advance to ensure that material is not
directed towards roads, sidewalks, bystanders, or similar areas. Avoid
ejecting material against walls or obstacles to prevent the risk of it
ricocheting back towards you.
•
Avoid pushing the lawn mower too hard, the lawn mower operates
more efficiently and safely at its designed speed range.
•
Never use the mower unless all accessories are properly installed and
fully operational.
•
Inspect the blades regularly and do not operate the mower with a worn
or damaged blade.
•
Never operate a lawn mower that is damaged or has been modified.
Failing to do so could result in severe personal injury.
•
Never use the lawn mower while crossing areas covered with gravel,
such as paths, driveways, or roads.
•
Do not tilt the machine when switching on the motor.
•
If the machine starts to vibrate abnormally or intensely, immediately
shut it down and disconnect the battery. Such vibration typically
indicates a problem.
•
Caution with each step you take. Slipping or falling could result in
significant injuries. Should you sense that you're about to lose your
balance, promptly let go of the Bail Switch, and the blade will cease
spinning within three seconds.
•
Keep the discharge opening clear all the way. A blocked opening can
lead to an accumulation of grass clippings and debris, creating a risk of
sudden, forceful discharge or causing the mower to clog and stall. Such
scenarios could endanger both the operator and bystanders.
•
If the mower strikes a foreign object, immediately stop the motor and
remove the battery pack. Once the blade has stopped rotating, inspect
the mower for damage. Repair any damage before operating the mower
again.
•
Exercise caution for holes, ruts, stones, hidden objects, or uneven
surfaces that might lead to slip or trip. Give special focus to areas with
long grass, as it may hide obstacles.
•
Do not pull the mower towards yourself. Should you need to move the
mower backwards away from a barrier or an obstacle, ensure you first
check below and behind you to prevent stumbling. Then, adhere to the
following instructions. Perform these steps repeatedly if necessary:
10
EN
2.10 Symbols and Decals
1. Stretch your arms fully away from the mower.
2. Gently pull the mower back towards you, but don't pull it all the way up
to yourself; always keep it at a distance of half an arm's length.
3. Maintain a stable posture while mowing.
NOTE:
Although all reasonable and necessary safety measures have
been adopted in the design, production, and testing of this power tool to
minimize potential risks, due to the inherent characteristics of mechanical
products and the diversity of usage scenarios, there may still be residual
risks that cannot be completely eliminated.
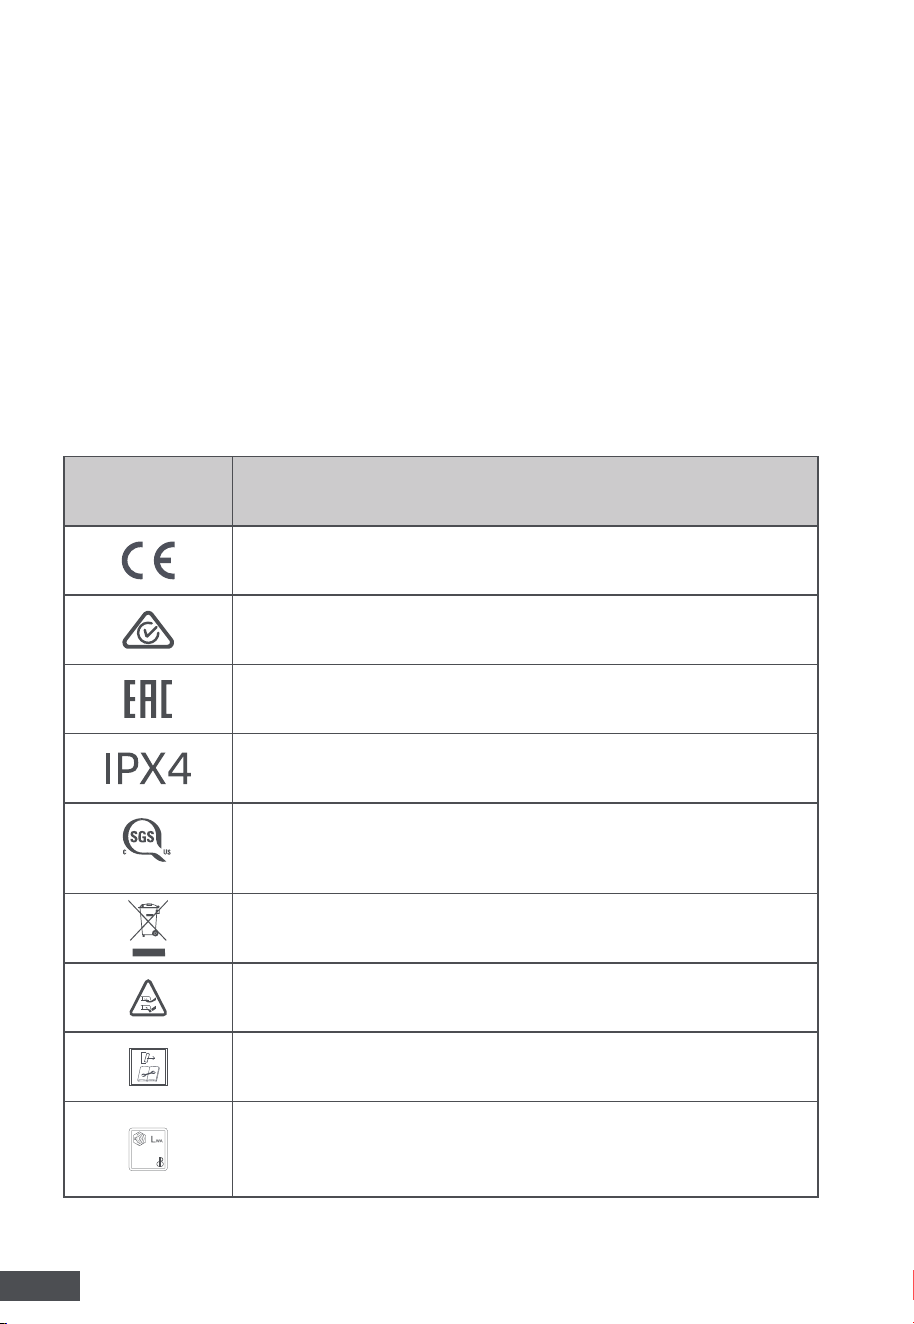
This section explains the safety symbols and decals that appear in this
manual and on the product. Understanding these markings is essential for
safe and proper operation.
Symbol Explanation
European Conformity
Regulatory compliance mark
Eurasian conformity
IP symbol
803706
This symbol indicates that the product has been tested
and certified by SGS for compliance with relevant safety
and quality standards.
Do not dispose of electrical products with household
waste. Recycle through authorized facilities.
WARNING –
Keep hands and feet away from the blades.
WARNING –
Disconnect battery before maintenance.
96
Guaranteed sound power level. Noise emission to the
environment according to the European community’s
Directive.
11
EN
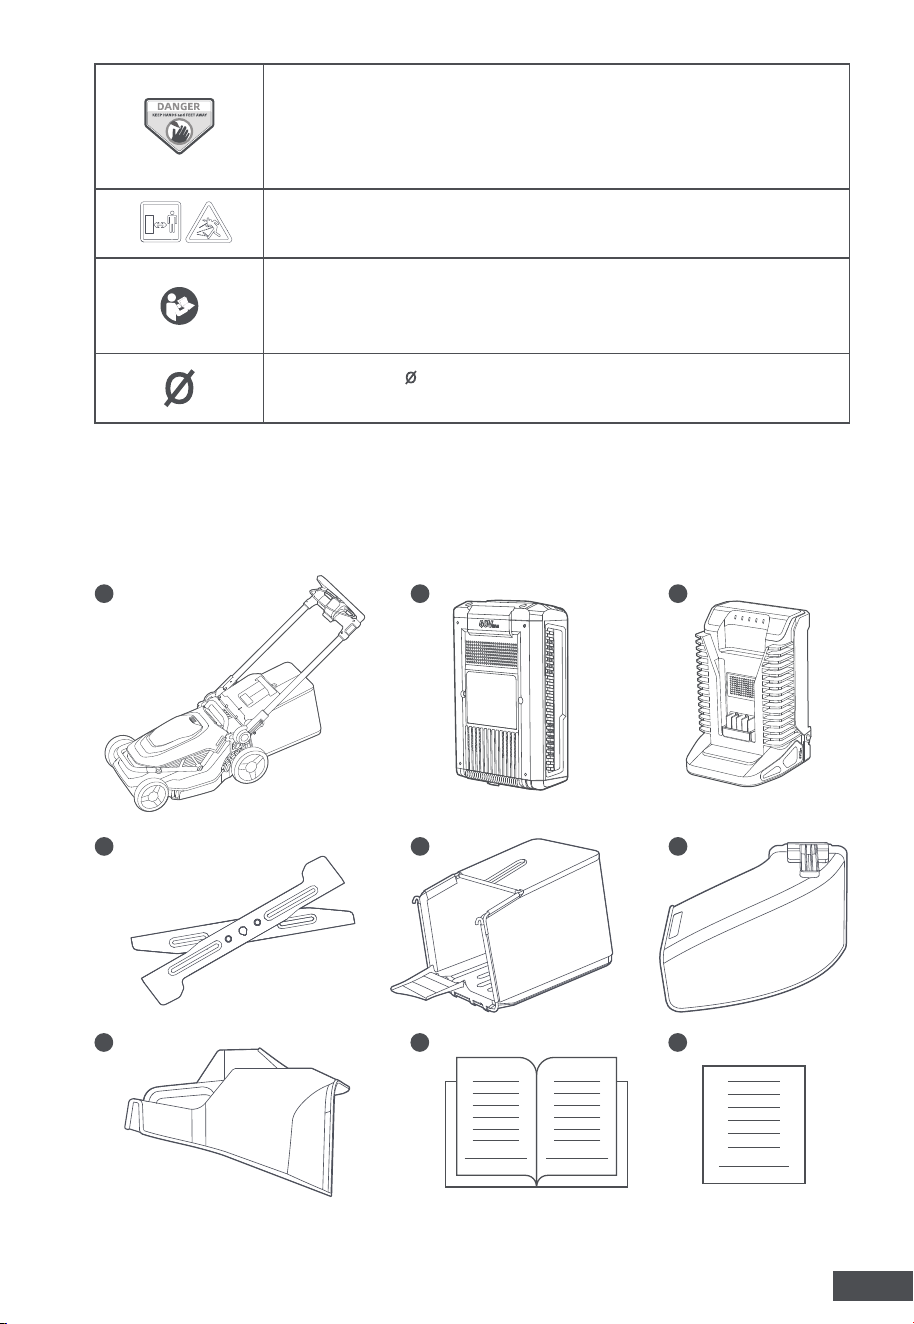
To reduce the risk of injury, keep hands and feet away
from rotating parts. Do not operate unless discharge
cover or grass bag is in its proper place.
If damaged, replace immediately.
WARNING-
Beware of thrown objects - keep bystanders away.
To reduce the risk of injury, read and understand the
User Manual before operating. Failure to do so may
result in serious injury to the user and/or bystander.
The symbol " " represents the diameter of a circular
object.
3 Product Introduction
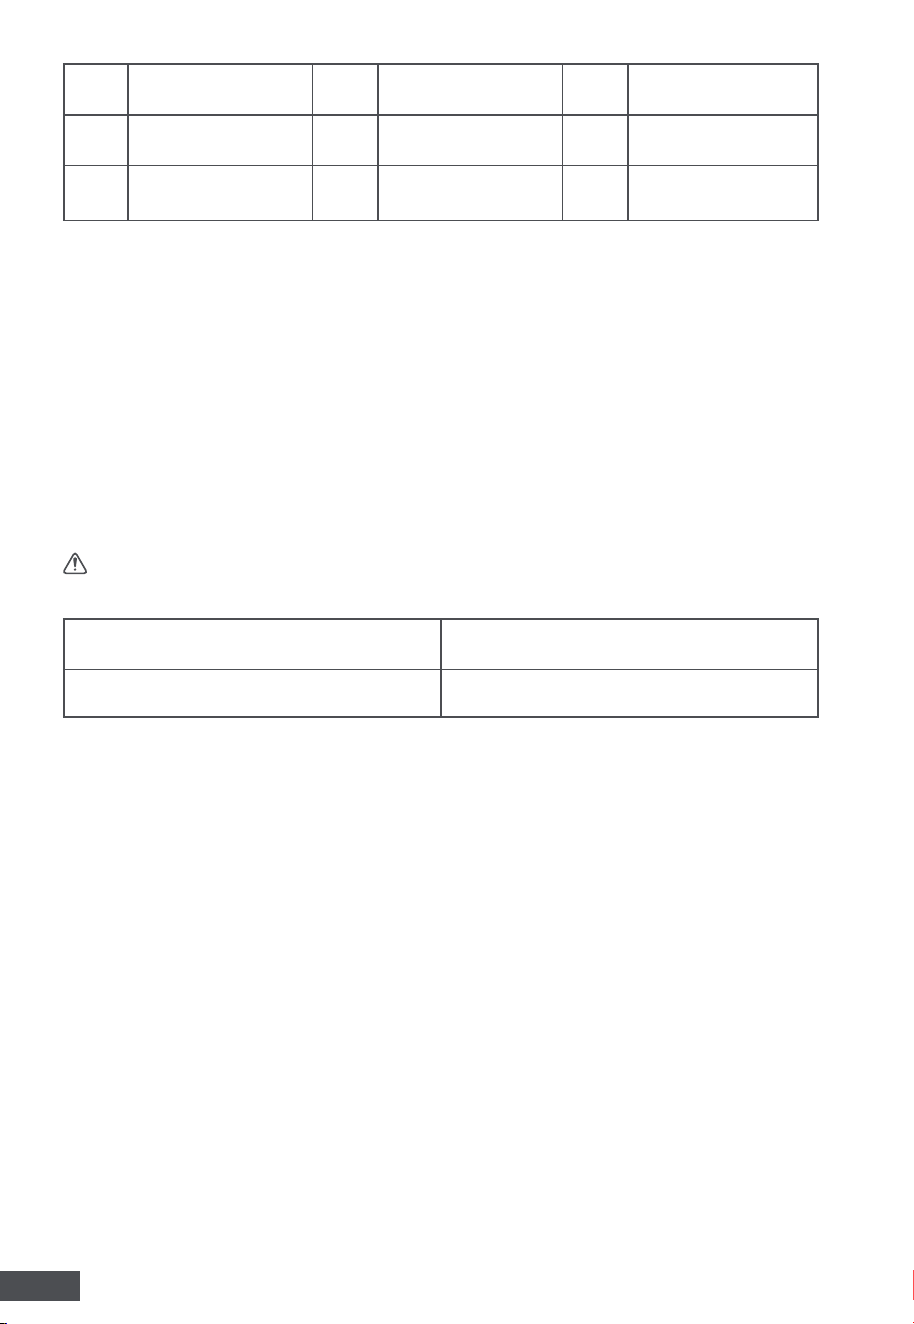
3.1 What's in the Box
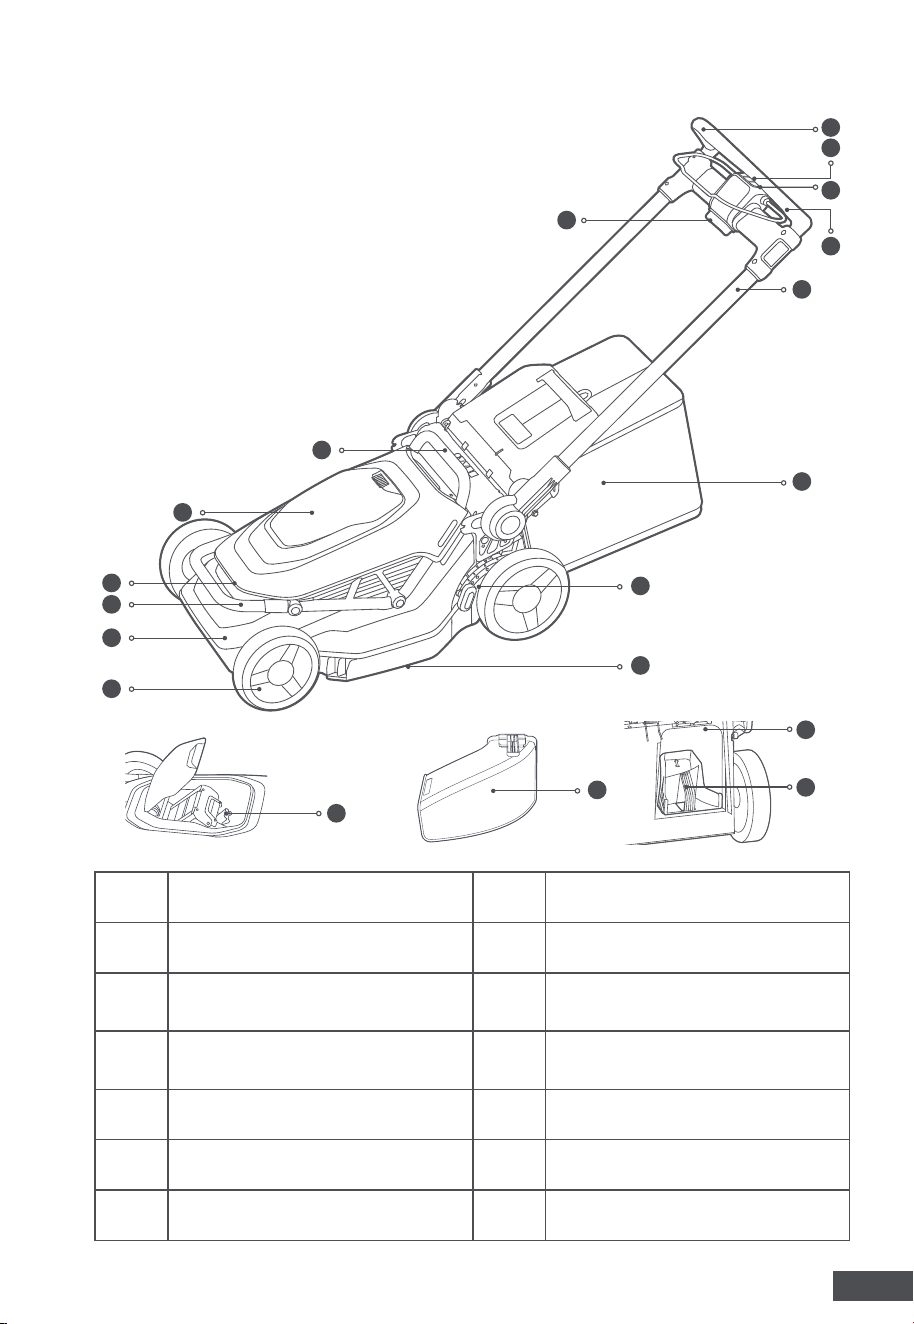
1
4
2
5
3
6
7 8
9
12
EN
1 Lawn Mower 4 Blade Set 7 Mulching Insert
2 Battery Pack* 5 Grass Bag 8 User Manual
3 Charger* 6
Side-discharge
Chute
9 Warranty Card
*The actual accessories supplied may vary depending on the product
model, sales region, production batch, or package configuration.
NOTE:
•Examine the tool and accessories listed above for any signs of shipping
damage.
•If any part is missing or damaged, contact the retailer or MOVA
Customer Service.
•Retain the packaging materials until you have fully inspected and tested
the product.
3.2 Recommended Accessories
WARNING:
Use only the accessories listed below. Using non-approved
accessories may result in poor performance or safety hazards.
Battery Pack GBA625, GBA650
Charger GCH606, GCH612
NOTE:
For usage instructions of the battery pack and charger, please
refer to the respective user manuals.
13
EN
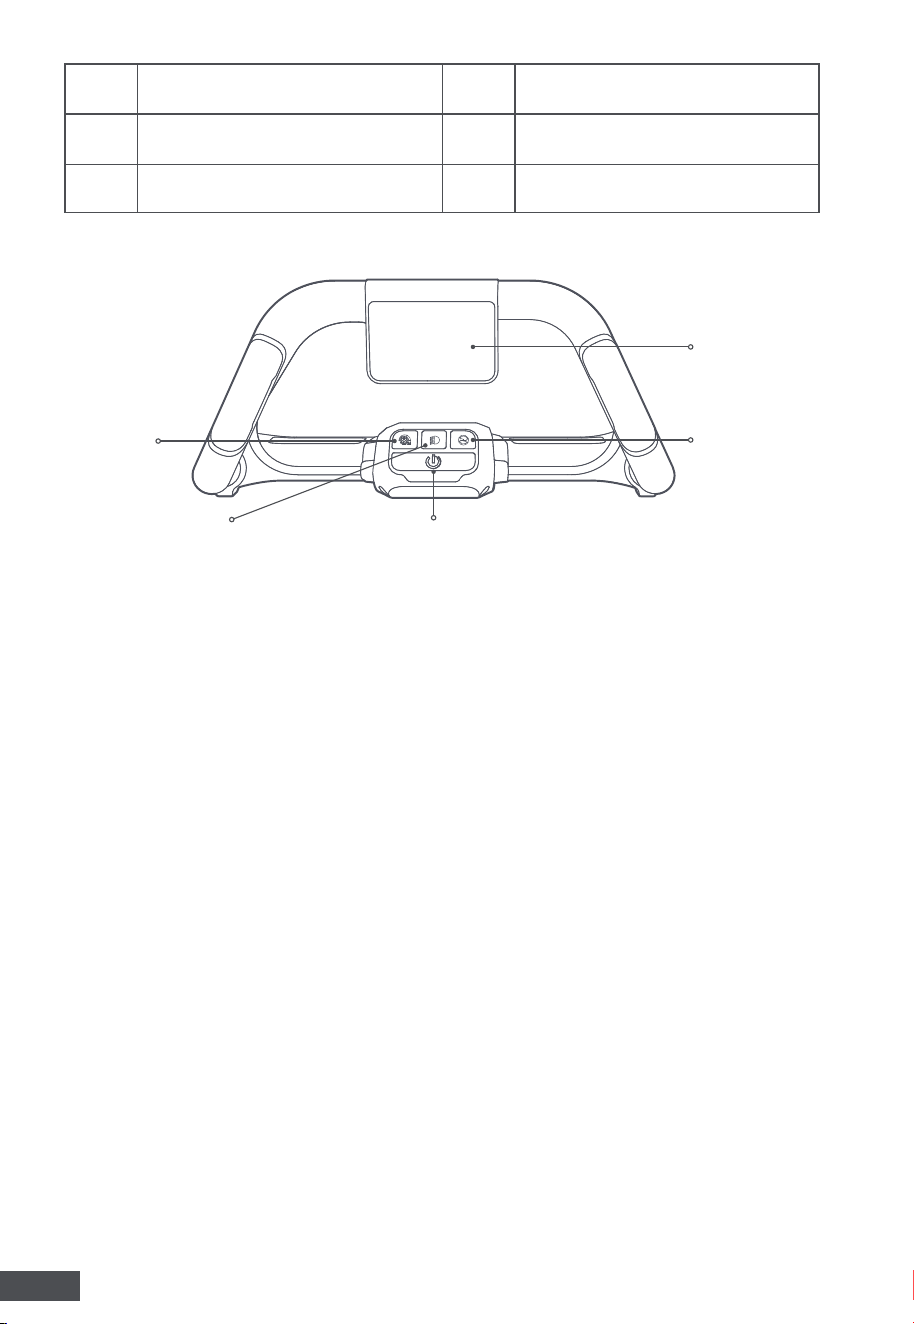
3.3 Product Overview
1
6
5
7
8
9
10
11
12
13
16
14
2
3
4
17
15
1 Handle 11 Mower Deck
2 Bail Switch 12 Wheels
3 Control Panel 13
Cutting-Height Adjustment
Lever
4
Self-Propelled Speed
Control Zones
14 Blades
5 Quick Adjust Button 15 Battery-Release button
6 Side Rail 16 Grass Bag
7 Rear Handle 17 Side Discharge Chute
18
19
14
EN
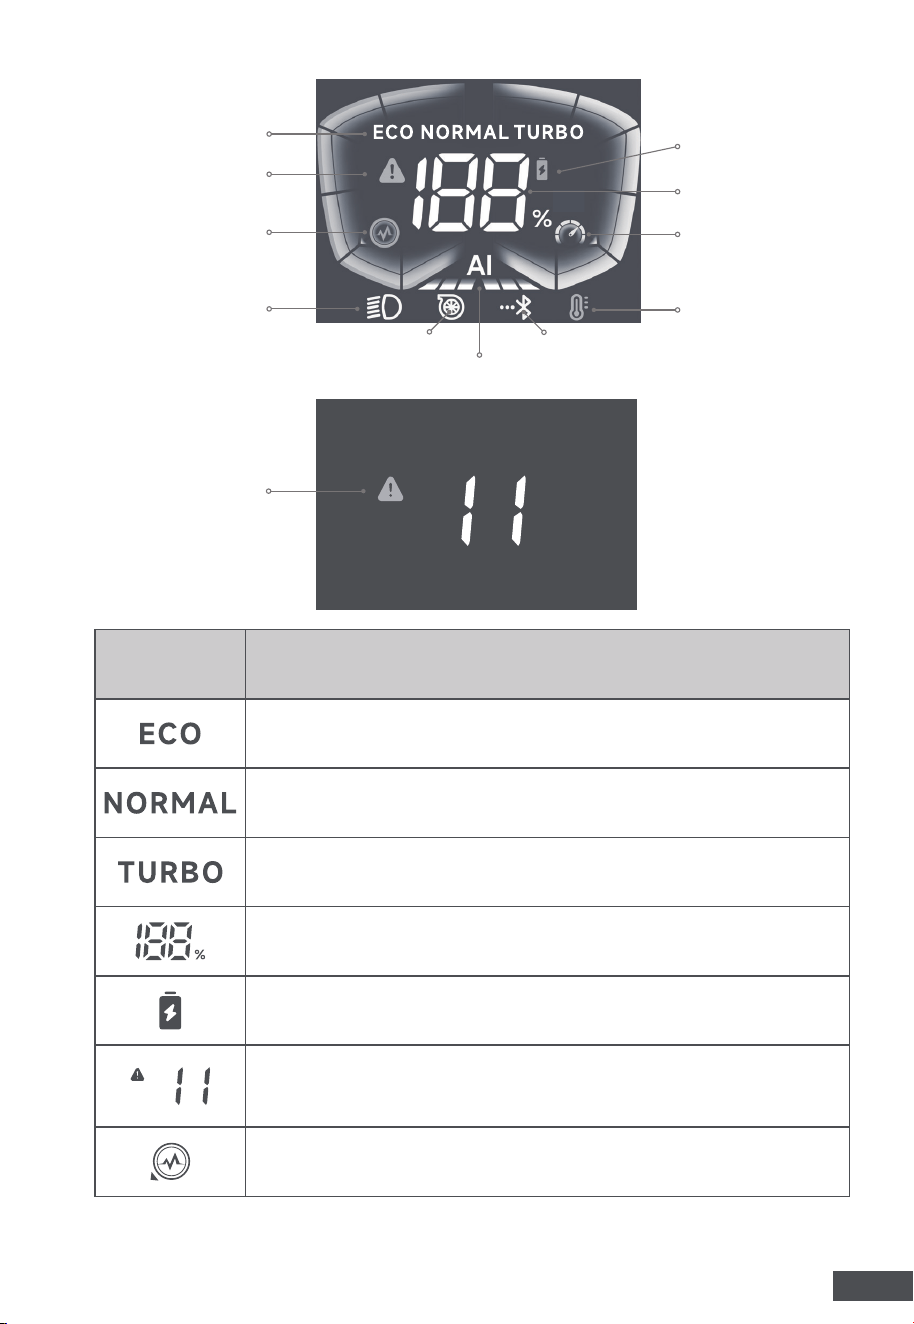
LED Screen
Provide important operational information and controls in an easy-to-
read digital format.
AI Button
To turn the self-Propelled function on/off and adjust the self-Propelled
speed.
LED Headlights Button
To turn the mower headlights on/off.
Blade Speed Mode Button
Select the blade speed according to different grass conditions.
Power Button
Press to activate the screen. To start the motor, press both the power
button and the bail switch simultaneously.
3.4 Control Panel
LED Screen
Al Button
LED Headlights Button
Power Button
Blade Speed
Mode Button
8 Battery Cover 18 Mulching Insert
9 LED Headlights 19 Rear Discharge Door
10 Front Handle
NOTE:
The screen turns off automatically if no operation is detected for
10 minutes. Press the power button to wake up the screen before any
operation.
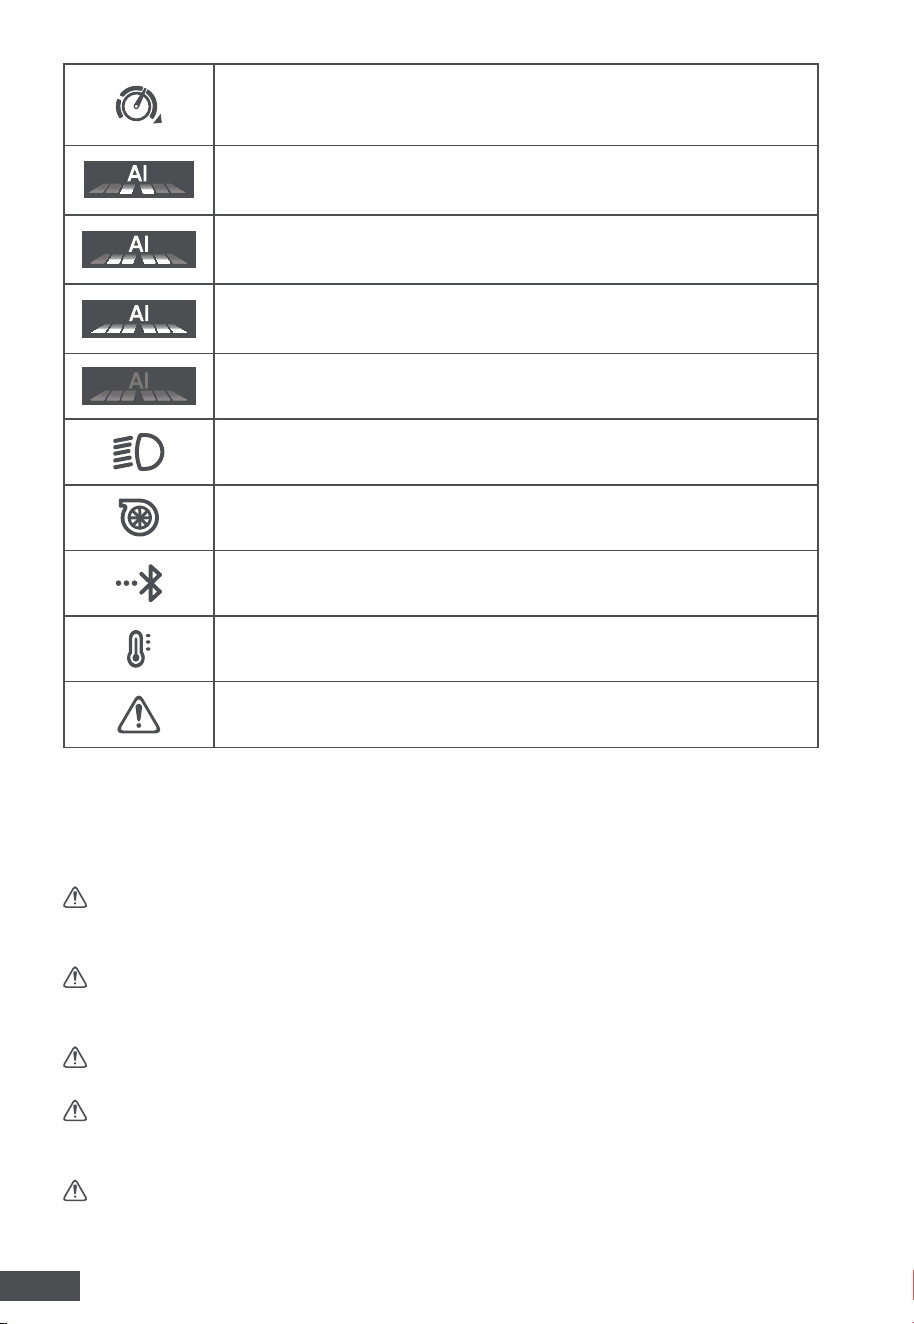
3.5 LED Screen Guide
15
EN
LED Display Meaning
Blade Speed Mode: ECO
Blade Speed Mode: NORMAL
Blade Speed Mode: TURBO
Displays the current battery level (%) when the screen is
activated.
Lights up when the battery pack is properly installed and
the display is on.
Lights up when a system malfunction is detected. Refer
to the displayed error code to troubleshoot the issue or
contact Customer Service for help.
Displays the current power output level of the tool.
Error Code
Self-Propelled Speed Mode Indicator
Blade Speed
Mode Indicator
Error Icon
Power
Indicator
LED Headlights
Icon
Turboflow™ Icon Bluetooth Icon
Battery Level
Indicator
Battery Pack Icon
Overheat Icon
Self-Propelled
Speed Indicator
16
EN
Displays the current self-Propelled speed when the self-
Propelled is activated — the progress bar grows as speed
increases.
Self-Propelled Speed Mode: LOW
Self-Propelled Speed Mode: MEDIUM
Self-Propelled Speed Mode: HIGH
Self-Propelled Speed Mode: OFF
Lights up when LED headlights are ON.
Lights up when Turboflow™ is activated.
Lights up when the tool is successfully connected via
Bluetooth.
Lights up when the tool is overheated.
Lights up when a system malfunction is detected.
4 Assembly
This product is delivered partially assembled and requires additional
assembly before use.
WARNING:
To avoid accidental starting that may cause serious
personal injury, always remove the battery pack and make sure the motor
has completely stopped before assembling or adjusting the tool.
WARNING:
Do not alter the mower's accessories or parts, nor use or
fabricate accessories not approved by MOVA. Unauthorized modifications
or misuse may lead to serious injury.
WARNING:
Wear protective gloves when handling the blade. It is
extremely sharp and may cause injury.
WARNING:
Do not assemble the tool if any parts are damaged or
missing. Operating with damaged or missing parts may result in serious
injury.
WARNING:
Do not attempt to start the tool unless all components are
securely installed.
17
EN
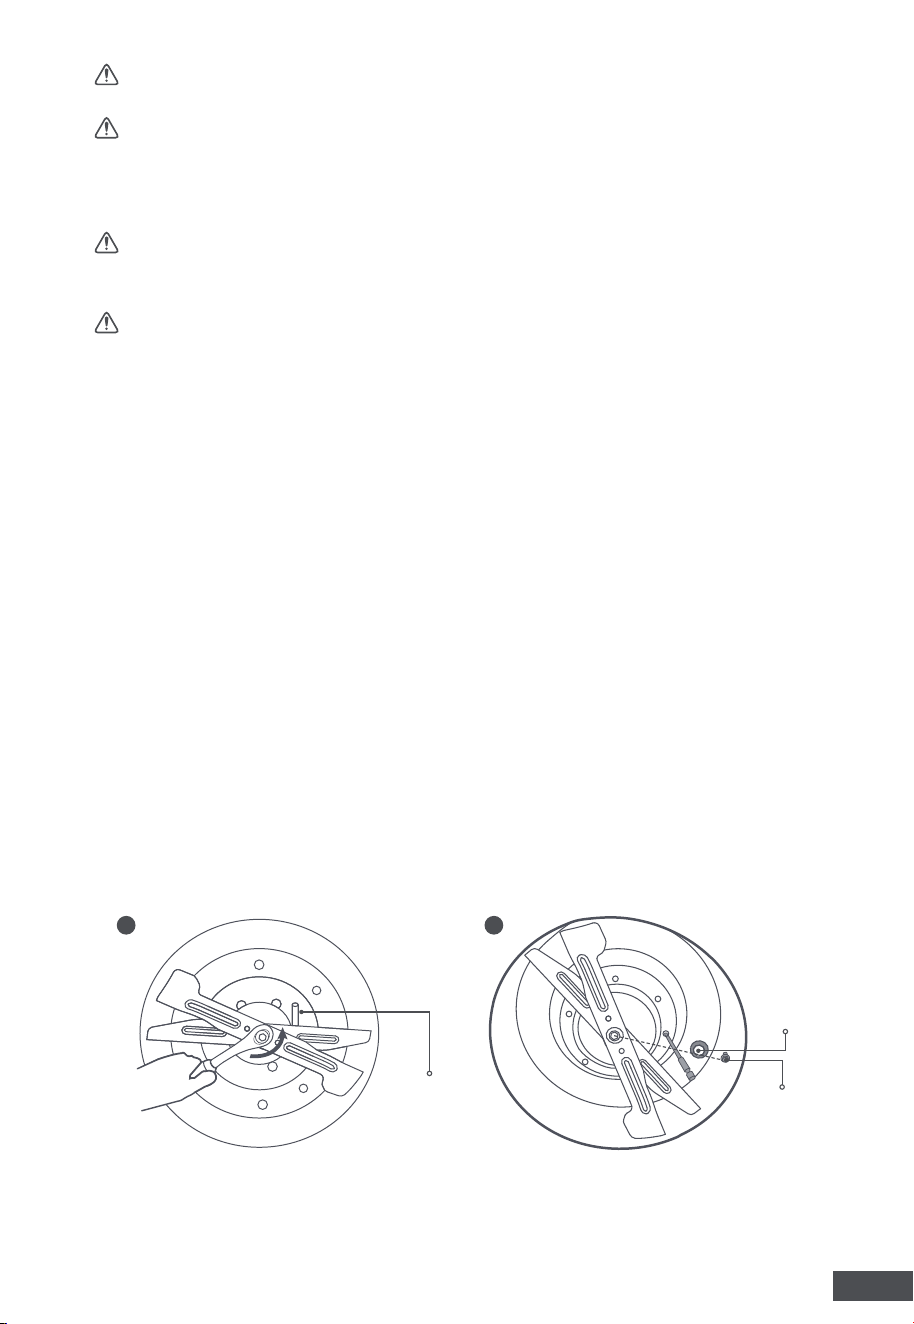
4.1.1 Remove the Blades
Step 1: Stop the motor and remove the battery pack.
Step 2: Stand the mower on end with the bottom of the mower face the
operator.
Step 3: Wear safety gloves. Insert a hand screwdriver or a metal rod with
a diameter of 5/16" (8 mm) or slightly smaller into the stabilizer hole. This
will keep the blades stationary as you unscrew the bolt (Fig. 1).
Step 4: Use a 9/16" (15mm) wrench to loosen and remove the 9/16" shaft
bolt and washer (Fig. 2).
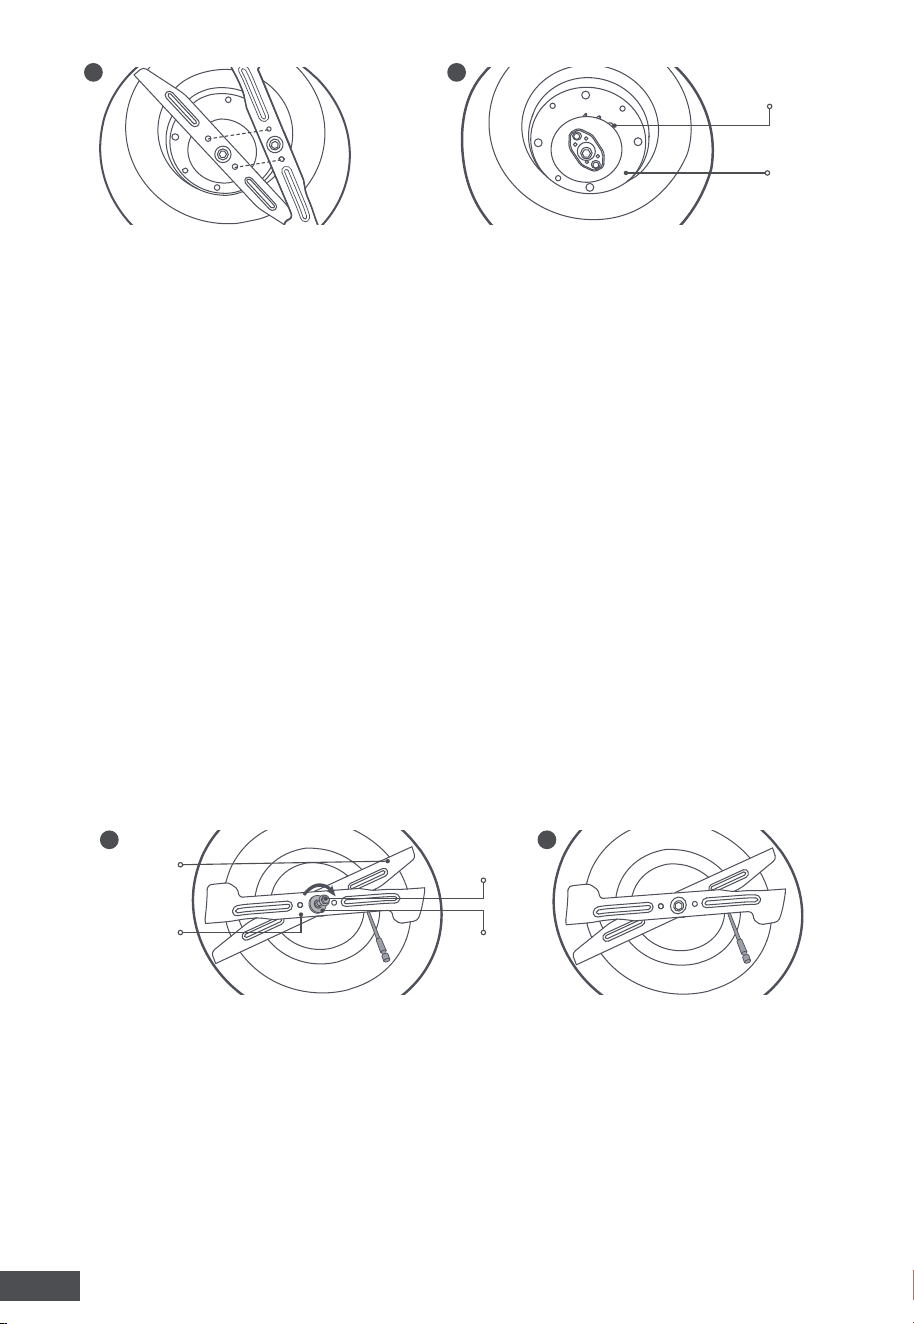
Step 5: Remove the lower blade and the upper blade from the motor
shaft (Fig. 3).
4.1 Cutting System
WARNING:
To prevent injury, always wear heavy-duty gloves or
protectively wrap the cutting edges with thick cloth before handling the
mower blades.
WARNING:
Never attempt to adjust the lawn mower without first
ensuring the motor is turned off, the battery pack is removed, and the
blade has completely stopped rotating.
NOTE:
The following tools are required before removing or installing the
blades:
9/16” (15 mm) or adjustable wrench (impact wrench with 9/16” socket is
recommended);
Manual screwdriver or metal rod with a diameter of 5/16” (8 mm).
WARNING:
Remove all adjustment tools after installing or replacing
parts.
WARNING:
Use only MOVA-approved accessories and parts.
Unauthorized modifications or misuse may cause serious injury.
Step 6: Leave the fan on the motor shaft. Be sure that the fan blade is
facing towards the deck (Fig. 4).
Stabilizer
Washer
Shaft bolt
1 2
18
EN
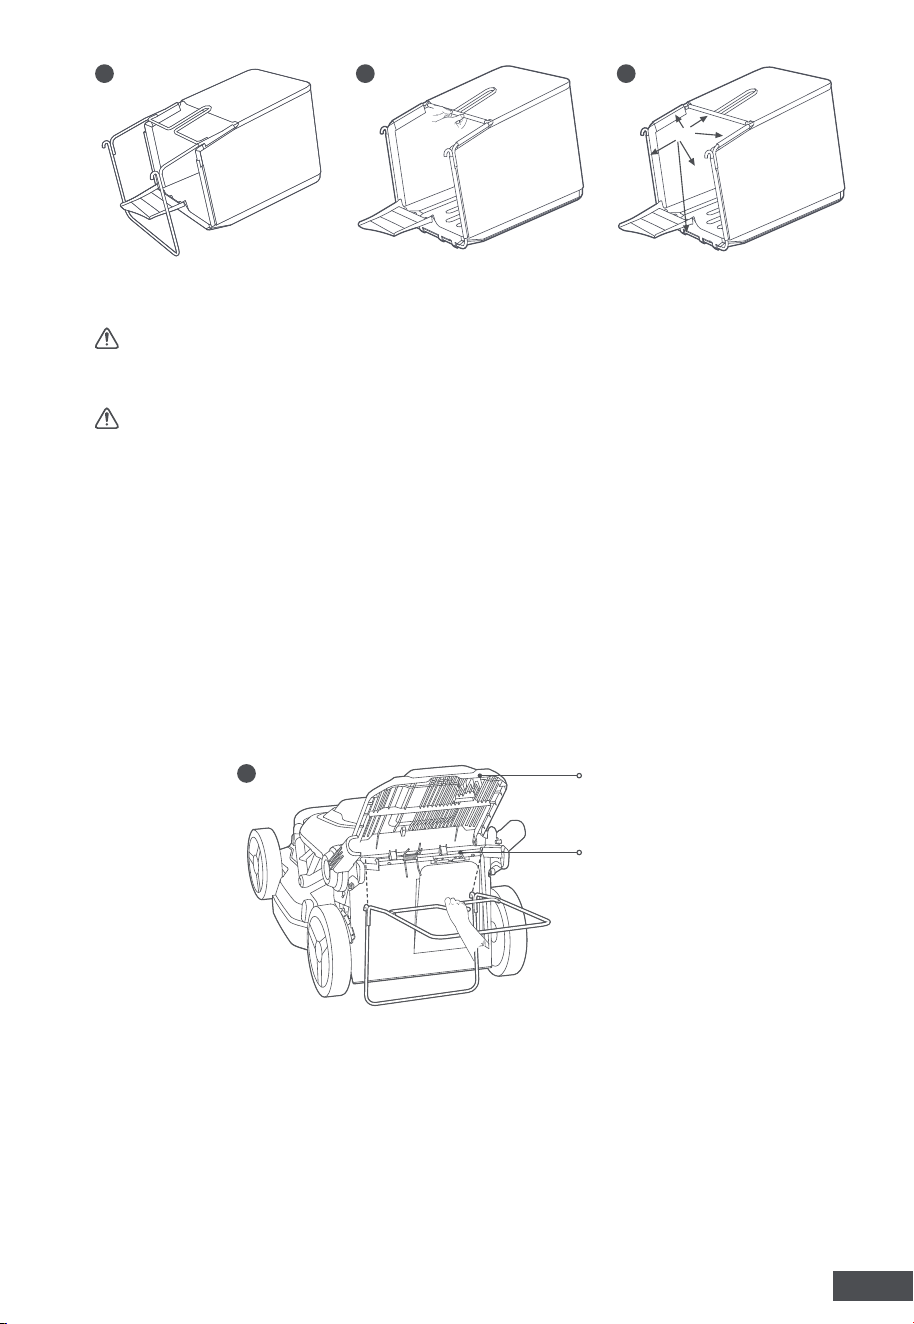
4.1.2 Install the Blades
NOTE:
Make sure that the statement
"THIS SIDE FACING DECK"
on the
upper blade is facing toward the mower deck and
"THIS SIDE FACING
GRASS"
on lower blade is facing toward the outside.
Step 1: Stop the motor, remove the battery pack.
Step 2: Stand the mower on end, let the bottom of the mower face the
operator.
Step 3: Mount the upper blade and lower blade onto the motor shaft.
Make sure that the statement
"THIS SIDE FACING DECK"
on the upper
blade is facing toward the mower deck; the statement
"THIS SIDE
FACING GRASS"
on the lower blade is facing toward the outside (Fig. 5).
Step 4: Install the washer and the shaft bolt to the motor shaft, then
manually pre-tighten the shaft bolt by turning it CLOCKWISE (Fig. 5).
Step 5: Insert a hand screwdriver or a metal rod with a diameter of 5/16"
(8 mm) or slightly smaller into the stabilizer hole. This will keep the blades
stationary as you unscrew the bolt (Fig. 6).
Step 6: Tighten the shaft bolt using a torque wrench that is 9/16" (15 mm)
in size. The recommended torque for the blade bolt is 36-43 ft-lb (49-59
Nm).
Fan Blade
Fan
3 4
4.2 Assembling the Grass Bag
1. Before assembly, inspect the bag and frame for any damage.
2. Slide the grass bag onto the frame (Fig. 7).
3. Attach the bottom clip to the frame, followed by the two side clips, and
finish with the top clips (Fig. 8)
4. Check if the grass bag and the frame are securely assembled (Fig. 9).
Upper Blade
Washer
Shaft Bolt
5 6
Lower Blade
19
EN
WARNING:
Ensure that the hooks of the grass bag are securely attached
to the pivot rod and that the rear discharge door is tightly pressed against
the top of the grass bag before operating the mower with the grass bag.
WARNING:
Under normal usage, the grass bag material is subject to
wear. To reduce the risk of injury, frequently inspect the bag assembly
and replace the bag if there are any signs of wear or deterioration. Use
only grass bags manufactured for this mower.
NOTE:
Before attaching the grass bag on the mower, remove either the
side discharge chute or the mulching insert.
1. Stop the motor and remove the battery pack.
2. Lift the rear discharge door.
3. Hook the grass bag onto the pivot rod, which connects the rear
discharge door to the mower. Release the discharge door so that it rests
on the grass bag.
4. To remove the grass bag, first lift the rear discharge door, then lift the
grass bag up and off the pivot rod.
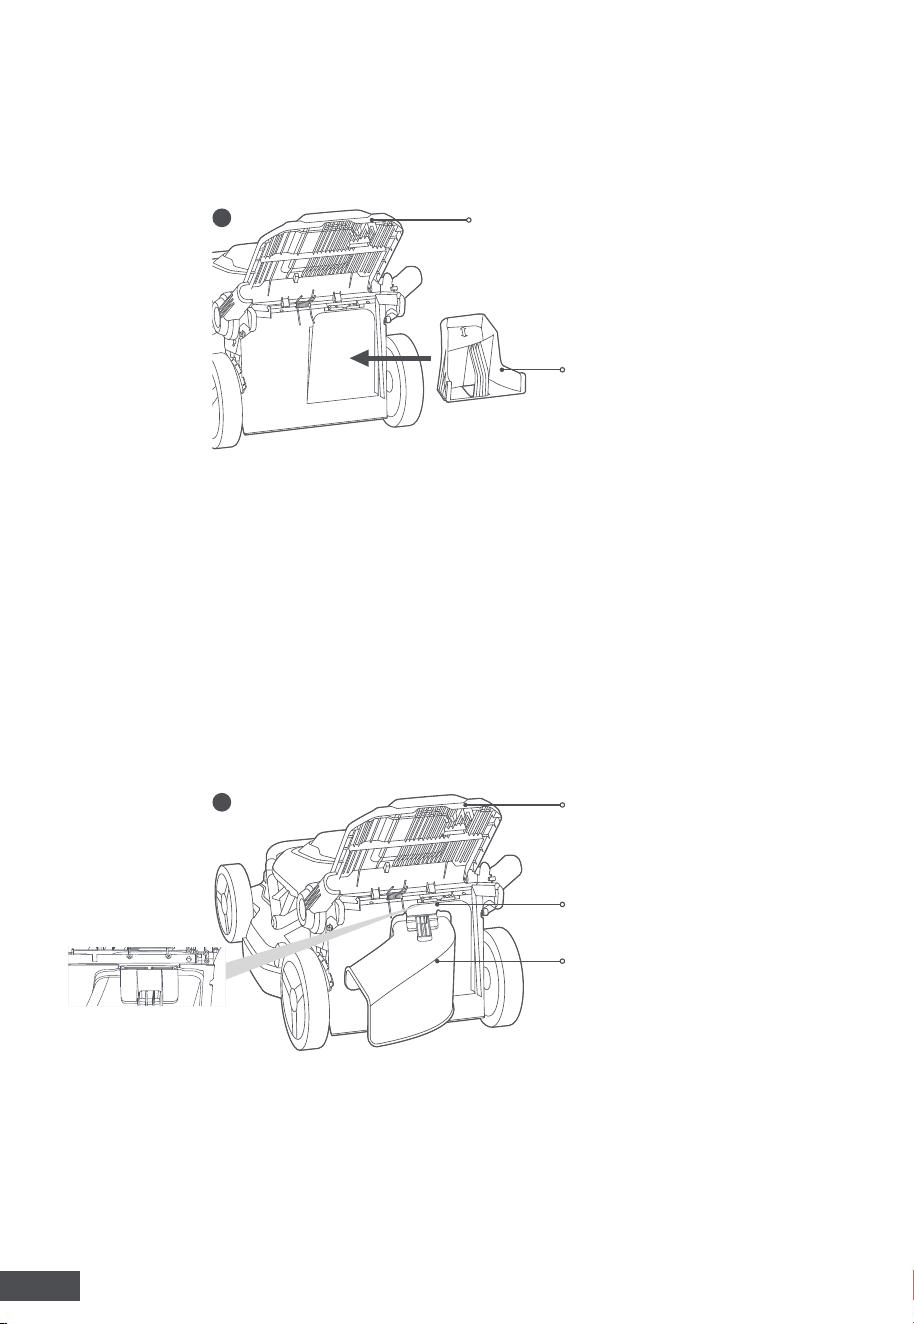
4.3 Attaching / Removing the Grass Bag (Fig. 10)
NOTE:
Before attaching the mulching insert, remove either the discharge
chute or the grass bag.
1. Stop the motor and remove the battery pack.
2. Lift the rear discharge door.
3. Hold the mulching insert, tilt it forward, and push it fully into the
4.4 Attaching / Removing the Mulching Insert (Fig.
11)
Clips
7 8 9
Rear Discharge Door
Pivot Rod
10
20
EN
1. Stop the motor and remove the battery pack.
2. Lift the rear discharge door.
3. Hold the chute and lift it slightly.
4. Align the chute’s top edge with the doorsill groove and insert it fully.
5. Let the discharge door down gently to ensure it securely leans on the
side-discharge chute.
6. To remove the side-discharge chute, open the rear-discharge door. Lift
the chute a little bit to remove it.
4.5 Attaching / Removing the Side-Discharge
Chute (Fig. 12)
Rear Discharge Door
Mulching Insert
11
mower. Then, pull it backward to ensure it is securely locked in place.
4. Let the discharge door down gently to ensure it securely leans on the
mulching insert.
5. To remove the mulching insert, lift the rear-discharge door, hold the
insert's handle, and pull it outward.
Rear Discharge Door
Side-discharge Chute
Groove
12
21
EN
2. Open the MOVAhome app and enable Bluetooth function on your
mobile device.
NOTE:
Please make sure that both the tool and your mobile device are
within range of the same Wi-Fi network, and your mobile device is within
10 m (33 ft) of the tool.
NOTE:
Press the power button to wake up the screen before connecting
the app.
3. Follow the instructions in
Section 6.1.3
to properly and securely install
the battery pack into the tool, activating the tool's display screen.
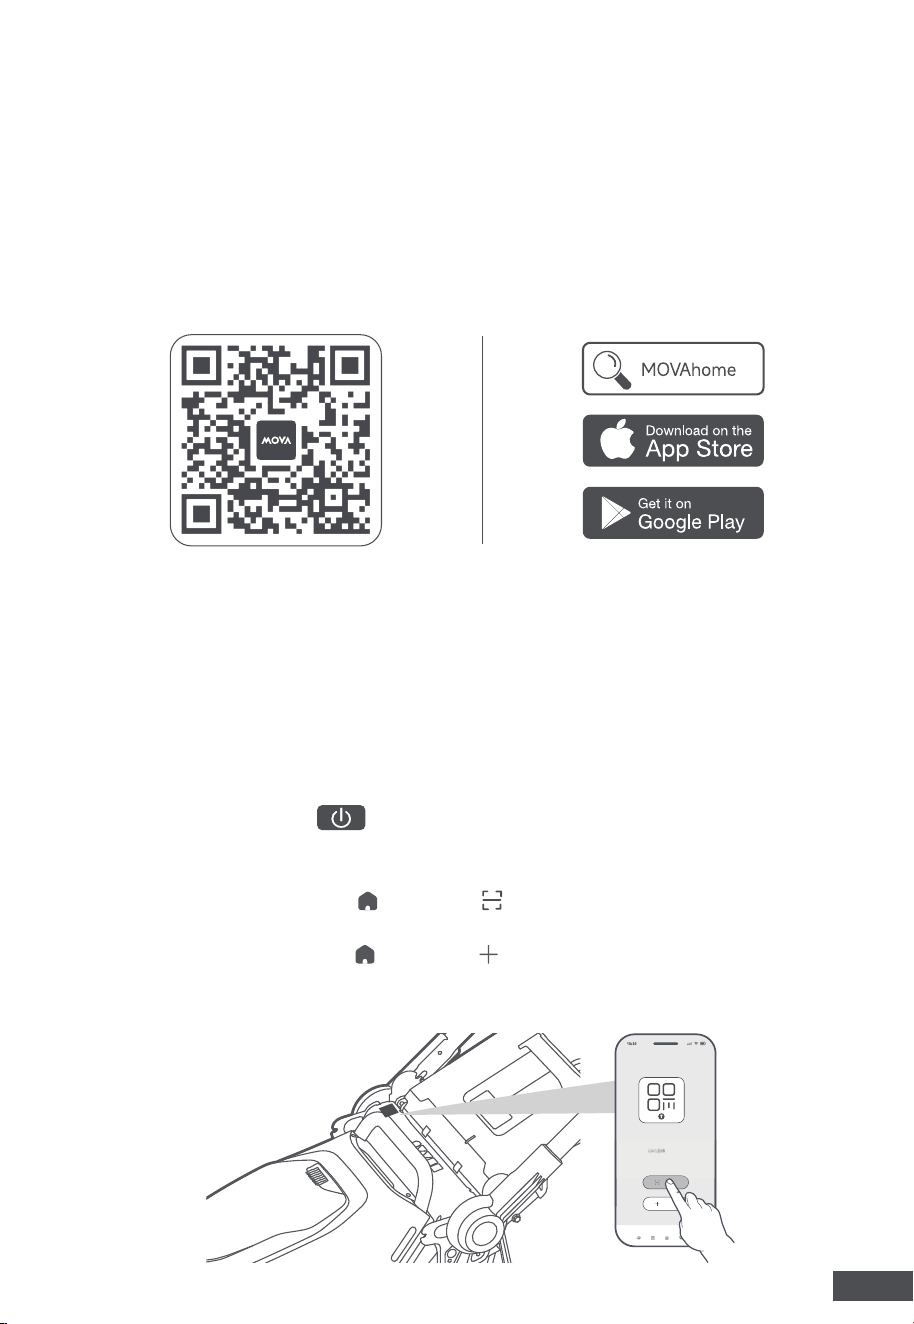
4. Press and hold the button on battery pack for 4 seconds to enter
Bluetooth pairing mode. Then, pair the tool with your mobile device
using one of the following two methods:
•
Scan QR code:
Go to
Device
>
Scan to Connect,
then scan the
code on the tool as shown below.
•
Add Manually:
Go to
Device
>
Add
, then select your tool model.
5. Follow the in-app instructions to complete the connection. The
Bluetooth Icon on the screen lights up when successfully paired.
5 MOVAhome APP
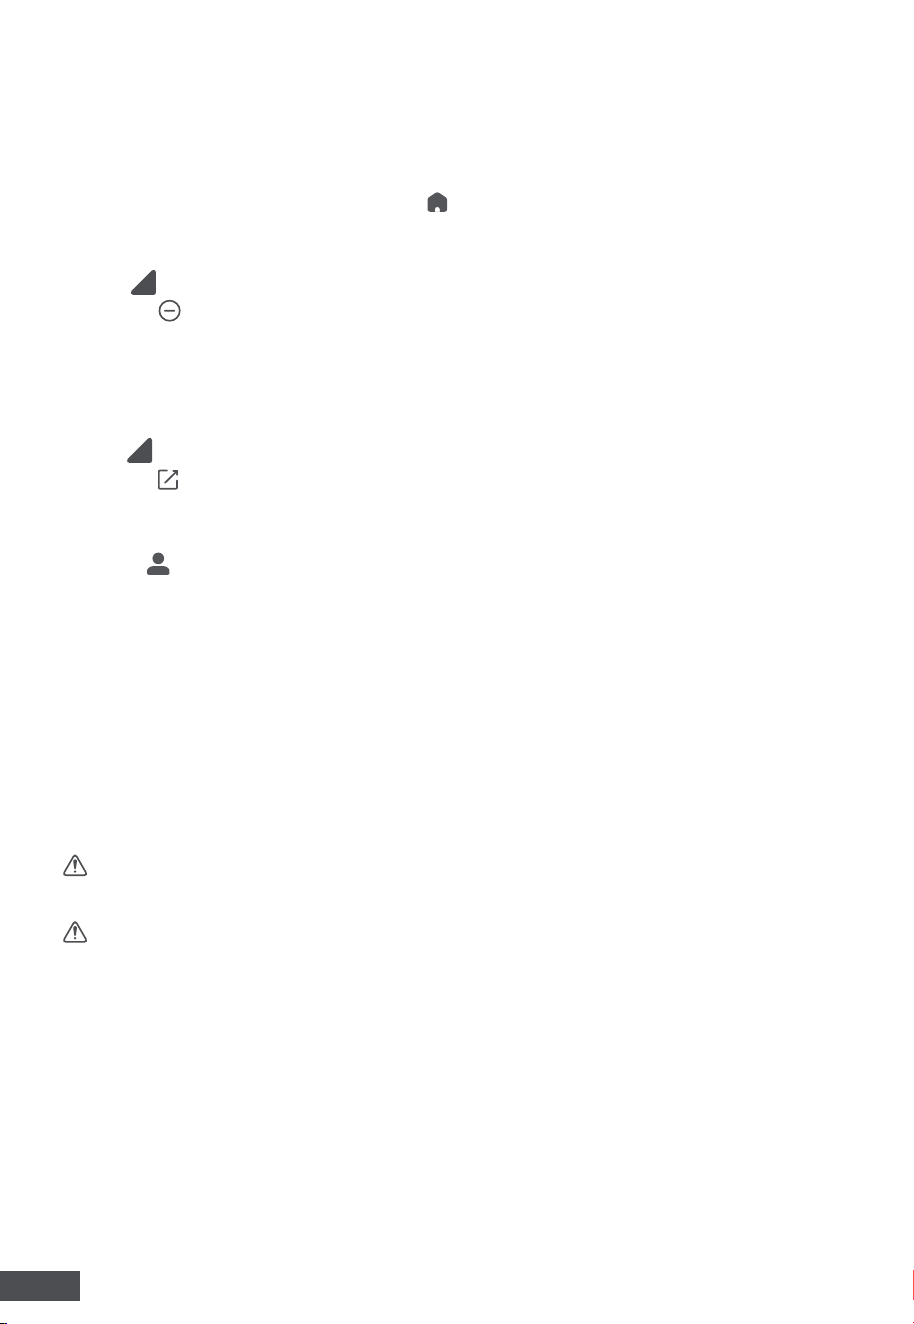
1. Scan the QR code below or search for "MOVAhome" in the App Store or
Google Play. Install the app, create an account, and log in.
The MOVAhome app allows you monitor your tool's status, track total
operation time, view mowed area, access user guides, and diagnose
potential issues.
5.1 Connecting to the MOVAhome App
22
EN
The tool is automatically bound to the MOVAhome account once pairing
is successful. Each tool can only be bound to one account at a time.
To pair the tool with a new account, you need to unbind it first:
1. Open the MOVAhome app. Go to
Device.
2. If you have multiple mowers bound to your MOVAhome account, swipe
left or right to access the page of the mower you want to edit.
3. Tap next to the tool's name.
4. Select
Delete.
NOTE:
Unbinding will permanently erase all user data associated with the
tool from the cloud.
5.2 Unbinding
1. Tap next to the tool's name.
2. Select
Device Sharing.
1. Go to
Me > Settings > General > Account.
2. Select
Log Out
or
Delete Account.
5.3 Sharing Your Device
5.4 Logging Out / Deleting Account
6 Operation
TurboFlow™ Technology
Under heavy load conditions, the lawn mower will automatically activate
TurboFlow™ Technology. This feature utilizes a specialized airflow motor
to significantly improve cutting, mulching, and bagging efficiency.
WARNING:
Adjustments must only be made after stopping the motor,
removing the battery pack, and confirming the blade is not rotating.
WARNING:
Be careful during adjustment of the machine to prevent
entrapment of the fingers between moving blades and fixed parts of the
machine.
6.1 Preparations Before Use
6.1.1 Adjusting the Handle
NOTE:
Handle must be locked in an operating position to activate motor
and self-Propelled system.
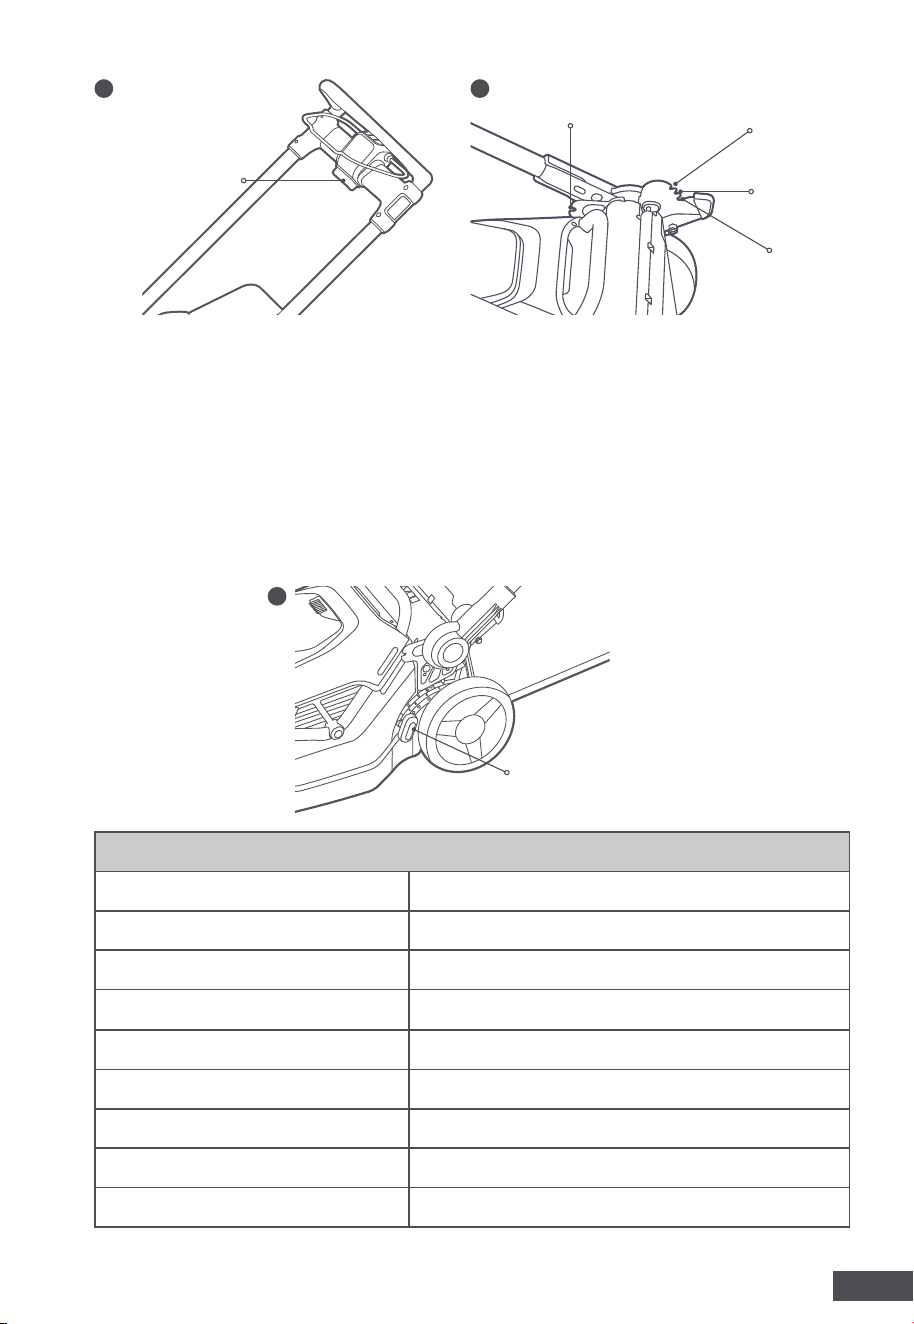
1. When unpacked, the handle is in the storage position.
2. Press down and hold the quick adjust button with one hand to
disengage the handle from its storage state (Fig. 13).
3. Gently raise the handle until the lock pin clicks into place at your
preferred operating position (Fig. 14).
23
EN
6.1.2 Adjusting the Cutting Height (Fig. 15)
The mower offers 8 cutting height settings. Select the appropriate height
based on grass conditions.
1. Pull the cutting-height adjustment lever outward from the slots on the
cutting-height panel.
2. While holding the lever, slide it forward or backward to select your
desired height setting (Levels 1–8).
3. Insert the cutting-height adjustment lever into the slot for the desired
cutting-height position.
Approximate Cutting-Height Setting
Number Height
1 0.75 in (20 mm)
2 1.25 in (32 mm)
3 1.50 in (39 mm)
4 2 in (51 mm)
5 2.50 in (64 mm)
6 3 in (76 mm)
7 3.5 in (89 mm)
8 4 in (100 mm)
Press the Quick
Adjust Button
Upper Operating
Position
Middle
Operating
Position
Lower Operating
Position
Storage Position
13 14
Cutting-Height Adjustment Lever
15
24
EN
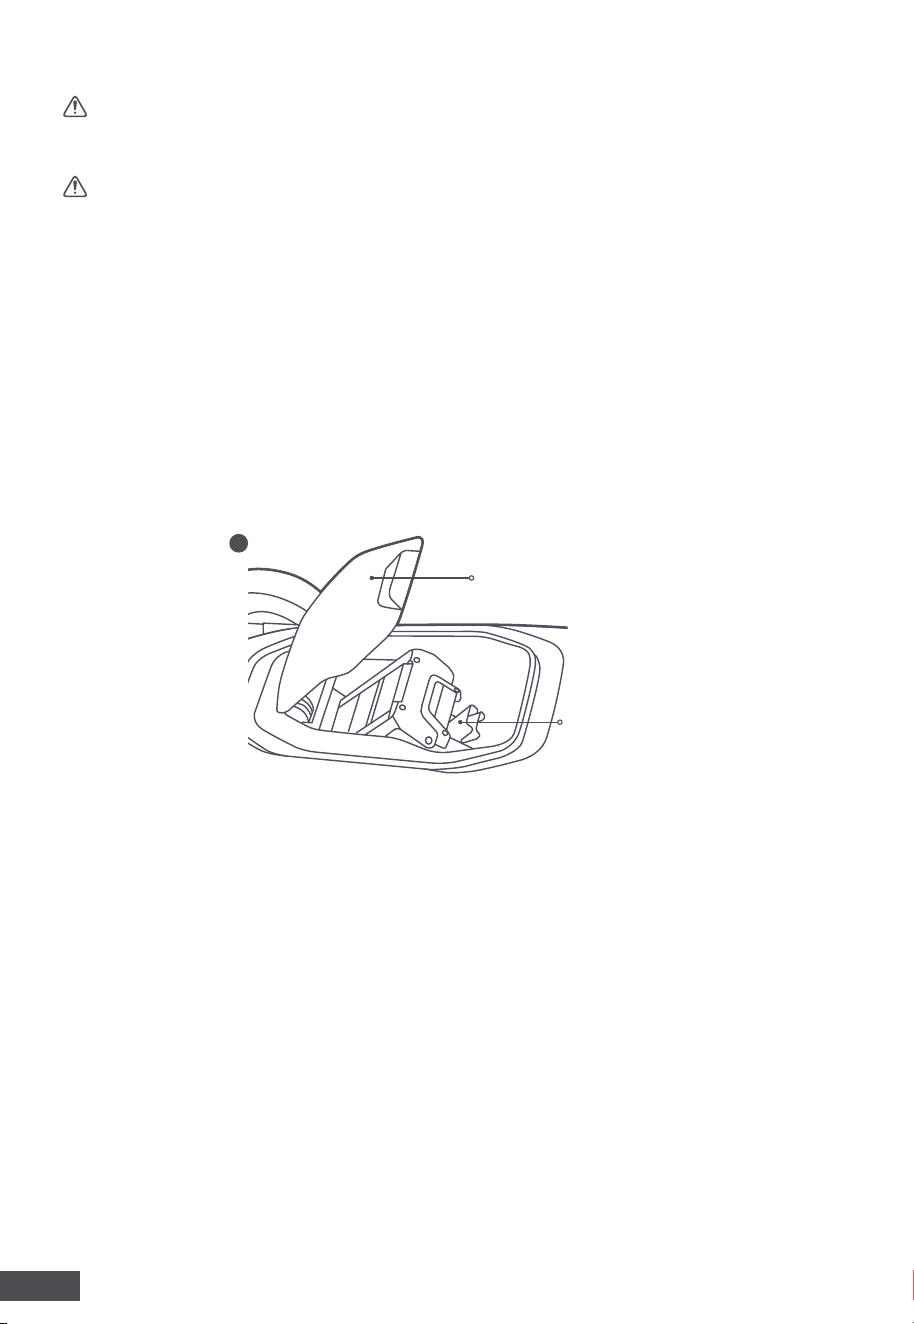
6.1.3 Attaching / Removing the Battery Pack (Fig. 16)
WARNING:
Use only the battery packs specified in
Section 3.2
. Use of
any other battery packs may create a risk of injury and fire. Fully charge
the battery pack before first use.
WARNING:
Do not use a damaged or modified battery pack. Damaged
batteries can behave unpredictably and may cause fire, explosion,
or injury. Do not use any battery that appears cracked, deformed, or
otherwise compromised.
NOTE:
Fully charge the battery pack before the first use.
1. Open the battery cover by lifting it with moderate force.
2. Align the grooves on the battery pack with the raised ribs inside the
compartment.
3. Push the battery pack until you hear a "click". The battery-release
button will spring up when secured.
4. Lift the battery cover. Depress the battery release button, and then
remove the battery pack.
5. Close the battery cover.
Battery Cover
Battery-Release Button
16
6.1.4 Selecting Blade Speed Mode
1. Select your desired blade speed mode (Fig. 17):
•
ECO
mode provides the lowest blade speed, featuring the longest
operating runtime and the lowest noise level.
•
NORMAL
mode provides the balance of operating performance and
runtime.
•
TURBO
mode provides the highest blade speed.
2. Press the power button to turn on the LED screen. Then, press the
blade speed mode button on the right of the control panel to select
among
ECO, NORMAL
or
TURBO
modes.
NOTE:
When the battery level is at or below 10%, the device automatically
switches to
ECO
mode for blade speed, and the mode cannot be
adjusted.
NOTE:
The default blade speed mode is
NORMAL
mode.
NOTE:
Higher blade speeds will reduce operating runtime.
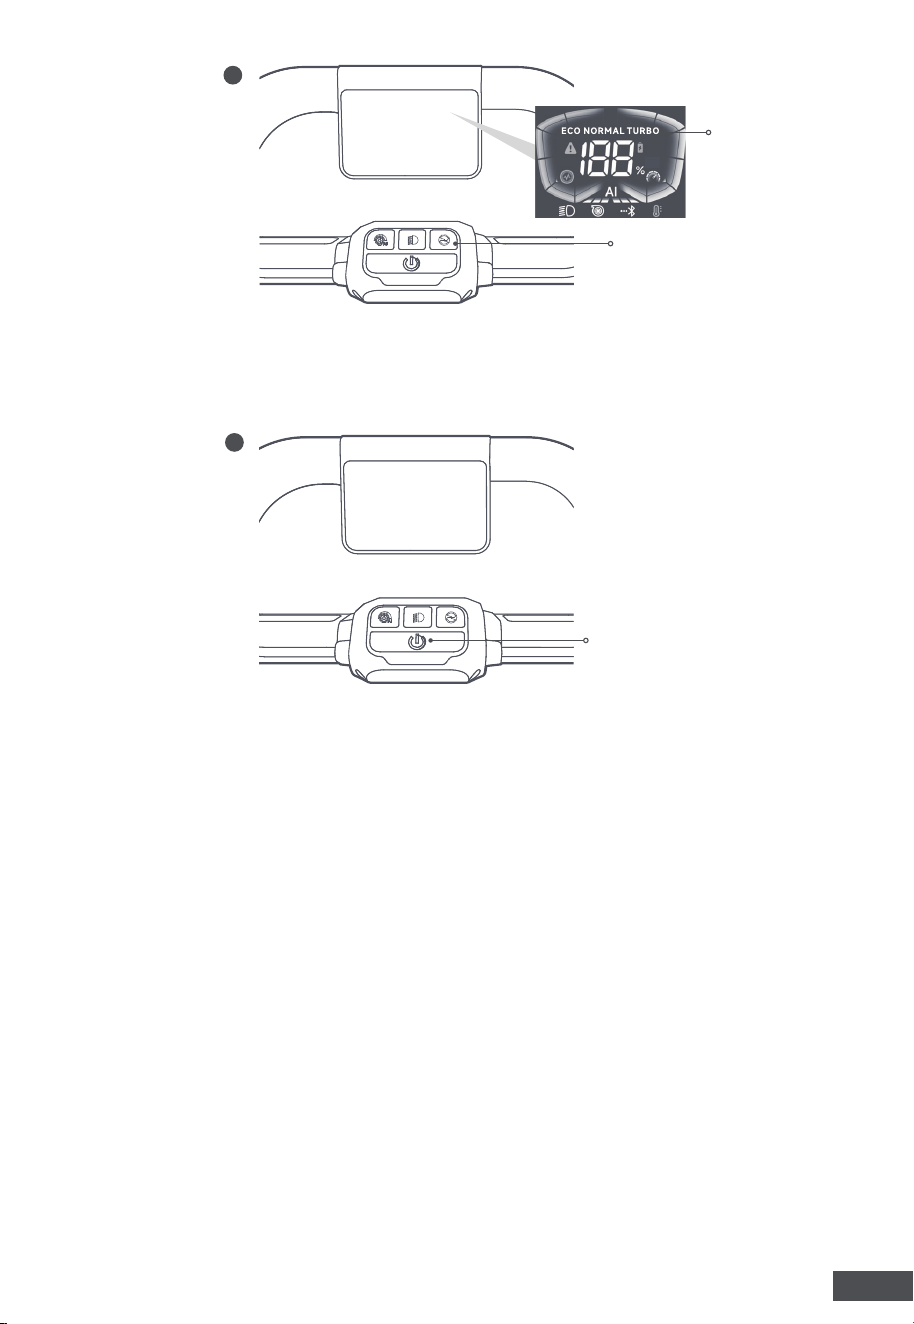
25
EN
NOTE:
The mower cannot be started if the handle is not in operating
position.
6.2 Starting / Stopping the Lawn Mower
Blade
Speed Mode
Indicator
Blade Speed Mode
Button
1. Lock the handle in one of the operating positions.
2. Install the battery pack into the mower, close the battery cover, and
make sure the cover is secured before operation.
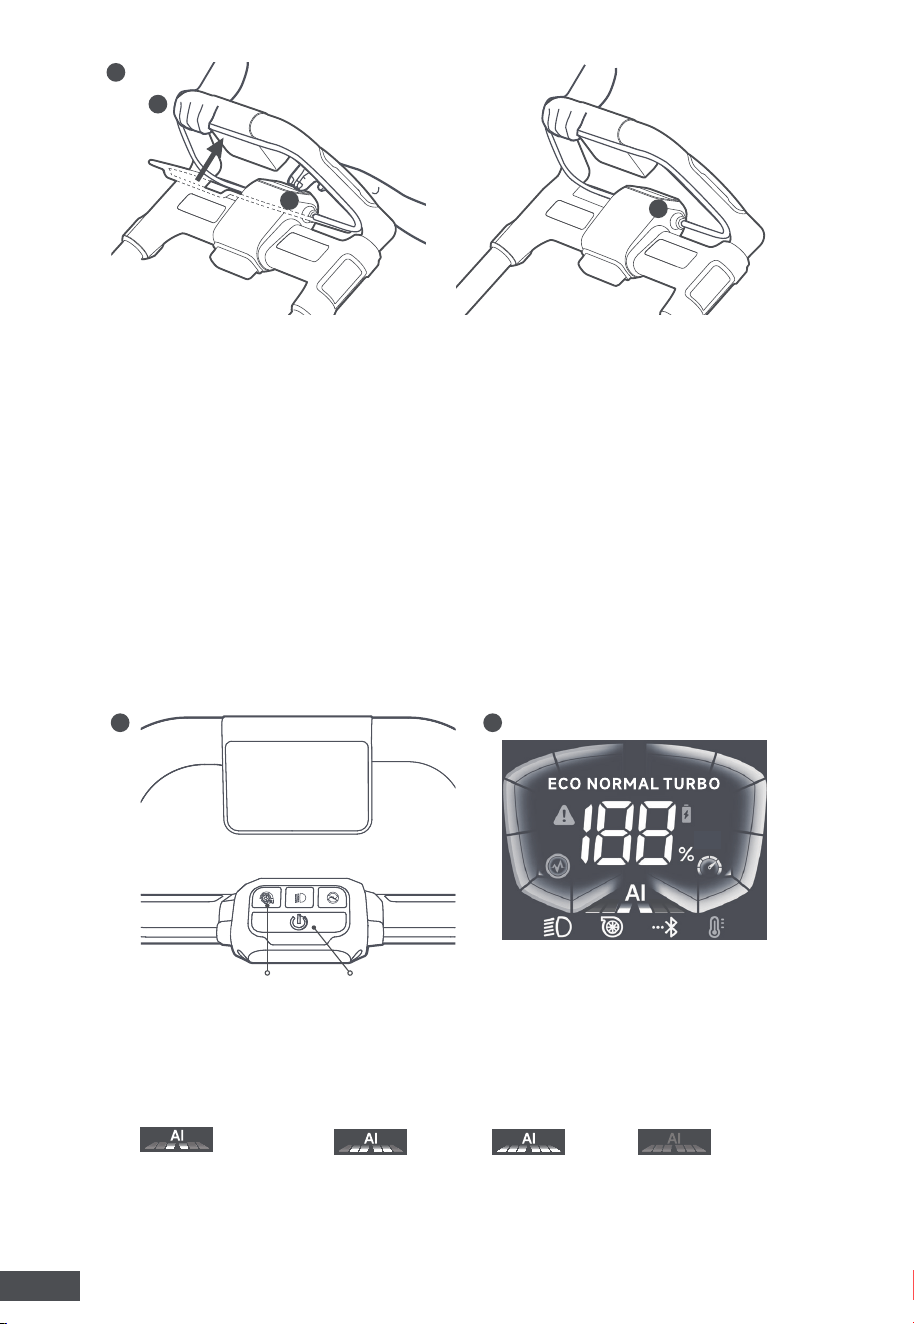
3. Press the power button to turn on the LED screen (Fig. 18).
4. Press the blade speed mode button to select the desired speed. Refer
to
Section 6.1.4
in this manual for details.
5.
Starting the Mower
(Fig. 19).
a. Depress the power button with one hand.
b. With the power button depressed, hold the bail switch and pull it
toward the handle.
c. Once the mower is turned on, release the power button.
17
Power Button
18
26
EN
NOTE:
The self-Propelled system operates independently from the blade
rotation system. This means you can use the self-Propelled feature to
move the mower without engaging the blade.
NOTE:
To mow around an obstacle or to mow forward and backward,
turning off the self-Propelled feature may improve control.
The lawn mower's adaptive self-Propelled system allows it to
automatically adjust its speed to match the walking pace.
6.3 Starting / Stopping Self-Propelled System
6.
Stopping the Mower
① Fully release the bail switch.
② The mower will stop operation, and the blade will come to a
complete stop within 3 seconds.
a
c
b
19
20
21
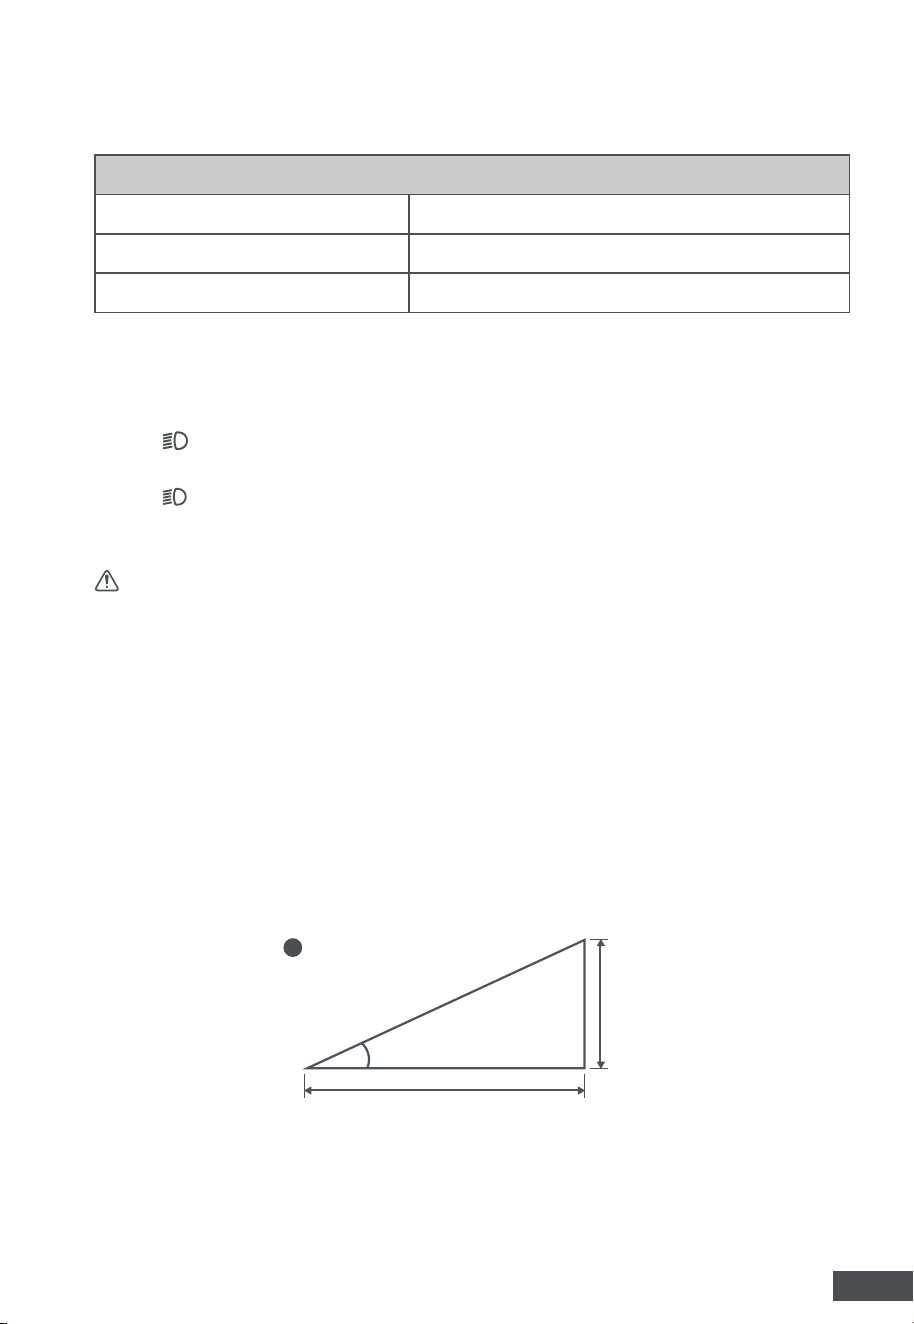
AI button
1. Press the power button to turn on the LED screen (Fig. 20).
2. The self-Propelled icon
AI
will appear on the screen. The default self-
Propelled speed mode is
LOW
(Fig. 21).
3. Press the AI button (Fig. 20) to select the self-Propelled speed mode in
LOW
-
MEDIUM
-
HIGH
-
OFF
.
4. Start the lawn mower, refer to
Section 6.2
in this manual for details.
5. Place both hands on the self-Propelled speed control zones and push
the lawn mower forward to engage the self-Propelled feature.
Power button
27
EN
Approximate Self-Propelled Speed (Maximum)
LOW 2.6 km/h
MEDIUM 5 km/h
HIGH 7 km/h
1. Press the power button to turn on the LED screen.
2. Press the LED headlight button to turn on the headlight. The headlight
icon will appear on the LED screen.
3. Press the LED headlight button again to turn off the headlight. The
icon will disappear from the screen.
WARNING:
Avoid mowing near drop-offs, ditches, or embankments.
Slopes significantly increase the risk of slip-and-fall accidents, which may
lead to severe injuries.
• Exercise increased caution when using the machine with the grass bag
attached, as it can impact the mower's balance.
• Operate the lawn mower across the slope, do not mow up and down.
Take additional care when turning or changing directions on slopes.
• Do not mow on slopes exceeding 15 degrees.
Slope Angle Reference
• The diagram below shows a 15° slope (26.8 cm rise per 100 cm
length).
• Compare your slope to the illustration (Fig. 22). If your slope appears
milder, it is likely under 15°.
6.4 Turning ON/OFF the Headlights
6.5 Operation On A Slope
116.89 mm
54.09 mm
a
max. 15° (26.8%)
b
22
6. With both hands on the control zones, press downward to incrementally
increase the self-Propelled speed, up to the maximum speed set for
each mode.

28
EN
WARNING:
Any maintenance must only be done after stopping
the motor, removing the battery pack, and confirming the blade is not
rotating.
WARNING:
Ensure hand protection during maintenance by wearing
heavy-duty gloves.
WARNING:
Have your power tool serviced by qualified personnel using
only identical replacement parts. Improper repairs may result in serious
hazards.
WARNING:
Wear protective glasses with side shields when performing
any maintenance on the blades.
WARNING:
Regularly inspect the blades for wear or damage. Worn or
damaged blades may break, posing a serious risk of injury.
WARNING:
An unbalanced blade can lead to significant vibration
during high-speed rotation. This could result in harm to the mower and
potentially break, leading to personal injury.
WARNING:
Rotating one blade can cause the other blade to rotate.
WARNING:
Even though the power source is switched off, the blades
can still be moved.
Sharpening the Blades
Always keep the blades sharp for better mowing performance. Using a
dull or damaged mowing blade may cause strain, poor cuts, and increase
wear, risking loss of control and potential injury or property damage.
1. Remove the blades from the mower. Please refer to
Section 4.1.2
for
operation details.
2. Place the blade in a vise, ensuring it remains stable during sharpening.
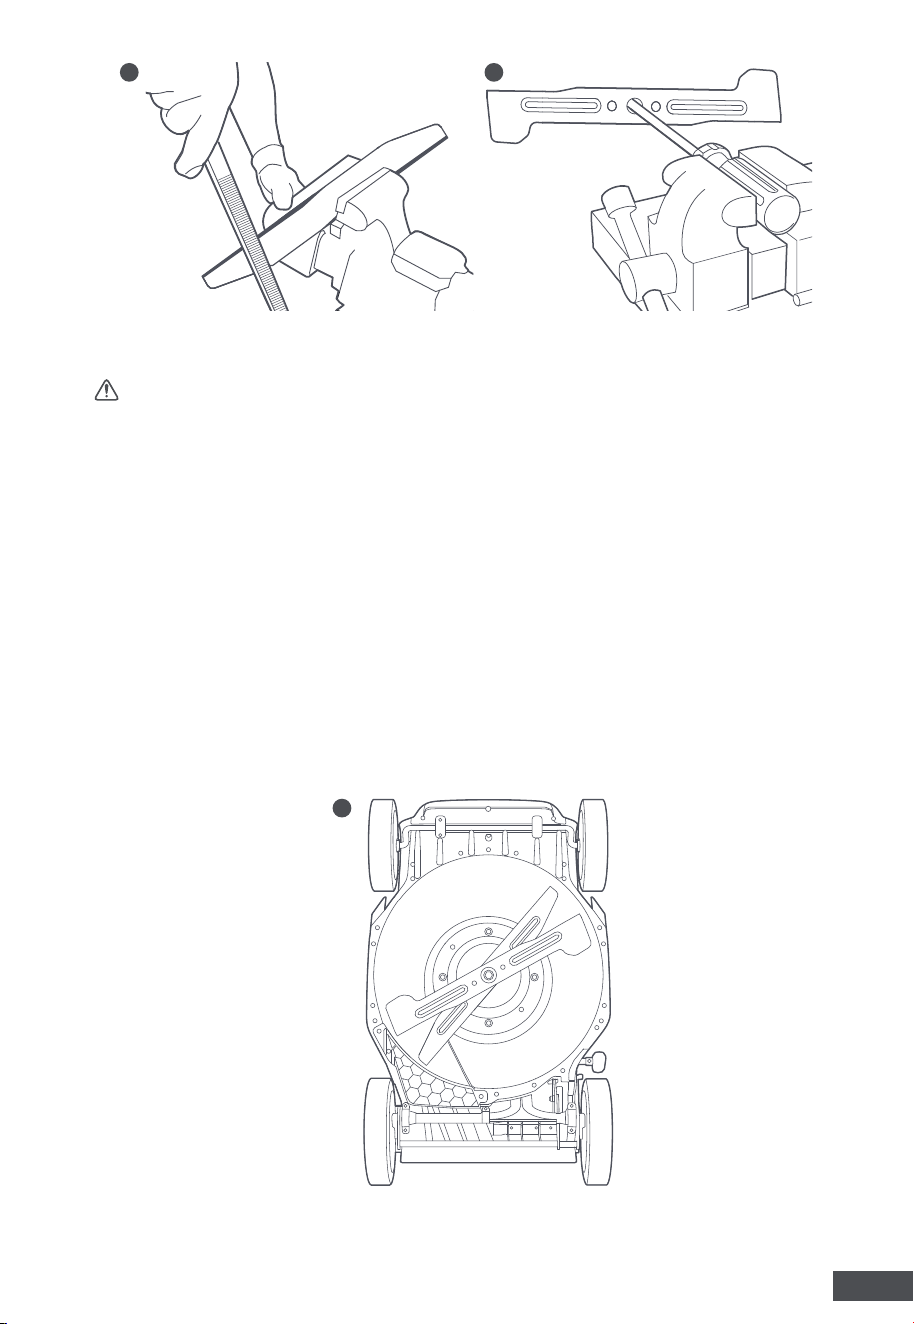
3. File the cutting edges of the blade in accordance with the original
angle with a flat file or a sharpening stone (Fig. 23).
4. To verify the balance of the blade: Secure a nail or a screwdriver
featuring a circular shaft in a level orientation. Arrange the blade in such
a manner that its center hole is suspended by the nail or the circular
shaft of the screwdriver, ensuring the blade is oriented horizontally.
Should any side of the blade tilt downwards, carefully subtract metal
from the end that appears heavier or descends lower, proceeding until
the blade achieves a state of balance (Fig. 24).
7.1 Blades Care
7 Maintenance
29
EN
WARNING:
Remove the battery pack from the mower before carrying
out any cleaning work.
NOTE:
It is essential to clean the underside of the mower deck after every
use. Neglecting this can lead to the accumulation of clippings, dirt, and
debris, which may cause rust and corrosion over time.
1. Fold the handle to the storage position.
2. Adjust the cutting height to position 6.
3. Stand the mower on end on a firm and level surface before doing
cleaning(Fig. 25).
4. Remove all grass clippings, leaves or debris from the mower deck.
5. Clean the mowing blade and the area around with a soft brush or a
damp cloth.
6. Avoid using solvents to clean the casing of the mower as most
commercial solvents will damage the plastic. Use clean cloth to
eliminate dust, dirt, grease, oil, and similar substances.
7.2 Cleaning
23
25
24
30
EN
Apply light oil as specified below at least once per season.
Key areas to lubricate:
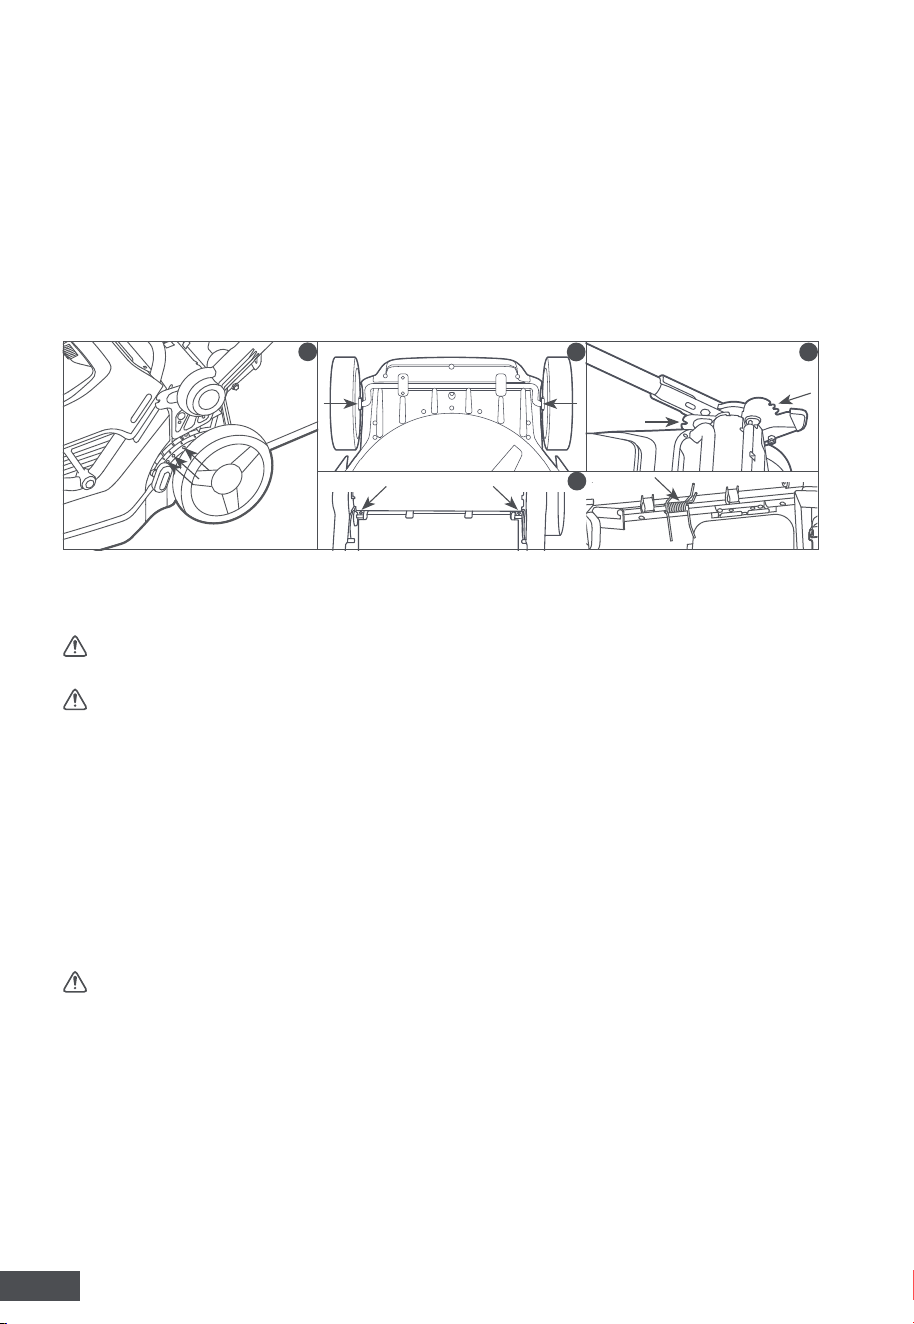
• Four wheel brackets (Fig. 26).
• Adjustment slots to securely lock the handle in both operating and
storage positions (Fig. 27).
• Pivots and torsion spring located at the rear discharge door (Fig. 28).
• Cutting height adjustment lever and 8 cutting height adjustment slots
(Fig. 29).
7.3 Lubrication
29
26
28
27
8 Transporting
WARNING:
Always remove the battery pack from the mower before
transporting.
CAUTION:
When moving the lawn mower by vehicle, ensure it is firmly
secured and positioned to avoid tipping over, impact, or damage. Utilize
ropes or straps to fasten the handles securely.
1. Fold the handle to the storage position.
2. To move the mower, hold the front handle with one hand and hold
the rear handle with the other hand. If possible, use two persons to
separately hold the rear and front handle.
9 Storing
WARNING:
Always remove the battery pack from the mower before
storage.
1. Keep the mower in a secure location away from children, pets, and
anyone who should not have access to it.
2. Thoroughly clean the mower deck to remove grass clippings and
debris.
3. Do not cover the lawn mower with heavy-duty plastic sheets as they
can trap moisture, and cause rust and corrosion.
For compact storage:
1. Detach the grass bag or the side-discharge chute.
31
EN
10 Disposal
To ensure environmental safety and compliance with legal regulations,
please do not dispose of the lawn mower and its accessories with regular
household waste. Refer to your local laws for proper machine disposal or
return it to a designated recycling center.
2. Lower the cutting height to its minimum setting, position 1.
3. Press the "quick adjust button" to adjust the handle to the storage
position.
4. Stand the mower vertically on its rear end.
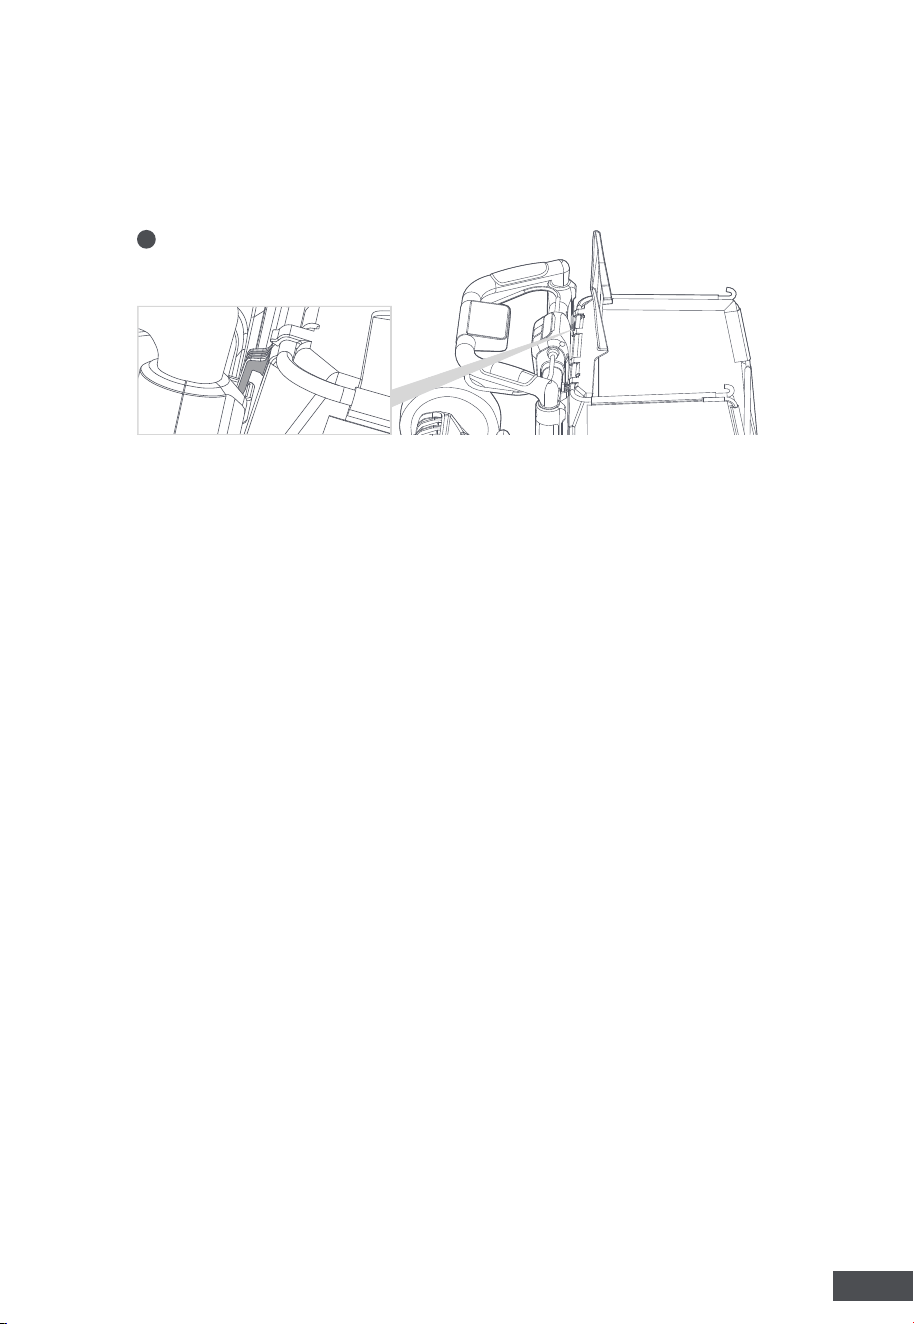
5. Hook the bottom of the grass bag onto the rear side of the mower
handle (Fig. 30).
30
32
EN
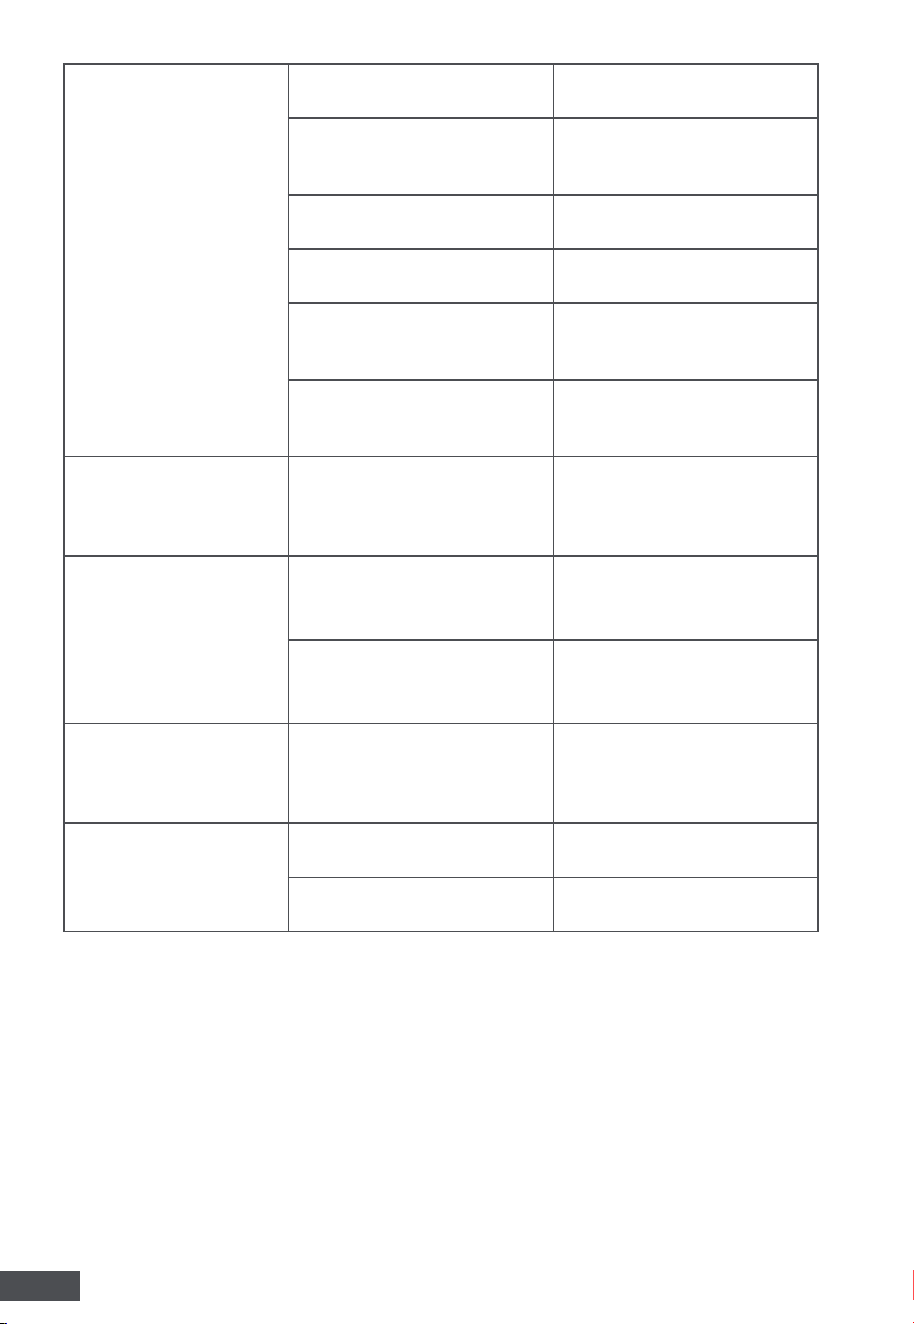
11 Troubleshooting
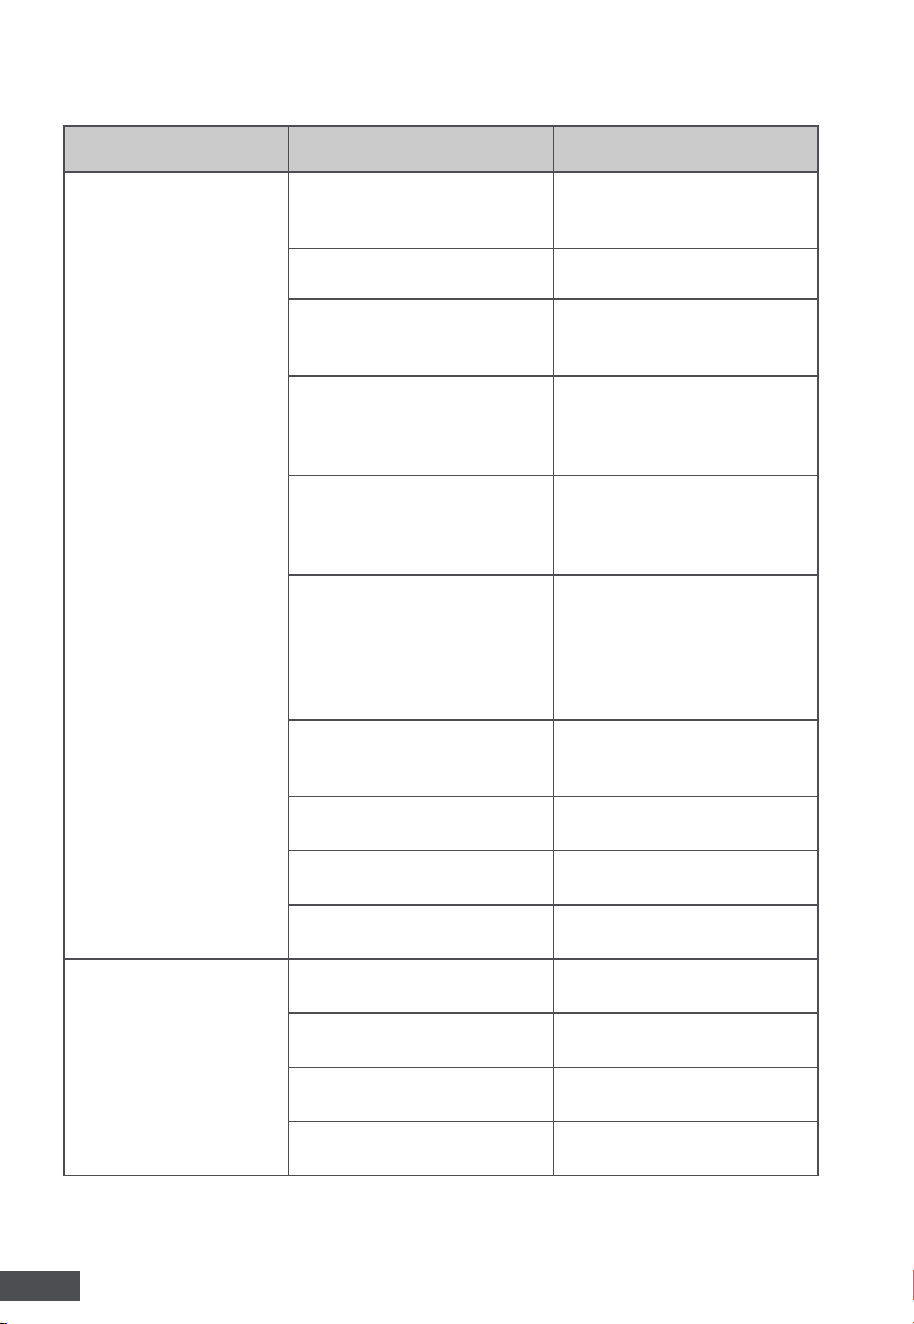
ISSUE CAUSE/ERROR CODE SOLUTION
The lawn mower / self-
Propelled system fails to
start.
The battery pack is not
attached or is attached
incorrectly to the tool.
Attach the battery pack
securely to the tool.
The battery pack is depleted. Charge the battery pack.
The handle is not locked in
an operating position.
Stop the mower and adjust
the handle to an operating
position.
The mower deck is blocked
with grass clippings, dirt, or
debris. (Error code E06)
Stop the mower, remove the
battery pack, and clean the
deck. Ensure blades rotate
freely.
The self-Propelled feature is
not activated.
Press the "power button"
to turn on the LED screen.
Press the "AI button" until
the "AI icon" appears.
The power button is pressed
and held while both self-
Propelled speed control
zones are simultaneously
pressed on. The screen will
begin to flash.
Release control zones and
the screen will stop flashing.
Then, place both hands on
the self-Propelled speed
control zones again to
activate the feature.
The battery pack is
overheated.
(Error code E01)
Allow the battery pack to
cool below 65°C (149°F).
The tool is overheated.
(Error code E07)
Allow the tool to cool below
65°C (149°F).
Battery pack malfunction
(Error code E11)
Please contact MOVA
Customer Service for help.
Tool malfunction
(Error code E13/E14/E15/E16)
Please contact MOVA
Customer Service for help.
The mower does not cut
evenly.
The blade is dull.
Sharpen or replace the
blade.
The cutting height is not set
properly.
Raise the deck to a higher
cutting-height position.
The blade is not installed
correctly.
Reassemble the blade. Refer
to
Section 4.1.
The blade speed mode is not
set properly.
Select the proper blade
speed mode.
33
EN
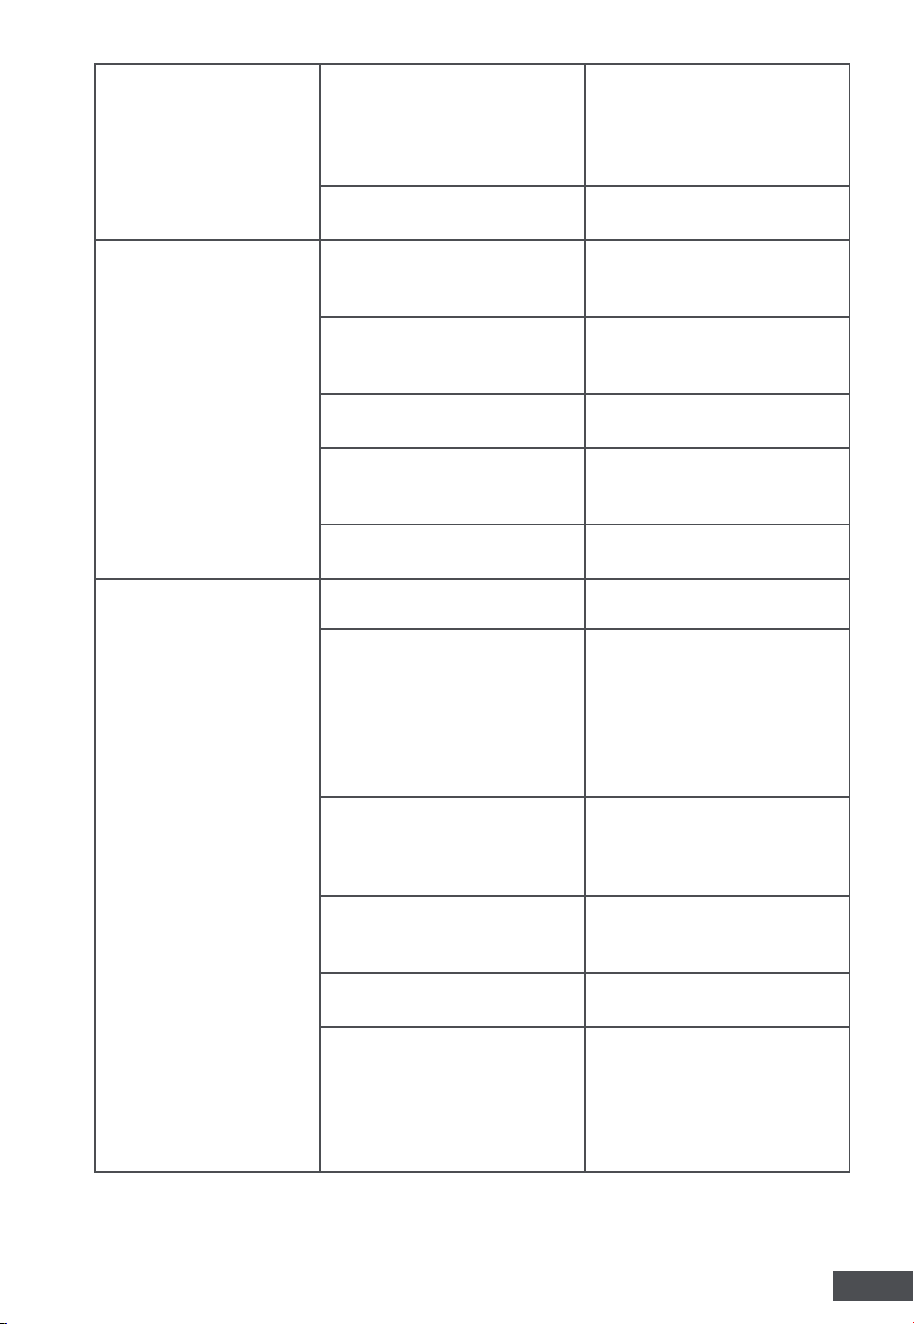
Short runtime with the
included battery.
The stated runtime is an
estimate based on light load
conditions; actual battery life
will vary with grass thickness
and cutting height.
Raise the cutting height and
slow your pace to reduce the
cutting load.
The blade speed mode is not
set properly.
Select a slower blade speed
mode.
The mower does not
mulch properly.
Wet grass clippings are
sticking to the underside of
the deck.
Clean the mower deck.
Always mow when the grass
is dry.
The mower cuts too much
grass at once, cause
overloading.
Raise the deck to a higher
cutting-height position.
The blade speed mode is not
set properly.
Select lower blade speed.
Airflow system overloaded
(Error code E04)
Remove the battery pack for
several minutes, then restart
the mower.
Airflow system malfunction
(Error code E14)
Please contact MOVA
Customer Service for help.
The lawn mower stops
unexpectedly during
operation.
The battery pack is depleted. Charge the battery pack.
The mower is overloaded.
(Error code E06)
Stop the mower, remove the
battery pack. Check for grass
clippings, dirt, or debris
under the mower deck, and
clean it if necessary. Raise
the cutting height or slow
down the mowing speed.
The mower deck is blocked
with grass clippings, dirt, or
debris. (Error code E06)
Stop the mower, remove the
battery pack, and clean the
deck. Ensure blades rotate
freely.
The battery pack is
overheated.
(Error code E01)
Allow the battery pack to
cool below 65°C (149°F)
The tool is overheated.
(Error code E07)
Allow the tool to cool below
65°C (149°F)
The front of the mower is
excessively tilted .(Error code
E09)
For safety reasons, avoid
operating the mower in this
condition. Instead, reduce
the tilt by adjusting the
lifting angle or place the
machine flat on the ground.
34
EN
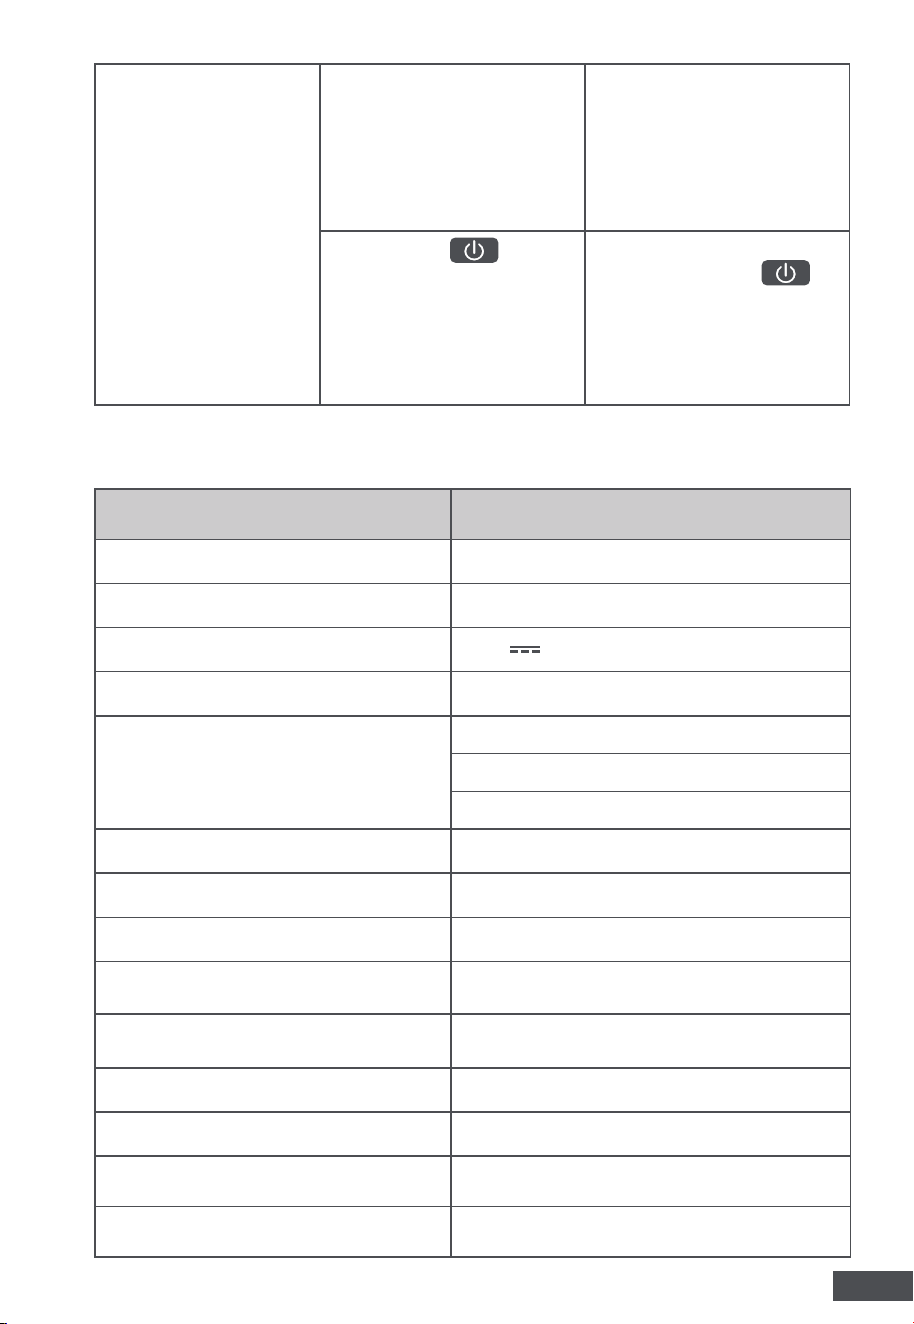
The lawn mower
vibrates excessively.
The cutting blades are not
securely fastened.
Tighten the blade nuts.
The cutting blades are out of
balance.
Keep the cutting blades
balanced. Refer to
Section
7.1 .
The cutting blades are bent
or deformed.
Replace the blades.
The motor shaft is bent.
Please contact MOVA
Customer Service for help.
The mower is overloaded.
Raise the cutting height
or slow down the mowing
speed.
The blade speed mode
does not match the grass
conditions.
Select the blade speed mode
to a lower setting.
The lawn mower is hard
to pull backward after
disengaging the self-
Propelled system.
Wheels are temporarily
locked.
Slightly push the mower
ahead or raise the rear
wheels and then try to move
the mower.
The mower becomes
harder to control while
navigating around
obstacles or mowing
back and forth when the
self-Propelled feature is
engaged.
Hub motors overloading
(Error code E05)
Remove the battery pack for
several minutes, then restart
the mower.
Hub motors malfunction
(Error code E15)
Please contact MOVA
Customer Service for help.
The motor works but
the blades doesn’t cut
the grass
The shaft bolt is not
sufficiently tightened.
Tighten the shaft bolt.
The recommended torque
specification: 36-43 ft-lb
(50-60 Nm).
The screen can not be
turned on.
The screen is in sleep mode.
Press the "power button" to
turn on the screen.
The screen malfunction.
Please contact MOVA
Customer Service for help.
35
EN
Failure to connect to the
APP.
Battery pack is out of
Bluetooth range.
Keep the battery pack within
10 m from the mobile device.
Insert the Bluetooth-paired
battery pack into the tool,
or insert the battery pack
first and then connect via
Bluetooth.
If holding the on the
battery pack for 2 seconds
(until the Bluetooth indicator
light flashes blue) does not
work, the battery pack or
tool may already be paired
with another account.
Press and hold the
for 4 seconds (until the
Bluetooth indicator light
flashes rapidly in blue) to re-
enter pairing mode.
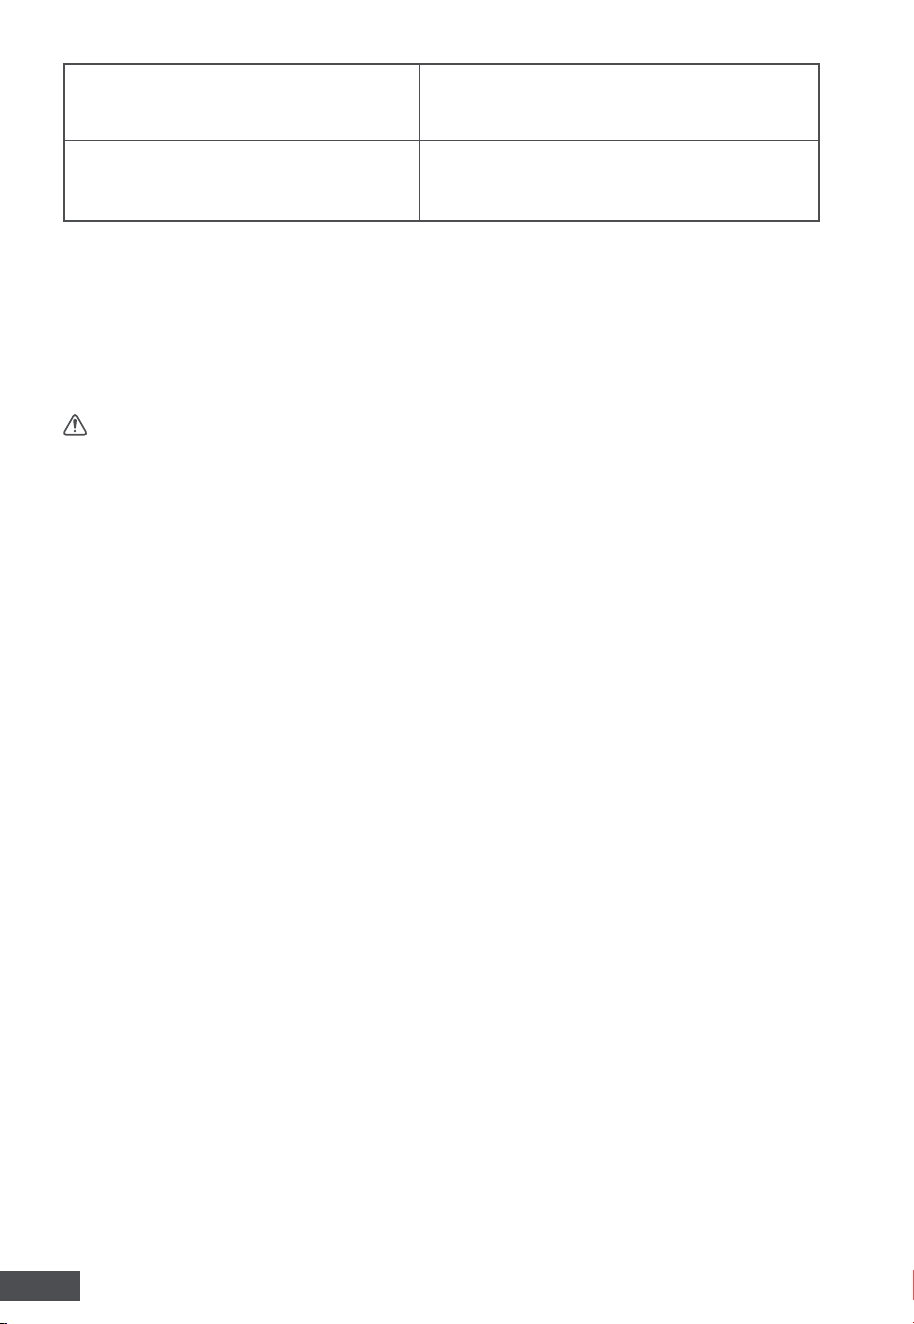
12 Specifications
Model GL620 / GL620X*
Product Name Lawn Mower
Brand MOVA
Voltage 60 V
Self-Propelled System Yes
No-Load Speed
ECO Mode: 2700 / min
NORMAL Mode: 2700-3000 / min
TURBO Mode: 2700-3200 / min
Grass Bag Volume 62 L
Cutting Height 20 mm - 100 mm
Cutting Capacity 47 cm
Mower Weight (without
battery&charger)
29 kg
Mower Dimensions (storage
position&cutting height:1)
1564(L) × 528(W) × 968(H) mm
Operating Tmeperature 0°C–40°C (32°F–104°F)
Storage Temperature -20°C–70°C (-4°F–158°F)
Measured Sound Power Level LwA
94.61 dB(A)
K=3.0 dB(A)
Sound Pressure Level at Operator's
Position LpA
82.2 dB(A)
K=3.0 dB(A)
36
EN
*X=0-999, A-Z may vary depending on the sales region or package
configuration, with no safety-related changes between these models.
NOTE:
The declared noise emission value(s) and vibration total value(s)
are measured in accordance with a standard test method, and may be
used both for comparing tools and for making a preliminary assessment
of exposure.
WARNING:
The noise and vibration emissions during actual use of the
power tool may differ from the declared value(s), depending on how the
tool is used. To protect the operator, hearing protection and gloves should
be worn under actual working conditions.
Guaranteed Sound Power Level LwA
(measured according to 2000/14/
EC)
96 dB(A)
Valuation Value
Left handle: 0.580 m/s²
Right handle: 0.652 m/s²
K=1.5 m/s²

Manufacturer: Lawnix Technology (Nanjing) Co., Ltd.
Address: Room 501-510, 5/F, Block E (Building 2), No.10 Mozhou East Road,
Jiangning Development Zone, Jiangning District, Nanjing, Jiangsu Province, P.R.China
Join our official Facebook group
where you can discuss your questions with
other fellow users.
Made in China

