(This version serves as a general instruction manual; please refer to
the product-specific manual according to the characteristics of the
product.
Thank you for purchasing our product. To ensure correct usage and your
safety, please read this instruction manual thoroughly before use and
retain it for future reference.
1. Pull firmly to remove the
damaged propeller, replace it with a
new one, then push it in with firm
yet careful pressure.
2. Each propeller blade bears a
letter; match the blades to the
corresponding letters on the drone.
If the battery is punctured, damaged or misused, there
is a risk of fire and personal injury.
1. Pull firmly to remove the
damaged propeller, replace it with a
new one, and push it in firmly but
carefully.
2. Each propeller blade bears a
letter; match the blades to the
corresponding letters on the drone.
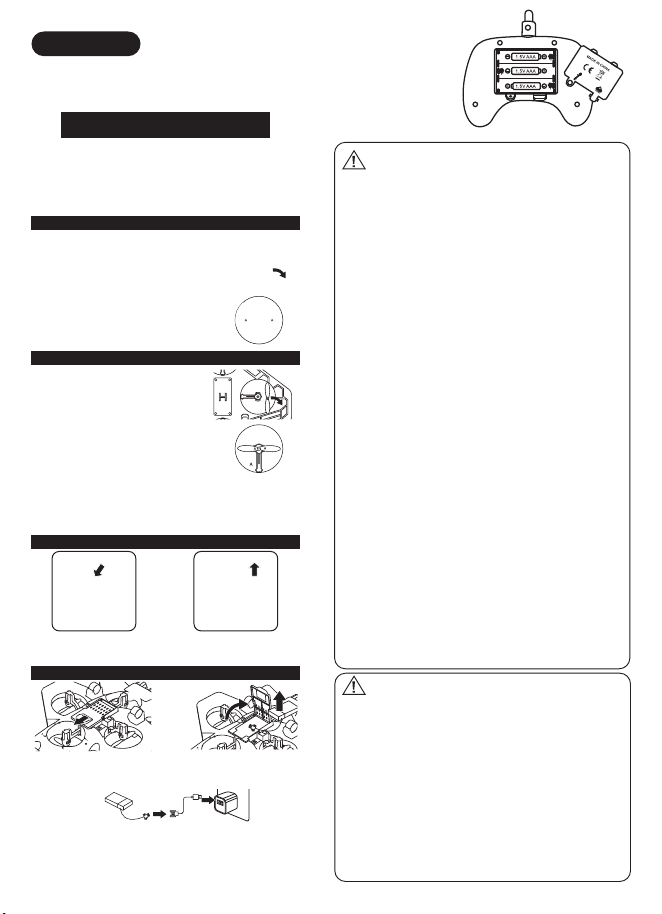
(Refer to the instruction manual according to the product's
characteristics)
Slide upwards as shown
to open the battery
compartment.
Open the battery
compartment and insert
three 1.5V “AAA”
batteries as shown in the
diagram.
Disconnect the power
supply connector and
remove the battery.
Slide upwards as shown
to open the battery
compartment.
Disconnect the power
supply connector and
remove the battery.
(Refer to the instruction manual according to the product's
characteristics)
Insert the USB connector of the charging cable into a USB port
(or use a power adapter with 5V-2A output), and connect the
other end of the cable to the battery socket. During charging, the
indicator light on the cable will remain illuminated; once charging
is complete, the light will turn off.
(This product is for indoor use
only)
How to Replace a Propeller
Rechargeable Battery Warning
(Replaceable Battery)
Battery Warning
Charging/Battery
Drone
remote control
Battery
cover
• Do not disassemble, crush, incinerate, or use
short-circuited batteries.
• Do not expose batteries to extreme temperatures or
humidity.
• Keep away from flammable materials and direct sunlight.
• Charge only using the supplied charger, cable, or
adapter.
• Batteries must be charged by adults only.
• Adult supervision is required during charging.
• Allow batteries to cool to an appropriate temperature
before charging.
• Should the battery become hot, swell, emit smoke or
produce a strong odour, cease charging immediately
• Charge on a non-flammable surface, away from
combustible materials
• Regularly inspect the battery charger, power cord, plug,
casing and other components used with this product for
damage. Should any damage be observed, the product
must not be used until the damage has been repaired
• Remove the battery (if removable) before storage
• Dispose of or recycle batteries in accordance with local
regulations
• Batteries or battery packs must not be disassembled,
crushed, punctured, opened, or otherwise damaged
• Seek immediate medical attention if a battery is
swallowed
• If electrolyte comes into contact with skin or eyes, rinse
immediately with fresh water for at least 15 minutes and
seek immediate medical attention
• Store batteries in their original packaging, away from
metallic objects that could cause a short circuit
• Avoid dropping batteries or subjecting them to severe
mechanical impact.
• Keep batteries or battery packs clean and dry during use
and storage. If metal terminals become soiled, wipe
them with a soft, dry cloth.
• Charge the battery or battery pack before use.
• For optimal performance, the battery or battery pack may
require two or three charge-discharge cycles upon initial
use or after prolonged storage.
• Unless otherwise specified by the manufacturer, charge
the battery or battery pack at temperatures between
15°C and 30°C.
• Retain the original product documentation for future
reference.
• Do not mix new and old batteries
• Do not mix alkaline batteries, standard batteries
(carbon-zinc batteries) or rechargeable batteries
• Use alkaline batteries only (use batteries of the specified
voltage only)
• Insert batteries with correct polarity. Use under adult
supervision. Replace batteries and recharge them (if
applicable)
• Do not attempt to recharge non-rechargeable batteries
• Do not short-circuit the battery terminals
• Do not dispose of batteries in fire; they may explode or
leak
• Remove batteries before storage
• Recycle or dispose of batteries in accordance with local
regulations
• Retain these instructions for future reference
Overdrive gear
No functionality
Headless mode
Short press to
reset
Long press for
emergency
stop
X1 Propeller Replacement
X1 How to remove the battery
X2/X3 How to remove the battery
X2/X3 Propeller Replacement
12 AGES AND UP
Multi-purpose
aircraft
21
The aircraft is marketed as a "toy drone"
intended for children's entertainment use; it
must not be used for any other purpose that
could compromise U.S. national security.
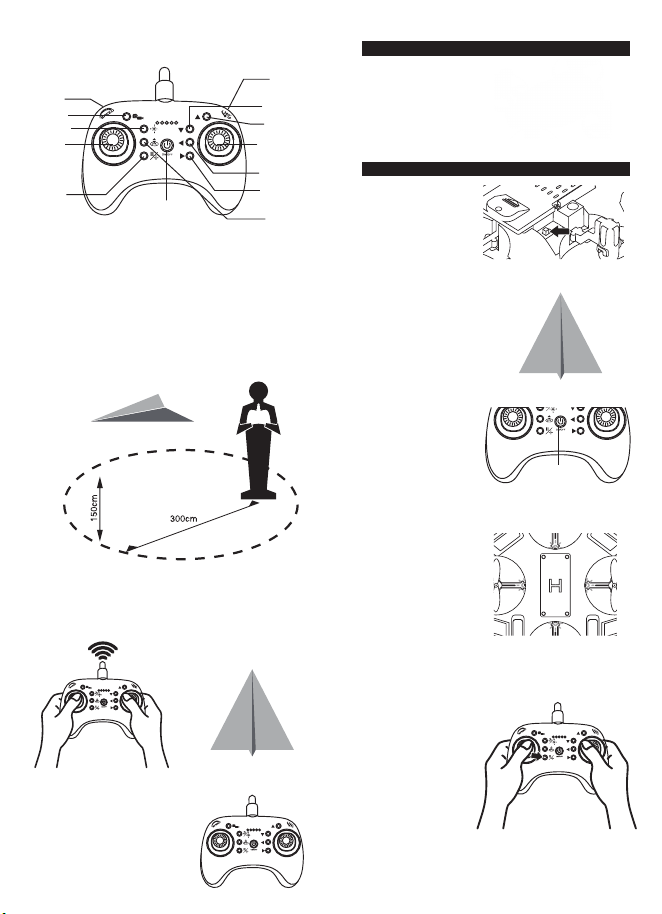
1. Read all warnings and instructions
2. Install the drone and remote controller batteries
3. Ensure the drone and remote controller are powered off
4. Charge the batteries
1. Ensure the remote control is switched off.
2. Insert the battery to power on and start.
2. Switch on the drone
3. Place the drone on a flat surface.
4. Switch on the remote control to
automatically synchronise
frequencies.
5. The drone's indicator light will
flash during pairing and remain
steady once pairing is complete.
6. Calibrate the drone (calibrate
the drone when it flies erratically
or veers off course)
Place the drone flat on the
ground. Open the remote
controller. Before take-off, briefly
press the reset button until the
aircraft lights transition from rapid
flashing to steady illumination.
The drone calibration is now
complete.
Before retrieving or handling the drone, ensure the remote
control is switched off to prevent accidental activation of the
propellers.
(Refer to the instruction manual according to the product's
characteristics)
Overview
Drone Operating Manual
1. Pre-flight inspection
2. Select location
3. Pairing drones
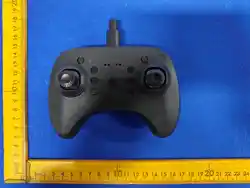
Overdrive gear
Switch
No functionality
Headless mode
Throttle
Short press to
reset
Long press for
emergency
stop
360-degree roll
Fine-tune
backwards
Fine-tune
forwards
Directional control
stick
Fine-tune left
Fine-tune right
One-touch
take-off
One-touch
landing
X1 Power-On Method
X2/X3 Power-On Method
Switch
321
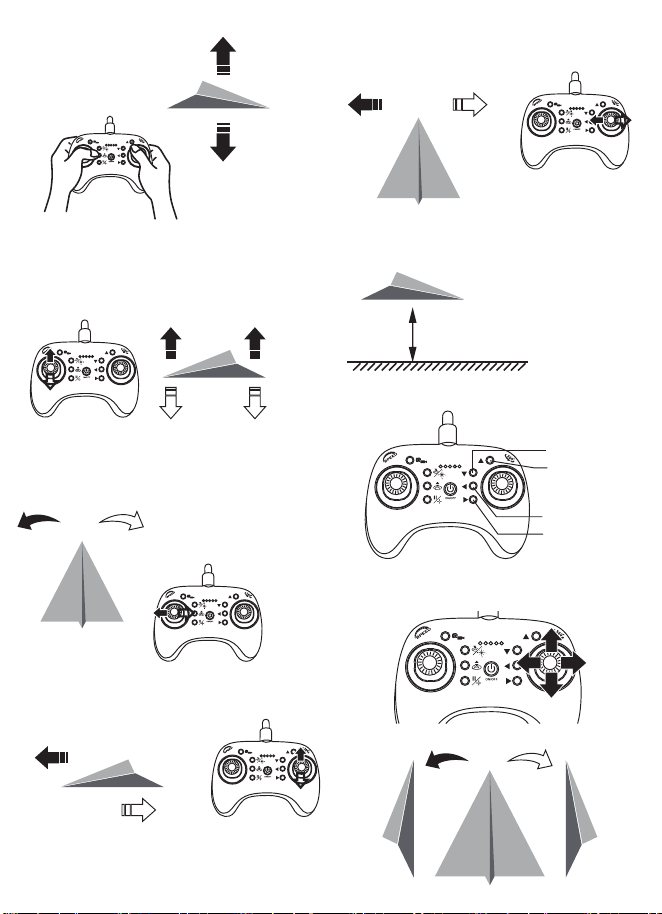
1. 360° rotation.
2. Fine-tuning
Hover the drone at least
three metres above the
ground.
Fine-tune backwards
Fine-tune forwards
Fine-tune left
Fine-tune right
3. Press down on the directional stick and move it left or right, or
forward or backward, to make the drone roll left, right, forward or
backward (sufficient power must be available for the roll manoeuvre to
be executed).
Advanced Mode
Press the one-touch
take-off and landing
button,
to initiate automatic
take-off and landing.
One-touch take-off and
landing
Operational Guide
Hovering above and below
Turning left and turning right
Forward and backward
horizontal
3m
432
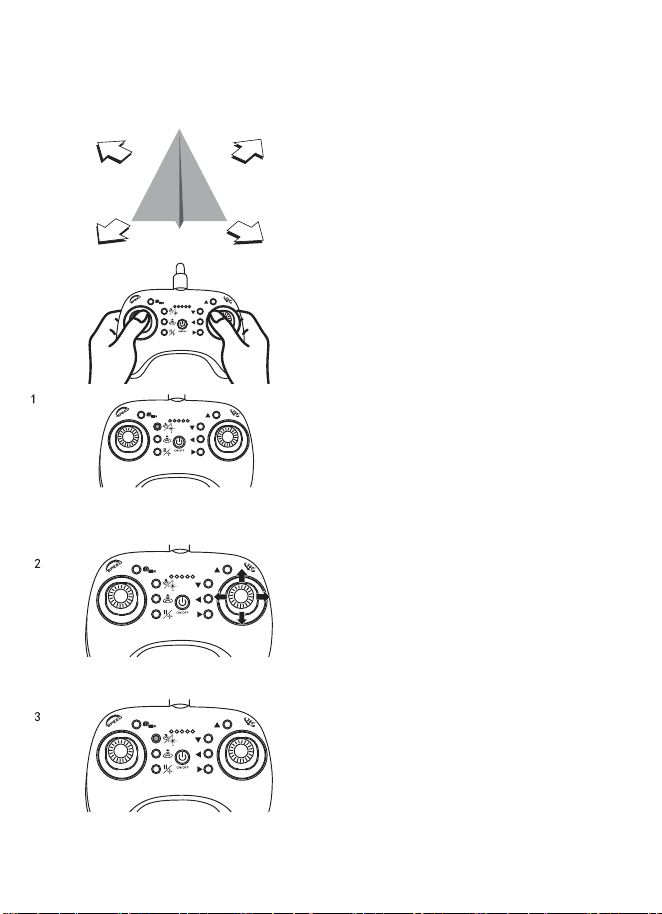
Pushing to the right will cause the drone to move away from the user;
pushing to the left will cause it to move to the left, and so forth.
Press the headless mode button to exit the mode.
When the drone is in headless mode, regardless of which direction the
drone is facing, it will orient itself towards the user (the remote
controller).
Press the headless mode button briefly; the remote control will emit a
beep every 6 seconds, indicating it is in automatic positioning mode.
Automatic orientation
Warning: Alterations or modifications to this apparatus without the
explicit approval of the responsible party may invalidate the user's right
to operate the equipment.
Prompt
Troubleshooting
When switching on the remote control, the indicator
light does not illuminate.
Remote power indicator flashing during flight:
1. Check whether the batteries in the remote control are correctly installed
2. Replace with new batteries
1. Remote battery power is low; land the drone immediately.
2. Replace the nine-point battery.
The drone controller has been paired correctly, but
the drone will not take off.
The drone battery requires charging; connect the drone battery to a power
source using the USB charging cable.
After fine-tuning the drone, its flight became highly
unstable and it was unable to operate normally:
1. One or more propellers may be damaged. Replace with suitable
propellers and attempt flight again.
2. Briefly press the reset button. The remote control will emit two beeps,
resetting the gyroscope.
3. Switch off both the drone and remote control, then re-pair the drone.
The remote control and drone cannot be paired.
The remote controller must remain within three metres of the drone.
Note: If multiple unpaired drones are present within three metres, one must
be successfully paired first before pairing additional drones.
• Do not crash the drone into sand or mud, as its gears
may become obstructed.
• When first learning to fly, practise take-offs and rotations.
• Maintain a distance of at least ten metres from walls and
buildings
• Following a crash or if propellers become obstructed,
always depress the throttle control stick fully to the
bottom
• Never operate the drone over or near people, as sudden
wind shifts or other circumstances may cause accidental
crashes
• Exercise caution when piloting the drone, comply with
relevant laws, and respect others' privacy and property
rights
• Do not modify the drone or use it for any purpose
beyond its intended application
543

Safety Guidance Notes
1. Keep small aircraft components out of reach of children.
2. This aircraft possesses considerable power. During initial flight, to prevent unnecessary collisions
or injury caused by excessive ascent, ensure the left control stick is moved slowly.
3. When concluding flight operations, first switch off the remote controller's power switch, then switch
off the aircraft's power switch.
4. Do not expose the aircraft battery to high temperatures or place it near flammable or explosive
materials.
5. To ensure safety and prevent injury, maintain a distance of 4.5 metres between the aircraft and
people or animals.
6. This aircraft is suitable for persons aged 12 years and above. Ensure safe operation within the
operator's (instructor's) line of sight.
7. If the remote controller uses non-rechargeable batteries, do not attempt to charge them. The
aircraft must be operated exclusively with its original factory-supplied battery.
8. When the aircraft is not in use for extended periods, remove the batteries from both the aircraft
and the remote controller.
9. Avoid causing short circuits during the charging process.
10. If the aircraft will not be used for more than 10 days, discharge the aircraft battery to 40-50%
capacity (achieved by flying for half the duration of a full charge). This will significantly extend the
battery's lifespan.
11. To prevent injury, maintain a safe distance from rotating propellers.
12. To comply with national aviation radio (station) electromagnetic environment regulations, remote
control radio operation is prohibited within 5000 metres of airport runways. All operators must also
adhere to broadcasting regulations established by certification bodies and relevant regulatory
authorities, including flight time and area restrictions.
13. Assemble the drone under adult supervision.
14. Operators bear responsibility for safe flight and maintaining safe distances. Do not hover over
crowds exceeding 12 persons.
15. Safety measure checklist: Emergency propeller rotation halt mechanism – Should the drone
collide or fall during flight, depress the left control stick fully to activate the emergency propeller
rotation halt function.
Safety Guidelines
1. The use of lithium batteries carries inherent risks and may cause significant harm to persons and
property. Exercise caution and assume full responsibility for all associated liabilities.
2. Should the battery leak, avoid contact of the liquid with skin or eyes. If skin contact occurs, wash
immediately with soap and water. If eye contact occurs, flush immediately with copious amounts of
cold water and seek medical attention.
3. Should the charger emit a suspicious odour, abnormal noise, or smoke, disconnect the power
supply immediately.
4. Do not charge swollen, leaking, or damaged batteries.
5. Avoid overcharging. Once the battery is fully charged, disconnect the charger.
6. Do not charge near flammable materials (such as carpets, wooden floors, solid wood furniture,
etc.) or on conductive surfaces. Keep the battery within sight during charging.
7. Never charge a battery immediately after use if it remains hot.
8. Batteries should be charged within a temperature range of 0°C to 40°C (32°F to 104°F).
Performance is impaired in cold conditions; storage, transport, or use in low temperatures is not
recommended.
9. Non-rechargeable batteries must not be charged.
10. Charging must be supervised by an adult.
11. Do not mix different battery types or new and used batteries.
12. Remove depleted batteries from the toy.
13. This toy contains non-replaceable batteries.
Safety Precautions
654

1. When operating a drone, ensure the operator (yourself) is alert and fully conscious, and not under
the influence of alcohol, drugs, or other substances. Furthermore, refrain from flying if you
experience dizziness, fatigue, nausea, or any other health condition that may compromise
operational safety.
Operator Health Precautions
1. Safe Handling of Energy Storage (Batteries)
- When installing or replacing batteries, ensure correct polarity and avoid using damaged or incompatible batteries.
- Use the original charging cable when charging. Avoid charging near flammable materials and ensure the charging
environment temperature is between 0°C and 40°C.
- Disconnect the power supply immediately after charging is complete to prevent overcharging.
- Cease use and dispose of batteries promptly if swelling, leakage, or other abnormalities occur.
2. Cleaning and Maintenance:
- Regularly clean the drone's exterior and propellers to ensure no dust, dirt, or foreign objects remain on the equipment.
- Inspect all sections of the drone, particularly moving parts and connection points, to verify no damage exists.
3. Pre-flight Calibration:
- Before powering on the drone and remote controller, ensure the drone is placed on a level surface.
- Perform one-touch calibration and frequency pairing as per the manual to ensure accurate flight orientation.
4. Plug and Protective Cover Usage:
- When using or storing the remote controller and other accessories, protect electronic interfaces and plugs from dust
and moisture.
5. Selection of Flight Environment:
- Choose open, unobstructed areas for flight operations, avoiding densely populated zones or locations frequented by
wildlife.
- Refrain from flying during extreme weather conditions, such as strong winds, rain, snow, or extreme temperatures.
Ground Services - Related Guidelines
1. Packaging for the drone and remote controller:
- Utilise the original packaging materials or equivalent protective materials to secure the drone and remote controller,
preventing impact or pressure damage during transit.
- Ensure every component of the drone and remote controller is firmly secured to avoid damage caused by movement.
2. Safe transport of batteries:
- Remove batteries from the drone and store them separately in fireproof and explosion-proof packaging.
- Avoid exposing batteries to extreme temperatures or direct sunlight to prevent overheating.
- Comply with local transport regulations, particularly those concerning lithium batteries.
3. Storage environment:
- Store the drone and remote controller in a dry, clean environment at a suitable temperature, avoiding damp or extreme
temperature conditions.
- The storage area should be distant from any potential heat sources, such as heaters or direct sunlight, to prevent
material degradation or equipment damage.
4. Long-Term Battery Storage:
- If batteries are unused for extended periods, maintain their charge level at approximately 50%, avoiding fully charged or
fully discharged states.
- Periodically inspect stored batteries, performing a full charge and discharge cycle at least every three months to
maintain battery health and safety.
5. Inspection and Maintenance:
- Regularly examine stored drones and remote controllers for any signs of physical damage or functional abnormalities.
- Ensure all connections and interfaces remain clean and free of dust to prevent corrosion or poor contact during
extended storage.
The transport and storage of drones, equipment for
remotely controlling drones, and batteries.
1. The maximum flight altitude of the drone may reach 30 metres above the take-off point. Upon reaching this height, the
system will automatically prevent further ascent, though operation in other directions remains possible. During flight,
environmental factors or signal interference may cause the drone to lose control and descend uncontrollably, making it
difficult for the pilot to effectively command ascent or other manoeuvres, thereby increasing flight safety risks. To ensure
safety and prevent loss of the drone, users must fully understand and adhere to the 30-metre altitude restriction prior to
operation.Please remain mindful of your surroundings and operate within areas of strong signal reception to minimise
flight hazards.
2. Drone response upon remote controller disconnection:
- The drone's indicator lights will commence flashing, followed by a gradual descent.
Loss of command and control link:
765

Post-flight operation
- To ensure the safety and performance of the drone after each flight,
the operator must conduct a thorough visual inspection, including
checking the battery and all critical components. Detailed inspection
steps are as follows:
1. Battery Inspection:
- Visual Inspection: Remove the battery and carefully examine the casing for signs of damage,
deformation, leakage, or swelling.
- Tactile Inspection: Gently touch the battery surface to check for abnormal temperatures
(overheating or excessive cold).
- Connector Inspection: Examine the battery connectors and wiring to ensure they are intact, with no
signs of looseness or poor contact.
- Charge Level Check: Verify remaining charge is normal using a battery meter or the drone's built-in
charge display function.
2. Airframe Inspection:
- Visual Inspection: Check the drone's airframe for cracks, scratches, or other physical damage,
particularly around the fuselage, landing gear, and propeller mounting points.
- Structural Integrity: Gently shake the drone to detect loose components or unusual sounds,
ensuring structural stability.
- Sensor and Camera Inspection: Examine the surfaces of the drone's sensors and cameras to
ensure they are clean and free from scratches or other damage, guaranteeing proper operation.
3. Propeller Inspection:
- Visual Inspection: Check the propellers for cracks, bends, or other damage. Replace any damaged
propellers immediately.
- Mounting Inspection: Ensure the propellers are securely mounted without any looseness. Verify that
the propeller locking mechanism functions correctly.
4. Motor Inspection:
- Visual Inspection: Visually examine the motor casings for any signs of damage or deformation.
Rotational Check: Gently rotate each motor by hand to verify smooth operation without binding or
abnormal noises.
5. Wiring and Connector Inspection:
- Visual Inspection: Examine all internal and external wiring and connectors for breaks, damage, or
loose connections.
- Connector inspection: Verify all connectors are securely fastened with no signs of looseness or
poor contact.
6. Remote Control Inspection:
- Visual inspection: Check the remote control casing for damage or cracks.
- Functional Check: Power on the remote controller and verify all buttons and control sticks operate
correctly, ensuring proper communication with the drone.
Summary:
By adhering to the detailed inspection procedures outlined above, operators can ensure the safety
and performance of the drone after each flight.
Regular visual inspections facilitate the early detection of potential issues, enabling timely
maintenance and repairs, ultimately extending the drone's operational lifespan.
76 8

According to the European Union Regulation (EU) 2019/947, operators
should be fully aware of the following main risks and take the
necessary measures to ensure safety
1. Ensure the safety of the UAS during maintenance operations.
1.1 Regular Inspection.
-Regularly inspect and test key components of the UAS, such as batteries, motors, propellers, and
control systems.
-Perform basic checks before and after each flight to ensure the UAV is in good working condition.
1.2 Battery Maintenance.
-Check batteries regularly for signs of expansion, leakage, or damage and replace any faulty
batteries promptly.
-Avoid overcharging or overdischarging the battery and follow the manufacturer's charging
guidelines.
1.3 Hardware Maintenance.
-Check and tighten all screws and connectors to ensure structural stability of the drone.
-Clean the exterior and sensors of the UAV to prevent dust and debris from affecting its performance.
2.Ensuring the safety of the UAS during transport: -The UAS and its accessories should be packed
in a safe place.
-The UAS and its accessories should be packaged in strong, appropriate protective packaging to
prevent mechanical damage during transport
-Use shock-absorbing materials (e.g. foam or bubble wrap) inside the packaging to reduce vibrations
and shocks that could damage the UAS.
-Ensure that batteries are stored safely and transported separately from the drone to prevent
short-circuiting or overheating during transport.Avoid transporting the drone and battery in extreme
temperature conditions to prevent damage due to high or low temperatures.
-Prevent the drone from coming into contact with moisture or water to prevent short-circuiting or
corrosion.
3. Ensure the safety of the UAS during shelf storage: -UAS should be stored in a dry and
well-ventilated environment.
-UAS should be stored in a dry, well-ventilated environment, avoiding humidity, high temperature and
direct sunlight.
-Storage areas should be kept away from flammable and explosive materials and chemicals.
-Batteries should be stored separately from the UAS to avoid over-discharging or charging.
-Charge the battery to approximately 50% before long-term storage to extend its life.
Caveats:
1. This product must be assembled by an adult and used under his/her direct supervision.
2. Short-circuiting the power terminals is prohibited.The transformer or battery charger should be
inspected periodically to ensure that there is no damage to the power cord, plug, case or other
components.If damage is found, it must be repaired before use.
3. This toy can only be connected to devices with any of the following markings:
4. Keep the packaging and the instructions: both contain important information and should be kept in
a safe place for reference.
5.Tat the toy shall be used with caution since skill is required in order to control theflight and avoid
collisions with the user, objects or third parties.
6."Do not touch the rotating rotor, avoid loose clothing or hairthat could be caught in the rotor, do not
fly near the face”.
7.It is recommended that adult supervisors guide children in safe flight and operation of the toy.
7 8

FCC Warning:
This device complies with part 15 of the FCC Rules. Operation is subject to the following two
conditions:
(1) This device may not cause harmful interference, and
(2) this device must accept any interference received, including interference that may cause
undesired operation.
Any Changes or modifications not expressly approved by the party responsible for compliance could
void the user's authority to operate the equipment.
Note: This equipment has been tested and found to comply with the limits for a Class B digital
device, pursuant to part 15 of the FCC Rules. These limits are designed to provide reasonable
protection against harmful interference in a residential installation. This equipment generates uses
and can radiate radio frequency energy and, if not installed and used in accordance with the
instructions, may cause harmful interference to radio communications. However, there is no
guarantee that interference will not occur in a particular installation. lf this equipment does cause
harmful interference to radio or television reception, which can be determined by turning the
equipment off and on, the user is encouraged to try to correct the interference by one or more of the
following measures:
-Reorient or relocate the receiving antenna.
-Increase the separation between the equipment and receiver.
-Connect the equipment into an outlet on a circuit different from that to which the receiver is
connected.
-Consult the dealer or an experienced radio/TV technician for help.
RF warning for Portable device:
The device has been evaluated to meet general RF exposure requirement. The device can be used
in portable exposure condition without restriction.
7
9