
User manual
SV12 JN.00000 PN.000000-00-00
00.00.00 VERSION NO.01
Contents
In the box
Getting started
The LCD screen
Download the MyDyson™ app
Getting started on the MyDyson™ app
Emptying your bin
Cleaning your bin
Washing the Fluffycones™
cleaner head
Washing the filter
Cleaning your tools
Clearing blockages
Clearing blockages from your
Hair screw tool
Disassembling your machine
Looking after your machine
Dyson logo
Dyson PencilVac Logo.
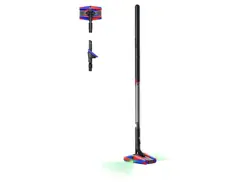
Dyson PencilVac cleaner with
Fluffycones cleaner head
Additional tools available.
Rotating combi-crevice tool Hair screw tool
Charger
Your machine is boxed in 3 parts:
1. Machine body
2. Battery
3. Cle ane r hea d / too ls
Simply attach the battery to the main body and then the cleaner
head / tool to the other end of the main body.
One-piece charger with plug,
connector and cable. Charges
your machine through the dock.
Dyson PencilVac™ cleaner charges on
the dock, ready for your next clean.
Magnetic charging dock
Our recommendation
Keep the charging jacks (on the charger and charging dock) away from
conductive materials such as carbon fiber.
Disconnect the charger from the mains before cleaning.
Battery
Fluff ycones™ cleaner head
Machine body
In the box
Diagram of
machine charger.
Illustrations of the
Dyson PencilVac
battery, machine
body and
cleaner head.
Diagram of
charging dock.
click
click
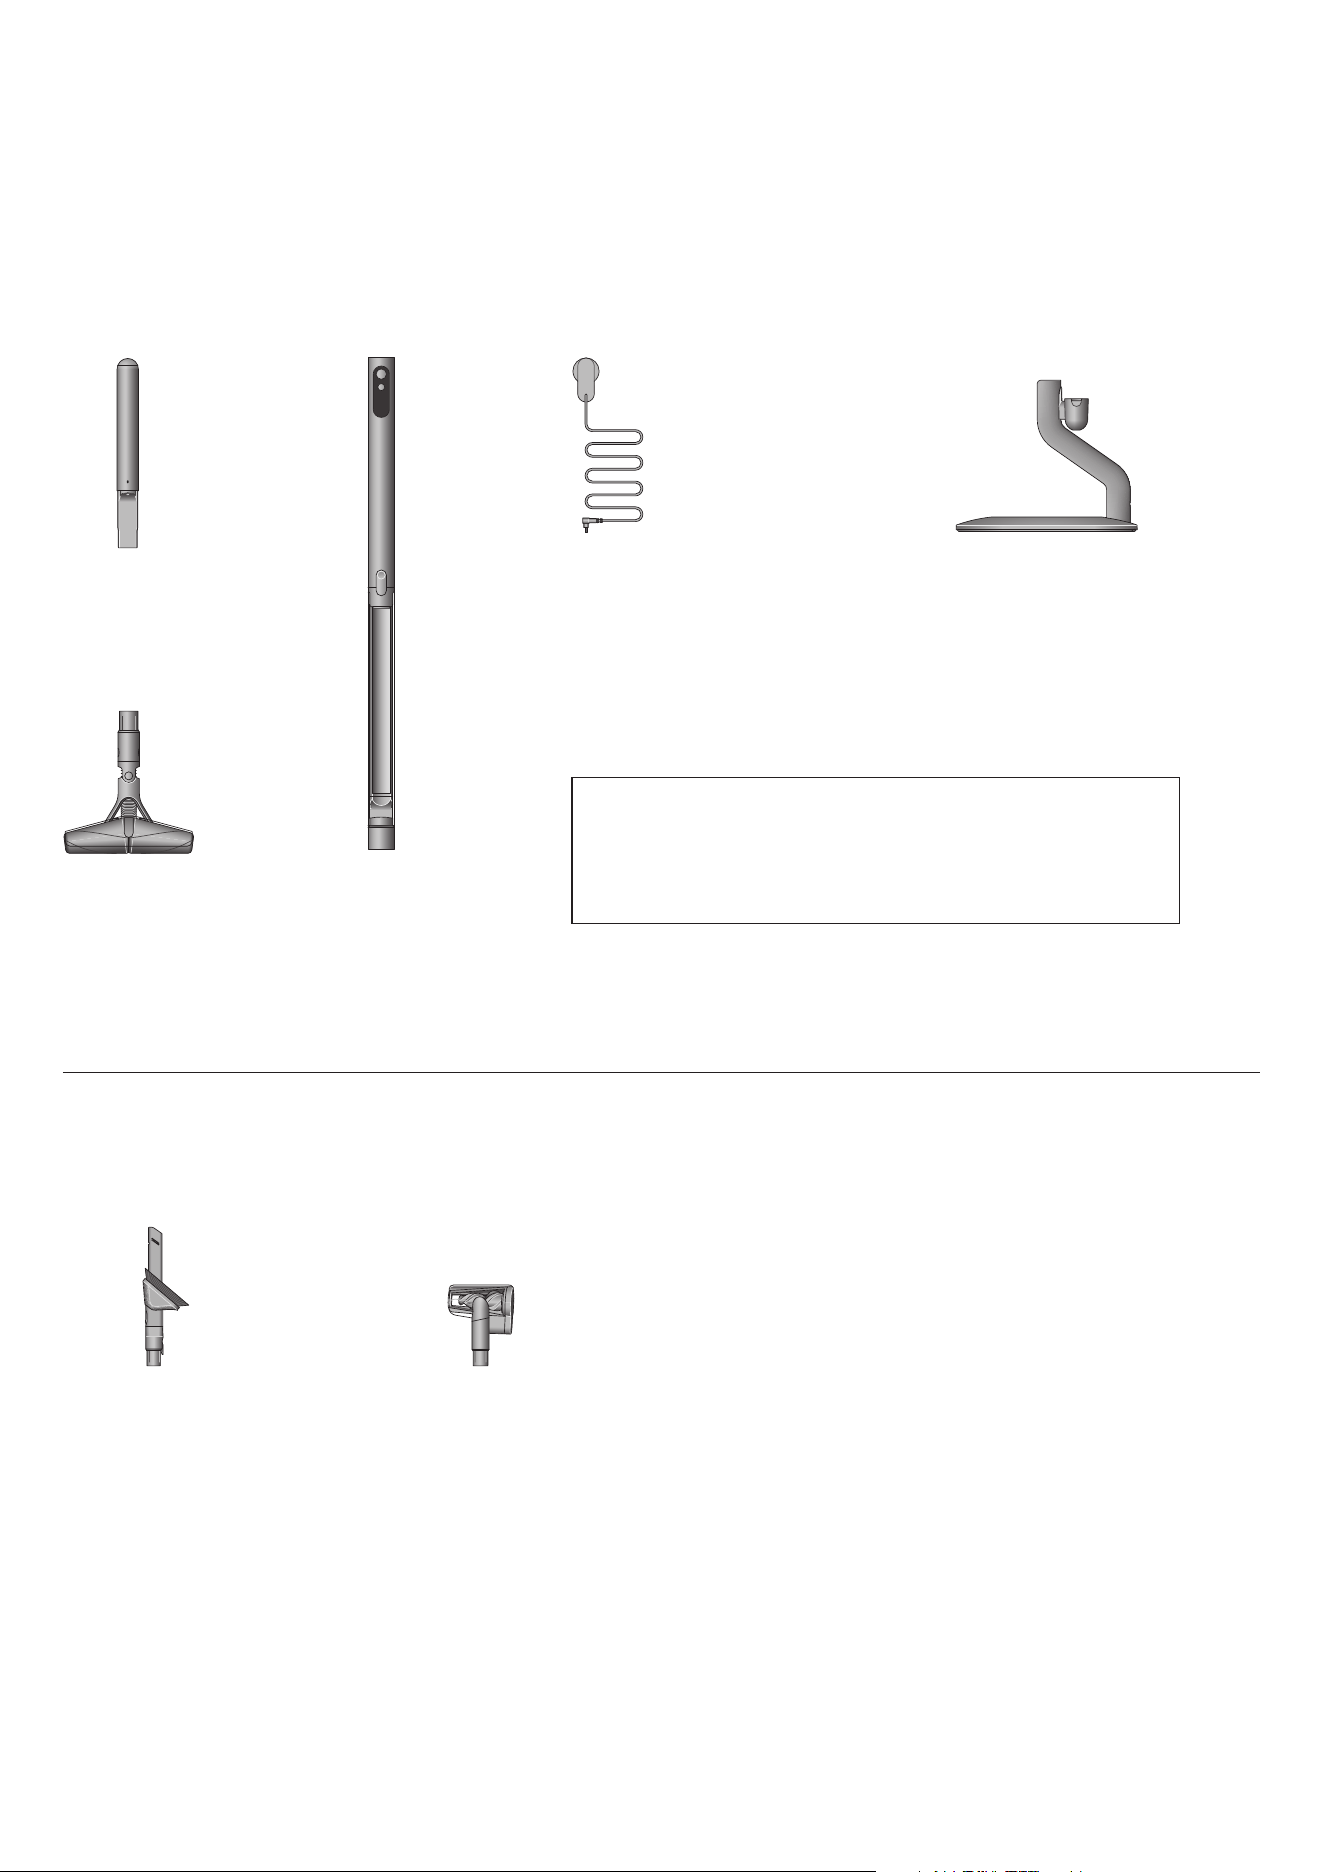
Getting started
Get to know your machine controls
Before use
Charge on dock.
Connect your machine
Using Bluetooth
®
wireless technology
1
or
the QR code on the box or LCD on screen.
Power on / o f f button
Mode select button
LCD screen
Modes
click
click
click
click
click
click
click
click
click
click
1. The Bluetooth® word mark and logos are registered trademarks owned by the
Bluetooth SIG, Inc. and any use of such marks by Dyson is under license.
Boost mode
Designed for intensive spot cleaning of
ground-in dirt.
Eco mode
Maximum run time for longer cleans all
around your home.
Med mode
The optimum balance of power and run
time. Attach your cleaner head or Hair
screw tool to activate Auto mode. Suction
power automatically adapts to dust levels.
Diagram indicating
mode, power and
max buttons.
Diagram showing
how the dock
clicks together.
Diagram showing how to
wind the cable around the
base of the dock.
Diagram showing how
to place the machine
on the dock to charge.
Illustration of a
mobile phone with
a Bluetooth icon
Diagram showing
how the machine
clicks together with
green arrows.
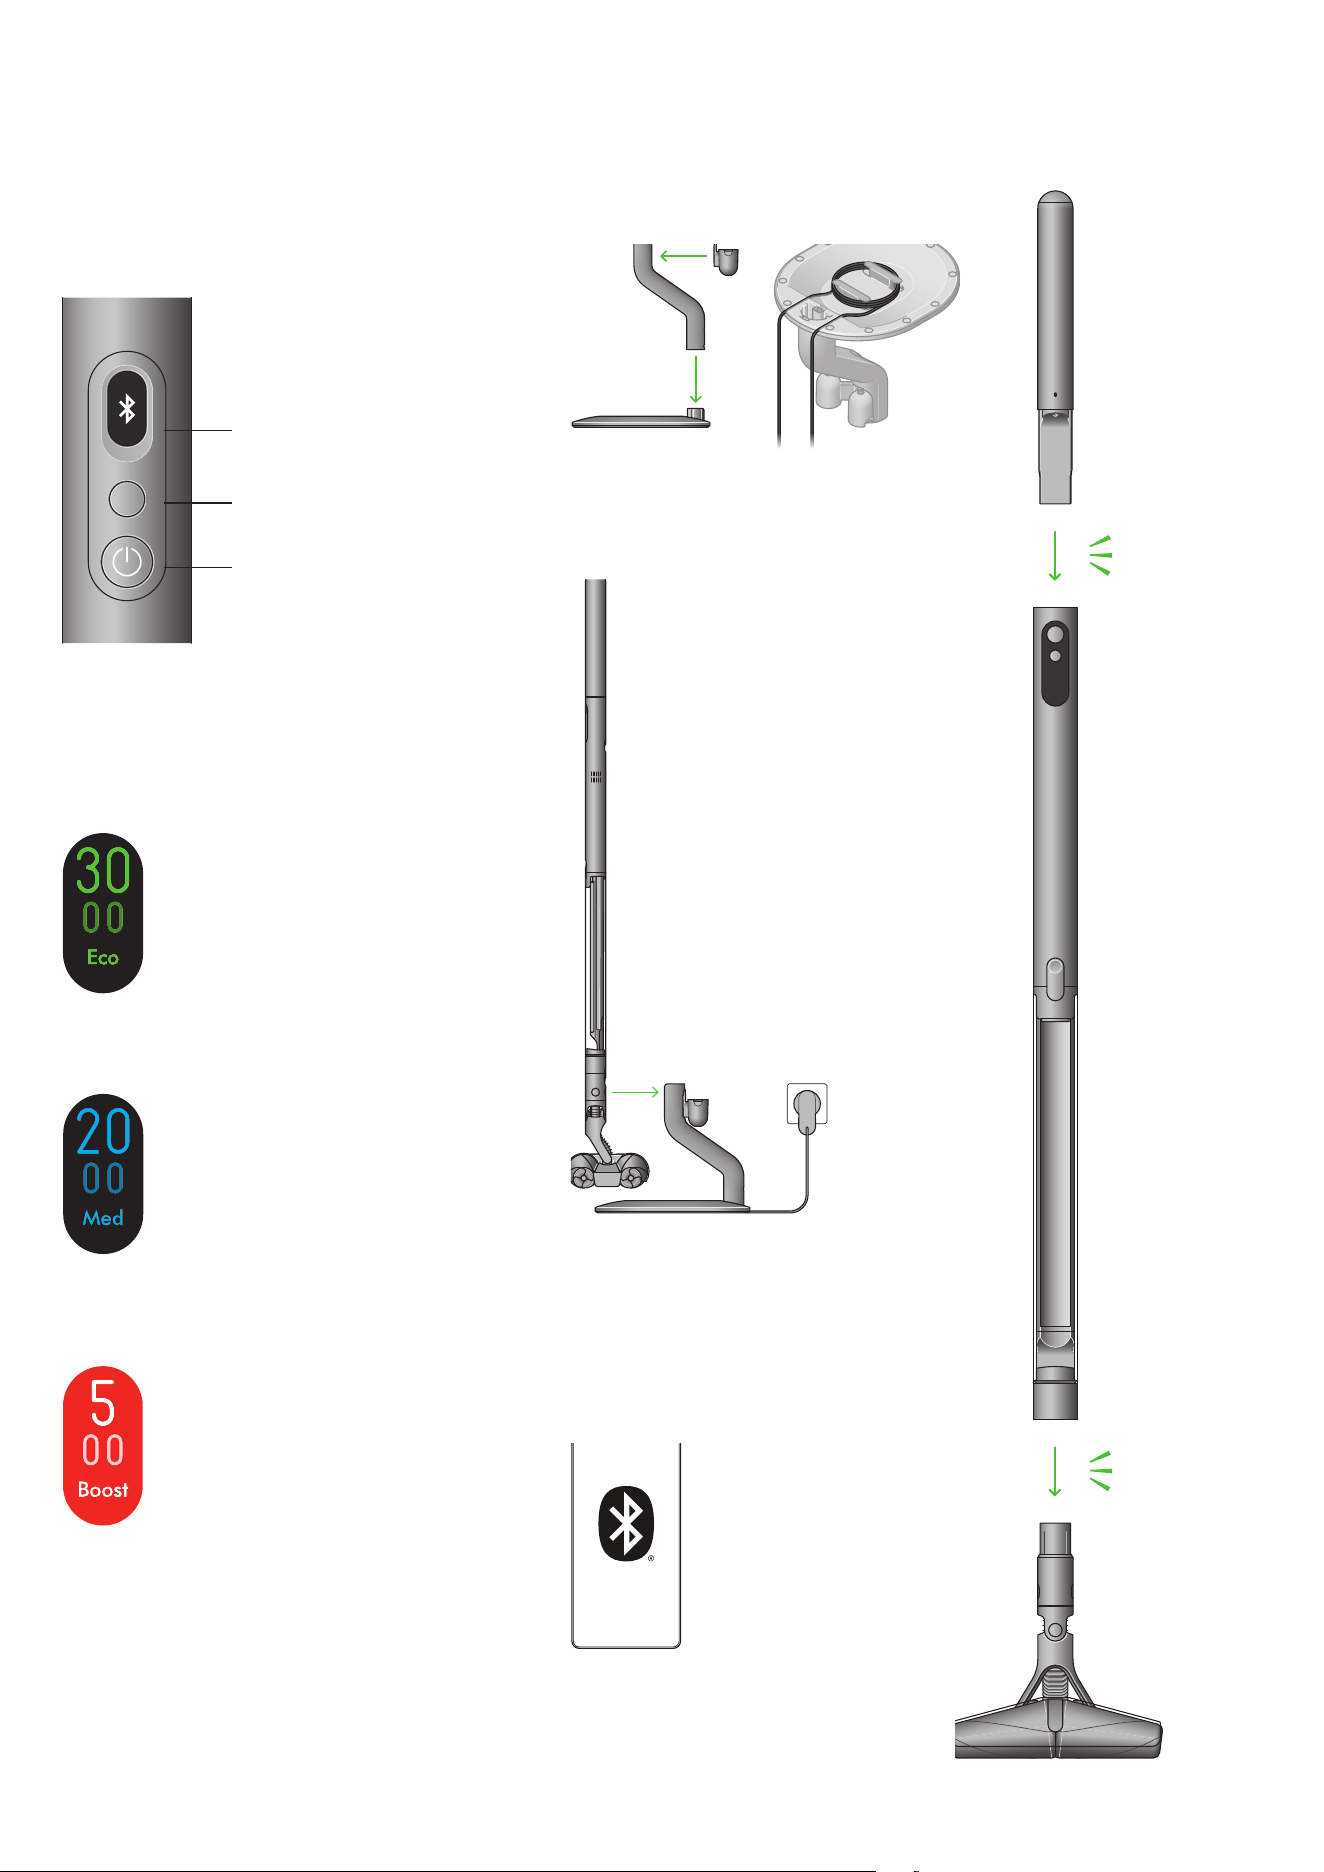
LCD screens showing each cleaning mode.
The LCD screen displays helpful performance information such
as modes, remaining run time and essential maintenance alerts.
The LCD screen
Eco
For fine dust.
Medium
For normal levels of dust.
Boost
For larger volumes of dust and debris.
Cleaning
Use the Mode button to select your power mode.
Press start to begin cleaning.
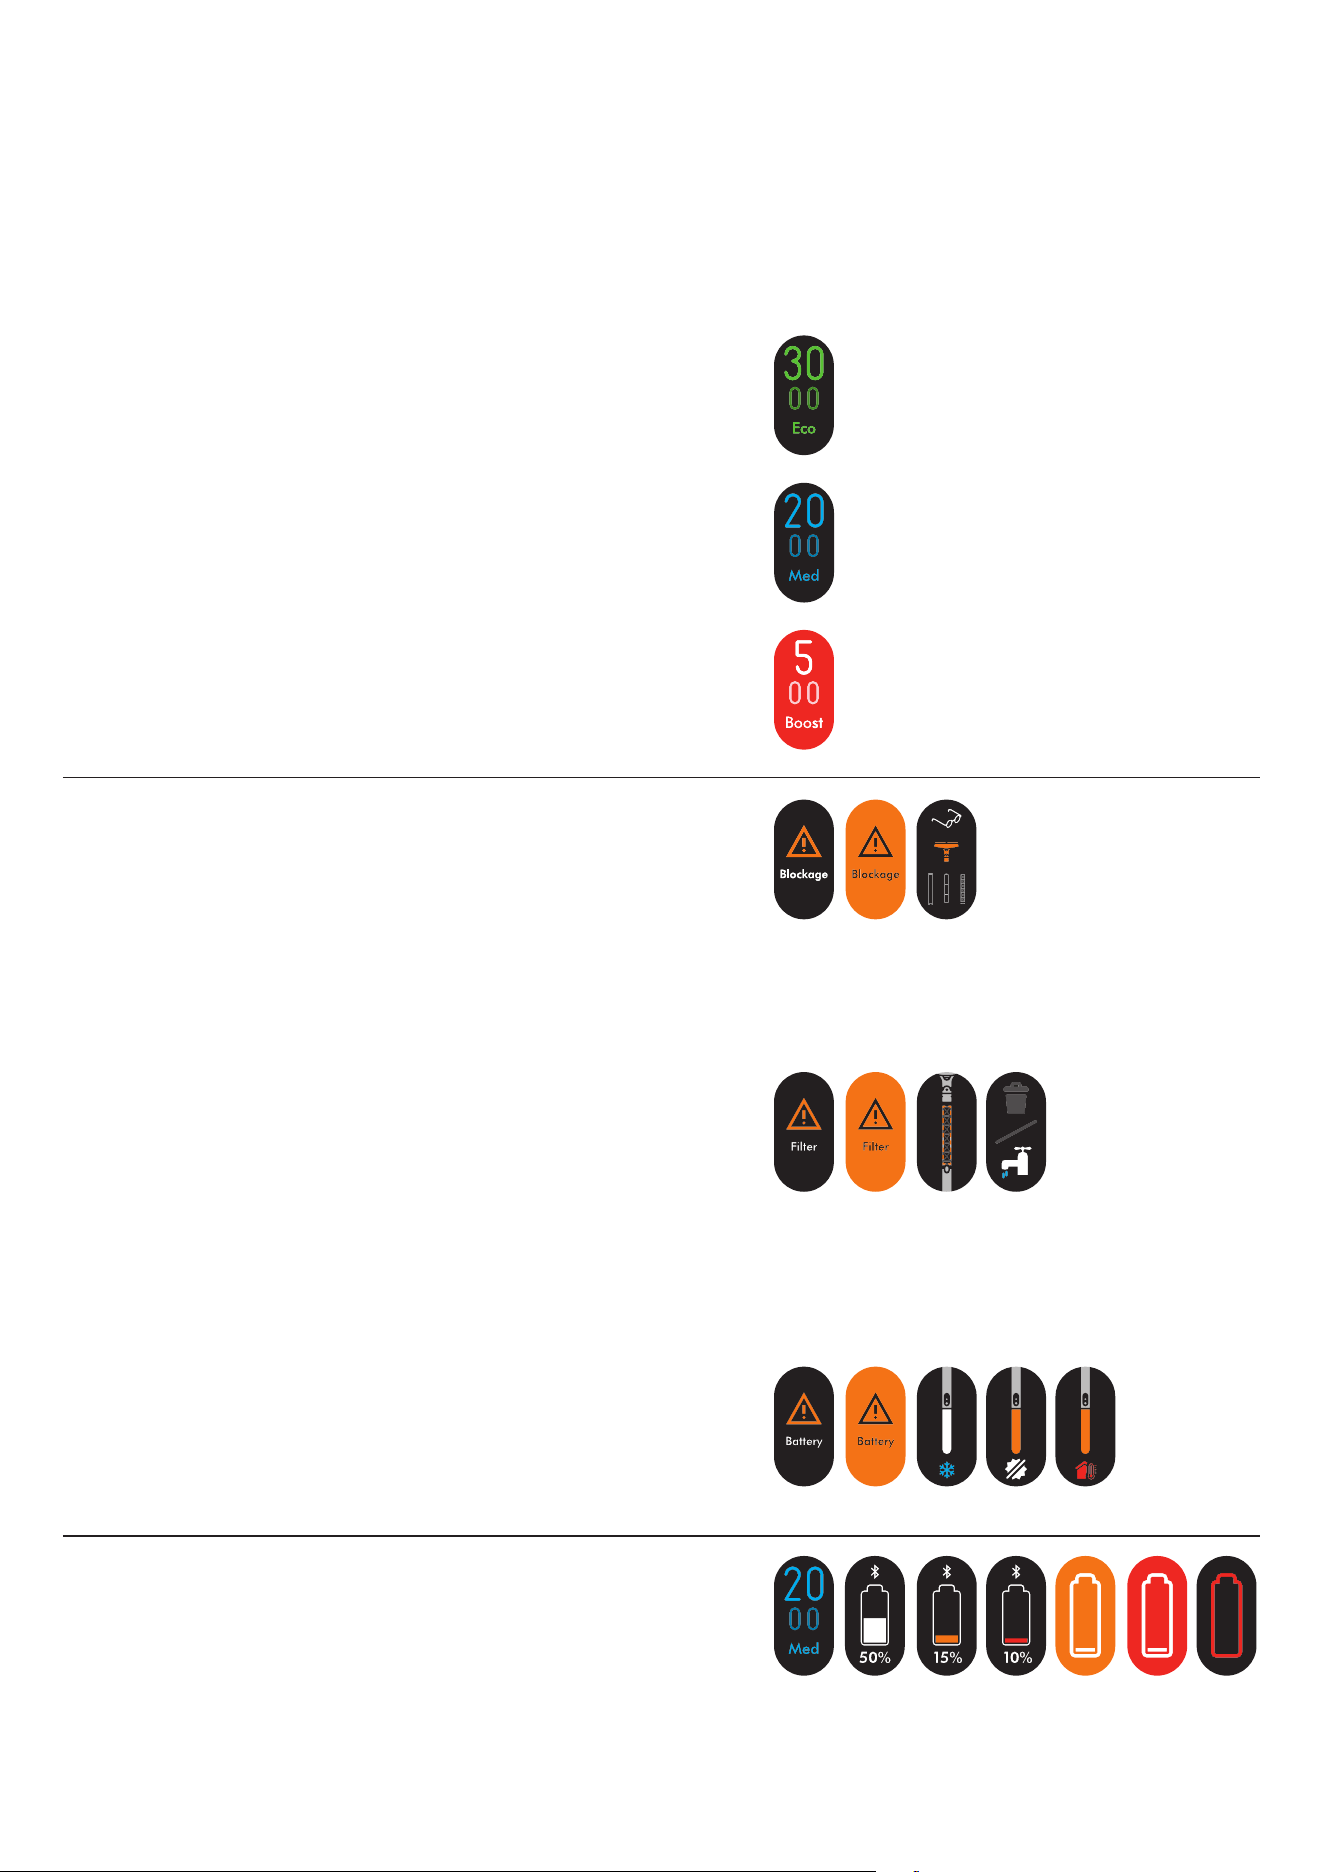
Runtime and battery
The LCD screen constantly displays the machine’s remaining
run time – so you’ll always know how much cleaning time you
have left.
Your Dyson PencilVac™ cleaner runs on a click-in battery with
up to 30 minutes of run time. To extend your cleaning time,
you can order an extra click-in battery at www.dyson.com
Alerts
The alerts you might see are:
Blockage – your machine has a blockage that
needs removing.
Battery
When the battery is unable to function, you will be prompted
with the alert.
Filter – the filter isn’t fitted correctly, or needs cleaning.
Image of LCD screen
showing 30 minutes
run time in Eco mode.
Image of the LCD
screen showing 20
minutes run time in
Medium mode.
Image of the LCD
screen showing 5
minutes run time in
Boost mode.
Collection of images
showing the alerts on
your lcd screen when
you have a blockage.
Collection of images
showing the alerts on
your lcd screen when
you have a filter issue.
Collection of images
showing the alerts
on your lcd screen
when you have a
battery issue.
Alert
indicating low
battery.
Getting started on
the MyD yson™ app
Connecting your machine
Scan the QR code on the LCD screen of your machine or find
your machine through the MyDyson™ app.
Hold your mobile device next to your machine. Press the power
button to activate pairing mode.
Once paired, follow the instructions within the app to set your
language and activate your warranty. Setup is now complete.
Download the
M y D y s on™ ap p
Download the MyDyson™ app from the App Store or Google
Play. Open the app and follow the on-screen instructions to
create a new account.
Apple and the Apple logo are trademarks of
Apple Inc., registered in the U.S. and other
countries. App Store is a service mark of Apple
Inc., registered in the U.S. and other countries.
Google Play and the Google Play logo are
trademarks of Google Inc.
Illustration of a hand holding
a phone with the MyDyson
app logo in the centre
Logos of Dyson, App store and Google Play.
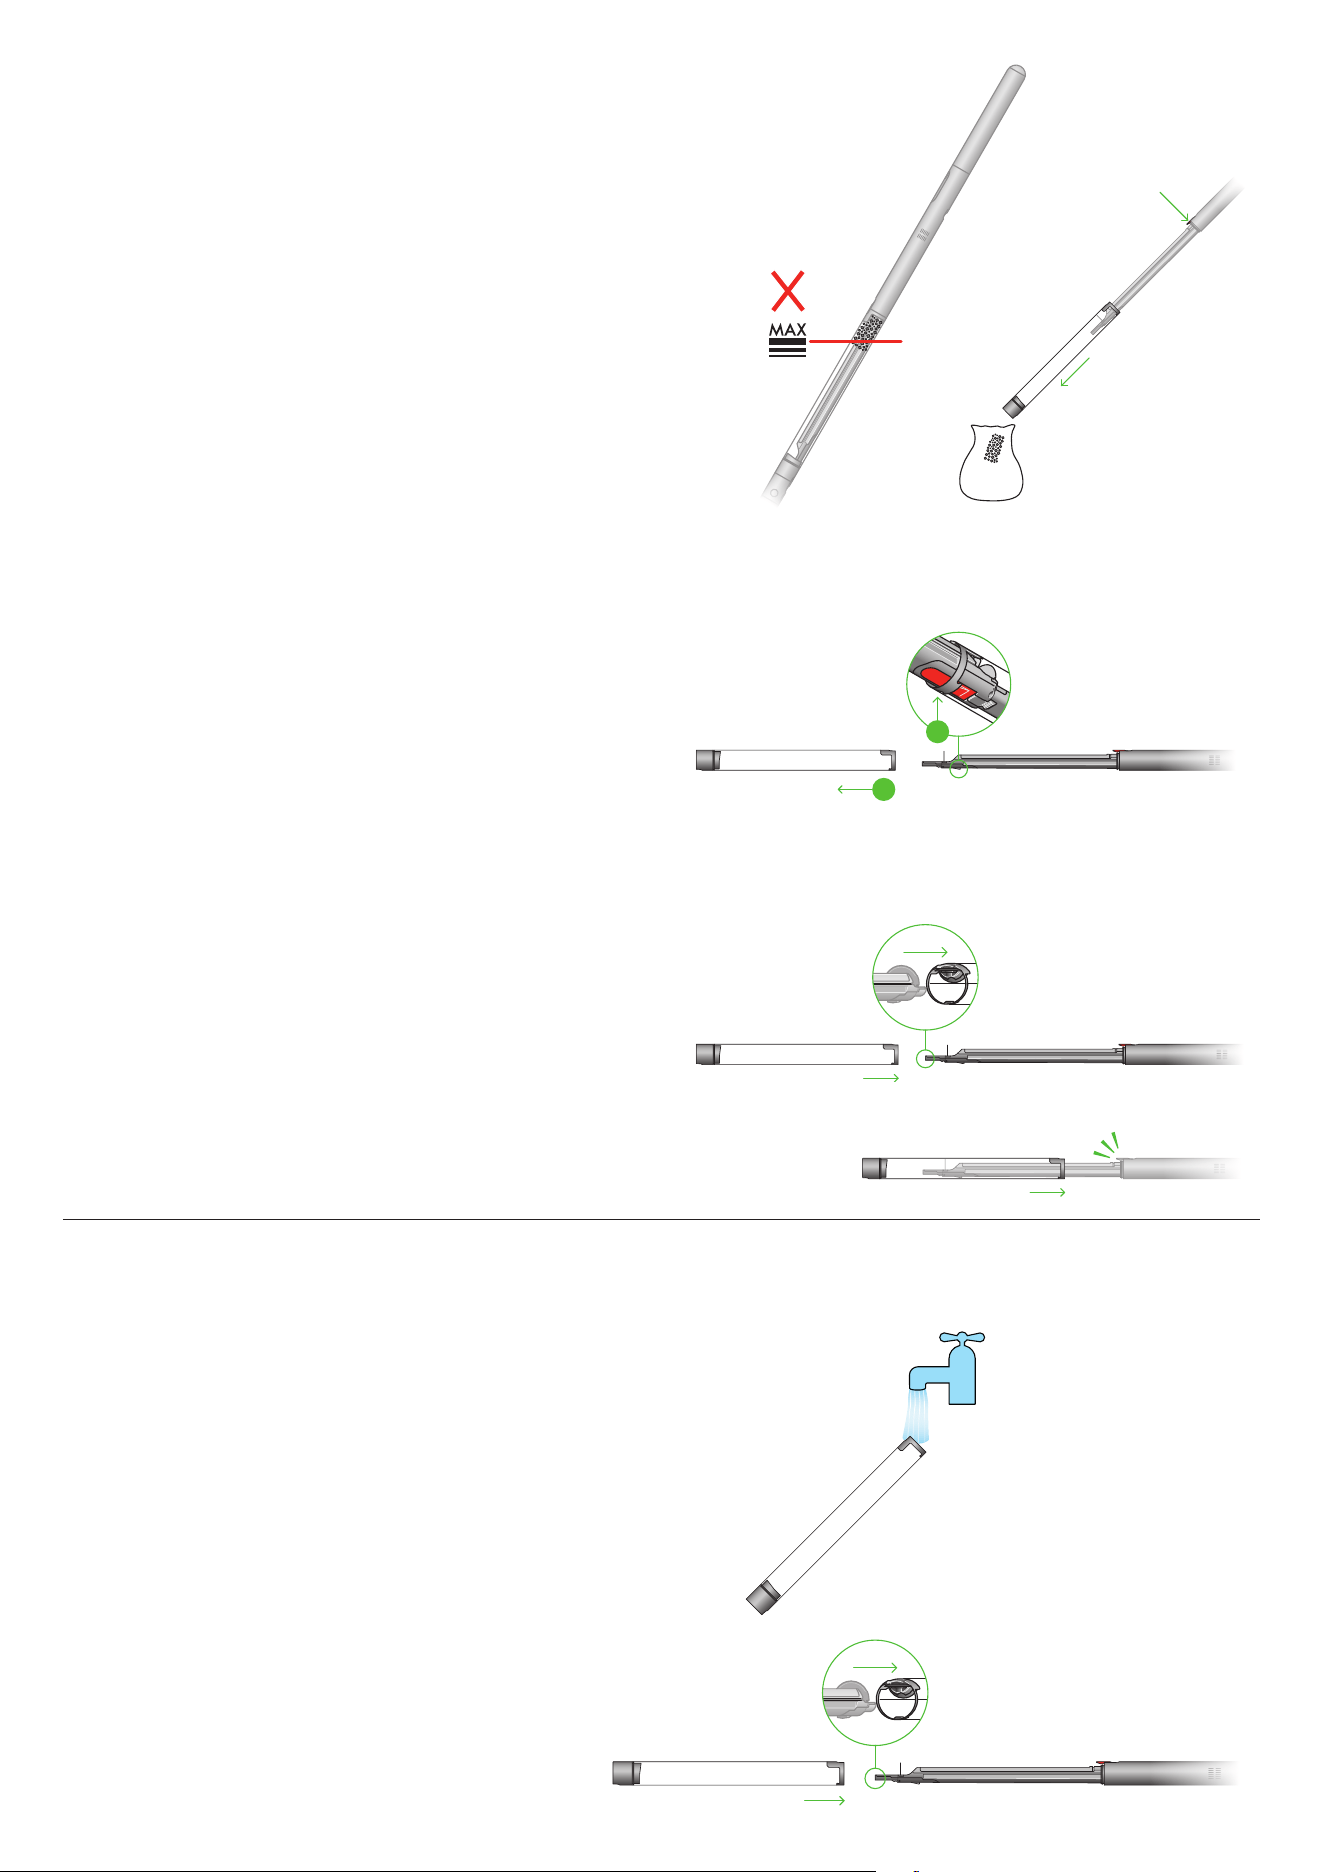
Emptying your bin
Empty your bin as soon as the dirt reaches the MAX mark.
You may need to clean the filter more often if you use your
machine with a full bin.
Cleaning your bin
Remove the bin
If the bin doesn’t empty fully, remove bin and empty the
dirt. Push the red bin stop catch on the separator to fully
release the bin.
Reassemble your machine
If you have removed your bin, slide it back on the separator.
Make sure that the bin is fully secure until engaged by
red bin catch.
Release the dirt
Press the red bin catch and pull the bin away from main body.
Hold your vacuum over a bin. This action will move dirt from
upper tray and separator. Repeat three times.
Don’t put any part of your machine in a dishwasher or use
detergents, polishes or air fresheners.
Replace your bin
Insert the spine on to the bin runner.
Close your bin by pushing the bin base upwards until the bin
and bin base click into place.
Clean your bin
If it is necessary to clean your bin, empty it as shown in the
‘Emptying your bin’ section.
Press the red button located on the bin runner to release the bin
and slide your bin off the runner.
Under flow of tap water, clean the dirt and rinse the bin.
Make sure that the bin and seals are completely dry
before replacing.
2
1
click
2
1
click
2
1
click
2
1
click
2
1
click
PencilVac cleaner
having the bin emptied.
PencilVac cleaner having
the bin removed.
PencilVac cleaner being
reassembled.
Collection of images
showing the PencilVac
cleaner being taken apart
ready for cleaning.

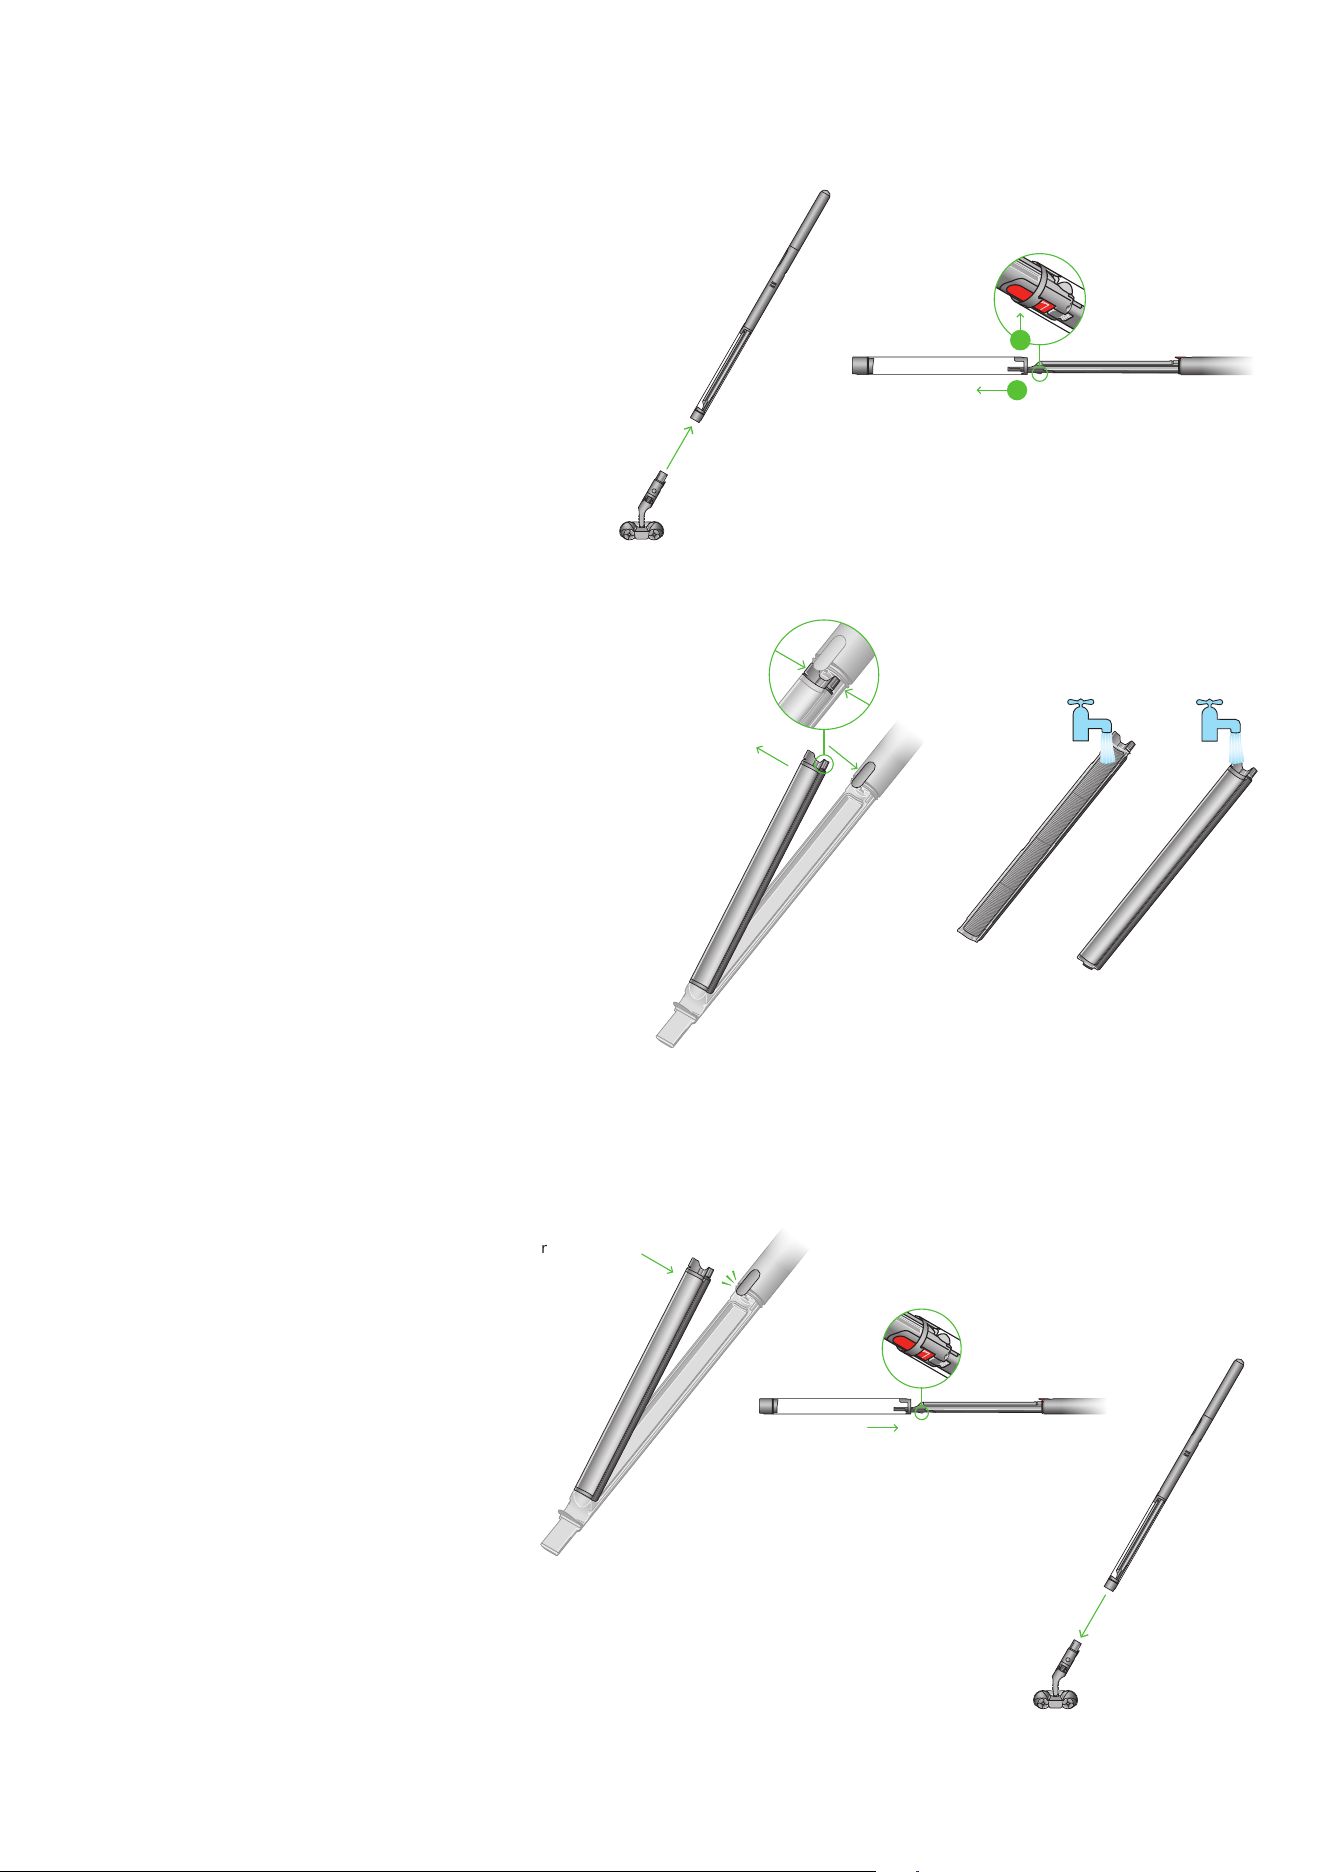
Washing the Fluffycones™
cleaner head
Wash the cones
Wash the cones under running water. Squeeze to remove excess
water and leave to dry fully.
Reattach the cones
Once dry, attach cones by matching the color of the plastic
fitting on the cone to the same color on the cleaner head.
Refit the upper plastic casing by gently pushing back into place.
Remove the cones
Remove the upper plastic casing by gently lifting away from
the cones. Unscrew each cone and pull away from fixture.
Wipe charging contact
Ensure clean and fully dry.
click
click
click
click
click
FluffyCones cleaner head.
Diagrams with green
arrows demonstrating
how to remove the plastic
casing and the cones.
Diagrams demonstrating
how to hand wash the
cones and leave to dry
thoroughly.
Diagrams demonstrating
how to reattach the cones
and upper plastic casing.
FluffyCones cleaner head.
Washing the filter
Remove, empty and wash the filter
Squeeze and pull the red tab at the top to remove the filter
from your machine. Slide down to separate the mesh from
pleated filter.
Gently tap both the mesh and pleated filter into a bin to remove
any excess dust and debris. Wash and vigorously shake both
parts of the filter under running water.
Repeat the stages above until clear water passes through the
pleated filter.
Shake to remove any excess water and leave for at least
24 hours to dry.
For quick regular cleaning of your filter, remove and gently tap
away any excess dust or dirt. We recommend doing a full clean
with water at least once a month.
Refit the filter
Align and press side mesh to pleated filter. Align lower end filter
and press to refit.
Reclose the clear bin and reattach cleaner head.
Three sequential diagrams demonstrating how to remove,
tap and wash the filter.
Remove the cleaner head and extend the clear bin
Press the red release catch to remove the cleaner head.
Press the red catch to fully extend the clear bin.
click
2
1
click
2
1
click
2
1
Diagrams with green arrows
demonstrating how to remove the
cleaner head and open the bin.
Diagrams demonstrating how to
remove, tap and wash the filter.
Diagrams demonstrating
how to refit the filter, bin
and cleaner head.
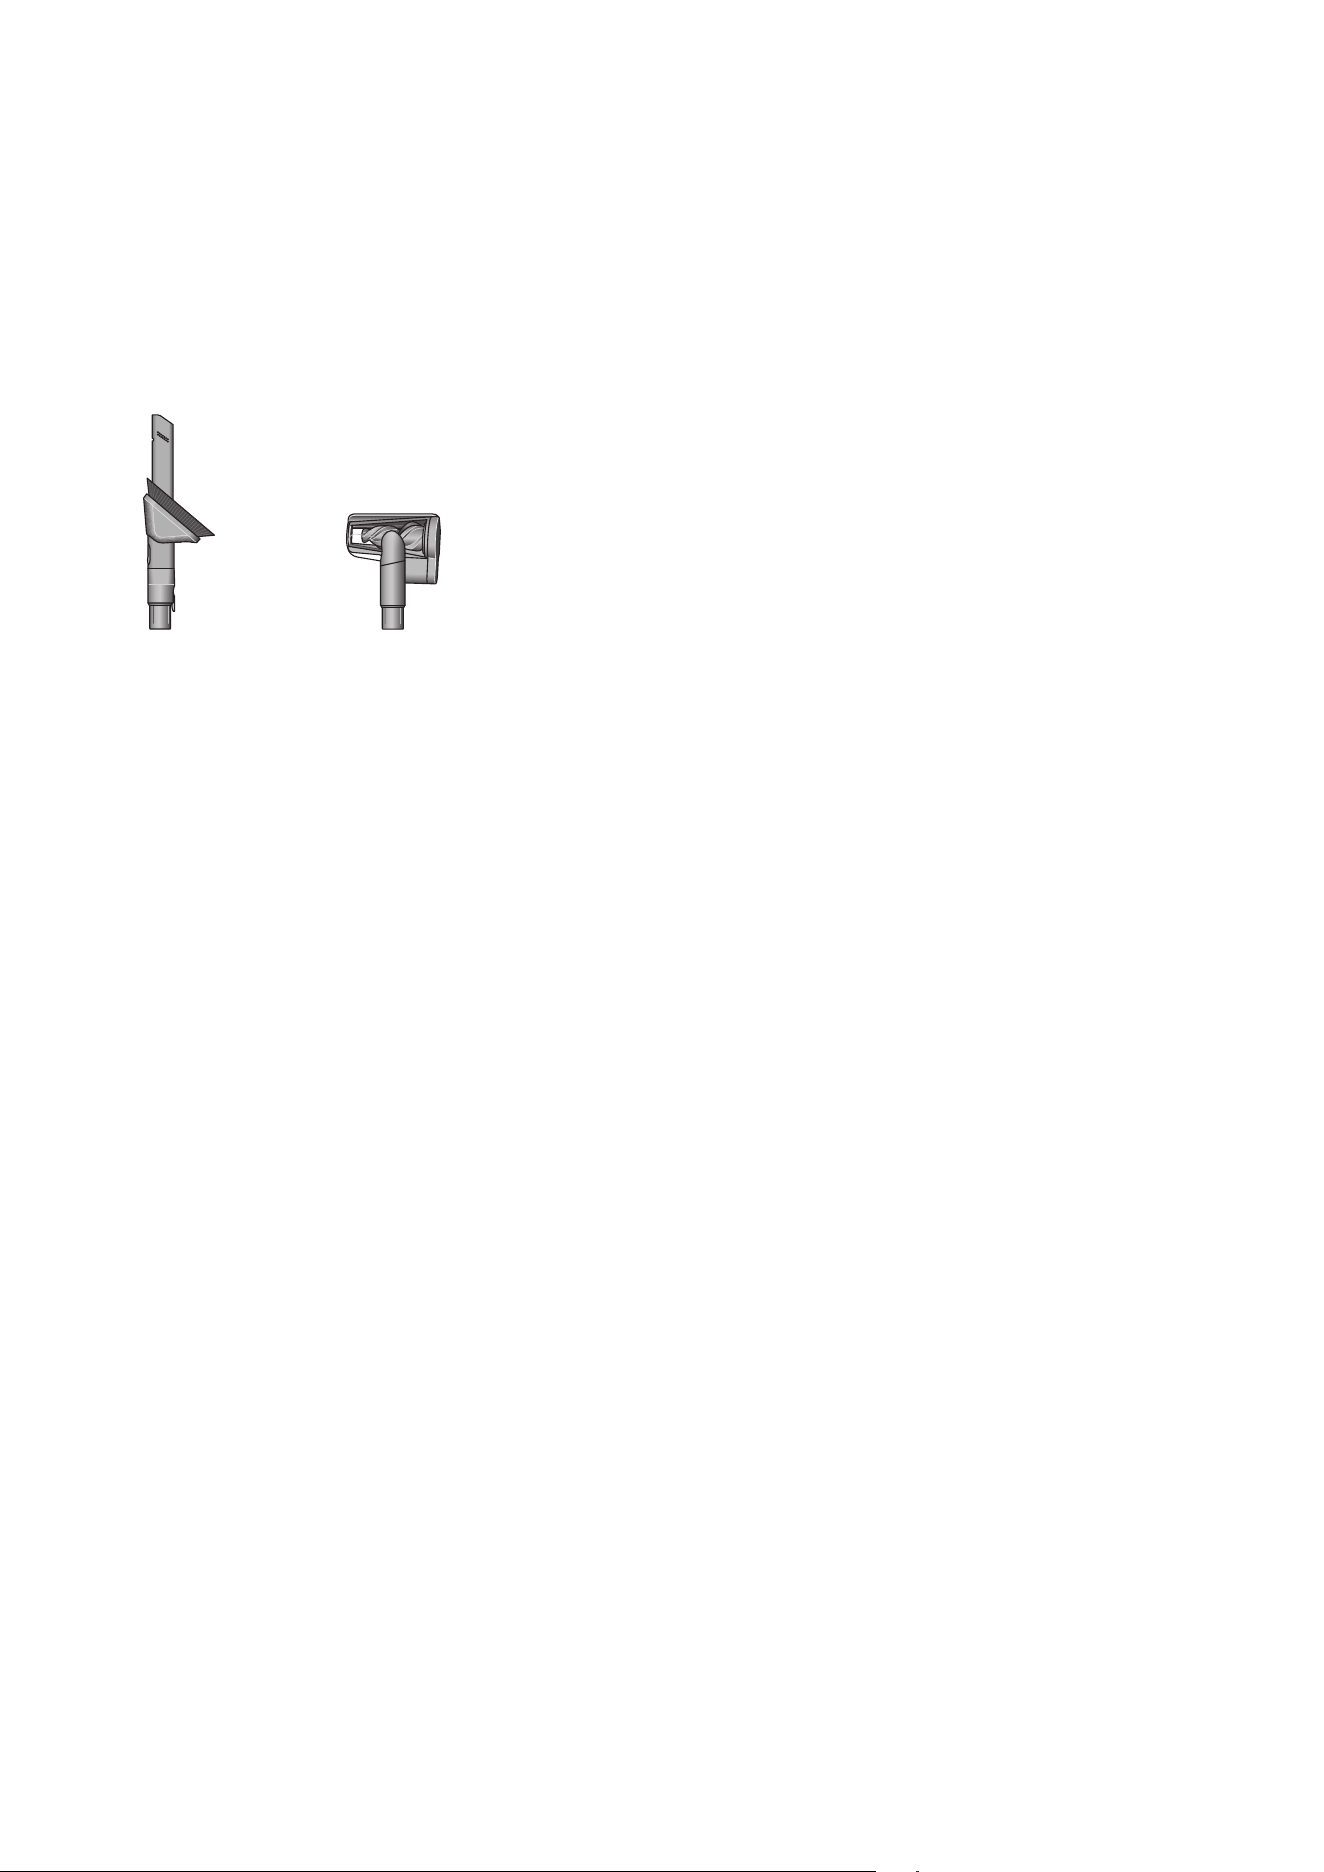
Cleaning your tools
Don’t put any part of your machine in a dishwasher or use
detergents, polishes or air fresheners.
Wipe with a damp, lint-free cloth, without touching the
connector end.
Make sure your tools are completely dry before using.
Hair screw toolRotating combi-crevice tool

Clearing blockages
If your machine detects a blockage, an alert will show on the
LCD screen. You won’t be able to use your machine until the
blockage has been cleared.
Leave your machine to cool down before looking for blockages
and, for your safety, take care not to touch the power button.
Disconnect your machine from the charger before looking
for blockages.
Leave your machine to cool down before looking
for blockages.
Don’t use your machine when looking for blockages as
this could cause injury.
Be careful of sharp objects that may be blocking your machine.
Check for blockages in the cleaner head, and if needed,
follow the instructions for removing the brush bars.
Make sure any blockages are completely cleared and all parts
are fitted before using your machine.
Remove stuck hair or debris
Press the red button to remove the baffle and remove
the obstruction. Once cleared, refit the baffle.
Illustration showing to look
for blockages in the
cleaner head and bin.
Illustrations to show
the baffle being
removed and the
obstruction taken out
of the cleaner head.
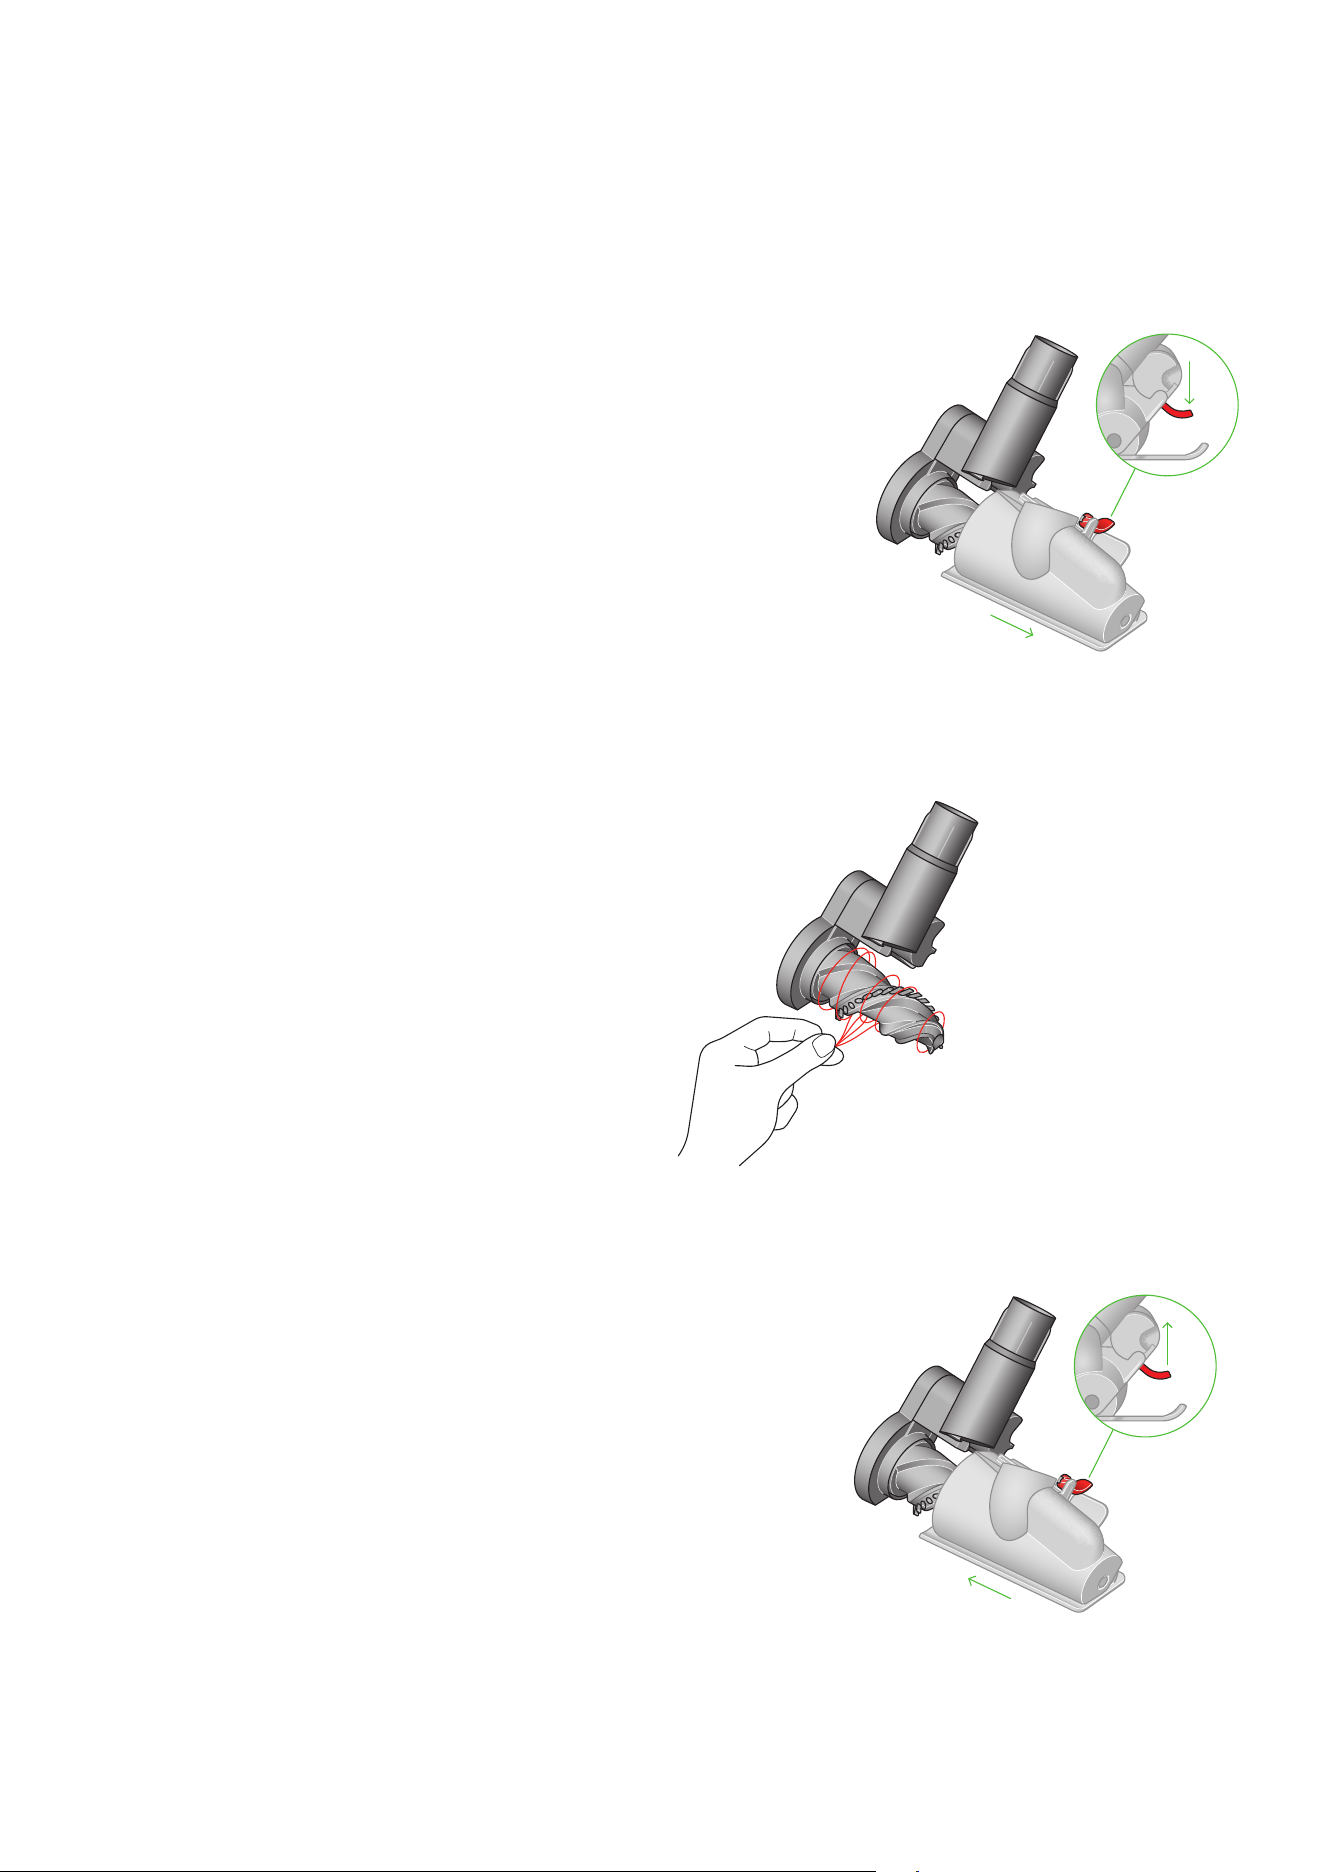
Remove the cover and brush bar
Remove the Hair screw tool from the wand or machine.
Push the base plate open. Press the red lever down to release
the cleaner head cover.
Pull the cleaner head cover off the main body of the tool.
Look for obstructions
Pull your brush bar firmly to remove it from the main body.
Check and remove any obstructions from all three parts of your
Hair screw tool.
Your Hair screw tool isn’t washable. Wipe over with a damp
lint-free cloth.
Don’t put any part of your machine in a dishwasher or use
detergents, polishes or air fresheners.
Re-assemble Hair screw tool
Put your brush bar back into position and press firmly until it
clicks back into position.
Check the red locking lever is in the unlocked position.
Align the cleaner head cover with the guide on the main body.
Push it down until it clicks into position.
Push the red locking lever up until it clicks into position and push
the base plate back into place.
Your Hair screw tool doesn’t have a washable brush bar.
To maintain optimum performance, check your brush bar
regularly and clear any obstructions.
Make sure your machine is disconnected from the charger
and take care not to touch the trigger.
Small details may vary.
Clearing blockages from
your Hair screw tool
Location of the lever to release
the brush bar is located at the
back of the Hair screw tool.
With the brush bar removed
from the housing, any threads,
hair or other obstructions can
be removed.
Slide the housing back on to the brush
bar and push the lever on the back of
the Hair screw tool upwards to lock.
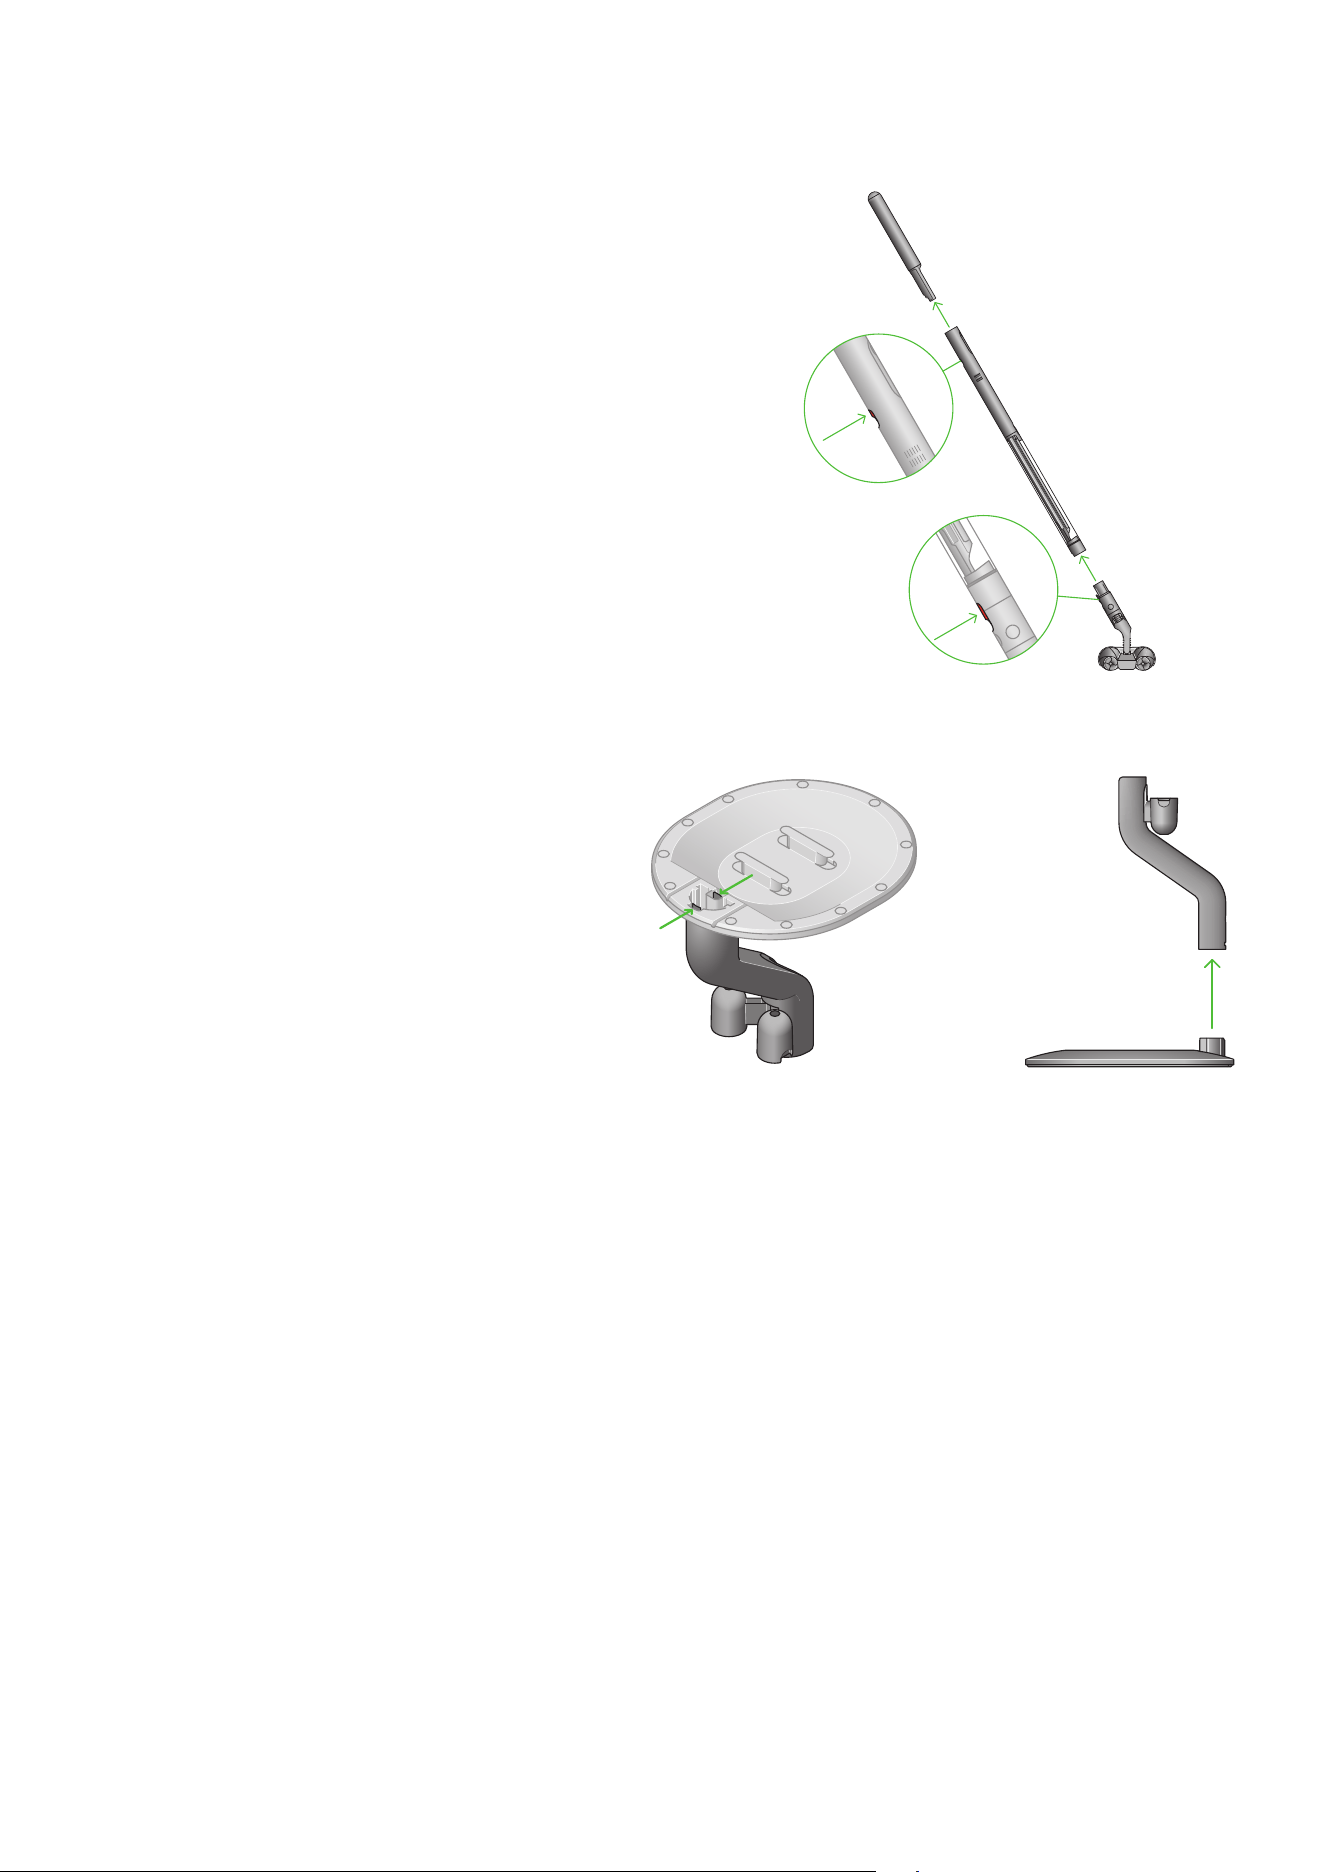
Disassembling your machine
Should you need to store or repackage your machine, detach the
cleaner head and battery from the main body, as shown opposite.
Detach the stem from the base of the dock by pressing both
catches inward and pulling the stem away from the base.
Diagram indicating where
to separate the cleaner
head and the battery.
Diagram showing that the
dock comes apart by
pinching together the clip.

Looking after your machine
Day-to-day machine care
To get the best performance from your machine, it’s important
to clean it regularly.
If your machine is dusty, wipe with a damp lint-free cloth.
Battery health
For best performance and battery life, use Boost mode only for
an intense burst of power.
Your battery is designed to charge on the dock and stops
charging when complete, so return the machine to the dock
after use, helps maintain battery life.
Where to find your machine’s serial number
The serial number is printed on the main body of the machine,
behind the back of the clear bin.
Use the serial number to register your machine.
For more information and support videos for your machine,
go online: ww w.dy son.com / suppor t
