User manual
Contents
In the box
Download the MyDyson™ app
Getting started
The LCD screen
Quick start
How to clean
Self-cleaning and daily maintenance
Regular maintenance
Deep-clean maintenance
Battery and performance tips
Disassemble your machine
Troubleshooting
Support and service
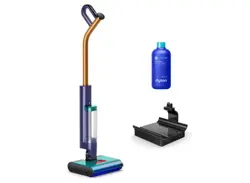
Dyson Clean+Wash
Hygiene Logo.
Dyson Clean+Wash
Hygiene hard floor cleaner.
Dyson logo
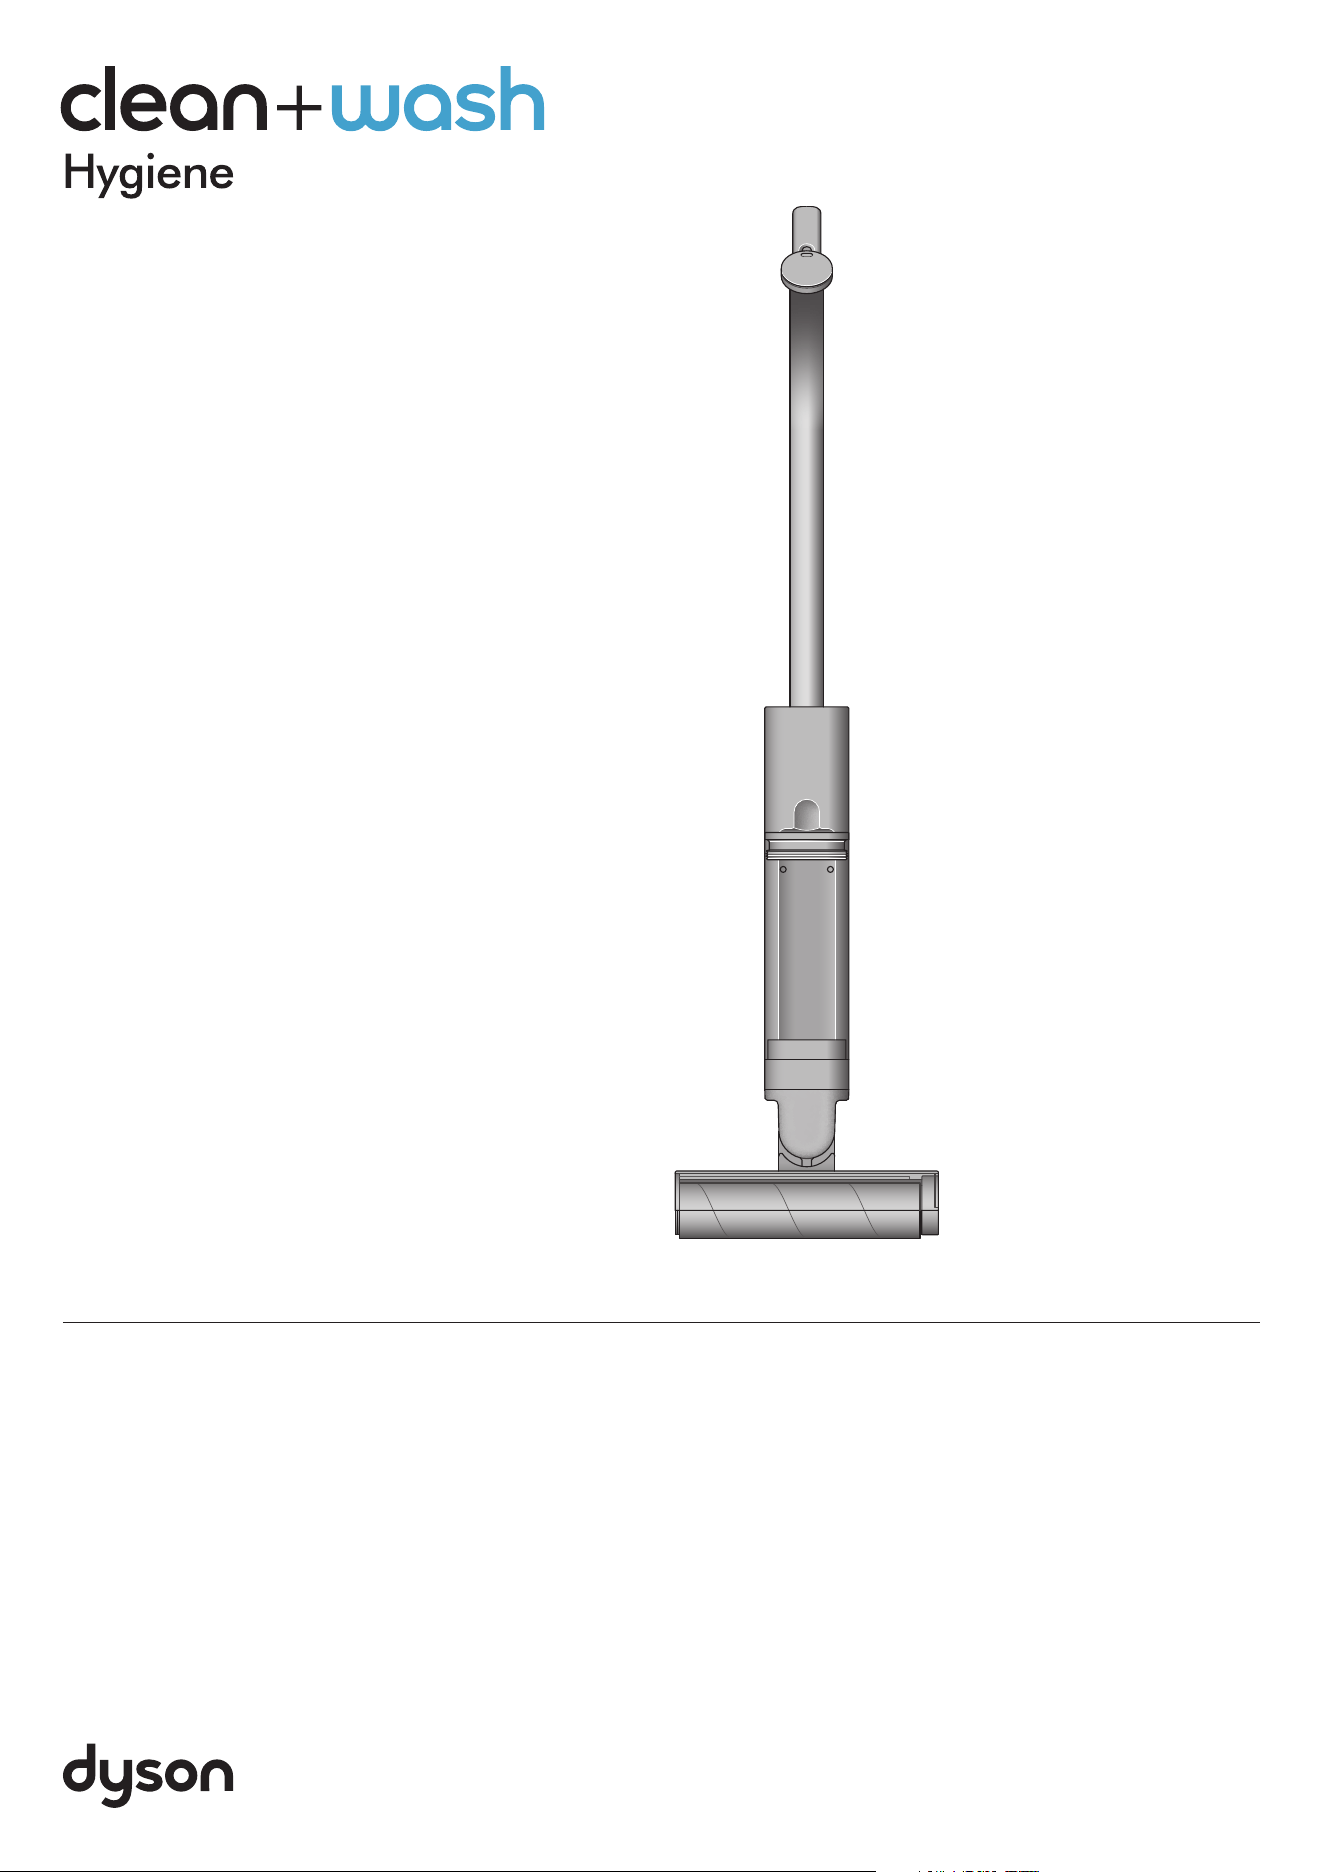
Hot-air drying dock
One-piece charging dock with plug. The Dyson
Clean+Wash Hygiene Hot-air drying dock
charges, cleans, and hot-air dries the
machine on the dock.
02 Probiotic cleaning solution
Handle Machine body
In the box
Your machine is boxed in two parts:
1. Machine body
2. Handle
Simply attach the handle to the main body.
Waste system
(pre-installed)
Includes debris tray
and dirty water tank.
Clean water tank
(pre-installed)
Microfiber roller
(pre-installed)
Download the MyDyson™ app
Download the MyDyson™ app from the App Store or Google Play.
Open the app and follow the on-screen instructions to create a new account.
Apple, the Apple logo, and Siri are trademarks of
Apple Inc. App Store is a service mark of Apple Inc.
Google Play, the Google Play logo, Google Assistant
are trademarks of Google Inc.
MyDyson logo.
Download on the Apple App Store.
Get it on Google Play.
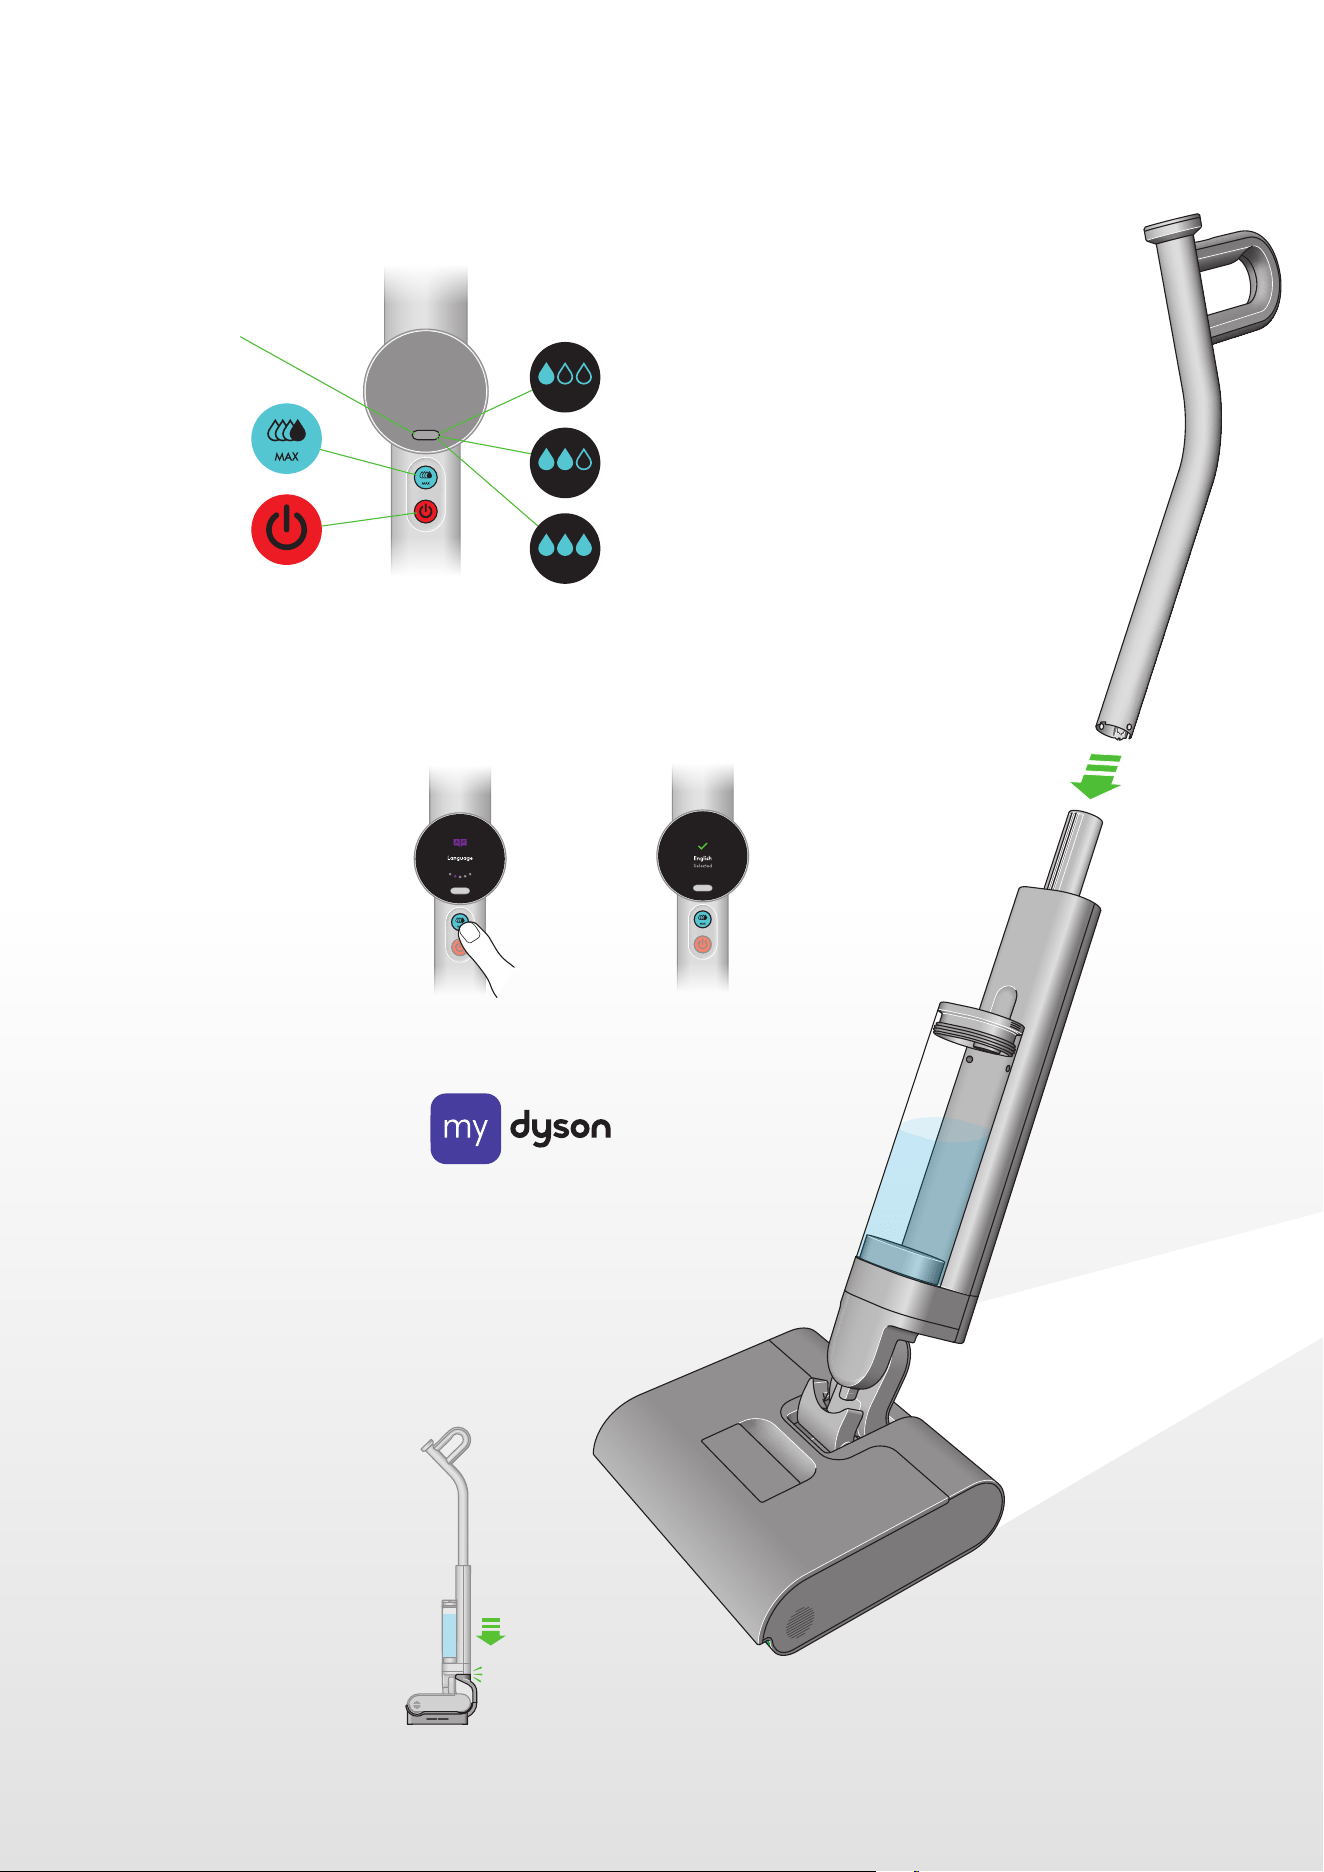
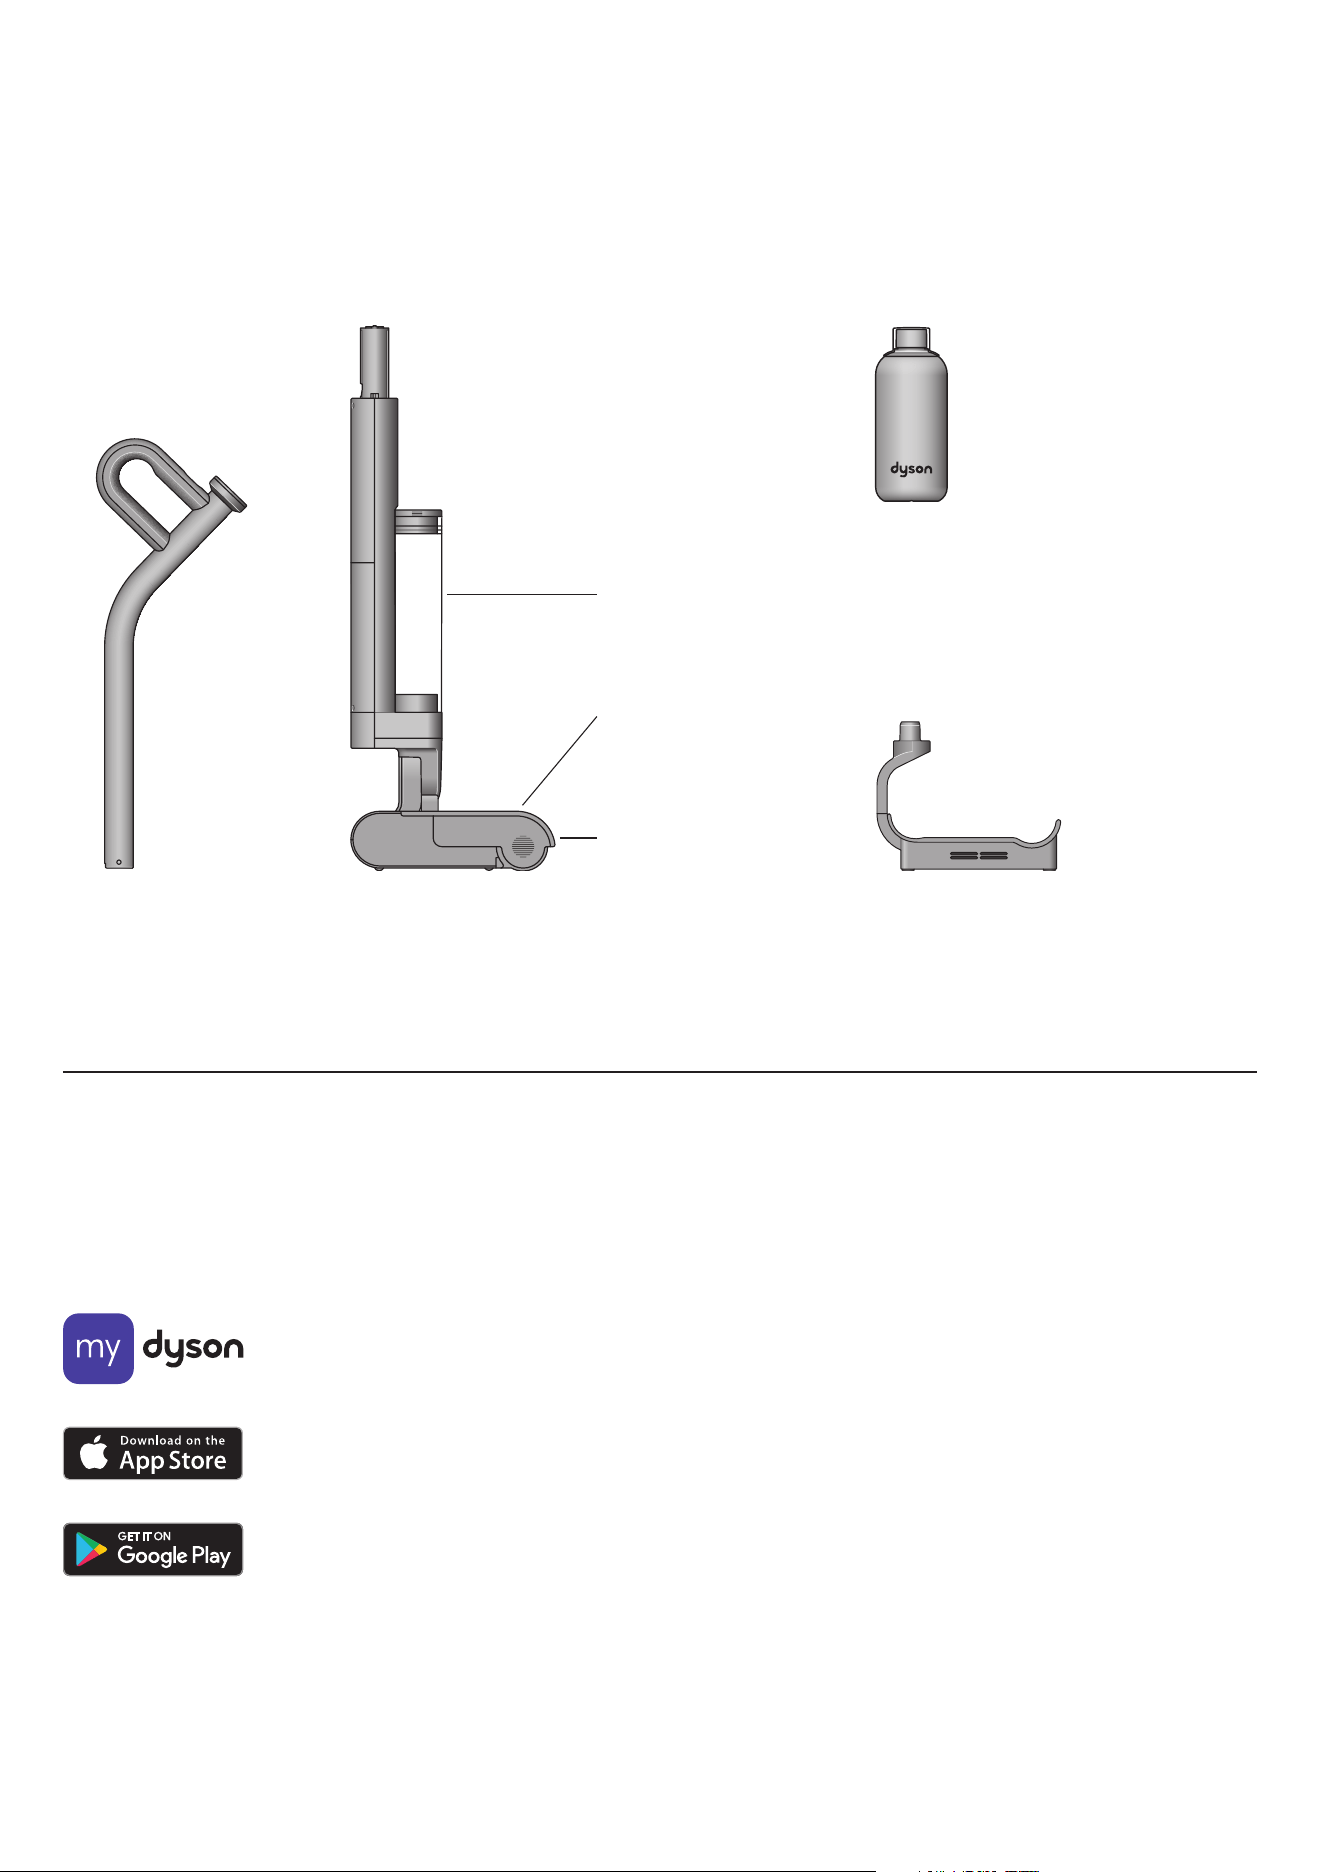
1. Click the wand into the main body
until it locks in place.
2. Wake the machine by pressing any
button. Press and hold the mode
select button to set your desired
language.
3. Download the MyDyson™ app
from the App Store or Google Play
via QR code shown on screen.
4. Register your machine using the
serial number (located behind
the battery pack).
5. Place your Clean+Wash Hygiene
on the charging dock and fully
charge before first use.
click
click
Getting started
Get to know your machine's controls
Hydration modes
Power on/off button
MAX button
Mode select button
Low
Med
High
MyDyson™ app logo.
The Clean+Wash Hygiene
stands upright in its dock.
The wand clicks into place above
the main body of the machine.
The Mode select button is located
just below the LCD screen, below
the screen is the MAX button and
then the Power on/off button.

The LCD screen displays helpful performance information
such as the selected mode, remaining run time and essential
maintenance alerts.
The LCD screen
Low mode (Least water applied)
For dust, hair and liquid spills
Cleaning
Med mode
For dry debris and thicker spills.
High mode
For oils, sticky spills and stains.
MAX mode (Most water applied)
Press and hold the MAX button for the most
stubborn stains and dirt.
Alerts
Empty dirty water tank
When your dirty water tank is full, you will be
prompted with an alert on the screen.
Roller stuck
You will be prompted with this alert if something is
stuck between the roller and the squeegee,
or if your roller is not attached correctly.
Self-cleaning and Hot air drying
Self-cleaning in progress
Shows when self-clean is
operating.
Hot-air drying progress
Shows when hot-air drying is
operating.
Self-clean awaiting
When machine is below 30%
battery, the self-clean cycle will
be disabled. Place the machine
on the dock to charge.
Replacement rollers
We recommend replacing your microfiber roller
at around 6 months, depending on usage. The
machine will alert you when they need to be
changed – and display a QR code for ordering
replacements. When fitting a new roller, reset
the lifetime counter.
Use the Mode button to select mode. Press start to begin cleaning.
Choose the mode to suit the task
Water droplet icons indicate power modes: Low, Med, High, MAX.
Tip: Use MAX sparingly to preserve battery life.
Run time
The LCD screen constantly displays the machine’s
remaining run time underneath the water droplet
icon – so you’ll always know how much cleaning
time you have left.
Your Dyson Clean+Wash Hygiene hard floor
cleaner runs on a battery with up to 45 minutes
charge. Low battery alert will be shown when
remaining run time is low.
One filled water droplet shows your
machine is in Low mode.
Three filled water droplets shows your
machine is in High mode.
Two filled water droplets shows your
machine is in Med mode.
Four water droplets and text reading MAX
shows your machine is in Max mode.
A caution sign with text reading:
Empty dirty water tank.
A caution sign with text reading:
Roller stuck.
Roller icon with text
reading: Roller life,
Caution sign with text
reading: Replace roller,
and a QR code.
LCD screen shows the cleaner
head with blue graphics
representing self-cleaning.
LCD screen shows the cleaner
head with red graphics
representing the hot-air drying.
Roller icon with text reading: Paused.
A caution sign with text
reading: Low battery.
Quick start
click
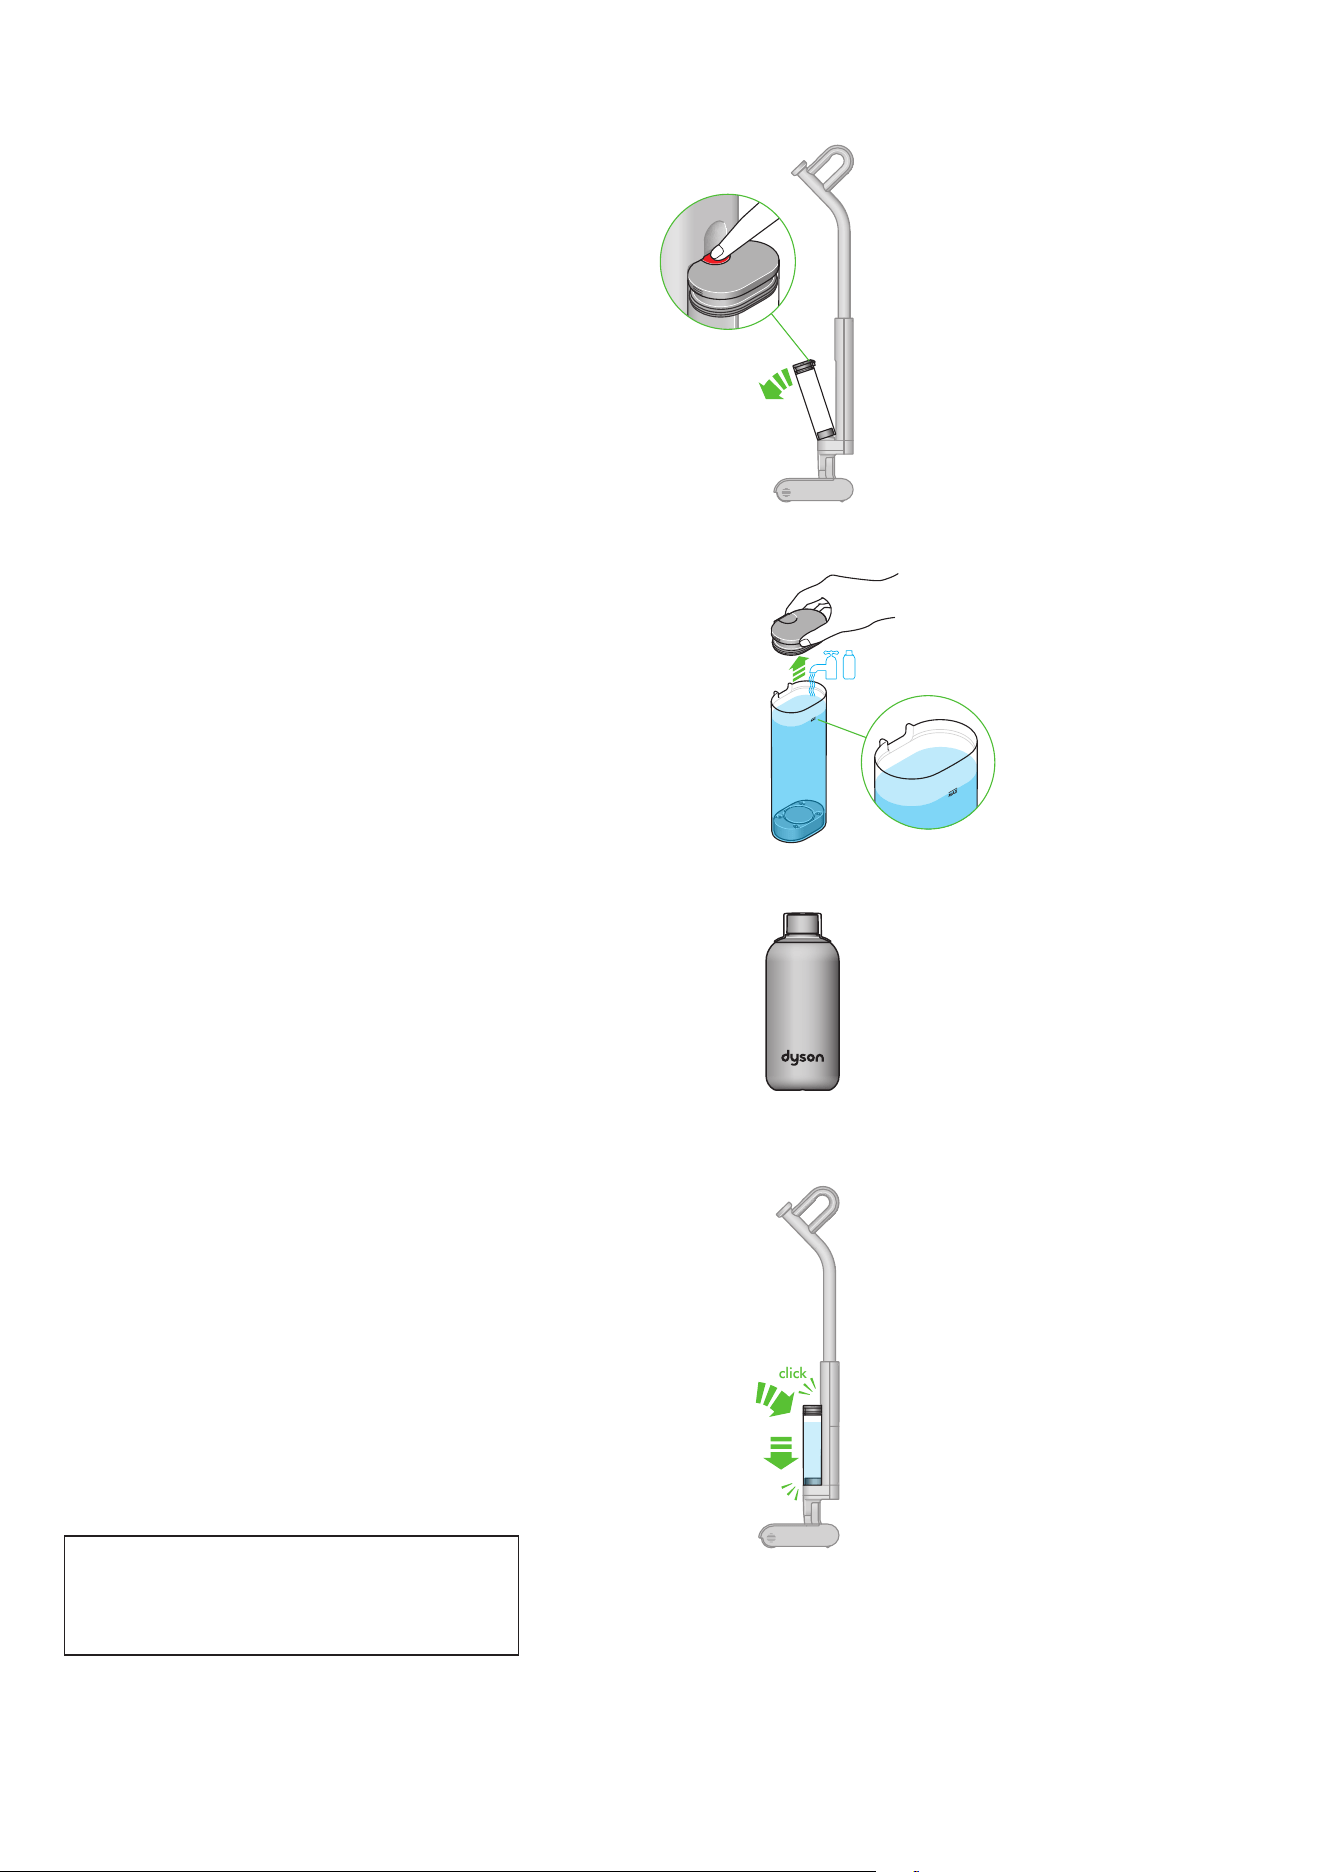
Remove the clean water tank
Press the release button and lift the clean water tank away
from the machine.
Fill the clean water tank
Open the lid and fill to the MAX line with clean water, or
just under if adding cleaning solution (Max 140° F).
Add cleaning solution
Add 20ml of 02 Probiotic hard floor cleaner.
Close and replace the clean water tank
Close the lid and reconnect the tank to the body of
the machine.
Allow roller to fully hydrate
For first use, allow 5 minutes for the roller to fully
hydrate. For subsequent uses allow 10 seconds.
The release button is
located on the top of
the clean water tank.
Dyson 02 Probiotic hard
floor cleaning solution.
click
click
click
click
How to clean
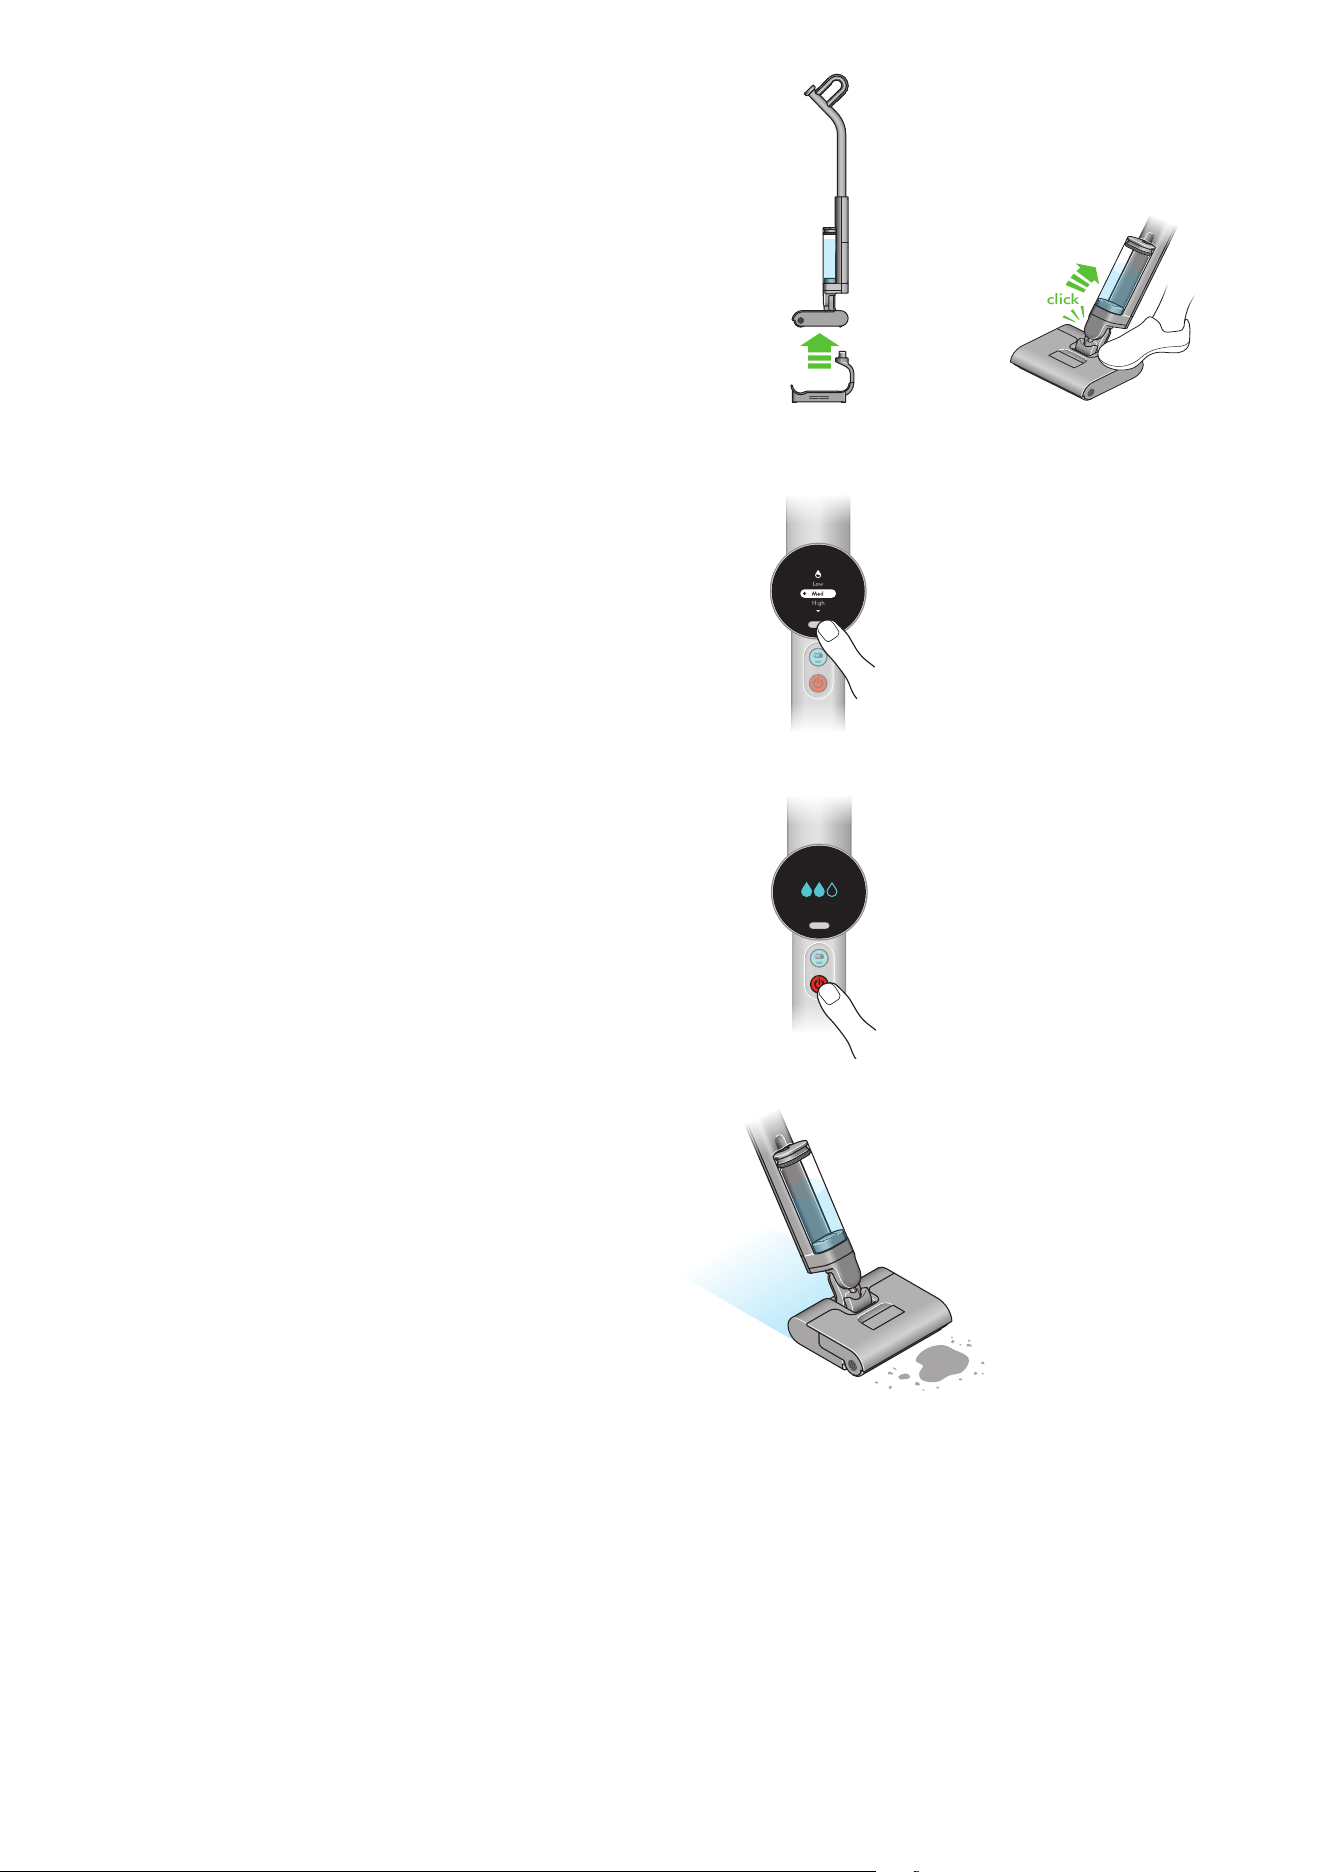
Position your machine
Take the machine off the dock. Gently place your foot on the
cleaner head and recline the handle until you hear a click.
Selecting cleaning mode
Select the mode using the mode button.
Starting the machine
Press the power button to start.
Cleaning method
For maximum pickup, move the machine at a slow pace.
Tip: For best results, clean in overlapping passes.
click
The power button is
located below the MAX
button, underneath the
LCD screen.
The mode select button
is located just below the
LCD screen.
Self-cleaning and daily maintenance
Recommended after every clean
Take your Clean+Wash Hygiene to where the waste will be disposed.
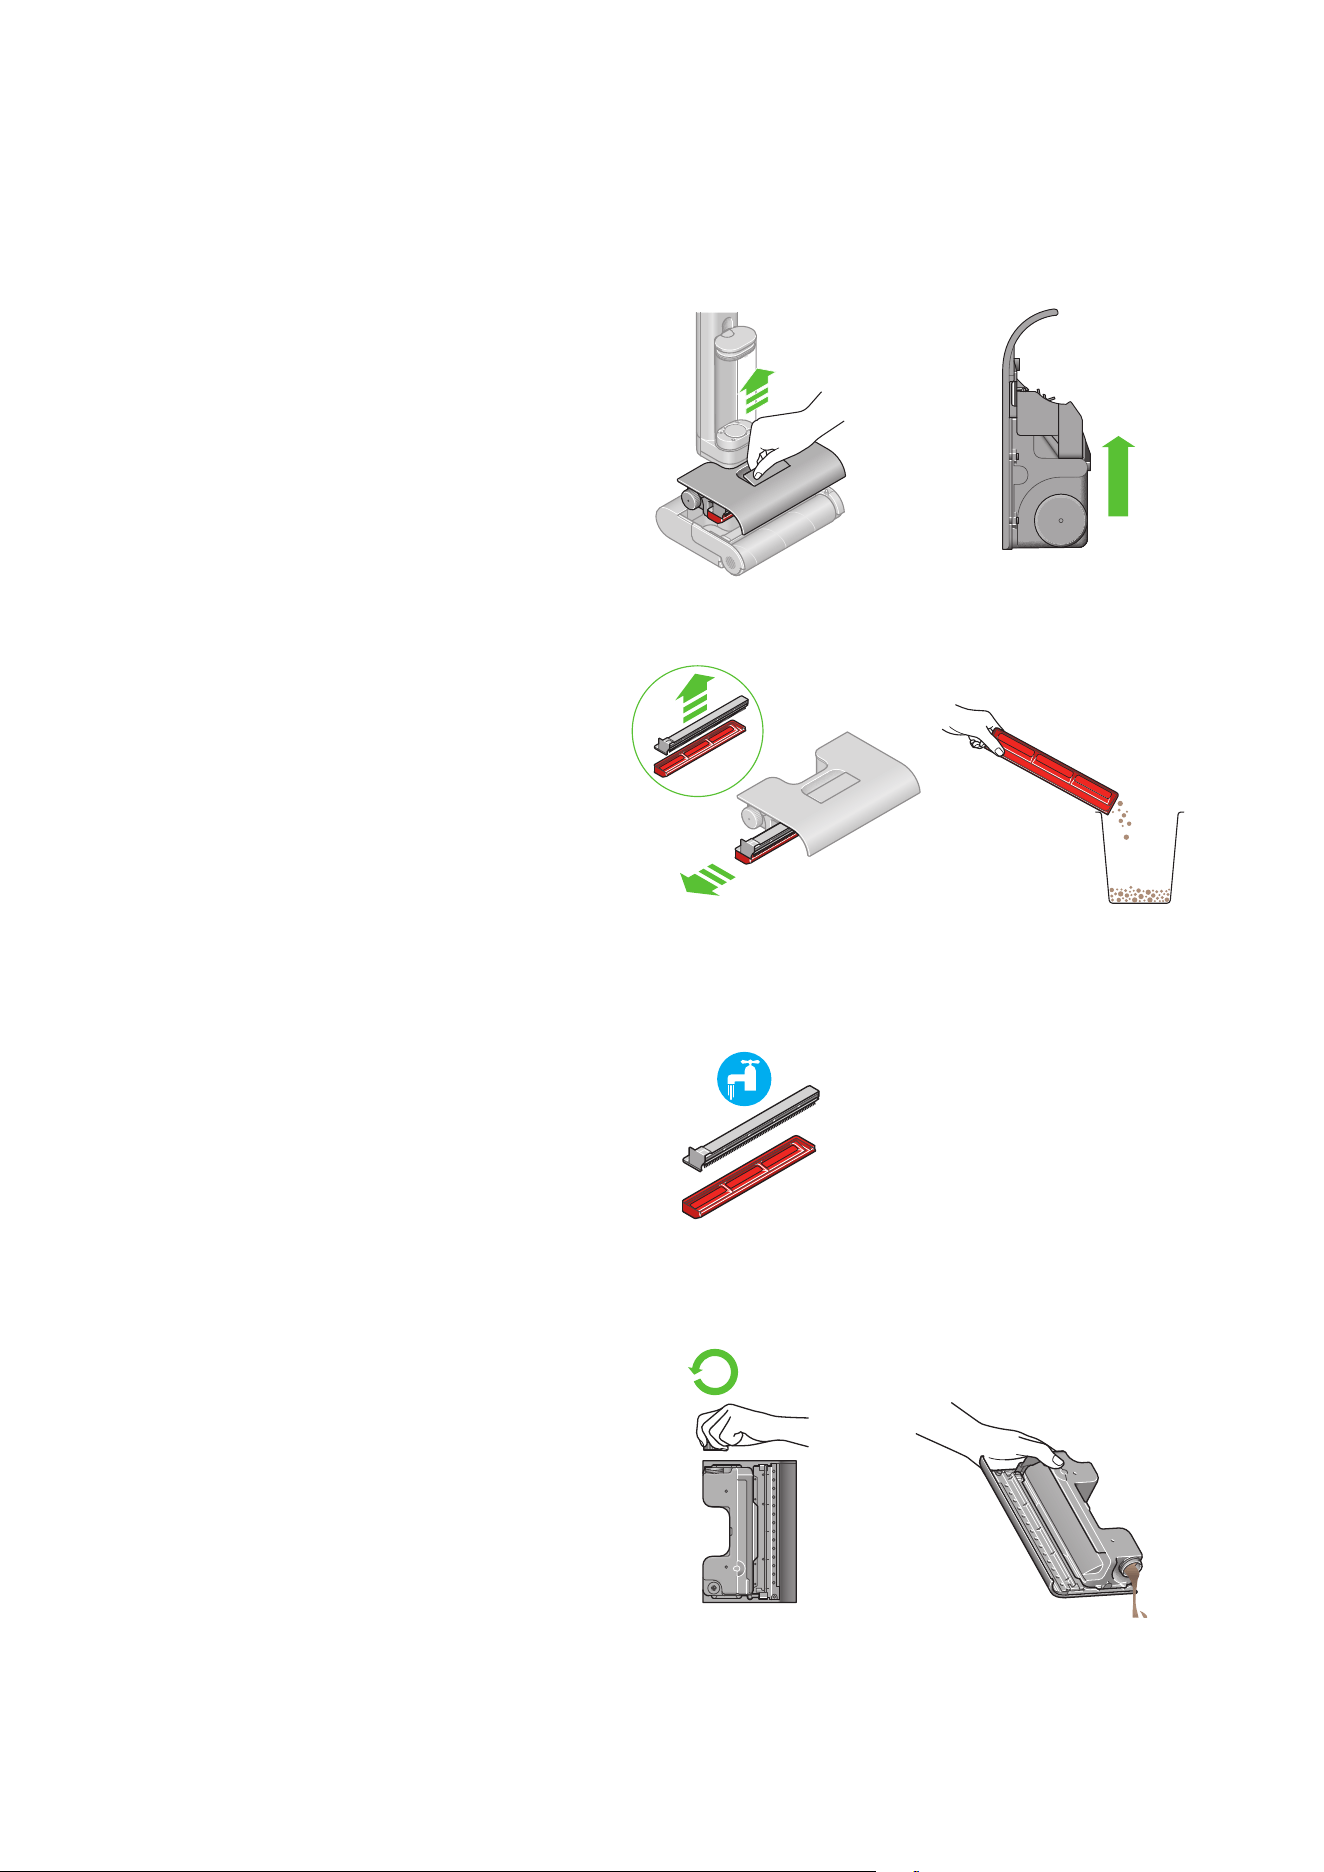
Remove the waste system
Gently lift the waste system from the cleaner head.
Once removed, hold the system upright with the debris
tray facing upwards, and dirty water tank below.
Dispose of dry debris
Pull the debris tray from the side of the system, and tap any
debris into the bin.
Clean the debris tray
Rinse the debris tray, anti-tangle comb and sprung mangle with
clean running water.
Empty and clean the dirty water tank
Dispose of dirty water from the dirty water tank and rinse with
clean water.
Lift using the red release handle on the
top of the waste system.
Unscrew the dirty water tank cap to empty.
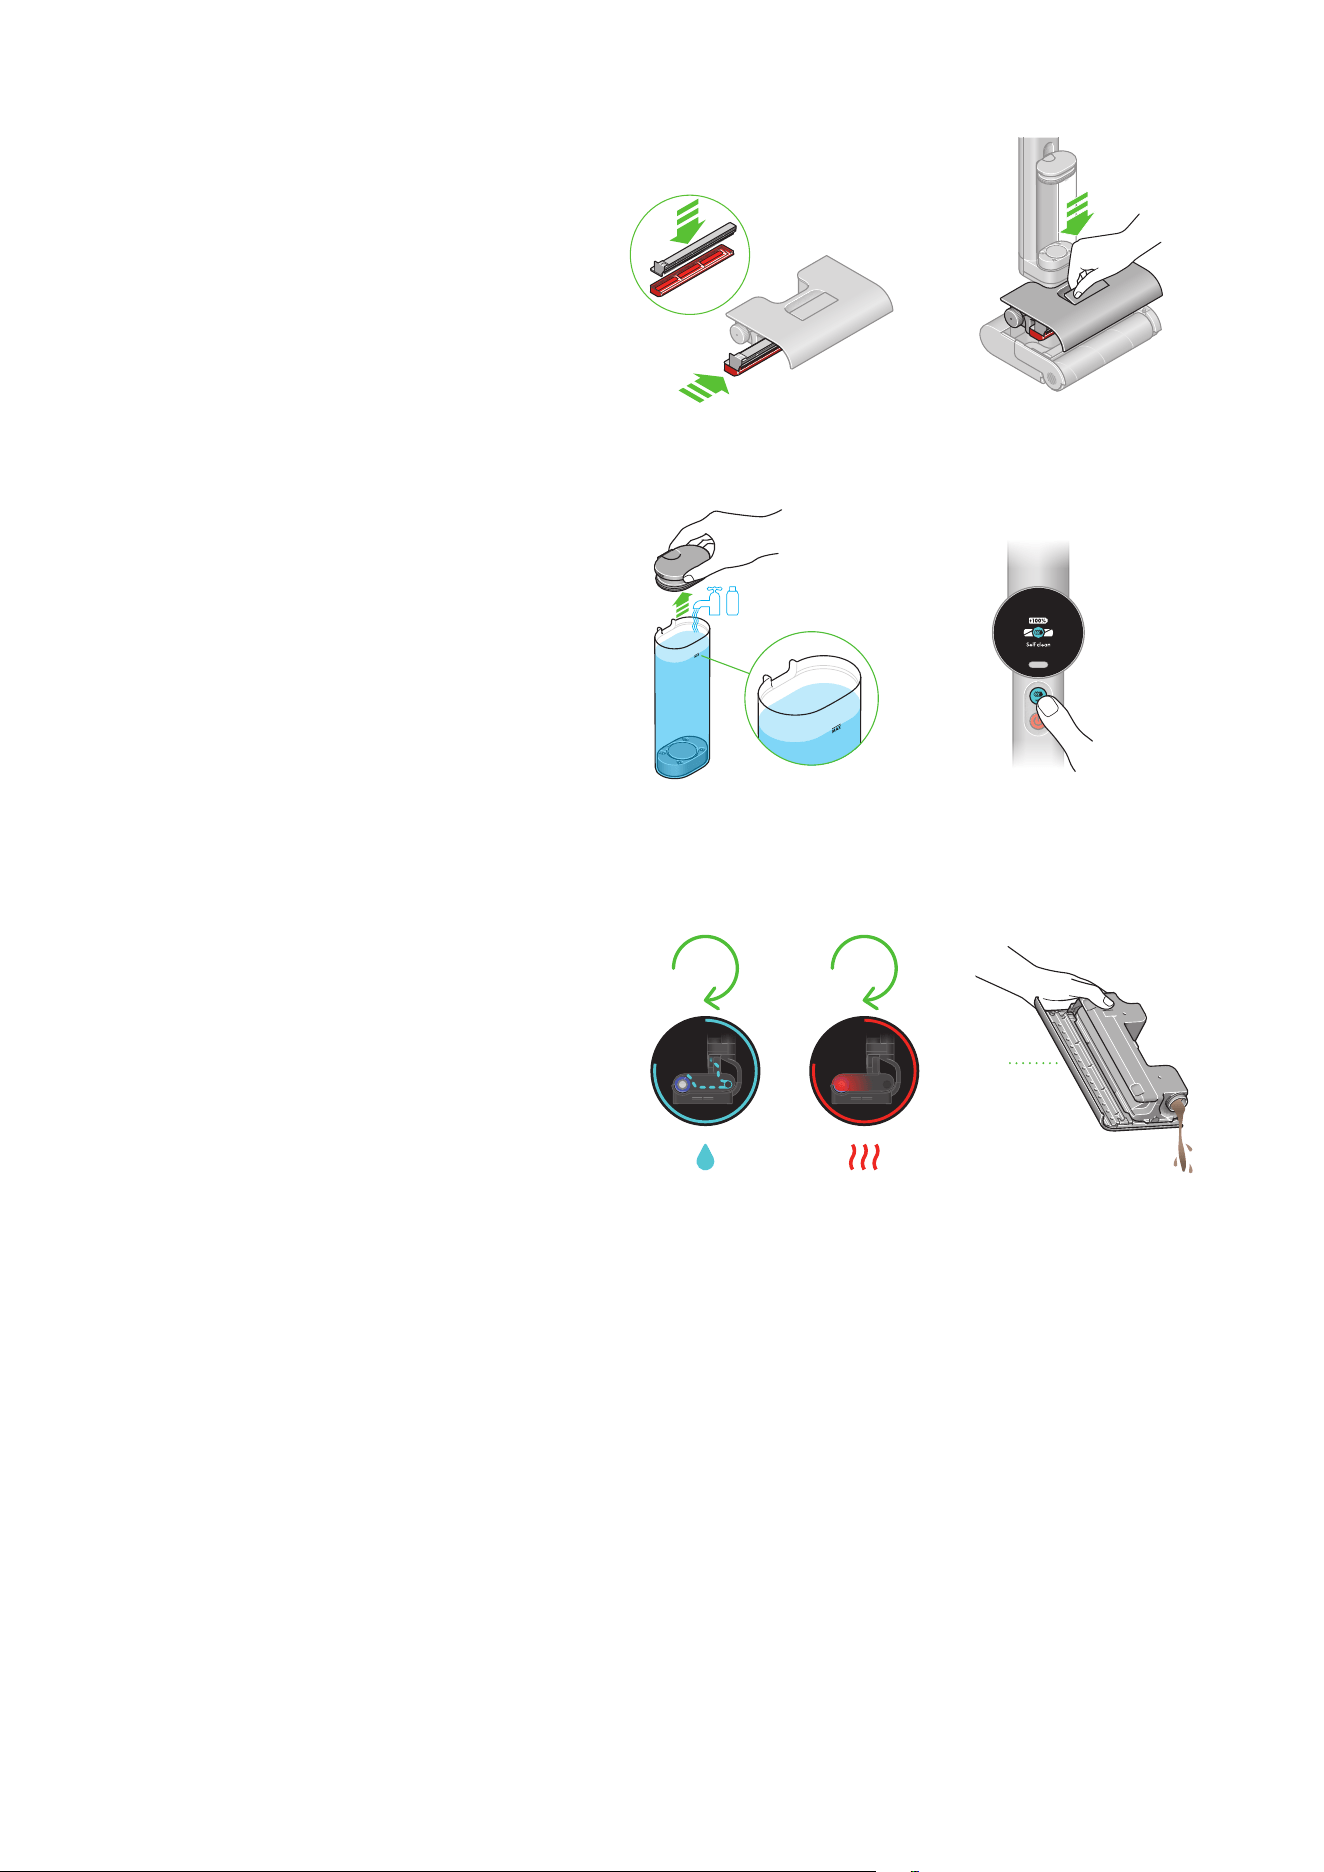
Re-assemble the waste system
Place the debris tray back into the waste system, ensuring it
is fitted all the way in.
Replace the waste system
Slot the whole waste system back into the cleaner head.
Ensure that it is fully locked into place by pressing firmly on
the central red lever until you hear a loud click. Place the
machine on the dock.
Setting up for self-clean
Fill the clean water tank to the MAX line or just under if adding
solution which should be measured to 20ml.
The LCD menu will auto-prompt ‘Self-Clean’. Follow the
instructions and press the MAX button to start self-cleaning.
If battery is below 30%, the LCD menu will alert ‘Low Battery’
and self-clean will be disabled until battery is charged to 30%.
Hot-air drying
The cleaning cycle runs for 145 seconds, flushing and
refreshing the system.
Hot-air drying will automatically start after the self-clean cycle
and will run for 30 mins.
After completion, empty the dirty water tank.
145
sec
145
sec
145
sec
30
mins
30
mins
Self-cleaning and daily maintenance
Recommended after every clean
The MAX button is
located just underneath
the LCD screen.
Regular maintenance
Recommended once every other week
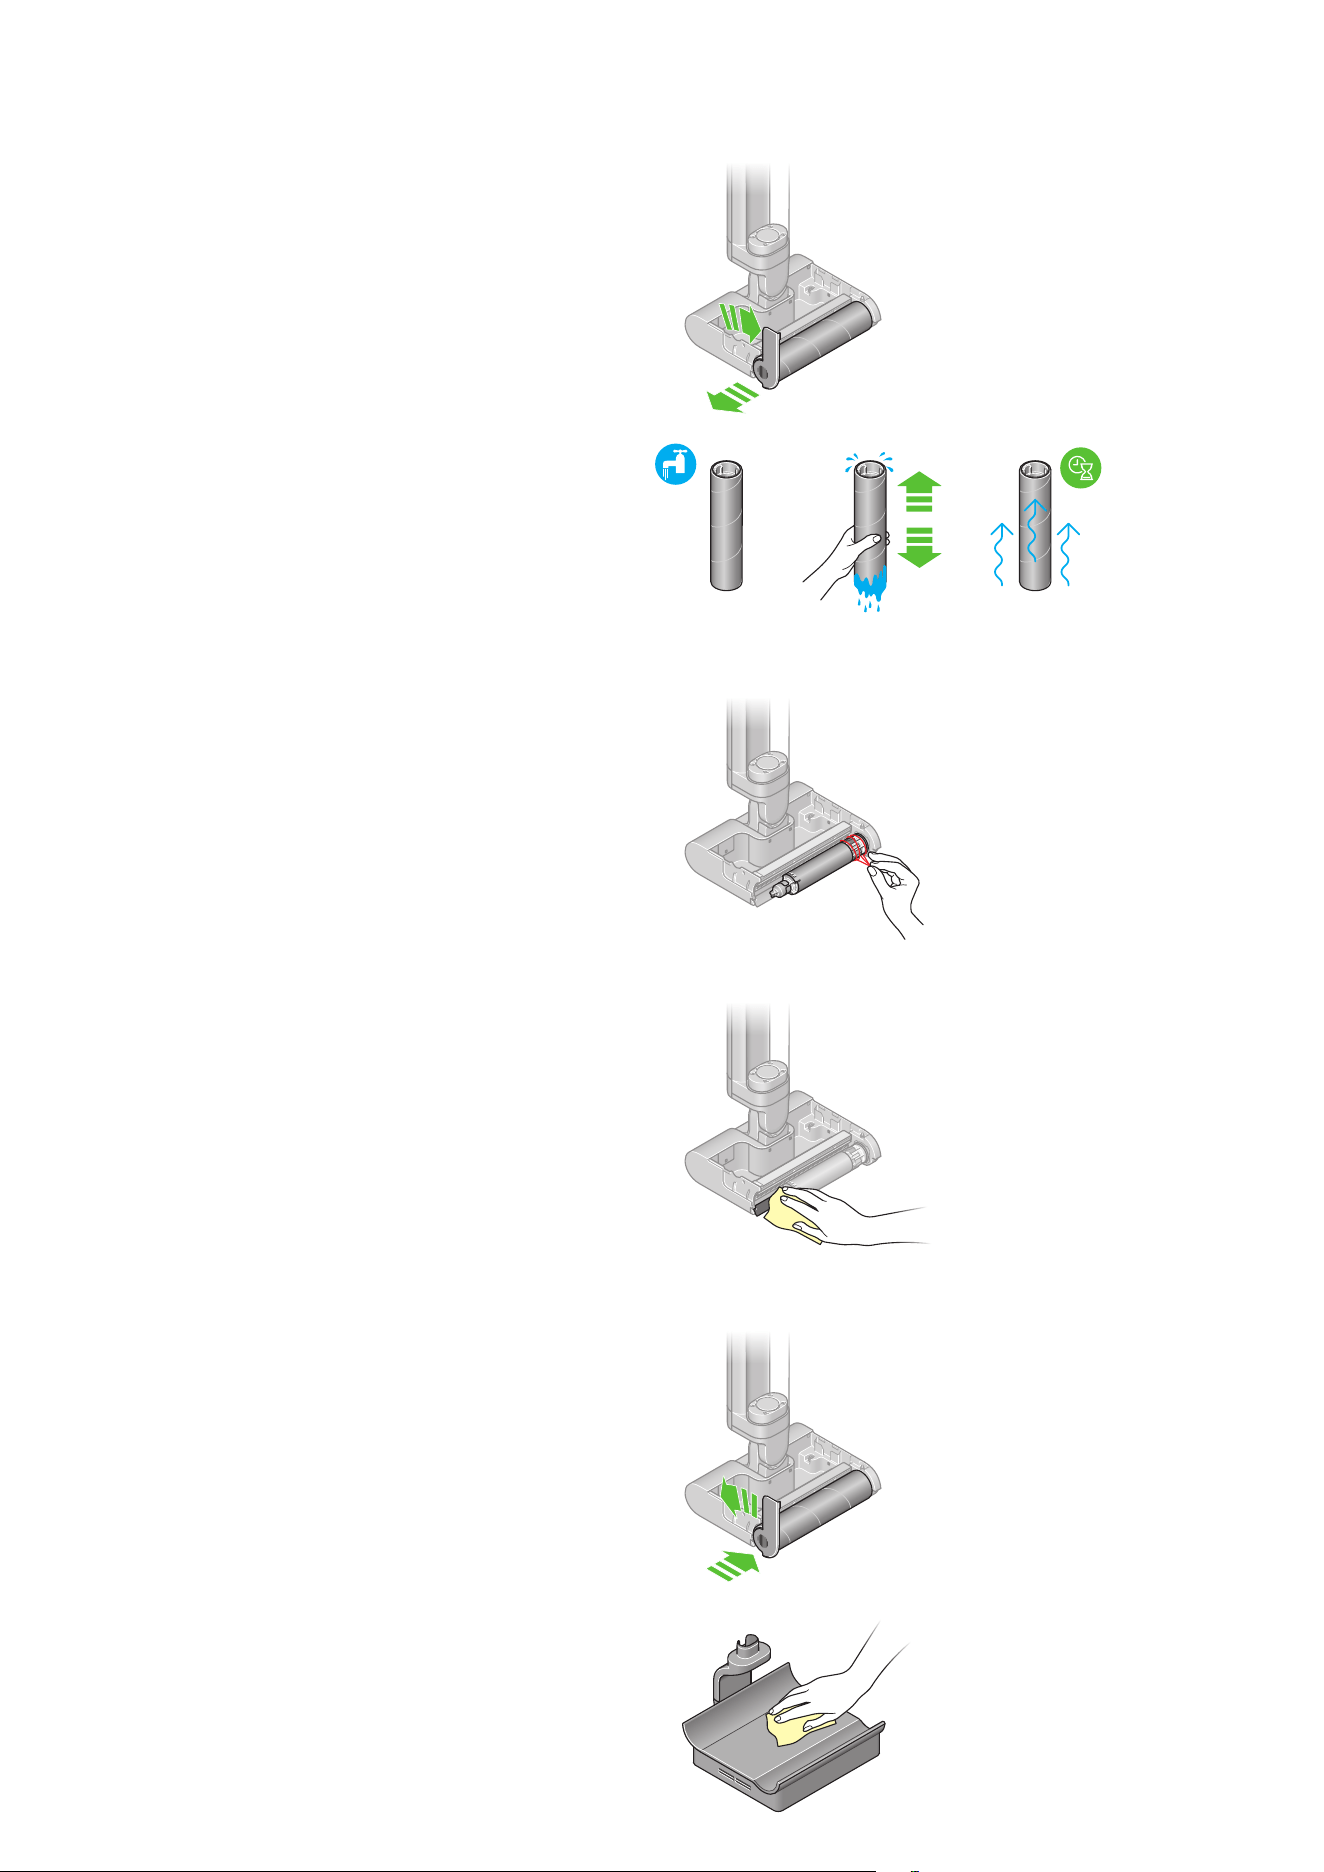
Remove the roller
Unlock and remove the roller from the side of the
cleaner head, detaching it from the motor component.
Wash the roller
Wash the roller in a sink, using warm water and
gentle detergent. Squeeze to remove excess water
and leave to dry.
Clean the end cap and the motor component
Remove any residue, debris or hair on the end cap
and the motor component. Use a damp cloth to
wipe clean if needed.
Clean the squeegee
Check behind the motor component to see if there
is any residue left on the squeegee. Use a damp
cloth to wipe clean if needed.
Reattach the roller
Reattach the roller to the end cap. Slide the roller
onto the motor component and lock it from the side.
Cleaning the dock
Remove the machine from the dock. Make sure the charger is
disconnected from the mains before cleaning. Wipe the dock
with warm water, detergent and a cloth. Allow to dry before
reconnecting to the mains.
Lift the release lever on the side of the
cleaner head to an upright position to
allow the roller to be removed.
The motor component can be
found where the roller connects
to the cleaner head.
Lock the roller in place by moving the
lever on the side of the cleaner head
to the horizontal position.
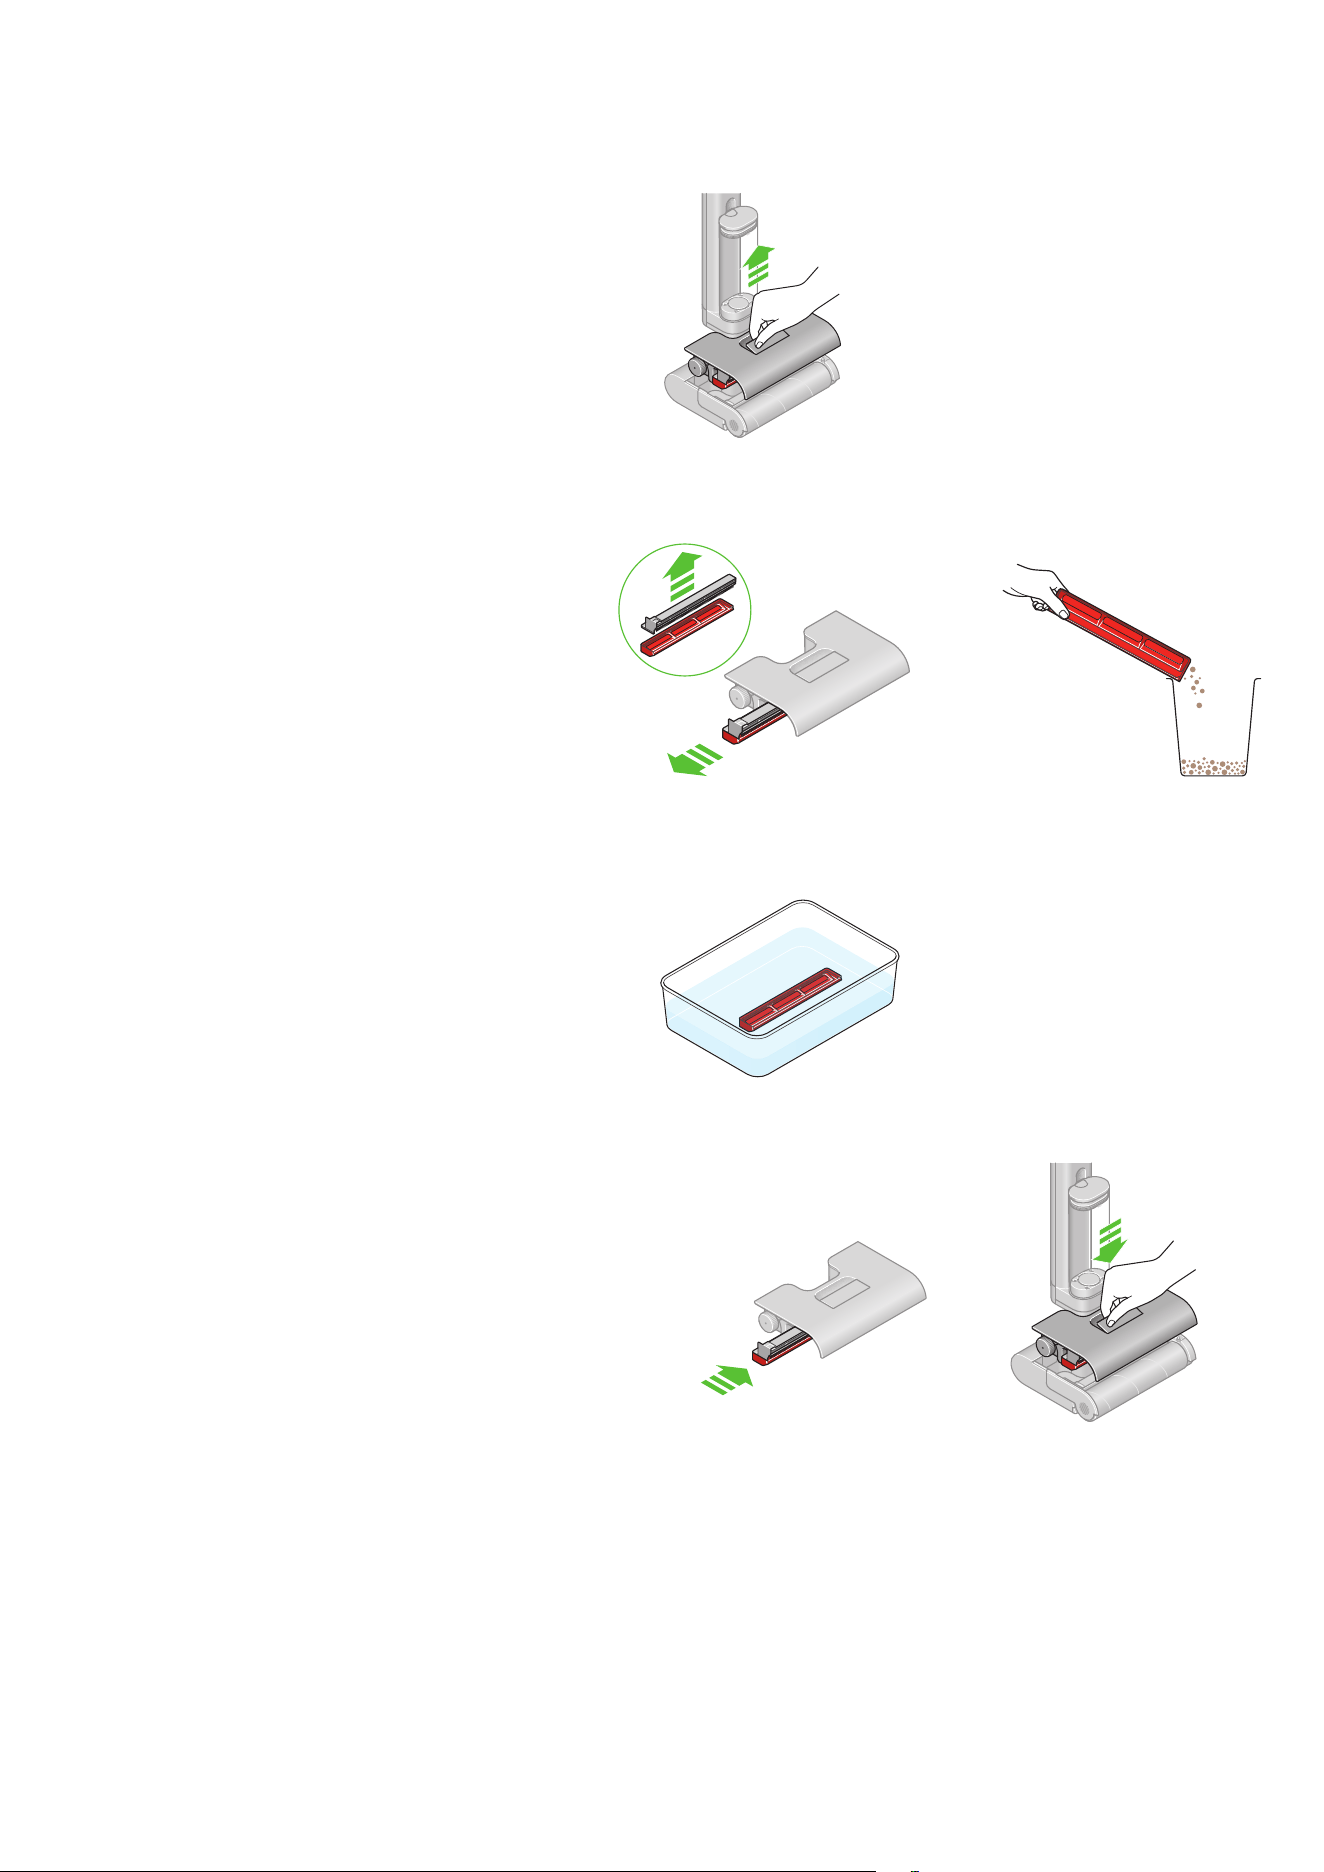
Remove the waste system
Gently lift the waste system from the cleaner head. Once
removed, hold the system upright with the debris tray facing
upwards, and dirty water tank below.
Dispose dry debris
Pull the debris tray from the side of the system, tap any
debris into the bin.
Soak the debris tray
Soak in citric acid/vinegar for one hour to remove limescale.
Re-assemble the waste system
Place the debris tray back into the waste system, ensuring it
is fitted all the way in.
Replace the waste system
Slot the whole waste system back into the cleaner head.
Ensure that it is fully locked into place by pressing firmly on
the central red lever until you hear a loud click. Place the
machine on the dock.
Deep-clean maintenance
Recommended every 6 months
Deep cleaning the debris tray
Lift using the red release handle
on the top of the waste system.
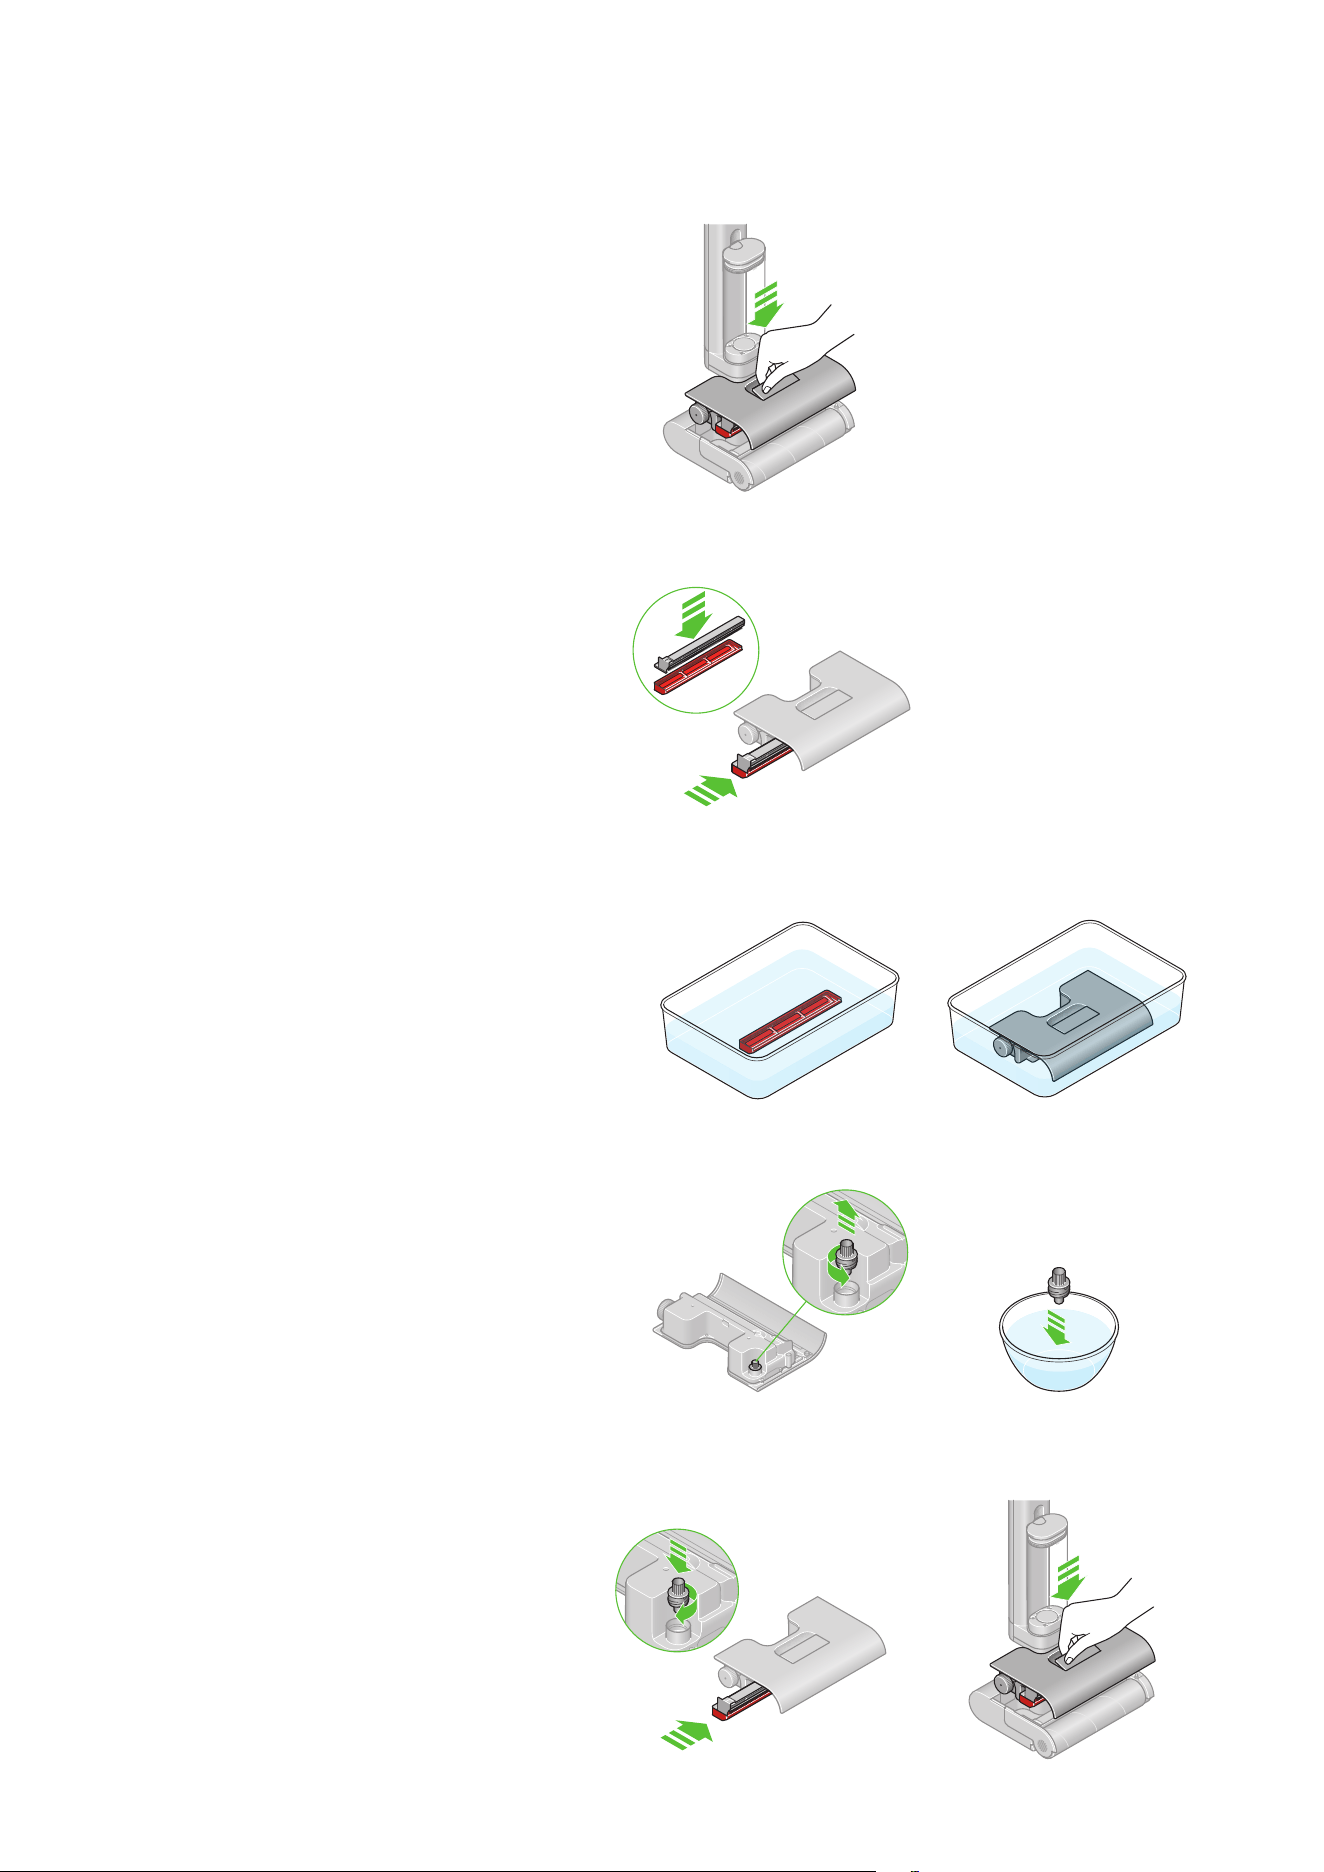
Remove the waste system
Gently lift the waste system from the cleaner head. Once
removed, hold the system upright with the debris tray facing
upwards, and dirty water tank below.
Remove the debris tray
Pull the debris tray from the side of the system.
Clean the dirty water tank
Rinse the dirty water tank with warm water and detergent.
The whole waste tank can be fully submerged in water and
formulation for a deeper clean if necessary.
Clean the rubber dirty water tank cap
Rotate and remove the rubber cap from the bottom of the dirty
water tank.
Wash in a sink using warm water, gentle detergent and a cloth.
Run clean water through the gap on the dirty water tank to
remove any remaining dirt.
Re-assemble the waste system
Place the debris tray back into the waste system, ensuring it
is fitted all the way in.
Replace the waste system
Slot the whole waste system back into the cleaner head.
Ensure that it is fully locked into place by pressing firmly on
the central red lever until you hear a loud click. Place the
machine on the dock.
Deep-clean maintenance
Recommended every 6 months
Deep-cleaning the waste tank
Lift using the red release handle
on the top of the waste system.
The rubber cap is located on the opposite side
to the screw cap on the dirty water tank.

Caution sign with text
reading: Replace roller.
Deep-clean maintenance
Recommended every 6 months
Replace the roller
Your Dyson Clean+Wash Hygiene microfiber roller has a lifespan
of 43 hours. We recommend you replace it every 6 months, or when
prompted to do so on the LCD screen. A QR code will be displayed
for ordering replacements from Dyson.
Battery and performance tips
Disassemble your machine
Keep your Clean+Wash Hygiene on the dock and store it in a
cool environment (<95° F) to best maintain battery health.
Avoid storing the cleaner with a dirty tank, dirty debris tray or
dirty roller – always empty and set to self-clean after use.
Use MAX mode for stubborn stains.
Replace parts promptly when alerted.
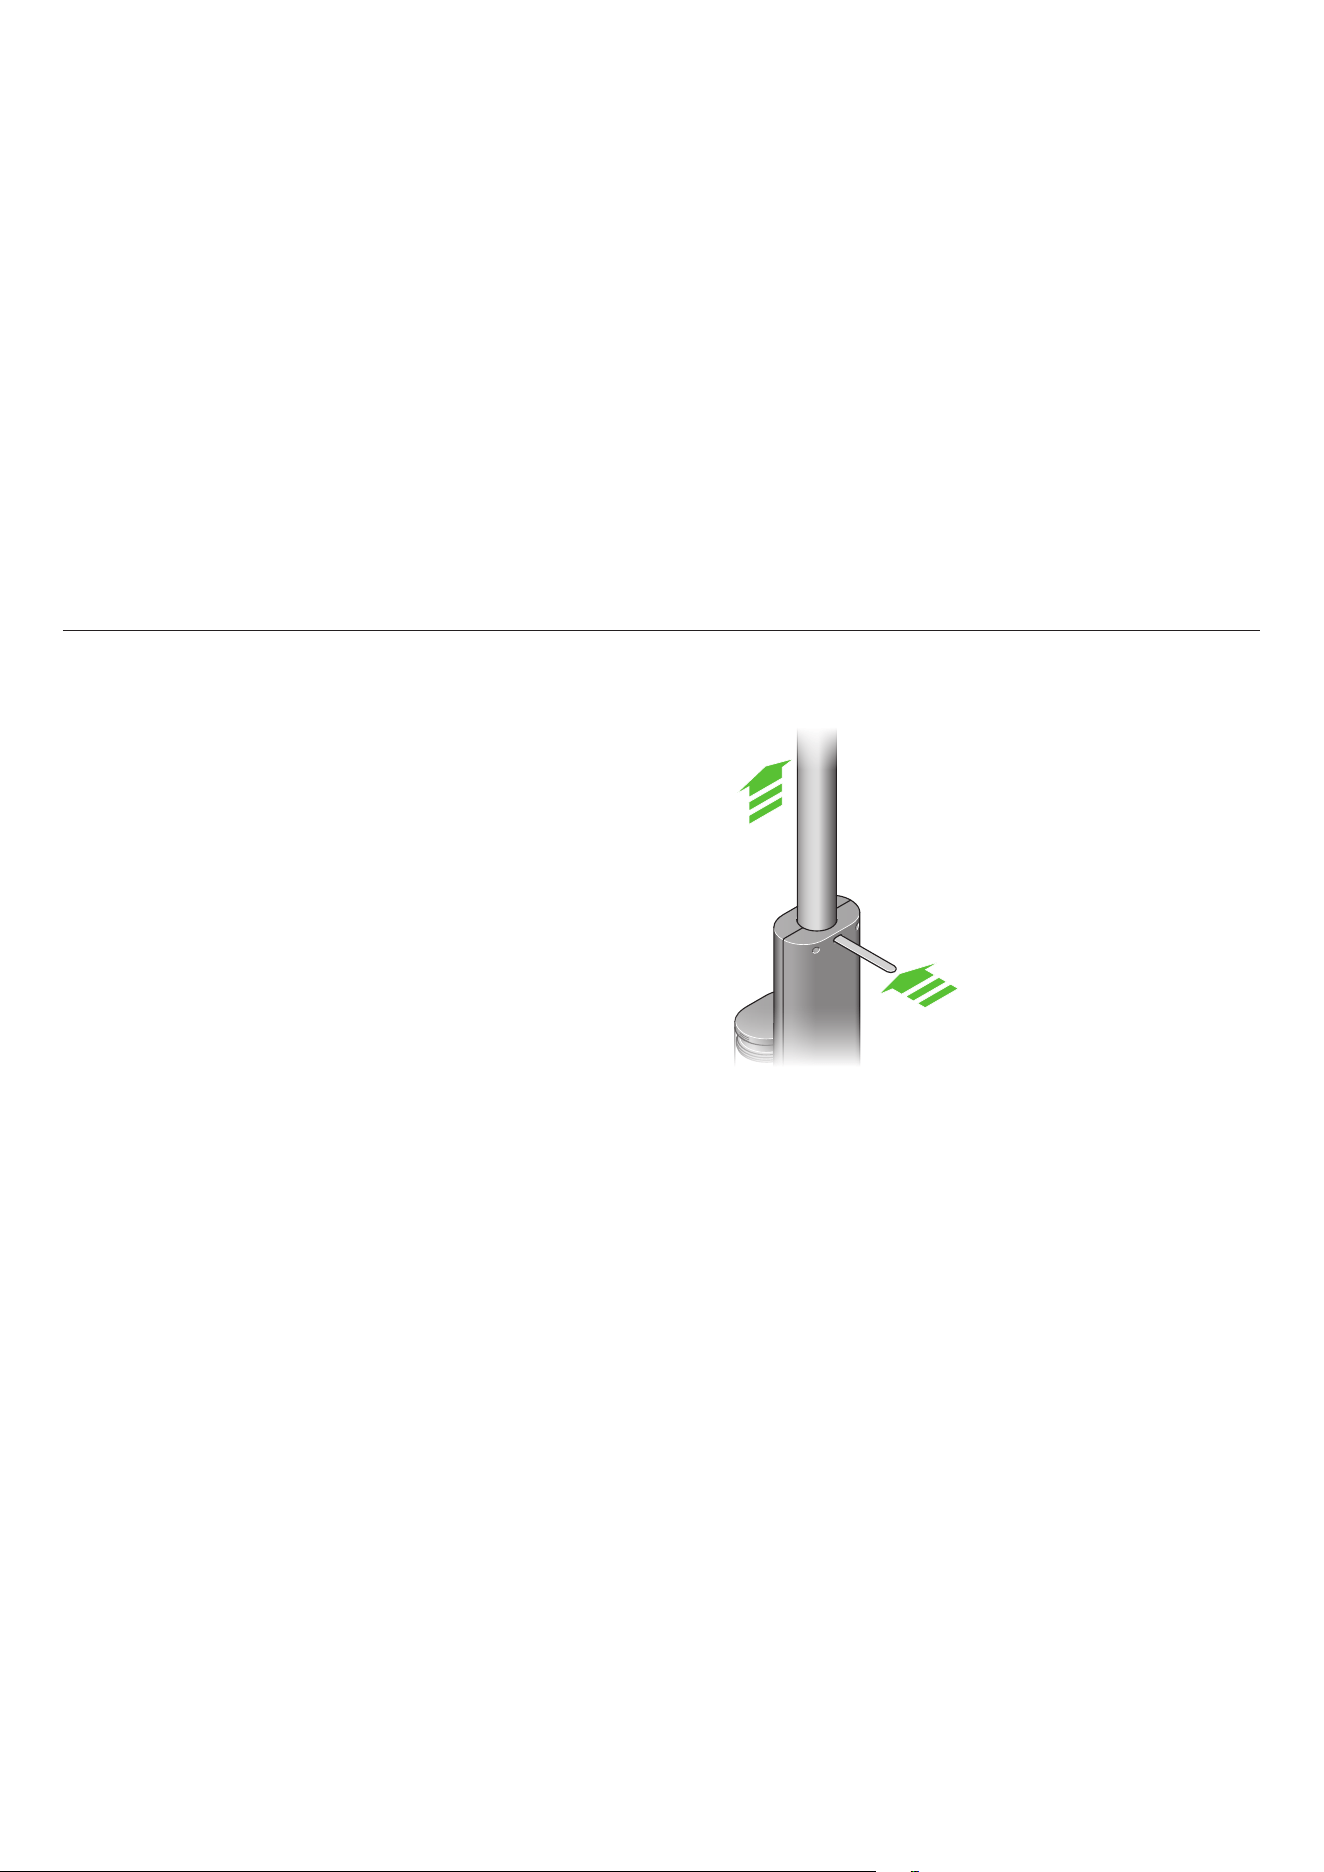
Should you need to store or repackage your machine, detach
the wand from the main body.
Use a flat head screwdriver or
similar tool to depress the release
latch and release the wand from the
body. The hole to access the release
latch is located just below where the
wand connects to the body.

Troubleshooting
Support and service
Excessive water leaking during usage or self-cleaning
Ensure that the debris tray has been assembled correctly, and
that the waste system is firmly clicked into the cleaner head.
No water output
Check that the clean water tank is full and seated correctly.
Poor pickup
Clean the roller, debris tray, sprung mangle and squeegee.
Replace the roller every 6 months (or sooner, if worn). Your
machine will alert you when they need to be changed.
Short run time
Fully charge the battery before use, avoid excessive use of
MAX mode.
Dirty Water Tank (DWT) alert
Empty the DWT and place it back properly, ensuring that it’s
fully clipped in.
Error alert
Refer to MyDyson™ app for guidance.
• Visit Dyson.com for videos, tips, and spare parts ordering.
• Contact Dyson Customer Care for assistance.
