SV12 JN.00000 PN.000000-00-00
00.00.00 VERSION NO.01
User guide
Contents
In the box
Getting started
Setting up your docking station
Setting up your robot
Downloading the MyDyson™ app
Connecting your robot
Mapping your home for the first time
Managing your map
Starting a clean
Scheduling and reviewing cleans
Looking after your robot
Emptying your docking station’s dry bin
Washing your filters
Maintaining your brush bar
Maintaining your wet roller
Cleaning your camera lens and sensors
Alerts
Resetting and upgrading software
Dyson logo
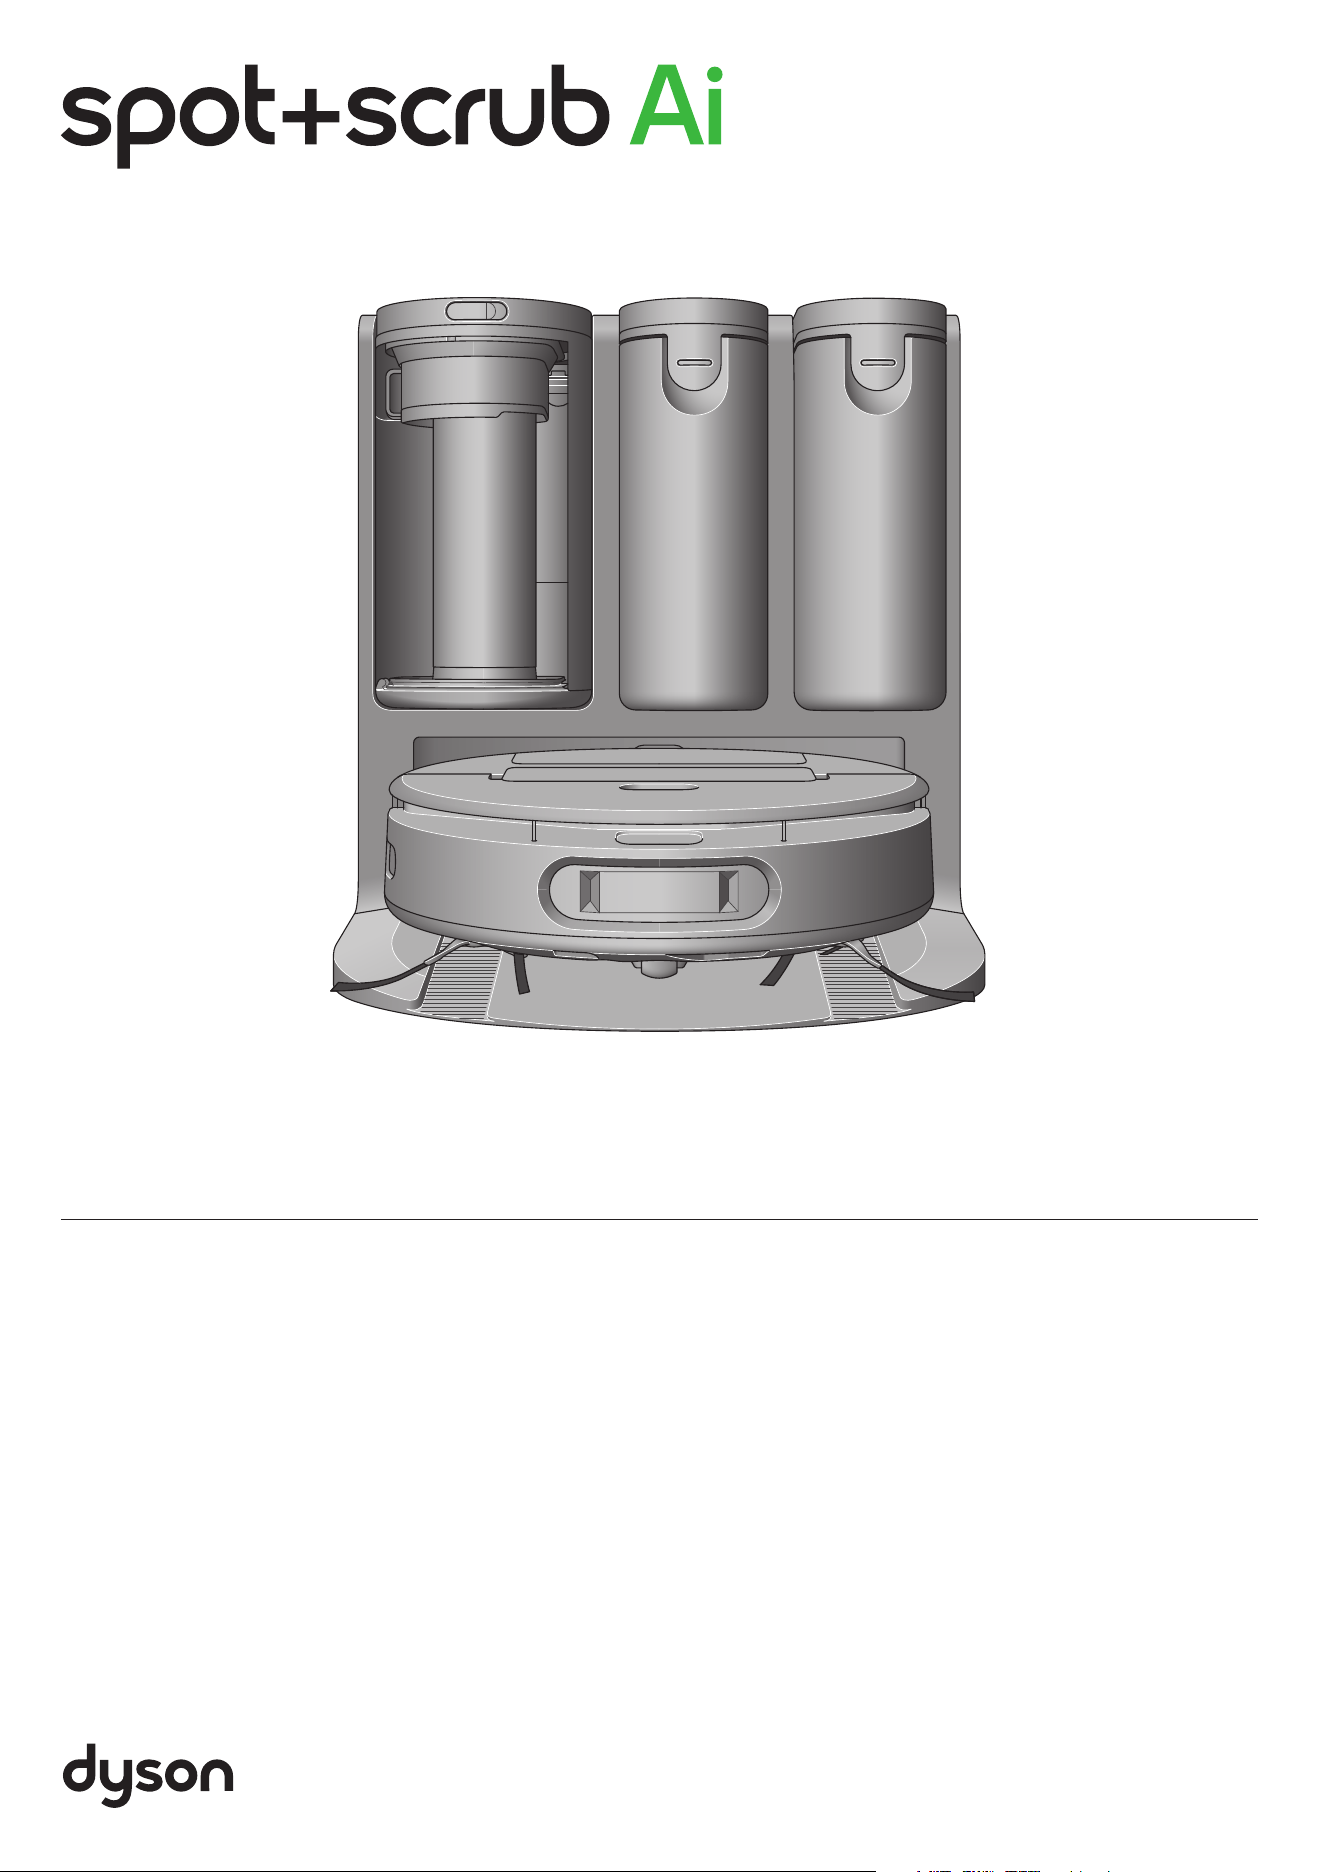
Spot+Scrub Ai logo
The Dyson Spot+Scrub
Ai robot vacuum in its
docking station.
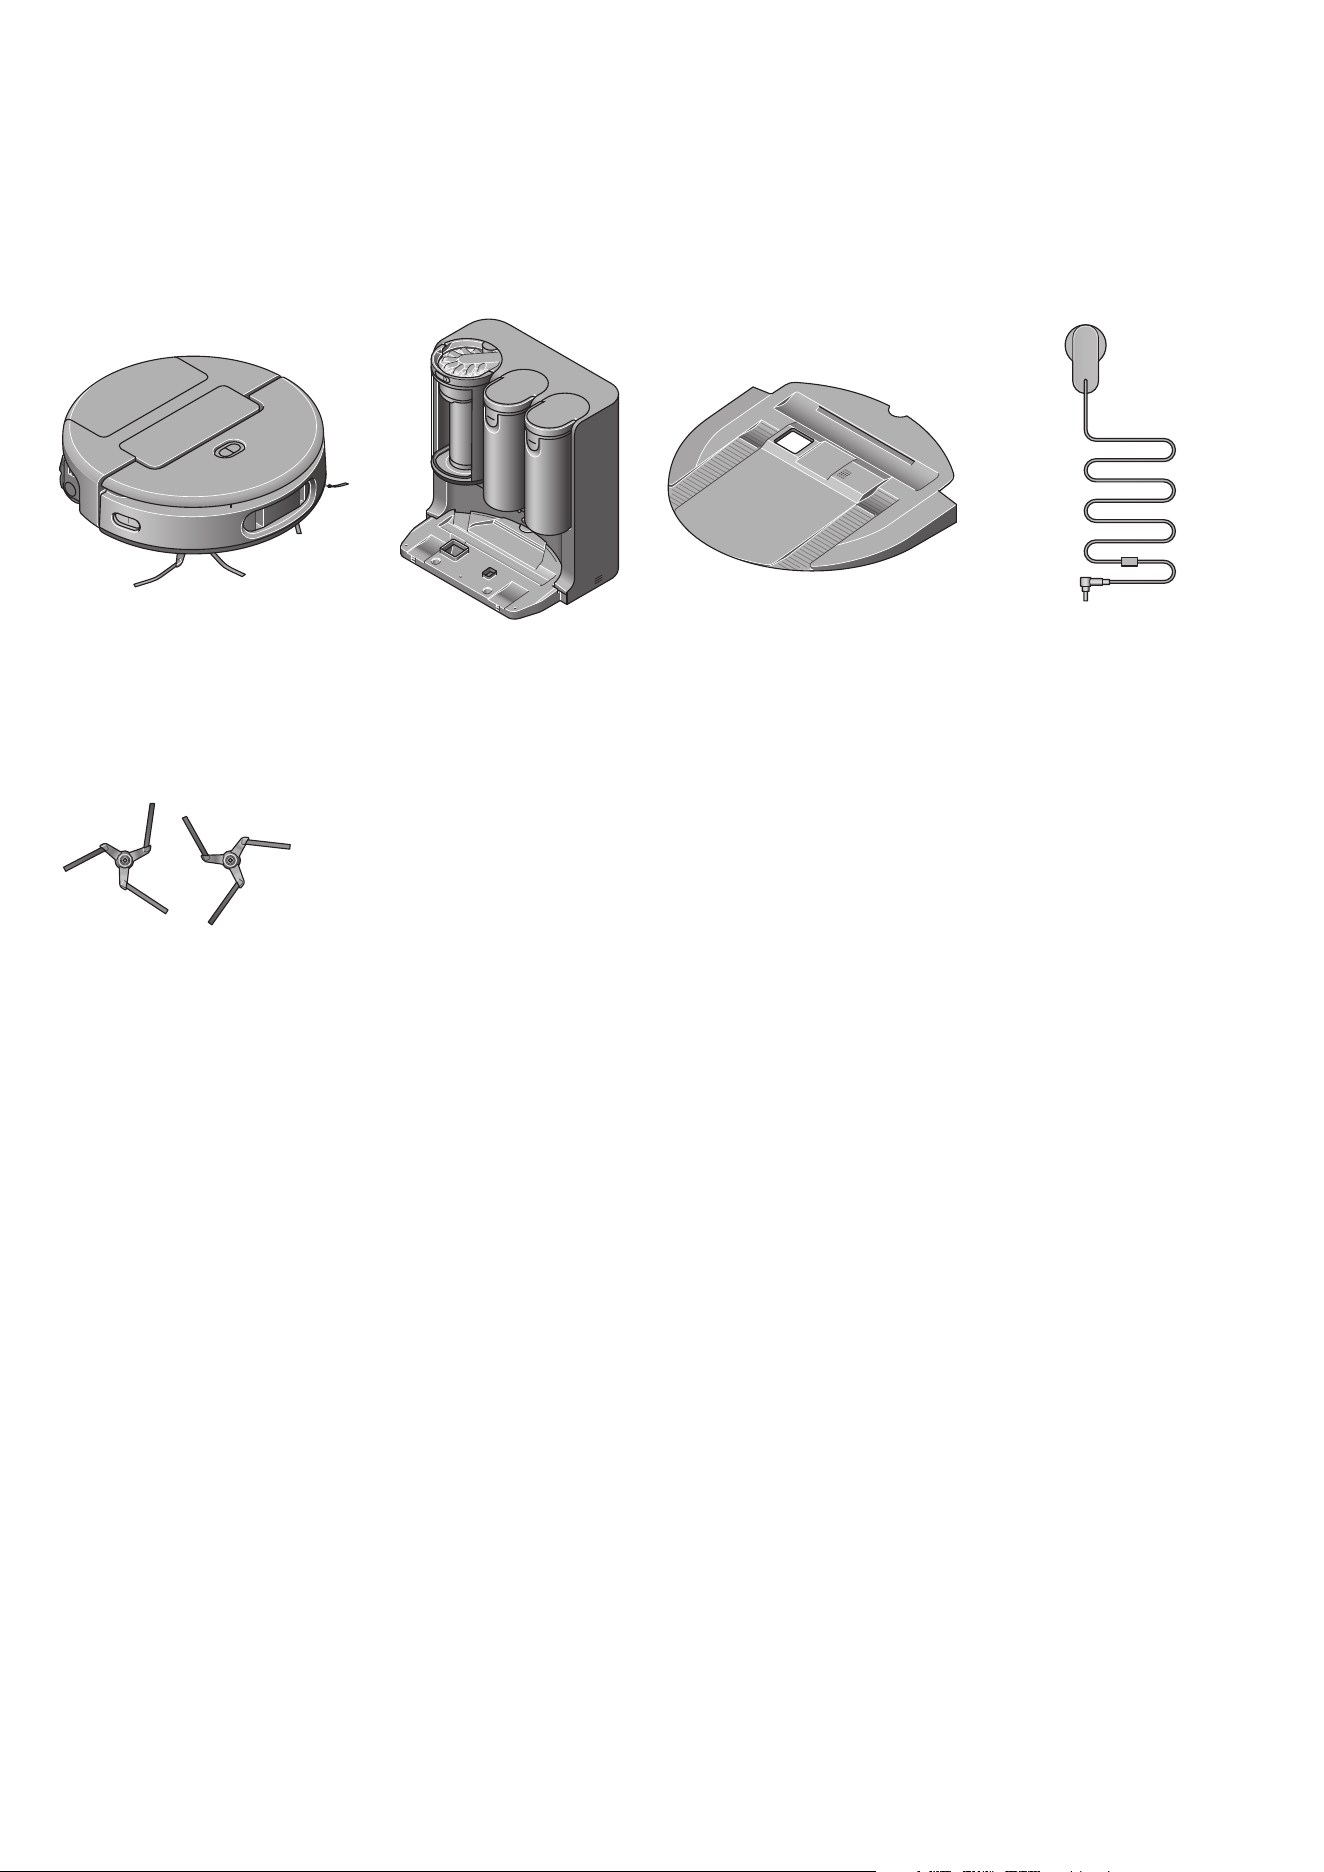
In the box
Docking station
Self-empties, self-cleans, refills
and recharges. All automatically.
Docking ramp
Stores your robot off the floor
and helps connect it to your
docking station.
Dyson Spot+Scrub™ Ai wet and
dry robot vacuum cleaner.
Side sweepers x2
Reach into tight spaces, corners
and around furniture legs.
Charging cable
Connects your docking station to a
power supply.
Dyson Spot+Scrub™ Ai wet and dry robot vacuum cleaner
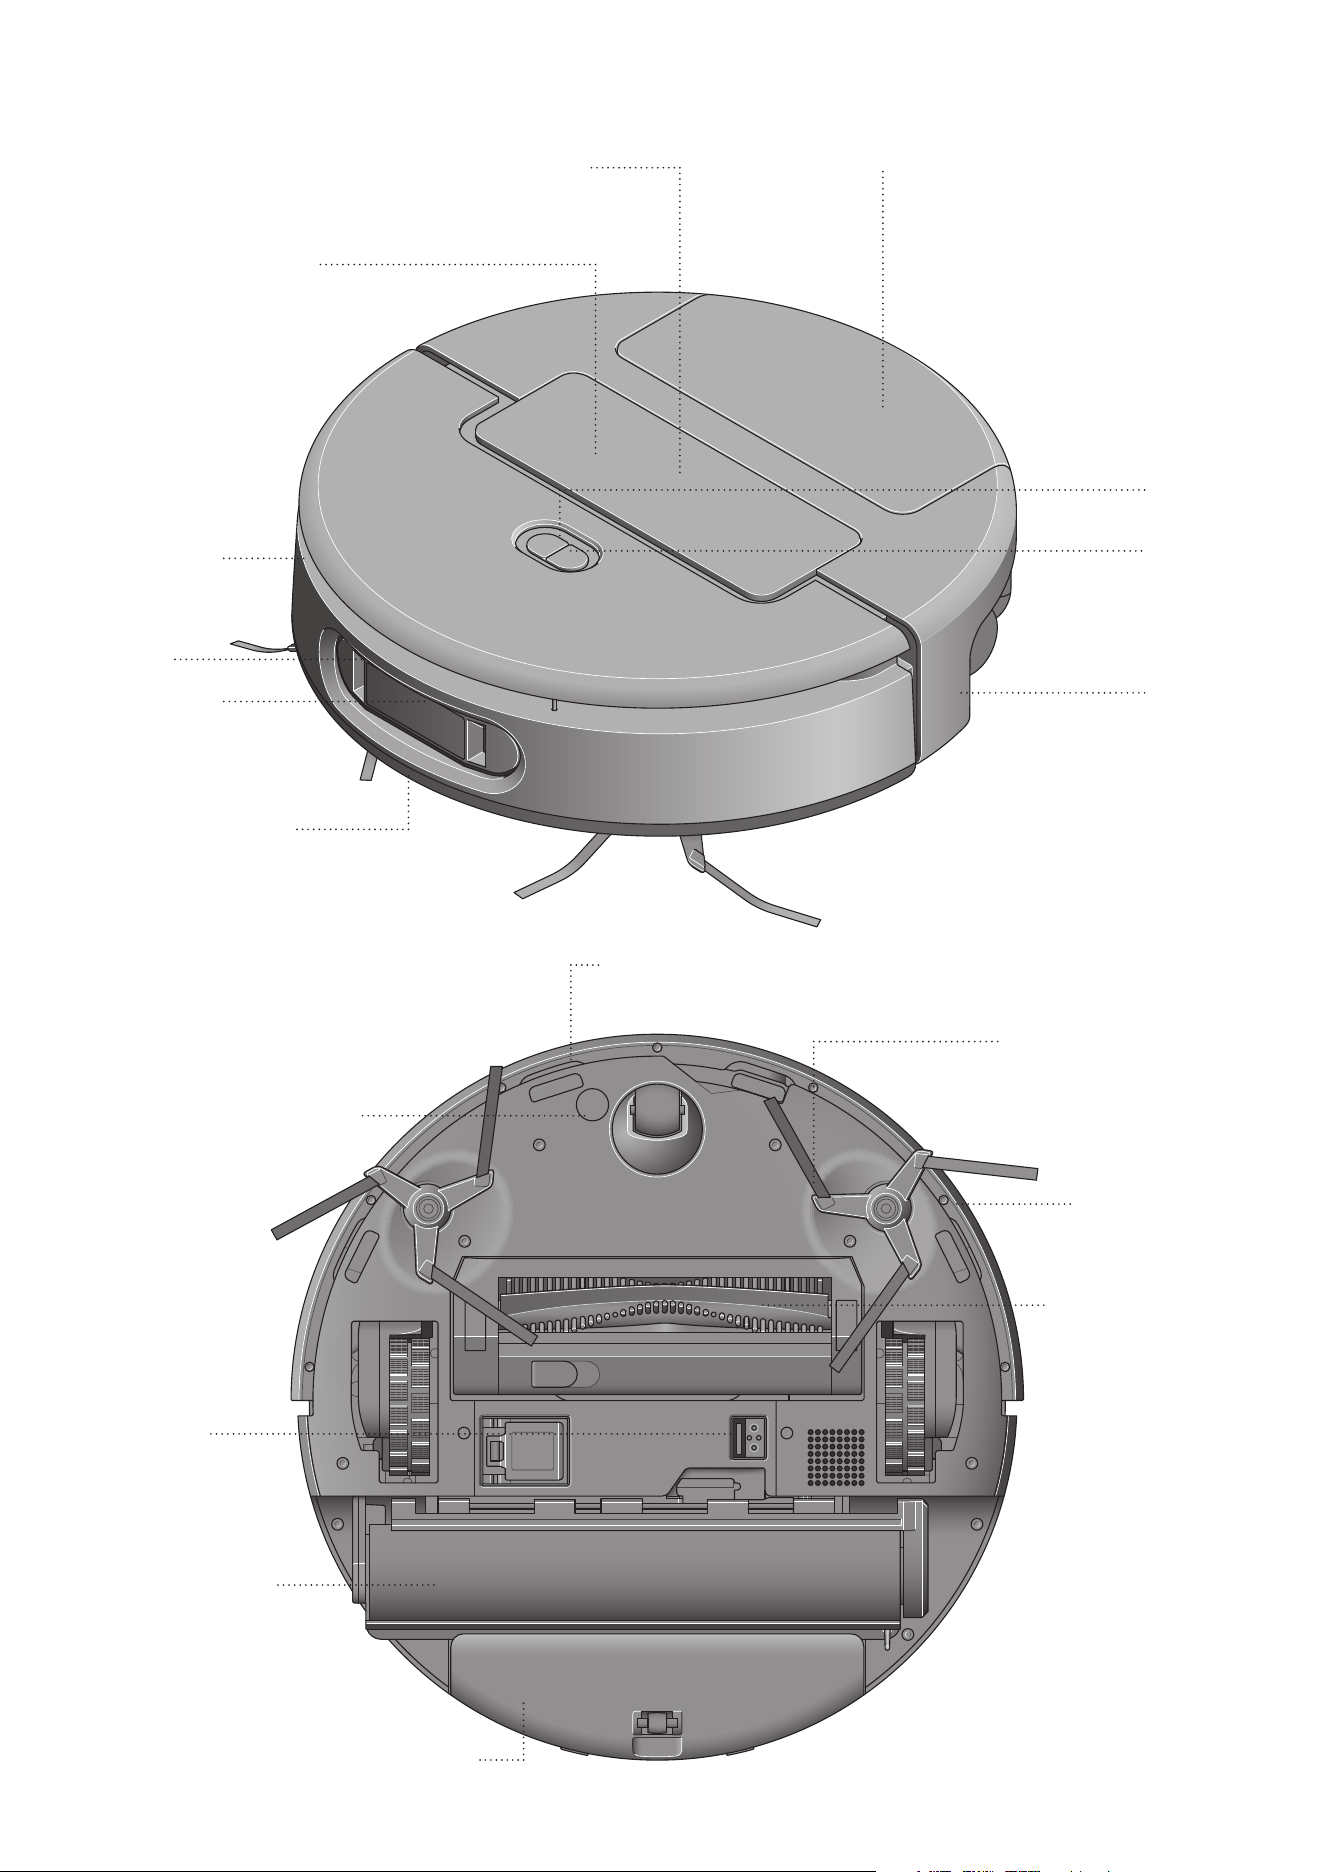
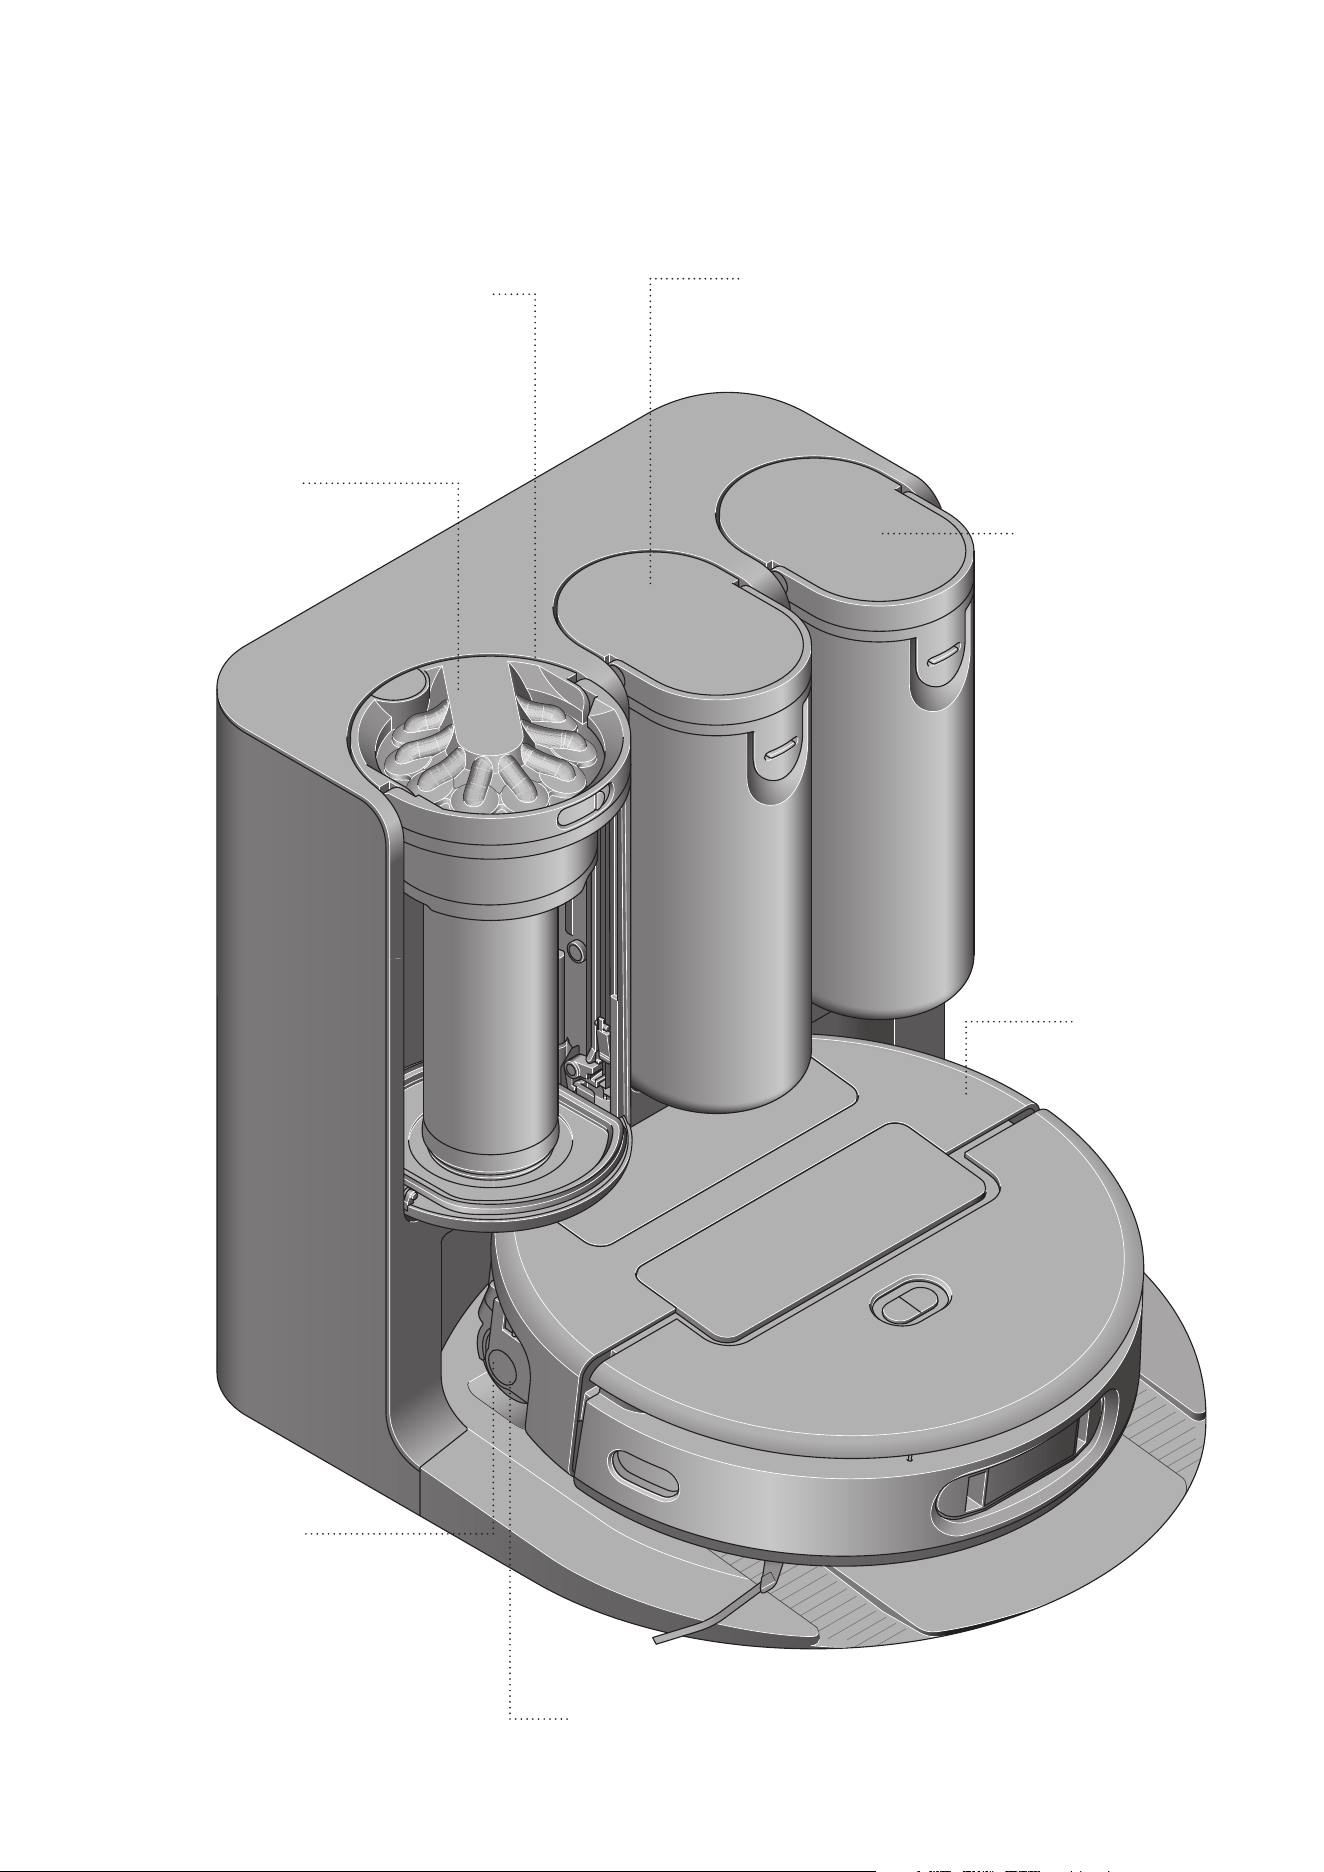
Getting started
Robot cleaner
LiDAR laser
Wall follow sensor
Drop sensors
Dry bin
Digital motor
Speaker
Filter
Pre-installed
in dry bin.
Clean water tank
Power button
Home button
HD camera
LED illumination
Front bump sensors
Anti-tangle brush bar
Microfiber wet roller
Side sweepers
Dirty water tank
Ultrasonic floor-type sensor
Top view of the Dyson
Spot+Scrub Ai robot cleaner.
View underneath the Dyson
Spot+Scrub Ai robot cleaner.
3-hour charge time
Robot automatically
returns to the dock to
recharge.
Built-in filter
Captures dust particles
as small as 0.1 microns.
Getting started
Docking station
Dirty water tank (0.6gal)
Clean water tank (0.6gal)
Dry bin
With Root Cyclone™
separation system.
Holds up to 100 days
of dry debris.
Automatic roller
Washes your wet roller
in 140°C hot water.
Automatic roller drying
Hygienically dries your
roller in 113°C hot air.
click
click
>1.64ft
>1.64ft
>5ft
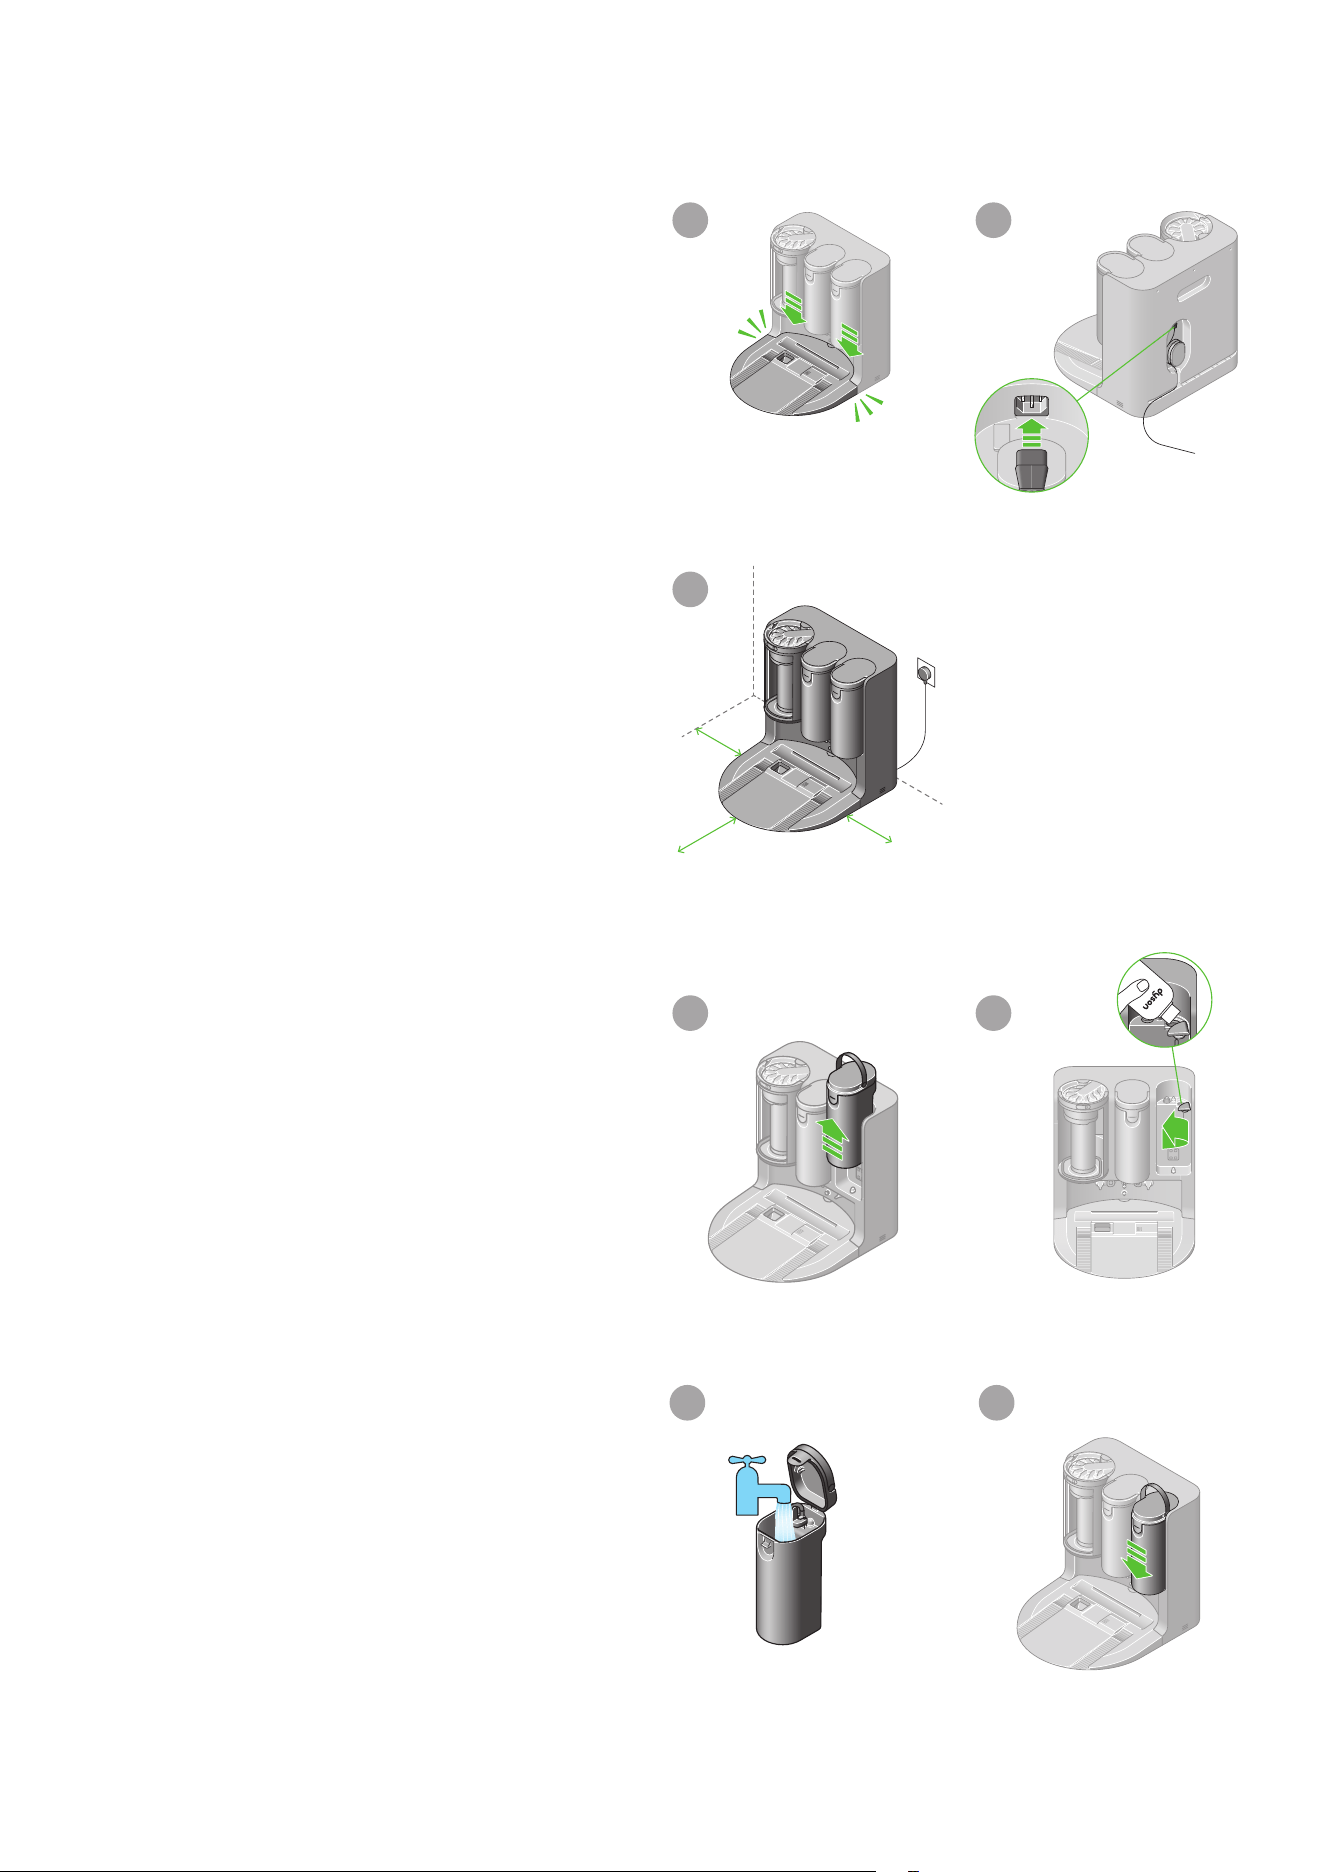
Assembling your docking station
Align the docking ramp with your docking station and press down
until it clicks into place.
Plug the charging cable into the back of your docking station and
connect to the mains power supply. A white LED will light up when
power is connected.
Wrap any excess cable around the cable tidy on the back of the
docking station.
Setting up your docking station
Choosing a location
Adding formulation and filling your clean water tank
The docking station should be located against a wall, on a level surface,
close to a main power supply. Make sure the position is out of bright
sunlight and not obscured under a table or other furniture.
The docking station also needs to have at least 1.64ft of clear space
around the sides and at least 4.9 ft in front.
Use the handle to lift the clean water tank out of your docking station.
Remove the rubber formulation cap located on the back of your docking
station. Fill with Dyson 02 Probiotic hard floor cleaning solution up to
the ‘Max’ mark and replace the rubber cap.
Open the lid of the clean water tank and fill with clean water until it
reaches the ‘Max’ mark. Close the lid and place the tank back into
your docking station.
1 2
4
3
5
6 7

click
click
click
click
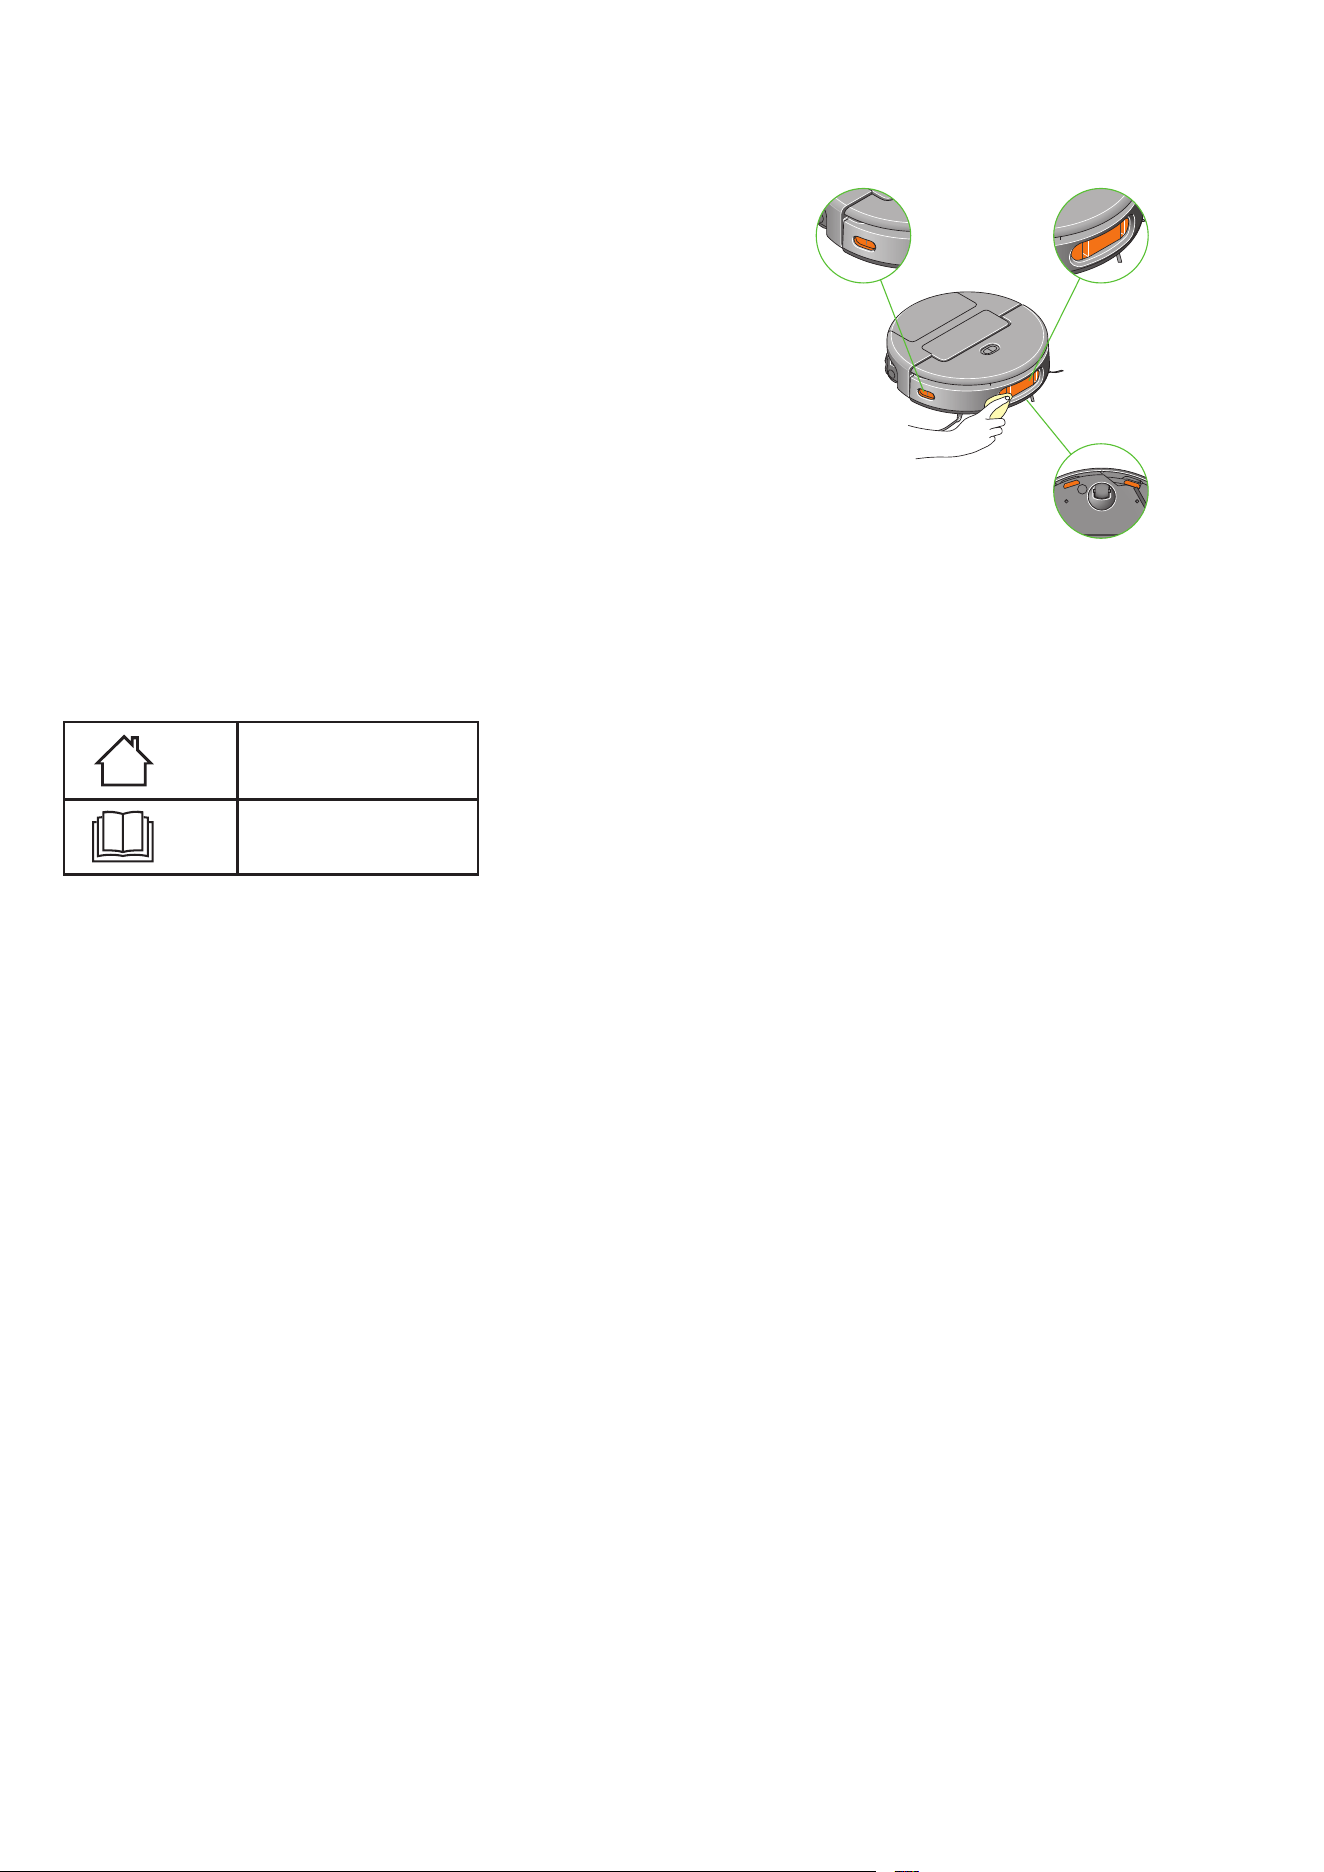
Setting up your robot
Attach your side sweepers
Turn your robot over on a soft surface. With the water tank at the bottom,
click in the side sweepers: red on the left, blue on the right.
Standby power
To save energy when it’s on the docking station, your robot will go
into standby mode and the Power and Home buttons will dim.
You can activate your robot by pressing the Power or Home buttons,
or by using the MyDyson™ app or voice control.
Powering off
If you need to turn off your robot’s power, take it off the docking station
and press and hold the Power button until your robot turns off.
Place your robot back on the docking station and it will automatically
turn on again.
Plug in and charge
Place your robot on the docking station. The top Power button will pulse white
to show your robot is charging.
1
2
3
First, remove the foam protectors between the roller and front bumper.
The side sweepers click into place on the
front half of the base of your robot.
With the camera facing
forward, your robot will
click into place on the
docking station.
The power and home
buttons are located on
the top of your robot.
Apple, the Apple logo, and Siri are trademarks of Apple Inc. App Store is a service mark of Apple Inc.
Google Play, the Google Play logo, Google Assistant are trademarks of Google LLC.
The Bluetooth
®
word mark and logos are registered trademarks owned by the Bluetooth SIG, Inc.
and any use of such marks by Dyson is under license.
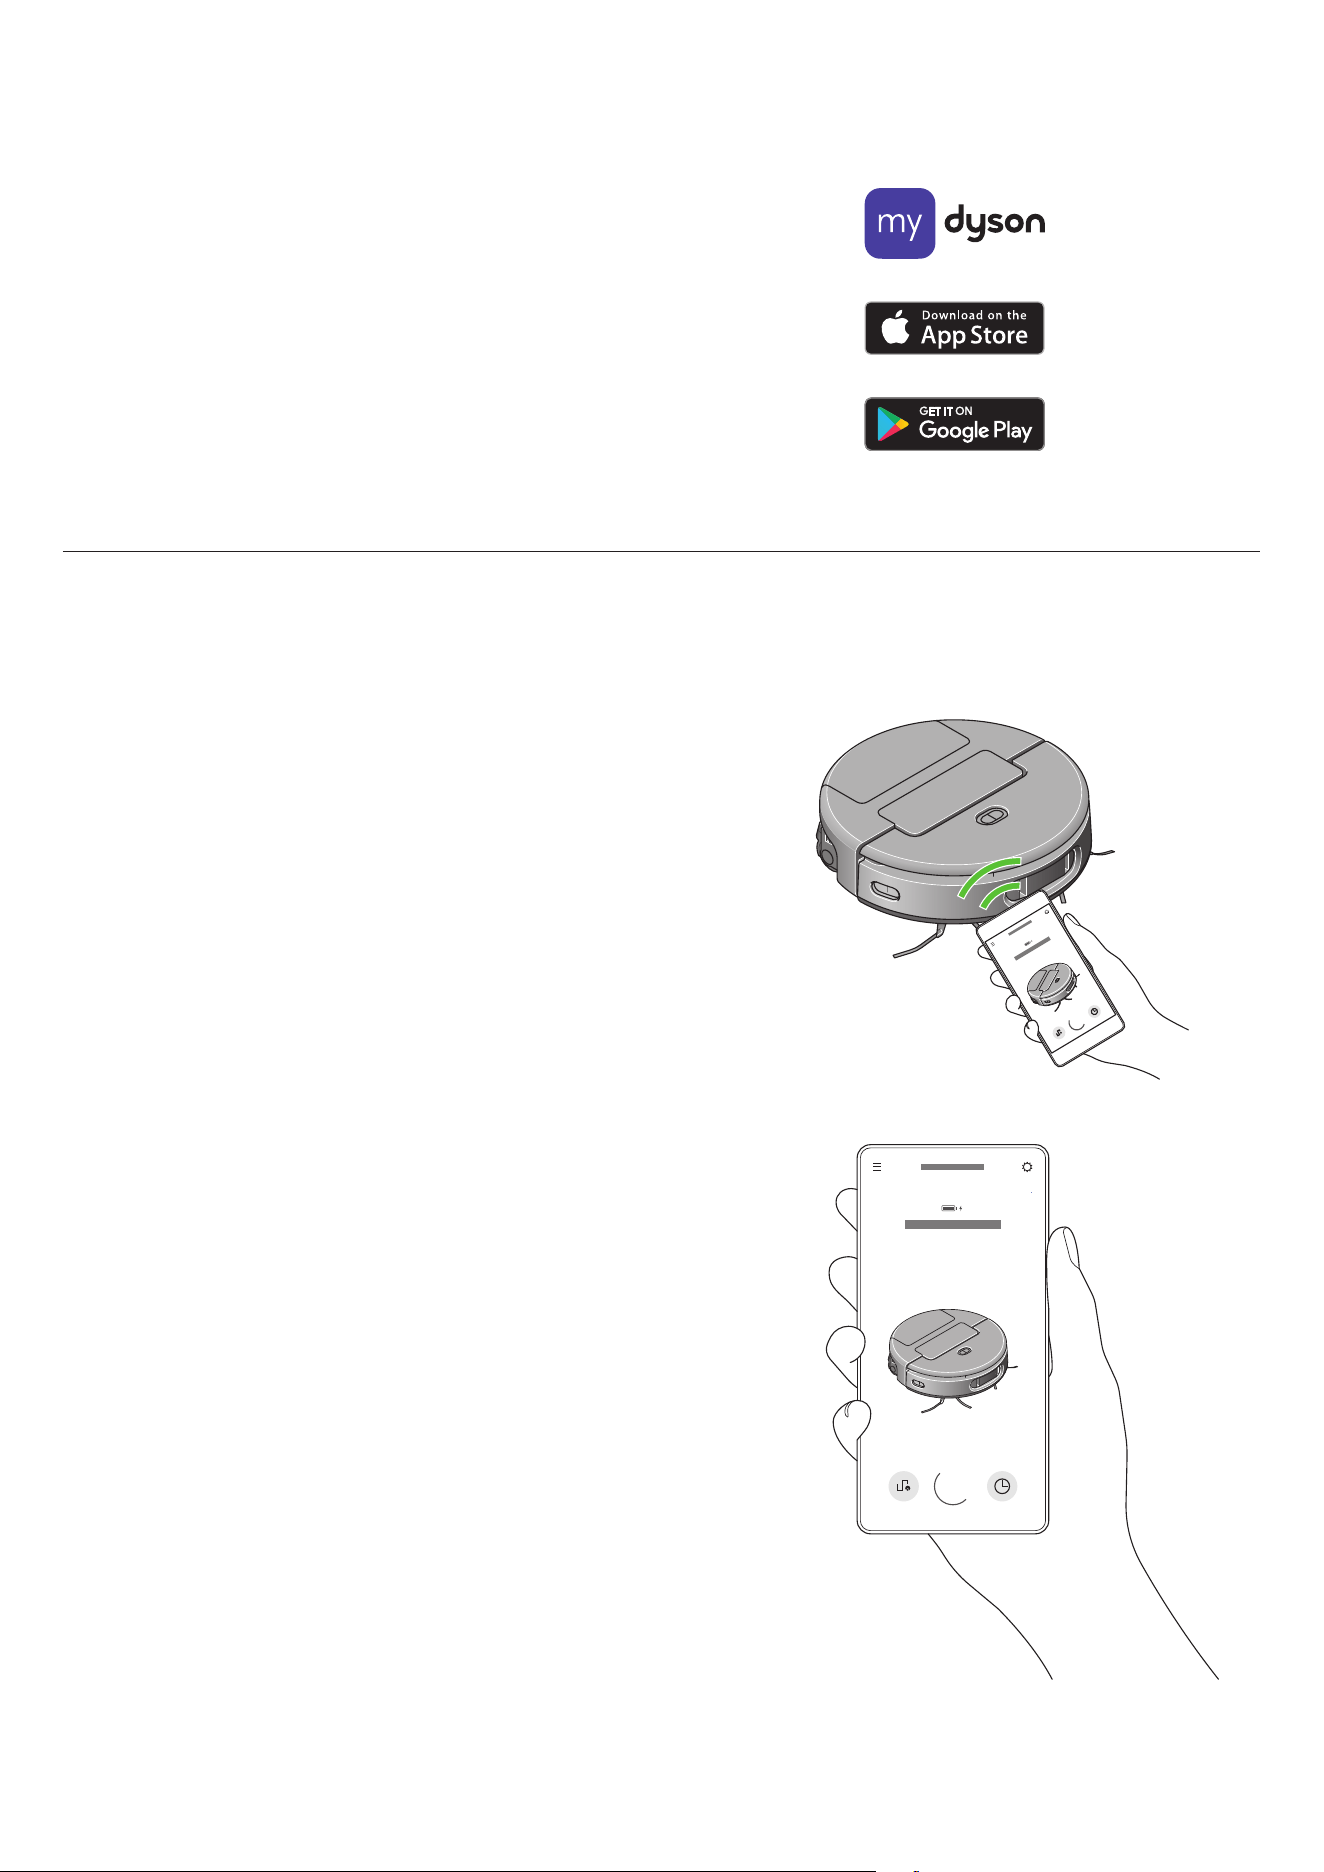
Connecting your robot
Downloading the MyDyson™ app
Control your robot – wherever you are. You can start cleaning, check your
robot’s progress, schedule a clean before you get home, or troubleshoot
a problem using your smartphone. If you haven’t already, download the
MyDyson™app to access all your robot’s available features and the latest
software updates.
You can download the app now from the App Store or Google Play. Then
open the app on your smartphone and follow the on-screen instructions to
create a new account.
Connecting your robot via Bluetooth
®
Place your robot in the docking station and ensure the dock is switched on
and powered.
Open the MyDyson™ app and follow the on-screen instructions for pairing
your robot.
Press both the Power button and the Home button simultaneously to confirm
the connection journey.
Connection problems
Your robot accesses the Internet through your home Wi-Fi network.
If your robot fails to connect, an alert will be displayed in the app. Click the alert
to diagnose the problem. If your robot is not connected to your Wi-Fi router or
the Internet, try the following:
1. Out of Wi-Fi coverage
Your robot may be too far from your Wi-Fi router, causing it to lose connection.
Bring your robot closer to the Wi-Fi router. Your robot should automatically
reconnect.
2. Automatic shutdown
Your robot may have powered off to save battery after being idle and away
from the dock for 30 minutes.
Press and hold the power button for 3 seconds to power on your robot.
3. Abnormal network connection
The robot, docking station and router may be connected abnormally.
Restart your robot. Your robot should automatically reconnect after.
4. Router issues
Your robot may not be able to connect due to:
• router restarting
• change in Wi-Fi name or password
• router blacklisting the robot
Resolve the router issue and check if your robot reconnects. If the issue persists,
switch to another Wi-Fi and try reconnecting.
5. Robot in standby state
Your robot may be in a standby state if it has been disconnected from the Wi-Fi
for more than 5 mins. Press the HOME button on your robot to exit standby and
your robot should automatically reconnect.
Changing or adding a new Wi-Fi network
Open the product settings tab in the MyDyson™ app and scroll down to
‘Change Wi-Fi Network’.
Follow the on-screen instructions to add a new Wi-Fi network.
MyDyson logo.
Download on the
app store.
Get it on Google
Play.
Hold mobile device
close to the robot to
pick up the signal.
Your robot will show
on your MyDyson app
when connected.
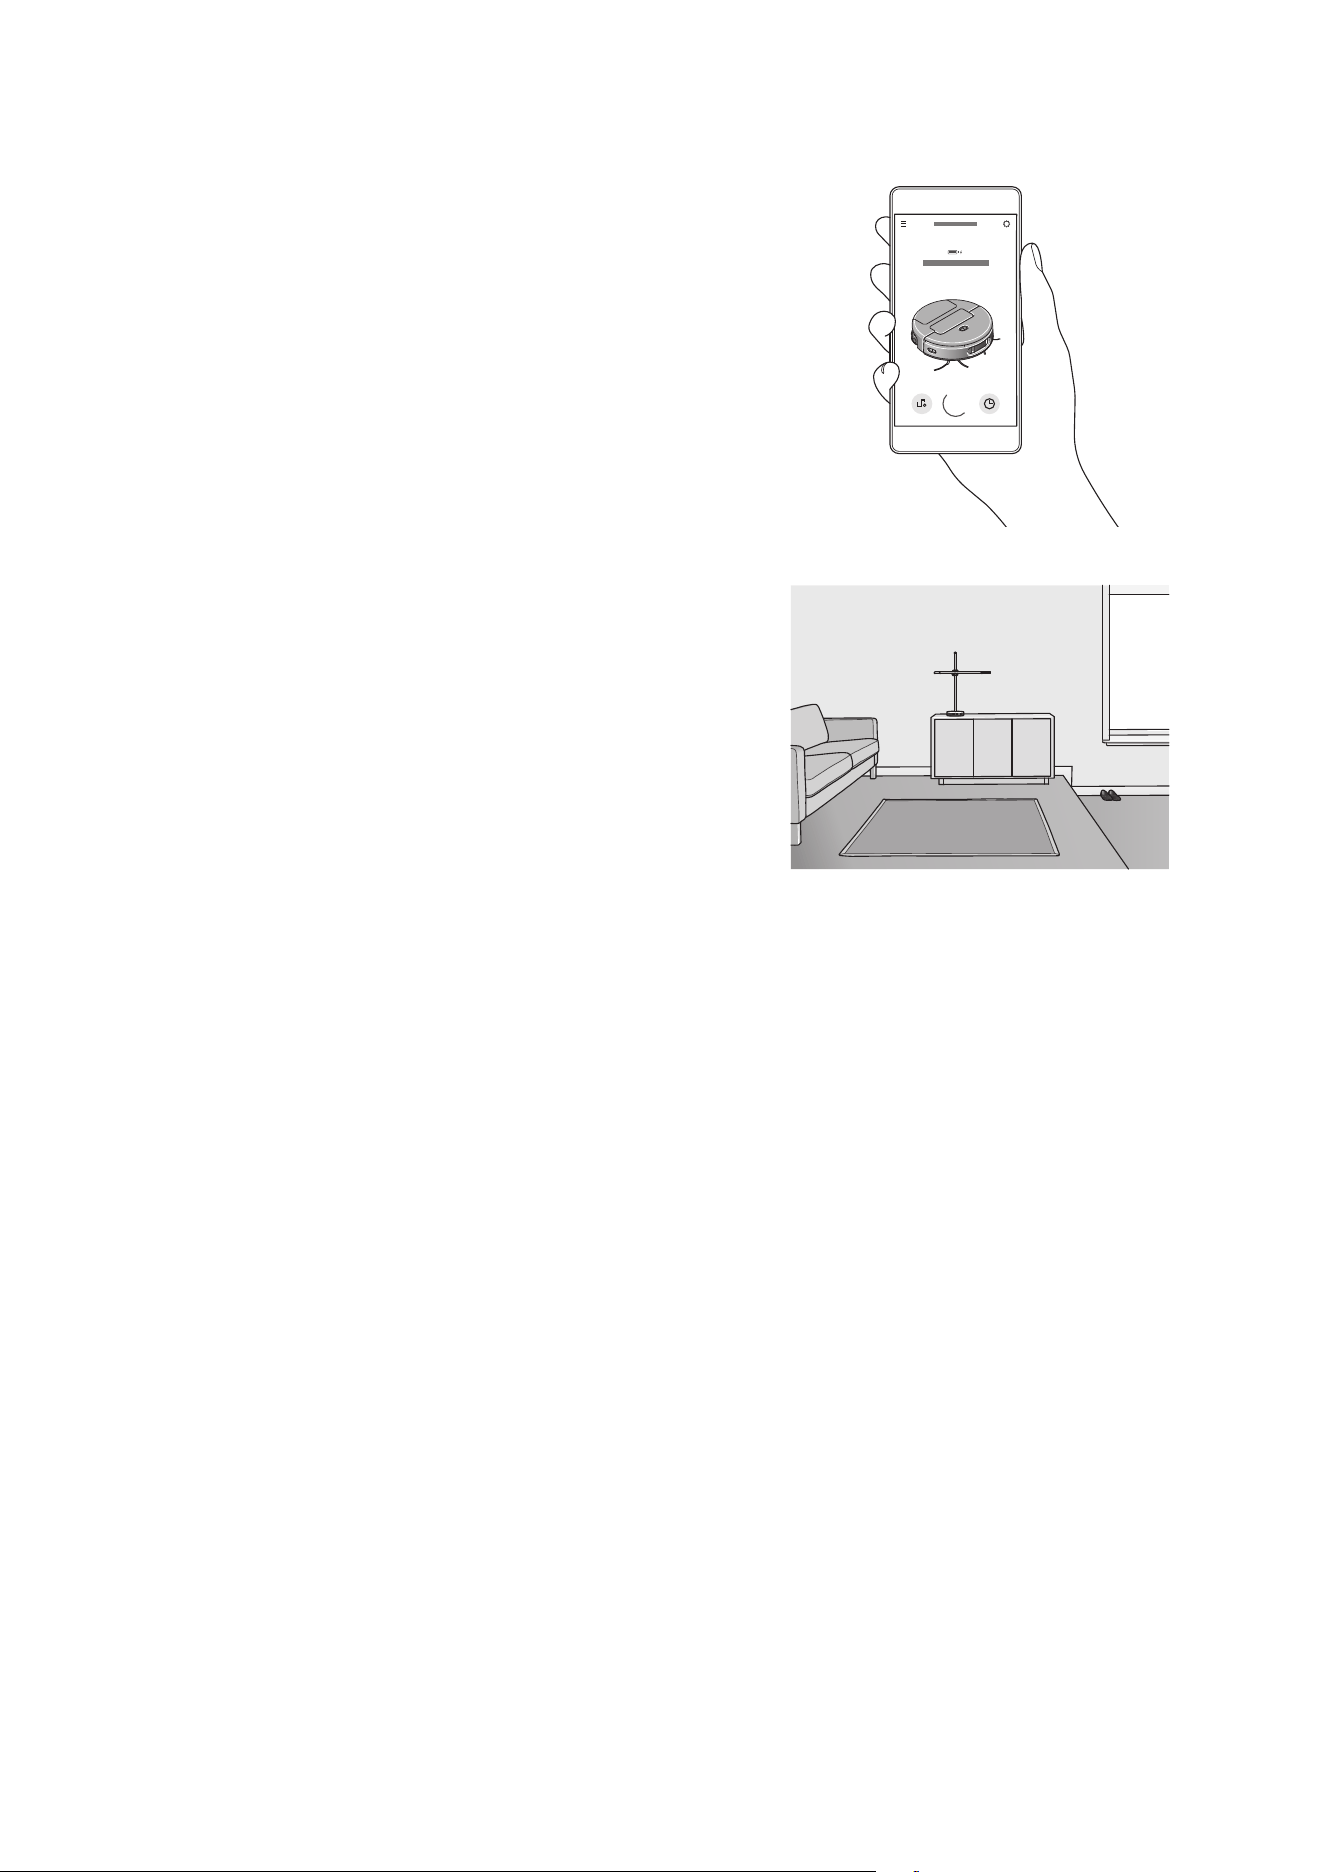
Mapping your home for the first time
Preparing to map your home
Before mapping, it’s a good idea to tidy up any loose objects from the floor
that your robot might suck up. Tidy away any small items such as shoe
laces, thin cables or small objects. Open internal doors and remove any
furniture that isn’t permanent. Place your robot on the docking station to start
mapping.
Building a complete map can take time, and depends on the size of your
home. During the mapping process, leave your robot to create your map.
It will return to the docking station by itself when mapping is complete.
During mapping
Your robot follows an optimized route to systematically map your home,
with the brush bar and suction turned off to save power and minimize
the time taken. For best results, avoid interrupting your robot while it’s
mapping.
Pausing or canceling mapping
Although you can’t cancel the first map, you can pause, resume or cancel
subsequent mapping at any time using the MyDyson™ app.
Multiple floors
If your home has more than one floor level, you can create a map for each
story of your home.
Move your robot to a suitable starting point on the new floor level and start
mapping using the MyDyson™ app.
Unlock intelligent features with the MyDyson™ app
Your robot works in tandem with the MyDyson™ app to intelligently navigate
and deep clean your home. Easily connect to see where it’s cleaned, manage
your maps and customize your robot’s behavior.
Creating a map of your home with the MyDyson™ app lets your robot learn
the layout. This gives you more control over where and how your robot cleans
areas of your home.
The Dyson Spot+Scrub
Ai robot vacuum on
the MyDyson app.
An example of a tidied room ready for mapping by the robot.
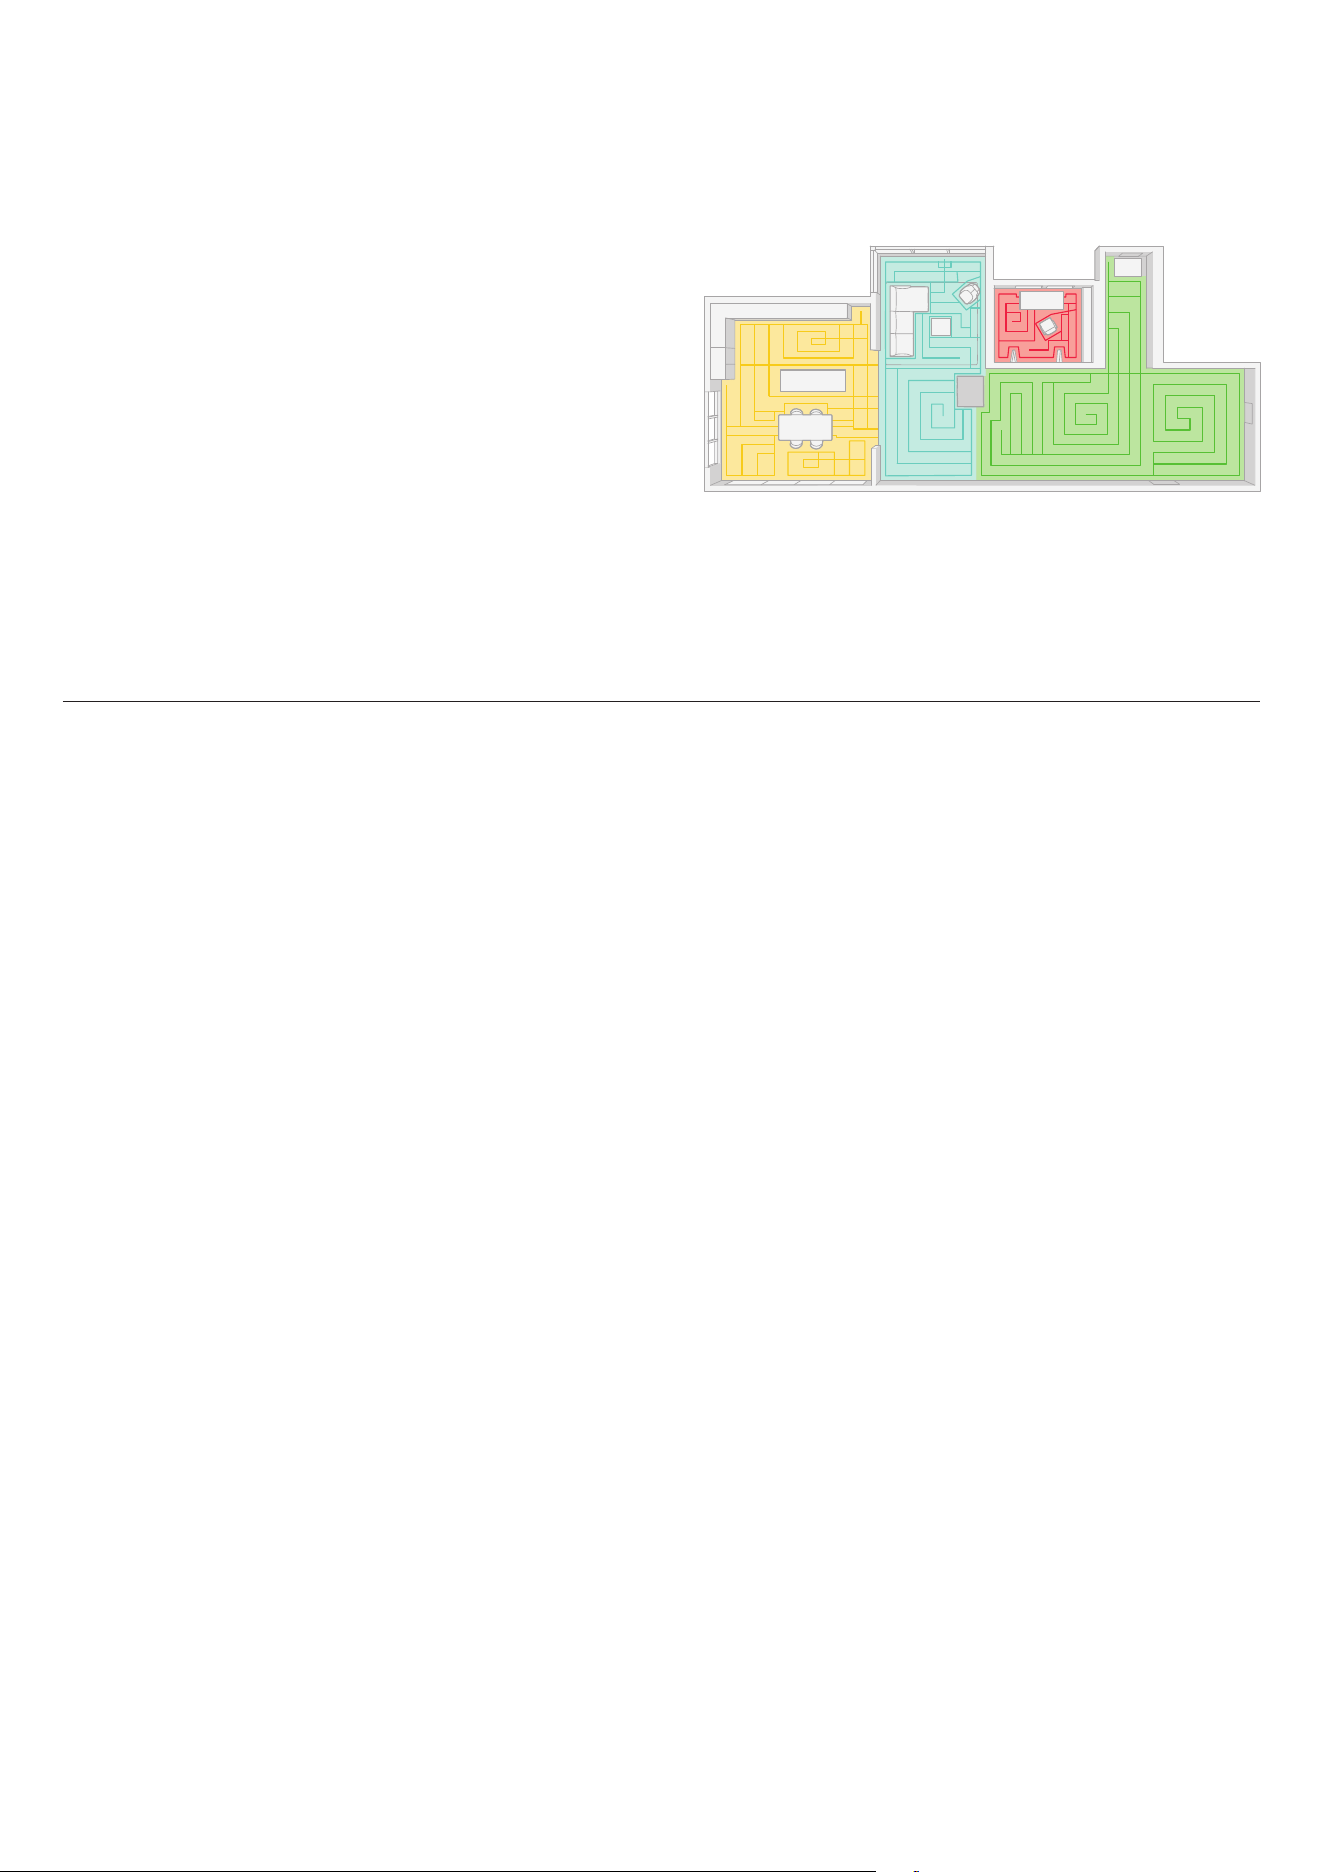
Managing your map
Adding rules
Once you’ve created a map, follow the instructions on the MyDyson™ app to
split, merge and rename rooms to reflect the layout of your home.
Once you’ve divided your map into different rooms, you can choose when
and how each room is cleaned.
You can use the MyDyson™ app to add directions or set rules for different
rooms on your map:
• Avoid area –your robot will avoid cleaning this area.
• Climb threshold –your robot will try to climb over small, raised obstacles.
• Wash only –your robot will only wash this area, using its wet roller.
• Vacuum only –your robot will only vacuum this area, using its brush bar
and side sweepers.
Scheduling and reviewing cleans
Scheduling cleans
Reviewing cleans
After every clean, your robot will share its activity history on the MyDyson™
app. You can use this to review where your robot has cleaned, or where it
encountered stains and spills.
Use the MyDyson™ app to schedule cleans for times when you’re not at home,
or to clean high-traffic areas like hallways more frequently.
A home map on the MyDyson app split into rooms.
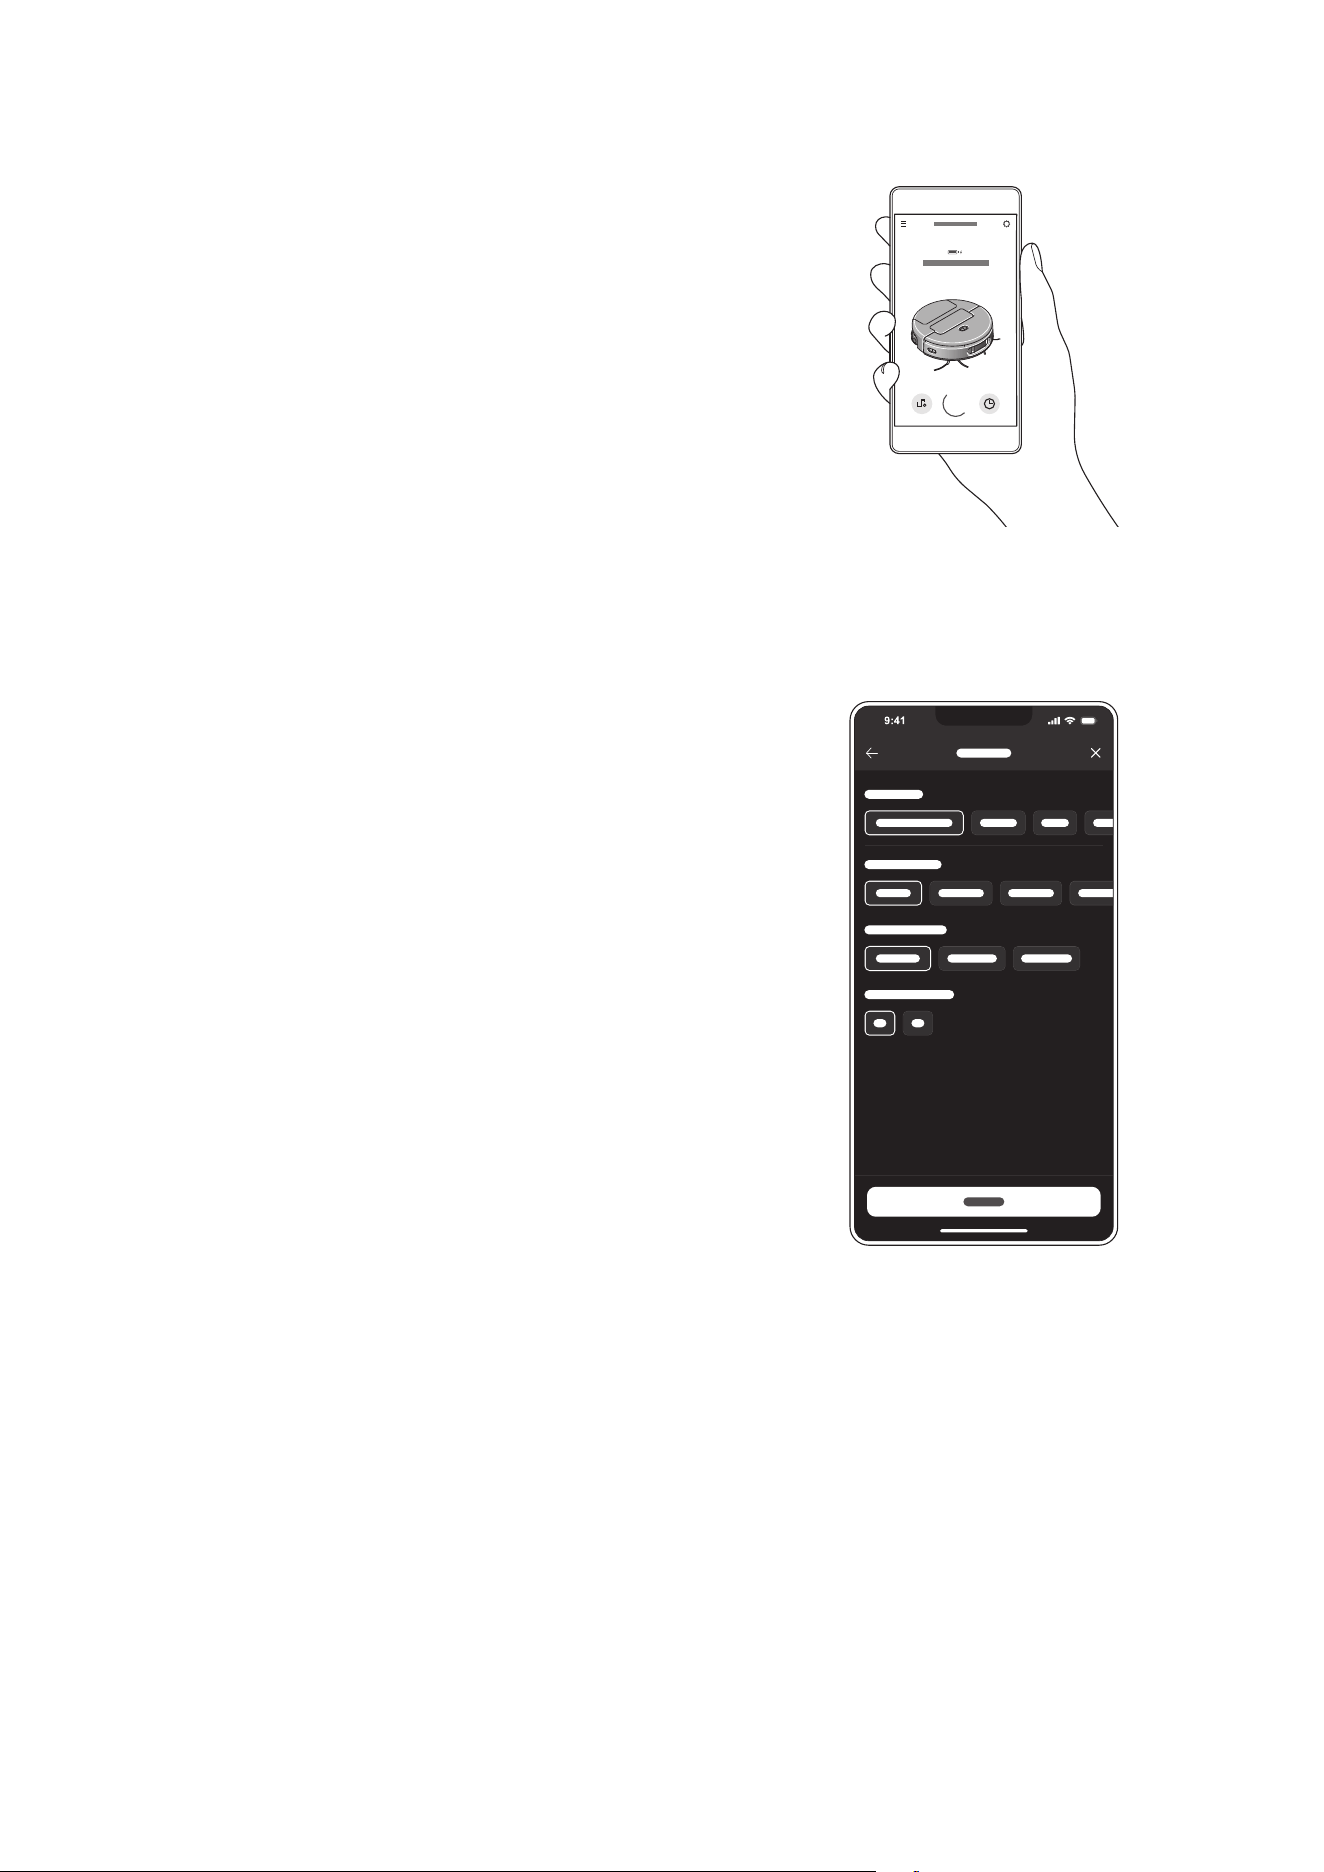
Starting a clean
Customizing cleans
Starting from a different location
Clean type
Pick a room or selection of rooms to clean.
Edit the cleaning settings for your selected room.
The order in which you select your rooms will define the order in which your
robot will clean them.
You can also select ‘Target clean’ for a specific area on your map.
To clean a different story or level of your home, move the robot to its starting
location and select the appropriate map from the ’Manage maps’ tab. Then
start the clean from the ’Overview’ tab.
Your robot will vacuum all the accessible space it can reach on a single charge.
When its battery is low it will return to the initial starting location.
Please note, wet cleaning is not available when starting your robot away from
the docking station.
Choose from the following cleaning types before you begin cleaning:
• Vacuum and wash simultaneously – your robot will automatically detect the
floor type as it vacuums and cleans the selected areas.
• Vacuum only.
• Wash only.
• Vacuum then wash – your robot will vacuum all carpets and rugs, then
complete the clean by washing hard floor areas.
Settings for Vacuum mode include:
• Auto mode – your robot intelligently adapts cleaning performance to match
the current floor type and situation.
• Quick mode –your robot will prioritize open areas and perform a zigzag
cleaning pattern for a shorter cleaning time.
• Quiet mode –a low-intensity cleaning mode that cleans all accessible areas
as quietly as possible.
• Boost mode –a high-intensity mode that vacuums all selected areas as
thoroughly as possible.
Settings for Wash mode include:
• Hydration level –Level 1, Level 2 or Level 3. This setting fine tunes how
much water your robot uses to wash your floors, to suit your preferences and
individual floor types.
• Wash repetitions –1x or 2x. This setting washes hard floors in your chosen
room(s) once or twice, for a more thorough clean.
Use the MyDyson™ app to start your clean. Start with your robot in the
docking station, or pick up your robot and move it to a specific location.
You can choose a customized clean of one room, or select multiple rooms
on your map in the MyDyson™ app. Your robot will clean according to
your instructions, following the room divisions and rules you apply in the
MyDyson™ app.
The Dyson Spot+Scrub
Ai robot vacuum on the
MyDyson app.
Room cleaning settings on
the MyDyson app.
Cleaning your docking station’s clean and dirty water tanks
We recommend cleaning periodically to maintain hygiene.
Remove the tank from the docking station. Unclip the lid and tip out the
contents. Wash in mild soapy water, rinse and wipe clean, then allow to dry
before refitting.
Please do not wash your water tanks in a dishwasher.
For more information and support videos for your machine, visit our support
pages online: dyson.com
Looking after your battery
Your machine won’t operate or charge if the ambient temperature is below
41° F (5° C). This is designed to protect both the motor and battery.
Looking after your robot
Cleaning your robot’s dirty water tank
Cleaning your robot’s dry bin
Push the red button down and slide the dirty water tank out from the front of
your robot. Then lift silver catch and open lid. Wash and rinse under running
water. Slide back into the front of your robot until it clicks into place.
Turn your robot off. Gently press the bin and filter assembly on the top of
your robot and it will pop up. Lift the assembly out of your robot.
Open the side panel, slide the filter tray out and set aside. Wash and rinse the
bin under running water. Leave the bin to dry for at least 24 hours, and make
sure it’s completely dry before refitting.
Emptying your docking station’s dirty water tank
Lift the tank vertically out of your docking station using the handle. Unclip
the lid and tip the contents into a sink or toilet. Rinse in warm water and wipe
clean, then allow to dry before refitting.
Look after your robot
For optimum performance, clean your robot frequently and check
underneath and around the wheels for any obstructions.
If your robot is dusty, wipe the machine and the front sensor array with a dry,
lint-free cloth.
Do not place any part of your machine in a dishwasher, or use detergents,
polishes or air fresheners to clean it as this could damage your machine.
Ensure your robot software and features are always kept up to date by
enabling automatic updates in the MyDyson™ app.
Looking after your robot:
Checking for blockages
Checking the docking station ramp for blockages
Checking your robot’s brush bar for obstructions
Checking your robot’s wet roller for obstructions
Pull upwards and unclip the ramp from your docking station. Wash and wipe
it clean, check the docking station airways are unobstructed, then leave the
ramp to dry fully before clicking it back into place.
Turn your robot over on a soft surface and remove any threads, hair or other
debris from the brush bar that may cause an obstruction.
Lift the red tab on the brush bar cover and remove the cover. You can now
remove the brush bar for cleaning, and check for any debris or obstructions
to the airways inside.
Turn the robot over on a soft surface. Push the silver button in the corner of
the wet roller unit down, then slide the unit out of your robot. Push the red
button to release the end cap holding the wet roller and slide the roller out of
the unit.
Check for any hair or debris causing an obstruction to the rotation of the
wet roller.
Checking your robot’s bin and filter for blockages
Turn your robot off. Gently press the bin and filter assembly on the top of
your robot and it will pop up. Lift the assembly out of your robot.
With the filter assembly removed, check the airways inside your robot for
any obstructions.
Check the bin and filter assembly for blockages by opening the side panel.
Slide the filter tray out to check for any debris.
Checking your docking station’s bin for blockages
Press the red release button on the top of the bin and pull it out of the
docking station. Check for any debris in the airway behind it.
Checking your robot’s dirty water tank for blockages
Push the red button down and slide the dirty water tank out from the front
of your robot. Check for any blockages or obstructions on the tank and inside
your robot. Once dry, slide back into the front of your robot until it clicks
into place.
Checking the wheels for obstructions
Turn your robot over on a soft surface. Check the wheels are clear of any
threads, hair or other debris that may cause an obstruction.
click
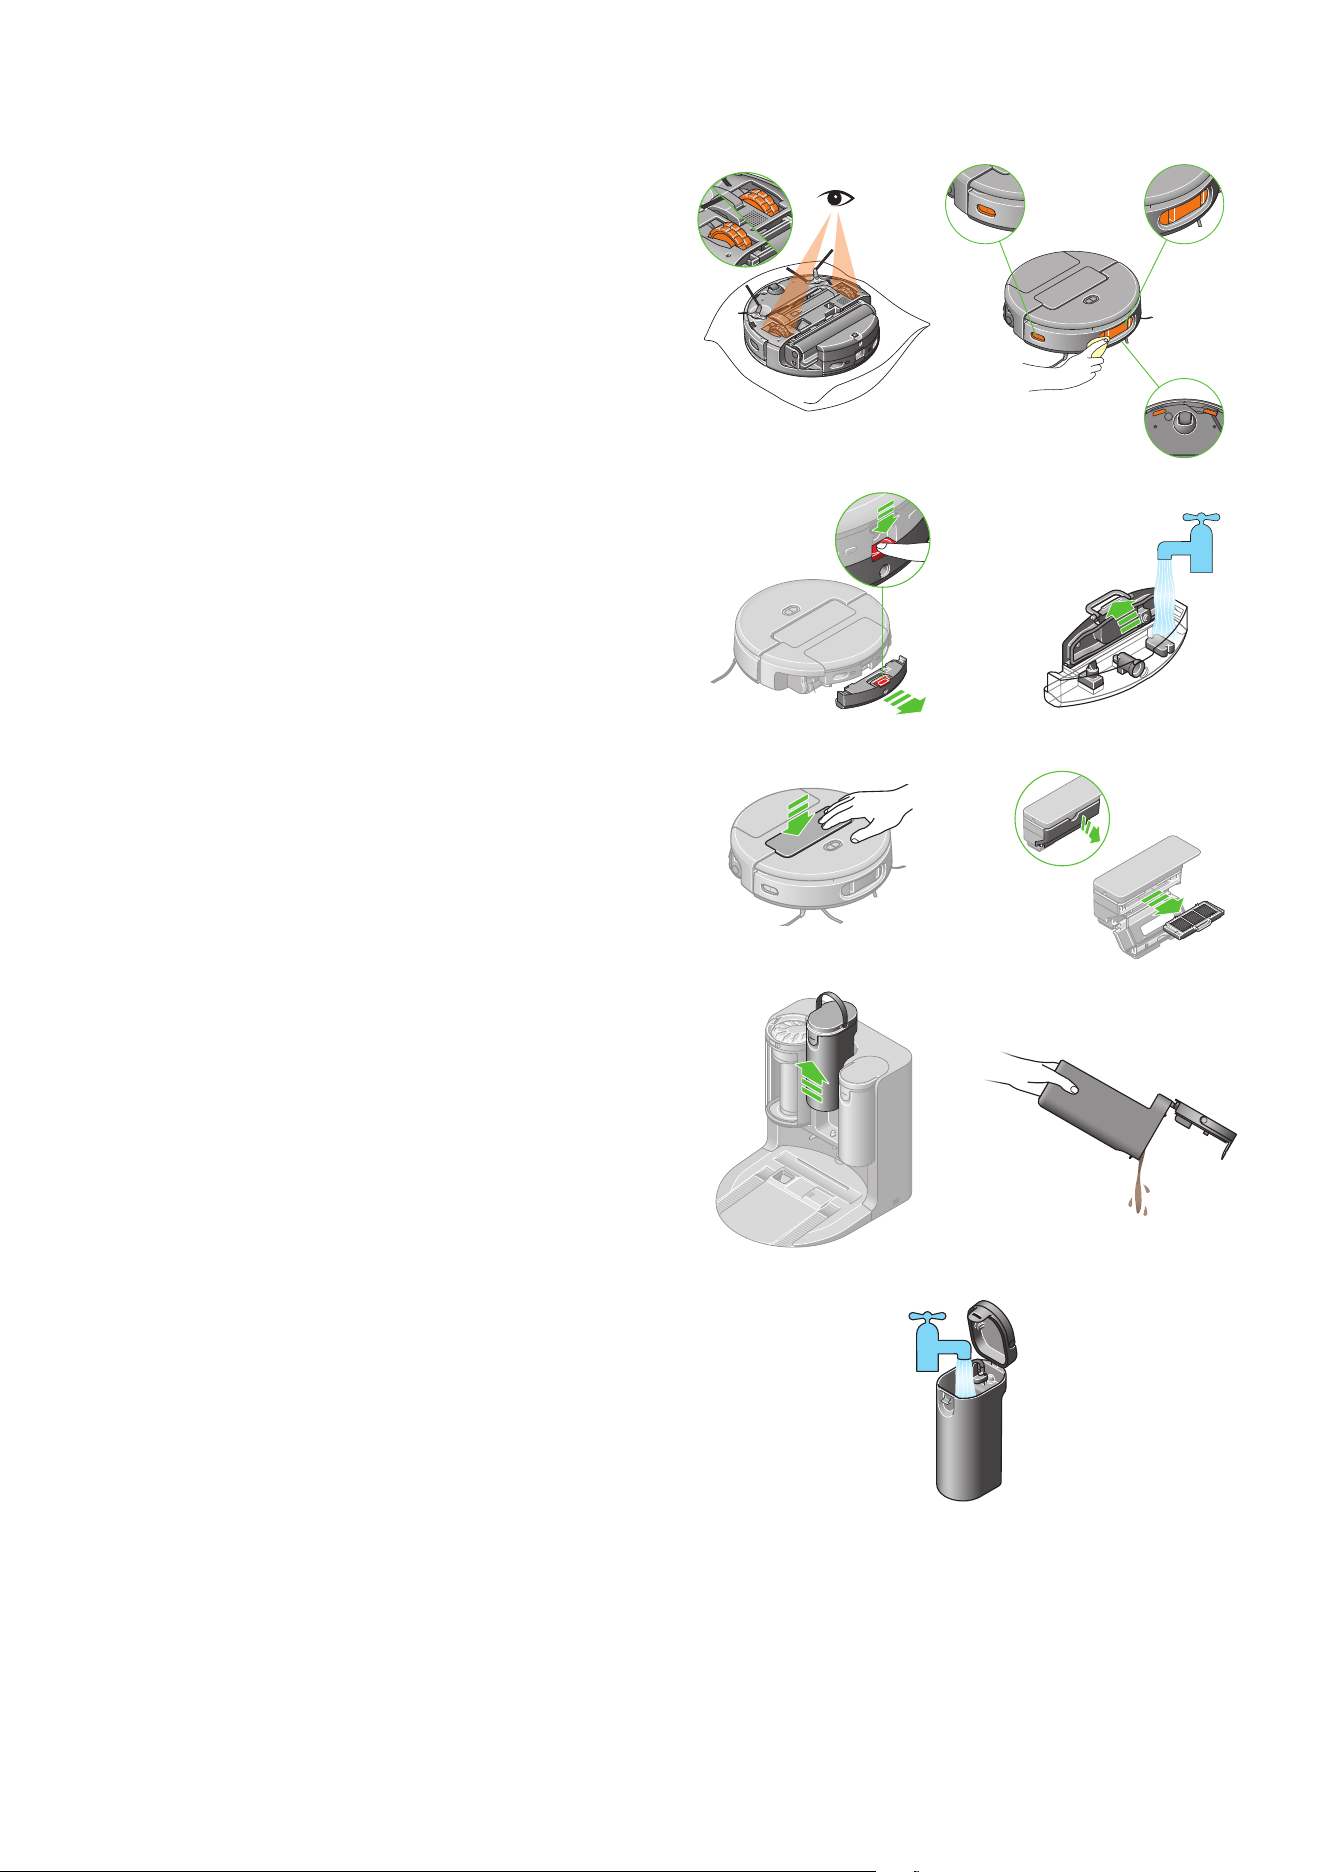
Emptying your docking station’s dry bin
Empty your dry bin as soon as dirt reaches the MAX level.
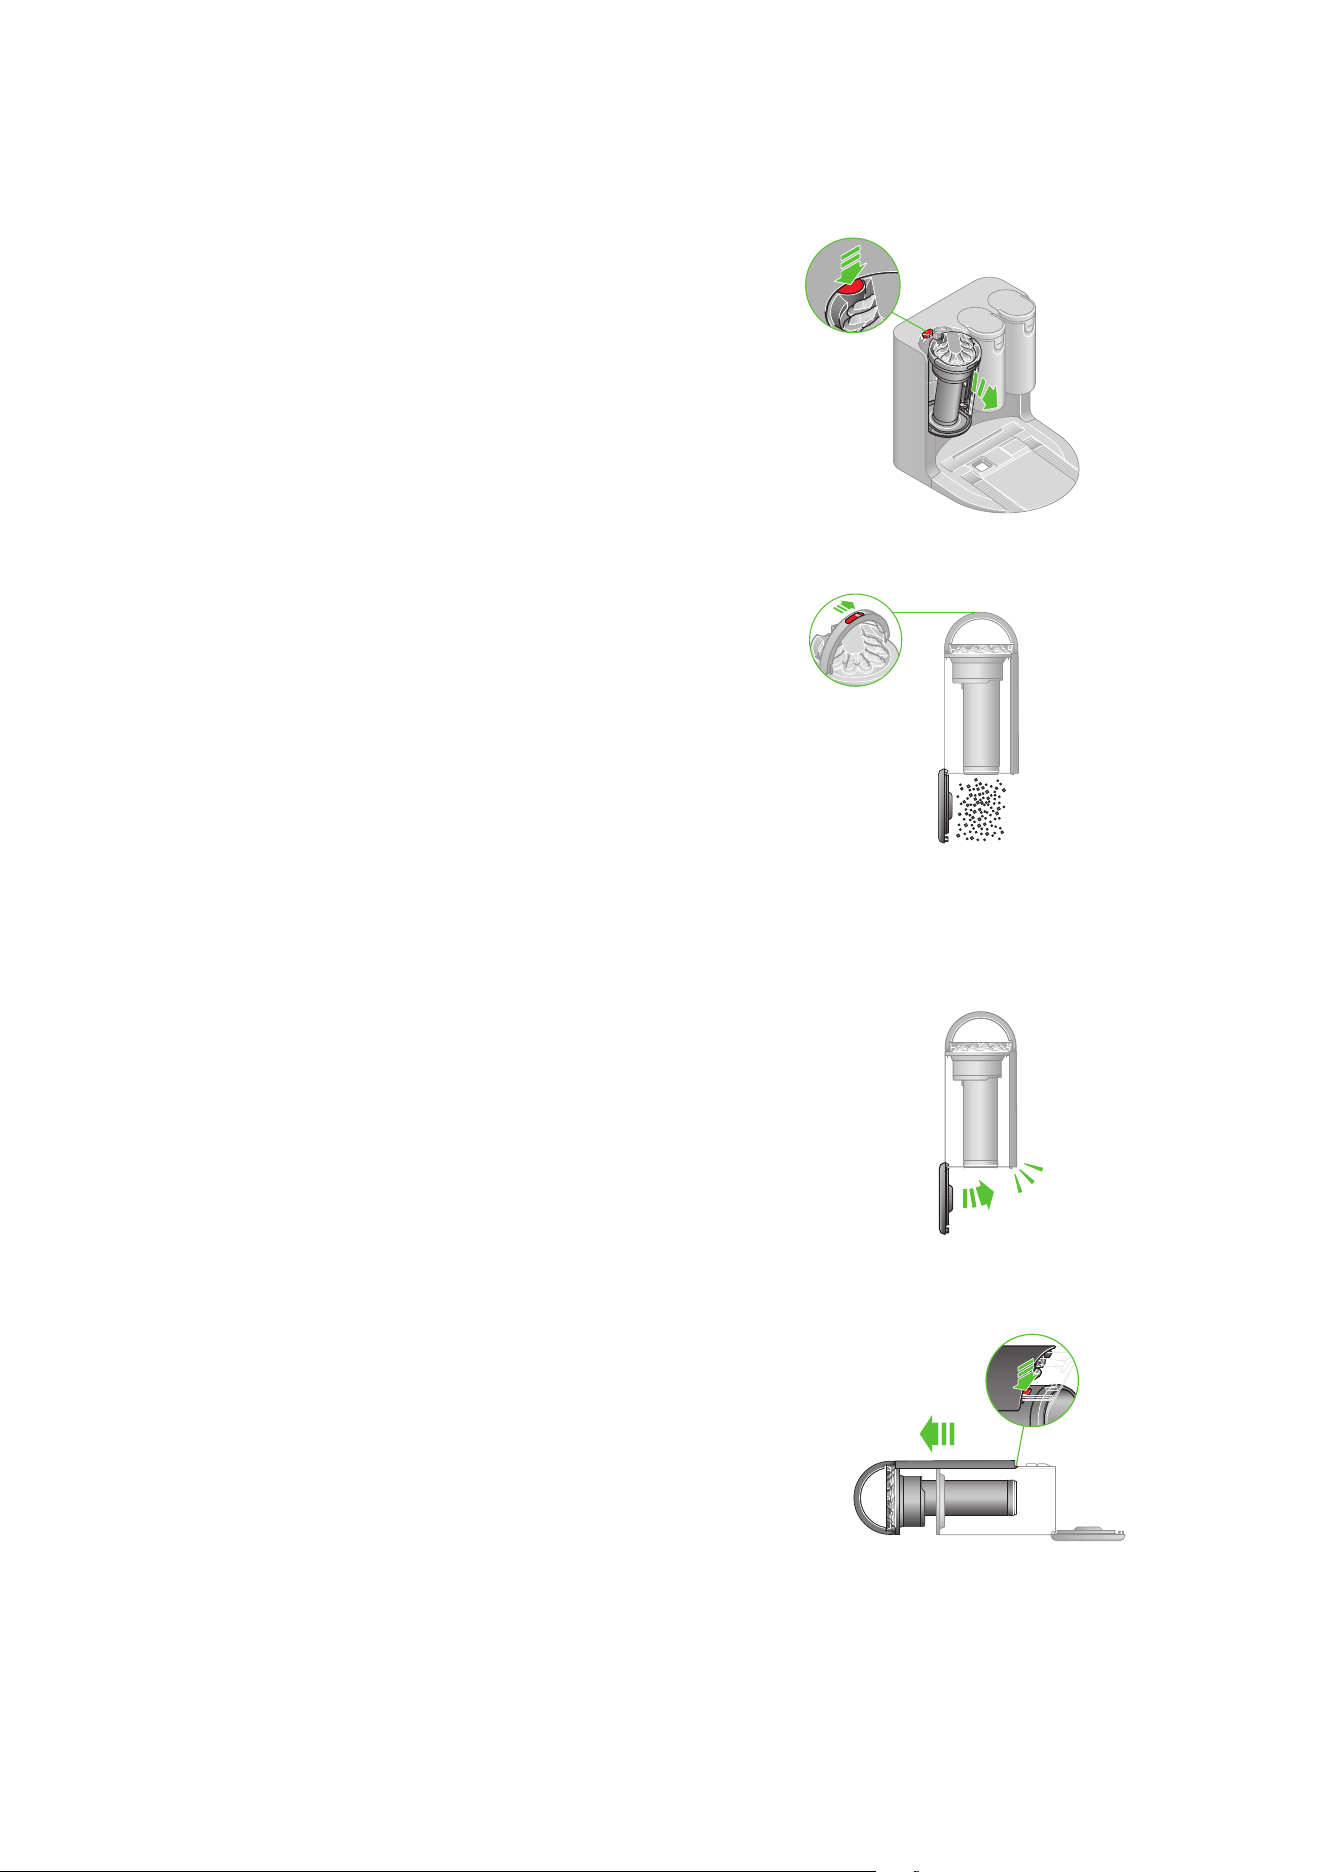
Removing the bin
Releasing the dirt
Hold your bin over a rubbish container with the base of the bin pointing
downwards. Slide the bin release button on the handle to open the base. Your
bin will slide down, cleaning the shroud, and opening the base, releasing the
dirt straight into the bin.
Close the bin by closing the base until it clicks into place. Lower your bin
back into the docking station and make sure it clicks securely back into the
docking station.
Minimizing dust contact
Alternatively, you can empty your bin directly into a bin liner or dustproof
bag. Cover your bin tightly in a dustproof bag while you empty. Remove your
bin carefully after emptying, seal the bag tightly and dispose.
Closing the bin
Push the bin base upwards until it clicks into place. Lower your bin back
into the docking station and make sure it clicks securely back into the
docking station.
Press the bin removal catch on the top of the bin and lift the bin out. Use the
handle to carry it.
Cleaning the bin
Remove the clear outer bin casing by pressing the red tab on the side of the
bin, near the base, and sliding it off your bin.
Clean the bin and the casing with a damp, lint-free cloth. Replace the outer
bin casing by sliding it back onto your bin until it clicks into place.
Make sure your bin and the seals around the lid are completely dry before
replacing it in your docking station.
Please do not wash your bin in a dishwasher, or use detergents, polishes
or air fresheners as this could damage your bin and affect your robot’s
performance.
24
hrs
Washing your filters
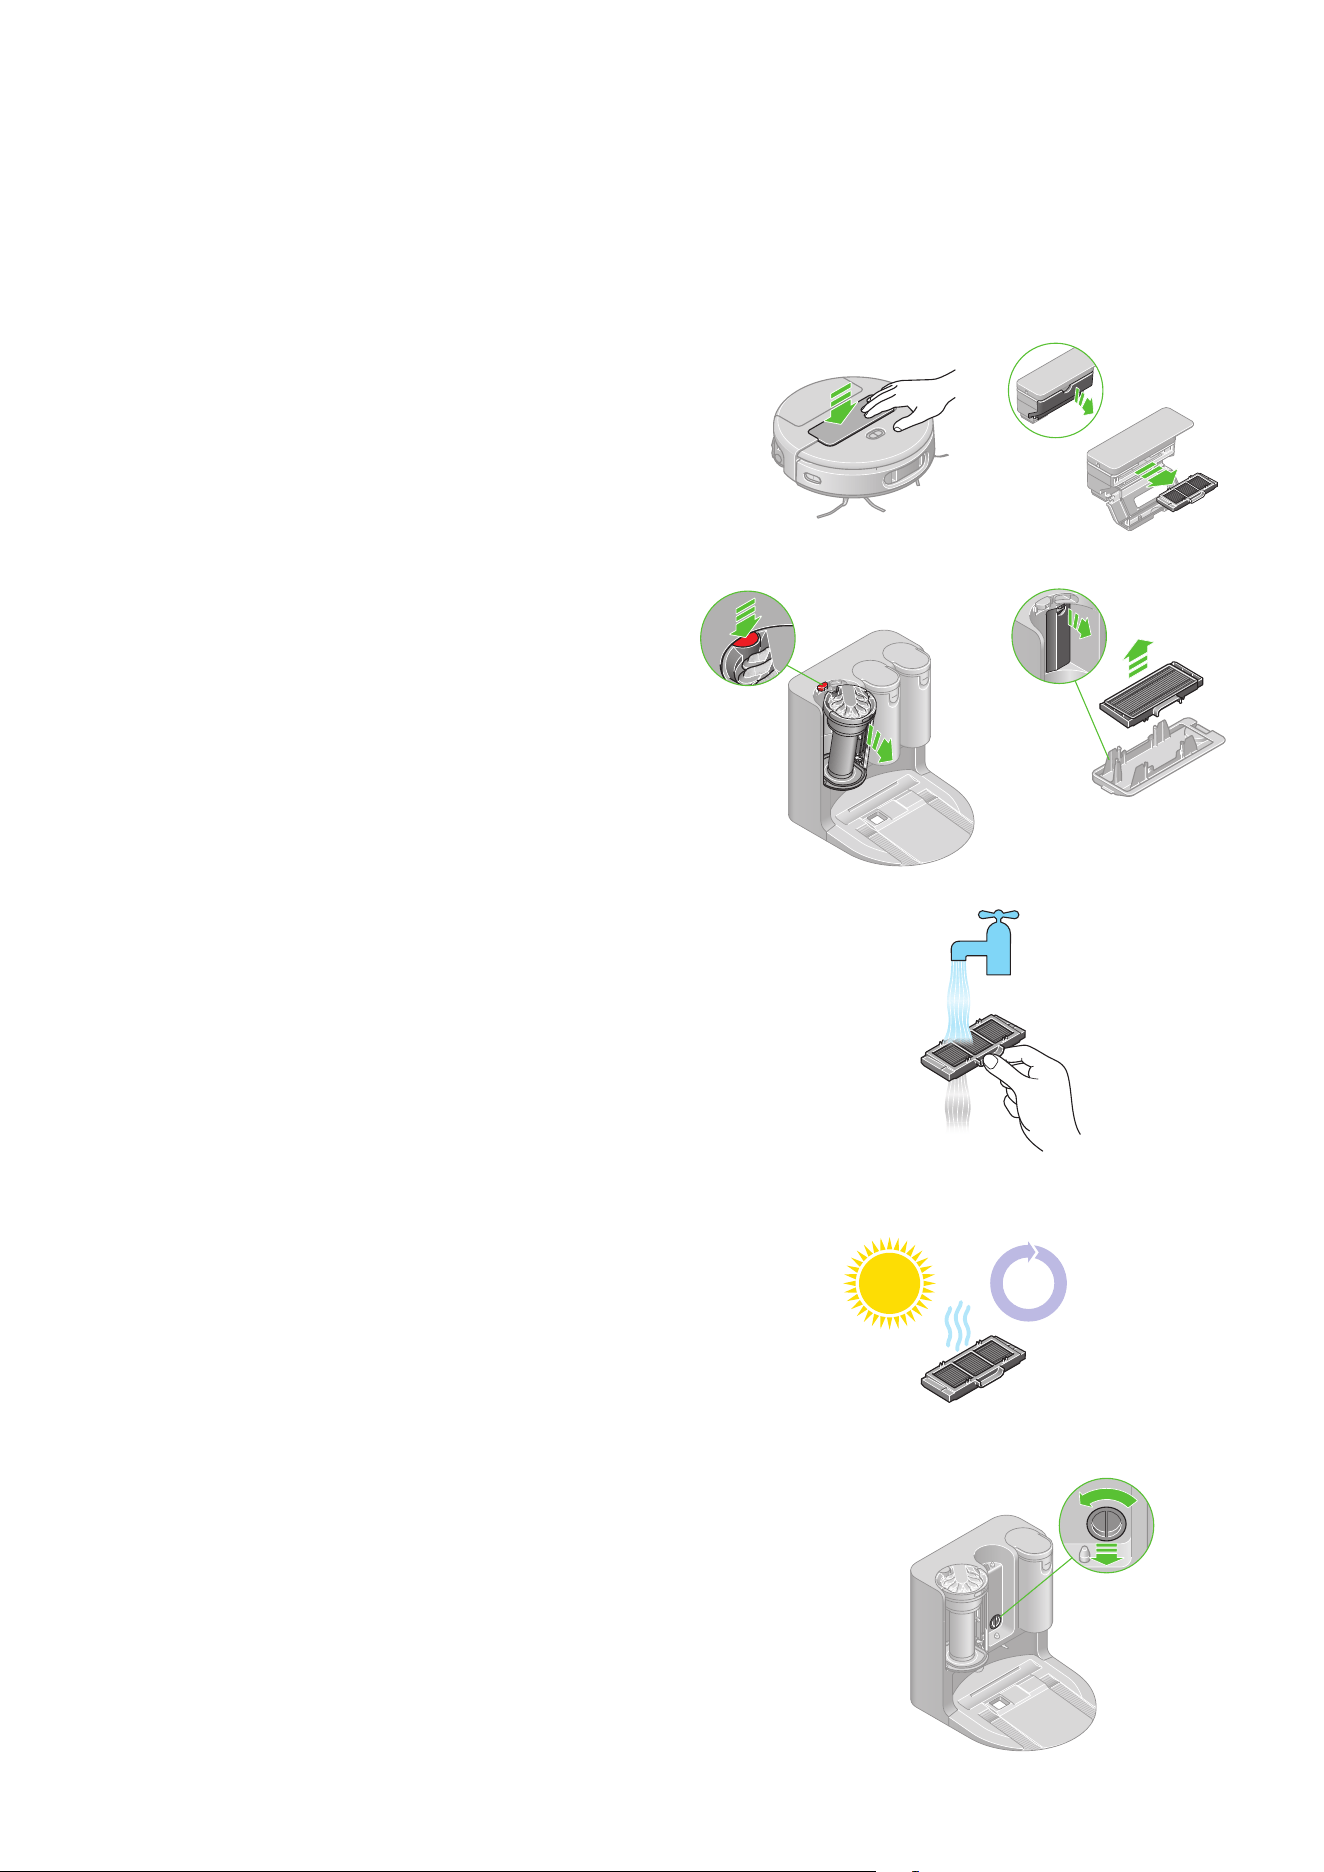
Before washing, tap your filter gently over a bin to remove any loose
dust or debris. Rinse with warm water to remove any dust or dirt. Wash until
the water runs clear.
Firmly shake your filter in both an upward and downward position to remove
any excess water. Keep shaking until there’s no more excess water coming
from the filter.
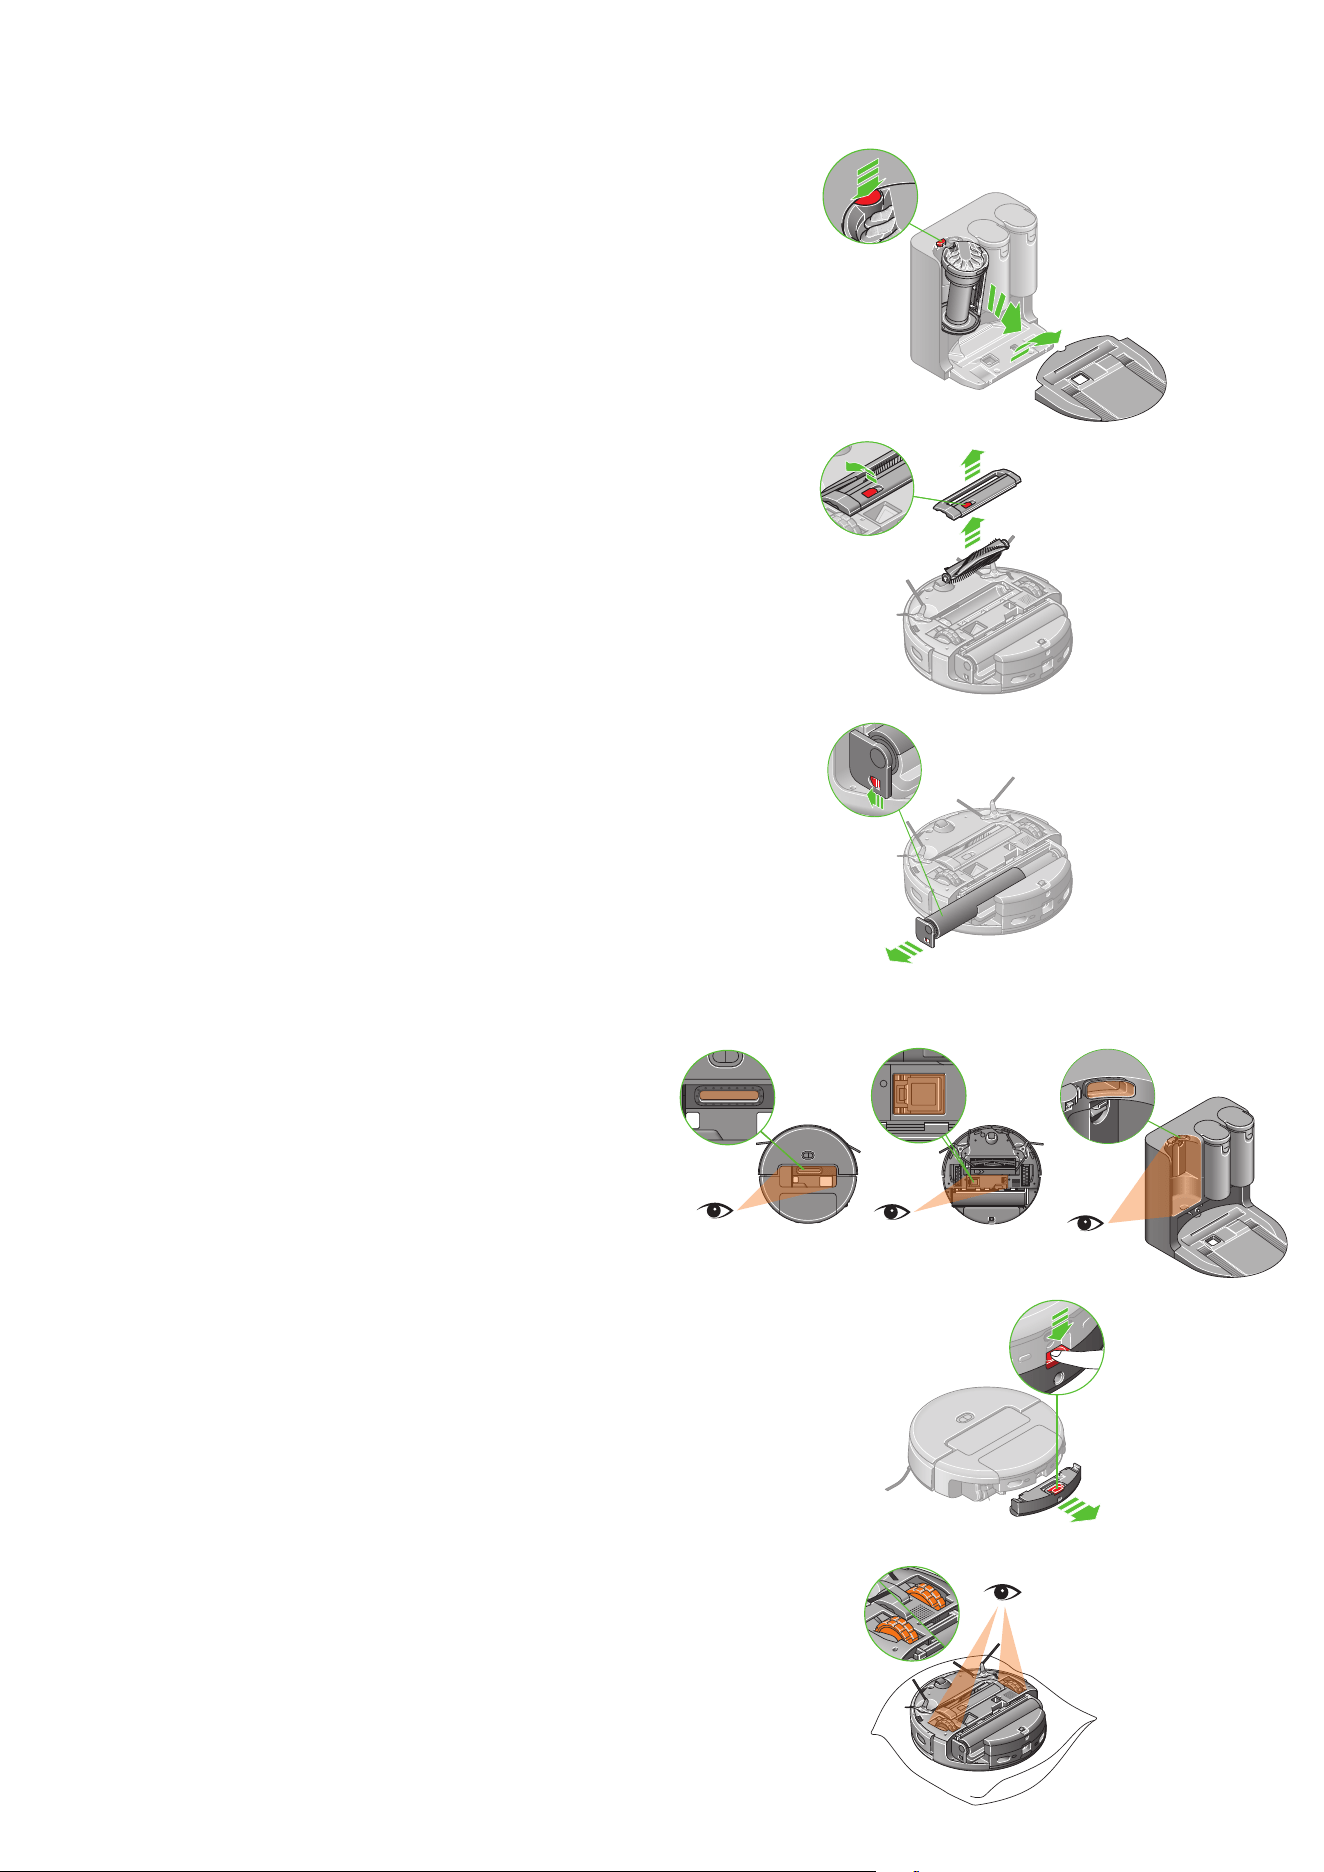
Washing your filters
Removing your robot’s filter
Turn your robot off. Gently press the central bin and filter assembly on the
top of your robot and it will pop up. Lift the assembly out of your robot.
Open the side panel, then pull the filter tray out.
Removing your docking station’s filter
Push the red button on the top of your docking station’s dry bin to lift it out.
At the back of the docking station where the dry bin used to be, you should
now be able to see a black tab. Push this down, then pull the tab to pull out
the filter. You can then unclip the filter from the casing.
Wash your robot and docking station filters at least once a month to
maintain optimum performance, and always ensure they are completely dry
before refitting.
The filter units housing your washable filters can be wiped with a damp,
lint-free cloth to remove any dirt or dust.
Replacing the water filter
The water filter is located behind the dirty water tank in your docking station.
To replace it, rotate the used water filter counterclockwise and pull it out.
Insert the new water filter and rotate it clockwise to close.
Drying your filter
Place your filter on its side and leave it to dry for at least 24 hours in a warm,
well-ventilated place.
Don’t dry your filter in a tumble dryer, microwave or near a naked flame.
Important: your filter must be completely dry before replacing it back into
your docking station. Your docking station and/or robot may be damaged if
it’s operated with a damp filter.
Washing and drying your brush bar
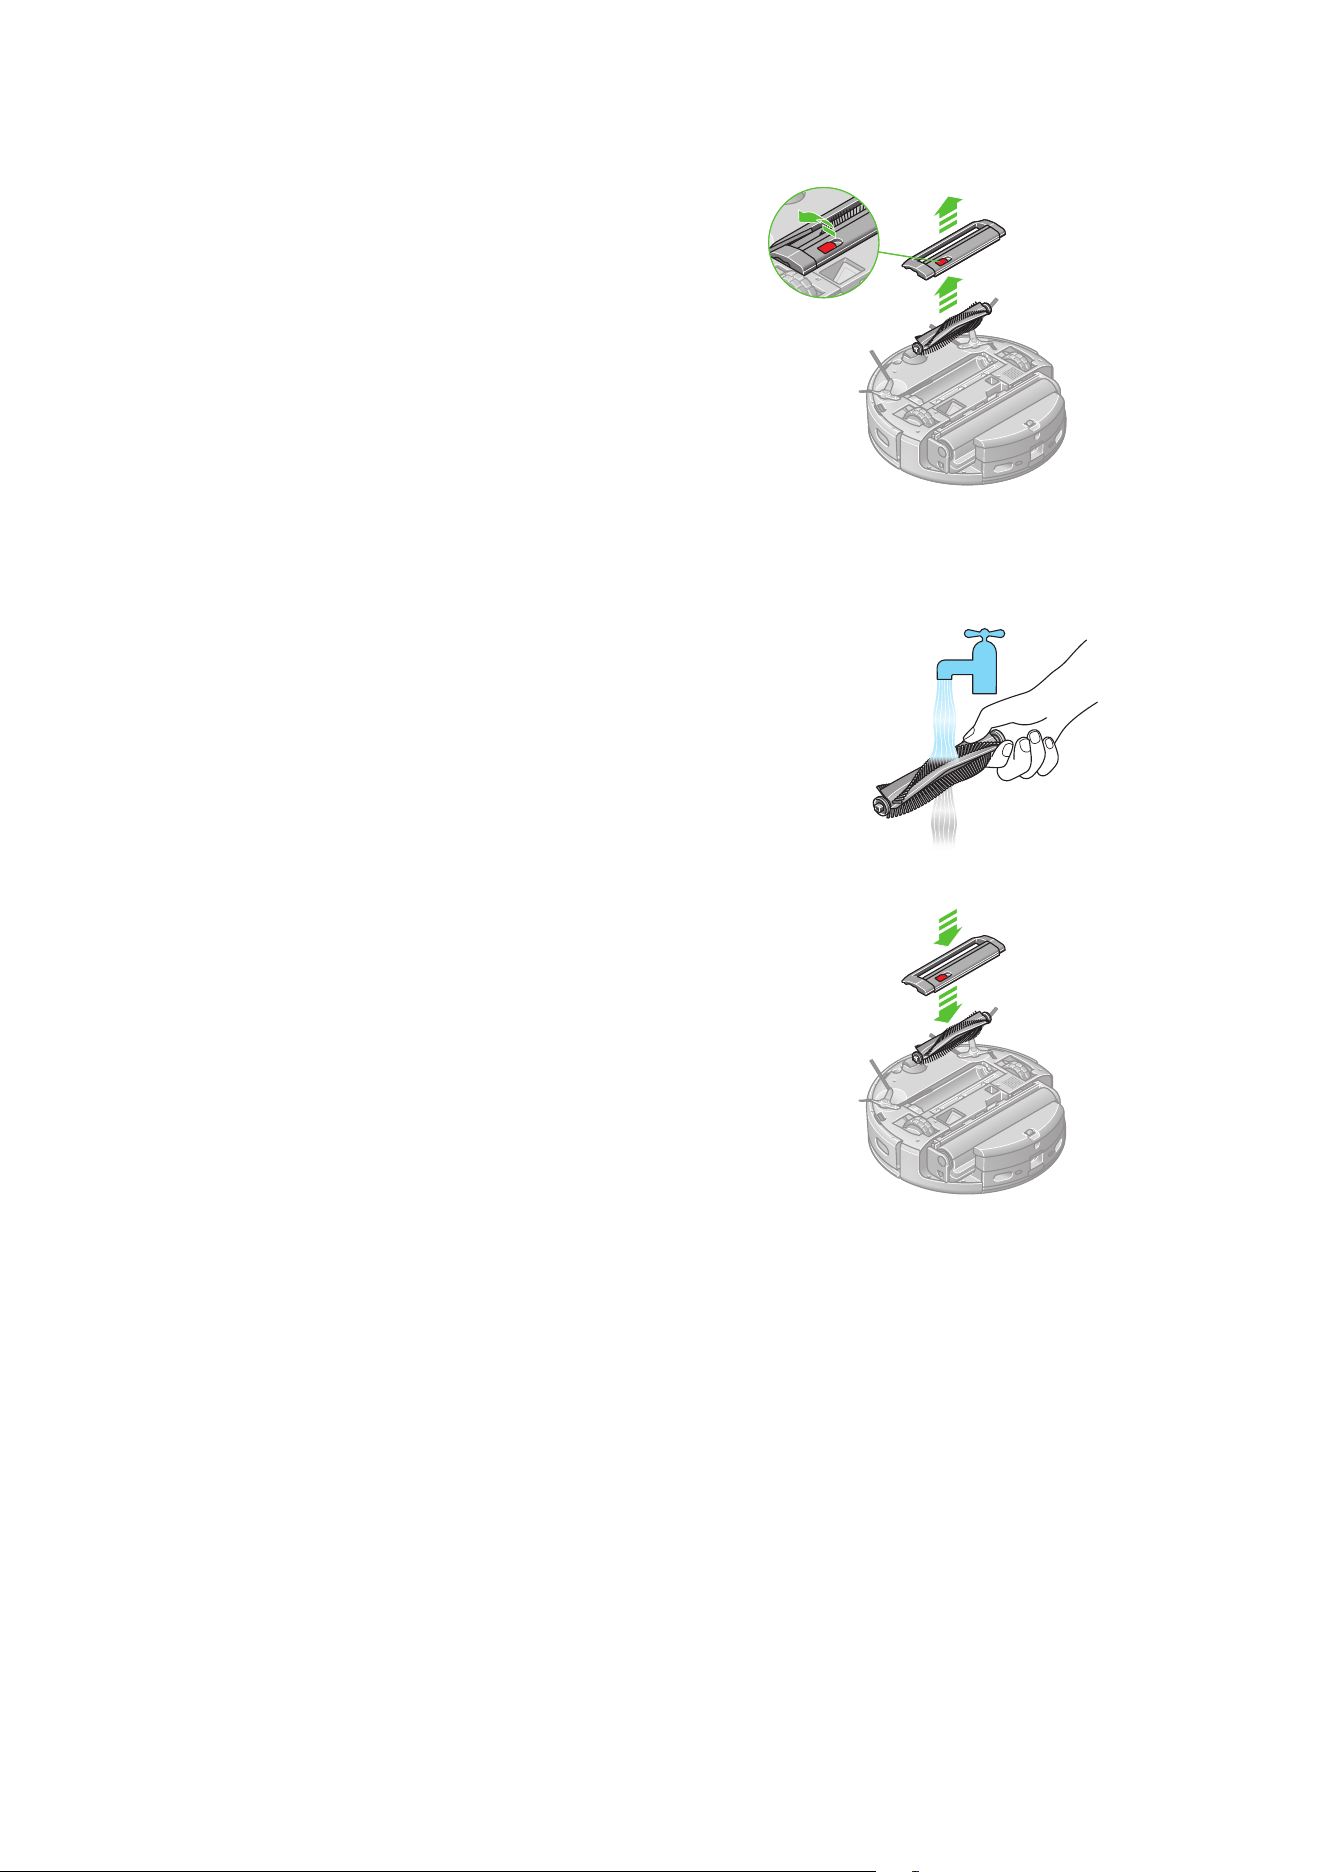
Removing your brush bar
Replacing your brush bar
Place the brush bar back into your robot. Replace the brush bar cover over
the top and gently push down until it clicks into place over the brush bar.
Lower the red tab on the brush bar cover to lock it in place.
Maintaining your brush bar
To maintain optimum performance, check and remove hair and debris from
your brush bar at least once a month.
Lift the red tab on the brush bar cover and remove the cover, then lift the
brush bar out for cleaning.
Remove any threads or hair. Check the brush bar recess and remove any
debris, including any threads wrapped around the rotating parts.
If your brush bar needs washing, hold it under running water and gently rub
to remove any lint or dirt.
After cleaning, remove as much excess water as possible. Run your hand
down the length of the brush bar to squeeze out any remaining water.
Stand your brush bar upright and leave to dry completely for at least 24
hours. Do not refit the brush bar until it is completely dry.
Washing and drying your wet roller
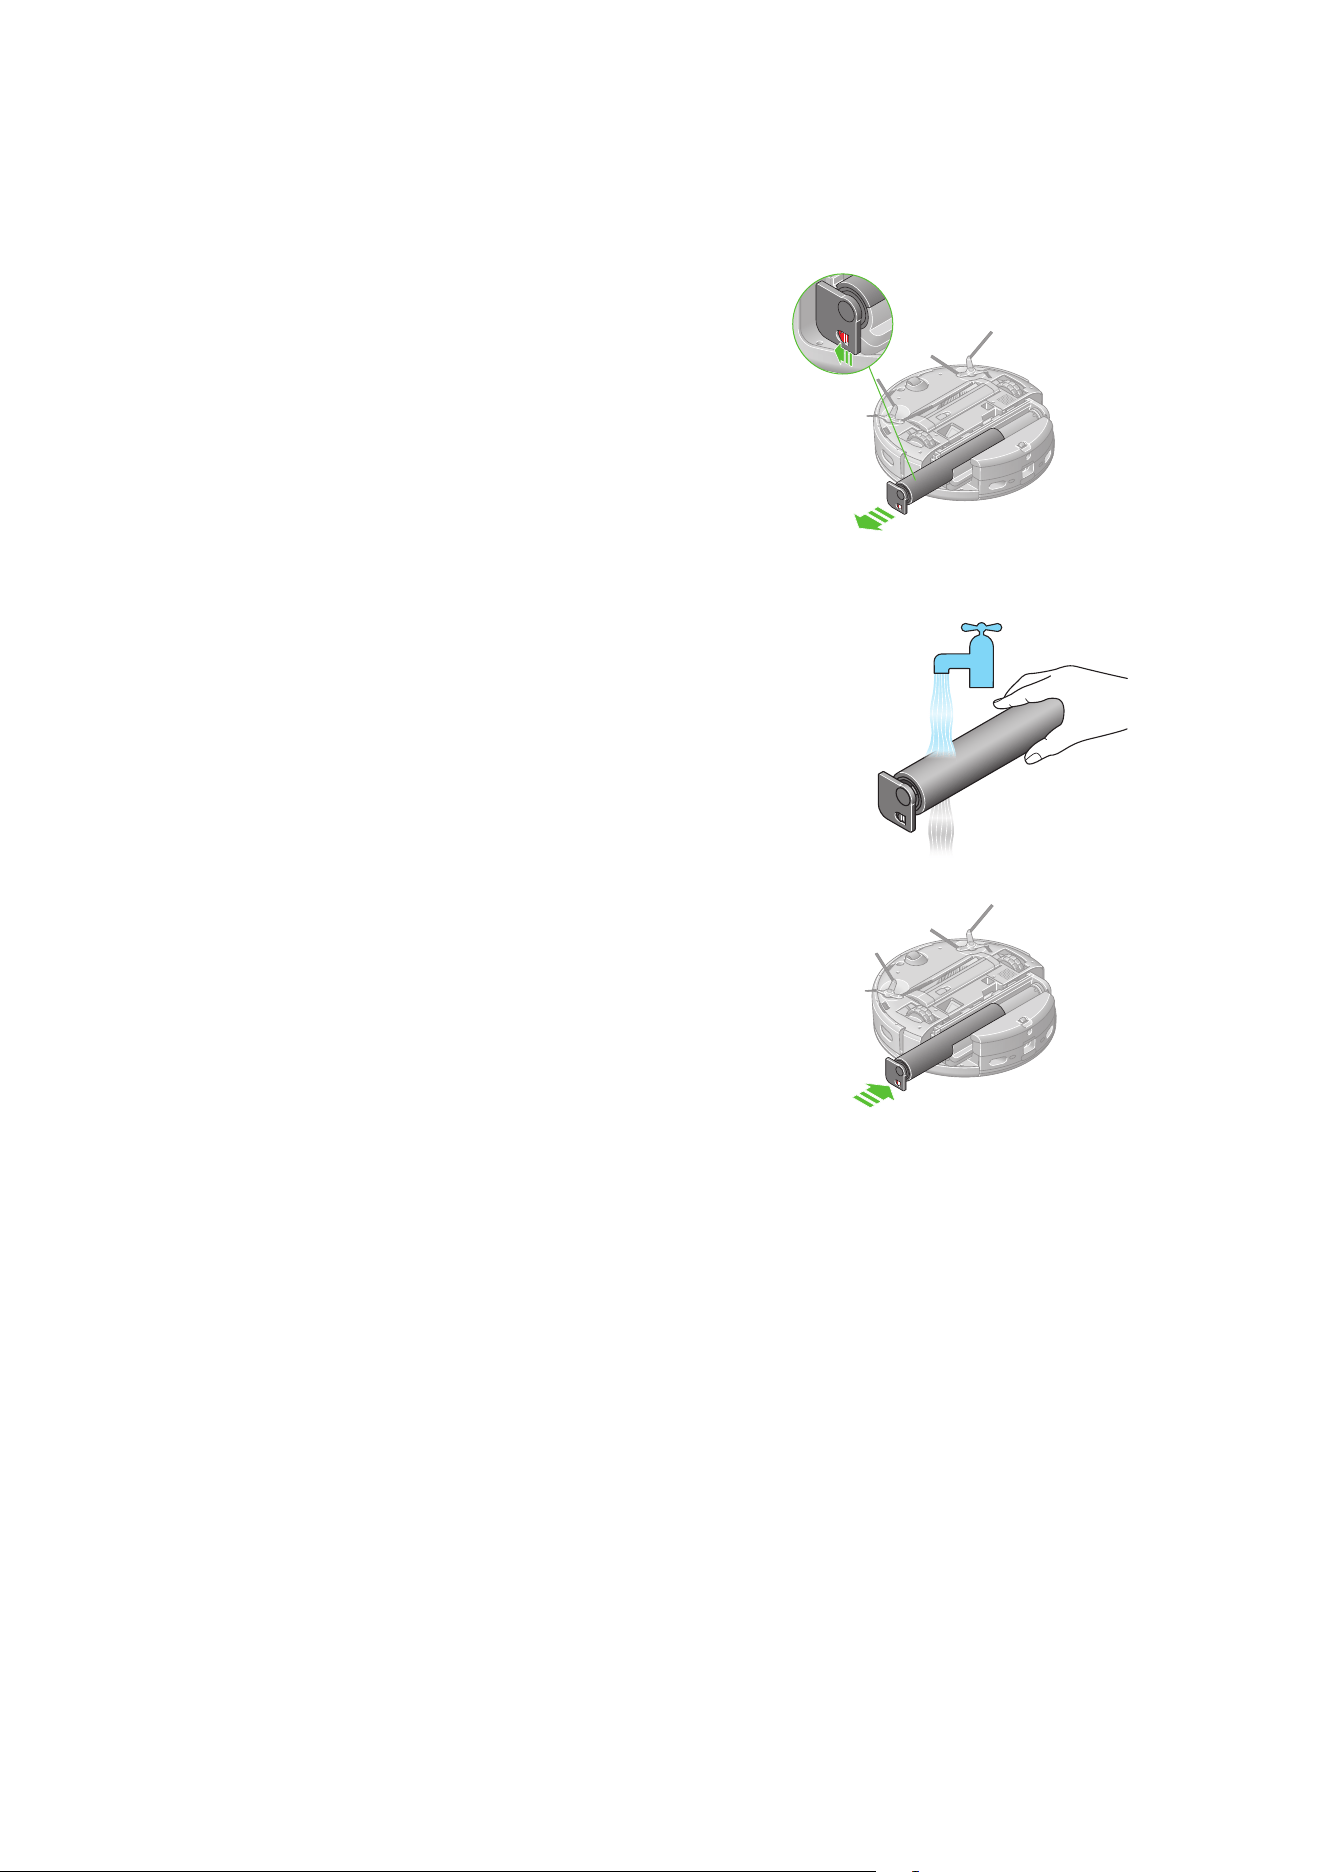
Removing your wet roller
Replacing your wet roller
Before replacing, check that your roller is completely dry.
Slide the wet roller back into your robot. Rotate the end cap into position
and press down until it clicks into place.
Maintaining your wet roller
To maintain optimum performance, check and remove hair and debris from
your wet roller at least once a month.
Turn the robot over on a soft surface. Slide the red button on the end cap
holding the wet roller and rotate the cap so you can slide the wet roller out
of your robot.
Remove any threads wrapped around the wet roller. Check the wet roller
recess and remove any debris, including any threads wrapped around the
rotating parts.
If your wet roller needs washing, hold it under running water and gently
rub it with detergent to clean the microfiber and remove any lint or dirt.
After washing, remove as much excess water as possible. Run your hand
down the length of the roller to squeeze out any remaining water.
For indoor use only
Read operator’s
manual
To maintain optimum performance, check the front sensor unit at least
once a month and clean any dust, smears or debris from the camera lens
and sensors.
Use a soft, dry, lint-free cloth to wipe the sensors and camera lens. Do not
use cleaning fluids, liquids or sprays of any kind.
Turn your robot over on a soft surface. Use the same cloth to wipe the sensors
on the bottom of the machine.
For more information and support videos for your machine, visit our support
pages online: Dyson.com
LiDAR laser
The laser sensor in this product meets the IEC 60825-1: 2014 and EN
60825-1:2014/A11:2021 Standard for Class 1 laser products.
Please avoid direct eye contact during use.
Cleaning your camera lens and sensors

Alerts
Notifications will appear in the MyDyson™ app to alert you that your robot
needs attention. Follow the instructions in the app to clear the alert.
Once an alert has been cleared, you can resume cleaning by placing your
robot on the floor, then press the Start button to resume.
If you’re unable to clear the alert, contact a Dyson Expert using the
MyDyson™ app.
Area unreachable
Please clear the area of obstructions to continue the clean.
Battery low
Place your robot on the docking station to recharge.
Battery temperature too high
Your robot’s battery temperature is too high to clean. Place your robot back
on the docking station and wait for it to cool down.
Your robot is engineered to work within a temperature range of 41-104 F°.
Brush bar stuck
The brush bar has stopped spinning. Lift your robot and check there are no
obstructions around the brush bar. Follow the ‘Maintaining your brush bar’
instructions to remove the brush bar and check the recess inside.
Set up an ‘Avoid area’ rule in the MyDyson™ app if this alert continues to
occur in a specific area of your home.
Camera obstructed
Check your robot’s camera and sensors for dirt, dust, fingerprints and
smears, and wipe clean with a dry, lint-free cloth.
Cleaning solution empty
Use the handle to lift the clean water tank out of your docking station.
Remove the rubber formulation cap located on the back of your docking
station. Fill with Dyson 02 Probiotic hard floor cleaning solution, or your
preferred cleaning formulation, up to the ‘Max’ mark.
Collision sensor obstructed
Please clear the collision sensor of any foreign objects.
Communication error
Your robot is unable to communicate with the docking station.
Check your robot is correctly positioned and connected to the
docking station.
Communication failure
Your robot is unable to communicate with the docking station.
Check the power is connected.
Check your robot is correctly positioned and connected to the
docking station.
Docking station bin not detected
Check the docking station bin is connected properly. Your robot won’t clean
if the bin is missing or incorrectly fitted.
Docking station clean water pump error
Restart your robot and docking station and try again. If the fault persists,
please contact a Dyson Expert using the MyDyson™ app.
Docking station clean water tank empty
Please add water to the docking station’s clean water tank.

Docking station clean water tank not detected
Check the docking station’s clean water tank is connected properly. Your
robot won’t clean if the clean water tank is missing or incorrectly fitted.
Docking station dirty water tank not detected
Check the docking station’s dirty water tank is properly connected. Your
robot won’t clean if the dirty water tank is missing or incorrectly fitted.
Docking station dirty water pump error
Restart your robot and docking station and try again. If the fault persists,
please contact a Dyson Expert using the MyDyson™ app.
Docking station dirty water tank full
Please empty the docking station’s dirty water tank.
Drop sensors obscured
Check your robot’s drop sensors for threads, dust or smears, and wipe clean
with a dry, lint-free cloth.
Filter fault
Please check the docking station’s filter and replace if necessary.
LiDAR sensor obstructed
Please clean the LiDAR sensor following the instructions in
‘Cleaning your sensors’.
Low power mode
When the robot is docked and fully charged, it will automatically enter Low
power mode after 20 minutes.
To test the Low power mode when the device is disconnected from Wi-Fi,
press and hold the Home button for 5 seconds. After hearing the prompt
tone, press and hold the Home button for another 5 seconds to restore
factory settings.
Mapping failed
Your robot has been unable to create a map, please repeat the mapping
sequence, removing any wires or small obstacles on the floor.
Place on the docking station
Your robot has encountered a problem and needs to be returned to the
docking station.
Go into Settings on the MyDyson™ app. Check your robot’s software is up to
date and automatic upgrades are enabled.
Positioning failure
The robot is unable to determine its location, please place the robot in an
already mapped area or create a new map.
Robot bin not detected
Check your robot’s bin is properly connected. Your robot won’t clean if the
bin is missing or incorrectly fitted.
Robot dirty water tank not detected
Check your robot’s dirty water tank is properly fitted. Your robot won’t clean
if the dirty water tank is missing or has not been inserted correctly.
Robot lifted
Your robot has detected it has been lifted, or cannot move away from a drop.
Ensure the robot has stopped cleaning, then pick up your robot from the base
for safer handling. Place it on level flooring, away from any drops, then press
the Start button to resume cleaning.
Set up an ‘Avoid area’ rule in the MyDyson™ app if this alert continues to
occur in a specific area of your home.
Robot not found
Check your robot is correctly positioned and connected to the
docking station.

Robot not charging
Please ensure the docking station is powered and the charging plate is clean.
Check the docking station’s white LED charging indicator light is on and the
plug is connected.
Wipe the charging contacts of the dock station and robot with a dry, lint-free
cloth.
If your robot is still not charging, please contact a Dyson Expert using the
MyDyson™ app.
Robot stuck
If your robot is unable to move, pick it up, move it away from any obstruction
or out of the area.
Set up an ‘Avoid area’ rule in the MyDyson™ app if this alert continues to
occur in a specific area of your home.
Robot stuck on carpet
If your robot is unable to move, pick it up and move it away from any obstacle
or obstruction.
Set up an ‘Avoid area’ rule in the MyDyson™ app if this alert continues to
occur in a specific area of your home.
Side sweeper stuck
A side sweeper has stopped spinning. Lift the robot and check if there are
any obstructions.
Set up an ‘Avoid area’ rule in the MyDyson™ app if this alert continues to
occur in a specific area of your home.
Something went wrong
Please return your robot to the docking station.
Stuck on slope
Please move your robot to flat ground.
Unable to return to dock
Your robot is unable to return to the docking station.
Your robot may have become boxed in by obstacles. Ensure that its path
back to the dock is not obstructed.
Check your robot’s sensors for dust or threads and clean the sensors with a
dry, lint-free cloth.
Go into the Settings in the MyDyson™ app. Check your robot’s software is up
to date and automatic upgrades are enabled.
Wall follow sensor obstructed
Please clean the wall follow sensor following the instructions in ‘Cleaning
your sensors’.
Wet roller stuck or not detected
Check your robot’s wet roller is properly connected. Your robot won’t clean if
the wet roller is missing or incorrectly fitted.
Wheel stuck
Lift your robot and check for any obstructions or items that may have become
entangled around the wheels.
Set up an ‘Avoid area’ rule in the MyDyson™ app if this alert continues to
occur in a specific area of your home.

Resetting and upgrading software
Changing ownership
When you first connect your robot to the MyDyson™ app, you automatically
become its owner. Your personal data, such as Wi-Fi settings, cleaning
schedules and maps are linked to your account.
If you want to add another user, they should download the MyDyson™ app
and follow the instructions to add the robot to their app. They’ll have the
option to be a user or owner.
Owner – has full control of the data and users.
User – only has access to the functions available in the app and robot.
If you want to change ownership, or if a new user wants to take full ownership
of the robot, the robot will be removed from the original owner’s account. A
notification of change of ownership will be sent to the original owner.
Removing and resetting
To remove your robot from the MyDyson™ app and remove your personal
data, such as maps, go into the Settings menu on the app and remove
your robot.
To erase data from your robot, move the robot off the docking station and
press and hold the ‘Home’ button for 10 seconds.
This will erase personal data stored on the robot, such as Wi-Fi passwords,
and return your robot to its factory settings.
Upgrading software
To get the best experience from your robot and to access all the latest
features, it’s important that your robot’s software is kept up to date.
We recommend enabling automatic updates in the MyDyson™ app when you
first set up your robot.
How to enable automatic updates
Open the Settings menu in the MyDyson™ app and scroll down to ‘Software
updates’. Slide ‘Auto update software’ to ‘On’.
When an update becomes available for your robot, it’ll automatically
download and install at the next available opportunity (when the robot is
inactive, on the docking station and connected to Wi-Fi).
