Register your instrument!
www.eppendorf.com/myeppendorf
Hardware hub
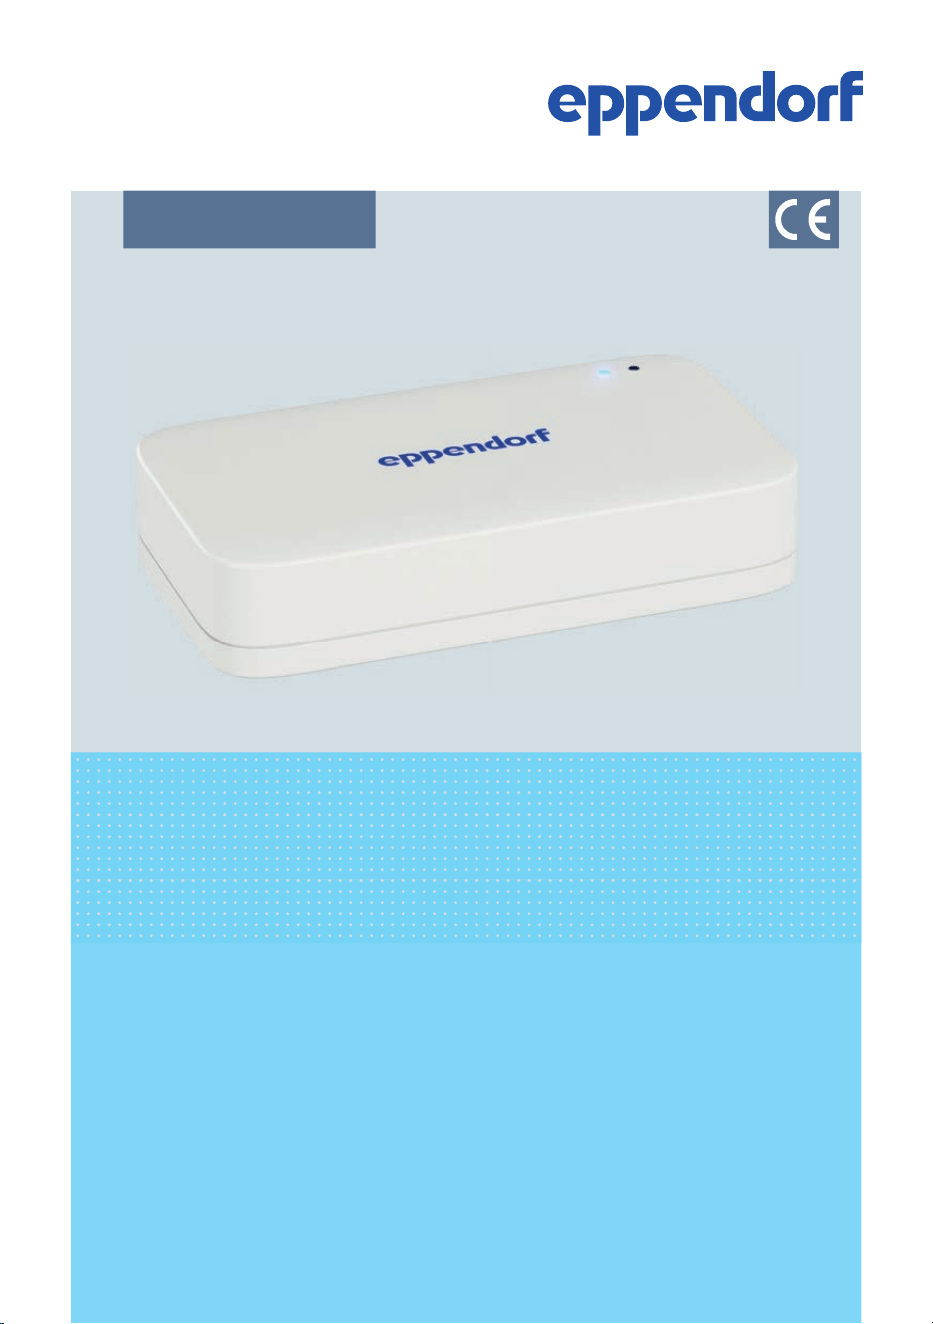
VisioNize box 2
VisioNize box 2 cable
Operating Manual

Copyright © 2026 Eppendorf SE, Germany. All rights reserved, including graphics and
images. No part of this publication may be r
eproduced without the prior permission of
the copyright owner.
Eppendorf
®
and the Eppendorf Brand Design are registered trademarks of Eppendorf SE,
Germany.
Eppendorf trademarks and trademarks of third parties may appear in this manual. All
trademarks are the property of their respective owners. The respective trademark name,
representations and listed owners can be found on
www.eppendorf.com/ip.
The softwar
e of this product contains open source software. License information is avail‐
able in the delivery box.
U.S. Patents and U.S. Design Patents are listed on
www.eppendorf.com/ip.
1008 900 015-03/2026-01

Table of contents
1
About this manual........................................................ 5
1.1 Version overview.................................................... 5
1.2 Notes on this manual................................................ 5
1.3 Warning notice structure............................................. 5
1.4 Graphics........................................................... 6
1.5 Other applicable documents.......................................... 6
1.6 Certificates......................................................... 6
2 Safety.................................................................... 7
2.1 Intended use....................................................... 7
2.2 Residual risks when used as intended................................. 7
2.2.1 Material damage........................................... 7
2.3 Application limits................................................... 8
2.4 Target groups...................................................... 9
2.5 Information for the owner............................................ 9
2.6 Personal protective equipment...................................... 10
2.7 Information on product liability...................................... 10
3 Product description...................................................... 11
3.1 Features.......................................................... 11
3.2 Product overview.................................................. 12
3.3 LED status display................................................. 12
3.4 Name plate....................................................... 14
3.5 Local interfaces.................................................... 16
4 Installation.............................................................. 17
4.1 Preparing installation.............................................. 17
4.1.1 Checking connection requirements.......................... 17
4.1.2 Checking the location...................................... 17
4.1.3 Checking the delivery and packing.......................... 18
4.1.4 Checking the delivery package.............................. 18
4.2 Performing the installation.......................................... 19
4.2.1 Installing the device....................................... 19
4.2.2 Registering the device in the VisioNize Lab Suite............. 19
4.2.3 Connecting the device to the power supply................... 20
4.2.4 Connection diagram....................................... 21
4.2.5 Compatible devices........................................ 22
4.2.6 Connecting compatible devices............................. 24
5 Operation............................................................... 28
5.1 Preparing the device for use........................................ 28
5.1.1 Switching on the device.................................... 28
5.1.2 Logging in to the device via a browser....................... 28
5.1.3 Configuring the VisioNize box 2 or VisioNize box 2 cable...... 28
3
Table of contents
VisioNize box 2 VisioNize box 2 cable
English (EN)

5.1.4 Configuring the WL
AN (for VisioNize box 2 only)............. 30
6 Maintenance............................................................ 31
6.1 Cleaning.......................................................... 31
6.2 Updating VisioNize box 2 or VisioNize box 2 cable.................... 31
7 Troubleshooting......................................................... 34
7.1 Device-specific messages........................................... 34
7.2 Error messages.................................................... 34
8 Transport............................................................... 37
8.1 Decontamination before shipment................................... 37
9 Disposal................................................................ 38
9.1 Legal regulations.................................................. 38
9.2 Preparing for disposal.............................................. 38
9.3 Handing over the device to the disposal company...................... 38
10 Technical data........................................................... 39
10.1 Dimensions....................................................... 39
10.2 Weight........................................................... 39
10.3 Mains/power supply................................................ 39
10.4 Ambient conditions................................................ 40
11 Ordering information.................................................... 41
11.1 Accessories....................................................... 41
4
Table of contents
VisioNize box 2 VisioNize box 2 cable
English (EN)
1 About this manual
1.1
Version overview
Version Change Content approved
01 • Document created 2024-02-15
02 • Renamed to VisioNize
box 2 / VisioNize box 2
cable
•
Content update of infor‐
mation on the VisioNize
Lab Suite
2025-05-15
03 • Chapter 3.4 changed:
Name plate updated
•
Chapter 3.5 added: Local
interfaces
• Chapter 5.1.3: Secure
password change
2026-01-16
1.2 Notes on this manual
The dates in this manual corr
espond to the international date format as specified in the
ISO 8601 standard. All dates are shown in the format YYYY-MM-DD or YYYY-MM.
1. Read this manual completely before using the product.
2. Please ensure that you have the manual available while using the product.
The current version of the manual can be found at www.eppendorf.com/manuals.
•
Contact Eppendorf SE to obtain another version of the manual.
1.3 Warning notice structure
HAZARD LEVEL! Type of danger
Sour
ce of danger
Consequences of disregarding the danger
– Measures to avoid the danger
5
About this manual
VisioNize box 2 VisioNize box 2 cable
English (EN)
Symbol Hazard level Type of danger Meaning
DANGER Personal injury Will lead to severe injuries or death.
WARNING Personal injury May lead to severe injuries or death.
CAUTION Personal injury May lead to minor or moderate inju‐
ries.
NOTICE Material damage May lead to material damage.
1.4 Graphics
Depiction Meaning
1.
2.
Work steps
• Bullet point
Text Display text
Key Name for port, button, status lamp, or key
Important information
Tip
1.5 Other applicable documents
The following documents supplement this manual:
•
Safety instructions for the power supply unit
• Installation guide
• VisioNize sense operating manual (for use with the VisioNize box 2)
All other applicable documents can be found on the webpage
www.eppendorf.com.
1.6 Cer
tificates
Declarations of conformity, certificates, Safety Data Sheets etc. on the product can be
found on the respective product page at
www.eppendorf.com.
6
About this manual
VisioNize box 2 VisioNize box 2 cable
English (EN)

2 Safety
2.1
Intended use
The VisioNize box 2 and the VisioNize box 2 cable are intended for use as external
accessories to connect laboratory devices to the VisioNize Lab Suite. The data from the
laboratory devices is forwarded from the VisioNize box 2 or the VisioNize box 2 cable to
the VisioNize Lab Suite.
The VisioNize box 2 can also be used in combination with products from VisioNize sense
to forward measurement data collected by sensors to the VisioNize Lab Suite.
The VisioNize box 2 and the VisioNize box 2 cable are intended for indoor use only and
for operation by trained and skilled personnel.
The VisioNize box 2 and the VisioNize box 2 cable are intended for general use in
laboratories.
Any changes or modifications to the VisioNize box 2 or the VisioNize box 2 cable that
have not been expressly approved by Eppendorf SE may void the user's authority to
operate the device.
2.2 Residual risks when used as intended
If the product is not used as intended, the installed safety devices may not function cor‐
rectly. To reduce the risk of personal injury and material damage and to avoid dangerous
situations, please observe the general safety instructions.
2.2.1 Material damage
2.2.1.1Warnings for the WLAN module (manufacturer)
The following warnings have been taken from the manufacturer of the WLAN module
(PAN9026 module). The warnings are translations of the original German texts.
The end customer must ensure that the device has a distance of more than 20 cm from
the human body under all circumstances. The end customer devices must meet the
current safety and health requirements in accordance with RED.
The FCC requires the user to be notified that any changes or modifications made to this
device (WLAN module – editor's note) that are not expressly approved by Panasonic
Industrial Devices Europe GmbH may void the user's authority to operate the equipment.
The use of the PAN9026 module (WLAN module – editor's note) in a vehicular environ‐
ment cannot be considered as indoor use.
7
Safety
VisioNize box 2 VisioNize box 2 cable
English (EN)
This equipment has been tested and found to comply with the limits for a Class B
digital device, pursuant to P
art 15 of the FCC Rules. These limits are designed to pro‐
vide reasonable protection against harmful interference in a residential installation. This
equipment generates, uses and can radiate radio frequency energy and, if not installed
and used in accordance with the instructions, may cause harmful interference to radio
communications.
The device complies with the Canadian RSS-Gen Rules. The device meets the require‐
ments for modular transmitter approval as detailed in RSS-Gen.
2.2.1.2Accessories and spare parts
NOTICE! Damage to device
The use of accessories and spare parts other than those recommended
by Eppendorf SE may impair the safety
, functioning, and precision of the
device. Eppendorf SE cannot be held liable or accept any liability for damage
resulting from the use of accessories and spare parts other than those rec‐
ommended.
– Use only the accessories and spare parts recommended by Eppendorf
SE.
NOTICE! Disruption of the radio link
For devices with class A noise emission in accordance with EN IEC
61326-1/EN 55011: The device cannot ensur
e adequate protection of radio
reception in residential areas and domestic environments. The device may
cause radio interference in residential or domestic environments.
– Do not use the device in residential or domestic environments.
The safety instructions and other notes in the operating manual apply in addition
to the safety instructions and warning notes in this installation guide. Read this
oper
ating manual completely before using the device for the first time.
2.3 Application limits
Due to its design, the product is not suitable for use in a potentially explosive atmos‐
phere.
The product may only be used in a safe environment, such as a ventilated laboratory
or under a fume hood. Substances which may potentially contribute to an explosive
atmosphere may not be used.
8
Safety
VisioNize box 2 VisioNize box 2 cable
English (EN)

2.4 Target groups
This manual is intended for the following target groups, who have dier
ent qualifications
and levels of knowledge.
Owner
The owner is any natural or legal person who operates or owns the device.
The owner pr
ovides the product and the necessary infrastructure. The owner has a
special responsibility to ensure the safety of all persons working on the product.
User
The user operates the product and works with it. The user must be instructed in the use
of the pr
oduct. The user must have read and fully understood the manual.
Any tasks that go beyond operation may only be performed by the user if this is specified
in this manual. The owner must explicitly assign these tasks to the user.
Technical personnel
The technical personnel supervises the building services and ensures the technical pre‐
r
equisites for the operation of the product.
Authorized service technician
The authorized service technician is trained and certified by Eppendorf SE to service,
maintain and r
epair the product.
2.5 Information for the owner
The owner must ensure the following:
• The product is in a safe operating condition.
• The safety devices are all available and functional.
• The product is serviced and cleaned according to the information in this manual.
• The product is disposed of in accordance with local regulations.
• All work on the product is carried out by users, technical personnel, or authorized
service technicians who are suitably qualified.
• Personal protective equipment is available and is worn.
• The manual is available during the use of the product.
• The manual is part of the product. Use the following link to download the current
version of the manual:
https://www.eppendorf.link/documents. For a printed or older
version of the manual for your pr
oduct, please contact your Eppendorf partner.
9
Safety
VisioNize box 2 VisioNize box 2 cable
English (EN)

2.6 Personal protective equipment
Personal protective equipment serves to ensure the safety and protection of the user
when working with the pr
oduct.
Personal protective equipment must comply with country-specific regulations and the
regulations of the laboratory.
2.7 Information on product liability
The owner of the device will be held liable for personal and material damage in the
following cases:
• The device is used outside of its intended use
• The device is not used in accordance with the operating manual
• Manipulation of safety devices
• The device has spare parts installed that are not authorized by Eppendorf SE
• The device is used with accessories or consumables that are not recommended by
Eppendorf SE
• Cleaning agents are used that are not recommended by Eppendorf SE
• Chemicals are used that are not recommended by Eppendorf SE
• Shipment not in original packing or in improper substitute packing
• The device is maintained or repaired by persons not authorized by Eppendorf SE
• Unauthorized modifications
10
Safety
VisioNize box 2 VisioNize box 2 cable
English (EN)

3 Product description
3.1
Features
VisioNize box 2 cable
The VisioNize box 2 cable connects Eppendorf devices to the VisioNize Lab Suite. It
is a har
dware hub and works as a data decoding and translation system enabling the
collection of device data in the VisioNize Lab Suite.
VisioNize box 2
With the VisioNize box 2, additional VisioNize sense products can be connected. In
addition to its function as a har
dware hub for integrating Eppendorf devices into the
VisioNize Lab Suite, the VisioNize sense environmental monitor can also be connected
via Bluetooth. In this context, the VisioNize box 2 acts as a gateway and transmits the
measurement data collected by the sensors (VisioNize sense environmental monitor and
VisioNize sense temperature sensor) to the VisioNize Lab Suite. For further information,
refer to the VisioNize sense operating manual.
The VisioNize box 2 replaces the former VisioNize sense gateway router.
11
Product description
VisioNize box 2 VisioNize box 2 cable
English (EN)
3.2 Product overview
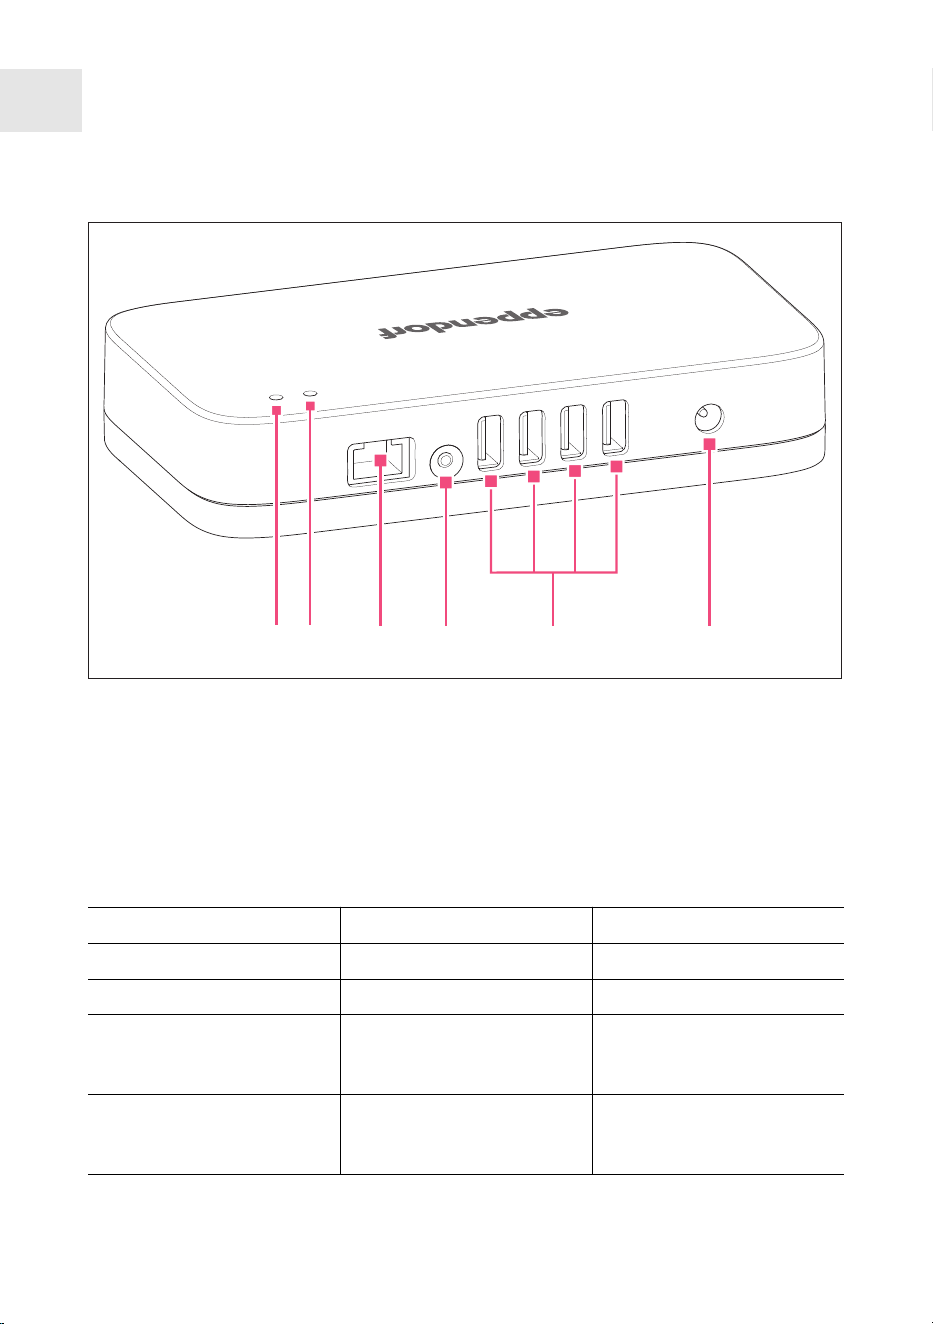
654321
Fig.3-1:Indicators and ports of the VisioNize box 2
1 Status LED
2 Power LED
3 Ethernet interface
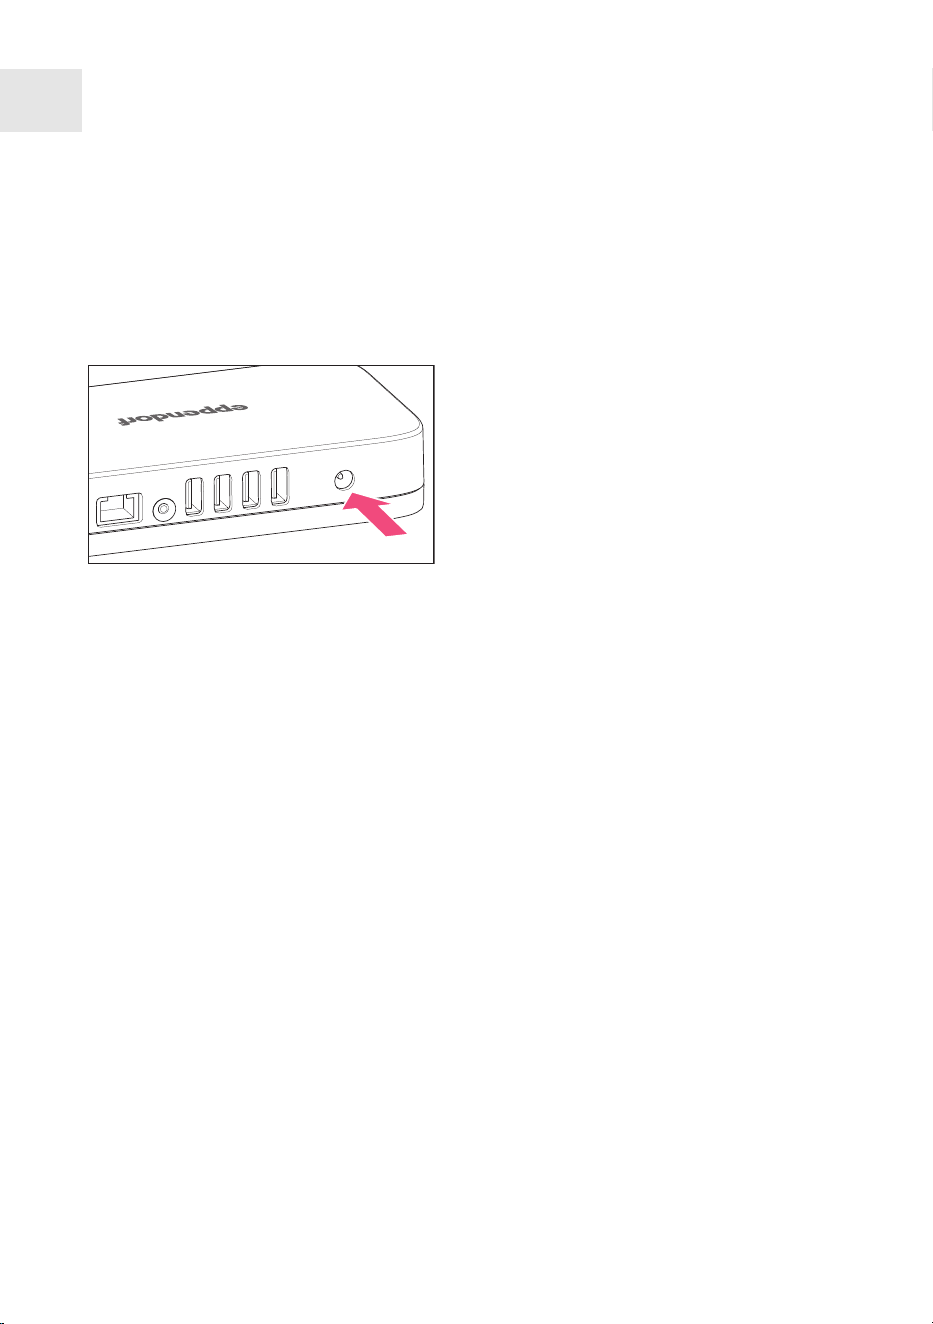
4 Button
5 USB interfaces
6 Power supply
3.3 LED status display
Left LED Description Comment
O The device is switched o.
White The device starts up.
Flashing blue The device must be regis‐
ter
ed in the VisioNize Lab
Suite.
Blue The device is registered in
the VisioNize Lab Suite and
r
eady for use.
12
Product description
VisioNize box 2 VisioNize box 2 cable
English (EN)

Left LED Description Comment
Yellow The software is being
updated.
Wait for the left LED to turn
blue again.
Green The software update is
complete.
Red Error
Flashing red Critical error Restart the device. Contact
your authorized Eppendorf
Service if the err
or persists.
Right LED Description Comment
White The device starts up.
White, flashes once A new device has been
detected or is no longer
detected.
For example, when con‐
necting or r
emoving a labo‐
ratory device.
Green, flashes once The device data is being
updated.
Data is read from a con‐
nected device.
Cyan, flashes once A USB storage medium
has been connected or
r
emoved.
Yellow, flashes once A new software version has
been found.
Blue, flashes once Data has been successfully
tr
ansferred to the VisioNize
Lab Suite.
Red, flashes once The data connection to the
VisioNize Lab Suite has
failed.
13
Product description
VisioNize box 2 VisioNize box 2 cable
English (EN)
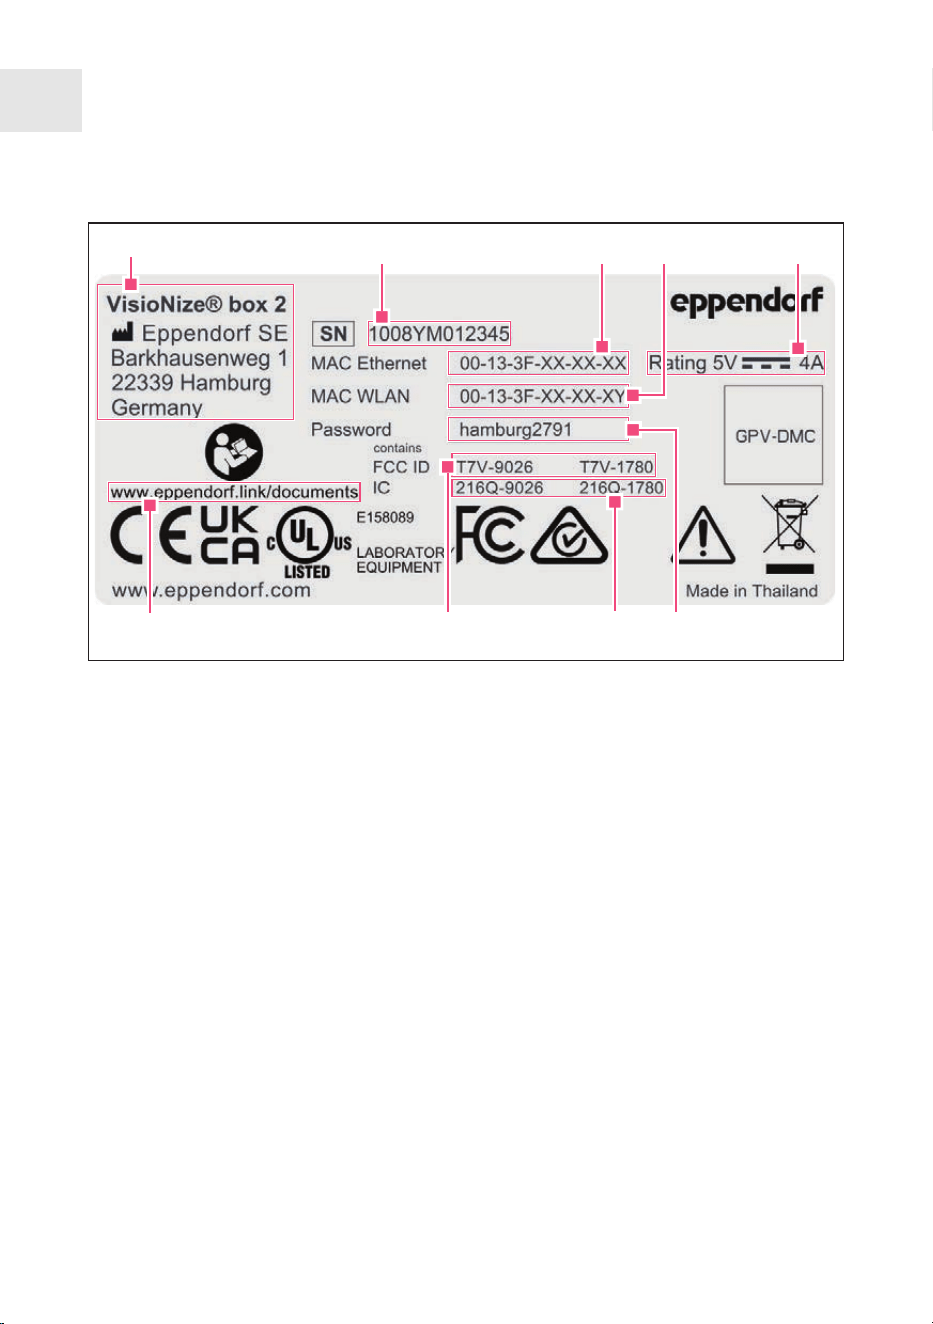
3.4 Name plate
1
2
3
4
5
8
7
9
6
1 Manufacturer's name and address
2 Serial number
3 Ethernet MAC address
4 WLAN MAC address (for the VisioNize
box 2 only)
5 Power rating
6 Preset password for initial setup to
access the device settings via web
browser
7
Industry Canada Identification (for the
VisioNize box 2 only)
8 Federal Communications Commission
Identification (for the VisioNize box 2
only)
9 Link to the Download Center for all
public Eppendorf documentation (e.g.,
operating manuals)
14
Product description
VisioNize box 2 VisioNize box 2 cable
English (EN)
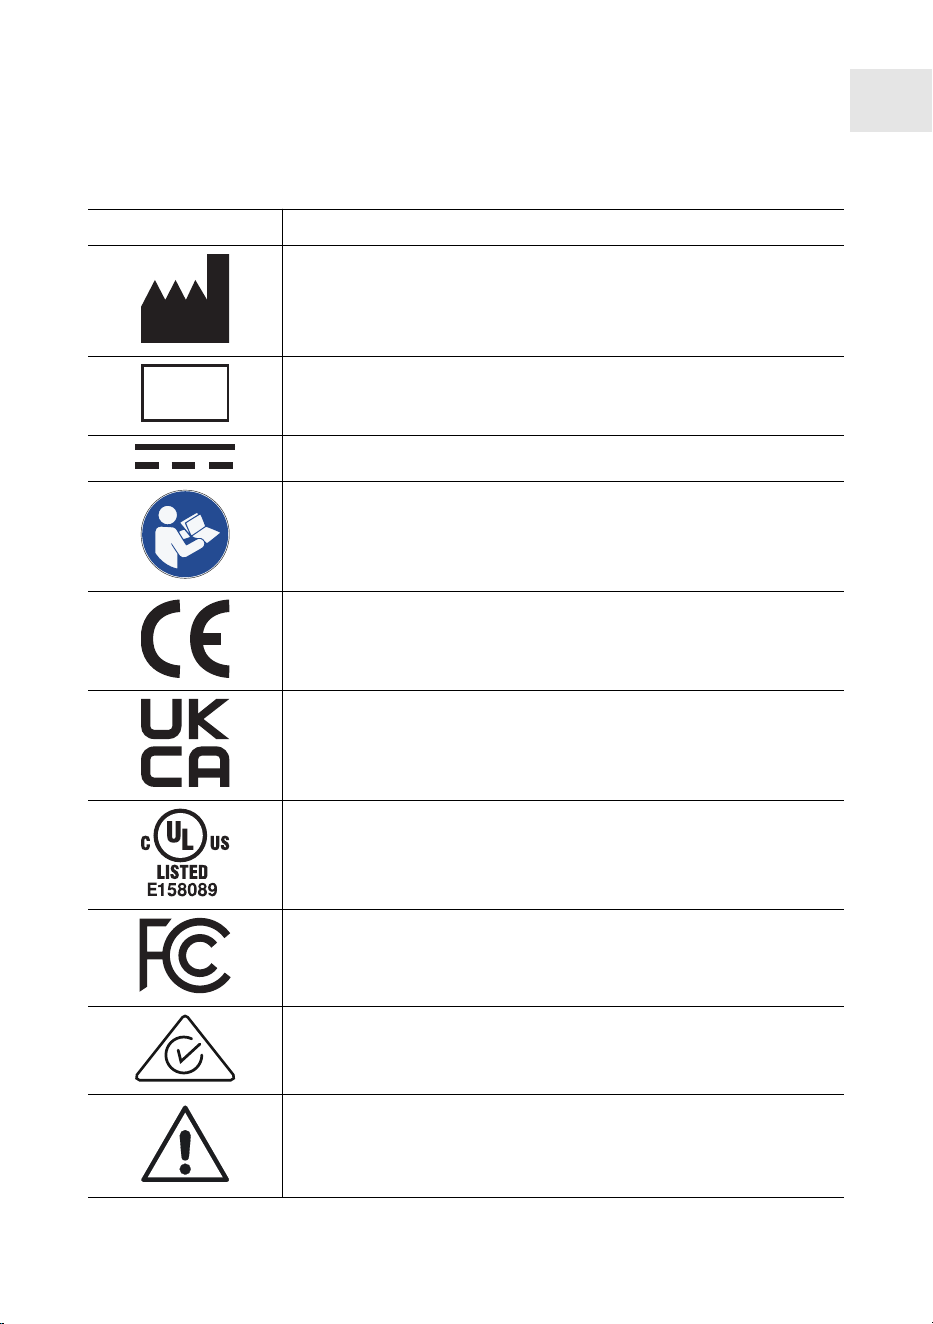
Certification and conformity marks and symbols on the device
Symbol Meaning
Manufacturer's name and address
SN
Serial number
Direct current
Read the operating manual
Certification mark for compliance with Eur
opean-wide require‐
ments for the protection of health, safety and the environment
Mark indicating conformity for the UK economic area
Certification mark indicating that r
epresentative samples of the
device have been tested by Underwriters Laboratories (UL)
against safety standards recognized by the USA and Canada
Certification mark indicating electr
omagnetic compatibility in
accordance with the requirements of the Federal Communica‐
tions Commission (FCC, USA)
Mark indicating conformity with the Australian Radiocommuni‐
cations Act
Observe the safety-relevant information in the manual.
15
Product description
VisioNize box 2 VisioNize box 2 cable
English (EN)

Symbol Meaning
Mark indicating the conformity of waste electrical and electronic
equipment with the DIN EN 50419 standar
d in accordance with
Directive 2012/19/EU of the European Union
3.5 Local interfaces
The device uses a device overview service and a device service interface. The device
overview service is used to pr
ovide an overview of all devices connected to the device.
The data of connected devices can be accessed over the device service interface.
16
Product description
VisioNize box 2 VisioNize box 2 cable
English (EN)

4 Installation
4.1
Preparing installation
• Access to the VisioNize Lab Suite is available.
• A power connection corresponding to the specifications of the power supply unit is
available.
• An active network socket for the local area network is available near the device.
• A standard Ethernet cable is available.
• A suitable connecting cable from the VisioNize box 2 or VisioNize box 2 cable to the
laboratory device is available.
• The laboratory device has the required software version.
More information on the connecting cable and the software version can be found at
Ä
Chapter 4.2.5 “Compatible devices” on page22.
Information on required firewall settings can be found at
https://labsuite.visionize.com/compatibility-list.html.
4.1.1 Checking connection requirements
All pr
erequisites must be met before the device can be installed and put into operation.
Checking the electrical connection
1. Check that the electrical connection meets the following conditions:
• The power connection corresponds to the specifications on the name plate.
•
A power socket with a PE conductor is present.
• The power socket is always freely accessible.
• A residual current circuit breaker is present and accessible.
4.1.2 Checking the location
NOTICE! Disruption of the radio link
For devices with class A noise emission in accordance with EN IEC
61326-1/EN 55011: The device cannot ensur
e adequate protection of radio
reception in residential areas and domestic environments. The device may
cause radio interference in residential or domestic environments.
– Do not use the device in residential or domestic environments.
17
Installation
VisioNize box 2 VisioNize box 2 cable
English (EN)

1. Check that the location meets the following requirements:
• The ambient conditions correspond to the specifications in the T
echnical data
chapter
• Non-explosive environment
2. Check that the location is protected from the following:
• Heat sources
• Sparks
• Open fire
• Direct sunlight
• UV radiation
• Strong electromagnetic radiation
All requirements must be met before the device can be installed and put into operation.
4.1.3 Checking the delivery and packing
1. Check whether the packages indicated on the delivery note match the packages
actually delivered.
2. Check the packing for transport damage.
3. Report any visible damage to your Eppendorf partner.
4.1.4 Checking the delivery package
1. Check that the supplied components match the specifications of the delivery package.
2. If any parts are missing, contact your Eppendorf partner.
Scope of delivery
Quantity Description
1 VisioNize box 2 or VisioNize box 2 cable
1 Power adapter
1 Installation guide
Keep the original packing for shipping and storing the device.
18
Installation
VisioNize box 2 VisioNize box 2 cable
English (EN)

4.2 Performing the installation
4.2.1
Installing the device
The device may only be connected to the local area network and put into opera‐
tion by a network administr
ator or trained personnel.
A incompatible communications structure will result in laboratory device mal‐
functions.
– Only connect approved laboratory devices.
–
If the device is disconnected from your laboratory device and connected to a
dierent laboratory device, data loss may occur.
1. Connect the device to the power line using the power adapter.
2. Connect the device to the network socket with a standard Ethernet cable. The
VisioNize box 2 can also be connected to the network via WLAN. For further infor‐
mation, please refer to
Ä
Chapter 5.1.4 “Configuring the WLAN (for VisioNize box 2
only)” on page30.
3. Connect your laboratory device without a network connection to the VisioNize box 2
or VisioNize box 2 cable with a suitable connecting cable.
To integrate the VisioNize box 2 and VisioNize box 2 cable, a user account is required for
the VisioNize Lab Suite. Mor
e information on setting up a user account can be found on
the Internet at
https://www.eppendorf.com/visionize.
4.2.2
Registering the device in the VisioNize Lab Suite
1. Open the web browser on a computer or mobile device with Internet access.
2. Enter the following URL for the VisioNize Internet page from Eppendorf:
https://www.eppendorf.com/visionize.
3. Go to the Log in button.
4. Log into the VisioNize Lab Suite with the VisioNize access data.
5. Open Devic
e Management.
6. Click on Add device.
7. Enter the serial number with no spaces and in capital letters.
The serial number can be found on the name plate of the VisioNize box 2 or
VisioNize box 2 cable.
The device appears in the VisioNize Lab Suite in Devic
e Management.
19
Installation
VisioNize box 2 VisioNize box 2 cable
English (EN)
4.2.3 Connecting the device to the power supply
Prerequisites:
•
The device has been installed according to this operating manual.
• The device has been acclimatized for at least 6h.
1. Select the earth/grounded socket
adapter that matches your power line
connection.
2. Attach the earth/grounded socket
adapter to the power adapter according
to the enclosed instructions.
3. Connect the power adapter to the rear
of the device.
4. Connect the power adapter to the earth/
grounded socket.
20
Installation
VisioNize box 2 VisioNize box 2 cable
English (EN)
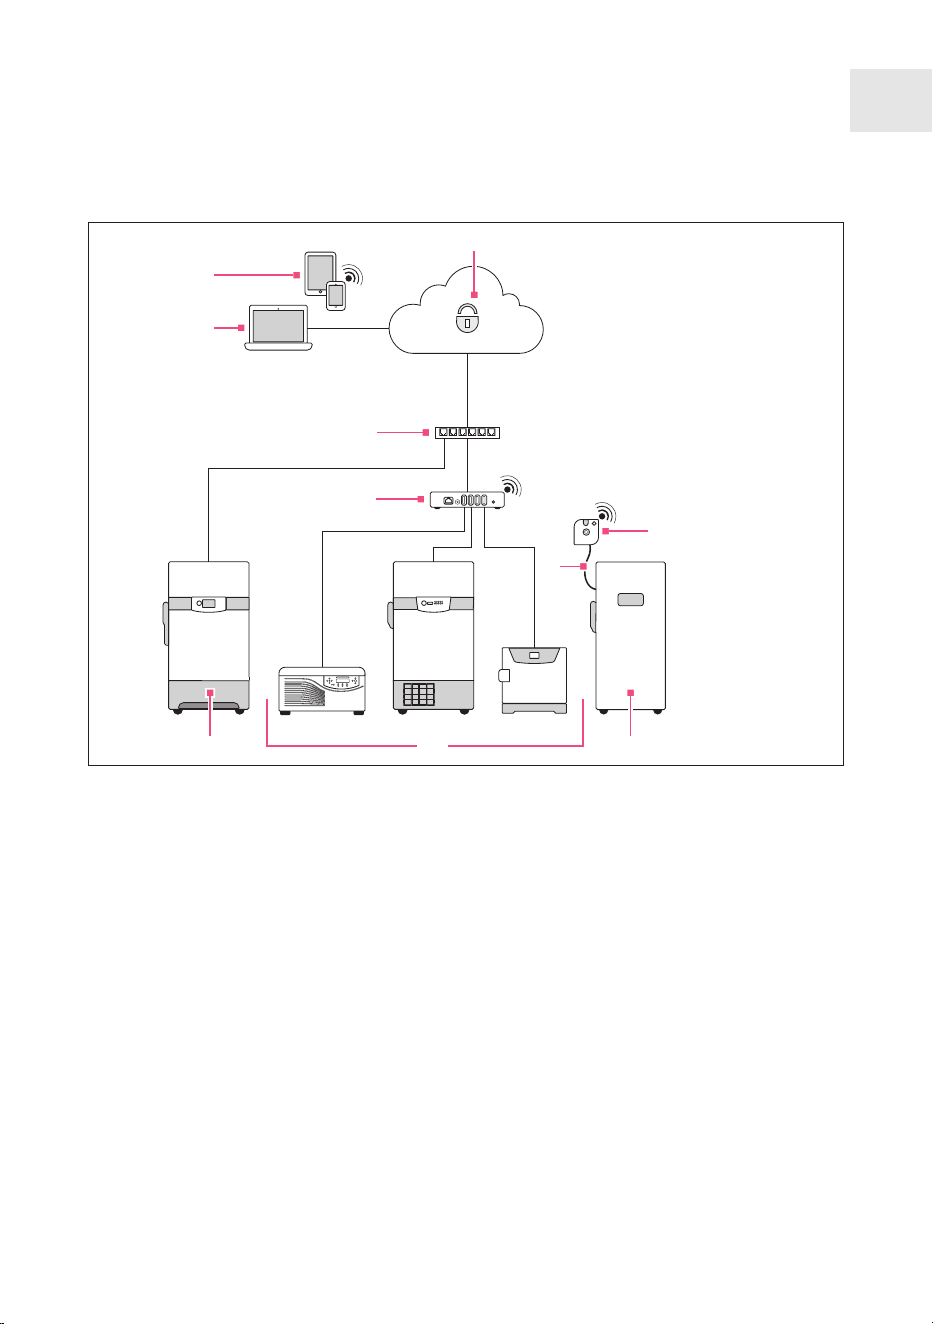
4.2.4 Connection diagram
1
2
8
4
9
5
3
6 107
1 VisioNize Lab Suite
2 Mobile devices
3 Computer
4 Corporate network
5 VisioNize box 2 or VisioNize box 2
cable
6 Devices compatible with VisioNize
box 2
7 Eppendorf devices compatible with
VisioNize
8 VisioNize sense environmental mon‐
itor (for use with the VisioNize box 2)
9 VisioNize sense temperature sensor
(for use with the VisioNize box 2)
10 Example device
21
Installation
VisioNize box 2 VisioNize box 2 cable
English (EN)

4.2.5 Compatible devices
The listed devices can exchange data via the VisioNize box 2 or the VisioNize box 2
cable. F
or this purpose, the devices must have at least the specified software version and
be connected to the VisioNize box 2 or the VisioNize box 2 cable via the corresponding
cables. The integration of older freezers, shakers, and incubators in VisioNize requires
a service upgrade by the authorized Eppendorf Service. Contact your local Eppendorf
partner to have an appropriate service upgrade carried out.
VisioNize Lab Suite device list
Device type Device Minimum software
ver
sion
Required connec‐
tion cables
Centrifuges Centrifuge 5910 R V1.4 5428 850 280
Centrifuge 5424 R V2.2 5428 850 280
Centrifuge 5425 V1.1 1006 077 001
Centrifuge 5425 R V1.0 5428 850 280
Centrifuge 5427 R V1.8 5428 850 280
Mixers and tem‐
per
ature control
systems
ThermoMixer C
V3.5.0 5382 000 201
ThermoMixer F0.5
ThermoMixer F1.5
ThermoMixer F2.0
ThermoMixer FP
ThermoMixer C
Shakers Innova 40
B/F 1006 071 003
Innova 42
Innova 43
Innova 44
ULT freezers CryoCube F740 series V3.10 1006 074 002
CryoCube F101 series
V4.1
1006 075 009
F652 999 007
CryoCube F440 series
CryoCube F570 series
CryoCube FC660 series
22
Installation
VisioNize box 2 VisioNize box 2 cable
English (EN)

Device type Device Minimum software
ver
sion
Required connec‐
tion cables
Innova U101
Innova U535
Innova U725
U570-G
U725-G
Premium U410
Premium U570
Thermocyclers Mastercyclernexus
V3.6.9.0 1006 073 006
Mastercycler nexus gra‐
dient
Mastercycler nexus flat
Mastercycler nexus X2
Mastercycler nexus GX2
Mastercycler nexus X1
Mastercycler nexus
GSX1
Detection devices BioSpectrometer basic
V4.3.6.0 1006 073 006
BioSpectrometer kinetic
BioSpectrometer fluo‐
r
escence
BioPhotometer D30
Incubators New Brunswick Galaxy
48R
BA2201181115 1006 071 003
New Brunswick S41i Display Board:
V2.03
IO Boar
d: V1.6.2
1006 073 006 with
1006 076 005
CellXpert C170 V1.7.1 1006 073 006 with
1006 076 005
23
Installation
VisioNize box 2 VisioNize box 2 cable
English (EN)

4.2.6 Connecting compatible devices
Connecting centrifuges
1. Remove the USB cable from the centrifuge.
2. Switch on the centrifuge.
3. Connect the USB cable to the centrifuge.
Connecting devices from the Innova 4X family
Before connecting the devices to the VisioNize box 2 or the VisioNize box 2 cable, install
the service upgr
ade with the order no. 0082 080.240.
To operate devices from the Innova 4X family on the VisioNize box 2 or the VisioNize
box 2 cable, set the following values for the RS-232 port.
• Port mode: Slave
• Baud rate: 9600
Connecting freezers
The F740 freezer family can be connected to the VisioNize network without any modifi‐
cation.
Other fr
eezers require the service upgrade with the article number 0082 070.096
together with the spare parts 1006 075.009 and F652 999.007 before connecting to the
VisioNize box 2 or the VisioNize box 2 cable.
Connecting the Mastercycler nexus and the BioSpectrometer family
To operate the Mastercycler nexus or a BioSpectrometer with the VisioNize box 2 or the
VisioNize box 2 cable, carry out the following steps.
1. Update the software.
2. Activate remote access for the thermocycler (see Mastercycler nexus operating
manual).
3. Integrate the thermocycler or the BioSpectrometer into the local network.
– If all devices are assigned to the same subnet, the VisioNize box 2 or the
VisioNize box 2 cable automatically r
ecognizes the thermocycler or the Bio‐
Spectrometer. If, in exceptional cases, VisioNize cannot assign a device auto‐
matically, you have to assign the device manually afterwards.
– Older BioSpectrometers do not have an Ethernet connection.
– After a software update, the Mastercycler nexus is only recognized by
VisioNize after a restart.
24
Installation
VisioNize box 2 VisioNize box 2 cable
English (EN)

Connecting incubators
Before connecting to the VisioNize box 2 or to the VisioNize box 2 cable, the incubators
Galaxy 48 R and New Brunswick S41i r
equire the service upgrade with the order no.
0082 060.096.
Galaxy 48R
1. Connect the RS232 connector of the connecting cable to the Galaxy 48R.
2. Connect the USB connector of the connecting cable to the VisioNize box 2 or the
VisioNize box 2 cable.
New Brunswick S41i
The VisioNize box 2 or the VisioNize box 2 cable can manage only one Ethernet-
to-USB adapter
. Connecting multiple adapters is not supported.
1. Connect the New Brunswick S41i and the Ethernet-to-USB adapter to the Ethernet
cable.
2. Connect the VisioNize box 2 or the VisioNize box 2 cable and the Ethernet-to-USB
adapter to the USB cable.
Connecting several New Brunswick S41i
The VisioNize box 2 or the VisioNize box 2 cable manages a maximum of 4
devices.
1. Connect the incubators to an Ethernet switch.
2. Connect the Ethernet switch to the Ethernet-to-USB adapter.
3. Connect the VisioNize box 2 or the VisioNize box 2 cable and the Ethernet-to-USB
adapter to the USB cable.
4. In the incubators’ network settings, select ZeroC
onf.
25
Installation
VisioNize box 2 VisioNize box 2 cable
English (EN)
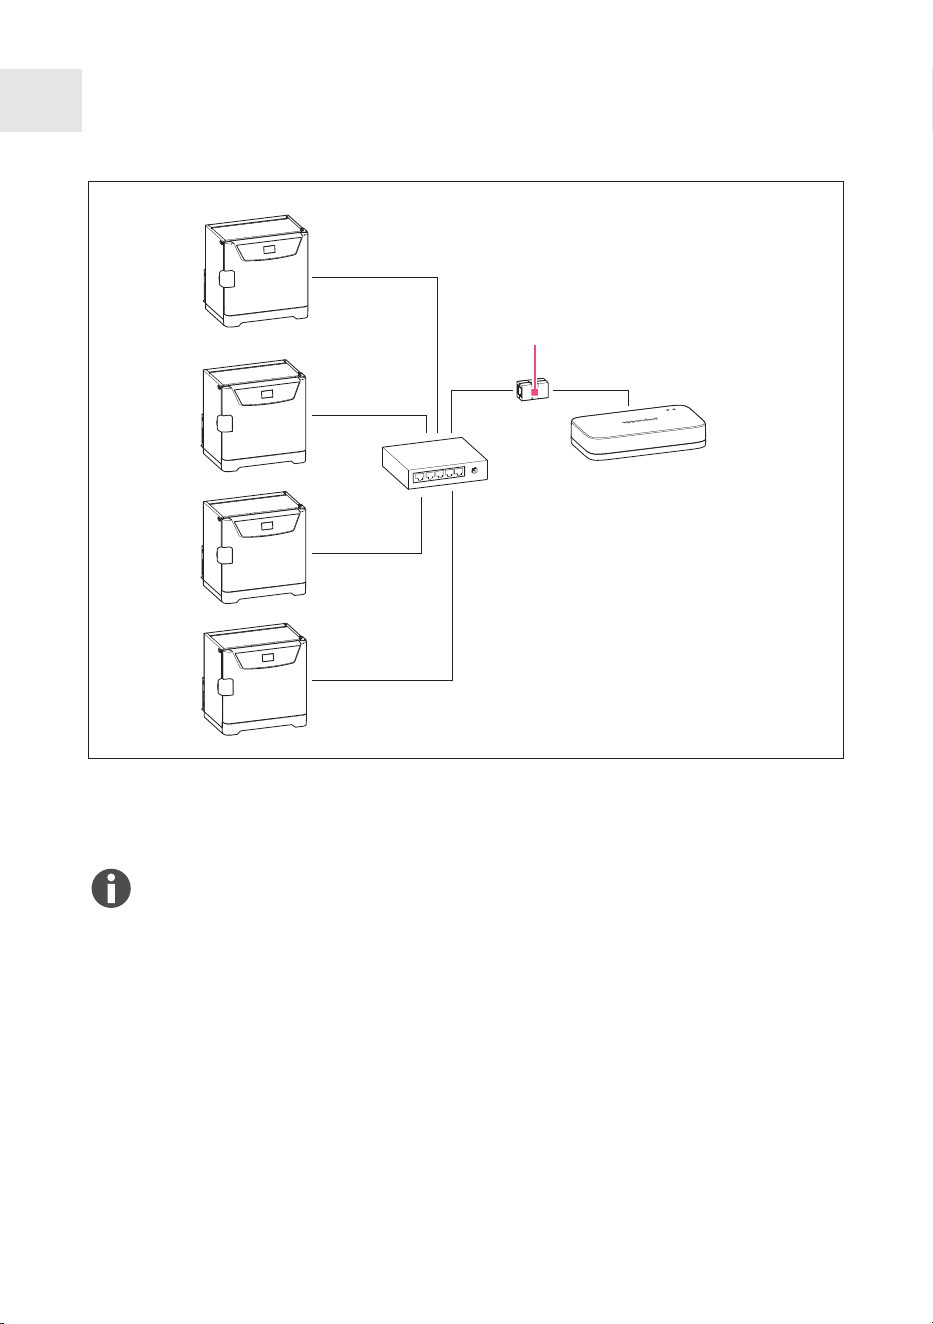
1
1 Ethernet-to-USB adapter
Connecting several CellXpert C170
The VisioNize box 2 or the VisioNize box 2 cable manages a maximum of 4
devices.
1. Connect the incubators to an Ethernet switch.
2. Connect the Ethernet switch to the Ethernet-to-USB adapter.
3. Connect the VisioNize box 2 or the VisioNize box 2 cable and the Ethernet-to-USB
adapter to the USB cable.
26
Installation
VisioNize box 2 VisioNize box 2 cable
English (EN)
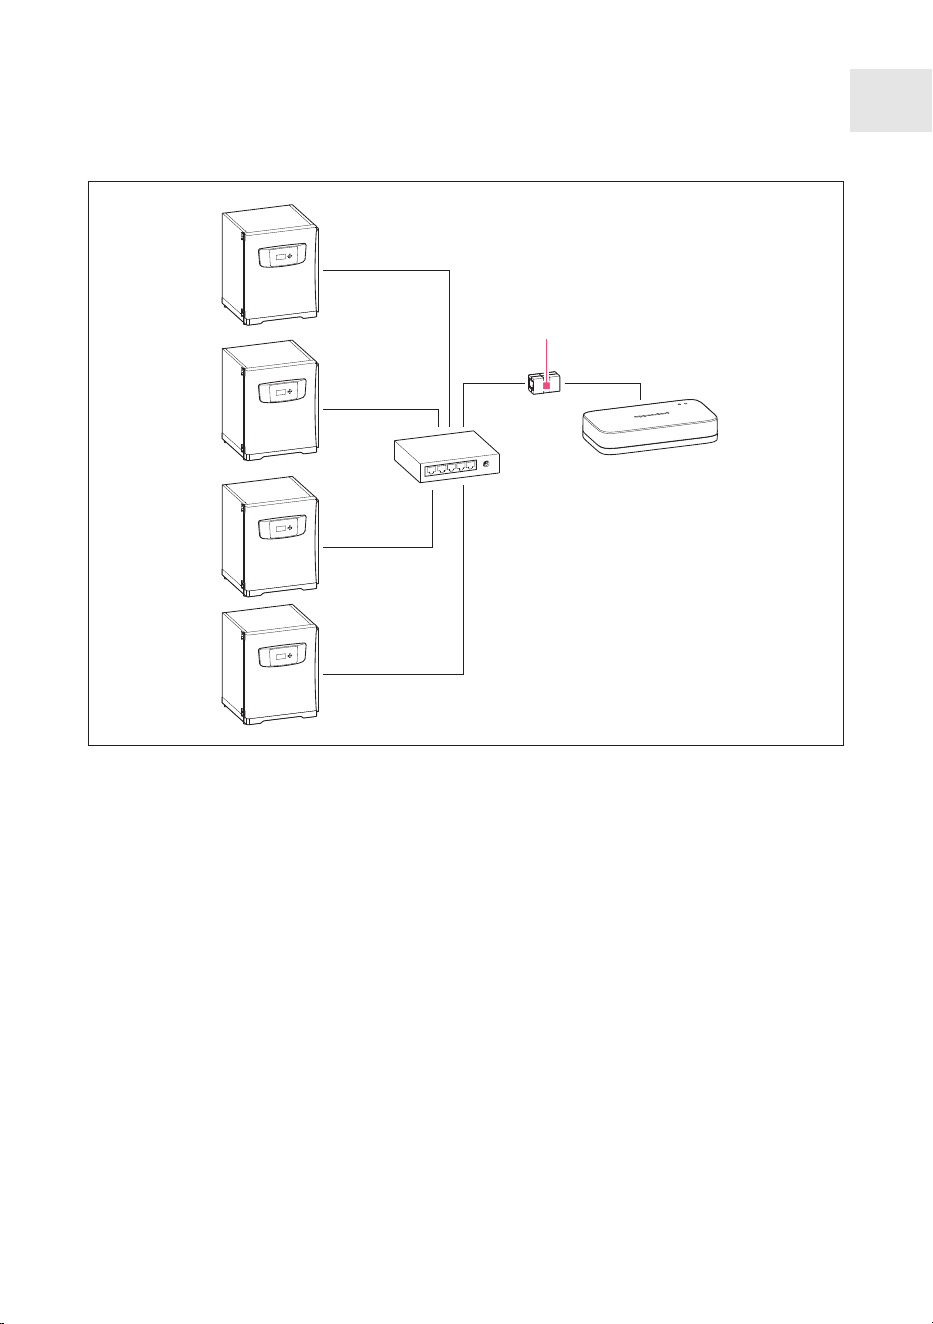
1
1 Ethernet-to-USB adapter
27
Installation
VisioNize box 2 VisioNize box 2 cable
English (EN)

5 Operation
5.1
Preparing the device for use
5.1.1 Switching on the device
This device does not have a mains/power switch. As soon as the mains/power adapter
connected to the device is supplied with power, the device also receives power.
5.1.2 Logging in to the device via a browser
General data, network parameters and connected laboratory devices are managed via a
web interface. If a computer is connected to the same network as the VisioNize box 2 or
the VisioNize box 2 cable, the VisioNize box 2 or the VisioNize box 2 cable is configured
using a web browser. If using the web interface, the latest versions of the Chrome or
Firefox web browsers should be used.
Material:
• A computer with network access
• A computer with Internet access
Prerequisites:
• The device is connected to the network.
• The device is connected to the power supply.
1. Enter the following address in the address bar of your Internet browser: epDevice +
serial number; example:
http://epDevice1008AB900001
The login window opens.
2. The individual password for accessing the device settings can be found on the name
plate.
3. Enter the password in the Enter user passwort window
.
The Dashboard with the Selected devices page opens.
5.1.3 Configuring the VisioNize box 2 or VisioNize box 2 cable
The VisioNize box 2 and the VisioNize box 2 cable have their own web interface, which
works in a similar way to a WLAN router. With it, you can change the general informa‐
tion and network settings and manage the connected laboratory devices.
28
Operation
VisioNize box 2 VisioNize box 2 cable
English (EN)

Prerequisites:
•
The requirements listed in
Ä
Further information on page17 are met.
• The VisioNize box 2 or the VisioNize box 2 cable is connected to the power line and
to the Internet.
• There is a personal computer or a mobile device with Internet access in the same
network as the VisioNize box 2 or the VisioNize box 2 cable.
1. Open the web browser on a computer or mobile device with Internet access.
2. To access the web interface of the VisioNize box 2 or the VisioNize box 2 cable, enter
the serial number or IP address of the VisioNize box 2 or the VisioNize box 2 cable in
the address bar of the web browser as shown below:
Serial number:
• https://epDevice<serial number_VisioNize_box>/login
Example:
http://epDevice1008AB900001/login
IP address:
•
https://<IP address_VisioNize_box>/login
Example:
http://192.168.1.74/login
A dialog window opens.
3. Identify the device-specific passwor
d on the name plate.
4. Enter the device-specific password.
The web interface opens.
5. Adjust the settings of the interface as needed. You can find the recommended set‐
tings in the following table.
Dashboard Overview of all connected and available
devices
Settings >General You can rename the VisioNize box 2 or the
VisioNize box 2 cable to make it easier to
identify the device within your IT network.
Settings >General >Date & Time Overview of the time zone settings of
the VisioNize box 2 or the VisioNize box
2 cable and the web br
owser used. We
recommend synchronizing the time zones
of your end device with those of the
VisioNize box 2 or the VisioNize box 2
cable to ensure that the data collected
from the connected devices is processed
correctly in the VisioNize Lab Suite. To do
this, select Save browser time to device.
29
Operation
VisioNize box 2 VisioNize box 2 cable
English (EN)

Settings >General >P
assword We recommend setting a personal and
comparably secure password for the web
interface of the VisioNize box 2 or the
VisioNize box 2 cable to restrict access.
The selected personal password must be
at least as secure as the initially set pass‐
word.
Settings >Network Enter the access data for the company
WL
AN
Access to network settings for LAN and
WLAN (DNS/NTP).
Settings >General >F
actory settings To reset the VisioNize box 2 or the
VisioNize box 2 cable to factory settings,
select Reset factory settings. All settings
entered manually will be lost.
5.1.4 Configuring the WL
AN (for VisioNize box 2 only)
Prerequisites:
• You have logged in to the web interface of the device.
• The access data for the company WLAN is available.
1. Navigate to the Settings > Network menu item.
2. Enter the WLAN ssid and the WLAN password of your company WLAN under Wlan
settings > Access data.
30
Operation
VisioNize box 2 VisioNize box 2 cable
English (EN)

6 Maintenance
6.1
Cleaning
Aggressive cleaning agents or sharp objects can damage the surface of the device.
• Do not use any corrosive cleaning agents, solvents or abrasive polishing agents.
• Take note of the material specifications.
• Clean the device with a soft cloth.
• Do not clean the device with Acetone or organic solvents that have a similar eect.
Liquid in the interior of the device may enter the electronics and cause a short-circuit.
The electronics of the device may be damaged.
• Switch o the device.
• Disconnect the device from the voltage supply.
• Contact an authorized service technician.
• Only put the device into operation if the service technician has confirmed that the
device interior is dry.
1. Switch o the device.
2. Disconnect the device from the mains/power line.
3. Remove contamination on the outside using a mild cleaning agent or isopropanol (70
%).
4. Remove cleaning agent residues using a damp cloth.
5. Allow the device to dry.
6. Connect the dry device to the mains/power line and put it into operation.
6.2 Updating VisioNize box 2 or VisioNize box 2 cable
To ensure optimum performance, it is essential that the device software version of the
VisioNize box 2 or the VisioNize box 2 cable is always up to date.
The default setting for the updating process of the device software version is via OTA.
A new device software version is provided via the cloud server of VisioNize and can be
updated in the VisioNize Lab Suite in the Device Management.
The device software version of the VisioNize box 2 or the VisioNize box 2 cable
can be found in the VisioNize Lab Suite in the Devic
e Management or in the
web interface of the VisioNize box 2 or the VisioNize box 2 cable under Info
>System information.
31
Maintenance
VisioNize box 2 VisioNize box 2 cable
English (EN)

During a restart of the VisioNize box 2 or the VisioNize box 2 cable, no data from
the connected devices is collected.
If the VisioNize box 2 or the VisioNize box 2 cable is reset to factory settings
during a r
estart, adjust the settings in the web interface.
In the web interface under Settings >F
irmware update >Automatic update, you
can set whether the device software update should generally be updated via OTA
or manually. When selecting Auto, the update will be executed via OTA and thus
via the VisioNize Lab Suite. When selecting Manual, you will have to start the
update process manually via the web interface of the VisioNize box 2 or the
VisioNize box 2 cable.
Updating via OTA
Prerequisites:
•
The VisioNize box 2 or the VisioNize box 2 cable is connected to the power line and
to the Internet.
• You are logged in to the VisioNize Lab Suite as an administrator or lab manager.
• The Device Management has been opened.
• A new device software version is available. This is displayed in the VisioNize Lab
Suite in the Device Management when opening the detail view of the VisioNize box 2
or the VisioNize box 2 cable.
1. In the Device Management, click on the VisioNize box you want to update.
2. Next to the current software version, click on Update available.
A dialog window opens showing all devices of the VisioNize box 2 for which the new
device software is available in their respective organization.
3. Confirm that the new device software is to be installed on the VisioNize box 2 or the
VisioNize box 2 cable.
During the update process, the status LED is lit in orange.
The VisioNize box 2 will restart once or several times.
The status LED will flash in green once the new device software version has been
installed successfully.
The status LED will turn blue again after the update process is completed.
Manual update
If it is not possible to update the device software version via OTA, you can update it
manually
.
32
Maintenance
VisioNize box 2 VisioNize box 2 cable
English (EN)

Prerequisites:
•
The VisioNize box 2 or the VisioNize box 2 cable is connected to the power line and
to the Internet.
1. Download the latest device software version from the website
https://www.eppendorf.link/software-downloads.
The download contains a ZIP file.
2. Unpack the ZIP file to an empty USB stor
age medium (FAT32 format).
3. Insert the USB storage medium into one of the 4 USB-A ports of the VisioNize box 2
or the VisioNize box 2 cable.
The update process starts automatically.
4. If the update is not started automatically, click on Settings >Firmware update in the
web interface.
5. Click on Install Firmware.
During the update process, the status LED is lit in orange.
The VisioNize box 2 or the VisioNize box 2 cable will restart once or several times.
The status LED will flash in green once the new device software version has been
installed successfully.
The status LED will turn blue again after the update process is completed.
6. Remove the USB storage medium.
33
Maintenance
VisioNize box 2 VisioNize box 2 cable
English (EN)

7 Troubleshooting
7.1 Device-specific messages
Error messages on the device (LED)
LED display Possible cause Solution
During the update:
The left LED changes fr
om
yellow to red.
• The update process was
not completed.
• Download the latest soft‐
ware update. Install the
update.
• Use another USB storage
medium.
The left LED lights up in
r
ed.
Various causes • Restart the device.
• Download the latest soft‐
ware update. Install the
update.
• Reset the device to its
factory settings. To do
this, use the Reset factory
settings function in the
web interface of the
VisioNize box 2.
• Contact your local
Eppendorf partner.
7.2 Error messages
Symptom/message Possible cause Solution
The web interface is
not found.
Various causes Restart the VisioNize box 2 or the
VisioNize box 2 cable.
Contact the system administrator.
Contact your local Eppendorf partner.
The laboratory
device is not dis‐
played in the web
interface.
The laboratory device
is not located in the
same network as the
VisioNize box 2 or the
VisioNize box 2 cable.
Connect the laboratory device to the
same network as the VisioNize box 2
or the VisioNize box 2 cable.
The laboratory device
is not connected cor‐
r
ectly.
Check the cables and connectors
between the devices.
34
Troubleshooting
VisioNize box 2 VisioNize box 2 cable
English (EN)

Symptom/message Possible cause Solution
The laboratory device is
not switched on.
Switch on the laboratory device.
The laboratory device is
not compatible with the
VisioNize box 2 or the
VisioNize box 2 cable.
Only connect compatible Eppendorf
labor
atory devices (see
Ä
Chapter
4.2.5 “Compatible devices” on page22).
The software version of
the labor
atory device is
not compatible with the
VisioNize box 2 or the
VisioNize box 2 cable.
Update the software of the laboratory
device.
The laboratory
device is not dis‐
played in VisioNize.
Various causes Restart the VisioNize box 2 or the
VisioNize box 2 cable.
Contact the system administrator.
Contact your local Eppendorf partner.
The software update
does not work auto‐
matically
.
The software version on
the VisioNize box 2 or
on the VisioNize box 2
cable is newer or the
same as the software
version on the USB
storage medium.
Download and install the latest soft‐
ware update for the VisioNize box 2 or
the VisioNize box 2 cable.
To install an older software version on
the VisioNize box 2 or the VisioNize
box 2 cable, use the manual update
function in the web interface of the
VisioNize box 2 or the VisioNize box
2 cable.
Interrupted commu‐
nication between the
labor
atory device
and VisioNize via the
VisioNize box 2 or
the VisioNize box 2
cable
Various causes Check the cables and connectors
between the individual components.
Restart the VisioNize box 2 or the
VisioNize box 2 cable and the labor
a‐
tory device.
Carry out a software update with the
latest version for the VisioNize box 2
or the VisioNize box 2 cable.
Restore the factory settings in the web
interface of the VisioNize box 2 or the
VisioNize box 2 cable using the R
eset
factory settings function.
35
Troubleshooting
VisioNize box 2 VisioNize box 2 cable
English (EN)

Symptom/message Possible cause Solution
Contact the system administrator.
Contact your local Eppendorf partner.
36
Troubleshooting
VisioNize box 2 VisioNize box 2 cable
English (EN)

8 Transport
8.1
Decontamination before shipment
WARNING! Contamination
Shipping or storing a contaminated device or contaminated accessories may
lead to contamination of persons or cause damage to health.
–
Decontaminate the device and accessories before shipping or putting
them into storage.
Hazardous substances:
• solutions that are hazardous to health
•
potentially infectious agents
• organic solvents and reagents
• radioactive substances
• proteins that are hazardous to health
1. Observe the notes on the "decontamination certificate for returned
goods." This is available as a PDF file on our website at:
https://www.eppendorf.link/decontamination/.
2. Enter the serial number of the device in the decontamination certificate.
3. Enclose the completed "decontamination certificate for r
eturned goods" with the
device.
4. Send the device to Eppendorf SE or to an authorized service.
37
Transport
VisioNize box 2 VisioNize box 2 cable
English (EN)

9 Disposal
9.1
Legal regulations
9.2 Preparing for disposal
Preparing disposal according to legal regulations
For information on the legal regulations that apply in your country, contact your
local authority and your Eppendorf partner
.
Dispose of non-decontaminable devices as hazardous waste.
1. Check which legal regulations apply to disposal in your country.
2. Choose a certified waste disposal company or contact your Eppendorf partner
.
Creating a decontamination certificate
Prerequisites:
•
The device has been decontaminated.
1. Download the decontamination certificate from the website
https://www.eppendorf.link/decontamination/.
2. Complete the decontamination certificate.
9.3 Handing over the device to the disposal company
1. Inform the disposal company of any hazards posed by the device, e.g., locking
devices, flammable substances.
2. Hand over the device and the decontamination certificate to the certified disposal
company
.
38
Disposal
VisioNize box 2 VisioNize box 2 cable
English (EN)

10 Technical data
10.1
Dimensions
Width 168mm
Height 34.5mm
Depth 95mm
10.2 Weight
Weight 196g
10.3 Mains/power supply
Mains/power adapter
Input voltage
100 V – 240 V, ±10%
Frequency
50Hz - 60Hz, ±5Hz
Output voltage
DC 5 V, ±6%
Maximum output 20W
Power consumption • Maximum: 24W
•
Standby (at 230 Vac, without load): <
0.1W
Overvoltage category II
Pollution degree 2 (IEC 664)
Protection class II
VisioNize box 2 / VisioNize box 2 cable
Input voltage
DC 5 V, ±6%
Maximum current consumption DC 4A
Maximum output 20W
Power consumption • Normal operation without power load
on the USB ports: 4W
•
Standby: 1.25W
39
Technical data
VisioNize box 2 VisioNize box 2 cable
English (EN)

USB port
Power load, maximum per port 500mA
10.4 Ambient conditions
Environment For indoor use only
Ambient temperature 15°Cto 35°C
Relative humidity 10%– 75%, non-condensing
Atmospheric pressure
79.5 kPa - 106 kP
a
Altitude Use up to an altitude of 2000m above
MSL.
40
Technical data
VisioNize box 2 VisioNize box 2 cable
English (EN)

11 Ordering information
11.1
Accessories
Description Order no.
CO2 Incubator Services - Upgrade Services
O2 upgr
ade
incl. CellXpert® 170(i) 0082 060 096
Interface RS-485
with PCB and cable F652999007
Shaker Service 0082 080 240
ULT Freezer Services 0082 070 096
USB cable
type A/B
length 3 m 5428 850 280
VisioNize® box 2
Har
dware hub that serves as connection point for VisioNize sense
equipment and additionally connects up to four qualified Eppendorf
devices. Features WLAN connectivity. 1008 000 006
VisioNize® box 2 cable
Har
dware hub that serves as connection point for up to four qualified
Eppendorf devices.
without radio module 1008 000 014
VisioNize® box adapter
for shakers and incubators 1006 071 003
for CryoCube® F740h 1006 074 002
for CO2 incubators 1006 076 005
for Eppendorf ThermoMixer® C and F models 5382 000 201
VisioNize® box adapter for freezers
(CryoCube® and Innova® models) 1006 075 009
VisioNize® cable
Ethernet, length 5 m 1006 073 006
41
Ordering information
VisioNize box 2 VisioNize box 2 cable
English (EN)

Description Order no.
VisioNize® sense environmental monitor
a wir
eless, rechargeable multi-sensor unit (ambient temperature,
humidity, pressure & light) ESS1000002
VisioNize® sense temperature sensor
PT
-100 extension that can measure temperature of any device
(including ULT Freezers) within the range of +60 to -90 °C. ESS1000003
42
Ordering information
VisioNize box 2 VisioNize box 2 cable
English (EN)


Evaluate Your Manual
Give us your feedback.
www.eppendorf.com/manualfeedback
Your local distributor: www.eppendorf.com/contact
Eppendorf SE · Barkhausenweg 1 · 22339 Hamburg · Germany
[email protected] · www.eppendorf.com
