1 1
1:1
K
A
1
2
4
6
3
5
1
2
4
6
3
5
B
C
D
E
F
G
H
A
B
C
D
E
F
G
H
技术要求(版本号:B,2023-06)
2.该说明书的幅面大小为: A5 ,未注直线尺寸公差应符合GB/T1804-v;
4.说明书警语及认证标志应满足CE/UL标准,CE:警语部分大写字母高度不低于3mm,CE标志不低于5mm,WEEE标志不低于7mm;
UL:大写字母字高不小于1/12”(2.11mm),小写字母字高不小于1/16”(1.6mm),“IMPORTANT SAFEGUARDS”,“SAVE
THESE INSTRUCTIONS”等词,其字高不小于3/16”(4.8mm),IMPORTANT SAFEGUARDS 必须在最前面。
5.产品应符合QMG-J53.021《产品说明书技术条件》的有关要求。
6.有ROHS指令要求的物料应符合美的企业标准QML-J11.006《产品中限制使用有害物质的技术标准》。
1.文字图案印刷颜色为: 单色 ,印刷字体需清晰可见,文字不能粘到一起;
广东美的生活电器制造有限公司
会 签
黎素文 卢灿飞
古广君
古广君
2024-03-08
制 图
设 计
校 对
审 核
标准化
审 定
日 期
标记
处数 更改文件号 签 字 日 期
空气炸锅
说明书
重点
校对项
1.物料编码
2.版面尺寸
3.材质标注
4.颜色标注
5.客户型号
6.产品名称
7.产品参数
8.电压功率
-----
-----
-----
9.单位符号
10.认证标志
16.商标LOGO
11.回型标志
15.目录及
页码
12.ROHS标志
13.警语警语
及字高
14.控制面板
及功能
3.该说明书的装订方式为: 钉装 ;[70P以下为钉装,70P以上为胶装(特殊要求除外)]
MIDEA-MF-CY110A2(MF-CY110A2)-0501
16161000A25405
材料: 80克双胶纸
认证图标
单位表述
产地表述
变更要求
000000
0000000
UL只有C+US或无ETL有C或US或C+US大于5mm
说明书、保修卡类
交流电: 频率: 功率: 容量: 电流: 压强:V~
MADE IN CHINA Made in China Made in P.R.C
Hz W mL/L A Pa/kPa/MPa 长度:mm/cm/m 时间:s/min/h重量:kg直流电:
大于5mm 大于5mm 大于5mm 大于7mm GS图标无高度要求,印刷可见即可
标准元素核对表(此表仅用于印刷品制作过程核对标准内容,非印刷内容)
PAP
22
图纸变更需要核实变更内容点以及涉及的物料和MO单,尤其关注92的在途MO单
MF-CY110A2
USER MANUAL
Warning notices: Before using this product, please read this manual carefully and keep it for future reference.
The design and specifications are subject to change without prior notice for product improvement.
Consult with your dealer or manufacturer for details.
The diagram above is just for reference. Please take the appearance of the actual product as the standard.
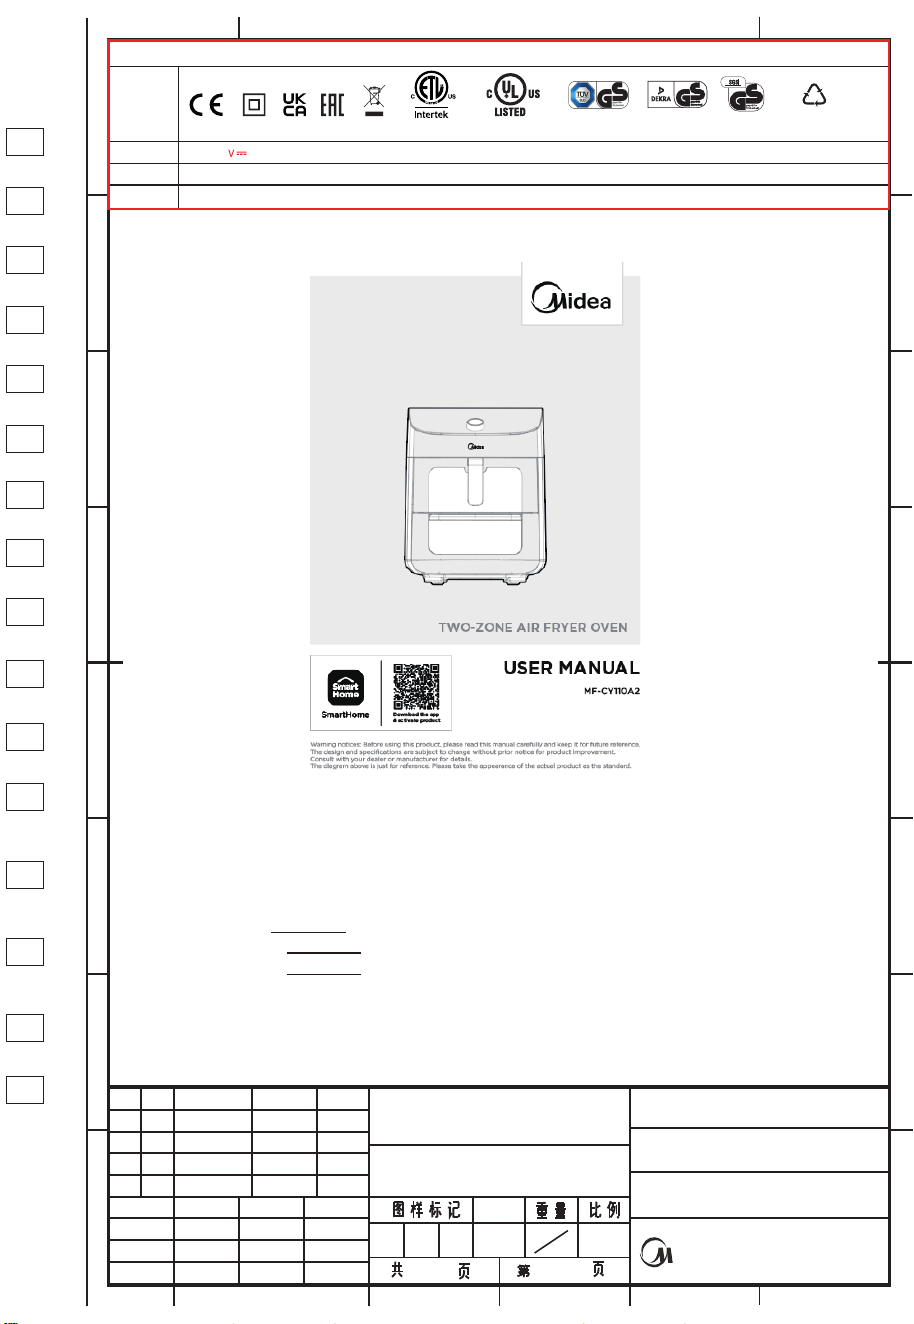
TWO-ZONE AIR FRYER OVEN
Download the app
& activate product

THANK YOU LETTER
Thank you for choosing Midea! Before using your new Midea product, please read
this manual thoroughly to ensure that you know how to operate the features and
functions that your new appliance offers in a safe way.
CONTENTS
01
0
02
1
05
06
07
22
23
25
27
28
29
THANK YOU LETTER
IMPORTANT SAFEGUARDS
SPECIFICATIONS
PRODUCT OVERVIEW
OPERATING INSTRUCTIONS
APP SET UP
CLEANING AND MAINTENANCE
TROUBLESHOOTING
TRADEMARKS, COPYRIGHTS AND LEGAL STATEMENT
DISPOSAL AND RECYCLING
DATA PROTECTION NOTICE
WARRANTY / SERVICE
30
02
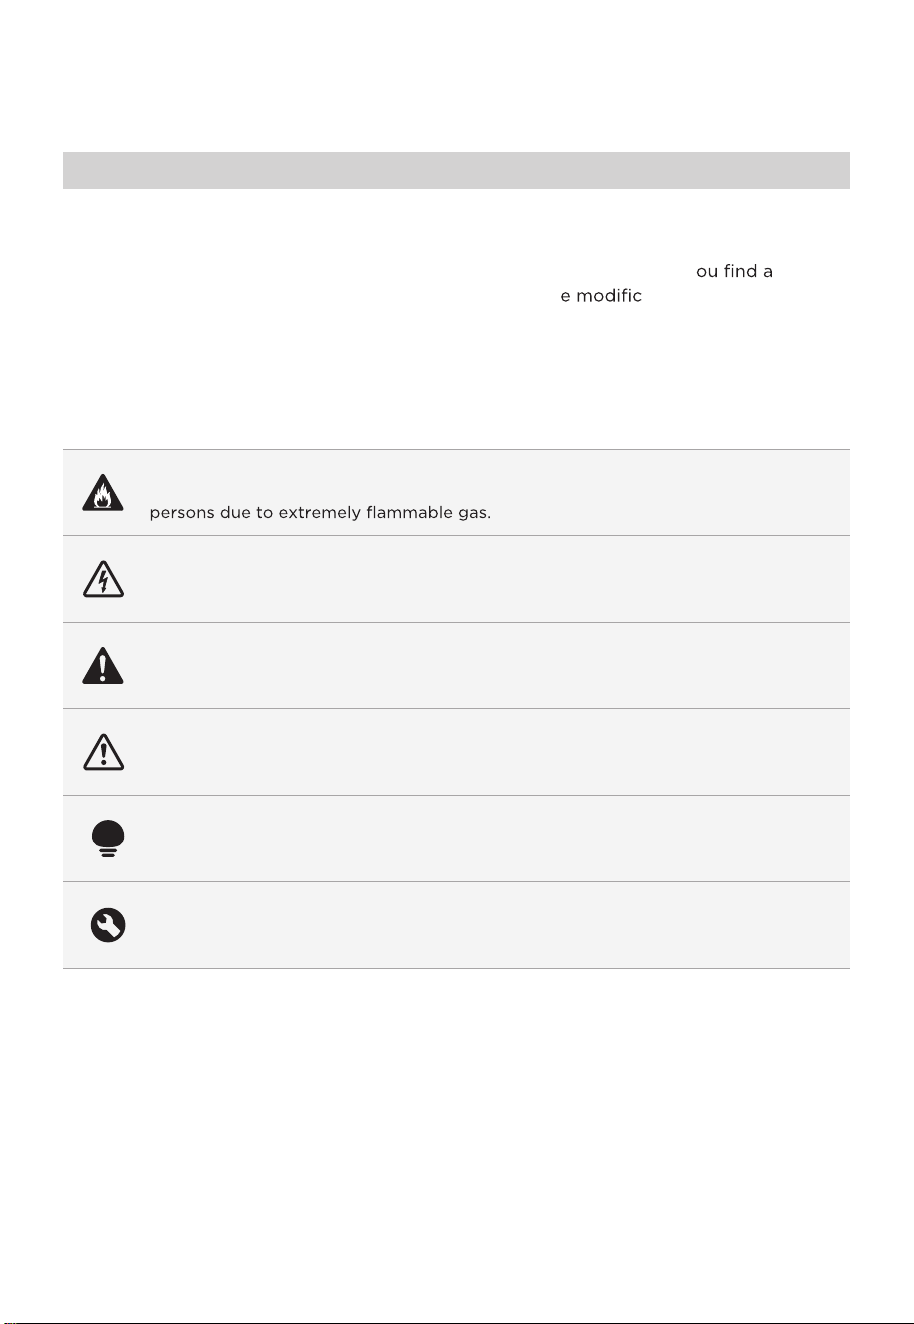
Danger
This symbol indicates that there are dangers to the life and health of
Warning of electrical voltage
This symbol indicates that there is a danger to life and health of
persons due to voltage.
Warning
The signal word indicates a hazard with a medium level of risk which, if
not avoided, may result in death or serious injury.
Caution
The signal word indicates a hazard with a low degree of risk which, if
not avoided, may result in minor or moderate injury.
Attention
The signal word indicates important information (e.g. damage to
property), but not danger.
Observe instructions
This symbol indicates that a service technician should only operate and
maintain this appliance in accordance with the operating instructions.
The following safety guidelines are intended to prevent unforeseen risks or damage from
unsafe or incorrect operation of the appliance. Please check the packaging and appliance
on arrival to make sure everything is intact to ensure safe operation. If y ny
damage, please contact the retailer or dealer. Please not ations or alterations to
the appliance are not allowed for your safety concern. Unintended use may cause
hazards and loss of warranty claims.
Read these operating instructions carefully and attentively before using/commissioning the
unit and keep them in the immediate vicinity of the installation site or unit for later use!
Intended Use
Explanation of Symbols
IMPORTANT SAFEGUARDS
WARNING
●
●
●
●
●
●
●
●
●
Safety Instructions
If the supply cord is damaged, it must be replaced by the
manufacturer, its service agent or similarly qualified persons
in order to avoid a hazard.
Do not immerse any part of the appliance in water or other
liquid.
Warning: Avoid spillage on the connector.
Do not use outdoors.
This appliance is intended to be used in household and
similar applications such as:
environments;
-farm houses;
-by clients in hotels, motels and other residential type
environments;
-In bed and breakfast type environments.
This appliance can be used by children aged from 8 years
and above and persons with reduced physical, sensory or
mental capabilities or lack of experience and knowledge if
they have been given supervision or instruction concerning
use of the appliance in a safe way and understand the
hazards involved. Children shall not play with the appliance.
Cleaning and user maintenance shall not be made by
children unless they are older than 8 and supervised. Keep
the appliance and its cord out of reach of children aged less
than 8 years.
Children should be supervised to ensure that they do not
play with the appliance. Keep the appliance and its cord out
of reach of children.
Warning: Misuse may cause potential injury.
03

Appliances are not intended to be operated by means of an
external timer or separate remote-control system.
WARNING: If the surface is cracked, switch off the appliance
to avoid the possibility of electric shock.
Always put the ingredients to be fried in the basket, to prevent
it from coming into contact with the heating elements.
Do not cover the air inlet and the air outlet openings while
the appliance is operating.
Do not fill the pan with oil as this may cause a fire hazard.
Never touch the inside of the appliance while it is operating.
During hot air frying, hot steam is released through the air
outlet openings. Keep your hands and face at a safe distance
from the steam and from the air outlet openings. Also be
careful of hot steam and air when you remove the pan from
the appliance.
Immediately unplug the appliance if you see dark smoke
coming out of the appliance. Wait for the smoke emission
to stop before you remove the pan from the appliance.
The surface are liable to get hot during use.
Operation frequency band(s): 2.4Ghz
RF output power: 18dBm
Type of equipment: WBR3
RED Declaration of Conformity (DoC) please refer to page 25.
●
●
●
●
●
●
●
●
●
●
●
04
SPECIFICATIONS
MF-CY110A2Product Model
Voltage
Frequency
Rated Power
220-240V~
50/60Hz
1550-1850W
Capacity 11L
05
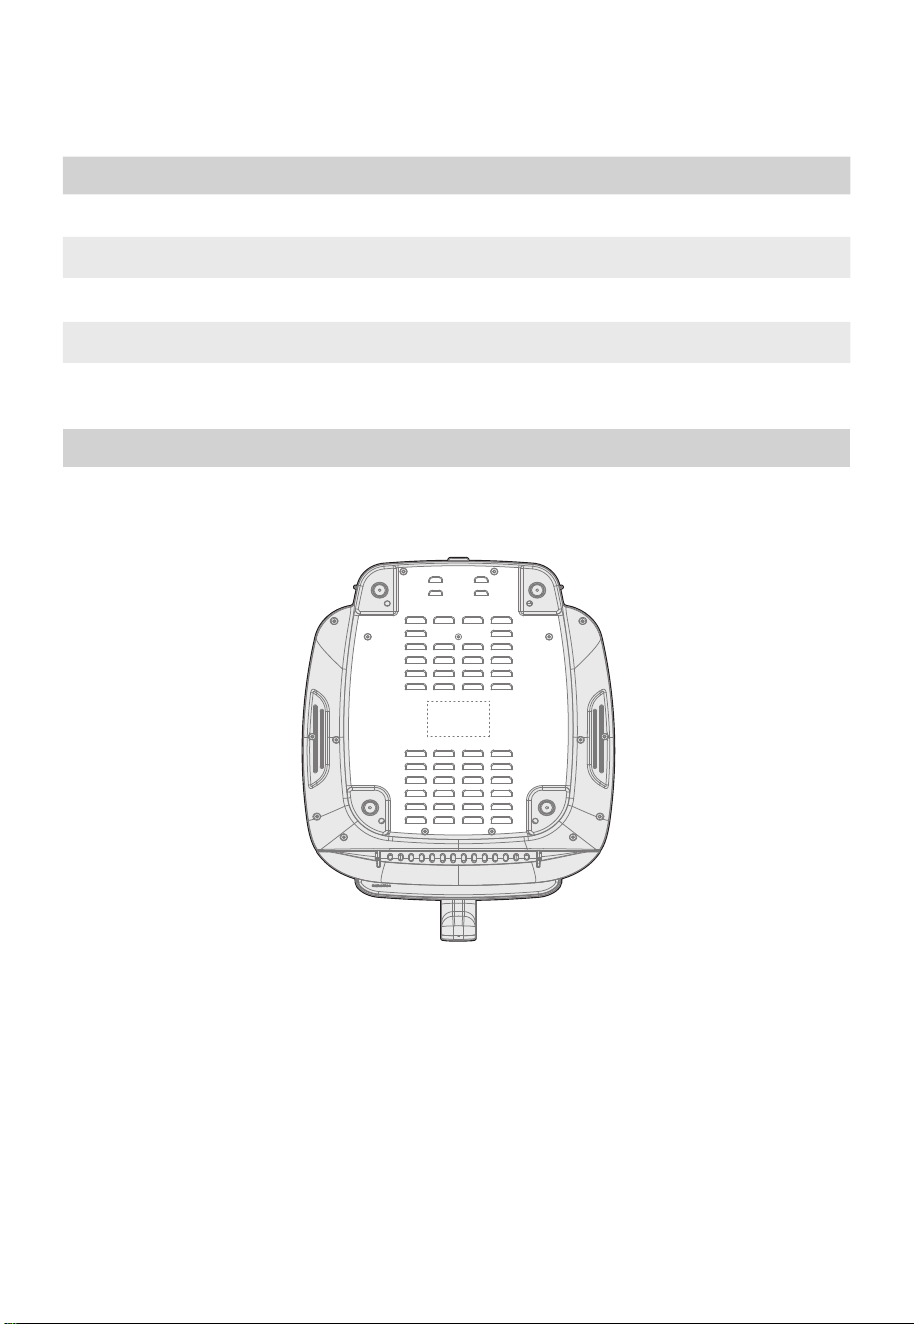
How To Find The Model Name And Serial Number
Both the model name and serial number can be found on the rating label that is located
on the bottom of the air fryer.
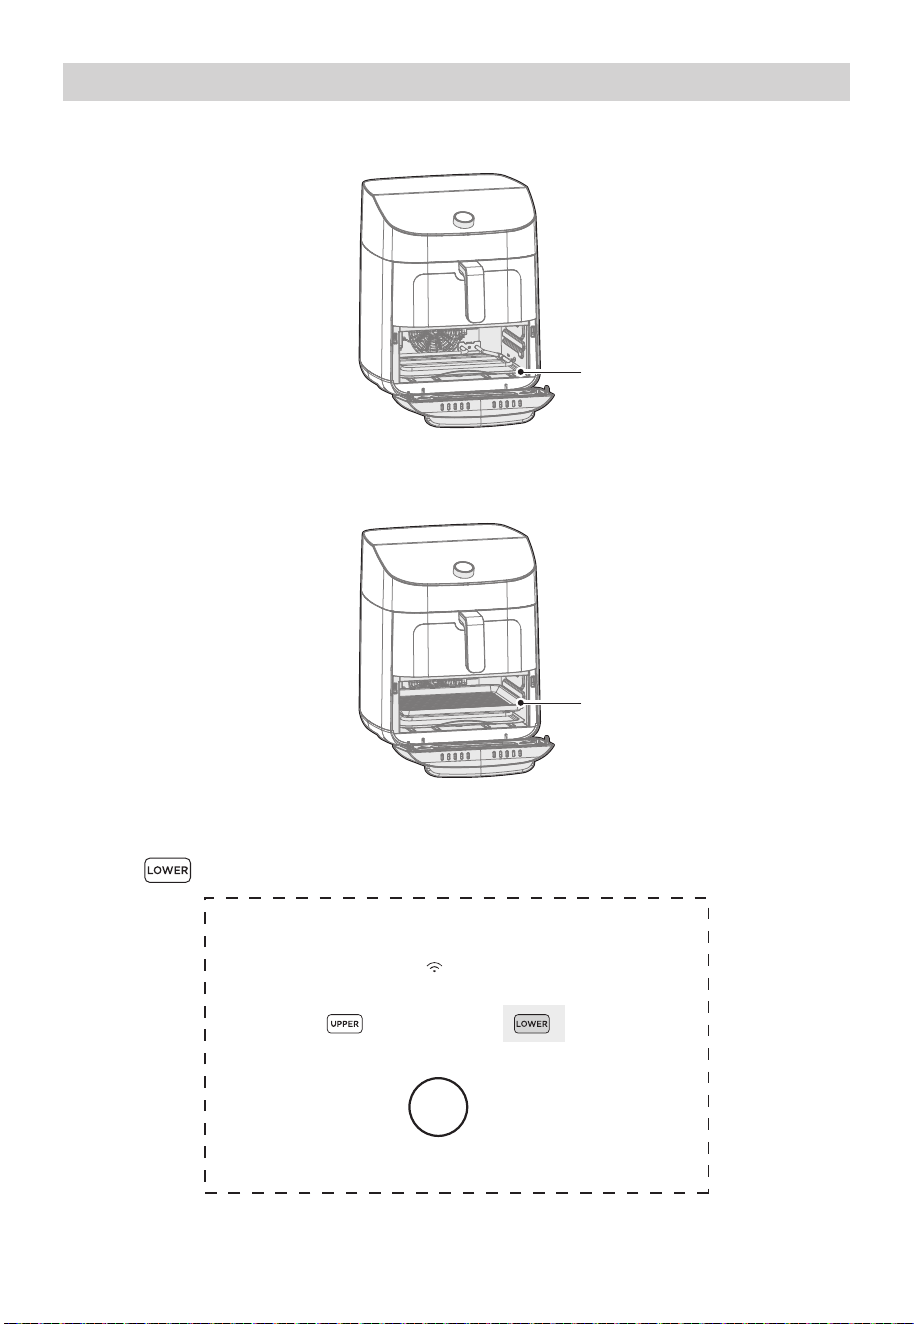
PRODUCT OVERVIEW
NOTE
All the pictures in this manual are for explanatory purposes only. Any discrepancy
between the real object and the illustration in the drawing shall be subject to the real
subject.
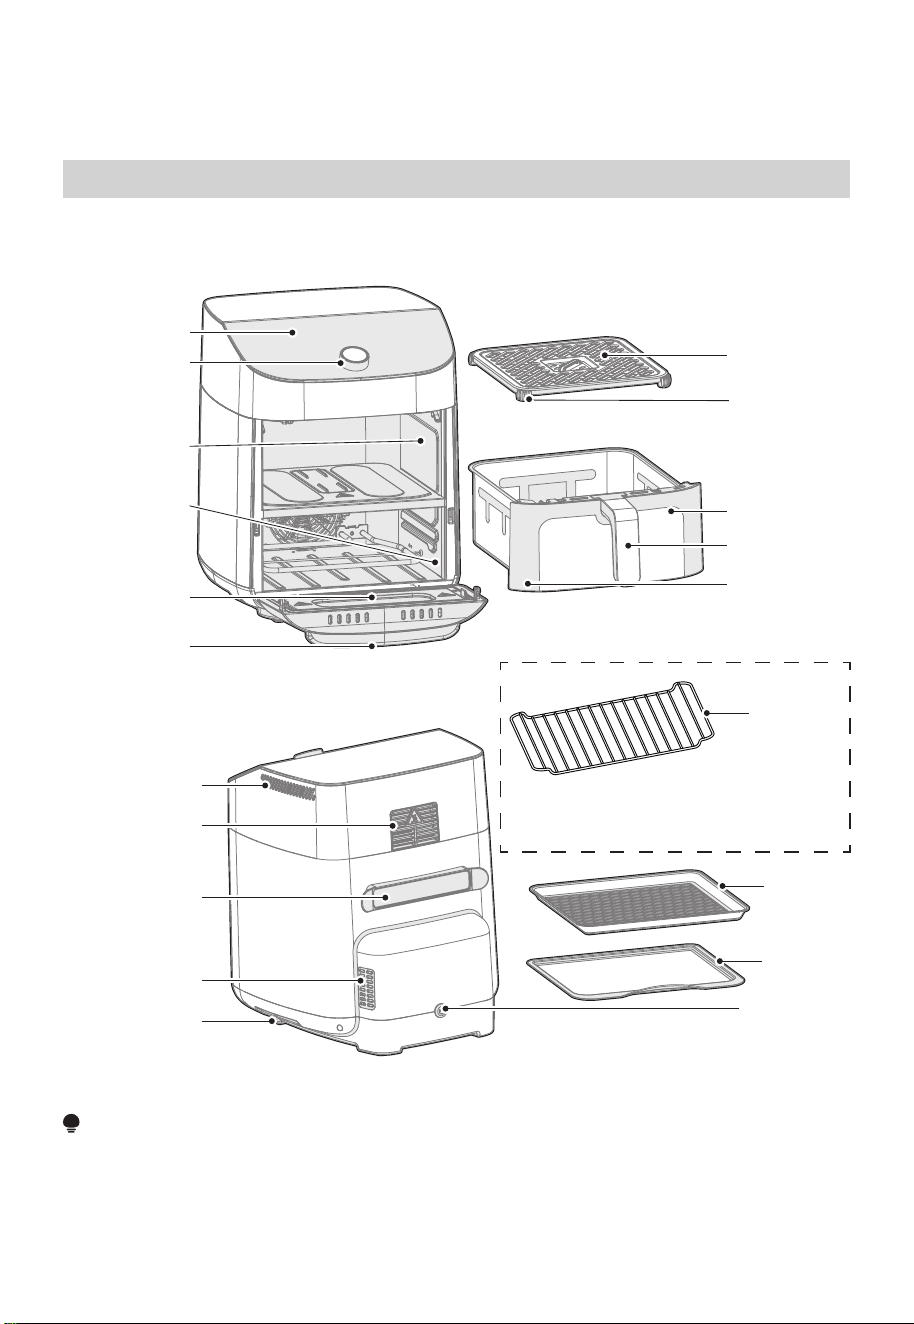
Parts and Accessories
Before using your new air fryer, make sure that all parts and accessories are included.
Wire Rack
Note:The wire rack is an option,
not included in all models
Grill tray
Drip tray
Air inlet
Air outlet
(Upper)
Power cord
storage wrap
Air outlet
(Lower)
Transportation
handle
Power cord
Control panel
Knob
Upper basket
cavity
Lower oven
cavity
Lower oven
window
Oven handle
Crisper plate
rubber
bumpers
Upper basket
handle
Upper basket
Upper basket
window
06
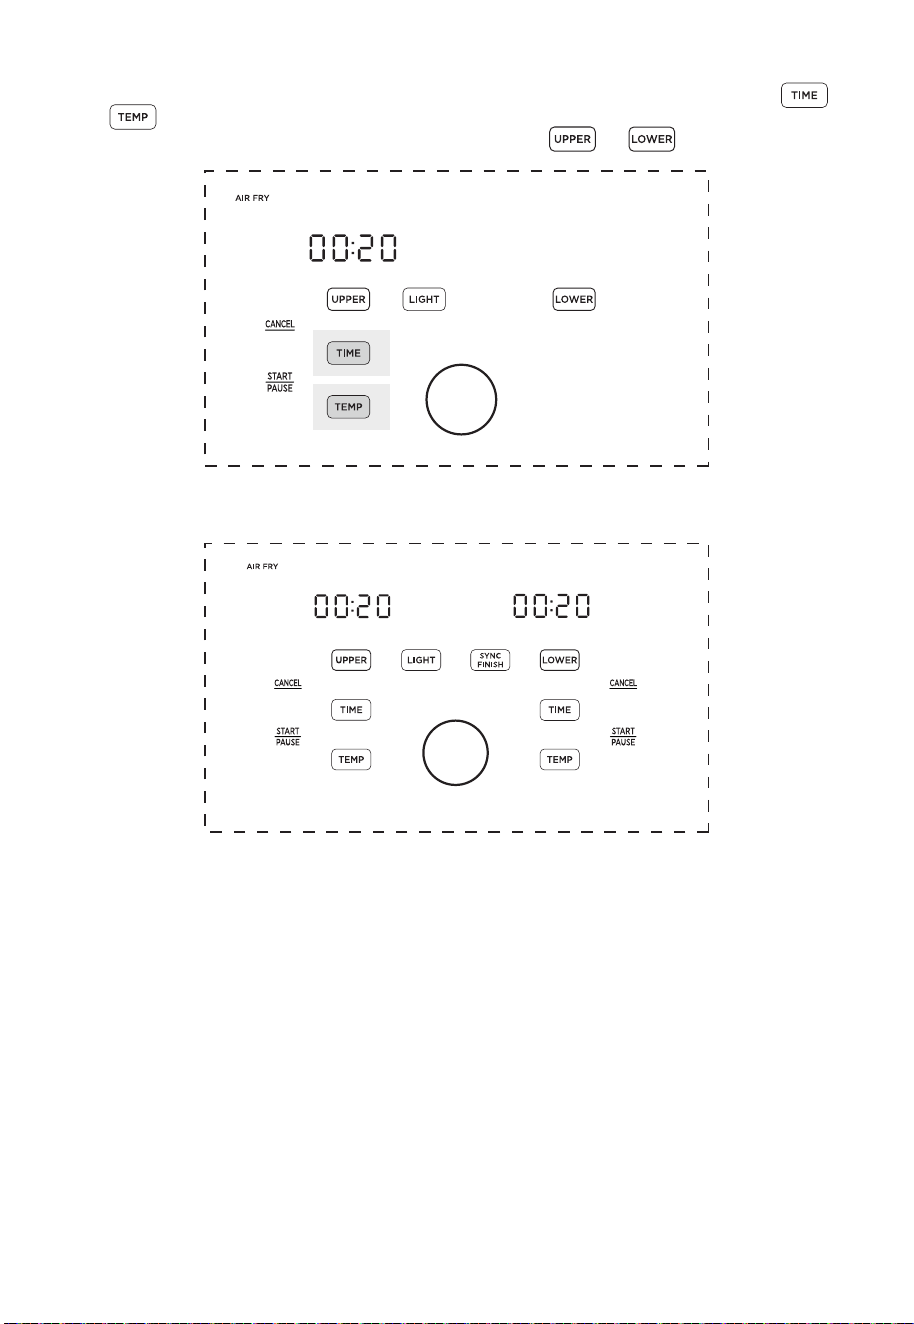
OPERATING INSTRUCTIONS
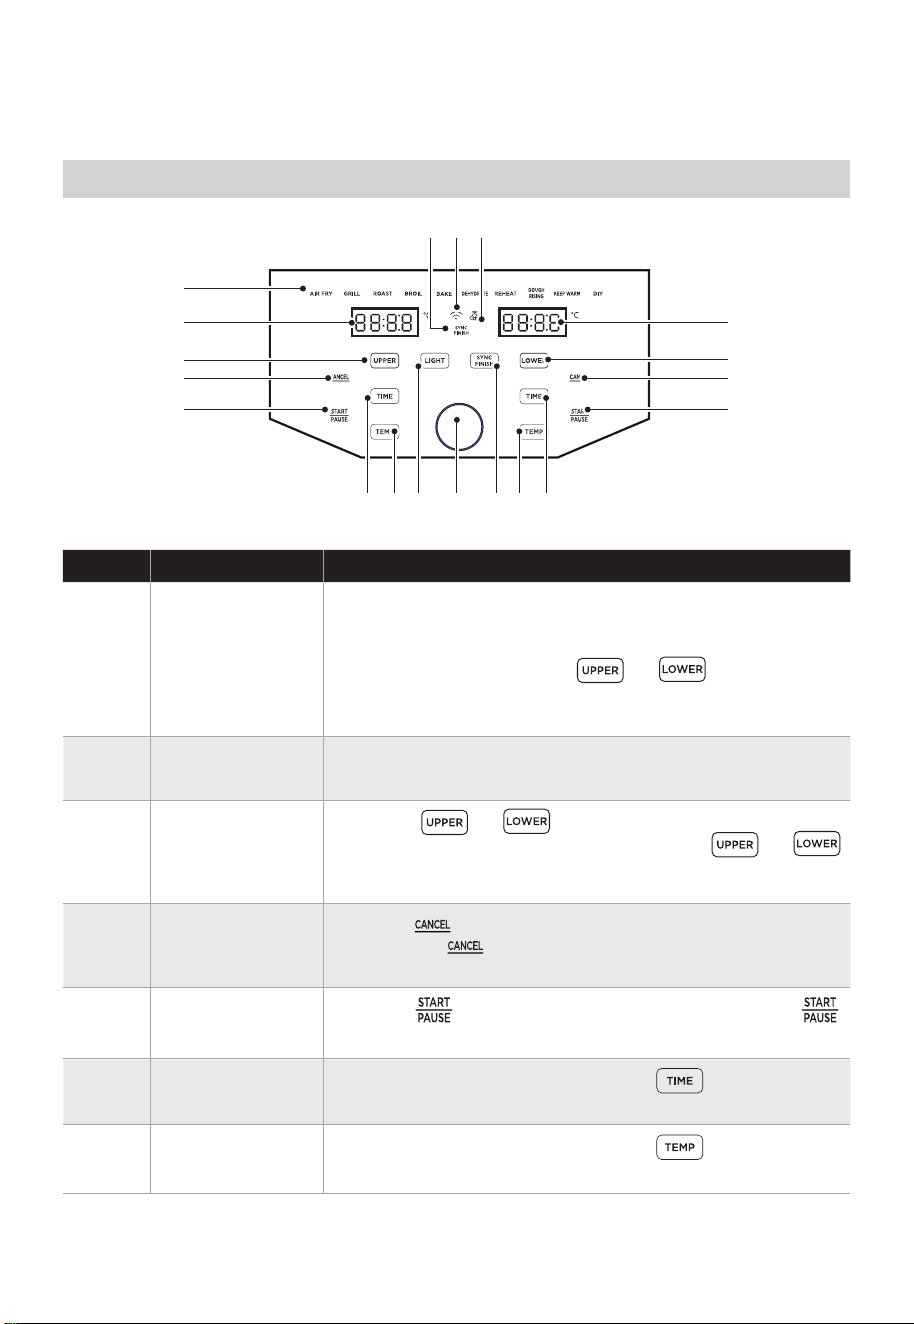
DescriptionName
• Any of the 10 functions can be used in the upper or
lower cavity to cook a large variety of meals. The
temperature and time can be adjusted for each
function. After touching or rotate the
knob to change the function and push the knob to
select the function.
• Touch or to program or adjust the
function for each cavity. While cooking, or
can be touched to show the respective function for
each cavity.
1 Functions
• The cook time, set temperature, reminder messages,
and error messages are shown here.
2
3
Display
• Touch to start cooking. While cooking, touch
to pause cooking and touch again to resume cooking.
5 Start/Pause
• After selecting a function, touch and rotate
the knob to adjust the set temperature.
7 TEMP
• After selecting a function, touch and rotate
the knob to adjust the set cook time.
6 TIME
Cancel
Control Panel
2
11 12* 13*
3
4
5
2
1
3
4
5
77 98 10 66
Cavity Selection
Button
• Touch while cooking to stop the cooking cycle
and touch while programming to return to the
standby state.
4
07
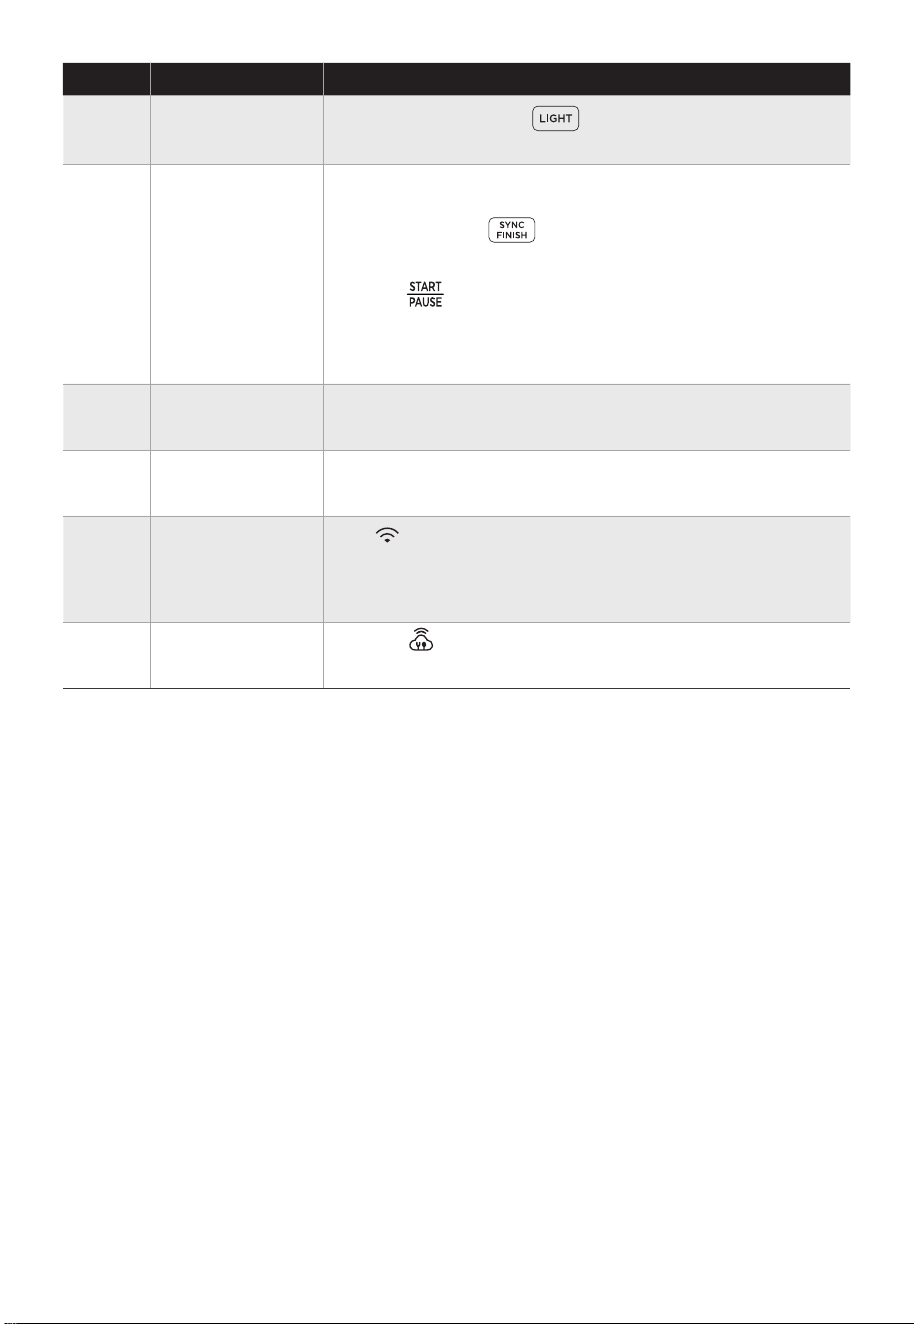
• If the is visible, cooking settings for a MSmartHome
recipe have been uploaded to the air fryer.
DescriptionName
• At any time, touch to activate or deactivate
the light in both cavities.
8 LIGHT
• Rotate the knob to adjust and push the knob to select
the cook time, set temperature, or function.
• If the sync finish indicator is visible, the sync finish
function is activated.
10 Knob
• If flashing, the air fryer is available to connect to
MSmartHome. If solid, the air fryer is connected to
MSmartHome. Long press the knob button to
reconnect to APP.
12*
• The sync finish function will make both cavities finish
cooking at the same time. After programming both
cavities, touch to activate or deactivate the
sync finish function. If the sync finish function is
activated, “SYNC FINISH” will appear and touching
either will start both cavities. The cavity with less
cook time will display “HoLd” until both cavities have
the same remaining cook time.
9
*Only applies to APP connected models.
SYNC FINISH
Button
11
SYNC FINISH
Indicator
13*
APP Recipe*
APP Connection*
08
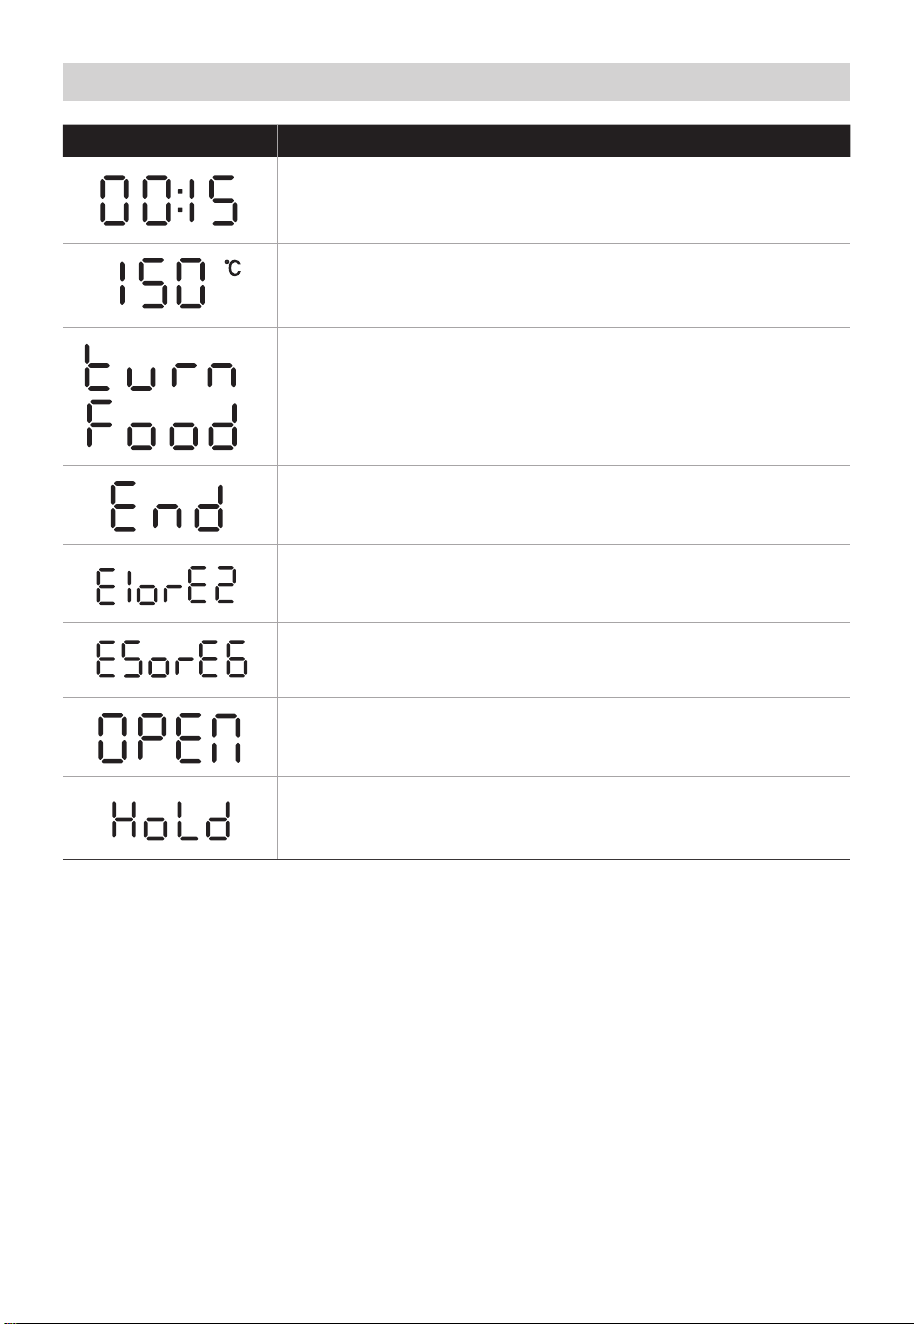
DescriptionMessage
• While programming, the display will show the set cook time.
While cooking, the display will show the remaining cook
time.
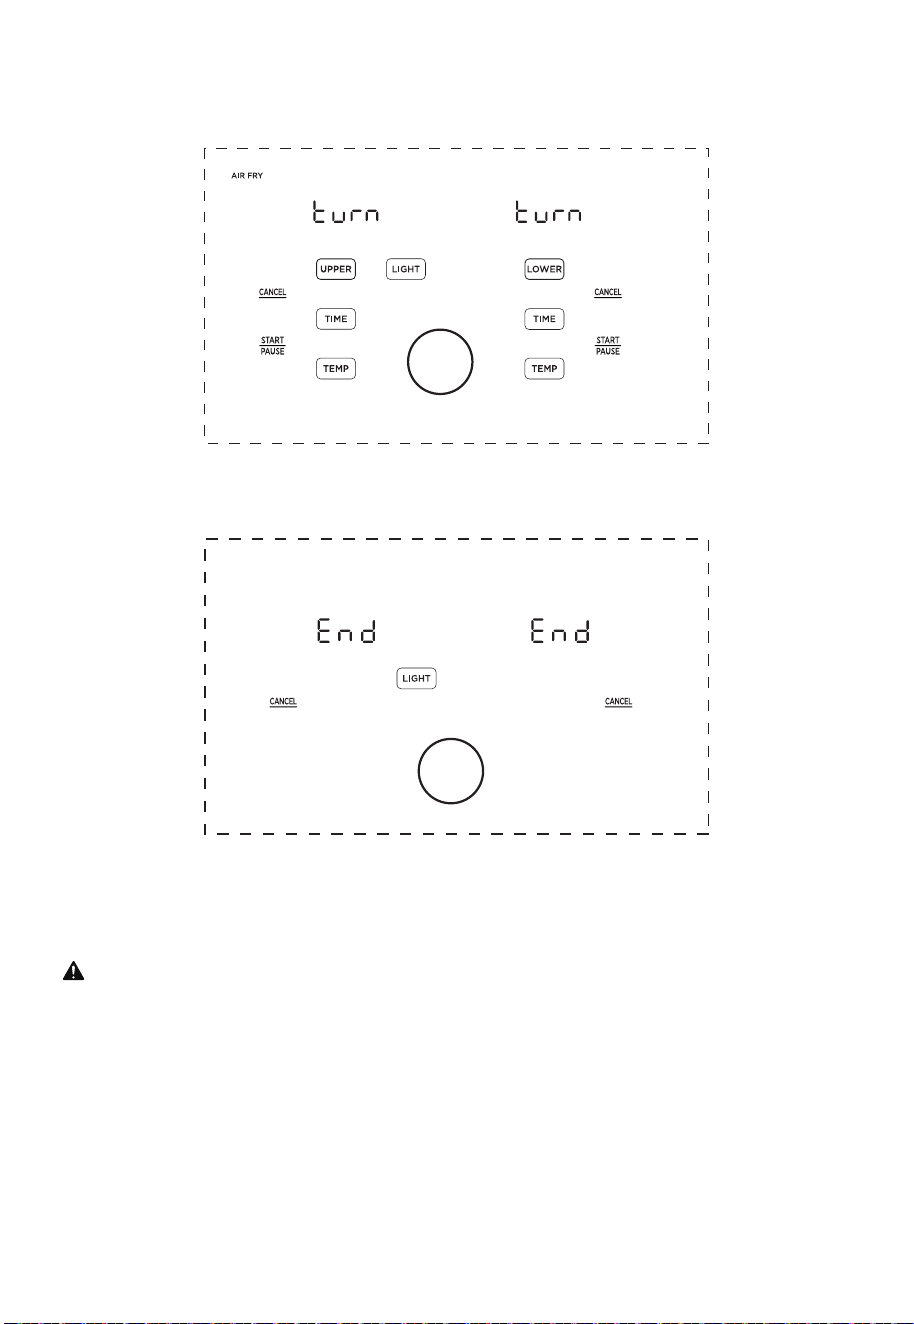
• Some recipes will display the "turn Food" reminder when the
food is ready to be turned, flipped, or shook.
• Cooking is complete and the upper basket or lower tray can
be removed.
• The upper cavity is not operating properly. Please contact
our Customer Service Center.
• The upper basket was removed, or the lower door is open.
Note: No buttons for that cavity can be used while open.
• While the sync finish function is activated, the cavity with
less cook time will show “HoLd” until both cavities have the
same remaining cook time.
• The display shows the set temperature.
Display Messages
• The lower cavity is not operating properly. Please contact
our Service service Center.
09

Upper Cavity Cooking (Basket)
1.
Place the crisper plate into the basket (crisper plate handle up) and evenly place food
onto the crisper plate.
2.
Insert the basket into the upper cavity.
3.
Plug the air fryer into an appropriate power outlet and the air fryer will now be in
standby mode.
5.
Rotate the knob to change the function and press the knob to select a function.
4.
Touch to start programming a cooking cycle for the upper cavity.
10
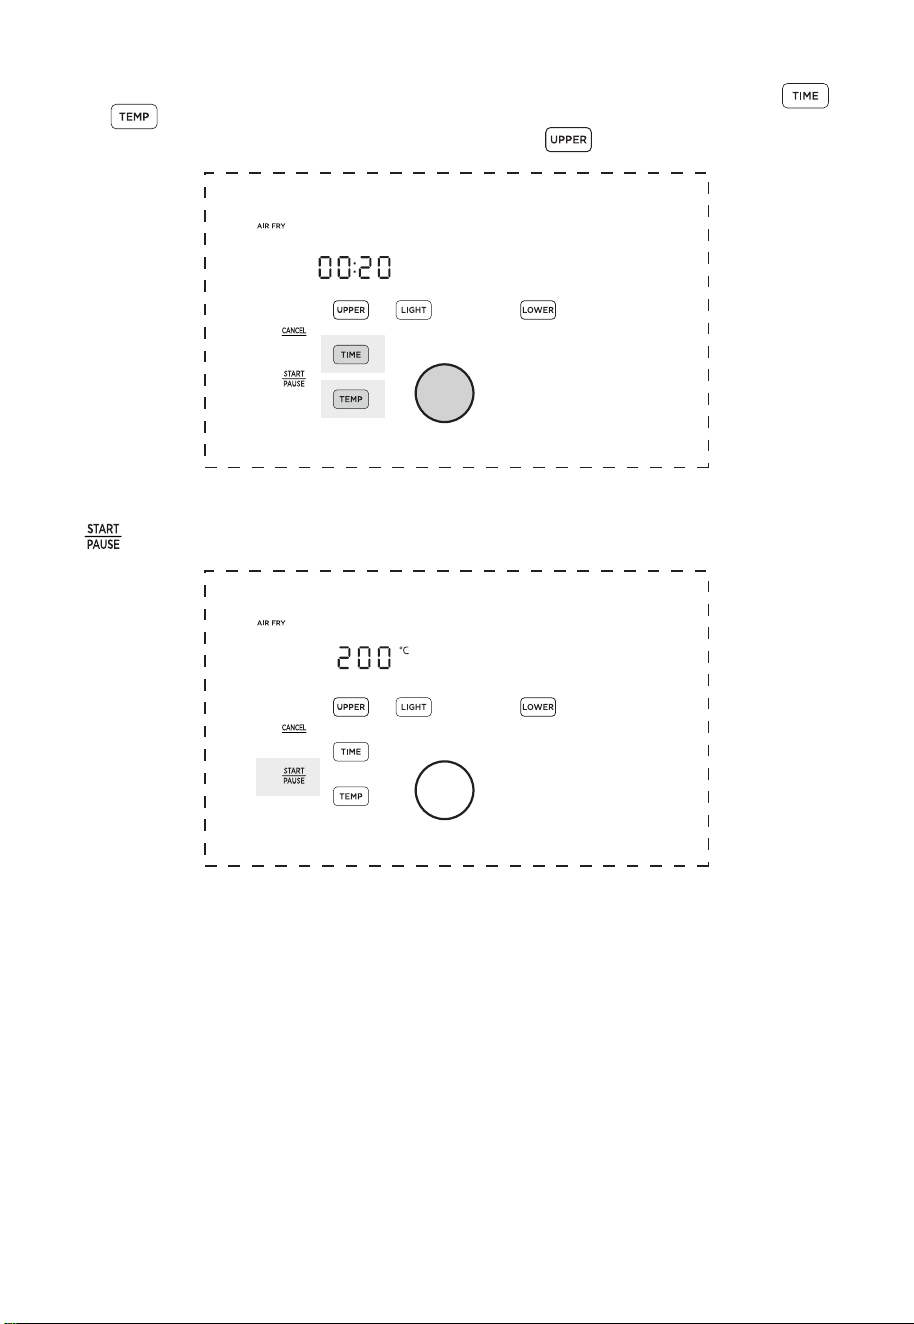
6.
The preset cook time will now be flashing. Rotate and push the knob to adjust and
select a cook time. If you want to further adjust the temperature or time, touch
or and rotate/push the knob to adjust the temperature or time.
Note: The function can still be changed by touching .
7.
Once the desired function, temperature, and time have been selected, touch the left
to start cooking.
11
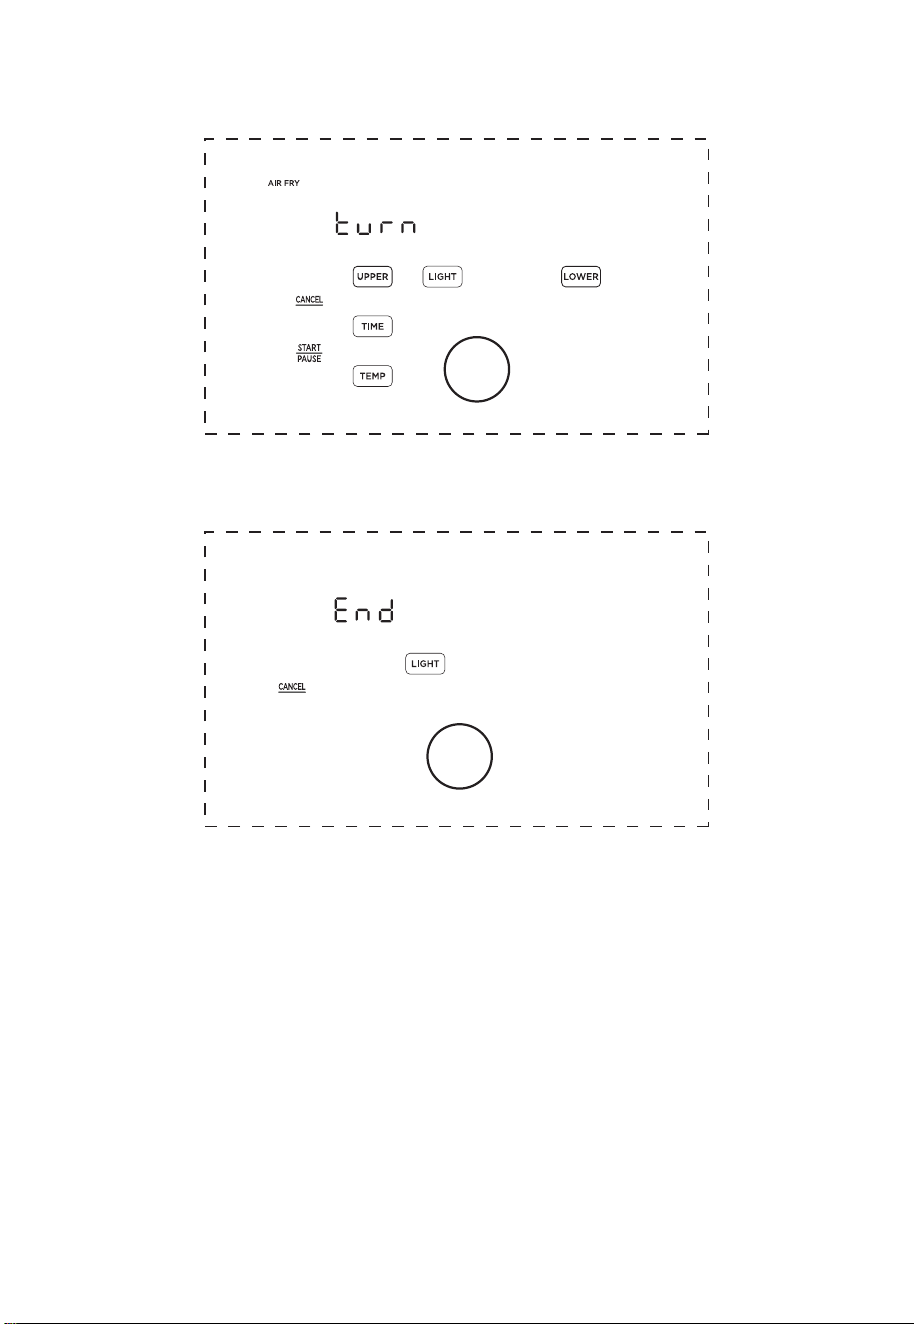
8.
Approximately half-way through cooking, the left display will show “Turn Food” If
recommended by the recipe, turn, flip, or shake the food. After 30 seconds the “Turn
Food” will go away.
9.
When cooking is complete, the left display will show “End” and there will be 3 beeps.
The food is now ready to be removed.
12
Lower Cavity Cooking (Oven)
1. Insert the drip tray into the lower cavity.
2. Evenly place food on the lower tray.
3. Insert the grill tray into the lower cavity.
4.
Plug the air fryer oven into an appropriate power outlet and the air fryer will now be in
standby mode.
5.
Touch to start programming a cooking cycle for the lower cavity.
Drip tray
Grill tray
13
14
7.
The preset cook time will now be flashing. Rotate and push the knob to adjust and
select a cook time. If you want to further adjust the temperature or time, touch
or and rotate/push the knob to adjust the temperature or time.
Note: The function can still be changed by touching .
8.
Once the desired function, temperature, and time have been selected, touch the right
to start cooking.
6.
Rotate the knob to change the function and press the knob to select a function.
15
9.
Approximately half-way through cooking, the right display will show “Turn Food”. If
recommended by the recipe, turn, flip, or shake the food. After 30 seconds the “Turn
Food” will go away.
10. When cooking is complete, the right display will show “End” and there will be 3
beeps. The food is now ready to be removed.
1 6
Two-Zone Cavity Cooking (Basket and Oven)
1.
Place the crisper plate into the basket (handle up) and evenly place food onto the
crisper plate. Then, evenly place food on the lower tray.
2.
Insert the basket into the upper cavity and tray into the lower cavity.
3.
Plug the air fryer into an appropriate power outlet and the air fryer will now be in
standby mode.
4.
Touch or to start programming a cooking cycle for the upper or lower
cavity.
5.
Rotate the knob to change the function and press the knob to select a function.
1 7
6.
The preset cook time will now be flashing. Rotate and push the knob to adjust and
select a cook time. If you want to further adjust the temperature or time, touch
or and rotate/push the knob to adjust the temperature or time.
Note: The function can still be changed by touching or .
7.
Repeat steps 4-6 for the cavity (Upper or Lower) that has not been programmed.
1 8
8.
With SYNC FINISH: After programming both cavities, touch to activate the sync
finish function. If the sync finish function is activated, “SYNC FINISH” will appear and
touching either will start both cavities. The cavity with less cook time will display
“Hold” until both cavities have the same remaining cook time.
9.
Without SYNC FINISH: After programming touch to activate or deactivate the
sync finish function. If sync finish is deactivated, the buttons must be touched
independently to start cooking in each cavity.
1 9
10.
Approximately half-way through cooking, the displays will show “Turn Food”.
If recommended by the recipe, turn, flip, or shake the food. After 30 seconds the “Turn
Food” will go away.
11.
When cooking is complete, the displays will show “End” and there will be 3 beeps. The
food is now ready to be removed.
Is something missing or damaged?
Contact the customer advisor and we will be happy to serve you.
WARNING
To avoid the risk of fire, property damage, and/ or personal injury, do not place anything
on top of the appliance, and do not block the air vents.
20
Pepperoni
Pizza
9 inch
10min165
°C
170
°C
17min 13min 18min
Brussel
Sprouts
0.9 lbs 9-12min190
°C
0.9 lbs 200
°C
Chicken
Breasts
Breaded
Chicken
1.1 lbs
37min 39min180
°C
1.1 lbs 37min 39min200
°C
1.1 lbs
21min 22min180
°C
1.1 lbs 21min 22min200
°C
Chicken
Thighs
Bagel
Asparagus
2.4 lbs
2.4 lbs
36min 42min180
°C
1.4 lbs 39min 43min200
°C
19min 23min180
°C
1.4 lbs 20min 24min200
°C
Upper Basket Setting Lower Oven Setting
Ingredient
Recommended
function
Frozen
Amount
Cooking
Temp
Time
(Single)
Time
(Dual)
Amount
Cooking
Temp
Time
(Single)
Time
(Dual)
• These cooking options give your meals all the rich and crispy flavor of deep frying with
with little to no oil.
• The default time and temps are a starting point that you can experiment with to get
the results you like best.
• The function listed for each food is a recommendation for optimal cooking. Any
function can be used in both the upper basket and lower oven cavities.
Cooking
French
Fries
1.1 lbs 16min 24min185
°C
0.6 lbs 21min 27min200
°C
Toast 4 slices 6min 10min180
°C
4
slices
6min 8min200
°C
2
pieces
13min 18min185
°C
2
pieces
15min 20min200
°C
Breaded
Fish
0.6 lbs 13min 18min185
°C
0.6 lbs 15min 20min200
°C
French
Toast
Sticks
0.3 lbs 5-9min
6-10
min
16-24
min
12-18
min
16-22
min
175
°C
0.3 lbs
6-10
min
6-10
min
195
°C
Chocolate
Chip
Cookies
0.2 lbs 8-13min
9-15
min
160
°C
0.2 lbs
9-15
min
9-16
min
175
°C
Breaded
Shrimp
0.4 lbs 9min 13min185
°C
0.4 lbs 11min 15min200
°C
Chicken
Wings
1.3 lbs 17min 21min
185
°C
0.9 lbs 19min 22min200
°C
1.3 lbs 14min 18min185
°C
0.9 lbs 17min 20min200
°C
9 inch
YesAir Fry
Air Fry
Air Fry
Air Fry
Air Fry
Dehydrate
Grill
Bagel
Roast
Air Fry
Air Fry
Toast
Air Fry
Air Fry
Air Fry
Toast
Air Fry
Bake
Bake
Yes
No
Yes
No
1 piece
120min
90
°C
1 piece 90
°C
No
1 piece 8min 11min175
°C
1 piece 8min 11min175
°C
Yes
3min 5min185
°C
4min 6min185
°C
No
0.88lbs 10min 14min180
°C
0.66lbs 12min 14min195
°C
No
Yes
Yes
Yes
Yes
Yes
Yes
No
No
No
No
Dehydrated
Apples
Beef Burgers
150min
120min
150min
2 Bagel
Halves
2 Bagel
Halves

21
• Always place food evenly on the crisper plate and grill tray for best cooking results.
• Overlapping food may result in uneven cooking performance.
• To increase crispiness, small amounts of oil can be sprayed or brushed onto the food
before cooking.
• If the air fryer has been paused for more than 10 minutes, it will return to standby mode
and clear all the existing settings.
• For most foods, turning, shaking, or flipping half-way through cooking will achieve the
best cooking results.
• Time and Temp can be adjusted at any time during cooking process.
Hints
RED Declaration of Conformity (DoC)
CAUTION
• To avoid the risk of fire, property damage and personal injury, DO NOT spray cooking
oil into the cooking cavity.
• Do not place any objects on top of air fryer at any time.
Unique identification of this DoC:
We,
Manufacturer’s name: Guangdong Midea Consumer Electric Manufacturing Co., Ltd.
Manufacturer’s Address: 19 Sanle Road, Beijiao, Shunde, 528311 Foshan, Guangdong,
PEOPLE’S REPUBLIC OF CHINA
....................................................................................................................................................
Declare under our sole responsibility that the product:
Product name: Kitchen machines (Air fryer)
Trade name: Midea
Type or model: MF-CY110A2
Relevant supplementary information:
(e.g. lot, batch or serial number, sources and numbers of items)
To which this declaration relates is in conformity with the essential requirements and
other relevant requirements of the RED Directive (2014/53/EU).
The product is in conformity with the following standards and/or other normative
documents:
HEALTH & SAFETY (Art. 3(1)(a)): EN 60335-1:2012/A15:2021, EN
60335-2-9:2003/A13:2010, EN 62233:2008, EN 62311:2008, EN IEC 62311:2020
EMC (Art. 3(1)(b)): EN IEC 55014-1:2021, EN IEC 55014-2:2021, EN 301 489-1
V2.2.3:2019, EN 301 489-17 V3.2.4:2020
SPECTRUM (Art. 3(2)): EN 300 328 V2.2.2:2019
OTHER (incl. Art. 3(3) and voluntary specs):
Other Union harmonization legislation (where applicable): N/A
Accessories: N/A
Software: N/A
Technical file held by: Guangdong Midea Consumer Electric Manufacturing Co., Ltd.
Place and date of issue (of this DoC): 19 Sanle Road, Beijiao, Shunde, 528311 Foshan,
Guangdong, PEOPLE’S REPUBLIC OF CHINA
2023-11-30
Signed by or for the manufacturer: Guangdong Midea Consumer Electric Manufactur-
ing Co., Ltd.
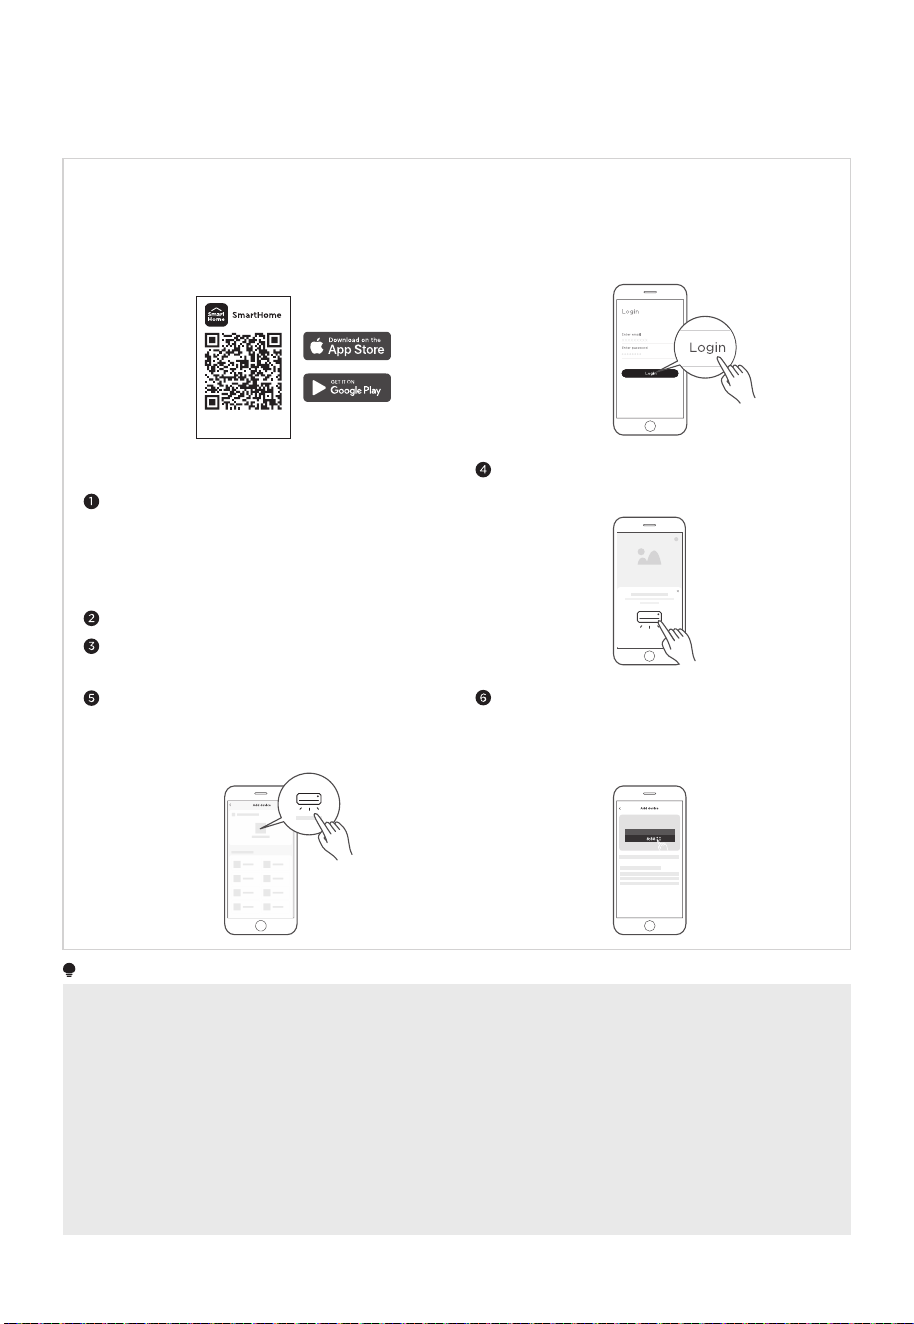
APP SETUP AND OPERATION
Register and log in
Please power on your devices.
Open SmartHome app on your phone.
Connect your devices to SmartHome
Download the SmartHome app
Please make sure your mobile phone is connected
to a wireless network. If it is not, go to Settings and
enable wireless networks and Bluetooth.
Connect your device to the wireless network
according to instructions on app. If the connection
fails, please follow the instructions provided by
the app to continue with the operation.
On an app market (Google Play Store, Apple App
Store), search for SmartHome* and find the
SmartHome app. Download and install it on your
phone. You can also download the app by scanning
the QR code below.
Open the SmartHome app, and create a new account
to start (you can also register through a third-party
account). If you already have an existing account, use
the account to log in.
If a message of “Smart devices discovered
nearby” appears, click to add.
If no message appears, select “+” on the page and
select your device in the list of nearby devices
available. If your device is not listed, please add
your device manually by the device category and
device model.
Download the app
& activate product
NOTE
• Make sure your devices are powered on.
• Keep your mobile phone close enough to your device when you are connecting your device to the network.
• Connect your mobile phone to the wireless network at home, and make sure you know the password of the
wireless network.
• Check if your wireless router supports 2.4 GHz band and turn it on. If you are not sure whether the router
supports 2.4 GHz band, please contact the router manufacturer.
• The device cannot connect to the wireless network that requires authentication, and it usually appears in public
areas such as hotels, restaurants, etc. Please connect to a wireless network that does not require authentication.
• Turn off the WLAN+ (Android) or WLAN Assistant (iOS) function of your mobile phone when connecting your
device to the network.
• In the case that your device connected to a wireless network before but it needs to reconnect, please click “+”
on the app Home page, and add your device again by the device category and model according to the
instructions on app.
22

23
CLEANING AND MAINTENANCE
• Clean the basket, crisper plate and grill tray after each use.
• Always unplug the air fryer and let it cool to room temperature before cleaning. Never
use harsh chemical detergents, scouring pads, or powders on any of the parts or
components.
• Let all surfaces dry thoroughly before use, and before storage.
Cleaning methodPart or accessory
• Clean the air fryer basket with a sponge or cloth and warm
water and dish soap. then rinse well. Ensure that all grease
and food debris are removed.
• DO NOT immerse the basket in water or any other liquid.
• DO NOT clean in the dishwasher.
Upper basket
• Clean the grill tray with a cloth or sponge and warm water
with dish soap.
• The grill tray has non-stick coating. To avoid damage to the
non-stick coating, DO NOT use metal cleaning utensils.
• DO NOT clean in the dishwasher.
• Clean the drip tray with a cloth or sponge and warm water
with dish soap.
• The drip tray has non-stick coating. To avoid damage to the
non-stick coating, DO NOT use metal cleaning utensils.
• DO NOT clean in the dishwasher.
• Clean the crisper plate with a cloth or sponge and warm
water with dish soap.
• The crisper plate has non-stick coating. To avoid damage to
the non-stick coating, DO NOT use metal cleaning utensils.
• DO NOT clean in the dishwasher.
• Clean the cooking cavity with a sponge or soft cloth and
warm water and dish soap.
• To remove baked-on grease and food residue from cooking
cavity, spray with a mixture of baking soda and vinegar and
wipe clean with a damp cloth.
• For stubborn residue, allow the mixture to sit on the affected
area for several minutes before scrubbing clean.
• Check the heating element for oil spatter and food debris.
Clean the heating element with a damp cloth as needed.
Ensure the heating element is completely dry before next use.
• DO NOT clean in the dishwasher.
• Clean the internal and external side of the windows with a
cloth or sponge and warm water with dish soap. DO NOT use
metal cleaning utensils.
• Clean with a soft and damp cloth or sponge and wipe dry.
Grill tray
Crisper plate
Drip tray
Upper basket
cavity/ Lower
oven cavity
Upper basket
window/ Lower
oven window
Exterior

24
Any other servicing must be performed by an authorized representative.
WARNING
• Without proper cleaning, food and grease splatter may build up around the heating
element. This can cause smoke, fire, and personal injury.
• If you see or smell smoke, touch Cancel, unplug the appliance, and allow it to cool.
Remove food residue or grease with a soft cloth and dishsoap.
25
TROUBLESHOOTING
Possible Reasons SolutionsProblem
No power
• Improper power cord and
outlet connection
• The unit is not operating
properly
• Check that the power cord is
firmly plugged into outlet. If this
cannot solve the problem, please
contact the Customer Service
Center.
• Contact the Customer Service
Center.
Display shows
E1 or E2
• Both the upper basket and
lower oven have not been
programmed
• To activate Sync Finish a
function must be selected for
both cavities. Then, the
button will appear. If Sync Finish
is activated the Sync Finish
indicator will be lit up. See
OPERATION INSTRUCTIONS.
Cannot
activate Sync
Finish
• Not using knob
• Sync Finish is activated
• The upper basket and lower
oven are operating at the
same time
• Food not placed in an even
layer
• After touching or the
knob can be rotated to change
the function and pushed to
select a function. The actual
functions cannot be touched for
selection. See OPERATION
INSTRUCTIONS.
• While Sync Finish is activated,
either button will start,
pause, and resume both cavities
to ensure that both cavities
finish at the same time. If you
wish to control each cavity
independently, do not use Sync
Finish.
• Overall, the Two-Zone Air Fryer
Oven is faster than cooking two
consecutive batches in the same
air fryer.
However, if the upper basket
and lower oven are operating
simultaneously, cook times will
need to be increased. See
COOKING.
• For best cooking performance,
place food in an even layer with
no overlapping. See COOKING.
Cannot select
function
Cannot pause
single cavity
Food
undercooked
Operation of your appliance can lead to errors and malfunctions. The following tables
contain possible causes and notes for resolving an error message or malfunction. It is
recommended to read the tables carefully below in order to save your time and money
that may cost for calling to the service center.

26
Possible Reasons SolutionsProblem
• Food improperly prepped
• Crisper plate not used in
upper basket
• Grill tray placed in wrong
slot
• Incorrect cook time or
temperature
• For the best air frying perfor-
mance, always use the crisper
plate in the upper basket. The
crisper plate allows air to flow
underneath food and produces
the best cooking results.
• For optimal crispiness, spray or
brush small amounts of oil onto
food before air frying. See
COOKING.
• The lower oven is a unique
design. Traditional cook times
and temperatures may need to
be adjusted for the lower oven.
See COOKING.
• Clean the interior and exterior
of windows after each use. See
CLEANING AND MAINTE-
NANCE.
• Do not pile food too high or the
food will contact the top of the
upper cavity. This can result in
difficulty inserting and removing
the upper basket and may cause
food to burn.
• Remove all debris from the
basket exterior and within the
upper cavity. See CLEANING
AND MAINTENANCE.
• The grill tray can be placed into
an upper or lower slot within the
lower oven cavity. Ensure that
the grill tray is placed in the
proper slot before cooking. See
COOKING.
• Improper window cleaning
• Too much food within basket
• Debris on basket exterior or
within upper cavity
• Light not activated
Difficult to see
through
windows
Difficult to
remove or
insert upper
basket
Food not
crispy
Lower oven
improperly
cooking
• Before looking through a
window, be sure to activate the
lights by touching .

27
logo, word marks, trade name, trade dress and all versions there of are
trademarks, copyrights and other intellectual property rights, and all goodwill derived
valuable assets of Midea Group and/or its affiliates (“Midea”), to which Midea owns
from using any part of an Midea trademark. Use of Midea trademark for commercial
purposes without the prior written consent of Midea may constitute trademark
infringement or unfair competition in violation of relevant laws.
This manual is created by Midea and Midea reserves all copyrights thereof. No entity or
individual may use, duplicate, modify, distribute in whole or in part this manual, or
bundle or sell with other products without the prior written consent of Midea.
All the described functions and instructions were up to date at the time of printing this
manual. However, the actual product may vary due to improved functions and designs.
TRADEMARKS, COPYRIGHTS
AND LEGAL STATEMENT
28
device must be returned to official collection point for
DISPOSAL AND RECYCLING
Important Instructions for Environment
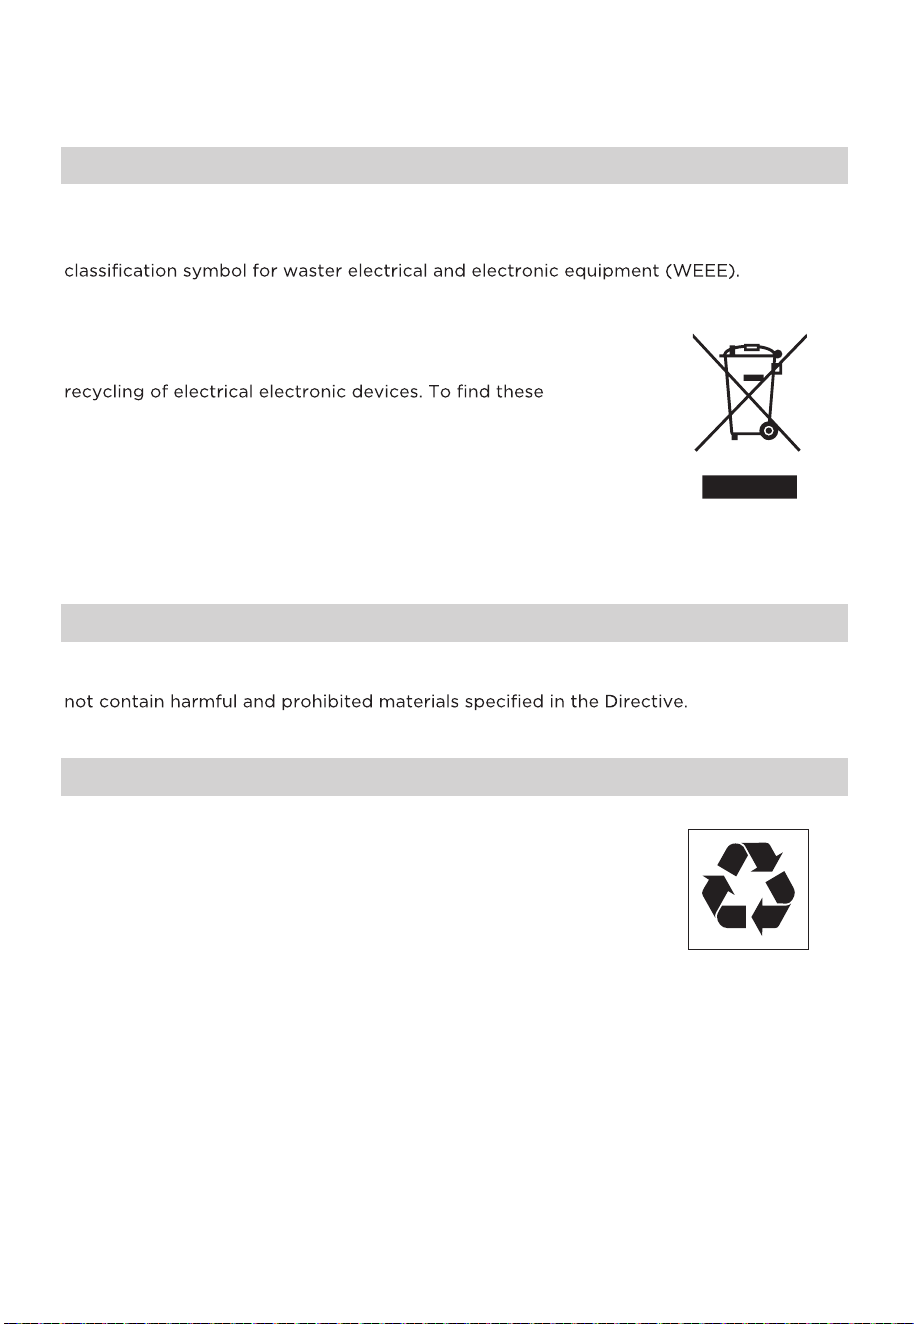
Compliance with the WEEE Directive and Disposing of the Waster Product:
This product complies with EU WEEE Directive (2012/19/EU). This product bears a
This symbol indicates that this product shall not be disposed
with other household wastes at the end of its service life. Used
collection systems please contact to your local authorities or
retailer where the product was purchased. Each household
performs important role in recovering and recycling of old
appliance. Appropriate disposal of used appliance helps
prevent potential negative consequences for the environment
and human health.
Compliance with RoHS Directive
The product you have purchased complies with EU RoHS Directive (2011/65/EU). It does
Package Information
Packaging materials of the product are manufactured from
recyclable materials in accordance with our National Environ-
ment Regulations. Do not dispose of the packaging materials
together with the domestic or other wastes. Take them to the
packaging material collection points designated by the local
authorities.

29
DATA PROTECTION NOTICE
For the provision of the services agreed with the customer,
we agree to comply without restriction with all stipulations of applicable data protection
law, in line with agreed countries within which services to the customer will be delivered,
as well as, where applicable, the EU General Data Protection Regulation (GDPR).
product safety reasons, to safeguard your rights in connection with warranty and
product registration questions. In some cases, but only if appropriate data protection is
ensured, personal data might be transferred to recipients located outside of the
European Economic Area.
Further information are provided on request. You can contact our Data Protection
Officer via [email protected]. To exercise your rights such as right to object your
personal date being processed for direct marketing purposes, please contact us via
9
30
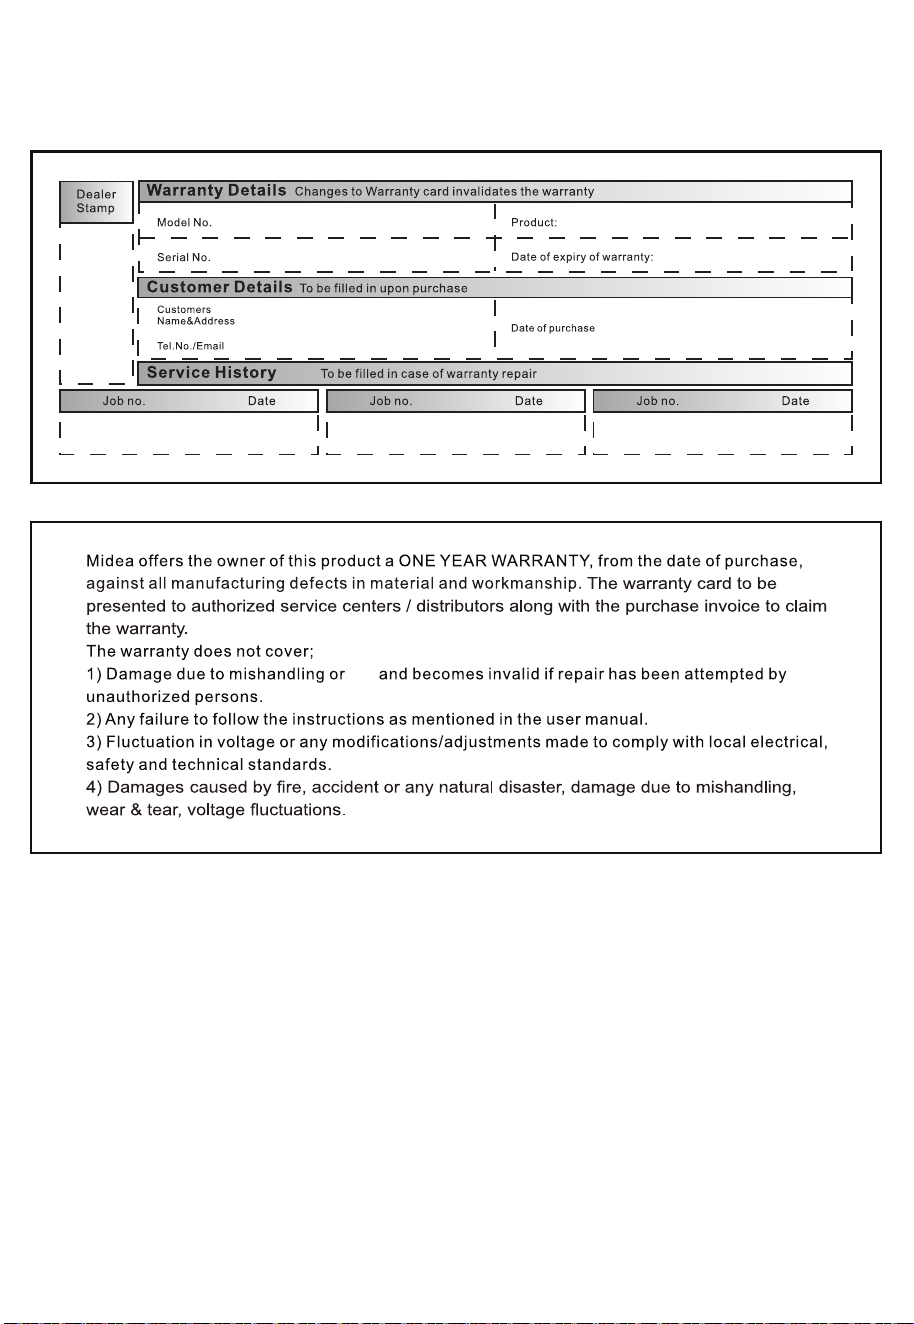
WARRANTY / SERVICE
fire

2022
