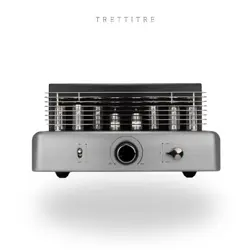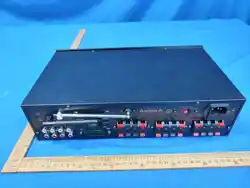
Carina X
Carina 150X
Carina GaN
1
safety If the provided plug does not fit into your outlet, consult an electrician for
replacement of the obsolete outlet.
.
WARNING: To reduce the risk of fire or electric shock, do not expose this apparatus
2
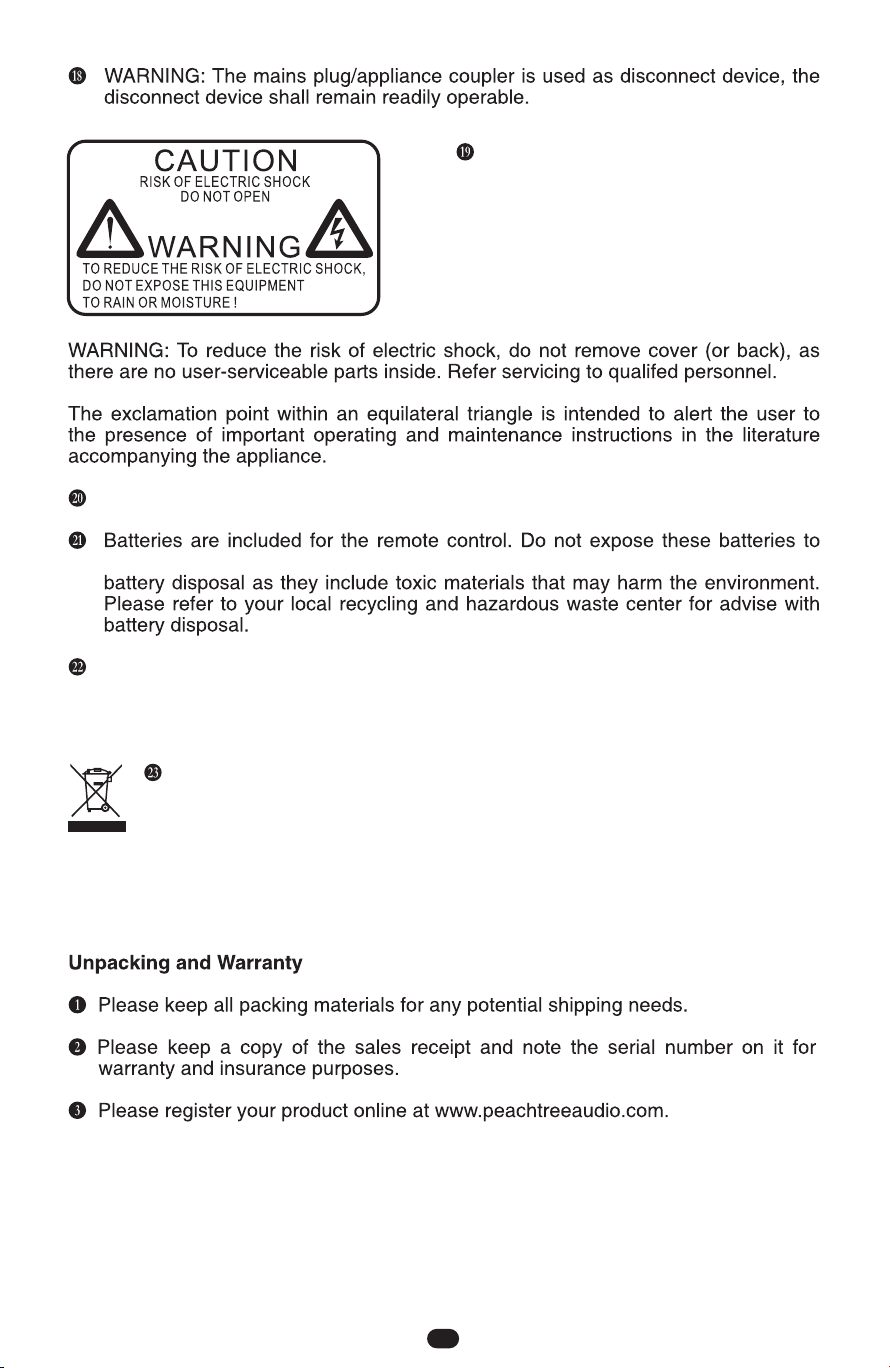
The lightning flash with arrowhead
symbol within an equilateral triangle
is intended to alert the user to
presence of on-insulated hazard
voltage within the product’s
enclosure that may be of sufficient
magnitude to constitute a risk of
electric shock.
No naked flame sources, such as lighted candles, should be placed on the apparatus.
direct sunlight or excessive heat such as a fire. Care should be taken in the act of
WARNING: The terminals marked with symbol of “+/-” may be of sufficient
magnitude to constitute a risk of electric shock. The external wiring
connected to the terminals requires installation by an instructed person or
the use of the ready-made insulated leads of cords.
Correct disposal of this product. This marking indicates that this product
should not be disposed with other household wastes throughout the EU.
To prevent possible harm to the environment or human health from
uncontrolled waste disposal, recycle it responsibly to promote the
sustainable reuse of material resources. To return your used device,
please use the return and collection systems or contact the retailers where
the product was purchased. The can take this product for environmentally
safe recycling.

3
This device complies with part 15 of the FCC Rules. Operation is subject to
the following two conditions: (1) this device may not cause harmful
interference, and (2) this device must accept any interference received,
including interference that may cause undesired operation.
Any changes or modifications not expressly approved by the party responsible
for compliance could void the user's authority to operate the equipment.
NOTE: This equipment has been tested and found to comply with the limits
for a Class B digital device, pursuant to Part 15 of the FCC Rules. These limits
are designed to provide reasonable protection against harmful interference in a
residential installation. This equipment generates, uses and can radiate radio
frequency energy and, if not installed and used in accordance with the
instructions, may cause harmful interference to radio communications.
However, there is no guarantee that interference will not occur in a particular
installation.
If this equipment does cause harmful interference to radio or television
reception,which can be determined by turning the equipment off and on, the
user is encouraged to try to correct the interference by one or more of the
following measures:
-- Reorient or relocate the receiving antenna.
-- Increase the separation between the equipment and receiver.
-- Connect the equipment into an outlet on a circuit different
from that to which the receiver is connected.
-- Consult the dealer or an experienced radio/TV technician for help.
To maintain compliance with FCC’s RF Exposure guidelines, This
equipment should be installed and operated with minimum distance between
20cm the radiator your body: Use only the supplied antenna.

Carina
5
7
10
11
12
16
14
Menu
Remote Control
Front Panel
Back Panel
Introduction
Specifications
Using Carina as a Power Amplifier
4
15
Warranty and Repair

Thank you for choosing Carina
Carina is an integrated amplifier platform designed to please your eyes and ears
Housed in a beautiful chassis crafted from metal and wood Carina performs several
critical functions in an audio system; digital to analog conversion volume control
phono pre amplification and power amplification for both speakers and headphones
Carina also features a dual knob user interface that provides a clean look and intuitive
control The front panel OLED display is large and bright and provides useful information
at a glance including; the current input the format of the incoming audio and the current
volume level A wireless remote control is provided for easy operation from your favorite
listening position
All Carinas include multiple digital audio inputs; USB C for a computer or mobile device
Bluetooth v5 for wireless devices two coaxial and one optical S PDIF inputs for digital
audio devices such as streamers or CD players Carina also includes a multi functional
analog input with a built in phono preamplifier custom designed for Moving Magnet MM
cartridges This input can be set to bypass the phono preamp when using an external
phono preamp turntables with built in preamps or moving coil cartridges or when using
the input as a Home Theater Bypass for integration with an AVR or preamp processor
A stereo analog audio preamp output is provided for integration with one or two
subwoofers or a separate power amplifier if desired A 12V trigger input and output allow
for power on off control to or from other devices
Internally Carina features a 32 bit architecture that is capable of handling all of the
major digital audio formats available today from compressed audio all the way up to 24
bit 768kHz PCM and DSD512 22 6MHz aka octuple rate DSD Carina utilize two
separate ESS 9068 DAC chips in mono mode One dedicated to the left channel and
the other dedicated to the right channel to maximize the signal to noise ratio dynamic
range and channel separation of the audio signal The menu provides easy access to the
available DAC filters and over sampling functions for fine tuning the sound even further
The internal architecture of Carina is differential aka balanced so external noise and
interference if present are dutifully removed from the audio signal paths
!
.
,
-- , ,
- .
-
.
,
.
.
-,
,/
.-
-()
.
(- )
"" /!
.
/.
,-
-
/(. )!
".”
-- ,
.
-.
()
,, .
Carina offers three compelling amplifier options The top of the line Carina GaN
utilizes a GaN Gallium Nitride power DAC amplifier and separate regulated power
supply to achieve exceptional transparency and sound quality It is driven directly by the
digital output of the DSP and does NOT utilize a negative feedback loop which alters the
signal driving the speakers The audible improvement is immediately apparent and
significant even to a casual listener The DAC section in Carina GaN provides the
analog signals for the headphone amplifier and preamplifier outputs only This novel
implementation of a GaN power DAC in an integrated amplifier results in sound quality
that was previously only attainable by much larger heavier and costlier solutions The
Carina X utilizes a Hypex NCORE X power amplifier with a separate power supply The
Hypex NCORE X design is simply the best example of a silicon based non GaN class
D power amplifier we have ever heard It is tremendously powerful yet remarkably
transparent and drives any speaker with ease authority and finesse The Carina 150.....
."---"
()"" ,,
.
.
,.
.
,.
.
(- ) -
.
,.
5
To be continued

.
(~
).
utilizes the critically acclaimed Hypex NCORE power amplifiers with integrated power
supplies to achieve impressive sound quality and performance at a lower cost The
Carina 150 is a great option if your speakers have relatively high sensitivity 88dB or
above or you have a smaller room
All Carinas are capable of driving speakers with a nominal impedance between 2 5 to
16 and have ample power reserves to drive the vast majority of speakers available
today to their full potential while delivering deep tight bass and transparent open and
natural sounding midrange and high frequencies that do NOT induce listener fatigue
over time All of the power amplifier options in Carina represents a major step forward in
sound quality from the past and compare favorably with amplifiers costing many times
more Combined with an audiophile quality DAC volume control and phono preamplifier
Carina has more in common with premium quality separates than it does with the
majority of integrated amplifiers available today
Carina also features a high quality fully balanced headphone amplifier that provides an
exceptional listening experience with headphones It has an extremely low noise floor so
music is reproduced cleanly and clearly The headphone amplifier includes a traditional
1 4 unbalanced output and a 4 4mm T RRRS pentaconn balanced output for
headphones that support it Balanced is the preferred connection method if the option is
available to you The headphone amplifier is a high performance internal component
that compares favorably with stand alone devices
Please continue reading the manual and visit www peachtreeaudio com to register your
unit to extend your warranty at no extra charge Your information will NOT be shared or
sold We sincerely hope that Carina brings you many years of listening enjoyment
Thank you again for choosing Carina
The Peachtree Audio Team
.Ω
Ω
,,
.
.,
-
.
-,-
.
.
/" . //// " "
.
.-
-.
..
!
. .
!
-
6
Continued
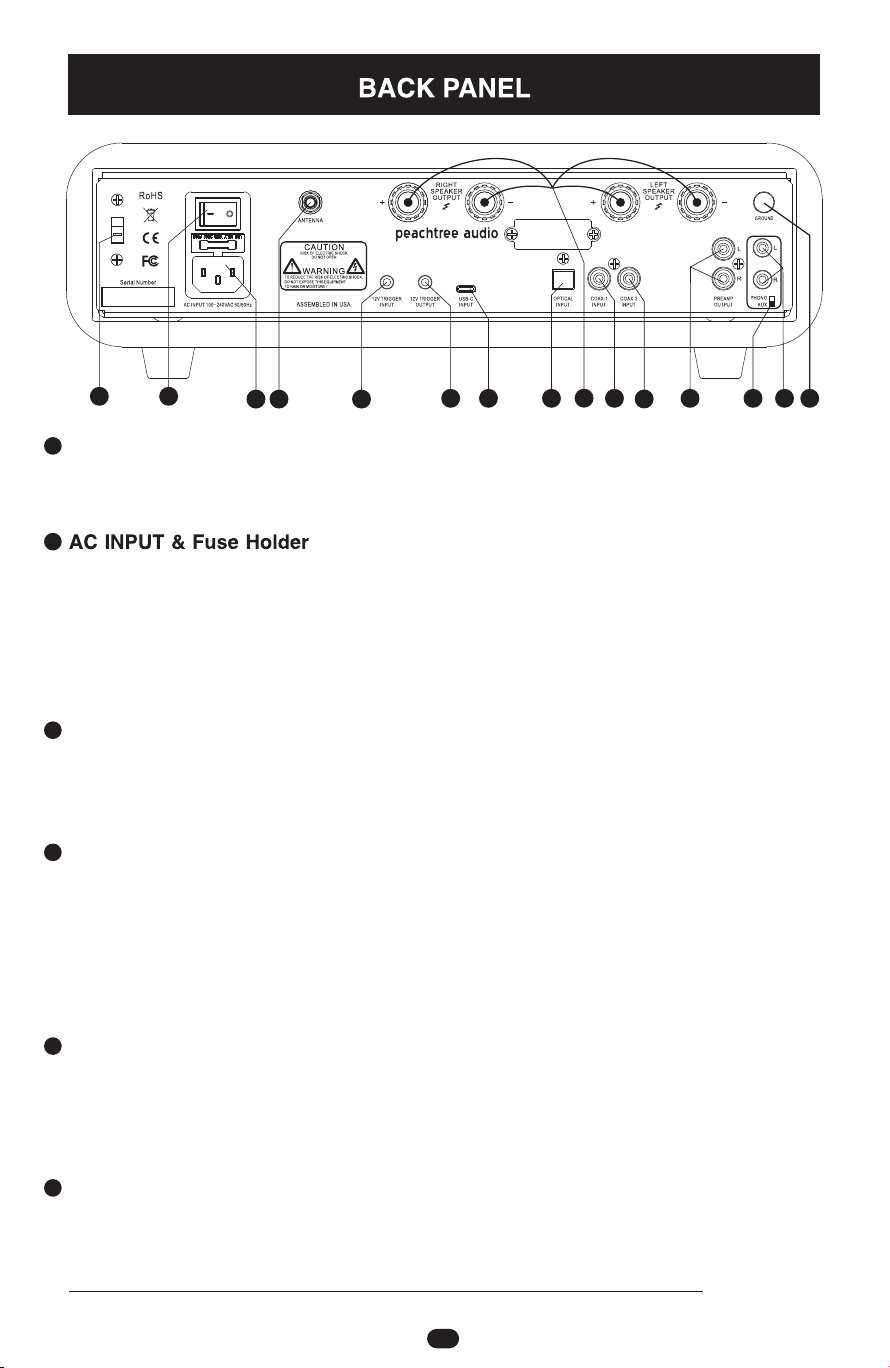
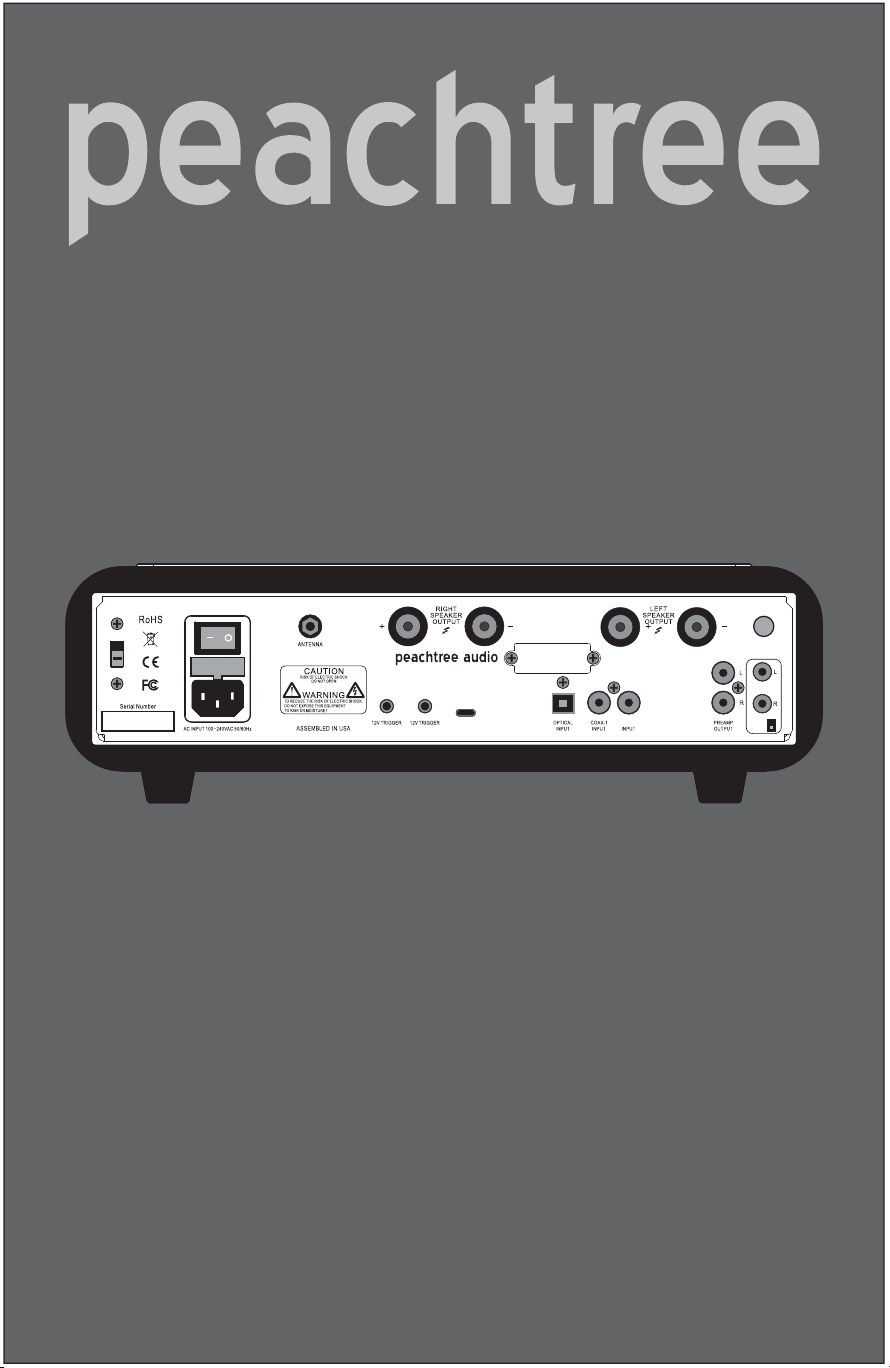
ANTENNA Connector
3
2
1
5
Provides an external antenna connection to maximize the reception range from
Bluetooth enabled devices. Attached the supplied antenna and position the
antenna for best performance. Try different angles for longer range, if desired.
Enables power on/off control from another product with a 12V trigger output.
Insert one end of a 3.5mm cable into this input and connect the other end to a
12V trigger output of the product that will control it. Once connected, The unit
should power on and off along with the product controlling it. The input trigger
can be configured in the to power on the unit select specific
input(s).
MENU AND
Enables power on/off control to another product with a 12V trigger input.
Insert one end of a 3.5mm cable into this output and connect the other end to a
12V trigger input of the product that will be controlled by it. Once connected,
the unit can power on and off the product controlled by it.
For connection to a 100-240 VAC 50/60 Hz AC outlet using the included power
cord. The fuse should only be replaced after turning the switch and
removing the power cord from the See the
section for the specific fuse values required. Caution: using an improper fuse
value may cause damage to the unit. Peachtree Audio does accept
responsibility for any damage caused by the use of an improper fuse value.
POWER OFF
AC INPUT SPECIFICATIONS
NOT
.
4
12V TRIGGER INPUT
12V TRIGGER OUTPUT
Connects and disconnects AC power to the unit when the power cord is
connected between the and a 100-240VAC 50/60Hz AC outlet.AC INPUT
7
POWER ON/OFF Switch
1
2
34
56
8
9
10
11
12 13 14
7
15
110V
6
Accepts digital audio input up to 32-bit/762KHz PCM & octuple DSD (aka
DSD512). Windows users note: to enable ASIO, WASAPI, or DSD playback,
along with “exclusive mode”, Please visit:
and download
the latest version.
http://www.peachtreeaudio.com/pages/usb-drivers-and-firmware
USB-C INPUT

8
7
8
9
12
10
PHONO utilizes the internal Moving Magnet (MM) phono preamplifer. AUX
bypasses the internal MM phono preamp for use with an external phono preamp
(required for a Moving Coil cartridge) or to use the input for Home Theater
Bypass or other "line-level" analog input types. See the Home Theater Bypass
section for more details on how to setup and use this feature.
11
Provides a variable analog audio output to connect to a powered subwoofer or an
external power amplifier. Note: the remain
active when the is used and both sets of outputs are
automatically muted when the mute function is engaged or when headphones
are connected via the front panel.
RIGHT & LEFT SPEAKER OUTPUTS
PREAMP OUTPUT
PREAMP OUTPUT
13
ANALOG AUDIO INPUT
COAX-2 INPUT
COAX-1 INPUT
Accepts S/PDIF digital audio input from a coaxial (RCA style) output up to
24-bit/192kHz PCM. For best results, please use a 75 Ohm cable with RCA style
ends designed for carrying digital audio or video signals. A regular audio cable
(typically 50 Ohm) will work but it is not ideal for this type of connection.
Accepts S/PDIF digital audio input from a coaxial (RCA style) output up to
24-bit/192kHz PCM. For best results, please use a 75 Ohm cable with RCA style
ends designed for carrying digital audio or video signals. A regular audio cable
(typically 50 Ohm) will work but it is not ideal for this type of connection.
OPTICAL INPUT
Accepts S/PDIF digital audio input from an optical (Toslink style) output up to
24-bit/192kHz PCM.
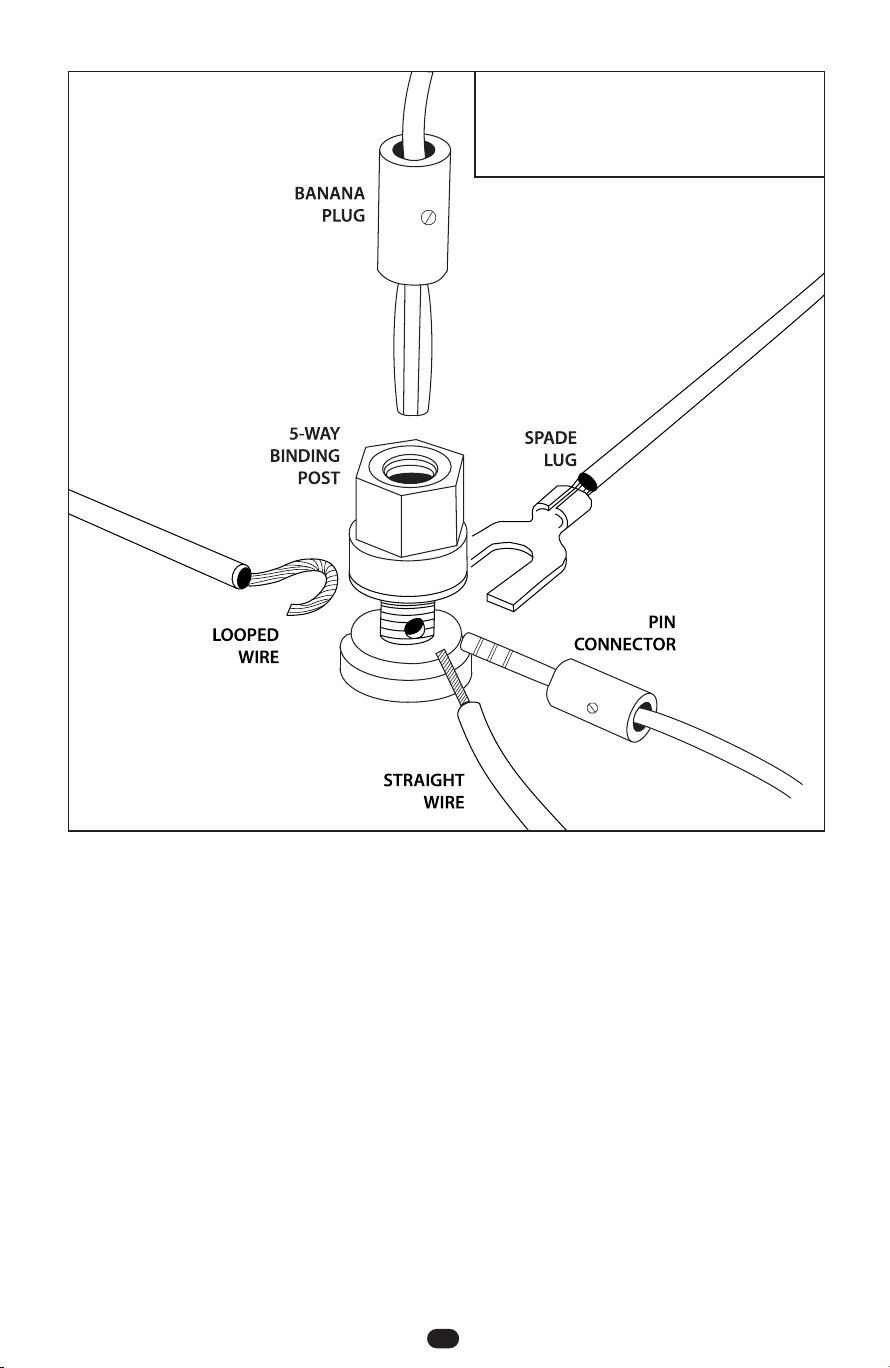
Speaker wire binding post outputs that accept banana connectors (insert into
hole on the back of the post), spade connectors (loosen, position spade around
post, tighten), pin connectors (loosen, insert pin through hole on post,
tighten) or bare wire connections (loosen, loop around post or insert through
the hole on the post, tighten). See the diagram on the following page for more
details.
RIGHT & LEFT SPEAKER OUTPUTS
SELECTOR SWITCH
Accepts analog audio input from a turntable equipped with a Moving Magnet
(MM) cartridge or other "line-level" analog audio sources. See the Home Theater
Bypass section for more details on how to setup and use this feature.
14
GROUND
Ground connection for a connected phonograph/turntable or REL brand
subwoofer.
15
AC VOLTAGE SWITCH (Carina X only)
Switches between low voltage 110 and high voltage 220 AC power supply systems
This is set by the factory for the intended location of use The value of the installed fuse is
also matched to this setting If the unit will be used at a different location that requires a
voltage switch please contact service peachtreeaudio.com for detailed instructions
before proceeding
() () .
.
.
,@
.
9
Diagram of a speaker binding post
and how the most common types
of speaker cable terminations can
be connected.
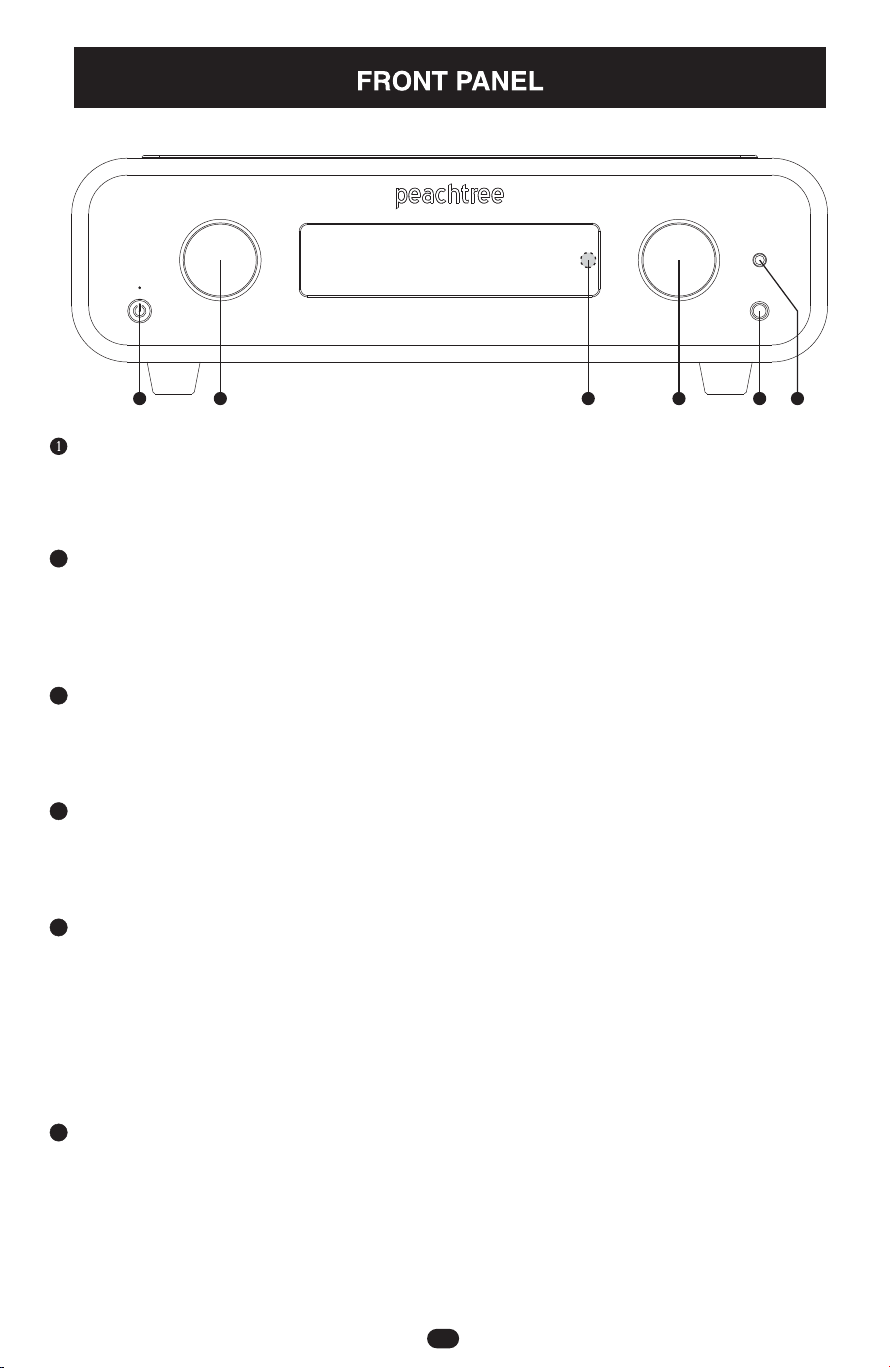
1 2 456
3
2
4
6
5
3
Left Knob
Right Knob
IR Receiver (concealed behind the front panel display window)
1/4" Unbalanced Headphone Output Connection
4.4mm Balanced T/R/R/R/S (aka Pentaconn) Headphone Output Connection
Rotate in either direction to select the desired input. Push and hold for ~3
seconds to enter the . Rotate to move the option selection arrow up or
down. Rotate the to change the setting of the currently selected
option. To exit the , press and hold this knob for ~3 seconds.
MENU
Right knob
MENU
Rotate clockwise or counter-clockwise to increase or decrease the volume/
output level. Push and release to mute and unmute the output. When in the
, rotate to change the setting of the currently selected option.MENU
For receiving Infra-Red (IR) commands from the included hand-held remote
control or third-party remote control system by attaching an IR transmitter on
the display in front of the IR Receiver.
Inserting a headphone connection automatically mutes the
and . Removing a headphone connection
automatically un-mutes the and
Caution please lower the output level when inserting or removing
headphone connections as headphone sensitivity varies widely and a
comfortable speaker listening level may result in a significantly louder output
level when switching to headphones.
RIGHT & LEFT
SPEAKER L & R PREAMP OUTPUTS
RIGHT & LEFT SPEAKER L & R PREAMP
OUTPUTS. :
Inserting a headphone connection automatically mutes the
and . Removing a headphone connection
automatically un-mutes the and
Caution: please lower the volume / output level when inserting or
removing headphone connections as headphone sensitivity varies widely and a
comfortable speaker listening level may result in a significantly louder output
level when switching to headphones.
RIGHT & LEFT
SPEAKERS L & R PREAMP OUTPUTS
RIGHT & LEFT SPEAKERS L & R PREAMP
OUTPUTS.
Toggles the unit between on mode (green LED) and standby mode (red LED).
Note: AC power cord must be connected and rear panel switch set to
for this button to function.
POWER
ON
10
On/Standby Button
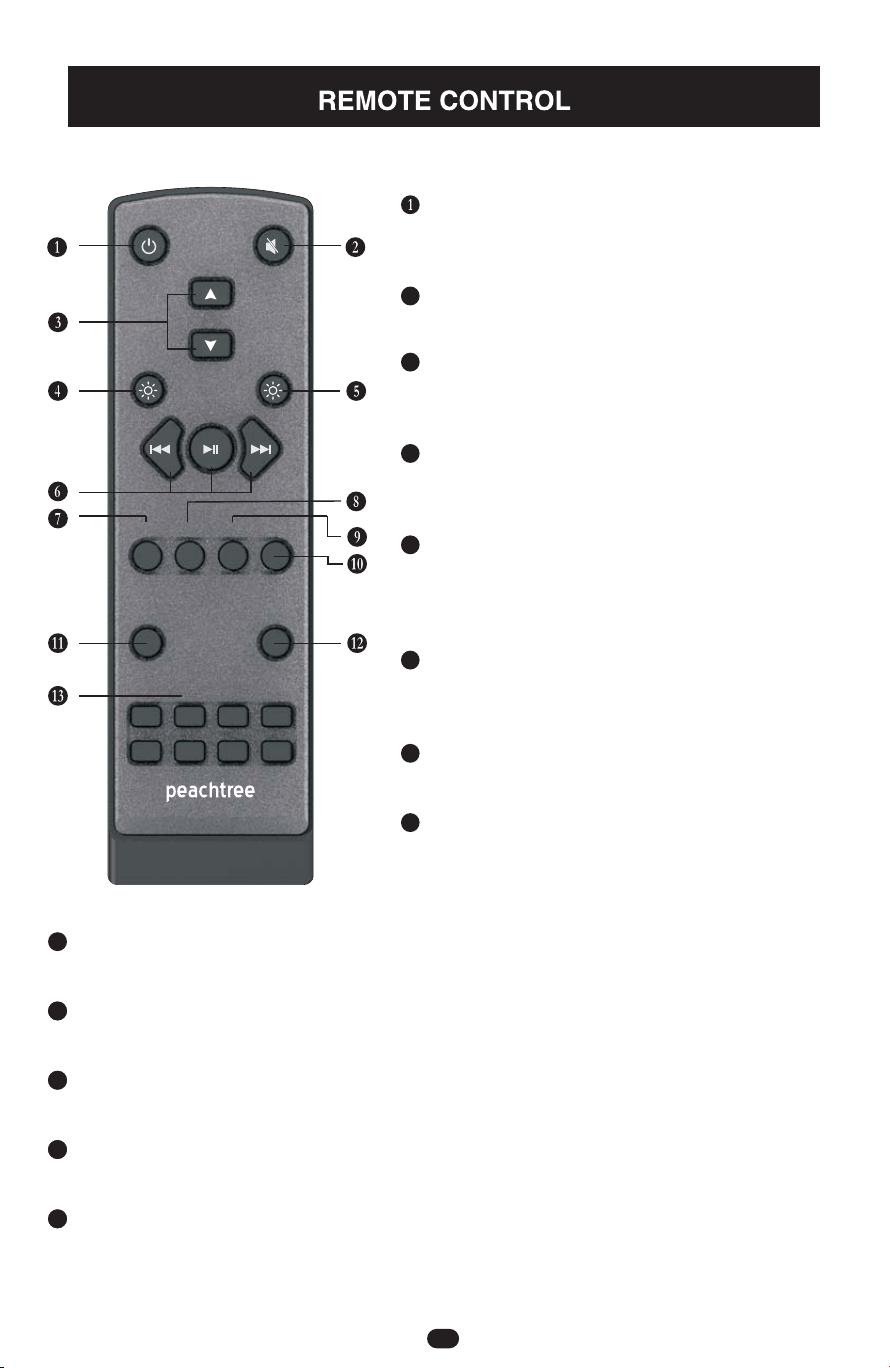
On/Standby Button
Mute Button
Toggles the mute function on and off.
3
4
5
6
7
2
Volume Up & Down Buttons
Display Brightness Button
Bluesound Display Brightness Button
Bluesound Transport Control Buttons
USB Button
Increase and decrease the volume
/ output level.
Toggles the unit between on mode and
standby mode.
Steps the brightness of the front panel
display through the available settings.
Steps the brightness of the LEDs on compatible
Bluesound products through the available
settings.
Controls play pause forward and back
functions on compatible Bluesound products
,,
.
Selects the USB-C INPUT.
8
COAX1 Button
Selects the COAX-1 INPUT.
9
10
11
12
13
COAX2 Button
OPT Button
ANLG Button
BT Button
Bluesound Presets 1-8
Selects the COAX-2 INPUT.
Selects the OPTICAL INPUT.
Selects the ANALOG INPUT.
Selects the Bluetooth INPUT.
Selects preset on compatible Bluesound products Search How to Create a Preset in
BluOS online for detailed instructions on how to set these up This feature is incredibly
useful for those that use a BluOS streamer
."
".
!
11
VOL
COAX2USB COAX1 OPT
NODEDISPLAY
ANLG
BT
PRESETS
24
1
3
68
5
7

MENU
1
2
3
4
PCM filter
NOS MODE
VOLUME
BT INPUT
ALWAYS
powers up internal Bluetooth radio only when the unit is on and the
Bluetooth input is selected. keeps the internal Bluetooth radio
powered up regardless of input selection.
L-FAST L FAST
H-FAST FAST
M-SLOW SLOW
is a inear phase roll-off filter. It is the most common type of
digital filter and is the most accurate and neutral acoustically.
is a Hybrid roll-off filter. The length of the pre-ringing is shorter
and more consistent than the length of the post-ringing which is more like
musical instruments.
is a Minimum phase roll-off filter. It has smooth out-of-band
attenuation characteristics, and because of its in-band attenuation
characteristics, it has a smoother overall sound.
Each filter has an objective (measurable) and subjective (audible to most) affect
on the sound. We encourage you to audition all three filters to determine the one
that sounds the best to you. Most people will experience the differences in high-
frequency reproduction where they are more readily heard. There is no "right" or
"wrong" answer here, its all about personal preference, room acoustics and the
characteristics of your speakers...
DIGITAL
HYBRID
uses a high-quality digital audio volume attenuator.
uses a high-quality analog resistor ladder in conjunction with a digital
audio attenuator to ensure optimal performance over the entire volume range.
There will be some clicking sounds from inside the unit when the relays switch as
well as some audible noise through the speakers or headphones at certain level
changes. This is normal and expected behavior for this type of volume control
and will not cause any harm.
BT POWER
12
To enter the MENU Press and hold LEFT knob IN for ~3 seconds
To change the settings Rotate the LEFT knob to move the selection arrow
(>) to the desired option Then rotate the RIGHT knob to cycle through the
available settings of the currently selected option
To exit the MENU Press and hold LEFT knob IN for ~3 seconds
:.
:
.
.
:.
ON DAC ONLY
ALL
Roon
OFF DAC
ANY BELOW
.
.
.,
, .
.
bypasses the oversampling feature in the s This mode is
recommend if of your incoming digital audio is set to a sample rate of
176 4kHz or higher otherwise the high frequency output may be
significantly reduced Most computers and audio applications such as
offer the ability to set the sampling rate of the digital audio output
maintains the oversampling feature in the s and is recommended
when incoming digital audio has a sample rate 176.4kHz

7
8
9
TRIGGER SEL
SET [INPUT] VOL
[INPUT] NAME ANLG, COAX-1, COAX-2, OPT
INPUT & LAST
The 12V INPUT TRIGGER can be set to select one of the specific INPUT(S) or to
select the LAST input used when the unit was put into standby.
Sets the starting point, at power on, for the volume / output level for each
input independently. Push the right knob to select the input to affect. Rotate
the right knob to change the initial volume / output level setting for THAT input.
sets the volume to the level used when the unit was put into
standby. -20, -35, -50 sets the volume level to these specific values. sets
the unit to 0dB FS (Full Scale-zero attenuation). Please use this setting with
extreme caution!
LAST LAST
FIXED
The input can be renamed: , or , the other inputs
can be renamed: , , or . The and
inputs can be renamed.
ANALOG PHONO AUX HTB
CD SACD TV STREAM USB-C Bluetooth
NOT
13
5
DISPLAY
ALWAYS
AUTO OFF
keeps the display on whenever the unit is on.
turns the display off after several seconds.
6
BRIGHTNESS
Sets the brightness of the front panel display. is the brightest, .81is the dimmest
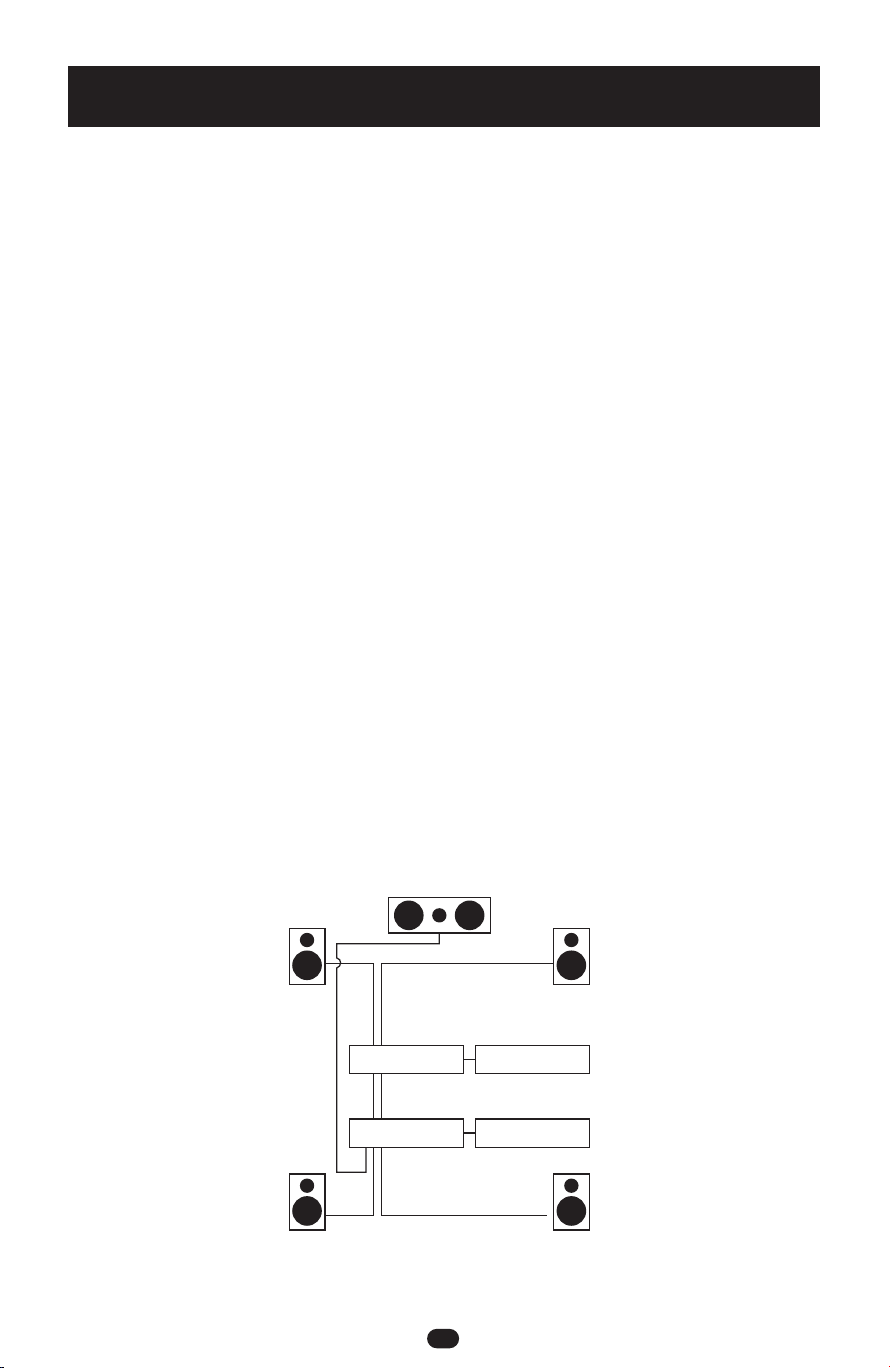
USING CARINA AS A POWER AMPLIFIER
Carina includes a “FIXED” volume input mode that is designed to send the incoming signal straight to the power
amplifier. All of the inputs have this option but it is especially useful when integrating Carina with an Audio-Video
Receiver (AVR) or Surround-Sound Processor (SSP) to create a “Home Theater Bypass.” This allows the AVR or
multi-channel amplifier to power the center and surround speakers while Carina powers the front left and right
speakers. This should provide a significant improvement to the overall sound quality when watching movies and
TV as the amplifier workload is distributed across two different amplifier power supplies and the amplifier in
Carina is likely to be of higher quality. This feature is also useful if you would like to use the volume control in an
app of a connected device to control the overall system volume for that input on Carina.
To setup Home Theater Bypass (please follow these steps in order):
the Surround-Sound Processor (SSP) or Audio-Video Receiver (AVR) and Carina
. Connect the from the SSP or AVR to the on
Carina using a standard RCA style audio cable
. On the rear panel of Carina, set the switch below the analog input to (not PHONO)
. If your AVR or SSP has a , connect it to the on Carina
. Power on your AVR or SSP (and Carina if not using a trigger)
. In the Carina menu set to (Skip this step if your AVR or SSP does NOT have
a trigger output)
. In the Carina menu set to
In the Carina menu set to
Exit the Carina menu and select the input (Required if your AVR or SSP does NOT have a
trigger output)
. Power on the AVR or SSP and (this is necessary to establish the proper
output levels, time delays and EQ for all of the speakers when watching movies or TV)
If you do NOT have a 12V trigger connected from the AVR or SSP to Carina, you will need to make sure Carina is
powered an and set to the ANALOG input to use the Home Theater Bypass feature. If you have a 12V trigger
connected, this will happen automatically whenever the AVR or SSP is powered on.
To setup Volume Control Bypass (please follow these steps in order):
1. Power on Carina
2. In the Carina menu set to for the input you want to use the volume control
bypass feature with
Caution: when any Carina input volume is set to “FIXED” in the menu, it is operating as a power amplifier (the
volume control in Carina is bypassed) when that input is selected and the device connected to Carina determines
the volume of the signal that is sent to the speakers. If this feature is NOT setup and used properly, significant
damage to the system may occur. Peachtree Audio does NOT accept responsibility for any damage caused by the
misuse of this feature.
1. Power off
2 front LEFT and RIGHT preamp outputs ANALOG input
3 AUX
4 12V trigger output TRIGGER INPUT
5
6 TRIGGER SEL ANALOG
7 ANALOG IN VOLUME FIXED
8 ANLG NAME HTB
9 ANALOG
10 re-calibrate the speakers
[INPUT] IN VOLUME FIXED
.
.
14
Connect Line-level (RCA style) front left and right outputs
from the AVR or SSP to the ANALOG input on the Carina.
Home Theater Bypass or Volume Control Bypass
Carina
SSP/AVR
Audio sources
A/V sources
Front Left & Right
Center Channel
Surround Speakers,
Subwoofer ( not drawn)
& Display ( not drawn)
Preamp out
Front L/R
Speaker Out
HTB
IN

15
In the event of a product failure, please pack the unit in its original carton and
391-9337) to abtain a Return Authorization (RA) number before shipping the
product!
Any products received without an RA number may be delayed, misdirected, or
lost.
After a RA number is issued by Peachtree Audio, please ship the product
using FedEx or UPS. Do NOT ship using a Postal Service! Also, do not ship
the unit in a carton with insufficient or loose packing material as the cabinet
will get damaged in transit and is NOT covered by Peachtree Audio.
Peachtree Audio assume no responsibility for products in transit. Please
insure the shipment for the product’s replacement value in the unlikely event it
is lost, stolen or damaged in transit.
www.peachtreeaudio.com
Before contacting Peachtree please try resetting the unit to see if the
issue is resolved
1 Place the unit in standby mode red LED
2 Press in and hold the right knob and keep it pressed in until told to
release it in step 4
3 Press the on standby button and allow the unit to power up until
default setting is shown in the left side of the display
4 Now release the right knob The unit should start up normally with
USB as the source
,
:
.()
.
.
./
"" .
..
.
Repair Process
International Warranty
Peachtree Audio warrants this product for two (2) years, parts and labor, from
the original date of purchase from an authorized source. If you register your
product online at http://www.peachtreeaudio.com/apps/product-registration
the warranty is extended to three (3) years, parts and labor.
Peachtree Audio reserves the right to refuse any warranty claims if coverage
cannot be verified by a valid proof of sale or serial number.
Peachtree Audio assumes no responsibility for product failures caused by
accident, neglect, misuse, modification or unauthorized repair.
Warranty does not cover shipping costs.
Visit for complete warranty details.www.peachtreeaudio.com
16
To be continued
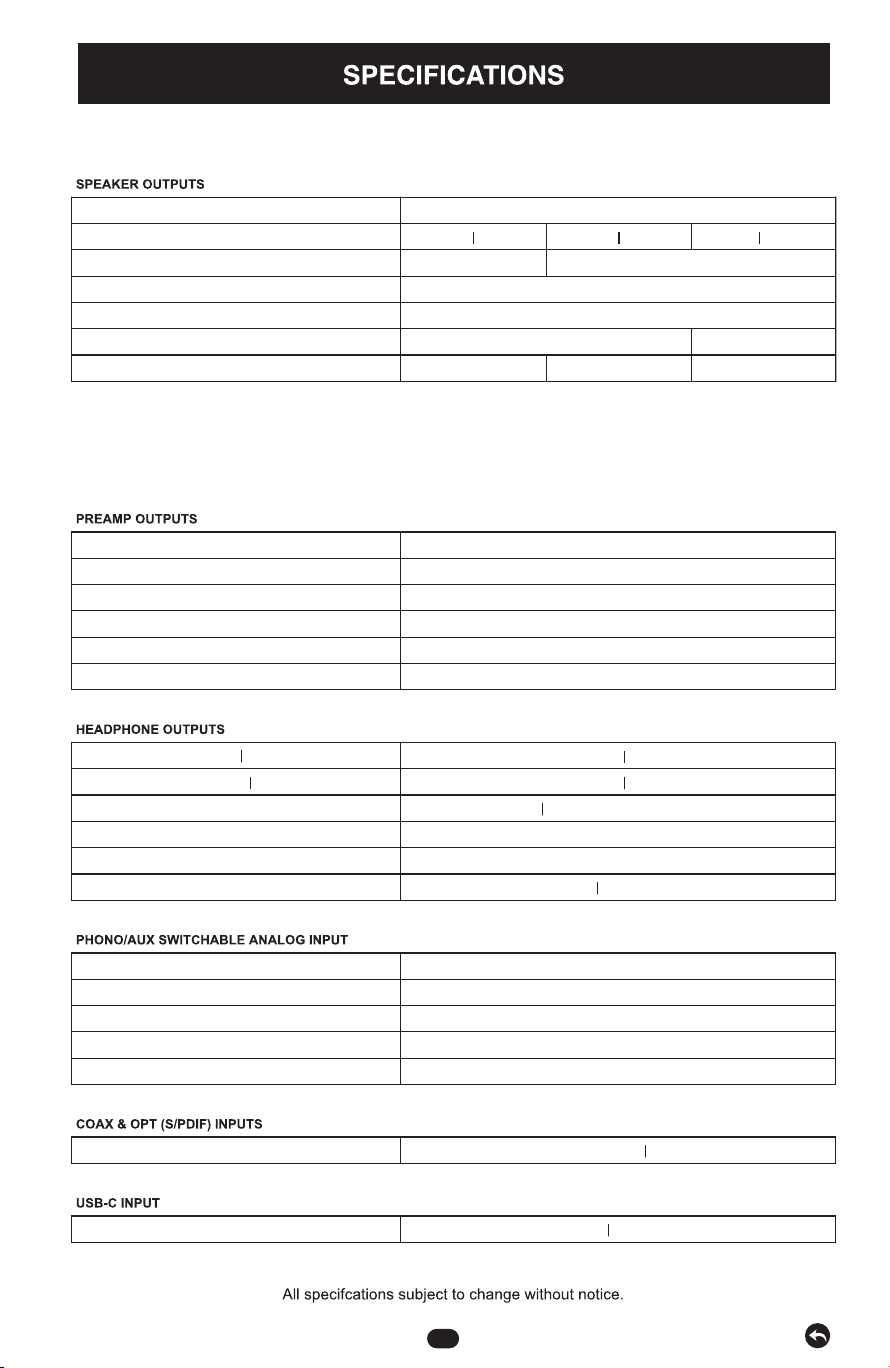
300 600
Carina GaN
107 dB >114 dB
150 250 200 200 *
< +/-0.2 dB
<0.005%
-90 dB -70 dB**
>90 dB >100 dB >70 dB
Carina X
2.5-16 Ω
Carina 150X
2.4V 0 dBFS input@
100Ω
> 130 dB
> 120 dB
+/- 0.1 dB
< 0.0002 %
1900 mW 720mW
305 mW 76mW
>120 dB (Balanced) 104dB, 108 dB (Unbalanced 300@Ω, 30Ω)
> 120 dB
+/- 0.87 dB
0.0003 % (Balanced) 0.0009% (Unbalanced 30Ω)
0.007 %
47 k (Suitable for MM Cartridge)Ω
Passive RIAA EQ, No rumble filter used
0.0005 %
2.3 kΩ
PCM 16-24 Bit, 44.1-192 kHz DSD Over PCM (DOP) 64
PCM 16-24 Bit, 44.1-768 kHz Native DSD 64-512, DOP 64-256
Formats supported
Formats supported
AUX Impedance
AUX THD + Noise
PHONO THD + Noise
PHONO Preamplifier Notes
PHONO Impedance
Total Harmonic Distortion
Frequency Response (20 Hz - 20 kHz)
Channel Separation (1 kHz)
Signal-to Noise Ratio (un-weighted)
Power 300 (Balanced Unbalanced)@Ω
Power 30 (Balanced Unbalanced)@Ω
Frequency Response (20Hz-20kHz)
Channel Separation (1 kHz)
Channel Separation (1 kHz, 8 Rated Output)Ω,
Total Harmonic Distortion (AES17, 1kHz, 8 )Ω
Inter-Modulation Distortion (SMPTE)
Frequency Response (20-20 kHz, 8 )Ω
Dynamic Range (AES 17)
Compatible Speakers (Nominal Impedance)
Power (8 4 , <1% THD + N, AES 17, 2 Chan DriveΩΩ
Impedance
Voltage (RMS)
Signal-to-Noise Ratio (Digital , un-weighted)
Total Harmonic Distortion (2V RMS, 1 kHz, un-weighted)
All specifications (except for PHONO/AUX) utilize 24-bit / 96 kHz test signals through the COAX-1 input.
*The Carina GaN features a regulated power supply which achieves maximum output at 8 and below. This is by design
to achieve the purest sound quality from the GaN output devices.
** The Carina GaN does NOT use a global negative feedback loop so some specifications are adversely affected. This is
by design to achieve the purest quality sound quality from the GaN output devices.
Ω
17
Continued
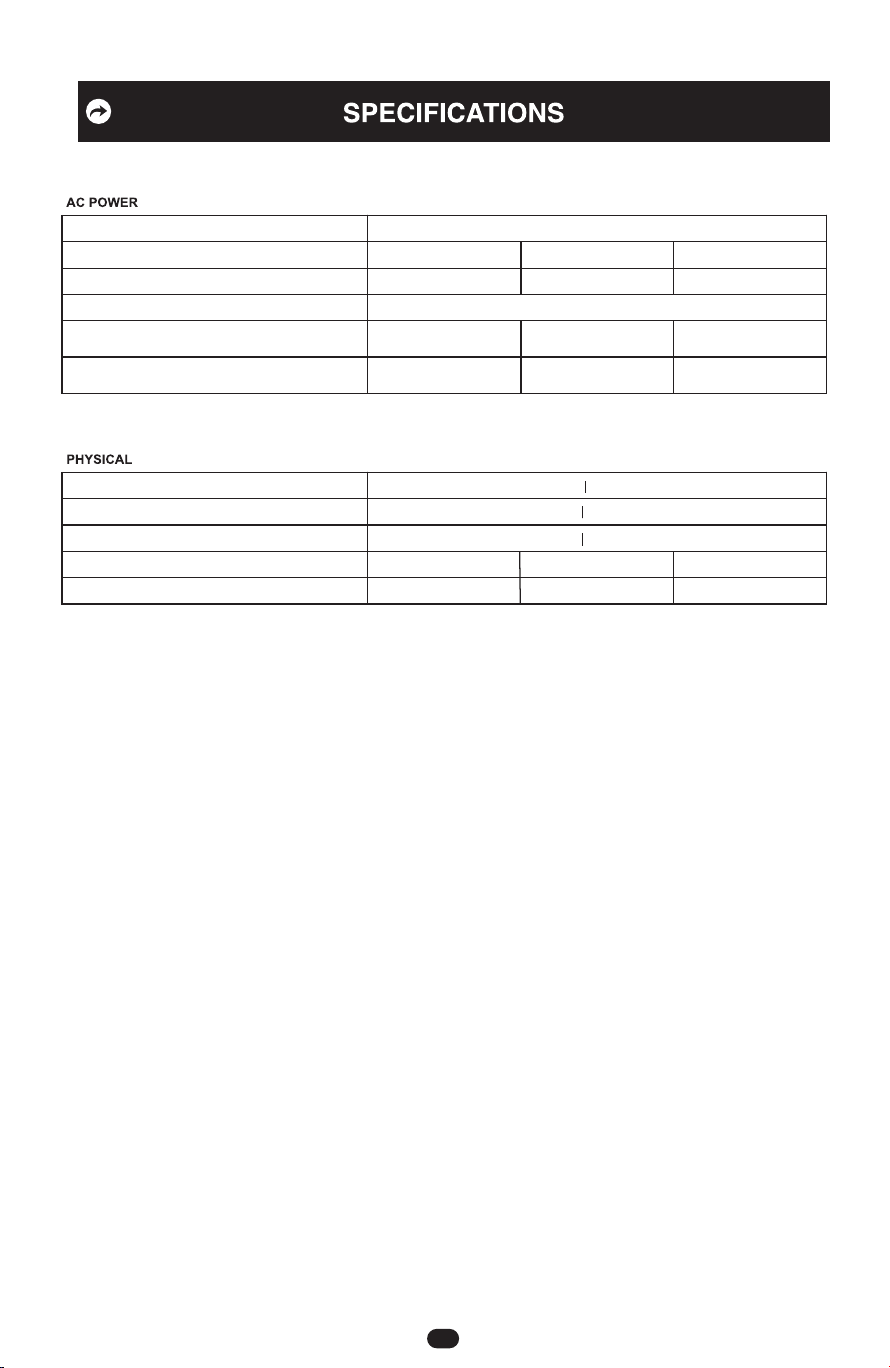
Carina GaN
Carina XCarina 150X
100-240 VAC, 50/60 Hz
650 W
1470 W 520 W
34 W
36 W
31 W
< 0.5 W
6.3 A / 250 V
Slow Blow
Slow Blow
Slow Blow
Slow Blow
Slow Blow
Slow Blow
3.15 A / 250 V 3.15 A / 250 V
6.3 A / 250 V12.0 A / 250 V
8.0 A / 250 V
111 mm 4.37 inches
356 mm 14.02 inches
362 mm 14.25 inches
12.5 lbs (17.0 lbs) 15.5 lbs (20.0 lbs) 14.5 lbs (19.0 lbs)
5.7 kg (7.7 kg) 7.0 kg (9.1 kg) 6.6 kg (8.6 kg)
CAUTION: Using an improper fuse value VOIDS the warranty and damage to the unit.
All specifications subject to change without notice.
Weight (Shipping Weight) in kilograms
Weight (Shipping Weight) in pounds
Width
Height (including feet)
Depth (including knobs and speaker binding posts)
Fuse (220-240 VAC) Higher Voltage AC Outlets
Fuse (220-240 VAC) Lower Voltage AC Outlets
Standby Mode Power Consumption
On Mode (Idle) Power Consumption
Maximum Power Consumption
AC Input
Model:
AUX
PHONO
GROUND
OUTPUT INPUTINPUT
USB-C
COAX-2
110V
Carina X
Carina 150X
Carina GaN