
2
contents
What's in the box 4
Part Names 5
Front Panel 6
Rear Panel: Y-50 7
Rear Panel: Y-40 8
Status Icons 9
Remote Controller 10
Connections 11
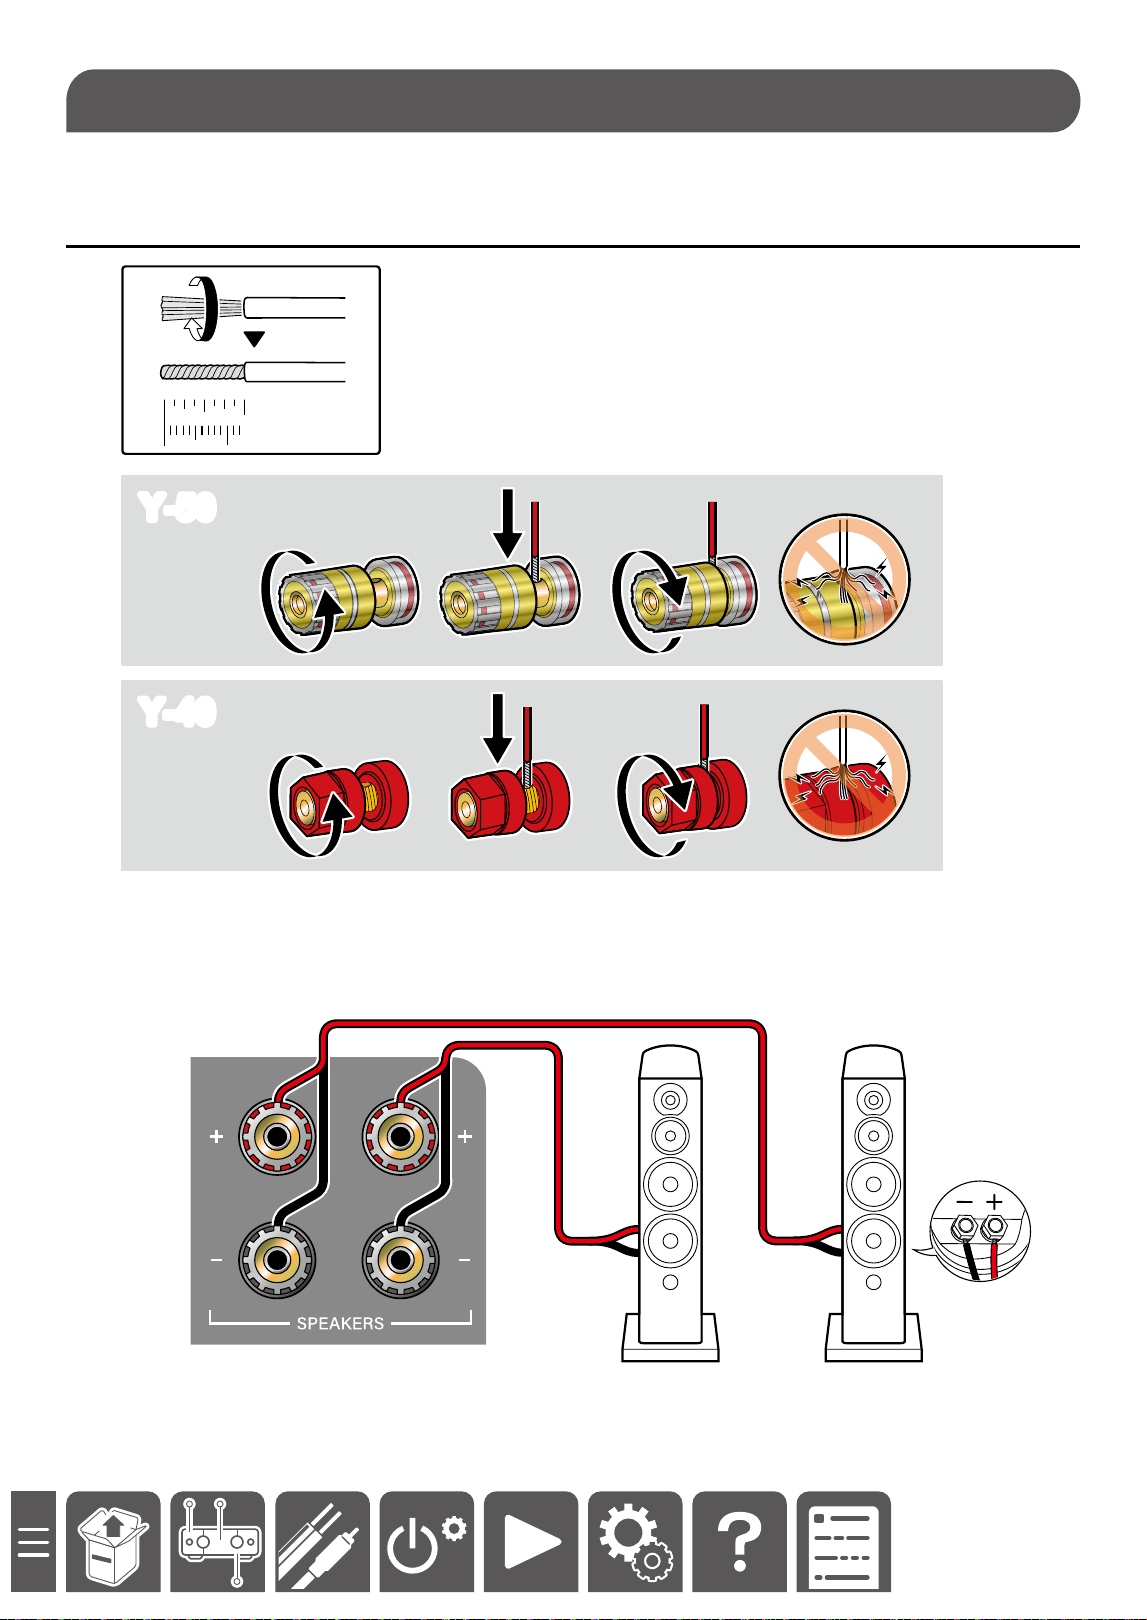
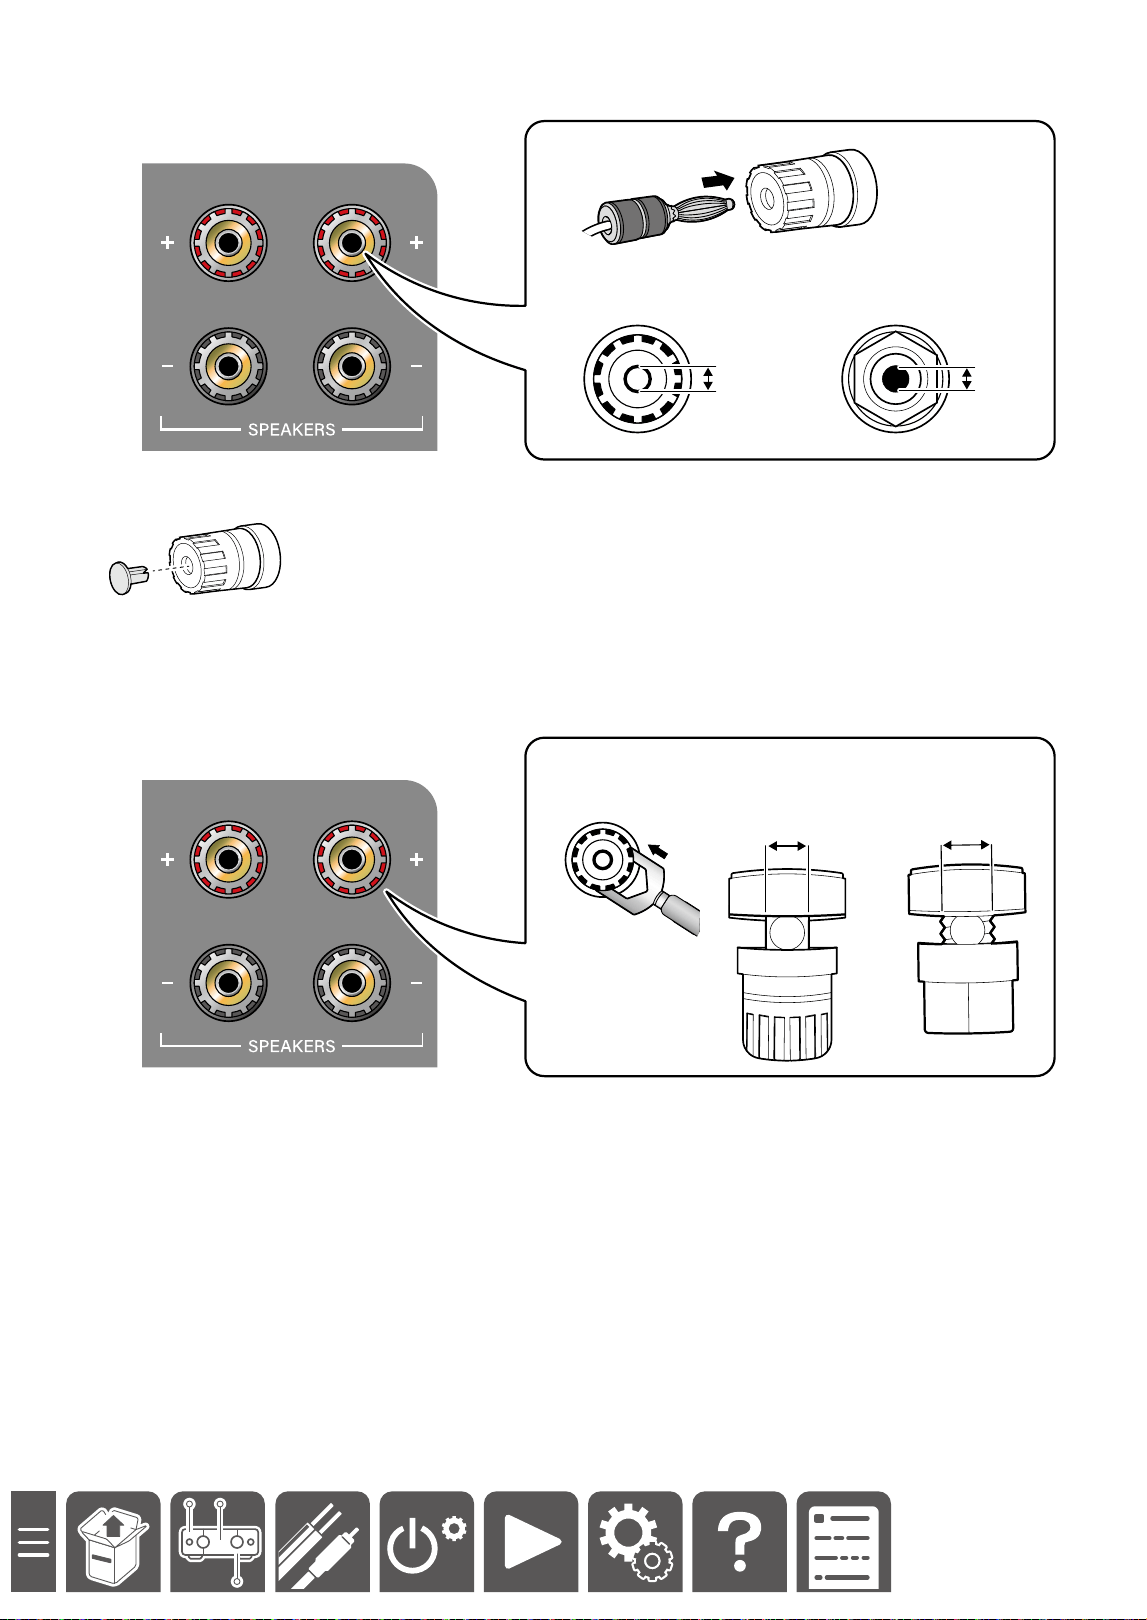
Connecting Your Speakers 12
Connect the Speaker Cables 12
Connect the Subwoofer (Y-50 Only) 14
Connecting a Turntable 15
Connecting the TV 16
To ARC TV 16
To Non-ARC TV 17
Connecting with a Device Equipped
with an HDMI Terminal (Y-50 Only) 18
Connecting a CD Player 19
Connecting a Headphone Amplier or
USB DAC 20
Connecting a Power Amplier 21
Connecting the Power Cord 22
Initial Setup 23
Downloading the App 24
Onkyo Controller 24
Network Connection 25
Connecting via a wired LAN 25
Connecting to Wi-Fi using Onkyo
Controller 26
Playback 27
Basic Operations 28
Turning the power on 28
Selecting a source to play 28
Adjusting the volume 29
Bluetooth
®
Playback 30
Playing audio from Bluetooth
wireless technology enabled devices
with this unit 30
Adjusting the Bass, Treble and
Balance 31
Vocal Adjustment 32
Using the DIRECT mode 33
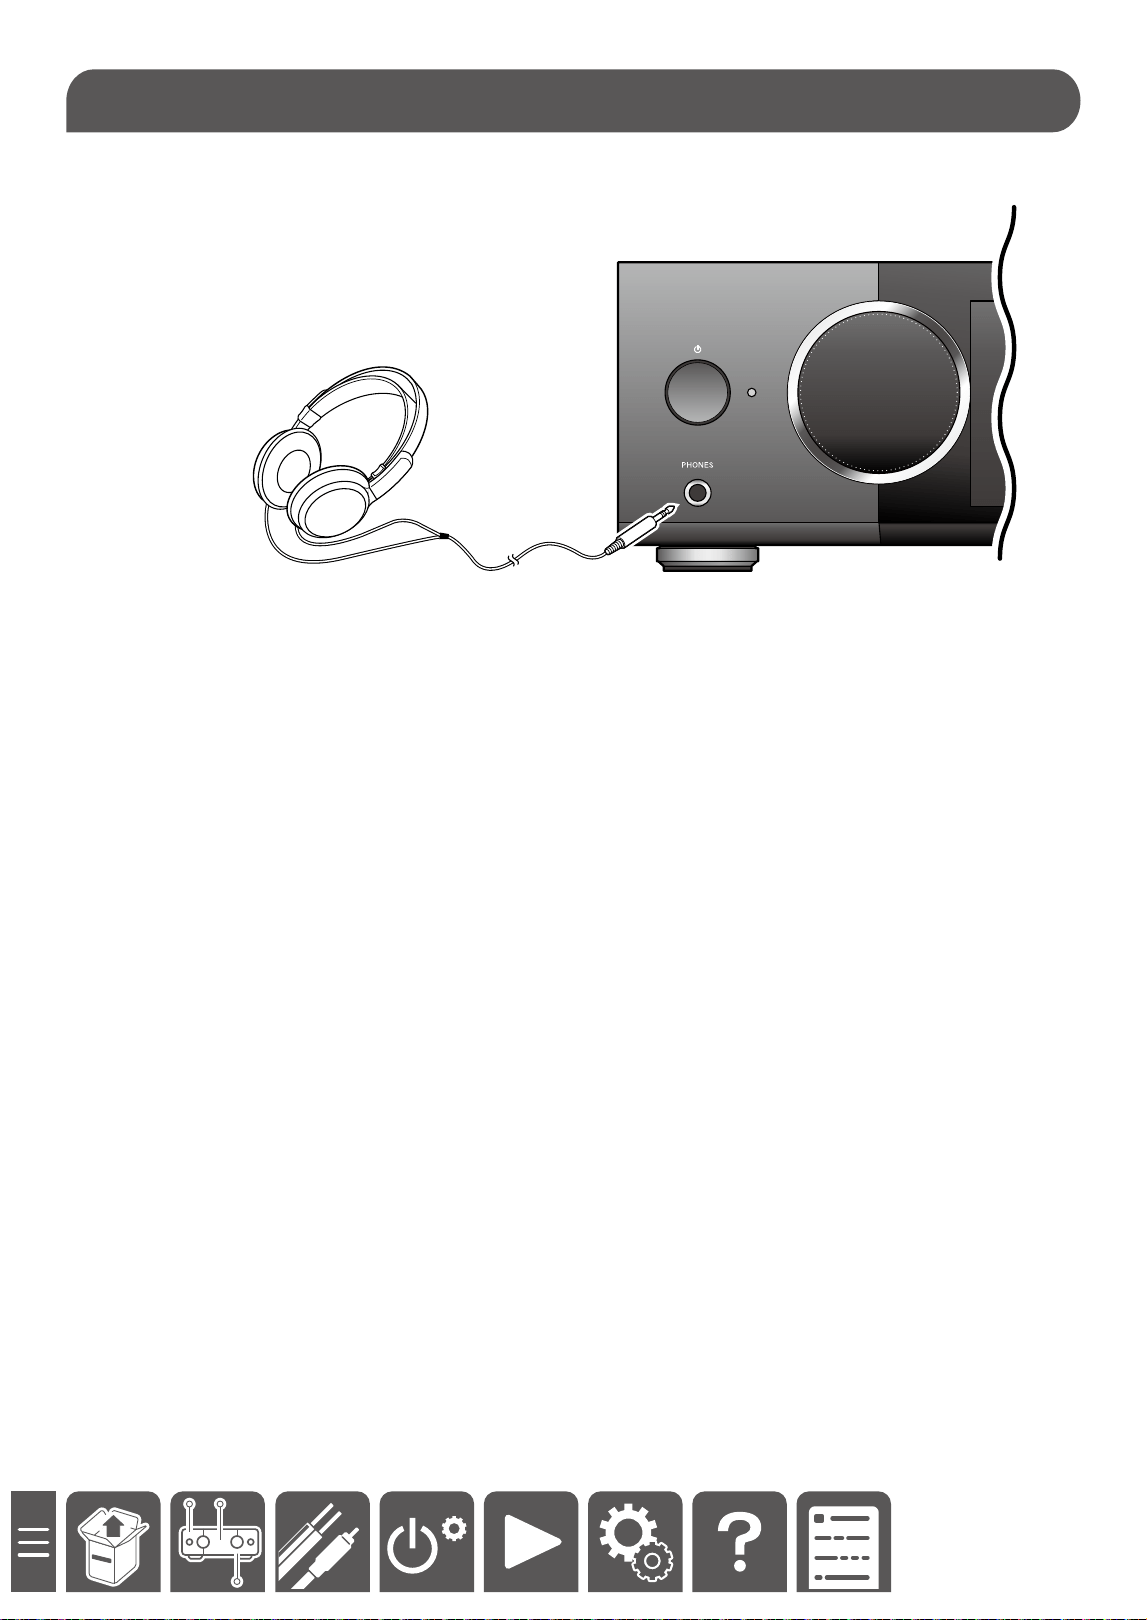
Using Headphones 34
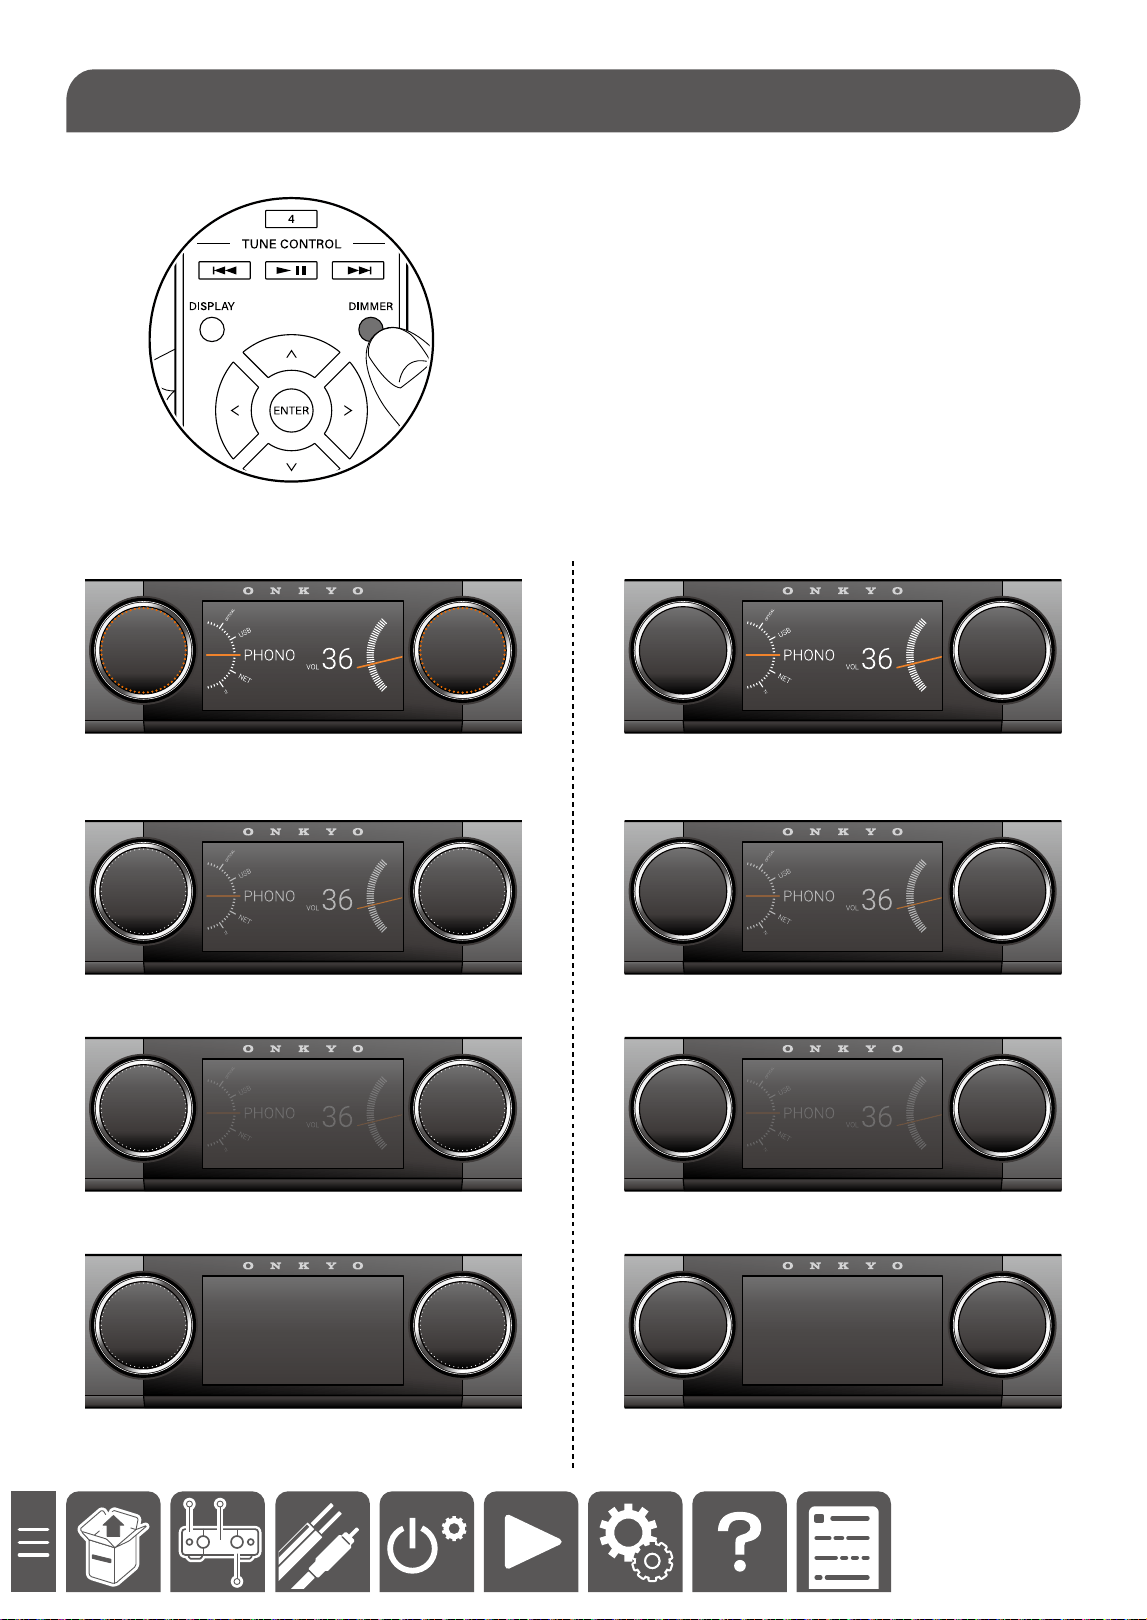
Switching the Display Content 35
Dimmer 37
Using MY INPUT 38
Playback of Music Files Stored in a
USB Storage Device 39
Playing Music Streaming on This Unit
40
Google Cast 41
Setting 41
Using Google Cast 41
Spotify 42
AirPlay
®
43
Basic Operations 43
Music Server 44
Setting Windows Media Player
Legacy 44
Playing Back 44
Setup Menu 45
Menu list 45
Equalizer 46
Speaker Setting (Y-50 Only) 47
Network 48
Bluetooth 49
Miscellaneous 50

3
Reducing the Power Consumption
in Standby State
When the following functions are enabled, the
power consumption in standby state increases. To
reduce the power consumption in standby state,
check each setting and set the functions to "O".
– Network Standby ( →p48)
– HDMI CEC ( →p50)
Troubleshooting 51
General Specications 52
License and Trademark 55
Update History 56
Supplementary Information
Features, etc. released in rmware updates
4
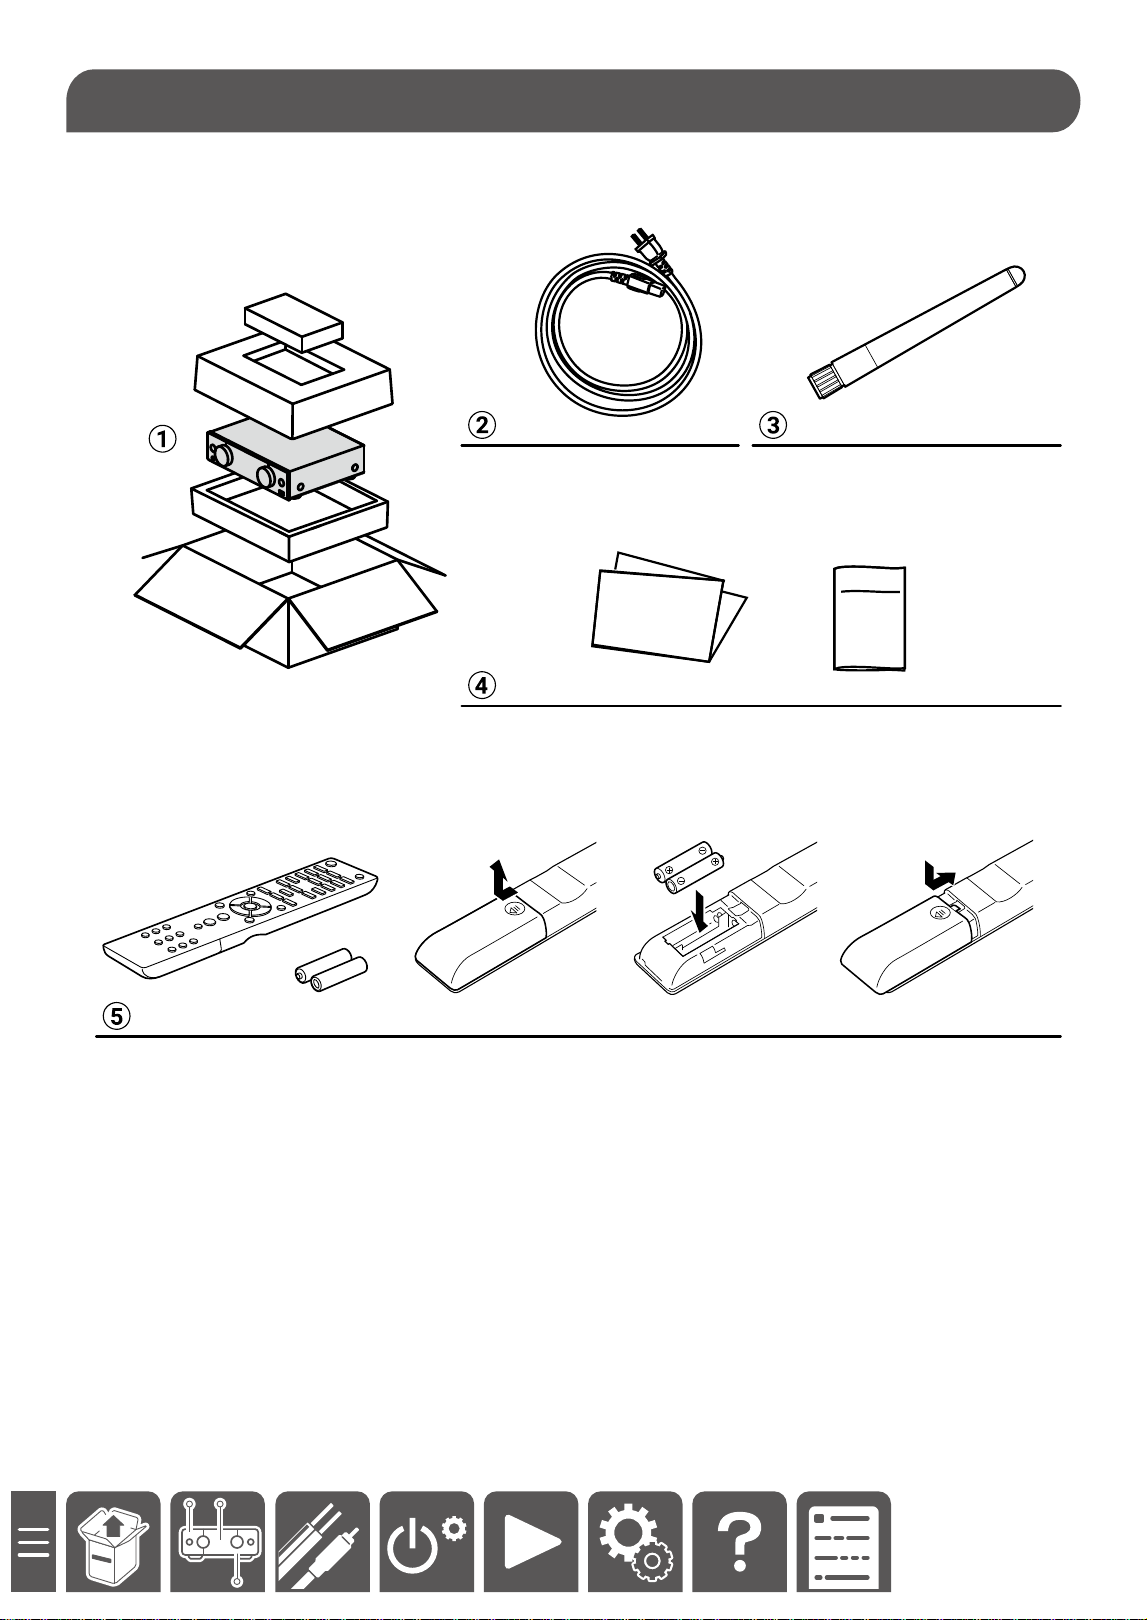
What's in the box
What's in the box
Safety
Information
Initial Setup
Guide
A Main unit
B Power cord (1) *Depending on the model, 2 or more Power Cords are supplied. Use the type of cord suited to
your area.
C Wireless antenna
D Initial Setup Guide, Safety Information
E Remote controller(RC-994S) (1)
Batteries (AAA/R03) (2)
* This is an online user manual. This is not supplied with the product.

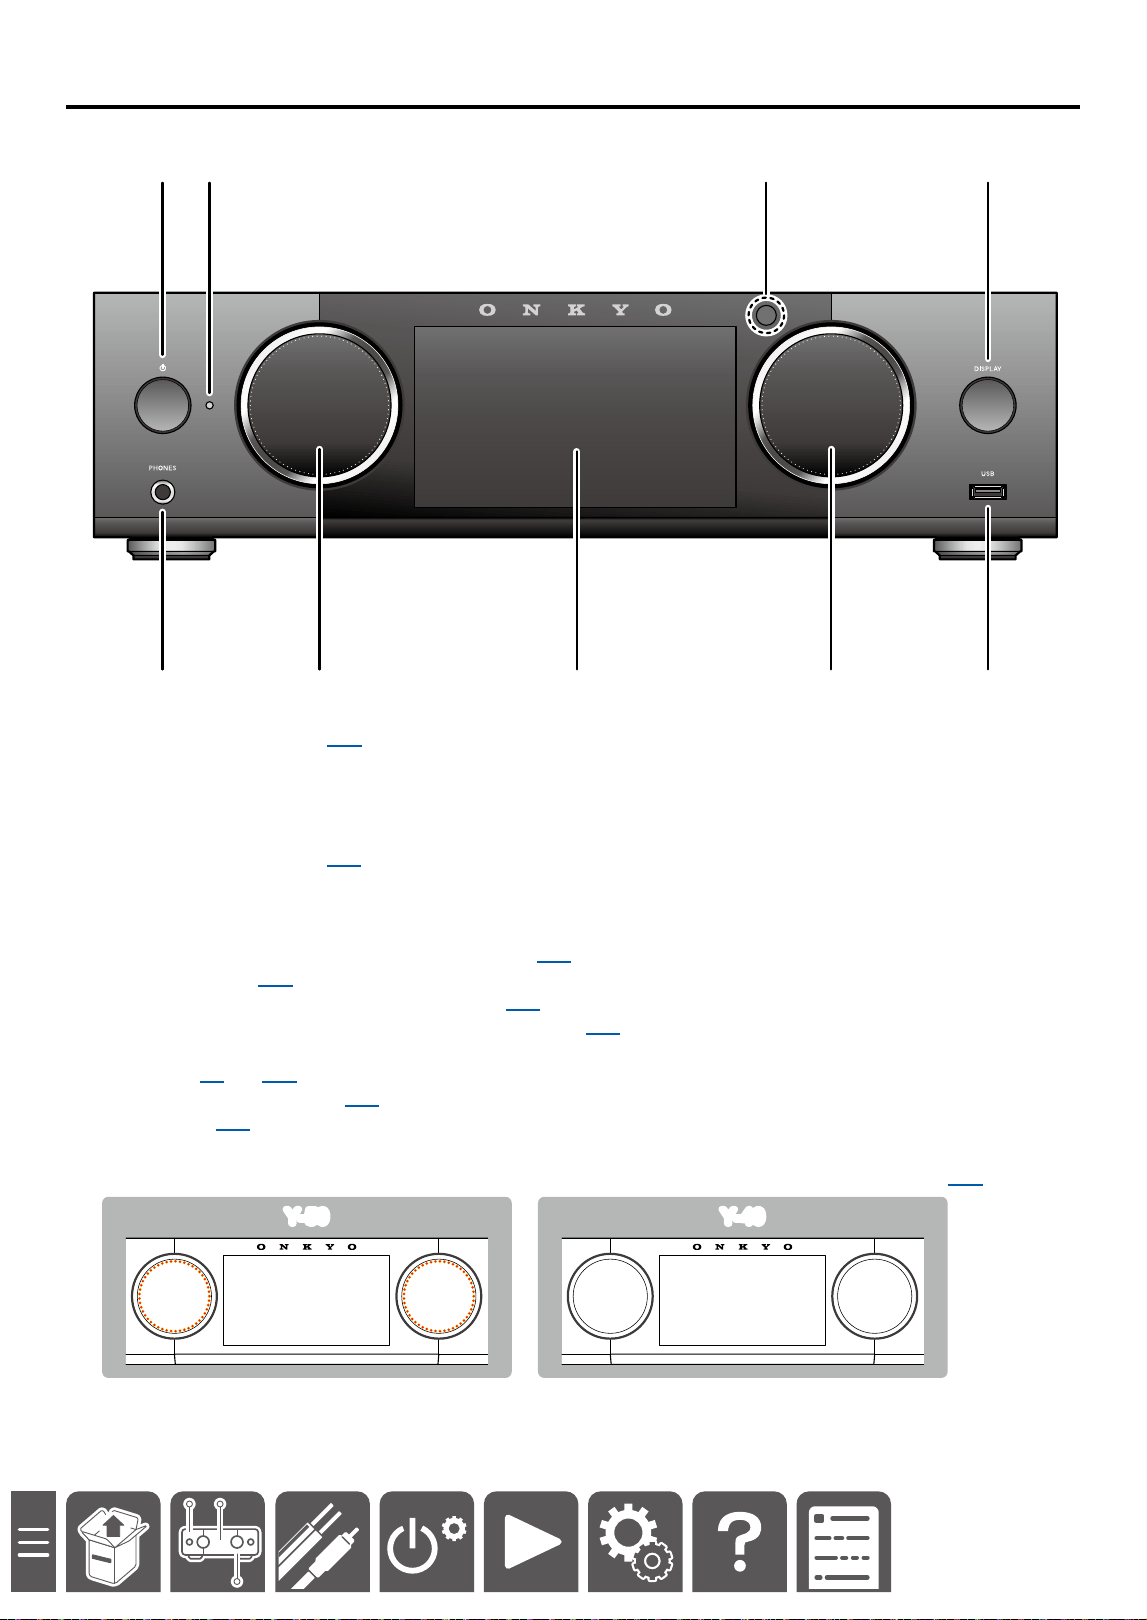
6
Part Names
Front Panel
A 2 3 4
5 6 7 8 9
* *
A ON/STANDBY button ( →p28)
B Power indicator:
Power On: Lit
Standby: Unlit*
* When the following setting is turned on, the power indicator is lit even in the standby mode.
Network Standby: On ( →p48)
C Remote control sensor: Receives signals from the remote controller.
• The reception range of the remote controller is within a distance of approx. 16´/5 m, and an angle of 20° in
vertical direction and 30° to right and left.
D Display button: Switches the display content. ( →p35)
E PHONES jack ( →p34)
F Selector knob: Switches the input source. ( →p28)
Pressing the selector knob displays the setup menu ( →p45) . Turning or pressing the knob congures the
settings for this unit.
G Display ( →p9)( →p35)
H MASTER VOLUME dial ( →p29)
I USB port ( →p39)
* The Selector knob and MASTER VOLUME dial of Y-50 are equipped with LEDs.
The LEDs light up by turning on the power, and can be turned o by using the Dimmer function.( →p37)
Y-50Y-50 Y-40Y-40
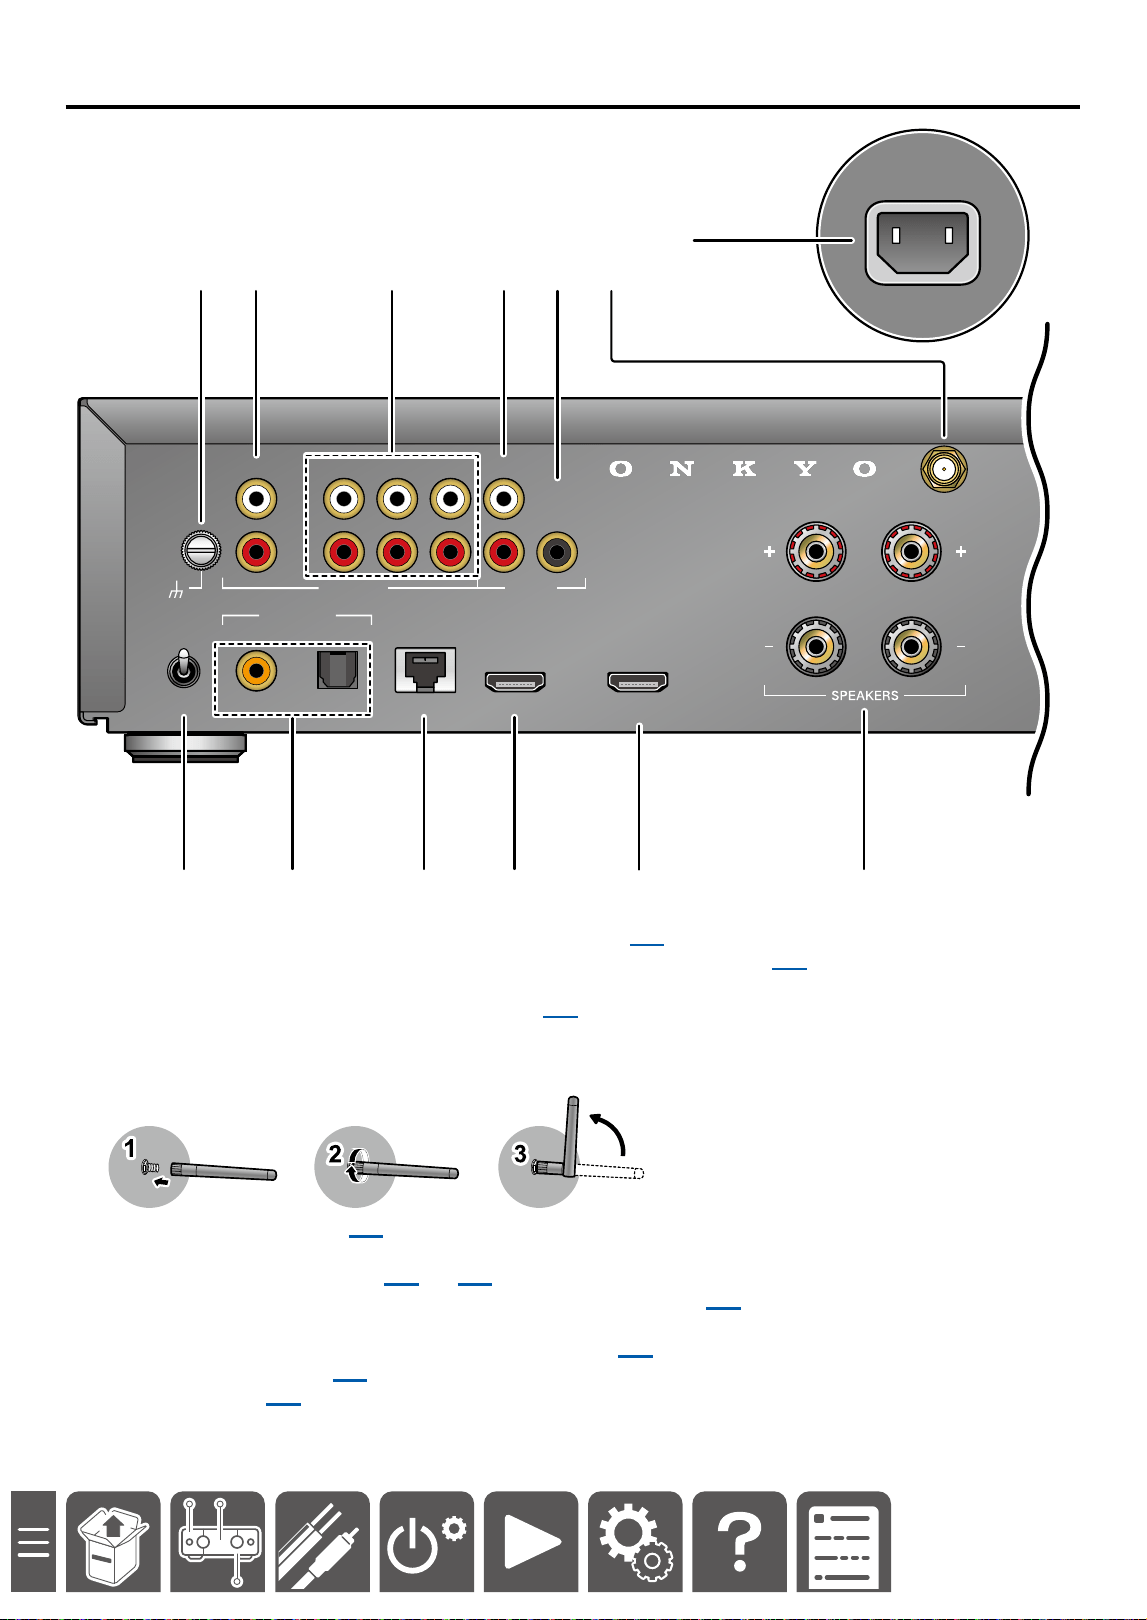
7
Part Names
Rear Panel: Y-50
GND
LR
HDMI INETHERNETOPTICAL HDMI OUT
ARC
(
TV
)
MC
MM
GND
PHONO
ANALOG
1
L
R
ANALOG
2
ANALOG
3
PRE OUT
SUBWOOFER
PRE OUT
L
R
AUDIO IN AUDIO
COAXIAL
(
CD
)
DIGITAL IN
AC INLET
LR
HDMI INETHERNET HDMI OUT
ARC
(
TV
)
SUBWOOFER
PRE OUT
AUDIO IN AUDIO
M
A 2 3 4 5
7 9 J K L8
6
A GND terminal: Connect the ground wire of the turntable. ( →p15)
B PHONO jacks: Input turntable audio signals with an analog audio cable. ( →p15)
C AUDIO IN jacks: Input AV component audio signals with an analog audio cable.
D PRE OUT jacks: Connect to a power amplier. ( →p21)
E SUBWOOFER PRE OUT jack: Connect a powered subwoofer with a subwoofer cable.
F Antenna terminal: Connect the supplied antenna to this terminal. Be sure to connect the antenna. Otherwise,
Wi-Fi and Bluetooth
®
cannot be used.
G MM/MC selector switch ( →p15)
H DIGITAL IN OPTICAL/COAXIAL jacks: Input TV or AV component digital audio signals with a digital optical
cable or digital coaxial cable. ( →p19)( →p17)
I ETHERNET port: Connect to the network with an Ethernet cable. ( →p25)
J HDMI IN jack: Use an HDMI cable to connect your game console, cable TV tuner, and Blu-ray player.
K HDMI OUT jack: Connect the TV using an HDMI cable. ( →p16)
L SPEAKERS terminals ( →p12)
M AC IN terminal ( →p22)
8
Part Names
Rear Panel: Y-40
GND
LR
ETHERNETOPTICAL
GND
PHONO
ANALOG
1
L
R
ANALOG
2
ANALOG
3
PRE OUT
L
R
AUDIO IN AUDIO
COAXIAL
(
CD
)
DIGITAL IN
ARC (TV)
AC INLET
LR
HDMI INETHERNET HDMI OUT
ARC
(
TV
)
SUBWOOFER
PRE OUT
AUDIO IN AUDIO
J
A 2 3 4
7 8 96
5
A GND terminal: Connect the ground wire of the turntable. ( →p15)
B PHONO jacks: Input turntable audio signals with an analog audio cable. ( →p15)
C AUDIO IN jacks: Input AV component audio signals with an analog audio cable.
D PRE OUT jacks: Connect to a power amplier. ( →p21)
E Antenna terminal: Connect the supplied antenna to this terminal. Be sure to connect the antenna. Otherwise,
Wi-Fi and Bluetooth cannot be used.
F DIGITAL IN OPTICAL/COAXIAL jacks: Input TV or AV component digital audio signals with a digital optical
cable or digital coaxial cable. ( →p19)( →p17)
G ETHERNET port: Connect to the network with an Ethernet cable. ( →p25)
H HDMI ARC jack: Connect the TV using an HDMI cable. ( →p16)
I SPEAKERS terminals( →p12)
J AC IN terminal ( →p22)
9
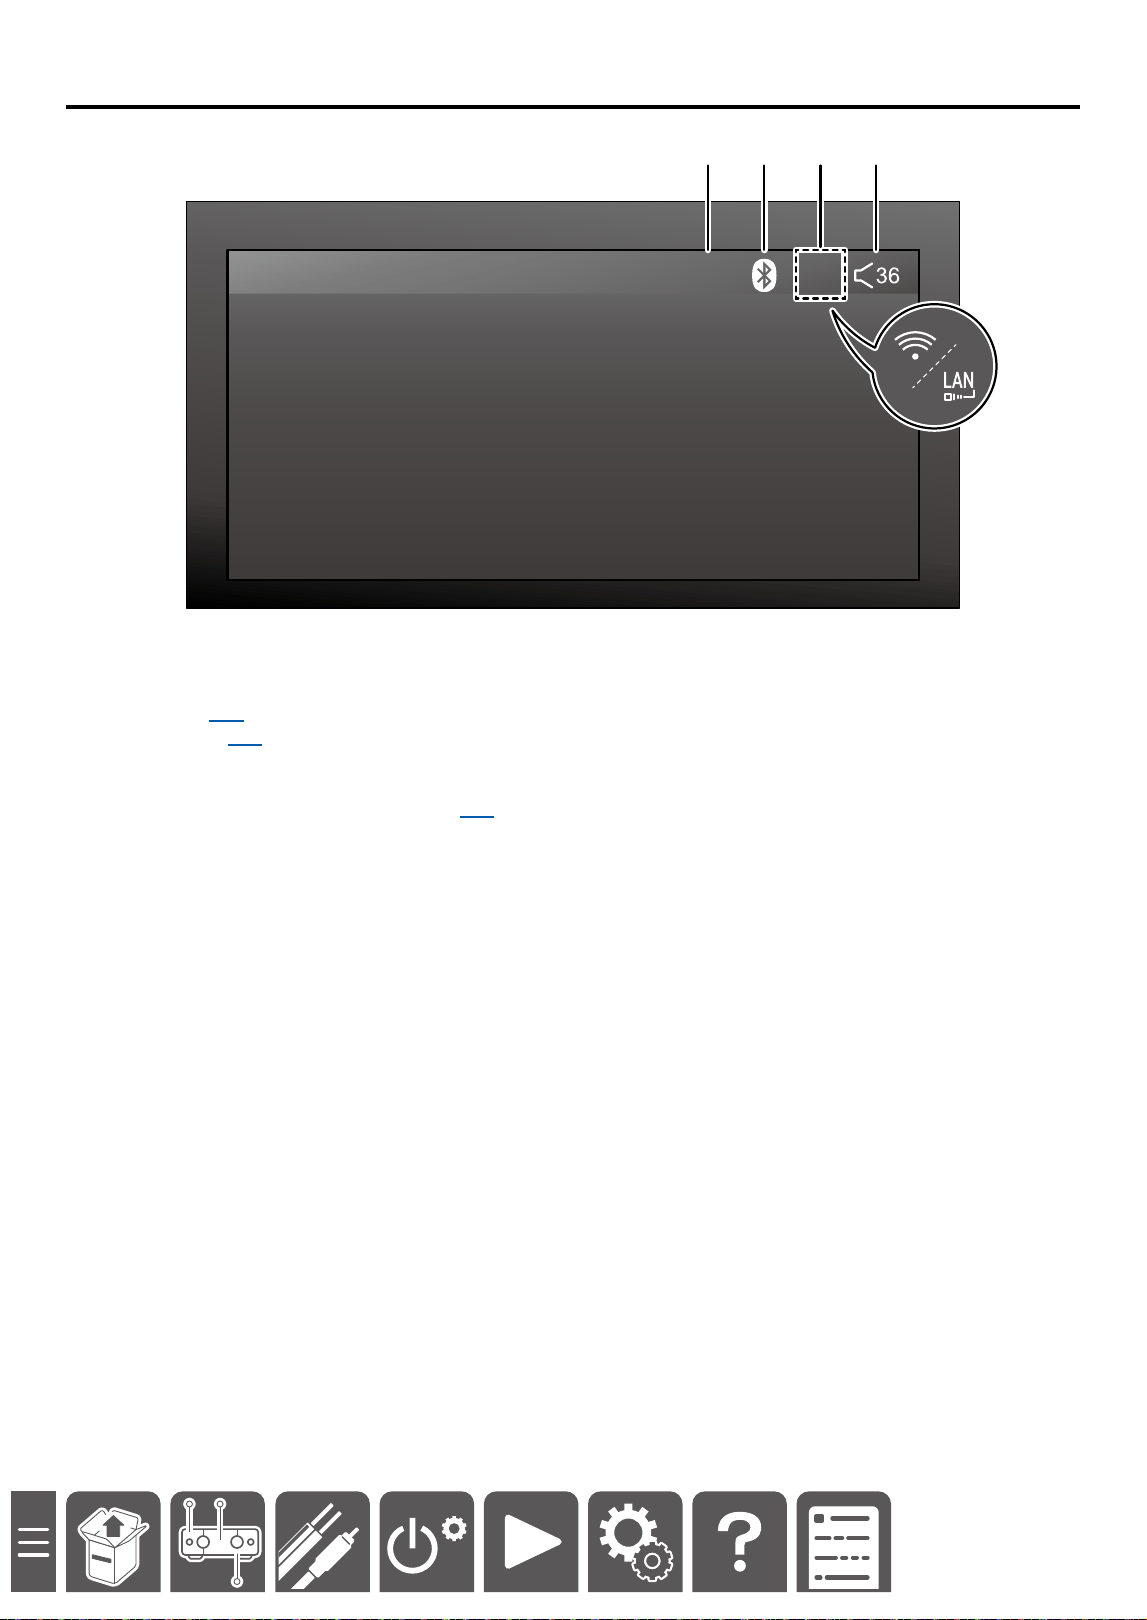
Part Names
Status Icons
DIRECT
A 2 3 4
A DIRECT ( →p33)
B Bluetooth ( →p30)
Displayed: Connected
Blinking*: Connection standby (pairing in progress)
Displayed dark: Bluetooth function o ( →p49)
*When Bluetooth is not used, turn o the Bluetooth function. The icon stops blinking.
C Network
Displayed: Connected to network
Blinking: Unconnected to network
Displayed dark: Unconnected to the external network
D Sound volume value
10
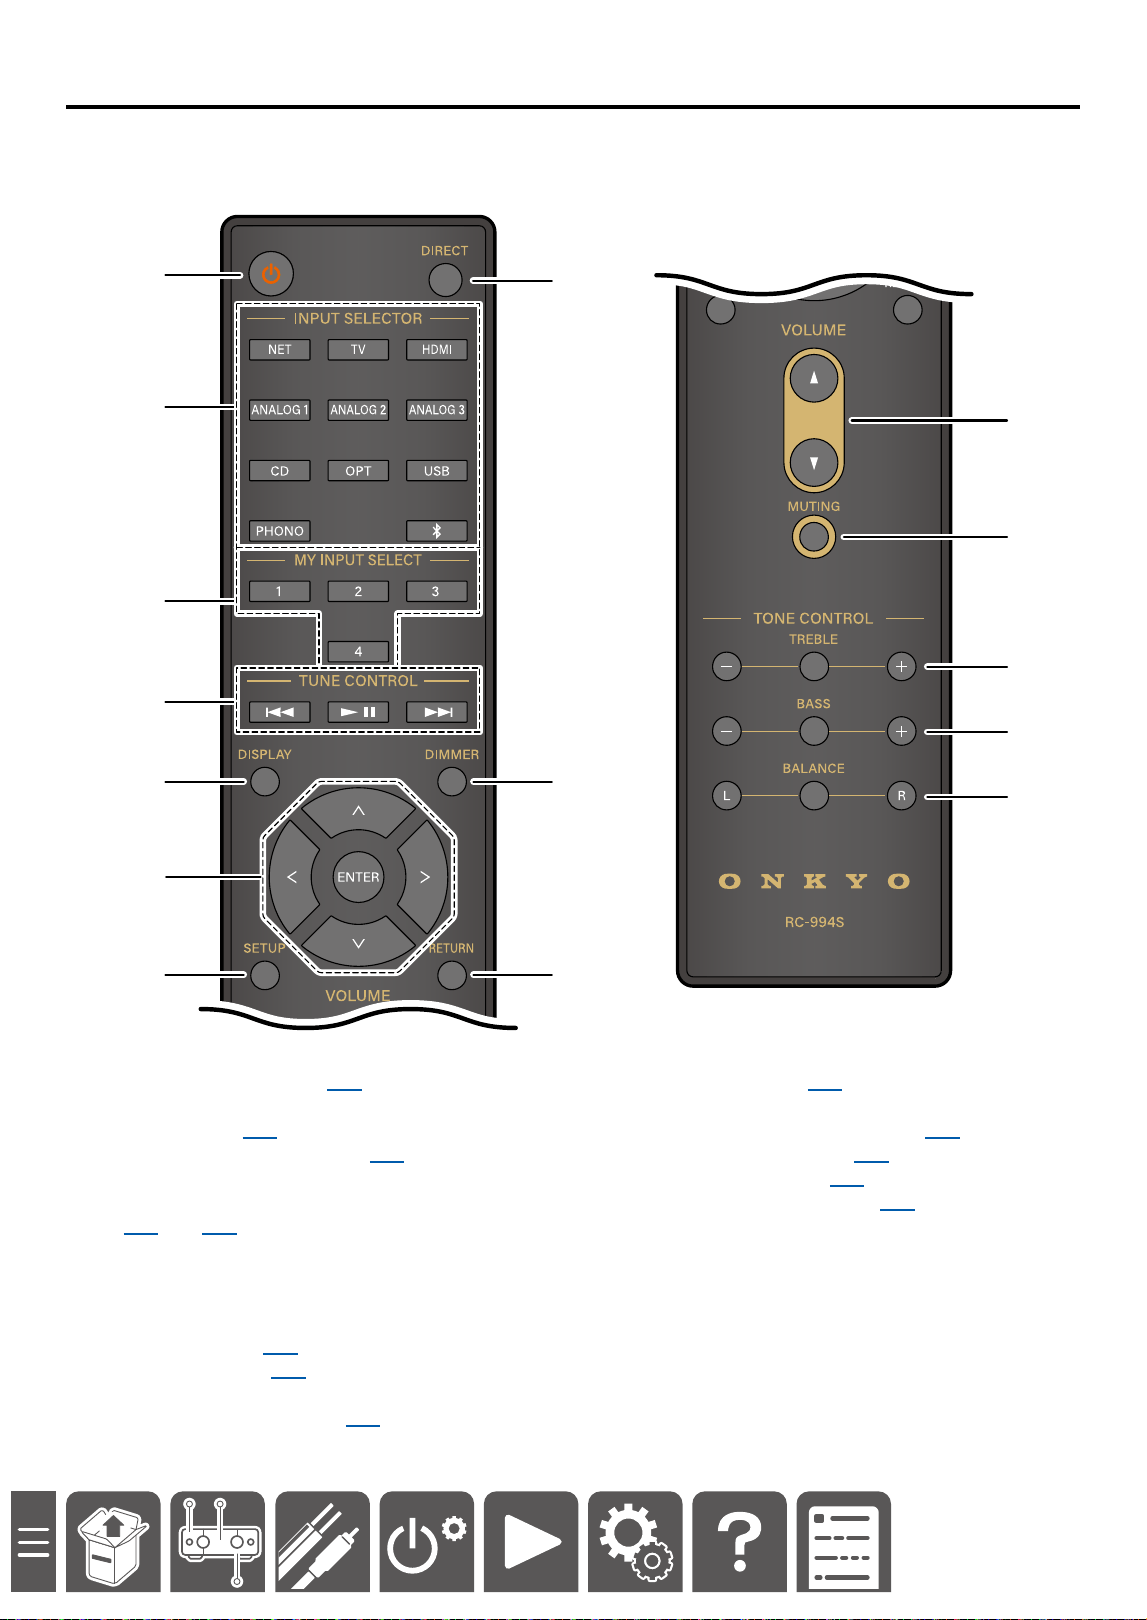
Part Names
Remote Controller
A
2
3
4
K
5
8
9
L
M
N
6
7 J
O
A ON/STANDBY button ( →p28)
B Input selector buttons: Switches the input source
for playback. ( →p28)
C MY INPUT 1/2/3/4 buttons ( →p38)
D TUNE CONTROL buttons: Used to play music
using the network function or a USB device.
( →p39) ( →p40)
E DISPLAY button: Switches the display content.
F Cursor buttons and ENTER button: Select an
item with the cursors, and press ENTER to conrm
your selection.
G SETUP button ( →p45)
H DIRECT button ( →p33)
I DIMMER button: Switches the brightness of the
display with three levels. ( →p37)
J RETURN button
K Volume buttons ( →p29)
L MUTE button: Temporarily mutes audio. Press the
button again to cancel muting. ( →p29)
M TREBLE +/- buttons* ( →p31)
N BASS +/- buttons* ( →p31)
O BALANCE L/R buttons* ( →p31)
*Displays the current setting value using the center
button, and adjusts the level using "+", "R" or "-", "L"
buttons.

11
Connections
Connections
Connecting Your Speakers 12
Connect the Subwoofer (Y-50 Only) 14
Connecting a Turntable 15
Connecting the TV 16
Connecting with a Device Equipped with
an HDMI Terminal (Y-50 Only) 18
Connecting a CD Player 19
Connecting a Headphone Amplier or
USB DAC 20
Connecting a Power Amplier 21
Connecting the Power Cord 22
Connections
15
Connections
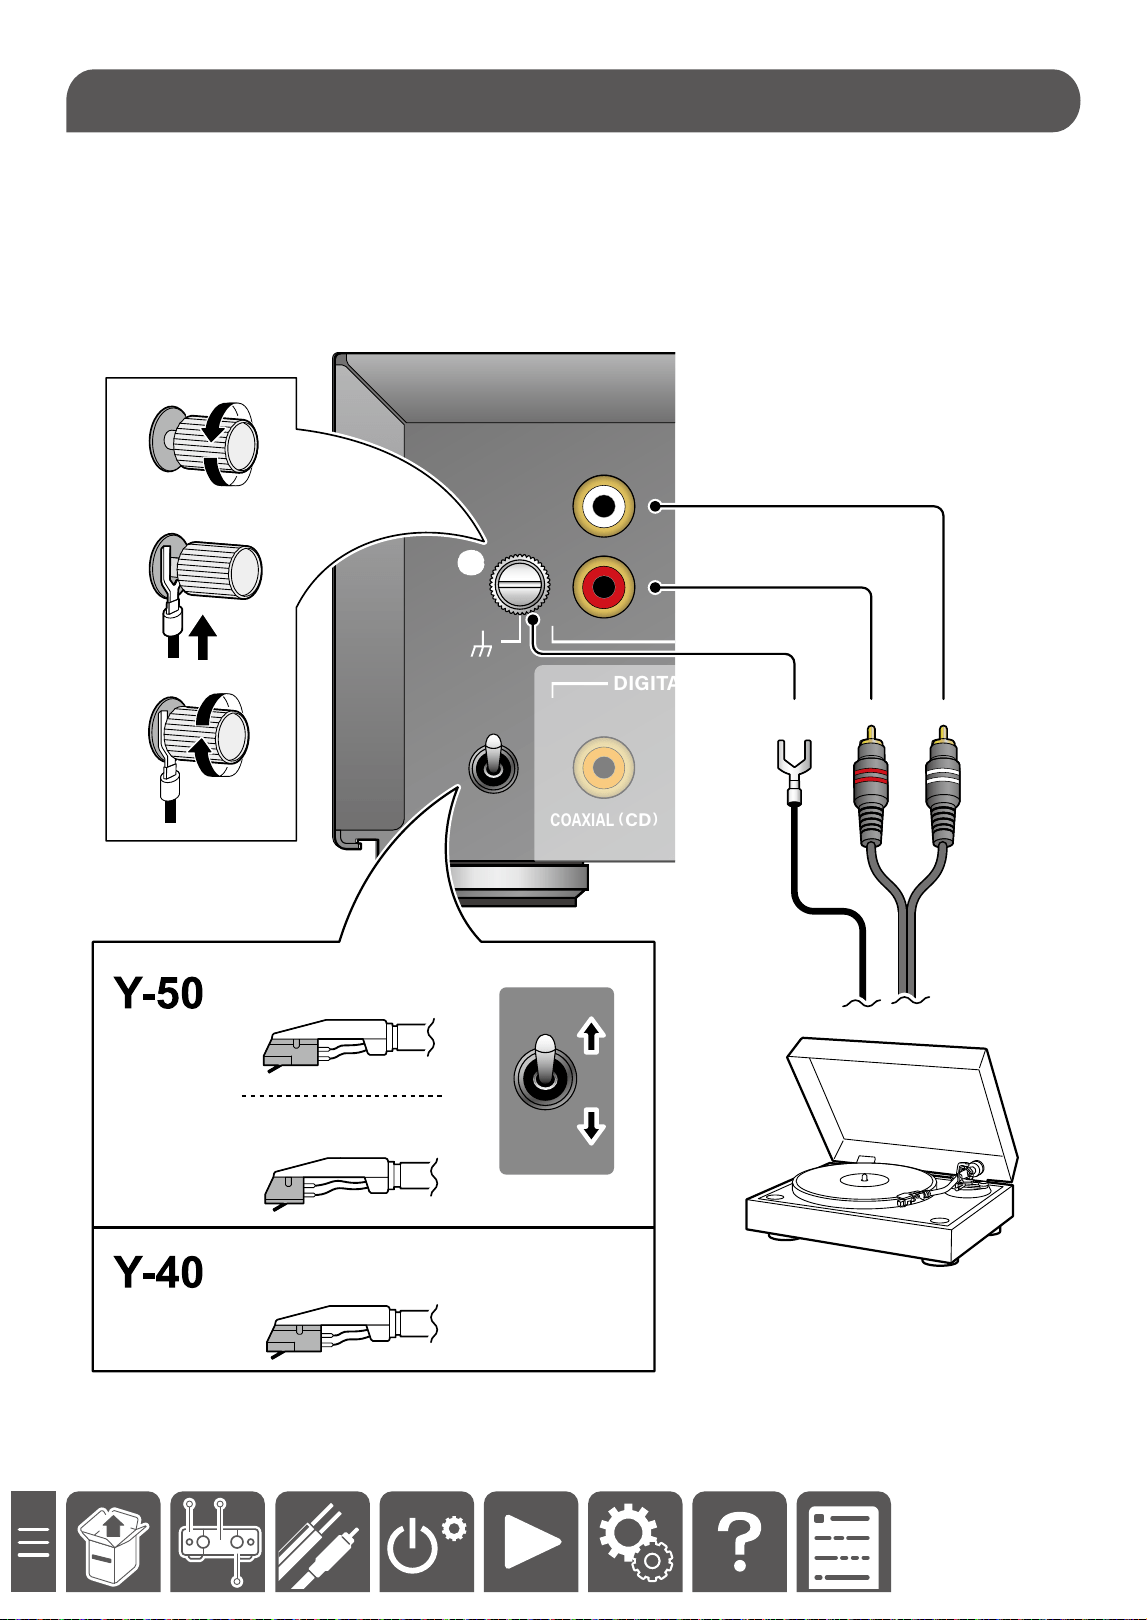
1. Using an analog audio cable (a), connect a turntable.
• If your turntable has a built-in phono preamp, you can connect the turntable to other analog inputs such as
ANALOG 1.
• If your turntable has a ground wire (b), connect it to the GND screw (c). With some turntables, connecting the
ground wire may produce an audible hum. If this happens, disconnect it.
2. According to the type of cartridge of the turntable, switch between MM and MC. (Y-50 only)
GND
MC
MM
GND
PHONO
L
R
COAXIAL
(
CD
)
DIGITAL IN
a
a
MM (Moving Magnet)
MC (Moving Coil)
MC
MM
MM (Moving Magnet)
b
b
c
c
Connecting a Turntable
16
Connections
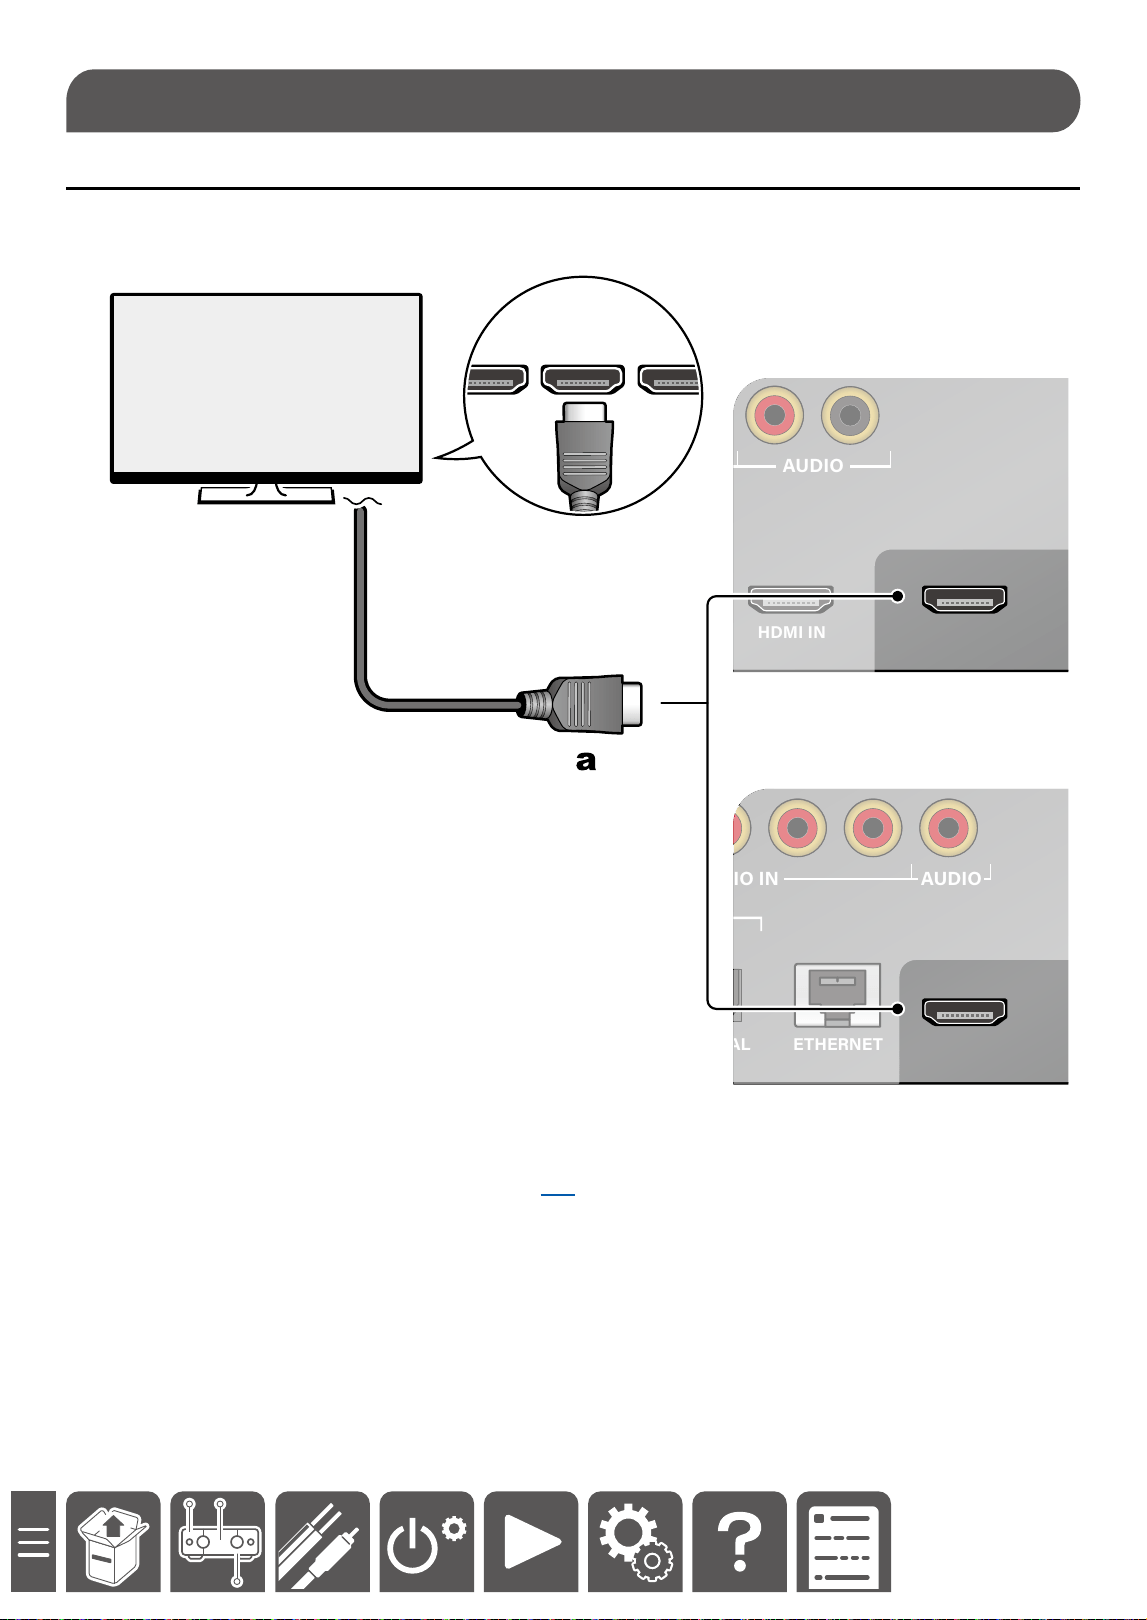
To ARC TV
If the TV supports the ARC (Audio Return Channel) function(*), use only the HDMI cable (a) to connect with the
TV. Use the ARC-compatible HDMI IN jack of the TV for connection.
GND
HDMI INETHERNETOPTICAL HDMI OUT
ARC
(
TV
)
MC
MM
GND
PHONO
ANALOG 1
L
R
ANALOG 2 ANALOG 3
PRE OUT
SUBWOOFER
PRE OUT
L
R
AUDIO IN AUDIO
COAXIAL
(
CD
)
DIGITAL IN
HDMI IN
HDMI IN
(ARC) HDMI IN
Y-50
GND
ETHERNETOPTICAL
GND
PHONO
ANALOG
1
L
R
ANALOG
2
ANALOG
3
PRE OUT
L
R
AUDIO IN AUDIO
COAXIAL
(
CD
)
DIGITAL IN
ARC (TV)
Y-40
• To play audio of TV connected with the HDMI cable, press the "TV" button on the remote controller or turn the
selector knob to switch the input source to "TV".( →p28)
(*) The ARC function transmits audio signals from the TV via an HDMI cable and plays the TV audio on this unit.
Please check the TV's instruction manual to see if it supports the ARC function.
Note
If the TV audio is not played from the speakers connected to this unit, check that the audio output destination is set
to an external device in the TV's ARC settings. Also, check that the HDMI cable is compatible with ARC.
Connecting the TV
17
Connections
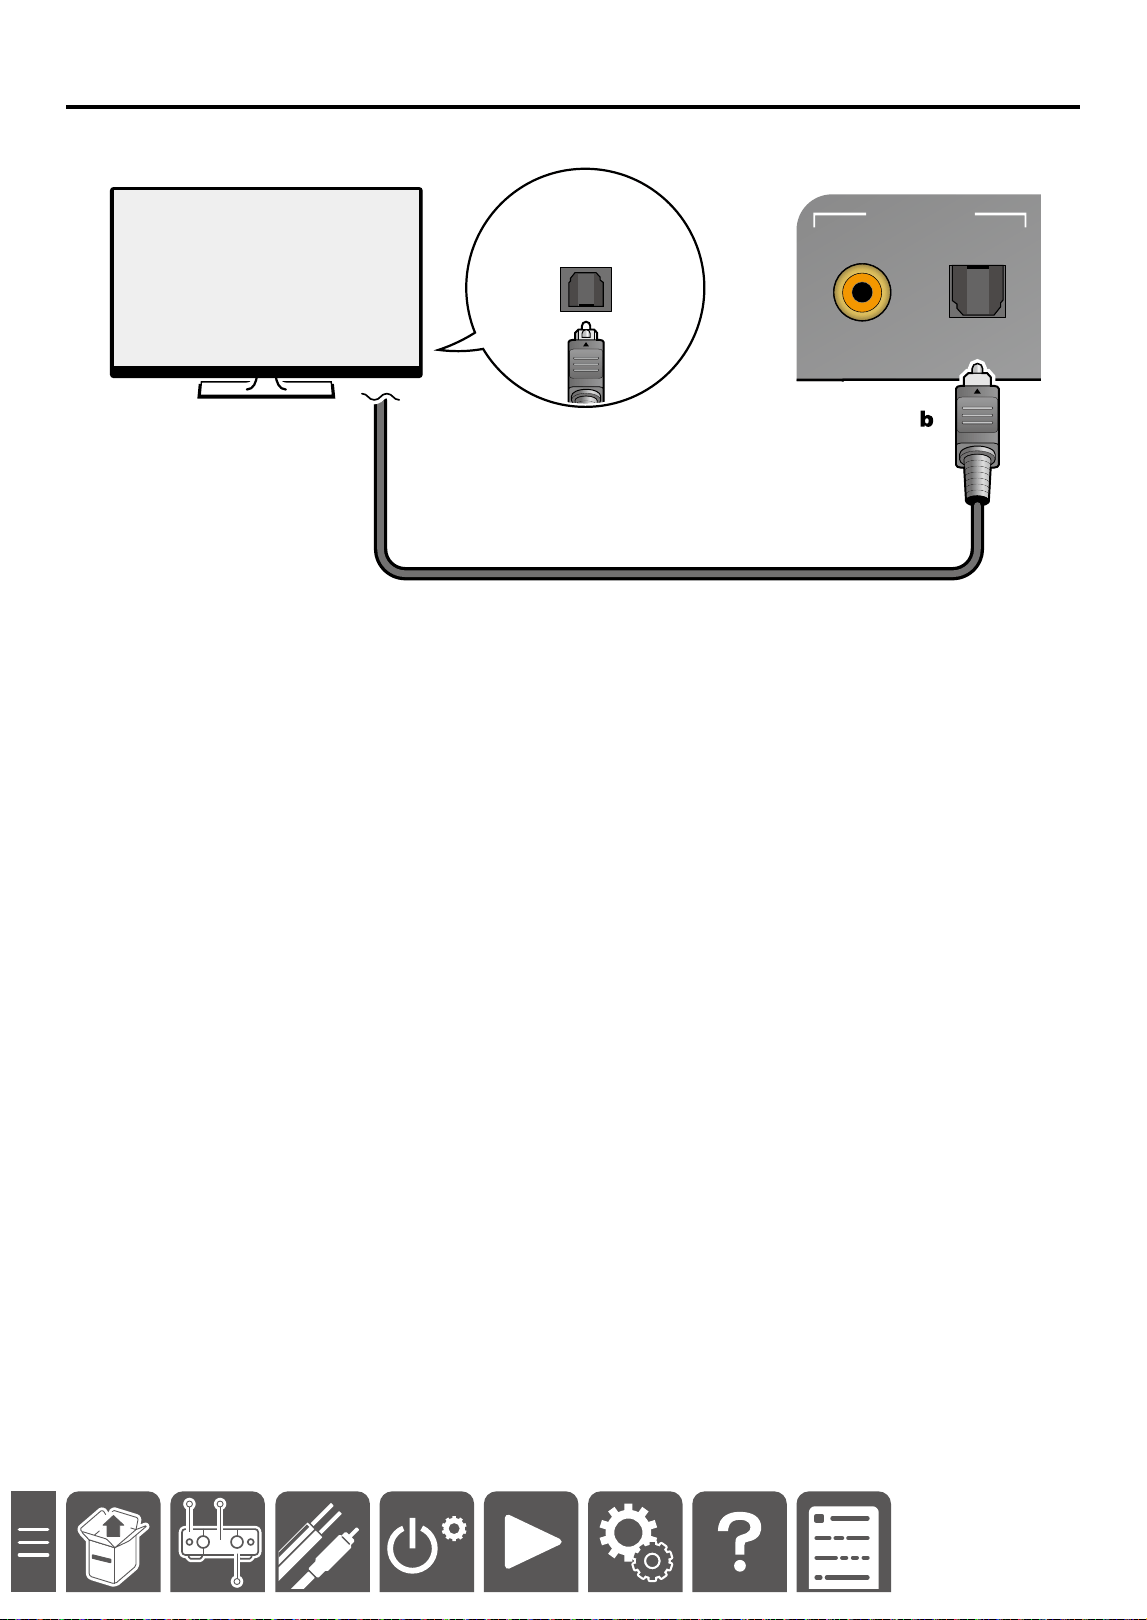
To Non-ARC TV
If your TV does not support ARC (Audio Return Channel) (*), connect a digital optical cable (b).
DIGITAL
OPTICAL
OUT
GND
OPTICAL
MC
MM
GND
AUDIO IN
COAXIAL
(
CD
)
DIGITAL IN
(*) The ARC function transmits audio signals from the TV via an HDMI cable and plays the TV audio on this unit.
Please check the TV's instruction manual to see if it supports the ARC function.
18
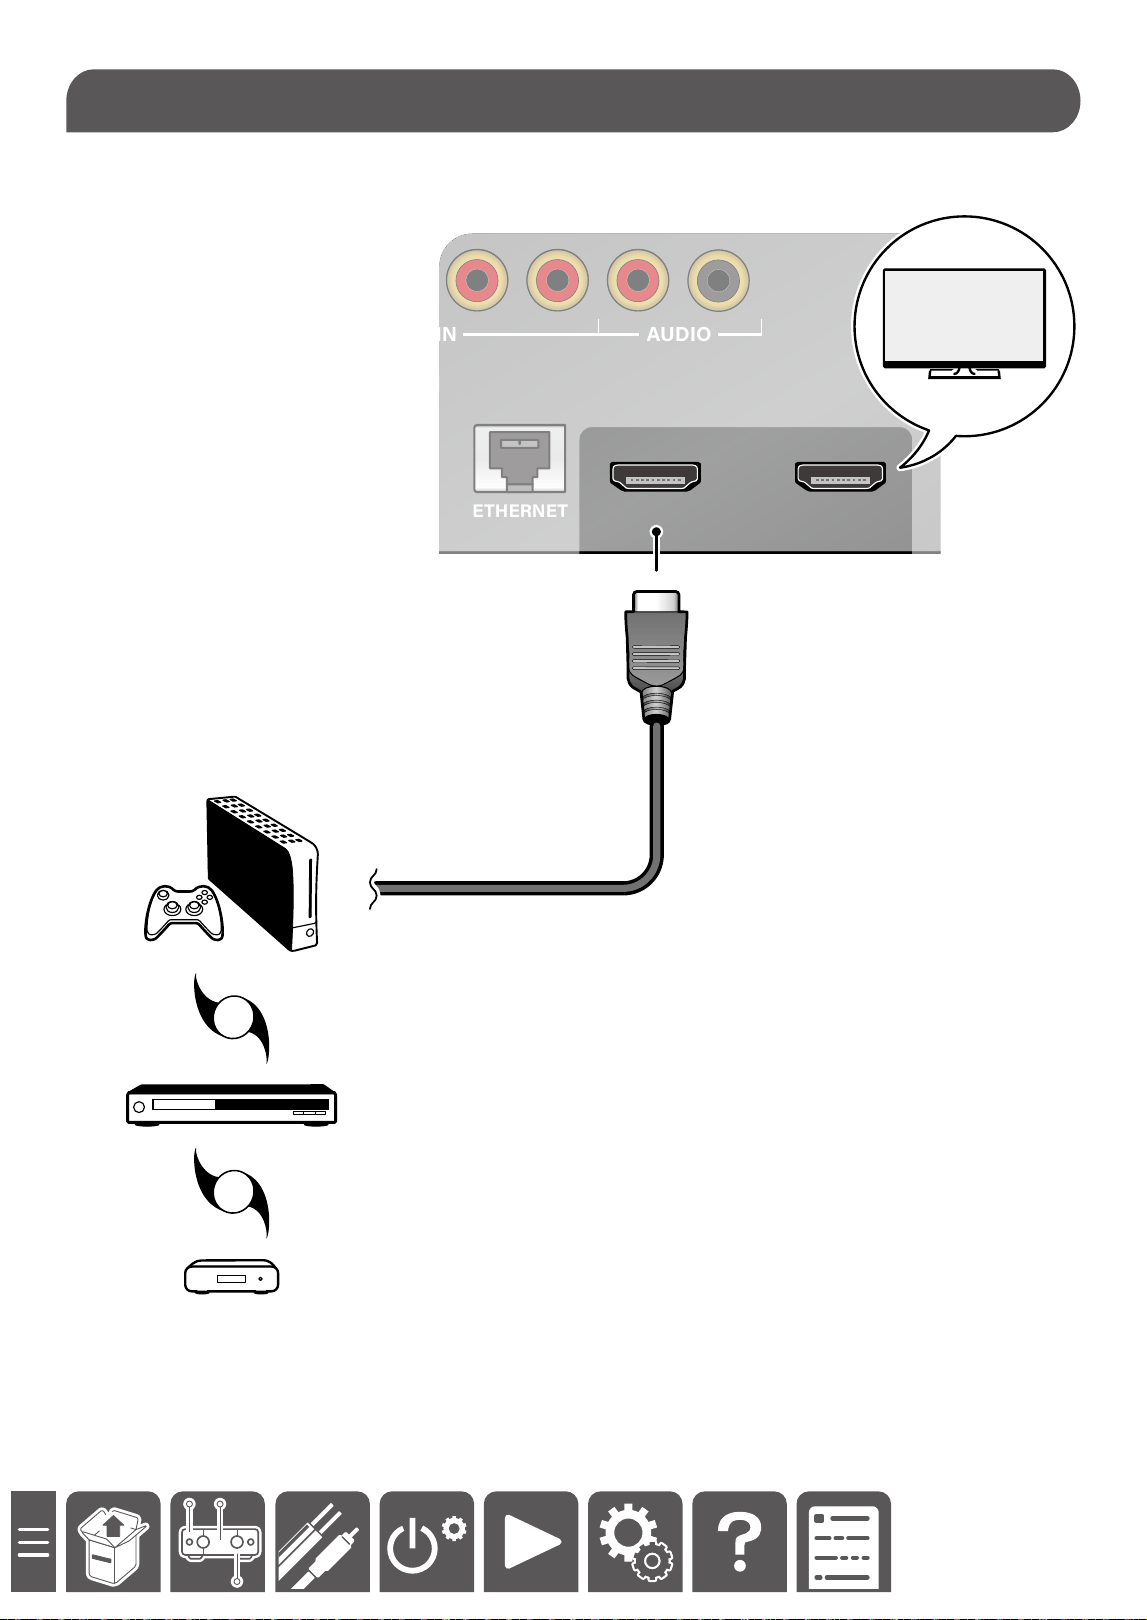
Connections
Using an HDMI cable (a) allows for connection with a game machine (b), Blu-ray disc/DVD player (c), set-top box
(d), etc.
GND
HDMI INETHERNETOPTICAL HDMI OUT
ARC
(
TV
)
MC
MM
GND
L
R
SUBWOOFER
PRE OUT
L
R
AUDIO IN AUDIO
COAXIAL
(
CD
)
DIGITAL IN
OR
OR
aa
b
b
c
c
c
d
TV
Connecting with a Device Equipped with an HDMI Terminal (Y-50 Only)
19
Connections
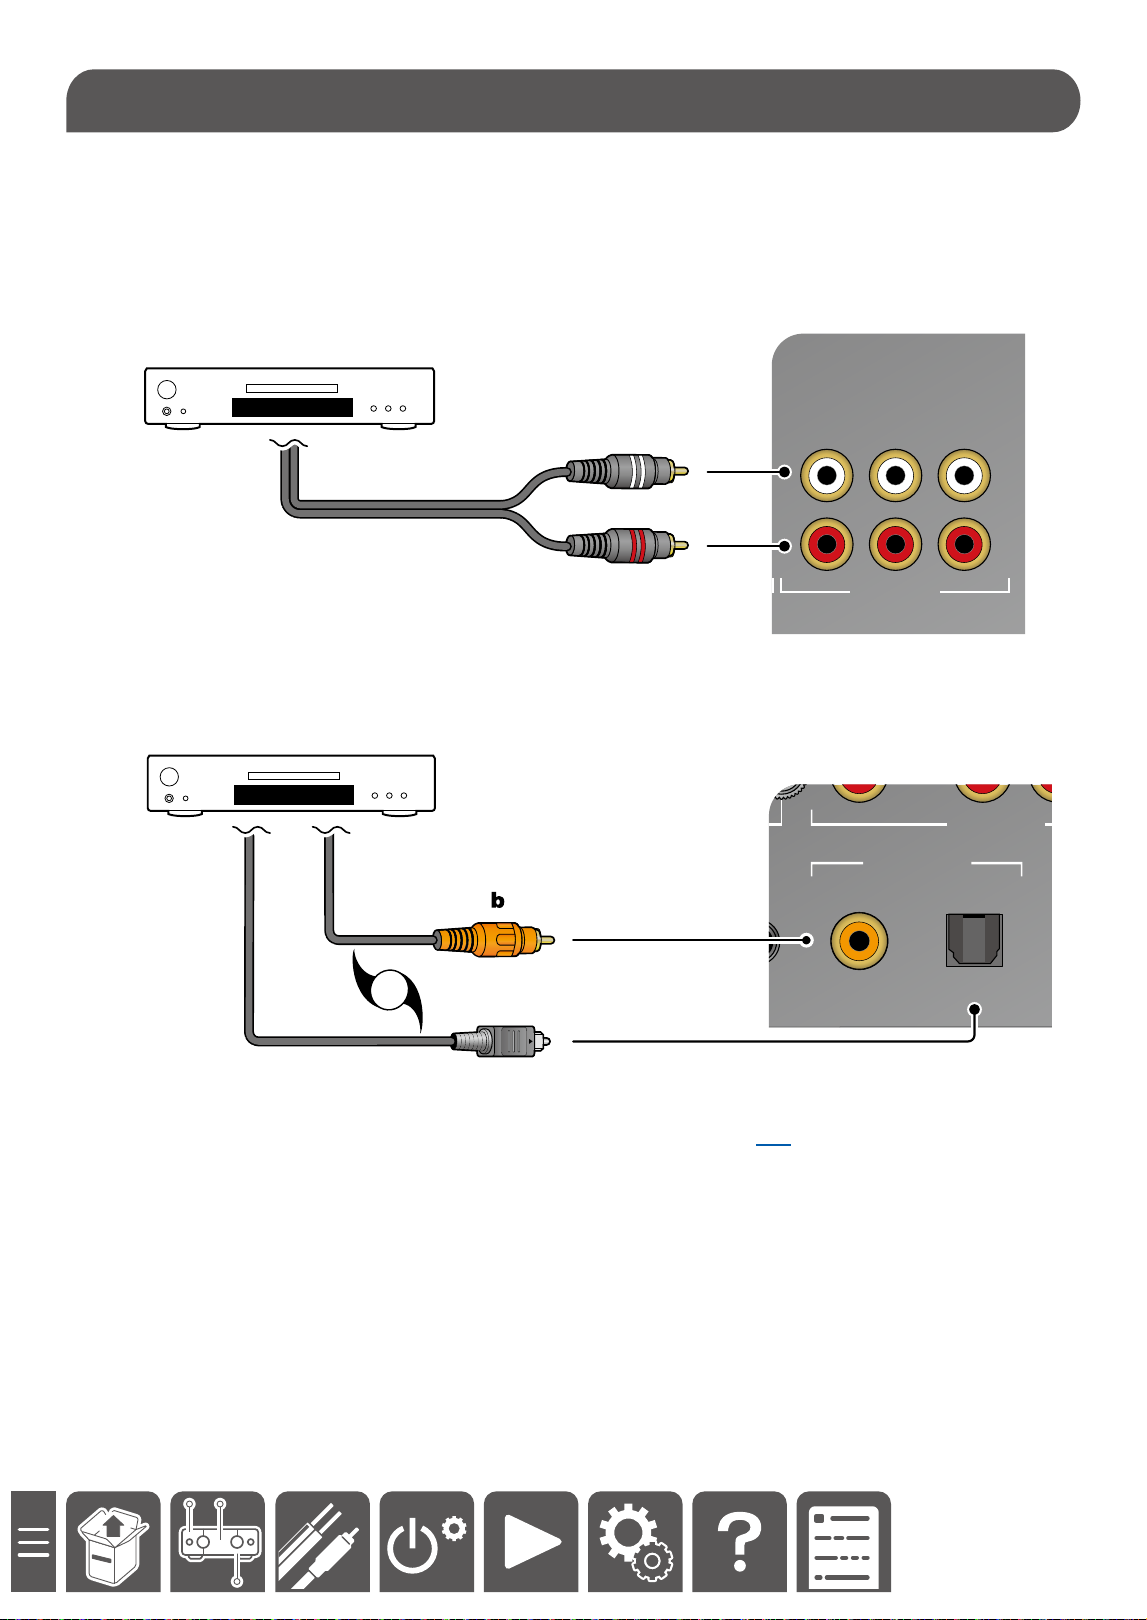
Connect the CD player using an analog cable or digital cable (optical digital cable or coaxial digital cable).
Analog Connection
Using an analog audio cable (a), connect a CD player to any of the following terminals.
: AUDIO IN (ANALOG 1, ANALOG 2, ANALOG 3).
OPT IN
OPT OUT
CD
AUDIO IN DIGITAL AUDIO IN
R
MM MC
GND
L
R
ANALOG
1
ANALOG
2
a
Digital Connection (Coaxial or Optical)
Using a digital coaxial cable (b) or digital optical cable (c), connect a CD player to the DIGITAL IN terminal.
OR
GND
ETHERNETOPTICAL
MC
MM
GND
R
R
AUDIO IN
COAXIAL
(
CD
)
DIGITAL IN
c
• To play audio of the CD player connected with the digital coaxial cable, press the "CD" button on the remote
controller or turn the selector knob to switch the input source to "COAX".( →p28)
Connecting a CD Player

20
Connections
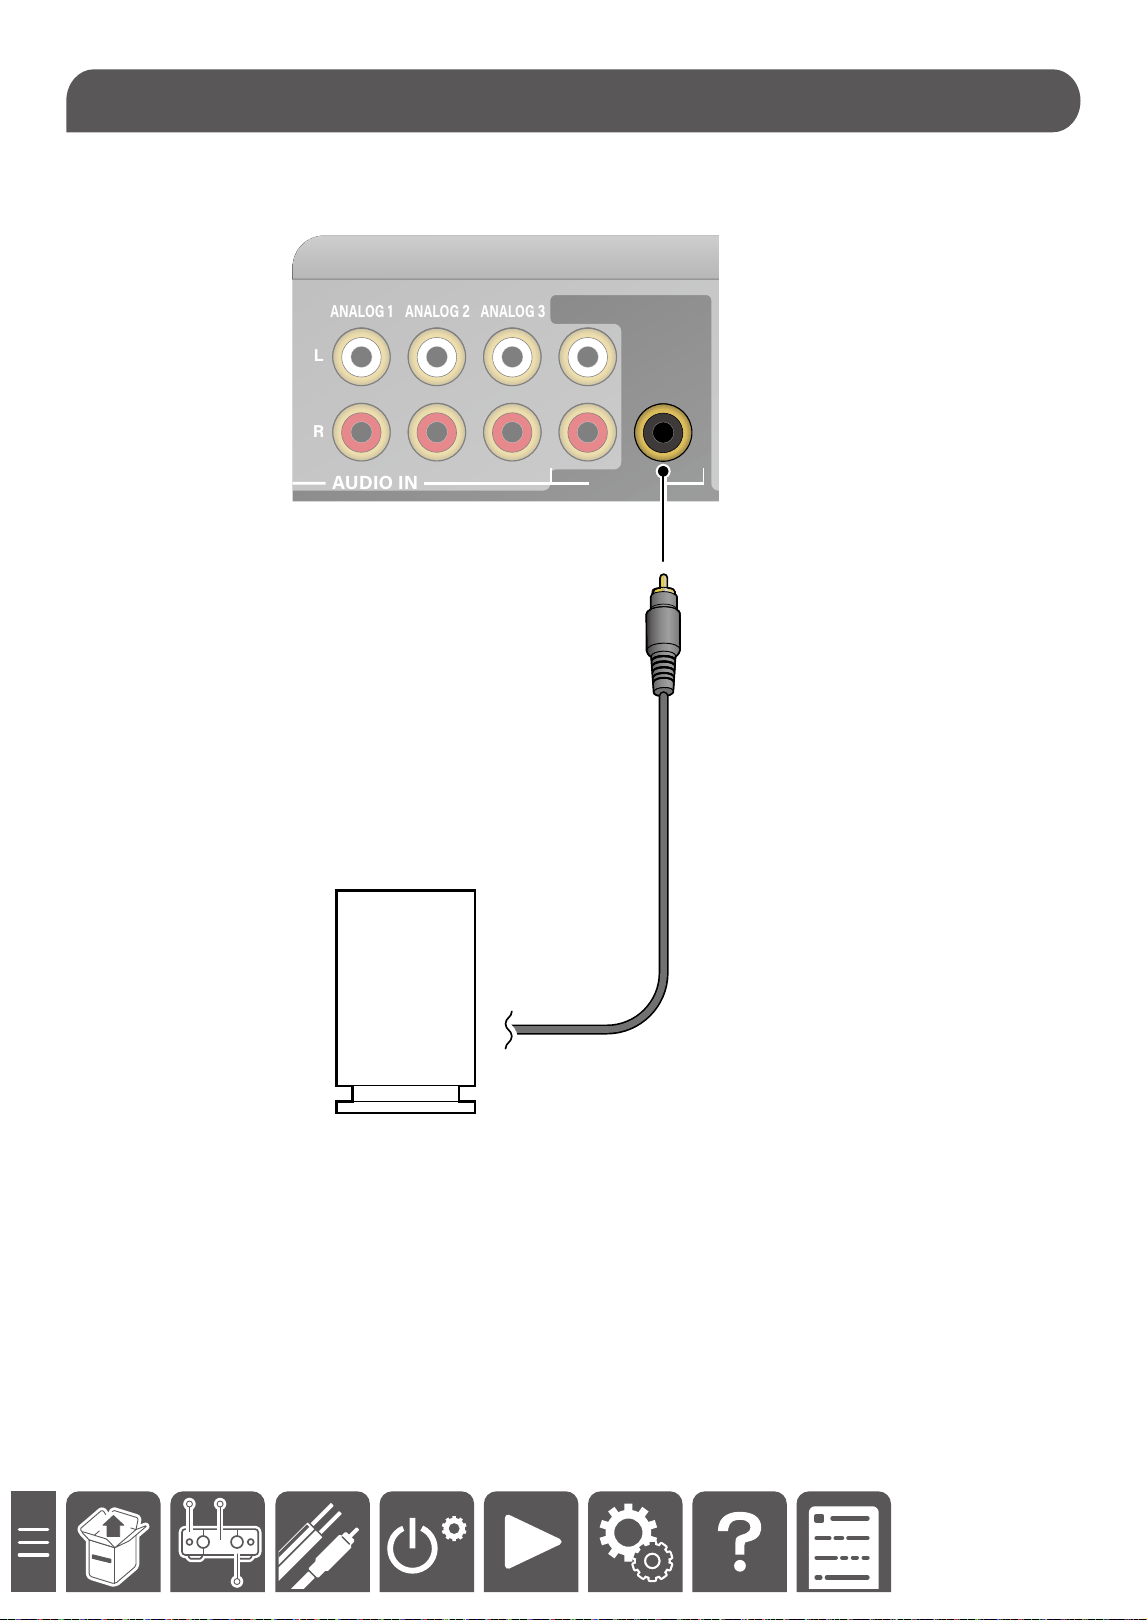
When connecting a smartphone or PC using a headphone amplier (a) or USB DAC (b), connect to the AUDIO IN
terminals (ANALOG 1, ANALOG 2, ANALOG 3) .
GND
GND
PHONO
ANALOG
1
L
R
ANALOG
2
ANALOG
3
PRE OUT
SUBWOOFER
PRE OUT
L
R
AUDIO IN AUDIO
a
a
b
b
c
d
c
c
c Conversion cable (*), d Analog audio cable
(*) Use a type of conversion cable that does not include a resistance part. Types of cables with resistance parts
are used for microphone terminals.
Connecting a Headphone Amplier or USB DAC
21
Connections
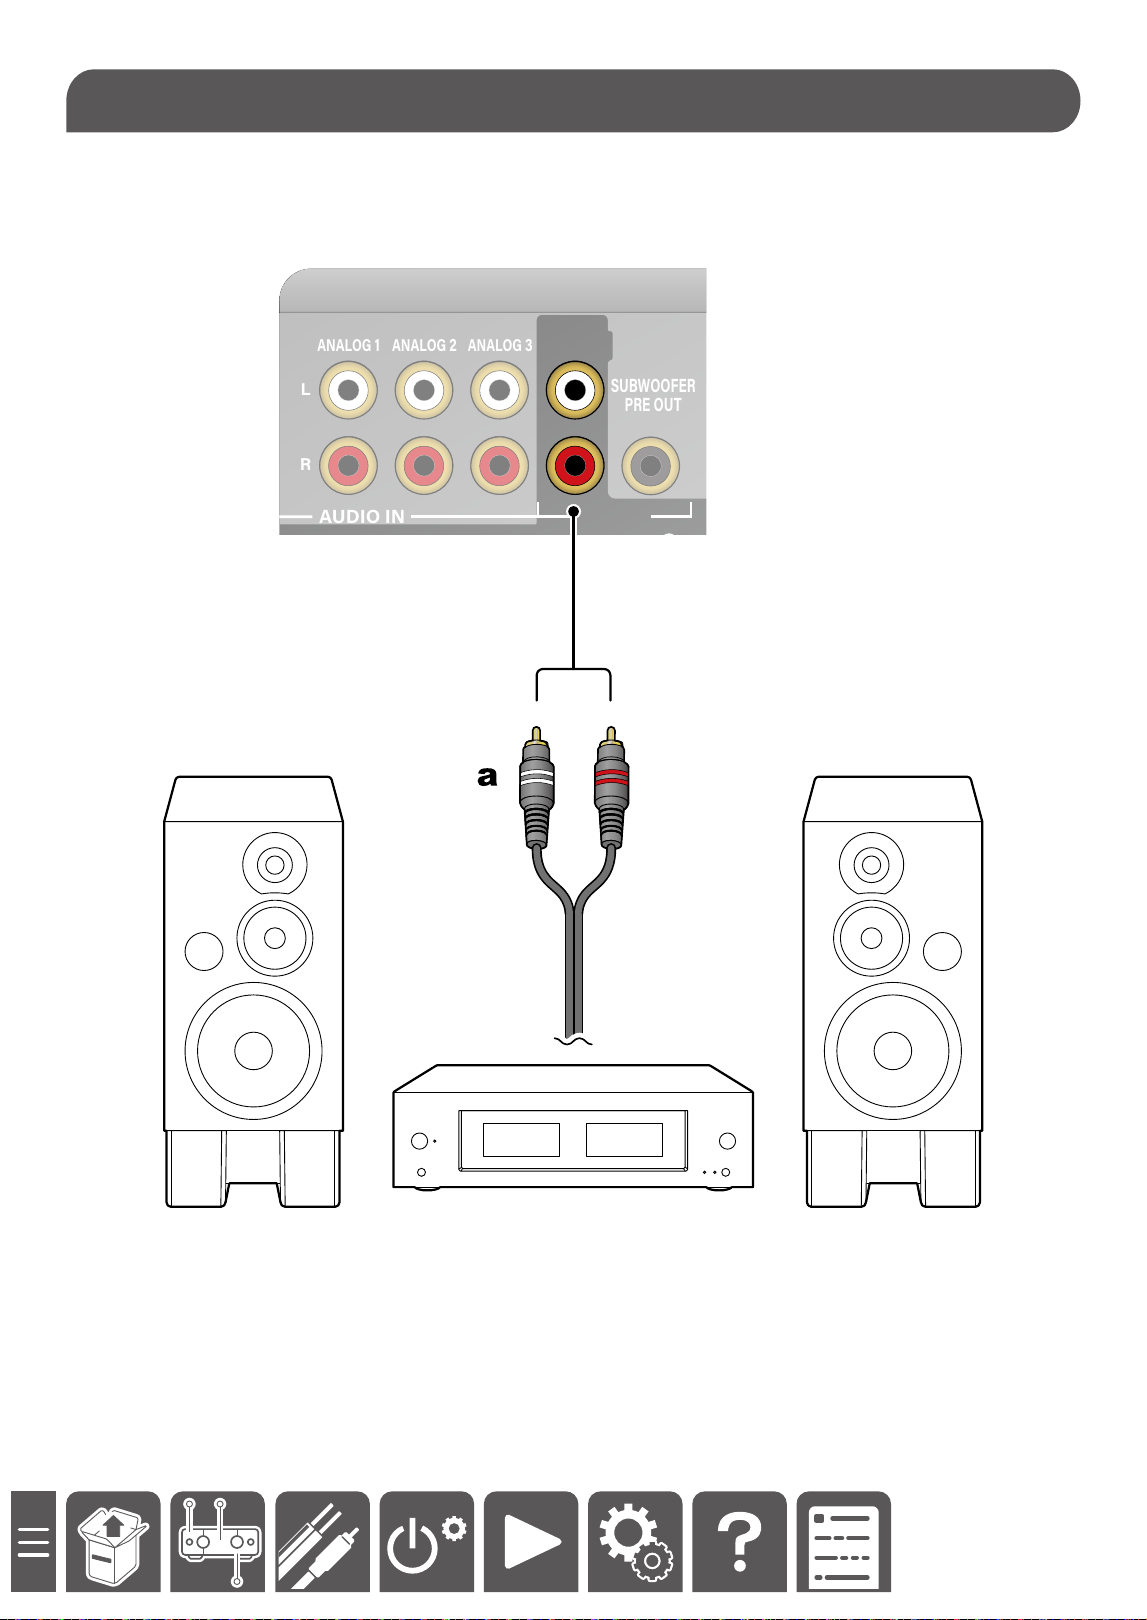
This unit is equipped with PRE OUT terminals to which a power amplier can be connected.
Use your desired power amplier.
HDMI INETHERNETOPTICAL HDMI OUT
ARC
(
TV
)
PHONO
ANALOG 1
L
R
ANALOG 2 ANALOG 3
PRE OUT
SUBWOOFER
PRE OUT
L
R
AUDIO IN AUDIO
COAXIAL
(
CD
)
DIGITAL IN
a Analog audio cable
Connecting a Power Amplier

24
Initial Setup
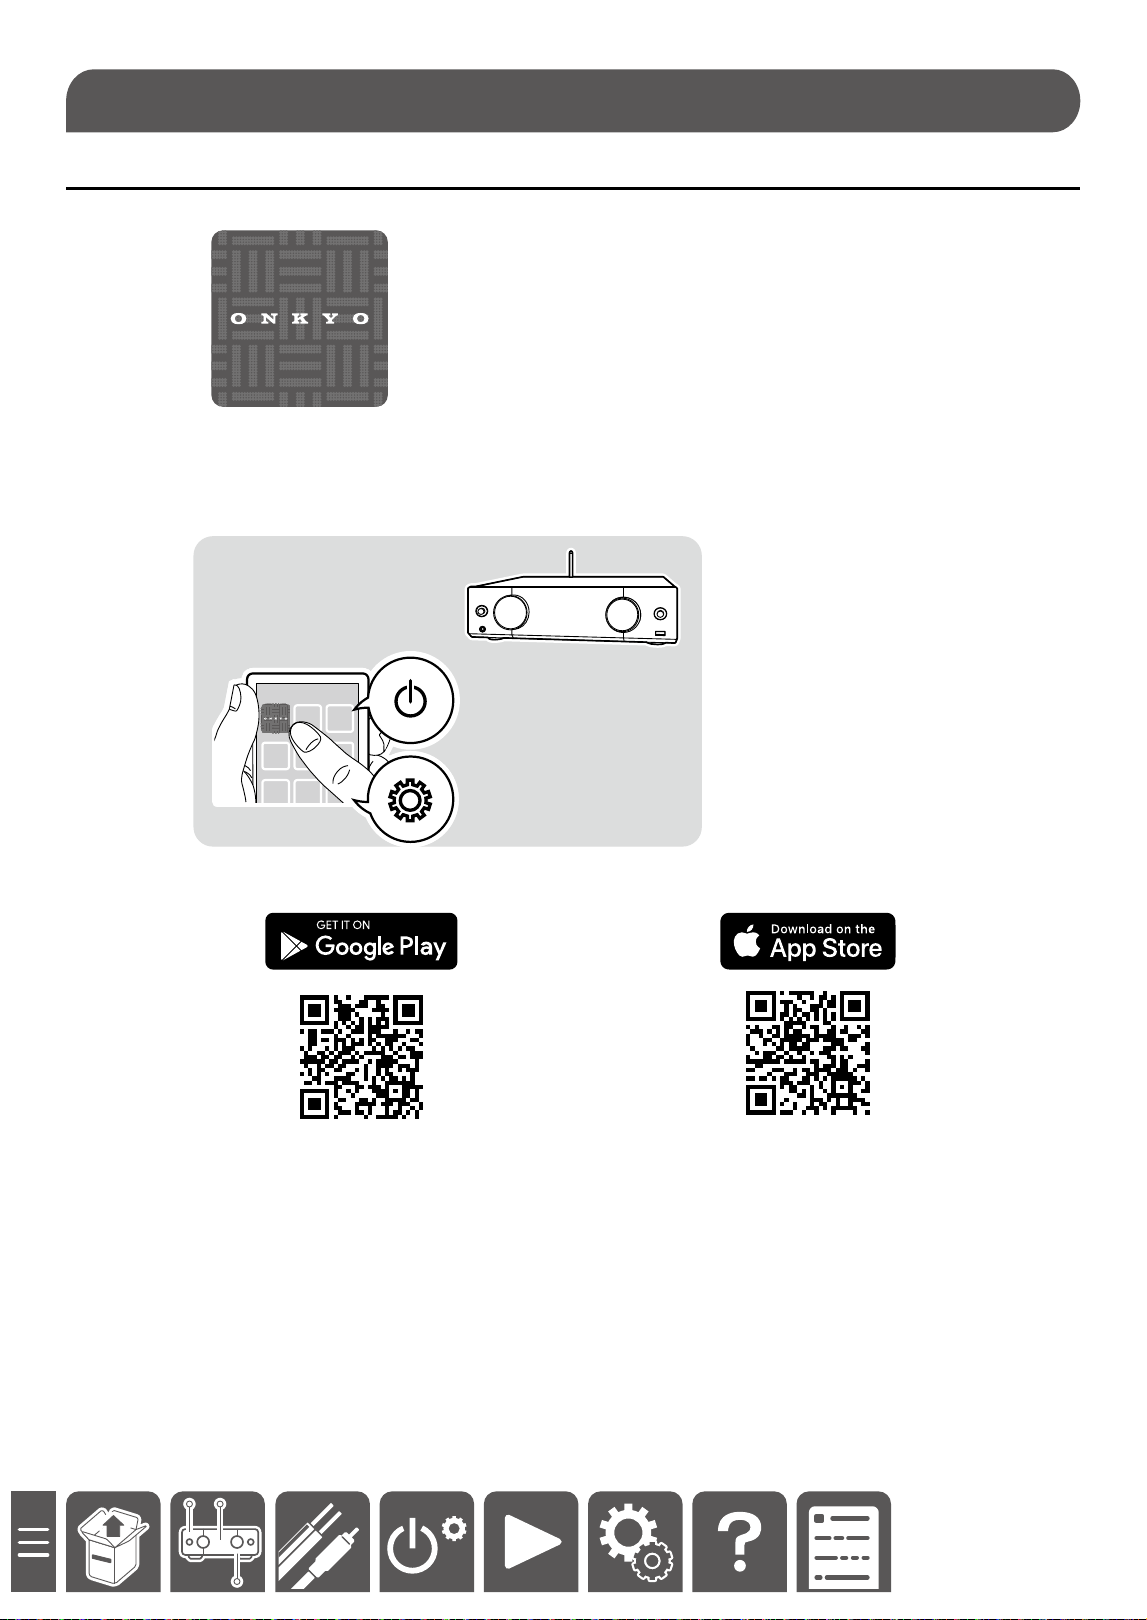
Onkyo Controller
Onkyo Controller (available on iOS and Android™ handsets) is a dedicated app available for free which allows you
to use your handset as a remote controller. Using this app allows you to congure Wi-Fi (wireless LAN) settings for
this unit, and perform input switching, volume adjustment, sound adjustment, etc.
https://onkyo.com/onkyo-app-ioshttps://onkyo.com/onkyo-app-android
Downloading the App
25
Initial Setup
This unit can be connected to a network via a wired LAN or Wi-Fi (wireless LAN). Connecting to the network
allows you to operate the main unit using the app or enjoy the network function such as streaming playback.
q Connecting via a wired LAN ( →p25)
q Connecting to Wi-Fi using Onkyo Controller ( →p26)
q Connecting to Wi-Fi using "Network Wizard" on the setup menu ( →p45)
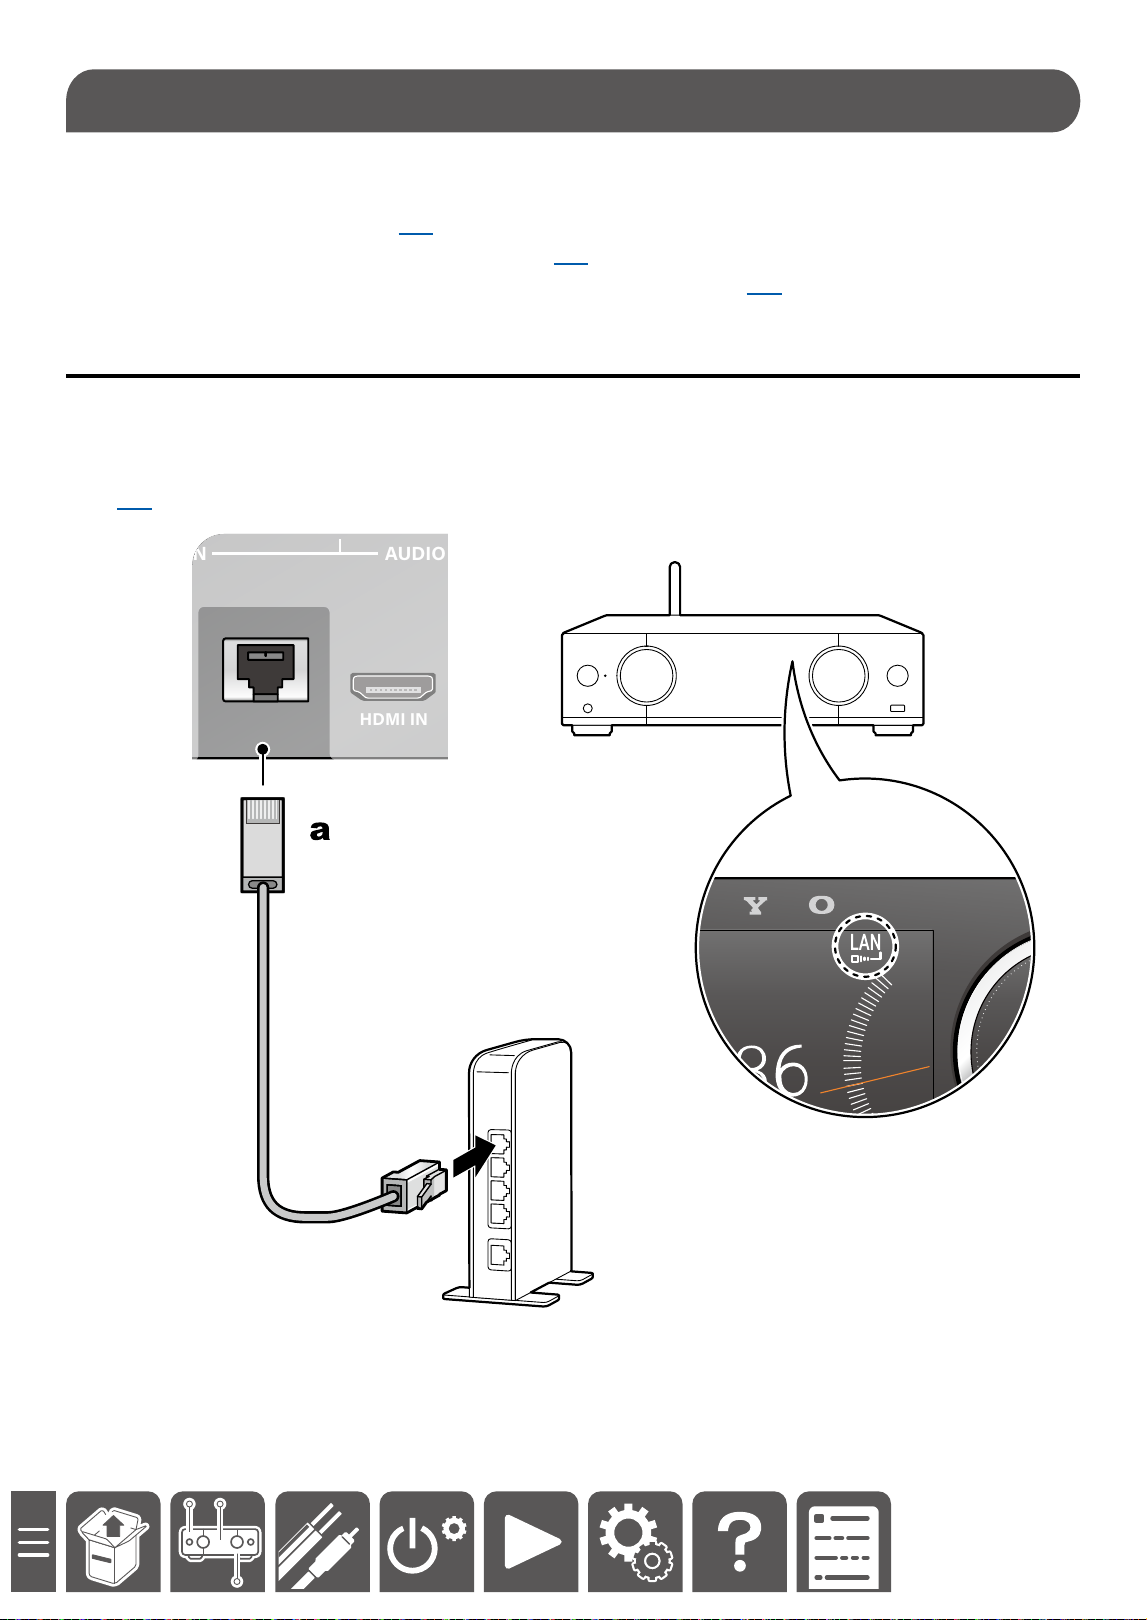
Connecting via a wired LAN
When using a wired LAN for connection, connect the router and the ETHERNET terminal using the Ethernet cable
(a) as shown below.
When the network connection is successful, the "LAN" icon is displayed.
• The IP address and other network information can be checked in "Network Information" on the setup menu.
( →p45)
HDMI INETHERNET HDMI OUT
ARC
(
TV
)
AUDIO IN AUDIO
36
VOL
PHONO
USB
NET
TV
OPTICAL
Note
For security reasons, always connect via a router, etc., when connecting this unit to the Internet. Do not directly
connect to the communication circuits (including public wireless LAN) of a telecommunications provider (mobile
communications company, xed-line communications company, Internet provider, etc.).
Network Connection

26
Initial Setup
Connecting to Wi-Fi using Onkyo Controller
Preparation
• First, search for the main unit using the Bluetooth function. Turn on the Bluetooth function of the mobile device.
• The screen of the app and operation procedure may change depending on the version.
1. Turn on the power of the main unit, and wait for approx. 10 seconds until the system starts up completely.
2. Start up Onkyo Controller.
3. Tap "Device Management".
4. Tap the search icon (a) to start searching.
When the main unit is found, tap and select it.
5. Enter the password of the wireless LAN router, and tap "Next".
6. When the connection to the wireless LAN router is successful, the privacy policy is displayed on the main unit
screen. To use all services, agree to the privacy policy. Press the cursor button of the remote controller
repeatedly, select "Accept", and press the ENTER button to conrm.
"Google cast Setup" menu is displayed on the screen of the app. Tap "Skip" to nish the setting, or tap "Accept"
to congure the setting. Google cast can be set later. ( →p41)
Device Management
Wi-Fi Network: SSID_***
Friendly Name
Onkyo Amp ******
Password input
Next
Device Management
Find a device to configure Wi-Fi settings
Select the device to connect to SSID_***
Onkyo
AMP
PRIVACY STATEMENT
Accept Not Accept
Some music services that use your log-in name,
e-mail address or password require your agreement
to Onkyo's privacy statement.
To know more about how we use them please
review our privacy statement athttp://www.onkyo.
com/privacy/.
20
15
10
5
0
-5
-10
You can cast music from your favorite mobile
apps to your device. Your use of Google cast
is subject to the Google Terms of Service.
The Google Privacy Policy describes how
your data is handled by Google Cast.
To learn more about how Google protects
your privacy, go to g.co/cast/privacy
Accept
Skip
20
15
10
5
0
-5
-10
Device Management
Find a device to configure Wi-Fi settings
Searching device
a
20
15
10
5
0
-5
-10
Home
Device Management
No active devices/zones registered.
Please register a device/zone from
Device Management button.
Google Cast Setup
28
Playback
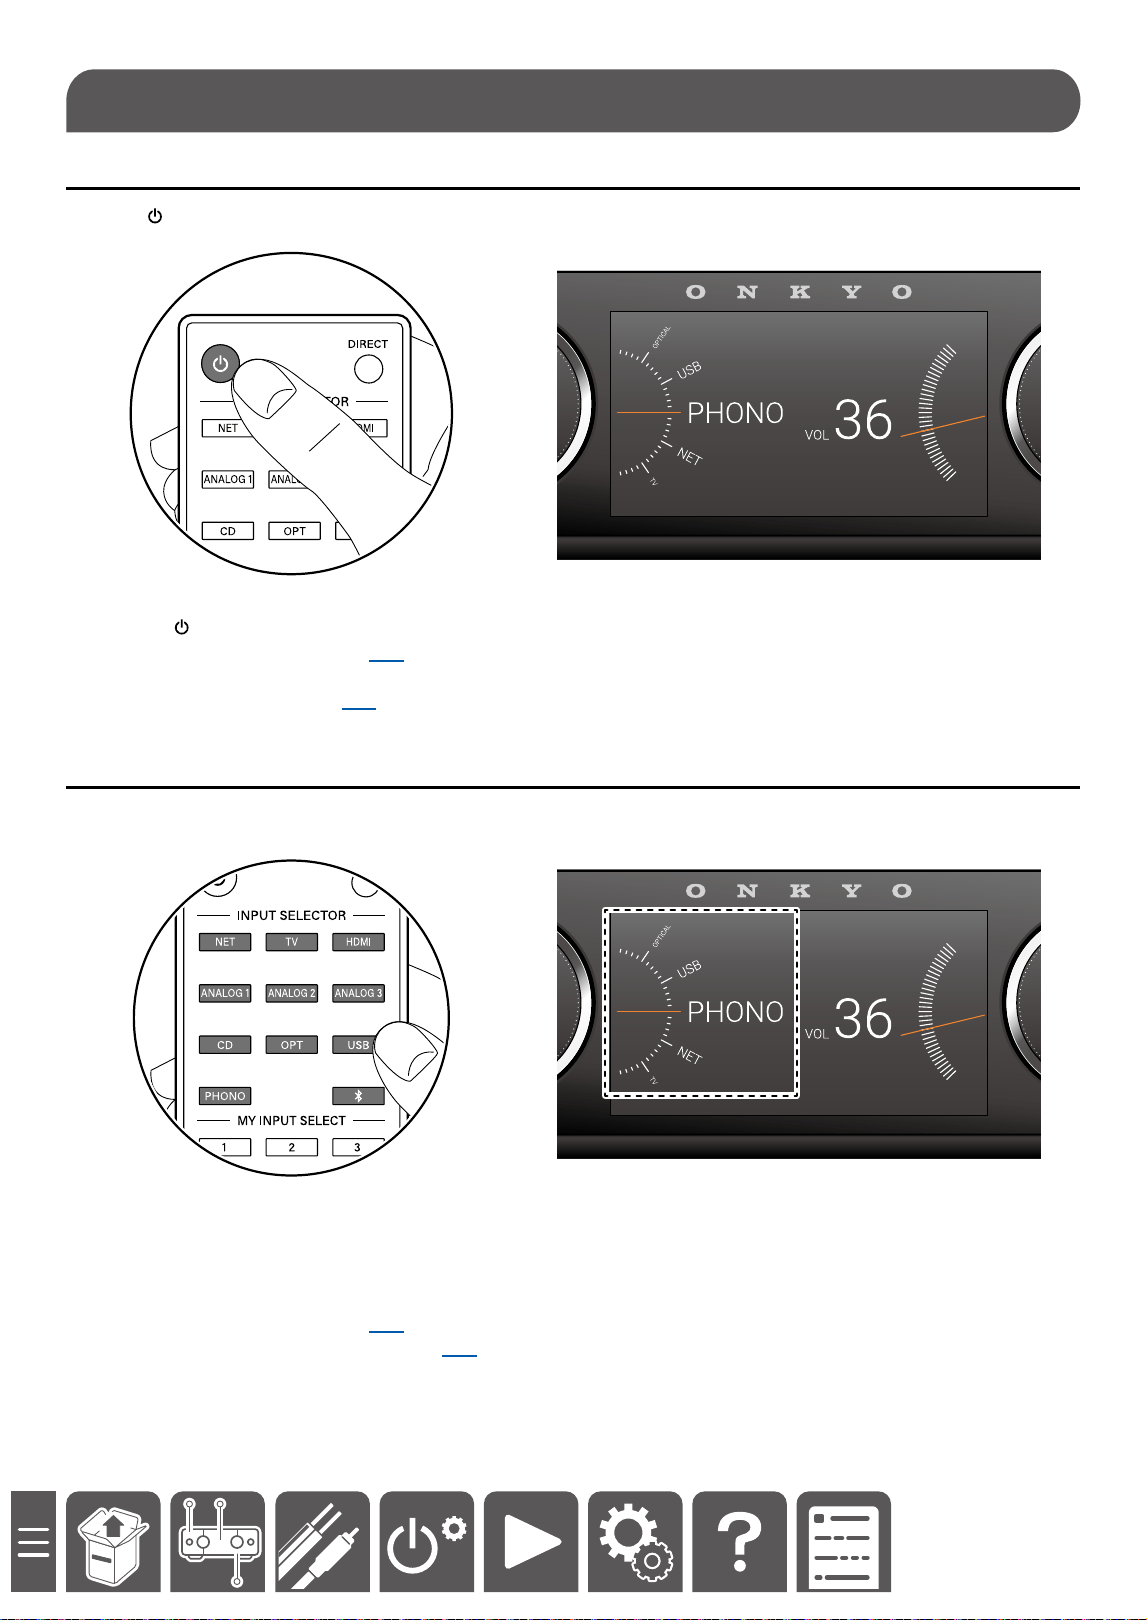
Turning the power on
1. Press ON/STANDBY on the remote controller to turn on the power of the unit.
36
VOL
PHONO
USB
NET
TV
OPTICAL
You can also turn on the power of the unit with the following operations:
– Pressing
ON/STANDBY on the main unit.
– Using the Onkyo Controller ( →p24)
• If no operation is performed for 20 minutes without audio, the Auto Standby function is activated, and the unit
enters the standby state. ( →p50)
Selecting a source to play
1. Press an input selector button on the remote controller to select a source.
36
VOL
PHONO
USB
NET
TV
OPTICAL
You can also select a source to play with the following operations:
– Turn the selector knob of the main unit.
Turning the selector knob switches the input source in the following order.
ANALOG 1 → ANALOG 1 → ANALOG 3 → OPTICAL → USB → PHONO → NET → TV → HDMI(Y-50 Only)
→ COAX(CD) → BLUETOOTH → ANALOG 1 • • •
– Using the Onkyo Controller ( →p24)
• Even if you use the DISPLAY button ( →p35) to switch to another screen, performing this operation displays
this screen for ve seconds.
Basic Operations
29
Playback
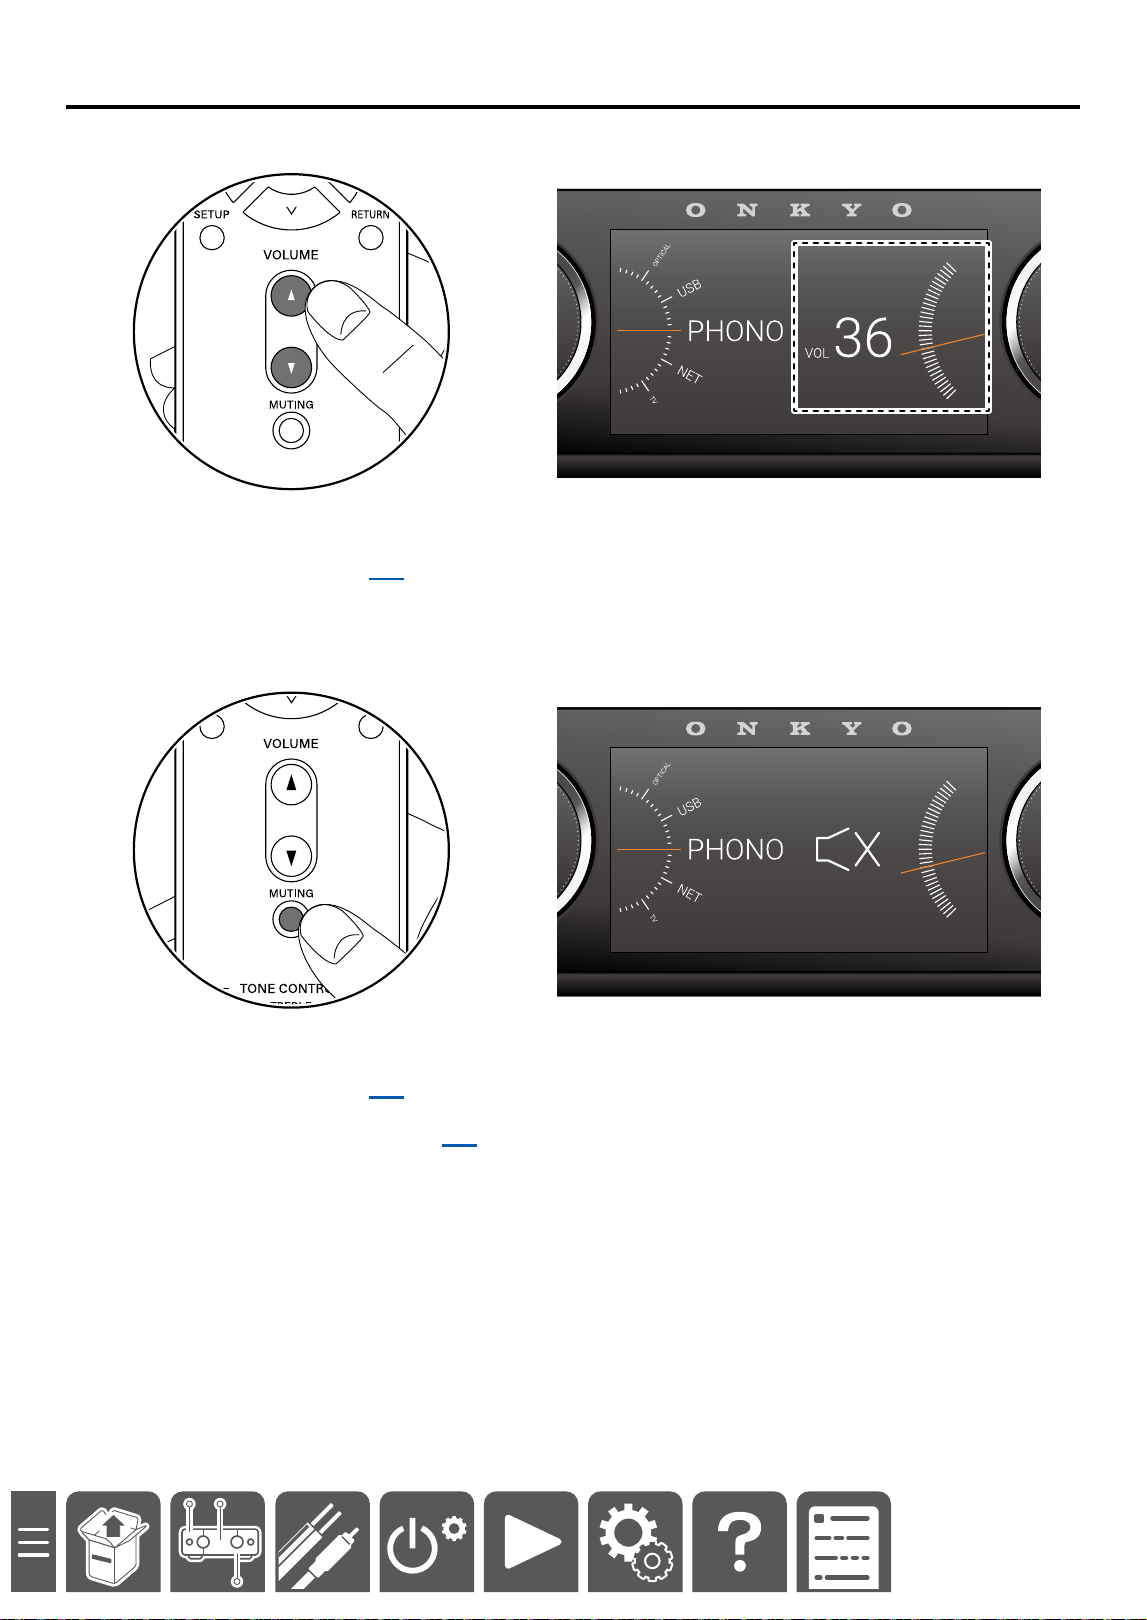
Adjusting the volume
1. Press the VOLUME buttons on the remote controller to adjust the volume.
36
VOL
PHONO
USB
NET
TV
OPTICAL
You can also adjust the volume with the following operations:
– Turn the volume dial on the main unit.
– Using the Onkyo Controller ( →p24)
2. To temporarily mute the sound, press the MUTING button.
Press the button again to cancel muting.
36
VOL
PHONO
USB
NET
TV
OPTICAL
You can also adjust the volume with the following operations:
– Press the volume dial on the main unit.
– Using the Onkyo Controller ( →p24)
• Even if you use the DISPLAY button ( →p35) to switch to another screen, performing this operation displays
this screen for ve seconds.
30
Playback
You can wirelessly play music on a smartphone or other Bluetooth wireless technology enabled device through the
speakers connected to this unit.
Playing audio from Bluetooth wireless technology enabled
devices with this unit
Pairing
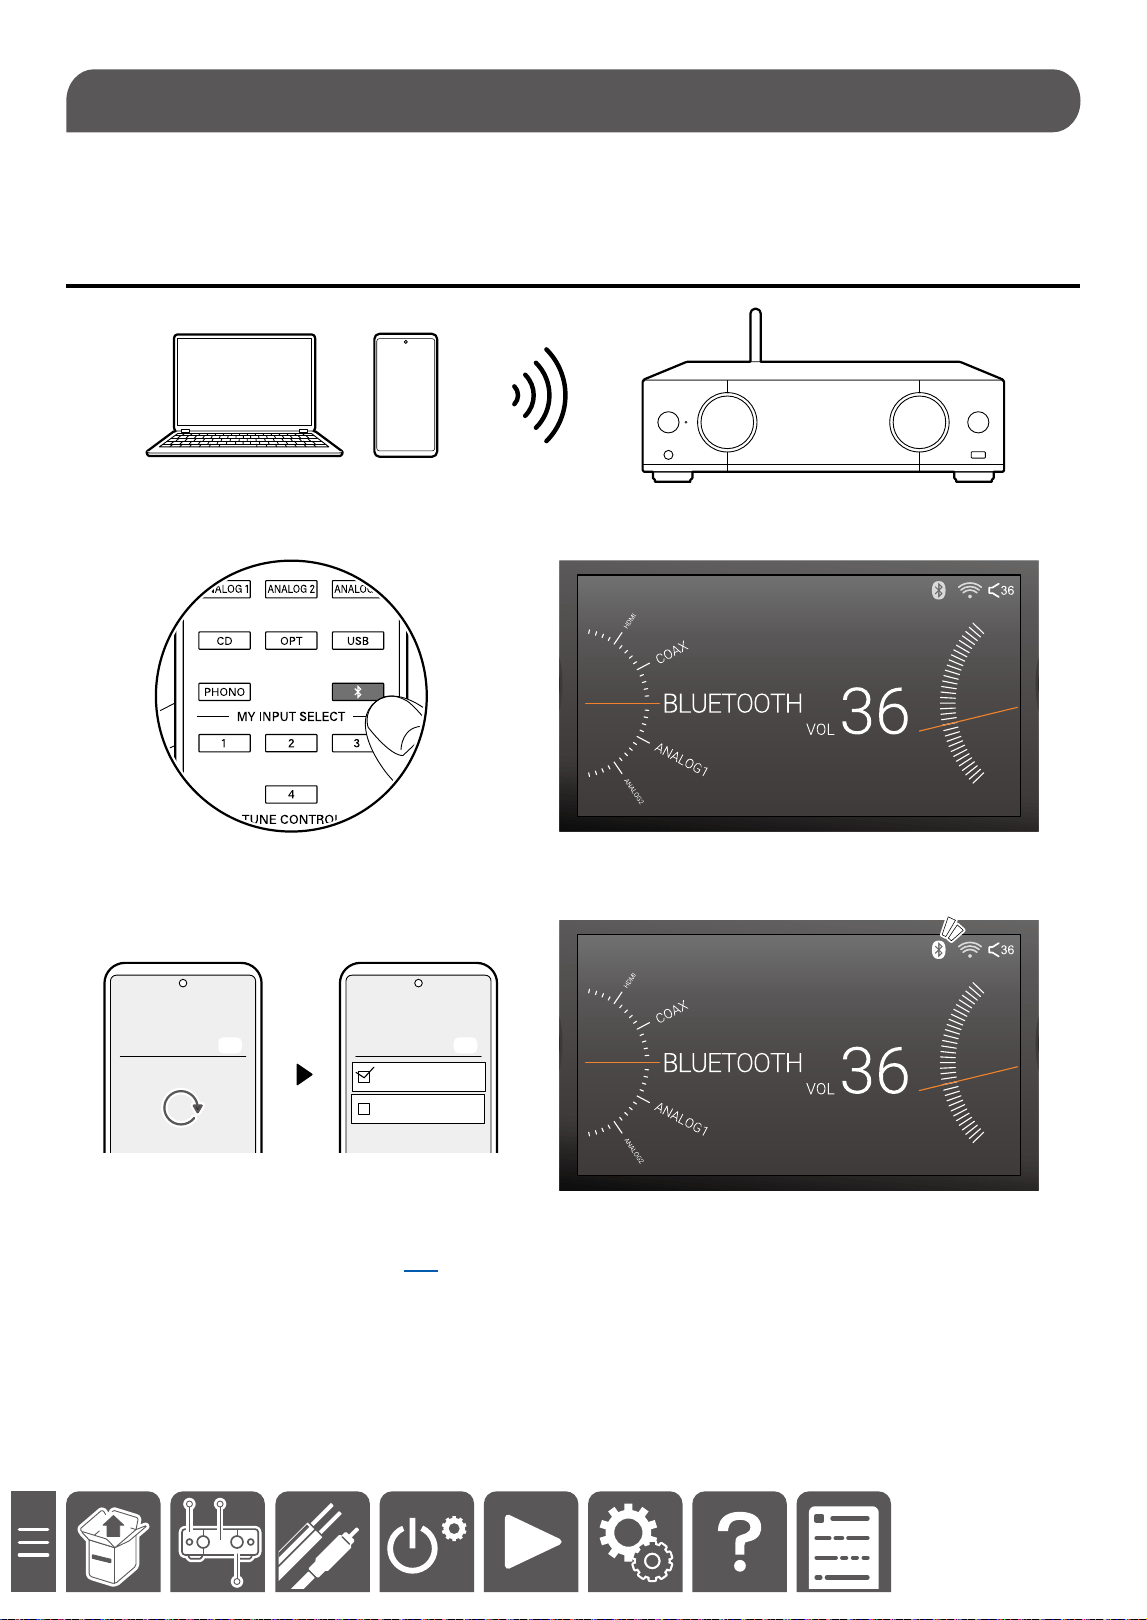
1. Press the BLUETOOTH button to switch to the BLUETOOTH selector.
2. Turn on the BLUETOOTH function of the BLUETOOTH-enabled device.
3. Operate the BLUETOOTH-enabled device, and select this unit.
When the pairing is successful, the BLUETOOTH icon status changes from blinking to lighting.
Bluetooth
Bluetooth Off
On
Bluetooth
Bluetooth Off
On
Y-50xxxx
Y-40xxxx
Note
To stop blinking of the Bluetooth icon, it is necessary to connect the BLUETOOTH-enabled device, or set
"Bluetooth" - "Bluetooth Receiver" ( →p45)to o on the setup menu.
Bluetooth
®
Playback
31
Playback
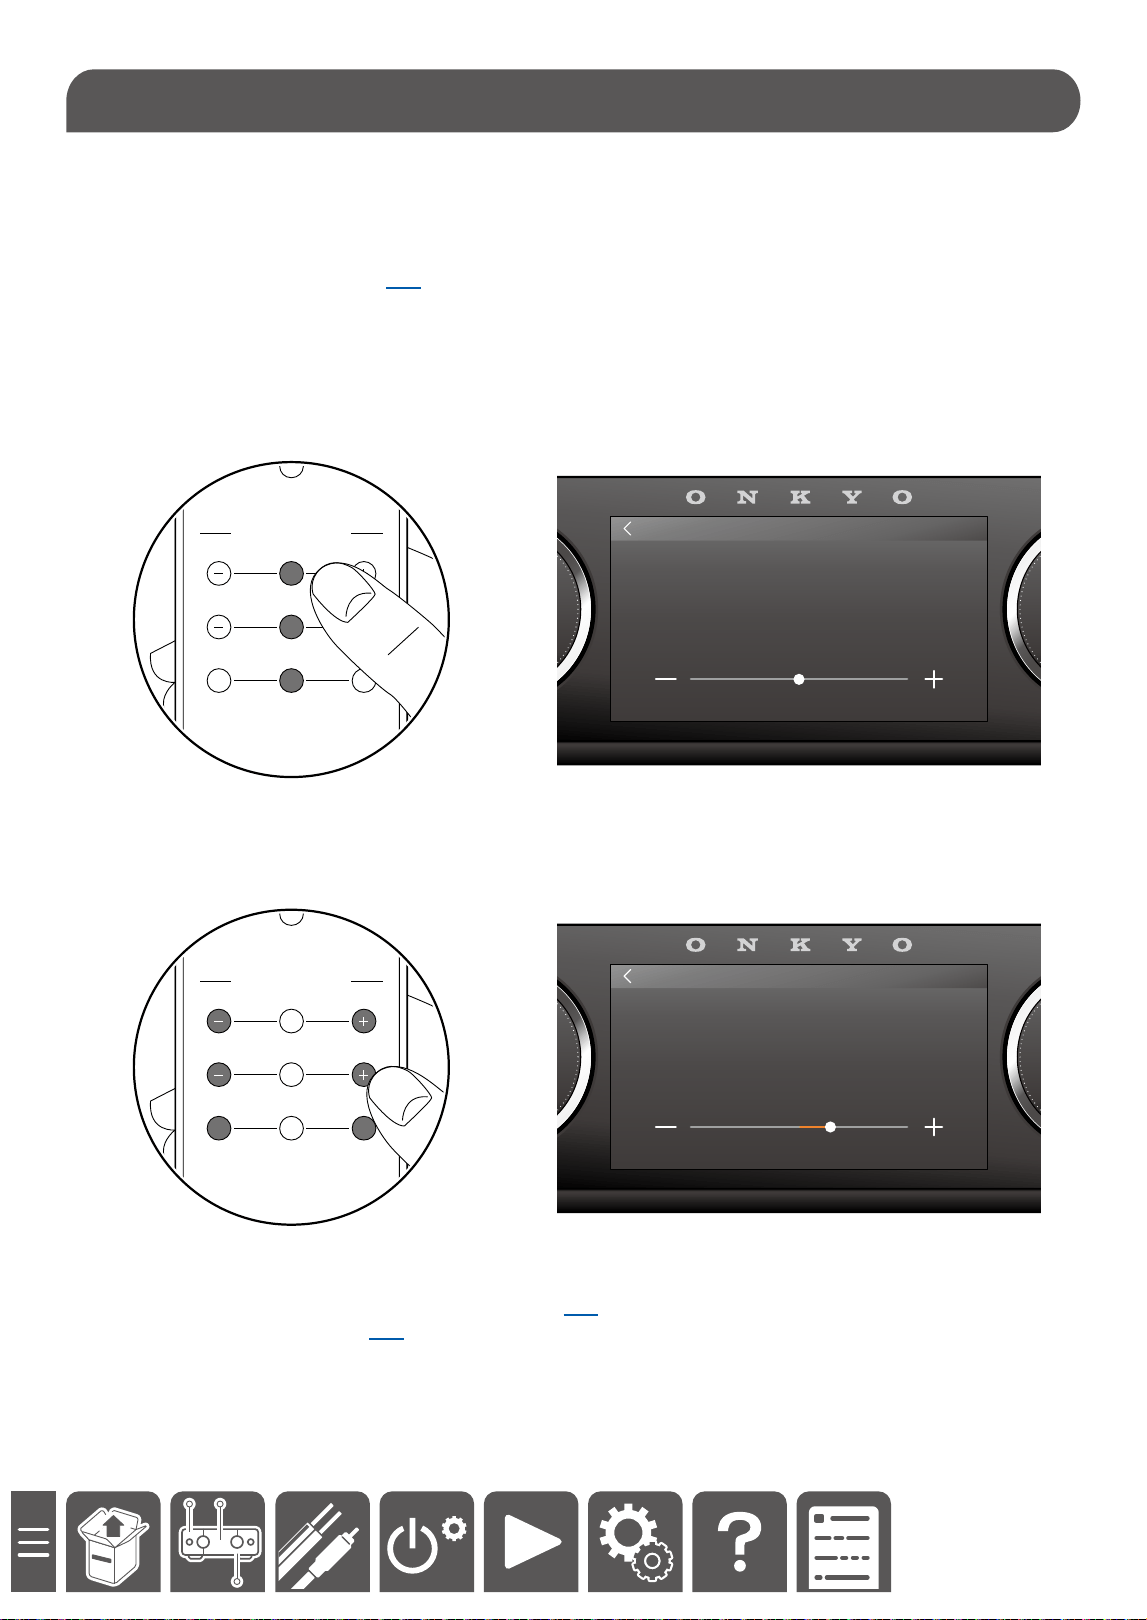
You can adjust the bass, treble and left/right output balance respectively.
TREBLE: Enhance or moderate the high pitched range.
BASS: Enhance or moderate the low pitched range.
BALANCE: Adjust the balance of the sounds output from the left and right speakers.
• Turning on the DIRECT mode ( →p33) disables these adjustments. Even if these settings are selected, the
sound does not change. Turning o the DIRECT mode enables the displayed setting.
• Turning on/o the DIRECT mode during playback of music allows you to check the dierence between before
and after adjustment.
1. Press the TONE CONTROL button (“TREBLE,” “BASS,” or ‘BALANCE’) on the remote control once.
The unit enters the adjustment mode, and the current setting value is displayed.
0.0
dB
TREBLE
TREBLE
BALANCE
BASS
TONE CONTROL
RC-991S
L R
2. Press the “+/-” button or the “L/R” button to adjust the level.
Level can be adjusted in 0.5-step increments. TREBLE and BASS can be adjusted from +10.0 to -10.0, and
BALANCE can be adjusted from R side 10.0 to L side 10.0.
2.5
dB
TREBLE
+
TREBLE
BALANCE
BASS
TONE CONTROL
RC-991S
L R
You can also change the TREBLE/BASS/BALANCE settings with the following operation:
– Using the "Equalizer" function on the setup menu ( →p45)
– Using the Onkyo Controller ( →p24)
Adjusting the Bass, Treble and Balance
32
Playback
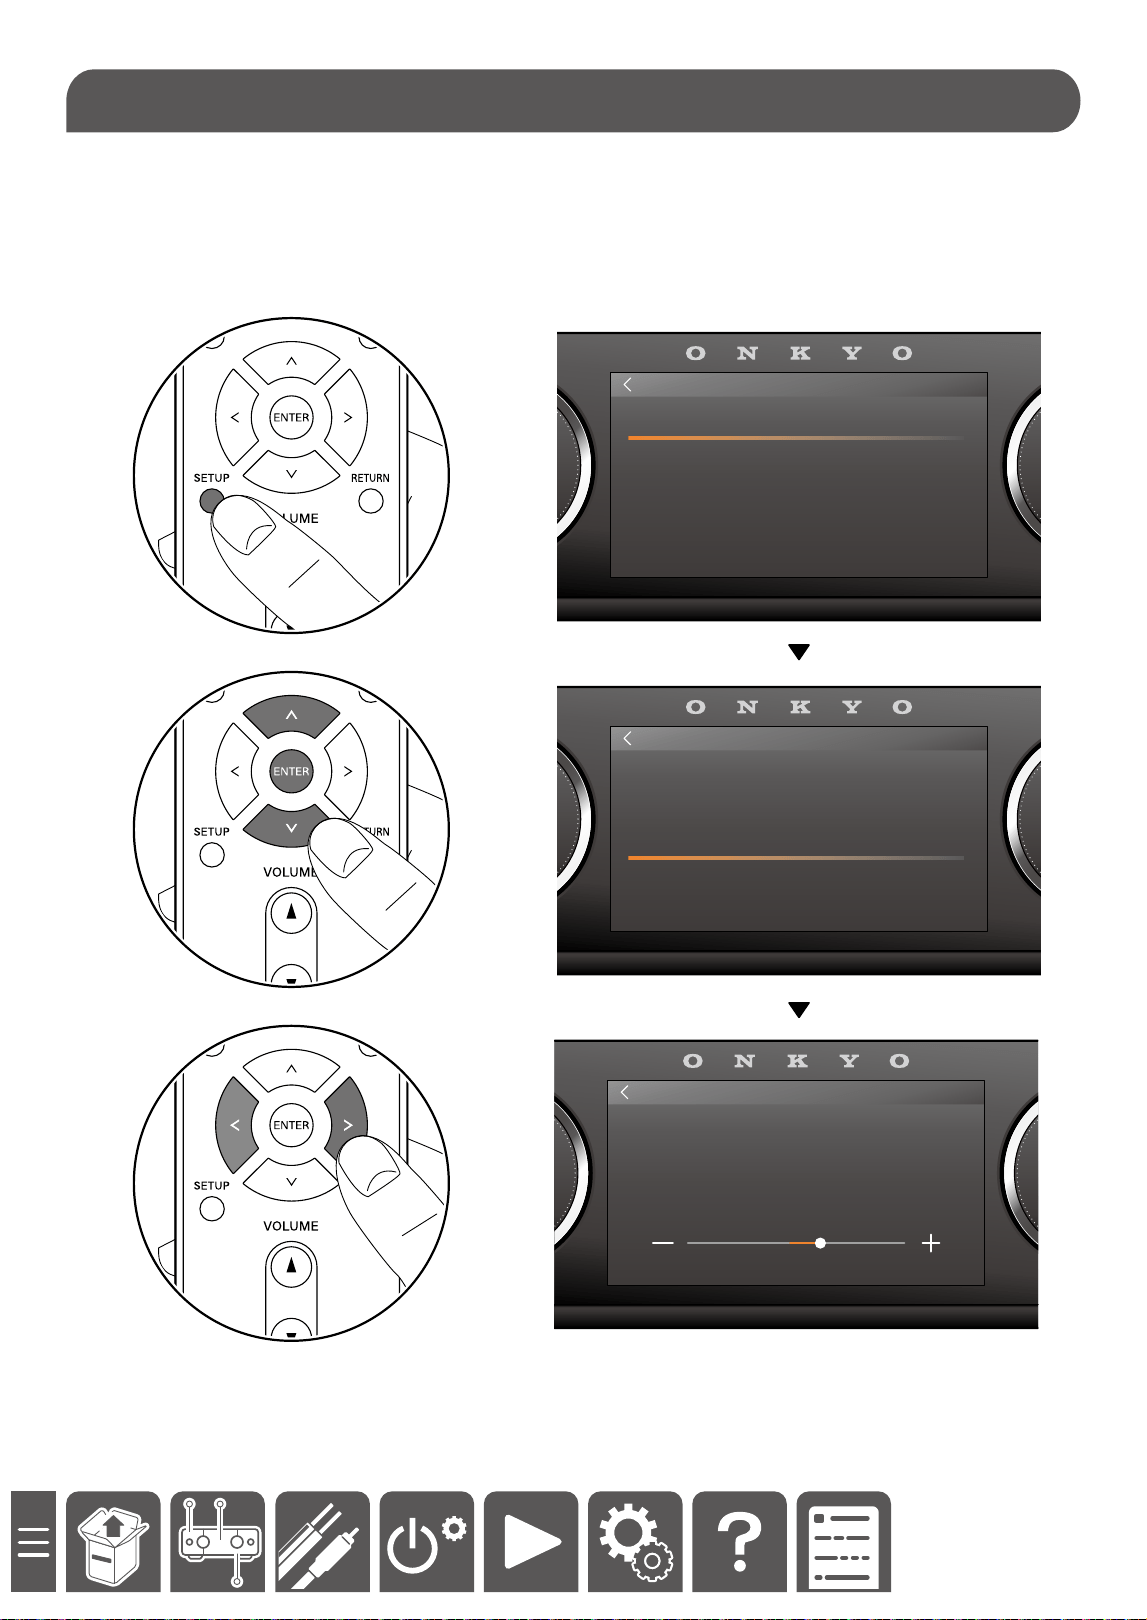
A vocal strength can be adjusted.
1. Press the "SETUP" button on the remote controller.
2. Select "Equalizer" - "Vocal Enhancer" from the setup menu, and adjust the vocal strength.
• Select a value between "-6.0 dB" and "+6.0 dB" (in 0.5 dB increments).
3. Press the "RETURN" button repeatedly, and nish the setting.
SYSTEM SETTINGS
Equalizer
Speaker Settings
Network
Bluetooth
Miscellaneous
Equalizer
Room EQ
Treble
Vocal Enhancer
Bass
Balance
2.5
db
VOCAL ENHANCER
+
Vocal Adjustment
33
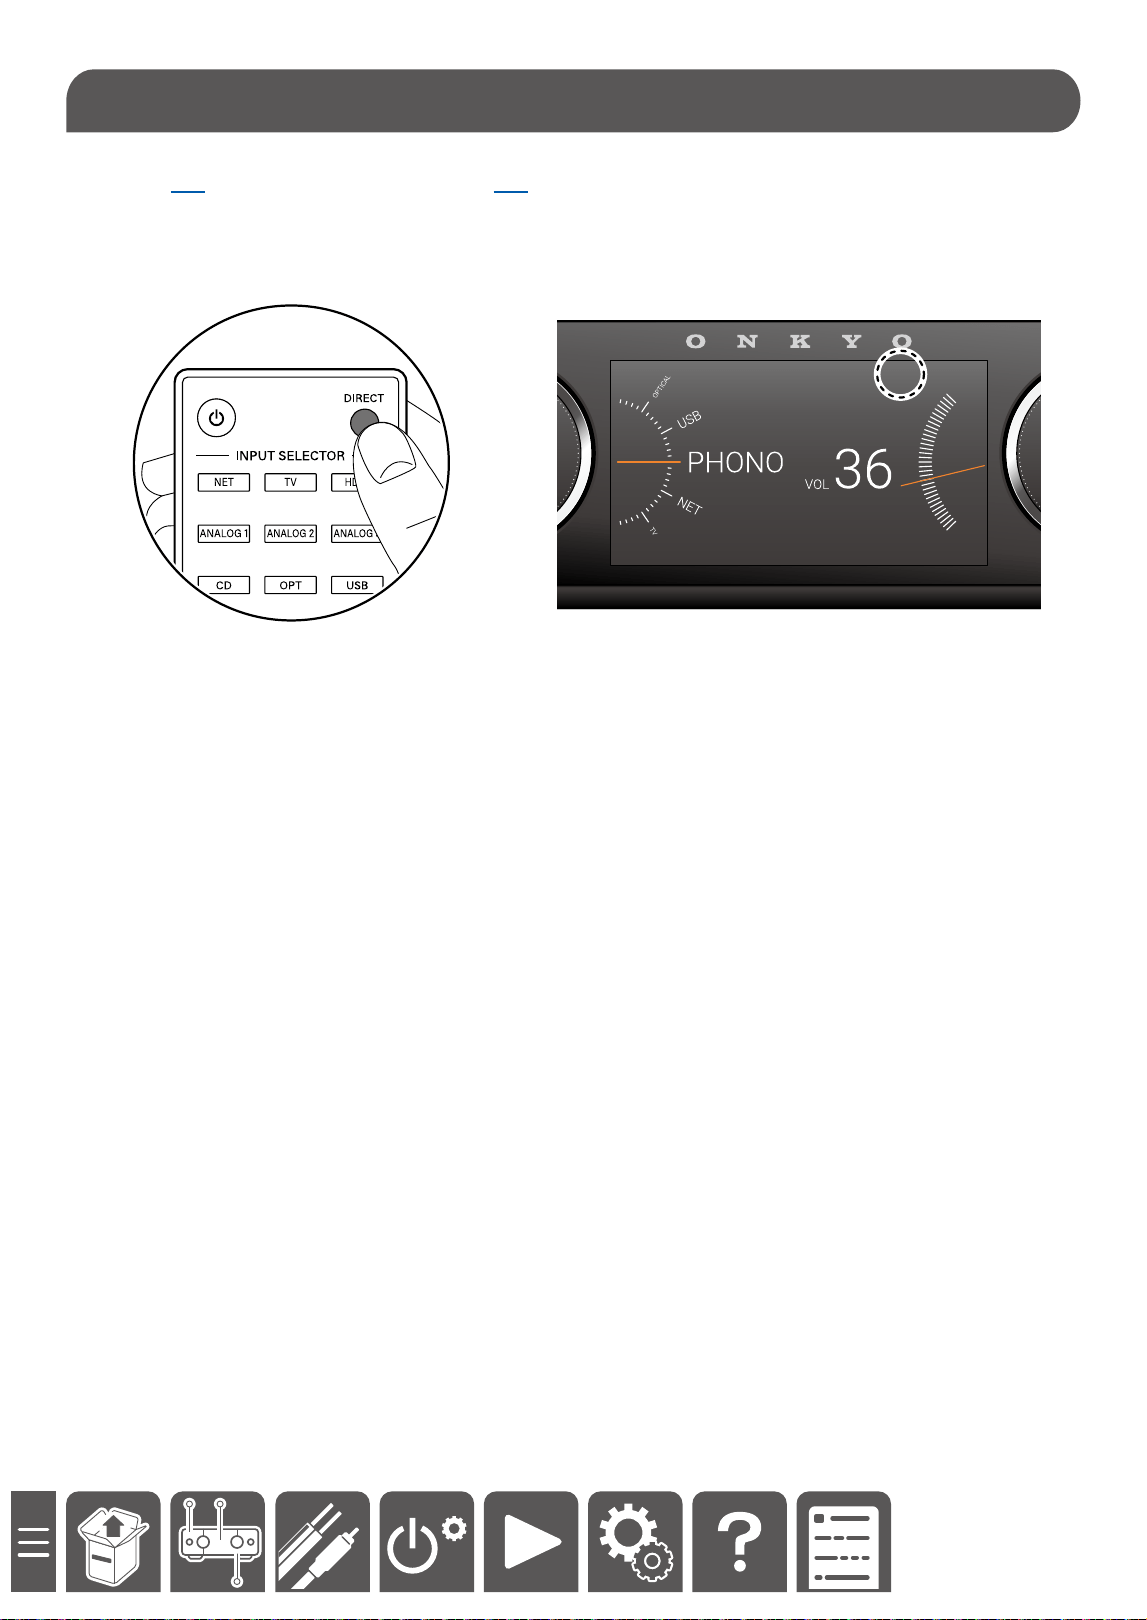
Playback
Turning on the DIRECT mode disables all sound quality adjustment functions including, bass, treble, balance,
VOCAL ( →p46), and Room EQ (Y-50 Only) ( →p46).
• Turning o the DIRECT mode returns to the original setting.
1. To turn on the DIRECT mode, press the "DIRECT" button on the remote controller.
To cancel the mode, press the button again.
36
VOL
PHONO
USB
NET
TV
OPTICAL
DIRECT
Using the DIRECT mode

35
Playback
Switching the Display Content
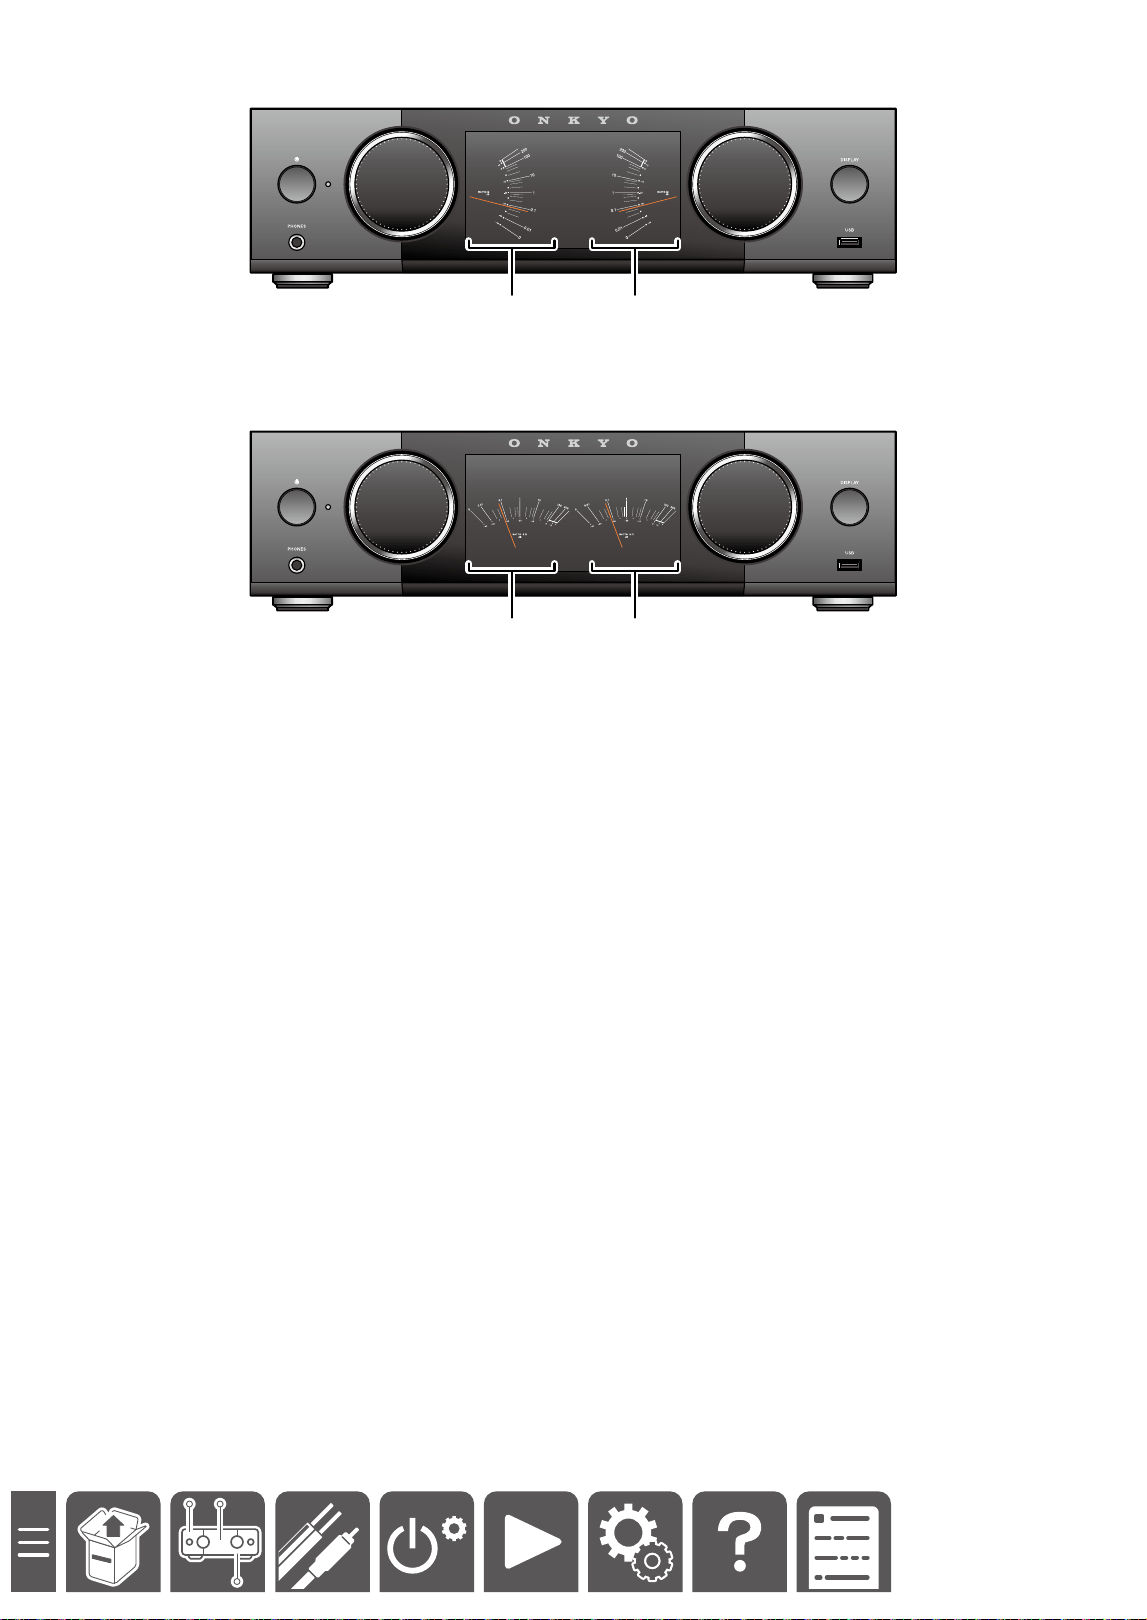
Pressing the "DISPLAY" button on the remote controller or the main unit switches the display content.
DISPLAY 1
Standard screen. When operations such as volume adjustment and input source switching are performed, this
screen is displayed for ve seconds even if other screens are displayed.
A 2
A Input source
B Volume value
DISPLAY 2
ALBUM
ARTIST
TITLE
44.1 kHz
4:16
USB
3 4
C Image space:
An illustration of input source or an image of music le is displayed.
D Information space:
When the input source is Network or USB, various information of music being played is displayed.
38
Playback
Up to four settings such as the current input source, sound adjustment, and Network Service (for NET selector)
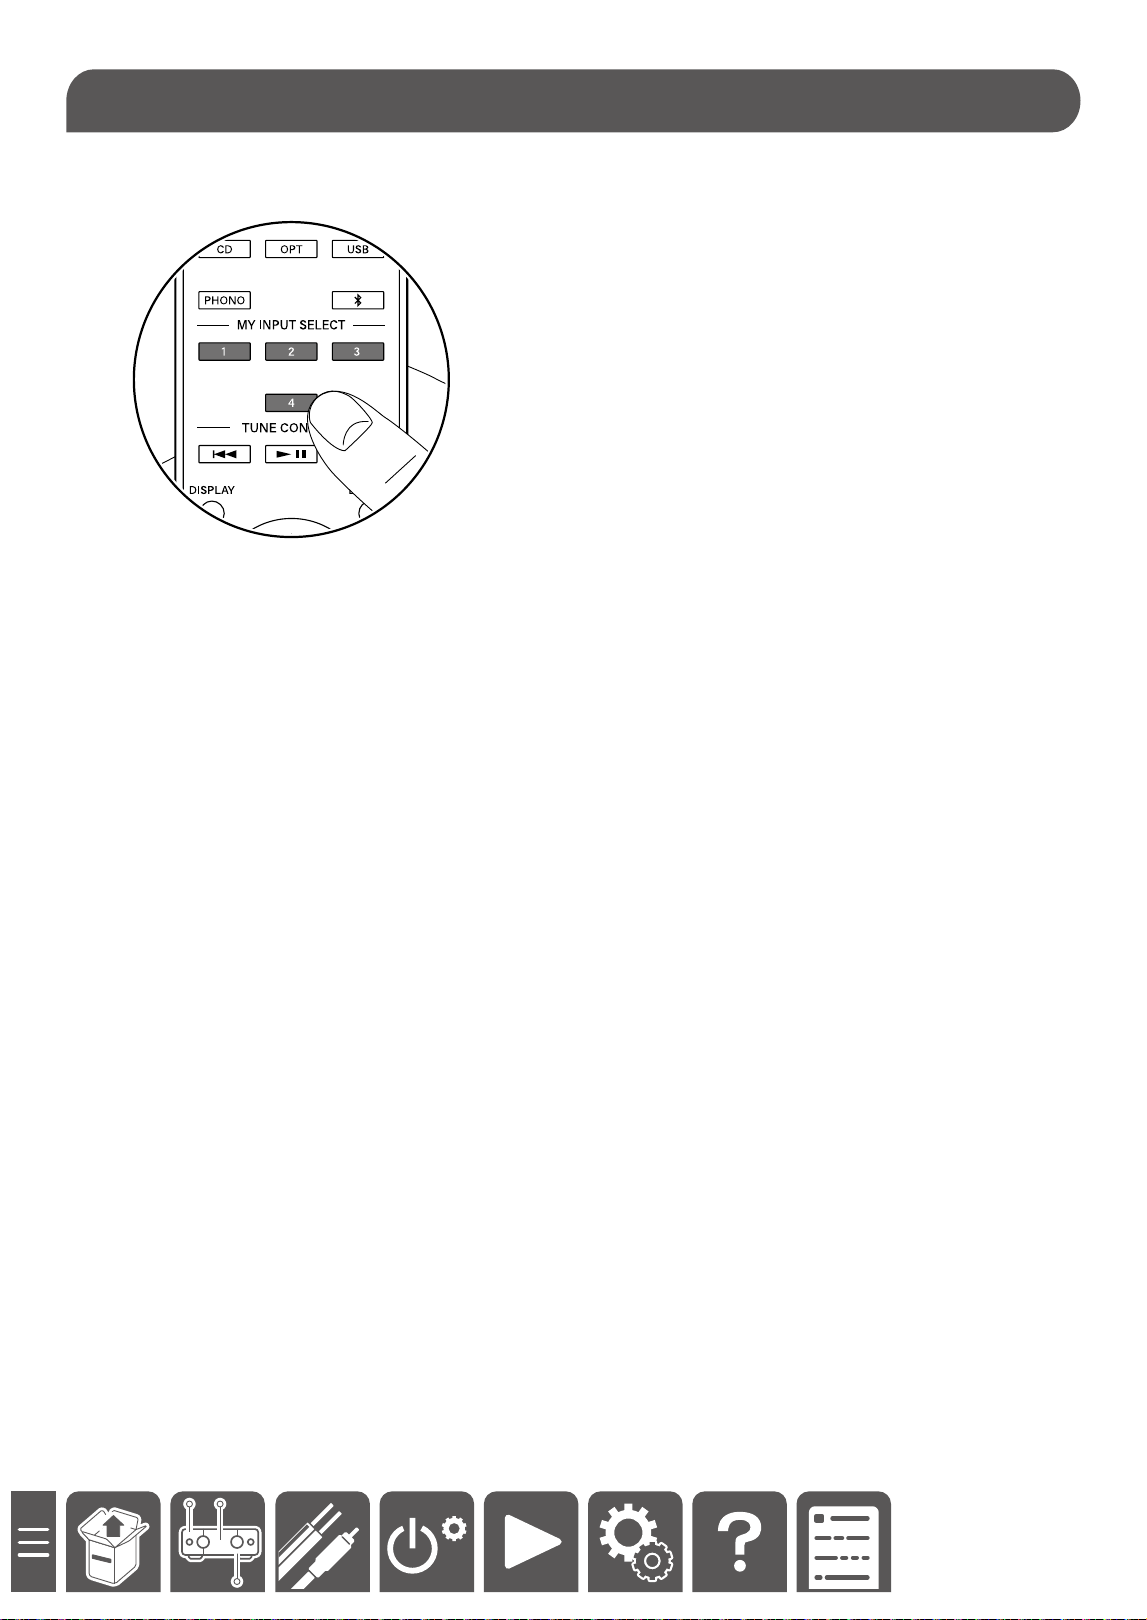
can be registered to MY INPUT, and the registered settings can be invoked easily.
Register MY INPUT on the remote controller.
1. Press and hold the MY INPUT button for ve seconds.
When the registration is successful, "add the MY Input successfully" is displayed.
• Content is overwritten if there was any already registered.
Regarding the settings that can be registered
– Master Volume
– Input Selector
– Network Service (if the input selector is “Network“)
• Spotify Connect can be played from tracks or Playlist.
– Treble
– Vocal Enhancer
– Bass
– Balance
Using MY INPUT
39
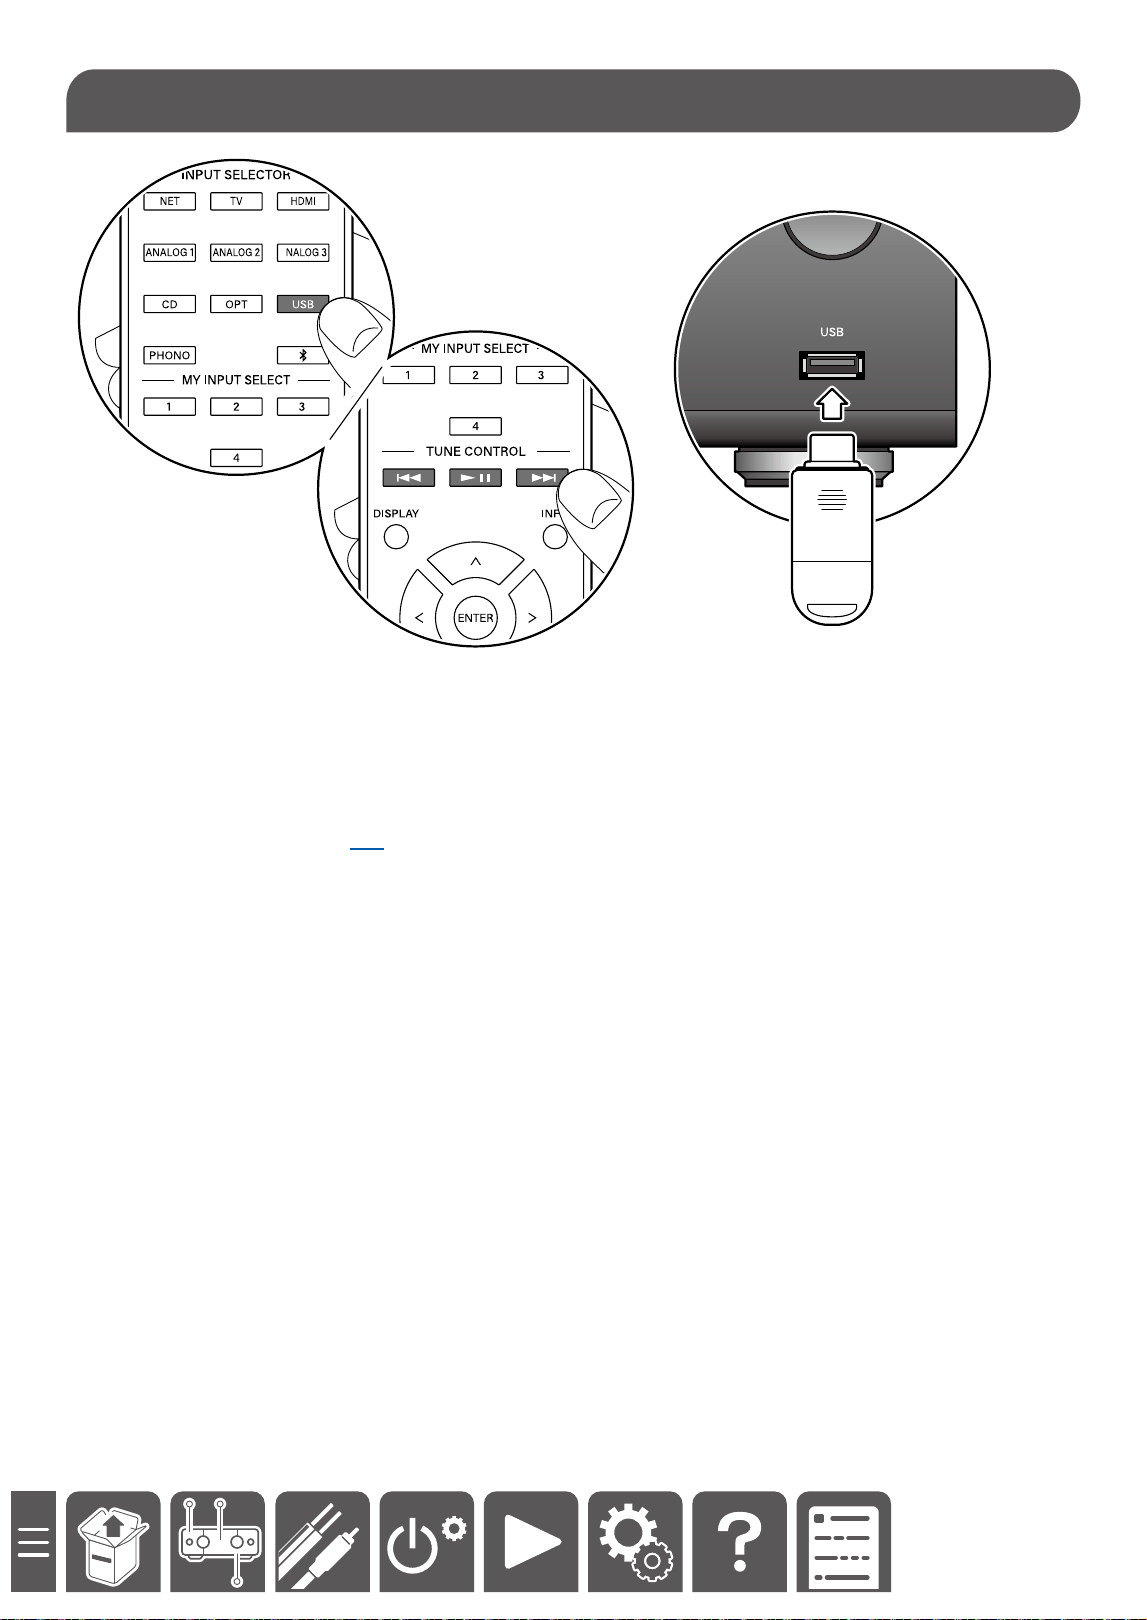
Playback
1. Press the USB button on the remote controller.
2. Insert a USB storage device into the USB terminal.
Music begins to be played automatically.
3. Press the "TUNE CONTROL" button to play, stop, or skip.
• Music is played in the order in which music les are saved in the USB storage device.
The order may be changed if the le names are changed or the les are copied or deleted in the USB storage
device.
• Supported Audio Formats ( →p54)
Playback of Music Files Stored in a USB Storage Device
40
Playback
• Available services dier depending on your residential area.
As an example, this section introduces the operation using a smartphone.
1. Install a music streaming app on the smartphone provided by each service company.
• For details of the settings and user registration, contact each service company.
2. Operate the app to play the music.
3. Tap the playback device switching icon (a)* on the app screen, and select this unit as a playback destination.
Thus, the playback of the content is transferred to this unit, and the unit performs streaming playback of the
music.
*The illustration of the switching icon diers depending on the app.
4. Operate the app to play, stop, or select the music.
Image gure
a
a
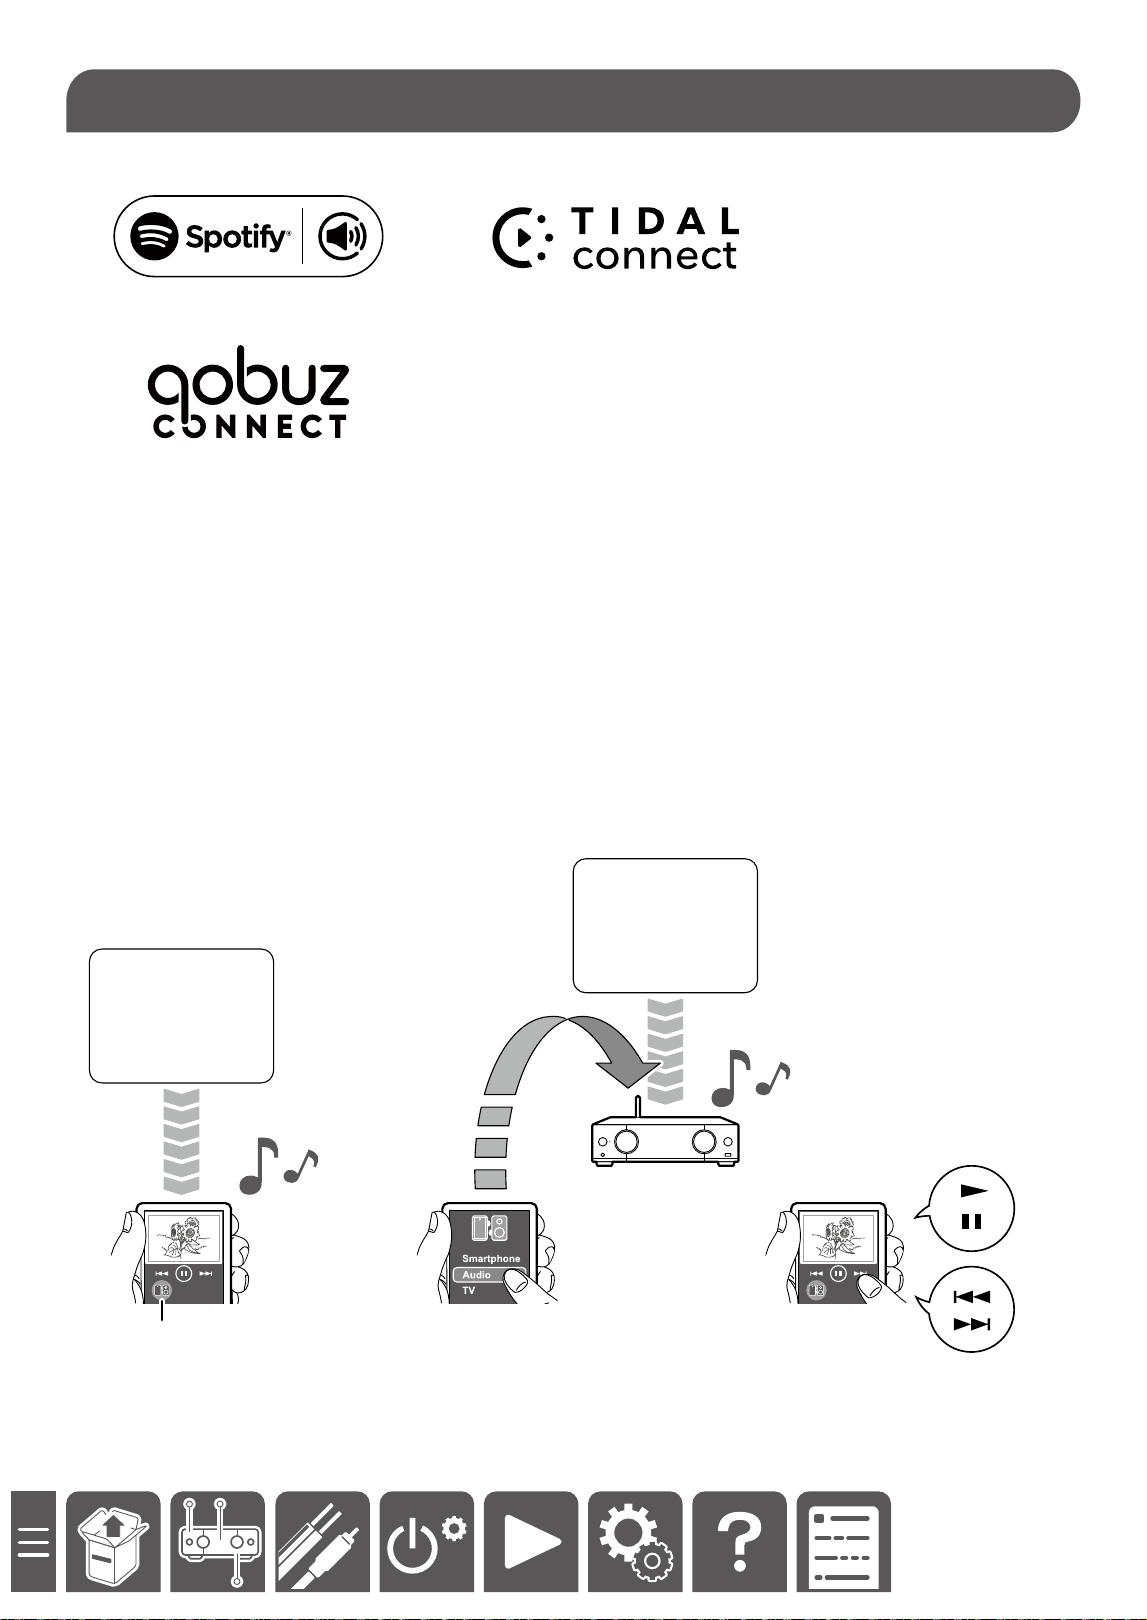
Spotify
TIDAL
Qobuz
Spotify
TIDAL
Qobuz
Playing Music Streaming on This Unit
41
Playback
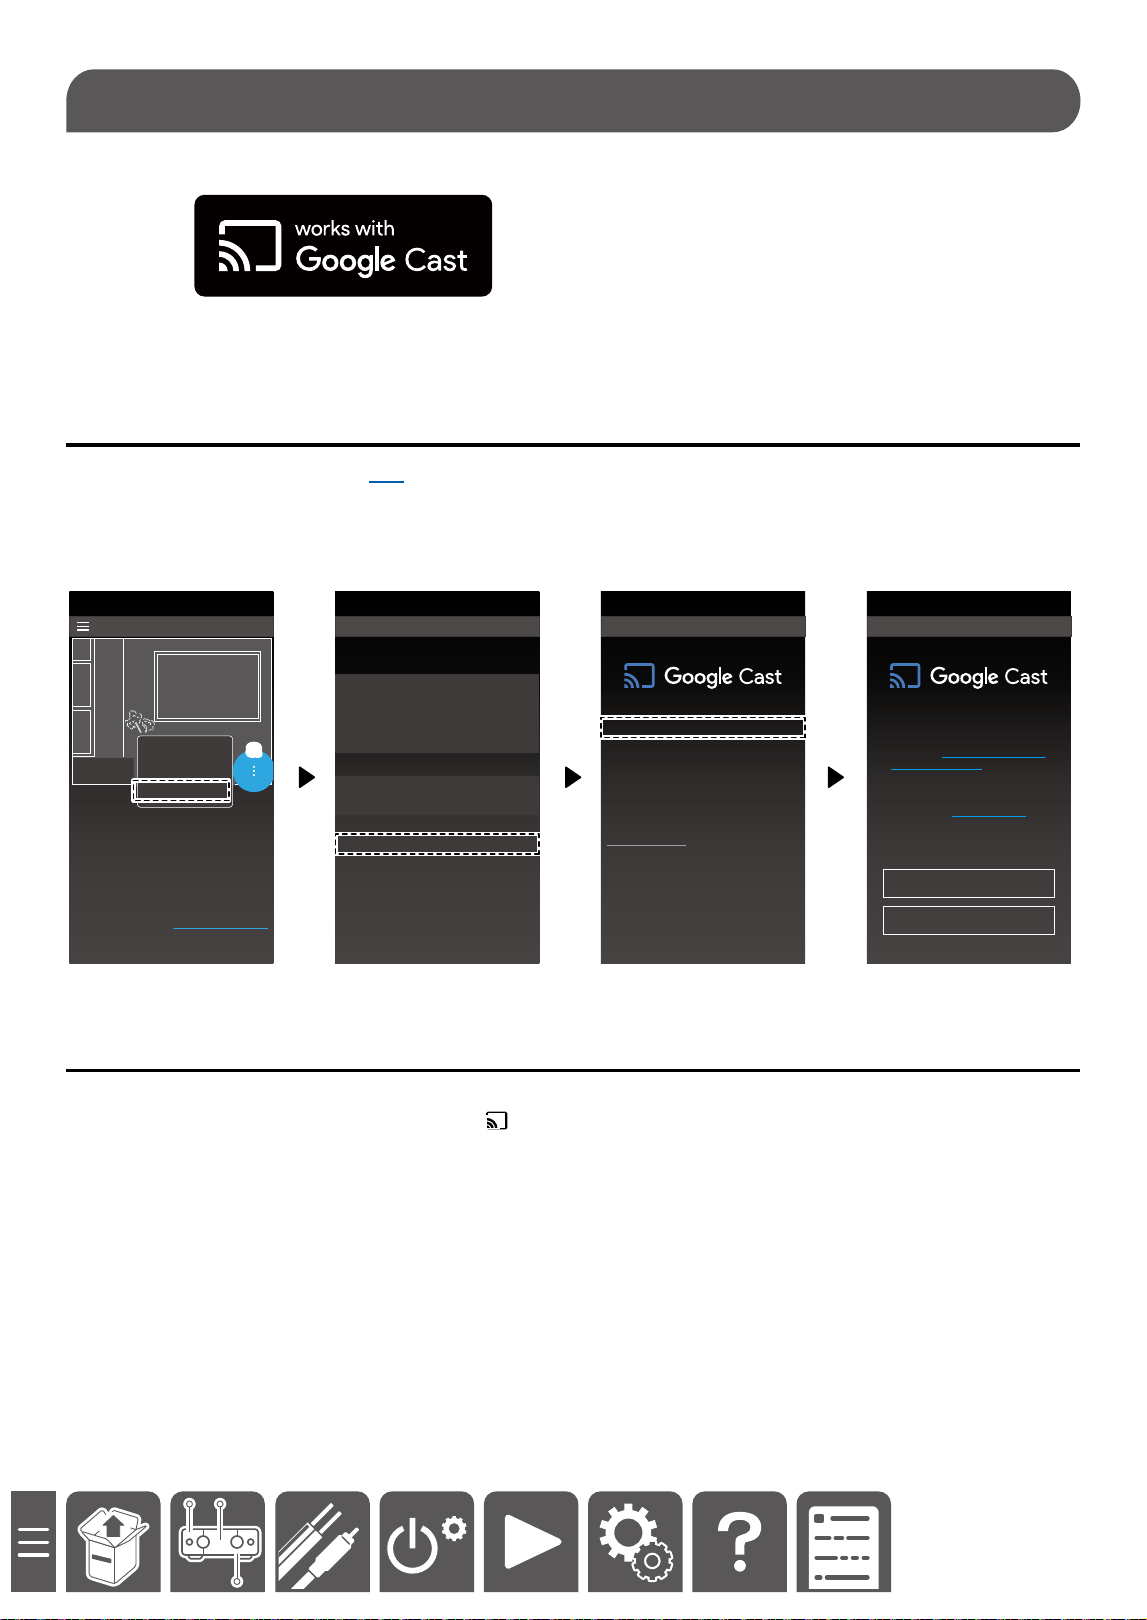
Music can be streamed to this device from your favorite apps of the smartphone, tablet, or laptop computer.
Setting
1. Start up ONKYO Controller ( →p24).
2. Tap the menu icon (a) .
3. Select "Device Setup" - "Google Cast" - "Activate Cast" from the menu.
4. Tap "Accept". Tapping this means that you have agreed with terms and conditions and privacy policy of Google.
5. Following the on-screen instructions, complete the setting.
20
15
10
5
0
-5
-10
Home
Device Management
AMP - Main
20
15
10
5
0
-5
-10
Device Settings
Device Info
Model Onkyo AMP_xxxxxx
IP address 192.168.xxx.xxx
Device ID xxxxxxxxxxxx
MAC Address xx:xx:xx:xx:xx:xx
AirPlay
Friendly Name Onkyo AMP_xxxxxx
Password
Google Cast
Google Cast >
20
15
10
5
0
-5
-10
Activate Cast >
Send device usage and
crash reports to Google
This selection does not affect your Google
Account controls at myaccount.google.com
Set up voice control and multiroom in the
Google Home App.
Google Cast
You can cast music from your favorite mobile
apps to your device. Your use of Google cast
is subject to the Google Terms of Service.
The Google Privacy Policy describes how
your data is handled by Google Cast.
To learn more about how Google protects
your privacy, go to g.co/cast/privacy
Accept
Skip
Google Cast Setup
Name
Background setting
Device Setup
a
Using Google Cast
1. Start up a music playback app supporting Google Cast.
2. Tap the playback device switching icon (e.g. ) on the app screen.
3. Selecting this unit using the switching icon plays the music on this unit.
Google Cast

43
Playback
By connecting this unit to the same network as that of iOS devices such as iPhone
®
, iPod touch
®
and iPad
®
, you
can enjoy music les on iOS devices wirelessly.
• Depending on the iOS version, operation screens or operation procedures on the iOS device may be dierent.
For details, refer to the operating instructions for the iOS device.
Basic Operations
1. Connect the iOS device to the access point where this unit is connected via network.
2. Tap the AirPlay icon in the play screen of the music app on an iOS device that supports AirPlay and select
this unit from the list of devices displayed.
3. Play the music le on the iOS device.
Note
• AirPlay and AirPlay2 allow for playback of music les stored on a PC with iTunes (Ver. 12.8 or later) installed.
Click the AirPlay icon
of iTunes, select this unit and an AirPlay or AirPlay2-enabled device to play from the
displayed devices, and play a music le.
AirPlay
®
44
Playback
This unit supports streaming playback of music les stored on a PC or NAS on the same network.
This section introduces the settings and operations of Windows Media Player Legacy. When using other apps,
contact respective providers.
Setting Windows Media Player Legacy
1. Turn on the power of the PC, and open Windows Media Player Legacy.
2. Select "Turn on media streaming" from the "Stream" menu, and open the dialog.
• If the media streaming is already enabled, select "More streaming options" from the "Stream" menu. Then, a
playback device list within the network is displayed. Conrm that this unit is set to "Allowed" and then move to
step 5.
3. Click "Turn on media streaming" and display the playback device list within the network.
4. Select this unit from "Media streaming options" and conrm that this unit is set to "Allowed".
5. Click "OK" and close the dialog.
6. Open the "Stream" menu and conrm that "Allow remote control of my Player" is selected.
• Depending on the version of Windows Media
®
Player, the names of items to select may dier from the above
description.
Playing Back
1. Open Windows Media Player Legacy.
2. Right-click the music le to be played, and open the menu bar.
3. Select "Cast to Device" from the menu bar, and select this unit from it.
Selecting this unit displays the "Cast to Device" window.
4. Register music on the "Cast to Device" window by dragging and dropping, or performing steps 2 and 3
repeatedly.
5. Press the play button on the "Cast to Device" window. Then this unit accesses the registered music le, and
plays the music.
• Using the volume bar on the "Cast to Device" window adjusts the volume of this unit.
• The volume on the "Cast to Device" window may not match the value on this unit.
• The volume changed on this unit is not reected on the "Cast to Device" window.
• "Cast to Device" does not support gapless playback.
• When les recorded with VBR (variable bit rate) are played, the playback time may not be displayed correctly.
Music Server
45
Setup
Setup
Congure the settings while checking the LED screen of the main unit.
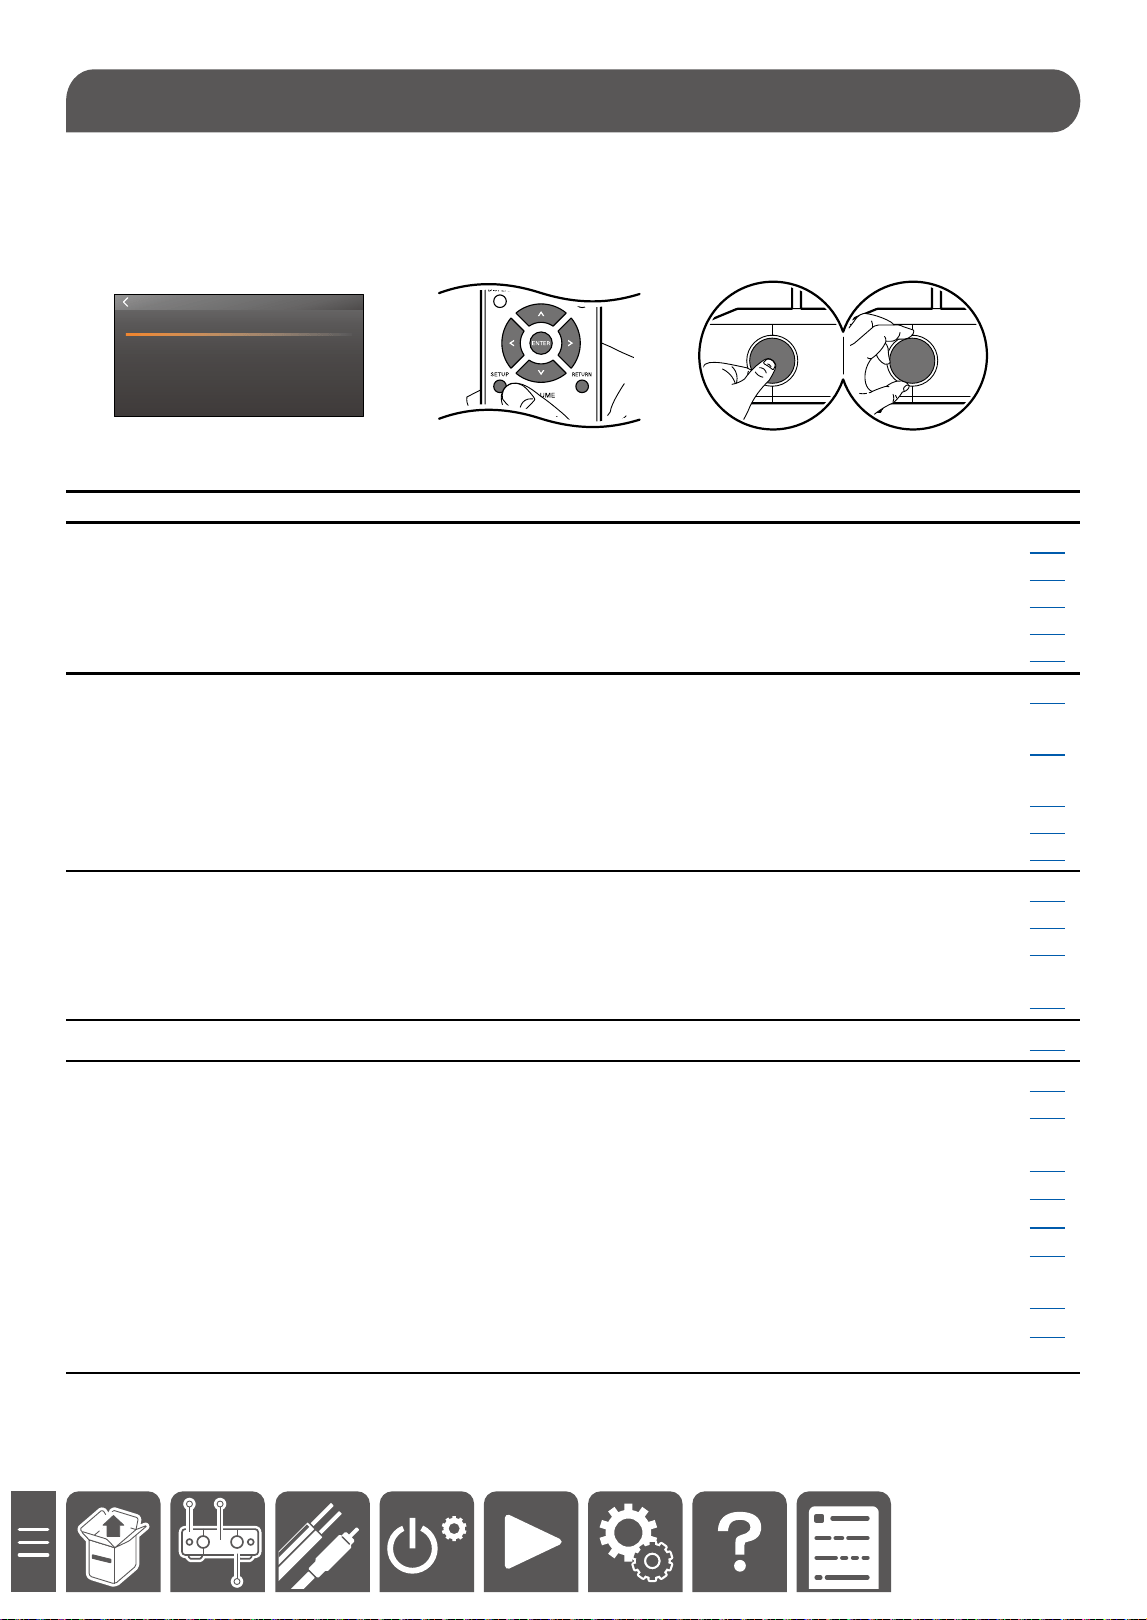
Pressing the SETUP button of the remote controller or the selector knob of the main unit displays the setup menu.
To return to the previous screen, press the RETURN button on the remote controller. Or select "<" on the upper
left of the screen, and press the ENTER button or the selector knob of the main unit, then you can return to the
previous screen.
SYSTEM SETTINGS
Equalizer
Speaker Settings
Network
Bluetooth
Miscellaneous
Menu list
Equalizer Room EQ ON/OFF(*) Sets Room EQ to On/O. p46
Treble Adjusts a high-tone range.
p46
Vocal Enhancer Adjusts a vocal strength.
p46
Bass Adjusts a low-tone range.
p46
Balance Adjusts volume balance between right and left.
p46
Speaker Settings(*) Room EQ Measurements are performed to calibrate the sound
eld to suit the room's environment.
p47
Subwoofer use or not
use
Set whether a powered subwoofer is connected or
not.
p47
Crossover Sets a crossover frequency.
p47
Speaker Level Adjusts the volume of speakers and subwoofer.
p47
Double Bass Sets Double Bass to On/O.
p47
Network Network Wizard Congures network settings.
p48
Network Information Displays network information.
p48
Network Standby Enables/Disables the network function in standby
mode.
p48
Privacy Statement Displays the privacy policy.
p48
Bluetooth Bluetooth Receiver Congures the Bluetooth setting.
p49
Miscellaneous Language Congures the language setting.
p50
Firmware Update Displays the rmware information and updates the
rmware.
p50
Auto Standby Sets Auto Standby to On/O.
p50
HDMI CEC
Sets HDMI CEC (HDMI interlocking function) to On/O.
p50
IR Lock Disables the remote controller operation.
p50
Factory Reset Restores all settings to the default states at the time
of purchase.
p50
Onkyo Controller Displays the app information.
p50
Manual Noties the download destination of the User's
Manual.
p50
(*)Y-50 Only
Setup Menu

46
Setup
Equalizer
q Room EQ ON/OFF (Y-50 Only)
Sets “Room EQ” ( →p47) to On/O.
For details, see here.
q Treble (Default Value: 0.0 dB)
It enhances or reduces high-tone range.
Select a value between "-10.0 dB" and "+10.0 dB" (in 0.5 dB increments).
q Vocal Enhancer (Default Value: 0.0 dB)
It enhances or reduces vocals.
Select a value between "-6.0 dB" and "+6.0 dB" (in 0.5 dB increments).
q Bass(Default Value: 0.0 dB)
It enhances or reduces low-tone range.
Select a value between "-10.0 dB" and "+10.0 dB" (in 0.5 dB increments).
q Balance(Default Value: 0.0)
Adjusts the output balance between the right speaker and the left speaker.
Select a value between “L 10.0” and “R 10.0” (in 0.5 increments).
47
Setup
Speaker Setting (Y-50 Only)
q Room EQ
Measures the sound eld correction to suit the room environment.
For details, see here.
q Subwoofer use or not use (Default Value: No)
Set whether a powered subwoofer is connected or not.
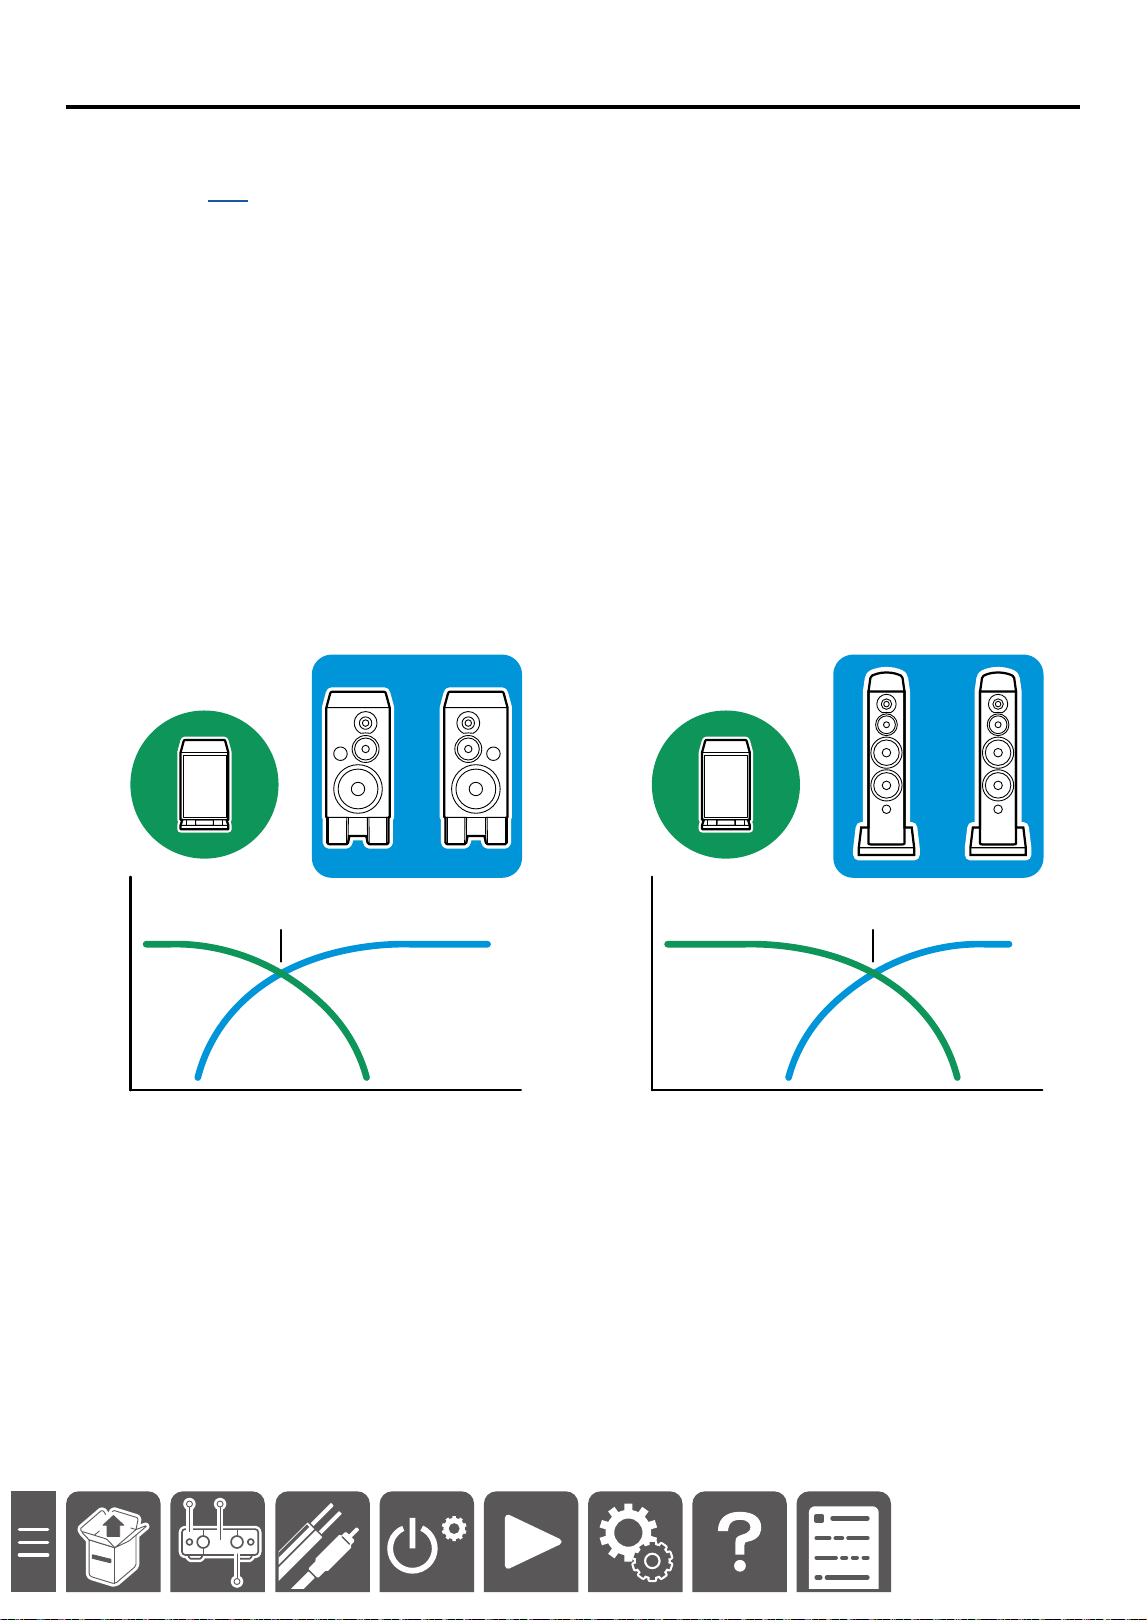
q Crossover (Default Value: 80 Hz)
Sets a crossover frequency.
Select a value between "20 Hz" and "200 Hz" (in 5 Hz increments). If the same value does not exist, select a value
one level higher.
• This setting cannot be selected when "Subwoofer use or not use" is set to "No".
< What is a crossover frequency setting? >
This setting determines the boundary of frequency of the sound output from the speakers and subwoofer.
Normally, when music is played, all frequencies from bass to treble are played from speakers.
However, speakers have frequency characteristics. For example, speakers supporting 35 Hz or above can also
play audio of 35 Hz or less, but the sound quality is not stable. By connecting a subwoofer to this unit and setting
the crossover to 35 Hz, the audio of 35 Hz or less is sent to the subwoofer to supplement bass that the speakers
could not stably reproduce.
35 Hz 50 Hz
q Speaker Level (Default Value: 0.0 dB)
Adjust the volume level of each speaker.
Select a value between "-10.0 dB" and "+10.0 dB" ("-10.0 dB" and "+8.5 dB" for Subwoofer) (in 0.5 dB increments).
q Double Bass (Default Value: O)
A bass sound is output from both speakers and subwoofer.
• This setting can be selected only when "Subwoofer use or not use" is set to "Yes" and "Crossover" is set to
"20 Hz".

48
Setup
Network
q Network wizard
Congures the wireless LAN setting.
SSID: Network connection is made by selecting the access point of the connection destination.
Use iOS Device: Network connection is made using iOS devices such as iPhone.
q Network information
Network status and product information of this unit can be checked.
SSID:
IP Address:
Device name:
Wi-Fi MAC address:
Bluetooth MAC address:
ETH MAC address
q Network Standby (Default Value: On)
When this function is set to "On", the network function works even in standby state, and you can turn on the power
of the unit via network using an application such as ONKYO Controller that can control this unit.
• Setting this function to "On" increases the power consumption in standby state.
q PRIVACY STATEMENT
Displays the privacy statement.

49
Setup
Bluetooth
Bluetooth Receiver
q Bluetooth Receiver (Default Value: On)
Sets the Bluetooth function to On/O. When this function is turned o, the Bluetooth icon ( →p9) turns dark.
q Bluetooth Disconnect
Releases the connected Bluetooth device.
q Device
Displays the name of the connected Bluetooth device.
q Status
Bluetooth: Displays the device connection status.
CONNECT: Connected state.
DISCONNECT: Disconnected state.
PAIRING: Pairing standby state.

50
Setup
Miscellaneous
q Language
Selects a language displayed on the screen of the main unit from the following.
English, Japanese, French, German, Spanish, Dutch, Traditional Chinese, Simplied Chinese, Swedish, and
Italian
q Firmware Update
Firmware update: The availability of update can be checked. When there is rmware to be updated, "Available" is
displayed. When the rmware is in the latest version, "Latest" is displayed.
Firmware version: The current rmware version is displayed.
Update via Network: The rmware is updated via network. Press the "ENTER" button for execution.
Update via USB: The rmware is updated via USB. Press the "ENTER" button for execution.
q Auto Standby (Default Value: On)
• If no operation is performed for 20 minutes without audio, the unit automatically enters the standby state. If this
function is turned o, the power will remain on, resulting in increased power consumption.
q HDMI CEC (Default Value: O)
Setting this function to "On" allows for turning on/o of the power in conjunction with the TV.
• Playback and volume adjustment of TV using ARC function operate in conjunction even if this setting is turned o.
q IR Lock (Default Value: O)
Turning on IR Lock disables the operation on the remote controller.
If there are more than one ONKYO products in the same room and remote controllers interfere with each other,
turn on IR Lock and perform operation on the main unit or with the app.
q Factory Reset
All the settings are restored to factory defaults.
q Onkyo Controller
Introduces the app that can be used with this unit.
q Manual
https://support.onkyousa.com/hc/en-us

51
Troubleshooting
Troubleshooting
When the unit is operating erratically
Turning o and on the power may solve the problem. Remove the power cord from the outlet, wait for at least 10
seconds, and turn on the power again. Then check how it works.
Also, updating the rmware may solve the problem. When this unit is connected to the network, the availability of
update can be checked from the setup menu.( →p50)
Troubleshooting: The power is not turned on.
If the power cord is not securely inserted to the slot on the back of the main unit, the power may not be turned on.
Insert the cord again by slightly applying a force.
If the problem persists even after the power cord is reconnected, the unit may have failed. Contact our service
desk.
Troubleshooting: No sound is delivered from the right or left speaker.
When an external device is connected to this unit using an analog cable, a contact failure or disconnection of the
cable may have occurred. Reconnect the cable or use another cable and check the condition.
When an external device is connected to this unit using a digital cable, check the audio output setting of the
external device.
If there is no problem with the cable or the setting, a malfunction may have occurred in this unit.
Troubleshooting: The unit cannot be paired with a BLUETOOTH-enabled
device.
Open the setting screen of the BLUETOOTH-enabled device (such as a smartphone and PC), and delete the
information of this unit (device name) that has been registered. Then perform the pairing operation again.
*For details, refer to the instruction manual of the BLUETOOTH-enabled device.
Troubleshooting

52
General Specications
■ Amplier Section
<Y-50>
Power Output
(North America models)
・ With 8 ohm loads, both channels driven, from 20 Hz
- 20 kHz; rated 125 watts per channel minimum RMS
power, with no more than 0.08 % total harmonic
distortion from 250 milliwatts to rated output. (FTC)
・ 2 ch × 250 W at 4 ohms, 1 kHz, 2 ch driven of 0.7%
THD
(European, Oceania and Asian models)
・ 2 ch × 125 W at 8 ohms, 20 Hz - 20 kHz, 2 ch
driven of 0.08% THD
・ 2 ch × 250 W at 4 ohms, 1 kHz, 2 ch driven of 0.7%
THD
THD+N (Total Harmonic Distortion + Noise)
・0.08% (20 Hz - 20 kHz, half power)
Input Sensitivity and Impedance
・200 mV/20 kΩ (LINE(RCA))
・4 mV, 47 kΩ/0.4 mV, 110Ω (PHONO MM/MC)
Rated RCA Output Level and Impedance
・1 V/470 Ω (PRE OUT (L/R, Subwoofer))
Phono Maximum Input Signal Voltage
・50 mV (MM 1 kHz 0.5%)
・4 mV (MC 1 kHz 0.5%)
Frequency Response
・20 Hz - 30 kHz/+1 dB, –3 dB (Direct)
Tone Control Characteristics
・±10 dB, 100 Hz (Bass), ±10 dB, 10 kHz (Treble)
Signal to Noise Ratio
・100 dB (IHF-A, LINE 2V IN, SP OUT)
・ 106 dB (IHF-A, Digital source with 0dB input, SP OUT)
・76 dB (IHF-A, PHONO MM 5mV IN, SP OUT)
・60 dB (IHF-A, PHONO MC 0.5mV IN, SP OUT)
Supported impedance of Speakers
・4 Ω - 16 Ω
Headphone Rated Output
・80 mW + 80 mW (32 Ω, 1 kHz, 10% THD)
Supported impedance of Headphones
・13 Ω - 600 Ω
Headphones Frequency Response
・20 Hz - 40 kHz
Input terminals
Analog
・4 (Including PHONO×1)
Digital
・ COAXIAL×1, OPTICAL×1
*Supported sampling rates for PCM signals (stereo,
mono) from a digital input are 32 kHz, 44.1 kHz, 48
kHz, 88.2 kHz, 96 kHz/16 bit, 20 bit, and 24 bit.
・HDMI IN ×1
Output terminal
Analog
・PRE OUT L/R×1
・SUBWOOFER PRE OUT ×1
・PHONES jack
Digital
・HDMI (ARC)×1
Other terminals
・Speaker terminal
・USB port
・GND terminal
<Y-40>
Power Output
(North America models)
・ With 8 ohm loads, both channels driven, from 20 Hz
- 20 kHz; rated 75 watts per channel minimum RMS
power, with no more than 0.08 % total harmonic
distortion from 250 milliwatts to rated output. (FTC)
・ 2 ch × 150 W at 4 ohms, 1 kHz, 2 ch driven of 0.7%
THD
(European, Oceania and Asian models)
・ 2 ch × 75 W at 8 ohms, 20 Hz - 20 kHz, 2 ch driven
of 0.08% THD
・ 2 ch × 150 W at 4 ohms, 1 kHz, 2 ch driven of 0.7%
THD
THD+N (Total Harmonic Distortion + Noise)
・0.08% (20 Hz - 20 kHz, half power)
Input Sensitivity and Impedance
・200 mV/20 kΩ (LINE(RCA))
・4 mV,47 kΩ
Rated RCA Output Level and Impedance
・1 V/470 Ω (PRE OUT L/R)
Phono Maximum Input Signal Voltage
・50 mV (MM 1 kHz 0.5%)
Frequency Response
・20 Hz - 30 kHz/+1 dB, –3 dB (Direct)
Tone Control Characteristics
・±10 dB, 100 Hz (Bass), ±10 dB, 10 kHz (Treble)
Signal to Noise Ratio
・100 dB (IHF-A, LINE 2V IN, SP OUT)
・ 106 dB (IHF-A, Digital source with 0dB input, SP
OUT)
・76 dB (IHF-A, PHONO MM 5mV IN, SP OUT)
Supported impedance of Speakers
・4 Ω - 16 Ω
Headphone Rated Output
・80 mW + 80 mW (32 Ω, 1 kHz, 10% THD)
Supported impedance of Headphones
・13 Ω - 600 Ω
Headphones Frequency Response
・20 Hz - 40 kHz
General Specications
General Specications

53
Input terminals
Analog
・4 (Including PHONO×1)
Digital
・ COAXIAL×1, OPTICAL×1
*Supported sampling rates for PCM signals (stereo,
mono) from a digital input are 32 kHz, 44.1 kHz, 48
kHz, 88.2 kHz, 96 kHz/16 bit, 20 bit, and 24 bit.
Output terminal
Analog
・PRE OUT L/R×1
・PHONES jack
Digital
・HDMI (ARC)×1
Other terminals
・Speaker terminal
・USB port
・GND terminal
■ General
<Y-50>
・ Power Supply
AC 100-240 V, 50/60 Hz
・ Power Consumption
120 W (North America model)
115 W (Europe models)
115 W (Asia and Oceania models)
115 W (Japan model)
・ Network Standby (wired)
1.8 W
・ Network Standby (wireless)
1.8 W
・ HDMI CEC Standby
0.7 W
- Standby mode (ALL ON)
2.2 W
・ Dimensions (W × H × D)
350 mm × 99 mm × 337 mm
13-3/4" × 3-7/8" × 13-1/4"
・ Weight
4.9 kg (10.8 lbs.)
<Y-40>
・ Power Supply
AC 120-240 V, 50/60 Hz
・ Power Consumption
65 W
・ Network Standby (wired)
1.8 W
・ Network Standby (wireless)
1.8 W
・ HDMI CEC Standby
0.4 W
- Standby mode (ALL ON)
1.8 W
・ Dimensions (W × H × D)
350 mm × 99 mm × 337 mm
13-3/4" × 3-7/8" × 13-1/4"
・ Weight
4.4 kg (9.7 lbs.)
■ Network Section
Ethernet LAN
・1 (10BASE-T/100BASE-TX)
Wireless LAN
・ IEEE 802.11 a/b/g/n/ac standard (Wi-Fi
®
standard) 5
GHz/2.4 GHz band
■ BLUETOOTH Section
Communication system
・BLUETOOTH Specication version 5.1
Frequency band
・2.4GHz (2.402-2.480GHz)
Modulation method
・FHSS (Frequency Hopping Spread Spectrum)
Compatible BLUETOOTH proles
・A2DP 1.4, AVCTP 1.4, AVDTP 1.3, AVRCP 1.6.2
Supported Codecs
・SBC, AAC
Transmission range (A2DP)
・20 Hz - 20 kHz (Sampling frequency 44.1kHz)
Maximum communication range
・ Line of sight approx. 15 m(*)
(*)The actual range will vary depending on factors
such as obstacles between devices, magnetic elds
around a microwave oven,static electricity, cordless
phone, reception sensitivity, antenna's performance,
operating system, software application, etc.
General Specications

54
■ USB Storage Device
Supported File Systems
FAT16, FAT32
Supported Audio Formats
MP3 (.mp3)
・ MPEG-1/MPEG-2 Audio Layer-3/44.1 kHz, 48 kHz/
Between 8 kbps and 320 kbps, and VBR/2 ch
WMA (.wma)
・ 44.1 kHz, 48 kHz/Between 5 kbps and 320 kbps, and
VBR/2 ch
WAV (.wav)
WAV les contain uncompressed PCM digital audio.
・ 44.1 kHz, 48 kHz, 88.2 kHz, 96 kHz, 176.4 kHz, 192
kHz/8 bit, 16 bit, 24 bit/2 ch
AIFF (.ai/.aif)
AIFF les contain uncompressed PCM digital audio.
・ 44.1 kHz, 48 kHz, 88.2 kHz, 96 kHz, 176.4 kHz, 192
kHz/8 bit, 16 bit, 24 bit/2 ch
AAC (.aac/.m4a/.mp4/.3gp/.3g2)
・ MPEG-2/MPEG-4 Audio/44.1 kHz, 48 kHz, 88.2 kHz,
96 kHz/Between 8 kbps and 320 kbps, and VBR/2 ch
FLAC (.ac)
・ 44.1 kHz, 48 kHz, 88.2 kHz, 96 kHz, 176.4 kHz, 192
kHz/8 bit, 16 bit, 24 bit/2 ch
Apple Lossless (.m4a/.mp4)
・ 44.1 kHz, 48 kHz, 88.2 kHz, 96 kHz, 176.4 kHz, 192
kHz/16 bit, 24 bit/2 ch
■Music Server
Supported Audio Formats
MP3 (.mp3)
・ MPEG-1/MPEG-2 Audio Layer-3/44.1 kHz, 48 kHz/
Between 8 kbps and 320 kbps, and VBR/2 ch
WMA (.wma)
・ 44.1 kHz, 48 kHz/Between 5 kbps and 320 kbps, and
VBR/2 ch
WAV (.wav)
WAV les contain uncompressed PCM digital audio.
・ 44.1 kHz, 48 kHz, 88.2 kHz, 96 kHz, 176.4 kHz, 192
kHz/8 bit, 16 bit, 24 bit/2 ch
AIFF (.ai/.aif)
AIFF les contain uncompressed PCM digital audio.
・ 44.1 kHz, 48 kHz, 88.2 kHz, 96 kHz, 176.4 kHz, 192
kHz/8 bit, 16 bit, 24 bit/2 ch
AAC (.aac/.m4a/.mp4/.3gp/.3g2)
・ MPEG-2/MPEG-4 Audio/44.1 kHz, 48 kHz, 88.2 kHz,
96 kHz/Between 8 kbps and 320 kbps, and VBR/2 ch
FLAC (.ac)
・ 44.1 kHz, 48 kHz, 88.2 kHz, 96 kHz, 176.4 kHz, 192
kHz/8 bit, 16 bit, 24 bit/2 ch
LPCM (Linear PCM)
・ 44.1 kHz, 48 kHz/16 bit/2 ch
Apple Lossless (.m4a/.mp4)
・ 44.1 kHz, 48 kHz, 88.2 kHz, 96 kHz, 176.4 kHz, 192
kHz/16 bit, 24 bit/2 ch
■HDMI Section
HDMI IN (Y-50 Only)
・4K/120p, 8K/60p
・VRR
・QFT
・ALLM
・QMS
・DSC
・HDCP2.3
Maximum radio-frequency power transmitted in the
frequency band(s)
・2400 MHz - 2483.5 MHz (20 dBm (e.i.r.p))
・5150 MHz - 5350 MHz (23 dBm (e.i.r.p))
・5470 MHz - 5725 MHz (23 dBm (e.i.r.p))
General Specications
55
License and Trademark
The terms HDMI and HDMI High-Denition Multimedia
Interface, and the HDMI Logo are trademarks or regis-
tered trademarks of HDMI Licensing Administrator,Inc.
in the United States and other countries.
The Wi-Fi CERTIFIEDTM Logo is a certication mark of
Wi-Fi Alliance
®
.
The BLUETOOTH
®
word mark and logos are registered
trademarks owned by Bluetooth SIG, Inc.
Use your phone, tablet or computer as a remote control
for Spotify.
Go to spotify.com/connect to learn how.
The Spotify software is subject to third party licenses
found here:
https://www.spotify.com/connect/third-party-licenses
Apple, AirPlay
®
, iPad
®
, iPad Air
®
, iPad Pro
®
, iPhone
®
,
iPod touch
®
and Lightning are trademarks of Apple Inc.,
registered in the U.S. and other countries.
Use of the Made for Apple badge means that an acces-
sory has been designed to connect specically to the
Apple product(s) identied in the badge, and has been
certified by the developer to meet Apple performance
standards. Apple is not responsible for the operation of
this device or its compliance with safety and regulatory
standards. Please note that the use of this accessory
with an Apple product may aect wireless performance.
Apple, AirPlay, iPad, iPad Air, iPad Pro, iPhone, iPod
touch and Lightning are trademarks of Apple Inc., regis-
tered in the U.S. and other countries.
Use of the Works with Apple badge means that an ac-
cessory has been designed to work specifically with
the technology identified in the badge and has been
certified by the developer to meet Apple performance
standards.
Apple, AirPlay, iPad, iPad Air, iPad Pro, iPhone, iPod
touch et Lightning sont des marques commerciales
d'Apple Inc., enregistrées aux États-Unis et dans d'au-
tres pays.
L’utilisation du badge Made for Apple signifie qu’un
accessoire a été conçu pour se connecter spécique-
ment aux produits Apple identifiés dans le badge, et
qu’il a été certié par le développeur comme répondant
aux normes de performances d’Apple. Apple n’est pas
responsable du fonctionnement de cet appareil ou sa
conformité aux normes réglementaires et de sécurité.
Veuillez noter que l’utilisation de cet accessoire avec
un produit Apple peut aecter les performances de la
connexion sans l.
Apple, AirPlay, iPad, iPad Air, iPad Pro, iPhone, iPod
touch et Lightning sont des marques commerciales
d'Apple Inc., enregistrées aux États-Unis et dans d'au-
tres pays.
L’utilisation du badge Works with Apple signifie qu’un
accessoire a été conçu pour fonctionner spécifique-
ment avec la technologie identifiée dans le badge et
qu’il a été certié par le développeur comme répondant
aux normes de performances d’Apple.
App Store is a service mark of Apple Inc., registered in
the U.S. and other countries.
IOS is a trademark or registered trademark of Cisco in
the U.S. and other countries and is used under license.
General Specications