

2
contents
What's in the box 4
Part Names 5
Front Panel 6
Rear Panel 7
Remote Controller 8
Connections 9
Connecting a Turntable 10
Connecting a CD Player 11
Connecting the TV 12
Connecting a Power Amplier 13
Connection using an unbalanced
RCA cable 13
Connection using a balanced XLR
cable 14
Connect the Subwoofer 15
Network Connection 16
Connecting the Power Cord 17
Playback 18
Basic Operations 19
Turning the power on 19
Selecting a source to play 19
Adjusting the volume 20
Mute 20
Adjusting the Bass, Treble and
Balance 21
Using the Direct Function 22
Bluetooth
®
Playback 23
Playing audio from Bluetooth wireless
technology enabled devices with this
unit 23
Transmitting audio from this unit
to Bluetooth wireless technology
enabled devices 24
Using MY INPUT 25
Playing music les saved on a USB
storage device 26
Using Headphones 27
Spotify 28
AirPlay
® 29
Basic Operations 29
Amazon Music 30
Registering This Unit with Amazon
Music 30
Playing Amazon Music using the
Onkyo Controller 30
TIDAL 31
TuneIn 32
Playing Back 32
Music Server 33
Music Server notes 33
Windows Media
®
Player 12 settings
33
Playing Back 33
Setup 34
Setup Flow 35
Onkyo Controller 36
Level Calibration 37
Level Calibration for Fidelity IQ 37
Measuring with Dirac Live 38
Using Dirac Live 39
Firmware Update 40
Settings Affecting Power
Consumption and Standby Power 41
Web Setup 42
Menu operations 42
Troubleshooting 43

4
What's in the box
What's in the box
Safety
Information
Initial Setup
Guide
A Main unit
B Power cord (1) *Depending on the model, 2 or more Power Cords are supplied. Use the type of cord suited to
your area.
C Speaker setup microphone
D Initial Setup Guide, Safety Information
E Remote controller(RC-991S) (1)
Batteries (AAA/R03) (2) (Some models only)
* This is an online user manual. This is not supplied with the product.

6
Part Names
Front Panel
NET
DIRECT
ON
OFF
SETUP MIC
C
D
T
V
NET
AN
1
AN2
OPT
USB
PHN
421 3
MY INPUT
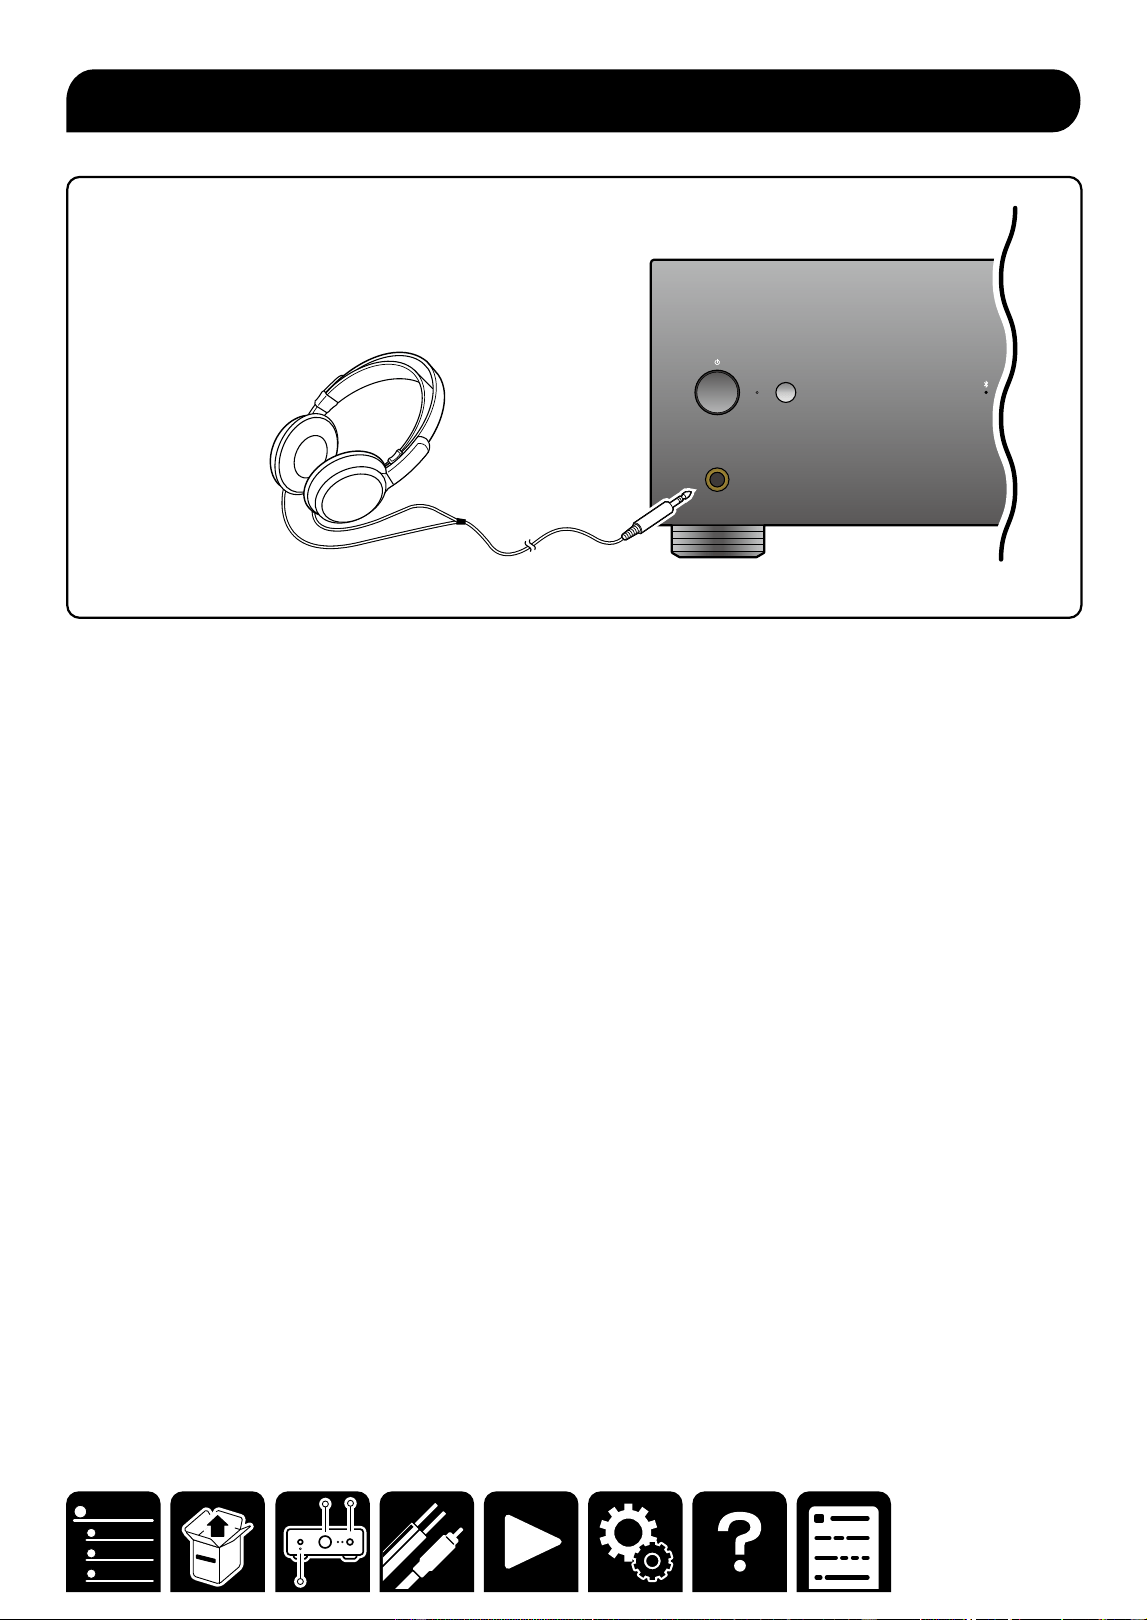
PHONES
A 2 3 4 5 6
7 8
9 J K L
A ON/STANDBY button ( →p19)
B Power indicator
C Remote control sensor
D MASTER VOLUME ( →p20)
E Selector indicator
F Selector knob ( →p19)
G PHONES jack ( →p27)
H BLUETOOTH indicator ( →p23)
I NET indicator
・ When the main unit is connected to the network, the status of this indicator changes from blinking to lighting.
When the network standby function ( →p41) is enabled, this indicator is lit even in the standby mode.
J DIRECT switch ( →p22)
K MY INPUT indicator ( →p25)
MY INPUT button ( →p25)
L SETUP MIC jack ( →p38)
7
Part Names
Rear Panel
SUBWOOFER
L
R L
R
CD
COAXIAL IN
OPT IN
OPT OUT
CD
AUDIO IN DIGITAL AUDIO IN PRE OUT
PHONO
L
R
MM MC
GND
L
R
USB ETHERNET
5V
/
1A
TV
(
ARC
)
2 HOT
3 COLD
1 GND
ANALOG
1
ANALOG
2
1
2
12V
TRIGGER
OUT
SUBWOOFER
L
R L
R
PRE OUT
L
R
USB ETHERNET
5V
/
1A
TV
(
ARC
)
2 HOT
3 COLD
1 GND
ANALOG
2
1
2
AC INLET
12V
TRIGGER
OUT
8 9 J K7
A 2 3 4 5 6
L
M
N
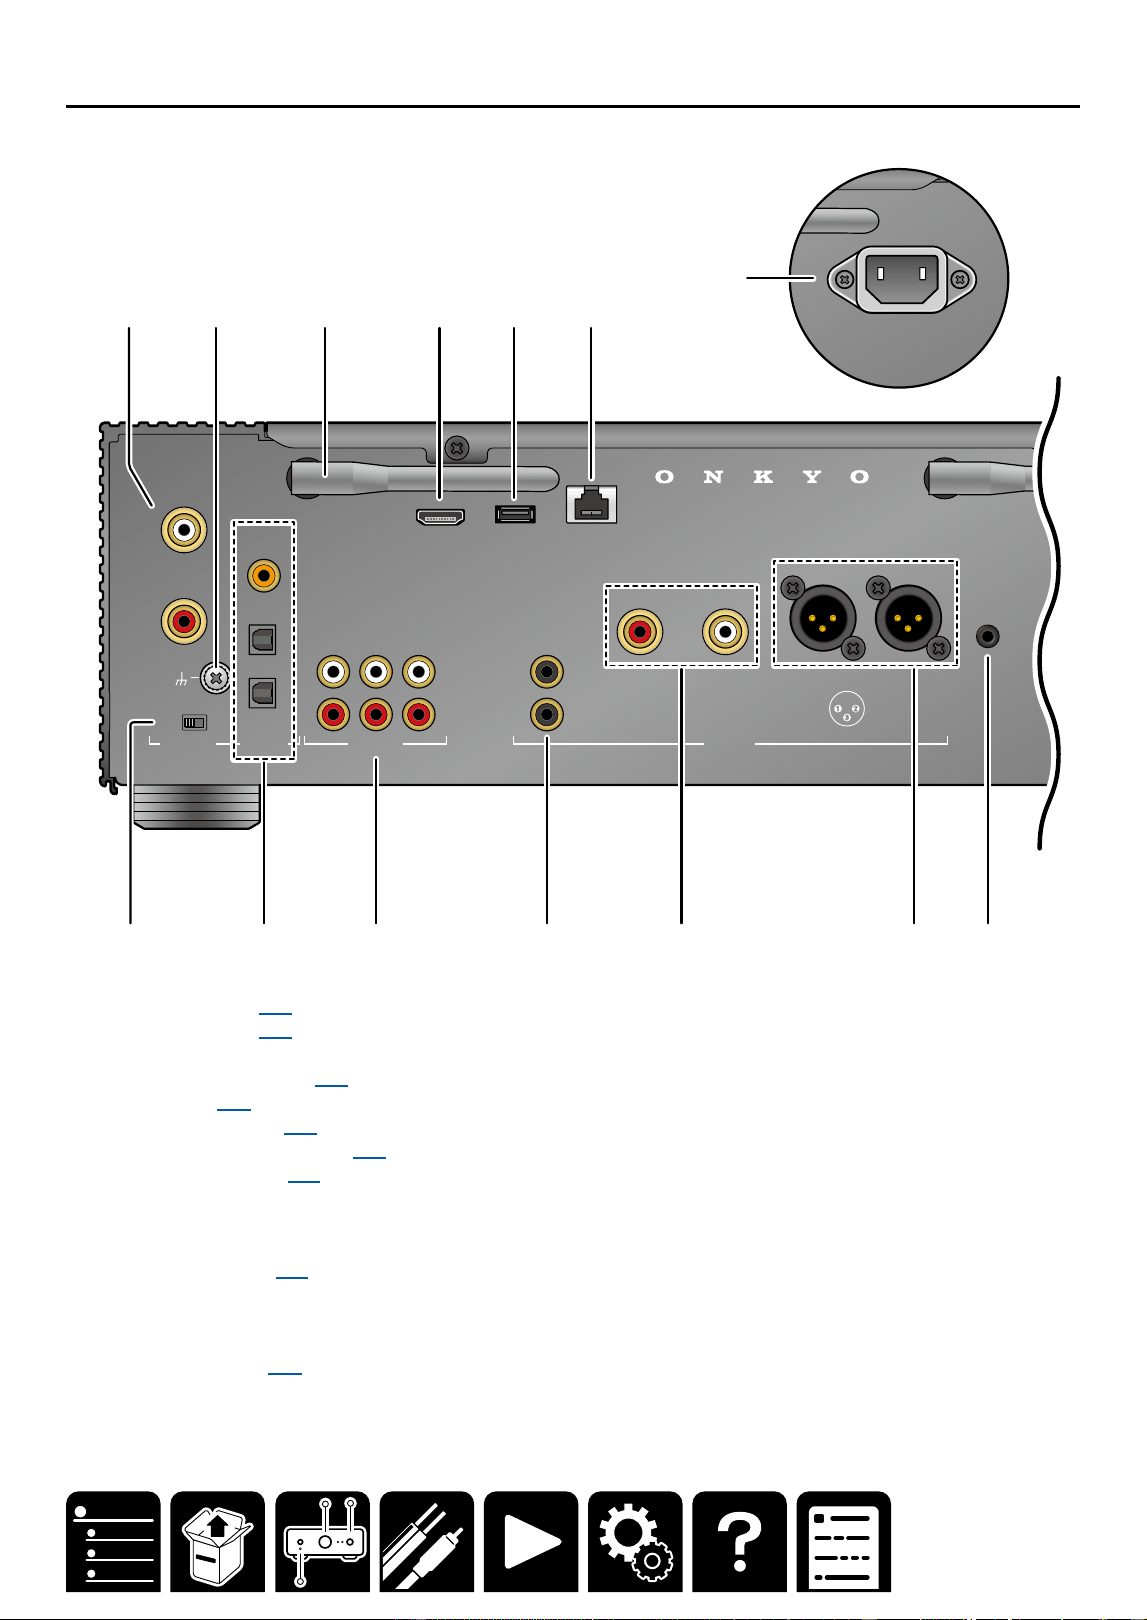
A PHONO jacks ( →p10)
B GND terminal ( →p10)
C Wireless antenna
D HDMI ARC terminal ( →p12)
E USB port ( →p26)
F ETHERNET port ( →p16)
G MM/MC selector switch ( →p10)
H Digital terminals ( →p11)
・Digital coaxial input terminal ×1
・Digital optical input terminal ×1
・Digital optical output terminal ×1
I AUDIO IN jacks ( →p11)
J SUBWOOFER PRE OUT jacks
K PRE OUT L/R jacks (unbalanced RCA output terminal)
L PRE OUT L/R jacks (balanced XLR output terminal)
M AC IN terminal ( →p17)
8
Part Names
Remote Controller
TONE CONTROL
L R
-
-
+
+
TREBLE
BASS
BALANCE
MUTING
VOLUME
RC-991S
NET TV CD
ANALOG 1
ANALOG 2
USB PHONO
TV
OPT
1 2 3
4
MY INPUT SELECT
TUNE CONTROL
LED ON/OFF
INPUT SELECTOR
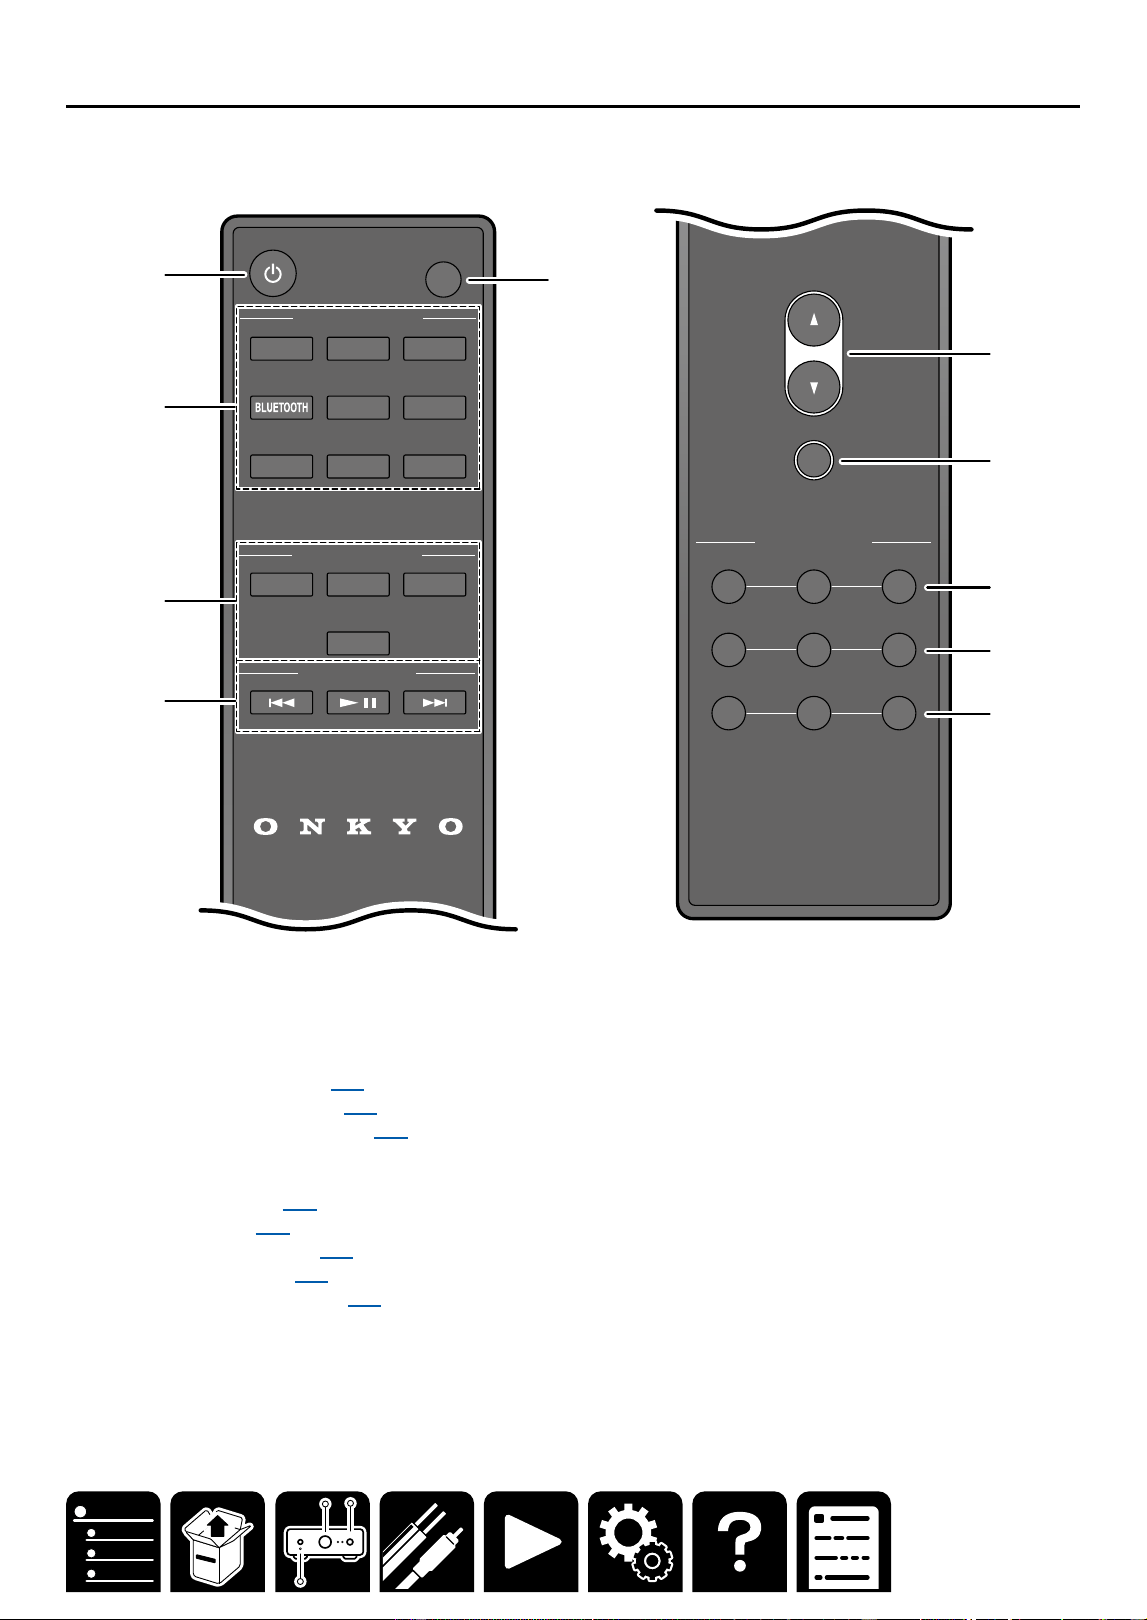
A
2
3
4
5
6
7
8
9
J
A ON/STANDBY button ( →p19)
B Input selector buttons ( →p19)
C MY INPUT 1/2/3/4 buttons ( →p25)
D TUNE CONTROL buttons
E LED ON/OFF button
F Volume buttons ( →p20)
G MUTE button ( →p20)
H TREBLE +/- buttons ( →p21)
I BASS +/- buttons ( →p21)
J BALANCE L/R buttons ( →p21)

9
Connections
Connections
Connecting a Turntable 10
Connecting a CD Player 11
Connecting the TV 12
Connecting a Power Amplier 13
Connect the Subwoofer 15
Network Connection 16
Connecting the Power Cord 17
Note
・ The illustration of the power amplier uses M-80,
the separately sold ONKYO power amplier.
When connecting another power amplier, also
check the instruction manual of the equipment to be
connected.
Connections
10
Connections
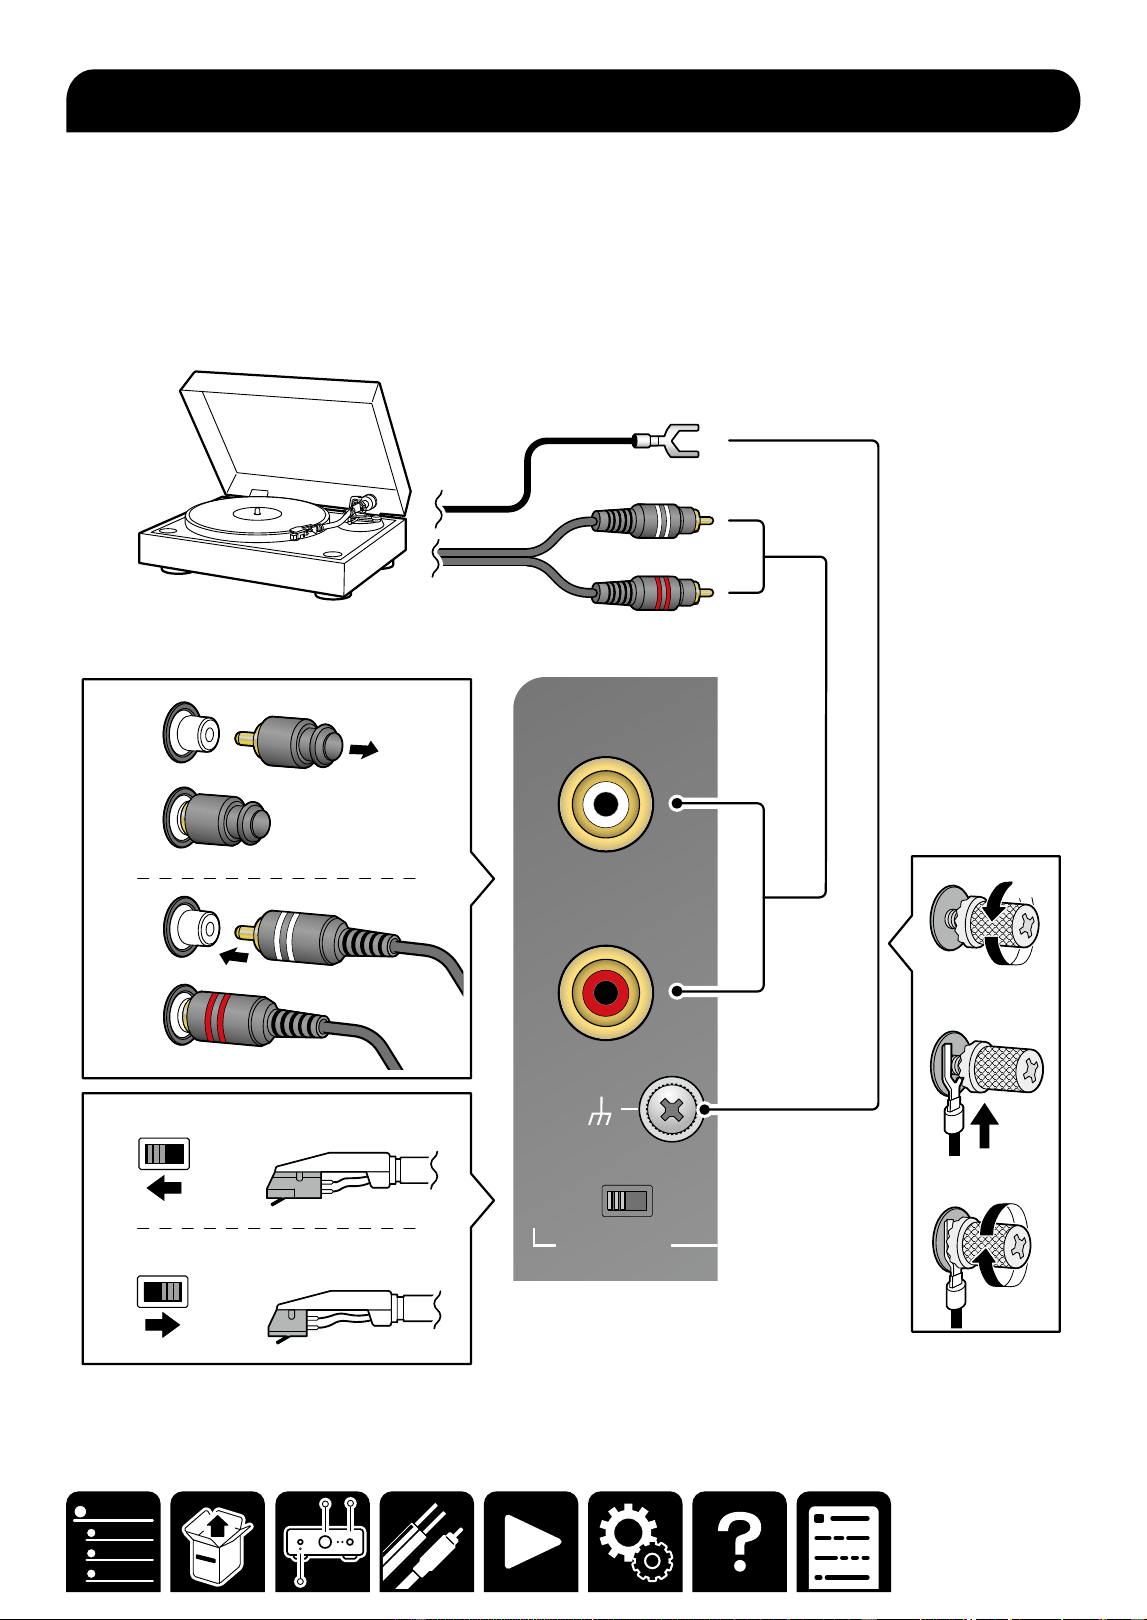
1. Remove the short pin (a), and connect the cable of the turntable.
・ If your turntable has a built-in phono preamp, you can connect the turntable to other analog inputs such as
ANALOG 1.
・ If your turntable has a ground wire, connect it to the GND screw (b). With some turntables, connecting the
ground wire may produce an audible hum. If this happens, disconnect it.
2. According to the type of cartridge of the turntable, switch between MM and MC.
CD
COAXIAL IN
OPT IN
OPT OUT
CD
AUDIO IN DIGITAL AUDIO IN
PHONO
L
R
MM MC
GND
ANALOG
1
ANALOG
2
MM (Moving Magnet)
MC (Moving Coil)
MM MC
MM MC
b
b
a
a
Connecting a Turntable
11
Connections
Connect a CD player using an analog cable or digital cable (digital optical cable or digital coaxial cable).
Note
DAC (Digital Analog converter) to be used diers depending on the connection method. DAC is an electronic
circuit that converts digital signals to analog signals (audio).
A-50A-50
CD Player
CD Player
Analog Connection
Digital Connection
■ Analog Connection
Connect the CD Player to either of the following jacks: AUDIO IN (CD, ANALOG 1, ANALOG 2).
OPT IN
OPT OUT
CD
AUDIO IN DIGITAL AUDIO IN
R
MM MC
GND
L
R
ANALOG
1
ANALOG
2
a
a Analog audio cable
■ Digital Connection (Coaxial or Optical)
CD
COAXIAL IN
OPT IN
OPT OUT
CD
PHONO
L
R
GND
OR
c
b Digital coaxial cable, c Digital optical cable
・ When audio is input into the AUDIO IN COAXIAL CD jack, the audio of the AUDIO IN CD jack is turned o.
Connecting a CD Player
12
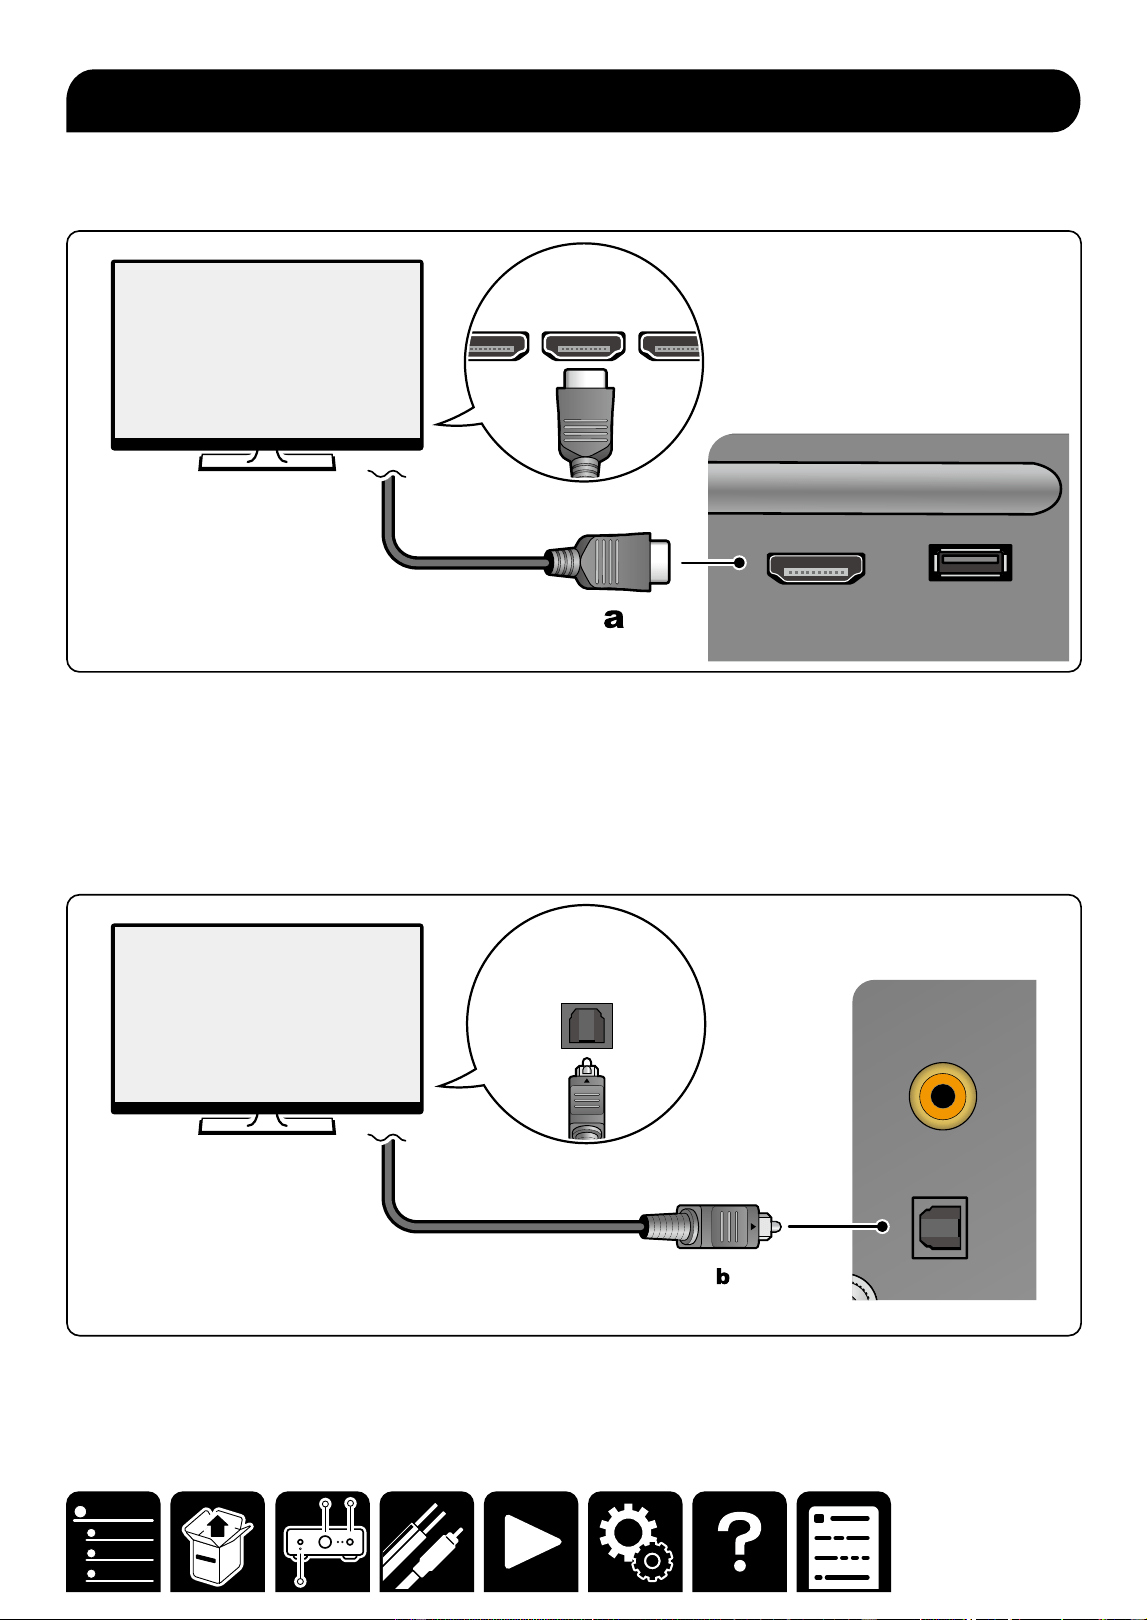
Connections
■ To ARC TV
If the TV supports the ARC (Audio Return Channel) function(*), use only the HDMI cable to connect with the TV.
Use the ARC-compatible HDMI IN jack of the TV for connection.
PHONO
CD
COAXIAL
L
USB
5V
/
1A
TV
(
ARC
)
HDMI IN
HDMI IN
(ARC) HDMI IN
a HDMI cable
Note
When the audio of the TV is not reproduced from the speakers connected to this unit, check that the audio output
destination is set to an external device on the ARC setting of the TV. Also, check that the HDMI cable supports
the ARC.
■ To Non-ARC TV
When the TV does not support the ARC (Audio Return Channel) function(*), connect a digital optical cable.
CD
COAXIAL IN
- . 2� ',
PHONO
L
R
GND
DIGITAL
OPTICAL
OUT
b Digital optical cable
(*) The ARC function transmits audio signals of a TV via an HDMI cable to reproduce the audio of the TV on this
unit. To check if the TV supports the ARC function, see the instruction manual of the TV or relevant documents.
Connecting the TV
13
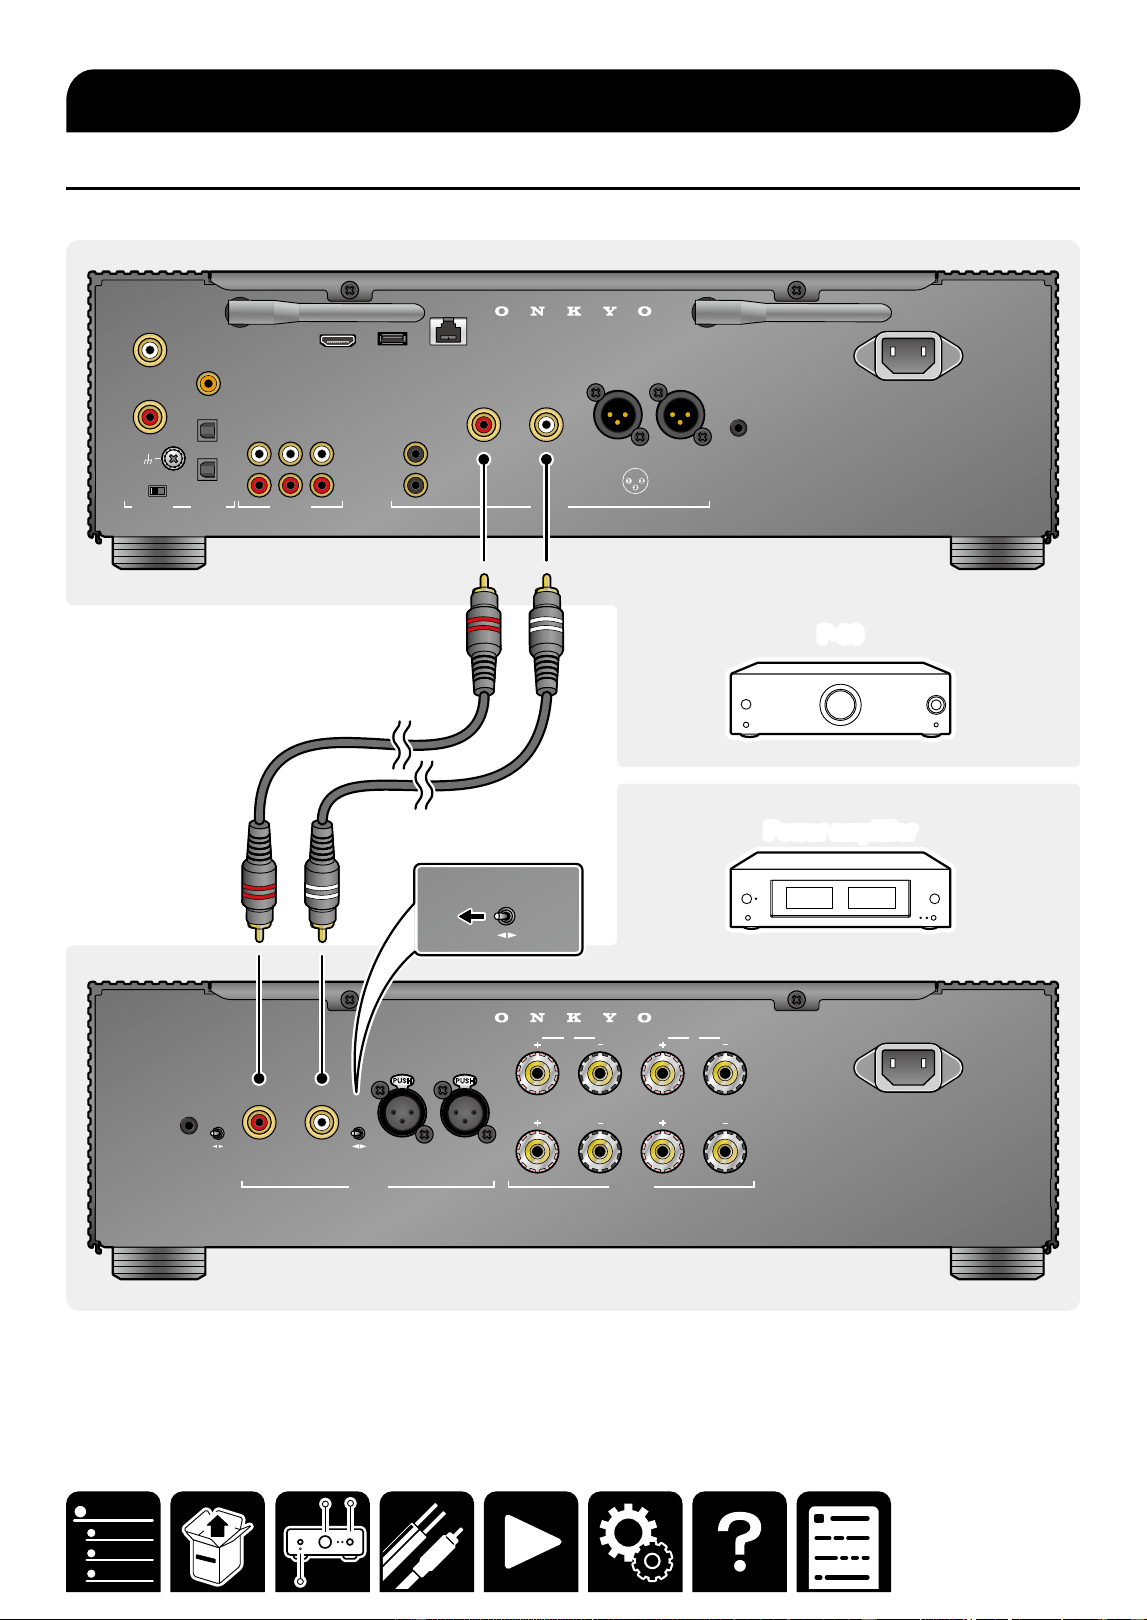
Connections
Connection using an unbalanced RCA cable
An unbalanced RCA cable (a) is a typical analog audio cable widely used for connection of audio equipment.
P-80
P-80
Power amplifier
Power amplifier
INPUT
SELECT
A
12V
TRIGGER
IN
AUTO
STA NDBY
OFF ON
UNBALANCED
BALANCED
AUDIO IN
L
R L
R
L
R
L
R
SPEAKERS
B
AC INLET
SUBWOOFER
L
R L
R
CD
COAXIAL IN
OPT IN
OPT OUT
CD
AUDIO IN DIGITAL AUDIO IN PRE OUT
PHONO
L
R
MM MC
GND
L
R
USB ETHERNET
5V
/
1A
TV
(
ARC
)
2 HOT
3 COLD
1 GND
ANALOG
1
ANALOG
2
1
2
AC INLET
INPUT
SELECT
UNBALANCED
BALANCED
AUDIO IN
R
12V
TRIGGER
OUT
aa
Connecting a Power Amplier
14
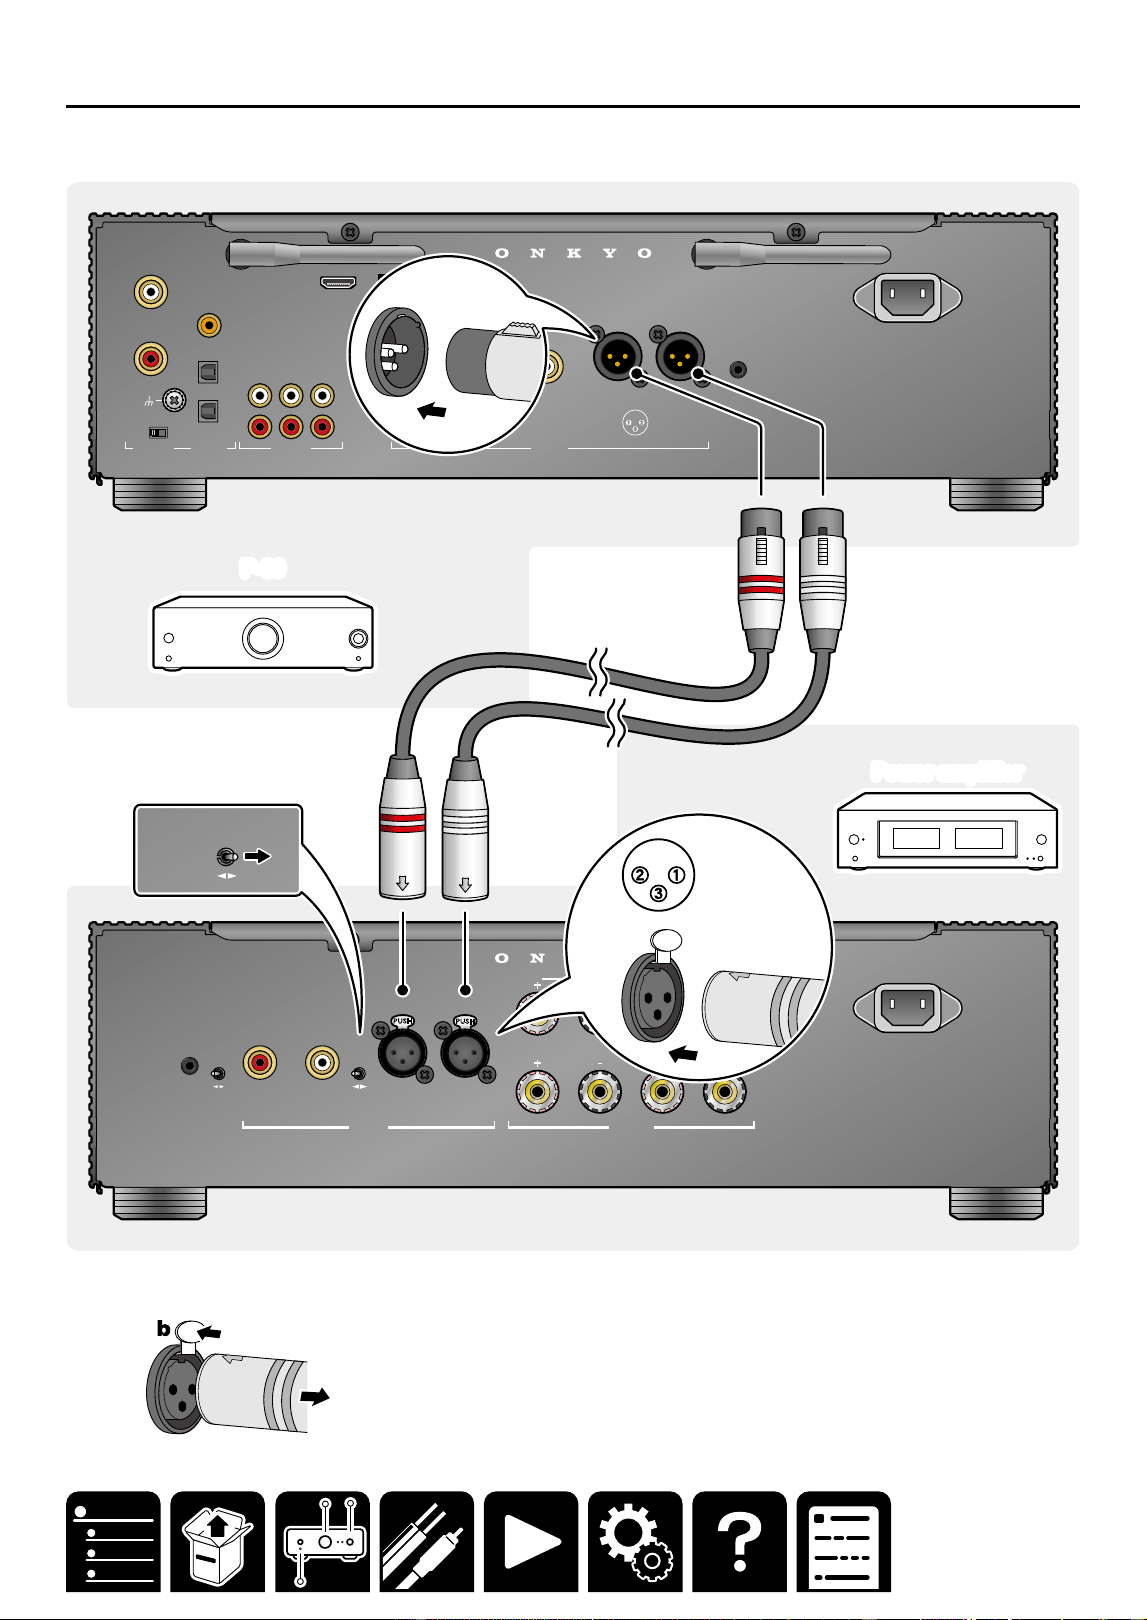
Connections
Connection using a balanced XLR cable
A balanced XLR cable (a) attenuates audio signals less than an unbalanced RCA cable, minimizing noise. This
cable is suited when a long cable is required to connect to equipment remotely located.
P-80P-80
Power amplifier
Power amplifier
INPUT
SELECT
A
12V
TRIGGER
IN
AUTO
STA NDBY
OFF ON
UNBALANCED
BALANCED
AUDIO IN
L
R L
R
L
R
L
R
SPEAKERS
B
AC INLET
SUBWOOFER
L
R L
R
CD
COAXIAL IN
OPT IN
OPT OUT
CD
AUDIO IN DIGITAL AUDIO IN PRE OUT
PHONO
L
R
MM MC
GND
L
R
USB ETHERNET
5V
/
1A
TV
(
ARC
)
2 HOT
3 COLD
1 GND
ANALOG
1
ANALOG
2
1
2
AC INLET
12V
TRIGGER
OUT
INPUT
SELECT
A
UNBALANCED
BALANCED
AUDIO IN
R L
L
R
L
R
SPEAKERS
B
1 GND
2 HOT
3 COLD
a
a
・To remove the XLR cable from this unit, press and hold the connector button (b), and pull the cable.

15
Connections
Connect a powered subwoofer with this unit using a subwoofer cable. Up to two powered subwoofers can be
connected. The same signal is output from each SUBWOOFER PRE OUT jack.
Note
Congure the setting to use the subwoofer. Download Onkyo Controller ( →p36) , select "Speaker Settings" -
"Subwoofer" on the menu screen, and select "1ch" or "2ch".
P-80
P-80
SUBWOOFER
L
R L
R
CD
COAXIAL IN
OPT IN
OPT OUT
CD
AUDIO IN DIGITAL AUDIO IN PRE OUT
PHONO
L
R
MM MC
GND
L
R
USB ETHERNET
5V
/
1A
TV
(
ARC
)
2 HOT
3 COLD
1 GND
ANALOG
1
ANALOG
2
1
2
AC INLET
12V
TRIGGER
OUT
aa
Connect the Subwoofer
16
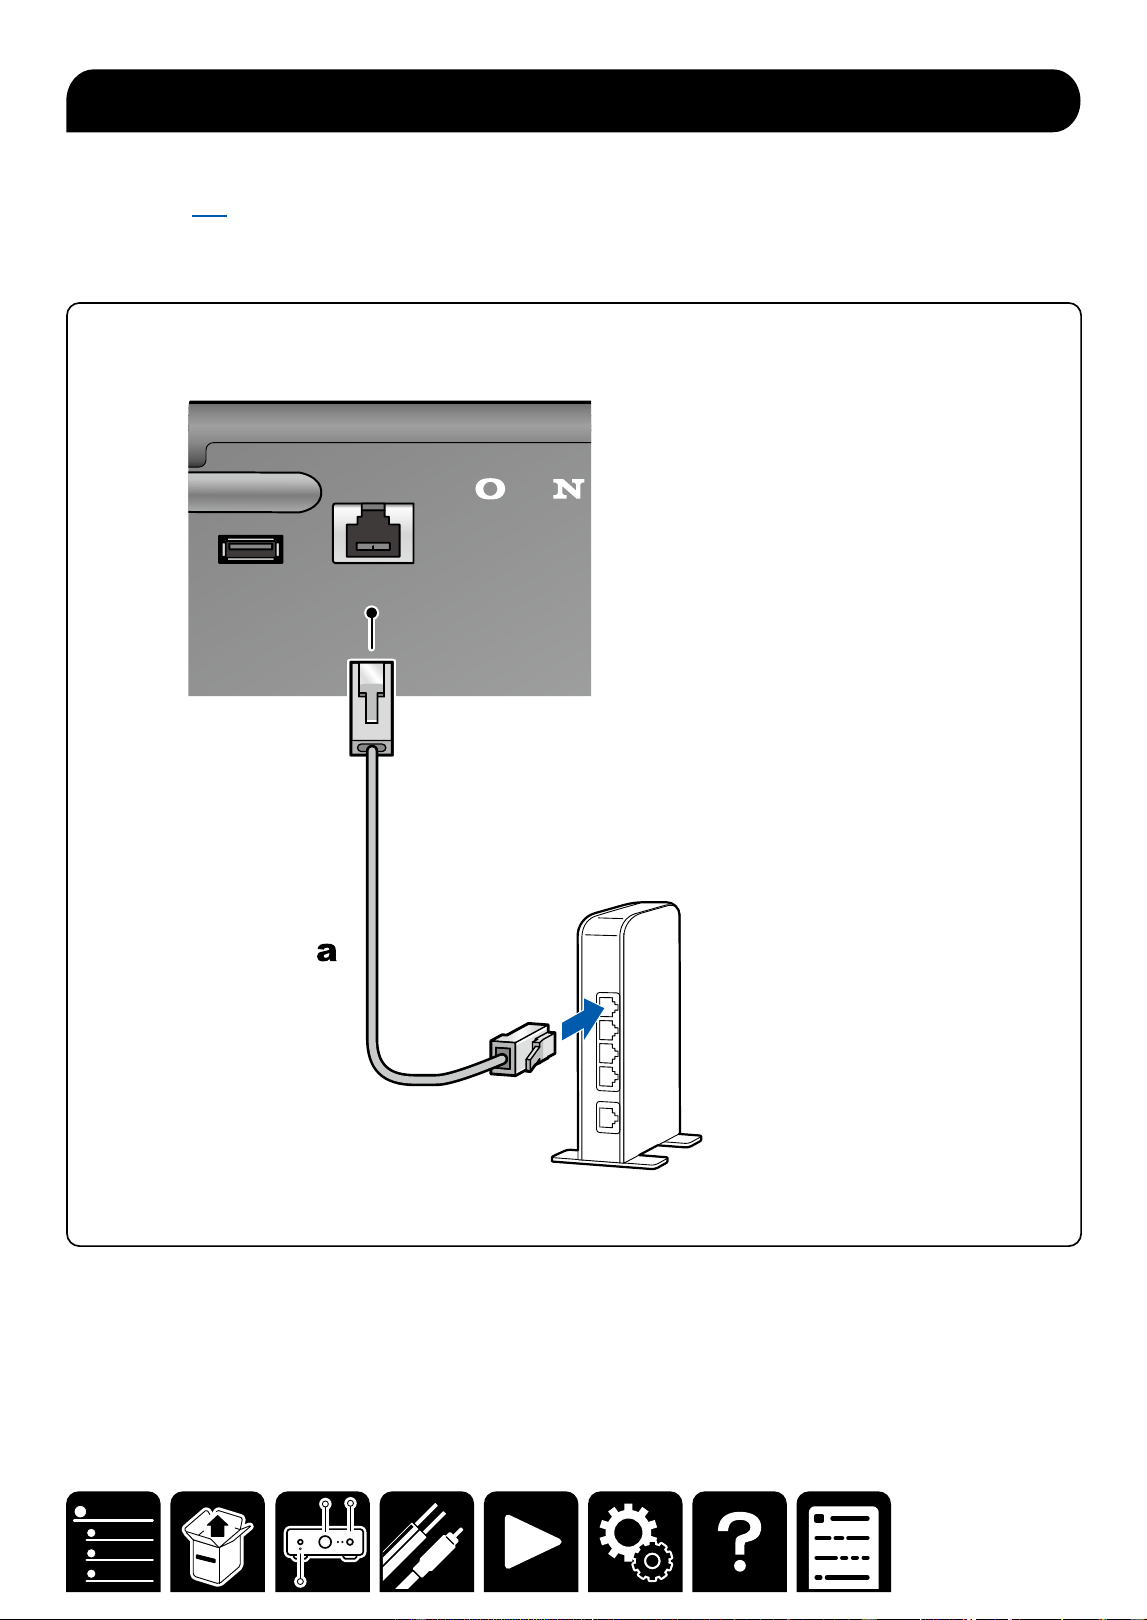
Connections
This unit can be connected to the network using a wired LAN or Wi-Fi (wireless LAN).
Connecting to the network enables playback of an Internet radio, or various operations and settings using Onkyo
Controller ( →p36). If connection is made by the wired LAN, connect the router and the ETHERNET jack with
the Ethernet cable as shown in the illustration. If connection is made via Wi-Fi, stand the wireless antenna on
the rear side, install Onkyo Controller on the mobile device, and congure the setting according to the on-screen
instruction.
SUBWOOFER
PRE OUT
USB ETHERNET
5V
/
1A
1
2
a Ethernet cable
Note
For security reasons, always connect via a router, etc., when connecting this unit to the Internet. Do not directly
connect to the communication circuits (including public wireless LAN) of a telecommunications provider (mobile
communications company, xed-line communications company, Internet provider, etc.).
Network Connection
17
Connections
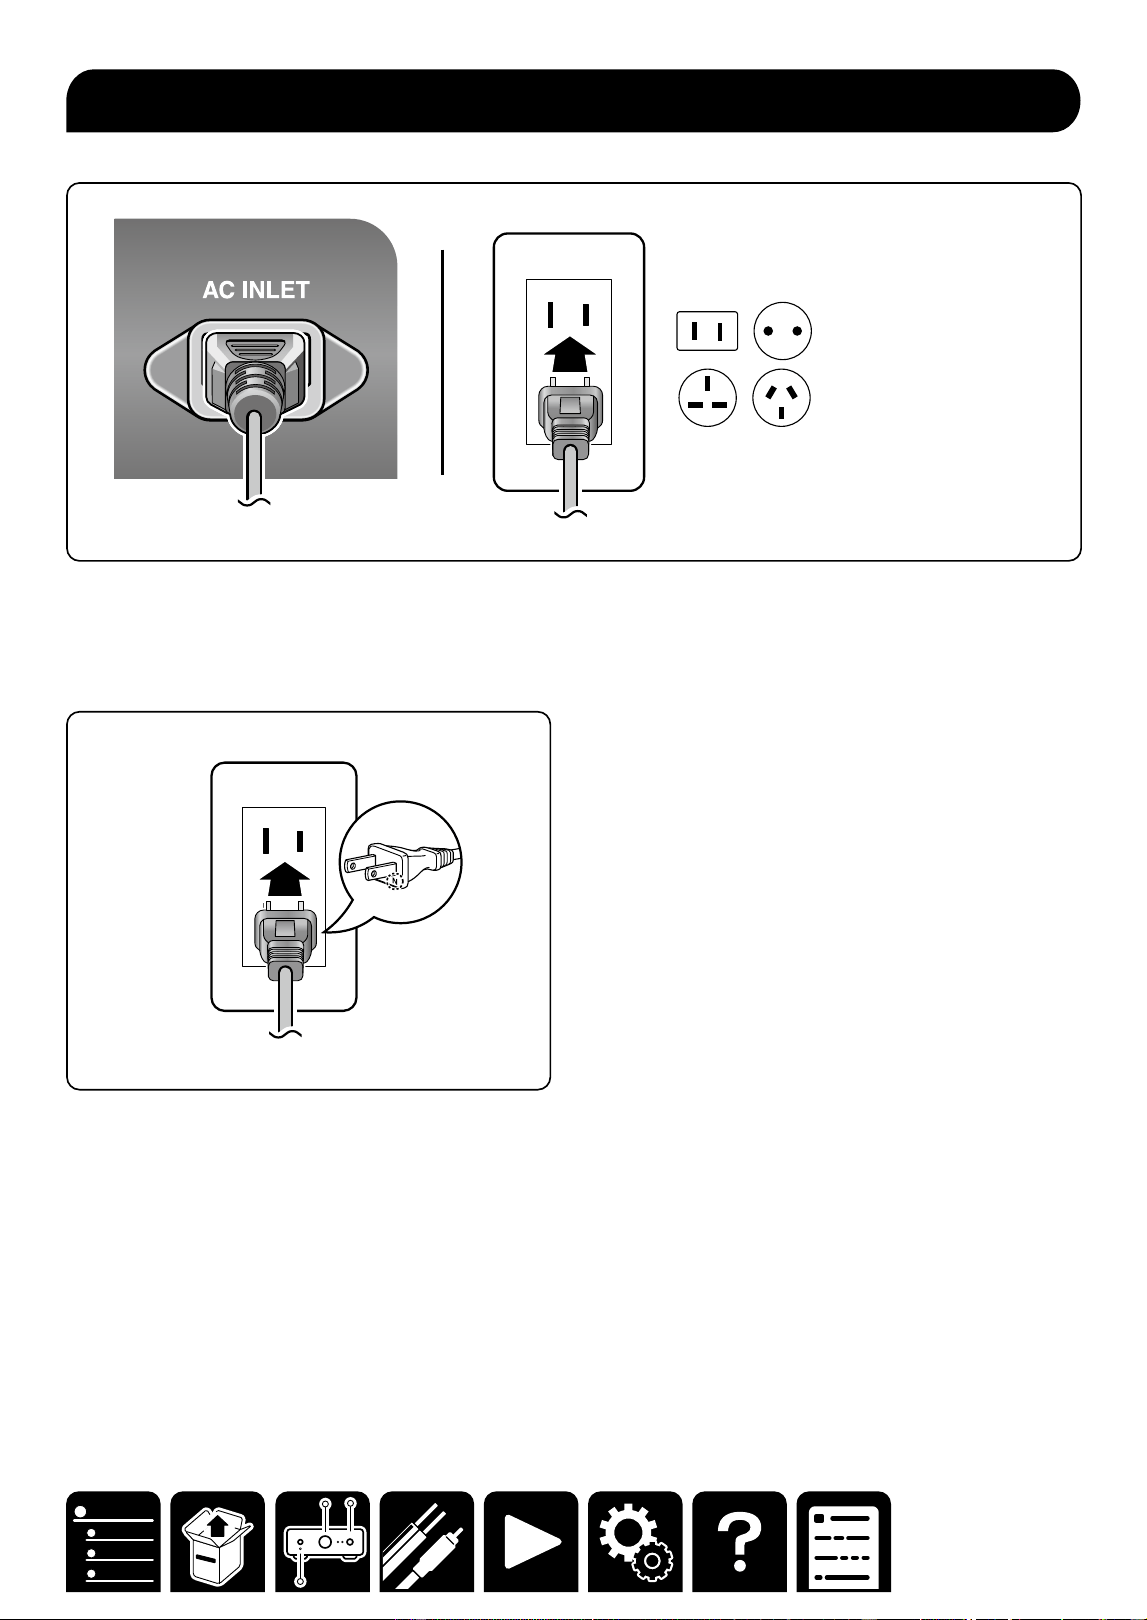
Connect the power cord after all the connections are completed.
Note
Japan model: Adapt the power source polarity for enhancement of the sound quality. Align the N-printed side
of the power plug supplied with this unit with the longer groove of the outlet, and insert the power plug. If both
grooves of the outlet are the same in length, either side can be connected.
Connecting the Power Cord
18
Playback
Playback
Basic Operations
Basic Operations 19
Adjusting the Bass, Treble and Balance
21
Using the Direct Function 22
Bluetooth
®
Playback 23
Using MY INPUT 25
Playing music les saved on a USB
storage device 26
Using Headphones 27
Network Services
Spotify 28
AirPlay
®
29
Amazon Music 30
TIDAL 31
TuneIn 32
Music Server 33
Note
To use the network service, Onkyo Controller
( →p36) is necessary.
Playback
19
Playback
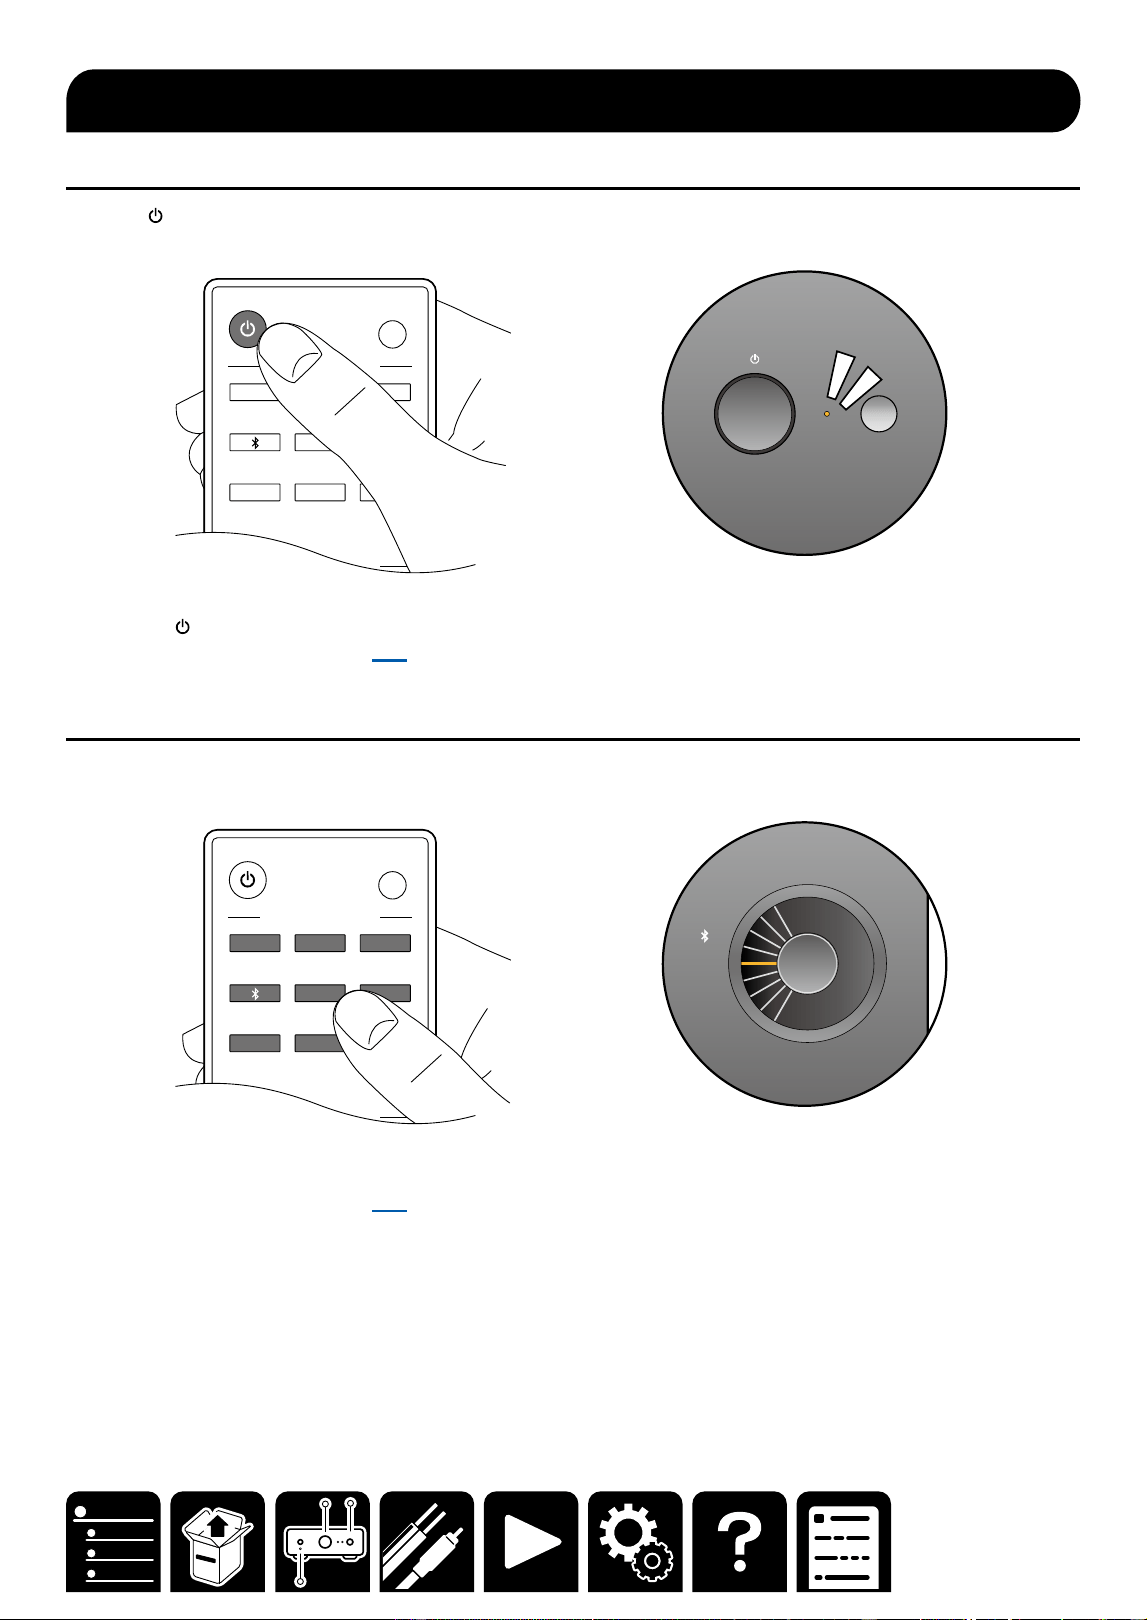
Turning the power on
1. Press ON/STANDBY on the remote controller to turn on the power of the unit.
LED ON
/
OFF
MY INPUT SELECT
INPUT SELECTOR
NET C
DT
V
ANALOG
1
ANALOG
2
OPT
USB
PHONO
1 2 3
PHONES
You can also turn on the power of the unit with the following operations:
– Pressing ON/STANDBY on the main unit.
– Using the Onkyo Controller ( →p36)
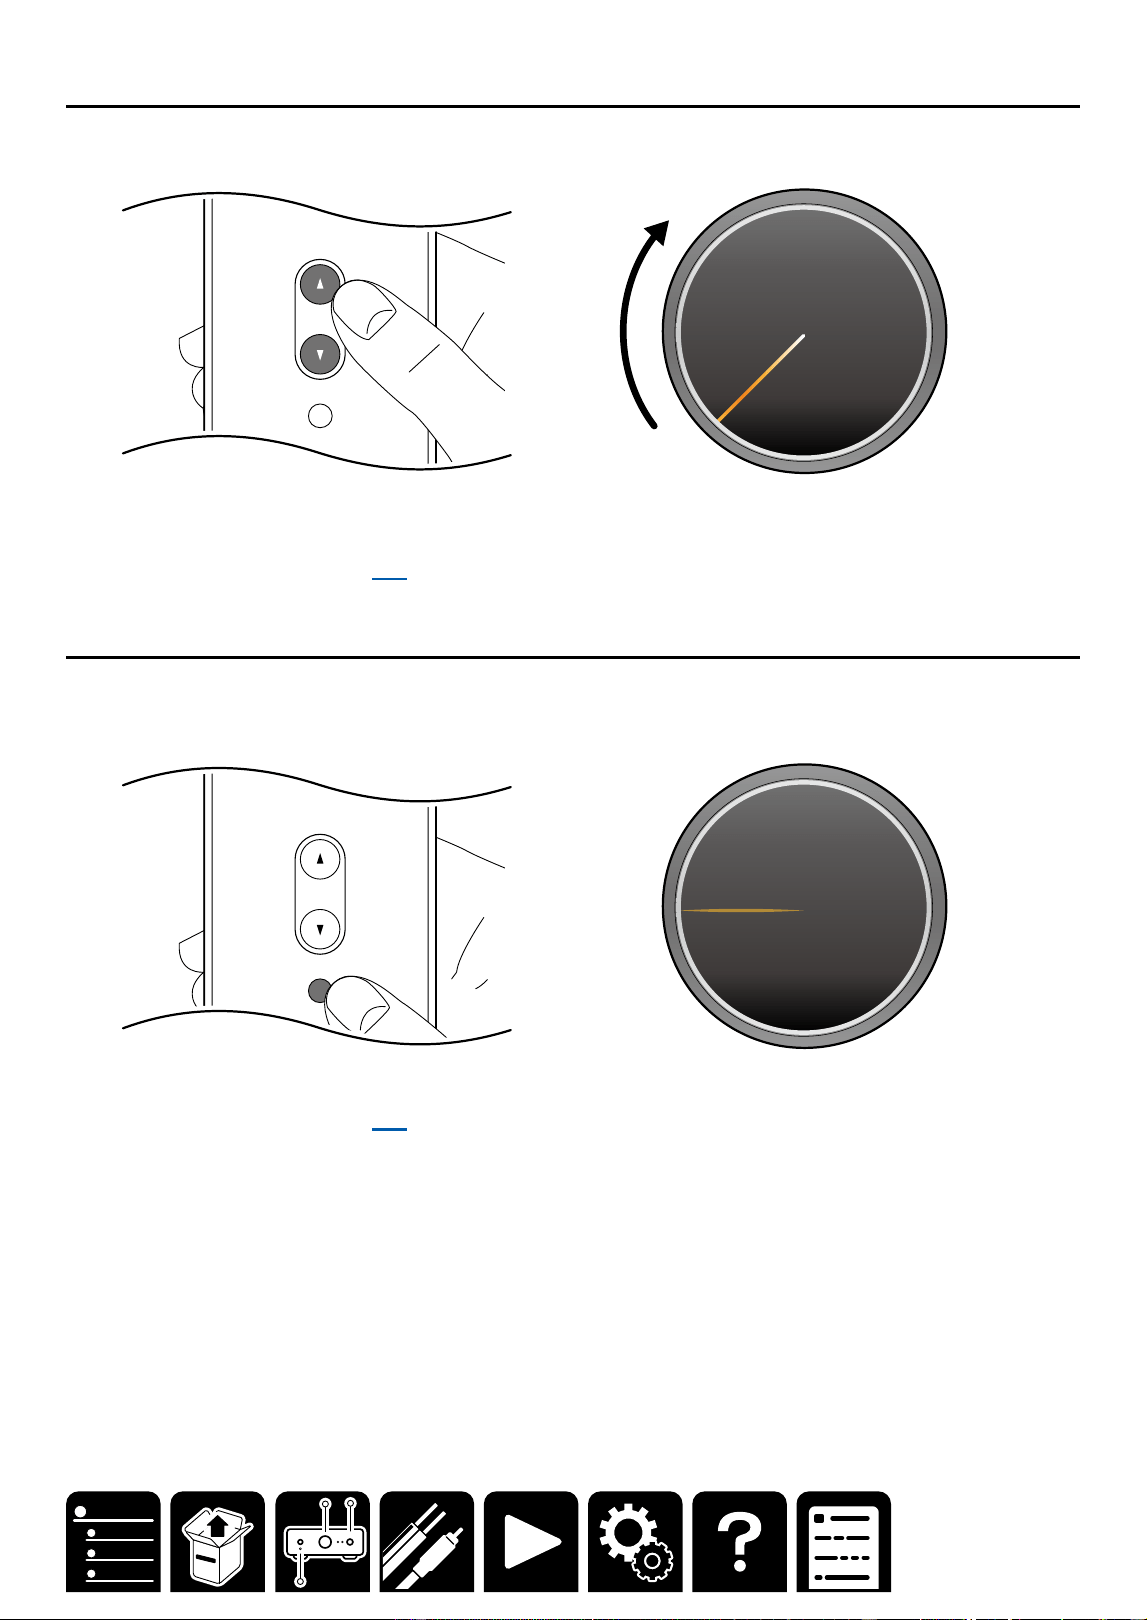
Selecting a source to play
1. Press an input selector button on the remote controller to select a source.
SETUP MIC
C
D
T
V
NET
AN
1
AN2
OPT
USB
PHN
MY INPUT
LED ON
/
OFF
MY INPUT SELECT
INPUT SELECTOR
NET C
DT
V
ANALOG
1
ANALOG
2
OPT
USB
PHONO
You can also select a source to play with the following operations:
– Turn the selector knob of the main unit.
– Using the Onkyo Controller ( →p36)
Basic Operations
20
Playback
Adjusting the volume
1. Press the VOLUME buttons on the remote controller to adjust the volume.
VOLUME
MUTING
TONE CONTROL
NET
You can also adjust the volume with the following operations:
– Using the VOLUME dial on the main unit
– Using the Onkyo Controller ( →p36)
Mute
1. To temporarily turn o the sound, press the MUTING button. Press again to cancel.
・In the muting state, the volume indicator slowly blinks.
VOLUME
MUTING
TREBLE
TONE CONTROL
NET
DIRECT
ON
OFF
You can also adjust the volume with the following operations:
– Using the Onkyo Controller ( →p36)
21
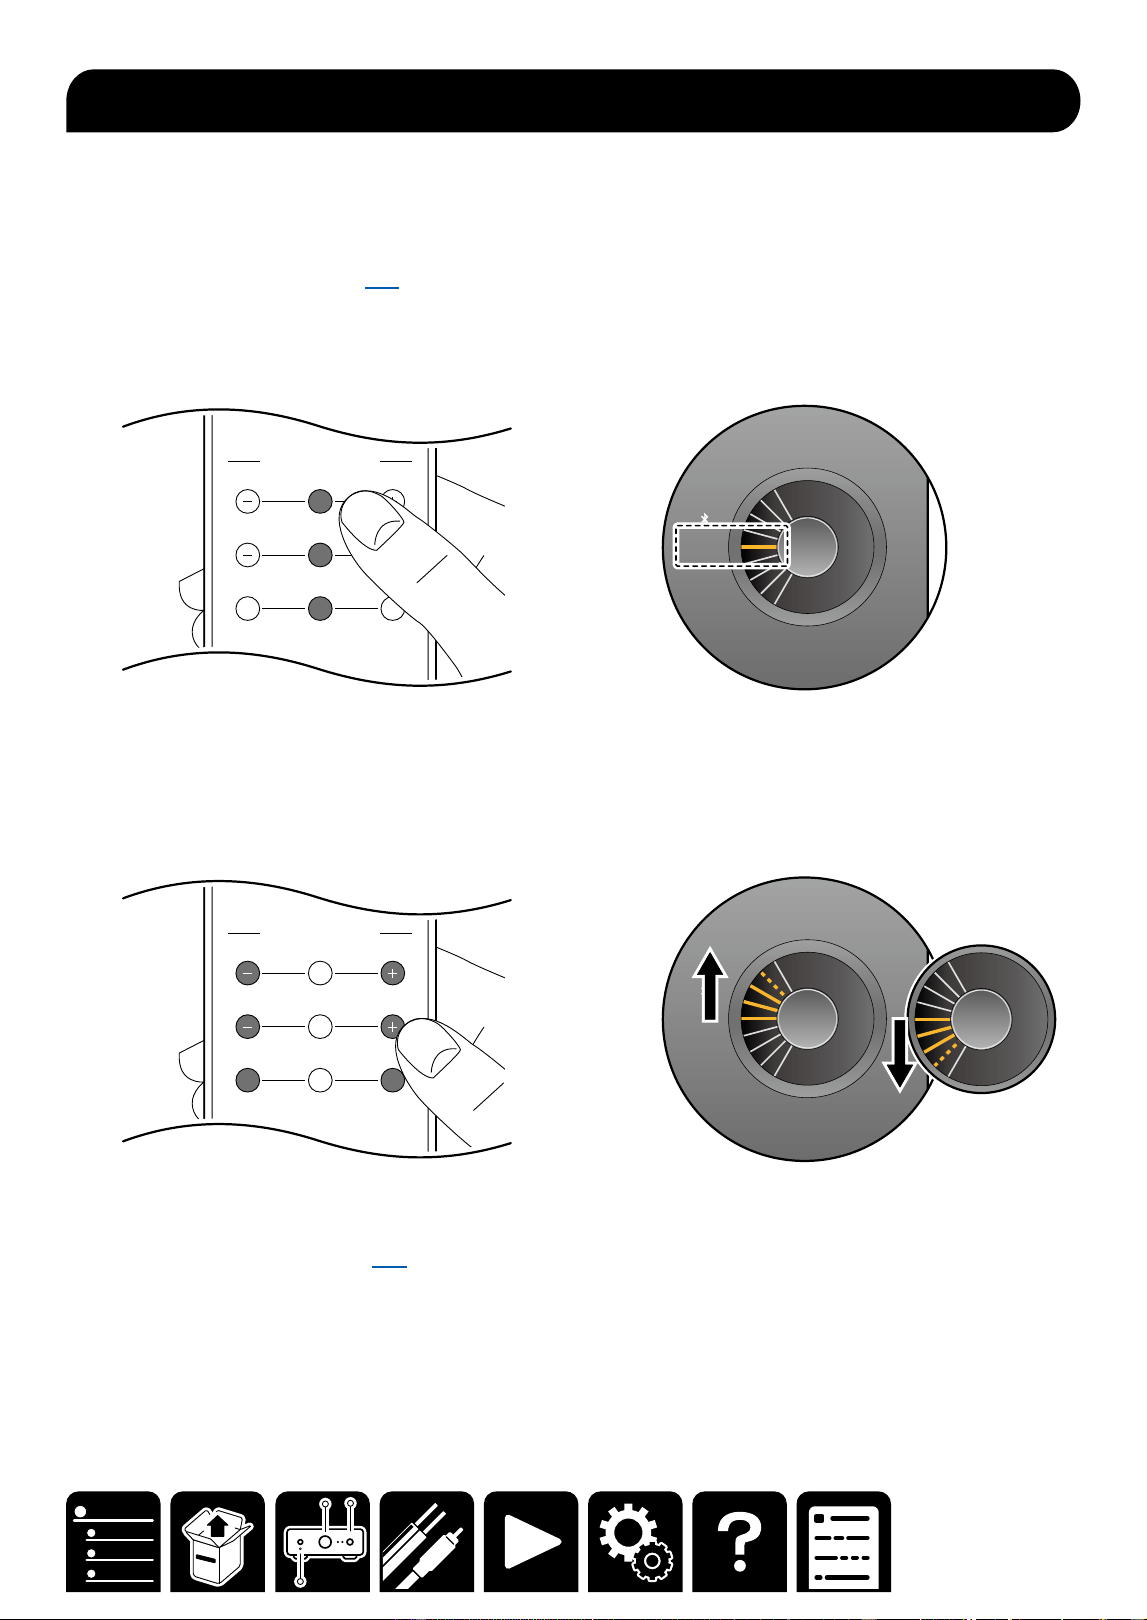
Playback
You can adjust the bass, treble and left/right output balance respectively.
TREBLE: Enhance or moderate the high pitched range.
BASS: Enhance or moderate the low pitched range.
BALANCE: Adjust the balance of the sounds output from the left and right speakers.
・When the DIRECT function ( →p22) is turned on, "TREBLE" and "BASS" are disabled.
1. Press the TONE CONTROL button ("TREBLE" or "BASS" or "BALANCE") of the remote controller once.
・When the adjustment is made for the rst time, the indicator of "AN 1" as the point of origin (±0) blinks.
TREBLE
BALANCE
BASS
TONE CONTROL
L R
DIRECT
ON
OFF
SETUP MIC
C
D
T
V
NET
AN
1
AN2
OPT
USB
PHN
421 3
MY INPUT
2. Press the "+/−" button or "L/R" button to adjust the level.
The level can be adjusted in 10 stages. TREBLE and BASS can be adjusted up to +10 or -10. BALANCE can
be adjusted up to +10 on the R side, or +10 on the L side. When the level adjustment reaches the upper limit,
all displayed indicators blink.
TREBLE
BALANCE
BASS
TONE CONTROL
L R
DIRECT
ON
OFF
SETUP MIC
C
D
T
V
NET
AN
1
AN2
OPT
USB
PHN
421 3
MY INPUT
DIRECT
ON
OFF
SETUP MIC
C
D
T
V
NET
AN
1
AN2
OPT
USB
PHN
421 3
MY INPUT
TREBLE, BASS, and BALANCE can also be set using the following operation.
– Using the Onkyo Controller ( →p36)
Adjusting the Bass, Treble and Balance
22
Playback
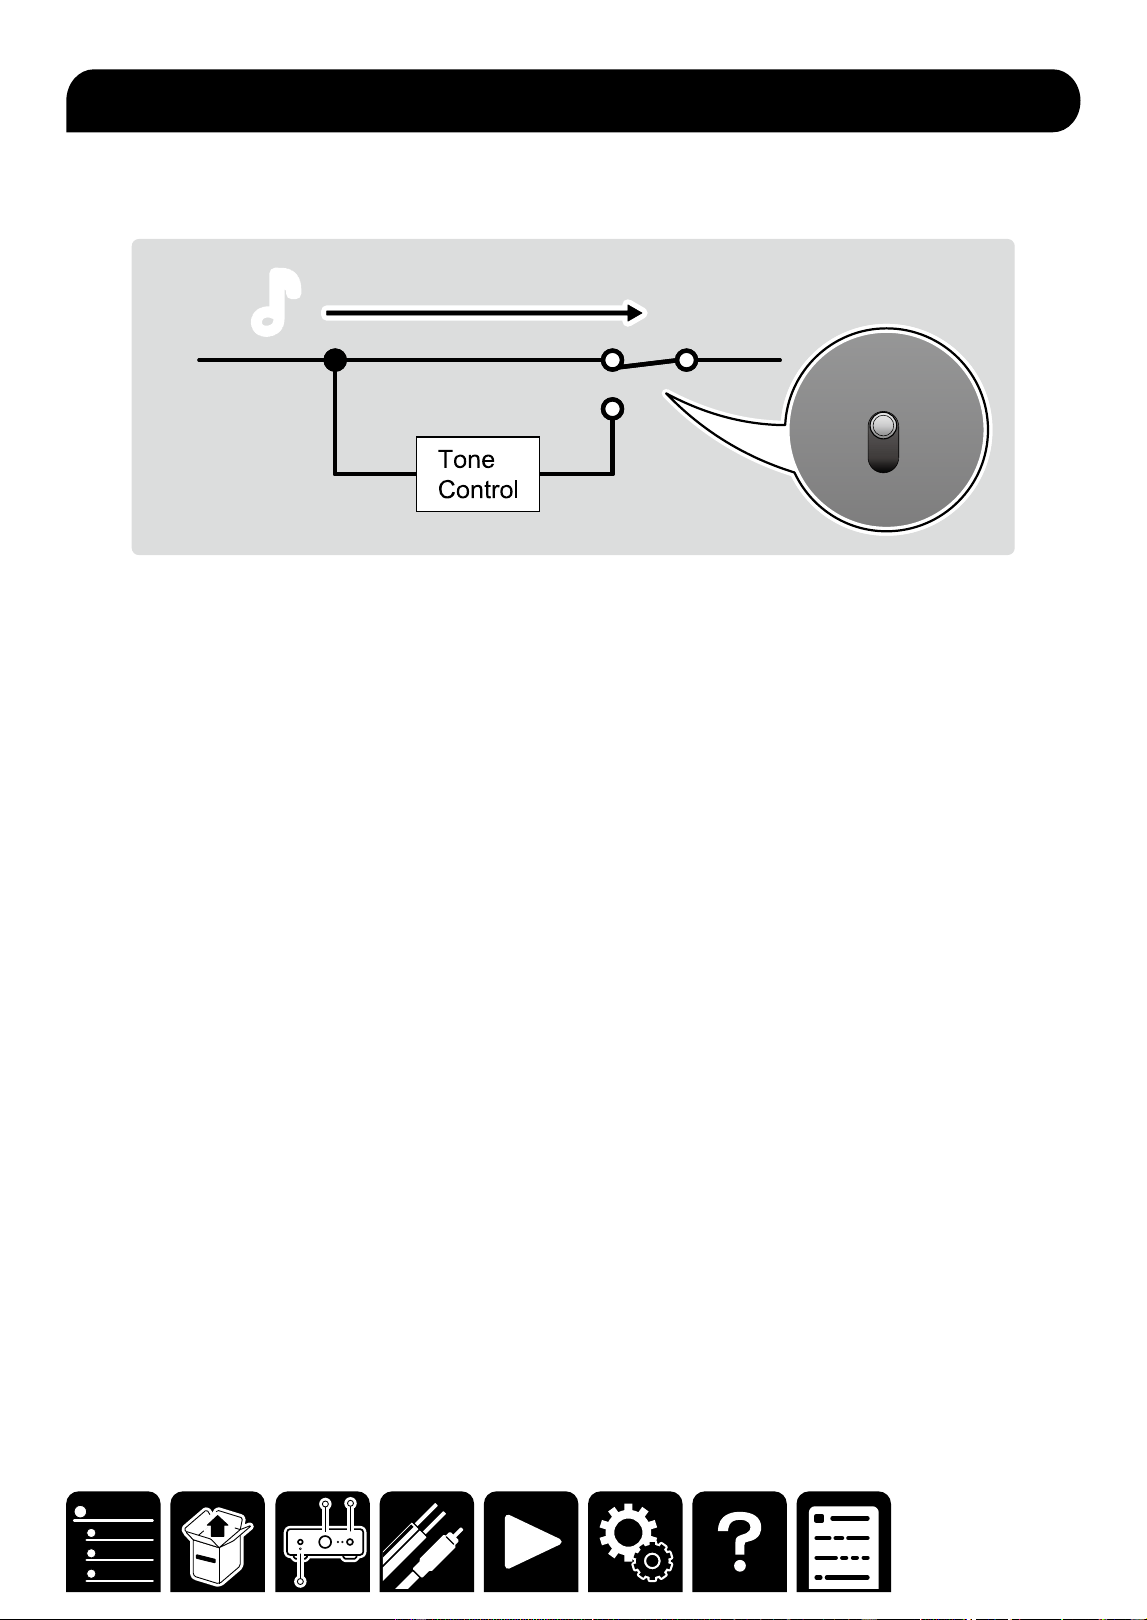
When the DIRECT function is turned on, the sound does not pass through the Tone Control circuit that adjusts
treble and bass, but passes through the shortest route in favor of sound quality. The output balance between right
and left can be adjusted since it uses a method that does not aect the sound quality.
♪♪
DIRECT
ON
OFF
Using the Direct Function
23
Playback
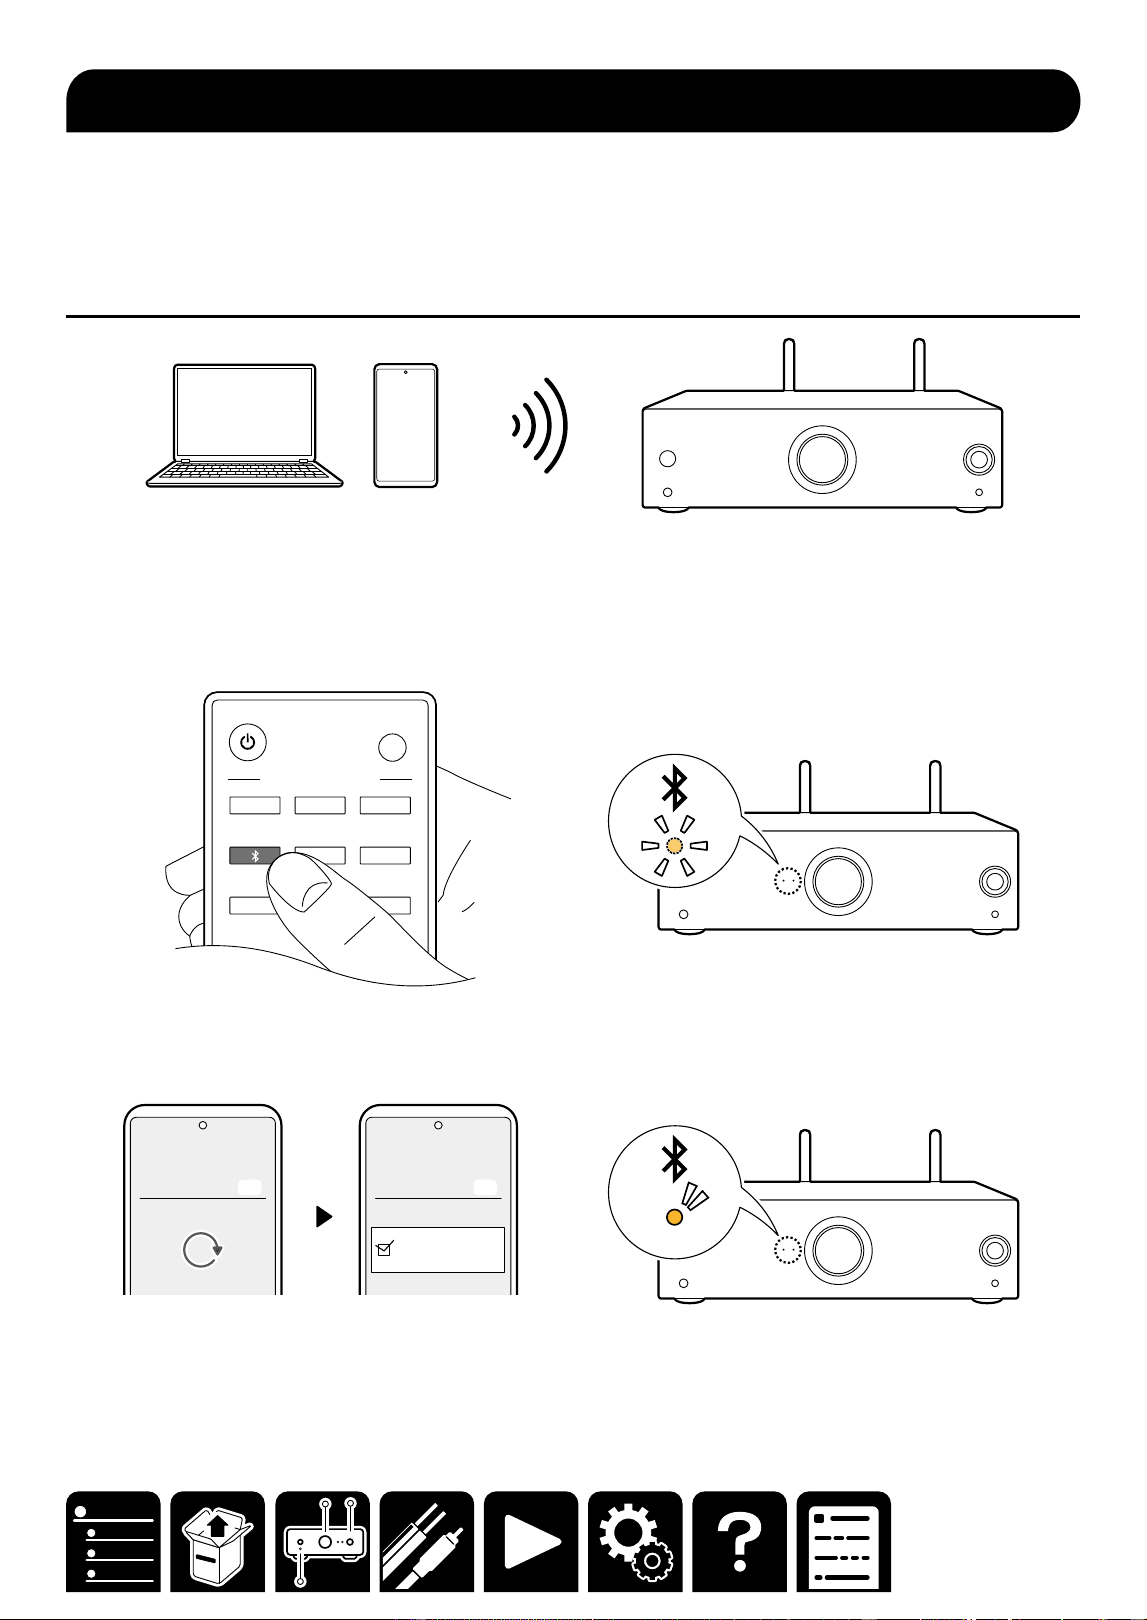
You can wirelessly play music on a smartphone or other Bluetooth wireless technology enabled device through
the speakers connected to this unit. It is also possible to transmit the audio from this unit to Bluetooth enabled
headphones, wireless speakers, etc.
Playing audio from Bluetooth wireless technology enabled
devices with this unit
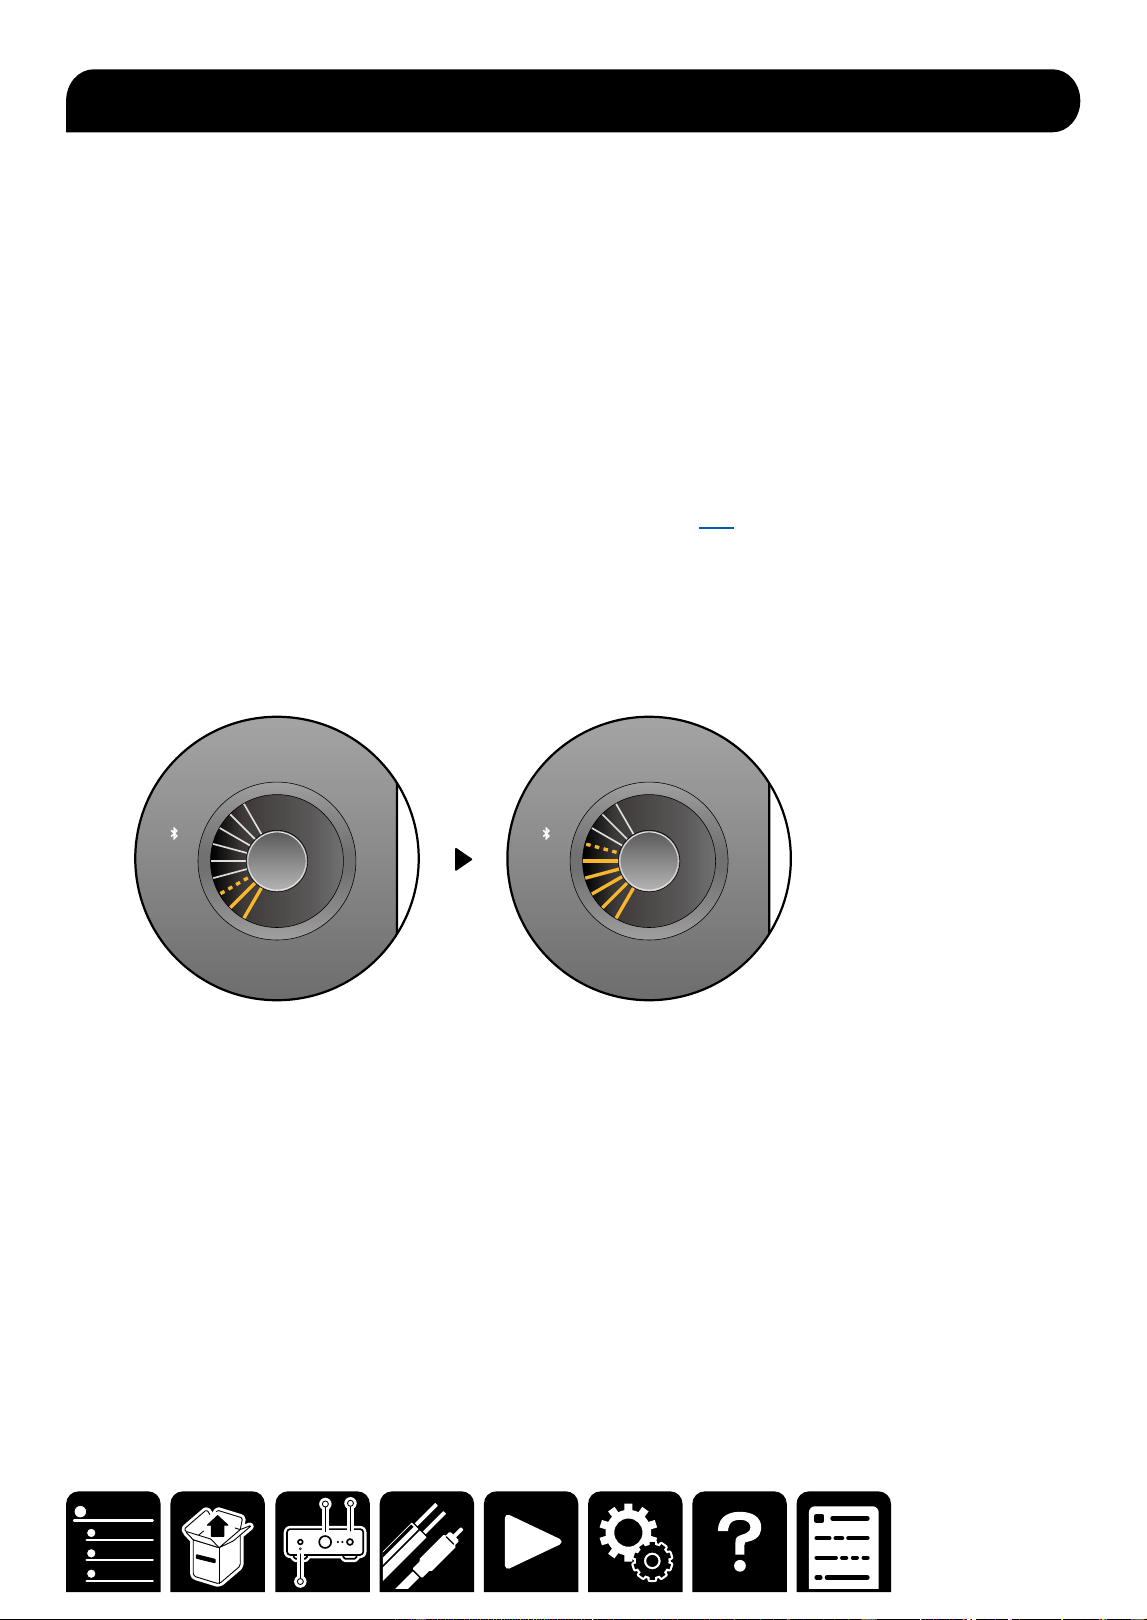
■ Pairing
1. Press the ON/STANDBY button to turn on the unit.
2. Press the BLUETOOTH button to switch to the BLUETOOTH selector.
The BLUETOOTH indicator blinks, and the unit enters the pairing standby state.
・ When the BLUETOOTH-enabled device is already connected, the unit enters the pairing standby state again
by canceling the connection or pressing and holding the selector knob of this unit for a few seconds.
LED ON
/
OFF
MY INPUT SELECT
INPUT SELECTOR
NET C
DT
V
ANALOG
1
ANALOG
2
OPT
USB
PHONO
3. Turn on the BLUETOOTH function of the BLUETOOTH-supported device.
4. Operate the BLUETOOTH-enabled device, and select this unit.
When the pairing is successful, the BLUETOOTH indicator status changes from blinking to lighting.
P-80xxxx
Bluetooth
Bluetooth Off
On
Bluetooth
Bluetooth Off
On
・ When multiple BLUETOOTH-enabled devices are connected, the unit needs to be put into the pairing standby
state again.
Set the input source to "Bluetooth" and then press and hold the selector tab for a few seconds. Then the
BLUETOOTH indicator blinks, and the unit enters the pairing standby state.
Bluetooth
®
Playback
24
Playback
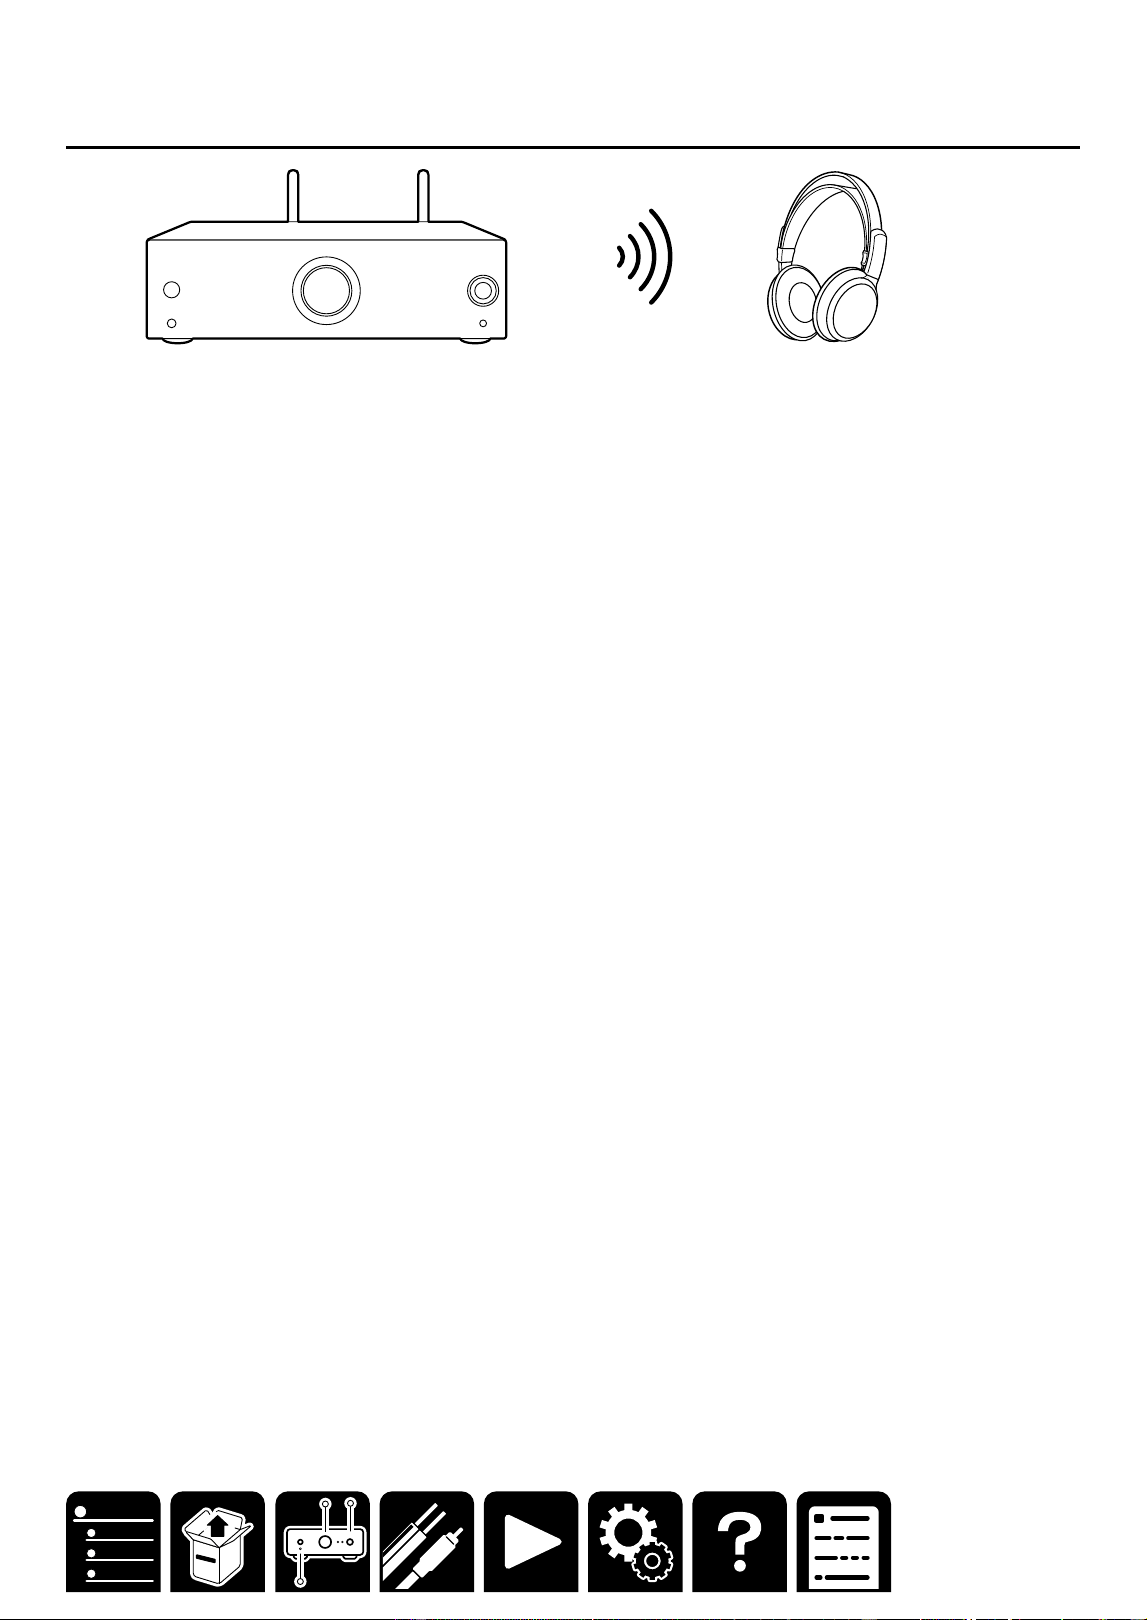
Transmitting audio from this unit to Bluetooth wireless
technology enabled devices
■ Pairing
To use this feature, the Onkyo Controller is required.
1. Launch the Onkyo Controller, select " ⁝ " - "Bluetooth Transmitter", and select either "On (Tx)" or "On (Main +
Tx)" in "Bluetooth Transmitter". (Default value is "O")
2. The search for available Bluetooth-enabled devices begins, and compatible devices will be displayed in a list.
Select the device you wish to output audio to and perform pairing.
・ Depending on the Bluetooth wireless technology enabled device, you may need to pair manually. If the device
name does not appear in the list, check the settings of the Bluetooth wireless technology enabled device.
Note
・You cannot transmit audio to multiple Bluetooth wireless technology enabled devices from this unit.
・ The coverage area is approx. 48´/15 m. Note that connection is not always guaranteed with all Bluetooth
enabled devices.
・ Audio cannot be output from a Bluetooth wireless technology enabled device in the following cases:
- When the audio le is DSD format
- When playing audio from one of the following network services: Chromecast built-in, Amazon Alexa, AirPlay,
Qobuz Connect
*The services may not be available, depending on your area of residence.

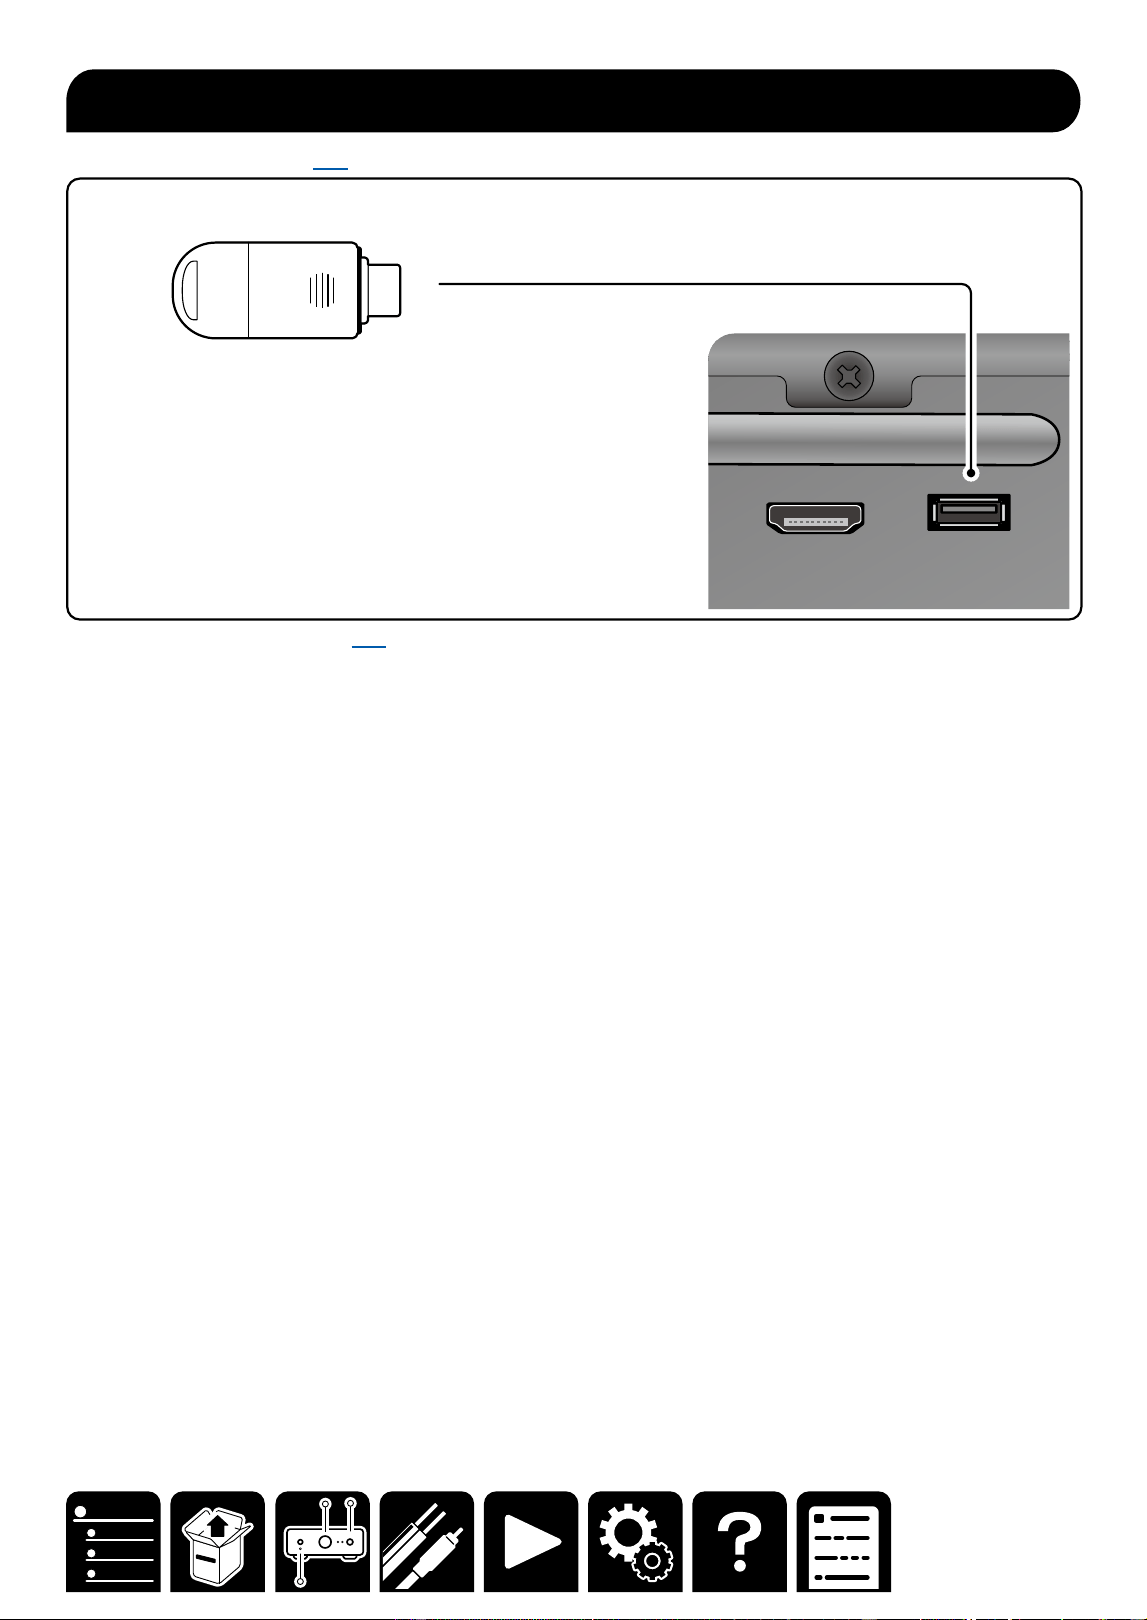
25
Playback
Up to four settings such as the current input source, sound adjustment, and Network Service (for NET selector)
can be registered to MY INPUT, and the registered settings can be invoked easily.
DIRECT
ON
OFF
SETUP MIC
C
D
T
V
NET
AN
1
AN2
OPT
USB
PHN
421 3
MY INPUT
MY INPUT registration is performed on the main unit.
1. Press and hold the MY INPUT button for a few seconds. When the indicator blinks, release your nger.
2. Press the MY INPUT button repeatedly, and select a registration destination for the setting from among 1 to 4.
3. Press and hold the MY INPUT button. When the indicator status changes from blinking to lighting, the
registration is complete.
Content is overwritten if there was any already registered.
・ Onkyo Controller ( →p36) can also be used to perform MY INPUT registration or invoke settings. Also, the
settings registered on MY INPUT can be checked.
Using MY INPUT


29
Playback
By connecting this unit to the same network as that of iOS devices such as iPhone
®
, iPod touch
®
and iPad
®
, you
can enjoy music les on iOS devices wirelessly.
• Depending on the iOS version, operation screens or operation procedures on the iOS device may be dierent.
For details, refer to the operating instructions for the iOS device.
Basic Operations
1. Connect the iOS device to the access point where this unit is connected via network.
2. Tap the AirPlay icon in the play screen of the music app on an iOS device that supports AirPlay and select
this unit from the list of devices displayed.
3. Play the music le on the iOS device.
• Due to the characteristics of AirPlay wireless technology, the sound produced on this unit may slightly be
behind the sound played on the AirPlay-enabled device.
Note
・ AirPlay and AirPlay2 allow for playback of music les stored on a PC with iTunes (Ver. 12.8 or later) installed.
Click the AirPlay icon of iTunes, select this unit and an AirPlay or AirPlay2-enabled device to play from the
displayed devices, and play a music le.
・ Due to the characteristics of AirPlay wireless technology, the sound produced on this unit may slightly be
behind the sound played on the AirPlay-enabled device.
AirPlay
®
30
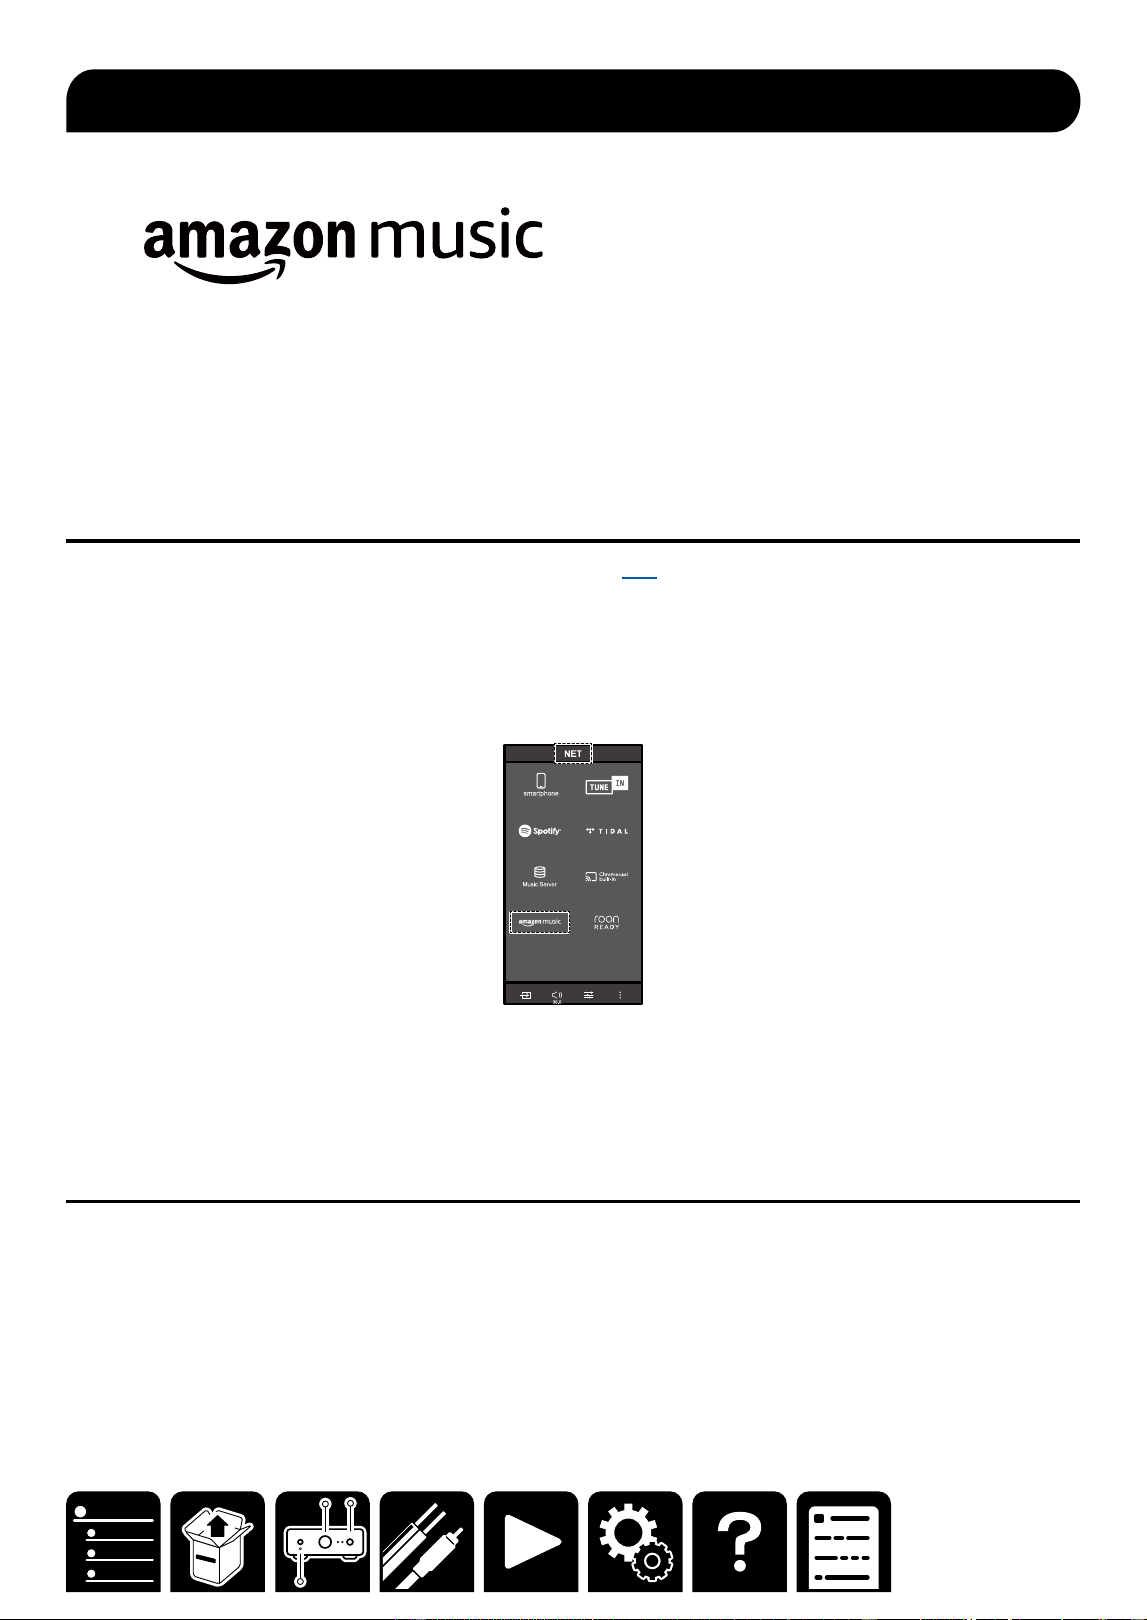
Playback
Registering this unit with Amazon Music allows you to enjoy the music distribution service provided by Amazon.
• To play Amazon Music, you need to have your Amazon account and sign up for Amazon Prime or Amazon
Music Unlimited. For more information, see the Amazon website.
Amazon Music is now available in several countries. If Amazon Music is not available in your country, please visit
https://music.amazon.com/ for more info.
Registering This Unit with Amazon Music
1. Register with the Amazon account on Onkyo Controller ( →p36). This cannot be set with operations on this
unit.
2. Start Onkyo Controller and tap the unit when displayed.
3. Operate Onkyo Controller, and switch to the NET selector. Then tap the "Amazon Music" icon to display the
login screen of Amazon Music. (Depending on the model, the icon names may be dierent.)
• If the login screen is not displayed but an update or installation screen is displayed instead, perform the
update or installation according to the on-screen instructions.
Available services may dier depending on your area.
4. Enter the Amazon account information such as email address and password to log in to Amazon. When the
login is successful and this unit is registered, the Amazon Music menu is displayed.
For playback, proceed to step 3 in the next section.
Playing Amazon Music using the Onkyo Controller
1. Start up Onkyo Controller. This unit is automatically displayed after startup. Then, tap and select this unit
displayed.
2. Operate Onkyo Controller, and switch to the NET selector. Then tap the "Amazon Music" icon.
3. Select the content to play from the menu screen of Amazon Music to start playback.
Amazon Music


32
Playback
By connecting this unit to an Internet-connected network, you can enjoy Internet radio services such as TuneIn
Radio.
• Use Onkyo Controller ( →p36) to play the Internet radio.
• Depending on the Internet radio service, a user registration may be required on your PC beforehand. For
details of each service, visit the website of each service.
Playing Back
1. Start up Onkyo Controller.
2. Select "NET" - "Tune In" from the input source.
TuneIn Radio account
When you create an account on the website of TuneIn Radio (tunein.com) and log into the website from this unit,
your favorite radio stations or programs you follow on the website are automatically added to "My Presets" on
this unit. "My Presets" is displayed on the top list of TuneIn Radio. To log into the website, select "Login" - "I have
a TuneIn account" on the top list of "TuneIn Radio" displayed on Onkyo Controller, and enter the user name and
password.
• Selecting "Login" displays a registration code. Using this registration code, associate the device on my page on
the TuneIn Radio website. Then, selecting "Login" - "Login with a registration code" allows you to log in without
entering the user name and password.
TuneIn
33
Playback
Using Onkyo Controller ( →p36) enables streaming playback of music les stored on a PC or NAS.
・To play music les, this unit needs to be connected to the same network as that for the PC or NAS.
・Supported Audio Formats ( →p47)
Music Server notes
・ The network servers this unit is compatible with are those PCs with players installed that have the server
functionality of Windows Media
®
Player 12, or NAS that are compatible with home network functionality. When
using Windows Media
®
Player 12, you need to make the settings beforehand. Note that with PCs, only music
les registered in the library of Windows Media
®
Player can be played.
・When playing les recorded with VBR (Variable bit-rate), the playback time may not be displayed correctly.
・ For music les on a server, up to 20,000 tracks per folder are supported, and folders can be nested up to 16
levels deep.
・Depending on the type of media server, the unit may not recognize it, or may not be able to play its music les.
Windows Media
®
Player 12 settings
1. Turn on your PC, and start Windows Media
®
Player 12.
2. In the "Stream" menu, select "Turn on media streaming" to display a dialog box.
・ If the media streaming is already turned on, select "More streaming options..." in the "Stream" menu to
display the list of playback devices in the network, and then go to step 4.
3. Click "Turn on media streaming" to display the list of playback devices in the network.
4. Select this unit in "Media streaming options" and check that it is set to "Allow".
5. Click "OK" to close the dialog.
6. Open the "Stream" menu and conrm that "Allow remote control of my Player..." is checked.
・ Depending on the version of Windows Media
®
Player, the names of items to select may dier from the above
description.
Playing Back
1. Start up Onkyo Controller, and select "NET" - " Music Server" from the input source.
Selecting Music Server displays a PC or NAS in the same network as that for this unit.
2. Select the PC or NAS to play the music stored.
・Depending on the type of media server, the unit may not recognize it, or may not be able to play its music les.
Music Server


36
Setup
Onkyo Controller (available on iOS and Android™ handsets) is a dedicated app available for free which allows
you to use your handset as a remote controller. Using this app allows you to congure Wi-Fi (wireless LAN)
settings for this unit, and perform input switching, volume adjustment, sound adjustment, etc.
1. Download Onkyo Controller.
https://onkyo.com/onkyo-app-ios https://onkyo.com/onkyo-app-android
2. Make a network connection following the guidance of the app.
・To use all services, you need to agree with Privacy Statement.
・ To switch between wireless LAN and wired LAN after the initial setup, congure the settings via “Web Setup” –
“Network Setting” ( →p42).
P-80
P-80(192.168.XXX.XXX)
Onkyo Controller
37
Setup
Level Calibration for Fidelity IQ
Fidelity IQ is a technology to automatically correct hearing of sound volume for each frequency.
A sense of hearing of a person diers in sensitivity depending on the frequency. For example, when vocal and
bass are reproduced at the same input level, you will sense dierence in sound volume.
This technology corrects sound volumes in treble and bass best suited to users' hearing environment by
optimizing the Fidelity IQ correction using the speaker setup microphone based on the hearing environment and
speaker characteristics.
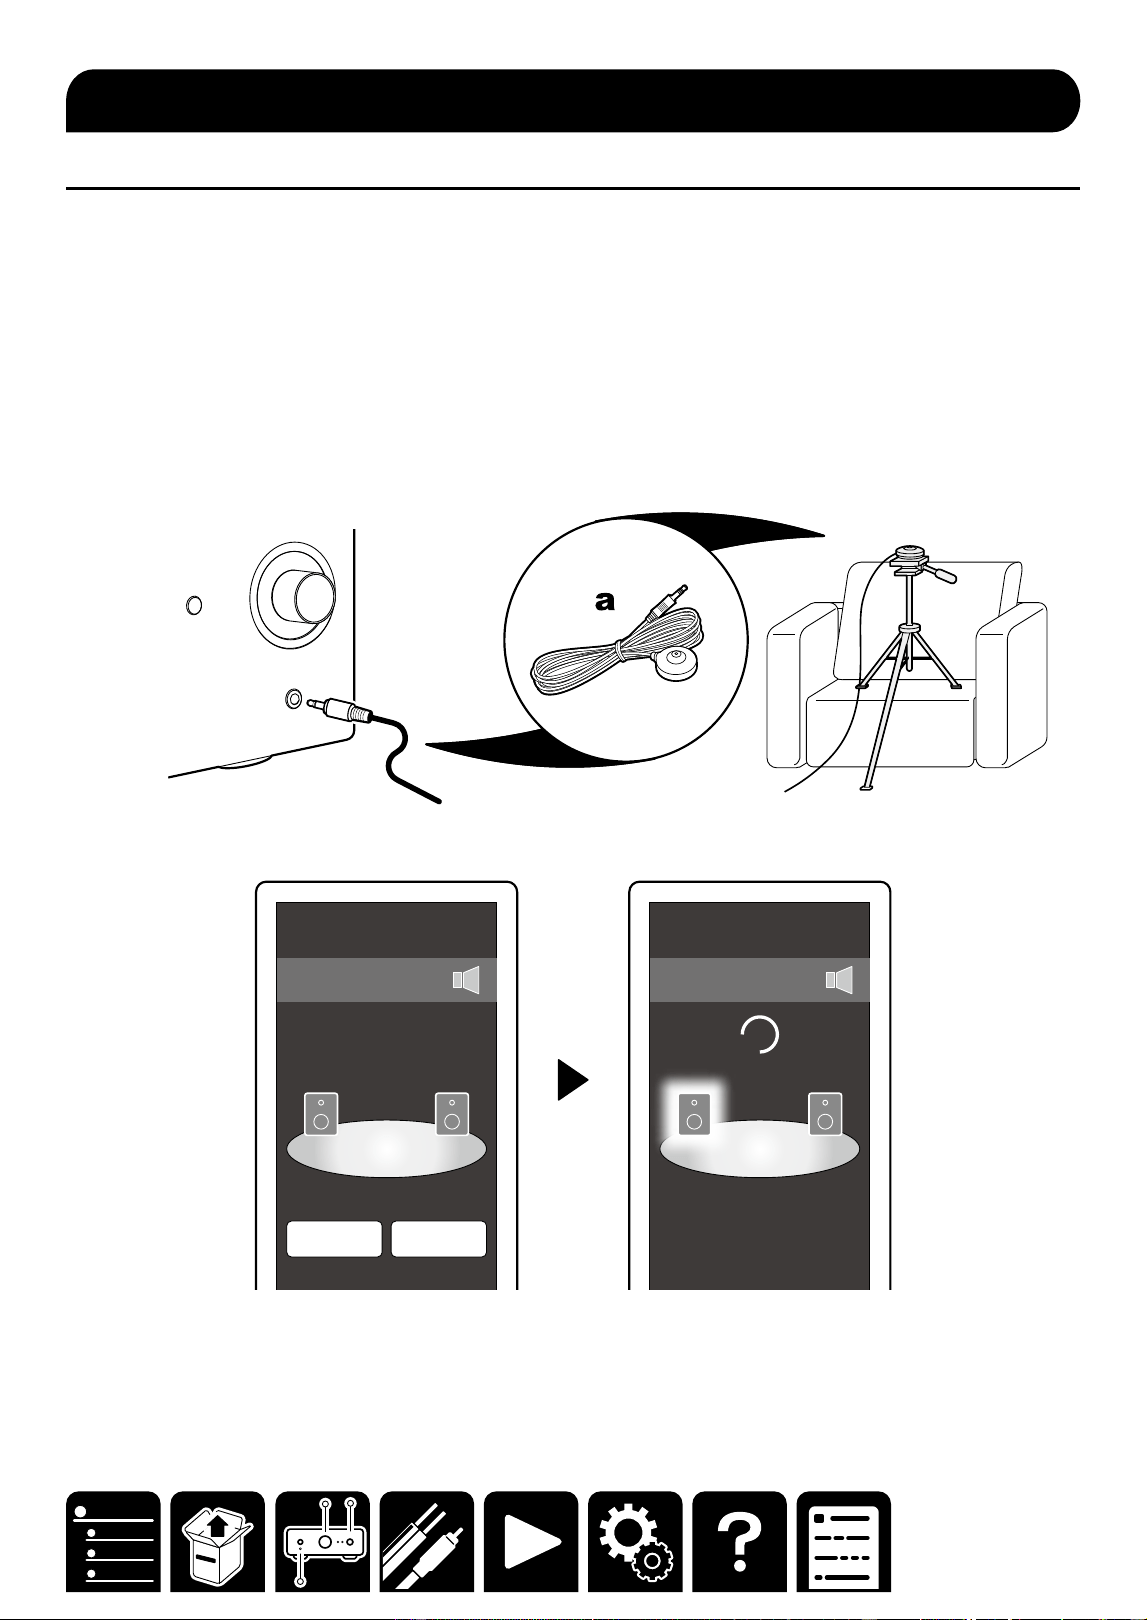
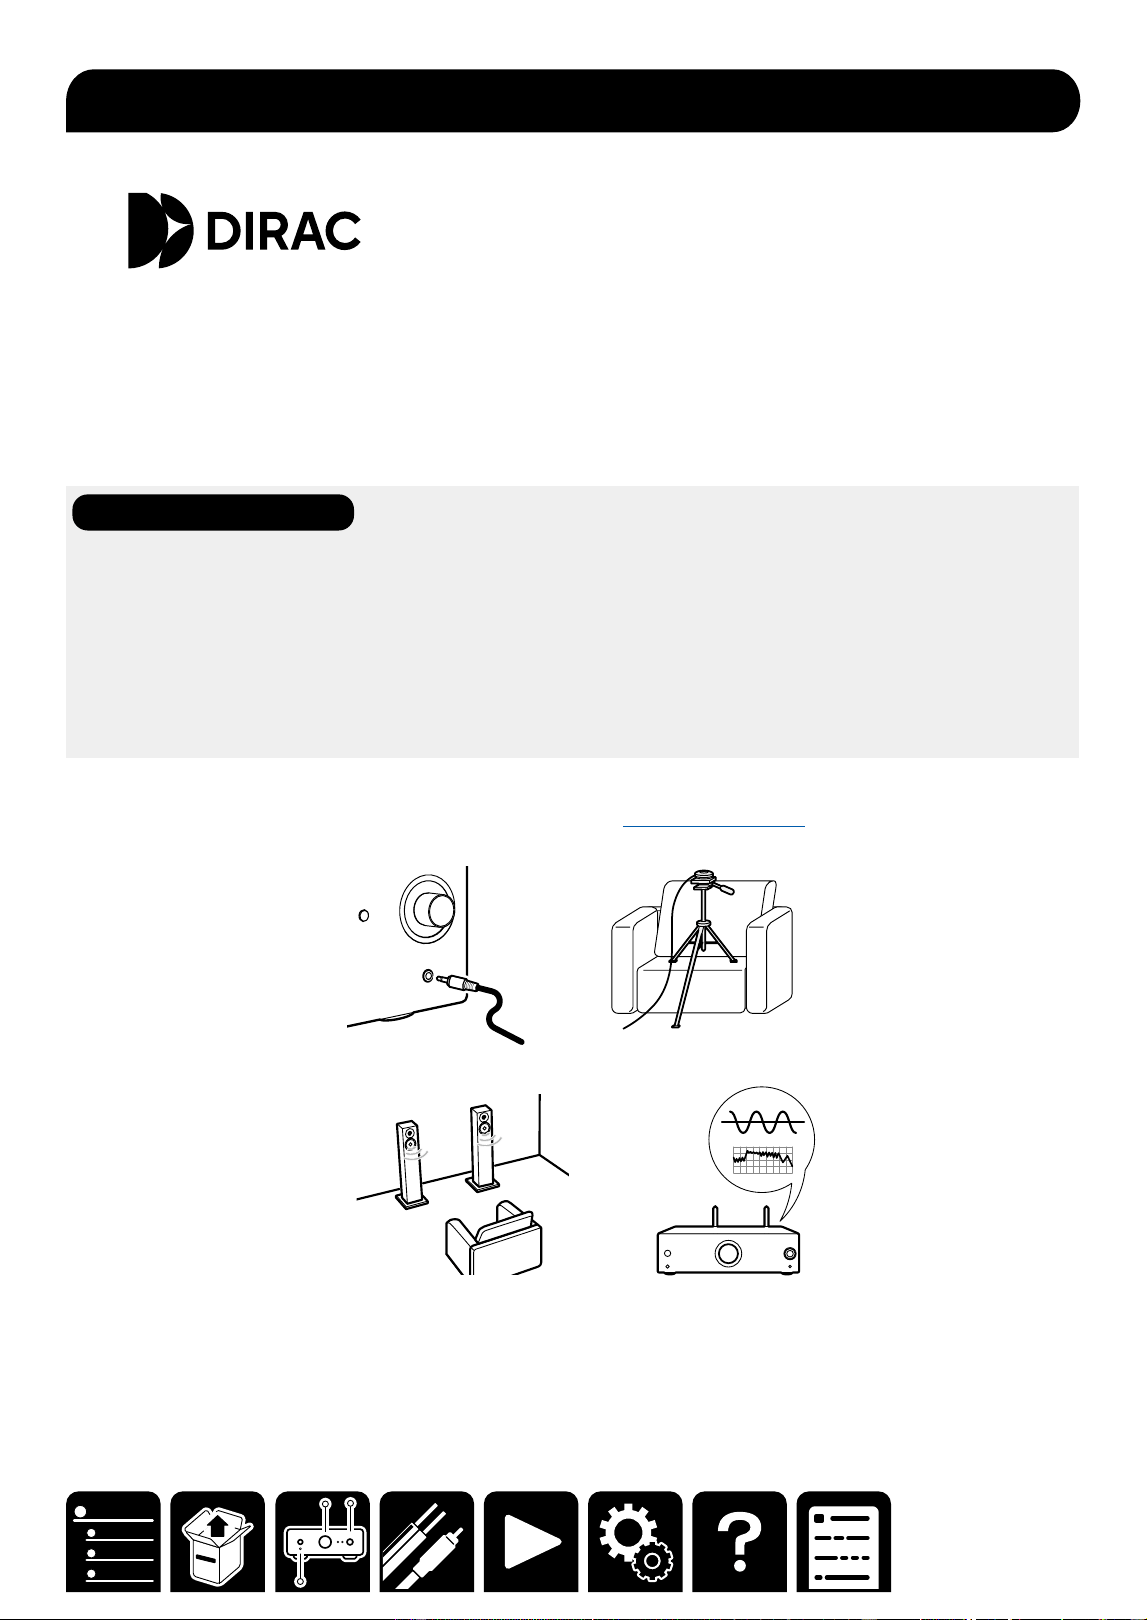
1. Connect the speaker setup microphone (a) to the SETUP MIC jack of the main unit, and set up the
microphone at the hearing position.
After setup, tap "Calibration" to start measurement. When skipping this process, tap "Skip".
SPEAKER LEVEL
CalibrateSkip
SPEAKER LEVEL
・ Performing measurement sets Fidelity IQ to "Low". Fidelity IQ can be set to "O", "Mid", or "High" from the
menu screen of the app.
・ Fidelity IQ can be used even if measurement is not performed. In this case, the hearing environment and
speaker characteristics are not reflected.
Level Calibration
38
Setup
Dirac Live
®
is an advanced room correction technology developed by Dirac Research. As one of the
most advanced room correction technology available on the market, Dirac Live helps listeners to
correct for one of the weakest components in the audio chain: the listening room. Dirac Live not only
corrects the frequency response, but also the impulse response of the loudspeakers in a room, yielding
improved imaging and timbre, better clarity, tighter bass, and less early reflections, as well as reduced
resonances and room modes.
Additional Functions
Dirac Live Bass Control
Dirac Live Bass Control is a technology to manage low-frequency channel routing from the signal to the
playback channels (speakers) of your audio device. Additionally, with full control over the deviceʼs channel and
frequency routing and output, the Dirac Live room correction technology is signicantly augmented. In particular
systems with multiple subwoofers will see a substantially improved room correction and bass performance.
To use Dirac Live Bass Control, you need to register with Dirac Live and obtain a Dirac Live Bass Control
license. For more information, see the Dirac Live website.
1. Start the Onkyo Controller and tap the unit when displayed.
*The application for PCs allows for more detailed settings. (Dirac Live for Onkyo)
2. Connect the supplied speaker setup microphone to the SETUP MIC jack on the main unit.
3. Follow the guidance of the app to start measurement.
Measuring with Dirac Live

40
Setup
Disclaimer: The program and accompanying online documentation are furnished to you for use at your own risk.
Our company will not be liable and you will have no remedy for damages for any claim of any kind whatsoever
concerning your use of the program or the accompanying online documentation, regardless of legal theory, and
whether arising in tort or contract.
In no event will our company be liable to you or any third party for any special, indirect, incidental, or
consequential damages of any kind, including, but not limited to, compensation, reimbursement or damages on
account of the loss of present or prospective prots, loss of data, or for any other reason whatsoever.
Note
・For the latest rmware contents and the rmware version, visit website.
・Do not turn o the power of the unit during update.
・ Some of the products forcibly start update when connected to the network.
When all selector indicators are blinking, press the selector knob to start update.
When the update is complete, the unit automatically enters the standby state.
1. The rmware is updated via the network using Onkyo Controller ( →p36).
When the new rmware becomes available, a guidance is displayed on the screen of the app. Follow the on-
screen instructions.
2. The update progress status can be checked on the selector indicators.
When the update is approaching the end, all MY INPUT indicators and selector indicators light up.
Then after approx. three minutes elapse, the update is completed, and the unit automatically enters the
standby state.
SETUP MIC
C
D
T
V
NET
AN
1
AN2
OPT
USB
PHN
MY INPUT
DIRECT
ON
OFF
SETUP MIC
C
D
T
V
NET
AN
1
AN2
OPT
USB
PHN
421 3
MY INPUT
Firmware Update

41
Setup
When the following functions are enabled, the power consumption in standby state increases. To reduce the
power consumption in standby state, check each setting and set the functions to "O".
These settings are congured using Onkyo Controller ( →p36) .
Network Standby:When this function is set to "On", the network function works even in standby state, and you
can turn on the power of the unit via network using an application such as Onkyo Controller that can control this
unit.
Bluetooth Wakeup:This function wakes up the unit on standby by connecting a BLUETOOTH enabled device.
HDMI CEC: Setting this to "ON" enables the linkage function with an HDMI-connected TV to work, allowing for
linkage of volume adjustment or power ON/OFF.
Setting the following function to "OFF" increases power consumption. To reduce the power consumption, conrm
the setting and set this function to "ON".
Auto Standby: When no operation is performed on this unit for 20 minutes without audio input, this function
automatically put the unit into the standby state. Setting this function to "OFF" increases the power consumption
since the power-on state continues.
Settings Affecting Power Consumption and Standby Power
42
Setup
Menu operations
You can make the settings for the network function of this unit using an Internet browser on a PC, smartphone,
etc.
1. Start Onkyo Controller ( →p36) and check the IP address of this unit displayed on the screen.
2. Start the Internet browser on your PC, smartphone, etc. and enter the IP address of this unit in the URL eld.
3. The screen for entering the user name and password is displayed. Enter the following then click "OK".
User name: admin (xed)
Password: admin (default value)
• Input is required again if you close the browser.
4. Change the password.
• Take a note of the password so that you do not forget it. If you do forget it, reset the unit ( →p43) then log
in again with the initial settings (admin).
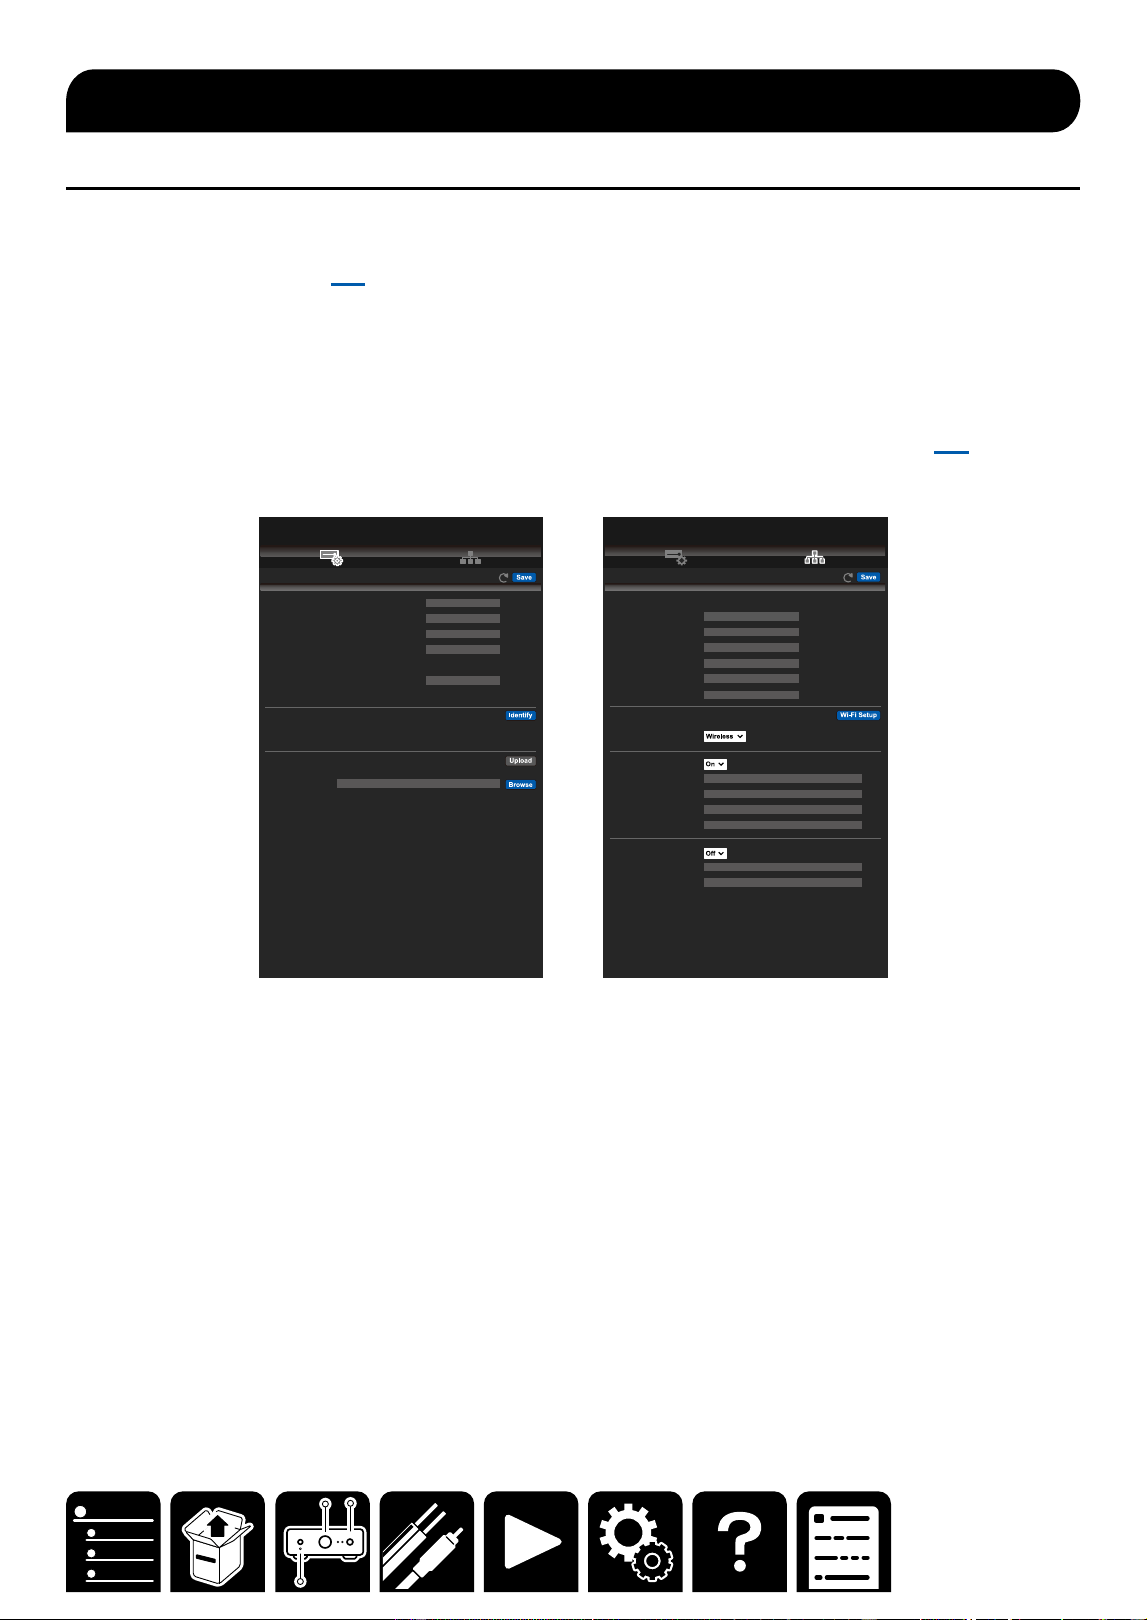
5. Information for the unit (Web Setup screen) is displayed in the internet browser.
Save
Device Information
Device Name:
Friendly Name:
AirPlay Device Name:
AirPlay Password:
Login User Name:
Login Password:
Control4
Firmware Update
Select the update file “xxxxxx_xxx” and start Upload.
Update File:
Web Setup
Network Setting
Status
MAC Address:
IP Address:
Subnet Mask:
Geteway:
DNS Server:
Login Password:
Network Setting
Network Connection:
DHCP:
IP Address:
Subnet Mask:
Geteway:
DNS Server:
Proxy :
Proxy URL:
Proxy port:
Web Setup
6. After changing the settings, select "Save" to save the settings.
Device Information
You can change the Friendly Name or AirPlay Device Name, set an AirPlay Password, etc.
Control4: Register this unit if you are using a Control4 system.
Firmware Update: Select the rmware le you have downloaded to your PC so you can update this unit.
Network Setting
Status: You can see information for the network such as the MAC address and IP address of this unit.
Network Connection: You can select a network connection method. If you select "Wireless", select an access
point from "Wi-Fi Setup" to connect.
DHCP: You can change DHCP settings. If you select "O", set "IP Address", "Subnet Mask", "Gateway" and
"DNS Server" manually.
Proxy: Display and set the URL for the proxy server.
Web Setup

43
Troubleshooting
Troubleshooting
When the unit is operating erratically
The problem may be remedied by restarting or initializing this unit.
Restart procedure
The settings on this unit are retained.
1. Turn on the power of the unit, and wait for approx. 10 seconds.
2. Press and hold the ON/STANDBY button on the main unit for ve seconds or more.
Initialization procedure
All settings are restored to the default states at the time of purchase.
1. Turn on the power of the unit, and wait for approx. 10 seconds.
2. While pressing and holding the selector knob, press the ON/STANDBY button two times.
3. Press the selector knob once. At intervals of one to two seconds, press the knob again.
When the initialization is complete, the unit enters the standby state.
Troubleshooting: The power does not turn on.
The protection circuit may be working.
Restart the unit and reconnect the cable according to the steps below.
1. Remove the AC cord from the unit, and wait for at least 10 minutes.
2. Remove the speaker cable connecting the right and left speakers, and connect it again.
3. Connect the AC cord again.
4. Press the ON/STANDBY button to check if the power of the unit turns on.
If the problem persists, a malfunction may have occurred.
Troubleshooting: No sound is delivered from the right or left speaker.
When an external device is connected to this unit using an analog cable, a contact failure or disconnection of the
cable may have occurred. Reconnect the cable or use another cable and check the condition.
When an external device is connected to this unit using a digital cable, check the audio output setting of the
external device.
If there is no problem with the cable or the setting, a malfunction may have occurred in this unit.
Troubleshooting: Pairing cannot be made with a BLUETOOTH-enabled
device.
Remove the information from the BLUETOOTH-enabled device and perform pairing again according to the steps
below.
1. Open the setting screen of the BLUETOOTH-enabled device (such as a smartphone and PC), and delete the
information of this unit (device name) that has been registered.
*For details, refer to the instruction manual of the BLUETOOTH-enabled device.
2. Turn on the power of this unit, and turn the selector knob to switch the input source to BLUETOOTH.
3. Conrm that the BLUETOOTH indicator on the front panel blinks and the unit is in the pairing standby state.
Then operate the BLUETOOTH-enabled device to perform pairing again.
4. When the pairing is successful and the BLUETOOTH indicator lights up, play music, etc. to check if the sound
is output.
Troubleshooting

44
General Specications
North America and Japan models
■ Amplier Section
THD+N (Total Harmonic Distortion + Noise)
・0.008% (20 Hz - 20,000 Hz, Rated output power)
Input Sensitivity and Impedance
・200 mV/32 kΩ (LINE(RCA))
・4 mV,47 kΩ/0.4 mV,110Ω (PHONO MM/MC)
Rated RCA Output Level and Impedance
・1 V/220 Ω (L/R PRE OUT)
・1 V/470 Ω (SUBWOOFER PRE OUT)
Rated XLR Output Level and Impedance
・2 V/220 Ω (L/R PRE OUT)
Phono Maximum Input Signal Voltage
・70 mV (MM 1 kHz 0.5%)
・7 mV (MC 1 kHz 0.5%)
Frequency Response
・10 Hz - 100 kHz/+1 dB, –3 dB (Direct)
Tone Control Characteristics
・± 10 dB, 20 Hz (Bass), ±10 dB, 20 kHz (Treble)
Headphone Rated Output
・80 mW + 80 mW (32 Ω, 1 kHz, 10% THD)
Supported impedance of Headphones
・8 Ω - 600 Ω
Headphones Frequency Response
・10 Hz - 100 kHz
Input terminals
Analog
・4 (Including PHONO×1)
Digital
・ 2 (COAXIAL×1, OPTICAL×1)
*Supported sampling rates for PCM signals (stereo,
mono) from a digital input are 32 kHz, 44.1 kHz, 48
kHz, 88.2 kHz, 96 kHz/16 bit, 20 bit, and 24 bit.
Output terminal
Analog
・3 (PRE OUT (RCA)×1,
PRE OUT (SUBWOOFER 1/2)×1,
PRE OUT (XLR)×1, )
・PHONES jack
Digital
・ 1 (OPTICAL×1)
*Audio of "NET", "USB", and "Bluetooth" can be
output from the digital optical output terminal. Note
that DSD is not supported.
・1 (HDMI (ARC))
Other terminals
・Speaker terminal
・12V TRIGGER OUT
・GND terminal
■ General
・ Power Supply
AC 120 V, 60 Hz (North America model)
AC 100V, 50/60 Hz (Japan model)
・ Power Consumption
35 W (North America model)
25 W (Japan model)
・ Network Standby (wired)
1.7 W (North America model)
1.6 W (Japan model)
・ Network Standby (wireless)
1.6 W (North America model)
1.6 W (Japan model)
・ Bluetooth Wakeup
1.8 W (North America model)
1.7 W (Japan model)
・ HDMI CEC Standby
0.1 W (North America model)
0. 1 W (Japan model)
- Standby mode (ALL ON)
1.7 W (North America model)
1.7 W (Japan model)
・ Dimensions (W × H × D)
435 mm × 135 mm × 355 mm
17-1/8" × 5-5/16" × 14"
・ Weight
9.5 kg (20.9 lbs.)
General Specications
General Specications

45
Europe models
■ Amplier Section
THD+N (Total Harmonic Distortion + Noise)
・0.008% (20 Hz - 20,000 Hz, Rated output power)
Input Sensitivity and Impedance
・200 mV/32 kΩ (LINE(RCA))
・4 mV,47 kΩ/0.4 mV,110Ω (PHONO MM/MC)
Rated RCA Output Level and Impedance
・1 V/220 Ω (L/R PRE OUT)
・1 V/470 Ω (SUBWOOFER PRE OUT)
Rated XLR Output Level and Impedance
・2 V/220 Ω (L/R PRE OUT)
Phono Maximum Input Signal Voltage
・70 mV (MM 1 kHz 0.5%)
・7 mV (MC 1 kHz 0.5%)
Frequency Response
・10 Hz - 100 kHz/+1 dB, –3 dB (Direct)
Tone Control Characteristics
・± 10 dB, 20 Hz (Bass), ±10 dB, 20 kHz (Treble)
Headphone Rated Output
・80 mW + 80 mW (32 Ω, 1 kHz, 10% THD)
Supported impedance of Headphones
・8 Ω - 600 Ω
Headphones Frequency Response
・10 Hz - 100 kHz
Input terminals
Analog
・4 (Including PHONO×1)
Digital
・ 2 (COAXIAL×1, OPTICAL×1)
*Supported sampling rates for PCM signals (stereo,
mono) from a digital input are 32 kHz, 44.1 kHz, 48
kHz, 88.2 kHz, 96 kHz/16 bit, 20 bit, and 24 bit.
Output terminal
Analog
・3 (PRE OUT (RCA)×1,
PRE OUT (SUBWOOFER 1/2)×1,
PRE OUT (XLR)×1, )
・PHONES jack
Digital
・ 1 (OPTICAL×1)
*Audio of "NET", "USB", and "Bluetooth" can be
output from the digital optical output terminal. Note
that DSD is not supported.
・1 (HDMI (ARC))
Other terminals
・Speaker terminal
・12V TRIGGER OUT
・GND terminal
■ General
・ Power Supply
AC 220-240 V, 50/60 Hz
・ Power Consumption
35 W
・ Network Standby (wired)
1.8 W
・ Network Standby (wireless)
1.7 W
・ Bluetooth Wakeup
1.8 W
・ HDMI CEC Standby
0.2 W
- Standby mode (ALL ON)
1.9 W
・ Dimensions (W × H × D)
435 mm × 135 mm × 355 mm
17-1/8" × 5-5/16" × 14"
・ Weight
9.5 kg (20.9 lbs.)
General Specications

46
Asia and Oceania models
■ Amplier Section
THD+N (Total Harmonic Distortion + Noise)
・0.008% (20 Hz - 20,000 Hz, Rated output power)
Input Sensitivity and Impedance
・200 mV/32 kΩ (LINE(RCA))
・4 mV,47 kΩ/0.4 mV,110Ω (PHONO MM/MC)
Rated RCA Output Level and Impedance
・1 V/220 Ω (L/R PRE OUT)
・1 V/470 Ω (SUBWOOFER PRE OUT)
Rated XLR Output Level and Impedance
・2 V/220 Ω (L/R PRE OUT)
Phono Maximum Input Signal Voltage
・70 mV (MM 1 kHz 0.5%)
・7 mV (MC 1 kHz 0.5%)
Frequency Response
・10 Hz - 100 kHz/+1 dB, –3 dB (Direct)
Tone Control Characteristics
・± 10 dB, 20 Hz (Bass), ±10 dB, 20 kHz (Treble)
Headphone Rated Output
・80 mW + 80 mW (32 Ω, 1 kHz, 10% THD)
Supported impedance of Headphones
・8 Ω - 600 Ω
Headphones Frequency Response
・10 Hz - 100 kHz
Input terminals
Analog
・4 (Including PHONO×1)
Digital
・ 2 (COAXIAL×1, OPTICAL×1)
*Supported sampling rates for PCM signals (stereo,
mono) from a digital input are 32 kHz, 44.1 kHz, 48
kHz, 88.2 kHz, 96 kHz/16 bit, 20 bit, and 24 bit.
Output terminal
Analog
・3 (PRE OUT (RCA)×1,
PRE OUT (SUBWOOFER 1/2)×1,
PRE OUT (XLR)×1, )
・PHONES jack
Digital
・ 1 (OPTICAL×1)
*Audio of "NET", "USB", and "Bluetooth" can be
output from the digital optical output terminal. Note
that DSD is not supported.
・1 (HDMI (ARC))
Other terminals
・Speaker terminal
・12V TRIGGER OUT
・GND terminal
■ General
・ Power Supply
AC 220-240 V, 50/60 Hz
・ Power Consumption
35 W
・ Network Standby (wired)
1.8 W
・ Network Standby (wireless)
1.7 W
・ Bluetooth Wakeup
1.8 W
・ HDMI CEC Standby
0.2 W
- Standby mode (ALL ON)
1.9 W
・ Dimensions (W × H × D)
435 mm × 135 mm × 355 mm
17-1/8" × 5-5/16" × 14"
・ Weight
9.5 kg (20.9 lbs.)
WLAN Module
Model: AW-CM276NF
Brand: AzureWave
NCC ID: CCAI17LP040AT4
Operation Frequency:
WLAN
2412-2462
5180-5240
5260-5320
5500-5700
5745-5825
BT
2402-2480
General Specications

47
Common to all destinations
■ Network Section
Ethernet LAN
・1 (10BASE-T/100BASE-TX)
Wireless LAN
・ IEEE 802.11 a/b/g/n/ac standard (Wi-Fi
®
standard) 5
GHz/2.4 GHz band
■ BLUETOOTH Section
Communication system
・BLUETOOTH Specication version 5.1
Frequency band
・2.4GHz (2.402-2.480GHz)
Modulation method
・FHSS (Frequency Hopping Spread Spectrum)
Compatible BLUETOOTH proles
・A2DP 1.4, AVCTP 1.4, AVDTP 1.3, AVRCP 1.6.2
Supported Codecs
・Receiving: SBC, AAC
・Transmitting: SBC, aptX, aptX HD
Transmission range (A2DP)
・20 Hz - 20 kHz (Sampling frequency 44.1kHz)
Maximum communication range
・ Line of sight approx. 15 m(*)
(*)The actual range will vary depending on factors
such as obstacles between devices, magnetic elds
around a microwave oven,static electricity, cordless
phone, reception sensitivity, antenna's performance,
operating system, software application, etc.
Maximum radio-frequency power transmitted in
the frequency band(s)
・2400 MHz - 2483.5 MHz (20 dBm (e.i.r.p))
・5150 MHz - 5350 MHz (23 dBm (e.i.r.p))
・5470 MHz - 5725 MHz (23 dBm (e.i.r.p))
■ Music Server ( →p33)
Supported Audio Formats
MP3 (.mp3)
・ MPEG-1/MPEG-2 Audio Layer-3/44.1 kHz, 48 kHz/
Between 8 and 320 kbps, and VBR/2 ch
WMA (.wma)
・ 44.1 kHz, 48 kHz/Between 5 and 320 kbps, and
VBR/2 ch
WAV (.wav)
WAV les contain uncompressed PCM digital audio.
・ 44.1 kHz, 48 kHz, 88.2 kHz, 96 kHz, 176.4 kHz, 192
kHz/8 bit, 16 bit, 24 bit/2 ch
AIFF (.ai/.aif)
AIFF les contain uncompressed PCM digital audio.
・ 44.1 kHz, 48 kHz, 88.2 kHz, 96 kHz, 176.4 kHz, 192
kHz/8 bit, 16 bit, 24 bit/2 ch
AAC (.aac/.m4a/.mp4/.3gp/.3g2)
・ MPEG-2/MPEG-4 Audio/44.1 kHz, 48 kHz, 88.2
kHz, 96 kHz/Between 8 and 320 kbps, and VBR/2
ch
FLAC (.flac)
・ 44.1 kHz, 48 kHz, 88.2 kHz, 96 kHz, 176.4 kHz,192
kHz/8 bit, 16 bit, 24 bit/2 ch
LPCM (Linear PCM)
・ 44.1 kHz, 48 kHz/16 bit/2 ch
Apple Lossless (.m4a/.mp4)
・ 44.1 kHz, 48 kHz, 88.2 kHz, 96 kHz, 176.4 kHz,192
kHz/16 bit, 24 bit/2 ch
DSD (.dsf/.d)
・ DSF/DSDIFF/2.8 MHz, 5.6 MHz, 11.2 MHz/2 ch
■ USB Storage Device ( →p26)
Supported Audio Formats
MP3 (.mp3)
・ MPEG-1/MPEG-2 Audio Layer-3/44.1 kHz, 48 kHz/
Between 8 and 320 kbps, and VBR/2 ch
WMA (.wma)
・ 44.1 kHz, 48 kHz/Between 5 and 320 kbps, and
VBR/2 ch
WAV (.wav)
WAV les contain uncompressed PCM digital audio.
・ 44.1 kHz, 48 kHz, 88.2 kHz, 96 kHz, 176.4 kHz, 192
kHz/8 bit, 16 bit, 24 bit/2 ch
AIFF (.ai/.aif)
AIFF les contain uncompressed PCM digital audio.
・ 44.1 kHz, 48 kHz, 88.2 kHz, 96 kHz, 176.4 kHz, 192
kHz/8 bit, 16 bit, 24 bit/2 ch
AAC (.aac/.m4a/.mp4/.3gp/.3g2)
・ MPEG-2/MPEG-4 Audio/44.1 kHz, 48 kHz, 88.2
kHz, 96 kHz/Between 8 and 320 kbps, and VBR/2
ch
FLAC (.flac)
・ 44.1 kHz, 48 kHz, 88.2 kHz, 96 kHz, 176.4 kHz,192
kHz/8 bit, 16 bit, 24 bit/2 ch
Apple Lossless (.m4a/.mp4)
・ 44.1 kHz, 48 kHz, 88.2 kHz, 96 kHz, 176.4 kHz,192
kHz/16 bit, 24 bit/2 ch
DSD (.dsf/.d)
・ DSF/DSDIFF/2.8 MHz, 5.6 MHz, 11.2 MHz/2 ch
General Specications

48
License and Trademark
The terms HDMI and HDMI High-Denition Multimedia
Interface, and the HDMI Logo are trademarks or regis-
tered trademarks of HDMI Licensing Administrator,Inc.
in the United States and other countries.
The Wi-Fi CERTIFIEDTM Logo is a certication mark of
Wi-Fi Alliance
®
.
The BLUETOOTH
®
word mark and logos are registered
trademarks owned by
Bluetooth SIG, Inc.
Amazon, Amazon Music, and all related logos and mo-
tion marks are trademarks of Amazon.com, Inc. or its
aliates.
Use your phone, tablet or computer as a remote
control for Spotify.
Go to spotify.com/connect to learn how.
The Spotify software is subject to third party licenses
found here:
https://www.spotify.com/connect/third-party-licenses
Apple, AirPlay
®
, iPad
®
, iPad Air
®
, iPad Pro
®
, iPhone
®
,
iPod touch
®
and Lightning are trademarks of Apple Inc.,
registered in the U.S. and other countries.
Use of the Made for Apple badge means that an acces-
sory has been designed to connect specically to the
Apple product(s) identied in the badge, and has been
certified by the developer to meet Apple performance
standards. Apple is not responsible for the operation of
this device or its compliance with safety and regulatory
standards. Please note that the use of this accessory
with an Apple product may aect wireless performance.
Apple, AirPlay, iPad, iPad Air, iPad Pro, iPhone, iPod
touch and Lightning are trademarks of Apple Inc., regis-
tered in the U.S. and other countries.
Use of the Works with Apple badge means that an ac-
cessory has been designed to work specifically with
the technology identified in the badge and has been
certified by the developer to meet Apple performance
standards.
Apple, AirPlay, iPad, iPad Air, iPad Pro, iPhone, iPod
touch et Lightning sont des marques commerciales
d'Apple Inc., enregistrées aux États-Unis et dans d'au-
tres pays.
L’utilisation du badge Made for Apple signifie qu’un
accessoire a été conçu pour se connecter spécique-
ment aux produits Apple identifiés dans le badge, et
qu’il a été certié par le développeur comme répondant
aux normes de performances d’Apple. Apple n’est pas
responsable du fonctionnement de cet appareil ou sa
conformité aux normes réglementaires et de sécurité.
Veuillez noter que l’utilisation de cet accessoire avec
un produit Apple peut aecter les performances de la
connexion sans l.
Apple, AirPlay, iPad, iPad Air, iPad Pro, iPhone, iPod
touch et Lightning sont des marques commerciales
d'Apple Inc., enregistrées aux États-Unis et dans d'au-
tres pays.
L’utilisation du badge Works with Apple signifie qu’un
accessoire a été conçu pour fonctionner spécifique-
ment avec la technologie identifiée dans le badge et
qu’il a été certié par le développeur comme répondant
aux normes de performances d’Apple.
App Store is a service mark of Apple Inc., registered in
the U.S. and other countries.
IOS is a trademark or registered trademark of Cisco in
the U.S. and other countries and is used under license.
General Specications