Need Help?
TEL: (800) 318-9865
Email: [email protected]
Made in China
Model: FJ111
User Manual
Automatic
Cat Litter
Box

IMPORTANT
SAFETY
INSTRUCTIONS
1-3
Safety Instructions
Specifications
1-2
3
EXPLORING
CAT LITTER
BOX
4-6
In the Box
Control Function
Status Indicators
4
5
6
USING CAT
LITTER BOX
7-13
CARE AND
CLEANING
14-16
TROUBLE-S
HOOTING
GUIDE
17-20
Setting Up
Wi-Fi Setup
Using with APP
7
11
13
TABLE OF CONTENTS
01
02
04
05
03
01 IMPORTANT SAFETY INSTRUCTIONS
Please read all instructions carefully before use
USE
KITTEN
MODE
When using an electrical appliance, especially around children, always follow basic safety precautions, including the
following:
- INTENDED USE
1. This appliance is not intended for use by persons, including children, with reduced physical, sensory, or mental capabilities, or lack of
experience and knowledge, unless they are supervised or instructed on the safe use of the appliance by a person responsible for their
safety.
2. To reduce the risk of injury, close supervision is necessary when the appliance is used by or near children. Children should be supervised to
ensure they do not play with, in, or around the appliance. Keep the appliance and all accessories out of reach of children.
3. This product is not intended for use by disabled, incapacitated, elderly, or mobility-impaired cats that may have difficulty entering or exiting
the litter box.
4. Do not use the appliance for any purpose other than its intended use. This product is designed for cats only and is intended solely for the
safe collection and disposal of cat waste.
- ELECTRICAL SAFETY
1. DO NOT operate the appliance if the power cord or plug is damaged, or if the appliance is malfunctioning or has been damaged in any way.
2. DO NOT use any external power supply other than the one provided with the appliance. Use only the included power adapter.
3. DO NOT immerse the power adapter or base in water or any other liquid, or allow moisture to come into contact with these parts.
4. DO NOT submerge or expose electrical components to water or cleaning solutions.
5. If the power cord is damaged, it must be replaced by the manufacturer, its service agent, or similarly qualified personnel to avoid a hazard.
6. Always unplug the appliance when not in use, before installing or removing parts, and before cleaning, maintenance, or servicing. To
unplug, grasp the plug, not the power cord.
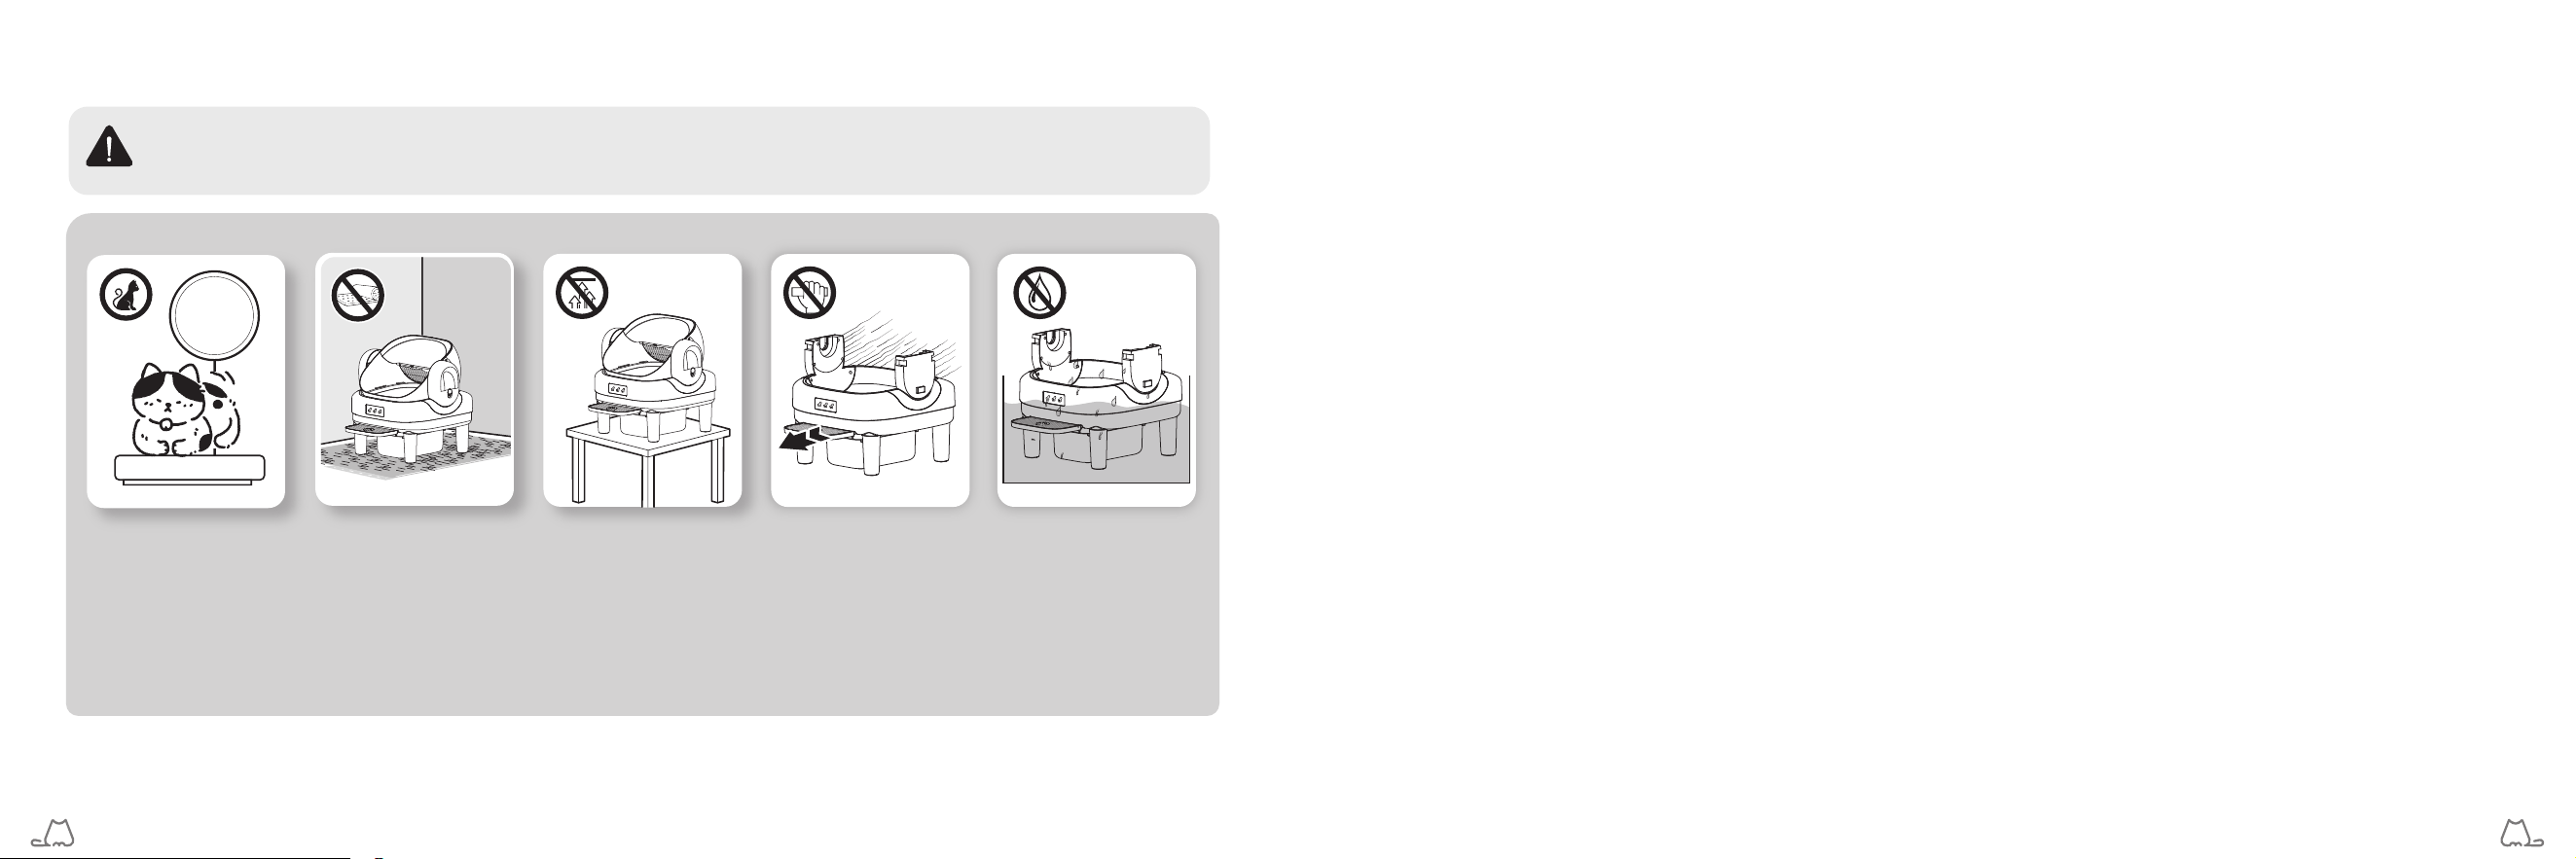
Kittens under 6 months
or weighing less than
3.3 lbs MUST activate
Kitten Mode before use.
Auto cycle & scheduled
cleaning are for bidden
to avoid entrapment risk.
DO NOT place the
device on carpet. Place
it on a sturdy and flat
floor and leave some
space around it.
DO NOT place the unit
on an elevated surface
where it could fall and
become damaged.
DO NOT drag the litter
box. To avoid damaging
the weight sensor, lift the
base with both hands
when moving the unit.
DO NOT rinse or
immerse the base in
water other liquids.
- USE AND PLACEMENT SAFETY
1. Always place the litter box on a firm, level surface. Avoid soft, uneven, or unstable flooring, as it may affect the accuracy of your cat’s weight
measurement. If using a litter mat or rug, place it in front of the unit. Do not place mats partially or completely under the unit.
2. Keep the unit indoors in a cool, dry location. Avoid exposure to high temperatures and humidity.
3. Avoid contact with moving parts.
4. DO NOT sit on or place anything on top of the litter box.
5. DO NOT place anything in the unit other than clumping litter or litter granules small enough to pass through the screen.
6. DO NOT allow pets to chew on or swallow any parts. Carefully cover or hide the power cord to prevent pets from biting it.
1
2
02 EXPLORING CAT LITTER BOX
- FOR HOUSEHOLD USE ONLY SAVE THESE INSTRUCTIONS
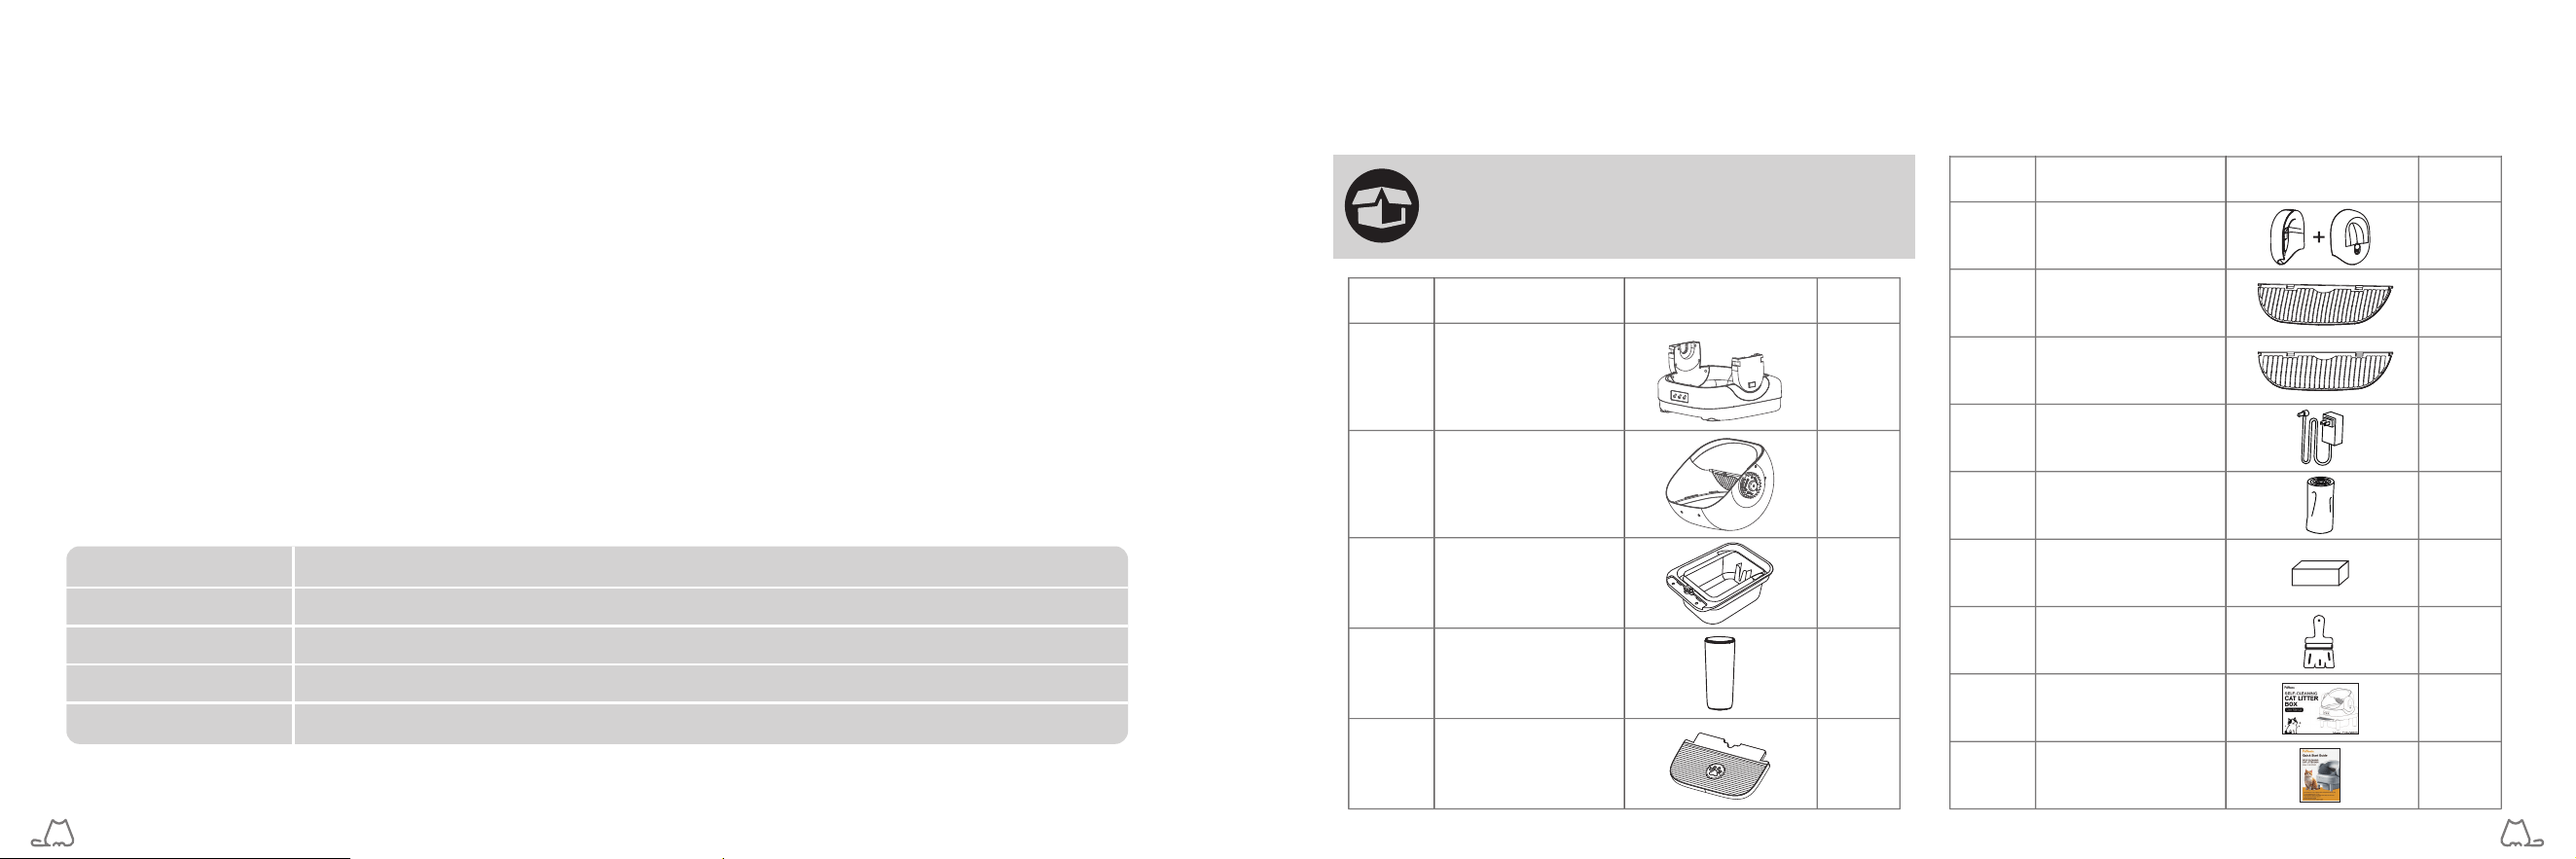
Check if all accessories are included.
If there is any part missing ordamaged.
Contact us via Email: [email protected]
Specifications
- Part List
Rating
Rated Power
Wi-Fi
For Cat
Applicable Litter
DC 12V 1A
8W
2.4GHz
Weight:<27.6lbs, Age :all
All clumping cat litter
(bentonite mineral, mixed and tofu cat litter)
7. DO NOT allow anything to rest on the power cord. Do not plug in power adapter in an area where people or animals may walk or trip on cord.
8. DO NOT attempt to disassemble, repair, modify or replace any part of the appliance. No user serviceable parts inside. All servicing should be
performed by qualified personnel only.
9. DO NOT use accessories or attachments that are not recommended by the manufacturer. Dispose of all packaging materials properly. Keep
away from children and pets. Keep plastic bags away from babies and small children.
10. DO NOT use in cribs, beds, carriages or play pens.
11. Always wash hands thoroughly after removing the waste. Pregnant women and those with suppressed immune systems should note that a
parasite sometimes found in cat feces could cause toxoplasmosis. Exercise caution and consult with a physician before handling the litter box.
12. Keep the deodorizers out of reach of children and pets to avoid accidental ingestion.
13. If the litter box will not be used for an extended period, empty and clean drum and waste drawer.
14. How often you will need to replace the litter box liner depends on the number and size of your cats. We recommend to replace every 3 to 5
days to avoid bacteria growth.
15. The litter box liner is not a toy. Keep it out of the reach of babies and children. Do not use in cribs, children's beds, prams, pushchairs or
anywhere in the vicinity of children.
3
4
Part Photo
Base
Drum
Waste Drawer
Support Legs
Description Quantity
A 1
B 1
C 1
1
D 4
Step
E
Side Cover
Deodorizer
Brush
User Manual
Quick Start Guide
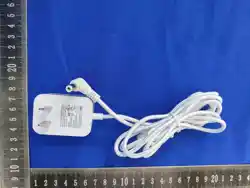
Power Adapter
Litter Box Liners
8mm
Small Mesh Ideal
for fine-grain litter
Part PhotoDescription Quantity
F 1+1
G 1
I 1
1
1
1
1
1
J
K
L
M
N
10 mm
Large Mesh Perfect
for clumping litter
1H
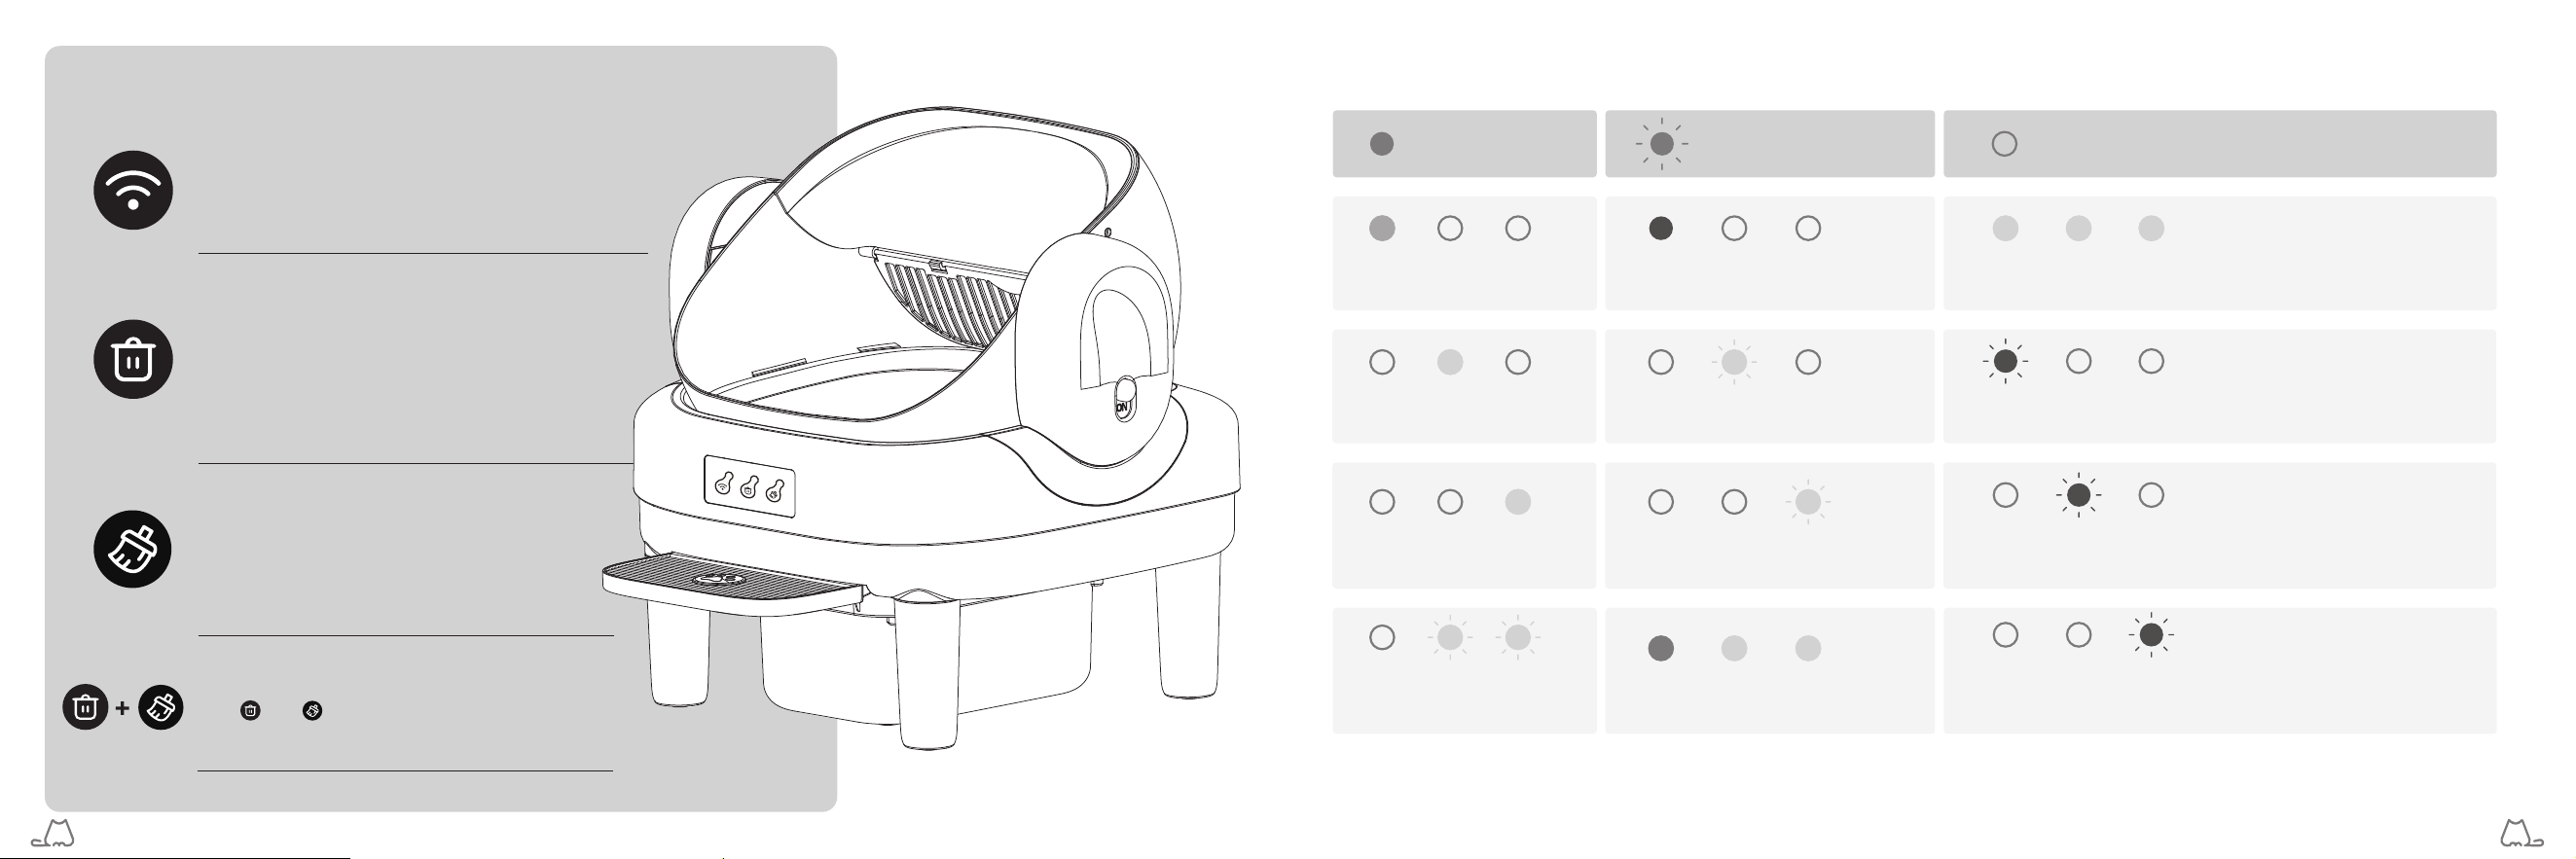
Setting up Wi-Fi
Hold for 3 seconds until one beep is heard to
bring the litter box into pairing mode
(Wi-Fi indicator running in sequence).
Solid ON Flashing OFF
Running in Sequence
Motor error
Flashing Red
Hall sensor error
Flashing Red
Weighing error
Child Lock ON
Solid ON Blue
Emptying all litter
Solid ON White
Cleaning waste litter
Solid ON White
Flashing Red
Cat / weight detected when standby
Infrared sensor blocked
Solid ON Red
Emptying paused
Flashing White
Cleaning paused
Flashing White
Drum Returning to Home position
Solid ON
Flashing Alternately
Wi-Fi Setup
• Hold for 3 seconds until one beep is heard to
start emptying all litter.
• If already started, press it once to pause.
• Emptying will automatically resume after 15
seconds if no further operation is done. To cancel
if already started, hold it for 3 seconds again.
Empty All Litter
• Press once to start cleaning the waste litter.If
already started, press it once again to pause.
• Cleaning will automatically resume after 15
seconds if no further operation is done.
Clean Waste Litter
Hold and simultaneously for 3 seconds to
turn on or cancel child lock.
Child Lock
- Control Function
- Status Indicators
5
6
03 USING CAT LITTER BOX
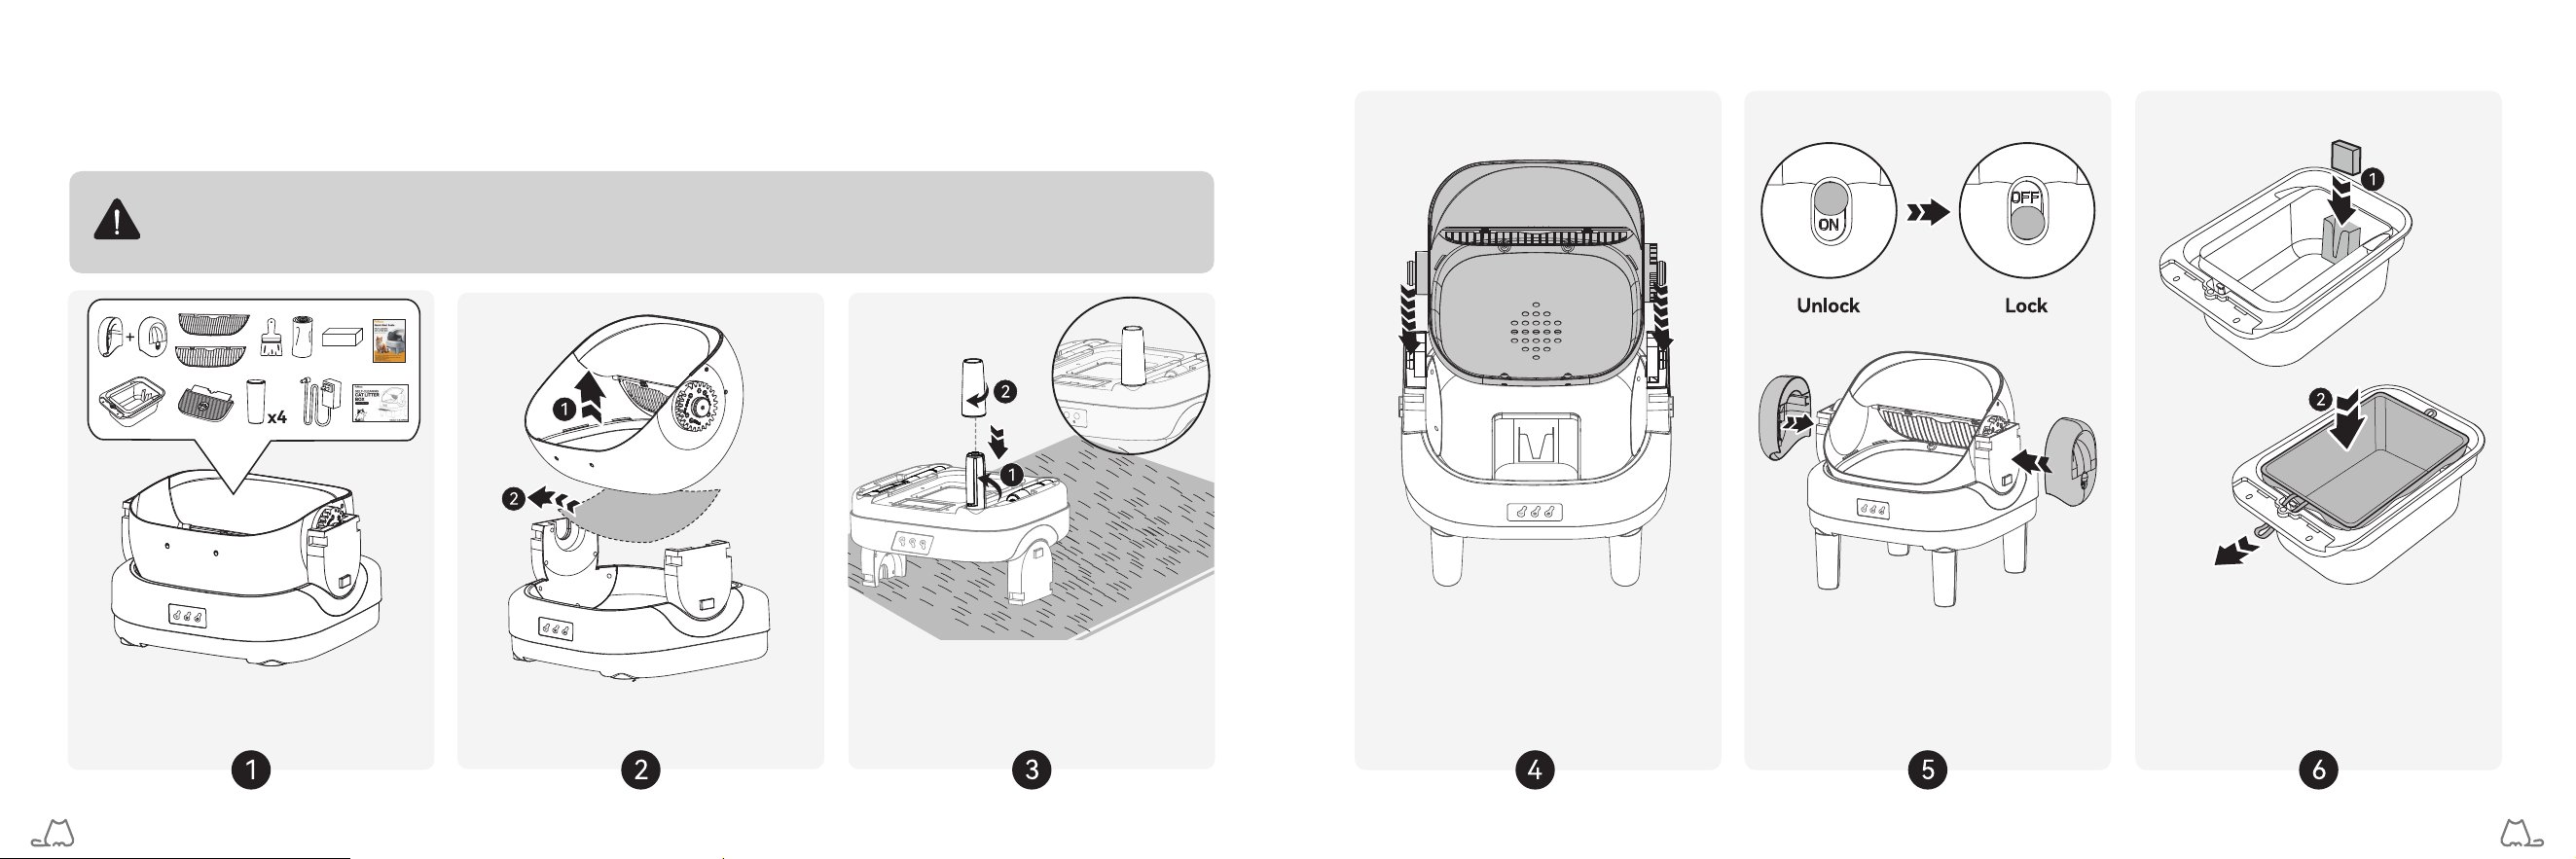
• Remove all protective tapes and foam pads before use.
• Make sure that the side covers are properly locked in place before use
• Make sure that the drum, support legs and waste drawer are properly installed in place before use.
• Bundle the extra power cord with cable ties or rubber bands.
- Setting Up
Remove all packing materials. Take out the
waste drawer and all accessories.
Lift and remove the drum, then take off the
protective foam pad.
Place the base upside down on a flat surface
with a mat underneath to avoid scratches.
Unfold the four bottom folding support legs 90°
until perpendicular to the ground, then slide the
support leg sleeves onto the legs and lock in
place.
Install the Roller: Set the base upright.
Lower the roller into position, making sure
the bearings on both sides are fully seated
in the slots.
Align the side cover with the guide rails
and slide it into place. Move the top lock
switch from ON to OFF to secure the
cover.
Place the deodorizer in. Spread a trash
bag evenly inside the waste drawer over
the pressure ring. Tuck the drawstrings
under flip ears.
7
8
Introducing New Litter Box to Your Cat
To help your cat transition to the new litter box:
• Location is Key. Place the litter box in the same location as theold one, or leave the old one nearby for a short period of time
(at least during transition).
• Keep the Old Box. Do not throw out the old box. Put the new one in its desgnated spot and stop cleaning out the old one.
• Use Recognizable Scents. Add a scoop of litter from the old litter box to provide a familiar scent for your cat.
If cat litter is added after the litter box is
plugged in, unplug and re-plug in, or press
once to return the drum to
Home position.
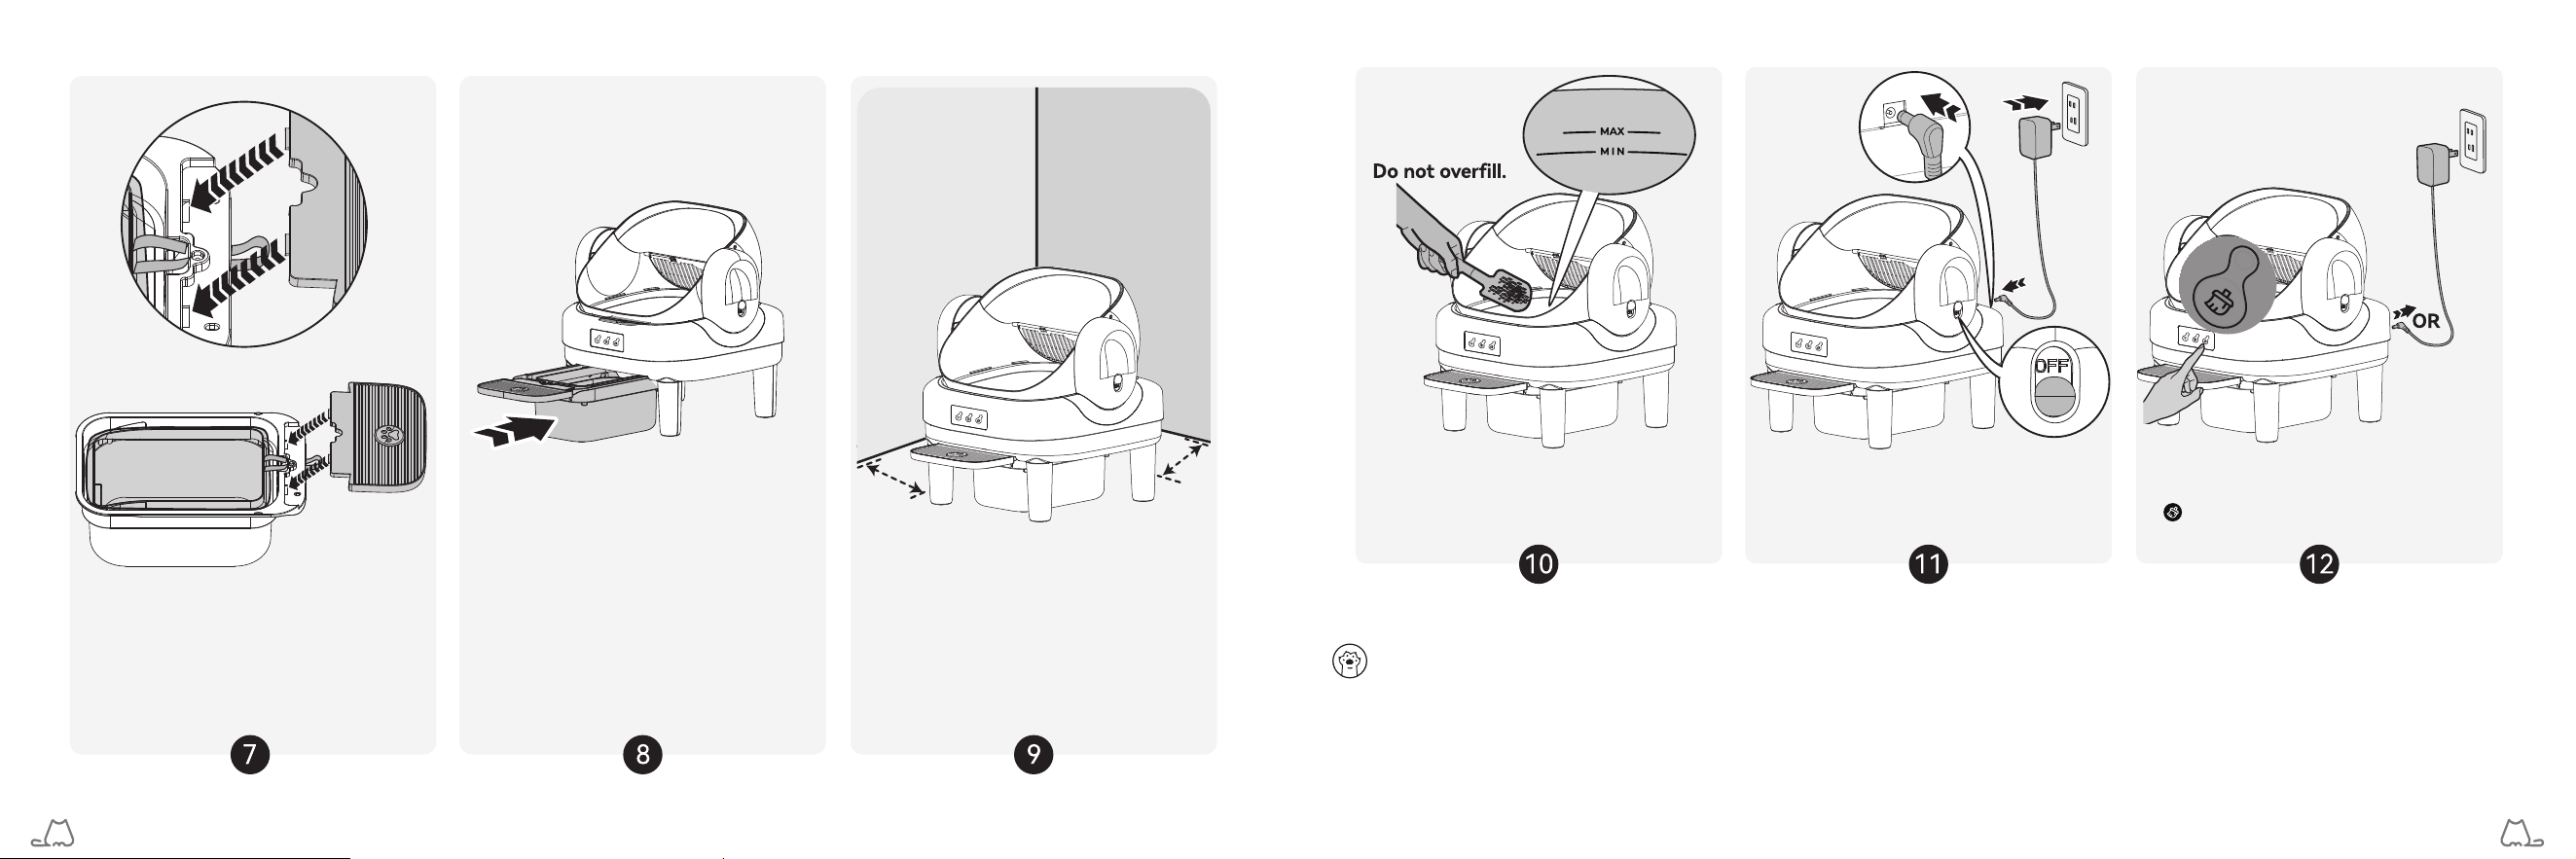
Align and attach the step to the waste
drawer.
Slide the waste drawer in along the rails
until it is fully in place.
Place the litter box indoors on a firm, level
surface with a minimum of 3 inches of
clearance from the wall.
Add clumping litter between the MAX and
MIN fill line when spread flat. Do not over
fill.
Wait for the drum to retum to Home position
automatically, then the unit is ready for use.
9
10
XXX-XXXXXXX
CLB-OPE001
- Wi-Fi Setup
• Make sure that your mobile is connected to a secure 2.4GHz network is enabled. Allow access to your location during
connection.
• Location during connection.
• Make sure that the drum is at the Home position before connectting
• You can use the litter box with control buttons only or download APP for mcustomizable options.
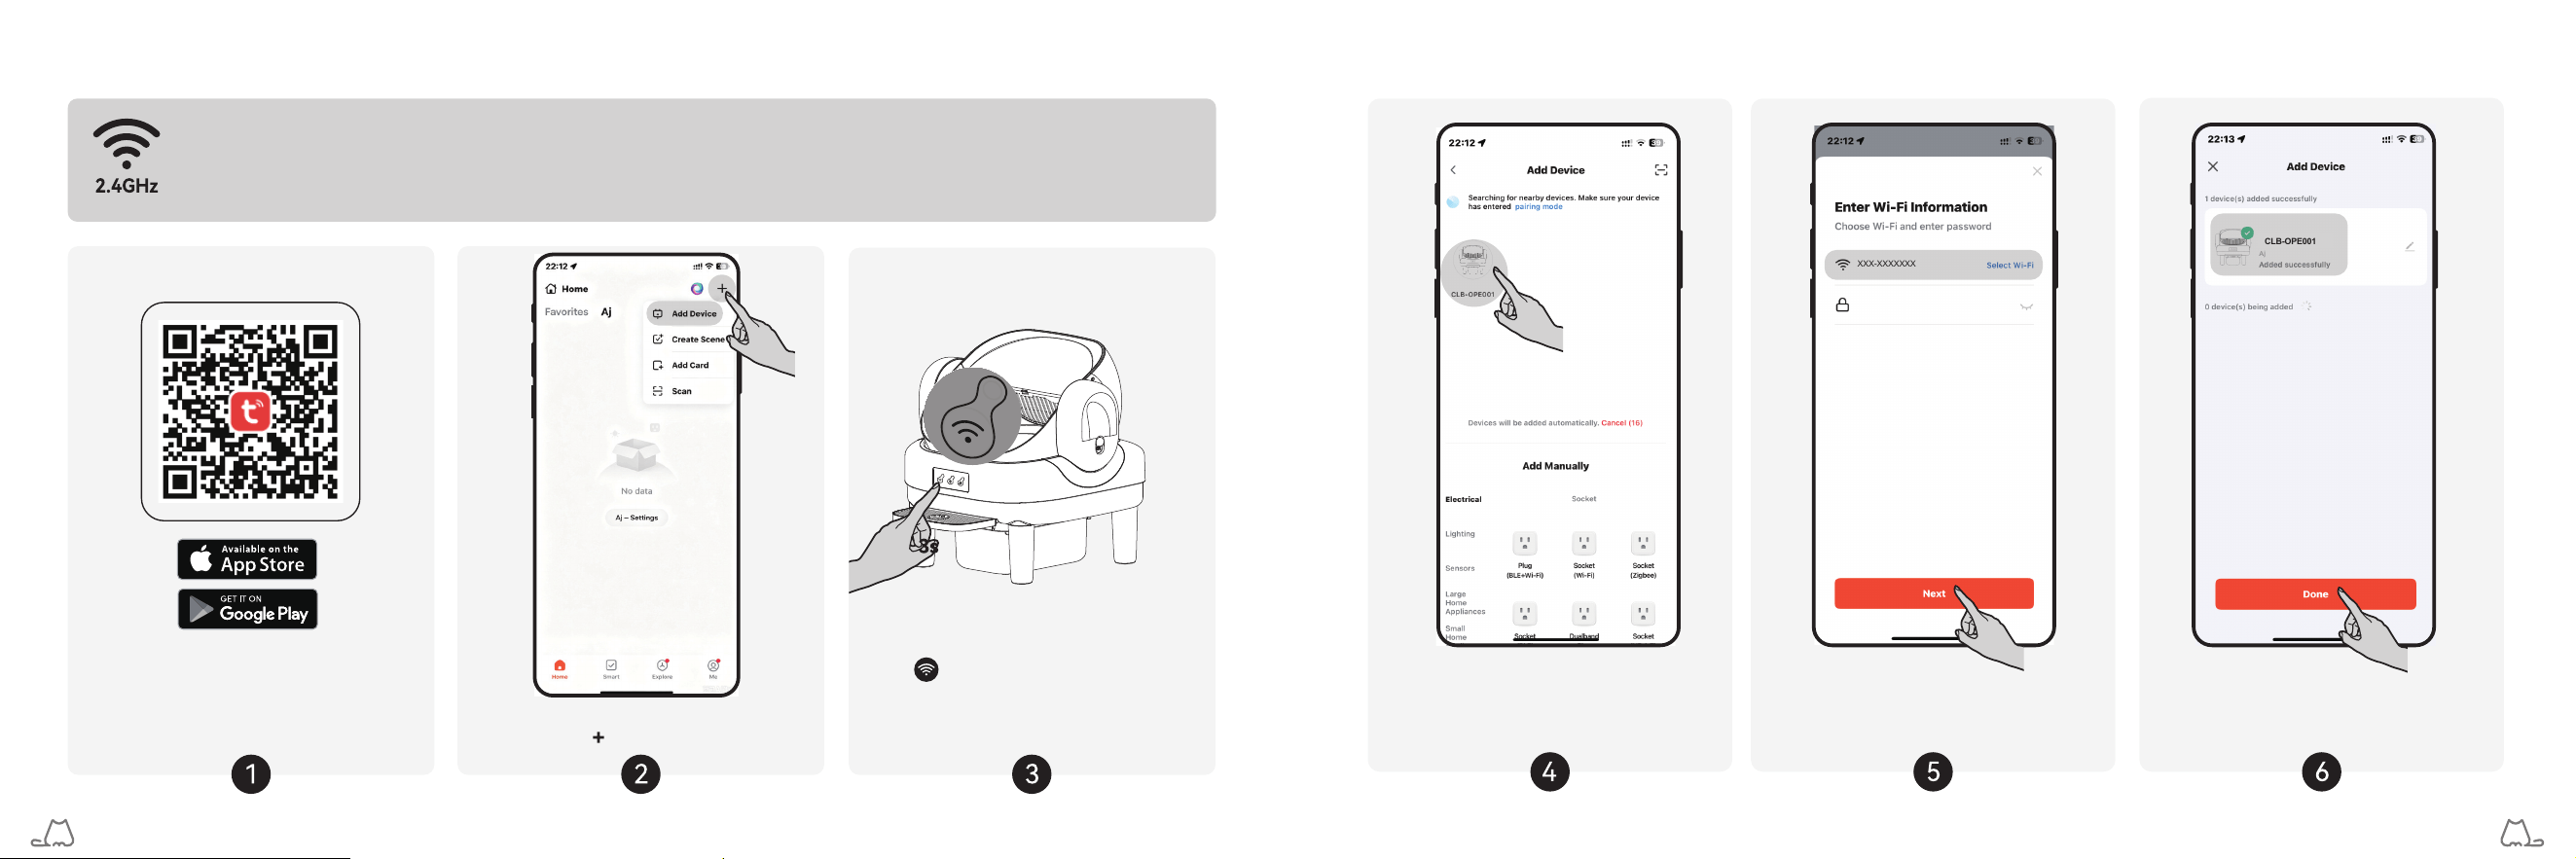
Search for “Tuya Smart” or scan the
QR code to download the Tuya Smart
app, then sign up as instructed.
Open app, tap , then tap Add Device.
Hold for 3 seconds until one beep
is heard to bring the litter box into
pairing mode (3 indicators running in
sequence).
Wait for auto searching, tap the device
to be added.
Select a 2.4GHz Wi-Fi and enter
password. Tap Next to continue.
Wait until it connects and the Wi-Fi
indicator turns solid on. Tap Done to
complete setup.
11
12
04 CARE AND CLEANING
• To prevent litter spillage, empty the waste drawer before empbtying all litter.
• Avoid using soaps, cleaners or chemicals that have strong odor or contain scents that are cat repellent, like citrus, lavender,
peppermint, etc.
• DO NOT rinse or immerse the base in water or other liquids.
• Always dry all parts thoroughly before reassembling for next use. Ensure all parts are properly assembled in place.
- Using with APP
The app interface is subject
to change due to software
updates. Please refer to the
actual interface in the app.
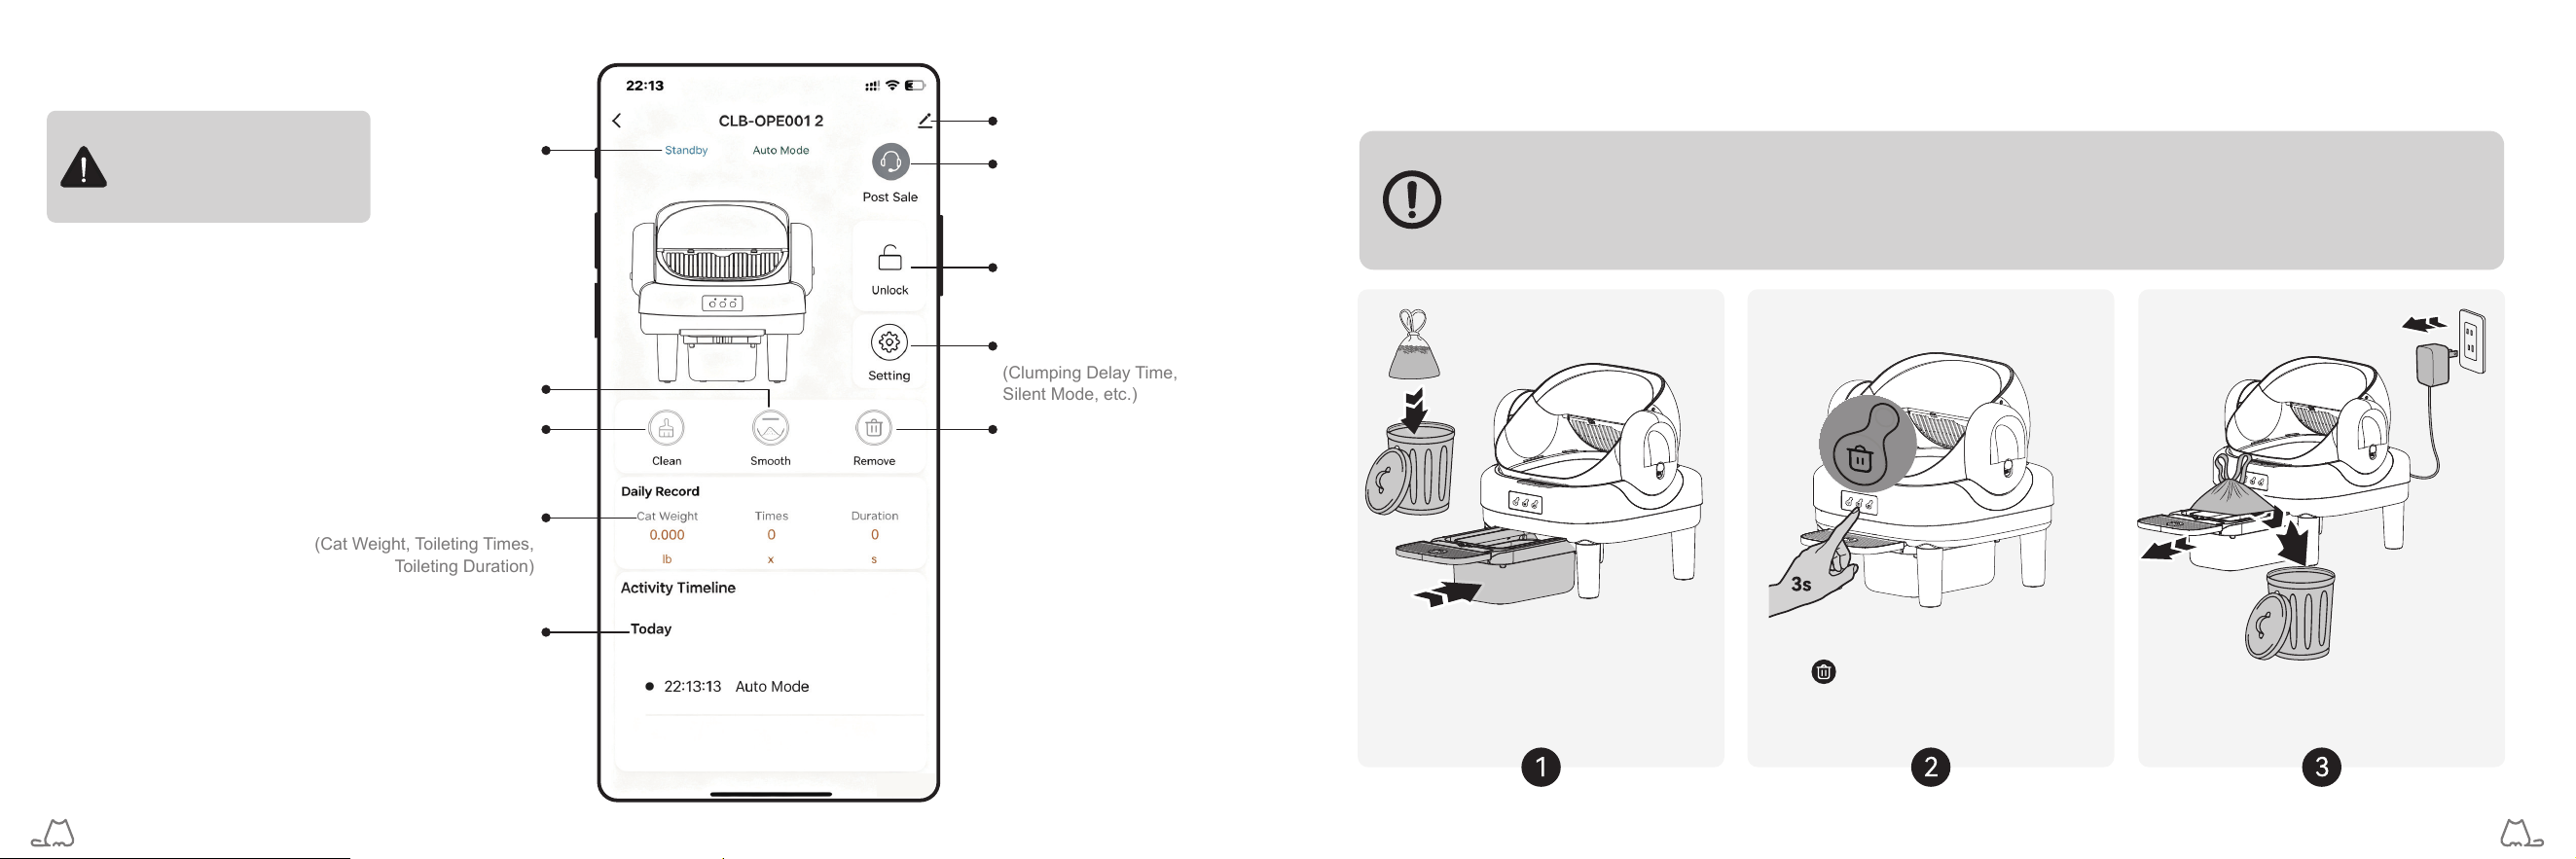
Slide out the waste drawer and dispose of
the trash bag. Replace the liner with a new
one, then slide the waste drawer back in.
* To prevent litter spillage, empty the waste
drawer before emptying all litter.
Hold for 3 seconds until one beep
is heard to to start emptying all litter.
Wait until the empty cycle is done.
Switch off and unplug the litter box.
Slide the waste drawer out and dispose
of the litter.
13
14
Real-time Status
Spread Litter Flat
Manual Clean
Daily Record
(Cat Weight, Toileting Times,
Toileting Duration)
Operation Logs
About Device / Settings
After-Sales Service
Child Lock On / Off
Cleaning / Other Settings
(Clumping Delay Time,
Silent Mode, etc.)
Empty All Litter
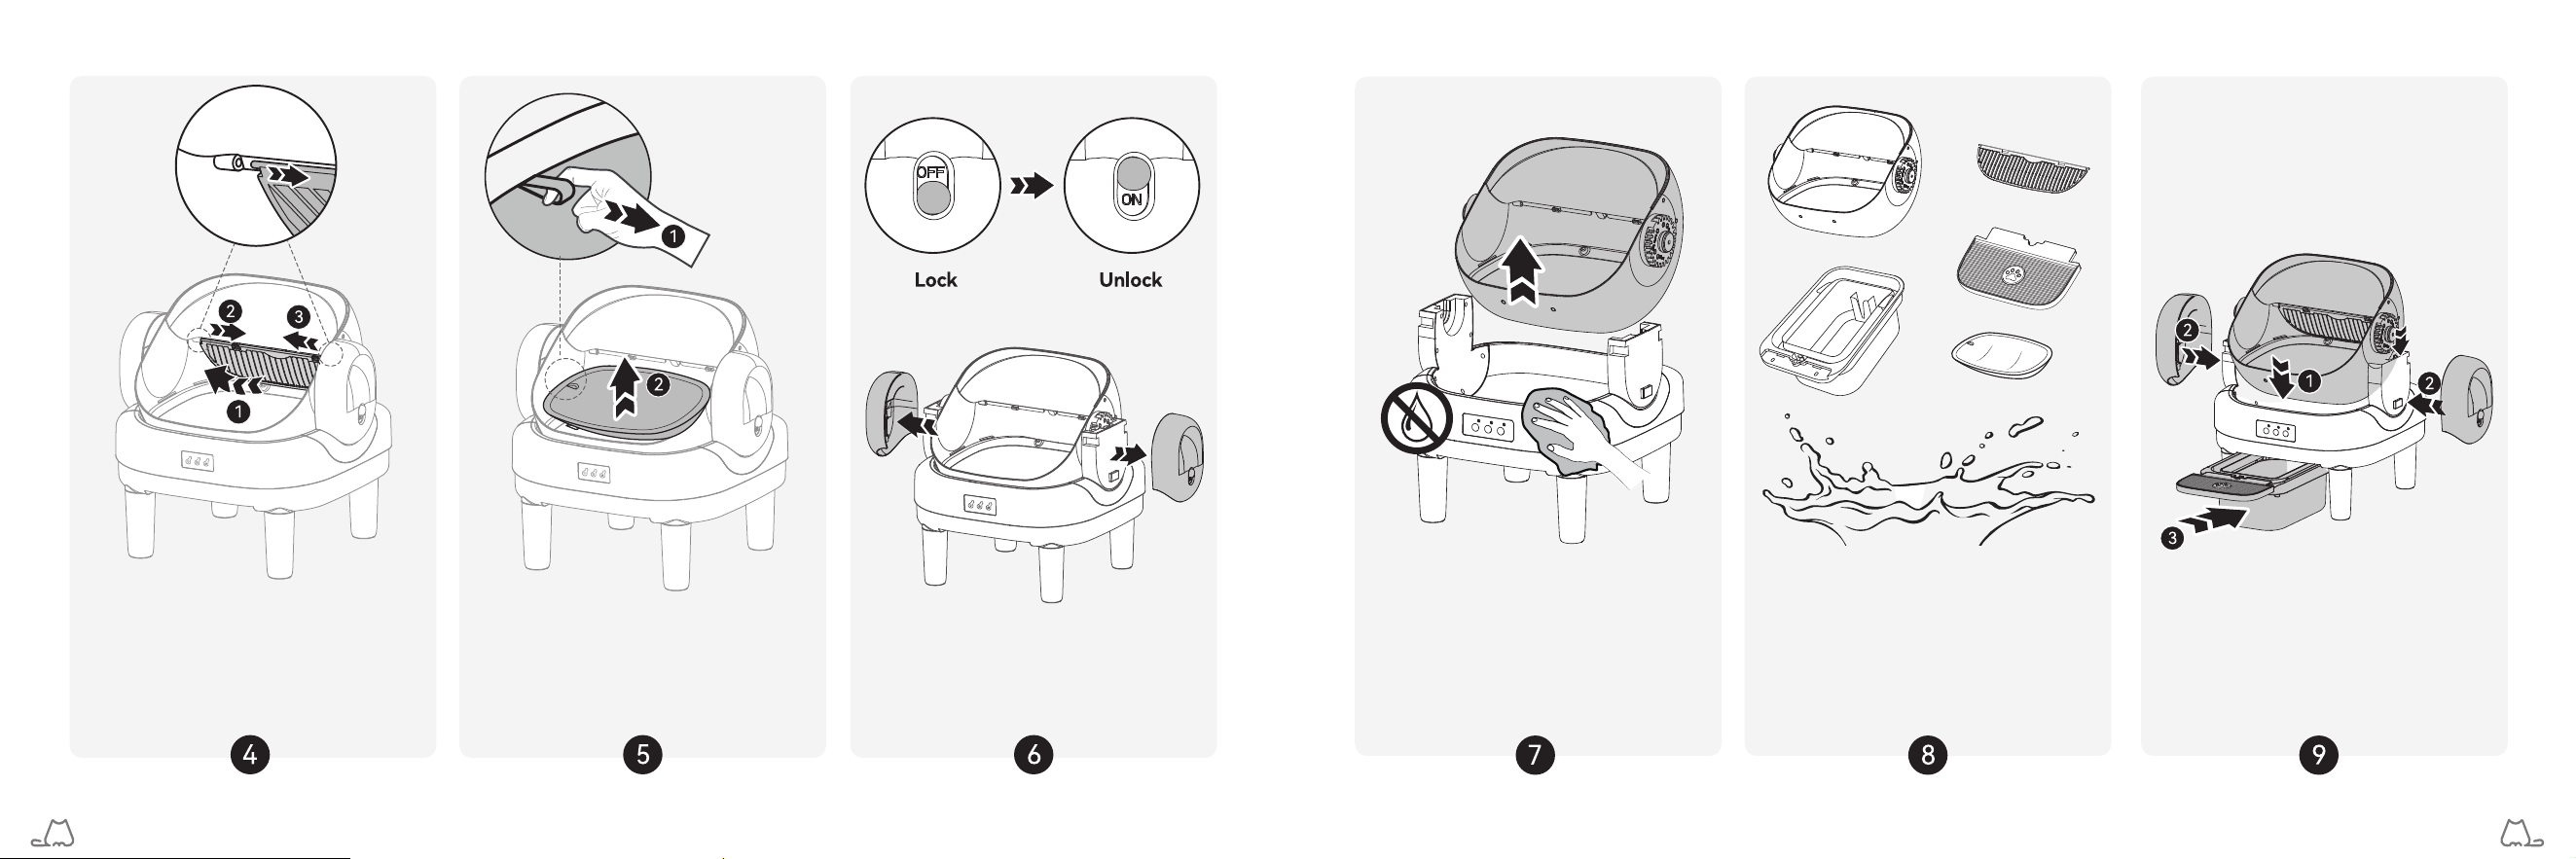
Flip the filter screen up to disengage
the two center clips, then pull the filter
screen out end-to-end from left to right.
Pull the tab to carefully remove the inner
fabric pad.
Slide the locking switch above the Side
Cover from OFF to ON.
Confirm the switch is in the ON position.
The Side Cover can then be horizontally
installed and removed.
Hold to take out the drum. Wipe clean
the base with a soft, slightly damp cloth
or sponge. Wipe or air dry thoroughly
before reassembling.
*Do not rinse or immerse the base in water.
Rinse clean the drum, waste drawer,
fabric pad, step and filter screen.
Wipe or air dry thoroughly before
reassembling.
Attach the drum, waste drawer, fabric
pad, and filter screen back.
Ensure that all parts are properly
assembled and locked in place.
15
16
• Check and make sure that Auto Mode is selected on app.
• Check if the cleaning delay time is set too long. It is recommended to set6min delay for
solid clumps.
• If cat litter is added, press once to return the drum to Home position.
• Disconnect from the power supply and then reconnect.
• To minimize unpleasant odors from the cat litter box,
• Scoop daily or more frequently to keep the odor at a minimum.
• Regularly clean the litter box and waste drawer.
• Regularly replace the litter. Fresh litter absorbs odors better.
• Choose odor-absorbing litter.
• Ensure proper ventilation. Place the litter box in a dry, well-ventilateed area where humidity
is at a minimum.
• Try the included deodorizer
• Introduce a second litter box. For multiple cats (3 cats or more), vve recommend using at
least two litter box.
• Choose a highly absorbent, fast-clumping litter for the litter bopx.
• Always keep enough litter between the MAX and MIN fill line.
• Regularly spread the litter to keep the surface even and prevent thiin spots.
• Set a longer time for forming solid clumps.
• Check if any part of the litter pad is damaged.
• For soft or loose stools, try adjusting your cat's diet or portion size. Icondition persists
beyond a day or two, seek advice from your veterinarian.
Check if child lock is enabled (Wi-Fi indicator on blue). Hold Empty aind Clean buttons
simultaneously for 3 seconds or tap Unlock on app to cancel childlock.
• Make sure that your mobile is connected to a secure 2.4GHz Wi-Fi network and Bluetooth
is enabled.
• Make sure that your mobile and litter box are connected to the same Wi-Fi network
• Make sure that you have entered a correct Wi-Fi password and the litter box is under
strong Wi-Fi signal.
• Check if the litter box is linked to another mobile. Press and hold for 3s to pair again or
have the mobile unbound on app.
• Check if a 5GHz frequency is used. Try a Personal Hotspot, or change 5GHz to 2.4GHz to
connect your mobile. Consult the router supplier for detailed instruction on router
configuration.
• Disconnect from the power supply and remove the drum to check if there is any foreign
object stuck at the rotating shaft.
• Make sure that the drum is properly installed on the base and the side covers are locked
Reconnect it to the power supply and try again.
• The drum stops rotating automatically when cat / weight is detected.It will resume rotating
• after the cat leaves, or the weight is removed.
• Check and make sure that the litter box liner is spread evenly inside the waste drawer.
• Disconnect from the power supply and remove the drum to chedck if the infrared sensors
are blocked by foreign object.
• Use only for cats weighing at least 3.3lbs but less than 27.6lbs.
05 TROUBLESHOOTING GUIDE
Problem
Solution
The troubleshooting guide addresses the most common problems. IIf problems persist, feel free to contact the
Customer Support via email: [email protected]
How to prevent litter
sticking?
Buttons are not responsive.
How to reduce unpleas-
ant odors from litter box?
I cannot connect the litter
box with my mobile.
Drum does not rotate or
stops rotating during
cleaning or emptying.
Drum does not stop when
cat enters.
Litter box does not clean
automatically after cat
leaves.
17
18
The entry height is adjustable. You can adjust the entry height to better suit your cat's habits.
To adjust, go to Settings Others Setting Entry Height in the app, select preferred
height, then press once to complete the reset.
1.A slower, more even rotation allows for more thorough filtering of the litter, giving larger
particles (e.g., mixed tofu litter) sufficient time to be properly filtereed.
2.The drum pauses briefly at its highest tilt angle, allowing larger clumps ough time to fall off
completely.
3.After the cleaning cycle is done, an automatic leveling cycle runs to spread the litter flat.
This makes it easier for your cat to use the box next time and also prormotes better
clumping.
Try adjusting the clumping delay time. For standard mineral litter, we recommend setting it to
6-8 minutes.
Litter box rotates so slowly.
Litter doesn't get cleaned
up properly, or it sticks
heavily to the bottom.
How often should I replace
the litter box liner?
Can I use the litter box
without APP?
How to get new litter box
liners or deodorizer?
Can the litter box be used
by all cats?
How often should I add cat
litter?
I cannot weigh my cat
accurately.
My cat frequently kicks
litter out of the box during
use.
• Make sure that the litter box placed on a firm, level surface with space around. Do not
place the mat partially or completely under the litter box.
• Disconnect from the power supply, reconnect and try again.
• Cat movement can cause weight errors of 10-20%, so the weight on app imight not reflect
its actual weight.
How often you will need to add cat litter depends on the litter depth in the litter box. Ensure
you always keep enough litter between the MAX and MIN fill line.
How often you will need to replace the litter box liner depends on your personal preference
and your cat's behavior. For a single cat, we recommend replacing daily in summer, and
every 2-3 days in spring/autumn. For multiple cats, we recommend repfacing every day.
Cat or kitten must weigh at least 3.3lbs but less than 27.6lbs, andage 6 months or older to
safely use the litter box. To ensure safety for small kittens (under 3.3lbs), enable Kitten
mode on app. This disables auto clean and allows manual clean
Yes, you can use the litter box with control button only or download APP for more custoiz-able
options.
For new litter box liners or deodorizer, search for Thereye litter beox liners or deodorizer on
Amazon or contact our Customer Support via email: [email protected]
19
20

22
This device complies with Part 15 of the FCC Rules. Operation is subject to the following two conditions
(1) this device may not cause harmful interference, and
(2) this device must accept any interference received, including interference may cause undesired operation
Warning: Changes or modifications not expressly approved by the party responsible for compliance could void the
user's authority to operate the equipment.
NOTE: This equipment has been tested and found to comply with the limits for a Class B digital device, pursuant to Part 15 of the
FCC Rules. These limits are designed to provide reasonable protection against harmful interference in a residential installation.
This equipment generates uses and can radiate radio frequency energy and, if not installed and used in accordance with the
instructions, may cause harmful interference to radio communications. However, thhere is no guarantee that interference will not
occur in a particular installation. If this equipment does cause harmful interference to radio or television reception, which can be
determined by turning the equipment off and on, the user is encouraged to try to correct the interference by one or more of the
following measures:
- Reorient or relocate the receiving antenna.
- Increase the separation between the equipment and receiver.
- Connect the equipment into an outlet on a circuit different frorm that to which the receiver is connected.
- Consult the dealer or an experienced radio/TV technician for help
This equipment complies with FCC radiation exposure limits set forth for an uncontrolled environment. This equipment should
be installed and operated with minimun distance 20cm between the radiator & your body.
FCC Compliance
FCC Radiation Exposure Statement
This device contains licence-exempt transmitter(s)/receiver(s) that comply with Innovation, Science and Economic Development Cana-
da's licence-exempt RSS(s). Operation is subject to the following two condditions:
(1) This device may not cause interference.
(2) This device must accept any interference, including interference that may cause undesired operation of the device.
L'émetteur/récepteur exempt de licence contenu dans le présent appaareil est conforme aux CNR d'Innovation, Sciences et Développe-
ment économique Canada applicables aux appareils radio exempts de licerce. L'exploitation est autorisée aux deux conditions suivantes
(1) L' appareil ne doit pas produire de brouillage;
(2) L' appareil doit accepter tout brouillage radioélectrique subi, mêmesi le brouillage est susceptible d' en compromettre le fonctionnment
Radio Frequency Exposure Statement for IC
The device has been evaluated to meet general RF exposure reqjuirements. The device can be used in mobile exposure conditions. The
min separation distance is 20cm.
Déclaration d'exposition aux radiofréquences pour IC
L'appareil a été utilisé pour répondre aux exigences générales en matière d'exposition aux radiofréquences.
Correct Disposal of This Product (Waste Electrical & Electronic Equipment)
(Applicable in countries with separate collection systems)
This marking on the product, accessories or literature indicates that the roduct and its electronic accessories should not be disposed of
with other household waste at the end of their working life. To prevent poble harm to the environment or human health from uncontrolled
waste disposal, please separate these items from other types of waste and recycle them responsibly to promote the sustainable reuse of
material resources. Household users should contact either the retailer where they purchased this product, or their local governmeent
office, for details of where and how they can take these items for environmentally safe recycling. Business users should contact their
supplier and check the terms and conditions of the purchase contract. This product andits electronic accessories should not be mixed with
other commercial wastes for disposal.
IC Compliance
21