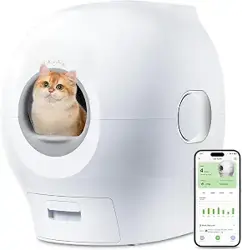

Please read this manual carefully and keep it properly before
using the product.
PW5 Smart Cat Litter Box Toilet
User Manual

Contents
1
3
2
2
4
8
13
14
15
17
22
23
24
25
16
5
6
7
17
17
18
20
Safety Precautions
Packing list
Product Description
Preparation Before Use
Button Instructions
Indicator Light Explanation
Feature Introduction
Maintenance and Care
Common Issues
Basic Parameters
After-sales Service
Service and Support
APP Download
Points for Users to Note
Regarding Pet Usage Recommendations
Upper Shell Assembly
Sand Tank Assembly
Base Assembly
I. Maintenance and Care Guidelines
II. Replacement of Air Purification Filter
III. Cat Litter Replacement Guide
IV. Cleaning Guide

FCC Caution
This device complies with part 15 of the FCC Rules. Operation is subject to the
following two conditions: (1) this device may not cause harmful interference, and (2)
this device must accept any interference received, including interference that may
cause undesired operation.
Any changes or modifications not expressly approved by the party responsible for
compliance could void the user's authority to operate the equipment.
NOTE: This equipment has been tested and found to comply with the limits for a Class
B digital device, pursuant to Part 15 of the FCC Rules. These limits are designed to
provide reasonable protection against harmful interference in a residential installation.
This equipment generates, uses and can radiate radio frequency energy and, if not
installed and used in accordance with the instructions, may cause harmful interference
to radio communications. However, there is no guarantee that interference will not
occur in a particular installation.
If this equipment does cause harmful interference to radio or television reception,
which can be determined by turning the equipment off and on, the user is encouraged
to try to correct the interference by one or more of the following measures:
- Reorient or relocate the receiving antenna.
- Increase the separation between the equipment and receiver.
- Connect the equipment into an outlet on a circuit different from that to which the
receiver is connected.
- Consult the dealer or an experienced radio/TV technician for help.
To maintain compliance with FCC’s RF Exposure guidelines, This equipment should be
installed and operated with minimum distance 20cm between the radiator and your
body: Use only the supplied antenna.
FCC ID:2BBKS-PW

1.
2.
3.
4.
5.
6.
7.
8.
9.
10.
11.
12.
13.
14.
15.
16.
17.
This product is not suitable for individuals with diminished physical, sensory, or mental capabilities,
or lack of experience and knowledge, including children, to use alone. Unless they are supervised
or guided by those responsible for their safety or family members after successful binding with the
app.
This product is not a toy. Children should be supervised to ensure they do not use the product as a
toy, as it may lead to unexpected accidents or injuries.
Children and the elderly should not perform product cleaning and maintenance without supervision.
Pregnant and lactating cats are strictly prohibited from using this product to prevent the risk of
giving birth to kittens or leaving them in the litter box.
This product should be placed on a clean, flat, hard surface and not on an inclined or soft object to
prevent tilting.
Avoid using this product in extreme high temperatures (>50°C) or low temperatures (≤ 0°C).
It is recommended to place the product in a cool, dry place indoors, away from heat sources, and
avoid direct sunlight to prevent accelerated aging of the product casing.
Do not plug or unplug the product power plug from a household power outlet with wet hands.
Do not modify or forcefully bend, pull, or twist the power cord, and do not place any heavy objects
on the power cord to avoid electric shock, short circuit, or fire.
Do not plug the power plug into an overloaded household power outlet or circuit, as it may cause
overheating, short circuit, and fire.
Do not move or relocate the product when pets are inside or when the product is in operation.
The product has a weight sensor inside. Please lift and place the sand tank with care.
Do not drop any solid objects or debris into the product to avoid damage to product components
and malfunctions.
For a good product experience, regularly clean and maintain the product. Unplug the power plug
before cleaning.
Do not use the power plug or power cord if damaged or hot, or if the power plug inserted into the
household power outlet becomes loose. Contact the manufacturer or authorized professionals for
replacement. Do not use third-party power cords to avoid quality issues and potential hazards.
Do not disassemble, dismantle, modify, or repair the product and its accessories without
authorization to prevent malfunctions and potential dangers due to abnormal operations.
When the product experiences abnormalities and malfunctions, immediately stop using it, unplug
the power plug, and contact customer service or authorized personnel for consultation and
* Please follow the instructions for using this product to avoid malfunction, other
unexpected losses, and potential dangers.
Safety Precautions
1

Points for Users to Note
Regarding Pet Usage Recommendations
1.
2.
3.
4.
5.
6.
7.
8.
9.
Please place this product on a firm and level surface, and do not place it against walls or other
objects.
Do not use this product in environments with temperatures at or below 0°C, as it may damage the
product's water inlet and drainage systems.
Avoid using the product in outdoor or damp environments for an extended period.
Do not immerse or expose the product to dripping or splashing water.
Do not place any solids or debris other than cat litter into the product.
Do not move or disassemble the product while it is in operation.
Do not clean this product with corrosive cleansers or chemical agents.
When adding cat litter to the drum, do not exceed 6 liters, and ensure the litter does not go beyond
the MAX line indicated on the litter pad.
Due to product functionality limitations, please use soluble cat litter.
1.
2.
3.
It is recommended for cats aged 3 months or older and weighing over 1 kg to use this product.
Pregnant, expecting, and lactating cats are strictly prohibited from using this product. In case of
special circumstances requiring usage, please disable the product's automatic cleaning function
and manually operate the buttons on the product.
If there are uncertainties about whether the product can be used for pets with advanced age,
limited mobility, or physiological conditions, consult with a professional (such as a pet doctor or
veterinarian) and use the product under their guidance.
2
18.
19.
resolution. Do not attempt to disassemble and repair the product yourself to avoid accidents.
(Examples of abnormalities or malfunctions include:
- Power cord damage, such as cracks or exposed cores.
- Abnormal heating, deformation, or discoloration of the product, power plug, or power cord.
- After moving the power cord, the product may not power on at times.
- The power plug, power cord, or product emits a burnt smell.)
When not using the product for an extended period, unplug the power plug, clean and maintain the
product for better future use. It is recommended to use a dust cover to protect the product after
cleaning.
Do not use any unofficial special accessories to avoid malfunctions or other dangerous incidents
due to quality issues. The company is only responsible for the performance and safety of officially
provided accessories.
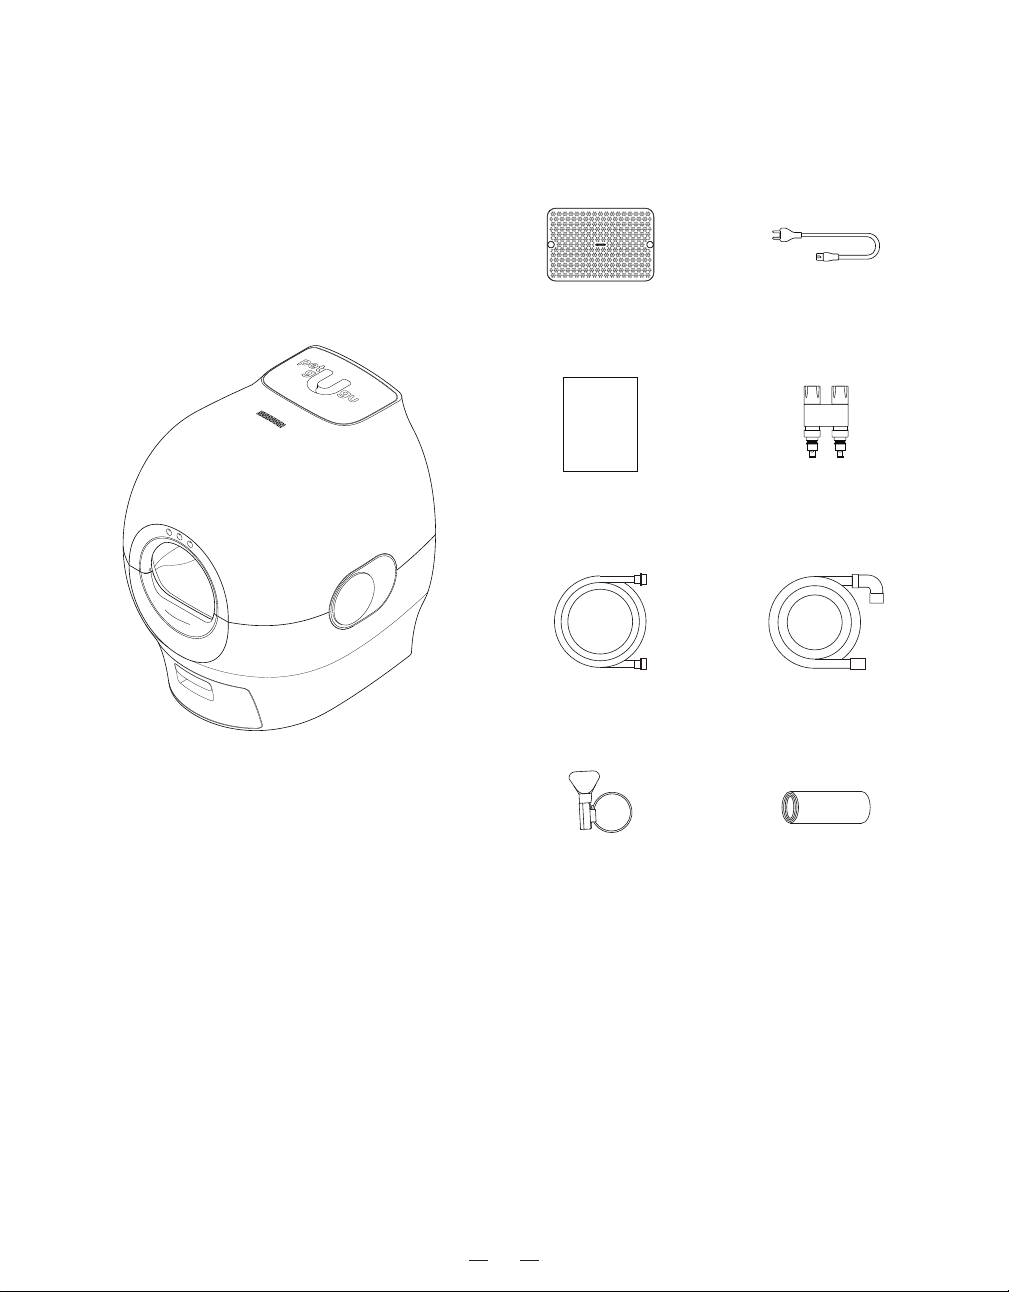
Throat clamp
Packing list
One-minute/
two-way faucet
Instruction manual
Robot (PW5)
Note: The illustrations of products, accessories, user interfaces, etc. in the manual are
schematic and for reference only. Due to product updates and upgrades, there may be slight
differences between the actual product and the illustrations. Please refer to the actual product
for accuracy.
Air purification filter
Inlet pipe
Power cord
Outlet pipe
Sand collection bag
3
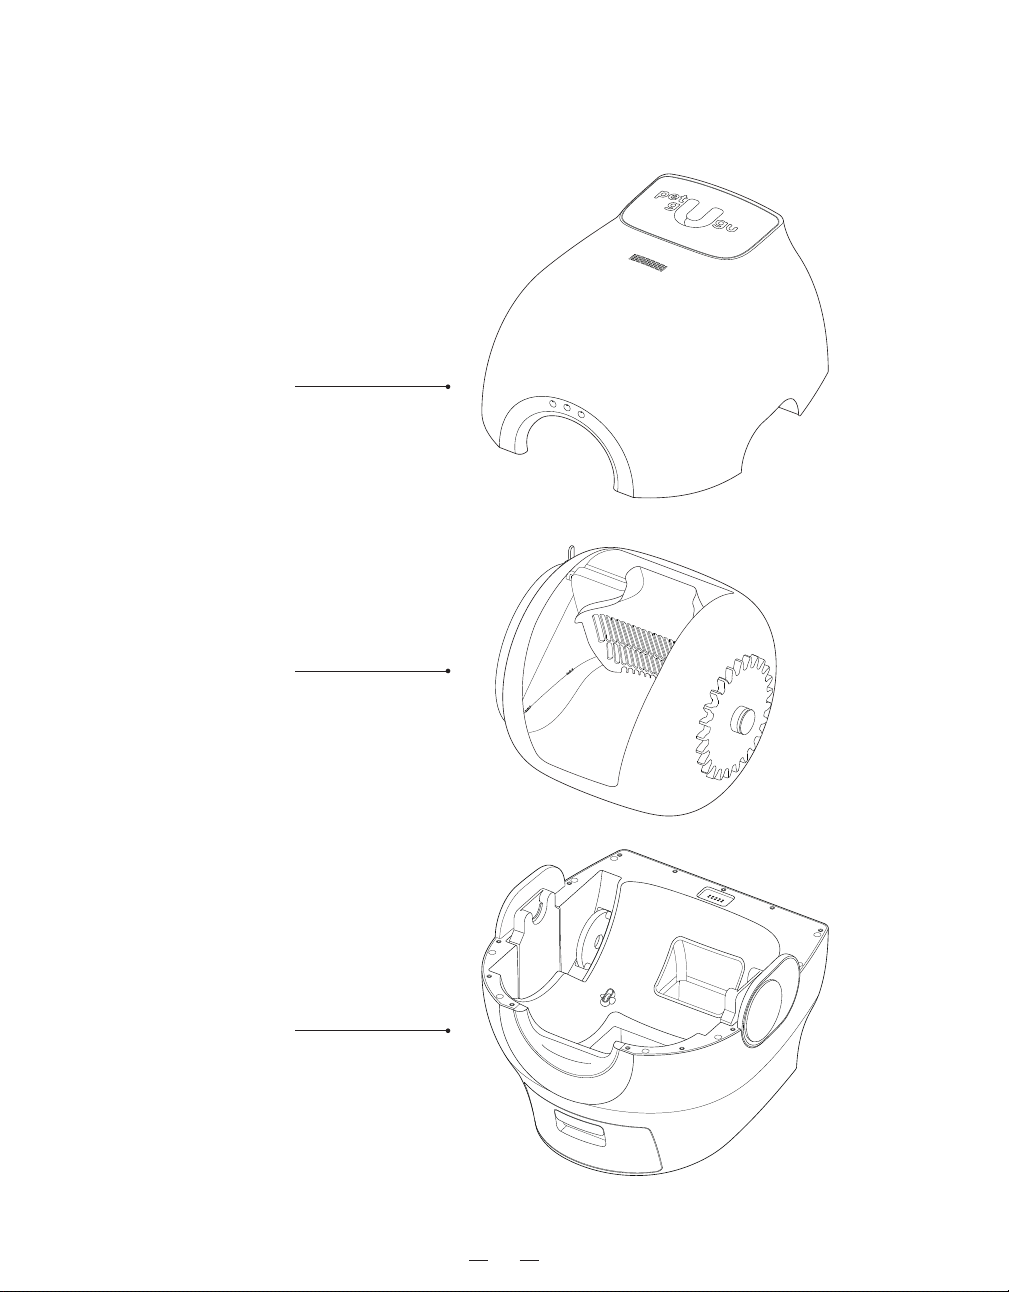
Product Description
Sand tank assembly
Upper shell assembly
Base assembly
4
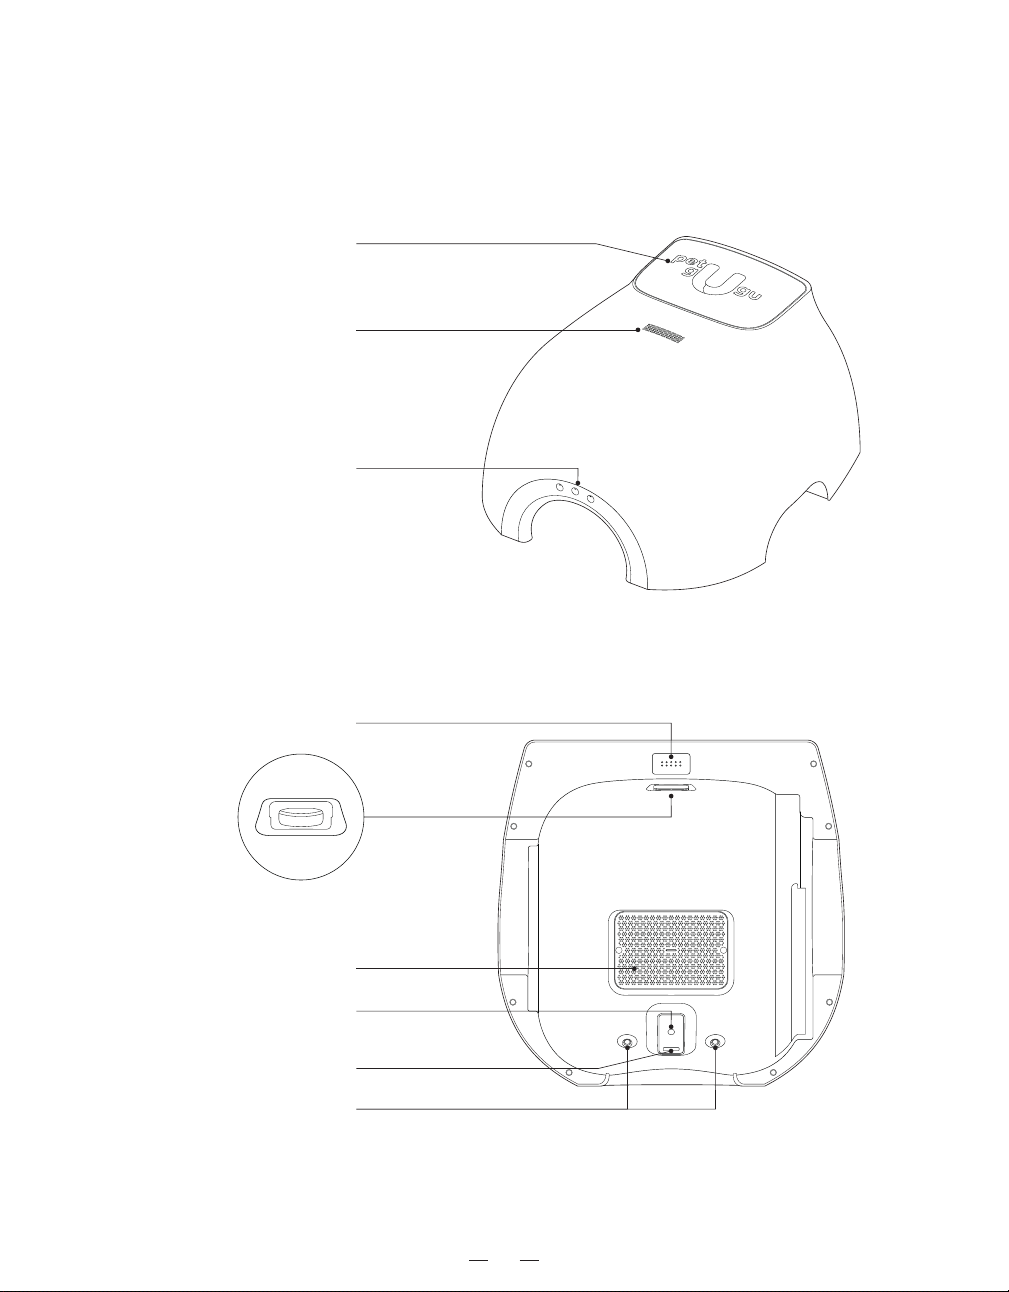
— Upper Shell Assembly
Sand tank cover
Connector pins
Air purification filter
Camera
Fill light
UV sterilization lamp
Function buttons
(For detailed information, please
refer to the instruction manual.)
Air outlet
Automatic sand
addition port
5
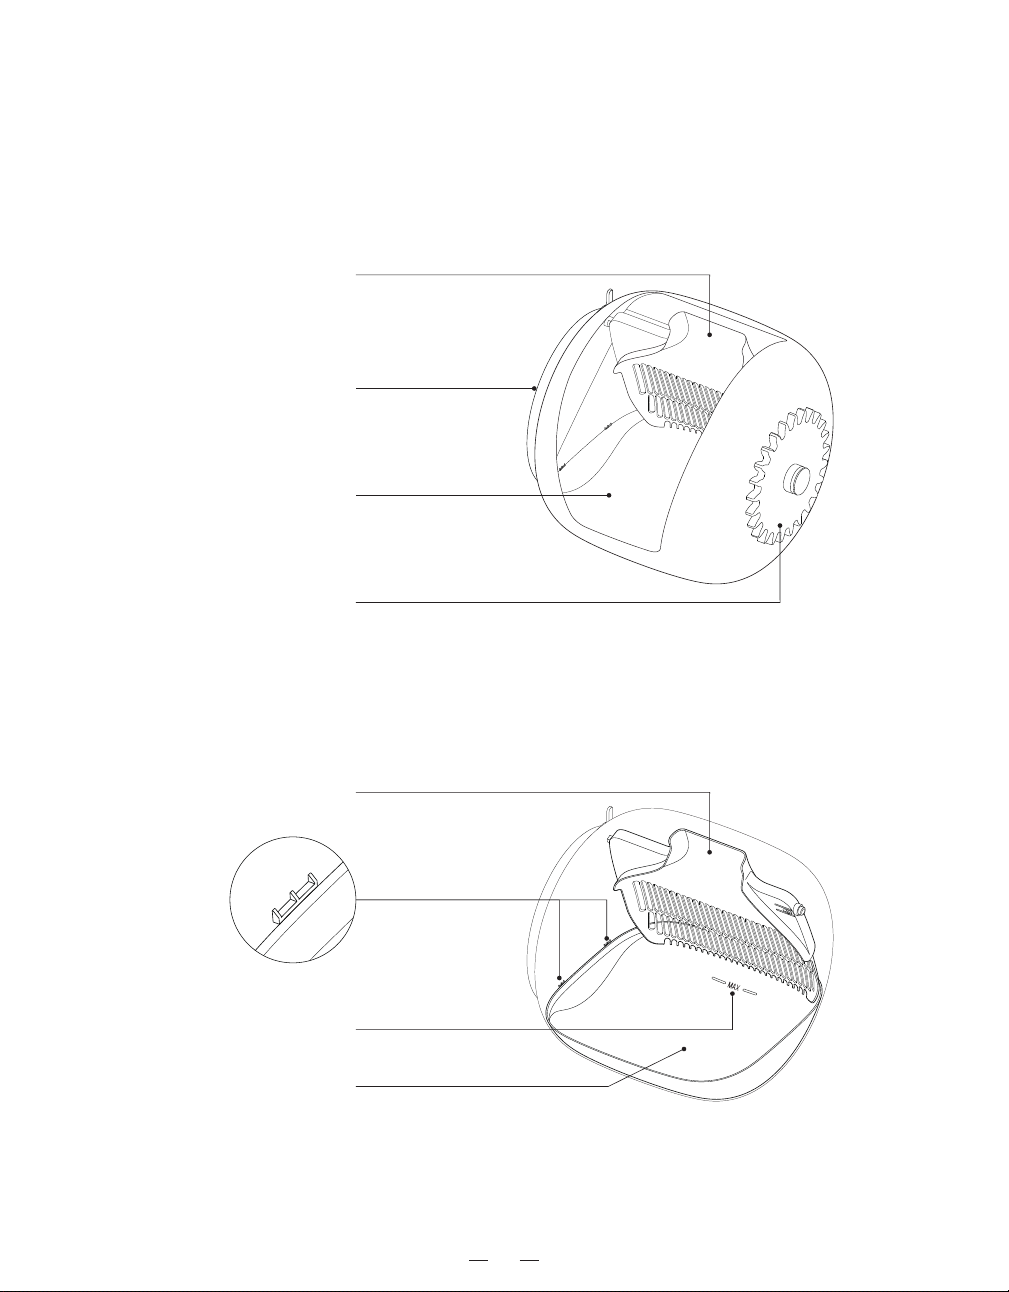
— Sand Tank Assembly
Filter mesh
Filter mesh
Cat litter pad
Sand tank
Cat litter pad
Cat litter pad buckle
Cat litter addition MAX line
Sand tank rotating gear
6
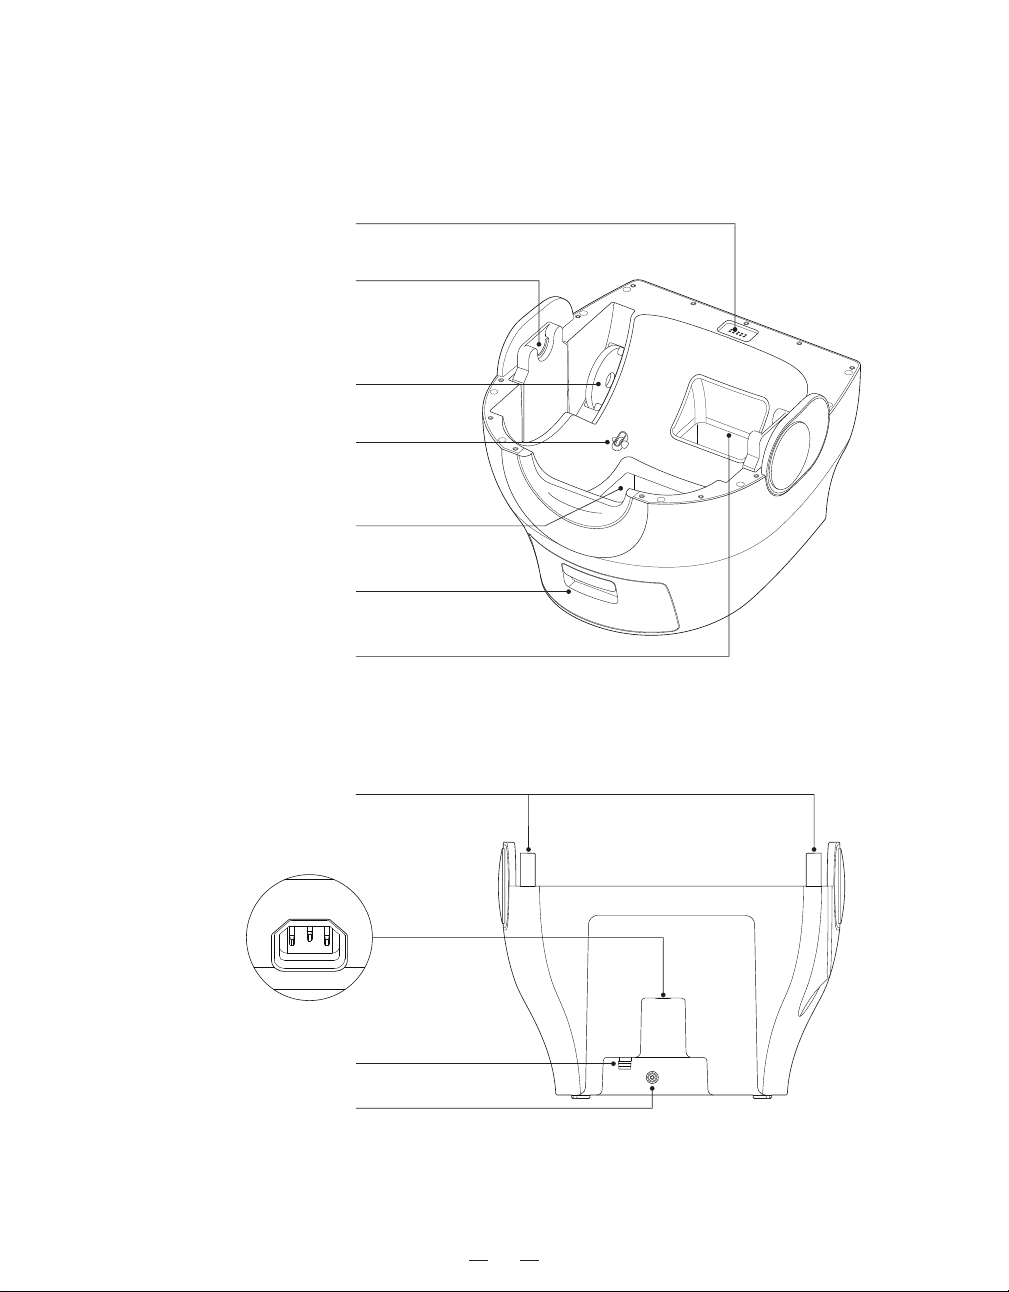
— Base Assembly
Sand tank bracket
Sand tank bracket
Drain outlet
Water inlet
Connector contacts
Mesh-driven wheel
Roller
Sand collection bin
Cleaning bin inlet
Sand collection opening
Power interface
7
Preparation Before Use
1. Installation Environment
-Due to the product's need for water intake and drainage, please place the product in an area
equipped with a faucet and floor drain.
-Position the product on a flat, hard surface. Clear any debris around the product, maintaining a
distance of at least 5cm from other objects (such as walls) to avoid excessive vibration and noise
during product operation.
* Please reserve sufficient space for the product based on its dimensions.
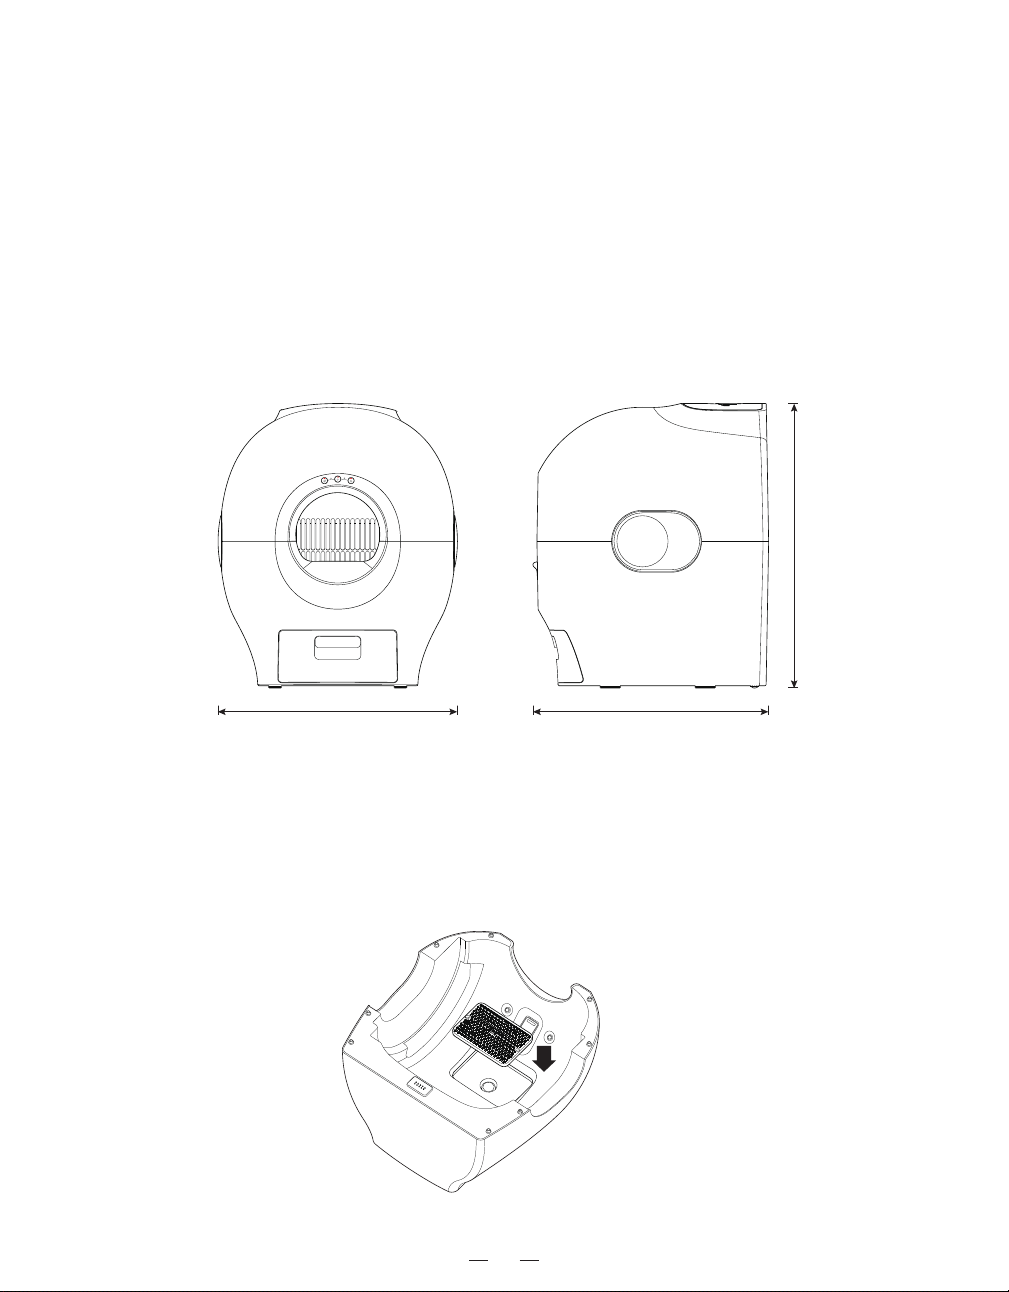
2. Install the Air Purification Filter
After confirming the product is free of any issues, take out the air purification filter from the packaging
and place it into the slot inside the upper shell component. Press gently to secure the filter.
63cm 62cm
75cm
8
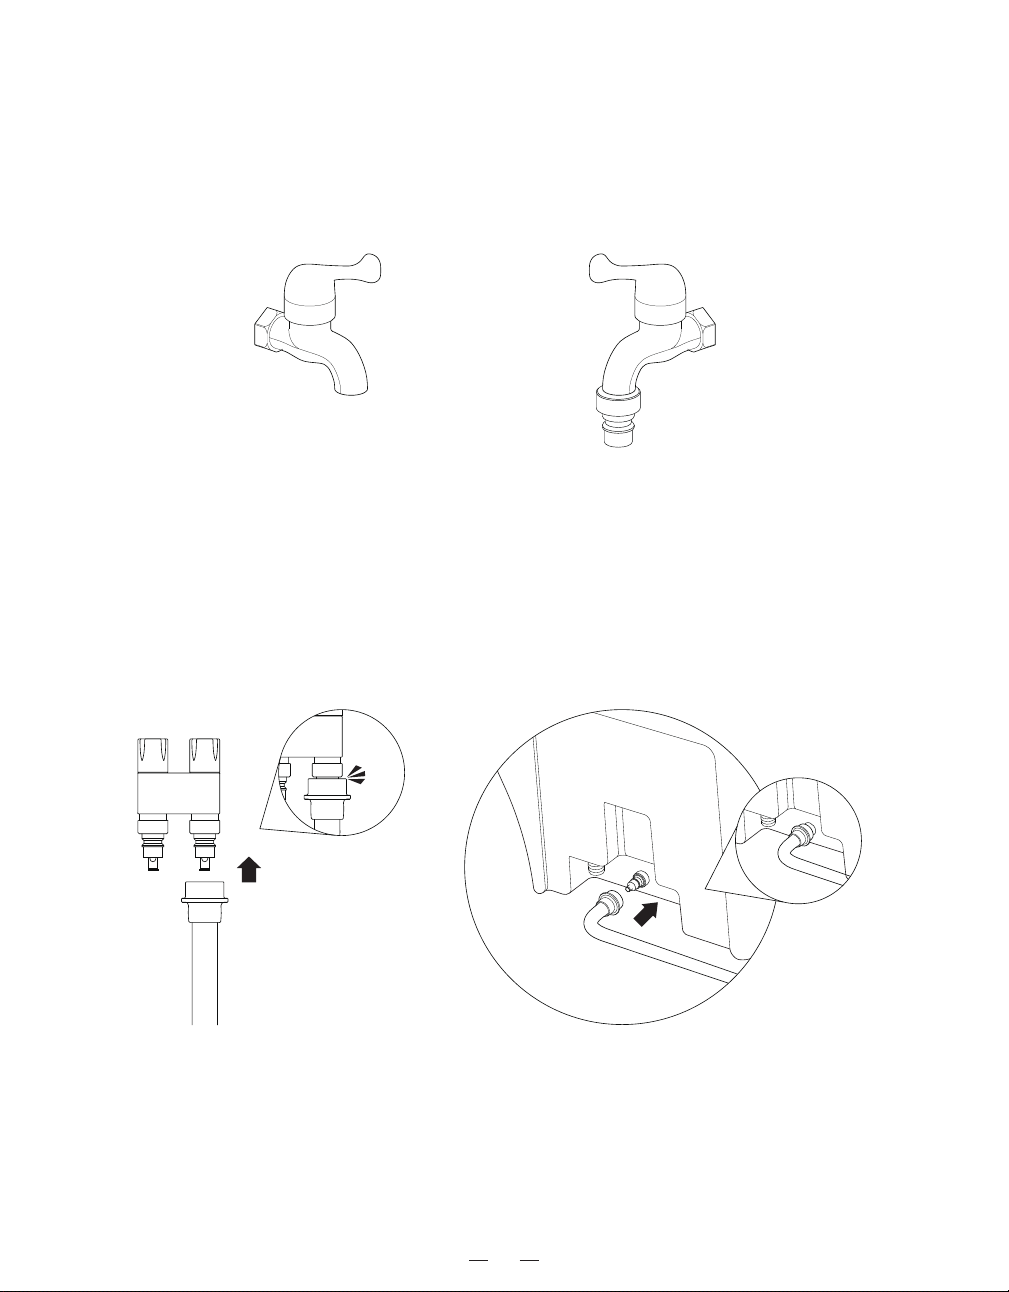
5. Check if the water inlet pipe is connected properly
After installing the water inlet pipe, gently pull and stretch it to confirm a secure connection. Open the
faucet to check if there are any leaks at the connection between the water inlet pipe, faucet, and water
inlet. (Do not forcefully bend or fold the water inlet pipe.)
3. Confirm the Faucet Connection for the Water Inlet Pipe
The water inlet pipe joint is a four-way quick connector. Check if the faucet has a four-way connector
structure. If the faucet does not have a four-way connector, replace the faucet with the one provided in
the accessories, which is a one-to-two faucet. (Users can also purchase a faucet that meets their
needs for installation and use.)
Regular faucet
Four-way interface faucet
4. Connect the water inlet pipe
Press down on the water inlet pipe joint slider, insert the water inlet pipe into the four-way interface of
the faucet, then release the slider until you hear a 'click' to complete the connection. (The connection
of the water inlet pipe to the product water inlet is similar.)
click
9
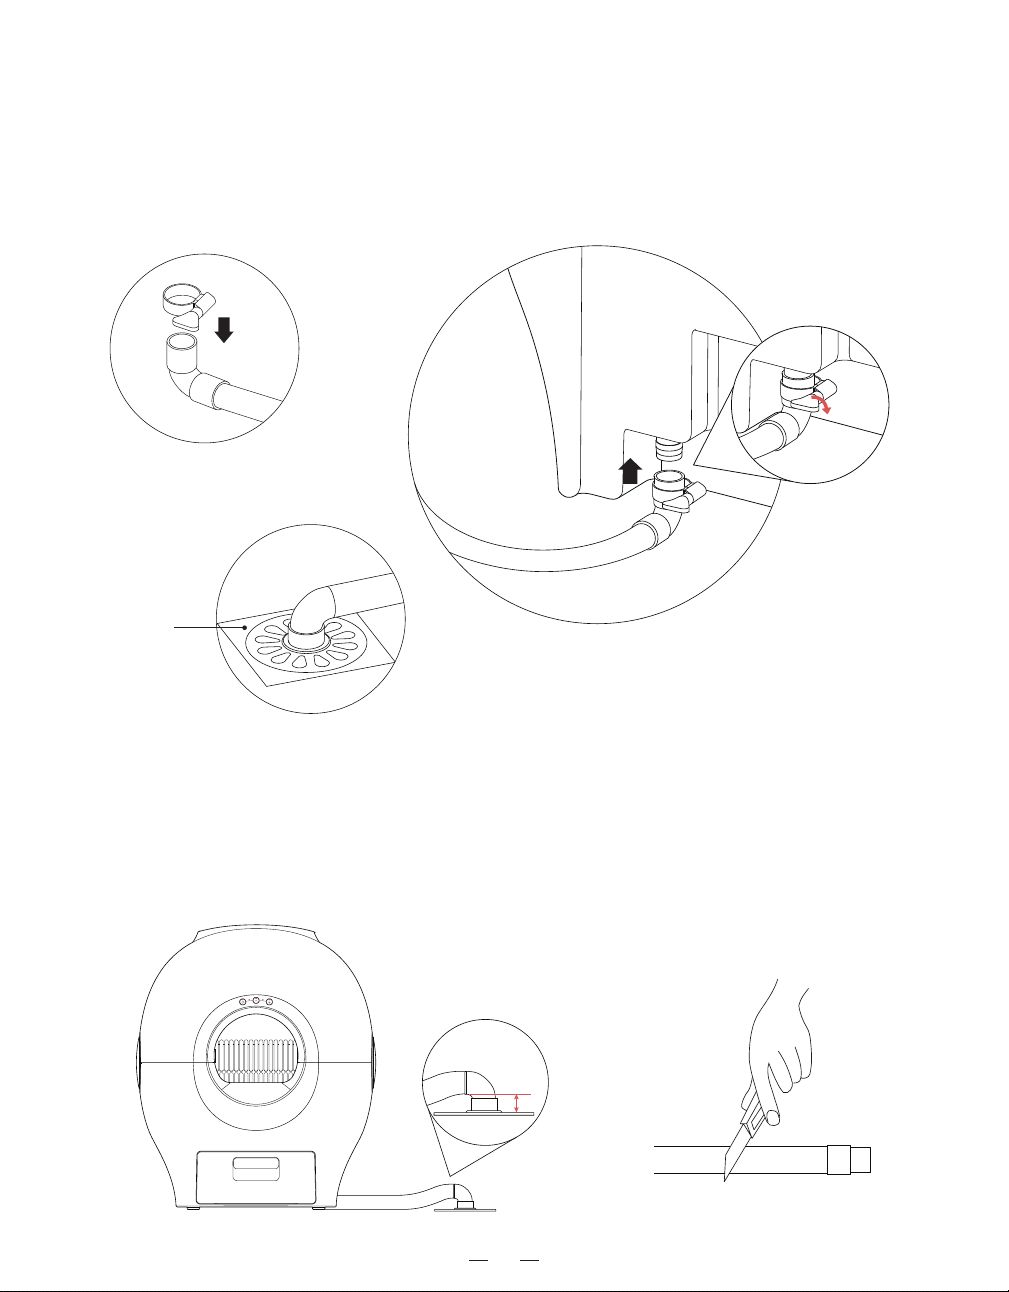
6. Connect the drain pipe
-Slip the hose clamp onto the L-shaped interface of the drain pipe.
-Forcefully push the L-shaped interface of the drain pipe into the product drain interface, then rotate
the locking knob on the hose clamp to secure the drain pipe to the product drain outlet.
-Insert the other end of the drain pipe interface into the floor drain.
Friendly Reminder
-To ensure smooth drainage, the height of the drainage pipe should be less than 5cm.
-If the drainage pipe is too long, you can cut off the excess part. However, if you need to extend the
drainage pipe, you will need to purchase an additional drainage pipe.
<5cm
Floor Drain
10
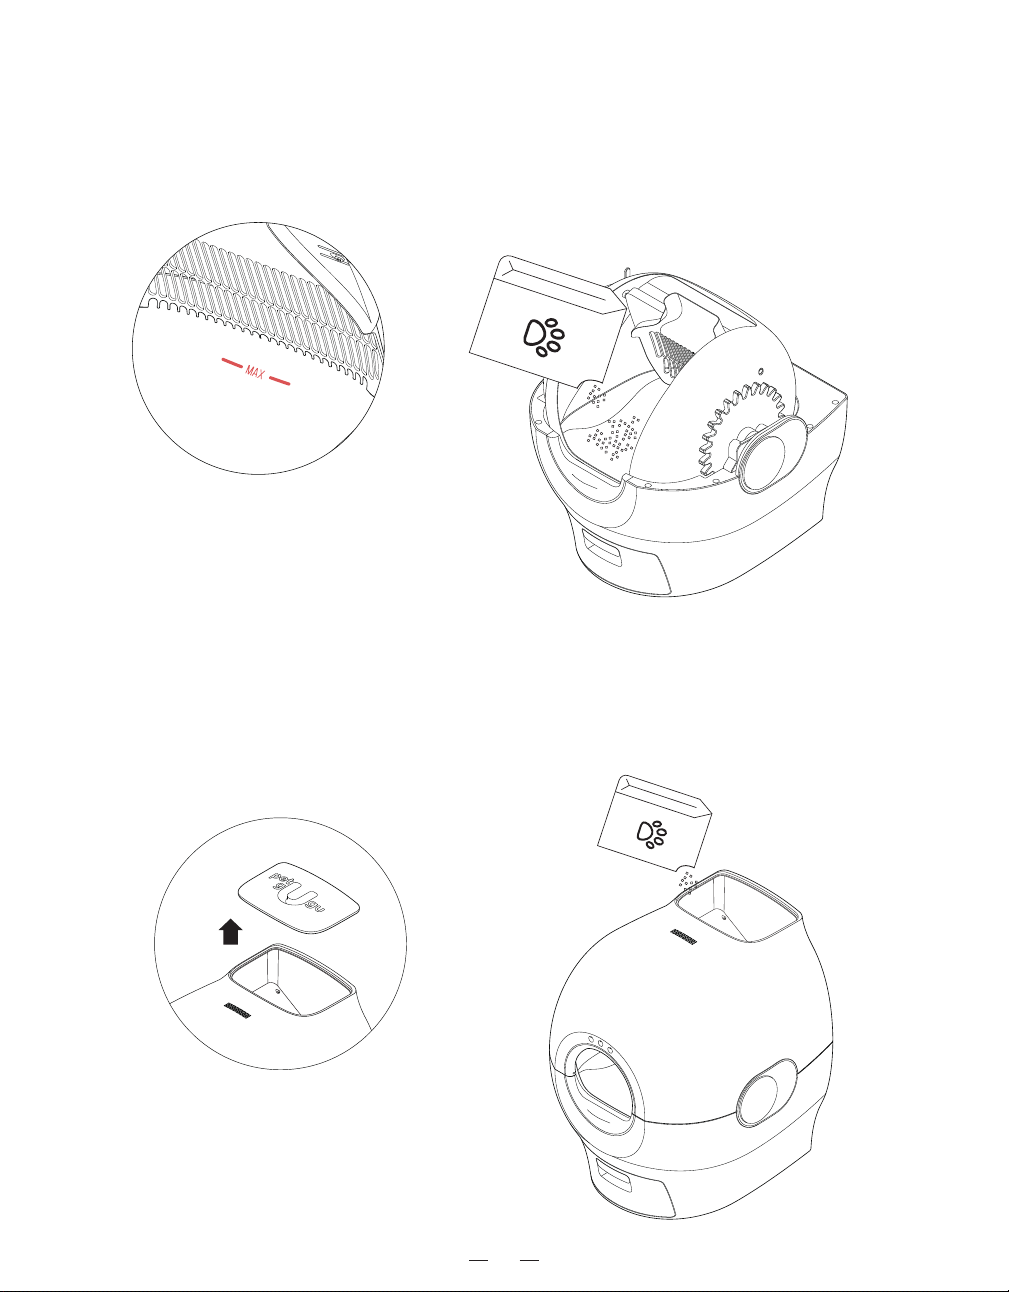
7. Adding Cat Litter
①. After removing the upper shell component, add cat litter to the sand bin.
* Note that the amount of cat litter added to the sand bin should not exceed the MAX line indicated
inside the sand bin (approximately 6.5L).
②. After adding cat litter to the sand bin, place the upper shell component back on the machine. Lift
the sand storage bin cover, add cat litter to the storage bin (maximum capacity approximately 8.5L),
and replace the cover after filling the storage bin with cat litter.
Ca
t
L
i
t
t
e
r
C
a
t
L
i
t
t
e
r
11
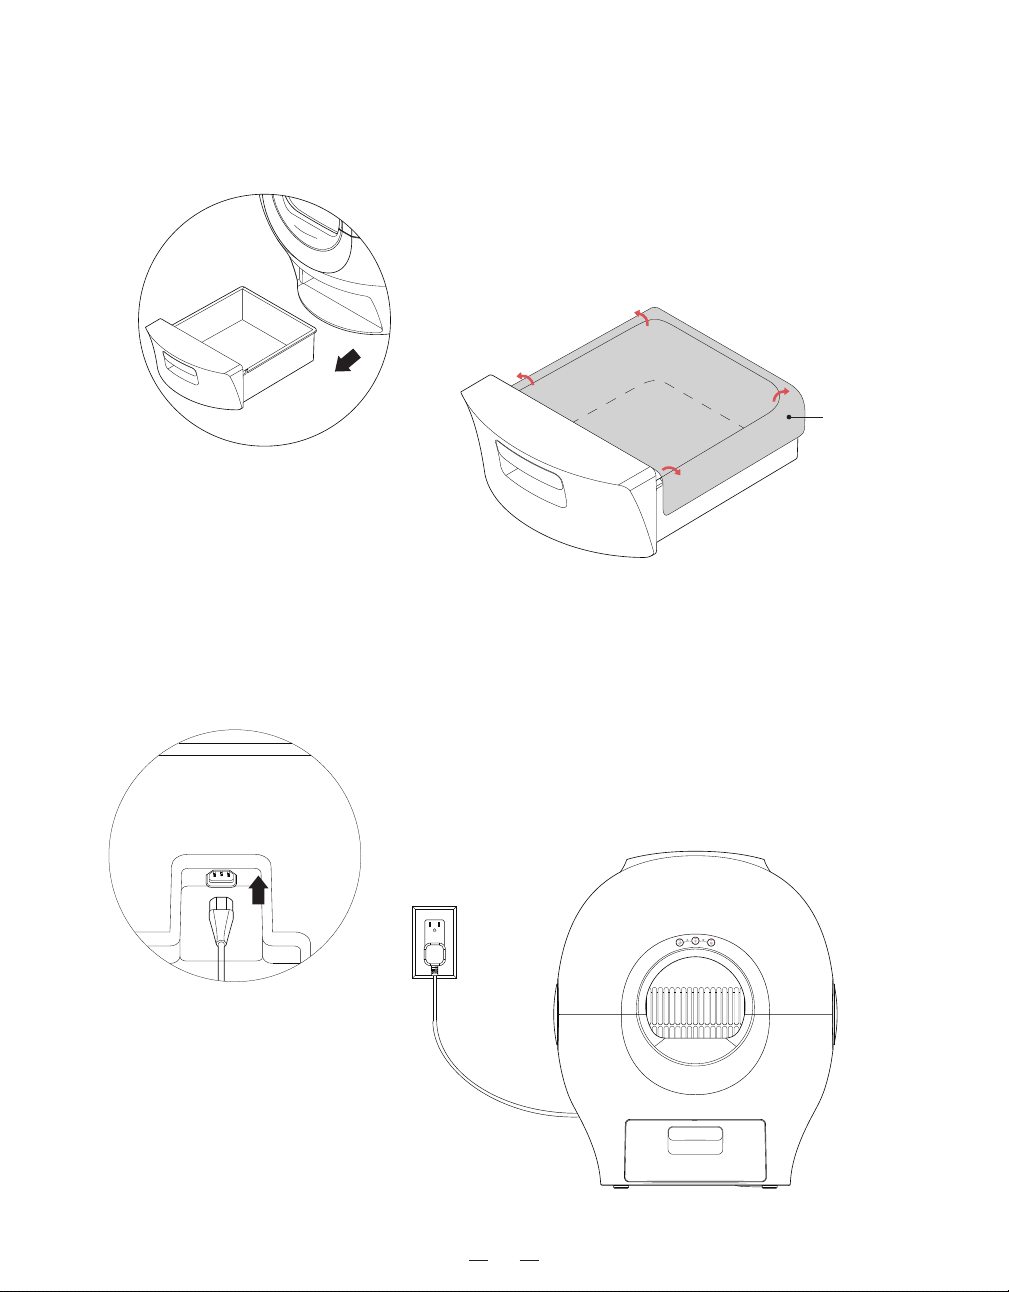
8. Install the Litter Bag
Pull out the litter bin from the product, place the litter bag into the litter bin, smooth the edges of the
litter bag, and push the litter bin back into the product.
9. Connect the Power
Insert the power cord interface into the power interface on the back of the product, and plug the power
plug into the power outlet.
Sand collection
bag
12
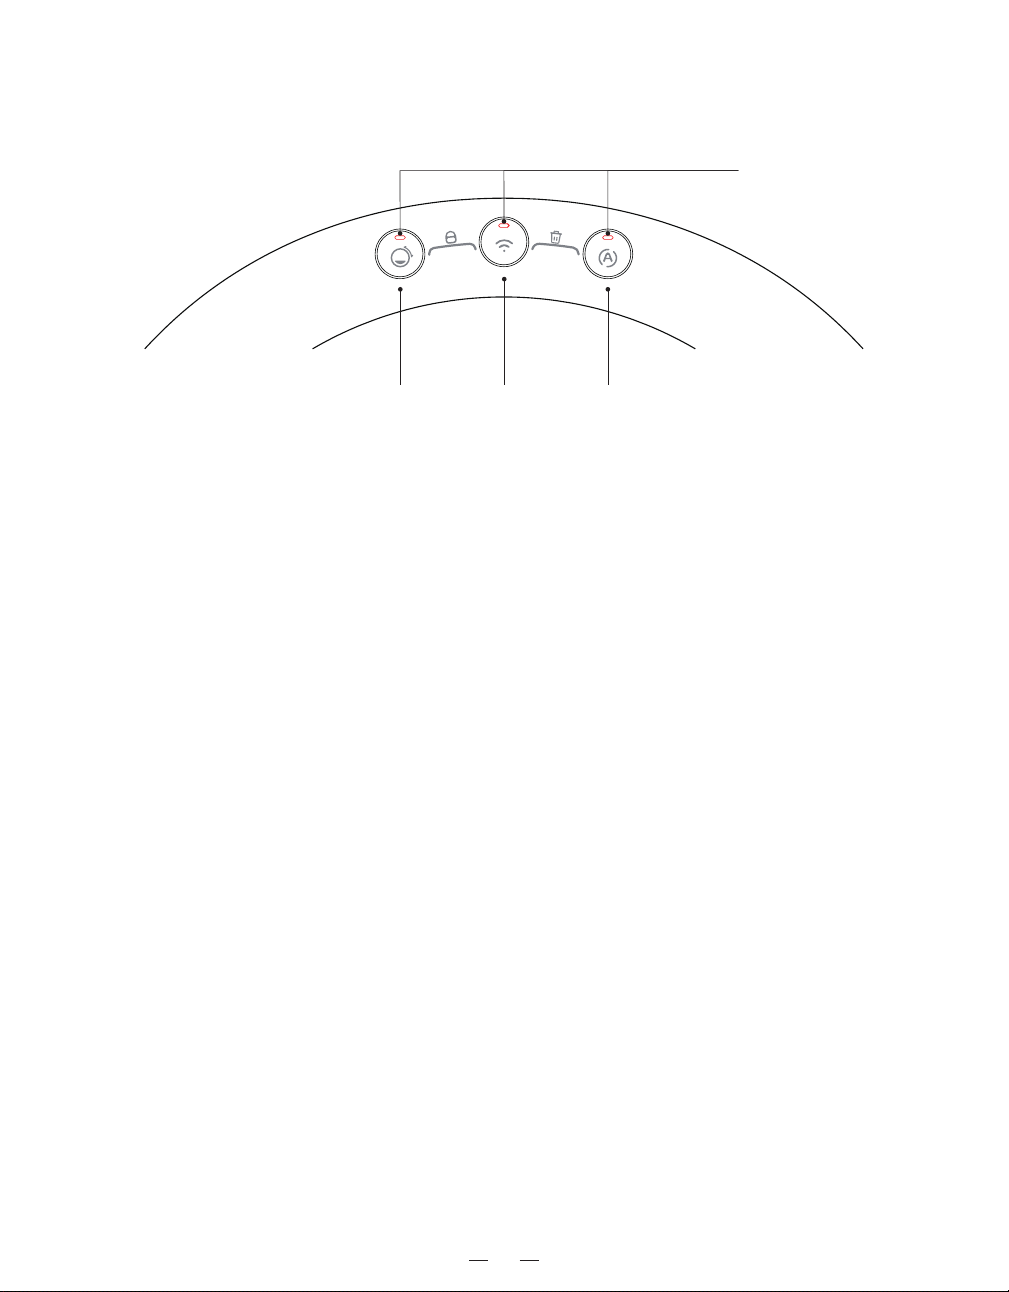
Button Instructions
Smooth Cat Litter Button
Press this button lightly, the button indicator light flashes white slowly (once every 3 seconds), the sand
bin rotates back and forth 40° three times, smoothing the cat litter on the cat litter pad.
Wi-Fi Button
Long press for 3 seconds, the button indicator light flashes white slowly, and the device enters Wi-Fi
pairing mode.
Auto-Cleaning Button
Lightly press this button, the button indicator flashes slowly in white, and the device enters automatic
cleaning mode to clean cat excrement inside the machine.
Open/Close Child Lock (Child Lock Key)
Simultaneously long-press the Flat Cat Litter Key and Wi-Fi Key to open/close the child lock.
* If there is no button action on the device for 10 minutes, the device will automatically enter child lock
mode. Please disable the child lock function before using the button features again.
One-Key Dumping of Cat Litter (One-Key Dumping Key)
Simultaneously long-press the Wi-Fi Key and Automatic Cleaning Key to enter the cat litter dumping
mode.
Note: If the sand collection bin at the base is not installed correctly, the device will be unable to
perform the cat litter dumping function.
Smooth Cat Litter Button Auto-Cleaning ButtonWi-Fi Button
Button Indicator Lights
13

Wi-Fi Key Indicator Light
White slow flash: ①Enters pairing mode, waiting for Wi-Fi connection;
②Wi-Fi disconnection and no automatic reconnection within 10 seconds.
White steady light: Wi-Fi connection successful.
* If connection fails or is disconnected for more than 2 minutes without reconnection or other opera-
tions, the indicator light will go out.
Auto-cleaning button indicator
White slow flash: The device has entered automatic cleaning mode and is undergoing automati
cleaning.
White steady light: Automatic cleaning is complete.
14
Indicator Light Explanation
Flat Cat Litter Key Indicator Light
White slow flashing: The machine is leveling cat litter.
White steady light: Leveling cat litter is completed.
* If there is no operation within one minute, the indicator light will automatically turn off.

Feature Introduction
Auto-Cleaning
Fully automated intelligent burying and cleaning of cat excrement, clean and sterile, freeing hands, and
odor-free; cat owners no longer need to manually scoop cat litter to clean cat excrement.
Video Monitoring
High-definition looping video automatically records the number of times the cat uses the toilet, allowing
cat owners to check the cat's defecation status on the app at any time, understanding the cat's
health.
Sterilization and Deodorization
The product has a built-in fresh air system and UV sterilization function. The fresh air system adsorbs
the odor generated by the cat after using the toilet, and UV sterilization kills bacteria in the litter box
through ultraviolet light.
Kitten Mode
After activating Kitten Mode on the app, the product will only bury the excrement after the cat uses the
toilet and will not perform automatic cleaning. Users need to press the button manually to put the
product into automatic cleaning mode.
Automatic Cat Litter Addition
The product is equipped with an 8.5L litter storage compartment at the top. When the litter in the
compartment is below the set level, it will automatically add an appropriate amount of cat litter to the
compartment. (During the automatic litter addition, the product will seal the compartment to prevent
dust pollution.)
One-Key Old Litter Disposal
By combining buttons, the product enables a one-key function to dump old cat litter, allowing it to be
emptied into the waste compartment.
15
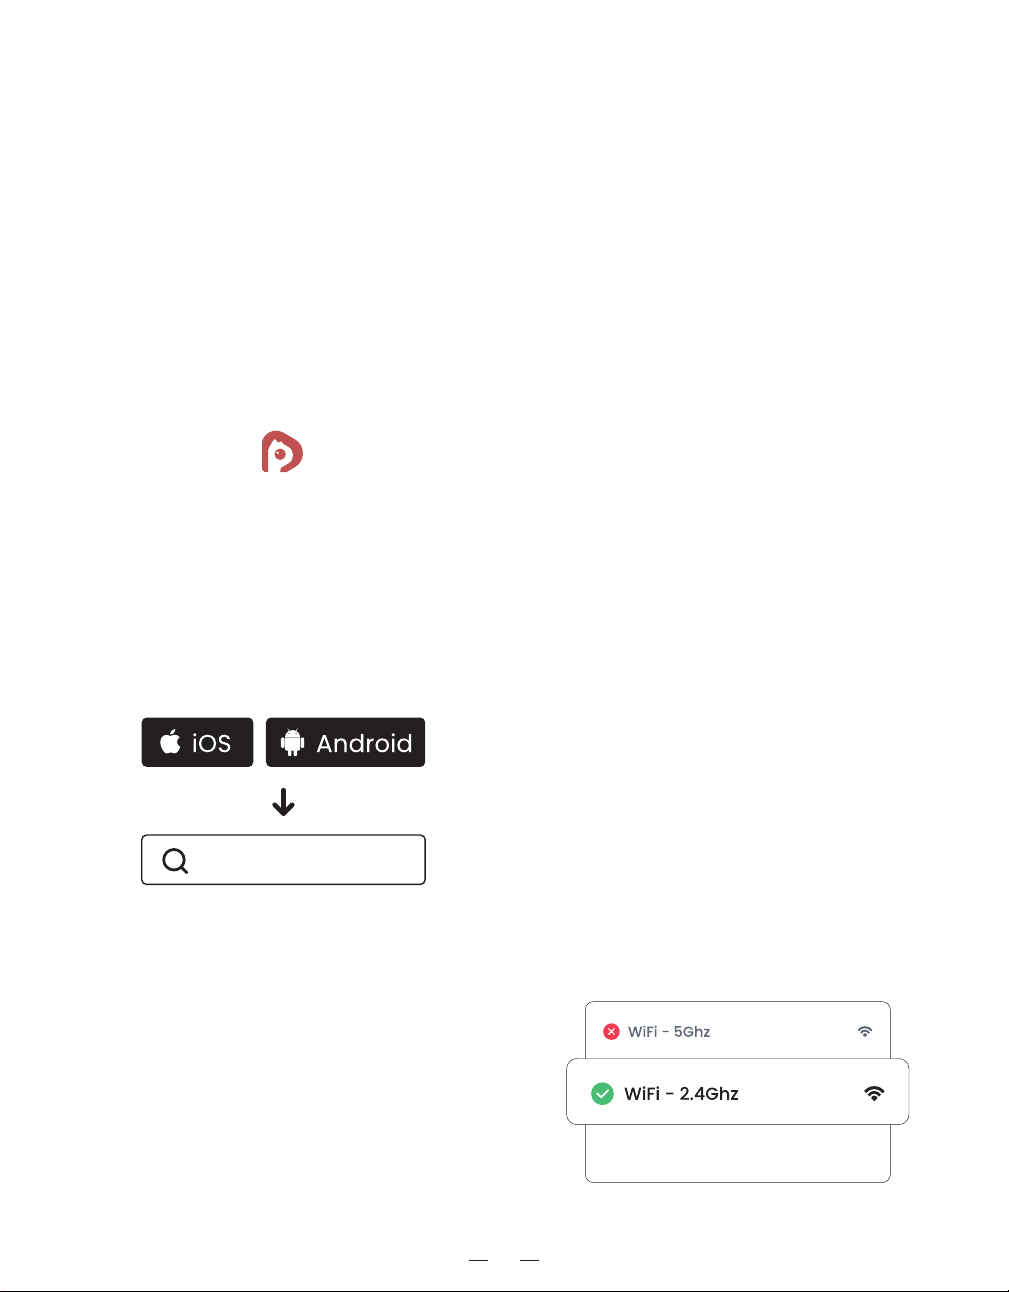
APP Download
Method 1:
Scan the QR code and download install the App according to the prompts.
Method 2:
Open the mobile app store, search for "petgugu", download and install.
petgugu
Tips:
- After installation, please complete the registration,
user login and network connection as instructed by
mobile App.
- Please confirm that the Wi-Fi is 2.4 G band network
before network connection.
This product is integrated with the petgugu APP, and users can download and install the
app through the following methods.
16

Maintenance and Care
I. Maintenance and Care Guidelines
1.
2.
3.
4.
5.
6.
7.
Please avoid placing the product in direct sunlight to prevent accelerated yellowing and aging.
For an optimal user experience, it is recommended to clean the product monthly to ensure a
hygienic environment for your cat.
Disconnect the product from the power source before performing cleaning and maintenance.
Do not use corrosive cleansers, gasoline, kerosene, polishing powder, bleach, or other chemical
agents to clean this product.
After powering off, lift the upper shell assembly, remove the sand compartment assembly, and
disassemble it for cleaning, including the sieve, cat litter pad, and sand compartment.
(Note: The sieve, cat litter pad, and sand compartment are washable.)
Due to electronic components in the upper shell and base assemblies, do not wash them with
water. Instead, wipe them with a damp cloth and neutral cleaner after disconnecting the power.
If the product is not used for an extended period, perform a thorough cleaning, cover it with a dust
cover, or return it to the original packaging in sequence. Store it in a dry place for better preservation
until the next use.
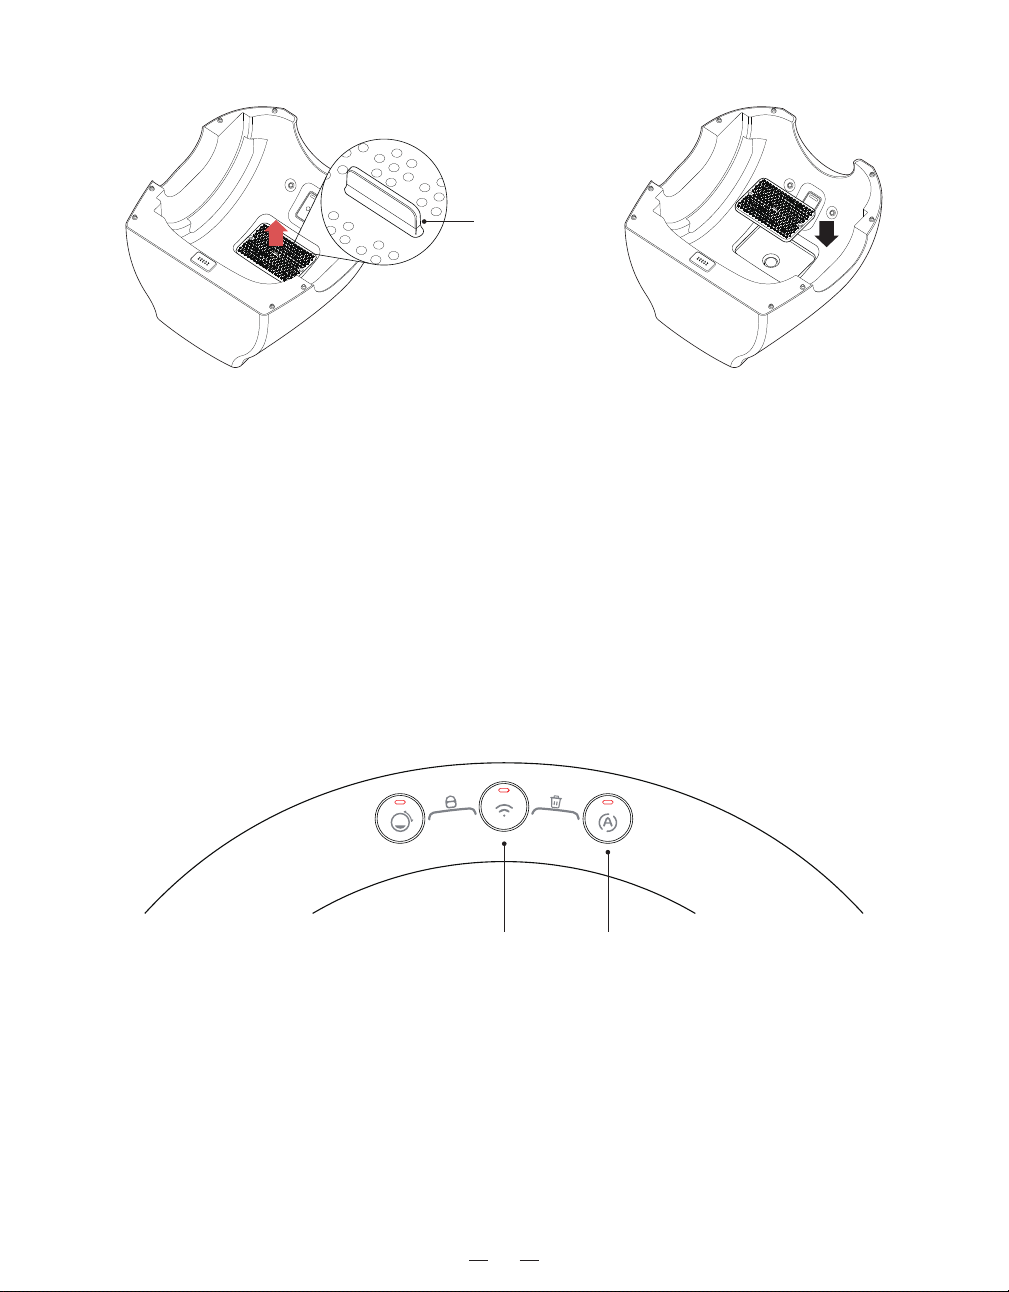
II. Replacement of Air Purification Filter
* To maintain the deodorizing effect of the product, it is recommended to replace the air
purification filter approximately every 30 days under normal usage conditions.
(Do not immerse the air evolution filter in water or wash it directly)
Replacement Guide
. Lift the upper shell component and place it upside down on a soft surface. Grip the silicone handle
on the air purification filter and pull it upward to remove the old air purification filter.
. Take out the new air purification filter, press it into its slot to secure it, and then place the upper shell
component back on the product to complete the replacement.
17
III. Cat Litter Replacement Guide
1. Clean the old cat litter from the litter compartment
Simultaneously press the Wi-Fi button and the automatic cleaning button, and the device enters
one-key cat litter dumping mode. Pour the old cat litter in the litter compartment into the bottom
collection bin.
* When the bottom collection bin is not properly installed, the device will be unable to perform the cat
litter dumping function.
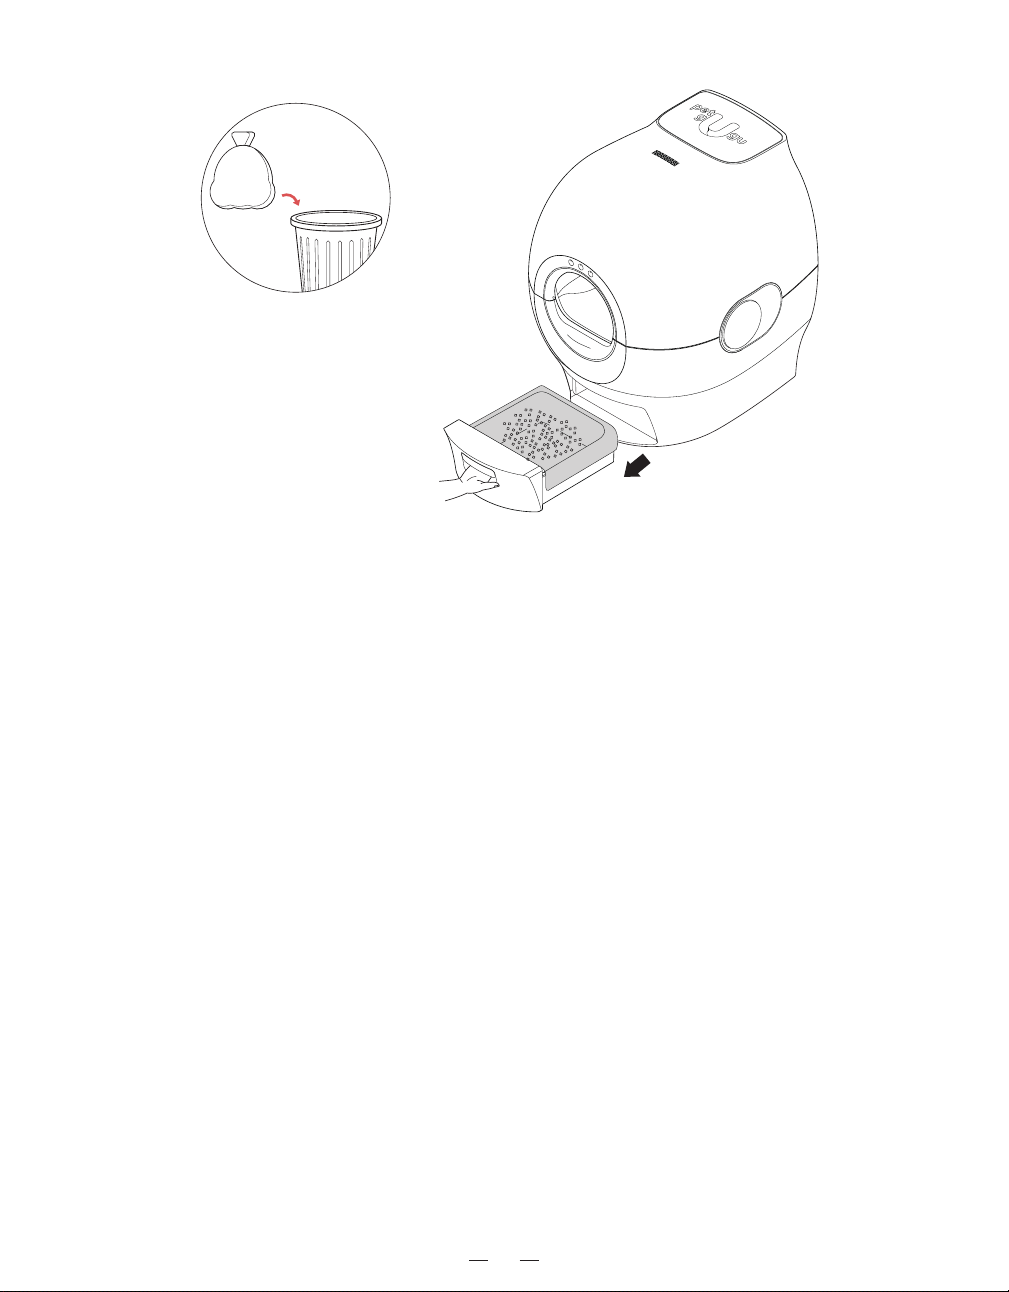
2. Clean the old cat litter from the collection bin
Pull out the collection bin from the base, lift and tie the bag containing the old cat litter, throw it into the
trash bin, then place a new collection bag on the collection bin and push the collection bin back into
the base.
Auto-Cleaning ButtonWi-Fi Button
18
Silicone Handle
19
3. Add cat litter
-You can use the mobile app to control the sand storage bin to automatically add cat litter to the
litter compartment.
-You can directly add an appropriate amount of cat litter to the litter compartment (be careful not to
exceed the MAX line).
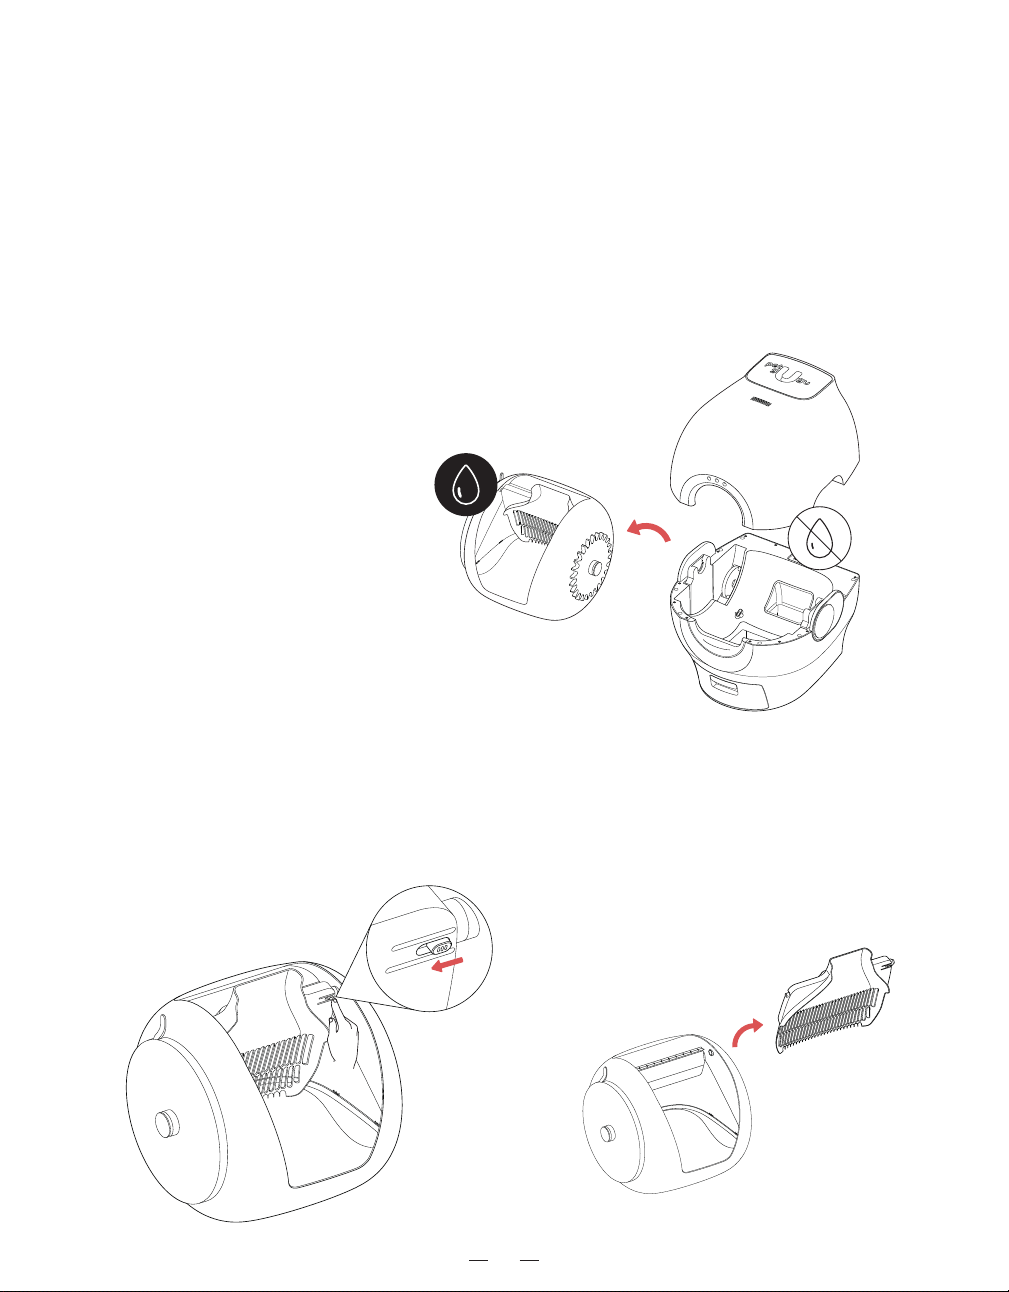
IV. Cleaning Guide
1. Remove the Sand Bin Assembly
Refer to the previous section on emptying the cat litter from the sand bin assembly. After disconnect-
ing the device's power, lift the upper shell assembly and then remove the sand bin assembly.
* Due to electronic components inside the device, neither the upper shell assembly nor the base
assembly can be washed with water. They can only be wiped clean with a damp cloth and a neutral
detergent. The sand bin assembly can be separated for washing.
2. Disassemble the Sand Bin Assembly
①. Push the sieve lock switch forcefully to the left to release the fixation between the sieve and the
sand bin assembly, then remove the sieve.
20
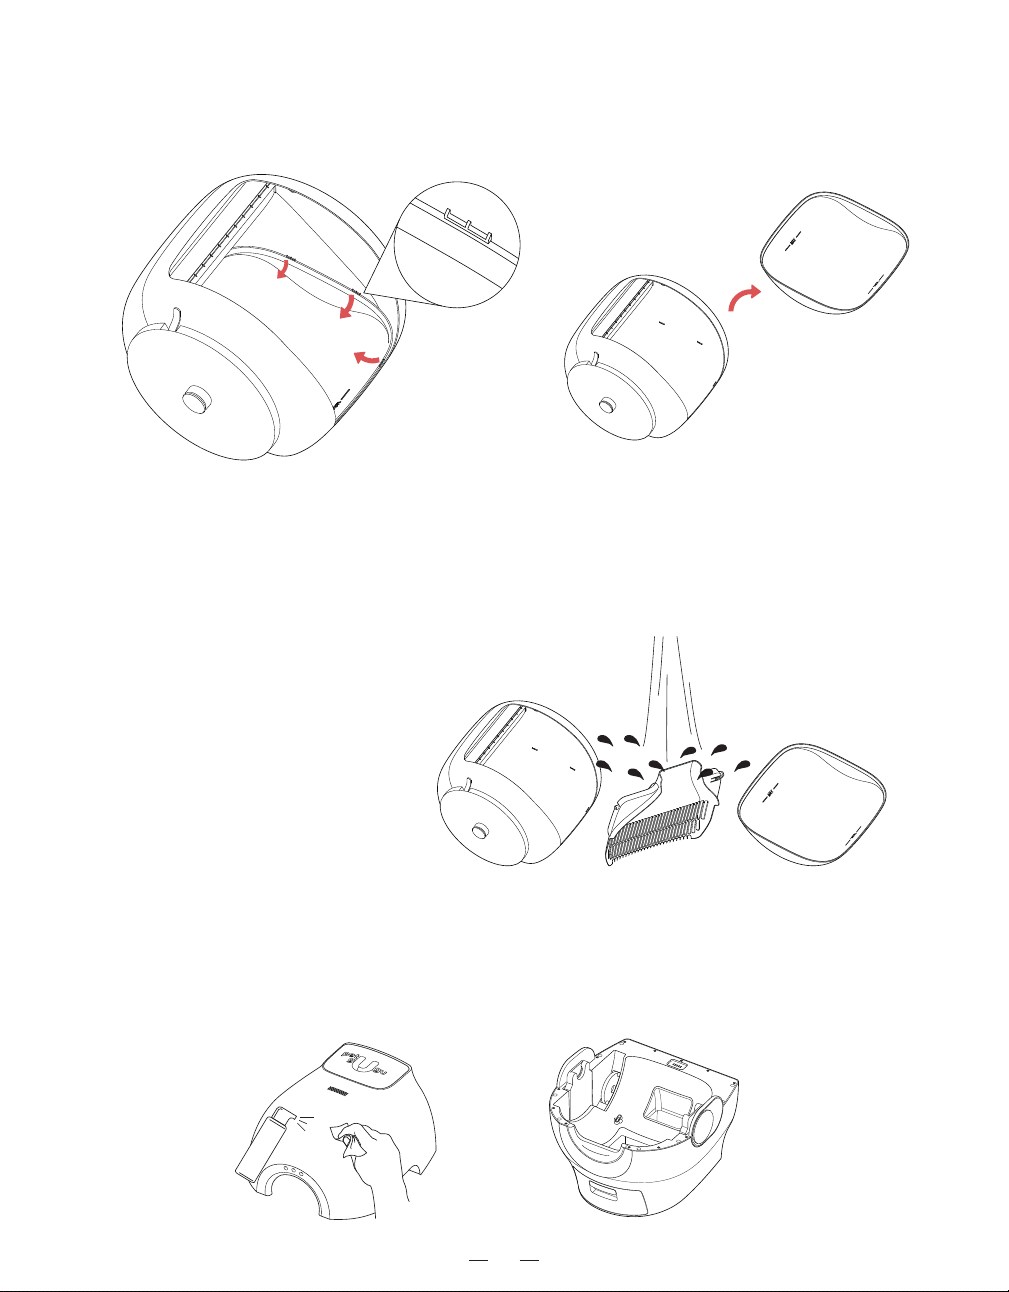
②. Use your hands to push along the edge of the cat litter pad towards the center, releasing the
buckle between the edge of the cat litter pad and the inner part of the sand bin. Then, remove the cat
litter pad.
3. Clean Each Component
Clean the sand bin, sieve, and cat litter pad with water, optionally using a neutral detergent. After
cleaning, each component must be completely air-dried before reassembly.
4. Wipe the Product's Exterior
The upper shell assembly and the base assembly can be wiped with a damp cloth and a neutral
detergent after the product is powered off.
21

5. Reassemble After Cleaning
After cleaning and ensuring that any residual moisture on the product has dried, reassemble the
product in sequence, then reconnect the power to use it again.
Common Issues
1. No response from the device after connecting the power?
①Please confirm the product's power line connection and check if the home power is on and the
socket is functioning properly.
②Check if there are any obstructions at the power connection point between the upper and lower
components.
2. No response from the device buttons?
The device may be in child lock mode. Please simultaneously long-press the flat Cat Litter button and
Wi-Fi button to deactivate the child lock.
3. Vibrations or unusual sounds during device operation?
If the device is placed on an uneven surface or if there are foreign objects at the bottom, please
position the device on a flat, hard surface. Clear any debris around the device and maintain a distance
of at least 5cm from other physical objects (e.g., walls).
4. Unable to drain or slow drainage?
①Check if the drainage pipe is bent, blocked, or frozen.
②Confirm if the highest point of the drainage pipe is 5cm above the ground.
5. The device only performs the burying action without water injection, cleaning, or
drainage?
①Check if the kitten mode is enabled in the mobile app.
②Verify if the faucet is open, if the water inlet pipe is bent, and if there are any blockages or freezing in
the faucet, water inlet pipe, and device water inlet.
6. Faucet leakage?
①Confirm if the faucet's shape is appropriate and if there is any damage.
②Ensure that the water inlet pipe joint is properly installed.
22

Basic Parameters
23
7. Unable to connect to the app?
①Confirm that the device is within Wi-Fi signal range and that the entered Wi-Fi username and
password are correct.
②Make sure that the network Wi-Fi being used is a 2.4G frequency network.
* If encountering unresolved or unsolved issues, please contact customer service for consultation. Do not
attempt to disassemble or repair the machine independently to avoid safety incidents.
Product Model
Rated Voltage
Rated Power
Net Weight
Sand Hopper Space
Sand Hopper Capacity
Product Dimensions
Operating Temperature
Operating Humidity
Power Cord Length
Sterilization Method
FCC ID
PW5
DC12V
120W
Approximately 27kg
80L
8.5L
63×62×75cm
5℃ ~ 50℃
10%-90%RH
1.2m
UV Ultraviolet Sterilization
×××××××

User Name
User Contact Number
User Mailing Address and Postal Code
Purchase Date
Purchase Information
Maintenance Center Name
Maintenance Center Phone Number
Date of Sending for Repair
Cause of Malfunction
Description of Malfunction during Repair
Refund Proof
Signature of Maintenance Personnel
Seal of Maintenance Center
Maintenance Records
* Out-of-Warranty Scenarios
1.
2.
3.
4.
1.
2.
Damage caused by improper use, maintenance, or storage by the consumer.
Damage resulting from self-disassembly or disassembly by unauthorized personnel.
Damage caused by force majeure such as natural disasters.
Product malfunctions or damage due to accidents or human factors (unauthorized modifications,
liquid ingress, scratches, collisions, compression, etc.).
* Service Policy Notes
If a purchased product exhibits quality issues upon unboxing, please contact the seller.
We provide lifetime maintenance services, and products beyond the warranty period require payment
of corresponding fees.
After-sales Service
24
3.
4.
For products with quality issues, the manufacturer covers the shipping costs; for non-quality issues,
the buyer is responsible for the shipping costs.
When returning for replacement or repair, please send the receipt and the machine together. If there
are gifts or invoices, please include them in the return shipment.
Website: www.petgugu.com
Email: [email protected]
Service and Support
25
Certificate OF Qualification
Inspected And Approved

Scannen Sie den QR-Code, um das Online-Handbuch auf Deutsch zu erhalten.
Scannez le QR code pour obtenir le manuel en ligne en français.
Scansiona il codice QR per ottenere il manuale online in italiano.
Escanee el código QR para obtener el manual en línea en español.
コードをスキャンして、日本語のオンライン マニュアルを取得します。