DO NOT THROW AWAY!
SERIAL NUMBER FOR FAN IS LOCATED ON THE BACK COVER OF THE OWNER’S GUIDE.
LEAVE WITH HOMEOWNER
OWNER’S GUIDE
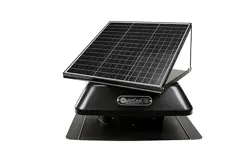
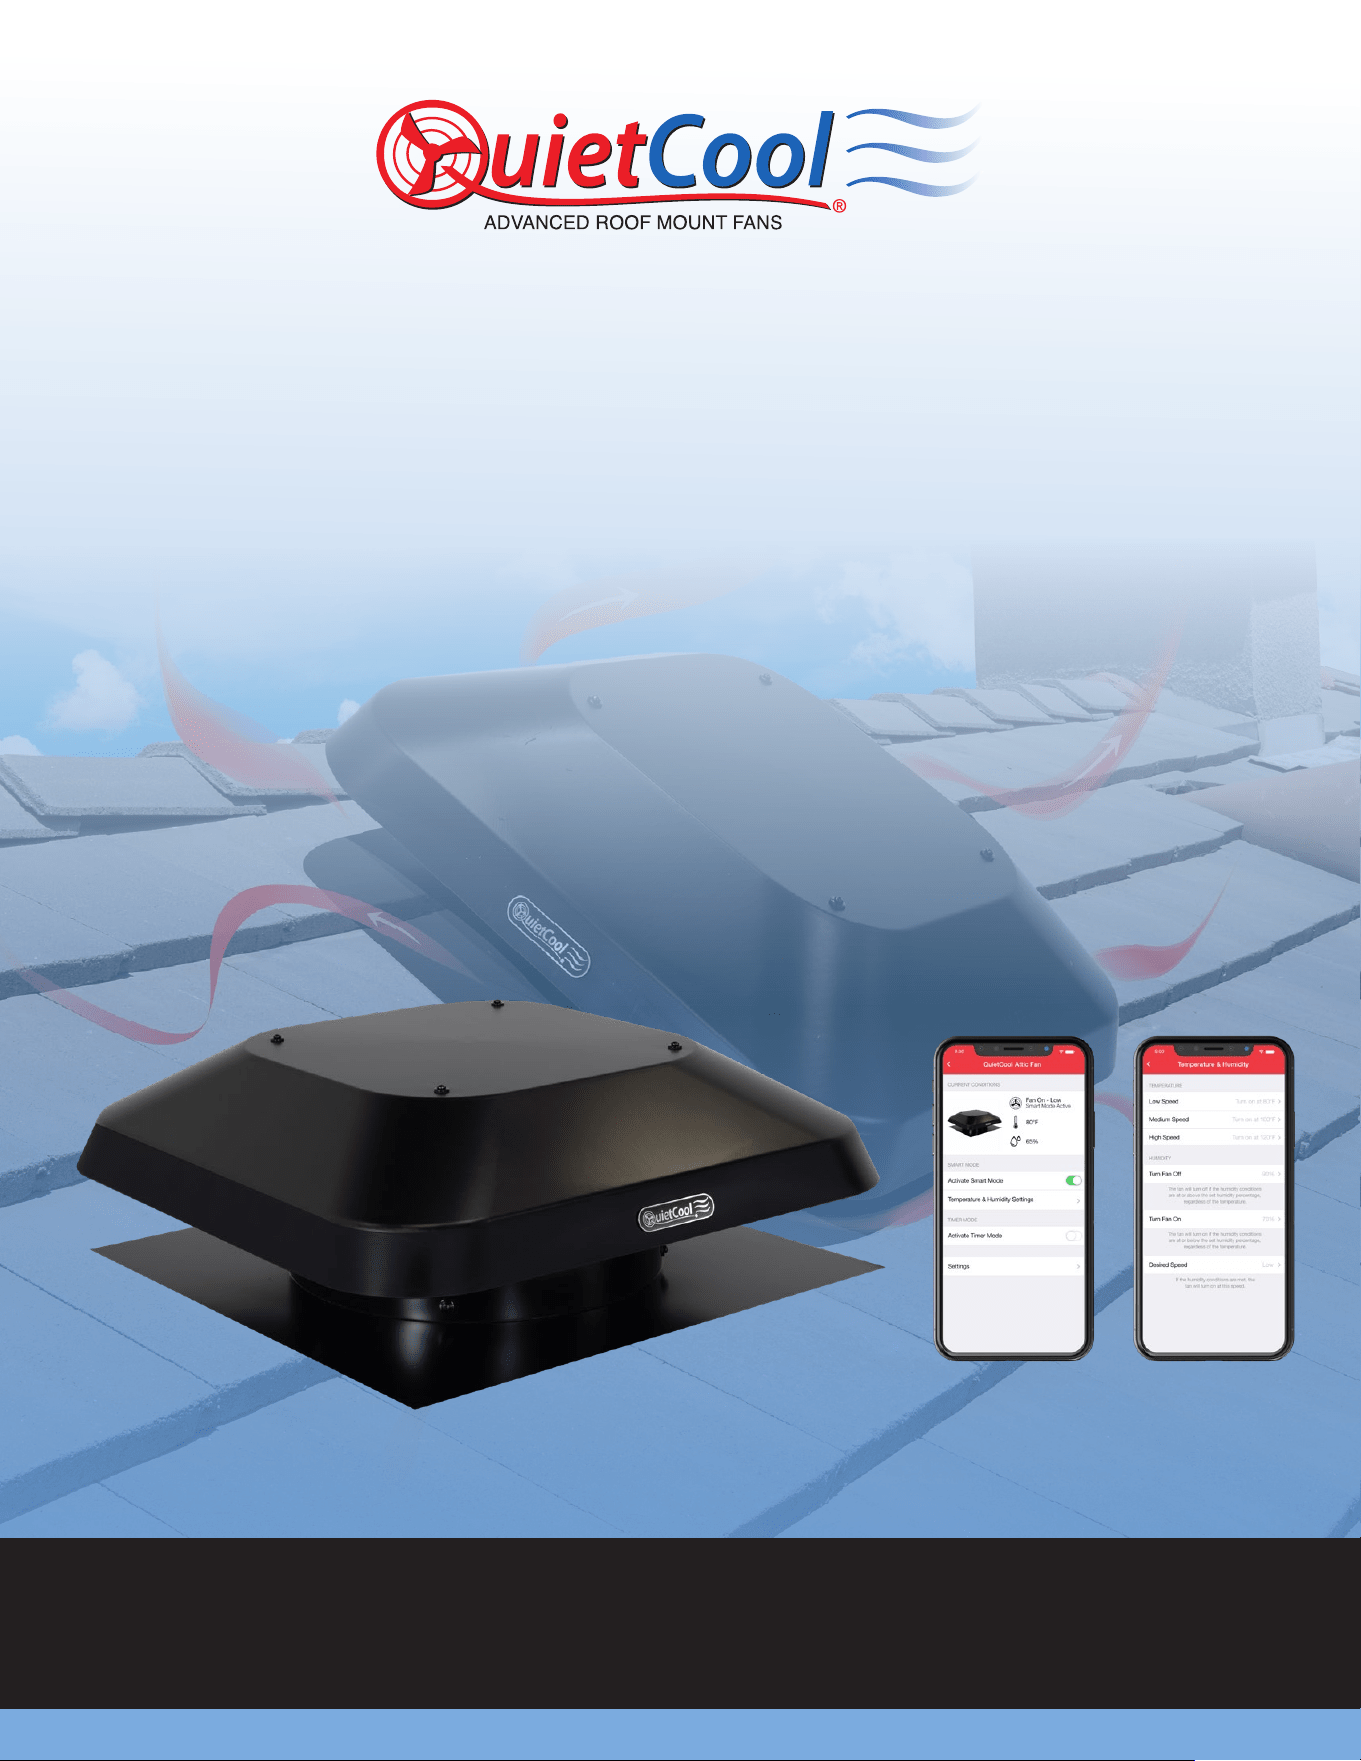
SMART ATTIC ROOF MOUNT FAN
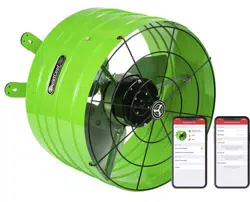
AFR SMT PRO-1.3
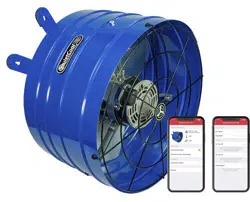
AFR SMT PRO-2.0
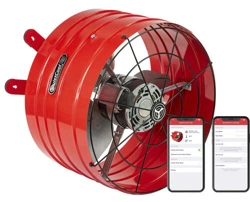
AFR SMT ES-2.0
!
1-888-QUIETCOOL 2
CONTENTS
1. SYSTEM OVERVIEW .......................................3
1.1 Introduction .........................................3
1.2 Features ............................................3
1.3 System Venting Requirements ...........................4
GETTING STARTED - IMPORTANT - READ BEFORE INSTALL! ......5
2. INSTALLATION ...........................................6
2.1 Installing AFR Model Fans - Shingle Roofs .................6
2.2 Installing AFR Model Fans - Tile/Cement Roofs .............8
3. WIRING ................................................10
3.1 Two Speed Wiring - AFR SMT PRO-1.3 & 2.0 ..............10
3.2 Three Speed Wiring - AFR SMT ES-2.0 ...................11
3.3 Smart Control Hub - LED Indicators .....................12
4. SYSTEM OPERATING INSTRUCTIONS .......................13
4.1 Download Smart Control App ..........................13
4.2 Operating the Smart Control App .......................13
4.3 Frequently Asked Questions ...........................21
4.4 Safety .............................................21
WARRANTY ...............................................22
QC MANUFACTURING, INC.
26040 YNEZ ROAD
TEMECULA, CA 92591
PHONE 1-888-QUIETCOOL
WEBSITE WWW.QUIETCOOLSYSTEMS.COM
WARNINGS
CAUTION: This unit has an unguarded impeller. Do not use in locations readily
accessible to people or animals.
CAUTION: Do not operate any fan with a damaged cord or plug. Discard fan
or return to an authorized service facility for examination and/or repair.
CAUTION: Do not run cord under carpeting. Do not cover cord with throw
rugs, runners, or similar coverings. Do not route cord under furniture or
appliances. Arrange cord away from trafc area and where it will not be
tripped over.
CAUTION: Automatically started device. To reduce the risk of injury,
disconnect from power supply before servicing. Do not use fan with any solid
state speed control device. For residential use only.
!!
!!
!!
!!
QUIETCOOLSYSTEMS.COM 3
1. SYSTEM OVERVIEW
1.1 INTRODUCTION
CONGRATULATIONS
on the purchase of your new QuietCool Smart Attic Fan!
QuietCool Attic Fans are the best in the business. New for 2023, our
Smart Line of roof mount attic fans have been completely
re-designed! With a new hood design, integrated wildlife guard, and
new ashing options, the AFR line is better than ever!
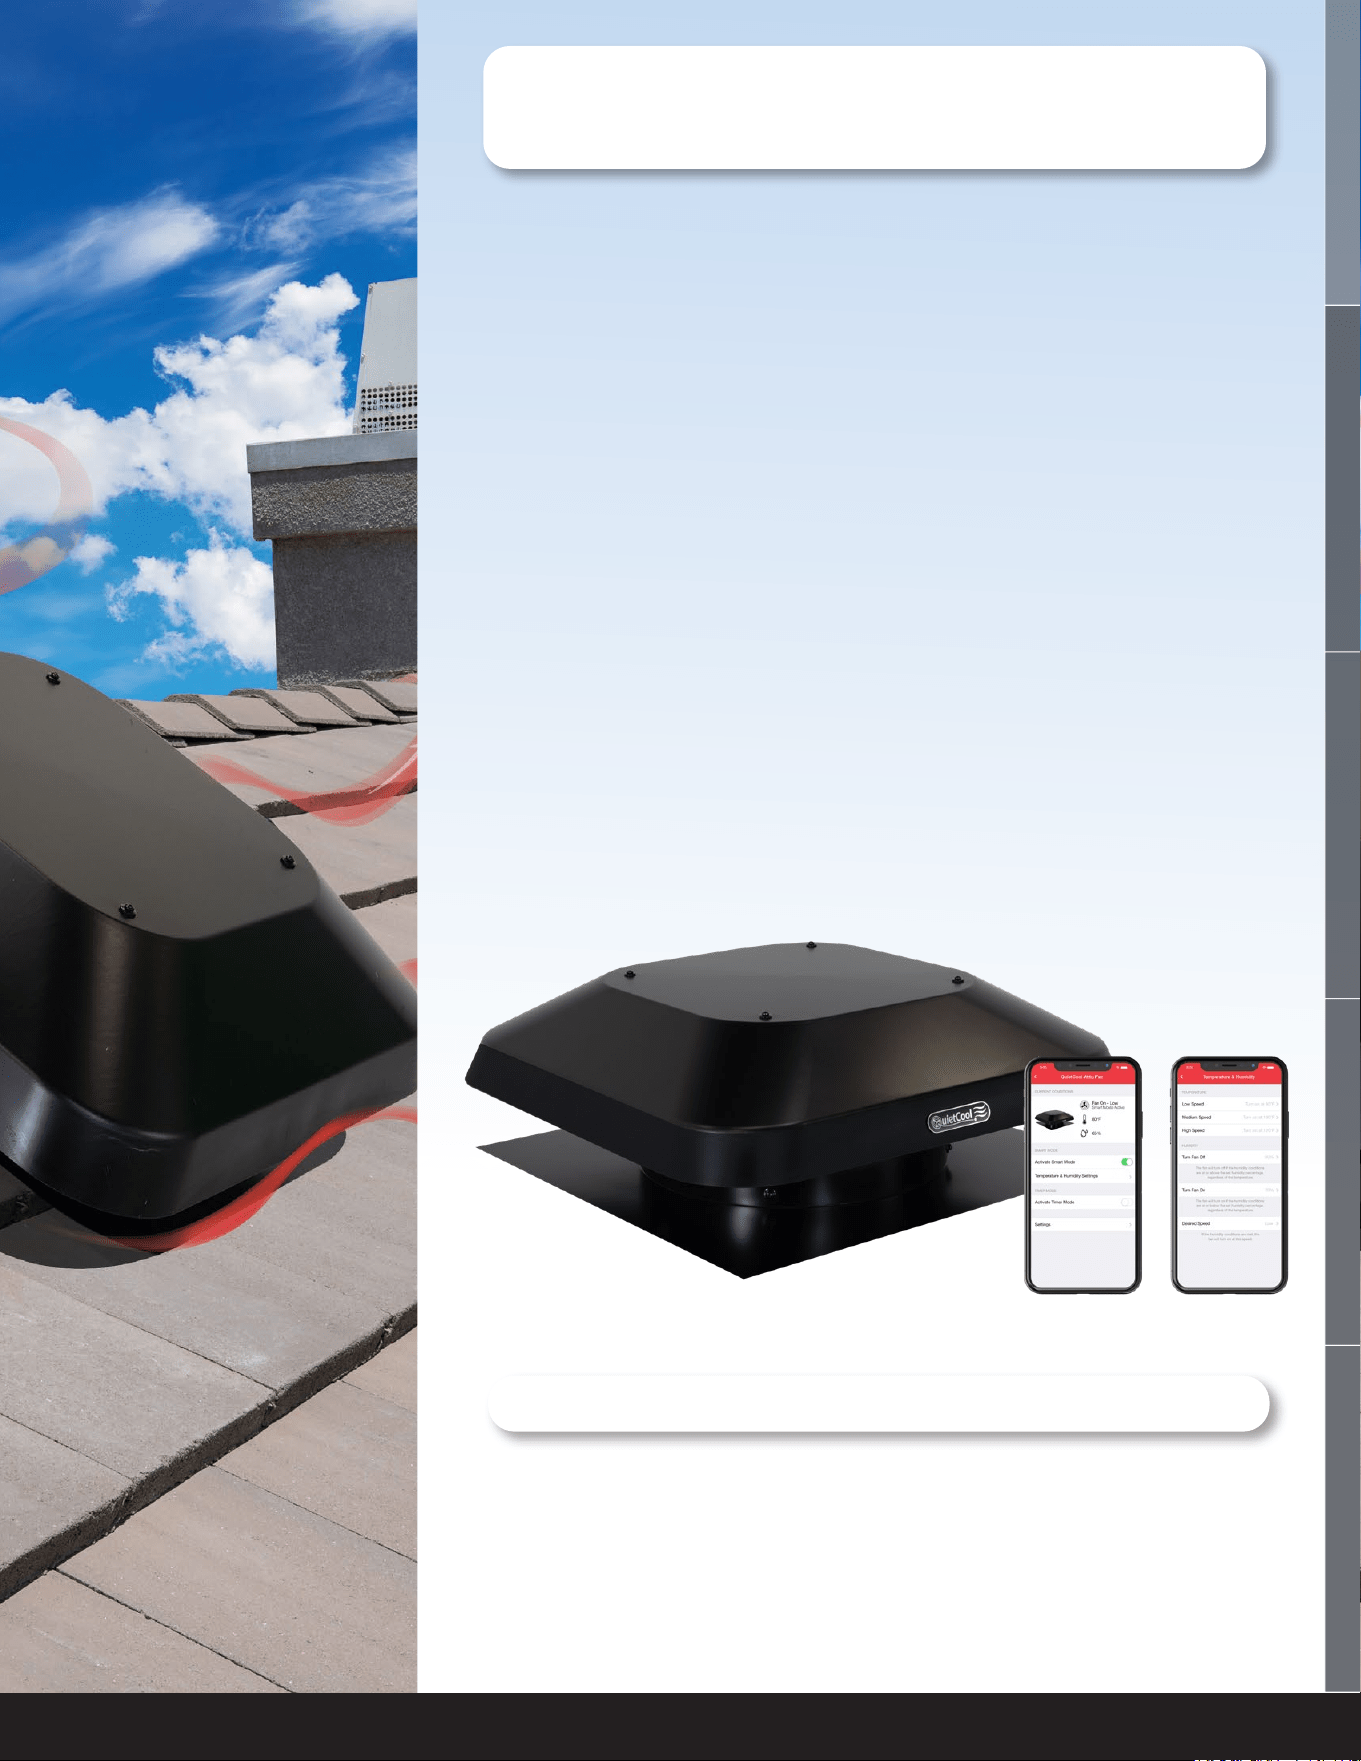
With the QuietCool Smart Control App, you can see your current
attic temperature and humidity, modify the temperatures for the
multiple speeds of the fan, setup presets for the different seasons of
the year, and even operate your fan on a timer!
QuietCool Attic Fans work almost everywhere, anytime. During the
summer, an attic can be 40-50 degrees hotter than the outside tem-
perature, which in turn heats up the house much faster. With an attic
fan, you can cool the attic to the same temperature as it is outside,
greatly reducing the house from heating as quickly.
1.2 FEATURES
+ High Efciency Multi-Speed Motors
+ High-quality Hybrid Black Polyester Paint Coating
+ App Based Smart Control
+ Designed and Built in California
+ 15 Year Warranty
WELCOME
INSTALLATION
WIRING OPERATION
WARRANTY
1-888-QUIETCOOL 4
1.3 SYSTEM VENTING REQUIREMENTS
VERY IMPORTANT: 1 SQUARE FOOT OF NET FREE VENT AREA PER 750 CFM
RECOMMENDED: 2 TO 4 SQUARE FEET OF INLET VENTS PER FAN
Venting plays a very signicant role in the performance of QuietCool fans. QuietCool recommends a mini-
mum of 1 SQ. FT. of venting for every 750 CFM in the QuietCool system. If an attic has at least 1:750 attic
venting, the QuietCool system will operate efciently and effectively. If an attic has less than 1:750 attic
venting, the system may not operate as efciently, or effectively, as it could with 1:750 attic venting. But
don’t worry, the system will still operate if there is not enough venting.
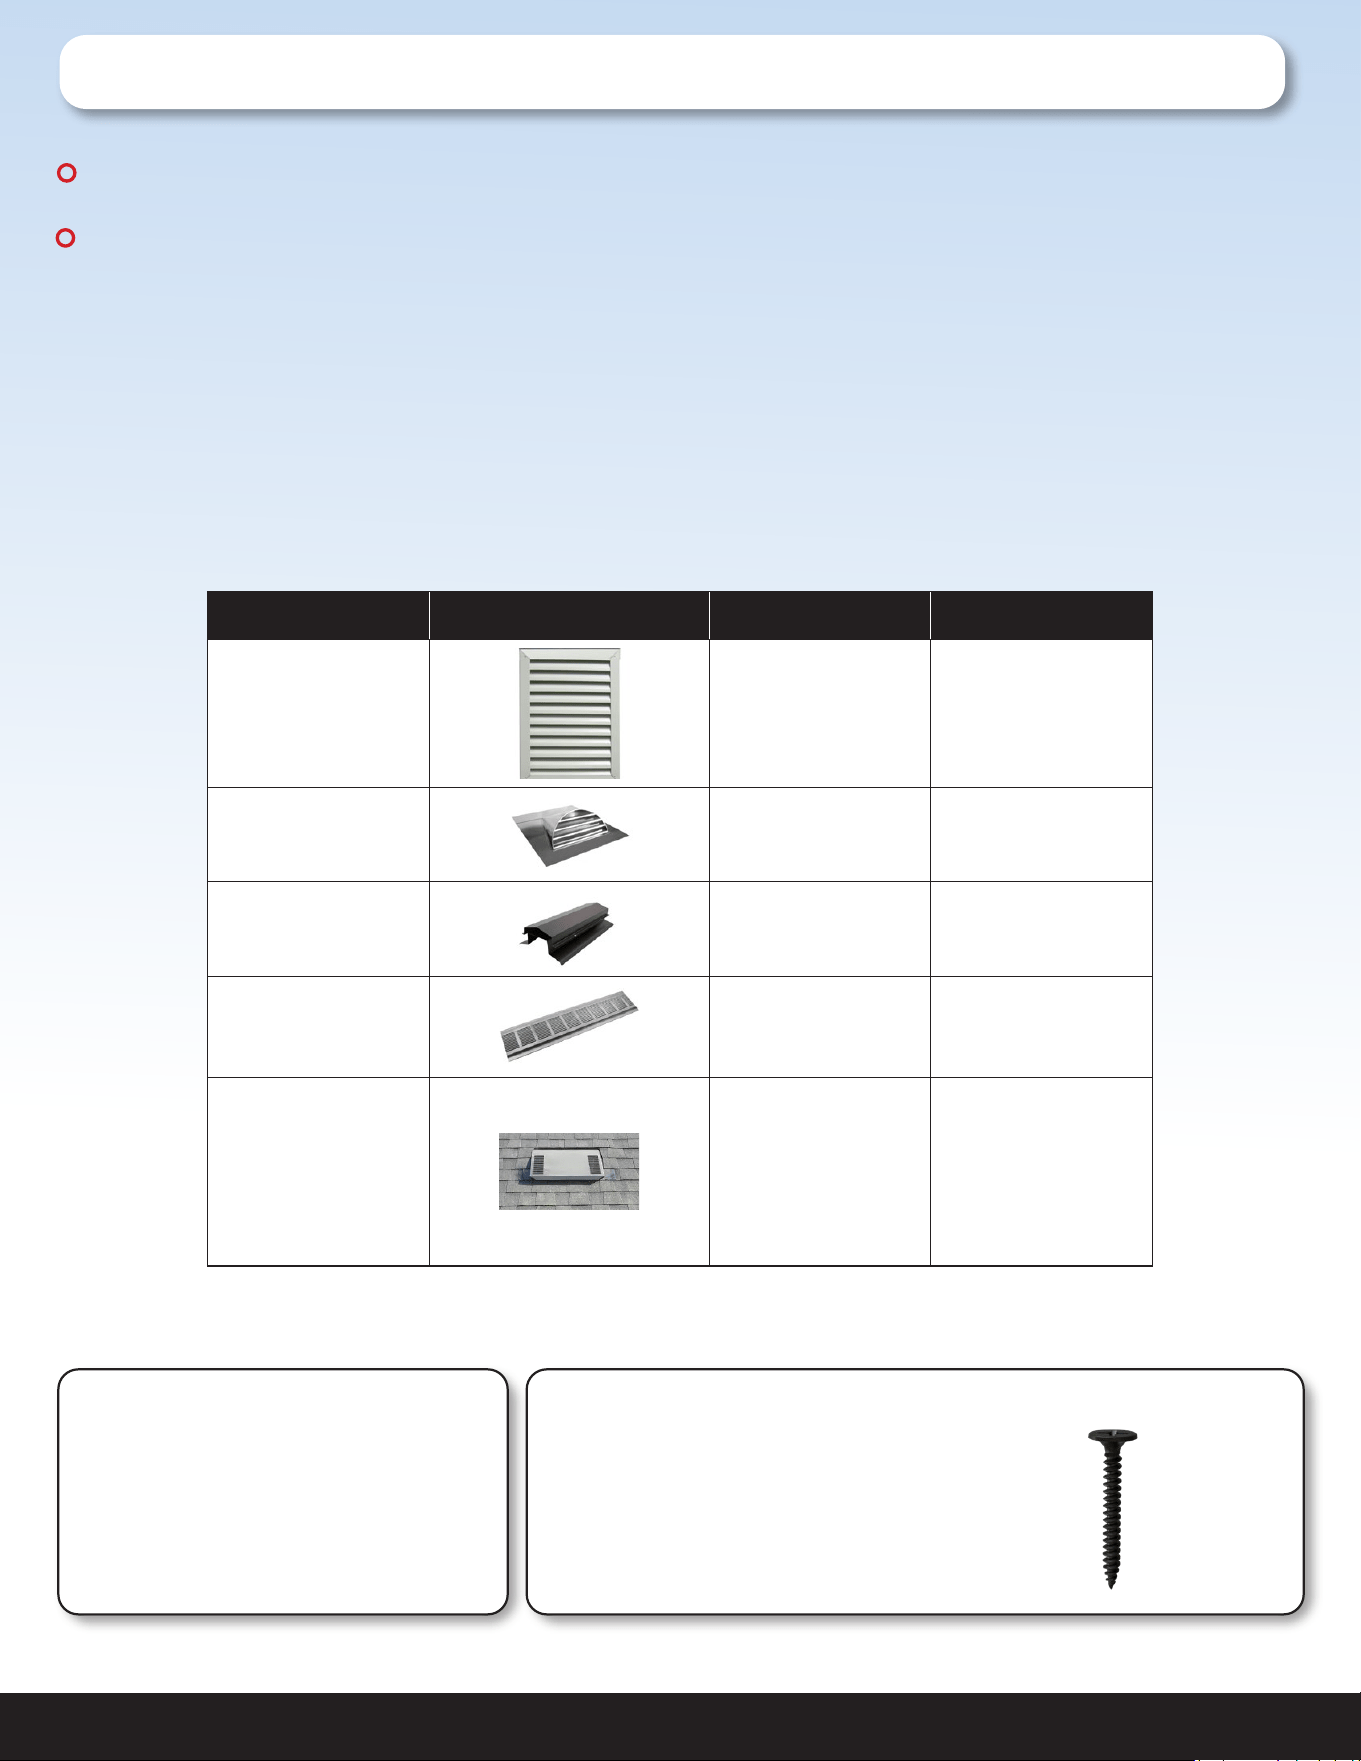
Insufcient venting is a very simple problem to x. Roong contractors can add extra venting to most
homes simply and easily. The most common types of venting is shown in the chart below.
Vent Type Model Type Average Size Venting Sq. Ft.
Gable vent 12” x 19.5” 1.20
Dormer Vent 14” x 8” 0.70
Ridge Vent 4’ - 12’ 0.125 per ft
Soft Vent
16” x 4”
16” x 6”
16” x 8”
0.19
0.29
0.39
O’Hagin Vent
Low/Medium
Prole
Tapered Low
Prole
Low Prole Flat
High Prole
0.5
0.6
0.68
0.68
*Note: This table is only a guideline and is not a guarantee of venting capacity.
!!
!!
INCLUDED IN THE BOX
- QuietCool Smart Roof Mount Attic Fan
- Hardware Kit
- Cut-out Template
HARDWARE KIT CONTENTS
A. (5) All-Purpose Screws
4 for Hub, 1 extra
A.
QUIETCOOLSYSTEMS.COM 5
WELCOME
INSTALLATION
WIRING OPERATION
WARRANTY
READ BEFORE ATTEMPTING TO INSTALL AN AFR FAN
GETTING STARTED
NOTE: Always follow local building codes because the fan may require specic fasteners or
anchoring systems not discussed in this installation guide. Installation should be done by a
licensed roong contractor.
IMPORTANT: Do not cut through any rafters or structural members while cutting the fan hole. Only
cut out the roof decking.
GENERAL SAFETY INFORMATION
1. READ INSTRUCTIONS - All safety and operation instructions must be read.
2. RETAIN INSTRUCTIONS - The safety and operating instructions should be kept for future reference.
3. HEED WARNINGS - All warnings should be followed.
4. FOLLOW INSTRUCTIONS - All installation and operating instructions should be followed.
5. WATER - The QuietCool system should not be used near water.
6. HEAT - The QuietCool system should be situated away from heat sources.
7. DAMAGE REQUIRING SERVICE - Only qualied service personnel should service the QuietCool system.
The user should not attempt to service the product.
8. SAFETY PRECAUTIONS -
+ Do not install the fan in wet or windy conditions
+ Tie-off both yourself and your equipment when working on steep pitched roofs to avoid falls
+ Wear safety glasses and protective gloves when using power tools
+ Always wear slip-resistant shoes when working on the roof
+ Do not cut through any rafters or structural members of the roof during installation
TOOLS/MATERIALS YOU WILL NEED
+ Cordless Drill with Nut Driver
+ Roong Nails
+ Reciprocating Saw
+ Measuring Tape
+ Weatherproof Roong Grade Sealant
CHOOSING THE RIGHT LOCATION
Choose a location to install your QuietCool roof mounted fan that allows for balanced airow throughout the attic
space. We always recommend the fan to be installed centrally located on the roof three feet below the ridge line.
This will allow you to access the fan very easily. Your roof mount fan should not be installed any closer than within 5
feet to an existing passive vent, ridge vent, or additional fan unit.
!!
!!
+ Roong Knife
+ Ladder Marker or Carpenter Pencil
+ Optional secondary ashing for tile/cement roofs
+ Optional curb ashing for at roofs
ROOF PITCH REQUIREMENTS (MAX ROOF PITCH 8:12)
AFRs installed with the primary or optional secondary ashing: roofs with 3:12 to 8:12 roof pitch
AFRs installed with the optional curb ashing: roofs with less than 3:12 roof pitch
OPTIONAL ACCESSORIES
+ Secondary Flashing for tile or cement roofs (part number FLA-SEC-3743)
+ Curb Flashing for at roofs (part number FLA-CRB-2222)
IMPORTANT: Installing the AFR without the use of a QuietCool ashing, using an improper ashing
based on the guidelines above, or installing the AFR on roofs with a pitch greater than 8:12 will void
the warranty of the unit and may compromise the integrity of your roof. Only install the AFR using
QuietCool ashings appropriate to the roof in which you are installing the AFR on.
!!
1-888-QUIETCOOL 6
Installation Video:
Watch the video by scanning the QR
code or visit
www.QuietCoolSystems.com/support
2. INSTALLATION
2.1 INSTALLING AFR
(Shingle Roofs from 3:12 to 8:12)
NOTE: This installation utilizes the included Primary Flashing of
the AFR. For installing the AFR on a tile or cement roof, please
skip to page 8.
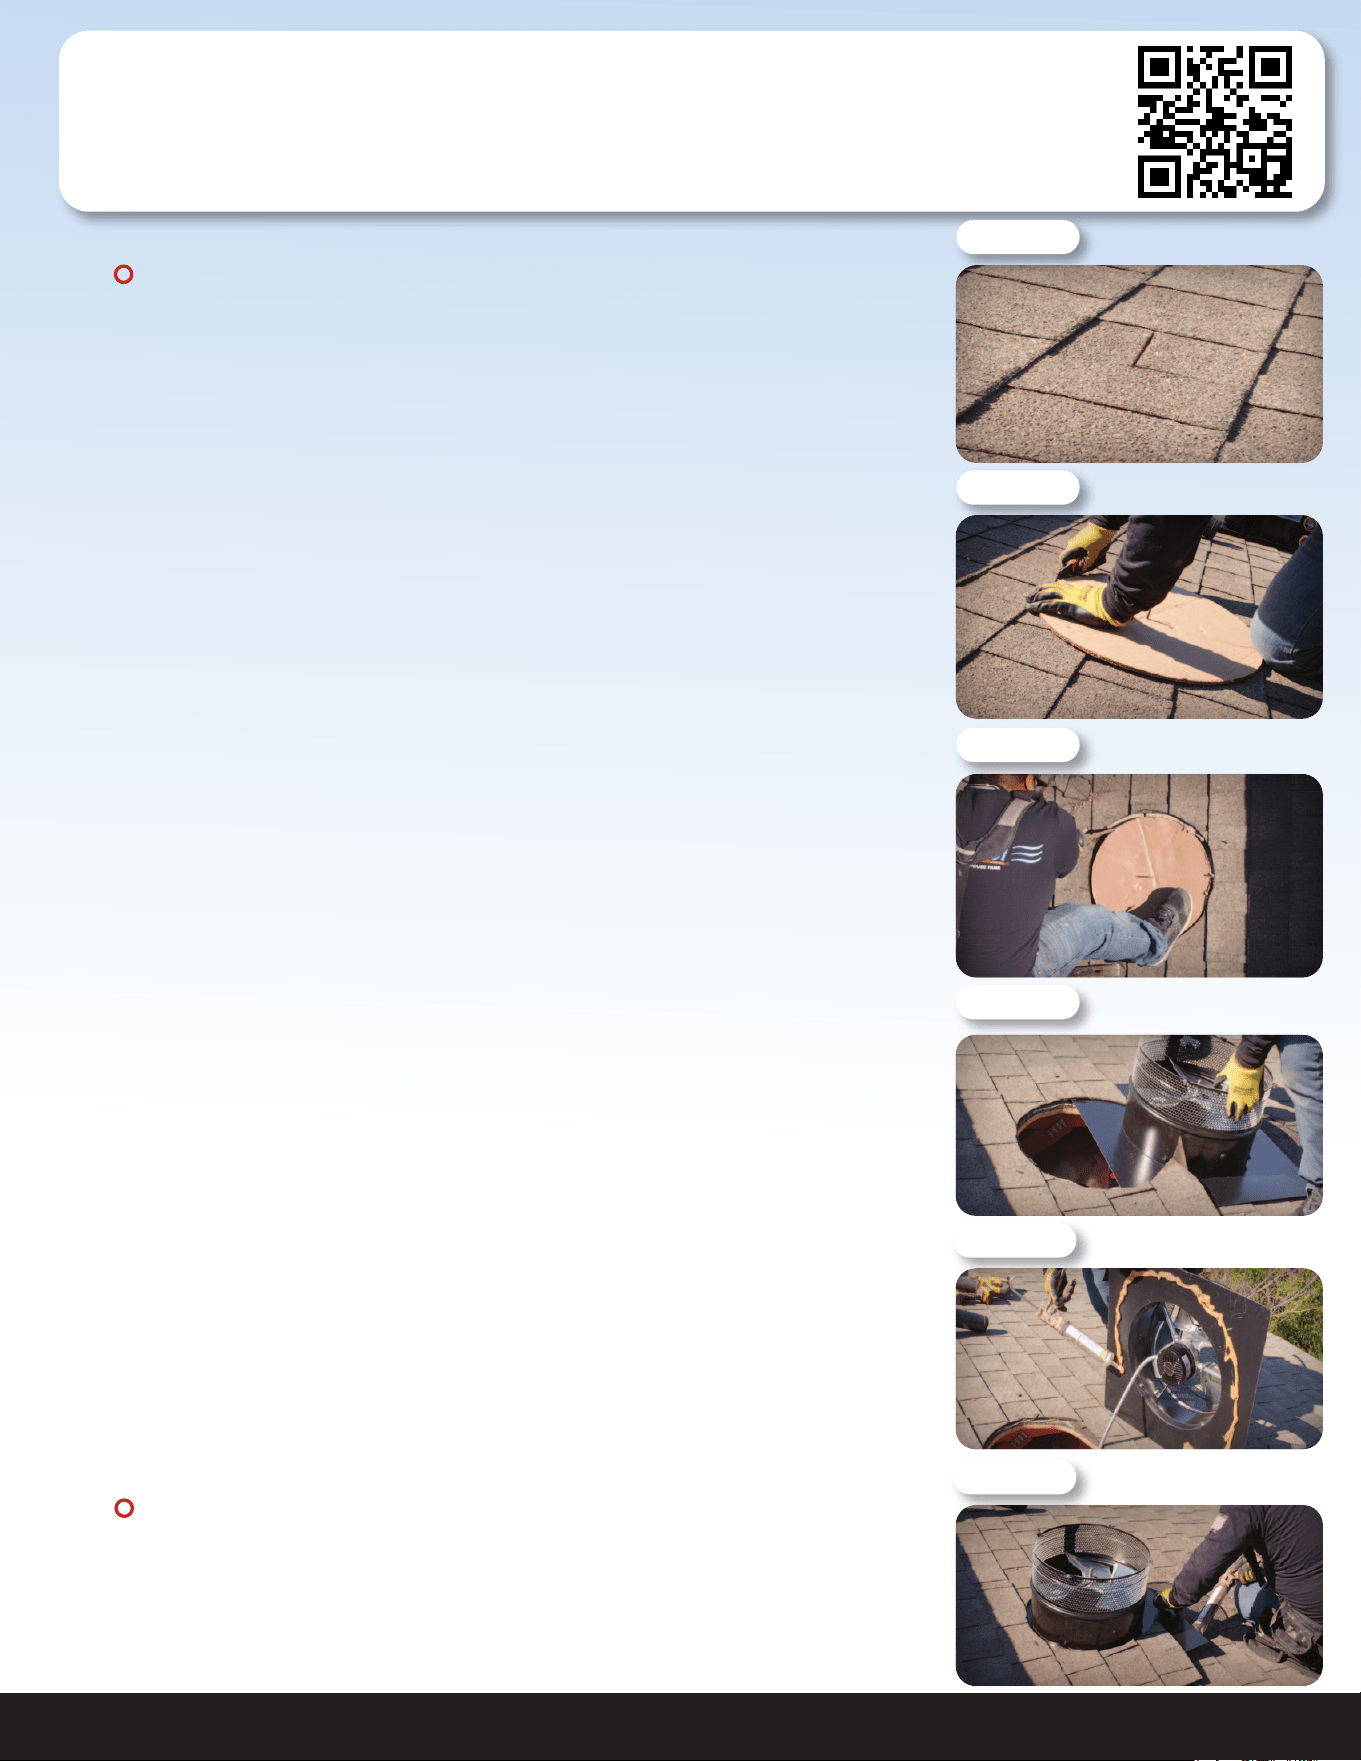
1. Determine in which area you would like to install your QuietCool
AFR.
2. From inside the attic, nd the center point between the two roof
rafters and mark it as the center of the fan hole. Partially insert a
screw into the center point mark. (see Figure 2.1A)
3. Go to the roof. Using the screw as a reference point and the
provided template, trace out the 17 1/4” diameter circle. (see
Figure 2.1B)
4. Use a reciprocating saw to cut out the traced hole pattern from the
roof decking. Remove the cut out decking material from around
the hole as needed. (see Figure 2.1C)
5. Insert the reciprocating saw sideways between the shingles and
roof decking. Starting at the 3 o’clock position of the vent hole,
begin cutting in a sweeping motion under the shingles, cutting
through any roong nails or staples. Continue cutting counter-
clockwise around the vent hole until reaching the 9 o’clock
position.
6. Using a roong knife, cut a 4 inch horizontal slit in the shingles at
the 9 o’clock and 3 o’clock positions of the hole, allowing the fan’s
ashing to slide underneath the shingles. (see Figure 2.1D)
7. Remove the fan hood for easier installation. This will help you line
up the fan to the hole in the roof.
8. Lifting the fan unit up at an angle, apply weatherproof sealant to
the bottom side of the fan unit. This will help keep the fan in place
and create a watertight seal. (See Figure 2.3E)
NOTE: Be sure to use a generous amount of weatherproof
sealant to create a watertight seal.
9. Slide the fan unit underneath the shingles until the fan reaches the
top of the hole and apply more sealant. (See Figure 2.1F)
Figure 2.1A
Figure 2.1B
Figure 2.1C
Figure 2.1D
!!
!!
Figure 2.1E
Figure 2.1F
QUIETCOOLSYSTEMS.COM 7
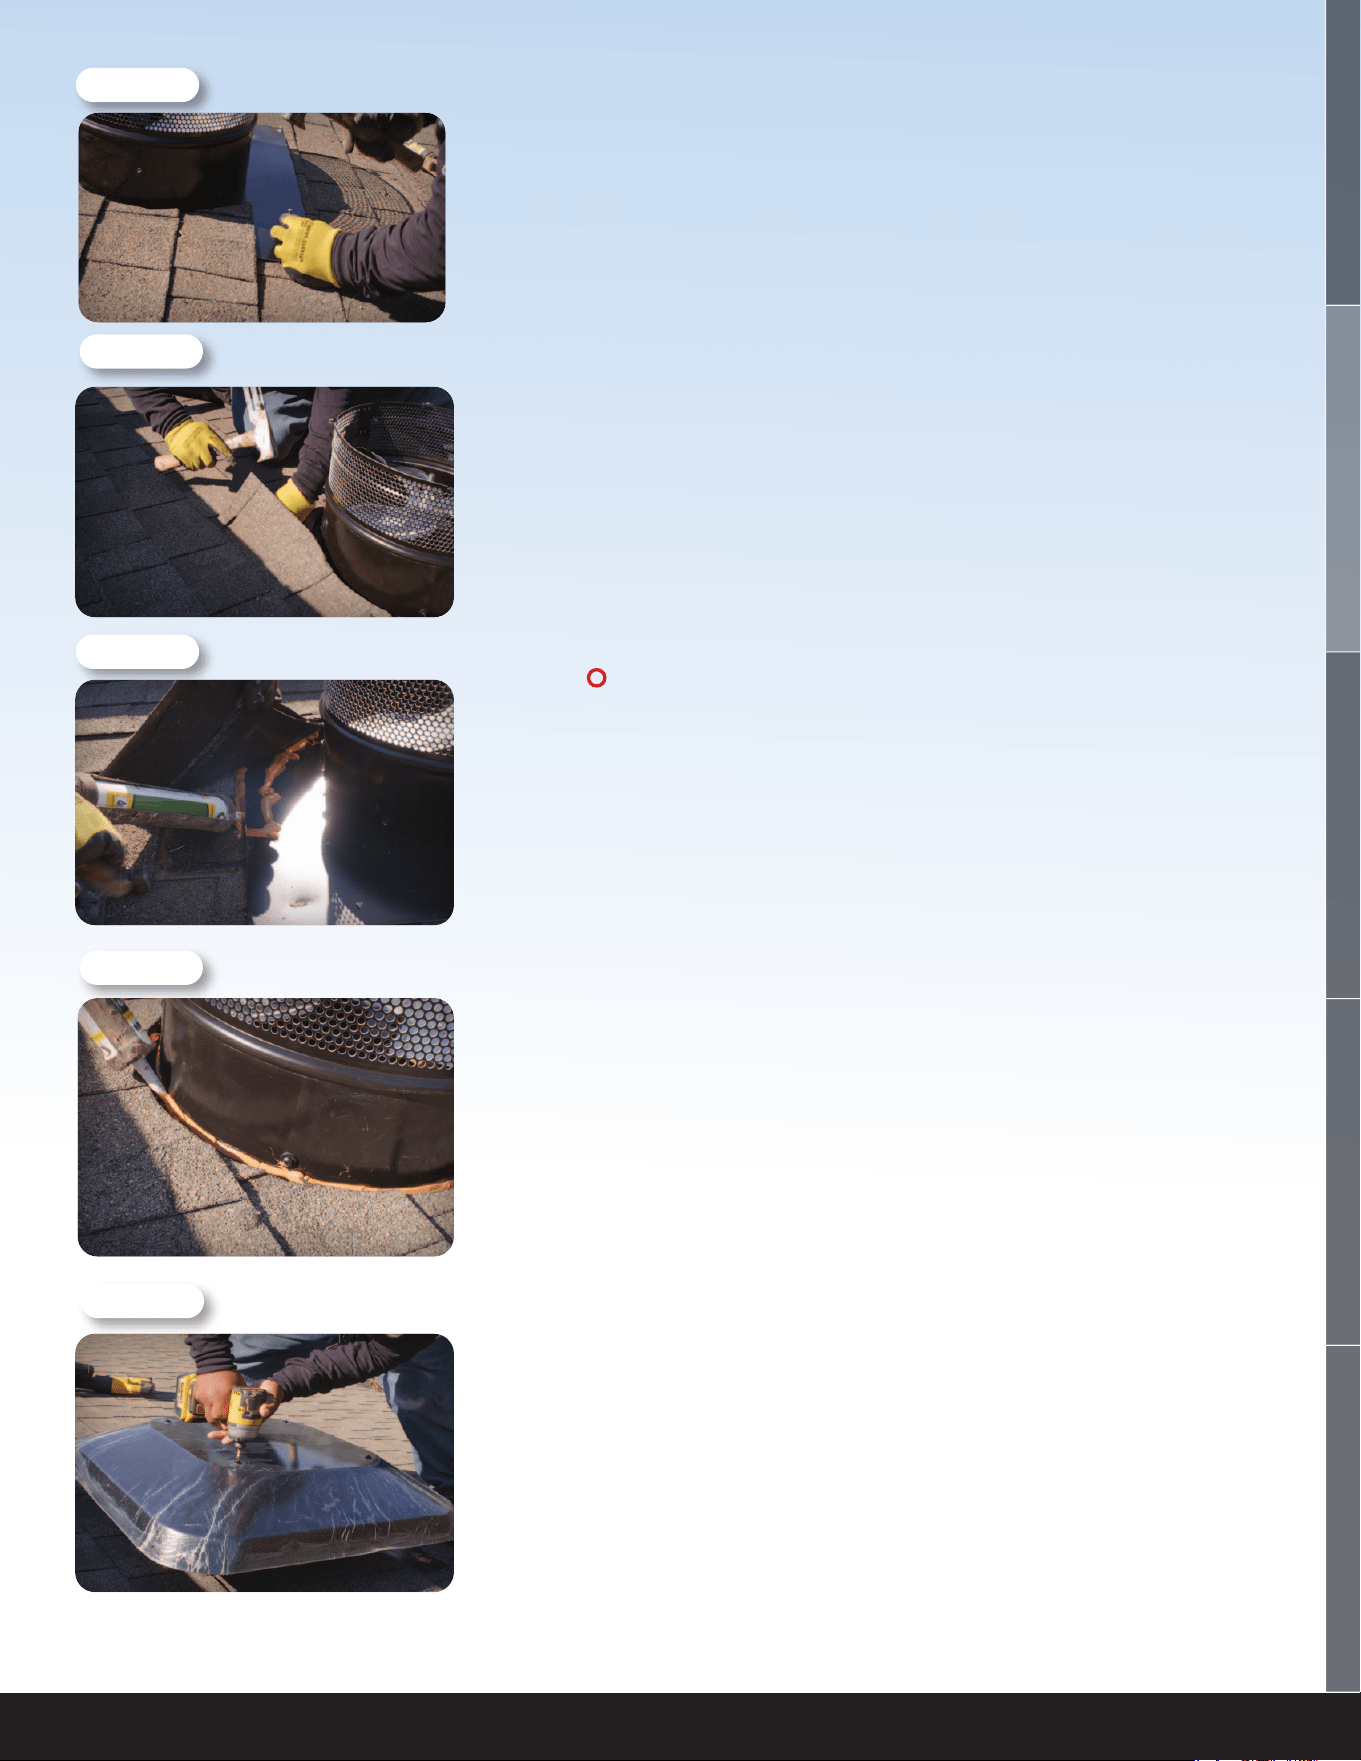
Figure 2.1G
Figure 2.1H
10. Using a minimum of 8 roong nails, nail the fan to
the roof through the primary ashing, securing the
fan to the roof. To prevent leaking, be sure to apply
weatherproof sealant on the nail heads. (see Figure
2.1G)
11. Secure the shingles by re-nailing them into the roof
and applying weatherproof sealant. (See Figure 2.1H
& I)
12. Apply weatherproof sealant to the seam between the
AFR fan housing and primary ashing. This seam must
be sealed to create a weatherproof barrier between
the fan and the ashing. (see Figure 2.1J)
NOTE: This seam exists to allow the use of
interchangeable ashings. If this seam is not sealed,
water may leak in between the fan housing and
the ashing. Be sure to use a generous amount of
weatherproof sealant to create a watertight seal.
13. Re-install the hood onto the fan unit and remove
protective lm. (see Figure 2.1K)
Figure 2.1I
Figure 2.1K
Figure 2.1J
WELCOME
INSTALLATION
WIRING OPERATION
WARRANTY
!!
1-888-QUIETCOOL 8
2.2 INSTALLING AFR
(Tile or Cement Roofs from 3:12 to 8:12)
NOTE: This installation requires the purchase of the QuietCool
Secondary Flashing accessory (part number FLA-SEC-3743)
NOTE: When applying weatherproof sealant, be sure to use a
generous amount to create a watertight seal.
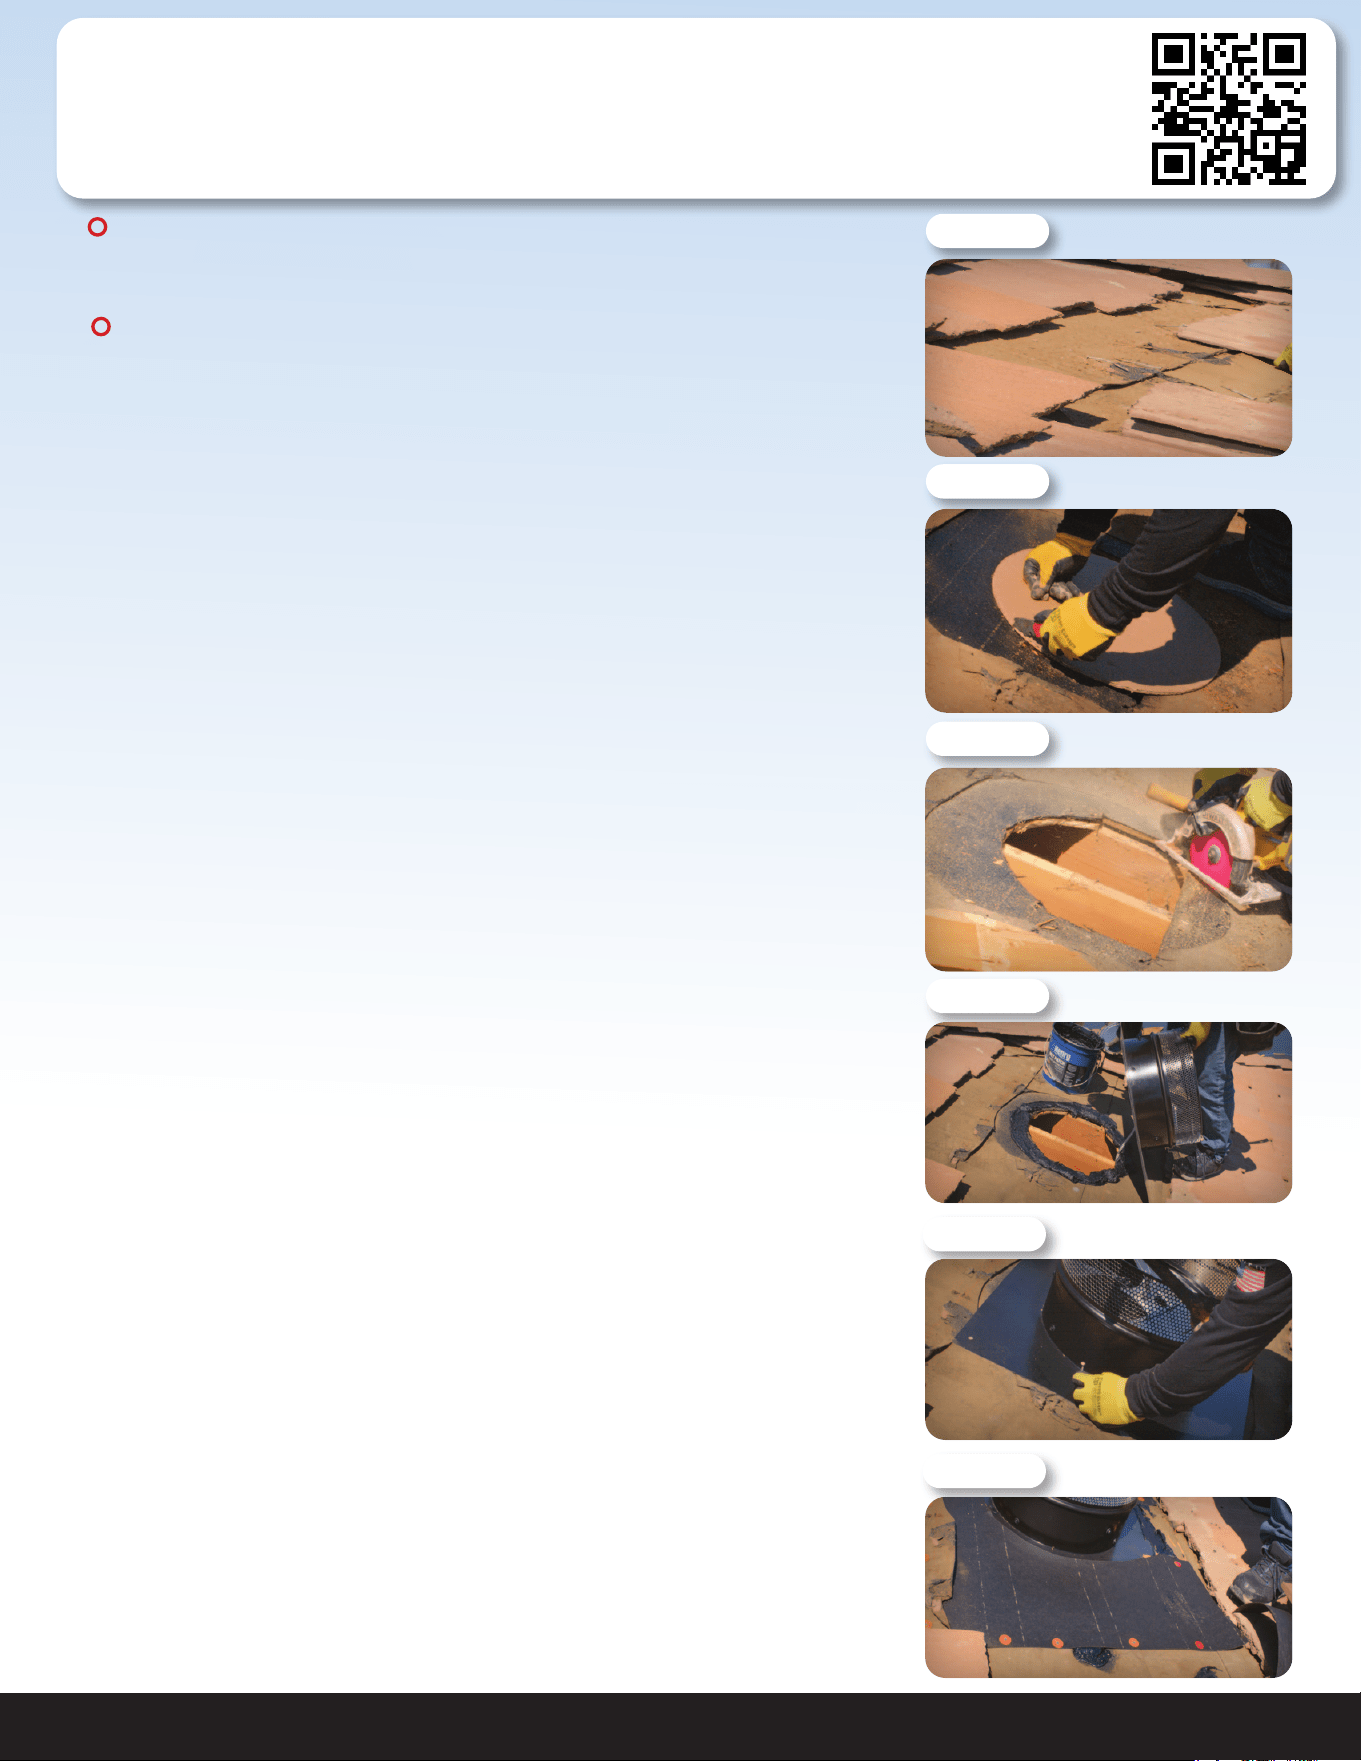
1. Determine in which area you would like to install your QuietCool
AFR.
2. From inside the attic, nd the center point between the two roof
rafters and mark it as the center of the fan hole. Partially insert a
screw into the center point mark.
3. Go to the roof and nd the area in which you marked your fan hole
with the screw. Move the tiles out of the way to expose a large area
around where you will cut the fan hole. (see Figure 2.2A)
4. Using the screw as a reference point and the provided template,
trace out the 17 1/4” diameter circle. (see Figure 2.2B)
5. Use a saw to cut out the traced hole pattern from the roof decking.
Remove the cut out decking material from around the hole as
needed. (see Figure 2.2C)
6. Apply weatherproof barrier to the roof.
7. Remove the fan hood for easier installation. This will help you line up
the fan to the hole in the roof and shape your tile.
8. Position the fan so that it is centered with the vent hole.
9. Lifting the fan unit up at an angle, apply weatherproof sealant to the
bottom side of the fan unit. This will help keep the fan in place and
create a watertight seal. (see Figure 2.2D)
10. Using a minimum of 8 roong nails, nail the fan to the roof through
the primary ashing, securing the fan to the roof. To prevent leaking,
be sure to apply weatherproof sealant on the nail heads. (see Figure
2.2E)
11. Once complete, apply more weatherproof barrier around the fan unit
on top and bottom. Be sure to apply a generous amount of weather
proof sealant underneath the weatherproof barrier and install with
roong nails. (see Figure 2.2F)
!!
Installation Video:
Watch the video by scanning the QR
code or visit
www.QuietCoolSystems.com/support
!!
Figure 2.2A
Figure 2.2B
Figure 2.2C
Figure 2.2D
Figure 2.2E
Figure 2.2F
QUIETCOOLSYSTEMS.COM 9
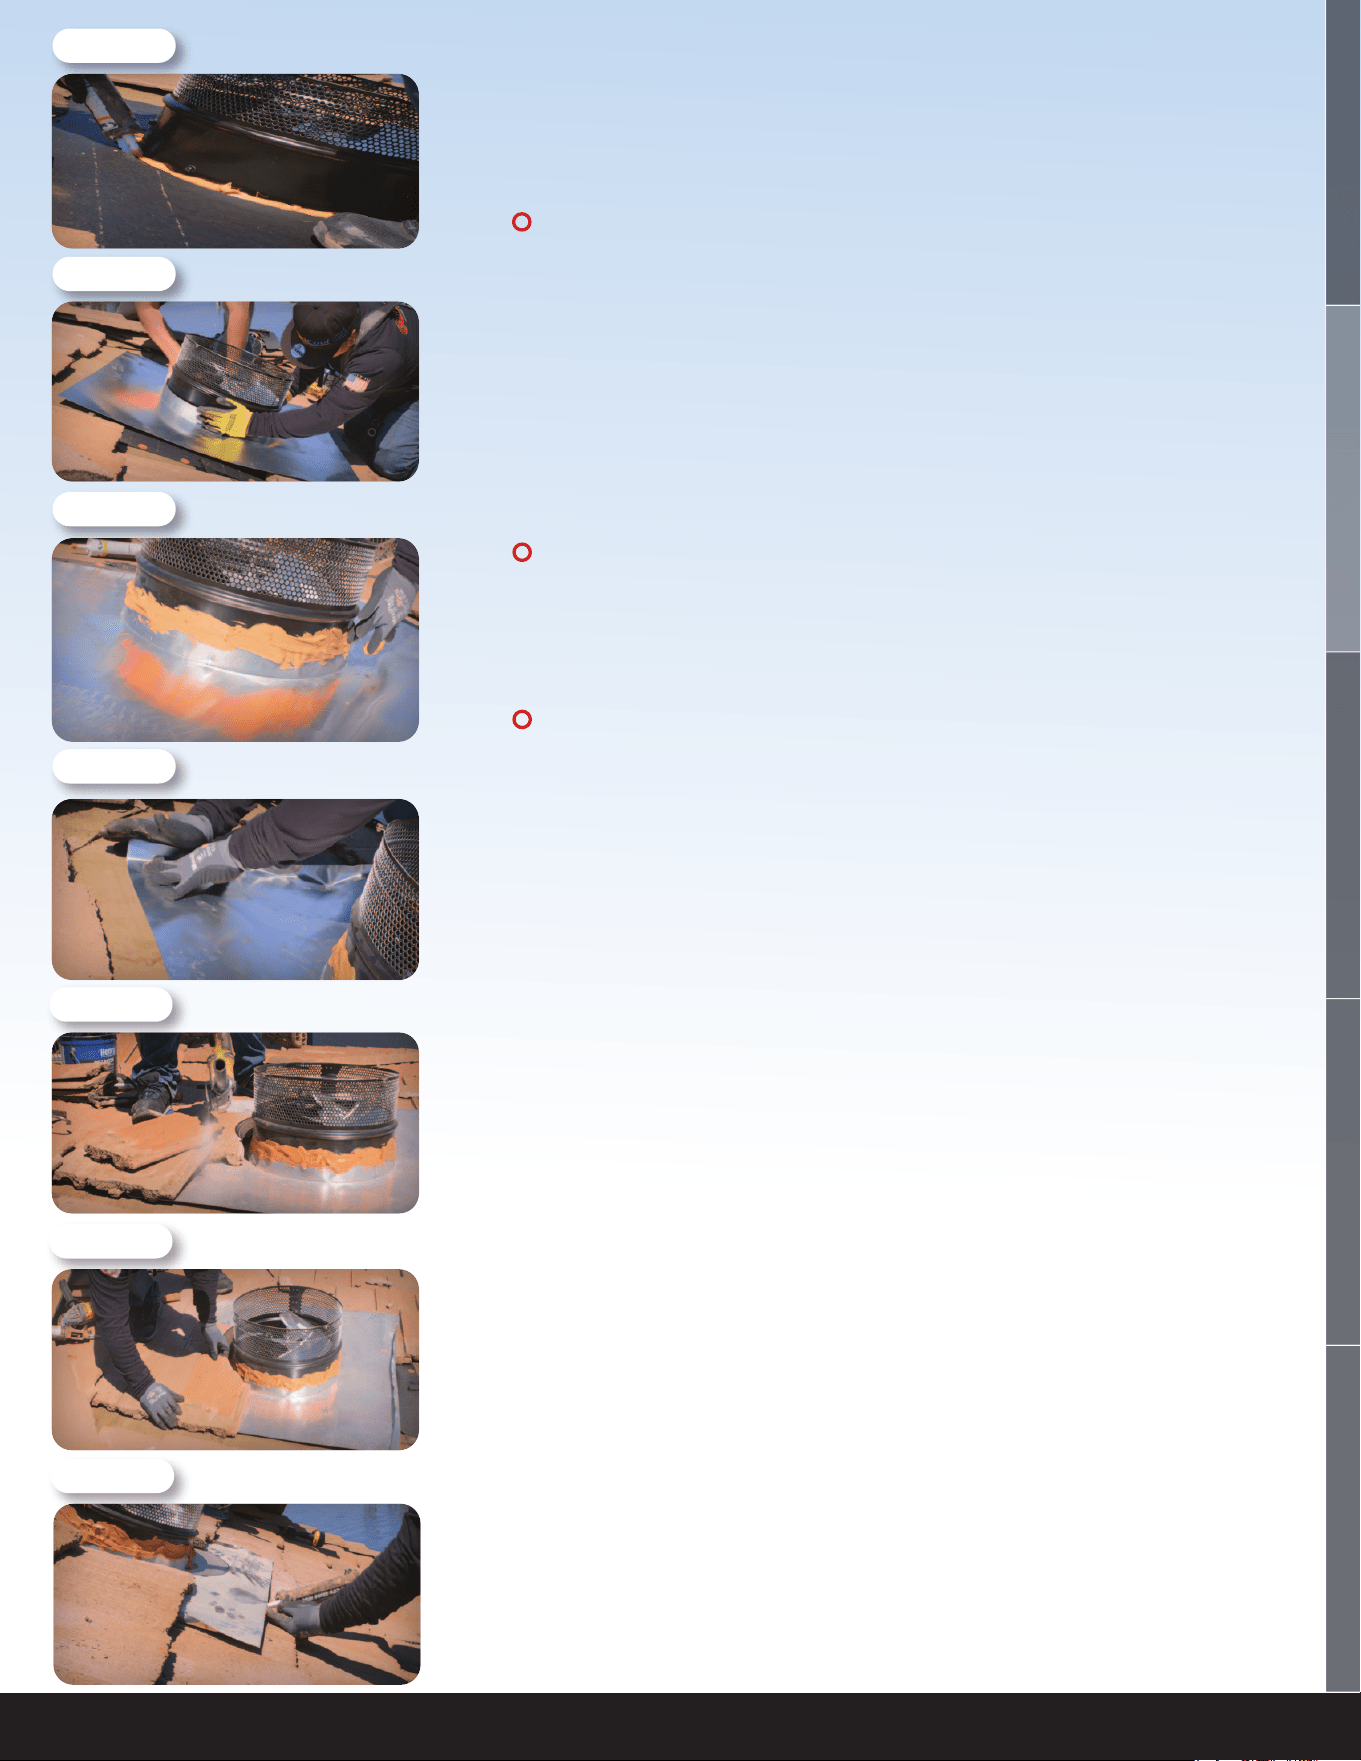
12. Apply weatherproof sealant to the seam between the AFR
fan housing and primary ashing. This seam must be sealed
to create a weatherproof barrier between the fan and the
ashing. (see Figure 2.2G)
NOTE: This seam exists to allow the use of interchangeable
ashings. If this seam is not sealed, water may leak in
between the fan housing and the ashing. Be sure to use
a generous amount of weatherproof sealant to create a
watertight seal.
13. Using the QuietCool Secondary Flashing accessory (part
number FLA-SEC-3743), gently slide the ashing over the fan
housing and hood mounting tabs. (see Figure 2.2H)
NOTE: The secondary ashing was designed to work with
almost all types of tile and cement roofs. The ashing can
be molded to create the shapes of more unique style roofs
such as S-Tile and M-Tile.
NOTE: Be sure that the secondary ashing extends onto
the roof tile at the bottom of the ashing. This ensures that
water cannot leak in between roof tiles.
15. Form the secondary ashing to close the gap between the
ashing and the fan housing. The aluminum is very malleable
so this should be done easily using your hands. Using
weatherproof sealant, seal the gap between the fan housing
and secondary ashing. (see Figure 2.2I)
16. Bend the left and right side edge of the secondary ashing
at a 90º angle to create a water channel on either side of the
ashing. This will help direct water to ow down and back onto
the roof rather than side to side under the tiles. (see Figure
2.2J)
17. Using an angle grinder, cut the removed tiles to t them to the
shape of the fan and secondary ashing. (see Figure 2.2K)
18. Re-install the tile around the fan unit. (see Figure 2.2L)
19. Apply weatherproof sealant on the bottom side of the
secondary ashing to secure the ashing to the roof tile.(see
Figure 2.2M)
20. Re-install the hood onto the fan unit and remove the
protective lm.
WELCOME
INSTALLATION
WIRING OPERATION
WARRANTY
!!
!!
!!
Figure 2.2G
Figure 2.2H
Figure 2.2I
Figure 2.2J
Figure 2.2K
Figure 2.2L
Figure 2.2M
1-888-QUIETCOOL 10
3. WIRING
IMPORTANT: Wiring Diagrams are for examples ONLY. Wiring should be done by a licensed
electrician following local building and electrical codes and/or NEC guidelines.
NOTE: Your fan came with the Smart Control Hub pre-wired to a power cord for testing purposes
before installation. If you would like to hard-wire the fan, or it is required by your local building
codes, please follow the wiring instructions below.
!!
!!
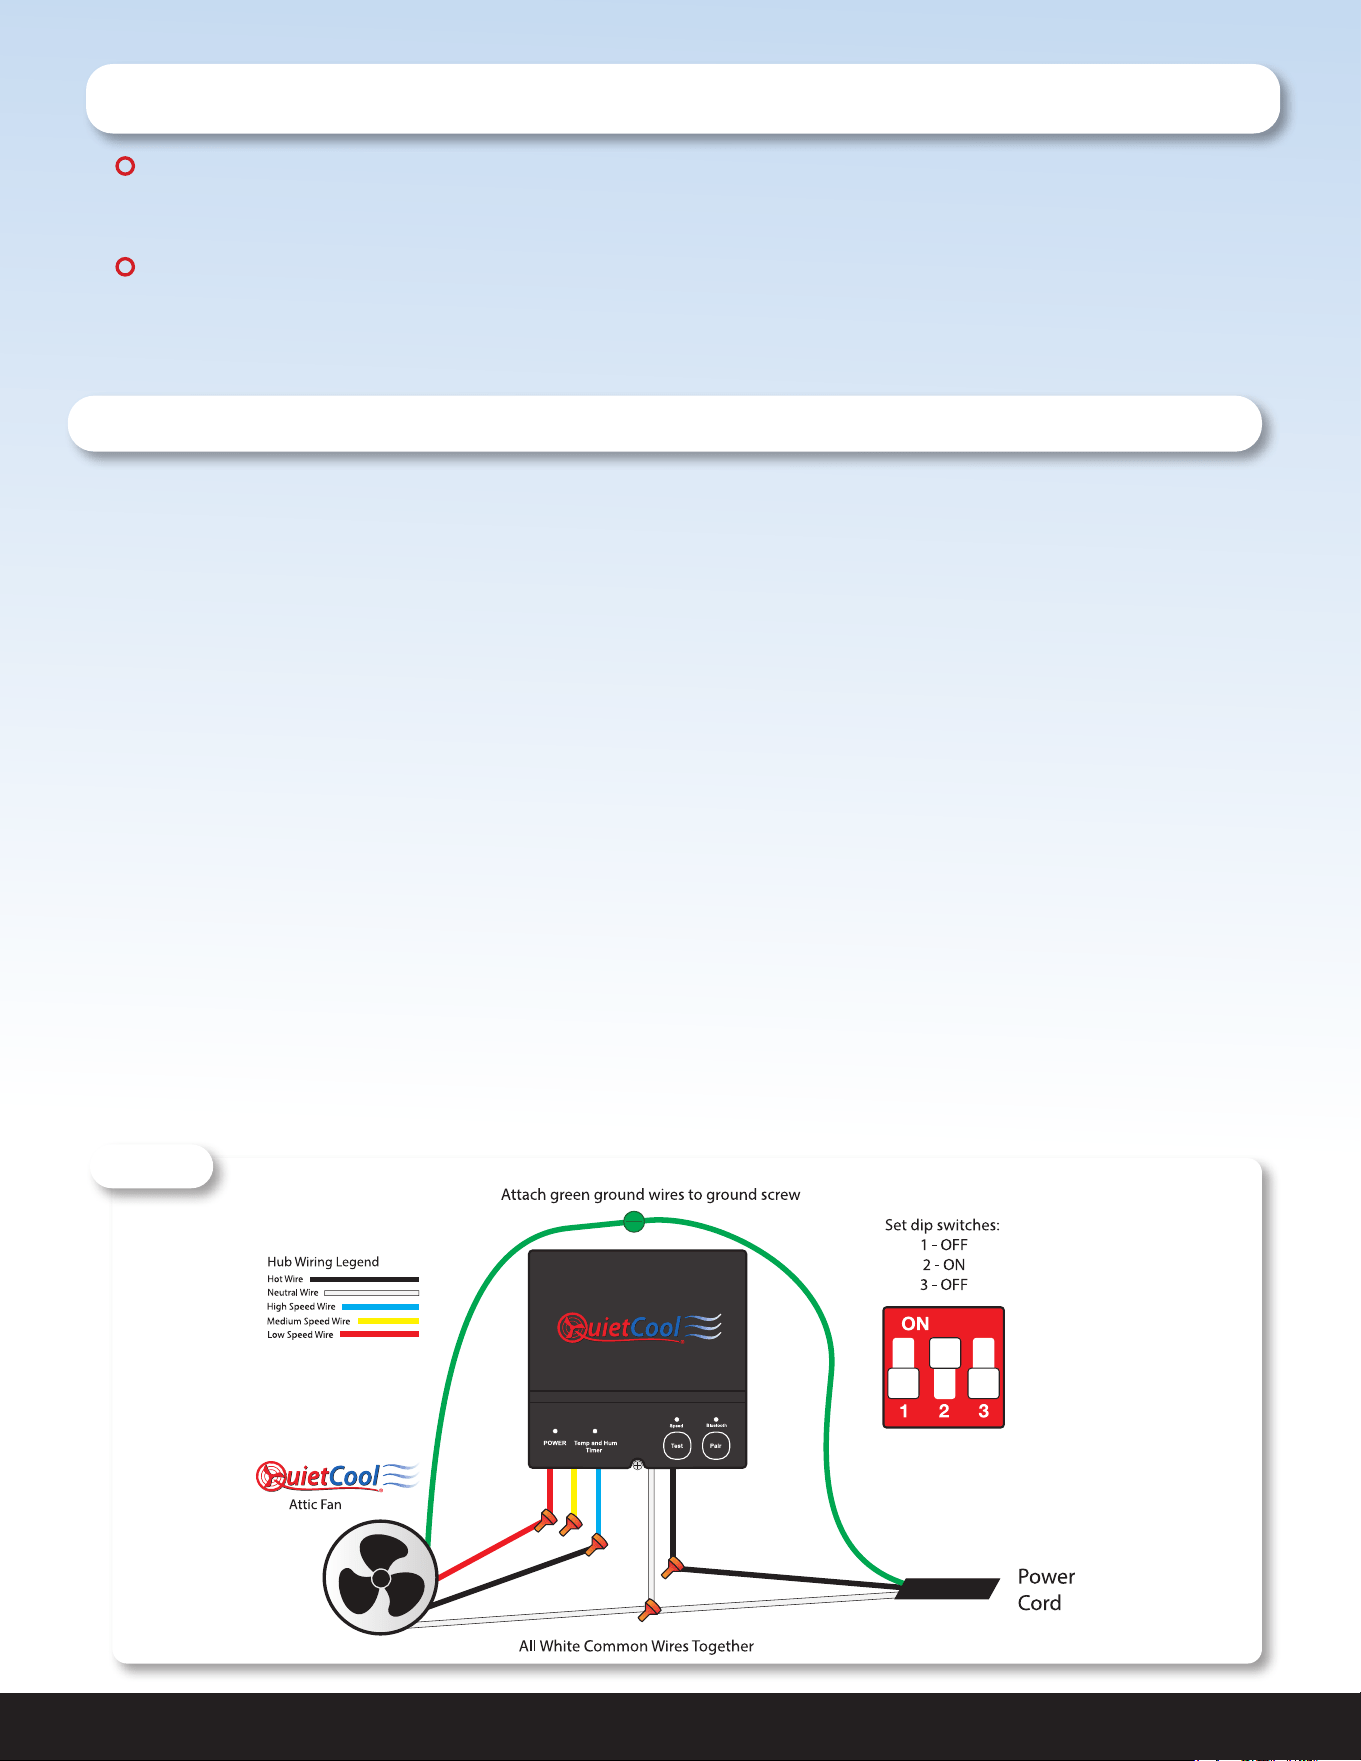
3.1 TWO SPEED WIRING - (AFR SMT PRO-1.3 & AFR SMT PRO-2.0)
1. Using a wire nut, connect the black wire from the power source to the black wire from the Hub.
2. Connect the white wire from the power source and the white wire on the fan to the white wire from
the Hub.
3. Connect the black wire from the fan to the blue wire on the Hub
4. Connect the red wire from the fan to the red wire on the Hub
5. Cap the yellow wire from the Hub.
6. Ground the green wire from the fan and the green wire from the power cord to the ground screw in
the Hub.
7. Set the dip switch positions inside the Hub as shown in the Figure 3.1A.
8. Power-on the Hub. The Power LED indicator will be lit.
9. Press the Test button to make sure the fan works. The Test LED indicator will blink three times every
two seconds indicating 2-speed and the fan will be on high. Press the Test button again and the fan
will switch to low speed and the Test LED indicator will blink once every two seconds. Press the Test
button again and the fan should shut off and the LED will be off.
10. If the fan doesn’t operate as described in step 9, please check the dip switch position/wiring.
Figure 3.1A
QUIETCOOLSYSTEMS.COM 11
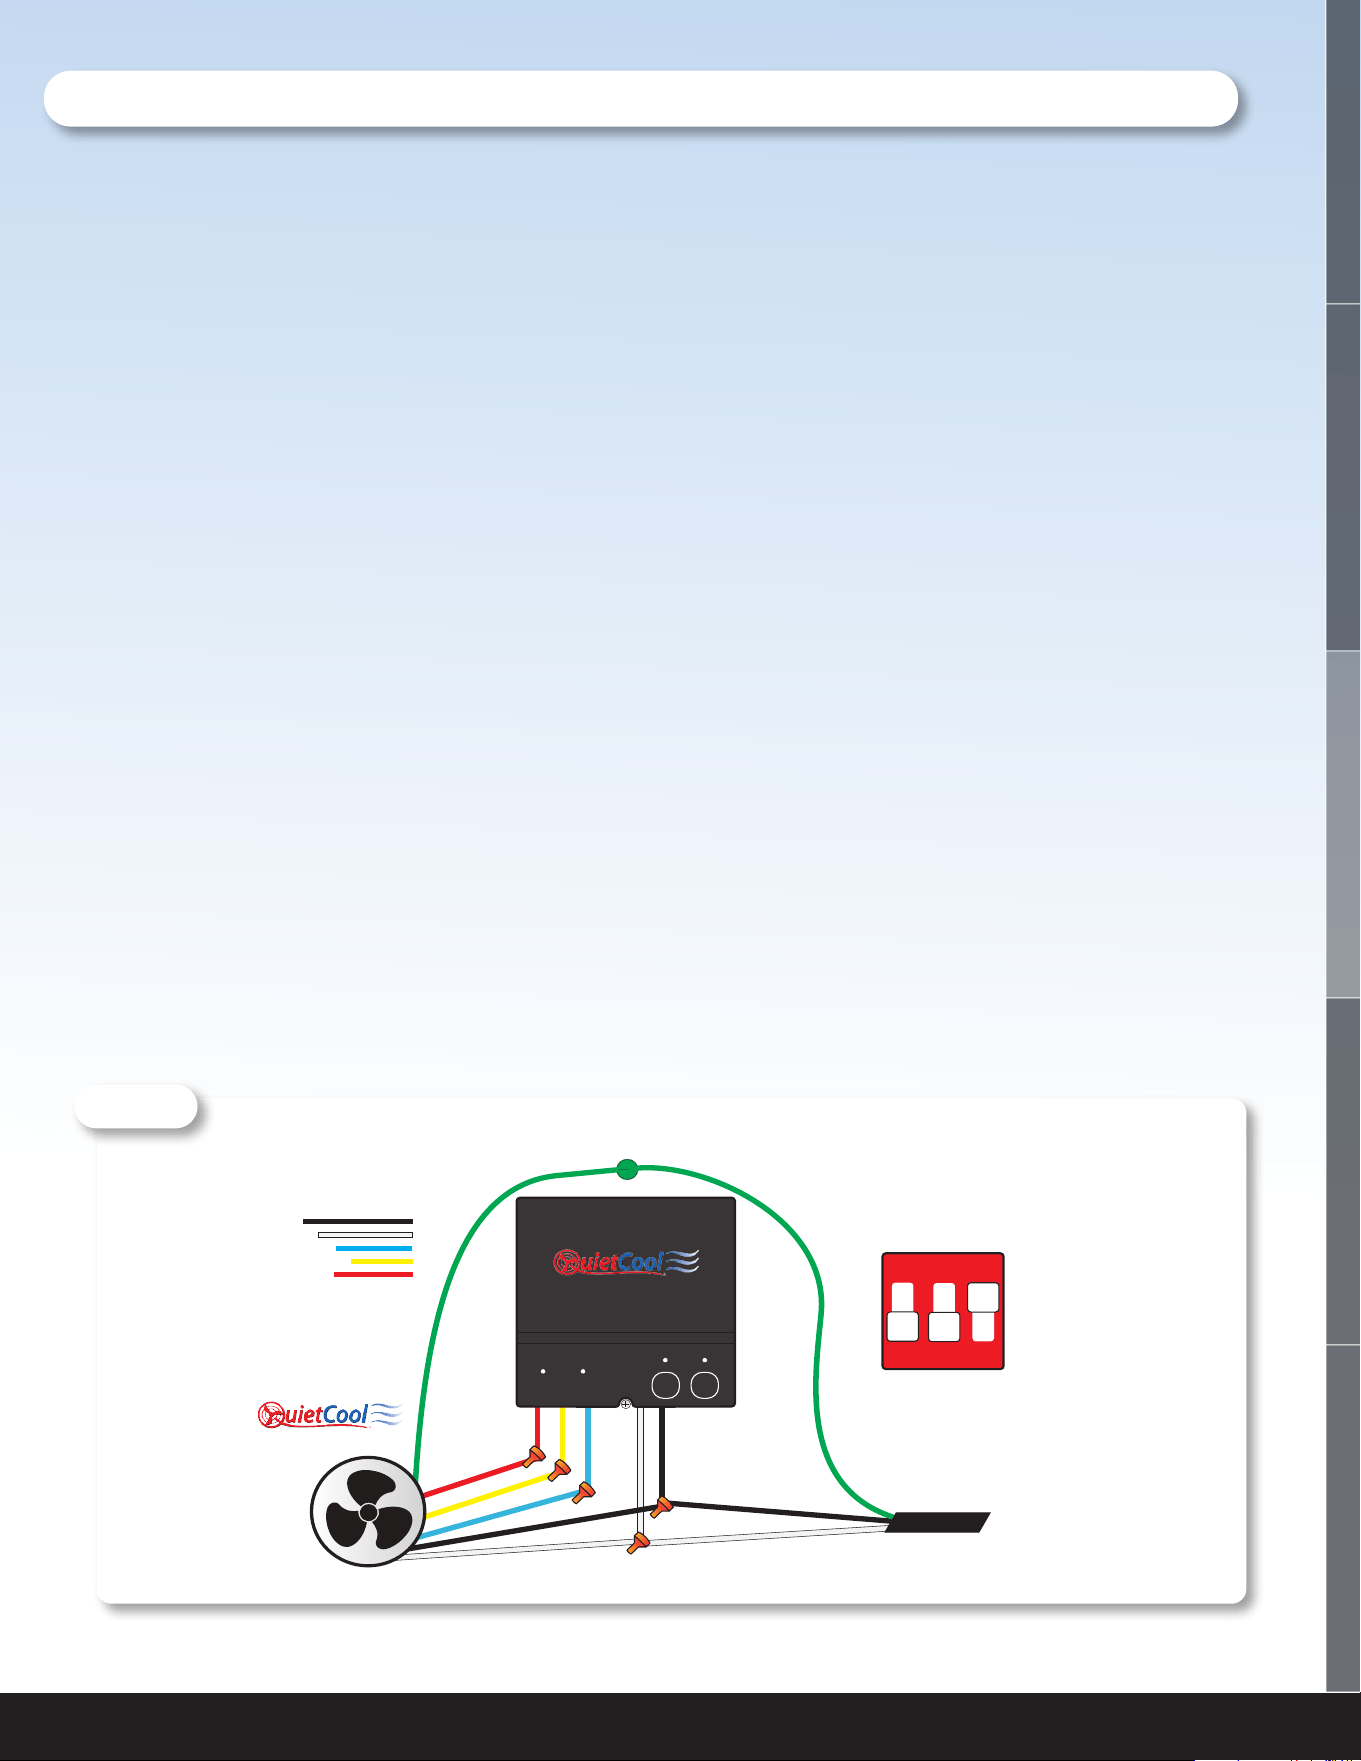
7. Set the dip switch positions inside the Hub as shown in Figure 3.2A.
8. Power-on the Hub. The Power LED indicator will be lit.
9. Press the Test button to make sure the fan works. The Test LED indicator will blink three times every
two seconds indicating 3-speed and the fan will be on high. Press the Test button again and the
fan will switch to medium speed and the LED will blink twice every two seconds. Press the Test
button again and the fan will switch to low speed and the LED will blink once every two seconds.
Press the Test button again and the fan should shut off and the LED will be off.
10. If the fan doesn’t operate as described in step 9, please check the dip switch position/wiring.
3.2 THREE SPEED WIRING - (AFR SMT ES-2.0)
1. Using a wire nut, connect the black wire from the power cord and the black wire from the fan to the
black wire from the Hub.
2. Connect the white wire from the power cord and the white wire on the fan to the white wire from the
Hub.
3. Connect the red wire from the fan to the red wire on the Hub
4. Connect the yellow wire from the fan to the yellow wire on the Hub
5. Connect the blue wire from the fan to the blue wire on the Hub
6. Ground the green wire from the fan and the green wire from the power cord to the ground screw in
the Hub.
Attach green ground wires to ground screw
Set dip switches:
1 - OFF
2 - OFF
3 - ON
Power
Cord
All White Common Wires Together
Attic Fan
ON
1 2 3
POWER Temp and Hum
Timer
Pair Test
Speed
Bluetooth
High Speed Wire
Medium Speed Wire
Low Speed Wire
Neutral Wire
Hot Wire
Hub Wiring Legend
Figure 3.2A
WELCOME
INSTALLATION
WIRING OPERATION
WARRANTY
1-888-QUIETCOOL 12
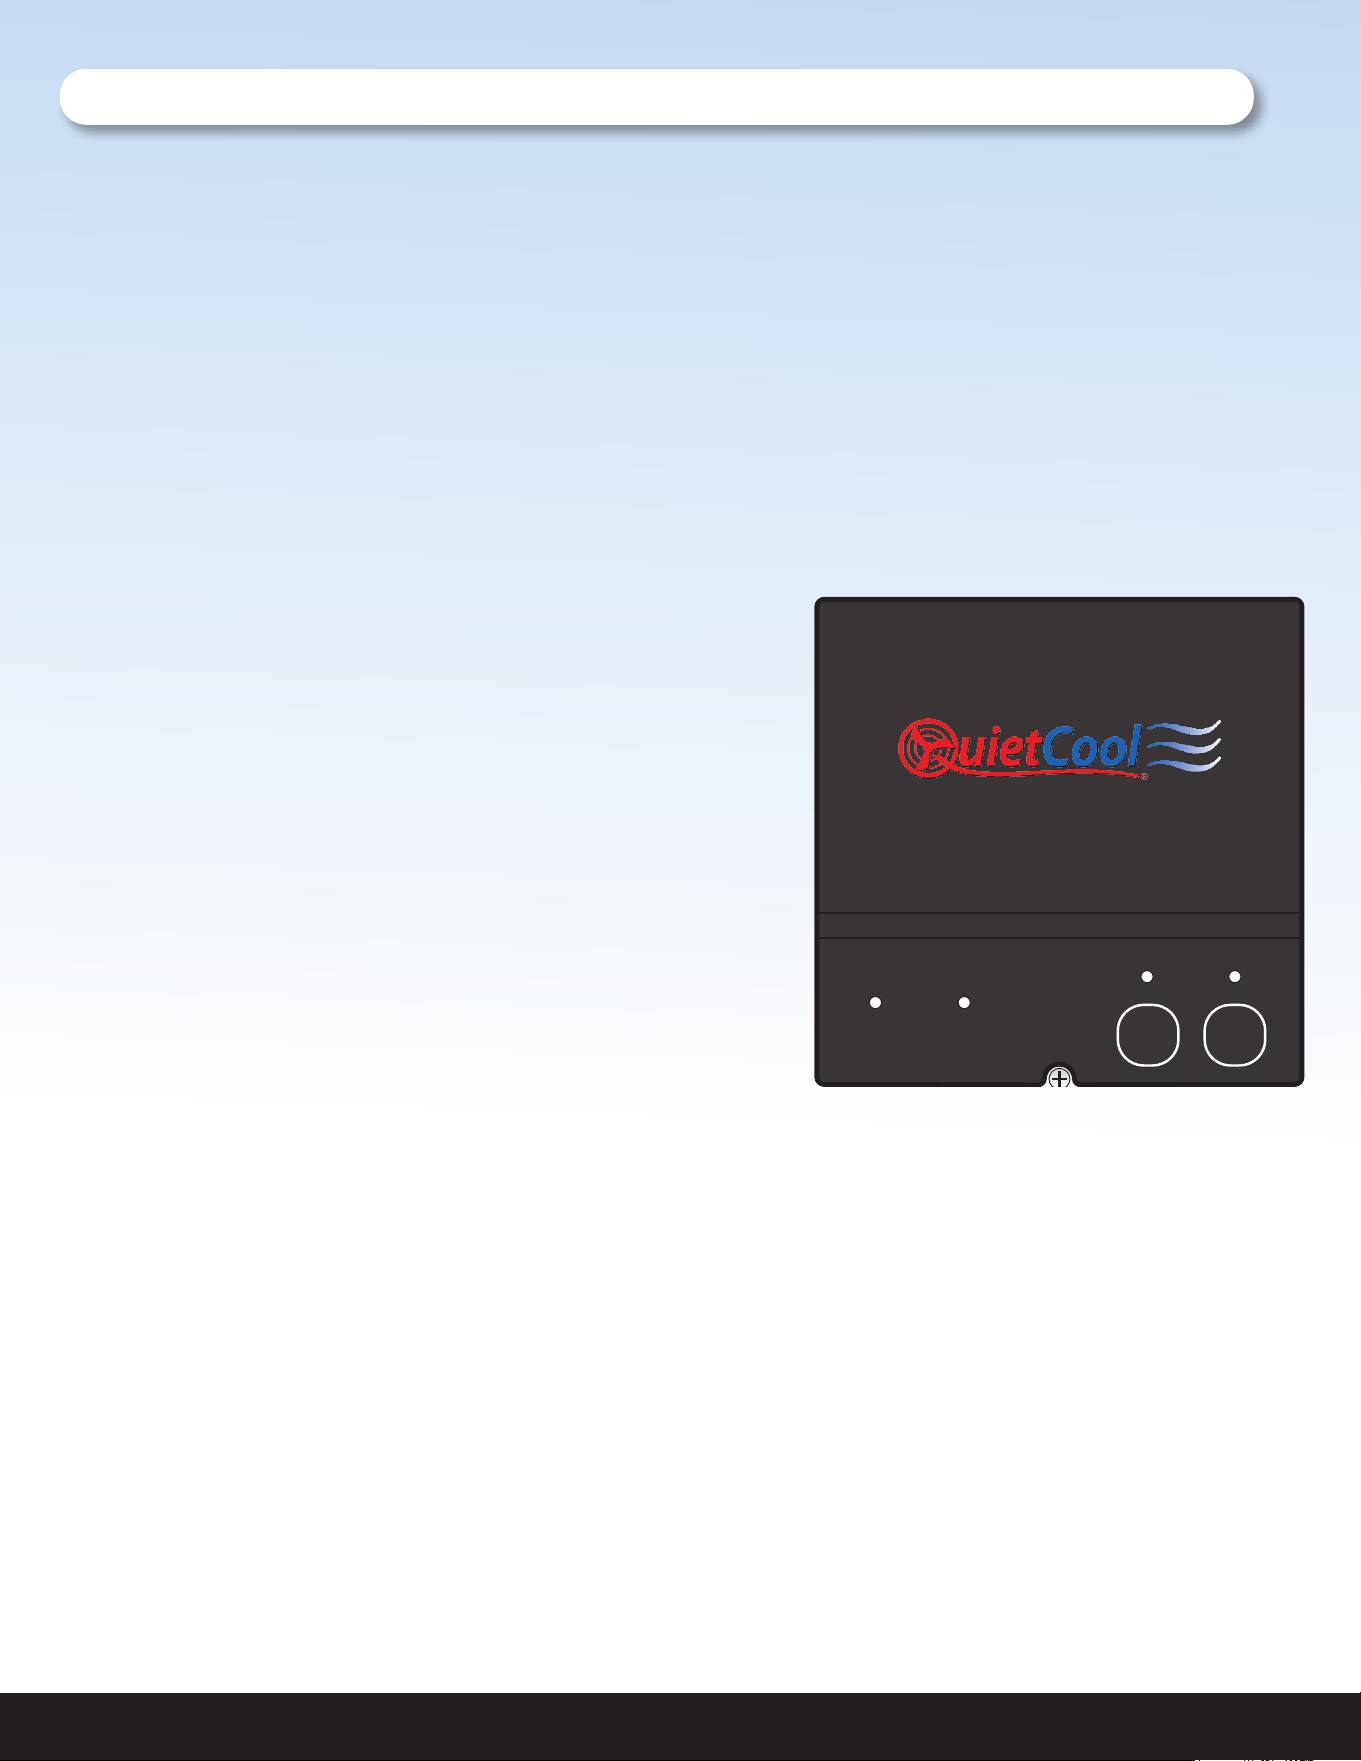
3.3 SMART CONTROL HUB - LED INDICATORS
• POWER Indicator
• The Power LED indicator will always be lit when the Hub is connected to Power.
• If this LED is not lit, check the power source.
• Temp and Hum | Timer Indicator
• This LED indicator will light up as shown below:
• Blinking: Timer Mode Active
• Solid: Smart Mode Active
• Test Indicator
• The Test LED indicator will light up as shown below when the Test button is pressed:
• Two Speed Fan: blink three times every 2 seconds on HIGH, blink once every 2 seconds on
LOW
• Three Speed Fan: blink three times every
2 seconds on HIGH, blink twice every
2 seconds on MED, blink once every 2
seconds on LOW
• Pair Indicator
• The Pair LED indicator will blink when making
pair operations. Please see SETTING UP YOUR
FAN on page 15 for details on pairing.
• The indicator will be lit up solid when a device is
connected via Bluetooth.
• The indicator will not be lit when no pairing
operations are being made or no device is
connected.
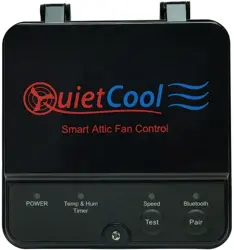
POWER Temp and Hum
Timer
Pair Test
Speed
Bluetooth
QUIETCOOLSYSTEMS.COM 13
WELCOME
INSTALLATION
WIRING
OPERATION
WARRANTY
4. SYSTEM OPERATING INSTRUCTIONS
4.1 DOWNLOADING THE QUIETCOOL
SMART CONTROL APP
Download the QuietCool Smart Control App onto your iOS or Android
device.
Scan the QR code above or visit QuietCoolSystems.com/smart-control/
and click the link to download the app to your device.
4.2 OPERATING THE QUIETCOOL SMART CONTROL APP
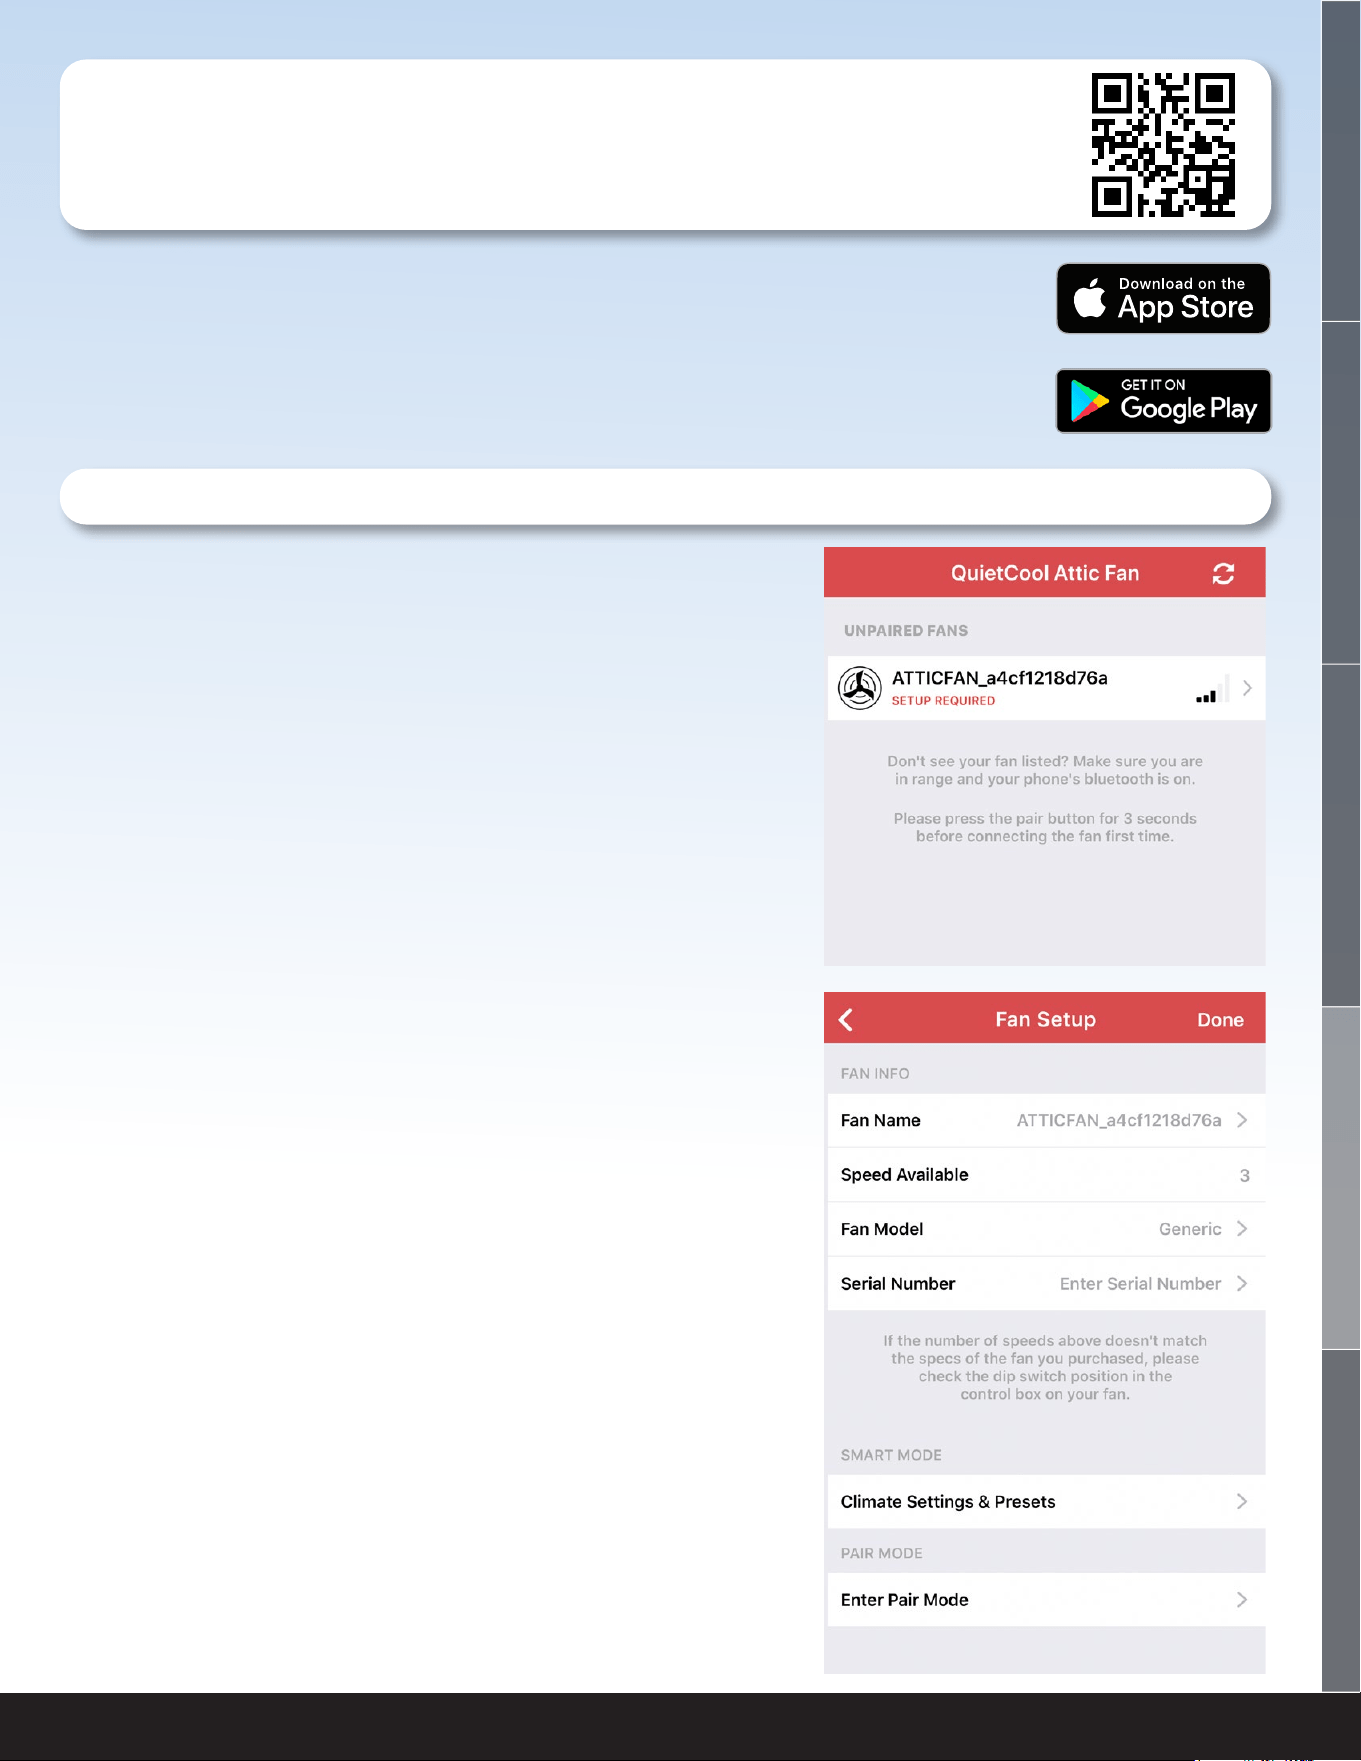
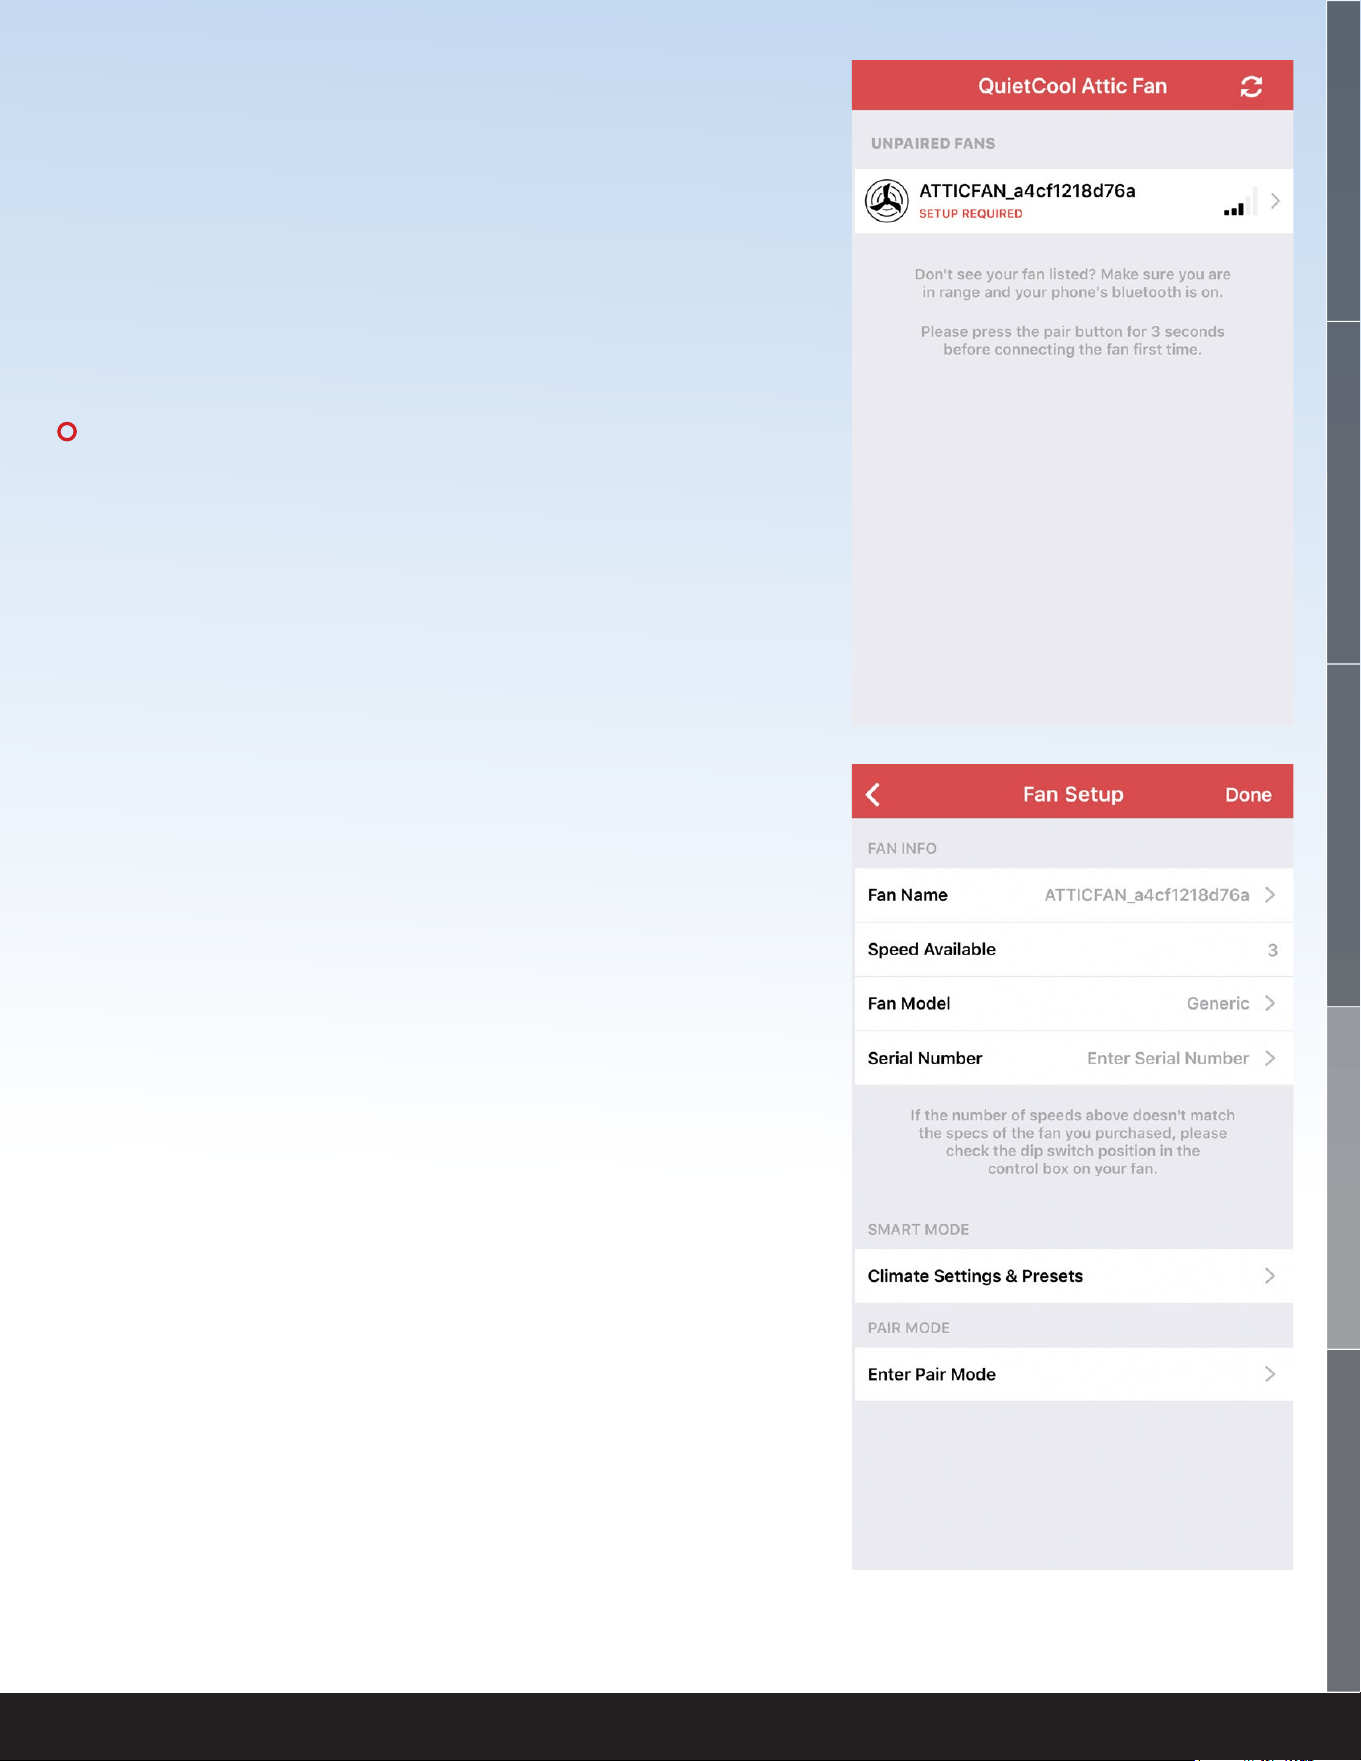
HOME PAGE
This is the home page of the app and is presented as soon
as the app is opened.
If you have not yet paired your phone to your Hub, it will
state SETUP REQUIRED.
If you have paired your phone to your Hub, it will show a
picture of the fan as well as the name of your fan.
FAN SETUP PAGE
This page is used to setup the fan for the rst time.
You can quickly change the Fan Name, check if the speeds
are set properly, change the Fan Model, enter the Serial
Number and adjust the Climate Settings & Presets.
These settings can be accessed again after setup is done
by clicking the Settings button on the Fan Control Page.
1-888-QUIETCOOL 14
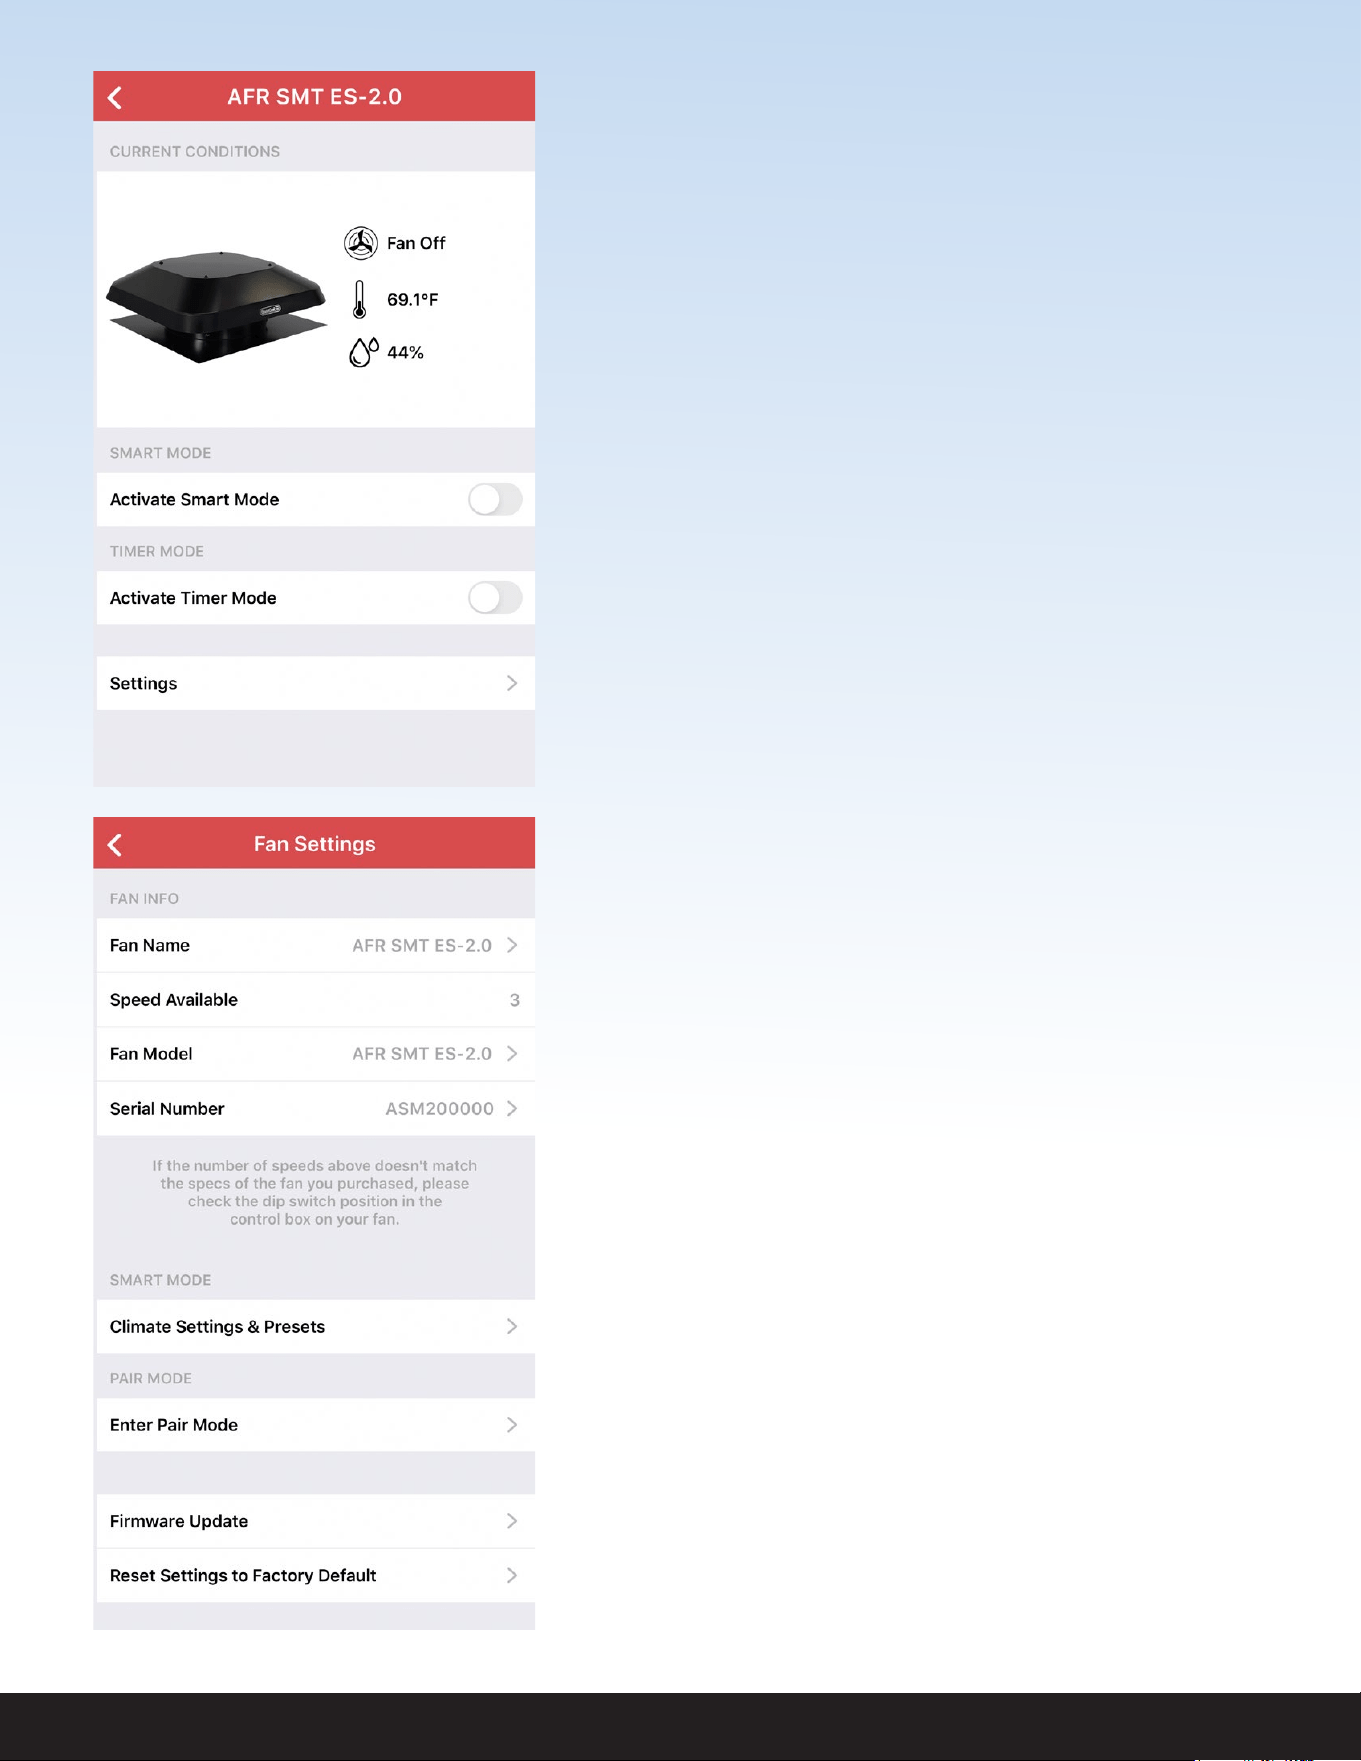
FAN CONTROL PAGE
This page is accessed when you tap on your fan from
the Home Page.
On this page you can see the current conditions in
your attic, activate the different modes of the fan, and
get to the Fan Settings page.
FAN SETTINGS PAGE
This page is used to adjust the settings of the fan.
You can quickly change the Fan Name, check if the
speeds are set properly, change the Fan Model, enter
the Serial Number and adjust the Climate Settings &
Presets.
You can also enter Pair Mode for remote pairing of
devices, perform a Firmware Update, as well as reset
all settings to factory defaults.
QUIETCOOLSYSTEMS.COM 15
WELCOME
INSTALLATION
WIRING OPERATION
WARRANTY
SETTING UP YOUR FAN
Once your attic fan has power, open up the QuietCool
Smart Control app. You will be taken to the Home Page. You
should see your attic fan show up in the list of available fans.
A message indicates that setup is required. Press and hold
the Pair button on the Hub until the LED indicator begins to
blink.
NOTE: You will need to initiate this Pairing process on
each device you want to use to control your attic fan.
Once the initial device is paired, you can use the “Enter
Pair Mode” function from the app described on page
16. This will prevent you from having to access the
Hub physically in the attic in order to perform pairing
operations.
Tap on the fan to start the setup process. Once you tap on
the fan, you will be taken to the Fan Setup page.
On this page, you will be able to change the following
settings:
• Fan Name
• Fan Model
• Serial Number
The Speeds Available section will tell you if you have
connected the fan and set your dip switch properly.
Make sure that this number matches the specication of the
fan you purchased.
We are setting up an AFR SMT ES-2.0 which is a 3-speed fan.
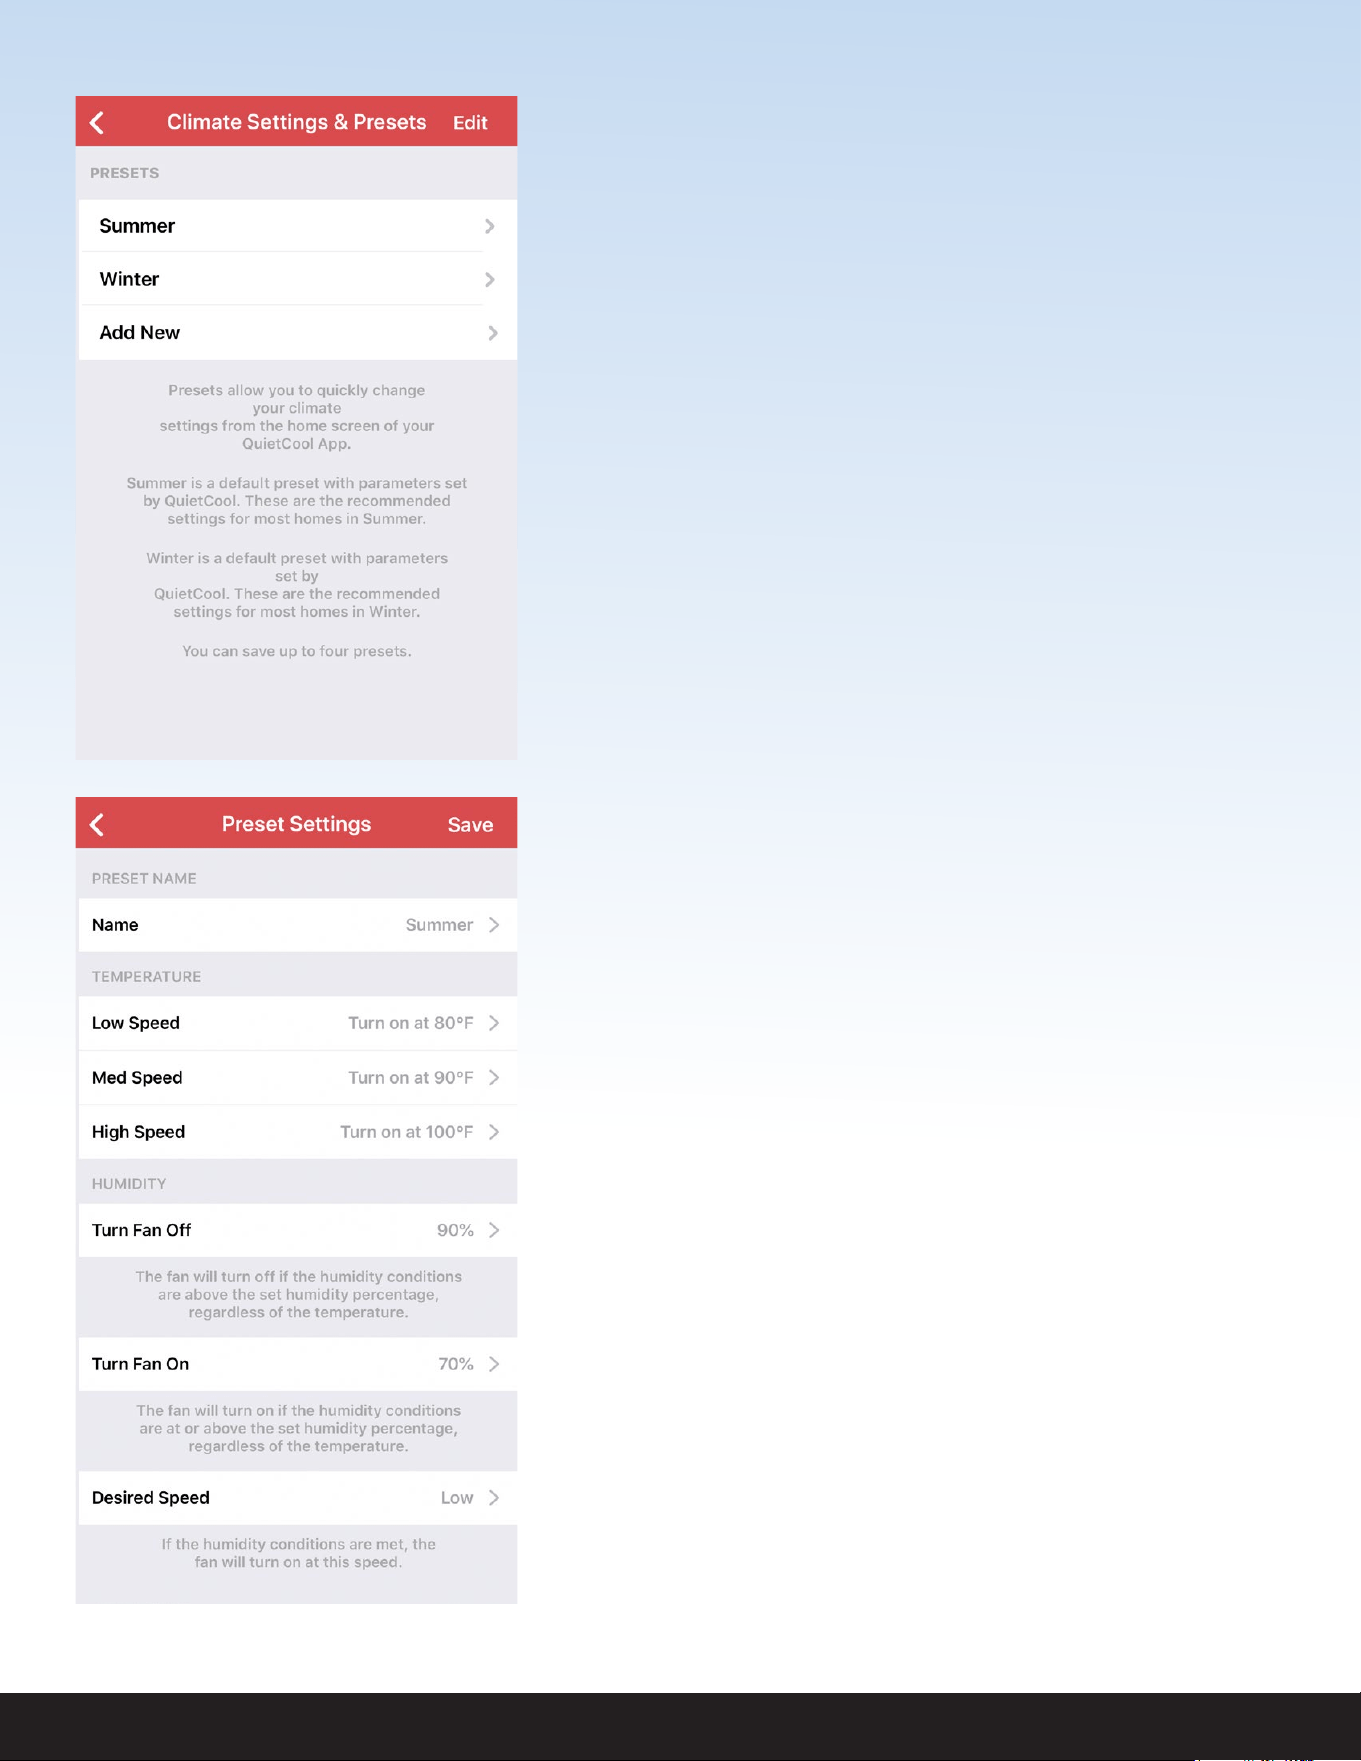
The QuietCool Smart Attic Fan Control has an innovative
Smart mode that allows the fan to adjust the speed based
on the temperature and humidity conditions in your attic.
Tap Climate Settings & Presets to adjust these settings.
Within this mode there are two standard presets, Summer
and Winter. You can modify these presets and add your own
custom presets to allow quick setting changes on the y.
!!
1-888-QUIETCOOL 16
TEMPERATURE
• The settings you choose in this section will
change what temperature the fan will come on at
each set speed.
• Tap on any speed to adjust the temperature for
each speed.
HUMIDITY
• Turn Fan Off: This is the humidity percentage
that will cause the fan to turn off. For example,
the factory setting is set at 90%, meaning the fan
will turn off if the humidity in the attic is 90% or
higher. Tap this setting if you would like to adjust
the percentage. If you do not want this feature,
you can select OFF at the top of the list.
• Turn Fan On: This is the humidity percentage
that will cause the fan to turn on, regardless if the
temperature settings are not met. For example,
the factory setting is set at 70%, meaning the fan
will turn on if the humidity in the attic is higher
than 70%, even if the temperature in the attic is
below the temperature settings in the app. If you
do not want this feature, you can select OFF at
the top of the list.
• Desired Speed: This is the speed the fan will use
if the humidity causes the fan to turn on.
These settings will be saved into the memory of
the Hub meaning all settings will sync between any
additional devices you pair to the Hub.
Click Done to complete Fan Setup. You can always
access these settings again from the Settings option
on the Fan Control Page.
QUIETCOOLSYSTEMS.COM 17
WELCOME
INSTALLATION
WIRING OPERATION
WARRANTY
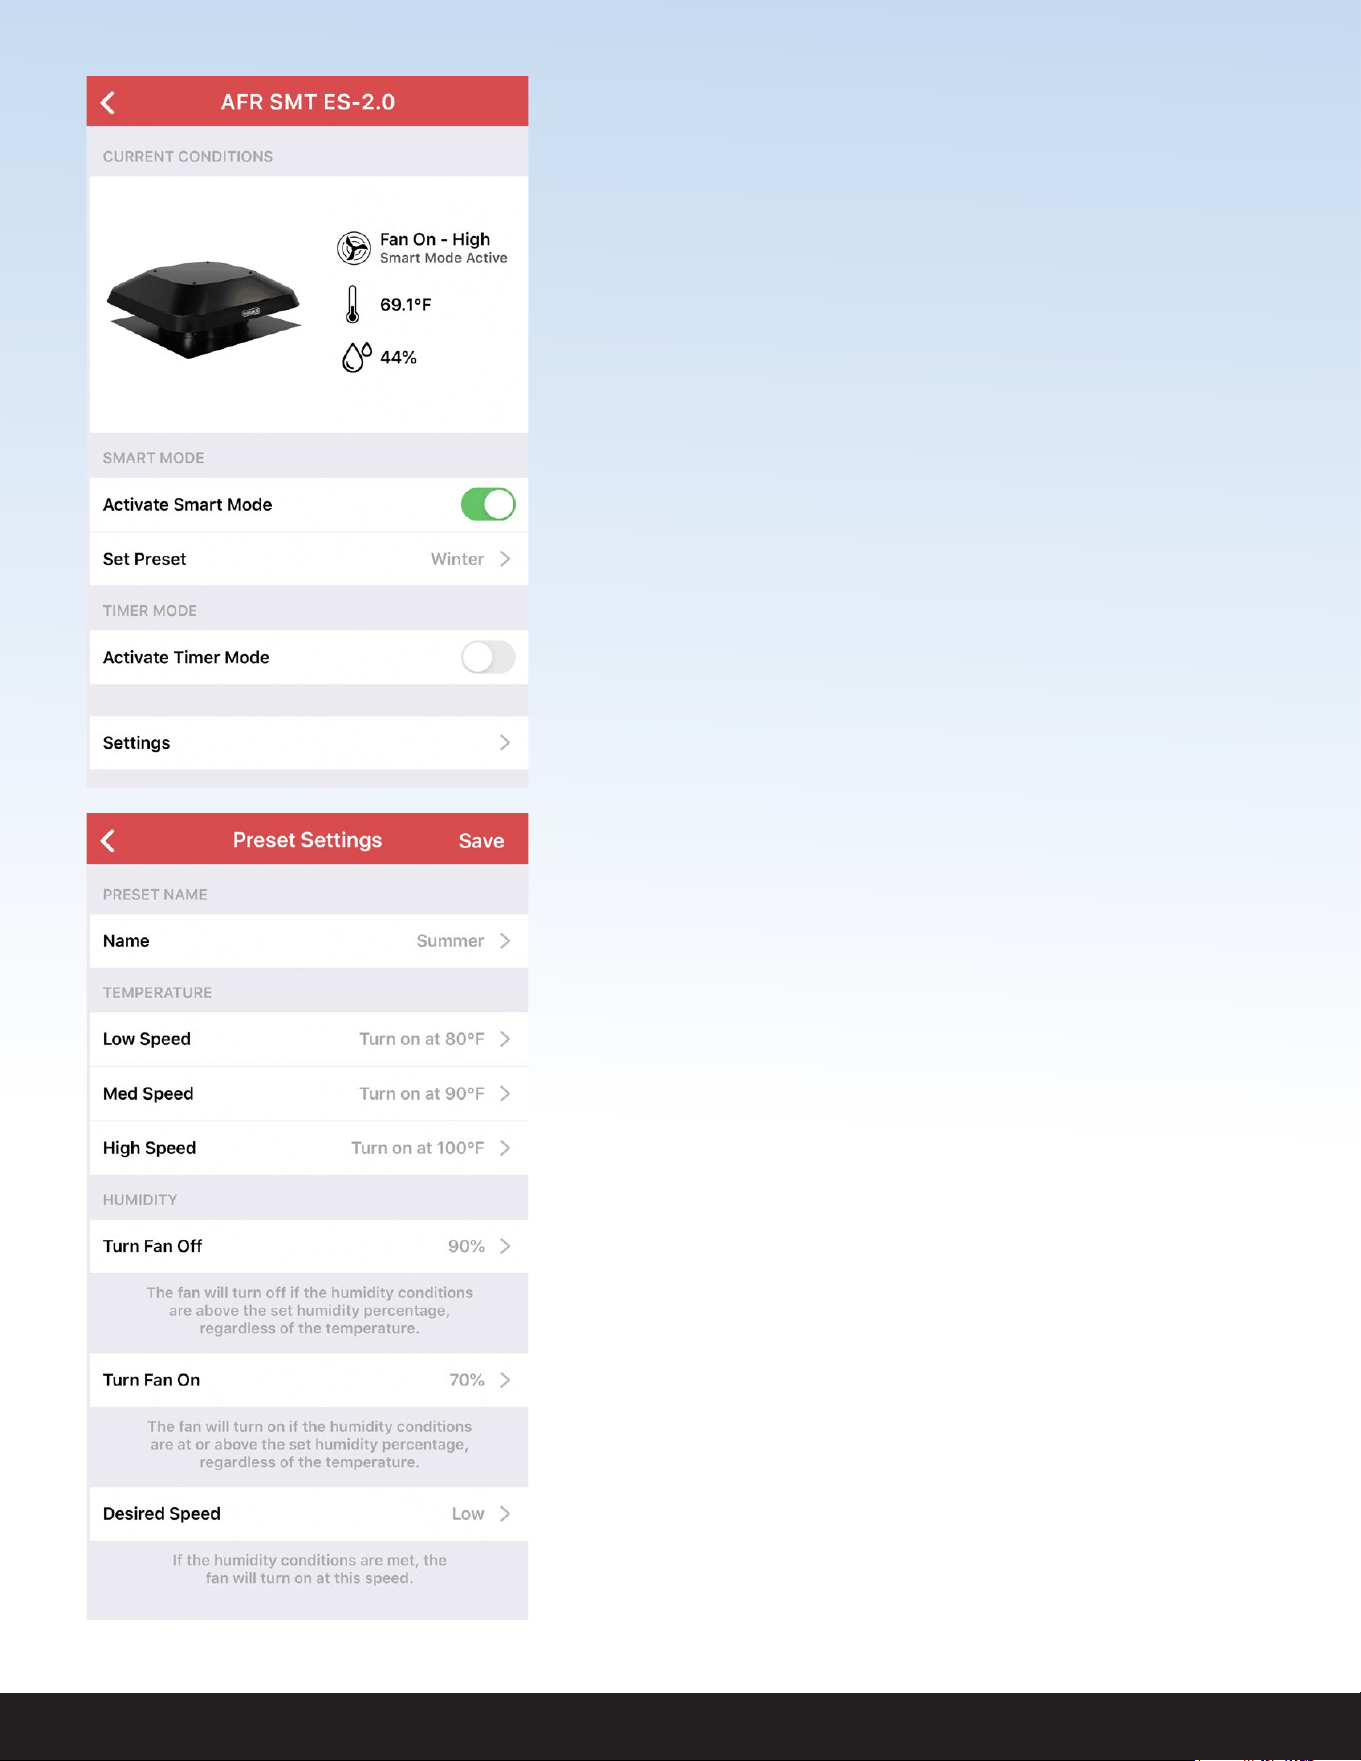
FAN CONTROL PAGE
On the Fan Control page, you will see the current
fan status, the current attic temperature, as well as
the current attic humidity level.
You also have the option to Activate Smart Mode
or Activate Timer Mode. You can also go into the
Fan Settings page and adjust the settings that you
setup in the rst step.
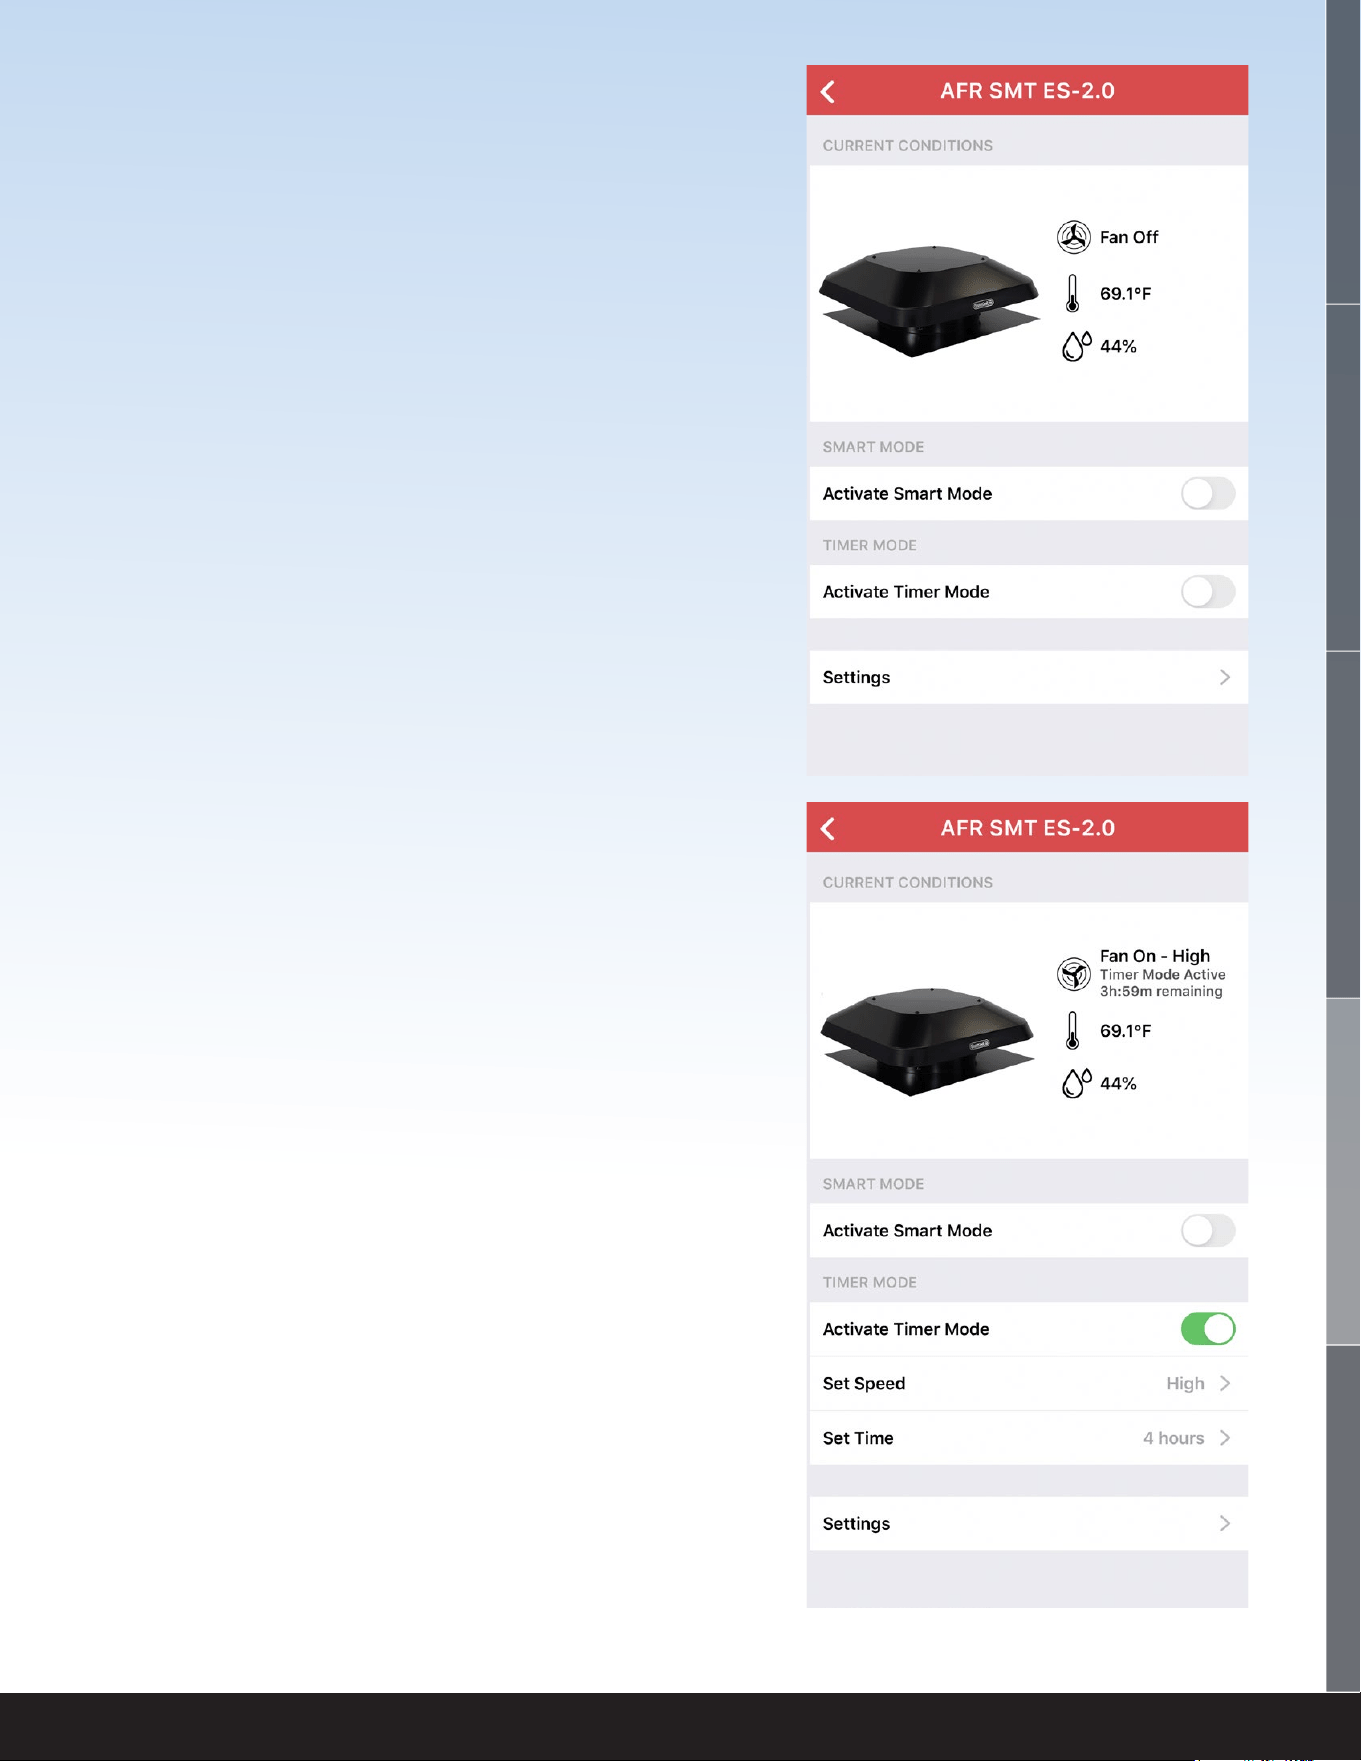
TIMER MODE
Timer Mode is a simple way to turn your attic fan on
for a set amount of time at a set speed.
To activate Timer Mode, simply tap Activate Timer
Mode. Once activated, you can select your speed
by tapping Set Speed. You can also select your
runtime by tapping Set Time.
When Timer Mode is active, you will see your
remaining time left on the timer at the top of the
screen.
1-888-QUIETCOOL 18
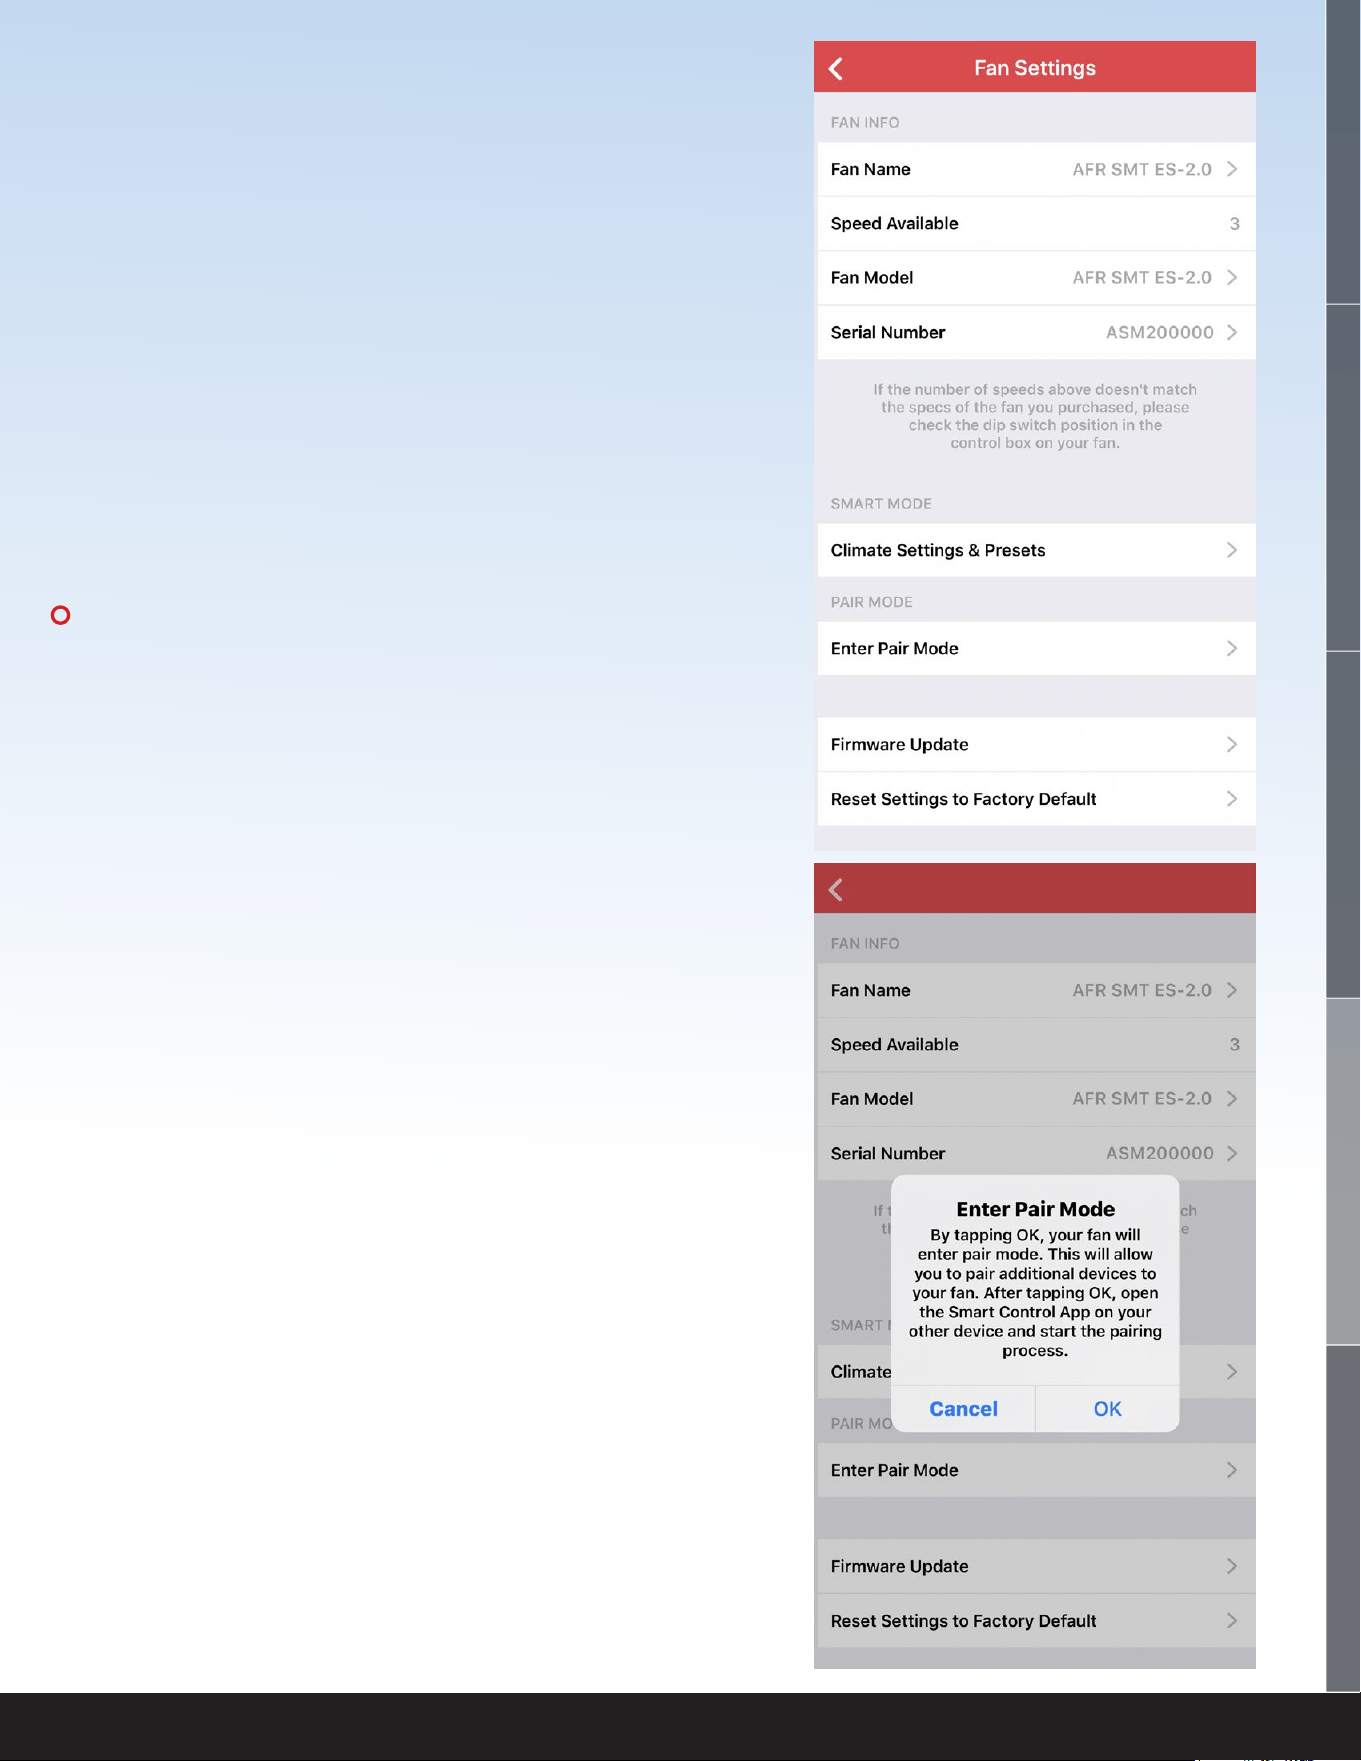
SMART MODE
Smart Mode will automatically change the speed
based on the attic temperature and humidity.
To activate Smart Mode, simply tap Activate Smart
Mode.
In Smart Mode, the rst parameter that is checked
is the Turn Fan Off humidity level. Regardless of the
temperature in the attic, if the Humidity level in the
attic is above the Turn Fan Off humidity setting, the
fan will not turn on, or if it is already running, the
fan will shut off.
If the humidity in the attic is below the Turn Fan
Off humidity setting, the second parameter
that is checked is the Attic Temperature. If the
temperature inside the attic is within the set
parameters in the app, the fan will turn on at the
appropriate speed.
If the temperature in the attic is below any of the
temperature parameters, the last parameter that
is checked is the Turn Fan On humidity level. If the
humidity level in the attic is above the Turn Fan
On humidity parameter but below the Turn Fan
Off humidity parameter, the fan will turn on at the
Desired Speed.
QUIETCOOLSYSTEMS.COM 19
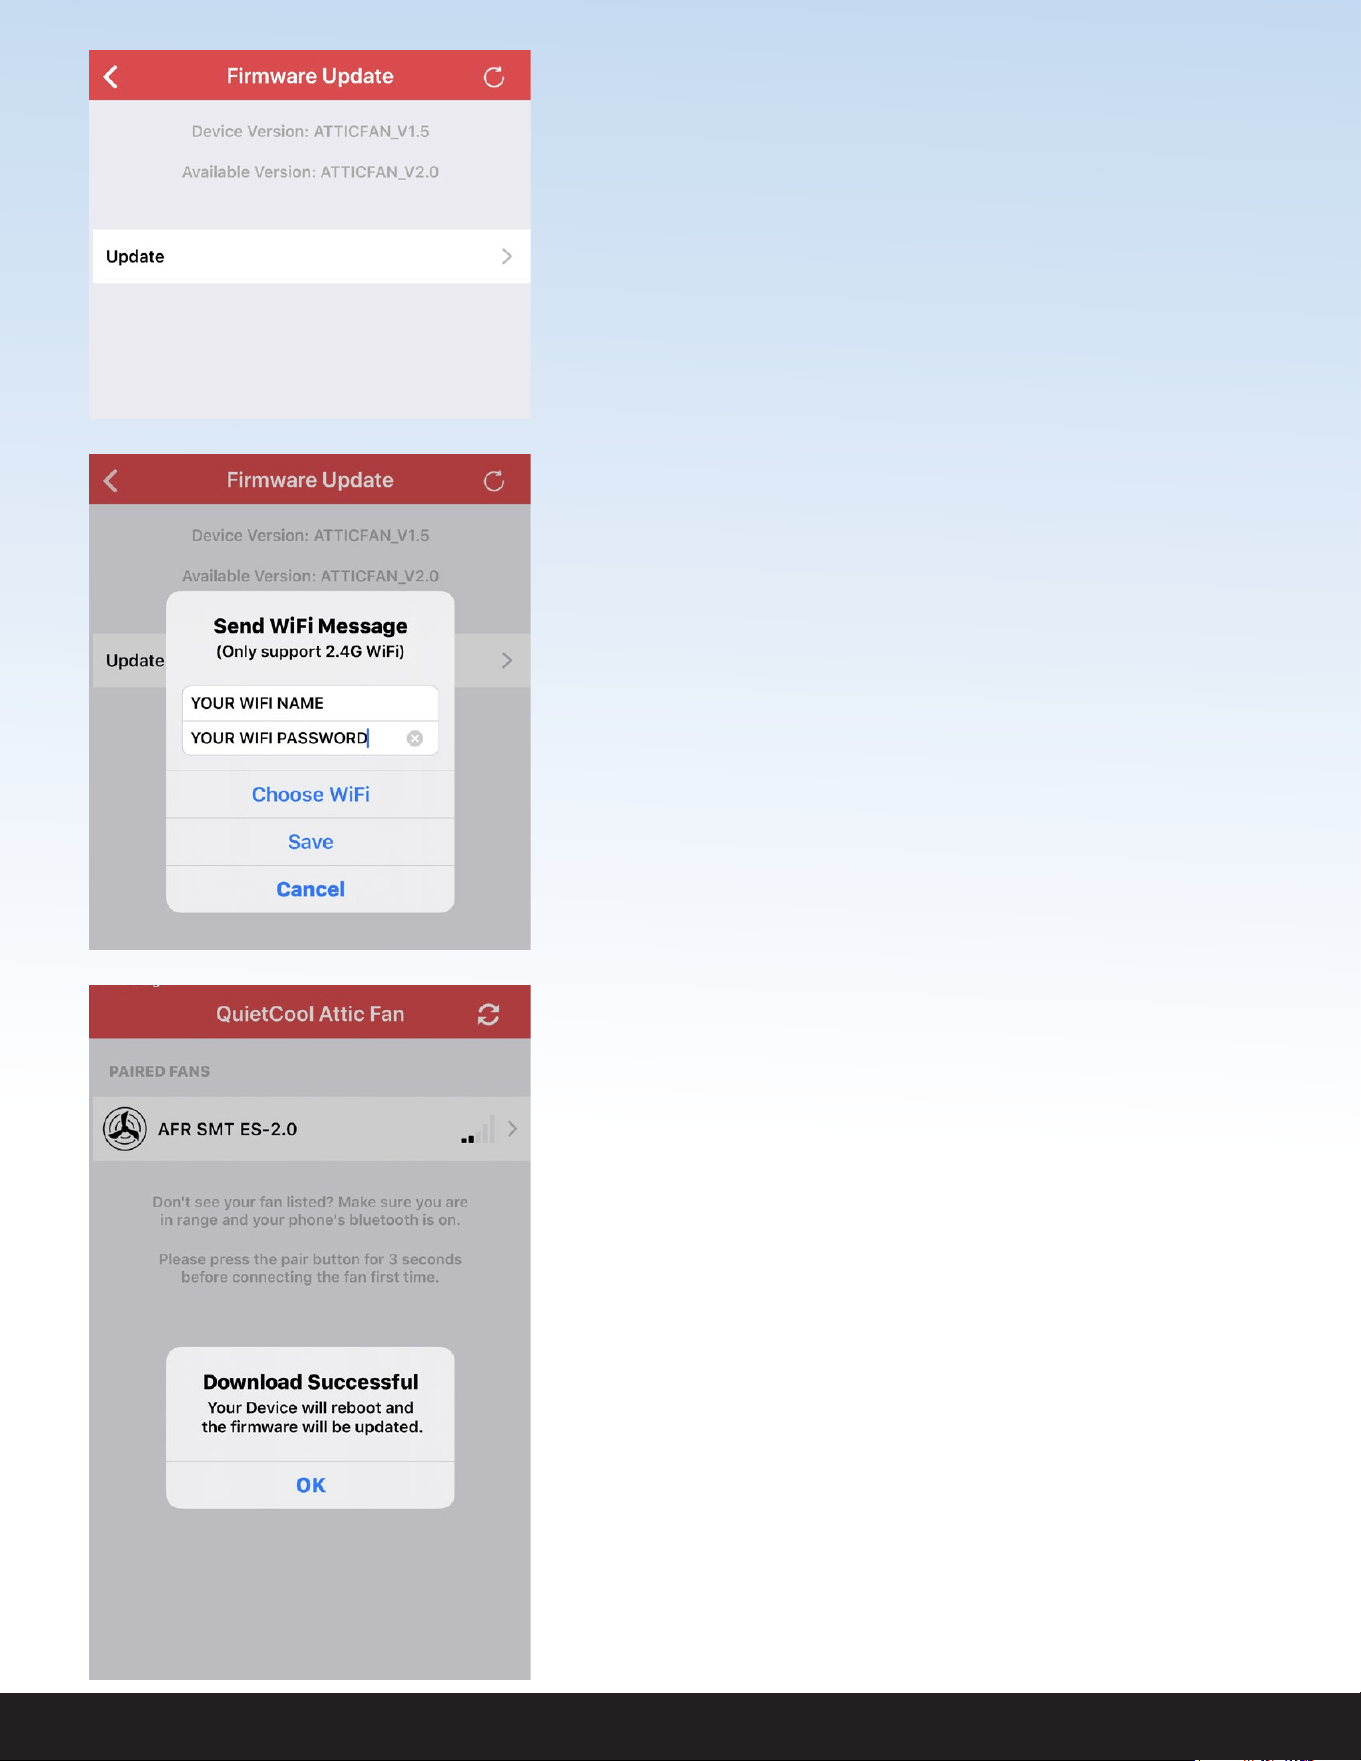
PAIR MODE
Pair Mode is a feature that was designed to prevent
users from having to get into the attic to access the
physical Hub in order to pair additional devices.
NOTE: In order to use this feature, you must have
one device that is already paired to the Fan Hub.
If you do not have any devices that are currently
paired to the Fan Hub, you will have to press the
physical Pair button.
In the Fan Settings page, tap Enter Pair Mode. An
alert box will come up on your screen indicating you
are about to enter Pair Mode. Tap OK.
Now, on the device you are trying to pair, open up
the Smart Control app and tap the fan. You will now
be taken to the Fan Setup page and you are now
paired.
!!
WELCOME
INSTALLATION
WIRING OPERATION
WARRANTY
1-888-QUIETCOOL 20
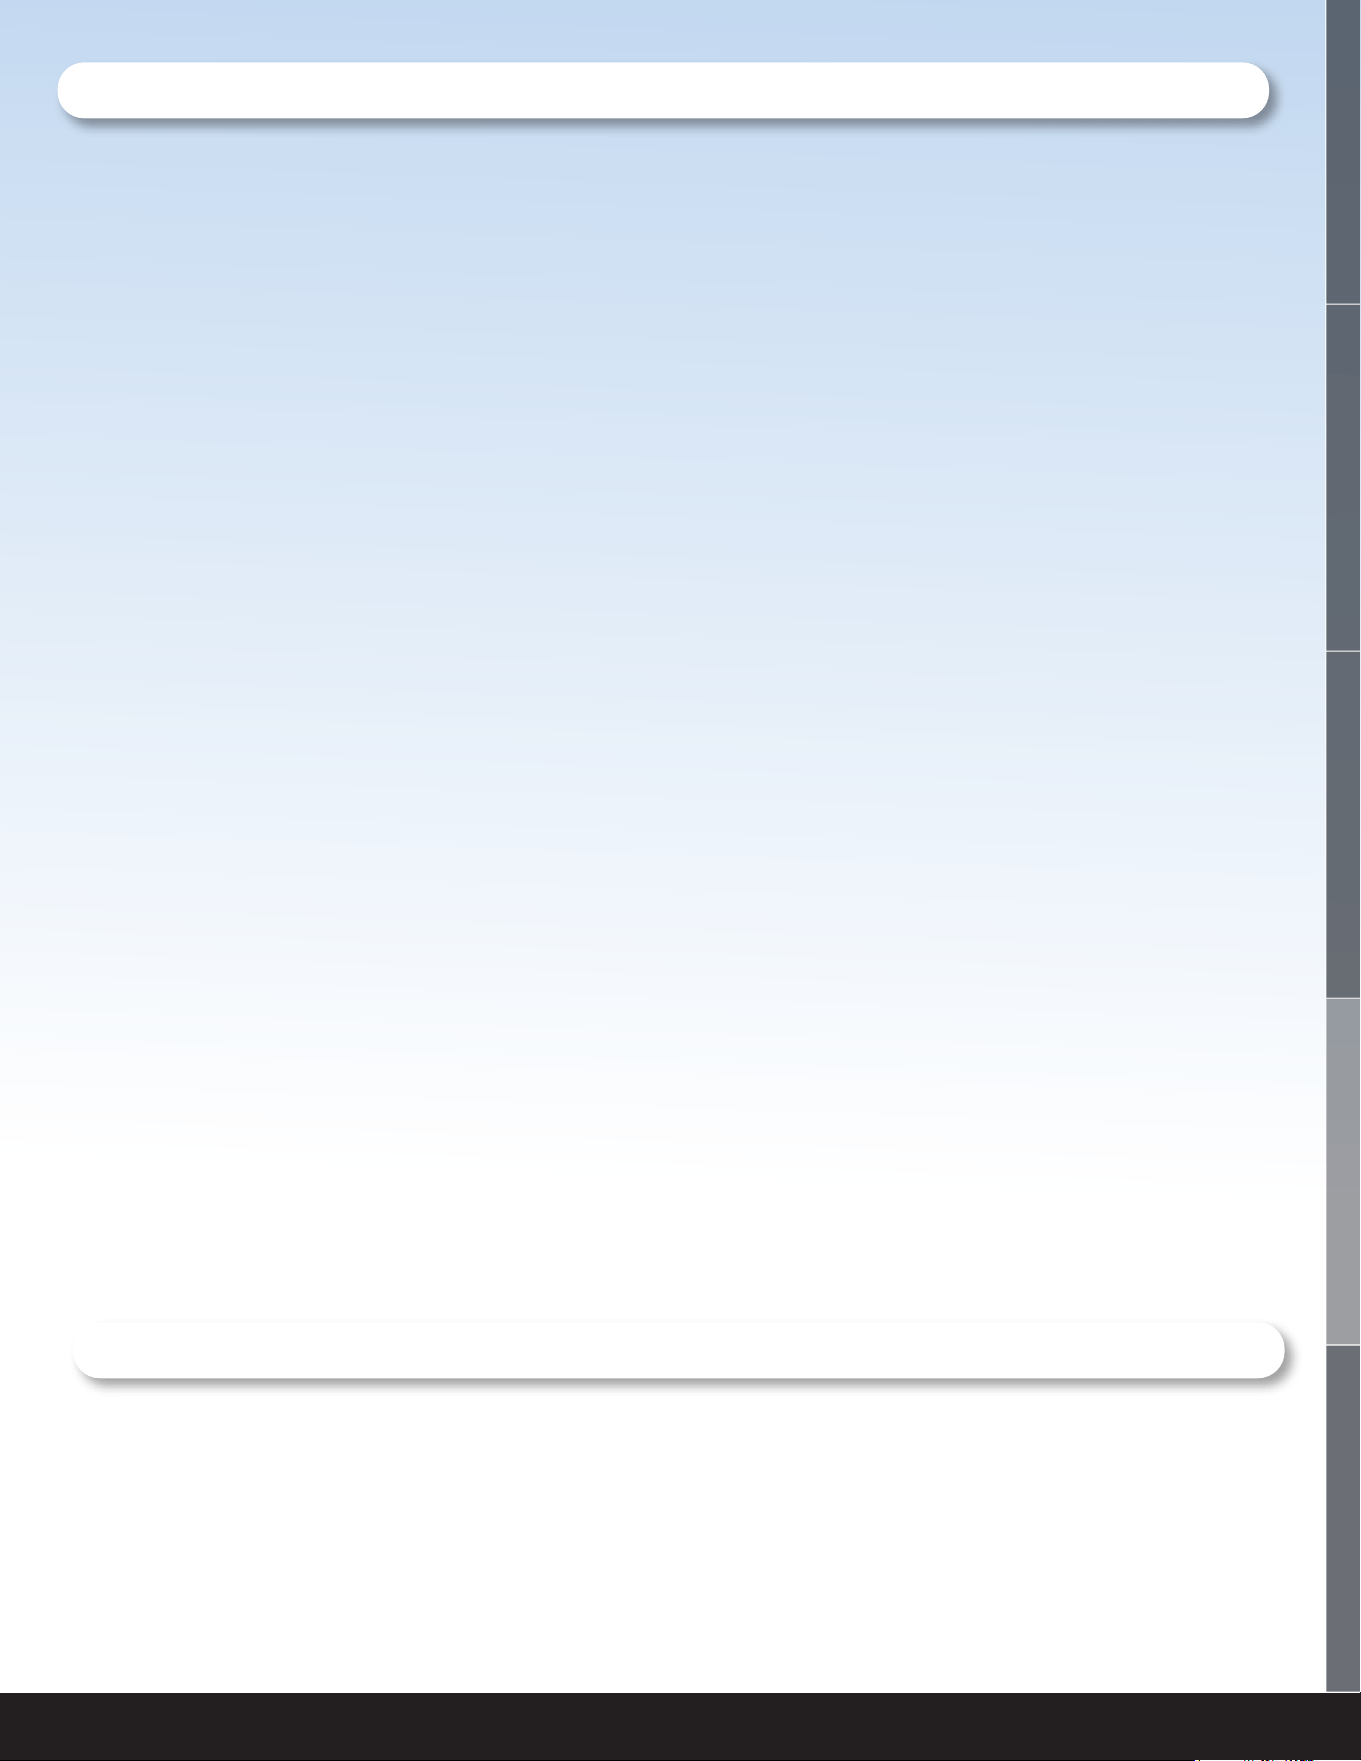
FIRMWARE UPDATE
Your attic fan includes a Firmware Update feature in
order for us to update your Fan Hub to include bug
xes and additional features in the future.
We recommend checking for a new rmware update
a few times per year.
To check for an available rmware update, go into
the Fan Settings page and tap Firmware Update.
If there is no update available, an alert will popup
indicating there is no available rmware update. At
the top of the page you will see your current device
version as well as what the available version is.
If there is an update available, you will be able to
tap the Update button. Once you tap Update, an
alert will popup asking you to type in your Wi-Fi
details.
You cannot initiate a rmware update while your
phone is on cellular so if you are not currently
connected to a Wi-Fi network on your phone, tap
Choose Wi-Fi. This will take you to your phone
settings. Connect to your home Wi-Fi network and
go back to the Smart Control app.
Once back in the app, your Wi-Fi network name will
be pre-lled. Type in your Wi-Fi password and tap
Save. The rmware update will now begin.
Once completed, an alert will popup indicating that
the download was successful and your Hub will
reboot. Your Hub is now updated.
QUIETCOOLSYSTEMS.COM 21
4.3 FREQUENTLY ASKED QUESTIONS
WHAT PROTOCOL DOES THIS CONTROL USE?
This control operates over Bluetooth to connect to your phone. The control uses Wi-Fi for rmware
updates.
WILL MY NEIGHBOR BE ABLE TO CONTROL MY FAN IF THEY HAVE THE SAME
SET UP AS ME?
No. In order to connect to your Smart Attic Fan Control Hub, you must rst pair your device by
using the Pair button on the Hub.
WHAT IS THE RANGE?
The range restriction between your phone and the attic fan is 50 ft through average household
obstructions.
WHY ARE ALL MY LIGHTS BLINKING ON THE HUB AND NOTHING IS
WORKING?
If you’re experiencing blinking lights on all LED indicators on the hub then it is an indication that
your DIP switches are not selected, or multiple DIP switches are selected. Disconnect power, adjust
your DIP switches, and the only light that should be lit is your RED power light.
HOW DO I CHANGE THE DIP SWITCH TO THE CORRECT SPEED OF MY FAN?
You will need to disconnect power, make your adjustment inside the hub, and then reconnect power.
CAN YOU CONNECT THE ATTIC FAN SMART CONTROL TO A SMART HOME
SYSTEM LIKE ALEXA, GOOGLE HOME, OR APPLE HOMEKIT?
No, in the current conguration the Smart Attic Fan Control cannot connect to a smart home
system. Smart home system control is not necessary as the fan runs on it’s own and hardly ever
needs manual control.
WHAT HAPPENS IF I GET A NEW PHONE?
If you get a new phone, you will need to pair your new phone to the Hub. This is very easy to do
if you still have your old phone, or have another phone in the home that is currently paired to the
Hub. If you have another device that is paired to the Hub, follow the instructions on page 16 for
Pair Mode. If you do not have any other devices in the home that are paired to the Hub, you will
need to press the physical Pair button on the Hub.
This control features an innovative re safety shut-off that will automatically turn the fan off if it
detects a temperature above 182ºF in your attic. The purpose of this is to shut off in the event of a
house re to prevent the spread of ames.
4.4 SAFETY
WELCOME
INSTALLATION
WIRING OPERATION
WARRANTY

1-888-QUIETCOOL 22
ROOF MOUNT ATTIC FANS LIMITED WARRANTY
This warranty is extended to the original purchaser of this model or, if this unit is purchased and requires installation by a building contractor,
to the original owner of the home. No subsequent purchaser of the unit or of a home in which it is installed is entitled to any of the benets
of this warranty. The QuietCool Product that you have purchased has a limited warranty from the date of purchase against defects in
workmanship and materials. Please see attached chart below for warranty details. If you believe you received a defective product, call our
customer service at 1-888-QUIETCOOL. Have proof of purchase available to validate the warranty. If it’s necessary to send the defective part
to QC Manufacturing, Inc., freight is paid by the customer. If found to be defective following examinations, any defective part will be replaced
free of charge and returned freight prepaid. This warranty does not cover any labor costs, including those required for diagnosis, eld repair
or replacement or removal of any allegedly defective part. The company reserves the right to require and receive proof of purchase of
the date of purchase before undertaking its obligations under this warranty. The right to require and receive proof of purchase of date of
purchase extends to all licensed dealers of QC Manufacturing Inc. products.
Limitations
QC Manufacturing, Inc. shall not be liable for, and this warranty does not apply to, any failure, defect or damage resulting from or connected
with misuse, abuse, neglect or improper handling or staging , or installation not in strict adherence to QC Manufacturing’s written instructions;
unauthorized alteration to factory specs, lack of maintenance, lack of proper ventilation transportation damage, impact of foreign objects,
re, ood, earthquake, lightning, hurricane, hail, tornado or other violent storms, force majeure or other act of (g)God; or defects in failure
of or damage caused by materials used as roong base over which the product is installed or by movement, distortion, cracking or settling
of walls or the foundation of the building. QC Manufacturing, Inc. reserves the right to discontinue or modify any of its products including,
without limitation, color, and shall not be liable as a result of such discontinuation or modication, nor shall QC Manufacturing, Inc. be liable
in the event replacement material may vary in color in comparison to the original product as a result of normal weathering.
This warranty does not cover damage caused by standing water. Applications exposed to salt spray or within 2 miles of the seacoast, must
be maintained by washing with fresh water at least twice a year. Not doing so could cause warranty to be voided. This warranty is restricted
to failures resulting from normal weathering and does not include coating failures caused by scratches, scrapes or any other unnatural
damage including; improperly formed, fabricated or embossed material. If QC Manufacturing, Inc. replaces any product under this warranty,
it may substitute products designated by QC Manufacturing, Inc. to be of comparable quality or price range in the event the product initially
installed has been discontinued or modied.
Even if your Fan was not properly installed according to QC’s published application instructions, this limited warranty remains in effect if your
Fan fails to perform as a result of a manufacturing defect.
However, QC will NOT compensate you for:
1. Damage resulting from any of the following:
• If any panels or other parts are installed in a manner that does not permit drainage of water from all surfaces.
• Corrosion caused by heavy fallout or exposure to corrosive chemicals, ash or fumes from any chemical plant, foundry,
plating works, kiln, fertilizer manufacturing, paper plant, aviation fuel or the like or corrosion caused by contact of the
panels and trim with dissimilar materials such as copper, lead or graphite or water runoff from these materials onto the
panels and trim.
• Deterioration caused by any corrosive substance or any condensate of any harmful substance contained, generated or
released inside the building.
• Damage caused by spray foam insulation.
2. Damage from anything other than an inherent manufacturing defect in your Fan, such as:
• Improper installation of your Fan, faulty application, or application not in strict accordance with QC’s published
application instructions.
• Settlement, movement, or defects in the building, walls, foundation, roof deck, or materials adjacent to or over which the
Fan was installed.
3. Damage to your Fan or leaking into your building resulting from factor beyond QC’s control, including, but not limited to:
• Acts of nature, such as, but not limited to, hurricanes, earthquakes, extraordinary winds, lightning, hail, re, radiation
• Improper storage or handling of your Fan.
4. Damage resulting from the application of overlying or adjacent roong materials.
5. Damage resulting from mold growth or condensation.
6. Chipping, fading, or peeling paint on your Fan, unless covered by paint coating limitations listed below.
7. Labor costs for removing or replacing your Fan except as specically provided for above or for any
other roong or building materials.
Paint Coating Warranty Coverage
1. Film Integrity
• Warranty covers paint coating not breaking down due to environmental factors, including aking, chipping, or peeling,
in each case under ordinary visual observation.
2. Chalk Performance
• Warranty covers paint coating not chalking or oxidizing in excess of a number 5 rating, when measured in accordance
with the standard procedures specied in ASTM D4214.
3. Color Performance
• Warranty cover freedom from fade or change in AE units calculated in accordance with ASTM D2244 paragraph
6.2.2 CIEL*a*b*, 100 Observer, specular included. Color change is measured on an exposed painted surface that has
been cleaned of surface soils and chalk and then compared to corresponding values measured on the original or
unexposed coated surface. Color change is warranted at AE<5.
4. Edge Creep:
• Warranty covers edge creep that exceeds 0.5”
QUIETCOOLSYSTEMS.COM 23
WELCOME
INSTALLATION
WIRING
OPERATION
WARRANTY
ROOF MOUNT ATTIC FANS LIMITED WARRANTY
Limited Warranty Protection
Roof Mount Attic Fan - Controls
QC Manufacturing, Inc. extends this warranty coverage to the original purchaser of the following QuietCool products (see
attached for applicable products) for a period of time (varies by product) provided that the product has been installed in strict
accordance with QC Manufacturing, Inc.’s written installation instructions. Under this warranty, QC Manufacturing, Inc., at no
charge, will repair or replace any product found to be defective during the warranty period as long as proof of purchase is
submitted to QC Manufacturing, Inc. (QC Manufacturing, Inc.’s period begins when the product installation is completed). QC
Manufacturing, Inc.’s maximum liability under this limited warranty will be equal to the reasonable cost to replace the defective
product.
Motor Replacements
The electrical motor is to be used solely as a direct replacement for a motor of the same model in QC Manufacturing, Inc.,
QuietCool products. Using the motor in any other product could result in electrical shock and/or re, which may cause
property damage, serious injury or even death. Any motor replacement should be installed by a qualied licensed electrician in
accordance with local, state and national electrical codes and standards. Make sure that power to the unit has been completely
turned OFF at the breaker before approaching or inspecting or installing the replacement motor. If found that the motor failure
was by improper installation QC will not be liable for any cost associated with the motor replacement. For example, cost of
motor and shipping costs to and from the customer. Repairs and replacement parts supplied under this warranty are warranted
only for the period listed in the below chart from the date of original retail purchase of the unit.
Other Conditions
This warranty is the entire agreement between you and QC Manufacturing, Inc., and there are no other oral or written
warranties, liabilities or obligations of QC Manufacturing except apart from those set forth herein. Pertinent state law shall
control for what period of time subsequent to sale a consumer/homeowner may seek a remedy pursuant to the implied warranty
of merchantability or tness for a particular purpose. In no event shall QC Manufacturing, Inc. be liable for consequential or
incidental damages of any kind, including any damage to the building, its contents or any persons therein, resulting from the
breach of any warranty set forth herein, unless exclusion of these types of damages are specically prohibited by state law. No
eld representative of QC Manufacturing, Inc. or any distributor or dealer is authorized to make any change or modications to
this warranty.
Products Model Numbers Warranty
Roof Mount Attic Fans
AFR PRO-1.3
AFR SMT PRO-1.3
AFR SMT PRO-2.0
AFR SMT ES-2.0
Fifteen (15) Year coverage applies to the
QuietCool motor fan assembly which
includes Motor, Fan Blade, Fan Housing and cover.
Five (5) Year coverage applies to paint coating of
fan housing and cover.
Accessories Model Numbers Warranty
Controls
IT-AF-SMT, IT-AF-SMT-NR, IT-30001, IT-30002
One (1) Year coverage applies to the models
indicated.
Flashings
FLA-SEC-3743, FLA-CRB-2222
Fifteen (15) Year coverage applies to the models
indicated.
Five (5) Year coverage applies to paint coating of
the models indicated.
How to Start the Warranty Process
To obtain service under this warranty, rst contact your dealer where you purchased the equipment. If you are unable to nd
or reach your dealer, contact Customer Service at QC Manufacturing, Inc. by phone, email or visiting our website at https://
quietcoolsystems.com/support/return-merchandise-authorization/ to start the RMA process.
An RMA (Return Merchandise Authorization) form is required for returns to the factory to ensure your return can be processed
efciently and quickly. There is no informal dispute settling mechanism available in the event of a controversy involving this
warranty.
QC Manufacturing, Inc. Customer Service
26040 Ynez Rd.
Temecula, CA 92591
www.QuietCoolSystems.com
951-325-6340
Rev. 5/5/23

FAN SERIAL NUMBER INFORMATION
RETAIN FOR YOUR RECORDS.
SERIAL NUMBER IS REQUIRED FOR WARRANTY PURPOSES.
1-888-QUIETCOOL | WWW.QUIETCOOLSYSTEMS.COM
Rev. 8/30/23