A
B
C
FRONT
FRONT
BACK
BACK
RIGHT
RIGHT
LEFT
LEFT
1.21.1 2.1 2.2
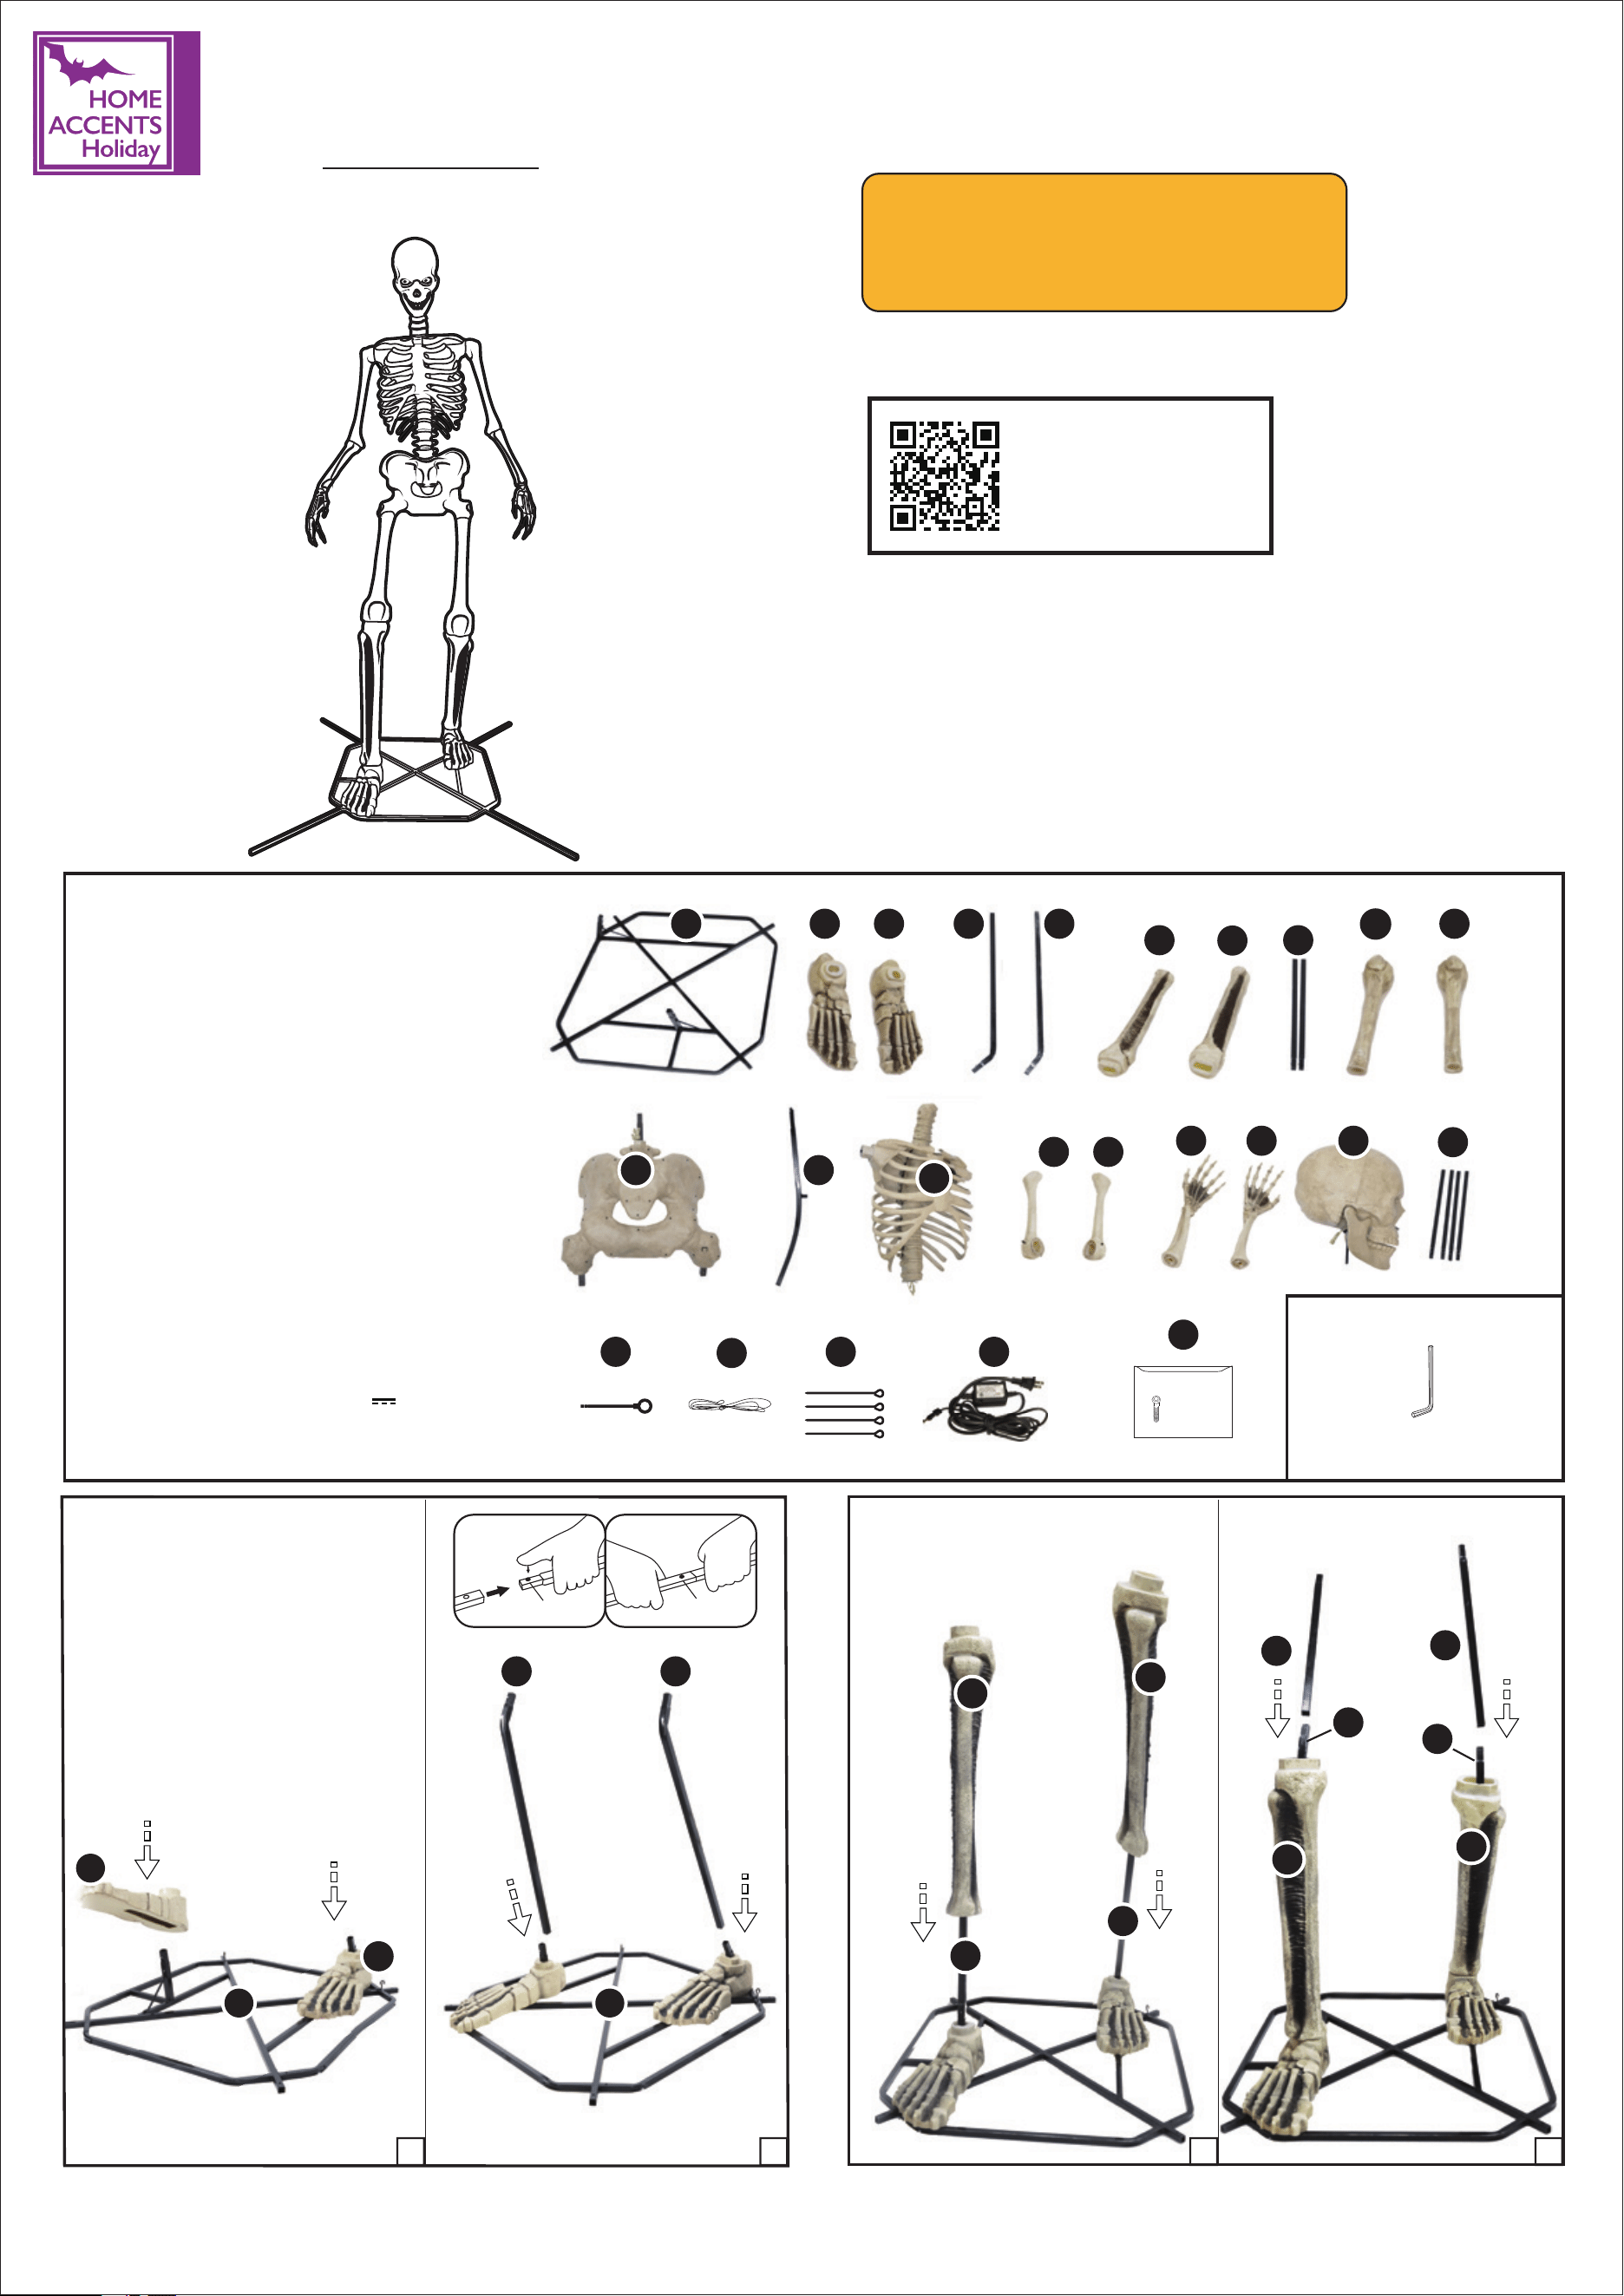
NOTE: Throughout the instructions, Right
and Left are relative to the character.
Hex wrench included for assembly.
NOTE: Slide the two shins over
the lower support poles and fit
them onto the feet as shown.
PARTS LIST
A. Base x 1
B. Right Foot x 1
C. Left Foot x 1
D. Right Lower Support Pole x 1
E. Left Lower Support Pole x 1
F. Right Shin x 1
G. Left Shin x 1
H. Upper Support Poles x 2
I. Right Femur x 1
J. Left Femur x 1
K. Pelvis x 1
L. Spinal Support x 1
M. Ribcage x 1
N. Right Humerus x 1
O. Left Humerus x 1
P. Right Forearm x 1
Q. Left Forearm x 1
R. Head x 1
S. Base Stabilizers x 4
T. Loop Screw x 1
U. Tether Cable x 1
V. Stakes x 4
W. Adapter * x 1
X. Small Parts Bag x 1
Power Adapter * Spec
Input: 120V~60Hz
Output: 5.9V 3.0A
Wattage: 17.7W
A
A
B D
E
E
E
F
F
G
G
F
G
H
H
H
I
J
O
K
P Q R
S
T
U
V W
X
L
M
N
C
D
D
D
1/5
E
Means It's
Locked
Click
Locking Pin
ASSEMBLY REQUIRES AT LEAST 2 ADULTS, 3 ADULTS ARE RECOMMENDED.
PLEASE FOLLOW THE STEP BY STEP GUIDE AND ENJOY YOUR 12 FT GRAVE
& BONES GIANT-SIZED ANIMATED LED APP CONTROLLED SKELLY WITH
LIFEEYES LCD EYES!
X1 Screw
M8*18mm
USE AND CARE GUIDE
12 FT Grave & Bones Giant-Sized Animated LED App
Controlled Skelly with LifeEyes LCD Eyes
TM
USA Item 1015092967
Model 26SV25555
1-855-HD-HOLIDAY (1-855-434-6543)
HOMEDEPOT.COM
Questions, problems, missing parts? Before returning to the store, Please have a copy of your receipt
ready and email the SVI customer experience team ([email protected]) within 90 days of
the date of purchase or call Home Accents Holiday Customer Service 8 a.m. - 7 p.m., EST,
Monday - Friday, 9 a.m. - 6 p.m., EST, Saturday
M6 hex wrench
(included)
TOOLS REQUIRED
Please scan QR
code to download
APP. Please refer to
the App instruction
manual for details.
To get started, Please hold the
“MODE” button for 7 seconds to
take the item out of demo mode.
Note: There may be slight differences between the App and Instruction
manual. Please refer to the App for the actual interface. Please
download the latest version of the app.
3.1 3.2
4.1
4.2
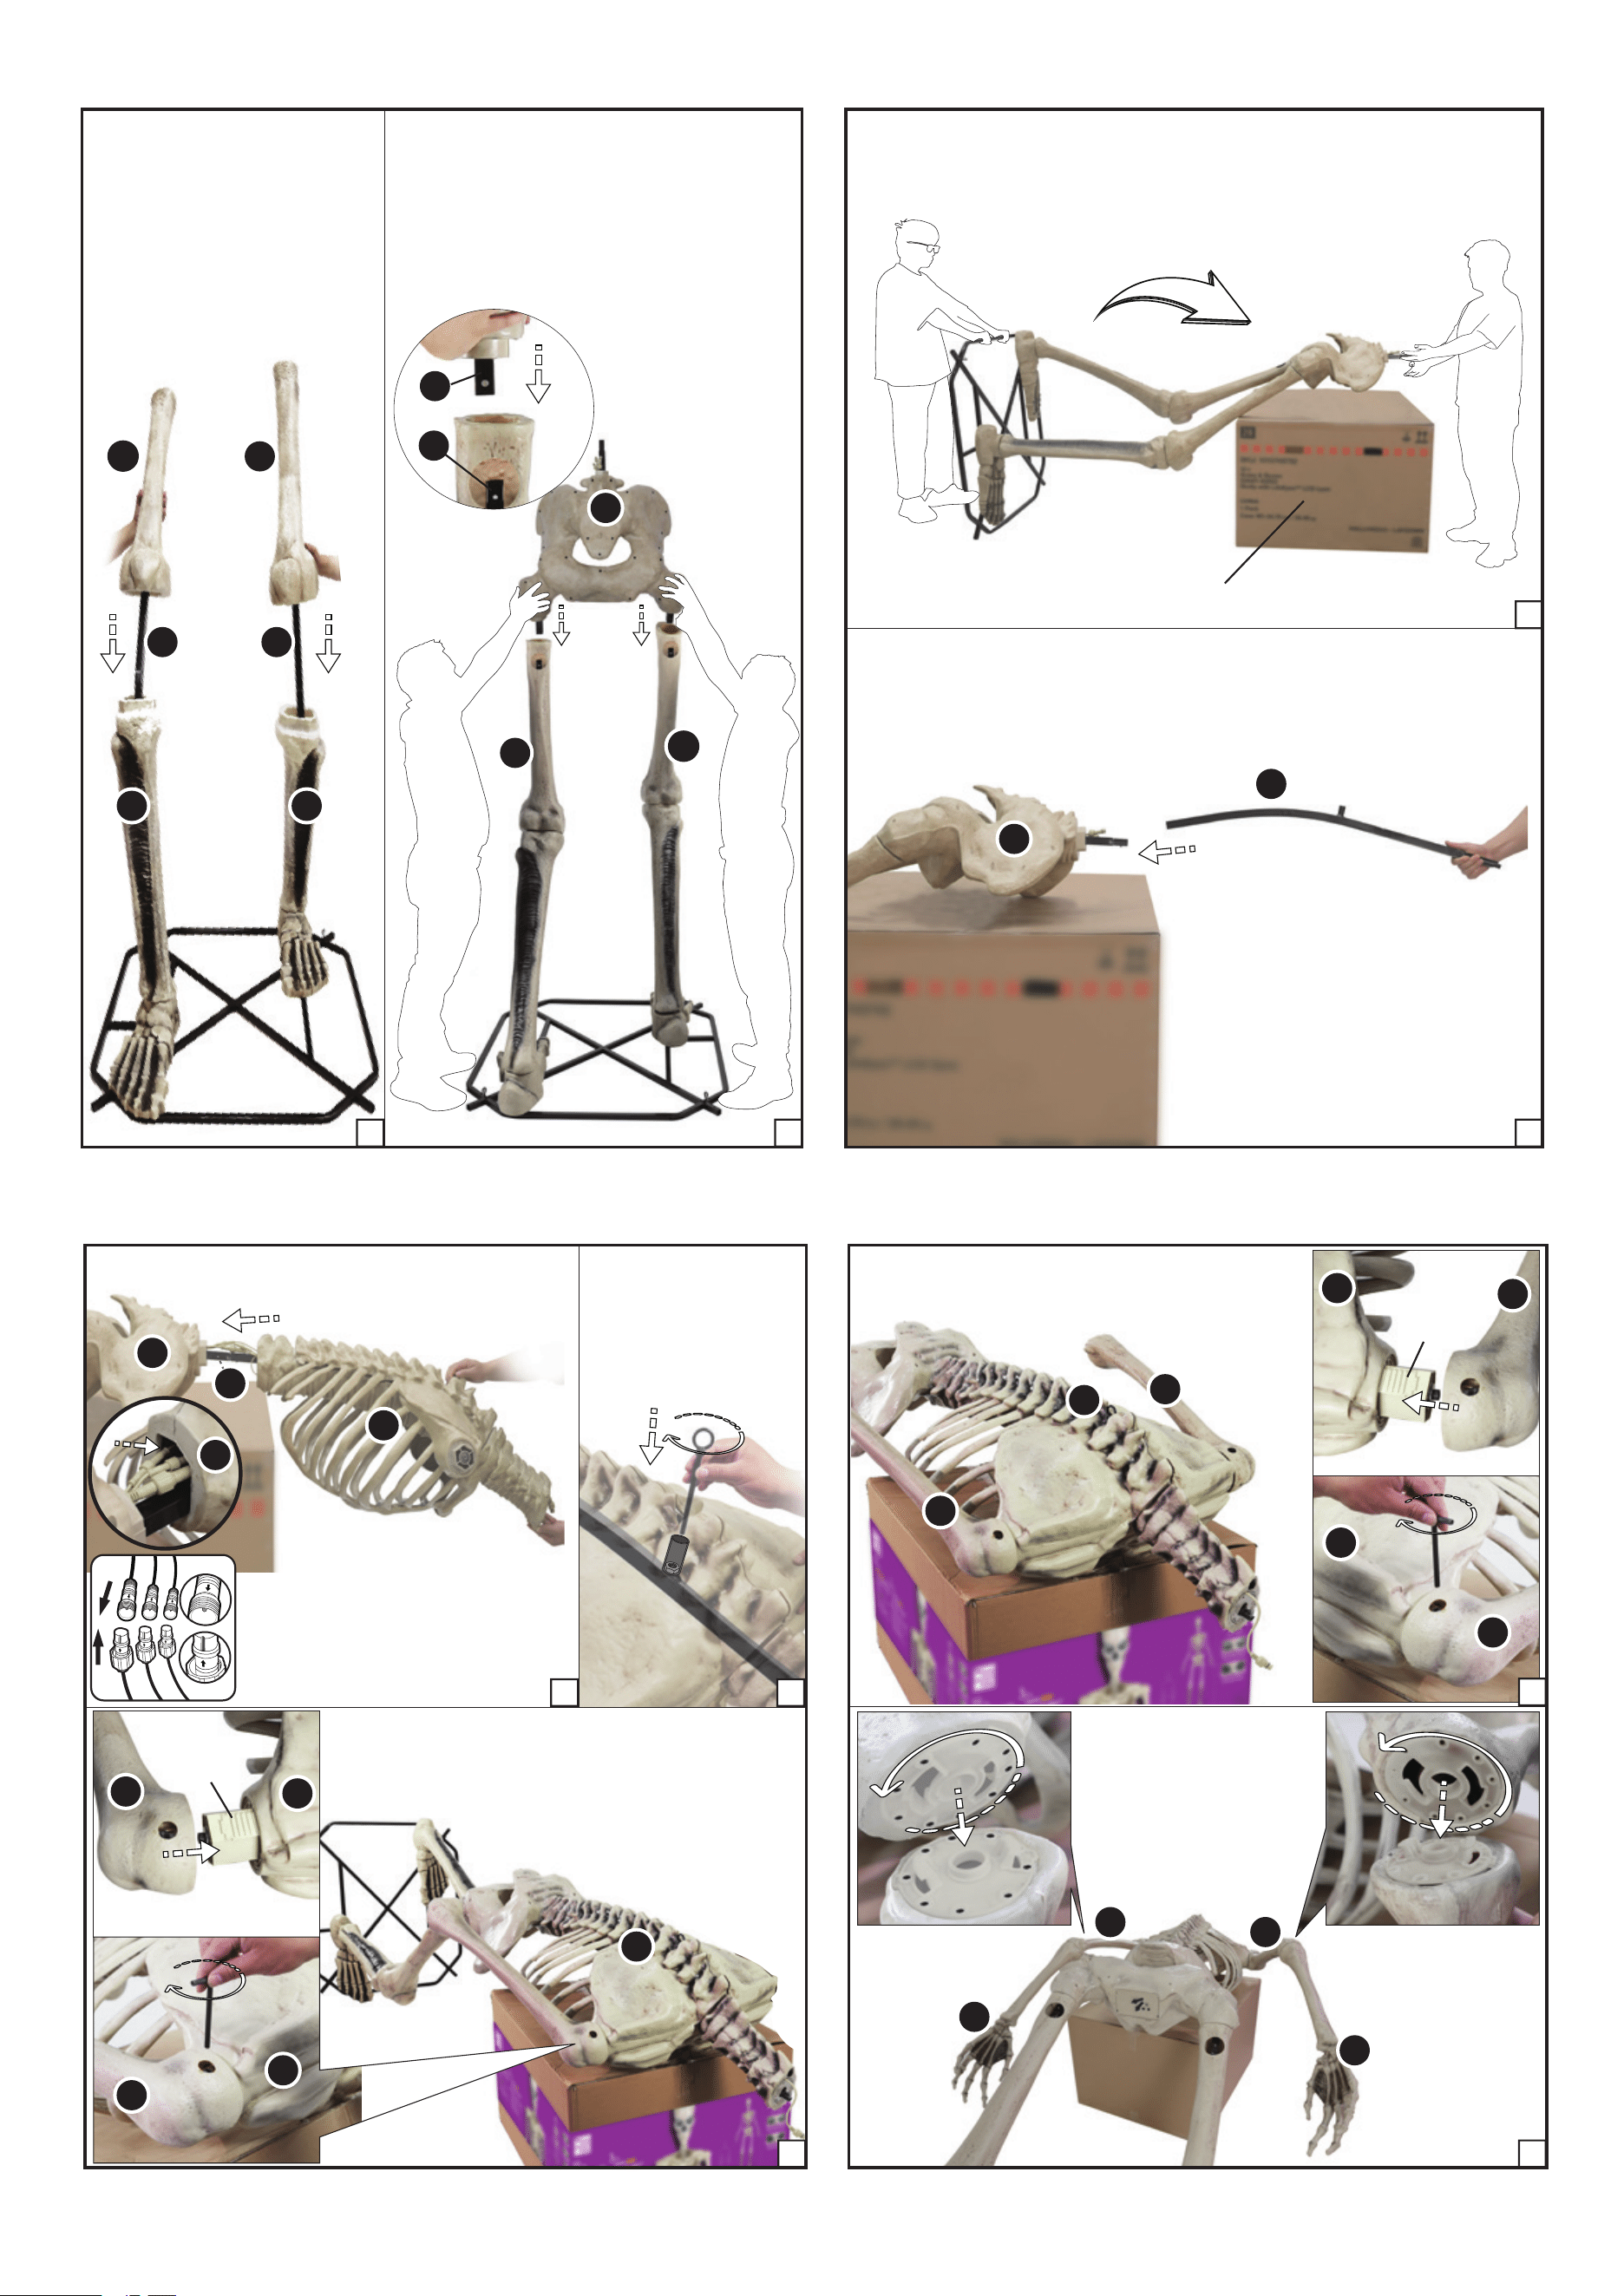
NOTE: Slide the two femurs
onto the upper support poles
and then fit them onto the
shins as shown.
Outer box
O
OO
M
M
M
M
NOTE: Screw the
loop into the area
inside of the
spine as shown.
T
K
K
L
F G
H H
I
I
J
J
K
2/5
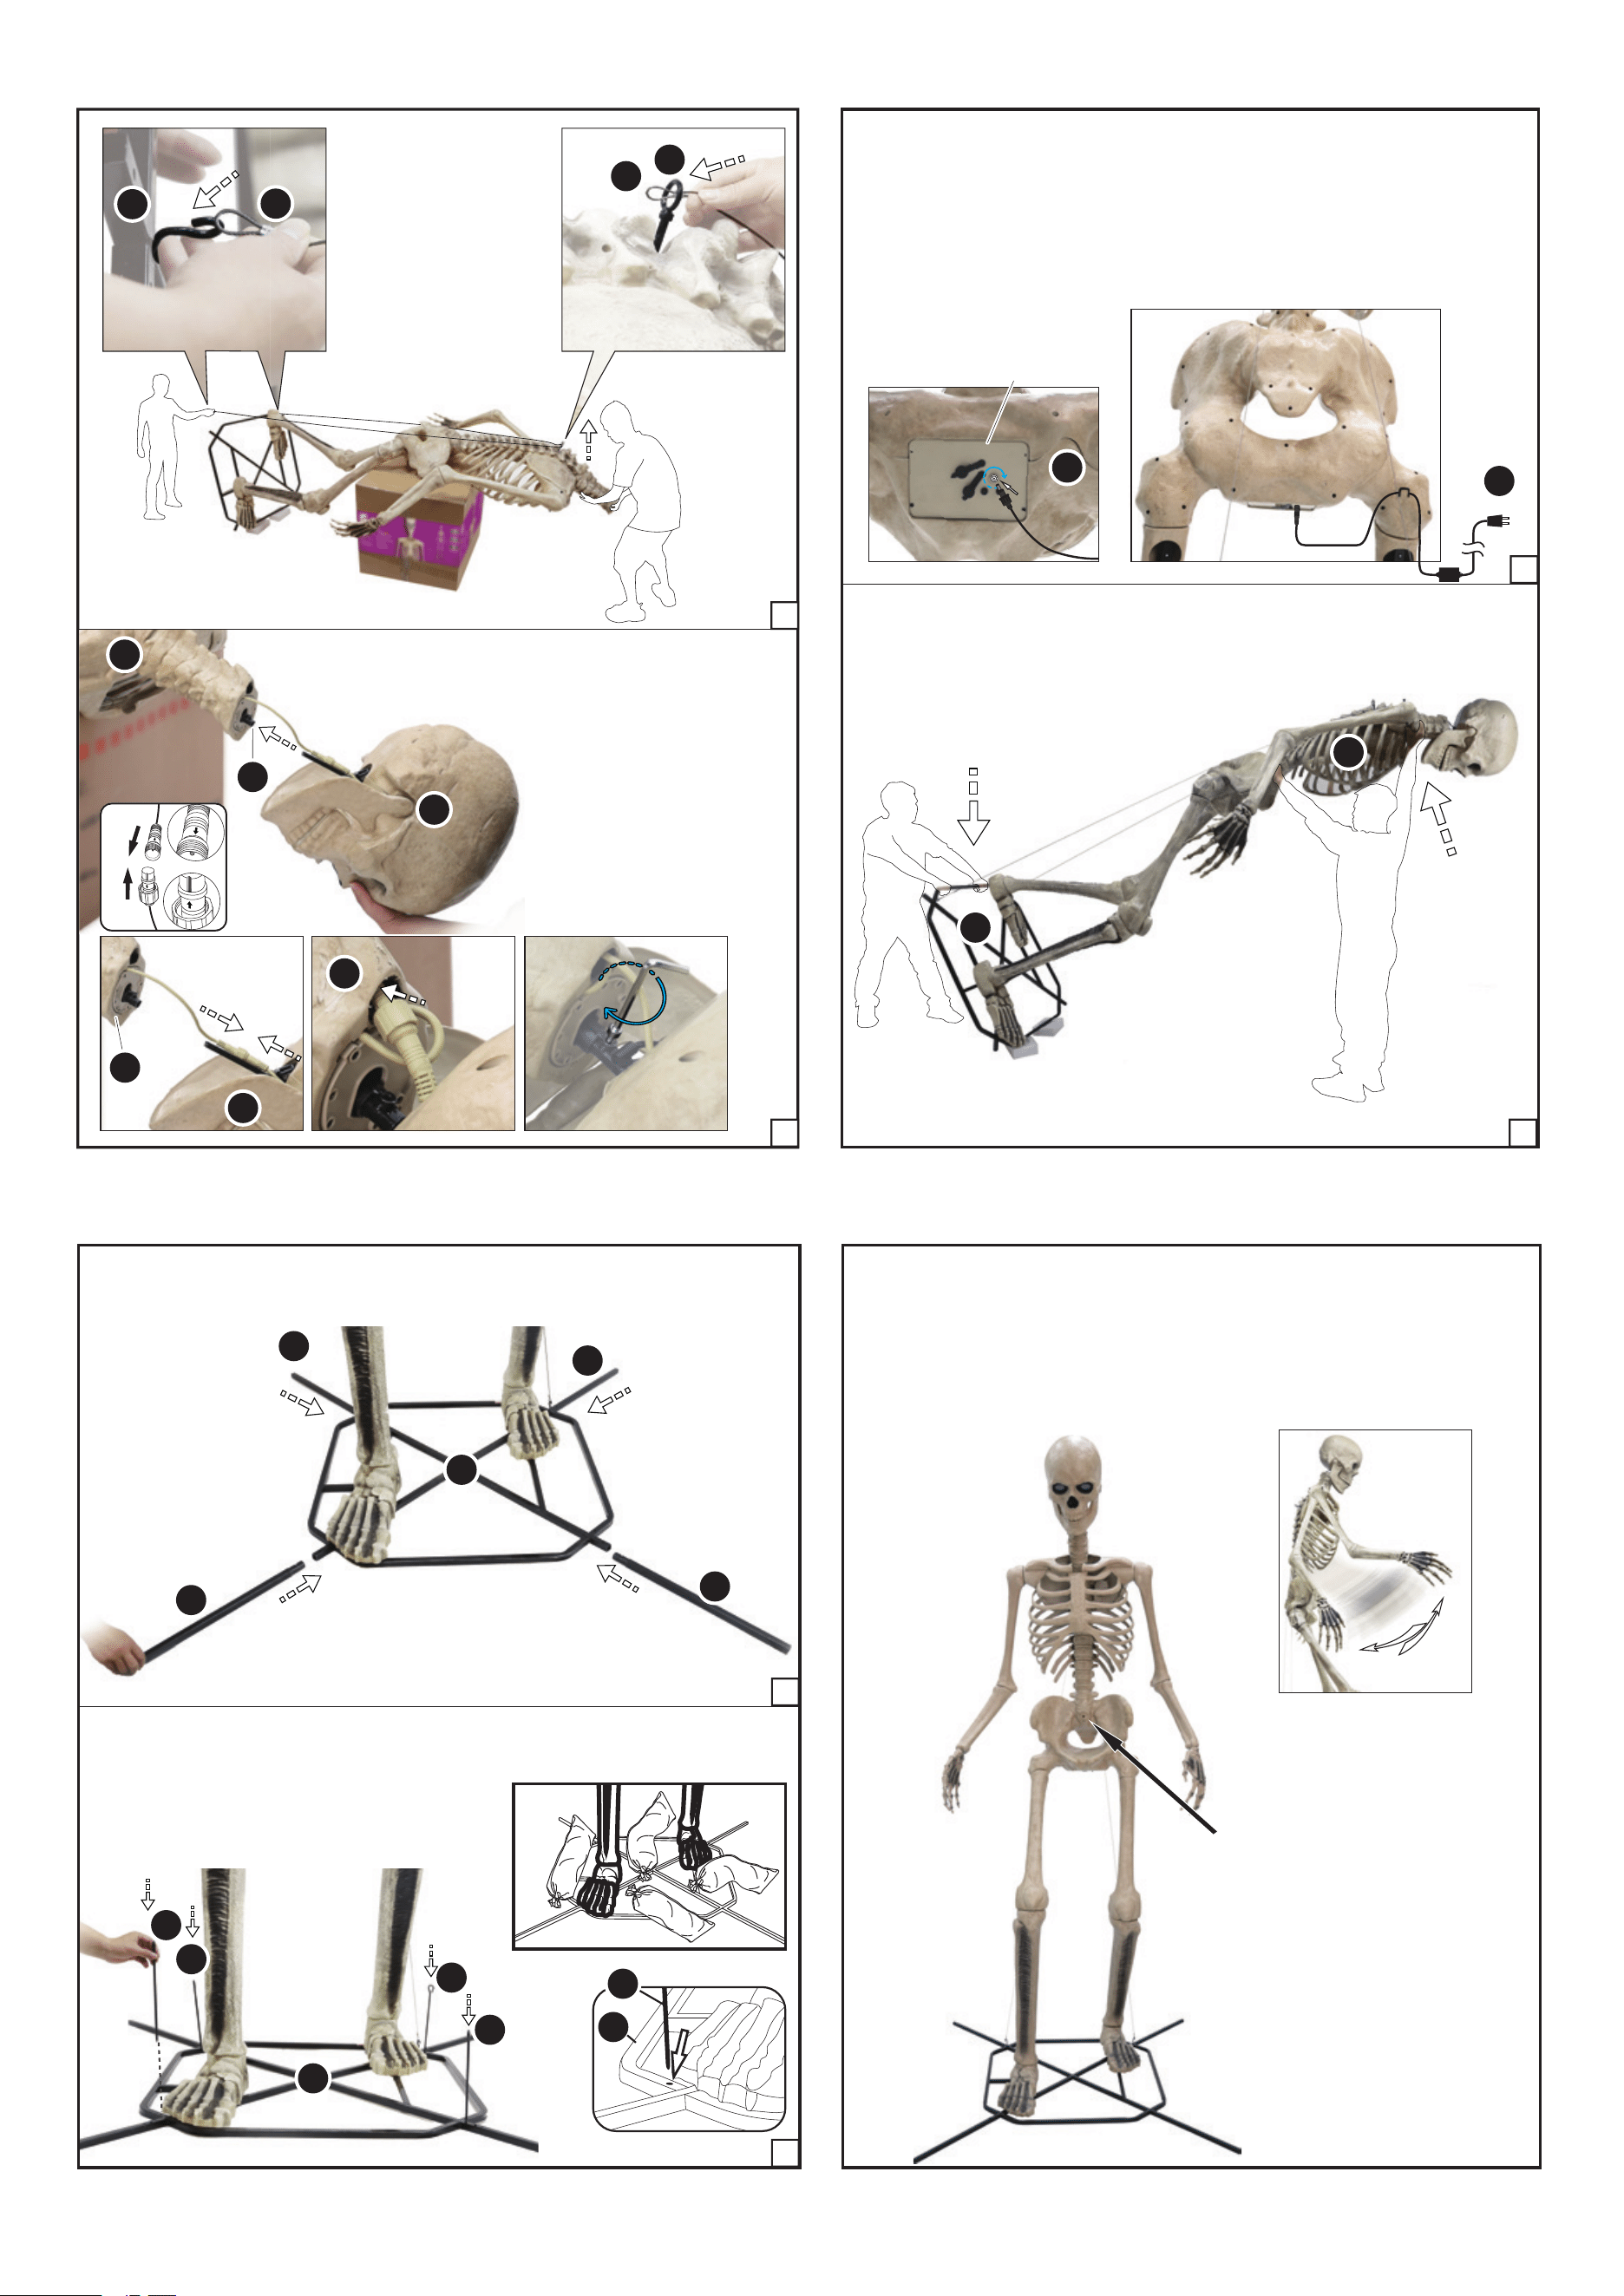
NOTE: Lean the skeleton against the box it came with for easier
assembly. 3 adults are strongly recommended for this step.
NOTE: A ladder and more than 2 people
are advised when assembling the (K)
Pelvis to the (H) Upper Support Poles
and the (I,J) Femurs.
If there is difficulty in assembling the
(K) Pelvis, try adjusting the upper legs
until they are properly aligned.
5.25.1
5.3
6.1
6.2
After connecting the wires, hide the excess inside the
available cavity at the bottom of the (M) Ribcage.
O
Q
M
N
NN
N
N
M
M
M
M
O
M
P
NOTE: Do not overtighten this screw. Overtightening may
result in damage to the product. The hex screw should
be perpendicular to the grooves on the shoulder.
If a screw is missing, check inside the box as it may
have fallen out of the arm.
M
Grooves
Grooves
Screw
M8*18mm
K
H
X1 Screw
M8*18mm
X1 Screw
M8*168mm
X1 Screw
M8*18mm
L
NOTE: When connecting cables, ensure that the
arrow indicators on each cable end are lined up with
and pointing at each other. There is also a groove
and a rod like protrusion by these arrows that fit into
each other. Then firmly press the cables together.
Rotate the cable cap clockwise onto the threading of
the corresponding cable until firmly in place.
9.1
9.2
NOTE: The arms can be raised or lowered to your preference. Apply firm steady
pressure on the upper arm.
Do not apply pressure at the hand or forearm to adjust arm height, this may damage
the parts.
Loud 'clacking' is normal as the arm moves. If you're unable to move the arm,
please contact customer service for further instructions.
Please pose arms before standing up, otherwise a ladder will be needed.
IR SENSOR
Be sure nothing is
blocking the sensor.
A
A
S
S
S
S
V
V
V
V
3/5
7.1
8.2
8.1
7. 2
CAUTION: Cable may have
sharp ends, use caution
when assembling.
If cable cannot reach, the
upper body of the 12ft
Giant Sized Skelly needs
to be lifted while in its
laying position. This
should enable the cable to
reach.
AA
U
U
U
U
T
T
V
A
R
R
M
M
M
NOTE: When plugging the adapter
into the 12ft Giant Sized Skelly,
ensure that the cap on the adapter
cable is rotated clockwise until
firmly in place as shown.
ADAPTER
Control Panel
K
A
M
W
CAUTION: The (U) Tether Cable must be secured before standing up the 12ft Giant
Sized Skelly. It is strongly advised that 3 adults participate in the assembly,
standing the skeleton up, setting the skeleton down, and disassembly. The item
must be laid down for disassembly.
X1 Screw
M8*18mm
L
NOTE: If your application requires additional
stability, add weights on top of the base (for
example sand bags – not included). You can
also add guy wires (not included) for added
stability.
NOTE: Once the (R) Head
is fully set in place,
tighten the screw.
4/5
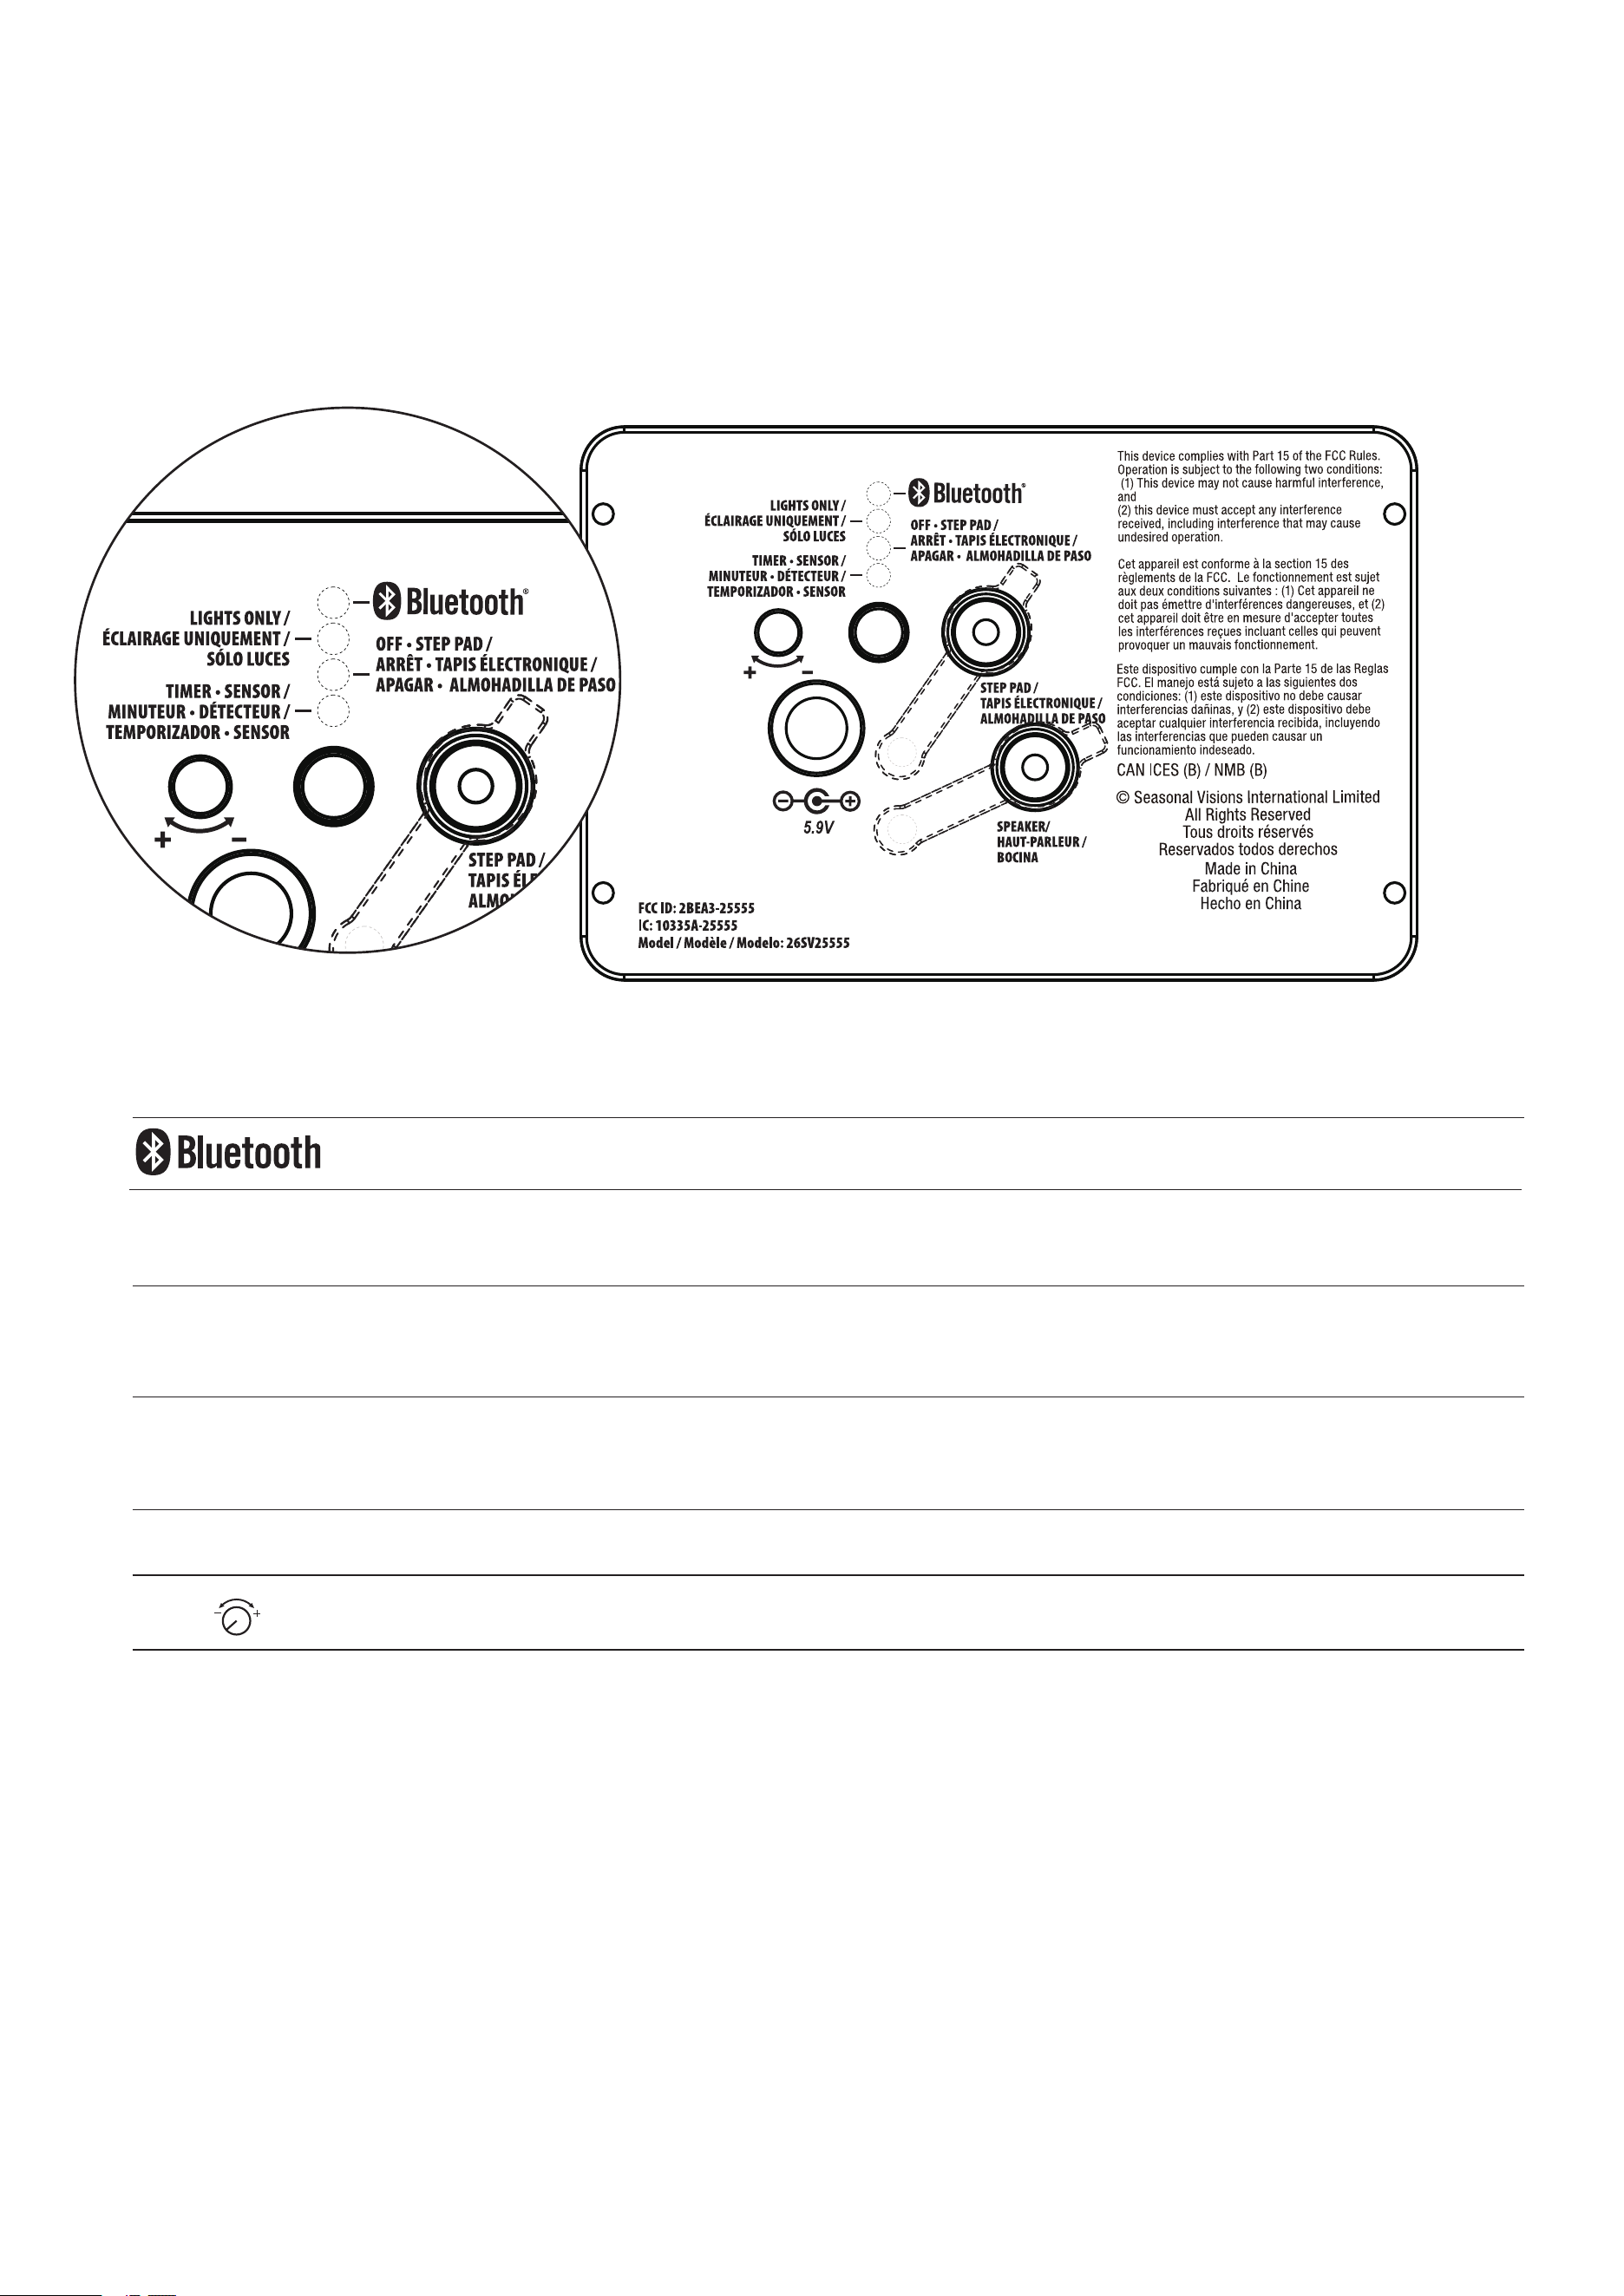
OPERATION INSTRUCTIONS - CONTROL BOX:
Plug the power adapter into a standard power outlet. Locate the push button on the control panel underneath the Pelvis (K). This button Let's the
user -lets the user . user toggle between BLUETOOTH, LIGHTS ONLY, OFF-STEP PAD, and TIMER-SENSOR.
NOTE: The 12 FT Grave & Bones Giant-Sized Animated LED App Controlled Skelly with LifeEyes LCD Eyes has 4 different function settings (BLUETOOTH, LIGHTS ONLY, OFF-STEP PAD and
TIMER-SENSOR) and 20 different Eye Options (MODES) to choose from from - see images on box.
Settings can be controlled at the Control Panel but eyes can only be toggled with the DECOR PRO phone App.
Timer setting is only available on the Skeleton Control Panel, located on the underside of the Pelvis (K).
WARNING
This item is not a toy and should be used for decoration only. This item contains small parts that can be a choking hazard. Keep all plastic and wire parts away from children.
1. Please use the adapter supplied by manufacturer.
2. Please assemble item according to instructions. Connect all wires according to matching color.
3. Children should be supervised by adults. Item should not be grabbed, as it becomes a tipping hazard. Keep flammables away from the adapter, as it heats up during operation.
Please view all instructions carefully before assembling. Save this instruction sheet for future reference.
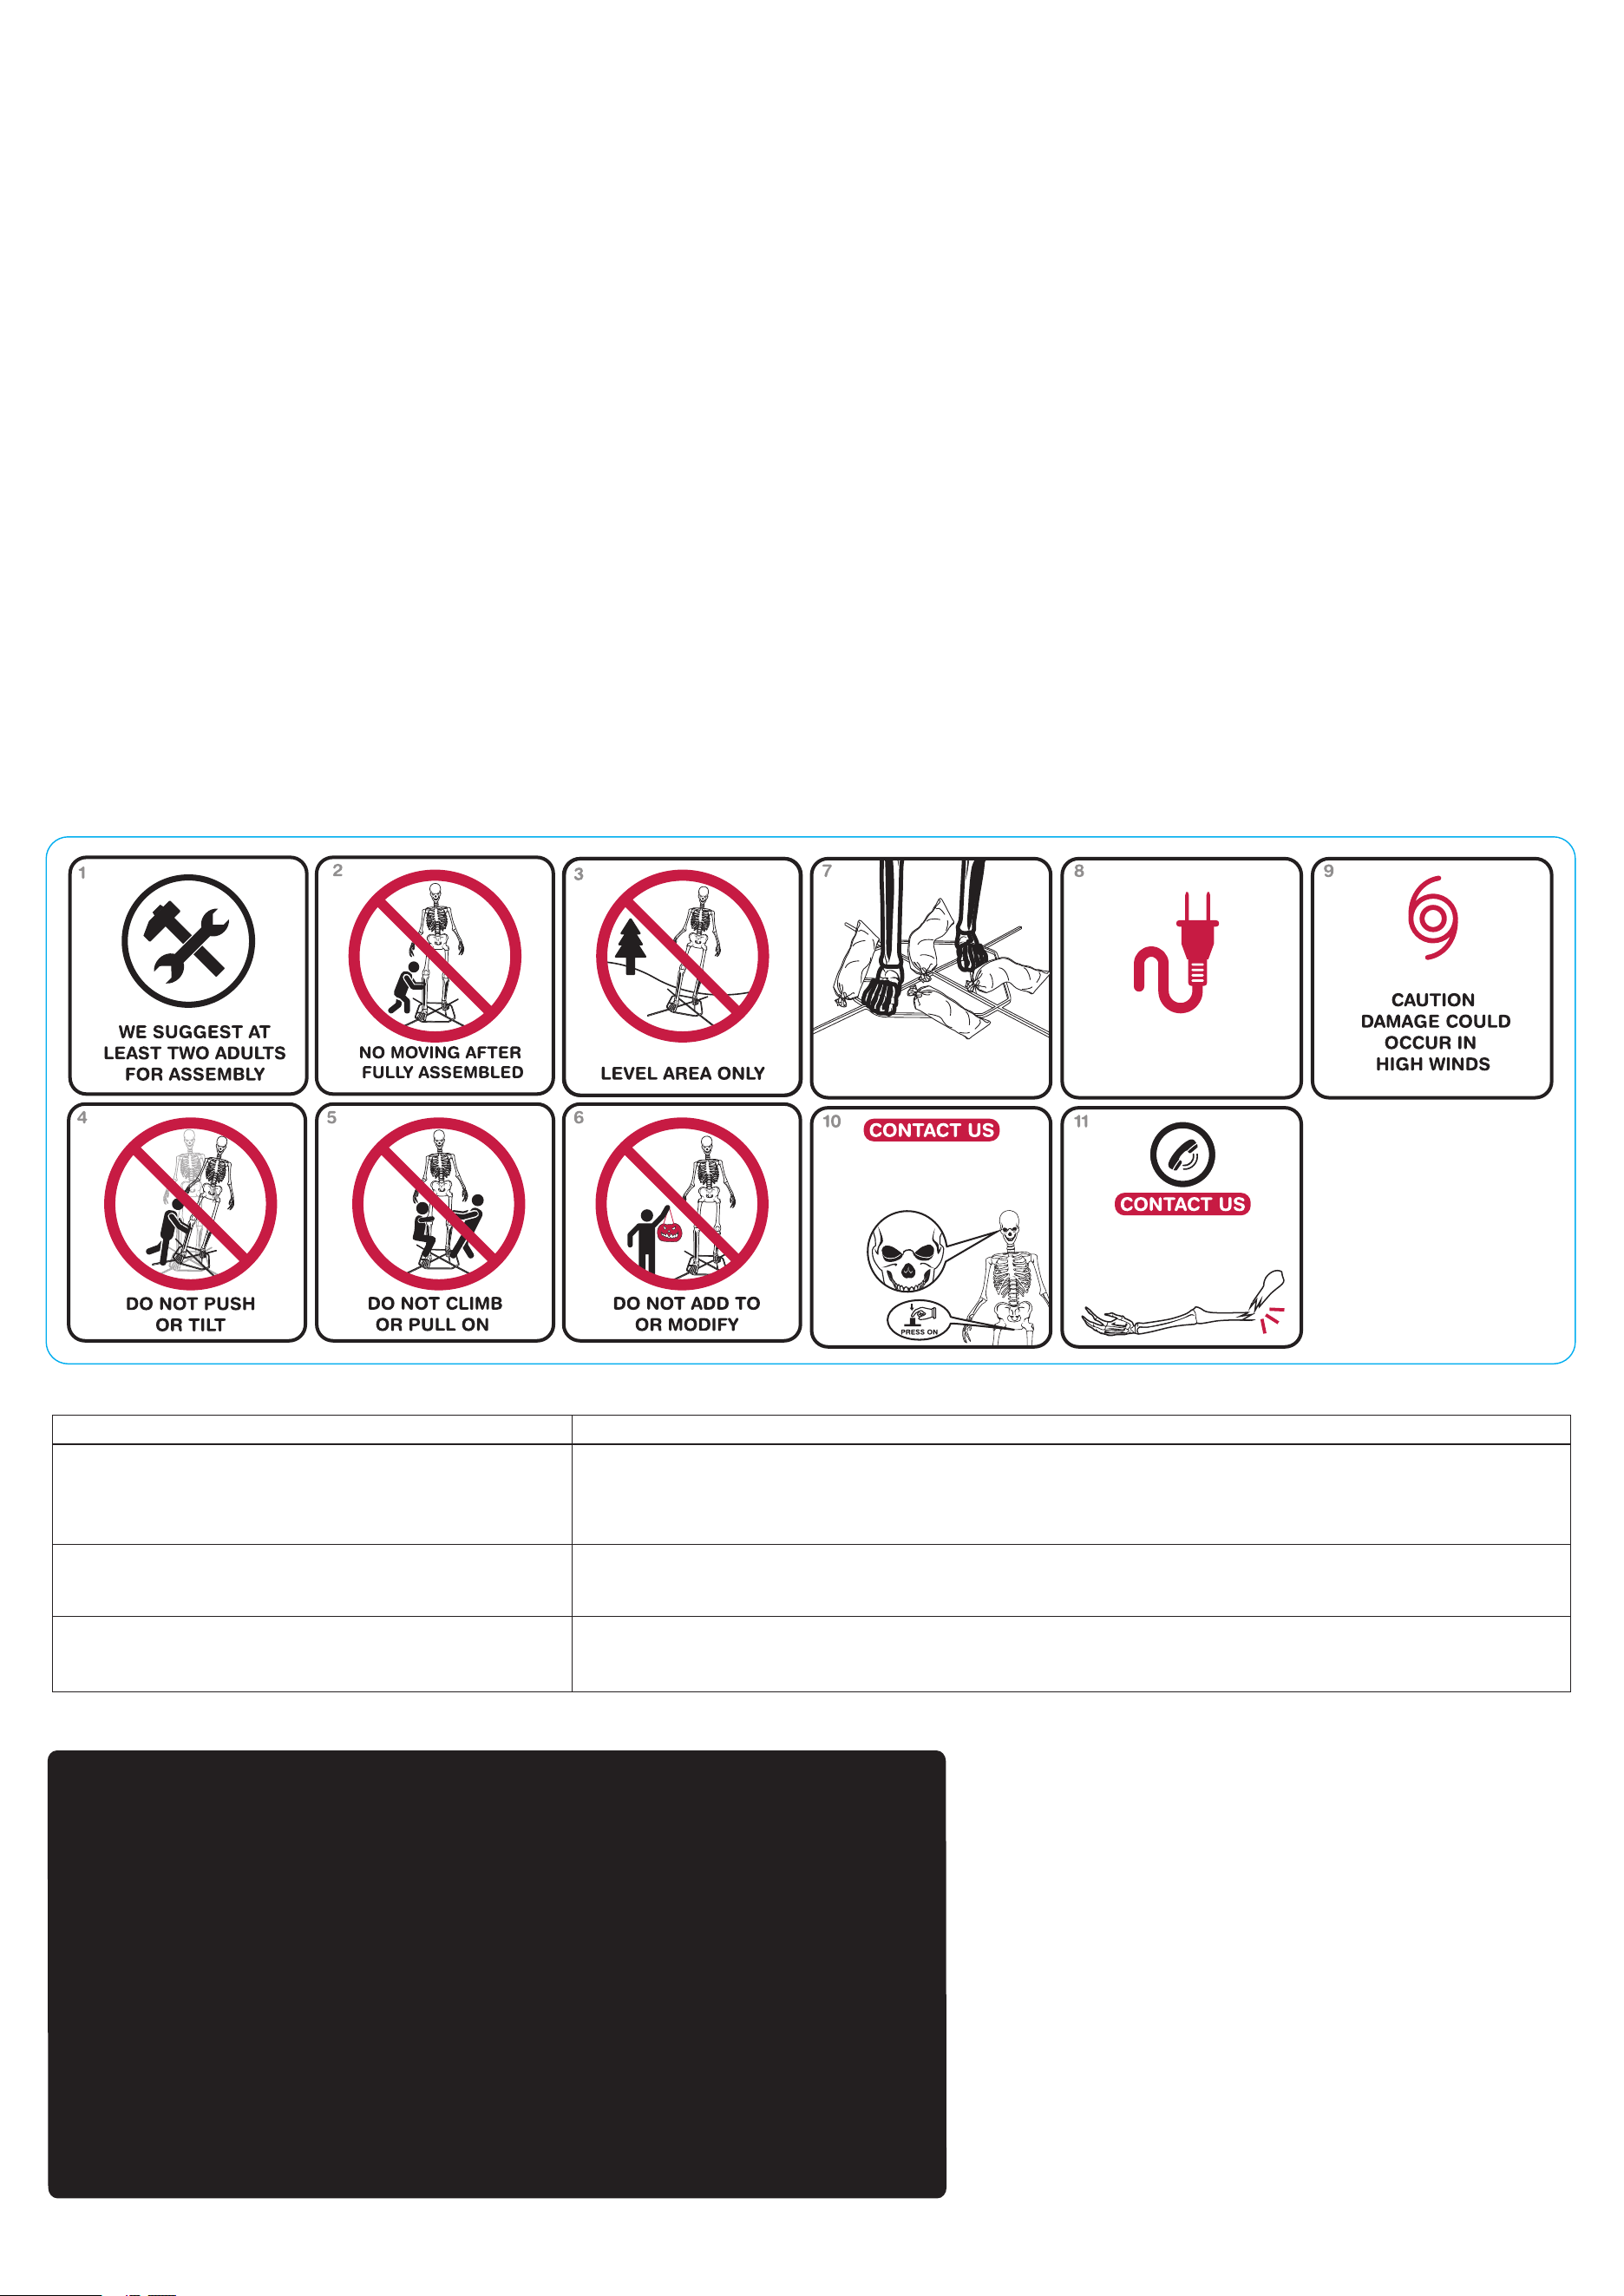
□ Lay product down before a storm or strong winds.
□ Don't climb or pull on product.
□ Do not add to or modify unless accessory is designed for product
□ Assemble and place the product on level surfaces only.
□ Don't push or tilt product.
THIS PRODUCT IS COMPATIBLE WITH EXTERNAL TIMERS AND PRESERVES ITS SETTING WHEN THE POWER IS TURNED OFF/ON.
2. Settings:
Press the MODE button to switch to "Bluetooth" Mode. Please refer to the APP Operation Instructions.
This switch mode will activate only the LifeEyes LCD eyes and lights of the item indefinitely until the switch mode is changed from the lights only setting.
This switch mode allows the item to be activated only if triggered by using a Step Pad or Try Me Button (Not Included). The lights, sounds, and animation
of the item will operate for one activity cycle with each Step Pad or Try Me activation. Otherwise, the item will stay off.
This switch mode will activate SENSOR mode for 6 hours followed by a deactivated period of 18 hours. This cycle will continue indefinitely unless the
setting is changed. During the 6-hour active period, the Infra-red (IR) sensor can be triggered. If the Infra-red (IR) sensor is activated, the prop will
activate for one activity cycle (animation and sound). The infra-red (IR) sensor has a range of up to 4 m/13 ft and will activate when someone comes
within an 80-degree angle from left to right as well as from above or below.
Plug any external speaker into this receiver using a 3.5 mm audio jack.
Raise or lower the volume using the volume control turn dial, turn all the way down to turn the volume off .
OFF • STEP PAD /
ARRÊT • TAPIS ÉLECTRONIQUE /
APAGAR • ALMOHADILLA DE PASO
TIMER • SENSOR /
MINUTEUR • DÉTECTEUR /
TEMPORIZADOR • SENSOR
LIGHTS ONLY /
ÉCLAIRAGE UNIQUEMENT /
SÓLO LUCES
SPEAKER/
HAUT-PARLEUR /
BOCINA
5/5
FAQ:
Why are the eyes of my 12 FT Grave & Bones Giant-Sized Animated LED App
Controlled Skelly with LifeEyes LCD Eyes are not working or do not light up?
• Check and ensure that all cables are connected to their corresponding cable as shown in the
instruction sheet (See steps 5.1 and 7.2)
My item does not activate or turn ON?
• Check that the adapter is properly connected with the threaded cap fully tightened to your 12ft Giant
Skelly and is plugged into a live outlet. (See step 8.1)
• Check and ensure that there is power to your 12 FT Grave & Bones Giant-Sized Animated LED App
Controlled Skelly with LifeEyes LCD Eyes by checking for the red indicator light
on the control panel. If there is power, a red indicator light will light up on the control box. If the red light
indicator is set to "OFF", please change it to "BLUETOOTH," "LIGHTS ONLY," or "TIMER-SENSOR."
If all the information above does not solve your issue, please contact our SVI customer service
experience team email (customerservice@svius.com) or call Home Accents Holiday Customer Service
Hotline 1-855-HD-HOLIDAY (1-855-434-8543
1-855-434-6543
(1-855-HDHoliday)
IF MOVEMENT,
SOUND OR LIGHTS
DON'T WORK
USE WEIGHTS
ON THE BASE
USE INCLUDED
ADAPTER ONLY
WARNING: Changes or modifications to this unit not expressly approved by the party responsible for compliance could void the user’s authority to operate the equipment.
NOTE: This equipment has been tested and found to comply with the limits for a Class B digital device, pursuant to Part 15 of the FCC Rules. These limits are designed to provide
reasonable protection against harmful interference in a residential installation. This equipment generates, uses and can radiate radio frequency energy and, if not installed and used in
accordance with the instructions, may cause harmful interference to radio communications.
However, there is no guarantee that interference will not occur in a particular installation. If this equipment does cause harmful interference to radio or television reception, which can be
determined by turning the equipment off and on, the user is encouraged to try to correct the interference by one or more of the following measures:
□ Reorient or relocate the receiving antenna.
□ Increase the separation between the equipment and receiver.
□ Connect the equipment into an outlet on a circuit different from that to which the receiver is connected.
□ Consult the dealer or an experienced radio/TV technician for help.
This device complies with Part 15 of the FCC Rules. Operation is subject to the following two conditions:
(1) this device may not cause harmful interference, and
(2) this device must accept any interference received, including interference that may cause undesired operation.
This device contains licence-exempt transmitter(s)/receiver(s) that comply with Innovation, Science and Economic Development Canada's licence-exempt RSS(s).Operation is subject to the
following two conditions:
1. This device may not cause interference.
2. This device must accept any interference, including interference that may cause undesired operation of the device.
L’émetteur/récepteur exempt de licence contenu dans le présent appareil est conforme aux CNR d’Innovation, Sciences et Développement économique Canada applicables aux appareils radio
exempts de licence. L’exploitation est autorisée aux deux conditions suivantes :
L’appareil ne doit pas produire de brouillage;
L’appareil doit accepter tout brouillage radioélectrique subi, même si le brouillage est susceptible d’en compromettre le fonctionnement.
CAN ICES (B) / NMB (B)
1-855-HD-HOLIDAY (1-855-434-6543)
HOMEDEPOT.COM
Questions, problems, missing parts? Before returning to the store, Please have a
copy of your receipt ready and email the SVI customer experience team
([email protected]) within 90 days of the date of purchase or call
Home Accents Holiday Customer Service 8 a.m. - 7 p.m., EST,
Monday - Friday, 9 a.m. - 6 p.m., EST, Saturday
Troubleshooting
Problem Solution
The prop has no sound, movement, or lights in the eyes or chest.
Ensure that all cables are firmly connected to their corresponding cables. Make sure that the adapter is plugged into a live outlet and
that the adapter is plugged firmly into the adapter receiver. If the issue persists, contact customer service.
Is sound on your 12ft App Skelly not working?
Please make sure that nothing is plugged into the speaker jack unless you are using an external speaker.
Is the try me port not working?
Please make sure your try-me button is not plugged into the speaker jack.