
Automatic Cat Litter Box
User Manual
MORE COMFORTABLE
AND CLEAN LIFE WITH PETS
Please scan
the code to watch
the guide video.
≤Φ�mm
≤
Φ�mm
L≤�mm
L≥��mm
L�/L�≥�mm
L�/L�≥�mm
Φ≤�mm
�≤L≤��mm
Cat Litter Adaptability Reference
Adapt �:� Reference Size

�、Please place the machine on a firm and flat ground.
�、Please add litter no higher than MAX line after placing the
machine well.
�、Please power on the machine and wait it to finish self-check.
Then itis ready for cat to use.
Cautions:
�.Please install and use this device strictly according to the instructions.
�.Please use it in an indoor environment, do not place it in direct sunlight, and keep it away
from fire sources.
�.Please place the device on a flat and hard ground, and do not place articles on the top of the
device.
�.Do not drag or place vigorously during placement to avoid device damage.
�.Kittens weighing less than �kg and lactating cats should not use the auto cleaning mode of
the device.
�.It is strictly forbidden to soak or immerse the host part of this device.
�.Please unplug the power cord when moving,cleaning the device or not using it for a long time.
�.Please use the original power adapter to avoid damage to the device or potential safety hazards.
�. If children use this device, please make sure to use it under the guidance of an adult.
��. Please perform maintenance under the guidance of professionals to avoid all kinds of
damages.
��.If you encounter product use problems, please contact customer service.
��.Please read this manual carefully before.Once installed and used, it means that you have
carefully read and accepted the following safety instructions.
��.If the product does not work properly due to other unknown conditions, and you do not
have time to refer to the instructions, please restart the power.
FOR THE FIRST USE
CONTENT
�� ��
FOR THE FIRST USE……………………………………………………….....……��
Ⅰ INSTRUCTIONS FOR THE FIRST USE……………………………...…………��
Ⅱ APP………………………………………………………………….................��
Ⅲ OPERATING INSTRUCTIONS……………………………………………….…��
Ⅳ FAULT SELF-CHECK METHOD……………………………......………………��
Ⅴ FAQ…………………………………….……..............................................��
Ⅵ PRODUCT LIST…………………………………………………………………��
Ⅶ INTRODUCTION OF CONTROL PANEL……….………………………………��
Ⅷ CIRCUIT DIAGRAM……………………….....…………………………………��
Ⅸ Filter and Bottom tray Disassembly & Assembly……………………..…...��
Ⅹ PARAMETERS AND SPECIFICATIONS…..……………………………………��
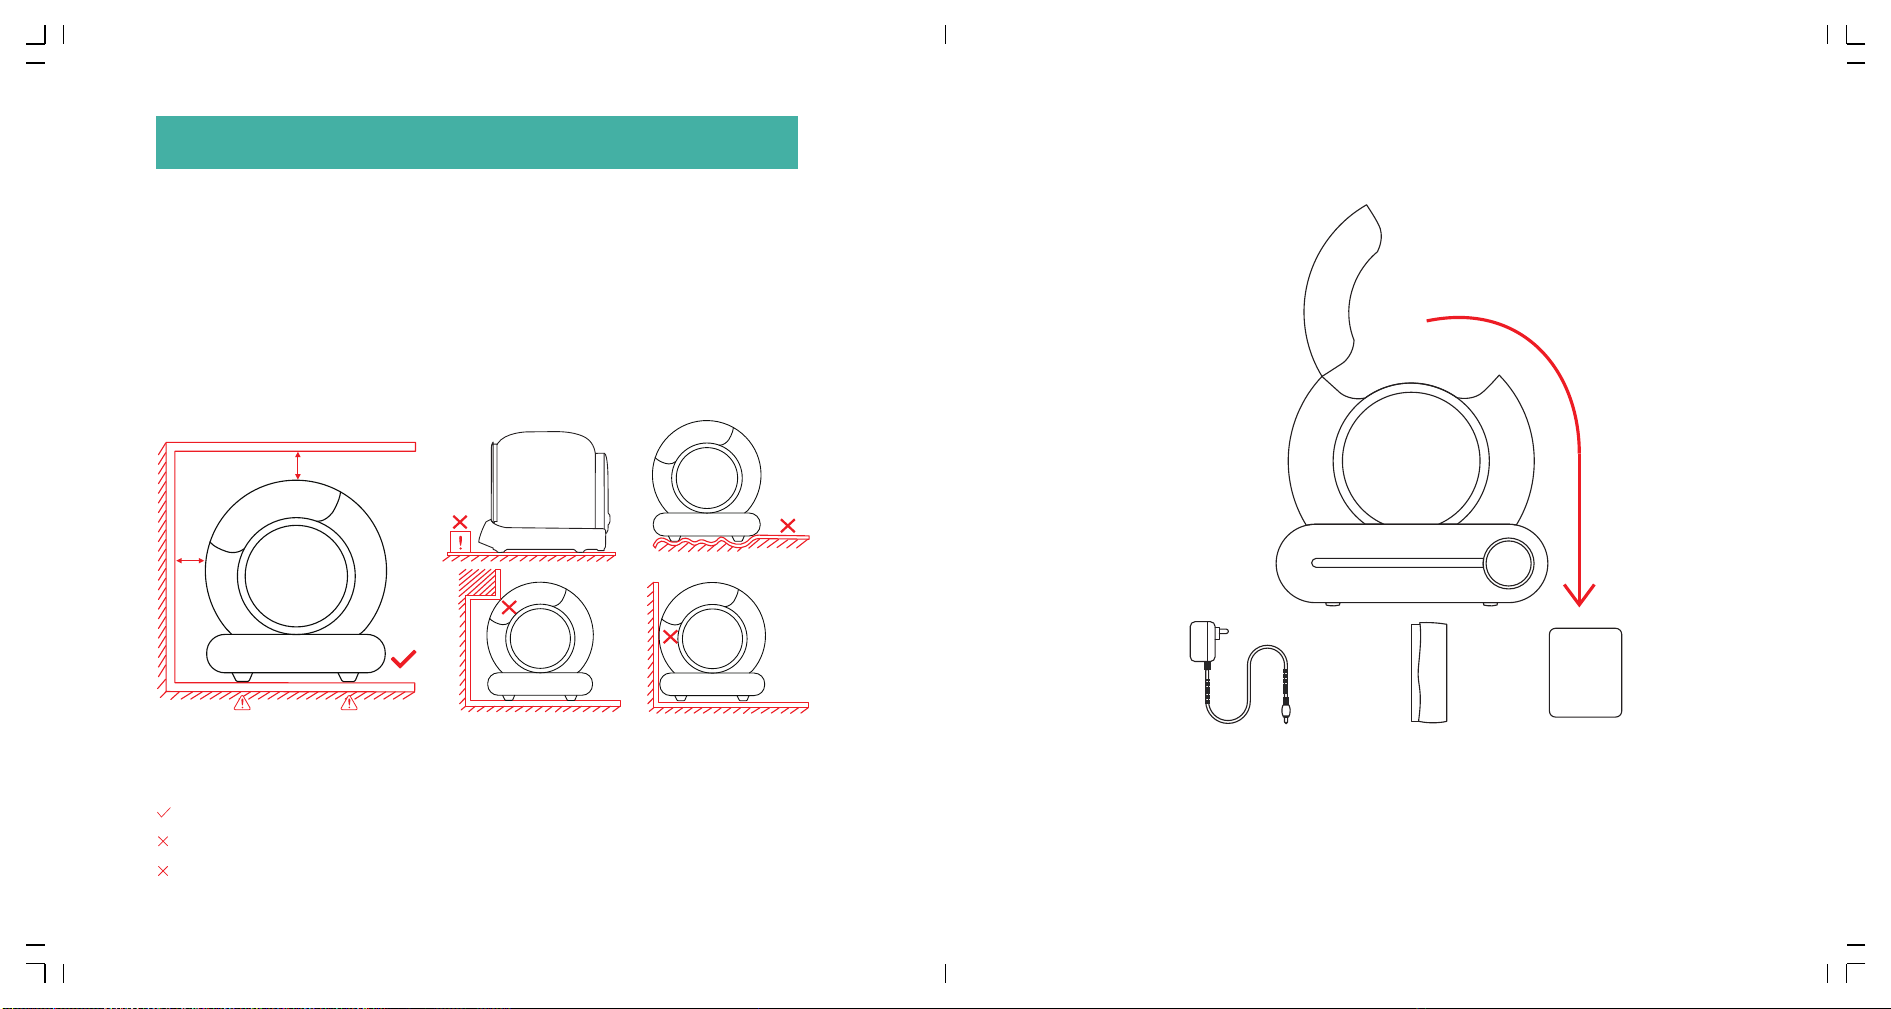
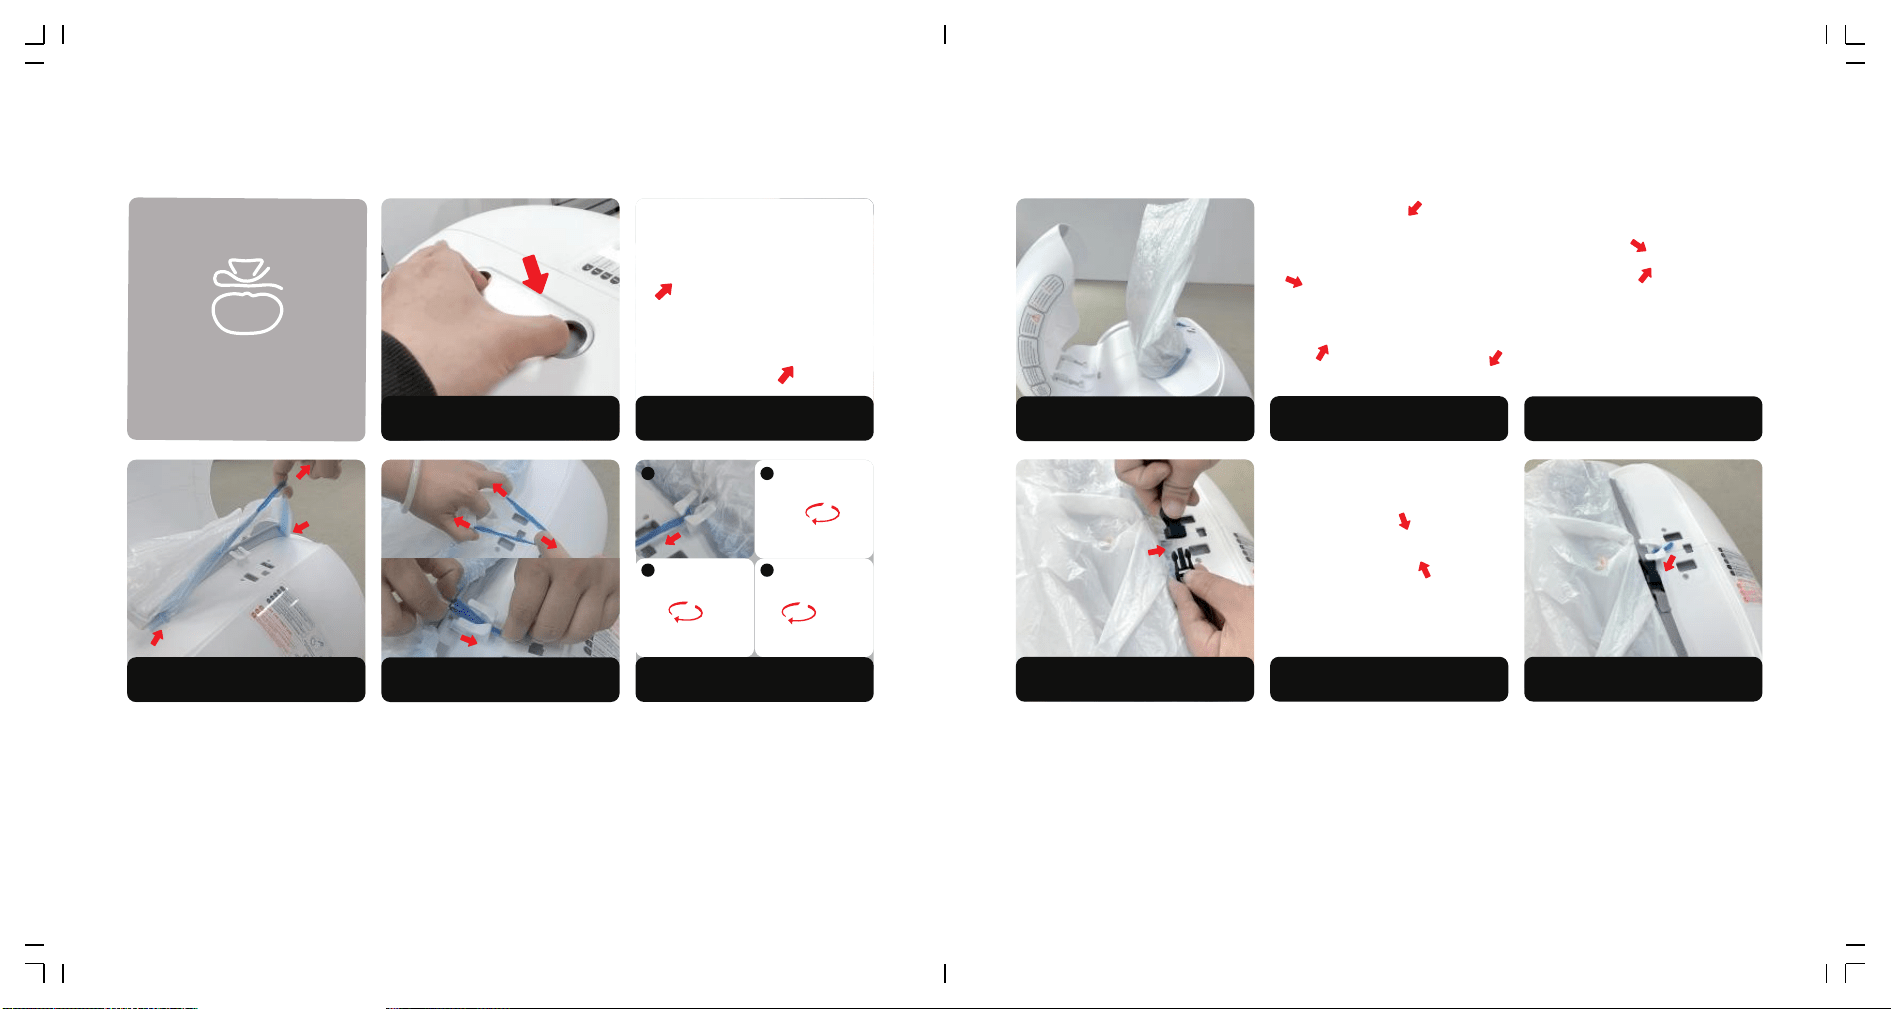
�.� Unpacking:
Turn over the carton to cut the tape from the bottom, then turn over back
the carton to pull up the carton vertically.
�.� Placement:
Place the machine on the flat ground and make sure all four feet of the
product are in contact with the ground. Items with a height of more
than �CM shall not be placed within ��CM in front of the product, so as
not to affect the cat identification sensor outside the product.
�.� Accessories(in litter storage box):
User
manual
Notice:
The four feet of the product must be in contact with a firm flat ground!
Place the machine on soft carpet.
Place the two front feet of the machine on the cat litter mat or carpet.
Adapter*�
Garbage bag
��*��cm(� roll)
User manual*�
Some product models have some differences in appearance due to
different configurations, please refer to the actual appearance of the product.
ⅠINSTRUCTIONS FOR THE FIRST USE
�� ��
≥�inch
≥�cm
≥�inch
≥�cm
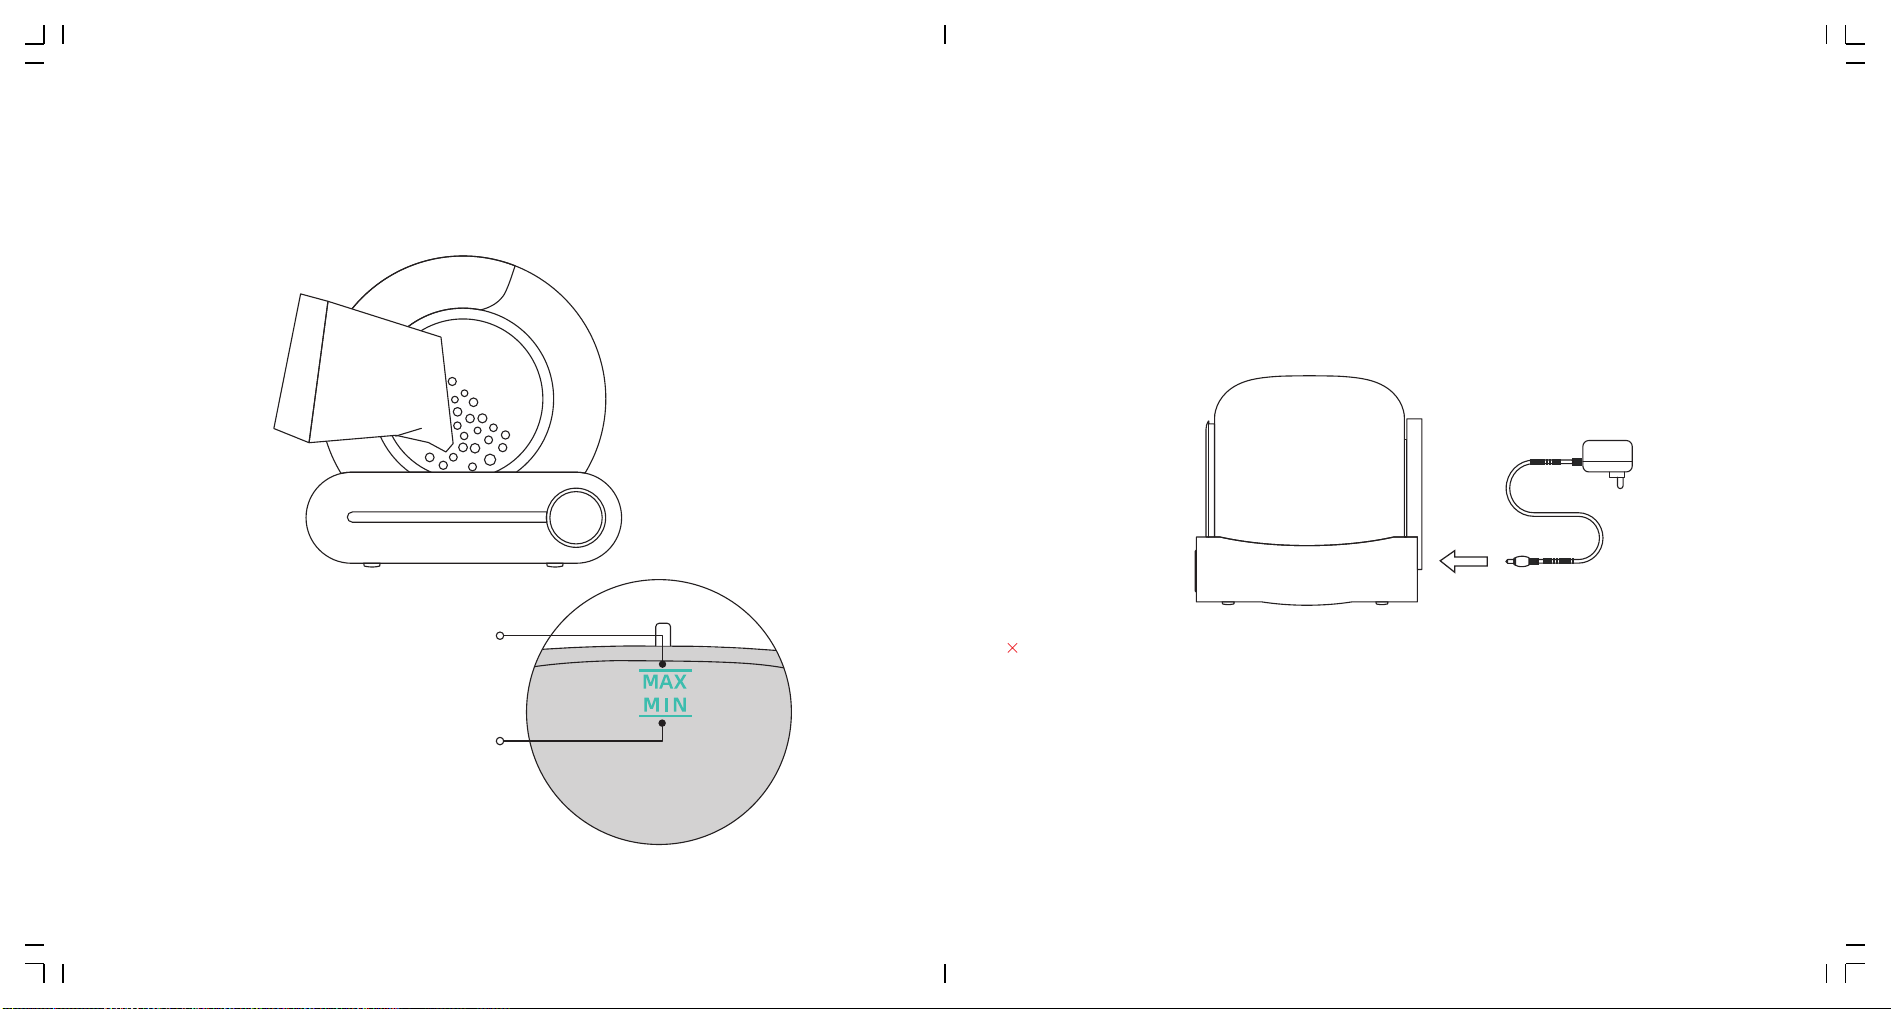
�.� Add litter sand:
Make sure the leveled litter height is between the MAX line and the
MIN line.(The amount of sand can be adjusted according to the actual situation.)
�.� Use:
�.�.� Power on with adapter and wait the machine to self-check for about
�-� minutes.It will automatically enter the state of sensing after
self-check, no need to change its program.
�.�.� After the cat leaves, the product will automatically clean up the
clumped cat excrement in about � minutes,last for � minutes.
�.�.� After cleaning, the product will automatically start the smell
cleaning function, and last for �� minutes.
Notice:
Pick up or drag the product after powering up.(This will interfere with weight calibration in
the reset program.)
➀If you place the product in a narrow space or there is an infrared interference source in front
of the product, the product self-check may take about �-� minutes.Please wait patiently.
➁If the product detected that the space is not suitable for its infrared sensor to work, the
infrared detection function will be automatically disabled after self-check is completed.But
the weight detection system inside the product will assume the judgment work of whether
the cat enters.
➂During the clearing process, all keys are suspended. If you need to perform other functions,
please wait until the clearing process is complete.
MAX Line
The amount of cat litter
should not exceed Max line
MIN Line
The amount of cat litter should
not be lower than Min line
�� ��

�.� Overseas users
�.� Networking:
�.�.� Confirm that the phone is
connected to �.�G WiFi, then turn on
Bluetooth and Location.
�.�.� Press "Auto" for �
seconds , WiFi indicator
begin to flash , so the
machine began to wait for
the network.
�.�.� Open your phone App
to add equipment or scan
automatically.
Method �: You can scan the above
icon with your mobile phone
Method �:You can download "tuya" App
and install it by search it in the App store.
ⅡAPP
�� ��
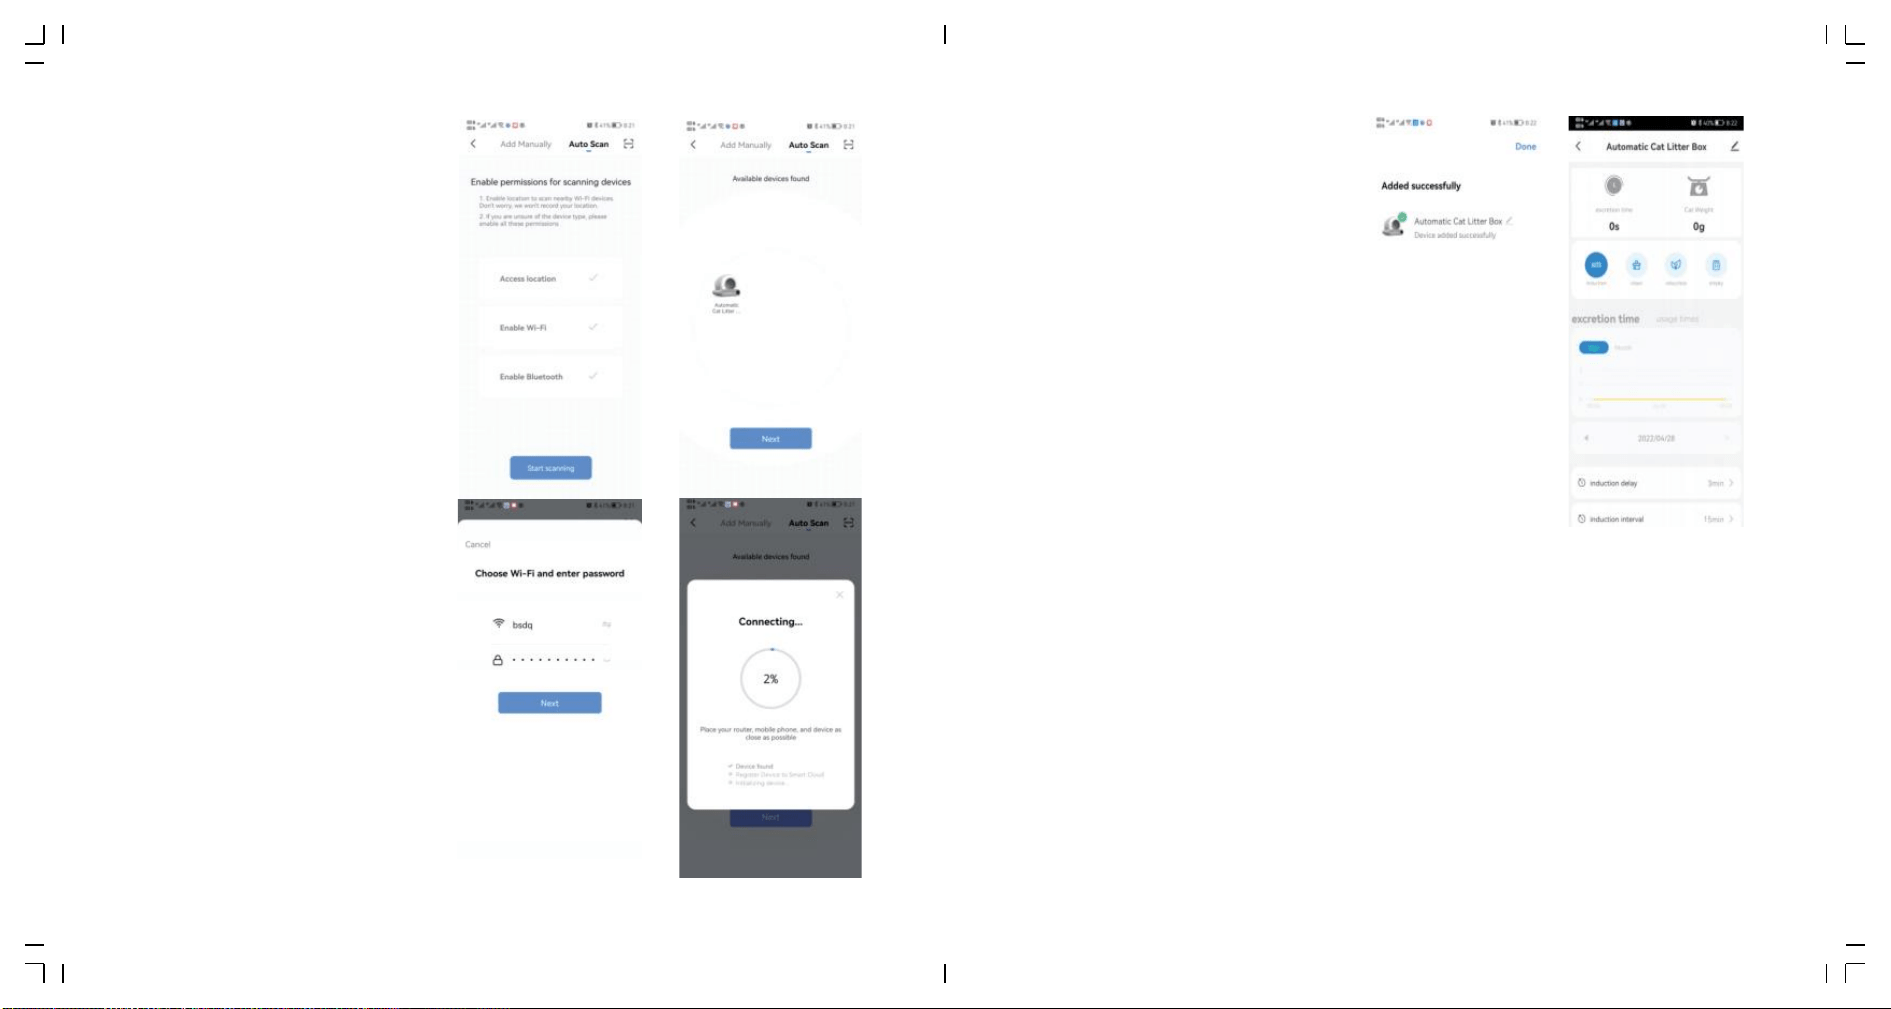
�.�.� Continue “Next”after
scanning the machine.
�.�.� Continue “Next" after
inputting WiFi code and wait
to connect.
�.�.� Enter APP after connecting.
Notice:
If the network configuration fails or a timeout message is displayed, check the following
possibilities:
➀Whether WiFi, Bluetooth, and Location switch are enabled at the same time.
➁Whether the WiFi is in �.�G band and whether the phone is connected to �.�G band WiFi
network.(The product cannot recognize the �G band network.)
➂Whether the WiFi indicator on the panel is flashing during network configuration.
➃Whether the WiFi network in your home is faulty or down, please check whether other devices
can use the network normally.
➄Whether the WiFi password is correct.
➅Whether the WiFi signal is too bad, please move the machine to a nearby router and
reconnect.
➆The router connects to many wireless devices, causing IP address conflicts.
➇For dual-frequency routers,the network cannot be configured directly. Users need to
separate �.�G and �G into independent channels in router Settings, and then select �.�G
channel for network configuration.
�� ��

�.� Auto:
Click“Auto”on the panel or on the App to start auto sensing for cats in and out.
(It will open automatically after the product is powered on and self-checked.)
Notice:
➀Please click“Auto"on the panel or on the App to close auto sensing, if you have kittens less
than �kg or the cat is pregnant.Then click “Clean” by your hand according to the actual use
of the machine.
➁If you are using litter that clumps quickly, you can adjust the "cleaning wait time" in the App,
such as � minute, to clean the litter as quickly as possible and reduce the smell. If you are a
multi-cat family, you can adjust the "cleaning interval" in the App, for example �� minutes, so
as to avoid repeated ineffective cleaning of the product.
➂If the cat enters the bin for more than �� seconds, the cat is judged to have potty behavior.
After the cat leaves for � minutes, the automatic cleaning procedure will be performed.(The
default interval between cleanups is �� minutes to prevent the product from being started
too frequently during multiple cats use. If the machine don't work after your second cat
pees, it may because the interval these two pees is less than �� minutes.)
➃The button on the App cannot be closed/opened or synchronized with the panel temporarily,
please check the network status or re-configure the network or click the corresponding
button on the App and repeat once ortwice.
Ⅲ OPERATING INSTRUCTIONS
�� ��
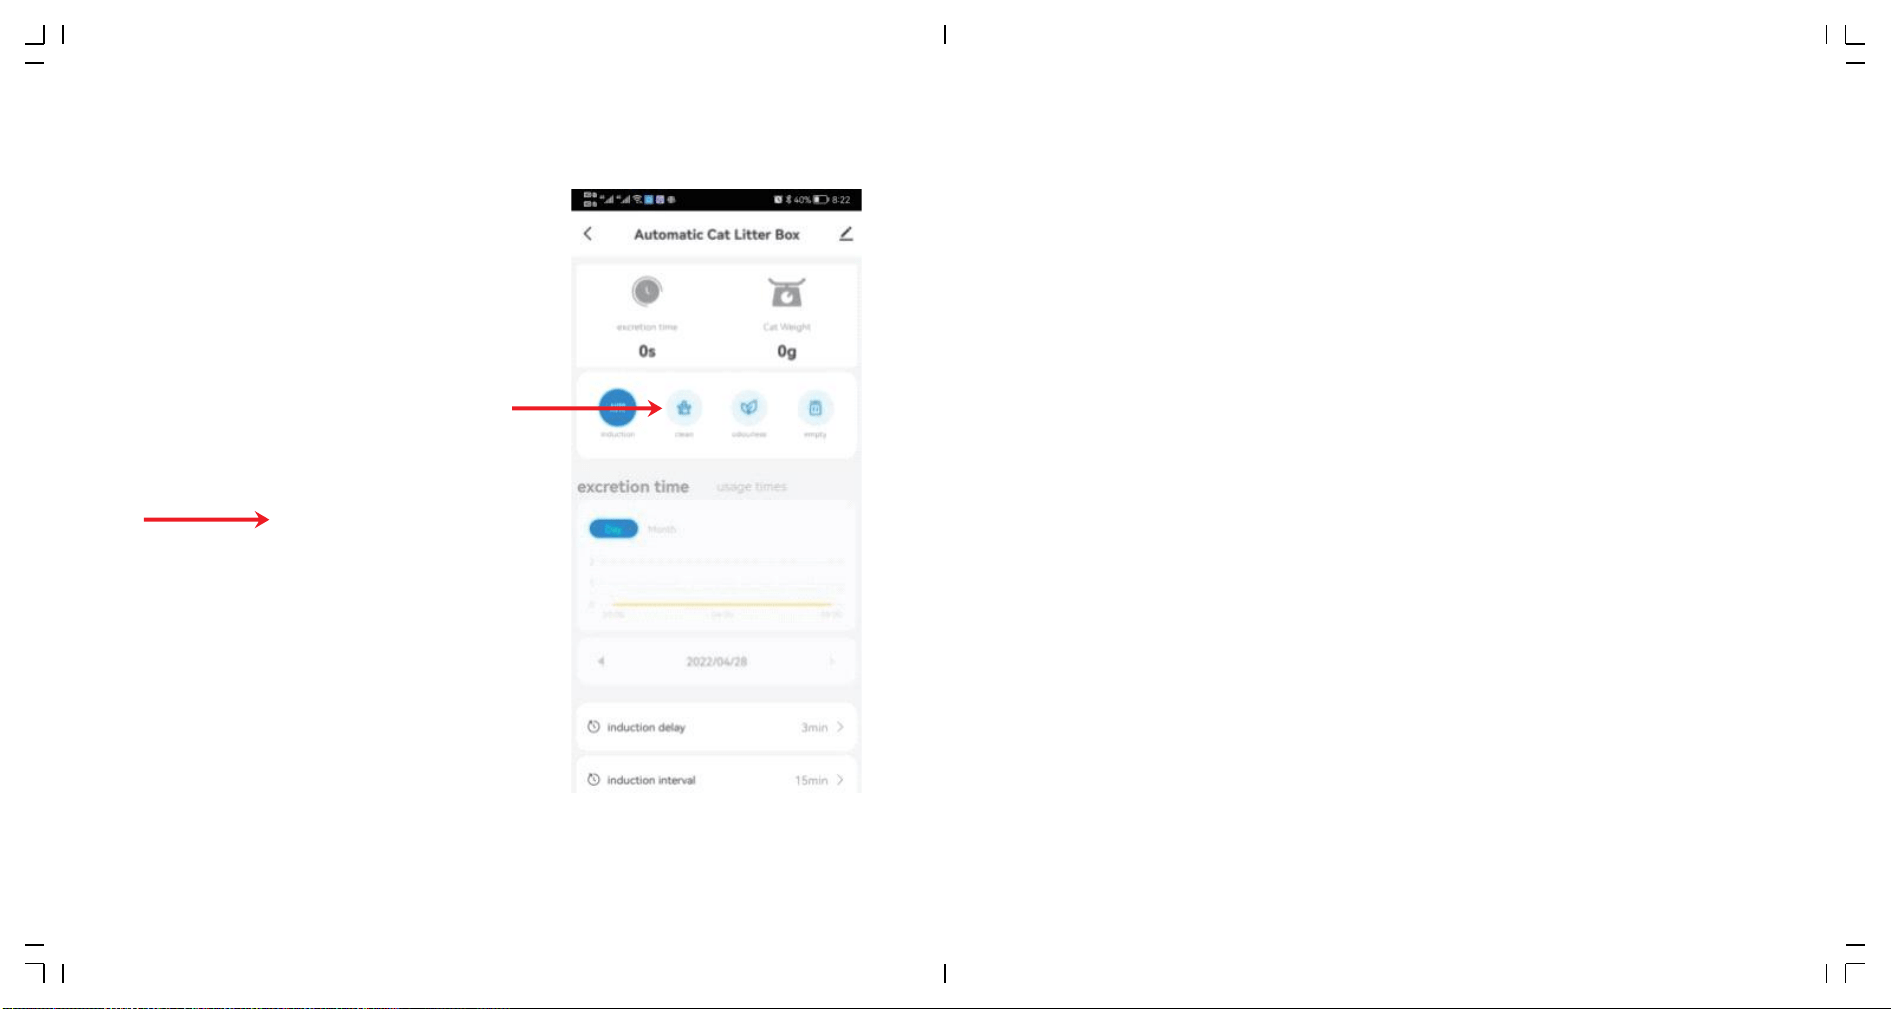
�.� Clean:
Click“Clean”on the panel or on the App to start clearing immediately.
Notice:
➀During the clearing process, all keys are suspended. If you need to perform other functions,
please wait until the clearing process is complete.
➁Prolong the waiting time for cleaning in phone App when the cat has diarrhea, so as to allow the
cat litter to take enough time to clump and reduce the pollution of soft feces to the ball bin.
➂If you have restarted the machine, the waiting time of“Clean”procedure will be restored to
the default value � minutes, which can be reset in the APP if necessary.(setting range: � to ��
minutes)
➃Prolong the interval time between two clearings when you have multiple cats,so as to
prevent repeated cleaning of products.
➄If you have restarted the machine, the interval time between two clearings will be restored to
the default value �� minutes, which can be reset in the APP if necessary.(setting range: � to
��� minutes)
�� ��

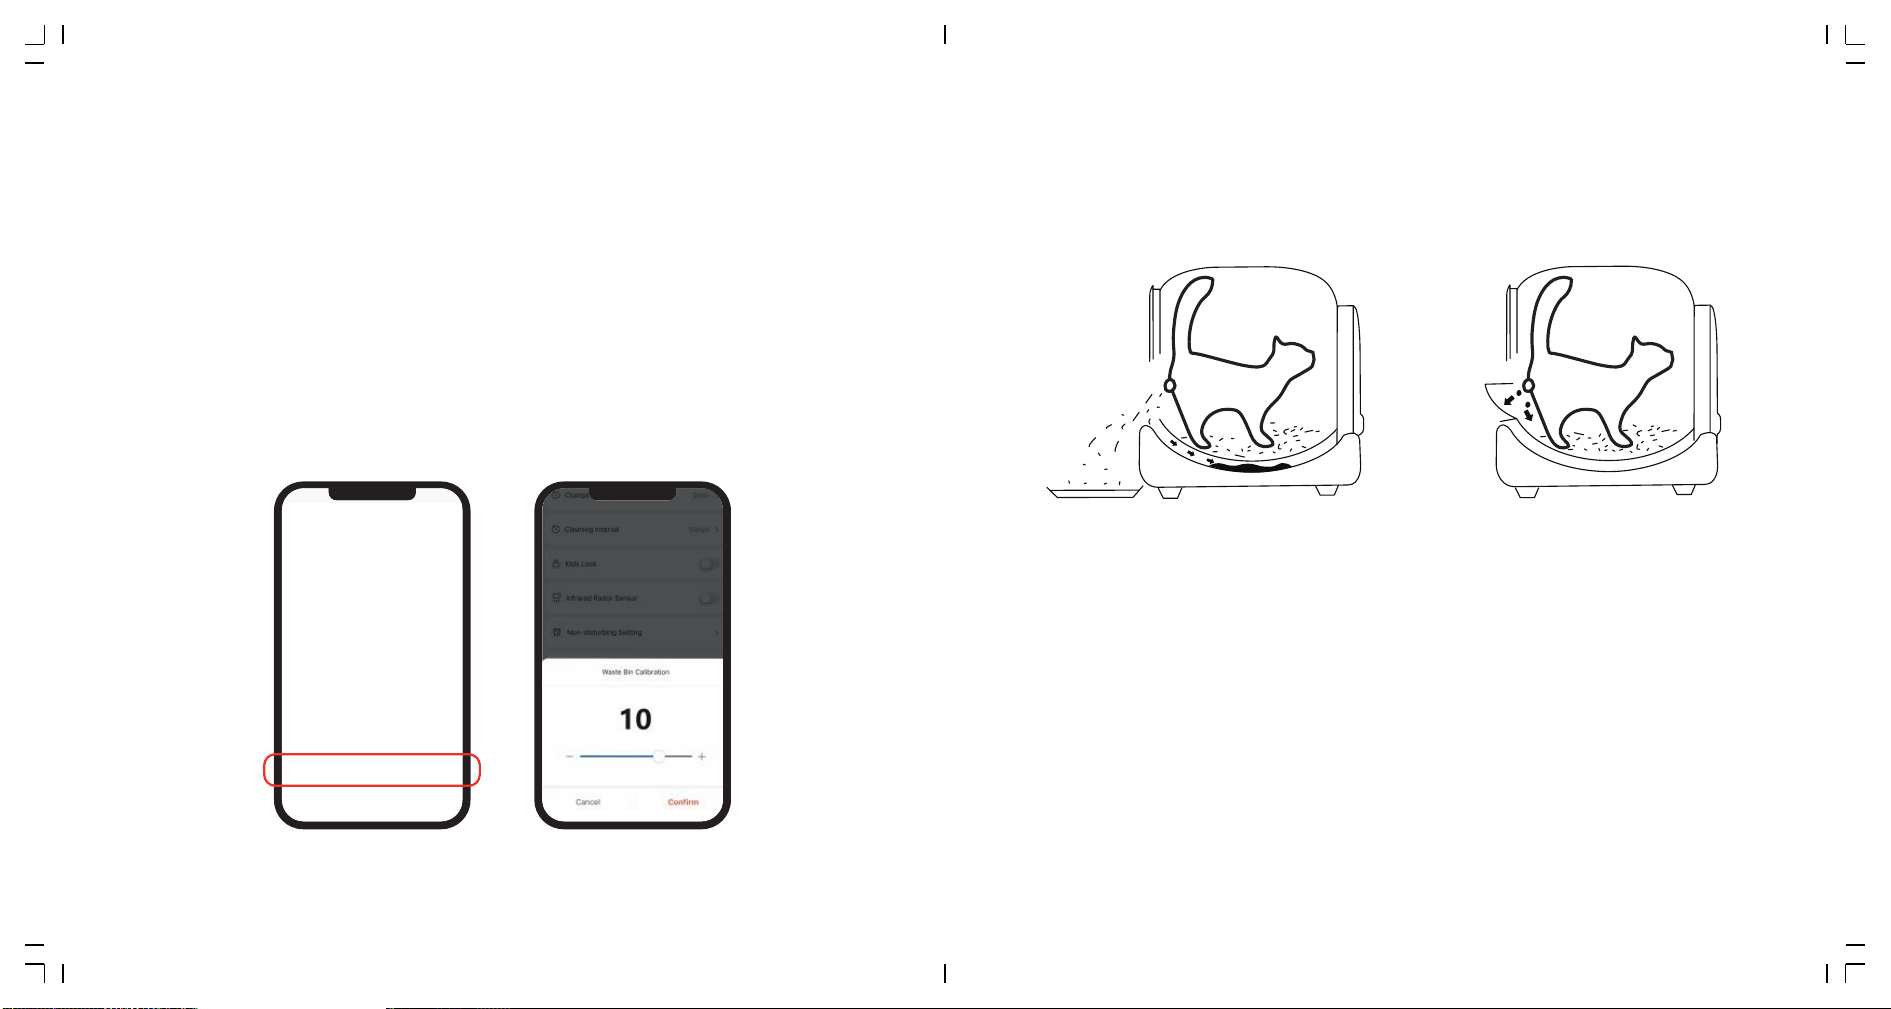
�.� Add cat litter:
➀ In "Auto" mode, if more than �kg of litter is added, the "Auto" icon will flash. No action is
needed — after �� minutes, the litter box will automatically level the litter and reset the
weight, then return to "Auto" mode. If you prefer not to wait, simply press and hold the
"➂" button for � seconds or more to instantly smooth the litter and reset the weight.
➁ After adding litter, simply reconnect the power. The litter box will self-check, level the
litter, and enter "Auto" mode.
➂ Add a small amount of litter first, then press and hold button "➂" to level the litter and
reset the weight. Make sure the litter surface is between the "MAX" text and the line — do
not cover the "MAX" text completely.
MAX Line
The amount of cat litter
should not exceed Max line
MIN Line
The amount of cat litter should
not be lower than Min line
Notice:
➀The machine won't stop when it is smoothing sand even cat enters in at this moment.
But don't worry.The machine only swing in some angles, this swing won't hurt cat.
(Besides this situation, the machine have protection function. It will stop immediately
once cat walks close to the entrance during clearing.)
➁Please make sure the height of the sand is between MIN line and MAX line after adding.
If not, please adjust it with method �.
➂You can find the sand surface correction option on the App to adjust the position of the
sand.(In grade �, the sand surface is tilted to the left, and in grade �, the sand surface
is tilted to the right.)
Recommended suitable cat litter:
Mineral litter、Bentonite litter
Compatibility Cat litter:
➀Tofu litter (diameter not more than �.�mm, length not more than ��mm)
➁Mixed litter of Tofu litter and Bentonite litter (diameter not more than �.�mm,
length not more than ��mm).
Cat litter that is not recommended:
➀Crystal litter, crystal litter can not clump well, which will bring a serious cleaning
burden to the inner wall of the cat litter basin.
➁Tofu litter with the length of more than ��mm, poor fluidity and filtration, there
will be some stuck inside the filter. This phenomenon can also be alleviated by
adjusting the parameter to � by “litter surface calibration” on the App.
➂Low-density cat litter, such as pine wood cat litter and activated carbon cat litter,
it is difficult to rely on its own weight to pass through the filter. Some of them will
be stuck inside the filter. This phenomenon can also be alleviated by adjusting the
parameter to � by “sand surface calibration” on the App.
�� ��

�.� Replace litter:
➀Replace the garbage bag with an empty one (to avoid that the original
one is already full of litters);
➁Make sure the rest sand is close to MIN line (to avoid the overflow when
the bin rotates);
➂Press“Replace Litter” for � seconds,then wait the machine to clear the
rest sand;(about � minutes)
➃Replace the garbage bag with an empty one again after clearing sand;
Notice:
➀Click“Replace Litter”again to cancel if you click it by mistake or if you find you have forgot to
replace the garbage bag first.
➁For fine mineral sand, when to replace the bag(step ➀) , to avoid the overflow of mineral sand
from the mouth of the bag, you can firstly press "Clean" for � seconds; then the litter bin will
rotate ��° counterclockwise to ensure that the mouth of the bag is upward when replacing.
After bag replacement, repeat➂and ➃.
�� ��
�.� Remove Odor:
Method � :
Click “Remove Odor”on the panel or click “Odorless” on your phone App.
Method �
Set regular work on your phone App.
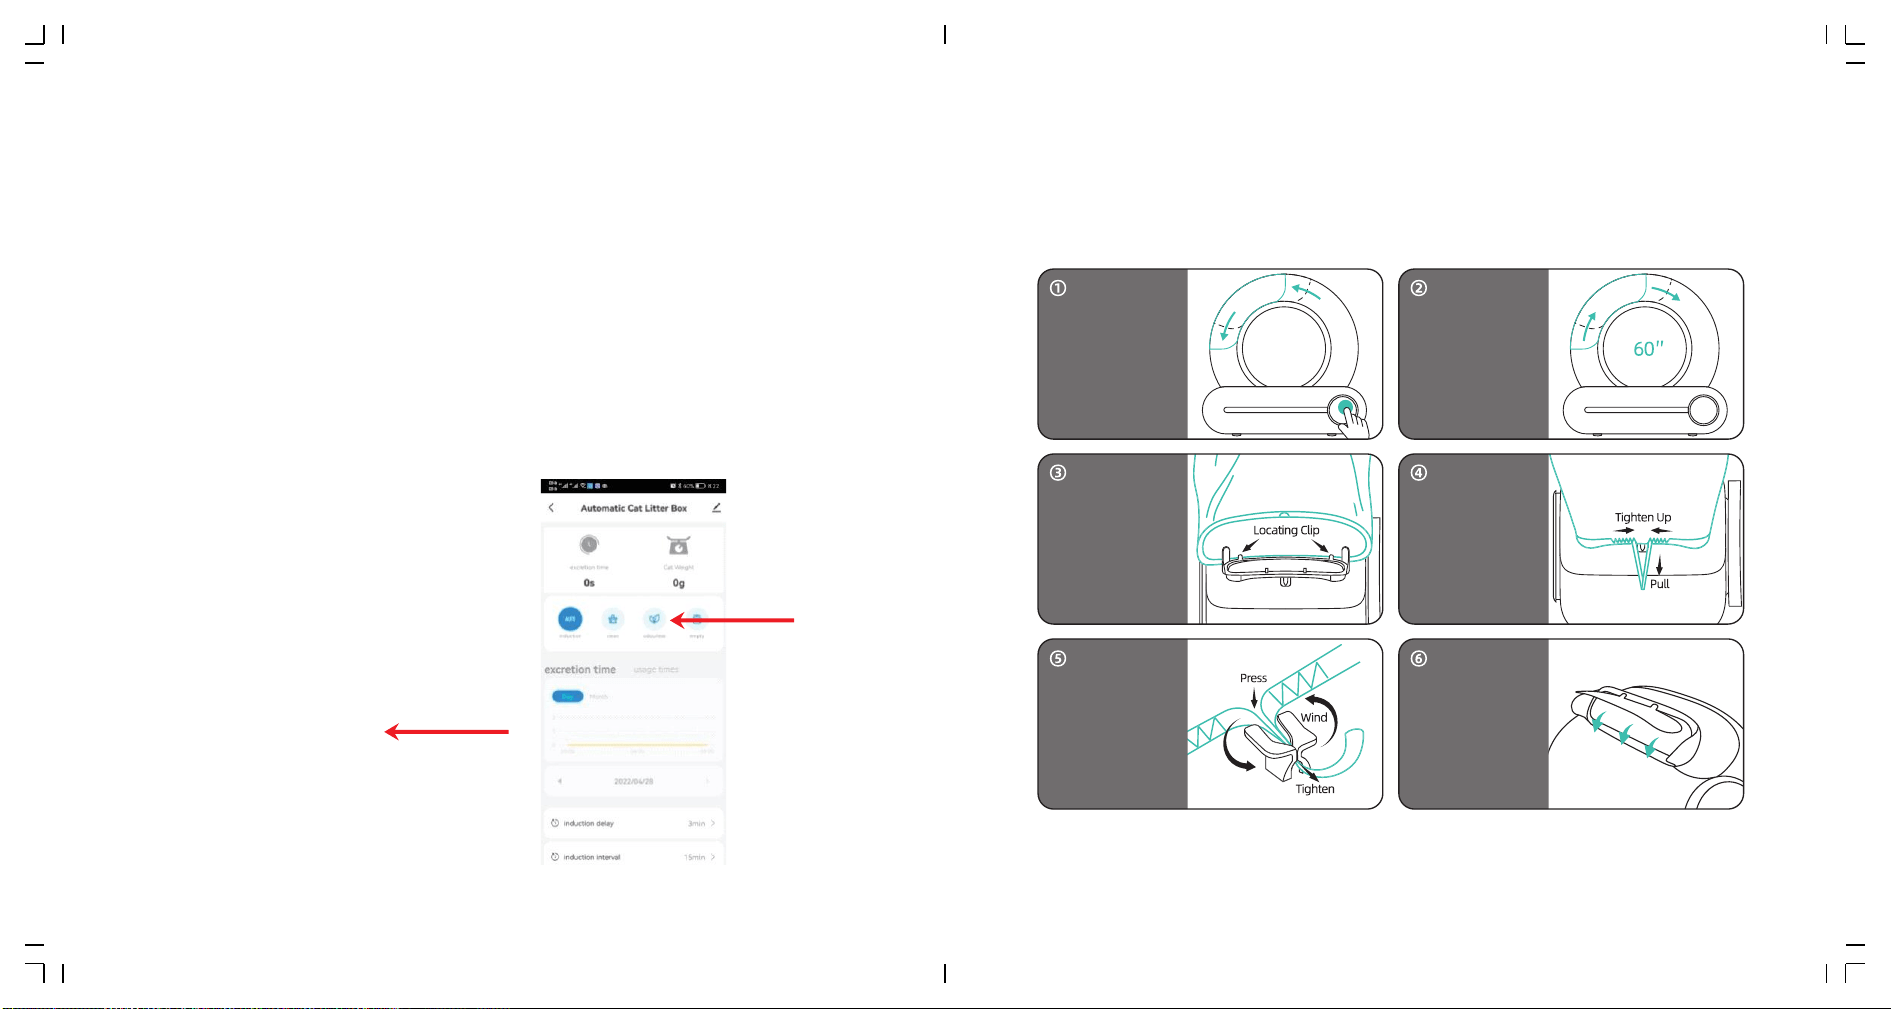
�.� Replace garbage bag:
When indicator“Full”lights up, you need to replace the garbage bag.
Notice:
➀The machine will remove odor automatically for �� minutes after every clearing.
➁It will stop automatically once cat enters in, continue to work after cat leave.
Press "Clean"for �
seconds, adjust
the waste bin to the
bag changing angle,
open the waste bin,
and take out the
used garbage bag.
The drawstring of the
new garbage bag is
aligned with the tie-up
pile, and the lower edge
of the bag opening is
clamped under the
locating clip.
Press the drawstring into
the tie-up pile, tighten
and wind it.
After the installation,
confirm that the automat-
ic flip door of the waste
bin is not blocked and can
open and close normally.
Arrange the back of the
garbage bag to prevent
being caught by the
waste bin cover.
Wrap the garbage bag
around the outer frame
of the waste bin gate,
and pullout the
drawstring.
The bag change Angle
lasts for �� seconds, and
the device automatically
returns after �� seconds.
If the new garbage bag is
not installed within ��
seconds, it can continue
after the device is
returned.
�� ��

Notice:
➀The“Full” prompt is only a reference value.When using different types of cat litter, its volume,
density and fluidity will affect the judgement of “Full”prompt. In the APP, you can adjust the
delay of“Full”prompt according to your own use.The default value is �(there is still a little
space in bag for garbage), and the maximum value can be adjusted to ��.
➁If you have restarted the machine, the delay of “Full”prompt will be restored to the default
value �, which can be reset in the APP if necessary.
➂Normally, the storage capacity of one cat can reach �� days, and three cats can reach � days.
Users can replace the garbage bag every � days depending on the number of cats or
temperature conditions.
�� ��
�.� Lock the keyboard:
Hold down“Auto”+“Remove Odor”for more than � seconds, or click the
“Child Lock" on the app to enable or disable the child lock function.
“auto”+“Remove odor”� seconds
Notice:
If the indicator of bin sign lights up,please restart the machine or click"Clean"to make it clear once.
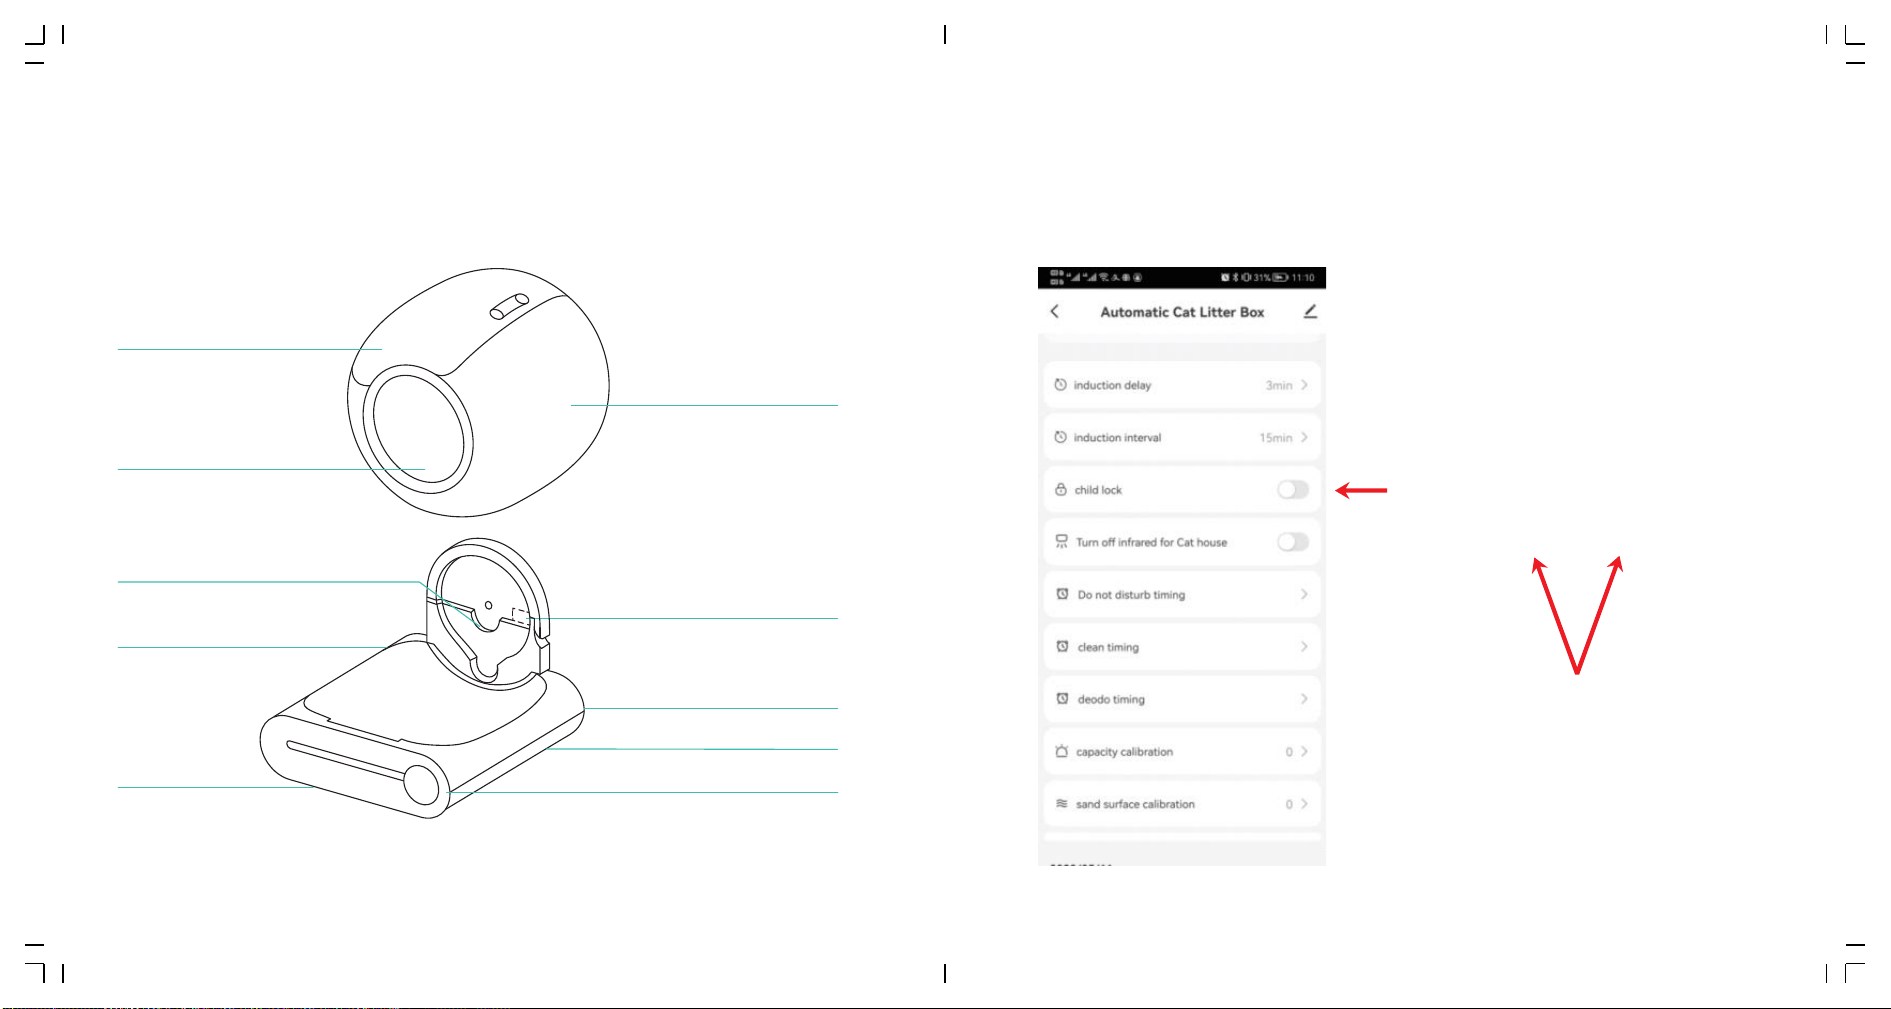
Waste bin
Barrel
Entrance
Barrel shaft Fixed groove
Host
� Weiaht sensors
Ion Purification module
Power socket
Clasp
Display and Control Panel
��
�.� Cleaning and Maintenance:
➀ Power off the device and remove the waste bin.
➁ Clean and dry the waste bin thoroughly, then reattach it to the base and add cat litter.
➂ Plug in the power, the device will reset automatically, enter "Auto" mode, and be ready
for use.
��
�.� Turn off or turn on infrared sensor:
When cat litter box is places in a cage or a narrow space, please hold down
“Clean”+“Replace litter”for more than � seconds, or click the bucket
infrared sensor option in the APP to turn off or on the bucket infrared
sensor to prevent the machine from always judging wrongly.
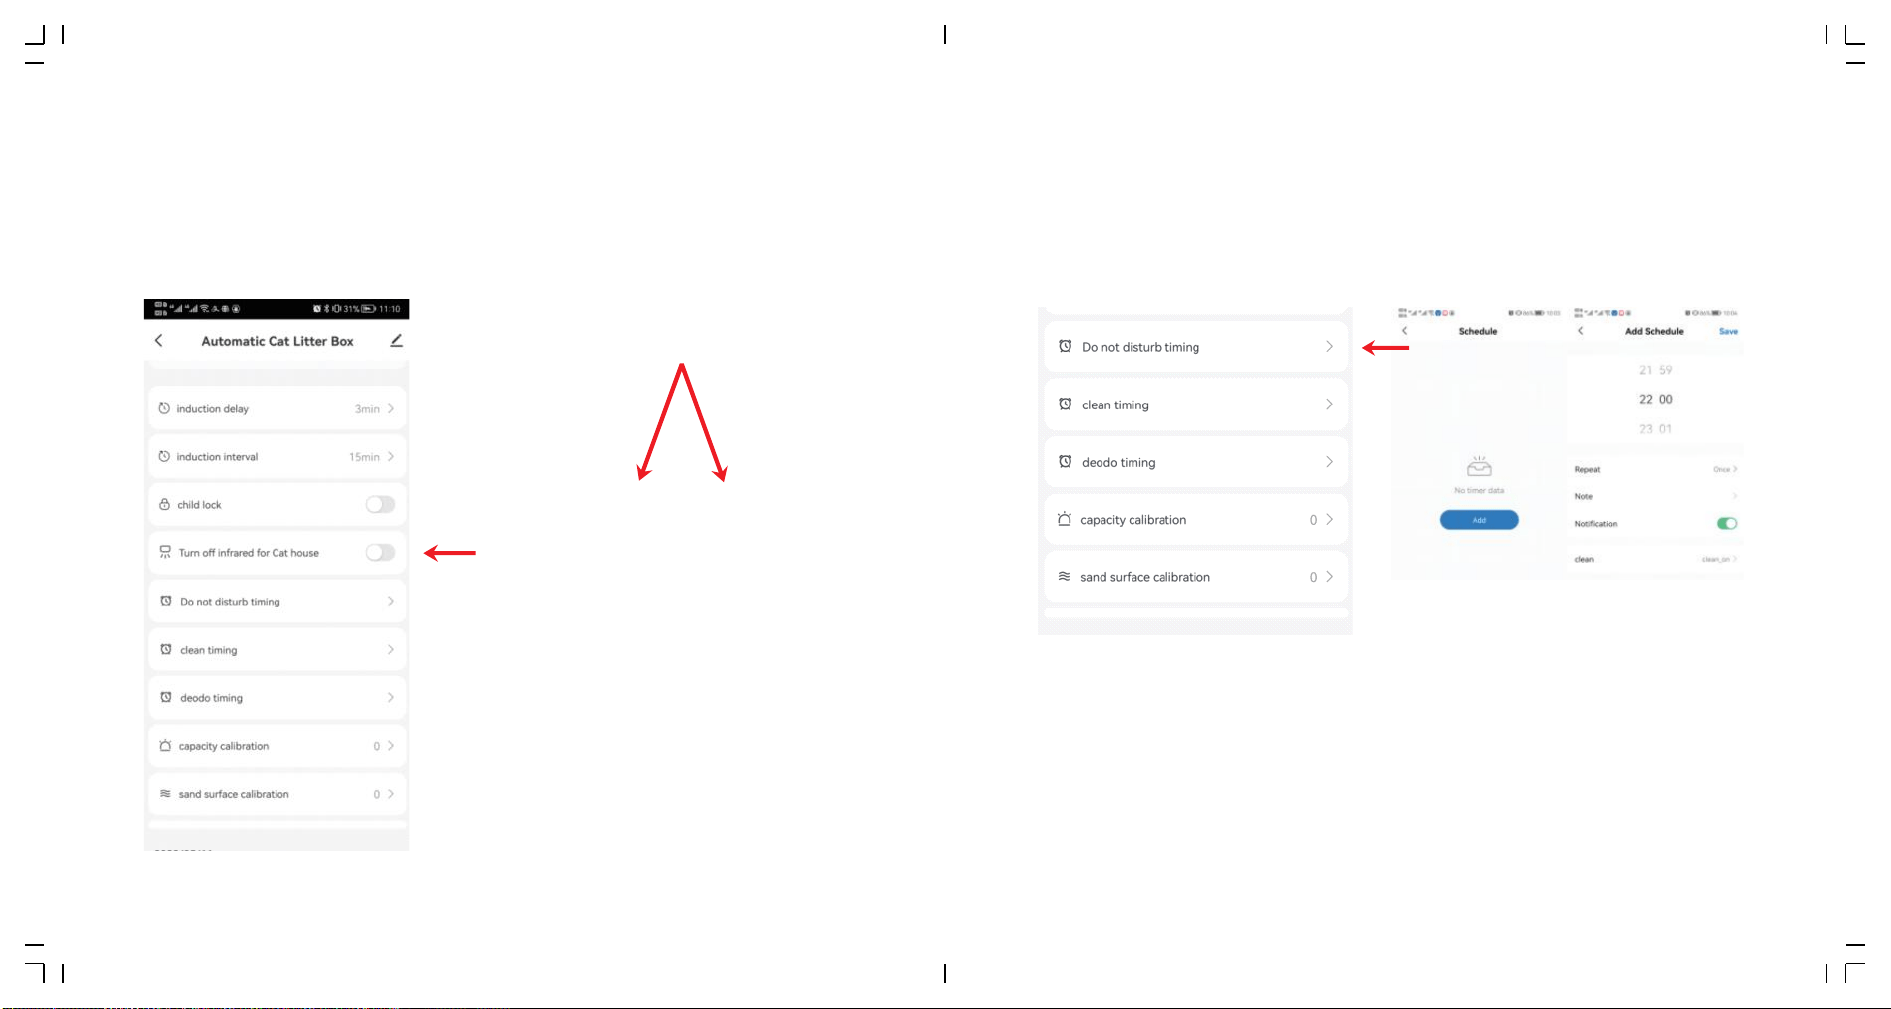
�.�� Timing:
�.��.� sleep mode
When cat litter box is placed in the bedroom, you can set in the App "Do not
Disturb Timing"to prevent the night-time activation from disturbing sleep.
Notice:
➀During the DND period, the light on the panel will be off. Touch any button to exit the DND
mode immediately.
➁If the product is clearing when setting DND, the machine will enter the DND state after the
cleaning is complete.
“Clean”“Replace litter”� seconds
�� ��

�.�� Timing:
�.��.� Regular clean-up mode
Set the machine to clean regularly in the App“Clean Timing”.
�.��.� Timing net flavour
Set the machine to remove odor regularly in the App“Deodo Timing”.
�.� Re-power on the product,click “Remove Odor” for more than � times
within � minutes, then the product will enter the testing mode.
�.� In testing mode:
➀Click each key to check whether the key works properly.If it works
properly, the PCB hardware is good.
➁Press the machine from the top with a force of more than �kg to see
whether the“Full”indicator flashes.If it does, the gravity sensor is good.
➂If the bin mark keeps lighting up, the motor is good.
➃If the WiFi mark keeps lighting up, the WiFi hardware is good.
➄Cover the infrared sensor at the barrel mouth,if the“Auto” mark
flashes, the sensoris good.
�.� Re-power on the machine after checking.
Notice:
If the execution time of these scheduled procedures overlap with the DND time, the product will
first perform odor and cleaning, and then return to DND mode.
�� ��
IV FAULT SELF-CHECK METHOD

Q: Why is the App showing motor failure/why is the fault indicator lighted on the
equipment panel/why is the equipment always self-checking?
A: If the self-check takes more than �� minutes, the fault indicator is on. It may be
that the barrel compartment is not properly installed or there is foreign matter
stuck in the rotation. Please open the buckle of the barrel compartment, lift the
barrel to check, and then put it back according to the tips(on the base) and close
the buckle.
Q: Why is the clearing time so long?
A: Lower revs make timid cats less scared; It will prolong the whole clearing time if
cats enter in or come close frequently due to curiosity.
Q: Why the machine rotates back for a while before finishing the whole rotation?
A: ln order to save sand and increase the capacity of the collection bin;
Q: Why the poop can't be cleaned to the garbage box?
A: The door may be blocked by cat litter or garbage bag, or garbage too large to pass
through; Please check whether the garbage entrance can be fully opened and
closed smoothly(it is recommended to check every time after installing new bag).
Large garbage can be handled manually to make it smaller first.
Q: Why does the app automatically remove the product after it's been configured?
A: It is recommended to start the child lock feature. This will help prevent the cat from
accidentally pressing buttons. Some cats may rest on the product, and their body or
nose contact can lead to unintended actions.
Q: What kind of cat litter sand should I use?
A:Mixed sand and tofu sand are preferred; Bentonite sand and mineral sand are
okay, may affecting the delay time of “Full”prompt due to their weight density
and liquidity.
Q:Why is there some sand left in the bin after I used the“Replace Litter”function?
A: Maybe there is not enough space in garbage bag, please replace the bag then
“Replace Litter”again.
Q: why is the sand leaking out from the mouth of the garbage box when replacing
garbage bag?
A: Please Press the button "➁" for � seconds,then the litter bin will rotate ��°
counterclockwise to ensure that the mouth of the bag is upward when replacing.
Q: Why the machine didn't stop working while cat enters in?
A:The machine won't stop when performing sand leveling and weight calibrating.
However, the safe structure of the product, together with the rotation Angle of
the action(±��°) is no danger for the cat to enter in when working.
Q: Why does the machine often go offline in the app?
A: Please refer to the network configuration process in the product manual and
reconfigure the network in the correct order, or refer to the offline reasons in the
"Network Configuration" section of the manual for detailed troubleshooting..
�� ��
V FAQ
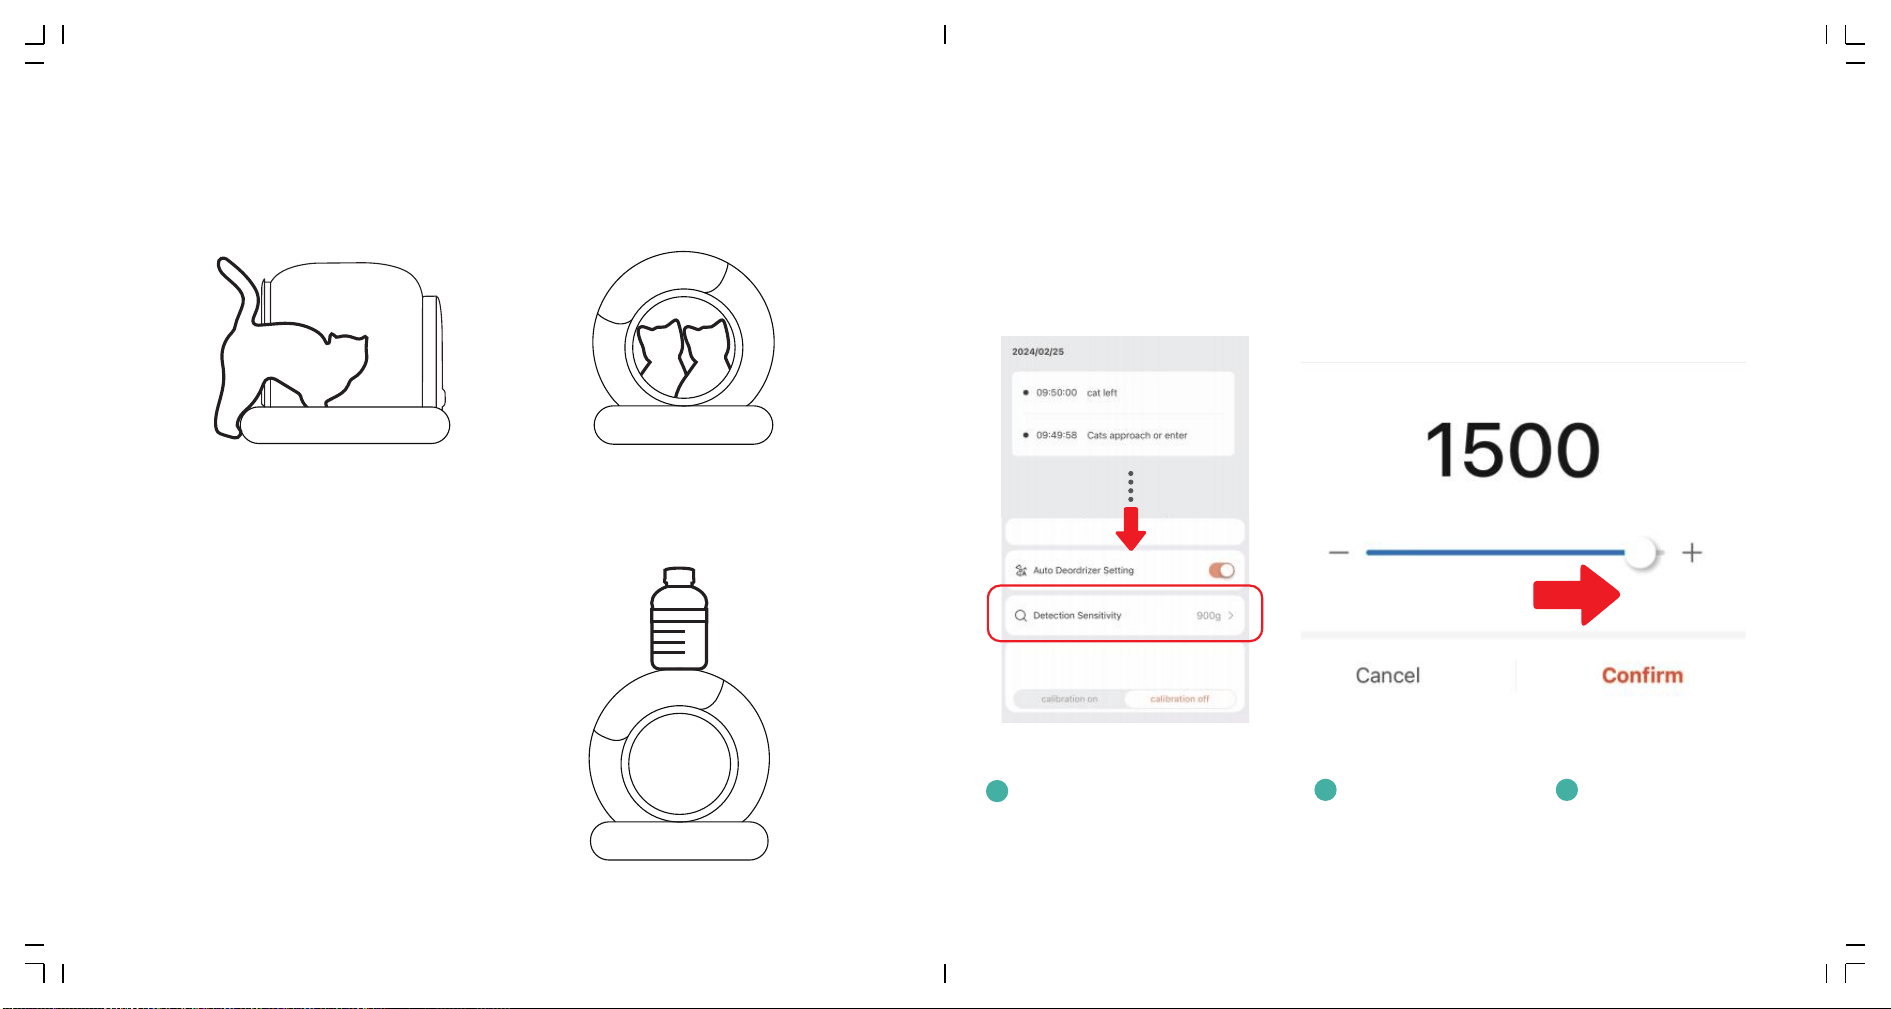
Q: Why does the app sometimes show inaccurate cat weight?
A: �. A moving or active cat inside the box may cause slight weight fluctuations. This is normal.
�. Two or more cats entering at the same time, or one cat entering right after another, may
affect the accuracy.
�. A cat entering with only part of its body inside can lead to large weight errors.
If you feel the weight is inaccurate, you can place a
bottle of mineral water on the product. The weight
should exceed �kg (�.�lbs). Wait for �� seconds, then
remove the bottle. Check if there is a large static
weight deviation.
Cats only enter half of their bodies
for long periods of time.
< Correct Weight
Multiple cats stay together in/on the barrel.
> Correct Weight
Q: Why does the machine pause during the cleaning process even when no cat is inside?
A:�. Adjust the sensitivity to a value of ����.
�. Make sure the machine is not near a wall or other objects.
�. The machine has four weight sensors at the bottom. For accurate weight measurement,
all four feet must be in contact with a flat and firm surface. Ensure the machine is placed
on a stable, solid ground.
�. If the surface is uneven, moving the machine a few centimeters can help reduce weight
data discrepancies.
1
Slide down the APP interface to
the bottom. (The next section of
"Activity Log")
2
Find the "Detection
Sensitivity" function.
3
Adjust the value to ����.
≥��s
≥�kg/�.�lbs
�� ��
Q: Why are there wrinkles on the silicone mat inside the barrel?
A: Wrinkles on the silicone mat are normal. Due to the corrosive nature of cat urine, the
material may shrink slightly after prolonged use. During production, sufficient allowance
for shrinkage was made, which is why wrinkles may appear.
Q: What should I do if the silicone mat inside the bucket is torn by my cat?
A: �. Offer your cat some toys or a scratching post to help burn off excess energy, divert their
attention, and reduce destructive behavior.
�. If the mat is severely damaged, please replace this part.
�. If the damage is minor, you can repair it using waterproof tape, such as tent tape.
Q: Why do cat waste clumps stick to the base and not fall off on their own?
A:�. If the waste clump is sticking to the middle area of the base, check if there is enough litter.
If the litter level is too low, please add more litter.
�. If the clump is sticking to the edge of the base, try adjusting the cleaning wait time and cleaning
interval, such as setting it to � minutes.
�. Different types of cat litter have varying absorption rates. Please check the absorption rate of the
litter you are using. It is recommended to choose litter with a higher absorption rate and faster
absorption speed.
Q: Why does the product have a strong odor after using it for a period of time?
A: �. Please check whether urine has accumulated between the barrel and the base. If so,
please install the baffle grate.
�. Is it used by large cats, is the cat in its physiological period, or has territorial marking
behavior. Although large cats can use it normally and achieve automatic cleaning, urine
often contacts the inner wall of the barrel first, and then flows to the cat litter area at the
bottom. If the inner wall is stained with cat urine and is not cleaned regularly, the odor will
be aggravated. It is recommended to clean the barrel every �� days.
�. Whether the cat litter is replaced regularly. When the cat litter has insufficient clumping
ability, small fragments may remain in the cat litter. If the cat litter is not completely replaced
for a long time, the odor problem will also be aggravated. It is recommended to completely
replace the cat litter every �� to �� days according to the performance of the cat litter.
Comparison
of Clumping
Effects with
Different
Absorption
Rates in Tofu
Cat Litter
Water
absorption
comparison
A
Cone-
shaped
clumping
B
Flat-
shaped
clumping
C
Q: Why does the product enter a repetitive cleaning cycle?
A:�. Disconnecting and reconnecting the power supply can help restore normal operation.
�. Avoid pressing the buttons repeatedly immediately after powering on.
*Cat litter with good water absorption will quickly form a flat cat litter ball and will not easily stick to the bottom.
�� ��
Q: Why does the "full" warning not match the actual waste bin status, or why doesn't the warning
disappear?
A:�. The "full" warning is intended to alert you that the waste bin is nearing full capacity. Even if it
appears, the machine will continue operation until the bin can no longer hold any more clumps.
For a �kg cat, the bin may last about �� days, but to avoid odors, we recommend changing the
waste bag at least once a week.
�. When the "full" light is on, please replace the waste bag, press the cleaning button once, and wait
for the cleaning to complete. The "full" warning will then disappear.
�. If there are foreign objects between the barrel and the base, they may affect the operation, causing
the "full" warning to trigger falsely. Please check and remove any possible obstructions.
�. If the "full" warning appears even though there's still space in the bin, you can adjust "Waste Bin
Calibration" in the app. The value ranges from � to ��. Gradually increasing the value can help
achieve more accurate alert conditions.
Q: Why is there urine and cat litter between the barrel and the base?
A: Please check if the baffle grate is properly installed. When first using the product, you may
temporarily remove the baffle grate, to help your cat adjust to the new litter box. Please reinstall
the baffle grate as soon as the cat has adapted. This will effectively prevent litter and urine from
getting into the gap between the barrel and the base, avoiding unnecessary odors.
Q: Why can't the buttons be operated?
A:�. When the product is powered on, it needs to complete a self-test process. You can only operate
the buttons after the self-test is finished.
�. If the product is cleaning, the buttons will be temporarily unresponsive. Please wait until the
machine completes its rotation.
�. If you're having trouble with the app controls, check the product's network connection to ensure
it's working properly.
�� ��

��
Q: Why is the cat litter uneven after cleaning?
A: �.Check if enough litter has been added. If the litter level is too low, it may cause noticeable
unevenness after cleaning.
�.Different types of litter have varying flow characteristics. Some litters may not distribute evenly.
If the surface has a noticeable tilt, you can adjust it using the "Litter Leveling Setting" feature
in the app.
�.After cleaning, the litter surface will be even. However, if you restart the machine, the litter
may show slight tilting. This is normal, please rely on the litter surface after cleaning.
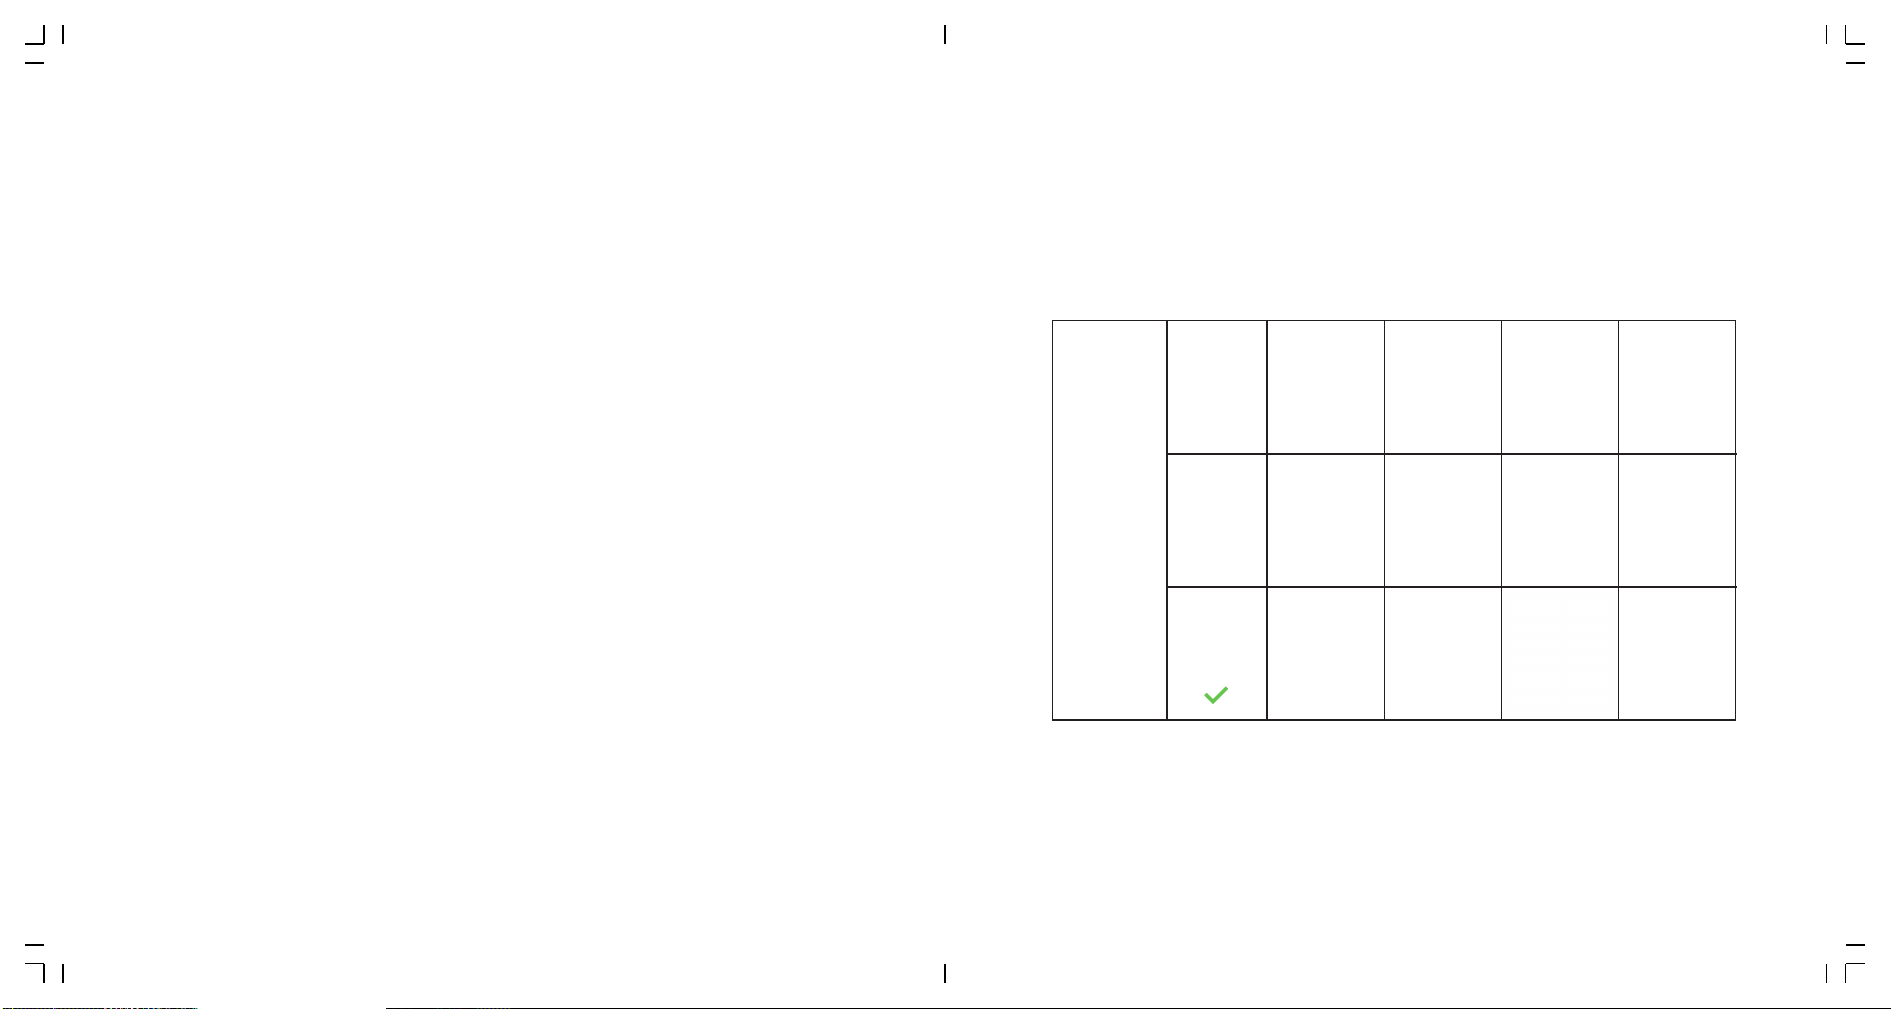
≤Φ�mm
≤
Φ�mm
L≤�mm
L≥��mm
L�/L�≥�mm
L�/L�≥�mm
Φ≤�mm
�≤L≤��mm
Cat Litter Adaptability Reference
Adapt �:� Reference Size
��
Q: Why does a lot of clean litter end up in the waste bag during cleaning?
A:�. If the litter is overfilled, try reducing the amount to avoid excess litter being moved into the
waste bag.
�. Ensure the litter size matches the filter specifications. Refer to the last page of the manual for
adjusting cat litter size accordingly.
1. Press and hold the boon
to replace garbage bag.
2. Open the waste drawer door.
3. Fix the bag under the
posioning clip.
4. Pull out the drawstring.
Gargage Bag Replacement Guide
6. Wrap and e the drawstring around
a winding stake. (DO NOT e to two stakes)
5. Pull the drawstring out
between the two winding stakes.
1 2
3 4
�� ��
1. Replace a new garbage
bag at the waste bin.
3. Hold both ends of the strap, pulling
it from lower edge to the upper.
4. Buckle up.
5. Buckle up.
6. Tidy up the buckle.
Further Tightening
2. Slide the strap along the waste
bin into the gap below opening.
Waste bin
Barrel
wifi
Start cleaning immediately
Start replacing cat litter
Start Auto cleaning
Start purifying the air
Reset WiFi to start join network
Leveling the cat litter
Adjust the barrel angle to the bag changing position
Locked/Unlock
Power On
Barrel is not installed or it cannot run
The device is connected
The device is trying to connect to the network
The device is not connected
Click
Press for �"
Click
Click
Press for �"
Press for �"
Press for �"
Press + for�'
Lighting
Lighting
Lighting
Flash
Unlit
Lighting
one ring
Long ring for �"
one ring
one ring
Long ring for � "
Long ring for �"
Long ring for �"
Long ring for �"
Clean
Replace litter
Auto cleaning
Remove odor
Join network
Leveling
Change garbage bag
Lock/Unlock
Ring lamp
Fault lamp (left)
WiFi lamp (middle)
Waste full lamp (right)
Host Key
Indicator
Remind users to replace garbage
bag when the waste bin is almost full
Category Function Operation Status Prompt tone
Entrance
Barrel shaft Fixed groove
Host
Infrared radar
� Weiaht sensors
Ion Purification module
Power socket
Clasp
Display and Control Panel
�� ��
VI PRODUCT LIST VII INTRODUCTION OF CONTROL PANEL
Ⅷ CIRCUIT DIAGRAM
Infrared Induction
Input DC ��V �.�A
Motor
Fan
Ion Generator
DC ��V �W
WiFi Module
Display And
Control Panel
Hall Sensors
Weight Sensors
Main Control Board
DC+
DC-

���
���/���
���
���
���
���
Product Name
Smart Cat Litter Box
Rated Voltage Rated Power
≤��W
Whole Machine Size
Suggested Pet Type
cat
Product Model
MSP-�� ���(W)���(D)���(H)mm
DC��V
IX Filter and Bottom tray Disassembly & Assembly
➀
➁
In order to facilitate users disassembly and assembly, the two accessories as
shown in the picture are fixed with buckles. If they fall off during transportation,
it is a normal phenomenon. Please refer to this picture, after installation, it can
be used normally.
�. Disassembly & Assembly method
of filter
Hold the left and right sides of the filter and
align it with the shaft hole of the filter baffle,
Disassembly & assembly can be completed
Disassembly & Assembly of ball bin filter
Disassembly & Assembly of ball bin bottom tray
Scan the QR code to watch the
disassembly & assembly video
�.� Remove the filter first
�.� After aligning the front and
rear anchor points, press the
four anchor points into the
installation slots in sequence
�.� In order to improve the fitting
area between the bottom tray
and the ball bin, the edge of the
bottom tray is relatively sharp
Please wear gloves when
disassembling
Note: Daily cleaning does not require removing
the silicone bottom mat. If there is any damage
from biting or scratching, please follow these
instructions to replace it.
�. Disassembly of bottom tray
�� ��
X PARAMETERS AND SPECIFICATIONS

IC Statement:
Radiation Exposure Statement:
This equipment complies with IC radiation exposure limits set forth for an uncontrolled environment. This equipment should be installed and operated with
minimum distance 20cm between the radiator & your body.
Déclaration d'exposition aux radiations:
Cet équipement est conforme aux limites d'exposition aux rayonnements IC établiespour un environnement non contrôlé. Cet équipement doit être installé et
utilisé avecun minimum de 20 cm de distance entre la source de rayonnement et votre corps.
This device complies with Industry Canada license-exempt RSS standard(s).Operation is subject to the following two conditions:
(1) this device may not cause interference,and
(2) this device must accept any interference, including interference that may cause undesired operation of the device.
Cet appareil est conforme avec Industrie Canada RSS exemptes de licence standard(s).Son fonctionnement est soumis aux deux conditions suivantes:
(1) cet appareil ne peut pas provoquer d'interférences, et
(2) cet appareil doit accepter toute interférence, y compris celles pouvant causer unmauvais fonctionnement de l'appareil.

FCC Statement
This device complies with part 15 of the FCC Rules. Operation is subject to the following two
conditions: (1) This device may not cause harmful interference, and (2) this device must
accept any interference received, including interference that may cause undesired operation.
This equipment has been tested and found to comply with the limits for a Class B digital device,
pursuant to Part 15 of the FCC Rules. These limits are designed to provide reasonable
protection against harmful interference in a residential installation. This equipment generates
uses and can radiate radio frequency energy and, if not installed and used in accordance with
the instructions, may cause harmful interference to radio communications. However, there is
no guarantee that interference will not occur in a particular installation. If this equipment does
cause harmful interference to radio or television reception, which can be determined by turning
the equipment off and on, the user is encouraged to try to correct the interference by one or
more of the following measures:
-- Reorient or relocate the receiving antenna.
-- Increase the separation between the equipment and receiver.
-- Connect the equipment into an outlet on a circuit different from that to which the receiver is
connected.
-- Consult the dealer or an experienced radio/TV technician for help.
Any Changes or modifications not expressly approved by the party responsible for compliance
could void the user's authority to operate the equipment.
This equipment should be installed and operated with a minimum distance of 20cm between
the radiator and your body.
This equipment complies with the FCC radiation exposure limits set forth for an uncontrolled
environment, This transmitter must not be co-located or operating in conjunction with any other
antenna or transmitter.