Style Selections and logo design are
trademarks or registered trademarks of
LF, LLC. All Rights Reserved.
Serial Number Purchase Date
ITEM #2573578
Lightweight Cordless
Stick Vacuum
MODEL #20Q
ATTACH YOUR RECEIPT HERE
Questions, problems, missing parts? Before returning to your retailer, call our customer
service department at 1-877-888-8225, 8 a.m. - 8 p.m., EST, Monday - Sunday.
SM20205

2
ABOUT THIS GUIDE
We’re here to help you get the most from your cordless stick vacuum, so please keep hold of this
manual for future use.
IMPORTANT SAFETY INSTRUCTIONS
When using an electrical appliance, basic precautions should always be followed, including the
following: READ ALL INSTRUCTIONS BEFORE USING THE STICK VAC. Failure to follow the
warnings and instructions may result in electric shock, re and/or serious injury.
WARNING–To reduce the risk of re, electric shock, or injury:
1. Do not use outdoors or on wet surfaces.
2. Do not allow to be used as a toy. Close attention is necessary when used by or near children,
pets or plants.
3. Use only as described in this manual. Use only manufacturer’s recommended attachments
4. Do not use with damaged cord or plug. If appliance is not working as it should, has been dropped,
damaged, left outdoors, or dropped into water, return it to a service center.
5. Do not pull or carry by cord, use cord as a handle, close a door on cord, or pull cord around sharp
edges or corners. Do not run appliance over cord. Keep cord away from heated surfaces.
6. Do not unplug by pulling on cord. To unplug, grasp the plug, not the cord.
7. Do not handle charger, including charger plug, and charger terminals with wet hands
8. Do not put any object into openings. Do not use with any opening blocked; keep free of dust, lint,
hair, and anything that may reduce air ow.
9. Keep hair, loose clothing, ngers, and all parts of body away from openings and moving parts.
10. Use extra care when cleaning on stairs.
11. Do not use to pick up ammable or combustible liquids, such as gasoline, or use in areas
where they may be present.
12. Do not pick up anything that is burning or smoking, such as cigarettes, matches, or hot ashes.
13. Do not use without lter and dust cup.
14. Prevent unintentional starting. Ensure the switch is in the off-position before connecting to battery
pack, picking up or carrying the appliance. Carrying the appliance with your nger on the switch
or energizing appliance that have the switch on invites accidents.
15. Recharge only with the charger specied by the manufacturer. A charger that is suitable for one
type of battery pack may create a risk of re when used with another battery pack.
16. Use appliances only with specically designated battery packs. Use of any other battery packs
may create a risk of injury and re.
17. When battery pack is not in use, keep it away from other metal objects, like paper clips, coins,
keys, nails, screws or other small metal objects, that can make a connection from one terminal to
another. Shorting the battery terminals together may cause burns or a re.
18. Under abusive conditions, liquid may be ejected from the battery; avoid contact. If contact
accidentally occurs, ush with water. If liquid contacts eyes, additionally seek medical help.
WARNING – TO REDUCE THE RISK OF ELECTRIC SHOCK – DO NOT USE OUTDOORS OR ON
WET SURFACES. TO REDUCE THE RISK OF INJURY, USER MUST READ INSTRUCTION MANUAL.
CAUTION – RISK OF INJURY. BRUSH MAY START UNEXPECTEDLY. DISCONNECT MOTORIZED
FLOOR NOZZLE BEFORE CLEANING OR SERVICING.

3
IMPORTANT SAFETY INSTRUCTIONS (continued)
AUTOMATIC THERMAL CUT OUT
A safety thermostat inside the stick vac protects the motor from overheating if the airways or lters
are clogged. If the appliance suddenly stops working during operation, switch off immediately. Allow
the motor to cool for an hour, empty the bin and thoroughly clean the lters and airways. Switch on
the stick vac again. The appliance should now operate normally.
Liquid ejected from the battery may cause irritation or burns.
19. Do not use a battery pack or appliance that is damaged or modied. Damaged or modied
batteries may exhibit unpredictable behavior resulting in re, explosion or risk of injury.
20. This product only be charged, used and stored at a temperature between 4°C to 40°C.
21. Do not expose a battery pack or appliance to re or excessive temperature. Exposure to re or
temperature above 130°C may cause explosion.
22. Follow all charging instructions and do not charge the battery pack or appliance outside of the
temperature range specied in the instructions. Charging improperly or at temperatures outside
of the specied range may damage the battery and increase the risk of re.
23. Have servicing performed by a qualied repair person using only identical replacement parts.
This will ensure that the safety of the product is maintained.
24. Do not modify or attempt to repair the appliance or the battery pack except as indicated in the
instructions for use and care.
SAVE THESE INSTRUCTIONS
Household use only.
This device complies with part 15 of the FCC Rules. Operation is subject to the following two
conditions: (1) This device may not cause harmful interference, and (2) this device must accept any
interference received, including interference that may cause undesired operation.
WARNING: Any changes or modications to this unit not expressly approved by the party
responsible for compliance could void the user’s authority to operate the equipment.
NOTE: This equipment has been tested and found to comply with the limits for a Class B digital
device, pursuant to part 15 of the FCC Rules. These limits are designed to provide reasonable
protection against harmful interference in a residential installation. This equipment generates, uses
and can radiate radio frequency energy and, if not installed and used in accordance with the
instructions, may cause harmful interference to radio communications. However, there is no
guarantee that interference will not occur in a particular installation. If this equipment does cause
harmful interference to radio or television reception, which can be determined by turning the
equipment off and on, the user is encouraged to try to correct the interference by one or more of
the following measures:
— Reorient or relocate the receiving antenna.
— Increase the separation between the equipment and receiver.
— Connect the equipment into an outlet on a circuit different from that to which the receiver is
connected.
— Consult the dealer or an experienced radio/TV technician for help.

4
TABLE OF CONTENTS
Safety Information ...........................................................................................................................2
Features & Package Contents.........................................................................................................5
Charging the Stick Vac.....................................................................................................................6
Assembly Instructions......................................................................................................................7
Operating Instructions .....................................................................................................................8
Using the Attachment ......................................................................................................................9
Emptying the Dust Cup ..................................................................................................................10
Removing and Cleaning the Dust Cup and Filters .........................................................................10
Removing and Cleaning the Floor Nozzle and Roller Brush...........................................................13
Clearing a Blockage .......................................................................................................................14
Storing the Cordless Stick Vac .......................................................................................................14
Installing the Wall Mount Bracket ...................................................................................................15
Troubleshooting .............................................................................................................................15
Warranty ........................................................................................................................................16
5
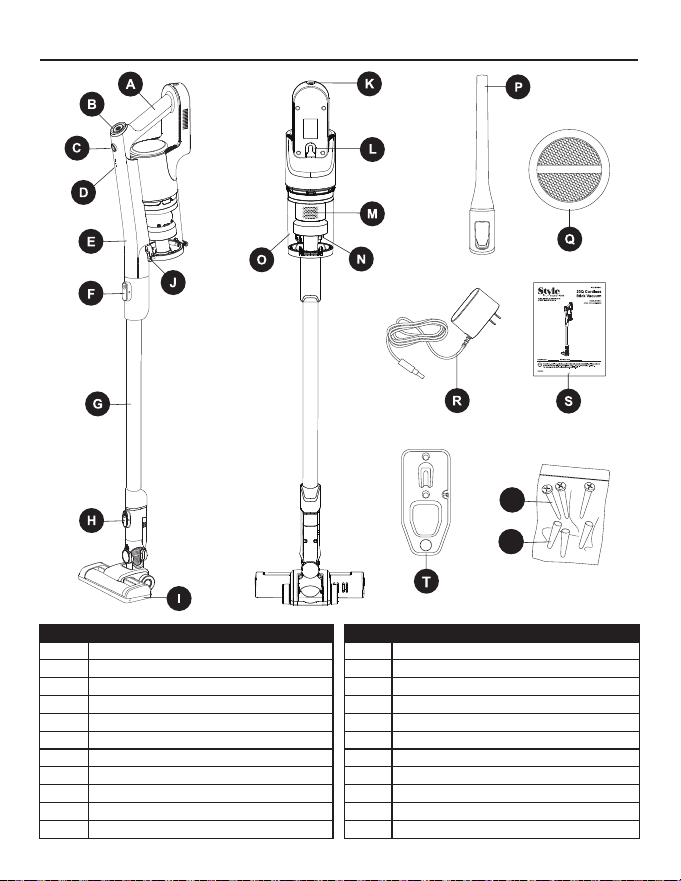
FEATURES & PACKAGE CONTENTS
PART
DESCRIPTION
A Carry Handle
B Power On/Off Button
C Mode Button
D Charge Indicator Lights
E Hand Vacuum
F Release Button for Hand Vacuum
G
Extension Pole
H Release Button for Floor Nozzle
I Floor Nozzle
J Easy Empty Dust Release Latch
K Charger Connection Point
PART
DESCRIPTION
L Mount Hook
M Filter Assembly
N Dust Cup Removal Button
O Dust Cup
P Crevice Tool
Q Circular Sponge Filter
R
Charger MC2805A
S User Manual
T Wall Mount Bracket
U Screws (M3.5*30mm) x3
V Drywall Anchors (6*30mm) x3
V
W
U
V
W
U
U
V
6
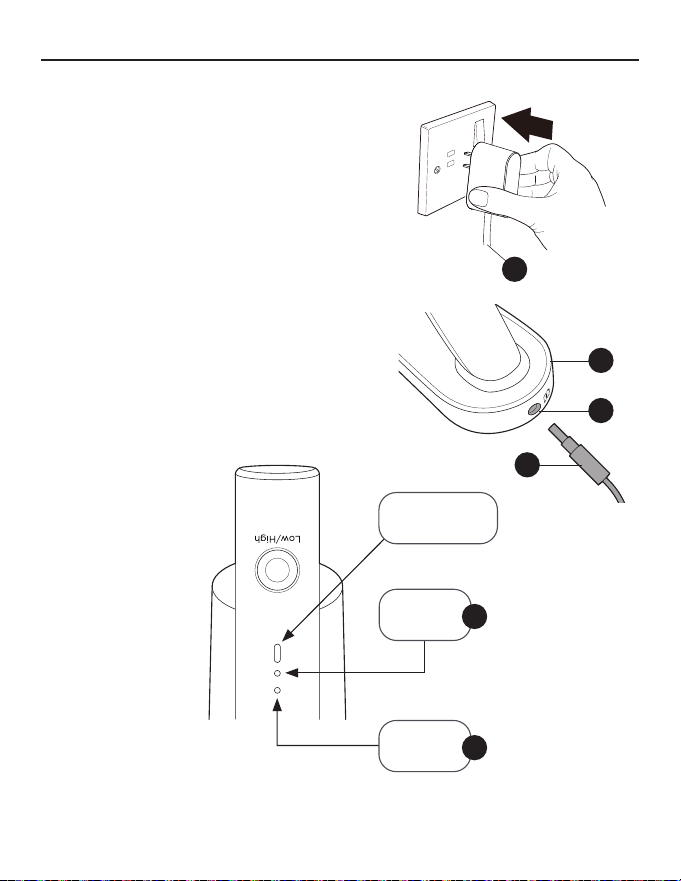
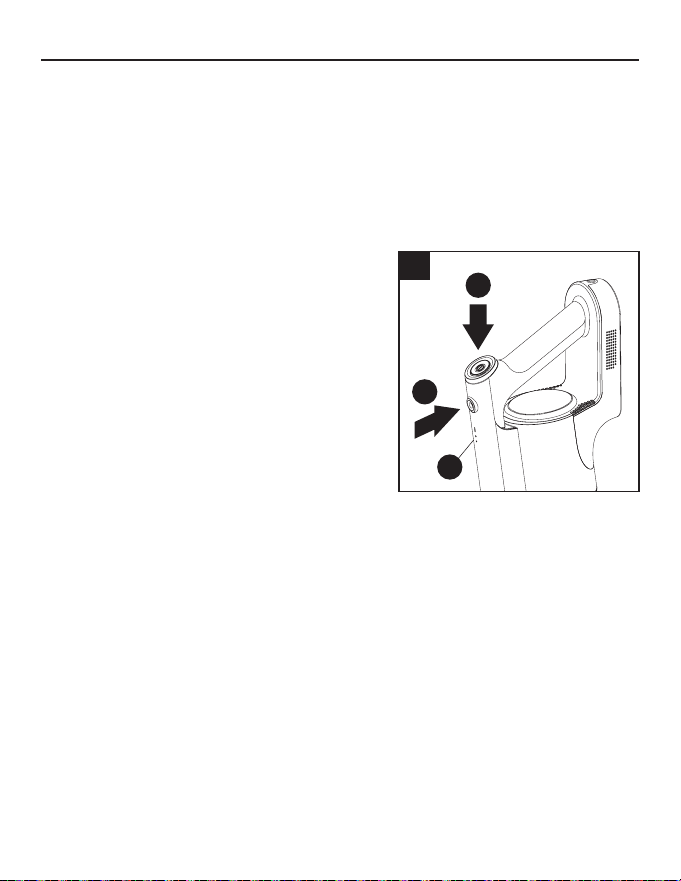
CHARGING THE STICK VAC
Charge battery fully before using for the rst time.
This may take up to six hours.
1. Plug charger (R) into power outlet on the wall.
2. Plug the charger connection (R) into the charger
port (K) on top of vacuum handle (E).
3. Both top light and lower light of charge indicator
lights (D) will ash on and off to show the appliance
is charging.
4. Once fully charged, both charge indicator lights (D)
will stop ashing and will be lit for around 10 minutes,
then they will turn off.
5. Once the vacuum has been fully charged, unplug
from the power outlet.
Note: Do not leave the stick vacuum unattended while
charging. The appliance will not work while it
is charging.
Max mode
light
Top
light
lower
light
E
K
R
R
D
D
7
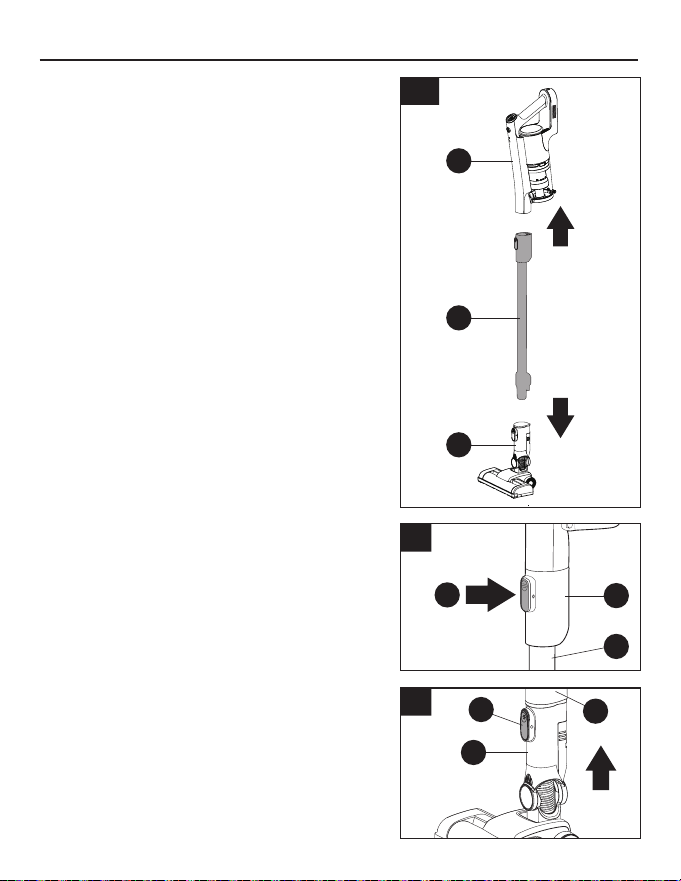
ASSEMBLY INSTRUCTIONS
3
Before assembling, disassembling or attaching
accessories ensure that the vacuum is turned off
and not connected to a power source.
1. Align the extension pole (G) with the top of the oor
nozzle (I) and push down until it clicks into place.
2. Align the hand vacuum (E) with the top of the
extension pole (G) and push down until it clicks into
place. The stick vac is now fully assembled and ready
to use.
3. To disassemble the hand vacuum (E) from the
extension pole (G), simply push the release button for
hand vacuum (F) on the extension pole (G) and pull
away.
4. To remove the oor nozzle (I) from the extension pole
(G), push the release button for oor nozzle (H) down
and pull the extension pole (G) up and out.
CLICK!
CLICK!
1-2
3
4
E
G
I
F
H
I
E
G
G
8
USING THE STICK VAC
Ensure the stick vac is fully charged and assembled
before using. Always take care when vacuuming stairs.
1. There are two power settings on the stick vac:
Max mode (this has a higher suction power but a
shorter running time, approx 15 mins) and Eco mode
(lower suction power with a longer running time,
approx 30 mins).
The stick vac will always start in Max mode. The run
time may vary depending on the surface being cleaned.
2. For the ‘Max’ mode simply press the power button (B),
while for ‘Eco’ mode press the power button (B)
followed by the mode button (C). The Max mode light
will illuminate when in ‘Max’ mode and go out when
switched to ‘Eco’ mode. When required, press the
power button (B) again to turn off the stick vac.
3. Move the oor nozzle back and forth over the surface.
Use even strokes. Don’t press hard; allow the stick
vac to suck away the debris.
4. The stick vac has charge indicator lights (D), these are
the two small lights on the handle.
While charging – the top light will ash and the
lower light is off.
Half charged – the top light is on and the lower light
will ash.
Fully charged – Both lights are on for around 10
minutes, then they will turn off.
When in use and the battery is almost gone, the
bottom light will be off and the top light will ash.
After approximately 10 seconds the stick vac will
automatically switch off.
5. It is advisable to empty the dust cup after each use.
For best performance, check the lters are clean
(see the ‘Removing and cleaning the dust cup and
lters’ section of this manual).
2
B
C
D

9
USING THE ATTACHMENT
When changing the attachment ensure the stick vac
is switched off.
The crevice tool (P) can t directly onto the hand vacuum
(E) for
close up vacuuming and low level dusting and cleaning.
For high level cleaning the tools can t on the end of
the extension pole (G).
1. Remove the oor nozzle (I) from the extension pole
(G) by
pushing down on the release button for oor nozzle
(H) and pulling the
extension pole (G) away from the oor nozzle (I).
2. Slide the crevice tool (P) onto the end of the extension
pole (G) until it clicks into place. The attachment is
now ready to use.
USING THE ATTACHMENT
9
When changing the attachment ensure the stick vac
is switched off.
The crevice tool can fit directly onto the main body for
close up vacuuming and low level dusting and cleaning.
For high level cleaning the tools can fit on the end of
the extension pole.
1. Remove the floor head from the extension pole by
pushing down on the release clip (1) and pulling the
extension pole away from the floor head (2).
2. Slide the crevice tool onto the end of the extension
pole until it clicks into place. The attachment is now
ready to use.
1
2
P
H
G
I
G

10
EMPTYING THE DUST CUP
REMOVING AND CLEANING THE DUST CUP AND FILTERS
Ensure the stick vac is switched off and any attachments
are removed before emptying the dust cup.
1. Hold the dust cup (O) assembly over a household bin
and push the dust release latch (J) on the side of the
dust cup. The debris will fall out into the bin.
Please note: Do not allow the dust cup to overll.
Don’t exceed the MAX level marker. Empty regularly.
Every time you empty the dust cup, check the lter
assembly and tap gently over the household bin to
remove any excess dust.
2. Once empty, close the lid until it clicks shut.
Before starting any cleaning, ensure the stick vac is not
charging and is switched off. It is easier to remove the
dust cup without any attachments on the stick vac.
1. Empty the dust cup as shown in the ‘Emptying the
dust cup’ section of this manual.
2. Press the dust cup removal button (N) located on the
side of the main body near the bottom of the dust
cup (O). Then pull the dust cup away from the main
body, keeping the cup fairly upright.
3. The dust cup houses the circular sponge lter (Q) and
lter assembly (M). Firstly remove the circular sponge
lter (Q) by pinching the ribbon material at the top of
the lter and pulling upwards, then set aside.
EMPTYING THE DUST CUP
10
1. Hold the cup assembly over a household bin and
push the dust release latch on the side of the dust
cup. The debris will fall out into the bin.
Please note: Do not allow the dust cup to overfill.
Don’t exceed the MAX level marker. Empty regularly.
Every time you empty the dust cup, check the filter
assembly and tap gently over the household bin to
remove any excess dust.
2. Once empty close the lid until it clicks shut.
Ensure the stick vac is switched off and any attachments
are removed before emptying the dust cup.
REMOVING AND CLEANING THE DUST CUP AND FILTERS
1. Empty the dust cup as shown in the ‘Emptying the
dust cup’ section of this manual.
2. Press the dust cup release button located on the
side of the main body near the bottom of the dust
cup (1). Then pull the dust cup away from the main
body, keeping the cup fairly upright (2).
3. The dust cup houses the circular sponge filter and
filter assembly. Firstly remove the circular sponge
filter by pinching the ribbon material at the top of
the filter and pulling upwards, then set aside.
Before starting any cleaning, ensure the stick vac is not
charging and is switched off. It is easier to remove the
dust cup without any attachments on the stick vac.
1
1
2
3
J
O
N
M
Q
O
11
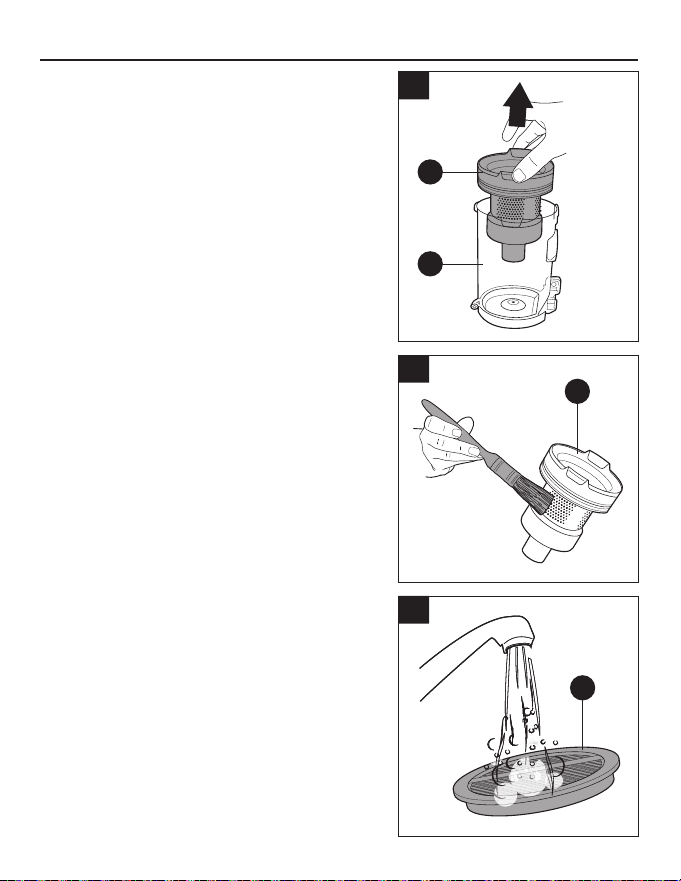
REMOVING AND CLEANING THE DUST CUP AND FILTERS (CONTINUED)
4. Pinch either side of the lter assembly (M) and
pull upwards away from the dust cup (O). Tap the lter
assembly (M) gently over the household bin to remove
any large amounts of dust.
Note: Do not allow the dust cup to overll. Don’t exceed
the MAX level marker. Empty regularly.
5. Remove anymore excess dust from the lter assembly
(M) using a soft brush or a clean paint brush. The lter
can be broken down into three parts. Hold the top
section and twist the lower section in the direction
of the arrow and the unlock padlock icon.
6. Rinse the dust cup, lter assembly parts and circular
sponge lter (Q) under warm water until the water runs
clear and leave to dry for 24 hours.
11
REMOVING AND CLEANING THE DUST CUP AND FILTERS (CONTINUED)
4. Pinch either side of the filter assembly and
pull upwards away from the dust cup. Tap the filter
assembly gently over the household bin to remove
any large amounts of dust.
5. Remove anymore excess dust from the filter assembly
using a soft brush or a clean paint brush. The filter
can be broken down into three parts. Hold the top
section and twist the lower section in the direction
of the arrow and the unlock padlock icon.
6. Rinse the dust cup, filter assembly parts and circular
sponge filter under warm water until the water runs
clear and leave to dry for 24 hours.
Note: Do not allow the dust cup to overfill. Don’t exceed
the MAX level marker. Empty regularly.
4
5
6
M
O
M
Q
12
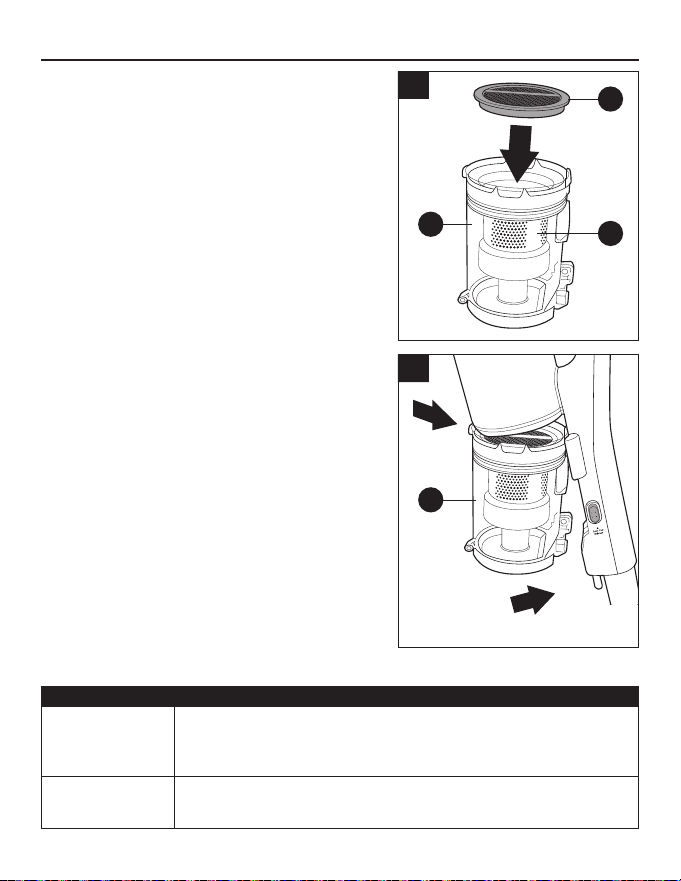
REMOVING AND CLEANING THE DUST CUP AND FILTERS (CONTINUED)
7. Once all the parts are thoroughly dry, reassemble
the lter assembly (M) parts following the arrow and the
icon for the locked padlock and place it back into the
dust cup (O). Don’t forget to put the circular sponge
lter (Q) back in the top of the lter assembly.
8. Replace the dust cup (O) to the main body by hooking
the channel on the top of the dust cup (O) with the
clasp on the main body (1). Push the dust cup (O)
back towards the main body until you hear it click into
place (2). Please note: Do not allow the dust cup to
overll. Don’t exceed the MAX level marker.
Empty regularly.
Note: It is important to regularly maintain and clean the
lters. A clogged lter reduces suction power and can
shorten the life of your stick vac.
Below is a recommended guide for how often you should clean the lters:
FILTER TYPE RECOMMENDED CLEANING TIMES
Filter assembly (M)
• Shake out debris when you empty the dust cup. Use the soft dusting brush
to gently remove any dust build-up.
• Rinse under warm water once a month or more often if required.
Circular
sponge lter (Q)
• Occasionally remove any dust/debris as necessary. The lter can also be
rinsed under warm water once a month.
FILTER TYPE RECOMMENDED CLEANING TIMES
Filter assembly • Shake out debris when you empty the dust cup. Use the soft dusting brush
to gently remove any dust build-up.
• Rinse under warm water once a month or more often if required.
• Occasionally remove any dust/debris as necessary. The filter can also be
rinsed under warm water once a month.
Circular
sponge filter
12
REMOVING AND CLEANING THE DUST CUP AND FILTERS (CONTINUED)
7. Once all the parts are thoroughly dry, reassemble
the filter assembly parts following the arrow and the
icon for the locked padlock and place it back into the
dust cup. Don’t forget to put the circular sponge filter
back in the top of the filter assembly.
8. Replace the dust cup to the main body by hooking
the channel on the top of the dust cup with the lug on
the main body (1). Push the dust cup back towards
the main body until you hear it click into place (2).
Note: It is important to regularly maintain and clean the
filters. A clogged filter reduces suction power and can
shorten the life of your stick vac.
Below is a recommended guide for how often you should clean the filters:
7
1
2
8
O
O
Q
M
13
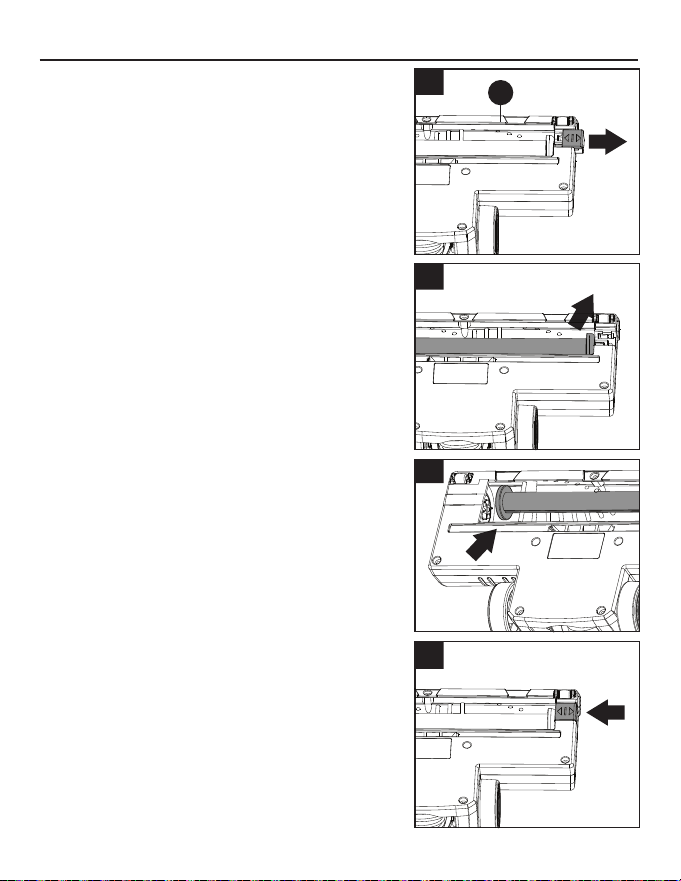
REMOVING AND CLEANING THE FLOOR NOZZLE AND ROLLER BRUSH
Before starting any cleaning, ensure the stick vac is not
charging and is switched off and remove the oor nozzle
from the rest of the stick vac.
If the roller brush becomes tangled during use, the automatic
thermal cut out will shut off the stick vac. If that happens,
please follow below steps.
1. Turn the oor nozzle (I) upside down. To access the roller
brush, slide the tab, marked with arrows, to the right.
2. Pull the roller brush at a slight angle up and out of the
oor nozzle.
Any build up of hair etc. can now be removed from the
roller brush. Scissors can be used to cut any hair away
from the roller if necessary, taking care not to cut any
of the brush bristles.
3. Once the roller brush is cleaned, replace the roller
brush by aligning the left, open side of the roller with
the star cog shape on the oor nozzle. You may need
to twist the roller head a little to lock this in place.
4. Push the other end of the roller down as far as it will go.
Slide the tab back to the left to lock in place.
13
REMOVING AND CLEANING THE FLOOR NOZZLE AND ROLLER BRUSH
1. Turn the floor head upside down. To access the roller
brush, slide the tab, marked with arrows, to the right.
2. Pull the roller brush at a slight angle up and out of the
floor head.
Any build up of hair etc. can now be removed from the
roller brush. Scissors can be used to cut any hair away
from the roller if necessary, taking care not to cut any
of the brush bristles.
3. Once the roller brush is cleaned, replace the roller
brush by aligning the left, open side of the roller with
the star cog shape on the floor head. You may need
to twist the roller head a little to lock this in place.
4. Push the other end of the roller down as far as it will go.
Slide the tab back to the left to lock in place.
Before starting any cleaning, ensure the stick vac is not
charging and is switched off and remove the floor head
from the rest of the stick vac.
If the roller brush becomes tangled during use, a red light
on top of the floor head will illuminate to indicate there is
an entanglement which needs attention.
1
4
2
3
I

14
CLEARING A BLOCKAGE
STORING THE CORDLESS STICK VAC
Ensure the stick vac is not plugged into the main power supply and is switched off before
dismantling the vac.
The stick vac would only become blocked if the dust cup has exceeded the ‘Max’ level, the lters
are clogged up or a large object has been sucked up.
1. Check the dust cup (O) and empty if necessary.
2. Check the 2 lters (M) and (Q) in the unit, remove any debris/dust and wash if necessary.
3. If the oor nozzle (I) or crevice tool (P) were in use, detach them from the hand vacuum (E) or
extension pole (G).
4. Detach the extension pole (G) and look down it to see if there are any blockages. If there are, use
the handle of a broom to clear the obstruction. Take care not to damage the pole in the process.
5. Check the roller brush for any hair or thread which may have become wrapped around the roller.
Cut away with a pair of scissors. To do this safely, remove as shown in the ‘Removing and
cleaning the oor nozzle roller brush’ section of this manual. Every time you empty the dust cup,
check the lter assembly and tap gently over the household bin to remove any excess dust.
6. Once empty close the lid until it clicks shut.
Your stick vac can be stored safely and securely by hanging from the wall mount (T) supplied with
your product or by removing all the attachments and stowing together in a cupboard.
Either way will help avoid the product falling over and causing damage.
Always turn off and unplug from the mains supply before storing.
1. Remove any attachments if the stick vac was last used with them on.
2. Store the stick vac and accessories away safely in a dry place.
15
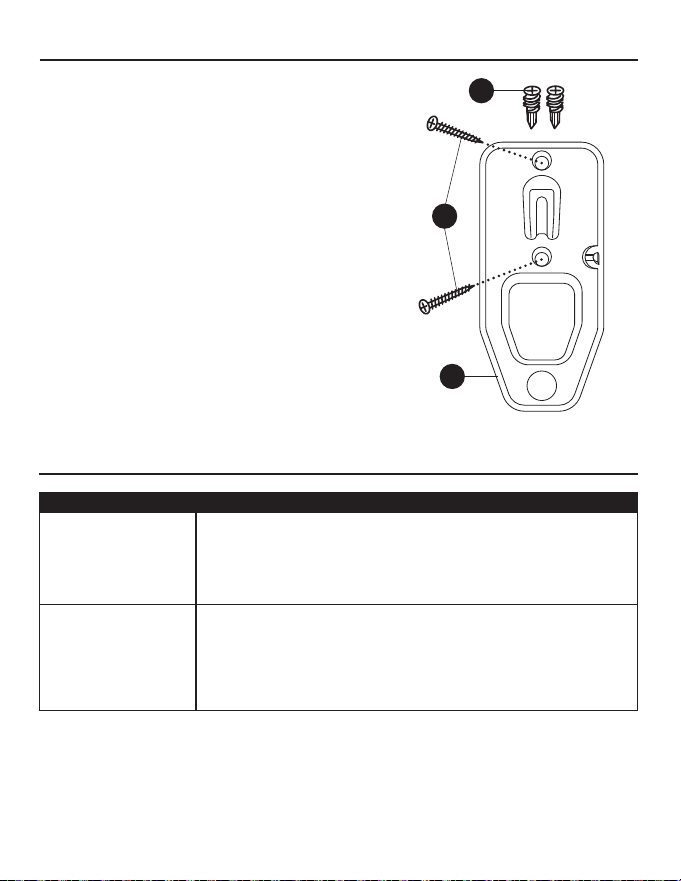
INSTALLING THE WALL MOUNT BRACKET
TROUBLESHOOTING
1. Choose a location near a power outlet. Locate a point
high enough on the wall to allow the wand and oor
nozzle to hang freely.
2. Place the mount (T) against the wall and use a pencil
to mark drill holes.
3. Drill holes (with 1/4” bit) and insert drywall anchors (V).
Insert screws (U) through holes on mount and tighten
until rmly attached.
PROBLEM WHAT TO DO
The stick vac is not
cleaning well
1. Empty the dust cup (O)
2. Remove excess dust from the lters
3. Wash the lters (M) and (Q)
4. Check for blockages
The stick vac has
stopped or won’t work.
1. Charge the vac (check the mains socket works and the switch is
turned on)
2. It might be blocked – check items 1 to 4 above
3. The thermal cut out activated. Switch off the vac and leave the
motor to cool for an hour then try using again.
T
V
U

16
WARRANTY
The Style Selections 1 year limited warranty
Style Selections, subject to the terms and conditions herein, warrants this vacuum cleaner to be free from defects in
material and workmanship for a term of one year from the date of original purchase when used in accordance with the
Style Selections operating and maintenance instructions and under normal household usage. This warranty is granted
only to the original purchaser and members of immediate household, and is applicable only to original purchases from
Style Selections authorized resellers.
What Style Selections will do:
Style Selections will, at its option, repair or replace a defective vacuum or vacuum part that is covered by this warranty.
Repairs may be performed using new or refurbished parts that meet or exceed Style Selections specications for new
parts. If Style Selections elects to replace the vacuum, the replacement may be a reconditioned unit. Depending on
availability of products, Style Selections reserves the right to provide you with a replacement product that is the same
or similar, or substitute equivalent of the original product. As a matter of warranty policy, Style Selections will not refund
the consumer’s purchase price.
This warranty does not cover:
• Battery module and battery components. The battery module and its components are covered by a separate one-
year limited battery warranty.
• Normal wear and tear of the vacuum and vacuum parts that require replacement under normal use such as
disposable dust bags, lters, drive belts, light bulbs, brush-roll, bristles, impellers and cleaning.
• Damages or malfunctions resulting from: improper or unreasonable use or maintenance, abuse, negligence, failure
to follow instructions contained in any written materials that accompany the product, deterioration by reason of
excess moisture, corrosive atmosphere, lightning, power surges, connections to improper voltage supply,
unauthorized alteration, or other external causes such as extremes in temperature or humidity, modications,
scratches or discoloration, accidents, misuse, or acts of God. This warranty also does not cover damage resulting
from repair or attempted repair by anyone other than Style Selections or an authorized Style Selections Warranty
Station. This warranty is not applicable to any product that has been altered or on which the serial number has been
defaced, modied or removed. Altering, erasing, or forging any proof-of-purchase documents voids any applicable
product warranty.
Obtaining warranty service:
To obtain warranty service you must contact the Style Selections Service Team, at 1-877-888-8225 to discuss the
warranty claim and procedures to be followed. All warranty claims must include submission of proof-of-purchase
documentation.
Shipping charges:
You will be responsible for any initial shipping and insurance charges if the defective product(s) must be shipped for
warranty service or warranty evaluation; however, Style Selections or a Style Selections Authorized Warranty Station
will pay the return shipping charges if repairs are covered by the warranty. When returning parts for repair, you must
include the model, type and serial number located on the rating plate. If any product submitted for warranty service
is found to be ineligible, an estimate of repair cost will be furnished and the repair performed only if requested by the
owner and upon receipt of payment or acceptable arrangements for payment.
Further limitations and exclusions:
Any warranty that may be implied in connection with your purchase or use of the vacuum, including any warranty of
Merchantability or any warranty of Fitness For A Particular Purpose is limited to the duration of this limited warranty.
Some states do not allow limitations on how long an implied warranty lasts, so the above limitations may not apply to
you. Your relief for the breach of this warranty is limited to the relief expressly provided above. In no event shall the
manufacturer be liable for any consequential or incidental damages you may incur in connection with your purchase or
use of the vacuum. Some states do not allow the exclusion or limitation of incidental or consequential damages, so the
above limitation or exclusion may not apply to you. This warranty gives you specic legal rights. You may also have
other rights, which may vary by state.

17
WARRANTY
The Style Selections 12-month limited battery warranty
Style Selections, subject to the terms and conditions herein, warrants this Battery Module to be free from defects in
material and workmanship for a term of one year from the date of original purchase when used in accordance with the
only to the original purchaser and members of immediate household, and is applicable only to original purchases from
Style Selections authorized resellers.
What Style Selections will do:
Style Selections will, at its option, repair or replace a defective Battery Module or battery part that is covered by this
warranty. Repairs may be performed using new or refurbished parts that meet or exceed Style Selections specications
for new parts. If Style Selections elects to replace the Battery Module, the replacement may be a reconditioned unit.
Depending on availability of products, Style Selections reserves the right to provide you with a replacement product that
is the same or similar, or substitute equivalent of the original product. As a matter of warranty policy, Style Selections will
not refund the consumer’s purchase price.
This warranty does not cover:
• Normal wear and tear of the Battery Module and battery parts that require replacement under normal use.
• Damages or malfunctions resulting from: improper or unreasonable use or maintenance, abuse, negligence, failure
to follow instructions contained in any written materials that accompany the product, deterioration by reason of excess
moisture, corrosive atmosphere, lightning, power surges, connections to improper voltage supply, unauthorized
alteration, or other external causes such as extremes in temperature or humidity, modications, scratches or discoloration,
accidents, misuse, or acts of God. This warranty also does not cover damage resulting from repair or attempted repair by
anyone other than Style Selections or an authorized Style Selections Warranty Station. This warranty is not applicable
to any product that has been altered or on which the serial number has been defaced, modied or removed. Altering,
erasing, or forging any proof-of-purchase documents voids any applicable product warranty.
Obtaining warranty service:
To obtain warranty service you must contact the Style Selections Service Team at 1-877-888-8225 to discuss the
warranty claim and procedures to be followed. All warranty claims must include submission of proof-of-purchase
documentation.
Shipping charges:
You will be responsible for any initial shipping and insurance charges if the defective product(s) must be shipped for
warranty service or warranty evaluation; however, Style Selections or a Style Selections Authorized Warranty Station will
pay the return shipping charges if repairs are covered by the warranty. When returning parts for repair, you must include
the model, type and serial number located on the rating plate. If any product submitted for warranty service is found to be
ineligible, an estimate of repair cost will be furnished and the repair performed only if requested by the owner and upon
receipt of payment or acceptable arrangements for payment.
Further limitations and exclusions:
Any warranty that may be implied in connection with your purchase or use of the Battery Module, including any warranty
of Merchantability or any warranty of Fitness For A Particular Purpose is limited to the duration of this limited warranty.
Some states do not allow limitations on how long an implied warranty lasts, so the above limitations may not apply to
you. Your relief for the breach of this warranty is limited to the relief expressly provided above. In no event shall the
manufacturer be liable for any consequential or incidental damages you may incur in connection with your purchase or use
of the Battery Module. Some states do not allow the exclusion or limitation of incidental or consequential damages, so the
above limitation or exclusion may not apply to you. This warranty gives you specic legal rights. You may also have other
rights, which may vary by state.

18
Discarding the vacuum and battery pack
Before you discard this vacuum, dispose of battery in an environmentally safe
manner. Do not discard battery with your regular household trash.
Important battery disposal information.
To nd a disposal location nearest you, call 1-800-822-8837.
To preserve natural resources, please recycle or dispose of expired battery
pack properly. This product contains a lithium-ion battery. It must be disposed
of properly. Local laws may prohibit disposal of lithium-ion batteries in ordinary
trash. Consult your local waste authority for information regarding available
recycling and/or disposal options.
Printed in China
!
Li-ion

19

20
Distributed by:
L G Sourcing, Inc.
1000 Lowe’s Blvd.
Mooresville, NC 28117
