

www.greenworkstools.comSTB415
EN OPERATOR MANUAL
STRING TRIMMER


1 Introduction............................ 4
1.1 Product description......................... 4
1.2 Intended use................................... 4
1.3 Product overview............................ 4
1.4 Symbols on the machine................ 4
1.5 California Proposition 65.................5
2 Safety...................................... 5
2.1 Safety definitions............................ 5
2.2 Important safety instructions...........5
2.3 Inspect safety features....................6
3 Service.................................... 7
4 Assembly................................7
4.1 Install the Trimmer guard................7
4.2 Assemble the shaft......................... 7
4.3 Install the auxiliary handle.............. 8
4.4 Attach the shoulder strap................8
5 Operation................................ 8
5.1 Before you use the product.............8
5.2 Operate the product........................9
5.3 Stop the product........................... 10
6 Maintenance......................... 11
6.1 Examine the battery and the
battery charger..............................11
6.2 Clean the product, the
battery, and the battery charger.... 11
6.3 Replace the spool......................... 11
6.4 Install the cutting line.................... 12
7 Transportation, storage,
and disposal.........................13
7.1 Transportation and storage...........13
7.2 Disposal of the battery,
battery charger, and product.........13
8 Troubleshooting...................13
9 Technical data...................... 14
10 Limited warranty.................. 14
3
English
EN
1 INTRODUCTION
1.1 PRODUCT DESCRIPTION
This product is a battery-operated string trimmer with
an electrical motor.
We are committed to continuously improving our
products, and reserve the right to modify the design
and appearance without prior notice.
1.2 INTENDED USE
This product is designed to cut, trim, and clear different
types of vegetation using the trimmer head. It should
not be used for any other tasks.
Please note that national or local regulations may
regulate the use of the product. It is important to
comply with any regulations given.
Always use accessories that are approved by the
manufacturer with this product.
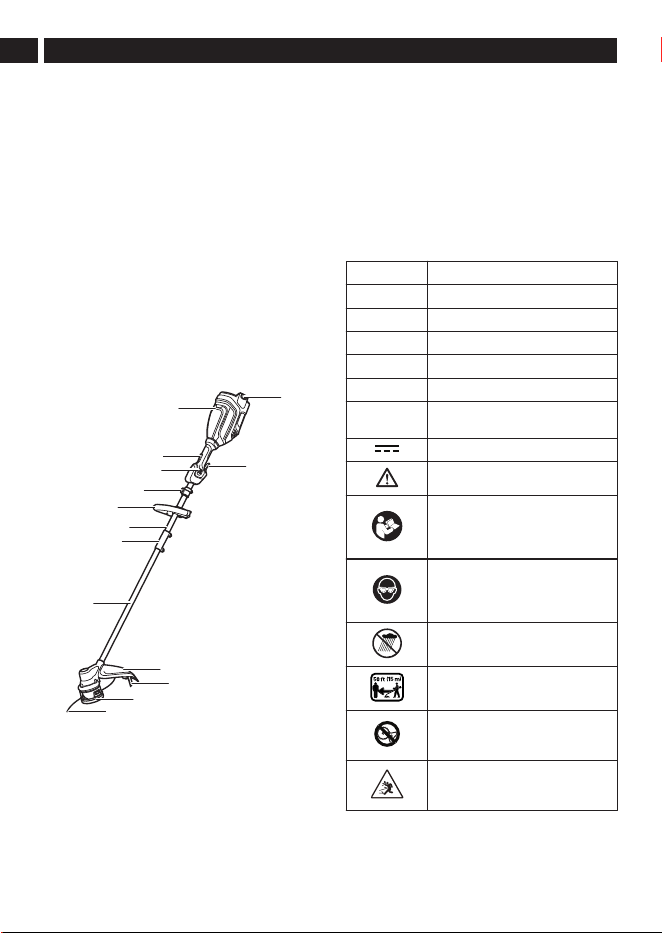
1.3 PRODUCT OVERVIEW
1
2
3
5
7
10
11
12
8
6
9
13
14
4
1
Battery compartment
2
Safety-lock button
3
Speed switch
4
Strap bracket
5
Auxiliary handle
6
Upper shaft
7
Coupler
8
Lower shaft
9
Cutting line
10
Trimmer head
11
String cut-off blade
12
Trimmer guard
13
Trigger
14
Battery release button
1.4 SYMBOLS ON THE MACHINE
Some of the following symbols can be used on this
machine. Please study them and learn their definition.
Proper interpretation of these symbols will let you
operate the tool better and safer.
Symbol Explanation
V Voltage
A Current
Hz Frequency (cycles per second)
W Power
min Time
/min
Revolutions, strokes, surface speed,
orbits etc., per minute
Direct current
Precautions that involve your safety.
Read and understand all instruc-
tions before you operate the ma-
chine and follow all warnings and
safety instructions.
Always wear safety glasses with
side shields marked to comply with
ANSI Z87.1 when you operate this
machine.
Do not expose the machine to rain
or moist conditions.
Keep all bystanders at least 50-ft
away.
Do not install or use any type of
blade on the machine or displaying
this symbol.
Thrown objects can ricochet and re-
sult in personal injury or property
damage.
4
English
EN

1.5 CALIFORNIA PROPOSITION 65
WARNING
THIS PRODUCT CONTAINS OR EMITS A
CHEMICAL KNOWN TO THE STATE OF
CALIFORNIA TO CAUSE CANCER OR BIRTH
DEFECTS OR OTHER REPRODUCTIVE HARM.
2 SAFETY
2.1 SAFETY DEFINITIONS
Warnings, cautions, and notes are used to point out
especially important parts of the manual.
WARNING
THERE IS A RISK OF INJURY OR DEATH
FOR THE OPERATOR OR BYSTANDERS IF THE
INSTRUCTIONS IN THE MANUAL ARE NOT
OBEYED.
CAUTION
THERE IS A RISK OF DAMAGE TO THE
PRODUCT, OTHER MATERIALS, OR THE
ADJACENT AREA, IF THE INSTRUCTIONS IN
THE MANUAL ARE NOT OBEYED.
Note: Used to give more information that is necessary
in a given situation.
2.2 IMPORTANT SAFETY INSTRUCTIONS
READ ALL INSTRUCTIONS BEFORE USING (THIS
POWER TOOL)
WARNING
READ AND UNDERSTAND ALL INSTRUCTIONS
BEFORE USING THIS PRODUCT. FAILURE TO
FOLLOW ALL INSTRUCTIONS LISTED BELOW
MAY RESULT IN ELECTRIC SHOCK, FIRE,
AND/OR SERIOUS PERSONAL INJURY.
• Use only identical manufacturer’s replacement parts
and accessories. Use of any other parts may create
a hazard or cause product damage.
• Always wear safety glasses with side shields
marked to comply with ANSI Z87.1. Everyday
glasses have only impact resistant lenses. They are
NOT safety glasses. Following this rule will reduce
the risk of eye injury. Use face mask if operating in
dusty workspaces.
• Avoid Dangerous Environment – Don’t expose
power tools to damp or wet conditions. Water
entering a power tool will increase the risk of electric
shock.
• Don’t use in rain.
• Keep all bystanders, children, and pets at least 50 ft.
away.
• Dress Properly – Do not wear loose clothing or
jewelry. They can be caught in moving parts. Use
of protective gloves and footwear is recommended
when working outdoors. Wear protective hair
covering to contain long hair.
• Use right Appliance. Do not use appliance for any
job except that for which it is intended.
• Avoid Unintentional Starting – Avoid holding finger
on the power switch when unit has battery inserted
and is not in use. Carrying this unit with finger on
switch when battery is inserted increases likelihood
of accident.
• Don’t Force Appliance – It will do the job better and
with less likelihood of a risk of injury at the rate for
which it was designed.
• Don’t overreach – Keep proper footing and balance
at all times.
• Stay alert – Watch what you are doing. Use
common sense. Do not operate this unit when you
are tired, ill or under the influence of alcohol, drugs,
or medication.
• Always store idle power tools indoors – When not
in use, power tools should be stored indoors in a
dry and high or locked-up place, out of reach of
children.
• The machine is not intended for use by persons
(including children) with reduced physical, sensory,
or mental capabilities, or lack of experience
and knowledge, unless they have been given
supervision or instruction concerning use of the
machine by a person responsible for their safety.
Children should be supervised to ensure that they
do not play with the machine.
• Maintain Appliance With Care – Replace string head
if cracked, chipped, or damaged in any way. Be sure
the string head is properly installed and securely
fastened. Keep cutting edge sharp and clean for
best performance and to reduce the risk of injury.
Follow instructions for lubricating and changing
accessories. Inspect appliance cord periodically,
and if damaged, have it repaired by an authorized
service facility. Inspect extension cords periodically
and replace if damaged. Keep handles dry, clean,
and free from oil and grease. Failure to do so can
cause serious injury.
• Check damaged parts before using the appliance,
a guard or other part that is damaged should be
carefully checked to determine that it will operate
properly and perform its intended function. Check
for alignment of moving parts, binding of moving
parts, breakage of parts, damaged mountings, and
any other condition that may affect its operation.
A guard or other part that is damaged should
be properly repaired or replaced by an authorized
5
English
EN

service center unless indicated elsewhere in this
manual.
• Remove or disconnect battery before servicing,
cleaning, or removing material from the gardening
appliance.
• Do not modify or attempt to repair the appliance or
the battery pack (as applicable) except as indicated
in the instructions for use and care. Use appliances
only with specifically designated battery packs. Use
of any other battery packs may create a risk of injury
and fire. Use only with Greenworks BAB740 battery
or other BAB series.
• Recharge only with the charger specified by the
manufacturer. A charger that is suitable for one
type of battery pack may create a risk of fire
when used with another battery pack. Use only with
Greenworks GCH8020 charger or other CAB series.
• When battery pack is not in use, keep it away from
other metal objects, like paper clips, coins, keys,
nails, screws, or other small metal objects, that can
make a connection from one terminal to another.
Shorting the battery terminals together may cause a
fire.
• Under abusive conditions, liquid may be ejected
from the battery; avoid contact. If contact
accidentally occurs, flush with water. If liquid
contacts eyes, additionally seek medical help. Liquid
ejected from the battery may cause irritation or
burns.
• Do not use a battery pack or appliance that
is damaged or modified. Damaged or modified
batteries may exhibit unpredictable behavior
resulting in fire, explosion, or risk of injury.
• Do not expose a battery pack or appliance to
fire or excessive temperature. Exposure to fire or
temperature above 265 °F (130 °C) may cause an
explosion.
• Do not dispose of the batteries in a fire. The cells
may explode. Check with local codes for possible
special disposal instructions.
• Do not open or mutilate the batteries. Released
electrolyte is corrosive and may cause damage to
the eyes or skin. It may be toxic if swallowed.
• Exercise care in handling batteries in order not to
short the battery with conducting materials such as
rings, bracelets, and keys. The battery or conductor
may overheat and cause burns.
• Follow all charging instructions and do not charge
the battery pack or appliance outside of the
temperature range specified in the instructions.
Charging improperly or at temperatures outside of
the specified range may damage the battery and
increase the risk of fire.
• Have servicing performed by a qualified repair
person using only identical replacement parts.
This will ensure that the safety of the product is
maintained.
• Keep guards in place and in working order.
• Keep hands and feet away from cutting area.
• Disconnect the battery pack from the appliance
before making any adjustments, changing
accessories, or storing appliance. Such preventive
safety measures reduce the risk of starting the
appliance accidentally.
• Use only with the nylon cutting line of 0.095"
(2.4 mm) diameter. Do not use heavier lines
than recommended by the manufacturer and line
materials of other types – for example, metal wire,
rope, and the like.
SAVE THESE INSTRUCTIONS
2.3 INSPECT SAFETY FEATURES
• Examine the work area to identify any potential
hazards, such as uneven terrain, slopes, rocks,
branches, or ditches.
• Perform all required safety inspections,
maintenance, and servicing as specified in this
manual.
• Check that all covers, guards, handles, and cutting
equipment are properly attached and undamaged.
• Check the cutting attachment and cutting
attachment guard for any damage or cracks and
replace if necessary.
2.3.1 CHECK THE SAFETY-LOCK BUTTON AND
TRIGGER
The safety-lock button is designed to prevent
accidental operation. See Product overview to find
where these parts are located on your product.
1. Make sure that the trigger is locked when the
safety-lock button is not pressed.
2. Make sure that the trigger and safety-lock button
move freely and that the return spring works
correctly.
3. Simultaneously push the safety-lock button and
pull the trigger to start the product.
4. Test on high-speed mode.
5. Release the trigger and make sure that the
cutting attachment stops completely.
2.3.2 CHECK CUTTING ATTACHMENT GUARD
The cutting attachment guard is a crucial safety device
that prevents objects from being thrown towards the
operator and prevents injury if the cutting attachment is
touched.
6
English
EN

WARNING
DO NOT USE A CUTTING ATTACHMENT
WITHOUT AN APPROVED AND CORRECTLY
ATTACHED CUTTING ATTACHMENT GUARD.
ALWAYS USE THE RECOMMENDED CUTTING
ATTACHMENT GUARD FOR THE CUTTING
ATTACHMENT THAT YOU USE. USING
AN INCORRECT OR FAULTY CUTTING
ATTACHMENT GUARD CAN CAUSE SERIOUS
PERSONAL INJURY.
1. Stop the product and remove the battery.
2. Visually inspect for damage, such as cracks.
3. Replace the cutting attachment guard if it is
damaged.
3 SERVICE
Servicing requires extreme care, and knowledge
and must be performed only by a qualified service
technician. Consult your nearest AUTHORIZED
SERVICE CENTER for repair. Call 1-855-345-3934 to
obtain the address. Only use identical manufacturer’s
replacement parts and accessories from the
AUTHORIZED SERVICE CENTER.
4 ASSEMBLY
This section describes how to assemble and adjust the
product.
WARNING
CAREFULLY READ AND UNDERSTAND THE
SAFETY CHAPTER AND THE ASSEMBLY
INSTRUCTIONS BEFORE YOU ASSEMBLE THE
PRODUCT.
4.1 INSTALL THE TRIMMER GUARD
WARNING
• THE STRING CUT-OFF BLADE MUST ALWAYS
BE EQUIPPED ON THE TRIMMER GUARD
BEFORE OPERATING THE PRODUCT.
• DO NOT TOUCH THE STRING CUT-OFF
BLADE.
1. Remove the screws from the trimmer guard with
a Phillips head screwdriver (not included).
2. Place the trimmer guard onto the shaft.
3. Securely tighten the screws with a Phillips head
screwdriver.
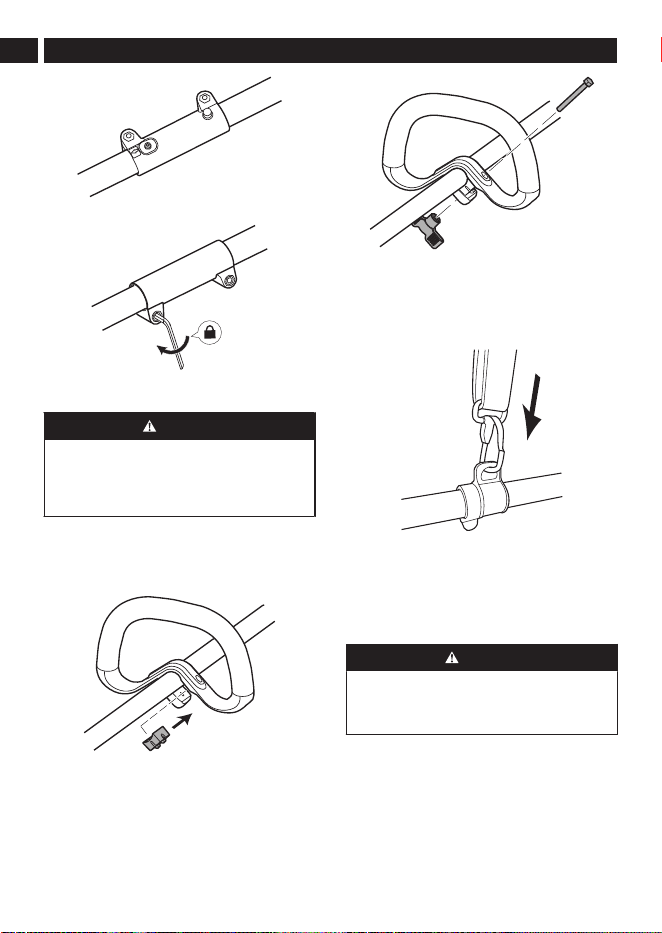
4.2 ASSEMBLE THE SHAFT
1. Loosen the screw on the coupler with the hex
wrench.
2. Push in the release button (1) on the lower shaft.
Align the release button with the mounting hole
(2) and slide the two shafts together.
2
1
CAUTION
EXERCISE CAUTION WHILE SLIDING THE TWO
SHAFTS TOGETHER TO PREVENT ANY RISK OF
PINCHING YOUR HANDS OR FINGERS.
3. Turn the lower shaft until the button locks into the
mounting hole.
7
English
EN
4. Securely tighten the screw with the hex wrench.
Note: When properly assembled, the upper and lower
shaft should not separate when pulled.
WARNING
CAREFULLY FOLLOW THE ASSEMBLY
INSTRUCTIONS AS DESCRIBED ABOVE.
FAILURE TO DO SO MAY LEAD TO THE
PRODUCT SEPARATING, WHICH INCREASES
THE RISK OF PERSONAL INJURY.
4.3 INSTALL THE AUXILIARY HANDLE
1. Attach the auxiliary handle on the shaft.
2. Place the lower clamp into the slot on the
auxiliary handle.
3. Install the screw and the knob. Do not fully
tighten.
4. Adjust the auxiliary handle to desired position.
5. Securely tighten the wing bolt.
4.4 ATTACH THE SHOULDER STRAP
1. Attach the carabiner to the strap bracket on the
shaft.
2. Put on the shoulder strap.
3. Adjust the length of the strap so that the
carabiner is about a hand’s width below your right
hip.
5 OPERATION
This section describes how to operate the product.
WARNING
CAREFULLY READ AND UNDERSTAND
THE SAFETY CHAPTER AND OPERATION
INSTRUCTIONS BEFORE YOU OPERATE THE
PRODUCT.
5.1 BEFORE YOU USE THE PRODUCT
5.1.1 CONNECT THE BATTERY CHARGER
1. Connect the battery charger to the proper voltage
and frequency that is specified on the rating plate.
2. Refer to the Battery Charger Operator Manual for
information about how to use the battery charger.
8
English
EN
5.1.2 CHARGE THE BATTERY
Refer to the Battery Charger Operator Manual for
information about how to use the battery charger.
5.1.3 BATTERY INFORMATION
Refer to the Battery Operator Manual for information
about how to use the battery.
5.1.4 CONNECT THE BATTERY TO THE
PRODUCT
WARNING
ONLY USE THE ORIGINAL BATTERY WITH THE
PRODUCT.
1. Make sure that the battery is fully charged.
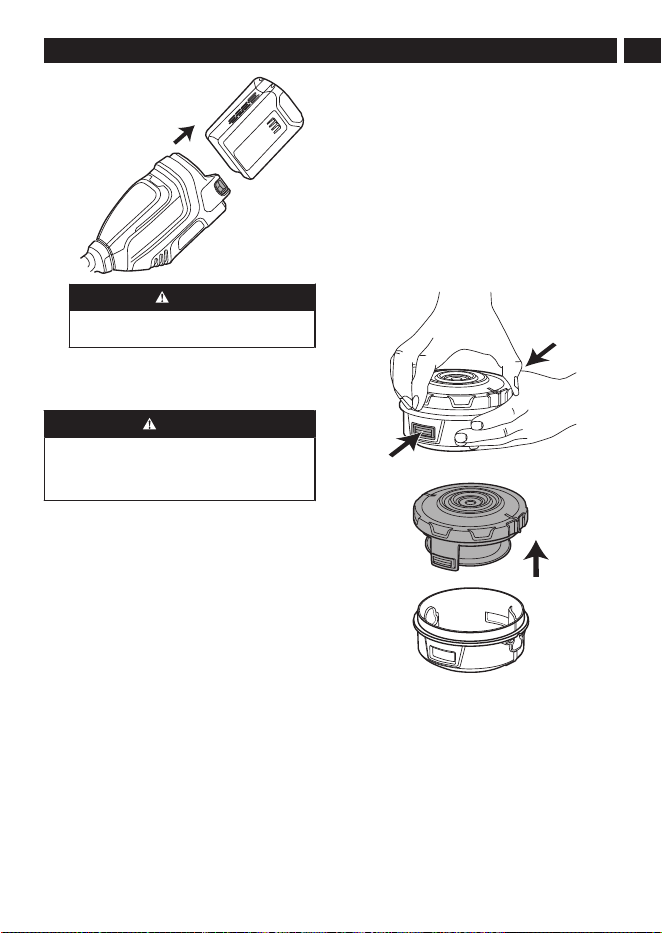
2. Push the battery into the battery compartment.
The battery locks into position when you hear a
click.
CAUTION
IF THE BATTERY DOES NOT FIT EASILY INTO
THE BATTERY HOLDER, IT MAY NOT BE
INSTALLED CORRECTLY, WHICH CAN CAUSE
DAMAGE TO THE BATTERY AND/OR THE
PRODUCT.
3. Make sure that the battery is installed securely.
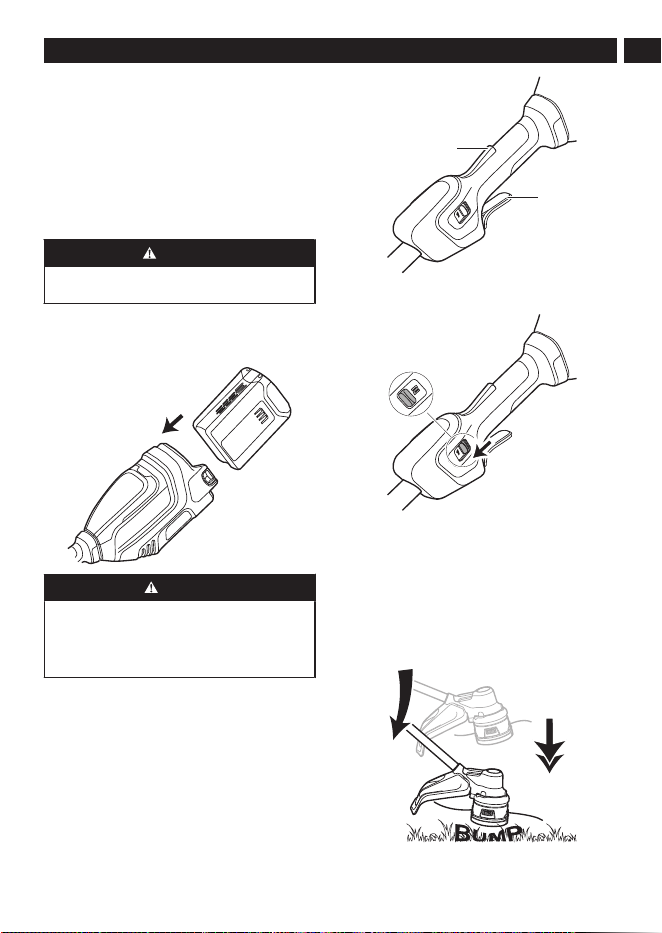
5.1.5 START THE PRODUCT
1. Simultaneously push the safety-lock button (1)
and pull the trigger (2).
2
1
2. Adjust the speed according to the grass condition
by sliding the speed switch.
5.2 OPERATE THE PRODUCT
5.2.1 ADJUST THE LENGTH OF THE CUTTING
LINE
When the cutting line becomes short during operation,
bump the trimmer head on a hard, flat surface to
extend more cutting line out. It is recommended to
operate the product on high-speed mode for dense
work areas.
This trimmer is equipped with a string cut-off blade
on the trimmer guard. The string cut-off blade
9
English
EN
continuously trims the line to ensure a consistent
and efficient cutting diameter. This will maintain best
performance and keep line long enough to advance
properly.
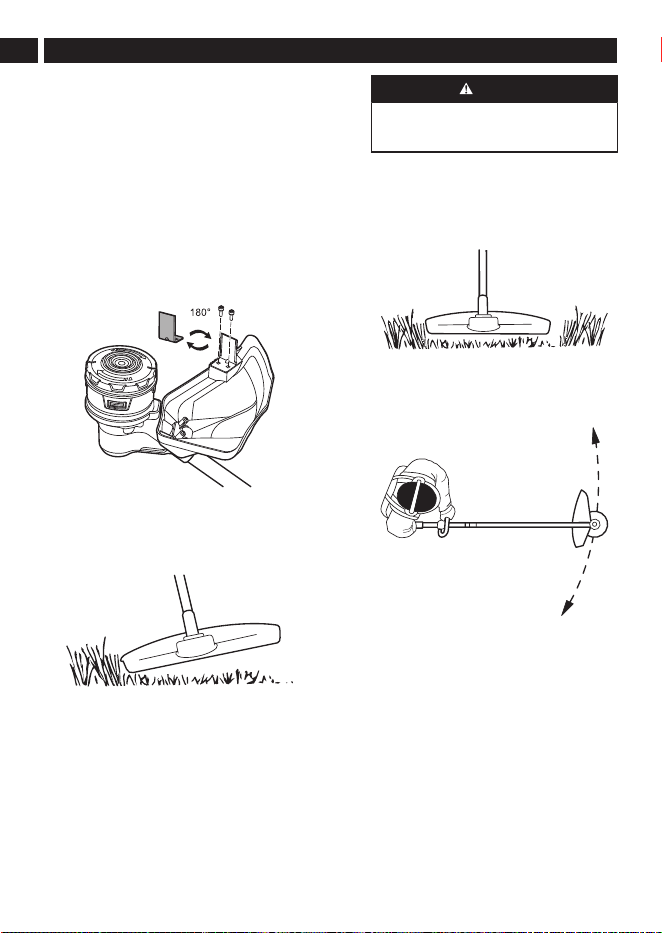
5.2.2 ADJUST THE CUTTING DIAMETER
Note: The cutting diameter of the product is set to 15
in. (38.1 cm), but it can be modified to 17 in. (43.2 cm)
for a larger cutting area or kept at 15 in. (38.1 cm) for
longer runtime.
1. First, start by removing the battery.
2. Unscrew the blade screws securing the string cut-
off blade with the hex key.
3. Turn the string cut-off blade 180°.
4. Securely tighten the blade screws.
5.2.3 TRIM GRASS WITH A TRIMMER HEAD
Trim the grass
1. Hold the trimmer head above the ground at an
angle. Do not push the cutting line into the grass.
2. Decrease the speed to decrease the risk of
damage to plants.
3. Use low-speed mode when cutting grass near
objects.
Clear the grass
1. Keep the trimmer head above the ground.
2. Tilt the trimmer head.
3. Cut with the end of the cutting line around objects
in the work area.
CAUTION
OTHER OBJECTS THAT ARE HIT BY THE
CUTTING LINE, INCREASE THE WEAR ON
THE CUTTING LINE.
4. Use low-speed mode when cutting and clearing
vegetation. This decreases the wear on the
trimmer head and cutting line.
Cut the grass
1. Make sure that the cutting line is parallel to the
ground.
2. Do not push the trimmer head to the ground as
this can cause damage to the product.
3. Move the product from side to side when you
cut grass. Use high-speed mode for optimal
performance.
Sweep the grass
The airflow from the rotating cutting line can be used to
remove cut grass from an area.
1. Hold the trimmer head and the cutting line parallel
to the ground and above the ground.
2. Use on high-speed mode.
3. Move the trimmer head from side to side to
sweep the grass.
5.3 STOP THE PRODUCT
1. Release the trigger.
2. Push the battery release button and pull out the
battery to fully stop its operation.
10
English
EN
WARNING
WAIT UNTIL THE MOTOR STOPS BEFORE
YOU REMOVE THE BATTERY.
6 MAINTENANCE
This section describes how to maintain the battery,
battery charger, and product.
WARNING
CAREFULLY READ AND UNDERSTAND
THE SAFETY CHAPTER AND OPERATION
INSTRUCTIONS BEFORE YOU DO ANY
MAINTENANCE WORK.
Before you do maintenance:
• Stop the product.
• Remove the battery.
• Allow the motor to cool.
• Use correct clothing, protective gloves, and safety
glasses.
6.1 EXAMINE THE BATTERY AND THE
BATTERY CHARGER
Carefully inspect the battery, battery charger, and
connection cord of the battery charger for any signs
of damage, such as cracks or broken parts. Replace if
necessary.
6.2 CLEAN THE PRODUCT, THE BATTERY,
AND THE BATTERY CHARGER
• Clean the product after each use with a moist cloth
and neutral detergent.
• Do not use strong detergents or solvents like "glass
cleaner" to clean the plastic parts or handles.
• Keep the trimmer head free from grass, leaves, or
excessive grease.
• Keep the air vents clean and free of debris to avoid
overheating and damage to the motor.
• Do not spray water on the motor and electrical
components.
• Clean the battery and battery charger with a dry
cloth. Keep the battery guide tracks clean.
• Prior to inserting the battery into the battery charger,
ensure that the terminals on both the battery and the
battery charger are clean.
6.3 REPLACE THE SPOOL
Note: For normal use, head disassembly is
not necessary. However, if circumstances require
disassembly, follow these instructions.
1. Push the two tabs on the sides of the trimmer
head at the same time.
2. Pull and remove the spool cover assembly.
3. Remove the remaining cutting line and thoroughly
clean any dirt or debris from all parts.
4. Remove screws (1), spool (2), slot cover (3), and
location housing (4) from the spool cover (5).
11
English
EN
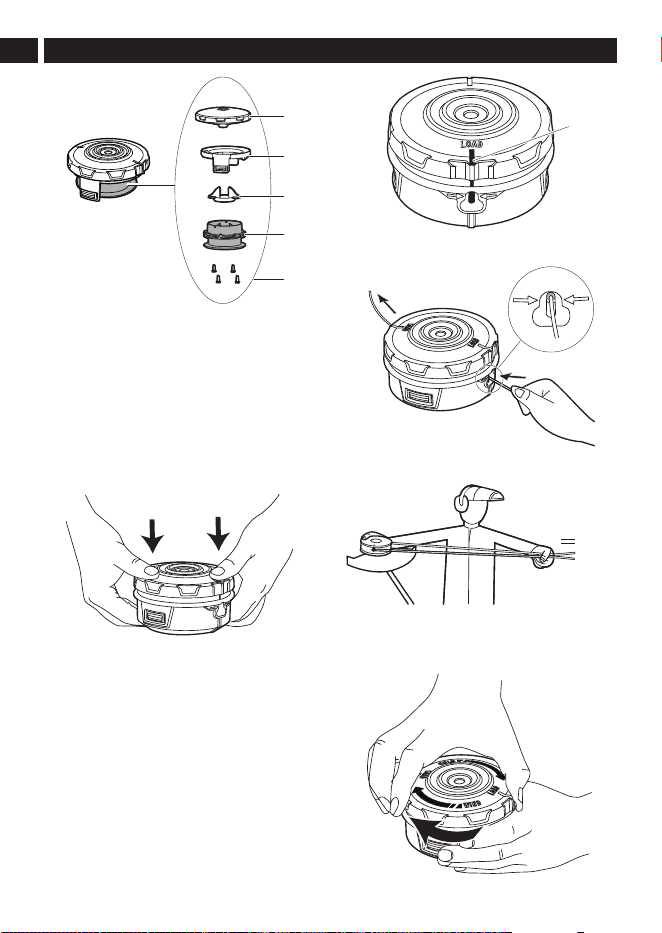
1
3
2
4
5
5. Replace with a new spool.
Note: If any parts of the spool assembly are damaged
or worn, replace the damaged part and reassemble
them as pictured in Step 4.
6. Place the location housing and slot cover onto the
spool cover, then put the spool onto the slot cover
to the desired position.
7. Tighten with the screws.
8. Align the spool tabs with the tab openings on the
spool housing.
9. Push the spool cover assembly until it clicks into
position.
6.4 INSTALL THE CUTTING LINE
Note: Do not use more than 23 ft. (7 m) of 0.095" (2.4
mm) cutting line at a time.
1. Remove any leftover cutting line from the trimmer
head.
2. Push and turn the spool cover. Ensure that the
slot (1) on the spool cover aligns with the line exit
hole on the trimmer head.
1
3. Feed the cutting line through the hole and push it
until it exits the opposite hole.
4. Pull the cutting line through until there is an equal
amount of cutting line on each side.
5. Turn the spool cover clockwise to wind the cutting
line into the trimmer head. Keep approximately
5" of cutting line above out of each side of the
trimmer head.
12
English
EN

7 TRANSPORTATION, STORAGE, AND
DISPOSAL
7.1 TRANSPORTATION AND STORAGE
• Follow special packaging and labeling requirements
for commercial transportation, including by third
parties and forwarding agents.
• Seek advice from a person with special training in
dangerous materials before shipping the product
and comply with all applicable national regulations.
• Use tape on open contacts when packaging the
battery and ensure it is securely packed to prevent
movement.
• Remove the battery before storing or transporting
the product.
• Store the battery and battery charger in a dry,
moisture-free, and frost-free space.
• Avoid storing the battery in an area where static
electricity may occur, and do not store in a metal
box.
• Charge the battery 30% to 50% before long-term
storage.
• Store the battery charger in a closed and dry space.
• Keep the battery away from the battery charger
during storage, and ensure that unauthorized
persons, including children, do not touch the
equipment. Store the equipment in a lockable
space.
• Clean the product and perform full servicing before
long-term storage.
• Use transportation guards on the product to prevent
injury or damage during transportation and storage.
• Securely stow the product during transport to ensure
safe handling.
7.2 DISPOSAL OF THE BATTERY, BATTERY
CHARGER, AND PRODUCT
Symbols on the product or the package of the product
mean that the product is not domestic waste. Recycle
it at a recycling station for electrical and electronic
equipment. This helps to prevent damage to the
environment and persons.
Get in touch with your local authorities, domestic waste
service, or your dealer for more information about how
to recycle your product.
8 TROUBLESHOOTING
Problem Possible
Cause
Solution
The prod-
uct does
not start
when the
No electrical
contact be-
tween the prod-
uct and the bat-
tery.
1. Remove battery.
2. Inspect the metal
contacts and re-
insert the battery.
Problem Possible
Cause
Solution
trigger is
pulled.
The battery is
depleted.
Charge the battery
pack.
The safety-lock
button and trig-
ger are not op-
erated at the
same time.
1. Push the safety-
lock button and
hold it.
2. Pull the trigger to
start the product.
The prod-
uct stops
when you
are cut-
ting.
The guard is
not attached to
the trimmer
head.
Remove the battery
and attach the guard
to the trimmer head.
Cutting line is
too heavy.
Use only with the
nylon cutting line of
0.095" (2.4 mm) diam-
eter.
The grass be-
comes tangled
around the mo-
tor shaft or the
trimmer head.
1. Stop the product.
2. Remove the bat-
tery.
3. Remove the
grass from the
motor shaft and
trimmer head.
The motor is
overloaded.
1. Pull the trimmer
head away from
the grassy area.
2. Allow the prod-
uct to cool for at
least 10 minutes.
3. Cut in stages
and guide the
trimmer head in
and out of the
grass, making
sure not to cut
more than 8" per
pass.
The battery or
product is too
hot.
1. Allow the battery
or product to
cool for at least
10 minutes. Re-
move the battery
from the product
to help the prod-
uct cool down
more quickly.
The battery
pack is discon-
nected from the
product.
Install the battery
again.
13
English
EN

Problem Possible
Cause
Solution
The battery
pack is deple-
ted.
Charge the battery
pack.
The cut-
ting line
does not
extend.
Lines are inter-
locked.
1. Remove the in-
terlocked lines.
2. Rewind the lines.
Not enough line
on spool.
Install more line.
Lines are worn
too short.
1. Remove the bat-
tery.
2. Press and hold
the bump head.
3. Pull out lines
manually.
Lines are tan-
gled on spool.
1. Remove the
lines from the
spool.
2. Wind the lines.
The cut-
ting line
keeps
breaking.
The product is
used incorrectly.
1. Cut with the tip
of the line, avoid
stones, walls,
and other hard
objects.
2. Advance the cut-
ting line regularly
to keep full cut-
ting width.
The grass
becomes
tangled
around
the trim-
mer head
and motor
housing.
Grass too high. 1. Cut in stages.
2. Cut no more
than 8" in each
pass to prevent
tangling.
The cut-
ting line is
improper-
ly cut.
The string cut-
off blade be-
comes dull.
Sharpen the string
cut-off blade with a file
or replace it.
Too much
vibration.
The line is worn
down at one
side and not ad-
vanced in time.
Make sure that the
line on both sides is
not damaged. Extend
the line.
The trimmer
head is worn
down.
Replace with a new
trimmer head.
The line has run
out.
Install more line.
9 TECHNICAL DATA
Type Cordless, battery pow-
ered
Motor 80V Brushless
No load speed 4900/5800 ± 10% RPM
Cutting line diameter 0.095" (2.4 mm)
Cutting width 15 in. / 17 in. (38.1 cm /
43.2 cm)
Line feeding system Bump Feed
Battery model BAB740 and other BAB
series
Charger model GCH8020 and other
CAB series
The recommended ambient temperature range:
Condition Temperature
Product storage 32°F (0°C) - 113°F (45°C)
Product operation 32°F (0°C) - 113°F (45°C)
Battery charging 39°F (4°C) - 104°F (40°C)
Charger operation 39°F (4°C) - 104°F (40°C)
Battery storage 32°F (0°C) - 113°F (45°C)
Battery discharging 32°F (0°C) - 113°F (45°C)
10 LIMITED WARRANTY
14
English
EN
90-Day Warranty
Renewed/Refurbished products and batteries are
protected against all defects in materials, parts or
workmanship under normal use for a period of 90
days from the shipping date or in-store purchase
date. All sales are final, no returns.

ITEMS NOT COVERED BY WARRANTY:
1. Any part that has become inoperative due
to misuse, commercial use, abuse, neglect,
accident, improper maintenance, or alteration; or
2. The unit, if it has not been operated and/or
maintained in accordance with the operator
manual; or
3. Normal wear;
4. Routine maintenance items such as lubricants,
blade sharpening;
5. Normal deterioration of the exterior finish due to
use or exposure.
HELPLINE:
Warranty service is available by calling our toll-free
helpline, at 1-855-345-3934.
TRANSPORTATION CHARGES:
Transportation charges for the movement of any power
equipment unit or attachment are the responsibility of
the purchaser. It is the purchaser’s responsibility to
pay transportation charges for any part submitted for
replacement under this warranty unless such return is
requested in writing by Greenworks.
USA address:
Greenworks Tools
P.O. Box 1238, Mooresville, NC 28115
Canadian address:
Greenworks Tools Canada, Inc.
P.O. Box 93095, Newmarket, Ontario, L3Y 8K3
Mexico address:
TECNOLOGIA CAMPO Y JARDIN S.A. DE C.V.
ADMINISTRADORES No. 5336 A, COL. ARCOS DE
GUADALUPE, ZAPOPAN , JALISCO , C.P. 45037
15
English
EN

www.greenworkstools.com
Rev B1
P0805308-00
