Technical Support and E-Warranty Certificate www.vevor.com/support
MURPHY BED KIT
MODEL:YFHVQN246
We continue to be committed to provide you tools with competitive price.
"Save Half", "Half Price" or any other similar expressions used by us only
represents an estimate of savings you might benefit from buying certain tools
with us compared to the major top brands and does not necessarily mean to cover
all categories of tools offered by us. You are kindly reminded to verify carefully
when you are placing an order with us if you are actually Saving
Half in comparison with the top major brands.

- 1 -
MODEL:YFHVQN246
NEED HELP? CONTACT US!
Have product questions? Need technical support? Please feel free to
contact us:
Technical Support and E-Warranty Certificate
www.vevor.com/support
This is the original instruction, please read all manual instructions
carefully before operating. VEVOR reserves a clear interpretation of our
user manual. The appearance of the product shall be subject to the
product you received. Please forgive us that we won't inform you again if
there are any technology or software updates on our product.
MURPHY BED KIT

- 2 -
SAFETY INSTRUCTIONS
1.Please read and understand this manual carefully before using the
Murphy Bed Kit .
The installation should be done by an adult, and children should not use it
without supervision.
2.Please install the Murphy Bed Kit completely before using the bed,
otherwise it may cause serious harm to people.
3.Check the stability and safety of the kit for regular intervals and use
should be stopped immediately in case of damage or suspicious problems.
4.Children should not use the kit alone to spread out or store the bed,
otherwise they may be harmed.
Thank you very much for choosing this Murphy Bed Kit.
If there is any difference between the color of this product and the picture in
the instruction manual, please refer to the physical object.
PARAMETER LIST
Model
YFHVQN246
Adapted models
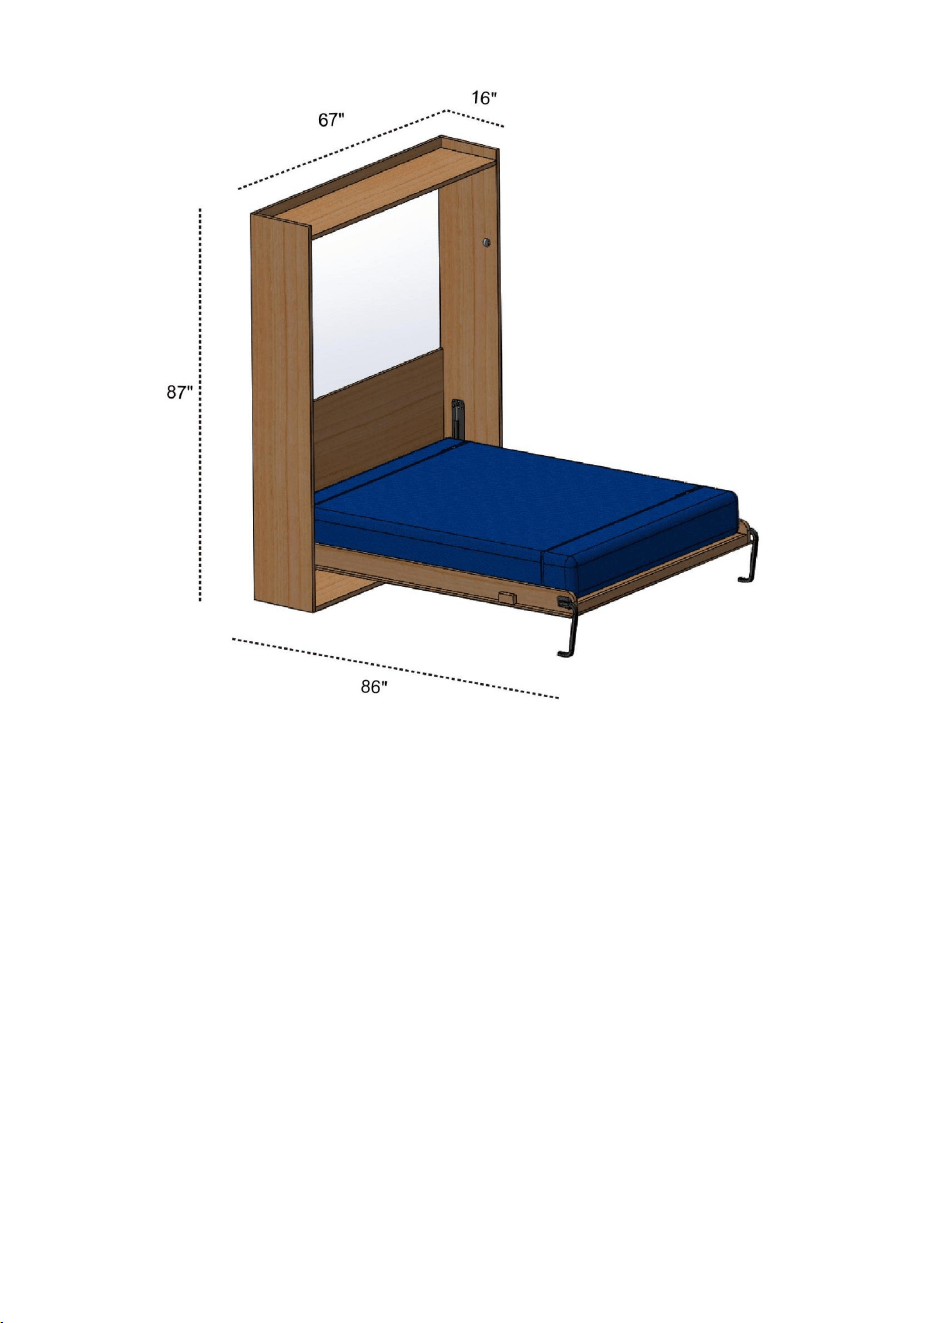
Queen-Vertical
Mattress size
W×L:60×80in(1520×2030mm)
mattress thickness
6-10in(152-254mm)
Maximum mattress weight
68lbs(31kg)
INSTRUCTIONS
Murphy Bed Kit suitability Queen-Vertical
Note: The Murphy Bed Kit does not include bed and bed cabinets, which
need to be equipped by users themselves.
Standard Queen Mattress
Max Weight: 68lbs
Max Depth : 10ʺ
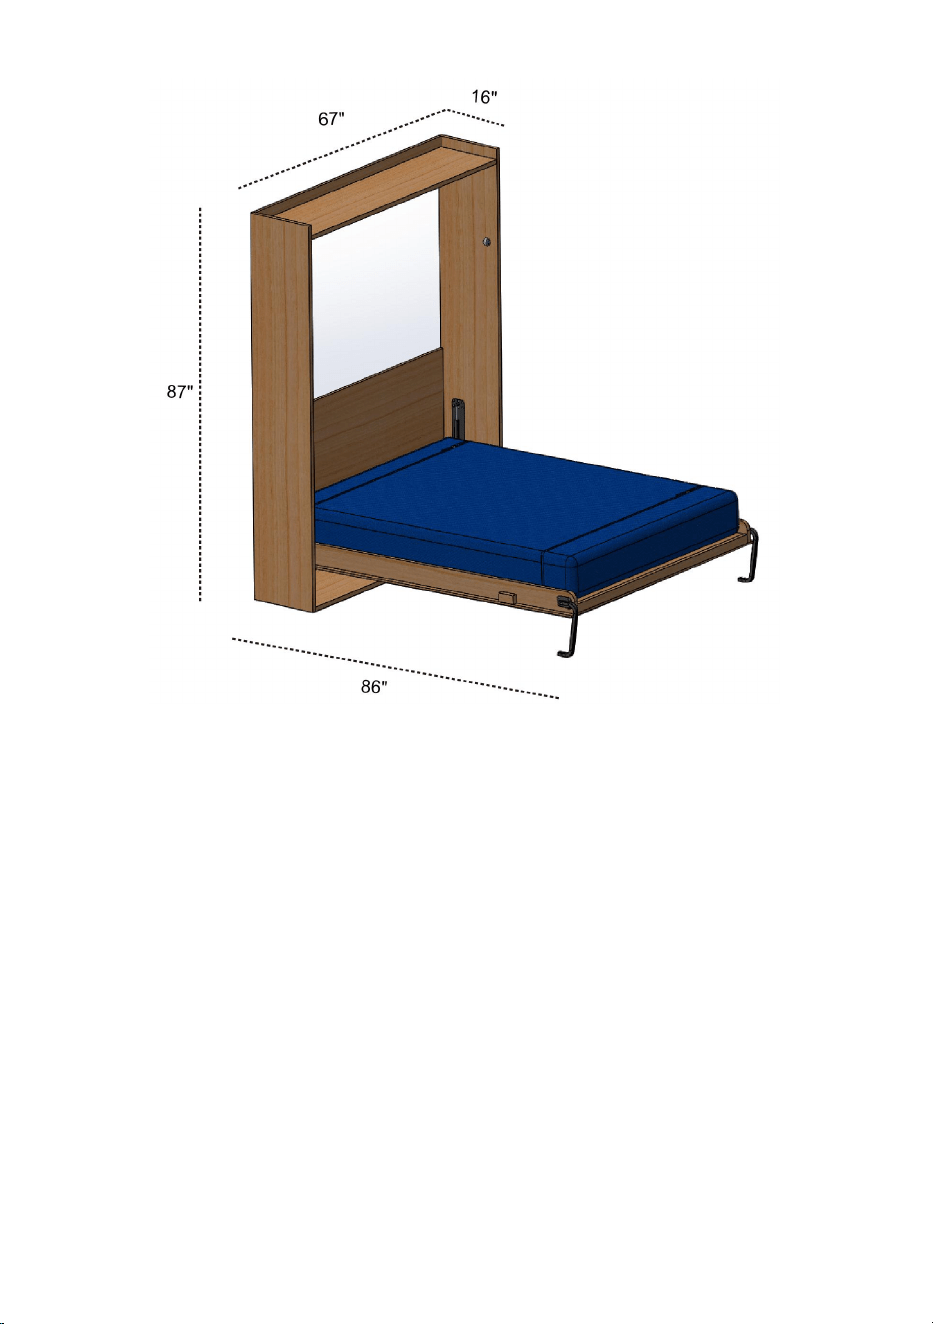
- 3 -
Max Weight capacity:900lbs
1. General description
Use
The murphy bed system allows to bring the bed spring from its vertical
position inside the cabinet in a horizontal positions, to be used as a bed , in
a absolutely quick and easy way, with very low efforts.
Before using the Murphy bed, the user must be sure of its good condition
and the good condition of its accessories.
Before using the Murphy bed, the user must make sure that on the
sleeping surface there is only the mattress and bed linens.
2 . Safety

- 4 -
Safety standard
Compliance with the Safety standards puts the user in terms of working
productively, without danger of harm to himself to others.
It's forbidden to use the product without any mattress on the
bedspring surface.
It's forbidden to use the bed for a different use, than the one
described previously in section USE.
Non correct installation or not made by specialized craftsmen, may
cause detachments, breaking or dysfonctions with possible damages to
persons, things or animals. All given instructions have to be strictly
observed.
Before starting to use the product the users shall be aware of its functions
and its technical features, learn through an accurate and complete reading
of the present user’s guide.
Tampering or replacement of bed parts that are not allowed.
The use of accessories or spare parts other than those recommended by
the supplier, present a non proper and hazardous use of the product.
It's strictly forbidden to remove any safety device and protection
(labels)on the set; periodically check the incidental position on the
mechanism of blankets or else. Before starting any maintenance, repair
work or cleaning the operator must have read and understood all technical
information contained in this guide. Any maintenance and repair shall be
performed by qualified personnel only.
WARNING !!!
Never place the product near any heat sources. Position and lock the bed
system to be maintained clear of objects that may hinder its movement.
The instructions and rules contained in this manual must be observed at all
times.

- 5 -
Suggest using below materials for wooden cabinets and bed frame
Wooden Sticks Plywood Sheet
Technical features
Cabinet
Number
Material
Dimension
IQTY
Important
1
1inch Plywood
2212*406*25 mm
2
Internal
dimensions of
cabinet:
1654*388*2102
mm
2
1inch Plywood
1654*388*25mm
1
3
1inch Plywood
1654*406*25mm
1
4
3/4 inch
Plywood
1654*550*18mm
1
5
3/4 inch
Plywood
1654*250*18mm
1
- 6 -
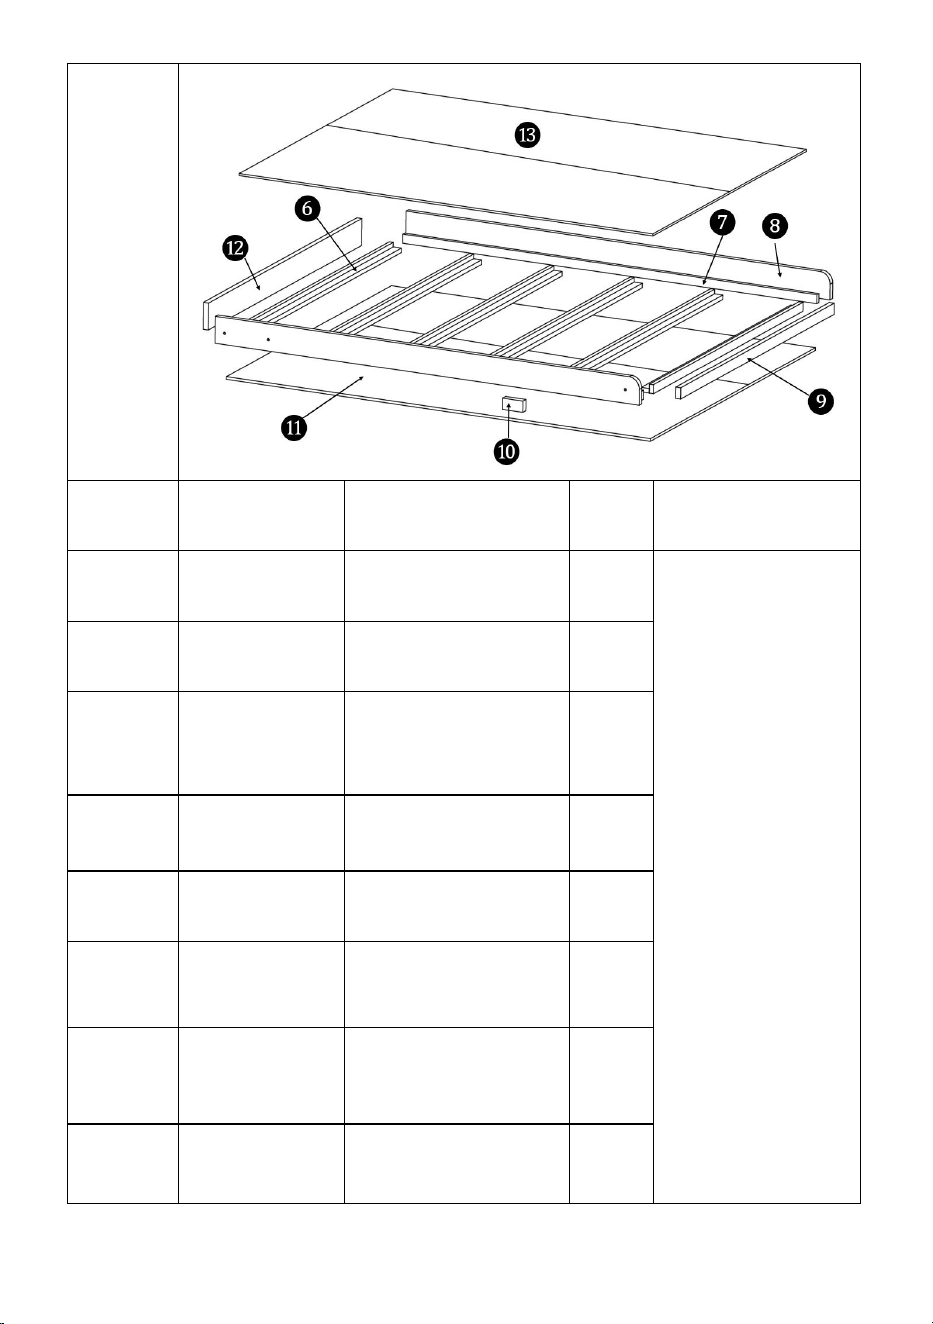
Bed
frame
Number
Material
Dimension
IQTY
Important
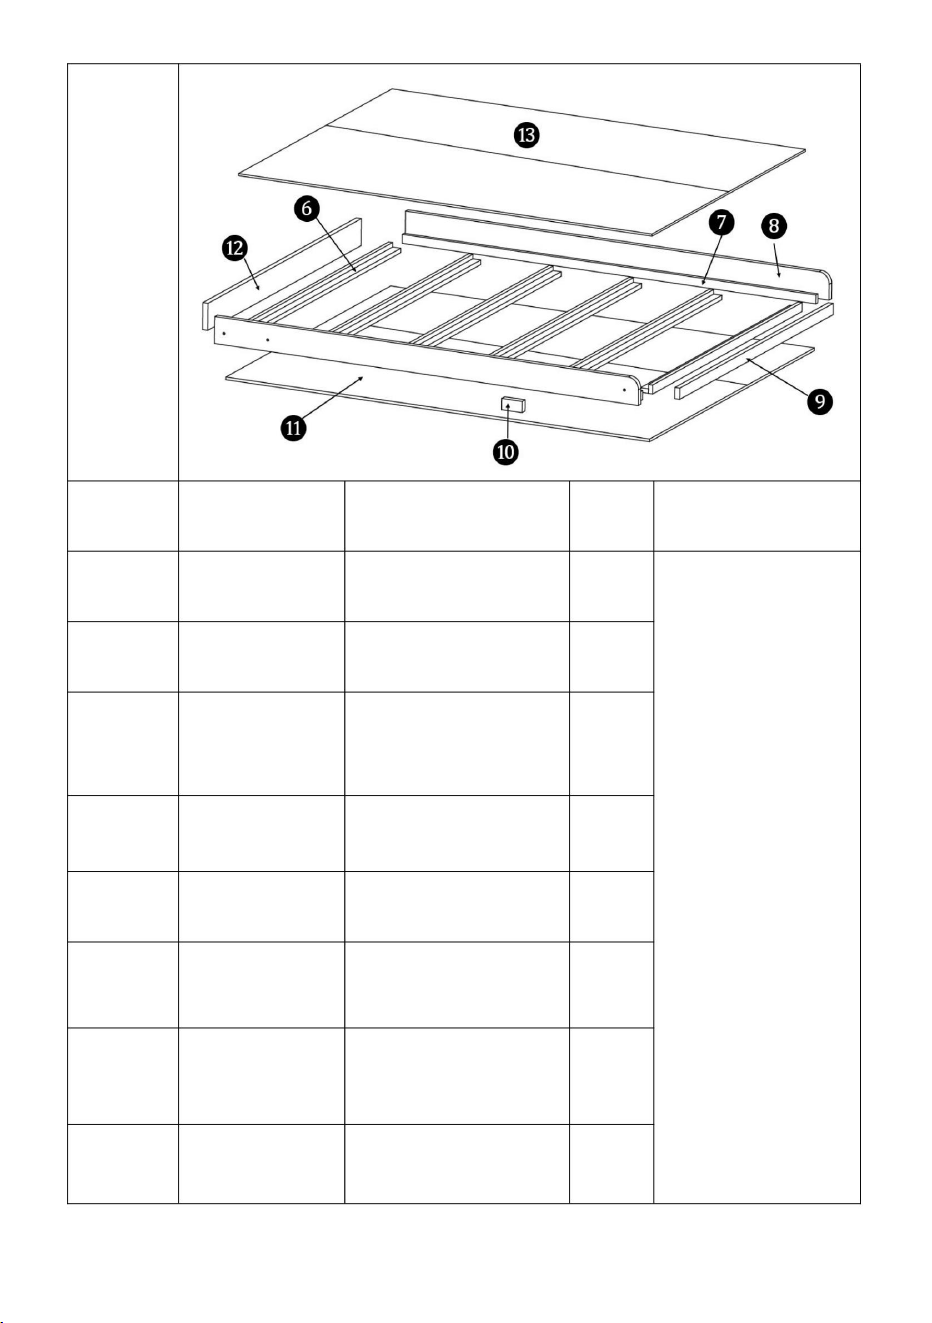
6
3/4 inch
wood
40*20*1480 mm
12
Weight of the
bed frame :
62kg(136.4lbs)
Dimensions of
bed frame :
2077*1634*132
mm
7
3/4 inch
wood
40*20*2027 mm
2
8
1inch
Plywood
2077*120*25 mm
2
9
1inch
Plywood
1520*50*25 mm
1
10
1-1/2 inch
wood
32*32*100mm
1
11
1/2 inch
Plywood
2077*1634*12mm
1
12
1inch
Plywood
1520*120*25 mm
1
13
3/8inch
Plywood
2022*1516*9 mm
1
- 7 -
Bed
frame
Number
Material
Dimension
IQTY
Important
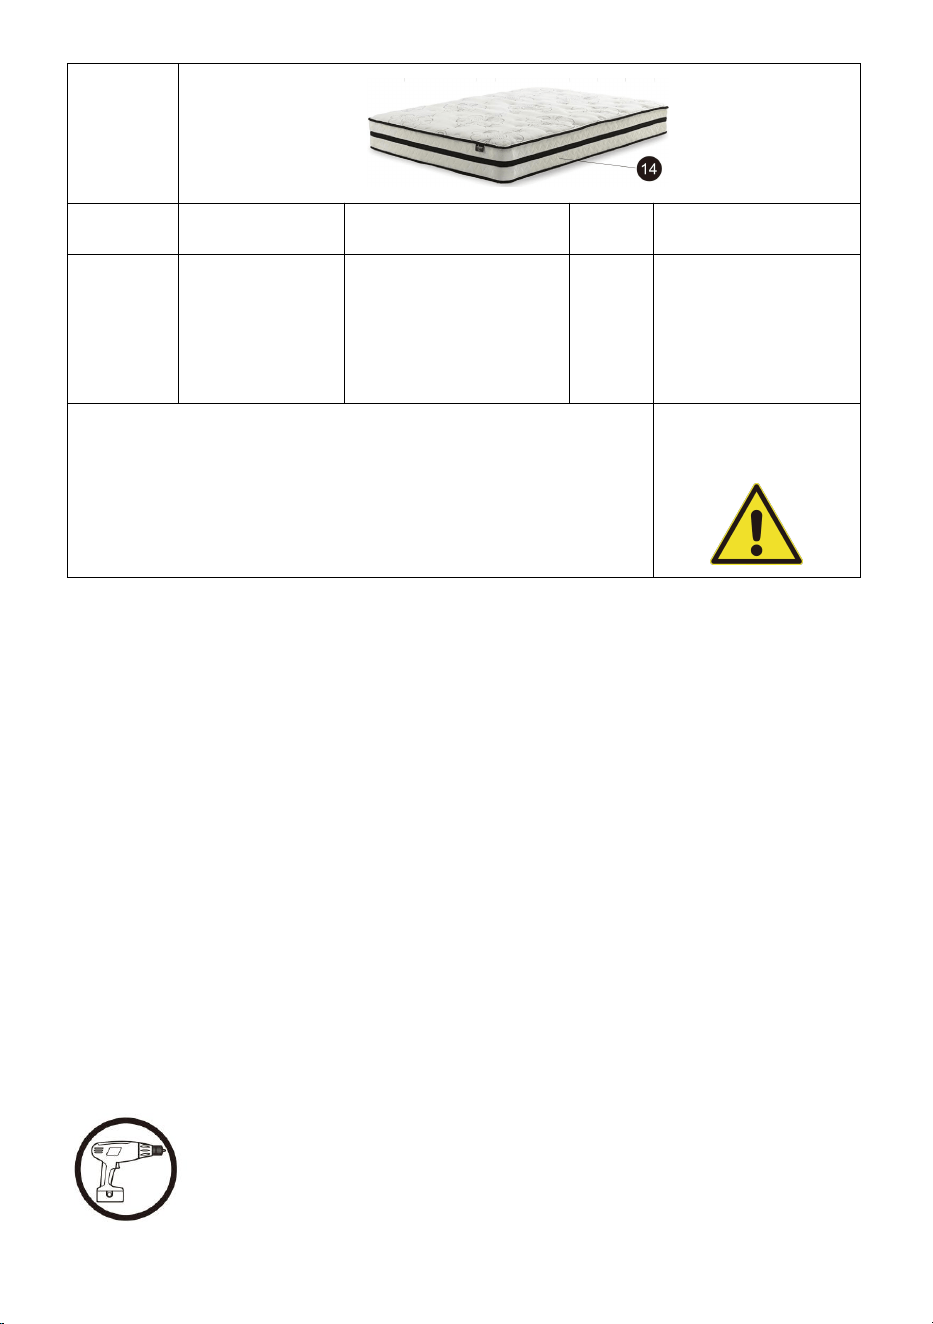
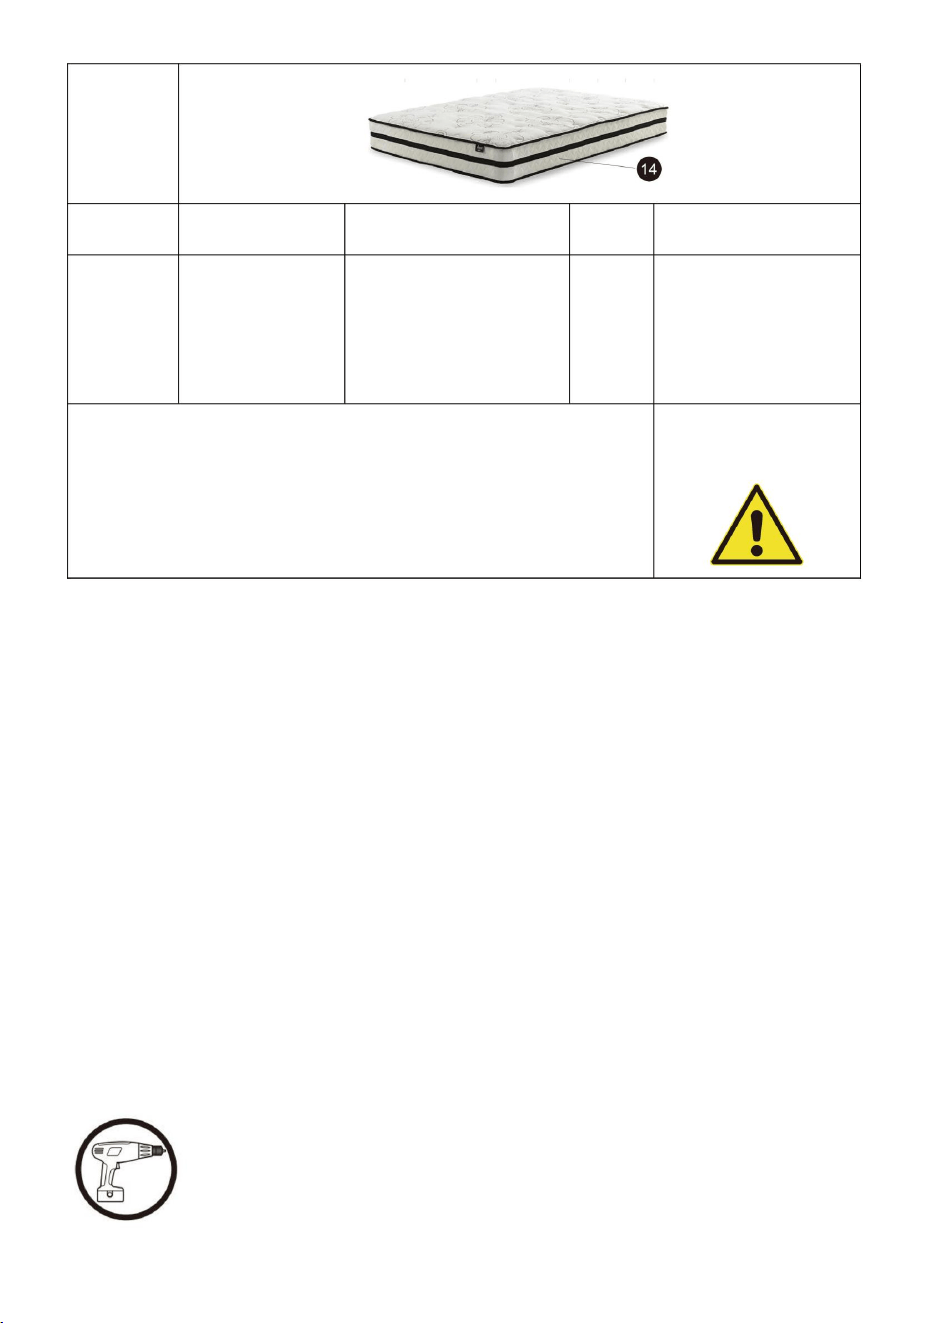
14
mattress
1520*2030*(152-2
54)mm
(60*80*(6-10)inch)
1
Weight of
mattress:
31kg (68lbs)
TOTAL WEIGHT OF BED FRAME AND MATTRESS
NEED TO BE:
92-95kg
(202lbs-209lbs)
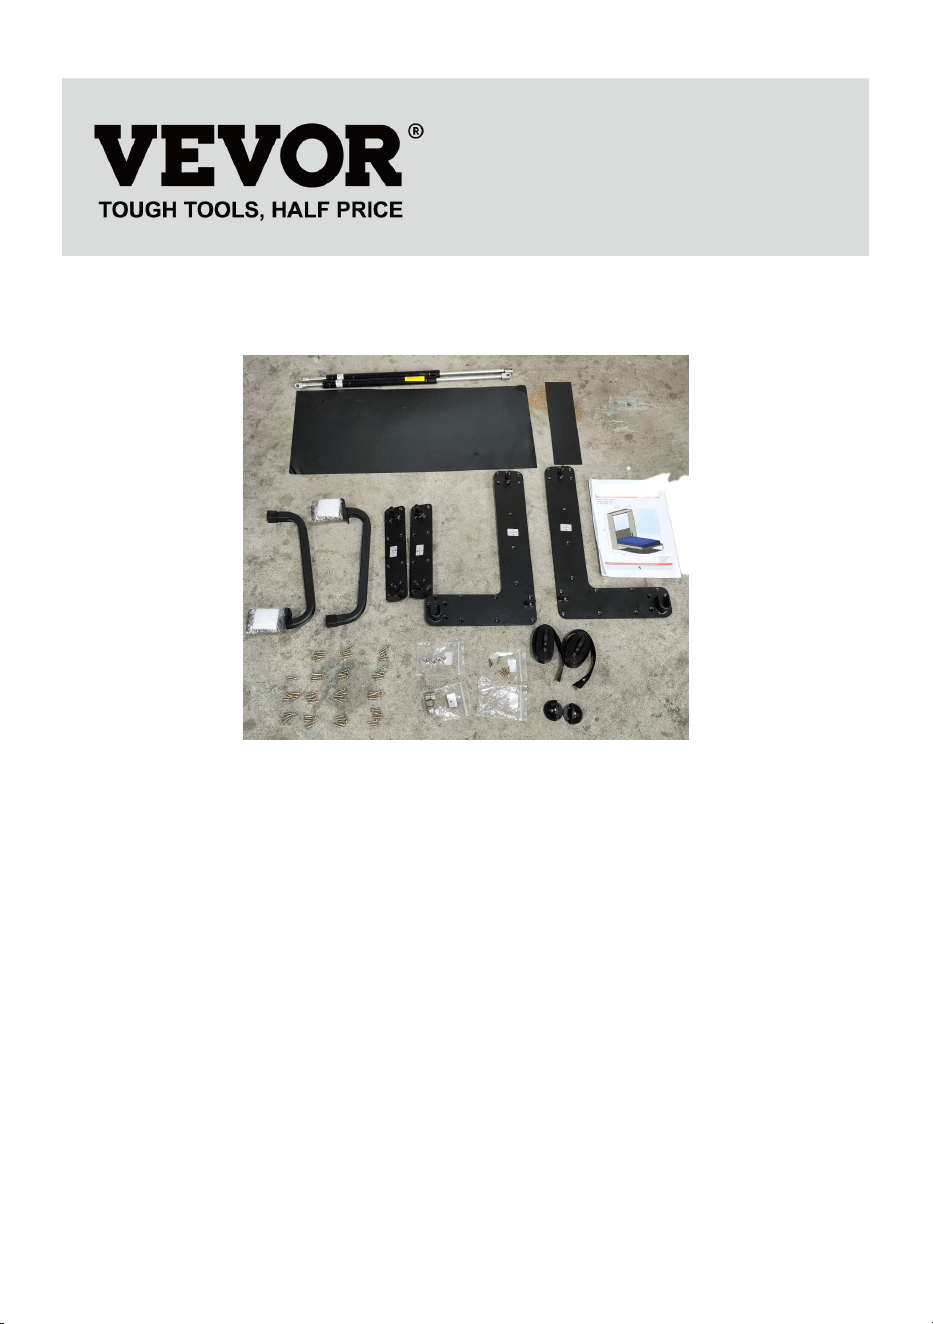
Safety and Care Advice
• Check you have all the components and tools listed on the following
pages.
• Remove all fittings from the plastic bags and separate them into their
groups.
• Keep children and animals away from the work area, small parts could
choke if swallowed.
• Make sure you have enough space to layout the parts before starting.
• During assembly do not stand or put weight on the product, this could
cause damage.
• Assemble the item as close to its final position (in the same room) as
possible.
• Assemble on a soft level surface to avoid damaging the unit or your floor.
• Parts of the assembly will be easier with 2 people.
• To reduce the likelihood of damaging your product please
ensure that your power drill is set on a low torque setting.
- 8 -
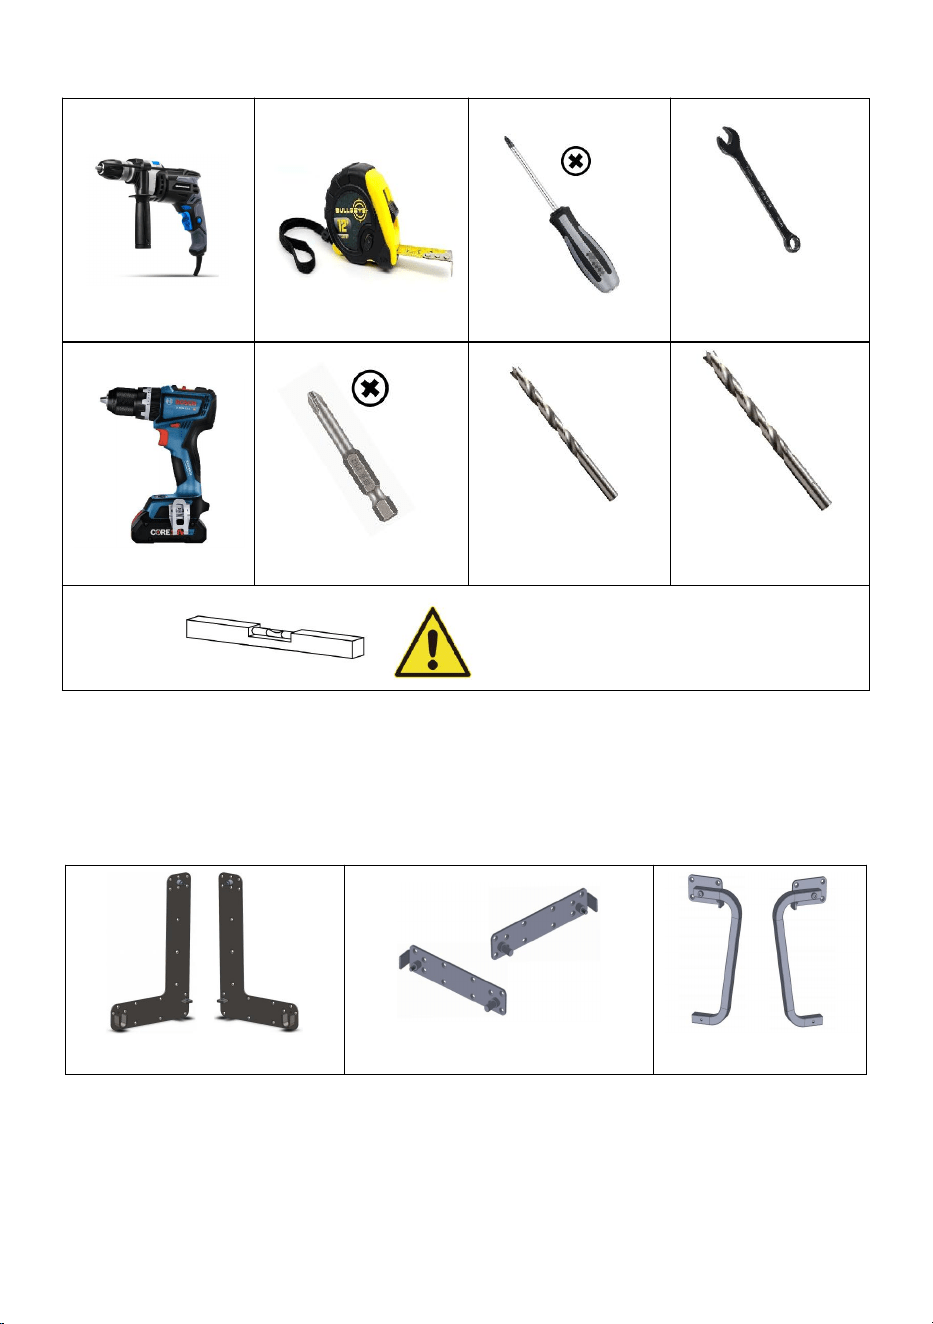
Install the required tools
13mm Open
End Wrench
Screws Drive Bits
Wood Drill Bit
Dia 6mm
Wood Drill Bit
Dia11mm
Horizontal adjustment tool
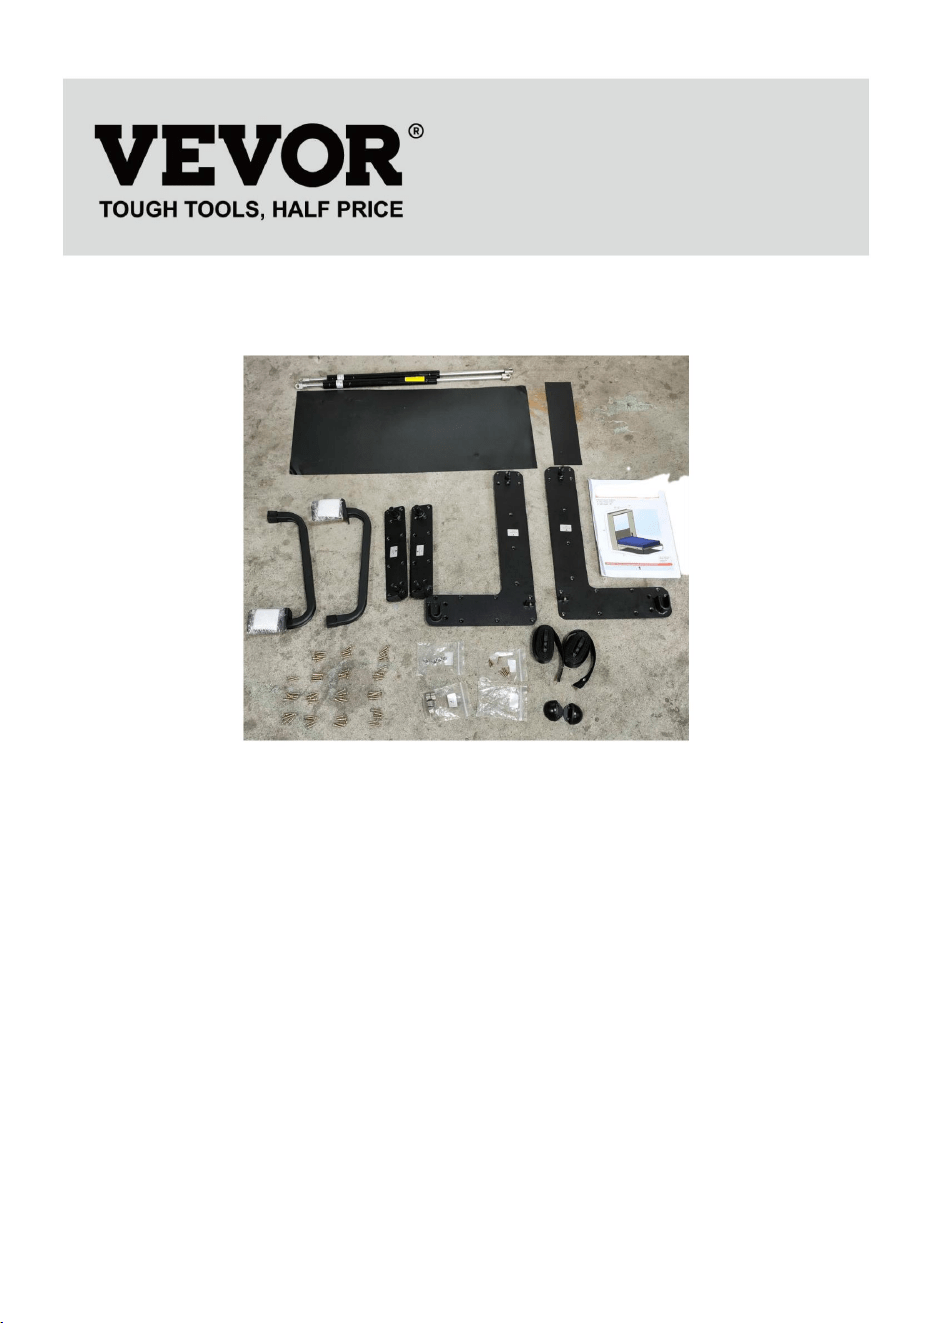
List of kit parts
Note: The quantities below are the correct amount to complete the
assembly. In some cases more fittings may be supplied than are required.
A:Side Bracket x 2pcs
B:Connect Bracket x 2pcs
C:Leg x 2pcs

- 9 -
D:YFGS5001100 x
2pcs
E:Mattress Strap x 2pcs
F:Bearing x 4pcs
G:Stopper x 2pcs
H:Metal Nut M8x 4pcs
Screw
I:M5x20mm
x72pcs
J:Screw M4x20mm
x8pcs
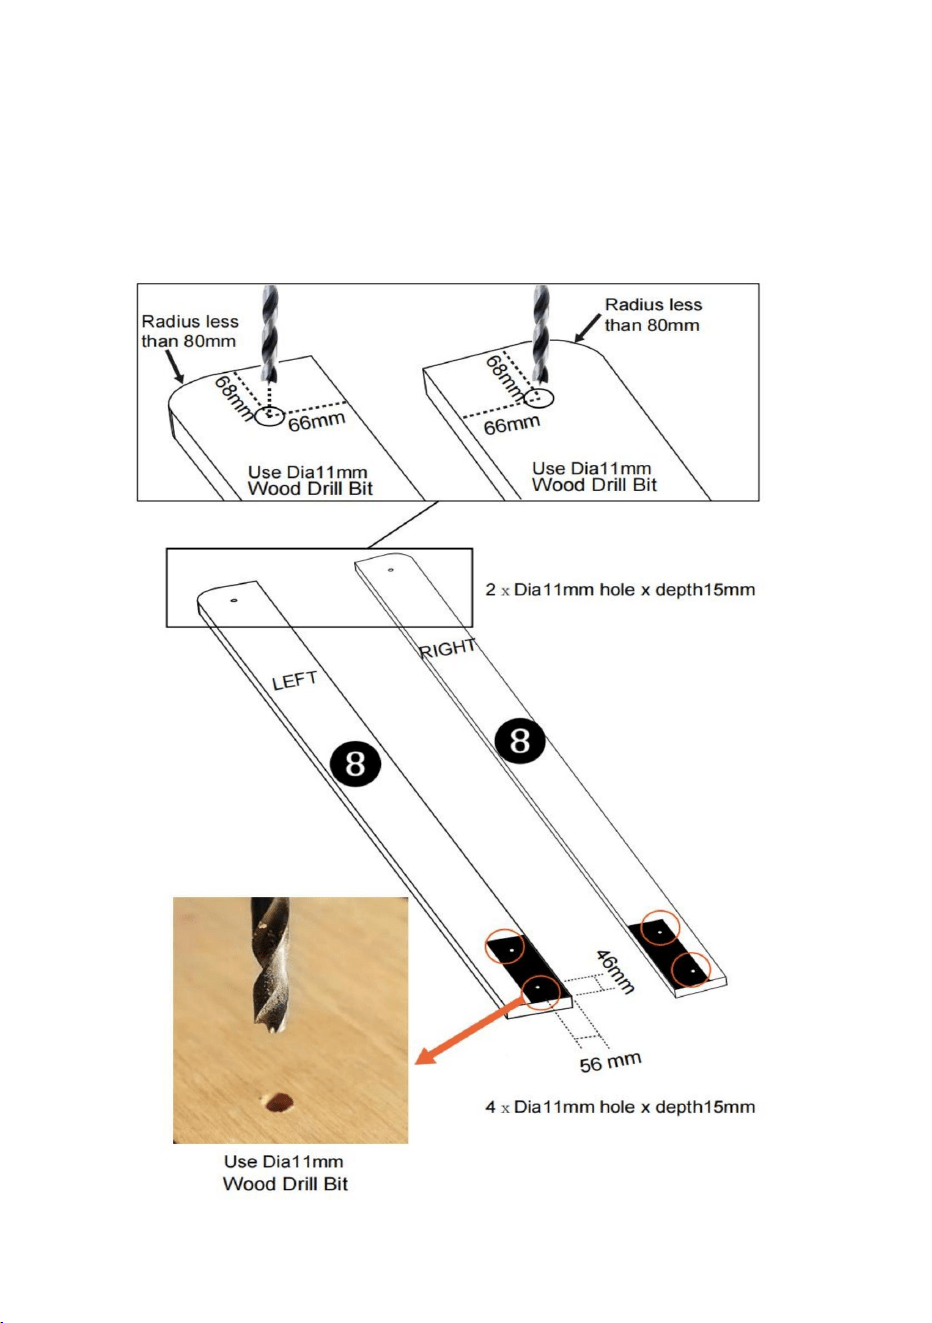
Drilling template:
710*294mm
Drilling template:
306*82mm
Construction guide
Step1:Make the cabinet
Put the drilling template of 710*294mm on the side panel and ensure the
edge of the template are flush with the side panel as the picture.
Mark the circular hole of the template on the side panel, then remove the
template and drill Dia11mm hole & Dia6mm hole as the picture, depth of
hole is 15mm.
Make the cabinet with screws and waterproof wood glue, ensure the
internal dimension as the picture, ensure the cabinet is stable and safety.

- 10 -
- 11 -
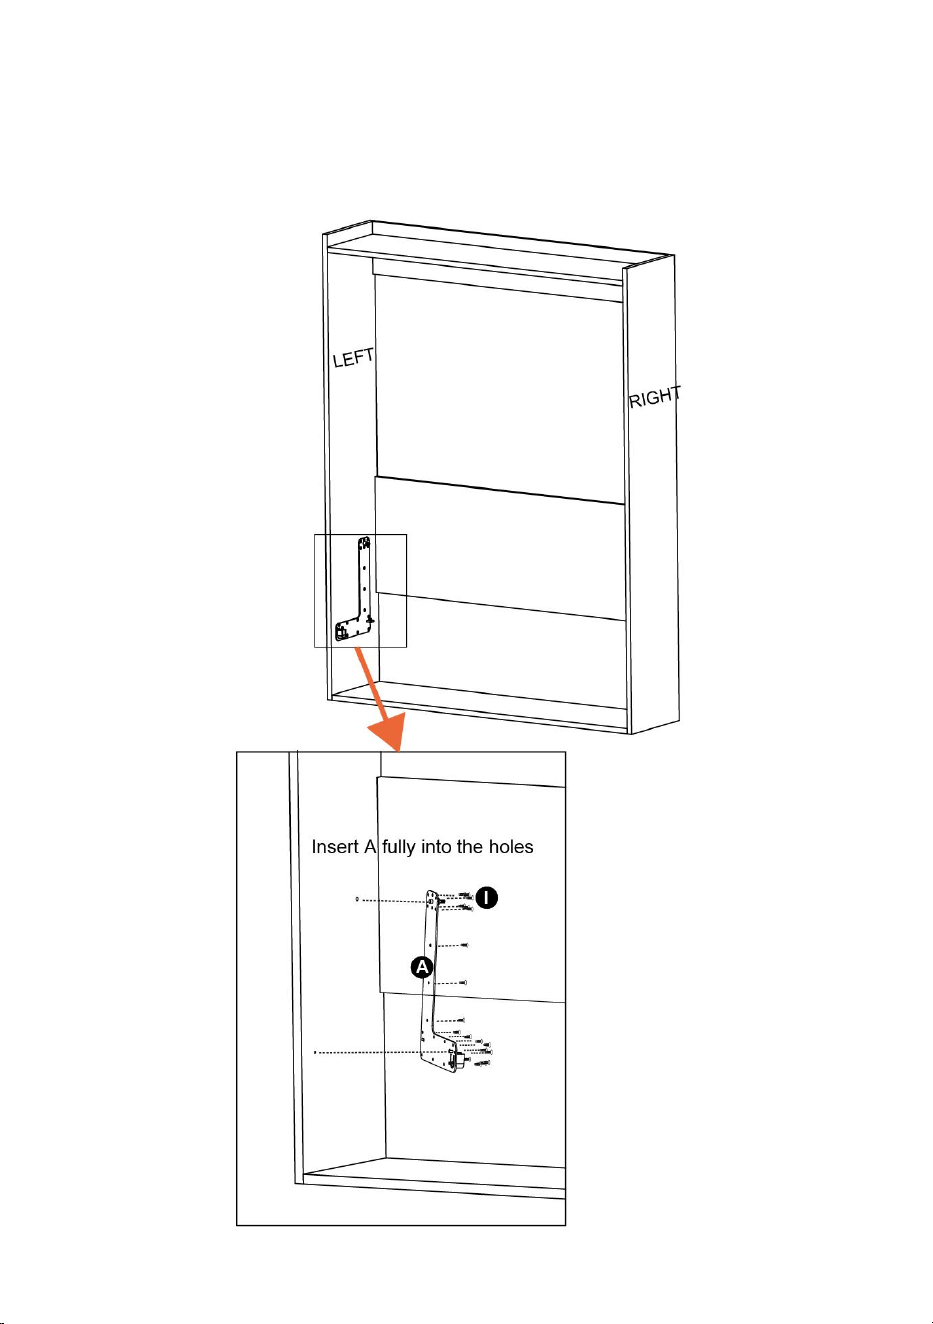
Step 2:
Insert the pin on the side bracket A fully into the Dia11mm hole and 6mm
hole, fix a to cabinet with screws I.
Repeat the above installation on the other side.

- 12 -
Step 3: Put the drilling template of 306*82mm on the panel 8 and ensure
the edge of the template are flush with the panel as the picture.
Mark the circular hole of the template on the panel 8, then remove the
template and drill Dia11mm hole as the picture, depth of hole is 15mm.
Mark the drilling holes according to the dimensions as the picture on
another side of the panel, then drill Dia11mm hole, depth of hole is 15mm.
- 13 -
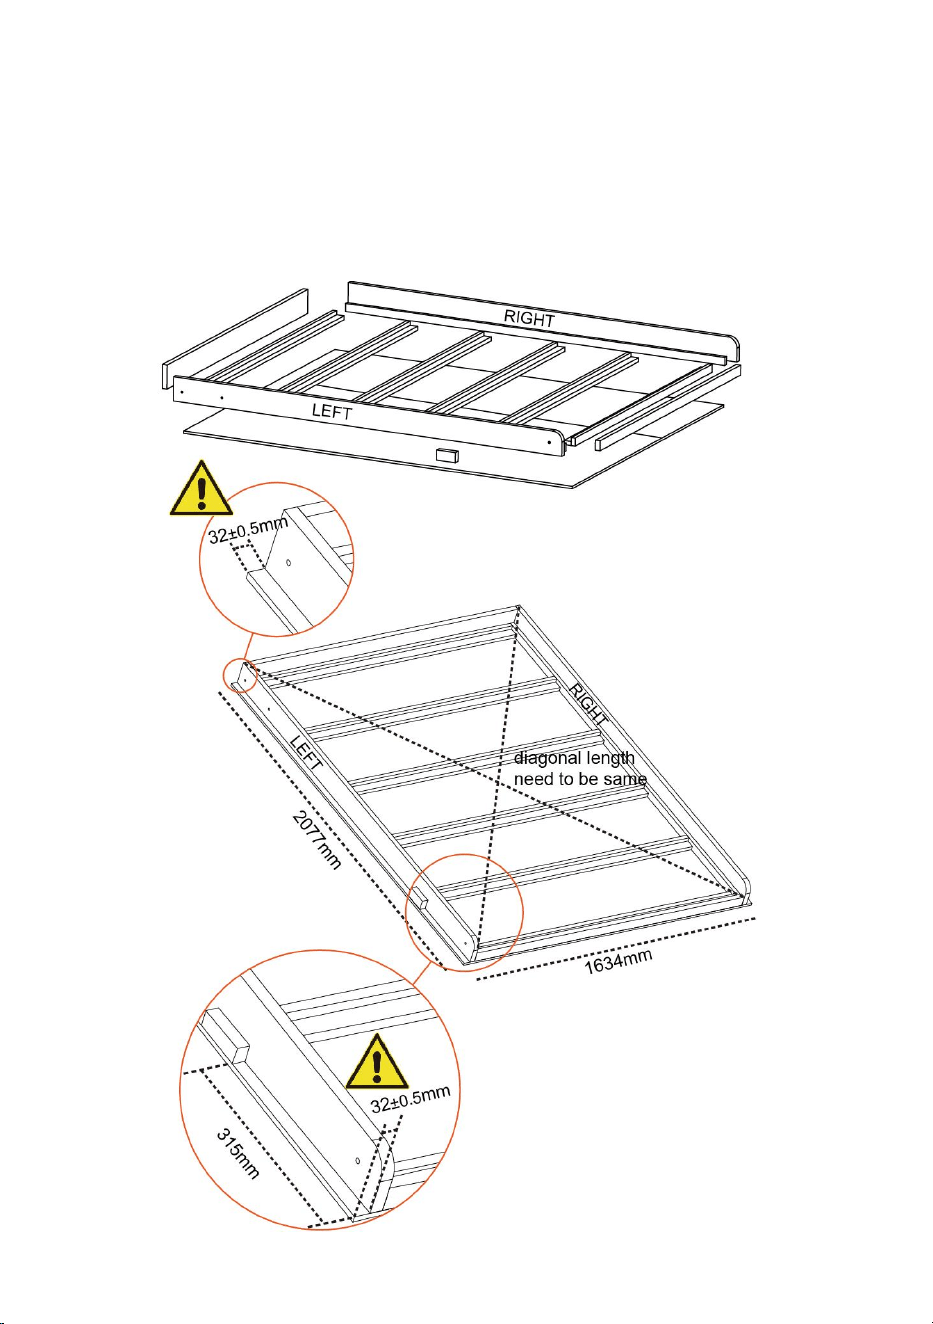
Step 4:
Make the bed frame with screws and waterproof wood glue as picture.
Ensure the dimension from the apron panel to the edge of the door panel
are 32mm as picture.
Keep the diagonal length as picture are same.
Ensure the cabinet is stable and safety.
- 14 -
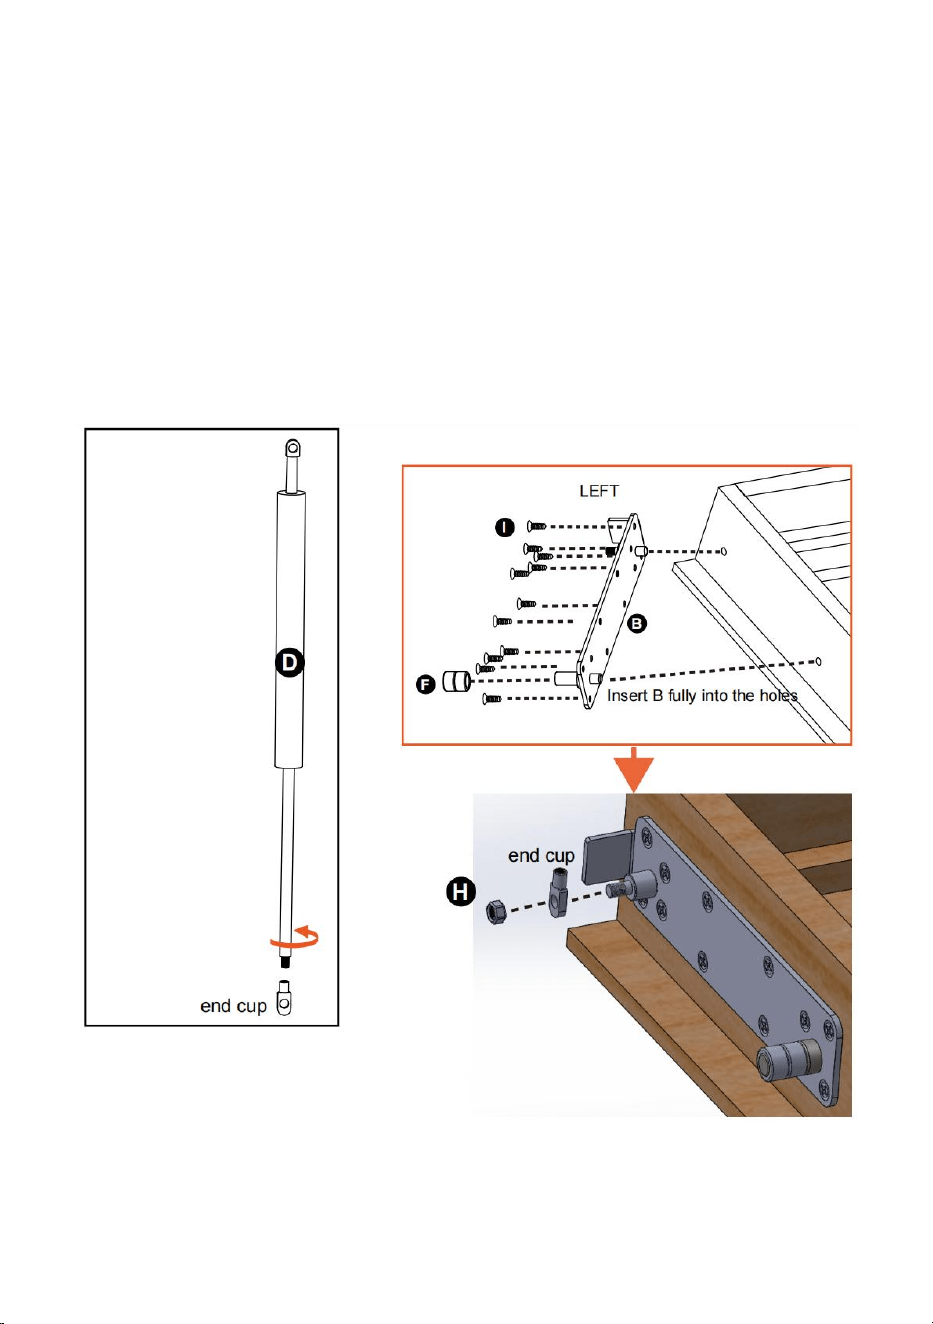
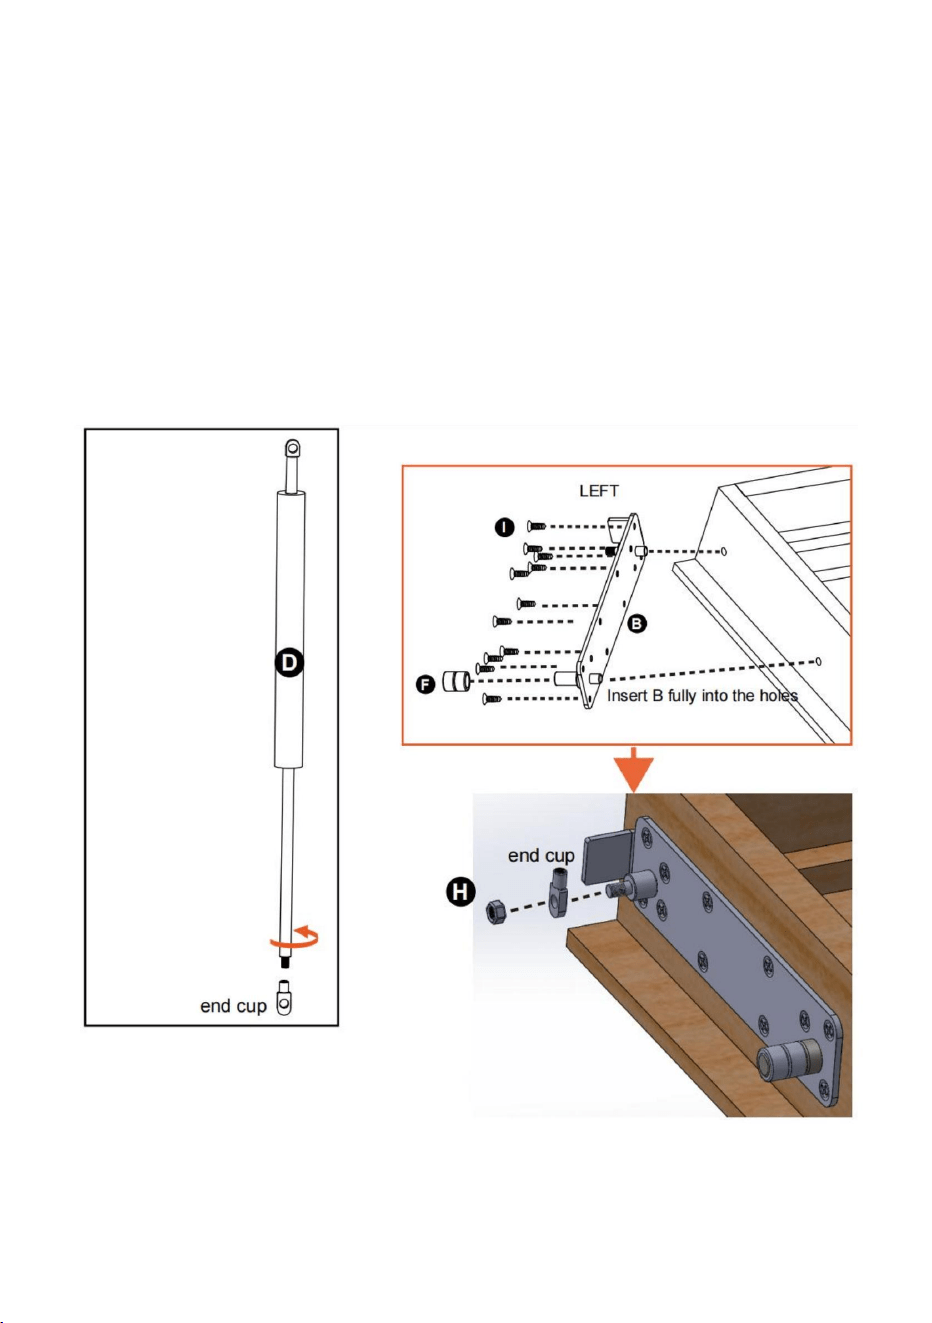
Step 5:
Insert the pin on the connect bracket B fully into the Dia11mm holes, then
fix B to the bed frame with screws I.
Insert 2pcs bearing F to the connect bracket B as the picture.
Turn the end cap of the gas spring out as the picture, then install it to the
connect bracket B and fix it with nut H as the picture .
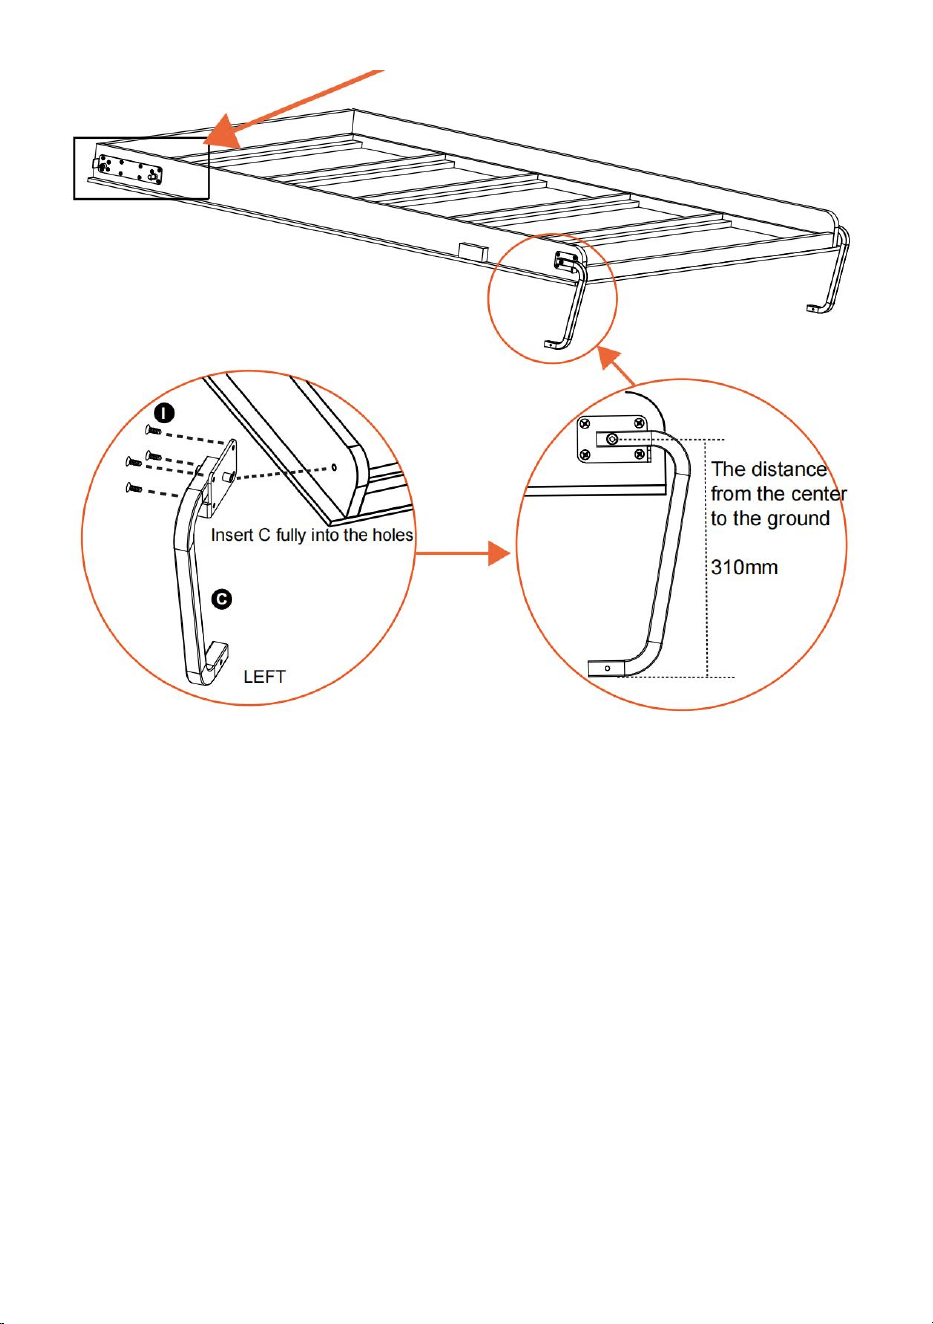
Insert the pin on the leg C fully into the Dia11mm holes, then fix C to the
bed frame with screws I. Keep the distance from the center to the ground is
310mm as the picture.
Repeat the above installation on the other side.
- 15 -
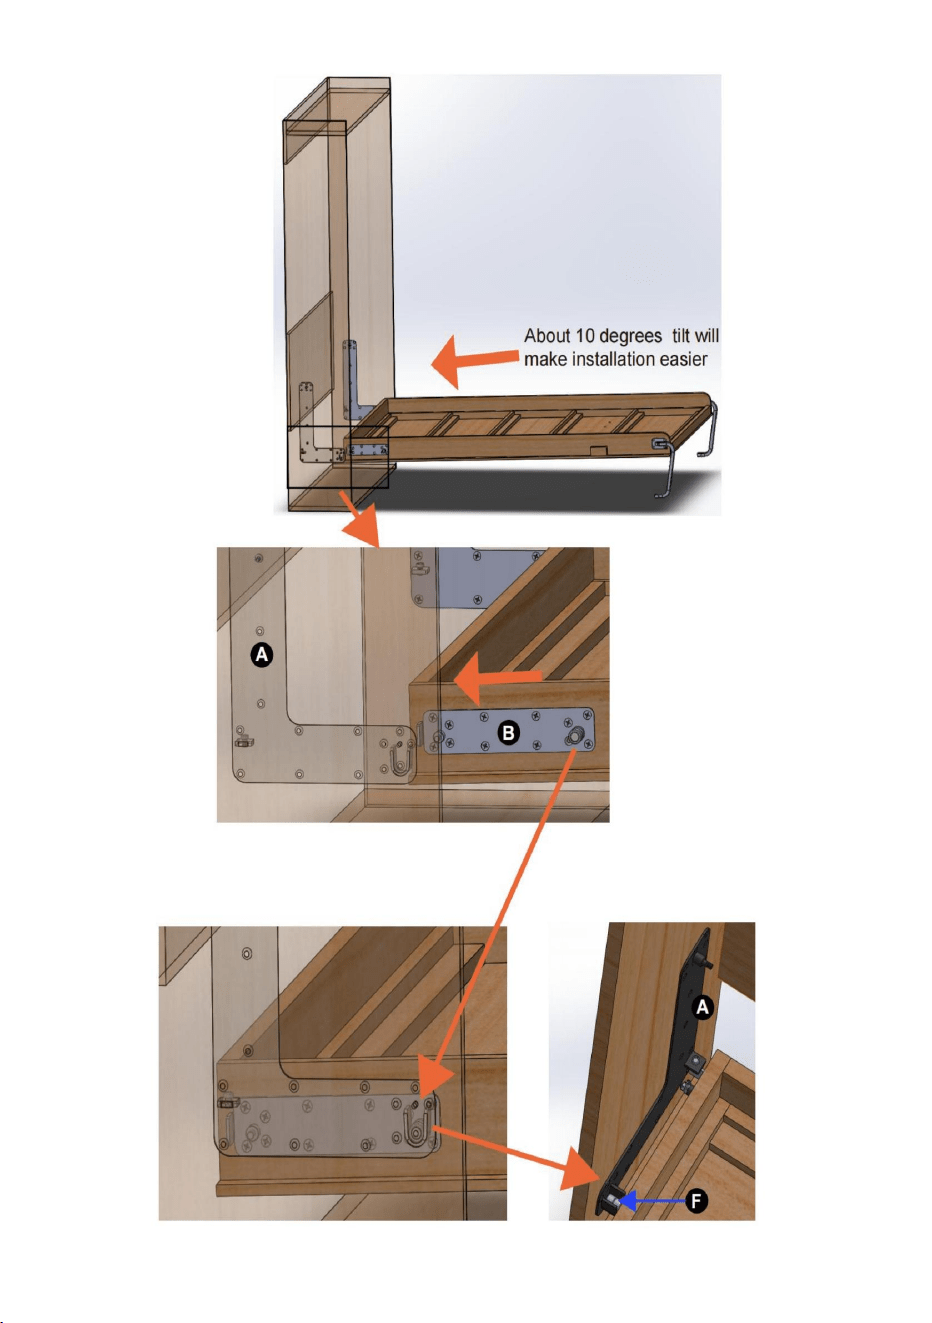
Step 6:
Insert the bed frame with a little angle to the cabinet as the picture.
Put the connect bracket B with bearing F on the side bracket A as the
picture. Install the handle to the bed frame.

- 16 -

- 17 -
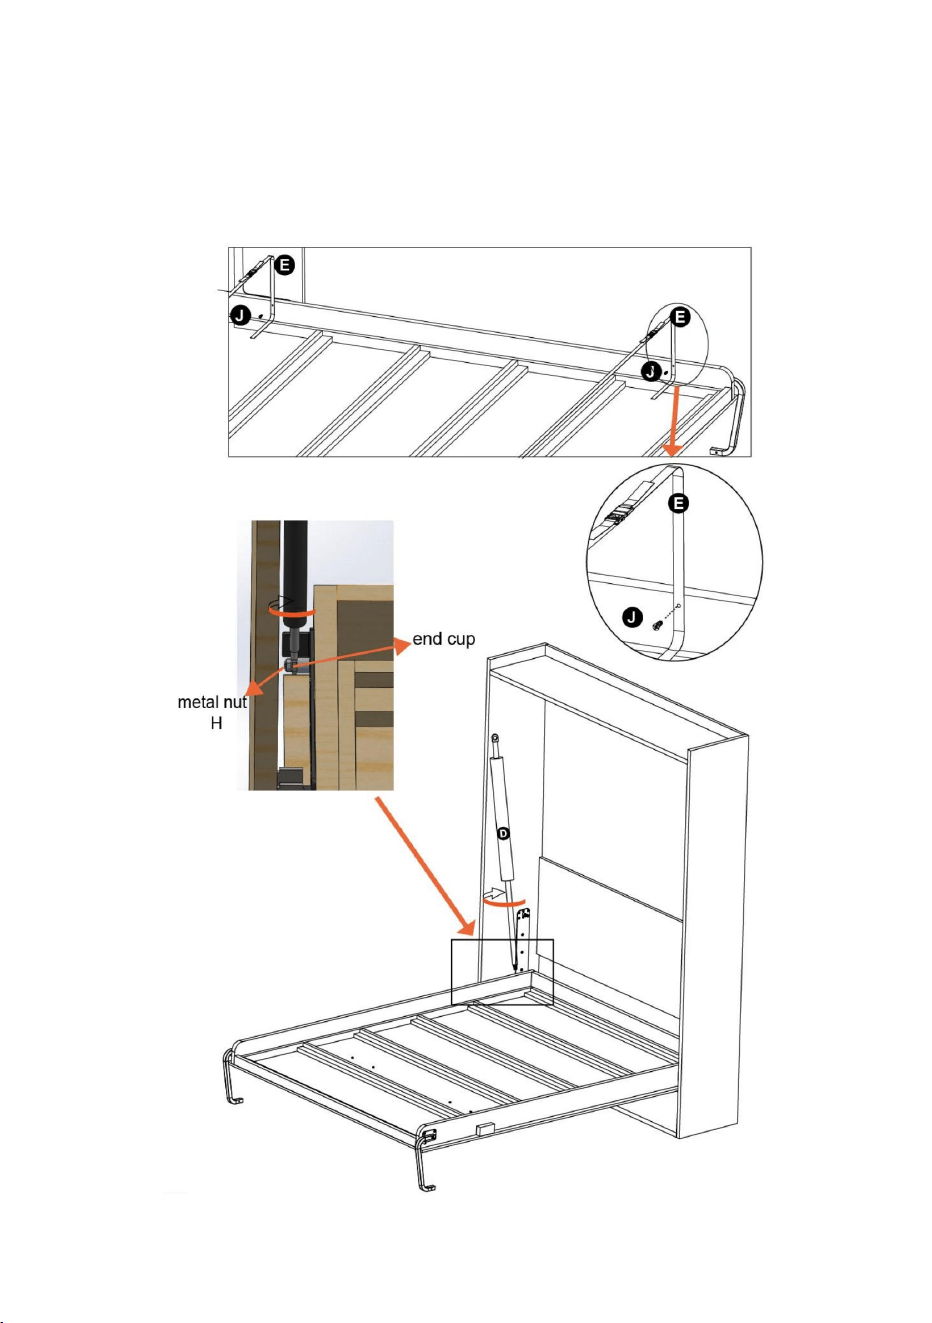
Step 7:
First, attach the two mattress straps E to the bed frame with a screw J;
Then turn the gas spring D into the end cap as the picture, tighten the gas
spring with the end cap;
Repeat the above installation on the other side.

- 18 -
Step 8:
Close the bed frame into the cabinet as the picture.
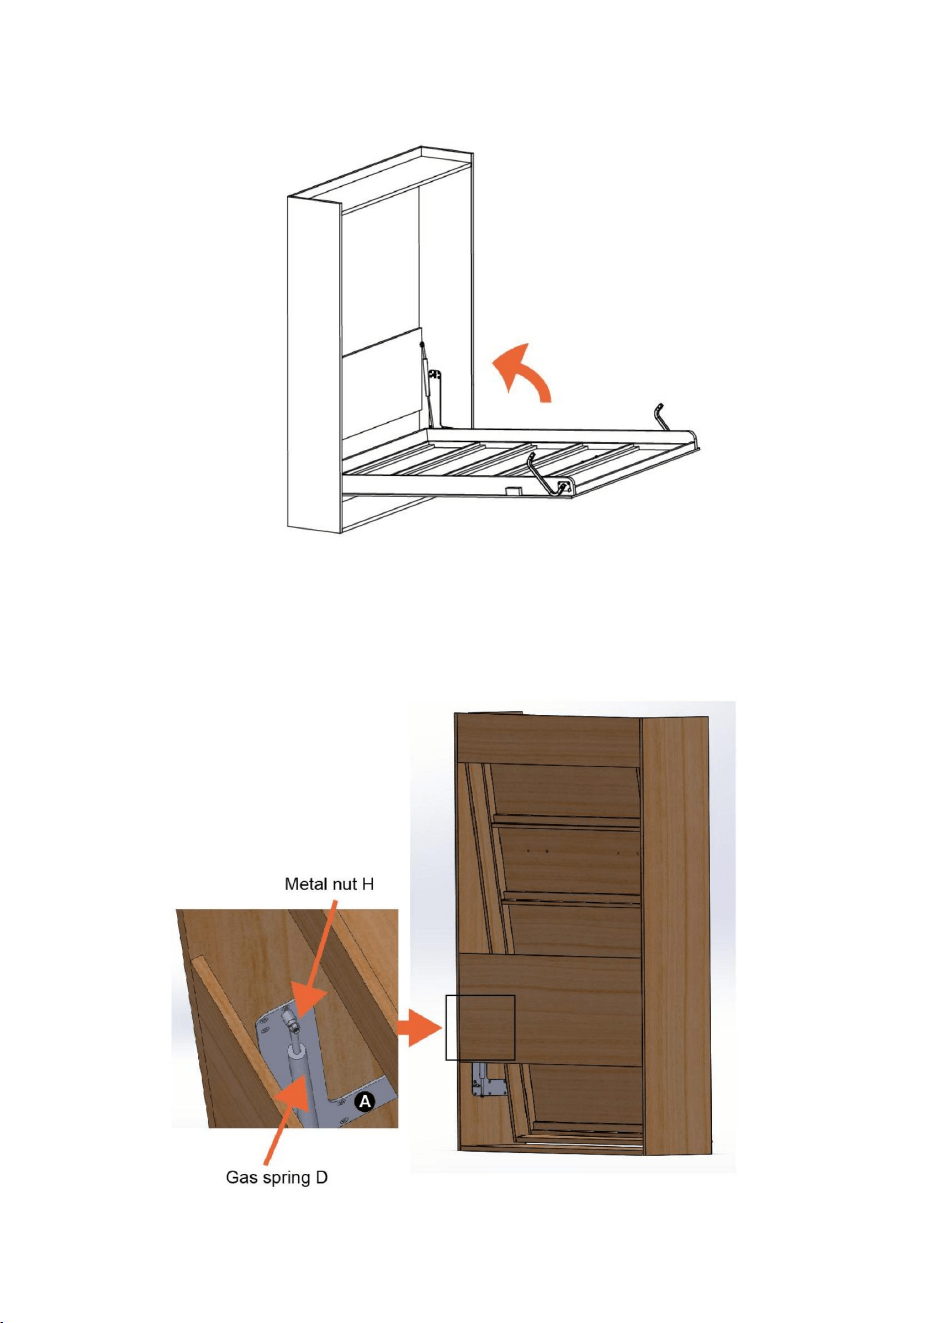
Step 9:
Install the gas spring D to the A bracket from the back of cabinet, fix it by
metal nut H.
Repeat the above installation on the other side.

- 19 -
Step 10:
Fix the cabinet to solid wall. The cabinet must be fixed to
the wall before open it.

- 20 -
Step 11:
Open the bed, put the panel 13 on the bed frame.
Put the mattress on the bed frame and fix by the straps E.
Install the stopper G to cabinet with screws J.
Repeat the above installation on the other side.
- 21 -
Manufacturer: Shanghaimuxinmuyeyouxiangongsi
Address: Shuangchenglu 803nong11hao1602A-1609shi, baoshanqu,
shanghai 200000 CN.
Imported to AUS: SIHAO PTY LTD. 1 ROKEVA STREETEASTWOOD
NSW 2122 Australia
Imported to USA: Sanven Technology Ltd. Suite 250, 9166 Anaheim
Place, Rancho Cucamonga, CA 91730
REP
UK
YH CONSULTING LIMITED. C/O YH Consulting
Limited Office 147, Centurion House, London
Road, Staines-upon-Thames, Surrey, TW18 4AX
REP
EC
E-CrossStu GmbH
Mainzer Landstr.69,
60329 Frankfurt am Main.


Modèle:YFHVQN246.
Nouscontinuonsànousengageràvousfournirdesoutilsàdesprixcompétitifs.
"Économisezlamoitié","Moitiéprix"outouteautreexpressionsimilairequenousutilisons
nereprésentequ'uneestimationdeséconomiesdontvouspourriezbénéficierenachetant
certainsoutilscheznousparrapportauxgrandesmarquesetnesignifiepasnécessairementcouvrir
touteslescatégoriesd'outilsproposés.parnous.Nousvousrappelonsdebienvouloirvérifier
attentivementlorsquevouspassezunecommandecheznoussivous
économisezréellementlamoitiéparrapportauxgrandesmarques.
KITLITMURPHY
Assistancetechniqueetcertificatdegarantieélectroniquewww.vevor.com/support
Machine Translated by Google

Machine Translated by Google

BESOIND'AIDE?CONTACTEZNOUS!
1
Vousavezdesquestionssurlesproduits?Besoind'uneassistancetechnique?N'hésitez
pasànous
contacter:Supporttechniqueetcertificatdegarantieélectronique
www.vevor.com/support
Modèle:YFHVQN246.
Ils'agitdesinstructionsoriginales,veuillezlireattentivementtouteslesinstructions
dumanuelavantdel'utiliser.VEVORseréserveuneinterprétationclairedenotremanuel
d'utilisation.L'apparenceduproduitdépendduproduitquevousavezreçu.Veuillez
nouspardonnerquenousnevousinformeronspluss'ilyadesmisesàjourtechnologiquesou
logiciellessurnotreproduit.
KITLITMURPHY
Machine Translated by Google

KitdelitescamotablecompatibleQueenVertical
2
S'ilyaunedifférenceentrelacouleurdeceproduitetl'imagedans
Modèlesadaptés
lemanueld'instructions,veuillezvousréféreràl'objetphysique.
Kitdelitescamotable.
Tailledumatelas
Matelasstandardpourgrandlit
épaisseurdumatelas
L'installationdoitêtreeffectuéeparunadulteetlesenfantsnedoiventpasl'utiliser
sanssurveillance.
Poidsmaximum:68lbs
Profondeurmaximale:10
YFHVQN246
2.VeuillezinstallercomplètementlekitdelitMurphyavantd'utiliserlelit,sinoncelapourraitcauser
degravesdommagesauxpersonnes.
QueenVertical
Poidsmaximumdumatelas
3.Vérifiezlastabilitéetlasécuritédukitàintervallesréguliersetutilisezle
L×L:60×80pouces(1520×2030mm)
610pouces(152254mm)
doitêtrearrêtéimmédiatementencasdedommagesoudeproblèmessuspects.
Remarque:Lekitdelitescamotablen'inclutpaslelitnilesarmoiresdelit,qui
doiventêtreéquipésparlesutilisateurseuxmêmes.
4.Lesenfantsnedoiventpasutiliserlekitseulspourétalerourangerlelit,sinonilspourraientêtre
blessés.
Mercibeaucoupd'avoirchoisicekitdelitMurphy.
68livres(31kg)
Modèle
1.Veuillezlireetcomprendreattentivementcemanuelavantd'utiliserle
LISTEDESPARAMÈTRES
CONSIGNESDESÉCURITÉ
INSTRUCTIONS
Machine Translated by Google

Utiliser
1.Descriptifgénéral
2.Sécurité
etlebonétatdesesaccessoires.
Avantd'utiliserlelitMurphy,l'utilisateurdoits'assurerquesurle
Avantd'utiliserlelitMurphy,l'utilisateurdoits'assurerdesonbonétat
surfacedecouchageiln'yaquelematelasetlelingedelit.
dans
positionneràl'intérieurdumeubledansdespositionshorizontales,pourêtreutilisé
commelitdemanièreabsolumentsimpleetrapide,avectrèspeud'efforts.
Lesystèmedelitescamotablepermetd'amenerlesommierdulitdesapositionverticale
Capacitédepoidsmaximale:900lb
,
3
Machine Translated by Google

observé.
mécanismedecouverturesouautre.Avantdecommencertoutentretien,réparez
Avantdecommenceràutiliserleproduit,lesutilisateursdoiventêtreconscientsdesesfonctions
demanièreproductive,sansdangerpourluimêmeoupourautrui.
travauxounettoyage,l'opérateurdoitavoirluetcompristouteslesinstructionstechniques
fois.
informationscontenuesdansceguide.Toutentretienetréparationdoitêtre
Ilestinterditd'utiliserleproduitsansaucunmatelassurle
surfacedusommier.
etsescaractéristiquestechniques,apprenezàtraversunelecturepréciseetcomplète
duprésentguidedel'utilisateur.
Ilestinterditd'utiliserlelitpourunusagedifférentdecelui
Altérationouremplacementdepartiesdulitnonautorisées.
effectuéuniquementpardupersonnelqualifié.
AVERTISSEMENT!!!
décritprécédemmentdanslasectionUTILISATION.
L'utilisationd'accessoiresoudepiècesderechangeautresqueceuxrecommandéspar
Neplacezjamaisleproduitàproximitéd'unesourcedechaleur.Positionneretverrouillerlelit
lefournisseur,présenteruneutilisationnonconformeetdangereuseduproduit.
Uneinstallationincorrecteounonréaliséepardesartisansspécialiséspeut
lesystèmedoitêtremaintenuàl’écartdetoutobjetsusceptibledegênersonmouvement.
Lesinstructionsetrèglescontenuesdanscemanueldoiventêtrerespectées
provoquerdesdécollements,descassuresoudesdysfonctionnementsavecdepossiblesdommagesà
despersonnes,deschosesoudesanimaux.Touteslesinstructionsdonnéesdoiventêtrestrictement
Ileststrictementinterditderetirertoutdispositifdesécuritéetprotection
(étiquettes)surleplateau;vérifierpériodiquementlapositionfortuitesurle
Lerespectdesnormesdesécuritémetl'utilisateurentermesdetravail
Normedesécurité
4
Machine Translated by Google

Caractéristiquestechniques
mm
1
2
4
1654*250*18mm
1
Interne
Nousvoussuggéronsd'utiliserlesmatériauxcidessouspourlesarmoiresenboisetlecadredelit.
Matériel
Contreplaqué1pouce2212*406*25mm2
1654*388*2102
3/4pouce
5
Nombre
1
3/4pouce
1
1
Contreplaqué1pouce1654*406*25mm
Contreplaqué
Dimension
dimensionsde
1654*550*18mm
3
Important
Desbâtonsdebois
Feuilledecontreplaqué
IQTÉ
armoire:
Contreplaqué
Armoire
Contreplaqué1pouce1654*388*25mm
5
Machine Translated by Google

6
Poidsducadre
delit:
6
1pouce
1520*50*25mm1
32*32*100mm
Contreplaqué
1520*120*25mm1
13
cadredelit:
7
Contreplaqué
Lit
1pouce
3/4pouce
2077*120*25mm2
bois
2077*1634*132
dix
11
12
3/4pouce
IQTÉ
62kg(136,4livres)
1
3/8pouces
bois
Important
9
1/2pouce
Contreplaqué
Contreplaqué
40*20*2027millimètres2
Dimensionsde
Contreplaqué
40*20*1480millimètres12
cadre
1pouce
2077*1634*12mm1
2022*1516*9mm1
Matériaudunuméro
11/2pouce
8
mm
bois
Dimension
Machine Translated by Google

Conseilsdesécuritéetd'entretien
matelas:
assurezvousquevotreperceuseélectriqueestrégléesurunréglagedecouplefaible.
14
Matériaudunuméro
•Vérifiezquevousdisposezdetouslescomposantsetoutilsrépertoriéscidessous.
pages.
•Retireztouslesraccordsdessacsenplastiqueetséparezlesdansleur
Dimension
IQTÉ
matelas
1
Important
31kg(68livres)
groupes.
•Gardezlesenfantsetlesanimauxéloignésdelazonedetravail,lespetitespiècespourraient
s'étoufferencasd'ingestion.
•Assurezvousd'avoirsuffisammentd'espacepourdisposerlespiècesavantdecommencer.•
Pendantl'assemblage,nevoustenezpasdeboutetnemettezpasdepoidssurleproduit,celapourrait
1520*2030*(1522
9295kg
afaitdesdégats.•
Assemblezl'articleaussiprèsdesapositionfinale(danslamêmepièce)que
(202lb209lb)
54)mm
possible.•
Assemblezsurunesurfacedouceetplanepouréviterd'endommagerl'appareilouvotresol.
•Certainespartiesdumontageserontplusfacilesà2personnes.
•Pourréduirelerisqued'endommagervotreproduit,veuillez
(60*80*(610)pouces)
Lit
Poidsde
POIDSTOTALDUCADREDELITETDUMATELAS
BESOIND'ÊTRE:
cadre
7
Machine Translated by Google

Foretàbois
Emboutsd'entraînementdevis Ilfait6mm
Listedespiècesdu
kitRemarque:Lesquantitéscidessoussontlaquantitécorrectepourterminer
l'assemblage.Danscertainscas,plusderaccordspeuventêtrefournisquenécessaire.
Foretàbois
Dia11mm
Cléd'extrémité
13mmOuvert
A:supportlatéralx2piècesB:supportdeconnexionx2piècesC:piedx2pièces
Outilderéglagehorizontal
Installerlesoutilsrequis
8
Machine Translated by Google
J:VisM4x20mmx8pcs
Gabaritdeperçage:
710*294mm
E:sangledematelasx2pièces
F:roulementx4pièces
Vis
GuidedeconstructionÉtape
1:Fabriquerl'armoirePlacezle
gabaritdeperçagede710*294mmsurlepanneaulatéraletassurezvousqueleborddugabarit
affleurelepanneaulatéralcommesurl'image.
Marquezletroucirculairedugabaritsurlepanneaulatéral,puisretirezlegabaritetpercezuntrou
de11mmdediamètreetuntroude6mmdediamètrecommesurl'image,laprofondeurdutrouest
de15mm.
Je:M5x20mm
Fabriquezl'armoireavecdesvisetdelacolleàboisimperméable,assurezvousquela
dimensioninterneestconformeàl'image,assurezvousquel'armoireeststableetsûre.
x72pièces
H:écroumétalliqueM8x4pièces
G:bouchonx2pièces
D:YFGS5001100x
Gabaritdeperçage:
306*82mm
2pièces
9
Machine Translated by Google

dix
Machine Translated by Google

11
Répétezl'installationcidessusdel'autrecôté.
Étape2:
InsérezcomplètementlagoupilledusupportlatéralAdansletroudediamètre11mmetle
troude6mm,fixezaàl'armoireaveclesvisI.
Machine Translated by Google

Marquezletroucirculairedugabaritsurlepanneau8,puisretirezle
gabaritetpercezuntroude11mmdediamètrecommesurl'image,laprofondeurdutrouestde15mm.
leborddumodèleaffleurelepanneaucommesurl'image.
Étape3:Posezlegabaritdeperçagede306*82mmsurlepanneau8etassurezvous
unautrecôtédupanneau,puispercezuntroudediamètre11mm,laprofondeurdutrouestde15mm.
Marquezlestrousdeperçageenfonctiondesdimensionscommesurl'image.
12
Machine Translated by Google

Vérifierladimensiondupanneaudetablierjusqu'auborddupanneaudeporte
sont32mmcommeimage.
Fabriquezlecadredelitavecdesvisetdelacolleàboisimperméablecommesurl'image.
Étape4:
Assurezvousquel'armoireeststableetsûre.
Gardezlalongueurdiagonalecarl'imageestlamême.
13
Machine Translated by Google

Insérez2roulementsFsurlesupportdeconnexionBcommesurl'image.
InsérezcomplètementlagoupilledupiedCdanslestrousdediamètre11mm,puis
fixezCaucadredelitaveclesvisI.Gardezladistanceentrelecentreetlesolde310
mmcommesurl'image.
Dévissezl'emboutduressortàgazcommesurl'image,puisinstallezlesurlesupport
deconnexionBetfixezleavecl'écrouHcommesurl'image.
Étape5:
InsérezentièrementlagoupilledusupportdeconnexionBdanslestrousdediamètre11mm,puisfixezB
aucadredelitaveclesvisI.
Répétezl'installationcidessusdel'autrecôté.
14
Machine Translated by Google

PlacezlesupportdeconnexionBavecleroulementFsurlesupportlatéralAcomme
surl'image.Installezlapoignéesurlecadredulit.
Étape6:
Insérezlecadredelitavecunpetitangleparrapportaumeuble,commesurl'image.
15
Machine Translated by Google
16
Machine Translated by Google

17
Étape
7:Toutd'abord,fixezlesdeuxsanglesdematelasEaucadredelitavecunevis
JEnsuite,tournezleressortàgazDdansl'emboutcommesurl'image,serrezle
ressortàgazavecl'embout
Répétezl'installationcidessussurl'autrecôté.
Machine Translated by Google

18
Répétezl'installationcidessusdel'autrecôté.
Étape
8:Fermezlecadredelitdansl'armoirecommesurl'image.
Étape9:
InstallezleressortàgazDsurlesupportAàl'arrièredel'armoire,fixezleavecl'écroumétalliqueH.
Machine Translated by Google

19
lemuravantdel'ouvrir.
Étape10:
Fixezl'armoireàunmursolide.L'armoiredoitêtrefixéeà
Machine Translated by Google

PosezlematelassurlecadredelitetfixezleparlessanglesE.
InstallezlabutéeGsurl'armoireaveclesvisJ.
Ouvrezlelit,placezlepanneau13surlecadredulit.
Étape11:
Répétezl'installationcidessusdel'autrecôté.
20
Machine Translated by Google

21
ImportéauxÉtatsUnis:SanvenTechnologyLtd.Suite250,9166AnaheimPlace,
RanchoCucamonga,CA91730
YHCONSULTINGLIMITÉE.C/OYHConsultingLimited
Bureau147,CenturionHouse,LondonRoad,Staines
uponThames,Surrey,TW184AX
ImportéenAustralie:SIHAOPTYLTD.1ROKEVASTREETASTWOODNSW2122
Australie
Fabricant:ShanghaimuxinmuyeyouxiangongsiAdresse:
Shuangchenglu803nong11hao1602A1609shi,baoshanqu,shanghai200000CN.
ECrossStuGmbH
MainzerLandstr.69,
60329FrancfortsurleMain.
REPRÉSENTANTCE
REPRÉSENTANTDUROYAUMEUNI
Machine Translated by Google


Schrankbett-Set
MODELL:YFHVQN246
Technischer Support und E-Garantie-Zertifikat www.vevor.com/support
„Sparen Sie die Hälfte“, „Halber Preis“ oder andere ähnliche Ausdrücke, die wir verwenden,
stellen nur eine Schätzung der Ersparnis dar, die Sie beim Kauf bestimmter Werkzeuge bei uns
im Vergleich zu den großen Topmarken erzielen können, und decken nicht unbedingt alle von uns
angebotenen Werkzeugkategorien ab. Wir möchten Sie freundlich daran erinnern, bei der
Bestellung bei uns sorgfältig zu prüfen, ob Sie im Vergleich zu den großen
Topmarken tatsächlich die Hälfte sparen.
Wir sind weiterhin bestrebt, Ihnen Werkzeuge zu wettbewerbsfähigen Preisen anzubieten.
Machine Translated by Google

Machine Translated by Google

Haben Sie Fragen zum Produkt? Benötigen Sie technischen Support? Bitte kontaktieren Sie
uns:
Technischer Support und E-Garantie-Zertifikat www.vevor.com/
support
MODELL:YFHVQN246
Dies ist die Originalanleitung. Bitte lesen Sie alle Anweisungen sorgfältig durch, bevor
Sie das Gerät in Betrieb nehmen. VEVOR behält sich eine klare Auslegung unserer
Bedienungsanleitung vor. Das Erscheinungsbild des Produkts richtet sich nach dem
Produkt, das Sie erhalten haben. Bitte verzeihen Sie uns, dass wir Sie nicht erneut informieren,
wenn es Technologie- oder Software-Updates für unser Produkt gibt.
Brauchen Sie Hilfe? Kontaktieren Sie uns!
Schrankbett-Set
- 1 -
Machine Translated by Google

Murphy-Bett-Kit Eignung Queen-Vertical
2. Bitte installieren Sie das Murphy-Bett-Set vollständig, bevor Sie das Bett benutzen, da es sonst zu
ernsthaften Verletzungen kommen kann.
Queen-Vertikal
3.Überprüfen Sie die Stabilität und Sicherheit des Kits in regelmäßigen Abständen und verwenden Sie
B×L: 60×80 Zoll (1520×2030 mm)
sollte bei Schäden oder verdächtigen Problemen sofort gestoppt werden.
6-10 Zoll (152-254 mm)
Hinweis: Das Murphy-Bett-Set enthält kein Bett und keine Bettschränke, die
Vielen Dank, dass Sie sich für dieses Schrankbett-Set entschieden haben.
4. Kinder sollten das Set nicht alleine zum Ausbreiten oder Verstauen des Bettes verwenden, da sie
sonst Schaden nehmen könnten.
68 Pfund (31 kg)
müssen vom Benutzer selbst ausgestattet werden.
1.Bitte lesen Sie dieses Handbuch sorgfältig durch, bevor Sie das
Wenn es einen Unterschied zwischen der Farbe dieses Produkts und dem Bild in
Modell
Schrankbett-Bausatz.
Die Bedienungsanleitung finden Sie am physischen Objekt.
Angepasste Modelle
Matratzengröße
Die Installation sollte von einem Erwachsenen durchgeführt werden und Kinder sollten es nicht verwenden
Matratzendicke
Standard Queen Matratze
Maximalgewicht: 68 Pfund
YFHVQN246
Maximales Matratzengewicht
Maximale Tiefe: 10ÿ
ohne Aufsicht.
PARAMETERLISTE
SICHERHEITSHINWEISE
ANWEISUNGEN
- 2 -
Machine Translated by Google

Verwenden
1. Allgemeine Beschreibung
2. Sicherheit
und den guten Zustand des Zubehörs.
Vor der Benutzung des Schrankbetts muss sich der Benutzer von seinem guten Zustand überzeugen
Vor der Benutzung des Schrankbettes muss der Benutzer sicherstellen, dass auf dem
In
Im Schrank in horizontaler Position positionieren und ganz schnell und einfach mit geringem
Kraftaufwand als Bett verwenden.
Das Schrankbettsystem ermöglicht es, die Bettfeder aus ihrer vertikalen Position zu bringen
Maximale Gewichtskapazität: 900 Pfund
Als Liegefläche sind lediglich die Matratze und die Bettwäsche vorhanden.
,
- 3 -
Machine Translated by Google

Es ist verboten, das Bett für einen anderen Zweck zu verwenden als den
Manipulationen oder der Austausch von Bettteilen sind nicht zulässig.
zuvor im Abschnitt VERWENDUNG beschrieben.
Die Verwendung von Zubehör oder Ersatzteilen, die nicht von uns empfohlen werden,
Stellen Sie das Produkt niemals in die Nähe von Wärmequellen. Positionieren und verriegeln Sie das Bett
Eine unsachgemäße Installation oder eine nicht von Fachhandwerkern durchgeführte
durch den Lieferanten, stellen eine unsachgemäße und gefährliche Verwendung des Produktes dar.
Das System muss frei von Objekten gehalten werden, die seine Bewegung behindern könnten.
Personen, Sachen oder Tiere. Alle gegebenen Anweisungen müssen genau befolgt werden
kann zu Ablösungen, Brüchen oder Funktionsstörungen führen und
Es ist strengstens verboten, Sicherheitsvorrichtungen und Schutzvorrichtungen zu entfernen
Die in dieser Anleitung enthaltenen Anweisungen und Vorschriften müssen stets beachtet werden.
beobachtet.
Die Einhaltung der Sicherheitsnormen stellt den Benutzer in Bezug auf die Arbeit
(Etiketten) am Gerät; überprüfen Sie regelmäßig die zufällige Position auf dem
produktiv, ohne Gefahr zu laufen, sich selbst oder andere zu schädigen.
Vor der Inbetriebnahme des Produkts müssen sich die Benutzer über dessen Funktionen im Klaren sein
Mechanismus von Decken oder anderen. Bevor Sie mit der Wartung beginnen, reparieren
Arbeiten oder Reinigung muss der Bediener alle technischen
Es ist verboten, das Produkt ohne Matratze auf dem
und seine technischen Eigenschaften, lernen Sie durch eine genaue und vollständige Lektüre
Informationen in diesem Handbuch. Alle Wartungs- und Reparaturarbeiten müssen
mal.
dieser Bedienungsanleitung.
nur von qualifiziertem Personal durchgeführt werden.
Bettfederoberfläche.
WARNUNG !!!
Sicherheitsnorm
- 4 -
Machine Translated by Google

Technische Eigenschaften
IQTY
Sperrholzplatte
Kabinett:
Sperrholz
1654 x 250 x 18 mm
1-Zoll-Sperrholz 1654 * 388 * 25 mm
Kabinett
mm
1
1-Zoll-Sperrholz 1654 * 406 * 25 mm
Holzstäbchen
Abmessungen
Dimensionen von
Sperrholz
1654 x 550 x 18 mm
3
Wichtig
1654*388*2102
1 Zoll Sperrholz 2212*406*25 mm 2
5
3/4 Zoll
3/4 Zoll
Nummer
1
1
1
2
4
Intern
Schlagen Sie vor, die folgenden Materialien für Holzschränke und Bettrahmen zu verwenden
Material
1
- 5 -
Machine Translated by Google

- 6 -
2077*1634*12 mm 1
1-1/2 Zoll
Nummer Material
8
mm
32 x 32 x 100 mm
Abmessungen
Holz
Gewicht des
Bettrahmens :
1520*120*25 mm 1
1/2 Zoll
Holz
Wichtig
rahmen
Sperrholz
40*20*2027 mm 2
9
Sperrholz
Dimensionen von
Sperrholz
40*20*1480 mm 12
2077*120*25 mm 2
3/4 Zoll
Holz
10
1 Zoll
12
2077*1634*132
11
62 kg (136,4 Pfund)
3/4 Zoll
IQTY
1
3/8 Zoll
2022*1516*9 mm 1
13
6
1 Zoll
1520*50*25 mm 1
Sperrholz
Sperrholz
7
Bett
1 Zoll
Bettrahmen :
Machine Translated by Google

Sicherheits- und Pflegehinweise
rahmen
Matratze:
MUSS SEIN:
Bett
Gewicht von
• Um die Wahrscheinlichkeit einer Beschädigung Ihres Produkts zu verringern,
(60*80*(6-10)Zoll)
Gesamtgewicht von Bettrahmen und Matratze
Stellen Sie sicher, dass Ihre Bohrmaschine auf eine niedrige Drehmomenteinstellung eingestellt ist.
(202 Pfund – 209 Pfund)
54) mm
möglichst. •
Bauen Sie das Gerät auf einer weichen, ebenen Fläche zusammen, um Schäden am Gerät oder am Boden zu
vermeiden. • Teile der Montage lassen sich mit 2 Personen leichter durchführen.
1520*2030*(152-2
92-95 kg
Schäden verursachen.
• Montieren Sie das Objekt so nah an seinem endgültigen Standort (im selben Raum) wie
Erstickungsgefahr bei
Verschlucken. • Stellen Sie sicher, dass Sie genügend Platz haben, um die Teile auszubreiten, bevor Sie beginnen.
• Stellen Sie sich während der Montage nicht auf das Produkt und belasten Sie es nicht, da dies zu Verletzungen führen kann.
Wichtig
31 kg (68 Pfund)
1
IQTY
• Halten
Sie Kinder und Tiere vom Arbeitsbereich fern, Kleinteile könnten
Seiten. •
Alle Armaturen aus den Plastiktüten entnehmen und in ihre
Abmessungen
Matratze
14
Nummer Material
• Überprüfen Sie, ob Sie alle auf der folgenden Seite aufgeführten Komponenten und Werkzeuge haben
- 7 -
Machine Translated by Google

Schrauben Antriebsbits Er ist 6 mm groß Durchmesser 11 mm
Holzbohrer Holzbohrer
Maulschlüssel
13mm offen
A: Seitenhalterung x 2 Stück B: Verbindungshalterung x 2 Stück C: Beine x 2 Stück
Liste der Bausatzteile
Hinweis: Die unten angegebenen Mengen sind die richtigen Mengen, um die Baugruppe
fertigzustellen. In einigen Fällen werden möglicherweise mehr Armaturen geliefert, als benötigt werden.
Horizontales Anpassungswerkzeug
Installieren Sie die erforderlichen Tools
- 8 -
Machine Translated by Google

- 9 -
2 Stück
J: Schraube M4x20mm
x8Stk
D:YFGS5001100 x
Bohrschablone:
306*82mm
G: Stopper x 2 Stück
H: Metallmutter M8x 4 Stück
x72 Stück
I:M5x20mm
Bauen Sie den Schrank mit Schrauben und wasserfestem Holzleim an. Achten Sie auf die
Innenmaße wie auf dem Bild und stellen Sie sicher, dass der Schrank stabil und sicher ist.
Markieren Sie das runde Loch der Schablone auf der Seitenwand, entfernen Sie dann die Schablone
und bohren Sie ein Loch mit 11 mm Durchmesser und 6 mm Durchmesser wie auf dem Bild, die
Lochtiefe beträgt 15 mm.
Schrauben
F: Lager x 4 Stück
Konstruktionsanleitung
Schritt 1: Bauen Sie den
Schrank. Legen Sie die Bohrschablone 710 x 294 mm auf die Seitenwand und stellen Sie sicher, dass
die Kanten der Schablone bündig mit der Seitenwand abschließen (siehe Abbildung).
Bohrschablone:
710*294mm
E: Matratzengurt x 2 Stück
Machine Translated by Google

- 10 -
Machine Translated by Google

- 11 -
Schritt 2:
Stecken Sie den Stift an der Seitenhalterung A vollständig in die Löcher mit 11 mm Durchmesser und 6 mm
Durchmesser und befestigen Sie A mit den Schrauben I am Schrank.
Wiederholen Sie die obige Installation auf der anderen Seite.
Machine Translated by Google

Markieren Sie das runde Loch der Schablone auf der Platte 8, entfernen Sie dann die
Schablone und bohren Sie ein Loch mit 11 mm Durchmesser wie auf dem Bild, die Lochtiefe beträgt 15 mm.
Die Kanten der Schablone sind bündig mit der Platte, wie auf dem Bild.
Schritt 3: Legen Sie die Bohrschablone von 306*82mm auf das Panel 8 und stellen Sie sicher
Bohren Sie auf der anderen Seite der Platte ein Loch mit 11 mm Durchmesser und einer Lochtiefe von 15 mm.
Markieren Sie die Bohrlöcher entsprechend den Abmessungen wie im Bild auf
- 12 -
Machine Translated by Google

Achten Sie auf die Abmessung von der Schürzenplatte bis zur Kante der Türplatte
sind 32 mm wie auf dem Bild.
Bauen Sie den Bettrahmen mit Schrauben und wasserfestem Holzleim wie abgebildet.
Schritt 4:
Stellen Sie sicher, dass der Schrank stabil und sicher ist.
Behalten Sie die Diagonallänge bei, sie ist wie im Bild.
- 13 -
Machine Translated by Google

- 14 -
Drehen Sie die Endkappe der Gasfeder wie abgebildet nach außen, montieren Sie sie dann an der
Verbindungshalterung B und befestigen Sie sie wie abgebildet mit der Mutter H.
Stecken Sie den Stift am Bein C vollständig in die Löcher mit 11 mm Durchmesser und befestigen Sie C dann mit
den Schrauben I am Bettrahmen. Achten Sie darauf, dass der Abstand von der Mitte zum Boden 310 mm beträgt, wie
auf dem Bild.
Setzen Sie 2 Lager F in die Verbindungshalterung B ein, wie in der Abbildung dargestellt.
Schritt 5:
Stecken Sie den Stift an der Verbindungshalterung B vollständig in die Löcher mit 11 mm Durchmesser und befestigen
Sie B anschließend mit den Schrauben I am Bettrahmen.
Wiederholen Sie die obige Installation auf der anderen Seite.
Machine Translated by Google

- 15 -
Setzen Sie die Verbindungshalterung B mit Lager F auf die Seitenhalterung A, wie in der
Abbildung dargestellt. Befestigen Sie den Griff am Bettrahmen.
Schritt 6:
Setzen Sie den Bettrahmen mit einem kleinen Winkel zum Schrank ein, wie auf dem Bild.
Machine Translated by Google

- 16 -
Machine Translated by Google

Schritt
7: Befestigen Sie zuerst die beiden Matratzengurte E mit einer Schraube J am
Bettrahmen. Drehen Sie dann die Gasfeder D wie abgebildet in die Endkappe und ziehen
Sie die Gasfeder mit der
Endkappe fest. Wiederholen Sie die obige Installation auf der anderen Seite.
- 17 -
Machine Translated by Google
Wiederholen Sie die obige Installation auf der anderen Seite.
Schritt 8:
Schließen Sie den Bettrahmen wie abgebildet in den Schrank.
Schritt 9:
Installieren Sie die Gasfeder D an der Halterung A auf der Rückseite des Schranks und befestigen Sie sie mit
der Metallmutter H.
- 18 -
Machine Translated by Google

Schritt 10:
Befestigen Sie den Schrank an einer festen Wand. Der Schrank muss an
die Wand, bevor Sie sie öffnen.
- 19 -
Machine Translated by Google

Öffnen Sie das Bett und legen Sie die Platte 13 auf den Bettrahmen.
Befestigen Sie den Stopper G mit den Schrauben J am Schrank.
Legen Sie die Matratze auf den Bettrahmen und befestigen Sie sie mit den Gurten E.
Schritt 11:
Wiederholen Sie die obige Installation auf der anderen Seite.
- 20 -
Machine Translated by Google

Vertreter der EG
UK REP
Importiert in die USA: Sanven Technology Ltd. Suite 250, 9166 Anaheim Place,
Rancho Cucamonga, CA 91730
YH CONSULTING LIMITED. C/O YH Consulting Limited
Office 147, Centurion House, London Road, Staines-
upon-Thames, Surrey, TW18 4AX
Nach AUS importiert: SIHAO PTY LTD. 1 ROKEVA STREETEASTWOOD NSW 2122
Australien
Hersteller: Shanghaimuxinmuyeyouxiangongsi Adresse:
Shuangchenglu 803nong11hao1602A-1609shi, baoshanqu, Shanghai 200000 CN.
E-CrossStu GmbH
Mainzer Landstr.69,
60329 Frankfurt am Main.
- 21 -
Machine Translated by Google


MODELLO:YFHVQN246
"Risparmia la metà", "Metà prezzo" o qualsiasi altra espressione simile da noi
utilizzata rappresenta solo una stima del risparmio che potresti trarre dall'acquistare
determinati strumenti con noi rispetto ai principali marchi più importanti e non significa
necessariamente coprire tutte le categorie di strumenti offerti da noi. Ti ricordiamo
gentilmente di verificare attentamente quando effettui un ordine con noi
se stai effettivamente risparmiando la metà rispetto ai migliori marchi principali.
Continuiamo a impegnarci per fornirvi strumenti a prezzi competitivi.
KIT LETTO MURPHY
Supporto tecnico e certificato di garanzia elettronica www.vevor.com/support
Machine Translated by Google

Machine Translated by Google

HO BISOGNO DI AIUTO? CONTATTACI!
- 1 -
Hai domande sul prodotto? Hai bisogno di supporto tecnico? Non esitate a contattarci:
Supporto
tecnico e certificato di garanzia elettronica www.vevor.com/
support
MODELLO:YFHVQN246
Queste sono le istruzioni originali, leggere attentamente tutte le istruzioni del manuale
prima dell'uso. VEVOR si riserva una chiara interpretazione del nostro manuale d'uso. L'aspetto
del prodotto sarà soggetto al prodotto ricevuto. Ti preghiamo di perdonarci se non ti
informeremo più se sono presenti aggiornamenti tecnologici o software sul nostro prodotto.
KIT LETTO MURPHY
Machine Translated by Google

YFHVQN246
deve essere interrotto immediatamente in caso di danni o problemi sospetti.
6-10 pollici (152-254 mm)
Peso massimo del materasso
3.Verificare la stabilità e la sicurezza del kit a intervalli e utilizzare regolarmente
L×L: 60×80 pollici (1520×2030 mm)
Nota: il kit letto ribaltabile non include il letto e i mobili letto
Modello
1.Si prega di leggere e comprendere attentamente questo manuale prima di utilizzare il
Se c'è qualche differenza tra il colore di questo prodotto e l'immagine in
Modelli adattati
4. I bambini non devono utilizzare il kit da soli per stendere o riporre il letto, altrimenti potrebbero subire
danni.
Grazie mille per aver scelto questo kit per letto ribaltabile.
68 libbre (31 kg)
devono essere equipaggiati dagli utenti stessi.
Materasso Queen standard
spessore del materasso
L'installazione deve essere eseguita da un adulto e i bambini non dovrebbero utilizzarla
Peso massimo: 68 libbre
il manuale di istruzioni, fare riferimento all'oggetto fisico.
Kit letto Murphy.
2. Installare completamente il kit letto ribaltabile prima di utilizzare il letto, altrimenti potrebbe causare
gravi danni alle persone.
Queen-Verticale
Dimensioni del materasso
Profondità massima: 10ÿ
senza supervisione.
-2-
Idoneità del kit letto Murphy Queen-Verticale
ELENCO PARAMETRI
ISTRUZIONI DI SICUREZZA
ISTRUZIONI
Machine Translated by Google

Utilizzo
1. Descrizione generale
2 . Sicurezza
Prima di utilizzare il letto Murphy, l'utente deve accertarsi del suo buono stato
Prima di utilizzare il letto Murphy, l'utente deve assicurarsi che sul
e il buono stato dei suoi accessori.
In
posizionarsi all'interno del mobile in posizione orizzontale, per essere utilizzato come
letto in modo assolutamente semplice e veloce, con minimi sforzi.
Il sistema letto pieghevole permette di portare la rete del letto dalla sua posizione verticale
Capacità di peso massima: 900 libbre
sul piano notte c'è solo il materasso e la biancheria da letto.
,
- 3 -
Machine Translated by Google

della presente guida per l'utente.
L'installazione non corretta o non eseguita da artigiani specializzati, potrebbe
il fornitore, denunciano un uso non corretto e pericoloso del prodotto.
eseguita solo da personale qualificato.
descritto precedentemente nella sezione UTILIZZO.
L'uso di accessori o pezzi di ricambio diversi da quelli consigliati da
Non posizionare mai il prodotto vicino a fonti di calore. Posizionare e bloccare il letto
mantenere il sistema lontano da oggetti che possano ostacolarne il movimento.
(etichette) sul set; controllare periodicamente la posizione accidentale sul
Il rispetto delle norme di sicurezza mette l'utilizzatore in condizioni di lavoro
osservato.
meccanismo delle coperte o altro. Prima di iniziare qualsiasi manutenzione, riparare
causare distacchi, rotture o disfunzioni con possibili danni al
persone, cose o animali. Tutte le istruzioni fornite devono essere rigorosamente
E' severamente vietato rimuovere qualsiasi dispositivo di sicurezza e protezione
Le istruzioni e le regole contenute nel presente manuale devono essere assolutamente rispettate
volte.
informazioni contenute in questa guida. Qualsiasi intervento di manutenzione e riparazione sarà
e le sue caratteristiche tecniche, apprendi attraverso una lettura accurata e completa
È vietato utilizzare il prodotto senza materasso sopra
Prima di iniziare a utilizzare il prodotto gli utenti devono essere consapevoli delle sue funzioni
produttivamente, senza pericolo di danneggiare se stesso e gli altri.
E' vietato utilizzare il letto per un uso diverso da quello previsto
Manomissione o sostituzione di parti del letto non consentite.
lavoro o pulizia l'operatore deve aver letto e compreso tutte le tecniche
AVVERTIMENTO !!!
superficie della rete.
Norma di sicurezza
-4-
Machine Translated by Google

Caratteristiche tecniche
Dimensione
dimensioni di
3/4 pollici
1654*388*2102
Compensato da 1 pollice 2212*406*25 mm2
5
Numero
1
3/4 pollici
1
1
2
4
Suggerisci di utilizzare i seguenti materiali per armadi in legno e struttura del letto
Materiale
Interno
1
QTÀ
Foglio di compensato
mobiletto:
Compensato
Mobiletto
1654*250*18mm
Compensato da 1 pollice 1654*388*25mm
mm
1
Compensato da 1 pollice 1654*406*25 mm
Compensato
1654*550*18mm
3
Importante
Bastoni di legno
-5-
Machine Translated by Google

-6-
Compensato
40*20*2027mm2
2077*1634*132
11
2077*120*25mm2
3/4 pollici
legna
10
12
3/4 pollici
QTÀ
3/8 pollici
62 kg (136,4 libbre)
1
6
1 pollice
1520*50*25 mm1
Compensato
13
Letto
1 pollice
Compensato
7
telaio del letto :
1-1/2 pollice
Materiale numerico
8
mm
2077*1634*12 mm1
legna
32*32*100 mm
Dimensione
Peso del giroletto:
1520*120*25 mm1
legna
Importante
9
1/2 pollice
Compensato
Dimensioni di
Compensato
40*20*1480 mm12
1 pollice
2022*1516*9 mm1
telaio
Machine Translated by Google
Consigli per la sicurezza e la cura
1
54)mm
(202 libbre-209 libbre)
gruppi. •
Tenere i bambini e gli animali lontani dall'area di lavoro, piccole parti potrebbero
1520*2030*(152-2
92-95 kg
causa danni. •
Assemblare l'oggetto il più vicino possibile alla sua posizione finale (nella stessa stanza).
possibile. •
Montare su una superficie morbida e piana per evitare di danneggiare l'unità o il pavimento. •
Parti dell'assemblaggio saranno più facili con 2 persone.
BISOGNO DI ESSERE:
telaio
materasso:
• Per ridurre la probabilità di danneggiare il prodotto, si prega di farlo
(60*80*(6-10) pollici)
Letto
Peso di
PESO TOTALE DEL GRUPPO LETTO E DEL MATERASSO
assicurati che il tuo trapano elettrico sia impostato su una coppia bassa.
pagine.
• Rimuovere tutti gli accessori dai sacchetti di plastica e separarli nei rispettivi
Dimensione
materasso
14
Materiale numerico
Importante
31 kg (68 libbre)
• Verificare di disporre di tutti i componenti e gli strumenti elencati di seguito
soffocare se ingerito. •
Assicurati di avere spazio sufficiente per disporre le parti prima di iniziare. • Durante il
montaggio non sostenere o appoggiare peso sul prodotto, ciò potrebbe
QTÀ
-7-
Machine Translated by Google

Punta da trapano per legno
Diametro11mmPunte per viti
Strumento di regolazione orizzontale
Chiave finale
Lui è 6mm
Punta da trapano per legno
13 mm aperto
A: Staffa laterale x 2 pezzi B: Staffa di collegamento x 2 pezzi C: Gamba x 2 pezzi
Elenco delle parti del
kit Nota: le quantità riportate di seguito sono quelle corrette per completare l'assemblaggio.
In alcuni casi possono essere forniti più raccordi del necessario.
Installare gli strumenti richiesti
-8-
Machine Translated by Google

-9-
Segnare il foro circolare del modello sul pannello laterale, quindi rimuovere il modello e
praticare un foro diametro 11 mm e un foro diametro 6 mm come nell'immagine, la profondità
del foro è 15 mm.
H: Dado in metallo M8x 4 pz
x72 pezzi
2 pezzi
J: Vite M4x20mm x8 pz
G: Tappo x 2 pezzi
D:YFGS5001100x
Dima di foratura:
306*82mm
F: Cuscinetto x 4 pezzi
Guida alla costruzione Fase
1: Realizzare il mobile
Posizionare la dima di foratura da 710*294 mm sul pannello laterale e assicurarsi che il bordo
della dima sia a filo con il pannello laterale, come mostrato nell'immagine.
Dima di foratura:
710*294mm
E:Cinghia per materasso x 2 pezzi
Io:M5x20mm
Realizza il mobile con viti e colla per legno impermeabile, assicurati che le dimensioni
interne siano come nell'immagine, assicurati che il mobile sia stabile e sicuro.
Vite
Machine Translated by Google

- 10 -
Machine Translated by Google

- 11 -
Ripetere l'installazione sopra sull'altro lato.
Passaggio 2: inserire il perno sulla staffa laterale A completamente nel foro da 11
mm e da 6 mm, fissare a al mobiletto con le viti I.
Machine Translated by Google
- 12 -
Segnare il foro circolare della dima sul pannello 8, quindi rimuovere la
un altro lato del pannello, quindi praticare un foro di diametro 11 mm, la profondità del foro è 15 mm.
il bordo della sagoma è a filo con il pannello come da immagine.
Passaggio 3: posizionare la dima di foratura da 306*82 mm sul pannello 8 e verificare
modello e praticare un foro diametro 11 mm come nell'immagine, la profondità del foro è 15 mm.
Contrassegnare i fori in base alle dimensioni come nell'immagine
Machine Translated by Google

- 13 -
Verificare la dimensione dal pannello del grembiule al bordo del pannello della porta
Assicurarsi che l'armadio sia stabile e sicuro.
Realizza la struttura del letto con viti e colla per legno impermeabile come da foto.
Passaggio 4:
sono 32mm come immagine.
Mantenere la lunghezza diagonale come quella dell'immagine.
Machine Translated by Google

- 14 -
Estrarre il cappuccio terminale della molla a gas come nell'immagine, quindi installarlo sulla staffa
di collegamento B e fissarlo con il dado H come nell'immagine.
Inserire 2 cuscinetti F nella staffa di collegamento B come mostrato nell'immagine.
Passaggio
5: inserire completamente il perno sulla staffa di collegamento B nei fori da 11 mm di diametro,
quindi fissare B al telaio del letto con le viti I.
Inserire completamente il perno sulla gamba C nei fori da 11 mm di diametro, quindi fissare C al
telaio del letto con le viti I. Mantenere la distanza dal centro al suolo pari a 310 mm, come mostrato
nell'immagine.
Ripetere l'installazione sopra sull'altro lato.
Machine Translated by Google

- 15 -
Posizionare la staffa di collegamento B con il cuscinetto F sulla staffa laterale A come da immagine. Installare la
maniglia sul telaio del letto.
Passaggio
6: inserire la struttura del letto con una piccola angolazione rispetto al mobiletto, come mostrato nell'immagine.
Machine Translated by Google

-16-
Machine Translated by Google
- 17 -
Passo
7: Innanzitutto, fissare le due cinghie del materasso E al telaio del letto con una
vite Jÿ Quindi ruotare la molla a gas D nel cappuccio terminale come in figura,
stringere la molla a gas con
il cappuccio terminaleÿ Ripetere l'installazione sopra sull'altro lato.
Machine Translated by Google

- 18 -
Ripetere l'installazione sopra sull'altro lato.
Passaggio
8: chiudere la struttura del letto nel mobile come mostrato nell'immagine.
Passo
9: Installare la molla a gas D sulla staffa A dal retro del mobile, fissarla con il dado metallico
H.
Machine Translated by Google

- 19 -
il muro prima di aprirlo.
Passaggio
10: fissare l'armadio alla parete solida. Il mobile deve essere fissato
Machine Translated by Google

-20-
Posizionare il materasso sul giroletto e fissarlo con le cinghie E.
Aprire il letto, posizionare il pannello 13 sul giroletto.
Passaggio 11:
Installare il fermo G sul mobiletto con le viti J.
Ripetere l'installazione sopra sull'altro lato.
Machine Translated by Google

REP.CE
REP. DEL REGNO UNITO
Importato negli Stati Uniti: Sanven Technology Ltd. Suite 250, 9166 Anaheim Place,
Rancho Cucamonga, CA 91730
Importato in AUS: SIHAO PTY LTD. 1 ROKEVA STREETEASTWOOD NSW 2122
Australia
Produttore: Shanghaimuxinmuyeyouxiangongsi Indirizzo:
Shuangchenglu 803nong11hao1602A-1609shi, baoshanqu, shanghai 200000 CN.
YH CONSULENZA LIMITATA. C/O YH Consulting Limited
Office 147, Centurion House, London Road, Staines-
upon-Thames, Surrey, TW18 4AX
E-CrossStu GmbH
Mainzer Landstr.69,
60329 Francoforte sul Meno.
- 21 -
Machine Translated by Google


MODELO:YFHVQN246
"Ahorreamitaddeprecio","Amitaddeprecio"ocualquierotraexpresiónsimilarutilizada
pornosotrossolorepresentaunaestimacióndelosahorrosquepodríabeneficiarsealcomprar
ciertasherramientasconnosotrosencomparaciónconlasprincipalesmarcasynosignifica
necesariamentecubrirtodaslascategoríasdeherramientasofrecidas.pornosotros.Lerecordamos
que,cuandorealiceunpedidoconnosotros,verifiquecuidadosamentesi
realmenteestáahorrandolamitadencomparaciónconlasprincipalesmarcas.
Seguimoscomprometidosaproporcionarleherramientasaprecioscompetitivos.
KITDECAMAMURPHY
Soportetécnicoycertificadodegarantíaelectrónicawww.vevor.com/support
Machine Translated by Google

Machine Translated by Google
¿NECESITASAYUDA?¡CONTÁCTENOS!
1
¿Tienepreguntassobreelproducto?¿Necesitasoportetécnico?Nodudeencontactarnos:
Soporte
técnicoycertificadodegarantíaelectrónicawww.vevor.com/support
MODELO:YFHVQN246
Estassonlasinstruccionesoriginales;leaatentamentetodaslasinstruccionesdel
manualantesdeoperar.VEVORsereservaunainterpretaciónclaradenuestromanualde
usuario.Laaparienciadelproductoestarásujetaalproductoquerecibió.Perdoneque
noleinformaremosnuevamentesihayactualizacionesdetecnologíaosoftwareennuestro
producto.
KITDECAMAMURPHY
Machine Translated by Google

AdecuacióndelkitdecamaMurphyQueenVertical
2
MuchasgraciasporelegirestekitdecamaMurphy.
Modelosadaptados
Lainstalacióndebeserrealizadaporunadultoylosniñosnodebenutilizarla.
espesordelcolchón
debenserequipadosporlospropiosusuarios.
Pesomáximo:68libras
KitdecamaMurphy.
Elmanualdeinstrucciones,consulteelobjetofísico.
Tamañodelcolchón
2.InstalecompletamenteelkitdecamaMurphyantesdeusarlacama;delocontrario,podríacausar
dañosgravesalaspersonas.
ReinaVertical
Profundidadmáxima:10
sinsupervisión.
YFHVQN246
Pesomáximodelcolchón
debedetenerseinmediatamenteencasodedañosoproblemassospechosos.
610pulgadas(152254mm)
Nota:ElkitdecamaMurphynoincluyelacamanilosgabinetesdelacama,que
3.Compruebelaestabilidadyseguridaddelkitaintervalosregularesyúselo.
Ancho×Largo:60×80pulgadas(1520×2030mm)
Modelo
Colchóntamañoqueenestándar
1.Leaycomprendaatentamenteestemanualantesdeutilizarel
4.Losniñosnodebenusarelkitsolosparaextenderseoguardarlacama,delocontrariopodrían
sufrirdaños.
Sihayalgunadiferenciaentreelcolordeesteproductoylaimagenen
68libras(31kg)
LISTADEPARÁMETROS
INSTRUCCIONESDESEGURIDAD
INSTRUCCIONES
Machine Translated by Google

Usar
1.Descripcióngeneral
2.Seguridad
AntesdeutilizarlacamaMurphy,elusuariodebeestarsegurodesubuenestado.
AntesdeutilizarlacamaMurphy,elusuariodebeasegurarsedequeenla
yelbuenestadodesusaccesorios.
Enlasuperficieparadormirsoloseencuentranelcolchónylaropadecama.
en
colocardentrodelmuebleenposiciónhorizontal,parautilizarlocomocamadeunamanera
absolutamenterápidaysencilla,conmuypocoesfuerzo.
Elsistemadecamaabatiblepermitesacarelsomierdesuposiciónvertical
Capacidadmáximadepeso:900libras
,
3
Machine Translated by Google

personas,cosasoanimales.Todaslasinstruccionesdadasdebenserestrictamente
Mecanismodemantasosino.Antesdeiniciarcualquiermantenimiento,reparar
ysuscaracterísticastécnicas,aprendeatravésdeunalecturaprecisaycompleta
Estáprohibidoutilizarelproductosincolchónenel
informacióncontenidaenestaguía.Cualquiermantenimientoyreparaciónserealizará
Lasinstruccionesyreglascontenidasenestemanualdebenobservarseentodo
productivamente,sinpeligrodedañarseasímismooalosdemás.
Antesdecomenzarautilizarelproducto,losusuariosdeberánconocersusfunciones.
trabajosolimpieza,eloperadordebehaberleídoycomprendidotodaslasinstruccionestécnicas.
Estáprohibidoutilizarlacamaparaunusodiferenteal
Manipulaciónosustitucióndepiezasdelacamaquenoestánpermitidas.
ADVERTENCIA!!!
superficiedelsomier.
delapresenteguíadelusuario.
realizadoúnicamenteporpersonalcalificado.
Unainstalaciónincorrectaonorealizadaporartesanosespecializados,puede
elproveedor,presentanunusoinadecuadoypeligrosodelproducto.
Elsistemadebemantenerselibredeobjetosquepuedanobstaculizarsumovimiento.
descritoanteriormenteenelapartadoUSO.
Elusodeaccesoriosorepuestosdistintosalosrecomendadospor
Nuncacoloqueelproductocercadefuentesdecalor.Colocarybloquearlacama.
(etiquetas)enelset;comprobarperiódicamentelaposiciónincidentalenel
veces.
Elcumplimientodelasnormasdeseguridadponealusuarioencondicionesdetrabajar
observado.
provocardesprendimientos,roturasodisfuncionesconposiblesdañosa
Estáestrictamenteprohibidoretirarcualquierdispositivodeseguridadyprotección.
Estándardeseguridad
4
Machine Translated by Google

Característicastécnicas
1
2
4
Sugierautilizarlossiguientesmaterialesparagabinetesdemaderayarmazonesdecama.
Material
Interno
1
3/4depulgada
1654*388*2102
Maderacontrachapadade1pulgada2212*406*25mm2
5
Número
1
3/4depulgada
1
Maderacontrachapadade1pulgada1654*406*25mm
Maderacontrachapada
1
1654*550*18mm
3
Importante
dimensionesde
Palitosdemadera
Dimensión
IQTY
Hojademaderacontrachapada
gabinete:
Maderacontrachapada
Gabinete
1654*250*18mm
Maderacontrachapadade1pulgada1654*388*25mm
milímetros
5
Machine Translated by Google

6
6
1pulgada
1520*50*25milímetros1
Maderacontrachapada
13
Cama
1pulgada
Maderacontrachapada
7
marcodelacama:
2077*1634*132
11
2077*120*25milímetros2
3/4depulgada
madera
10
12
3/4depulgada
IQTY
3/8pulgadas
62kg(136,4libras)
madera
Importante
9
1
1/2pulgada
Maderacontrachapada
Dimensionesde
Maderacontrachapada
40*20*1480milímetro12
1pulgada
2022*1516*9milímetro1
40*20*2027milímetro2
Maderacontrachapada
marco
11/2pulgada
Númerodematerial
8
milímetros
2077*1634*12mm1
madera
32*32*100mm
Dimensión
Pesodelaestructura
delacama:
1520*120*25milímetros1
Machine Translated by Google

Consejosdeseguridadycuidado
Cama
Pesode
Dimensión
colchón
páginas.
•Retiretodoslosaccesoriosdelasbolsasdeplásticoysepárelosensus
•Parareducirlaprobabilidaddedañarsuproducto,porfavor
Númerodematerial
14
•Verifiquequetengatodosloscomponentesyherramientasenumeradosacontinuación
Importante
31kg(68libras)
ahogarsesiseingiere.
•Asegúresedetenersuficienteespacioparadiseñarlaspiezasantesdecomenzar.•
Duranteelmontajenoseparenipongapesosobreelproducto,estopodría
IQTY
1
grupos.•
Mantengaalosniñosyanimalesalejadosdeláreadetrabajo,laspiezaspequeñaspodrían
54)mm
(202libras209libras)
posible.•
Realiceelmontajesobreunasuperficiesuaveyniveladaparaevitardañarlaunidadoelsuelo.•
Partesdelmontajeseránmásfácilescon2personas.
1520*2030*(1522
9295kg
causardaño.•
Ensambleelartículolomáscercaposibledesuposiciónfinal(enlamismahabitación).
NECESITANSER:
asegúresedequesutaladroeléctricoestéconfiguradoenunajustedetorsiónbajo.
colchón:
marco
(60*80*(610)pulgadas)
PESOTOTALDELESTRUCTURADELACAMAYDELCOLCHÓN
7
Machine Translated by Google

Brocaparamadera
diámetro11mmBrocasparatornillos
Brocaparamadera
Elmide6mm
Llavefinal
13mmabierto
Listadepiezasdelkit
Nota:Lascantidadesacontinuaciónsonlascorrectasparacompletarelensamblaje.Enalgunos
casos,esposiblequesesuministrenmásaccesoriosdelosnecesarios.
herramientadeajustehorizontal
A:Soportelateralx2piezasB:Soportedeconexiónx2piezasC:Patax2piezas
Instalelasherramientasnecesarias
8
Machine Translated by Google

9
D:YFGS5001100x
Plantilladeperforación:
306*82mm
F:rodamientox4Uds.
GuíadeconstrucciónPaso1:
HagaelgabineteColoquelaplantilla
deperforaciónde710*294mmenelpanellateralyasegúresedequeelbordedelaplantillaestéalrascon
elpanellateralcomosemuestraenlaimagen.
E:Correadecolchónx2piezas
Plantilladeperforación:
710*294mm
Yo:M5x20mm
Hagaelgabinetecontornillosypegamentoparamaderaimpermeable,asegúresedequeladimensión
internaseacomosemuestraenlaimagen,asegúresedequeelgabineteseaestableyseguro.
Tornillo
Marqueelorificiocirculardelaplantillaenelpanellateral,luegoretirelaplantillaytaladreunorificiode
11mmdediámetroyunorificiode6mmdediámetrocomosemuestraenlaimagen,laprofundidaddel
orificioesde15mm.
H:TuercametálicaM8x4piezas
x72piezas
J:TornilloM4x20mmx8uds
2piezas
G:tapónx2uds.
Machine Translated by Google

10
Machine Translated by Google

Repitalainstalaciónanteriorenelotrolado.
Paso2:
InserteelpasadordelsoportelateralAcompletamenteenelorificiode11mmdediámetroyenel
orificiode6mm,fijeaalgabineteconlostornillosI.
11
Machine Translated by Google

Elbordedelaplantillaestáalrasconelpanelcomosemuestraenlaimagen.
otroladodelpanel,luegotaladreunorificiode11mmdediámetro,laprofundidaddelorificioesde15mm.
Marqueelorificiocirculardelaplantillaenelpanel8,luegoretirela
Paso3:Coloquelaplantilladeperforaciónde306*82mmenelpanel8yasegúrese
plantillaytaladreunorificiode11mmdediámetrocomosemuestraenlaimagen,laprofundidaddelorificioesde15mm.
Marquelosorificiosdeperforacióndeacuerdoconlasdimensionescomosemuestraenlaimagende
12
Machine Translated by Google

13
Asegúresedeladimensióndesdeelpaneldelaplataformahastaelbordedelpaneldelapuerta.
Asegúresedequeelgabineteseaestableyseguro.
Hagaelmarcodelacamacontornillosypegamentoparamaderaimpermeablecomoenlaimagen.
Etapa4:
Son32mmcomoenlaimagen.
Mantengalalongituddiagonalcomoenlaimagen.
Machine Translated by Google
14
Girelatapadelextremodelresortedegascomosemuestraenlaimagen,luegoinstálelaenelsoportede
conexiónByfíjelaconlatuercaHcomosemuestraenlaimagen.
Inserte2piezasderodamientoFenelsoportedeconexiónBcomosemuestraenlaimagen.
Paso5:
InsertecompletamenteelpasadordelsoportedeconexiónBenlosorificiosde11mmdediámetroyluegofije
BalmarcodelacamaconlostornillosI.
InserteelpasadordelapataCcompletamenteenlosorificiosde11mmdediámetro,luegofijeCalarmazón
delacamaconlostornillosI.Mantengaladistanciadesdeelcentroalsueloen310mmcomosemuestraenla
imagen.
Repitalainstalaciónanteriorenelotrolado.
Machine Translated by Google

15
ColoqueelsoportedeconexiónBconelcojineteFenelsoportelateralAcomosemuestraenla
imagen.Instalelamanijaenelmarcodelacama.
Paso6:
Inserteelmarcodelacamaconunpequeñoánguloenelgabinetecomosemuestraenlaimagen.
Machine Translated by Google

dieciséis
Machine Translated by Google

17
Paso7:
Primero,fijelasdoscorreasdelcolchónEalmarcodelacamaconuntornilloJ
LuegogireelresortedegasDenlatapadelextremocomosemuestraenlaimagen,
aprieteelresortedegascon
latapadelextremoRepitalainstalaciónanteriorenelotrolado.
Machine Translated by Google

18
Paso9:
InstaleelresortedegasDenelsoporteAdesdelaparteposteriordelgabineteyfíjeloconlatuerca
metálicaH.
Paso8:
cierreelmarcodelacamaenelgabinetecomosemuestraenlaimagen.
Repitalainstalaciónanteriorenelotrolado.
Machine Translated by Google

19
Paso10:
fijeelgabineteaunaparedsólida.Elgabinetedebefijarsea
laparedantesdeabrirla.
Machine Translated by Google

20
ColoqueelcolchónenelarmazóndelacamayfíjeloconlascorreasE.
Abralacama,coloqueelpanel13enelarmazóndelacama.
Paso11:
InstaleeltopeGalgabineteconlostornillosJ.
Repitalainstalaciónanteriorenelotrolado.
Machine Translated by Google

REPRESENTANTEDELACE
REPRESENTANTEDELREINOUNIDO
ImportadoaEE.UU.:SanvenTechnologyLtd.Suite250,9166AnaheimPlace,
RanchoCucamonga,CA91730
ImportadoaAUS:SIHAOPTYLTD.1ROKEVASTREETASTWOODNSW2122
Australia
Fabricante:ShanghaimuxinmuyeyouxiangongsiDirección:
Shuangchenglu803nong11hao1602A1609shi,baoshanqu,shanghai200000CN.
YHCONSULTINGLIMITADO.C/OYHConsultingLimited
Oficina147,CenturionHouse,LondonRoad,Staines
uponThames,Surrey,TW184AX
ECrossStuGmbH
MainzerLandstr.69,
60329FráncfortdelMeno.
21
Machine Translated by Google


MODEL: YFHVQN246
Nadal dokładamy wszelkich starań, aby zapewnić Państwu narzędzia w konkurencyjnej cenie.
„Zaoszczędź połowę”, „połowa ceny” lub inne podobne wyrażenia używane przez nas
przedstawiają jedynie szacunkową oszczędność, jaką możesz zyskać kupując u nas określone
narzędzia w porównaniu z głównymi najlepszymi markami i niekoniecznie oznaczają uwzględnienie
wszystkich kategorii oferowanych narzędzi przez nas. Przypominamy, abyś podczas składania
zamówienia u nas dokładnie sprawdził, czy faktycznie oszczędzasz połowę w
porównaniu z czołowymi markami.
ZESTAW ŁÓŻKA MURPHY
Wsparcie techniczne i certyfikat e-gwarancji www.vevor.com/support
Machine Translated by Google

Machine Translated by Google

POTRZEBUJĘ POMOCY? SKONTAKTUJ SIĘ Z NAMI!
- 1 -
Masz pytania dotyczące produktu? Potrzebujesz wsparcia technicznego? Prosimy o kontakt:
Wsparcie
techniczne i certyfikat e-gwarancji www.vevor.com/support
MODEL: YFHVQN246
To jest oryginalna instrukcja. Przed przystąpieniem do obsługi prosimy o dokładne
zapoznanie się ze wszystkimi instrukcjami. VEVOR zastrzega sobie jasną interpretację naszej
instrukcji obsługi. Wygląd produktu zależy od produktu, który otrzymałeś. Proszę
wybaczyć nam, że nie będziemy ponownie informować Państwa, jeśli pojawią się jakieś
aktualizacje technologii lub oprogramowania naszego produktu.
ZESTAW ŁÓŻKA MURPHY
Machine Translated by Google

Zestaw łóżek Murphy przydatności Queen-Vertical
- 2 -
68 funtów (31 kg)
muszą być wyposażone przez samych użytkowników.
grubość materaca
Instalacja powinna być wykonana przez osobę dorosłą, a dzieci nie powinny z niej korzystać
Standardowy materac Queen
Maksymalna waga: 68 funtów
instrukcji obsługi, proszę zapoznać się z obiektem fizycznym.
Zestaw do łóżka Murphy.
2. Przed użyciem łóżka należy całkowicie zainstalować zestaw łóżka Murphy, w przeciwnym razie może
on spowodować poważne obrażenia u ludzi.
Królowa-pionowa
Rozmiar materaca
Maksymalna głębokość: 10 cali
bez nadzoru.
YFHVQN246
6–10 cali (152–254 mm)
należy natychmiast przerwać w przypadku uszkodzenia lub podejrzanych problemów.
Maksymalna waga materaca
Uwaga: Zestaw łóżek Murphy nie obejmuje łóżka ani szafek łóżkowych, które
3. Regularnie sprawdzaj stabilność i bezpieczeństwo zestawu oraz jego użytkowanie
Szer. × dł.: 60 × 80 cali (1520 × 2030 mm)
Model
1. Proszę uważnie przeczytać i zrozumieć niniejszą instrukcję przed użyciem
Jeśli istnieje jakakolwiek różnica między kolorem tego produktu a zdjęciem
Dostosowane modele
4.Dzieci nie powinny używać samego zestawu do rozkładania lub przechowywania łóżka, w przeciwnym
razie mogą doznać krzywdy.
Dziękujemy bardzo za wybranie tego zestawu łóżek Murphy.
LISTA PARAMETRÓW
INSTRUKCJE BEZPIECZEŃSTWA
INSTRUKCJE
Machine Translated by Google
2. Bezpieczeństwo
1. Opis ogólny
Używać
Użytkownik przed użyciem łóżka Murphy musi mieć pewność, że jest on w dobrym stanie
Przed użyciem łóżka Murphy użytkownik musi upewnić się, że na
oraz dobry stan akcesoriów.
W
ustawić wewnątrz szafki w pozycji poziomej, aby wykorzystać ją jako łóżko w szybki i
łatwy sposób, przy bardzo niewielkim wysiłku.
System łóżka w szafie pozwala na wysunięcie sprężyny łóżka z pionu
Maksymalna waga: 900 funtów
na powierzchni spania znajduje się tylko materac i pościel.
,
- 3 -
Machine Translated by Google

Surowo zabrania się usuwania jakichkolwiek urządzeń zabezpieczających i zabezpieczeń
Należy bezwzględnie przestrzegać wskazówek i zasad zawartych w niniejszej instrukcji
informacje zawarte w tym przewodniku. Wszelkie prace konserwacyjne i naprawy będą
i jego właściwości technicznych, można się tego nauczyć poprzez dokładne i pełne czytanie
Zabrania się używania produktu bez materaca na łóżku
czasy.
Przed rozpoczęciem użytkowania produktu użytkownicy powinni zapoznać się z jego funkcjami
produktywnie, bez narażania siebie na krzywdę innym.
Zabrania się wykorzystywania łóżka do celów innych niż zamierzone
Niedozwolone manipulowanie lub wymiana części łóżka.
pracy lub czyszczenia, operator musi przeczytać i zrozumieć wszystkie informacje techniczne
OSTRZEŻENIE !!!
powierzchnia sprężyny łóżka.
niniejszego podręcznika użytkownika.
dostawcy, wskazują na niewłaściwe i niebezpieczne użycie produktu.
Nieprawidłowa instalacja lub niewykonanie przez wyspecjalizowanych rzemieślników może
wykonywane wyłącznie przez wykwalifikowany personel.
system należy utrzymywać z dala od obiektów, które mogą utrudniać jego ruch.
opisano wcześniej w rozdziale UŻYTKOWANIE.
Stosowanie akcesoriów lub części zamiennych innych niż zalecane przez
Nigdy nie umieszczaj produktu w pobliżu źródeł ciepła. Ustaw i zablokuj łóżko
(etykiety) na planie; okresowo sprawdzaj przypadkowe położenie na
Przestrzeganie norm bezpieczeństwa stawia użytkownika w zakresie pracy
zauważony.
mechanizm koców lub coś innego. Przed rozpoczęciem jakiejkolwiek konserwacji należy dokonać naprawy
spowodować oderwanie, pęknięcie lub zniekształcenie, co może skutkować uszkodzeniem
osób, rzeczy lub zwierząt. Wszystkie podane instrukcje muszą być ściśle przestrzegane
Norma bezpieczeństwa
- 4 -
Machine Translated by Google

Właściwości techniczne
1
2
4
Zasugeruj użycie poniższych materiałów do drewnianych szafek i ramy łóżka
Materiał
Wewnętrzny
1
3/4 cala
1654*388*2102
1-calowa sklejka 2212*406*25 mm 2
5
Numer
1
3/4 cala
1
1-calowa sklejka 1654*406*25mm
Sklejka
1
1654*550*18mm
3
Ważny
wymiary
Drewniane patyki
Wymiar
ILOŚĆ
Arkusz sklejki
gabinet:
Sklejka
Gabinet
1654*250*18mm
1-calowa sklejka 1654*388*25mm
mm
- 5 -
Machine Translated by Google
- 6 -
6
1 cal
1520*50*25mm 1
Sklejka
13
Łóżko
1 cal
Sklejka
7
Rama łóżka :
2077*1634*132
11
2077*120*25mm2
3/4 cala
drewno
10
12
3/4 cala
ILOŚĆ
3/8 cala
62 kg (136,4 funta)
drewno
Ważny
9
1
1/2 cala
Sklejka
Wymiary
Sklejka
40*20*1480mm 12
1 cal
2022*1516*9mm 1
40*20*2027mm2
rama
Sklejka
1-1/2 cala
Numer Materiał
8
mm
2077*1634*12mm 1
drewno
32*32*100mm
Wymiar
Waga ramy łóżka:
1520*120*25mm 1
Machine Translated by Google

Wskazówki dotyczące bezpieczeństwa i pielęgnacji
Łóżko
Waga
Wymiar
materac
strony.
• Wyjąć wszystkie elementy z plastikowych torebek i rozdzielić je do osobnych
• Aby zmniejszyć prawdopodobieństwo uszkodzenia produktu, prosimy
Numer Materiał
14
• Sprawdź, czy masz wszystkie komponenty i narzędzia wymienione poniżej
Ważny
31 kg (68 funtów)
udławić się w przypadku
połknięcia. • Przed rozpoczęciem upewnij się, że masz wystarczająco dużo miejsca na ułożenie części.
• Podczas montażu nie stawaj ani nie obciążaj produktu, gdyż może to spowodować jego uszkodzenie
ILOŚĆ
1
grupy. •
Trzymaj dzieci i zwierzęta z dala od miejsca pracy, ponieważ mogą to być małe części
54)mm
(202-209 funtów)
możliwy. •
Montaż na miękkiej, poziomej powierzchni, aby uniknąć uszkodzenia urządzenia lub podłogi.
• Montaż części będzie łatwiejszy w przypadku 2 osób.
1520*2030*(152-2
92-95 kg
powoduje szkody.
• Zmontuj element jak najbliżej jego ostatecznej pozycji (w tym samym pomieszczeniu).
MUSZĄ BYĆ:
upewnij się, że wiertarka jest ustawiona na niski moment obrotowy.
rama
(60*80*(6-10) cali)
materac:
CAŁKOWITA MASA RAMY ŁÓŻKA I MATERACA
- 7 -
Machine Translated by Google

Wiertło do drewna
Średnica 11 mmŚruby Napęd Bity
Narzędzie do regulacji poziomej
Wiertło do drewna
On ma 6mm
Klucz końcowy
Otwarte 13 mm
A: Wspornik boczny x 2 szt. B: Wspornik łączący x 2 szt. C: Noga x 2 szt.
Lista części zestawu
Uwaga: Poniższe ilości odpowiadają ilościom niezbędnym do ukończenia montażu. W
niektórych przypadkach może zostać dostarczonych więcej okuć niż jest to wymagane.
Zainstaluj wymagane narzędzia
- 8 -
Machine Translated by Google

- 9 -
D:YFGS5001100 x
Szablon do wiercenia:
306*82mm
F: Łożysko x 4 szt
Przewodnik po budowie
Krok 1: Wykonaj szafkę Umieść
szablon do wierceń o wymiarach 710*294 mm na panelu bocznym i upewnij się, że
krawędzie szablonu zrównają się z panelem bocznym, jak pokazano na rysunku.
E: Pasek do materaca x 2 szt
Szablon do wiercenia:
710*294mm
Ja: M5x20mm
Wykonaj szafkę za pomocą śrub i wodoodpornego kleju do drewna, upewnij się, że
wymiary wewnętrzne są takie jak na zdjęciu, upewnij się, że szafka jest stabilna i bezpieczna.
Śruba
Zaznacz okrągły otwór szablonu na panelu bocznym, następnie usuń szablon i wywierć otwór
o średnicy 11 mm i otwór o średnicy 6 mm jak na zdjęciu, głębokość otworu wynosi 15 mm.
H:Nakrętka metalowa M8x 4szt
x72szt
2 szt
G: Korek x 2 szt
J:Śruba M4x20mm x8szt
Machine Translated by Google

- 10 -
Machine Translated by Google

- 11 -
Powtórz powyższą instalację po drugiej stronie.
Krok 2:
Włóż kołek wspornika bocznego A całkowicie w otwór o średnicy 11 mm i otwór o średnicy 6 mm,
przymocuj element a do szafki za pomocą śrub I.
Machine Translated by Google

- 12 -
Zaznacz okrągły otwór szablonu na panelu 8, a następnie usuń
drugiej stronie panelu, następnie wywierć otwór o średnicy 11 mm, głębokość otworu wynosi 15 mm.
krawędzie szablonu są zlicowane z panelem, jak pokazano na rysunku.
Krok 3: Umieść szablon do wiercenia 306*82mm na panelu 8 i upewnij się
szablon i wywierć otwór o średnicy 11 mm jak na zdjęciu, głębokość otworu wynosi 15 mm.
Zaznacz otwory do wiercenia zgodnie z wymiarami jak na rysunku
Machine Translated by Google

- 13 -
Wykonaj ramę łóżka za pomocą śrub i wodoodpornego kleju do drewna jak na zdjęciu.
Upewnij się, że szafka jest stabilna i bezpieczna.
Zapewnić wymiar od panelu fartucha do krawędzi panelu drzwi
Krok 4:
mają 32 mm jak na zdjęciu.
Zachowaj długość przekątnej, ponieważ obraz jest taki sam.
Machine Translated by Google

- 14 -
Wykręć zaślepkę sprężyny gazowej, jak pokazano na rysunku, następnie zamontuj ją w
wsporniku łączącym B i przymocuj nakrętką H, jak pokazano na rysunku.
Włóż 2 sztuki łożyska F do wspornika łączącego B, jak pokazano na zdjęciu.
Krok 5:
Włóż całkowicie sworzeń wspornika łączącego B do otworów o średnicy 11 mm, a następnie
przymocuj B do ramy łóżka za pomocą śrub I.
Włóż sworzeń nogi C całkowicie w otwory o średnicy 11 mm, a następnie przymocuj C do
ramy łóżka za pomocą śrub I. Zachowaj odległość od środka do podłoża wynoszącą 310 mm,
jak pokazano na rysunku.
Powtórz powyższą instalację po drugiej stronie.
Machine Translated by Google
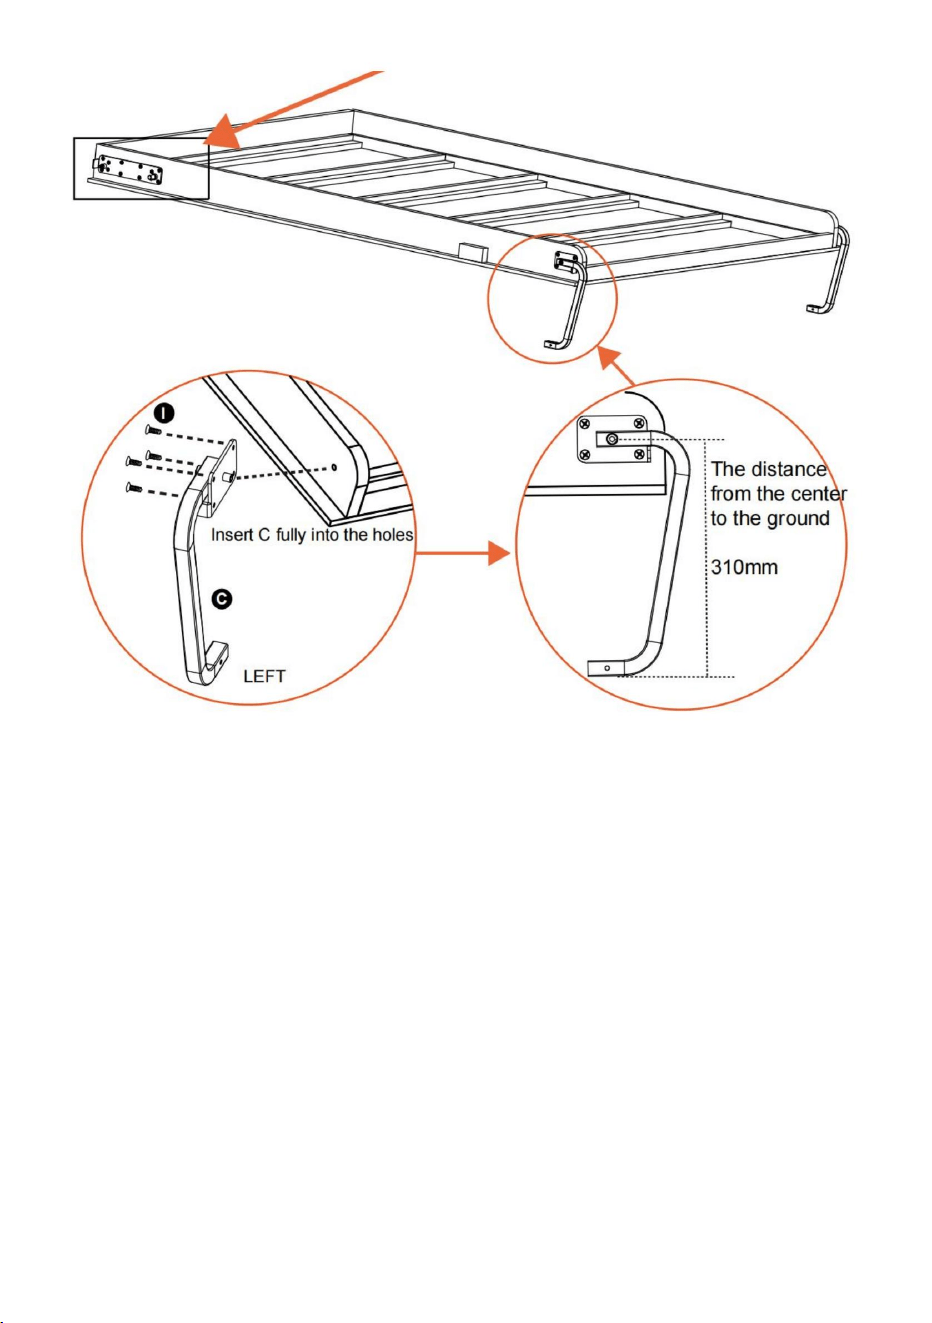
- 15 -
Umieść wspornik łączący B z łożyskiem F na wsporniku bocznym A, jak
pokazano na rysunku. Zamontuj uchwyt do ramy łóżka.
Krok 6:
Włóż ramę łóżka pod niewielkim kątem do szafki, jak pokazano na zdjęciu.
Machine Translated by Google

- 16 -
Machine Translated by Google

- 17 -
Krok 7:
Najpierw przymocuj dwa paski materaca E do ramy łóżka za pomocą śruby J;
Następnie wkręć sprężynę gazową D w zaślepkę, jak pokazano na rysunku, dokręć
sprężynę gazową za
pomocą zaślepki; Powtórz powyższy montaż z drugiej strony strona.
Machine Translated by Google

- 18 -
Krok 9:
Zamontuj sprężynę gazową D do wspornika A z tyłu szafy i przymocuj ją metalową nakrętką
H.
Krok 8:
Zamknij ramę łóżka w szafce, jak pokazano na zdjęciu.
Powtórz powyższą instalację po drugiej stronie.
Machine Translated by Google

- 19 -
ścianę, zanim ją otworzysz.
Krok 10:
Przymocuj szafkę do litej ściany. Do szafki należy przymocować
Machine Translated by Google

- 20 -
Otwórz łóżko, załóż panel 13 na ramę łóżka.
Połóż materac na ramie łóżka i przymocuj za pomocą pasów E.
Krok 11:
Zamontuj ogranicznik G do szafki za pomocą śrub J.
Powtórz powyższą instalację po drugiej stronie.
Machine Translated by Google
REPUBLIKA Wielkiej Brytanii
REPREZENT KE
Import do USA: Sanven Technology Ltd. Suite 250, 9166 Anaheim Place, Rancho
Cucamonga, CA 91730
Import do AUS: SIHAO PTY LTD. 1 ROKEVA STREETEASTWOOD NSW 2122 Australia
Producent: Shanghaimuxinmuyeyouxiangongsi Adres:
Shuangchenglu 803nong11hao1602A-1609shi, baoshanqu, szanghaj 200000 CN.
YH CONSULTING SPÓŁKA Z OGRANICZONĄ
ODPOWIEDZIALNOŚCIĄ. C/O YH Consulting Limited
Office 147, Centurion House, London Road, Staines-upon-Thames, Surrey, TW18 4AX
E-CrossStu GmbH
Mainzer Landstr.69,
60329 Frankfurt nad Menem.
- 21 -
Machine Translated by Google


MODEL:YFHVQN246
We blijven ons inzetten om u gereedschap tegen een concurrerende prijs te bieden.
'Bespaar de helft', 'Halve prijs' of andere soortgelijke uitdrukkingen die door ons worden gebruikt
vertegenwoordigen slechts een schatting van de besparingen die u zou kunnen profiteren als u
bepaalde gereedschappen bij ons koopt in vergelijking met de grote topmerken en betekenen niet
noodzakelijkerwijs dat ze alle aangeboden categorieën gereedschappen dekken. door ons. U wordt er
vriendelijk aan herinnerd om, wanneer u een bestelling bij ons plaatst, zorgvuldig te
verifiëren of u daadwerkelijk de helft bespaart in vergelijking met de grote topmerken.
MURPHY BEDKIT
Technische ondersteuning en e-garantiecertificaat www.vevor.com/support
Machine Translated by Google

Machine Translated by Google

HULP NODIG? NEEM CONTACT MET ONS OP!
- 1 -
Heeft u productvragen? Technische ondersteuning nodig? Neem gerust contact met ons op:
Technische
ondersteuning en e-garantiecertificaat www.vevor.com/
support
MODEL: YFHVQN246
Dit is de originele instructie. Lees alle handleidingen zorgvuldig door voordat u ermee
aan de slag gaat. VEVOR behoudt zich een duidelijke interpretatie van onze
gebruikershandleiding voor. Het uiterlijk van het product is afhankelijk van het product
dat u heeft ontvangen. Vergeef ons alstublieft dat we u niet opnieuw informeren als er
technologie- of software-updates zijn voor ons product.
MURPHY BEDKIT
Machine Translated by Google

Murphy Bed Kit geschikt voor Queen-Verticaal
- 2 -
2. Installeer de Murphy Bed Kit volledig voordat u het bed gebruikt, anders kan dit ernstige
schade aan mensen veroorzaken.
Koningin-verticaal
Maximale diepte: 10ÿ
zonder toezicht.
YFHVQN246
Maximaal matrasgewicht
matras dikte
De installatie moet door een volwassene worden uitgevoerd en kinderen mogen er geen gebruik van maken
Maximaal gewicht: 68 pond
de handleiding, raadpleeg het fysieke object.
Murphy bedset.
Matras maat
Model
1.Lees en begrijp deze handleiding zorgvuldig voordat u het apparaat gebruikt
Als er een verschil is tussen de kleur van dit product en de afbeelding in
Aangepaste modellen
4. Kinderen mogen de set niet alleen gebruiken om het bed uit te spreiden of op te bergen,
anders kunnen ze gewond raken.
Hartelijk dank dat u voor deze Murphy-bedset hebt gekozen.
68 pond (31 kg)
6-10 inch (152-254 mm)
moet onmiddellijk worden gestopt in geval van schade of verdachte problemen.
Let op: De Murphy Bed Kit bevat geen bed en bedkasten
moeten door de gebruikers zelf worden uitgerust.
3. Controleer regelmatig de stabiliteit en veiligheid van de set en gebruik deze
B×L: 60×80in (1520×2030mm)
Standaard Queen-matras
PARAMETERLIJST
VEILIGHEIDSINSTRUCTIES
INSTRUCTIES
Machine Translated by Google

Gebruik
1. Algemene beschrijving
2. Veiligheid
Voordat de gebruiker het opklapbed gebruikt, moet de gebruiker zeker zijn van de goede staat ervan
Voordat de gebruiker het opklapbed gebruikt, moet hij ervoor zorgen dat hij op het bed staat
Plaats het in een horizontale positie in de kast, zodat het op een absoluut snelle en gemakkelijke
manier en met zeer weinig inspanning als bed kan worden gebruikt.
slaapoppervlak er is alleen het matras en beddengoed.
Het opklapbedsysteem maakt het mogelijk om de bedveer uit zijn verticale stand te brengen
en de goede staat van de accessoires.
in
Maximale gewichtscapaciteit: 900 pond
,
- 3 -
Machine Translated by Google

Het is verboden het bed voor een ander doel te gebruiken dan waarvoor het bedoeld is
Knoeien met of vervangen van bedonderdelen die niet zijn toegestaan.
keer.
WAARSCHUWING!!!
oppervlak van het bedvering.
van deze gebruikershandleiding.
uitsluitend door gekwalificeerd personeel worden uitgevoerd.
informatie in deze handleiding. Elk onderhoud en reparatie moet
Het is verboden om het product te gebruiken zonder matras erop
en de technische kenmerken ervan, leer door een nauwkeurige en volledige lezing
Voordat gebruikers het product gaan gebruiken, moeten zij op de hoogte zijn van de functies ervan
productief, zonder gevaar voor schade aan zichzelf en aan anderen.
werkzaamheden of schoonmaakwerkzaamheden moet de bediener alle technische gegevens hebben gelezen en begrepen
(labels)op de set; Controleer periodiek de incidentele positie op de
Het voldoen aan de veiligheidsnormen stelt de gebruiker in termen van werken
opgemerkt.
mechanisme van dekens of anders. Voordat u met enig onderhoud begint, dient u eerst reparaties uit te voeren
losraken, breken of disfunctioneren veroorzaken met mogelijke schade aan
personen, dingen of dieren. Alle gegeven instructies moeten strikt worden gevolgd
Het is ten strengste verboden om veiligheidsvoorzieningen en bescherming te verwijderen
de leverancier, een ongepast en gevaarlijk gebruik van het product aantoont.
Een onjuiste installatie of niet uitgevoerd door gespecialiseerde vakmensen is mogelijk
systeem vrij te houden van voorwerpen die de beweging ervan kunnen belemmeren.
De instructies en regels in deze handleiding moeten absoluut worden nageleefd
eerder beschreven in sectie GEBRUIK.
Het gebruik van accessoires of reserveonderdelen anders dan aanbevolen door
Plaats het product nooit in de buurt van warmtebronnen. Plaats en vergrendel het bed
Veiligheidsnorm
- 4 -
Machine Translated by Google
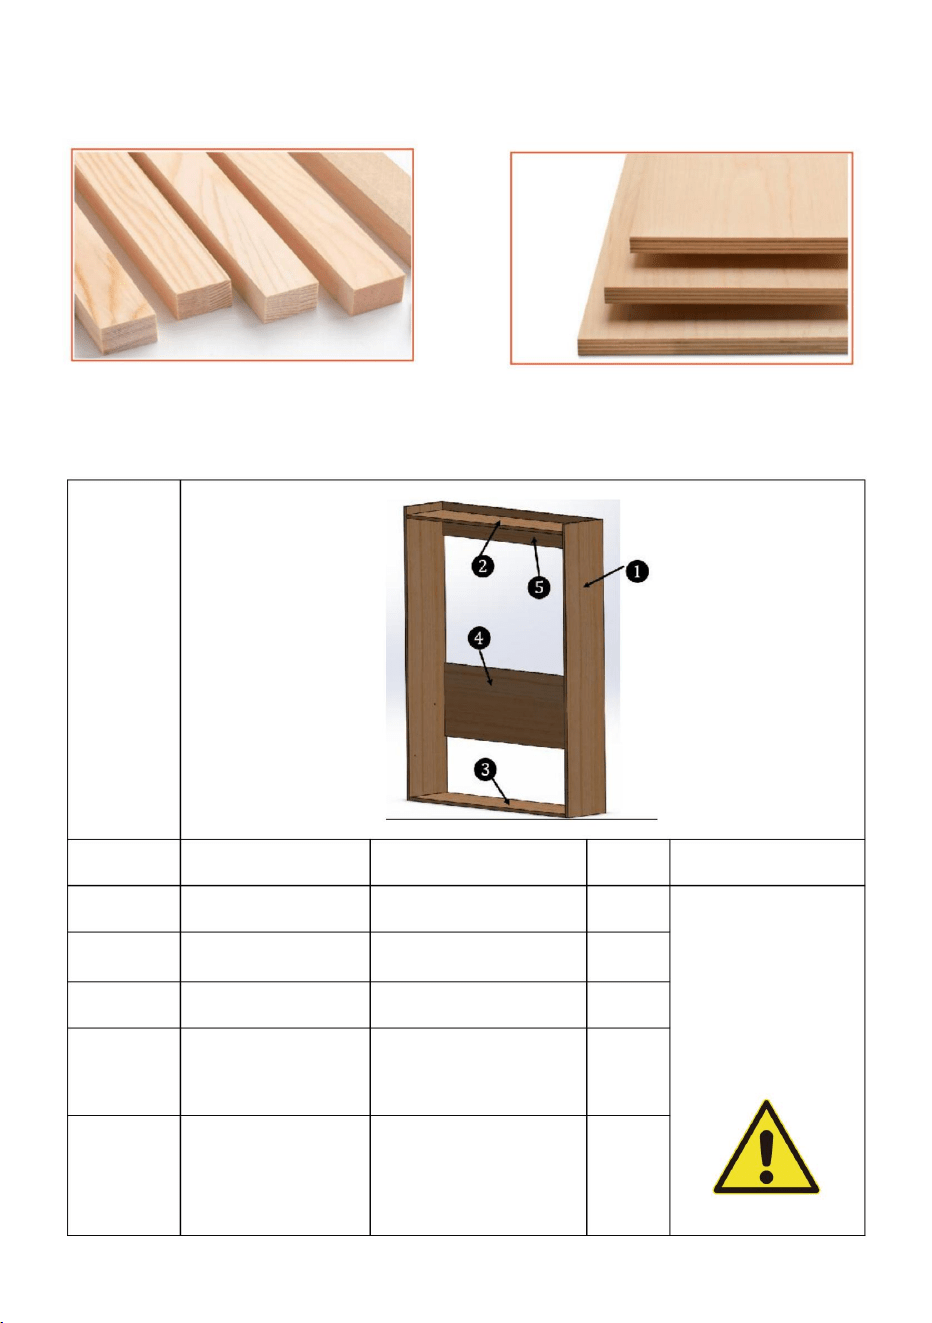
Technische kenmerken
1654*388*2102
1654*550*18mm
3
Belangrijk
5
Houten stokken
Dimensie
dimensies van
1
1 inch Multiplex 1654*406*25mm
Multiplex
Kastje
1 inch Multiplex 1654*388*25mm
mm
1654*250*18mm
Multiplex blad
IQTY
kastje:
Multiplex
Stel voor om onderstaande materialen te gebruiken voor houten kasten en bedframe
1
Intern
Materiaal
2
1
4
Nummer
1
3/4 inch
3/4 inch
1
1inch Multiplex 2212*406*25mm 2
- 5 -
Machine Translated by Google

- 6 -
2077*120*25mm2
Dimensies van
hout
Multiplex
40*20*1480mm 12
10
1 inch
Multiplex
kader
40*20*2027 mm2
hout
Belangrijk
9
1/2 inch
12
Multiplex
2022*1516*9mm 1
hout
Dimensie
Gewicht van
het bedframe:
32*32*100mm
1520*120*25mm 1
Nummer Materiaal
1-1/2 inch
8
mm
2077*1634*12mm 1
Bed
bedframe:
7
1 inch
Multiplex
1 inch
6
1520*50*25mm 1
Multiplex
13
3/4 inch
IQTY
62 kg
2077*1634*132
1
11
3/8 inch
3/4 inch
Machine Translated by Google

Veiligheids- en verzorgingsadvies
Belangrijk
31kg (68lbs)
Zorg ervoor dat uw boormachine op een laag koppel is ingesteld.
stikken als het wordt
ingeslikt. • Zorg ervoor dat u voldoende ruimte heeft om de onderdelen op te stellen voordat u
begint. • Ga tijdens de montage niet op het product staan of er gewicht op uitoefenen, dit kan gebeuren
IQTY
1
groepen.
• Houd kinderen en dieren uit de buurt van het werkgebied; kleine onderdelen kunnen beschadigd raken
Pagina's.
• Haal alle fittingen uit de plastic zakken en doe ze in hun aparte zakken
Dimensie
matras
14
Nummer Materiaal
• Controleer of u over alle onderstaande onderdelen en gereedschappen beschikt
MOET ZIJN:
matras:
kader
• Om de kans op beschadiging van uw product te verkleinen
(60*80*(6-10) inch)
Bed
Gewicht van
(202 pond-209 pond)
54) mm
TOTALE GEWICHT VAN BEDFRAME EN MATRAS
mogelijk. •
Monteer op een zachte, vlakke ondergrond om schade aan het apparaat of uw vloer te voorkomen.
• Delen van de montage zullen gemakkelijker zijn met 2 personen.
1520*2030*(152-2
92-95kg
schade veroorzaken.
• Monteer het item zo dicht mogelijk bij de uiteindelijke positie (in dezelfde kamer) als
- 7 -
Machine Translated by Google

Dia11mmSchroeven Aandrijfbits
Houtboor
Horizontaal aanpassingshulpmiddel
Houtboor
Hij is 6 mm
Eindsleutel
13 mm geopend
Lijst met
kitonderdelen Opmerking: De onderstaande hoeveelheden zijn de juiste
hoeveelheid om de montage te voltooien. In sommige gevallen kunnen er meer fittingen worden geleverd dan nodig is.
A: Zijbeugel x 2 stuks B: Verbindingsbeugel x 2 stuks C: Poot x 2 stuks
Installeer de benodigde gereedschappen
- 8 -
Machine Translated by Google

- 9 -
Ik:M5x20mm
Maak de kast met schroeven en waterdichte houtlijm, zorg voor de binnenafmetingen
zoals op de afbeelding, zorg ervoor dat de kast stabiel en veilig is.
Schroef
Markeer het ronde gat van de sjabloon op het zijpaneel, verwijder vervolgens de sjabloon
en boor een gat van 11 mm en een gat van 6 mm zoals op de afbeelding, de diepte van het
gat is 15 mm.
F: Lager x 4 stuks
Bouwhandleiding Stap 1:
Maak de kast. Plaats het
boorsjabloon van 710*294 mm op het zijpaneel en zorg ervoor dat de rand van het
sjabloon gelijk ligt met het zijpaneel, zoals op de afbeelding.
Boorsjabloon:
710*294mm
E: Matrasriem x 2 stuks
J: Schroef M4x20mm
x8 stuks
2 stuks
G: Stop x 2 stuks
D:YFGS5001100 x
Boorsjabloon:
306*82mm
H:Metalen Moer M8x 4st
x72st
Machine Translated by Google

- 10 -
Machine Translated by Google

Herhaal de bovenstaande installatie aan de andere kant.
Stap 2:
Steek de pin op de zijbeugel A volledig in het gat van 11 mm en 6 mm, bevestig a aan
de kast met schroeven I.
- 11 -
Machine Translated by Google

de rand van de sjabloon ligt gelijk met het paneel, zoals op de afbeelding.
Markeer het ronde gat van de sjabloon op het paneel 8 en verwijder vervolgens de
Stap 3: Plaats de boorsjabloon van 306 * 82 mm op paneel 8 en zorg ervoor dat deze goed vastzit
Markeer de boorgaten volgens de afmetingen zoals op de afbeelding
sjabloon en boor een gat van Dia11mm zoals op de afbeelding, de diepte van het gat is 15 mm.
andere kant van het paneel en boor vervolgens een gat van Dia11 mm, de diepte van het gat is 15 mm.
- 12 -
Machine Translated by Google
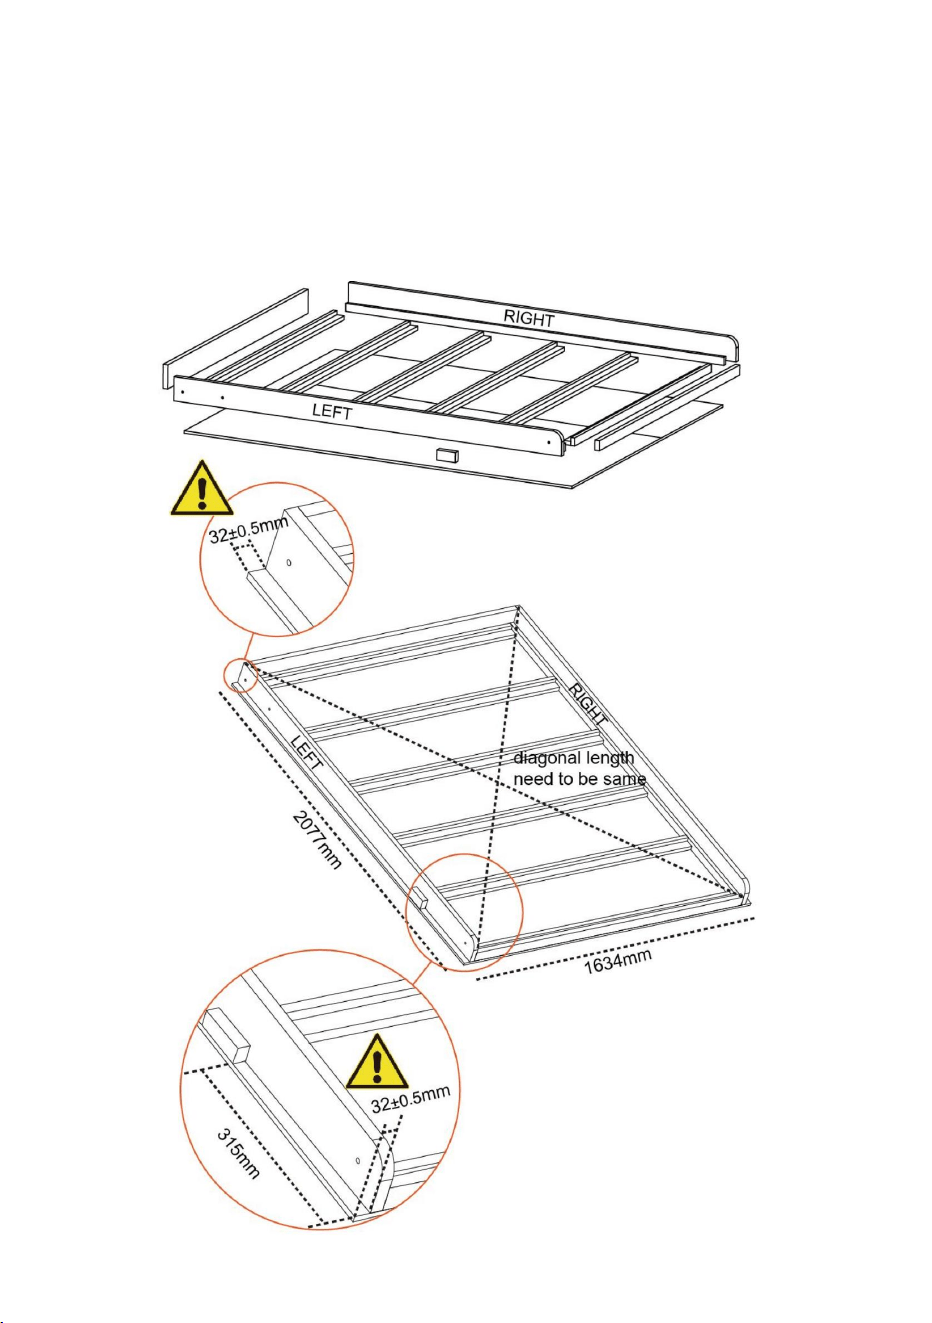
- 13 -
Zorg voor de afmeting vanaf het schortpaneel tot de rand van het deurpaneel
Maak het bedframe met schroeven en waterdichte houtlijm zoals afgebeeld.
Stap 4:
Houd de diagonale lengte aan, aangezien de afbeelding hetzelfde is.
zijn 32 mm zoals afgebeeld.
Zorg ervoor dat de kast stabiel en veilig is.
Machine Translated by Google

- 14 -
Draai de eindkap van de gasveer naar buiten zoals op de afbeelding, monteer deze vervolgens op de
verbindingsbeugel B en bevestig deze met moer H zoals op de afbeelding.
Plaats 2 stuks lager F in de verbindingsbeugel B, zoals afgebeeld.
Stap 5:
Steek de pin op verbindingsbeugel B volledig in de gaten met een diameter van 11 mm en bevestig
B vervolgens aan het bedframe met schroeven I.
Herhaal de bovenstaande installatie aan de andere kant.
Steek de pin op poot C volledig in de gaten van Dia 11 mm en bevestig C vervolgens aan het
bedframe met schroeven I. Houd de afstand van het midden tot de grond 310 mm, zoals op de afbeelding.
Machine Translated by Google

- 15 -
Plaats de verbindingsbeugel B met lager F op de zijbeugel A zoals afgebeeld. Installeer de
handgreep op het bedframe.
Stap 6:
Plaats het bedframe met een kleine hoek ten opzichte van de kast, zoals op de afbeelding.
Machine Translated by Google

- 16 -
Machine Translated by Google

- 17 -
Stap 7:
Bevestig eerst de twee matrasriemen E aan het bedframe met een schroef J;
Draai vervolgens de gasveer D in de eindkap zoals afgebeeld, draai de gasveer
vast met de eindkap;
Herhaal de bovenstaande installatie aan de andere kant kant.
Machine Translated by Google

- 18 -
Herhaal de bovenstaande installatie aan de andere kant.
Stap 8:
Sluit het bedframe in de kast zoals op de afbeelding.
Stap 9:
Installeer de gasveer D op beugel A vanaf de achterkant van de kast en bevestig deze met
metalen moer H.
Machine Translated by Google
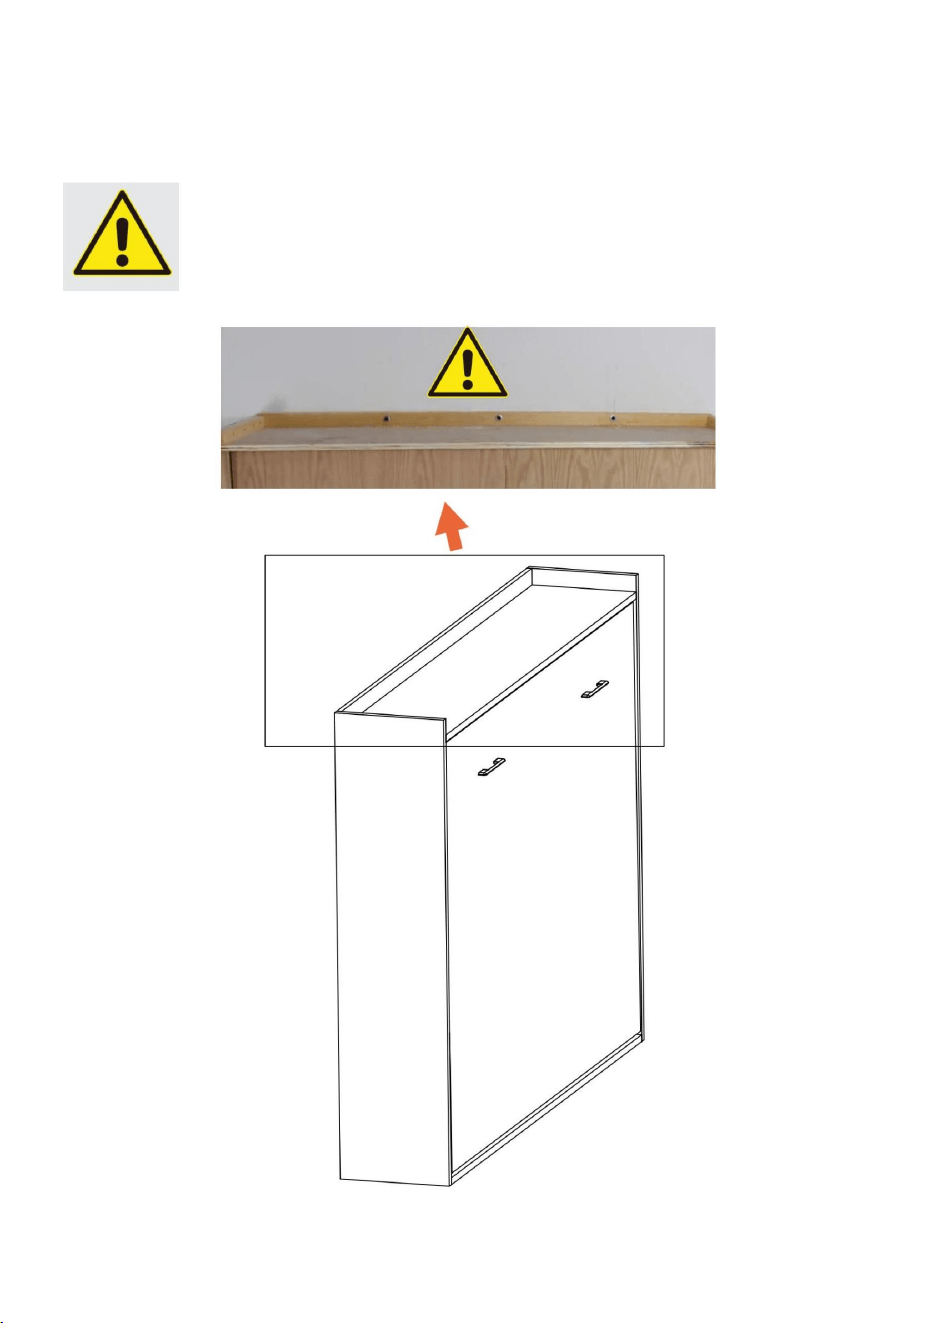
- 19 -
de muur voordat u deze opent.
Stap 10:
Bevestig de kast aan een massieve muur. De kast moet vastgemaakt worden
Machine Translated by Google
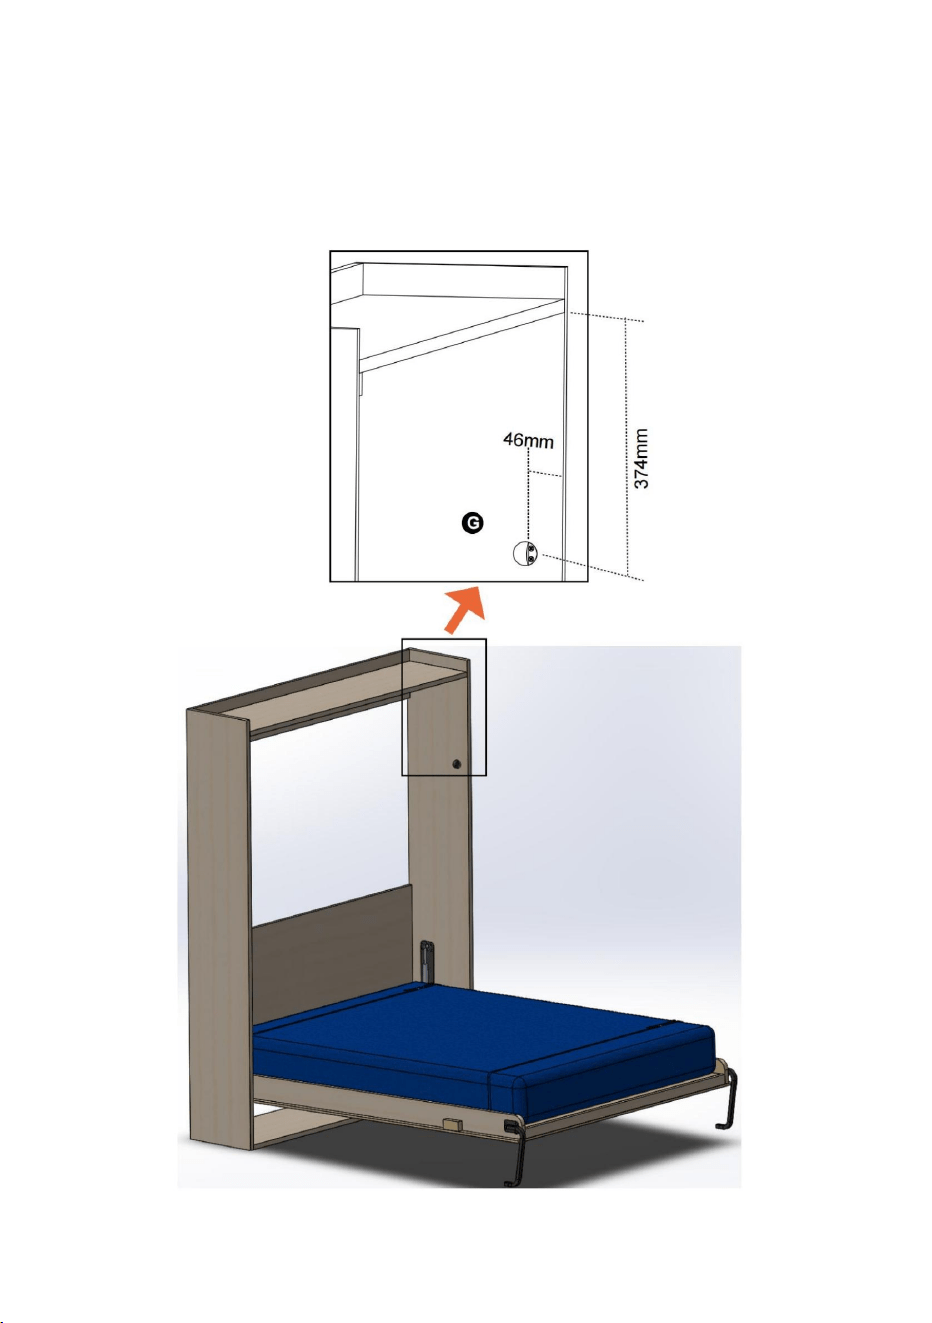
- 20 -
Plaats de matras op het bedframe en zet deze vast met de riemen E.
Open het bed, plaats het paneel 13 op het bedframe.
Stap 11:
Herhaal de bovenstaande installatie aan de andere kant.
Installeer de stop G op de kast met schroeven J.
Machine Translated by Google

EG REP
Britse REP
Geïmporteerd naar de VS: Sanven Technology Ltd. Suite 250, 9166 Anaheim Place,
Rancho Cucamonga, CA 91730
Geïmporteerd naar AUS: SIHAO PTY LTD. 1 ROKEVA STREETEASTWOOD NSW
2122 Australië
Fabrikant: Shanghaimuxinmuyeyouxiangongsi Adres:
Shuangchenglu 803nong11hao1602A-1609shi, baoshanqu, shanghai 200000 CN.
E-CrossStu GmbH
Mainzer Landstr.69,
60329 Frankfurt am Main.
YH CONSULTING LIMITED. C/O YH Consulting Limited
Office 147, Centurion House, London Road, Staines-
upon-Thames, Surrey, TW18 4AX
- 21 -
Machine Translated by Google


MODELL:YFHVQN246
"Spara hälften", "halva priset" eller andra liknande uttryck som används av oss
representerar bara en uppskattning av besparingar du kan dra nytta av att köpa vissa
verktyg hos oss jämfört med de stora toppmärkena och betyder inte nödvändigtvis att täcka
alla kategorier av verktyg som erbjuds av oss. Du påminns om att noggrant kontrollera
när du gör en beställning hos oss om du verkligen sparar hälften i
jämförelse med de främsta varumärkena.
Vi fortsätter att vara engagerade i att ge dig verktyg till konkurrenskraftiga priser.
MURPHY SÄNGKIT
Teknisk support och e-garanticertifikat www.vevor.com/support
Machine Translated by Google

Machine Translated by Google

BEHÖVS HJÄLP? KONTAKTA OSS!
- 1 -
Har du produktfrågor? Behöver du teknisk support? Kontakta oss gärna: Teknisk support och
e-
garanticertifikat www.vevor.com/support
MODELL:YFHVQN246
Detta är den ursprungliga instruktionen, läs alla instruktioner noggrant innan du
använder den. VEVOR reserverar sig för en tydlig tolkning av vår användarmanual. Utseendet
på produkten är beroende av den produkt du fått. Ursäkta oss att vi inte kommer att
informera dig igen om det finns någon teknik eller mjukvaruuppdateringar på vår produkt.
MURPHY SÄNGKIT
Machine Translated by Google

Murphy Bed Kit lämplighet Queen-Vertikal
- 2 -
2. Installera Murphy Bed Kit helt innan du använder sängen, annars kan det orsaka
allvarlig skada på människor.
Drottning-Vertikal
Max djup: 10'
utan tillsyn.
YFHVQN246
Max madrassvikt
madrassens tjocklek
Installationen ska göras av en vuxen och barn ska inte använda den
Maxvikt: 68lbs
bruksanvisningen, se det fysiska objektet.
Murphy Bed Kit.
Madrassstorlek
Modell
1. Läs och förstå denna bruksanvisning noggrant innan du använder
Om det är någon skillnad mellan färgen på denna produkt och bilden i
Anpassade modeller
4.Barn ska inte använda kitet ensamt för att sprida ut eller förvara sängen, annars kan
de skadas.
Tack så mycket för att du valde detta Murphy Bed Kit.
68 lbs (31 kg)
6-10 tum (152-254 mm)
bör stoppas omedelbart vid skada eller misstänkta problem.
Obs: Murphy Bed Kit innehåller inte säng- och sängskåp, vilket
måste utrustas av användarna själva.
3. Kontrollera satsens stabilitet och säkerhet för regelbundna intervaller och användning
B×L:60×80 tum (1520×2030 mm)
Standard Queen Madrass
PARAMETERLISTA
SÄKERHETS INSTRUKTIONER
INSTRUKTIONER
Machine Translated by Google

Använda sig av
1. Allmän beskrivning
2 . Säkerhet
Innan du använder Murphy-sängen måste användaren vara säker på dess goda skick
Innan du använder Murphy-sängen måste användaren se till att på
placera inuti skåpet i ett horisontellt läge, för att användas som en säng ett
absolut snabbt och enkelt sätt, med mycket låga ansträngningar.
sovyta finns bara madrass och sängkläder.
i
och tillbehörens goda skick.
Murphy sängsystemet gör det möjligt att få sängfjädern från sin vertikala höjd
Max viktkapacitet: 900lbs
,
- 3 -
Machine Translated by Google

Det är förbjudet att använda sängen för en annan användning än den
Ändring eller byte av sängdelar som inte är tillåtna.
gånger.
VARNING!!!
sängfjäderyta.
i denna användarhandbok.
endast utföras av kvalificerad personal.
informationen i den här guiden. Allt underhåll och reparation ska vara
Det är förbjudet att använda produkten utan någon madrass på
och dess tekniska funktioner, lär dig genom en korrekt och fullständig läsning
Innan produkten börjar användas ska användarna vara medvetna om dess funktioner
produktivt, utan fara för att skada sig själv för andra.
arbete eller rengöring måste operatören ha läst och förstått allt tekniskt
(etiketter) på uppsättningen; kontrollera med jämna mellanrum den tillfälliga positionen på
observerade.
Överensstämmelse med säkerhetsstandarderna sätter användaren i form av arbete
mekanism av filtar eller annat. Innan du påbörjar något underhåll, reparera
orsaka lossningar, brott eller dysfunktioner med möjliga skador på
personer, saker eller djur. Alla givna instruktioner måste vara strikt
Det är strängt förbjudet att ta bort någon säkerhetsanordning och skydd
leverantören, presentera en felaktig och farlig användning av produkten.
Felaktig installation eller inte gjord av specialiserade hantverkare, kan
systemet ska hållas fritt från föremål som kan hindra dess rörelse.
Instruktionerna och reglerna i denna manual måste överhuvudtaget följas
beskrivits tidigare i avsnittet ANVÄNDNING.
Användning av andra tillbehör eller reservdelar än de som rekommenderas av
Placera aldrig produkten nära några värmekällor. Placera och lås sängen
Säkerhetsstandard
- 4 -
Machine Translated by Google

Tekniska funktioner
siffra
1
1
1 tum Plywood 1654*406*25mm
Plywood
3
1654*550*18mm
Viktig
Träpinnar
Dimensionera
dimensioner av
Plywood ark
IQTY
skåp:
Plywood
1 tum Plywood 1654*388*25mm
mm
1654*250*18mm
Skåp
2
1
4
Föreslå att du använder nedanstående material för träskåp och sängram
Material
1
Inre
3/4 tum
1 tums plywood 2212*406*25 mm 2
1654*388*2102
5
3/4 tum
1
- 5 -
Machine Translated by Google

- 6 -
3/4 tum
IQTY
1/2 tum
trä
Viktig
9
Plywood
Plywood
Mått på
40*20*1480 mm 12
Plywood
ram
40*20*2027 mm 2
Nummer Material
1-1/2 tum
8
mm
1 tum
2022*1516*9 mm 1
2077*1634*12mm 1
Dimensionera
Vikt på sängramen:
32*32*100 mm
trä
1520*120*25 mm 1
13
1 tum
6
1520*50*25 mm 1
Säng
1 tum
Plywood
sängram :
7
Plywood
2077*1634*132
11
3/4 tum
2077*120*25 mm 2
trä
10
12
62 kg (136,4 lbs)
1
3/8 tum
Machine Translated by Google

Säkerhets- och skötselråd
Viktig
31 kg (68 lbs)
se till att din borrmaskin är inställd på ett lågt vridmoment.
kvävs vid förtäring. • Se
till att du har tillräckligt med utrymme för att layouta delarna innan du börjar. • Stå inte eller
lägg vikt på produkten under monteringen, detta kan
IQTY
1
grupper.
• Håll barn och djur borta från arbetsområdet, små delar kan
sidor. •
Ta bort alla beslag från plastpåsarna och separera dem i deras
Dimensionera
madrass
14
Nummer Material
• Kontrollera att du har alla komponenter och verktyg som anges nedan
BEHÖVER VARA:
ram
madrass:
• För att minska sannolikheten för att skada din produkt vänligen
(60*80*(6-10)tum)
Säng
Vikt av
(202lbs-209lbs)
54) mm
TOTALVIKT PÅ SÄNGRAM OCH MADRASS
möjlig. •
Montera på en mjuk, jämn yta för att undvika att skada enheten eller ditt golv. • Delar av
monteringen blir lättare med 2 personer.
1520*2030*(152-2
92-95 kg
orsaka skada. •
Sätt ihop föremålet så nära dess slutliga position (i samma rum) som
- 7 -
Machine Translated by Google

Diameter 11 mmSkruvar drivbits
Träborr
Horisontellt justeringsverktyg
Träborr
Han är 6 mm
Slutnyckel
13 mm öppen
A:Sidofäste x 2st B:Anslutningsfäste x 2st C:Ben x 2st
Lista över
satsdelar Obs: Antalet nedan är rätt mängd för att slutföra
monteringen. I vissa fall kan fler beslag levereras än vad som krävs.
Installera nödvändiga verktyg
- 8 -
Machine Translated by Google

- 9 -
Jag: M5x20mm
Gör skåpet med skruvar och vattentätt trälim, se till den invändiga
dimensionen som bilden, se till att skåpet är stabilt och säkert.
Skruva
Markera mallens cirkulära hål på sidopanelen, ta sedan bort mallen och borra Dia11mm hål &
Dia6mm hål som bilden, hålets djup är 15mm.
F: Lager x 4st
Byggguide Steg 1:
Gör skåpet Sätt
borrmallen på 710*294 mm på sidopanelen och se till att kanten på mallen
är i jämnhöjd med sidopanelen som bilden.
Borrmall:
710*294mm
E: Madrassrem x 2st
2 st
J:Skruv M4x20mm
x8st
G:Propp x 2st
D:YFGS5001100 x
Borrmall:
306*82mm
H:Metallmutter M8x 4st
x72st
Machine Translated by Google

- 10 -
Machine Translated by Google
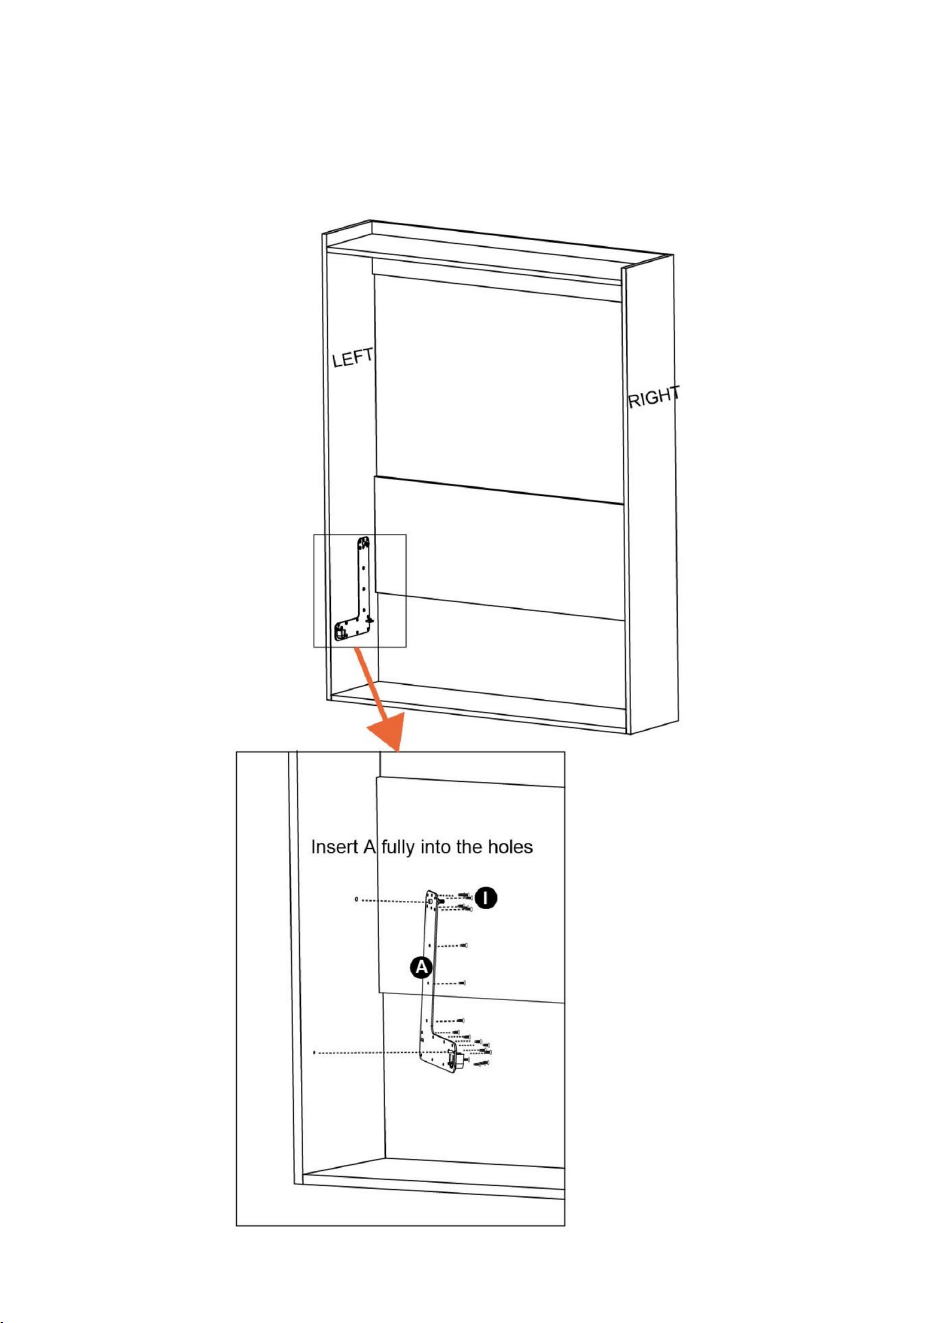
- 11 -
Upprepa ovanstående installation på andra sidan.
Steg 2:
Sätt in stiftet på sidofästet A helt i hålet på 11 mm och 6 mm hålet, fäst a i
skåpet med skruvarna I.
Machine Translated by Google

- 12 -
mallens kant är i jämnhöjd med panelen som bilden.
Markera mallens cirkulära hål på panelen 8 och ta sedan bort
Steg 3: Sätt borrmallen på 306*82 mm på panelen 8 och se till
Markera borrhålen enligt mått som bilden på
mall och borra Dia11mm hål som bilden, hålets djup är 15mm.
en annan sida av panelen, borra sedan ett hål på 11 mm, hålets djup är 15 mm.
Machine Translated by Google

- 13 -
Se till att måttet från förklädespanelen till kanten av dörrpanelen
Gör sängramen med skruvar och vattentätt trälim som bild.
Steg 4:
Behåll den diagonala längden eftersom bilden är densamma.
är 32 mm som bilden.
Se till att skåpet är stabilt och säkert.
Machine Translated by Google

- 14 -
Vrid gasfjäderns ändlock som bilden, montera den sedan på anslutningsfästet B och fixera
den med mutter H som bilden .
Sätt i 2st lager F i anslutningsfästet B som bilden.
Steg 5:
Sätt in stiftet på anslutningsfästet B helt i hålen med diameter 11 mm och fäst sedan B på
sängramen med skruvarna I.
Upprepa ovanstående installation på andra sidan.
Sätt in stiftet på benet C helt i hålen med diameter 11 mm och fäst sedan C i sängramen
med skruvar I. Håll avståndet från mitten till marken 310 mm som på bilden.
Machine Translated by Google

- 15 -
Sätt anslutningsfästet B med lager F på sidofästet A som bilden.
Montera handtaget på sängramen.
Steg
6: Sätt in sängramen med lite vinkel mot skåpet som bilden.
Machine Translated by Google

- 16 -
Machine Translated by Google

- 17 -
Steg
7: Fäst först de två madrassremmarna E till sängramen med en skruv Jÿ
Vrid sedan gasfjädern D in i gaveln som bilden, dra åt gasfjädern med gaveln.
Upprepa ovanstående
installation på den andra sida.
Machine Translated by Google

- 18 -
Upprepa ovanstående installation på andra sidan.
Steg 8:
Stäng sängramen i skåpet som bilden.
Steg 9:
Montera gasfjädern D på A-fästet från baksidan av skåpet, fixera den med metallmutter H.
Machine Translated by Google

- 19 -
Steg 10:
Fäst skåpet på en solid vägg. Skåpet ska fästas vid
väggen innan du öppnar den.
Machine Translated by Google

- 20 -
Sätt madrassen på sängramen och fäst med remmarna E.
Öppna sängen, sätt panelen 13 på sängramen.
Steg 11:
Upprepa ovanstående installation på andra sidan.
Montera proppen G på skåpet med skruvarna J.
Machine Translated by Google

EC REP
UK REP
Importerad till USA: Sanven Technology Ltd. Suite 250, 9166 Anaheim Place,
Rancho Cucamonga, CA 91730
Importerad till AUS: SIHAO PTY LTD. 1 ROKEVA STREETEASTWOOD NSW 2122
Australien
Tillverkare: Shanghaimuxinmuyeyouxiangongsi Adress:
Shuangchenglu 803nong11hao1602A-1609shi, baoshanqu, shanghai 200000 CN.
E-CrossStu GmbH
Mainzer Landstr.69,
60329 Frankfurt am Main.
YH CONSULTING LIMITED. C/O YH Consulting Limited
Office 147, Centurion House, London Road, Staines-
upon-Thames, Surrey, TW18 4AX
- 21 -
Machine Translated by Google