
Model
HA22-66
Collated Drywall Screwgun Attachment
WARNING: To prevent serious injury, User must read and
understand Owner’s Manual. SAVE THIS MANUAL.
When unpacking, make sure that the product is intact and undamaged.
If any parts are missing or broken, please call 1-888-866-5797
as soon as possible. Reference 70062.
Owner’s Manual &
Safety Instructions
24c

Page 2 For technical questions, please call 1-888-866-5797. Items 70062
IMPORTANT SAFETY INFORMATION
General Power Tool Safety Warnings
Read all safety warnings, instructions, illustrations
and specifications provided with this power tool.
Failure to follow all instructions listed below may
result in electric shock, fire and/or serious injury.
Save all warnings and instructions
for future reference.
1. PRIOR TO USING THIS PRODUCT, READ
AND UNDERSTAND ALL INSTRUCTIONS
AND SAFETY PRECAUTIONS AS OUTLINED
IN THE MANUFACTURER’S MANUAL OF
THE SCREWGUN THAT IS TO BE USED.
2. This product is not a toy. Do not allow
children to play with or near this item.
3. Use as intended only.
4. Keep hands clear of moving parts.
5. Maintain labels and nameplates on
the tool. These carry important safety
information. If unreadable or missing, contact
Harbor Freight Tools for a replacement.
6. Stay alert, watch what you are doing and use
common sense when operating a power tool. Do
not use a power tool while you are tired or under
the influence of drugs, alcohol or medication.
A moment of inattention while operating power
tools may result in serious personal injury.
7. The warnings, precautions, and instructions
discussed in this instruction manual cannot
cover all possible conditions and situations
that may occur. It must be understood by the
operator that common sense and caution are
factors which cannot be built into this product,
but must be supplied by the operator.
8. Vibration Safety
This tool vibrates during use.
Repeated or long-term exposure to vibration may
cause temporary or permanent physical injury,
particularly to the hands, arms and shoulders.
To reduce the risk of vibration-related injury:
a. Anyone using vibrating tools regularly or for an
extended period should first be examined by a
doctor and then have regular medical check-
ups to ensure medical problems are not being
caused or worsened from use. Pregnant women
or people who have impaired blood circulation
to the hand, past hand injuries, nervous system
disorders, diabetes, or Raynaud’s Disease
should not use this tool. If you feel any symptoms
related to vibration (such as tingling,
numbness, and white or blue fingers), seek
medical advice as soon as possible.
b. Do not smoke during use. Nicotine reduces
the blood supply to the hands and fingers,
increasing the risk of vibration-related injury.
c. Wear suitable gloves to reduce the
vibration effects on the user.
d. Use tools with the lowest vibration
when there is a choice.
e. Include vibration-free periods each day of work.
f. Grip tool as lightly as possible (while still keeping
safe control of it). Let the tool do the work.
g. To reduce vibration, maintain the tool as
explained in this manual. If any abnormal
vibration occurs, stop use immediately.
Page 3For technical questions, please call 1-888-866-5797.Items 70062
Warning Symbols and Definitions
This is the safety alert symbol. It is used to
alert you to potential personal injury hazards.
Obey all safety messages that follow this symbol to
avoid possible injury or death.
Indicates a hazardous
situation which, if not
avoided, will result in death or serious injury.
Indicates a hazardous
situation which, if not
avoided, could result in death or serious injury.
Indicates a hazardous
situation which, if not
avoided, could result in minor or moderate injury.
Addresses practices not
related to personal injury.
SPECIFICATIONS
Max. Screw Capacity 2" (51mm)
SETUP - BEFORE USE:
Read the ENTIRE IMPORTANT
SAFETY INFORMATION section at the
beginning of this manual including
all text under subheadings therein
before set up or use of this product.
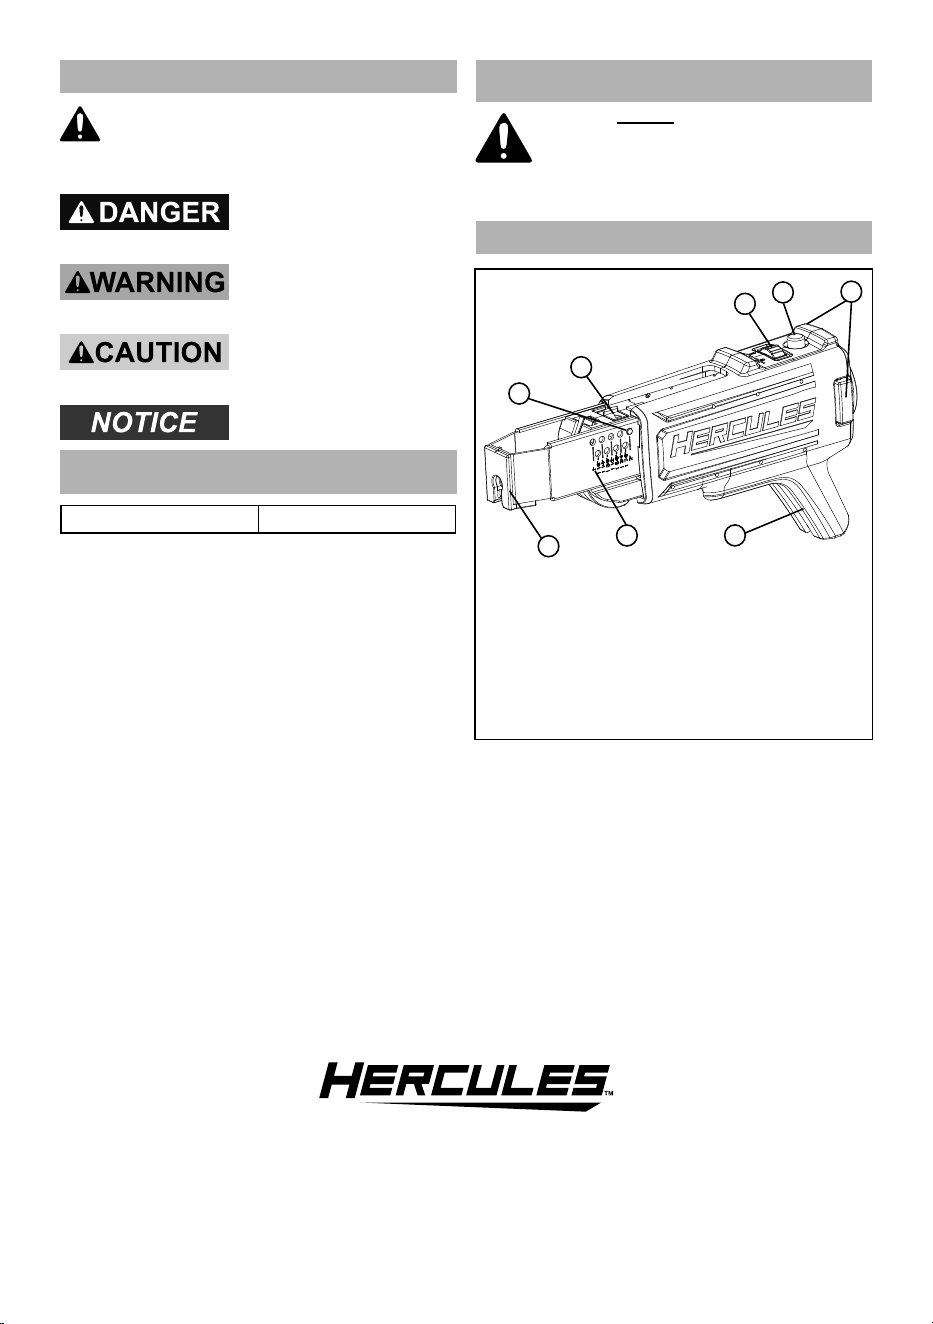
Functional Description
1. Screw Length Indicator
2. Screw Length Adjustment Lever
3. Depth Adjustment Dial
4. Lock Button
5. Tool Release Buttons
6. Screw Strip Guide
7. Screw Length Scale
8. Nose
1
2
3
4
6
7
8
5
Page 4 For technical questions, please call 1-888-866-5797. Items 70062
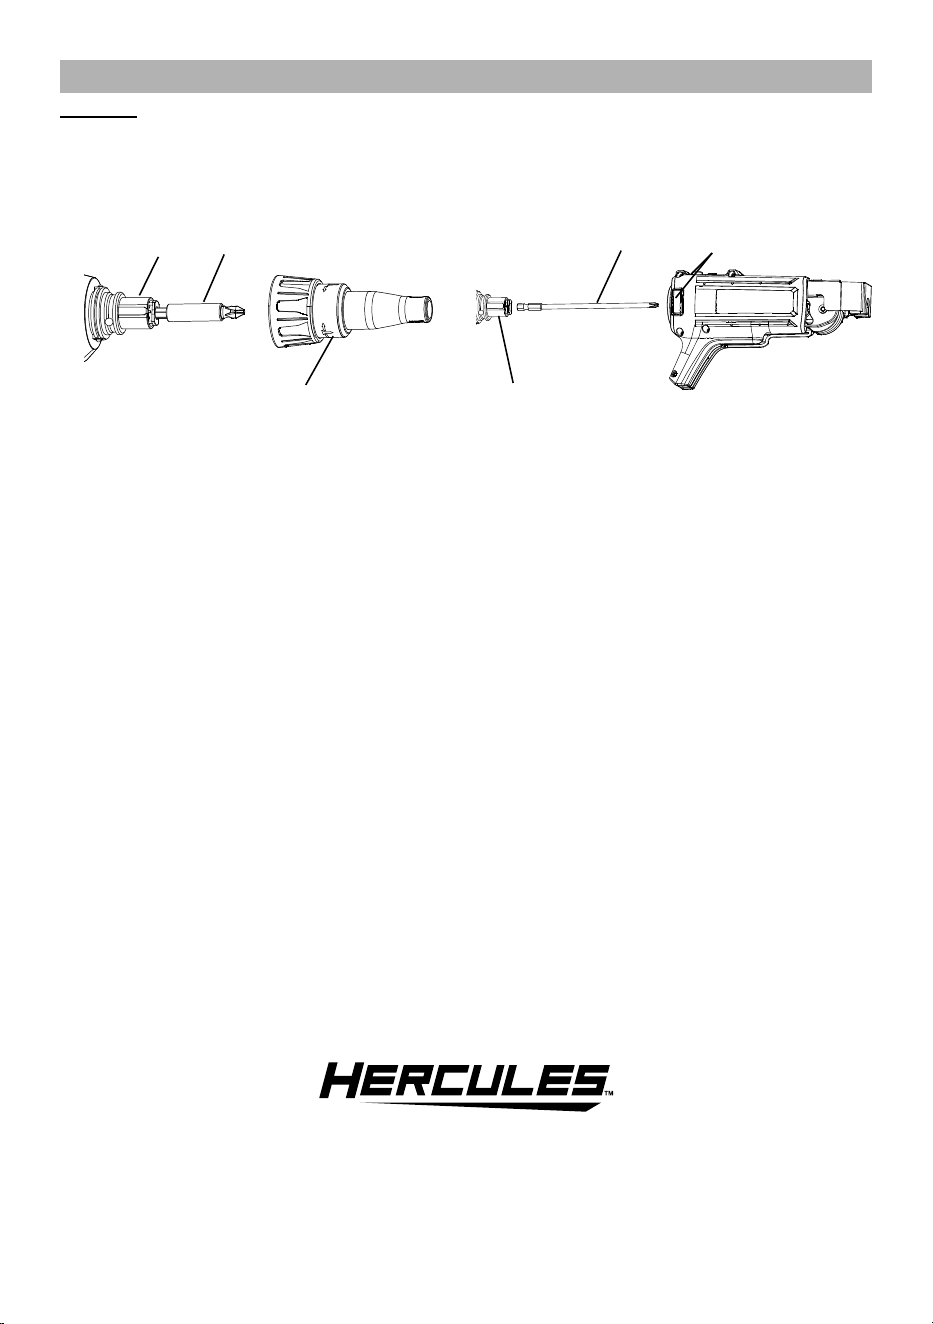
Assembly
CAUTION! TO PREVENT INJURY: Only
use with Hercules Drywall Screwgun.
1. Remove Screwgun’s battery pack (sold separately).
2. Pull Depth Collar off Spindle.
3. Press Quick Release in and pull Bit Holder out.
Depth
Collar
Bit
Holder
Quick
Release
4. Push 6″ Bit into Spindle until its
shank snaps in place.
5. Squeeze Tool Release Buttons, then slide
Attachment over Bit and onto Spindle.
6" Bit
Spindle
Tool Release
Buttons

Page 5For technical questions, please call 1-888-866-5797.Items 70062
OPERATION
Read the ENTIRE IMPORTANT
SAFETY INFORMATION section at the
beginning of this manual including
all text under subheadings therein
before set up or use of this product.
Tool Set Up
TO PREVENT SERIOUS INJURY FROM
ACCIDENTAL OPERATION:
Make sure that the Trigger is locked and Battery
Pack is removed before performing any procedure in
this section.
Adjusting Depth of Drive
Rotate the Depth Adjustment Dial clockwise
to increase to the desired depth. To decrease
depth, rotate Dial counterclockwise.
Adjusting Screw Length
1. Push the Screw Length Adjustment Lever
and slide the Nose to the proper screw length
indicated on the Screw Length Scale.
2. Release the Screw Length Adjustment Lever
and verify that the Nose is locked in place.
Installing Screw Strip
Feed collated screw strip (sold separately) up through the
Screw Strip Guide to the Nose until it clicks into position.
Screw Strip
Guide
NOTICE: TO PREVENT TOOL DAMAGE: Do not install
screw strip from the top or pull it from the bottom.
General Operation
1. The Attachment can be rotated in 8 different positions
to keep it clear of interference. Press the Lock Button
and rotate the Attachment to the desired position.
2. Make sure that the Screwgun’s Trigger is in the
off-position, then attach the battery pack.
3. Move the Screwgun’s Direction
Switch to the forward position.
4. Press Screwgun’s Auto Drive Button,
then press and lock Trigger.
5. Holding the Screwgun with both hands, place the
Attachment’s Nose squarely on drywall, then press
Attachment firmly against drywall to drive screw.
6. Remove Screwgun, the next screw will move
into place. Adjust depth of drive as needed.
7. When finished, remove Screwgun’s battery pack,
then pull Screw Strip forward to remove.
8. Press Tool Release Buttons and remove
Attachment, then remove Bit.
9. Clean, then store Attachment and Bit
indoors out of children’s reach
Page 6 For technical questions, please call 1-888-866-5797. Items 70062
MAINTENANCE AND SERVICING
Procedures not specifically explained in this manual must
be performed only by a qualified technician.
TO PREVENT SERIOUS INJURY FROM ACCIDENTAL OPERATION:
Make sure the Trigger is locked is removed, before performing any procedure in this section.
TO PREVENT SERIOUS INJURY FROM TOOL FAILURE:
Do not use damaged equipment. If abnormal noise or vibration occurs or
damage is noted, have the problem corrected before further use.
Cleaning, Maintenance, and Lubrication
1. BEFORE EACH USE, inspect the general
condition of the Tool. Check for:
• leaking, swollen, or cracked Battery Pack,
• loose hardware,
• misalignment or binding of moving parts,
• cracked or broken parts,
• damaged electrical wiring,
• any other condition that may
affect its safe operation.
2. AFTER USE, wipe external surfaces
of the Tool with clean cloth.
TROUBLESHOOTING
Problem Possible Causes Likely Solutions
Tool is jammed
1. Wrong screw length selected
on Screw Length Scale.
2. Bit installed incorrectly
or worn out.
1. Verify correct screw length is selected
on Screw Length Scale.
2. Verify bit is installed correctly and
that it is not worn out.
Screws won’t feed
Screw Strip not installed correctly. Verify Screw Strip is fully installed.
Screws are not
at correct depth
1. Wrong screw length selected
on Screw Length Scale.
2. Depth Adjustment Dial
adjusted incorrectly.
1. Verify correct screw length is selected.
2. Verify Depth Adjustment Dial is set to the correctly.
Follow all safety precautions whenever diagnosing or servicing the tool.
Disconnect Battery Pack and Charger power supply before service.

Page 7For technical questions, please call 1-888-866-5797.Items 70062
Record Product’s Serial Number Here:
Note: If product has no serial number, record month and year of purchase instead.
Note: Replacement parts are not available. Reference UPC 193175488442.

26677 Agoura Road • Calabasas, CA 91302 • 1-888-866-5797
Visit our website at: http://www.harborfreight.com
Email our technical support at: [email protected]
For technical questions, please call 1-888-866-5797
Copyright
©
2023 by Harbor Freight Tools
®
. All rights reserved. No portion of this manual or
any artwork contained herein may be reproduced in any shape or form without the express
written consent of Harbor Freight Tools. Diagrams within this manual may not be drawn
proportionally. Due to continuing improvements, actual product may differ slightly from the
product described herein. Tools required for assembly and service may not be included.
LIMITED 90 DAY WARRANTY
Harbor Freight Tools Co. makes every effort to assure that its products meet high quality and durability standards,
and warrants to the original purchaser that this product is free from defects in materials and workmanship for the
period of 90 days from the date of purchase. This warranty does not apply to damage due directly or indirectly,
to misuse, abuse, negligence or accidents, repairs or alterations outside our facilities, criminal activity, improper
installation, normal wear and tear, or to lack of maintenance. We shall in no event be liable for death, injuries
to persons or property, or for incidental, contingent, special or consequential damages arising from the use of
our product. Some states do not allow the exclusion or limitation of incidental or consequential damages, so the
above limitation of exclusion may not apply to you. THIS WARRANTY IS EXPRESSLY IN LIEU OF ALL OTHER
WARRANTIES, EXPRESS OR IMPLIED, INCLUDING THE WARRANTIES OF MERCHANTABILITY AND FITNESS.
To take advantage of this warranty, the product or part must be returned to us with transportation charges
prepaid. Proof of purchase date and an explanation of the complaint must accompany the merchandise.
If our inspection verifies the defect, we will either repair or replace the product at our election or we may
elect to refund the purchase price if we cannot readily and quickly provide you with a replacement. We will
return repaired products at our expense, but if we determine there is no defect, or that the defect resulted
from causes not within the scope of our warranty, then you must bear the cost of returning the product.
This warranty gives you specific legal rights and you may also have other rights which vary from state to state.
