Robot Vacuum
cleaner
RV2800YEEU SERIES,
RV2800ZEEU SERIES,
AV2800ZEEU SERIES
SELF-EMPTY
NEVERTOUCH
SHARKCLEAN APP
sharkclean.eu
WARNING
To reduce the risk of fire, electric shock, injury, or property damage:
IMPORTANT SAFETY INSTRUCTIONS
PLEASE READ CAREFULLY BEFORE USE • FOR HOUSEHOLD USE ONLY
GENERAL WARNINGS
When using an electrical appliance, basic
precautions should always be followed, including
the following:
1. This appliance consists of a Robot Floor
Cleaner vacuum and charging dock with power
supply. These components contain electrical
connections, electrical wiring, and moving parts
that potentially present risk to the user.
2. Before each use, carefully inspect all parts for
any damage. If a part is damaged, discontinue
use.
3. Use only identical replacement parts. See
replacement accessories page of this booklet.
4. This Robot Floor Cleaner contains no
serviceable parts.
5. Use only as described in this manual. DO NOT
use Robot Floor Cleaner for any purpose other
than those described in this manual.
6. Do not expose any parts of the robot floor
cleaner to water or other liquids.
7. DO NOT put hands into any opening in the
dock or robot.
USE WARNINGS
8. This product has a Class 1 Laser. Always
turn o the power before lifting the robotic
vacuum cleaner or performing any maintenance
on it.
9. DO NOT look directly into laser.
10. Always turn o the robotic vacuum cleaner
before inserting or removing the filter or
dustbin.
11. DO NOT handle plug, charging dock, charging
cable or Robot Floor Cleaner with wet hands.
Cleaning and user maintenance must not be
done by children without supervision
12. Children should NOT play with the appliance.
13. This appliance can be used by children aged
from 8 years and above and persons with
reduced physical, sensory, or mental capabilities
or lack of experience and knowledge if they
have been given supervision or instruction
concerning use of the appliance in a safe way
and understand the hazards involved.
14. DO NOT use the robot without the dustbin,
filter in place.
15. DO NOT damage the charging cord:
a) DO NOT pull or carry charging dock by the
cord or use the cord as a handle.
b) DO NOT unplug by pulling on cord. Grasp
the plug, not the cord.
c) DO NOT close a door on the cord, pull the
cord around sharp corners, or leave the cord
near heated surfaces.
d) The supply cord cannot be replaced. If the
cord is damaged the appliance should be
scrapped.
16. DO NOT put any objects into nozzle or
accessory openings. DO NOT use with any
opening blocked; keep free of dust, lint, hair,
and anything that may reduce airflow.
17. DO NOT use if Robot Floor Cleaner airflow is
restricted. If the air paths become blocked,
turn the vacuum cleaner o and remove all
obstructions before turning on the unit again.
18. Keep nozzle and all vacuum openings away
from hair, face, fingers, uncovered feet, or
loose clothing.
19. DO NOT use if Robot Floor Cleaner is not
working as it should, or has been dropped,
damaged, left outdoors, or dropped into water.
20. DO NOT place vacuum cleaner on unstable
surfaces.
21. DO NOT use to pick up:
a) Liquids.
b) Large objects.
c) Hard or sharp objects (glass, nails, screws, or
coins).
d) Large quantities of dust (drywall dust,
fireplace ash, or embers.)
e) DO NOT use as an attachment to power
tools for dust collection.
f) Smoking or burning objects (hot coals,
cigarette butts, or matches).
g) Flammable or combustible materials (lighter
fluid, petrol, or kerosene).
h) Toxic materials (chlorine bleach, ammonia,
or drain cleaner).
CHILDREN OR ANIMALS SHOULD NOT BE LEFT UNATTENDED IN ANY ROOMS
THAT THE ROBOTIC VACUUM HAS ACCESS TO DURING CLEANING.
LASER WARNING
THIS PRODUCT HAS A CLASS 1 LASER. ALWAYS TURN OFF THE POWER BEFORE LIFTING THE ROBOTIC
VACUUM CLEANER OR PERFORMING ANY MAINTENANCE ON IT.
DO NOT LOOK DIRECTLY INTO LASER.
IF THE CHARGING CABLE PLUG DOES NOT FIT FULLY INTO THE SOCKET, CONTACT A QUALIFIED
ELECTRICIAN. DO NOT FORCE INTO SOCKET OR TRY TO MODIFY TO FIT.
ENGLISH
sharkclean.eu
i) Toxic materials (high concentrations of
chlorine bleach liquid, high concentrations of
ammonia, or drain cleaning solution).
22. DO NOT use in the following areas:
a) Outdoor areas near fireplaces with
unobstructed entrances
b) Spaces that are enclosed and may contain
explosive or toxic fumes or vapors (lighter
fluid, petrol, kerosene, paint, paint thinners,
mothproofing substances, or flammable dust
c) In an area with a space heater
d) Near fireplaces with unobstructed
entrances.
23. Turn o the Robot Floor Cleaner before
any adjustment, cleaning, maintenance or
troubleshooting. Note: in the OFF (O) position,
the robot still uses a small amount of power.
24. Allow all filters to air-dry completely before
reinstalling them to prevent liquid from being
drawn into electric parts.
25. DO NOT modify or attempt to repair the
robotic vacuum cleaner or the battery yourself,
except as indicated in this Owner's Guide. DO
NOT use the vacuum if it has been modified or
damaged.
26. DO NOT use any household cleaners (all-
purpose cleaners, glass cleaners, bleach) on
any of the polished high gloss surfaces on the
docking station or robot vacuum cleaner as
they contain chemicals that may damage these
surfaces. Instead use a cloth dampened with
water to gently clean.
27. To minimise the risk of the robot traveling
beyond an unsafe boundary (stair or cli
edges, fireplaces, water hazards), establish
these areas as no-go zones using the mapping
feature in the SharkClean mobile app. Upon
setting the boundary, run the vacuum and
visually confirm that the settings eectively
prevent the robot from passing beyond the set
boundary. Adjust settings as necessary. For
nonapp users, use a boundary to block o an
unsafe boundary.
BATTERY USE
28. The battery is the power source for the
vacuum. Carefully read and follow all charging
instructions.
29. To prevent unintentional starting, ensure the
vacuum is powered off before picking it up or
carrying it. DO NOT carry the appliance with
your finger on the power switch.
30. Use only the SHARK charging dock and battery
outlined in the table below. and use only
battery RVBAT58002 (33V). Use of batteries
or battery chargers other than those indicated
may create a risk of fire.
31. Keep the battery away from all metal objects
such as paper clips, coins, keys, nails, or
screws. Shorting the battery terminals together
increases the risk of fire or burns.
32. Under abusive conditions, liquids may be
ejected from the battery. Avoid contact with
this liquid, as it may cause irritation or burns.
If contact occurs, flush with water. If liquid
contacts eyes, seek medical help.
33. Robotic vacuum cleaner should not be stored,
charged, or used at temperatures below
50°F (10°C) or above 104°F (40°C). Ensure
the battery and vacuum have reached room
temperature before charging or use. Exposing
the robot or battery to temperatures outside
of this range may damage the battery and
increase the risk of fire.
34. DO NOT expose the Robot Floor Cleaner or
battery to fire or temperatures above 130°C
(265°F) as it may cause explosion.
NO-GO ZONES AND BOTBOUNDARY STRIPS
35 DO NOT put BotBoundary strips underneath
carpet or rugs.
36. DO NOT place BotBoundary strips on top of
one another.
37. Always use no-go zones or Bot-Boundary
strips around reflective flooring and surfaces.
38.
No-go zones or BotBoundary strips should
always be used near carpeted stairs.
39. DO NOT use no-go zones or Bot-Boundary
strips strips within 3 metres of the dock.
40. For your robot’s cli sensors to work properly,
all runners, rugs, carpets, or small thresholds
(like child gates) must be 20 centimetres from
any stairs (or must be continuous and extend
over the edge of the stairs). If a runner, rug,
carpet, or small threshold that is less than 20
centimetres from the stairs cannot be moved,
you must use a no-go zone or a BotBoundary
strip to block o the stairs.
ENGLISH
SAVE THESE INSTRUCTIONS
For the latest warnings and cautions, go to www.sharkclean.co.uk/robothelp
Unit
Battery
SKU
RVBAT85002
(33V)
Unit
Dock
RV2800YEEU
RV2800ZEEU
AV2800ZEEUWH
RV2800ZEEUWH
XDKRV2800WDEU
XDRV2800WDEU
XDOCK2800WDEU
XDKR2800ZEEUWH
sharkclean.eu
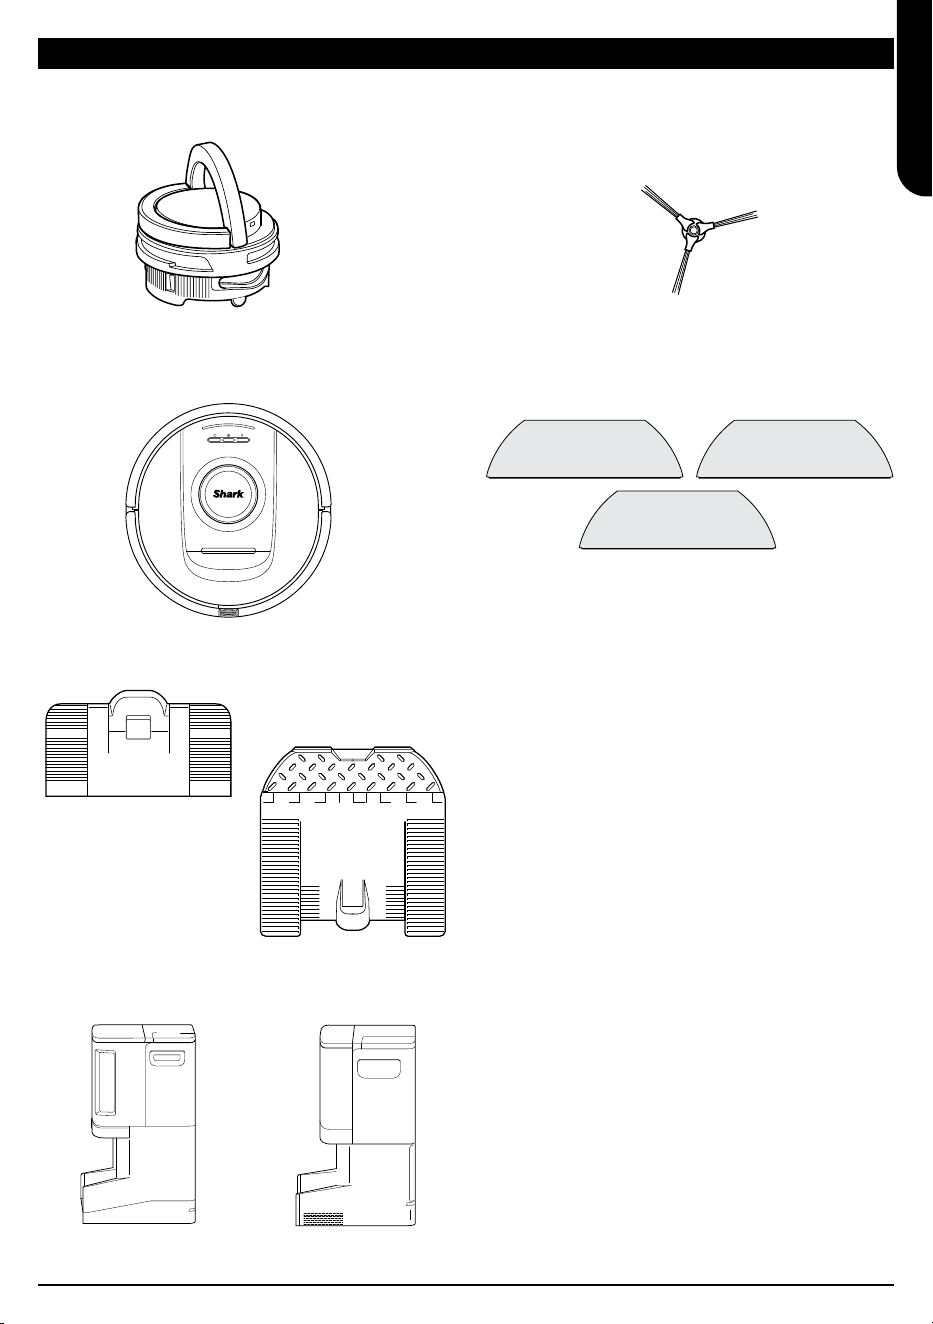
WHAT'S INCLUDED
1. Anti-Odour Cartridge (1X)
3. Robot (1X)
5. Ramp (1X)
6. NeverTouch Base (1X)
4. Antimicrobial Mopping Pads (3X)
2. Side Brush (2X)
Side brush design may very. Some models
include a spare.
Note: Not included
on all models
OR
OR
ENGLISH
sharkclean.eu
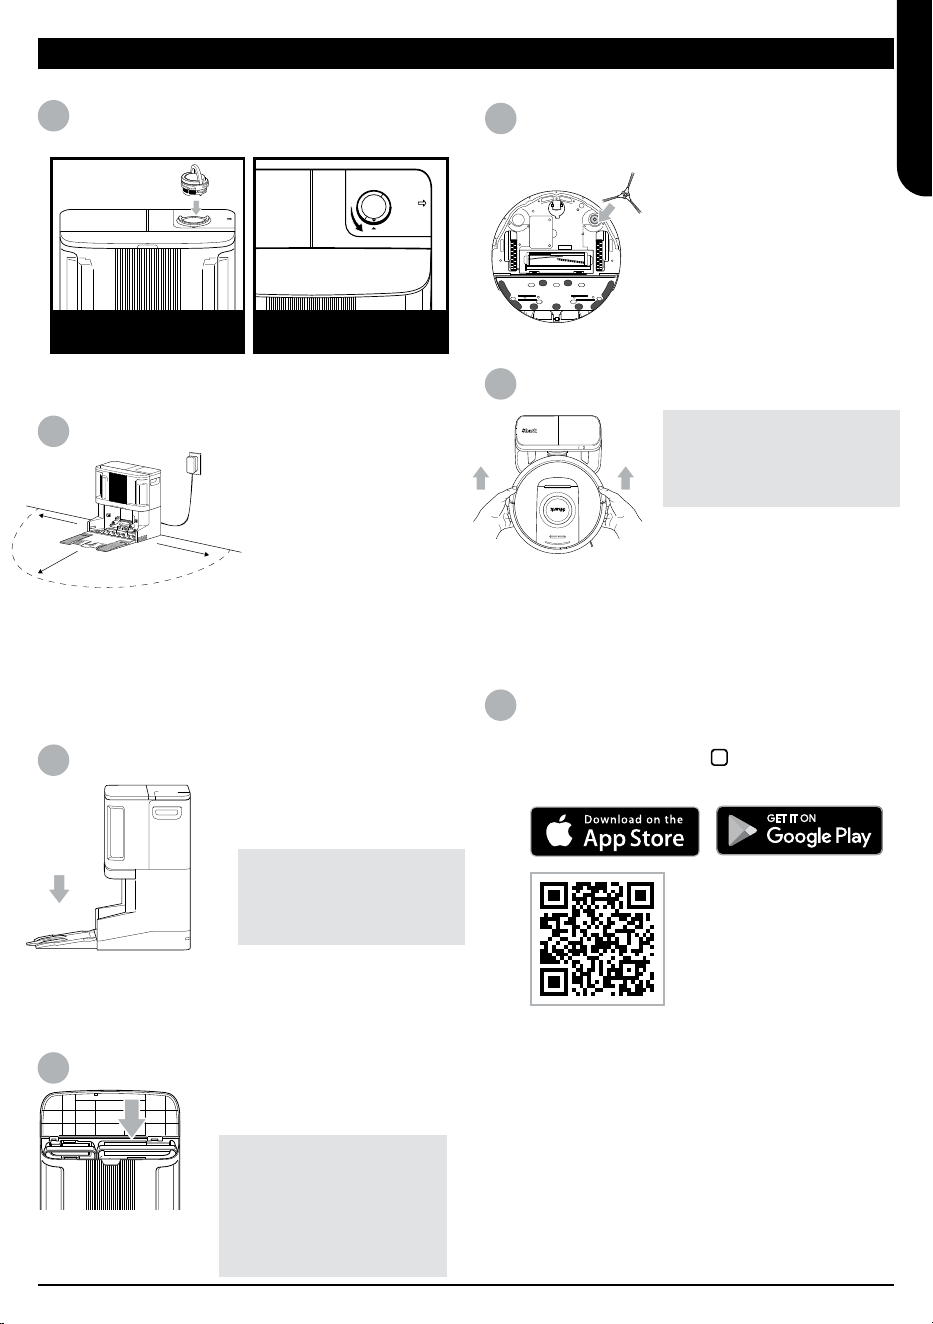
SET-UP YOUR SHARK ROBOT & NEVERTOUCH BASE
1
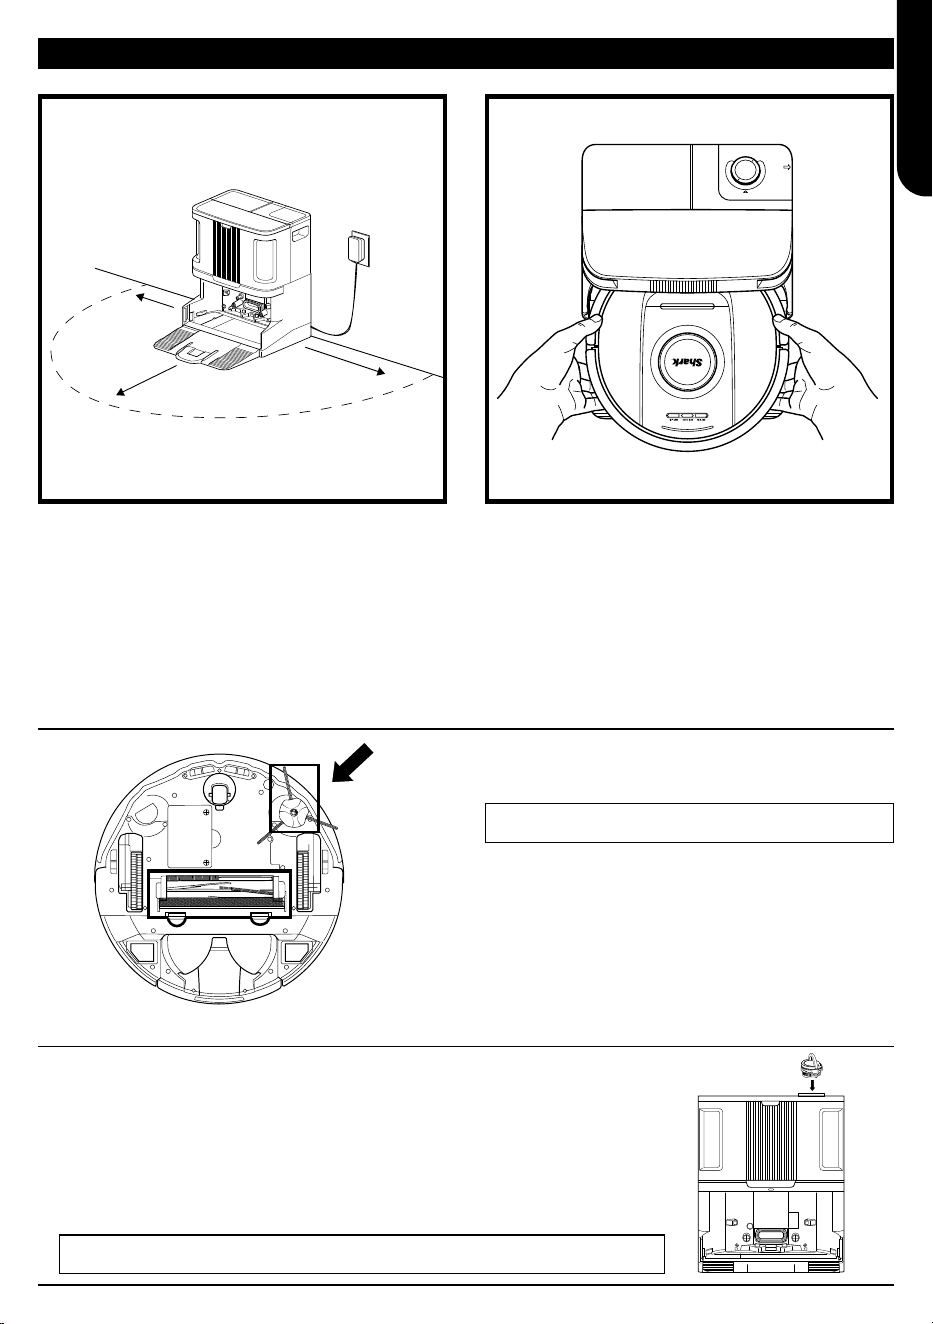
Insert Odour Cartridge
Note: Not included on all models
Note: Make sure the odour cartridge is installed
in the base before using the robot.
ROTATE TO CLICK
INTO PLACE
INSERT CARTRIDGE INTO
THE TOP OF THE BASE
2
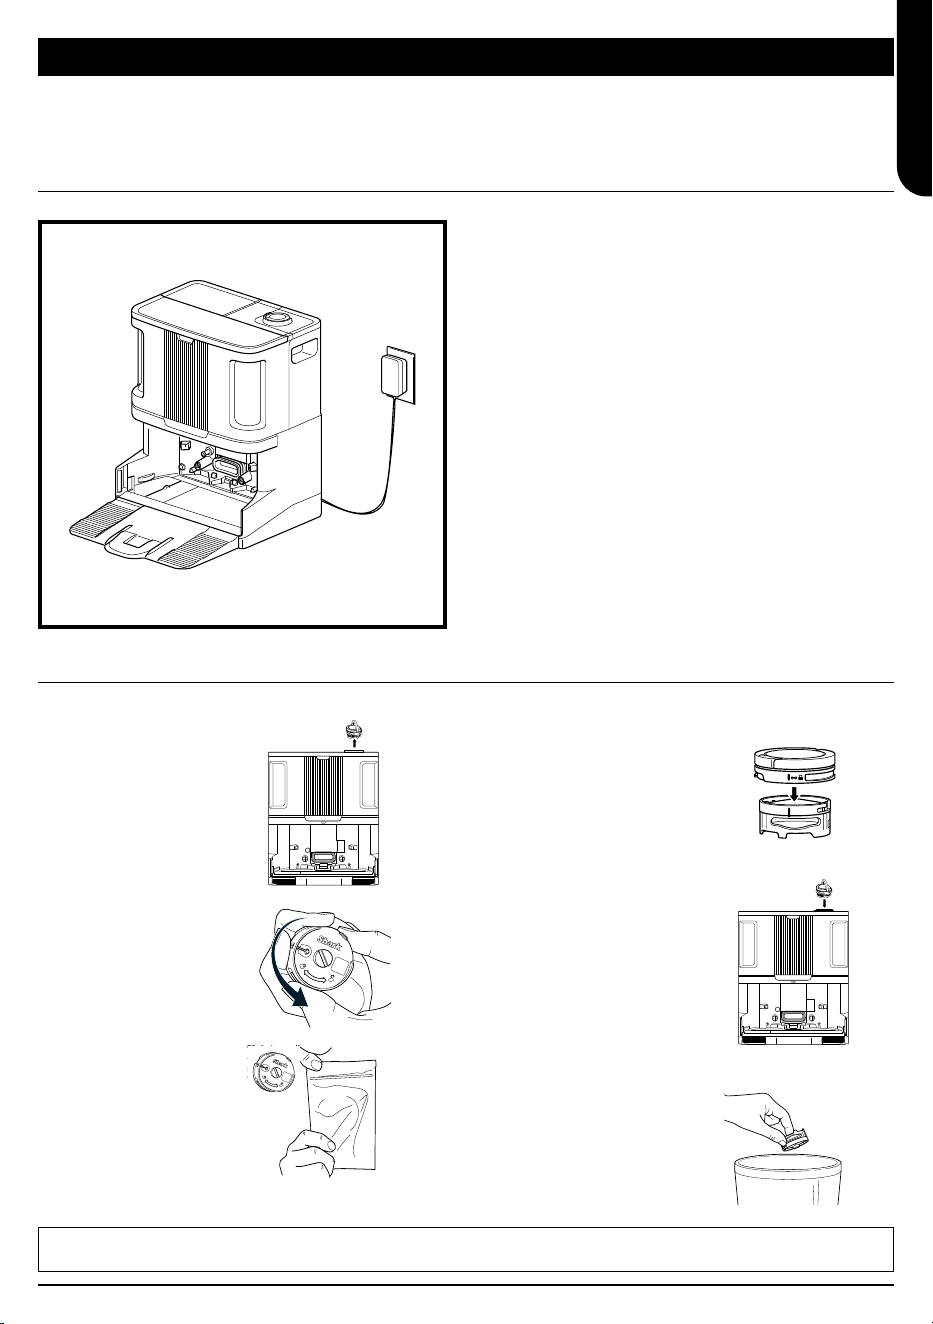
Set Up Base
1. Remove all plastic wrap
and foam.
2. Find a permanent
location for the base
in a central area with a
strong WI-FI signal.
3. Ensure the base is not
placed in area with direct
sunlight.
4. Plug in the base. The
LED will turn green
when it is powered on.
0.6m
0.3m
0.3m
3
Install Ramp On Base
1. Align the flat side of the
ramp with the bottom of
the base.
2. Lift the ramp slightly
above the base, align,
and press down until the
ramp clicks into place.
3. Leave at least 0.6m of
hard floor space in front
of the base, starting from
the end of the ramp.
5
Attach a Side Brush
to Bottom of Robot
1. The side brush can be
found inside the robot
box.
2. Align the hole in the
brush over the peg on the
bottom of the robot, then
press down on the brush
until it clicks into place.
Side Brush
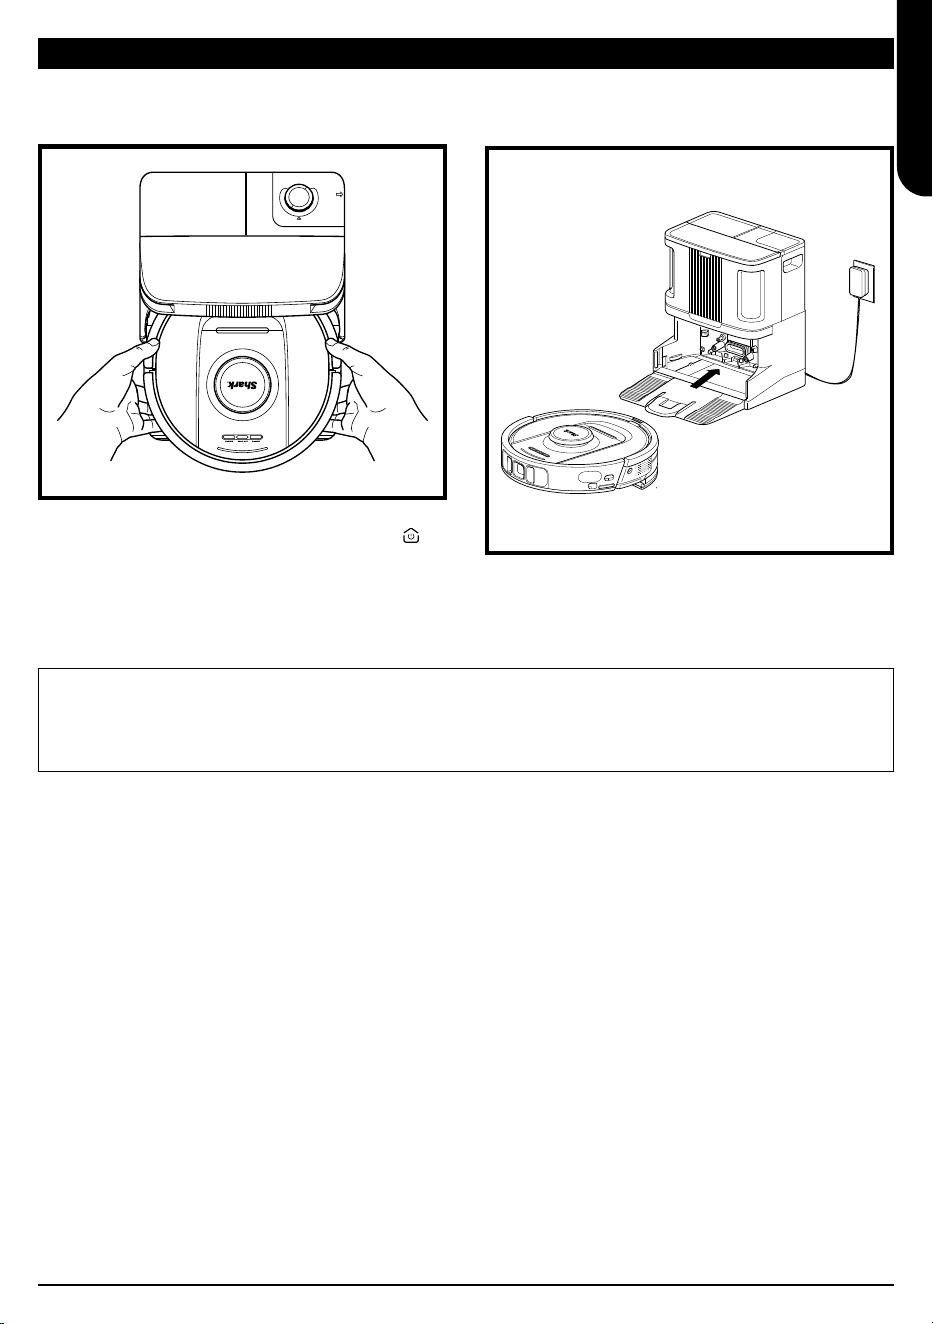
6
Slide Robot Onto Base
1. Align the robot with the
Shark logo upside down,
then slide it up the ramp,
onto the base.
2. The LEDs on the base
will turn green when the
robot is charging.
3. After 10 to 15 seconds,
the robot will begin to
evacuate dust and debris
into the base.
7
Download & Explore
SharkClean App
or press the Dry icon on your robot
to start a dry clean.
App Features
✔ Mapping
✔ Scheduling
✔ No-Go Zones
✔ Cleaning Reports
4
Fill The Clean Water Tank
1. Lift the water tank o the
front of the base.
2. Fill the tank up to the
MAX fill line with room-
temperature water.
Reinstall the tank.
ENGLISH
sharkclean.eu
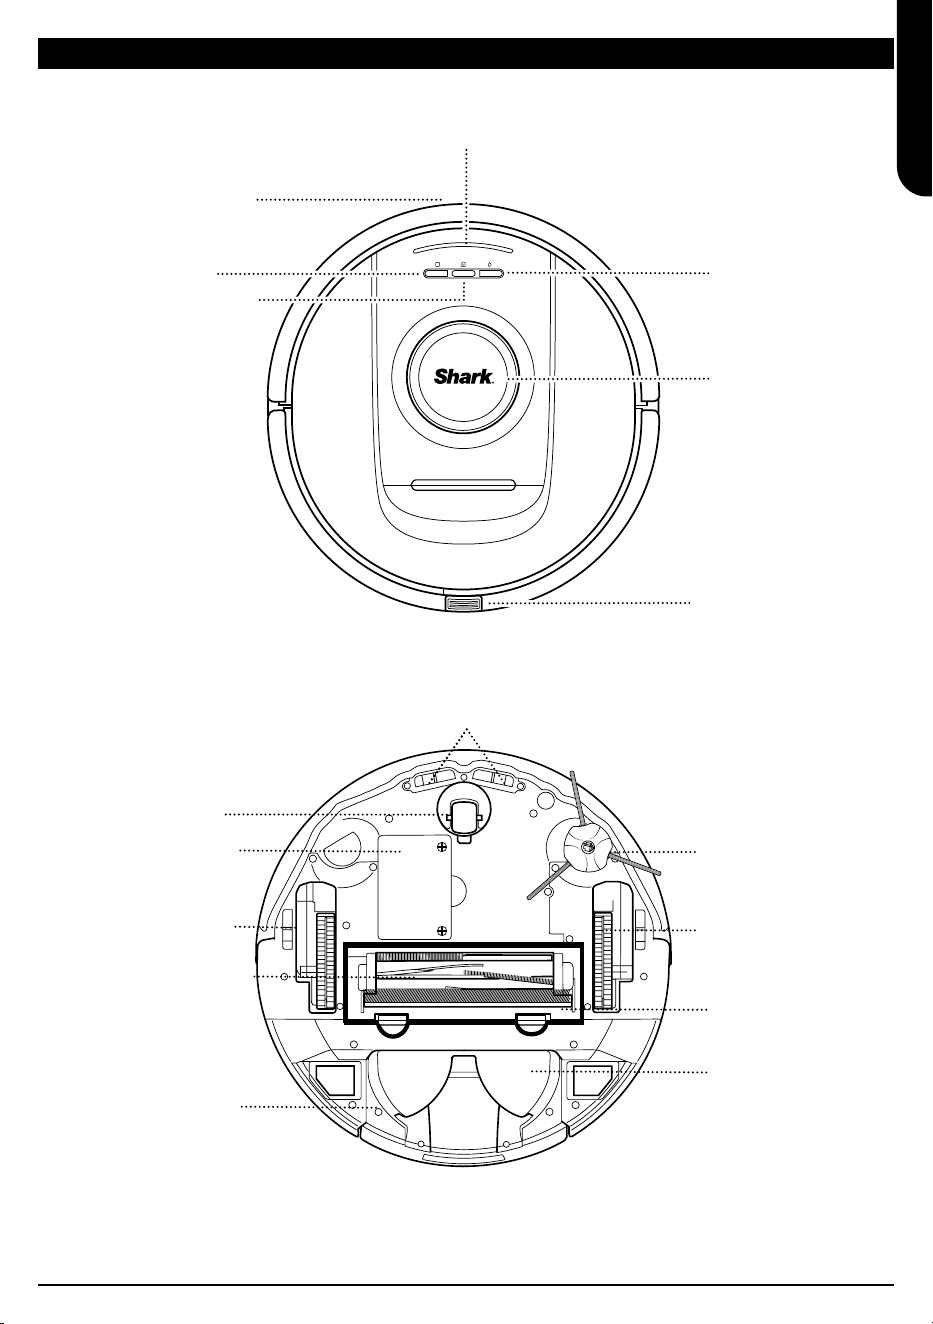
GETTING TO KNOW YOUR SHARK ROBOT
DRY CLEAN Button
Base Button
WET CLEAN Button
LIDAR Module
Robot Combo Dust Bin &
Water Tank Release Button
Front Bumper
Indicator Lights
Cli Sensors
Mop Pad Plate
Battery Door
Brushroll
Ultrasonic Floor
Detect Sensors
Drive Wheel
Side Brush
Robot Dust Bin
and Filter
Front Caster Wheel
Brushroll Door
ENGLISH
sharkclean.eu
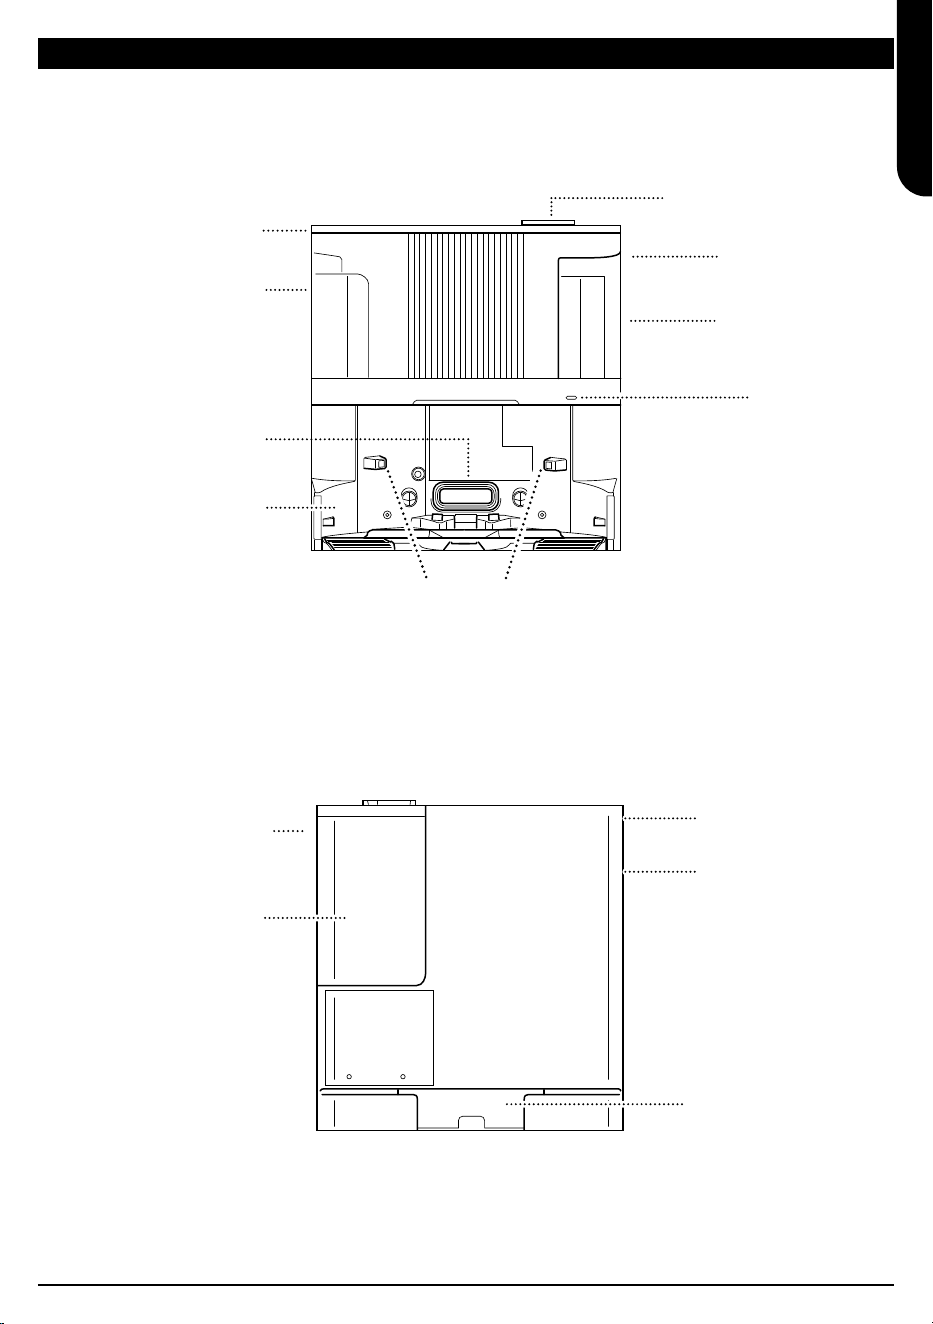
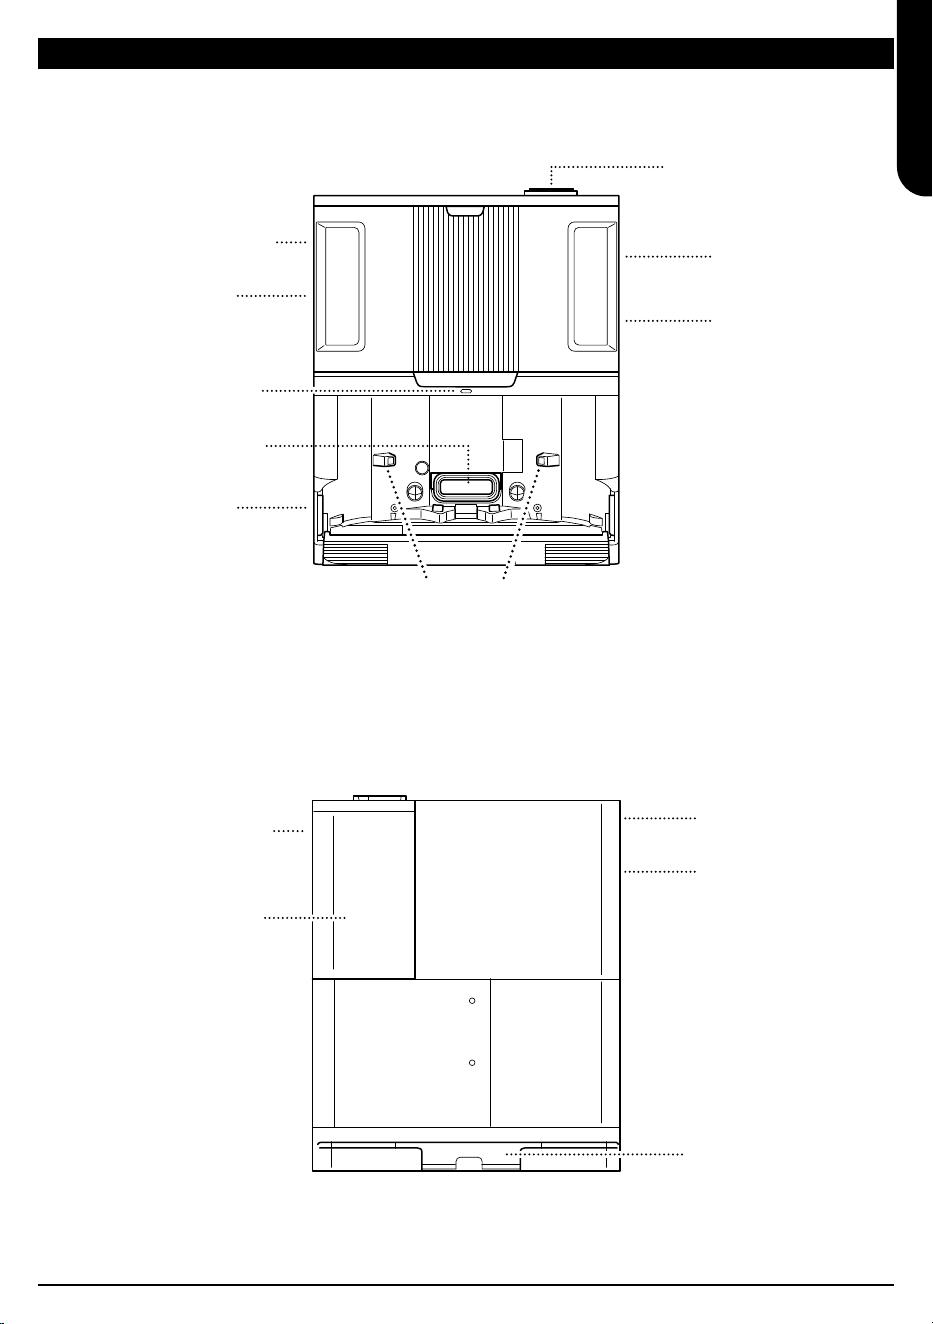
GETTING TO KNOW YOUR SHARK POWERDETECT NEVERTOUCH BASE
Pre-Motor Filter
Housing
Pre-Motor Filter
Access Door
Base Dust Bin
Clean Water Tank
Anti-Odour Cartridge
Not included with all models.
Debris Intake
Post-Motor Filter
Access Door
Pad Dry Fan
Clean Water Tank Lid
Charging Contacts
SELF-EMPTY BASE BACK
Base Dust Bin
Base Dust Bin
Release Button
Cord Storage
Indicator Light
ENGLISH
sharkclean.eu
GETTING TO KNOW YOUR SHARK POWERDETECT NEVERTOUCH PRO BASE
Pre-Motor Filter Housing
Pre-Motor Filter
Access Door
Base Dust Bin
Blue (Clean)
Water Tank
Anti-Odour Cartridge
Not included with all models.
Indicator Light
Debris Intake
Post-Motor Filter
Access Door
Pad Dry Fan
Grey (Dirty) Water Tank
Charging Contacts
SELF-EMPTY BASE BACK
Base Dust Bin
Base Dust Bin
Release Button
Cord Storage
ENGLISH
sharkclean.eu
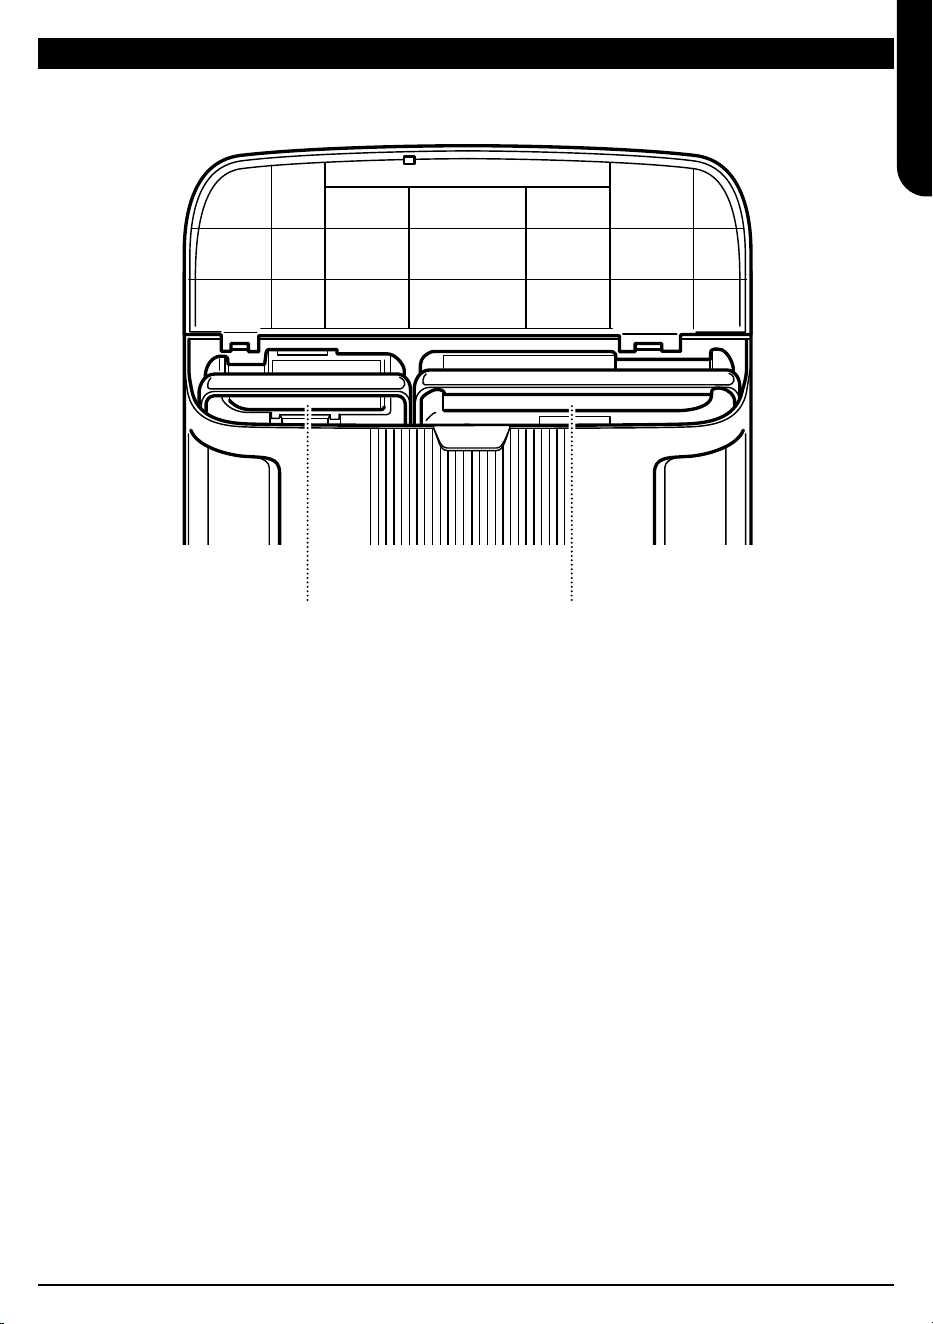
GETTING TO KNOW YOUR SHARK POWERDETECT NEVERTOUCH PRO BASE
Grey (Dirty) Water Tank Blue(Clean) Water Tank
ENGLISH
sharkclean.eu
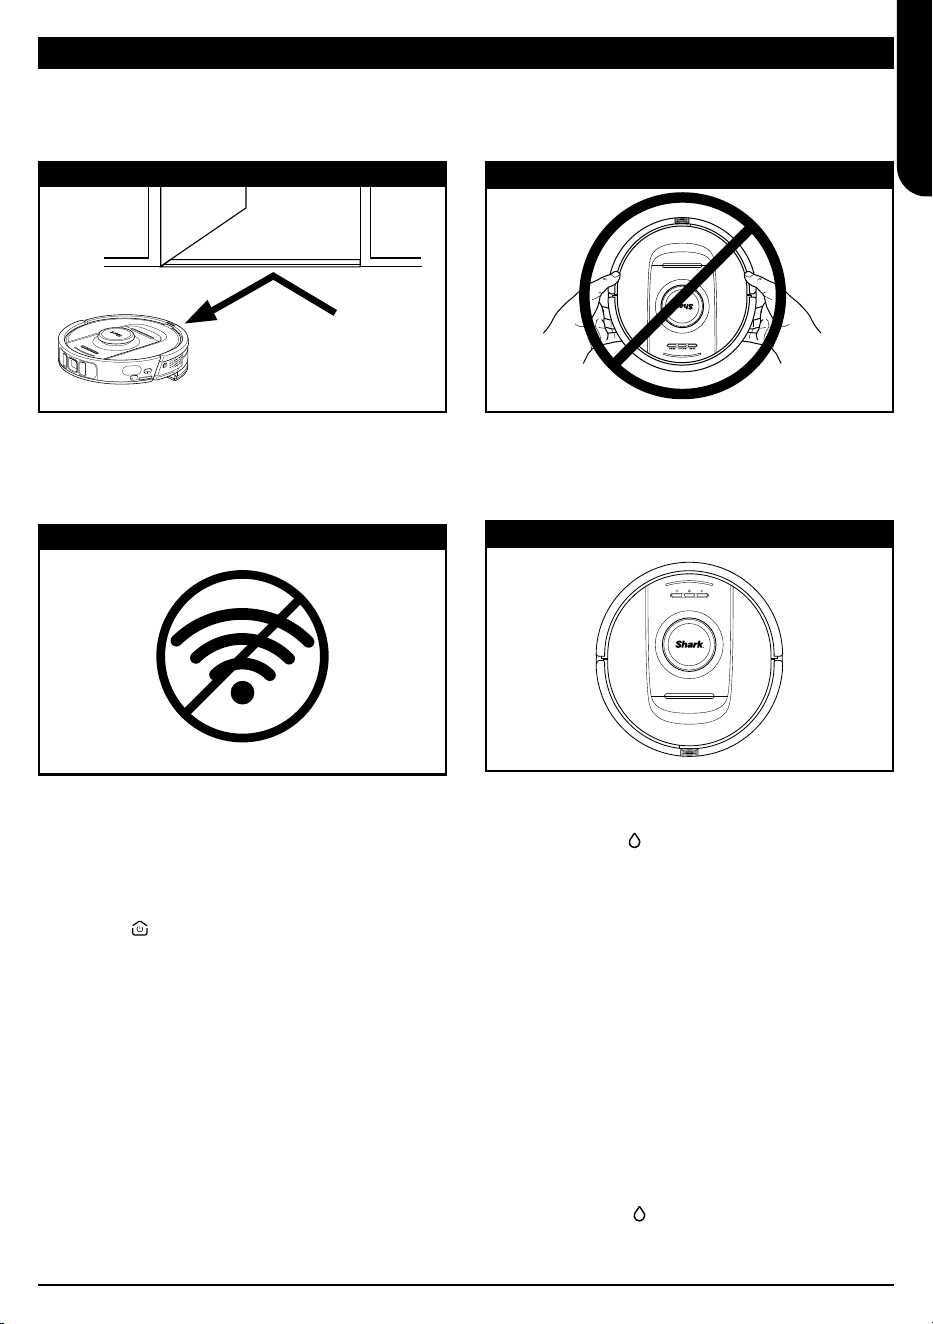
LIVING WITH YOUR ROBOT
CAN’T CONNECT TO WI-FI?
NOTE:
Shark Robots use 2.4 GHz networks to connect. Typical
home Wi-Fi netwroks support both 2.4 GHz and 5 GHz.
Restart your phone
• Turn o phone, wait a few minutes, then turn it back on
and connect to Wi-Fi.
Reboot your robot
• Take robot o base and press and hold down the
DOCK icon
on the robot for 5 to 7 seconds.
Turn your robot back on by sliding it on the base.
Reboot your router
• Unplug the router power cable for 30 seconds, then
plug it back in. Allow several minutes for your router to
reboot completely.
• Then follow the steps outlined in the SharkClean app
Wi-Fi setup instructions.
AVOID MOVING THE ROBOT OR SELF-EMPTY BASE
START MOPPING MODE MANUALLY
While your robot is cleaning, DO NOT pick it up
and move it, or move the Self-Empty Base—this will
impact the robot’s ability to map your home. If the
base is moved, you will need to remap your home.
If your POWERDETECT Base has enough water in
the clean water tank and has a pad plate with mop
pad attached, you can begin a wet clean by simply
pressing WET icon
on the robot or by starting a wet
clean in the app. For manual setup, please follow the
below steps:
Fill the robot water reservoir with water.
• Remove the combo dust bin & water tank from the
robot. Lift the cap of the water reservoir and rotate it
to the side. Fill water reservoir with water. Reinsert the
water reservoir cap.
Attach a mop pad to the pad plate.
• If a mop pad is not currently attached to the pad plate,
attach a mop pad by aligning the edge of the mop
pad to the inlet of the pad plate. Slide the mop pad
into this inlet, and when fully inserted, attach the mop
pad to the pad plate.
Attach the pad plate and insert the robot dust bin.
• Attach the pad plate to the underside of the robot’s
combo dust bin & water tank by sliding it on from the
rear of the robot dust bin. You will hear an audible
CLICK when attached. With the mop pad side facing
down, insert the robot combo dust bin & water tank
into the robot.
Press the WET icon
on the robot to begin mopping!
Please visit sharkclean.eu/app or visit Sharkclean on YouTube for troubleshoot videos.
Your robot can easily climb over most thresholds,
but if one is higher than 2.5cm, set up a no-go zone in
the app to block it o.
DOORWAYS AND THRESHOLDS
ENGLISH
sharkclean.eu
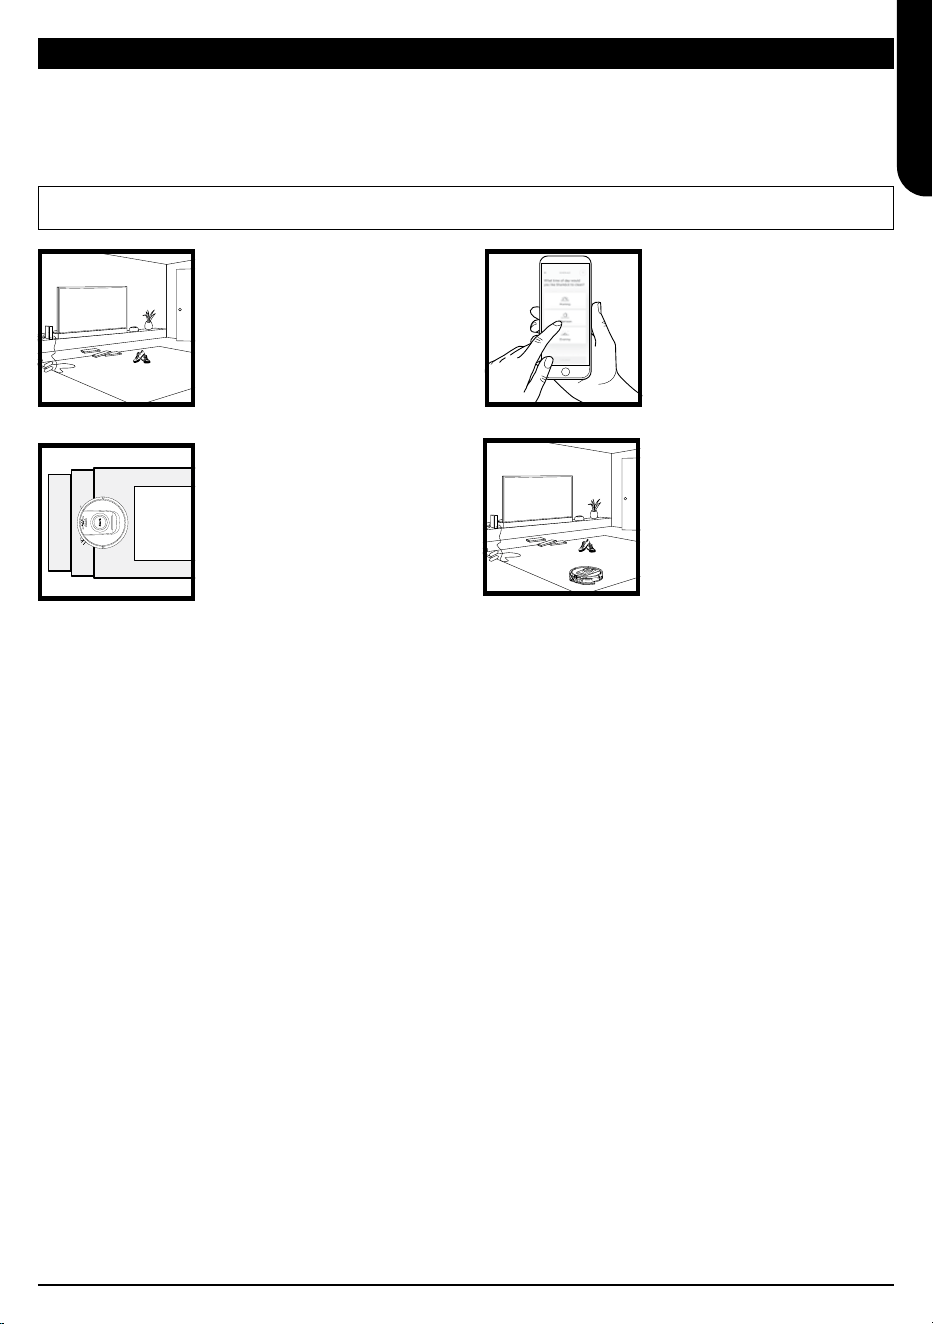
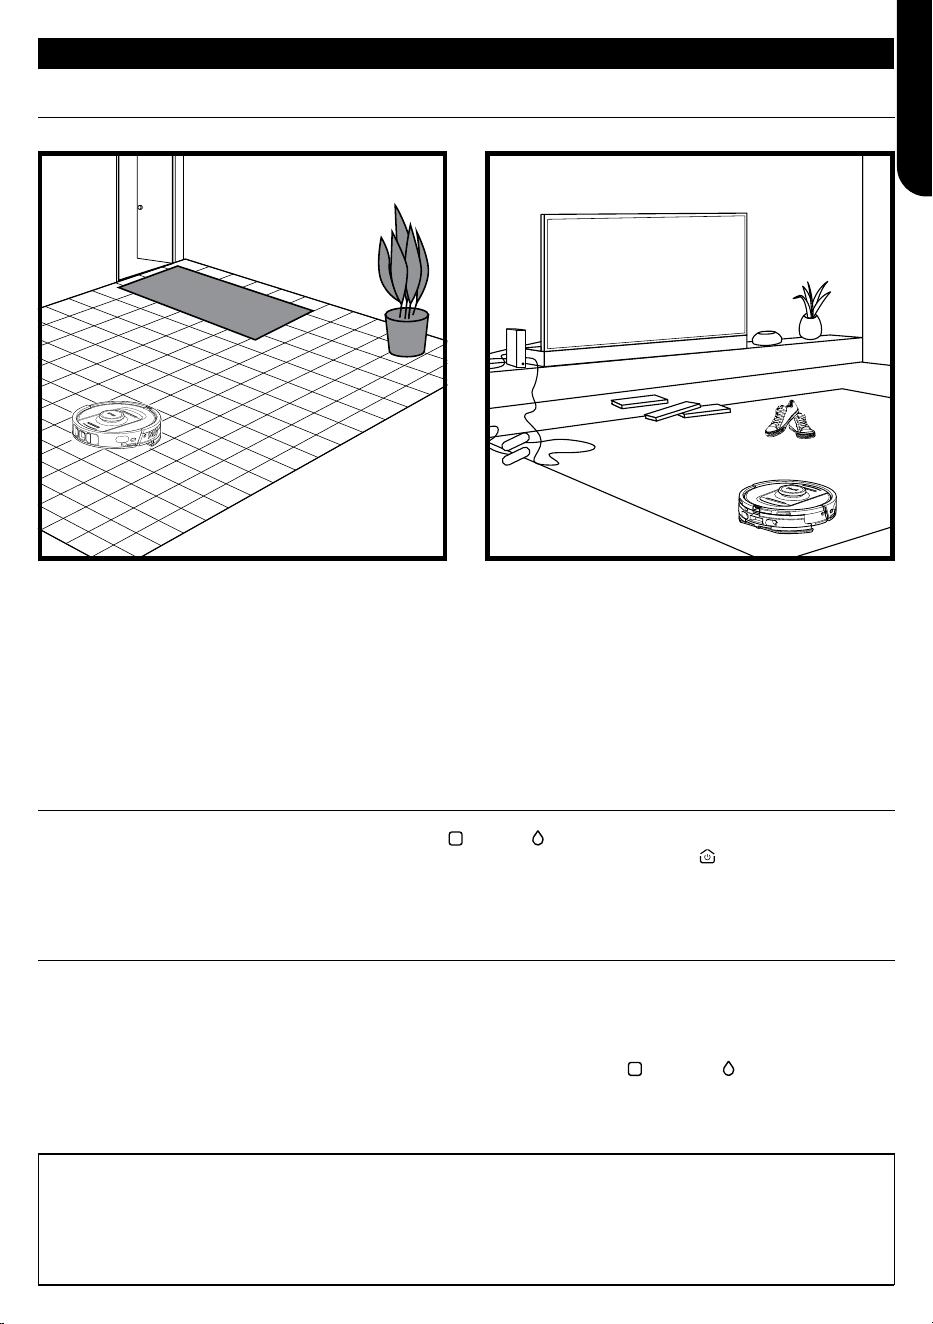
PREPARE YOUR HOME
NOTE: Scheduling is one of many features that can only be done in the app.
Your robot uses an array of sensors to navigate around walls, furniture legs, and other obstacles while it
cleans. To prevent the robot from entering areas you don't want it to, set up no-go zones in the app. For
best results, prepare your home as indicated below, and schedule a daily cleaning to ensure all floor areas
are regularly maintained.
OBSTRUCTIONS
Your Power Detect robot
will avoid cords, but for
the best coverage and
cleaning, remove cords and
objects smaller than 11.5 cm
in height from floors.
To ensure a complete map
of your home, open interior
doors.
CARPET MAPPING
Your robot will perform a dry,
cleaning run while exploring and
mapping your home. During
this time, the robot will also
automatically identify carpeted
areas. If carpets are moved, you
may need to have the robot re-
explore your home.
SCHEDULING
Schedule whole-home
vacuuming runs with the app.
STAIRS
Your robot’s cli sensors
will prevent it from falling
o ledges. For the cli
sensors to work properly in
any mode, all runners, rugs,
or carpets must be at least
20cm from any stairs, or
must extend over the edge
of the stairs.
ENGLISH
sharkclean.eu
NOTE: Side brush design may vary.
NOTE: The Odour Neutralizer Technology is not included with all models.
ROBOT BASE SET-UP
INSTALLING THE SIDE BRUSH
INSTALLING THE ANTI- ODUOR CARTRIDGE
Attach the side brush to the post on the
bottom of the robot.
0.6m
0.3
0.3
• Place the base with its back against a wall. Select a level surface on a BARE FLOOR in a central area with a
strong Wi-Fi signal. Do not place it against baseboard heaters or other heating elements. Ensure the base
is not placed in area with direct sunlight.
• Select a permanent location for the Robot Base because every time you relocate it, your robot will have
to re-map your space. Remove any packaging from both the robot and the base.
• Remove any objects that are closer than 0.3m from either side of the base or closer than 0.6m from the
front of the base. Ensure any carpeted floor is 1.2m away from the front of the base, or more.
• Plug in the base. The indicator light will illuminate green when the base has power.
1. Open the packaged Odour Cartridge.
2. Flip up the handle on the odor dial.
3. Align the arrows.
4. Insert the assembly into the slot on the top right side of the base.
5. To lock the cartridge in-place, rotate it anti clockwise until it clicks
in to place.
6. Continue to rotate the dial toward the high position to increase the intensity.
ENGLISH
sharkclean.eu
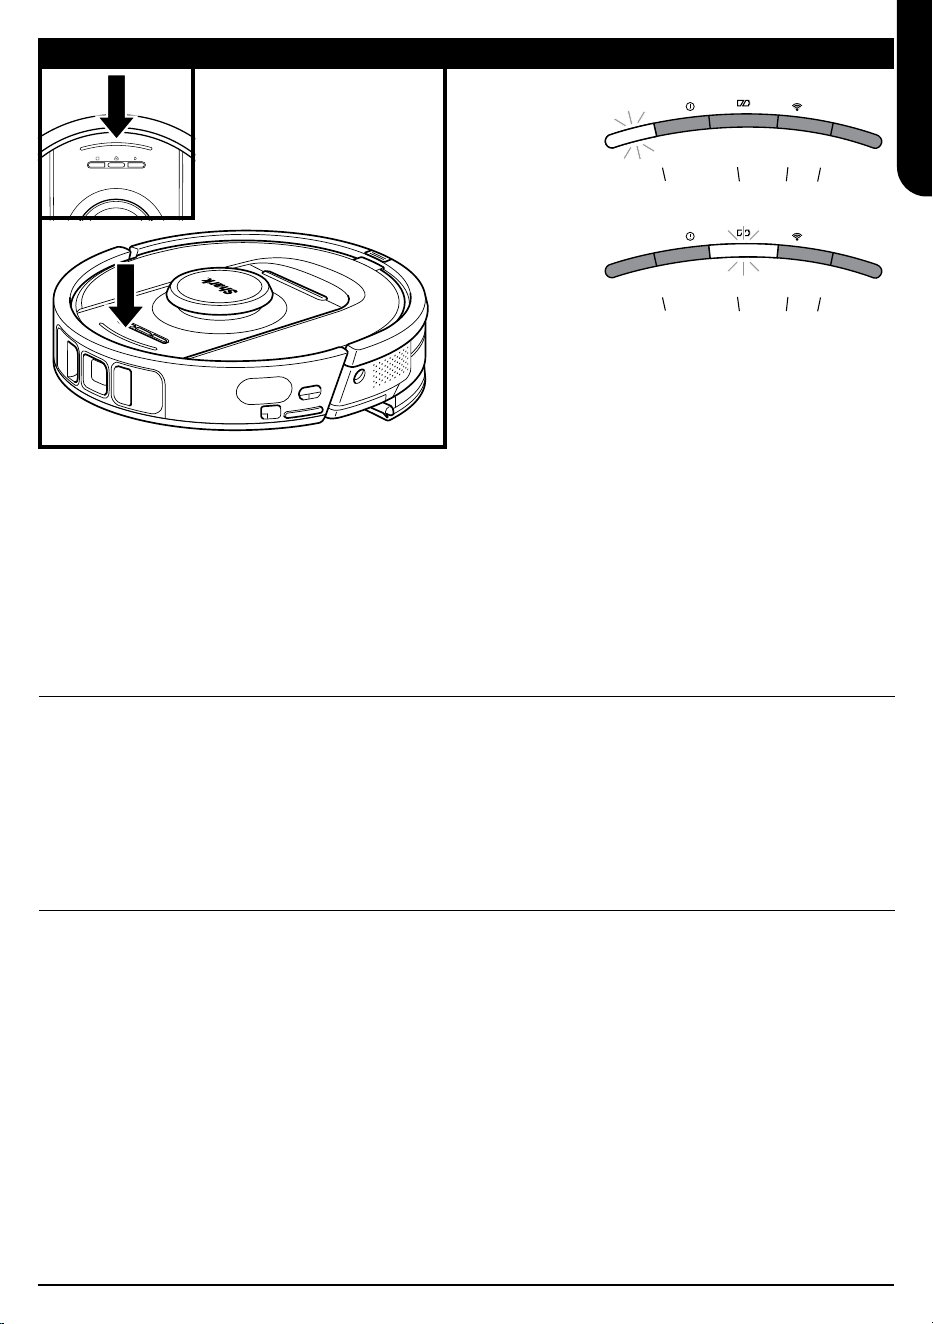
ROBOT INDICATOR LIGHTS
If your robot is low on battery power, the left LED
light will pulse RED. Manually place the robot on the
base to begin charging. When the robot is charging,
the battery indicator light will pulse, based on the
current battery charge level: RED for low, YELLOW
for medium, GREEN for high.
When cleaning, the remaining battery level is
indicated by the number of LED lights illuminated.
At full battery power, 5 indicator lights will be
illuminated. At 80% battery, 4 indicator lights will
be illuminated, and so on.
DirtDetect detects hidden debris and automatically boosts power until no more dirt is detected. When the
robot detects a mess, the lights on the robot will turn PURPLE to indicate that DirtDetect is enabled. The
robot will deep-clean in a 3' x 3' pattern.
When your robot activates ActiveLift to better navigate your home, your indicator lights will flash ORANGE to
indicate that it has activated.
DIRTDETECT
ACTIVELIFT
Charging
BATTERY LED pulsing
RED for low, YELLOW for medium,
GREEN for high
LEFT
NOTIFICATION
BATTERY WI-FI RIGHT
Low Battery
LEFT
NOTIFICATION
BATTERY WI-FI RIGHT
LEFT LED pulsing RED
ENGLISH
sharkclean.eu
To TURN THE ROBOT ON: Slide the robot up the
ramp on to the base or hold down DOCK icon
for 5 to 7 seconds, until the indicator lights turn on.
After 10 to 15 seconds, the robot will begin to
evacuate dust and debris into the base.
When the cleaning cycle is complete, or if the battery
is running low, the robot will search for the Self-
Empty Base. If the robot doesn't return to the base,
its charge may have run out.
CHARGING
IMPORTANT: Be sure to charge the robot completely before its first clean so that it can explore, map, and
clean as much of your home as possible. It may take up to 4 hours* to fully charge your robot.
NOTE: When manually placing the robot on the base, make sure the Charging Contacts on the back end of the robot are
touching the ones on the base.
NOTE: When picking up the robot, be careful not to place fingers between the bumper and the back of the robot.
*Battery charge time may vary.
ENGLISH

sharkclean.eu
ROBOT BUTTONS
DRY CLEAN BUTTON
If the robot is on the base,
press the DRY icon on the
robot
for a whole-home
clean. Press again to pause
the cleaning session.
For a 1.5m x 1.5m spot clean,
press and hold the DRY icon
for 5-7 seconds.
WET CLEAN BUTTON
If the robot is on the base,
press the WET icon
on
the robot for a whole-home
clean. Press again to pause
the cleaning session.
For a 1.5m x 1.5m spot clean,
press and hold the WET icon
for 5-7 seconds.
DOCK BUTTON
To turn on/o your robot,
press the DOCK icon
on
the robot for 5-7 seconds.
Short press the DOCK icon
to send the robot back to
the base.
RECHARGE & RESUME
Press and hold the DOCK
icon
for 15 seconds to turn
Recharge & Resume ON or
OFF.
The Recharge & Resume function is turned ON
by default. The robot will run until it reaches low
battery. If its cleaning mission is not complete
at that time, it will return to the base, recharge,
and then pick up where it left o.
ENGLISH

sharkclean.eu
USING THE SHARK POWERDETECT
ERROR CODE PROBLEM
LEFT LED (YELLOW) flashing Wrong password for Wi-Fi
LEFT LED (YELLOW) + RIGHT LED (YELLOW) flashing SSID cannot be found, try connecting again
NOTIFICATION LED (RED) + WiFI LED (RED) flashing Cannot connect to Wi-Fi
USING THE SHARKCLEAN APP AND VOICE CONTROLS
SETTING UP VOICE CONTROL WITH THE GOOGLE ASSISTANT OR AMAZON ALEXA
Visit sharkclean.eu/app for setup instructions, which include how to enable Shark Skill for Amazon Alexa
and using with Google Assistant.
Google Assistant:
Hey Google, start vacuuming.
Hey Google, tell (robot name) to vacuum.
Hey Google, pause vacuuming.
Hey Google, tell (robot name) to go home.
Amazon Alexa:
Alexa, ask Shark to start vacuuming/cleaning the
(room name).
Alexa, start/stop the vacuum.
Alexa, send the vacuum to Self-Empty Base.
Please visit sharkclean.eu/app or visit SharkClean on YouTube for troubleshooting videos.
Get the most out of your Shark® robot vacuum with these app features:
• Recharge and Resume
The robot will return to the
Self-Empty Base, recharge,
and can pick up where it
left o.
• Vacuum + Mop: Full home
cleaning. Dry cleaning of
carpeted areas followed by
mopping of bare floors.
• No-Go Zones
Use the no-go zones in the
app to keep your robot out
of the areas you would like it
to avoid.
• Scheduling
Set up whole-home
cleanings for any time,
any day.
• Control From Anywhere
Wherever you are, you’re
in control of your robot.
• Cleaning Reports
Each time your robot cleans,
your app will generate a
cleaning report.
Search for SharkClean in the app store and download the app to your smartphone..
RUMPELSTILTSKIN
Schedule History
EDIT OPTIONS
MapsControl
Shark
Kitchen
Living Room
Dining Room
o
m
WI-FI TROUBLESHOOTING
To use the app, your phone must be connected to a
2.4GHz network. The app will only work on a 2.4GHz
network.
• Typical home Wi-Fi networks support both 2.4GHz
and 5GHz.
• Do not use a VPN or a proxy server.
• Make sure Wi-Fi isolation is turned o on the router.
• Questions? Steps if You're Stuck: Having trouble
connecting to your robot? For how-to videos,
FAQs, troubleshooting, and tips & tricks visit:
sharkclean.eu
STILL CAN'T CONNECT?
Restart your phone
Turn o phone, wait a few minutes, then turn it back
on and connect to Wi-Fi.
Reboot your robot
• Take robot o Self-Empty Base and press and hold
the DOCK icon
on the robot for 5-7 seconds to
turn o power. To turn power back on, place the
robot back on the base.
Reboot your router
• Unplug the router power cable for 30 seconds,
then plug it back in. Allow several minutes for your
router to reboot completely.
LEFT
NOTIFICATION
BATTERY WI-FI RIGHT
ENGLISH
sharkclean.eu
WI-FI TROUBLESHOOTING
How do I use my robot with Amazon Alexa?
Open the Amazon Alexa app, go to the menu and select Skills. Or go to the Alexa Skills store on the Amazon
website. Search for "Shark Skill". Select the Shark Skill to open the detail page, then select the Enable Skill
option. Once enabled, you can ask Alexa to control your robot (i.e., "Alexa, tell Shark to start cleaning").
How do I set up my robot with the Google Assistant on an Apple device?
1. Download, open, and sign into the Google Assistant app. 2. Select the “Explore” icon. Search for “Shark” and
select “Try it.” 3. To allow Google to link to your SharkClean account, sign into your SharkClean account. This is
the same account you used when setting up your Shark robot in the SharkClean app. Select “Authorize” to link
your SharkClean account to the Google Assistant. Congratulations! The Google Assistant now works with your
Shark robot. To send your robot into action, use the voice command, “Google, tell Shark to start cleaning.”
How do I set up my robot with the Google Assistant on Android?
1. Download, open, and sign into the Google Assistant app. 2. Select the “Explore” icon. Search for “Shark” and
select “Link.” 3. Sign into your SharkClean account. This is the same account you used when setting up your
Shark robot in the SharkClean app. Congratulations! The Google Assistant now works with your Shark robot.
To send your robot into action, use the voice command, “Google, tell Shark to start cleaning.”
What should I do if my Wi-Fi randomly disconnects?
Turn OFF the robot, by pressing and holding the DOCK button for 5-7 seconds. Wait 10 seconds, then turn
the robot power back on by pressing and holding the DOCK button for 5-7 seconds. Turn o your phone.
Wait 30 seconds, then turn your phone back on. Open Wi-Fi settings on your phone, find the Shark network,
and select Forget Network. Reopen SharkClean app and retry the connection process. It is normal for your
robot to temporarily lose connectivity when it goes under furniture or moves far from your router. Your Shark®
robot will automatically reconnect to Wi-Fi. If the robot does not reconnect, power it o, wait 10 seconds, pow-
er the robot back on, and place it back on the base.
What should I do if I verified a wireless network password that is incorrect?
Close the app, then reopen it. Make sure that you entered the correct Wi-Fi network password this time. In
your phone's network settings, choose your home 2.4 GHz network, and select Forget. Reconnect to your
home network. Make sure to use the correct password. If you were able to connect to your home network,
proceed to the app setup process. We recommend that you use the eye icon when entering your password to
make sure it is correct. Turn o your router and wait 30 seconds. Turn your router back on. Check to make sure
your 2.4 GHz network is visible in your phone settings. Turn o the robot, then wait 10 seconds. Turn the robot
back on and wait for the voice prompt. Hard-close the app and restart the connection process on the robot. If
you cannot locate your Wi-Fi password, please contact your Internet service provider.
What should I do if my username or password is invalid?
We recommend you select the eye icon next to the password entry to verify you are entering your password
correctly. Select the ‘Forgot Password’ option on the sign-in page. The automated system will email you a link
to reset your password. If you do not see an email, search your inbox and spam folder for emails from myshark-
[email protected]. You can use the “Resend code” option to send the email again.
What should I do if there is an issue resetting password (did not receive the email or token
was invalid)?
Select the ‘Forgot Password’ option on the sign-in page. The automated system will email you a link to reset
your password. If you do not see an email, search your inbox and spam folder for emails from
mysharkninja@sharkninja.com. You can use the “Resend code” option to send the email again.
ENGLISH
sharkclean.eu
WI-FI TROUBLESHOOTING
What should I do if my Shark® robot won't connect to Wi-Fi or loses Wi-Fi connectivity?
If you are an iOS user and recently upgraded to iOS 14, you need to enable local network access on your
phonefor the SharkClean app. Please take the following steps to enable.
• Go to your phone settings --> Select Privacy--> Select Local Network --> Toggle SharkClean on, then try
connecting again.
Other troubleshooting steps:
• Ensure your phone is connected to your home Wi-Fi network before trying to connect your robot.
• Typical home Wi-Fi networks support both 2.4 GHz and 5 GHz. Ensure you are connected to a 2.4 GHz
network when you enter your username and password.
• Ensure your robot is turned on and you hear an audio prompt. Do not use a VPN or a proxy server. Ensure
Wi-Fi isolation is turned o on the router.
Note: Shark® robot vacuums cannot connect to 5GHz band.
There may be instances where your Shark robot loses connectivity while operating, due to a weak Wi-Fi
signal, or entering a zone that blocks Wi-Fi. In such cases:
• Turn o the robot.
• Wait 10 seconds, then turn the power back on and wait for the voice prompt.
• Power o your phone, wait 30 seconds, and power back on.
• Open Wi-Fi settings on your phone, find the Shark network, then select Forget Network.
• Reopen the SharkClean app and retry the connection process.
It is normal for your robot to temporarily lose connectivity when it goes under furniture or moves far from
your router. Your Shark robot will automatically reconnect to Wi-Fi.
• If the robot does not reconnect on its own, remove the unit from the base.
• Power the robot o, wait 10 seconds, and place it back on the base.
ENGLISH
sharkclean.eu
USING THE SHARK POWERDETECT
3D SENSOR AND AI LASER NAVIGATION
After setup is complete, your robot will conduct an
Explore Run to create an initial map of your home.
The robot will travel from room to room to identify
walls, furniture, carpets, and other obstacles as it
cleans. The robot will complete a full dry clean as it
creates the map of your home.
The robot's object detection technology helps it
navigate around obstacles taller than 11.5cm in
height, as well as some common household objects
like cords, cables, shoes, and clothes.
MANUAL CLEANING MODE
To manually start a dry or wet clean, press the DRY or WET icons on the robot or on the mobile app,
respectively. To immediately send the robot back to the base, press the DOCK icon
VACUUM + MOP
Vacuum + Mop mode enables a whole home, wet and dry clean with zero manual interaction required.
A Vacuum + Mop can be activated within the SharkClean app, or manually without the app.
• Vacuum + Mop with the SharkClean app: To start a Vacuum + Mop with the app and your robot will begin by
vacuuming the carpets then resume mopping all bare floor surfaces.
• To enter Vacuum + Mop manually: simultaneously press and hold the DRY
and WET icons on the robot
for 3 or more seconds.
Vacuum + Mop can only be used for a whole home clean. Vacuum + Mop is not compatible with cleaning
by room.
TIP: Be sure to charge the robot completely before its first clean so that it can explore, map, and clean as much of your
home as possible. It may take up to4hours* to fully charge your robot.
NOTE: Avoid moving the base. If it is relocated, the robot may not be able to find its way back to the base, and you will
need to re-map your home. If the robot is relocated while in use, it may not be able to follow its intelligent cleaning path
or find its way back to the base.
*Battery charge time may vary.
ENGLISH
sharkclean.eu
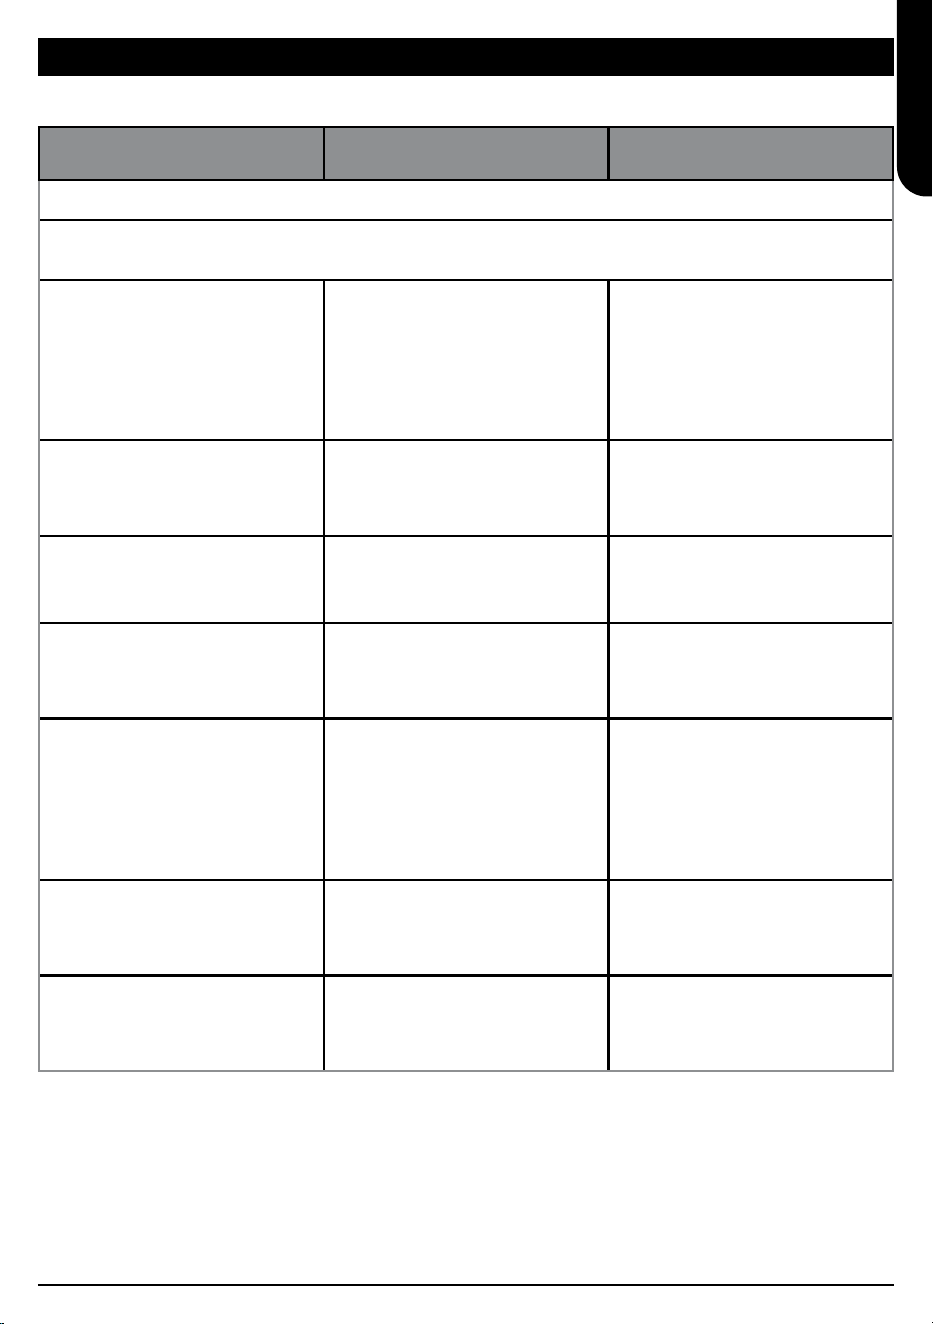
MAINTENANCE OVERVIEW
Component Frequency Replacement Part(s)
Base Maintenance
BEFORE PERFORMING ANY MAINTENANCE, TURN OFF POWER
TO YOUR BASE BY UNPLUGGING IT FROM ITS POWER SOURCE.
Base Dust Bin
NOTE: Capacity varies
depending on the model.
Every 30
or 60 days, depending
on the model
4920KU2800WDEU
4922KU2800WDEU
5021K2800WDEU
Base Pre-Motor Filter
Every 30 days,
or as needed
XPRFRV2800EEU
Base Post-Motor Filter
(HEPA)
Every 6 months,
or as needed
XPRFRV2800EEU
Base Ramp
Every 3 months,
or as needed
4928KU2800WDEU
4919KU2800WDEU
Anti-Odour
Technology
NOTE: Anti-Odour
Technology is not
included with all models.
Every 6 months,
or as needed
5344Z3000EUKT
Blue (Clean) Water Tank
Every 30 days,
or before every refill
4923K2800WDEU
4924K2800WDEU
Grey (Dirty) Water Tank
NOTE: Not all models
include a grey water tank.
Every 30 days,
or as needed
4925K2800WDEU
NOTE: To order replacement visit sharkclean.eu.
ENGLISH
sharkclean.eu
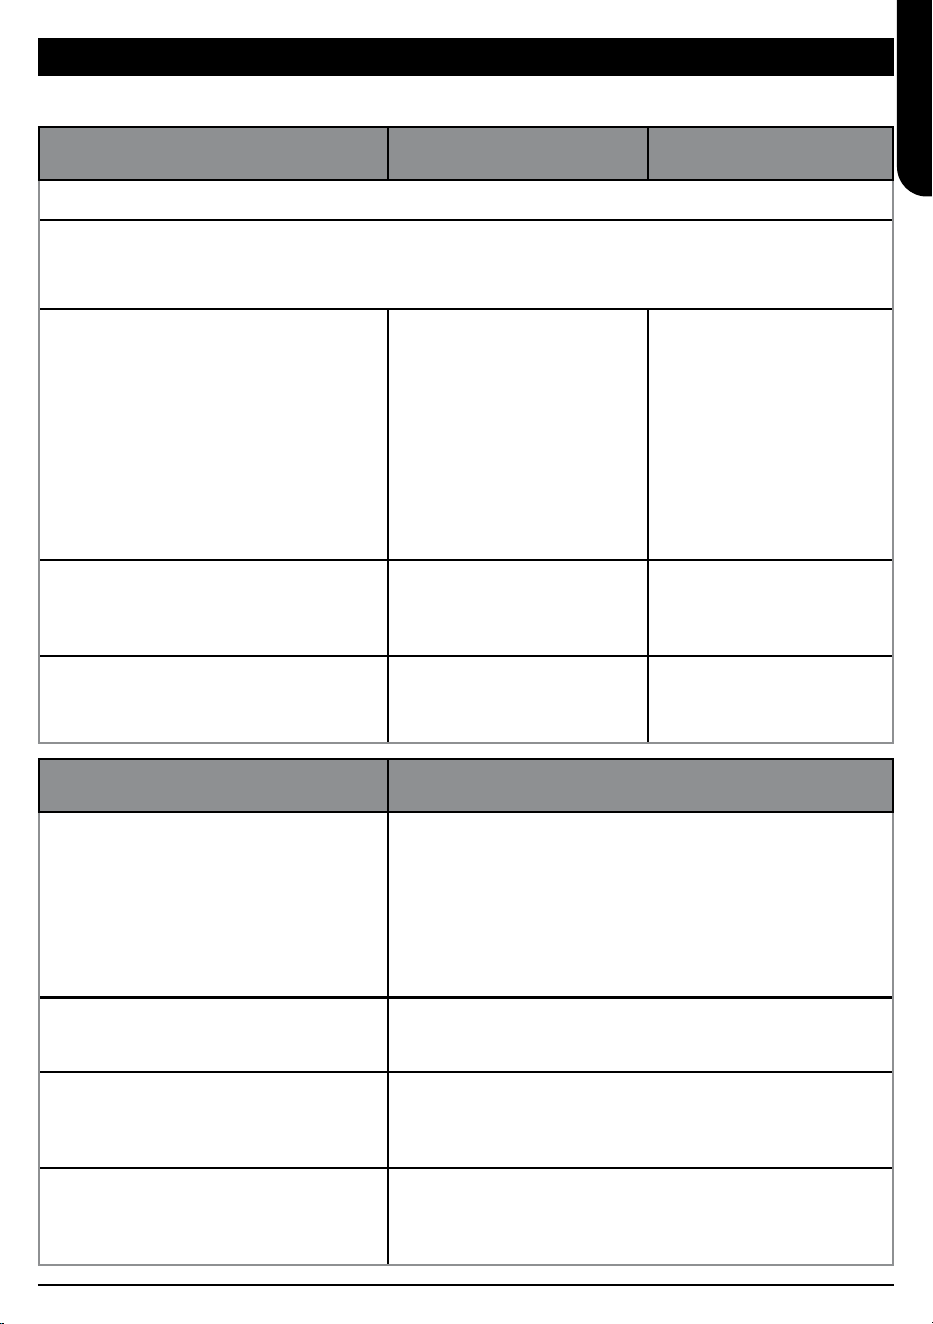
MAINTENANCE OVERVIEW
Component Frequency Replacement Part(s)
Robot Maintenance
BEFORE PERFORMING ANY MAINTENANCE, POWER OFF YOUR ROBOT.
TO DO THIS, PRESS AND HOLD THE DOCK ICON ON THE ROBOT FOR 5-7 SECONDS.
REMOVE THE ROBOT WATER TANK.
Mop Pad
NOTE: After a wet clean mission,
the NEVERTOUCH PRO base
will automatically wash the
robot mop pad. Regardless, it
is recommended to clean the
mop pad in the washing machine
or replace the pad every three
months or as needed.
Every 3 months,
or as needed
4918K2800WDEU
4917K2800WDEU
4938K2800WDEUK
Sensors and Charging Contacts
Every 30 days,
or as needed
N/A
Side Brush As needed 58MMSB2PKEUK
Sensor Name Functional Description
Cli Sensor
Cli sensors monitor the cli to avoid falling by
way of infrared ranging. If there is a downward
stair in front (e.g. the height of the white ground
is greater than 50mm, or the black ground is
greater than 30mm), the reading value of the
sensor exceeds the preset value, then robot stop
moving forward.
Lidar Sensor
Lidar sensor help robot map through laser
ranging. Detective distance is 8m.
3D Sensor
With 2 line-lasers and an IR camera, the 3D sensor
scans the objects to identify the image through
algorithms. FOV: H=100°, V=78.7°.
Wall Follow Sensor
Wall follow sensor detects the distance between
the objects and the left side of the robot by the
TOF ranging. Detective distance is 30mm.
ENGLISH
sharkclean.eu
MAINTENANCE
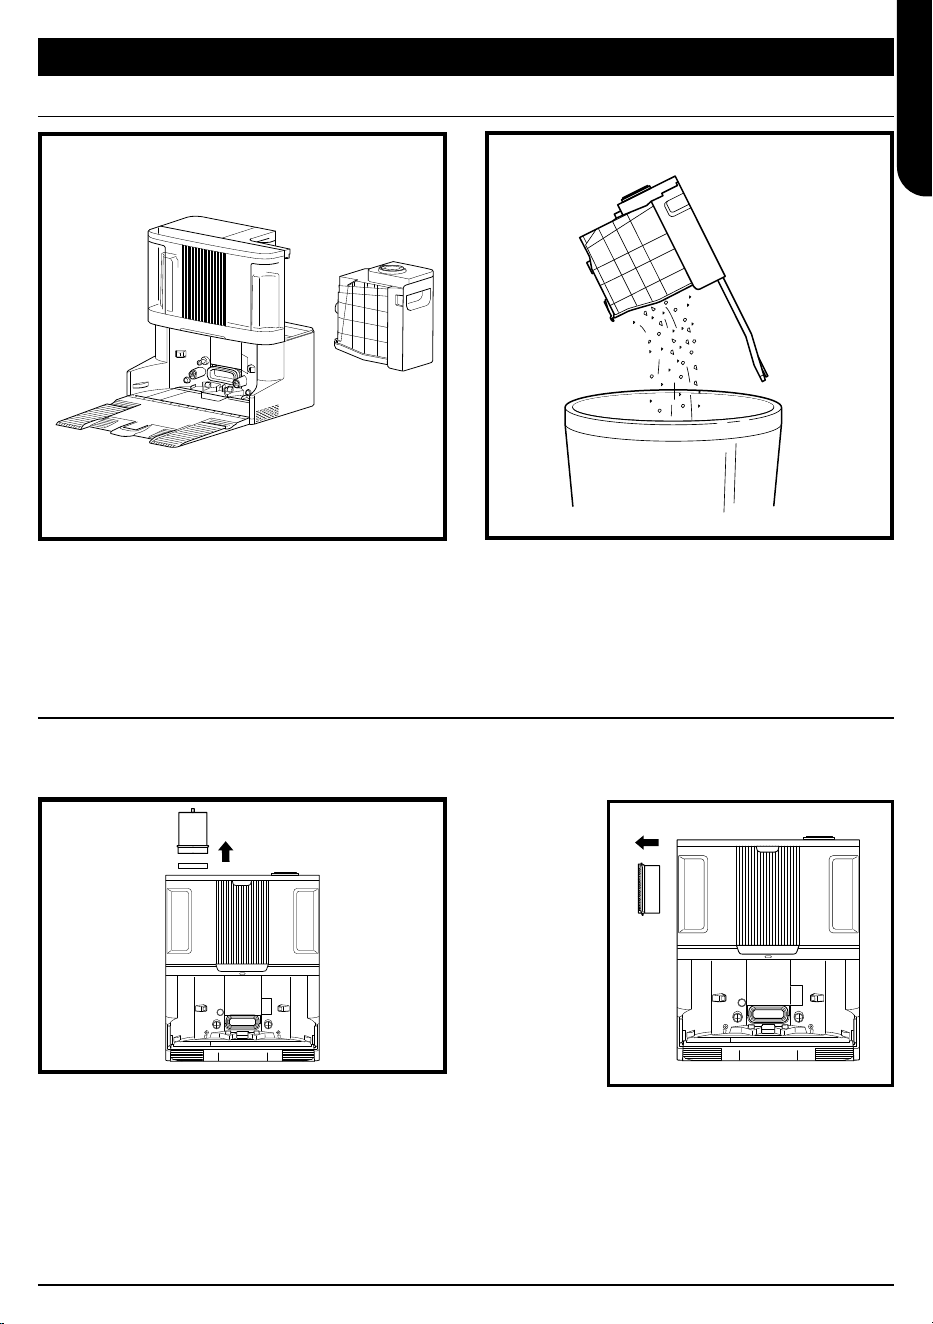
MAINTAINING THE BASE DUST BIN
CLEANING AND REPLACING THE BASE FILTERS
Depending on the size of the base, empty the base
dust bin every 30 to 60 days or as needed.
To detach the bin, press the Dust Bin Release
button on the back right side of the base, then slide
out the bin.
To empty the bin, hold it over the trash, then press
the dustbin release button to empty. The bin lid
will open, releasing dust and debris. Lightly tap the
dust bin against the inside of the trash receptacle
to knock o any remaining debris. Reinstall the bin
by sliding it into the slot in the base until it clicks
into place.
CLEAN
POST-MOTOR
FILTER EVERY
SIX MONTHS
Press the
button at the
top of the
Filter Door,
then tilt the
door and lift
it o. Remove
the Post-Motor
Filter from
the base by
pulling the tab
down.
Tap the filters
clean over the trash. DO NOT use water or soap to
clean this filter as this will cause damage. More
frequent cleaning may be required with heavy use.
Reinstall the filer to the base by inserting the bottom
half first. Push filter until it clicks into place. Then
reinstall the filter door.
CLEAN PRE-MOTOR FILTERS ONCE A MONTH
To open the filter housing lid, hold the top left edge
of the base and pull up on the lid. With the lid open,
remove the foam filter by the top handle, then lift out
the felt filter underneath. Tap the filters clean over the
trash, then rinse with cold water ONLY, as soap may
damage them. Allow filters to air-dry completely for
at least 48 hours before reinstalling to prevent liquid
from being drawn into electrical parts. The filters must
be installed correctly for the base to work properly.
Reinsert the felt filter first, then the foam filter.
Regularly clean the filters to keep your vacuum's suction power optimal. Replace filters every 6-12
months or as needed.
IMPORTANT: DO NOT use soap when cleaning the filters.
ENGLISH
sharkclean.eu
MAINTENANCE
With the ramp removed, you can access the pad
plate tray.
To clean the pad plate tray, wipe it down with a
damp microfiber cloth.
For base models with pad wash: carefully remove
the grey water mesh on the left-hand side and clear
any debris, then reinstall.
Allow the tray to completely dry for at least 48
hours before reinstalling the ramp and the robot.
CAUTION: Turn off power before performing any maintenance. To turn the base power off, simply unplug it
from the electrical outlet.
It is recommended to replace the Anti-Odour Technology cartridge every 6 months, or as needed.
CLEANING THE PAD PLATE TRAY
ANTI-ODOUR TECHNOLOGY
NOTE: The Anti-Odour Technology is not included in all models.
1. Flip up the handle
and rotate the dial
anti-clockwise until
the two arrows are
aligned. Pull the
handle to remove the
dial from the base.
4. Align the yellow arrow on
the side of the cartridge
with the yellow arrow on
the side of the dial cover,
then insert the cartridge
into the dial. Rotate the
cartridge clockwise to lock
it in place.
2. Rotate the cartridge
anti-clockwise in the
dial housing and pull
out the cartridge to
remove it.
5. Align the arrow on the dial
cover with the arrow on the
base, then reinsert the dial
into the base. Rotate the
dial anti-clockwise until
it clicks into an intensity
setting to engage. Rotate
further to change the
intensity setting.
3. Remove the new
odour cartridge from
the sealed packaging.
To maintain the life
of the cartridge,
keep it in the sealed
packaging until you
are ready to install it.
6. Dispose of the old
cartridge by dropping it
into the trash.
ENGLISH

sharkclean.eu
MAINTENANCE
MANUAL ROBOT INTERACTIONS
PAD PLATE REMOVAL & REINSTALLATION
FILLING THE ROBOT WATER TANK
1. To open the robot water tank, pull the rubber stop
from its sealed location to open the port. Fill with
water and then secure the rubber seal back in
place.
2. After filling and sealing the robot water tank, be
sure to wipe the robot evacuation port dry with a
microfiber cloth.
1. To remove the pad plate, use two fingers to gently
pull the pad plate o the bottom of the robot.
2. To reattach the pad plate, slide it until you hear it
click into place.
NOTE: DO NOT to remove the pad platedirectly
from the base.
If the pad plate is on the base, slide therobot up the
ramp to install, send the robotfor a wet clean, pause
the robot, and thenremove the pad plate from the
robotfollowing the steps above.
CAUTION: Turn off power and remove the robot’s water tank before performing any maintenance. To turn
the robot power off, press and hold the DOCK icon
on the robot for 5-7 seconds.
NOTE: With the self-emptying robot, these actions will not be required for regular maintenance.
Though the base will automatically refill the robot water tank, you can also access and fill it manually if needed.
Though the base will automatically remove and reinstall the pad plate, you can also remove it manually if needed.
ENGLISH
sharkclean.eu
MAINTENANCE
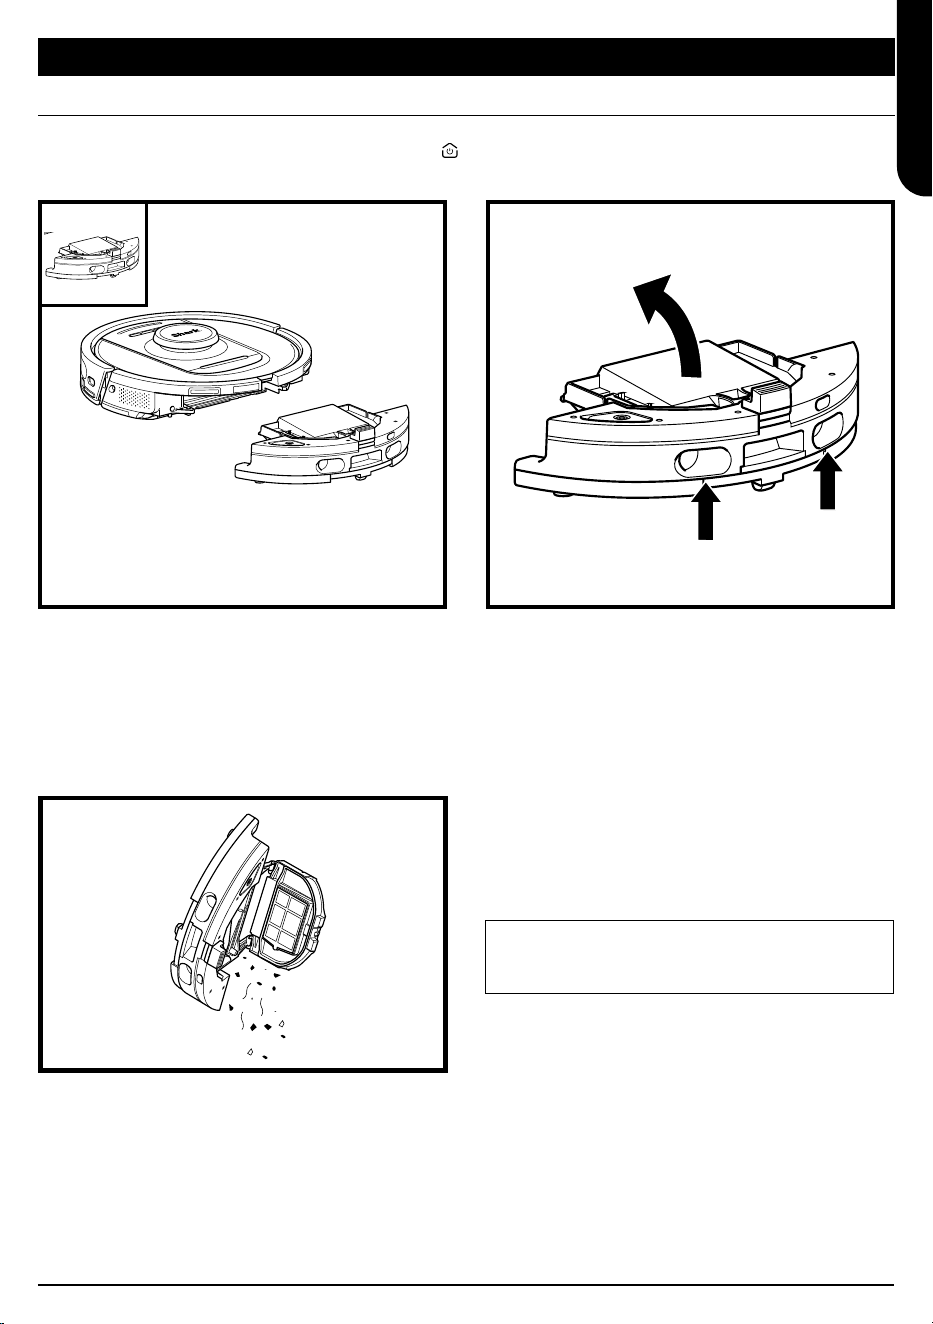
EMPTYING THE ROBOT DUST BIN
Press the Dust Bin Release Button and slide the
dust bin out from the robot.
To open the robot dust bin lid, pinch and lift up
using the finger slots.
Empty debris and dust into the trash. If desired,
you may use a dry cloth to wipe the interior of the
dust bin.
Remove the filter out of the dust bin using the tabs.
Lightly tap the filter over the trash to remove debris
every time you empty the dust bin. Reinsert the filter
into the dust bin, then slide the dust bin back into the
robot until it clicks into place.
Regularly clean the filters to keep your vacuum's suction power optimal. Replace filters every 6-12
months or as needed.
IMPORTANT: DO NOT use soap when cleaning the filters.
NOTE: After emptying the dust bin, reinsert the dust
bin completely, until it clicks into place on the robot.
CAUTION: Turn off power and remove the robot’s water tank before performing any maintenance. To turn
the robot power off, press and hold the DOCK icon
on the robot for 5-7 seconds.
NOTE: With the self-emptying robot, these actions will not be required for regular maintenance.
ENGLISH
sharkclean.eu
MAINTENANCE
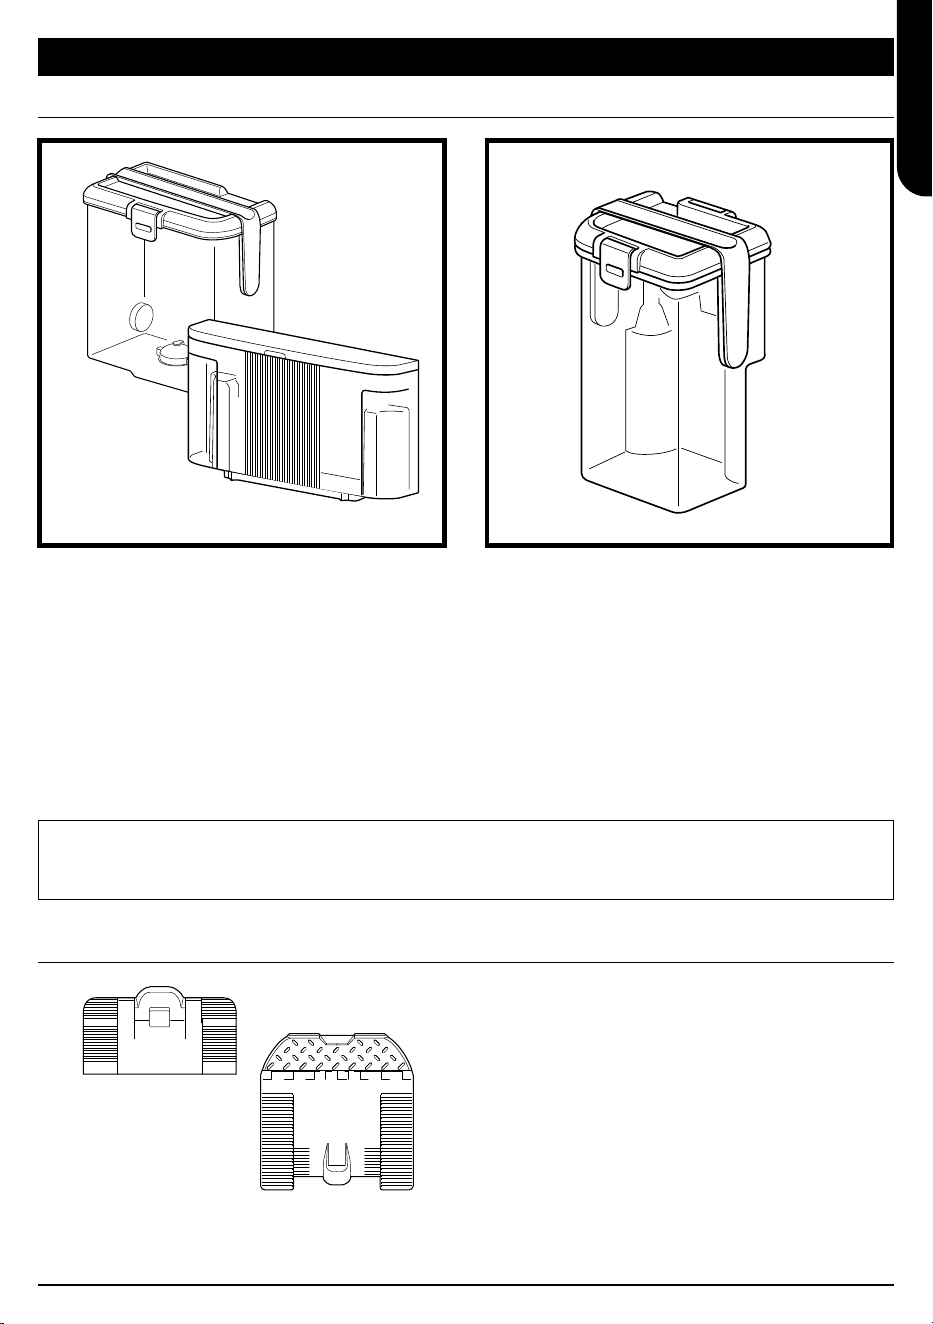
MAINTAINING THE WATER TANK(S)
CLEANING THE BASE RAMP
DO NOT reinstall any water tanks filled with warm water. Always use room-temperature water to fill the water tank
before use.
DO NOT move the base while the water tank is full.
1. It is recommended to clean the base clean water
tank before every refill, or once every 30 days.
2. To do so, wash the clean water tank with warm
water and soap. Rinse thoroughly.
3. Allow the tank to air-dry for at least 48 hours
before reinstalling.
1. The NEVERTOUCH PRO base includes a grey water
tank that collects and store dirty water after pad
wash.
2. This tank should be emptied and cleaned as
needed, or once every 30 days.
3. To do so, open the tank lid and pour out the dirty
water. Fill the tank with clean water and some
soap, close the lid, lock it, and shake.
4. Pour out the dirty water and rinse thoroughly.
5. Allow the tank to air-dry for at least 48 hours
before reinstalling.
It is recommended to clean the base ramp every
three months or as needed.
TO DO SO:
1. Carefully lift the ramp up and away from the base.
2 Use a damp cloth to wipe down the ramp. Allow
the ramp to air-dry for at least 48 hours before
reinstalling.
3. Once dry, lift the ramp slightly above the base,
align, and press down until the ramp clicks into
place.
OR
ENGLISH
sharkclean.eu
MAINTENANCE
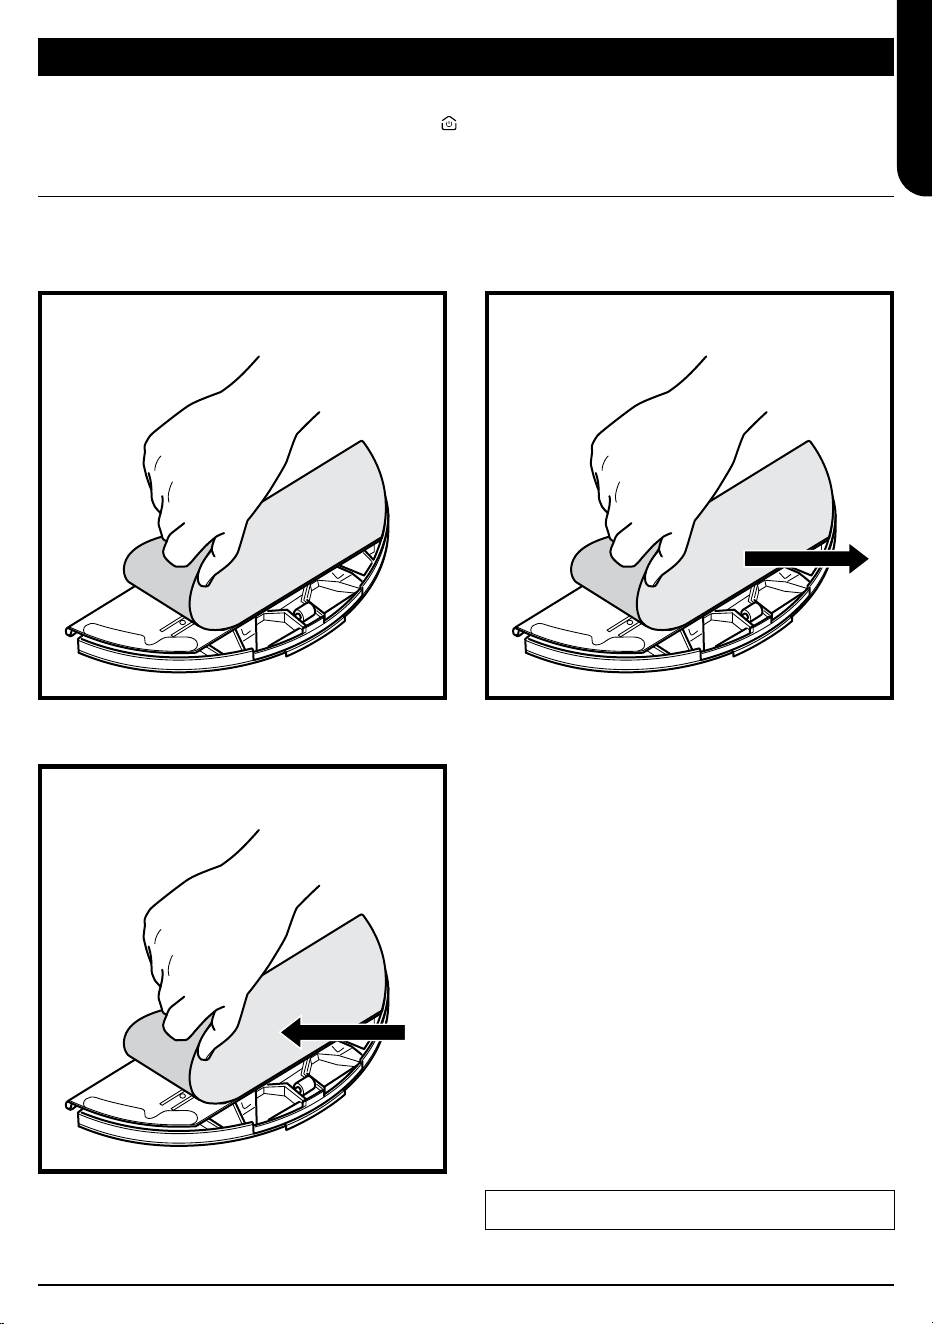
1. Carefully pull the pad away from the pad plate.
3. Slide a clean or new pad into the edge of the pad
plate. Secure the pad to the plate with a light press
to engage the Velcro.
2. Slide the pad to one side, away from the pad plate.
CAUTION: Turn off power and remove the robot’s water tank before performing any maintenance. To turn
the robot power off, press and hold the DOCK icon
on the robot for 5-7 seconds.
After a wet clean mission, the NEVERTOUCH PRO base will automatically wash the robot mop pad.
Regardless, it is recommended to clean the mop pad in the washing machine or replace the pad every three
months or as needed. To do so:
CLEANING AND REPLACING THE MOP PAD
NOTE: Mop pad colour may vary.
ENGLISH
sharkclean.eu
MAINTENANCE
CLEANING THE ROBOT FILTER
CLEANING THE SIDE BRUSH
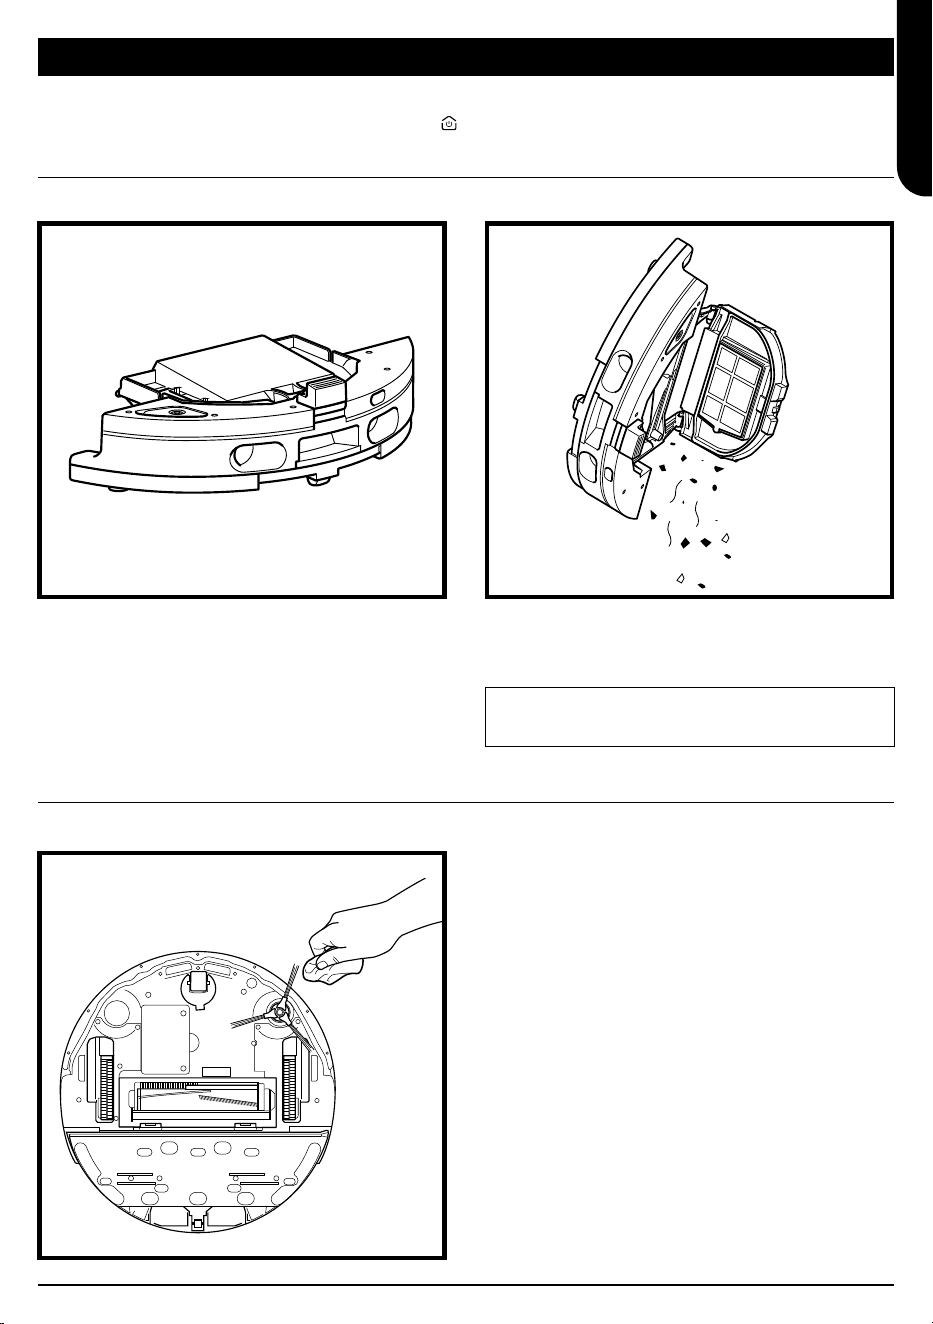
1. Remove and empty the dust bin. Clean any hair or
debris o the back of the dust bin.
1. Remove the side brush from the robot.
2. Carefully unwind and remove any string or hair
wrapped around the brush or gear.
3. Gently wipe brush with a dry cloth. To reinstall,
snap the brush over the peg. Spin the brush
manually to make sure it is installed correctly.
CLEAN SIDE BRUSH AS NEEDED.
2. Every time you empty the dust bin, slide the filter
out and lightly tap it over a trash can to remove
any dust and dirt. Use a dry cloth or soft brush to
remove any remaining debris.
CAUTION: Turn off power and remove the robot’s water tank before performing any maintenance. To turn
the robot power off, press and hold the DOCK icon
on the robot for 5-7 seconds.
For optimal suction power, clean the filter inside the robot's dust bin.
DO NOT use water or soap to clean this filter as this will
cause damage.
ENGLISH
sharkclean.eu
MAINTENANCEMAINTENANCE
• Locate the charging contacts on either side of the
base.
• These sensors require occasional maintenance.
• With a dry cloth, gently dust o both charging
contacts on the base, removing any dust or debris
that might impact robot docking performance.
CLEAN SENSORS AND CHARGING CONTACTS
AS NEEDED.
• The sensors on the robot require occasional
maintenance.
• With a dry cloth or cotton swab, gently dust o
the sensors located on the bottom and sides of the
robot.
CAUTION: Turn off power and remove the robot’s water tank before performing any maintenance. To turn
the robot power off, press and hold the DOCK icon
on the robot for 5-7 seconds.
CAUTION: Turn off power before performing any maintenance. To turn the base power off, simply unplug it
from the electrical outlet.
CLEANING THE BASE CHARGING CONTACTS
CLEANING THE SENSORS
IMPORTANT: The robot uses cliff sensors to avoid stairs and other steep drops. Sensors may work less effectively when
they are dirty. For best results, clean sensors once every 30 days or as needed.
ENGLISH
sharkclean.eu
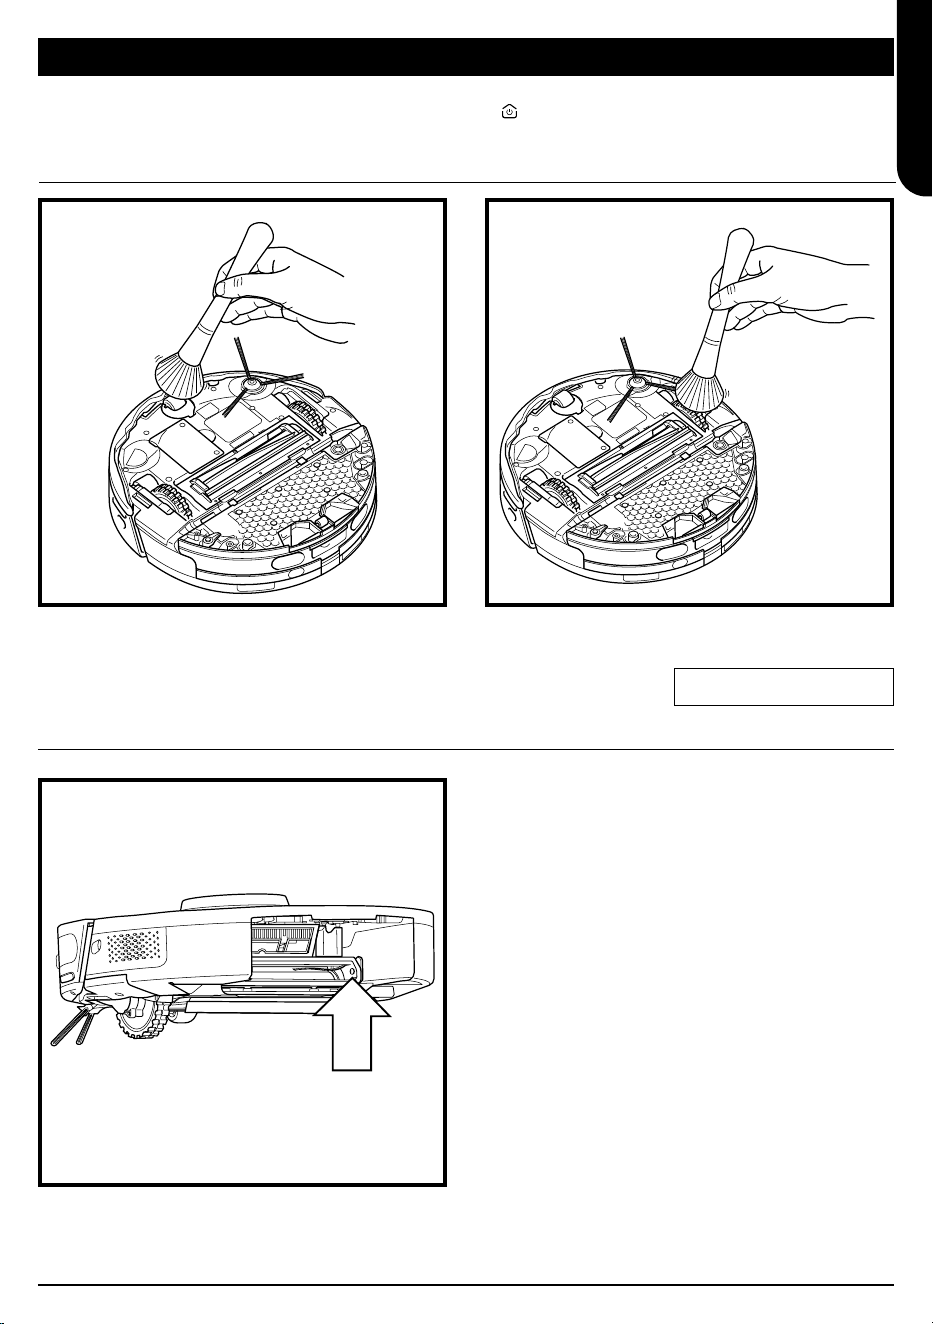
LIDAR MODULE
1. Check the navigation module on top of the robot
and gently remove any hair or debris.
2. For a more complete clean, place the robot on a
level surface and turn o the power.
3. Use compressed air to blow away any dirt or debris
from the gap around the rotating LiDAR module.
4. It is also recommended to use a cotton bud to
clean the lidar turret by spinning the lidar module
manually 5 times in both directions.
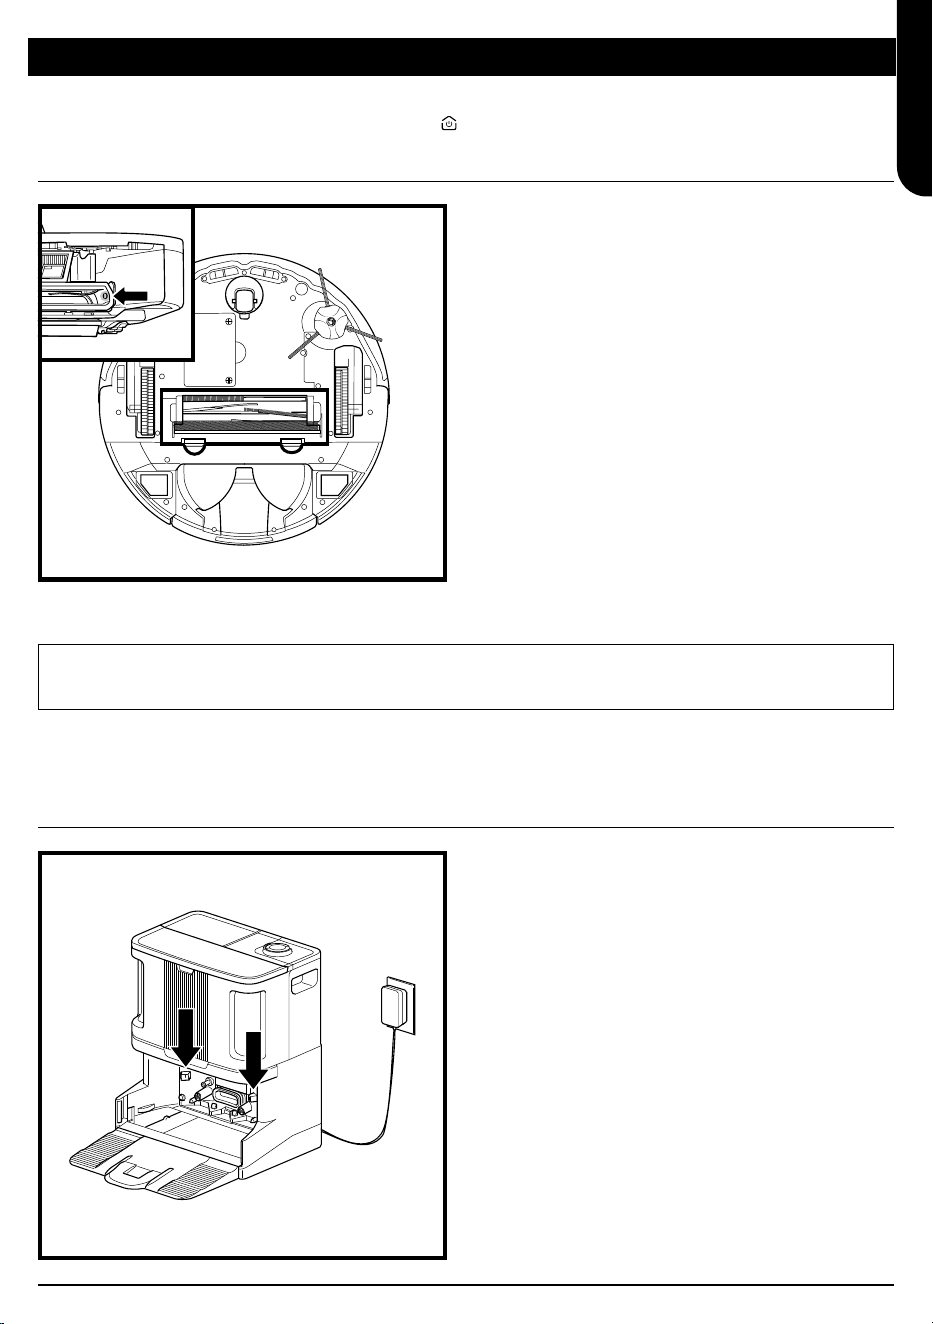
BRUSHROLL
MAINTENANCE
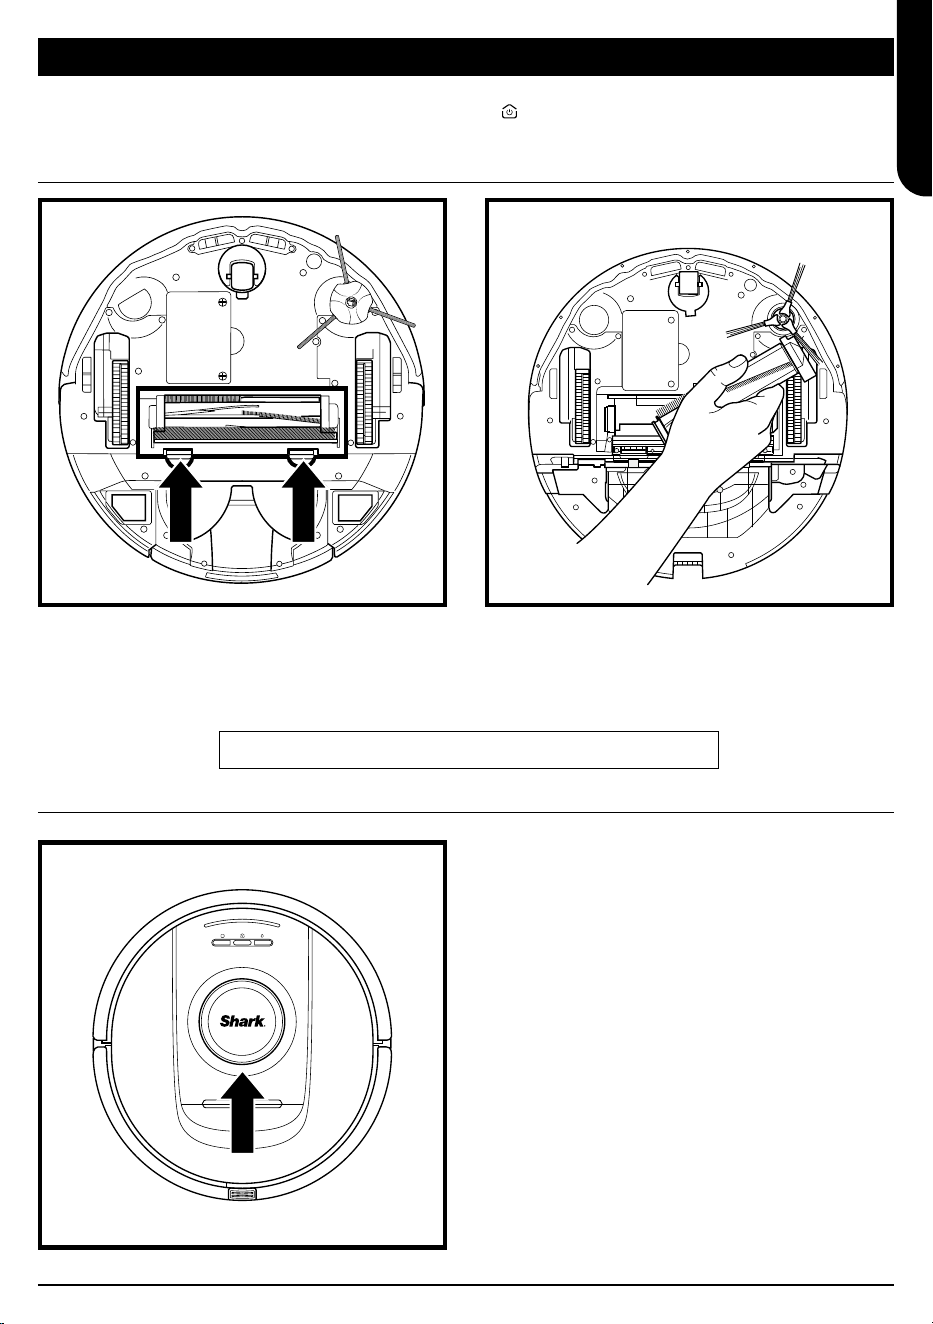
1. To access the brushroll, push up on the tabs on the
brushroll door, then lift o the door.
2. Take out the brushroll and remove the cap on the
end. Clean o any hair or debris then replace the
cap. Reinstall the brushroll, inserting the flat end
first. Close the brushroll access door and press
down until both sides click into place.
NOTE: Replace brushroll every 6 to 12 months, or when visibly worn.
CAUTION: Turn off power and remove the robot’s water tank before performing any maintenance.
To turn the robot power off, press and hold the DOCK icon
on the robot for 5-7 seconds.
ENGLISH
sharkclean.eu
CLEANING THE DIRTDETECT SENSORS
Remove the robot dust bin. Using a dry microfibre
cloth, wipe o the area indicated to remove any dust
or debris covering the sensor.
CLEANING THE WHEELS
MAINTENANCE
1. Rotate the front wheel while lightly brushing away
dirt and debris. Clean the wheel and the housing
around it.
CLEAN FRONT WHEEL HOUSING PERIODICALLY.
2. Periodically clean the drive wheels and the
housing around them. To clean, rotate each drive
wheel while dusting.
NOTE: Brush not included.
CAUTION: Turn off power and remove the robot’s water tank before performing any maintenance.
To turn the robot power off, press and hold the DOCK icon
on the robot for 5-7 seconds.
ENGLISH
sharkclean.eu
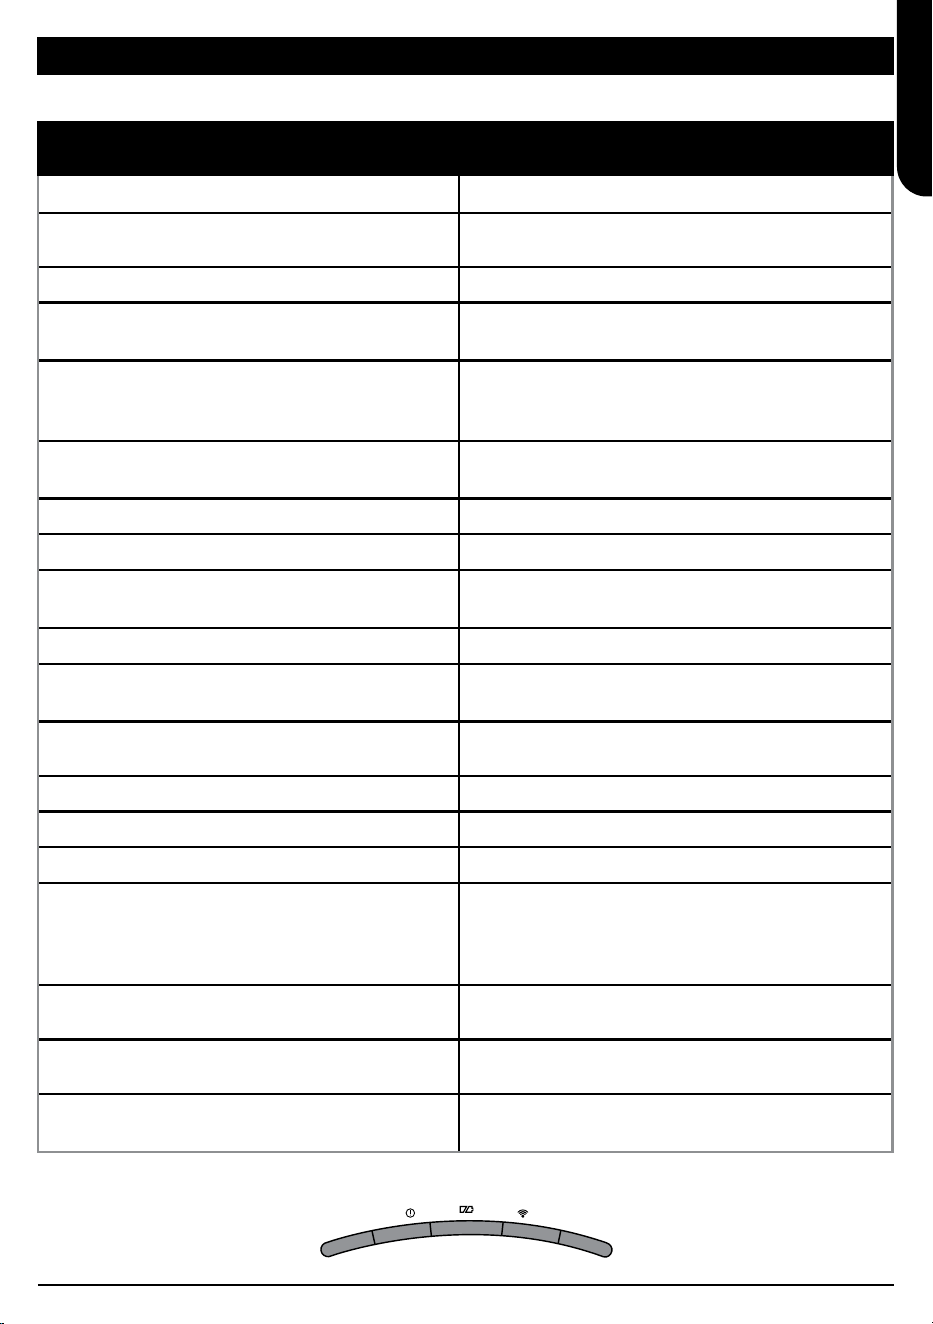
UNDERSTANDING THE ROBOT USER INTERFACE
LED COMBINATION FUNCTIONALITY
ALL LEDS (WHITE) - FLASHING
Robot is booting up.
ALL LEDS (WHITE) - SOLID
Robot finishes booting up and enters standby
mode. Robot is waiting for commands.
ALL LEDS (GREEN) - SOLID
Battery level 80%-100%.
4 LEDS (GREEN) – SOLID
RIGHT LED (OFF)
Battery level 60%-79%.
LEFT LED (YELLOW) + NOTIFICATION
LED (YELLOW) + BATTERY LED
(YELLOW)
Battery level 40%-59%.
LEFT LED (YELLOW) + NOTIFICATION
LED (YELLOW)
Battery level 20%-39%.
LEFT LED (RED) - SOLID
Battery level 0%-19%.
ALL LEDS (GREEN) - BREATHE
Robot is making its way back to the base.
LEDS COMPLETE CELEBRATION
SEQUENCE
Robot returns to base successfully.
WIFI LED (BLUE) – BREATHE
Robot is connecting to WIFI.
LEDS COMPLETE CELEBRATION
SEQUENCE
WIFI connection is successful.
ALL LEDS (GREEN) - BREATHE
Robot is evacuating dry debris into
the base dust bin.
BATTERY LED (RED) - SOLID
Robot has low battery.
ALL LEDS (WHITE) – FLASH x2
Robot has been paused.
ALL LEDS (PURPLE) – FLASH
Robot has enabled DirtDetect mode.
BATTERY LED:
• GREEN BREATHE: 66-100%
• YELLOW BREATHE: 33-65%
• RED BREATHE: 5-32%
Robot is on the base and charging.
ALL LEDS (TURQUOISE) - FLASH
Robot is activating pad shift during a wet
cleaning mission along a wall.
ALL LEDS (TURQUOISE) - BREATHE
Robot is saturating the pad at the start of a
wet cleaning mission.
ALL LEDS (TURQUOISE) – FILL FROM
ONE SIDE TO OTHER
The base is refilling the robot's water tank
before a wet cleaning mission.
If any lights are illuminated or flashing on your robot, refer to the chart below to understand why:
LEFT
NOTIFICATION
BATTERY WI-FI RIGHT
ENGLISH
sharkclean.eu
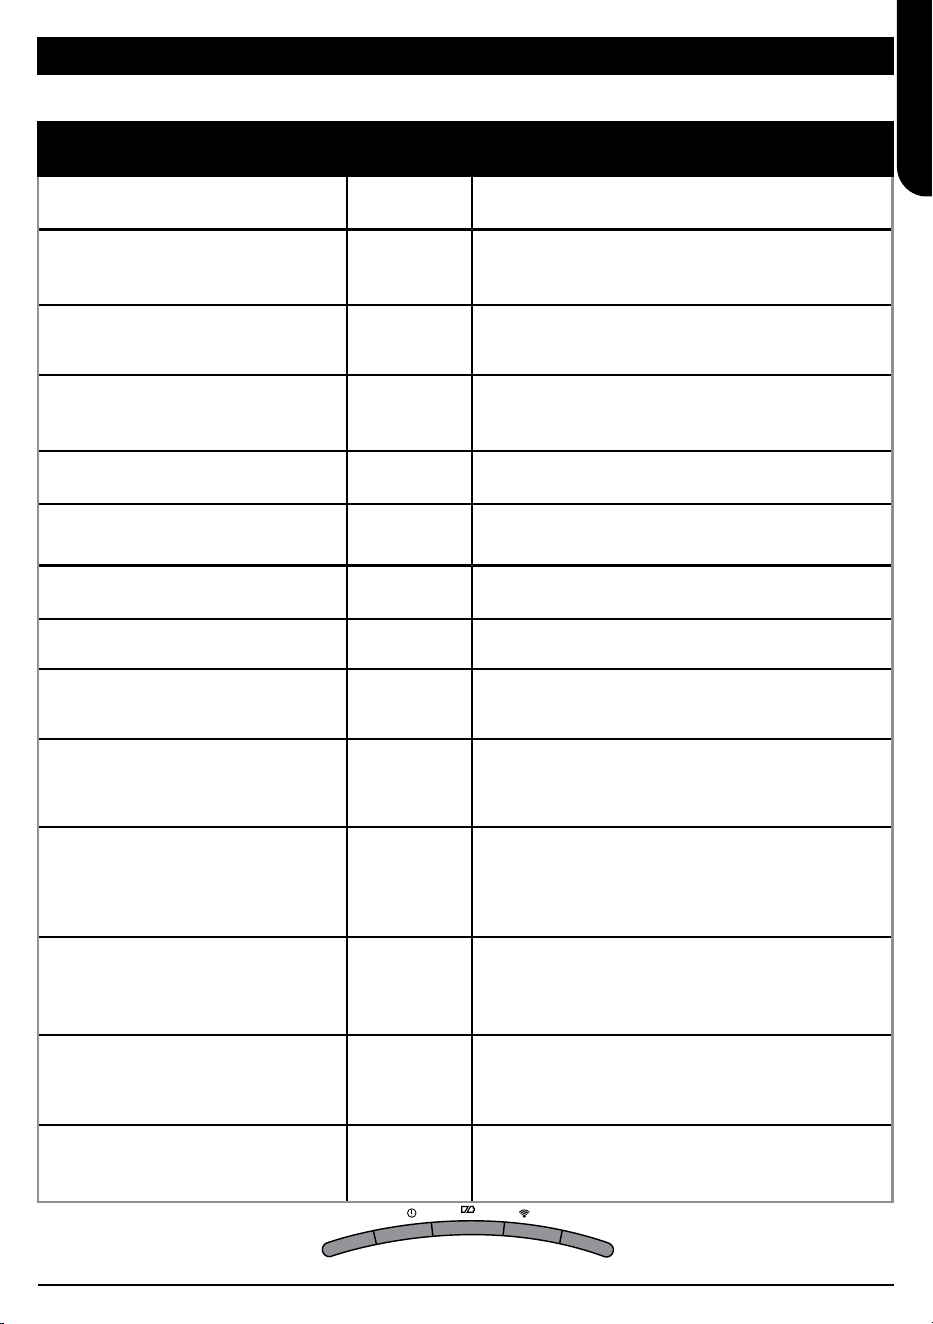
COMMON ERROR CODES
ERROR CODE
ERROR
NUMBER
SOLUTION
BATTERY LED (RED)
+ WIFI LED (RED)
2
Side brush is stuck. Remove any debris from
around the side brush so it moves freely.
NOTIFICATION LED (RED)
+ WIFI LED (RED) + RIGHT LED
(YELLOW)- ALLFLASHING
3
Suction motor failure. Remove and empty the
dust bin, clean the filters, remove the brushroll
and brushroll door, and remove blockages.
NOTIFICATION LED (RED)
+ RIGHT LED (YELLOW)
4
Blockage in brushroll. Remove any debris from
around and inside the brushroll so that it can
spin freely.
BATTERY LED (RED) + WIFI
LED (RED) + RIGHT LED
(YELLOW)
5
A drive wheel is stuck. Clean the wheels and
remove any debris wrapped around the axles so
they can move freely.
WIFI LED (RED)
+ RIGHT LED (YELLOW)
6
Front bumper may be jammed. Clean the bumper
and make sure it moves in and out freely.
NOTIFICATION LED (RED)
+ WIFI LED (RED)
7
Cli sensor error. Move your robot to a new
location and clean its cli sensors.
BATTERY LED (RED)
+ RIGHT LED (YELLOW)
9
Robot dust bin needs to be reinstalled. Insert
the dust bin until it clicks in place.
WIFI LED (RED)
10
Robot may be stuck on an obstacle. Move robot
to a new location on a level surface.
NOTIFICATION LED (RED)
16
Robot is stuck. Move your robot to a new
location and make sure the front bumper moves
in and out freely.
NOTIFICATION LED (RED)
+ BATTERY LED (RED)
+ WIFI LED (RED)
23
Robot cannot find the base. Please make sure the
base is powered ON and is free of all obstacles.
LEFT LED (RED) FLASHING
24
Battery is critically low and needs recharging.
Please pick up your robot and place it on the
base. Make sure the base indicator light turns
blue to confirm your robot is placed on the base
and charging.
NOTIFICATION LED (RED)
+ BATTERY LED (RED)
+ WIFI LED (RED) + RIGHT LED
(YELLOW)
26
Blockage in dust bin. Check the evacuation
port on the base and robot dust bin for clogs.
Clear any debris and reinstall the base dust bin,
ensuring that it clicks into place.
RIGHT LED (RED) FLASHING
33
There may be a blockage with Active Lift. Turn
o the robot and ensure that there is nothing
blocking the wheel suspension from moving up
and down
LEFT LED (PINK)
+ RIGHT LED (PINK)
- ALLFLASHING
36
There may be a blockage in the base. Unplug the
base and ensure that there is nothing blocking
the space where the robot sits in the base.
If any error lights are illuminated or flashing on your robot, refer to the error code chart below:
LEFT
NOTIFICATION
BATTERY WI-FI RIGHT
For all other issues, please visit support.sharkclean.eu
ENGLISH
sharkclean.eu
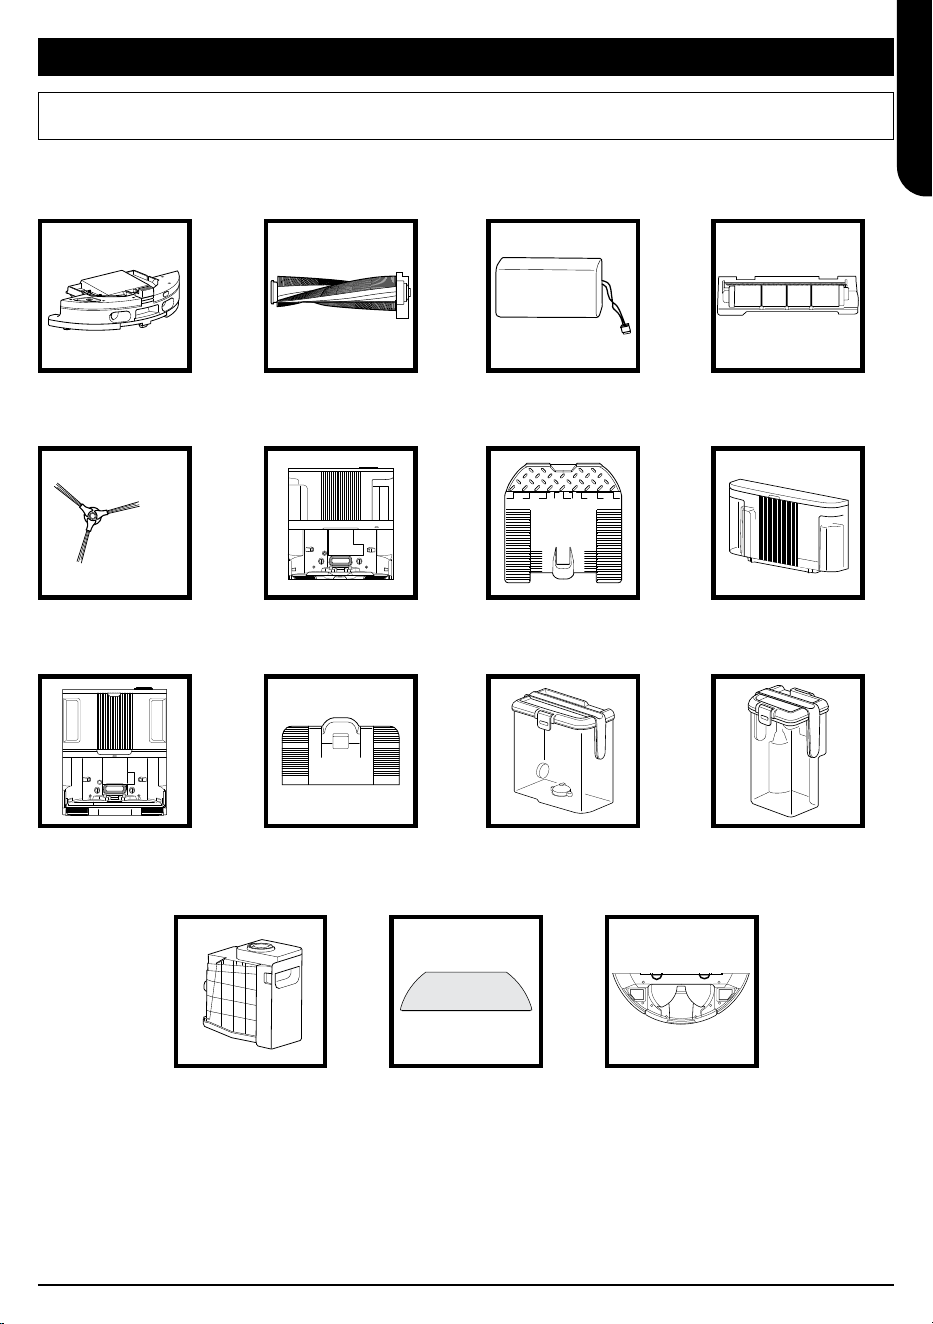
REPLACEMENT PARTS
NOTE: To order replacement visit sharkclean.eu
REPLACEMENT PARTS: ROBOT
Brushroll
NeverTouch Base
NeverTouch Pro
Base Ramp
Robot Dust Bin
Side Brush
NeverTouch Pro
Base
Base Dust Bin
Battery
NeverTouch Base
Ramp
NeverTouch Pro
Clean Water Tank
Mop Pad
Brushroll Door
NeverTouch Clean
Water Tank
NeverTouch Pro
Grey Water Tank
Pad Plate
ENGLISH

sharkclean.eu
ENGLISH
END-USER LICENSE AGREEMENT FOR SHARKNINJA SOFTWARE
IMPORTANT: PLEASE READ THE TERMS AND CONDITIONS OF THIS LICENCE AGREEMENT CAREFULLY
BEFORE COMMENCING USE OF THIS PRODUCT
This End-User License Agreement (“EULA”) is a legal agreement between you and SharkNinja Operating
LLC’s (“SharkNinja”, “us” or “we”) for [the]/[SharkNinja’s] computer software which is preinstalled on
your SharkNinja device, which you download in order to control the SharkNinja device from your phone or
computer, or, in either case, is made available by way of updates (the “Software”), as well as any printed,
online or electronic documents related to the Software (the “Documentation”).
We grant you the right to use of the Software and Documentation on the terms of this License. We do not sell
the Software or Documentation to you. We remain the owners of the Software and Documentation at all times.
If you do not agree to the terms of this EULA, do not install or use the Software, the Documentation or
the SharkNinja device. In that case, you may return the unused SharkNinja device to us for a full refund.
This does not aect your legal rights to return goods to your retailer if you change your mind or if they are
faulty, or the terms of our separate manufacturer’s guarantee, if any.
1. GRANT OF LICENSE.
Installation and Use. In return for you agreeing to comply with the terms of this EULA, SharkNinja grants
you the right to use the Software and Documentation, and to receive and use any free supplementary
software code or update of the Software incorporating "patches" and corrections of errors as may be
provided by the Licensor from time to time, solely for the purpose of domestic operation and use of the
SharkNinja device in relation to which the Software was supplied.
2. DESCRIPTION OF OTHER RIGHTS AND LIMITATIONS.
2.1. Maintenance of Copyright Notices. You must not remove or alter any copyright notices on any and all
copies of the Software and Documentation.
2.2. Copying and Distribution. You must not make or distribute to third parties copies of the Software or the
Documentation.
2.3. Prohibition on Reverse Engineering, Decompilation, and Disassembly. You must not reverse engineer,
decompile, or disassemble the Software, except and only to the extent that such activity is expressly
permitted by applicable law notwithstanding this limitation.
2.4. Rental. You must not rent, lease, or lend the Software or the Documentation without written permission
from SharkNinja.
2.5. “Not for resale” software. Software identified as “Not for Resale” or “NFR”, must not be resold,
transferred, or used for any purpose other than demonstration, test, or evaluation.
2.6. Support Services. SharkNinja may provide you with support services related to the Software or your
SharkNinja device (the “Support Services”). Any supplemental software code provided to you as part
of the Support Services shall be considered part of the Software and be subject to the terms and
conditions of this EULA.
2.7. Ownership of Software. SharkNinja retains ownership of all intellectual property rights in the Software
and the Documentation.
2.8. Compliance with Applicable Laws. You must comply with all applicable laws regarding use of the
Software and Documentation.
3. UPDASTES.
SharkNinja may upgrade or update, or require you to upgrade or update, the Software, provided that
the Software shall always match the description of it that we provided to you before you bought your
SharkNinja device. This EULA will govern any upgrades or updates provided by SharkNinja that replace
and/or supplement the Software supplied pre-loaded to your SharkNinja device, unless such upgrade is
accompanied by a separate End User Licence Agreement, in which case the terms of that End User Licence
Agreement will govern.
4. DATA AND PRIVACY.
SharkNinja is committed to ensuring your privacy by adhering to high standards of fairness and integrity,
and complying with applicable data protection laws. We are committed to keeping our customers informed
about how we use the information we gather from you through the use of the Software. Our privacy
practices are described in SharkNinja’s Privacy Policy, as well as in separate notices given when an app,
product, or service is purchased or downloaded. At all times your information will be treated in accordance
with the SharkNinja Privacy Policy, which is incorporated by reference into this EULA and can be viewed at
the following URL: https://ninjakitchen.co.uk/systempage.privacypolicy.pagelet2-page-cms-systempage.
privacyPolicy.pagelet2-Page. Please read and review our Privacy Policy and any other relevant privacy
notices carefully to understand how your personal data is collected, processed and shared by SharkNinja,
and your data subject rights in relation to such data.

sharkclean.eu
ENGLISH
5. THIRD-PARTY APPLICATION LIBRARIES AND EMBEDDED SOFTWARE
5.1 You acknowledge that Ayla Networks, Inc. (“Ayla”) has provided certain application libraries that have
been embedded into the Software (“Ayla Application Libraries”) and enables SharkNinja devices to
connect to the Ayla Cloud Service (“Ayla Embedded Software”).
5.2 You must not use the Ayla Application Libraries except as an incorporated portion of the Software,
unmodified from the form provided to you.
5.3 You must not use the Ayla Embedded Software except as an incorporated portion of your SharkNinja
device, unmodified from the form provided to you.
5.4 You must not reverse engineer, decompile, or disassemble the Ayla Application Libraries or the
Ayla Embedded Software, except and only to the extent that such activity is expressly permitted by
applicable law notwithstanding this limitation.
5.5 SharkNinja retains ownership of all intellectual property rights in the Ayla Application Libraries and the
Ayla Embedded Software incorporated into the Software.
5.6 You must not use the Ayla Application Libraries or Ayla Embedded Software to attempt to gain
unauthorised access to or use of the systems/services of SharkNinja’s other licensors; nor will you
transmit viruses, worms, Trojan horses, time bombs, spyware, malware, cancelbots, passive collection
mechanisms, robots, data mining software, or any other malicious or invasive code or program into the
systems/services of SharkNinja’s other licensors.
5.7 You will not use the Ayla Application Libraries or Ayla Embedded Software to interfere with, breach, or
circumvent any security feature, authentication feature, or any other feature that restricts or enforces
limitations on the use of, or access to, the systems/services of SharkNinja’s other licensors.
5.8
You will not probe, attack, scan, or test the vulnerability of the systems/services of SharkNinja’s other licensors.
5.9 SharkNinja’s other licensors of the Software, Ayla Application Libraries, and the Ayla Embedded
Software, are the express third-party beneficiaries of this EULA, and the provisions of this Section of
this EULA are made expressly for the benefit of such licensors, and are enforceable by such licensors.
6. TERMINATION.
Without prejudice to any other rights, SharkNinja may terminate this EULA if you commit a
material or persistent breach of this EULA which you fail to remedy (if remediable) within 14 days after the
service of written notice requiring you to do so. Upon termination for any reason, all rights granted to you
under this EULA shall cease, you must cease all activities authorised by this EULA, and you must immediately
delete or remove the Software from all computer equipment in your possession and immediately destroy or
return to us (at our option) all copies of the Software then in your possession, custody or control.
7. OUR RESPONSIBILITY FOR LOSS AND DAMAGE CONSUMERS SUFFER.
7.1. The Software is for domestic and private use. If you use the Software for any commercial, business
or resale purpose we will have no liability to you for any loss of profit, loss of business, business
interruption, or loss of business opportunity.
7.2
You acknowledge that the Software has not been developed to meet Your individual requirements, and that it is
therefore Your responsibility to ensure that the Software as described in the Documents meets your requirements.
7.3 We are responsible for loss or damage you suer that is a foreseeable result of our breaking this EULA or
our failing to use reasonable care and skill, but we are not responsible for any loss or damage that is not
foreseeable, except as set out at 7.3 to 7.4 below. Loss or damage is foreseeable if either it is obvious that
it will happen or if, at the time this EULA came into force, both we and you knew it might happen.
7.4 If defective digital content that we have supplied damages a device or digital content belonging to you,
then, in accordance with section 46 of the Consumer Rights Act 2015, we will either repair the damage
or pay you compensation. However, we will not be liable for damage that you could have avoided by
following our advice to apply an update or upgrade oered to you free of charge or for damage that
was caused by you failing to correctly follow installation instructions or to have in place the minimum
system requirements advised by us.
7.5 If you bought the SharkNinja device directly from SharkNinja or one of its group companies, we or our
group company, as the seller, may be responsible to you under the contract of sale for loss or damage
caused by your use of the Software. You can find our terms and conditions of sale here: https://
ninjakitchen.co.uk/terms-and-conditions . If you bought the SharkNinja device from another company,
they may have a similar responsibility to you.
7.6
Many SharkNinja products come with a free manufacturer’s guarantee. If you suer loss or damage as a result
of using the Software, you may be able to claim under the guarantee. You can find the terms of our guarantee
here: https://support.ninjakitchen.co.uk/hc/en-gb/articles/360013838359-Ninja-Guarantee-Terms-Conditions.
7.7 We do not exclude or limit in any way our liability to you where it would be unlawful to do so. This
includes liability for death or personal injury caused by our negligence or the negligence of our
employees, agents or subcontractors or for fraud or fraudulent misrepresentation.
8. APPLICABLE LAW AND JURISDICTION. This EULA is governed by English law and you can bring legal
proceedings in respect of the products in the English courts. If you live in Scotland you can bring legal
proceedings in respect of the products in either the Scottish or the English courts. If you live in Northern Ireland
you can bring legal proceedings in respect of the products in either the Northern Irish or the English courts.
9. ASSIGNMENT. We may transfer our rights and obligations under this EULA to another organisation. We
will always tell you in writing if this happens and we will ensure that the transfer will not aect your
rights under the EULA.
sharkclean.eu
ENGLISH
MANUFACTURER’S GUARANTEE
The Shark Guarantee
When a consumer buys a product in the UK, they get the benefit of legal rights relating to the quality of the
product (your “legal rights”). You can enforce your legal rights against your retailer, including Shark if you
bought your appliance from sharkclean.eu . However, at Shark we are so confident about the quality of our
products that we give the owner an additional, free parts and labour manufacturer’s guarantee of up to 2 years.
The guarantee it comes with is an important consideration - and reflects how much confidence the
manufacturer has in its product and manufacturing quality.
The manufacturer’s guarantee does not aect your legal rights.
How long are new Shark machines guaranteed for?
Our manufacturer’s guarantee lasts for one year from the date of purchase as standard, or for two years if
you register your purchase with us within 28 days.
How do I register my Shark guarantee?
If you have purchased your Shark appliance directly from sharkclean.eu your guarantee is registered
automatically. If you bought it from anywhere else in the UK, you can register your guarantee online within
28 days of purchase.
• To register online, please visit sharkclean.eu/register-guarantee or scan the QR code in your
instruction booklet.
• Keep a note of the date you purchased the machine.
IMPORTANT:
• Keep your receipt if you bought your Shark appliance from anywhere except sharkclean.eu . You will
need it to claim under your guarantee.
• The free Shark guarantee only applies in the UK.
What are the benefits of registering my free Shark guarantee?
When you register your guarantee, you will get an extra one year of cover. We’ll also have your details to
hand if we ever need to get in touch. If you further agree to receive communications from us, you can also
receive tips and advice on how to get the best out of your Shark appliance and hear the latest news about
new Shark technology and launches.
What is covered by the free Shark guarantee?
Repair or replacement (at Shark’s discretion) of your Shark machine, including all parts and labour.
What is not covered by the free Shark guarantee?
• Normal wear and tear.
• Accidental damage or faults caused by negligent use or care, misuse, neglect, careless operation or
handling of the Shark appliance which is not in accordance with the Shark Operating Manual supplied
with your machine.
• Damage caused by use of the Shark appliance for anything other than normal domestic household purposes.
• Damage caused by use of parts not assembled or installed in accordance with the operating instructions.
• Damage caused by use of parts and accessories which are not Shark Genuine Components
• Faulty installation (except where installed by Shark).
• Repairs or alterations carried out by parties other than Shark or its agents.
sharkclean.eu
ENGLISH
MANUFACTURER’S GUARANTEE
How can I claim under the free Shark guarantee?
Contact our customer service helpline on 0800 862 0453. For service hours please visit our website under
‘Contact Us’. It’s free to call, and you’ll be put straight through to a Shark representative. You’ll also find
online support at support.sharkclean.eu . The Shark representative will go through some troubleshooting
with you, and if we conclude that the item has failed, we will send you a replacement part or a returns label
to send the defective item back to us free of charge. When you have delivered the defective product to us,
we will send you a replacement.
Please remember that the item will need to be boxed when you return it to us. It can be any suitable box, it
does not have to be the original packaging.
Where can I buy genuine Shark spares and accessories?
Shark spares and accessories are developed by the same engineers who developed your Shark appliance.
You’ll find a full range of Shark spares, replacement parts and accessories for all Shark machines at
sharkclean.eu . Please remember that damage caused by the use of non-Shark spares may not be covered
under your guarantee.
These instructions are designed to help you keep your Shark Robot running at peak performance.
SharkNinja Europe Ltd,
1st/2nd Floor Building 3150,
Thorpe Park,
Century Way,
Leeds, England,
LS15 8ZB
SharkNinja Germany GmbH,
Rotfeder-Ring 9,
60327 Frankfurt am Main, Germany
sharkclean.eu
Illustrations may dier from actual product. We are constantly striving to improve our products; therefore
the specifications contained herein are subject to change without notice.
RV2800ZEEU_RV2800YEEU_IB_MP_Mv3_241003
sharkclean.eu
SharkNinjaEurope Ltd, 1st/2nd Floor Building 3150, Thorpe Park, Century Way, Leeds, England, LS15 8ZB
www.sharkclean.eu
SharkNinja Germany GmbH, Rotfeder-Ring 9, 60327 Frankfurt am Main, Tyskland
www.sharkclean.eu
DANSK Illustrationerne kan afvige fra det aktuelle produkt. Vi
bestræber os hele tiden på at forbedre vores produkter, hvorfor
specifikationerne i denne manual kan blive ændret uden varsel.
© 2024 SharkNinja Operating LLC. SHARK er et registreret
varemærke i den Europæiske Union tilhørende SharkNinja
Operating LLC.
Apple App Store er et registreret varemærke tilhørende Apple Inc.
Google, Android og Google Play er varemærker tilhørende Google LLC.
DEUTSCH Die Abbildungen können vom tatsächlichen Produkt
abweichen. Im ständigen Bemühen um die fortlaufende
Verbesserung unserer Produkte behalten wir uns Änderungen
der hierin enthaltenen Spezifikationen ohne Ankündigung vor.
© 2024 SharkNinja Operating LLC. SHARK ist eine in der
Europäischen Union eingetragene Marke der SharkNinja
Operating LLC.
Apple App Store ist ein Markenzeichen von Apple Inc.
Google, Android und Google Play sind Marken von Google LLC.
ENGLISH Illustrations may dier from actual product
We are constantly striving to improve our products; therefore
the specifications contained here in are subject to change
without notice.
© 2024 SharkNinja Operating LLC. SHARK is a registered
trademark in the European Union of SharkNinja Operating LLC.
Apple App Store is a trademark of Apple Inc.
Google, Android and Google Play are trademarks of Google LLC.
ESPAÑOL Las ilustraciones pueden variar con respecto al
producto. Nos esforzamos continuamente por mejorar nuestros
productos; por lo tanto, las especificaciones incluidas en la
presente guía están sujetas a cambio sin aviso previo.
© 2024 SharkNinja Operating LLC. SHARK es una marca
registrada en la Unión Europea para SharkNinja Operating LLC.
Apple App Store es una marca comercial de Appel Inc.
Google, Android y Google Play son marcas de Google LLC.
FRANÇAIS Les illustrations peuvent être diérentes du produit
réel. Nous nous eorçons constamment d'améliorer nos produits ;
par conséquent, les spécifications contenues dans ce manuel
peuvent être modifiées sans préavis.
© 2024 SharkNinja Operating LLC. SHARK est une marque
déposée de SharkNinja Operating LLC au sein de l’Union
européenne.
Apple App Store est une marque commerciale d’Apple Inc.
Google, Android et Google Play sont des marques de Google LLC.
ITALIANO Il prodotto illustrato può essere diverso dal prodotto
eettivo. Shark si impegna costantemente per migliorare i propri
prodotti, pertanto, le specifiche descritte nel presente documento
possono essere soggette a modifica senza preavviso.
© 2024 SharkNinja Operating LLC. SHARK è un marchio registrato
nell'Unione europea per SharkNinja Operating LLC.
Apple App Store è un marchio di Apple Inc.
Google, Android e Google Play sono marchi di Google LLC.
NEDERLANDS De afbeeldingen kunnen afwijken van het werkelijke
product. Wij streven er constant naar om onze producten
te verbeteren; daarom zijn de specificaties in dit document
onderhevig aan wijzigingen zonder voorafgaande kennisgeving.
© 2024 SharkNinja Operating LLC. SHARK is een geregistreerd
handelsmerk in de Europese Unie van SharkNinja Operating LLC.
Apple App Store is een handelsmerk van Apple Inc. Google,
Android en Google Play zijn handelsmerken van Google LLC.
NORSK Illustrasjonene kan avvike fra det faktiske produktet.
Vi tilstreber kontinuerlig å forbedre produktene våre; derfor kan
spesifikasjonene heri bli endret uten videre varsel.
© 2024 SharkNinja Operating LLC. SHARK er et registrert
varemerke i Den europeiske union som tilhører SharkNinja
Operating LLC.
Apple App Store et varemerke for Apple Inc.
Google, Android og Google Play er varemerker som eies
av Google LLC.
PORTUEGUESE As ilustrações podem diferir do produto real
Estamos constantemente empenhados em melhorar os nossos
produtos; por conseguinte, as especificações aqui contidas estão
sujeitas para mudar sem aviso prévio.
© 2024 SharkNinja Operating LLC. SHARK é uma marca registada
na União Europeia da SharkNinja Operating LLC.
Apple App Store é uma marca comercial da Apple Inc.
Google, Android e Google Play são marcas comerciais da Google LLC.
SUOMI Kuvat saattavat näyttää erilaisilta kuin varsinainen tuote.
Pyrimme jatkuvasti parantamaan tuotteitamme. Siksi tässä annetut
tiedot voivat muuttua milloin tahansa ilman erillistä ilmoitusta.
© 2024 SharkNinja Operating LLC. SHARK on SharkNinja
Operating LLC -yhtiön Euroopan unionissa rekisteröity
tavaramerkki.
Apple App Store on Apple Inc.: n tavaramerkki.
Google, Android ja Google Play ovat Google LLC:n tavaramerkkejä.
SVENSKA Illustrationerna kan avvika från den verkliga produkten.
Vi strävar ständigt efter att förbättra våra produkter och därför kan
specifikationerna i detta dokument ändras utan föregående meddelande.
© 2024 SharkNinja Operating LLC. SHARK är ett registrerat
varumärke i Europeiska unionen för SharkNinja Operating LLC.
Apple App Store är varumärken som tillhör Appe INC.
Google, Android och Google Play är varumärken som tillhör
Google LLC.
