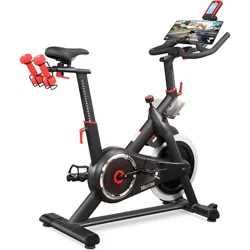
NICEDAY INDOOR CYCLING BIKE
MANUAL
MODEL:305M
Please read this manual carefully before installing and using
the bike, and save for further use.

Contents
WARNING DECAL PLACEMENT....................................................... 1
CUSTOMER SERVICE ......................................................................... 2
SAFETY INSTRUCTIONS .......................................................................... 3
PRODUCT OVERVIEW .............................................................................. 5
ASSEMBLY INSTRUCTIONS .................................................................... 7
ADJUSTMENT INSTRUCTIONS ............................................................. 13
MONITOR SPECIFICATION ................................................................... 15
APPLICATION .............................................................................................18
WARRANTY................................................................................................. 26
WARM UP..................................................................................................... 27
MAINTENANCE.......................................................................................... 28
......
.......
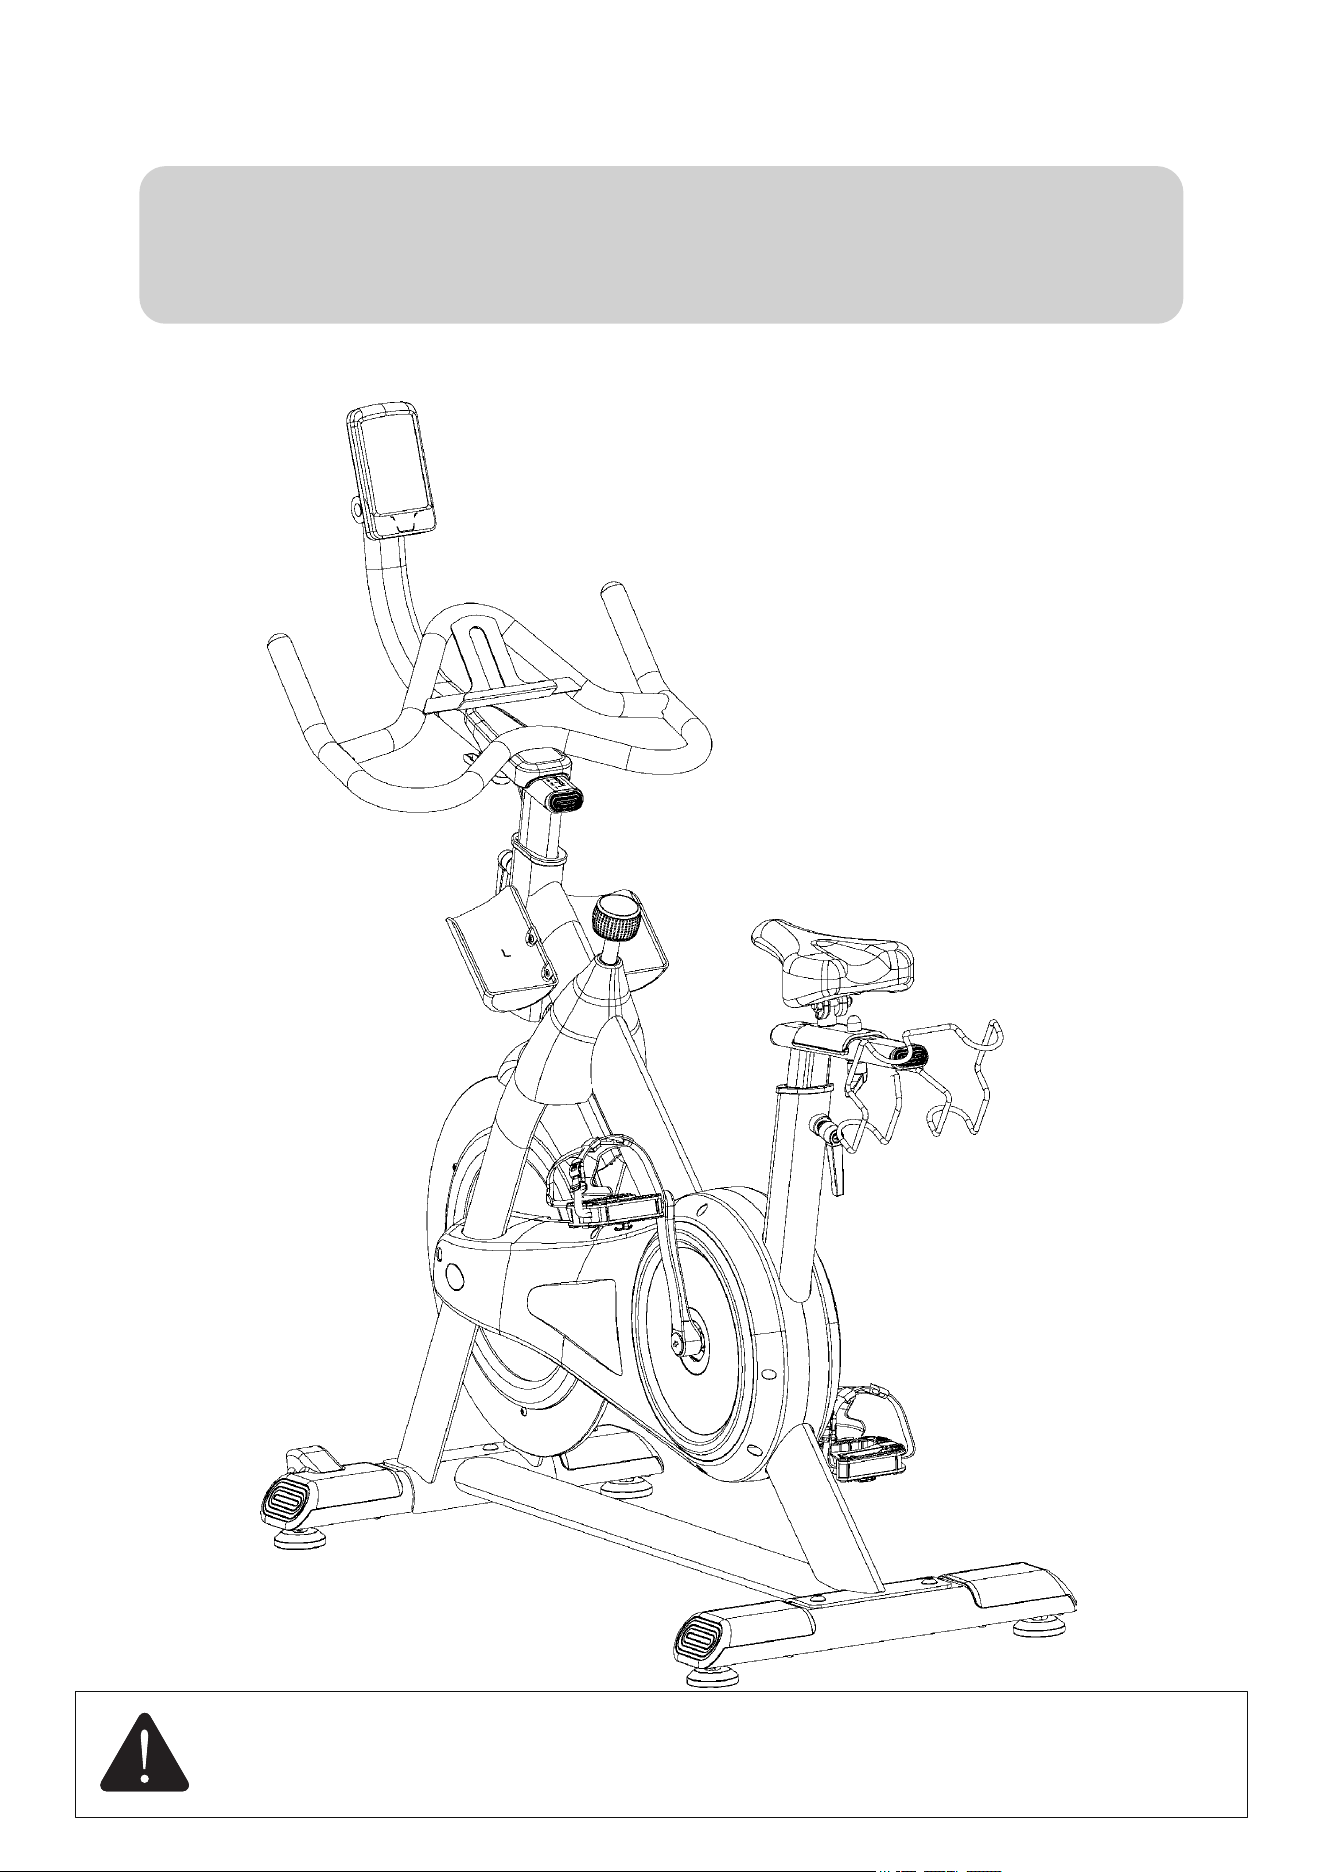
Warning Decal Placement
1

Customer Service
If you have any concerns, please feel free to contact our customer service at:
>> Email address: [email protected]
>> Contact us via Amazon: Login to your Amazon account > choose "Your orders" >
find the order ID > click "Contact seller"
2

Safety Instructions
ATTENTION
Please read through the manual carefully before installing and using the bike, only
correctly installed, proper maintenance and using correctly can reach the safe and
efficient result.
All EXERCISERS MUST READ ALL INSTRUCTIONS BEFORE USING THE BIKE.
1) Before using this exercise bike, please consult your doctor to confirm whether your
physical conditions allows or they might be some potential injuries that may endanger
your health and safety. If you are currently on medication regarding your heart rate,
blood pressure or cholesterol levels, then your doctor's advice is very important to you.
2) Please be aware of your body signals. Warning: Health related injuries may result
from incorrect or excessive use of exercise equipment. If you feel any pain, irregular
heartbeat, shortness of breath pain, weakness, dizziness or any discomfort, please stop the
exercise immediately.
3) Please put this machine on hard and horizontal level ground or with carpet. Do not
move it when using this machine, or fixed it to the wall or ceiling, and some other fixed
structures. Always remember safety is the priority. While using this machine, please do
not allow the others reach this machine’s main part, especially kids, please keep a safe
space for using. This machine is intended for adults only.
4) Please check all the screws and bolts, pull pin knobs are well secured and locked.
5) Warning: Please keep regular maintenance to this machine to reach ideal usage.
3

6) Warning: Please put this machine on stable and horizontal level ground to install.
And follow the installing instructions to assemble this machine. If any parts found
missing, or any noise found, please stop use this bike, please contact our customer
immediately.
7) Please wear shoes with rubber or high traction soles. Do not use shoes with heels,
leather soles, cleats or spikes. Make sure no stones are embedded in the soles. Do not use
this product in bare feet. Keep all loose clothing, shoelaces and towels away from
moving parts.
8) Please be careful of when move this machine, move in correct way, and ask for
assistance if needed.
9) Please make sure pedal strips are fully tightened before using this bike.
10) This machine has flywheel inertial system, it may cause your feet, ankle, leg and
knee injuries during exercise if not used correctly, always remember to press the
resistance knob before stop.
11) Warning: Please make sure all adjustment knobs are in locked situation. If not using
it, please slightly adjust this knob in counter wise direction to lock the cranks and
flywheel. Do not keep children nearby the knobs, in case injuries may happen.
12) Please do not change the original internal design of this machine.
13) Warning: This machine is not for professional medical treatment.
14) This product meets the standard of GB17498.1-2008/GB17498.10 -2008.
15) Do not exceed maximum user weight of 385 lbs(175KG).
4

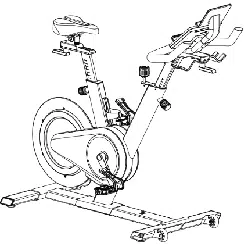
Product Overview
Below picture is the main parts of this bike, please take it as a reference, and make sure
all the parts are included before you install the bike.
5

Main Components
No
Name
Specification
QTY
1
Monitor Holder
/
1
2
Handlebar
/
1
3
Handlebar Post
/
1
4
M5*10
4
5
M6*13
2
6 Washer ¢19 2
7
M8*16
2
8
/
1
9
L-Shaped Knob
M10
2
10
Seat
/
1
11
Seat Post
/
1
12
Dumbbell Rack
/
1
13
L-Shape Pull Pin Knob
M16
2
14
Main Frame
/
1
15
Front Stabilizer
/
1
16
Rear Stabilizer
/
1
17
M10*60
4
18L
Left Pedal
/
1
18R
Right Pedal
/
1
19L
Left Bottle Holder
/
1
19R
Right Bottle Holder
/
1
A S6
1
B
Open-end Wrench 14-15
14-15
1
C
Open-end Wrench 13-24
13-24
1
Screw
Screw
Screw
Allen Key with Phillips
Screwdriver
Screw
Handlebar Bracket
6
Assembly Instructions
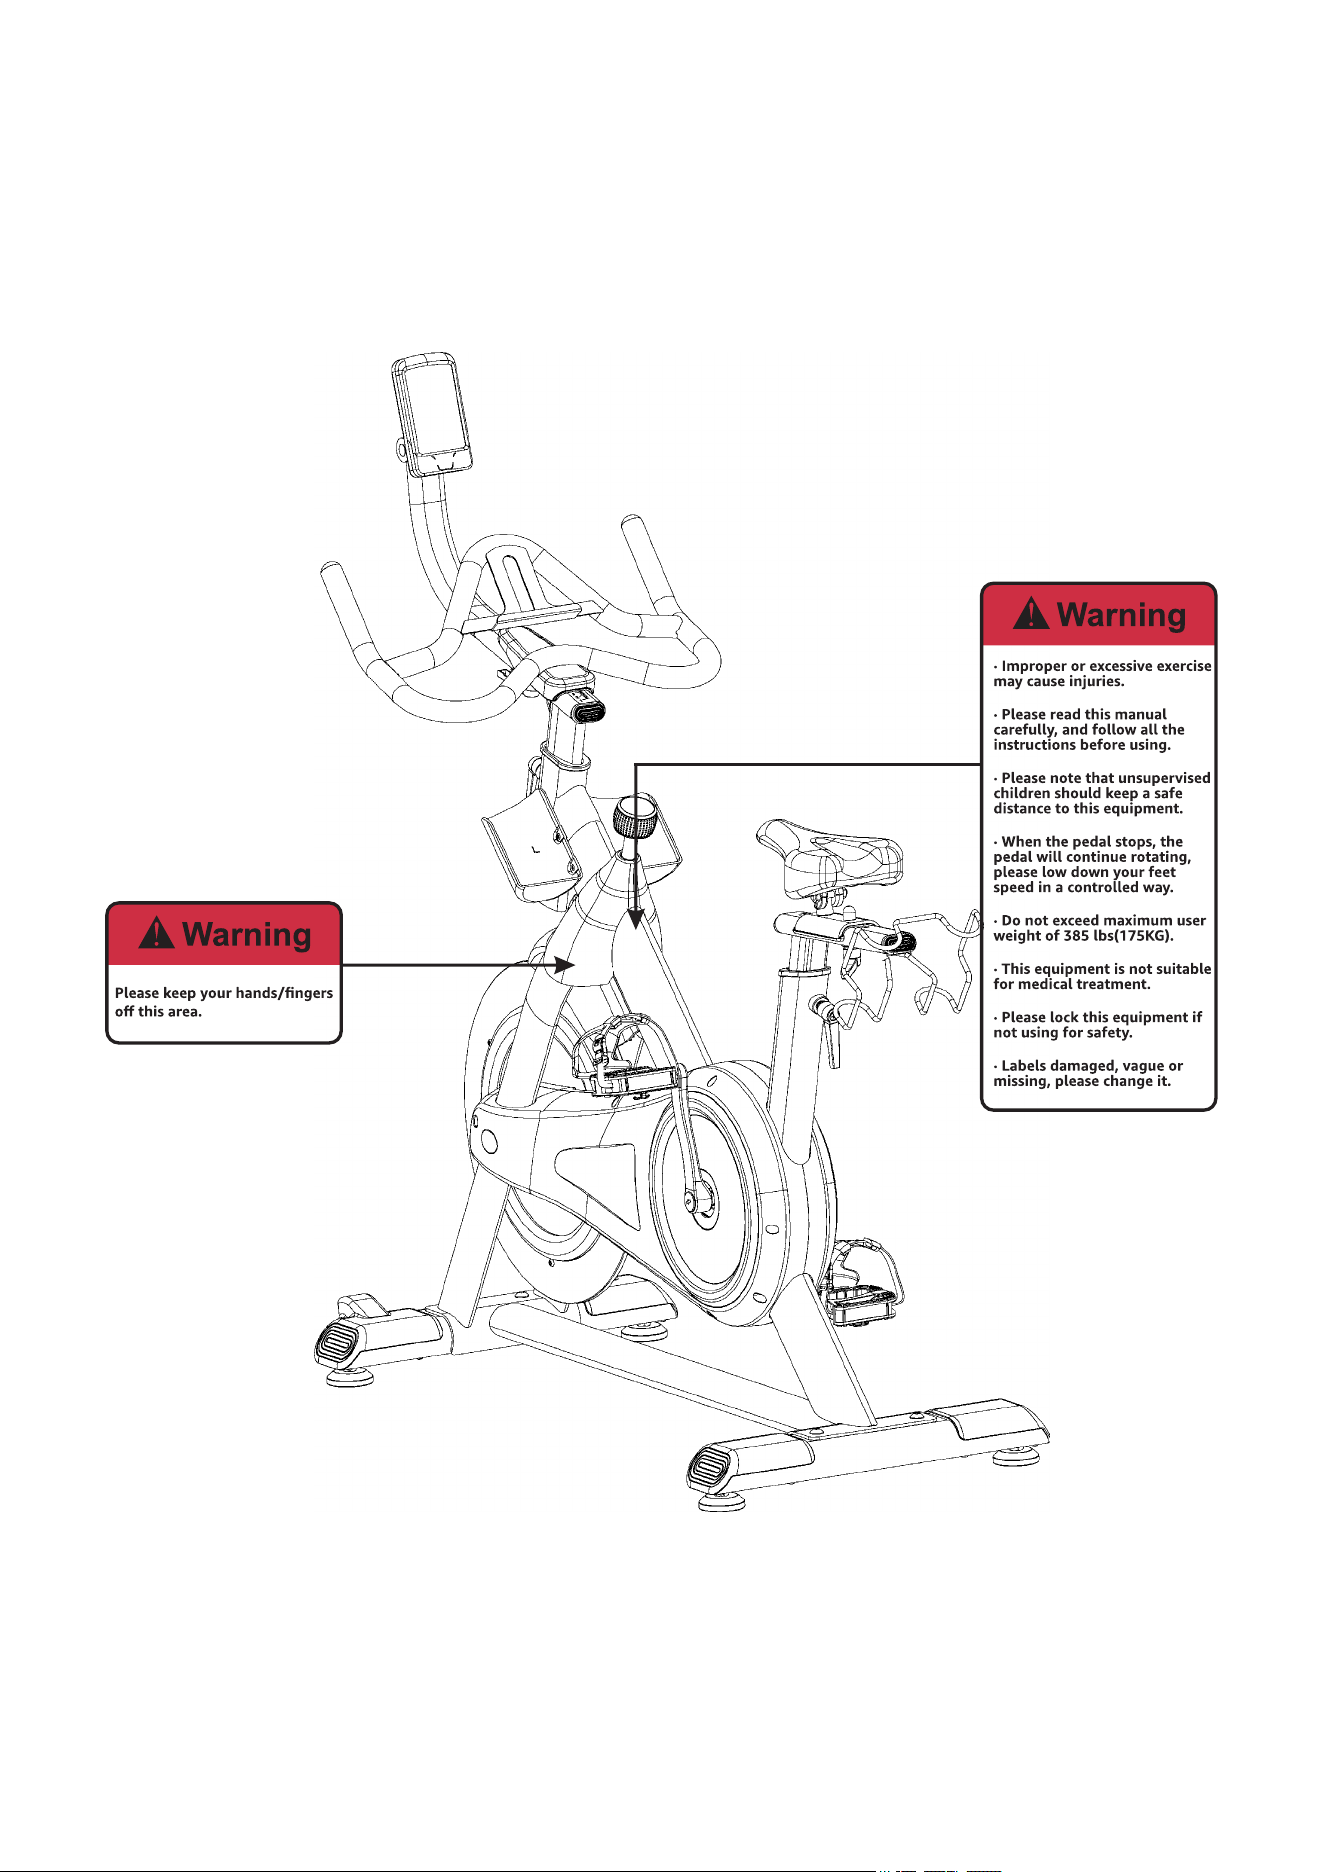
Step 1:Attach #15 Front Stabilizer to Main Frame, insert two #17 Screws, and tighten
and secure them with A: Allen Key with Phillips Screwdriver.
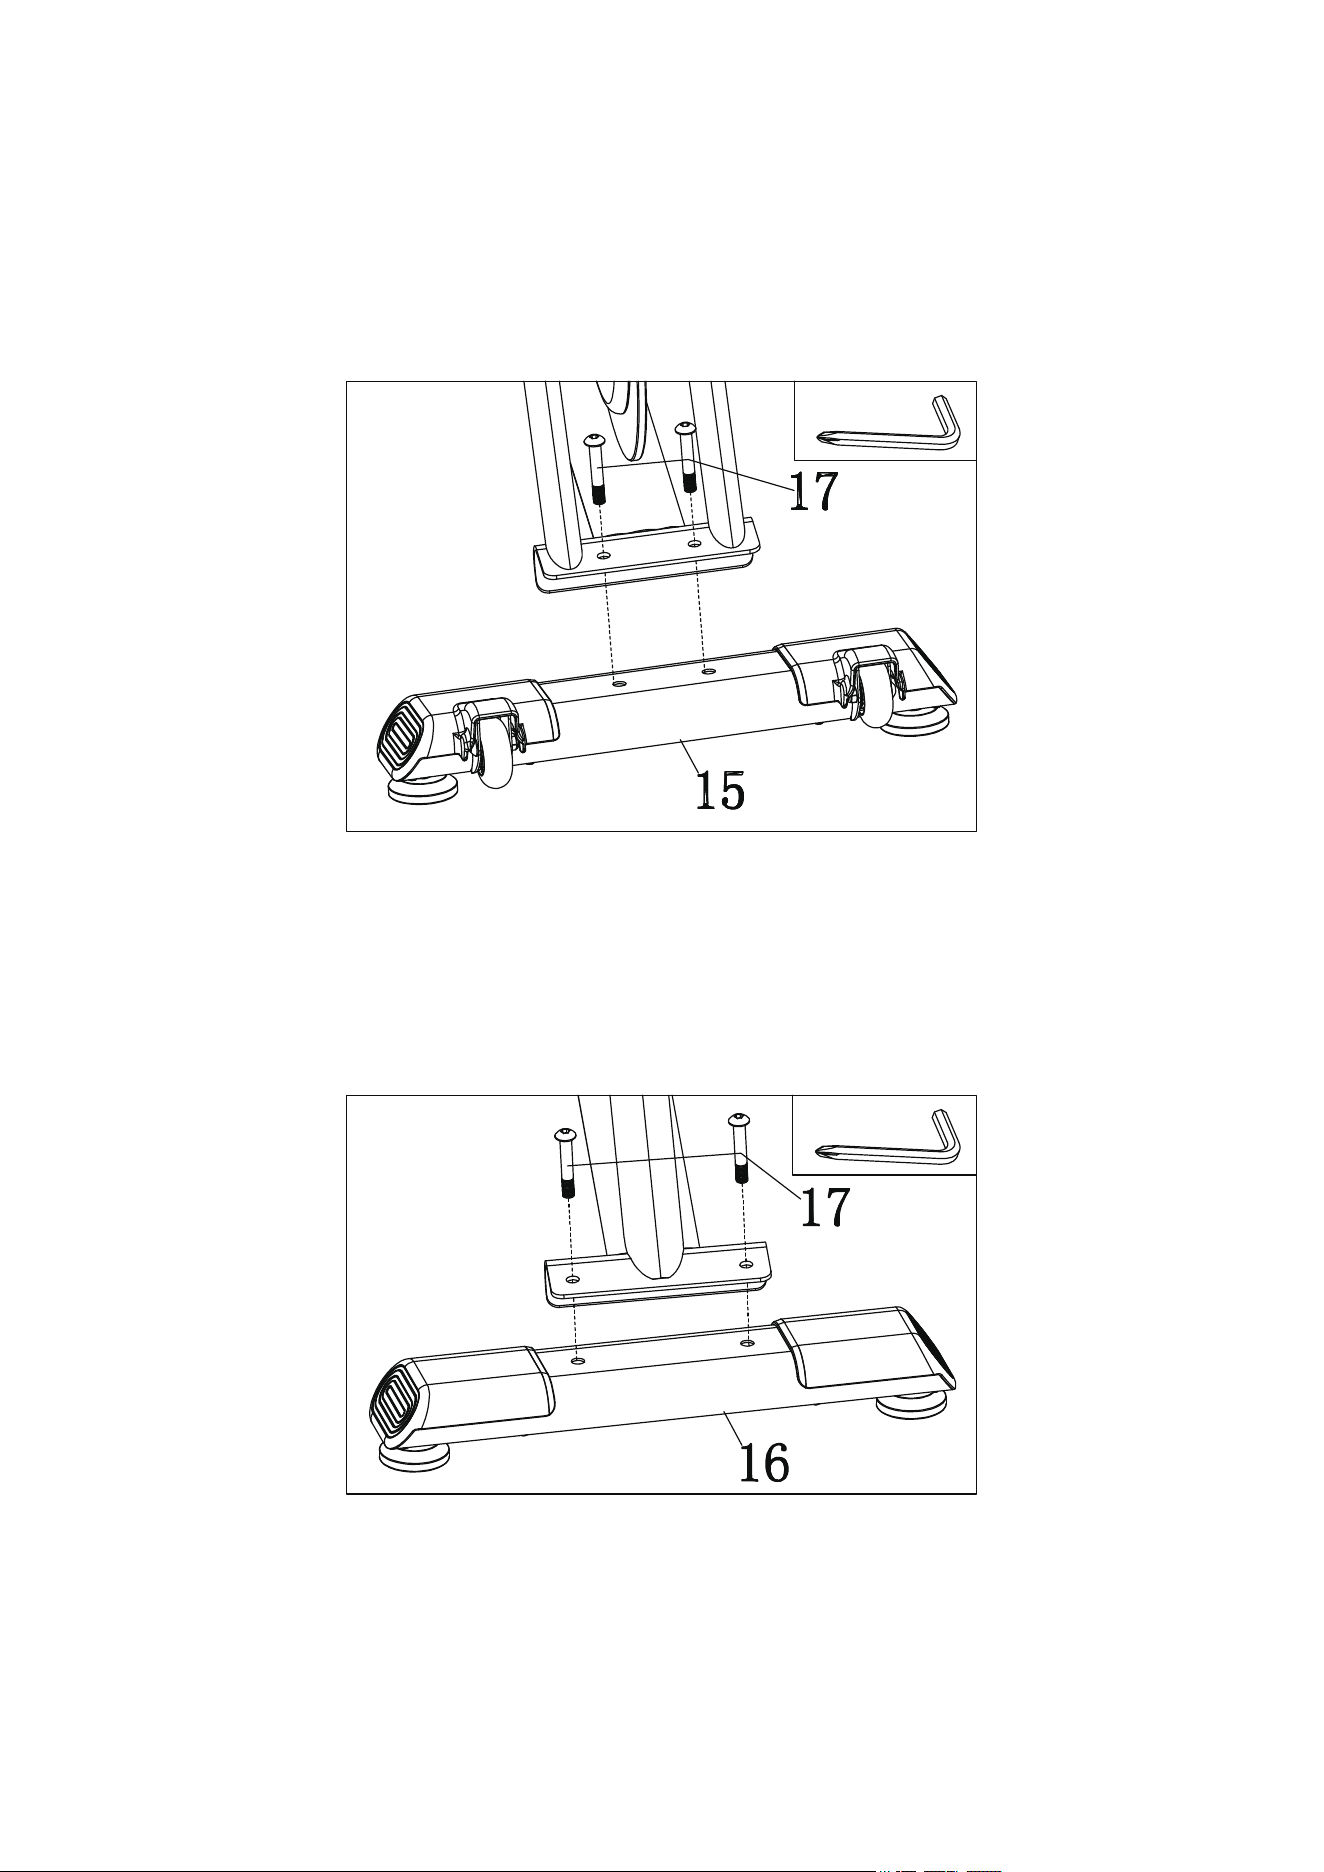
Step 2:Attach #16-Rear Stabilizer to Main Frame, insert two #17 Screws, and tighten
and secure them with A:Allen Key with Phillips Screwdriver.
7
A
A
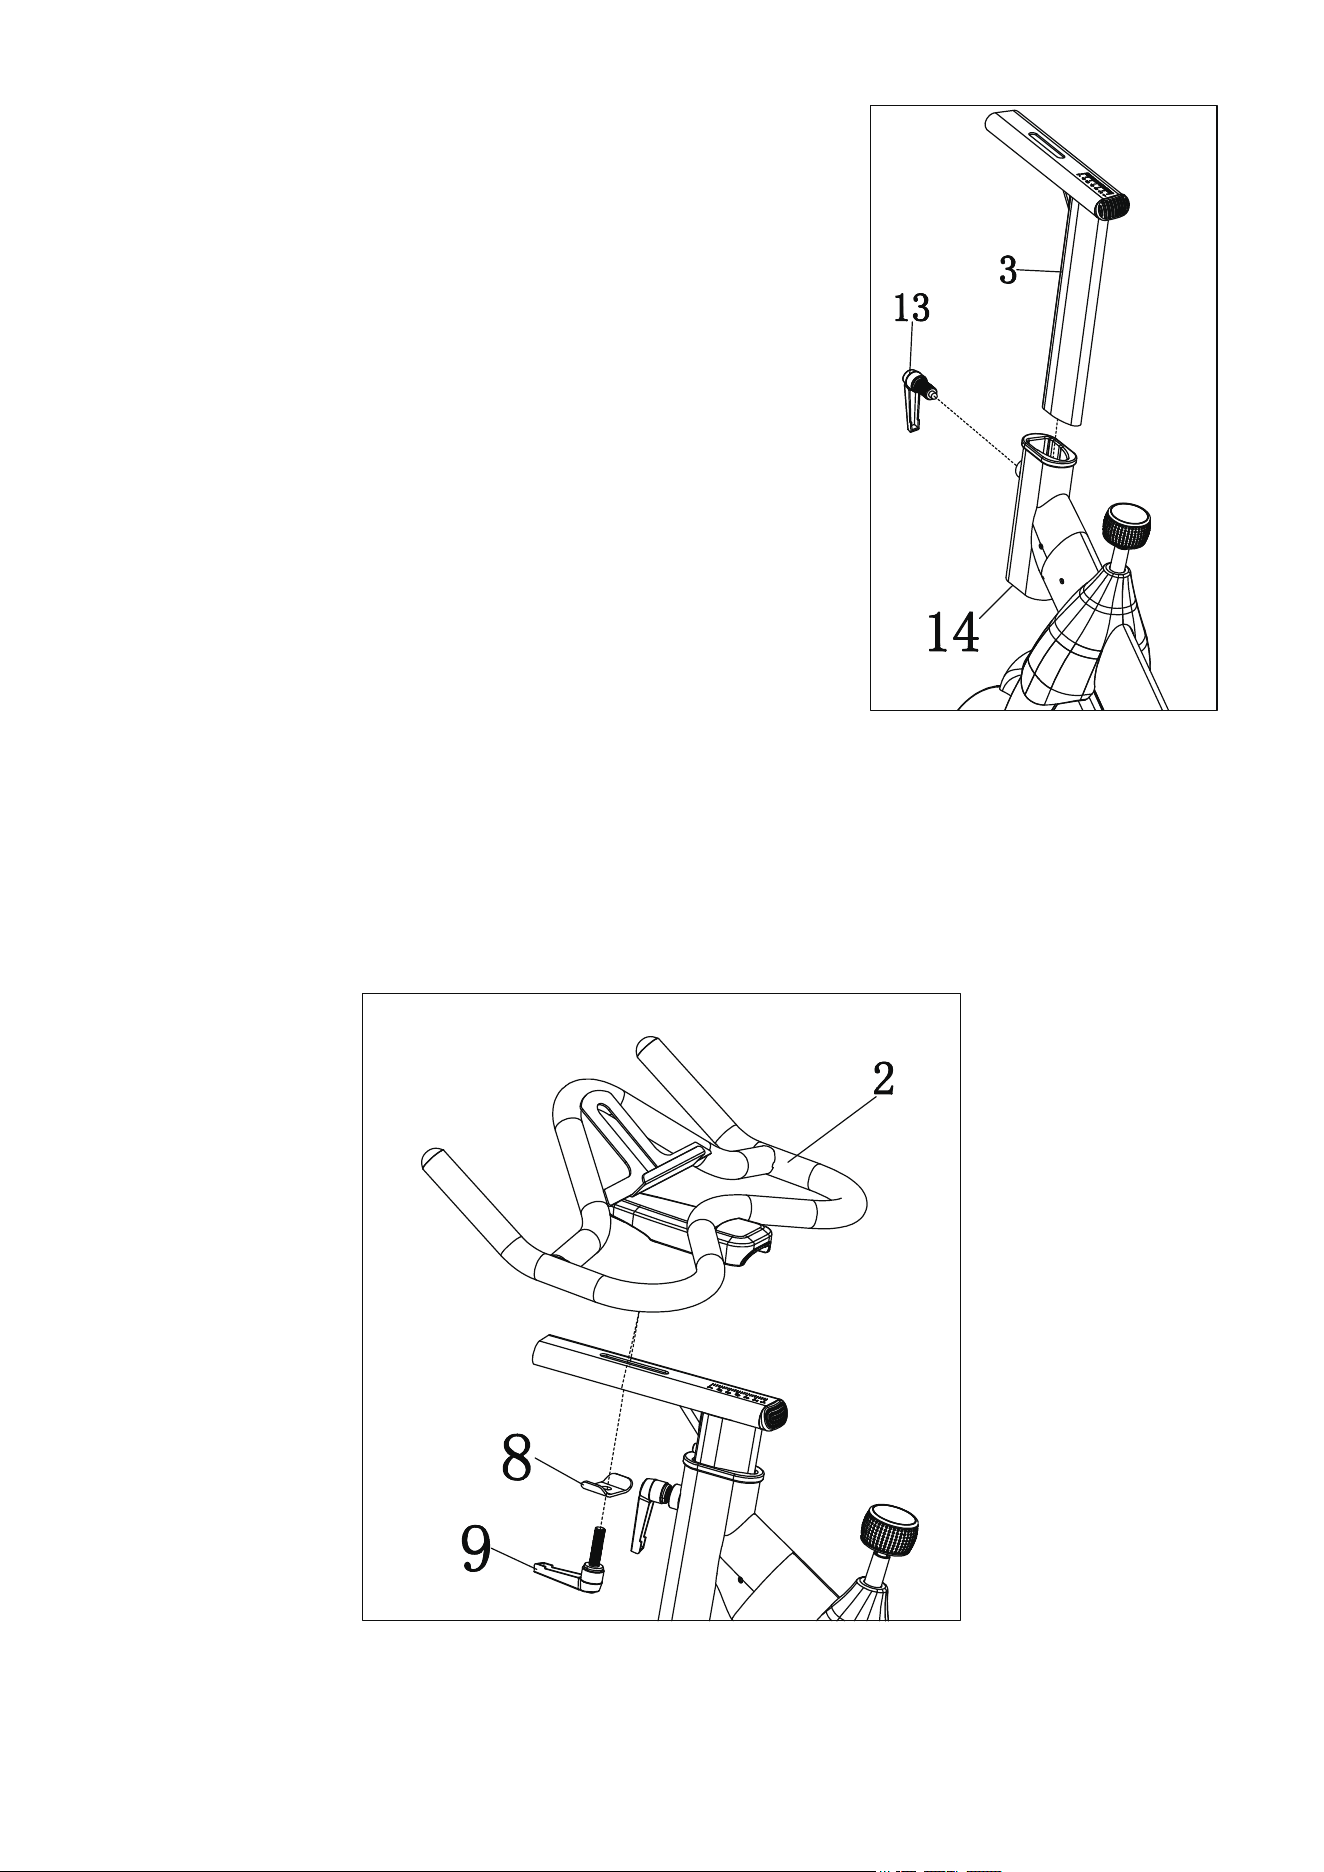
Step 3:Unscrew #13 L-Shaped Pull Pin Knob
counter clockwise, insert and slide #3 Handlebar Post
to #14 Main Frame, move #3 Handlebar Post upward
or downward to the desired position, release #13
L-Shaped Pull Pin Knob into an adjustment hole in #3
Handlebar Post, and then tighten this knob, make sure
the knob is firmly engaged in an adjustment hole.
Step 4:Place #2 Handlebar on #3 Handlebar Post. Place #8 Handlebar Bracket to
#3 Handlebar Post, screw in #9 L-Shaped Knob, and lock and secure this knob tightly.
YouTube search Niceday L-Shaped Knob Adjustment for detailed instructions.
8
Step 5:Insert #1 Monitor Holder into #2
Handlebar, and tighten and secure two #7
Screws and two #6 Washers to #2 Handlebar
with A:Allen Key with Phillips Screwdriver.
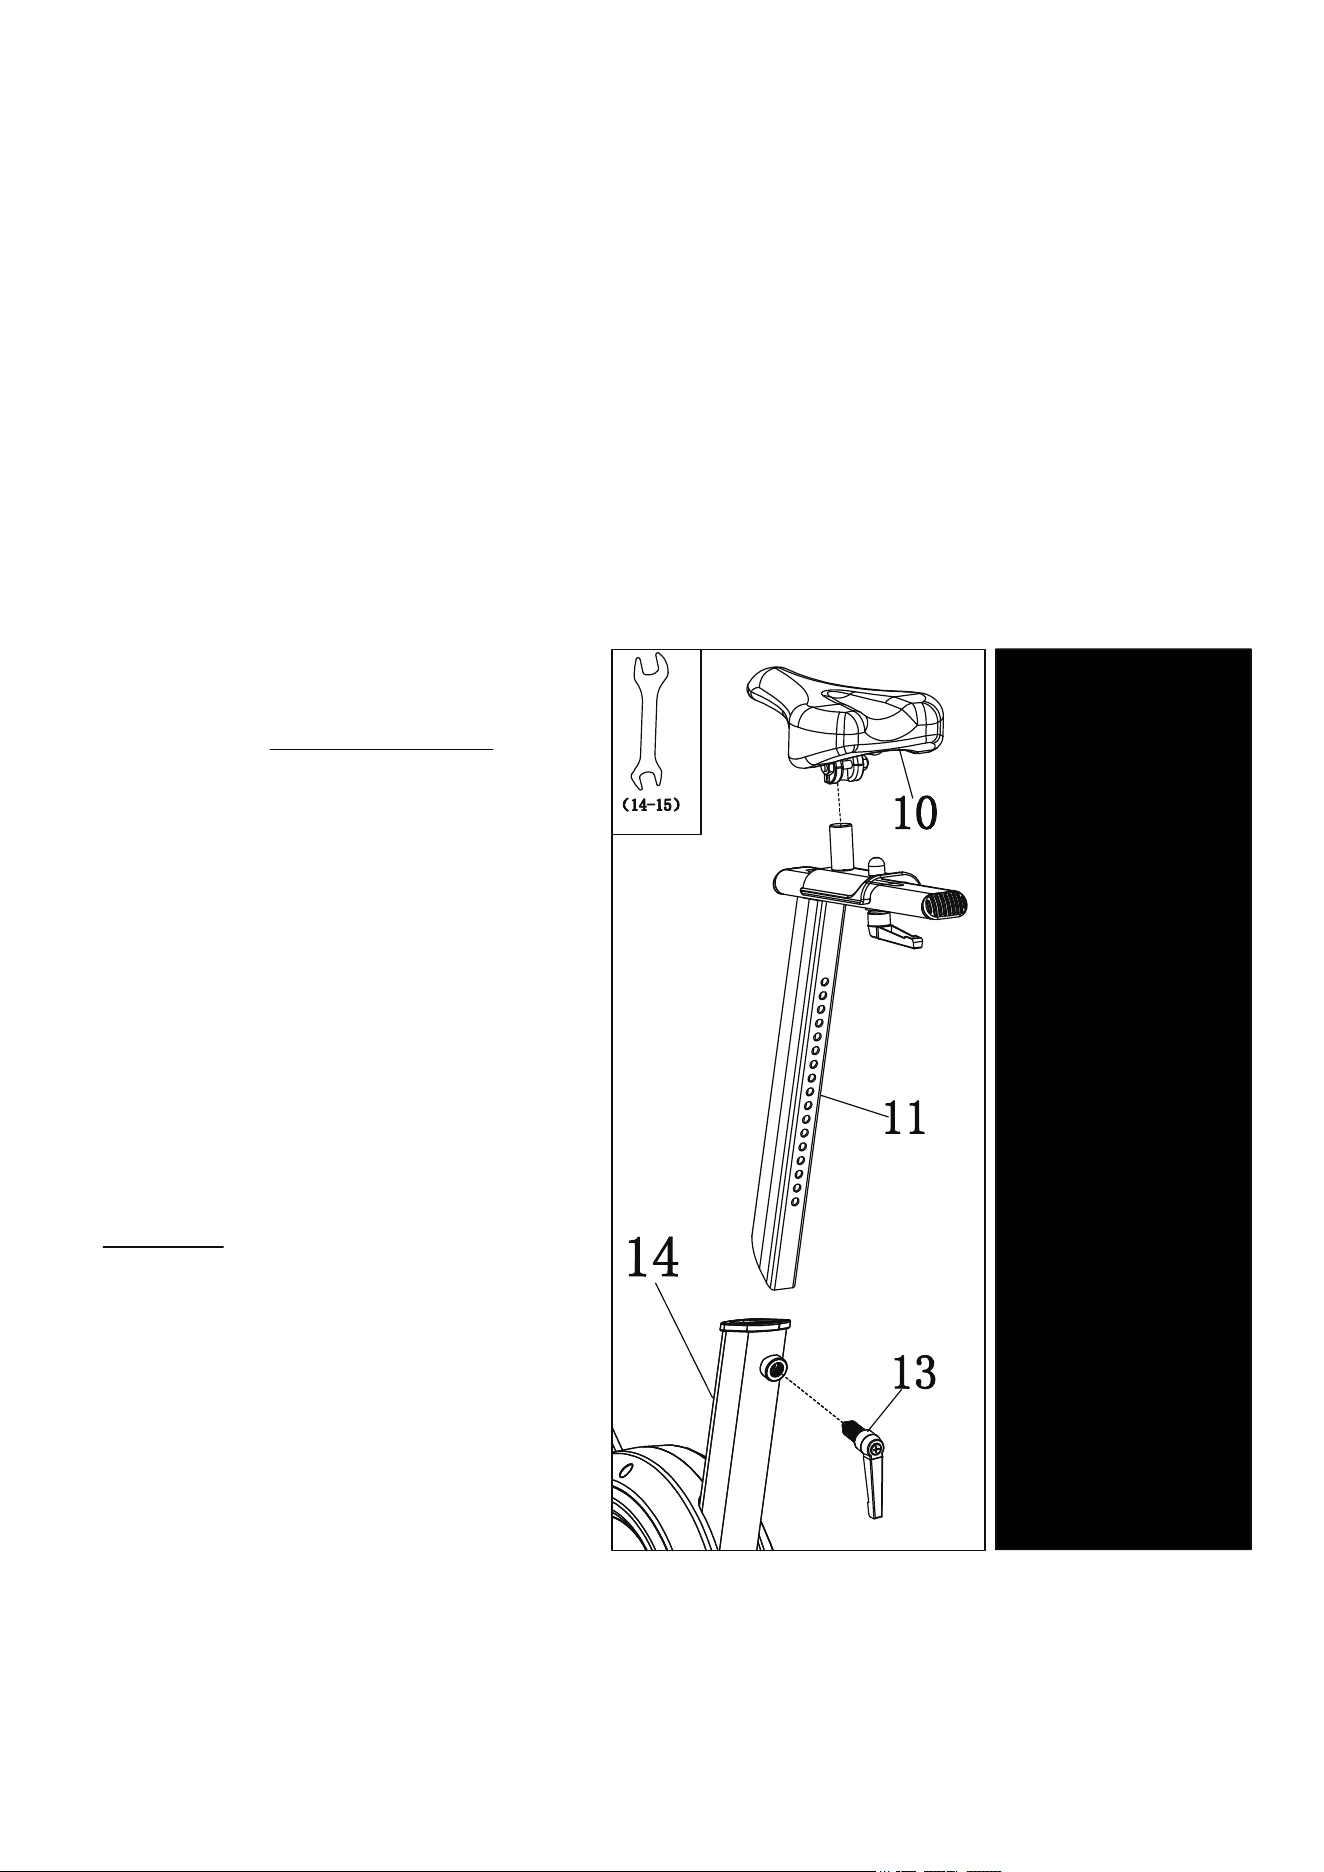
Step 6:Unscrew #13 L-Shaped Pull
Pin Knob in counter clockwise, insert
and slide #11 Seat Post to #14 Main
Frame, move #11 Seat Post upward
or downward to the desired position,
release #13 L-Shaped Pull Pin Knob
into an adjustment hole in #11 Seat
Post, and then tighten this knob in
clockwise, make sure the knob is
firmly engaged in an adjustment hole.
Put the #10 Seat onto #11 Seat Post,
secure the bolts underneath the seat
with B: Open-end Wrench 14-15.
9
B
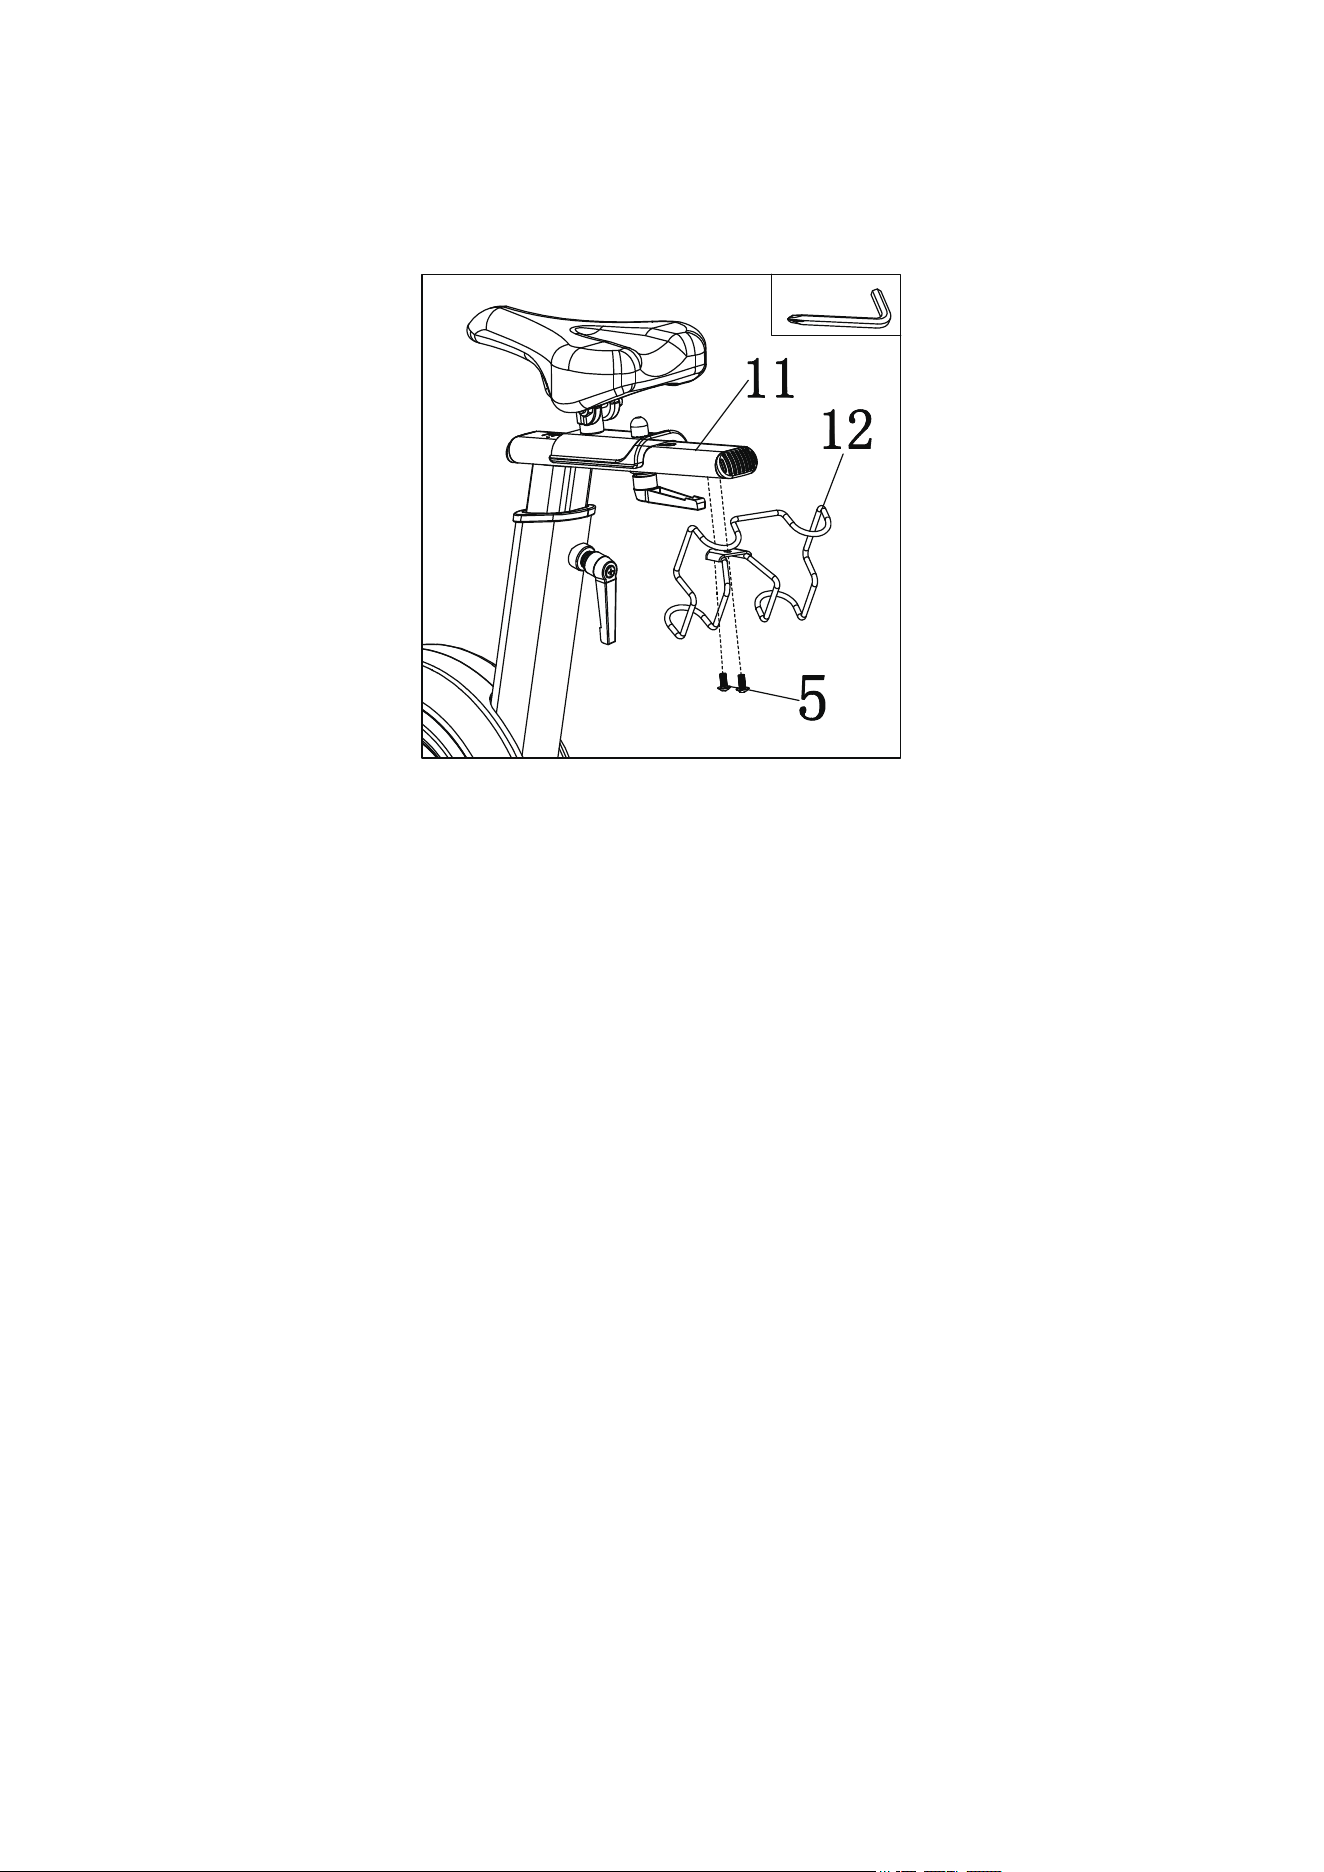
Step 7: Align #12 Dumbbell Rack to #11 Seat Post, and tighten two #5 Screws with
A: Allen Key with Phillips Screwdriver.
Step 8:Align the two holes on #19L Left Bottle Holder to the two holes on the left side
of the #14 Main Frame, insert two #4 Screws to the holes and secure them with A:
Allen Key with Phillips Screwdriver. Repeat the same way to the other side for #19R
Right Bottle Holder.
10
A
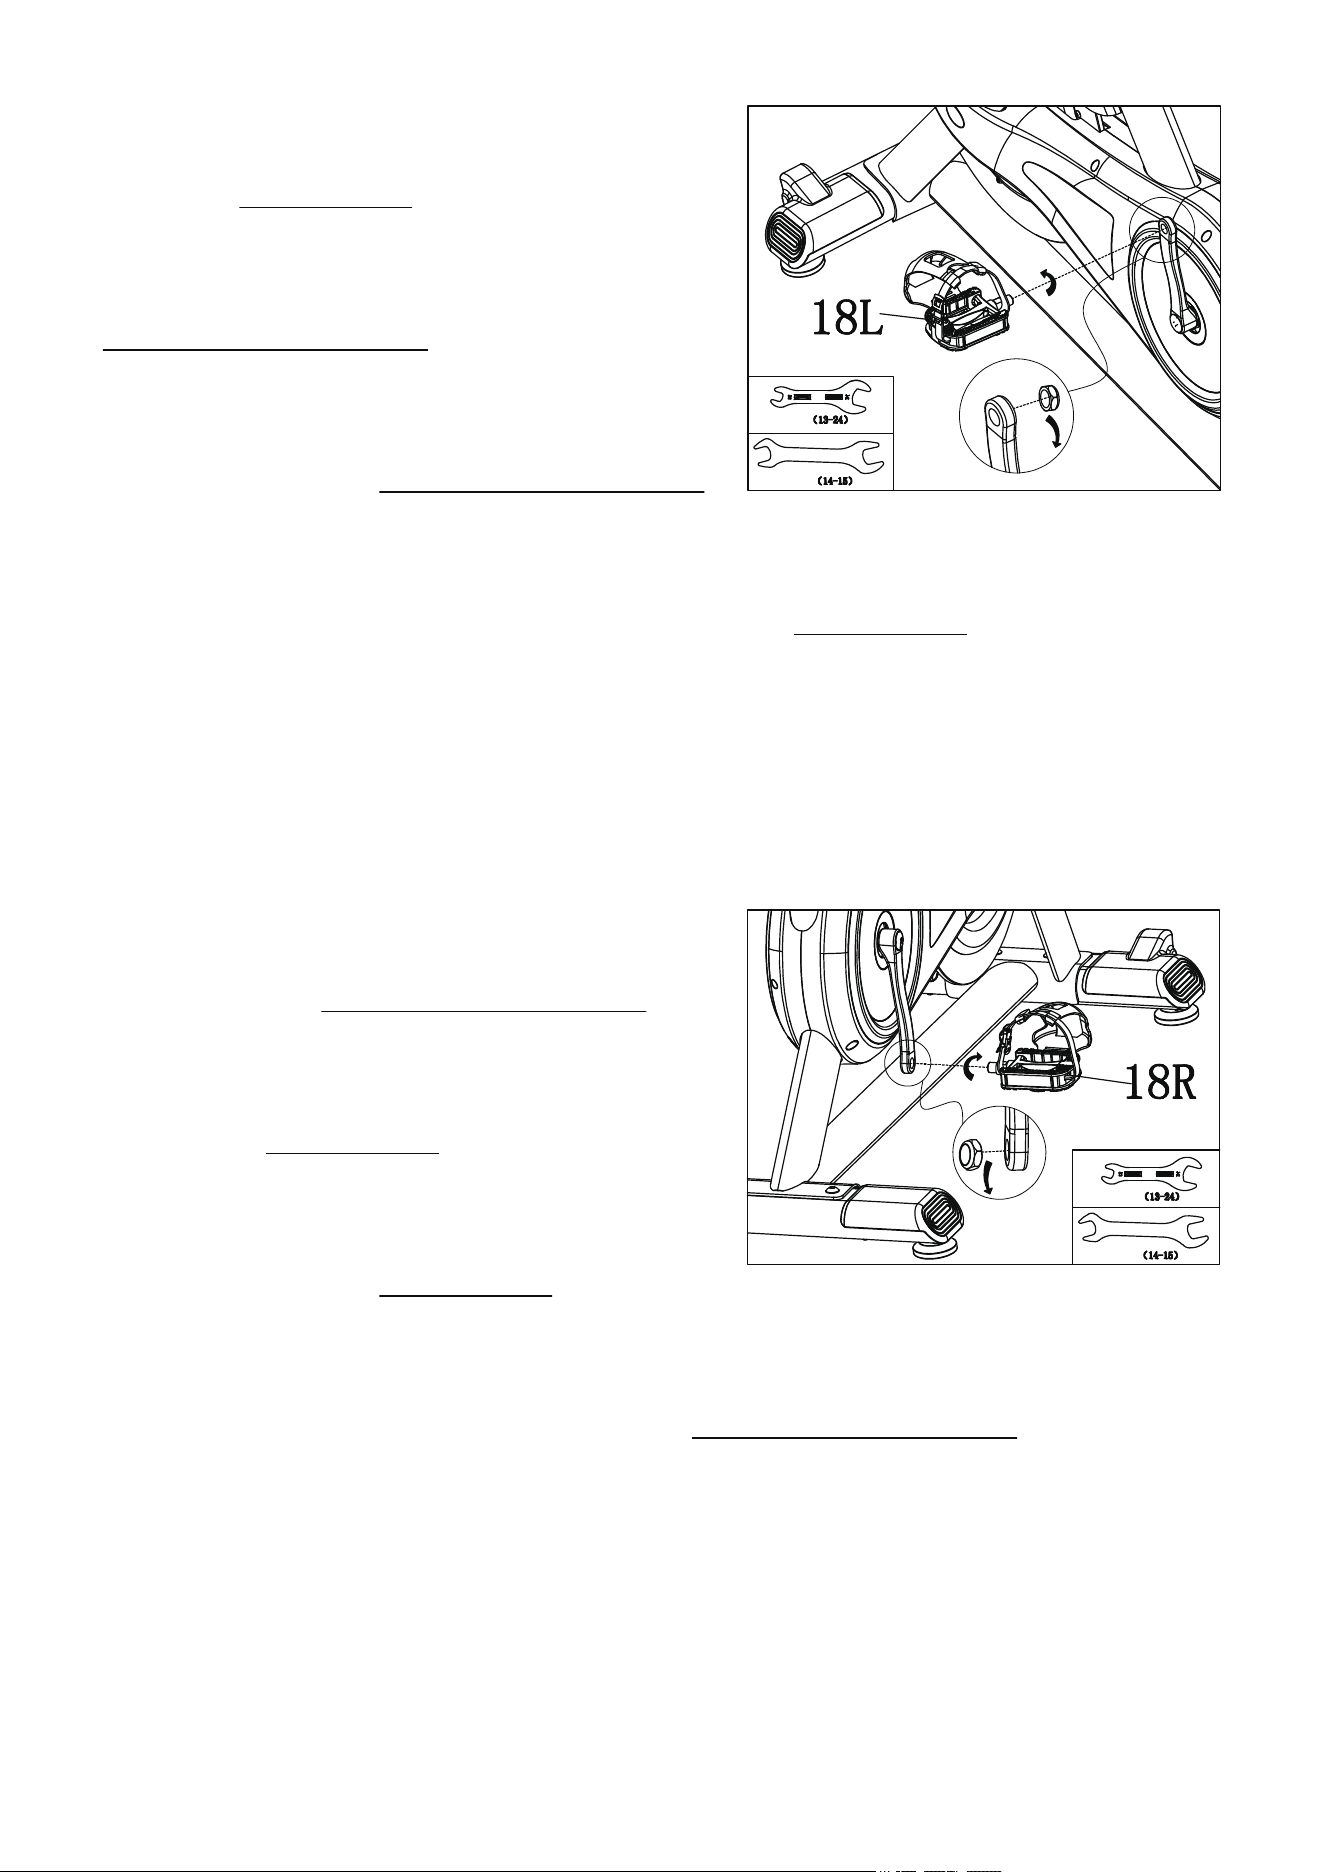
Step 9:Remove the nut on #18L Left Pedal
by turning CLOCKWISE, than insert #18L Left
Pedal into left crank with hand in
COUNTER-CLOCKWISE firstly, and use B:
Open-end Wrench 14-15 to secure the pedal.
Finger tighten the nut COUNTER-CLOCKWISE
back onto #18L Left Pedal. Hold #18L Left Pedal with B: Open-end Wrench 14-15
and use C: Open-end Wrench 13-24 to lock the pedal CLOCKWISE to the crank. Please
make sure pedal and nut is fully secured, or it may cause damage to pedal and crank in
further.
Step 10:Remove the nut on #18R Right
Pedal by turning COUNTER-CLOCKWISE ,
than insert #18R Right Pedal into right crank
with hand in CLOCKWISE firstly, and use B:
Open-end Wrench 14-15 to secure the pedal.
Finger tighten the nut CLOCKWISE back onto
#18R Right Pedal. Hold #18R Right Pedal with B: Open-end Wrench 14-15 and use
C: Open-end Wrench 13-24 to lock the pedal COUNTER-CLOCKWISE to the crank.
Please make sure pedal and nut is fully secured, or it may cause damage to pedal and
crank in further.
11
C
B
C
B
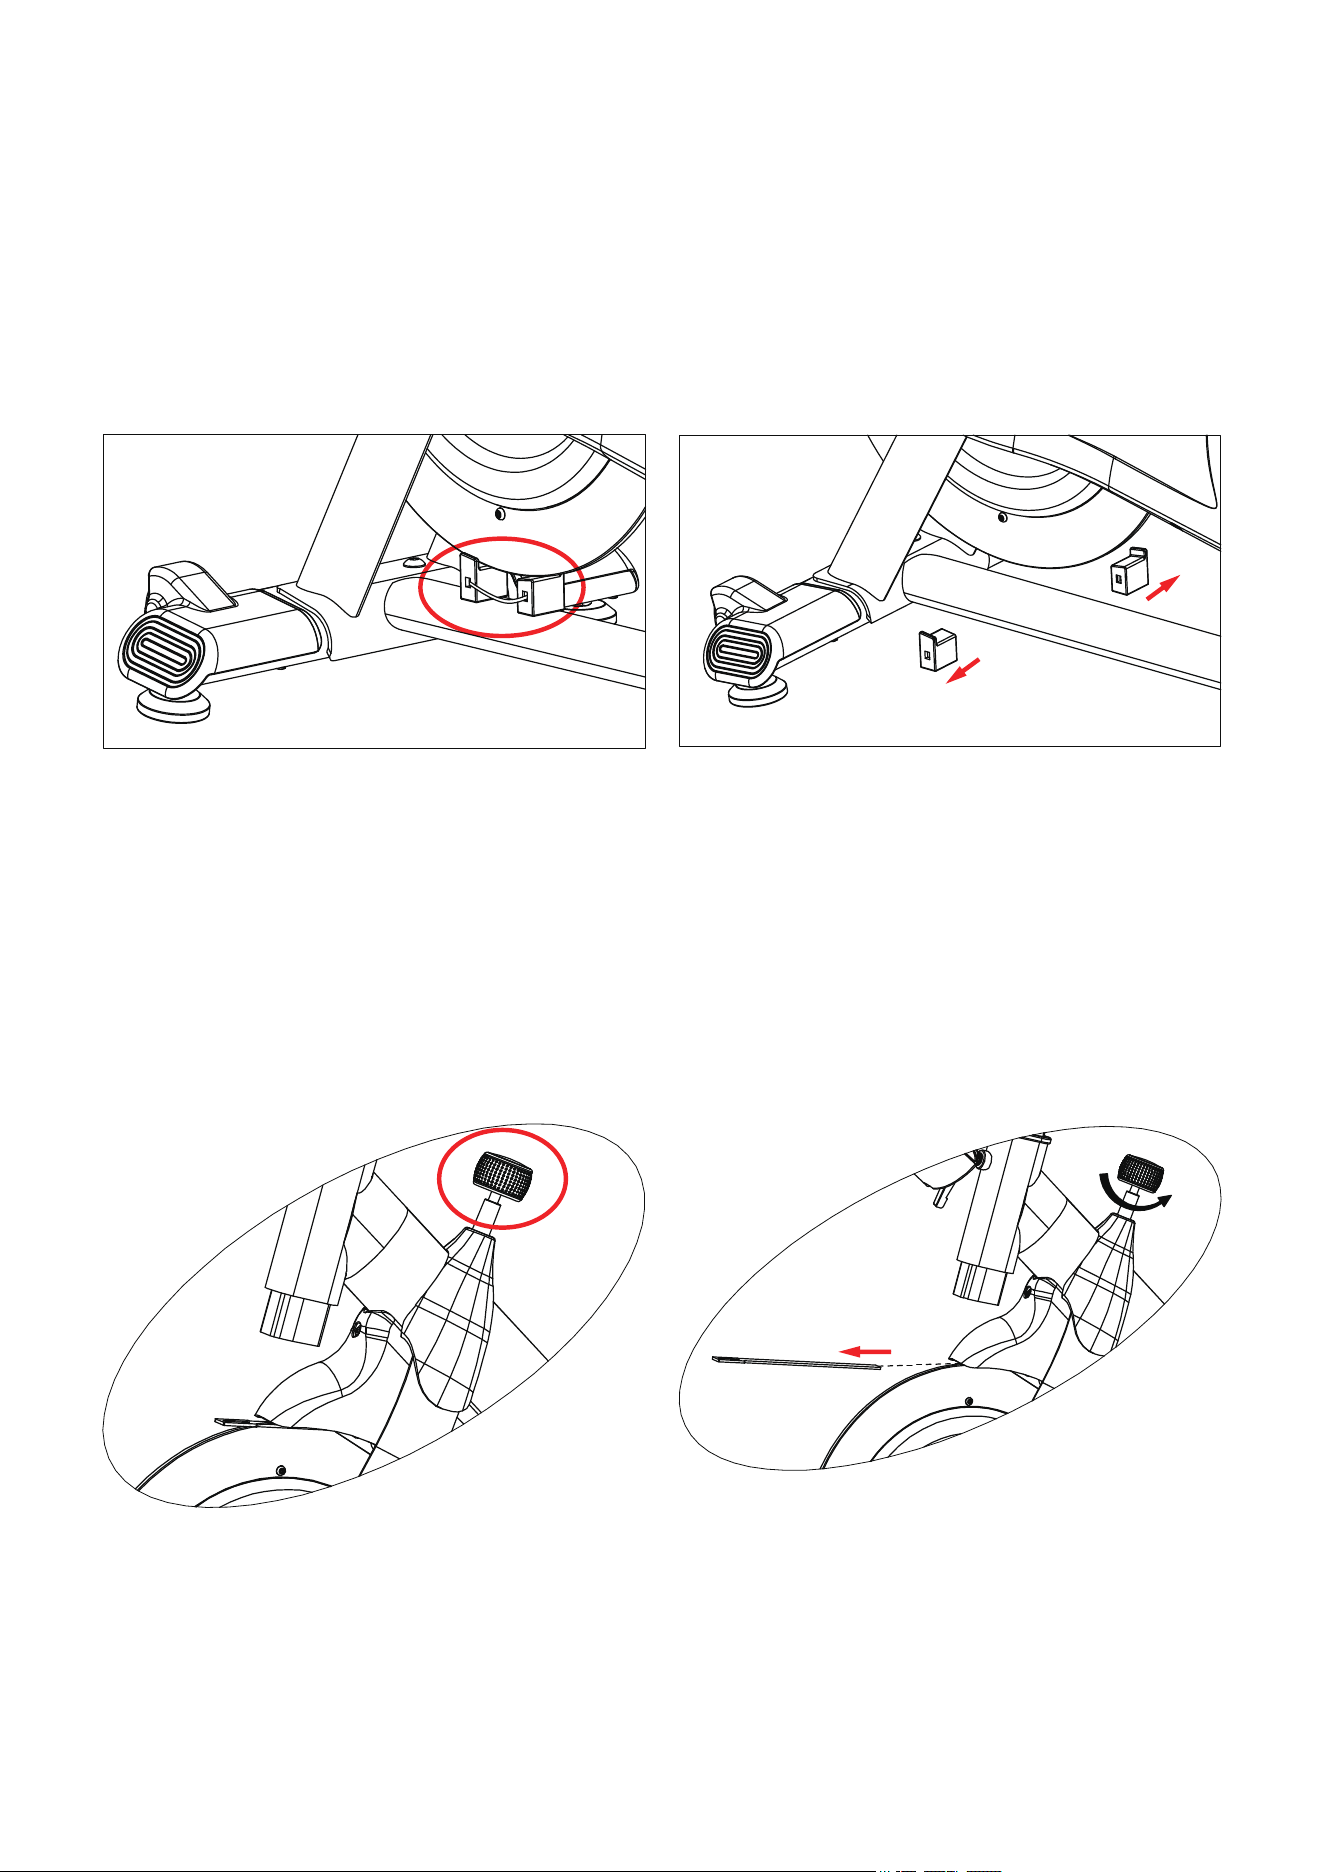
Dismantle Flywheel Protection Auxiliary Accessory
Below are protections for the flywheel during transporting, please REMOVE these
before using this machine.
1. Cut the ribbon off, and then remove the rubber block.
2. Loosen the resistance knob by turning Counterclockwise, then remove the insert from
the flywheel cover.
12

Adjustment Instructions
I-Seat&Handlebar Distance Adjustment
II-Seat Height Adjustment
You can adjust your 305M indoor cycling bike as a normal used road bike, which you
can form the correct postures and make sure your muscles can get proper exercise. But
comfort level varies from person to person. Here we have some adjustment tips to meet
your expectations.
Adjust the seat/handlebar in back and forth: Loosen the #9 L-Shaped Knob clockwise
first, and move the seat/handlebar to the proper position then tighten the knob
counter-clockwise.
Adjust the seat height: Loosen the #13 L-Shape Pull Pin Knob counter-clockwise first,
then pull it to slide the seat post up and down, find your desired position, then lock the
knob clockwise.
Loose
Tight
13

Attn: Please do NOT over lift the seat post, the MAX is the maximum height. If you’ve
any questions, please do not lock it by force, and contact us at the first time.
Loose
Pull out knob
to control the
seat post
Lock the knob
If minor wobbles happen while using this bike, please
adjust the two foot-raisers on #15 Front Stabilizer and
two foot-raisers on #16 Rear Stabilizer to adapt the
floor until it stays stable.
III-Brake Resistance Knob Adjustment
As the arrow shows: increase the resistance by turning
clockwise, and lower the resistance by turning
counter-clockwise. Users can base on their own needs
to adjust this resistance. If an urgent stop is needed,
please press down the knob to brake, it can stop the
flywheel. Unpressed to release the knob.
IV-Bike Balance Adjustment
14

Monitor Specification
ITEM DESCRIPTION
SPEED
. When there is no SENSOR input, it will return to "0" within 4s.
. Range 0.0 ~ 99.9,when it exceeds the range of 99.9, it will display
99.9.
RPM
. When there is no SENSOR input, it will return to "0" within 4s.
. Range 0 ~ 188,when it exceeds the range of 188, it will display 188.
. Its value cannot be set, and it starts to display after inputting a signal.
TIME
. Without setting the target value, time will count up.
. When setting the target value, time will count down from your target
time to 0 and alarm will ring(8 beeps of BIBI),then turn to counting.
. If there is no signal input within 4 seconds, it will display P.
. Range 0:00 ~ 99:59
DISTANCE
. Without setting the target value, distance will count up.
. When setting the target value, time will count down from your target
time to 0 and alarm will ring(8 beeps of BIBI).
. Range 0.00~99.99
CALORIES
Pulse
. Without setting the target value, calorie will cou nt up.
. When setting the target value, time will count down from your target
time to 0 and alarm will ring(8 beeps of BIBI).
. Range 0~9999
.
When there is a signal input, it will be displayed after 4 seconds.
.Display P after 4 seconds when there is no signal input.
.When the heartbeat value exceeds the set range, the BIBI sound
prompts.
.Range 30~0~230 BPM
15

KEY FUNCTION:
ITEM
SET
MODE
. Each time you press it, it will switch to the next mode, and when SCAN,
the current function will be locked.
. There will be a "BI "sound prompt every time you press a button.
. Press and hold for 2 seconds to reset to zero and restart the machine.
. In MODE/SET state, press once to clear the current data.
RESET
. In setting mode, press RESET key once to reset the current function figures.
. Press RESET key and hold for 4 seconds to reset all function figures.
DESCRIPTION
OPERATION PROCEDURE
POWER ON
. LCD will display all segments as Drawing 1 for 1
second and there will be a long "BI" sound (a prompt
tone), and it will enter the standby mode.
POWER OFF
. When there is a signal input or key input, the
monitor WAKE UP.
Without any signal being transmitted into the monitor for
4 minutes the monitor will enter SLEEP mode.
. Press SET key to increase value. Press and hold the key to increase value faster.
. TIME setting range: 00:00~99:00 (Each increment is 1:00)
. CAL setting range: 0~9999 (Each increment is 10)
. DIST setting range: 0.00~99.50 (Each increment is 0.5)
. Pulse setting range: 30~0~230 (Each increment is 1)
Drawing 1
16

OPERATION
I-Workout setting
Press MODE key to select the function of TIME, DISTANCE, CALORIES. Use SET Key
for setting and press MODE key for confirmation.
For instance, the time set-up, when the time value is blinking, you can use SET Key to adjust
the number. Press MODE key for confirmation and skip to next set-up. The set-up of
DISTANCE, CALORIES is the same as TIME set-up.
Once the workout begins and the console picks up the exercise signal, the value of
SPEED,RPM, TIME, DST and CAL will count up on the display.
17
II-Trouble shooting
. When the display of LCD is dim, it means the batteries need to be changed.
. If there is no signal when you pedal, please check if the cable is well connected.
NOTE:
1. When stop training for 4 minutes, the main screen will be off.
2. If the computer displays abnormally, please re-install the 2*AAA batteries and try again.
3. The pulse will be only showed when connected by professional heart beat straps or
monitor.

APP Instructions for Use
(Note: The scenario simulation function in the KINOMAP & Zwift APP is free for a
limited time. The final right of interpretation belongs to the official KINOMAP & Zwift
APP. )
1.FUNCTIONS OF THE BLUETOOTH :
1.1 Working frequency: This wireless transmitter is a Bluetooth 4.2 device. Its working
frequency is 2.4GHZ.
1.2 Requirements for Cell-phone APP Installation:
1.2.1 IOS cell-phone system should be no lower than 7.1 version and support Bluetooth 4.2,
iphone 4s and beyond.
1.2.2 For Android, a system no lower than 4.3 is required and the cell-phone shall support
bluetooth 4.2.
1.3 The wireless transmitter only records the user's data when connected to the mobile
phone and sends it to the mobile app. Before starting sports equipment, please connect the
app to the transmitter to ensure the authenticity and validity of the data.
1.4 The transmitter will go into Sleep mode if it receives no signal input in 2 minutes. In
Sleep mode, transmitter is unavailable for cell-phone. In this situation, wake up the Bluetooth
transmitter by using the sports equipment and it can be found by the cell-phone again.
Note:
1. Search "iconsole" "Kinomap" "Ziwft"and"Pelton" download it on your phone or Ipad.
2. Once console is connected to smart device via Bluetooth, the console will power off.
3. Search "How to connect your monitor with iconsole and Kinomap" on YOUTUBE or scan
the QR code below to check out how to connect APP.
18

APP OPERATING INSTRUCTIONS :
Note:
1.When the bluetooth pairing is successful, the screen will display the Bluetooth symbol, the
rest will be turned off, and the "bibi "will be cut twice, representing the Bluetooth connection
2.With "iconsole" "Kinomap" "Ziwft"and"Pelton"and other Apps.
3.After the Bluetooth is disconnected or the APP ends, the monitor "BI" restarts with a long
sound.
1.Description of "iconsole" connection:
1.1 Open the "iconsole" to enter the home page, click QuickStart or other training modes.Select
the Bluetooth device, and then press the upper right arrow key to enter exercise.
1.2 Select the Bluetooth device, and then press the upper right arrow key to enter exercise.
19

2.Description of "Kinomap" connection:
2.1 Open the "Kinomap" to enter the home page, click the button in the lower right corner to
add a new device.
2.2 Click fitness equipment management, then click the "+" symbol in the upper right
corner to start adding equipment.
20

2.3 Click on the Bike graphic, then enter various brand connection screens, select SENSORS or
iConsole.
2.4 Select iBiking 10 levels, then select the Bluetooth device.Complete the new device, press the
Home button to return to the home page.
21

2.6 Select a motion video, you must select the type of Bike, and press the button to enter the
motion picture.
2.7 Start pedaling, if you want to stop, you can press the pause button at the top of the
screen.Entering the pause screen can choose to continue or exit to end the exercise.
22

3.Description of "Zwift" connection:
3.1 Open the Zwift app, select the user.
3.2 Enter the device connection screen, select SPEED SENSOR.
3.3 Select bluetooth device,select Other.
23

3.4 Select SPEED SENSOR&CADENCE and press LET’S GO.
3.5 Press the cycling button to enter the sports screen.Enter the motion picture and start pedaling.
3.6 Press anywhere on the screen to display options, click the option button in the lower left
corner to enter pause.You can choose to continue or end the exercise.
24

4.Description of "Peloton" connection:
4.1 After logging in to the account, enter the selection mode and select
Cycling.Choose an exercise class.
4.2 Press START.Click to connect device.Click CADENCE + Find Bluetooth Device
25

4.3 Pairing a Bluetooth device,start cycling.
4.
4 Click on the video to appear END, press END to leave the sports mode;END leave
the movement.
Warranty
If our indoor cycling bike fails due to a defect in material or workmanship within 3 years
of the date of your purchase, please reach us to get free replacement parts (or replacement
if repair proves impossible).This warranty does not apply when the bike is used for rental
purposes.
26

Warm Up
Before exercise, it is better Warm muscles stretch more
easily, so the first of 5 ~ 10 minutes to warm up. Then in
accordance with the following methods to stop and do
stretching exercises - do five times, each leg every time 10
seconds or more time to do it again after the end of the
exercise.
Down the stretch: knees slightly curved, the body bent
forward slowly, so that the back and shoulders relaxed,
hands try to touch your toes. Maintain 10 to 15 seconds, and
then relax. Repeat three times to do (see Figure l).
Hamstring stretch: sitting on the clean seat, put one leg
straight. Inward close to the other leg to make it close to the
inside leg straight. Hands try to touch the toes. Maintain 10
to 15 seconds, and then relax. Repeat for each leg do three
times (see Figure 2).
Legs and feet tendon stretch: two on the Rotary wall or tree
stand, one foot in the post. Keep legs straight and heel to tilt
the direction of the wall or tree. Maintain 10 to 15 seconds,
and then relax. Repeat for each leg do three times (see
Figure 3).
Quadriceps stretch: the left hand wall or table Cu master balance, and then stretched his
right hand back to seize the right foot to the buttocks with slowly pull until you feel the
front thigh muscles tense. Maintain 10 to 15 seconds, then relax. Repeat for each leg to
do three times (see Figure 4).
Sartorial muscle (inner thigh muscles) stretch: Foot In contrast, the knee outward to sit
down. The hands grasp the feet to the groin pull. Maintain 10 to 15 seconds, and then
relax. Repeat three times (see Figure 5).
27

Maintenance
This general information for daily, weekly, and monthly maintenance to be performed on
your bike.
I-Daily Maintenance
After each exercise session, wipe down all the equipment: seat, frame, and handlebars.
Pay special attention to the seat post, handlebar post, and belt guard. Sweat is very
corrosive and may cause problems that require parts replacement later.
1.Get on the bike and engage the drive train.
2.Pay attention to any vibrations felt through the pedals. If you feel any vibrations, you
may need to tighten the pedals, bottom bracket, or adjust the drive belt tension.
3.Use a wrench to tighten the pedals until they are secure.
II-Weekly Maintenance
4.Inspect moving parts and tighten the hardware.
5.2.Inspect pull pin frame fittings to make sure the fittings are secure. Loose frame
fittings may strip out threads over time and cause extensive damage.
6.Clean and lubricate pop pin assemblies. Pull on the pin and spray a small amount of
lubricant onto the shaft.
7.Tighten the seat hardware to make sure the seat is level and centered.
8.Brush and treat the brake pads. Remove any foreign material that may have collected
on the pads. Spray the pads with a few drops of water. This helps to reduce noise from
friction between the pads and the flywheel.
9.Visually inspect the bottom bracket, toe clips and toe straps. If any of them are loose or
disconnected, attach and tighten.
28

III-Monthly Maintenance
10.Check if all hardware is secure, such as: water bottle holder, flywheel nuts, belt guard
bolts, brake caliper lock nuts, and brake caliper tension rod nuts.
11.Inspect the brake tension rod for signs of wear such as missing threads. Clean and
lubricate the brake tension rod.
12.Clean and lubricate the seat post, handlebar post and seat slider. Remove any built up
of foreign material.
29