
www.auna-multimedia.com
Arizona Sing
Jukebox
10037817


3
DE
English 23
Français 39
Español 55
Italiano 71
Technische Daten 4
Sicherheitshinweise 5
Geräteübersicht 7
Bedienfeld 8
Anschlüsse 9
Bedienung 11
Reinigung und Pege 16
Fehlersuche und Fehlerbehebung 16
Spezielle Entsorgungshinweise für Verbraucher in Deutschland 19
Hinweise zur Entsorgung 21
Konformitätserklärung 21
Sehr geehrter Kunde,
wir gratulieren Ihnen zum Erwerb Ihres Gerätes.
Lesen Sie die folgenden Hinweise sorgfältig durch
und befolgen Sie diese, um möglichen Schäden
vorzubeugen. Für Schäden, die durch Missachtung der
Hinweise und unsachgemäßen Gebrauch entstehen,
übernehmen wir keine Haftung. Scannen Sie den
folgenden QR-Code, um Zugri auf die aktuellste
Bedienungsanleitung und weitere Informationen rund
um das Produkt zu erhalten:
INHALTSVERZEICHNIS
4
DE
TECHNISCHE DATEN
Artikelnummer 10037817
Stromversorgung DC-Eingang: 9V 1A
(AC-Adapter mitgeliefert für
AC 100-240 V ~ 50/60 Hz)
Betriebstemperatur 0°C bis +35°C
Lautsprecher 1 x 4“
Lautsprecher Ausgangsleistung 1 x 8W = 8W RMS
Mikrofon-Anschlüsse 2 x 6,3 mm Mikrofoneingang
Line-In-Eingang 3,5 mm AUX-Buchse
Kompatible Disks CD, CD+G, CD-R, CD-RW
BT-Frequenz 2402-2480 MHz
BT-Sendeleistung ≤ -3.325 dBm
LIEFERUMFANG
• Jukebox (1x)
• RCA-Kabel (1x)
• Kabelmikrofon (1x)
• Bedienungsanleitung (1x)
• AC-Netzadapter (DC 9 V, 1 A) (1x)

5
DE
SICHERHEITSHINWEISE
Allgemeine Hinweise
• Blitzschlag - Wenn Sie das Gerät länger nicht benutzen oder es
gewittert, ziehen Sie den Stecker aus der Steckdose oder trennen
Sie das Gerät vom Antennenanschluss. Dadurch werden Schäden am
Produkt durch Blitzschlag und Überspannung vermieden.
• Überlastung - Überlasten Sie keine Steckdosen, Verlängerungskabel
oder integrierten Steckdosen, da dies zu einem Brand oder Stromschlag
führen kann.
• Fremdkörper und Flüssigkeitseintritt - Schieben Sie niemals
Gegenstände jeglicher Art durch Önungen in das Gerät, da sie
gefährliche Spannungspunkte berühren oder Teile kurzschließen
können, die zu einem Brand oder einem elektrischen Schlag führen
könnten. Verschütten Sie niemals Flüssigkeiten jeglicher Art auf dem
Gerät.
• Reparatur und Wartung - Versuchen Sie nicht, dieses Produkt selbst zu
warten, da Sie sich durch das Önen oder Entfernen von Abdeckungen
gefährlichen Spannungen oder anderen Gefahren aussetzen.
Überlassen Sie alle Wartungsarbeiten qualiziertem Servicepersonal.
• Schäden, die einen Service erfordern - Ziehen Sie den Netzstecker aus
der Steckdose und wenden Sie sich an einen qualizierten Fachbetrieb,
wenn eine der folgenden Situationen eintritt:
a) Wenn das Netzkabel oder der Stecker beschädigt ist.
b) Wenn Flüssigkeit verschüttet wurde oder Gegenstände auf das
Produkt gefallen sind.
c) Wenn das Produkt Regen oder Wasser ausgesetzt war.
d) Wenn das Produkt heruntergefallen oder beschädigt ist.
e) Wenn das Produkt eine deutlich verringerte Leistung aufweist.
• Ersatzteile - Wenn Ersatzteile benötigt werden, stellen Sie sicher, dass
der Fachbetrieb, der die Teile ersetzt, nur Ersatzteile verwendet, die
vom Hersteller zugelassen sind oder dieselben Eigenschaften wie das
Originalteil haben. Unbefugter Austausch kann zu Feuer, Stromschlag
oder anderen Gefahren führen.
• Wärme - Stellen Sie das Gerät nicht in der Nähe von Wärmequellen
wie Heizkörpern, Heizregistern, Öfen oder anderen Produkten
(einschließlich Verstärkern) auf.

6
DE
Besondere Hinweise
• Dieses Gerät kann von Kindern ab 8 Jahren sowie von Personen mit
verringerten physischen, sensorischen und geistigen Fähigkeiten
oder Mangel an Erfahrung und/oder Wissen benutzt werden, wenn
sie beaufsichtigt werden oder im sicheren Gebrauch des Gerätes
unterwiesen wurden und die daraus resultierenden Gefahren
verstanden haben.
• Reinigung und Wartung durch den Benutzer dürfen nicht von Kindern
vorgenommen werden, es sei denn, sie sind 8 Jahre oder älter und
werden beaufsichtigt.
• Kinder dürfen nicht mit dem Gerät spielen.
• Achten Sie darauf, dass Kinder und Babys nicht mit Plastiktüten oder
anderen Verpackungsmaterialien spielen.
• Achten Sie darauf, dass der Netzstecker/Netzadapter immer leicht
zugänglich bleibt, damit das Gerät im Notfall schnell von Stromnetz
getrennt werden kann.
• Wenn Sie das Gerät nicht mehr benutzen, schalten Sie es aus und
ziehen Sie den Stecker aus der Steckdose.

7
DE
GERÄTEÜBERSICHT
1 LED-Dekorationsleuchte 5 CD-Fach
2 Vorderseite 6 Tragegri
3
Lautsprecher und
Lautsprecherbeleuchtung
7 Mikrofonhalterung
4
Halterung für Smartpone oder
Tablet
8 Rückseite

8
DE
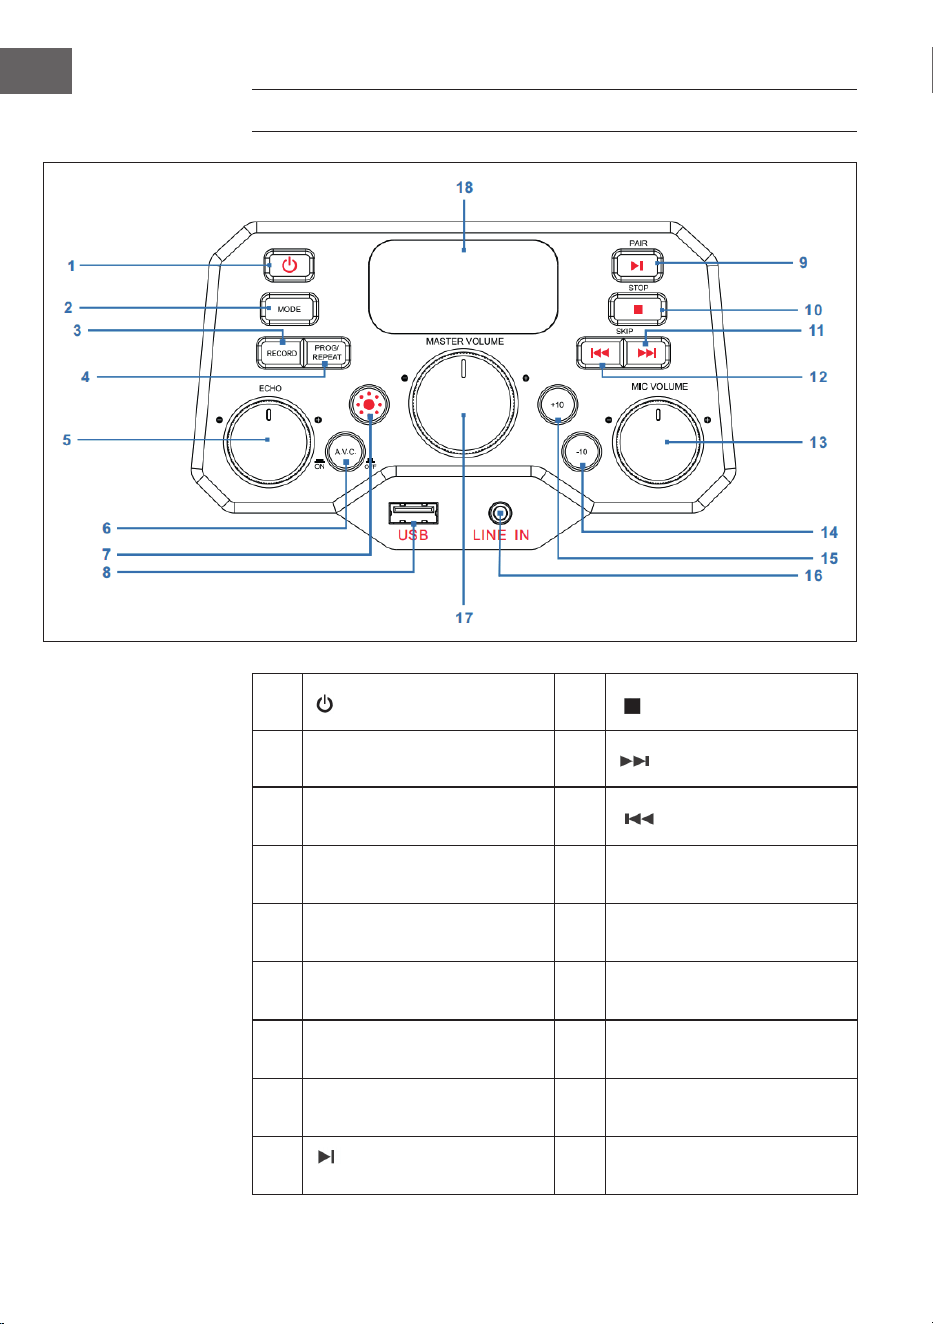
BEDIENFELD
1 Ein/Aus-Taste 10
STOP: Stopp-Taste
2 MODE: Modus-Taste 11
SKIP+ : Nächster Titel
3 RECORD: Aufnahme-Taste 12
SKIP- : Vorheriger Titel
4
PROG/REPEAT: Speicher-/
Wiederholungstaste
13
MIC VOLUME: Mikrofon-
Lautstärkeregler
5
ECHO: Regler für die
Echoeinstellung
14
-10: Vorherige 10 Titel
überspringen
6
A.V.C: Auto-Voice-Control
aktivieren/deaktivieren
15
+10: Nächste 10 Titel
überspringen
7 Licht-Modus-Taste 16
LINE IN: 3,5 mm Line-In-
Anschluss
8 USB: USB-Anschluss 17
MASTER VOLUME:
Haupt-Lautstärkeregler
9
PAIR: Play/Pause/
Verbinden-Taste
18 LED-Bildschirm
9
DE
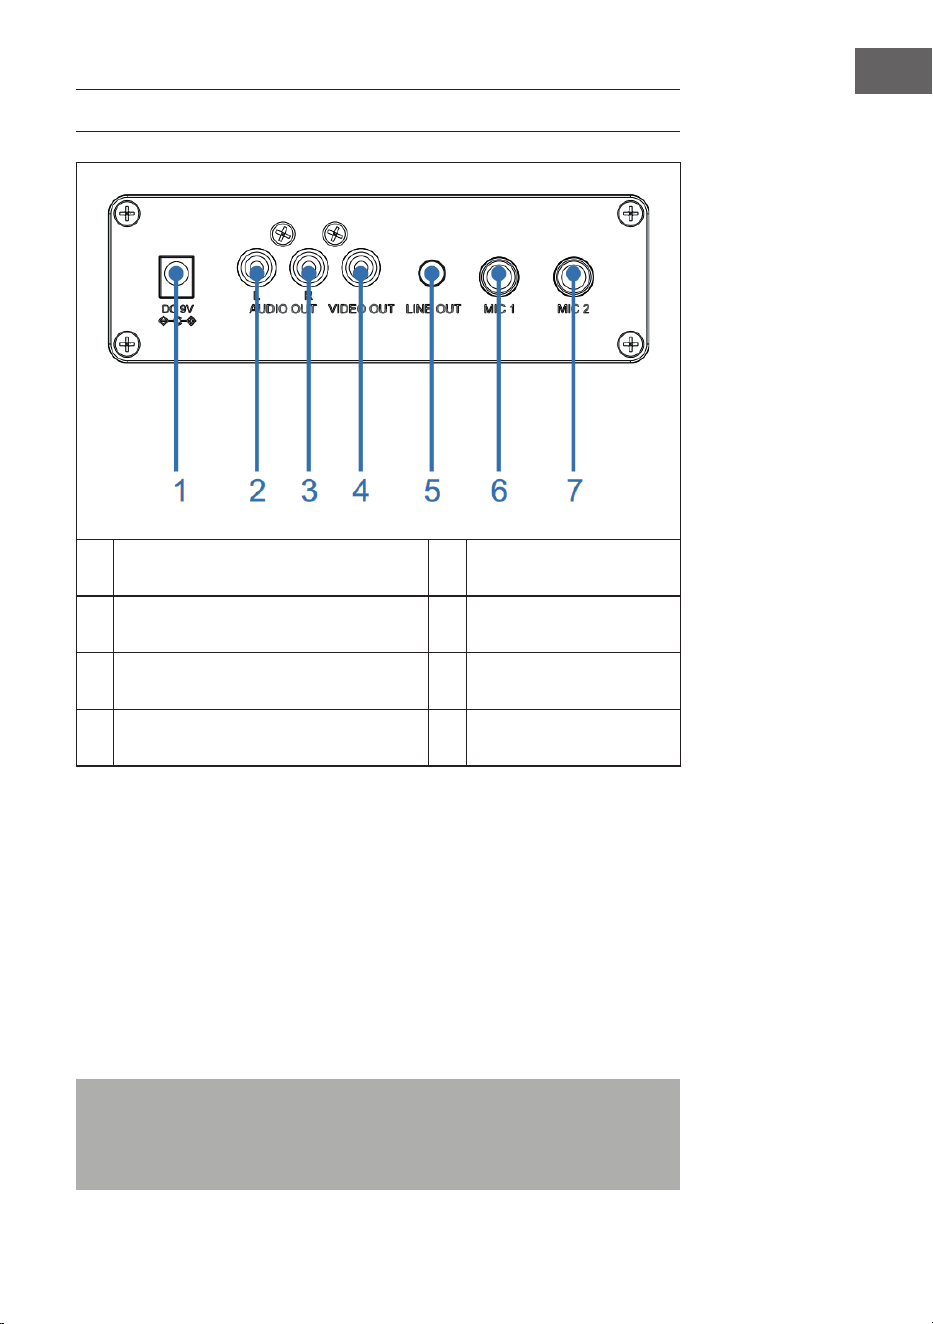
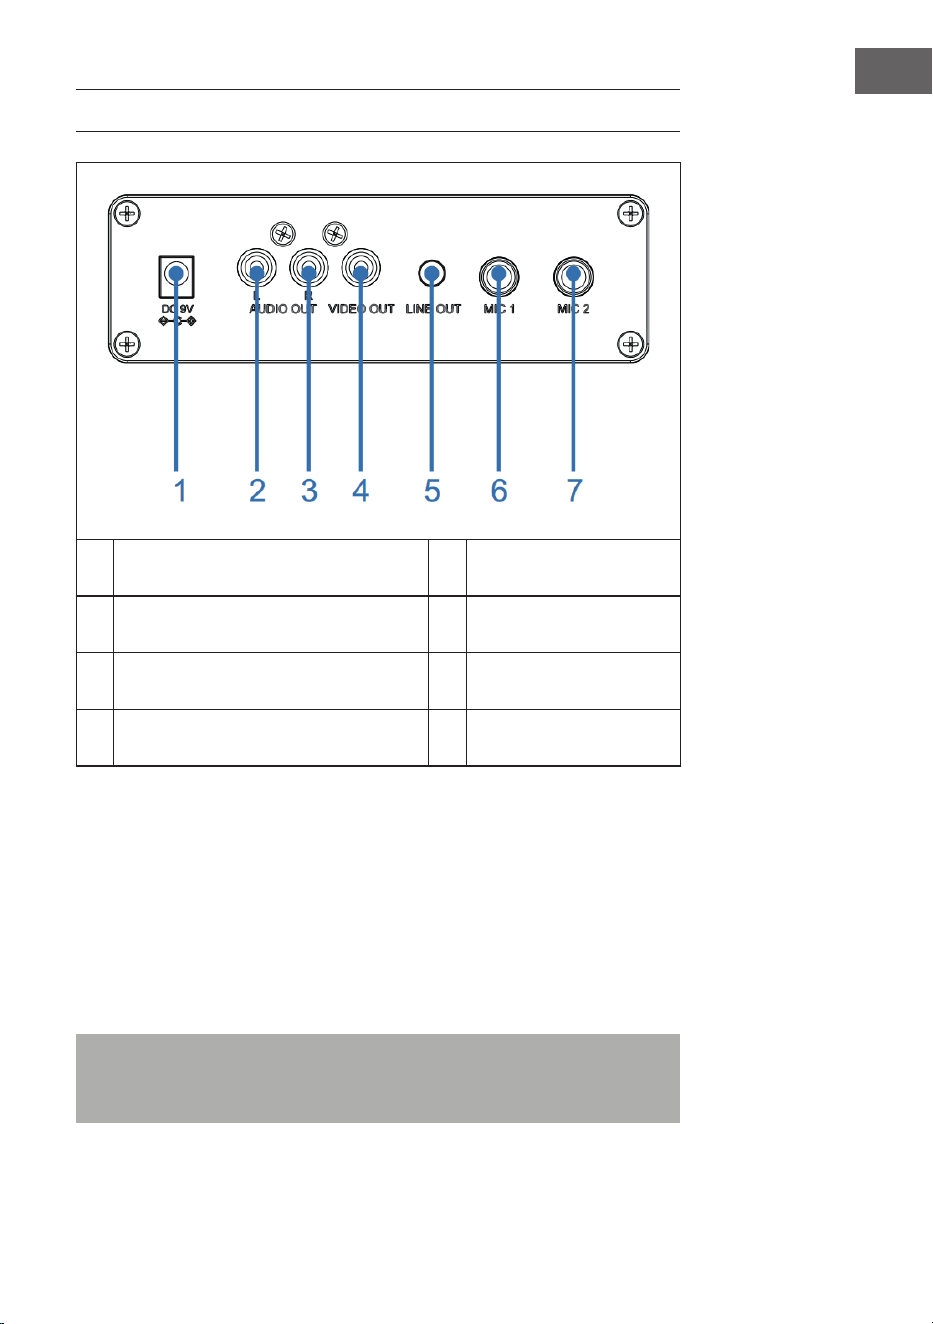
ANSCHLÜSSE
1 DC-IN-Anschluss 5 Line-Out-Anschluss
2 Audioausgang (L), Mikrofoneingang 6 Mikrofonanschluss 1
3 Audioausgang (R) 7 Mikrofonanschluss 2
4 Videoausgang
Stromanschluss
1. Stellen Sie das Gerät auf eine ache, stabile Oberäche.
2. Verbinden Sie das eine Ende des Netzadapters (im Lieferumfang
enthalten) mit dem DC-IN-Anschluss an der Rückseite des Geräts und
stecken Sie das andere Ende in die Steckdose.
Mikrofonanschluss
Verbinden Sie das Mikrofon mit dem Mikrofonanschluss 1 MIC 1 (6) an der
Rückseite des Geräts sowie (falls gewünscht) mit dem Mikrofonanschluss
MIC2 (7).
Hinweis: Lassen Sie das Mikrofon nicht fallen, da dadurch sowohl das
Mikrofon als auch die Lautsprecher beschädigt werden könnten. Wirbeln
Sie das Mikrofon nicht am Kabel herum, da die ummantelte Verkabelung
dadurch beschädigt werden könnte.

10
DE
Anschluss des Geräts an einen Fernseher
Um Video, Songtext und Audio über Ihren Fernseher wiedergeben zu lassen,
müssen die nachfolgenden Schritte befolgt werden:
1. Verbinden Sie das RCA-Videokabel (gelb) mit dem Videoausgang VIDEO
OUT (4) und die Audiokabel (weiß und rot) mit den Audioausgängen
AUDIO OUT (2 & 3) an der Rückseite des Geräts.
2. Verbinden Sie das andere Ende des RCA-Videokabels (gelb) mit
dem Videoeingang und die Audiokabel mit dem Audioeingang Ihres
Fernsehers.
HINWEISE:
• Dieses Gerät kann sowohl mit als auch ohne Fernseher verwendet
werden. Es wird allerdings empfohlen, dass Gerät in Kombination mit
einem Fernseher zu nutzen, um alle Funktionen nutzen zu können.
• Beachten Sie die Bedienungsanleitung Ihres Fernsehers.
• Um die Songtexte auf dem Bildschirm sehen zu können, müssen CD+G
Disks oder MP3+G Dateien verwendet werden.
Line-In-Anschluss
3. Drücken Sie zum Einschalten des Geräts die Ein/Aus-Taste (1).
4. Stecken Sie das 3,5 mm Audiokabel (nicht im Lieferumfang enthalten) in
den Line-In-Anschluss LINE IN (16) an der Vorderseite des Geräts.
5. Drücken Sie die Taste MODE (2) auf der Vorderseite des Geräts, um in
den AUX-Modus zu wechseln.
6. Verwenden Sie die Tasten des angeschlossenen Geräts, um
Audiodateien über das Gerät wiedergeben zu lassen.
Line-Out-Anschluss
Dieses Gerät kann für eine größere Audioausgabe via 3,5 mm AUX-
Kabel (nicht im Lieferumfang enthalten) an ein anderes Audiosystem
angeschlossen werden.
1. Stecken Sie ein Ende des AUX-Kabels in den Line-Out-Ausgang LINE
OUT (5) an der Rückseite des Geräts.
2. Stecken Sie das andere Ende des AUX-Kabels in den Line-In-Eingang
Ihres externen Audiogeräts. Schauen Sie sich hierfür gegebenenfalls die
Bedienungsanleitung des externen Geräts an.

11
DE
BEDIENUNG
Erste Schritte
• Lesen Sie sich die Bedienungsanleitung aufmerksam durch.
• Entnehmen Sie das Gerät aus der Verpackung.
• Entfernen Sie das gesamte Verpackungsmaterial und bewahren Sie
dieses für die zukünftige Verwendung auf (beispielweise für einen
Umzug).
Disko-Lichter
Das Gerät verfügt über drei Lichtmodi:
• Lichtmodus 1: Das Gerät synchronisiert sich zu der wiedergegebenen
Musik oder zum von Ihnen gesprochenen/gesungenen Ton.
• Lichtmodus 2: Das Gerät leuchtet in zufälligen Farben und Mustern auf.
• Lichtmodus 3: Die Lichteekte werden deaktiviert.
HINWEIS: Wenn Sie das Gerät einschalten, wird Lichtmodus 1 automatisch
aktiviert. Drücken Sie die Lichtmodus-Taste (7) auf der Vorderseite des
Geräts, um in den Lichtmodus 2 zu wechseln. Drücken Sie die Taste erneut,
um das Licht auszuschalten.
CD-Wiedergabe
1. Drücken Sie zum Einschalten des Geräts die Ein/Aus-Taste (1).
2. Önen Sie das CD-Fach (auf der Oberseite des Holzgehäuses) und
legen Sie eine CD (mit Standarddateien oder MP3+G Dateien) oder
eine CD+G ein und drücken Sie diese vorsichtig auf die Mittelspindel.
Schließen Sie das CD-Fach anschließend.
Was ist eine CD+G?
Eine CD+G (CD+Graken) ist das Standardformat für die meisten
Karaoke-CDs, welche die Wörter auf dem Bildschirm anzeigen können.
Was ist eine MP3+G?
MP3+G ist das neueste Format für Karaokemusik, welches MP3s der
kleinsten Dateigröße verwendet. Die Wörter werden auf dem Bildschirm
angezeigt.

12
DE
3. Drücken Sie mehrfach die Taste MODE (2) auf der Vorderseite des
Geräts, um den CDG/CD-Modus auszuwählen. Auf dem LED-Bildschirm
(18) blinkt „---“ auf, während nach einer CD gesucht wird. Anschließend
wird die Gesamtzahl der Titel auf dem Bildschirm angezeigt.
4. Drücken Sie die Taste PAIR (9) auf der Vorderseite des Geräts, um die
Wiedergabe zu starten. Wenn Sie eine CD+G Datei verwenden, werden
Bild und Songtext auf dem TV-Bildschirm angezeigt (falls verbunden).
Wenn eine CDG-Disk eingelegt wird, leuchtet die CDG-Anzeige auf.
• Falls das Gerät mit einem Fernseher verbunden ist, werden
die ausgewählten Songs und Ordner auf dem Bildschirm des
Fernsehers angezeigt.
• Drücken Sie auf der Vorderseite des Geräts die Taste SKIP+ (11) oder
SKIP- (12), um den Song, den Sie wiedergeben lassen möchten,
auszuwählen.
5. Stellen Sie mit dem Lautstärkeregler MASTER VOLUME (17) die
Lautstärke auf ein angenehmes Level an.
6. Schließen Sie ein (zwei) Mikrofon(e) an und schieben Sie den Schalter
ON/OFF des Mikrofons in die Position „ON“ (An).
7. Drehen Sie den Lautstärkeregler des Mikrofons MIC VOLUME (13) an der
Vorderseite des Geräts, um die Mikrofonlautstärke einzustellen. Dies
wirkt sich auf beide Mikrofone aus.
8. Drehen Sie den Regler ECHO (5) auf der Vorderseite, um Ihrer Stimme
einen Echoeekt zu verleihen.
9. Drücken Sie die Taste A.V.C. (6) auf der Vorderseite des Geräts, um die
Lautstärke der Hauptstimme zu senken, damit diese von Ihrer Stimme
überdeckt wird, wenn Sie einen Song mit Mikrofon singen. Diese
Funktion ist nur auf Songs anwendbar, die mit getrenntem Gesang
aufgenommen und heruntergeladen wurden.
HINWEISE:
• Legen Sie ausschließlich CDs in das CD-Fach ein. Andernfalls könnte Ihr
Gerät beschädigt werden.
• Wenn keine CD eingelegt wird, erscheint „no“ auf dem Bildschirm.
• Wenn das Gerät an einen Fernseher oder eine andere Audioquelle
angeschlossen wurde, passen Sie die Lautstärke entweder über den
Fernseher oder die andere Audioquelle an.
USB-Wiedergabe
1. Drücken Sie zum Einschalten des Geräts die Ein/Aus-Taste (1).
2. Stecken Sie einen USB-Stick in den USB-Anschluss USB (8) an der
Vorderseite des Geräts.
3. Drücken Sie mehrfach die Taste MODE (2) auf der Vorderseite, um den
USB-Modus auszuwählen. „USB“ wird auf dem Bildschirm angezeigt und
blinkt während der Suche nach dem USB-Stick. Anschließend wird die
Gesamtzahl der auf dem USB-Stick bendlichen Songs angezeigt.

13
DE
HINWEIS: Es wird empfohlen, das Gerät für die USB-Wiedergabe mit einem
Fernseher zu verbinden.
4. Drücken Sie zum Starten der Wiedergabe auf der Vorderseite des
Geräts die Taste PAIR (9). Wenn Sie eine MP3+G-Datei hören, werden
das Bild und die Songtexte auf dem Fernsehbildschirm angezeigt (falls
verbunden).
HINWEISE:
• Wenn das Gerät mit einem Fernseher verbunden ist, werden die
ausgewählten Songs und Ordner auf dem Fernsehbildschirm angezeigt.
• Drücken Sie zur Auswahl des Songs, den Sie abspielen möchten, die
Tasten SKIP- (12) und SKIP+ (11) auf der Vorderseite des Geräts.
5. Passen Sie die Lautstärke mit dem Lautstärkeregler MASTER VOLUME
(17) auf ein angenehmes Level an.
HINWEIS: Wenn Sie das Gerät mit einem Fernseher oder einer anderen
Audioquelle verbunden haben, verwenden Sie dessen Lautstärkeanpassung.
6. Schließen Sie ein Mikrofon an und schieben Sie den Schalter ON/OFF
des Mikrofons in die Position „ON“ (An).
7. Passen Sie die Mikrofonlautstärke mit dem Regler MIC VOLUME (13) an
der Vorderseite des Geräts an. Dies hat Einuss auf beide Mikrofone.
8. Drehen Sie zum Einstellen eines Echoeekts auf Ihre Stimme an der
Vorderseite des Geräts am Regler ECHO (5).
9. Wiederholen (REPEAT):
• Drücken Sie während der Wiedergabe auf der Vorderseite des
Geräts einmal die Taste PROG/REPEAT (3), um den ausgewählten
Song zu wiederholen. Die Wiederholungsanzeige blinkt schnell auf.
• Drücken Sie die Taste erneut, um den ausgewählten Ordner zu
wiederholen. Die Wiederholungsanzeige blinkt langsam auf.
• Drücken Sie die Taste ein drittes Mal, um alle Ordner zu
wiederholen. Die Wiederholungsanzeige leuchtet permanent rot
auf.
• Drücken Sie die Taste ein viertes Mal, um die
Wiederholungsfunktion abzubrechen. Die Wiederholungsanzeige
erlischt.
10. Pausieren (PAUSE):
• Drücken Sie zum Pausieren der Musik während der Wiedergabe
die Taste PAIR (9) auf der Vorderseite des Geräts. Die Anzeige
PLAY/PAUSE blinkt dann auf. Drücken Sie die Taste erneut, um die
normale Wiedergabe fortzusetzen.

14
DE
11. Drücken Sie die Taste STOP (10) auf der Vorderseite des Geräts, um die
Wiedergabe zu stoppen.
12. Drücken Sie zum Ausschalten des Geräts die Ein/Aus-Taste (1).
BT-Gerät verwenden
1. Schließen Sie das Gerät wie zuvor beschrieben an. Drücken Sie zum
Einschalten des Geräts die Ein/Aus-Taste (1) auf der Vorderseite des
Geräts.
2. Drücken Sie mehrfach die Taste MODE (2) auf der Vorderseite des
Geräts, um BT auszuwählen. „bt“ wird auf dem LED-Display angezeigt
und die BT-Anzeige auf der Vorderseite des Geräts blinkt blau auf. Das
Gerät sucht automatisch nach verfügbaren BT-Geräten in der Nähe und
verbindet sich automatisch mit einem zuvor gekoppelten Gerät (falls
zuvor verbunden). Wenn zuvor noch kein externes BT-Gerät verbunden
wurde, stellen Sie die Verbindung wie im nächsten Schritt beschrieben
her.
HINWEIS: Sie können, um die Verbindung zu einem anderen BT-Gerät
herzustellen, die Taste PAIR (9) auf der Vorderseite des Geräts lang gedrückt
halten, um alle gekoppelten Geräte zu trennen und ein neues Gerät zu
verbinden.
3. Aktivieren Sie bei Ihrem externen Gerät die BT-Funktion. Wählen Sie aus
der Geräteliste des externen Geräts „Arizona Sing“ aus.
Hinweis: Ziehen Sie für detailliertere Hinweise die Bedienungsanleitung
des externen Geräts hinzu.
4. Die BT-Anzeige leuchtet dann permanent blau auf und ein Piepen
ertönt.
HINWEISE:
• Falls zum Herstellen der BT-Verbindung die Eingabe eines PINs
erforderlich sein sollte, geben Sie „0000“ ein.
• Bei einigen Geräten muss, nach der erfolgreichen
Verbindungsherstellung, „als Audiogerät verwenden“ oder ähnliches
ausgewählt werden.
• Falls die Verbindung nach der erfolgreichen Kopplung getrennt wird,
sollten Sie den Abstand zwischen dem externen Gerät und Ihrem
Gerät verringern. Der Abstand sollte nicht mehr als 10 Meter (30 Fuß)
betragen.
5. Starten Sie auf dem externen BT-Gerät die Wiedergabe. Drücken Sie
während der Wiedergabe die Taste PAIR (9) auf der Vorderseite des
Geräts, um einen Song zu pausieren.

15
DE
6. Durch Drücken der Tasten SKIP- (12) und SKIP+ (11) auf der Vorderseite
des Geräts, können Sie den vorherigen/nächsten Titel überspringen.
Aufnahmefunktion
1. Um sowohl Ihren Gesang als auch die Musik aufzunehmen, drücken
Sie die Taste RECORD (3) auf der Vorderseite des Geräts. Die
Betriebsanzeige blinkt zunächst grün. Wenn sie dauerhaft grün leuchtet,
beginnt die Aufnahme.
2. Wenn Sie mit der Aufnahme fertig sind, drücken Sie die Taste RECORD
(3) erneut. Die Betriebsanzeige erlischt.
3. Die aufgenommene Audiodatei wird auf dem USB-Laufwerk
gespeichert.
4. Um den aufgenommenen Song anzuhören, drücken Sie die Taste
MODE (2) an der Vorderseite, um in den USB-Modus zu wechseln. Sie
können den aufgezeichnete Song in der REC-Datei nden. Drücken
Sie die Tasten SKIP- (12) und SKIP+ (11), um den gewünschten Song
auszuwählen.
5. Drücken Sie die Taste PAIR (9), um den ausgewählten Song abzuspielen.
HINWEIS: Die Aufnahmefunktion ist im BT-, AUX- und CD-Modus verfügbar.
Im CD-Modus können nur Titel im CD-, CD-R-, CD-RW- und CD+G-Format
aufgenommen werden. Für das MP3-Format ist sie nicht verfügbar.
Speicherfunktion
1. Drücken Sie bei eingeschaltetem Gerät die Taste STOP (10), um in den
Stopp-Modus zu gelangen. Drücken Sie dann die Taste PROG/REPEAT
(4). die Speicheranzeige blinkt und „01“ erscheint auf dem Bildschirm,
um anzuzeigen, dass der erste Song gespeichert werden kann.
2. Wählen Sie den ersten Titel mit den Tasten SKIP- (12) und SKIP+ (11) aus.
3. Drücken Sie die Taste PROG/REPEAT (4) erneut, um die Eingabe zu
bestätigen.
4. Wiederholen Sie den Vorgang, um bis zu 20 Titel zu speichern. Wenn
Sie fertig sind, drücken Sie die Taste PAIR (9), um die Wiedergabe zu
starten.
HINWEISE:
• Drücken Sie zweimal die Taste STOP (10), um den Speichervorgang zu
stoppen und die Speicherliste zu löschen.
• Sie können bis zu 20 Titel für die Wiedergabe in beliebiger Reihenfolge
speichern. Wenn Sie versuchen, mehr als 20 Titel zu speichern, erscheint
„FUL“ auf dem Bildschirm.
• Die Speicherfunktion ist im CD- und USB-Modus verfügbar.

16
DE
REINIGUNG UND PFLEGE
• Ziehen Sie vor der Reinigung den Netzstecker des Geräts aus der
Steckdose.
• Reiben Sie das Gerät, falls es staubig ist, mit einem weichen und
trockenen Staubtuch ab.
• Verwenden Sie zur Reinigung, ausschließlich, ein weiches Tuch.
Verwenden Sie keinesfalls Wachs, Poliersprays oder aggressive
Reinigungsmittel.
Hinweis: Achten Sie darauf, dass während der Reinigung niemals
Flüssigkeiten ins Geräteinnere gelangen.
FEHLERSUCHE UND FEHLERBEHEBUNG
Prüfen Sie, bevor Sie das Gerät bei Problemen einsenden oder sich an den
Kundendienst wenden, die in der nachfolgenden Tabelle aufgeführten
Vorschläge zur Fehlerbehebung. Sollte sich das Problem mit den
nachfolgenden Informationen weiterhin nicht beheben lassen, wenden Sie
sich an den Hersteller oder den Kundendienst.
Problem Mögliche Ursache/Lösung
Das Gerät ist aus. Das Gerät ist ausgeschaltet. Drücken Sie zum
Einschalten die Ein/Aus-Taste (1).
Stellen Sie sicher, dass der Netzadapter richtig
an der Rückseite des Geräts angeschlossen ist.
Stecken Sie den Netzstecker in eine andere
Steckdose.
Falls Sie Batterien verwenden, tauschen Sie die
Batterien aus.
Kein Ton (allgemein) Der Lautstärkeregler MASTER VOLUME steht
auf der niedrigsten Einstellung. Erhöhen Sie die
Lautstärke.
Es wurde nicht die richtige Funktion ausgewählt
Wählen Sie die richtige Funktion mit der Taste
MODE (2) aus.
Falls Sie ein externes Gerät nutzen, erhöhen Sie
dessen Lautstärke.
17
DE
Problem Mögliche Ursache/Lösung
Kein Ton (wenn mit
Fernseher verbunden)
Die Fernseher ist stummgeschaltet oder die
Lautstärke ist zu niedrig eingestellt.
Stellen Sie die Lautstärke wie gewünscht ein.
Im Fernsehmenü wurde nicht die richtige Quelle
(normalerweise AV) ausgewählt.
Der Songtext wird
nicht auf dem
Fernsehbildschirm
angezeigt.
Wenn das Gerät mit einem Fernseher
verbunden ist, kann es sein, dass der Stecker
des Videokabels nicht richtig angeschlossen
ist. Überprüfen Sie dies und stellen Sie die
Verbindung her.
Wenn das Gerät mit einem Fernseher
verbunden ist, wählen Sie die richtige Quelle
aus (für gewöhnlich AV).
Die wiedergegebene Datei/der wiedergegebene
Titel enthält keinen Songtext.
Wenn Sie den Line-In-Anschluss oder BT
verwenden, wird auf dem Fernsehbildschirm
nichts angezeigt.
Kein Ton des
Mikrofons.
Stellen Sie sicher, dass das Mikrofon richtig
mit dem Mikrofon-Anschluss MIC1 oder MIC2
verbunden ist.
Stellen Sie sicher, dass der Schalter ON/OFF
des Mikrofons sich in der Position „ON“ (An)
bendet.
Stellen Sie sicher, dass die Mikrofon-Lautstärke
nicht zu niedrig eingestellt ist.
Der Lautstärkeregler MASTER VOLUME steht
auf der niedrigsten Einstellung. Erhöhen Sie die
Lautstärke.
Dateien auf einem
USB-Stick werden
nicht wiedergegeben.
Die verwendete Datei ist defekt. Ersetzen Sie
die Datei.
Das Dateiformat kann nicht vom Gerät
wiedergegeben werden.
Der angeschlossene USB-Stick wird vom Gerät
nicht unterstützt.
18
DE
Problem Mögliche Ursache/Lösung
Ein externes BT-Gerät
kann nicht mit dem
Gerät verbunden
werden.
Die BT-Funktion Ihres externen Geräts wurde
nicht aktiviert. Lesen Sie sich hierfür die
Bedienungsanleitung des externen Geräts
durch.
Das Gerät bendet sich nicht im
Kopplungsmodus. Drücken Sie zum
Wiederholen des Koppelns die Taste PAIR.
Die Musik ist nach
dem erfolgreichen
Herstellen einer
BT-Verbindung nicht
verfügbar.
Stellen Sie sicher, dass ihr externes BT-Gerät
das A2DP-BT-Prol unterstützt.
Die Lautstärke des externen BT-Geräts ist zu
niedrig eingestellt oder stumm geschaltet.
Passen Sie diese an.

19
DE
SPEZIELLE ENTSORGUNGSHINWEISE FÜR
VERBRAUCHER IN DEUTSCHLAND
Entsorgen Sie Ihre Altgeräte fachgerecht. Dadurch wird gewährleistet,
dass die Altgeräte umweltgerecht verwertet und negative Auswirkungen
auf die Umwelt und menschliche Gesundheit vermieden werden. Bei der
Entsorgung sind folgende Regeln zu beachten:
• Jeder Verbraucher ist gesetzlich verpichtet, Elektro- und
Elektronikaltgeräte (Altgeräte) sowie Batterien und Akkus
getrennt vom Hausmüll zu entsorgen. Sie erkennen die
entsprechenden Altgeräte durch folgendes Symbol der
durchgestrichene Mülltonne (WEEE Symbol).
• Sie haben Altbatterien und Altakkumulatoren, die nicht vom Altgerät
umschlossen sind, sowie Lampen, die zerstörungsfrei aus dem
Altgerät entnommen werden können, vor der Abgabe an einer
Entsorgungsstelle vom Altgerät zerstörungsfrei zu trennen.
• Bestimmte Lampen und Leuchtmittel fallen ebenso unter das Elektro-
und Elektronikgesetz und sind dementsprechend wie Altgeräte zu
behandeln. Ausgenommen sind Glühbirnen und Halogenlampen.
Entsorgen Sie Glühbirnen und Halogenlampen bitte über den Hausmüll,
sofern Sie nicht das WEEE Symbol tragen.
• Jeder Verbraucher ist für das Löschen von personenbezogenen Daten
auf dem Elektro- bzw. Elektronikgerät selbst verantwortlich.
Rücknahmepicht der Vertreiber
Vertreiber mit einer Verkaufsäche für Elektro- und Elektronikgeräte von
mindestens 400 Quadratmetern sowie Vertreiber von Lebensmitteln
mit einer Gesamtverkauläche von mindestens 800 Quadratmetern, die
mehrmals im Kalenderjahr oder dauerhaft Elektro- und Elektronikgeräte
anbieten und auf dem Markt bereitstellen, sind verpichtet,
1 bei der Abgabe eines neuen Elektro- oder Elektronikgerätes an einen
Endnutzer ein Altgerät des Endnutzers der gleichen Geräteart, das
im Wesentlichen die gleichen Funktionen wie das neue Gerät erfüllt,
am Ort der Abgabe oder in unmittelbarer Nähe hierzu unentgeltlich
zurückzunehmen und
2 auf Verlangen des Endnutzers Altgeräte, die in keiner äußeren
Abmessung größer als 25 Zentimeter sind, im Einzelhandelsgeschäft
oder in unmittelbarer Nähe hierzu unentgeltlich zurückzunehmen; die
Rücknahme darf nicht an den Kauf eines Elektro- oder Elektronikgerätes
geknüpft werden und ist auf drei Altgeräte pro Geräteart beschränkt.

20
DE
• Bei einem Vertrieb unter Verwendung von Fernkommunikationsmitteln
ist die unentgeltliche Abholung am Ort der Abgabe auf Elektro- und
Elektronikgeräte der Kategorien 1, 2 und 4 gemäß § 2 Abs. 1 ElektroG,
nämlich „Wärmeüberträger“, „Bildschirmgeräte“ (Oberäche von mehr
als 100 cm²) oder „Großgeräte“ (letztere mit mindestens einer äußeren
Abmessung über 50Zentimeter) beschränkt. Für andere Elektro- und
Elektronikgeräte (Kategorien 3, 5, 6) ist eine Rückgabemöglichkeit in
zumutbarer Entfernung zum jeweiligen Endnutzer zu gewährleisten.
• Altgeräte dürfen kostenlos auf dem lokalen Wertstohof oder in
folgenden Sammelstellen in Ihrer Nähe abgegeben werden:
www.take-e-back.de
• Für Elektro- und Elektronikgeräte der Kategorien 1, 2 und 4 an bieten
wir auch die Möglichkeit einer unentgeltlichen Abholung am Ort der
Abgabe. Beim Kauf eines Neugeräts haben sie die Möglichkeit eine
Altgerätabholung über die Webseite auszuwählen.
• Batterien können überall dort kostenfrei zurückgegeben werden, wo sie
verkauft werden (z. B. Super-, Bau-, Drogeriemarkt). Auch Wertsto- und
Recyclinghöfe nehmen Batterien zurück. Sie können Batterien auch per
Post an uns zurücksenden. Altbatterien in haushaltsüblichen Mengen
können Sie direkt bei uns von Montag bis Freitag zwischen 07:30 und
15:30 Uhr unter der folgenden Adresse unentgeltlich zurückgeben:
Chal-Tec GmbH
Member of Berlin Brands Group
Handwerkerstr. 11
15366 Dahlwitz-Hoppegarten
Deutschland
• Wichtig zu beachten ist, dass Lithiumbatterien aus Sicherheitsgründen
vor der Rückgabe gegen Kurzschluss gesichert werden müssen (z. B.
durch Abkleben der Pole).
• Finden sich unter der durchgestrichenen Mülltonne auf der Batterie
zusätzlich die Zeichen Cd, Hg oder Pb ist das ein Hinweis darauf, dass
die Batterie gefährliche Schadstoe enthält. (»Cd« steht für Cadmium,
»Pb« für Blei und »Hg« für Quecksilber).
Hinweis zur Abfallvermeidung
Indem Sie die Lebensdauer Ihrer Altgeräte verlängern, tragen Sie dazu
bei, Ressourcen eizient zu nutzen und zusätzlichen Müll zu vermeiden.
Die Lebensdauer Ihrer Altgeräte können Sie verlängern indem Sie defekte
Altgeräte reparieren lassen. Wenn sich Ihr Altgerät in gutem Zustand
bendet, könnten Sie es spenden, verschenken oder verkaufen.

21
DE
HINWEISE ZUR ENTSORGUNG
Wenn es in Ihrem Land eine gesetzliche Regelung
zur Entsorgung von elektrischen und elektronischen
Geräten gibt, weist dieses Symbol auf dem Produkt
oder auf der Verpackung darauf hin, dass dieses
Produkt nicht im Hausmüll entsorgt werden darf.
Stattdessen muss es zu einer Sammelstelle für
das Recycling von elektrischen und elektronischen
Geräten gebracht werden. Durch regelkonforme
Entsorgung schützen Sie die Umwelt und die
Gesundheit Ihrer Mitmenschen vor negativen
Konsequenzen. Informationen zum Recycling
und zur Entsorgung dieses Produkts, erhalten
Sie von Ihrer örtlichen Verwaltung oder Ihrem
Hausmüllentsorgungsdienst.
Dieses Produkt enthält Batterien. Wenn es in Ihrem
Land eine gesetzliche Regelung zur Entsorgung
von Batterien gibt, dürfen die Batterien nicht im
Hausmüll entsorgt werden. Informieren Sie sich
über die örtlichen Bestimmungen zur Entsorgung
von Batterien. Durch regelkonforme Entsorgung
schützen Sie die Umwelt und die Gesundheit Ihrer
Mitmenschen vor negativen Konsequenzen.
KONFORMITÄTSERKLÄRUNG
Hersteller:
Chal-Tec GmbH, Wallstraße 16, 10179 Berlin,
Deutschland.
Importeur für Großbritannien:
Berlin Brands Group UK Ltd
PO Box 1145
Oxford, OX1 9UW
United Kingdom
Hiermit erklärt Chal-Tec GmbH, dass der
Funkanlagentyp Arizona Sing der Richtlinie
2014/53/EU entspricht. Der vollständige Text der
EU-Konformitätserklärung ist unter der folgenden
Internetadresse verfügbar: use.berlin/10037817


23
EN
Technical Data 24
Safety Instructions 25
Device Overview 27
Control Panel 28
Connections 29
Operation 31
Cleaning and Maintenance 35
Troubleshooting 36
Disposal Considerations 38
Declaration of Conformity 38
Dear Customer,
Congratulations on purchasing this device. Please read
the following instructions carefully and follow them to
prevent possible damages. We assume no liability for
damage caused by disregard of the instructions and
improper use. Scan the QR code to get access to the
latest user manual and more product information.
CONTENTS

24
EN
TECHNICAL DATA
Item number 10037817
Power supply DC input: 9V 1A
(AC adaptor supplied for
AC 100-240 V ~ 50/60 Hz)
Operation temperature 0°C bis +35°C
Speakers 1 x 4“
Speaker output 1 x 8W = 8W RMS
Microphone connections 2 x 6.3 mm microphone jack
Line-In 3.5 mm AUX jack
Compatible discs CD, CD+G, CD-R, CD-RW
BT frequency 2402-2480 MHz
BT transmission power ≤ -3.325 dBm
SCOPE OF DELIVERY
• Jukebox (1x)
• RCA cable (1x)
• Wired microphone (1x)
• Instruction manual (1x)
• AC Adapter (DC 9 V, 1 A) (1x)

25
EN
SAFETY INSTRUCTIONS
General information
• Lightning - If you are not going to use the device for a long time or
if there is a storm, disconnect the plug from the electrical outlet and
disconnect the device from the antenna connector. This will avoid
damage to the product that may be caused by lightning or overvoltage.
• Overload - Do not overload power outlets, extension cords, or built-in
power outlets, as this may result in a re or electric shock.
• Foreign objects and liquid - Never push objects of any kind through
openings in the device as they may touch dangerous voltage points or
short out parts, which could result in a re or electric shock. Never spill
liquids of any kind on the device.
• Repairs and maintenance - Do not attempt to service this product
yourself, as opening or removing covers will expose you to dangerous
voltages or other hazards. Leave all maintenance to qualied service
personnel.
• Damage requiring service - Disconnect the power plug from the outlet
and consult a qualied specialist if any of the following conditions
occur:
a) If the power cord or plug is damaged.
b) If liquid has been spilled or objects have fallen onto the product.
c) If the product has been exposed to rain or water.
d) If the product has been dropped or damaged.
e) If the product has a markedly reduced performance.
• Replacement parts - When replacement parts are required, make
sure that the service professional who replaces the parts only uses
replacement parts that have been approved by the manufacturer or
that have the same characteristics as the original part. Unauthorized
replacement may result in re, electric shock or other hazards.
• Heat - Do not place the unit near heat sources such as radiators,
heaters, stoves or other products (including ampliers).

26
EN
Special Instructions
• This device may only be used by children from the age of 8 and up and
by persons with reduced physical, sensory and mental capabilities or
a lack of experience and / or knowledge if they are supervised or have
been instructed in the safe use of the device and have understood the
resulting dangers.
• Cleaning and user maintenance should not be done by children unless
they are 8 years of age or older and are supervised.
• Children must not play with the device.
• Ensure children and babies do not play with plastic bags or any
packaging materials.
• Mains plug/power adaptor is used as disconnect device and it should
remain readily operable during intended use.
• In order to disconnect the apparatus from the mains completely, the
main plug/power adaptor should be disconnected from the mains
socket outlet completely.

27
EN
DEVICE OVERVIEW
1 LED decoration light 5 CD compartment
2 Front panel 6 Carrying handle
3 Speaker and speaker light 7 Microphone holder
4 Slot for smartphone or tablet 8 Back panel

28
EN
CONTROL PANEL
1 Power on/o button 10
STOP button
2 MODE button 11
SKIP+ button:
(next track)
3 RECORD button 12
SKIP- button
(previous track)
4 PROG/REPEAT button 13
MIC VOLUME knob
(microphone volume)
5 ECHO knob 14
-10 button
(skip previous 10 tracks)
6
A.V.C on/of button
(Auto Voice Control)
15
+10 button
(skip next 10 tracks)
7 Light Mode button 16 LINE IN jack (3.5 mm )
8 USB port 17 MASTER VOLUME knob
9
PAIR button
(Play/Pause/Pairing)
18 LED display

29
EN
CONNECTIONS
1 DC in jack 5 Line out jack
2 Audio out (L) jack 6 Microphone in jack 1
3 Audio out (R) jack 7 Microphone in jack 2
4 Video out jack
Connecting Power Source
1. Place the unit on a at, stable surface.
2. Connect AC adaptor (provided) into the DC IN jack (1) on the back panel
of the unit and plug the the other end to the mains outlet.
Connecting the Microphone
Connect the microphone into MIC 1 jack (6) on the back panel as well as
MIC2 jack (7) on the back panel (when desired).
Note: Do not drop or tap the Microphone as damage to the Microphone
or speakers may occur. Do not twirl the microphone by cord as it will
cause damage to the encased wiring.

30
EN
Connecting the Unit to a TV
To output the video, lyrics and audio to your TV, perform the following
steps:
1. Connect the RCA video cable (Yellow) to the VIDEO OUT jack (4) and the
audio cables (White and Red) to the AUDIO OUT jacks (2 & 3) located on
the back of the jukebox.
2. Connect the opposite end of the RCA video cable (Yellow) to the VIDEO
IN jack and the audio cables (White and Red) to the AUDIO IN on your
TV.
NOTES:
• This unit can be used with or without a TV, but it is highly recommended
to use a TV in order to utilize all the features.
• Also refer to the TV’s User Guide.
• To see the lyrics on the screen, you must use a CD+G disc or MP3+G
les.
Connecting to Line In Jack
1. Press the POWER button (1) on the front panel to turn the unit on.
2. Insert the 3.5mm audio cable (not included) into the LINE IN jack (16) on
the front panel.
3. Press the MODE button (2) on the front panel to switch to AUX mode.
4. Use the controls on the connected device to begin playing audio routed
through the unit.
Connecting to Line Out Jack
This unit can be connected to another audio system for greater audio output
via 3.5mm AUX cord (not included).
1. Plug one end of AUX cord into the LINE OUT jack (5) located on the back
panel.
2. Plug the other end of the AUX cord into the Line In jack on your separate
audio device. You may need to refer the instructions of your separate
audio device for more details.

31
EN
OPERATION
First Steps
• Read this instruction manual carefully.
• Remove the appliance from the box.
• Remove the packaging and save it for future use (for example when
moving the unit).
Disco Lights
There are three light modes as follows:
• Light mode 1: The unit will synchronize to the music being played or
with the sound when you speak or sing into the microphone.
• Light mode 2: The unit will light up with random colors and patterns.
• Light mode 3: The light eects will be turned o.
NOTE: When the unit is turned on, the Light mode 1 is automatically
activated. Press LIGHT MODE button (7) on the front panel to switch to Light
mode 2, and press again to turn o the light.
Playing a CD
1. Press the POWER button (1) on the front panel to turn the unit on
2. Lift open the CD door (on top of the wooden cabinet) and insert a CD
(with standard or MP3+G les) or a CD+G by gently pressing it on the
center spindle. Then close the CD door.
What is a CD+G?
A CD+G (CD+Graphics) is the standard format for most karaoke discs
that will display the words on the screen.
What is an MP3+G
MP3+G is the newest format for karaoke music utilizing the MP3’s small
le size. It will display the words on the screen.

32
EN
3. Repeatedly press the MODE button (2) on the front panel to select the
CDG/CD mode; “---” will blink on the LED display (18) when searching
the disc and then the total number of tracks will appear.
4. Press the PAIR button (9) on the front panel to start playback. If listening
to a CD+G le, the image and lyrics will appear on the TV screen (if
connected). When a CDG disc is inserted, the CDG indicator will light.
• If connected to a TV you will see the selected song and folders on
the TV screen.
• Press the SKIP+ (11) or SKIP- button (12) on the front panel to choose
the song that you want to play.
5. Adjust the volume to a comfortable level using the MASTER VOLUME
knob (17) on the front panel.
6. Connect microphone(s), and slide the ON/OFF switch on the
microphone to the ON position.
7. Rotate the MIC VOLUME knob (13) on the front panel to increase or
decrease the microphone volume as you desired, which will aect both
microphones.
8. Rotate the ECHO knob (5) on the front panel to adjust the echo eect
for your voice.
9. Press A.V.C button (6) on the front panel, the lead vocal will be
decreased and covered by your voice when you’re singing a song with
microphone. This function is only applicable to the songs recorded with
separated vocals that is downloaded.
NOTES:
• Never place anything other than a CD in the compartment, as foreign
objects can damage the unit.
• If no disc is inserted, “no” will appear on the display.
• If connected to a TV or other audio source, adjust the volume of the TV
using its own volume control.
Playing Songs from the USB
1. Press the POWER button (1) on the front panel to turn the unit on.
2. Insert a USB ash drive into the USB slot (8) on the front panel of the
unit.
3. Repeatedly press the MODE button (2) on the front panel to select the
USB mode. “USB” will be shown on the display and “USB” will blink
when searching the drive and then the total number of tracks will
appear.
NOTE: It is highly recommended to have it connected to a TV for USB
playback.

33
EN
4. Press the PAIR button (9) on the front panel to start playback. If listening
to an MP3+G le, the image and lyrics will appear on the TV screen (if
connected).
NOTES:
• If connected to a TV you will see the selected song and folders on the
TV screen.
• Press the SKIP- (12) and SKIP+ (11) buttons on the front panel to choose
the song that you want to play.
5. Adjust the volume to a comfortable level using the MASTER VOLUME
knob (17) on the front panel.
NOTE: If connected to a TV or other audio source, adjust the volume of the
TV using its own volume control.
6. Connect microphone(s), and slide the ON/OFF switch on the
microphone to the ON position.
7. Rotate the MIC VOLUME knob (13) on the front panel to increase or
decrease the microphone volume as you desired, which will aect both
microphones.
8. Rotate the ECHO knob (5) on the front panel to adjust the echo eect
for your voice.
9. REPEAT:
• During playback, press the PROG/REPEAT button(3) on the front
panel once to repeatedly play the selected song, the REPEAT
indicator will blink rapidly.
• Press it again to repeatedly play the selected folder, the REPEAT
indicator will blink slowly.
• Press it again to repeatedly play all the folders, the REPEAT
indicator will turn solid red.
• Press it again to cancel the repeat function, the REPEAT indicator
will turn o.
10. PAUSE:
• During playback, if you wish to pause the music momentarily, press
the PAIR button (9) on the front panel, the PLAY/PAUSE indicator
will blink. Press again to resume normal playback.
11. Press the STOP button (10) on the front panel to stop playback.
12. Press the POWER button(1) on the front panel to turn the unit o.

34
EN
Using a BT Device
1. Connect the unit as described previously. Press the POWER button (1) on
the front panel to turn the unit on.
2. Repeatedly press MODE button (2) on the front panel to select BT. “bt”
will appear in the LED display and BT indicator on the front panel will
ash blue. The unit automatically searches for and pairs a previously
paired BT device (if previously paired). If no previously paired devices
are present, connect as shown in the next step.
NOTE: You can also long press the PAIR button (9) on the front panel to
disconnect any paired devices in order to pair another device.
3. Turn on your device’s BT option in settings to search for a discoverable
device with a BT signal. Select “Arizona Sing” from the device results on
the BT menu.
Note: Also refer to the user manual of your BT device for detailed
instructions.
4. The BT indicator will light solid blue and a chime will sound.
NOTES:
• If your BT prompts you for a pass code during the pairing process,
please enter “0000” to connect.
• On some BT devices, once pairing is complete, select your BT device as
“Use as Audio Device” or similar.
• If connection is lost after successful pairing, check to make sure the
distance between speaker and BT enabled device does not exceed
10meters (30 feet).
5. Start playback of your BT device. Press the PAIR button (9) on the front
panel during playback to pause the song.
6. Advance or go back one track by pressing the “SKIP- (12) and SKIP+ (11)
buttons on the front panel.
Using recording function
1. To record your singing as well as the music, press the RECORD button
(3) on the front panel, the POWER indicator will ash green and then
turn solid green, the recording will begin.
2. When done recording, press the RECORD button (3) again, the POWER
indicator will turn o.
3. The recorded audio le will be recorded onto the USB drive.

35
EN
4. To listen to the recorded song, press the MODE button (2) on the front
panel to switch to USB mode, you can nd the recorded song in the REC
le. Press th SKIP- (12) and SKIP+ (11) buttons to choose the song that
you want to play.
5. Press the PAIR button (9) to play the selected song.
NOTE: The recording function is available in BT, AUX, and CD mode. While
in CD mode, it can only record the songs with CD, CD-R, CD-RW, and CD+G
format, not available for MP3 format.
Using programming function
1. When the unit is on, press STOP button (10) to enter into STOP mode,
press the PROG/REPEAT button (4). The PROGRAM indicator will blink
and ”01” will appear on the display indicating the rst program is ready
to program.
2. Select the rst track by using the SKIP- (12) and SKIP+ (11) buttons.
3. Press the PROG/REPEAT button (4) again to conrm the entry.
4. Repeat to set up to 20 tracks into memory. When done, press the PAIR
button (9) to start playback.
NOTES:
• Press the STOP button (10) TWICE to stop and clear the program.
• You can program up to 20 tracks for playback in any desired order.
If more than 20 tracks are attempted to be programmed, “FUL” will
appear in the display.
• The programming function is available in CD and USB mode.
CLEANING AND MAINTENANCE
• Disconnect the appliance from the power source when cleaning.
• If the unit becomes dusty, wipe it with a soft and dry duster.
• Use a soft cloth to clean this appliance. Do not use any wax, polish
sprays, or abrasive cleaners on the unit.
Note: Never allow any water or other liquids to get inside the unit while
cleaning.
36
EN
TROUBLESHOOTING
Before taking the unit to be repaired, please check the following table when
a problem occurs. Contact the manufacturer or the customer service if the
problem cannot be solved with the following information.
Problem Possible Cause/Solution
No power Power is not on; press the POWER button (1) to
turn power on.
Conrm the AC adapter is connected securely to
the back of the unit.
Connect the unit to a dierent outlet.
If using batteries, replace with new ones.
No sound
(general)
MASTER VOLUME is set to minimum; raise
volume.
Correct function was not selected; select using
the MODE button (2).
If using an external device, raise the volume.
No sound
(if connected to a TV)
Volume on the TV is muted or too low.
Adjust the volume as desired.
Correct source (usually AV) was not selected on
the TV’s menu.
Lyrics do not appear
on the TV screen
If connected to a TV, Video plug is not
connected properly, check carefully and connect
it properly.
If connected to a TV, select the correct source on
the TV (usually AV).
The le/track being played is not a track
recording with lyrics. These are the only les
that allow you to view the lyrics on the TV
screen.
Nothing will appear on the TV screen when
using LINE IN or BT.
37
EN
Problem Possible Cause/Solution
No sound from the
microphone
Make sure the microphone is rmly connected
to the MIC 1 or MIC 2 jack.
Make sure the Mic’s ON/OFF switch on the Mic
is set to the ON position
Make sure the microphone’s volume is not set
too low.
MASTER VOLUME is set to minimum; raise
volume.
File(s) on USB jack not
playing
The le is corrupted; replace the le.
The le is not in a format this unit will play.
The connected USB device is not supported by
the jukebox.
The BT device cannot
be paired or connected
with the unit.
You have not activated the BT function of your
device; please refer to the BT device user’s
manual.
The system is not in pairing mode; press the
PLAY/PAUSE button to restart pairing.
The Music is not
available on the unit
after successfully
connecting the BT.
Ensure your BT device can support the A2DP BT
prole.
The volume on the external BT device is set to
low or muted; raise as desired.

38
EN
DISPOSAL CONSIDERATIONS
If there is a legal regulation for the disposal of
electrical and electronic devices in your country,
this symbol on the product or on the packaging
indicates that this product must not be disposed of
with household waste. Instead, it must be taken to
a collection point for the recycling of electrical and
electronic equipment. By disposing of it in accordance
with the rules, you are protecting the environment and
the health of your fellow human beings from negative
consequences. For information about the recycling
and disposal of this product, please contact your local
authority or your household waste disposal service.
This product contains batteries. If there is a legal
regulation for the disposal of batteries in your country, the
batteries must not be disposed of with household waste.
Find out about local regulations for disposing of batteries.
By disposing of them in accordance with the rules, you are
protecting the environment and the health of your fellow
human beings from negative consequences.
DECLARATION OF CONFORMITY
Manufacturer:
Chal-Tec GmbH, Wallstrasse 16, 10179 Berlin,
Germany.
Importer for Great Britain:
Berlin Brands Group UK Ltd
PO Box 1145
Oxford, OX1 9UW
United Kingdom
Hereby, Chal-Tec GmbH declares that the radio
equipment type Arizona Sing is in compliance with
Directive 2014/53/EU. The full text of the EU declaration
of conformity is available at the following internet
address: use.berlin/10037817
For Great Britain: Hereby, Chal-Tec GmbH declares that
the radio equipment type Arizona Sing is in compliance
with the relevant statutory requirements. The full text of
the declaration of conformity is available at the following
internet address: use.berlin/10037817

39
FR
Fiche technique 40
Consignes de sécurité 41
Aperçu de l'appareil 43
Panneau de commande 44
Connexions 45
Utilisation 47
Nettoyage et entretien 52
Identication et résolution des problèmes 52
Conseils pour le recyclage 54
Déclaration de conformité 54
Cher client, chère cliente,
Toutes nos félicitations pour l’acquisition de ce
nouvel appareil. Lisez attentivement les indications
suivantes et suivez-les pour éviter d'éventuels
dommages. Nous ne saurions être tenus pour
responsables des dommages dus au non-respect
des consignes et à la mauvaise utilisation de
l’appareil. Scannez le QR-Code pour obtenir la
dernière version du mode d'emploi ainsi que
d'autres informations concernant le produit :
SOMMAIRE

40
FR
FICHE TECHNIQUE
Numéro d'article 10037817
Alimentation Entrée DC : 9V 1A
(Adaptateur AC fourni pour
AC 100-240 V ~ 50/60 Hz)
Température de fonctionnement 0°C à +35°C
Enceinte 1 x 4“
Puissance de sortie de l'enceinte 1 x 8W = 8W RMS
Prises micro 2 x entrées de 6,3 mm
Entrée de ligne Prise AUX 3,5 mm
Disques compatibles CD / CD+G / CD-R / CD-RW
Fréquence de BT 2402-2480 MHz
Puissance d'émission BT ≤ -3.325 dBm
CONTENU DE L'EMBALLAGE
• Jukebox (1x)
• Câble RCA (1x)
• Câble de micro (1x)
• Mode d'emploi (1x)
• Adaptateur secteur AC (DC 9 V, 1 A) (1x)

41
FR
CONSIGNES DE SÉCURITÉ
Consignes générales
• Foudre - Si vous prévoyez de ne pas utiliser l'appareil pendant
une longue période ou en cas d'orage, retirez la che de la prise ou
débranchez l'antenne de l'appareil. Cela empêchera la foudre et les
surtensions d'endommager le produit.
• Surcharge - Ne surchargez pas les prises électriques, les rallonges ou
les prises électriques intégrées car cela pourrait provoquer un incendie
ou une électrocution.
• Corps étrangers et liquides - Ne glissez jamais d'objets de quelque
sorte que ce soit à travers les ouvertures de l'appareil, car ils pourraient
entrer en contact avec des points à la tension dangereuse ou court-
circuiter des pièces, ce qui pourrait provoquer un incendie ou une
électrocution Ne renversez jamais de liquides de quelque sorte que ce
soit sur l'appareil.
• Réparations et maintenance - Ne tentez pas de réparer ce produit
vous-même car vous vous exposeriez à des tensions dangereuses ou à
d'autres risques en ouvrant ou en retirant les couvercles. Conez toute
la maintenance à un personnel qualié.
• Dégâts nécessitant l'intervention d'un professionnel - Débranchez la
che d'alimentation de la prise et consultez un spécialiste qualié si l'un
des cas suivants se produit :
a) Si le câble d'alimentation ou la prise est endommagé.
b) Si du liquide a été renversé ou si des objets sont tombés sur le
produit.
c) Si le produit a été exposé à la pluie ou à l'eau.
d) Si le produit a fait une chute ou a été endommagé.
e) Si les performances du produit sont nettement réduites.
• Pièces de remplacement - Si des pièces de rechange sont nécessaires,
assurez-vous que l'entreprise spécialisée n'utilise que des pièces
approuvées par le fabricant ou ayant les mêmes propriétés que la pièce
d'origine. Le remplacement non autorisé peut entraîner un incendie, un
choc électrique ou d'autres dangers.
• Chaleur - Ne placez pas l'appareil à proximité de sources de chaleur
telles que des radiateurs, des grilles de chauage, des fours ou d'autres
produits (y compris les amplicateurs).

42
FR
Consignes particulières
• Les enfants à partir de 8 ans et les personnes sourant de handicaps
mentaux, sensoriels et physiques ne peuvent utiliser l'appareil que s'ils
ont été parfaitement familiarisés avec les fonctions et les précautions
de sécurité par une personne responsable et s'ils comprennent les
risques associés.
• Le nettoyage et l'entretien par l'utilisateur ne doivent pas être eectués
par des enfants sauf s'ils sont âgés de plus de 8 ans et sont sous
surveillance.
• Les enfants ne sont pas autorisés à jouer avec l'appareil.
• Ne laissez pas les jeunes enfants et les bébés jouer avec les sacs en
plastique et autres matériaux d'emballages.
• Assurez-vous que la che d'alimentation / l'adaptateur secteur est
toujours facilement accessible an que l'appareil puisse être rapidement
déconnecté de l'alimentation électrique en cas d'urgence.
• Lorsque vous n'utilisez plus l'appareil, éteignez-le et débranchez la che
de la prise.

43
FR
APERÇU DE L'APPAREIL
1 Eclairage décoratif LED 5 Compartiment CD
2 Face avant 6 Poignée de transport
3
Enceinte et éclairage
d'enceinte
7 Support de micro
4
Support pour smartphone et
tablette
8 Dos de l'appareil
44
FR
PANNEAU DE COMMANDE
1 Touche de marche/arrêt 10
STOP : Touche stop
2 MODE : Touche mode 11
SKIP+ : titre suivant
3
RECORD : Touche
d'enregistrement
12
SKIP- : Titre précédent
4
PROG/REPEAT: Touche
mémorisation / répétition
13
MIC VOLUME : (volume du
micro)
5
ECHO : Réglage de l'eet
écho
14 -10 : saut arrière de 10 titres
6
A.V.C : Auto-Voice-Control
activer /désactiver
15 +10 : saut avant de 10 titres
7 Touche du mode éclairage 16
LINE IN : Prise Line-In 3,5
mm
8 USB : Port USB 17
MASTER VOLUME :
Réglage du volume principal
9
PAIR : Touche Play/
Pause/Connexion
18 Écran LED
45
FR
CONNEXIONS
1 Prise DC-IN 5 Prise Line-Out
2 Sortie audio (L), entrée de micro 6 Prise micro 1
3 Sortie audio (R) 7 Prise micro 2
4 Sortie vidéo
Branchement au secteur
1. Placez l'appareil sur une surface plane et solide.
2. Connectez une extrémité de l'adaptateur secteur (inclus) à la prise DC-
IN à l'arrière de l'appareil et branchez l'autre extrémité dans la prise.
Prise micro
Connectez le micro à la prise micro 1 MIC 1 (6) à l'arrière de l'appareil et (si
nécessaire) à la connexion micro MIC 2 (7).
Remarque : Ne faites pas tomber le micro car cela pourrait
l'endommager ainsi que les enceintes. Ne faites pas tournoyer le micro
au bout de son câble car vous risquez de l'endommager.

46
FR
Connexion de l'appareil à un téléviseur
Pour lire la vidéo, les paroles et l'audio sur votre téléviseur, suivez les étapes
suivantes ci-après :
1. Connectez le câble vidéo RCA (jaune) à la sortie vidéo VIDEO OUT (4) et
les câbles audio (blanc et rouge) aux sorties audio AUDIO OUT (2 & 3) à
l'arrière de l'appareil.
2. Connectez l'autre extrémité du câble vidéo RCA (jaune) au port d'entrée
vidéo et les câbles audio au port d'entrée audio de votre téléviseur.
REMARQUES :
• Cet appareil peut être utilisé avec ou sans téléviseur. Cependant, il est
recommandé d'utiliser l'appareil avec un téléviseur an de pouvoir
utiliser toutes les fonctions.
• Lisez le mode d'emploi de votre téléviseur.
• Pour voir les paroles des chansons sur l'écran, vous devez utiliser des
disques CD+G ou des chiers MP3+G.
Prise Line-In
3. Pour éteindre l'appareil, appuyez sur la touche de Marche/arrêt (1).
4. Branchez le câble audio de 3,5 mm (non fourni) dans la prise d'entrée
de ligne LINE IN (16) à l'avant de l'appareil.
5. Appuyez sur la touche mode (2) à l'avant de l'appareil pour sélectionner
le mode AUX.
6. Utilisez les touches de l'appareil connecté pour lire des chiers audio
sur l'appareil.
Prise Line-Out
Cet appareil peut être connecté à un autre système audio pour une
meilleure sortie audio par câble AUX de 3,5 mm (non inclus).
1. Branchez une extrémité du câble AUX dans le port de sortie LINE OUT
(5) à l'arrière de l'appareil.
2. Branchez l'autre extrémité du câble AUX dans l'entrée Line-In de votre
périphérique audio externe. Si nécessaire, reportez-vous au mode
d'emploi de l'appareil externe.

47
FR
UTILISATION
Premiers pas
• Lisez attentivement le mode d'emploi.
• Retirez l'appareil de son emballage.
• Retirez tout le matériel d'emballage et conservez-le pour une utilisation
future (par exemple pour un déménagement).
Lumières disco
L'appareil dispose de trois modes d'éclairage :
• Mode éclairage 1 : L'appareil se synchronise sur la musique en cours de
lecture ou le son que vous avez prononcé / chanté.
• Mode éclairage 2 : L'appareil s'allume dans des couleurs et des motifs
aléatoires.
• Mode éclairage 3 : Eets de lumière désactivés.
REMARQUE : Lorsque vous allumez l'appareil, le mode d'éclairage 1 s'active
automatiquement. Appuyez sur la touche mode d'éclairage (7) à l'avant
de l'appareil pour changer le mode d'éclairage. Appuyez à nouveau sur la
touche pour désactiver l'éclairage.
Lecture d'un CD
1. Pour allumer l'appareil, appuyez sur la touche de Marche/arrêt (1).
2. Ouvrez le compartiment CD (sur le dessus du boîtier en bois) et insérez
un CD (avec des chiers standard ou des chiers MP3 + G) ou CD +
G et appuyez doucement dessus sur l'axe central. Fermez ensuite le
compartiment CD.
Qu'est-ce qu'un CD+G ?
Un CD + G (CD + Graphics) est le format standard de la plupart des CD
de karaoké qui peuvent aicher du texte à l'écran.
Qu'est-ce qu'un MP3+G ?
MP3 + G est le dernier format de musique de karaoké utilisant la taille de
chier MP3 la plus compacte. Les paroles s'aichent à l'écran.

48
FR
3. Appuyez plusieurs fois sur la touche MODE (2) à l'avant de l'appareil
pour choisir le mode CDG/CD. L'écran aiche "---" en clignotant pendant
la recherche du CD. Puis l'écran aiche le nombre total de titres.
4. Appuyez sur la touche PAIR (9) à l'avant de l'appareil pour démarrer la
lecture. Si vous utilisez un chier CD + G, l'image et les paroles seront
aichées sur l'écran du téléviseur (si connecté). Lorsqu'un disque CDG
est inséré, le témoin CDG s'allume.
• Si l'appareil est connecté à un téléviseur, les morceaux et les
dossiers sélectionnés seront aichés sur l'écran du téléviseur.
• Appuyez sur la touche SKIP+ (11) ou SKIP- (12) à l'avant de l'appareil
pour sélectionner le morceau que vous souhaitez lire.
5. Réglez un volume agréable avec MASTER VOLUME (17).
6. Branchez un (deux) micro(s) et glissez l'interrupteur ON/OFF du micro
en position "ON" (marche).
7. Tournez la commande de volume du micro MIC VOLUME (13) à l'avant
de l'appareil pour régler le volume du micro. La commande agit sur les
deux micros.
8. Tournez la commande ECHO (5) sur le panneau avant pour donner à
votre voix un eet d'écho.
9. Appuyez sur la touche A.V.C. (6) à l'avant de l'appareil pour baisser
le volume de la voix principale an qu'elle soit couverte par votre
voix lorsque vous chantez une chanson avec un micro. Cette fonction
s'applique seulement aux morceaux enregistrés et téléchargés avec des
voix séparées.
REMARQUES :
• Insérez uniquement des CD dans le compartiment CD. Faute de quoi
vous risquez d'endommager votre appareil.
• En l'absence de CD, l'écran aiche "no"
• Lorsque l'appareil est branché à un téléviseur ou à une source audio
autre, réglez le volume depuis le téléviseur ou depuis la source audio.
Lecture par USB
1. Pour allumer l'appareil, appuyez sur la touche de Marche/arrêt (1).
2. Insérez une clé USB dans le port USB (8) à l'avant de l'appareil.
3. Appuyez plusieurs fois sur la touche MODE (2) à l'avant pour choisir le
mode USB. L'écran aiche "USB" et clignote pendant la recherche de la
clé USB. Puis l'écran aiche le nombre total de titres se trouvant sur la
clé USB.
REMARQUE : il est recommandé de connecter l'appareil à un téléviseur
pour la lecture par USB.

49
FR
4. Pour démarrer la lecture, appuyez sur PAIR (9) à l'avant de l'appareil.
Si vous utilisez un chier MP3 + G, l'image et les paroles s'aichent sur
l'écran du téléviseur (si connecté).
REMARQUES :
• Si l'appareil est connecté à un téléviseur, les morceaux et les dossiers
sélectionnés s'aichent sur l'écran du téléviseur.
• Pour sélectionner le morceau que vous souhaitez lire, appuyez sur les
touches SKIP- (12) et SKIP+ (11) à l'avant de l'appareil.
5. Réglez un volume agréable avec MASTER VOLUME (17).
REMARQUE : Si vous avez connecté l'appareil à un téléviseur ou à une autre
source audio, utilisez son réglage du volume.
6. Branchez un micro et glissez l'interrupteur ON/OFF du micro en position
"ON" (marche).
7. Réglez le volume du micro avec MIC VOLUME (13) à l'avant de l'appareil.
La commande agit sur les deux micros.
8. Tournez la commande ECHO (5) sur le panneau avant pour donner à
votre voix un eet d'écho.
9. Répétition (REPEAT)
• Pendant la lecture, appuyez une fois sur PROG / REPEAT (3) à
l'avant de l'appareil pour répéter le morceau sélectionné. Le
témoin de répétition clignote rapidement.
• Appuyez à nouveau sur la touche pour répéter le dossier
sélectionné. Le témoin de répétition clignote lentement.
• Appuyez une troisième fois sur la touche pour répéter tous les
dossiers. Le témoin de répétition reste allumé en rouge.
• Appuyez une quatrième fois sur la touche pour annuler la fonction
de répétition. Le témoin de répétition s'éteint.
10. Mettre en pause (PAUSE) :
• Pour mettre en pause la musique pendant la lecture, appuyez sur
PAIR (9) à l'avant de l'appareil. L'aichage PLAY/PAUSE se met à
clignoter. Appuyez une nouvelle fois sur la touche pour reprendre la
lecture normale.
11. Appuyez sur la touche STOP (10) à l'avant de l'appareil pour arrêter la
lecture.
12. Pour éteindre l'appareil, appuyez sur la touche de Marche/arrêt (1).

50
FR
Utilisation d'un appareil BT
1. Branchez l'appareil comme décrit plus haut. Pour allumer l'appareil,
appuyez sur la touche de Marche/arrêt (1) à l'avant de l'appareil.
2. Appuyez plusieurs fois sur la touche MODE (2) pour choisir BT. L'écran
LED aiche "bt" et le témoin de BT clignote en bleu à l'avant de
l'appareil. L'appareil recherche automatiquement des appareils BT
disponibles à proximité et se connecte automatiquement avec un
appareil déjà connu (si une connexion a déjà été réalisée avec cet
appareil). Si vous n'avez encore jamais connecté d'appareil BT externe,
établissez la connexion en suivant les étapes ci-après.
REMARQUE : Pour établir la connexion avec un autre appareil BT,
maintenez la touche PAIR (9) à l'avant de l'appareil pour déconnecter tous
les appareils couplés et connecter un nouvel appareil.
3. Activez la fonction BT sur votre appareil externe. Choisissez "Arizona
Sing" dans la liste des appareils disponibles.
Remarque : Pour plus d'informations, reportez-vous au mode d'emploi
du périphérique externe.
4. Le témoin BT reste alors allumé en bleu et l'appareil émet un bip.
REMARQUES :
• S'il vous est demandé un code PIN pour établir la connexion BT,
saisissez "0000".
• Avec certains appareils, une fois la connexion établie, vous devez
sélectionner "Utiliser comme appareil audio" ou quelque chose de
similaire.
• Si la connexion se coupe après un couplage réussi, rapprochez
l'appareil externe de votre appareil. La distance doit être inférieure à 10
mètres (30 pieds)
5. Démarrez la lecture sur votre appareil externe BT. Pour mettre en
pause la musique pendant la lecture, appuyez sur PAIR (9) à l'avant de
l'appareil.
6. Sautez la piste précédente / suivante en appuyant sur les touches SKIP-
(12) et SKIP+ (11) à l'avant de l'appareil.

51
FR
Fonction d'enregistrement
1. Pour enregistrer à la fois votre chant et la musique, appuyez
sur le bouton RECORD (3) à l'avant de l'appareil. Le témoin de
marche clignote alors en vert. Lorsqu'il reste allumé en vert xe,
l'enregistrement commence.
2. Une fois l'enregistrement terminé, appuyez de nouveau sur la touche
RECORD (3). Le témoin de marche s'éteint.
3. Le chier enregistré est mémorisé sur la clé USB.
4. Pour écouter un titre enregistré, appuyez sur la touche MODE (2) à
l'avant de l'appareil pour passer en mode USB. Vous trouverez le
morceau enregistré dans le chier REC. Appuyez sur les touches SKIP-
(12) et SKIP+ (11) pour sélectionner le morceau souhaité.
5. Appuyez sur la touche PAIR (9) pour lire le titre sélectionné.
REMARQUE : la fonction d'enregistrement est disponible avec les modes
BT, AUX et CD. En mode CD, les titres ne peuvent être enregistrés qu'aux
formats CD, CD R, CD RW et CD+G. Elle n'est pas disponible pour le format
MP3.
Fonction mémoire
1. L'appareil allumé, appuyez sur la touche STOP (10) pour accéder au
mode STOP. Appuyez ensuite sur la touche PROG/REPEAT (4). Le
témoin de mémorisation clignote et l'écran aiche "01", indiquant que le
premier morceau peut être sauvegardé.
2. Choisissez le premier titre avec les touches SKIP-(12) et SKIP+ (11).
3. Appuyez de nouveau sur la touche PROG/REPEAT (4) pour conrmer la
saisie.
4. Répétez le processus pour mémoriser jusqu'à 20 titres. Lorsque vous
avez terminé, appuyez sur la touche PAIR (9) pour démarrer la lecture.
REMARQUES :
• Appuyez deux fois sur STOP (10) pour arrêter le processus de
mémorisation et supprimer la liste en mémoire.
• Vous pouvez mémoriser une liste de lecture comprenant jusqu'à
20titres dans l"ordre que vous souhaitez. Si vous essayez de mémoriser
plus de 20 titres, l'écran aichera "FUL".
• La fonction mémorisation est disponible en mode CD et USB.

52
FR
NETTOYAGE ET ENTRETIEN
• Avant le nettoyage, débranchez la che d'alimentation de la prise.
• Si l'appareil est poussiéreux, essuyez -le avec un plumeau doux et sec.
• Pour le nettoyage, utilisez uniquement un chion doux. N'utilisez en
aucun cas de la cire, un spray de polissage ou des produits agressifs.
Remarque : Assurez-vous qu'aucun liquide ne pénètre à l'intérieur de
l'appareil pendant le nettoyage.
IDENTIFICATION ET RÉSOLUTION DES
PROBLÈMES
Avant d'envoyer l'appareil en cas de problème ou de contacter le service
client, consultez les suggestions de dépannage dans le tableau ci-dessous.
Si les informations suivantes ne vous permettent pas de résoudre le
problème, contactez le fabricant ou le service client.
Problème Cause possible / Solution
L'appareil est éteint. L'appareil est éteint. Pour allumer l'appareil,
appuyez sur la touche de marche/arrêt (1).
Vériez que l'adaptateur secteur est bien
branché à l'arrière de l'appareil.
Branchez la che dans une autre prise.
Si vous utilisez des piles, essayez de les changer.
Pas de son (général) Le volume MASTER VOLUME est réglé au
minimum. Augmentez le volume.
Vous n'avez pas choisi la bonne fonction.
Choisissez la bonne fonction avec la touche
MODE (2).
Si vous utilisez un appareil externe, augmentez
le volume sur ce dernier.
Pas de son (appareil
connecté à un
téléviseur)
Le téléviseur est sur muet ou le volume est réglé
trop bas.
Réglez le volume à votre convenance.
Vous n'avez pas choisi la bonne source
(généralement AV) dans le menu TV.

53
FR
Problème Cause possible / Solution
Les paroles des
chansons ne
s'aichent pas sur
l'écran du téléviseur.
Si l'appareil est connecté à un téléviseur,
le connecteur du câble vidéo peut ne pas
être correctement connecté. Vériez cela et
établissez la connexion.
Lorsque l'appareil est connecté à un téléviseur,
choisissez la bonne source (généralement AV).
Le chier ou le titre lu ne contient pas de paroles
de chansons.
Si vous utilisez la Line In ou le BT, rien ne
s'aichera sur l'écran du téléviseur.
Pas de son au micro Vériez que le micro est bien branché sur MIC1
ou MIC2.
Vériez que l'interrupteur ON/OFF du micro est
en position "ON" (marche).
Vériez que le volume du micro n'est pas réglé
trop bas.
Le volume MASTER VOLUME est réglé au
minimum. Augmentez le volume.
Les chiers sur clé USB
ne sont pas lus.
Le chier utilisé est défectueux. Remplacez le
chier.
Le format de chier n'est pas lisible par
l'appareil.
La clé USB branchée n’est pas reconnue par
l'appareil.
Impossible de
connecter un appareil
BT externe avec
l'appareil.
La fonction BT de votre appareil externe n'est
pas activée. Lisez le mode d'emploi de votre
appareil externe.
L'appareil ne se trouve pas en mode
d'appairage. Pour eectuer l'appairage de
nouveau, appuyez sur la touche PAIR.
La musique n'est
pas disponible après
l'établissement d'une
connexion BT.
Vériez que votre appareil externe BT prend en
charge le prol A2DP-BT.
Le volume de l'appareil externe BT est réglé
trop bas ou sur muet. Ajustez-le.

54
FR
CONSEILS POUR LE RECYCLAGE
S‘il existe une réglementation pour l‘élimination ou le
recyclage des appareils électriques et électroniques
dans votre pays, ce symbole sur le produit ou sur
l‘emballage indique que cet appareil ne doit pas
être jeté avec les ordures ménagères. Vous devez le
déposer dans un point de collecte pour le recyclage
des équipements électriques et électroniques.
La mise au rebut conforme aux règles protège
l‘environnement et la santé de vos semblables des
conséquences négatives. Pour plus d‘informations
sur le recyclage et l‘élimination de ce produit, veuillez
contacter votre autorité locale ou votre service de
recyclage des déchets ménagers.
Ce produit contient des piles. S‘il existe une
réglementation pour l‘élimination ou le recyclage
des piles dans votre pays, vous ne devez pas les
jeter avec les ordures ménagères. Renseignez-vous
sur les dispositions locales relatives à la collecte
des piles usagées. La mise au rebut conforme aux
règles protège l‘environnement et la santé de vos
semblables des conséquences négatives.
DÉCLARATION DE CONFORMITÉ
Fabricant :
Chal-Tec GmbH, Wallstraße 16, 10179 Berlin,
Allemagne.
Importateur pour la Grande Bretagne :
Berlin Brands Group UK Ltd
PO Box 1145
Oxford, OX1 9UW
United Kingdom
Le soussigné, Chal-Tec GmbH, déclare que
l’équipement radioélectrique du type Arizona Sing est
conforme à la directive 2014/53/UE. Le texte complet
de la déclaration UE de conformité est disponible à
l’adresse internet suivante : use.berlin/10037817

55
ES
Datos técnicos 56
Indicaciones de seguridad 57
Descripción del aparato 59
Panel de control 60
Conexiones 61
Funcionamiento 63
Limpieza y cuidado 68
Detección y reparación de anomalías 68
Retirada del aparato 70
Declaración de conformidad 70
Estimado cliente:
Le felicitamos por la adquisición de este producto.
Lea atentamente el siguiente manual y siga
cuidadosamente las instrucciones de uso con el
n de evitar posibles daños. La empresa no se
responsabiliza de los daños ocasionados por un
uso indebido del producto o por haber desatendido
las indicaciones de seguridad. Escanee el siguiente
código QR para obtener acceso al manual de usuario
más reciente y otra información sobre el producto.
ÍNDICE

56
ES
DATOS TÉCNICOS
Número de artículo 10037817
Alimentación Entrada CC: 9V 1A
(Adaptador CA incluido para
CA 100-240 V ~ 50/60 Hz)
Temperatura de funcionamiento 0°C a +35°C
Altavoz 1 x 4“
Potencia de salida altavoz 1 x 8W = 8W RMS
Conexiones de micrófono 2 entradas de micrófono de 6,3 mm
Entrada de línea Toma AUX 3,5 mm
Discos compatibles CD, CD+G, CD-R, CD-RW
Frecuencia BT 2402-2480 MHz
Potencia de transmisión BT ≤ -3.325 dBm
CONTENIDO DEL ENVÍO
• Gramola (x1)
• Cable RCA (x1)
• Micrófono de cable (x1)
• Manual de instrucciones (x1)
• Fuente de alimentación CA (CC 9V, 1A) (x1)

57
ES
INDICACIONES DE SEGURIDAD
Indicaciones generales
• Rayos- Si no va a utilizar la unidad durante un período prolongado de
tiempo, o si hay rayos, desenchufe la unidad de la toma de corriente
y desconecte el conector de la antena. Esto evitará que el producto
resulte dañado por los rayos y las subidas de tensión.
• Sobrecarga - No sobrecargue las tomas de corriente, los alargadores
o los receptáculos integrales, ya que puede provocar un incendio o una
descarga eléctrica.
• Entrada de objetos extraños y líquidos- No introduzca nunca objetos
de ningún tipo en el producto a través de las aberturas, ya que podrían
tocar puntos de tensión peligrosos o provocar un cortocircuito en las
piezas que podría dar lugar a un incendio o a una descarga eléctrica. No
derrame nunca líquidos de ningún tipo sobre la unidad.
• Reparación y mantenimiento- No intente reparar este producto usted
mismo, ya que al abrir o retirar las cubiertas puede exponerse a voltajes
peligrosos u otros riesgos. Remita todas las reparaciones a personal de
servicio cualicado.
• Daños que requieren servicio técnico - Desenchufe este producto de
la toma de corriente y diríjase a personal de servicio cualicado siempre
que se produzca alguna de las siguientes situaciones:
a) Si el cable de alimentación o el enchufe están dañados.
b) Si se ha derramado líquido o han caído objetos sobre el producto.
c) Si el producto ha sido expuesto a la lluvia o al agua.
d) Si el producto se ha caído o dañado.
e) Si el producto presenta un rendimiento signicativamente
reducido.
• Piezas de repuesto - Cuando se necesiten piezas de repuesto,
asegúrese de que el servicio técnico que las sustituya utilice únicamente
piezas de repuesto aprobadas por el fabricante o que tengan las
mismas características que la pieza original. Las sustituciones no
autorizadas pueden provocar incendios, descargas eléctricas u otros
peligros.
• Calor - No instale el aparato cerca de fuentes de calor como radiadores,
registros de calor, estufas u otros productos (incluidos amplicadores).

58
ES
Instrucciones especiales
• Este aparato puede ser utilizado por niños a partir de 8 años y por
personas con capacidades físicas, sensoriales o mentales reducidas
o con falta de experiencia y/o conocimientos, siempre que se les
supervise o instruya sobre cómo usar el aparato de forma segura y
entiendan los peligros que conlleva.
• La limpieza y el mantenimiento no deben ser realizados por niños, a
menos que tengan 8 años o más y sean supervisados.
• Los niños no deben jugar con el aparato.
• Asegúrese de que los niños y bebés no jueguen con las bolsas de
plástico ni otras partes del embalaje.
• Asegúrese de que el enchufe/fuente de alimentación esté accesible
para poder desenchufar el aparato en caso de emergencia.
• Cuando ya no necesite utilizar el aparato, apáguelo y desconecte el
enchufe de la toma de corriente.

59
ES
DESCRIPCIÓN DEL APARATO
1 Luces LED decorativas 5 Compartimento de CD
2 Parte delantera 6 Asa de transporte
3
Altavoz e iluminación del
altavoz
7 Soporte para el micrófono
4
Soporte para smartphone o
tablet
8 Parte trasera
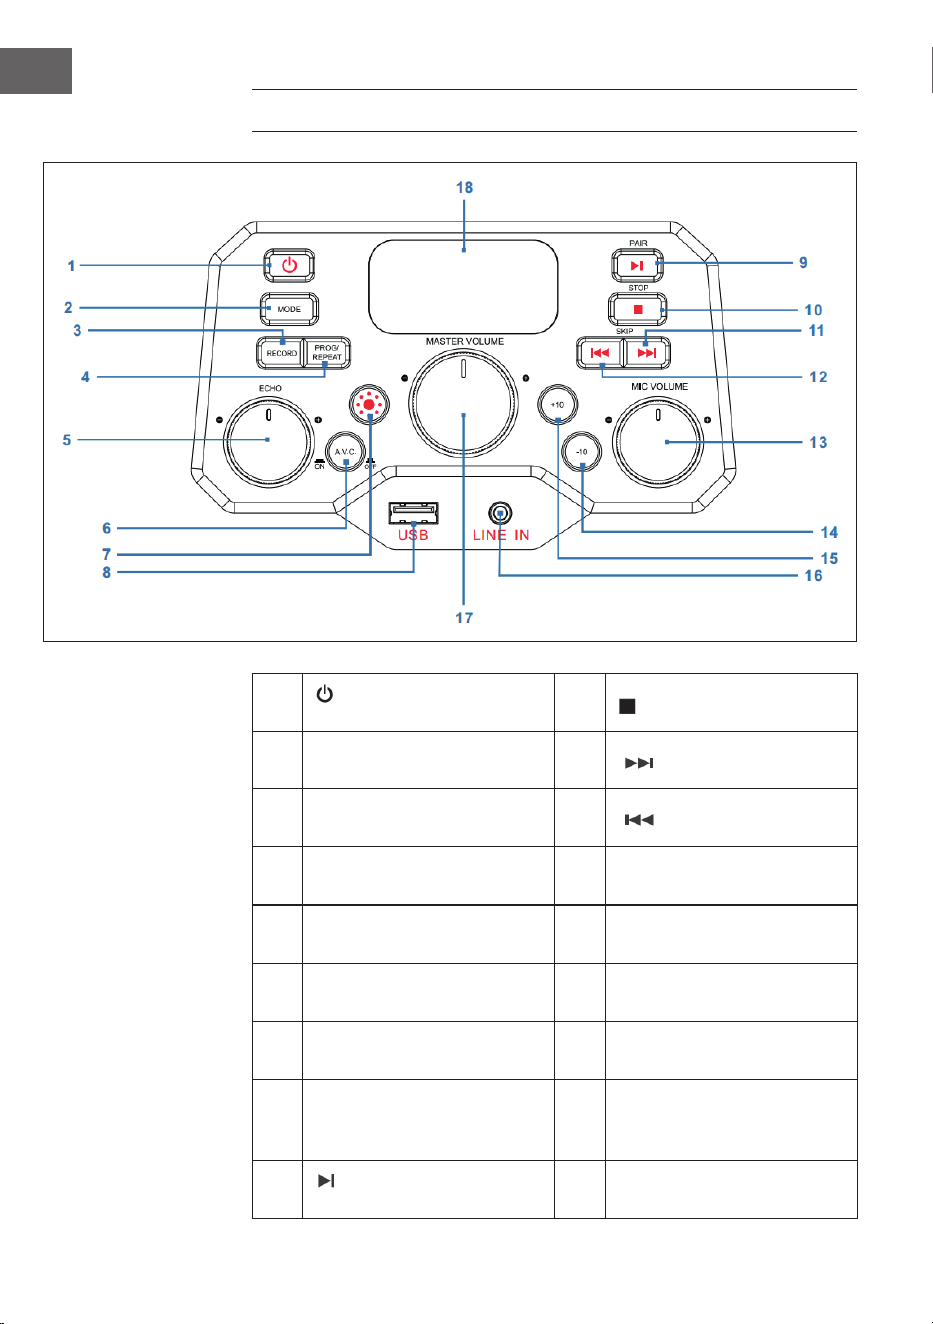
60
ES
PANEL DE CONTROL
1
Tecla de encendido/
apagado
10
STOP: tecla de parada
2 MODE: tecla de modo 11
SKIP+ : pista siguiente
3
RECORD: tecla de
grabación
12
SKIP- : pista anterior
4
PROG/REPEAT: tecla de
memoria/repetición
13
MIC VOLUME: regulador de
volumen del micrófono
5
ECHO: regulador para el
ajuste del eco
14
-10: saltar las 10 pistas
anteriores
6
A.V.C: activar/desactivar
control automático de voz
15
+10: saltar las 10 pistas
siguientes
7
Tecla de modo de
iluminación
16
LINE IN: conexión de
entrada de línea de 3,5 mm
8 USB: toma USB 17
MASTER VOLUME:
regulador de volumen
principal
9
PAIR: tecla Play/Pause/
sincronización
18 Pantalla LED

61
ES
CONEXIONES
1 Toma de entrada CC 5 Toma de salida de línea
2
Salida de audio (IZQ), entrada de
micrófono
6 Toma de micrófono 1
3 Salida de audio (DER) 7 Toma de micrófono 2
4 Salida de vídeo
Conexión a la red eléctrica
1. Coloque el aparato en una supercie estable y plana.
2. Conecte un extremo de la fuente de alimentación (incluida en el envío)
a la toma de entrada de CC situada en la parte trasera del aparato y el
otro extremo, a la toma de corriente.
Toma de micrófono
Conecte el micrófono a la toma de micrófono 1 MIC 1 (6) situada en la parte
trasera del aparato, y (si lo desea) a la toma de micrófono MIC2 (7).
Nota: no deje caer el micrófono, ya que tanto este como los altavoces
podrían sufrir daños. No agarre el micrófono por el cable, pues el
cableado recubierto podría sufrir daños.

62
ES
Cómo conectar el aparato a un televisor
Para poder reproducir vídeos, textos de canciones y audio a través de un
televisor, debe seguir estos pasos:
1. Conecte el cable de vídeo RCA (amarillo) a la salida de vídeo VIDEO
OUT (4) y el cable de audio (blanco y rojo) a las salidas de audio AUDIO
OUT (2 y 3) situadas en la parte trasera del aparato.
2. Conecte el otro extremo del cable de vídeo RCA (amarillo) a la entrada
de vídeo y el cable de audio, a la entrada de audio de su televisor.
NOTA:
• Este aparato puede utilizarse sin y con televisor. No obstante, se
recomienda utilizarlo con un televisor para poder disfrutar de todas las
funciones.
• Consulte el manual de instrucciones de su televisor.
• Para poder ver los textos de canciones en pantalla, deben utilizarse
discos CD+G o archivos MP3+G.
Conexión de entrada de línea
3. Pulse la tecla de encendido/apagado (1) para encender el aparato.
4. Conecte el cable de audio de 3,5 mm (no incluido en el envío) a la
toma de entrada de línea LINE IN (16) situada en la parte delantera del
aparato.
5. Pulse la tecla MODE (2) en la parte frontal del aparato para seleccionar
el modo AUX.
6. Utilice los botones del dispositivo conectado para reproducir archivos
de audio a través del aparato.
Toma de salida de línea
Para una mayor transmisión de audio, este aparato se puede conectar a
otro equipo de audio mediante un cable AUX de 3,5 mm (no incluido en el
envío).
1. Conecte un extremo del cable AUX a la salida de línea LINE OUT (5)
situada en la parte trasera del aparato.
2. Conecte el otro extremo del cable AUX a la entrada de línea de su
dispositivo de audio externo. Para ello, consulte también el manual de
instrucciones del dispositivo externo.

63
ES
FUNCIONAMIENTO
Primeros pasos
• Lea atentamente el manual de instrucciones.
• Retire el aparato de su embalaje.
• Retire todo el material de embalaje y consérvelo para un uso posterior
(por ejemplo, en caso de mudanza).
Luces de discoteca
El aparato dispone de tres modos de iluminación:
• Modo de iluminación 1: el aparato se sincroniza con la música que se
reproduce o con el tono en el que usted habla o canta.
• Modo de iluminación 2: el aparato se iluminación en colores y diseños
aleatorios.
• Modo de iluminación 3: los efectos de luz están desactivados.
NOTA: si enciende el aparato, automáticamente se activa el nivel de
iluminación 1. Pulse la tecla del modo de iluminación (7) en la parte
delantera del aparato para cambiar al modo de iluminación 2. Pulse de
nuevo la tecla para desactivar el modo de iluminación.
Reproducción de CD
1. Pulse la tecla de encendido/apagado (1) para encender el aparato.
2. Abra el compartimento del CD (en la parte superior de la carcasa de
madera) e introduzca un CD (con archivos estándar o MP3+G) o un
CD+G y presiónelo ligeramente contra el eje central. A continuación,
cierre el compartimento del CD.
¿Qué es un CD+G?
Un CD+G (CD+grácos) es el formato estándar para la mayoría de CD de
karaoke, donde se muestran palabras en pantalla.
¿Qué es un MP3+G?
MP3+G es el formato más nuevo para la música de karaoke que utiliza
MP3 del tamaño de archivo más pequeño. Las palabras aparecen en la
pantalla.

64
ES
3. Pulse varias veces la tecla MODE (2) en la parte delantera del aparato
para seleccionar el modo CDG/CD. En la pantalla LED (18) parpadea "---"
mientras se detecta el CD. A continuación, se muestra el número total
de pistas en pantalla.
4. Pulse la tecla PAIR (9) en la parte delantera del aparato para iniciar la
reproducción. Si utiliza un archivo CD+G, aparece la imagen y el texto
de la canción en la pantalla del televisor (si está conectado). Si utiliza
un disco CDG, se ilumina el indicador correspondiente.
• Si el aparato está conectado a un televisor, se muestran las
canciones y carpetas seleccionadas en la pantalla del televisor.
• Pulse en la parte delantera del aparato SKIP+ (11) o SKIP- (12) para
seleccionar la canción que desea reproducir.
5. Con el regulador de volumen MASTER VOLUME (17), seleccione el
volumen a un nivel agradable.
6. Conecte un (dos) micrófono/s y desplace el interruptor ON/OFF del
micrófono a la posición "ON" (encendido).
7. Gire el regulador de volumen del micrófono MIC VOLUME (13) en la
parte delantera del aparato para regular el volumen del micrófono. El
ajuste afecta a los dos micrófonos.
8. Gire el regulador ECHO (5) en la parte delantera para darle a su voz un
efecto eco.
9. Pulse la tecla A.V.C. (6) en la parte delantera del aparato para reducir el
volumen de la voz principal para que quede tapada por su voz cuando
cante una canción con el micrófono. Esta función solo puede utilizarse
en canciones con las voces grabadas y descargadas por separado.
NOTAS:
• Introduzca exclusivamente CD en el compartimento para CD. De lo
contrario, podría averiar el aparato.
• Si no hay ningún CD dentro, en pantalla aparece "no".
• Si el aparato se ha conectado a una televisor o a otra fuente de audio,
adapte el volumen a través del televisor o de la otra fuente de audio.
Reproducción USB
1. Pulse la tecla de encendido/apagado (1) para encender el aparato.
2. Conecte un dispositivo USB a la toma USB (8) de la parte delantera del
aparato.
3. Pulse varias la tecla MODE (2) en la parte delantera para seleccionar
el modo USB. "USB" aparece en pantalla y parpadea mientras se
detecta el dispositivo USB. A continuación, aparece el número total de
canciones contenidas en el dispositivo USB.
NOTA: se recomienda conectar el aparato para la reproducción USB a un
televisor.

65
ES
4. Para iniciar la reproducción, pulse la tecla PAIR (9) en la parte delantera
del aparato. Si está escuchando un archivo MP3+G, en la pantalla
del televisor aparecerán la imagen y los textos de la canción (si está
conectado).
NOTAS:
• Si el aparato está conectado a un televisor, se muestran las canciones y
carpetas seleccionadas en la pantalla del televisor.
• Para seleccionar la canción que desea reproducir, pulse las teclas SKIP-
(12) y SKIP+ (11) en la parte superior del aparato.
5. Con el regulador de volumen MASTER VOLUME (17), seleccione el
volumen a un nivel agradable.
NOTA: si ha conectado el aparato a un televisor o a otra fuente de audio,
utilice su regulación de volumen.
6. Conecte un micrófono y desplace el interruptor ON/OFF del micrófono
a la posición "ON" (encendido).
7. Ajuste el volumen del micrófono con el regulador MIC VOLUME (13) en
la parte delantera del aparato. Esto afecta a ambos micrófonos.
8. Para ajustar el efecto del eco en su voz, gire el regulador ECHO (5) en la
parte delantera del aparato.
9. Repetir (REPEAT):
• Durante la reproducción, pulse la tecla PROG/REPEAT (3) en la
parte delantera del aparato para repetir la canción seleccionada. El
indicador de repetición parpadea rápidamente.
• Presione de nuevo la tecla para repetir la carpeta seleccionada. El
indicador de repetición parpadea lentamente.
• Presione una tercera vez la tecla para repetir todas las carpetas. El
indicador de repetición se ilumina de manera permanente.
• Presione la tecla una cuarta vez para desactivar la función de
repetición. El indicador de repetición se apaga.
10. Pausar (PAUSE):
• Durante la reproducción, pulse la tecla PAIR (9) en la parte
delantera del aparato para pausar la música. El indicador PLAY/
PAUSE parpadea. Pulse de nuevo la tecla para continuar con la
reproducción.
11. Pulse la tecla STOP (10) en la parte delantera del aparato para detener
la reproducción.
12. Pulse el botón de encendido/apagado (1) para apagar el aparato.

66
ES
Utilizar un dispositivo BT
1. Conecte el aparato como se ha descrito anteriormente. Para encender
el aparato, pulse la tecla de encendido/apagado (1) en la parte
delantera del aparato.
2. Pulse varias veces la tecla MODE (2) en la parte delantera del
aparato para seleccionar BT. "bt" aparece en la pantalla LED y el
indicador BT de la parte delantera del aparato parpadea. El aparato
busca automáticamente dispositivos BT disponibles cercanos y se
conecta automáticamente al aparato con el que se haya sincronizado
anteriormente (si existe). Si todavía no se ha conectado un dispositivo
BT externo, establezca la conexión como se describe en los siguientes
pasos.
NOTA: para establecer la conexión con otro dispositivo BT, puede mantener
presionada la tecla PAIR (9) en la parte delantera del aparato para
desconectar todos los dispositivos sincronizados y conectar uno nuevo.
3. Active la función BT en su dispositivo BT. Seleccione en la lista del
dispositivo externo "Arizona Sing".
Nota: para más detalles, consulte el manual de instrucciones del
dispositivo externo.
4. El indicador BT se ilumina permanentemente en azul y suena un pitido.
NOTAS:
• Si es necesario introducir un PIN para establecer la conexión BT,
introduzca "0000".
• En algunos dispositivos debe seleccionarse "utilizar como dispositivo de
audio" o similar tras establecer la conexión.
• Si se desconecta la conexión tras una sincronización correcta, debe
reducir la distancia entre el dispositivo externo y el aparato. La distancia
no debe ser superior a 10 metros (30 pies).
5. Inicie la reproducción en su dispositivo BT externo. Durante la
reproducción, pulse la tecla PAIR (9) en la parte delantera del aparato
para pausar una canción.
6. Pulsando las teclas SKIP- (12) y SKIP+ (11) en la parte delantera del
aparato puede saltar a la pista anterior/siguiente.

67
ES
Función de grabación
1. Para grabar tanto su canto como la música, pulse la tecla RECORD
(3) en la parte delantera del aparato. El indicador de funcionamiento
parpadea en verde. Si se ilumina en verde permanentemente, comienza
la grabación.
2. Cuando termine con la grabación, pulse la tecla RECORD (3) de nuevo.
El indicador de funcionamiento se apaga.
3. El archivo de audio grabado se guarda en la unidad USB.
4. Para escuchar la canción grabada, pulse la tecla MODE (2) en la
parte delantera para pasar al modo USB. Podrá encontrar la canción
grabada en los archivos REC. Pulse las teclas SKIP- (12) y SKIP+ (11) para
seleccionar la canción correspondiente.
5. Pulse la tecla PAIR (9) para reproducir la canción seleccionada.
NOTA: la función de grabación está disponible en los modos BT, AUX y CD.
En el modo CD solo pueden grabarse pistas en formato CD, CD-R, CD-RW y
CD+G. No está disponible para el formato MP3.
Función de memoria
1. Con el aparato encendido, pulse la tecla STOP (10) para acceder al
modo de parada. A continuación, pulse la tecla PROG/REPEAT (4),
el indicador de la memoria parpadea y "01" aparece en pantalla para
mostrar que se puede guardar la primera canción.
2. Seleccione la primera pista con las teclas SKIP- (12) y SKIP+ (11).
3. Pulse la tecla PROG/REPEAT (4) de nuevo para conrmar la selección.
4. Repita el proceso para guardar hasta 20 pistas. Cuando termine, pulse
la tecla PAIR (9) para iniciar la reproducción.
NOTAS:
• Pulse dos veces la tecla STOP (10) para detener el proceso de memoria
y eliminar la lista de memoria.
• Puede guardar hasta 20 pistas para reproducir en el orden que desee. Si
intenta guardar más de 20 pistas, aparecerá "FUL" en pantalla.
• La función de memoria está disponible en el modo CD y USB.
68
ES
LIMPIEZA Y CUIDADO
• Antes de limpiar el aparato, desconecte el enchufe de la toma de
corriente.
• Frote el aparato con una bayeta seca y suave si tiene polvo.
• Utilice solo un paño suave para limpiar el aparato. Nunca utilice cera,
sprays abrillantadores o limpiadores agresivos.
Nota: asegúrese de que durante la limpieza nunca se ltren líquidos al
interior del aparato.
DETECCIÓN Y REPARACIÓN DE ANOMALÍAS
Antes de enviar el aparato por una avería o de contactar con el servicio de
atención al cliente, compruebe la siguiente tabla con propuestas detalladas
sobre reparación de anomalías. Si el problema persiste tras haber aplicado
la siguiente información, contacte con el fabricante o el servicio de atención
al cliente.
Problema Posible causa/solución
El aparato está
apagado.
El aparato está desconectado. Pulse la tecla
de encendido/apagado (1) para encender el
aparato.
Asegúrese de que la fuente de alimentación
esté correctamente conectada a la parte trasera
del aparato.
Introduzca el enchufe en otra toma de corriente.
Si utiliza pilas, sustitúyalas.
No hay sonido
(general)
El regulador de volumen MASTER VOLUME está
ajustado al nivel mínimo. Aumente el volumen.
No se ha seleccionado la función correcta.
Seleccione la función correcta con la tecla
MODE (2).
Si utiliza un dispositivo externo, aumente su
volumen.
No hay sonido (si lo
conecta al televisor).
El televisor está silenciado o el volumen está
ajustado a un nivel muy bajo.
Ajuste el volumen como desee.
En el menú del televisor no se ha seleccionado
la fuente correcta (normalmente, AV).
69
ES
Problema Posible causa/solución
El texto de la canción
no aparece en la
pantalla del televisor.
Si el aparato está conectado a un televisor,
puede ocurrir que el conector del cable de
vídeo no está bien conectado. Compruébelo y
establezca la conexión.
Si el aparato está conectado a un televisor,
seleccione la fuente correcta (normalmente, AV).
El archivo/pista reproducida no contiene texto
con canción.
Si utiliza una toma de entrada de línea o BT, no
se mostrará nada en la pantalla del televisor.
No se escucha el
sonido del micrófono.
Asegúrese de que el micrófono esté bien
conectado a la toma MIC1 o MIC2.
Asegúrese de que el interruptor ON/OFF
del micrófono se sitúe en la posición "ON"
(encendido).
Asegúrese de que el volumen del micrófono no
esté ajustado al mínimo.
El regulador de volumen MASTER VOLUME está
ajustado al nivel mínimo. Aumente el volumen.
No se reproducen
los archivos de un
dispositivo USB.
El archivo utilizado está defectuoso. Sustituya el
archivo.
El formato de archivo no es compatible con el
aparato.
El dispositivo USB conectado no es compatible
con el aparato.
No se puede conectar
un dispositivo BT
externo al aparato.
La función BT de su dispositivo externo está
desactivada. Lea el manual de instrucciones del
dispositivo externo.
El aparato no se encuentra en modo
sincronización. Para repetir la sincronización,
pulse la tecla PAIR.
No se escucha la
música tras establecer
correctamente la
conexión BT.
Asegúrese de que su dispositivo BT externo sea
compatible con el perl A2DP de BT.
El volumen del dispositivo BT externo es
demasiado bajo o está silenciado. Ajústelo.

70
ES
RETIRADA DEL APARATO
Si en su país existe una disposición legal relativa a
la eliminación de aparatos eléctricos y electrónicos,
este símbolo estampado en el producto o en
el embalaje advierte que no debe eliminarse
como residuo doméstico. En lugar de ello, debe
depositarse en un punto de recogida de reciclaje
de aparatos eléctricos y electrónicos. Una gestión
adecuada de estos residuos previene consecuencias
potencialmente negativas para el medio ambiente
y la salud de las personas. Puede consultar más
información sobre el reciclaje y la eliminación de este
producto contactando con su administración local o
con su servicio de recogida de residuos.
Este producto contiene baterías. Si en su país existe
una disposición legal relativa a la eliminación de
baterías, estas no deben eliminarse como residuo
doméstico. Infórmese sobre la normativa vigente
relacionada con la eliminación de baterías. Una
gestión adecuada de estos residuos previene
consecuencias potencialmente negativas para el
medio ambiente y la salud de las personas.
DECLARACIÓN DE CONFORMIDAD
Fabricante:
Chal-Tec GmbH, Wallstraße 16, 10179 Berlín, Alemania.
Importador para Gran Bretaña:
Berlin Brands Group UK Ltd
PO Box 1145
Oxford, OX1 9UW
United Kingdom
Por la presente, Chal-Tec GmbH declara que el tipo
de equipo radioeléctrico Arizona Sing es conforme
con la Directiva 2014/53/UE. El texto completo de la
declaración UE de conformidad está disponible en la
dirección Internet siguiente: use.berlin/10037817

71
IT
Dati tecnici 72
Avvertenze di sicurezza 73
Descrizione del dispositivo 75
Pannello di controllo 76
Connessioni 77
Utilizzo 79
Pulizia e manutenzione 84
Ricerca e correzione degli errori 84
Smaltimento 86
Dichiarazione di conformità 86
Gentile cliente,
La ringraziamo per aver acquistato il dispositivo.
La preghiamo di leggere attentamente le seguenti
istruzioni per l’uso e di seguirle per evitare possibili
danni. Non ci assumiamo alcuna responsabilità per
danni scaturiti da una mancata osservazione delle
avvertenze di sicurezza e da un uso improprio del
dispositivo. Scansionare il codice QR seguente, per
accedere al manuale d’uso più attuale e per ricevere
informazioni sul prodotto.
INDICE

72
IT
DATI TECNICI
Numero articolo 10037817
Alimentazione Ingresso DC: 9V 1A
(adattatore AC in dotazione per
AC 100-240 V ~ 50/60 Hz)
Temperatura operativa 0°C-+35°C
Altoparlanti 1 x 4“
Potenza di uscita altoparlanti 1 x 8W = 8W RMS
Connessioni microfono 2 x ingressi microfono da 6,3 mm
Ingresso Line-In Ingresso AUX da 3,5 mm
Dischi compatibili CD/CD+G/CD-R/CD-RW
Frequenza BT 2402-2480 MHz
Potenza di trasmissione BT ≤ -3.325 dBm
VOLUME DI CONSEGNA
• Jukebox (1x)
• Cavo RCA (1x)
• Cavo microfono (1x)
• Manuale d'uso (1x)
• Adattatore AC (DC 9 V, 1 A) (1x)

73
IT
AVVERTENZE DI SICUREZZA
Avvertenze generiche
• Colpo di fulmine - Se non si usa più il dispositivo o se ci sono
temporali, staccare la spina dalla presa elettrica o scollegare il
dispositivo dall'antenna. In questo modo si evitano danni al prodotto
dovuti a colpi di fulmine e sovratensione.
• Sovraccarico - Non sovraccaricare prese elettriche, prolunghe o prese
elettriche integrate, altrimenti possono risultare incendi o scosse
elettriche.
• Penetrazione di corpi estranei e liquidi - Non inserire oggetti di
alcun tipo nelle aperture del dispositivo, dato che potrebbero entrare
in contatto con pericolosi punti di tensione o causare il cortocircuito
di alcuni componenti, con il conseguente rischio di incendi o scosse
elettriche. Non versare mai liquidi sul dispositivo.
• Riparazione e manutenzione - Non cercare di realizzare
autonomamente opere di manutenzione sul dispositivo, dato che
l'apertura o la rimozione della copertura possono esporre a tensioni
pericolose o altri rischi. Lasciare che tutte le opere di manutenzione
siano realizzate da personale di assistenza qualicato.
• Danni che richiedono l'intervento del servizio di assistenza -
Staccare la spina dalla presa elettrica e rivolgersi a un'azienda tecnica
qualicata nelle seguenti situazioni:
a) Se cavo di alimentazione o spina sono danneggiati.
b) Se sono stati versati liquidi o sono caduti oggetti sul dispositivo.
c) Se il prodotto è stato esposto a pioggia o acqua.
d) Se il prodotto è caduto o è danneggiato.
e) Se il prodotto presenta prestazioni sensibilmente ridotte.
• Pezzi di ricambio - Se sono necessari pezzi di ricambio, assicurarsi
che l'azienda tecnica responsabile della sostituzione utilizzi solo
pezzi di ricambio autorizzati dal produttore o che presentano le
stesse caratteristiche dei componenti originali. Una sostituzione non
autorizzata può causare incendi, scosse elettriche o altri pericoli.
• Calore - Non posizionare il dispositivo vicino a fonti di calore, come
termosifoni, batterie di riscaldamento, forni e altri prodotti (inclusi
amplicatori).

74
IT
Avvertenze particolari
• Questo dispositivo può essere utilizzato da bambini a partire da 8
anni e da persone con limitate capacità siche, psichiche e sensoriali o
con conoscenza e/o esperienza insuicienti, solo se sono tenuti sotto
controllo o se sono stati istruiti sulle modalità di utilizzo sicuro del
dispositivo e comprendono i rischi che ne risultano.
• Pulizia e manutenzione da parte dell'utente non possono essere
realizzate da bambini, a meno che siano maggiori di 8 anni e siano
costantemente supervisionati.
• I bambini non devono giocare con il dispositivo.
• Assicurarsi che bambini e bebè non giochino con sacchetti di plastica o
altri materiali di imballaggio.
• Assicurarsi che spina/adattatore siano sempre facilmente accessibili,
in modo da poter scollegare rapidamente il dispositivo dalla presa
elettrica in caso di emergenza.
• Quando non si usa più il dispositivo, spegnerlo e staccare la spina.
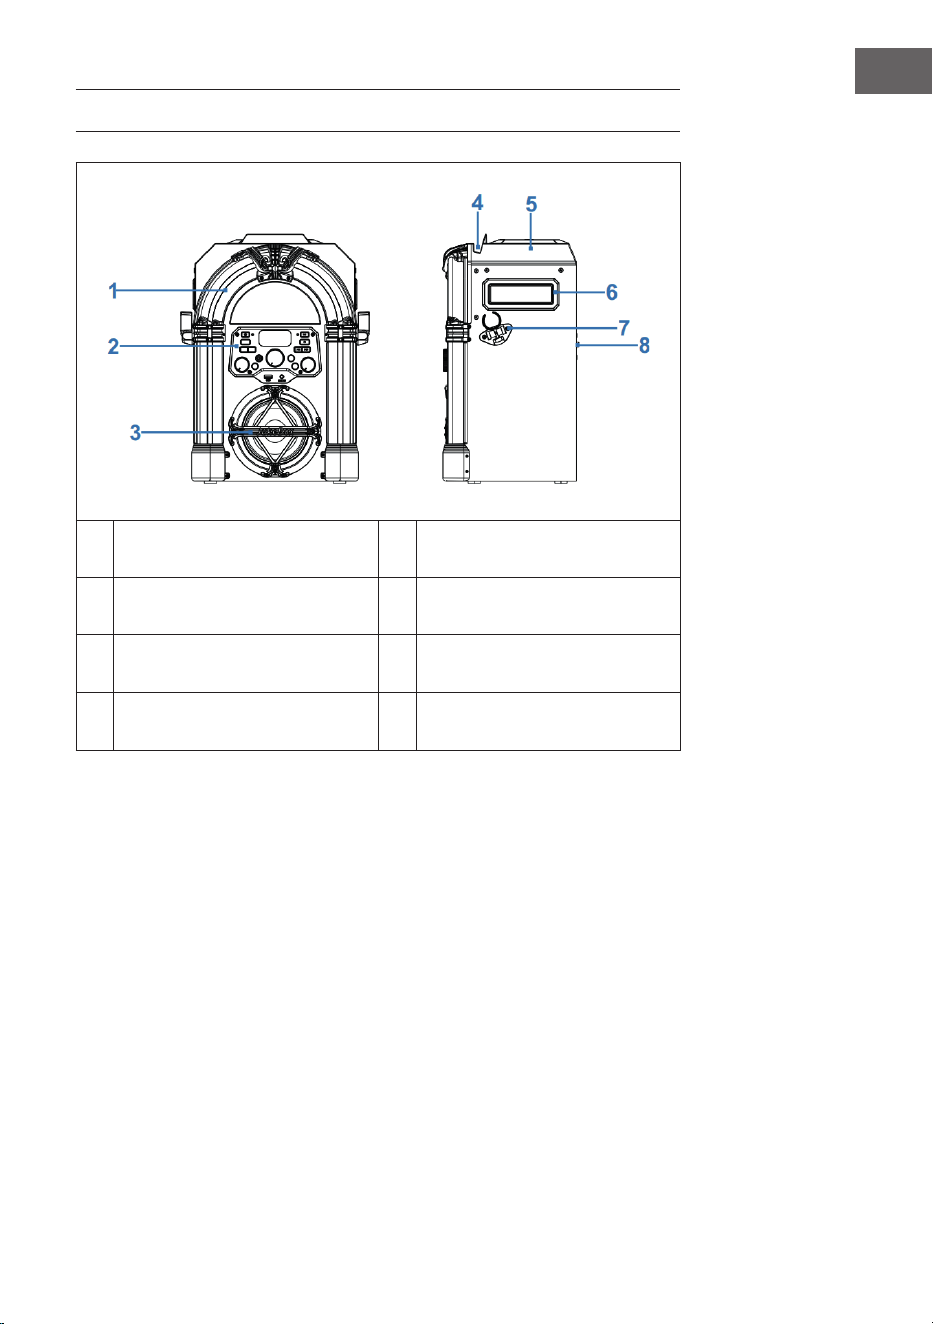
75
IT
DESCRIZIONE DEL DISPOSITIVO
1 Luci LED decorative 5 Vano CD
2 Lato anteriore 6 Impugnatura di trasporto
3
Altoparlanti e illuminazione
altoparlanti
7 Supporto microfono
4
Supporto per smartphone o
tablet
8 Lato posteriore
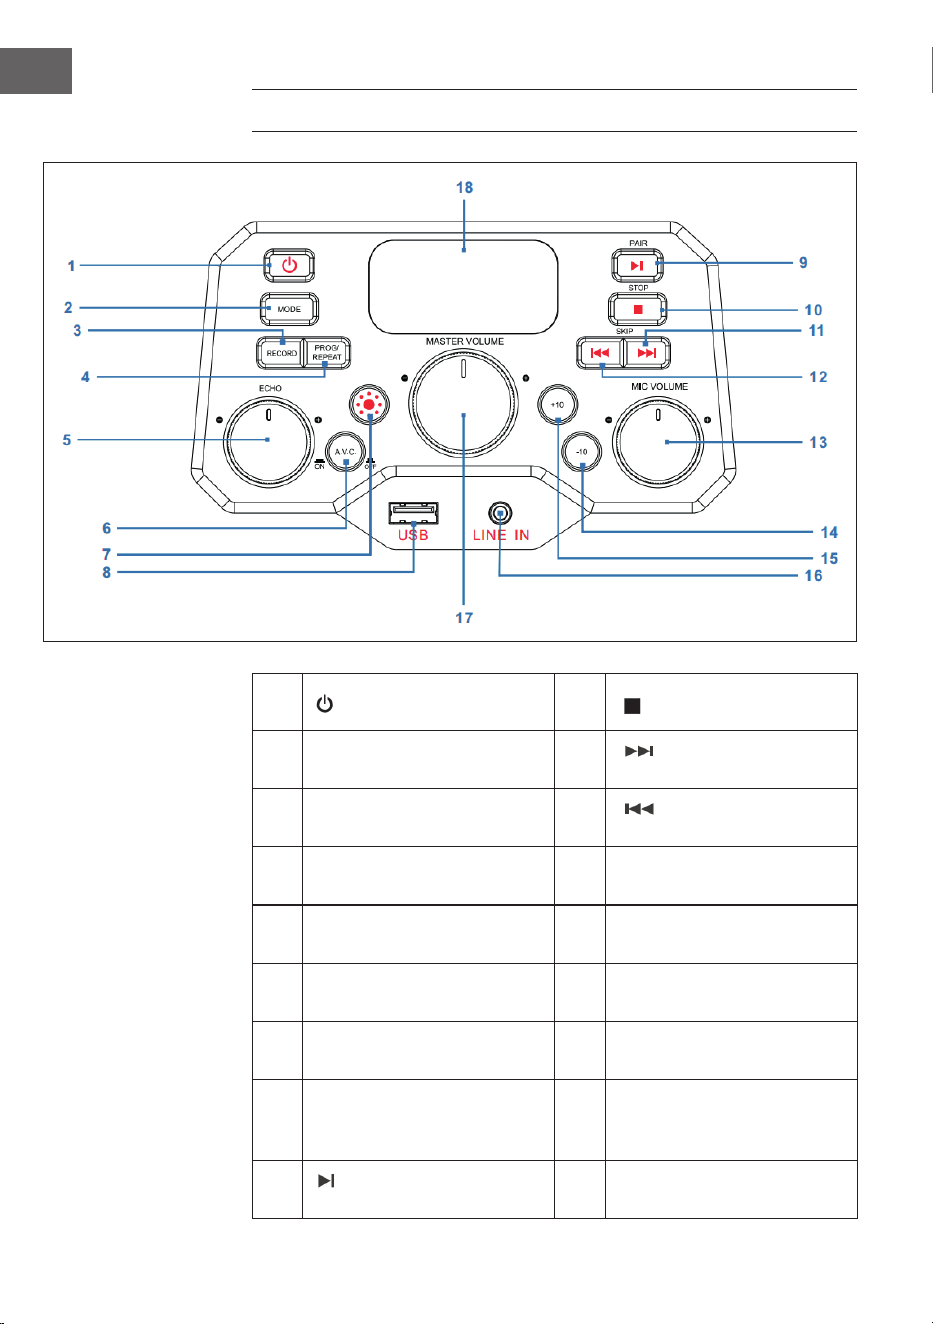
76
IT
PANNELLO DI CONTROLLO
1 Tasto ON/OFF 10
STOP: tasto di arresto
2 MODE: tasto delle modalità 11
SKIP+: titolo
successivo
3
RECORD: tasto di
registrazione
12
SKIP-: titolo
precedente
4
PROG/REPEAT: tasto
memoria/ripetizione
13
MIC VOLUME: regolazione
del volume del microfono
5
ECHO: manopola per
impostare l'eco
14
-10: saltare i 10 titoli
precedenti
6
A.V.C: attivare/disattivare
Auto-Voice-Control
15
+10: saltare i 10 titoli
successivi
7
Tasto modalità di
illuminazione
16
LINE IN: connessioneLine-In
da 3,5 mm
8 USB: connessione USB 17
MASTER VOLUME:
regolazione del volume
principale
9
PAIR: tasto Play/Pausa/
Collegamento
18 Schermo LED
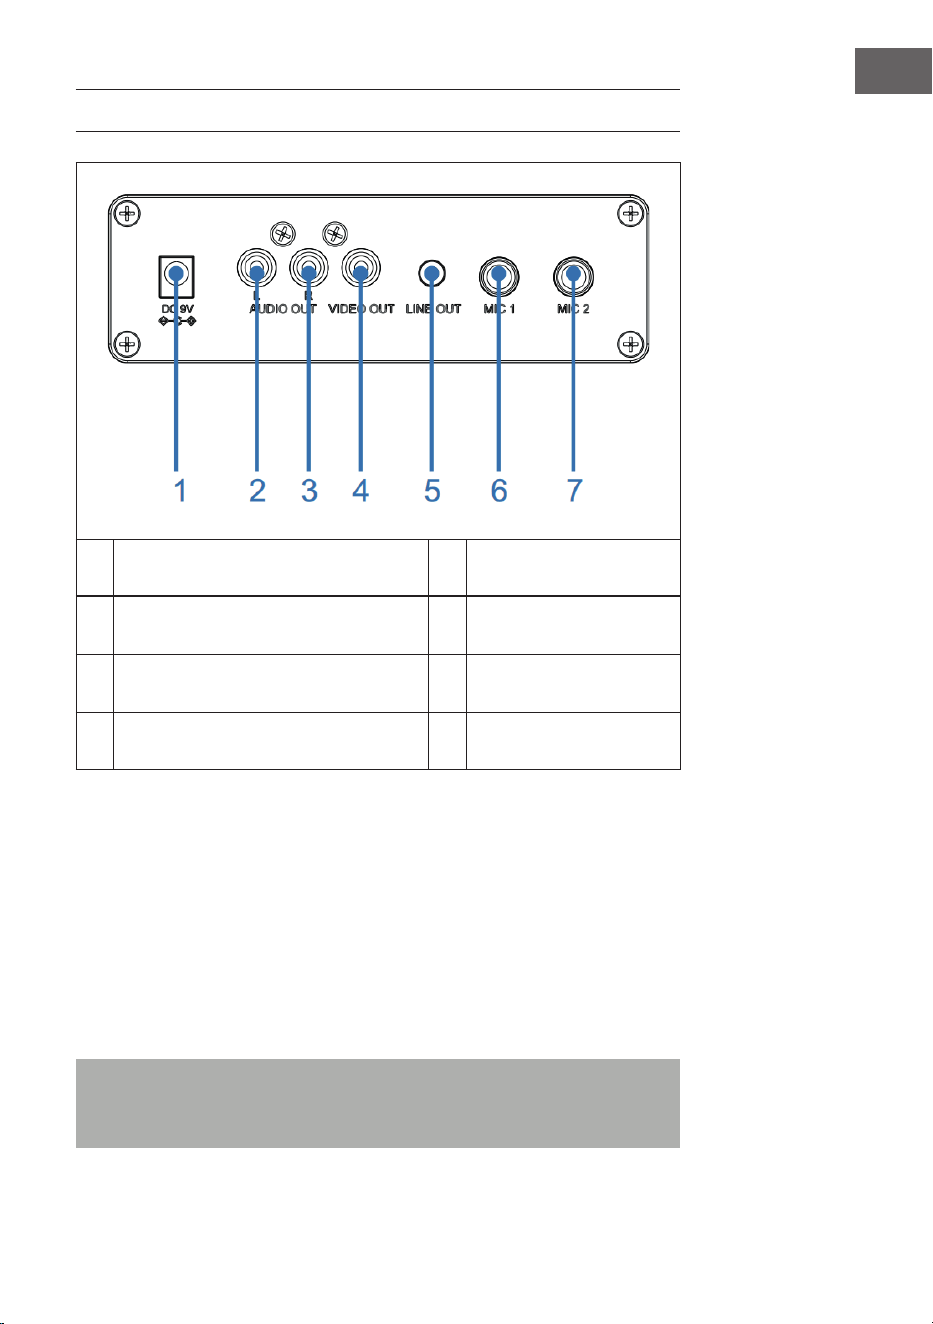
77
IT
CONNESSIONI
1 Connessione DC-IN 5 Connessione Line-Out
2 Uscita audio (L), ingresso microfono 6
Connessione microfono
1
3 Uscita audio (R) 7
Connessione microfono
2
4 Uscita video
Connessione alla rete elettrica
1. Posizionare il dispositivo su una supercie piana e stabile.
2. Collegare un'estremità dell'adattatore (incluso nel volume di consegna)
con la connessione DC-IN sul retro del dispositivo e inserire l'altra
estremità in una presa elettrica.
Connessione microfono
Collegare il microfono alla connessione MIC 1 (6) sul retro del dispositivo e
(se si desidera) con la connessione MIC2 (7).
Nota: non far cadere il microfono, altrimenti si potrebbero danneggiare
microfono e altoparlante. Non far volteggiare il microfono tenendolo dal
cavo, altrimenti si danneggia il rivestimento del cavo.

78
IT
Collegare il dispositivo a un televisore
Per riprodurre video, testi delle canzoni e audio dal televisore, è necessario
seguire questi passaggi:
1. Collegare il cavo video RCA (giallo) con l'uscita video VIDEO OUT (4) e
il cavo audio (bianco e rosso) con le uscite audio AUDIO OUT (2 & 3) sul
retro del dispositivo.
2. Collegare l'altra estremità del cavo video RCA (giallo) con l'ingresso
video e il cavo audio con l'ingresso audio del televisore.
NOTE:
• Il dispositivo può essere utilizzato con o senza televisore. Tuttavia, si
consiglia l'utilizzo in combinazione con un televisore, in modo da poter
utilizzare tutte le funzioni.
• Rispettare le indicazioni sul manuale d'uso del televisore.
• Per poter visualizzare i testi delle canzoni sullo schermo, è necessario
utilizzare dischi CD+G o le MP3+G.
Connessione Line-In
3. Premere il tasto ON/OFF (1) per accendere il dispositivo.
4. Inserire il cavo audio da 3,5 mm (non incluso nel volume di consegna)
nella connessione LINE IN (16) sul lato anteriore del dispositivo.
5. Premere MODE (2) sul lato anteriore del dispositivo per passare in
modalità AUX.
6. Utilizzare i tasti del dispositivo collegato per riprodurre le audio dal
dispositivo.
Connessione Line-Out
Per un'emissione audio di livello maggiore, questo dispositivo può essere
collegato a un altro impianto audio con un cavo AUX da 3,5 mm (non
incluso nel volume di consegna).
1. Inserire un'estremità del cavo AUX nell'uscita LINE OUT (5) sul retro del
dispositivo.
2. Inserire l'altra estremità del cavo AUX nell'ingresso Line-In del
dispositivo audio esterno. A tal ne, se necessario, consultare il
manuale d'uso del dispositivo esterno.

79
IT
UTILIZZO
Primi passaggi
• Leggere attentamente il manuale d'uso.
• Togliere il dispositivo dall'imballaggio.
• Rimuovere tutto il materiale d'imballaggio e conservarlo per futuri
utilizzi (ad es. in caso di trasloco).
Luci da discoteca
Il dispositivo è dotato di tre modalità di illuminazione:
• Modalità di illuminazione 1: il dispositivo si sincronizza alla musica in
riproduzione o all'audio di ciò che si dice/canta.
• Modalità di illuminazione 2: il dispositivo si illumina con colori e motivi
casuali.
• Modalità di illuminazione 3: gli eetti luminosi vengono disattivati.
NOTA: quando si accende il dispositivo, viene attivata automaticamente la
modalità di illuminazione 1. Premere il tasto della modalità di illuminazione
(7) sul lato anteriore del dispositivo per passare alla modalità di
illuminazione 2. Premere di nuovo il tasto per spegnere la luce.
Riproduzione CD
1. Premere il tasto ON/OFF (1) per accendere il dispositivo.
2. Aprire il vano CD (sul lato superiore dell'alloggiamento di legno) e
inserire un CD (con le standard o MP3+G) o un CD+G e premere sul
perno centrale facendo attenzione. Chiudere poi il vano CD.
Cos'è un CD+G?
Un CD+G (CD+graca) è il formato standard della maggior parte dei CD
per karaoke, che possono mostrare parole sullo schermo.
Cos'è un MP3+G?
MP3+G è il formato più recente per musica al karaoke, che utilizza le
MP3 delle dimensioni più piccole. Le parole vengono mostrate sullo
schermo.

80
IT
3. Premere più volte MODE (2) sul lato anteriore del dispositivo per
selezionare la modalità CDG/CD. Sullo schermo LED (18) lampeggia "---"
mentre viene cercato un CD. In seguito viene mostrato sullo schermo il
numero complessivo di titoli.
4. Premere PAIR (9) sul lato anteriore del dispositivo per avviare la
riproduzione. Se si utilizza un le CD+G, sullo schermo del televisore (se
collegato) vengono mostrati immagine e testo della canzone. Se viene
inserito un CDG, si illumina l'indicazione CDG.
• Se il dispositivo è collegato a un televisore, sul suo schermo
vengono mostrate la canzone e la cartella selezionate.
• Premere SKIP+ (11) o SKIP- (12) sul lato anteriore del dispositivo per
selezionare la canzone da riprodurre.
5. Impostare il volume a un livello piacevole con la manopola MASTER
VOLUME (17).
6. Collegare un microfono/due microfoni e posizionare l'interruttore ON/
OFF del microfono su ON (acceso)
7. Girare la manopola MIC VOLUME (13) sul lato anteriore del dispositivo
per impostare il volume del microfono. Questo ha eetto su entrambi i
microfoni.
8. Girare la manopola ECHO (5) sul lato anteriore, per donare un eetto
eco alla voce.
9. Premere A.V.C. (6) sul lato anteriore del dispositivo per abbassare il
volume della voce principale, in modo che questa venga coperta da
quella di chi canta al microfono. Questa funzione è disponibile solo
per canzoni che sono state registrate e scaricate con traccia canora
separata.
NOTE:
• Inserire solo CD nel vano CD. In caso contrario si potrebbe danneggiare
il dispositivo.
• Se non viene inserito alcun CD, sullo schermo compare "no".
• Se il dispositivo è stato collegato a un televisore a un'altra sorgente
audio, regolare il volume dal televisore o dall'altra sorgente audio.
Riproduzione USB
1. Premere il tasto ON/OFF (1) per accendere il dispositivo.
2. Inserire una chiavetta USB nella connessione USB (8) sul lato anteriore
del dispositivo.
3. Premere più volte MODE (2) sul lato anteriore per selezionare la
modalità USB. "USB" compare sullo schermo e lampeggia durante la
ricerca della chiavetta USB. In seguito, viene mostrato il numero totale
di brani sulla chiavetta USB.
NOTA: si consiglia di collegare il dispositivo a un televisore per la
riproduzione USB.

81
IT
4. Premere PAIR (9) sul lato anteriore del dispositivo per avviare la
riproduzione. Se si ascolta un le MP3+G, sullo schermo del televisore
(se collegato) vengono mostrati immagine e testi delle canzoni.
NOTE:
• Se il dispositivo è collegato a un televisore, sul suo schermo vengono
mostrate la canzone e la cartella selezionate.
• Per scegliere la canzone che si desidera riprodurre, premere SKIP- (12) e
SKIP+ (11) sul lato anteriore del dispositivo.
5. Impostare il volume a un livello piacevole con la manopola MASTER
VOLUME (17).
NOTA: se il dispositivo è stato collegato a un televisore o a un'altra
sorgente audio, regolare il volume dal relativo dispositivo esterno.
6. Collegare un microfono e posizionare l'interruttore ON/OFF del
microfono su ON (acceso).
7. Regolare il volume del microfono con la manopola MIC VOLUME (13) sul
lato anteriore del dispositivo. Questo ha eetto su entrambi i microfoni.
8. Girare la manopola ECHO (5) sul lato anteriore, per donare un eetto
eco alla voce.
9. Ripetizione (REPEAT):
• Premere una volta PROG/REPEAT (3) sul lato anteriore del
dispositivo durante la riproduzione per ripetere la canzone
selezionata. L'indicazione della ripetizione lampeggia rapidamente.
• Premere di nuovo il tasto per ripetere la cartella desiderata.
L'indicazione della ripetizione lampeggia lentamente.
• Premere il tasto una terza volta per ripetere tutte le cartelle.
L'indicazione della ripetizione resta illuminata di rosso.
• Premere il tasto una quarta volta per interrompere la funzione di
ripetizione. L'indicazione della ripetizione scompare.
10. Mettere in pausa (PAUSE):
• Premere PAIR (9) sul lato anteriore del dispositivo per mettere in
pausa la musica in riproduzione. L'indicazione PLAY/PAUSE inizia
a lampeggiare. Premere di nuovo il tasto per procedere con la
normale riproduzione.
11. Premere STOP (10) sul lato anteriore del dispositivo per arrestare la
riproduzione.
12. Premere il tasto ON/OFF (1) per spegnere il dispositivo.

82
IT
Utilizzare un dispositivo BT
1. Collegare il dispositivo come descritto in precedenza. Premere il tasto
ON/OFF (1) sul lato anteriore per accendere il dispositivo.
2. Premere più volte MODE (2) sul lato anteriore per selezionare BT.
"bt" compare sul display LED e l'indicazione BT sul lato anteriore del
dispositivo si illumina di blu. Il dispositivo cerca automaticamente i
dispositivi BT disponibili nelle vicinanze e si collega automaticamente
con un dispositivo accoppiato in precedenza (se disponibile). Se non
sono stati collegati dispositivi BT esterni in precedenza, stabilire il
collegamento come descritto nel prossimo passaggio.
NOTA: per stabilire un collegamento con un altro dispositivo BT, tenere
premuto a lungo PAIR (9) sul lato anteriore, in modo da scollegare tutti i
dispositivi accoppiati e collegare un nuovo dispositivo.
3. Attivare la funzione BT sul dispositivo esterno. Selezionare "Arizona
Sing" dall'elenco sul dispositivo esterno.
Nota: per informazioni più dettagliate, consultare il manuale d'uso del
dispositivo esterno.
4. L'indicazione BT rimane illuminata di blu e viene emesso un segnale
acustico.
NOTE:
• Se viene richiesta l'immissione di una password per il collegamento BT,
inserire "0000".
• In alcuni dispositivi, dopo aver stabilito con successo il collegamento, è
necessario selezionare "utilizzare come dispositivo audio" o similari.
• Se il collegamento viene interrotto ad accoppiamento avvenuto, ridurre
la distanza tra dispositivo esterno e jukebox. La distanza non deve
essere superiore a 10 metri (30 piedi).
5. Avviare la riproduzione sul dispositivo BT esterno. Premere PAIR (9) sul
lato anteriore del dispositivo durante la riproduzione per mettere in
pausa una canzone.
6. Premere SKIP- (12) e SKIP+ (11) sul lato anteriore del dispositivo per
saltare il titolo precedente/successivo.

83
IT
Funzione di registrazione
1. Per registrare musica e canto, premere RECORD (3) sul lato anteriore
del dispositivo. L'indicazione di funzionamento inizia a lampeggiare di
verde. Quando rimane illuminata di verde, inizia la registrazione.
2. Quando la registrazione è terminata, premere di nuovo RECORD (3).
L'indicazione di funzionamento si spegne.
3. I le registrati vengono salvati sul supporto USB.
4. Per ascoltare il brano registrato, premere MODE (2) sul lato anteriore
per passare in modalità USB. Il brano registrato si trova nel le REC.
Premere SKIP- (12) e SKIP+ (11) per selezionare il brano desiderato.
5. Premere PAIR (9) per riprodurre il brano desiderato.
NOTA: la funzione di registrazione è disponibile nelle modalità BT, AUX e
CD. In modalità CD è possibile registrare solo titoli in formato CD, CD-R,
CD-RW e CD+G. Non p disponibile per il formato MP3.
Funzione di memorizzazione
1. Premere STOP (10) a dispositivo acceso per passare in modalità stop.
Premere poi PROG/REPEAT (4). L'indicazione di memorizzazione
lampeggia e sullo schermo compare "01" per indicare che è possibile
salvare la prima canzone.
2. Selezionare il primo titolo con SKIP- (12) e SKIP+ (11).
3. Premere di nuovo PROG/REPEAT (4) per confermare.
4. Ripetere la procedura per salvare no a 20 titoli. Al termine, premere
PAIR (9) per avviare la riproduzione.
NOTE:
• Premere due volte STOP (10) per arrestare la procedura di
memorizzazione e per cancellare la playlist.
• Possono essere salvati no a 20 titoli per la riproduzione in ordine a
scelta. Se si cerca di salvare più di 20 titoli, sullo schermo compare
"FUL".
• La funzione di memorizzazione è disponibile nelle modalità CD e USB.
84
IT
PULIZIA E MANUTENZIONE
• Staccare la spina dalla presa prima della pulizia.
• Se il dispositivo è impolverato, stronarlo con un panno morbido e
asciutto.
• Utilizzare solo un panno morbido per la pulizia. Non utilizzare
assolutamente cera, lucidi spray o detergenti aggressivi.
Nota: assicurarsi che non penetrino mai liquidi all'interno del dispositivo
durante la pulizia.
RICERCA E CORREZIONE DEGLI ERRORI
Prima di rispedire indietro il dispositivo o di rivolgersi al servizio di
assistenza ai clienti, controllare i consigli per la risoluzione dei problemi
descritti nella seguente tabella. Se non è possibile risolvere il problema con
le informazioni seguenti, rivolgersi al produttore o al servizio di assistenza
ai clienti.
Problema Possibile causa/Soluzione
Il dispositivo è spento. Il dispositivo è spento. Premere il tasto ON/OFF
(1) per accendere il dispositivo.
Assicurarsi che l'adattatore sul retro del
dispositivo sia collegato correttamente.
Inserire la spina in un'altra presa elettrica.
Se si usano batterie, sostituirle.
Nessun audio (in
generale)
La regolazione del volume MASTER VOLUME è
al minimo. Alzare il volume.
Non è stata selezionata la funzione corretta.
Selezionare la funzione corretta con MODE (2).
Se si usa un dispositivo esterno, alzare il suo
volume.
Nessun audio (quando
collegato a un
televisore)
Il televisore è in funzione muta o il volume è
troppo basso.
Impostare il volume al livello desiderato.
Nel menu del televisore non è stata selezionata
la sorgente corretta (normalmente AV).

85
IT
Problema Possibile causa/Soluzione
Il testo della canzone
non viene mostrato
sullo schermo del
televisore.
Se il dispositivo è collegato a un televisore, può
essere che il connettore del cavo video non sia
collegato correttamente. Controllare e stabilire
il collegamento.
Quando il dispositivo è collegato a un
televisore, selezionare la sorgente corretta
(normalmente AV).
Il le/titolo riprodotto non contiene il testo del
brano.
Se si utilizza la connessione Line-In o il BT, sullo
schermo del televisore non viene mostrato
nulla.
Nessun audio dal
microfono.
Assicurarsi che il microfono sia collegato
correttamente con le connessioni MIC1 o MIC2.
Assicurarsi che l'interruttore del microfono sia in
posizione "ON" (acceso).
Assicurarsi che il volume del microfono non sia
troppo basso.
La regolazione del volume MASTER VOLUME è
al minimo. Alzare il volume.
Impossibile riprodurre
le da chiavetta USB.
Il le è danneggiato. Sostituire il le.
Il formato non può essere riprodotto dal
dispositivo.
La chiavetta USB collegata non viene supportata
dal dispositivo.
Non è possibile
collegare un
dispositivo BT esterno
con il jukebox.
La funzione BT del dispositivo esterno non è
stata attivata. A tal ne, consultare il manuale
d'uso del dispositivo esterno.
Il dispositivo non si trova in modalità di
accoppiamento. Premere PAIR per ripetere
l'accoppiamento.
La musica non è
disponibile dopo aver
stabilito con successo
un collegamento BT.
Assicurarsi che il dispositivo BT esterno supporti
il prolo BT A2DP.
Il volume del dispositivo esterno è troppo
basso o è attivata la funzione muta. Regolare di
conseguenza.

86
IT
SMALTIMENTO
Se nel proprio paese si applicano le
regolamentazioni inerenti lo smaltimento di
dispositivi elettrici ed elettronici, questo simbolo
sul prodotto o sulla confezione segnala che questi
prodotti non possono essere smaltiti con i ri uti
normali e devono essere portati a un punto di
raccolta di dispositivi elettrici ed elettronici. Grazie
al corretto smaltimento dei vecchi dispositivi si
tutela il pianeta e la salute delle persone da possibili
conseguenze negative. Informazioni riguardanti
il riciclo e lo smaltimento di questi prodotti si
ottengono presso l’amministrazione locale oppure il
servizio di gestione dei ri uti domestici.
Il prodotto contiene batterie. Se nel proprio
paese si applicano le regolamentazioni inerenti
lo smaltimento di batterie, non possono essere
smaltite con i normali ri uti domestici. Preghiamo
di informarvi sulle regolamentazioni vigenti sullo
smaltimento delle batterie. Grazie al corretto
smaltimento dei vecchi dispositivi si tutela l’ambiente
e la salute delle persone da conseguenze negative.
DICHIARAZIONE DI CONFORMITÀ
Produttore:
Chal-Tec GmbH, Wallstraße 16, 10179 Berlino,
Germania.
Importatore per la Gran Bretagna:
Berlin Brands Group UK Ltd
PO Box 1145
Oxford, OX1 9UW
United Kingdom
Il fabbricante, Chal-Tec GmbH, dichiara che il tipo
di apparecchiatura radio Arizona Sing è conforme
alla direttiva 2014/53/UE. Il testo completo della
dichiarazione di conformità UE è disponibile al
seguente indirizzo Internet: use.berlin/10037817