
www.auna-multimedia.com
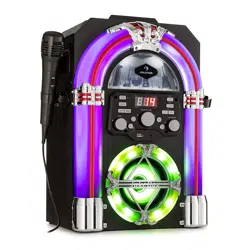
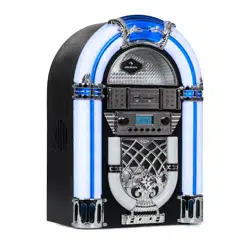
Graceland Mini
Jukebox
10036452


3
DE
English 33
Français 61
Español 89
Italiano 117
Sehr geehrter Kunde,
wir gratulieren Ihnen zum Erwerb Ihres Gerätes.
Lesen Sie die folgenden Hinweise sorgfältig durch
und befolgen Sie diese, um möglichen Schäden
vorzubeugen. Für Schäden, die durch Missachtung der
Hinweise und unsachgemäßen Gebrauch entstehen,
übernehmen wir keine Haftung. Scannen Sie den
folgenden QR-Code, um Zugri auf die aktuellste
Bedienungsanleitung und weitere Informationen rund
um das Produkt zu erhalten:
INHALTSVERZEICHNIS
Technische Daten 4
Sicherheitshinweise 5
Gerateübersicht 7
Fernbedienung 9
Inbetriebnahme und Einstellungen 12
DAB-Radio 14
FM-Radio 16
CD 18
USB/SD-Wiedergabe 19
BT 20
PROG (Speicherliste erstellen) 21
Plattenspieler 22
Lichteekte einschalten 27
Fehlerbehebung 28
Spezielle Entsorgungshinweise für Verbraucher in Deutschland 30
Hinweise zur Entsorgung 32
Konformitätserklärung 32
4
DE
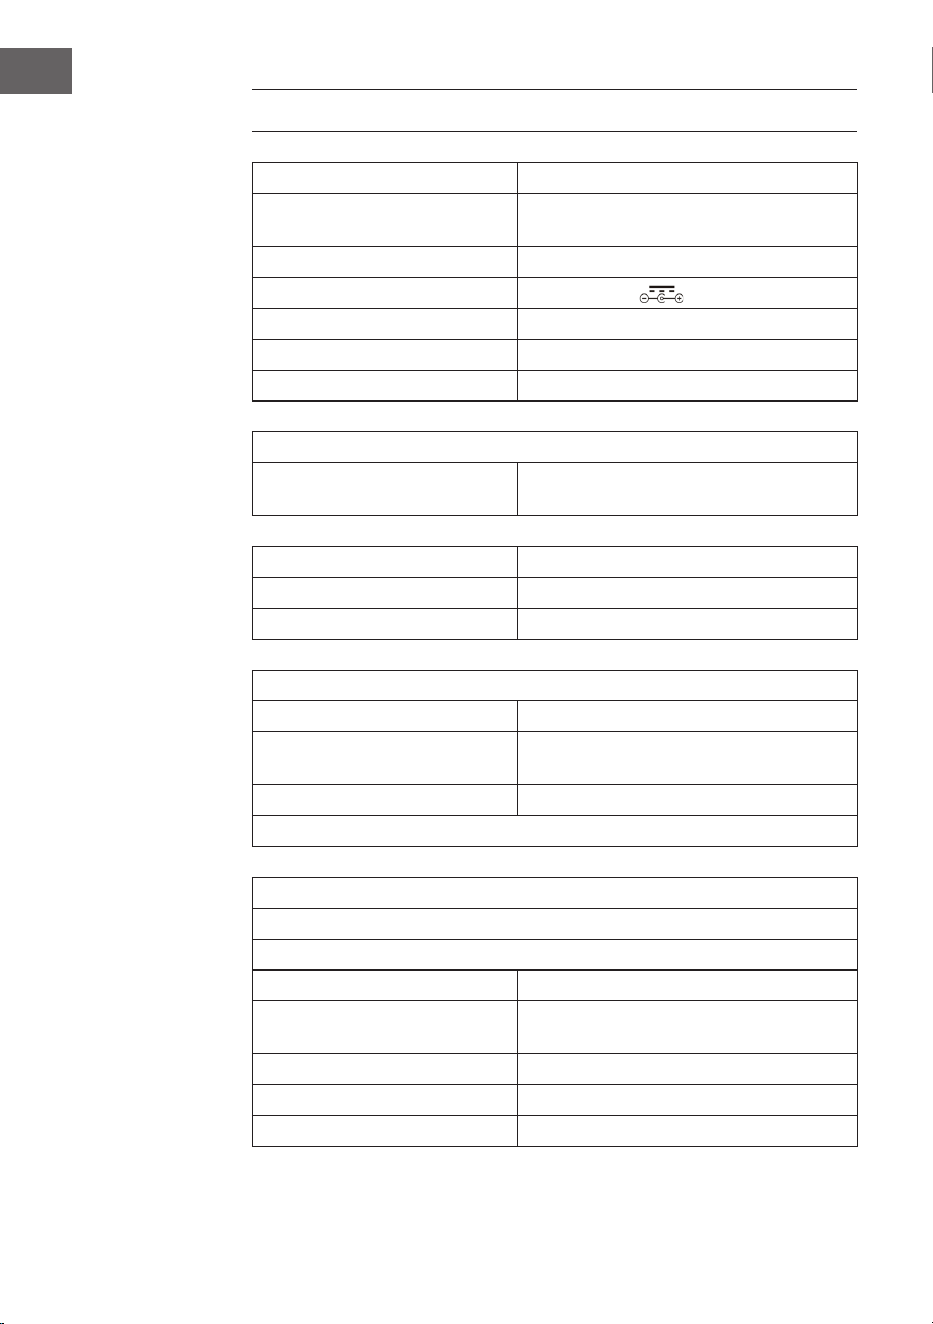
TECHNISCHE DATEN
Artikelnummer 10036452
Stromversorgung
(AC/DC-Netzteil)
100-240 V ~ 50/60 Hz
Batterie (Fernbedienung) CR2025 3 V Lithium-Batterie
Ausgangsleistung DC 14 V 1,75 A
Leistung 24,5 W
Verstärkerkanalart 2,0 Kanal
Ausgangsleistung 4 W + 4 W
Radio (FM/DAB)
Frequenzbereich
FM 87,5 – 108 MHz
DAB 174,928 – 239,200 MHz
BT
BT Frequenzband 2,4 – 2,480 GHz
BT Sendeleistung (max.) 4 dBm
Kompatible USB-Geräte oder SD-Karten
USB-Anschluss USB 2.0 oder USB 1.1 wird unterstützt
Dateisystem
FAT 16/32
(NTFS Dateisystem wird nicht unterstützt)
Maximale Anzahl Dateien < 999
Externe HDDs, Kartenlesegeräte und andere gesicherte Geräte werden
nicht unterstützt.
Anforderungen an abspielbare Dateien
MP3/WMA Musikdateien
MP3/WMA Dateikompatibilität mit diesem Gerät ist folgendermaßen
limitiert:
Frequenzbereich zwischen 32 und 48 kHz
Bitrate zwischen 32 und 320 kbps (MP3),
40 bis 192 kbs (WMA)
Maximale Anzahl Dateien < 999
Maximale Anzahl Ordner < 99
Dateierweiterungen .mp3 oder .wma

5
DE
SICHERHEITSHINWEISE
Allgemeine Hinweise
• Blitzschlag - Wenn Sie das Gerät länger nicht benutzen oder es
gewittert, ziehen Sie den Stecker aus der Steckdose oder trennen
Sie das Gerät vom Antennenanschluss. Dadurch werden Schäden am
Produkt durch Blitzschlag und Überspannung vermieden.
• Überlastung - Überlasten Sie keine Steckdosen, Verlängerungskabel
oder integrierten Steckdosen, da dies zu einem Brand oder Stromschlag
führen kann.
• Fremdkörper und Flüssigkeitseintritt - Schieben Sie niemals
Gegenstände jeglicher Art durch Önungen in das Gerät, da sie
gefährliche Spannungspunkte berühren oder Teile kurzschließen
können, die zu einem Brand oder einem elektrischen Schlag führen
könnten. Verschütten Sie niemals Flüssigkeiten jeglicher Art auf dem
Gerät.
• Reparatur und Wartung - Versuchen Sie nicht, dieses Produkt selbst zu
warten, da Sie sich durch das Önen oder Entfernen von Abdeckungen
gefährlichen Spannungen oder anderen Gefahren aussetzen.
Überlassen Sie alle Wartungsarbeiten qualiziertem Servicepersonal.
• Schäden, die einen Service erfordern - Ziehen Sie den Netzstecker aus
der Steckdose und wenden Sie sich an einen qualizierten Fachbetrieb,
wenn eine der folgenden Situationen eintritt:
a) Wenn das Netzkabel oder der Stecker beschädigt ist.
b) Wenn Flüssigkeit verschüttet wurde oder Gegenstände auf das
Produkt gefallen sind.
c) Wenn das Produkt Regen oder Wasser ausgesetzt war.
d) Wenn das Produkt heruntergefallen oder beschädigt ist.
e) Wenn das Produkt eine deutlich verringerte Leistung aufweist.
• Ersatzteile - Wenn Ersatzteile benötigt werden, stellen Sie sicher, dass
der Fachbetrieb, der die Teile ersetzt, nur Ersatzteile verwendet, die
vom Hersteller zugelassen sind oder dieselben Eigenschaften wie das
Originalteil haben. Unbefugter Austausch kann zu Feuer, Stromschlag
oder anderen Gefahren führen.
• Wärme - Stellen Sie das Gerät nicht in der Nähe von Wärmequellen
wie Heizkörpern, Heizregistern, Öfen oder anderen Produkten
(einschließlich Verstärkern) auf.
6
DE
Besondere Hinweise
• Dieses Gerät kann von Kindern ab 8 Jahren sowie von Personen mit
verringerten physischen, sensorischen und geistigen Fähigkeiten
oder Mangel an Erfahrung und/oder Wissen benutzt werden, wenn
sie beaufsichtigt werden oder im sicheren Gebrauch des Gerätes
unterwiesen wurden und die daraus resultierenden Gefahren
verstanden haben.
• Reinigung und Wartung durch den Benutzer dürfen nicht von Kindern
vorgenommen werden, es sei denn, sie sind 8 Jahre oder älter und
werden beaufsichtigt.
• Kinder sollten beaufsichtigt werden, um sicherzustellen, dass sie nicht
mit dem Gerät spielen. Achten Sie darauf, dass Kinder und Babys nicht
mit Plastiktüten oder anderen Verpackungsmaterialien spielen.
• Achten Sie darauf, dass der Netzstecker/Netzadapter immer leicht
zugänglich bleibt, damit das Gerät im Notfall schnell von Stromnetz
getrennt werden kann.
• Wenn Sie das Gerät nicht mehr benutzen, schalten Sie es aus und
ziehen Sie den Stecker aus der Steckdose.
WARNUNG
Verletzungsgefahr! Bewahren Sie Batterien außerhalb der
Reichweite von Kindern auf. Verschlucken kann in nur zwei
Stunden zu schweren Verletzungen oder zum Tod durch
innere Verbrennungen führen. Falls Batterien verschluckt
wurden, begeben Sie sich sofort in die Notaufnahme eines
Krankenhauses. Entsorgen Sie verbrauchte Batterien
umgehend.
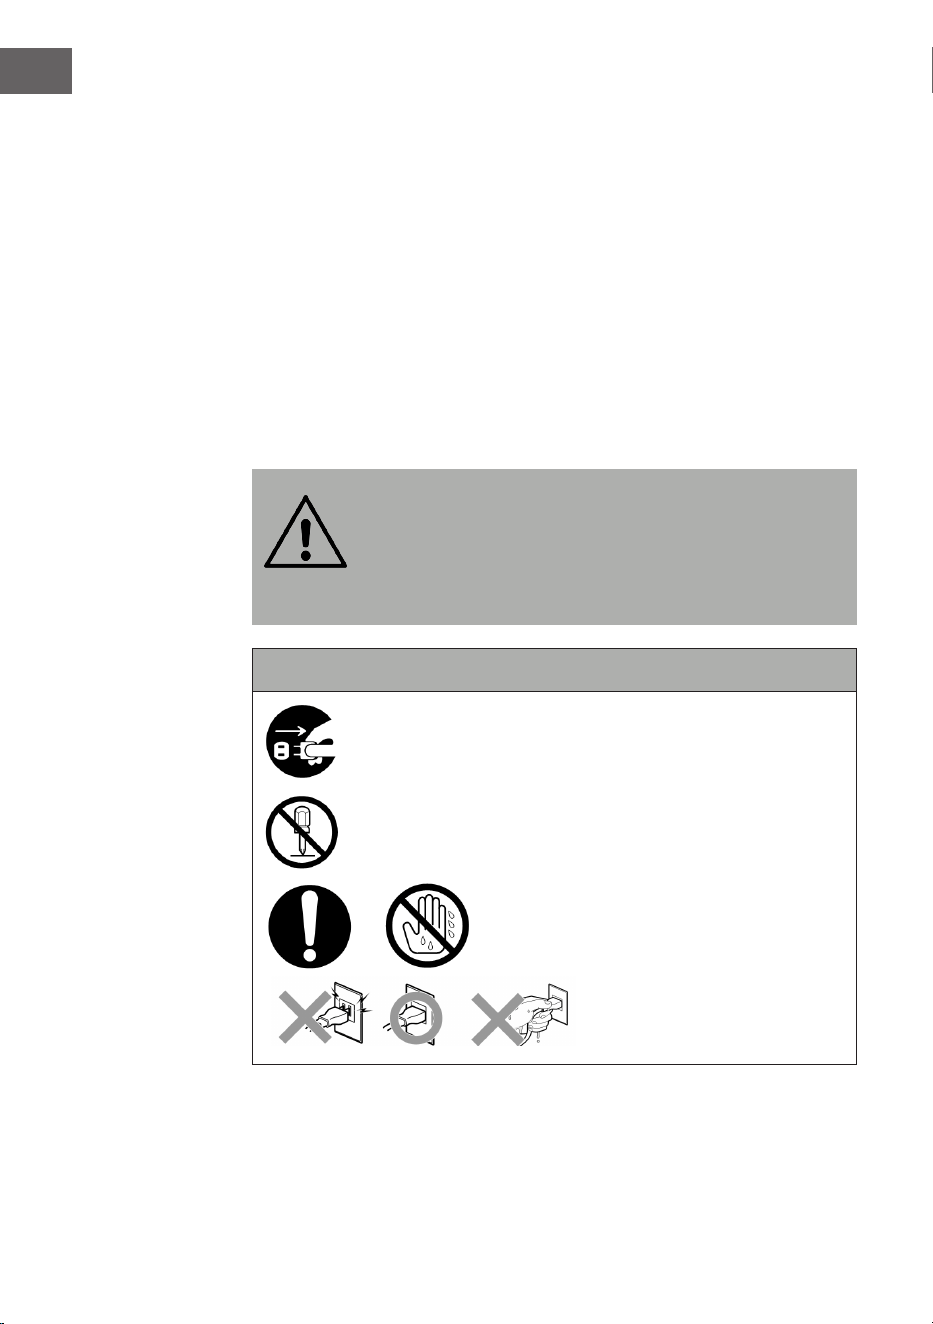
Wichtige Sicherheitshinweise
Achten Sie darauf, dass Babys und Kleinkinder den
Netzstecker nicht herausziehen!
Auseinanderbauen verboten!
Fassen Sie das Gerät nicht mit nassen
Händen an!

7
DE
GERATEÜBERSICHT
Vorderseite
1 Staubschutz Plattenspieler 14 Zurück/Schneller Rücklauf/PRE+
2 Schallplattenspieler 15 Fernbedienungsempfangsfenster
3 LIGHT (LIcht/Lampenfarbe ändern) 16 Tuning/EQ (Stimmmuster)
4 Position der Diskolampe 17 Bildschirm
5 Bedienfeld 18 USB-Anschluss
6 Tieftonlautsprecher 19 OPEN / CLOSE (CD-Tür önen/schließen)
7 Betriebsanzeige 20 P/R/MENU (Programmierung und Menü)
8 Lautstärke/Standby 21 REP/INFO (Wiederholung und Info)
9 SD-Karten-Anschluss 22
Vor/Schneller Vorlauf/PRE+
10 MODE (Modus) 23 OFF (Lampe ausschalten)
11 CD-Fach-Tür 24 PLAY (Der Lichtfarbenzyklus ändert sich.)
12
PLAY/PAUSE/SCAN (Suche) 25 HOLD (Die Lichtfarbe stoppt in einem
bestimmten Zustand.)
13
STOPP/ENTER (Eingabetaste)

8
DE
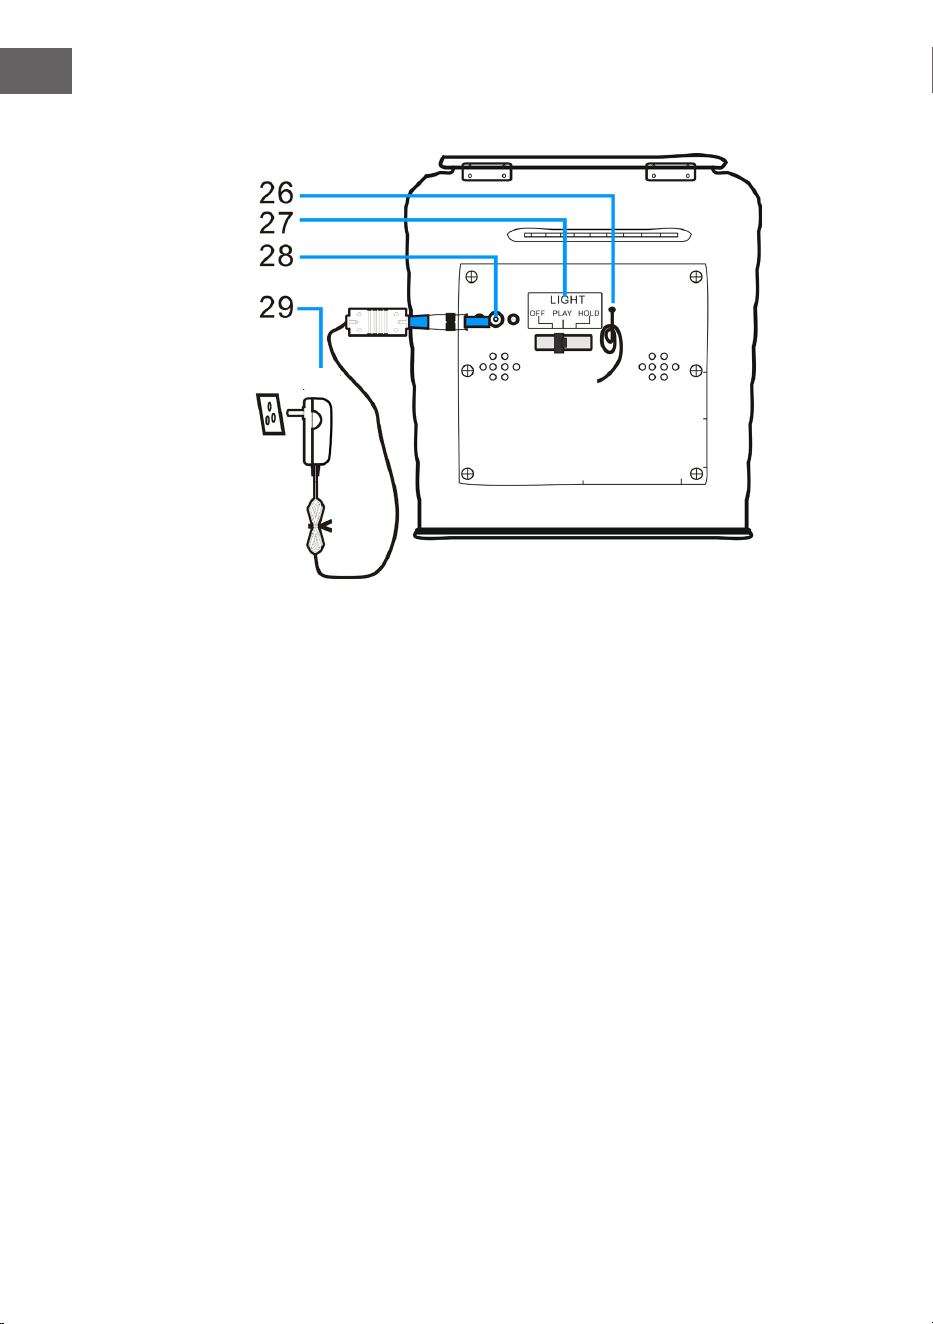
Rückseite
26 FM-Antenne (Hinweis: Die FM-Antenne muss vollständig
ausgefahren werden, um den bestmöglichen Empfang zu
gewährleisten).
27 Licht-Modus-Schalter (Lichteekte)
28 DC-Anschluss
29 Netzteil
AC-Netzteil

9
DE
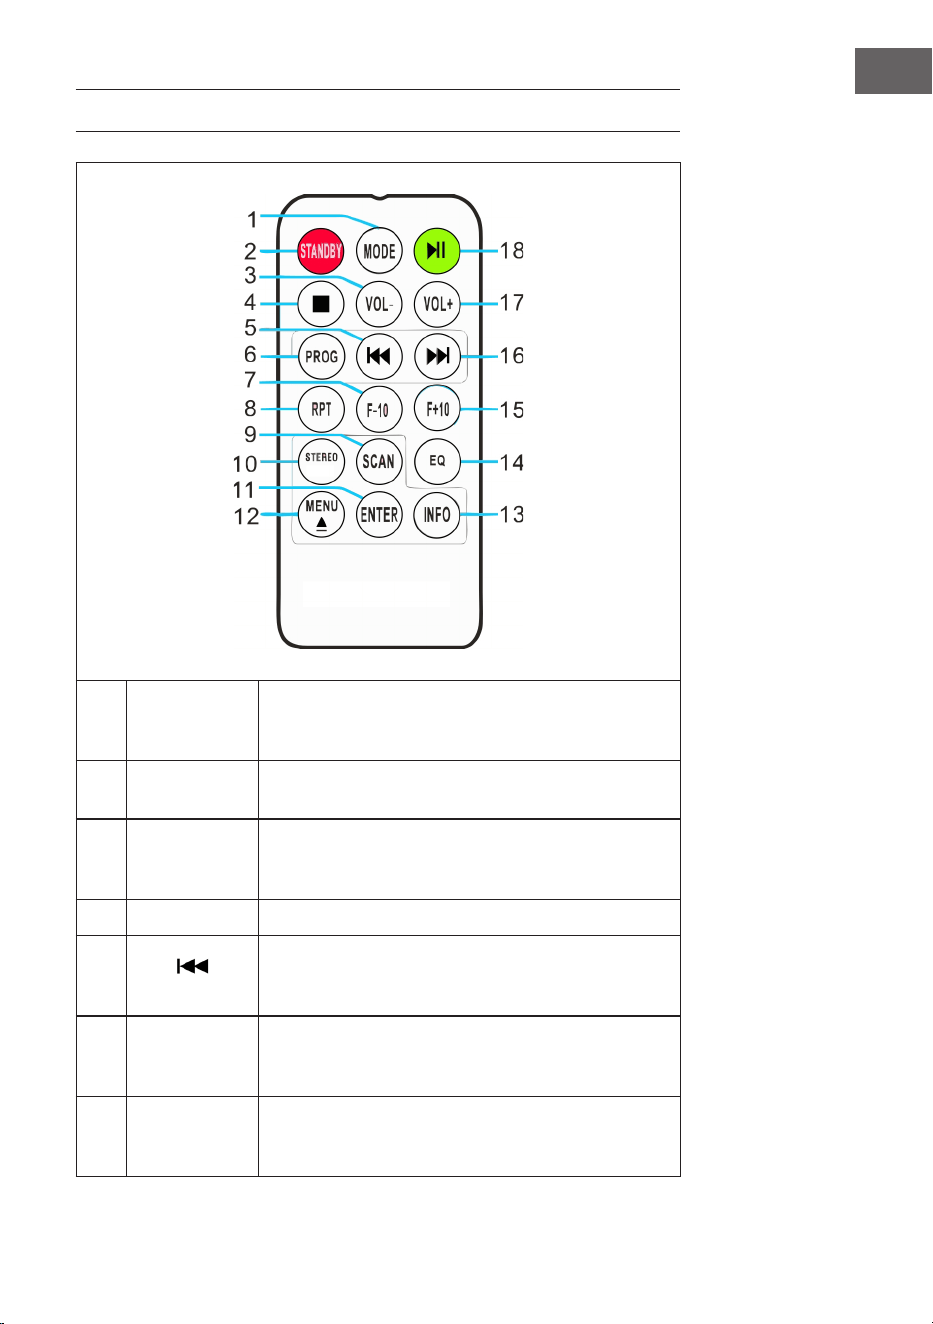
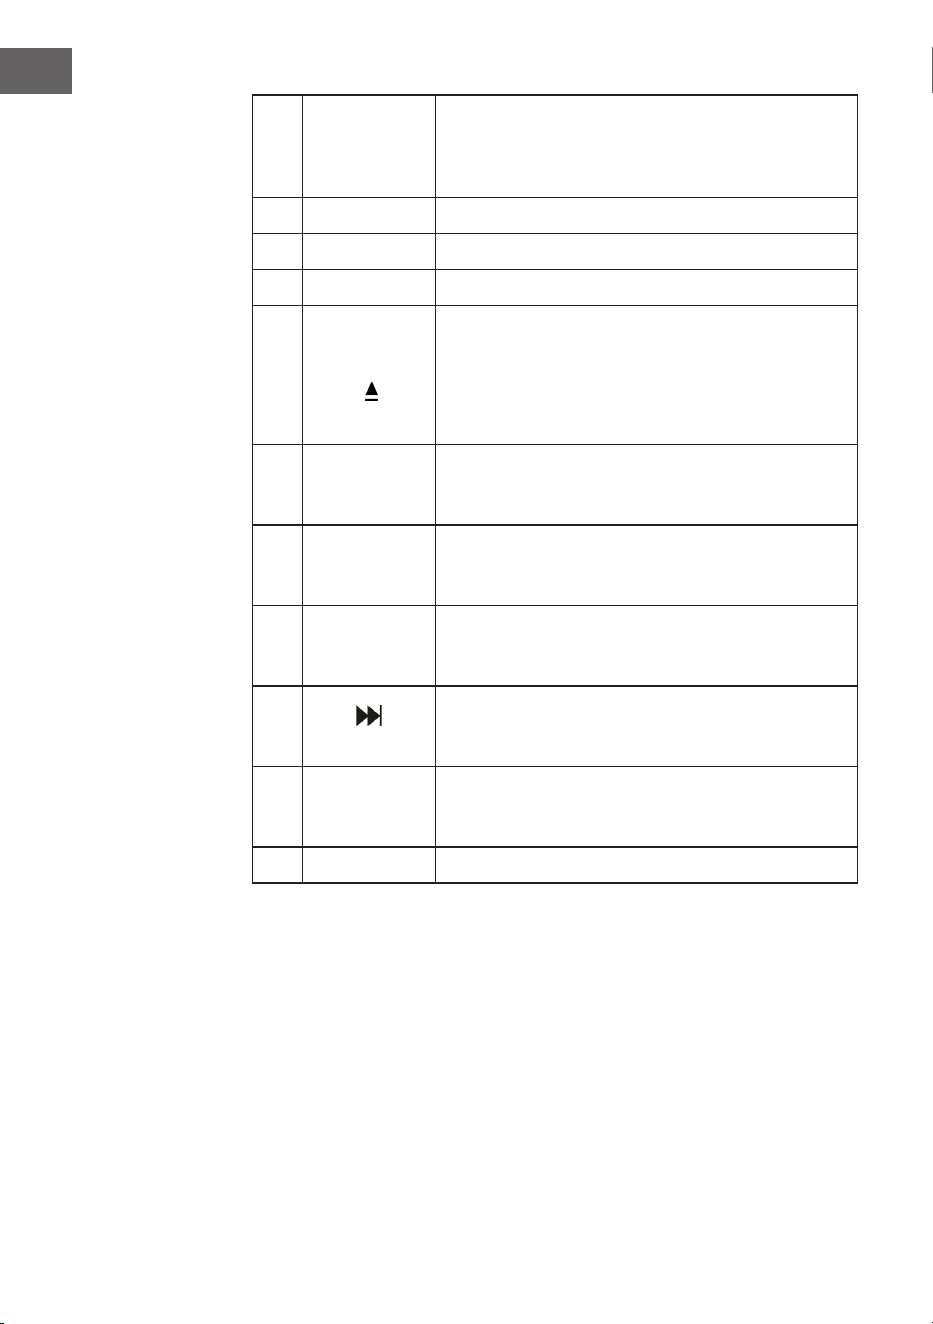
FERNBEDIENUNG
1 MODE
Modusauswahl: Sie können aus den verschiedenen
Modi DAB/FM, CD, USB, SD, BT und Plattenspieler
auswählen.
2 STANDBY
Drücken Sie die Taste POWER, um den Standby-
Modus zu verlassen und in den DAB-Modus zu
gelangen.
3 VOL-
Lautstärke senken: Drücken Sie die Taste
mehrmals oder drücken Sie diese einmal und
halten Sie sie gedrückt, bis Sie den gewünschten
Lautstärkepegel erreicht haben.
4 STOP
Drücken Sie diese Taste zum Stoppen der
Wiedergabe.
5
(Vorheriger
Titel)
Schneller Rücklauf: Drücken Sie diese Taste, um
zum vorherigen Titel zu gelangen oder halten Sie
diese Taste gedrückt, um innerhalb eines Titels
zurück zu spulen. Sie können zum Starten der
Wiedergabe anschließend die Taste PLAY drücken.
10
DE
6
PROG
(Speichern)
Mit dieser Funktion können Sie eine Speicherliste
Ihrer Lieblingssongs aus einer Musikquelle
zusammenstellen (für weiter Informationen siehe
Abschnitt „Speichern“).
7 F-10
Überspringen Sie die vorherigen 10 Titel
(überspringt jedes Mal 10 Titel). Im zufälligen
Wiedergabemodus („RAN“) ist diese Funktion
deaktiviert.
8
RPT
(Wiederholen)
Drücken Sie diese Taste einmal, um einen
bestimmten Titel zu wiederholen. Drücken Sie
diese Taste zweimal, um alle Titel zu wiederholen.
Drücken Sie die Taste dreimal, um die
Zufallswiedergabe zu starten.
9 SCAN
Drücken Sie diese Taste, um die automatische
Sendersuche zu starten und Sender zu speichern.
10 STEREO
Stereo-/Mono-Auswahl im Radiomodus (wo
verfügbar).
11 ENTER
Eingabebestätigung: Speichern in verschiedenen
Einstellungen bestätigen und speichern.
12
MENU
Nehmen Sie Einstellungen für FM-Radio und
DAB-Radio vor. Sie nden eine Auswahl relevanter
Einstellungen im Menü.
EJECT: Wenn Sie während der CD-Wiedergabe
diese Taste drücken, önet sich das CD-Fach.
Drücken Sie die Taste erneut, um das CD-Fach zu
schließen.
13 INFO
Falls ein FM-Radio- oder DAB-Sender oder eine
Datei Informationen enthält, können Sie sich diese
durch Drücken der Taste anzeigen lassen.
14 EQ
Zum Wechsel der Equalizereinstellung, können Sie
diese Taste drücken. Sie können wählen zwischen
JAZZ, FLAT, CLASSIC, ROCK und POP.
15 F+10
Überspringen der nächsten 10 Titel
(überspringt jedes Mal 10 Titel). Im zufälligen
Wiedergabemodus („RAN“) ist diese Funktion
deaktiviert.
16
(Nächster
Titel)
Schneller Vorlauf: Drücken Sie diese Taste, um
zum nächsten Titel zu gelangen oder halten
Sie diese Taste gedrückt, um innerhalb eines
Titels vor zu spulen. Sie können zum Starten der
Wiedergabe jederzeit die Taste PLAY drücken.
11
DE
17 VOL+
Lautstärke erhöhen: Drücken Sie die Taste
mehrmals oder drücken Sie diese einmal und
halten Sie sie gedrückt, bis Sie den gewünschten
Lautstärkepegel erreicht haben.
18 PLAY/PAUSE
Drücken Sie diese Taste, um die Wiedergabe zu
starten oder zu pausieren.
WARNUNG
Verletzungsgefahr! Bewahren Sie Batterien außerhalb der
Reichweite von Kindern auf. Verschlucken kann in nur zwei
Stunden zu schweren Verletzungen oder zum Tod durch
innere Verbrennungen führen. Falls Batterien verschluckt
wurden, begeben Sie sich sofort in die Notaufnahme eines
Krankenhauses. Entsorgen Sie verbrauchte Batterien
umgehend.
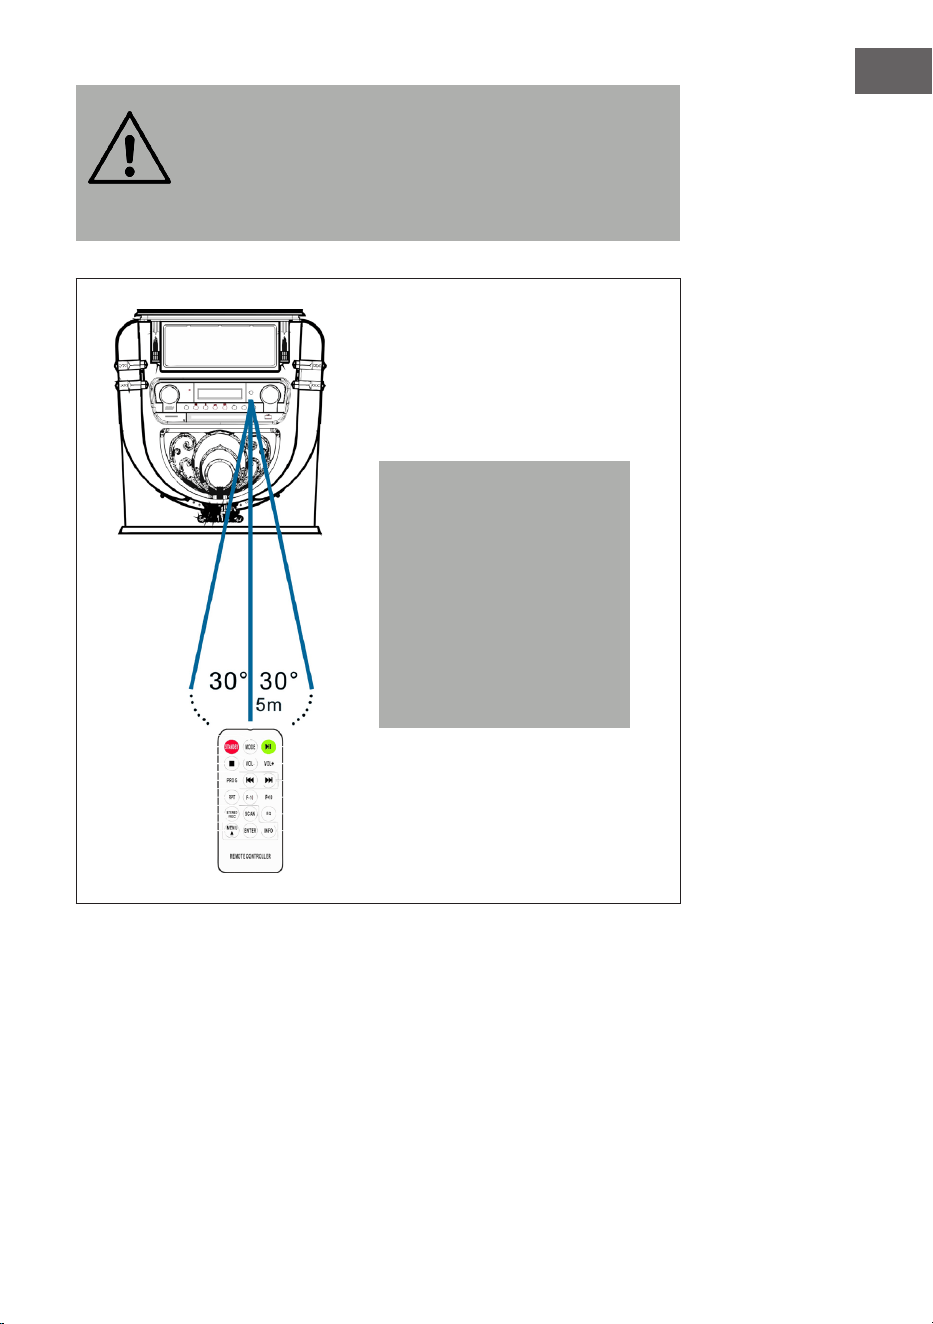
Hinweis: Die beste
Übertragungsdistanz
zwischen dem Gerät und
der Fernbedienung wird
innerhalb von 5 Metern
ohne Barriere (Winkel ca.
30°) erreicht. Wenn die
Batterie der Fernbedienung
fast leer ist, führt dies dazu,
dass die Fernbedienung
nicht wie gewohnt
verwendet werden kann.
Setzen Sie eine neue
Batterie ein.
12
DE
INBETRIEBNAHME UND EINSTELLUNGEN
Uhrzeit einstellen
Schließen Sie das Netzteil an das Gerät an und stecken Sie den Netzstecker
in die Steckdose. Das Gerät wird automatisch in den Standby-Modus
versetzt und die Zeit „00:00“ oder „12:00“ wird auf dem LCD-Bildschirm
angezeigt.
• Amerikanische Version: 12 Stunden System
Wenn die Jukebox in den Standby-Modus versetzt wird, zeigt der LCD-
Bildschirm „12:00“ an.
• Europäische Version: 24 Stunden System
Wenn die Jukebox in den Standby-Modus versetzt wird, zeigt der LCD-
Bildschirm „00:00“ an.
Beispiel: Amerikanische Betriebsversion
Um die Uhrzeit einzustellen, drücken Sie einfach die Taste „P/R“ auf dem
Bedienfeld (20) oder der Fernbedienung (6) und halten Sie diese Taste
3–5 Sekunden lang gedrückt, bis „12-H“ auf dem Bildschirm angezeigt
wird („12-H“ bedeutet, dass die Uhrzeit im 12-Stunden-Format eingestellt
wird). Drücken Sie anschließend die Taste oder , um das 12- oder
24-Stunden-Format zu wählen. Sobald „12-H“ auf dem Bildschirm angezeigt
wird, drücken Sie erneut die Taste „P/R“. Auf dem Bildschirm wird dann
wieder „00:00“ angezeigt, wobei die erste „00“ blinkt. Wählen Sie mit den
Tasten und auf dem Bedienfeld (3) oder der Fernbedienung (6) die
richtige Stundeneinstellung aus (beachten Sie, dass die Zeit im 12-Stunden-
Format eingestellt wird) und drücken Sie dann zur Bestätigung die Taste
„P/R“. Die zweite „00“ blinkt nun. Wählen Sie mit den Tasten und die
richtige Minuteneinstellung aus und drücken Sie dann die Taste „P/R“, um
diese Zahl zu speichern.
HINWEIS: Die Uhrzeit wird nur im Betriebs- oder Standby-Modus der
Jukebox gespeichert. Wenn Sie die eingestellte Zeit in der Jukebox
speichern möchten, drücken Sie einfach auf dem Bedienfeld die Taste
STANDBY (8), um die Jukebox in den Standby-Modus zu versetzen. Wenn
Sie das Netzteil entfernen, wird die Zeiteinstellung gelöscht und der
oben beschriebene Vorgang muss wiederholt werden, um beim nächsten
Einschalten die korrekte Zeit einzustellen.
Die amerikanische und die europäische Ausgabe der Uhrzeiteinstellung ist
identisch.
13
DE
Lautstärke einstellen
1. Um die Lautstärke zu erhöhen, drehen Sie wiederholt den Regler VOL+
oder drücken Sie einmal die Taste VOL+ der Fernbedienung und halten
Sie diese gedrückt, bis Sie den gewünschten Lautstärkepegel erreicht
haben.
2. Um die Lautstärke zu verringern, drehen Sie den Regler VOL- wiederholt
oder drücken Sie einmal die Taste VOL- der Fernbedienung und halten
Sie diese gedrückt, bis Sie die gewünschte Lautstärke erreicht haben.
Hinweis: Überprüfen Sie die Lautstärke, bevor Sie Musik abspielen, um
zu verhindern, dass Kinder, gebrechliche Personen oder schwangere
Frauen durch den plötzlichen und lauten Klang der Jukebox erschreckt
werden.
Hinweis: Wenn Sie die Jukebox über einen längeren Zeitraum mit hoher
Lautstärke verwenden, kann dies zu einer Überhitzung der Jukebox
führen und die internen Komponenten beschädigen. Verwenden Sie die
Jukebox NICHT über einen längeren Zeitraum mit einer hohen Lautstärke.
Die Lautstärkeeinstellungen werden gespeichert, wenn das Gerät
ausgeschaltet wird. Nach dem erneuten Einschalten des Geräts ist die
Lautstärke genauso wie beim letzten Ausschalten des Geräts eingestellt.
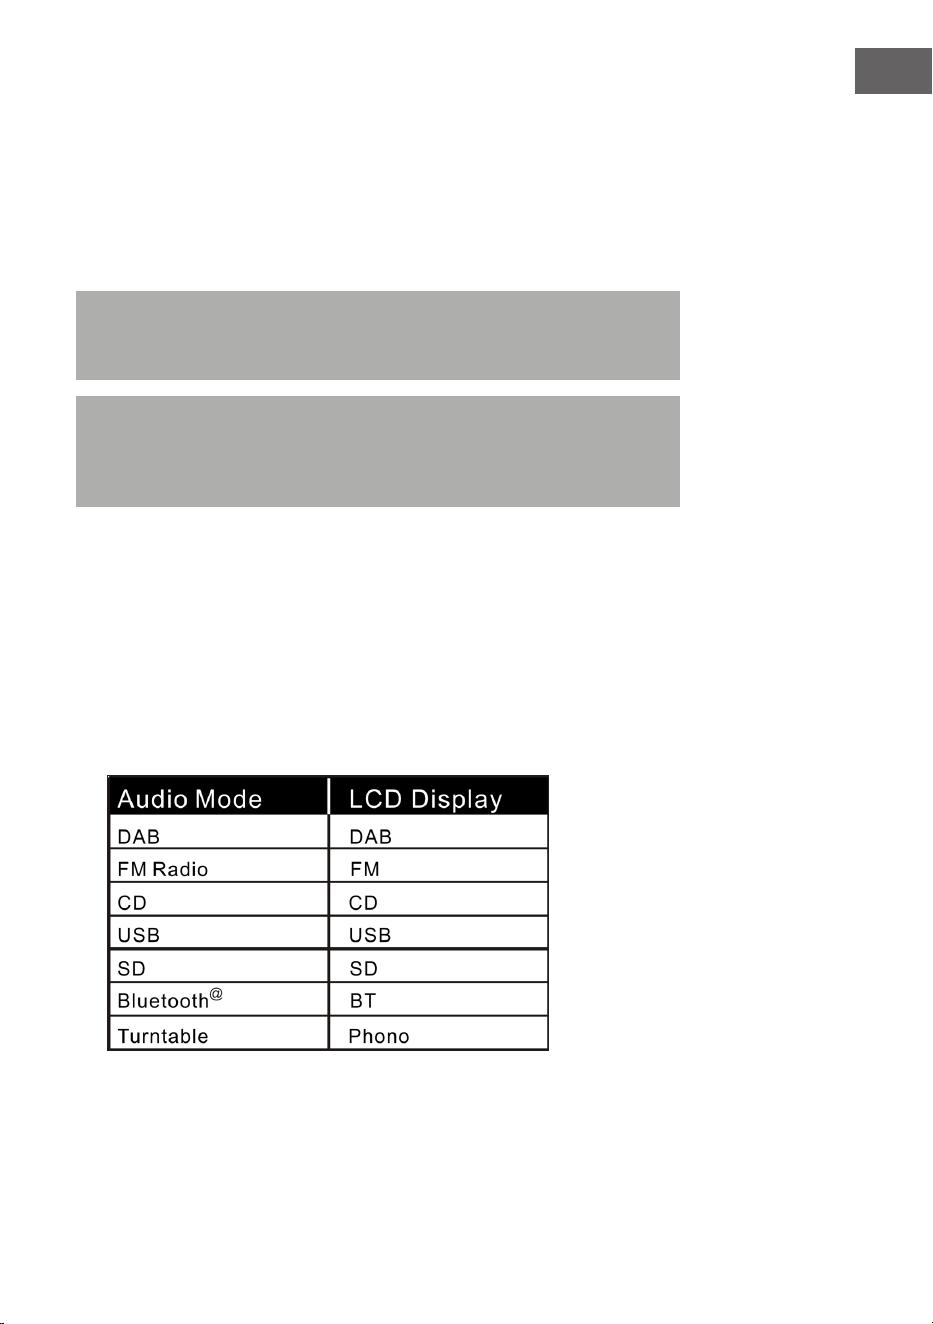
Equalizer-Einstellungen
1. Stellen Sie einen beliebigen Audiomodus ein:
Die Jukebox verfügt über mehrere verschiedenen Funktionen zur
Audiowiedergabe. Gehen Sie wie folgt vor, um zwischen DAB/FM, CD-
Player, USB-Eingang, SD-Karteneingang, analogem UKW-Radio,
BT-Audio-Streaming und Plattenspieler zu wählen.

14
DE
2. Drücken Sie die Taste EQ, bis Sie die gewünschte Equalizer-Einstellung
erreicht haben. Der Klang ändert sich sofort, wenn die jeweilige
Equalizer-Einstellung gewählt wird.
3. Die Jukebox verfügt über 5 wählbare Equalizer-Einstellungen, mit denen
Sie den Klangpegel so anpassen können, dass die jeweilige Art der
abgespielten Musik verstärkt wird.
Die auf der Jukebox vorinstallierten Equalizer-Einstellungen sind:
JAZZ, FLAT, CLASSIC (klassisch), ROCK und POP.
DAB-RADIO
Frequenzbereich: DAB 174,928–239,200 MHz
1. Drücken Sie die Taste STANDBY auf dem Gerät (8) oder auf der
Fernbedienung (2), um den Standby-Modus zu verlassen. Das Gerät
wird automatisch in den DAB-Modus versetzt und sucht automatisch
nach DAB-Signalen in der Nähe.
2. Drehen Sie am Tuning-Regler, um einen DAB-Sender mit starkem
Empfang zu nden (drehen Sie den Tuning-Regler Schritt für Schritt).
3. Drücken Sie die Taste , um zu nachfolgenden gespeicherten
Radiosendern zu gelangen.
4. Drücken Sie die Taste , um zu vorherigen gespeicherten
Radiosendern zu gelangen.
5. Drücken Sie die Taste SCAN, um automatisch nach DAB-Sendern zu
suchen und diese automatisch zu speichern (Sender mit dem stärksten
aktuellen Signal). Es können bis zu 20 Sender gespeichert werden.
6. Drücken Sie die Taste INFO, um die Informationen über den Sender zu
erhalten.
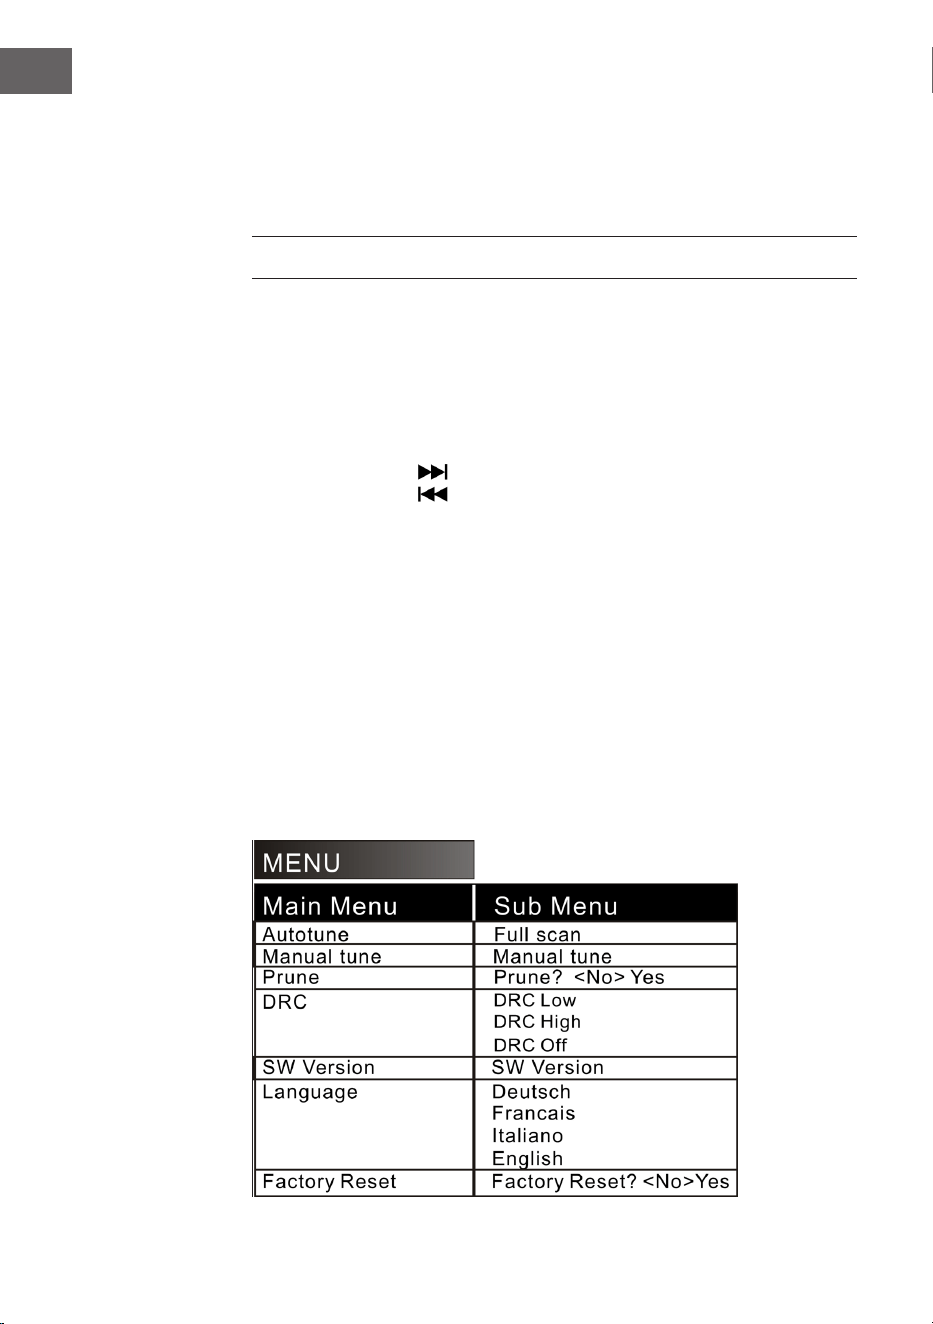
7. Wenn Sie die Taste MENU drücken, erscheinen sowohl das Menü für
die automatische Sendersuche (Autotune) als auch andere Menüs.
Drehen Sie am Tuning-Regler, um den gewünschten Inhalt auszuwählen.
Drücken Sie anschließend die Taste ENTER, um das Hauptmenü des
gewünschten Inhalts auszuwählen. Drehen Sie anschließend am
Tuning-Regler, um in das Untermenü zu gelangen. Drücken Sie zum
abschließenden Bestätigen die Taste ENTER.
8. Wählen Sie im Hauptmenü „Language“ (Sprache) und dann eine der vier
verfügbaren Sprachen aus (Deutsch/Französisch/Italienisch/Englisch).
9. Wenn Sie die vorherigen Einstellungen oder den Speicher löschen
möchten, wählen Sie in dem Menü „Factory Reset“ (Zurücksetzen auf
Werkseinstellung) „Yes“ (Ja) aus.
15
DE
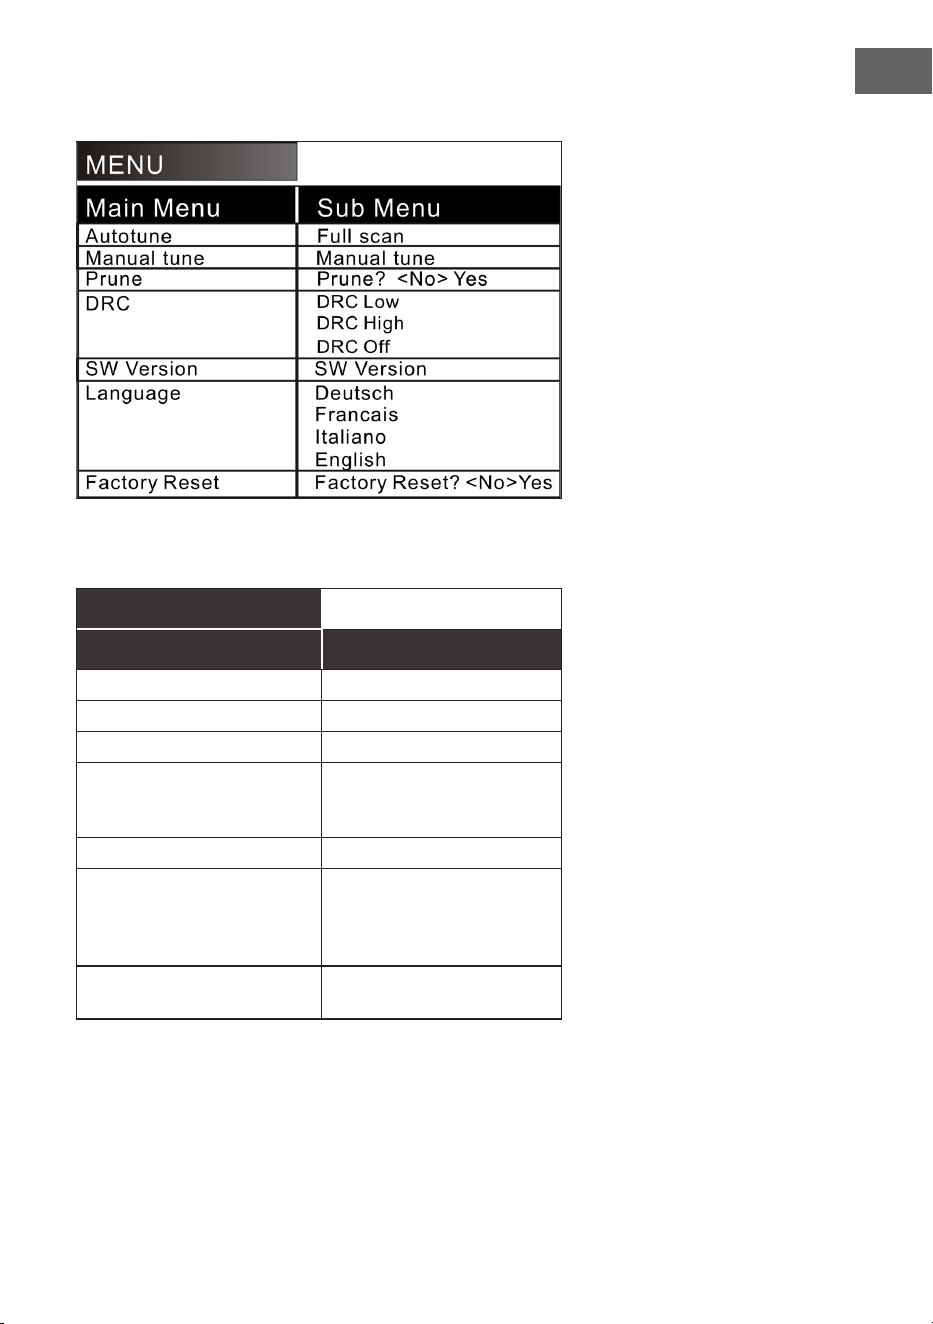
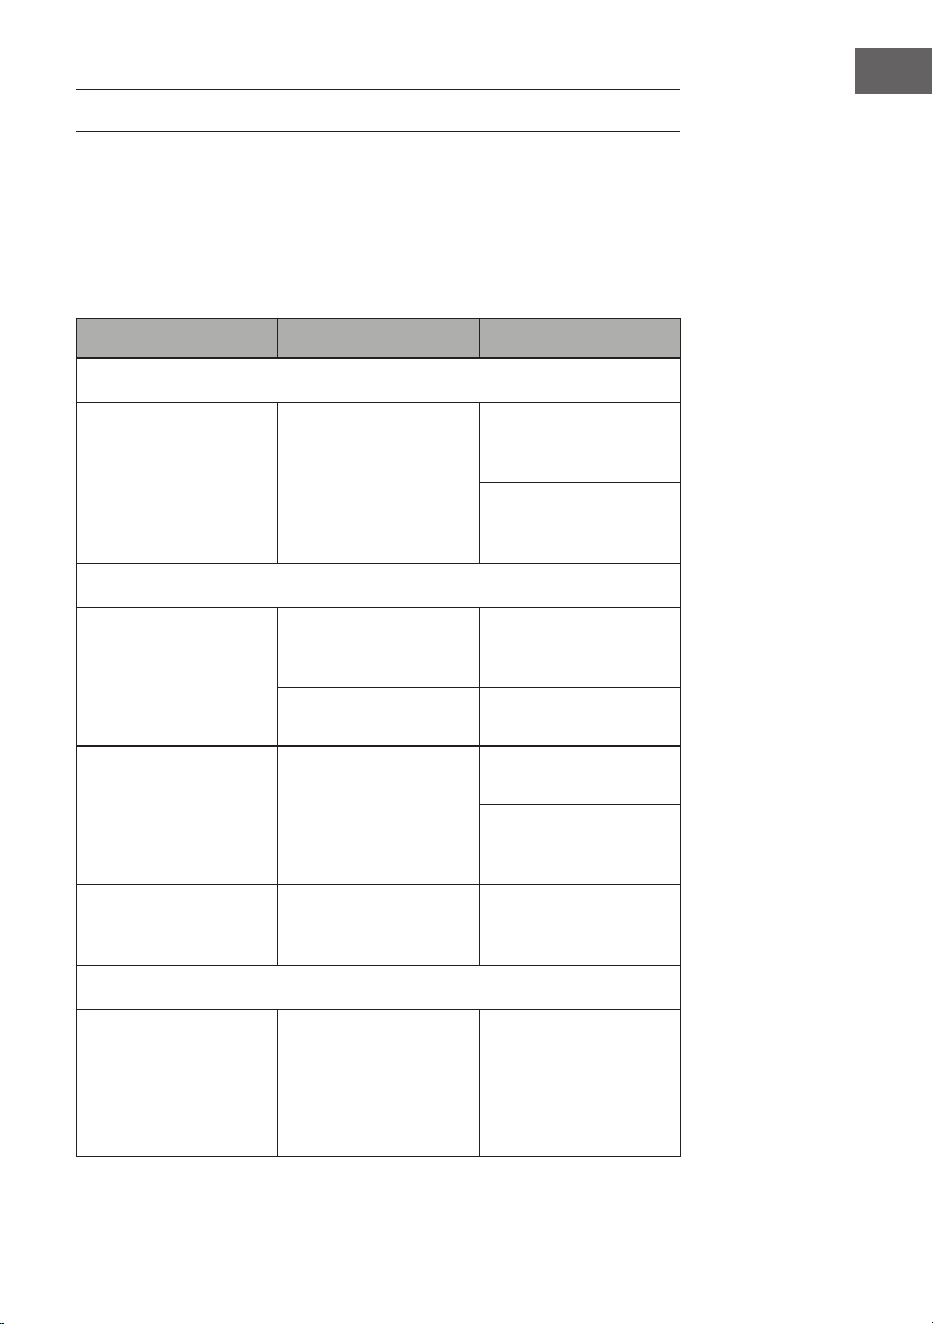
Die folgenden Menüoptionen sind verfügbar:
Erläuterung (Deutsch):
MENÜ
Hauptmenü Untermenü
Automatische Sendersuche Vollständige Sendersuche
Manuelle Sendersuche Manuelle Sendersuche
Löschen Löschen? <Nein> Ja
DRC DRC niedrig
DRC hoch
DRC aus
SW Version SW Version
Sprache Deutsch
Französisch
Italienisch
Englisch
Auf Werkseinstellungen
zurücksetzen
Auf Werkseinstellungen
zurücksetzen? <Nein> Ja
16
DE
HINWEISE:
• Fahren Sie die Antenne im DAB- und FM-Modus vollständig aus.
Stellen Sie das Gerät an einen Ort mit gutem Empfang. (Die Antenne
bendet sich an der Rückseite des Geräts.)
• Sender mit schwachem Signal können ausschließlich manuell
eingestellt werden.
• Es können maximal 20 Sender gespeichert werden. Falls weniger
als 20lokale Sender mit starkem Signal verfügbar sind, werden
ausschließlich die Sender mit starkem Signal gespeichert. (Falls es
keine 20 Sender mit starkem Signal gibt, können keine 20 Sender
gespeichert werden.)
FM-RADIO
Frequenzbereich: FM 87,5 – 108 MHz
Dieses Gerät verfügt über eine eingebaute FM-Funktion mit automatischer
Sendersuche. Es können bis zu 20 Sender gespeichert werden.
Wenn Sie das Gerät zum ersten Mal verwenden, wird das Gerät, wenn
Sie den Netzstecker in die Steckdose gesteckt haben, automatisch in den
Standby-Modus versetzt (Uhrzeitanzeige). Drücken Sie die Taste STANDBY
auf dem Gerät oder die Taste POWER auf der Fernbedienung, um das Gerät
einzuschalten. Bei der ersten Verwendung wird das Gerät automatisch in
den DAB-Modus versetzt. Drücken Sie die Taste MODE, um in den FM-
Modus zu gelangen. Auf dem LCD-Bildschirm wird anschließend FM 87,5
MHz (oder eine andere Radiofrequenz) angezeigt und die Lautsprecher
geben ein diuses Rauschen ab (es sei denn, die Frequenz 87,5 enthält
einen lokalen Radiosender).
1. Drücken Sie die Taste STANDBY auf dem Gerät (8) oder der
Fernbedienung (2), um das Gerät aus dem Standby-Modus zu erwecken.
Das Gerät wird dann automatisch in den FM-Modus versetzt.
2. Halten Sie die Taste oder gedrückt, um nach zuletzt
gespeicherten Sendern zu suchen (0,1 MHz oder 0,05 MHz für jedes
Drücken). Drehen Sie am Frequenzregler, um einen Sender mit starkem
Empfang zu nden.
3. Drücken Sie die Taste oder (länger als 3 Sekunden), sucht
das FM-Radio automatisch nach Sendern (wird ein Sender mit starkem
Signal gefunden, wird dieser automatisch wiedergegeben).

17
DE
4. Automatische Suche und Speichern: Wenn Sie die Taste (SCAN)
drücken, beginnt das Gerät bei der Frequenz 87,5 aufwärts automatisch
nach Sendern zu suchen. Bei der automatischen Sendersuche
werden gefundene Sender ebenfalls gespeichert. Das Gerät verfügt
über 20Speicherplätze für Ihre Lieblingssender, die mit „P01“ bis
„P20“ benannt sind (Programm 1 bis Programm 20). Der erste vom
Gerät gefundene Sender wird unter „P01“ gespeichert. Der zweite
gefundene Sender bei „P02“ etc. Die automatische Sendersuche wird
so lange fortgesetzt, bis alle Sender mit starkem Signal gefunden und
gespeichert wurden. Sobald alle 20 Speicherplätze belegt sind, wird die
automatische Sendersuche abgebrochen, auch wenn noch mehr Sender
mit starkem Signal verfügbar wären.
5. Wenn Sie die Taste MENU drücken, wird auf dem Bildschirm „Auto
tune“ und andere Menüs angezeigt. Wählen Sie mit dem Regler den
gewünschten Inhalt aus. Drücken Sie anschließend die Taste ENTER,
um das Hauptmenü auszuwählen. Drehen Sie anschließend wieder am
Regler, um das Untermenü auszuwählen. Drücken Sie anschließend für
eine letzte Bestätigung die Taste ENTER.
6. Im Hauptmenü „Language“ (Sprache) können Sie aus vier Sprachen
auswählen (Deutsch/Französisch/Italienisch/Englisch).
HINWEISE:
• Bei der amerikanischen Version wird in Schritten von 0,1 MHz nach
Sendern gesucht. Bei der europäischen Version wird in Schritten von
0,05 MHz nach Sendern gesucht.
• Fahren Sie die FM-Antenne vollständig aus. Stellen Sie das Gerät
an einen Ort mit gutem Empfang (Die Antenne bendet sich an der
Rückseite des Geräts).
• Sender mit schwachem Signal können ausschließlich manuell
eingestellt werden.
• Es können maximal 20 Sender gespeichert werden. Falls weniger
als 20 lokale Sender mit starkem Signal verfügbar sind, werden
ausschließlich die Sender mit starkem Signal gespeichert (falls es
keine 20 Sender mit starkem Signal gibt, können keine 20 Sender
gespeichert werden).
• Wenn das Gerät ausgeschaltet wird, speichert das Gerät die aktuelle
Einstellung. Wenn Sie das Radio anschließend wieder einschalten,
wird der vor dem Ausschalten eingestellte Sender oder die zuletzt
ausgewählte Funktion wiederhergestellt.
18
DE
CD
Hinweis: CDs müssen mit der beschrifteten Seite nach oben in das CD-
Fach eingelegt werden.
1. Drücken Sie so lange die Taste MODE, bis auf dem LCD-Bildschirm „CD“
angezeigt wird. Anschließend werden auf dem Bildschirm die Anzahl
der auf der CD bendlichen Titel angezeigt. Die Wiedergabe wird
automatisch gestartet.
2. Drücken Sie zum Önen des CD-Fachs die Taste
auf dem Bedienfeld
oder die Taste EJECT auf der Fernbedienung.
3. Legen Sie die CD mit der beschrifteten Seite nach oben und der
glänzenden Seite nach unten in das CD-Fach ein.
• Dieses Gerät wurde speziell für die Tonwiedergabe von CDs mit der
Kennzeichnung „compact disc“ entwickelt. Es können keine anderen
Disks verwendet werden.
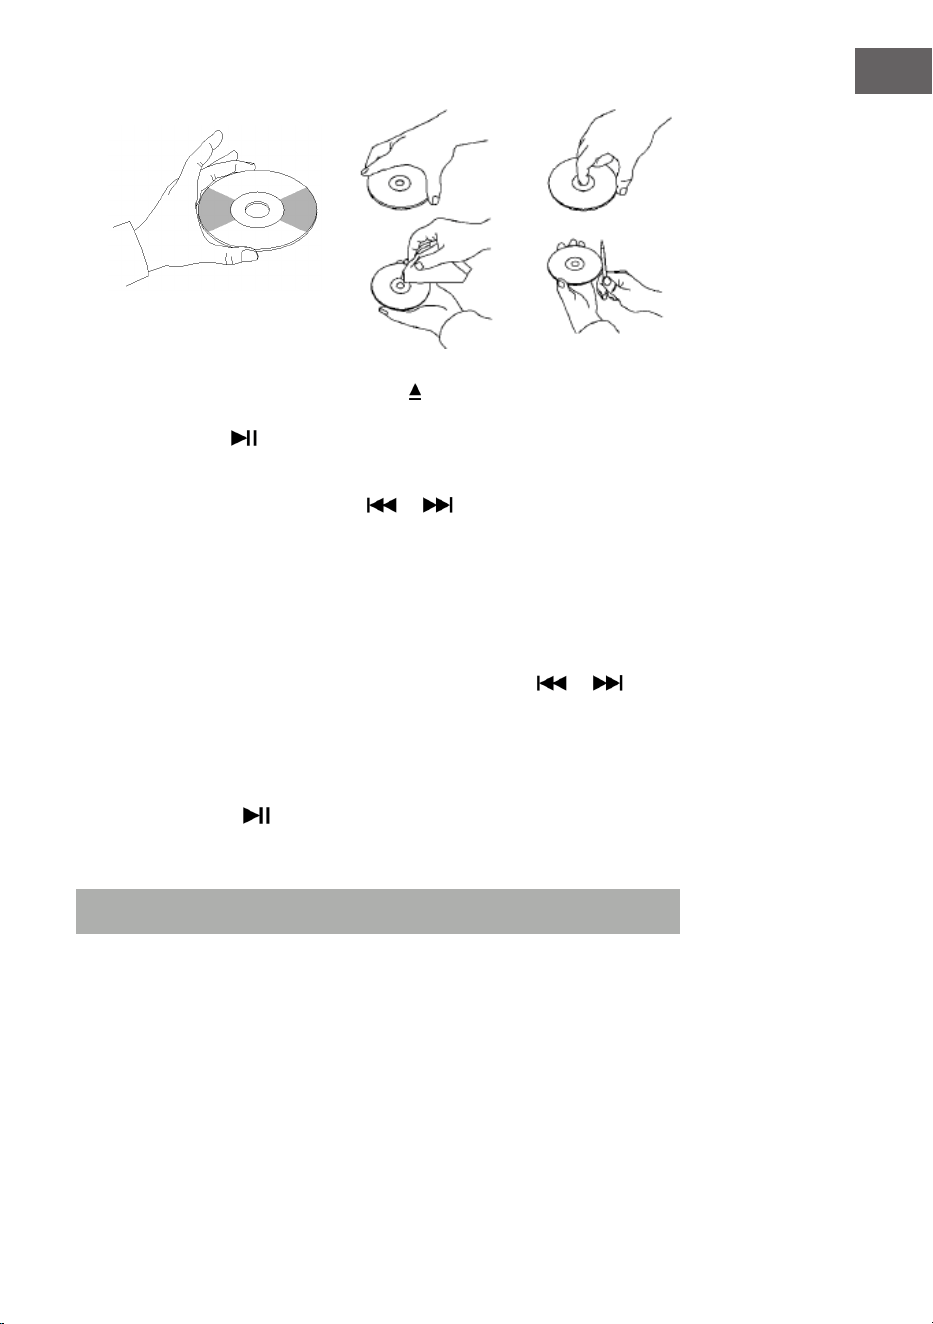
• Um eine Disk aus ihrer Aufbewahrungshülle zu entnehmen, drücken
Sie auf die Mitte der Hülle und heben Sie die Disk heraus, indem Sie
diese vorsichtig am Rand festhalten.
4. Drücken Sie zum Schließen des CD-Fachs erneut die Taste auf dem
Bedienfeld oder die Taste EJECT auf der Fernbedienung.
5. Wählen Sie mit der Taste den gewünschten Song aus. Halten Sie
die Taste gedrückt, um schnell durch einen Titel zu spulen. Drücken Sie
die Taste (PLAY), um die Wiedergabe zu starten.
6. Wählen Sie mit den Tasten oder den gewünschten Song aus.
7. Passen Sie die Lautstärke mit dem Lautstärkeregler VOLUME +/- an.
8. Drücken Sie die Taste REP einmal, um einen Song zu wiederholen.
In der linken oberen Ecke des LCD-Bildschirms blinkt dann „REP 1“
auf. Wenn Sie die Taste REP erneut drücken, werden alle auf der CD
bendlichen Titel wiederholt. In der oberen linken Ecke des LCD-
Bildschirms blinkt dann „REP A“ auf. Drücken Sie die Taste REP erneut,
um die Wiederholungsfunktion abzubrechen.
19
DE
9. Drücken Sie für die Wiedergabe in zufälliger Reihenfolge die Taste
REP erneut so lange, bis an der Unterseite des LCD-Bildschirms
„Rand“ angezeigt wird. Drücken Sie die Tasten oder , um einen
zufälligen Song auszuwählen.
10. Drücken Sie zum Erstellen einer Speicherliste zunächst die Taste
STOP, um die Wiedergabe zu stoppen. Drücken Sie die Taste P/R,
um in den Speichermodus zu gelangen. Die LCD-Bildschirmanzeige
blinkt und zeigt dann „P01“ an. Wählen Sie den Titel aus, den Sie als
Erstes speichern möchten und drücken Sie anschließend erneut P/R.
Drücken Sie zum Stoppen des Speichervorgangs und zum Starten der
Wiedergabe der gespeicherten Titel die Taste . Auf dem LCD-
Bildschirm wird dann „PROG CD“ angezeigt. Das Gerät kann bis zu
20Titel speichern. Weitere Informationen hierzu nden Sie im Abschnitt
„PROG (Speicherliste erstellen)“.
Hinweis: Schließen Sie das CD-Fach nicht gewaltsam, da dies zu
Fehlfunktionen führen kann.
USB/SD-WIEDERGABE
1. Drücken Sie so lange die Taste MODE, bis auf dem LCD-Bildschirm
„USB or SD“ angezeigt wird. Auf dem Bildschirm wird zunächst die
Anzahl der Ordner und dann die Anzahl der Titel angezeigt. Die
Wiedergabe startet automatisch.
2. Wählen Sie mit den Tasten oder den gewünschten Song aus.
3. Drücken Sie die Taste REP einmal, um einen Song zu wiederholen. In
der linken oberen Ecke des LCD-Bildschirms blinkt dann „REP 1“ auf.
Wenn Sie die Taste REP erneut drücken, werden alle Titel wiederholt.
In der oberen linken Ecke des LCD-Bildschirms blinkt dann „REP A“
auf. Drücken Sie die Taste REP erneut, um die Wiederholungsfunktion
abzubrechen.
4. Drücken Sie für die Wiedergabe in zufälliger Reihenfolge die Taste
REP erneut so lange, bis an der Unterseite des LCD-Bildschirms
„Rand“ angezeigt wird. Drücken Sie die Tasten oder , um einen
zufälligen Song auszuwählen.
5. Drücken Sie zum Erstellen einer Speicherliste zunächst die Taste
STOP, um die Wiedergabe zu stoppen. Drücken Sie die Taste P/R,
um in den Speichermodus zu gelangen. Die LCD-Bildschirmanzeige
blinkt und zeigt dann „P01“ an. Wählen Sie den Titel aus, den Sie als
Erstes speichern möchten und drücken Sie anschließend erneut P/R.
Drücken Sie zum Stoppen des Speichervorgangs und zum Starten der
Wiedergabe der gespeicherten Titel die Taste . Auf dem LCD-
Bildschirm wird dann „PROG CD“ angezeigt. Das Gerät kann bis zu
20Titel speichern. Weitere Informationen hierzu nden Sie im Abschnitt
„PROG (Speicherliste erstellen)”.

20
DE
6. Drücken Sie die Taste MODE, um die USB- oder SD-Wiedergabe zu
beenden. Ziehen Sie während der USB- oder SD-Wiedergabe nicht
den Netzstecker aus der Steckdose, da dies zu Fehlfunktionen führen
könnte.
HINWEISE:
• Sollte der USB-Stick Audiodateien enthalten, die nicht mit der
Jukebox kompatibel sind, wird die Jukebox nicht dazu in der Lage
sein, diese zu lesen. Diese Titel werden in der Gesamtanzahl der
angezeigten Titel nicht mit aufgeführt und werden auch nicht
wiedergegeben.
• Sollte die SD-Karte Audiodateien enthalten, die nicht mit der Jukebox
kompatibel sind, wird die Jukebox nicht dazu in der Lage sein, diese
zu lesen. Diese Titel werden in der Gesamtanzahl der angezeigten
Titel nicht mit aufgeführt und werden auch nicht wiedergegeben.
Hinweis: Für eine optimale Funktionsweise wird empfohlen, einen USB-
Stick der Version 2.0 (nicht 3.0) zu verwenden.
BT
So koppeln Sie die Jukebox mit einem externen BT-Gerät:
1. Drücken Sie so lange die Taste MODE bis auf dem LCD-Bildschirm „BT“
angezeigt wird.
2. Schalten Sie das externe BT-Gerät ein und aktivieren Sie dessen BT-
Funktion. Starten Sie die Suche nach verfügbaren BT-Geräten.
3. Wählen Sie in der Geräteliste des externen Geräts „Graceland Mini“ aus.
4. Sobald die beiden Geräte miteinander gekoppelt sind, wird auf dem
Bildschirm „connected“ angezeigt. Sie können die Titel-Wiedergabe nun
auf Ihrem externen BT-Gerät starten. Steuern Sie die Wiedergabe über
Ihr externes BT-Gerät, die Jukebox oder die Fernbedienung der Jukebox.
Bedienung über das BT-Gerät:
• Verwenden Sie die Tasten auf dem Bildschirm, um Titel auszuwählen,
die Lautstärke anzupassen, die Wiedergabe zu starten oder zu
pausieren und für die Funktionen und .
Bedienung über die Jukebox/Fernbedienung:
• Sobald die Kopplung erfolgreich war, wird die Wiedergabe über das BT-
Gerät automatisch gestartet.
• Drehen Sie am Lautstärkeregler VOLUME+/-, um die Lautstärke
einzustellen.
21
DE
• Drücken Sie die Taste oder , um zum vorherigen/nächsten Titel
zu gelangen.
• Drücken Sie zum Pausieren/Fortsetzen der Wiedergabe die Taste .
• Um die Kopplung zu beenden, drücken Sie die Taste MODE, um eine
andere Funktion auszuwählen, oder deaktivieren Sie die BT-Verbindung
Ihres externen BT-Geräts.
Hinweis: Die optimale Übertragungsdistanz für die BT-Verbindung
wird innerhalb von 10 Metern ohne Barriere erreicht. Wenn das zuletzt
verbundene BT-Gerät sich innerhalb der Reichweite der Jukebox
bendet, kann kein neues Gerät mit der Jukebox verbunden werden. Die
BT-Verbindung des zuletzt verbundenen Geräts muss deaktiviert werden,
wenn Sie ein neues Gerät mit der Jukebox verbinden möchten.
PROG (SPEICHERLISTE ERSTELLEN)
1. Drücken Sie während der Wiedergabe von einer Musikquelle die Taste
STOP.
2. Drücken Sie auf der Fernbedienung die Taste PROG (6) oder die Taste
P/R des Bedienfeldes, um in den Speichermodus zu gelangen. „PROG“
blinkt dann in der unteren linken Ecke des Bildschirms auf. Eine
Positionsnummer blinkt ebenfalls auf dem Bildschirm auf (z.B. „P01“).
3. Drücken Sie zur Auswahl des Titels, den Sie speichern möchten, die
Taste oder . Drücken Sie zum Speichern Ihrer Auswahl die Taste
PROG.
4. Wiederholen Sie zum Speichern weiterer Titel die oben genannten
Schritte.
5. Sobald Sie alle gewünschten Titel gespeichert haben, können Sie die
Wiedergabe starten. Sie können dies jederzeit tun, sobald Sie die
gewünschte Anzahl an Titeln gespeichert haben.
6. Wenn Sie das Speichern der Titel abbrechen möchten, drücken Sie die
Taste STOP.
7. Wenn die Maximalanzahl der zu speichernden Titel erreicht ist, wird auf
dem Bildschirm „VOLL“ angezeigt.
HINWEIS: Wenn Sie den Wiedergabemodus gewechselt haben oder das
Gerät neu gestartet haben, muss die Speicherliste neu erstellt werden
(wiederholen Sie hierfür die oben genannten Schritte).
22
DE
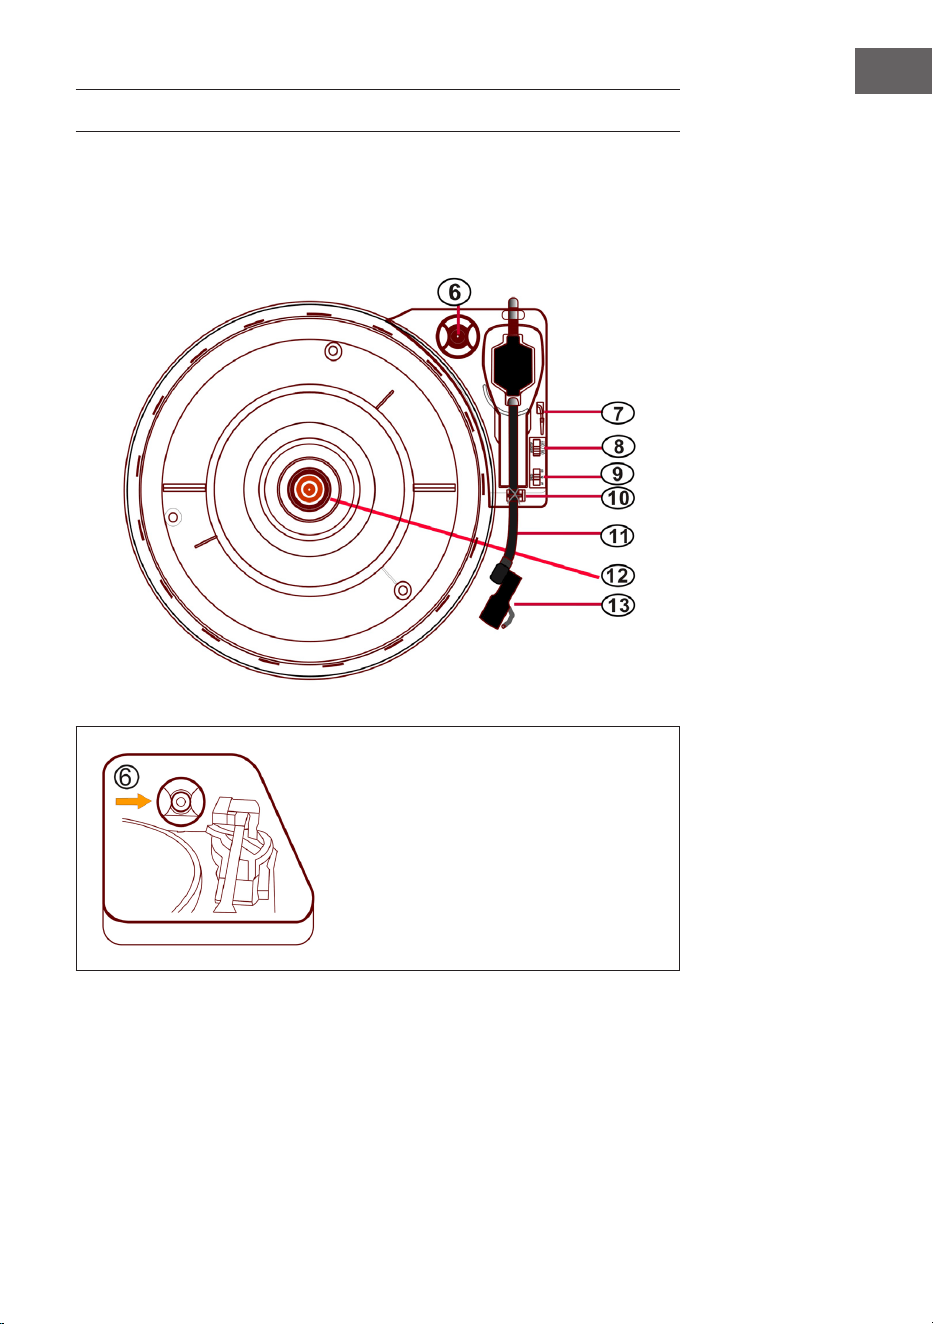
PLATTENSPIELER
• Drücken Sie so lange die Taste MODE, bis auf dem LCD-Bildschirm
„Phono“ angezeigt wird.
• Legen Sie eine Schallplatte in den Plattenspieler ein. Wählen Sie eine
Geschwindigkeitsstufe aus. Die Geschwindigkeitsstufen 33/45/78 sind
verfügbar (werkseitig eingestellt ist „33“). Sobald die Nadel sich über
der Schallplatte bendet, wird die Wiedergabe gestartet.
45 RPM Adapter
Legen Sie eine Schallplatte auf den
Drehteller. Verwenden Sie bei der
Wiedergabe von Single-Schallplatten
den im Lieferumfang enthaltenen
45RPM-Adapter.
45 RPM-Adapter

23
DE
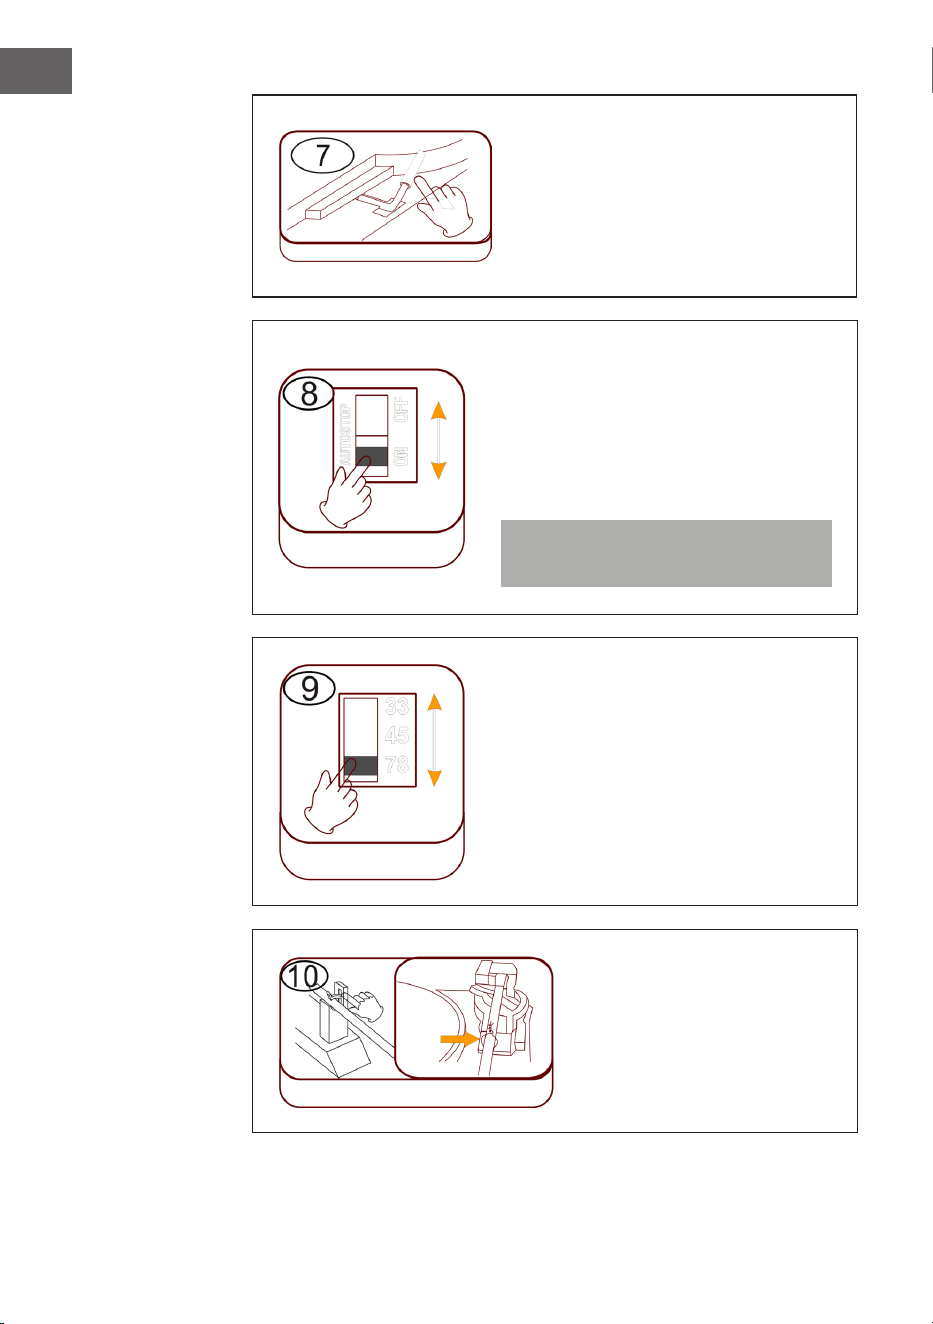
Lifthebel anheben/senken
• Heben Sie den Tonarm vorsichtig
an und bewegen Sie diesen über
die gewünschte Position auf der
Schallplatte.
• Senken Sie den Tonarm langsam
und vorsichtig ab.
Automatisches Stoppen (Autostop)
• Regler nach oben schieben: Die
Musikwiedergabe endet, der
Drehteller dreht sich weiter.
• Regler nach unten schieben: Die
Musikwiedergabe endet, der
Drehteller stoppt.
Hinweis: Bewegen Sie den Tonarm
nach dem Ende der Wiedergabe in
dessen Ruheposition zurück.
Geschwindigkeitseinstellung
Die drei Geschwindigkeitsstufen
33/45/78 sind verfügbar.
Lifthebel
Autostop
Geschwindigkeit

24
DE
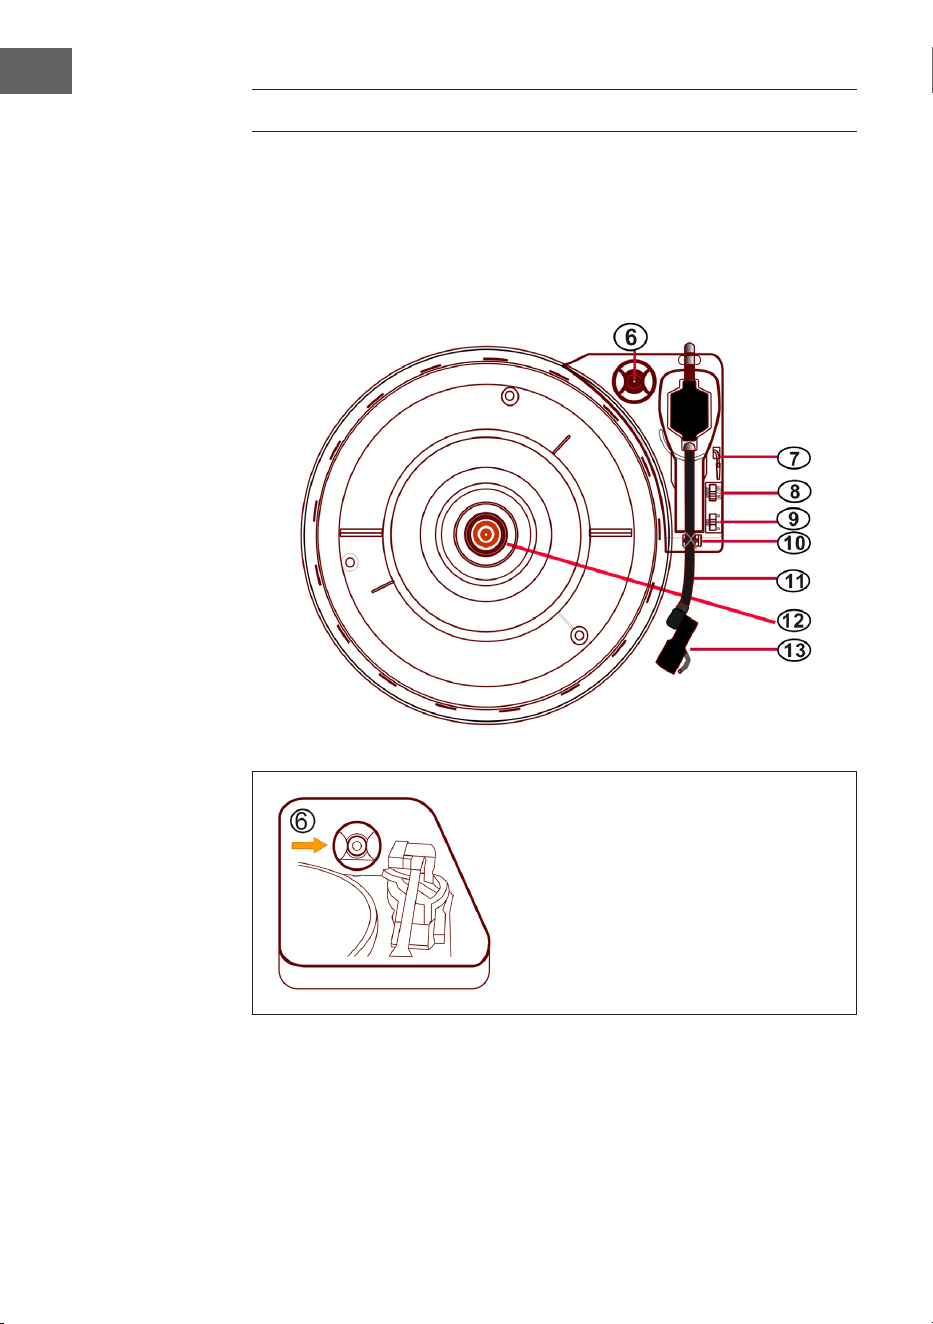
Tonarmsperre
Lösen Sie vor der Verwendung
die Tonarmsperre.
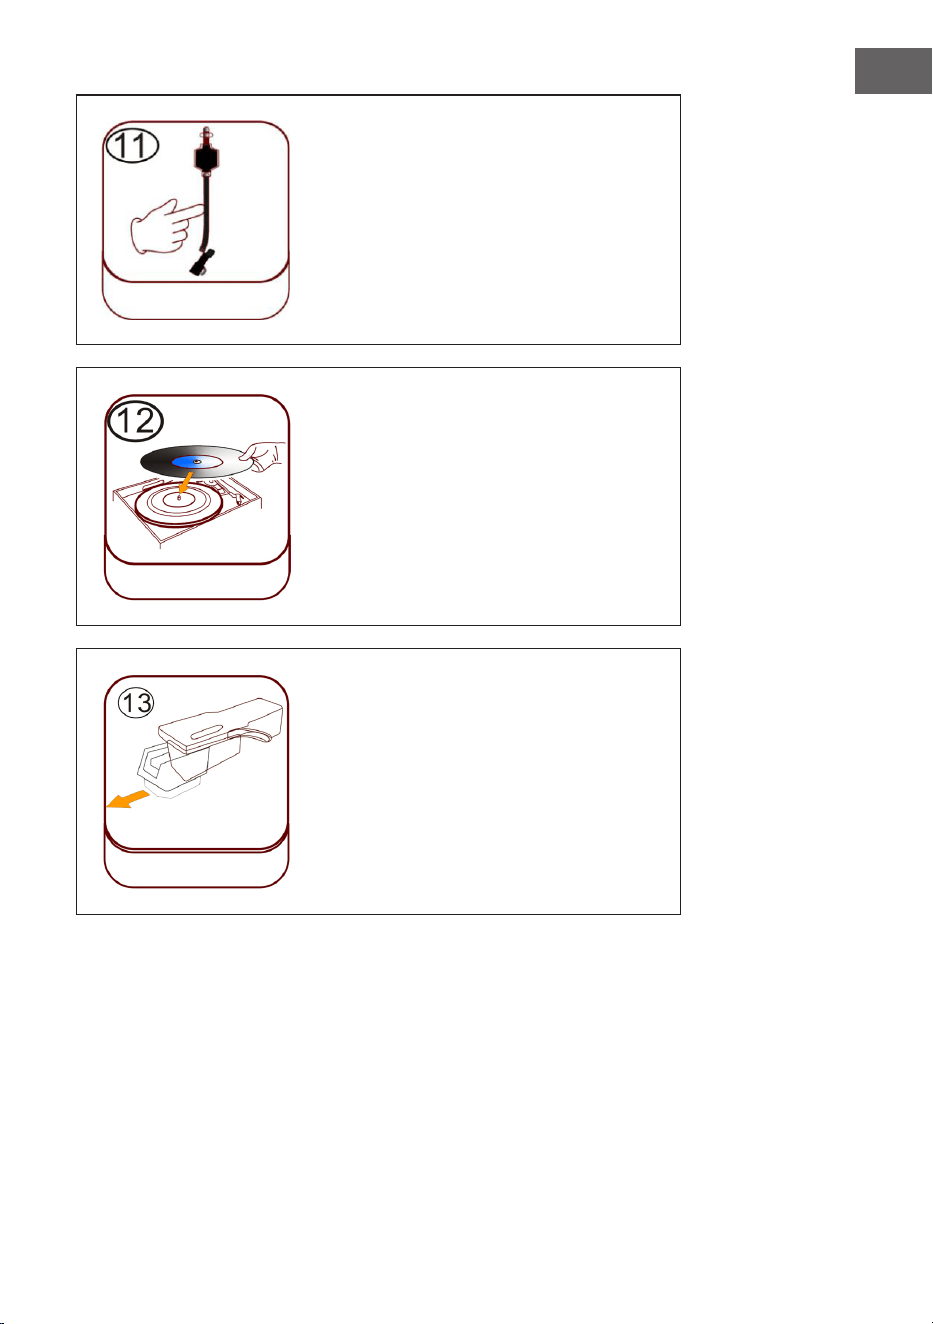
Tonabnehmer (Tonarm)
Schallplatte auegen
Legen Sie eine passende Schallplatte auf
den Drehteller. Heben Sie den Tonarm an
und platzieren Sie diesen vorsichtig auf
der Schallplatte. Es können nun Titel von
der Schallplatte abgespielt werden.
Plastik-Nadelschutz
Entfernen Sie die Nadel, indem Sie
diese gerade nach unten, in die
entgegengesetzte Richtung des Tonarms,
herausziehen.
Tonarmsperre
Verschluss
Tonarm
Schallpatte
auegen
Plastik-Nadelschutz
25
DE
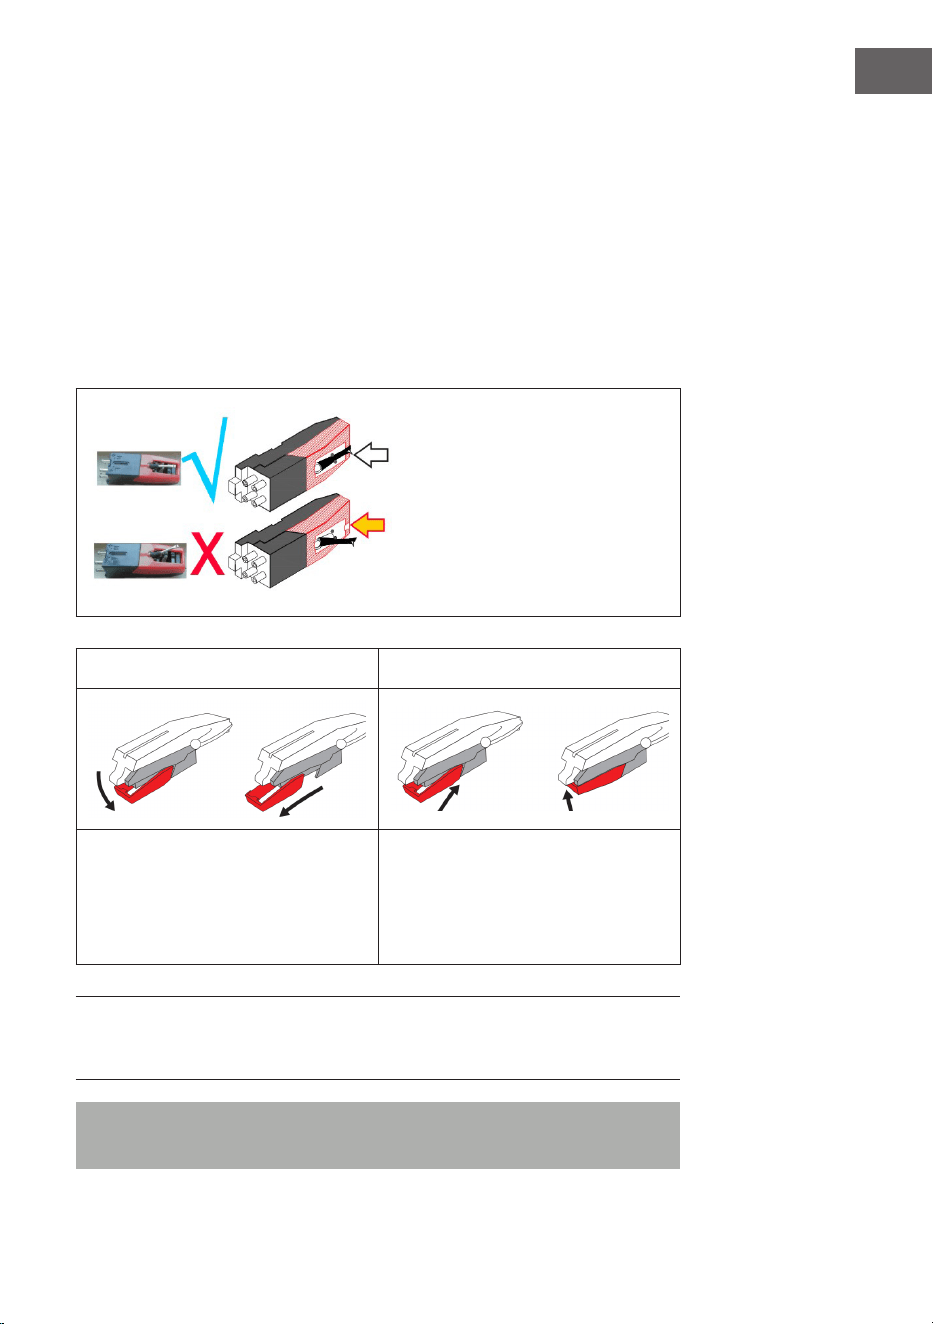
Nadelpege
• Drücken Sie so lange die Taste MODE, bis auf dem Bildschirm „Phono“
angezeigt wird. Entfernen Sie den Nadelschutz (siehe Abbildung 1).
Legen Sie eine Schallplatte auf den Plattenteller. Wählen Sie eine
Geschwindigkeitsstufe 33/45/78 aus. Sobald die Nadel über die
Schallplatte bewegt wird, startet die Wiedergabe.
• Es wird empfohlen, die Nadel auszutauschen, sobald Sie eine
Veränderung in der Tonqualität bemerken.
• Die Verwendung einer abgenutzten Nadel kann zu Schäden an
der Schallplatte führen. Die Abnutzung der Abtastnadel wird beim
Abspielen von 78-RPM-Schallplatten beschleunigt.
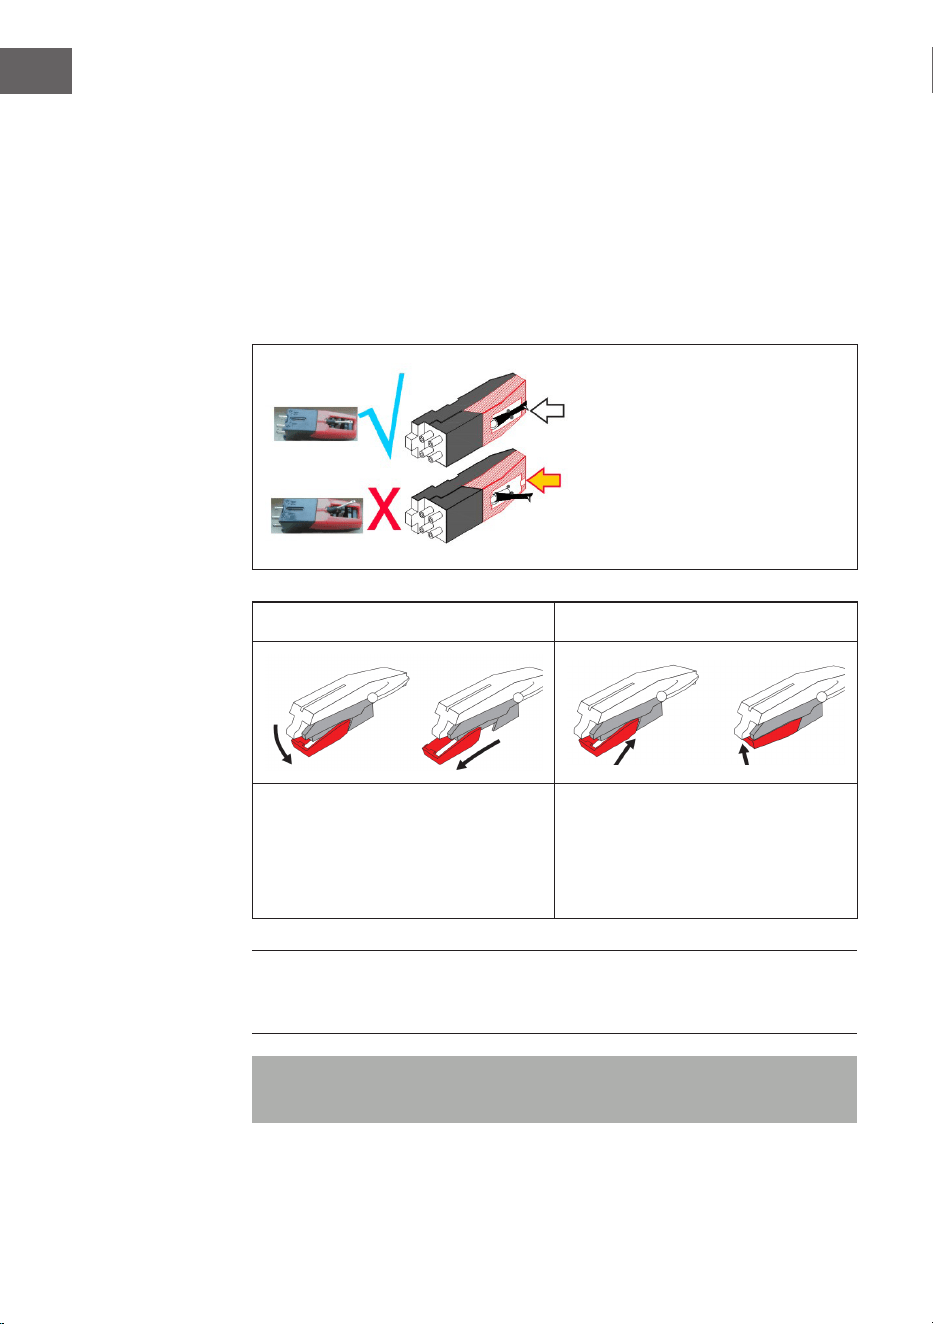
Die Abtastnadel muss in der
mittleren Position ausgerichtet
werden (in der Mitte des
Schlitzes).
Sollte die Abtastnadel aus dem
Schlitz herausragen, kann dies zu
Aussetzern bei der Wiedergabe
führen (Nadelschleifen etc.).
Abbildung 1 Abbildung 2
Entfernen Sie die Nadel, indem Sie
diese gerade nach unten, in die
entgegengesetzte Richtung des
Tonarms, herausziehen.
Ersetzen Sie die Nadel durch eine
kompatible Nadel. Bringen Sie die
neue Nadel, mit der Spitze nach
unten zeigend, an und drücken Sie
sie vorsichtig hinein.
HINWEIS: Wenn Sie die Ersatznadel in einem Geschäft kaufen, ist es
hilfreich, die alte Nadel als Referenz mitzubringen. Die meisten guten
Elektronik- und Musikgeschäfte führen Ersatztnadeln.
Hinweis: Vergewissern Sie sich immer, dass der Tonarm gesichert ist,
bevor Sie die Jukebox transportieren.

26
DE
HINWEIS: Am Ende der Aufnahme kehrt der Tonarm nicht automatisch in
die Halterung zurück, sondern der Plattenspieler und der Tonarm hören auf,
sich zu drehen (Bewegen Sie den Tonarm manuell auf die Halterung zurück).
Setzen Sie den Nadelschutz auf die Nadel, wenn
Sie das Gerät nicht verwenden.
Wichtige Hinweise zur Verwendung der Nadel
• Verbiegen Sie die Abtastnadel nicht.
• Um Verletzungen zu vermeiden, berühren Sie die Nadel nicht.
• Außerhalb der Reichweite von Kindern aufbewahren!
• Lassen Sie Vorsicht walten, da die Nadel sehr empndlich ist. Die
Verwendung einer verbogenen oder gebrochenen Abtastnadel kann
die Schallplatte beschädigen und zu Fehlfunktionen führen.
• Setzen Sie die Abtastnadel keiner starken Hitze aus.
• Wenden Sie sich an einen qualizierten Techniker, wenn Sie
Schwierigkeiten beim Auswechseln der Abtastnadel haben.

27
DE
LICHTEFFEKTE EINSCHALTEN
Die Jukebox verfügt über 2 farbwechselnde LED-Lichtröhren, die auf den
Jukebox-Teilen angezeigt werden. Es gibt auch mehrere andere mehrfarbige
LED-Beleuchtungseekte, die im CD-Spieler und USB/SD-Fach und an der
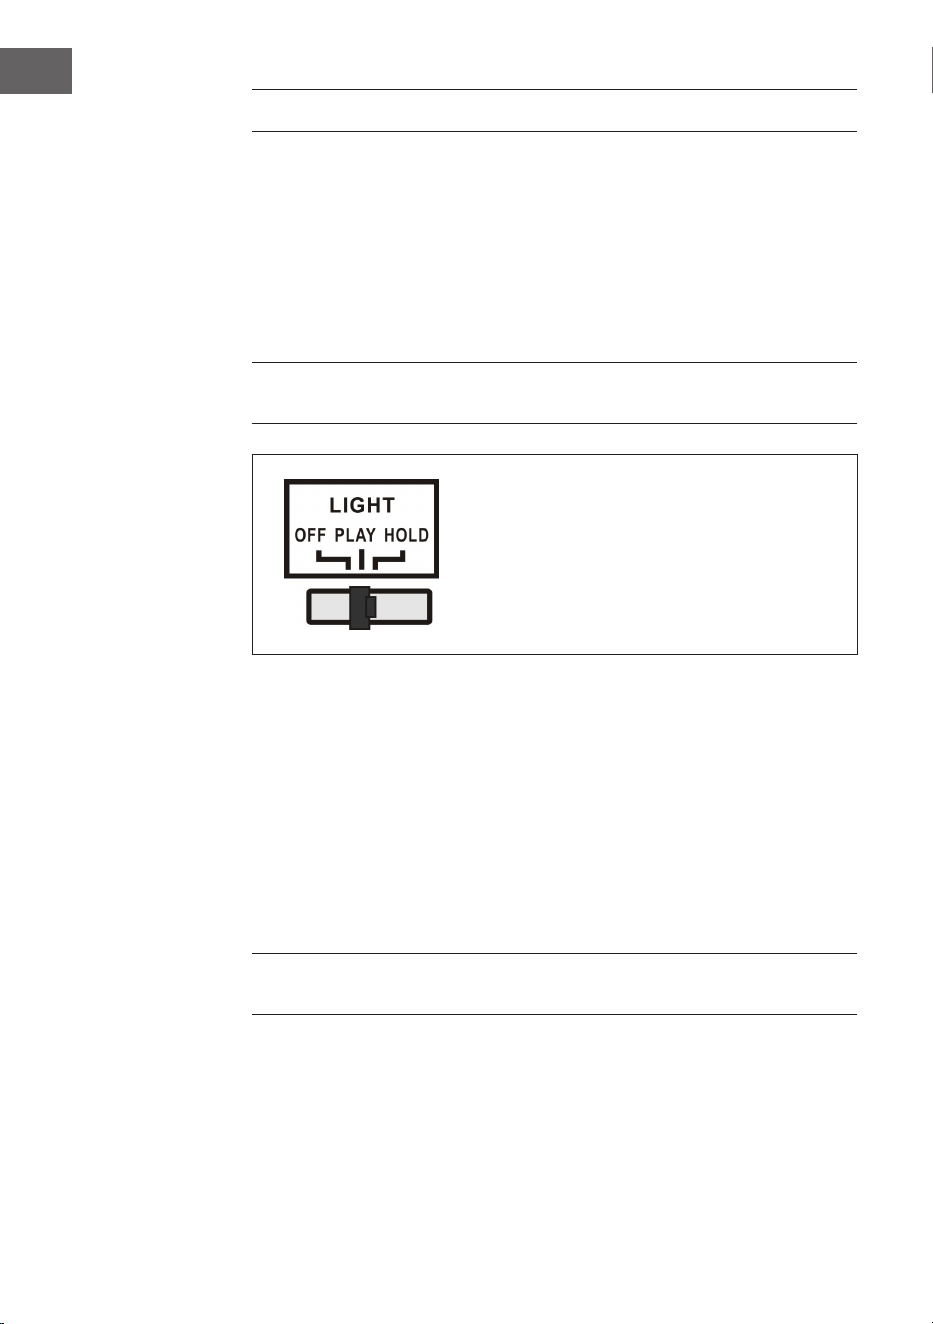
Unterseite des Lautsprecherpanels zu sehen sind.
Der Netzschalter für die Lampe bendet sich auf der Rückseite des Geräts.
Wenn der Schalter von der „OFF“-Position in die „PLAY“-Position geschoben
wird, leuchtet die Lampe.
HINWEIS: Die LIGHT-Taste steuert die Stromversorgung der Lichteekte
und bendet sich auf der Rückseite des Geräts.
PLAY: Der Lichtfarbenzyklus verändert sich.
HOLD: Die Lichtfarbe wird in einem
bestimmten Zustand beibehalten (beinhaltet
unsichtbares Licht).
OFF: Das Licht wird ausgeschaltet und
leuchtet nicht länger.
Auf der Rückseite der Jukebox bendet sich ein LED-Lichtmodus-Schalter
(27) (siehe Abschnitt „Geräteübersicht – Rückseite“). Wenn dieser
eingeschaltet wird, wechseln die LED-Lichtröhren kontinuierlich die Farbe.
Im HOLD-Modus leuchten die LED-Lichtröhren nur in einer Farbe. Wenn
Sie in den PLAY-Modus umschalten, beginnt die LED-Lichtröhre, durch die
Farben zu wechseln. Durch Zurückschalten in den HOLD-Modus kann eine
andere Farbe zur Anzeige ausgewählt werden, die beibehalten wird (bitte
beachten Sie, dass diese Farben festgelegt sind und es sich möglicherweise
nicht exakt um dieselbe Farbe handelt, in der die LED-Lichtröhre beim
Umschalten in den HOLD-Modus beleuchtet war).
Das Licht wird ausgeschaltet, wenn der Schalter in die Position „OFF“
geschoben wird.
HINWEIS: Im HOLD-Modus ist möglicherweise kein sichtbares Licht
vorhanden, das ist normal (der Schalter muss neu eingestellt werden).
28
DE
FEHLERBEHEBUNG
Die nachfolgenden Überprüfungen helfen bei der Behebung der
meisten Probleme, die bei Ihrem Gerät auftreten können. Bevor Sie die
nachfolgende Checkliste durchgehen, sollten Sie zunächst prüfen, ob das
Netzteil richtig angeschlossen wurde. Sollte das Problem nach den im
Folgenden aufgeführten Überprüfungen weiterhin bestehen, wenden Sie
sich für Wartung und Reparatur an den Hersteller, den Kundendienst oder
einen autorisierten Fachbetrieb.
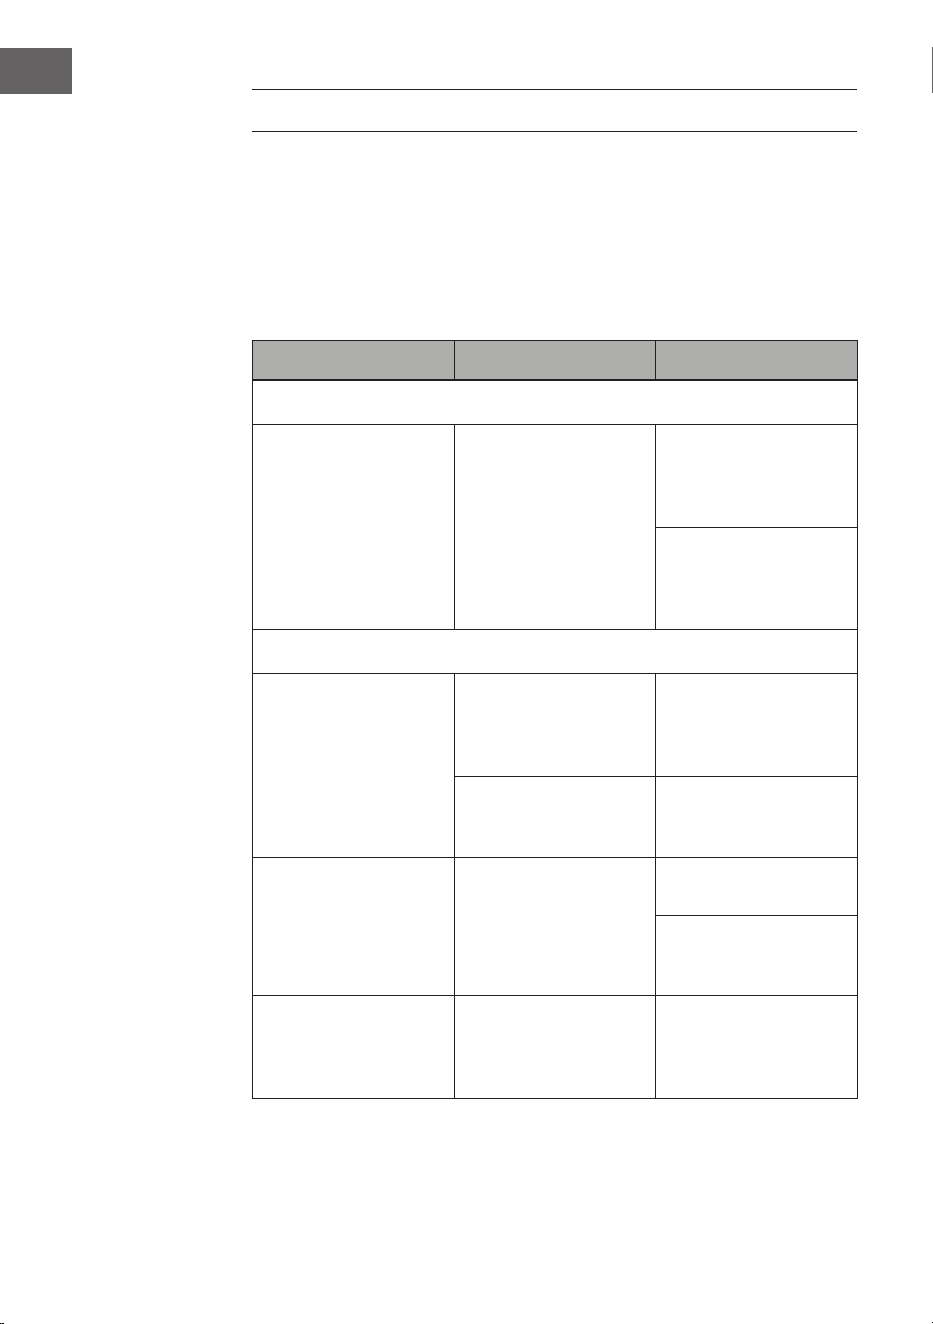
Problem Mögliche Ursache Lösungsansatz
Radioempfang
Kein Radioempfang
Die Modus-Regler
wurde nicht auf die
richtige Position
gestellt.
Stellen Sie die
gewünschte Lautstärke
mit dem Lautstärke-
Regler ein.
Drehen Sie am Tuning-
Regler, um nach
einem Radiosender zu
suchen.
CD-Wiedergabe
CD wird nicht
abgespielt oder es gibt
Tonaussetzer.
Die CD wurde falsch
eingelegt.
Legen Sie CD mit der
beschrifteten Seite
nach oben in das CD-
Fach ein.
Die CD ist verschmutzt.
Reinigen Sie die CD.
Starten Sie das Gerät
neu.
Der Klang ist gestört.
Ändern Sie den
Installationsort.
Drücken Sie die Taste
STANDBY (starten Sie
das Gerät neu).
Der CD-Player
funktioniert nicht.
Drücken Sie die Taste
STOP und speichern
Sie anschließend die
gewünschten Titel.

29
DE
Problem Mögliche Ursache Lösungsansatz
Allgemein
Die CD-Speicherliste
lässt sich nicht
abspielen.
Der Netzstecker steckt
nicht in der Steckdose.
Stecken Sie den
Netzstecker richtig in
die Steckdose.
Drücken Sie die Taste
STANDBY (starten Sie
das Gerät neu).
Keine Tonausgabe
Der Lautstärkeregler
ist nicht richtig
eingestellt.
Drehen Sie den
Lautstärkeregler im
Uhrzeigersinn.
Lautes Brummen oder
Rauschen.
Ein Fernseher oder
Video/DVD-Recorder
bendet sich zu nah
am Stereosystem.
Stellen Sie das Gerät
an einen anderen Ort.
Die Bildschirmanzeige
ist verzerrt, oder
funktioniert nicht.
Schalten Sie das Gerät
aus und starten Sie
es neu.

30
DE
SPEZIELLE ENTSORGUNGSHINWEISE FÜR
VERBRAUCHER IN DEUTSCHLAND
Entsorgen Sie Ihre Altgeräte fachgerecht. Dadurch wird gewährleistet,
dass die Altgeräte umweltgerecht verwertet und negative Auswirkungen
auf die Umwelt und menschliche Gesundheit vermieden werden. Bei der
Entsorgung sind folgende Regeln zu beachten:
• Jeder Verbraucher ist gesetzlich verpichtet, Elektro- und
Elektronikaltgeräte (Altgeräte) sowie Batterien und Akkus
getrennt vom Hausmüll zu entsorgen. Sie erkennen die
entsprechenden Altgeräte durch folgendes Symbol der
durchgestrichenen Mülltonne (WEEE-Symbol).
• Sie haben Altbatterien und Altakkumulatoren, die nicht vom Altgerät
umschlossen sind, sowie Lampen, die zerstörungsfrei aus dem
Altgerät entnommen werden können, vor der Abgabe an einer
Entsorgungsstelle vom Altgerät zerstörungsfrei zu trennen.
• Bestimmte Lampen und Leuchtmittel fallen ebenso unter das Elektro-
und Elektronikgesetz und sind dementsprechend wie Altgeräte zu
behandeln. Ausgenommen sind Glühbirnen und Halogenlampen.
Entsorgen Sie Glühbirnen und Halogenlampen bitte über den Hausmüll,
sofern sie nicht das WEEE-Symbol tragen.
• Jeder Verbraucher ist für das Löschen von personenbezogenen Daten
auf dem Elektro- bzw. Elektronikgerät selbst verantwortlich.
Rücknahmepicht der Vertreiber
Vertreiber mit einer Verkaufsäche für Elektro- und Elektronikgeräte von
mindestens 400 Quadratmetern sowie Vertreiber von Lebensmitteln mit
einer Gesamtverkaufsäche von mindestens 800 Quadratmetern, die
mehrmals im Kalenderjahr oder dauerhaft Elektro- und Elektronikgeräte
anbieten und auf dem Markt bereitstellen, sind verpichtet,
1 bei der Abgabe eines neuen Elektro- oder Elektronikgerätes an einen
Endnutzer ein Altgerät des Endnutzers der gleichen Geräteart, das
im Wesentlichen die gleichen Funktionen wie das neue Gerät erfüllt,
am Ort der Abgabe oder in unmittelbarer Nähe hierzu unentgeltlich
zurückzunehmen und
2 auf Verlangen des Endnutzers Altgeräte, die in keiner äußeren
Abmessung größer als 25 Zentimeter sind, im Einzelhandelsgeschäft
oder in unmittelbarer Nähe hierzu unentgeltlich zurückzunehmen; die
Rücknahme darf nicht an den Kauf eines Elektro- oder Elektronikgerätes
geknüpft werden und ist auf drei Altgeräte pro Geräteart beschränkt.

31
DE
• Bei einem Vertrieb unter Verwendung von Fernkommunikationsmitteln
ist die unentgeltliche Abholung am Ort der Abgabe auf Elektro- und
Elektronikgeräte der Kategorien 1, 2 und 4 gemäß § 2 Abs. 1 ElektroG,
nämlich „Wärmeüberträger“, „Bildschirmgeräte“ (Oberäche von mehr
als 100 cm²) oder „Großgeräte“ (letztere mit mindestens einer äußeren
Abmessung über 50 Zentimeter) beschränkt. Für andere Elektro- und
Elektronikgeräte (Kategorien 3, 5, 6) ist eine Rückgabemöglichkeit in
zumutbarer Entfernung zum jeweiligen Endnutzer zu gewährleisten.
• Altgeräte dürfen kostenlos auf dem lokalen Wertstohof oder in
folgenden Sammelstellen in Ihrer Nähe abgegeben werden: www.take-
e-back.de
• Für Elektro- und Elektronikgeräte der Kategorien 1, 2 und 4 bieten
wir auch die Möglichkeit einer unentgeltlichen Abholung am Ort der
Abgabe. Beim Kauf eines Neugeräts haben Sie die Möglichkeit, eine
Altgerätabholung über die Webseite auszuwählen.
• Batterien können überall dort kostenfrei zurückgegeben werden, wo sie
verkauft werden (z. B. Super-, Bau-, Drogeriemarkt). Auch Wertsto- und
Recyclinghöfe nehmen Batterien zurück. Sie können Batterien auch per
Post an uns zurücksenden. Altbatterien in haushaltsüblichen Mengen
können Sie direkt bei uns von Montag bis Freitag zwischen 08:00 und
16:00 Uhr unter der folgenden Adresse unentgeltlich zurückgeben:
Chal-Tec Fulllment GmbH
Norddeutschlandstr. 3
47475 Kamp-Lintfort
• Wichtig zu beachten ist, dass Lithiumbatterien aus Sicherheitsgründen
vor der Rückgabe gegen Kurzschluss gesichert werden müssen (z. B.
durch Abkleben der Pole).
• Finden sich unter der durchgestrichenen Mülltonne auf der Batterie
zusätzlich die Zeichen Cd, Hg oder Pb ist das ein Hinweis darauf, dass
die Batterie gefährliche Schadstoe enthält (»Cd« steht für Cadmium,
»Pb« für Blei und »Hg« für Quecksilber).
Hinweis zur Abfallvermeidung
Indem Sie die Lebensdauer Ihrer Altgeräte verlängern, tragen Sie dazu
bei, Ressourcen eizient zu nutzen und zusätzlichen Müll zu vermeiden.
Die Lebensdauer Ihrer Altgeräte können Sie verlängern, indem Sie defekte
Altgeräte reparieren lassen. Wenn sich Ihr Altgerät in gutem Zustand
bendet, könnten Sie es spenden, verschenken oder verkaufen.

32
DE
HINWEISE ZUR ENTSORGUNG
Wenn es in Ihrem Land eine gesetzliche Regelung
zur Entsorgung von elektrischen und elektronischen
Geräten gibt, weist dieses Symbol auf dem Produkt
oder auf der Verpackung darauf hin, dass dieses
Produkt nicht im Hausmüll entsorgt werden darf.
Stattdessen muss es zu einer Sammelstelle für
das Recycling von elektrischen und elektronischen
Geräten gebracht werden. Durch regelkonforme
Entsorgung schützen Sie die Umwelt und die
Gesundheit Ihrer Mitmenschen vor negativen
Konsequenzen. Informationen zum Recycling
und zur Entsorgung dieses Produkts, erhalten
Sie von Ihrer örtlichen Verwaltung oder Ihrem
Hausmüllentsorgungsdienst.
Dieses Produkt enthält Batterien. Wenn es in Ihrem
Land eine gesetzliche Regelung zur Entsorgung
von Batterien gibt, dürfen die Batterien nicht im
Hausmüll entsorgt werden. Informieren Sie sich
über die örtlichen Bestimmungen zur Entsorgung
von Batterien. Durch regelkonforme Entsorgung
schützen Sie die Umwelt und die Gesundheit Ihrer
Mitmenschen vor negativen Konsequenzen.
KONFORMITÄTSERKLÄRUNG
Hersteller:
Chal-Tec GmbH, Wallstraße 16, 10179 Berlin,
Deutschland.
Importeur für Großbritannien:
Berlin Brands Group UK Limited
PO Box 42
272 Kensington High Street
London, W8 6ND
United Kingdom
Hiermit erklärt Chal-Tec GmbH, dass der
Funkanlagentyp Graceland Mini der Richtlinie
2014/53/EU entspricht. Der vollständige Text der
EU-Konformitätserklärung ist unter der folgenden
Internetadresse verfügbar: use.berlin/10036452

33
EN
Dear Customer,
Congratulations on purchasing this device. Please read
the following instructions carefully and follow them to
prevent possible damages. We assume no liability for
damage caused by disregard of the instructions and
improper use. Scan the QR code to get access to the
latest user manual and more product information.
CONTENTS
Technical Data 34
Safety Instructions 35
Device Overview 37
Remote Control 39
Commissioning and Settings 42
DAB Radio 44
FM Radio 45
CD 46
USB/SD Playback 48
BT 49
PROG (Create Memory List) 50
Record Player 51
Turning on the Lighting Eects 56
Troubleshooting 57
Disposal Considerations 59
Declaration of Conformity 59
34
EN
TECHNICAL DATA
Item number 10036452
Power supply
(AC/DC power adapter)
100-240 V ~ 50/60 Hz
Battery (remote control) CR2025 3 V Lithium battery
Output voltage DC 14 V 1,75 A
Power consumption 24,5 W
Power amplier channel type 2.0 channel
Output power 4 W + 4 W
Radio (FM/DAB)
Frequency range
FM 87.5 – 108 MHz
DAB 174.928 – 239.200 MHz
BT
BT frequency band 2.4 – 2.480 GHz
BT sending power (max.) 4 dBm
Compatible USB devices or SD cards
USB ash drive supports USB 2.0 or USB 1.1.
File system
FAT 16/32
(NTFS le system is not supported)
Maximum number of les < 999
External HDD, card readers and locked devices are not supported.
Playable le requirements
MP3/WMA music le requirements
MP3/WMA le compatibility with this unit is limited as follows:
Frequency within 32 to 48 kHz
Bit rate within 32 to 320 kbps (MP3),
40 to 192 kbs (WMA)
Maximum number of les < 999
Maximum number of folders < 99
File extensions .mp3 oder .wma

35
EN
SAFETY INSTRUCTIONS
General information
• Lightning - If you are not going to use the device for a long time or
if there is a storm, disconnect the plug from the electrical outlet and
disconnect the device from the antenna connector. This will avoid
damage to the product that may be caused by lightning or overvoltage.
• Overload - Do not overload power outlets, extension cords, or built-in
power outlets, as this may result in a re or electric shock.
• Foreign objects and liquid - Never push objects of any kind through
openings in the device as they may touch dangerous voltage points or
short out parts, which could result in a re or electric shock. Never spill
liquids of any kind on the device.
• Repairs and maintenance - Do not attempt to service this product
yourself, as opening or removing covers will expose you to dangerous
voltages or other hazards. Leave all maintenance to qualied service
personnel.
• Damage requiring service - Disconnect the power plug from the outlet
and consult a qualied specialist if any of the following conditions
occur:
a) If the power cord or plug is damaged.
b) If liquid has been spilled or objects have fallen onto the product.
c) If the product has been exposed to rain or water.
d) If the product has been dropped or damaged.
e) If the product has a markedly reduced performance.
• Replacement parts - When replacement parts are required, make
sure that the service professional who replaces the parts only uses
replacement parts that have been approved by the manufacturer or
that have the same characteristics as the original part. Unauthorized
replacement may result in re, electric shock or other hazards.
• Heat - Do not place the unit near heat sources such as radiators,
heaters, stoves or other products (including ampliers).
36
EN
Special Instructions
• This device may be only used by children 8 years old or older and
persons with limited physical, sensory and mental capabilities and/
or lack of experience and knowledge, provided that they have
been instructed in use of the device by a responsible person who
understands the associated risks.
• Children should be supervised to ensure that they do not play with the
appliance.
• Ensure children and babies do not play with plastic bags or any
packaging materials.
• Mains plug/Power adaptor is used as disconnect device and it should
remain readily operable during intended use.
• In order to disconnect the apparatus from the mains completely, the
main plug/power adaptor should be disconnected from the mains
socket outlet completely.
WARNING
Risk of injury! Keep batteries out of the reach of children.
Swallowing can cause serious injury or death in as little as
two hours due to internal burns. If batteries are swallowed,
go straight to a hospital emergency room. Dispose of used
batteries immediately.
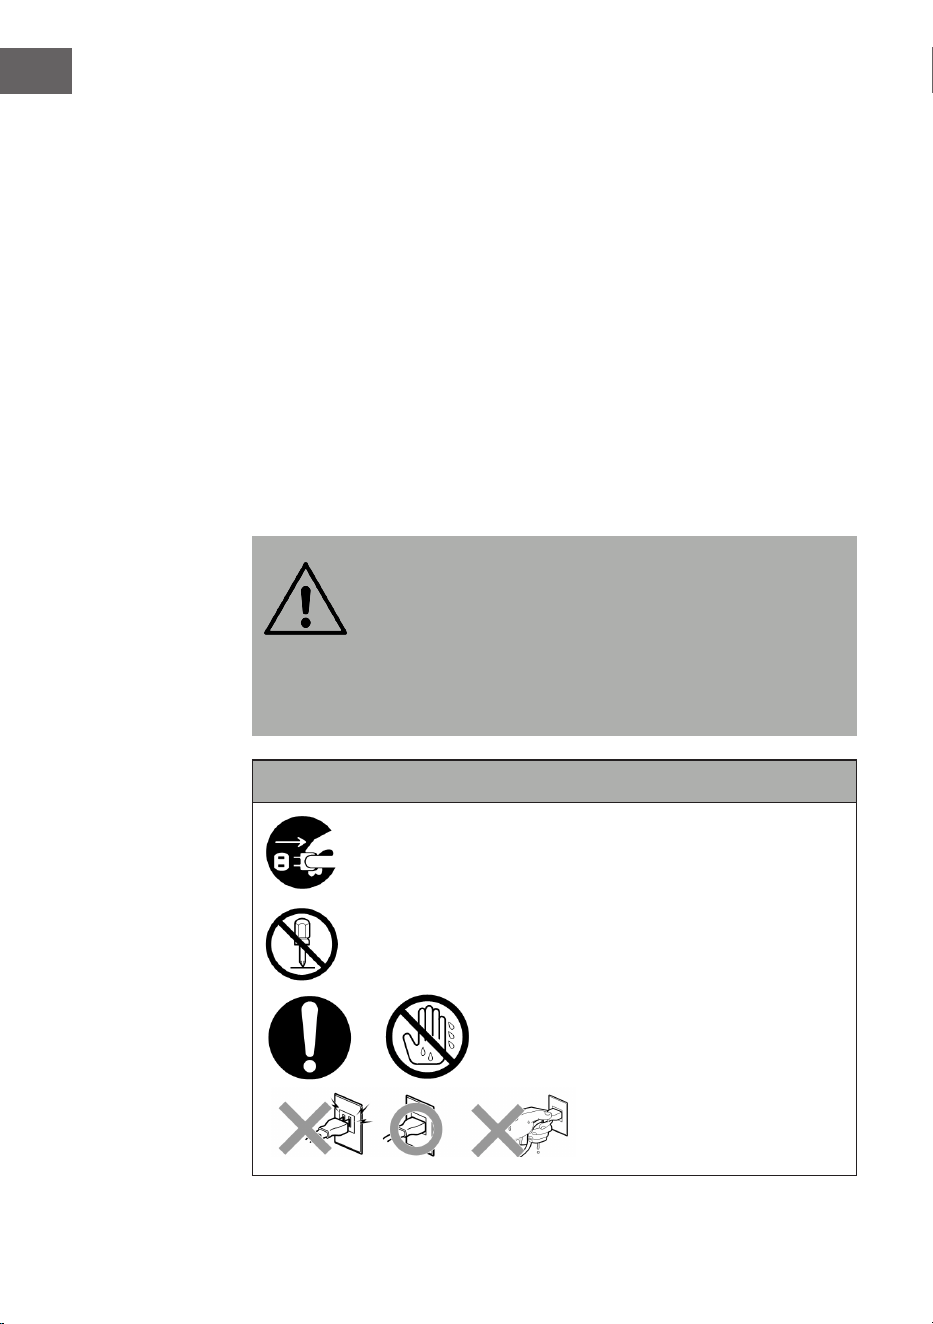
Important safety instructions
Make sure that babies and small children do not pull out
the mains plug!
Disassembly prohibited!
Do not handle the device with wet hands!

37
EN
DEVICE OVERVIEW
Front side
1 Vinyl turntable dust cover 14 Back/Fast rewind/PRE+
2 Vinyl turntable player 15 Remote control receiving window
3 LIGHT (Change color lamp control switch) 16 Tuning/EQ (voice patterns)
4 Position of discoloration lamp 17 Display
5 Function operation control panel 18 USB input socket
6 Tenor speaker 19 OPEN/CLOSE (CD door access control)
7 Power indicator light 20 P/R/MENU (Programming and menu)
8 Volume/Standby 21 REP/INFO (Repeats and info)
9 SD card input socket 22
Forward/Fast Forward/PRE+
10 MODE 23 OFF (Turn o lamp power.)
11 CD door 24 PLAY (The light color cycle changes.)
12
PLAY/PAUSE/SCAN 25 HOLD (Light color stops in a certain state.)
13
STOP/ENTER
38
EN
Back side
26 FM Antenna (Note: The FM antenna needs to be long and in the best
position to receive the strongest stations).
27 Light mode switch (lighting eects)
28 DC power input socket
29 Power adapter
AC power adaptor
39
EN
REMOTE CONTROL
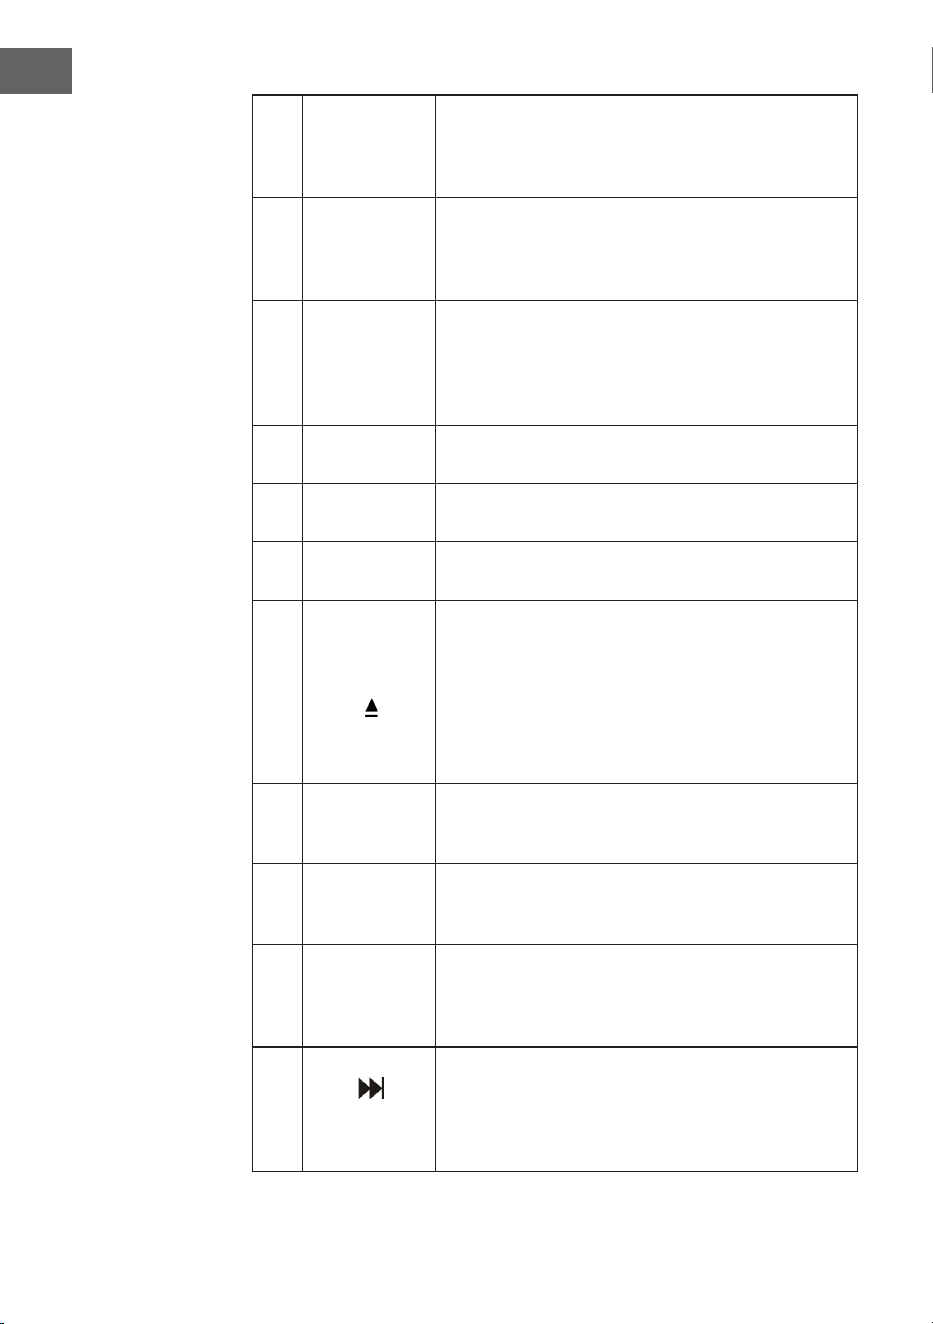
1 MODE
To select between the dierent functions such as
the DAB/FM tuner, CD player, USB input, SD input,
BT and turntable .
2 STANDBY
Press the POWER button on the remote control to
exit standby mode and enter DAB radio mode.
3 VOL-
Reduce volume: Press the button repeatedly or
press once and hold down until you reach the
desired volume level.
4 STOP Press the button to stop a track.
5
PREV
Fast back: Press to go to the previous track or
rewind back through a track. You can then press
the play button to start playback.
6
PROG
(Program)
Allows you to program only particular songs of
your choice to playback from your music source.
Further info on this function in section “PROG”.
7 F-10
Skip the previous 10 tracks (skips 10 tracks each
time). If the Jukebox is in random (“RAN”) mode
the folder skipping function will be disabled.
40
EN
8
RPT
(Repeat)
Press to replay one particular track. Press the
button once repeating ONE track only, press the
button twice repeating ALL the tracks. Press the
button three times repeated RANDOM play.
9 SCAN Press to Radio Auto-search and save stations.
10 STEREO Stereo/Mono selection in Radio (where available).
11 ENTER Conrm save in various settings and storage.
12
MENU
Tune the FM radio or DAB radio status. You can
nd and select relevant settings in the menu..
EJECT: If you press this button during CD playback,
the CD tray opens. Press the button again to close
the CD tray.
13 INFO
If an FM radio or DAB station or le contains
information, you can display it by pressing the
button.
14 EQ
To change the equalizer setting, you can press
this button. You can choose between JAZZ, FLAT,
CLASSIC, ROCK and POP.
15 F+10
Skip next 10 tracks (skips 10 tracks each time). If
the Jukebox is in random (“RAN”) mode the folder
skipping function will be disabled .
16
NEXT
Fast Forward: Press this button to go to the next
track or fast forward through a track. You can then
press the PLAY button to start playback.
17 VOL+
Increase volume: Press the button repeatedly or
press once and hold down until you reach the
desired volume level.
18 PLAY/PAUSE Press the button to play or pause a track.
41
EN
WARNING
Risk of injury! Keep batteries out of the reach of children.
Swallowing can cause serious injury or death in as little as
two hours due to internal burns. If batteries are swallowed,
go straight to a hospital emergency room. Dispose of used
batteries immediately.
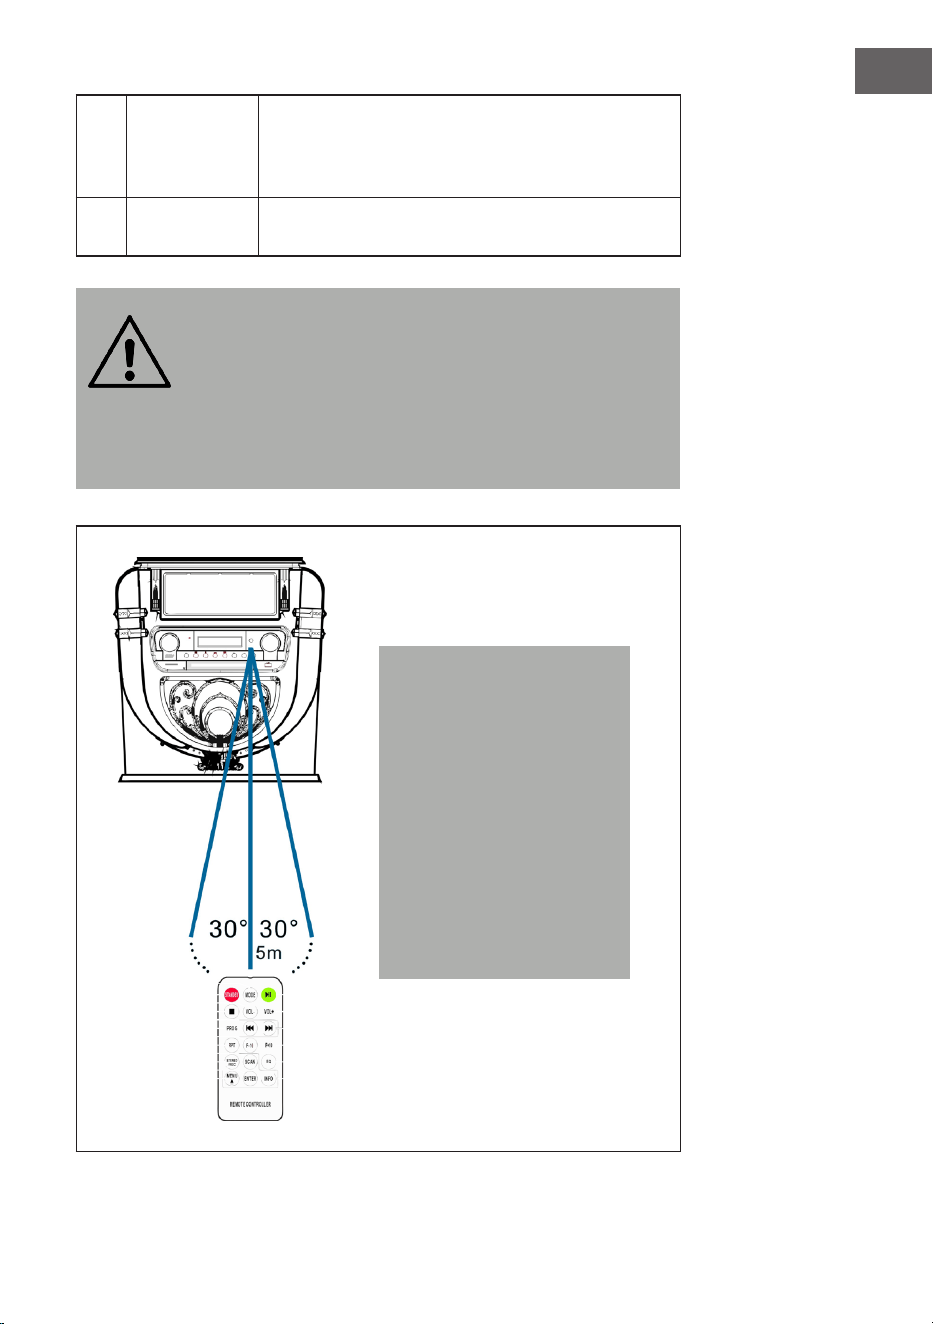
Note: The best transmission
distance between the device
and the remote control is
achieved within 5 metres
without a barrier (angle
approx. 30°). If the battery
of the remote control is
almost empty, this means
that the remote control
cannot be used as usual.
Insert a new battery.

42
EN
COMMISSIONING AND SETTINGS
Setting the time
Connect the mains adapter to the device and insert the mains plug into the
mains socket. The device is automatically set to standby mode and the time
“00:00“ or “12:00“ is displayed on the LCD screen.
• American version: 12 hour system
When the jukebox is put into standby mode, the LCD screen displays
“12:00“.
• European version: 24 hour system
When the Jukebox is put into standby mode, the LCD screen displays
“00:00“.
Example: American operation version
To set the time, simply press the “P/R“ button on the control panel (20)
or the remote control (6) and hold it down for 3-5 seconds until “12-H“
is displayed on the screen (“12-H“ means that the time is set in 12-hour
format). Then press the button or to select the 12- or 24-hour format.
As soon as “12-H“ is displayed on the screen, press the “P/R“ button again.
The screen will then display “00:00“ again with the rst “00“ ashing. Use
the and buttons on the control panel (3) or the remote control (6) to
select the correct hour setting (keep in mind that the time is set in 12-hour
format) and then press the “P/R“ button to conrm. The second “00“ now
ashes. Use the and buttons to select the correct minute setting,
then press the “P/R“ button to save this number.
NOTE: The time is only saved when the jukebox is in operating or standby
mode. If you want to save the set time in the jukebox, simply press the
STANDBY button (8) on the control panel to put the jukebox in standby
mode. If you remove the power supply, the time setting will be erased and
the above procedure must be repeated to set the correct time the next time
the Jukebox is switched on.
The American and European editions of the time setting are identical.
43
EN
Adjusting the volume
1. To increase the volume, turn the VOL+ knob repeatedly or press and
hold the VOL+ button on the remote control once until you reach the
desired volume level.
2. To decrease the volume, turn the VOL- knob repeatedly or press the
VOL- button on the remote control once and hold it down until you
reach the desired volume level.
Note: Check the volume before playing music to prevent children, inrm
persons or pregnant women from being frightened by the sudden and
loud sound of the jukebox.
Note: Using the Jukebox at a high volume for an extended period of
time may cause the Jukebox to overheat and damage the internal
components. DO NOT use the Jukebox at a high volume for an extended
period of time.
The volume settings are saved when the device is switched o. When the
device is switched on again, the volume is set the same as when the device
was last switched o.
Equalizer settings
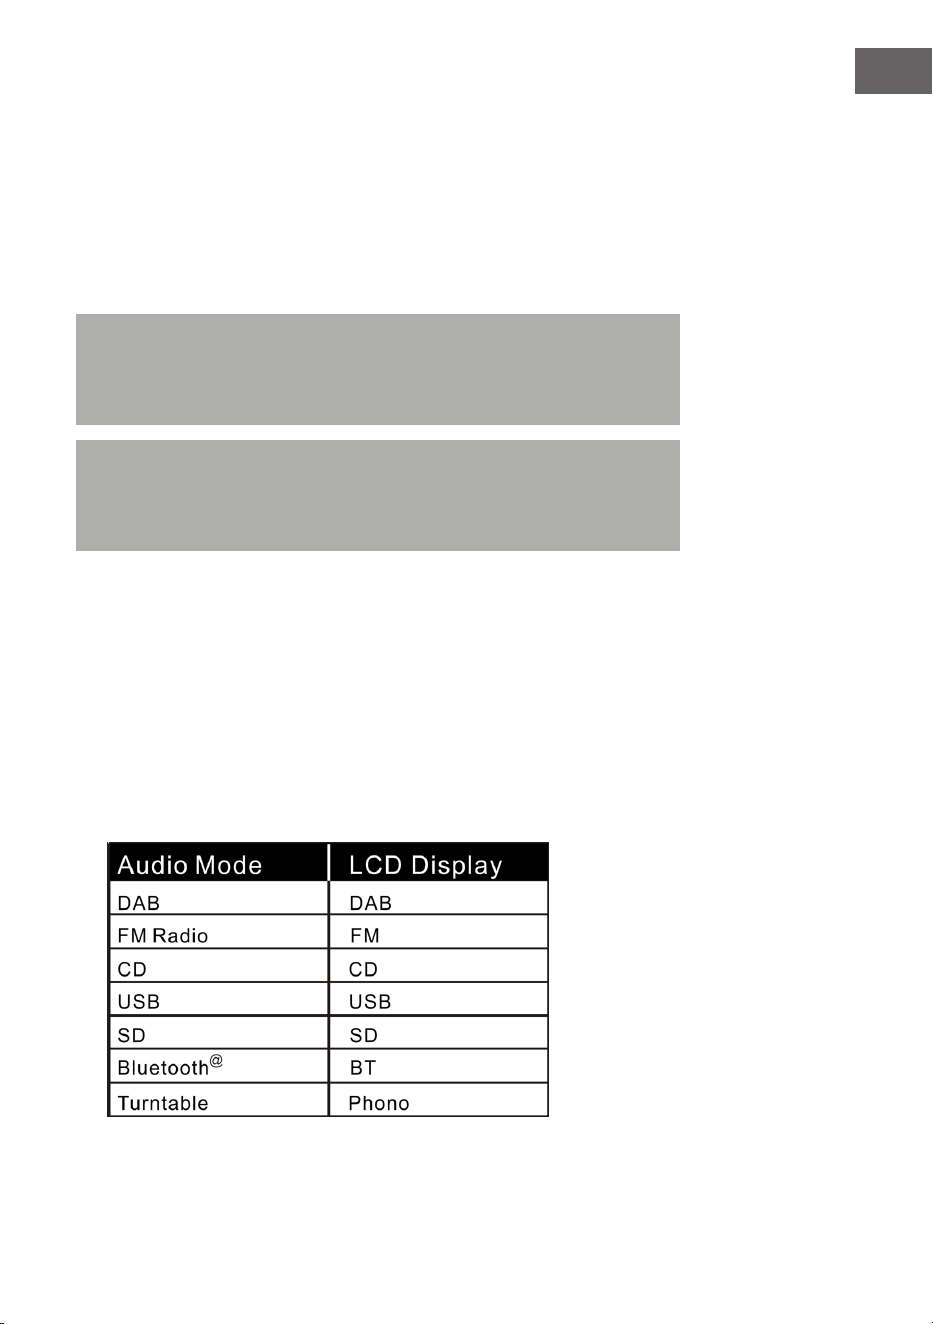
1. Set any audio mode:
The jukebox has several dierent audio playback functions. Follow the
steps below to choose between DAB/FM, CD player, USB input, SD card
input, analogue FM radio, BT audio streaming and turntable.
2. Press the EQ button until you reach the desired equalizer setting. The
sound changes immediately when the respective equalizer setting is
selected.
44
EN
3. The jukebox has 5 selectable equalizer settings that allow you to adjust
the sound level to enhance the type of music being played.
The preloaded equalizer settings on the jukebox are:
JAZZ, FLAT, CLASSIC (Classical), ROCK and POP.
DAB RADIO
Frequency range: DAB 174.928-239.200 MHz
1. Press the STANDBY button on the device (8) or on the remote control
(2) to exit standby mode. The device is automatically set to DAB mode
and automatically searches for DAB signals nearby.
2. Rotate the tuning knob to nd a DAB station with strong reception
(rotate the tuning knob step by step).
3. Press the button to go to subsequent stored radio stations.
4. Press the button to go to previous stored radio stations.
5. Press the SCAN button to automatically search for and store DAB
stations (stations with the strongest current signal). Up to 20 stations
can be stored.
6. Press the INFO button to get the information about the station.
7. When you press the MENU button, both the automatic station search
menu (Autotune) and other menus appear. Rotate the Tuning knob to
select the desired content. Then press the ENTER button to select the
main menu of the desired content. Then rotate the Tuning knob to enter
the submenu. Press the ENTER button to conrm.
8. In the main menu, select “Language” and then one of the four available
languages (German/French/Italian/English).
9. If you want to clear the previous settings or memory, select “Yes” in the
“Factory Reset” menu.
The following menu options are available:
45
EN
NOTES:
• Fully extend the antenna in DAB and FM mode. Place the device in a
location with good reception. (The antenna is located on the back of
the device).
• Stations with a weak signal can only be tuned in manually.
• A maximum of 20 stations can be stored. If there are less than
20local strong signal stations available, only the strong signal
stations are stored. (If there are no 20 stations with a strong signal,
no 20 stations can be stored).
FM RADIO
Frequency range: FM 87.5 - 108 MHz
This device has a built-in FM function with automatic station search. Up to
20 stations can be stored.
When you use the device for the rst time, if you have plugged the mains
plug into the mains socket, the device will automatically go into standby
mode (clock display). Press the STANDBY button on the device or the
POWER button on the remote control to switch on the device. The rst time
the device is used, it is automatically set to DAB mode. Press the MODE
button to enter FM mode. The LCD screen will then display FM 87.5 MHz (or
other radio frequency) and the speakers will emit a diuse noise (unless the
87.5 frequency contains a local radio station).
1. Press the STANDBY button on the device (8) or the remote control (2) to
wake the device from standby mode. The device is then automatically
set to FM mode.
2. Press and hold the or button to search for recently stored
stations (0.1 MHz or 0.05 MHz for each press). Rotate the frequency
control to nd a station with strong reception.
3. Press the or button (longer than 3 seconds), the FM radio
automatically searches for stations (if a station with a strong signal is
found, it is automatically played).
4. Auto search and save: When you press the (SCAN) button, the
device automatically starts searching for stations at the frequency 87.5
up. During the automatic station search, stations found are also stored.
The device has 20 memory locations for your favourite stations, named
“P01” to “P20” (programme 1 to programme 20). The rst station found
by the device is stored under “P01”. The second station found at “P02”
etc. The automatic station search continues until all stations with a
strong signal have been found and stored. As soon as all 20 memory
locations are occupied, the automatic station search is interrupted, even
if more stations with a strong signal were available.

46
EN
5. When you press the MENU button, the screen displays “Auto tune“
and other menus. Use the knob to select the desired content. Then
press the button ENTER to select the main menu. Then rotate the knob
again to select the submenu. Then press the ENTER button for a nal
conrmation.
6. In the main menu “Language“ you can choose from four languages
(German/French/Italian/English).
NOTES:
• The American version searches for stations in steps of 0.1 MHz. The
European version searches for stations in steps of 0.05 MHz.
• Fully extend the FM antenna. Place the device in a location with good
reception (the antenna is on the back of the device).
• Stations with a weak signal can only be tuned in manually.
• A maximum of 20 stations can be stored. If less than 20 local strong
signal stations are available, only the strong signal stations are
stored (if there are no 20 strong signal stations, no 20 stations can be
stored).
• When the device is switched o, the device stores the current setting.
When you subsequently switch the radio on again, the station or
function last selected before switching o is restored.
CD
Note: CDs must be inserted into the CD tray with the labelled side facing
up.
1. Press the MODE button until “CD” is shown on the LCD display. The
display then shows the number of tracks on the CD. Playback starts
automatically.
2. To open the CD tray, press the button
on the control panel or the
EJECT button on the remote control.
3. Insert the CD into the CD tray with the label side facing up and the shiny
side facing down.
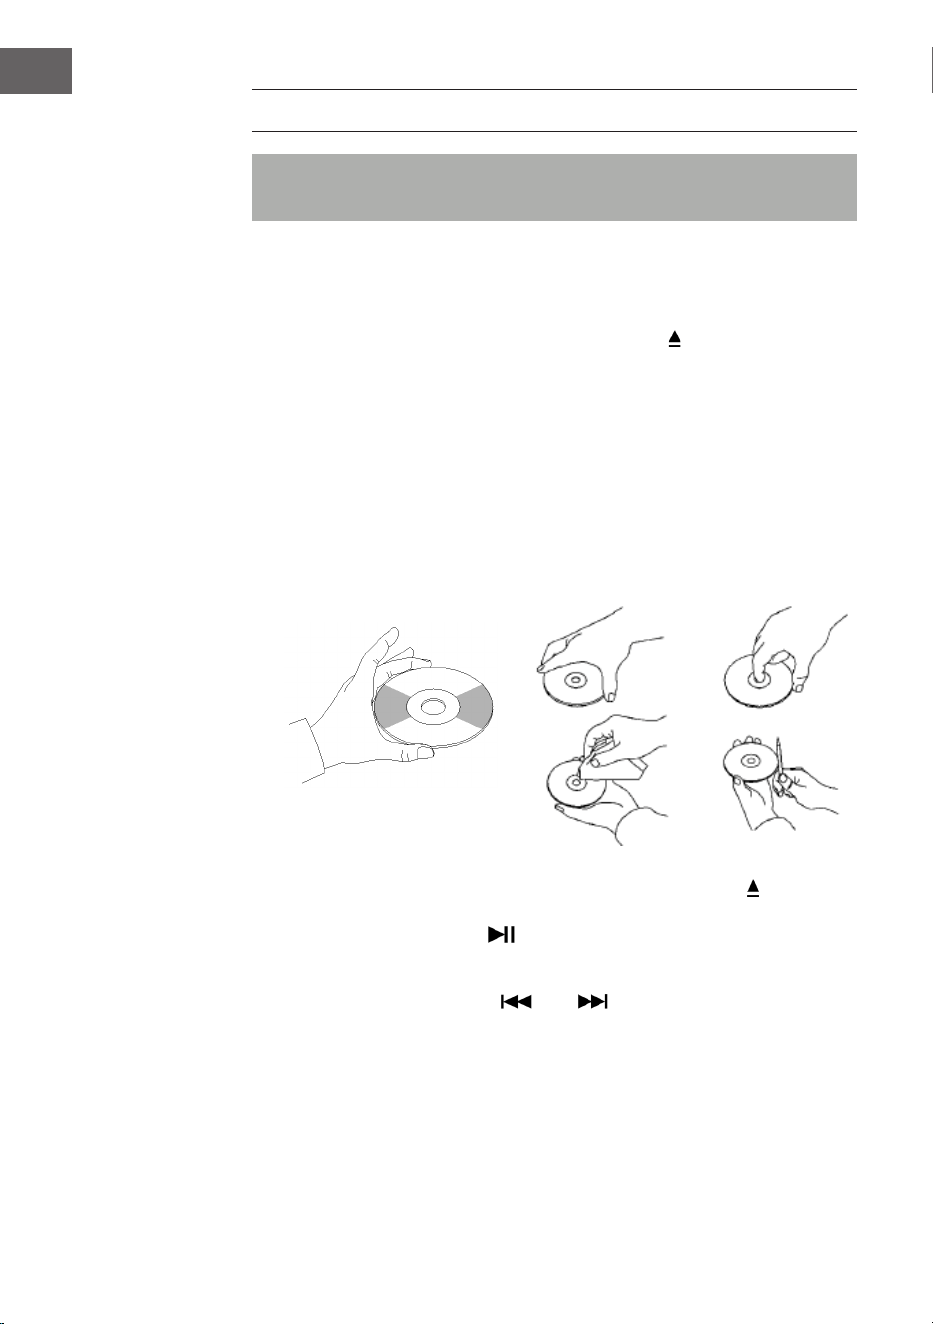
• This device has been specially designed for sound reproduction
from compact discs bearing the mark. No other discs can be used.
• To remove a disc from its storage case, press the centre of the case
and lift the disc out, holding it gently by the edge.
47
EN
4. To close the CD tray, press the button on the control panel again or
the EJECT button on the remote control.
5. Use the button to select the desired song. Press and hold the
button to fast forward through a track. Press the (PLAY) button to start
playback.
6. Select the desired song with the or buttons.
7. Adjust the volume with the VOLUME +/- knob.
8. Press the REP button once to repeat a song. “REP 1” then ashes in the
upper left corner of the LCD display. If you press the REP button again,
all the tracks on the CD are repeated. “REP A” then ashes in the upper
left corner of the LCD display. Press the REP button again to cancel the
repeat function.
9. For random playback, press the REP button again until “Rand” is
displayed on the bottom of the LCD display. Press the or
buttons to select a random song.
10. To create a memory list, rst press the STOP button to stop playback.
Press the P/R button to enter the memory mode. The LCD display
ashes and then displays “P01”. Select the track you want to save rst,
then press P/R again. To stop saving and start playing the saved tracks,
press the button . The LCD display will then show “PROG CD”. The
device can store up to 20 tracks. For more information, see the section
“PROG (Create Memory List)”.
Note: Do not close the CD tray by force as this may cause malfunctions.
48
EN
USB/SD PLAYBACK
1. Press the MODE button until the LCD display shows “USB or SD”. The
display rst shows the number of folders and then the number of tracks.
Playback starts automatically.
2. Select the desired song with the or buttons.
3. Press the REP button once to repeat a song. “REP 1” then ashes in the
upper left corner of the LCD display. If you press the REP button again,
all songs are repeated. “REP A” then ashes in the upper left corner
of the LCD display. Press the REP button again to cancel the repeat
function.
4. For random playback, press the REP button again until “Rand” is
displayed on the bottom of the LCD display. Press the or
buttons to select a random song.
5. To create a memory list, rst press the STOP button to stop playback.
Press the P/R button to enter the memory mode. The LCD display
ashes and then shows “P01”. Select the track you want to save rst,
then press P/R again. To stop saving and start playing the saved tracks,
press the button . The LCD display will show “PROG CD”. The device
can store up to 20 tracks. For more information, refer to the section
“PROG (Create Memory List)”.
6. Press the MODE button to stop USB or SD playback. Do not disconnect
the mains plug from the socket during USB or SD playback as this may
cause malfunction.
NOTES:
• If the USB drive contains audio les that are not compatible with the
Jukebox, the Jukebox will not be able to read them. These tracks will
not be included in the total number of tracks displayed and will not
be played.
• If the SD card contains audio les that are not compatible with the
Jukebox, the Jukebox will not be able to read them. These tracks will
not be included in the total number of tracks displayed and will not
be played.
Note: For optimum performance it is recommended to only use a USB
2.0 ash drive (not a 3.0 version).
49
EN
BT
To pair the jukebox with an external BT device:
1. Press and hold the MODE button until “BT” is displayed on the LCD
display.
2. Switch on the external BT device and activate its BT function. Start the
search for available BT devices.
3. Select “Graceland Mini” from the device list of the external device.
4. As soon as the two devices are paired, “connected” is shown on the
display. You can now start track playback on your external BT device.
Control playback via your external BT device, the jukebox or the jukebox
remote control.
Operation via the BT device:
• Use the buttons on the display to select tracks, adjust the volume, start
or pause playback and for the functions and .
Operation via the jukebox/remote control:
• Once the pairing is successful, playback via the BT device will start
automatically.
• Rotate the VOLUME +/- knob to adjust the volume.
• Press the button or to go to the previous/next track.
• To pause/resume playback, press the button .
• To stop pairing, press the MODE button to select another function or
deactivate the BT connection of your external BT device.
Note: The optimum transmission distance for BT connection is achieved
within 10metres without a barrier. If the last connected BT device is
within the range of the Jukebox, no new device can be connected to
the Jukebox. The BT connection of the last connected device must be
deactivated if you want to connect a new device to the jukebox.

50
EN
PROG (CREATE MEMORY LIST)
1. Press the STOP button during playback from a music source.
2. Press the PROG button (6) on the remote control or the P/R button on
the control panel to enter the memory mode. “PROG” then ashes in
the lower left corner of the display. A position number also ashes on
the display (e.g. P01).
3. To select the track you want to save, press the button or . Press
the PROG button to save your selection.
4. Repeat the above steps to save more tracks.
5. Once you have saved all the tracks you want, you can start playback.
You can do this at any time once you have saved the desired number of
tracks.
6. If you want to stop saving the tracks, press the STOP button.
7. When the maximum number of tracks to be saved is reached, the
display shows “FULL”.
NOTE: If you have changed the playback mode or restarted the device, the
memory list must be reprogrammed (repeat the steps above to do this).
51
EN
RECORD PLAYER
• Press the MODE button until the LCD display shows “Phono”.
• Insert a record on the turntable. Select a speed level. The speed levels
33/45/78 are available (factory setting is “33”). As soon as the needle is
above the record, playback starts.
45 RPM adapter
Place a record on the turntable.
When playing single records, use
the 45RPM adapter included in the
delivery.
45 RPM adapter
52
EN
Raise/lower lift lever
• Carefully raise the tone arm and
move it over the desired position
on the record.
• Lower the tone arm slowly and
carefully.
Automatic stop (Auto stop)
• Slide the control upwards: Music
playback stops, the turntable
continues to rotate.
• Slide the control down: Music
playback ends, the turntable stops.
Note: After the end of playback, move
the tone arm back to its rest position.
Speed setting
Three speed levels 33/45/78 are
available.
Tone arm lock
Release the tone arm lock
before use.
Cue lever
Auto stop
Speed setting
Tone arm lock
Cabletie
53
EN
Pick-up arm (tone arm)
Placing a record
Place a suitable record on the turntable.
Lift the tone arm and carefully place it on
the record. You can now play tracks from
the record.
Plastic needle guard
Remove the needle by pulling it straight
down, in the opposite direction of the
tone arm.
Arm shaft
Placing a record
Plastic needle guard
54
EN
Needle maintenance
• Press the MODE button until the display shows “Phono”. Remove the
needle guard (see gure 1). Place a record on the turntable. Select a
speed level 33/45/78. As soon as the needle is moved over the record,
playback starts.
• It is recommended to replace the stylus as soon as you notice a change
in the sound quality.
• Using a worn-out stylus can cause damage to the record. Wear on the
stylus is accelerated when playing 78 RPM records.
The stylus must be aligned in the
median position (in the middle of
the slot).
If the stylus protrudes from the
slot, this can lead to dropouts
during playback (stylus skids
etc.).
Figure 1 Figure 2
Remove the stylus by pulling it
straight down and out, in the
opposite direction of the tone arm.
Replace the stylus with a
compatible stylus. Attach the
new stylus with the point facing
downwards and press it back into
place gently.
NOTE: If purchasing the replacement stylus in a store, it will be helpful to
bring the old stylus with you for your reference. Most good Electronic and
Music stores will have replacement styluses.
Note: Always ensure that the tone arm is secured by the arm lock before
transporting the Jukebox.

55
EN
NOTE: At the end of the recording, the tone arm does not automatically
return to the holder, but the turntable and the tone arm stop rotating (move
the tone arm back to the bracket manually).
When not using the needle, put the needle
protector back on.
Important notes on the use of the needle
• Do not bend the stylus.
• To avoid injury, do not touch the needle.
• Keep out of the reach of children!
• Exercise caution as the stylus is very delicate. Using a bent or broken
stylus can damage the record and cause it to malfunction.
• Do not expose the stylus to intense heat.
• Consult a qualied technician if you have diiculty replacing the
stylus.
56
EN
TURNING ON THE LIGHTING EFFECTS
The jukebox has 2 colour-changing LED light tubes that are displayed on the
jukebox parts. There are also several other multi-colour LED lighting eects
that can be seen in the CD player and USB/SD tray and on the base of the
speaker panel.
The power switch for the lamp is located on the back of the device. When
the switch is moved from the “OFF“ position to the “PLAY“ position, the
lamp lights up.
NOTE: The LIGHT button controls the power supply to the lighting eects
and is located on the back of the device.
PLAY: The light colour cycle changes.
HOLD: The light colour is maintained in a
certain state (includes invisible light).
OFF: The light is switched o and no longer
illuminates.
There is an LED light mode switch (27) on the back of the jukebox (see
section “Device overview - Back side“). When this is switched on, the LED
light tubes change colour continuously. In HOLD mode, the LED light tubes
only light up in one colour. When you switch to PLAY mode, the LED light
tubes start to change through the colours. Switching back to HOLD mode
allows you to select a dierent colour to display, which will be retained
(please note that these colours are xed and may not be exactly the same
colour as the LED light tube was illuminated in when switching to HOLD
mode).
The light is switched o when the switch is pushed to the “OFF“ position.
NOTE: There may be no visible light in HOLD mode, this is normal (the
switch must be reset).
57
EN
TROUBLESHOOTING
The following checks will help troubleshoot most problems that may occur
with your device. Before going through the following checklist, you should
rst check that the power supply unit has been connected correctly. If the
problem persists after the checks listed below, contact the manufacturer,
customer service or an authorised service centre for maintenance and
repair.
Problem Possible cause Solution
Radio reception
No radio reception
The mode selector has
not been set to the
correct position.
Set the desired volume
with the VOLUME
knob.
Rotate the Tuning
knob to search for a
radio station.
CD playback
CD does not play or
sound skips.
The CD was inserted
incorrectly.
Insert the CD into
the CD tray with the
labelled side facing up.
The CD is dirty.
Clean the CD. Restart
the device.
Sound skips
Change the installation
location.
Press the STANDBY
button (restart the
device).
The CD player is not
working.
Press the STOP button
and then save the
desired tracks.
General
The CD memory list
cannot be played.
The mains plug is not
inserted in the socket.
Insert the mains plug
correctly into the
socket.
Press the STANDBY
button (restart the
device).

58
EN
Problem Possible cause Solution
No sound output
The VOLUME knob is
not set correctly.
Rotate the VOLUME
knob clockwise.
Severe hum or noise.
The TV or VCR is too
close to the stereo
system.
Move the device to
another location.
The display is garbled
or does not work.
Switch o the device
and restart it.

59
EN
DISPOSAL CONSIDERATIONS
If there is a legal regulation for the disposal of
electrical and electronic devices in your country,
this symbol on the product or on the packaging
indicates that this product must not be disposed of
with household waste. Instead, it must be taken to
a collection point for the recycling of electrical and
electronic equipment. By disposing of it in accordance
with the rules, you are protecting the environment and
the health of your fellow human beings from negative
consequences. For information about the recycling
and disposal of this product, please contact your local
authority or your household waste disposal service.
This product contains batteries. If there is a legal
regulation for the disposal of batteries in your country, the
batteries must not be disposed of with household waste.
Find out about local regulations for disposing of batteries.
By disposing of them in accordance with the rules, you are
protecting the environment and the health of your fellow
human beings from negative consequences.
DECLARATION OF CONFORMITY
Manufacturer:
Chal-Tec GmbH, Wallstrasse 16, 10179 Berlin,
Germany.
Importer for Great Britain:
Berlin Brands Group UK Limited
PO Box 42
272 Kensington High Street
London, W8 6ND
United Kingdom
Hereby, Chal-Tec GmbH declares that the radio
equipment type Graceland Mini is in compliance with
Directive 2014/53/EU. The full text of the EU declaration
of conformity is available at the following internet
address: use.berlin/10036452
For Great Britain: Hereby, Chal-Tec GmbH declares that
the radio equipment type Graceland Mini is in compliance
with the relevant statutory requirements. The full text of
the declaration of conformity is available at the following
internet address: use.berlin/10036452


61
FR
Cher client, chère cliente,
Toutes nos félicitations pour l’acquisition de ce
nouvel appareil. Lisez attentivement les indications
suivantes et suivez-les pour éviter d'éventuels
dommages. Nous ne saurions être tenus pour
responsables des dommages dus au non-respect
des consignes et à la mauvaise utilisation de
l’appareil. Scannez le QR-Code pour obtenir la
dernière version du mode d'emploi ainsi que
d'autres informations concernant le produit :
SOMMAIRE
Fiche technique 62
Consignes de sécurité 63
Aperçu de l’appareil 65
Télécommande 67
Mise en marche et paramètres 70
Radio DAB 72
Radio FM 74
CD 76
Lecture en mode USB/SD 77
BT 78
PROG (programmation d’une liste) 79
Platine vinyle 80
Pour allumer les eets d’éclairage 85
Résolution des problèmes 86
Conseils pour le recyclage 88
Déclaration de conformité 88

62
FR
FICHE TECHNIQUE
Numéro d'article 10036452
Alimentation
(adaptateur AC/DC)
100-240 V ~ 50/60 Hz
Pile (télécommande) Pile CR2025 3 V Lithium
Puissance de sortie DC 14 V 1,75 A
Puissance 24,5 W
Type de canal d'amplicateur Canal 2,0
Puissance de sortie 4 W + 4 W
Radio (FM/DAB)
Plage de fréquence
FM 87,5 – 108 MHz
DAB 174,928 – 239,200 MHz
BT
Bande de fréquence BT 2,4 – 2,480 GHz
Puissance émission BT (max) 4 dBm
Périphériques USB ou cartes SD compatibles
Port USB Prise en charge de USB 2.0 ou USB 1.1
Système de chiers
FAT 16/32
(système de chiers NTFS non pris en
charge)
Nombre maximum de chiers < 999
Les disques durs externes, lecteurs de cartes et autres périphériques
sécurisés ne sont pas pris en charge.
Conditions requises pour les chiers lisibles
Fichiers audio MP3/WMA
La compatibilité des chiers MP3 / WMA avec cet appareil est limitée
comme suit :
Plage de fréquence Entre 32 et 48 kHz
Taux d'échantillonnage entre 32 et 320 kbps (MP3),
40 à 192 kbs (WMA)
Nombre maximum de chiers < 999
Nombre maximal de dossiers < 99
Extensions de chiers .mp3 oder .wma

63
FR
CONSIGNES DE SÉCURITÉ
Consignes générales
• Foudre - Si vous prévoyez de ne pas utiliser l'appareil pendant
une longue période ou en cas d'orage, retirez la che de la prise ou
débranchez l'antenne de l'appareil. Cela empêchera la foudre et les
surtensions d'endommager le produit.
• Surcharge - Ne surchargez pas les prises électriques, les rallonges ou
les prises électriques intégrées car cela pourrait provoquer un incendie
ou une électrocution.
• Corps étrangers et liquides - Ne glissez jamais d'objets de quelque
sorte que ce soit à travers les ouvertures de l'appareil, car ils pourraient
entrer en contact avec des points à la tension dangereuse ou court-
circuiter des pièces, ce qui pourrait provoquer un incendie ou une
électrocution Ne renversez jamais de liquides de quelque sorte que ce
soit sur l'appareil.
• Réparations et maintenance - Ne tentez pas de réparer ce produit
vous-même car vous vous exposeriez à des tensions dangereuses ou à
d'autres risques en ouvrant ou en retirant les couvercles. Conez toute
la maintenance à un personnel qualié.
• Dégâts nécessitant l'intervention d'un professionnel - Débranchez la
che d'alimentation de la prise et consultez un spécialiste qualié si l'un
des cas suivants se produit :
a) Si le câble d'alimentation ou la prise est endommagé.
b) Si du liquide a été renversé ou si des objets sont tombés sur le
produit.
c) Si le produit a été exposé à la pluie ou à l'eau.
d) Si le produit a fait une chute ou a été endommagé.
e) Si les performances du produit sont nettement réduites.
• Pièces de remplacement - Si des pièces de rechange sont nécessaires,
assurez-vous que l'entreprise spécialisée n'utilise que des pièces
approuvées par le fabricant ou ayant les mêmes propriétés que la pièce
d'origine. Le remplacement non autorisé peut entraîner un incendie, un
choc électrique ou d'autres dangers.
• Chaleur - Ne placez pas l'appareil à proximité de sources de chaleur
telles que des radiateurs, des grilles de chauage, des fours ou d'autres
produits (y compris les amplicateurs).
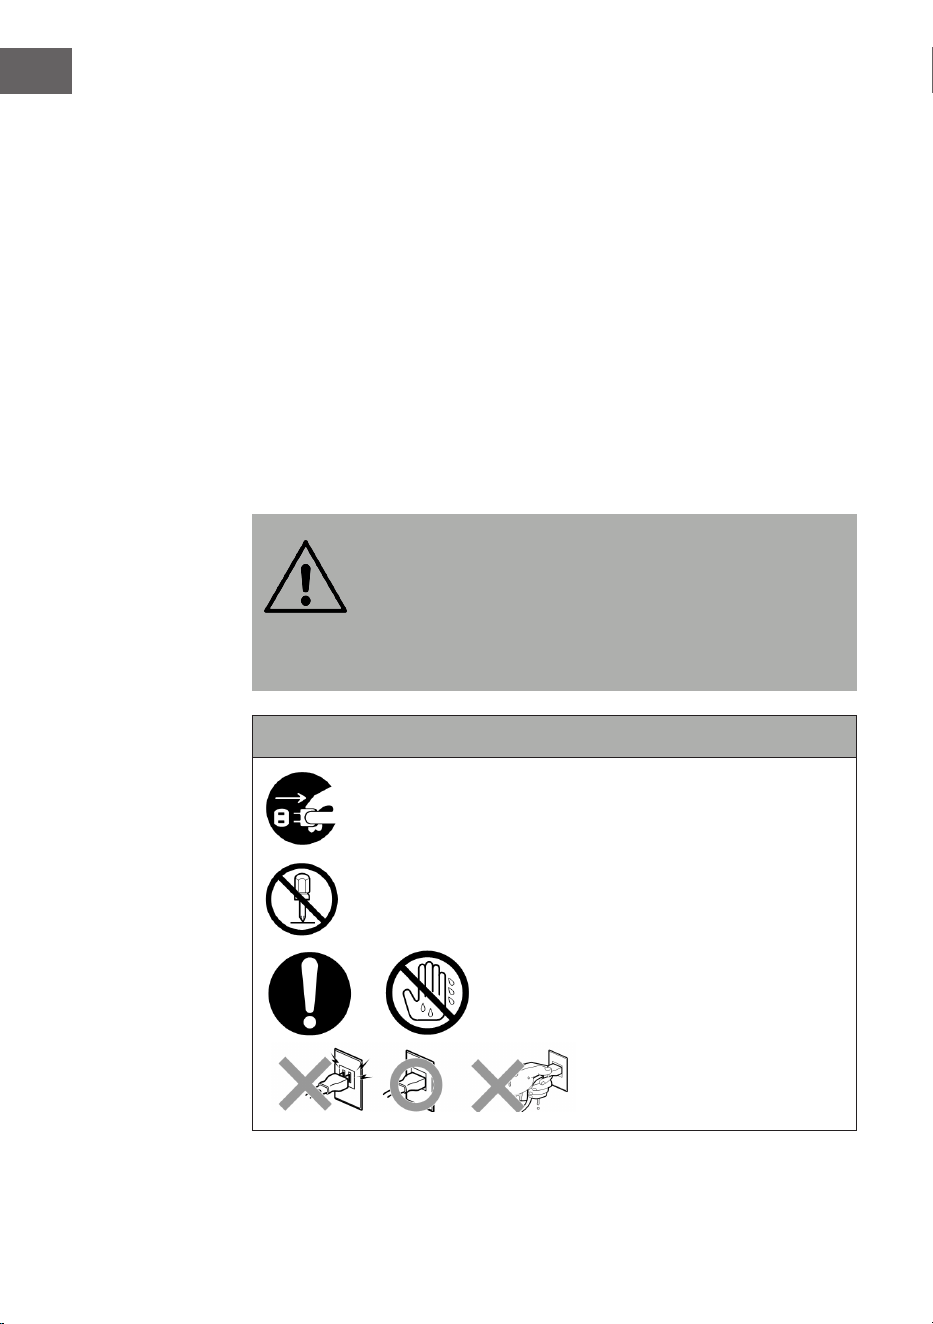
64
FR
Consignes particulières
• Les enfants à partir de 8 ans et les personnes sourant de handicaps
mentaux, sensoriels et physiques ne peuvent utiliser l'appareil que s'ils
ont été parfaitement familiarisés avec les fonctions et les précautions
de sécurité par une personne responsable et s'ils comprennent les
risques associés.
• Le nettoyage et l'entretien par l'utilisateur ne doivent pas être eectués
par des enfants sauf s'ils sont âgés de plus de 8 ans et sont sous
surveillance.
• Surveillez les enfants pour qu'ils ne jouent pas avec l'appareil. Ne
laissez pas les jeunes enfants et les bébés jouer avec les sacs en
plastique et autres matériaux d'emballages.
• Assurez-vous que la che d'alimentation / l'adaptateur secteur est
toujours facilement accessible an que l'appareil puisse être rapidement
déconnecté de l'alimentation électrique en cas d'urgence.
• Lorsque vous n'utilisez plus l'appareil, éteignez-le et débranchez la che
de la prise.
MISE EN GARDE :
Risque de blessure ! Rangez les piles hors de portée des
enfants. Leur ingestion peut provoquer des blessures graves
ou la mort par brûlures internes en seulement deux heures.
En cas d'ingestion de piles, rendez-vous immédiatement aux
urgences d'un hôpital. Jetez immédiatement les piles
usagées.
Importantes consignes de sécurité
Veillez à ce que les bébés et les jeunes enfants ne
débranchent pas l'adaptateur !
Démontage interdit !
Ne touchez pas l'appareil avec les mains
mouillées.

65
FR
APERÇU DE L'APPAREIL
Face avant
1 Couvercle anti poussière de la platine
vinyle
14 Retour / retour rapide / PRE+
2 Platine vinyle 15 Fenêtre du capteur de la télécommande
3 LIGHT (éclairage/ modication de la
couleur de la lampe)
16 Tuning/EQ (modèle de son)
4 Position de la lampe disco 17 Écran
5 Panneau de commande 18 Port USB
6 Haut-parleur grave 19 OPEN / CLOSE (ouvrir/ fermer la porte du
lecteur CD)
7 Voyants de fonctionnement 20 P/R/MENU (Programmation et menu)
8 Volume / veille 21 REP/INFO (répétition et info)
9 Lecteur de cartes SD 22
Avance/ avance rapide/PRE+
10 MODE 23 OFF (éteindre l'éclairage)
11 Porte du lecteur CD 24 PLAY (Le cycle de couleur de la lumière
change.)
12
PLAY/PAUSE/SCAN (recherche) 25 HOLD (La couleur de la lumière s'arrête
dans un certain état.)
13
STOPP/ENTER (touche entrée)

66
FR
Dos de l'appareil
26 Antenne FM (remarque : L'antenne FM doit être complètement
déployée pour assurer la meilleure réception possible).
27 Interrupteur de mode d'éclairage (eets de lumière)
28 Prise DC
29 Adaptateur secteur
Adaptateur
secteur AC
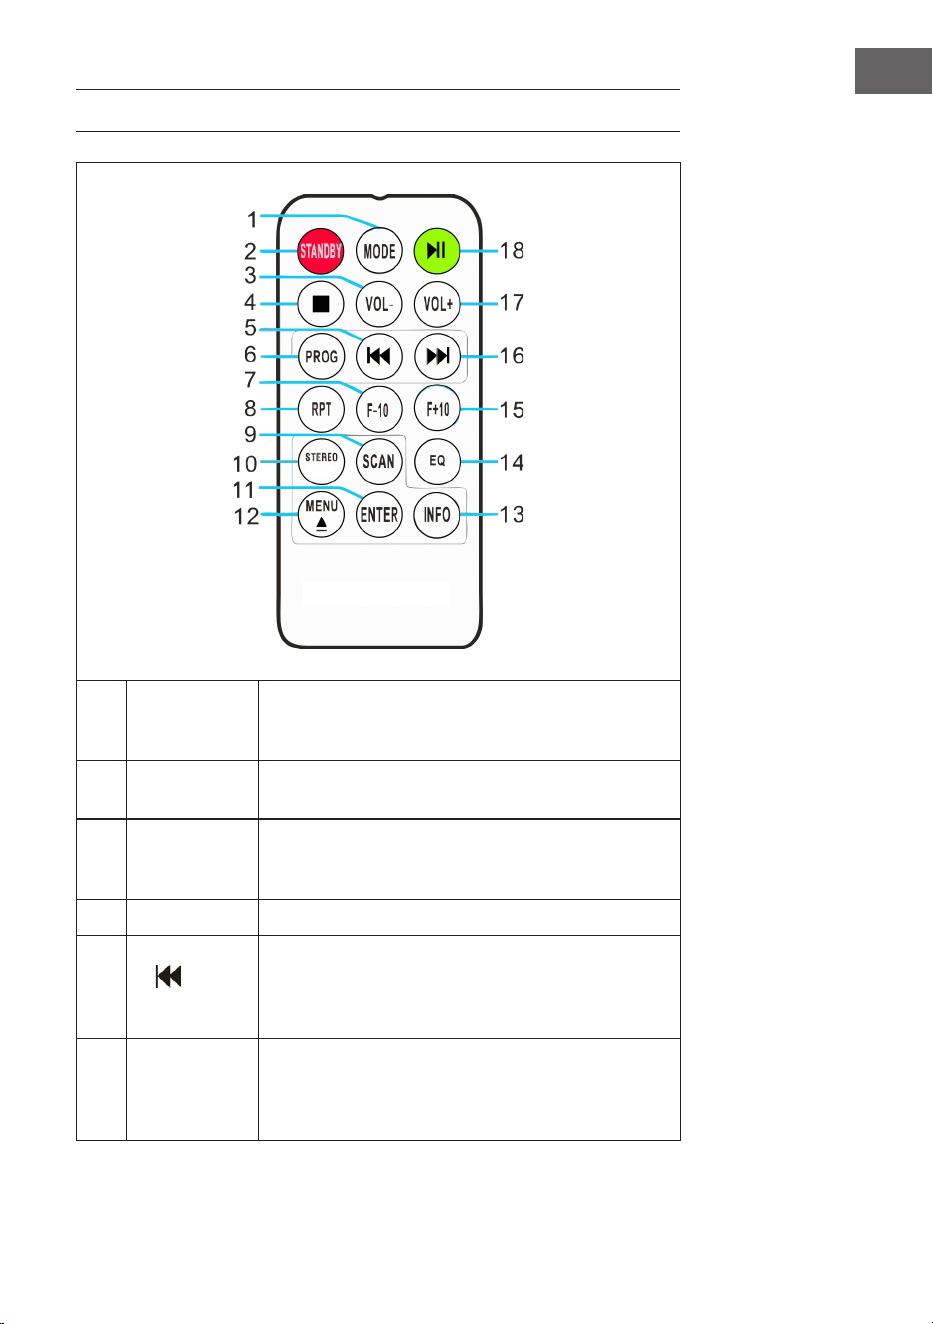
67
FR
TÉLÉCOMMANDE
1 MODE
Choix du mode : vous pouvez choisir parmi les
diérents modes DAB / FM, CD, USB, SD, BT et
platine.
2 STANDBY
Appuyez sur POWER pour quitter le mode veille et
passer en mode DAB.
3 VOL-
Baisser le volume : appuyez plusieurs fois sur
la touche ou maintenez-la jusqu'à ce que vous
atteigniez le niveau de volume souhaité.
4 STOP Appuyez sur cette touche pour arrêter la lecture.
5
(Titre
précédent)
Retour rapide : appuyez pour aller à la piste
précédente ou maintenez pour revenir en arrière
d'une piste. Appuyer ensuite sur PLAY pour
démarrer la lecture.
6
PROG
(mémoriser)
Avec cette fonction, programmez une liste de
vos chansons préférées à partir d'une source
audio (pour plus d'informations, voir la section
"Mémoriser").
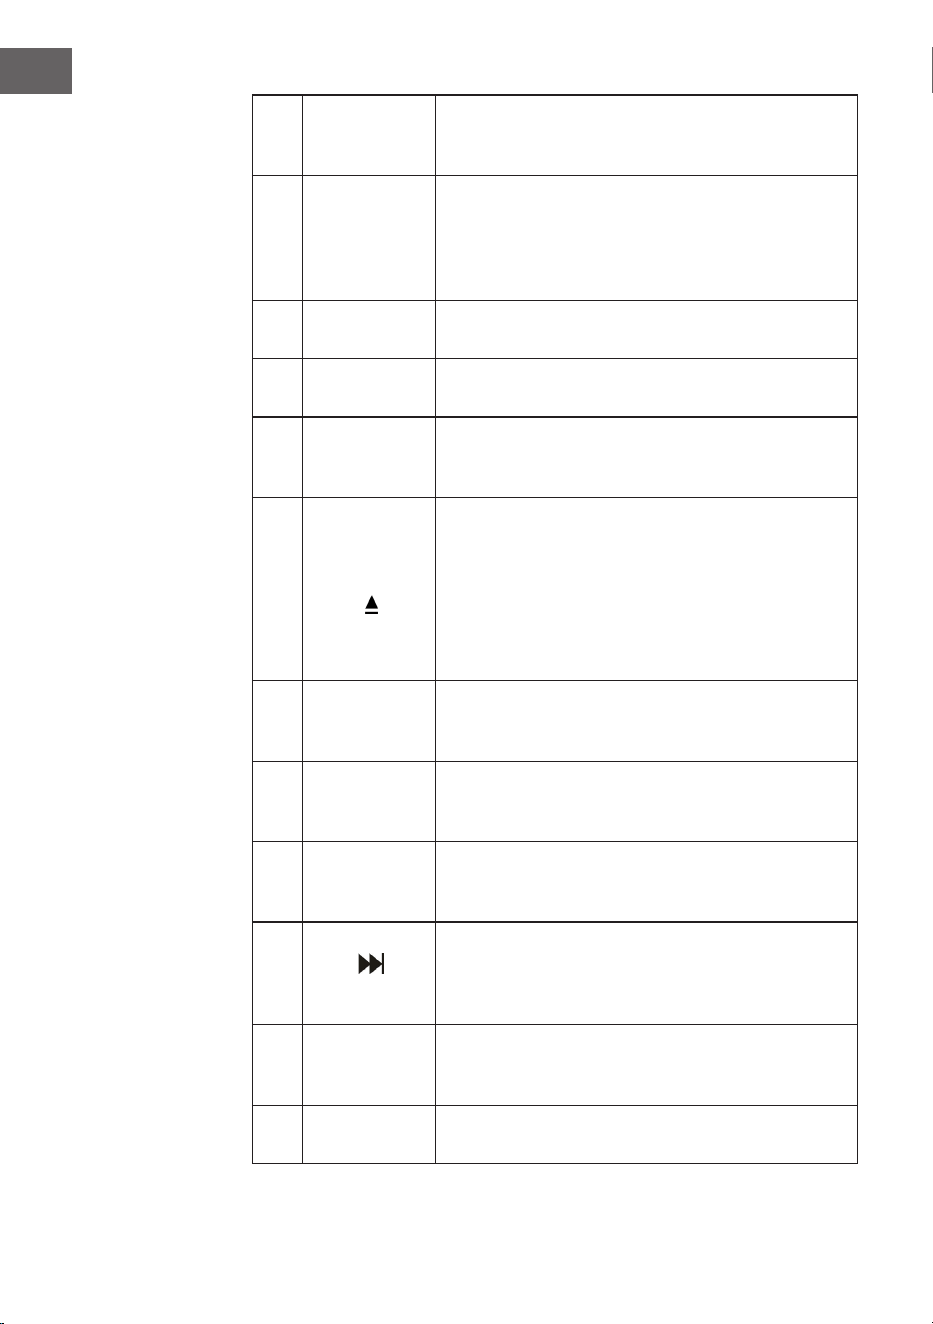
68
FR
7 F-10
Saute les 10 pistes précédentes (saute 10 pistes à
chaque fois). En mode de lecture aléatoire ("RAN"),
cette fonction est désactivée.
8
RPT
(répétition)
Appuyez une fois sur cette touche pour répéter
une piste spécique. Appuyez deux fois sur cette
touche pour répéter toutes les pistes. Appuyez
trois fois sur cette touche pour démarrer la lecture
aléatoire.
9 SCAN
Appuyez sur cette touche pour démarrer la
recherche automatique et mémoriser les stations.
10 STEREO
Sélection stéréo / mono en mode radio (si
disponible).
11 ENTER
Conrmation de la saisie : conrmez
l'enregistrement dans divers paramètres et
enregistrez.
12
MENU
Eectuez les réglages de la radio FM et de la radio
DAB. Vous trouverez une sélection de paramètres
pertinents dans le menu.
EJECT : appuyez sur cette touche pendant la
lecture d'un CD pour ouvrir le compartiment CD.
Appuyez à nouveau sur cette touche pour fermer le
compartiment CD.
13 INFO
Si une radio FM ou une station DAB ou un chier
contient des informations, appuyez sur cette
touche les aicher.
14 EQ
Appuyer sur cette touche pour modier le réglage
de l'égaliseur. Vous pouvez choisir entre JAZZ,
FLAT, CLASSIC, ROCK et POP.
15 F+10
Saut des 10 pistes suivantes (saute 10 pistes à
chaque fois). En mode de lecture aléatoire ("RAN"),
cette fonction est désactivée.
16
(titre suivant)
Avance rapide : appuyez pour aller à la piste
suivante ou maintenez pour avancer à l'intérieur
de la piste. Appuyer à tout moment sur PLAY pour
démarrer la lecture.
17 VOL+
Augmenter le volume : appuyez plusieurs fois sur
la touche ou maintenez-la jusqu'à ce que vous
atteigniez le niveau de volume souhaité.
18 PLAY/PAUSE
Appuyez sur cette touche pour démarrer ou mettre
en pause la lecture.
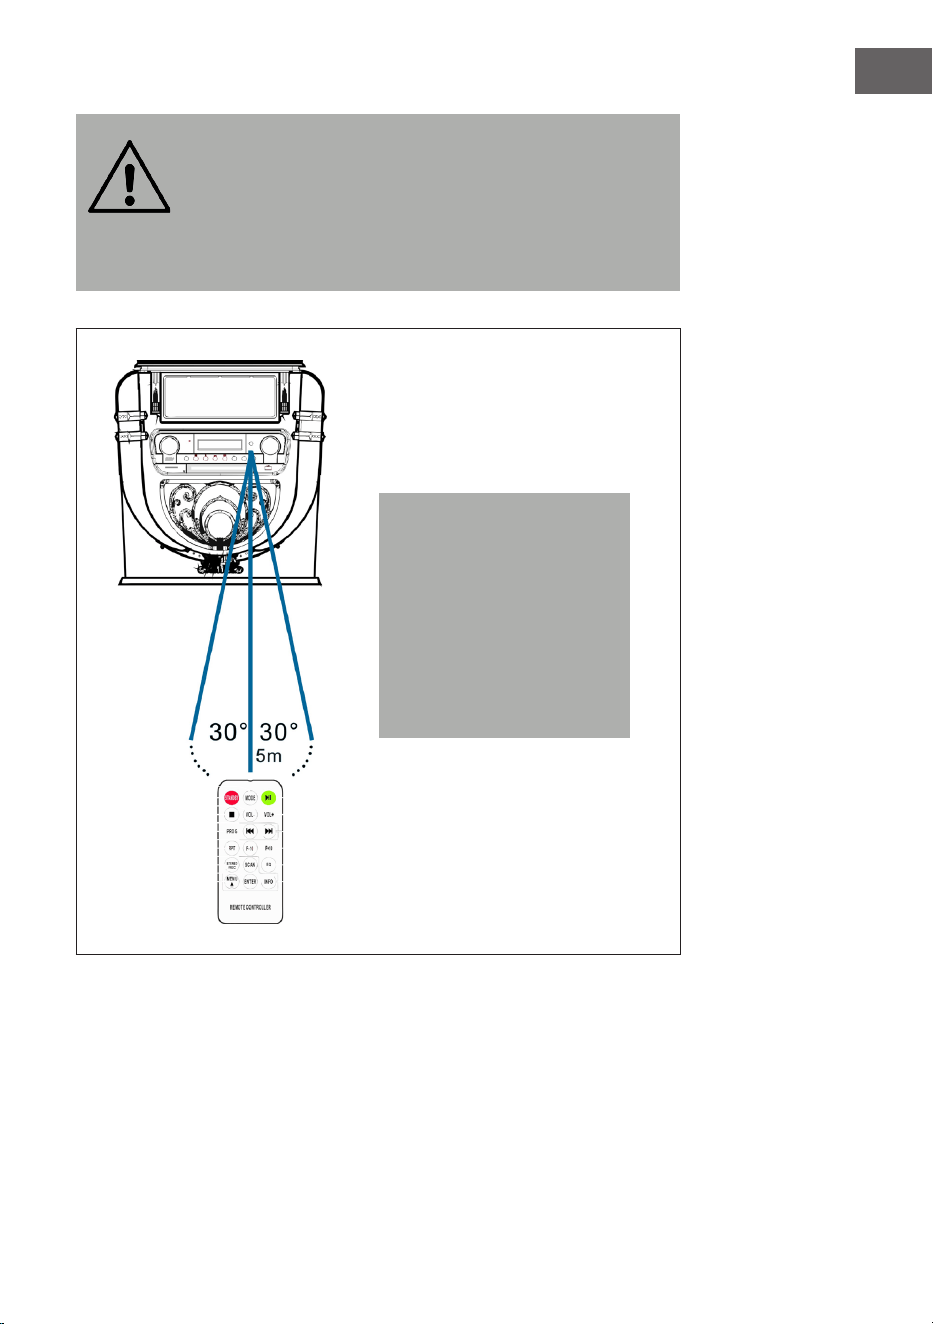
69
FR
MISE EN GARDE :
Risque de blessure ! Rangez les piles hors de portée des
enfants. Leur ingestion peut provoquer des blessures graves
ou la mort par brûlures internes en seulement deux heures.
En cas d'ingestion de piles, rendez-vous immédiatement aux
urgences d'un hôpital. Jetez immédiatement les piles
usagées.
Remarque : La meilleure
distance de transmission
entre l'appareil et la
télécommande est obtenue
à moins de 5 mètres sans
obstacle (angle d'environ
30 °). Si la pile est faible, la
télécommande ne peut pas
être utilisée normalement.
Insérez une pile neuve.
70
FR
MISE EN MARCHE ET PARAMÈTRES
Réglage de l'heure
Connectez l'adaptateur secteur à l'appareil et insérez la che d'alimentation
dans la prise. L'appareil passe automatiquement en mode veille et l'écran
LCD aiche l'heure "00:00" ou "12:00".
• Version américaine : système 1 2 heures
Lorsque le juke-box est en mode veille, l'écran LCD aiche "12:00".
• Version européenne :système 24 heures
Lorsque le juke-box est en mode veille, l'écran LCD aiche "00:00".
Exemple :Version d'exploitation américaine
Pour régler l'heure, appuyez simplement sur le bouton "P / R" du panneau
de commande (20) ou de la télécommande (6) et maintenez-le pendant 3
à 5 secondes jusqu'à ce que l'écran aiche "12-H" ("12-H" signie que l'heure
est réglée au format 12 heures). Appuyez ensuite sur ou pour choisir le
format 12 ou 24 heures. Dès que l'écran aiche "12-H", appuyez de nouveau
sur la touche "P/R". L'écran aiche à nouveau "00:00" et le premier "00"
clignote. Utilisez les touches et du panneau de commande (3) ou de la
télécommande (6) pour régler l'heure correcte (notez que l'heure est réglée
au format 12 heures), puis appuyez sur le bouton "P / R" pour conrmer. Le
second "00" clignote maintenant. Réglez les minutes avec les touches et
puis appuyez sur la touche "P/R" pour enregistrer.
REMARQUE : L'heure ne s'enregistre que lorsque le juke-box est en marche
ou en veille. Si vous souhaitez enregistrer l'heure dénie dans le juke-box,
appuyez simplement sur la touche STANDBY (8) du panneau de commande
pour mettre le juke-box en mode veille. Si vous débranchez l'alimentation
électrique, le réglage de l'heure sera supprimé et vous devrez recommencer
le processus ci-dessus pour régler l'heure au prochain démarrage de
l'appareil.
Les versions américaine et européenne de la mise à l'heure sont identiques.

71
FR
Réglage du volume
1. Pour augmenter le volume, tournez plusieurs fois la molette VOL+ ou
appuyez une fois sur la touche VOL+ de la télécommande et maintenez-
la jusqu'à atteindre le niveau de volume souhaité.
2. Pour réduire le volume, tournez plusieurs fois la molette VOL- ou
appuyez une fois sur la touche VOL- de la télécommande et maintenez-
la jusqu'à atteindre le niveau de volume souhaité.
Remarque : Vériez le volume avant de lire de la musique pour éviter
d'erayer les enfants, les personnes vulnérables ou les femmes
enceintes par le son soudain et fort du juke-box.
Remarque :Une utilisation prolongée du juke-box à un volume élevé
peut provoquer une surchaue du juke-box et endommager ses
composants internes. N'utilisez PAS le juke-box à un volume élevé
pendant une période prolongée.
Les réglages de volume sont enregistrés lorsque vous éteignez l'appareil.
Au redémarrage de l'appareil, le volume reste au niveau où il était avant la
dernière mise hors tension de l'appareil.
Réglages de l'égaliseur
1. Réglez n'importe quel mode audio :
le jukebox a plusieurs fonctions diérentes de lecture audio. Suivez ces
étapes pour choisir entre DAB / FM, lecteur CD, entrée USB, entrée de
carte SD, radio FM analogique,
streaming audio BT et platine.
2. Appuyez sur la touche EQ jusqu'à atteindre le réglage d'égaliseur
souhaité. Le son change dès que vous choisissez un autre mode

72
FR
d'égaliseur.
3. Le jukebox dispose de 5 réglages d'égaliseur qui vous permettent
d'ajuster le son pour amplier le type de musique en cours de lecture.
Les pré-réglages suivants sont disponibles sur l'égaliseur :
JAZZ, FLAT, CLASSIC, ROCK et POP.
RADIO DAB
Plage de fréquence : DAB 174,928–239,200 MHz
1. Appuyez sur la touche STANDBY de l'appareil (8) ou de la
télécommande (2) pour quitter le mode veille. L'appareil passe
automatiquement en mode DAB et recherche automatiquement les
signaux DAB à proximité.
2. Tournez la molette du tuner pour trouver une station DAB avec une
forte réception (tournez la molette du tuner pas à pas).
3. Appuyez sur la touche pour accéder aux stations de radio
mémorisées suivantes.
4. Appuyez sur la touche pour accéder aux stations de radio
mémorisées précédentes.
5. Appuyez sur la touche SCAN pour rechercher automatiquement les
stations DAB et les mémoriser automatiquement (stations avec le signal
actuel le plus fort). Vous pouvez mémoriser jusqu'à 20 stations.
6. Appuyez sur la touche INFO pour obtenir des informations sur la station.
7. Appuyez sur la touche MENU pour faire apparaître le me nu de
recherche automatique (auto tune) et les autres menus. Tournez la
molette du tuner pour choisir le contenu. Appuyez ensuite sur la touche
ENTER pour sélectionner le menu principal du contenu choisi. Tournez
la molette du tuner pour accéder au sous-menu. Appuyez sur la touche
ENTER pour conrmer.
8. Sélectionnez "Langue" dans le menu principal, puis sélectionnez l'une
des quatre langues disponibles (allemand / français / italien / anglais).
9. Si vous souhaitez eacer les paramètres précédents ou la mémoire,
sélectionnez "Oui"dans le menu "Réinitialisation aux paramètres
d'usine".

73
FR
Les options de menu suivantes sont disponibles :
Explication (allemand) :
MENU
Menu principal Sous-menu
Recherche automatique de
stations
Recherche complète de
stations
Recherche manuelle de
stations
Recherche manuelle de
stations
Supprimer Supprimer ? <Non> Oui
DRC DRC bas
DRC haut
DRC désactivé
Version de SW Version de SW
Langue Allemand
Français
Italien
Anglais
Réinitialiser aux
paramètres d'usine
Réinitialiser aux
paramètres d'usine ?
<Non> Oui
74
FR
REMARQUES :
• Déployez complètement l'antenne en mode DAB et FM. Installez
l'appareil à un endroit où la réception est bonne. (L'antenne se trouve
à l'arrière de l'appareil)
• Les stations avec un signal faible ne peuvent être réglées que
manuellement.
• Vous pouvez mémoriser jusqu'à 20 stations. Si moins de 20 stations
locales avec un signal fort sont disponibles, seules les stations avec
un signal fort sont mémorisées. (S'il n'y a pas 20 stations avec un
signal fort, vous ne pourrez pas mémoriser 20 stations.)
RADIO FM
Plage de fréquence : FM 87,5 – 108 MHz
Cet appareil dispose d'une fonction FM intégrée avec recherche
automatique de stations. Vous pouvez mémoriser jusqu'à 20 stations.
Lorsque vous utilisez l'appareil pour la première fois, après avoir inséré la
che d'alimentation dans la prise, l'appareil passe automatiquement en
mode veille (aichage de l'horloge). Appuyez sur STANDBY sur l'appareil
ou sur la touche POWER de la télécommande pour allumer l'appareil. Lors
de la première utilisation, l'appareil passe automatiquement en mode DAB.
Appuyez sur la touche MODE pour accéder au mode FM. L'écran LCD aiche
alors FM 87,5 MHz (ou une autre fréquence radio) et les enceintes émettent
un bruit dius (sauf si la fréquence 87,5 contient une station radio locale).
1. Appuyez sur STANDBY sur l'appareil (8) ou sur la télécommande (2)
pour sortir l'appareil du mode veille. L'appareil passe automatiquement
en mode FM.
2. Maintenez la touche ou pour rechercher les stations
récemment enregistrées (0,1 MHz ou 0,05 MHz à chaque pression).
Tournez la molette du tuner pour trouver une station avec un signal fort.
3. Appuyez sur les touches ou (plus de 3 secondes), la radio FM
recherche automatiquement les stations (si une station avec un signal
fort est trouvée, elle sera lue automatiquement).

75
FR
4. Recherche automatique et mémorisation : Appuyez sur la touche
(SCAN)pour lancer la recherche automatique à partir de la
fréquence 87,5 vers le haut. Pendant la recherche automatique, les
stations trouvées sont également enregistrées. L'appareil dispose de
20 emplacements de mémoire pour vos stations préférées, nommées
"P01" à "P20" (programme 1 à programme 20). La première station que
l'appareil trouve sera mémorisée sous "P01". La seconde sous "P02",
etc. La recherche automatique des stations se poursuit jusqu'à ce que
toutes les stations avec un signal fort aient été trouvées et enregistrées.
Dès que les 20 emplacements de mémoire sont occupés, la recherche
automatique de stations s'arrête, même si plusieurs stations avec un
signal fort sont encore disponibles.
5. Appuyez sur MENU, "Auto tune" et d'autres menus s'aichent à l'écran.
Choisissez le contenu avec la molette. Appuyez ensuite sur la touche
ENTER pour sélectionner le menu principal. Tournez à nouveau la
molette pour sélectionner le sous-menu. Appuyez ensuite sur la touche
ENTER pour une conrmation nale.
6. Dans le menu principal "Language" (Langue), sélectionnez l'une des
quatre langues disponibles (allemand / français / italien / anglais).
REMARQUES :
• La version américaine recherche les stations par intervalle de 0,1 MHz.
La version européenne recherche les stations par intervalle de 0,05
MHz.
• Déployez complètement l'antenne FM. Installez l'appareil dans un
endroit où la réception est bonne (l'antenne se trouve à l'arrière de
l'appareil).
• Les stations avec un signal faible ne peuvent être réglées que
manuellement.
• Vous pouvez mémoriser jusqu'à 20 stations. Si moins de 20 stations
locales avec un signal fort sont disponibles, seules les stations avec
un signal fort sont mémorisées (s'il n'y a pas 20 stations avec un
signal fort, vous ne pourrez pas mémoriser 20 stations).
• L'appareil mémorise les réglages en cours lorsque vous l'éteignez. Si
vous rallumez la radio, la station réglée avant l'arrêt ou la dernière
fonction sélectionnée sera rétablie.
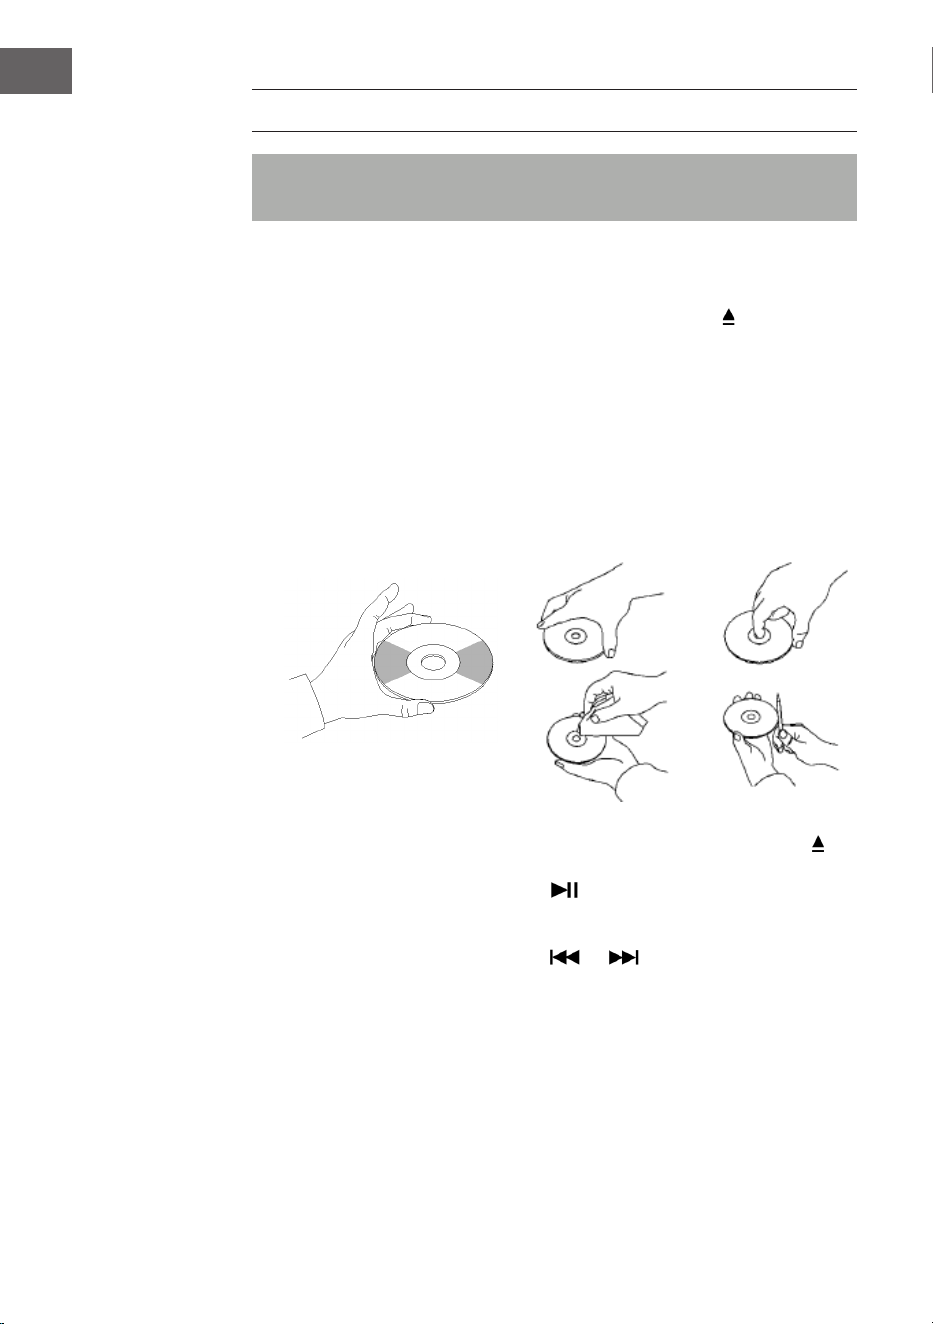
76
FR
CD
Remarque : Les CD doivent être insérés dans le lecteur avec la face
imprimée vers le haut.
1. Appuyez sur la touche MODE jusqu'à ce que l'écran LCD aiche "CD". Le
nombre de pistes sur le CD s'aiche alors à l'écran. La lecture démarre
automatiquement.
2. Pour ouvrir le compartiment CD, appuyez sur le bouton
du panneau de
commande ou sur la touche EJECT de la télécommande.
3. Placez le CD avec la face imprimée vers le haut et la face brillante vers
le bas dans le compartiment CD.
• Cet appareil a été spécialement développé pour la reproduction
sonore de CD marqués "compact disc". Vous ne pouvez pas utiliser
d'autres disques.
• Pour retirer un disque de son boîtier, appuyez sur le centre du boîtier
et soulevez le disque en le tenant doucement par le bord.
4. Pour fermer le compartiment CD, appuyez à nouveau sur la touche du
panneau de commande ou sur la touche EJECT de la télécommande.
5. Choisissez un titre avec la touche . Maintenez la touche pour
parcourir rapidement un titre. Appuyez sur la touche PLAY pour
démarrer la lecture.
6. Choisissez un titre avec la touche ou .
7. Réglez le volume avec la commande VOLUME +/- .
8. Appuyez une fois sur la touche REP pour répéter une piste spécique.
"REP 1" clignote alors dans le coin supérieur gauche de l'écran LCD.
Appuyez de nouveau sur REP pour répéter toutes les pistes se trouvant
sur le CD. "REP A" clignote alors dans le coin supérieur gauche de
l'écran LCD. Appuyez de nouveau sur REP pour quitter la fonction de
répétition.
9. Pour lire dans un ordre aléatoire, appuyez à nouveau sur la touche REP
jusqu'à ce que "Rand" apparaisse en bas de l'écran LCD. Appuyez sur les
77
FR
touches ou pour choisir un titre aléatoire.
10. Pour créer une liste en mémoire, appuyez d'abord sur STOP pour
arrêter la lecture. Appuyez sur la touche P/R pour accéder au mode
programmation. L'écran LCD clignote et aiche "P01". Sélectionnez
d'abord la piste que vous souhaitez programmer, puis appuyez à
nouveau sur P / R. Pour arrêter la sauvegarde et commencer la lecture
des pistes enregistrées, appuyez sur la touche . L'écran LCD aiche
"PROG CD". L'appareil peut mémoriser jusqu'à 20 titres. Vous trouverez
de plus amples informations dans la section "PROG (programmation
d'une liste)".
Remarque : ne forcez pas pour fermer le compartiment CD car cela
pourrait provoquer un dysfonctionnement.
LECTURE EN MODE USB/SD
1. .Appuyez sur la touche MODE jusqu'à ce que l'écran aiche "USB ou
SD". L'écran aiche alors le nombre de dossiers puis le nombre de
pistes. La lecture démarre automatiquement.
2. Choisissez un titre avec la touche ou .
3. Appuyez une fois sur la touche REP pour répéter une piste spécique.
"REP 1" clignote alors dans le coin supérieur gauche de l'écran LCD.
Appuyez de nouveau sur REP pour répéter toutes les pistes. "REP A"
clignote alors dans le coin supérieur gauche de l'écran LCD. Appuyez de
nouveau sur REP pour quitter la fonction de répétition.
4. Pour lire dans un ordre aléatoire, appuyez à nouveau sur la touche REP
jusqu'à ce que "Rand" apparaisse en bas de l'écran LCD. Apupyez sur les
touches ou pour choisir un titre aléatoire.auszuwählen.
5. Pour créer une liste en mémoire, appuyez d'abord sur STOP pour
arrêter la lecture. Appuyez sur la touche P/R pour accéder au mode
programmation. L'écran LCD clignote et aiche "P01". Sélectionnez
d'abord la piste que vous souhaitez programmer, puis appuyez à
nouveau sur P / R. Pour arrêter la sauvegarde et commencer la lecture
des pistes enregistrées, appuyez sur la touche . L'écran LCD aiche
"PROG CD". L'appareil peut mémoriser jusqu'à 20 titres. Vous trouverez
de plus amples informations dans la section "PROG (programmation
d'une liste)".
78
FR
6. Appuyez sur la touche MODE pour quitter la lecture USB ou SD. Ne
débranchez pas la che de la prise pendant la lecture USB ou SD car
cela peut provoquer un dysfonctionnement.
REMARQUES :
• Si la clé USB contient des chiers audio qui ne sont pas compatibles
avec le juke-box, le juke-box ne pourra pas les lire. Ces titres ne sont
pas inclus dans le nombre total de titres aichés et ne sont pas non
plus lus.
• Si la carte SD contient des chiers audio qui ne sont pas compatibles
avec le juke-box, le juke-box ne pourra pas les lire. Ces titres ne sont
pas inclus dans le nombre total de titres aichés et ne sont pas non
plus lus.
Remarque : Pour une fonctionnalité optimale, il est recommandé
d'utiliser une clé USB de version 2.0 (et non 3.0).
BT
Comment appairer le juke-box avec un appareil BT externe :
1. Appuyez sur la touche MODE jusqu'à ce que l'écran LCD aiche "BT".
2. Allumez l'appareil externe et activez sa fonction BT. Démarrez le
recherche d'appareils BT disponibles.
3. Choisissez "Graceland Mini" dans la liste des appareils disponibles.
4. Dès que les deux appareils sont appairés, "connected" s'aiche à
l'écran. Vous pouvez maintenant commencer la lecture de la piste sur
votre appareil BT externe. Contrôlez la lecture depuis votre appareil BT
externe, le juke-box ou la télécommande du juke-box.
Utilisation avec l'appareil BT :
• Utilisez les touches à l'écran pour sélectionner les pistes, régler le
volume, démarrer ou interrompre la lecture et les fonctions et .
Utilisation avec le juke-box / télécommande :
• Dès que l'appairage a réussi, la lecture depuis l'appareil BT démarre
automatiquement.
• Tournez la commande de volume VOLUME+/- pour régler le volume.
• Appuyez sur les touches ou pour accéder au titre précédent /
suivant.
• Pour mettre en pause / reprendre la lecture, appuyez sur la touche .
• Pour mettre n à l'appairage, appuyez sur MODE pour sélectionner
une autre fonction ou désactiver la connexion BT de votre appareil BT
79
FR
externe.
Remarque : La distance de transmission optimale pour la connexion BT
est atteinte à moins de 10 mètres sans obstacle. Si le dernier appareil BT
connecté est à portée du juke-box, aucun nouvel appareil ne peut être
connecté au juke-box. La connexion BT du dernier appareil connecté
doit être désactivée si vous souhaitez connecter un nouvel appareil au
juke-box.
PROG (PROGRAMMATION D'UNE LISTE)
1. Pendant la lecture d'une source audio, appuyez sur STOP.
2. Appuyez sur PROG (6) sur la télécommande ou sur P / R du panneau de
commande pour passer en mode programme. "PROG" clignote alors
dans le coin inférieur gauche de l'écran LCD. Un numéro de position
clignotera également à l'écran (par exemple "P01").
3. Choisissez le titre à programmer avec les touches ou . Pour
enregistrer votre choix, appuyez sur PROG.
4. Répétez les étapes pour programmer d'autres titres.
5. Une fois que vous avez programmé tous les titres souhaités, vous
pouvez commencer la lecture. Vous pouvez le faire à tout moment une
fois que vous avez enregistré le nombre de pistes souhaité.
6. Pour annuler la mémorisation des pistes, appuyez sur la touche STOP.
7. Lorsque le nombre maximum de plages à stocker est atteint, l'écran
aiche "FULL".
REMARQUE : Si vous avez changé de mode de lecture ou redémarré
l'appareil, vous devez créer à nouveau la liste de mémoire (répétez les
étapes ci-dessus pour ce faire).

80
FR
PLATINE VINYLE
• Appuyez sur la touche MODE jusqu'à ce que l'écran LCD aiche "Phono".
• Posez un disque vinyle sur la platine. Choisissez une vitesse de lecture.
Les vitesses de rotation 33/45/78 sont disponibles (réglage par défaut
sur 33 tours). Dès que l'aiguille se trouve sur le disque, la lecture
commence.
Adaptateur 45 tours
Posez un disque sur la platine. Pour
lire des singles, utilisez l'adaptateur
45 tours fourni.
Adaptateur 45
tours
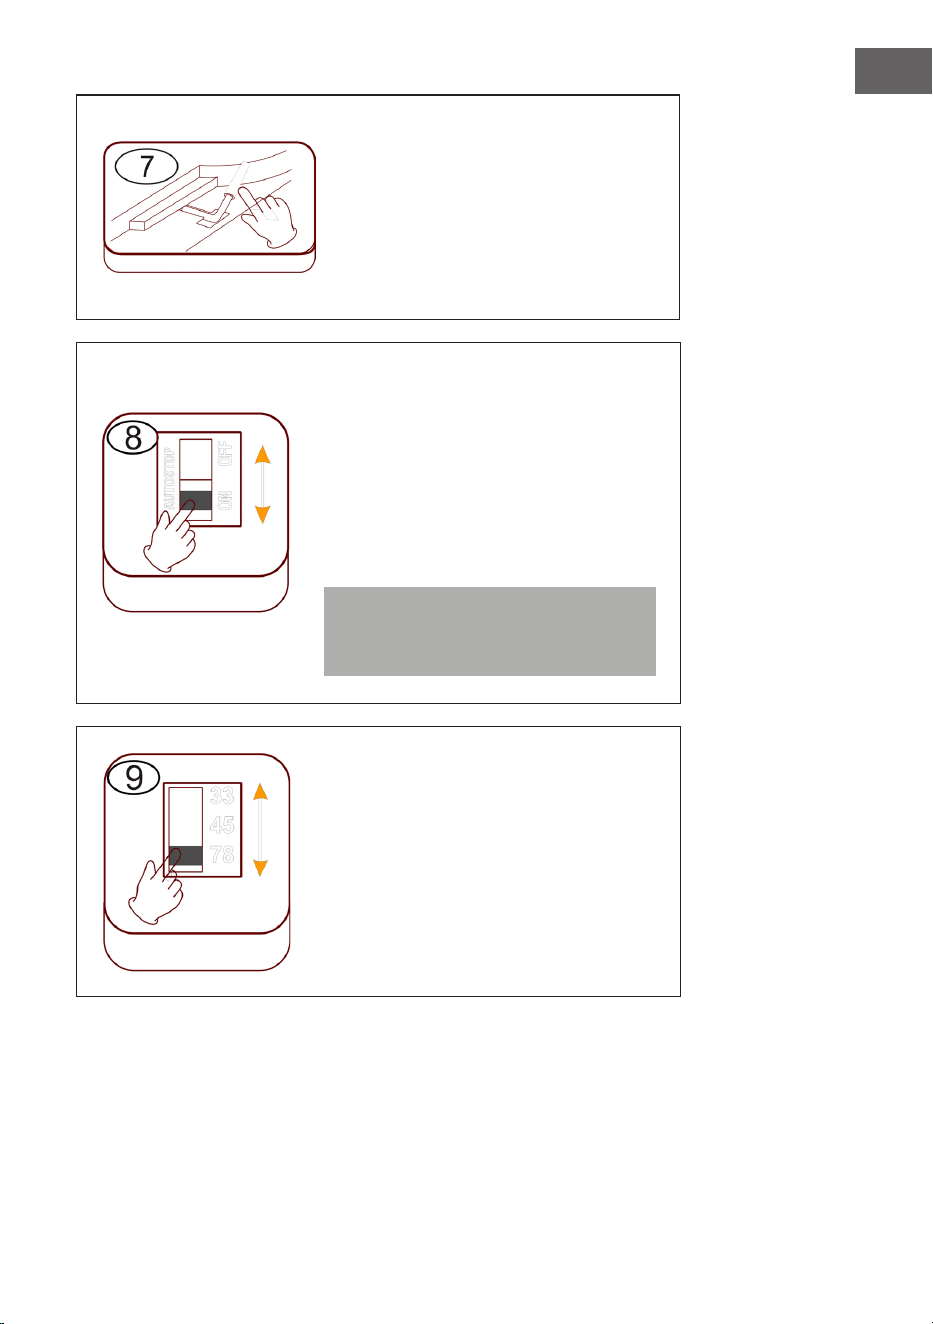
81
FR
Pour lever/ abaisser le levier
• Soulevez délicatement le bras de
lecture et déplacez-le au-dessus
de l'emplacement voulu sur le
disque.
• Abaissez le bras de lecture
doucement et avec précaution.
Arrêt automatique (autostop)
• Faites glisser le contrôleur vers
le haut : la lecture de la musique
s'arrête, la platine continue de
tourner.
• Faites glisser le contrôleur vers le bas
: la lecture de la musique s'arrête, la
platine s'arrête.
Remarque : Remettez le bras de
lecture en position de repos une fois
la lecture terminée.
Réglage de la vitesse
Les trois vitesses 33/45/78 sont
disponibles.
Levier
Autostop
Vitesse

82
FR
Blocage du bras de lecture
Relâchez le verrou du bras de
lecture avant utilisation.
Tête de lecture (bras de lecture)
Poser un disque
Posez un disque sur la platine. Soulevez
délicatement le bras de lecture et
déplacez-le au-dessus du disque avec
précaution. Vous pouvez maintenant lire
les titres du disque.
Protection en plastique de l'aiguille
Retirez l'aiguille en la tirant vers le bas
dans la direction opposée du bras de
lecture.
Blocage bras
de lecture
Verrouillage
Bras de lecture
Poser un disque
Protection en
plastique de
l'aiguille
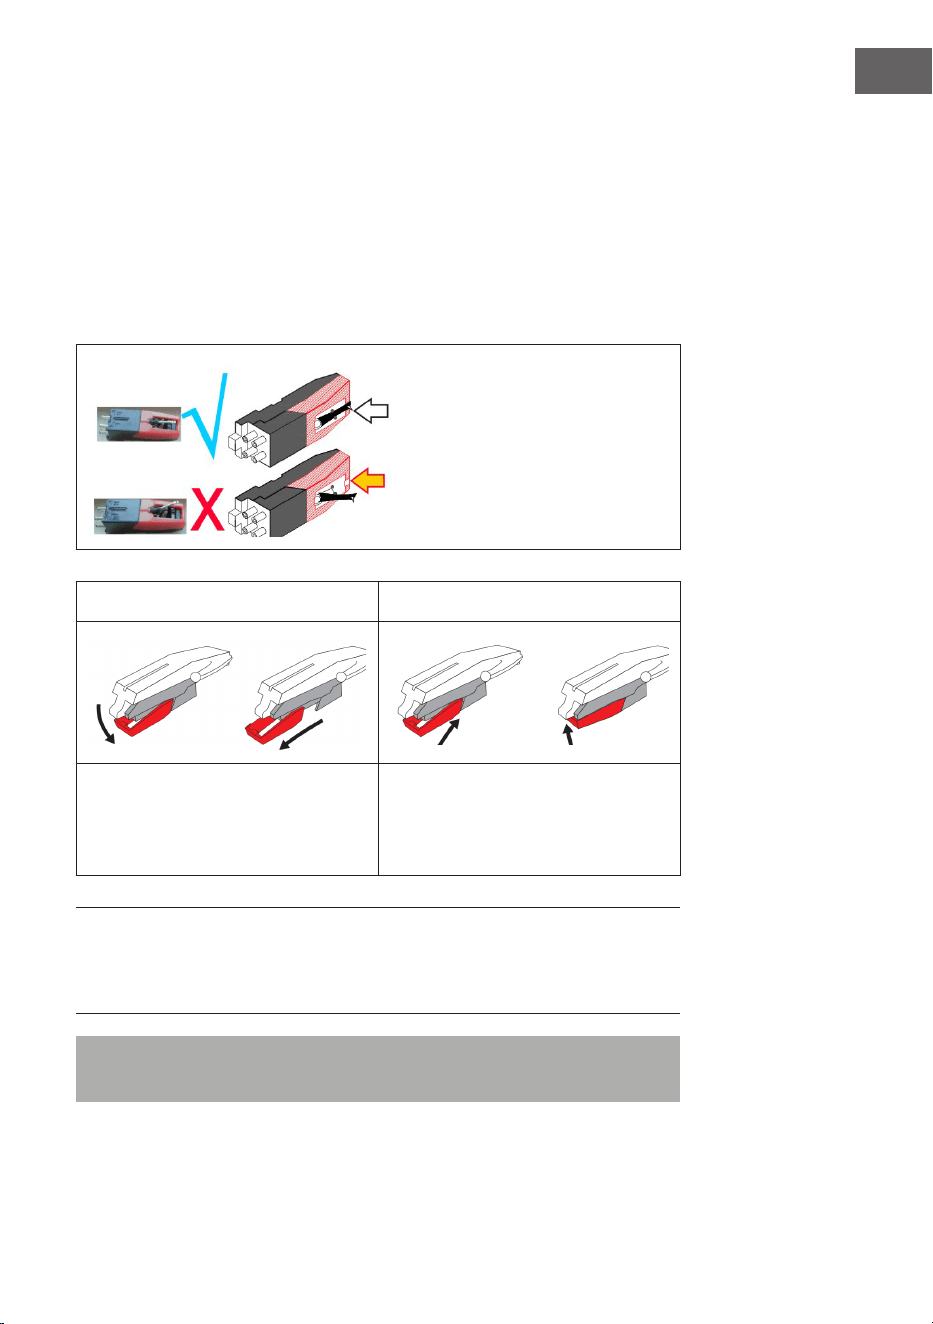
83
FR
Entretien de l'aiguille
• Appuyez sur la touche MODE jusqu'à ce que l'écran LCD aiche "Phono".
Retirez la protection de l'aiguille (voir gure 1). Posez un disque vinyle
sur la platine. Choisissez la vitesse de lecture parmi 33/45/78 tours. Dès
que l'aiguille se déplace sur le disque, la lecture commence.
• Il est conseillé de remplacer l'aiguille dès que vous remarquez un
changement dans la qualité du son.
• L'utilisation d'une aiguille usée peut endommager vos disques vinyles.
L'usure de l'aiguille est plus rapide lors de la lecture de disques 78 tours.
L'aiguille doit être alignée en
position médiane (au milieu de
la fente).
Si l'aiguille dépasse de la fente,
cela peut entraîner des pertes
pendant la lecture (aiguille pliée,
etc.).
Figure 1 Figure 2
Retirez l'aiguille en la tirant vers le
bas dans la direction opposée du
bras de lecture.
Remplacez l'aiguille par une autre
compatible. Fixez la nouvelle
aiguille, pointe vers le bas et
poussez-la doucement.
REMARQUE : Lorsque vous achetez l'aiguille de remplacement dans un
magasin, il est utile d'apporter l'ancienne aiguille avec vous pour référence.
La plupart des bons magasins d'électronique et de musique vendent des
aiguilles de remplacement.
Remarque : assurez-vous toujours que le bras de lecture est bloqué
avant de déplacer le juke-box

84
FR
REMARQUE : à la n du disque, le bras de lecture ne revient pas
automatiquement sur le support, mais le plateau tournant et le bras de
lecture s'arrêtent de tourner (ramenez manuellement le bras de lecture sur
le support).
Mettez la protection sur l'aiguille lorsque vous
n'utilisez pas l'appareil.
Remarque importante concernant l'utilisation de l'aiguille
• Ne pliez pas l'aiguille.
• Pour ne pas vous blesser, ne touchez pas l'aiguille.
• Tenez-la hors de portée des enfants !
• Soyez prudent car l'aiguille est très fragile. L'utilisation d'une aiguille
pliée ou cassée peut endommager le disque et provoquer un
dysfonctionnement.
• N'exposez jamais l'aiguille à une forte chaleur.
• Contactez un technicien qualié si vous rencontrez des diicultés
pour changer l'aiguille.
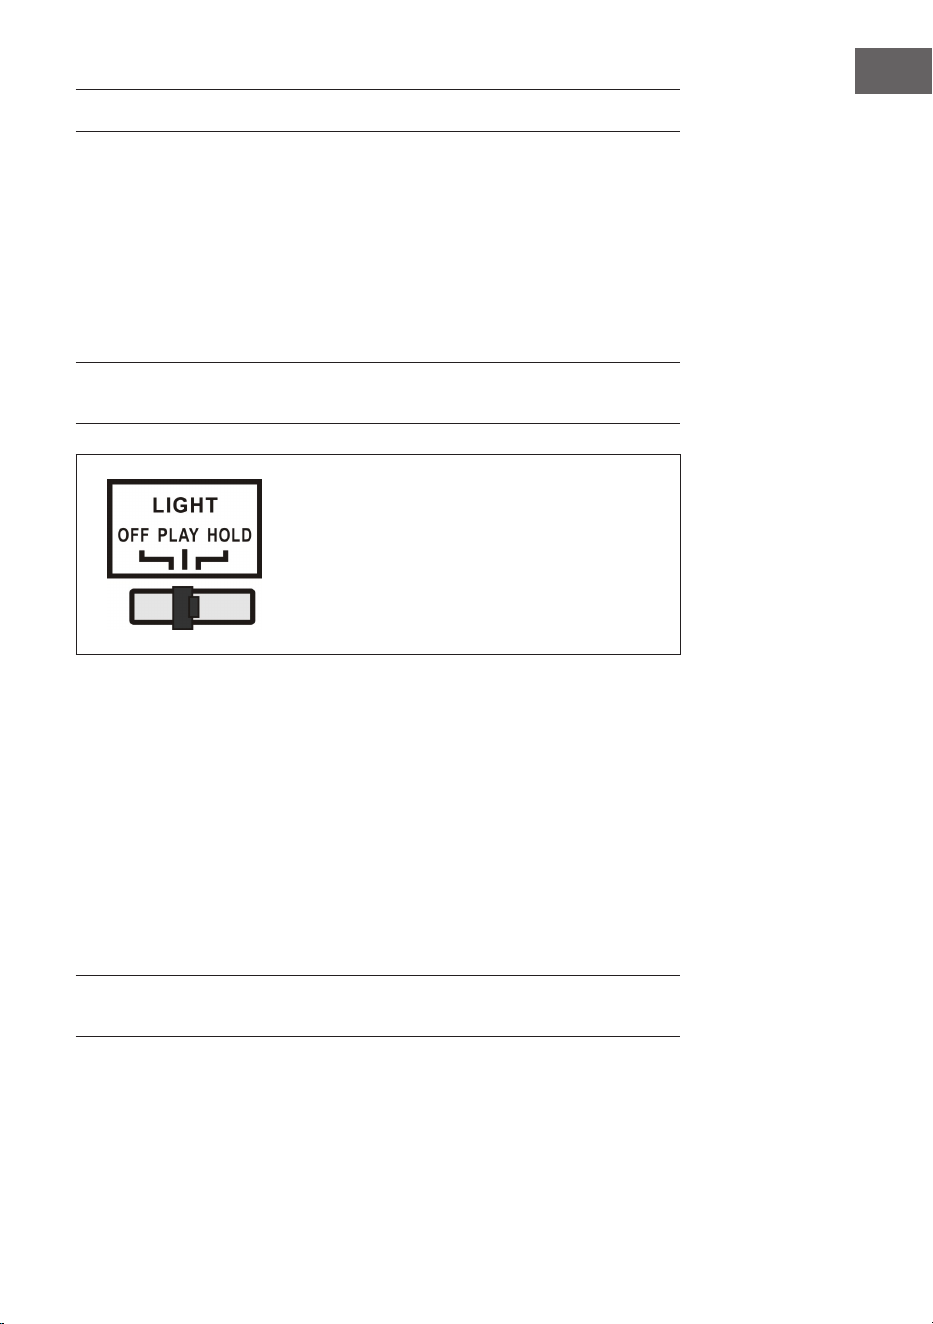
85
FR
POUR ALLUMER LES EFFETS D'ÉCLAIRAGE
Le juke-box dispose de 2 tubes lumineux LED à couleur changeante aichés
sur les pièces du juke-box. Il existe également plusieurs autres eets
d'éclairage LED multicolores qui peuvent être vus dans le lecteur CD et la
fente USB / SD et sur le bas du panneau des enceintes.
L'interrupteur d'éclairage se trouve à l'arrière de l'appareil. Lorsque
l'interrupteur passe de la position "OFF" à la position "PLAY" la lampe
s'allume.
REMARQUE : La touche LIGHT contrôle l'alimentation électrique des eets
d'éclairage et se trouve à l'arrière de l'appareil.
PLAY :Le cycle de couleur de la lumière
change.
HOLD : La couleur de la lumière est
maintenue (inclut la lumière invisible).
OFF : La lumière s'éteint et ne se rallume
plus.
Un interrupteur de mode d'éclairage LED (27) se trouve à l'arrière du juke-
box (voir la section "Aperçu de l'appareil - dos de l'appareil"). Lorsqu'il est
activé, les tubes lumineux LED changent de couleur en continu. En mode
HOLD, les tubes lumineux LED ne s'allument que d'une seule couleur.
Lorsque vous passez en mode PLAY, le tube lumineux LED commence à
parcourir les couleurs. En repassant en mode HOLD, vous pouvez choisir
une couleur diérente pour l'aichage, elle sera conservée (veuillez noter
que ces couleurs sont xes et qu'il se peut qu'il ne soit pas exactement de
la même couleur que le tube lumineux LED lorsque le mode HOLD était
allumé. ).
L'éclairage s'éteint lorsque l'interrupteur est sur la position "OFF".
REMARQUE : Il se peut qu'il n'y ait pas de lumière visible en mode HOLD,
c'est normal (le commutateur doit être réinitialisé)

86
FR
RÉSOLUTION DES PROBLÈMES
Les vérications ci-dessous vous aideront à résoudre la plupart des
problèmes que vous pourriez rencontrer avec votre appareil. Avant
de parcourir la liste de contrôle suivante, vériez d'abord que le bloc
d'alimentation est correctement connecté. Si le problème persiste après
les vérications énumérées ci-dessous, contactez le fabricant, le service
client ou une entreprise spécialisée agréée pour la maintenance et les
réparations.
Problème Cause possible Solution
Réception radio
Pas de réception radio
La commande de
mode n'est pas dans la
bonne position.
Réglez le volume
souhaité avec la
commande de volume.
Tournez la molette du
tuner pour rechercher
une station de radio.
Lecture d'un CD
Le CD n'est pas lu ou
il y a des coupures de
son.
Le CD est mal inséré.
Placez le CD avec la
face imprimée vers le
haut et la face brillante
vers le bas dans le
compartiment CD.
le CD est poussiéreux.
Nettoyez le CD.
Redémarrez l'appareil.
Le son est brouillé.
Changez
d'emplacement.
Appuyez sur la touche
STANDBY (redémarrez
l'appareil).
Le lecteur CD ne
fonctionne pas.
Appuyez sur STOP,
puis enregistrez les
pistes souhaitées.

87
FR
Problème Cause possible Solution
Général
Impossible de lire la
liste programmée.
La che secteur
n'est pas insérée
correctement dans la
prise.
Branchez la che dans
la prise.
Appuyez sur la touche
STANDBY (redémarrez
l'appareil).
Pas de son
Le volume est mal
réglé.
Tournez la commande
de volume dans le
sens des aiguilles
d'une montre pour
augmenter le volume.
Bourdonnement ou
parasites forts.
Un téléviseur ou
un magnétoscope
/ enregistreur DVD
est trop proche du
système stéréo.
Déplacez l'appareil.
L'aichage à l'écran
est déformé ou ne
fonctionne pas.
Éteignez et redémarrez
l'appareil.

88
FR
CONSEILS POUR LE RECYCLAGE
S‘il existe une réglementation pour l‘élimination ou le
recyclage des appareils électriques et électroniques
dans votre pays, ce symbole sur le produit ou sur
l‘emballage indique que cet appareil ne doit pas
être jeté avec les ordures ménagères. Vous devez le
déposer dans un point de collecte pour le recyclage
des équipements électriques et électroniques.
La mise au rebut conforme aux règles protège
l‘environnement et la santé de vos semblables des
conséquences négatives. Pour plus d‘informations
sur le recyclage et l‘élimination de ce produit, veuillez
contacter votre autorité locale ou votre service de
recyclage des déchets ménagers.
Ce produit contient des piles. S‘il existe une
réglementation pour l‘élimination ou le recyclage
des piles dans votre pays, vous ne devez pas les
jeter avec les ordures ménagères. Renseignez-vous
sur les dispositions locales relatives à la collecte
des piles usagées. La mise au rebut conforme aux
règles protège l‘environnement et la santé de vos
semblables des conséquences négatives.
DÉCLARATION DE CONFORMITÉ
Fabricant :
Chal-Tec GmbH, Wallstraße 16, 10179 Berlin,
Allemagne.
Importateur pour la Grande Bretagne :
Berlin Brands Group UK Limited
PO Box 42
272 Kensington High Street
London, W8 6ND
United Kingdom
Le soussigné, Chal-Tec GmbH, déclare que
l’équipement radioélectrique du type Graceland Mini
est conforme à la directive 2014/53/UE. Le texte
complet de la déclaration UE de conformité est
disponible à l’adresse internet suivante :
use.berlin/10036452

89
ES
Estimado cliente:
Le felicitamos por la adquisición de este producto.
Lea atentamente el siguiente manual y siga
cuidadosamente las instrucciones de uso con el
n de evitar posibles daños. La empresa no se
responsabiliza de los daños ocasionados por un
uso indebido del producto o por haber desatendido
las indicaciones de seguridad. Escanee el siguiente
código QR para obtener acceso al manual de usuario
más reciente y otra información sobre el producto.
ÍNDICE
Datos técnicos 90
Indicaciones de seguridad 91
Vista general del aparato 93
Mando a distancia 95
Puesta en funcionamiento y manejo 98
Radio DAB 100
Radio FM 102
CD 104
Reproducción USB/SD 105
BT 106
PROG (crear lista de reproducción). 107
Tocadiscos 108
Activar efectos de luz 113
Reparación de anomalías 114
Retirada del aparato 116
Declaración de conformidad 116
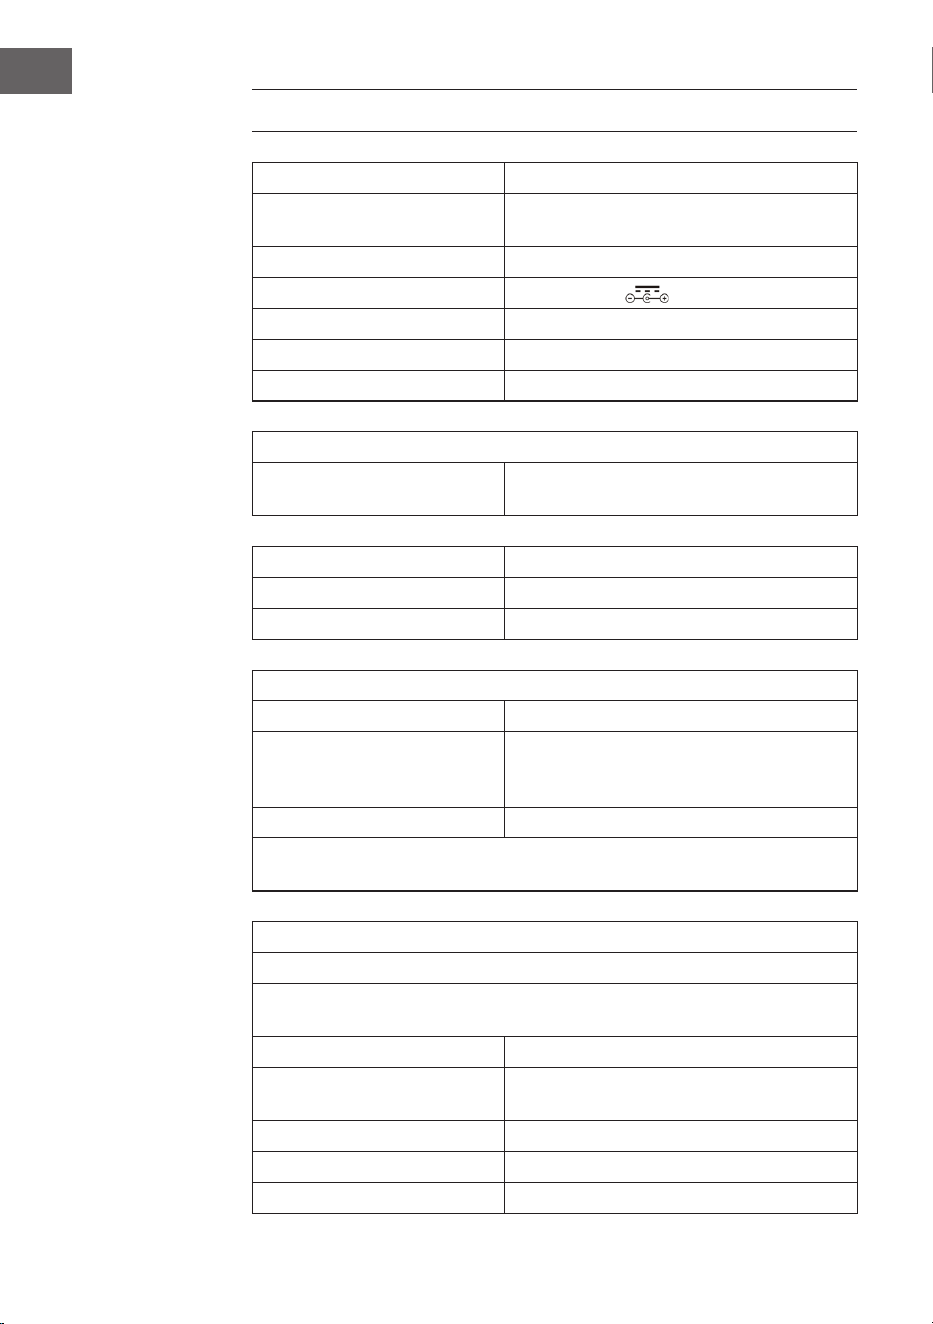
90
ES
DATOS TÉCNICOS
Número de artículo 10036452
Suministro eléctrico
(Fuente alimentación CA/CC)
100-240 V ~ 50/60 Hz
Batería (mando a distancia) Batería de litio CR2025 3V
Potencia de salida CC 14 V 1,75 A
Potencia 24,5 W
Tipo de canal amplicador Canal 2,0
Potencia de salida 4 W + 4 W
Radio (FM/DAB)
Banda de frecuencia
FM 87,5 – 108 MHz
DAB 174,928 – 239,200 MHz
BT
Banda de frecuencia BT 2,4 – 2,480 GHz
Transmisión BT (máx.) 4 dBm
Dispositivos USB o tarjetas SD compatibles
Toma USB Compatibilidad con USB 2.0 o USB 1.1
Sistema de archivos
FAT 16/32
(El sistema de archivos NTFS no es
compatible)
Número máximo de archivos < 999
Los HDD externos, dispositivos de lectura de tarjetas y otros dispositivos
protegidos no son compatibles.
Requisitos de archivos reproducibles
Archivos de música MP3/WMA
Compatibilidad de archivos MP3/WMA con este dispositivo limitada del
siguiente modo:
Banda de frecuencia entre 32 y 48 kHz
Tasa de bits entre 32 y 320 kbps (MP3),
40 a 192 kbs (WMA)
Número máximo de archivos < 999
Número máximo de carpetas < 99
Extensiones de archivo .mp3 o .wma

91
ES
INDICACIONES DE SEGURIDAD
Indicaciones generales
• Rayos- Si no va a utilizar la unidad durante un período prolongado de
tiempo, o si hay rayos, desenchufe la unidad de la toma de corriente
y desconecte el conector de la antena. Esto evitará que el producto
resulte dañado por los rayos y las subidas de tensión.
• Sobrecarga - No sobrecargue las tomas de corriente, los alargadores
o los receptáculos integrales, ya que puede provocar un incendio o una
descarga eléctrica.
• Entrada de objetos extraños y líquidos- No introduzca nunca objetos
de ningún tipo en el producto a través de las aberturas, ya que podrían
tocar puntos de tensión peligrosos o provocar un cortocircuito en las
piezas que podría dar lugar a un incendio o a una descarga eléctrica. No
derrame nunca líquidos de ningún tipo sobre la unidad.
• Reparación y mantenimiento- No intente reparar este producto usted
mismo, ya que al abrir o retirar las cubiertas puede exponerse a voltajes
peligrosos u otros riesgos. Remita todas las reparaciones a personal de
servicio cualicado.
• Daños que requieren servicio técnico - Desenchufe este producto de
la toma de corriente y diríjase a personal de servicio cualicado siempre
que se produzca alguna de las siguientes situaciones:
a) Si el cable de alimentación o el enchufe están dañados.
b) Si se ha derramado líquido o han caído objetos sobre el producto.
c) Si el producto ha sido expuesto a la lluvia o al agua.
d) Si el producto se ha caído o dañado.
e) Si el producto presenta un rendimiento signicativamente
reducido.
• Piezas de repuesto - Cuando se necesiten piezas de repuesto,
asegúrese de que el servicio técnico que las sustituya utilice únicamente
piezas de repuesto aprobadas por el fabricante o que tengan las
mismas características que la pieza original. Las sustituciones no
autorizadas pueden provocar incendios, descargas eléctricas u otros
peligros.
• Calor - No instale el aparato cerca de fuentes de calor como radiadores,
registros de calor, estufas u otros productos (incluidos amplicadores).
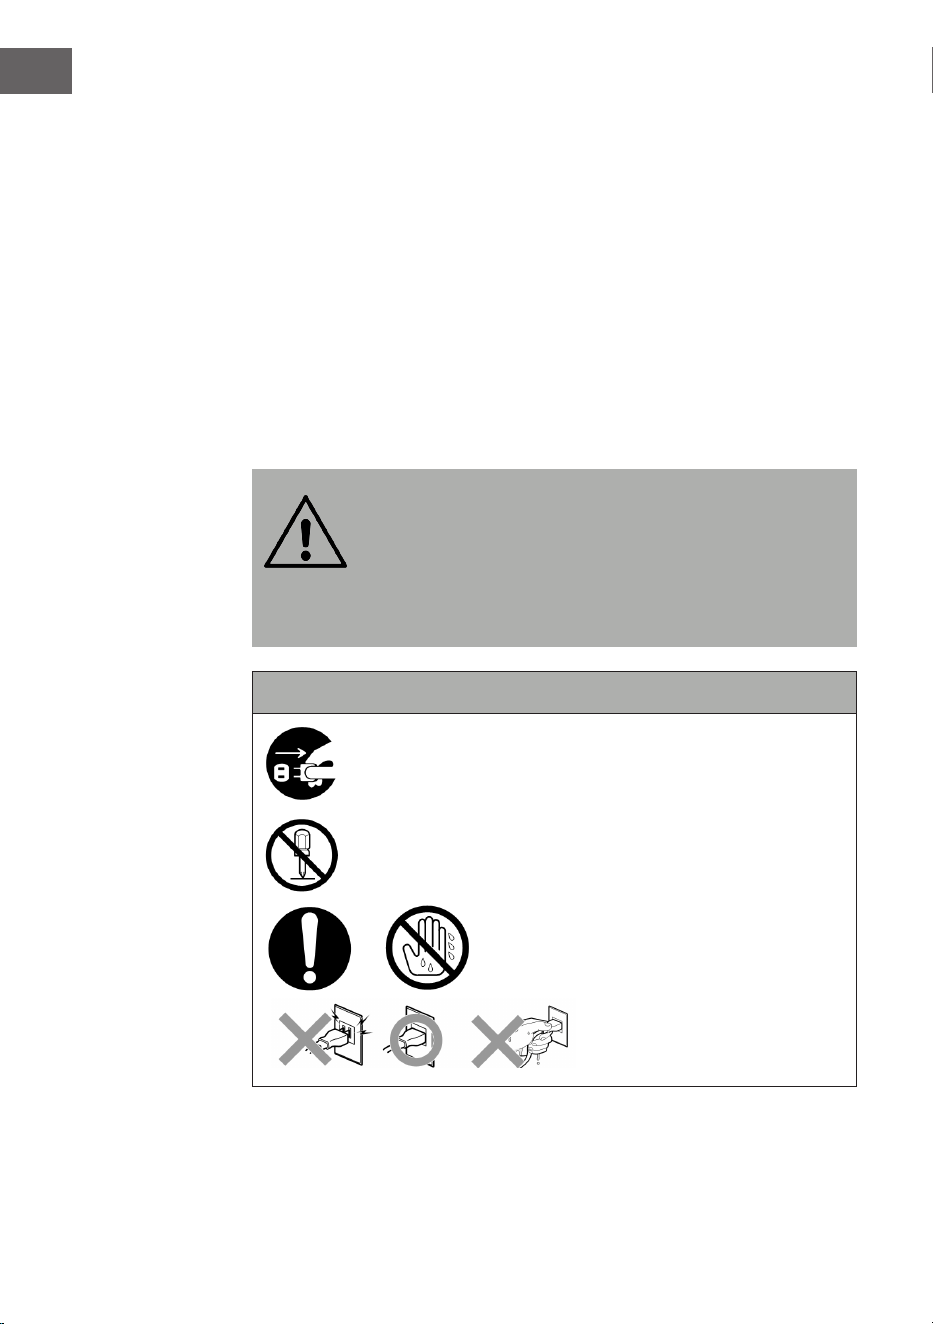
92
ES
Instrucciones especiales
• Este aparato puede ser utilizado por niños a partir de 8 años y por
personas con capacidades físicas, sensoriales o mentales reducidas
o con falta de experiencia y/o conocimientos, siempre que se les
supervise o instruya sobre cómo usar el aparato de forma segura y
entiendan los peligros que conlleva.
• La limpieza y el mantenimiento no deben ser realizados por niños, a
menos que tengan 8 años o más y sean supervisados.
• Los niños deben estar bajo supervisión para garantizar que no jueguen
con el aparato. Asegúrese de que los niños y bebés no jueguen con las
bolsas de plástico ni otras partes del embalaje.
• Asegúrese de que el enchufe/fuente de alimentación esté accesible
para poder desenchufar el aparato en caso de emergencia.
• Cuando ya no necesite utilizar el aparato, apáguelo y desconecte el
enchufe de la toma de corriente.
ADVERTENCIA
¡Riesgo de lesiones! Guarde las pilas fuera del alcance de los
niños. La ingesta puede ocasionar tras dos horas lesiones
graves o incluso la muerte debido a quemaduras internas. Si
se ingieren las pilas, contacte inmediatamente con el
servicio de urgencias de un hospital. Elimine
inmediatamente las pilas usadas.
Indicaciones de seguridad importantes
Asegúrese de que los bebés y los niños pequeños no tiren
del enchufe.
¡Queda prohibido desmontar el aparato!
¡No toque el aparato con las manos
mojadas!

93
ES
VISTA GENERAL DEL APARATO
Parte delantera
1 Protección antipolvo del tocadiscos 14 Atrás/ retroceso rápido / PRE+
2 Tocadiscos 15 Visor de recepción del mando a distancia
3 LIGHT (luz/ modicar el color de la luz) 16 Sintonizador/EQ (ecualizador)
4 Posición de la lámpara de discoteca 17 Pantalla
5 Panel de control 18 Toma USB
6 Altavoz de graves 19 OPEN / CLOSE (abrir/cerrar la puerta del
compartimento de CD)
7 Indicador de funcionamiento 20 P/R/MENU (programación y menú)
8 Volumen/ modo espera 21 REP/INFO (repetición e info)
9 Ranura para tarjeta SD 22
Adelante/avance rápido/PRE+
10 MODE (modo) 23 OFF (apagar la lámpara)
11 Puerta del compartimento del CD 24 PLAY (el ciclo de color de la luz cambia)
12
PLAY/PAUSE/SCAN (búsqueda) 25 HOLD (El color de la luz se detiene en un
determinado estado).
13
STOP/ENTER (tecla de conrmación)
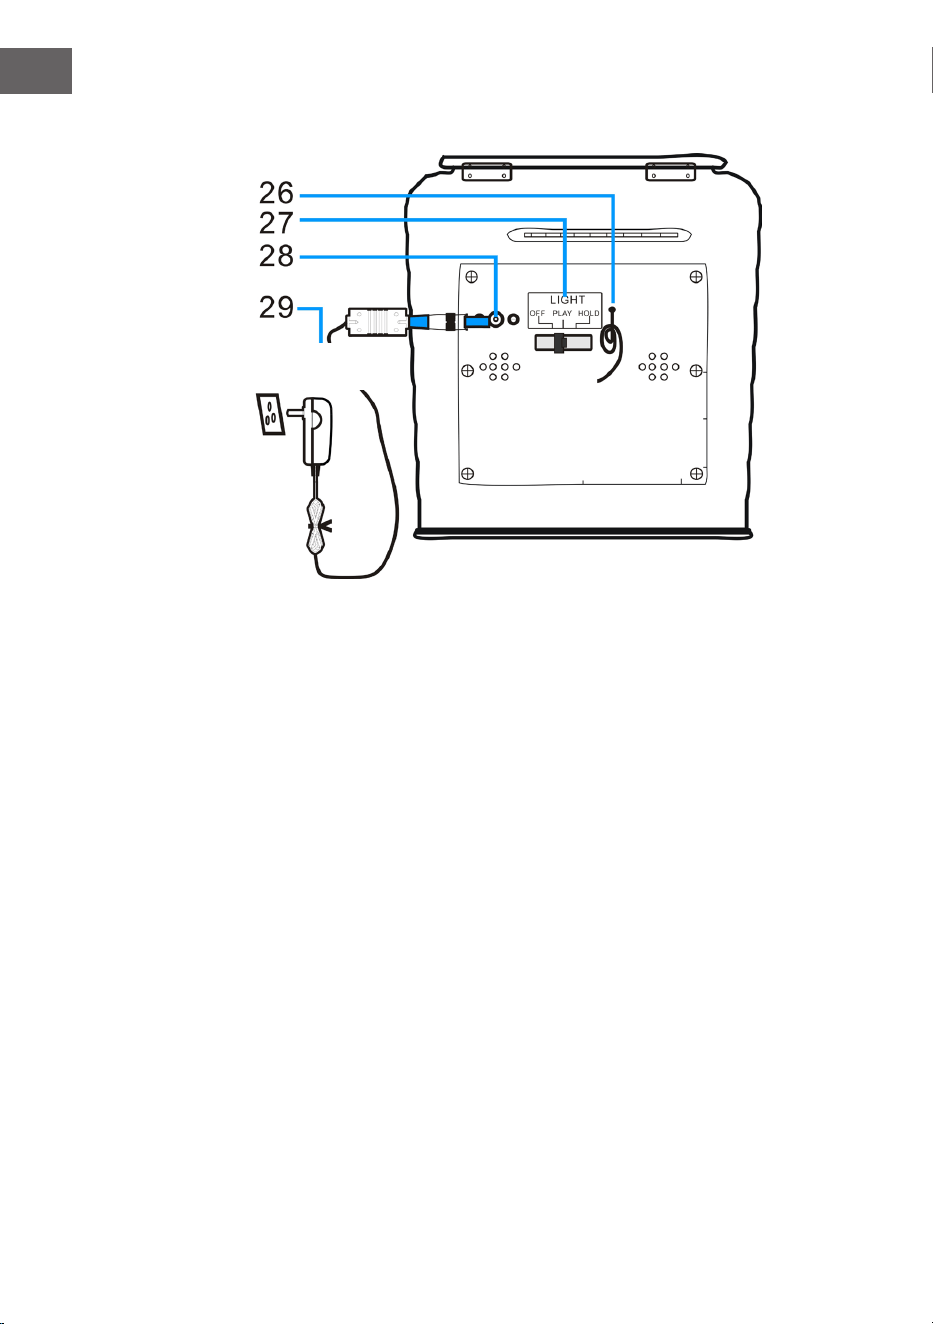
94
ES
Parte trasera
26 Antena FM (Nota: la antena FM debe desplegarse completamente
para garantizar la mejor recepción posible).
27 Interruptor del modo de luz (efecto de luz)
28 Toma CC
29 Fuente de alimentación
Fuente de
alimentación CA

95
ES
MANDO A DISTANCIA
1 MODE
Selección de modo: puede elegir entre los
distintos modos DAB/FM, CD, USB, SD, BT y
tocadiscos.
2 STANDBY
Pulse el botón POWER para abandonar el modo
de espera y acceder al modo DAB.
3 VOL -
Bajar el volumen: pulse la tecla varias veces o
manténgala presionada una vez hasta que haya
alcanzado el nivel de volumen deseado.
4 STOP Pulse esta tecla para nalizar la reproducción.
5
(pista
anterior)
Retroceso rápido: pulse esta tecla para acceder a
la pista anterior o mantenga pulsada la tecla para
retroceder en una pista. Puede presionar la tecla
PLAY para iniciar la reproducción.
6
PROG
(guardar)
Con esta función puede reunir una lista de
reproducción de sus pistas favoritas de una fuente
musical (para más información, consulte la sección
"guardar").
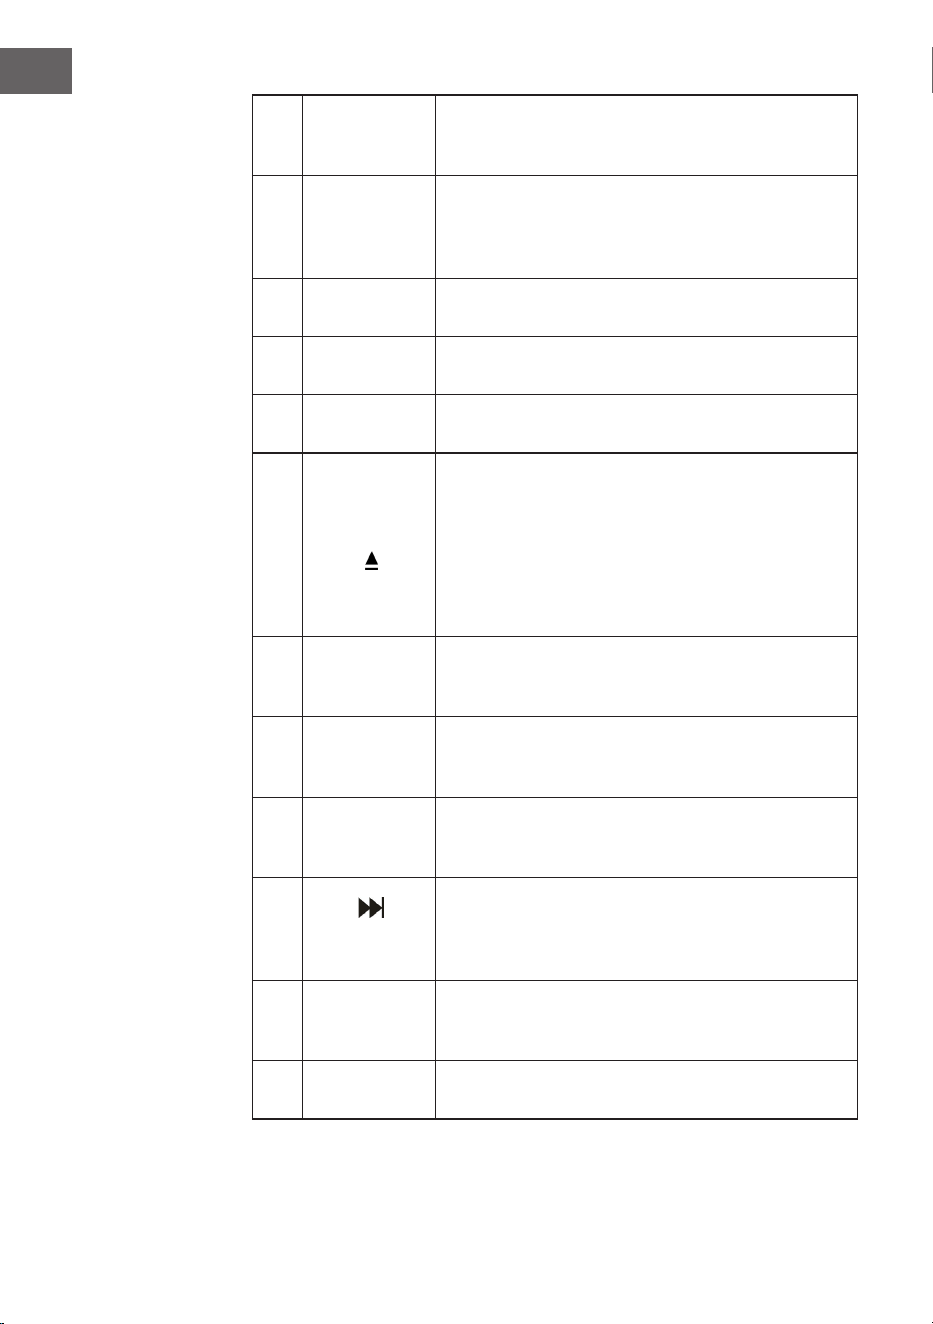
96
ES
7 F-10
Salte las 10 pistas anteriores (salta cada vez 10
pistas). En el modo aleatorio de reproducción
("RAN") esta función está desactivada.
8
RPT
(repetir)
Pulse esta tecla una vez para repetir una pista
determinada. Pulse dos veces esta tecla para
repetir todas las pistas. Pulse tres veces esta tecla
para iniciar el modo de reproducción aleatorio.
9 SCAN
Pulse esta tecla para iniciar la búsqueda
automática de emisoras y memorizar las emisoras.
10 STEREO
Selección estéreo/mono en modo radio (donde
esté disponible).
11 ENTER
Conrmación de ajuste: conrmar y guardar los
distintos ajustes.
12
MENÚ
Realice los ajustes para la radio FM y la radio DAB.
Encontrará una selección de ajustes relevantes en
el menú.
EJECT: si durante la reproducción de CD presiona
esta tecla, se abre el compartimento de CD. Pulse
de nuevo esta tecla para cerrar el compartimento
de CD.
13 INFO
Si una emisora de radio FM o DAB o un archivo
contiene información, puede visualizarla
presionando esta tecla.
14 EQ
Para cambiar los ajustes del ecualizador, puede
presionar esta tecla. Puede elegir entre JAZZ, FLAT,
CLASSIC, ROCK y POP.
15 F+10
Salte las 10 pistas siguientes (salta cada vez 10
pistas). En el modo aleatorio de reproducción
("RAN") esta función está desactivada.
16
(pista
siguiente)
Avance rápido: pulse esta tecla para acceder a la
pista siguiente o mantenga pulsada la tecla para
avanzar en una pista. Puede pulsar la tecla PLAY
en cualquier momento para iniciar la reproducción.
17 VOL+
Subir el volumen: pulse la tecla varias veces o
manténgala presionada una vez hasta que haya
alcanzado el nivel de volumen deseado.
18 PLAY/PAUSE
Pulse este botón para iniciar o pausar la
reproducción.
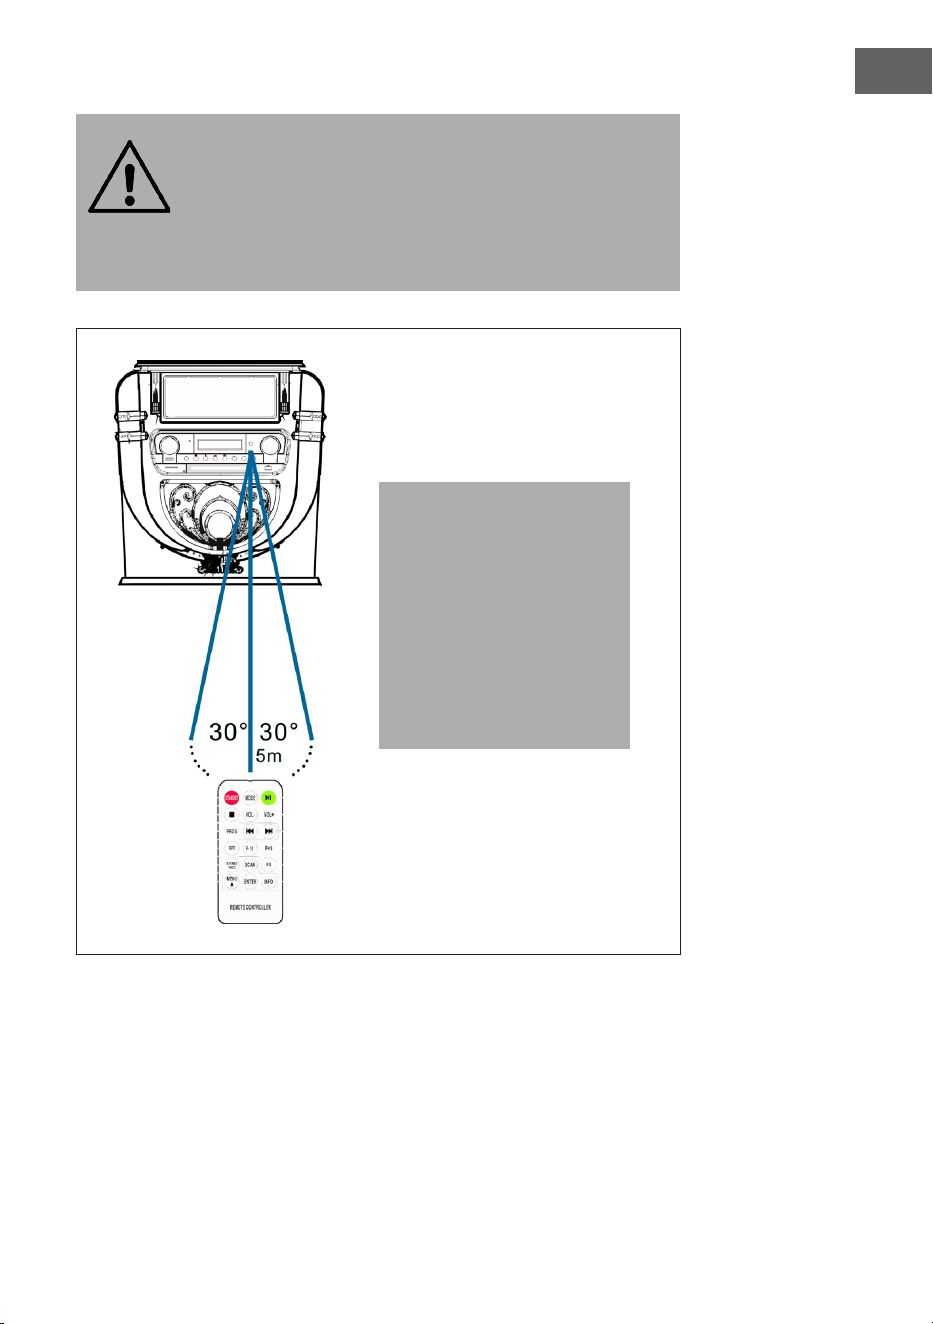
97
ES
ADVERTENCIA
¡Riesgo de lesiones! Guarde las pilas fuera del alcance de los
niños. La ingesta puede ocasionar tras dos horas lesiones
graves o incluso la muerte debido a quemaduras internas. Si
se ingieren las pilas, contacte inmediatamente con el
servicio de urgencias de un hospital. Elimine
inmediatamente las pilas usadas.
Nota: la mejor distancia de
transmisión entre el aparato
y el mando a distancia
se alcanza en menos de
5 metros sin obstáculos
(ángulo de aprox. 30°). Si la
pila del mando a distancia
está casi vacía, el mando a
distancia no podrá utilizarse
correctamente. Introduzca
una nueva pila.
98
ES
PUESTA EN FUNCIONAMIENTO Y MANEJO
Congurar la hora
Conecte la fuente de alimentación al aparato y conecte el enchufe a la toma
de corriente. El aparato cambia automáticamente al modo de espera y la
hora "00:00" o "12:00" se muestra en la pantalla LCD.
• Versión americana: sistema de 12 horas
Si la gramola pasa al modo de espera, la pantalla LCD muestra "12:00".
• Versión europea: sistema de 24 horas
Si la gramola pasa al modo de espera, la pantalla LCD muestra "00:00".
Ejemplo: versión americana
Para ajustar la hora, pulse simplemente la tecla "P/R" en el panel de control
(20) o en el mando a distancia (6) y mantenga pulsada la tecla 3-5 segundos
hasta que aparezca "12 H" en pantalla (12-H signica que la hora se muestra
en formato de 12 horas). A continuación, pulse la tecla o para elegir
entre el formato de 12 o 24 horas. En cuanto se muestre "12 H" en pantalla,
pulse de nuevo la tecla "P/R". En pantalla aparece a continuación "00:00",
donde parpadeará el primer "00". Con las teclas y en el panel de
control (3) o en el mando a distancia (6), seleccione el ajuste correcto de la
hora (tenga en cuenta que la hora se seleccione en un formato de 12 horas)
y, a continuación, conrme con la tecla "P/R". El siguiente "00" parpadea.
Con los botones y , elija el ajuste de minutos correcto y a continuación
presione "P/R" para guardar la cifra.
NOTA: la hora aparece ahora en modo de funcionamiento o de espera en
la gramola. Si desea guardar la hora seleccionada en la gramola, pulse
simplemente en el panel de control la tecla STANDBY (8) para cambiar la
gramola al modo de espera. Si retira la fuente de alimentación, el ajuste de
la hora se elimina y es necesario repetir el proceso anteriormente descrito
para seleccionar la hora correcta después del siguiente encendido.
Las versiones europea y americana son idénticas en cuanto a la selección
de la hora.
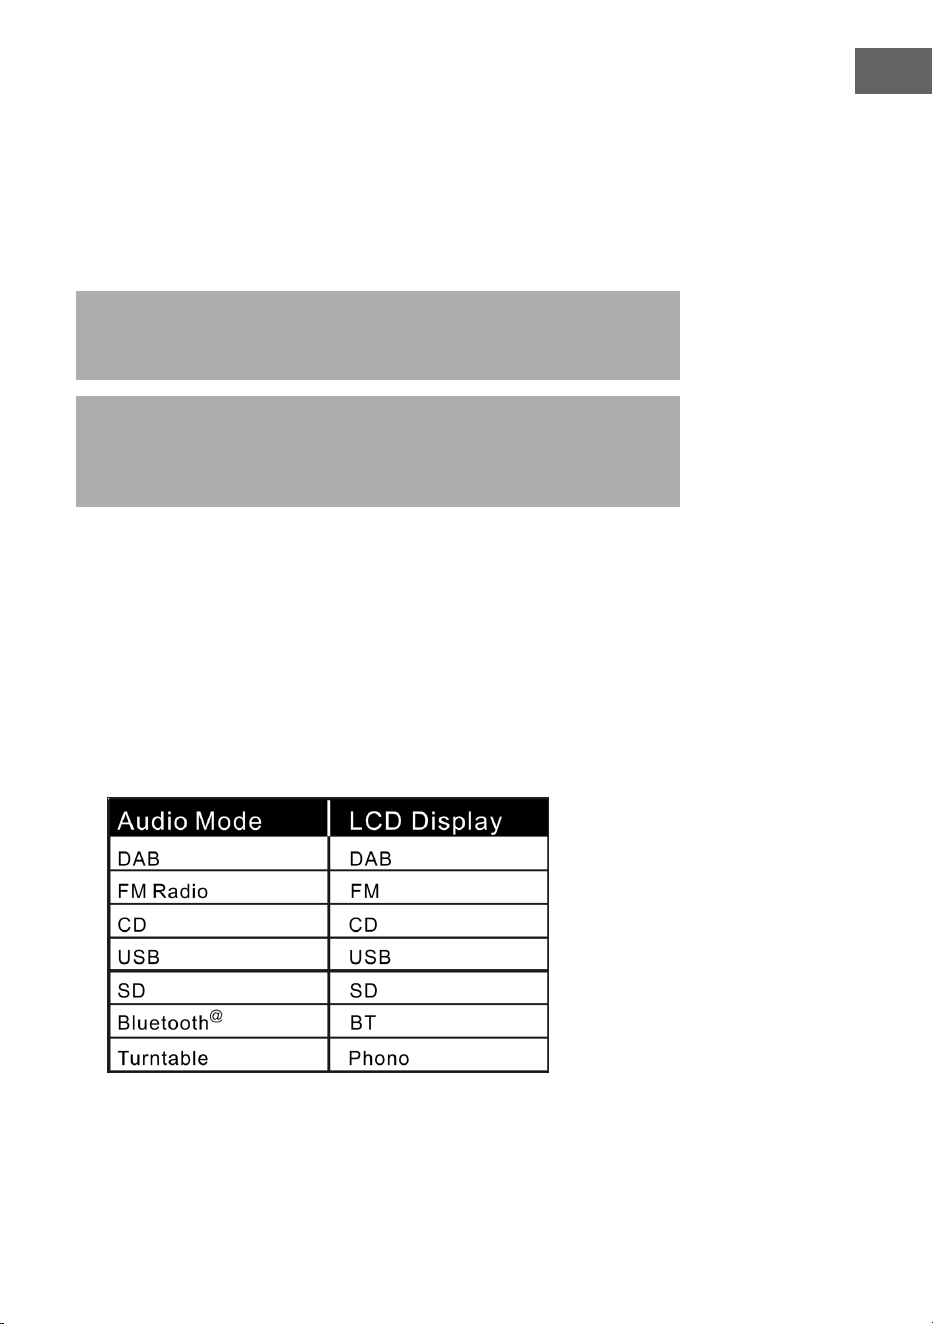
99
ES
Ajustar el volumen
1. Para aumentar el volumen, gire el regulador VOL+ o pulse una vez
la tecla VOL+ del mando a distancia y manténgala presionada hasta
alcanzar el nivel de volumen deseado.
2. Para reducir el volumen, gire el regulador VOL- varias veces o presione
una vez la tecla VOL- del mando a distancia y manténgala presionada
hasta conseguir el volumen deseado.
Nota: compruebe el volumen antes de reproducir la música para evitar
que los niños, las personas indefensas y las embarazadas estén en
peligro a través del sonido repentino y potente de la gramola.
Nota:si utiliza la gramola a volumen elevado durante mucho tiempo,
puede provocar un sobrecalentamiento de la gramola y dañar los
componentes internos. NO utilice la gramola durante un periodo de
tiempo prolongado a un volumen elevado.
Los ajustes de volumen se guardan cuando el aparato se apaga. Después de
volver a encender el aparato, el volumen se mantendrá igual que la última
vez que se ha encendido el aparato.
Conguración del ecualizador
1. Seleccione el modo de audio que desee:
la gramola dispone de distintas funciones para reproducir audio.
Proceda del siguiente modo para elegir entre DAB/FM, reproductor de
CD, entrada USB, entrada de tarjeta SD, radio FM analógica,
streaming de audio BT y tocadiscos.

100
ES
2. Pulse la tecla EQ hasta haber alcanzado el ajuste deseado del
ecualizador. El tono se modica en cuanto seleccione el ajuste de
ecualizador correspondiente.
3. La gramola dispone de 5 ajustes de ecualizador a elegir, con los que
puede ajustar el tono para potenciar el tipo de música que reproduzca
en cada momento.
Los ajustes de ecualizador preinstalados en la gramola son:
JAZZ, FLAT, CLASSIC (clásico), ROCK y POP.
RADIO DAB
Banda de frecuencia: DAB 174,928–239,200 MHz
1. Pulse la tecla STANDBY en el aparato (8) o en el mando a distancia (2)
para abandonar el modo de espera. El aparato pasa automáticamente
al modo DAB y busca automáticamente señales DAB cerca de él.
2. Gire el sintonizador para encontrar una emisora DAB con señal fuerte
(gire el sintonizador poco a poco).
3. Pulse la tecla para acceder a las emisoras siguientes de radio
guardadas.
4. Pulse la tecla para acceder a las emisoras anteriores de radio
guardadas.
5. Pulse la tecla SCAN para buscar automáticamente emisoras DAB
y guardarlas automáticamente (emisoras con la señal actual más
potente). Pueden guardarse hasta 20 emisoras.
6. Pulse la tecla INFO para obtener información sobre las emisoras.
7. Si pulsa la tecla MENU, aparecerá tanto el menú para la búsqueda
automática de emisoras (autotune) como otros menús. Gire el
sintonizador para seleccionar el contenido deseado. Pulse a
continuación la tecla ENTER para seleccionar el menú principal del
contenido deseado. A continuación, gire el sintonizador para acceder al
submenú. Finalmente, pulse la tecla ENTER para conrmar.
8. En el menú principal, seleccione "Language" (idioma) y, a continuación,
uno de los cuatro idiomas disponibles (alemán/francés/italiano/inglés).
9. Si desea eliminar los ajustes previos o la memoria, elija en el menú
"Factory Reset" (restablecer los ajustes de fábrica) y "Yes" (sí).

101
ES
Están disponibles las siguientes opciones de menú:
Explicación:
MENÚ
Menú principal Submenú
Búsqueda automática de
emisoras
Búsqueda completa de
emisoras
Búsqueda manual de
emisoras
Búsqueda manual de
emisoras
Eliminar ¿Eliminar? <No> Sí
DRC DRC baja
DRC alta
DRC desactivada
Versión SW Versión SW
Idioma Alemán
Francés
Italiano
Inglés
Restablecer los valores de
fábrica
¿Restablecer los valores
de fábrica? <No> Sí
102
ES
NOTA:
• Extienda completamente la antena DAB y FM. Coloque el aparato en
un lugar con buena recepción. (La antena se encuentra en la parte
trasera del aparato).
• Las emisoras con señal débil solamente podrán sintonizarse
manualmente.
• Pueden guardarse un máximo de 20 emisoras. Si hay menos de
20emisoras locales disponibles con buena señal, se almacenarán
exclusivamente aquellas que tengan una señal potente. (Si no hay 20
emisoras con buena señal, no podrán guardarse 20 emisoras).
RADIO FM
Banda de frecuencia: FM 87,5 – 108 MHz
Este aparato cuenta con una función FM integrada con búsqueda
automática de emisoras. Pueden guardarse hasta 20 emisoras.
Si utiliza el aparato por primera vez, cuando enchufe el aparato, este pasará
automáticamente al modo de espera (pantalla con la hora). Pulse la tecla
STANDBY en el aparato o la tecla POWER del mando a distancia para
encender el aparato. La primera vez que utilice el aparato, pasará al modo
DAB. Pulse la tecla MODE para acceder al modo FM. En la pantalla LCD
aparece a continuación FM 87,5 MHz (u otra radiofrecuencia) y los altavoces
emitirán un ruido de fondo difuso (a menos que la frecuencia 87,5 contenga
una emisora de radio local).
1. Pulse la tecla STANDBY en el aparato (8) o en el mando a distancia
(2) para sacar al aparato del modo de espera. El aparato entra
automáticamente en el modo FM.
2. Mantenga pulsadas las teclas o para buscar las últimas
emisoras guardadas (0,1 MHz o 0,05 MHz por cada pulsación). Gire el
sintonizador para encontrar una emisora de señal potente.
3. Pulse la tecla o (más de tres segundos) y la radio FM busca
emisoras automáticamente (si se encuentra una emisora con señal
potente, esta se reproduce automáticamente).

103
ES
4. Búsqueda y memorización automáticas: Si pulsa la tecla (SCAN),
el aparato comienza a buscar emisoras automáticamente hacia
adelante desde la frecuencia 87,5. En la búsqueda automática de
emisoras se memorizan también las emisoras detectadas. El aparato
cuenta con 20espacios de memoria para sus emisoras favoritas, que
se identican con "P01", "P20" (programa 1 a programa 20). La primera
emisora encontrada por el aparato se guardará en el espacio "P01". La
segunda emisora guardada, en "P02", etc. La búsqueda automática de
emisoras continúa hasta que se hayan detectado y guardado todas las
emisoras de señal potente. En cuanto los 20 espacios de memoria estén
ocupados, se interrumpe la búsqueda automática de emisoras, aunque
todavía queden disponibles otras emisoras de señal potente.
5. Si presiona la tecla MENU, en pantalla aparece "Auto tune" y
otros menús. Seleccione con el regulador el contenido deseado. A
continuación, presione la tecla ENTER para elegir el menú principal. A
continuación, gire el regulador para elegir el submenú. Pulse la tecla
ENTER para la última conrmación.
6. En el menú principal "Language" (idioma) puede elegir entre cuatro
idiomas (alemán/francés/italiano/inglés).
NOTA:
• En la versión americana, las emisoras se buscan en intervalos de 0,1
MHz. En la versión europea, las emisoras se buscan en intervalos de
0,05 MHz.
• Extienda completamente la antena FM. Coloque el aparato en un
lugar con buena recepción (la antena se encuentra en la parte trasera
del aparato).
• Las emisoras con señal débil solamente podrán sintonizarse
manualmente.
• Pueden guardarse un máximo de 20 emisoras. Si hay menos de
20emisoras locales disponibles con buena señal, se almacenarán
exclusivamente aquellas que tengan una señal potente (si no hay 20
emisoras con señal potente, no se podrán guardar 20 emisoras).
• Cuando el aparato se apaga, memorizará los ajustes actuales. Una
vez vuelva a encender la radio, se restablecerá la última función
seleccionada o la última emisora sintonizada.
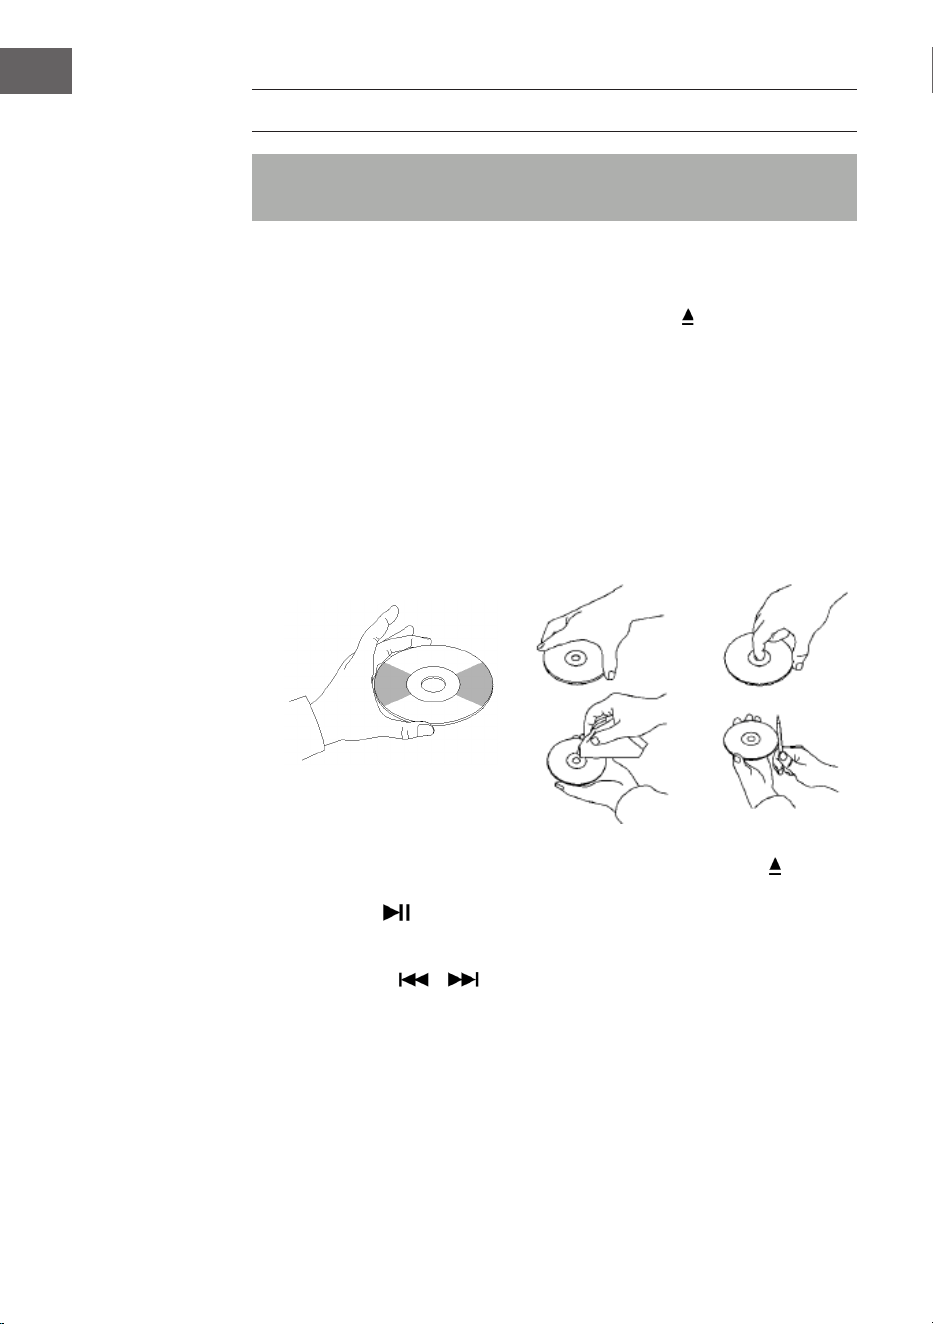
104
ES
CD
Nota: los CD deben introducirse con la parte estampada hacia arriba
dentro del compartimento.
1. Presione la tecla MODE hasta que aparezca "CD" en pantalla. A
continuación, se mostrarán en pantalla el número de pistas contenidas
en el CD. La reproducción se inicia automáticamente.
2. Para abrir el compartimento del CD, pulse la tecla
en el panel de
control o la tecla EJECT del mando a distancia.
3. Introduzca un CD con la cara estampada hacia arriba y la cara brillante
hacia abajo dentro del compartimento.
• Este aparato se ha diseñado especialmente para la reproducción de
CD identicados como "compact disc". No pueden utilizarse otros
tipos de discos.
• Para retirar el disco de su carcasa de almacenamiento, pulse en el
centro de la carcasa y levante el disco sujetándolo con cuidado por
el borde.
4. Para cerrar el compartimento del CD, pulse de nuevo la tecla en el
panel de control o la tecla EJECT del mando a distancia.
5. Con la tecla seleccione la pista deseada. Mantenga la tecla
pulsada para avanzar en una pista. Pulse la tecla (PLAY) para iniciar la
reproducción.
6. Con las teclas o seleccione la pista deseada.
7. Ajuste el volumen con el regulador VOLUME +/-.
8. Pulse la tecla REP una vez para repetir una pista. En la esquina superior
izquierda de la pantalla LCD parpadea "REP 1". Si pulsa de nuevo la pista
REP, se repetirán todas las pistas que contiene el CD. En la esquina
superior izquierda de la pantalla LCD parpadea "REP A". Pulse de nuevo
la tecla REP para desactivar la función de repetición.
9. Para reproducir las pistas en orden aleatorio, pulse la tecla REP hasta
que en la parte inferior de la pantalla LCD aparezca "Rand". Pulse las
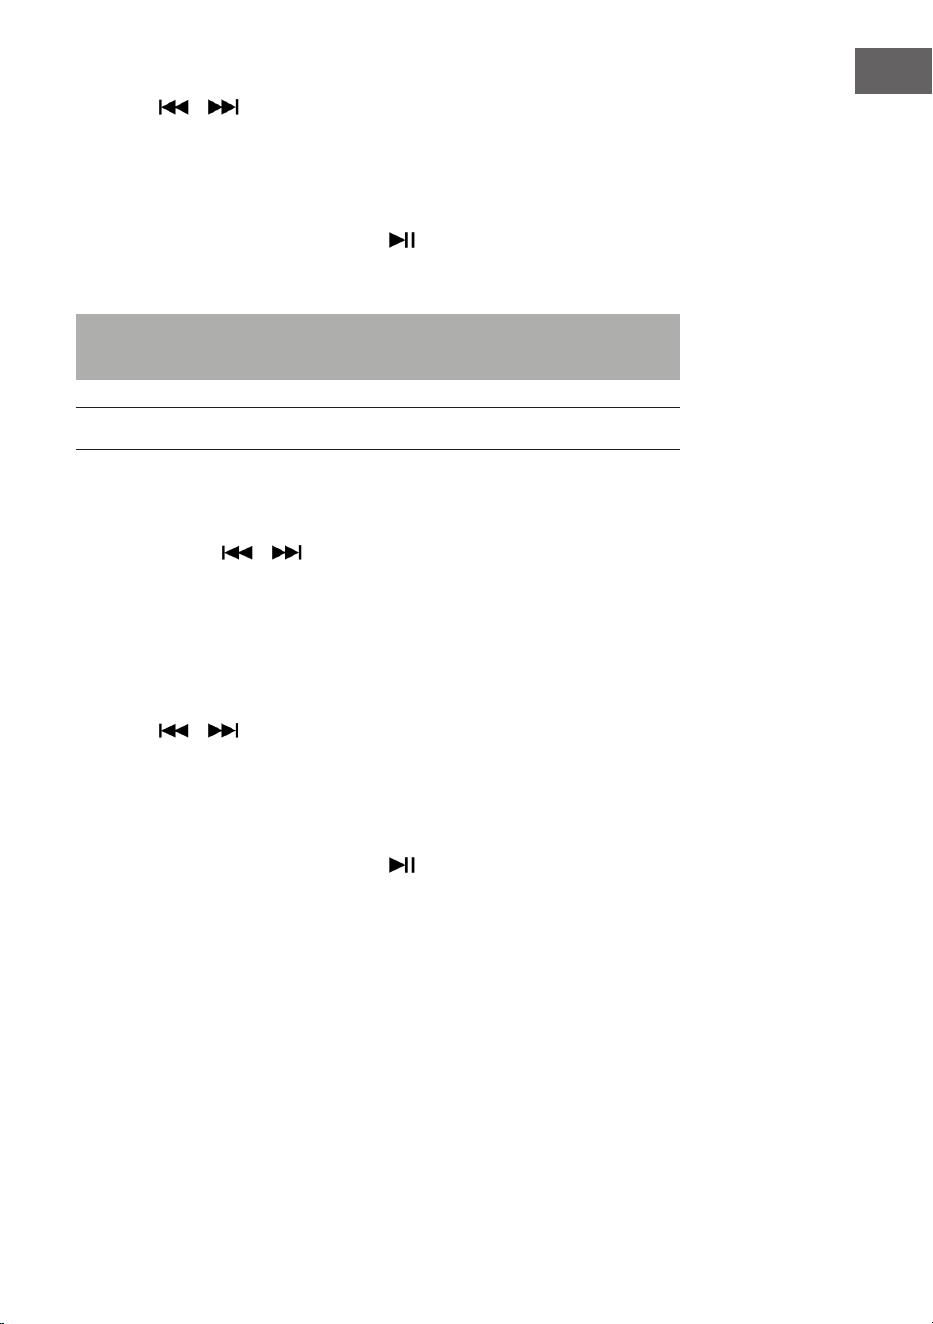
105
ES
teclas o para seleccionar aleatoriamente una pista.
10. Para crear una lista de reproducción, pulse la tecla STOP para detener
la reproducción. Luego pulse P/R para acceder al modo de memoria.
El indicador de pantalla LCD parpadea y muestra "P01". Seleccione una
pista que desee guardar en primer lugar y vuelva a pulsar la tecla P/R.
Para detener el proceso de almacenamiento e iniciar la reproducción
de la pista guardada, pulse la tecla . En la pantalla LCD aparece
"PROG CD". El aparato puede guardar hasta 20pistas. Encontrará más
información en la sección "PROG (crear lista de reproducción)".
Nota: no cierre el compartimento del CD con violencia, podría ocasionar
un fallo en el funcionamiento.
REPRODUCCIÓN USB/SD
1. Presione la tecla MODE hasta que aparezca "USB o SD" en pantalla. En
pantalla se muestra primero el número de carpetas y luego el número
de pistas. La reproducción se inicia automáticamente.
2. Con las teclas o , seleccione la pista deseada.
3. Pulse la tecla REP una vez para repetir una pista. En la esquina superior
izquierda de la pantalla LCD parpadea "REP 1". Si pulsa de nuevo la
pista REP, se repetirán todas las pistas. En la esquina superior izquierda
de la pantalla LCD parpadea "REP A". Pulse de nuevo la tecla REP para
desactivar la función de repetición.
4. Para reproducir las pistas en orden aleatorio, pulse la tecla REP hasta
que en la parte inferior de la pantalla LCD aparezca "Rand". Pulse las
teclas o para seleccionar aleatoriamente una pista.
5. Para crear una lista de reproducción, pulse la tecla STOP para detener
la reproducción. Luego pulse P/R para acceder al modo de memoria.
El indicador de pantalla LCD parpadea y muestra "P01". Seleccione una
pista que desee guardar en primer lugar y vuelva a pulsar la tecla P/R.
Para detener el proceso de almacenamiento e iniciar la reproducción
de la pista guardada, pulse la tecla . En la pantalla LCD aparece
"PROG CD". El aparato puede guardar hasta 20pistas. Encontrará más
información en la sección "PROG (crear lista de reproducción)".
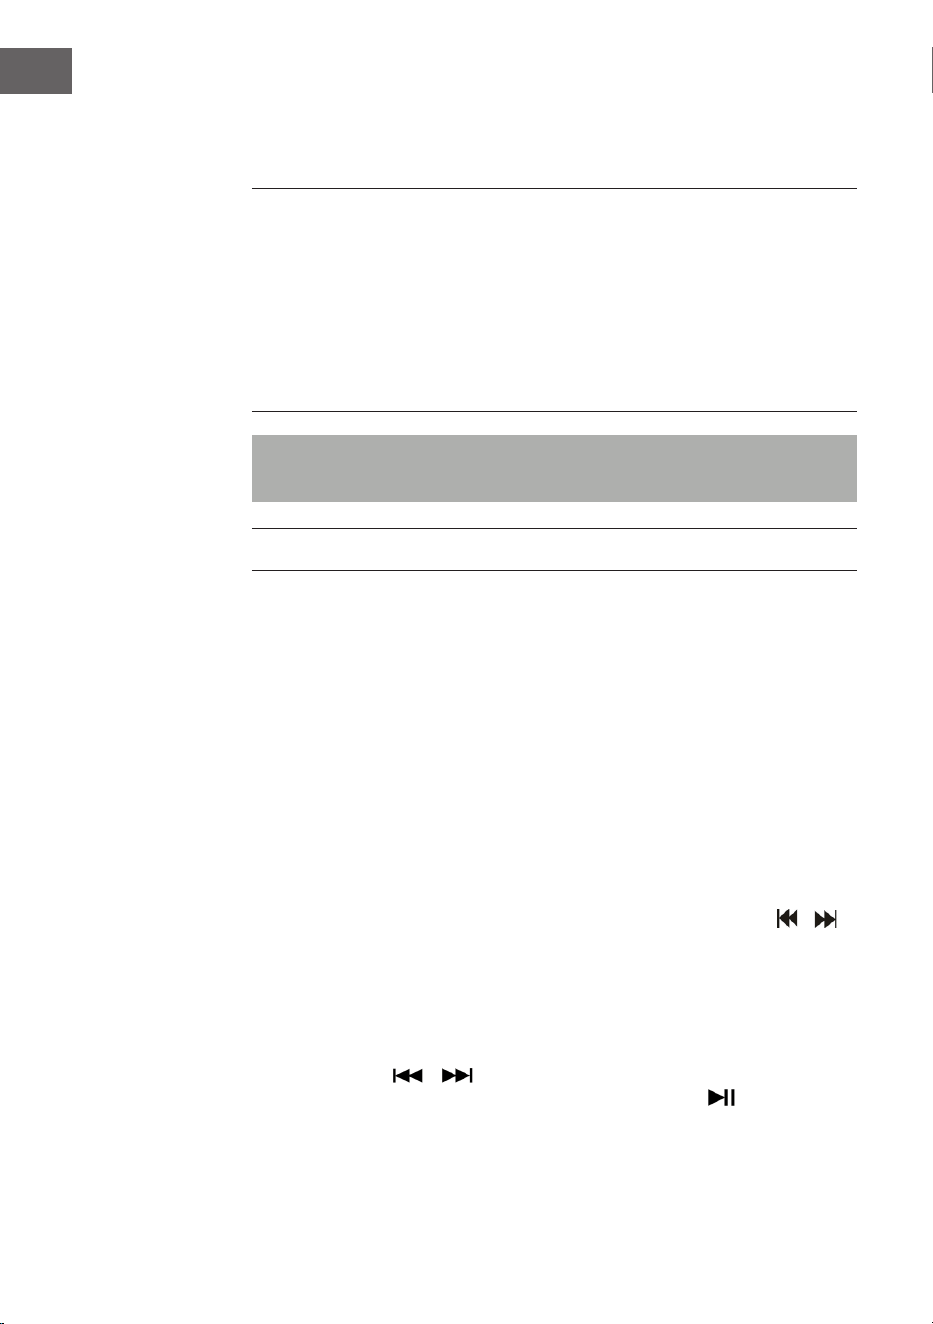
106
ES
6. Pulse la tecla MODE para nalizar la reproducción USB o SD. Durante
la reproducción USB o SD, no desconecte el enchufe de la toma de
corriente, pues puede ocasionar fallos en el funcionamiento.
NOTA:
• Si el dispositivo USB contiene archivos de audio que no son
compatibles con la gramola, esta no podrá reproducirlos. Estas pistas
no se incluirán en el número total de pistas mostradas y tampoco se
reproducirán.
• Si la tarjeta SD contiene archivos de audio que no son compatibles
con la gramola, esta no podrá reproducirlos. Estas pistas no se
incluirán en el número total de pistas mostradas y tampoco se
reproducirán.
Nota: para un funcionamiento óptimo, se recomienda utilizar un
dispositivo USB de la versión 2.0 (no 3.0).
BT
Cómo sincronizar la gramola con un dispositivo BT externo:
1. Presione la tecla MODE hasta que aparezca "BT" en pantalla.
2. Encienda el dispositivo BT externo y active su función BT. Inicie la
búsqueda de dispositivos BT disponibles.
3. Seleccione en la lista de dispositivos "Graceland Mini".
4. En cuanto ambos dispositivos se sincronicen, en pantalla aparecerá
"connected". Puede iniciar la reproducción de pistas en su dispositivo
BT externo. Controle la reproducción a través del dispositivo externo,
de la gramola o del mando a distancia de esta última.
Manejo a través del dispositivo BT:
• Utilice las teclas de la pantalla para seleccionar la pista, ajustar el
volumen, iniciar o pausar la reproducción y para las funciones y .
Manejo a través de la gramola/mando a distancia:
• En cuanto se establezca la conexión, se inicia automáticamente la
reproducción a través del dispositivo BT.
• Gire el regulador VOLUME+/- para ajustar el volumen.
• Pulse la tecla o para acceder a la pista siguiente/anterior.
• Para pausar/continuar la reproducción, pulse la tecla .
• Para nalizar la sincronización, pulse la tecla MODE para seleccionar
otra función o desactive la conexión BT de su dispositivo externo.

107
ES
Nota: la distancia de transmisión óptima para la conexión BT se
alcanza en menos de 10 metros sin obstáculos. Si el último dispositivo
BT conectado se encuentra fuera del alcance de la gramola, no puede
conectarse el aparato a la gramola. La conexión BT del último aparato
conectado debe desactivarse si desea conectar la gramola a un
dispositivo nuevo.
PROG (CREAR LISTA DE REPRODUCCIÓN).
1. Durante la reproducción de una fuente de música, pulse la tecla STOP.
2. Pulse la tecla PROG (6) o la tecla P/R del panel de control para acceder
al modo memoria. "PROG" parpadea en la esquina inferior izquierda de
la pantalla. Un número de posición parpadea en pantalla (p. ej. "P01").
3. Para seleccionar la pista que desea guardar, pulse la tecla o .
Para guardar la pista, pulse la tecla PROG.
4. Repita los pasos anteriormente mencionados para guardar más pistas.
5. En cuanto se guarden todas las pistas que desee, puede iniciar la
reproducción. Puede hacerlo en cualquier momento en cuanto haya
guardado el número de pistas deseadas.
6. Si desea interrumpir el guardado de las pistas, pulse la tecla STOP.
7. Cuando se haya alcanzado el número máximo de pistas para guardar,
en pantalla aparece "VOLL".
Nota: si ha cambiado al modo de reproducción o ha iniciado el aparato, la
lista de reproducción deberá crearse de nuevo (repita los pasos anteriores).

108
ES
TOCADISCOS
• Presione la tecla MODE hasta que aparezca "Phono" en pantalla.
• Coloque un disco en el tocadiscos. Seleccione un nivel de velocidad.
Están disponibles las velocidades 33/45/78 (el valor por defecto
es "33"). En cuanto la aguja se sitúe sobre el disco, se inicia la
reproducción.
Adaptador de 45 RPM
Coloque un disco sobre el plato.
Utilice el adaptador de 45 RPM
incluido en el envío para reproducir
discos sencillos.
Adaptador de
45 RPM
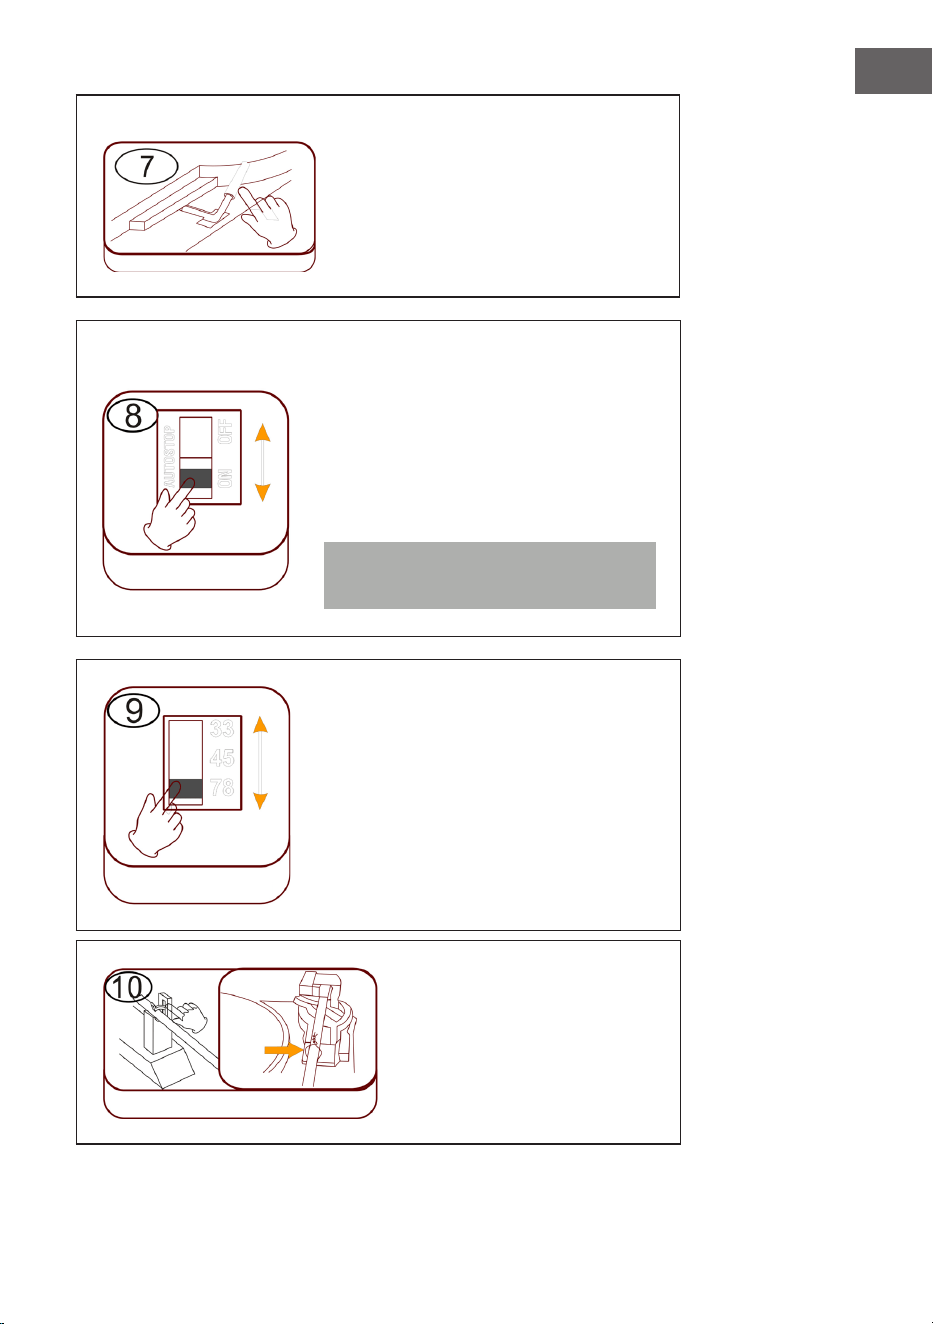
109
ES
Levantar/bajar la palanca
• Levante con cuidado el brazo y
muévalo a la posición deseada en
el plato.
• Baje el brazo despacio y con
cuidado.
Detención automática (Autostop)
• Desplazar el regulador hacia arriba:
naliza la reproducción musical, el
plato sigue girando.
• Desplazar el regulador hacia abajo:
naliza la reproducción musical, el
plato se detiene.
Nota: mueva el brazo tras nalizar la
reproducción a su posición de reposo.
Ajuste de velocidad
Los tres niveles de velocidad 33/45/78
están disponibles.
Bloqueo del brazo
Suelte el bloqueo del brazo
antes de utilizarlo.
Palanca
Autostop
Velocidad
Bloqueo del
brazo
Cierre
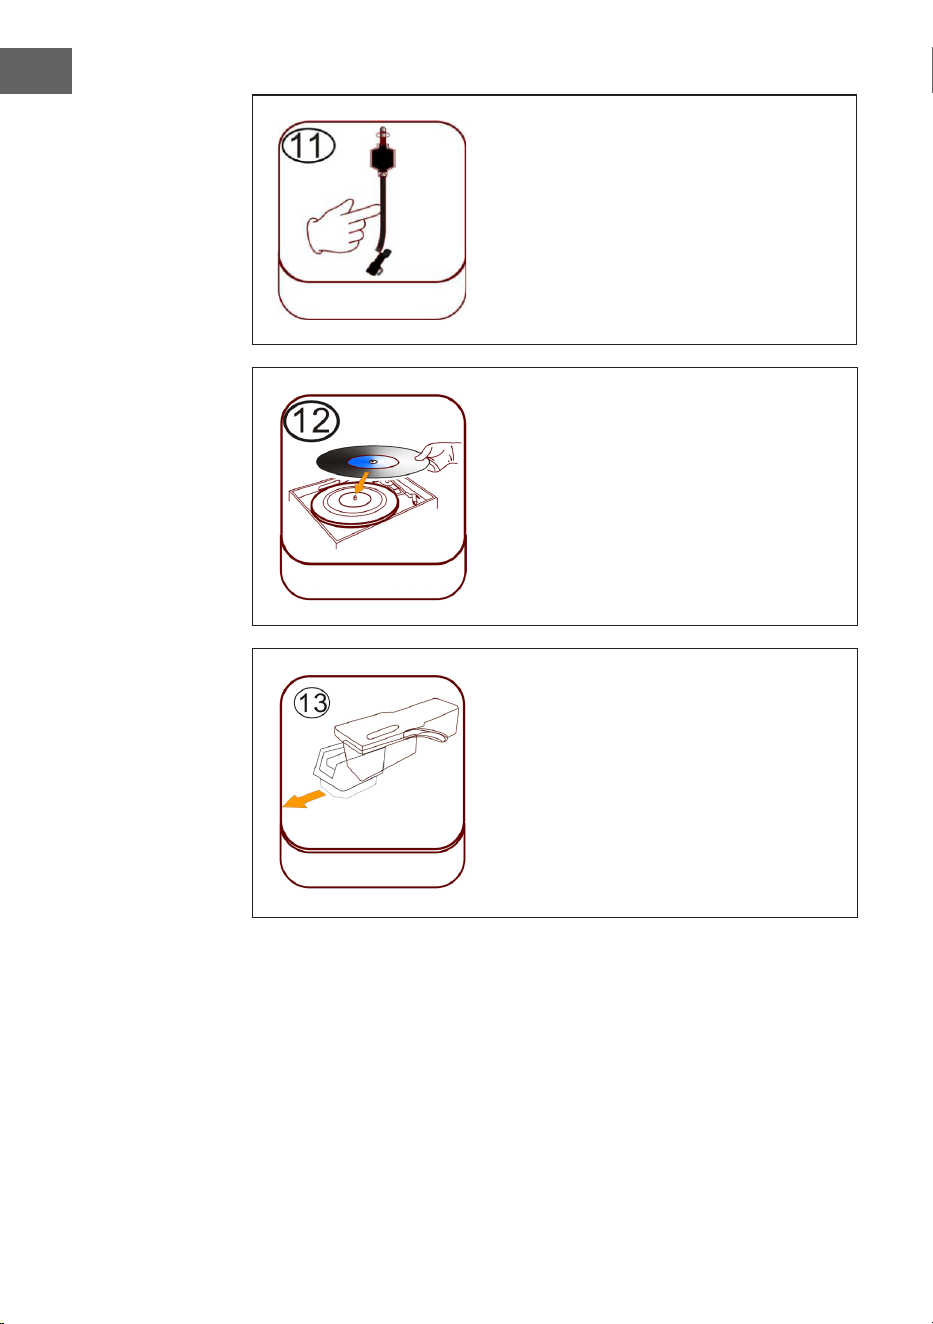
110
ES
Fonocaptor (brazo)
Colocar disco
Coloque un disco adecuado sobre el
plato. Levante con cuidado el brazo y
colóquelo con cuidado sobre el disco.
Ahora pueden reproducirse pistas del
disco.
Protección de plástico de la aguja
Retire la aguja tirando de ella hacia abajo
en la dirección opuesta al brazo.
Colocar disco
Protección de plástico de
la aguja
Brazo

111
ES
Cuidado de la aguja
• Presione la tecla MODE hasta que aparezca "Phono" en pantalla. Retire
la protección de la aguja (consultar ilustración 1). Coloque un disco en el
plato. Seleccione un nivel de velocidad 33/45/78. En cuanto la aguja se
mueva sobre el disco, se inicia la reproducción.
• Se recomienda sustituir la aguja en cuanto detecte un cambio en la
calidad del sonido.
• El uso de una aguja desgastada puede conllevar daños en el disco. El
desgaste de la aguja se acelera con la reproducción de discos de 78
RPM.
La aguja debe orientarse a la
posición central (en el centro de
la ranura).
Si la aguja sale fuera de la ranura,
puede suponer la interrupción
de la reproducción (pulido de la
aguja, etc.).
Ilustración 1 Ilustración 2
Retire la aguja tirando de ella
hacia abajo en la dirección
opuesta al brazo.
Sustituya la aguja por otra
compatible. Monte una nueva
aguja con la punta orientada hacia
abajo y presiónela ligeramente
hacia adentro.
NOTA: si compra una aguja de repuesto en un comercio, recomendamos
aportar la aguja antigua como referencia. La mayoría de los comercios de
electrónica y música disponen de agujas de repuesto.
Nota: asegúrese siempre de que el brazo esté jado antes de transportar
la gramola.

112
ES
NOTA: al nalizar la reproducción, el brazo no regresa automáticamente a
su soporte, sino que el tocadiscos y el brazo dejan de girar (debe desplazar
el brazo manualmente hacia su soporte).
Coloque la protección de la aguja en la aguja
cuando no utilice esta última.
Indicaciones importantes sobre el uso de la aguja
• No doble la aguja.
• Para evitar lesiones, no toque la aguja.
• Guárdela fuera del alcance de los niños.
• Manipúlela con cuidado, pues es muy frágil. El uso de una aguja
doblada o rota puede dañar el disco y ocasionar fallos en el
funcionamiento.
• No exponga la aguja a altas temperaturas.
• Contacte con un técnico cualicado si tiene dicultades a la hora de
cambiar la aguja.

113
ES
ACTIVAR EFECTOS DE LUZ
La gramola dispone de 2 tiras de luz LED que cambian de color y que
muestran las partes de la gramola. También existen otros efectos de
iluminación LED multicolor, disponibles en el reproductor de CD y en el
compartimento de USB/SD y en la parte inferior del panel de altavoces.
El interruptor principal de la lámpara se encuentra en la parte trasera del
aparato. Si el interruptor se encuentra en la posición "OFF" y se desplaza a
la posición PLAY, la lámpara se ilumina.
NOTA: la luz LIGHT controla el suministro eléctrico de los efectos de luz y se
encuentra en la parte trasera del aparato.
PLAY: el ciclo de color de la luz cambia.
HOLD: el color de la luz se mantiene en un
determinado estado (incluye luz invisible).
OFF: la luz se apaga y no se enciende más.
En la parte trasera de la gramola se encuentra un interruptor para el modo
de luz LED (27) (ver sección "Vista general del aparato - parte trasera"). Con
el aparato encendido, las tiras de luz LED cambian continuamente de color.
En modo HOLD, las tiras de luz LED solo se iluminan en un color. Si cambia
al modo PLAY, las tiras de luz LED cambian de color. Retrocediendo en el
modo HOLD se puede elegir otro color único (recuerde que estos colores
están establecidos y que probablemente no se trate del mismo color que
estaba activado en las tiras LED con la activación del modo HOLD).
La luz se apaga cuando el interruptor se coloca en la posición "OFF".
NOTA: en modo HOLD, probablemente no se vea ninguna luz, lo que es
normal (es necesario volver a congurar el interruptor).
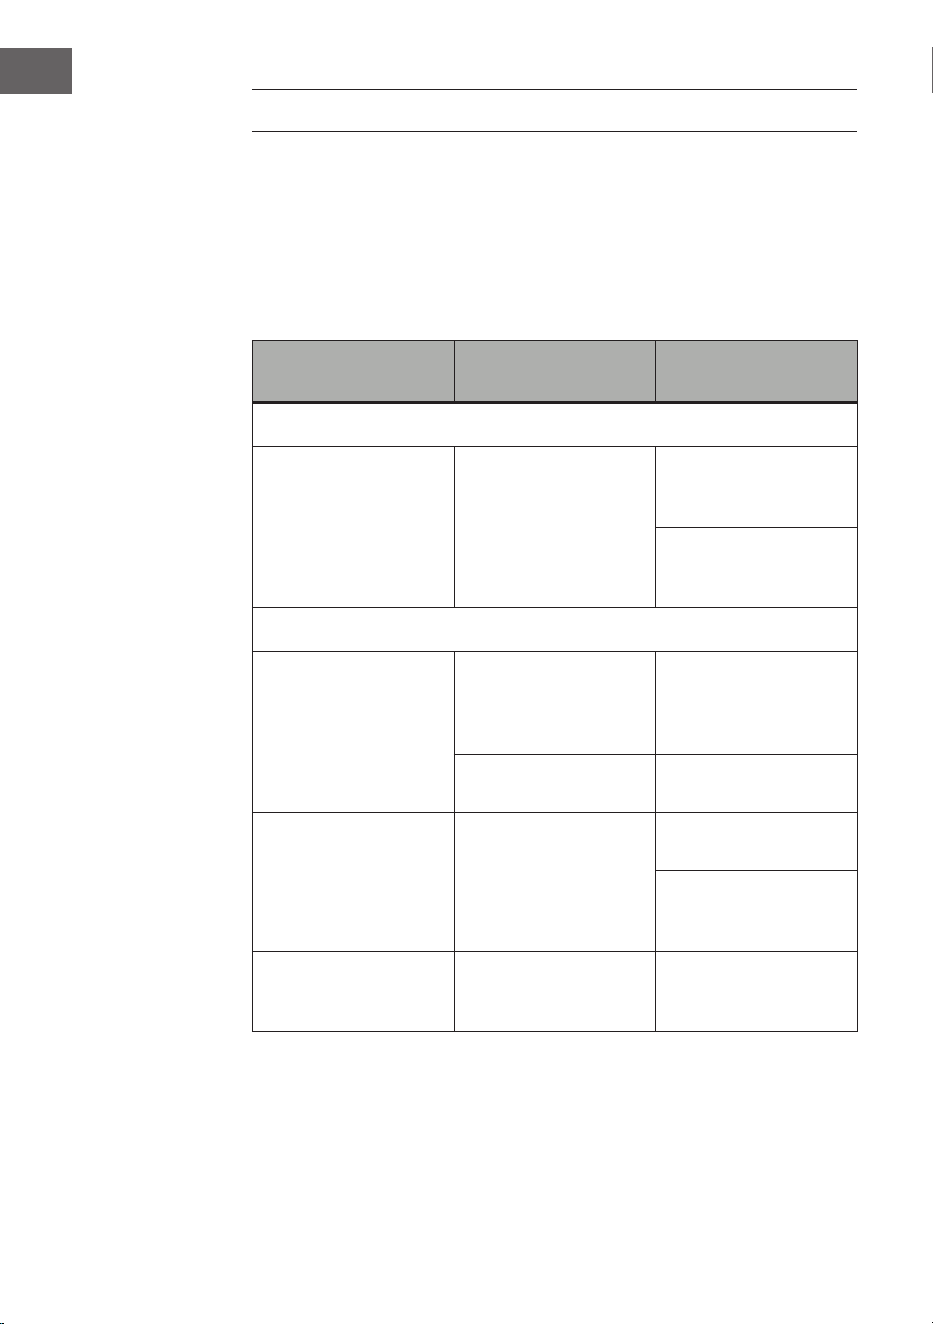
114
ES
REPARACIÓN DE ANOMALÍAS
Las siguientes comprobaciones ayudarán a solucionar la mayoría de los
problemas que pueden surgirle en el aparato. Antes de proceder a la
siguiente lista de comprobación, primero debe comprobar que la fuente
de alimentación se haya conectado correctamente. Si el problema persiste
después de realizar las comprobaciones, contacte con el fabricante, el
servicio de atención al cliente o un servicio técnico autorizado para su
mantenimiento y reparación.
Problema Posible causa Propuesta de
solución
Recepción de radio
No hay recepción de
radio
El regulador de modo
no se ha colocado en
la posición correcta.
Ajuste el volumen
deseado con el
regulador de volumen.
Gire el sintonizador
para buscar una
emisora de radio.
Reproducción de CD
El CD no se reproduce
o no hay sonido.
El CD se ha
introducido
incorrectamente.
Introduzca un CD con
la cara estampada
hacia arriba dentro del
compartimento.
El CD está sucio.
Limpie el CD. Reinicie
el aparato.
El sonido se emite
distorsionado.
Modique el lugar de
instalación.
Presione la tecla
STANDBY (reinicie el
aparato).
El reproductor de CD
no funciona.
Pulse la tecla STOP y
posteriormente guarde
la pista deseada.

115
ES
Problema Posible causa Propuesta de
solución
General
La lista de
reproducción de CD no
se puede reproducir.
El enchufe no está
encajado en la toma
de corriente.
Introduzca el cable
de alimentación en
la toma de corriente
correctamente.
Presione la tecla
STANDBY (reinicie el
aparato).
No hay sonido.
El regulador de
volumen no está
correctamente
ajustado.
Gire el regulador de
volumen en sentido
horario.
Zumbido o
interferencias
notables.
Hay una televisión o
grabador de vídeo/
DVD cerca del sistema
estéreo.
Reubique el aparato.
El indicador de
la pantalla está
distorsionado o no
funciona.
Apague el aparato y
reinícielo.

116
ES
RETIRADA DEL APARATO
Si en su país existe una disposición legal relativa a
la eliminación de aparatos eléctricos y electrónicos,
este símbolo estampado en el producto o en
el embalaje advierte que no debe eliminarse
como residuo doméstico. En lugar de ello, debe
depositarse en un punto de recogida de reciclaje
de aparatos eléctricos y electrónicos. Una gestión
adecuada de estos residuos previene consecuencias
potencialmente negativas para el medio ambiente
y la salud de las personas. Puede consultar más
información sobre el reciclaje y la eliminación de este
producto contactando con su administración local o
con su servicio de recogida de residuos.
Este producto contiene baterías. Si en su país existe
una disposición legal relativa a la eliminación de
baterías, estas no deben eliminarse como residuo
doméstico. Infórmese sobre la normativa vigente
relacionada con la eliminación de baterías. Una
gestión adecuada de estos residuos previene
consecuencias potencialmente negativas para el
medio ambiente y la salud de las personas.
DECLARACIÓN DE CONFORMIDAD
Fabricante:
Chal-Tec GmbH, Wallstraße 16, 10179 Berlín, Alemania.
Importador para Gran Bretaña:
Berlin Brands Group UK Limited
PO Box 42
272 Kensington High Street
London, W8 6ND
United Kingdom
Por la presente, Chal-Tec GmbH declara que el tipo
de equipo radioeléctrico Graceland Mini es conforme
con la Directiva 2014/53/UE. El texto completo de la
declaración UE de conformidad está disponible en la
dirección Internet siguiente: use.berlin/10036452

117
IT
Gentile Cliente,
La ringraziamo per aver acquistato il dispositivo.
La preghiamo di leggere attentamente le seguenti
istruzioni per l’uso e di seguirle per evitare possibili
danni. Non ci assumiamo alcuna responsabilità per
danni scaturiti da una mancata osservanza delle
avvertenze di sicurezza e da un uso improprio del
dispositivo. Scansionare il codice QR seguente per
accedere al manuale d’uso più attuale e per ricevere
informazioni sul prodotto.
INDICE
Dati tecnici 118
Avvertenze di sicurezza 119
Descrizione del dispositivo 121
Telecomando 123
Messa in funzione e impostazioni 126
Radio DAB 128
Radio FM 130
CD 132
Riproduzione USB/SD 133
BT 134
PROG (creare una playlist) 135
Giradischi 136
Accendere gli eetti luminosi 141
Correzione degli errori 142
Smaltimento 144
Dichiarazione di conformità 144
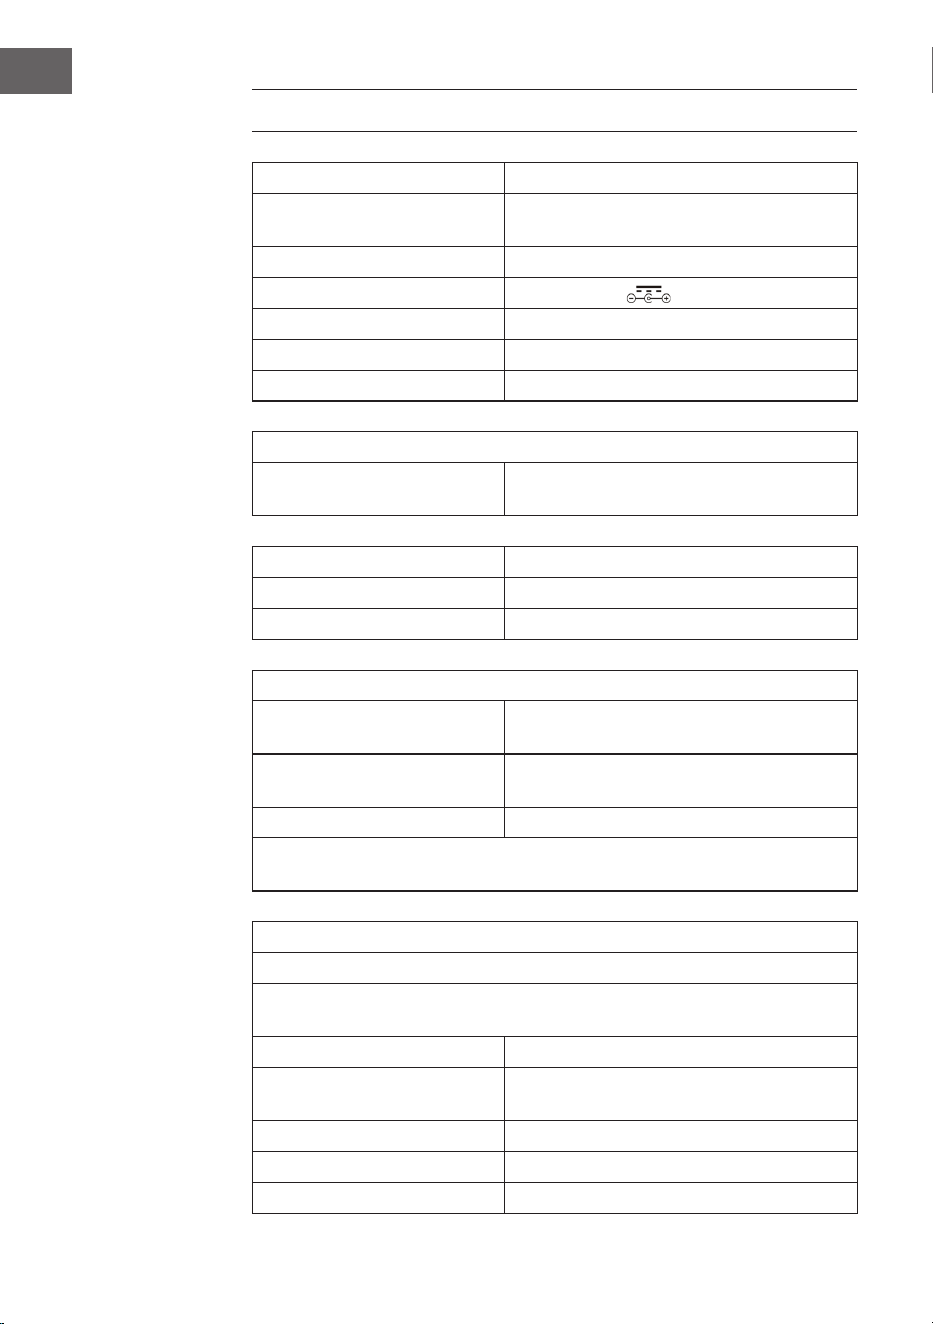
118
IT
DATI TECNICI
Numero articolo 10036452
Alimentazione
(alimentatore AC/DC)
100-240 V ~ 50/60 Hz
Batteria (telecomando) Batteria al litio CR2025 da 3 V
Potenza di uscita DC 14 V 1,75 A
Potenza 24,5 W
Tipo canale amplicatore Canale 2.0
Potenza di uscita 4 W + 4 W
Radio (FM/DAB)
Gamma di frequenza
FM 87.5 - 108 MHz
DAB 174.928 - 239.200 MHz
BT
Banda di frequenza BT 2.4-2.480 GHz
Trasmissione BT (max.) 4 dBm
Dispositivi USB o schede SD compatibili
Connessione USB Vengono supportate le connessioni USB
2.0 o USB 1.1
File system
FAT 16/32
(il le system NTFS non viene supportato)
Numero massimo di le < 999
Dischi rigidi esterni, dispositivi di lettura schede e altri dispositivi protetti
non vengono supportati.
Requisiti necessari dei le riproducibili
File musicale MP3/WMA
La compatibilità di le MP3/WMA di questo dispositivo è limitata come
indicato di seguito:
Gamma di frequenza tra 32 e 48 kHz
Bitrate tra 32 e 320 kbps (MP3),
da 40 a 192 kbs (WMA)
Numero massimo di le < 999
Numero massimo di cartelle < 99
Estensioni le .mp3 o .wma

119
IT
AVVERTENZE DI SICUREZZA
Avvertenze generiche
• Colpo di fulmine - Se non si usa più il dispositivo o se ci sono
temporali, staccare la spina dalla presa elettrica o scollegare il
dispositivo dall'antenna. In questo modo si evitano danni al prodotto
dovuti a colpi di fulmine e sovratensione.
• Sovraccarico - Non sovraccaricare prese elettriche, prolunghe o prese
elettriche integrate, altrimenti possono risultare incendi o scosse
elettriche.
• Penetrazione di corpi estranei e liquidi - Non inserire oggetti di
alcun tipo nelle aperture del dispositivo, dato che potrebbero entrare
in contatto con pericolosi punti di tensione o causare il cortocircuito
di alcuni componenti, con il conseguente rischio di incendi o scosse
elettriche. Non versare mai liquidi sul dispositivo.
• Riparazione e manutenzione - Non cercare di realizzare
autonomamente opere di manutenzione sul dispositivo, dato che
l'apertura o la rimozione della copertura possono esporre a tensioni
pericolose o altri rischi. Lasciare che tutte le opere di manutenzione
siano realizzate da personale di assistenza qualicato.
• Danni che richiedono l'intervento del servizio di assistenza -
Staccare la spina dalla presa elettrica e rivolgersi a un'azienda tecnica
qualicata nelle seguenti situazioni:
a) Se cavo di alimentazione o spina sono danneggiati.
b) Se sono stati versati liquidi o sono caduti oggetti sul dispositivo.
c) Se il prodotto è stato esposto a pioggia o acqua.
d) Se il prodotto è caduto o è danneggiato.
e) Se il prodotto presenta prestazioni sensibilmente ridotte.
• Pezzi di ricambio - Se sono necessari pezzi di ricambio, assicurarsi
che l'azienda tecnica responsabile della sostituzione utilizzi solo
pezzi di ricambio autorizzati dal produttore o che presentano le
stesse caratteristiche dei componenti originali. Una sostituzione non
autorizzata può causare incendi, scosse elettriche o altri pericoli.
• Calore - Non posizionare il dispositivo vicino a fonti di calore, come
termosifoni, batterie di riscaldamento, forni e altri prodotti (inclusi
amplicatori).
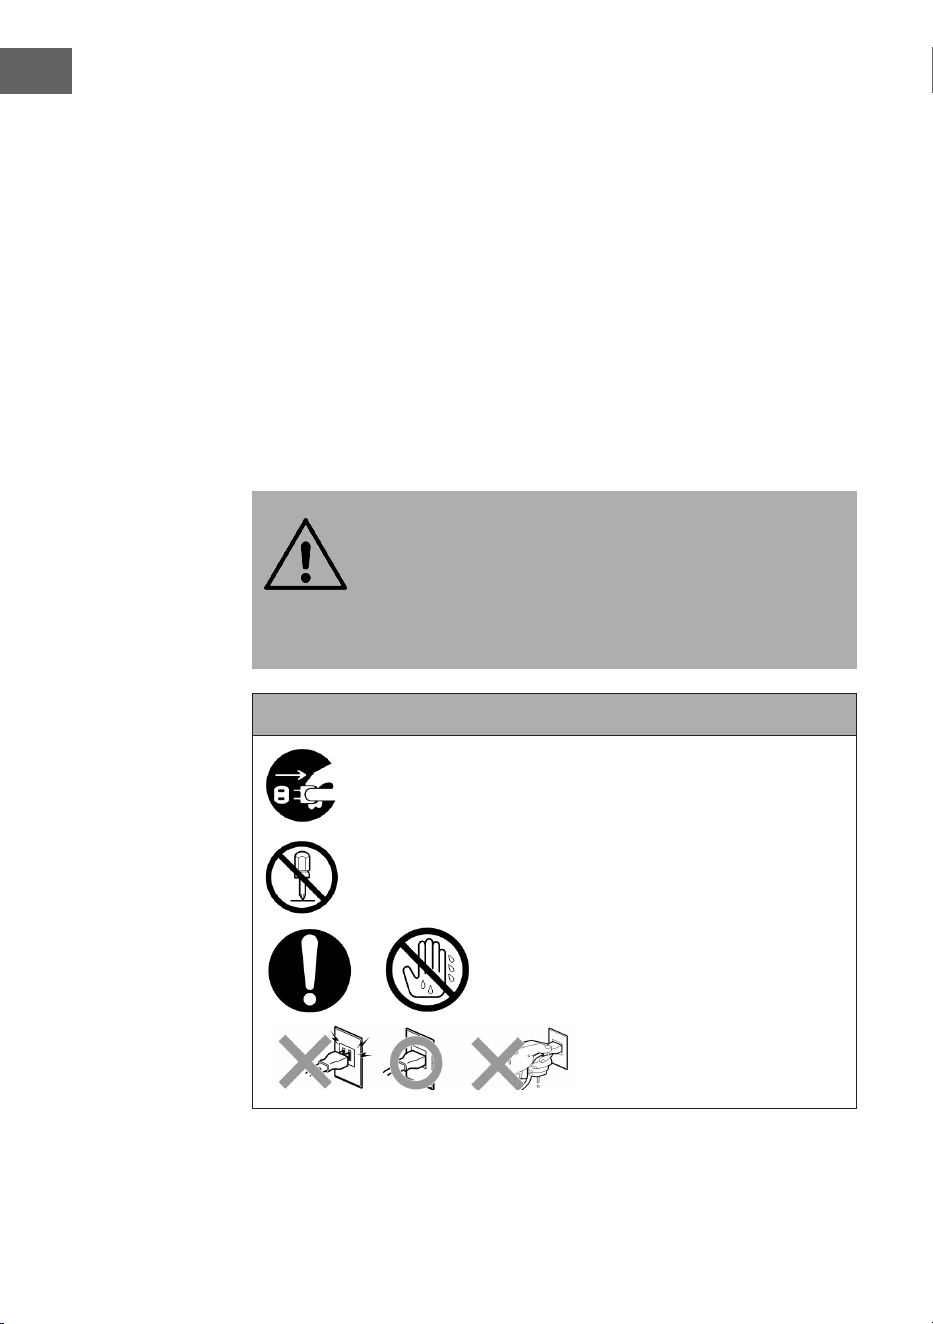
120
IT
Avvertenze particolari
• Questo dispositivo può essere utilizzato da bambini a partire da 8
anni e da persone con limitate capacità siche, psichiche e sensoriali o
con conoscenza e/o esperienza insuicienti, solo se sono tenuti sotto
controllo o se sono stati istruiti sulle modalità di utilizzo sicuro del
dispositivo e comprendono i rischi che ne risultano.
• Pulizia e manutenzione da parte dell'utente non possono essere
realizzate da bambini, a meno che siano maggiori di 8 anni e siano
costantemente supervisionati.
• Tenere sotto controllo i bambini per assicurarsi che non giochino con il
dispositivo. Assicurarsi che bambini e bebè non giochino con sacchetti
di plastica o altri materiali di imballaggio.
• Assicurarsi che spina/adattatore siano sempre facilmente accessibili,
in modo da poter scollegare rapidamente il dispositivo dalla presa
elettrica in caso di emergenza.
• Quando non si usa più il dispositivo, spegnerlo e staccare la spina.
AVVERTENZA
Pericolo di lesione! Conservare le batterie fuori dalla portata
dei bambini. L'ingerimento può causare serie lesioni nel giro
di solo due ore o provocare addirittura la morte a causa di
ustioni interne. Se vengono ingerite delle batterie, dirigersi
immediatamente al pronto soccorso. Smaltire
immediatamente le batterie scariche.
Importanti avvertenze di sicurezza
Assicurarsi che bebè e bambini piccoli non stacchino la
spina dalla presa!
Divieto di disassemblare il dispositivo!
Non toccare il dispositivo con le mani
bagnate!
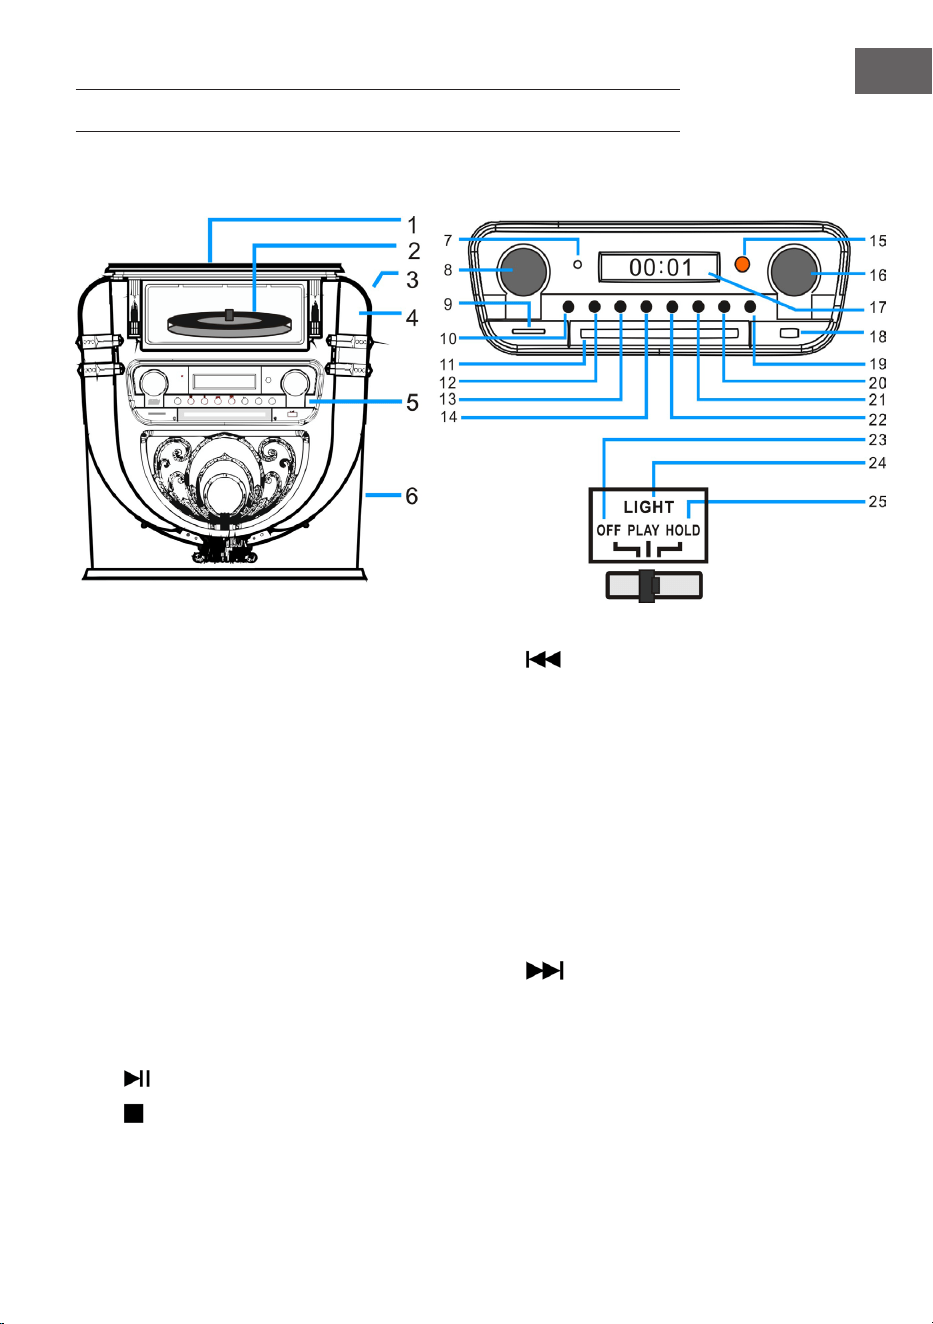
121
IT
DESCRIZIONE DEL DISPOSITIVO
Lato anteriore
1 Copertura antipolvere del giradischi 14 Indietro/Indietro rapidamente/PRE+
2 Giradischi 15 Finestrella di ricezione del telecomando
3 LIGHT (luce/cambiare il colore della luce) 16 Tuning/EQ (impronta vocale)
4 Posizione della luce da discoteca 17 Schermo
5 Pannello di controllo 18 Connessione USB
6 Subwoofer 19 OPEN/CLOSE (aprire/chiudere lo sportello
del vano CD)
7 Indicazione di funzionamento 20 P/R/MENU (programmazione e menu)
8 Volume/Standby 21 REP/INFO (ripetizione e informazioni)
9 Connessione per schede SD 22
Avanti/Avanti rapidamente/PRE+
10 MODE (modalità) 23 OFF (spegnere la lampada)
11 Sportello del vano CD 24 PLAY (cambia il ciclo cromatico della luce)
12
PLAY/PAUSE/SCAN (ricerca) 25 HOLD (il colore della luce si ferma su una
determinata impostazione)
13
STOP/ENTER (tasto di inserimento)

122
IT
Lato posteriore
26 Antenna FM (nota: l'antenna FM deve essere estesa completamente,
in modo da garantire la migliore ricezione possibile).
27 Interruttore per modalità luminosa (eetti luminosi)
28 Connessione DC
29 Alimentatore
Alimentatore
AC
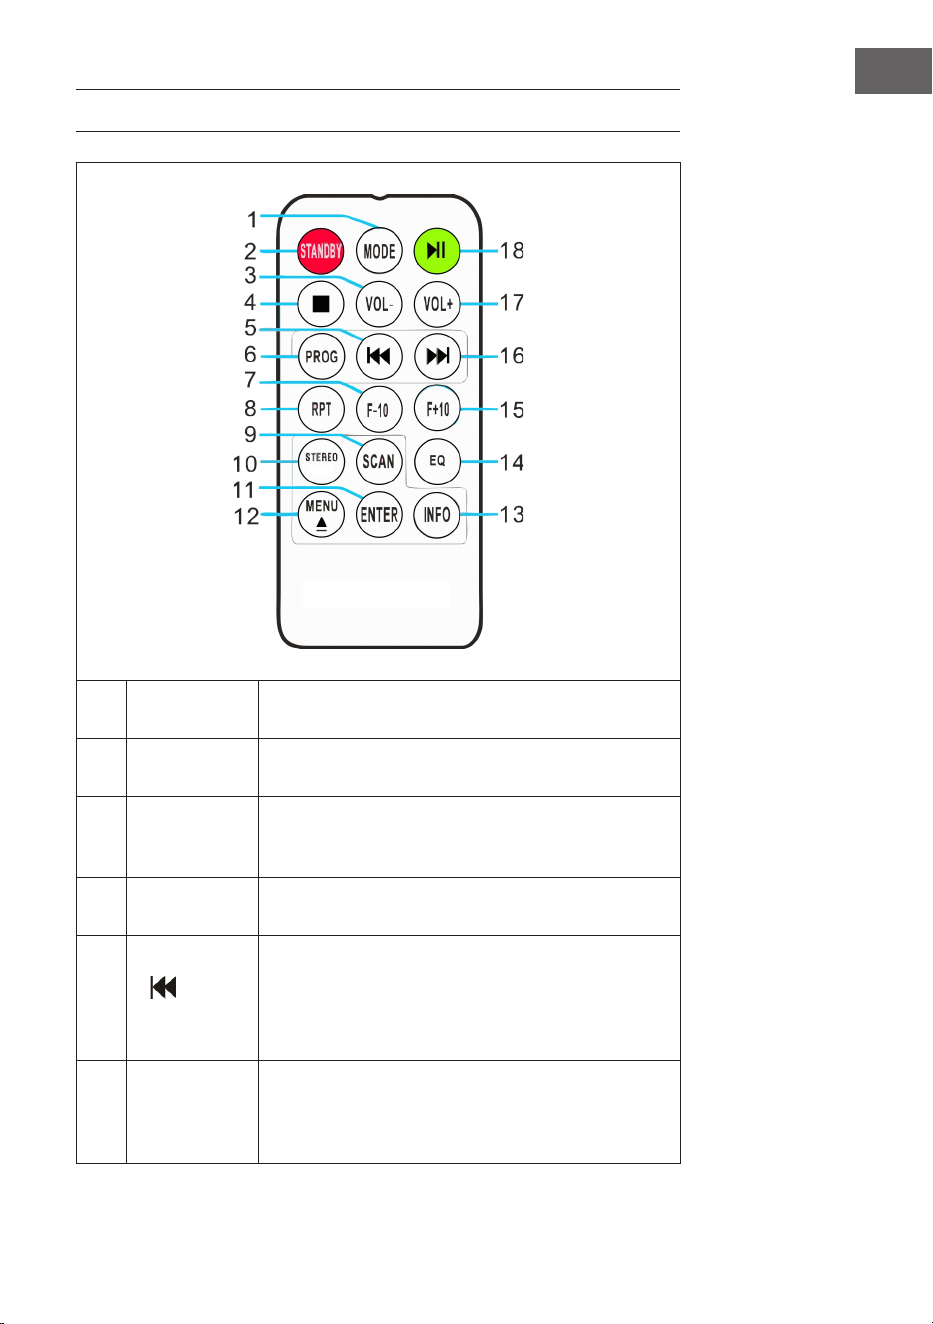
123
IT
TELECOMANDO
1 MODE
Selezione della modalità: è possibile scegliere tra
le modalità DAB/FM, CD, USB, SD, BT e giradischi.
2 STANDBY
Premere POWER per uscire dallo standby e
raggiungere la modalità DAB.
3 VOL-
Abbassare il volume: premere più volte il tasto
o tenerlo premuto no a raggiungere il livello
desiderato.
4 STOP
Premere questo tasto per interrompere la
riproduzione.
5
(Titolo
precedente)
Indietro rapidamente: premere questo tasto per
raggiungere il titolo precedente o tenerlo premuto
per tornare indietro rapidamente all'interno
di un titolo. Premere poi PLAY per avviare la
riproduzione.
6
PROG (creare
una playlist)
Con questa funzione è possibile creare una playlist
con i vostri brani preferiti da una fonte musicale
(per ulteriori informazioni, v. il paragrafo "PROG/
Creare una playlist").
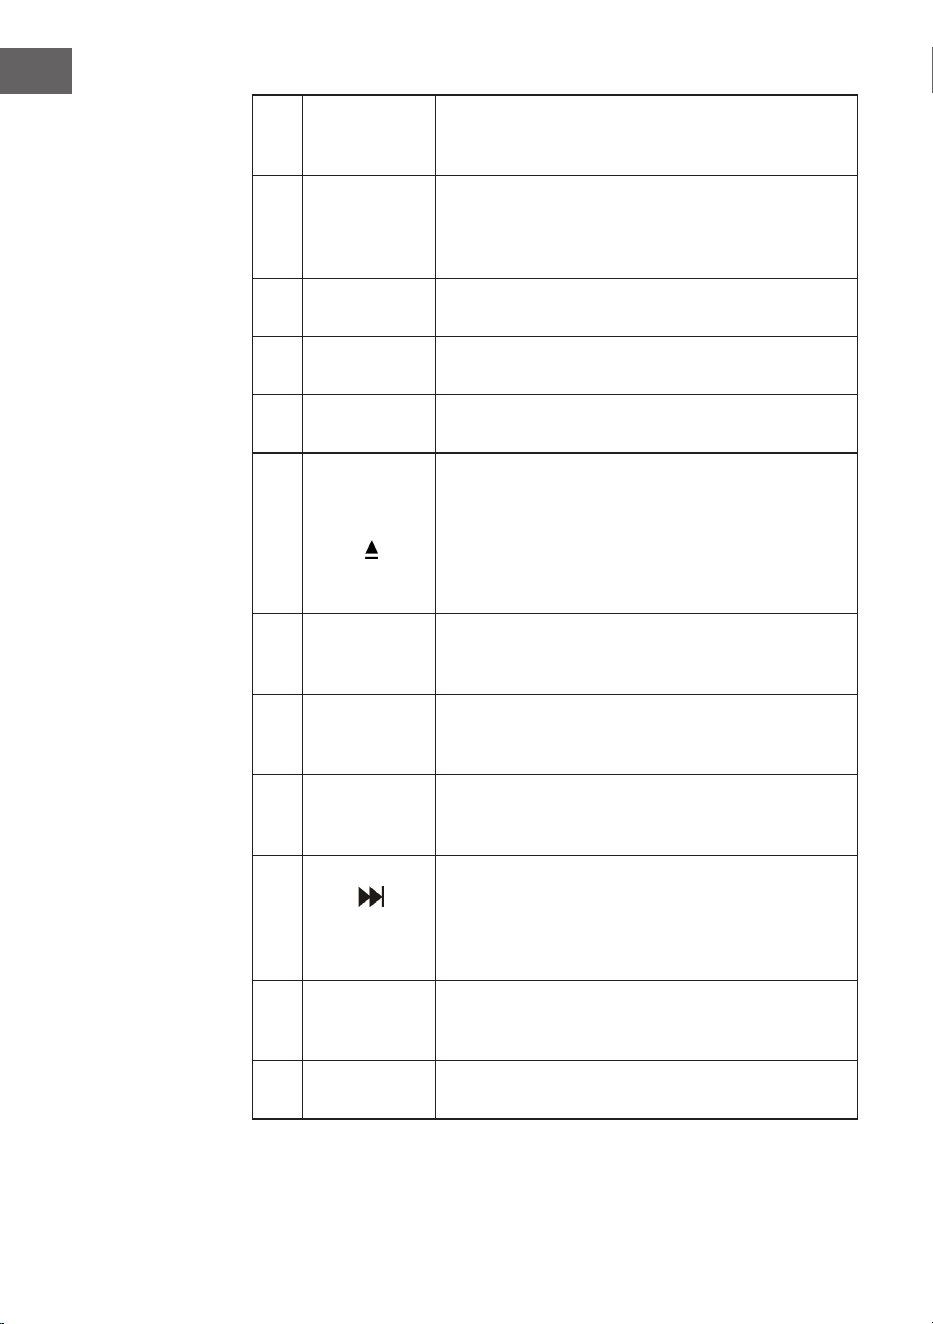
124
IT
7 F-10
Saltare i 10 titoli precedenti (si saltano 10 titoli alla
volta). In modalità di riproduzione casuale ("RAN"),
questa funzione è disattivata.
8
RPT
(ripetizione)
Premere una volta questo tasto per ripetere un
determinato titolo. Premerlo due volte per ripetere
tutti i titoli. Premerlo tre volte per avviare la
riproduzione casuale.
9 SCAN
Premere questo tasto per avviare la ricerca
automatica delle emittenti e per salvarle.
10 STEREO
Selezionare la modalità stereo/mono in modalità
Radio (se disponibile).
11 ENTER
Confermare l'inserimento: confermare e salvare
diverse impostazioni.
12
MENU
Eettuare impostazioni per radio FM e DAB.
Nel menu si trova una selezione di impostazioni
rilevanti.
EJECT: se si preme questo tasto durante la
riproduzione CD, il vano CD si apre. Premere di
nuovo il tasto per chiudere il vano.
13 INFO
Se un le o un'emittente FM/DAB contengono
informazioni, possono essere visualizzate
premendo questo tasto.
14 EQ
Premere questo tasto per cambiare le impostazioni
dell'equalizzatore. Sono disponibili le impostazioni
JAZZ, FLAT, CLASSIC, ROCK e POP.
15 F+10
Saltare i 10 titoli successivi (si saltano 10 titoli alla
volta). In modalità di riproduzione casuale ("RAN"),
questa funzione è disattivata.
16
(Titolo
successivo)
Avanti rapidamente: premere questo tasto per
raggiungere il titolo successivo o tenerlo premuto
per avanzare rapidamente all'interno di un titolo.
Premere PLAY in qualunque momento per avviare
la riproduzione.
17 VOL+
Alzare il volume: premere più volte il tasto o
tenerlo premuto no a raggiungere il livello
desiderato.
18 PLAY/PAUSA
Premere questo tasto per avviare o mettere in
pausa la riproduzione.

125
IT
AVVERTENZA
Pericolo di lesione! Conservare le batterie fuori dalla portata
dei bambini. L'ingerimento può causare serie lesioni nel giro
di solo due ore o provocare addirittura la morte a causa di
ustioni interne. Se vengono ingerite delle batterie, dirigersi
immediatamente al pronto soccorso. Smaltire
immediatamente le batterie scariche.
Nota: la migliore
trasmissione tra dispositivo
e telecomando si ottiene
entro una distanza di
5 metri senza barriere
(angolazione di circa
30°). Se la batteria del
telecomando è quasi
scarica, il telecomando non
può essere utilizzato come
di consueto. Sostituire la
batteria con una nuova.
126
IT
MESSA IN FUNZIONE E IMPOSTAZIONI
Impostare l'ora
Collegare l'alimentatore al dispositivo e inserire la spina nella presa
elettrica. Il dispositivo passa automaticamente in standby e l'ora "00:00" o
"12:00" compare sullo schermo.
• Versione americana: formato 12 ore
Quando il jukebox passa in standby, lo schermo LCD mostra "12:00".
• Versione europea: formato 24 ore
Quando il jukebox passa in standby, lo schermo LCD mostra "00:00".
Esempio: versione operativa americana
Per impostare l'ora basta tenere premuto per 3-5 secondi il tasto "P/R"sul
pannello di controllo (20) o sul telecomando (6), no a quando sullo
schermo compare "12-H" ("12-H" indica che è stato impostato il formato
orario a 12 ore). Premere poi o per selezionare il formato a 12 o 24
ore. Non appena sullo schermo compare "12-H", premere di nuovo "P/R".
Sullo schermo compare nuovamente "00:00", con i primi "00" lampeggianti.
Selezionare l'impostazione oraria corretta con i tasti e sul pannello
di controllo (3) o sul telecomando (6) (assicurarsi che l'ora sia impostata
in formato a 12 ore) e premere "P/R" per confermare. Ora lampeggiano i
secondi "00". Selezionare l'impostazione dei minuti corretta con e e
confermare poi con "P/R".
NOTA: l'ora viene salvata solo se il jukebox è in modalità di funzionamento
o standby. Se si desidera salvare l'ora impostata nel jukebox, basta
premere STANDBY (8) sul pannello di controllo, in modo che il jukebox
passi in modalità standby. Se si stacca l'alimentatore, l'ora impostata viene
cancellata ed è necessario ripetere il procedimento descritto in precedenza
per impostare l'ora corretta all'accensione successiva.
L'output americano ed europeo dell'impostazione oraria è identico.
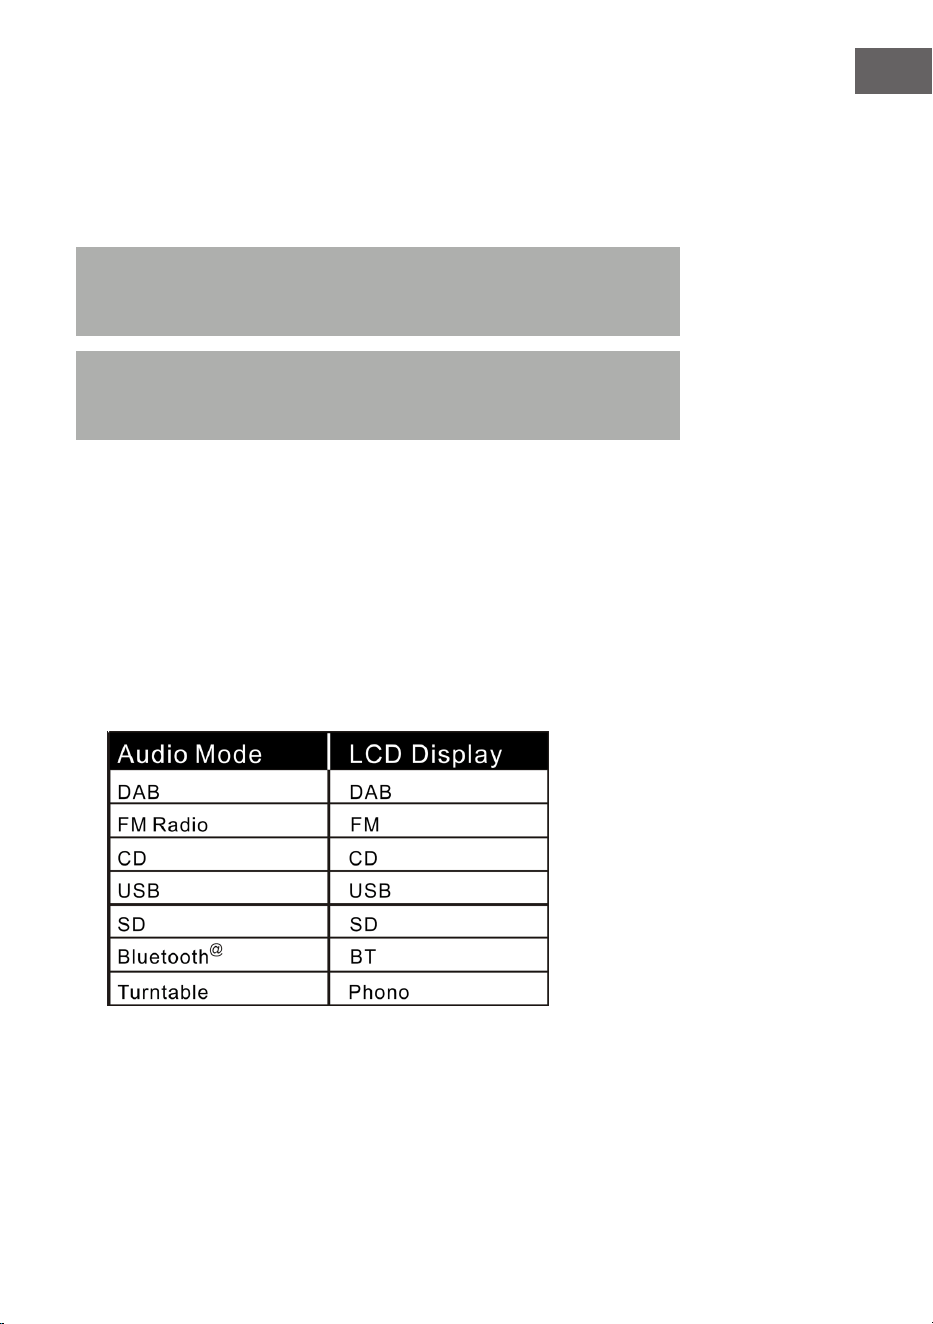
127
IT
Impostare il volume
1. Per alzare il volume, girare la manopola VOL+ o tenere premuto VOL+
sul telecomando no a raggiungere il livello desiderato.
2. Per abbassare il volume, girare la manopola VOL- o tenere premuto
VOL- sul telecomando no a raggiungere il livello desiderato.
Nota: controllare il livello del volume prima di iniziare l'ascolto, in
modo da evitare di spaventare bambini, persone sensibili o donne in
gravidanza con il suono improvviso e ad alto volume del jukebox.
Nota: se si utilizza il jukebox a lungo con volume elevato, si potrebbe
surriscaldare e i componenti interni potrebbero danneggiarsi. NON
utilizzare il jukebox ad alto volume per tempi prolungati.
Le impostazioni del volume vengono salvate quando si spegne il
dispositivo. Quando si riaccende il dispositivo, il volume sarà allo stesso
livello impostato prima dell'ultimo spegnimento.
Impostazioni dell'equalizzatore
1. Impostare una modalità audio a piacere:
il jukebox è dotato di diverse funzioni per la riproduzione audio.
Procedere come descritto di seguito per selezionare tra DAB/FM,
lettore CD, ingresso USB, ingresso per schede SD,
streaming audio BT e giradischi.

128
IT
2. Premere EQ no a raggiungere l'impostazione desiderata. Il sound
cambia non appena viene selezionata l'impostazione di equalizzazione.
3. Il jukebox è dotato di 5 impostazioni di equalizzazione, con cui regolare
il livello sonoro per adattarsi al meglio al genere musicale in ascolto.
Le impostazioni di equalizzazione predenite sul jukebox sono:
JAZZ, FLAT, CLASSIC, ROCK e POP.
RADIO DAB
Gamma di frequenza: DAB 174.928–239.200 MHz
1. Premere STANDBY sul dispositivo (8) o sul telecomando (2) per
abbandonare la modalità standby. Il dispositivo passa automaticamente
in modalità DAB e cerca automaticamente i segnali DAB nelle vicinanze.
2. Girare la manopola Tuning per trovare un'emittente DAB con segnale
intenso (girare la manopola Tuning gradualmente).
3. Premere per raggiungere l'emittente salvata successiva.
4. Premere per raggiungere l'emittente salvata precedente.
5. Premere SCAN per cercare e salvare automaticamente le emittenti DAB
(emittenti con il segnale attuale più intenso). Possono essere salvate
no a 20 emittenti.
6. Premere INFO per ricevere informazioni sull'emittente.
7. Se si preme MENU, compaiono sia il menu per la ricerca automatica
delle emittenti (Autotune) che gli altri menu. Girare la manopola
Tuning per selezionare il contenuto desiderato. Premere poi ENTER per
selezionare il menu principale del contenuto desiderato. Girare dunque
la manopola Tuning per entrare nel sottomenu. Premere ENTER per
confermare.
8. Selezionare "Language" (lingua) nel menu principale e scegliere poi una
delle lingue disponibili (tedesco/francese/italiano/inglese).
9. Per cancellare le impostazioni precedenti o la memoria, selezionare
"Yes" (sì) nel menu "Factory Reset" (resettare alle impostazioni di
fabbrica).
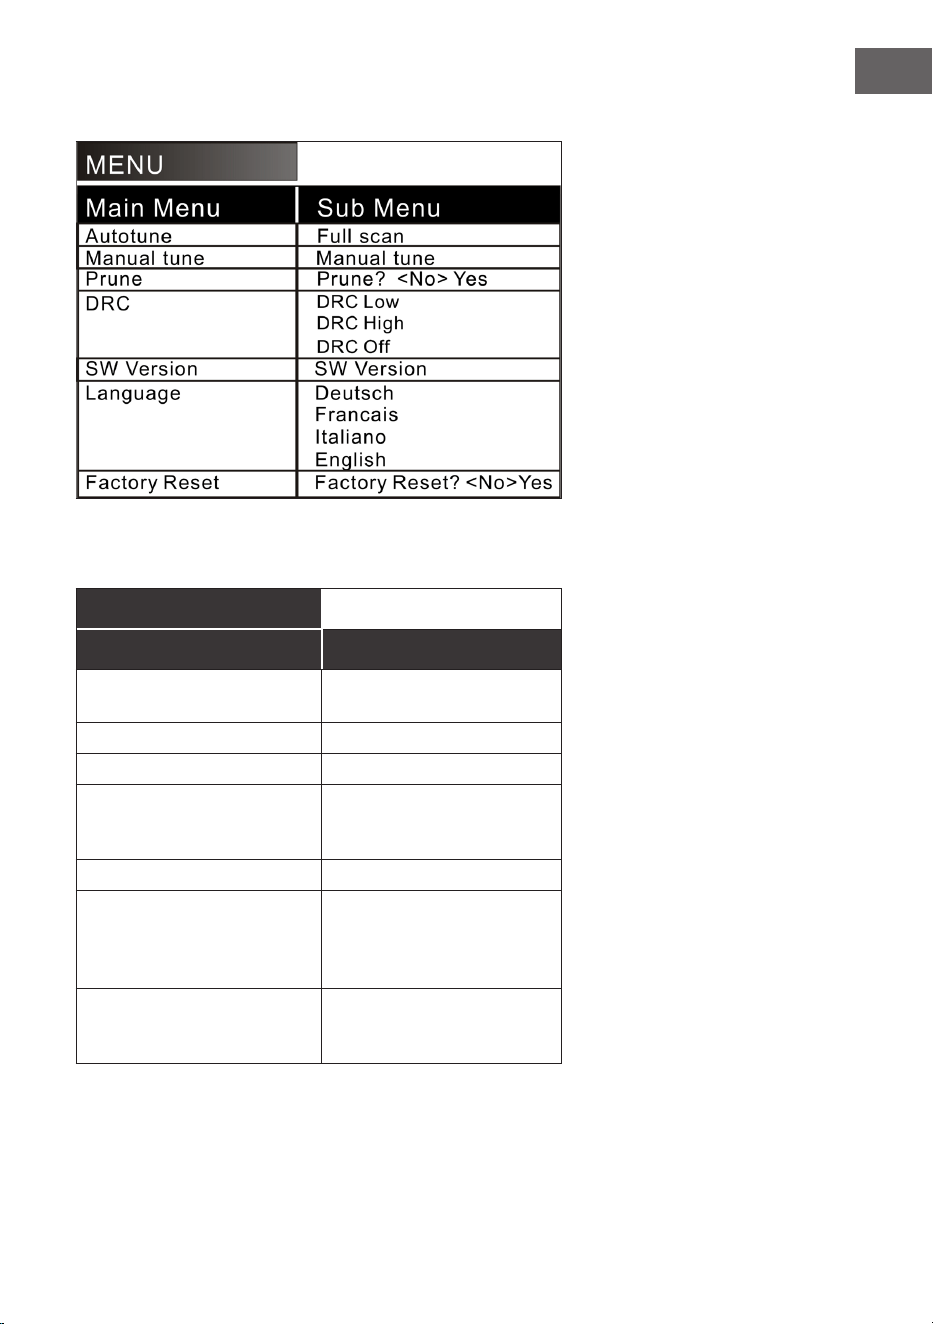
129
IT
Nel menu sono disponibili le seguenti opzioni:
Spiegazione (tedesco):
MENU
Menu principale Sottomenu
Ricerca emittenti
automatica
Ricerca emittenti
completa
Ricerca emittenti manuale Ricerca emittenti manuale
Cancellare Cancellare? <No> Sì
DRC DRC basso
DRC alto
DRC spento
Versione SW Versione SW
Lingua Tedesco
Francese
Italiano
Inglese
Resettare alle
impostazioni di fabbrica
Resettare alle
impostazioni di fabbrica?
<No> Sì
130
IT
NOTE:
• Estrarre completamente l’antenna in modalità DAB e FM. Posizionare
il dispositivo in un luogo con una buona ricezione. (L'antenna si trova
sul lato posteriore del dispositivo).
• Le emittenti con segnale debole possono essere impostate solo
manualmente.
• Possono essere salvate no a 20 emittenti. Se sono disponibili meno
di 20emittenti locali con segnale intenso, verranno salvate solo
quelle con segnale intenso. (Se non sono disponibili 20 emittenti con
segnale intenso, non sarà possibile salvarne 20).
RADIO FM
Gamma di frequenza: FM 87.5-108 MHz
Questo dispositivo è dotato di funzione FM integrata con ricerca emittenti
automatica. Possono essere salvate no a 20 emittenti.
Quando si utilizza il dispositivo per la prima volta e si inserisce la spina
nella presa elettrica, viene impostata automaticamente la modalità standby
(indicazione oraria). Premere STANDBY sul dispositivo o POWER sul
telecomando per accendere il dispositivo. Al primo utilizzo, il dispositivo
passa automaticamente in modalità DAB. Premere MODE per raggiungere
la modalità FM. Lo schermo LCD mostra FM 87.5 MHz (o un'altra frequenza
radio) e gli altoparlanti emettono un rumore gracchiante diuso (a meno
che sulla frequenza 87.5 MHz venga trasmessa un’emittente locale).
1. Premere STANDBY sul dispositivo (8) o sul telecomando (2) per uscire
dalla modalità standby. Il dispositivo passa in modalità FM.
2. Tenere premuto o per cercare le emittenti salvate di recente
(0.1 MHz o 0.05 MHz ogni volta che si preme). Girare la manopola
di regolazione della frequenza per trovare un'emittente con segnale
intenso.
3. Se si preme o (per più di 3 secondi), la radio FM cerca
automaticamente le emittenti (se viene trovata un'emittente con
segnale intenso, viene riprodotta automaticamente).

131
IT
4. Ricerca automatica e salvataggio: se si preme (SCAN), il
dispositivo inizia la ricerca automatica partendo dalla frequenza
87.5. Nella ricerca automatica, le emittenti trovate vengono anche
salvate. Il dispositivo mette a disposizione 20posizioni in memoria
per le vostre emittenti preferite, che vengono denominate "P01"-"P20"
(da programma 1 a programma 20). La prima emittente trovata dal
dispositivo viene salvata in posizione "P01". La seconda emittente viene
salvata in posizione"P02", ecc. La ricerca automatica prosegue no
a quando tutte le emittenti con segnale intenso sono state trovate e
salvate. Non appena le 20 posizioni di memoria sono piene, la ricerca
automatica viene interrotta, anche se dovessero essere disponibili
ulteriori emittenti con segnale intenso.
5. Se si preme MENU, sullo schermo compaiono "Auto tune" e altri menu.
Scegliere il contenuto desiderato con la manopola. Premere poi ENTER
per selezionare il menu principale. Girare la manopola per selezionare il
sottomenu. Premere poi ENTER per un'ultima conferma.
6. Nel menu principale "Language" (lingua) è possibile scegliere tra
quattro lingue (tedesco/francese/italiano/inglese).
NOTE:
• Nella versione americana, le emittenti vengono cercate in intervalli
di 0.1 MHz. Nella versione europea, le emittenti vengono cercate in
intervalli di 0.05 MHz.
• Estrarre completamente l’antenna FM. Posizionare il dispositivo in un
luogo con buona ricezione (l'antenna si trova sul lato posteriore del
dispositivo).
• Le emittenti con segnale debole possono essere impostate solo
manualmente.
• Possono essere salvate no a 20 emittenti. Se sono disponibili meno
di 20 emittenti locali con segnale intenso, vengono salvate solo le
emittenti con segnale intenso (se non sono disponibili 20 emittenti
con segnale intenso, non è possibile salvare 20 emittenti).
• Se si spegne il dispositivo, viene salvata l'impostazione attuale.
Quando si riaccende la radio, viene impostata nuovamente
l'emittente o la funzione selezionata prima dello spegnimento.
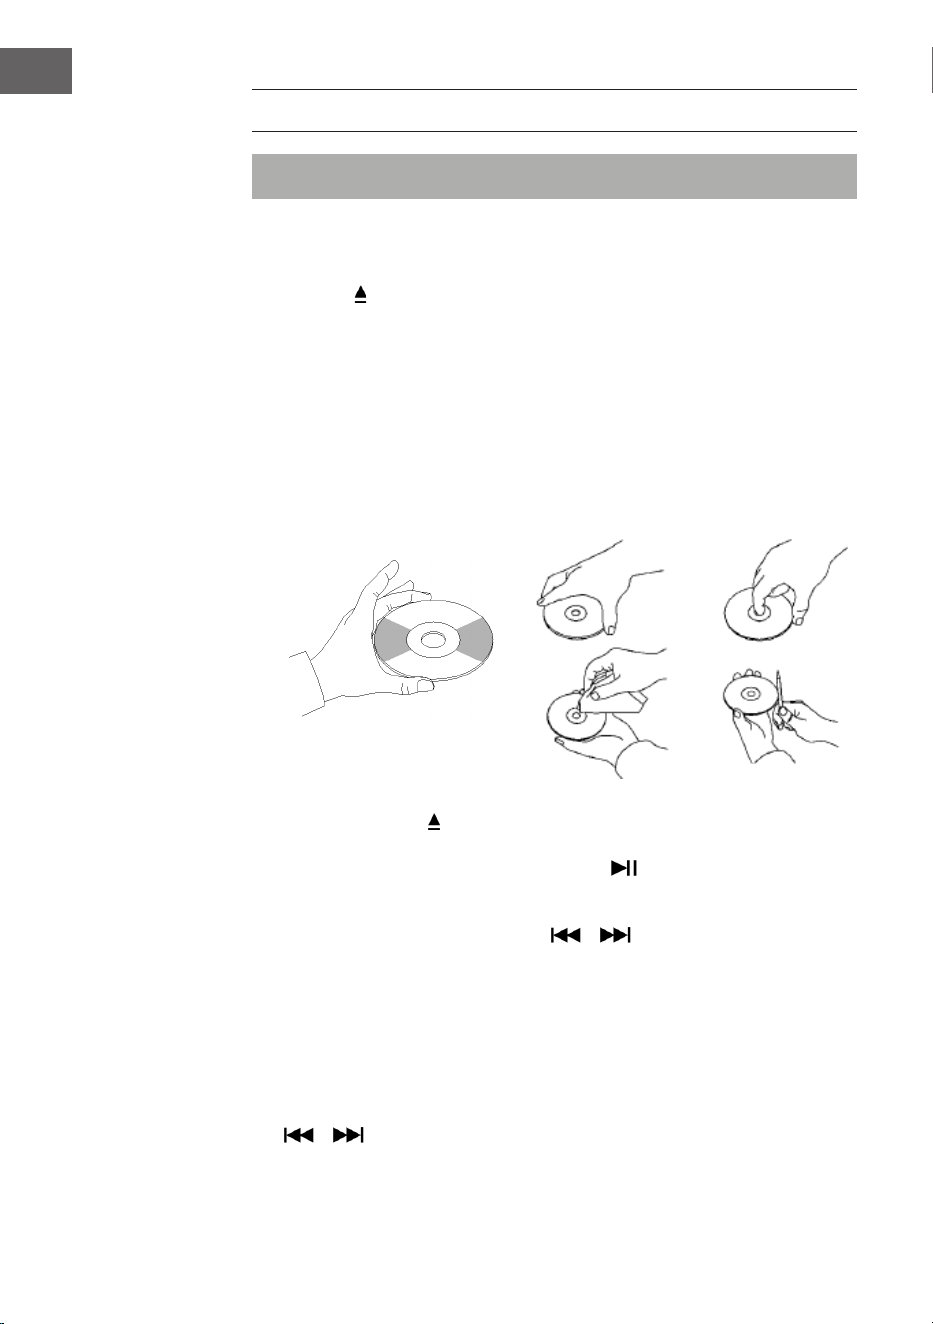
132
IT
CD
Nota: mettere un CD con la parte scritta verso l’alto nel vano.
1. Premere MODE no a quando sullo schermo compare "CD". Sullo
schermo compare poi il numero di brani che si trovano sul CD. La
riproduzione viene avviata automaticamente.
2. Premere
sul pannello di controllo o EJECT sul telecomando per aprire
il vano CD.
3. Inserire il CD nel vano con il lato stampato verso l'alto e quello
riettente verso il basso.
• Questo dispositivo è stato sviluppato appositamente per la
riproduzione di CD con l'indicazione "compact disc". Non è possibile
utilizzare altri dischi.
• Per togliere un CD dalla custodia, premere al centro della custodia e
sollevare il CD tenendolo con cura dal bordo.
4. Premere di nuovo sul pannello di controllo o EJECT sul telecomando
per chiudere il vano CD.
5. Scegliere il brano desiderato con il tasto . Tenere premuto il tasto
per scorrere rapidamente all'interno di un titolo. Premere PLAY per
avviare la riproduzione.
6. Scegliere il brano desiderato con o .
7. Regolare il volume con VOLUME +/-.
8. Premere una volta REP per ripetere un brano. Sull'angolo superiore
sinistro dello schermo LCD lampeggia "REP 1". Se si preme di nuovo
REP, vengono ripetuti tutti i titoli sul CD. Sull'angolo superiore sinistro
dello schermo LCD lampeggia "REP A". Premere REP di nuovo per
interrompere la funzione di ripetizione.
9. Per riprodurre i brani in ordine casuale, premere di nuovo REP no a
quando sul lato inferiore dello schermo LCD compare "Rand". Premere
o per scegliere una canzone casuale.
10. Per creare una playlist, fermare la riproduzione con STOP. Premere
133
IT
P/R per raggiungere la modalità di salvataggio. Sullo schermo LCD
lampeggia "P01". Selezionare il primo titolo che si desidera salvare e
premere di nuovo P/R. Premere per interrompere la procedura di
salvataggio e avviare la riproduzione dei titoli salvati. Sullo schermo
appare "PROG CD". Il dispositivo può salvare no a 20titoli. Ulteriori
informazioni sono disponibili al paragrafo "PROG (creare una playlist)".
Nota: non chiudere con forza il vano CD, altrimenti possono risultare
malfunzionamenti.
RIPRODUZIONE USB/SD
1. Premere MODE no a quando sullo schermo compare "USB or SD".
Sullo schermo compaiono prima il numero di cartelle e poi il numero di
titoli. La riproduzione si avvia automaticamente.
2. Scegliere il brano desiderato con o .
3. Premere una volta REP per ripetere un brano. Sull'angolo superiore
sinistro dello schermo LCD lampeggia "REP 1". Se si preme di nuovo
REP, vengono ripetuti tutti i titoli. Sull'angolo superiore sinistro
dello schermo LCD lampeggia "REP A". Premere REP di nuovo per
interrompere la funzione di ripetizione.
4. Per riprodurre i brani in ordine casuale, premere di nuovo REP no a
quando sul lato inferiore dello schermo LCD compare "Rand". Premere
o per scegliere una canzone casuale.
5. Per creare una playlist, fermare la riproduzione con STOP. Premere
P/R per raggiungere la modalità di salvataggio. Sullo schermo LCD
lampeggia "P01". Selezionare il primo titolo che si desidera salvare e
premere di nuovo P/R. Premere per interrompere la procedura di
salvataggio e avviare la riproduzione dei titoli salvati. Sullo schermo
appare "PROG CD". Il dispositivo può salvare no a 20titoli. Ulteriori
informazioni sono disponibili al paragrafo "PROG (creare una playlist)".
134
IT
6. Premere MODE per terminare la riproduzione USB o SD. Durante la
riproduzione USB o SD, non staccare la spina dalla presa, altrimenti
potrebbero esserci malfunzionamenti.
NOTE:
• Se la chiavetta USB dovesse contenere le audio non compatibili con
il jukebox, non sarà possibile la lettura. Questi titoli non verranno
calcolati nel numero totale di titoli mostrati e non verranno riprodotti.
• Se la scheda SD dovesse contenere le audio non compatibili con
il jukebox, non sarà possibile la lettura. Questi titoli non verranno
calcolati nel numero totale di titoli mostrati e non verranno riprodotti.
Nota: per un funzionamento ottimale, si consiglia l'uso di chiavette USB
della versione 2.0 (non 3.0).
BT
Come accoppiare il jukebox con un dispositivo BT esterno:
1. Premere MODE no a quando sullo schermo compare "BT".
2. Accendere il dispositivo BT esterno e attivare la funzione BT. Avviare la
ricerca di dispositivi BT disponibili.
3. Selezionare "Graceland Mini" dall'elenco sul dispositivo esterno.
4. Non appena i dispositivi sono accoppiati, sullo schermo compare
"connected". Ora è possibile avviare la riproduzione di brani dal
dispositivo BT esterno. La riproduzione può essere gestita dal
dispositivo BT esterno, dal jukebox o dal telecomando del jukebox.
Controllo tramite dispositivo BT:
• Utilizzare i tasti sullo schermo per scegliere un titolo, regolare il volume,
avviare o mettere in pausa la riproduzione e per le funzioni e .
Controllo tramite jukebox/telecomando:
• Una volta realizzato l'accoppiamento, la riproduzione tramite il
dispositivo BT viene avviata automaticamente.
• Regolare il volume con la manopola VOLUME+/-.
• Premere o per passare al titolo precedente/successivo.
• Premere per avviare/mettere in pausa la riproduzione.
• Per terminare l'accoppiamento, premere MODE per selezionare un'altra
funzione o disattivare il collegamento BT del dispositivo esterno.
135
IT
Nota: la trasmissione ottimale per il collegamento BT si raggiunge entro
i 10 metri senza barriere. Se il dispositivo BT che è stato collegato per
ultimo si trova entro la portata del jukebox, non è possibile accoppiare
un nuovo dispositivo. Il collegamento dell'ultimo dispositivo BT deve
essere disattivato, se si desidera accoppiare il jukebox con un nuovo
dispositivo.
PROG (CREARE UNA PLAYLIST)
1. Premere STOP durante la riproduzione di una fonte musicale.
2. Premere PROG (6) sul telecomando o P/R sul pannello di controllo per
raggiungere la modalità di salvataggio. Sull'angolo inferiore sinistro
dello schermo LCD lampeggia "PROG". Sullo schermo lampeggia anche
il numero di una posizione (ades. "P01").
3. Premere o per scegliere il titolo che si desidera salvare. Premere
PROG per salvare il titolo scelto.
4. Ripetere questi passaggi per salvare altri titoli.
5. Una volta salvati tutti i titoli desiderati, è possibile avviare la
riproduzione. Questo è possibile non appena è stato salvato il numero
desiderato di brani.
6. Se si desidera interrompere il salvataggio dei titoli, premere STOP.
7. Quando si raggiunge il numero massimo di titoli che è possibile salvare,
sullo schermo compare "FULL".
NOTA: se è stata cambiata la modalità di riproduzione o se il dispositivo
è stato riavviato, è necessario creare nuovamente la playlist (ripetere i
passaggi descritti in precedenza).
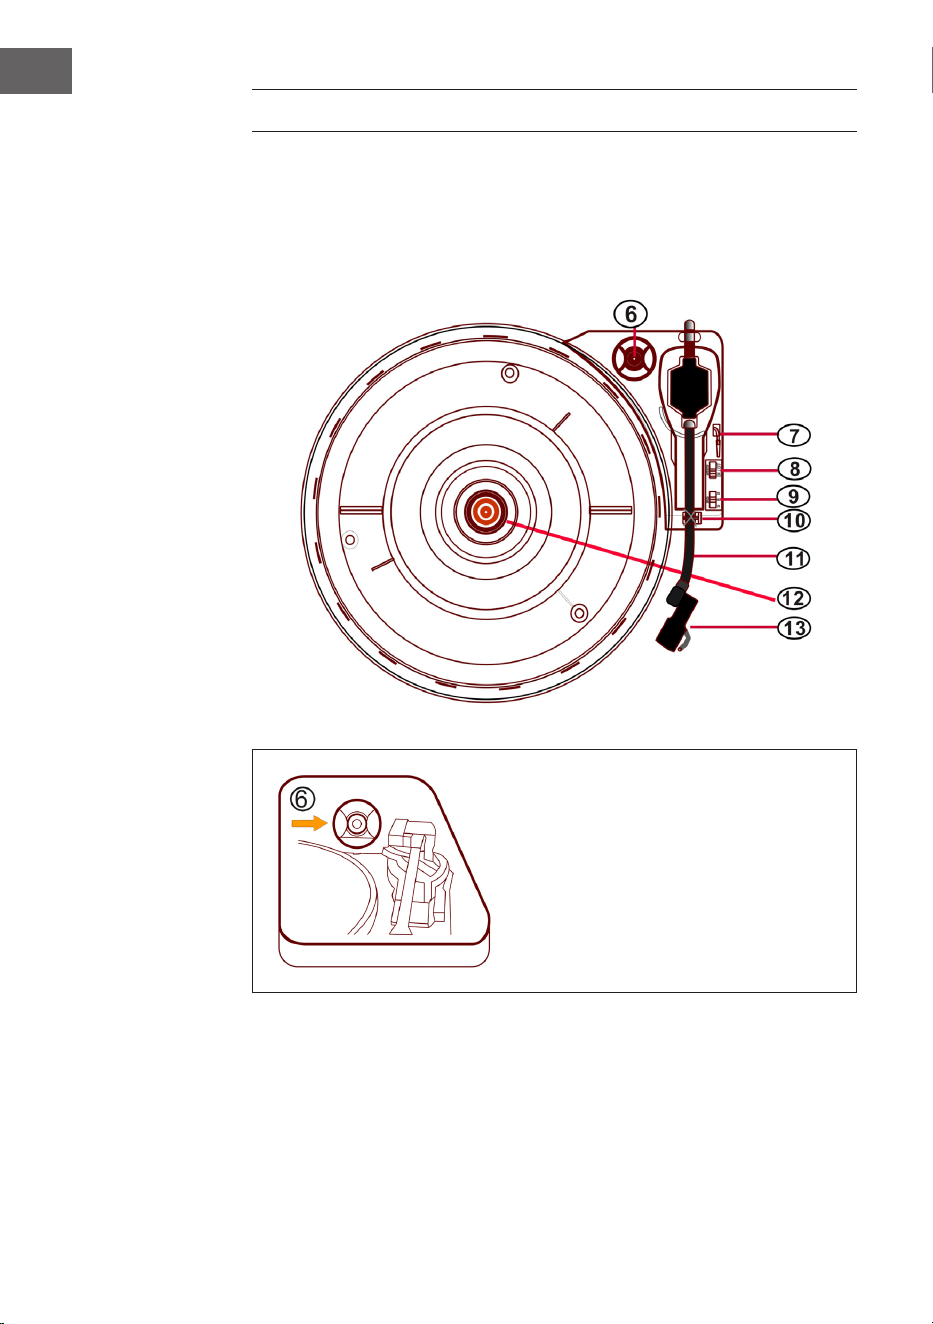
136
IT
GIRADISCHI
• Premere MODE no a quando sullo schermo LCD compare "Phono".
• Poggiare un disco sul piatto del giradischi. Scegliere una velocità.
Le velocità disponibili sono 33/45/78 (la velocità predenita in
fabbrica è "33"). Non appena la puntina si trova sopra al disco, inizia la
riproduzione.
Adattatore per 45 giri
Mettere un disco sul piatto del
giradischi. Per riprodurre vinili di
brani singoli, utilizzare l'adattatore
per 45giri incluso nel volume di
consegna.
Adattatore per
45 giri
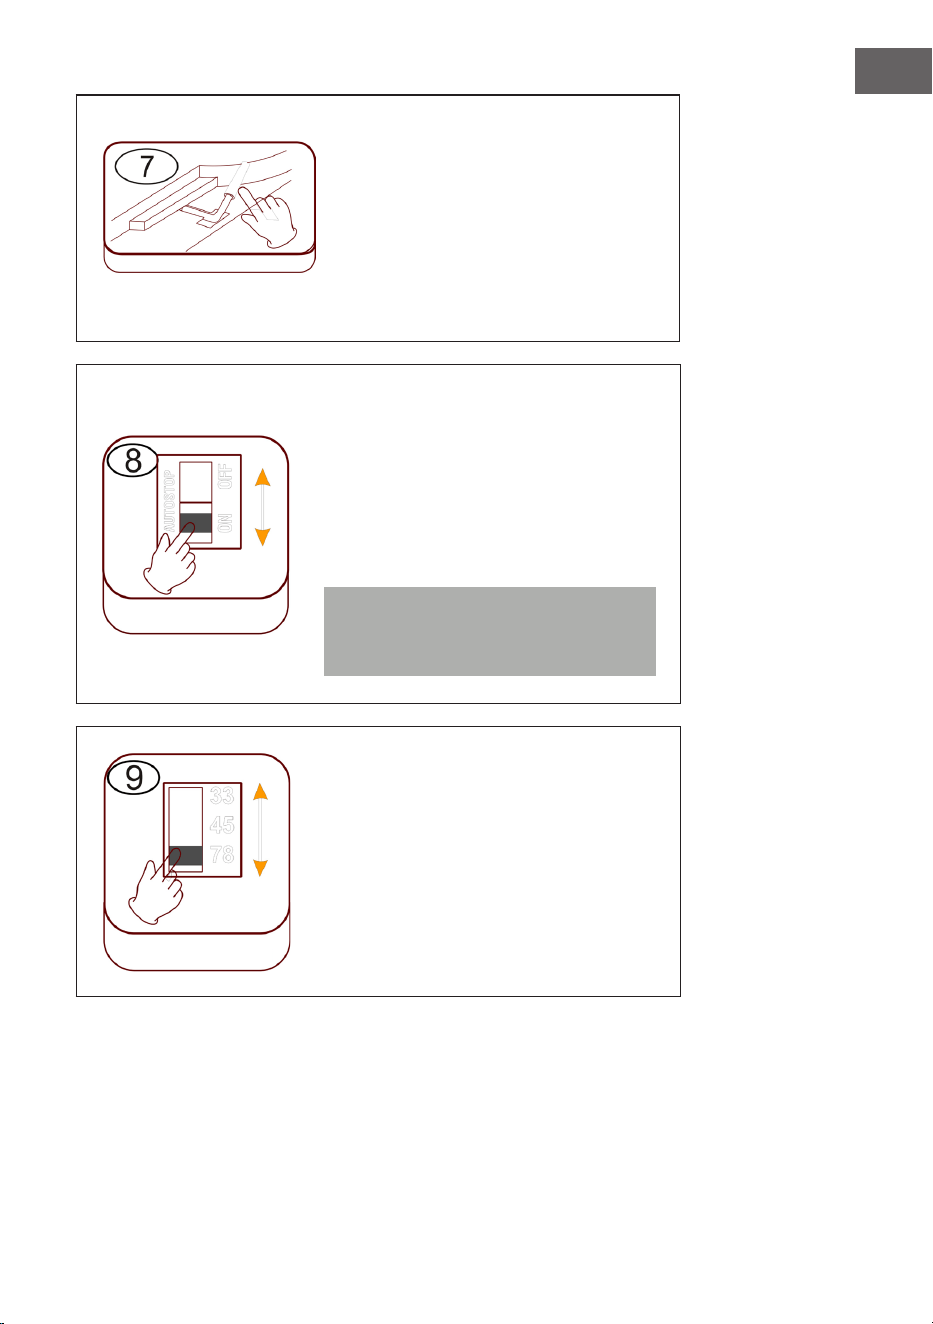
137
IT
Alzare/abbassare il braccio del pick
up
• Alzare con cura il braccio del pick
up e metterlo in corrispondenza
del punto del disco che si
desidera ascoltare.
• Abbassare il braccio del pick up
facendo attenzione.
Arresto automatico (Autostop)
• Spostando il cursore verso l'alto: la
riproduzione nisce, il piatto continua
a girare.
• Spostando il cursore verso il basso:
la riproduzione nisce, il piatto si
ferma.
Nota: al termine della riproduzione,
rimettere il braccio del pick up nella
sua posizione originaria.
Impostare la velocità
Sono disponibili le velocità 33/45/78.
Leva di
sollevamento
Autostop
Velocità
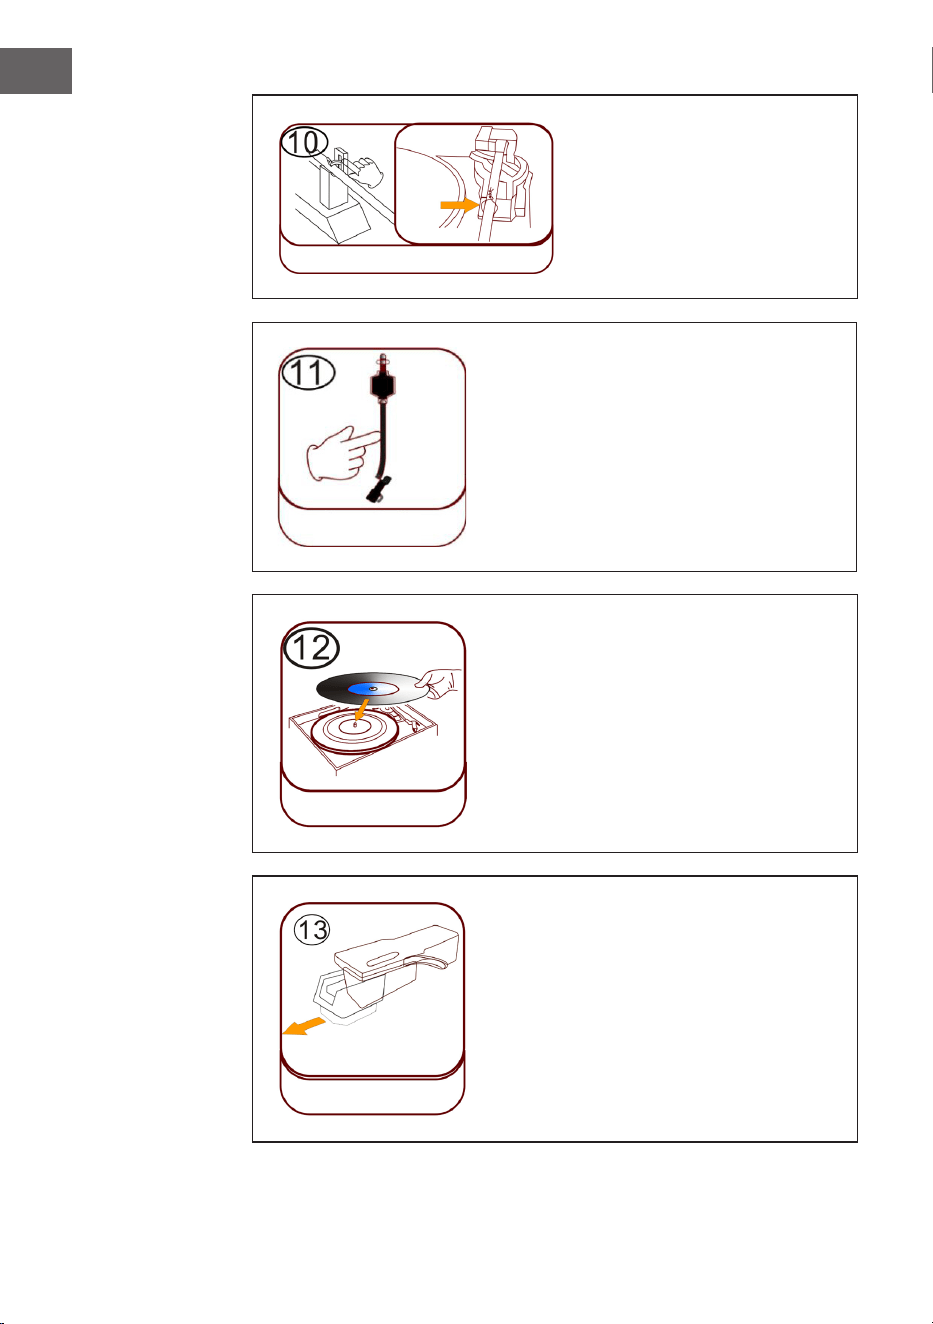
138
IT
Blocco del braccio del pick
up
Prima dell'uso, sganciare il
blocco del braccio del pick up.
Pick up (braccio del pick up)
Posizionare il disco
Mettere un disco adatto sul piatto del
giradischi. Alzare il braccio del pick up
e poggiarlo con cura sul disco. Ora è
possibile riprodurre titoli dal disco.
Protezione in plastica della puntina
Rimuovere la puntina tirandola verso
il basso, con un movimento diritto in
direzione opposta del braccio del pick up.
Blocco braccio
pick up
Chiusura
Braccio pick
up
Posizionare
il disco
Protezione in
plastica della
puntina
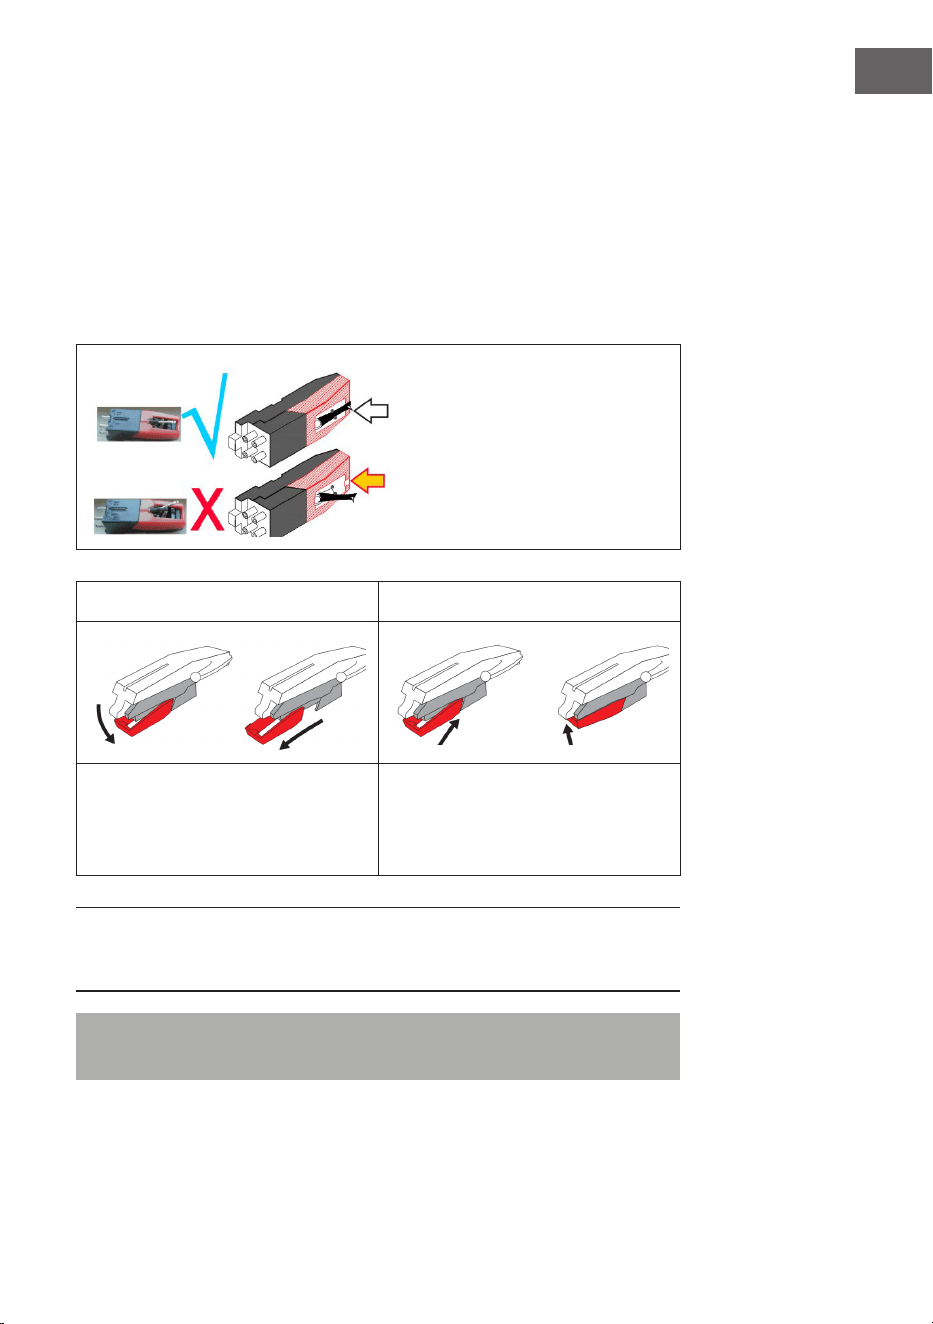
139
IT
Cura della puntina
• Premere MODE no a quando sullo schermo compare "Phono".
Rimuovere la protezione della puntina (v. immagine 1). Mettere un
disco sul piatto del giradischi. Scegliere una velocità tra 33/45/78. Non
appena la puntina viene spostata sopra al disco, inizia la riproduzione.
• Si consiglia di cambiare la puntina non appena si notano cambiamenti
nella qualità dell'audio.
• L'uso di puntine usurate può rovinare i dischi. L'usura delle puntine è più
rapida se si riproducono disci a 78 giri.
La puntina deve essere orientata
in posizione centrale (al centro
della scanalatura).
Se la puntina sporge dalla
scanalatura potrebbero
esserci interruzioni durante la
riproduzione.
Immagine 1 Immagine 2
Rimuovere la puntina tirandola
verso il basso, con un movimento
diritto in direzione opposta del
braccio del pick up.
Sostituire la puntina con una
compatibile. Installare la puntina,
con la punta rivolta verso il basso,
premendola con cura in posizione.
NOTA: se si compra la puntina in un negozio, consigliamo di portare con sé
la puntina vecchia come riferimento La maggior parte dei negozi di musica
ed elettronica di buona qualità orono puntine di ricambio.
Nota: assicurarsi sempre che il braccio del pick up sia bloccato quando si
trasporta il jukebox.

140
IT
NOTA: al termine della registrazione, il braccio del pick up non torna
automaticamente sul suo supporto, ma il giradischi smette di girare
(spostare manualmente il braccio del pick up sul suo supporto).
Mettere la protezione sulla puntina quando non si
usa il dispositivo.
Note importanti sull’utilizzo della puntina
• Non piegare la puntina.
• Per evitare lesioni, non toccare la puntina.
• Conservare fuori dalla portata dei bambini!
• Prestare attenzione, dato che la puntina è molto delicata.
L'utilizzo di puntine piegate o rotte può rovinare i dischi e causare
malfunzionamenti.
• Non esporre la puntina a calore estremo.
• Rivolgersi a un tecnico qualicato se ci dovessero essere diicoltà
nella sostituzione della puntina.
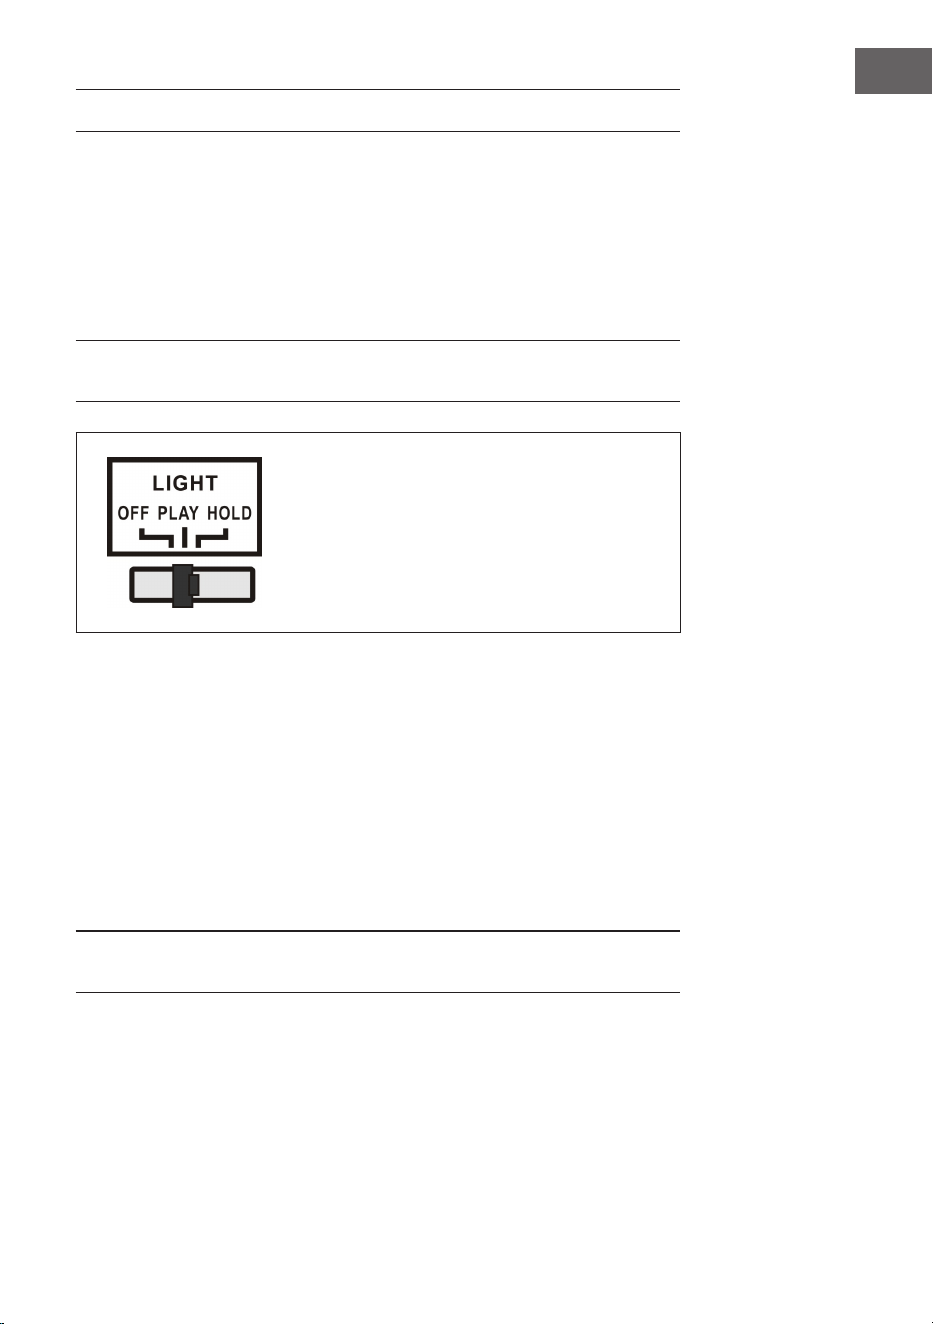
141
IT
ACCENDERE GLI EFFETTI LUMINOSI
Il jukebox è dotato di due tubi luminosi LED a cambiamento cromatico,
visibili sui componenti del dispositivo. Ci sono anche molti altri eetti
luminosi LED multicolore, visibili nel lettore CD, nelle slot USB/SD e sul lato
inferiore del pannello degli altoparlanti.
L'interruttore per la lampada è sul lato posteriore del dispositivo. Se si
sposta l'interruttore da "OFF" a "PLAY", la lampada si illumina.
NOTA: il tasto LIGHT controlla l'alimentazione degli eetti luminosi e si
trova sul lato posteriore del dispositivo.
PLAY: cambia il ciclo cromatico della luce.
HOLD: il colore della luce rimane sso su
una determinata tonalità (contiene luce
invisibile).
OFF: la luce viene spenta e non si illumina
più.
Sul lato posteriore del dispositivo c'è un interruttore per la modalità
luminosa LED (27) (v. paragrafo "Descrizione del dispositivo - Lato
posteriore). Quando viene attivato, i tubi luminosi LED cambiano
costantemente colore. In modalità HOLD, i tubi luminosi LED si illuminano
in una sola tonalità. Se si passa alla modalità PLAY, il colore dei tubi
luminosi LED inizia a cambiare. Ritornando in modalità HOLD è possibile
selezionare un altro colore sso (tenere presente che questi colori sono
deniti e potrebbe non trattarsi dello stesso identico colore visibile sui tubi
luminosi LED quando si è passati in modalità HOLD).
La luce si spegne quando si sposta l'interruttore su "OFF".
NOTA: in modalità HOLD potrebbe non esserci alcuna luce visibile. Questo
è normale (è necessario reimpostare l'interruttore).

142
IT
CORREZIONE DEGLI ERRORI
I seguenti controlli aiutano a risolvere la maggior parte dei problemi che
potrebbero comparire nel dispositivo. Prima di consultare la seguente
lista, controllare che l'alimentatore sia collegato correttamente. Se il
problema persiste anche dopo aver realizzato i seguenti controlli, rivolgersi
al produttore, al suo servizio di assistenza ai clienti o a un'azienda tecnica
autorizzata per manutenzione e riparazioni.
Problema Possibile causa Soluzione
Ricezione radio
Nessuna ricezione
radio
La manopola della
modalità non è nella
posizione corretta.
Impostare il volume
desiderato con
l'apposita manopola.
Girare la manopola
Tuning per cercare
un'emittente radio.
Riproduzione CD
Il CD non viene
riprodotto o ci sono
interruzioni.
Il CD è stato inserito in
modo errato.
Inserire il CD nel vano
con il lato stampato
verso l'alto.
Il CD è sporco.
Pulire il CD. Riavviare il
dispositivo.
Il sound non è pulito.
Spostare il dispositivo.
Premere STANDBY
(riavviare il
dispositivo).
Il lettore CD non
funziona.
Premere STOP e
salvare il titolo
desiderato.

143
IT
Problema Possibile causa Soluzione
Generici
Non è possibile
riprodurre la playlist
da CD.
La spina non è inserita
nella presa elettrica.
Inserire correttamente
la spina nella presa
elettrica.
Premere STANDBY
(riavviare il
dispositivo).
Nessun audio
Il volume non
è impostato
correttamente.
Ruotare la manopola
del volume in senso
orario.
Forti rumori
gracchianti e ronzii.
C'è un
videoregistratore o un
lettore DVD troppo
vicino al dispositivo.
Spostare il dispositivo.
Lo schermo è sfocato
o non funziona.
Spegnere e riavviare il
dispositivo.

144
IT
SMALTIMENTO
Se nel proprio paese si applicano le
regolamentazioni inerenti lo smaltimento di
dispositivi elettrici ed elettronici, questo simbolo
sul prodotto o sulla confezione segnala che questi
prodotti non possono essere smaltiti con i riuti
normali e devono essere portati a un punto di
raccolta di dispositivi elettrici ed elettronici. Grazie
al corretto smaltimento dei vecchi dispositivi si
tutela il pianeta e la salute delle persone da possibili
conseguenze negative. Informazioni riguardanti
il riciclo e lo smaltimento di questi prodotti si
ottengono presso l’amministrazione locale oppure il
servizio di gestione dei riuti domestici.
Il prodotto contiene batterie. Se nel proprio
paese si applicano le regolamentazioni inerenti
lo smaltimento di batterie, non possono essere
smaltite con i normali riuti domestici. Preghiamo
di informarvi sulle regolamentazioni vigenti sullo
smaltimento delle batterie. Grazie al corretto
smaltimento dei vecchi dispositivi si tutela l’ambiente
e la salute delle persone da conseguenze negative.
DICHIARAZIONE DI CONFORMITÀ
Produttore:
Chal-Tec GmbH, Wallstraße 16, 10179 Berlino,
Germania.
Importatore per la Gran Bretagna:
Berlin Brands Group UK Limited
PO Box 42
272 Kensington High Street
London, W8 6ND
United Kingdom
Il fabbricante, Chal-Tec GmbH, dichiara che il tipo di
apparecchiatura radio Graceland Mini è conforme
alla direttiva 2014/53/UE. Il testo completo della
dichiarazione di conformità UE è disponibile al
seguente indirizzo Internet: use.berlin/10036452