
User Manual
V 1.00
Digital Projector
Home Entertainment Series | TK705i/TK705STi

2
Copyright & disclaimer
Copyright
Copyright © 2025 by BenQ Corporation. All rights reserved. No part of
this publication may be reproduced, transmitted, transcribed, stored in a
retrieval system or translated into any language or computer language,
in any form or by any means, electronic, mechanical, magnetic, optical,
chemical,manual or otherwise, without the prior written permission of
BenQ Corporation.
The Bluetooth® word mark and logos are registered trademarks owned
by Bluetooth SIG, Inc. and any use of such marks by BenQ Corporation is
under license.
iOS is a trademark or registered trademark of Cisco in the U.S. and other
countries and is used under license.
macOS® is a trademark of Apple Inc., registered in the U.S. and other
countries.
Google TV is the name of this device's software experience and a
trademark of Google LLC. Google, YouTube, Google Cast, YouTube Music
and other marks are trademarks of Google LLC.
Netflix is a trademark of Netflix, Inc.
Manufactured under license from Dolby Laboratories. Dolby, Dolby Audio,
and the double-D symbol are trademarks of Dolby Laboratories Licensing
Corporation.
The terms HDMI, HDMI High-Definition Multimedia Interface, HDMI Trade
dress and the HDMI Logos are trademarks or registered trademarks of
HDMI Licensing Administrator, Inc.

3
All other logos, products, or company names mentioned in this manual
may be the registered trademarks or copyrights of their respective
companies, and are used for informational purposes only.
Disclaimer
BenQ Corporation makes no representations or warranties, either
expressed or implied, with respect to the contents hereof and specifically
disclaims any warranties, merchantability or fitness for any particular
purpose. Further, BenQ Corporation reserves the right to revise this
publication and to make changes from time to time in the contents hereof
without obligation of BenQ Corporation to notify any person of such
revision or changes. This user manual aims to provide the most updated
and accurate information to customers, and thus all contents may be
modified from time to time without prior notice. Please visit http://support.
benq.com for the latest version of this manual.
It is the sole responsibility of the user if problems (such as data loss and
system failure) occurred due to non-factory installed software, parts, and/
or non-original accessories.
Warranty
BenQ warrants this product against any defects in material and
workmanship, under normal usage and storage.
Proof of purchase date will be required with any warranty claim. In the
event this product is found to be defective within the warranty period,
BenQ’s only obligation and your exclusive remedy shall be replacement
of any defective parts (labor included). To obtain warranty service,
immediately notify the dealer from which you purchased the product of
any defects.
Important: The above warranty shall be void if the customer fails to
operate the product in accordance with BenQ’s written instructions,
especially the ambient humidity must be in-between 10% and 90%,
temperature in-between 0°C and 40°C, altitude lower than 2000 meters,
and avoiding to operate the projector in a dusty environment. This warranty
gives you specific legal rights, and you may have other rights which vary
from country to country.
For other information, please visit www.BenQ.com.

4
Statement regarding hyperlinks and
third-party websites
BenQ is not responsible for the content of the websites or of similar
resources, which are maintained and controlled by third parties, that may
be linked from this product. Providing links to those websites or to similar
resources does not mean that BenQ makes any warranty or representation
to their content by expression or by implication.
Any third party content or service preinstalled in this product is provided
“as is”. BenQ does not, by expression or by implication, make any warrant
to the content or to the services provided by third parties. BenQ does not
warrant or guarantee that the content or services provided by third parties
are accurate, effective, most up-to-date, legal, or complete. Under no
circumstances shall BenQ be liable for the content or services provided by
third parties including their negligence.
Services provided by third parties may be terminated temporarily or
permanently. BenQ does not warrant or guarantee that any content or
services provided by third parties are in good condition at any time, and is
not liable for the termination of the said content and services.
In addition, BenQ is not involved in any transactions you conduct in the
websites or similar resources maintained by third parties.
You should contact the content or service providers for any questions,
concerns, or disputes.
Product support
You are strongly recommended to upgrade the product to the latest
firmware version and refer to the most up-to-date user manual to make
best use of the product.
This document aims to provide the most updated and accurate information
to customers, and thus all contents may be modified from time to time
without prior notice. Please visit the website for the latest version of this
document and other product information. Available files vary by model.
1. Make sure your computer is connected to the Internet.
2. Visit the local website from Support.BenQ.com. The website layout and
content may vary by region/country.Look for the following regularly to
get the most up-to-date information.
• User manual and related document


6
Q&A index
Start with the topics you are interested in:
Setup
How do I set up the projector and turn it on?
Choosing a location 27
Powering on and initial setup 32
Image adjustment
How do I adjust the focus of the projected image?
Fine-tuning the image clarity 46
How do I t the projected image to the screen?
Keystone 47
Screen Fit 48
Usage
How do I project wirelessly?
Wireless projection (screen casting) 58
How do I play music via the projector?
Playing music with your projector 62
Maintenance and product support
What should I do if I don't plan to use the projector for a long
time?
Storing the projector 80

7
Table of Contents
Copyright & disclaimer ..........................................................................2
Copyright ..........................................................................................................2
Disclaimer ......................................................................................................... 3
Warranty............................................................................................................3
Statement regarding hyperlinks and third-party websites .......4
Product support ....................................................................................... 4
Servicing ...................................................................................................... 5
Q&A index .................................................................................................... 6
Safety instructions ...................................................................................11
Package contents ................................................................................... 16
Introduction ............................................................................................... 17
Projector overview ........................................................................................17
Overview ........................................................................................................ 17
Keypad ........................................................................................................... 19
I/O ports ....... .................................................................................................. 20
Dimensions .................................................................................................... 21
Projector connections ................................................................................22
Wireless connection ..................................................................................... 22
Wired connection (USB-A port) ................................................................... 22
Wired connection (HDMI port) ..................................................................... 22
Wired connection (USB-C port) .................................................................... 22
Remote control ............................................................................................ 24
Remote control effective range .................................................................... 26
Installation ................................................................................................ 27
Choosing a location ...................................................................................27
Obtaining a preferred image size ....................................................... 29
Projection dimensions .................................................................................. 29
Using the projector at high altitude .................................................... 31
Getting started..............................................................................................32

8
Powering on and initial setup .................................................................32
Power LED indicator ...................................................................................... 33
Power settings and options for saving power ...........................35
Shutting down the projector .................................................................. 36
Accessing helpful BenQ apps ........................................................... 37
Apps downloaded to your projector ...................................................37
Download
SmartRemote for BenQ Projector
app to your
mobile device ................................................................................................37
Upgrading your projector ...................................................................38
Updating the operating system ........................................................... 38
Advanced rmware updating .............................................................. 38
Mounting ....................................................................................................39
Tripod mounting (purchased separately) ...................................... 39
Screw location ............................................................................................... 39
Flexible setup ................................................................................................ 39
Working with a tripod plate ........................................................................... 40
Ceiling mounting ........................................................................................ 42
Screw location ............................................................................................... 42
Working with a ceiling mount ....................................................................... 43
Using the top adjustable foot ...........................................................45
Adjusting the projected image.............................................................46
Fine-tuning the image clarity ............................................................... 46
Fitting the image to your screen .......................................................... 47
Keystone ........................................................................................................ 47
Screen Fit ....................................................................................................... 48
Obstacle avoidance ...................................................................................... 49
Projection size and position adjustment (Digital zoom and image
reposition) ..................................................................................................... 49
Adjusting screen brightness ..................................................................50
Activating smart eye protection ..........................................................50
Optimizing image quality by Auto Cinema mode .......................50

9
Changing the input source ..................................................................... 51
Watching streaming videos ..............................................................52
Google TV home screen .......................................................................... 52
Dashboard ..................................................................................................... 53
Choosing a proper picture mode for video streaming ..............54
Choosing a proper sound mode for video streaming ................55
Enhancing gaming experience .......................................................57
Auto Low Latency Mode (ALLM) ............................................................ 57
Gaming boost .............................................................................................. 57
Projection ................................................................................................... 58
Wireless projection (screen casting) ................................................58
Screen casting from iOS/macOS device devices ....................................... 58
Screen casting from Android™ OS devices with Google Cast™ ................. 59
Screen casting from Android™ OS devices with Google Home ................. 59
Screen casting from PC devices with Google Cast™ .................................. 60
Wired projection ........................................................................................... 61
Playing music with your projector .................................................. 62
Making your projector a Bluetooth speaker .................................. 62
Bluetooth speaker mode LED indicator ....................................................... 63
Connecting the projector to an external Bluetooth speaker /
headphone ....................................................................................................64
Making your projector a wireless speaker .......................................64
Turning the screen off during music playback ............................................ 65
Playing multimedia les from a USB ash drive .......................66
Power delivery to a USB-C device ..................................................67
USB-C power delivery notice ................................................................. 67
Menu navigation ....................................................................................68
Set your device name ...............................................................................68
Input .................................................................................................................69
Projector ......................................................................................................... 70

10
Display & Sound .......................................................................................... 74
Network & Internet ..................................................................................... 78
Accounts & Proles .................................................................................... 78
Privacy ............................................................................................................. 79
Apps ................................................................................................................. 79
System ............................................................................................................. 79
Accessibility .................................................................................................. 79
Remotes & Accessories ........................................................................... 79
Help & Feedback ......................................................................................... 79
Maintenance ............................................................................................80
Care of the projector .................................................................................80
Cleaning the lens ........................................................................................80
Storing the projector .................................................................................80
Transporting the projector ...................................................................... 81
Light source information .......................................................................... 81
Troubleshooting .......................................................................................... 82
Specications ..........................................................................................85
Projector specications ...........................................................................85
Timing chart .................................................................................................. 87
HDMI input ..................................................................................................... 87
USB-C input .................................................................................................... 90
Supported le formats ............................................................................. 92
Video .............................................................................................................. 92
Audio .............................................................................................................. 93
11
Safety instructions
Your projector is designed and tested to meet the latest standards for
safety of information technology equipment. However, to ensure safe use
of this product, it is important that you follow the instructions mentioned
in this manual and marked on the product.
1. Please read this user manual before you operate your projector.
Keep this manual in a safe place for future reference.
2. Always place the projector on a level, horizontal surface during
operation.
• Do not place the projector on an unstable cart, stand, or table as it
may fall and be damaged.
• Do not place inflammables near the projector.
Do not use if tilted at an angle of more than 10 degrees left to
right, nor at angle of more than 15 degrees front to back.
3. Do not store the projector on end vertically. Doing so may cause the
projector to fall over, causing injury or resulting in damage.
4. Do not place this projector in any of the following environments.
• Space that is poorly ventilated or confined. Allow at least 50 cm
clearance from walls and free flow of air around the projector.
• Locations where temperatures may become excessively high,
such as the inside of a car with all windows rolled up.
• Locations where excessive humidity, dust, or cigarette smoke may
12
contaminate optical components, shorten the projector’s lifespan
and darken the screen.
• Locations near fire alarms.
• Locations with an ambient temperature goes beyond the
maximum limit stated in the product specifications.
• Locations where the altitudes exceed the maximum limit specified
in the product specifications.
0 m
(0 feet)
Above
maximum limit
5. Do not block the vents holes while the projector is on (even in power-
saving mode).
• Do not cover the projector with any item.
• Do not place the projector on a blanket, bedding or any other soft
surface.
6. In areas where the mains power supply voltage may fluctuate by
±10 volts, it is recommended that you connect the projector through
a power stabilizer, surge protector or uninterruptible power supply
(UPS) as appropriate to your situation.
13
7. Do not step on the projector or place any objects upon it.
8. Do not place liquids near or on the projector. Liquids spilled into
the projector will void your warranty. If the projector does become
wet, disconnect it from the power point and call BenQ to have the
projector repaired.
9. Do not look straight into the projector lens during operation. It may
harm your sight.
10. Do not operate the projector laser beyond the rated laser life.
11. Do not attempt to disassemble this projector. There are dangerous
high voltages inside which may cause death if you should come into
14
contact with live parts.
Under no circumstances should you ever undo or remove any other
covers. Refer servicing only to suitably qualified professional service
personnel.
Warning
• Please keep the original packing for possible future shipment.
• If you need to pack your projector after use, adjust the projection lens to an appropriate position,
put the lens cushion around the lens, and fit the lens cushion and projector cushion together to
prevent damage during transportation.
12. When you think service or repair is required, take the projector only
to a suitably qualified technician.
Moisture condensation
Never operate the projector immediately after moving it from a cold
location to a hot location. When the projector is exposed to such a change
in temperature, moisture may condense on the crucial internal parts. To
prevent the projector from possible damage, do not use the projector for at
least 2 hours when there is a sudden change in temperature.
Avoid volatile liquids
Do not use volatile liquids, such as insecticide or certain types of cleaner,
near the projector. Do not have rubber or plastic products touching the
projector for a long time. They will leave marks on the finish. If cleaning
with a chemically treated cloth, be sure to follow the cleaning product’s
safety instructions.

15
Disposal
This product contains the following materials which are harmful to human
bodies and environment.
• Lead, which is contained in solder.
To dispose of the product, consult your local environment authorities for
regulations.
Note
• The illustrations and the images shown in this document are for your reference.
• The actual content may vary by the product supplied for your region.
16
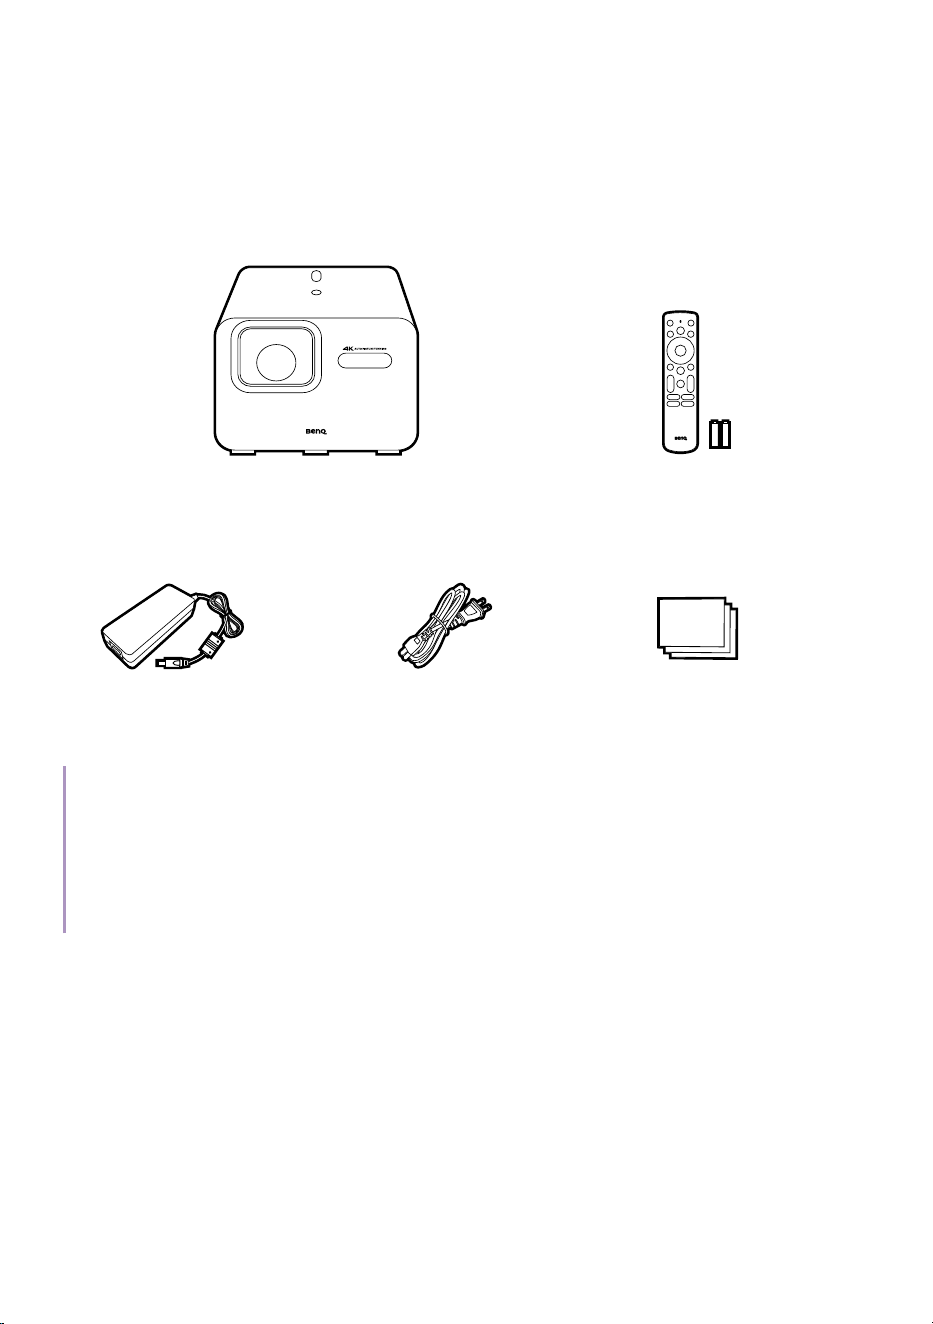
Package contents
Carefully unpack and verify that you have all of the items shown below.
Some of the items may not be available depending on your region of
purchase. If any of these items are missing, please contact your place of
purchase.
Quick
Guide
Projector
Remote control
(With two AAA batteries)
(Availability varies by region)
Power adapter
Power cord
(Varies by region)
User documents
Note
• Actual product’s features and specications are subject to change without notice.
• Some of the accessories may vary by region.
• The warranty card is only supplied in some specic regions. Please consult your dealer for detailed
information, or check warranty information online.
• Use original accessories to ensure compatibility.
• Power cord plug type may change based on regional requirements.
17
Introduction
Projector overview
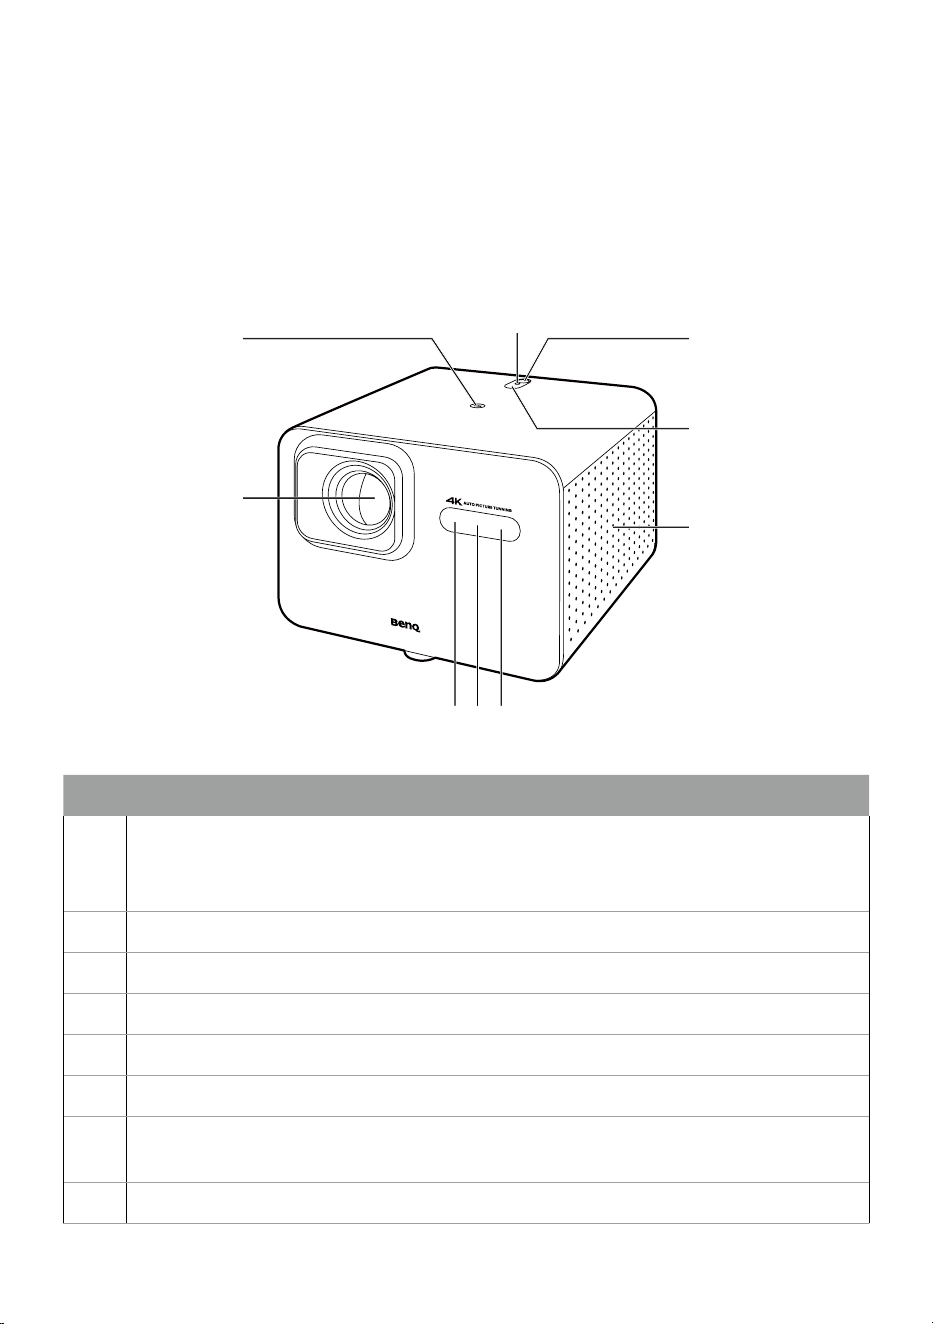
Overview
1
2
3 45
6
5
7
8
No. Descriptions
1.
Tripod screw hole
See "Tripod mounting (purchased separately)" on page 39 for
details.
2. Projection lens
3. Auto focus camera
4. Time of Flight (ToF) sensor
5. IR remote control sensor
6. Right speaker and vents
7.
Top adjustable foot
See "Using the top adjustable foot" on page 45 for details.
8. Ambient Light Sensor (ALS)
18
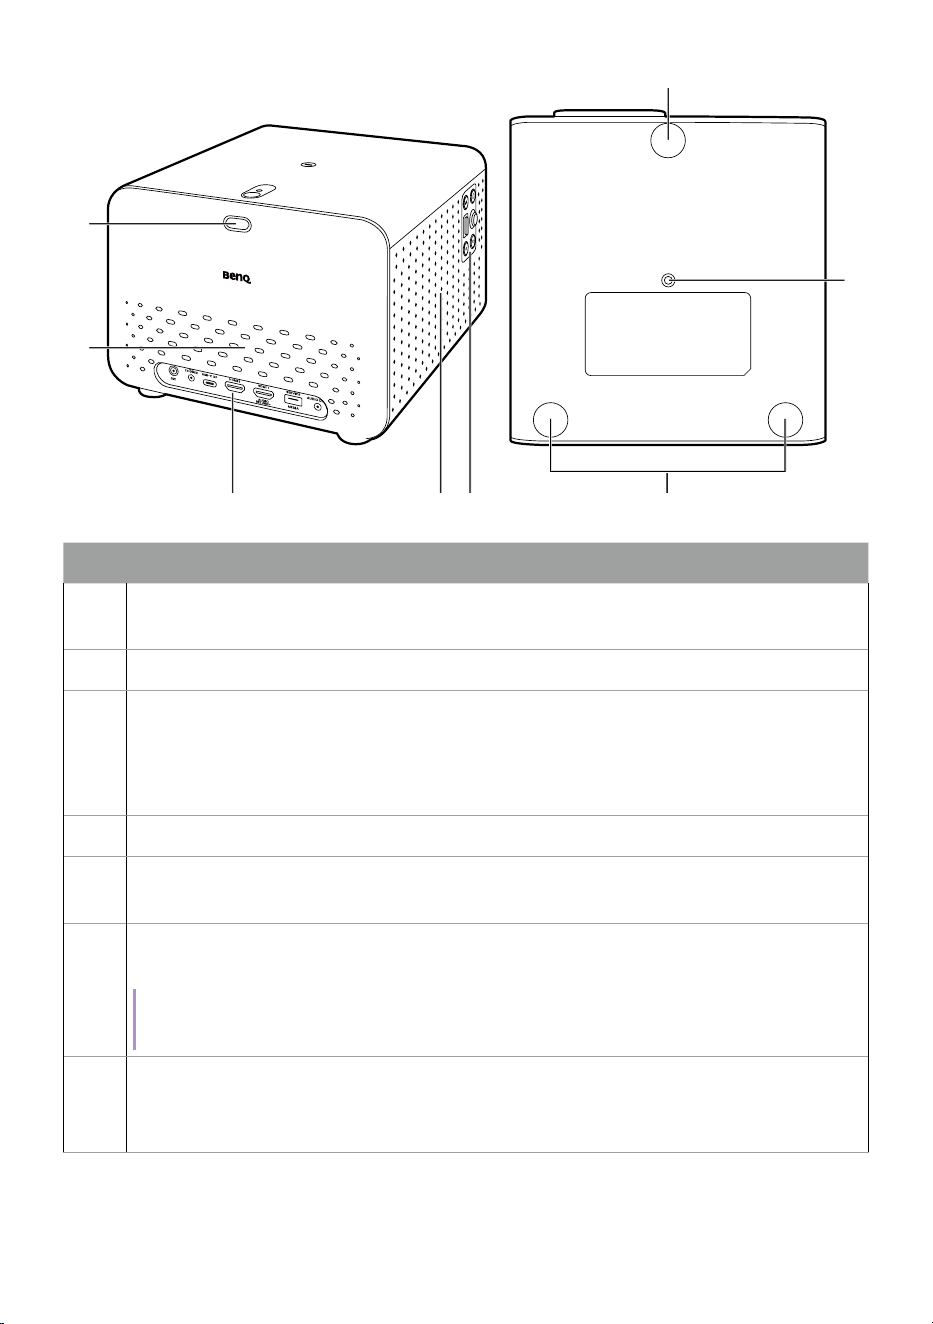
14
15
10
11 12 13
14
9
No. Descriptions
9.
Top adjustable foot button
See "Using the top adjustable foot" on page 45 for details.
10. Air vents
11.
I/O ports
See the following for details.
• "I/O ports" on page 20
• "Projector connections" on page 22
12. Left speaker and vents
13.
Keypad
See "Keypad" on page 19 for details.
14.
Projector feet / ceiling mount screw holes
See "Ceiling mounting" on page 42 for details.
Note
You can access the ceiling mount screw holes after removing the projector feet.
15.
Tripod screw hole
See "Tripod mounting (purchased separately)" on page 39 for
details.
19
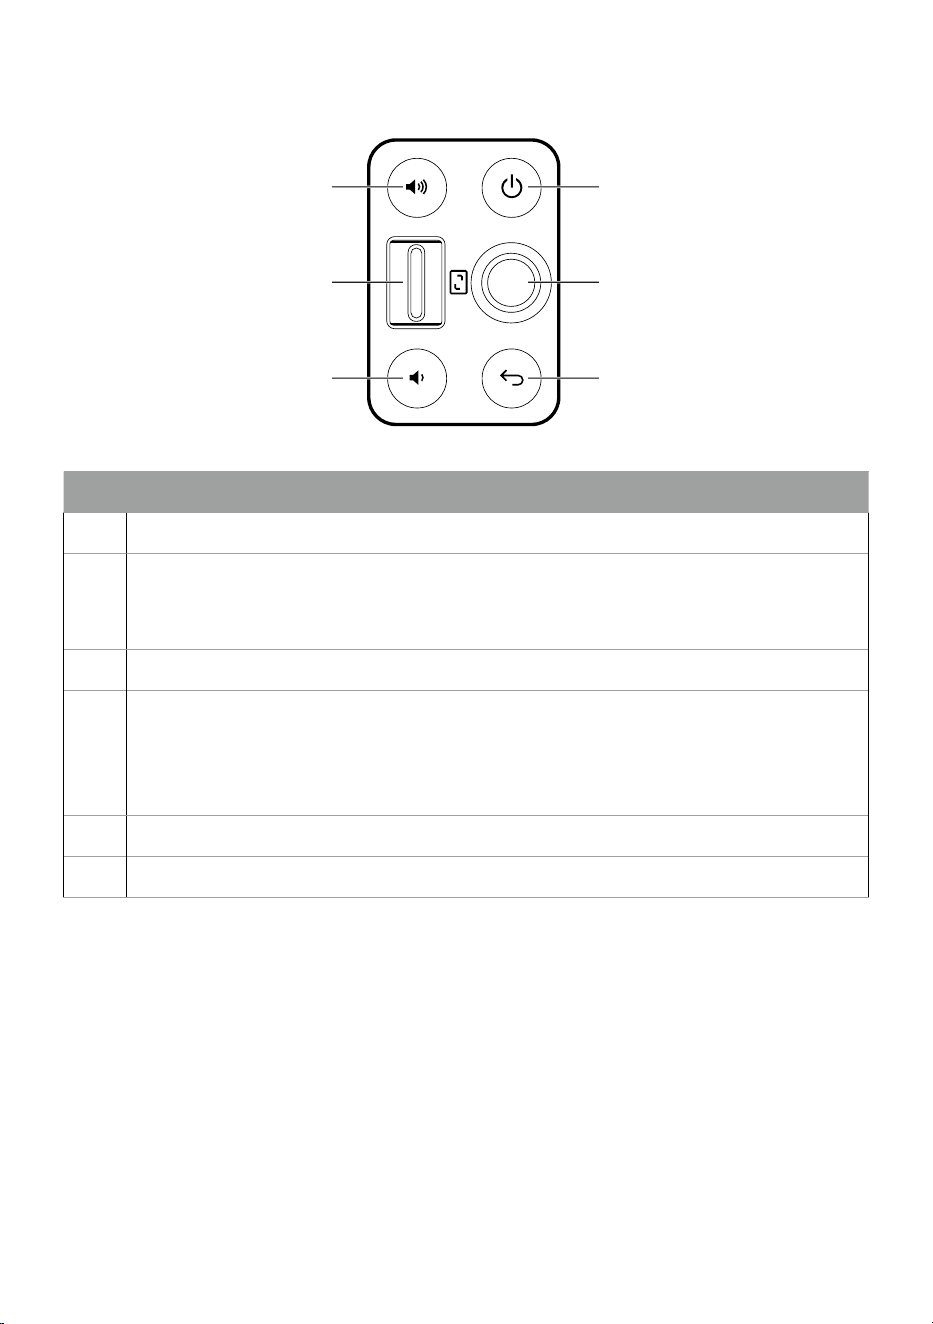
Keypad
1
2
3
4
5
6
No. Descriptions
1. Volume up button
2.
Zoom in/zoom out switch
• Mechanically and digitally zooms in/out for TK705i
• Digitally zooms in/out for TK705STi
3. Volume down button
4.
Power button and LED
See the following for details.
• "Power LED indicator" on page 33
• "Bluetooth speaker mode LED indicator" on page 63
5. Joystick
6. Back
20
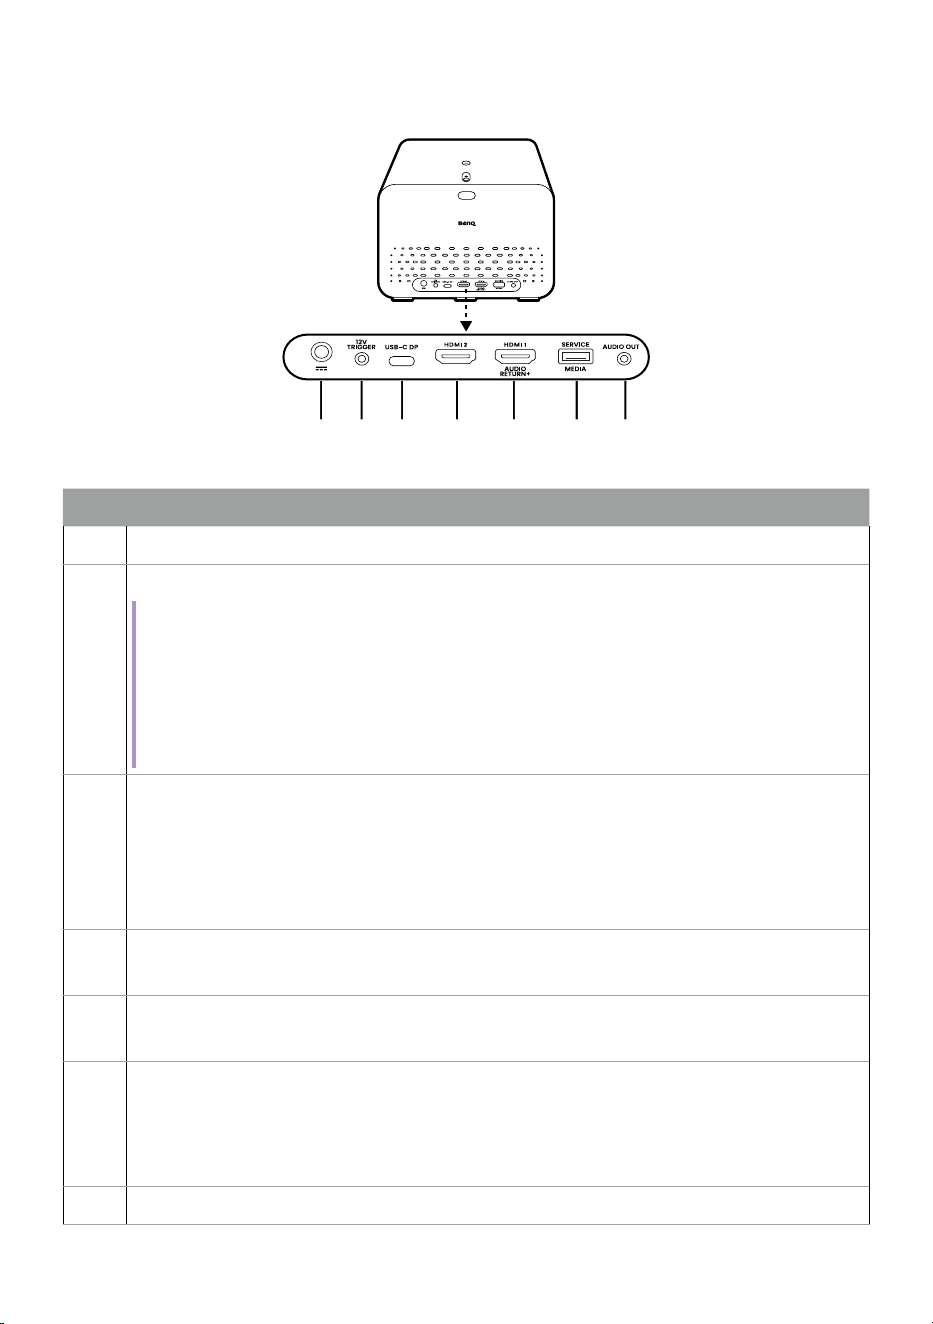
I/O ports
1 2 3 4 5 6 7
No. Descriptions
1. Power adapter port
2.
12V/0.5A power trigger output port
Note
The 12V/0.5A power trigger output delivers 12V/0.5A power to power on and lower the
motorized electronic projection screen simultaneously when the projector is powered
on. When the projector is powered off, the screen will be powered off and raised
simultaneously as the 12V power is cut off from the screen. Refer to the user manual of the
motorized electric projection screen for instructions about how to connect the projector
with the projection screen via the 12V/0.5A power trigger output port.
3.
USB Type-C port
See the following for details.
• "Wired projection" on page 61
• "Playing multimedia files from a USB flash drive" on page 66
• "Power delivery to a USB-C device" on page 67
4.
HDMI 2 input port
See "Wired projection" on page 61 for details.
5.
HDMI 1 input port (with Audio Return Channel+)
See "Wired projection" on page 61 for details.
6.
USB Type-A port (for service and media reader)
See the following for details.
• "Advanced firmware updating" on page 38
• "Playing multimedia files from a USB flash drive" on page 66
7. 3.5mm audio output jack
21
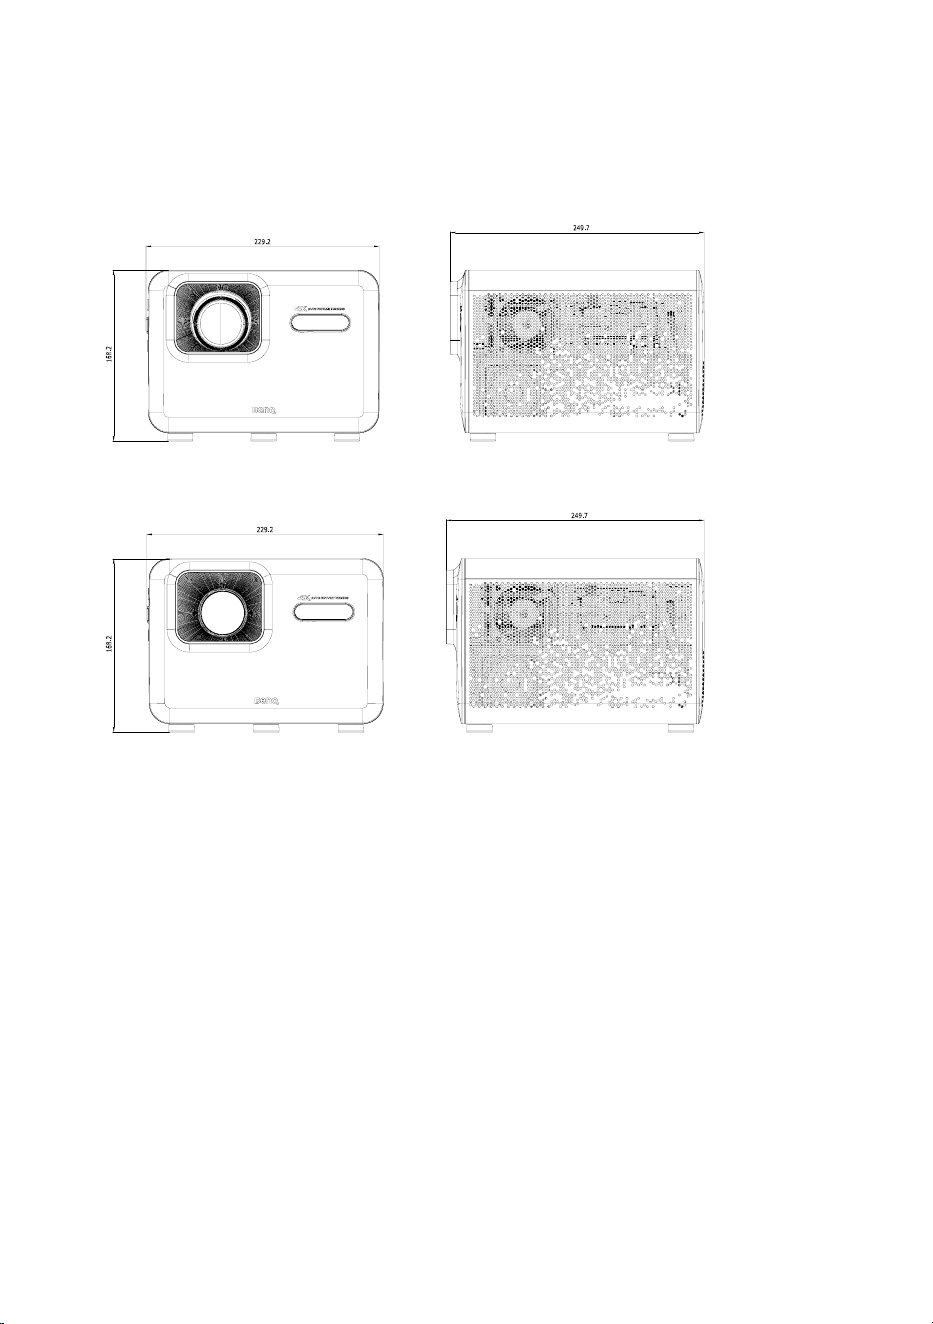
Dimensions
229.2 (W) x 249.7 (D) x 168.2 (H) mm (9.02 x 9.83 x 6.62 in)
TK705i
Unit: mm
TK705STi
Unit: mm

22
Projector connections
You can connect your device to the projector in various ways to project
video content.
Wireless connection
• Smartphone, tablet, laptop/PC (see "Wireless projection (screen
casting)" on page 58)
• Bluetooth devices (speakers, headphone, mouse, etc.)
Before making any wireless connections, be sure to place the projector
within range of the wireless AP you plan to connect it to.
Wired connection (USB-A port)
• USB-A flash drive (see "Playing multimedia files from a USB flash drive"
on page 66)
Wired connection (HDMI port)
• A/V device
• Smartphone, tablet, laptop/PC
Wired connection (USB-C port)
• Smartphone, tablet, laptop/PC (see "Wired projection" on page 61)
• USB-C flash drive (see "Playing multimedia files from a USB flash drive"
on page 66)
Before making any wired connections, be sure to use the correct cable
with corresponding functions (e.g., DP Alt Mode or Power Delivery) for
each source and that it is plugged in securely. Connection with USB-C
cables/devices certified by USB-IF may increase compatibility.
23
a
b
c
e
c
d
c
Certified devices with
USB-C port which
supports DP Alt Mode
Computer / gaming console / AV device
USB peripherals
Computer / gaming console /
AV device
Speakers
Wireless AP
Projection screen
Sound bar
No. Descriptions No. Descriptions
a.
12V/0.5A trigger for electronic
projection screen control
d.
USB flash drive for media
reader and peripherals
b.
Certified DP Alt mode USB-C
cable
e.
Audio cable
c.
HDMI cable
Note
• In the connections above, some cables may not be included with the projector (see "Package con-
tents" on page 16). They are commercially available from stores.
• The connection illustrations are for reference only.
• If the selected video image is not displayed after the projector is turned on and the correct video
source has been selected, check that the video source device is turned on and operating correctly.
Also check that the signal cables have been connected correctly.
• The built-in speaker(s) will be muted when the AUDIO OUT jack is connected.
24
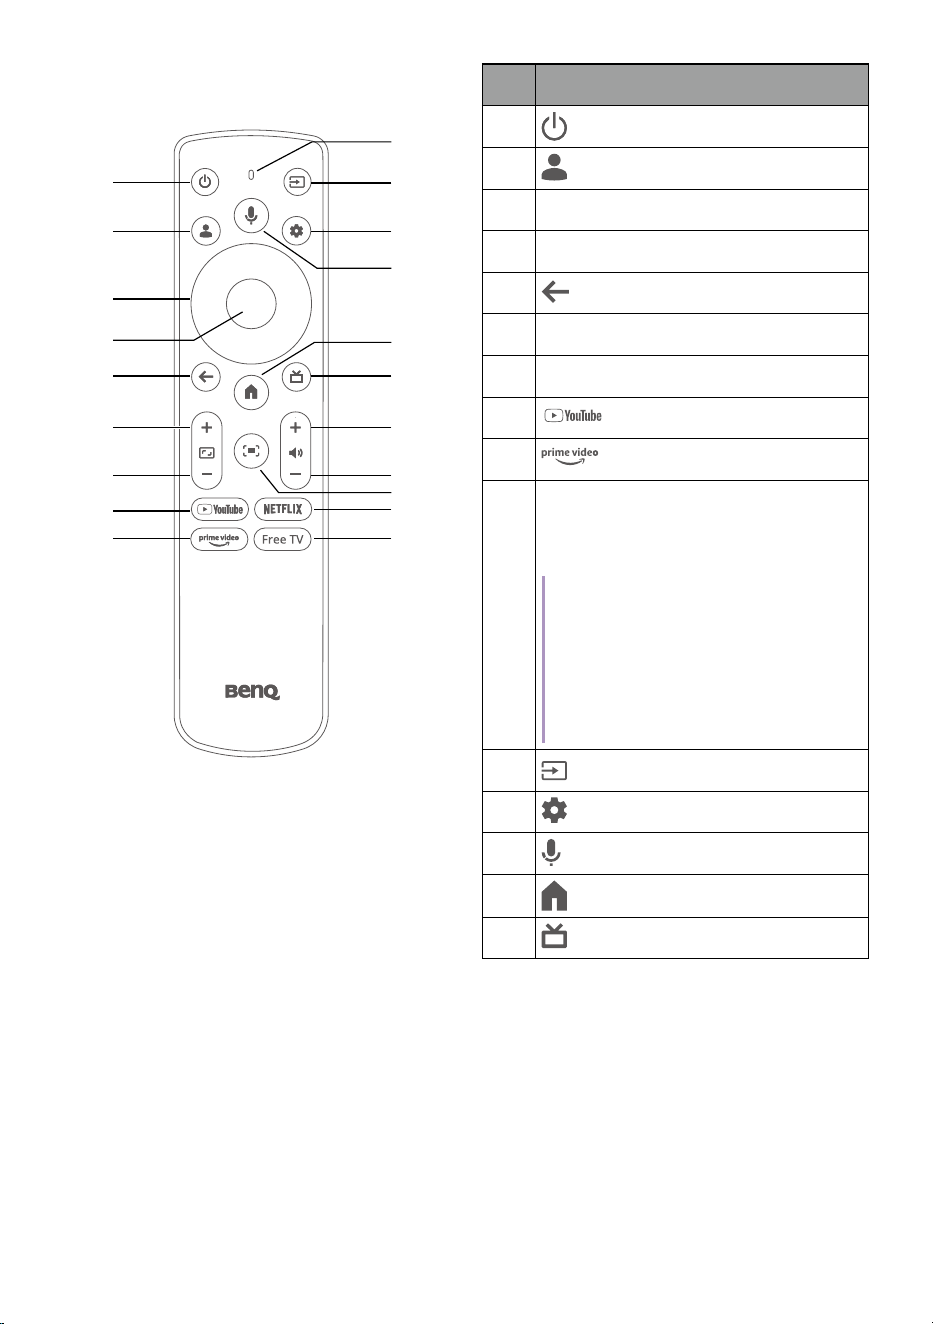
Remote control
11
10
3
4
5
6
7
8
9
13
12
1
2
14
15
16
18
17
19
20
No. Descriptions
1.
Power
2.
Profiles
3. Arrow keys
4. OK
5.
Back
6. Zoom in
7. Zoom out
8.
YouTube
9.
Prime Video
10. • Microphone
• Bluetooth pairing status
indicator LED
Note
When a button on the remote control
is pressed, the LED will blink red if the
remote control is not paired with the
projector via Bluetooth, and blink blue
if it is paired with the projector via
Bluetooth .
11. Source
12.
Dashboard
13.
Voice search
14.
TV home screen
15.
HDMI source
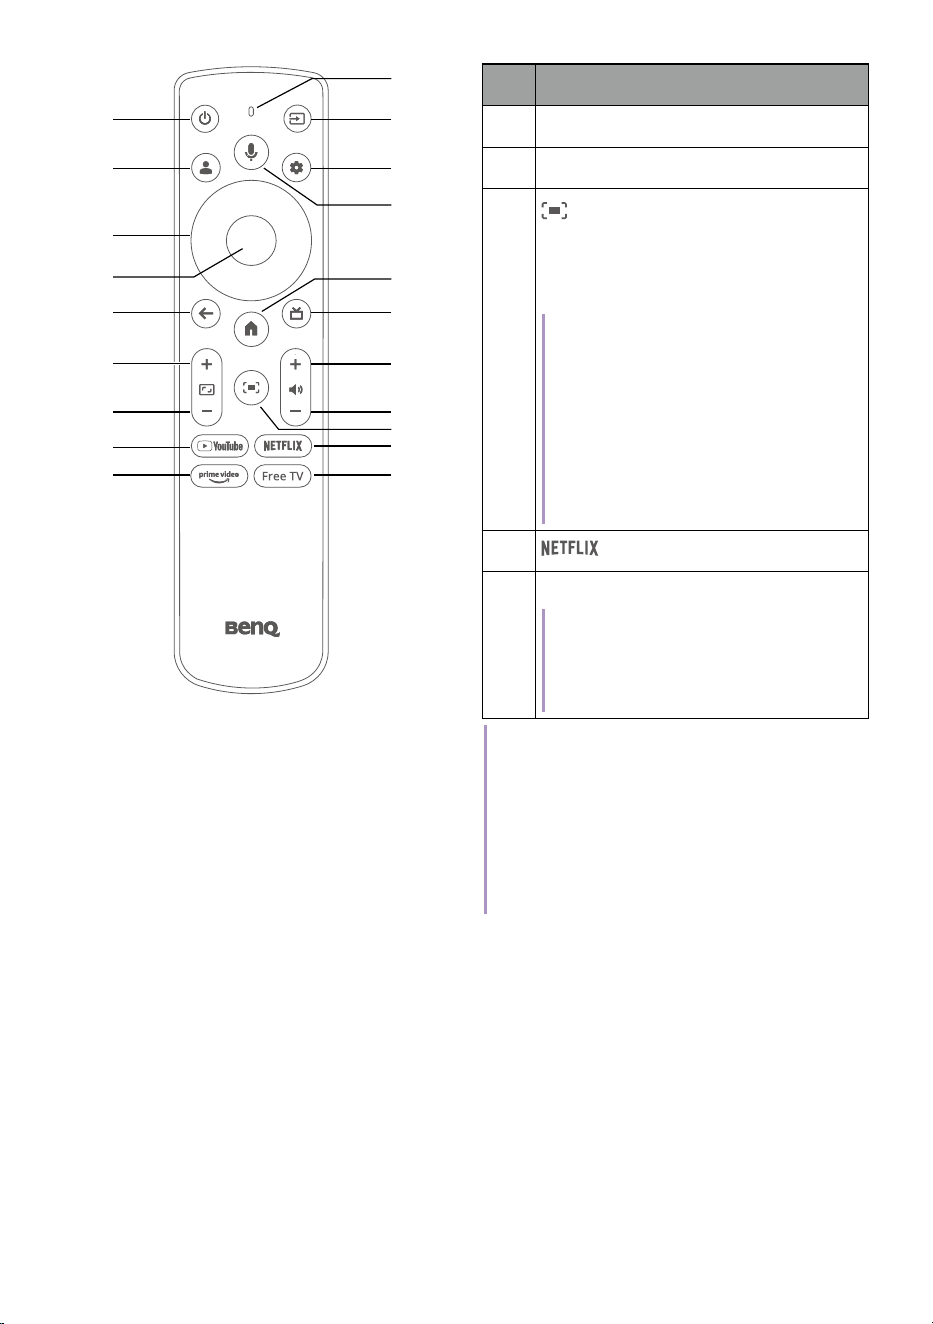
25
11
10
3
4
5
6
7
8
9
13
12
1
2
14
15
16
18
17
19
20
No. Descriptions
16. Volume up
17. Volume down
18.
• Screen adjustment
• Auto Cinema mode (See
page 50 )
Note
When Picture Mode is set to
Auto Cinema, pressing this button will
activate both the screen adjustment
function and the Auto Cinema mode
setting. When Picture Mode is not
set to Auto Cinema, pressing this
button will activate only the screen
adjustment function.
19. Netflix
20. Free TV/Live TV
Note
The Free TV/Live TV streaming
service app availability varies by
region.
Tip
You are provided with the
SmartRemote for BenQ Projector app as
an alternative of remote control. Install
the app on your mobile device and make it
your new remote control. Check "Accessing
helpful BenQ apps" on page 37 for more
information.

26
Remote control effective range
The projector has one IR remote control sensor located at the front of the
projector and another sensor at its top side with a range of 8 meters (~26
feet) at an angle of 30 degrees (left and right) and 20 degrees (up and
down). Prior to remote control pairing process during the setup wizard
(see "Powering on and initial setup" on page 32), the remote control can
only be used either by pointing it directly at the IR sensor or by reflecting
the IR signal off of a wall/screen, making sure that there are no obstacles
between the remote control and the IR sensors on the projector.
Once the remote control has been paired to the projector, you will be able
to use it at any angle within a range of 8 meters (~26 feet).
Note
Voice search functionality on the remote control is only available after the remote control has been
paired to the projector. See "Powering on and initial setup" on page 32 for more details.
27
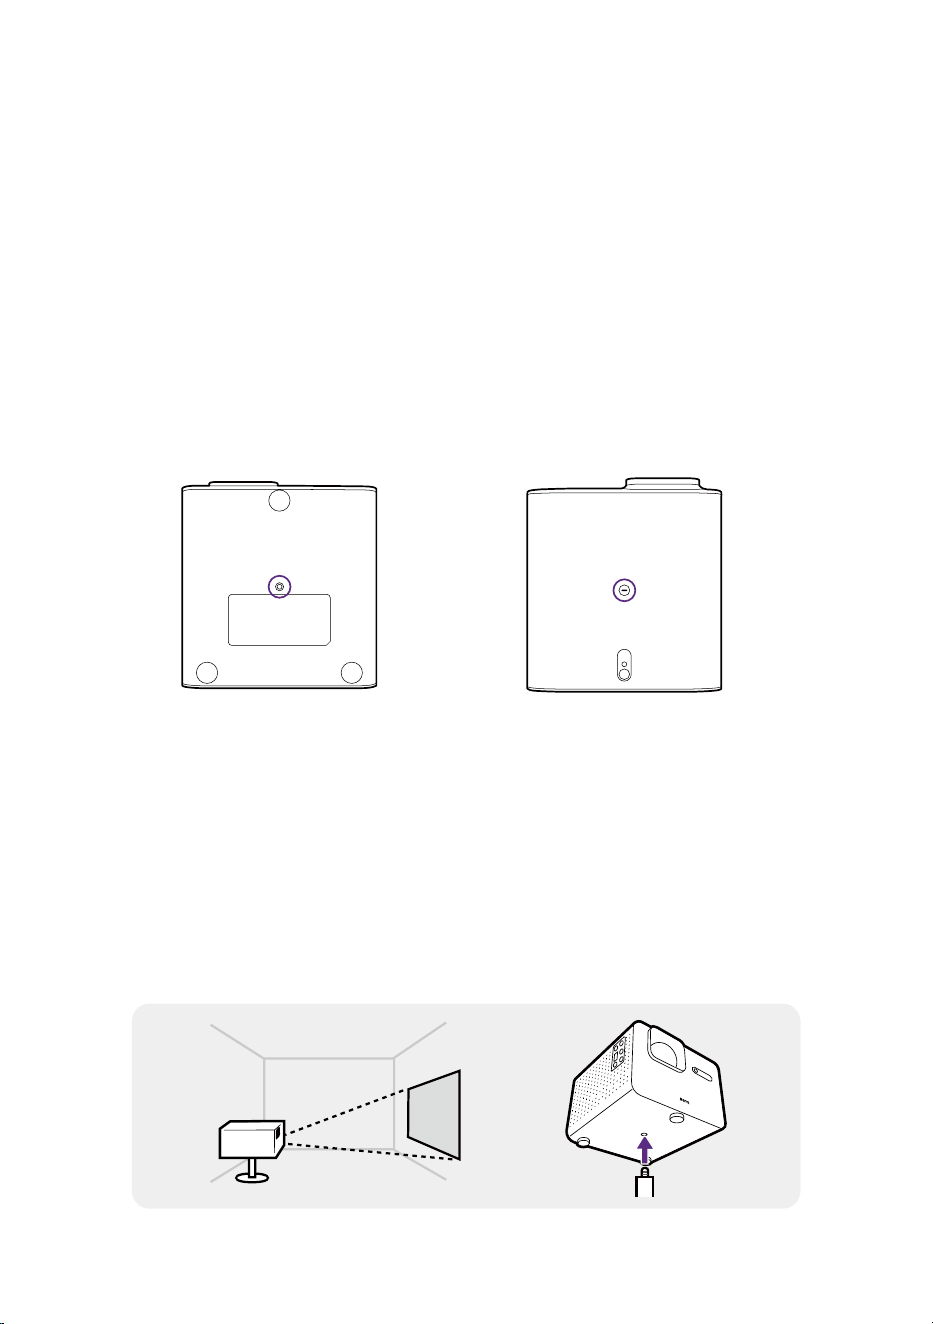
Installation
Choosing a location
Before choosing an installation location for your projector, take the
following factors into consideration:
• Size and position of your screen
• Electrical outlet location
• Location and distance between the projector and the rest of your
equipment
• Location and distance between the projector and the wireless access
point
You can install your projector in the following ways from
> All settings >
Projector > Advanced Settings > Projection Mode.
• Auto
Changes the projection mode automatically
by detecting whether the projector is placed
upside down between Front and Front Ceiling
by the using scenario (upward or downward).
The audio channels are switched accordingly
to go with the projector position.
Note
Auto is the default projection mode.
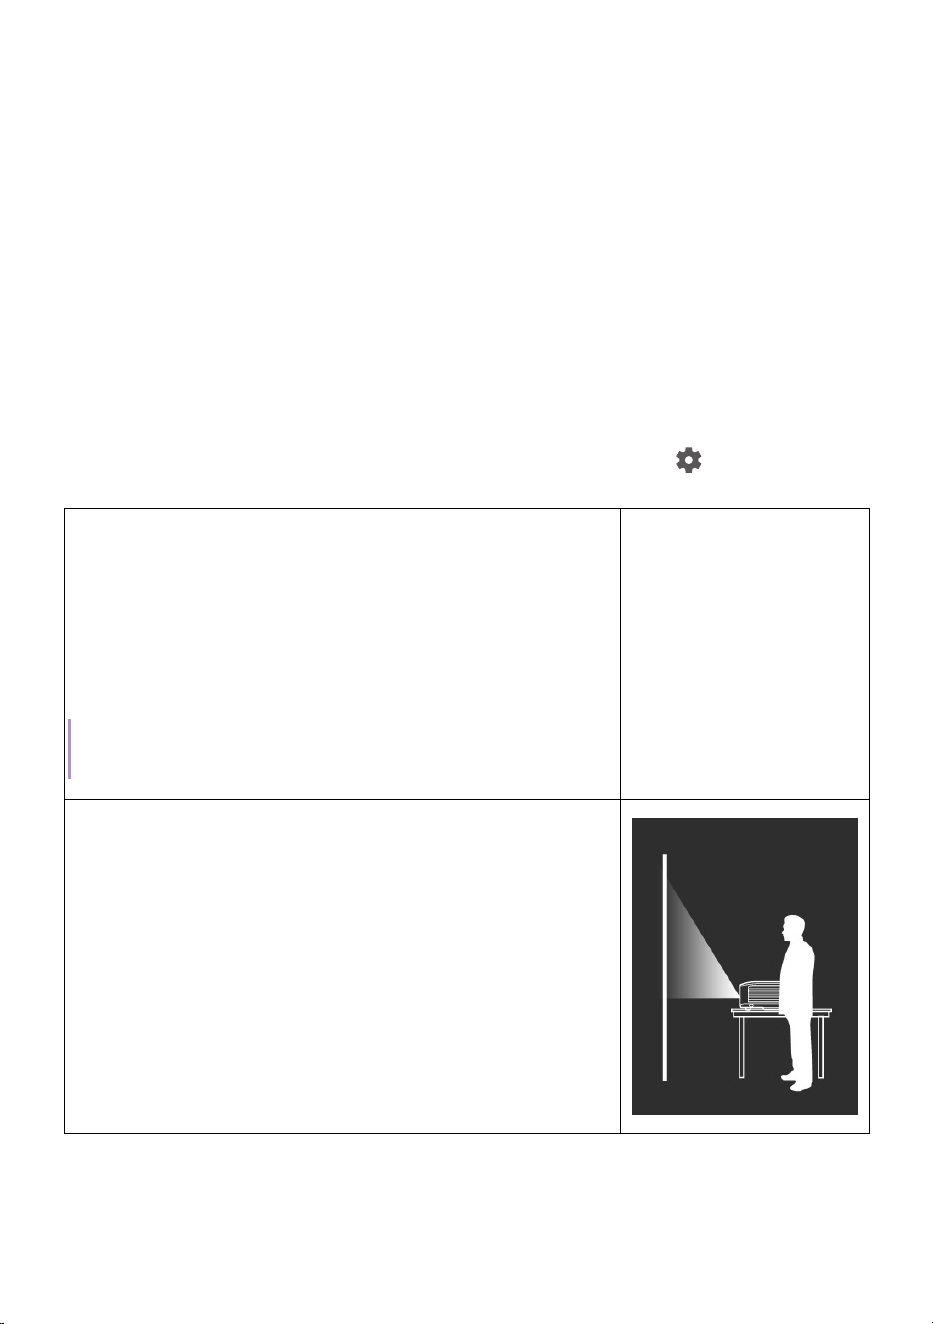
• Front
Select this location with the projector placed
near the floor in front of the screen.
This is the most common way to position the
projector for quick setup and portability.
28
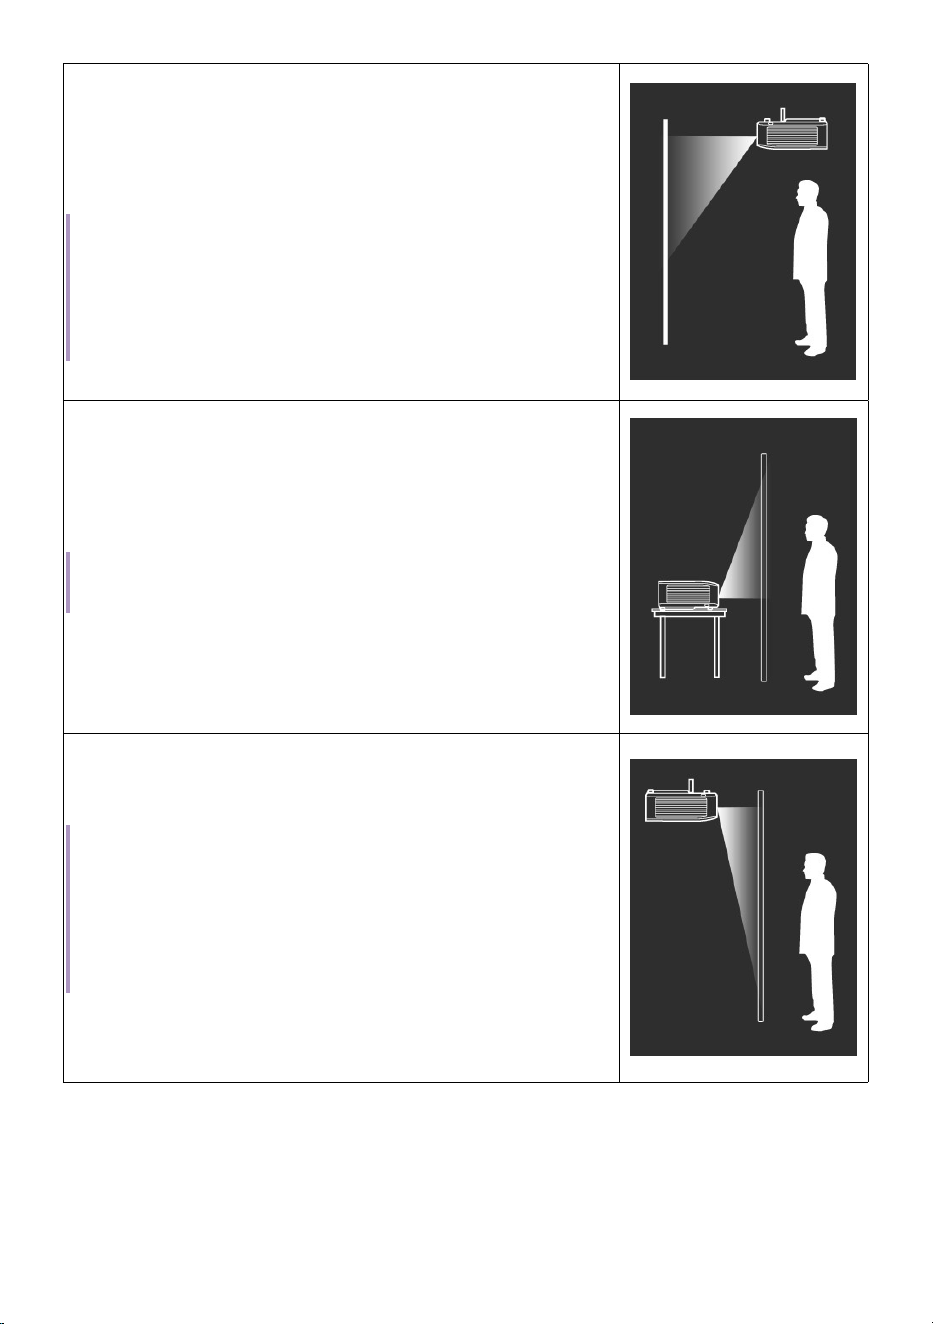
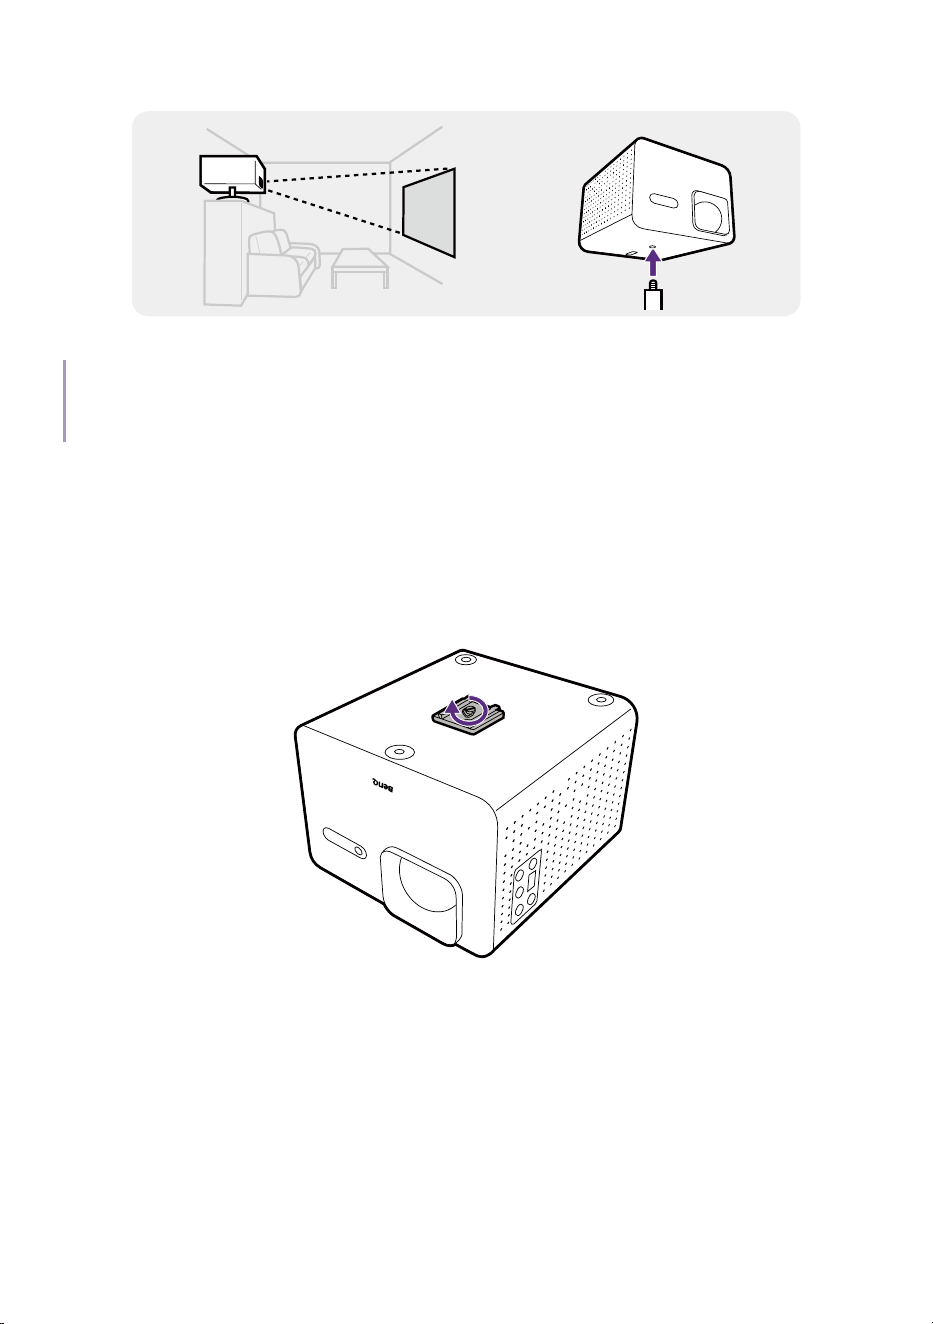
• Front Ceiling
Select this location with the projector elevated
near the ceiling in front of the screen.
The audio channels are switched accordingly
to go with the projector position.
Note
The projector does not feature ceiling mount components/
equipment. When choosing to use a ceiling location, you must
place it on an elevated and even shelf purchased separately. Make
sure the shelf is stable enough to support the projector’s weight.
Secure the shelf properly and keep the projector from falling.
• Rear
Select this location with the projector placed
near the floor behind the screen.
The audio channels are switched accordingly
to go with the projector position.
Note
A special rear projection screen is required.
• Rear Ceiling
Select this location with the projector elevated
from the ceiling behind the screen.
Note
• A special rear projection screen is required.
• The projector does not feature ceiling mount components/equip-
ment. When choosing to use a ceiling location, you must place
it on an elevated and even shelf purchased separately. Make
sure the shelf is stable enough to support the projector’s weight.
Secure the shelf properly and keep the projector from falling.
29
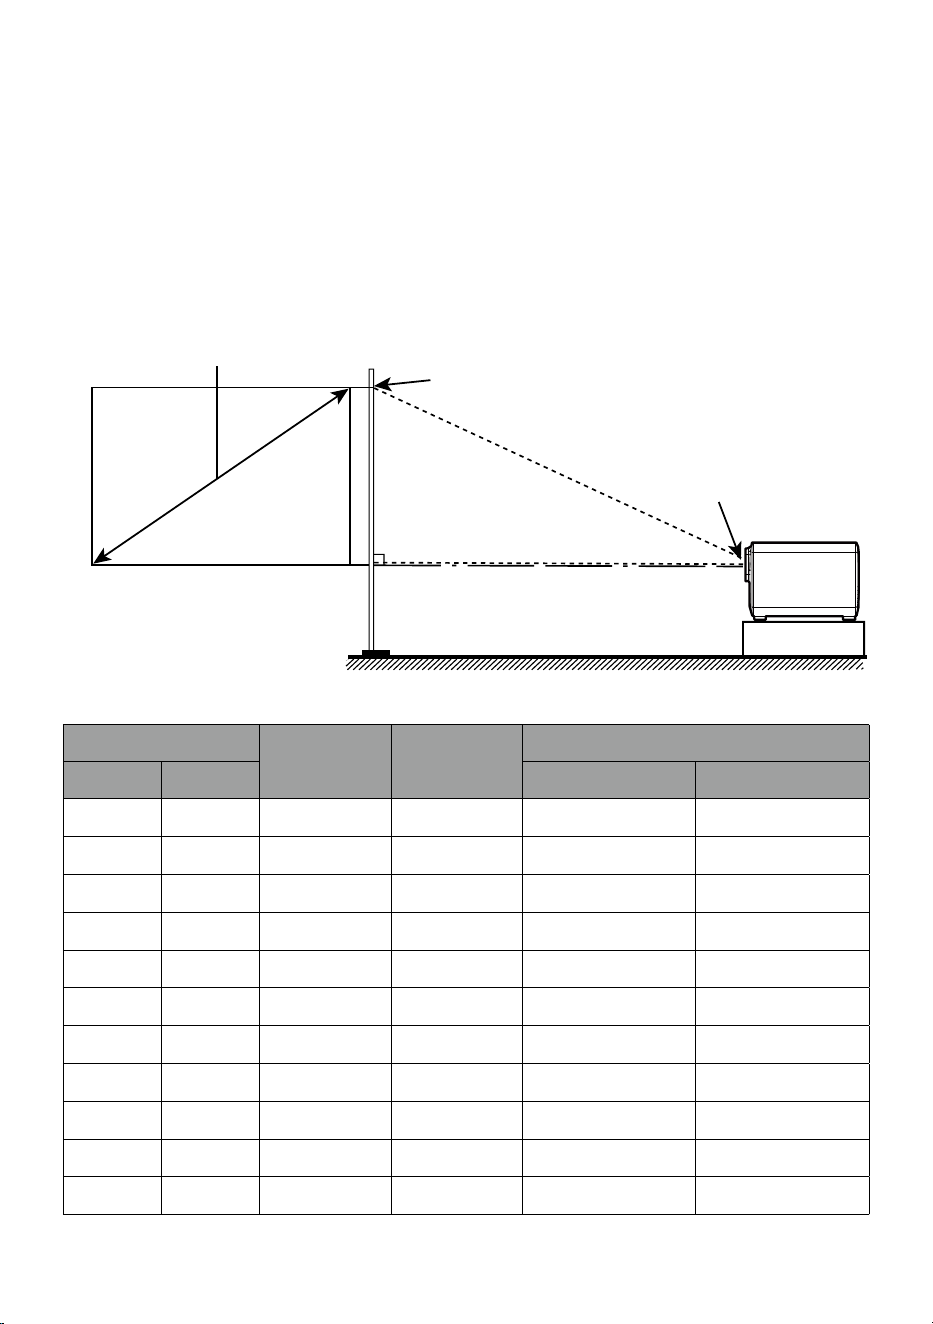
Obtaining a preferred image size
The distance from the projector lens to the screen, the zoom setting, and
the video format each factors in the projected image size.
Projection dimensions
The screen aspect ratio is 16:9 and the projected picture is in a 16:9
aspect ratio
.
16:9 Screen Diagonal
Screen
Center of lens
Projection Distance
H
W
TK705i
Screen size
W (mm) H (mm)
Projection Distance (mm)
Inch mm Wide: TR1.00 Tele: TR1.30
50 1270 1107 623 1107 1439
60 1524 1328 747 1328 1727
70 1778 1550 872 1550 2015
80 2032 1771 996 1771 2303
90 2286 1992 1121 1992 2591
100 2540 2214 1245 2214 2878
110 2794 2435 1370 2435 3166
120 3048 2657 1494 2657 3454
130 3302 2878 1619 2878 3742
140 3556 3099 1743 3099 4030
150 3810 3321 1868 3321 4317

30
Screen size
W (mm) H (mm)
Projection Distance (mm)
Inch mm Wide: TR1.00 Tele: TR1.30
160 4064 3542 1992 3542 4605
TK705STi
Screen size
W (mm) H (mm) Projection Distance (mm)
Inch mm
50 1270 1107 623 886
60 1524 1328 747 1063
70 1778 1550 872 1240
80 2032 1771 996 1417
90 2286 1992 1121 1594
100 2540 2214 1245 1772
110 2794 2435 1370 1949
120 3048 2657 1494 2126
130 3302 2878 1619 2303
140 3556 3099 1743 2480
150 3810 3321 1868 2657
160 4064 3542 1992 2834
For example, if you are using a 100-inch screen, the recommended
projection distance is 2,214/2,878 mm (for TK705i) or 1,772 mm (for
TK75STi).
If your measured projection distance is 1,992/2,591 mm (for TK705i) or
1,594 (for TK705STi), the projected screen size is 90-inch.
Note
• All measurements are approximate and may vary from the actual sizes.
• BenQ recommends that if you intend to permanently install the projector, you should physically
test the projection size and distance using the actual projector in situ before you permanently
install it, so as to make allowance for this projector’s optical characteristics. This will help you
determine the exact mounting position so that it best suits your installation location.

31
Using the projector at high altitude
We recommend you use the High Altitude Mode when your environment is
between 1500 m - 2000 m above sea level and the ambient temperature is
between 0°C to 40°C.
Operation under the High Altitude Mode may cause a higher decibel of
operating noise level because of the increased fan speed necessary to
improve overall system cooling and performance.
If you use this projector under other extreme conditions excluding the
above, it may display auto shut-down symptoms, which is designed to
protect your projector from over-heating.
In cases like this, you should switch to High Altitude Mode to solve these
symptoms. Go to
> All settings > Projector > Energy & Performance >
High Altitude Mode.
However, this is not to state that this projector can operate under any and
all harsh or extreme conditions.
32
Getting started
Powering on and initial setup
1. Choose a preferred location and image size as instructed in "Choosing
a location" on page 27.
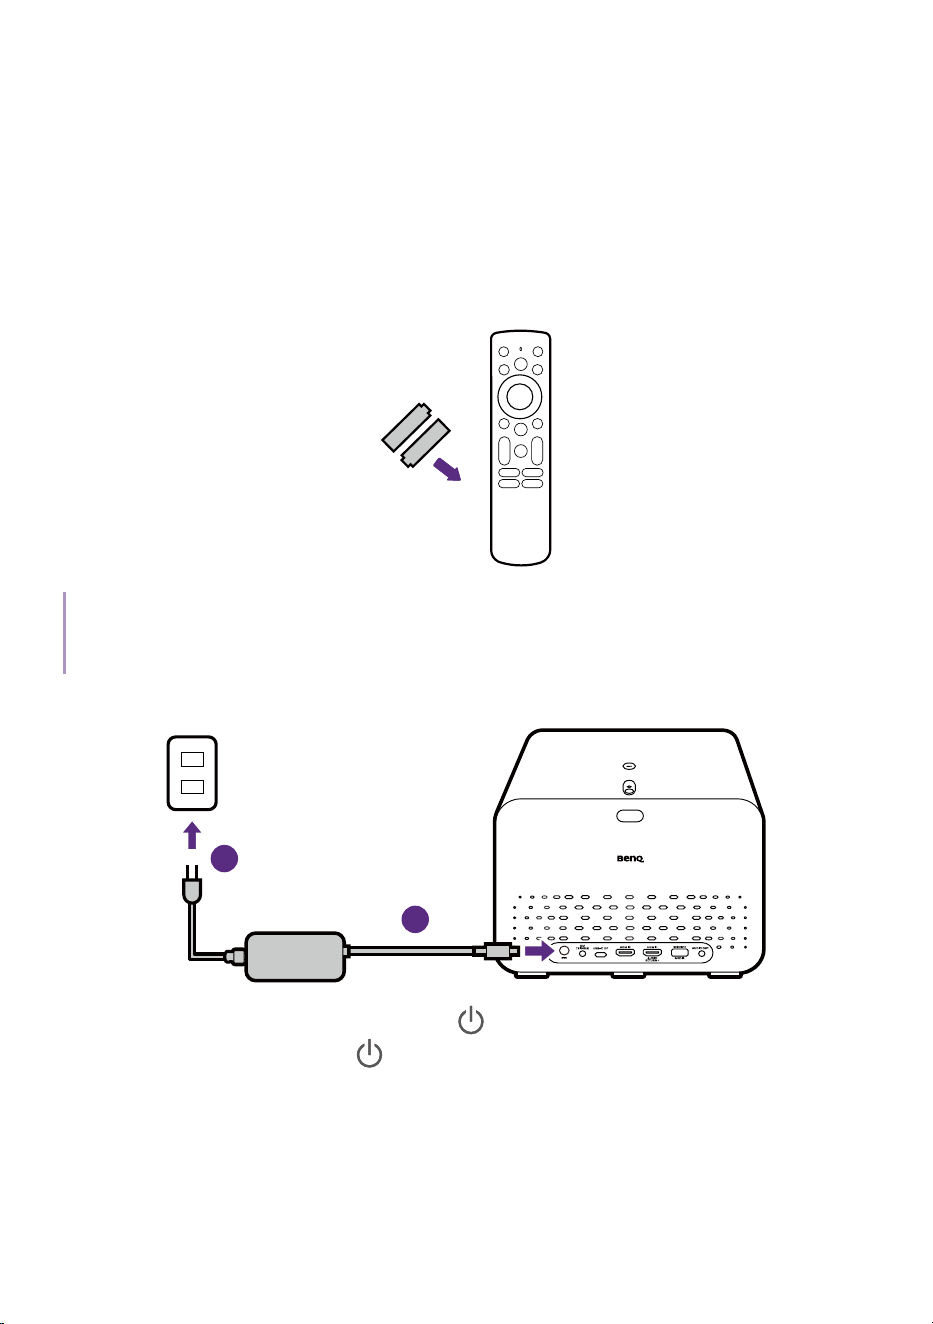
2. Install the remote control's batteries.
Note
Avoid leaving the remote control and batteries in an excessively hot or humid environment like the
kitchen, bathroom, sauna, sunroom or in a closed car.
3. Connect power to the projector.
1
2
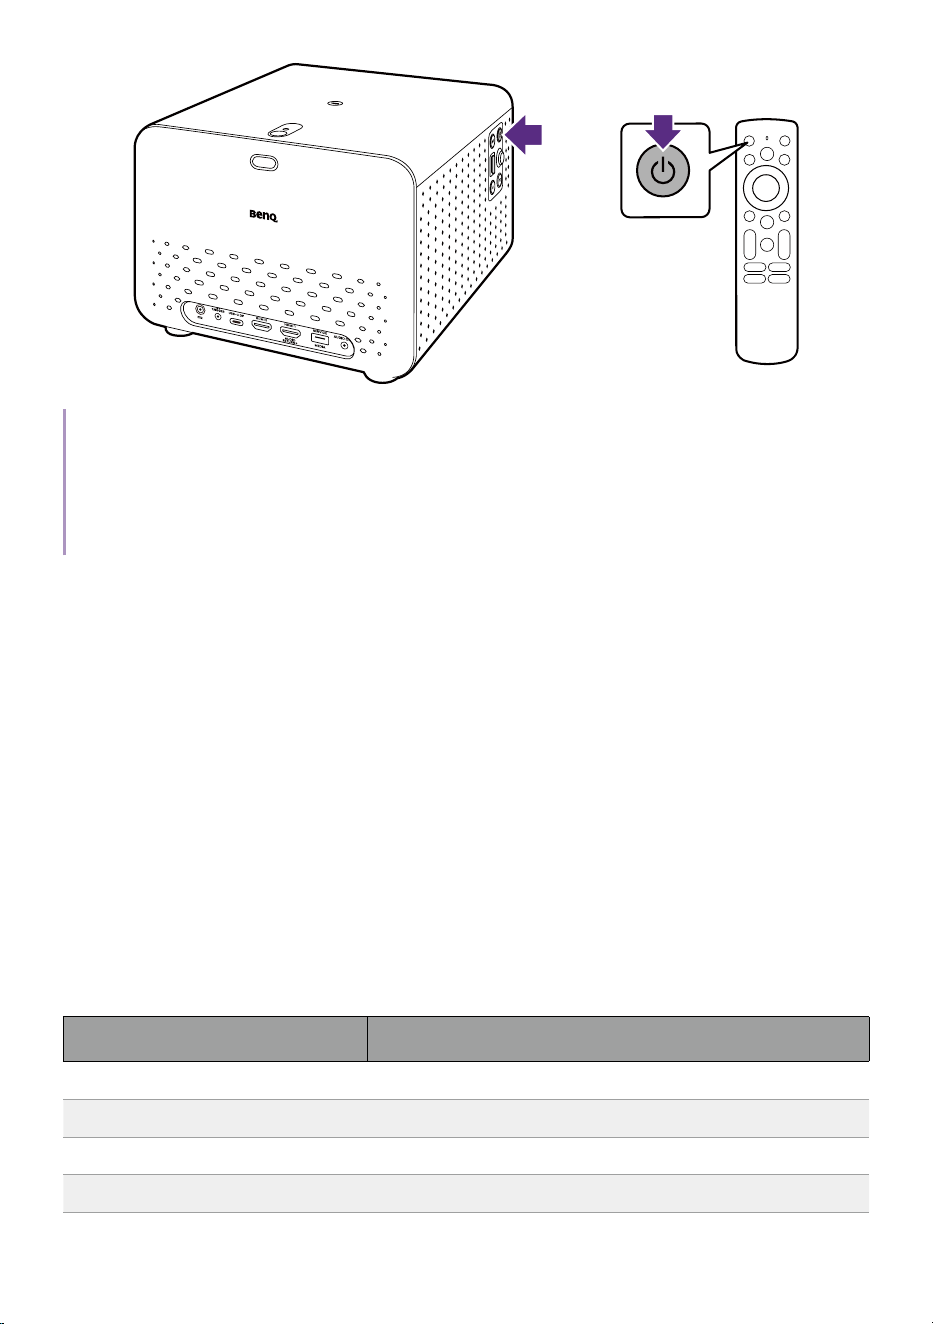
4. Press and hold the power button on the projector for 1 second or
press the power button
on the remote control. The power LED will
flash green when the projector is powering and then turn solid green
when the projector is ready for use.
33
1 second
or
2
1 second
Note
• When supplying power directly to the projector via the supplied power adapter please use the
supplied power cable to avoid possible dangers such as electric shock and re.
• Prior to pairing the remote control to your projector you must ensure that your remote control is
in range of the projector’s IR sensor. See "Remote control effective range" on page 26 for more
details.
5. Follow the on-screen instructions to complete the initial set up. Pair
your remote control properly in the first step.
6. When prompted, select Set up Google TV. Google TV
TM
brings together
movies, shows, and more from across your apps and subscriptions and
organizes them just for you.
7. In next step, select Set up on TV instead on the lower part of the
screen to access Google TV.
8. Check if an updated firmware is available for your product. Refer to
"Upgrading your projector" on page 38.
9. Go for a preferred scenario.
• "Watching streaming videos" on page 52
• "Projection" on page 58
• "Playing music with your projector" on page 62
Power LED indicator
LED status Power status
Flashing green Powering on properly
Solid green Powered on and ready to use
Flashing orange Powering off properly
Solid orange On Standby Mode/Network Standby Mode

34
LED status Power status
Flashing red Downloading firmware
Flashing orange/blue In Audio Only mode
35
Power settings and options for
saving power
To save power, by default the projector will be automatically switched off
(i.e., enter Network Standby mode) after being inactive for 20 minutes or
after 4 hours of watch time.
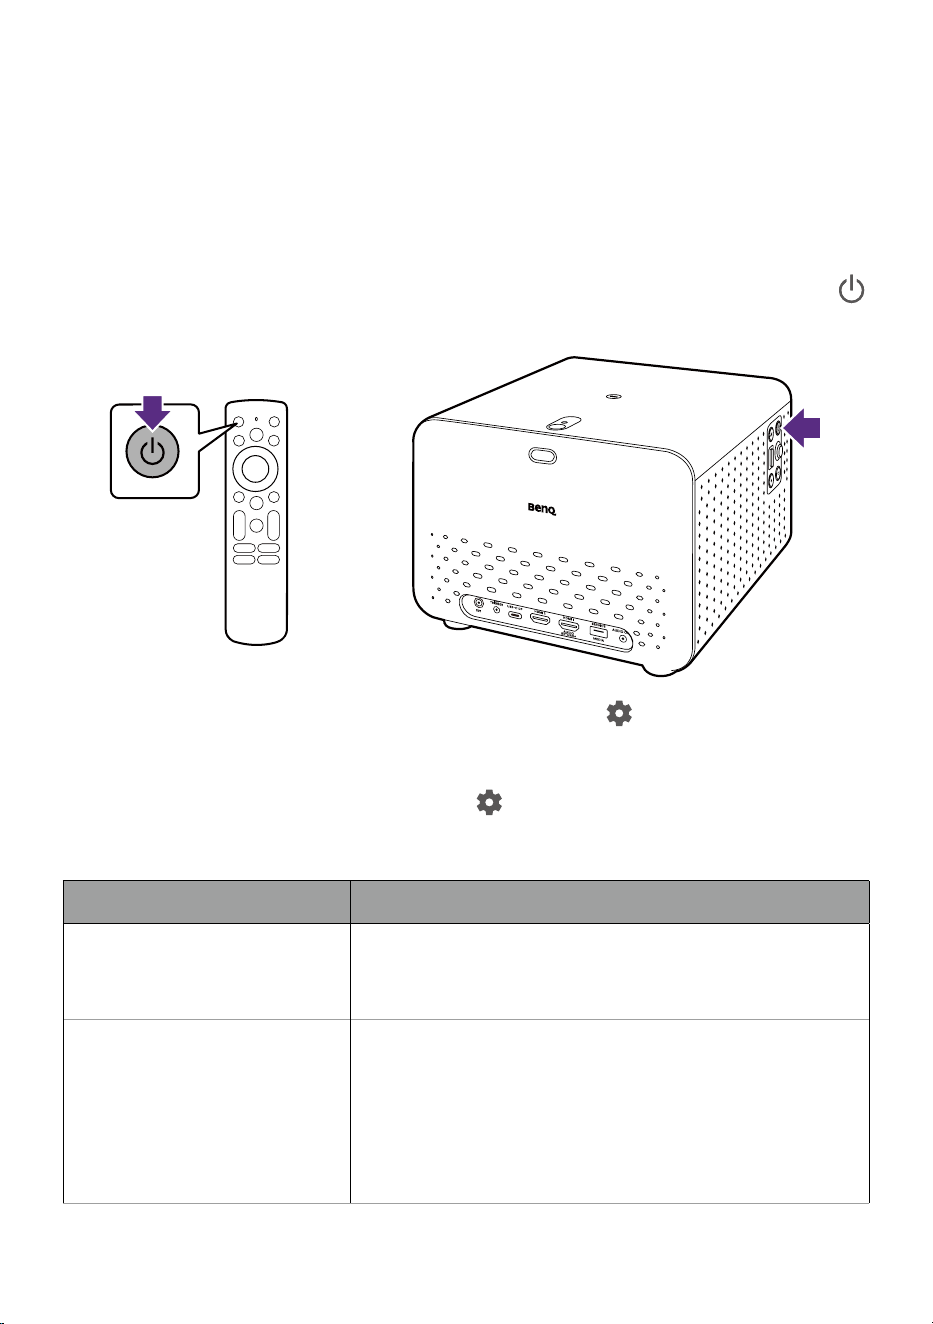
To manually enable Network Standby mode, briefly press the power key
on the remote control / projector for 1 second.
or
2
You can change the network standby setting from > All settings >
System > Power & Energy > Shut-Off Timer > When inactive. This setting
does not power off the projector.
To navigate more power menus, go to
> All settings > System >
Power & Energy. Set according to your preferences. Here are some
settings under Power & Energy that may help.
Item Descriptions
Shut-Off Timer
Allows you to set up a timer to power off the
projector automatically after a set time of
inactivity or watching.
Scheduled power on/off
• Allows you to set up a timer to
automatically power on/off the projector
automatically at the set time.
• Allows you to set up a timer to
automatically power off the projector
automatically after a set time of use.
36
Note
The projector will power off after 20 minutes of inactivity by default. If you prefer to extend the
standby time, go to
> All settings > System > Power & Energy > Shut-Off Timer > When inactive
and select Never or an option that is more than 20 minutes.
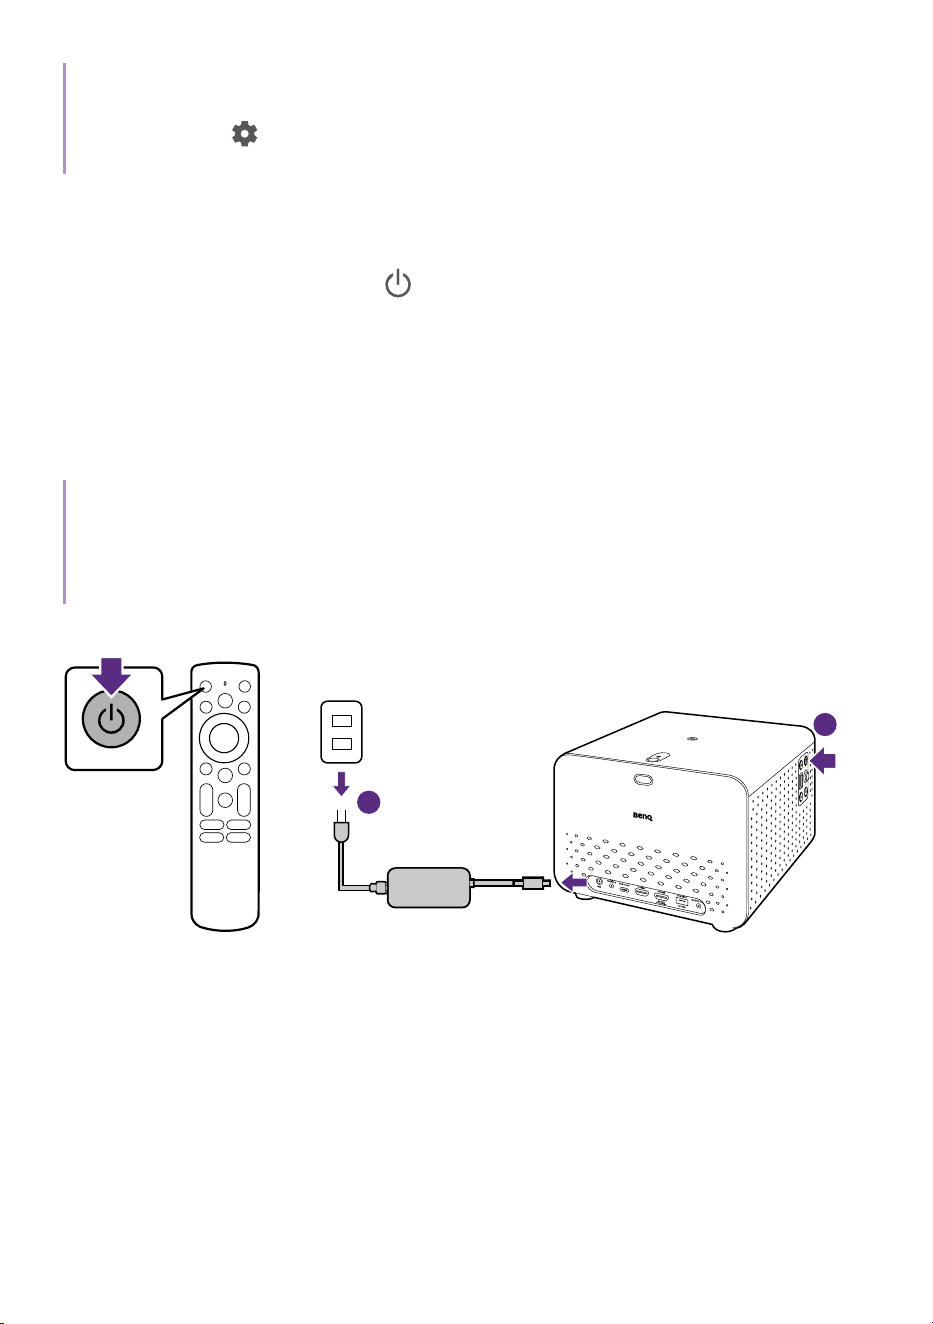
Shutting down the projector
Press and hold the power key on remote control / projector for 1 second
and the projector will shut down directly.
The power LED will flash orange. The fans may continue to run in order to
cool the system.
If the projector will not be used for an extended period, unplug the power
cable from the power outlet and remove the batteries from the remote
control.
Note
• If you prefer to switch the projector to Network Standby mode automatically, set Shut-Off Timer
rst. See "Power settings and options for saving power" on page 35 for details.
• The system will automatically enter Standby mode once the power adapter's DC output is connect-
ed.
or
2
1 second
1 second
1
2
37
Accessing helpful BenQ apps
You can install certain BenQ apps to extend the functionalities of your
projector.
Apps downloaded to your projector
• BenQ Projector Assistant: provides tips, FAQs, and product support.
• Screen Sharing for iOS: helps cast your content from iOS/macOS
device wirelessly. See "Screen casting from iOS/macOS device devices"
on page 58 for more information.
To install apps on your projector, go to the Apps tab on the top of your
home screen to search for your preferred app.
Download
SmartRemote for BenQ
Projector
app to your mobile device
SmartRemote for BenQ Projector: pairs your mobile device with the
projector to handle basic functions (adjusting volume, moving the
directional keys, focusing, etc.), and advanced control of hotkeys for
streaming services, text input, and a touchpad, making the usage smarter
and more convenient.

38
Upgrading your projector
It is suggested that you update the projector with the latest version of the
firmware to optimize the user experience.
Updating the operating system
When operating system updates are available for your projector, a
notification will appear on the Google TV home screen. Follow the
on-screen instructions from the notification to complete the update.
Notifications will only appear on the home screen when your projector is
connected to a wireless network.
Alternatively, go to
> All settings > System > About > System update to
check for update manually.
Advanced rmware updating
If a USB flash drive is required, use one with USB-A connector in FAT32 disk format.
1. Visit Support.BenQ.com and download the new firmware files (if
available) of your projector. Upgrade procedures may vary by hardware
component. Find out the updates and instructions from the upgrade
notice. You should download the latest projector user manual for
reference as well.
2. Keep stable power supply to the projector via the power adapter. Do
not power off the projector.
3. The way to perform advanced firmware update may vary. Refer to the
firmware upgrade notice for instructions to complete the upgrade.
39
Mounting
Tripod mounting (purchased
separately)
The projector features two tripod screw holes individually located at the
top and bottom. Please ensure that the accessory you purchase separately
supports a ¼” standard screw type and has a minimum weight capacity of
at least 4 kg.
Screw location
Bottom side
Screw type: 1/4"
Screw hole length: 10mm
Top side
Screw type: 1/4"
Screw hole length: 10mm
Flexible setup
With the two tripod screw holes, you can easily mount the projector on a
tripod (purchased separately) for flexible setup to accommodate different
room settings.
• Front projection
40
• Upside down projection
Note
You can also use the top adjustable foot to project upside down without a tripod. See "Using the top
adjustable foot" on page 45.
Working with a tripod plate
To use a tripod plate to mount the projector onto a tripod:
1. Install the tripod’s quick release plate to the projector’s tripod screw
hole and tighten the plate’s screw.
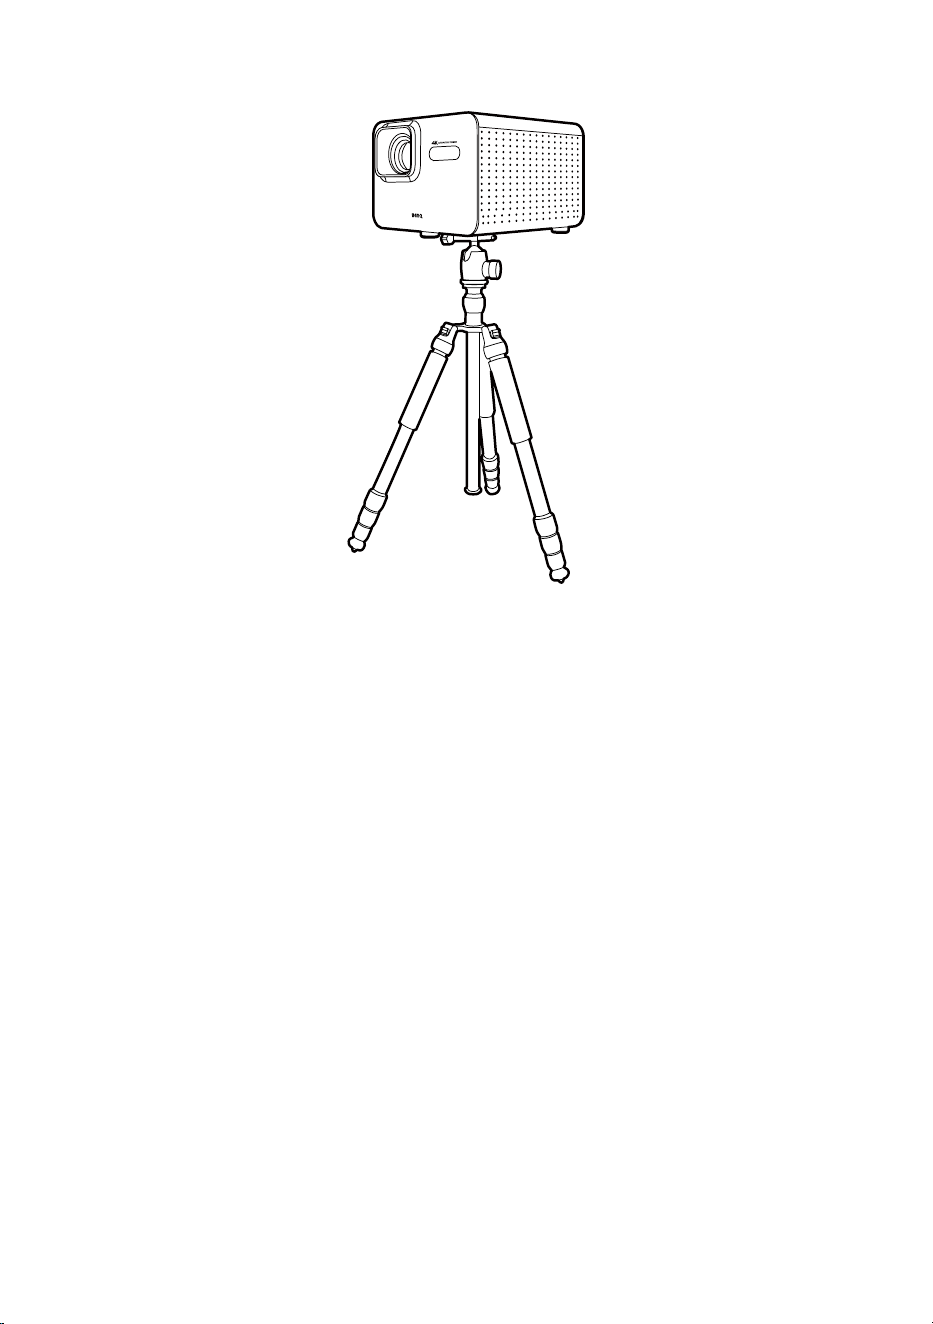
41
2. Install the projector onto the tripod.
42
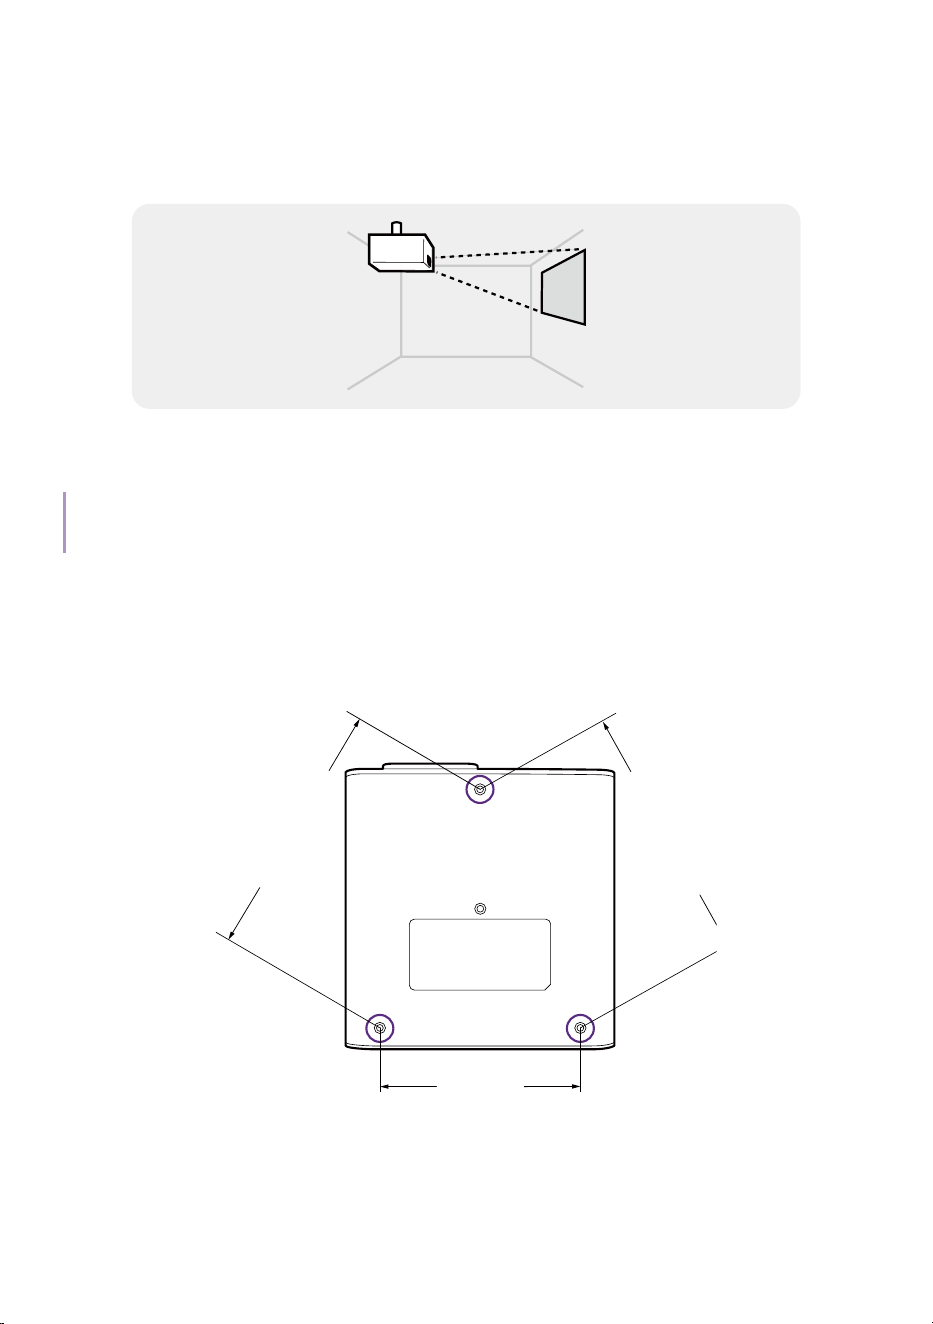
Ceiling mounting
The projector features installation points on the bottom for a traditional
ceiling mount.
Please ensure that the ceiling mount you purchase separately supports an
M4 screw type and has a minimum weight capacity of at least 4 kg.
Note
The projector is compatible with the BenQ CM00G3 universal ceiling mount.
Screw location
You can access the ceiling mount screw holes after removing the projector
feet from its bottom side.
211.54 mm
211.54 mm
164 mm
Screw type: M4
Screw hole length: 10mm
43
Working with a ceiling mount
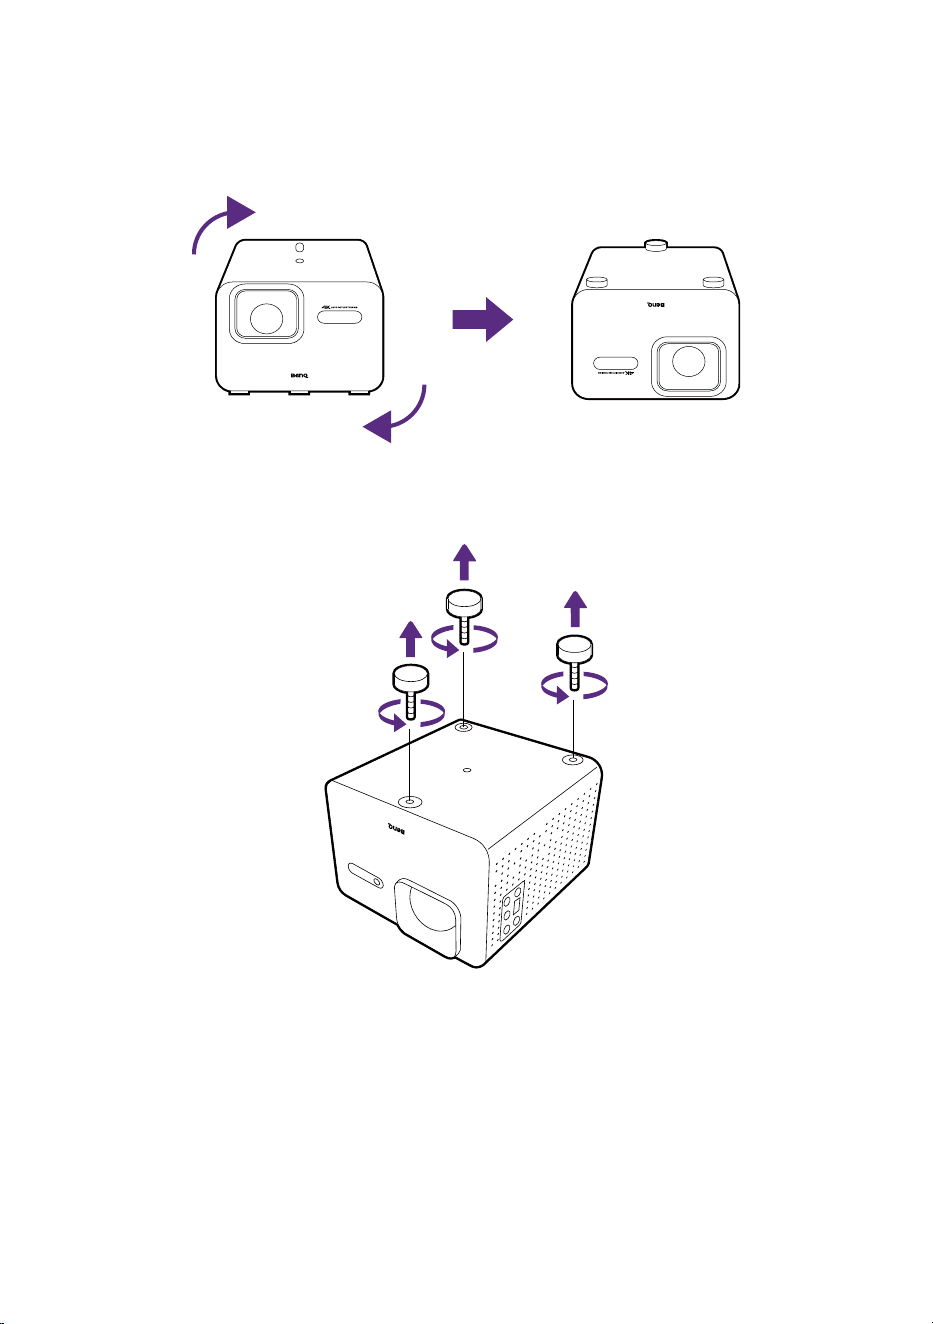
To install the projector onto a ceiling mount:
1. Place the projector upside down on a flat surface.
2. Using your hand, remove the three adjustable feet from the bottom side
of the projector to access the ceiling mount screw holes.
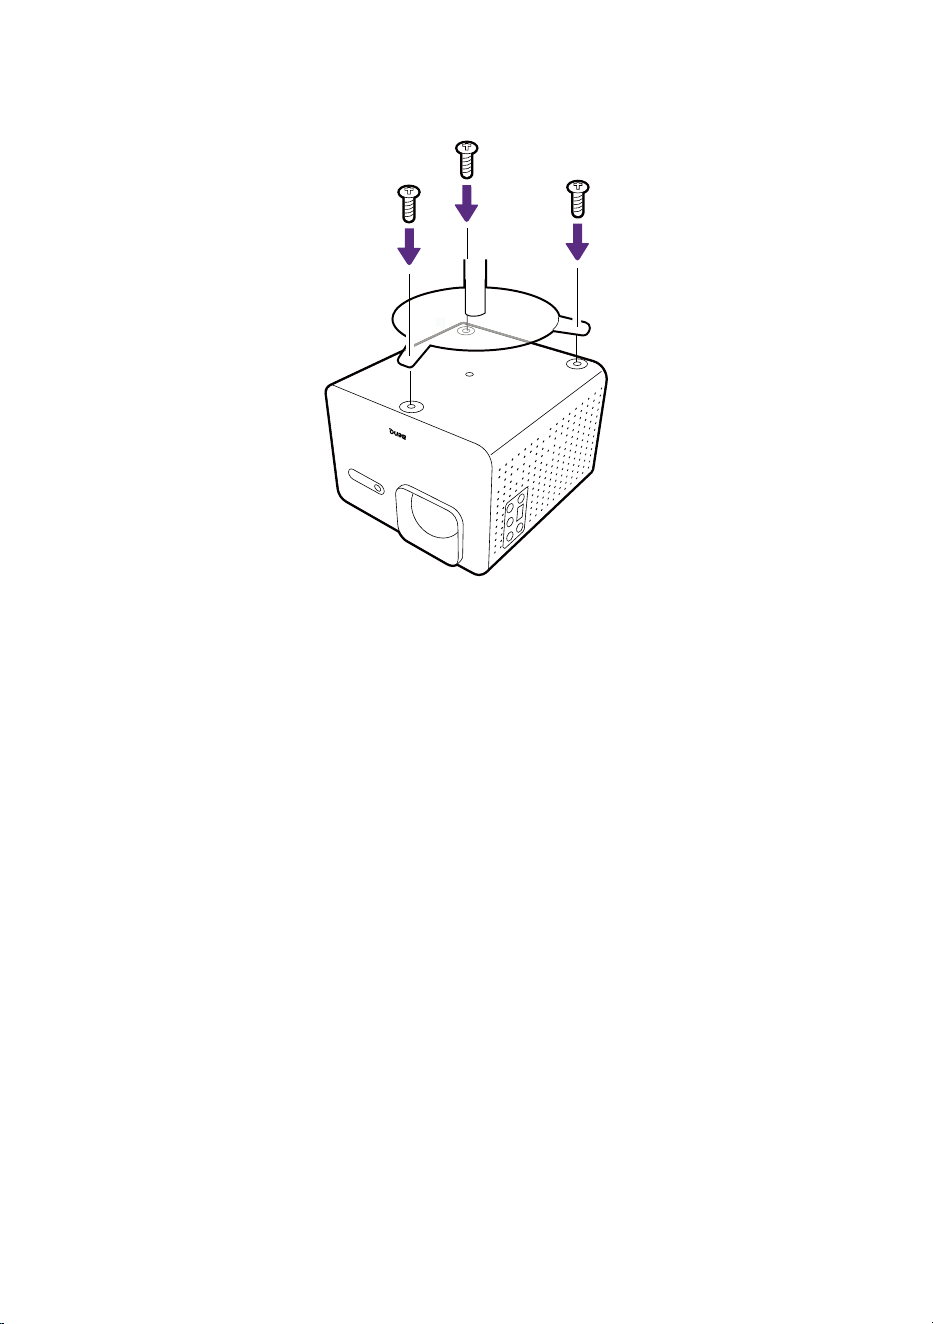
44
3. Install the projector onto the ceiling mount and secure it in place with
the ceiling mount's screws.
45
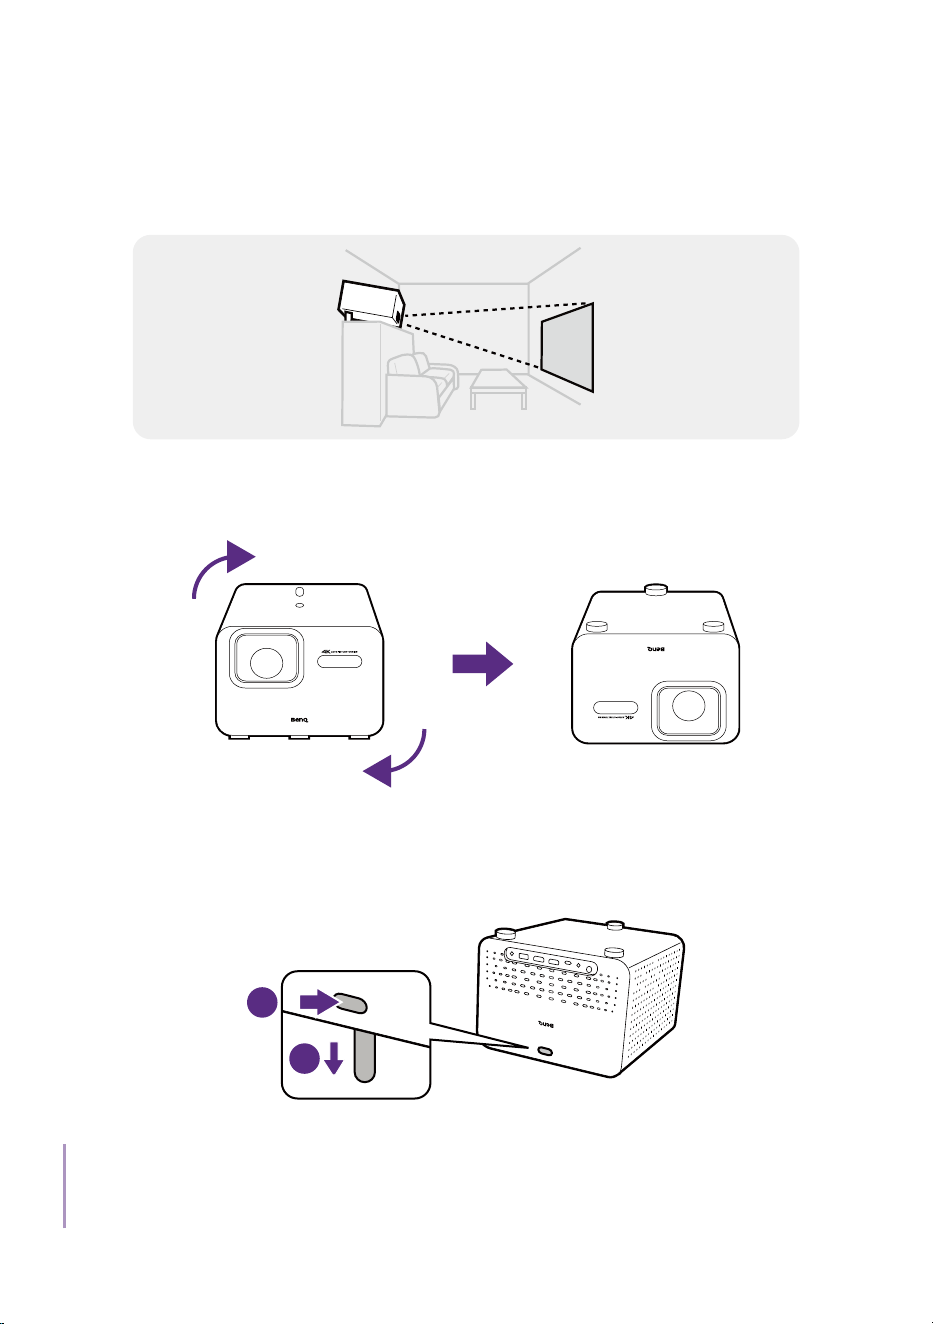
Using the top adjustable foot
The projector features an adjustable foot on its top side with a button
to release it at the rear side. The foot allows you to project upside down
without a tripod.
To use the top adjustable foot:
1. Place the projector upside down on a flat surface.
2. Slightly tilt the projector to create space below the adjustable foot and
then push the button at the rear side of the projector to release the
adjustable foot from the slot.
1
2
Note
There is no mechanism to eject the adjustable foot out of the projector. It can only be pulled out of
its slot by gravity when the the button is pushed while the projector is held upside down.
46
Adjusting the projected image
Fine-tuning the image clarity
To sharpen the picture, adjust the focus.
• Real-time focus & keystone adjustment: Your projector adjusts focus
and keystone automatically at startup by default. This function will
be performed automatically as well when the projector is moved. To
check/change the auto focus setting, go to
> All settings > Projector
> Focus > Focus Settings. The effective distance from the projection
lens to the screen is 1.3 – 4.9 meters.
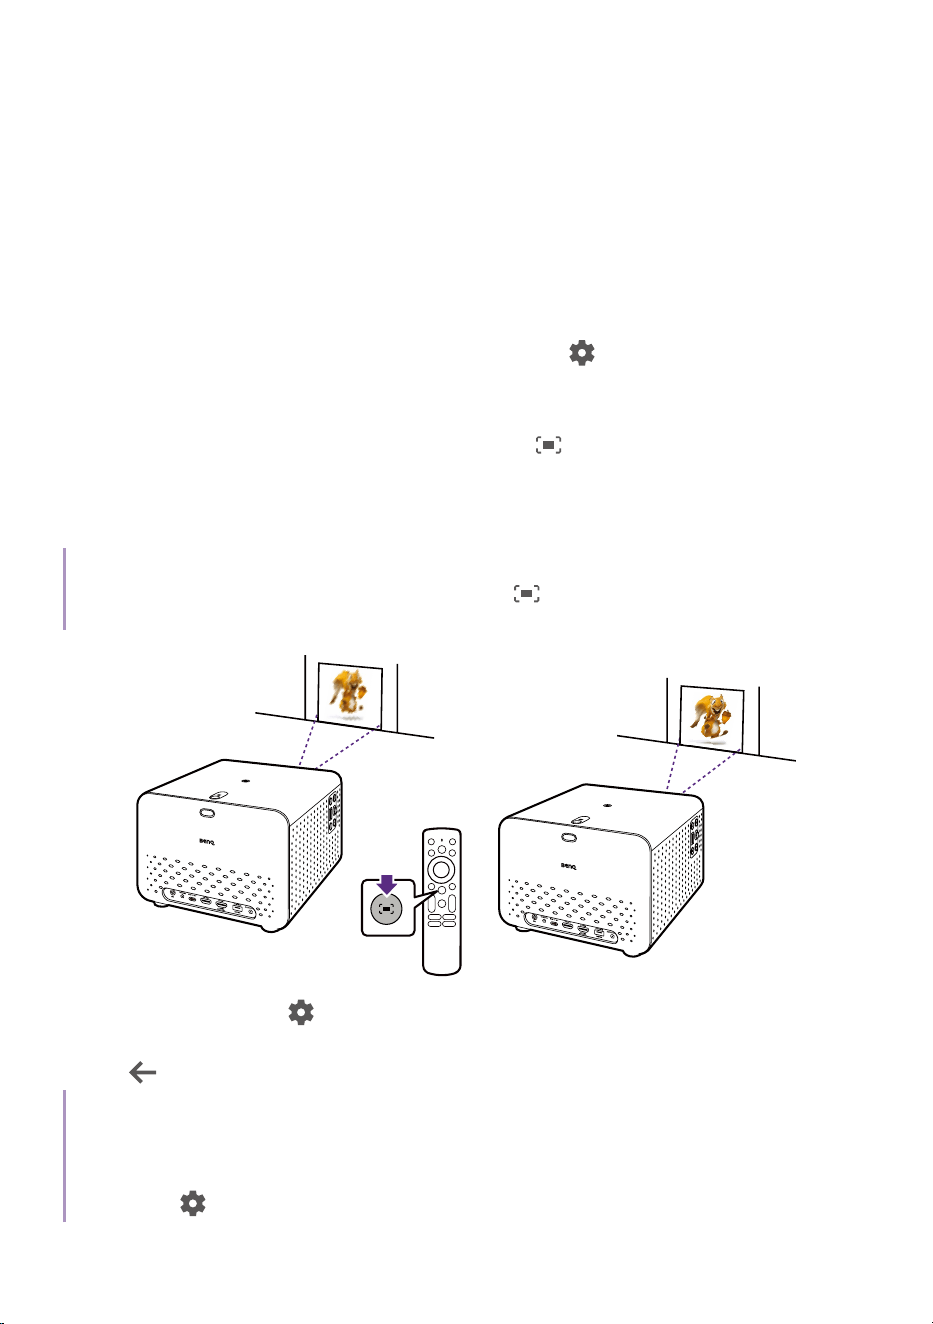
• One-click screen adjustment: Press the
button on the remote
control and the projector will automatically focus the image and adjust
keystone. Make sure the full keystone pattern is displayed on the
screen to ensure a successful correction.
Note
When Picture Mode is set to Auto Cinema, pressing the
button on the remote control will
activate both the screen adjustment function and the Auto Cinema mode setting.
Manual focus: Go to > All settings > Projector > Focus > Manual Focus.
Press up/down keys to make adjustment. When the focus is completed,
press
to leave.
Note
A focus pattern is displayed to ensure image focus adjustment by default. It is recommended to
display the focus pattern for better focus adjustment during video playback in particular. If you
prefer not to be distracted by the pattern during adjustment process, you can manually disabled the
pattern from
> All settings > Projector > Focus > Focus Settings > Deep Focus Always On.
47
Fitting the image to your screen
Keystone
The keystone effect refers to the situation where the projected image
is noticeably wider at the top / bottom / left / right. It occurs when the
projector is not perpendicular to the screen. Make sure the keystone
pattern is completely visible on the screen to ensure a successful
correction.
• Real-time focus & keystone correction: Your projector adjusts focus
and keystone automatically at startup by default. The real-time
focus & keystone function is also enabled by default. As a result, the
projector automatically adjusts focus and runs keystone correction
whenever it is touched or moved.To check/change the auto keystone
setting, go to
> All settings > Projector > Keystone Correction >
Keystone Correction Settings. The effective range of auto keystone is
as follows:
• Vertical: ± 30 degrees (single axis)
• Horizontal: ± 20 degrees (single axis)
• Distance from lens to wall: 2 meters
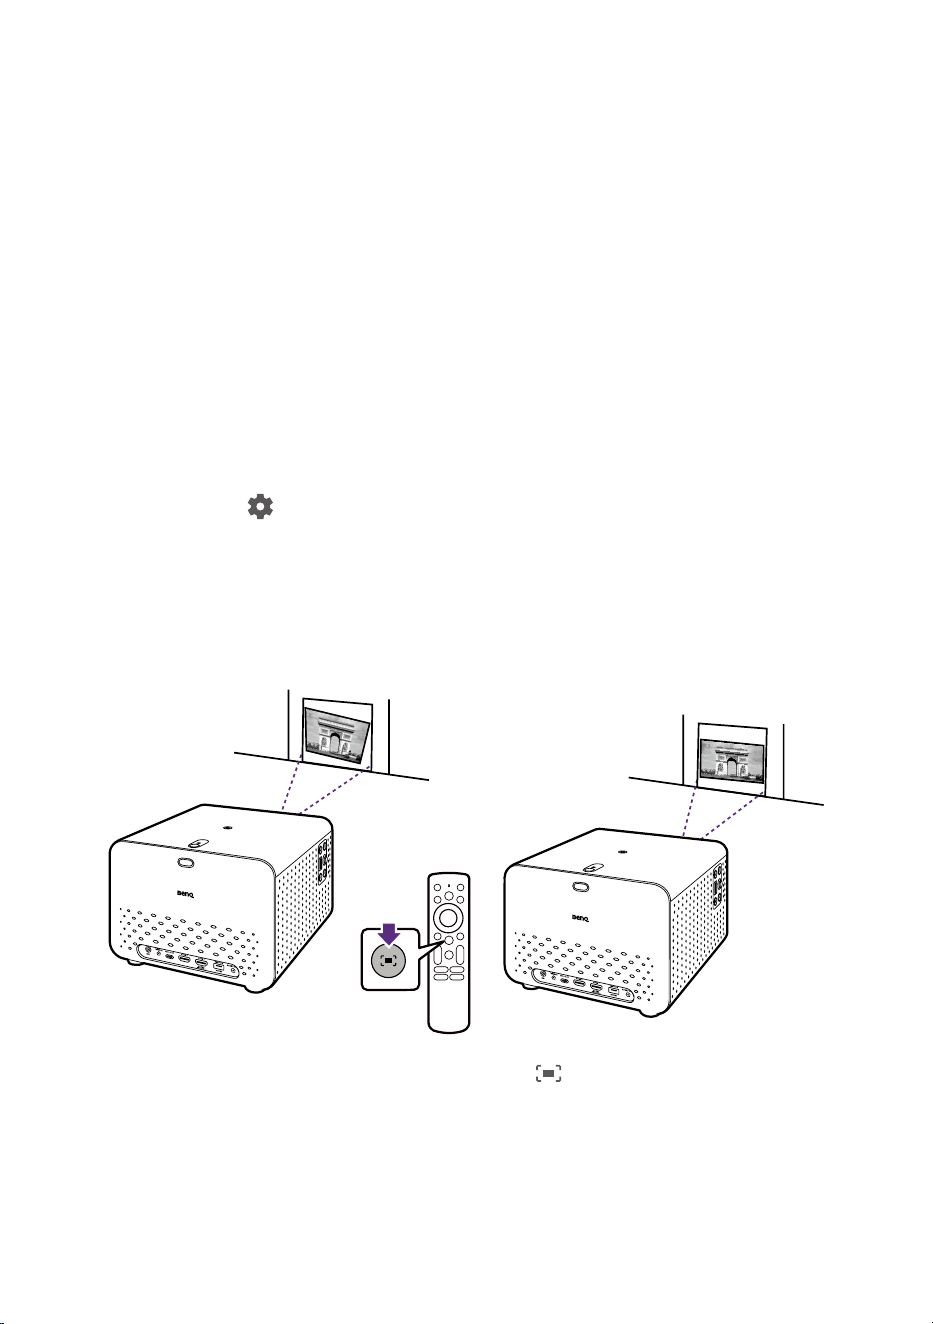
• One-click screen adjustment: Press the button on the remote
control and the projector will automatically focus the image and adjust
keystone. Make sure the full keystone pattern is displayed on the
screen to ensure a successful correction.

48
Note
When Picture Mode is set to Auto Cinema, pressing the
button on the remote control will
activate both the screen adjustment function and the Auto Cinema mode setting.
• Manual keystone: Go to > All settings > Projector >
Keystone Correction > Manual Keystone Correction. Simply follow the
on-screen instructions to make adjustments. When the adjustment is
completed, press
to save your changes and return to the previous
menu.The effective range of manual keystone is as follows:
• Vertical: ± 30 degrees (single axis)
• Horizontal: ± 20 degrees (single axis)
• Distance from lens to wall: 2 meters
Note
The way to adjust keystone varies by projection distance and the displayed pattern varies
accordingly. This will not change the corrected result, however.
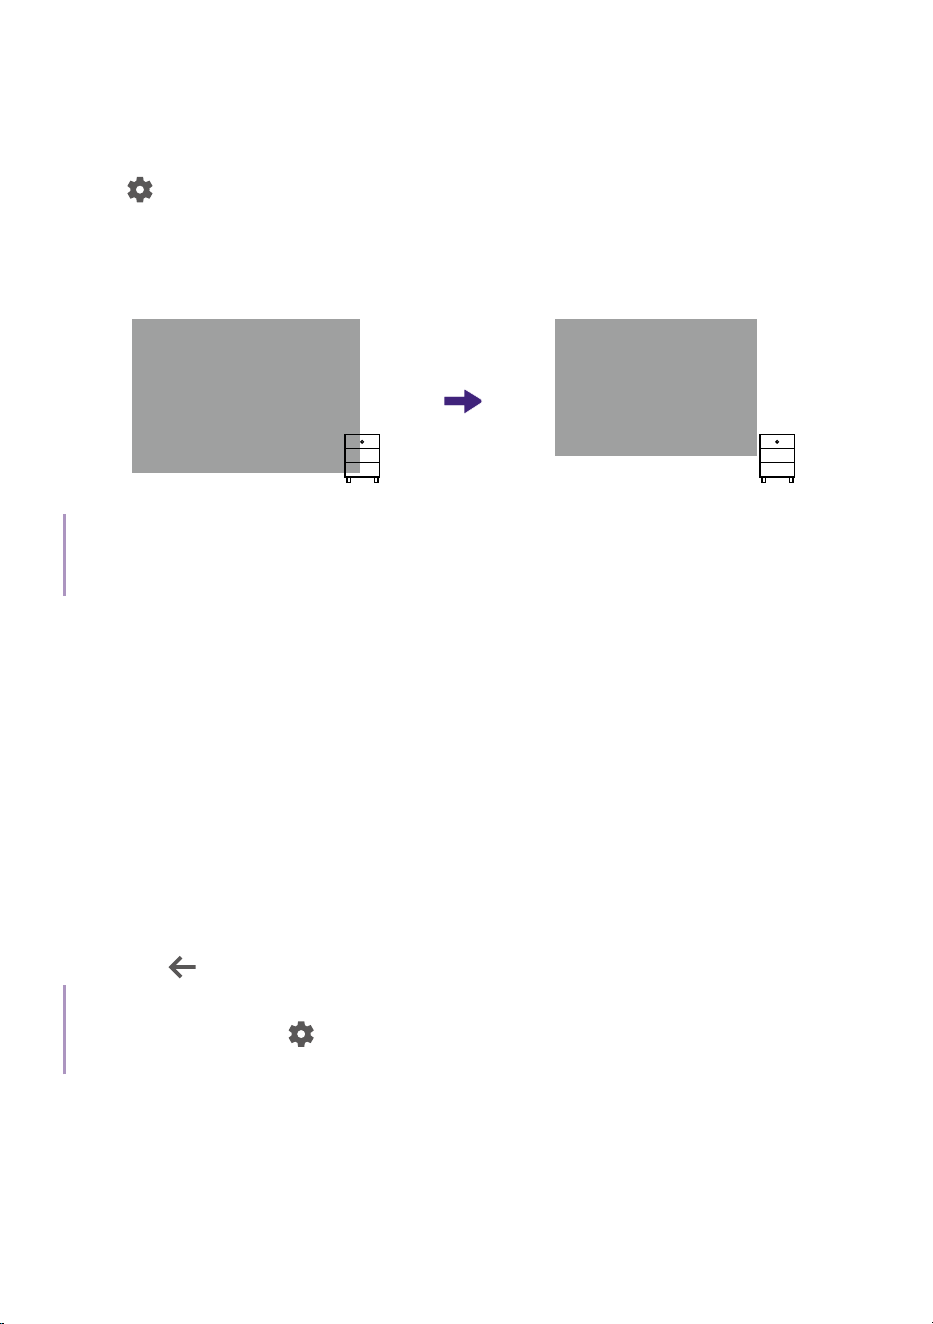
Screen Fit
If the projector is placed off-centered, the image may be distorted and
exceeded your screen. With the Screen Fit function, you can adjust the
image to align with 4 borders of the screen to fit the screen properly. Note
that the Screen Fit function works only when at least two borders of the
screen are detected by the focus/keystone camera.
1. Make sure the projection covers the whole screen and is larger than the
screen.
2. Go to
> All settings > Projector > Advanced Settings > Fit to Screen.
3. Follow the on-screen instructions. Make sure the full keystone pattern
is displayed on the screen to ensure a successful correction. The
projection will fit into the screen automatically.
Tip
To perform this function automatically when the
button on the remote control is pressed,
go to
> All settings > Projector > Keystone Correction > Keystone Correction Settings >
Auto Fit to screen via Remote Control. Toggle the switch on.
49
Obstacle avoidance
With this function, the projector detects if the screen is shaded by any
object, and resizes the projected image automatically to avoid the object.
Go to
> All settings > Projector > Advanced Settings > Avoid Obstacles.
The projector will automatically resize to avoid the object shading the
screen. Make sure the full keystone pattern is completely displayed on the
screen to ensure a successful correction.
Note
The Fit to Screen and Avoid Obstacles functions cannot work together. The correction result will be
based on screen detection.
Projection size and position adjustment
(Digital zoom and image reposition)
Resize and shift the projected image to fit your space with the digital zoom
and reposition functions easily.
1. To resize an image to a smaller space, press the digital zoom in/
out keys on the remote control. The maximum size is the image you
projected in the first place.
2. Press OK to switch to image reposition function. Use the arrow
keys on the remote control to move the image. Follow the on-screen
instructions to switch between digital zoom and image reposition.
3. Press to save and exit.
Tip
To access the menu, go to
> All settings > Projector > Keystone Correction > Image Adaptation
> Image Reposition.

50
Adjusting screen brightness
Go to > All settings > Projector > Energy & Performance >
Light Source Mode.
Item Descriptions
Normal
Provides full light brightness.
ECO
Lowers brightness to extend the light life and decreases the
fan noise.
Custom
Ten levels of brightness are provided to decrease the
current peak brightness.
Activating smart eye protection
This function reduces the screen brightness when an object/person is
detected within 2 meters in front of the projection lens.
To activate this function, go to
> All settings > Projector >
Advanced Settings > Smart Eye Protection.
Optimizing image quality by
Auto Cinema mode
Auto Cinema mode allows the projector to automatically optimize the
image quality by adjusting parameters such as saturation, brightness,
contrast, and sharpness in real time based on changes in environmental
conditions, e.g., ambient light, projector position, screen distance, and the
color of the wall to which the image is projected.
Auto Cinema mode can be triggered by moving the projector or pressing
the screen adjustment button on the remote control. Under these
circumstances the projector will project the calibration pattern and
automatically optimize the aforementioned image parameter settings.
Auto Cinema mode is available between a projection distance of 1.2 and
4.0 meter for TK705i or 1.0 and 3.0 meter for TK705STi.
Go to
> All settings > Display & Sound > Display > Picture Mode to
switch picture mode.

51
Changing the input source
By default, the projector will display the Google TV home screen any time it
is powered on.
Connect a device to one of the projector's input ports. Press the source
key on the remote control and select the desired input source from the
source menu.
You can also press the home button
on the remote control to return to
the Google TV home screen at any time.
Note
A USB flash drive is not considered as an input source. To play files from a USB flash drive, see
"Playing multimedia files from a USB flash drive" on page 66.

52
Watching streaming videos
Make sure the projector has been connected to a wireless network and
you are signed into your Google Account.
Google TV home screen
Upon initial startup or when you press the key on the remote control, the
projector will display the Google TV home screen.
2 4
10
9
81 5 73 6
Note
Actual screen and features may vary depending on your country/region.
No. Item Description
1
Profile Signed-in profile.
2
For You Access to home screen.
3
Movies Browse a variety of movies.
4
Shows Explore an assortment of shows.
5
Apps Download new apps or access installed apps.
6
Library Access to your personalized watchlist.
7
Search Enables text input to search.
8
Dashboard Quick access to setting menu and certain
functions (See page 53 ).
53
No. Item Description
9
Recommendations Discover movies and shows from across your
apps with personalized suggestions.
10
Your Apps Browse your installed apps.
Dashboard
Use the side panel dashboard to quickly access certain functions and
settings.
Fri. Jun 28
10:00 AM
Screensaver Inputs
Picture
Wi-Fi
Sound
Accessibility
Bluetooth
1 2
4
3
No. Item Descriptions
1
System time Displays the time.
2
Settings Access to the settings menus.
3
Profiles Switch to different user profiles.
4
Default frequently
used menus
Access to frequently used menus/functions.
Note
Actual screen may vary by the availability of network and Google TV version. It may also subject to
change without prior notice.
54
Choosing a proper picture mode for
video streaming
You are provided with a variety of picture modes for different scenarios
in Picture Mode. Go to
> All settings > Display & Sound > Display >
Picture Mode for selection. Usually Energy Saving is recommended for
watching movies.
Available options vary by content. When HDR/HLG/HDR10+ content is
available, some options under Picture support HDR/HLG/HDR10+ content.
Compared to its standard picture mode, an HDR mode helps deliver High
Dynamic Range effects with higher contrasts of brightness and colors.
Option Descriptions
Energy Saving
With accurate colors and deepest contrast at a lower
brightness level, this mode is suitable for playing
movies in an environment with a bit of ambient light.
Auto Cinema /
HDR Auto Cinema
Automatically adjusts color settings based on
wall color, ambient light, and screen size. In an
environment with a bit of ambient light, this mode is
suitable for playing movies with authentic colors and
deepest contrast at a lower brightness level. Under a
small amount of ambient light, this mode is suitable
for playing streaming TV with well-saturated colors
and fine-tuned sharpness. See "Optimizing image
quality by Auto Cinema mode" on page 50 for more
information.
RPG / FPS /
HDR RPG /
HDR FPS
Picture settings appropriate for playing Role Playing
Games or First-Person Shooters. This mode especially
enhances details in dark scenes so that enemies
cannot hide.
Note
Noise reduction is not available in this mode.
User / HDR User
/ HDR10+ User /
HLG User
Accesses the customized settings.
Bright
Maximizes the brightness of the projected image. This
mode is the brightest mode on your projector.
55
Option Descriptions
HDR10
Delivers High Dynamic Range effects with higher
contrasts of brightness and colors.
HDR10+
Delivers High Dynamic Range effects with higher
contrasts of brightness and colors especially for HDR
Blu-ray movies.
HLG
Delivers Hybrid Long Gamma effects by adding a
logarithmic curve with extra brightness over the top of
the signal.
Choosing a proper sound mode for
video streaming
In general, you can select a sound mode from Sound Mode to suit your
scenario. Go to
> All settings > Display & Sound > Sound > Sound Mode
for selection. Usually Cinema is recommended for watching movies.
Option Descriptions
Cinema
This mode balances the background music and movie
sound effect and especially enhances vocal dialogue
for clear whispered voices and stereo bass sound effect
for explosive action scenes, such as gunshots and
firefights.
Music
This mode emphasizes total balance (low, middle, and
high frequency) to fully display the timbre of musical
instruments, rhythm of symphonies, and solos of
singers in hot concerts or in live halls for different types
of music, like pop, rock, and jazz.
Game
This mode emphasizes clear position and spatial
dynamic to enhance directional sound; therefore game
players can recognize the direction of gunshots or
footsteps from right to left so that enemies cannot hide
when in an action or fighting game.

56
Option Descriptions
Sport
This mode allows users to enjoy the rich vividness of
sport broadcasts and light entertainment programs.
The commentators' voice is clear and high pitch shrill
cheers from the audience is processed.

57
Enhancing gaming experience
To enhance your gaming experience, you are provided with picture
and sound modes that are suitable for gaming. In general, RPG / FPS
/ HDR RPG / HDR FPS (picture mode) and Game (sound mode) are
recommended for gaming.
Auto Low Latency Mode (ALLM)
Auto Low Latency Mode (ALLM) is designed to provide a smooth gaming
experience with low input lag. It allows the projector to automatically
switch to low latency mode when it detects gaming signals sent from a
gaming console, PC, laptop, or other device. In low latency mode, once the
projector detects the gaming signal has ended, it will return to its standard
display mode.
ALLM is only available when the input source is HDMI and the picture
mode is set to RPG / FPS / HDR RPG / HDR FPS.
ALLM is disabled by default. To enable this function, go to
> All settings
> Display & Sound > Display > HDMI Display Settings > ALLM.
Gaming boost
When you have already set the picture mode to RPG / FPS / HDR RPG
/ HDR FPS and want to have an even more responsive gaming
experience, go to
> All settings > Display & Sound > Display >
HDMI Display Settings > Game Mode to enable Gaming Boost.
Note
• Gaming Boost is available only when Picture Mode is set to RPG / FPS / HDR RPG / HDR FPS and
the input source is either HDMI or USB-C.
• Once Gaming Boost is enabled, the keystone correction value will be automatically set to zero.
Therefore, before enabling Gaming Boost, ensure the project is placed perpendicular to the screen.
• To use the keystone correction function in the RPG / FPS / HDR RPG / HDR FPS mode, go to
All settings > Display & Sound > Display > Expert Settings > HDMI Display Settings > Game Mode
to disable Gaming Boost .
58
Projection
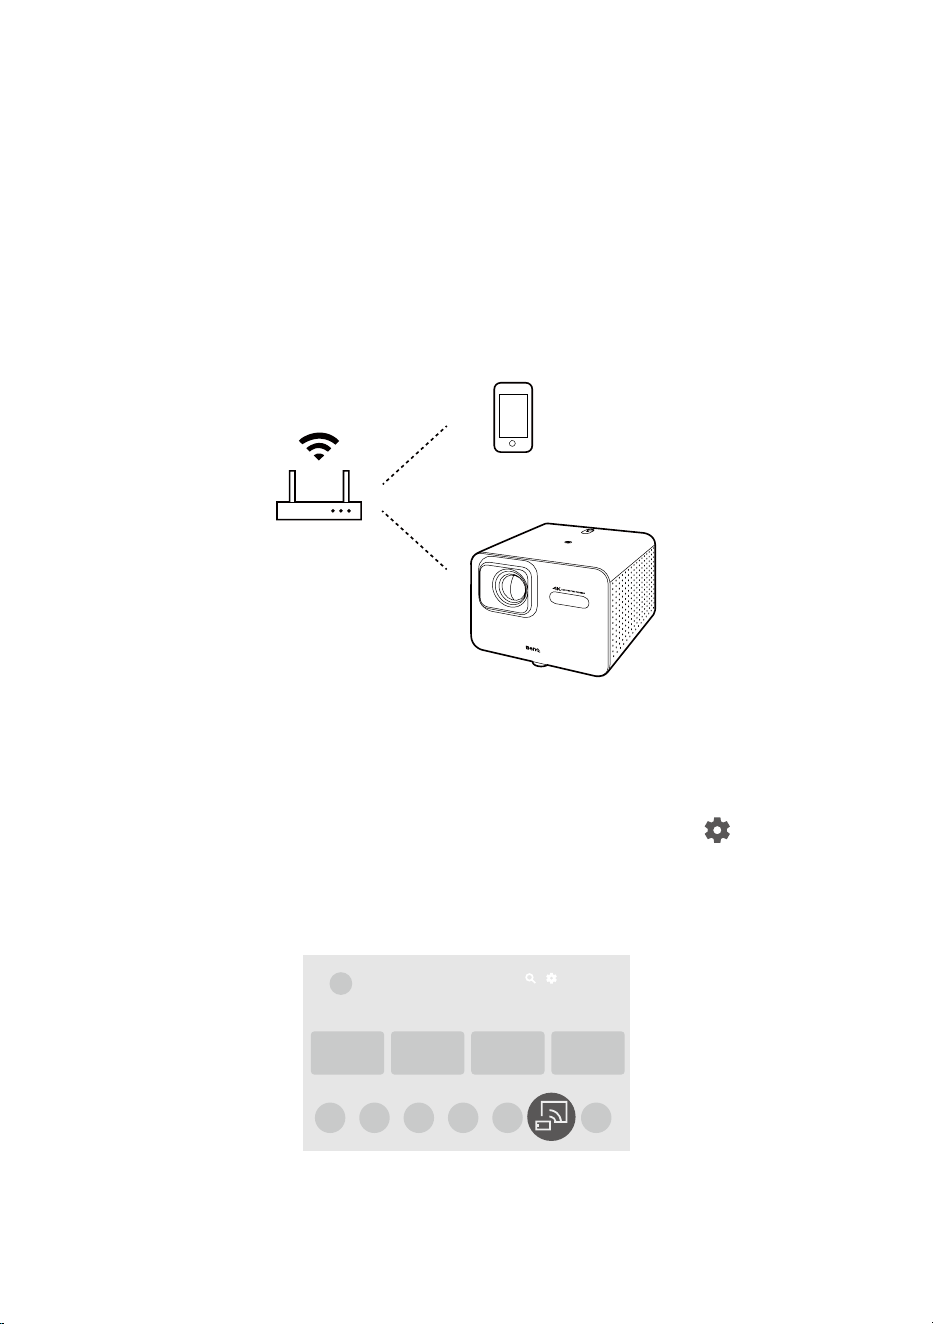
Wireless projection (screen casting)
To screen cast from your mobile device, tablet or computer to your
projector, ensure that both devices are connected to the same wireless
network.
Depending on your mobile device, different procedures and options are
required. Follow the instructions.
Screen casting from iOS/macOS device
devices
1. Install and launch the Screen Sharing for iOS app from >
All settings > Projector > Advanced Settings > Screen Sharing for iOS.
2. Go to Apps from the Google TV home screen on the projector, and
launch the Screen Sharing for iOS app.
Google TV
3. Follow the on-screen instructions to grant the access right.
59
4. Make sure your mobile device and the projector are connected to the
same wireless network.
5. Enable the screen mirroring function from your iOS/macOS device.
Choose TK001 (the default device name of your projector) from the
device list. If you have changed the name, look for the new name from
the device list.
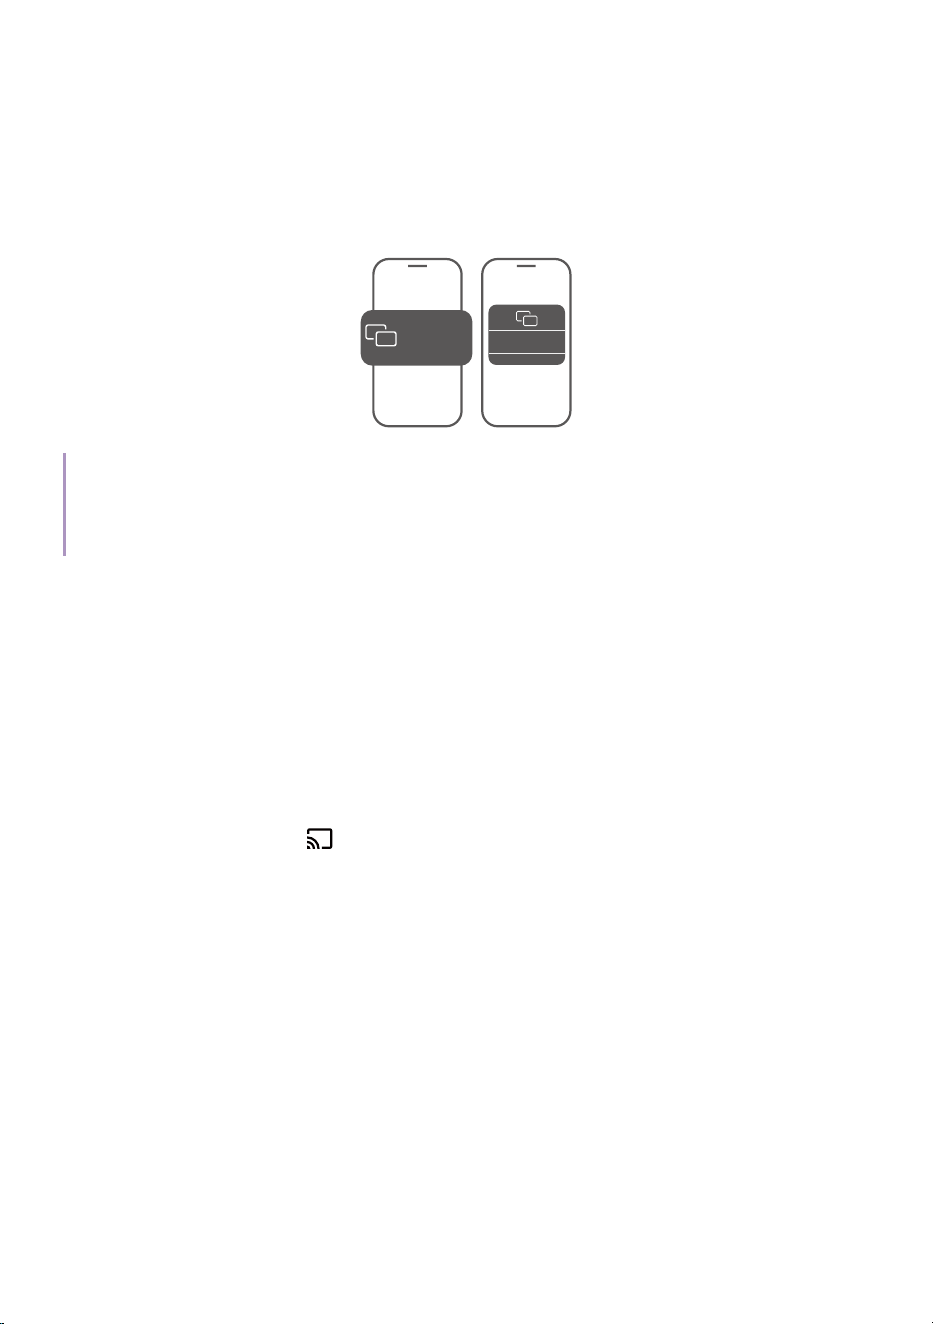
Mirroring
Screen
TK001
Tip
Some of the streaming apps use portrait screens only and may not be projected in full screen in a
landscape projection. You can press the left / right key to rotate the screen when casting an iOS/
MacOS device.
Screen casting from Android™ OS devices
with Google Cast™
1. Make sure your mobile device and your projector are connected to the
same wireless network.
2. Open a Google Cast-enabled app on your mobile device.
3. Select the content you would like to cast from your mobile device to
your projector.
4. Tap the Cast icon ( ) on your mobile device and select TK001 (the
default device name of your projector) as the device you would like to
cast to.
Screen casting from Android™ OS devices
with Google Home
1. Make sure your mobile device and the projector are connected to the
same wireless network.
2. Go to Google Play on your mobile device. Install and launch the
Google Home app.
3. Follow the on-screen instructions. Select TK001 (the default device
name of your projector) as your cast device from Google Home to
60
enable the screen mirroring function from your mobile device. If you
have changed the name, look for the new name from the device list.
2
Google Home
TK001
Device:
1
Screen casting from PC devices with Google
Cast™
1. Make sure your computer and the projector are connected to the same
wireless network.
2. Enable the screen mirroring (cast) function from the browser (e.g.
Chrome) of your computer. Available name and access to the screen
mirroring function may vary by program. Note that the projector is
named TK001 by default. If you have changed the name, look for the
new name from the device list.
Windows
TK001
Device:

61
Wired projection
Using an HDMI or certified USB-C 3.0 cable you can connect a device that
is equipped with HDMI or DP Alt Mode capabilities to broadcast videos or
images on the projector.
Note
Not all devices with a USB-C port have DisplayPort functionality. Check your device’s documentation
for clarification.
1. Connect the device to the HDMI or USB-C port on the projector with a
certified cable.
2. Press the source key , and then select the corresponding port in the
source menu.
3. Use the source menu or press the home button
to exit and go back
to the Google TV home screen.
4. If the device remains connected and you want to project its video
again, press the source button
, and then select the corresponding
port in the source menu.
Note
• Some computers feature HDMI ports that do not transmit audio. In such cases a separate audio
cable must be connected to the projector.
• Some laptops do not turn on their external video ports when connected to a projector. Usually a
key combination like Fn + F3 or CRT/LCD key turns the external display on/off. Locate a function
key labeled CRT/LCD or a function key with a monitor symbol on the laptop. Press Fn and the la-
beled function key simultaneously. Refer to your laptop’s documentation to discover your laptop’s
key combination.
Tip
Your projector features video/audio transfer and power delivery from the USB-C port. With this
feature, you can charge your gaming console (with USB-C video output) directly during gaming
without any other docking. See "Power delivery to a USB-C device" on page 67 for details.

62
Playing music with your
projector
With the built-in speakers, you can enjoy music playback via the projector
without a projection screen. The projector can work as an ordinary speaker
or a wireless speaker.
Making your projector a Bluetooth
speaker
Available when input source is set to Google TV.
1. Go to > All settings > Projector > Bluetooth Speaker Mode to enable
the projector's Bluetooth function.
2. Enable your device's Bluetooth function as well. Select TK001 (the
default device name of your projector) from the device list for pairing.
If you have changed the name, look for the new name from the device
list.
3. After the pairing is done successfully, you can output the audio from
your device to the projector.
4. To stop the music playback from the projector and disconnect
Bluetooth connection, press any key and press and hold the back
button
on the remote control.
Note
The projector does not support automatic re-connections with previously paired devices. In order to
re-connect to a paired device or connect to another device, repeat the steps above.
63
Bluetooth speaker mode LED indicator
Note
The Bluetooth speaker mode LED indicator is on the power button, sharing the same location as the
power LED indicator. See "Keypad" on page 19 for the location of the power button.
Scenario LED status Bluetooth status
Switching to Bluetooth
speaker mode, or
pairing and connecting a
Bluetooth device
Flashing blue
Bluetooth speaker mode
enabled
Waiting for Bluetooth device
to pair and connect
Bluetooth device pairing
and connecting in progress
Solid blue
Bluetooth device connected
successfully
Disconnecting and
unpairing a Bluetooth
device
Flashing blue
Bluetooth device unpairing
and disconnecting in
progress
Bluetooth device
disconnected
Exiting Bluetooth speaker
mode
Off Off

64
Connecting the projector to an
external Bluetooth speaker /
headphone
Available when input source is set to Google TV.
1. Go to > All settings > Remotes & Accessories > Pair accessory on
your projector.
2. Activate Bluetooth-pairing mode on the speaker or headphones.
3. Select the speaker / headphones from the device list.
4. Select Pair.
5. Once the projector and speaker / headphones have successfully
connected, you can output the audio from your projector to the speaker
/ headphones.
Note
The projector does not support automatic re-connections with previously paired devices. In order to
re-connect to a paired device or connect to another device, repeat the steps above.
Making your projector a wireless
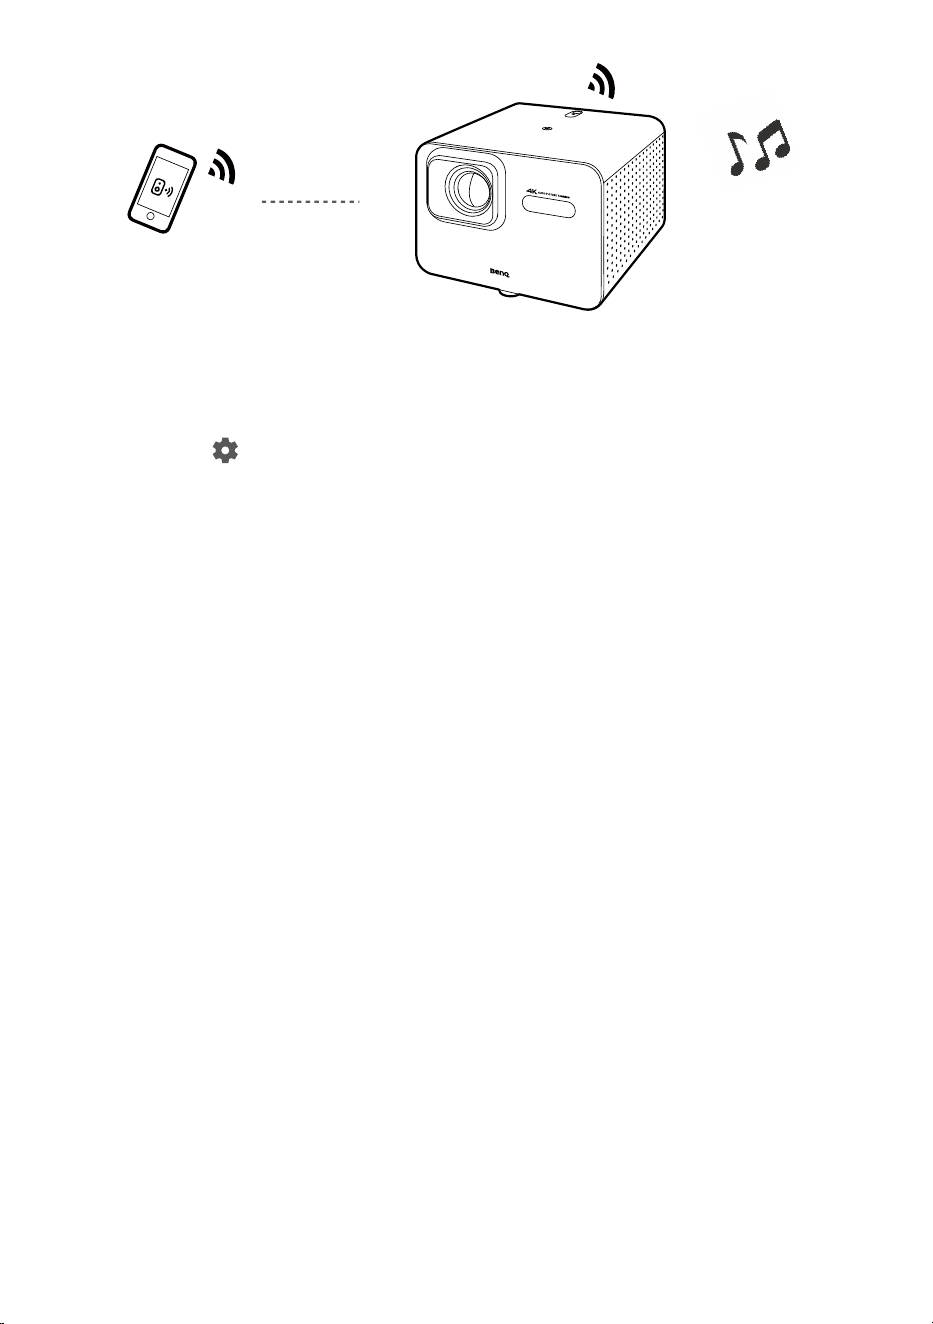
speaker
1. Power on the projector (see "Powering on and initial setup" on page
32).
2. Connect your mobile device and the projector to the same wireless
network.
3. Cast your audio from the mobile device to the projector as instructed in
"Wireless projection (screen casting)" on page 58.
4. Go to
> All settings > Display & Sound > Audio Only Mode on your
projector to turn off the screen. See "Turning the screen off during
music playback" for details.
5. Launch the music app on your mobile device and use the casting
function through Google Cast as instructed in "Wireless projection
(screen casting)". Find TK001 as the casting device to enjoy music
streaming.
65
Turning the screen off during music playback
You can enjoy music playback via the projector without a projection
screen. Go to
> All settings > Display & Sound > Audio Only Mode on
your projector to turn off the screen while the music playback continues.
You can adjust volume by pressing the volume adjustment keys without a
projection screen.
To stop the playback or to perform other operations, press any key (except
the power and volume adjustment keys) on the remote control to bring the
projection screen back.

66
Playing multimedia les from a
USB ash drive
A media reader app required. Install one before accessing files from a USB flash drive.
To play media files stored on a USB flash drive, you must make
connections and settings properly.
1. Connect your USB flash drive to the USB-A / USB-C port of the
projector.
2. You are prompted when the USB storage device is detected. Follow
the on-screen instructions. On the home screen go to Apps > Search
"media player" and download a preferred app.
3. Launch a media reader app on your projector to access the multimedia
files stored on your USB flash drive. Supported file formats for
playback may vary by app.
Note
Supported USB flash drive formats: NTFS, FAT, and FAT32.

67
Power delivery to a USB-C
device
Available only when the projector is supplied power via the included power adapter.
With the power delivery function, your projector is able to supply power to
a connected USB-C device certified by USB-IF.
Supported USB-C power delivery:
• 5V/2A
• 9V/2A
• 12V/1.5A
• 15V/2A
USB-C power delivery notice
• The information is based on the standard testing criteria and is
provided for reference. The compatibility is not guaranteed as the user
environments vary. When a separately purchased USB-C cable is used,
make sure the cable is certified by USB-IF and is full-featured with
power delivery function.
• A connected device needs to be equipped with a USB-C connector that
supports charging function via USB power delivery.
• If the connected device requires more than the power supplied by your
projector for operation or for boot up, use the original power adapter
that came with the device.
68
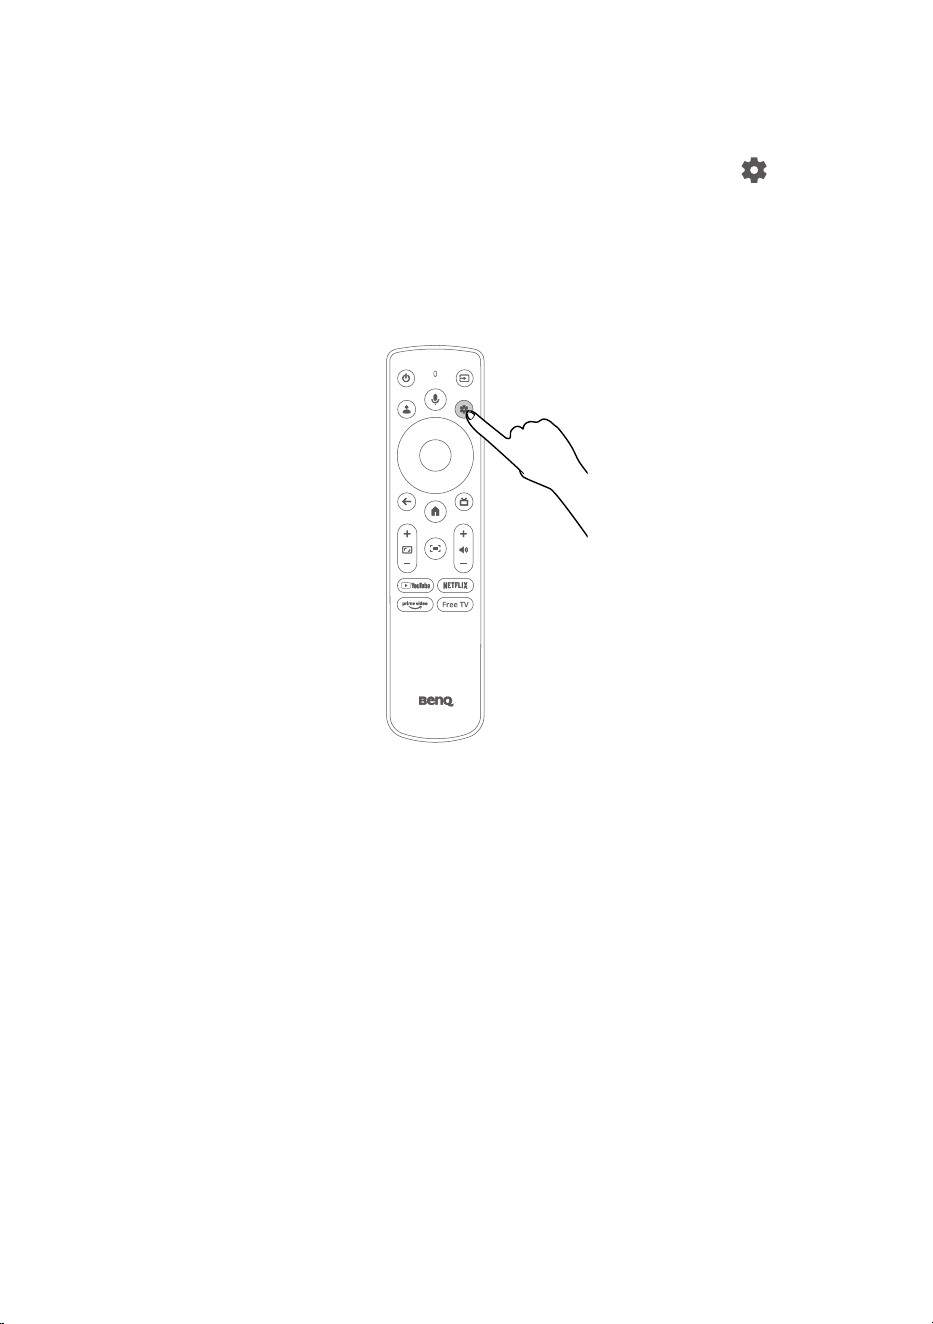
Menu navigation
To let you make various adjustments or settings on the projector, the
projector provides a settings menu. To access the menu, go to
>
All settings.
Actual menu and options may vary depending on your country/region.
Here are some menus related to projector settings. Visit https://tv.google/
for more information on menus and options.
Set your device name
You can change the projector's name if desired.

69
Input
> All settings > Input
Item
Options and descriptions
Switch Input
Allows you to switch the input source.
Input
HDMI 1/AUDIO RETURN+ / HDMI 2 / USB-C
Note
The settings below apply to all the three input sources
(HDMI 1/AUDIO RETURN+, HDMI 2, and USB-C).
• Show this input
Enables/disables this specific input source to be
displayed in the Input section of the OSD menu.
• PIN lock
Allows you to set up a PIN for this specific input
source and enable/disable its PIN lock function.
When enabled, changing to this input requires
this input's PIN.
• Edit names
Allows you to select or customize a name for
this input source.
• No signal standby timeout
Allows you to set up a timer to turn off the
projector automatically after the set time when
the projector detects no signal input from this
input.
• HDMI EDID Version
Allows you to select an EDID version for this
input.
Global CEC control
Enables/disables global CEC control. When enabled,
the projector and connected devices can control
each other via CEC.
Allow projector to turn off connected devices
Enables/disables the projector's HDMI CEC auto
power off function. When enabled, powering off the
projector will also power off the connected devices
that support CEC.
70
Allow connected devices to turn on projector
Enables/disables the projector's HDMI CEC auto
power on function. When enabled, powering on the
connected devices that support CEC will also power
on the projector.
Projector
> All settings > Projector
Item Options and descriptions
Focus
Allows you to adjust the image clarity and the focus
settings.
Auto Focus
Automatically adjusts the image clarity.
Manual Focus
Shows the focus pattern and allows you to manually
adjust the image clarity.
Focus Settings
• Auto Focus at Startup
Enables/disables the projector to run auto focus
when the projector is starting up.
• Auto Focus After Movement
Enables/disables the projector to run auto focus
after the projector is moved.
• Deep Focus Always On
Enables/disables the deep focus function for a
clearer image.
Keystone Correction
Allows you to run keystone correction, fit the screen,
scale and shift projection images, and adjust
keystone correction settings.
Auto Keystone Correction
Automatically adjusts the image to a rectangular
shape and avoids obstacles. See "Keystone" on
page 47.

71
Item Options and descriptions
Manual Keystone Correction
Allows you to perform keystone correction
manually. See "Keystone" on page 47.
Keystone Correction Settings
• Auto Keystone Correction at Startup
Enables/disables the projector to run auto
keystone correction when it is starting up.
• Auto Keystone Correction After Movement
Enables/disables the projector to automatically
adjust the image to a rectangular shape after it
is moved.
• Auto Keystone Correction Via Remote Control
Enables/disables the projector to run auto
keystone correction when the screen adjustment
button (
) on the remote control is pressed.
• Auto Fit to screen via Remote Control
Enables/disables the projector to run the fit-to-
screen function during a keystone correction
process when the screen adjustment button (
) on the remote control is pressed. See "Screen
Fit" on page 48.
• Avoid Obstacles Always On
Enables/disables the projector's ability to avoid
obstacles during a keystone correction process.
See "Obstacle avoidance" on page 49.
Image Adaptation
• Zoom
Allows you to scale the projection image size
proportionally.
• Image Reposition
Allows you to shift the projected image.
Reset to Default Image
Resets the image adjustments.

72
Item Options and descriptions
Advanced Settings
Access the advanced projector functions.
Screen Sharing for iOS
Installs or launches the Screen Sharing for iOS app
for screen casting from an iOS/macOS device. See
"Screen casting from iOS/macOS device devices"
on page 58.
Fit to Screen
Automatically aligns the image with a screen. See
"Screen Fit" on page 48.
Avoid Obstacles
Detects if the screen is shaded by any objects
and automatically resizes the image to avoid the
obstacle. See "Obstacle avoidance" on page 49.
Smart Eye Protection
Enables/disables the smart eye protection function.
When enabled, the projector will lower image
brightness when a person is detected near the
projection lens to protect their eyes. See "Activating
smart eye protection" on page 50.
Projection Mode
Allows you to change the installation location of
your projector. See "Choosing a location" on page
27.
Wall Color
Allows you to select the color of the wall to which
the image will be projected so as to adjust the
image color based on the selected wall color.
You can choose from White, Sky Blue, Ivorine,
Cream Yellow, Egg Green, Light Pink, or Auto.
When the Wall Color is set to Auto, the projector will
detect the wall color and automatically adjust the
image color accordingly.
73
Item Options and descriptions
Focus Calibration
Calibrates the focus function.
Note
Place the projector on a flat surface that is 1.5-2 meters away from the
screen when performing the Focus Calibration function.
Keystone Calibration
Calibrates the keystone correction function.
ALS Calibration
Calibrates the ambient light sensor (ALS) function.
12V Trigger
Enables/disables the 12V/0.5A power output from
the 12V/0.5A power trigger output port.
Note
See "I/O ports" on page 20 for the location of the power trigger
output port.
Advanced Firmware Update
Upgrades the MCU firmware from a USB-A device
connected to the service USB Type-A port.
Energy & Performance
Allows you to adjust screen brightness and improve
projector performance.
Light Source Mode
Allows you to adjust screen brightness. See
"Adjusting screen brightness" on page 50.
High Altitude Mode
Enables/disables High Altitude Mode. See "Using
the projector at high altitude" on page 31.
Light Source Usage Time
Displays the amount of time (in hours) that the light
source has been used.
System Acceleration
Helps to free memory space to improve projector
performance.
Bluetooth Speaker
Mode
Allows you to switch the projector to Bluetooth
speaker mode. See "Making your projector a
Bluetooth speaker" on page 62.

74
Display & Sound
> All settings > Display & Sound
Item
Options and descriptions
Display
Allows you to adjust picture image settings.
Picture Mode
Allows you to choose a proper picture mode for the
content. See "Choosing a proper picture mode for
video streaming" on page 54.
Brightness
Allows you to adjust the brightness of the projected
image in the range of 0 to 100.
Contrast
Allows you to adjust the contrast of the projected
image in the range of 0 to 100.
Saturation
Allows you to adjust the saturation of the projected
image in the range of 0 to 100.
Hue
Allows you to adjust the hue of the projected image
in the range of -50 to 50.
Sharpness
Allows you to adjust the sharpness of the projected
image in the range of 0 to 20.

75
Expert Settings
• Gamma
Allows you to adjust the gamma setting.
• DNR
Allows you to adjust the Digital Noise Reduction
(DNR) setting.
• MPEG NR
Allows you to adjust the Moving Picture Experts
Group (MPEG) noise reduction setting.
• Global Contrast Enhancer
Allows you to adjust the global contrast enhance
setting.
• Local Contrast Enhancer
Allows you to adjust the local contrast enhance
setting.
• MEMC
Allows you to adjust the Motion Estimate and
Motion Compensation (MEMC) setting.
• Dynamic Color Booster
Allows you to adjust the dynamic color booster
setting.
• Color Tuner
Allows you to adjust the color tuner setting.
• 11 Point white balance
Allows you to adjust the white balance of the
projected image.
Audio Only Mode
Turns off the projector's light source.
Note
To turn on the light source again, press any key (except the power and
volume adjustment keys).

76
HDMI Display Settings
• Game Mode
Allows you to adjust the game mode settings.
• ALLM
Enables/disables the ALLM function. See "Auto
Low Latency Mode (ALLM)" on page 57.
• HDMI RGB Range
Allows you to adjust the HDMI RGB color range
setting.
Reset to Default
Resets image settings to their factory defaults.
Screen
Allows you to adjust the aspect ratio of the projected
image.
Note
This setting is not available when the projector is in Google TV mode.
Auto
Scales an image proportionally to fit the projector's
native resolution based on its width or height.
Full
Scales an image so that it fully fits the screen.
Unscaled
Projects an image with the original aspect ratio the
same as the input source without scaling the image.
4:3
Scales an image so that it is displayed in the center
of the screen with a 4:3 aspect ratio.
Movie expand 14:9
Scales an image so that it is displayed in the center
of the screen with a 14:9 aspect ratio.
Movie expand 16:9
Scales an image so that it is displayed in the center
of the screen with a 16:9 aspect ration.

77
Sound
Allows you to select a sound mode and adjust the
speakers settings.
Sound Mode
Allows you to choose a proper sound mode for the
content. See "Choosing a proper sound mode for
video streaming" on page 55.
Basic Settings
• Balance
Allows you to adjust the audio balance setting of
the speakers.
• Bass
Allows you to adjust the low frequency of the
speakers.
• Treble
Allows you to adjust the high frequency of the
speakers.
• Equalizer Detail
Allows you to adjust the equalizer settings of the
speakers.
• Auto Volume Control
Enables/disables the projector to adjust the
speakers' volume automatically.
Speakers
Turns on/off the projector's speakers.
Speaker Delay
Allows you to adjust the delay time between the
audio output and image projection in the range of 0
to 250 ms.
Downmix Mode
Allows you to select a downmix mode including
Stereo and Surround.
Dialog Enhancer
Allows you to enable/disable Dialog Enhancer
and configure the level of enhancement from Low,
Medium, or High.

78
Reset to Default
Resets the sound mode and speakers settings to
their factory default.
Audio Output
Allows you to adjust the audio output settings.
Digital Output
Allows you to configure the format of the audio
signal output to Auto, Bypass, PCM, MAT,
Dolby Digital Plus, or Dolby Digital.
When Auto is selected, the projector will detect the
input source and set an audio format automatically.
Digital Output Delay
Allows you to adjust the audio output delay time in
the range of 0 to 250 ms when the audio is output via
the projector's internal speakers or an external wired
audio device.
Bluetooth Delay
Allows you to adjust the audio output delay time in
the range of 0 to 500 ms when the audio is output via
a Bluetooth audio device connected to the projector.
Audio Output Device
Allows you to select the audio output device from
among Auto, TV Speaker, HDMI eARC, Bluetooth, or
Headphone.
When Auto is selected, the projector will detect and
automatically select the audio output device.
Network & Internet
> All settings > Network & Internet
Sets the network connection. You can activate or deactivate wireless
connection.
Accounts & Proles
> All settings > Accounts & Profiles
Manages accounts.

79
Privacy
> All settings > Privacy
Manages your privacy settings.
Apps
> All settings > Apps
Manages the installed apps.
System
> All settings > System
Accesses device settings.
Accessibility
> All settings > Accessibility
Configures accessibility settings.
Remotes & Accessories
> All settings > Remotes & Accessories
You can manually pair a remote via Bluetooth, or manage a paired device.
Help & Feedback
> All settings > Help & Feedback
Accesses Google TV help page or sends feedback.

80
Maintenance
Care of the projector
Your projector needs little maintenance. The only thing you have to do on a
regular basis is to keep the lens clean.
Never remove any parts of the projector. Contact your dealer or local
customer service center if the projector fails to operate as expected.
Cleaning the lens
Clean the lens whenever you notice dirt or dust on the surface. Please
be sure to turn off the projector and let it cool down completely before
cleaning the lens.
• Use a canister of compressed air to remove dust.
• If there is dirt or smears, use lens-cleaning paper or moisten a soft
cloth with lens cleaner and gently wipe the lens surface.
• Never use any type of abrasive pad, alkaline/acid cleaner, scouring
powder, or volatile solvent, such as alcohol, benzene, thinner or
insecticide. Using such materials or maintaining prolonged contact
with rubber or vinyl materials may result in damage to the projector
surface and cabinet material.
Note
Never use wax, alcohol, benzene, thinner or other chemical detergents. These can damage the case.
Storing the projector
If you need to store the projector for an extended time, please follow the
instructions below:
• Make sure the temperature and humidity of the storage area are
within the recommended range for the projector. Please refer to
"Specifications" on page 85 or consult your dealer about the range.
• Remove the batteries from the remote control.
• Pack the projector in its original packing or equivalent.

81
Transporting the projector
It is recommended that you ship the projector with its original packing or
equivalent.
Light source information
To check the light usage time, go to > All settings > Projector >
Energy & Performance > Light Source Usage Time.
82
Troubleshooting
The LED indicator is flashing.
Power LED status Scenario
Solid red Fan error
Flashing red/green Temperature error
Flashing orange/green Light source life exhausted
Flashing green/purple DLP communication error
Flashing purple/red G-sensor error
Solid purple Driver board error
Flashing purple TOF sensor error
Contact customer service for assistance.
Note
Refer to "Power LED indicator" on page 33 for power LED indicator details.
The projector does not turn on.
Possible cause Remedy
There is no power from
the power cord.
Plug the power cord into the AC power jack on
the projector, and plug the power cord into the
power outlet. If the power outlet has a switch,
make sure that it is switched on.
Attempting to turn
the projector on again
during the cooling
process.
Wait until the cooling down process has
completed.
83
No picture.
Possible cause Remedy
The video source is not
turned on or connected
correctly.
• Check if the video source is properly
connected.
• The projector may be in Audio-only or
Network Standby mode. Press the power key
to disable.
The projector is not
correctly connected to
the input signal device.
Check the connection.
The input signal has not
been correctly selected.
Select the correct input signal with the
key.
Blurred image
Possible cause Remedy
The projection lens is
not correctly focused.
Manually adjust the focus of the lens.
See "Fine-tuning the image clarity" on page 46.
The projector and the
screen are not aligned
properly.
Adjust the projection angle and direction as well
as the height of the projector if necessary.
The auto keystone
function did not work.
Adjust the projection angle.
The ToF sensor is dirty. Clean the sensor gently with a cleaning cloth.
Remove dust or fingerprint carefully.
Remote control does not work.
Possible cause Remedy
The batteries are out of
power
Replace both of the batteries with new ones.
There is an obstacle
between the remote
control and the
projector.
Remove the obstacle.

84
Possible cause Remedy
You are too far away
from the projector
Stand within 8 meters (26 feet) of the projector.

85
Specications
Projector specications
Category
Item
Descriptions
Display Brightness (ANSI lumens)
3000
Native Resolution
UHD (3840 x 2160)
Native Aspect Ratio
16:9
Contrast Ratio (FOFO)
600,000:1
Display Color
30 Bits (1.07 billion colors)
Light Source
LED
Light Source Life Eco: 30000 hours
Normal: 20000 hours
Optical Throw Ratio - TK705i: 1.0 – 1.3
- TK705STi: 0.8
Zoom Ratio
Fixed
Mechanic Zoom - TK705i: 1.3
- TK705STi: N/A
Lens - TK705i: F/# = 1.8-1.85, f = 10.55-13.68
mm
- TK705STi: F/# = 1.8, f = 8.498 mm
Projection Offset (Full-Height)
100%
Keystone Adjustment (Auto) Vertical: ± 30 degrees (single axis),
Horizontal: ± 20 degrees (single axis)
Clear Image Size
60" – 150"
Projection Size
30" – 300"
Picture
Rec. 709 Coverage 98%
Compatibility
Resolution Support VGA (640 x 480) to 4K UHD (3840 x 2160)
Horizontal Frequency 15 kHz – 102 kHz
Vertical Scan Rate 23 Hz – 120 Hz
HDTV Compatibility 480i, 480p, 576i, 567p, 720p, 1080i, 1080p,
2160p
I/O Interface HDMI in (x2)
- HDMI-1 (CEC)
- HDMI-2 (CEC / Audio Return+ with
multichannel audio output)
USB Type-A (x1)
USB 2.0 (5V 1.5A): For service and power
supply (up to 5V/1.5A) / USB reader /
Firmware upgrade
USB Type-C (x1)
Display Port 1.4 / PD output 5V (2A) /
9V (2A) / 12V (1.5A) / 15V (2A) / Media
reader USB 2.0
12V/0.5A Trigger
(x1)

86
Category
Item
Descriptions
Audio Speaker (x2)
8 W
Audio out (3.5mm Mini Jack) (x1)
HDMI Audio Return+ eARC, bypass 5.1 channel, 7.1 channel
Environment Power Supply
AC 100 V to 240 V, 50 Hz / 60 Hz
Power Consumption
250 W (Max.); < 0.5 W (Standby)
Power consumption in
networked standby / standby
mode
2 W / < 0.5 W
Acoustic Noise (Typ./Eco.)(dB)
28 dBA / 24 dBA
Operating Temperature
0°C – 40°C
Storage Temperature
-20°C – 60°C, without condensation
Operating Relative Humidity
10% – 90% RH, without condensation
Storage Relative Humidity
10% – 90% RH, without condensation
Smart Features
Bluetooth Bluetooth 5.2
Wi-Fi Standard 802.11 a/b/g/n/ac/ax (2.4G / 5G)
Dimensions and
Weight
Net Weight (kg)
3.8 kg
Net Weight (lb)
8.4 lb
Dimensions (WxDxH) (mm)
229.2 (W) x 249.7 (D) x 168.2 (H)
Dimensions (WxDXH) (inch)
9.02 (W) x 9.83 (D) x 6.62 (H)
Projection System Projection System
DLP
DMD size
0.47”
Note
• LED life results will vary depending on environmental conditions and usage.
• The performance of Wi-Fi and Bluetooth might be disturbed by distance and obstacles.

87
Timing chart
HDMI input
PC
Resolution Mode
Vertical
frequency
(Hz)
Horizontal
frequency
(KHz)
Dot Clock
Frequency
(MHz)
640 x 480 VGA_60 59.940 31.469 25.175
800 x 600 SVGA_60 60.317 37.879 40.000
1024 x 768 XGA_60 60.004 48.363 65.000
1280 x 720 1280 x 720_60 60 45.000 74.250
1280 x 800 WXGA_60 59.810 49.702 83.500
1600 x 1200 UXGA 60.000 75.000 162.000
1600 x 1200 1920 x 1080_60 60.00 74.04 154.00
1920 x 1080@60HZ
1920 x 1080_60
(CEA-861)
60 67.5 148.5
2560 x 1440@60HZ 2560 x 1440_60 59.951 88.787 241.5
3840 x 2160
3840 x 2160_30
(For 4K/2K model)
30 67.5 297
3840 x 2160
3840 x 2160_60
(For 4K/2K model)
60 135 594

88
Video
Timing Resolution
Vertical
frequency
(Hz)
Horizontal
frequency
(KHz)
Dot Clock
Frequency
(MHz)
480i 720(1440) x 480 60 15.73 27
480p 720 x 480 59.94 31.47 27
576i 720(1440) x 576 50 15.63 27
576p 720 x 576 50 31.25 27
720/50p 1280 x 720 50 37.5 74.25
720/60p 1280 x 720 60 45.00 74.25
1080/24P 1920 x 1080 24 27 74.25
1080/25P 1920 x 1080 25 28.13 74.25
1080/30P 1920 x 1080 30 33.75 74.25
1080/50i 1920 x 1080 50 28.13 74.25
1080/60i 1920 x 1080 60 33.75 74.25
1080/50P 1920 x 1080 50 56.25 148.5
1080/60P 1920 x 1080 60 67.5 148.5
2160/24P 3840 x 2160 24 54 297
2160/25P 3840 x 2160 25 56.25 297
2160/30P 3840 x 2160 30 67.5 297
2160/50P 3840 x 2160 50 112.5 594
2160/60P 3840 x 2160 60 135 594
Note
As the timings available are limited to the EDID file and VGA graphic card, the user may not be able
to select some of the above timings on the VGA display card.

89
Audio format
• 1.4.1 Audio Format Code: LPCM
Channels: 2
Sampling Freq: 32 kHz, 44.1 kHz, 48 kHz
Sampling Size (bit): 24, 20, 16
• 1.4.2 Audio Format Code: Dolby Digital
Channels: 6
Sampling Freq: 32 kHz, 44.1 kHz, 48 kHz
Max Bit Rate: 640 kbps
• 1.4.3 Audio Format Code: Dolby Digital Plus
Channels: 8
Sampling Freq: 44.1 kHz, 48 kHz

90
USB-C input
PC
Resolution Mode
Vertical
frequency
(Hz)
Horizontal
frequency
(KHz)
Dot Clock
Frequency
(MHz)
640 x 480 VGA_60 59.94 31.469 25.175
800 x 600 SVGA_60 60.317 37.879 40
1024 x 768 XGA_60 60.004 48.363 65
1280 x 720 1280 x 720_60 60 45 74.25
1280 x 768 1280 x 768_60 59.87 47.776 79.5
1280 x 800 SVGA_60 59.81 49.702 83.5
1280 x 1024 SXGA_60 60.02 63.981 108
1280 x 960 1280 x 960_60 60 60 108
1360 x 768 1360 x 768_60 60.015 47.712 85.5
1440 x 900 WXGA+_60 59.887 55.935 106.5
1440 x 1050 SXGA+_60 59.978 65.317 121.75
1680 x 1050 1680 x 1050_60 59.954 65.29 146.25
1920 x 1080@60HZ
1920 x 1080_60
(CEA-861)
60 67.5 148.5

91
Video
Timing Resolution
Vertical
frequency
(Hz)
Horizontal
frequency
(KHz)
Dot Clock
Frequency
(MHz)
480i 720(1440) x 480 59.94 15.73 27
480p 720 x 480 59.94 31.47 27
576i 720(1440) x 576 50 15.63 27
576p 720 x 576 50 31.25 27
720/50p 1280 x 720 50 37.5 74.25
720/60p 1280 x 720 60 45.00 74.25
1080/24P 1920 x 1080 24 27 74.25
1080/25P 1920 x 1080 25 28.13 74.25
1080/30P 1920 x 1080 30 33.75 74.25
1080/50i 1920 x 1080 50 28.13 74.25
1080/60i 1920 x 1080 60 33.75 74.25
1080/50P 1920 x 1080 50 56.25 148.5
1080/60P 1920 x 1080 60 67.5 148.5
1440/60P 2560 x 1440 59.951 - 241.5
2160/60P 3840 x 2160 60 - -
2160/50P 3840 x 2160 50 - -
2160/30P 3840 x 2160 30 - -
2160/25P 3840 x 2160 25 - -
2160/24P 3840 x 2160 24 - -
Note
As the timings available are limited to the EDID file and VGA graphic card, the user may not be able
to select some of the above timings on the VGA display card.
Audio format (based on DP-Alt mode)
• Audio Format Code: LPCM
Channels: 2
Sampling Freq: 32 kHz, 44.1 kHz, 48 kHz
Sampling Size (bit): 24, 20, 16

92
Supported le formats
Video
MPEG-2 video decoder
• IISO/IEC 11172-2 MPEG-1 video format decoding
• ISO/IEC 13818-2 MPEG-2 video MP@HL and HD level
• Supports resolutions up to HDTV (1,080p60, 1,080i, 720p) and SDTV
• Supports bitrate up to 60 Mbps
• Supports FHDp60 2x fast forwarding playback
MPEG-4/H.263 video decoder
• IISO/IEC 14496-2 MPEG-4 ASP@L5/SP@L6
• Supports resolutions up to HDTV (1,080p@60fps)
• Supports bitrate up to 60 Mbps
AVC/H.264 video decoder
• ITU-T H.264, ISO/IEC 14496-10 (MP/HiP/CBP up to level 5.2) video
decoding
• Supports resolutions up to 4K@60fps + 720p@30fps
• Supports bitrate up to 135 Mbps
HEVC/H.265 video decoder
• Supports HEVC/H.265 video decoding
• Supports main/main-10 profile, level 5.1
• Supports 8-bit/10-bit color depth
• Supports resolutions up to 4K@60fps + 720p@30fps
• Supports the maximum bitrate up to 100 Mbps
VP8 video decode
r
• Supports Google VP8 decoder
• Supports resolutions up to 1,920x1,080@60fps
• Supports the maximum bitrate up to 40Mbps

93
VP9 video decoder
• Supports Google VP9 decoder
• Supports Profile 0/2 and 8-bit/10-bit color depth
• Supports resolution up to 4K@60fps + 720p@30fps
• Supports the maximum bitrate up to 100 Mbps
AV1 video decoder
• Supports AV1 video decoding
• Supports main profile, level 5.1
• Supports 8-bit/10-bit color depth
• Supports resolution up to 4K@60fps + 720p@30fps
• Supports the maximum bitrate up to 100 Mbps
VC-1 video decoder
• Supports SMPTE-421M (VC-1 video) decoding up to AP@L4
• Supports resolutions up to HDTV (1,080p@60fps)
• Supports bitrate up to 60 Mbps
Audio
Supported digital audio formats:
• MPEG-1
• MPEG-2 (Layer I/II)
• MP3
• AAC-LC
• HE-AAC
• WMA
• WMA9 Pro

BenQ.com
© 2025 BenQ Corporation.
All rights reserved. Rights of modification reserved.
