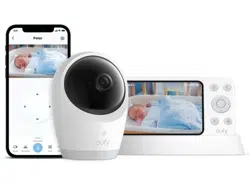

1. What's in the Box
2. At a Glance
2.1 Camera
2.2 Monitor
2.3 Charging Stand
3. Using Your Camera and Monitor
3.1 Power On / O
3.2 Connect the Camera and Monitor
3.3 Add a Camera to the Monitor
4. Charging Your Camera and Monitor
4.1 Charge the Camera
4.2 Charge the Monitor
4.3 Replace the Monitor Battery
5. Monitor Screen Guide
5.1 Menu Settings
5.2 On-Screen Icons
6. Placing the Camera
6.1 On the Wall
6.2 On a Table or Shelf
6.3 On the Crib
1. What's in the Box
Baby Camera
(Model: T8354)
Power Adapters
× 2
(5V 2A)
Baby Monitor
with Charging
Stand
Mounting Plate
Camera Power
Cable (3 m)
Cot Mount Set
Monitor Power
Cable (1.5 m)
Screw Pack
Power Cable
for Charging
Stand (1.5 m)
Quick Start
Guide
2. At a Glance
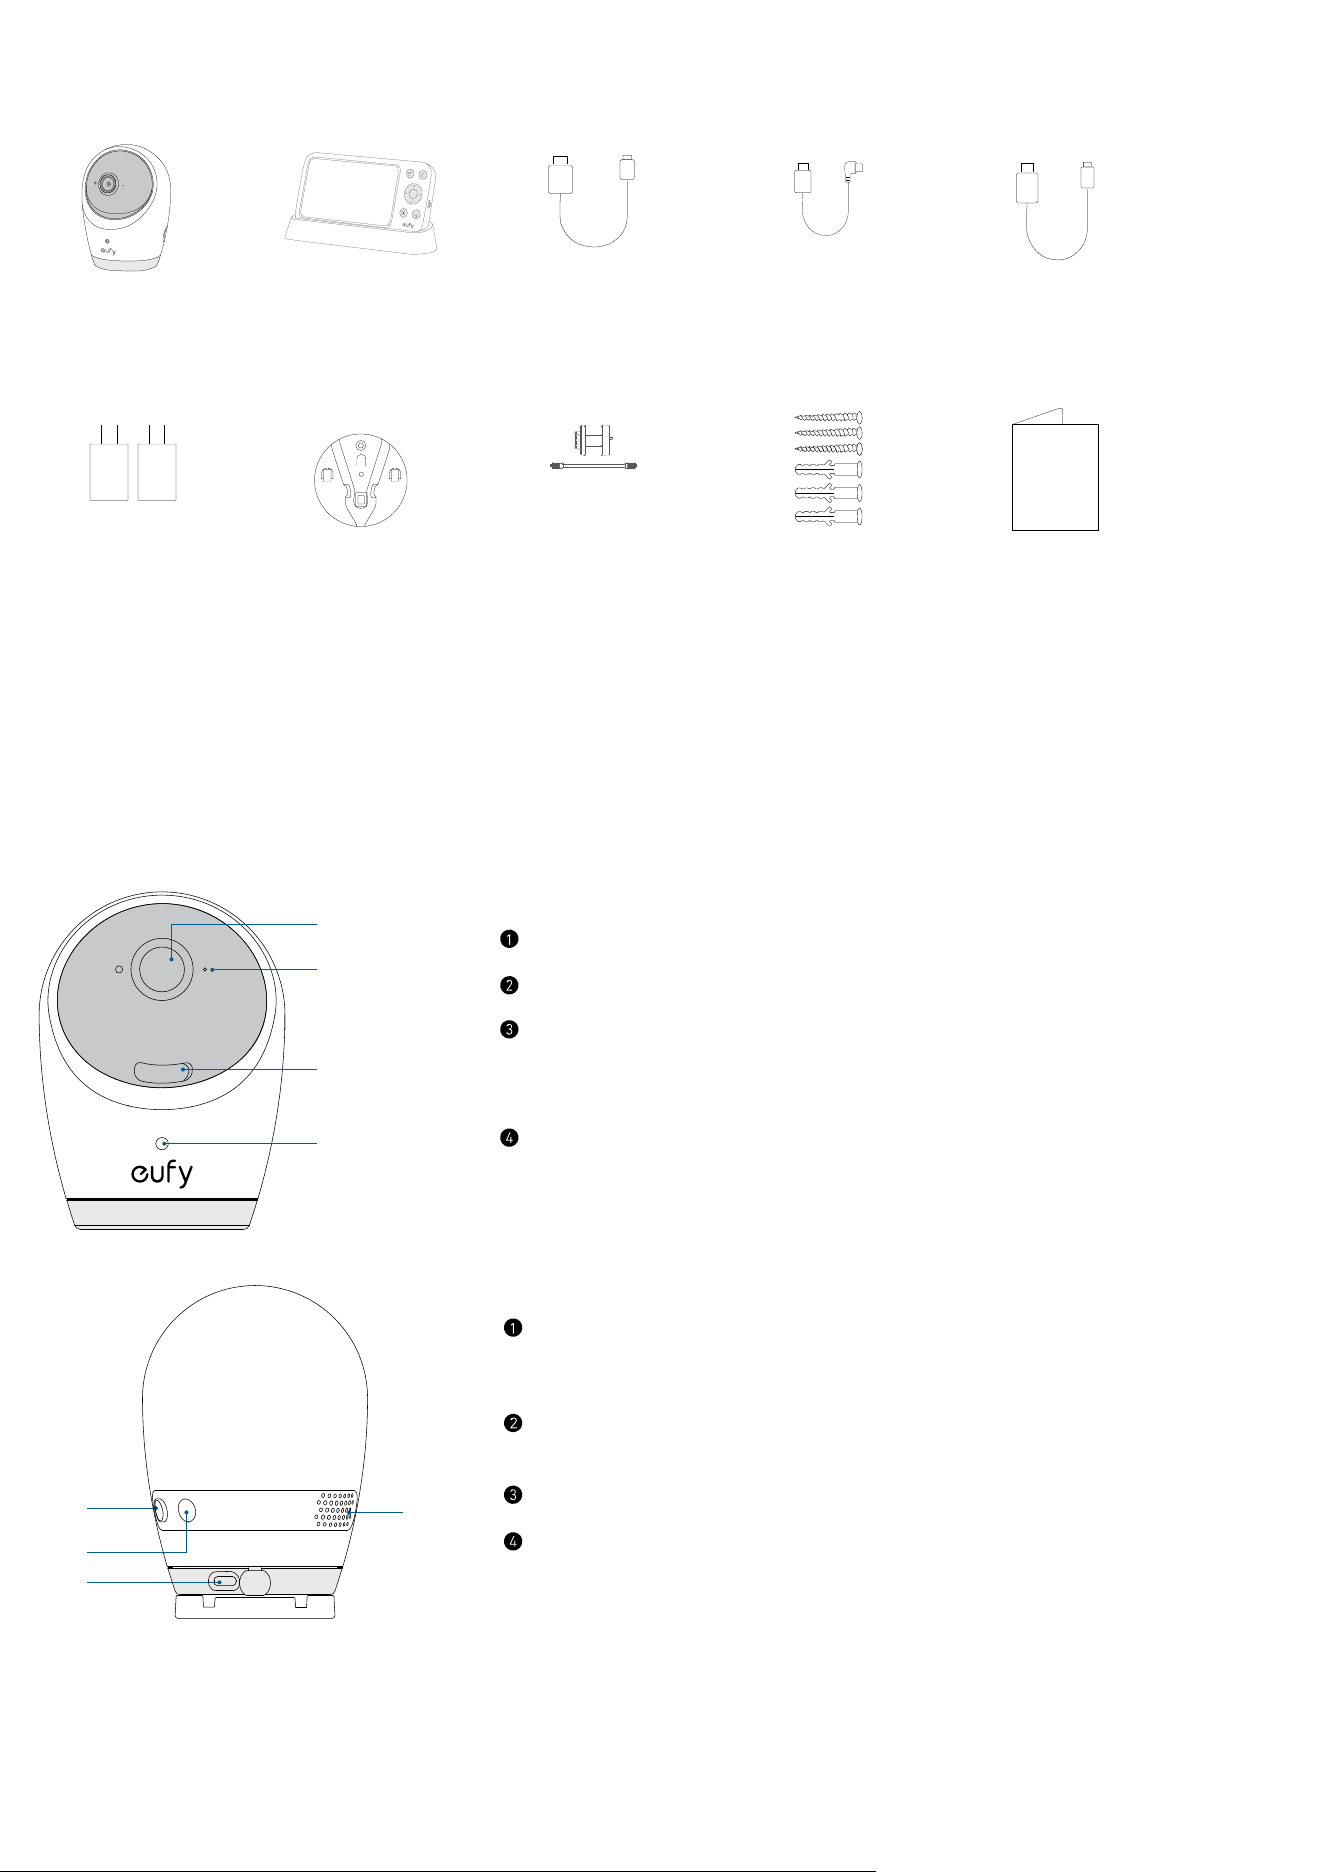
2.1 Camera
①
②
③
④
Front View
Camera lens
Microphone
MicroSD slot
• Insert a microSD card (not included) to store recordings. Use
at least a Class 10 microSD card with a maximum of 128 GB.
Status LED
①
②
③
④
Rear View
Wi-Fi switch
• Green: Wi-Fi connection enabled.
• White: Wi-Fi connection disabled.
Power button
• Press and hold for 2 seconds to power on / o the camera.
USB-C charging port
Speaker
①
②
③
Bottom View
QR code
• Scan to add the camera to the device list in the app.
Sync button
• Press and hold for 2 seconds to enable the pairing mode.
• Press and hold for 8 seconds to reset the camera.
Temperature sensor
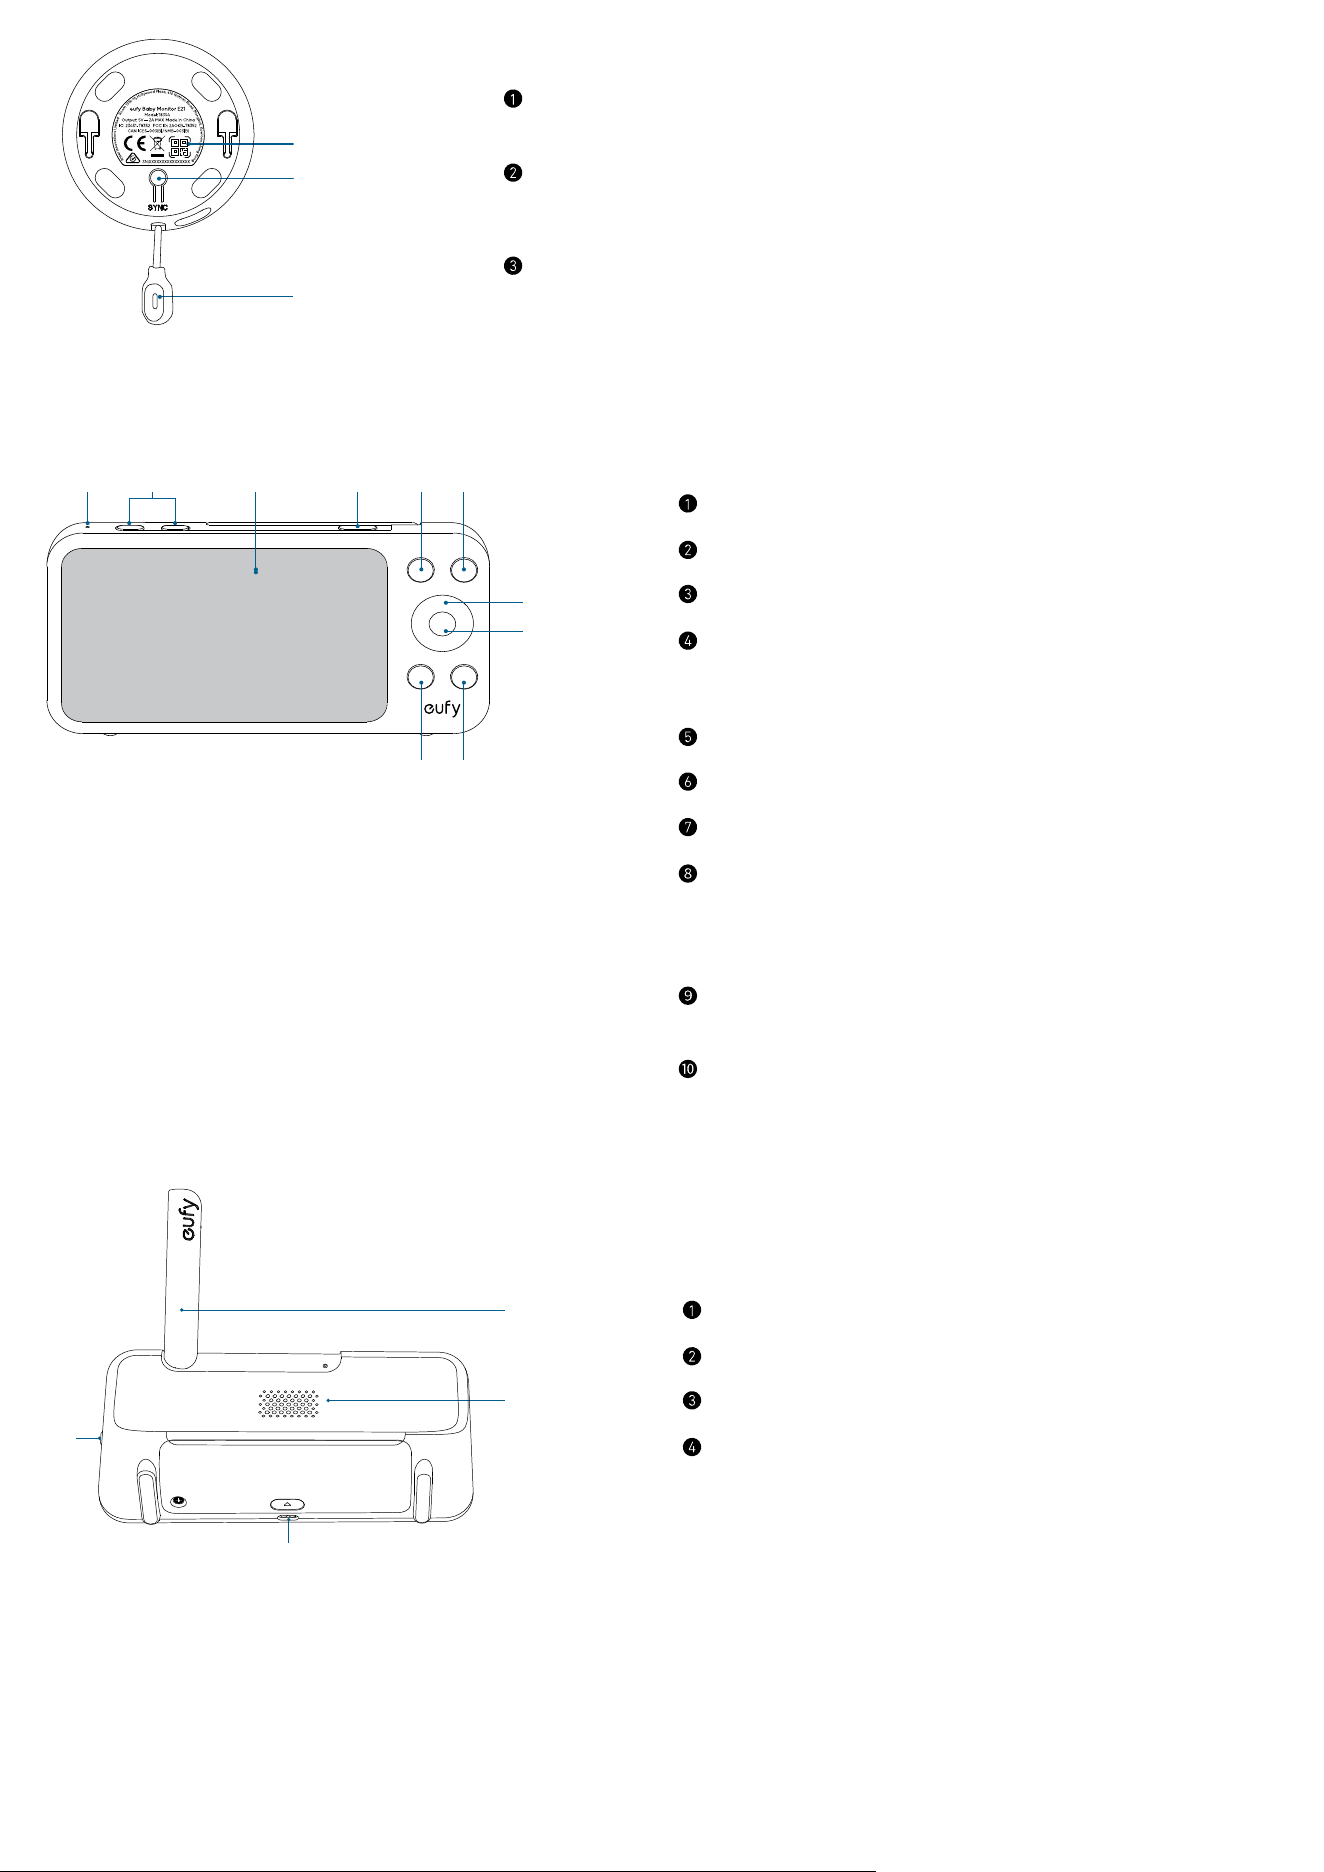
2.2 Monitor
⑥⑤
⑦
①②③④
⑩⑨
⑧
Front View
Microphone
Volume up / down buttons
Screen
Power button
• Press to lock / unlock the monitor screen.
• Press and hold for 2 seconds to power on / o.
Menu button
Return button
Navigation buttons
OK button
• Press to confirm the selection.
• One press to get a close-up of your baby on the monitoring screen,
and press again to resume full-screen display.
Zoom button
• Press to zoom in the image.
Talk button
• Press and hold to speak to the camera.
①
②
③
④
Rear View
Antenna
Speaker
USB-C charging port
Charging pins
• Connect to the charging base.
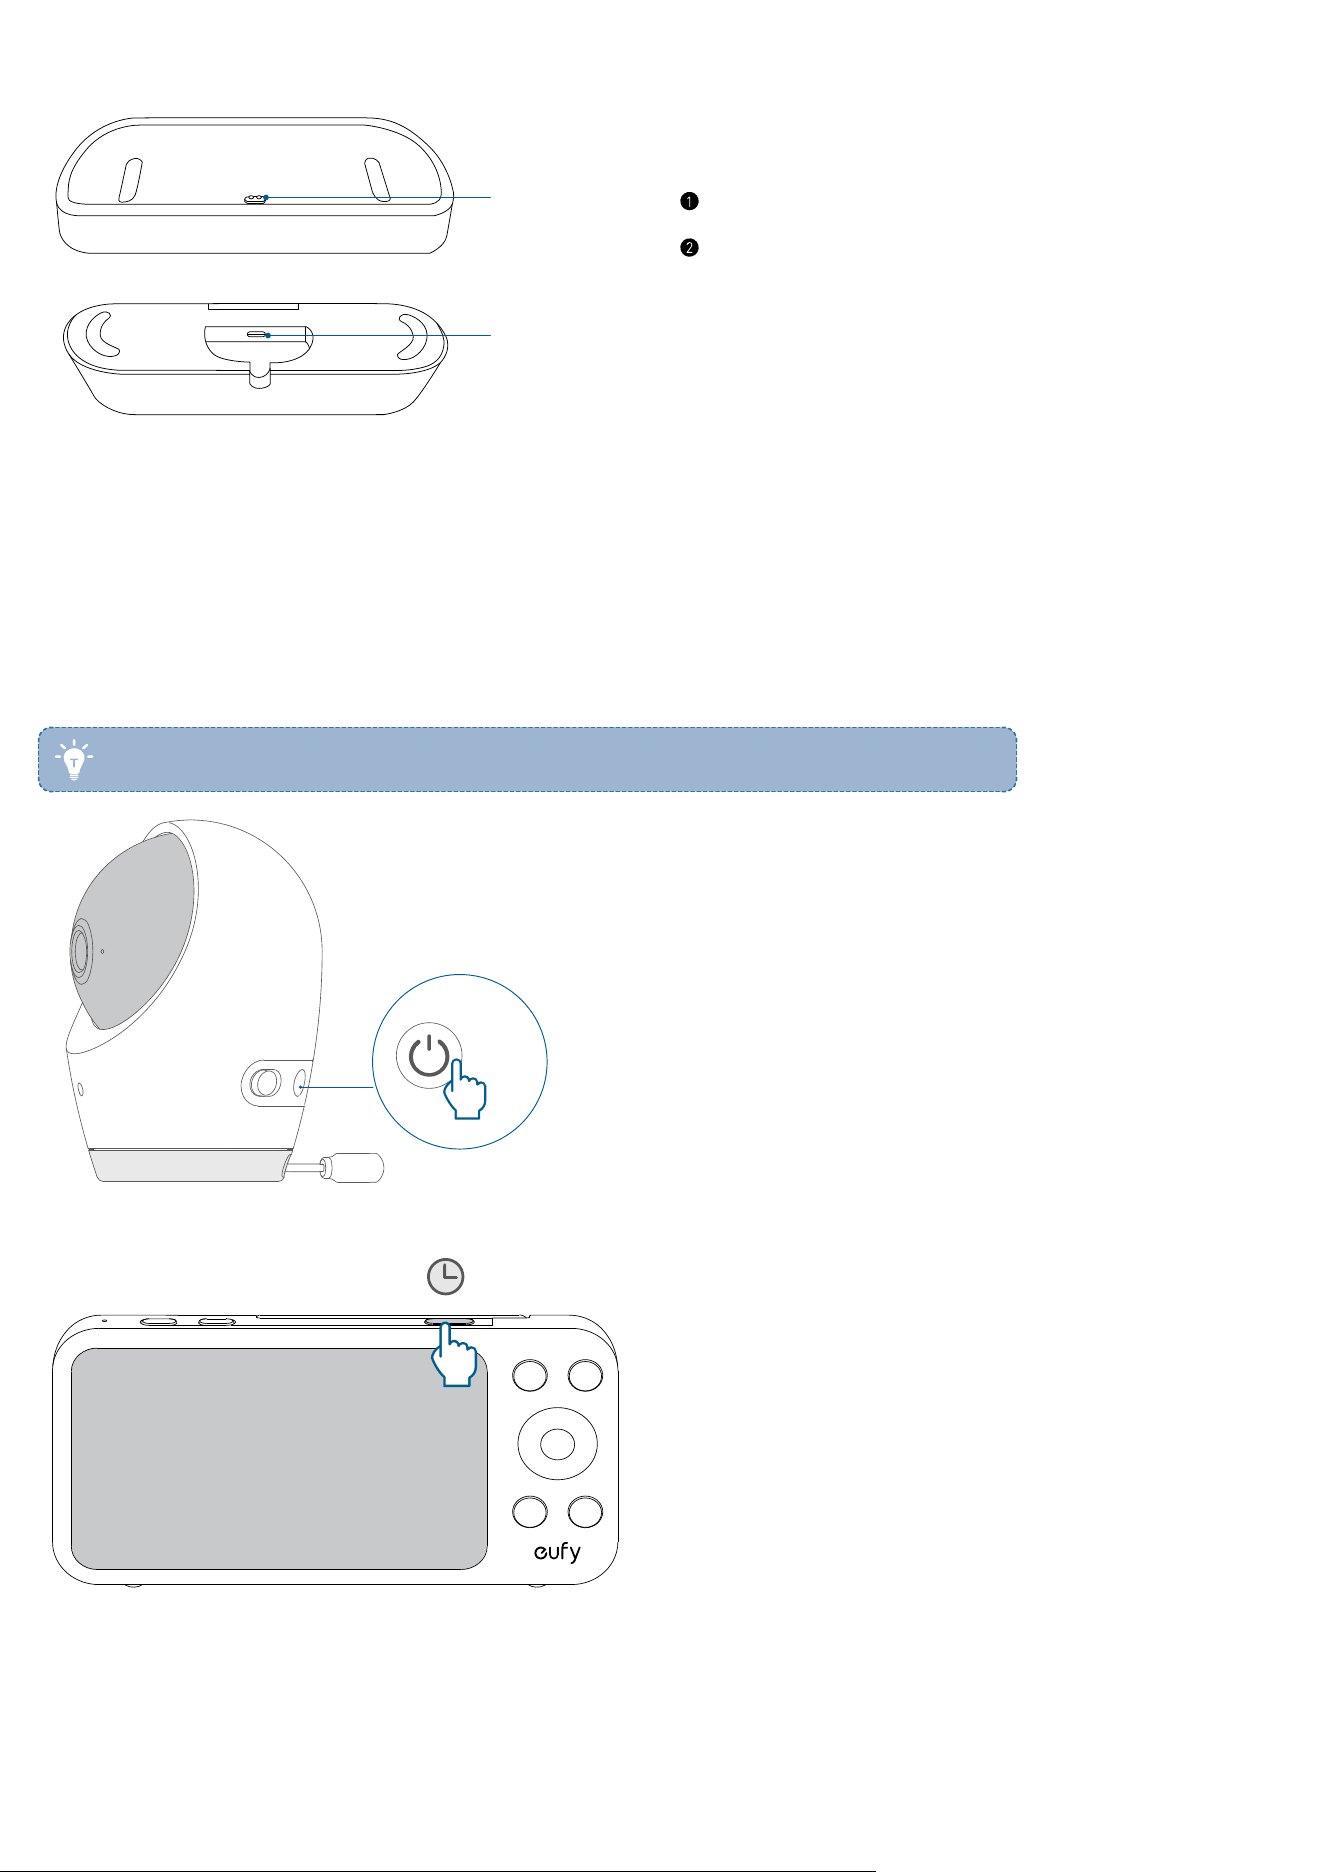
2.3 Charging Stand
①
②
Charging port
Power port
3. Using Your Camera and Monitor
3.1 Power On / O
You can turn the camera on or o by pressing and holding the power button for 2 seconds. The camera is automatically
switched on when you connect it to a power source.
• The camera includes a 5000mAh battery, allowing you to use the camera wirelessly.
2s
To turn the monitor on or o, press and hold the power button for 2 seconds.
2s
3.2 Connect the Camera and Monitor
Connect without Wi-Fi
When powered on, the camera and monitor are automatically connected and ready for use.
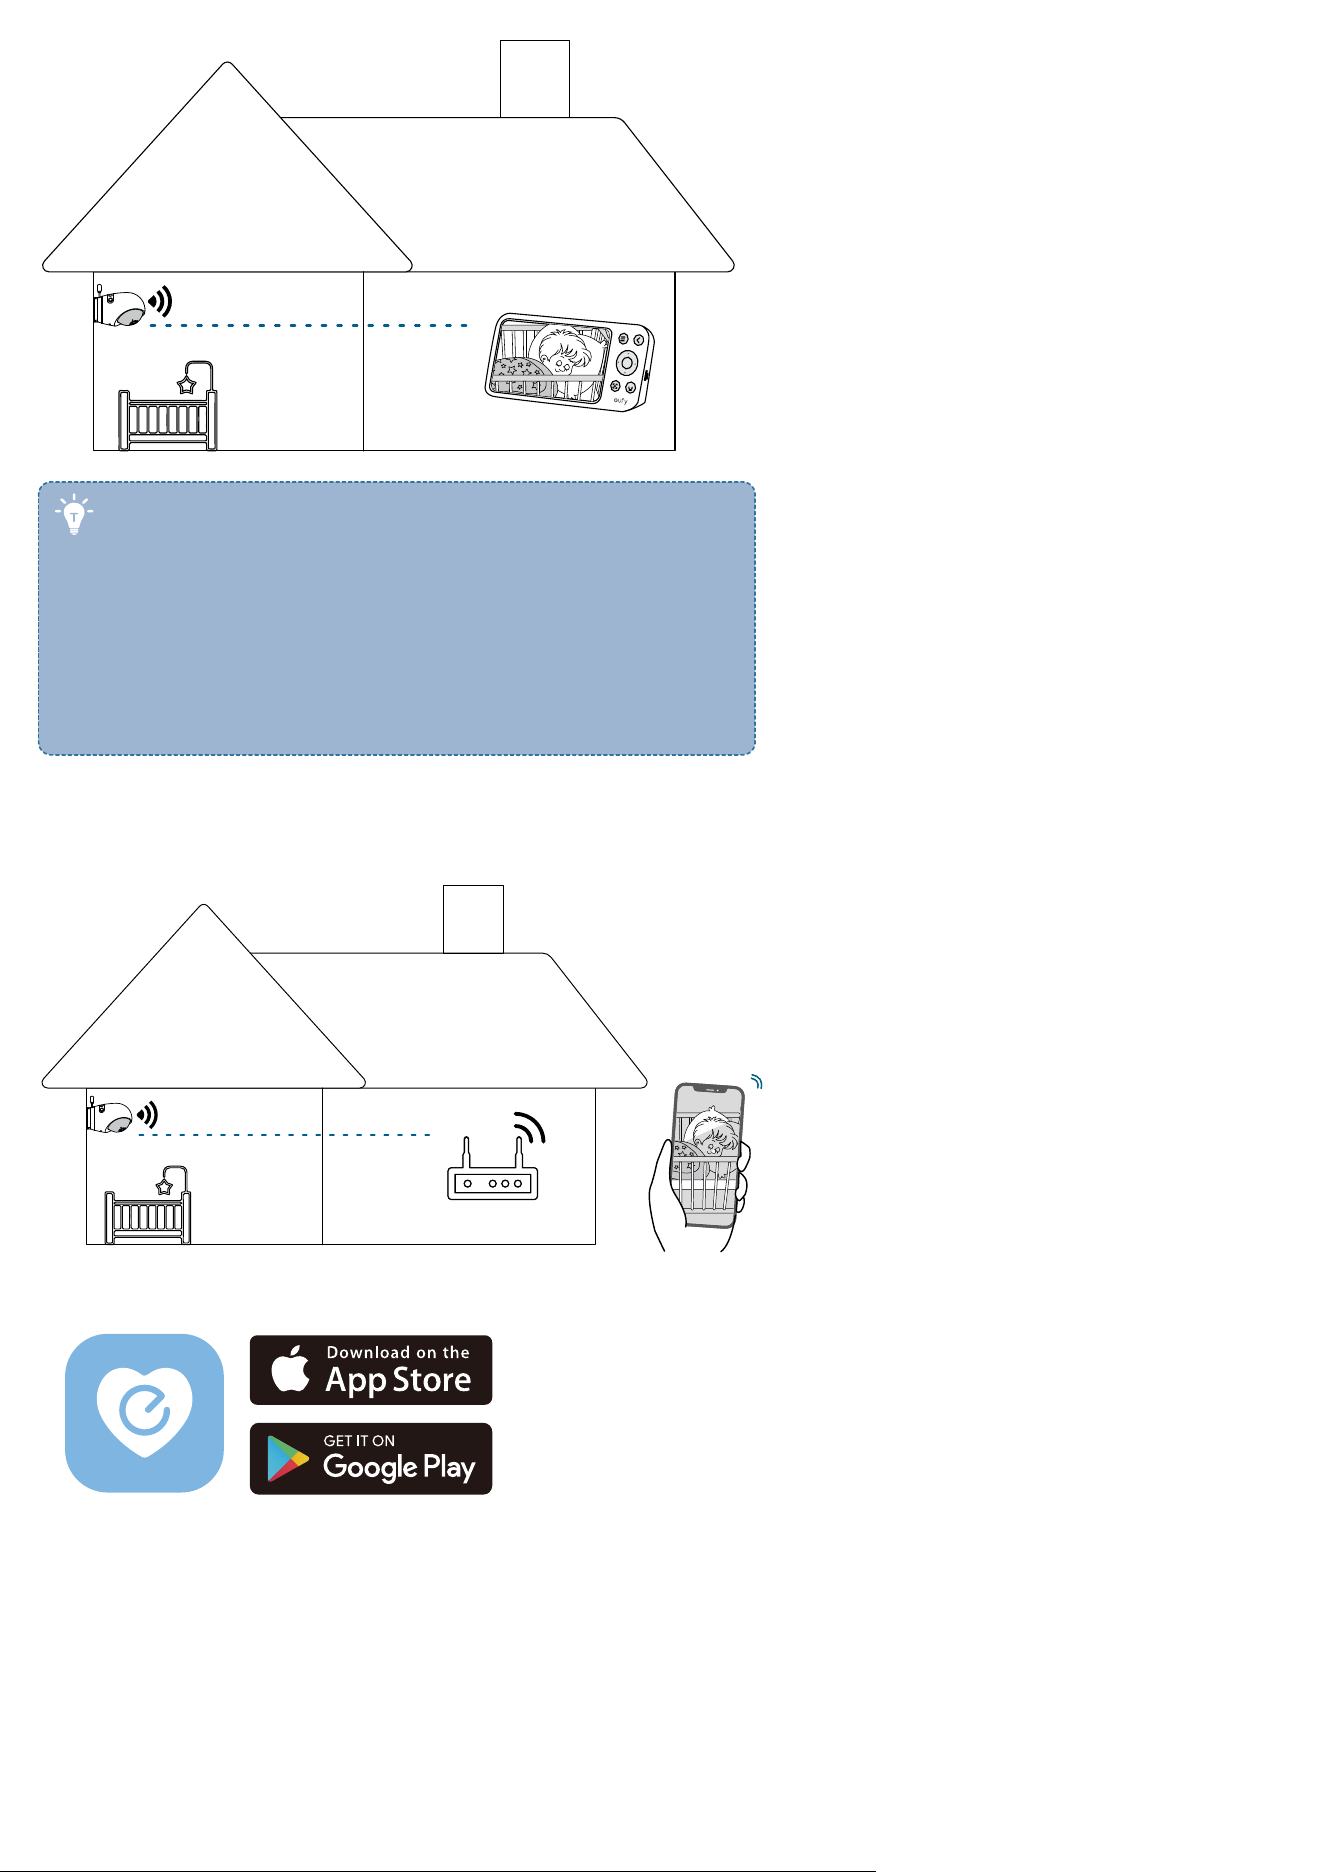
• If you connect the camera and monitor without Wi-Fi, the
live video stream is only available on the monitor screen. To
watch live video on your mobile device, connect the camera
to the app.
• If your camera and monitor are far apart or there are
obstacles such as interior walls between them, signal
strength may be reduced. To improve signal strength, move
the monitor closer to the camera. Alternatively, you can
connect the monitor to a Wi-Fi network.
Connect with Wi-Fi
Connect the Camera to the App
To control your camera and watch live video from anywhere, connect the camera to the eufy Baby app.
1. Download and install the eufy Baby app from the App Store(ios devices) or Google Play(Android devices), and sign up for
an account.
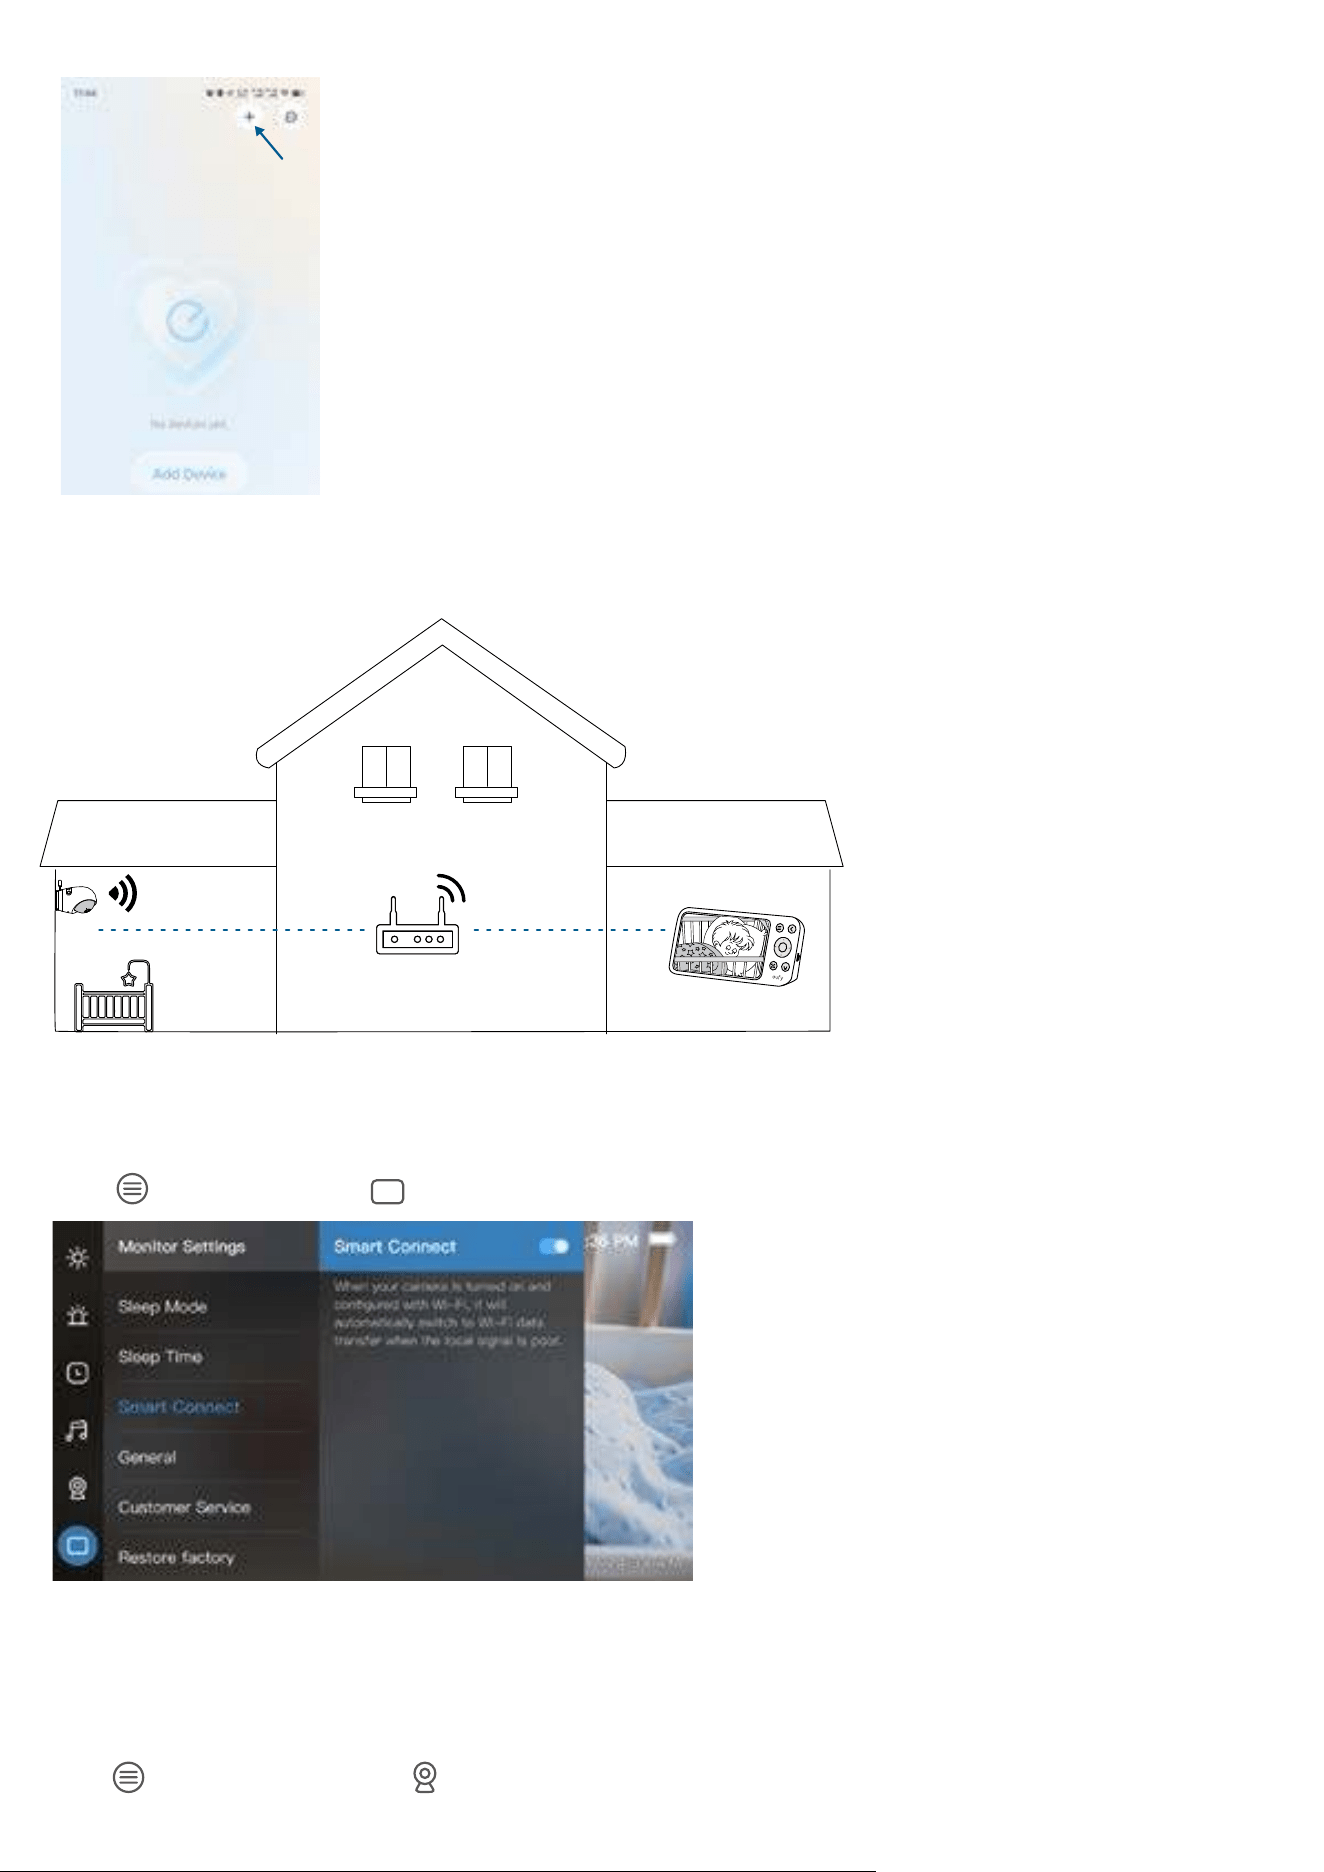
2. Tap + to add the Baby Monitor to your device list. Follow the in-app instructions to complete Wi-Fi connection.
Connect the Monitor to Wi-Fi
Distance or obstacles between the camera and monitor may weaken the signal. To improve signal strength, you can
connect the monitor to a Wi-Fi network.
1. Place the camera and monitor in locations with a strong Wi-Fi signal.
2. Make sure that the camera is connected to Wi-Fi using the eufy Baby app. For detailed instructions, refer to Connect the
Camera to the App.
3. Press
on the monitor, go to > Smart Connect, and turn on the Smart Connect switch.
3.3 Add a Camera to the Monitor
Your camera and monitor are paired out of the box. Refer to the following steps when adding extra cameras or after
resetting a camera.
1. Press
on the monitor, and go to > Add Camera.
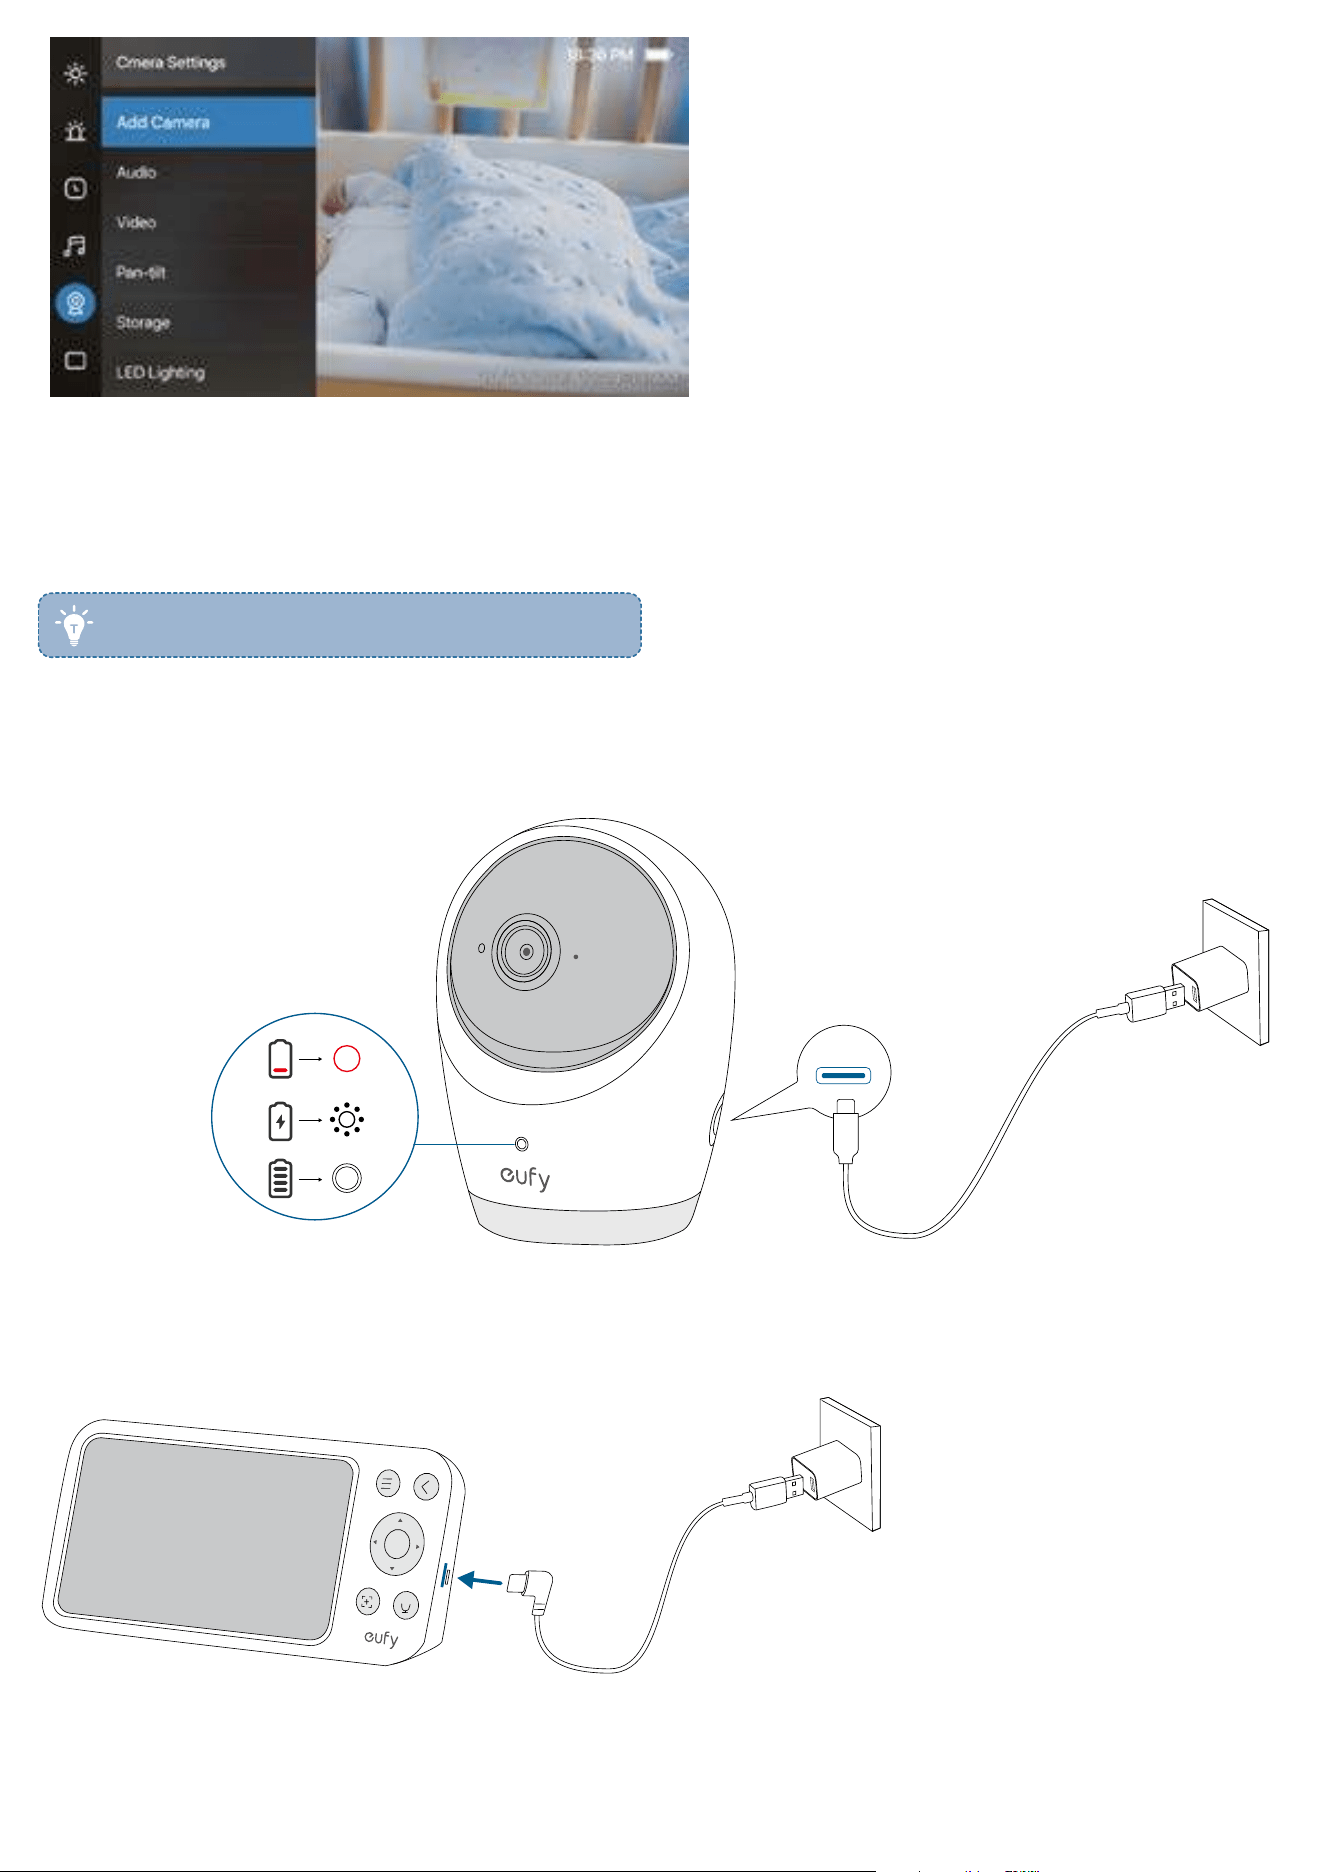
2. Follow the on-screen instructions to start the pairing.
4. Charging Your Camera and Monitor
• Fully charge the camera and monitor before use.
4.1 Charge the Camera
Connect the camera to a power outlet using the power adapter and camera power cable.
Low battery
Charging
Fully charged
4.2 Charge the Monitor
The monitor can be charged via its USB-C charging port or the charging stand.
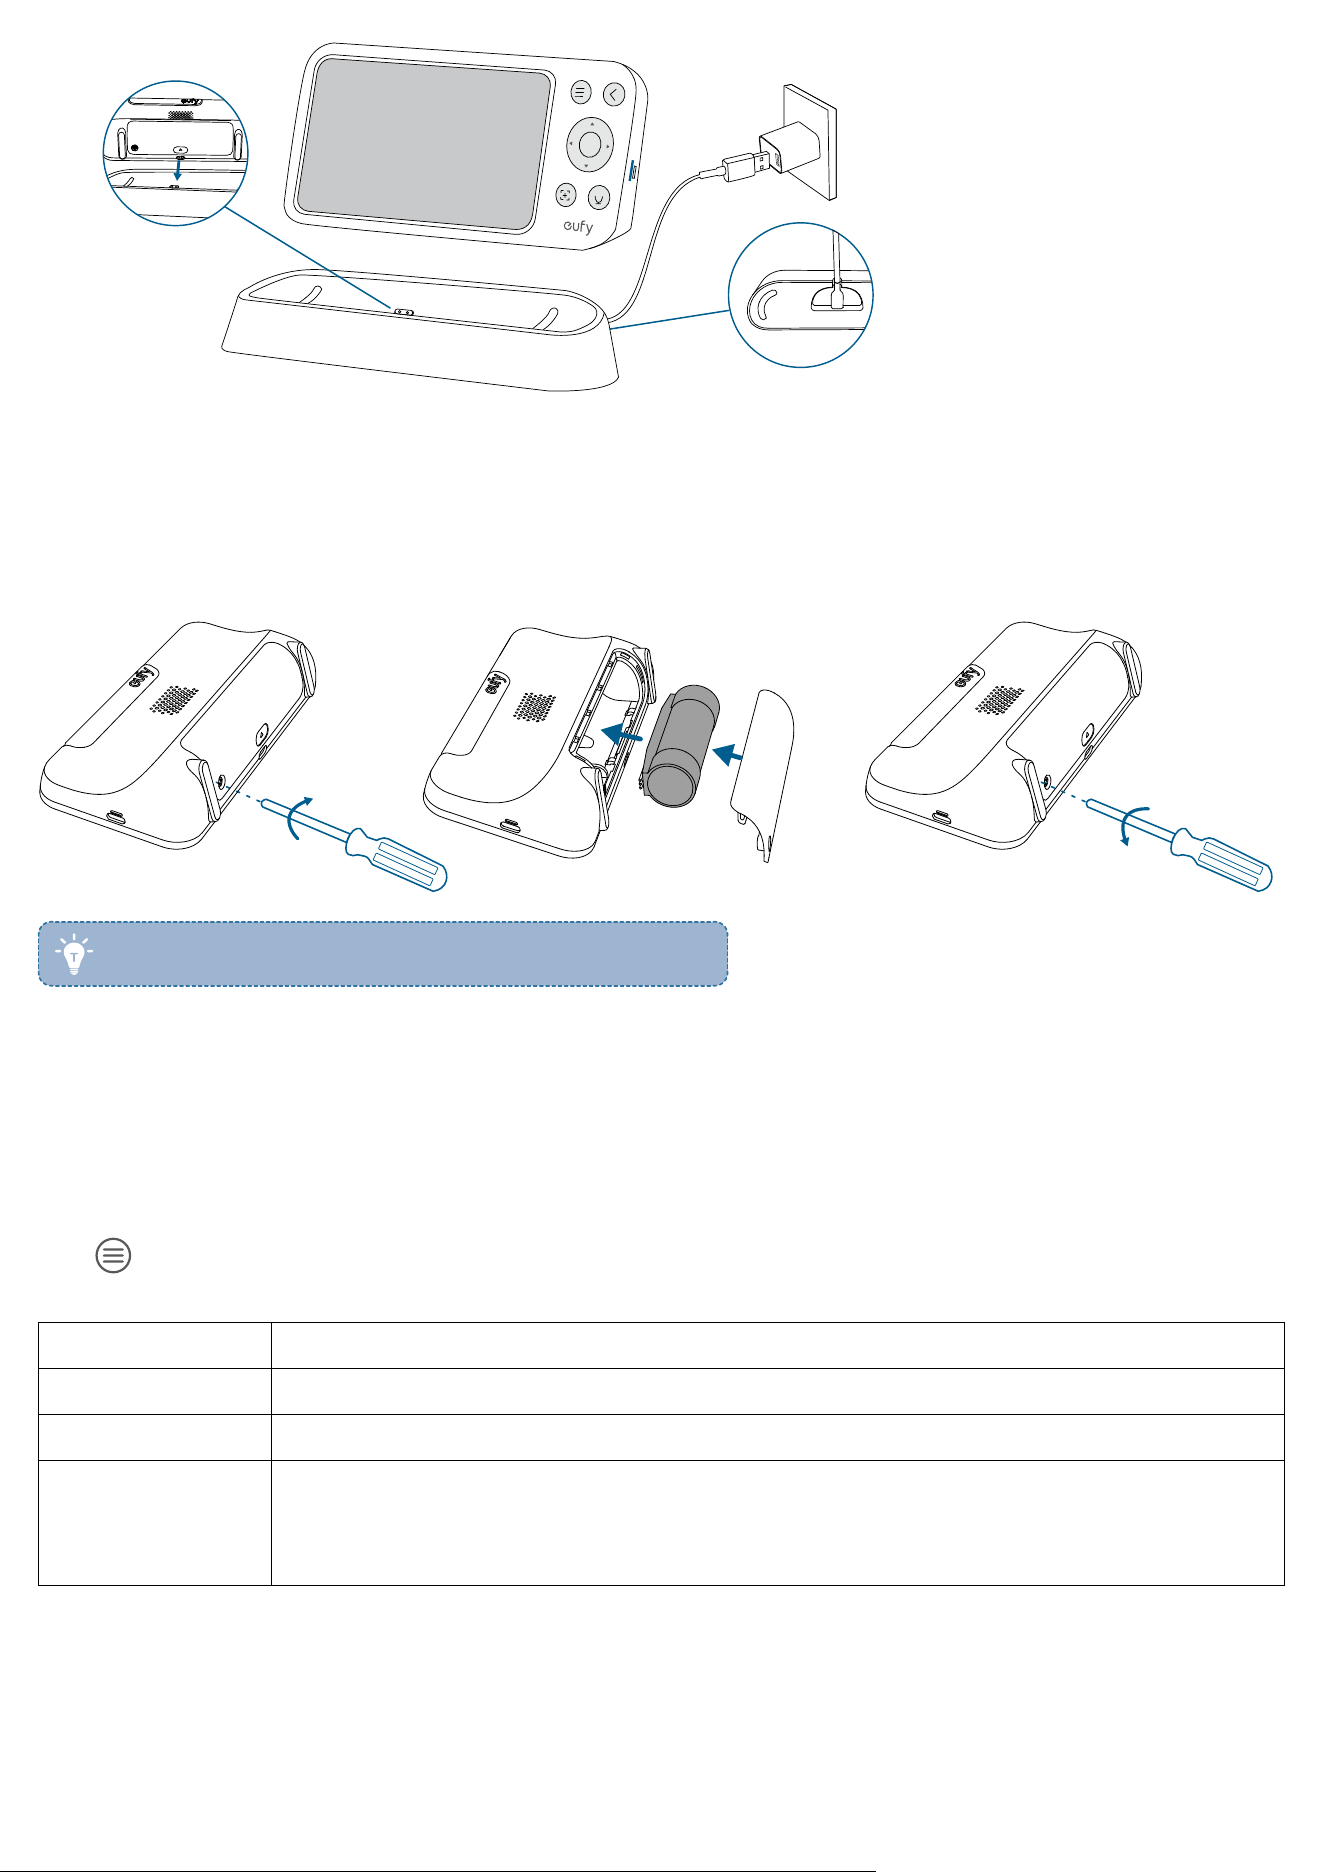
4.3 Replace the Monitor Battery
The monitor battery may not perform optimally over an extended period of use. To replace the monitor battery, follow these
steps.
❷❸❶
• To buy a new monitor battery, please visit www.eufy.com.
5. Monitor Screen Guide
5.1 Menu Settings
Press
on the monitor to access menu settings. Some of the options are not available when the camera is oine or has
not been added.
Brightness Set the brightness of the screen.
Alert Turn on/o and set the alert.
Event View recordings or highlights from video.
White Noise Select your desired white noise type.
Play Settings: Loop a single track or a playlist. Set a timer for the duration of the song.
Volume: Adjust the volume using the up and down buttons.
Camera Settings
Add Camera: Add up to four cameras for a monitor.
Audio: Enable or disable audio recording. Adjust the speaker volume.
Video: Customize settings on video recording.
Timestamp: Select whether or not to include a timestamp to the video.
Night Vision: When Auto is enabled, the camera will change the screen color according to the
light conditions in the room. When disabled, the camera will stick to the daylight screen color and
will not change when the surrounding environment is getting dark. It is recommended to enable
this feature for most situations.
Pan-tilt: Adjust the speed levels and perform pan-tilt calibration.
Storage: Check the camera storage, and format the microSD card.
LED Lighting: Turn on / o the camera's status LED.
About Device: Check the device information of the camera.
Delete Camera: Remove a connected camera from the list.
Monitor Settings
Sleep Mode: Enable or disable sleep mode. Select VOX mode.
Sleep Time: Set the time for sleep mode.
Smart Connect: It's enabled by default. When enabled, it will automatically switch to Wi-Fi data
transmission mode when the local signal is poor.
General: Set the time, language and temperature units.
Customer Service: Get contact information.
Restore Factory: Restore to factory defaults.
About Device: Check the device information of the monitor.
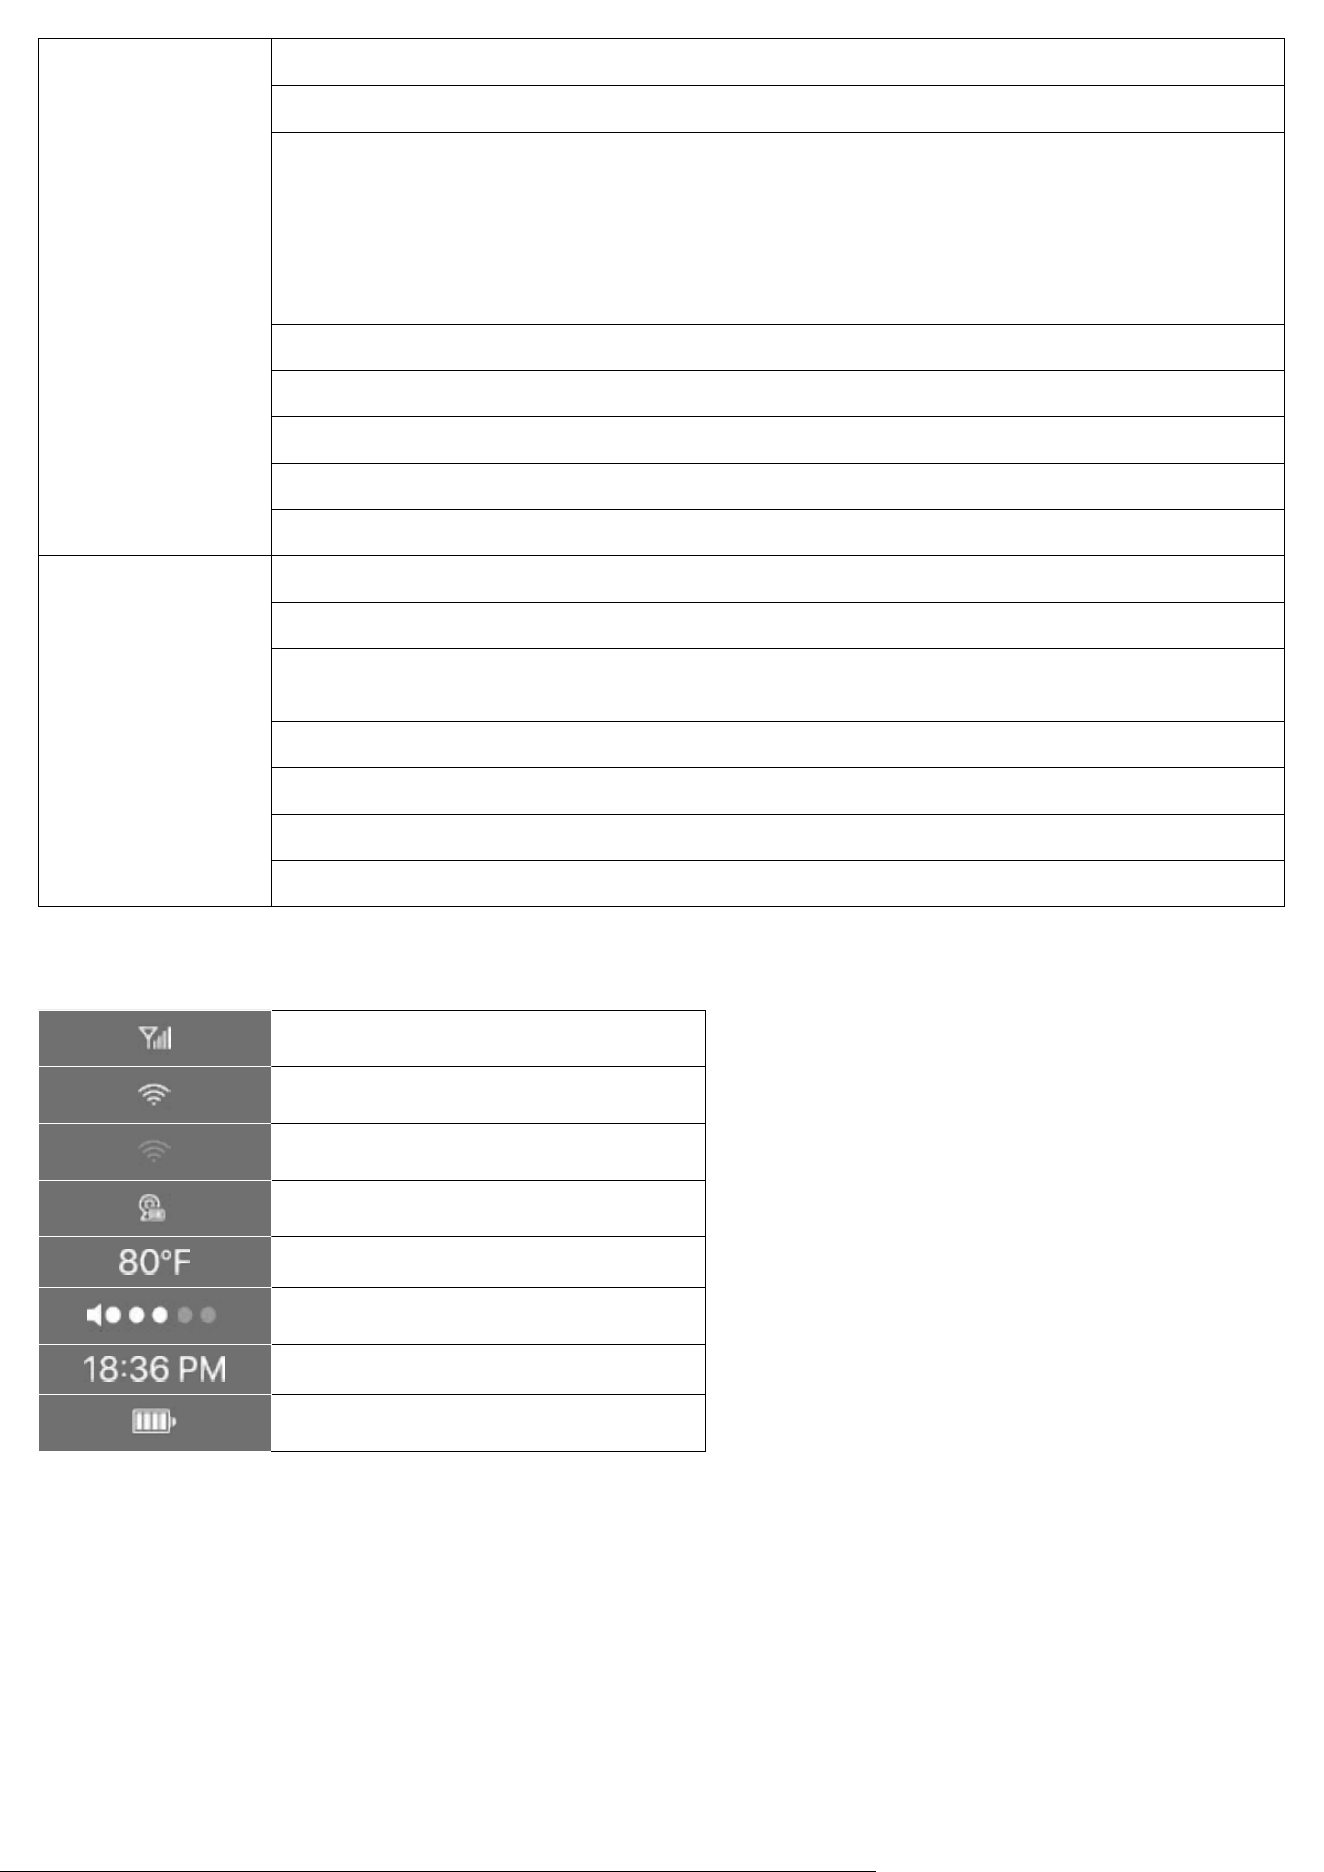
5.2 On-Screen Icons
Wireless signal strength
Monitor connected to Wi-Fi
Monitor disconnected to Wi-Fi
Status of the camera battery
Current temperature
Sound level of the room the camera is in
Time
Status of the monitor battery
6. Placing the Camera
The camera can be placed on a table or shelf, or can be installed on a wall or crib.
Select a location and height that achieves your desired view and is within reach of a power outlet. Use the monitor to test
the viewing angle from your desired mounting spot.
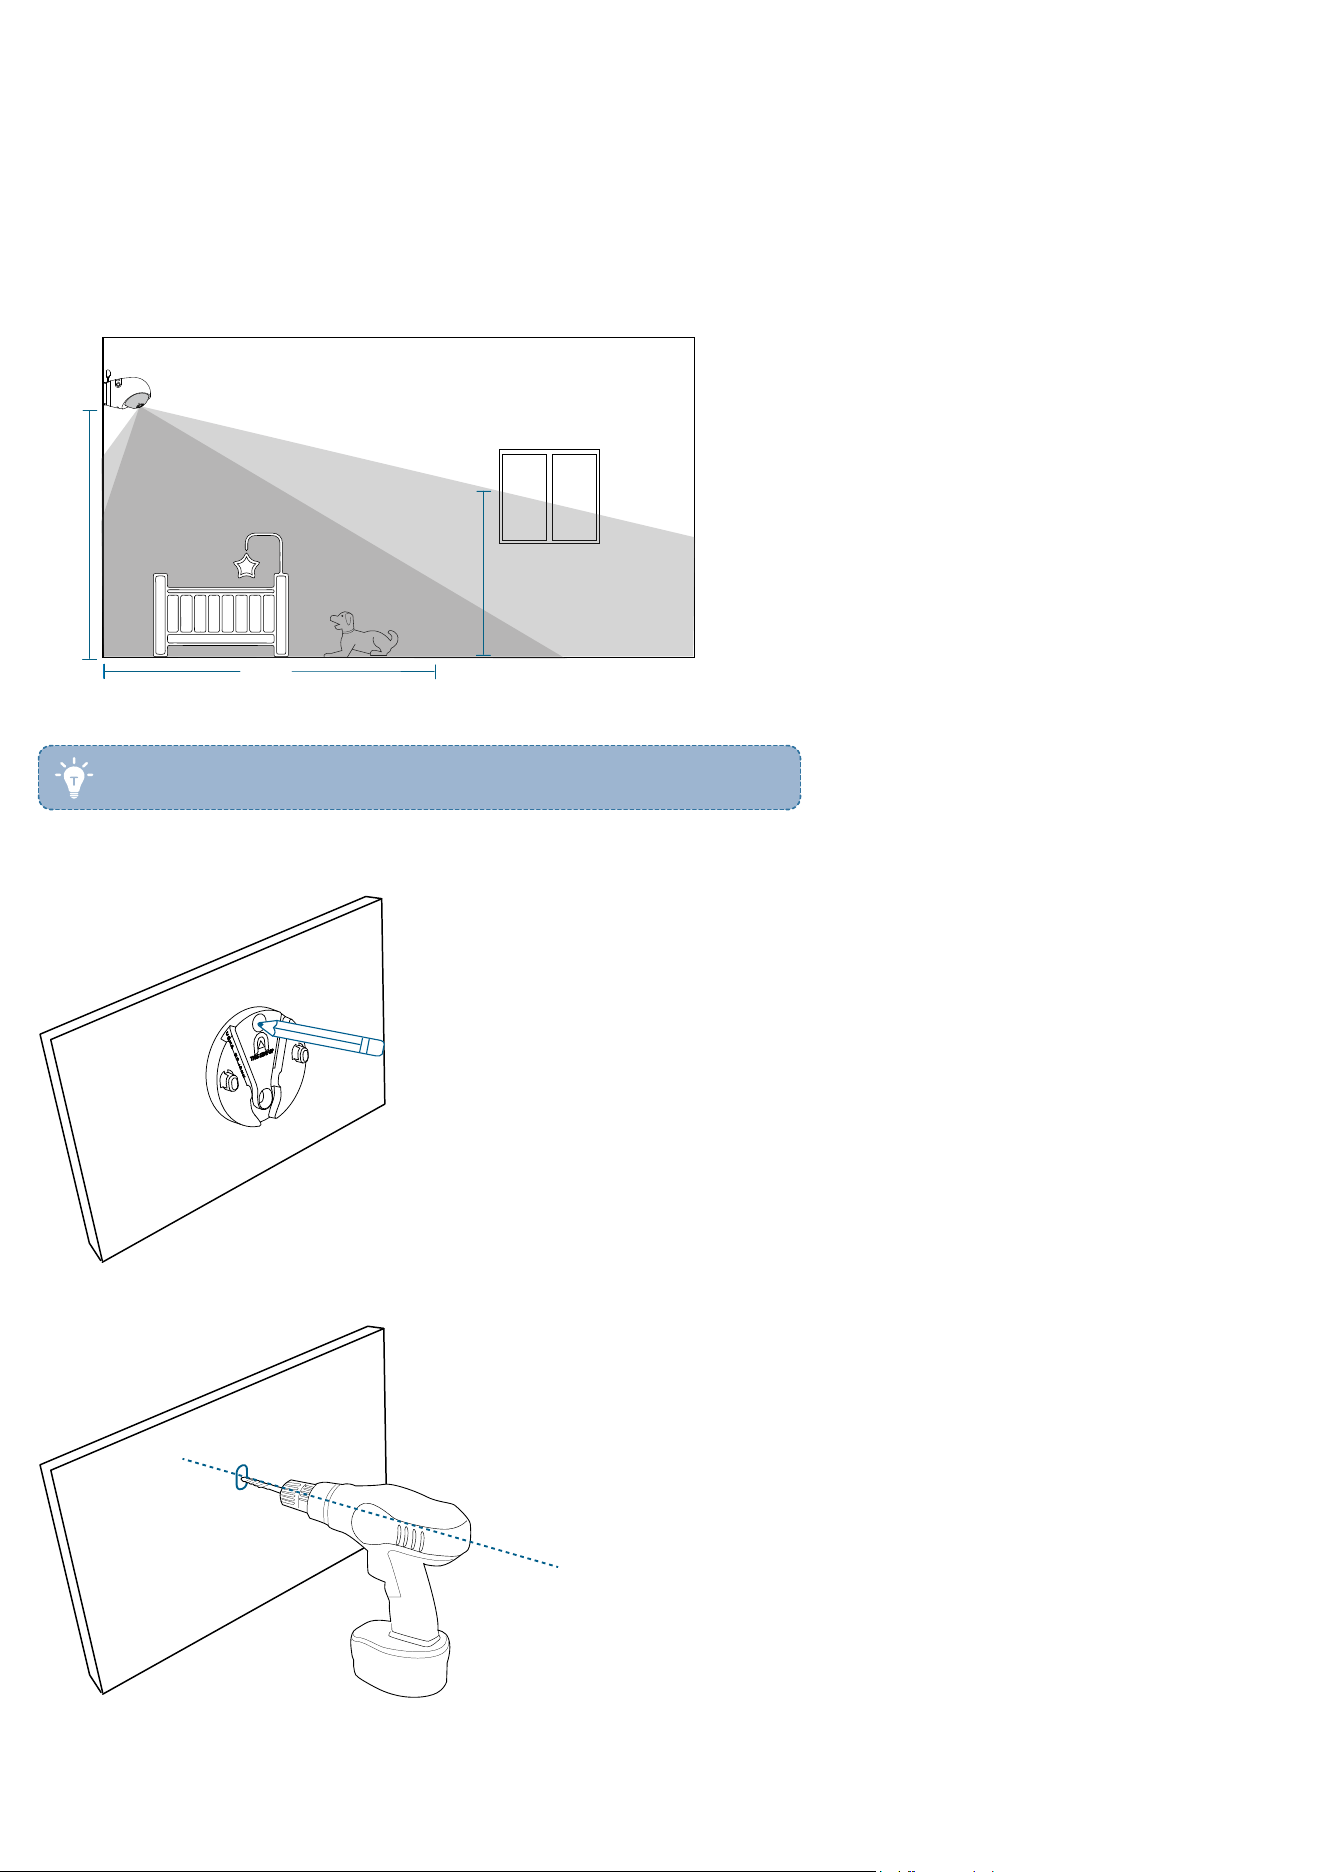
6.1 On the Wall
8 ft
9 ft
5.6 ft
Follow the steps below to mount the camera on the wall.
• Disconnect the camera from the power outlet before mounting.
1. Place the mounting plate against the wall, matching the direction as UP indicates. Mark the screw holes with a pencil.
2. Drill holes into the wall and then insert anchors into the holes. Anchors are not needed for wooden walls.
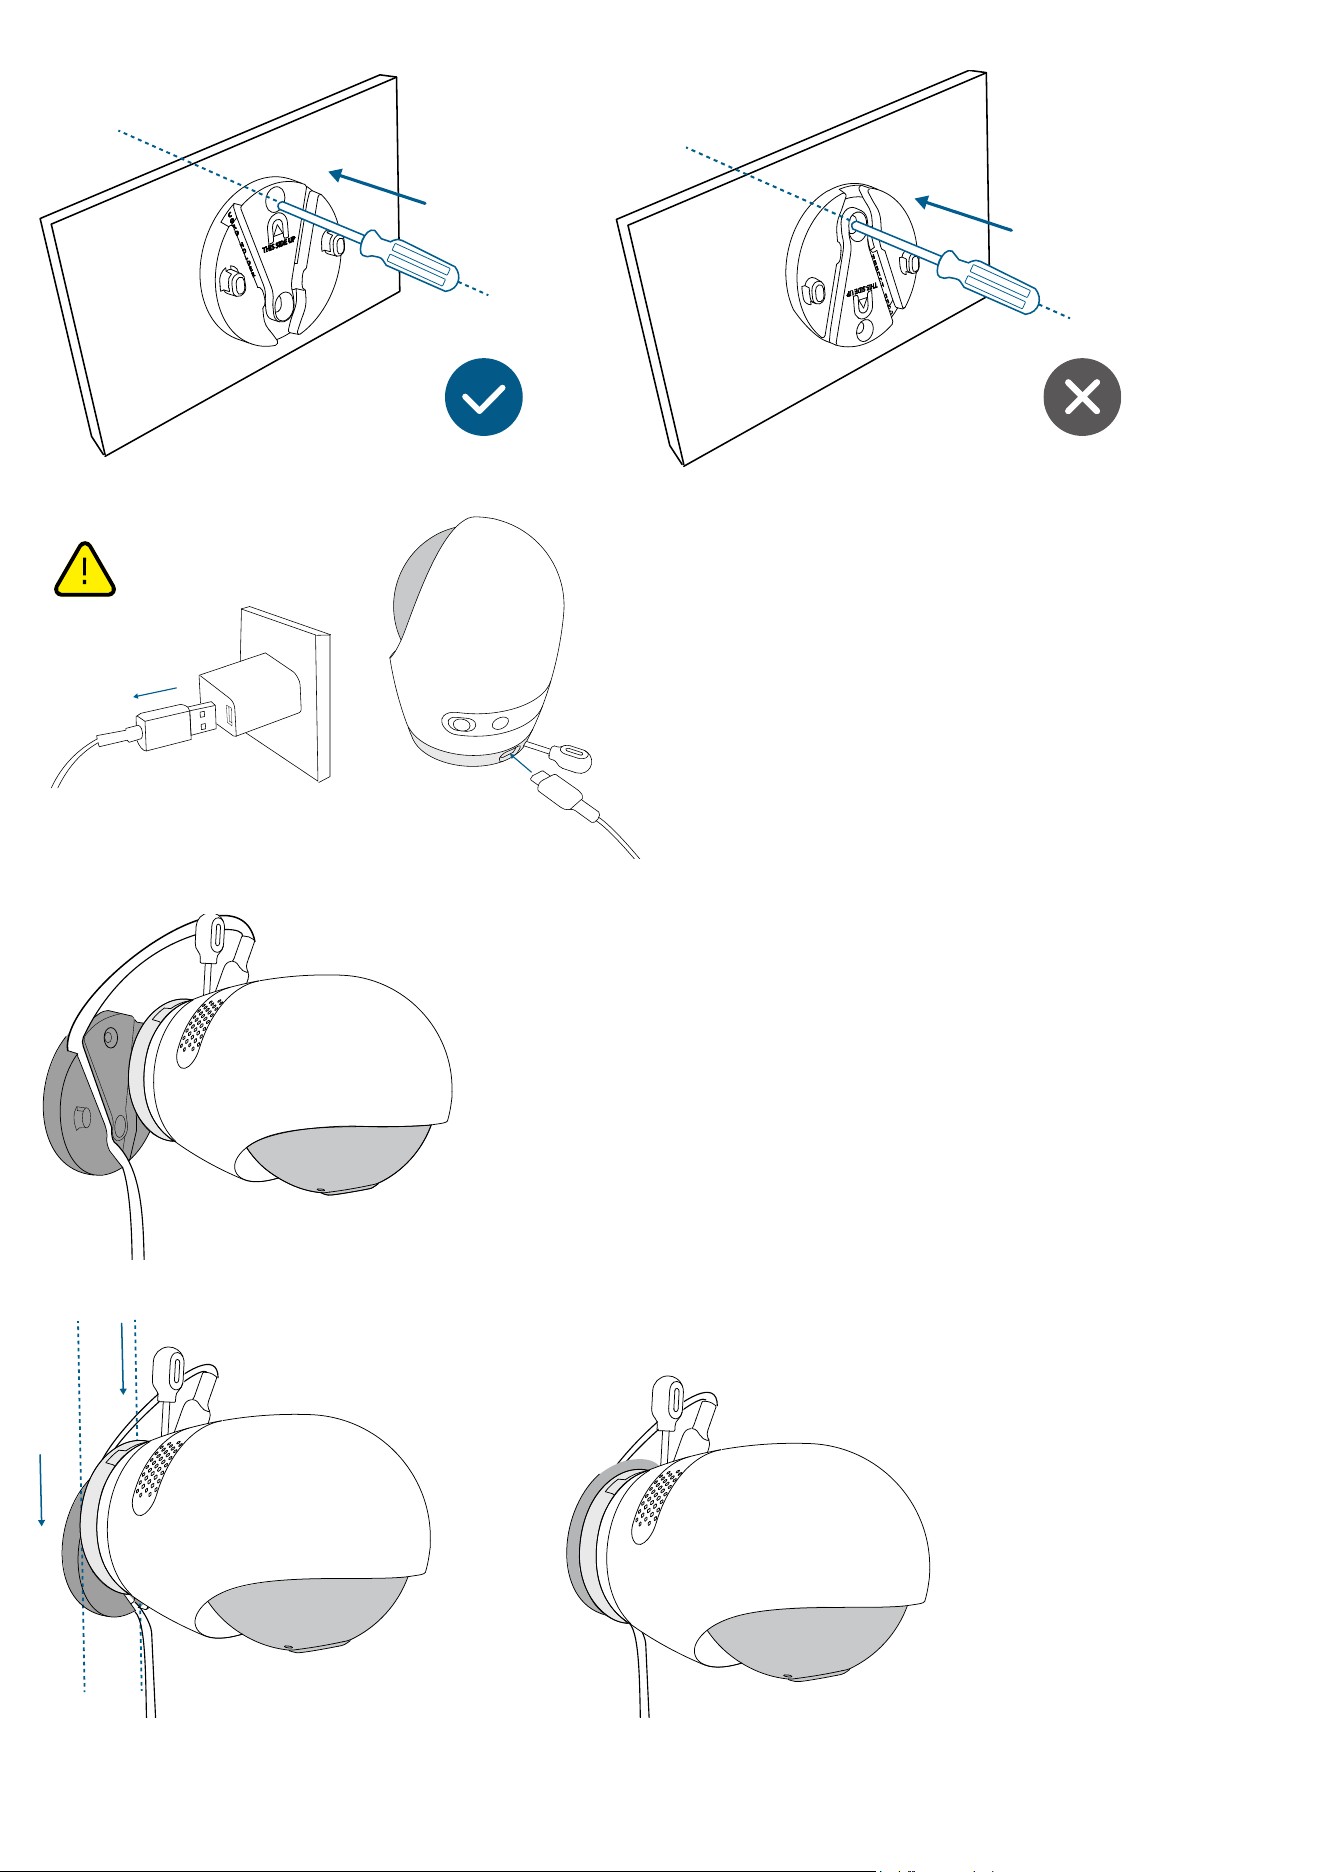
3. Secure the mounting plate to the wall or ceiling with the screws.
4. Keep the camera disconnected from power. Connect one end of the charging cable to the camera.
5. Place the cable into the cable channel of the mounting plate.
6. Slide the camera onto the mounting plate and make sure it is attached securely.
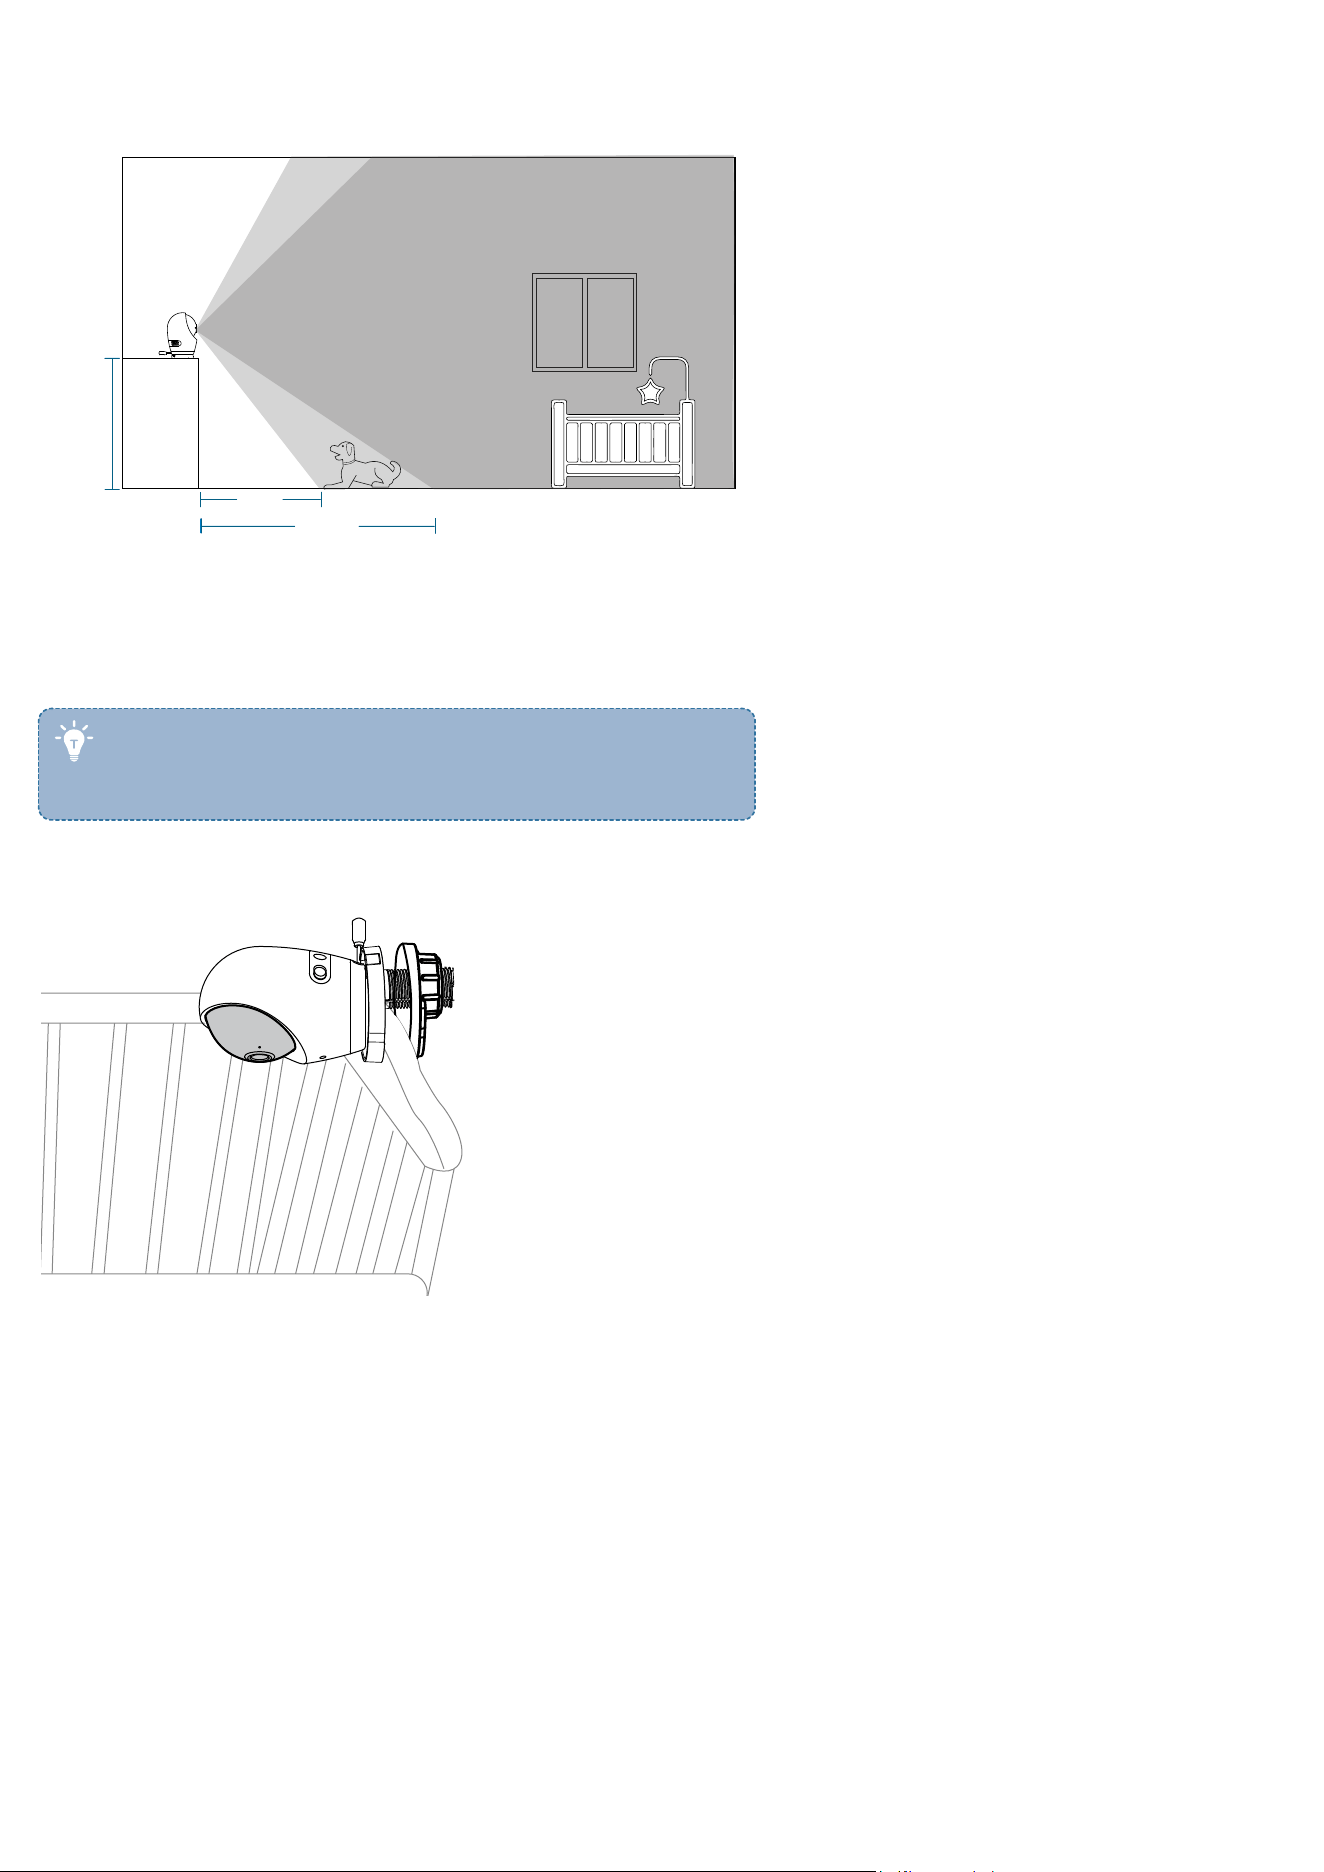
6.2 On a Table or Shelf
Adjust the angle of the camera to aim at your baby.
2 ft
3.3 ft
2.6 ft
6.3 On the Crib
You can install the camera on the crib either with a single cot mount or a set of cot mount and gooseneck arm.
• When using the cot mount, attach it out of the reach of the
child. Do not use the cot mount when the child starts trying
to get up on its hands and knees in a crawling position.
Option 1 With a Cot Mount
1. Align the mounting plate with the cot mount, and slide the mounting plate onto the cot mount, matching the direction as
UP indicates.
2. Slide the camera onto the mounting plate and make sure it is attached securely.
3. Loosen the screw to adjust the width, install the cot mount to the crib, and tighten the screw to secure the installation.
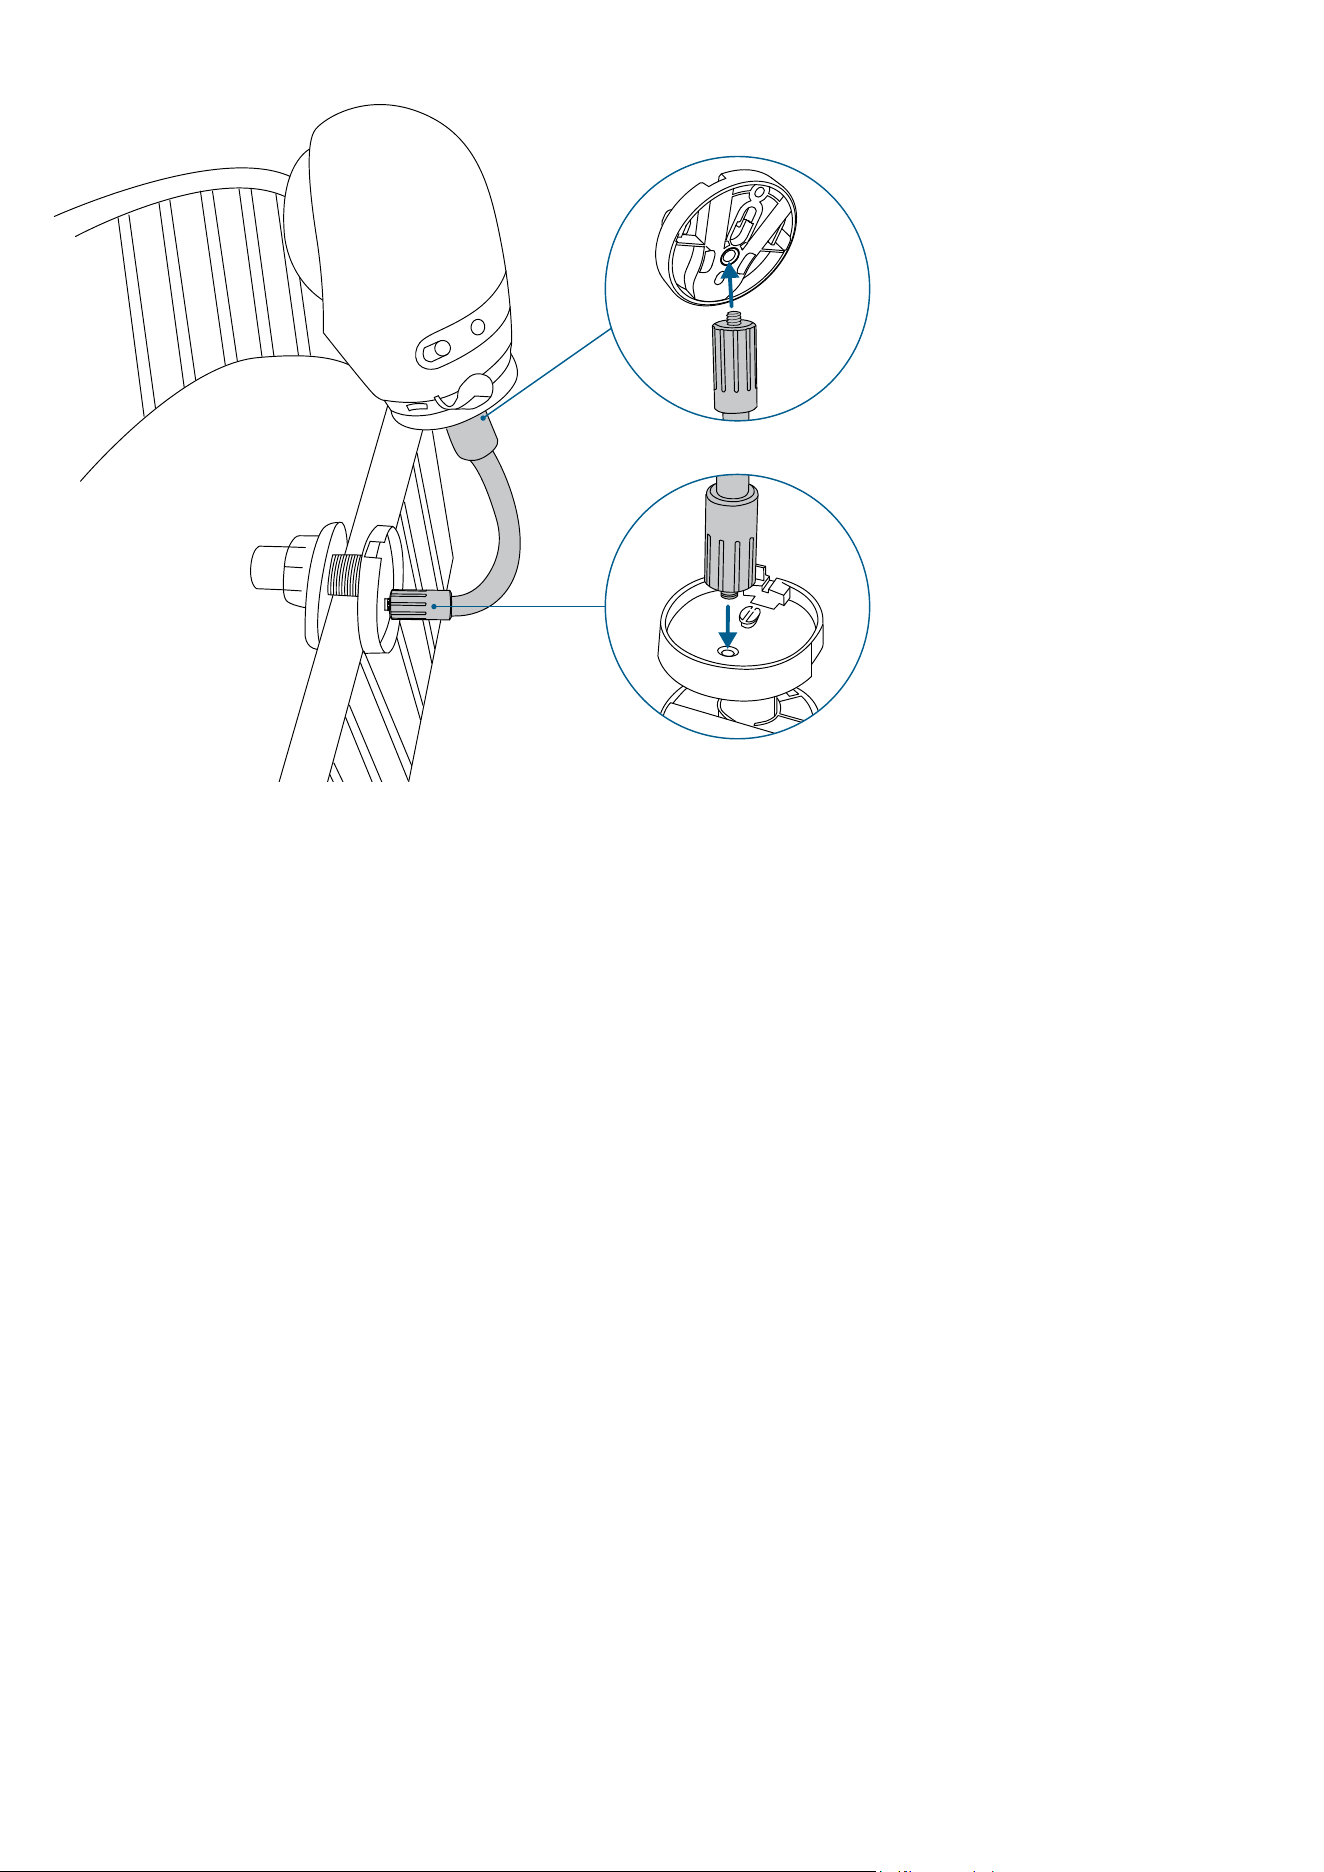
Option 2 With Cot Mount and Gooseneck Arm
1. Align the mounting plate with the cot mount, and slide the mounting plate onto the cot mount, matching the direction as
UP indicates.
2. Slide the camera onto the mounting plate and make sure it is attached securely.
3. Align the two ends of the gooseneck arm with the screw holes on the cot mount and on the mounting plate respectively,
and screw down to secure the connection.
