
Technical Support and E-Warranty Certificate
www.vevor.com/support
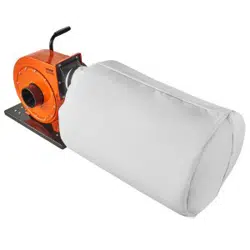
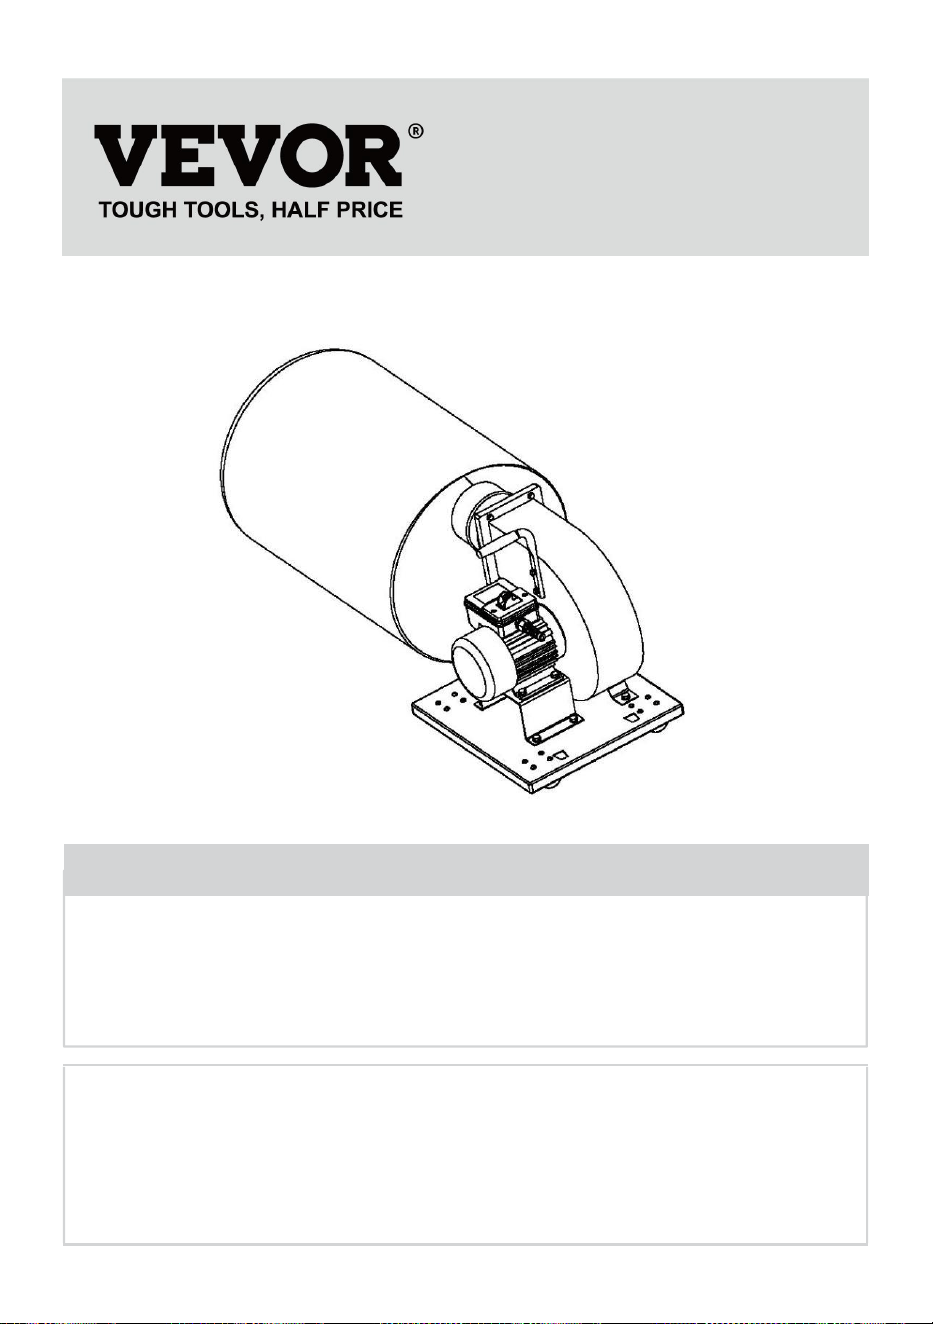
DUST COLLECTOR
MODEL: DC100 M
We continue to be committed to provide you tools with competitive price.
"Save Half", "Half Price" or any other similar expressions used by us only represents an
estimate of savings you might benefit from buying certain tools with us compared to the major
top brands and does not necessarily mean to cover all categories of tools offered by us. You
are kindly reminded to verify carefully when you are placing an order with us if you are
actually saving half in comparison with the top major brands.


- 1 -
MODEL: DC100 M
Have product questions? Need technical support? Please feel free to
contact us:
Technical Support and E-Warranty Certificate
www.vevor.com/support
NEED HELP? CONTACT US!
This is the original instruction, please read all manual instructions
carefully before operating. VEVOR reserves a clear interpretation of our
user manual. The appearance of the product shall be subject to the
product you received. Please forgive us that we won't inform you again if
there are any technology or software updates on our product.
DUST COLLECTOR
- 2 -
Warning-To reduce the risk of injury, user must read
instructions manual carefully.
Using the DC100M
• The DC100M dust collector can be used to vacuum up waste (chips,
shavings, etc) after planing, milling and sawing.
• Do not use the DC100M for ink or paint spray, or explosive substances
such as gases• or powders.
• Collection of wood dust and chips is not permitted in industrial premises.
• Non-industrial use of the mini dust collector is allowed, except by regular
employees, people in training, schools and domestic situations, or other
people in an employment• situation.
•The collection container should be emptied as required, but at least after
each use.
•The filtering bag should be cleaned each time the dust bag is changed.
•Do not operate this unit until the pvc hose isinstalled onto the dust inlet
port.
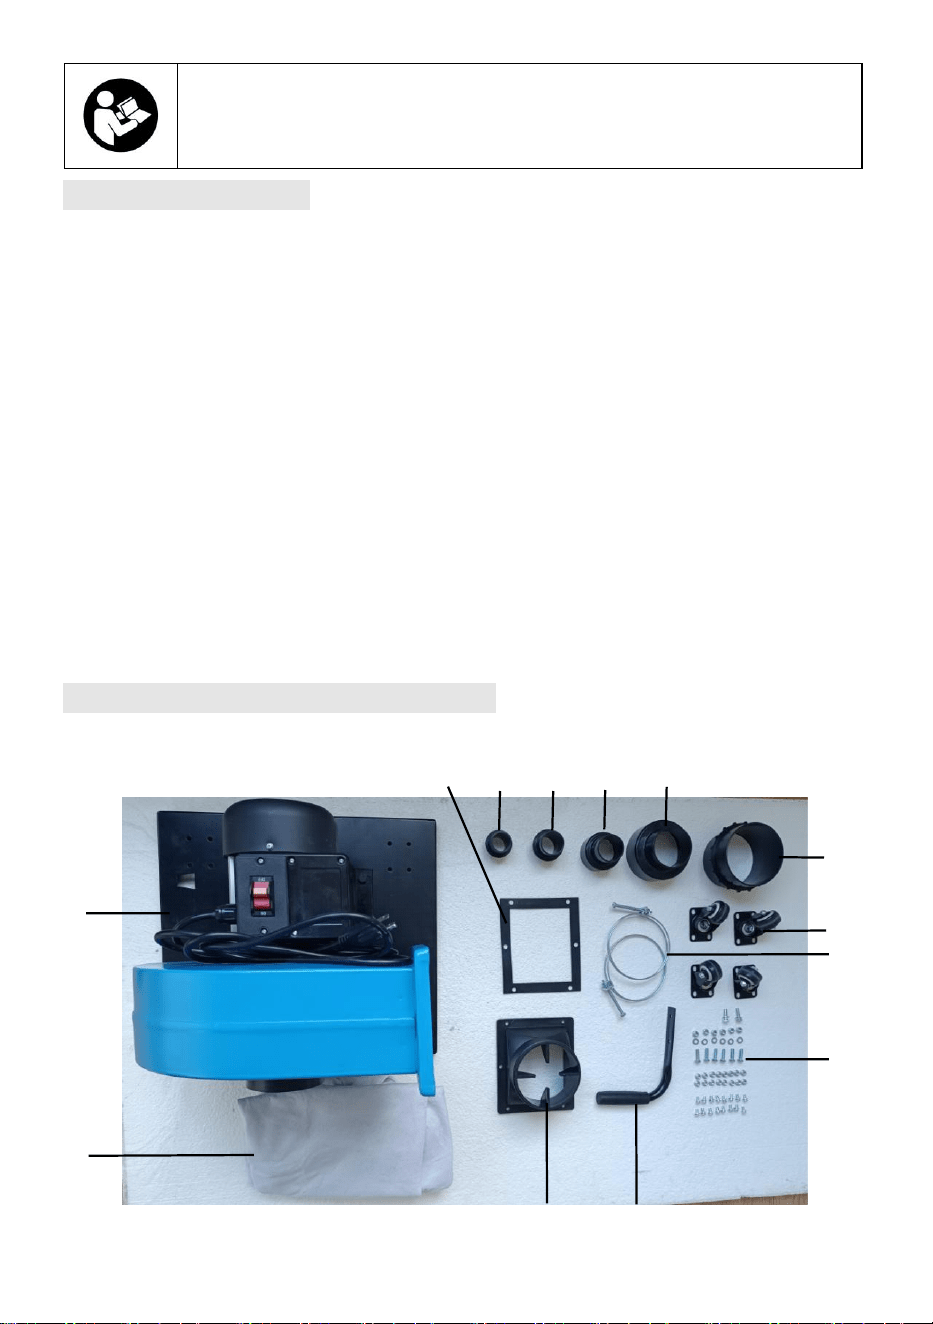
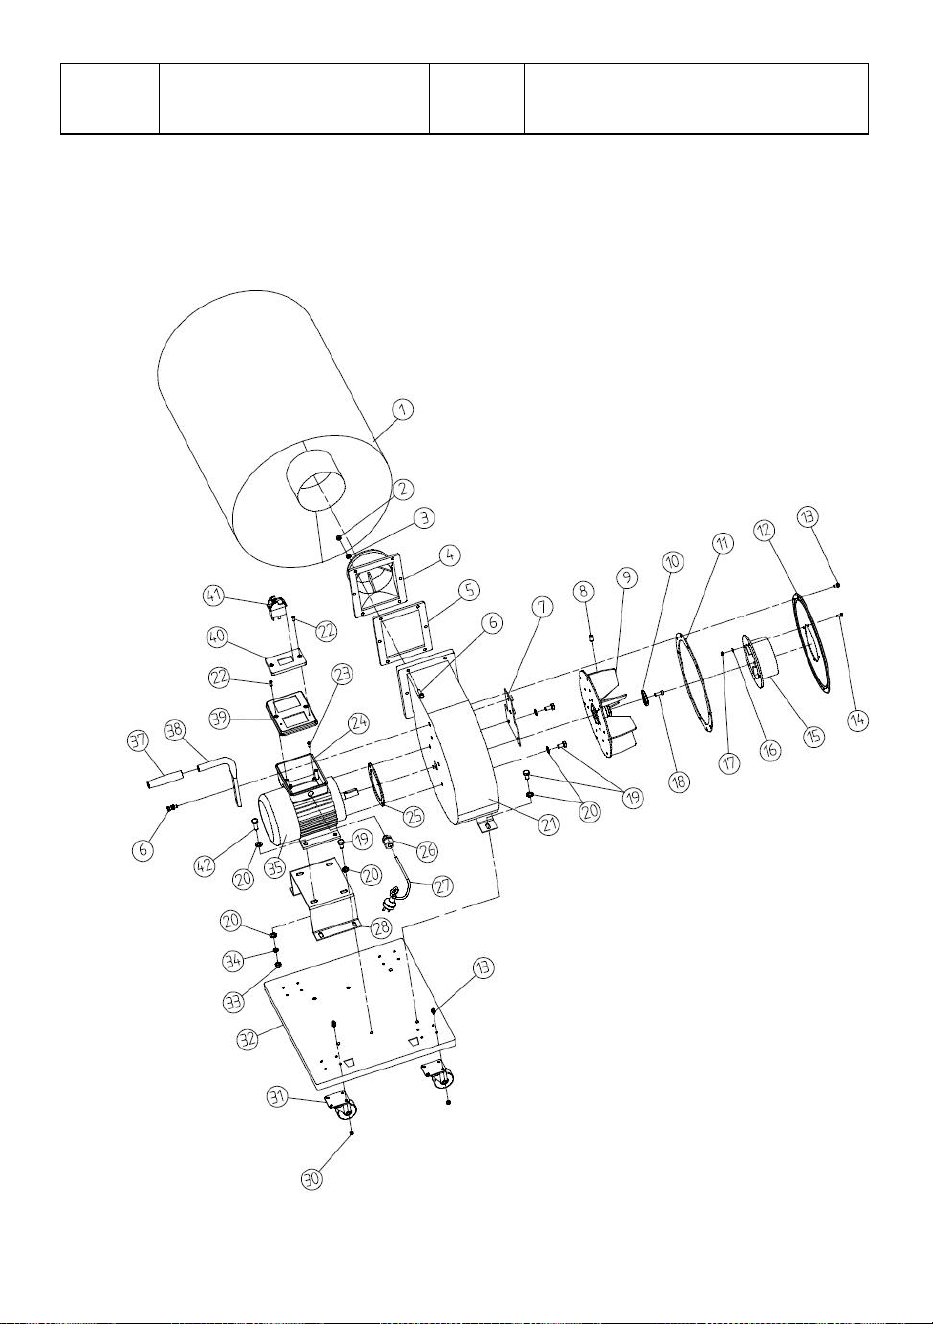
Unpacking and checking contents
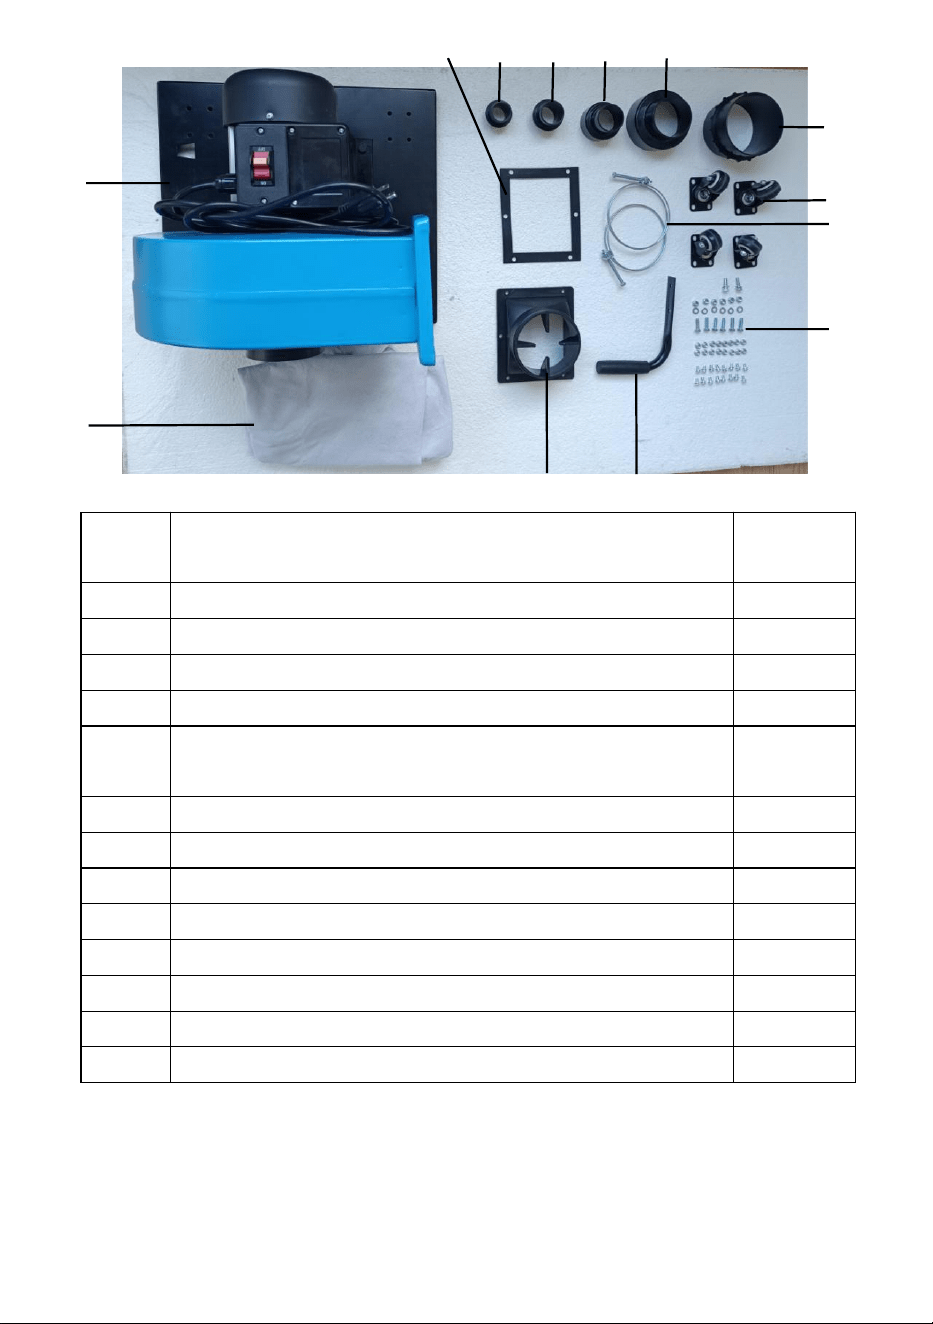
Unpack carton, check machine, to see parts listed below.
1
2
3
4
5
6
7
8
9
12
10
11
13

- 3 -
TECHNICAL DATA
Item
Discription
Q'TY
1
Collector body & fan/motor assembly
1
2
Filtering bag
1
3
Connector
1
4
Handle
1
5
Nuts, screws,washers, spring washers, and wrench
52
6
Clamp for suction hose
2
7
Wheel
4
8
Adaptor C
1
9
Adaptor F
1
10
Adaptor G
1
11
Adaptor H
1
12
Adaptor I
1
13
Gasket
1
Motor power(HP/Watt)
1Hp/750W
Inlet diameter(inch/mm)
4/100
Bag capacity(cubic meter)
21gal (80L )
Nom. collection volume:
537CFM (900m3/h )
(
60Hz
)
460CFM (780m3/h )
(
50Hz
)
Hose connector:
100mm
Overall size(LWH)(mm)
1200*380*480 mm
Weight:
16KG
Dimensions L x W x H:
440*425*440mm

- 4 -
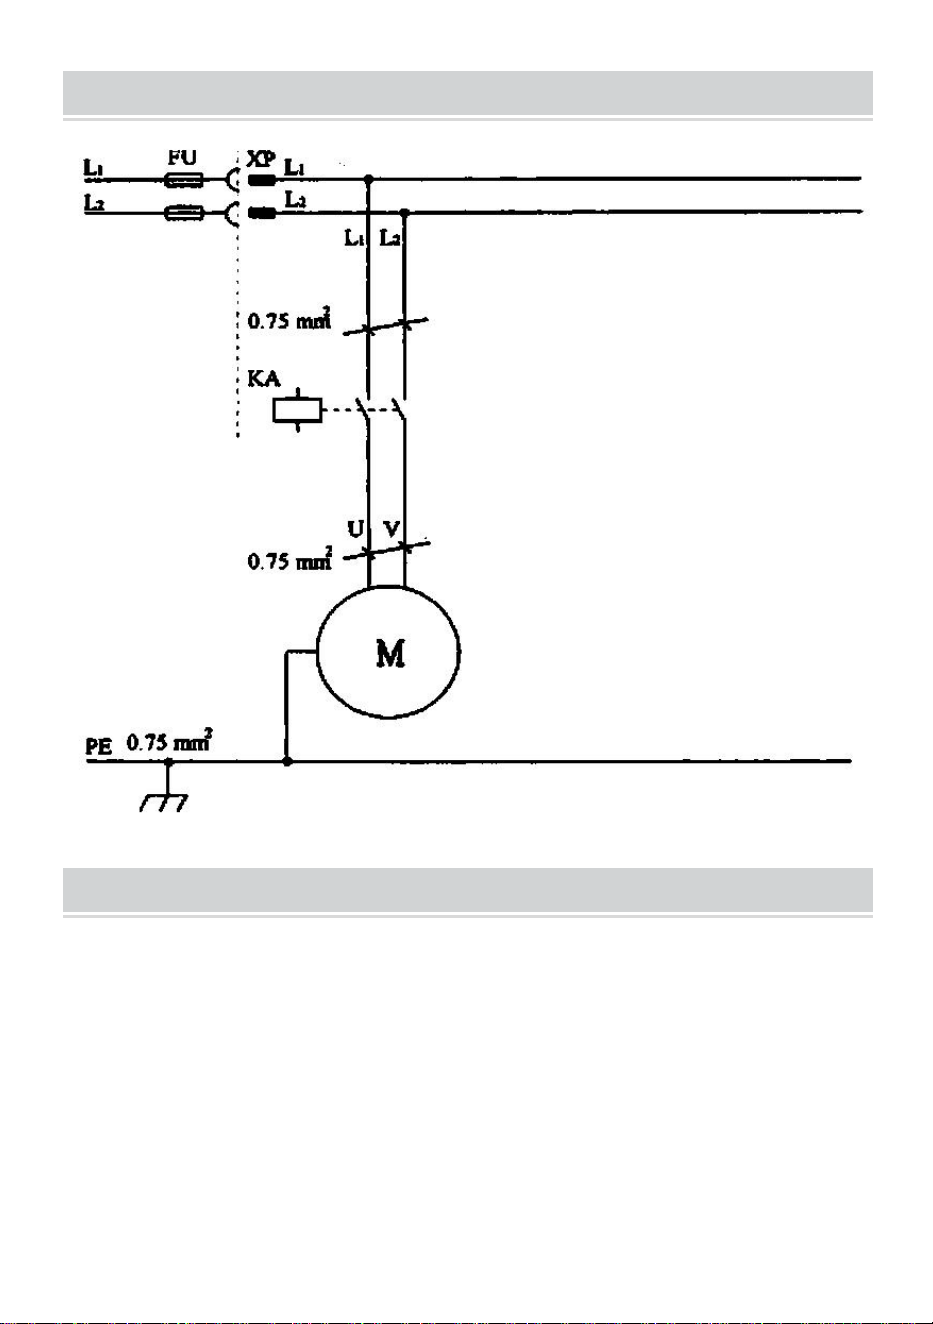
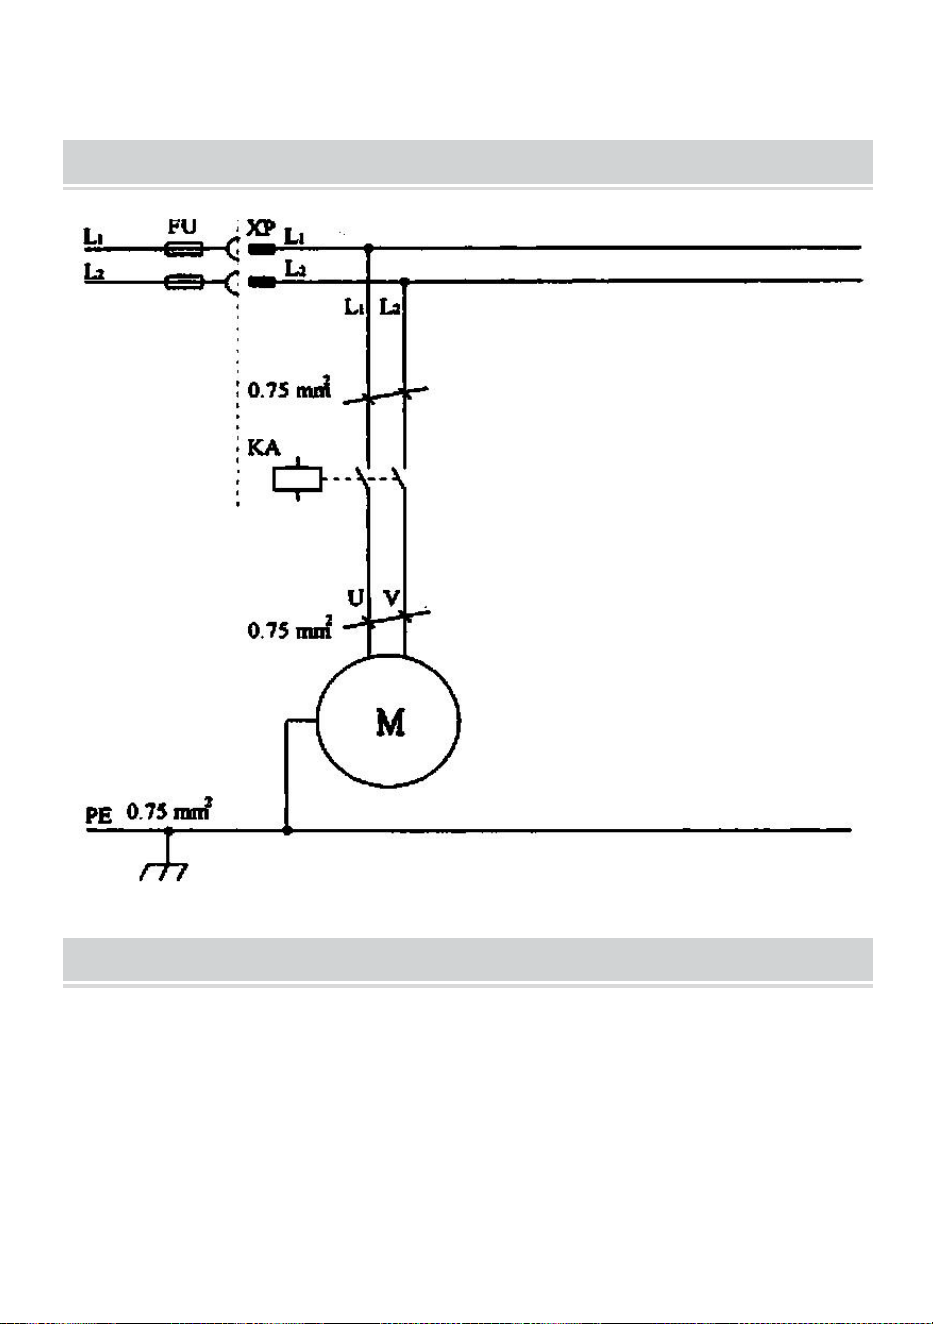
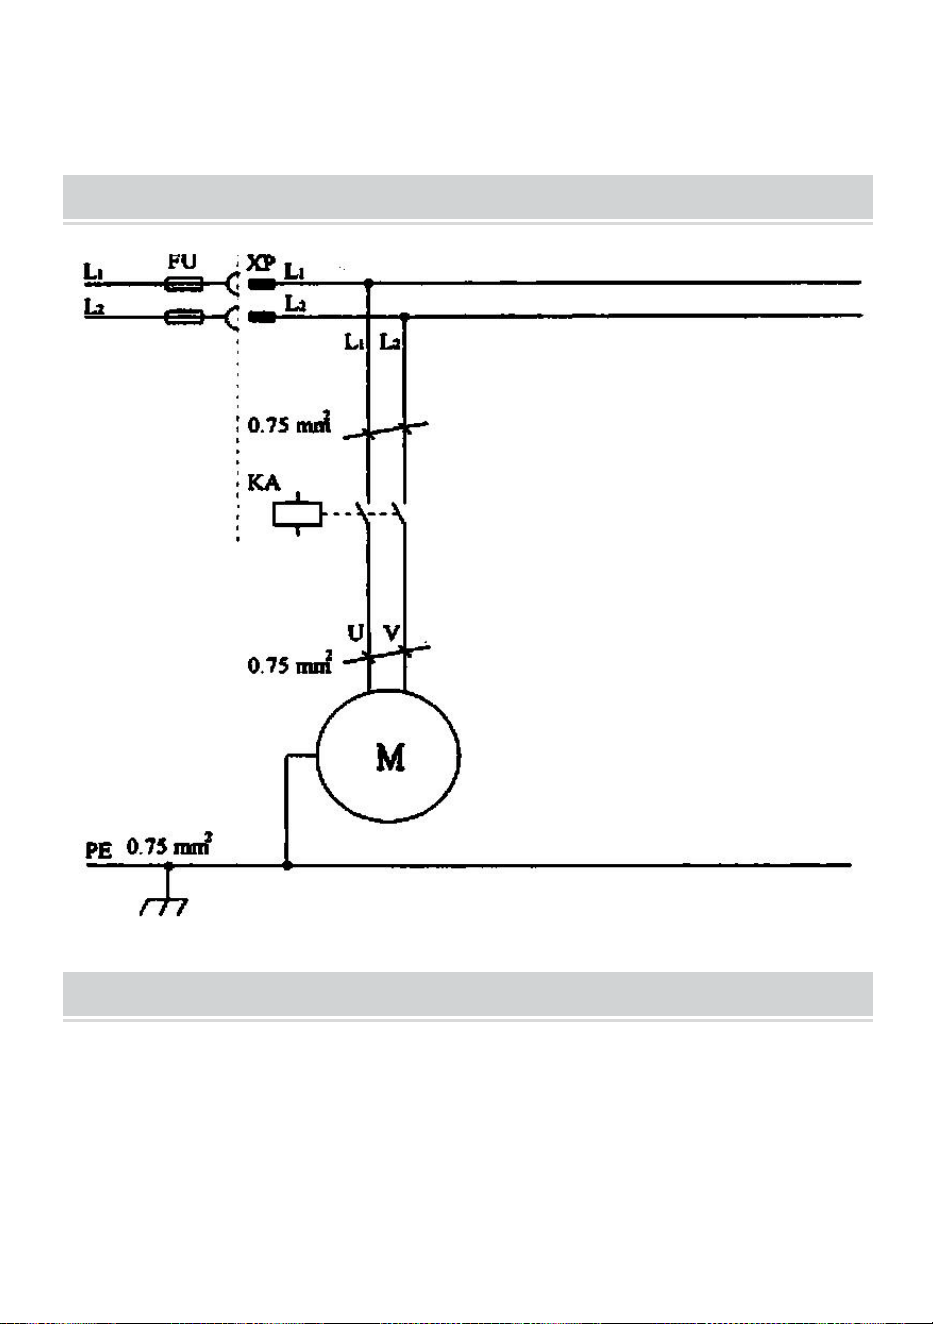
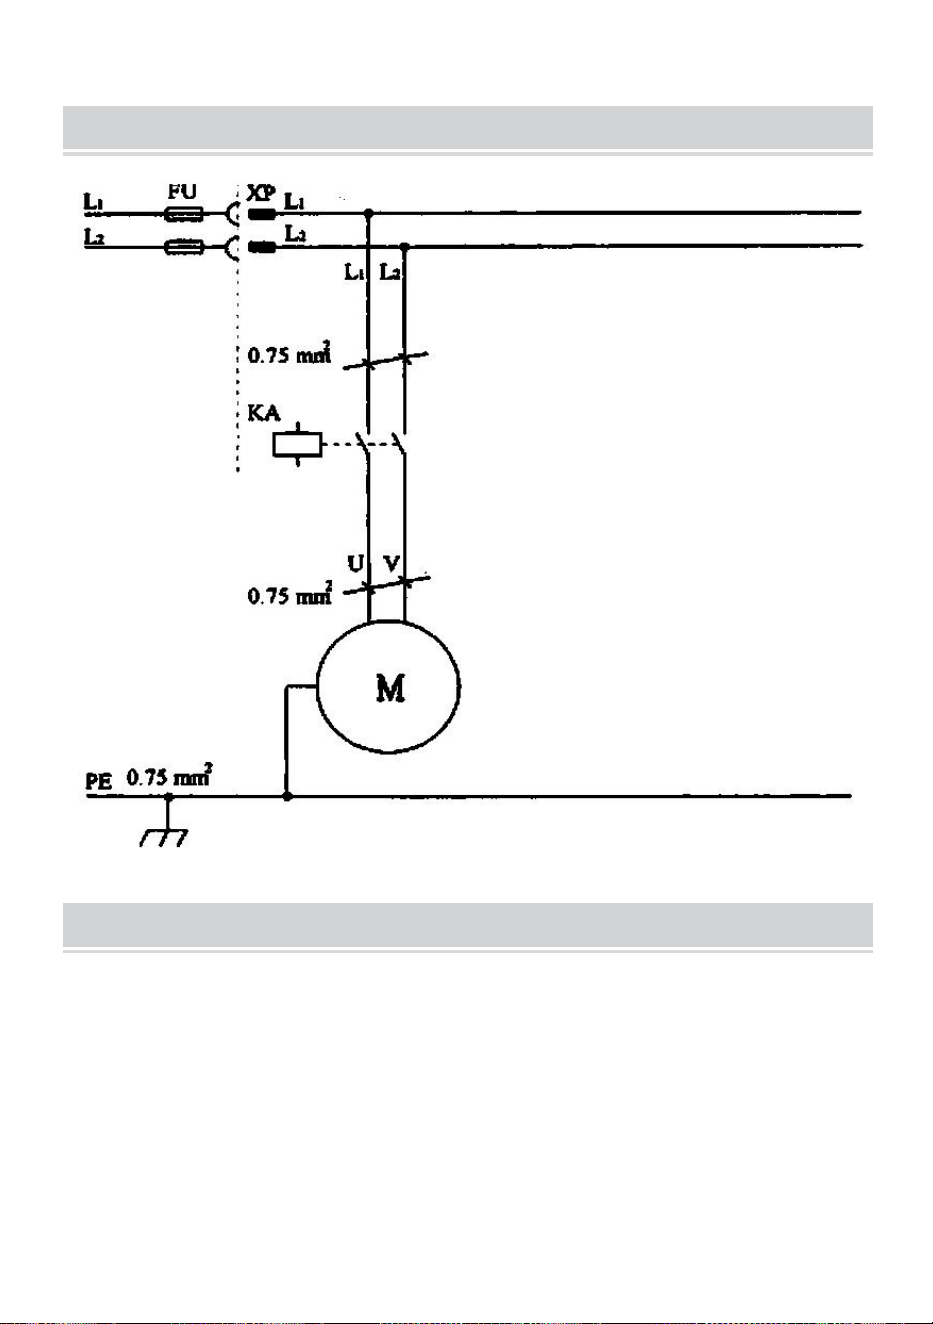
1 Electrical connection
• The motor operates on the sign. The cord must be at least 0.75mm in
cross-section. If a fault occurs, immediately remove the plug from the
power outlet. Then check the machine and rectify any fault.
2 General
• Do not suck pieces of metal, large blocks of wood or pieces of batten into
the collector.
• Use only accessories designed for the DC100M.
• It is more efficient to use the filter cartridge than the dust bag to collect
wood chips.
3 Cleaning
• The dust collector should be cleaned each time the collection bag is
changed.
• Damaged filters and bags must be replaced immediately in order to
minimize dust dispersion in the work area.
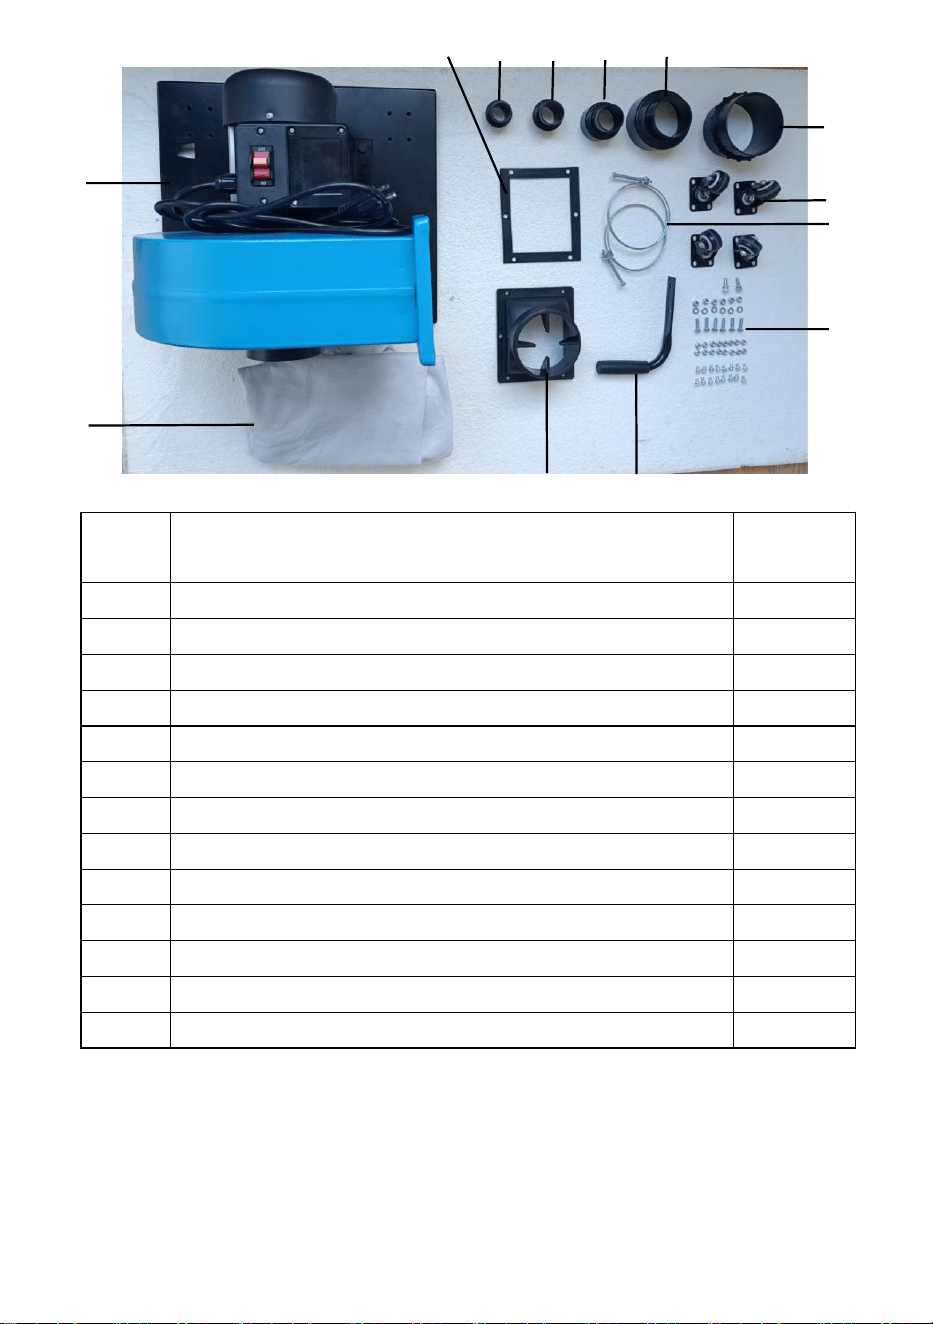
4 Assembly
a. Fix the connector (No.4) to the body by screw, plain washer and nut;
b. Fix wheel (No.31) to the base (No.32) by screw, plain washer and nut;
c. Fix Handle(No.38) to the body;
d. Fix the dust collecting bag to the connector (No.4).

- 5 -
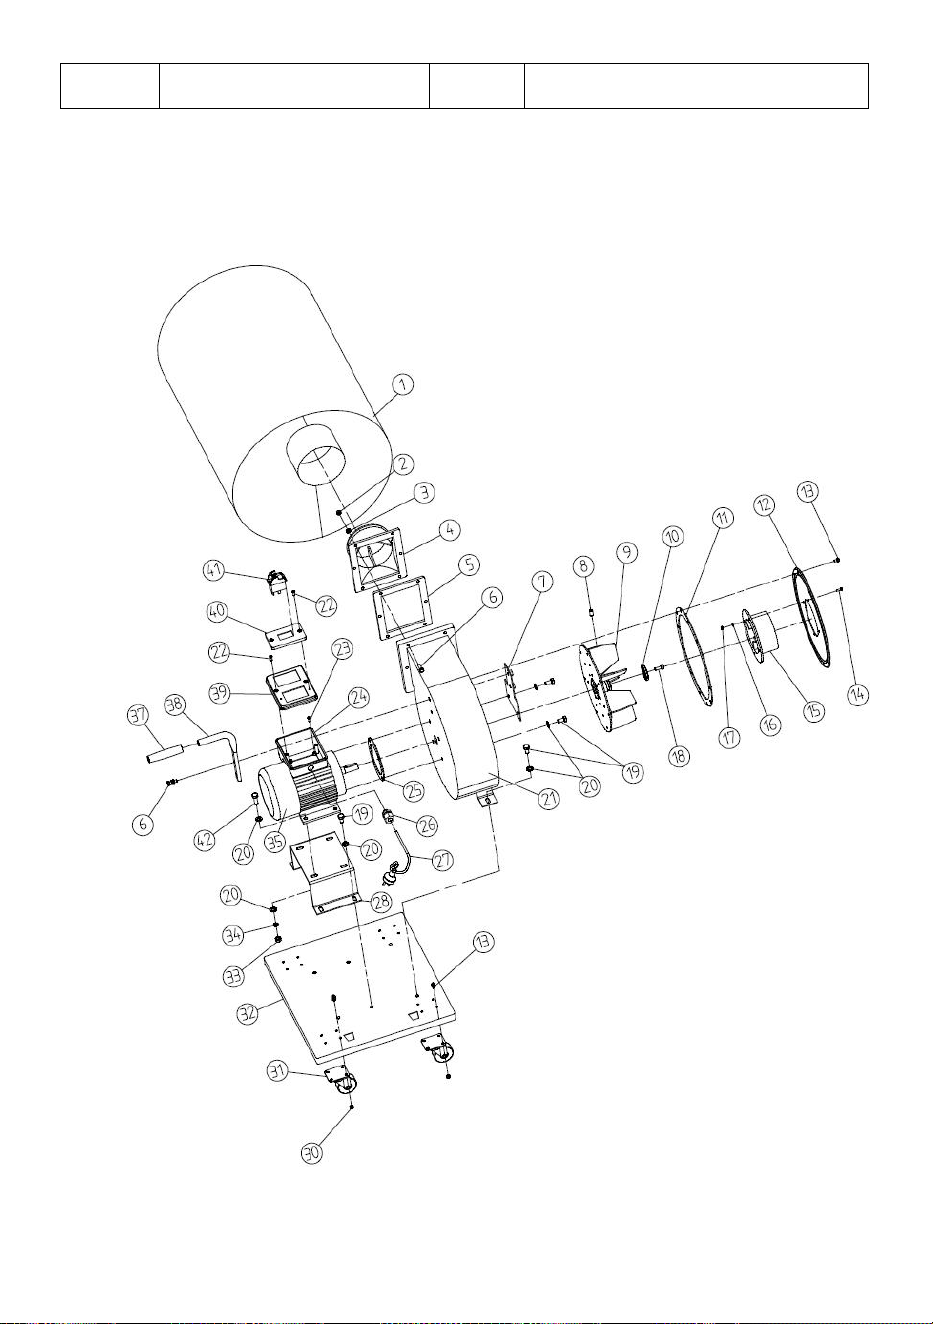
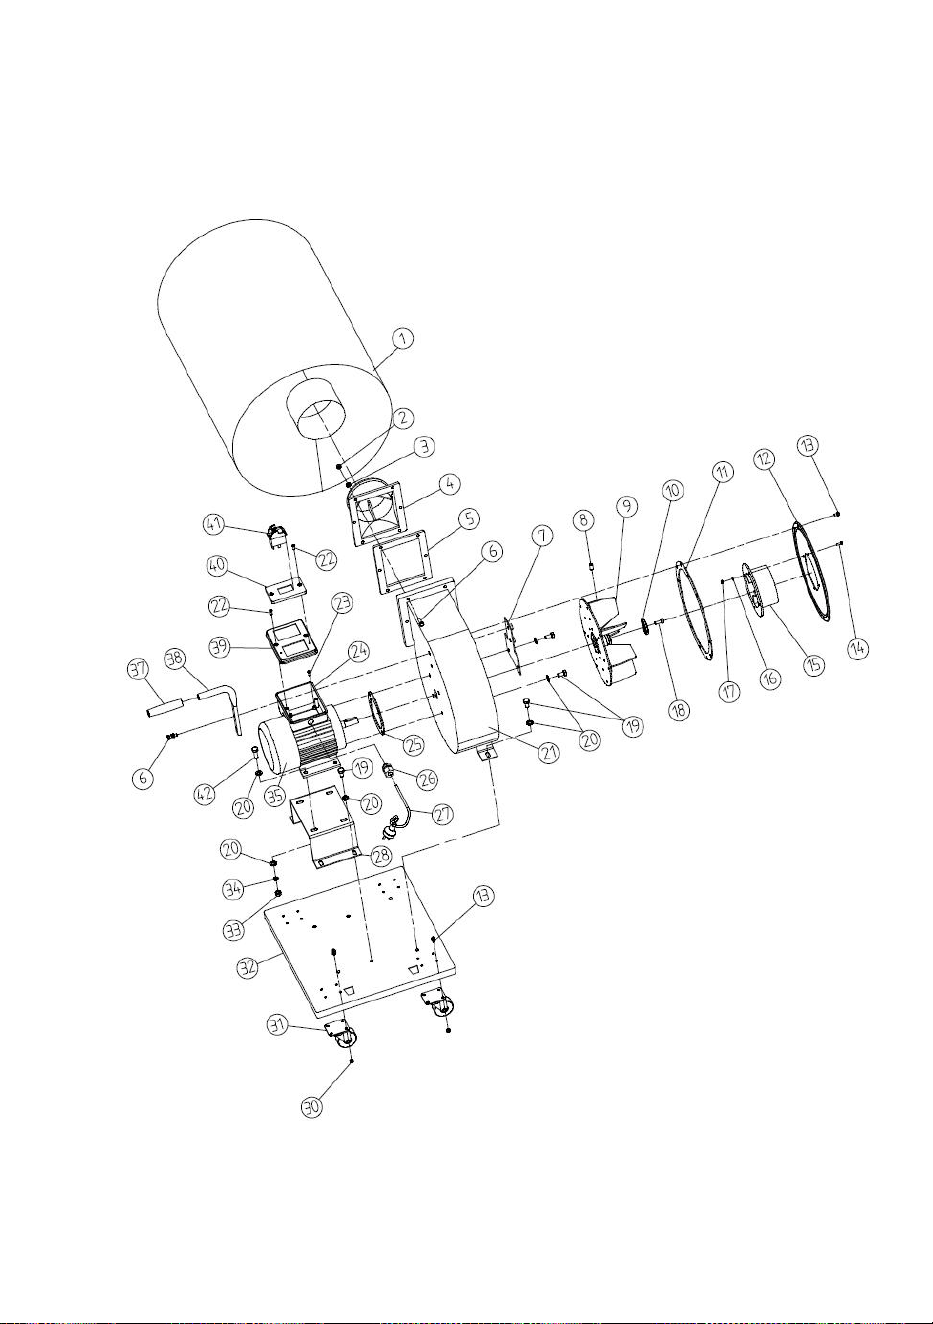
PARTS LIST
Item:
Name:
Item:
Name:
1
Filtering bag
22
Self tapping screw ST3.5x15
2
Nut M6
23
Self tapping screw ST4.2x8
3
Washer Ф6
24
Switch box
4
Connector
25
Plain washer
5
Gasket
26
Strain relief
6
Bolt M6x20
27
Power cord
7
Plate
28
Motor support
8
Screw M8×10
29
Plain washer 5
9
Fan
30
Nut M5
10
Fixing plate
31
Wheel
11
Plate
32
Base
12
Cover of fan housing
33
Nut M8
13
Screw M5×10
34
Spring washer Ф8
14
Screw M4×12
35
Motor
15
Inlet connector
36
Spring washer Ф6
16
Spring washer Ф4
37
Handle sleeve
17
Nut M4
38
Handle
18
bolt M6x20(left)
39
Cover of switch box
19
Screw M8x16
40
Fixing plate of switch box
20
Washer Ф8
41
Switch
21
Fan housing

- 6 -

- 7 -
CIRCUIT DIAGRAM
SAFETY RULES
1. Read and become familiar with the entire operating manual.
2. Keep guards and cover in place and in working order.
3. Always use safety glasses, also use face or dust mask if cutting
operations is dusty. Everyday eve-glasses only have impact resistant
lense; they are not safety glasses.
4. Keep work area clean. Cluttered areas and bendches invite accidents.
5. Don’t force tools. It will do a better and safer job at the rate for which is

- 8 -
was designed.
6. Avoide accidental starting. Make sure switch is in “off” Position before
plugging in cord.
7. Disconnect tools before servicing and when changing accessories such
as blades, bits, cutters.
8. Don’t overreach. Keep your proper footing and balance at all times. For
best footing wear rubber soled footwear. Keep floor clear or oil, scrap
wood, etc.
9. Wear proper apparel. Loose clothing or jewelry may get caught in
moving parts. Wear protective hair covering to contain long hair.
10. Make workshop kidproof. Place a padlock on the switch when blade
saw is not in use and store the key in a safe location.
11. Revove adjusting keys and wrenches. Form habit of checking to see
that keys and adjusting wrenches are removed from tool before turning it
on.
12. Avoid dangerous environment. Don’t use power tools in damp or wet
locations. Keep your work area well illuminated do not use in explosive
atmosphere (around paint, flammable liquids, etc.)
13. Keep children away. All visitors should be kept a safe distance from
work area, especially while operating unit.
14. Use the proper tool. Don’t force tool or attachment to do a job for which
it was not designed.
15. Maintain tools in top condition. Keep tools sharp and clean for best
and safest performance. Follow instructions for lubricating and changing
accessories.
16. Secure work. Use clamps or a vise to hold work, when practical. It’s
safer than using your hand and prevents round or irregularly shaped
pieces from turning.

- 9 -
17. Check damaged parts. Before further use of the tool, a guard or other
part that is damaged should be checked to assure that it will operate
properly and perform its intended function check for alignment of moving
parts, breakage of parts, mounting, any other conditions that may affect
its operations a guard or other part that is damaged should be properly
repaired or replaced.
18. Use recommended accessories-consult owner’s manual. Use of
improper accessories could be hazardous.
19. Never stand on tool. Injury cold occur from a fall.
20. Never leave tool runnin and unattned.
21. Always remove cord plug from electrical outlet when adjusting,
changing parts or working on tool.
22. Always remove cord plug from electrical outlet when adjusting,
changing parts or working on tool.
Address: Baoshanqu Shuangchenglu 803long 11hao 1602A-1609shi
Shanghai
Imported to AUS: SIHAO PTY LTD, 1 ROKEVA STREETEASTWOOD
NSW 2122 Australia
Imported to USA: Sanven Technology Ltd, Suite 250, 9166 Anaheim
Place, Rancho Cucamonga, CA 91730
REP
EC
SHUNSHUN GmbH
Römeräcker 9 Z2021, 76351
Linkenheim-Hochstetten, Germany
REP
UK
Pooledas Group Ltd
Unit 5 Albert Edward House, The
Pavilions Preston, United Kingdom
Made In China


- 2 -
Technique Assistance et certificat de garantie électronique
www.vevor.com/support
COLLECTEUR DE POUSSIÈRE
MODÈLE : DC100M
We continue to be committed to provide you tools with competitive price.
"Save Half", "Half Price" or any other similar expressions used by us only represents an
estimate of savings you might benefit from buying certain tools with us compared to the major
top brands and does not necessarily mean to cover all categories of tools offered by us. You
are kindly reminded to verify carefully when you are placing an order with us if you are
actually saving half in comparison with the top major brands.

3

- 1 -
MODÈLE : DC100M
Have product questions? Need technical support? Please feel free to
contact us:
Technical Support and E-Warranty Certificate
www.vevor.com/support
NEED HELP? CONTACT US!
This is the original instruction, please read all manual instructions
carefully before operating. VEVOR reserves a clear interpretation of our
user manual. The appearance of the product shall be subject to the
product you received. Please forgive us that we won't inform you again if
there are any technology or software updates on our product.
DUST COLLECTOR

- 2 -
Avertissement : Pour réduire le risque de blessure,
l'utilisateur doit lire attentivement le manuel d'instructions.
Utilisation du DC100M
• Le dépoussiéreur DC100M permet d'aspirer les déchets (copeaux,
copeaux, etc) après rabotage, fraisage et sciage.
• N'utilisez pas le DC100M avec de l'encre ou de la peinture en aérosol, ou
des substances explosives telles que • des gaz ou des poudres.
• La collecte de poussières et copeaux de bois n'est pas autorisée dans les
locaux industriels.
• L'utilisation non industrielle du mini dépoussiéreur est autorisée, sauf par
les employés réguliers, les personnes en formation, à l'école et en
situation domestique, ou d'autres personnes en situation d' emploi .
•Le récipient de collecte doit être vidé au besoin, mais au moins après
chaque utilisation.
•Le sac filtrant doit être nettoyé à chaque changement de sac à poussière.
• N'utilisez pas cet appareil tant que le tuyau en PVC n'est pas installé sur
l'orifice d'entrée de poussière.
Déballage et vérification du contenu
Déballez le carton, vérifiez la machine pour voir les pièces répertoriées
ci-dessous.
- 3 -
Artic
le
Description
Q'TÉ
1
Corps de collecteur et ensemble ventilateur/moteur
1
2
Sac filtrant
1
3
Connecteur
1
4
Poignée
1
5
Écrous, vis, rondelles, rondelles élastiques et clé
52
6
C pour tuyau d'aspiration
2
7
Roue
4
8
Un adaptateur C
1
9
Un adaptateur F
1
dix
Un adaptateur G
1
11
Un adaptateur H
1
12
Un adaptateur que je
1
13
Joint
1
1
2
3
4
5
6
7
8
9
12
10
11
13

- 4 -
TECHNICAL DATA
Puissance du moteur (HP/Watt)
1CV / 7 50W
Diamètre d'entrée (pouces/mm)
4/100
Capacité du sac (mètre cube)
21 gallons (80L)
Nom. volume de collecte :
537CFM (900m3/h) ( 60Hz )
460CFM (780m3/h) ( 50Hz )
Connecteur de tuyau:
100mm
Taille globale (LWH)(mm)
1200*380*480 millimètres
Poids:
16KG _
Dimensions L x l x H :
440*425*440mm

- 5 -
1 Raccordement électrique
• Le moteur fonctionne sur le panneau. Le cordon doit avoir une section
transversale d'au moins 0,75 mm. En cas de problème, retirez
immédiatement la fiche de la prise de courant. Vérifiez ensuite la machine
et corrigez tout défaut.
2 Général
• N'aspirez pas de morceaux de métal, de gros blocs de bois ou de
morceaux de lattes dans le collecteur.
• Utilisez uniquement des accessoires conçus pour le DC100M.
• Il est plus efficace d'utiliser la cartouche filtrante que le sac à poussière
pour récupérer les copeaux de bois.
3 Nettoyage
• Le dépoussiéreur doit être nettoyé à chaque changement de sac de
collecte.
• Les filtres et sacs endommagés doivent être remplacés immédiatement
afin de minimiser la dispersion de poussière dans la zone de travail.
4 Assemblage
e. Fixer le connecteur (No.4) au corps à l'aide de vis, rondelle plate et
écrou ;
f. Fixer la roue (No.31) à la base (No.32) à l'aide d'une vis, d'une
rondelle plate et d'un écrou ;
g. Fixez la poignée (n° 38) au corps ;
h. Fixez le sac collecteur de poussière au connecteur (n°4).

- 6 -
PARTS LIST
Article:
Nom:
Article:
Nom:
1
Sac filtrant
22
Vis autotaraudeuse ST3,5x15
2
Écrou M6
23
Vis autotaraudeuse ST4.2x8
3
Rondelle F 6
24
Boîte de commutation
4
Connecteur
25
Rondelle plate
5
Joint
26
Décharge de traction
6
Boulon M6x20
27
Cordon d'alimentation
7
Plaque
28
Assistance moteur
8
Vis M8 × 10
29
Rondelle plate 5
9
Ventilateur
30
Écrou M5
dix
Plaque de fixation
31
Roue
11
Plaque
32
Base
12
Couvercle du boîtier du
ventilateur
33
Écrou M8
13
Vis M5×10
34
Rondelle élastique F8
14
Vis M4×12
35
Moteur
15
Connecteur d'entrée
36
Rondelle élastique F6
16
Rondelle élastique F4
37
Manchon de poignée
17
Écrou M4
38
Poignée
18
boulon M6x20 (gauche)
39
Couvercle du coffret électrique
19
Vis M8x16
40
Plaque de fixation du coffret
électrique
20
Rondelle F8
41
Changer
21
Boîtier du ventilateur
- 7 -
- 8 -
CIRCUIT DIAGRAM
SAFETY RULES
21. Lisez et familiarisez-vous avec l’intégralité du manuel d’utilisation.
22. Gardez les protections et la couverture en place et en état de
fonctionnement.
23. Utilisez toujours des lunettes de sécurité, utilisez également un
masque facial ou un masque anti-poussière si vous coupez. les
opérations sont poussiéreuses. Les lunettes de veille de tous les jours
n'ont que des verres résistants aux chocs ; ce ne sont pas des lunettes
de sécurité.

- 9 -
24. Gardez la zone de travail propre. Les zones encombrées et les virages
sont propices aux accidents.
25. Ne forcez pas les outils. Il fera un travail meilleur et plus sûr au rythme
pour lequel il a été conçu.
26. Évitez les démarrages accidentels. Assurez-vous que l'interrupteur est
en position « arrêt » avant de brancher le cordon.
27. Débranchez les outils avant l'entretien et lors du changement
d'accessoires tels que lames, embouts, couteaux.
28. N'allez pas trop loin. Gardez votre équilibre et votre équilibre à tout
moment. Pour une meilleure stabilité, portez des chaussures à semelles
en caoutchouc. Gardez le sol propre ou huileux, les restes de bois, etc.
29. Portez des vêtements appropriés. Les vêtements amples ou les bijoux
peuvent se coincer dans les pièces mobiles. Portez un couvre-cheveux
protecteur pour contenir les cheveux longs.
30. Rendez l’atelier à l’épreuve des enfants. Placez un cadenas sur
l'interrupteur lorsque la scie à lame n'est pas utilisée et rangez la clé
dans un endroit sûr.
31. Revovez les clés et les clés de réglage. Prenez l’habitude de vérifier
que les clés et les clés de réglage sont retirées de l’outil avant de
l’allumer.
32. Évitez les environnements dangereux. N'utilisez pas d'outils
électriques dans des endroits humides ou mouillés. Gardez votre zone
de travail bien éclairée et ne pas utiliser en atmosphère explosive (à
proximité de peinture, de liquides inflammables, etc.)
33. Éloignez les enfants. Tous les visiteurs doivent être maintenus à une
distance sûre de la zone de travail, en particulier lorsqu'ils utilisent
l'unité.
34. Utilisez l’outil approprié. Ne forcez pas l'outil ou l'accessoire à
effectuer un travail pour lequel il n'a pas été conçu.

- 10 -
35. Maintenir les outils en parfait état. Gardez les outils affûtés et propres
pour des performances optimales et sûres. Suivez les instructions pour
lubrifier et changer les accessoires.
36. Travail sécurisé. Utilisez des pinces ou un étau pour maintenir le
travail, lorsque cela est possible. C'est plus sûr que d'utiliser votre main
et empêche les pièces rondes ou de forme irrégulière de tourner.
37. Vérifiez les pièces endommagées. Avant d'utiliser davantage l'outil,
une protection ou une autre pièce endommagée doit être vérifiée pour
garantir qu'elle fonctionnera correctement et remplira sa fonction prévue.
Vérifiez l'alignement des pièces mobiles, la casse des pièces, le
montage, toute autre condition pouvant affecter son opérations, une
protection ou une autre pièce endommagée doit être correctement
réparée ou remplacée.
38. Utilisez les accessoires recommandés – consultez le manuel du
propriétaire. L'utilisation d'accessoires inappropriés peut être
dangereuse.
39. Ne vous tenez jamais debout sur l'outil. Les blessures causées par le
froid surviennent suite à une chute.
40. Ne laissez jamais l'outil fonctionner sans surveillance.
21. Retirez toujours la fiche du cordon de la prise électrique lors du réglage,
du changement de pièces ou du travail sur l'outil.
22. Retirez toujours la fiche du cordon de la prise électrique lors du réglage,
du changement de pièces ou du travail sur l'outil.
Adresse : Baoshanqu Shuangchenglu 803long 11hao 1602A-1609shi
Shanghai
Importé en Australie : SIHAO PTY LTD, 1 ROKEVA STREETASTWOOD
NSW 2122 Australie
Importé aux États-Unis : Sanven Technology Ltd, Suite 250, 9166
Anaheim Place, Rancho Cucamonga, CA 91730

- 11 -
REP
EC
SHUNSHUN GmbH
Römeräcker 9 Z2021, 76351
Linkenheim-Hochstetten, Germany
REP
UK
Pooledas Group Ltd
Unit 5 Albert Edward House, The
Pavilions Preston, United Kingdom
Fabriqué en Chine


- 2 -
Technisch Support- und E-Garantiezertifikat
www.vevor.com/support
STAUBFÄNGER
MODELL: DC100 M
We continue to be committed to provide you tools with competitive price.
"Save Half", "Half Price" or any other similar expressions used by us only represents an
estimate of savings you might benefit from buying certain tools with us compared to the major
top brands and does not necessarily mean to cover all categories of tools offered by us. You
are kindly reminded to verify carefully when you are placing an order with us if you are
actually saving half in comparison with the top major brands.

3

- 1 -
MODELL: DC100 M
Have product questions? Need technical support? Please feel free to
contact us:
Technical Support and E-Warranty Certificate
www.vevor.com/support
NEED HELP? CONTACT US!
This is the original instruction, please read all manual instructions
carefully before operating. VEVOR reserves a clear interpretation of our
user manual. The appearance of the product shall be subject to the
product you received. Please forgive us that we won't inform you again if
there are any technology or software updates on our product.
DUST COLLECTOR

- 2 -
Warnung: Um das Verletzungsrisiko zu verringern, muss der
Benutzer die Bedienungsanleitung sorgfältig lesen.
Verwendung des DC100M
• Der Staubsammler DC100M kann zum Aufsaugen von Abfällen (Späne,
Späne, usw.) nach dem Hobeln, Fräsen und Sägen.
• Verwenden Sie die DC100M nicht für Tinte oder Farbspray oder
explosive Substanzen wie Gase • oder Pulver.
• Das Sammeln von Holzstaub und -spänen ist in Industrieräumen nicht
gestattet.
• Die nicht-industrielle Nutzung des Mini-Staubsammlers ist erlaubt, außer
durch reguläre Mitarbeiter. Personen in Ausbildung, Schule und
häuslicher Umgebung oder andere Personen in einer
Beschäftigungssituation .
•Der Auffangbehälter sollte nach Bedarf geleert werden, mindestens
jedoch nach jedem Gebrauch.
•Der Filterbeutel sollte bei jedem Staubbeutelwechsel gereinigt werden.
• Betreiben Sie dieses Gerät erst, wenn der PVC-Schlauch an der
Staubeinlassöffnung angebracht ist.
Auspacken und Inhalt prüfen
Packen Sie den Karton aus, überprüfen Sie die Maschine, um die unten
aufgeführten Teile zu sehen.
- 3 -
Artik
el
Beschreibung
MENGE
1
Kollektorgehäuse und Lüfter-/Motorbaugruppe
1
2
Filterbeutel
1
3
Verbinder
1
4
Handhaben
1
5
Muttern, Schrauben, Unterlegscheiben,
Federscheiben und Schraubenschlüssel
52
6
C- Lampe für Saugschlauch
2
7
Rad
4
8
Ein Adapter C
1
9
Ein Daptor F
1
10
Ein Daptor G
1
11
Ein Daptor H
1
12
Ein Daptor I
1
13
Dichtung
1
1
2
3
4
5
6
7
8
9
12
10
11
13

- 4 -
TECHNICAL DATA
Motorleistung (PS/Watt)
1 PS / 7 50 W
Einlassdurchmesser (Zoll/mm)
4/100
Beutelkapazität (Kubikmeter)
21 Gallonen (80 l)
Nom. Sammelvolumen:
537CFM (900m3/h) ( 60Hz )
460CFM (780m3/h) ( 50Hz )
Schlauchverbinder:
100mm
Gesamtgröße (LWH) (mm)
1200*380*480 mm
Gewicht:
16K G
Abmessungen L x B x H:
440*425*440mm

- 5 -
1 Elektrischer Anschluss
• Der Motor arbeitet auf dem Schild. Das Kabel muss einen Querschnitt von
mindestens 0,75 mm haben. Wenn eine Störung auftritt, ziehen Sie sofort
den Stecker aus der Steckdose. Überprüfen Sie anschließend die
Maschine und beheben Sie eventuelle Fehler.
2 Allgemeines
• Saugen Sie keine Metallstücke, große Holzblöcke oder Lattenstücke in
den Kollektor.
• Verwenden Sie nur Zubehör, das für die DC100M entwickelt wurde.
• Es ist effizienter, die Filterpatrone zum Auffangen von Holzspänen zu
verwenden als den Staubbeutel.
3 Reinigung
• Der Staubsammler sollte jedes Mal gereinigt werden, wenn der
Auffangbeutel gewechselt wird.
• Beschädigte Filter und Beutel müssen sofort ausgetauscht werden, um die
Staubverteilung im Arbeitsbereich zu minimieren.
4 Montage
i. Befestigen Sie den Steckverbinder (Nr. 4) mit einer Schraube, einer
Unterlegscheibe und einer Mutter am Gehäuse.
j. Befestigen Sie das Rad (Nr. 31) mit Schraube, Unterlegscheibe und
Mutter an der Basis (Nr. 32).
k. Befestigen Sie den Griff (Nr. 38) am Körper.
l. Befestigen Sie den Staubsammelbeutel am Anschluss (Nr. 4).

- 6 -
PARTS LIST
Artikel:
Name:
Artikel:
Name:
1
Filterbeutel
22
Selbstschneidende Schraube
ST3,5x15
2
Mutter M6
23
Selbstschneidende Schraube
ST4,2x8
3
Unterlegscheibe Ф 6
24
Schaltkasten
4
Verbinder
25
Unterlegscheibe
5
Dichtung
26
Zugentlastung
6
Schraube M6x20
27
Netzkabel
7
Platte
28
Motorunterstützung
8
Schraube M8 × 10
29
Unterlegscheibe 5
9
Lüfter
30
Mutter M5
10
Befestigungsplatte
31
Rad
11
Platte
32
Base
12
Abdeckung des
Lüftergehäuses
33
Mutter M8
13
Schraube M5×10
34
Federscheibe Ф8
14
Schraube M4×12
35
Motor
15
Einlassanschluss
36
Federscheibe Ф6
16
Federscheibe Ф4
37
Griffhülse
17
Mutter M4
38
Handhaben
18
Schraube M6x20 (links)
39
Abdeckung des Schaltkastens
19
Schraube M8x16
40
Befestigungsplatte des
Schaltkastens
20
Unterlegscheibe Ф8
41
Schalten
- 7 -
21
Lüftergehäuse
- 8 -
CIRCUIT DIAGRAM
SAFETY RULES
41. Lesen und machen Sie sich mit der gesamten Bedienungsanleitung
vertraut.
42. Halten Sie die Schutzvorrichtungen und die Abdeckung an Ort und
Stelle und in funktionsfähigem Zustand.
43. Tragen Sie immer eine Schutzbrille und beim Schneiden auch eine
Gesichts- oder Staubmaske Der Betrieb ist staubig. Alltagsbrillen haben

- 9 -
nur schlagfeste Gläser; Es handelt sich nicht um eine Schutzbrille.
44. Halten Sie den Arbeitsbereich sauber. Überfüllte Bereiche und Kurven
laden zu Unfällen ein.
45. Setzen Sie Werkzeuge nicht mit Gewalt ein. Bei der Geschwindigkeit,
für die es ausgelegt ist, wird es eine bessere und sicherere Arbeit
leisten.
46. Vermeiden Sie versehentliches Starten. Stellen Sie sicher, dass der
Schalter auf „Aus“ steht, bevor Sie das Kabel einstecken.
47. Trennen Sie die Werkzeuge vor Wartungsarbeiten und beim
Auswechseln von Zubehör wie Klingen, Bits und Schneidwerkzeugen.
48. Übertreiben Sie es nicht. Achten Sie stets auf den richtigen Stand und
das Gleichgewicht. Für besten Halt tragen Sie Schuhe mit Gummisohlen.
Halten Sie den Boden frei und ölen Sie ihn nicht, verwenden Sie Altholz
usw.
49. Tragen Sie angemessene Kleidung. Lose Kleidung oder Schmuck
können sich in beweglichen Teilen verfangen. Tragen Sie einen
Haarschutz, um lange Haare einzudämmen.
50. Machen Sie die Werkstatt kindersicher. Befestigen Sie ein
Vorhängeschloss am Schalter, wenn die Säge nicht verwendet wird, und
bewahren Sie den Schlüssel an einem sicheren Ort auf.
51. Einstellschlüssel und Schraubenschlüssel entfernen. Machen Sie es
sich zur Gewohnheit, vor dem Einschalten zu überprüfen, ob die
Schlüssel und Einstellschlüssel vom Werkzeug entfernt sind.
52. Vermeiden Sie gefährliche Umgebungen. Benutzen Sie
Elektrowerkzeuge nicht an feuchten oder nassen Orten. Sorgen Sie
dafür, dass Ihr Arbeitsbereich gut beleuchtet ist. Verwenden Sie das
Gerät nicht in explosiver Atmosphäre (in der Nähe von Farbe,
brennbaren Flüssigkeiten usw.).
53. Halten Sie Kinder fern. Alle Besucher sollten einen Sicherheitsabstand

- 10 -
zum Arbeitsbereich einhalten, insbesondere während der Bedienung
des Geräts.
54. Verwenden Sie das richtige Werkzeug. Zwingen Sie das Werkzeug
oder Anbaugerät nicht dazu, eine Arbeit auszuführen, für die es nicht
ausgelegt ist.
55. Halten Sie die Werkzeuge in Top-Zustand. Halten Sie die Werkzeuge
scharf und sauber, um die beste und sicherste Leistung zu erzielen.
Befolgen Sie die Anweisungen zum Schmieren und Wechseln von
Zubehör.
56. Sicheres Arbeiten. Verwenden Sie nach Möglichkeit Klammern oder
einen Schraubstock, um die Arbeit festzuhalten. Dies ist sicherer als die
Verwendung Ihrer Hand und verhindert, dass sich runde oder
unregelmäßig geformte Teile drehen.
57. Beschädigte Teile prüfen. Vor der weiteren Verwendung des
Werkzeugs sollte eine Schutzvorrichtung oder ein anderes beschädigtes
Teil überprüft werden, um sicherzustellen, dass es ordnungsgemäß
funktioniert, und die vorgesehene Funktion auf Ausrichtung der
beweglichen Teile, Bruch von Teilen, Montage und alle anderen
Bedingungen, die sich darauf auswirken könnten, durchgeführt werden
Bei Vorgängen sollte eine beschädigte Schutzvorrichtung oder ein
anderes Teil ordnungsgemäß repariert oder ersetzt werden.
58. Verwenden Sie empfohlenes Zubehör – lesen Sie die
Bedienungsanleitung. Die Verwendung von ungeeignetem Zubehör
kann gefährlich sein.
59. Stellen Sie sich niemals auf das Werkzeug. Bei einem Sturz kann es
zu Erkältungsverletzungen kommen.
60. Lassen Sie das Werkzeug niemals laufen und unbeaufsichtigt.
21. Ziehen Sie immer den Netzstecker aus der Steckdose, wenn Sie
Einstellungen vornehmen, Teile austauschen oder am Werkzeug
arbeiten.

- 11 -
22. Ziehen Sie immer den Netzstecker aus der Steckdose, wenn Sie
Einstellungen vornehmen, Teile austauschen oder am Werkzeug
arbeiten.
Adresse: Baoshanqu Shuangchenglu 803long 11hao 1602A-1609shi
Shanghai
Importiert nach AUS: SIHAO PTY LTD, 1 ROKEVA STREETEASTWOOD
NSW 2122 Australien
In die USA importiert: Sanven Technology Ltd, Suite 250, 9166 Anaheim
Place, Rancho Cucamonga, CA 91730
REP
EC
SHUNSHUN GmbH
Römeräcker 9 Z2021, 76351
Linkenheim-Hochstetten, Germany
REP
UK
Pooledas Group Ltd
Unit 5 Albert Edward House, The
Pavilions Preston, United Kingdom
In China hergestellt


- 2 -
Tecnico Supporto e certificato di garanzia elettronica
www.vevor.com/support
ASPIRAPOLVERE
MODELLO: DC100 M
We continue to be committed to provide you tools with competitive price.
"Save Half", "Half Price" or any other similar expressions used by us only represents an
estimate of savings you might benefit from buying certain tools with us compared to the major
top brands and does not necessarily mean to cover all categories of tools offered by us. You
are kindly reminded to verify carefully when you are placing an order with us if you are
actually saving half in comparison with the top major brands.

3
- 1 -
MODELLO: DC100 M
Have product questions? Need technical support? Please feel free to
contact us:
Technical Support and E-Warranty Certificate
www.vevor.com/support
NEED HELP? CONTACT US!
This is the original instruction, please read all manual instructions
carefully before operating. VEVOR reserves a clear interpretation of our
user manual. The appearance of the product shall be subject to the
product you received. Please forgive us that we won't inform you again if
there are any technology or software updates on our product.
DUST COLLECTOR

- 2 -
Avvertenza: per ridurre il rischio di lesioni, l'utente deve
leggere attentamente il manuale di istruzioni.
Utilizzando il DC100M
• L'aspiratore DC100M può essere utilizzato per aspirare rifiuti (trucioli,
trucioli, ecc) dopo piallatura, fresatura e segatura.
• Non utilizzare la DC100M per inchiostro o vernice spray o sostanze
esplosive come gas • o polveri.
• Negli stabilimenti industriali non è consentita la raccolta di polveri e
trucioli di legno.
• È consentito l'uso non industriale del mini aspiratore, tranne che da parte
di dipendenti regolari, persone in formazione, scuola e situazioni
domestiche, o altre persone in una situazione • lavorativa .
•Il contenitore di raccolta deve essere svuotato secondo necessità, ma
almeno dopo ogni utilizzo.
•Il sacco filtrante deve essere pulito ogni volta che si cambia il sacco
raccoglipolvere.
• N on utilizzare questa unità finché il tubo in PVC non è installato sulla
porta di ingresso della polvere.
Disimballaggio e controllo del contenuto
Disimballare il cartone, controllare la macchina per vedere le parti elencate
di seguito.

- 3 -
Artic
olo
Descrizione
QUANTI
TÀ
1
Corpo del collettore e gruppo ventola/motore
1
2
Sacco filtrante
1
3
Connettore
1
4
Maniglia
1
5
Dadi, viti, rondelle, rondelle elastiche e chiave
52
6
Lampada C per tubo di aspirazione
2
7
Ruota
4
8
Un adattatore C
1
9
Un adattatore F
1
10
Un datore G
1
11
Un adattatore H
1
12
Un daptor I
1
13
Guarnizione
1
1
2
3
4
5
6
7
8
9
12
10
11
13

- 4 -
TECHNICAL DATA
Potenza motore (HP/Watt)
1Hp / 7 50W
Diametro dell'ingresso
(pollici/mm)
4/100
Capacità della borsa (metro
cubo)
21 galloni (80 litri)
Nominativo volume di raccolta:
537 CFM (900 m3/ora) ( 60
Hz )
460 CFM (780 m3/ora) ( 50
Hz )
Connettore del tubo:
100 mm
Dimensioni complessive (LWH)
(mm)
1200*380*480 millimetri
Peso:
16K G
Dimensioni L x P x A:
440*425*440mm

- 5 -
1 Collegamento elettrico
• Il motore funziona sul segnale. Il cavo deve avere una sezione trasversale
di almeno 0,75 mm. In caso di guasto, staccare immediatamente la spina
dalla presa di corrente. Quindi controllare la macchina e correggere
eventuali guasti.
2 Generale
• Non aspirare pezzi di metallo, grossi blocchi di legno o pezzi di listello nel
collettore.
• Utilizzare solo accessori progettati per il DC100M.
• Per raccogliere i trucioli di legno è più efficace utilizzare la cartuccia
filtrante piuttosto che il sacchetto raccoglipolvere.
3 Pulizia
• Il contenitore della polvere deve essere pulito ogni volta che si cambia il
sacco di raccolta.
• Filtri e sacchetti danneggiati devono essere sostituiti immediatamente per
ridurre al minimo la dispersione di polvere nell'area di lavoro.
4 Assemblea
m. Fissare il connettore (N.4) al corpo tramite vite, rondella piana e dado;
n. Fissare la ruota (N.31) alla base (N.32) tramite vite, rondella piana e
dado;
o. Fissare la maniglia (n.38) al corpo;
p. Fissare il sacchetto di raccolta della polvere al connettore (N.4).

- 6 -
PARTS LIST
Articol
o:
Nome:
Articol
o:
Nome:
1
Sacco filtrante
22
Vite autofilettante ST3.5x15
2
Dado M6
23
Vite autofilettante ST4.2x8
3
Rondella Ô 6
24
Interruttore
4
Connettore
25
Semplice lavatrice
5
Guarnizione
26
Pressacavo
6
Bullone M6x20
27
Cavo di alimentazione
7
Piatto
28
Supporto motorio
8
Vite M8 × 10
29
Rondella piana 5
9
Fan
30
Dado M5
10
Piastra di fissaggio
31
Ruota
11
Piatto
32
Base
12
Copertura
dell'alloggiamento della
ventola
33
Dado M8
13
Vite M5×10
34
Rondella elastica Ф8
14
Vite M4×12
35
Il motore
15
Connettore di ingresso
36
Rondella elastica Ф6
16
Rondella elastica Ф4
37
Manicotto della maniglia
17
Dado M4
38
Maniglia
18
bullone M6x20(sinistra)
39
Coperchio del quadro elettrico
19
Vite M8x16
40
Piastra di fissaggio del quadro
elettrico
20
Rondella Ф8
41
Interruttore
- 7 -
21
Alloggiamento della
ventola
- 8 -
CIRCUIT DIAGRAM
SAFETY RULES
61. Leggere e acquisire familiarità con l'intero manuale operativo.
62. Mantenere le protezioni e la copertura in posizione e in ordine.
63. Utilizzare sempre occhiali di sicurezza, utilizzare anche una maschera
facciale o antipolvere se si taglia le operazioni sono polverose. Gli
occhiali da vista di tutti i giorni hanno solo lenti resistenti agli urti; non

- 9 -
sono occhiali di sicurezza.
64. Mantenere pulita l'area di lavoro. Le aree disordinate e le panche
favoriscono gli incidenti.
65. Non forzare gli strumenti. Farà un lavoro migliore e più sicuro alla
velocità per la quale è stato progettato.
66. Evitare avviamenti accidentali. Assicurarsi che l'interruttore sia in
posizione "spento" prima di collegare il cavo.
67. Scollegare gli strumenti prima della manutenzione e quando si
cambiano accessori come lame, punte, frese.
68. Non esagerare. Mantieni sempre il giusto equilibrio e la giusta
posizione. Per una migliore stabilità, indossare calzature con suola in
gomma. Mantenere il pavimento pulito e privo di olio, scarti di legno,
ecc.
69. Indossare un abbigliamento adeguato. Indumenti larghi o gioielli
potrebbero impigliarsi nelle parti in movimento. Indossare una copertura
protettiva per contenere i capelli lunghi.
70. Rendi il workshop a prova di bambino. Posizionare un lucchetto
sull'interruttore quando la sega a lama non è in uso e conservare la
chiave in un luogo sicuro.
71. Revove le chiavi e le chiavi inglesi di regolazione. Prendi l'abitudine di
controllare che le chiavi e le chiavi di regolazione siano rimosse
dall'utensile prima di accenderlo.
72. Evitare ambienti pericolosi. Non utilizzare gli utensili elettrici in luoghi
umidi o bagnati. Mantenere l'area di lavoro ben illuminata e non
utilizzare in atmosfere esplosive (intorno a vernici, liquidi infiammabili,
ecc.)
73. Tenere lontani i bambini. Tutti i visitatori devono essere tenuti a
distanza di sicurezza dall'area di lavoro, soprattutto durante l'utilizzo
dell'unità.

- 10 -
74. Utilizzare lo strumento adeguato. Non forzare l'utensile o l'accessorio
a svolgere un lavoro per il quale non è stato progettato.
75. Mantenere gli strumenti in ottime condizioni. Mantieni gli strumenti
affilati e puliti per prestazioni migliori e più sicure. Seguire le istruzioni
per la lubrificazione e la sostituzione degli accessori.
76. Lavoro sicuro. Se possibile, utilizzare morsetti o una morsa per
trattenere il lavoro. È più sicuro che usare la mano e impedisce che i
pezzi rotondi o di forma irregolare girino.
77. Controllare le parti danneggiate. Prima di utilizzare ulteriormente
l'utensile, è necessario controllare una protezione o un'altra parte
danneggiata per assicurarsi che funzioni correttamente e che esegua la
funzione prevista, controllare l'allineamento delle parti mobili, la rottura
delle parti, il montaggio e qualsiasi altra condizione che possa
influenzarne il funzionamento. operazioni una protezione o altra parte
danneggiata deve essere adeguatamente riparata o sostituita.
78. Utilizzare gli accessori consigliati: consultare il manuale del
proprietario. L'uso di accessori non corretti potrebbe essere pericoloso.
79. Non salire mai sullo strumento. Le lesioni da raffreddore si verificano a
causa di una caduta.
80. Non lasciare mai lo strumento in funzione e incustodito.
21. Rimuovere sempre la spina del cavo dalla presa elettrica durante la
regolazione, la sostituzione delle parti o l'intervento sull'utensile.
22. Rimuovere sempre la spina del cavo dalla presa elettrica durante la
regolazione, la sostituzione delle parti o l'intervento sull'utensile.
Indirizzo: Baoshanqu Shuangchenglu 803long 11hao 1602A-1609shi
Shanghai
Importato in AUS: SIHAO PTY LTD, 1 ROKEVA STREETEASTWOOD
NSW 2122 Australia
Importato negli Stati Uniti: Sanven Technology Ltd, Suite 250, 9166

- 11 -
Anaheim Place, Rancho Cucamonga, CA 91730
REP
EC
SHUNSHUN GmbH
Römeräcker 9 Z2021, 76351
Linkenheim-Hochstetten, Germany
REP
UK
Pooledas Group Ltd
Unit 5 Albert Edward House, The
Pavilions Preston, United Kingdom
Made in China


- 2 -
Técnico Certificado de soporte y garantía electrónica
www.vevor.com/support
COLECTOR DE POLVO
MODELO: DC100M
We continue to be committed to provide you tools with competitive price.
"Save Half", "Half Price" or any other similar expressions used by us only represents an
estimate of savings you might benefit from buying certain tools with us compared to the major
top brands and does not necessarily mean to cover all categories of tools offered by us. You
are kindly reminded to verify carefully when you are placing an order with us if you are
actually saving half in comparison with the top major brands.

3

- 1 -
MODELO: DC100M
Have product questions? Need technical support? Please feel free to
contact us:
Technical Support and E-Warranty Certificate
www.vevor.com/support
NEED HELP? CONTACT US!
This is the original instruction, please read all manual instructions
carefully before operating. VEVOR reserves a clear interpretation of our
user manual. The appearance of the product shall be subject to the
product you received. Please forgive us that we won't inform you again if
there are any technology or software updates on our product.
DUST COLLECTOR

- 2 -
Advertencia: para reducir el riesgo de lesiones, el usuario
debe leer atentamente el manual de instrucciones.
Usando el DC100M
• El colector de polvo DC100M se puede utilizar para aspirar residuos
(virutas, virutas, etc) después de cepillar, fresar y aserrar.
• No utilice el DC100M para tinta o pintura en aerosol, ni sustancias
explosivas como gases • o polvos.
• No está permitida la recogida de astillas y polvo de madera en los locales
industriales.
• Se permite el uso no industrial del mini colector de polvo, excepto por
parte de empleados regulares, personas en formación, escuelas y
situaciones domésticas, u otras personas en una situación • laboral .
•El contenedor de recogida debe vaciarse según sea necesario, pero al
menos después de cada uso.
•La bolsa filtrante debe limpiarse cada vez que se cambia la bolsa para
polvo.
• No opere esta unidad hasta que la manguera de PVC esté instalada en el
puerto de entrada de polvo.
Desembalaje y comprobación del contenido
Desempaque la caja, revise la máquina para ver las piezas que se
enumeran a continuación.

- 3 -
Artíc
ulo
Descripción
CANTID
AD
1
Conjunto de cuerpo colector y ventilador/motor
1
2
bolsa filtrante
1
3
Conector
1
4
Manejar
1
5
Tuercas, tornillos, arandelas, arandelas elásticas y
llave
52
6
C para manguera de succión
2
7
Rueda
4
8
Un adaptador C
1
9
Un adaptador F
1
10
Un adaptador G
1
11
Un adaptador H
1
12
un daptador yo
1
13
Empaquetadura
1
1
2
3
4
5
6
7
8
9
12
10
11
13

- 4 -
TECHNICAL DATA
Potencia del motor (HP/vatio)
1CV / 7 50W
Diámetro de entrada
(pulgadas/mm)
4/100
Capacidad de la bolsa (metro
cúbico)
21 galones (80 litros)
Nom. volumen de colección:
537CFM (900m3/h) ( 60Hz )
460CFM (780m3/h) ( 50Hz )
Conector de la manguera:
100mm
Tamaño total (LWH) (mm)
1200*380*480 milímetros
Peso:
16K G
Dimensiones largo x ancho x
alto:
440*425*440mm

- 5 -
1 conexión eléctrica
• El motor actúa sobre la señal. El cable debe tener una sección transversal
de al menos 0,75 mm. Si ocurre una falla, retire inmediatamente el
enchufe de la toma de corriente. A continuación comprobar la máquina y
subsanar cualquier avería.
2 generales
• No succione piezas de metal, grandes bloques de madera o listones en el
colector.
• Utilice únicamente accesorios diseñados para el DC100M.
• Es más eficaz utilizar el cartucho filtrante que la bolsa para el polvo para
recoger las astillas de madera.
3 limpieza
• El recolector de polvo debe limpiarse cada vez que se cambia la bolsa
recolectora.
• Los filtros y bolsas dañados deben reemplazarse inmediatamente para
minimizar la dispersión de polvo en el área de trabajo.
4 Asamblea
q. Fijar el conector (No.4) al cuerpo mediante tornillo, arandela y tuerca;
r. Fije la rueda (No.31) a la base (No.32) mediante tornillo, arandela
plana y tuerca;
s. Fije la manija (No.38) al cuerpo;
t. Fije la bolsa recolectora de polvo al conector (No.4).

- 6 -
PARTS LIST
Artícul
o:
Nombre:
Artícul
o:
Nombre:
1
bolsa filtrante
22
Tornillo autorroscante
ST3.5x15
2
Tuerca M6
23
Tornillo autorroscante ST4.2x8
3
Lavadora Ф 6
24
Caja de interruptores
4
Conector
25
Arandela
5
Empaquetadura
26
Alivio de tensión
6
Perno M6x20
27
Cable de alimentación
7
Lámina
28
soporte motor
8
Tornillo M8 × 10
29
Arandela plana 5
9
Admirador
30
Tuerca M5
10
Placa de fijación
31
Rueda
11
Lámina
32
Base
12
Tapa de la carcasa del
ventilador
33
Tuerca M8
13
Tornillo M5×10
34
Arandela elástica Ф8
14
Tornillo M4×12
35
Motor
15
Conector de entrada
36
Arandela elástica Ф6
diecisé
is
Arandela elástica Ф4
37
Manga del mango
17
Tuerca M4
38
Manejar
18
perno
M6x20(izquierda)
39
Tapa de la caja de
interruptores
19
Tornillo M8x16
40
Placa de fijación de la caja de
interruptores.

- 7 -
20
Lavadora Ф8
41
Cambiar
21
Carcasa del ventilador

- 8 -
CIRCUIT DIAGRAM
SAFETY RULES
81. Lea y familiarícese con todo el manual de funcionamiento.
82. Mantenga las protecciones y la cubierta en su lugar y en buen estado
de funcionamiento.
83. Utilice siempre gafas de seguridad, utilice también una mascarilla o
una mascarilla antipolvo si corta las operaciones son polvorientas. Los

- 9 -
anteojos de uso diario solo tienen lentes resistentes a los impactos; No
son gafas de seguridad.
84. Mantenga limpia el área de trabajo. Las áreas desordenadas y las
curvas invitan a los accidentes.
85. No fuerces las herramientas. Hará un trabajo mejor y más seguro al
ritmo para el que fue diseñado.
86. Evite el arranque accidental. Asegúrese de que el interruptor esté en
la posición "apagado" antes de enchufar el cable.
87. Desconecte las herramientas antes de realizar tareas de
mantenimiento y cuando cambie accesorios como cuchillas, brocas y
cortadores.
88. No te excedas. Mantenga una posición y equilibrio adecuados en todo
momento. Para un mejor equilibrio, use calzado con suela de goma.
Mantenga el piso limpio o sin aceite, restos de madera, etc.
89. Use ropa adecuada. La ropa suelta o las joyas pueden quedar
atrapadas en las piezas móviles. Use una cobertura protectora para el
cabello para contener el cabello largo.
90. Haga el taller a prueba de niños. Coloque un candado en el interruptor
cuando la sierra de hoja no esté en uso y guarde la llave en un lugar
seguro.
91. Revove las llaves y llaves de ajuste. Adquiera el hábito de comprobar
que las llaves y las llaves de ajuste estén retiradas de la herramienta
antes de encenderla.
92. Evite entornos peligrosos. No utilice herramientas eléctricas en
lugares húmedos o mojados. Mantenga su área de trabajo bien
iluminada, no la utilice en atmósferas explosivas (alrededor de pintura,
líquidos inflamables, etc.)
93. Mantenga a los niños alejados. Todos los visitantes deben
mantenerse a una distancia segura del área de trabajo, especialmente

- 10 -
mientras operan la unidad.
94. Utilice la herramienta adecuada. No fuerce la herramienta o el
accesorio para realizar un trabajo para el cual no fue diseñado.
95. Mantener las herramientas en óptimas condiciones. Mantenga las
herramientas afiladas y limpias para un rendimiento mejor y más seguro.
Siga las instrucciones para lubricar y cambiar los accesorios.
96. Trabajo seguro. Utilice abrazaderas o un tornillo de banco para sujetar
el trabajo, cuando sea práctico. Es más seguro que usar la mano y evita
que giren piezas redondas o de forma irregular.
97. Verifique las piezas dañadas. Antes de seguir utilizando la
herramienta, se debe revisar una protección u otra pieza que esté
dañada para asegurar que funcionará correctamente y realizará su
función prevista. Verifique la alineación de las piezas móviles, rotura de
piezas, montaje y cualquier otra condición que pueda afectar su
operaciones, una protección u otra pieza que esté dañada debe
repararse o reemplazarse adecuadamente.
98. Utilice los accesorios recomendados; consulte el manual del
propietario. El uso de accesorios inadecuados podría ser peligroso.
99. Nunca se pare sobre la herramienta. Las lesiones por frío se producen
por una caída.
100.Nunca deje la herramienta funcionando y desatendida.
21. Siempre retire el enchufe del cable del tomacorriente cuando ajuste,
cambie piezas o trabaje en la herramienta.
22. Siempre retire el enchufe del cable del tomacorriente cuando ajuste,
cambie piezas o trabaje en la herramienta.
Dirección: Baoshanqu Shuangchenglu 803long 11hao 1602A-1609shi
Shanghai
Importado a AUS: SIHAO PTY LTD, 1 ROKEVA STREETEASTWOOD

- 11 -
NSW 2122 Australia
Importado a EE. UU.: Sanven Technology Ltd, Suite 250, 9166 Anaheim
Place, Rancho Cucamonga, CA 91730
REP
EC
SHUNSHUN GmbH
Römeräcker 9 Z2021, 76351
Linkenheim-Hochstetten, Germany
REP
UK
Pooledas Group Ltd
Unit 5 Albert Edward House, The
Pavilions Preston, United Kingdom
Hecho en china


- 2 -
Techniczny Certyfikat wsparcia i e-gwarancji
www.vevor.com/support
ODPYLACZ
MODEL: DC100 M
We continue to be committed to provide you tools with competitive price.
"Save Half", "Half Price" or any other similar expressions used by us only represents an
estimate of savings you might benefit from buying certain tools with us compared to the major
top brands and does not necessarily mean to cover all categories of tools offered by us. You
are kindly reminded to verify carefully when you are placing an order with us if you are
actually saving half in comparison with the top major brands.

3

- 1 -
MODEL: DC100 M
Have product questions? Need technical support? Please feel free to
contact us:
Technical Support and E-Warranty Certificate
www.vevor.com/support
NEED HELP? CONTACT US!
This is the original instruction, please read all manual instructions
carefully before operating. VEVOR reserves a clear interpretation of our
user manual. The appearance of the product shall be subject to the
product you received. Please forgive us that we won't inform you again if
there are any technology or software updates on our product.
DUST COLLECTOR

- 2 -
Ostrzeżenie — aby zmniejszyć ryzyko obrażeń, użytkownik
musi uważnie przeczytać instrukcję obsługi.
Korzystanie z DC100M
• Odpylacz DC100M może służyć do odkurzania odpadów (wiórów, wiórów,
itp.) po struganiu, frezowaniu i piłowaniu.
• Nie używaj DC100M do atramentu, farby w sprayu lub substancji
wybuchowych, • gazów lub proszków.
• W obiektach przemysłowych nie jest dozwolone zbieranie pyłu i wiórów
drzewnych.
• Dopuszczalne jest użytkowanie miniodpylacza w celach
nieprzemysłowych, za wyjątkiem pracowników etatowych, osoby
uczestniczące w szkoleniu, w szkołach i w gospodarstwie domowym lub
inne osoby • pracujące .
•Pojemnik na odpady należy opróżniać w razie potrzeby, ale przynajmniej
po każdym użyciu.
• Worek filtrujący należy czyścić przy każdej wymianie worka na kurz.
• Nie używaj tego urządzenia, dopóki wąż PCV nie zostanie podłączony do
portu wlotu kurzu.
Rozpakowanie i sprawdzenie zawartości
Rozpakuj karton, sprawdź maszynę, aby zobaczyć części wymienione
poniżej.

- 3 -
Przed
miot
Opis
ILOŚĆ
1
Korpus kolektora i zespół wentylatora/silnika
1
2
Worek filtrujący
1
3
Złącze
1
4
Uchwyt
1
5
Nakrętki, śruby, podkładki, podkładki sprężyste i
klucz
52
6
C do węża ssącego
2
7
Koło
4
8
Daptor C _
1
9
Daptor F _
1
10
Daptor G _
1
11
Daptor H _
1
12
Daptor I _
1
13
Uszczelka
1
1
2
3
4
5
6
7
8
9
12
10
11
13

- 4 -
TECHNICAL DATA
Moc silnika (KM/W)
1 KM / 7 50 W
Średnica wlotu (cale/mm)
4/100
Pojemność worka (metr
sześcienny)
21 gal (80 l)
Nie m. objętość kolekcji:
537CFM (900m3/h)
(
60 Hz
)
460CFM (780m3/h)
(
50 Hz
)
Złącze węża:
100mm
Całkowity rozmiar (LWH) (mm)
1200*380*480mm
Waga:
16K G
Wymiary dł. x szer. x wys.:
440*425*440mm

- 5 -
1 Podłączenie elektryczne
• Silnik działa na znaku. Przewód musi mieć przekrój co najmniej 0,75 mm.
W przypadku wystąpienia usterki należy natychmiast wyjąć wtyczkę z
gniazdka elektrycznego. Następnie sprawdź maszynę i usuń wszelkie
usterki.
2 Ogólne
• Nie wciągaj do kolektora kawałków metalu, dużych bloków drewna ani
kawałków listew.
• Używaj wyłącznie akcesoriów przeznaczonych dla DC100M.
• Do zbierania wiórów bardziej efektywne jest użycie wkładu filtra niż worka
na kurz.
3 Czyszczenie
• Po każdej wymianie worka na kurz należy oczyścić pojemnik na kurz.
• Uszkodzone filtry i worki należy natychmiast wymienić, aby
zminimalizować rozprzestrzenianie się pyłu w miejscu pracy.
4 Montaż
u. Przymocuj złącze (nr 4) do korpusu za pomocą śruby, podkładki
zwykłej i nakrętki;
v. Przymocuj koło (nr 31) do podstawy (nr 32) za pomocą śruby,
podkładki gładkiej i nakrętki;
w. Przymocuj uchwyt (nr 38) do korpusu;
x. Przymocuj worek na kurz do złącza (nr 4).

- 6 -
PARTS LIST
Przed
miot:
Nazwa:
Przed
miot:
Nazwa:
1
Worek filtrujący
22
Wkręt samogwintujący
ST3,5x15
2
Nakrętka M6
23
Wkręt samogwintujący
ST4.2x8
3
Podkładka Ф 6
24
Skrzynka z wyłącznikami
4
Złącze
25
Zwykła podkładka
5
Uszczelka
26
Odciążenie
6
Śruba M6x20
27
Kabel zasilający
7
Płyta
28
Wsparcie silnika
8
Śruba M8 × 10
29
Zwykła podkładka 5
9
Wentylator
30
Nakrętka M5
10
Płyta mocująca
31
Koło
11
Płyta
32
Baza
12
Pokrywa obudowy
wentylatora
33
Nakrętka M8
13
Śruba M5×10
34
Podkładka sprężysta Ф8
14
Śruba M4×12
35
Silnik
15
Złącze wlotowe
36
Podkładka sprężysta Ф6
16
Podkładka sprężysta
Ф4
37
Rękaw uchwytu
17
Nakrętka M4
38
Uchwyt
18
śruba M6x20 (lewa)
39
Pokrywa skrzynki rozdzielczej
19
Śruba M8x16
40
Płyta mocująca skrzynki
rozdzielczej
- 7 -
20
Podkładka Ф8
41
Przełącznik
21
Obudowa wentylatora

- 8 -
CIRCUIT DIAGRAM
SAFETY RULES
101.Przeczytaj i zapoznaj się z całą instrukcją obsługi.
102.Utrzymuj osłony i osłony na swoim miejscu i w dobrym stanie.
103.Zawsze używaj okularów ochronnych, a w przypadku cięcia używaj
także maski na twarz lub przeciwpyłowej operacji jest zakurzony.
Okulary przeciwsłoneczne na co dzień mają wyłącznie soczewki

- 9 -
odporne na uderzenia; nie są to okulary ochronne.
104.Utrzymuj miejsce pracy w czystości. Zagracone obszary i zakręty
sprzyjają wypadkom.
105.Nie używaj narzędzi na siłę. Wykona lepszą i bezpieczniejszą pracę w
tempie, do jakiego zostało zaprojektowane.
106.Unikaj przypadkowego uruchomienia. Przed podłączeniem przewodu
upewnij się, że przełącznik znajduje się w pozycji „wyłączony”.
107.Odłącz narzędzia przed serwisowaniem i przy wymianie akcesoriów,
takich jak ostrza, wiertła, obcinaki.
108.Nie przesadzaj. Przez cały czas utrzymuj prawidłową postawę i
równowagę. Aby uzyskać najlepszą stopę, noś obuwie na gumowej
podeszwie. Utrzymuj podłogę w czystości, olej, złom drewna itp.
109.Noś odpowiednią odzież. Luźna odzież lub biżuteria mogą zostać
wciągnięte przez ruchome części. W przypadku długich włosów należy
nosić osłonę ochronną na włosy.
110.Spraw, aby warsztaty były bezpieczne dla dzieci. Załóż kłódkę na
wyłącznik, gdy piła tarczowa nie jest używana, a klucz przechowuj w
bezpiecznym miejscu.
111. Odkręć klucze regulacyjne i klucze. Wykształć w sobie nawyk
sprawdzania, czy klucze i klucze regulacyjne zostały wyjęte z narzędzia
przed jego włączeniem.
112.Unikaj niebezpiecznego środowiska. Nie używaj elektronarzędzi w
wilgotnych lub mokrych miejscach. Utrzymuj miejsce pracy dobrze
oświetlone. Nie używaj w atmosferze wybuchowej (w pobliżu farby,
łatwopalnych cieczy itp.).
113.Trzymaj dzieci z daleka. Wszyscy odwiedzający powinni zachować
bezpieczną odległość od miejsca pracy, zwłaszcza podczas obsługi
urządzenia.
114.Użyj odpowiedniego narzędzia. Nie zmuszaj narzędzia ani osprzętu do

- 10 -
wykonywania zadań, do których nie zostało zaprojektowane.
115.Utrzymuj narzędzia w doskonałym stanie. Aby zapewnić najlepszą i
najbezpieczniejszą pracę, narzędzia należy utrzymywać ostre i czyste.
Postępuj zgodnie z instrukcjami dotyczącymi smarowania i wymiany
akcesoriów.
116.Bezpieczna praca. Jeśli jest to praktyczne, użyj zacisków lub imadła
do przytrzymania pracy. Jest to bezpieczniejsze niż używanie dłoni i
zapobiega obracaniu się okrągłych lub nieregularnych kawałków.
117.Sprawdź uszkodzone części. Przed dalszym użyciem narzędzia
należy sprawdzić osłonę lub inną uszkodzoną część, aby upewnić się,
że będzie działać prawidłowo i wykonać zamierzone działanie,
sprawdzić ustawienie ruchomych części, pęknięcie części, montaż i
wszelkie inne warunki, które mogą mieć wpływ na jego działanie.
operacji, osłonę lub inną uszkodzoną część należy odpowiednio
naprawić lub wymienić.
118.Używaj zalecanych akcesoriów – zapoznaj się z instrukcją obsługi.
Używanie niewłaściwych akcesoriów może być niebezpieczne.
119.Nigdy nie stawaj na narzędziu. Do urazów przeziębienia dochodzi w
wyniku upadku.
120.Nigdy nie pozostawiaj narzędzia uruchomionego i bez nadzoru.
21. Zawsze odłączaj wtyczkę przewodu od gniazdka elektrycznego
podczas regulacji, wymiany części lub pracy przy narzędziu.
22. Zawsze odłączaj wtyczkę przewodu od gniazdka elektrycznego
podczas regulacji, wymiany części lub pracy przy narzędziu.
Adres: Baoshanqu Shuangchenglu 803long 11hao 1602A-1609shi
Szanghaj
Import do AUS: SIHAO PTY LTD, 1 ROKEVA STREETEASTWOOD NSW
2122 Australia
Import do USA: Sanven Technology Ltd, Suite 250, 9166 Anaheim Place,

- 11 -
Rancho Cucamonga, CA 91730
REP
EC
SHUNSHUN GmbH
Römeräcker 9 Z2021, 76351
Linkenheim-Hochstetten, Germany
REP
UK
Pooledas Group Ltd
Unit 5 Albert Edward House, The
Pavilions Preston, United Kingdom
Wyprodukowano w Chinach


- 2 -
Technisch Ondersteuning en e-garantiecertificaat
www.vevor.com/support
STOF VERZAMELAAR
MODEL: DC100 M
We continue to be committed to provide you tools with competitive price.
"Save Half", "Half Price" or any other similar expressions used by us only represents an
estimate of savings you might benefit from buying certain tools with us compared to the major
top brands and does not necessarily mean to cover all categories of tools offered by us. You
are kindly reminded to verify carefully when you are placing an order with us if you are
actually saving half in comparison with the top major brands.

3

- 1 -
MODEL: DC100 M
Have product questions? Need technical support? Please feel free to
contact us:
Technical Support and E-Warranty Certificate
www.vevor.com/support
NEED HELP? CONTACT US!
This is the original instruction, please read all manual instructions
carefully before operating. VEVOR reserves a clear interpretation of our
user manual. The appearance of the product shall be subject to the
product you received. Please forgive us that we won't inform you again if
there are any technology or software updates on our product.
DUST COLLECTOR

- 2 -
Waarschuwing-Om het risico op letsel te verminderen, moet
de gebruiker de handleiding zorgvuldig lezen.
Gebruik van de DC100M
• De DC100M stofafscheider kan worden gebruikt voor het opzuigen van
afval (spanen, spaanders, etc) na het schaven, frezen en zagen.
• Gebruik de DC100M niet voor inkt- of verfspray, of explosieve stoffen
zoals • gassen of poeders.
• Het verzamelen van houtstof en spanen is niet toegestaan in
bedrijfspanden.
• Niet-industrieel gebruik van de mini-stofafscheider is toegestaan, behalve
door vaste medewerkers, mensen in opleiding, scholen en thuissituaties,
of andere mensen in een • arbeidssituatie .
•De verzamelcontainer moet indien nodig, maar in ieder geval na elk
gebruik, worden geleegd.
•De filterzak moet elke keer dat de stofzak wordt vervangen, worden
gereinigd.
• Bedien dit apparaat niet voordat de pvc-slang op de stofinlaatpoort is
geïnstalleerd.
Uitpakken en inhoud controleren
Pak de doos uit, controleer de machine en bekijk de onderstaande
onderdelen.

- 3 -
Item
Beschrijving
AANTAL
1
Collectorlichaam en ventilator/motorconstructie
1
2
Filterzak
1
3
Connector
1
4
Hendel
1
5
Moeren, schroeven, ringen, veerringen en
moersleutel
52
6
C- lamp voor zuigslang
2
7
Wiel
4
8
Een Dapper C
1
9
Een daptor F
1
10
Een daptor G
1
11
Een daptor H
1
12
Een daptor I
1
13
Pakking
1
1
2
3
4
5
6
7
8
9
12
10
11
13

- 4 -
TECHNICAL DATA
Motorvermogen (PK/Watt)
1 pk / 7 50 W
Inlaatdiameter (inch/mm)
4/100
Zakcapaciteit (kubieke meter)
21 gal (80L)
Nom. inzamelvolume:
537CFM (900m3/u) ( 60Hz )
460CFM (780m3/u) ( 50Hz )
Slangaansluiting:
100 mm
Totale maat (LWH) (mm)
1200*380*480 mm
Gewicht:
16K G
Afmetingen L x B x H:
440*425*440mm

- 5 -
1 Elektrische aansluiting
• De motor werkt op het bord. Het snoer moet een doorsnede van minimaal
0,75 mm hebben. Als er een storing optreedt, haal dan onmiddellijk de
stekker uit het stopcontact. Controleer vervolgens de machine en verhelp
eventuele storingen.
2 Algemeen
• Zuig geen stukken metaal, grote blokken hout of stukken lat in de collector.
• Gebruik uitsluitend accessoires die voor de DC100M zijn ontworpen.
• Het is efficiënter om de filterpatroon te gebruiken dan de stofzak om
houtsnippers op te vangen.
3 Reiniging
• De stofafscheider moet elke keer dat de opvangzak wordt vervangen,
worden gereinigd.
• Beschadigde filters en zakken moeten onmiddellijk worden vervangen om
de verspreiding van stof in de werkomgeving te minimaliseren.
4 Montage
y. Bevestig de connector (nr. 4) aan de behuizing met een schroef,
sluitring en moer;
z. Bevestig het wiel (nr. 31) aan de basis (nr. 32) met een schroef,
sluitring en moer;
aa. Bevestig handvat (nr. 38) aan het lichaam;
ab. Bevestig de stofopvangzak aan de connector (nr. 4).

- 6 -
PARTS LIST
Item:
Naam:
Item:
Naam:
1
Filterzak
22
Zelftappende schroef
ST3,5x15
2
Moer M6
23
Zelftappende schroef ST4,2x8
3
Sluitring Ф 6
24
Schakelkast
4
Connector
25
Gewone sluitring
5
Pakking
26
Trekontlasting
6
Bout M6x20
27
Stroomdraad
7
Bord
28
Motorische ondersteuning
8
Schroef M8 × 10
29
Gewone sluitring 5
9
Fan
30
Moer M5
10
Bevestigingsplaat
31
Wiel
11
Bord
32
Baseren
12
Afdekking van
ventilatorhuis
33
Moer M8
13
Schroef M5×10
34
Veerring Ф8
14
Schroef M4×12
35
Motor
15
Inlaatconnector
36
Veerring Ф6
16
Veerring Ф4
37
Handvat mouw
17
Moer M4
38
Hendel
18
bout M6x20(links)
39
Deksel van schakelkast
19
Schroef M8x16
40
Bevestigingsplaat van
schakelkast
20
Sluitring Ф8
41
Schakelaar
21
Behuizing ventilator
- 7 -
- 8 -
CIRCUIT DIAGRAM
SAFETY RULES
121.Lees en maak uzelf vertrouwd met de gehele bedieningshandleiding.
122.Houd de beschermkappen en afdekking op hun plaats en in goede
staat.
123.Gebruik altijd een veiligheidsbril en gebruik bij het snijden ook een
gezichts- of stofmasker werkzaamheden zijn stoffig. Dagelijkse
vooravondbrillen hebben alleen een slagvaste lens; het zijn geen
veiligheidsbrillen.

- 9 -
124.Houd de werkplek schoon. Rommelige ruimtes en bankjes nodigen uit
tot ongelukken.
125.Forceer geen gereedschap. Het zal beter en veiliger werk leveren in
het tempo waarvoor het is ontworpen.
126.Voorkom onbedoeld starten. Zorg ervoor dat de schakelaar in de
“uit”-stand staat voordat u de stekker in het stopcontact steekt.
127.Koppel het gereedschap los voordat u onderhoud uitvoert en wanneer
u accessoires vervangt, zoals messen, bits en frezen.
128.Overdrijf niet. Zorg ervoor dat u altijd goed staat en in evenwicht blijft.
Draag voor de beste grip schoenen met rubberen zolen. Houd de vloer
vrij van olie, sloophout enz.
129.Draag geschikte kleding. Losse kleding of sieraden kunnen vast
komen te zitten in bewegende delen. Draag een beschermende
haarbedekking om lang haar tegen te houden.
130.Maak workshop kindproof. Plaats een hangslot op de schakelaar als
de zaag niet in gebruik is en bewaar de sleutel op een veilige plaats.
131.Draai de stelsleutels en moersleutels om. Maak er een gewoonte van
om te controleren of de sleutels en stelsleutels van het gereedschap zijn
verwijderd voordat u het inschakelt.
132.Vermijd gevaarlijke omgeving. Gebruik geen elektrisch gereedschap
op vochtige of natte locaties. Houd uw werkgebied goed verlicht.
Gebruik het apparaat niet in een explosieve atmosfeer (in de buurt van
verf, brandbare vloeistoffen, etc.)
133.Houd kinderen uit de buurt. Alle bezoekers moeten op veilige afstand
van de werkplek worden gehouden, vooral tijdens het bedienen van de
unit.
134.Gebruik het juiste gereedschap. Forceer het gereedschap of hulpstuk
niet bij werkzaamheden waarvoor het niet is ontworpen.
135.Houd gereedschap in topconditie. Houd gereedschap scherp en

- 10 -
schoon voor de beste en veiligste prestaties. Volg de instructies voor het
smeren en vervangen van accessoires.
136.Veilig werken. Gebruik klemmen of een bankschroef om het werk vast
te houden, indien praktisch mogelijk. Het is veiliger dan met de hand en
voorkomt dat ronde of onregelmatig gevormde stukken gaan draaien.
137.Controleer beschadigde onderdelen. Voordat u het gereedschap
verder gaat gebruiken, moet een beschermkap of ander onderdeel dat
beschadigd is, worden gecontroleerd om er zeker van te zijn dat deze
naar behoren werkt en de beoogde functie uitvoert. Controleer de
uitlijning van bewegende delen, breuk van onderdelen, montage en
andere omstandigheden die de werking ervan kunnen beïnvloeden.
werkzaamheden moet een beschermkap of een ander onderdeel dat
beschadigd is, op de juiste manier worden gerepareerd of vervangen.
138.Gebruik de aanbevolen accessoires – raadpleeg de
gebruikershandleiding. Het gebruik van onjuiste accessoires kan
gevaarlijk zijn.
139.Ga nooit op het gereedschap staan. Letselkoude ontstaat door een
val.
140.Laat het gereedschap nooit onbeheerd achter.
21. Haal altijd de stekker uit het stopcontact als u aanpassingen doet,
onderdelen verwisselt of aan het gereedschap werkt.
22. Haal altijd de stekker uit het stopcontact als u aanpassingen doet,
onderdelen verwisselt of aan het gereedschap werkt.
Adres: Baoshanqu Shuangchenglu 803long 11hao 1602A-1609shi
Shanghai
Geïmporteerd naar AUS: SIHAO PTY LTD, 1 ROKEVA
STREETEASTWOOD NSW 2122 Australië
Geïmporteerd naar de VS: Sanven Technology Ltd, Suite 250, 9166
Anaheim Place, Rancho Cucamonga, CA 91730

- 11 -
REP
EC
SHUNSHUN GmbH
Römeräcker 9 Z2021, 76351
Linkenheim-Hochstetten, Germany
REP
UK
Pooledas Group Ltd
Unit 5 Albert Edward House, The
Pavilions Preston, United Kingdom
Gemaakt in China


- 2 -
Teknisk Support och e-garanticertifikat
www.vevor.com/support
DAMMUPPSAMLARE
MODELL: DC100 M
We continue to be committed to provide you tools with competitive price.
"Save Half", "Half Price" or any other similar expressions used by us only represents an
estimate of savings you might benefit from buying certain tools with us compared to the major
top brands and does not necessarily mean to cover all categories of tools offered by us. You
are kindly reminded to verify carefully when you are placing an order with us if you are
actually saving half in comparison with the top major brands.

3

- 1 -
MODELL: DC100 M
Have product questions? Need technical support? Please feel free to
contact us:
Technical Support and E-Warranty Certificate
www.vevor.com/support
NEED HELP? CONTACT US!
This is the original instruction, please read all manual instructions
carefully before operating. VEVOR reserves a clear interpretation of our
user manual. The appearance of the product shall be subject to the
product you received. Please forgive us that we won't inform you again if
there are any technology or software updates on our product.
DUST COLLECTOR

- 2 -
Varning - För att minska risken för skada måste användaren
läsa instruktionerna noggrant.
Använder DC100M
• Dammuppsamlaren DC100M kan användas för att dammsuga upp avfall
(spån, spån, etc) efter hyvling, fräsning och sågning.
• Använd inte DC100M för bläck eller färgspray, eller explosiva ämnen som
gaser • eller pulver.
• Samling av trädamm och spån är inte tillåten i industrilokaler.
• Icke-industriell användning av minidammuppsamlaren är tillåten, förutom
av vanliga anställda, personer i utbildning, skolor och hemsituationer
eller andra personer i en arbetssituation .
•Uppsamlingsbehållaren ska tömmas vid behov, men åtminstone efter
varje användning.
•Filtreringspåsen ska rengöras varje gång dammpåsen byts.
• Använd inte denna enhet förrän pvc-slangen är installerad på
damminloppsporten.
Packar upp och kontrollerar innehållet
Packa upp kartongen, kontrollera maskinen för att se delarna som listas
nedan.

- 3 -
Artik
el
Beskrivning
ANTAL
1
Samlarkropp & fläkt/motorenhet
1
2
Filterpåse
1
3
Anslutning
1
4
Hantera
1
5
Muttrar, skruvar, brickor, fjäderbrickor och
skiftnyckel
52
6
C -lampa för sugslang
2
7
Hjul
4
8
En daptor C
1
9
En daptor F
1
10
En daptor G
1
11
En daptor H
1
12
En daptor I
1
13
Packning
1
1
2
3
4
5
6
7
8
9
12
10
11
13

- 4 -
TECHNICAL DATA
Motoreffekt (HP/Watt)
1Hp / 7 50W
Inloppsdiameter (tum/mm)
4/100
Påskapacitet (kubikmeter)
21 gal (80L)
Nom. samlingsvolym:
537CFM (900m3/h)
(
60Hz
)
460CFM (780m3/h)
(
50Hz
)
Slangkoppling:
100 mm
Total storlek (LWH) (mm)
1200*380*480 mm
Vikt:
16K G
Mått L x B x H:
440*425*440mm

- 5 -
1 Elanslutning
• Motorn fungerar på skylten. Sladden måste vara minst 0,75 mm i tvärsnitt.
Om ett fel uppstår, dra omedelbart ut kontakten ur eluttaget. Kontrollera
sedan maskinen och åtgärda eventuella fel.
2 Allmänt
• Sug inte in metallbitar, stora träblock eller läktbitar i uppsamlaren.
• Använd endast tillbehör avsedda för DC100M.
• Det är mer effektivt att använda filterpatronen än dammpåsen för att samla
upp träflis.
3 Rengöring
• Dammuppsamlaren ska rengöras varje gång uppsamlingspåsen byts.
• Skadade filter och påsar måste bytas ut omedelbart för att minimera
dammspridning i arbetsområdet.
4 Montering
ac. Fäst anslutningen (nr.4) till kroppen med skruv, vanlig bricka och
mutter;
ad. Fäst hjulet (nr 31) på basen (nr 32) med skruv, vanlig bricka och
mutter;
ae. Fäst handtaget (nr 38) på kroppen;
af. Fäst dammuppsamlingspåsen på kontakten (nr 4).

- 6 -
PARTS LIST
Artikel:
Namn:
Artikel:
Namn:
1
Filterpåse
22
Självgängande skruv
ST3,5x15
2
Mutter M6
23
Självgängande skruv ST4.2x8
3
Bricka Ф 6
24
Byt låda
4
Anslutning
25
Vanlig bricka
5
Packning
26
Dragavlastning
6
Bult M6x20
27
Strömsladd
7
Tallrik
28
Motorstöd
8
Skruv M8 × 10
29
Vanlig bricka 5
9
Fläkt
30
Mutter M5
10
Fästplatta
31
Hjul
11
Tallrik
32
Bas
12
Kåpa till fläkthus
33
Mutter M8
13
Skruv M5×10
34
Fjäderbricka Ф8
14
Skruv M4×12
35
Motor
15
Inloppskontakt
36
Fjäderbricka Ф6
16
Fjäderbricka Ф4
37
Handtagshylsa
17
Mutter M4
38
Hantera
18
bult M6x20 (vänster)
39
Kåpa till kopplingsdosa
19
Skruv M8x16
40
Fästplatta för kopplingsdosa
20
Bricka Ф8
41
Växla
21
Fläkthus
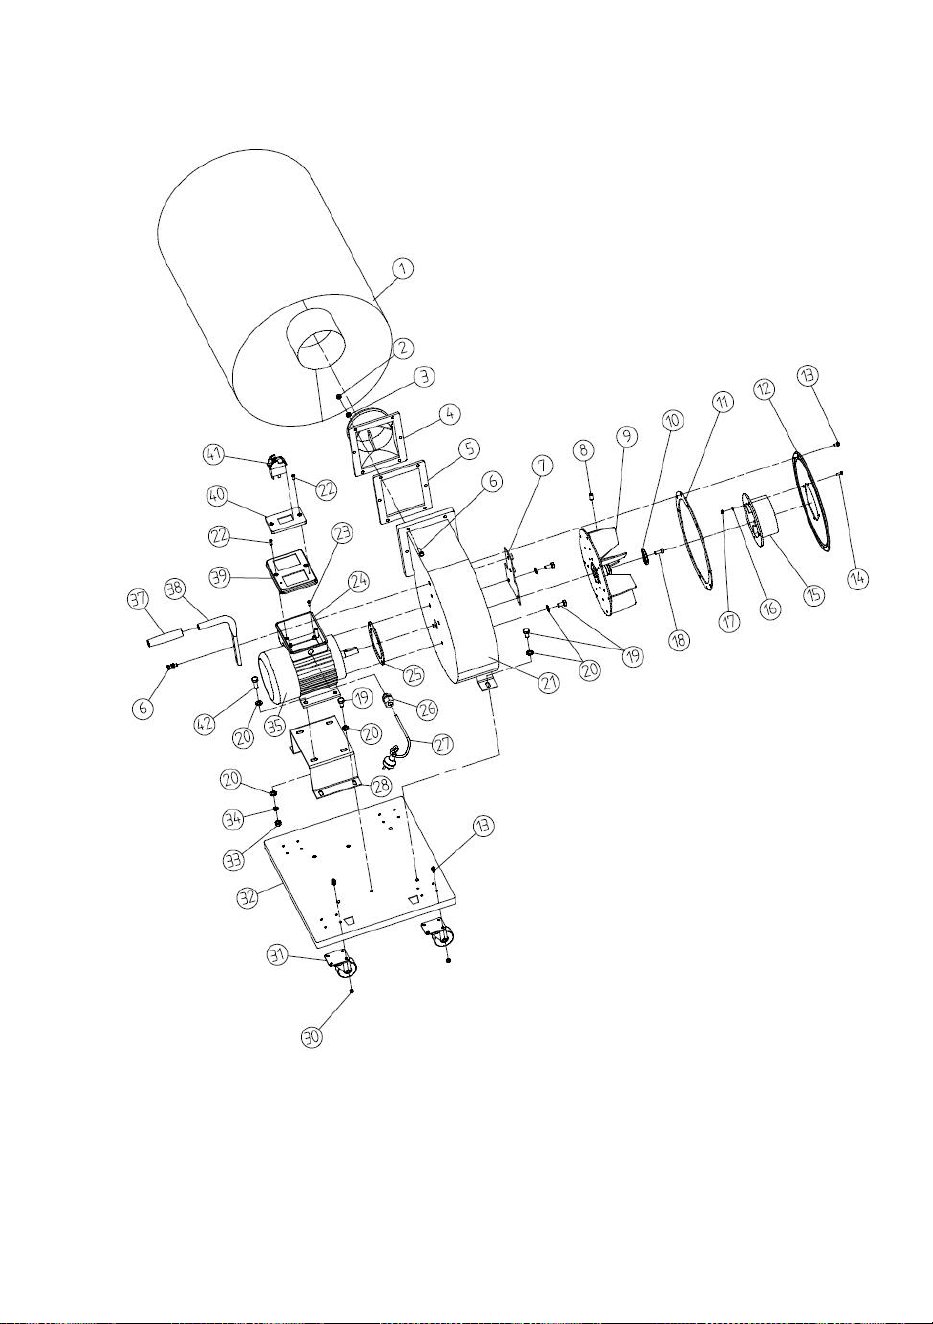
- 7 -

- 8 -
CIRCUIT DIAGRAM
SAFETY RULES
141.Läs och bekanta dig med hela bruksanvisningen.
142.Håll skydd och skydd på plats och i fungerande skick.
143.Använd alltid skyddsglasögon, använd även ansikts- eller dammmask
vid skärning verksamheten är dammig. Vardagsglasögon har bara
slagtåliga glas; de är inte skyddsglasögon.
144.Håll arbetsområdet rent. Röriga områden och bänkar leder till olyckor.
145.Tvinga inte verktyg. Det kommer att göra ett bättre och säkrare jobb i

- 9 -
den takt som den är designad för.
146.Undvik oavsiktlig start. Se till att strömbrytaren är i "off"-läge innan du
ansluter sladden.
147.Koppla bort verktyg före service och när du byter tillbehör som knivar,
bits, fräsar.
148.Överdriv inte. Håll alltid rätt fotfäste och balans. För bästa fotslitage
skodon med gummisulor. Håll golvet rent eller olja, skrot, etc.
149.Bär ordentliga kläder. Lösa kläder eller smycken kan fastna i rörliga
delar. Bär skyddande hårskydd för att innehålla långt hår.
150.Gör verkstaden barnsäker. Placera ett hänglås på strömbrytaren när
bladsågen inte används och förvara nyckeln på en säker plats.
151.Revove justeringsnycklar och skiftnycklar. Ta för vana att kontrollera
att nycklar och justeringsnycklar tas bort från verktyget innan du slår på
det.
152.Undvik farlig miljö. Använd inte elverktyg på fuktiga eller våta platser.
Håll ditt arbetsområde väl upplyst och använd inte i explosiv atmosfär
(runt färg, brandfarliga vätskor, etc.)
153.Håll barn borta. Alla besökare bör hållas på säkert avstånd från
arbetsområdet, särskilt när enheten används.
154.Använd rätt verktyg. Tvinga inte verktyg eller tillbehör att utföra ett jobb
som det inte är designat för.
155.Håll verktygen i toppskick. Håll verktygen skarpa och rena för bästa
och säkraste prestanda. Följ instruktionerna för smörjning och byte av
tillbehör.
156.Säkert arbete. Använd klämmor eller ett skruvstäd för att hålla arbetet,
när det är praktiskt. Det är säkrare än att använda handen och förhindrar
att runda eller oregelbundet formade bitar vrids.
157.Kontrollera skadade delar. Innan du använder verktyget ytterligare, bör

- 10 -
ett skydd eller annan del som är skadad kontrolleras för att säkerställa
att den fungerar korrekt och utför sin avsedda funktionskontroll för
inriktning av rörliga delar, brott på delar, montering, andra förhållanden
som kan påverka dess operationer bör ett skydd eller annan del som är
skadad repareras eller bytas ut.
158.Använd rekommenderade tillbehör - se bruksanvisningen. Användning
av felaktiga tillbehör kan vara farligt.
159.Stå aldrig på verktyget. Skada kyla uppstå från ett fall.
160.Lämna aldrig verktyget igång och obevakat.
21. Dra alltid ut sladden från eluttaget när du justerar, byter delar eller
arbetar med verktyget.
22. Dra alltid ut sladden från eluttaget när du justerar, byter delar eller
arbetar med verktyget.
Adress: Baoshanqu Shuangchenglu 803long 11hao 1602A-1609shi
Shanghai
Importerad till AUS: SIHAO PTY LTD, 1 ROKEVA STREETEASTWOOD
NSW 2122 Australien
Importerad till USA: Sanven Technology Ltd, Suite 250, 9166 Anaheim
Place, Rancho Cucamonga, CA 91730
REP
EC
SHUNSHUN GmbH
Römeräcker 9 Z2021, 76351
Linkenheim-Hochstetten, Germany
REP
UK
Pooledas Group Ltd
Unit 5 Albert Edward House, The
Pavilions Preston, United Kingdom
Tillverkad i Kina