ENGLISH
Read these instructions carefully before using your appliance, and keep it carefully.
If you follow the instructions, your appliance will provide you with many years of good service.
MODEL NUMBER SERIES
FDWBI8041-18S | FDWBI8041-18BLK | FDWBI8041-18WHT
INSTRUCTION MANUAL
DISHWASHER
01/2024

Thank you for purchasing a Frono product. Please read the entire instruction manual before operating your new
appliance for the first time. Whether you are an occasional user or an expert, it will be beneficial to familiarize yourself
with the safety practices, features, operation and care recommendations of your appliance.
Both the model and serial number are listed inside the product. For warranty purposes, you will also need the date of
purchase .
Services in Canada and Untied States
Keep the instruction manual handy to answer your questions. If you don’t understand something or need more
assistance, please visit our website for fast support. Please provide us your name, number, address,serial number
of the product that troubleshooting, proof of purchase, and a short description of the issue. A customer service
representative will contact you as soon as possible. All warranty work needs to be authorized by FORNO customer
service. All our authorized service providers are carefully selected and rigorously trained by us.
Product Information Service Information
Model Number : _________________________________________
Use these numbers in any
correspondence or services calls
concerning your product.
If you received a damaged product,
immediately contact Forno.
To save time and money, before
you call for serviced, check the
troubleshooting guide. It listed the
causes of minor operation problems
that you can correct yourself.
Serial Number : __________________________________________
Date of Purchase :________________________________________
Purchase Address And Phone : _____________________________
_______________________________________________________
_______________________________________________________
Customer Care
“Need some quick help? Simply scan the qr code and get access
to our fast support form. We’re always here to assist you with any
questions or concerns you may have. So, don’t hesitate to reach out!”
2

:KDWWKLVOLPLWHGZDUUDQW\FRYHUV
7KH:DUUDQW\FRYHUDJHSURYLGHGE\)RUQR$SSOLDQFHVLQWKLVVWDWHPHQWDSSOLHVH[FOXVLYHO\WRWKHRULJLQDO)RUQR
DSSOLDQFH ³3URGXFW´ VROG WR WKH FRQVXPHU ³3XUFKDVHU´ E\ DQ DXWKRUL]HG )RUQR GHDOHUGLVWULEXWRUUHWDLOHU
SXUFKDVHGDQGLQVWDOOHGLQWKH8QLWHG6WDWHVRU&DQDGDDQGZKLFKKDVDOZD\VUHPDLQHGZLWKLQWKHRULJLQDO
FRXQWU\RISXUFKDVHWKH8QLWHG6WDWHVRU&DQDGD:DUUDQW\FRYHUDJHLVDFWLYDWHGRQWKHGDWHRIWKH3URGXFWV
RULJLQDOUHWDLOSXUFKDVHDQGKDVDGXUDWLRQRIWZR\HDUV
:DUUDQW\ FRYHUDJH LV QRQWUDQVIHUDEOH ,Q WKH HYHQW RI UHSODFHPHQW RI SDUWV RU RI WKH HQWLUH SURGXFW WKH
UHSODFHPHQW3URGXFWRUSDUWVVKDOODVVXPHWKHUHPDLQLQJRULJLQDO:DUUDQW\DFWLYDWHGZLWKWKHRULJLQDOUHWDLO
SXUFKDVHGRFXPHQW7KLV:DUUDQW\VKDOOQRWEHH[WHQGHGZLWKUHVSHFWWRVXFKUHSODFHPHQW)RUQR$SSOLDQFHV
ZLOOUHSDLURUUHSODFHDQ\FRPSRQHQWSDUWZKLFKIDLOVRUSURYHVGHIHFWLYHGXHWRPDWHULDOVDQGRUZRUNPDQVKLS
ZLWKLQ \HDUV RI WKH GDWH RI WKH RULJLQDO UHWDLO SXUFKDVH DQG XQGHU FRQGLWLRQV RI RUGLQDU\ UHVLGHQWLDO
QRQFRPPHUFLDOXVH5HSDLURUUHSODFHPHQWZLOOEHIUHHRIFKDUJHLQFOXGLQJODERUDWVWDQGDUGUDWHVDQGVKLSSLQJ
H[SHQVHV3XUFKDVHULVUHVSRQVLEOHIRUPDNLQJWKH3URGXFWUHDVRQDEO\DFFHVVLEOHIRUVHUYLFH5HSDLUVHUYLFH
PXVWEHSHUIRUPHGE\D)RUQR$XWKRUL]HG6HUYLFHFRPSDQ\GXULQJQRUPDOZRUNLQJKRXUV
,03257$17
5HWDLQSURRIRIRULJLQDOSXUFKDVHWRHVWDEOLVKZDUUDQW\SHULRG)RUQR¶VOLDELOLW\RQDQ\FODLPRIDQ\NLQGZLWK
UHVSHFWWRWKHJRRGVDQGRUVHUYLFHVSURYLGHGVKDOOLQQRHYHQWH[FHHGWKHYDOXHRIWKHJRRGVRUVHUYLFHRUSDUW
WKHUHRIZKLFKKDVJLYHQULVHWRWKHFODLP
'D\&RVPHWLF:DUUDQW\
7KH3XUFKDVHUPXVWLQVSHFWWKHSURGXFWDWWKHWLPHRIGHOLYHU\)RUQRZDUUDQWVWKDWWKH3URGXFWLVIUHHIURP
PDQXIDFWXULQJGHIHFWVLQPDWHULDOVDQGZRUNPDQVKLSIRUDSHULRGRIWKLUW\GD\VIURPGDWHRIWKHRULJLQDOUHWDLO
SXUFKDVHRIWKH3URGXFW
7KLVFRYHUDJHLQFOXGHV
3DLQWEOHPLVKHV
&KLSV
0DFURVFRSLFILQLVKGHIHFWV
&RVPHWLFZDUUDQW\GRHV127FRYHU
! LVVXHVUHVXOWLQJIURPLQFRUUHFWWUDQVSRUWKDQGOLQJDQGRULQVWDOODWLRQHJGHQWVEURNHQZDUSHGRUGHIRUPHG
VWUXFWXUHVRUFRPSRQHQWVFUDFNHGRURWKHUZLVHGDPDJHGJODVVFRPSRQHQWV
! VOLJKWFRORUYDULDWLRQVRQSDLQWHGHQDPHOHGFRPSRQHQWV
! GLIIHUHQFHVFDXVHGE\QDWXUDORUDUWLILFLDOOLJKWLQJORFDWLRQRURWKHUDQDORJRXVIDFWRUV
! VWDLQVFRUURVLRQGLVFRORUDWLRQFDXVHGE\H[WHUQDOVXEVWDQFHVDQGRUHQYLURQPHQWDOIDFWRUV
! ODERU FRVWV GLVSOD\ IORRU %VWRFN RXWRIER[³DVLV´DSSOLDQFHVDQGGHPRXQLWV
+RZWRUHFHLYHVHUYLFH
7RUHFHLYHZDUUDQW\VHUYLFHVWKH3XUFKDVHUPXVWFRQWDFWWKH)RUQR6XSSRUWGHSDUWPHQWLQRUGHUWRGHWHUPLQH
WKHSUREOHPDQGWKHUHTXLUHGVHUYLFHSURFHGXUHV7URXEOHVKRRWLQJZLWKDFXVWRPHUVHUYLFHUHSUHVHQWDWLYHZLOOEH
QHFHVVDU\ EHIRUH PRYLQJ IRUZDUG ZLWK WKH VHUYLFH 0RGHO QXPEHU VHULDO QXPEHU DQG GDWH RI RULJLQDO UHWDLO
SXUFKDVHZLOOEHUHTXHVWHG
:DUUDQW\

7+(5($5(12(;35(66:$55$17,(627+(57+$17+26(/,67('$1''(6&5,%('$%29($1'12
:$55$17,(6 (,7+(5 (;35(66 25 ,03/,(' ,1&/8',1* %87 127 /,0,7(' 72 $1< ,03/,('
:$55$17,(62)0(5&+$17$%,/,7<25),71(66)25$3$57,&8/$5385326(7+$76+$//$33/<
$)7(57+((;35(66:$55$17<3(5,2'667$7('$%29($1'1227+(5(;35(66:$55$17<25
*8$5$17(( *,9(1 %< $1< 3(5621 ),50 25 &25325$7,21 :,7+ 5(63(&7 72 7+,6 352'8&7
6+$//%(%,1',1*21)2512)25126+$//127%(/,$%/()25/2662)5(9(18(25352),76
)$,/85(725($/,=(6$9,1*62527+(5%(1(),767,0($:$<)520:25.0($/6/2662))22'
25%(9(5$*(675$9(/,1*25+27(/(;3(16(6(;3(16(6725(1725385&+$6($33/,$1&(6
5(02'(/,1*&216758&7,21(;3(16(6,1(;&(662)',5(&7'$0$*(6:+,&+$5(81'(1,$%/<
&$86(' (;&/86,9(/< %< )2512 25 $1< 27+(5 63(&,$/ ,1&,'(17$/ 25 &216(48(17,$/
'$0$*(6&$86('%<7+(86(0,686(25,1$%,/,7<7286(7+,6352'8&75(*$5'/(662)7+(
/(*$/7+(25<21:+,&+7+(&/$,0,6%$6('$1'(9(1,))2512+$6%((1$'9,6('2)7+(
3266,%,/,7<2)68&+'$0$*(61256+$//5(&29(5<2)$1<.,1'$*$,167)2512%(*5($7(5
,1 $02817 7+$1 7+( 385&+$6( 35,&( 2) 7+( 352'8&7 62/' %< )2512 $1' &$86,1* 7+(
$//(*(''$0$*(:,7+28735(-8',&(727+()25(*2,1*385&+$6(5$6680(6$//5,6.$1'
/,$%,/,7< )25/266'$0$*( 25 ,1-85< 72 385&+$6(5$1' 385&+$6(5¶6 3523(57< $1' 72
27+(56$1'7+(,53523(57<$5,6,1*)5207+(86(0,686(25,1$%,/,7<7286(7+,6352'8&7
62/' %< )2512 7+$7 ,6 127 $ ',5(&7 5(68/7 2) 1(*/,*(1&( 21 7+( 3$57 2) )2512 7+,6
/,0,7(':$55$17<6+$// 127(;7(1'72$1<21( 27+(57+$17+(25,*,1$/385&+$6(5 2)
7+,6352'8&7,612175$16)(5$%/($1'67$7(6<285(;&/86,9(5(0('<
! 8VH RI WKH 3URGXFW LQ DQ\ QRQUHVLGHQWLDO
FRPPHUFLDODSSOLFDWLRQ
! 8VH RI WKH 3URGXFW IRU DQ\WKLQJ RWKHU WKDQ LWV
LQWHQGHGSXUSRVH
! 5HSDLU VHUYLFHV SURYLGHG E\ DQ\RQH RWKHU WKDQ D
)RUQR$XWKRUL]HG6HUYLFHDJHQF\
! 'DPDJHV RU UHSDLU VHUYLFHV WR FRUUHFW VHUYLFHV
SURYLGHG E\ XQDXWKRUL]HG SDUWLHV RU WKH XVH RI
XQDXWKRUL]HGSDUWV
! ,QVWDOODWLRQ QRW LQ DFFRUGDQFH ZLWK
ORFDOVWDWHFLW\FRXQW\ILUHFRGHVHOHFWULFDOFRGHVJDV
FRGHV SOXPELQJ FRGHV EXLOGLQJ FRGHV ODZV RU
UHJXODWLRQV
! 'HIHFWVRUGDPDJHGXHWRLPSURSHUVWRUDJHRIWKH
3URGXFW
! 'HIHFWVGDPDJHRUPLVVLQJSDUWVRQSURGXFWVVROG
RXWRIWKHRULJLQDOIDFWRU\SDFNDJLQJRUIURPGLVSOD\V
! 6HUYLFH FDOOV RU UHSDLUV WR FRUUHFW DQ LQFRUUHFW
LQVWDOODWLRQRIWKH3URGXFWDQGRUUHODWHGDFFHVVRULHV
! 5HSODFHPHQW RI SDUWVVHUYLFH FDOOV WR FRQQHFW
FRQYHUWRURWKHUZLVHUHSDLUWKHHOHFWULFDOZLULQJDQGRU
JDVOLQHLQRUGHUWRSURSHUO\XVHWKHSURGXFW
! 5HSODFHPHQW RI SDUWVVHUYLFH FDOOV WR SURYLGH
LQVWUXFWLRQVDQGLQIRUPDWLRQRQWKHXVHRIWKH3URGXFW
! 5HSODFHPHQWRISDUWVVHUYLFHFDOOVWRFRUUHFWLVVXHV
DULVLQJIURPWKHSURGXFWEHLQJXVHGLQDPDQQHURWKHU
WKDQZKDWLVQRUPDODQGFXVWRPDU\IRUUHVLGHQWLDOXVH
! 5HSODFHPHQWRISDUWVVHUYLFHFDOOVGXHWRZHDUDQG
WHDU RI FRPSRQHQWV VXFK DV VHDOV NQREV SDQ
VXSSRUWV VKHOYLQJ FXWOHU\ EDVNHWV EXWWRQV WRXFK
GLVSOD\VVFUDWFKHGRUEURNHQFHUDPLFJODVVWRSV
! 5HSODFHPHQW RI SDUWVVHUYLFH FDOOV IRU ODFN
RILPSURSHUPDLQWHQDQFHLQFOXGLQJEXWQRWOLPLWHGWR
EXLOGXSRIUHVLGXHVVWDLQVVFUDWFKHVGLVFRORUDWLRQ
FRUURVLRQ
! 'HIHFWV DQG GDPDJHV DULVLQJ IURP DFFLGHQWV
DOWHUDWLRQPLVXVHDEXVHRULPSURSHULQVWDOODWLRQ
! 'HIHFWV DQG GDPDJHV DULVLQJ IURP 3URGXFW
WUDQVSRUW ORJLVWLFV DQG KDQGOLQJ ,QVSHFWLRQ RI WKH
SURGXFWPXVWEHPDGHDWWLPHRIGHOLYHU\)ROORZLQJ
UHFHLSW DQG LQVSHFWLRQ WKH VHOOLQJ GHDOHUGHOLYHU\
FRPSDQ\PXVWEHQRWLILHGRIDQ\LVVXHVDULVLQJIURP
KDQGOLQJWUDQVSRUWDQGORJLVWLFV
! 'HIHFWVDQG GDPDJHVDULVLQJIURPH[WHUQDOIRUFHV
EH\RQGWKHFRQWURORI)RUQR$SSOLDQFHVLQFOXGLQJEXW
QRWOLPLWHGWRZLQGUDLQVDQGILUHVIORRGVPXGVOLGHV
IUHH]LQJ WHPSHUDWXUHV H[FHVVLYH PRLVWXUH RU
H[WHQGHG H[SRVXUH WR KXPLGLW\ SRZHU VXUJHV
OLJKWQLQJVWUXFWXUDOIDLOXUHVVXUURXQGLQJWKHDSSOLDQFH
DQGRWKHUDFWVRI*RG
! 3URGXFWV ZKRVH VHULDO QXPEHU KDV EHHQ
DOWHUHGGDPDJHGWDPSHUHG ZLWK ,Q QR FDVH VKDOO
)RUQR EH KHOG OLDEOH RU UHVSRQVLEOH IRU GDPDJH WR
VXUURXQGLQJ SURSHUW\ LQFOXGLQJ IXUQLWXUH FDELQHWU\
IORRULQJSDQHOVDQGRWKHUVWUXFWXUHVVXUURXQGLQJWKH
3URGXFW)RUQRLVQHLWKHUOLDEOHQRUUHVSRQVLEOHIRUWKH
3URGXFW LI LW LV ORFDWHG LQ D UHPRWH DUHD RU DQ DUHD
ZKHUHFHUWLILHGWUDLQHGWHFKQLFLDQVDUHQRWUHDVRQDEO\
DYDLODEOH3XUFKDVHUPXVWEHDUDQ\WUDQVSRUWDWLRQDQG
GHOLYHU\FRVWVRIWKH3URGXFWWRWKHQHDUHVW$XWKRUL]HG
6HUYLFH&HQWHURUWKHDGGLWLRQDOWUDYHOH[SHQVHVRID
FHUWLILHGWUDLQHGWHFKQLFLDQ
:DUUDQW\([FOXVLRQV
:KDW,V1RW&RYHUHG

*,-../
0
1
2
1
3
!
4
$
$
!
*
&+
&%
1!
!
1
1
!
5
!
"
#
"
$
% #
$
!
&
Specification
Capacity
Dimension
Power Supply
Rated power usage
8 place settings
17 6 . x 22.6 x 32.4 inches (W x D x H)
120volts, 60Hz
Wash motor 100W Heater 700W
Water Feed Pressure 5.8 ~ 145 psi (0.04 ~ 1MPa)
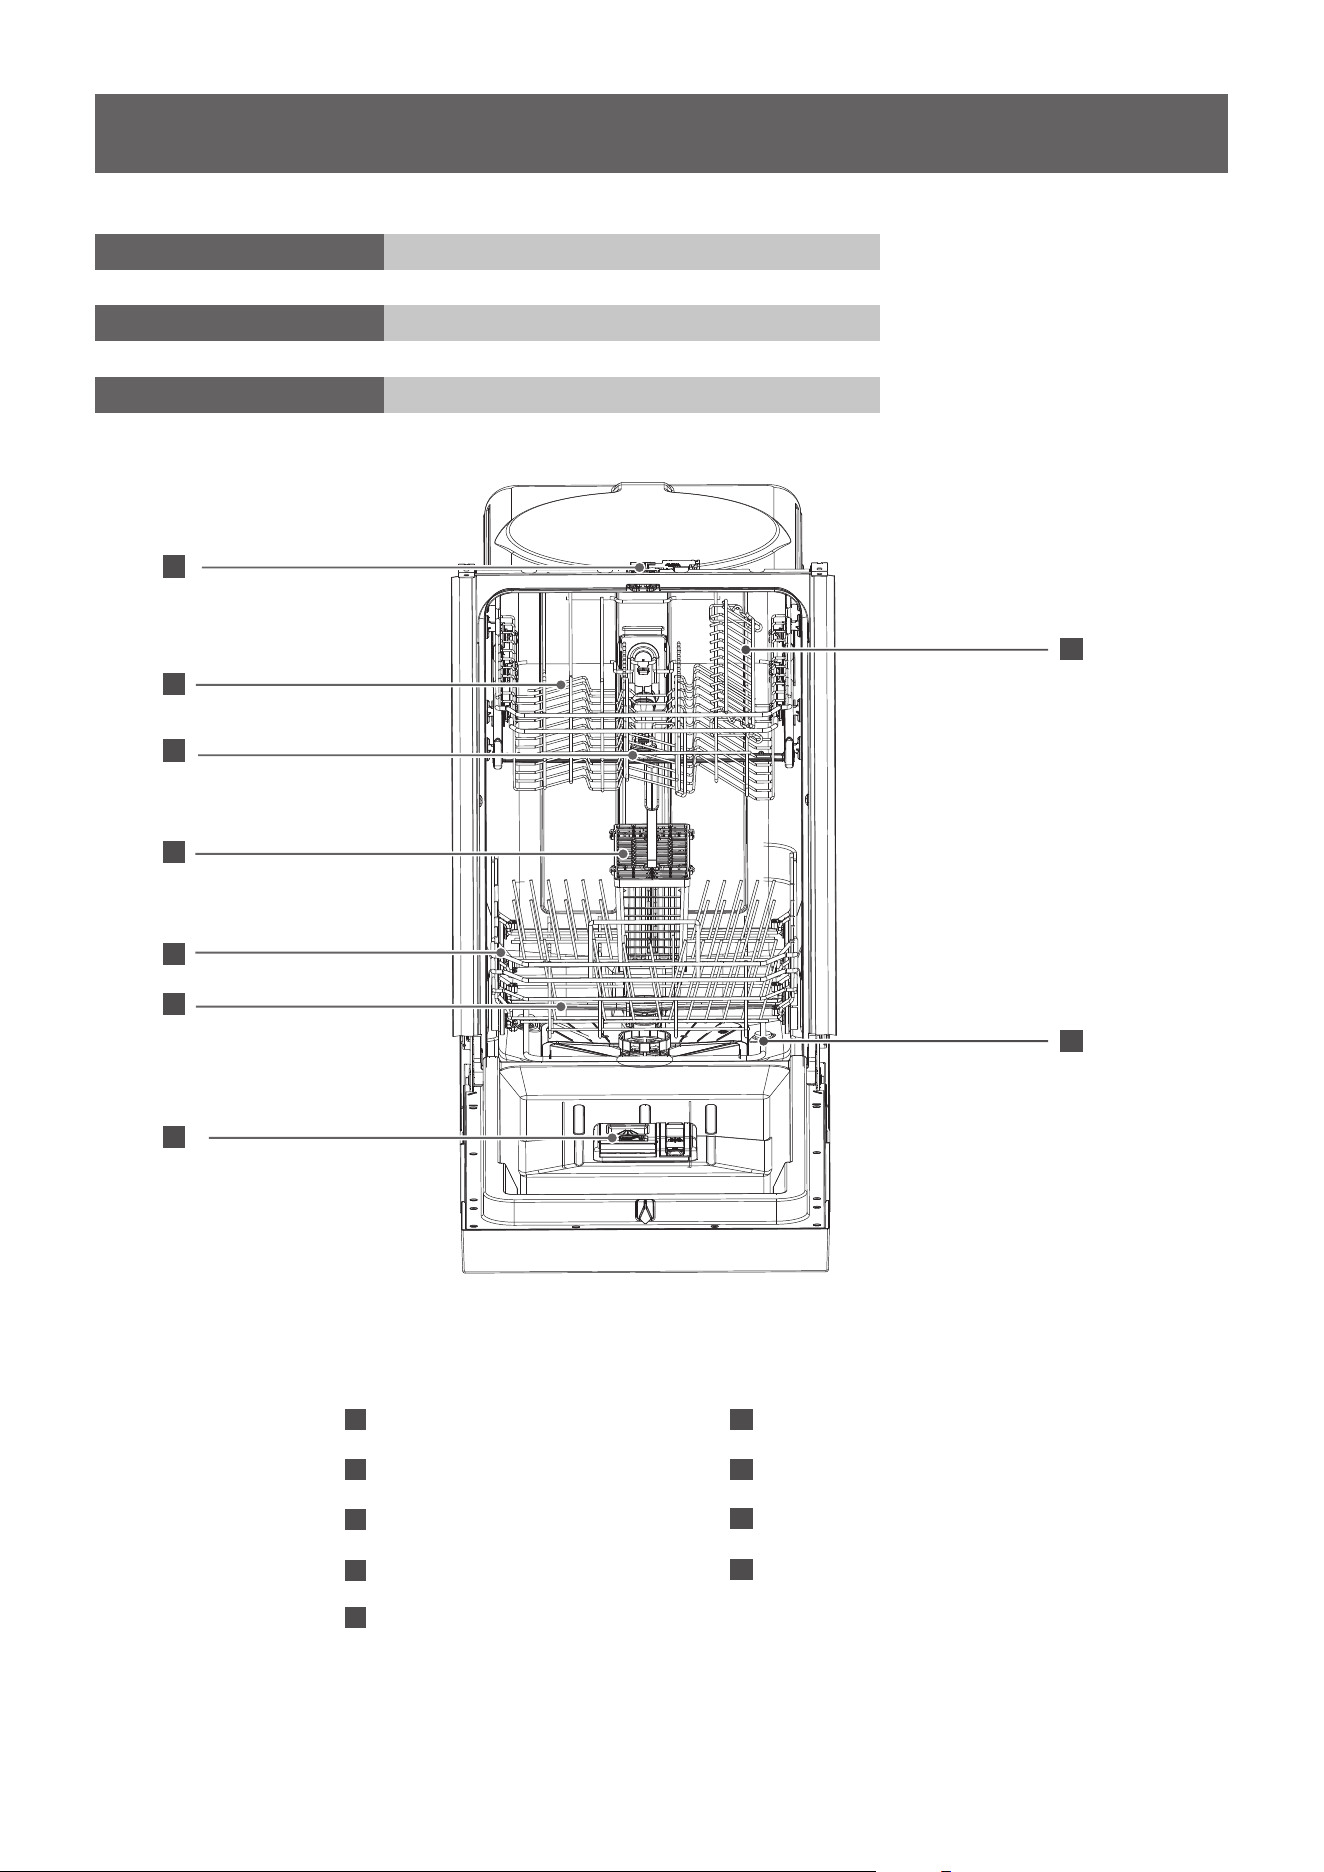
FEATURES OF YOUR NEW DISHWASHER
8
6
3
6
5
4
2
7
9
1
6
7
8
9
Lower Spray Arm
Rinse Aid Dispenser
Cup Shelf
Heating Element
1
2
3
4
5
Lock
Upper Basket
Upper Spray Arm
Cutlery Basket
Lower Basket
1
2
3 4
5
6 7 8
9
A
B
C
D
E
F
G
H
I
J
K
L
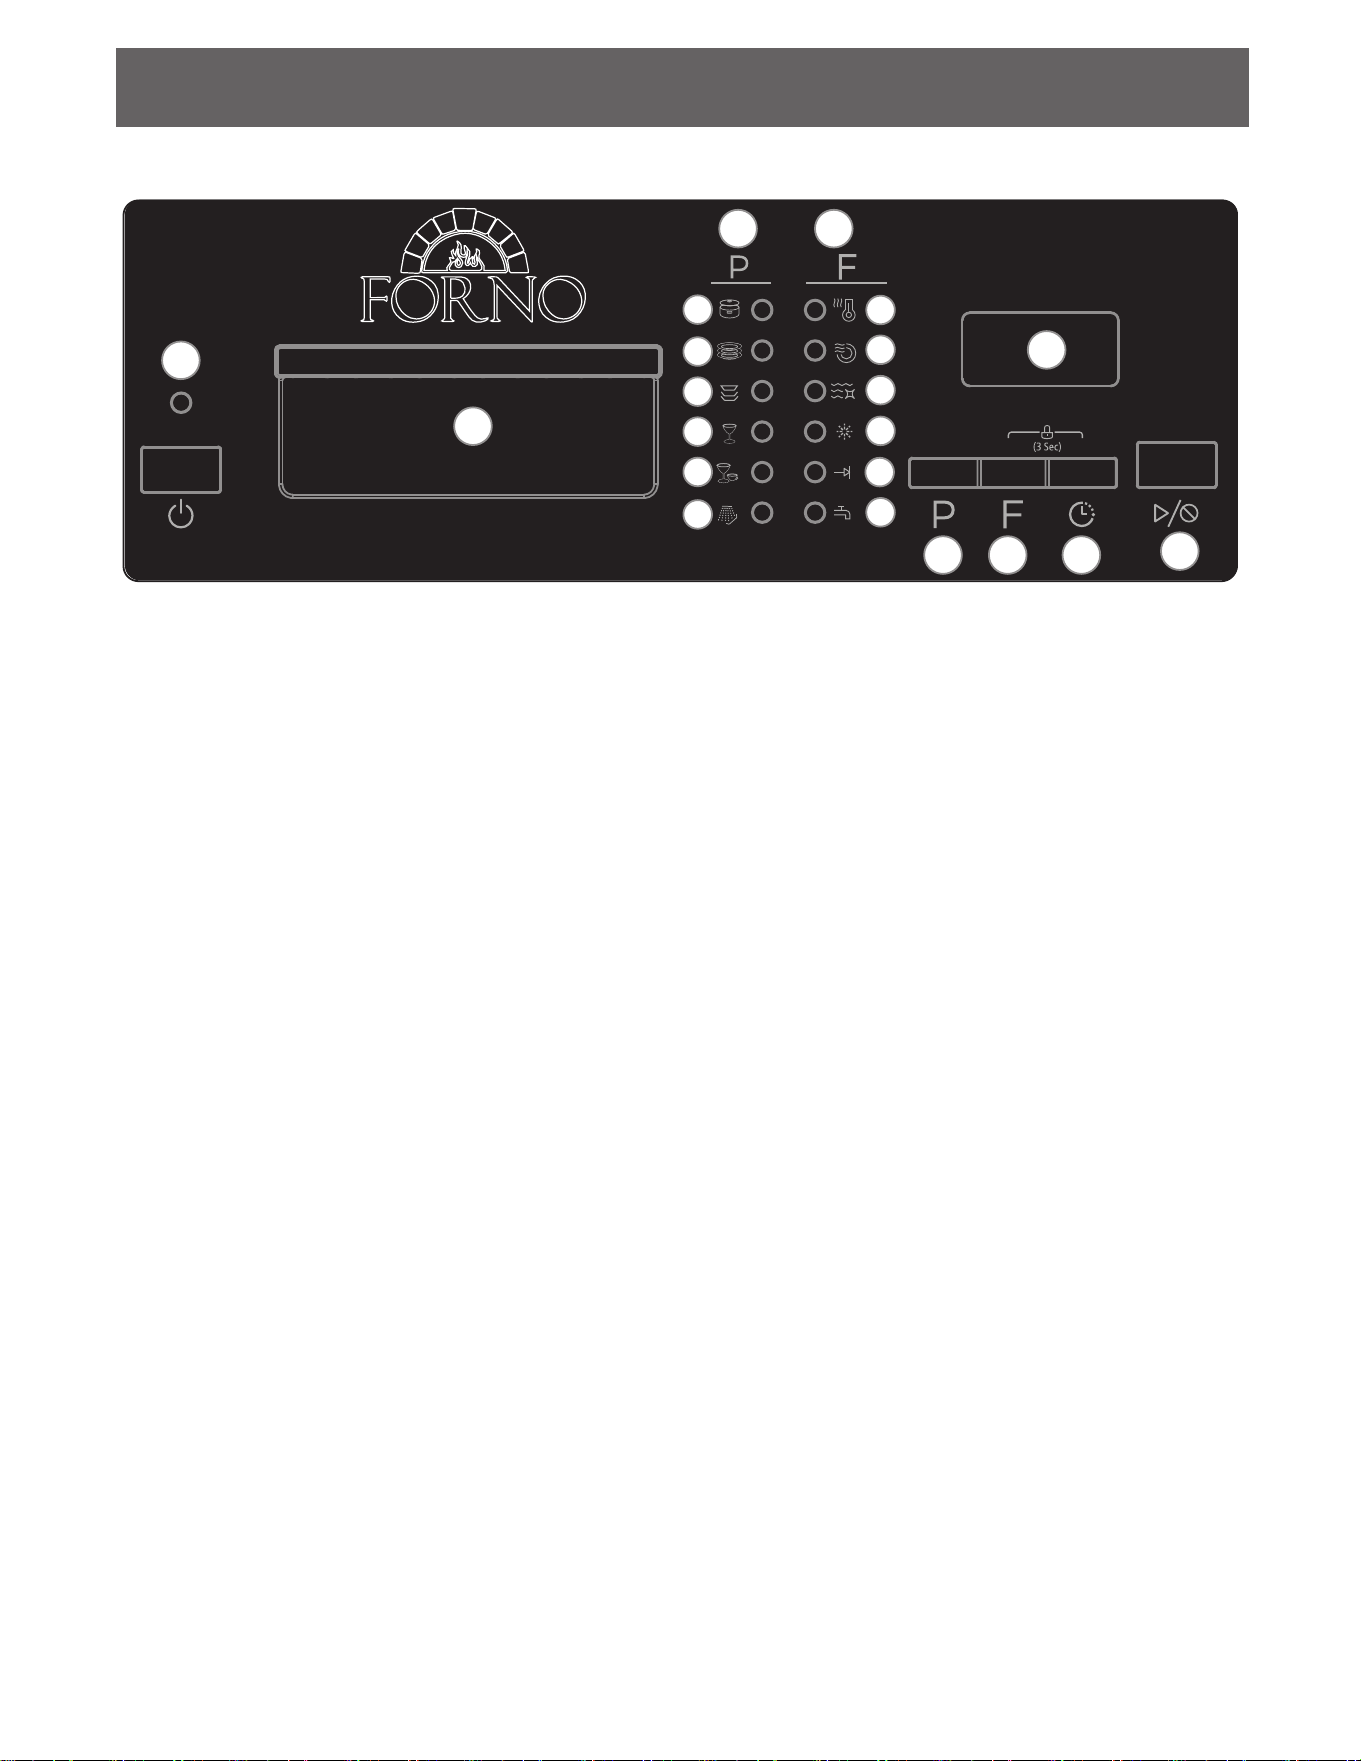
CONTROL PANEL
7
1. Power button: Use to turn the appliance on or off.
2. Handle
3. Programs: The light will illuminate to show which program has been selected.
A: Heavywash
B: Normal wash
C: ECO wash
D: Glass wash
E: Rapid wash
F: Rinse
4. Features: The light will illuminate to show which features have been selected.
G: High temp wash - water temperature will be maintained at 60°C (140°F)
H: Heated dry - the heater will operate during the drying cycle.
I: Sanitize - water temperature will be maintained at 69°C (156°F)
J: Rinse aid indicator light - light will illuminate when the rinse aid dispenser is empty
K: Cycle end indicator light - light will illuminate when the program is finished
L: Faucet warning indicator light - light will illuminate when the appliance is not receiving
enough water; turn on the nearby water faucet to correct the water flow
5. Display screen: Shows the remaining running time in the current program.
6. Program button: Press to select the desired program.
7. Features button: Press to select the desired features.
8. Timed delay button: Press to set the desired time delay.
9. Start/Cancel button: Press to start the desired program. Press to cancel a program which it is
in operation.
OPERATING THE DISHWASHER
OPERATING THE DISHWASHER
NOTE
The remaining time could suddenly
increase or drop several minutes.
This means the Smart Sensor has
checked the soil level and determined
if additional water fills are needed or if
water fills can be deleted.
Status Window Error Indication
Cycle Chart
In certain situations, which are critical to
the machines function and safe oper-
ation, the control will shut down and
indicate an errorcode
(See Error Codes on page 18).
If Error codes are displayed, contact the
dealer or a serviceman. They will be able to
provide assistance in troubleshooting
the problem and or locate authorized
service technician if needed.
H:01- H:24
If the Delay Start option is selected,
the number of delay start hours
shows in the status window.
2:25-0 :00
After the machine starts operation,
the remaining time of the selected
cycle will be shown in the window.
8
Program
Heavy
Description of Cycle
Water
(
L/G
)
Cycle time(min)
NORMAL
Glass
Rinse
Pre Wash
Main Wash(140°F)
Rinse(149°F)
Rinse(with Sani 156.2°F)
Drying
19. 7L/5. 2G
9.5~18.5L/
2.5~4.9G
15. 5L/4.1G
15.5L/4.1G
12.5L/3.3G
6.7L/1.8G
155
105~135
105
95
60
20
Pre Wash
Main Wash(122-131°F)
(122-131°F)
Rinse(136.4-140°F)
Rinse(with Sani156.2°F)
Drying
Pre Wash
Main Wash(113-122°F)
Rinse(122-131°F)
Rinse(with Sani 156.2°F)
Drying
Pre Wash
Main Wash(118.4-122°F)
Rinse
Drying
Pre Wash
Main Wash(122°F)
Rinse(131°F)
Pre Wash
Main Wash
Energy
Quick
PREPARING AND LOADING DISHES
Dish Preparation
Scrape away large pieces of food, bones, pits, toothpicks, etc. The continuously filtered wash system will
remove the remaining food particles. Burned-on food should be loosened before loading. Empty liquids
from glasses and cups. Food such as mustard, mayonnaise, vinegar, lemon juice and tomato based
products may cause discoloration of stainless steel and plastics if allowed to sit for a long period of time.
Unless the dishwasher is to be operated at once it is best to rinse off these food soils. If the dishwasher
drains into a food disposal, be sure the disposal is completely empty before starting dishwasher.
9
Loading the Upper Basket
The upper basket is designed for cups,
glasses, small plates, bowls and plastic items
marked dishwasher safe etc.
For best results, place the bowls, cups,
glasses, sauce pans with soiled surface
facing down or toward the center. Tilt slightly
for better drainage.
The b
The fold-down tines in the bottom
load those extra large and
hard-to-fit items. The tines may be left
up for normal use or folded down for more
flexible loading. Fold down for more space
to load large pots or pans.
ottom is designed to load
plates, soup bowls, plates, saucers an
d
cookware. The adjustable space will
allow you to load items with a maximum
height of 11 inches.
make it easy to
basket
basket
basket
Loading the Bottom Basket
Make sure the loaded dishes do
not interfere with the rotation of
the middle spray arm, which is
located at the bottom of the upper
basket. (Check this by rotating the
middle spray arm by hand.)
Large items should be placed
along the edge so they do not
interfere with the middle spray
arm rotation, and make sure
they not prevent the detergent
dispenser from opening.
Large items should be turned so
that the inside f
aces downward,
and make sure these items
do not interfere with the lower
spray arm rotation.

PREPARING AND LOADING DISHES
10
The lower basket has been especially designed for dinner dishes, soup bowls, plates, pots, lids, and casserole
dishes.
Load large items such as pans and pots into the dishwasher so their open sides face downwards. We
recommend loading cups, stemware, and small plates into the upper basket.
See the recommended loading patterns below.
8 place setting
The upper basket has been designed for small plates, mugs, glasses, and plastic items marked “dishwasher
safe”. Load your plates into the dishwasher in two half rows, so that the front of each plate faces the back
of the plate in front of it, and the open sides of the plates at the center of the dishwasher face each other.
See the illustrations below.
Make sure the loaded dishes do not interfere with the rotation of the nozzle which is located at the bottom
of the upper basket. (Check this by rotating the nozzle by hand.)
When loading dishes, pull the upper basket out suff iciently so you can load it without striking the counter
8 place setting
Loading the Lower Basket
Loading the Upper Basket
PREPARING AND LOADING DISHES
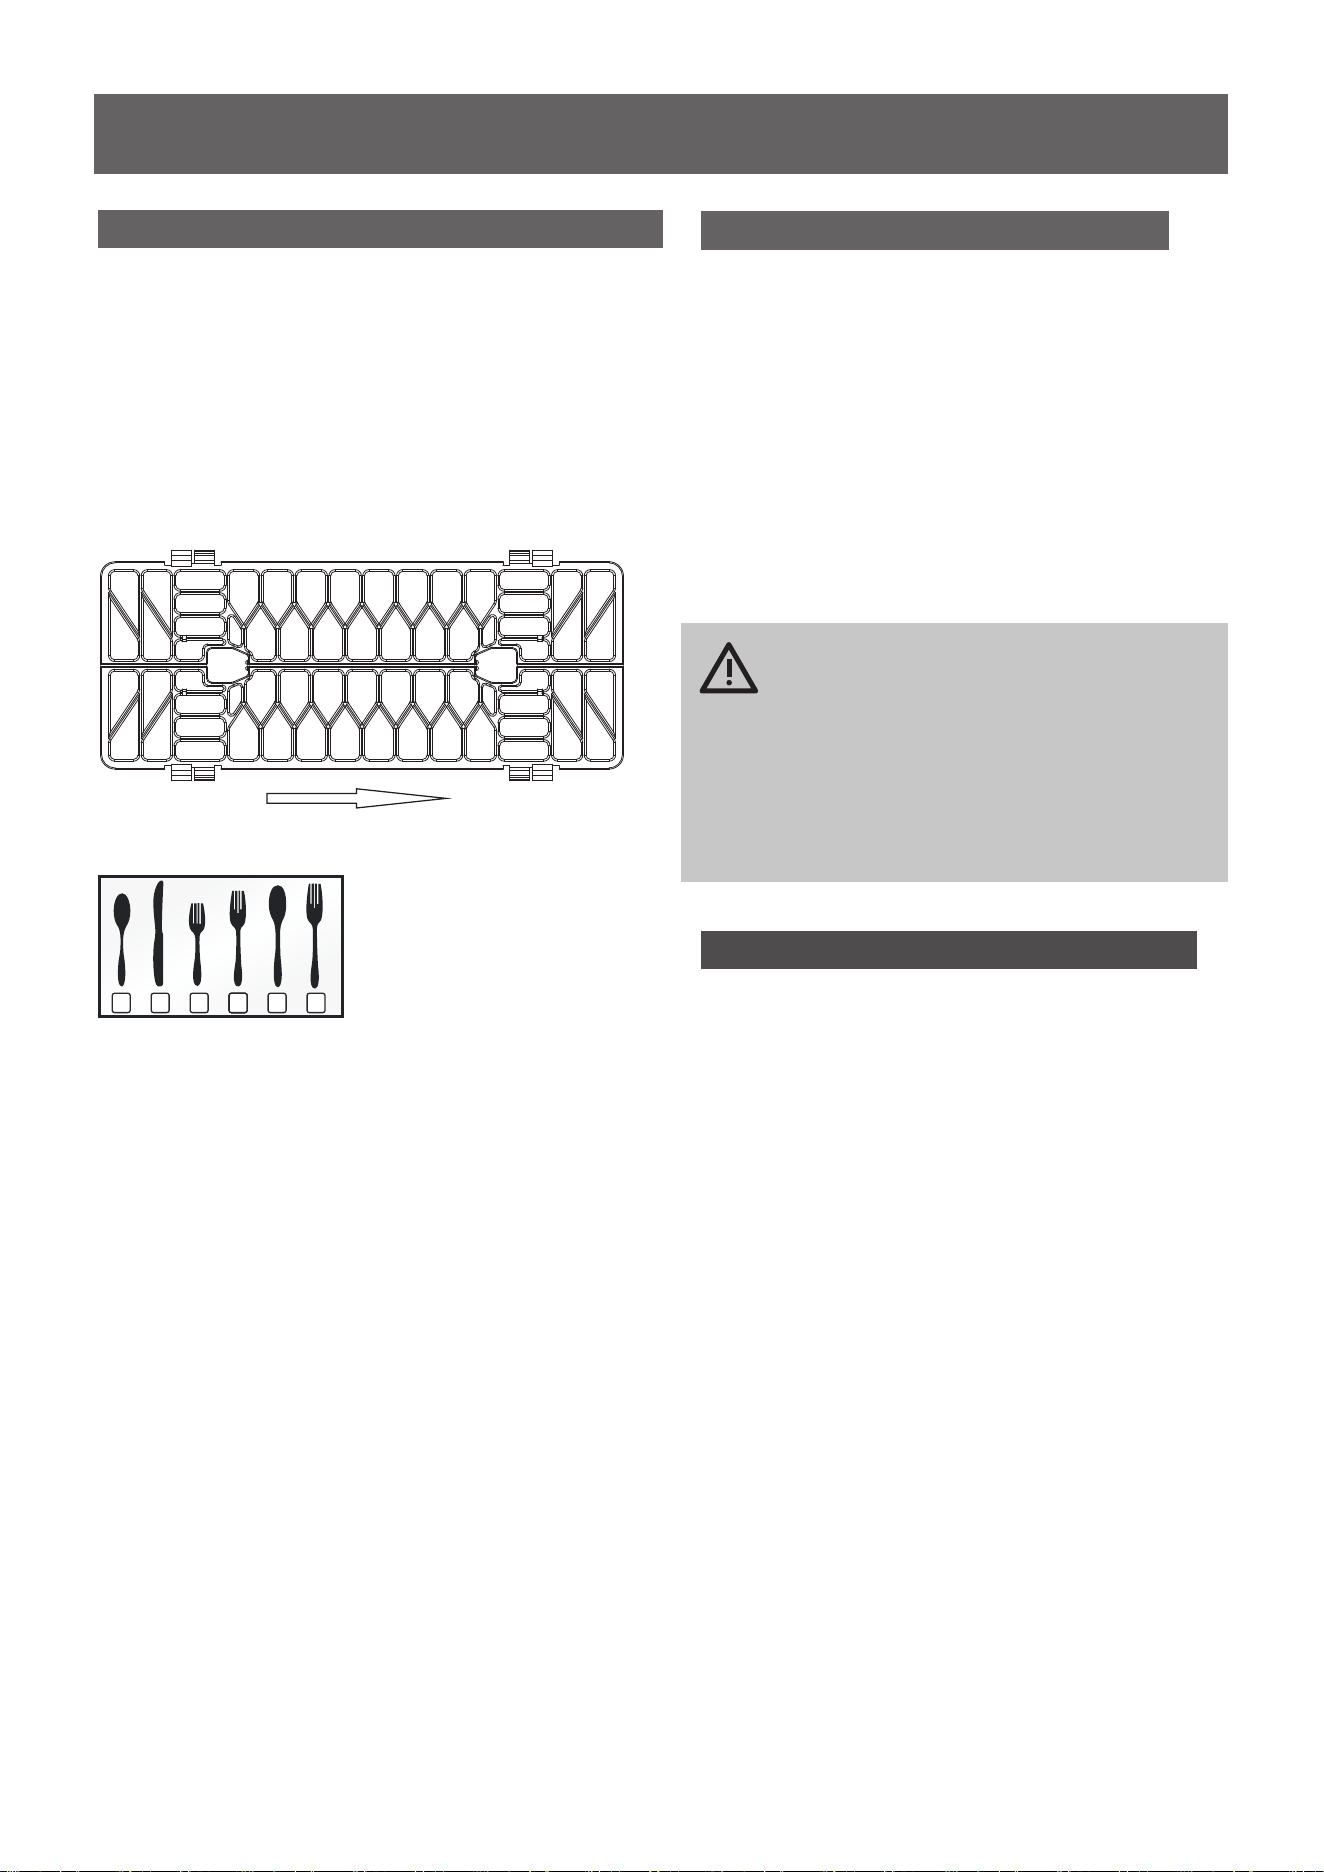
Loading the Silverware Basket
The silverware basket can be divided
into three separate modules that can
be used in both upper and lower racks
1.Spoons
2.Knives
3.Salad forks
4.Forks
5.Large spoons
6. Large forks
WARNING
1.Do not let item extend though
bottom.
2.Be sure nothing protrudes
though bottom of the basket or
rack to block the lower spray
arm
Adding A Dish
To add or remove items after
wash cycle starts:
1. Open door slightly and wait a few
seconds until wash action stops
before completely opening.
2.Add the item.
3.Close the door firmly to latch within 4 secs,
then cycle will automatically resume.
CAUTION
TO AVOID BURN INJURY: Slightly
open door and wait until spray arms
and wash action stop. Hot water may
splash out of dishwasher. Failure to
do so may result in injury.
Filling the Rinse Aid Dispenser
Rinse aid greatly impro
If the rinse aid is low, the Rinse Aid light
is illuminated at the beginning and end
of the cycle indicating that it is time to
refill.
ves drying and
reduces water spots and filming. Without
rinse aid your dishes and dishwasher
interior will have excessive moisture.
The Heated Dry option will not perform
as well without rinse aid. The rinse aid
dispenser, located next to the detergent
cup, automatically releases a measured
amount of rinse aid during the last rinse.
1
1
46
45
4
4
5
4
4
4
4
1 1 1 1 1 1
1 1 1 1 1 1
1
1
1
1
2 2 2 2
2 2 2 2
33
33
33
33
1 32 6444 5
In
PREPARING AND LOADING DISHES
Filling the Rinse Aid Dispenser
1
2
Your dishwasher is designed to use a liquid rinse aid.
The use of rinse greatly improves drying performance after the
final rinse. Do not use a solid or bar-type rinse aid. Under normal
conditions, the rinse aid will last approximately one month. It is
best to keep it full, but do not over fill.
Filling the detergent dispenser
1. Open the detergent dispenser c ap by pushing the detergent
dispenser release catch.
The fl ap is always open at the end of a dishwashing cycle.
2. Add the recommended amount of detergent to the main
wash detergent compartment.
3. Close the fl ap and then press it down.

PREPARING AND LOADING DISHES
13
Filling the rinse aid reservoir
Your dishwasher has been designed to use liquid rinse aid only.
Using a powdered rinse aid will clog the reservoir opening and cause the dishwasher to
Rinse aid improves the drying performance of the dishwasher.
Do not add regular detergent to the rinse aid reservoir.
1. Remove the rinse aid reservoir cap by rotating it
counterclockwise.
2. Fill the rinse aid reservoir with rinse aid.
Use the viewing port when fil ling the rinse aid reservoir.
Do not fi ll the reservoir above the full level indicator.
Excess rinse aid can over flo w during the wash cycle.
3. Close the rinse aid reservoir cap by rotating it clockwise.
CAUTION
CAUTION
malfunction.
1
4
Keeping your dishwasher clean improves its performance, reduces unnecessary
repairs, and lengthens its life.
CLEANING THE EXTERIOR
It’s best to clean spills on the outside of your dishwasher as they occur. Use a soft, damp cloth on the
control panel to gently wipe away spills and dust. Do not use benzene, wax, thinner, chlorine bleach, or
alcohol. These materials may discolor the inner walls and cause stains. Do not clean the dishwasher by
sprinkling water over it and avoid letting water come into contact with any of the electrical parts.
If your dishwasher has a stainless steel door panel, you can clean it with a stainless steel cleaner for
Home Appliances or a similar product using a clean, soft cloth.
CLEANING THE INTERIOR
Clean the interior of your dishwasher periodically to remove any dirt or food particles. Wipe the inside of
the dishwasher and the inner part of the door with a wet dishcloth. We recommend fi lling the detergent
dispenser with dish detergent, and then running the dishwasher empty periodically using either the Normal
or Express 60 cycle with the sanitize option. This will keep your dishwasher clean.
If white spots and odor are still present in your dishwasher, run the Normal cycle with the dishwasher empty
and without detergent until it fl ushes. Then, interrupt the cycle and put an 8 ounce cup of white vinegar into
the lower basket. Close the dishwasher and let the cycle fi nish.
Do not remove the tub front seal (the long rubber seal enclosing the opening of the dishwasher).
CLEANING THE FILTERS
1. Turn off the dishwasher.
2. Rotate the fi lter insert counterclockwise to unfasten and then detach
the fi lter insert.
3. Remove the fi ne fi lter (fl at, rectangular).
CAUTION
Do not touch the HEATING ELEMENT during or immediately after use.
Open
Care & Cleaning
15
4. Remove any dirt or other remains from the fil ters, and then rinse them
under running water.
5. Reassemble the fi lters in the reverse order of the dissasembly, replace
the fi lter insert, and rotate clockwise to the close arrow.
If the fil ter insert is not closed properly, its performance will
be decreased.
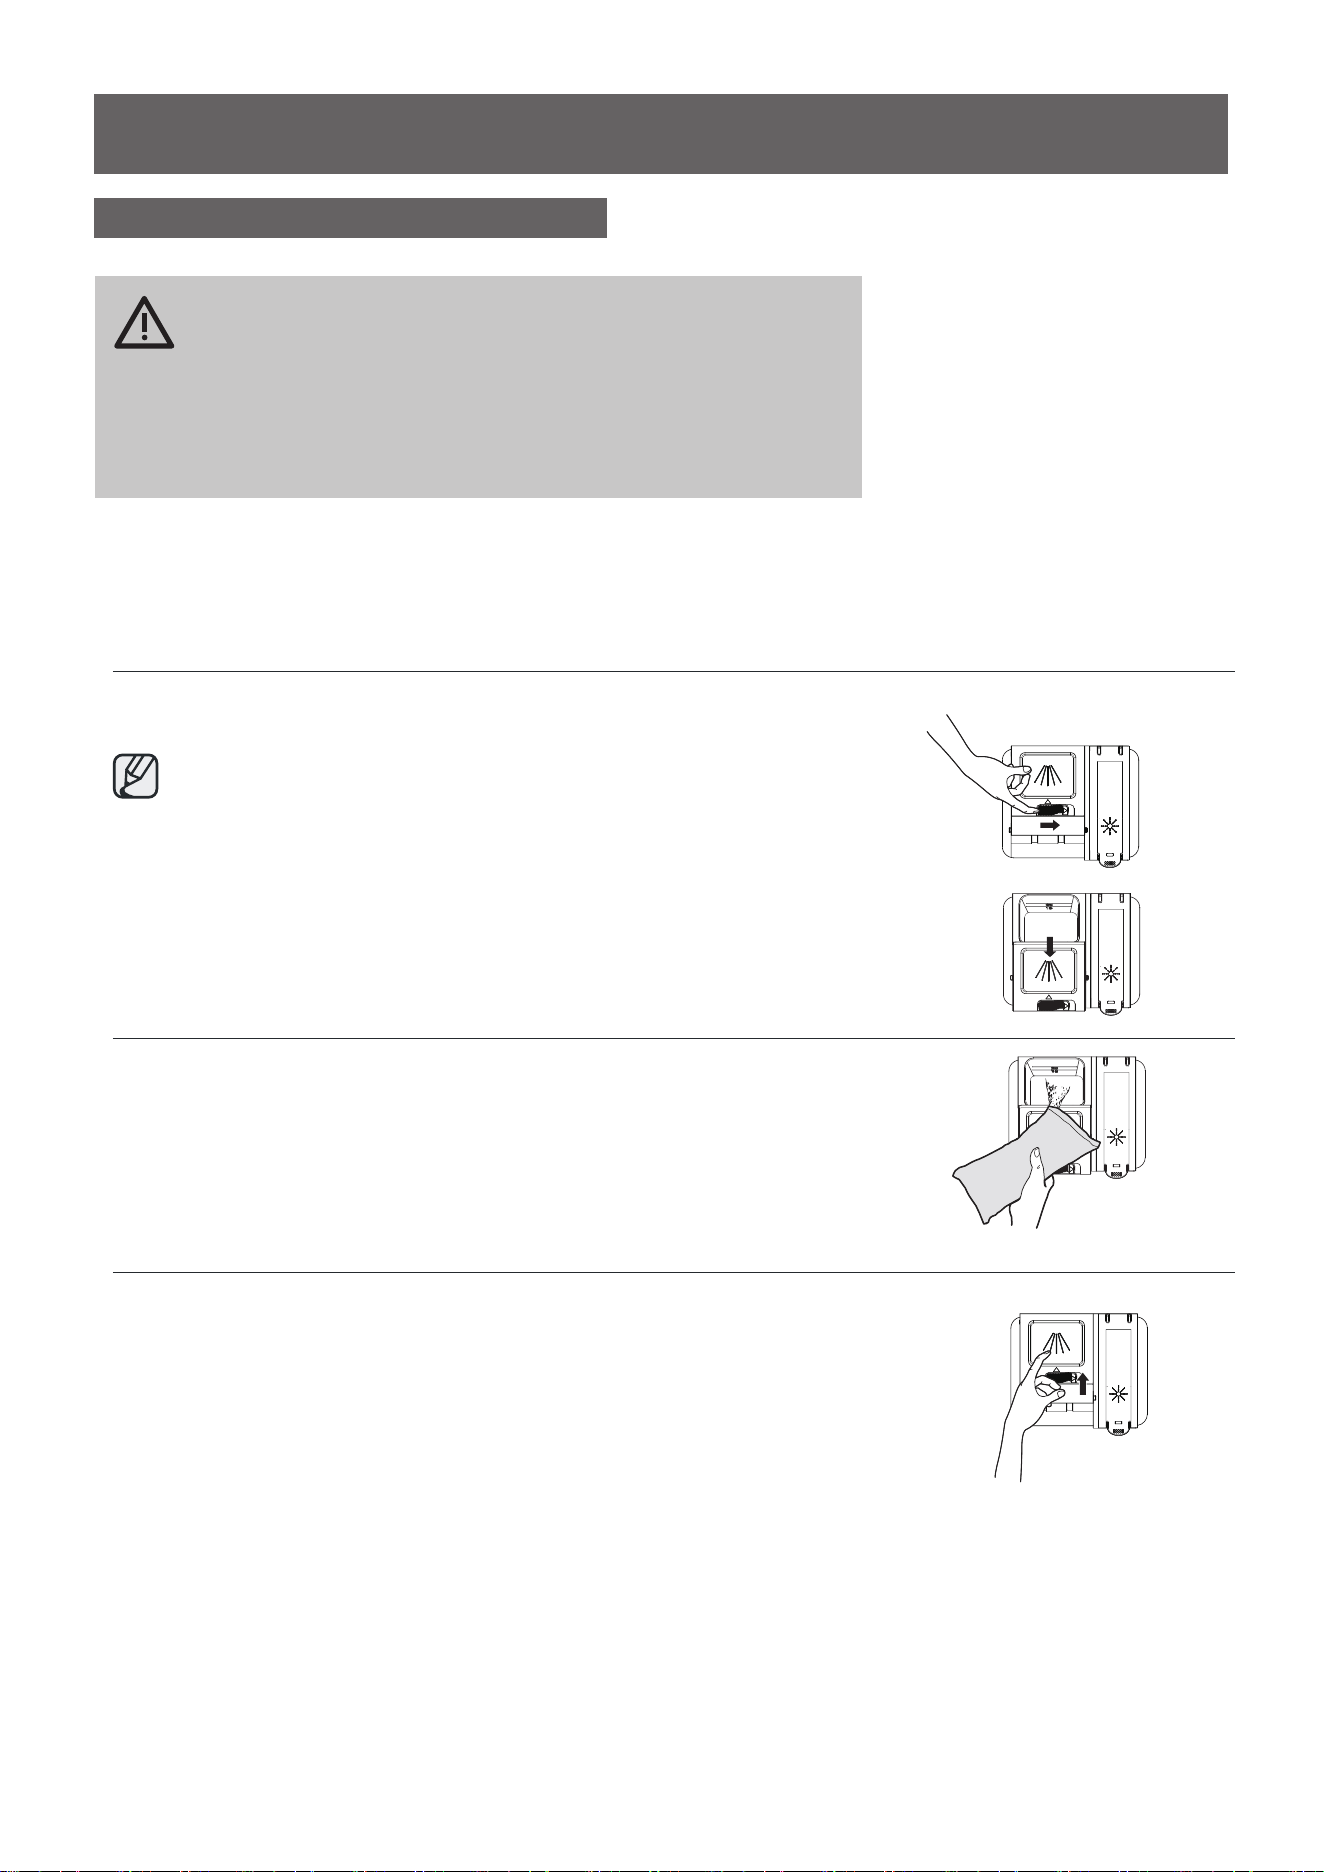
CLEANING THE NOZZLES
If your dishwasher does not seem to be cleaning adequately or the nozzles seem clogged, you can clean
each of the nozzles. When removing the nozzles, take care as they may break.
Lower nozzle
1. Check whether the nozzle holes are
clogged by food particles.
2. If cleaning is needed, remove the nozzle by
pulling it upwards.
3. Clean the nozzle, and then push it back
into place.
4. Check whether the nozzle is engaged
correctly by rotating it by hand.
CAUTION
Care & Cleaning

Troubleshooting
1
6
Etching
Using too much detergent Use less detergent if you have soft water
Lower the inlet water temperature
Problem
Dishwasher won't start
Dishwasher beeps at the end of
the cycle
Rinse Aid light on
Dishwasher operates too long
Dishes are not clean enough
Dishes not drying enough
Spots and filming on dishes
Possible cause
Power supply or power line is not connected
Rinse detergent deficient
The dishwasher is connected to cold water
Water pressure is temporarily low
Detergent dispenser is empty
Water hardness is too high
Dishwasher won't start
Child Lock activated
(selected models)
It indicates the wash cycle finished, the
dishwasher will beep
The cycle time will vary due to the soil
The sanitize option is selected
The inlet water temperature is low
Dishes are loaded too close together
Improper use of detergent
The selected cycle is not suitable for food
soil condition
Spay arms are blocked by some items
Improper loading of dishes
The cycle you chose did not included the
drying
Improper loading of dishes
Old rinse aid is used
Rinse dispenser empty
Add rinse aid
Check the dishwasher, make sure it is properly
connected t
o the hot water supply
Fill rinse aid dispenser or increase the amount of
rinse aid.
For extremely hard water install a water softener
Deactivate the child lock, refer to child lock
section in this manual
When heavy soil is detected, the auto, normal,
pots&pan cycle will automatically increase the
cycle time
When sanitize option is selected, the cycle time
will be increase to meet the sanitized temperature
request
Load the dishes again as the manual
Add detergent depending on the water hardness
and the cycle you chose. Use fresh detergent
Make sure the dishwasher is connected to the hot
water supply
Try not use your dishwasher when hot water is
being used elsewhere in the house
Choose anther cycle for longer washing time
Make sure the spay arm can rotated freely
Load the dishes again as the manual instructs.
Choose the proper cycle with drying
Load the dishes again as the manual indicates
Use fresh rinse aid
Add rinse aid to the dispenser
Delay Start option has been selected
Check and connect the power supply
Shut the door completely make sure it is latched
Refer to Delay Start section in this manual to reset
Use you dishwasher when the water pressure is
normal
Solution
The inlet water temperature exceeds 158℉

1
7
Troubleshooting
Problem Possible cause
Detergent left in dispenser cup
Detergent may be too old
Spray arm is blocked
Use fresh detergent
Load the dishes, making sure the spray arms
are not blocked
Detergent dispenser will not
shut
Improper operation of the detergent cover
Add the detergent and rinse aid as indicated by
the manual
Water remains in the
dishwasher
Previous cycle has not finished or has been
interrupted
Select the proper cycle explained in the manual
Dishwasher does not
drain properly
Drain is clogged
Check the air gap if you have one. Make su
re the
disposal is empty if the dishwasher is connected
to the disposal.
Drain hose is kinked
Make sure the drain hose is properly connected
to the sink
Suds in the tub
Improper detergent is used
Make sure to use only the automatic dishwasher
detergent
Dishwasher leaks
Excessive suds caused by using the
improper detergent
Make sure to use only the proper dishwasher
detergent
Dishwasher is not level Level the dishwasher
Black or gray marks on dishes
Aluminum utensils have rubbed
against dishes
Stained tub interior
Coffee and tea soil
Using an approved spot cleaner to remove the
soil
Reddish stain
Some tomato-based foods will cause this, use of
the rinse only cycle right after loading this will
decrease the staining
Noises
Detergent cup opening\ Drain pump sound
This is normal
A hard object has entered the wash module.
When the object is ground up, the sound
should stop
If the noise persists after a complete cycle, call
for service.
Dishwasher won't fill
Water valve is turn off
Check if the water valve is turn on
Door latch may not be properly seated
Make sure the door is closed
Solution
Rearrange the dishes
Make sure the inlet water is no less than 120H

18
Error Codes
When some malfunctions come on, the appliance will display error codes to warn you:
Codes
E1
E4
E3
Meanings
Longer inlet time.
Overflow.
Not reaching required temperature.
Possible Causes
Faucets is not opened, or water intake is
restricted, or water pressure is too low.
Some element of dishwasher leaks .
Malfunction of heating element.
If overflow occurs, turn off the main water
supply before calling a service.
If there is water in the base pan because of
an overfill or small leak, the water should be
removed before restarting the dishwasher.
WARNING
SAFETY INSTRUCTIONS
Important Safety Instructions
What the icons and signs in this installation guide mean:
Hazards or unsafe practices that may result in severe personal injury or death.
Hazards or unsafe practices that may result in personal injury or property damage.
To reduce the risk of fire, explosion, electric shock, or personal injury when using the
dishwasher, follow these basic safety precautions:
Follow directions explicitly.
Make sure the machine is grounded to prevent electric shock.
Call the service center for help.
These warning signs are here to prevent injury to you and others.
Please follow them explicitly.
After reading this section, keep it in a safe place for future reference.
Throughout this manual, you'll see Warning and Caution notes. These warnings, cautions, and the
important safety instructions that follow do not cover all possible conditions and situations that may
occur. It's your responsibility to use common sense, caution, and care when installing, maintaining,
and operating the dishwasher.
Read all instructions before using the appliance.
Install and store the dishwasher inside, away from exposure to weather.
Do not install the dishwasher near electrical components. Keep the dishwasher away from open flames.
Do not install the dishwasher on a carpet as this is a fire hazard.
Do not install the dishwasher in a location where the water may freeze (where the temperature falls below
32°F(0°C). Frozen water in the hoses or pipes may damage the dishwasher.
As with all equipment using electricity, water and moving parts, potential hazards exist. To safely operate this
appliance, become familiar with its operation and exercise care when using it.
The dishwasher must be properly grounded. Never connect it to an ungrounded outlet.
Prior to removal of original dishwasher and the installation of your new unit, make sure to switch off your
circuit breaker. Do not connect the dishwasher until you have completed the installation. Connecting the
power cable is the last step when installing the dishwasher.
All wiring and grounding must be done in accordance with the electrical code applicable to the region.
INSTALLATION INSTRUCTIONS
GROUNDING INSTRUCTIONS
For a permanently connected appliance:
This appliance must be connected to grounded metal, a permanent wiring system, or an equipment-grounding
conductor must be run with the circuit conductors and connected to the equipment-grounding terminal or
lead on the appliance.
The dishwasher is very heavy. Do not attempt to move or carry a dishwasher alone. Two or more people are
needed to move a dishwasher and avoid potential injuries.
If the power cable is damaged, it must be replaced by the manufacturer, a service agent or similarly qualified
person in order to avoid a hazard.
Do not touch the power cable with wet hands.
Do not connect another appliance to the same power outlet as the dishwasher.
Make sure to use a new water supply line. Old lines are susceptible to breakage because they become
hardened and may cause property damage due to a water leakage.
The dishwasher must be connected to a hot water supply with a temperature between 120 °F(49°C) and 131 °
F(55°C). This temperature range provides the best washing result and shortest cycle time. Temperature should
not exceed 131 °F(55°C) to prevent damage to dishes.
Ensure that the water supplied to the dishwasher does not freeze. Frozen water can damage the hoses, valves,
pump, or other components.
For a full list of safety information, please refer to the User Manual.
Before Installing The Dishwasher
Tip-Over Hazard
Do not use the dishwasher until it is correctly installed.
Do not push down on the door when it is open.
Do not place excessive weight on the open door.
Electric Shock Hazard
Failure to follow these instructions can result in death, fire, or electric shock:
Electrically ground the dishwasher
Connect the ground wire to the green ground connector in the junction box.
Do not use an extension cord.
To reduce the risk of electric shock, fire, or injury to persons, the installer must ensure that
dishwasher is completely enclosed at the time of installation.
CONTENTS
PREPARING THE DISHWASHER ENCLOSURE
Product dimensions
Enclosure dimensions
5
5
5
06
6
6
8
INSTALLING THE DISHWASHER
STEP 1 Check the parts and tools
STEP 2 Select the best location for the dishwasher
STEP 3 Check water supply requirements and cautions
STEP 4 Check the electrical requirements and cautions
STEP 5 Unpacking and inspecting the dishwasher
STEP 6 Preparing the dishwasher
STEP 7 Placing the dishwasher and connecting the hot water supply line
STEP 8 Leveling the dishwasher
STEP 9 Securing the dishwasher
STEP 10 Connecting the drain hose
STEP 11 Wiring connections
STEP 12 Completing the installation
9
10
11
13
14
15
16
17
20
21
SPECIFICATIONS
22
22
17.7"(450mm)
minimum
32.5 "(825mm)
minimum
23"(580mm)
minimum
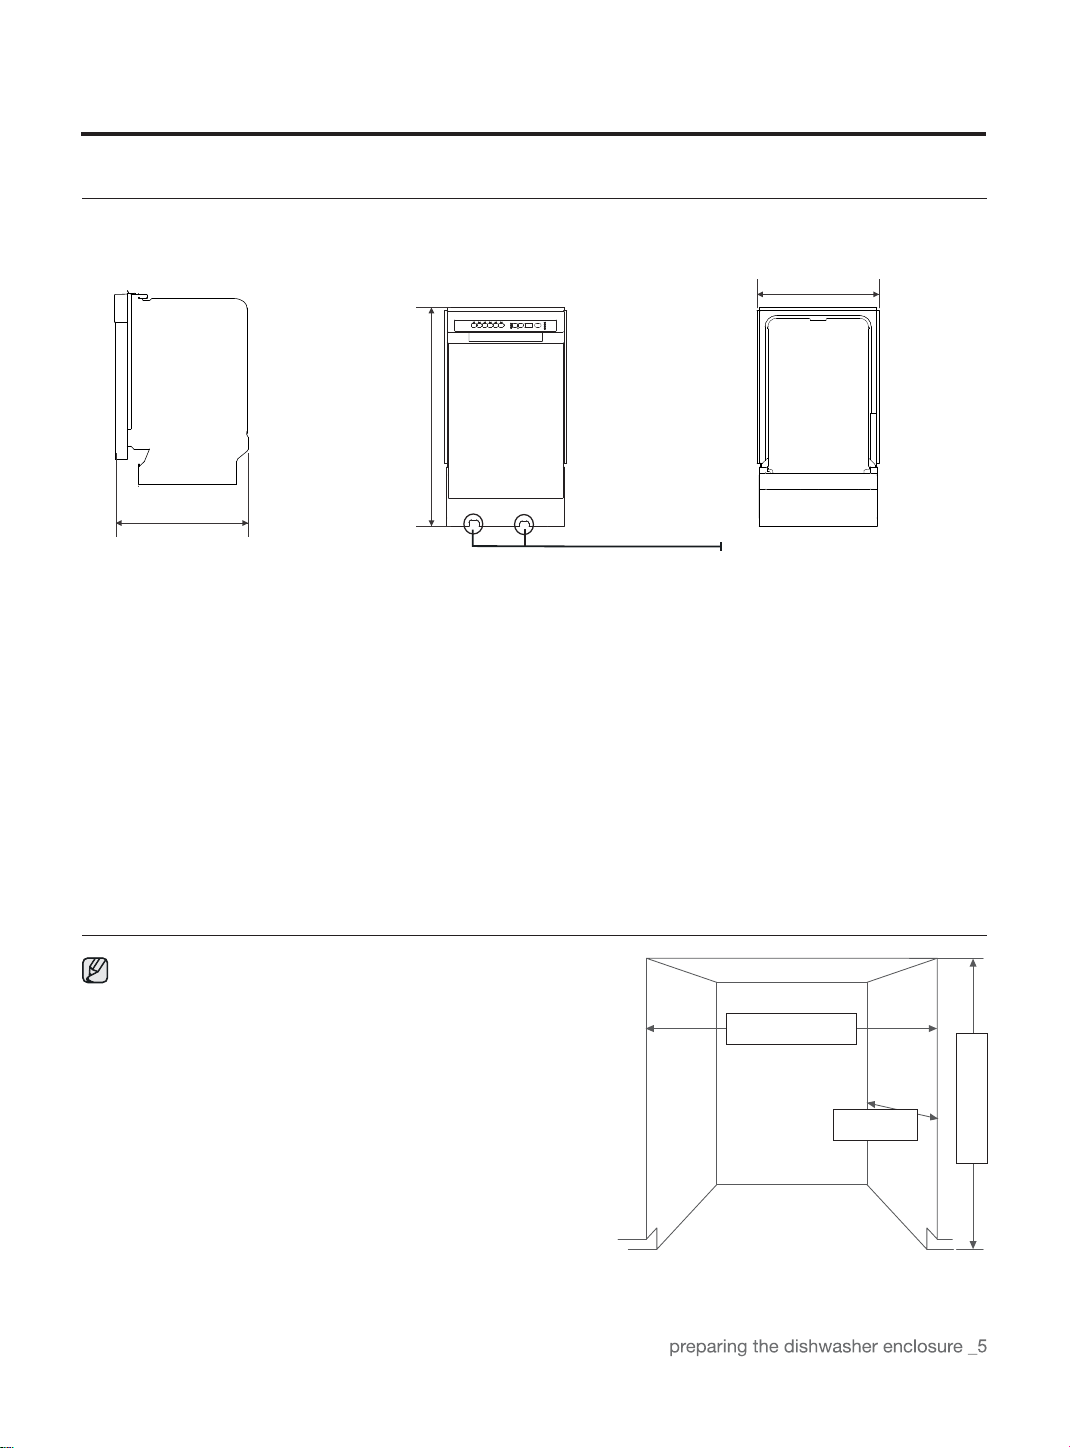
PREPARING THE DISHWASHER ENCLOSURE
Product Dimensions
Enclosure Dimensions
The water supply
line, power cable
and drain hose
should go through
this space behind
the dishwasher.
Then, the power
cable run in
channels under
the dishwasher to
connections in the
Front.
This dishwasher is designed to be enclosed on the top and
on both sides by a standard residential kitchen cabinet unit.
The installation enclosure must be clean and free
of any obstructions.
The enclosure must be at least 17.7 inches wide 23 inches
deep and 32.5 inches high.
For the front door of the dishwasher to be flush with the
leading edge of the counter top, the counter top must be at
least 23 inches deep.
Rear view
Front view
Back view
575mm
825mm
450mm
INSTALLING THE DISHWASHER
Be sure that you or your installer follow these instructions closely so that the new dishwasher works
properly and that you're not at risk of injury when washing dishes.
Step 1 Check The Parts And Tools
Before starting on the installation, prepare all the necessary tools and parts required to install the
dishwasher. This will save installation time and simplify the installation process.
Parts Required
Provided with the dishwasher. Check when you unbox the dishwasher in Step 5.
For the hot water supply line ? We strongly recommend using copper tubing with a compression fitting or a flexible stainless
steel braided hot water supply line.
Do not use plastic tubing. Plastic tubing can deteriorate over time and cause a leak inside the tube fitting.
ST3.5*9 X2
(For the installation
bracket)
Installation brackets
X2
ST3.9*13 X2
(for the kick plate)
ST4*14 X2
(For installation
Brackets)
Adjustment cap X2
Condensation strip
Cable Tie
(for the drain hose)
Kick plate
90° Elbow
Twist on wire
connector
Strain relief
Electrical tape &
Standard duct tape
Power cable
Hot water supply line
Tube fittings
Air gap
Rubber connector
Teflon tape or sealing
compound
Hose clamp
Tools required
Electric drill
Safety glasses
Gloves
Flashlight
Adjustable wrench
Wire stripper
Pliers
Nipper
Tape measure
Pencil
Phillips screwdriver
Flat screwdriver
Tubing cutter
Cutting knife
Hole saw
Level
Torx t20
Hex L-wrench
INSTALLING THE DISHWASHER
New installation
If the dishwasher is a new installation, most of the installation work must be done before the dishwasher is
moved into place.
Step 2 Select The Best Location For The Dishwasher
The following criteria are important to ensure the best location for the dishwasher:
The location must have a solid floor that is able to support the weight of the dishwasher.
The location must be near a sink with easy access to the water supply, drain, and electrical outlet.
For the drain to operate properly, the dishwasher should be installed within 9.8 ft (3 m) of the sink.
The location must let you load your dishes into the dishwasher easily.
The location must have sufficient space for the dishwasher door to open easily and provide
enough space between the dishwasher and the cabinet sides (at least 0.1 in (2 mm)).
If the dishwasher is installed in a comer, ensure that the side of the dishwasher is more than 2 in (50 mm) from
the wall or cabinet to its right or left.
The wall at the back must be free of obstructions.
If this is a new installation, follow these steps:
Replacement
If the dishwasher is replacing an old dishwasher, you must check the exising dishwasher connections for
compatibility with the new dishwasher. Repace the existing connections as necessary.
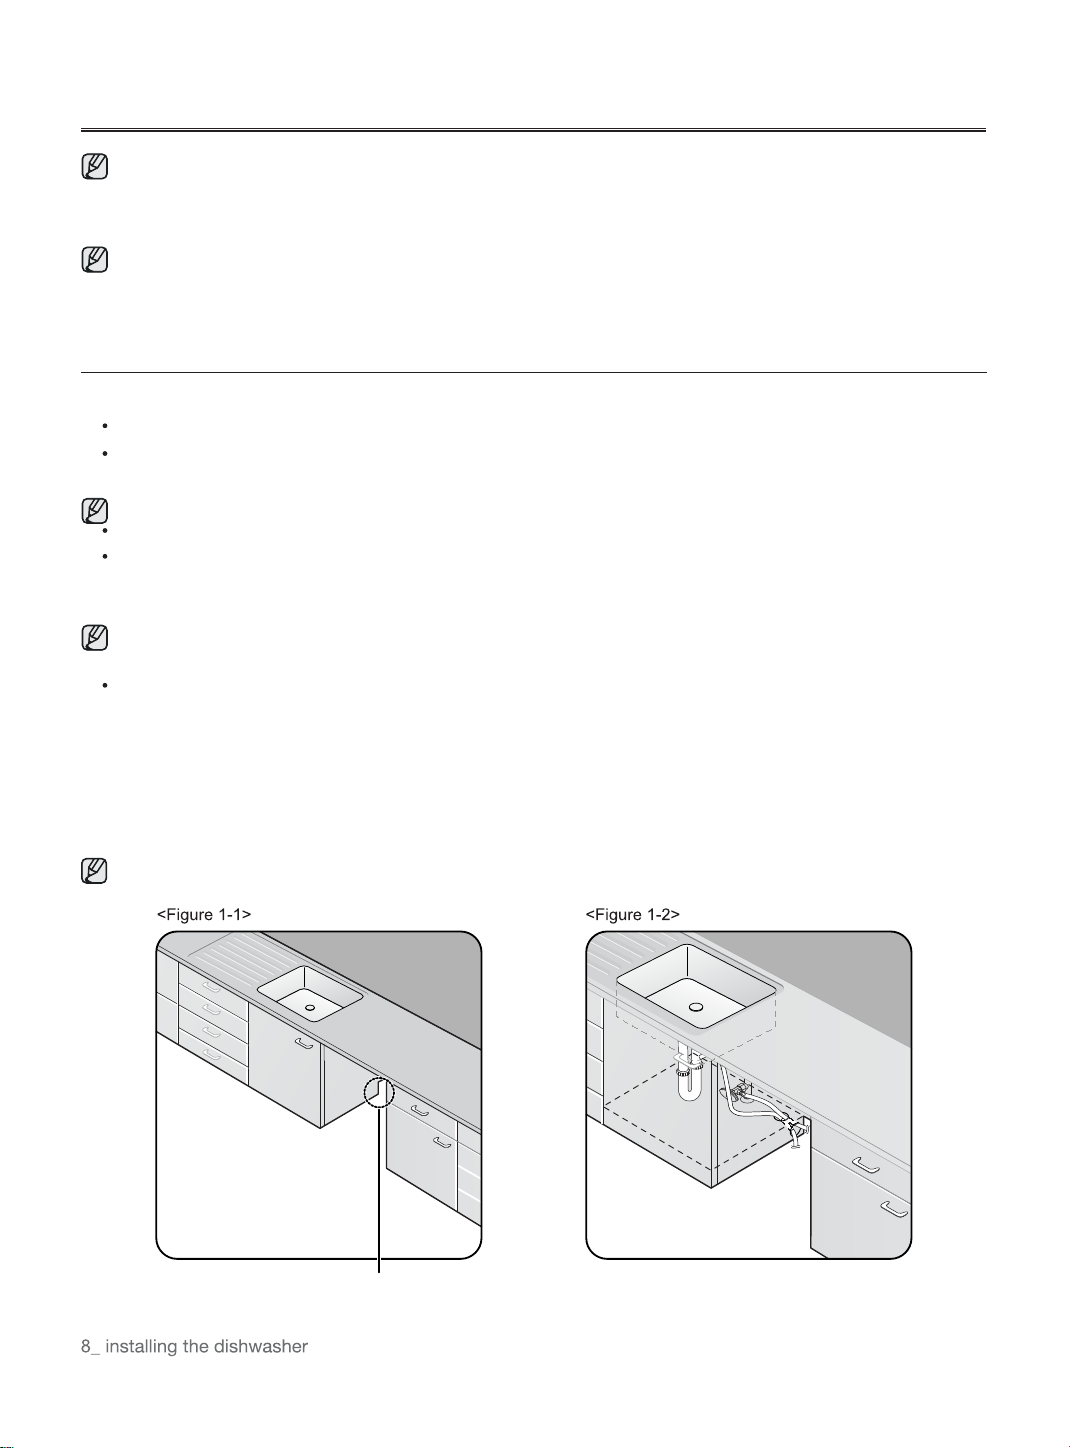
1. Using a hole saw, cut a hole into the side of the cabinet that hold the sink as shown in Figure 1-1 below.
2. If the base inside the sink cabinet is raised above the kitchen floor and is higher than the connections on
the dishwasher, make a hole in the base inside the cabinet and in the cabinet side as shown in Figure 1-2.
Depending on where your electrical outlet is, you may need to cut a hole in the opposite cabinet side.
The hole for the water supply line, drain hose and
power cables.
STEP 3 CHECK WATER SUPPLY REQUIREMENTS AND CAUTIONS
The hot water supply line pressure must be between 0.04-1MPa.
Adjust the water heater to deliver water between 120 °F(49°C) ~131 °F(55°C).
The dishwasher must be connected to a hot water supply between 120 °F(49°C) ~131 °F(55°C). This
temperature range provides the best washing result and shortest cycle time. Temperature should not excee d 1 31
°F(55°C) to prevent damage to dishes.
Ensure that the water supply valve is turned off before connecting the hot water supply line to the
dishwasher.
Seal the hot water supply line connections using teflon tape or sealing compound to stop any water
leakage.
When you install the dishwasher, ensure there is nothing on the drain hose and be careful not to tear it
during the installation process.
INSTALLING THE DISHWASHER
Step 4 Check The Electrical Requirements And Cautions
In the United States, install in accordance with the National Electric Code/State and Municipal codes and/or local
codes.
In Canada, install in accordance with the Canadian Electric Code C22.1-latest edition/Provincial and Municipal
codes and/or local codes.
For cable direct connections.
Use flexible, armored or non-metallic sheathed, copper wire with a grounding wire that meets the wiring
requirements for your local codes and ordinances.
Use the strain relief method provided with the wiring junction box or install a U.L.-listed/CSA-certified clamp
connector to the wiring junction box. If using conduit, use a U.L.-listed/CSA-certified conduit connector.
The electrical requirements for the dishwasher are as follows:
Step 5 Unpacking And Inspecting The Dishwasher
Iunbox the dishwasher in an open area free of obstruction both around the carton and overhead. We recommend
that you retain the carton and all of the packing materials until the dishwasher is fully installed and operational to
ensure you have removed all the product's components from the carton prior to disposal.
Unboxing
1. Unbuckle or cut the four straps securing the carton top.
2. Lift the top of the telescoping carton clear of the carton tray and the contents, and then turn it over and
place it on the floor.
3. Put the straps and all of the packing materials from around the dishwasher inside the carton top,
inspecting them for any signs of damage.
4. Locate and set aside the dishwasher's kick plate. The Kick plate is attached to packing material of the
dishwasher.
5. Lift the dishwasher from the carton tray, and then place it on the floor. Put the tray into the carton top.
6. Remove the bag that protects the dishwasher during shipping.
ALWAYS LIFT THE Dishwasher TO MOVE IT. Sliding it over rough surfaces can damage the dishwasher's
feet and sliding the feet over finished surfaces can, in some cases, damage that finish or the underlying
surface.
7. There is also packing inside the dishwasher that you may want to leave in place until the dishwasher is
installed.
8. DO not, under any circumstances, remove the sound-absorbent padding that surrounds the exterior of
the tub of the dishwasher.
Inspecting
Mechanical
1. Check the plastic base assembly to ensure that it is intact
2. Check the dishwasher's feet to ensure they are in place and can be adjusted so you can level and secure
the dishwasher.
3. Check all the visible components on the bottom of the dishwasher to ensure they are intact and secure.
4. Check the door latch, the operation of the hinges, and confirm the door is properly secured to the
dishwasher.

INSTALLING THE DISHWASHER
Plumbing
1. Check the hot water connection on the front left-side of the base of the dishwasher. The mounting
plate should be secured to the front of the base, the threads inside the connection should be smooth
and shiny, and the area should be clean and free of any debris.
2. Check the plastic Brake and Sensor cases to ensure these assemblies are not cracked and that all
connections are secure.
3. Check the drain hose for any holes or deformities that could allow a water leak during draining.
Electrical
1. Confirm the junction box cover is secured to the junction box on the front right-side of the base of the
dishwasher.
2. Confirm the electrical box was not damaged during shipping and that it is secured to the base of the
dishwasher.
Appearance
1. Confirm there are no dents or scratches on the front of the dishwasher
2. Check the edges of the doors for any roughness or cracking
3. Check the control panel to ensure it is clear and unscratched, and that all the control markers are in
their proper places.
Parts
1. Confirm you have all the parts listed in Step 1 an page 6.
Step 6 Preparing The Dishwasher
1. Ensure that the circuit breaker and water supply valve are turned off before proceeding with the following steps.
Before you move or lay down the dishwasher for installation, make sure to adjust the height of the legs so the
legs are as short as possible. This prevents the legs from breaking. Level the dishwasher by adjusting the height
of the legs after you have the dishwasher in place.
2. Make sure there are no kinks and that the hose is not bent at any extreme angles that could constrict the flow of
water.
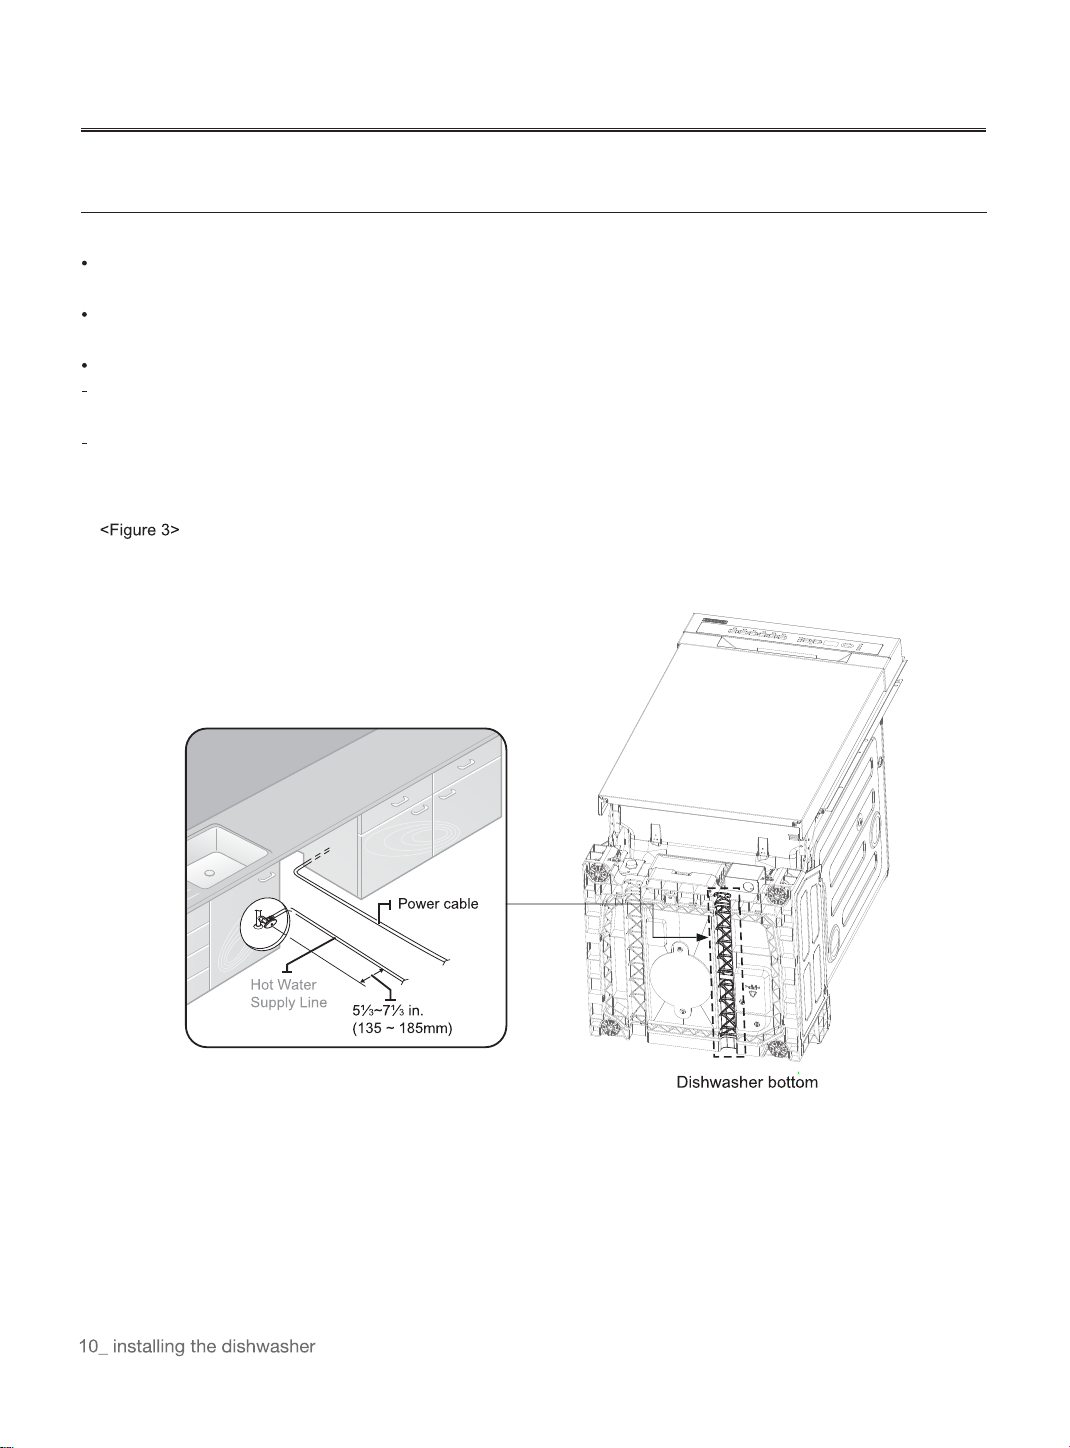
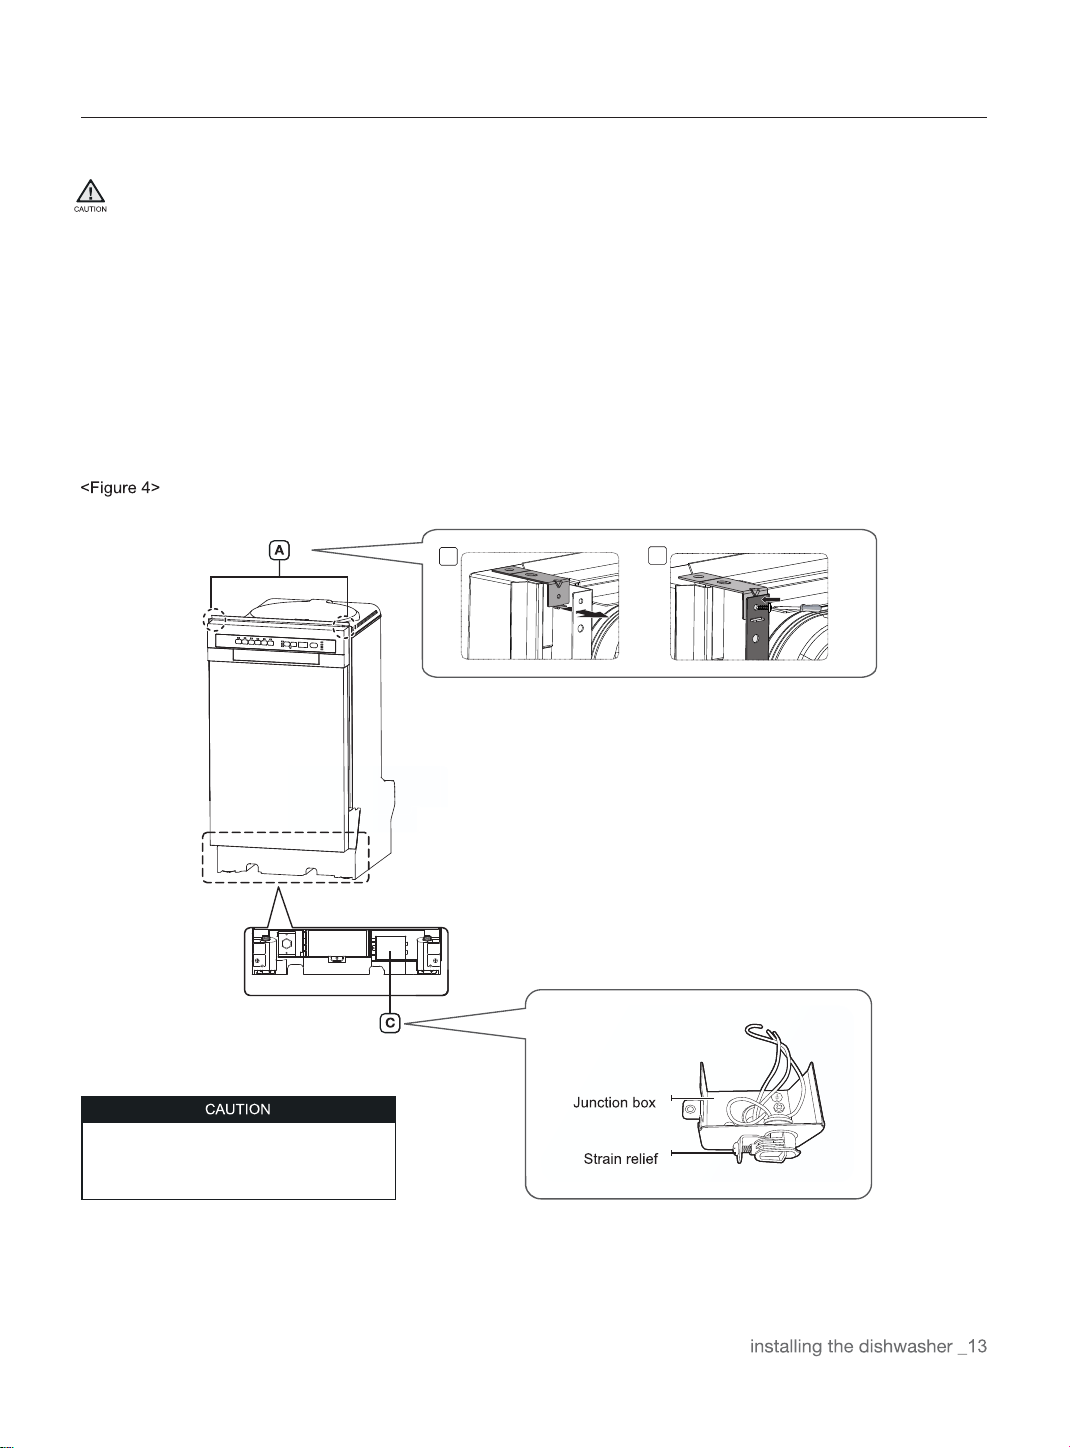
3. Remove the junction box cover located at the bottom front right of the dishwasher using a screwdriver, and then
Install the strain relief (Figure 4 - C). Make sure to keep the junction box cover you removed. It is used in Step 11,
Wiring Connections.
4. If the countertop is made of wood or a material that is not damaged by drilling, attach the two Installation
brackets that were supplied with the dishwasher using the supplied screws (Figure 4 - A). They will be used in
Step 9. Securing the Dishwasher.
Do not overtighten the 90° Elbow.
Doing so may damage the water inlet valve
and cause a water leak.
1
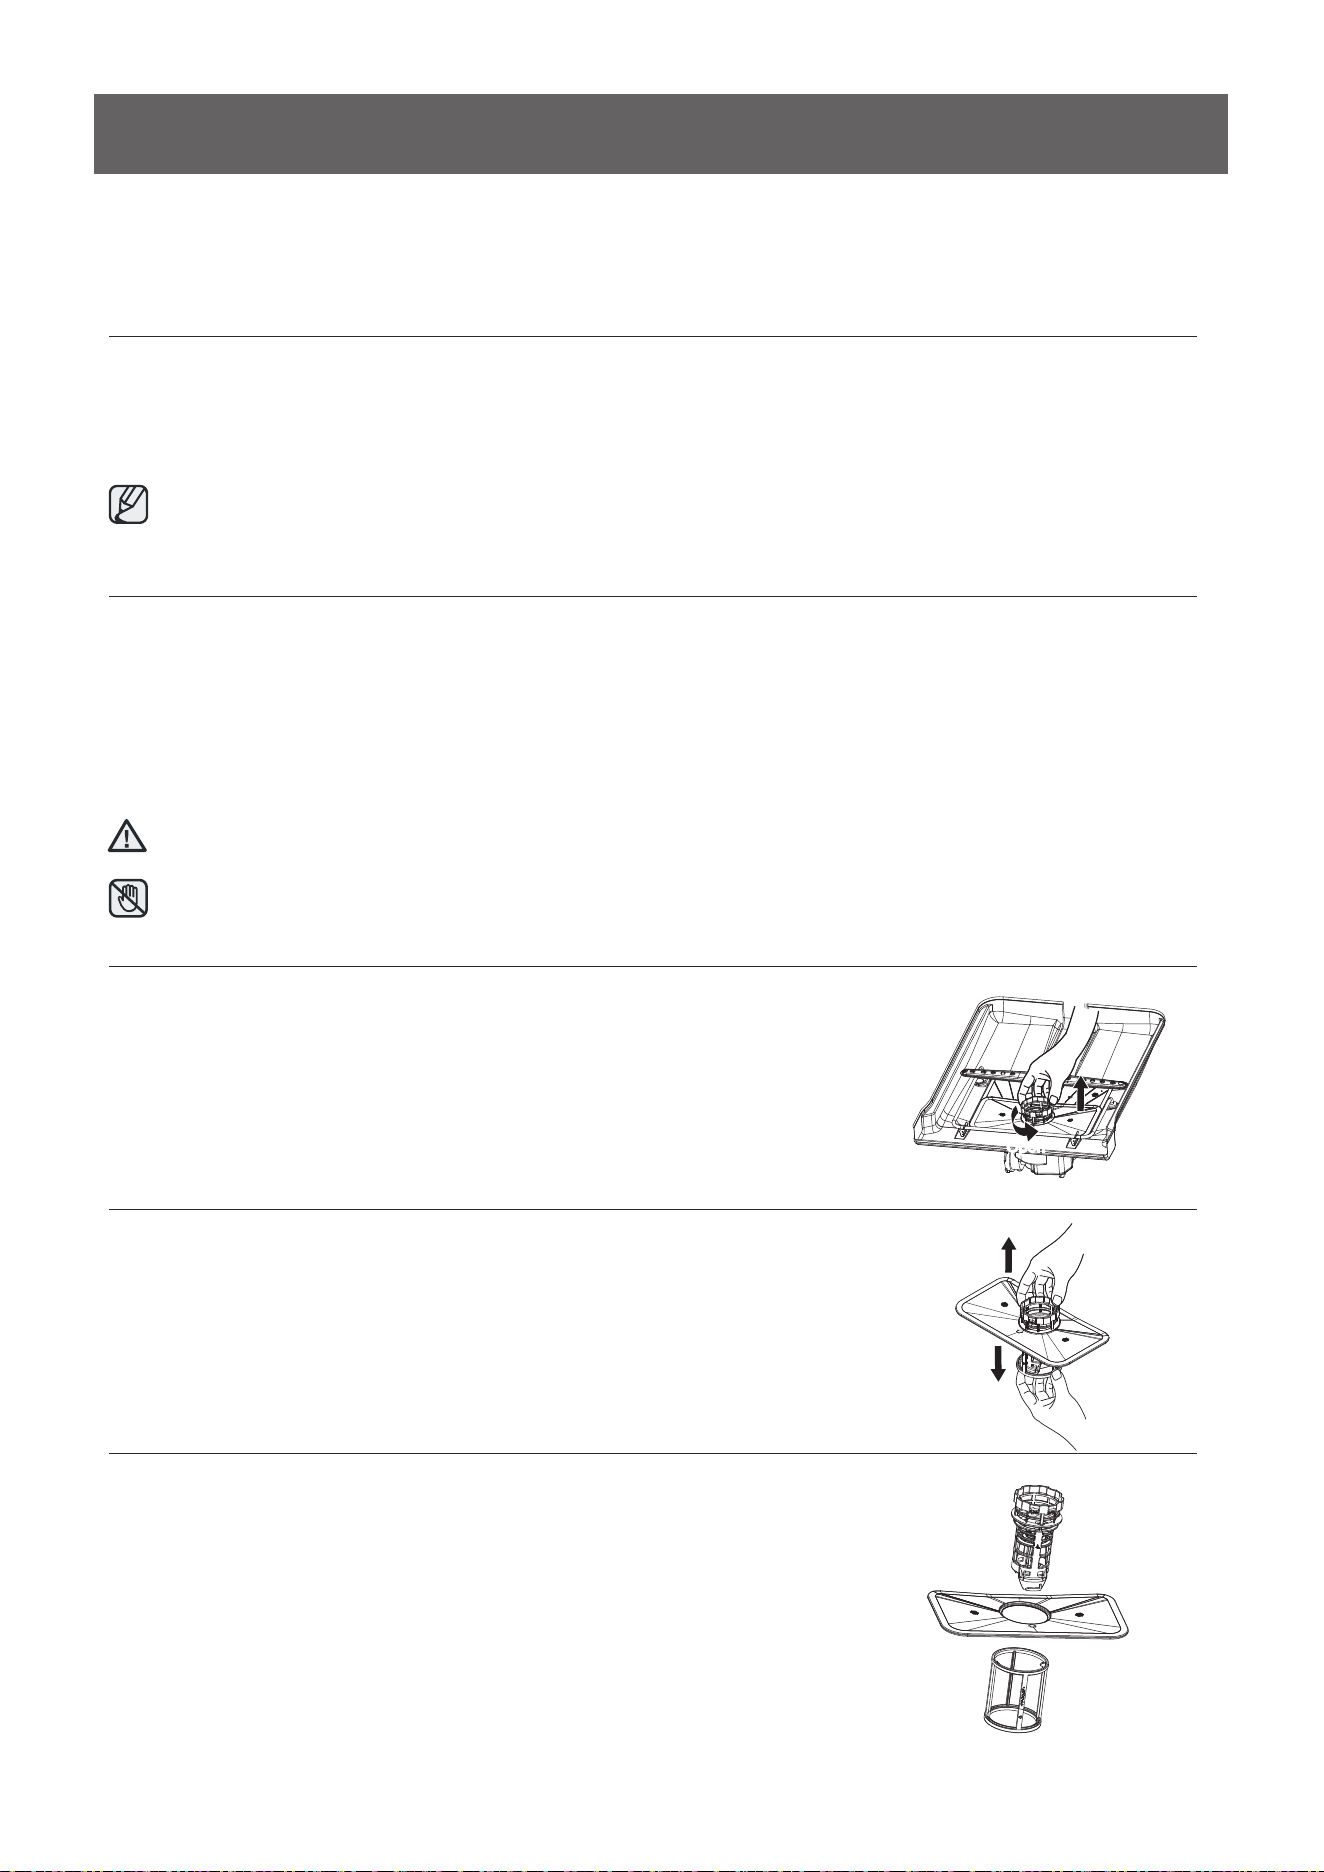
2
Drain Hose2
Drain hose1
Drain hose2
Hose clamp on the gray area
INSTALLING THE DISHWASHER
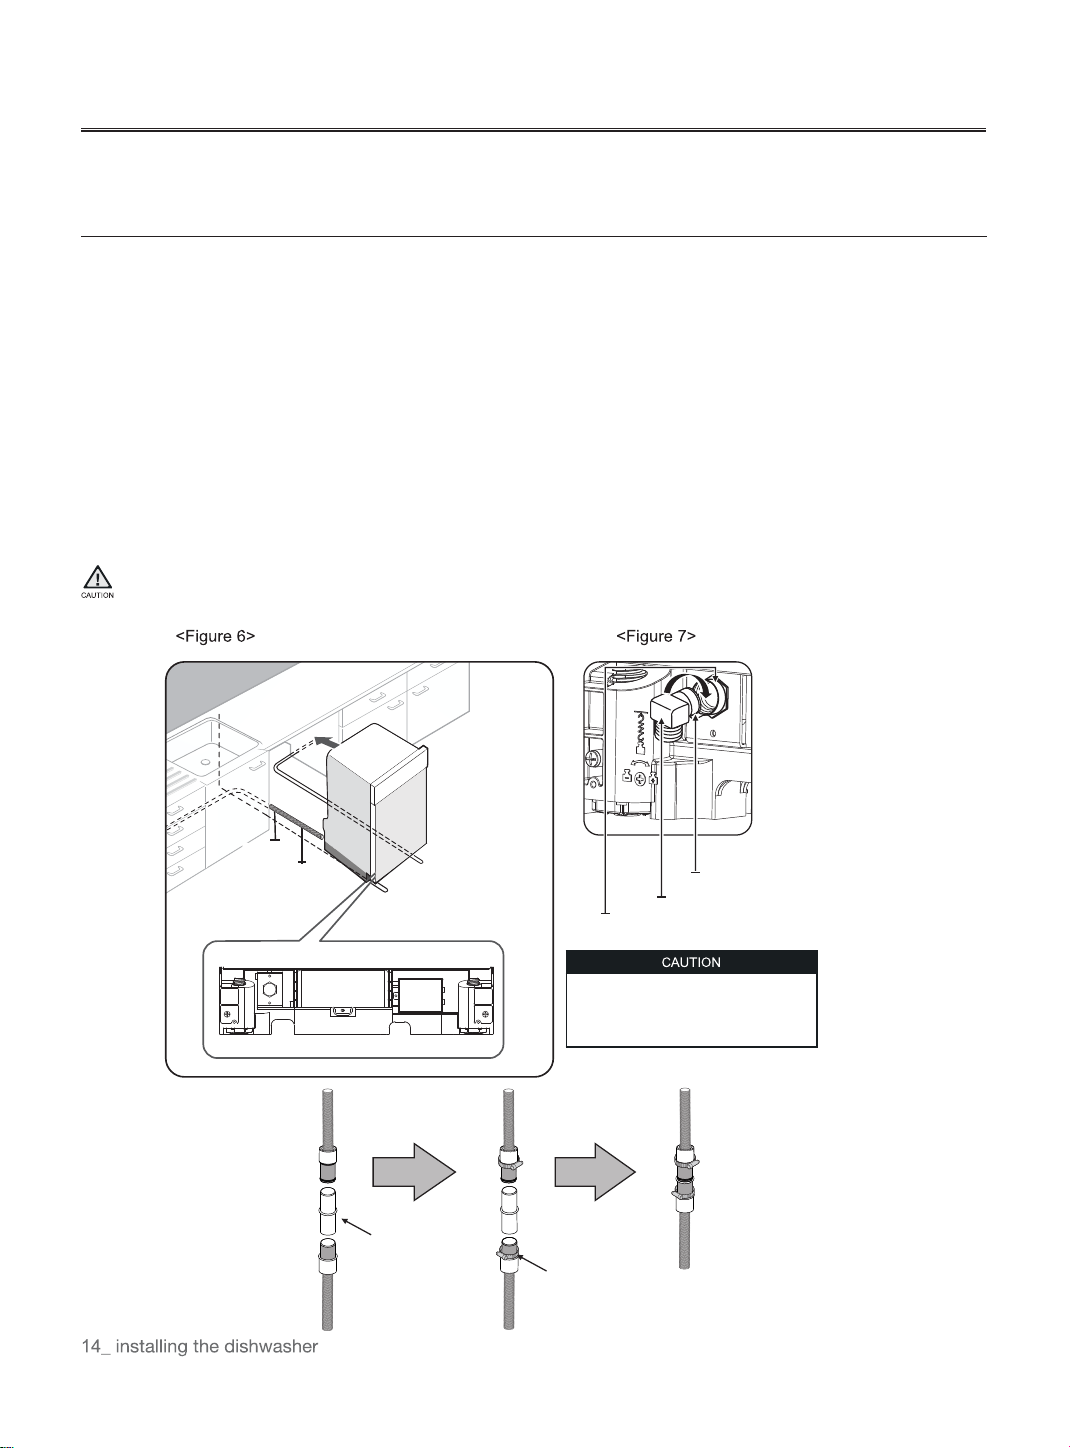
Step 7 placing The Dishwasher And Connecting The Hot Water
Supply Line
1. Adjust the three leveling legs at the bottom of the dishwasher after measuring the height of the cabinet
opening from under the countertop to the floor. (See Step 8, Leveling the Dishwasher.)
2. Locate the hot water supply line and the power cable.
3. Place the dishwasher so that the power cable is in the right channel of the base of the dishwasher. Use
standard duct tape or cable ties to secure the electrical cable to their adjacent channels in the base. This
can prevent the electrical cable from being squeezed when you push the dishwasher into place.
4. Pull the drain hose through the hole in the sink cabinet side wall. Keep it free of kinks.
5. Make sure the hot water supply line is not twisted, and then connect the hot water supply line to the elbow
joint.
6. Slide the dishwasher carefully into the installation space. If possible, gently pull any excess lengths of water
supply line, drain hose, or power cable back as you move the dishwasher. Get a second or third person to
help you do this if necessary.
Do not place the dishwasher on the water supply line, drain hose, or power cable.
Also, make sure they are not folded or twisted.
Do not overtighten the 90° Elbow.
Doing so may damage the water inlet
valve and cause a water leak.
Hotwatersupplyline
Rubber connector
90° Elbow
Inletvalve
Teflon tape or sealing compound
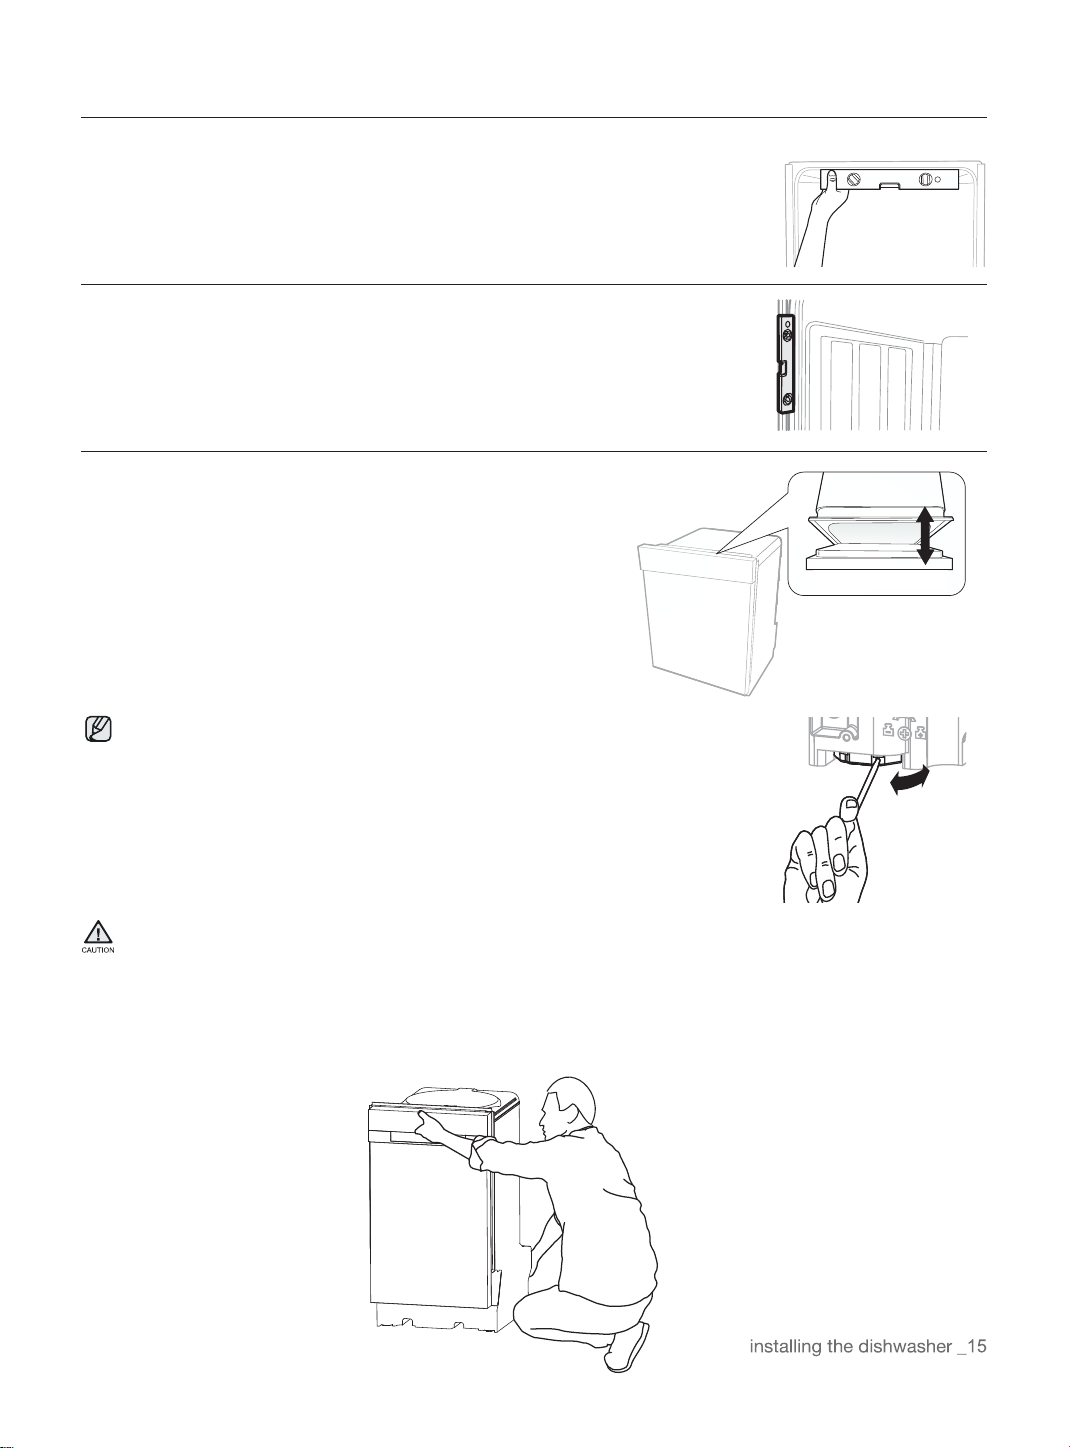
Step 8 Leveling The Dishwasher
1. Open the door and place the level against the top of the tub on the inside
and check if the the dishwasher is level.If it is not level, rotate the leveling
legs at the bottom front of the dishwasher until the dishwasher is level.See
the first note below for instructions on adusting the height of the front legs.
2. Use the level to check if the dishwasher is level front to back, as shown in the
figure to the right.If the dishwasher is not level front to back, adjust the height
of the rear leg until the dishwasher is level.See the second note below for
instructions on adusting the the rear leg.
3. Open the door of the dishwasher andcheck if both the tub and
door clearancesare correct.If not, rotate the leveling legs on the
bottom front of the dishwasher.You can also check this by placing
a levelagainst an inside front vertical surface ofthe tub.
If the leveling legs are rotated to the right (counter clockwise), they are
lossened and the front of the dishwasher is raised. And the maximum
height be raised is about 50mm. If they are rotated to the left (clockwise),
they are tightened and the front of the dishwasher is lowered.
Before you move the dishwasher for installation, make sure to adjust the height of the legs so the legs are as
short as possible. This prevents the legs from breaking. Level the dishwasher by adjusting the height of the legs
after you have the dishwasher in place.
When you prepare to move the dishwasher for installation, you should put your hand under the basement, this
prevents your hand from injuring.

INSTALLING THE DISHWASHER
Step 9 Securing The Dishwasher
You must fix the dishwasher to the countertop or cabinet side walls for additional stability and safety.
If the countertop is made of wood or the material will not be damaged by drilling, follow the instructions in 2-1
below.
If the countertop is made of granite, marble, or any other material that can be damaged by drilling, follow the
Instructions in 2-2 below.
Put a large towel into the bottom of the dishwasher to prevent wood shavings or a dropped screw from falling
into the dishwasher.
Carefully drill screw holes Into the counter top bottom by passing the drill bit through a screw hole in each
bracket, and then drilling into the counter top bottom beneath.
Make sure the hole you drill is smaller than the diameter of the screw.
Firstly, put the installation bracket into the slot of the side plane and tighten to the dishwasher with screw
ST3.5*9. Secondly, insert the provided screws into the brackets, and then tighten to secure the dishwasher to
the counter top.
Put a large towel into the bottom of the dishwasher to prevent wood shavings or a dropped screw from falling
into the dishwasher. Remove the adjustment cap with the tip of a screwdriver. The caps are just inside the tub
near the middle of the tub an both sides(Figure 9 on the next page).
Drill a hole into the sides of the kitchen cabinet on both sides by carefully passing a drill bit through the screw
holes exposed by the removal of the spacer caps, and then drilling into the cabinet side beneath.
Make sure the hole you drill is smaller than the diameter of the screw.
Also make sure the drill bit does not strike the sides of the spacer cap holes. Firstly, put the installation bracket
into the slot of the side plane and tighten to the dishwasher with screw ST3.5*9. Secondly, Insert the provided
screws into the holes, and then tighten to secure the dishwasher to the cabinet. Make sure the tub is not
distorted by pressure from the screws.
If the tub is distorted, loosen the screws a little.
Replace the tub spacer caps.
1.
2-1.
2-2.
The screws or tub spacer cap may fall into the dishwasher while you are working with the door open. Cover
the interior of the dishwasher with a towel to prevent any screws from falling into the dishwasher. If any
foreign items such as a screw get into the dishwasher, it may cause noise, an abnormal operation, damage,
or a malfunction.
Use a magnetic screwdriver to help prevent screws from falling into the dishwasher.
If a foreign item such as a screw gets into the dishwasher and you are unable to remove it. the dishwasher
needs to be disassembled. Contact a qualified service technician for this.
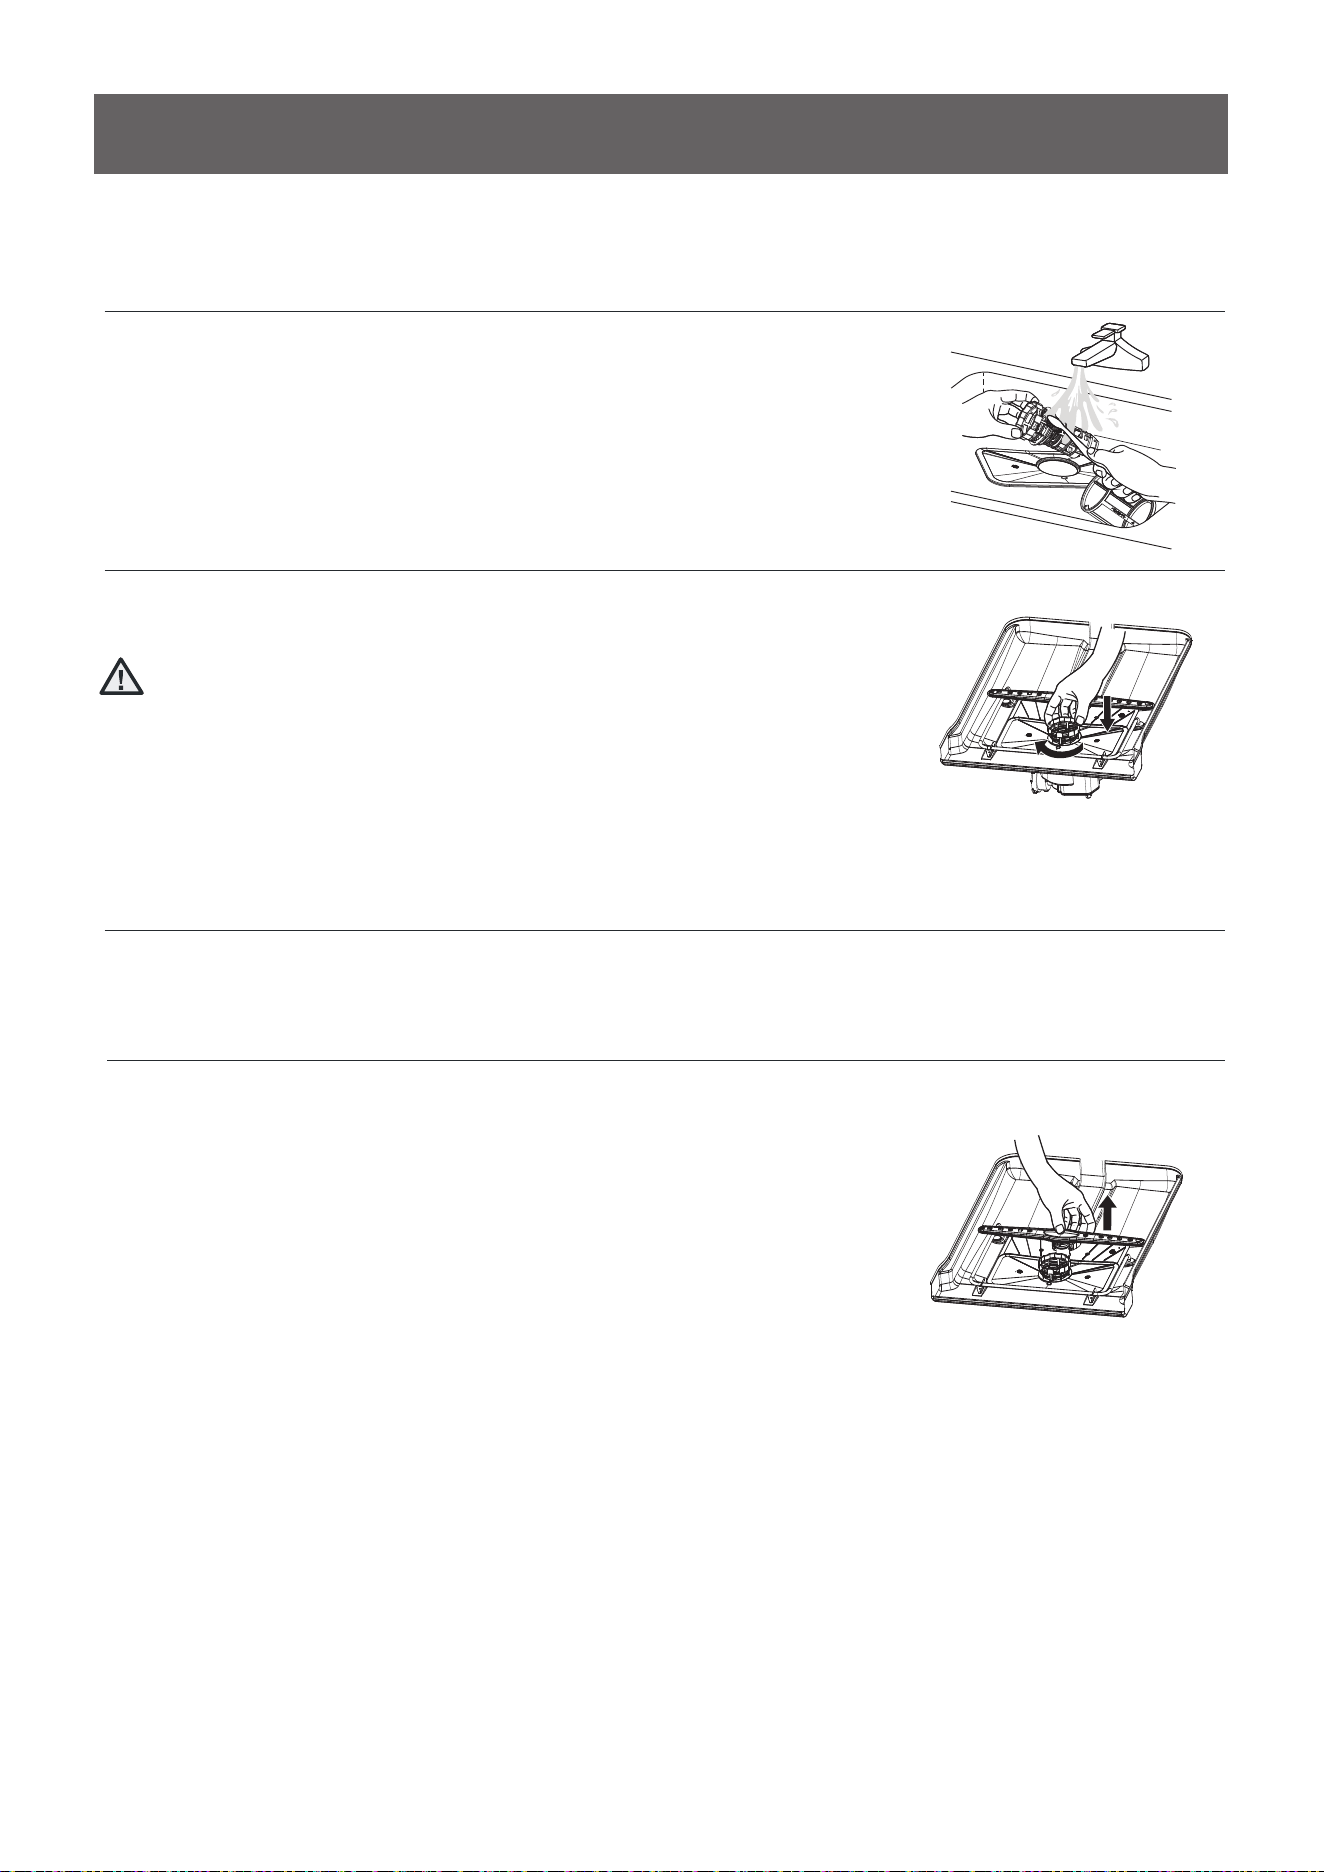
Drain hose2
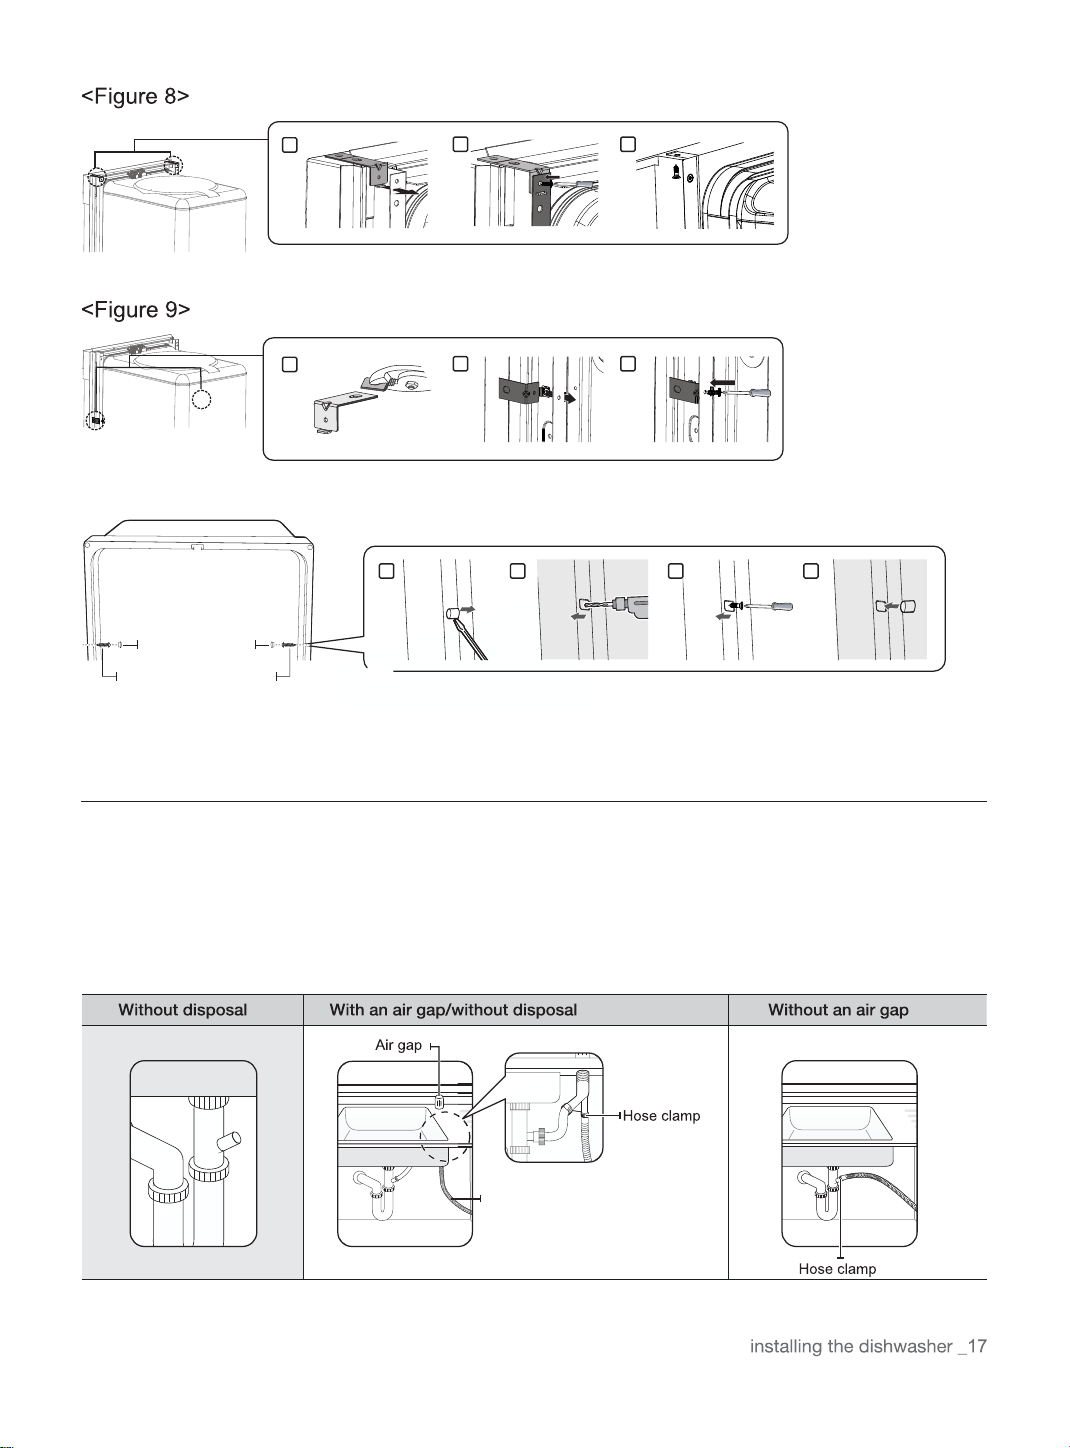
Step 10 Connecting The Drain Hose
1. Check the parts on the sink to which the drain hose will be connected.
2. There are several ways to insert the drain hose into the drain hose connector of the sink, as shown in the
followi n g figures. You must connect the drain hose in accordance with the water pipe installation regulations in
yo u r region.
<Figure 10>
Case 1. Without disposal
Adjustment cap
Screw to side wall
1
2 3
3 4
1
2 3
1 2
INSTALLING THE DISHWASHER
Case 2. With disposal
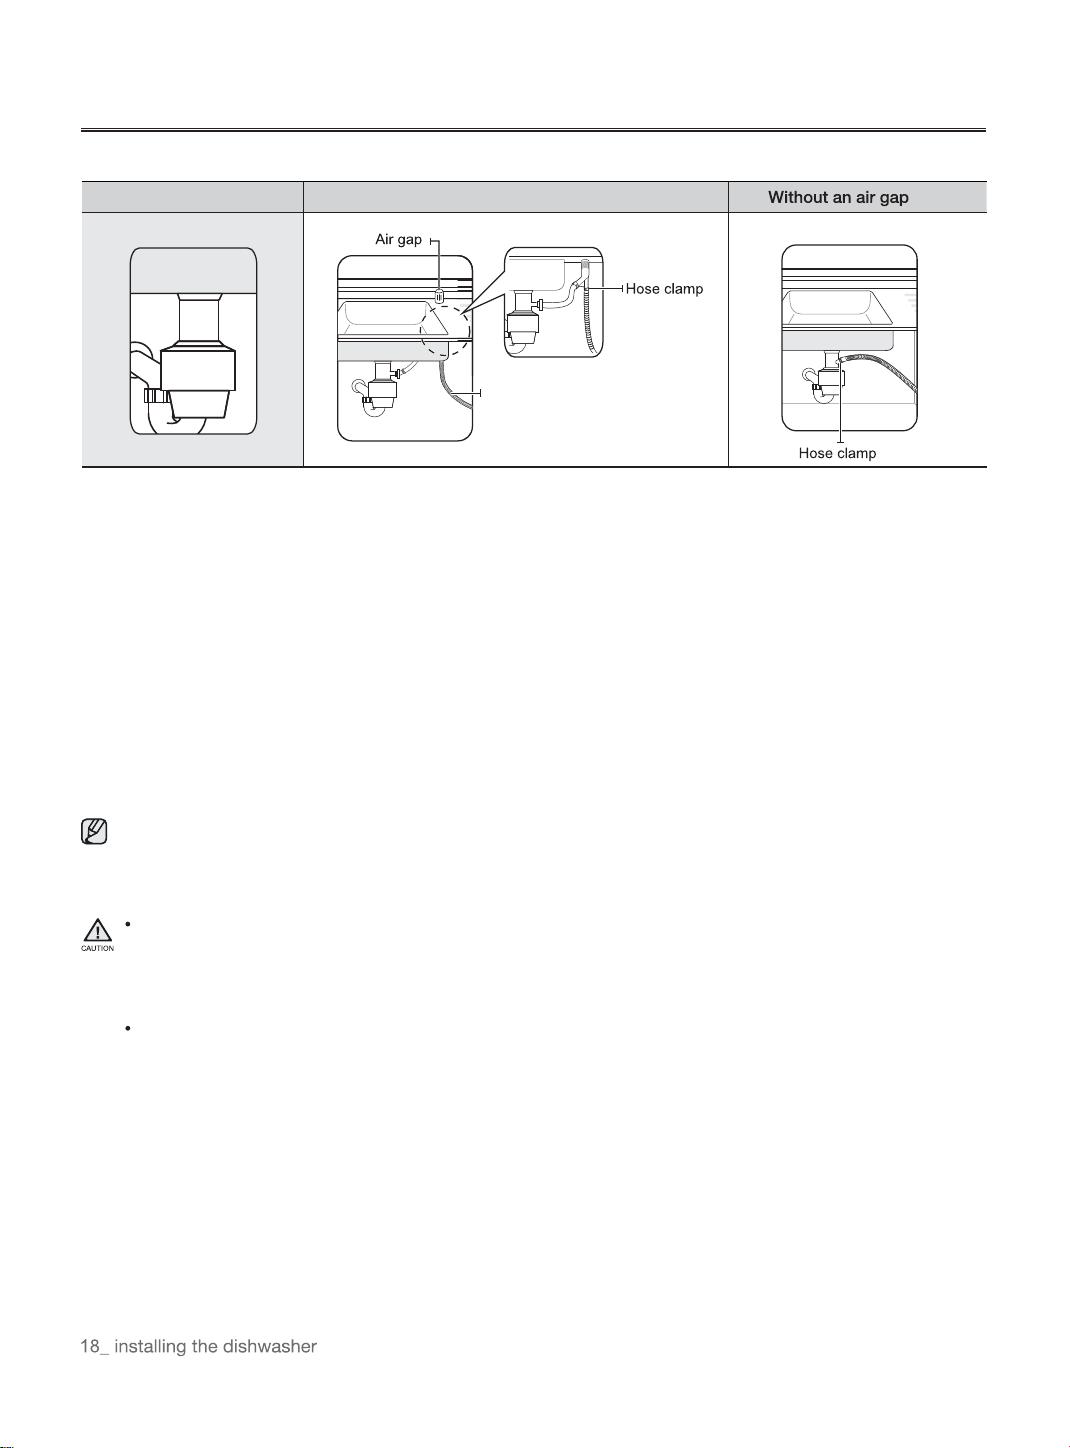
Check the size of the sink's drain hose connector(21mm- as shown in Figure 11 below). If the end of the drain hose
does not fit onto the drain hose connector of the sink, use an adaptor purchasable at a plumbing/hardware supply
store.
Slide a hose clamp over the end of the drain hose. Attach the drain hose to the sink connector, slide the hose
clamp to the end of the hose, and then tighten the hose clamp.
Note : You must use a hose clamp. Failure to do so may cause water leakage.
If there is no air gap, make sure to hang. the middle of the drain hose well above the sink cabinet base to prevent
backflow (see Figure 13 on the next page).
When drilling a hole for the drain hose on the cabinet wall, take caution not to damage the drain hose by sharp
edges of the hole. On wooden walls, use sand paper to soften the edges.On metal walls, use insulation tape or
duct tape to cover the sharp edges around the hole.
Take caution not the damage the drain hose when installing the dishwasher on the floor, wall,or cabinet.
3.
4.
5.
6.
7.
To prevent leaks or drainage problems, make sure the drain hose is not damaged, kinked,or twisted.
8. Do not cut the wrinkled area of the drain hose to fit the size. When arranging the drain hose, take caution not to
contact on sharp edges of the cabinet or under-sink.
Be careful when cutting off the end of the drain hose as there is a risk of injury. Clean around the sink's drain
connection so that it does not damage the hose. Check for any foreign items in the drain hose and remove
them.
When arranging the drain hose, make sure the drain hose is not cut, torn, or broken by any sharp edges of
the floor, the product itself, or the cabinet. A damaged drain hose causes a leak.
Drain hose2
With disposal Disposal with an air gap
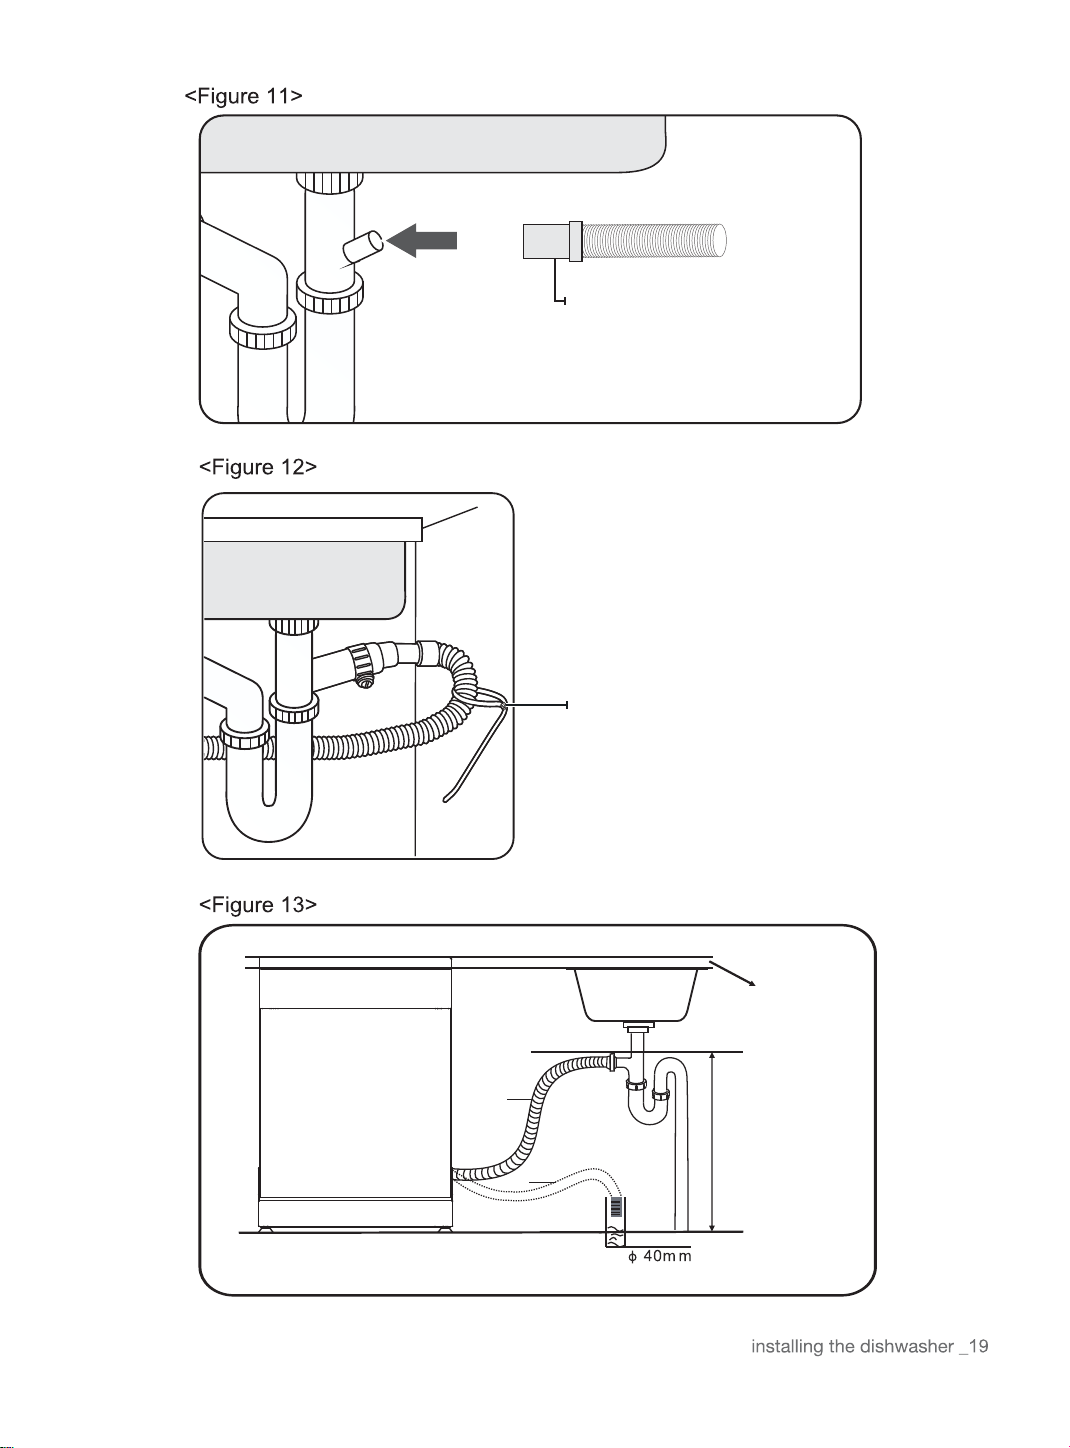
The drain hose internal
diameteris 21mm
Secure the drain hose to the sink wall using
cable ties or other fastening materials.
Otherwise, the drain hose may bend at the
end. causing a drainage problem or excessive
supply of water.
B
A
MAX 1000mm
Counter TOP
Front of dishwasher
Drain hose
NOTE:
The top of the drain
hose must be less
than 1000mm
INSTALLING THE DISHWASHER
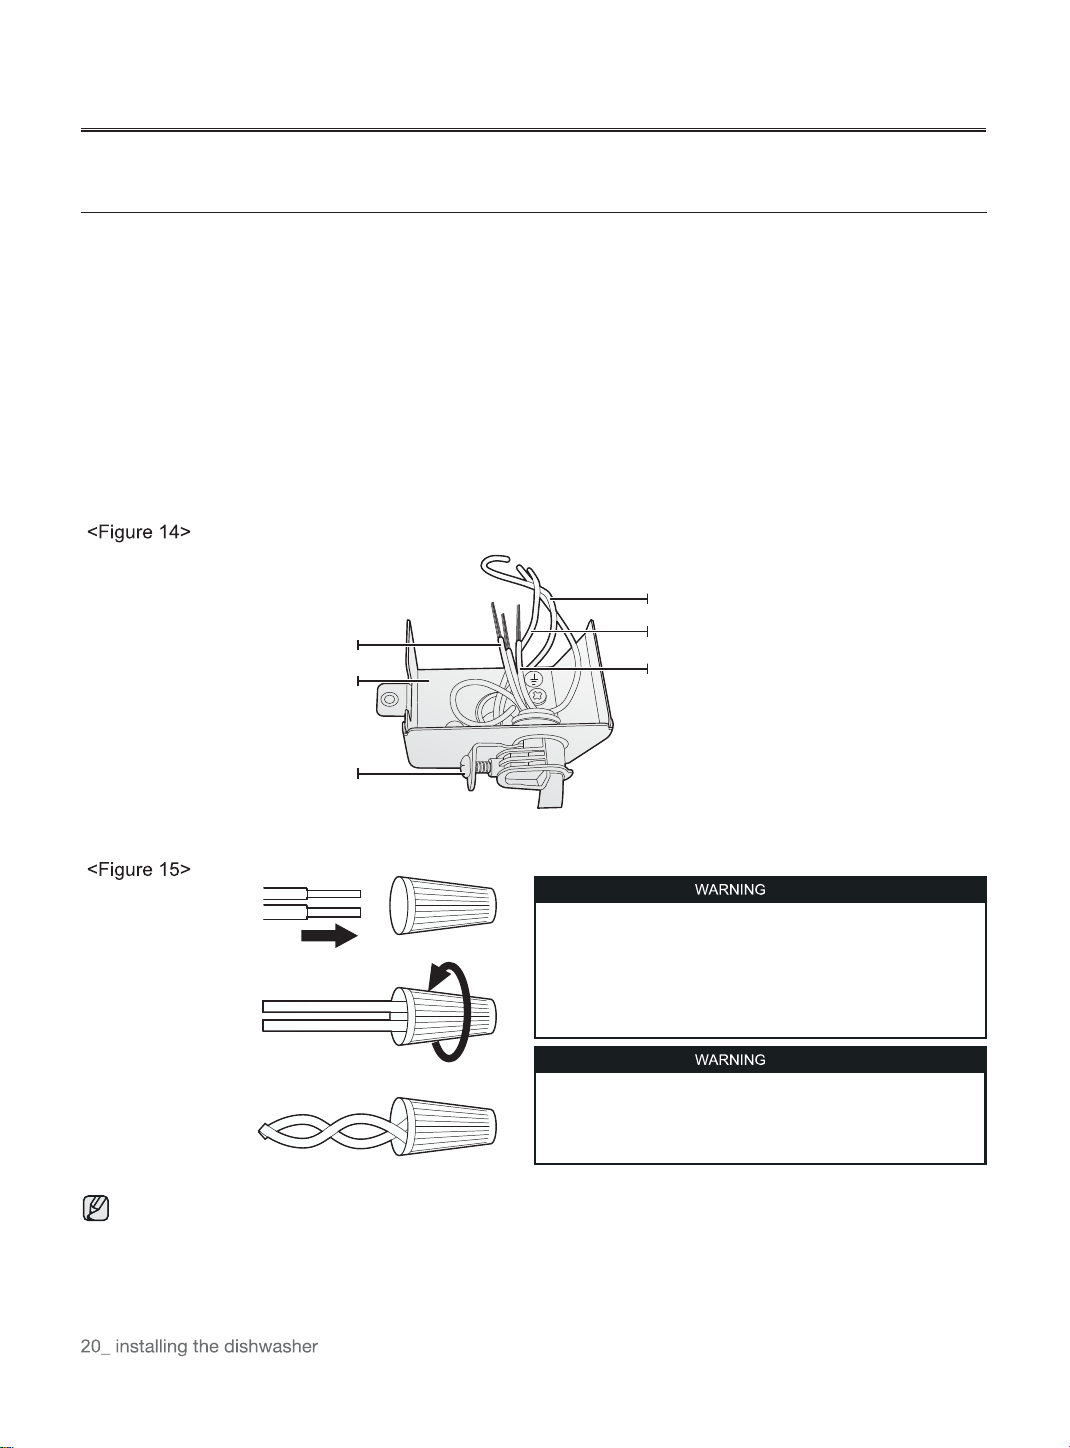
Step 11 Wiring Connections
Before connecting the power cable to the dishwasher, make sure the circuit breaker is off.
In the junction box located at the front bottom right of the dishwasher, find the three power wires from the
dishwasher including the grounding line.
Pass the power cable through the strain relief, and then into the junction box (Figure 14).
Connect the black wire of the dishwasher to the black wire of the power cable by inserting both into a wire nut
and then rotating the wire connector as shown in Figure 15.
Connect the white wire to the white wire and the green to the green in the same manner.
Recheck each wire to ensure it is connected correctly and securely.
Each colored wire should be connected to the corresponding wire of the same color.
White should be connected to white, black to black, and green to green.
Replace the junction box cover on the dishwasher.
1.
2.
3.
4.
5.
6.
Electrical Shock Hazard
To avoid electrical shock, do not work on an energized circuit.
Doing so could result in serious injury or death. Only qualified
electricians should perform electrical work. Do not attempt
any work on the dishwasher electric supply circuit until you are
certain the circuit is de-energized.
Fire Hazard
To avoid a fire hazard, make sure electrical work is properly
installed. Only qualified electricians should perform electrical
work.
Recheck each wire to ensure it is connected correctly and securely.
Each colored wire should be connected to the corresponding wire of the same color.
Power cable
Junction box
Strain relief
Black to black
White to white
Green to green
(Ground to ground)
Step 12 Completing The Installation
1. Open the door and remove all foam, paper packaging, and unnecessary parts.
2. Turn on the circuit breaker you turned off before you began the installation.
3. Open the water supply valve to supply water to the dishwasher.
4. Turn on the dishwasher, and then select and run a cycle.
Check if the power turns on correctly and if there is any water leakage while the dishwasher is operating. If no
errors occur while it is operating, turn off the dishwasher, and then go to Step 5 below.
If an error has occurred, turn off the dishwasher, close the water supply valve, and then refer to the user manual
or contact local service center.
Make sure to check for water leakage on both ends of the water supply line and drain hose connector.
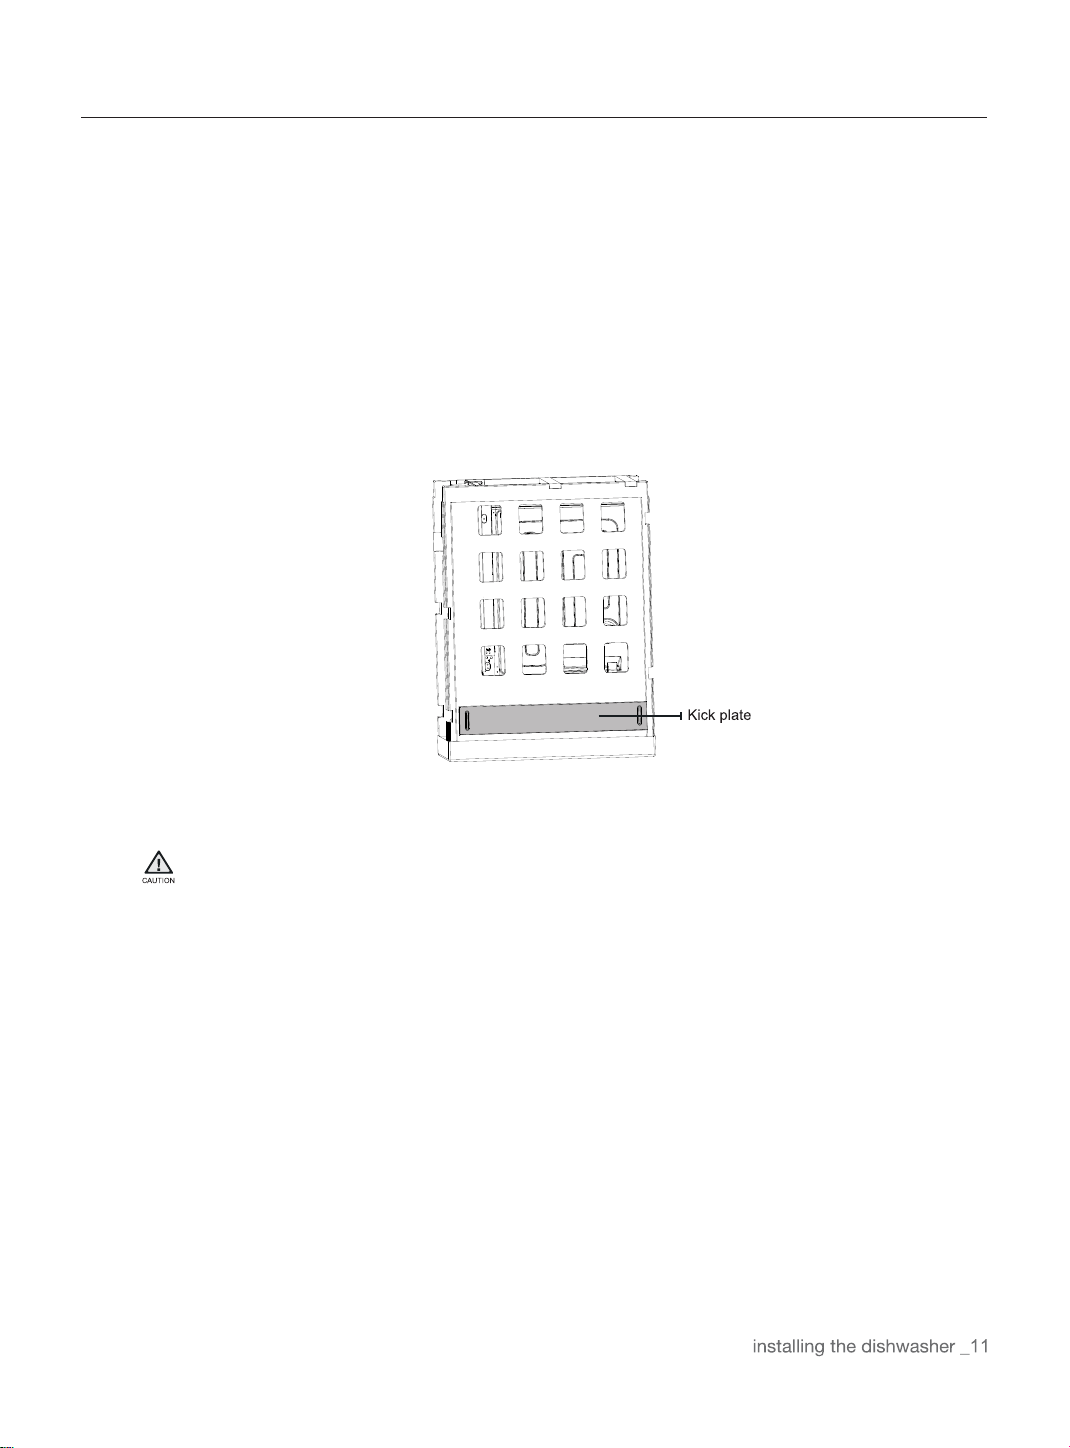
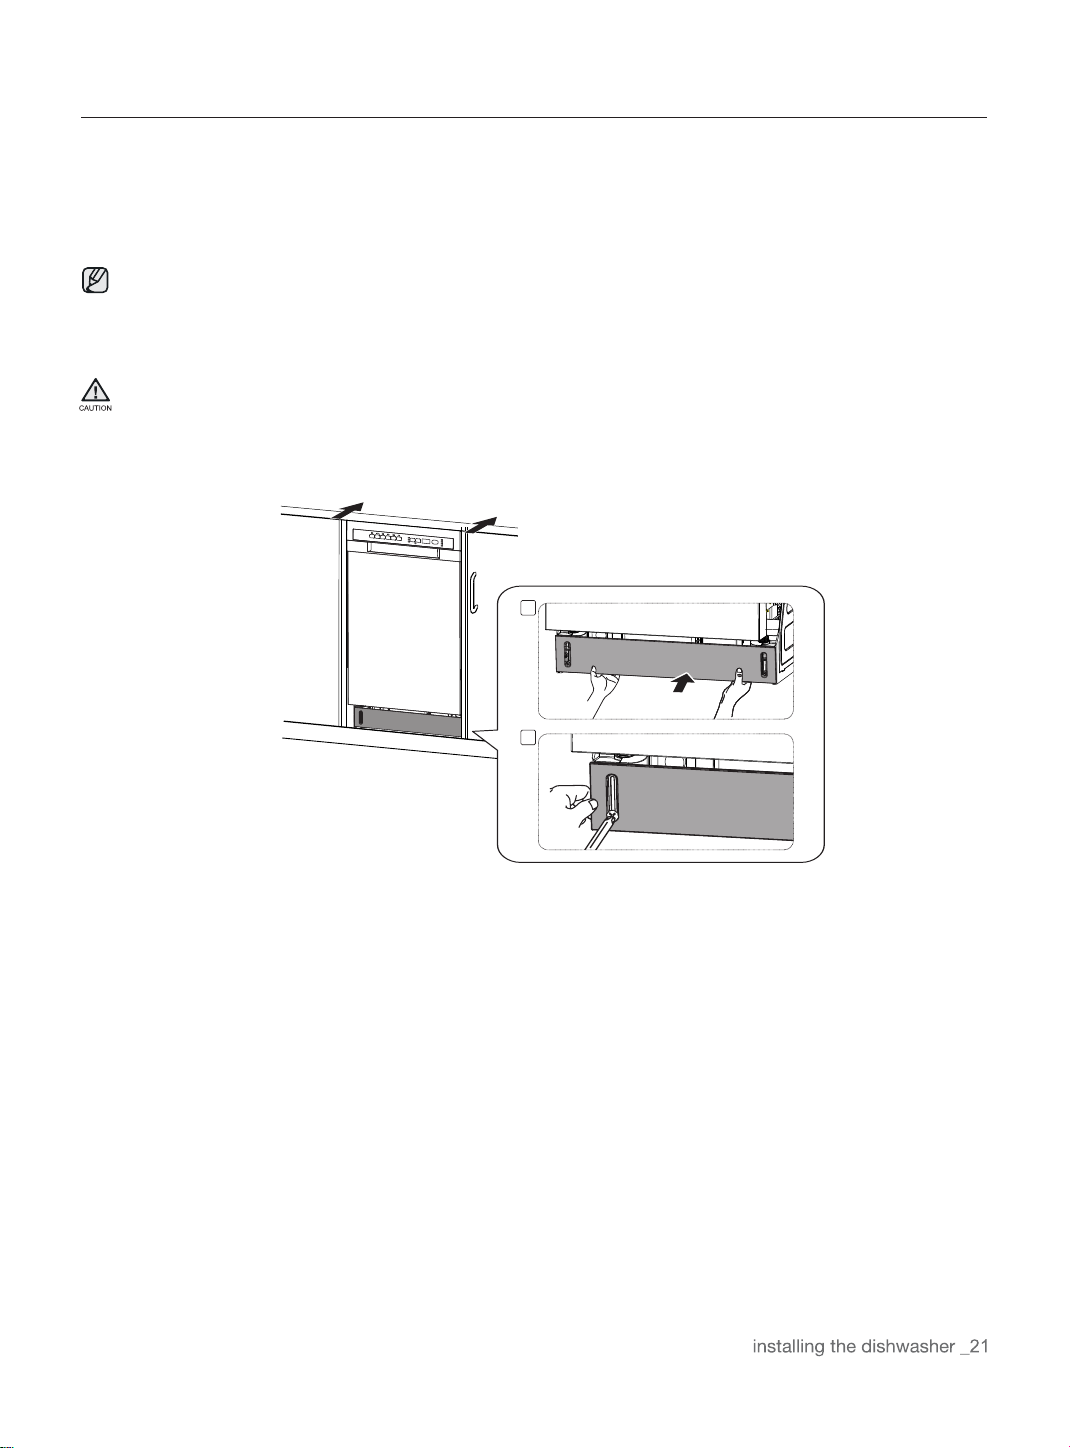
5. Confirm that the kick plate gasket is on the bottom of the kick plate. To install the kick plate with screw ST3.9*13,
refer to the figure below.
1
2

SPECIFICATIONS
Specifications are subject to change without notice for quality improvement purposes.
The actual appearance of the dishwasher may differ from the illustrations in this manual.
Power supply
Water pressure
Dimensions
(Width x Depth xHeight)
Nominal inlet water
temperature
120 V 60 Hz
0.04 - 1 MPa
450mm x 580mm x 825mm
120 °F(49°C)
