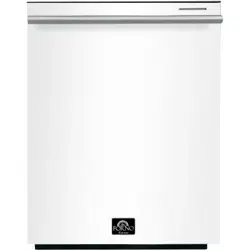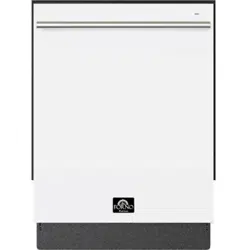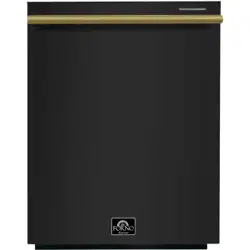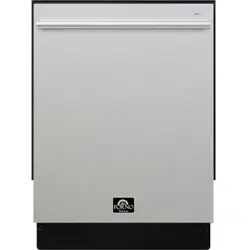
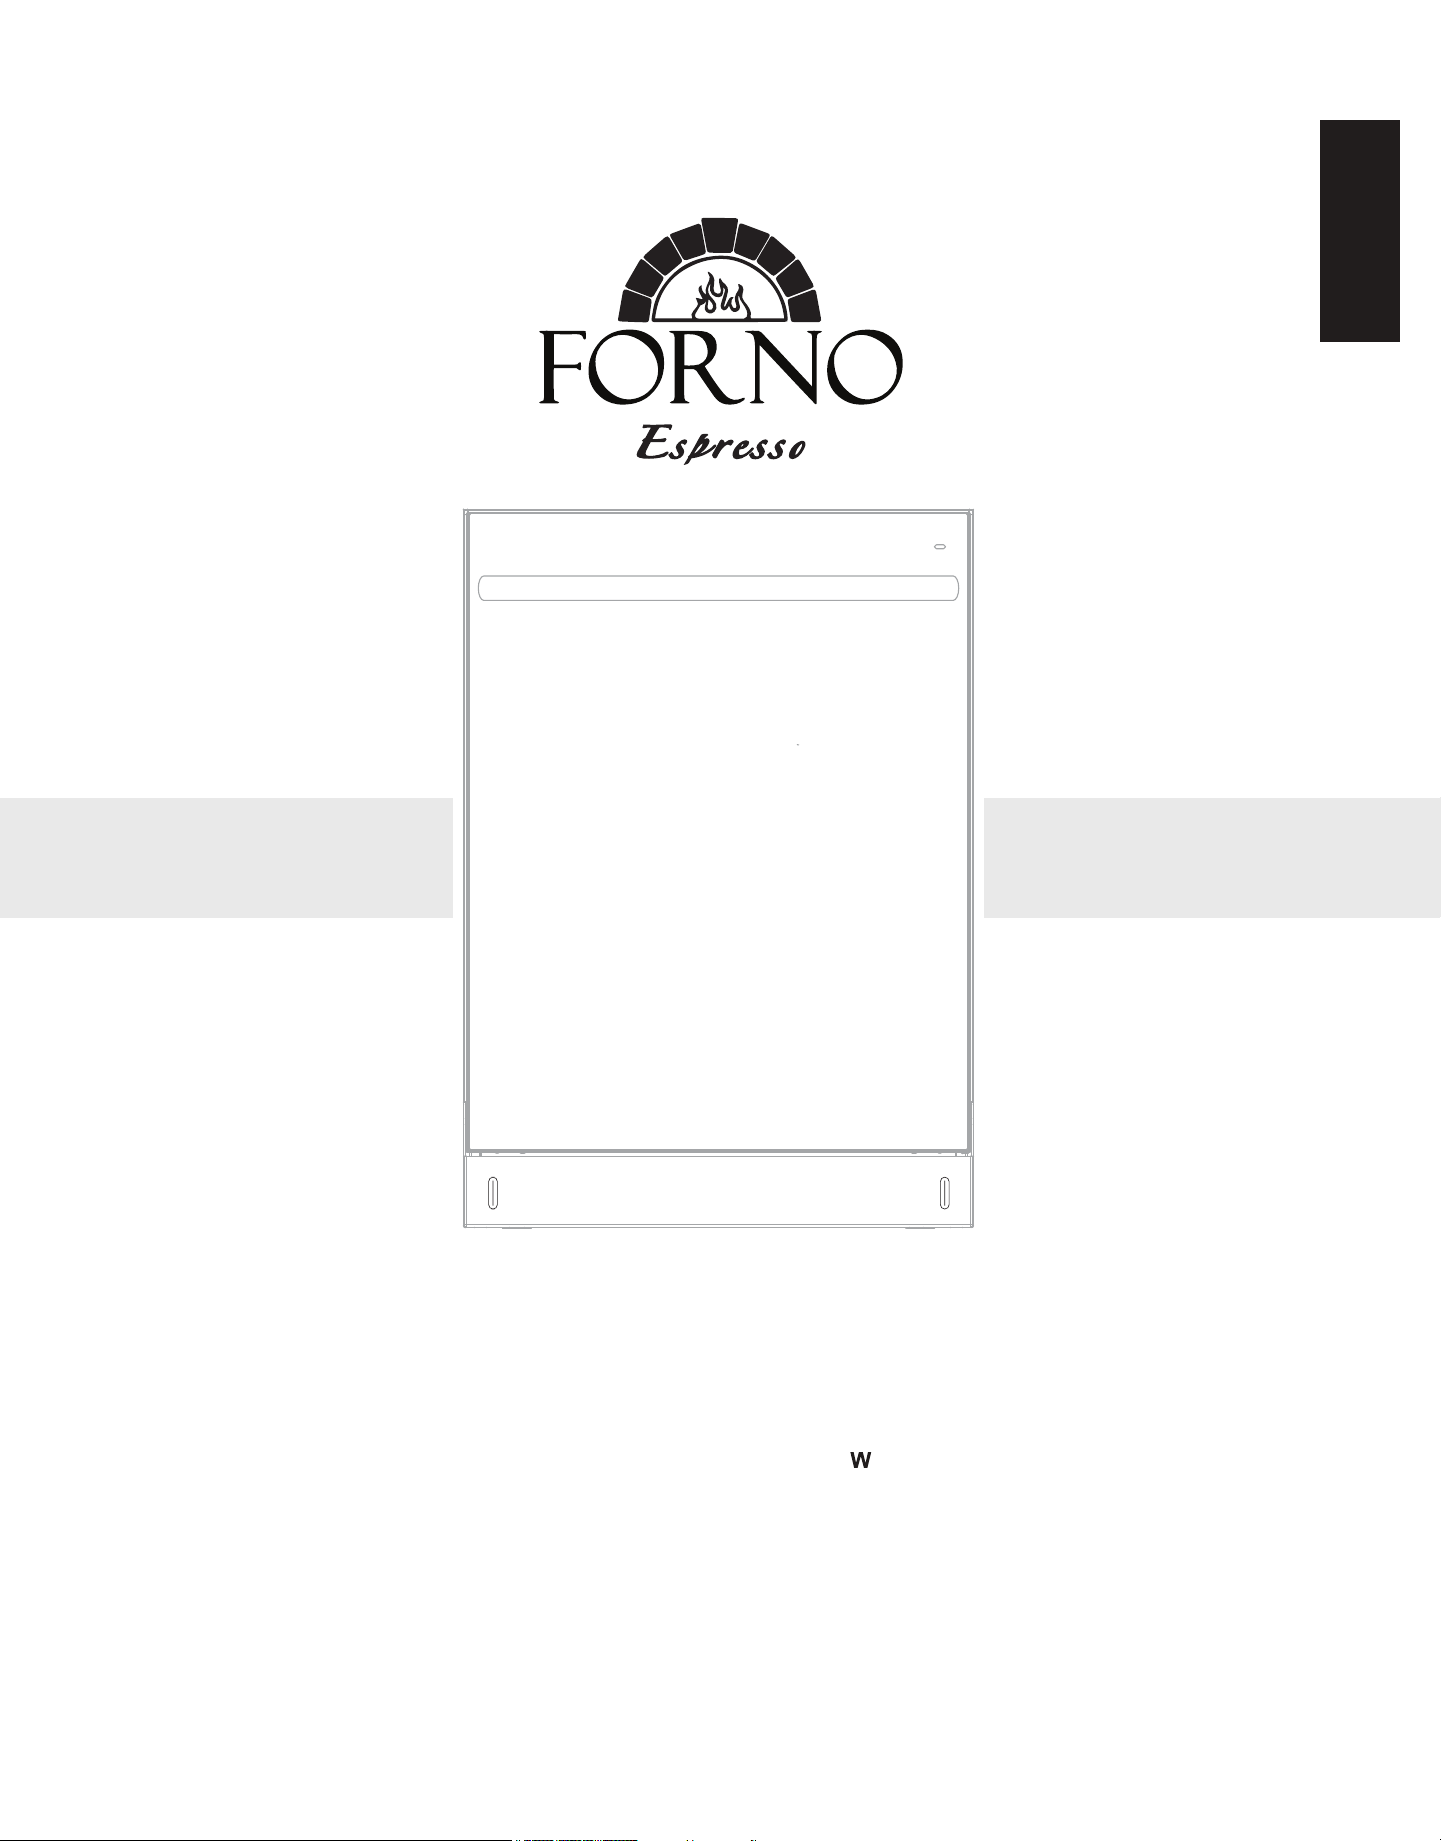
ENGLISH
24” Built-In Dishwasher
MODEL NUMBER SERIES:
FDWBI8035-24S / FDWBI8035-24BLK / FD BI8035-24WHT
INSTRUCTION MANUAL &
INSTALLATION GUIDE
Read these instructions carefully before using your appliance, and keep it carefully.
If you follow the instructions, your appliance will provide you with many years of good service.

2

3
Customer Care
Warning
Important Safety
Product Dimension
Cutout
Names of Parts and Accessories
Installations Preparation
Installation Procedure
Operating Instruction
Care and Maintenance
Troubleshooting
Wire Diagram
Warranty
TABLE OF CONTENTS
4
5
6
7
8
9
10
13
18
24
26
27
28
4
Thank you for purchasing a Forno product. Please read the entire instruction manual before operating your new appliance
practices, features, operation and care recommendations of your appliance.
Both the model and serial number are listed inside the product. For warranty purposes, you will also need the date of
purchase .
Record this information below for future reference.
Services in Canada and Untied States
Keep the instruction manual handy to answer your questions. If you don’t understand something or need more assistance,
please visit our website for fast support. Please provide us your name, number, address,serial number of the product that
troubleshooting, proof of purchase, and a short description of the issue. A customer service representative will contact you
providers are carefully selected and rigorously trained by us.
Product Information Service Information
Model Number : _________________________________________
Use these numbers in any
correspondence or services calls
concerning your product.
If you received a damaged product,
immediately contact Forno.
To save time and money, before
you call for serviced, check the
troubleshooting guide. It listed the
causes of minor operation problems
that you can correct yourself.
Serial Number :
Date of Purchase :________________________________________
Purchase Address And Phone : _____________________________
_______________________________________________________
_______________________________________________________
Customer Care
“Need some quick help? Simply scan the qr code and get access
to our fast support form. We’re always here to assist you with any
questions or concerns you may have. So, don’t hesitate to reach out!”
5
WARNING
FOR YOUR SAFETY
DANGER
WARNING
CAUTION
We have provided many important safety messages in this manual and on your appliance. Always read and obey all
safety messages
All safety messages will tell you what the potential hazard is, tell you how to reduce the chance of injury, and tell you
what can happen if the instructions are not followed.
You can be killed or seriously injured if you don’t immediately follow instructions.
You can be killed or seriously injured if you don’t follow instructions.
A potentially hazardous situation which, if not avoided, could result in minor or
moderate injury.
This is the safety alert symbol. This symbol alerts you to potential hazards that can kill or hurt you
and others. Al l safety messages will follow the safety alert symbol and either the word “DANGER,”
“WARNING” or “CAUTION.” These words mean:
WARNING : This product can expose you to chemicals including [Lead, lead and lead
compound, which is [are] known to the state of California to cause cancer and birth defects
or other reproductive harm. For more information go to www.P65Warning.ca.gov.

Important Safety Instructions
6
Proper installation
Please install your dishwasher properly follow the installation guide.
Basic precaution before use
WARNING
Read all instructions before using the dishwasher.
The manual does not cover every possible condition and situation that may occur .
Use the dishwasher only for intended function as described in this manual.
When loading items to be washed:
* Load sharp items and knives so that they are not likely to damage the door seal and tub.
* Load sharp items and knives with the handles up to reduce the risk of cut type injury.
If the dishwasher drains into a food disposer, make sure disposer is completely empty before running dishwasher
Do not tamper with control.
Do not operate your dishwasher unless all enclosure panels are in the properly place.
Do not let children abuse, sit or stand on door or racks of a dishwasher.
Use only detergents or rinse agents recommended for use in a dishwasher and keep them out of the reach of children.
Keep young children and infants away from dishwasher when it is operating.
Remove the door to the washing compartment when removing an old dishwasher from service or discarding it.
Under certain conditions, hydrogen gas may be produced in a hot water system that has not been used for two weeks
or more. Hydrogen gas is explosive. If the hot water system has not been used for sucha period, before using
dishwasher, turn on all hot water faucets and let water flow from each for several minutes.This will release any accu-
mulated hydrogen gas. Hydrogen gas is flammable.Do not smoke or use an open flame during this time.
Do not use the dishwasher if it has a damaged power line or plug,and do not plug the dishwasher into a damaged
outlet,failure to observe these instructions may result in electrical shock.
For your safety,the information in this manual must be followed to minimize the risk of fire or explosion,electric shock,and
to prevent property damage,personal injury.
Water supply temperature should between 50°F to 140°F.
Dispose of the discarded appliance and packing material properly.
The dishwasher must be grounded,or it can result in a risk of electric shock.
If there is any damage of the Dishwasher,please contact to your Dealer,do not attempt to repair or replace any part by
yourself.
Do not wash plastic items unless marked dishwasher safe or the equivalent,if not marked, check with manufacture for
recommendation,items that are not dishwasher safe may melt and create a potential fire hazard.
Do not store or use combustible materials,gasoline or other flammable vapors and liquids in the vicinity of this or any
other appliance.
7
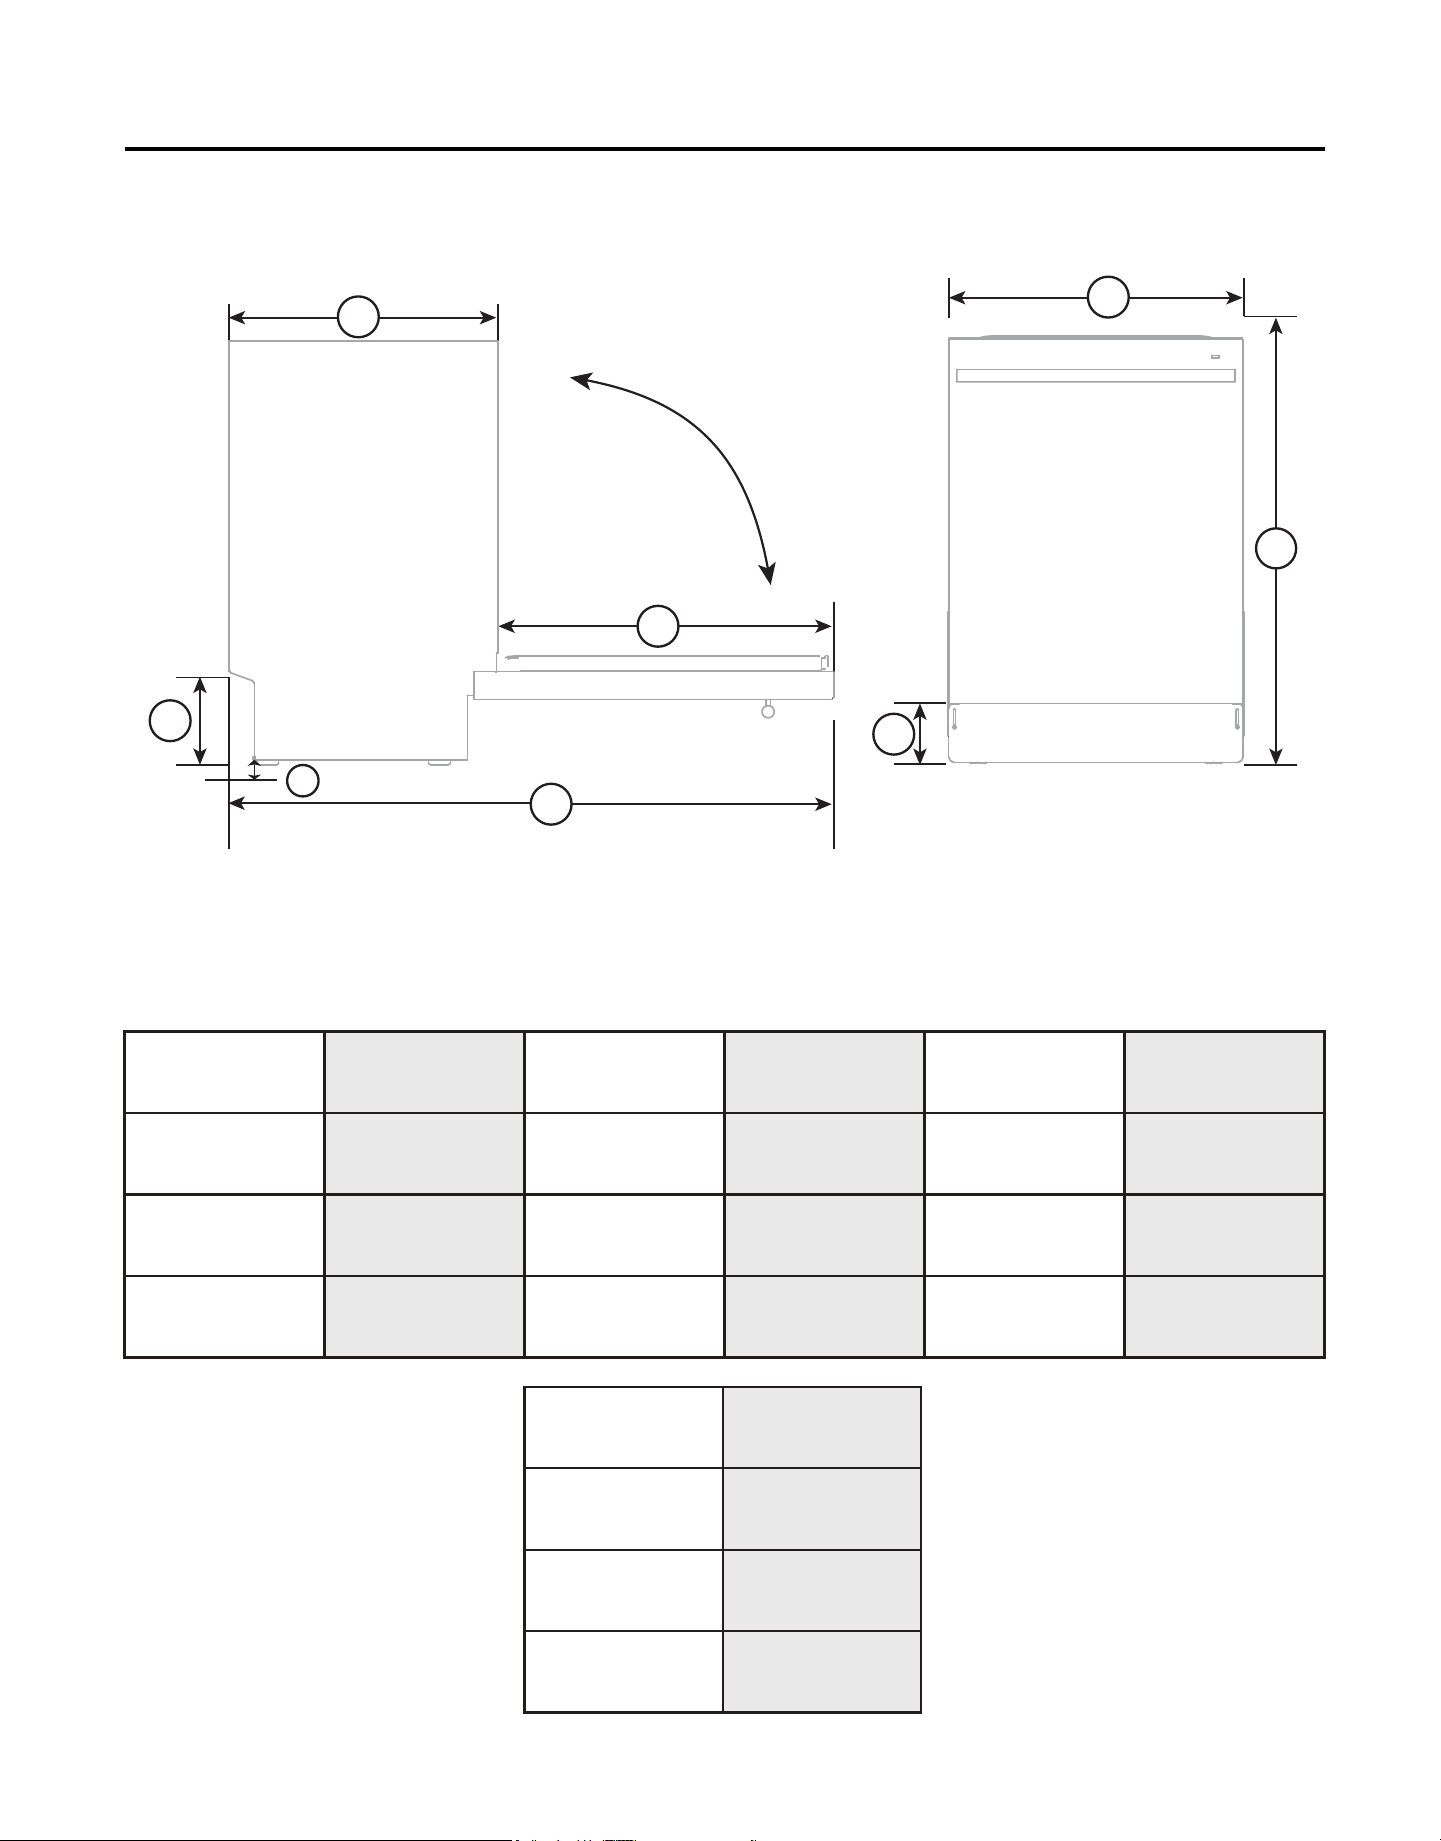
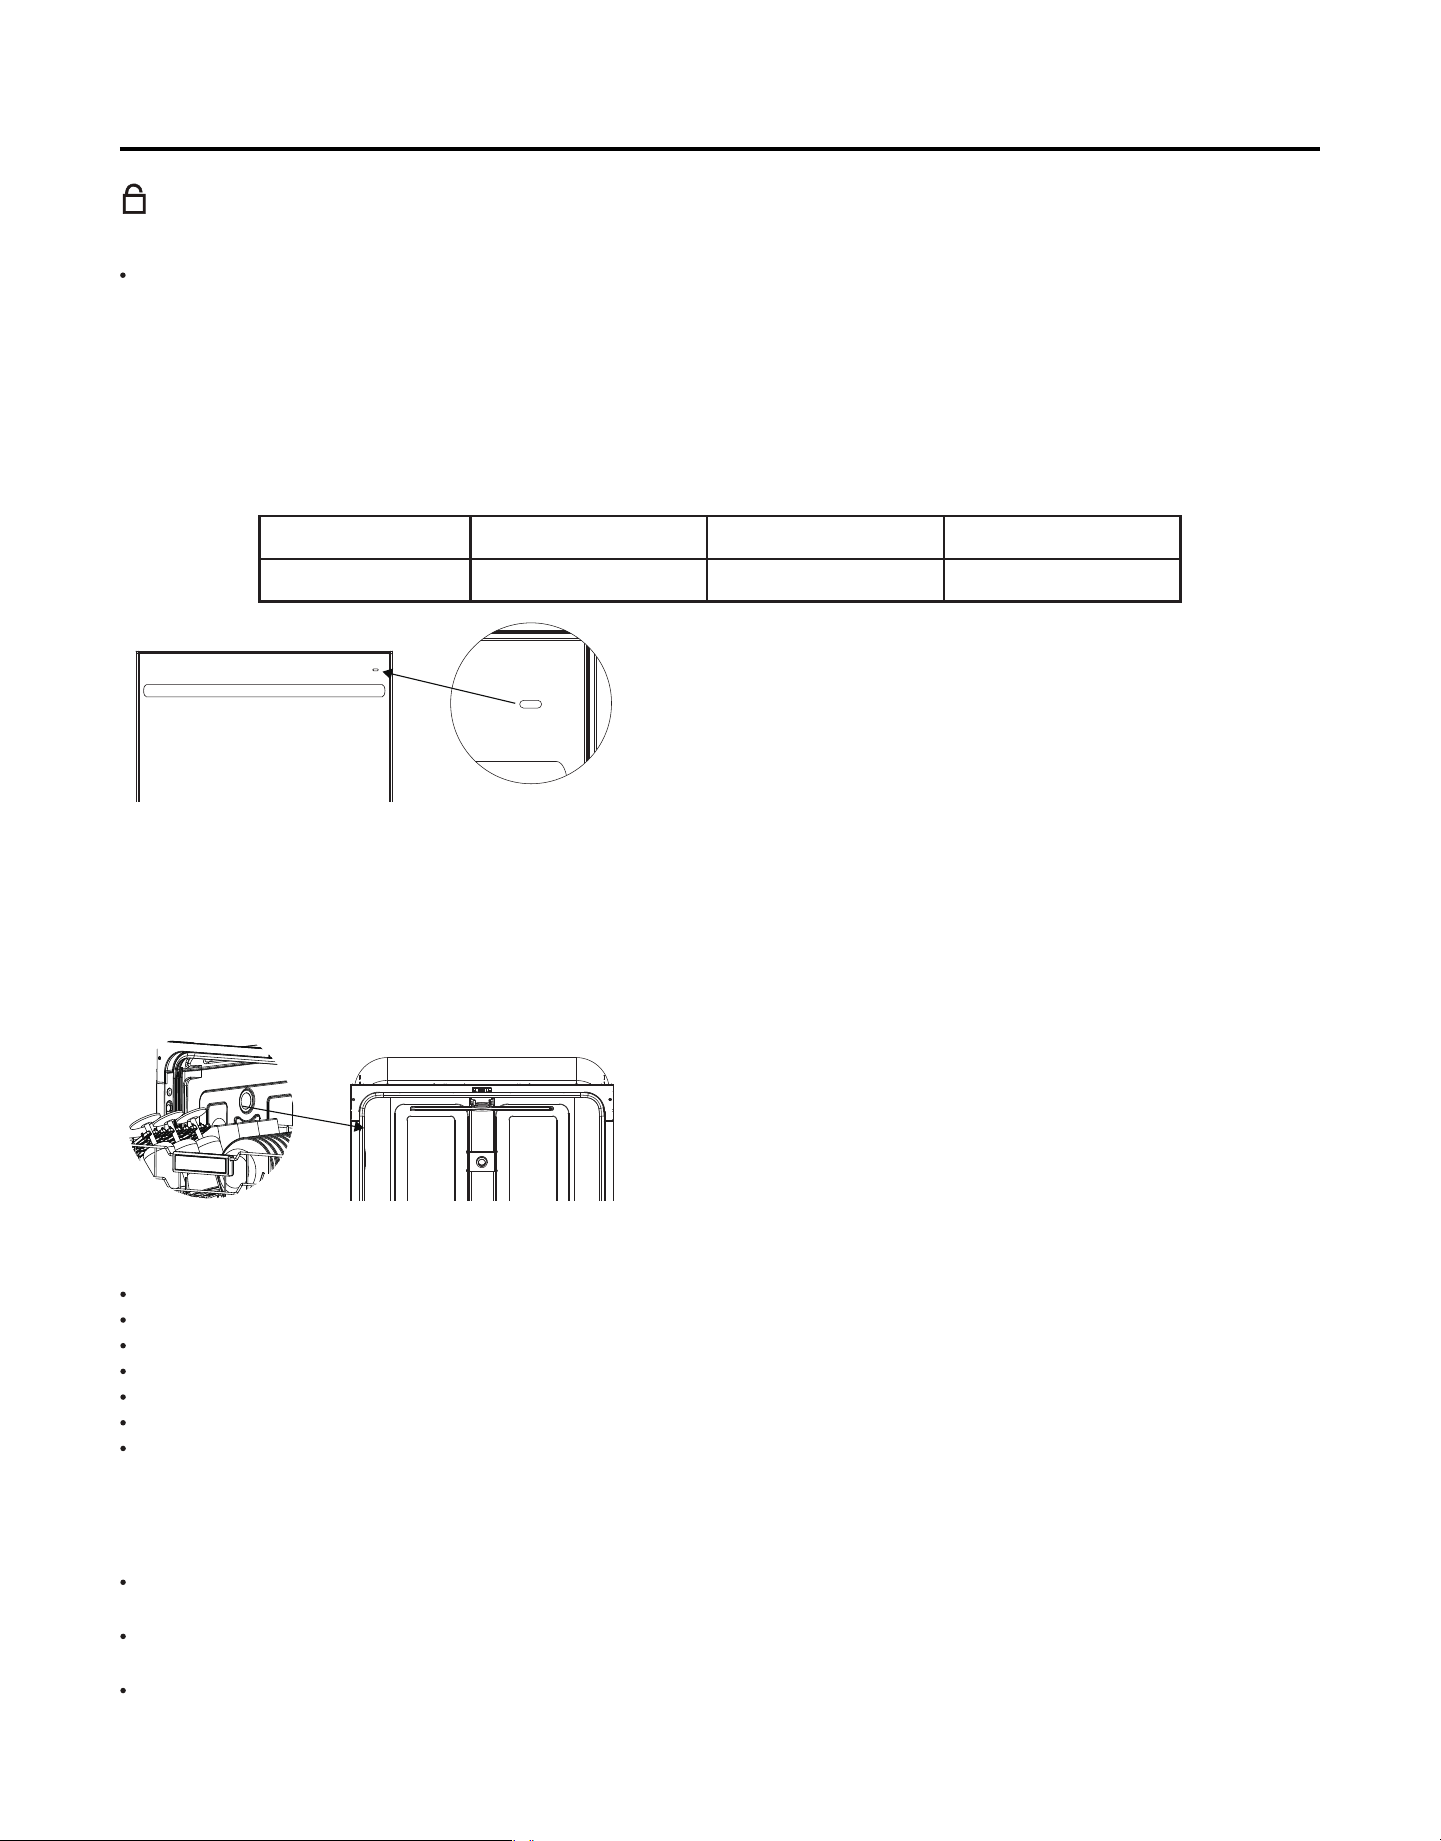
Product Dimension
A
A
B C D
Depth control
panel to tub frame
E F
Overall Width
Overall Height
Min./Max.
Overall Depth
Overall depth
door full open
Height back shield
top to feet
33.70”/34.50”
22.44” 24.43” 46.06” 7.87”23.43”
85.5cm/88.0cm
57cm 64.6cm 117cm 20cm
90°
G
B
G H
Height kickplate
1.57” 4.7”
4cm 12cm
Depth back
shield
59.5cm
A
H
E
D
C
F
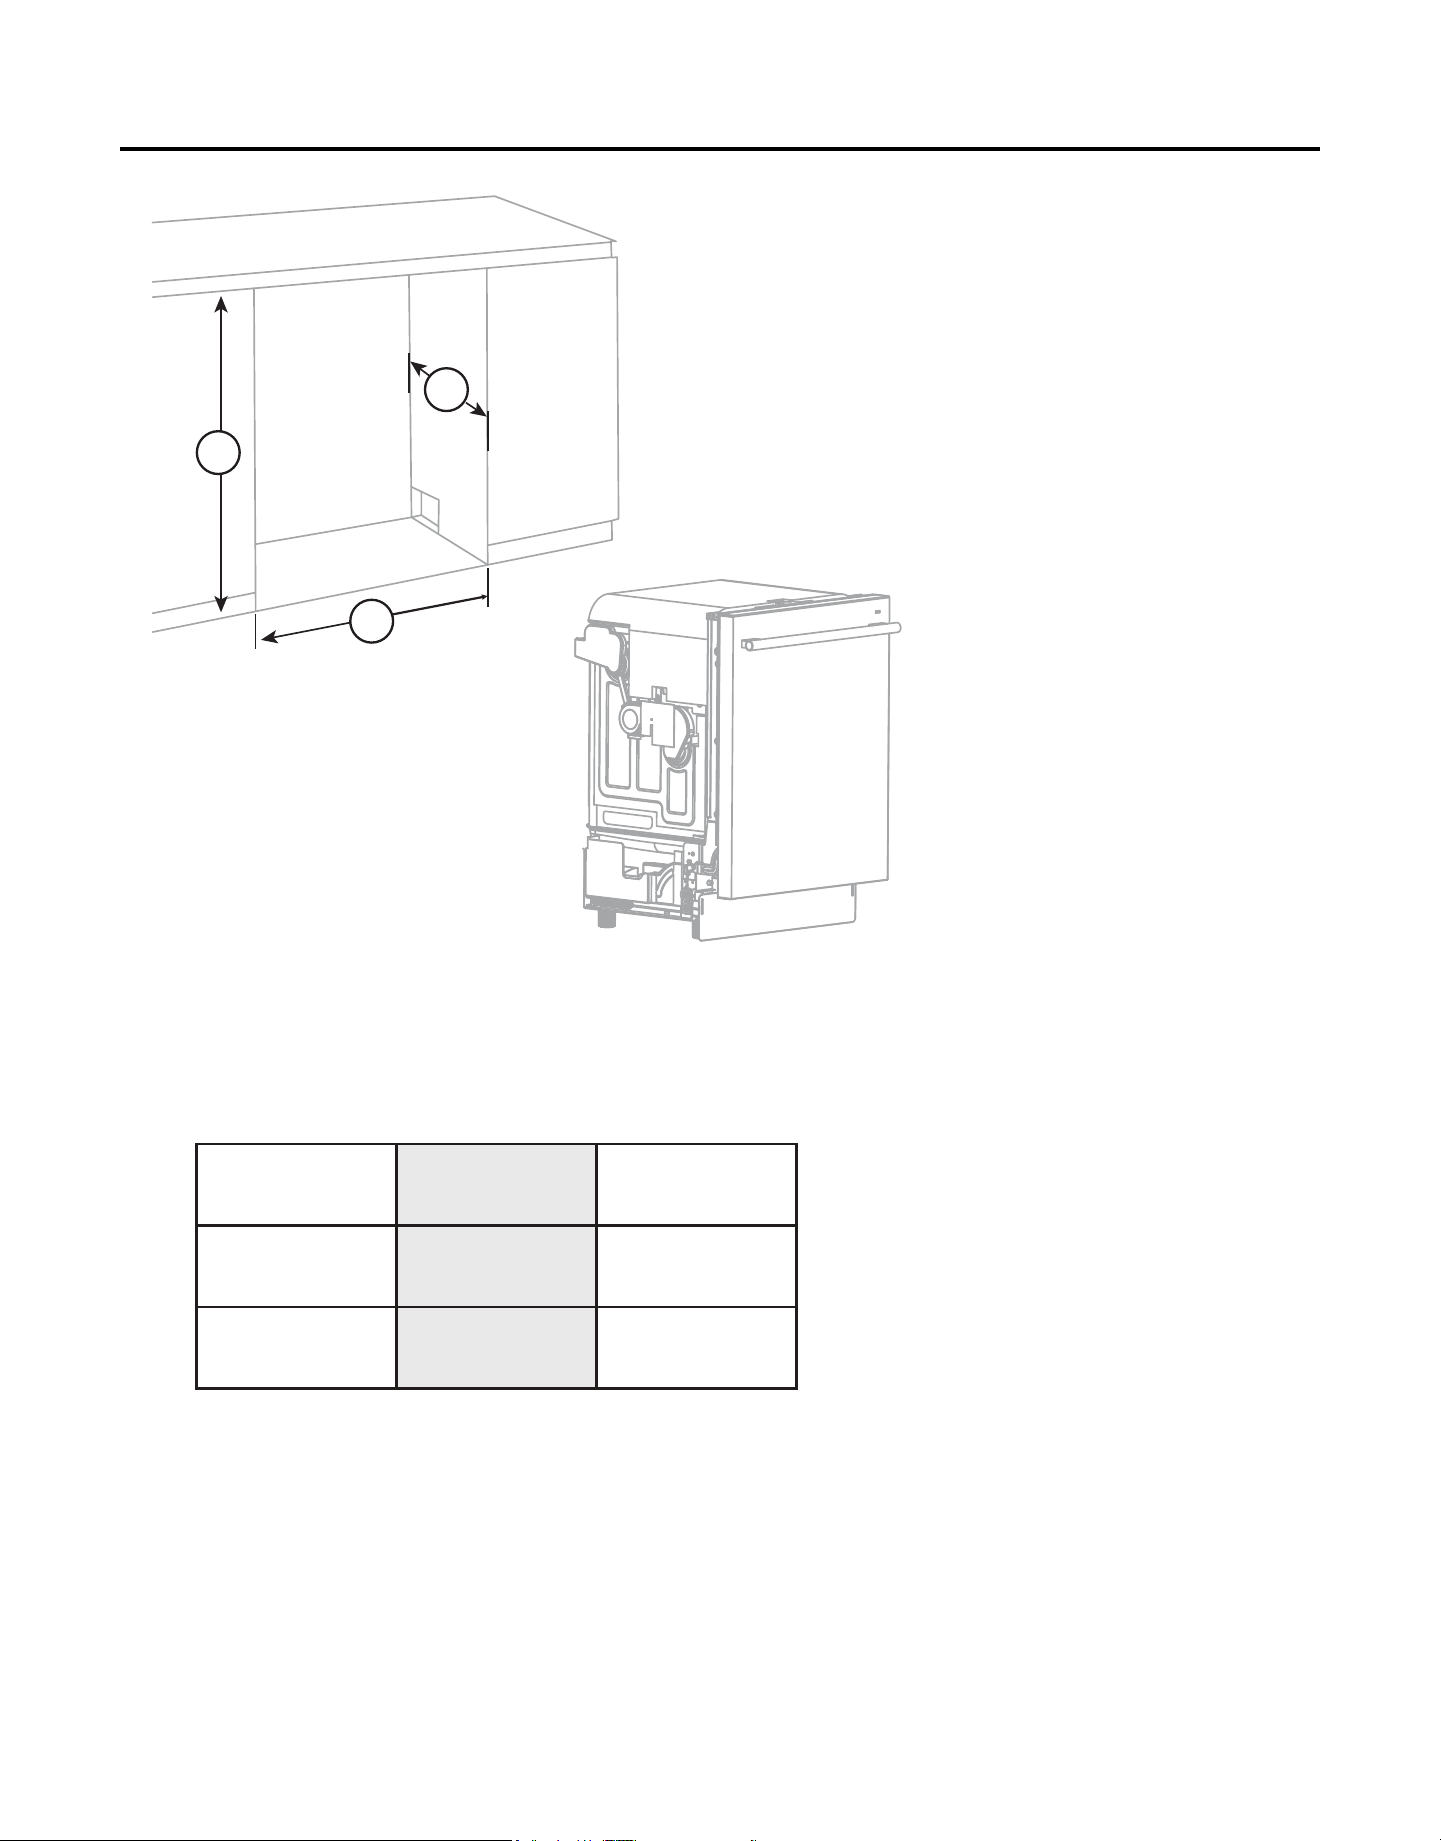
Cutout
8
A
B
C
A B C
34-35” 23.6”
24”
86.36-88.9cm 59.94cm
60.96cm
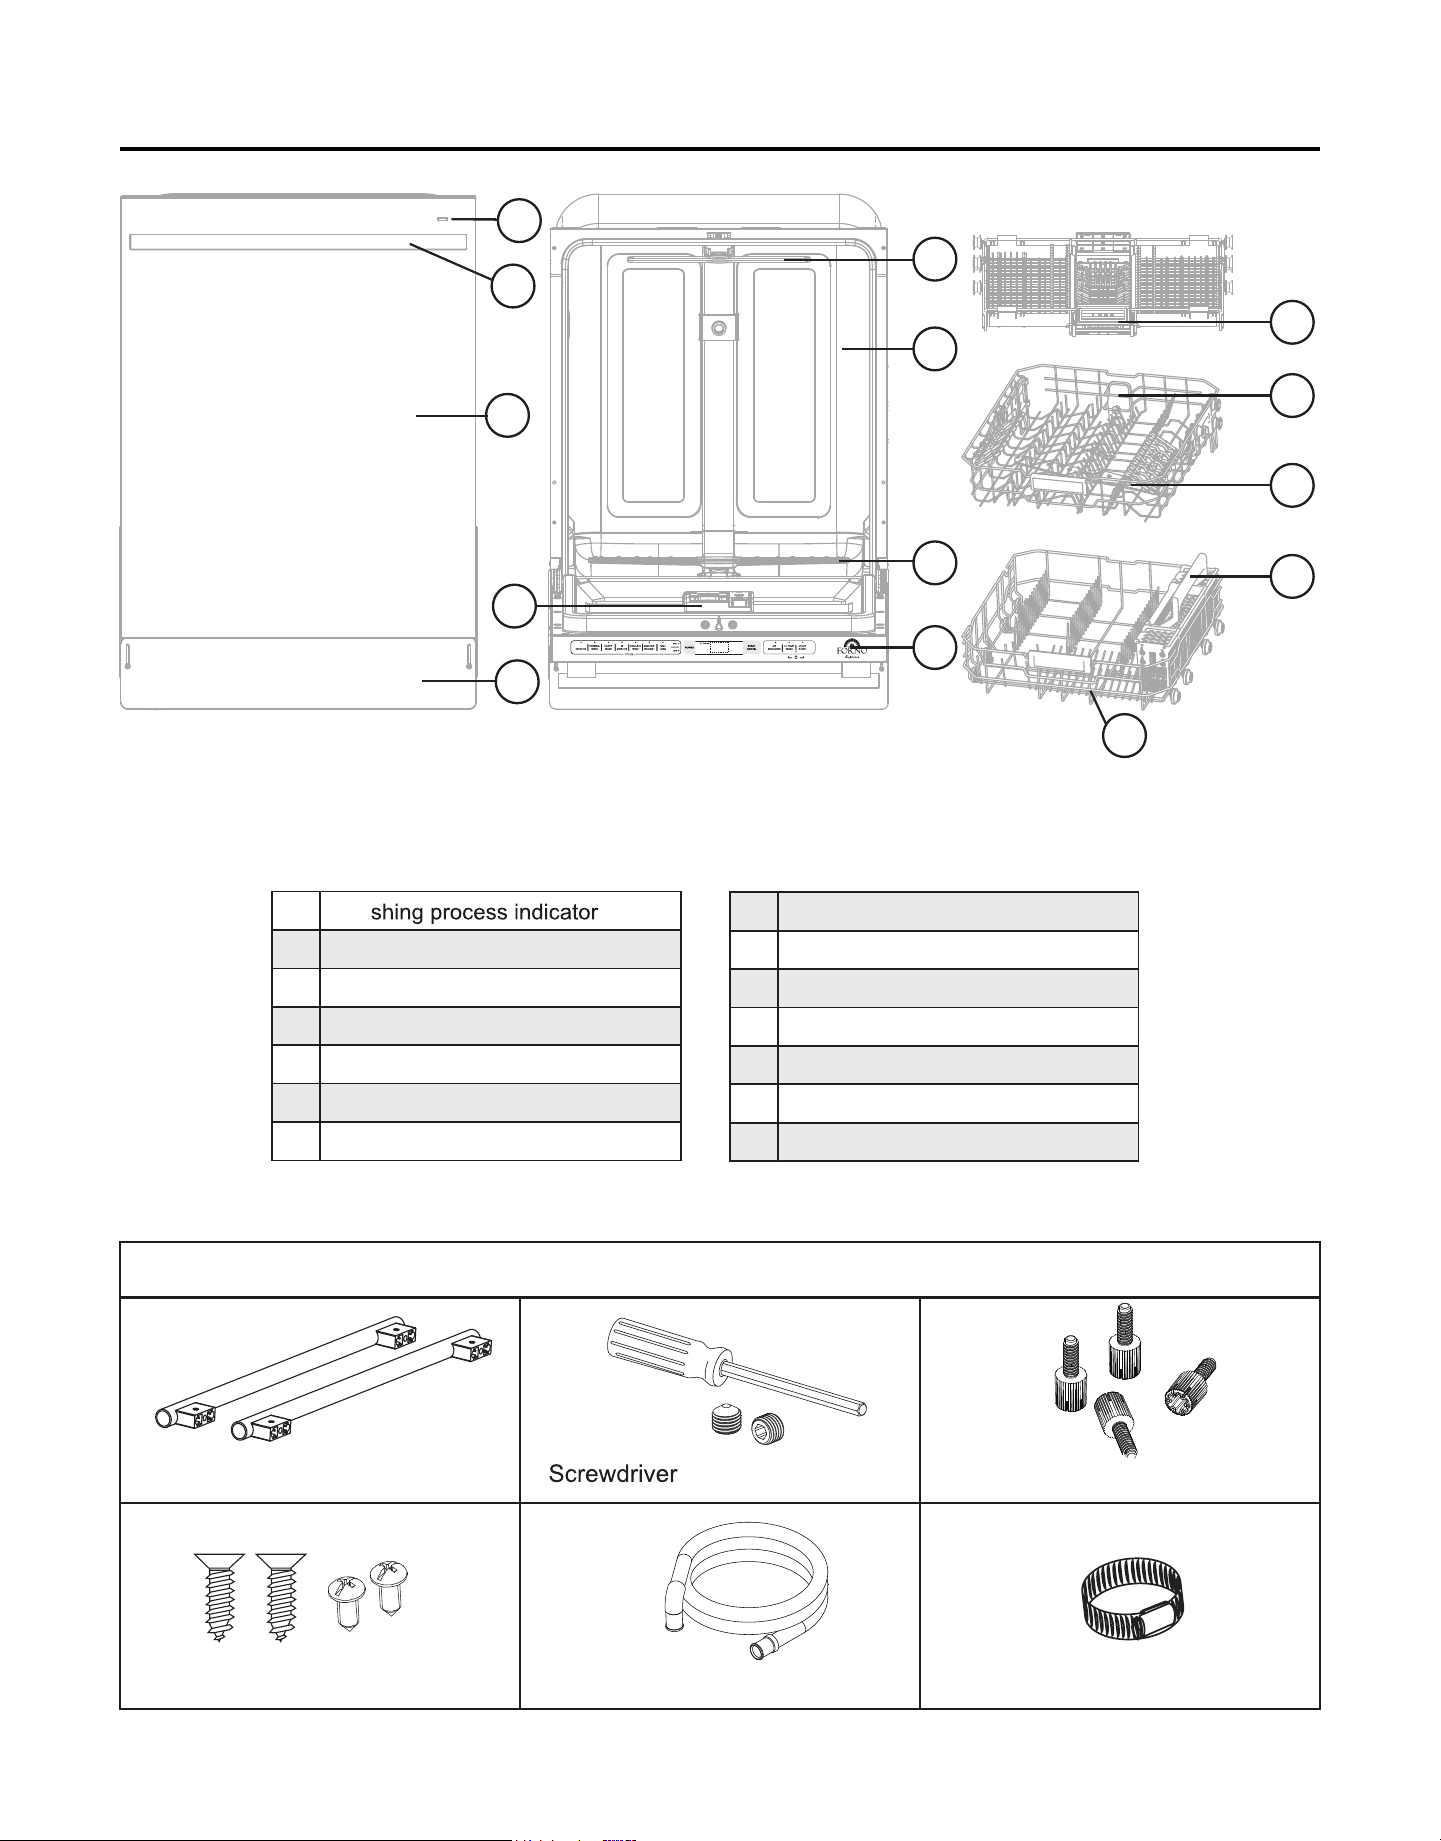
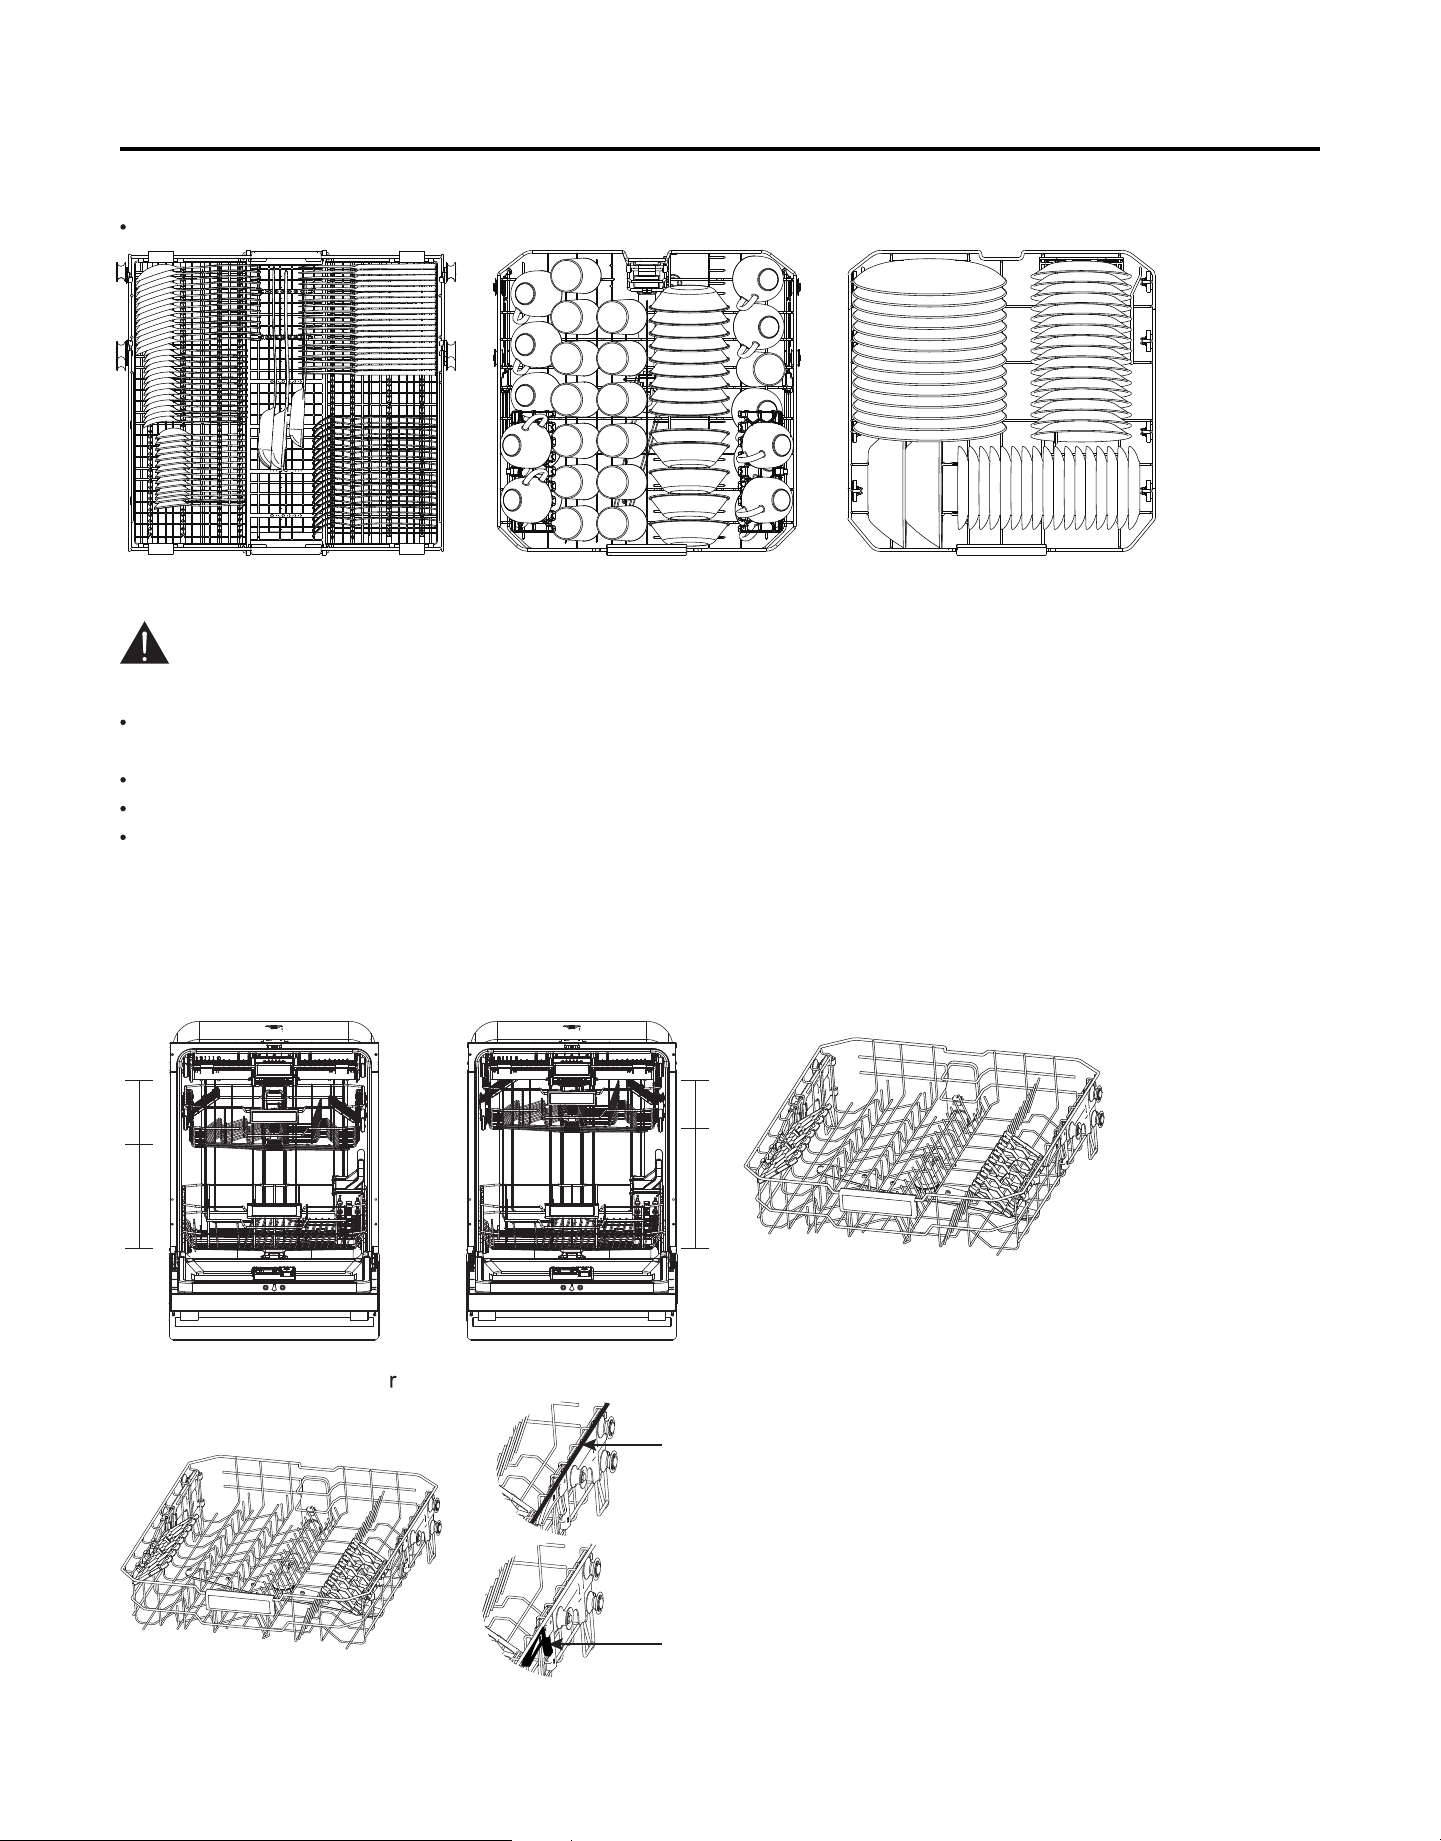
Name of Parts and Accessories
9
14
10
11
12
Wa
Handle
Door plate
Kick plate
Upper rack
Middle rack
Middle washing arm
1
2
3
4
5
6
7
Silverware basket
Lower rack
Upper washing arm
Tub
Lower washing arm
Dispenser
Control panel
8
9
10
11
12
13
14
2x Handle; Only for black &
white units***
and 2x screws
Supplied Parts
4x Leveling leg
2x Fixing, 2x toe kick screws Drain hose Drain hose clamp
1
3
4
13
2
5
6
7
8
9
90
Installation Preparation
10
WARNING
MATERIALS YOU WILL NEED (NOT INCLUDE IN THE PACKAGING):
CLEARANCES:
INSTALLATION PREPARATION
DRAIN REQUIREMENTS
To reduce the risk of electrical shock, fire,or injury to persons, the installer must ensure that the dishwasher is completely
enclosed at the time of installation.
Ferrule, compression
nut and 3/4” 90°Elbow
The rough cabinet opening must be at least 24" deep.The opening should be 35" max. height.
Follow local codes and ordinances.
Do not exceed 10 feet distance to drain.
Do not connect drain lines from other devices to the dishwasher drain hose.
Air gap must be used if waste tee or disposer connection is less than 18" above the floor to prevent siphoning.
The dishwasher must be installed so that drain hose is no more than 10 feet in length for proper drainage.
The dishwasher must be fully enclosed on the top, sides and back, and must not support any part of the enclosure.
When installed into a corner, allow 2" min clearance between dishwasher and adjacent cabinet, wall or
other appliances. Allow 24.43" min clearance from the front of the dish-washer for door opening.
Thread seal tape
Wire nuts 3pcs
Water linePower cord set
Hose clamp1,2
Ferrule, compression nut and
3/4” 90°Elbow
Thread seal tape
Wire nuts 3pcs
Water line
Power cord set
Hose clamp1,2
Strain relief
Strain relief Phillips screwdriver
23.6”
Dishwasher must be connected to waste line with an air gap (not supplied) or 23.6" maximum high drain loop,
depending on local codes and ordinances to prevent back flow into the dishwasher.
24.43

Installation Preparation (continued)
11
Method 1 - Air Gap with Waste Tee or Disposer
Method 2 - High Drain with Waste Tee or Disposer
Provide a method to attach drain hose to underside of countertop.
Install waste tee or disposer and air gap according to manufacturer's instructions.
23.6
23.6
Fasten to underside
of countertop
Fasten to underside
of countertop
Waste Tee Installation Disposer Installation
Waste Tee Installation Disposer Installation
Grounding Instructions - Cable Direct
This appliance must be connected to a grounded metal,permanent wiring system, or an equipment grounding conductor
must be run with the circuit conductors and be connected to the equipment grounding terminal or lead on the appliance.
CAUTION
An air gap MUST BE USED if the drain hose is connected to waste tee or disposer lower than 18" above the floor.
Failure to provide the proper drain connection height with air gap or
" m imum, high drain loop will result in
improper draining of the dishwasher.
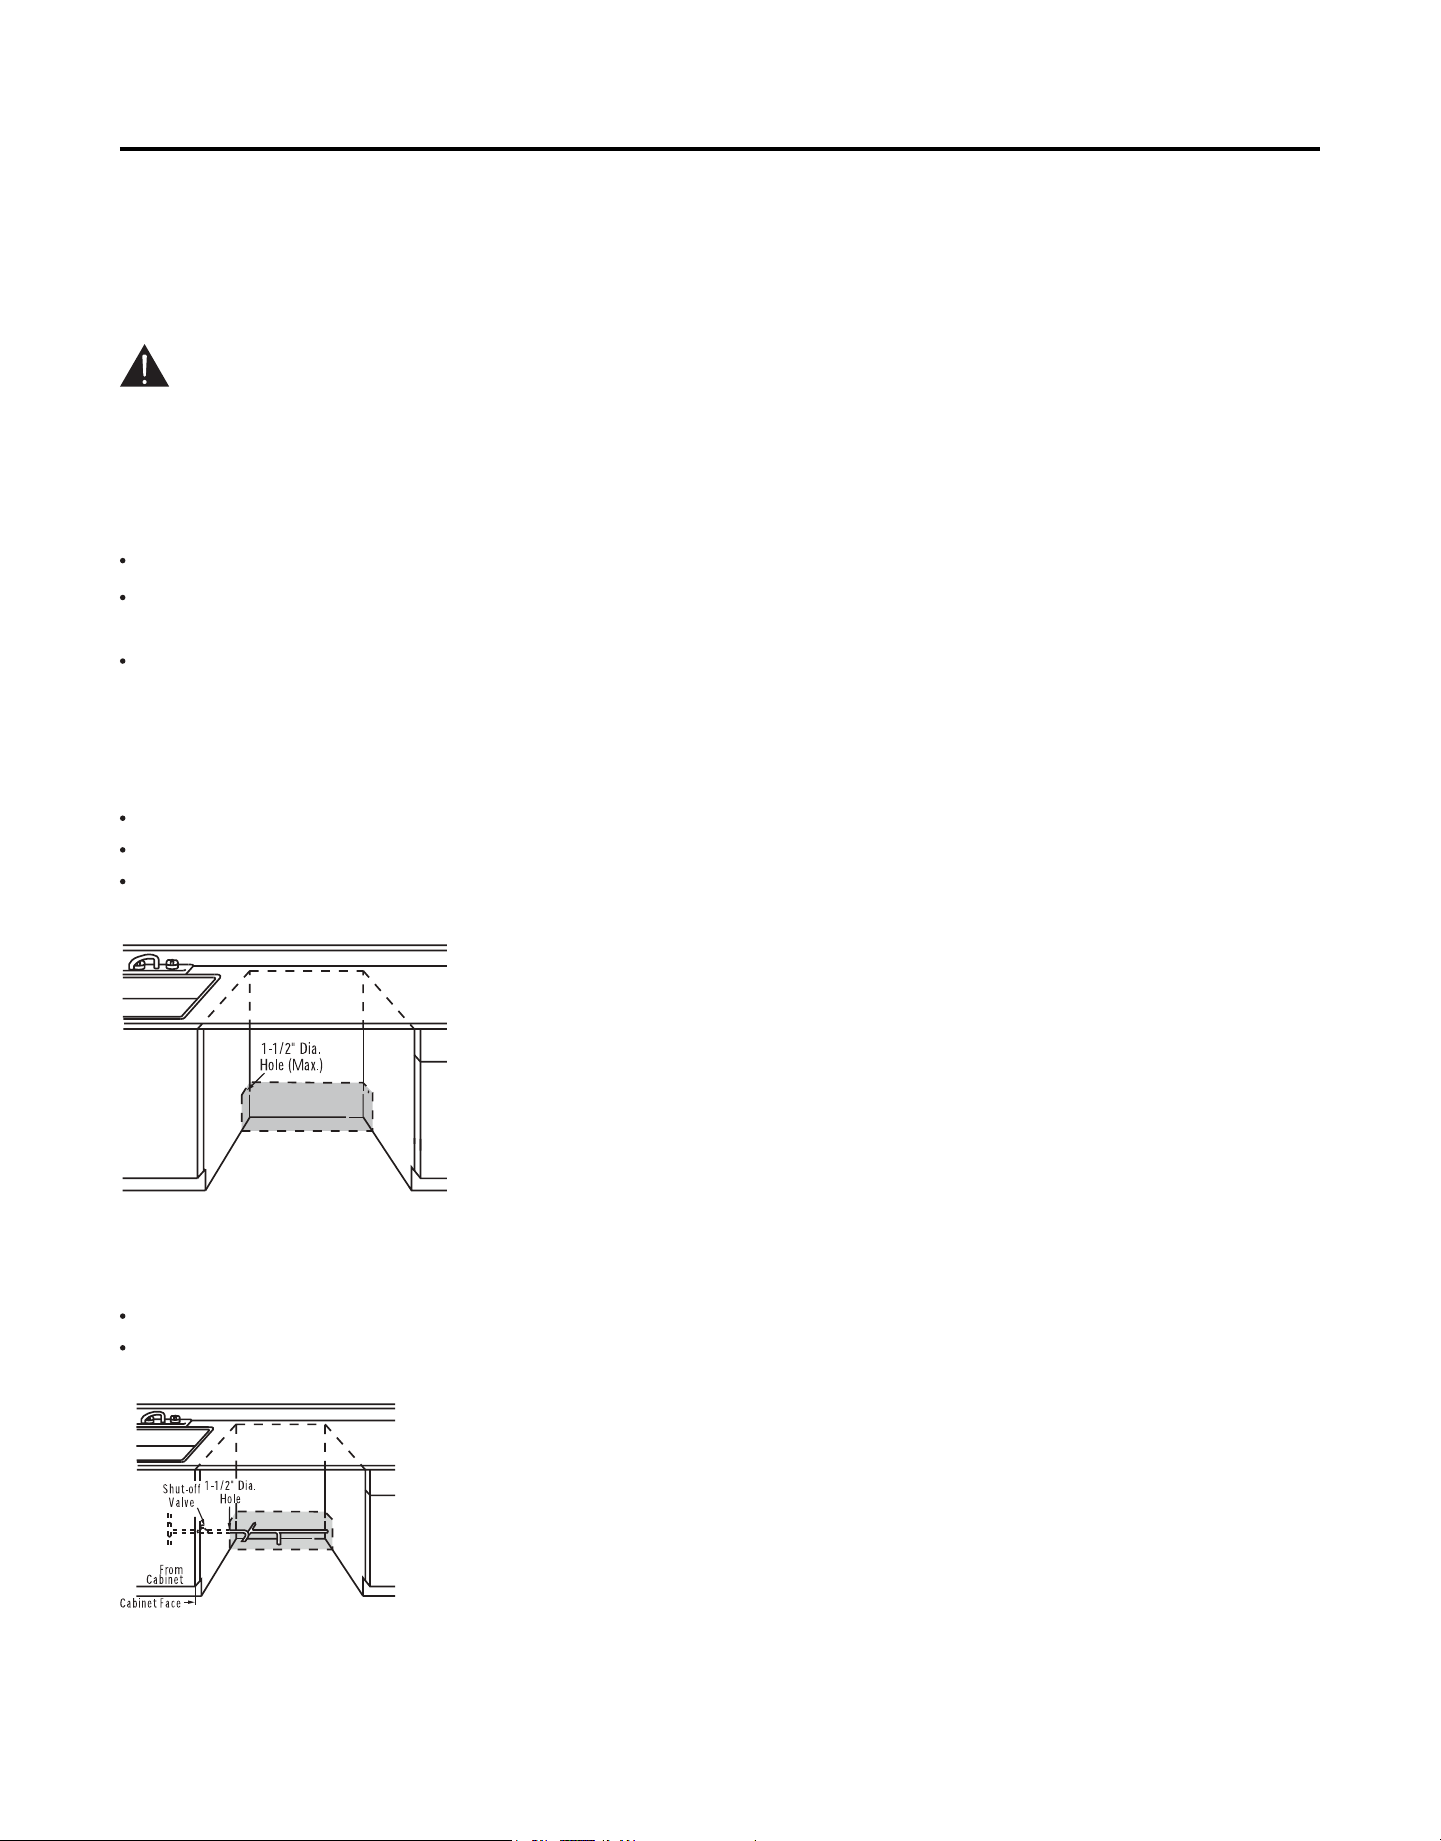
CABINET PREPARATION
Drill a 1-1/2" dia. hole in the cabinet wall within the shaded areas shown in
igure for the drain hose connection. The
hole should be smooth with no sharp edges.
PREPARE ELECTRICAL WIRING
WARNING
FOR PERSONAL SAFETY: Remove house fuse or open circuit breaker before beginning installation. Do not use an
extension cord or adapter plug with this appliance.
Electrical Requirements
This appliance must be supplied with 120V, 60 Hz., and connected to an individual properly grounded branch circuit,
protected by a 15 or 20 ampere circuit breaker or time delay fuse.
Wiring must be 2 wire with ground.
If the electrical supply does not meet the above requirements, call a licensed electrician before proceeding.
Max.
Max.
Installation Preparation (continued)
12
WARNING
PREPARE WATER LINE
The improper connection of the equipment grounding conductor can result in a risk of electric shock. Check with a quali-
fied electrician or service representative if you are in doubt that the appliance is properly grounded.
Grounding Instructions - Power Cord Models
Cabinet Preparation & Wire Routing
Electrical Connection to Dishwasher
This appliance must be grounded.
In the event of a malfunction or breakdown, grounding will reduce the risk of electrical shock by providing a path of least
resistance for electric current. The plug must be plugged into an appropriate outlet that is installed and grounded in
accordance with local codes and ordinances.
The wiring may enter the opening from either side,rear or the floor within the shaded area.
For cable direct connections the cable must be routed as shown in following figure.
For power cord connections, install a 3-prong grounding type receptacle.
The line may enter from either side, rear or floor within the shaded area shown in following figure.
The line may pass through the same hole as the electrical cable and drain hose. Or, cut an additional 1-1/2" dia. hole
to accommodate the water line. If power cord with plug is used, water line must not pass through power cord hole.
The power-supply receptacle for the appliance shall be installed in a cabinet or on a wall adjacent to the under
counter space in which the appliance is to be installed.
Cut a 1-1/2" max, diameter, hole to admit the electrical cable.The hole must be free of sharp edges. If the cabinet
wall is metal, the hole edge must be covered with a bushing.
Cable direct connections may pass through the same hole as the drain hose and hot water line, if convenient.If
cabinet wall is metal, the hole edge must be covered with a bushing.
NOTE: Power cords with plug must pass through a separate hole.
Hot / Cod
Installation Preparation (continued)
13
Installation Procedure
Water Line Connection
BEFORE YOU BEGIN
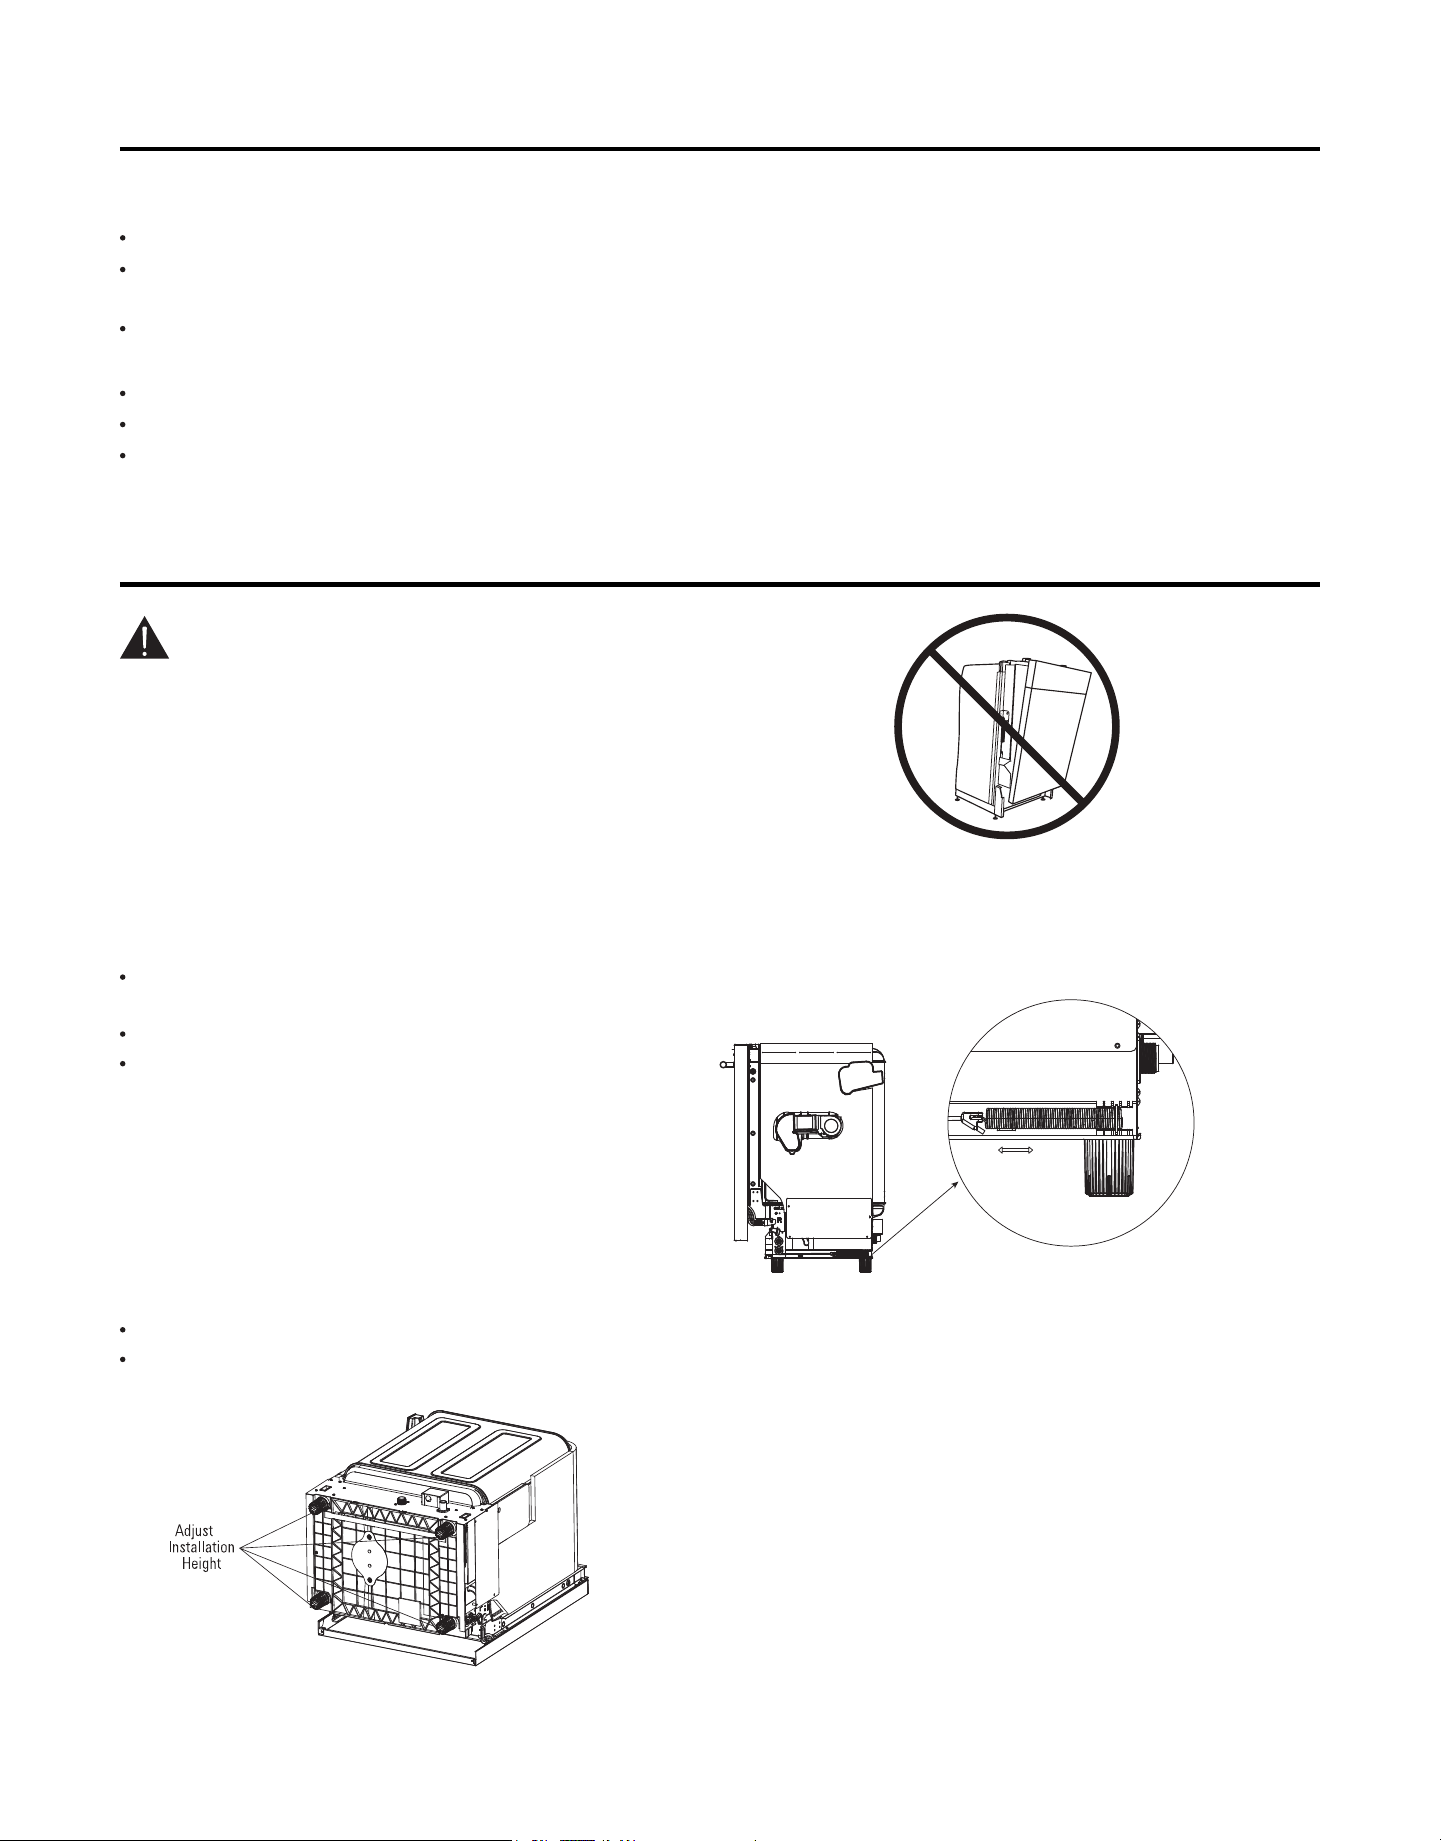
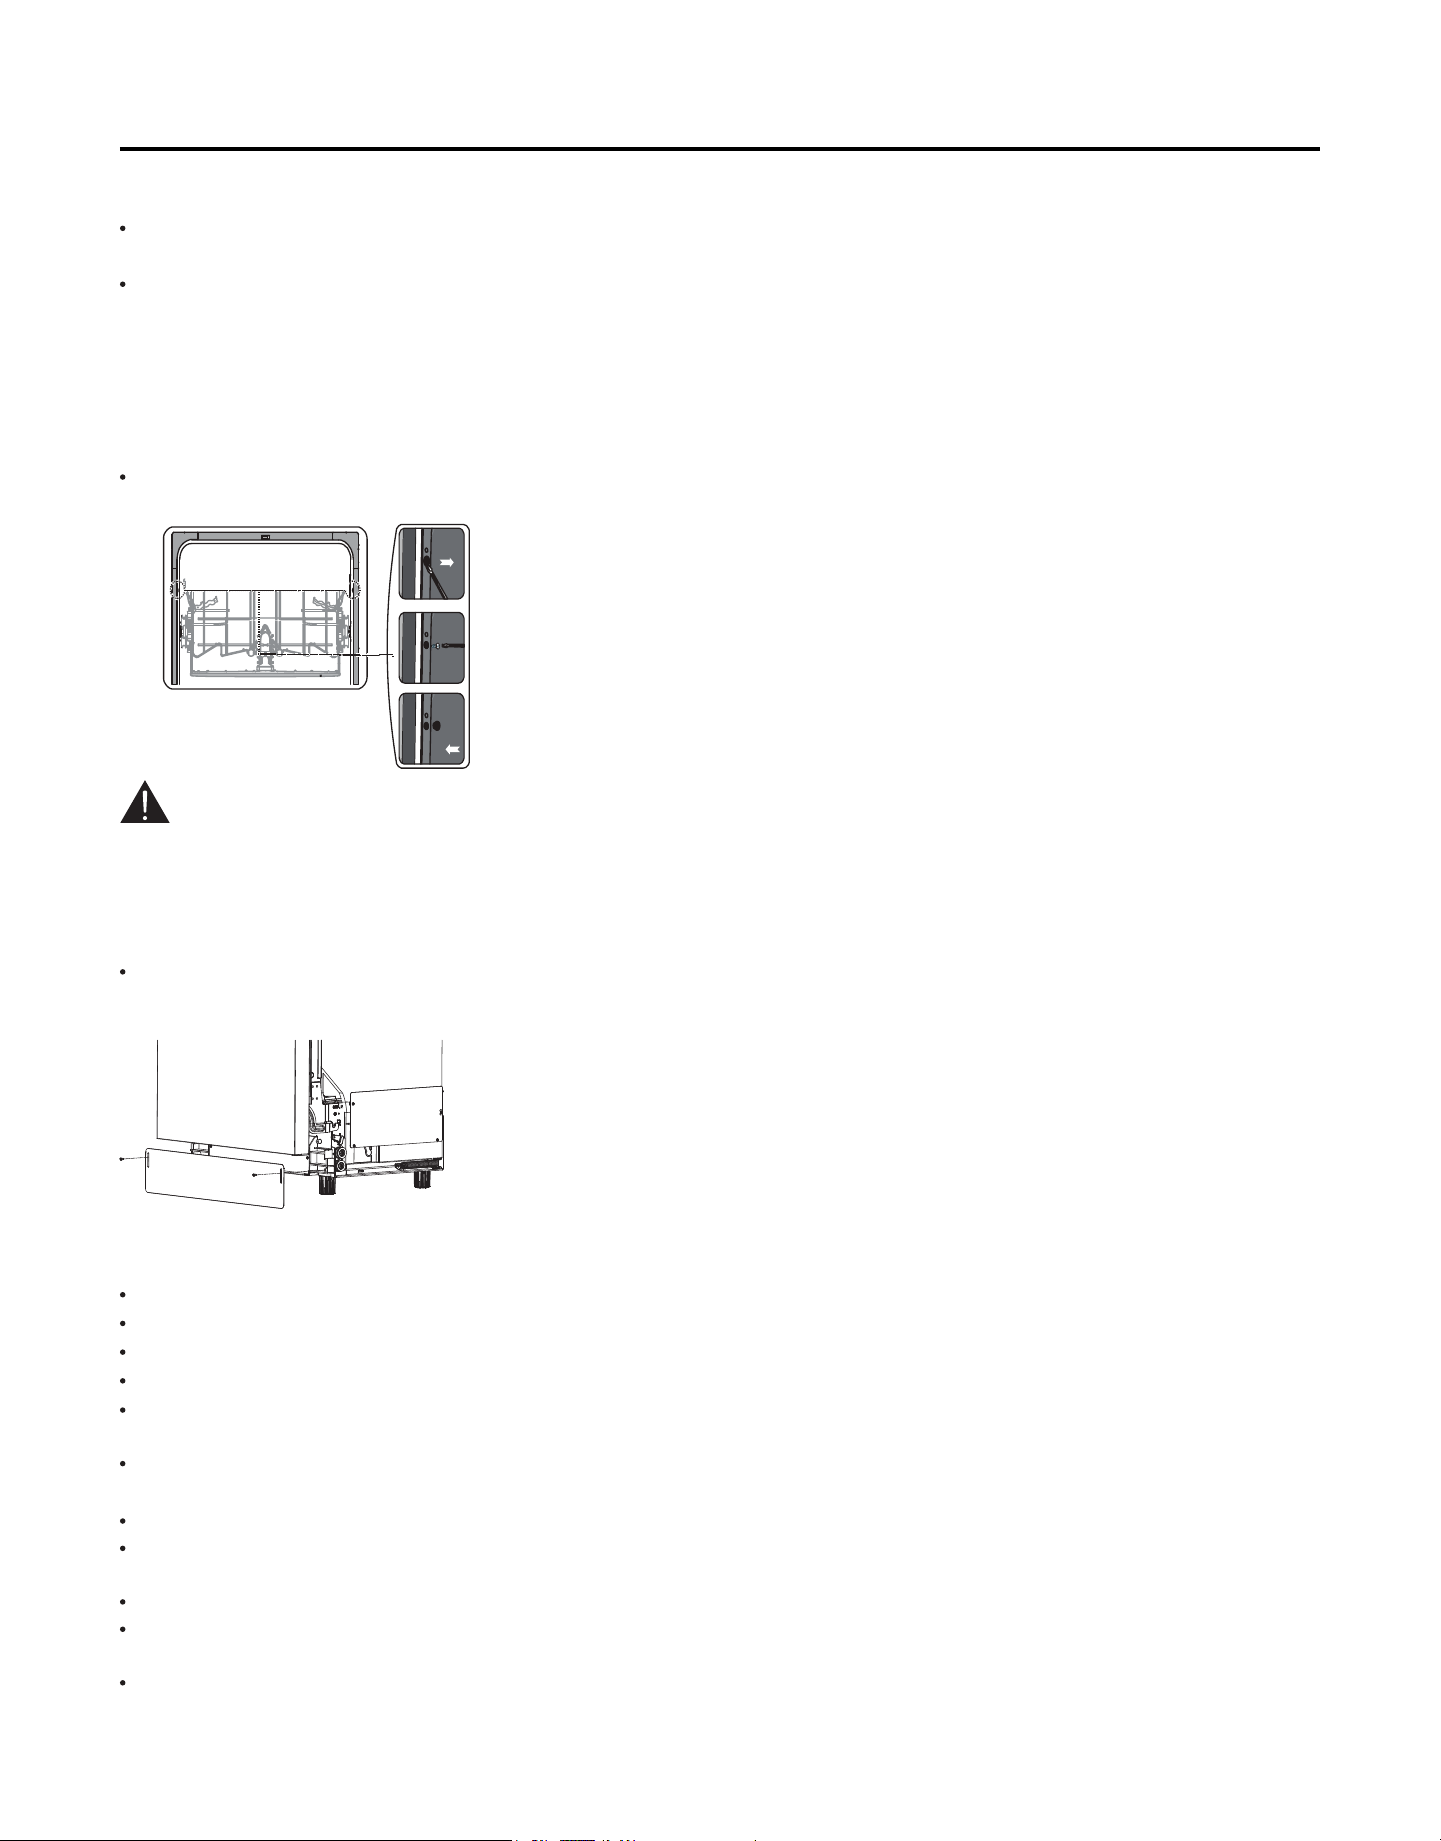
STEP 1 CHECK DOOR BALANCE
STEP 2 ADJUST LEVELING LEGS
Opening the door will cause the dishwasher to tip forward.
Do not open the door until you are ready to install the dishwasher. If it is
necessary to open the door, hold the top of the dishwasher securely with
one hand and hold the door with the other hand.
Locate and set aside the package containing 2 head counter-top mounting screws and 2 additional toe kick screws
(located in the literature package).
Open the door slowly, if the door drops when released, increase
spring tension. If the door closes when released, decrease tension.
Adjust both door springs to the same tension.
Continue moving the spring pin until door is balanced.
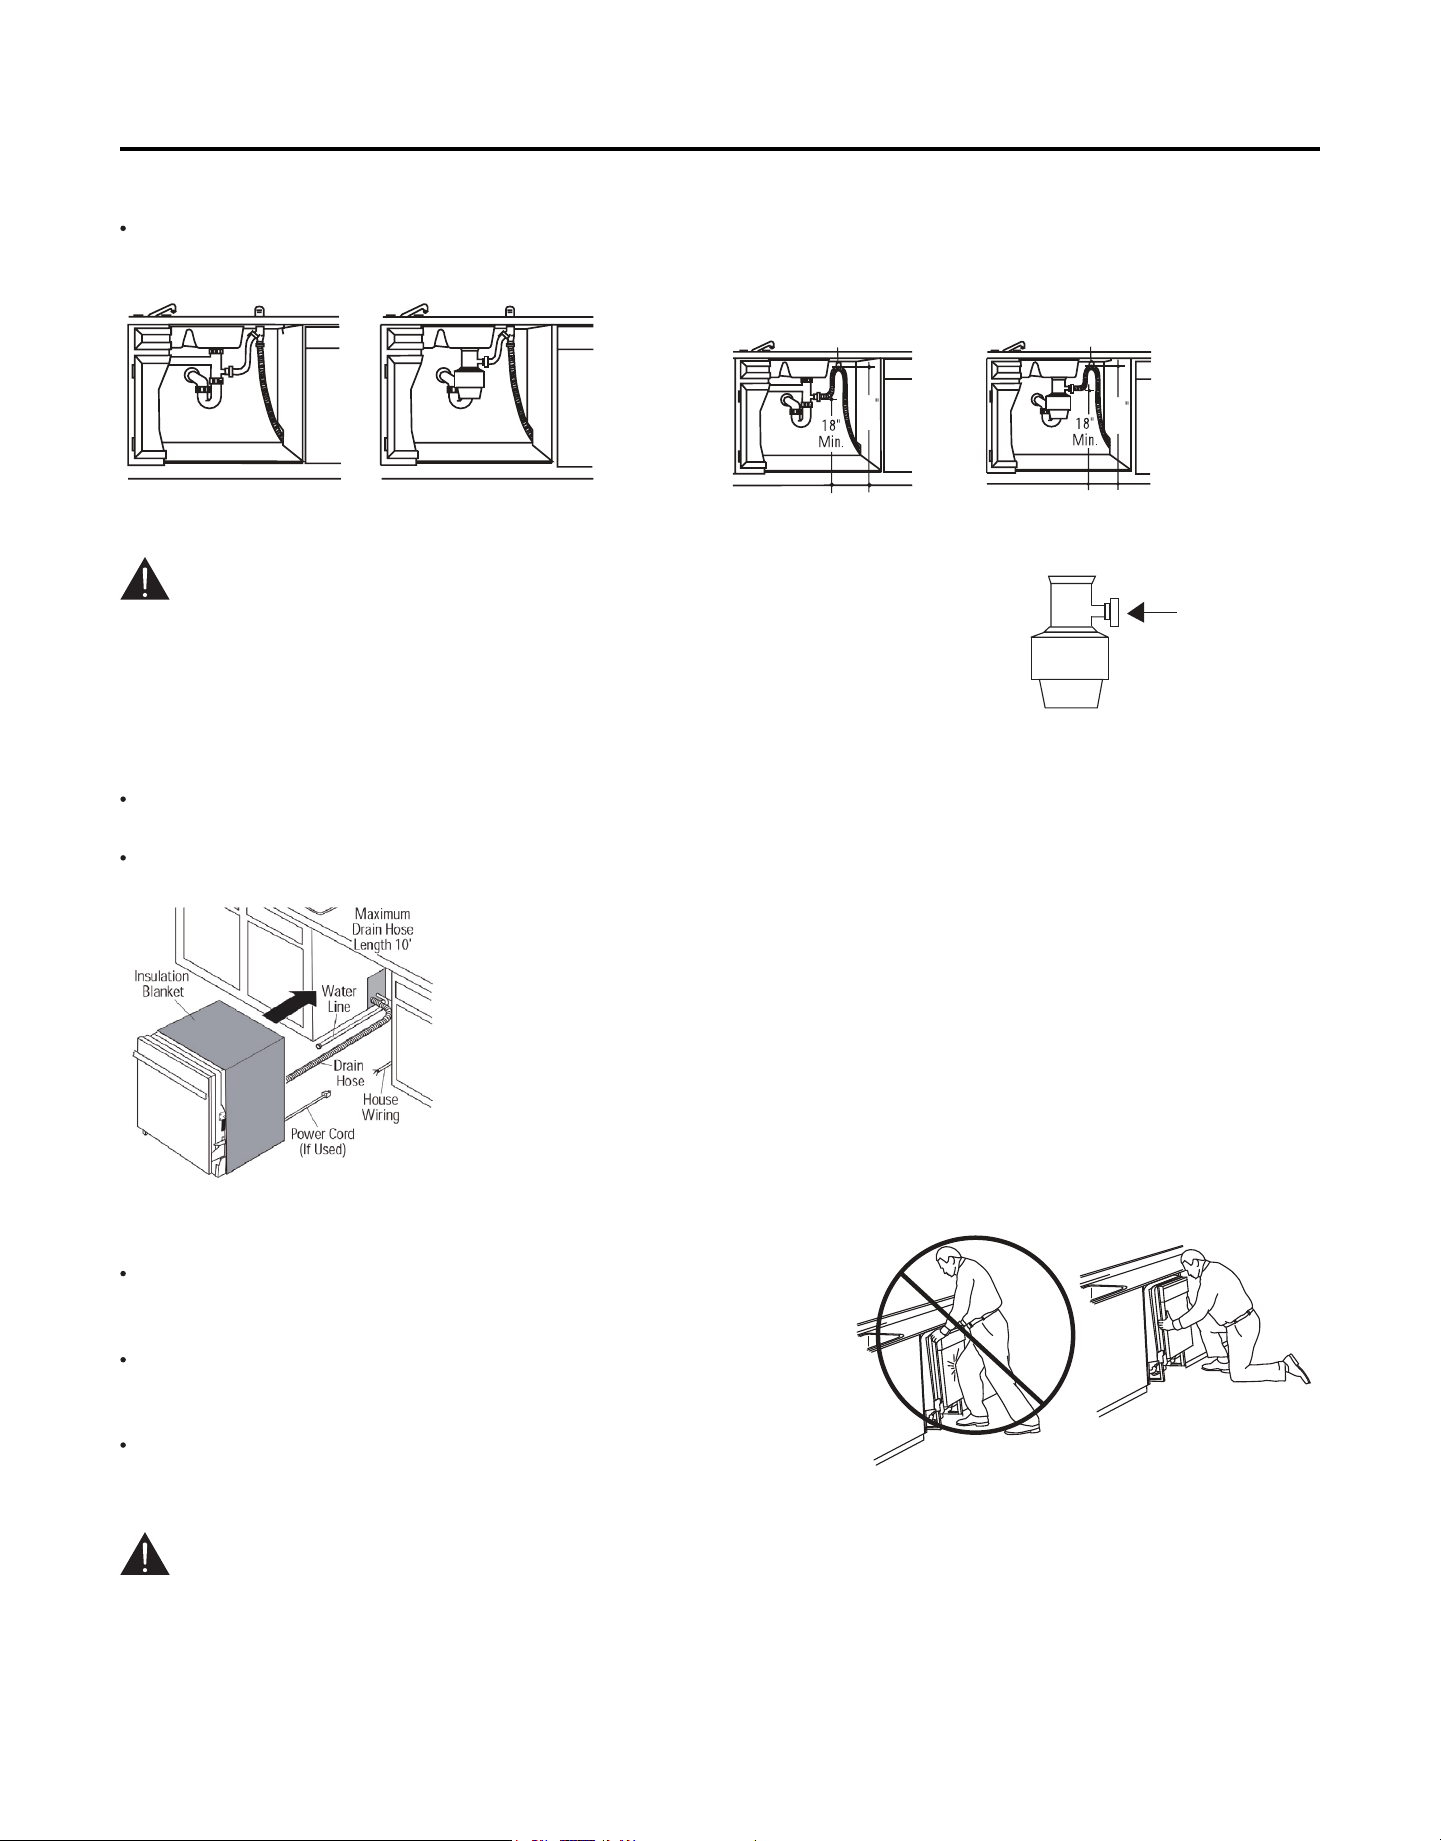
Move the dishwasher close to the installation location and lay it on its back.
Measure installation height and dishwasher height. Approx. 1/4” less than
installation height.
Turn off the water supply.
Install a hand shut-off valve in an accessible location, such as under the sink.(Optional, but strongly recommended
and may be required by local codes.)
Water connection is on the left side of the dishwasher. Install the water inlet line, using 3/4’’ 90° elbow and copper tube
no less than 3/8” O.D..
Adjust water supply temperature between 50°F to 140°F.
Flush water line to clean out debris.
The hot water supply line pressure must be 20-120 PSI.
CAUTION
Loose Intense
Installation Procedure (continued)
14
TIP: Pull lower rack out, about half way. Check to be sure the rack does not roll forward or back into dishwasher. If the
rack rolls in either direction, the dishwasher must be leveled again.
If door hits the tub, the dishwasher is not installed correctly. Adjust leveling legs to align door to tub.
IMPORTANT- Dishwasher must be level for proper dish rack operation and wash performance.
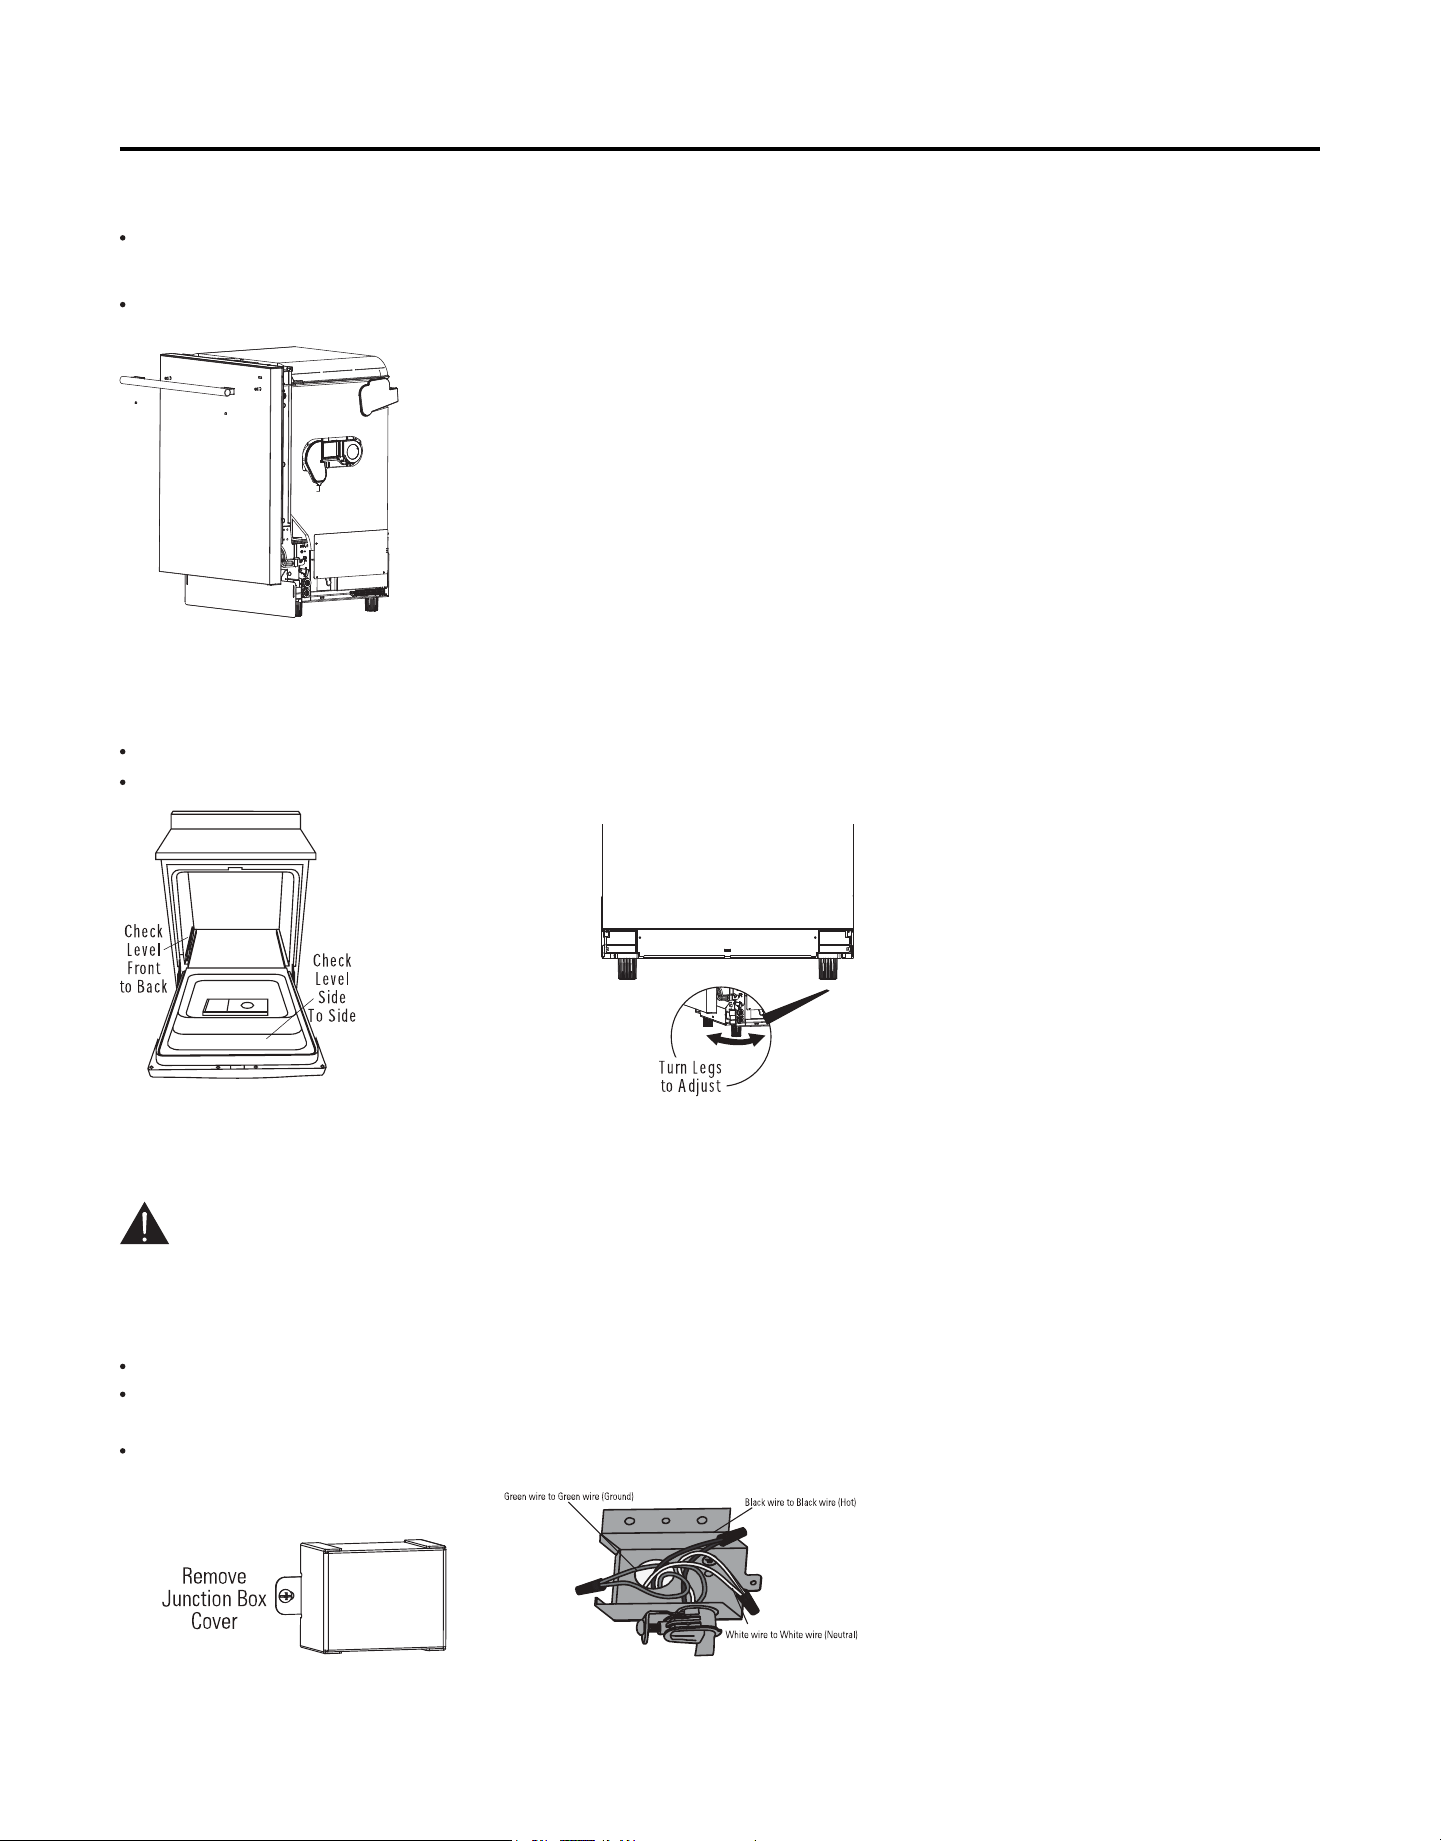
Place the dishwasher at upright, find the studs on the door plate and align the two studs into the hole of handle’s
gather block, use the allen socket screwdriver to fasten two screws into each holes at below of gathering block.
STEP 3 INSTALL THE HANDLE
STEP 4 LEVEL DISHWASHER
STEP 5 INSTALL POWER CORD
Recommended power cord length is 54" min. and 64"max.
Connect incoming power cord white (or ribbed) to dishwasher white,black (or smooth) to black and ground to
dishwasher green wire. Use cUL/UL listed wire nuts of appropriate size.
Replace junction box cover. Be sure wires are not pinched under the cover.
Be sure soft treatment to prevent the door form scratches.
Level the dishwasher by adjusting the four leveling legs individually.
Place level on door and rack track inside the tub as shown to check that the dishwasher is level.
CAUTION
UP DOWN
Installation Procedure (continued)
15
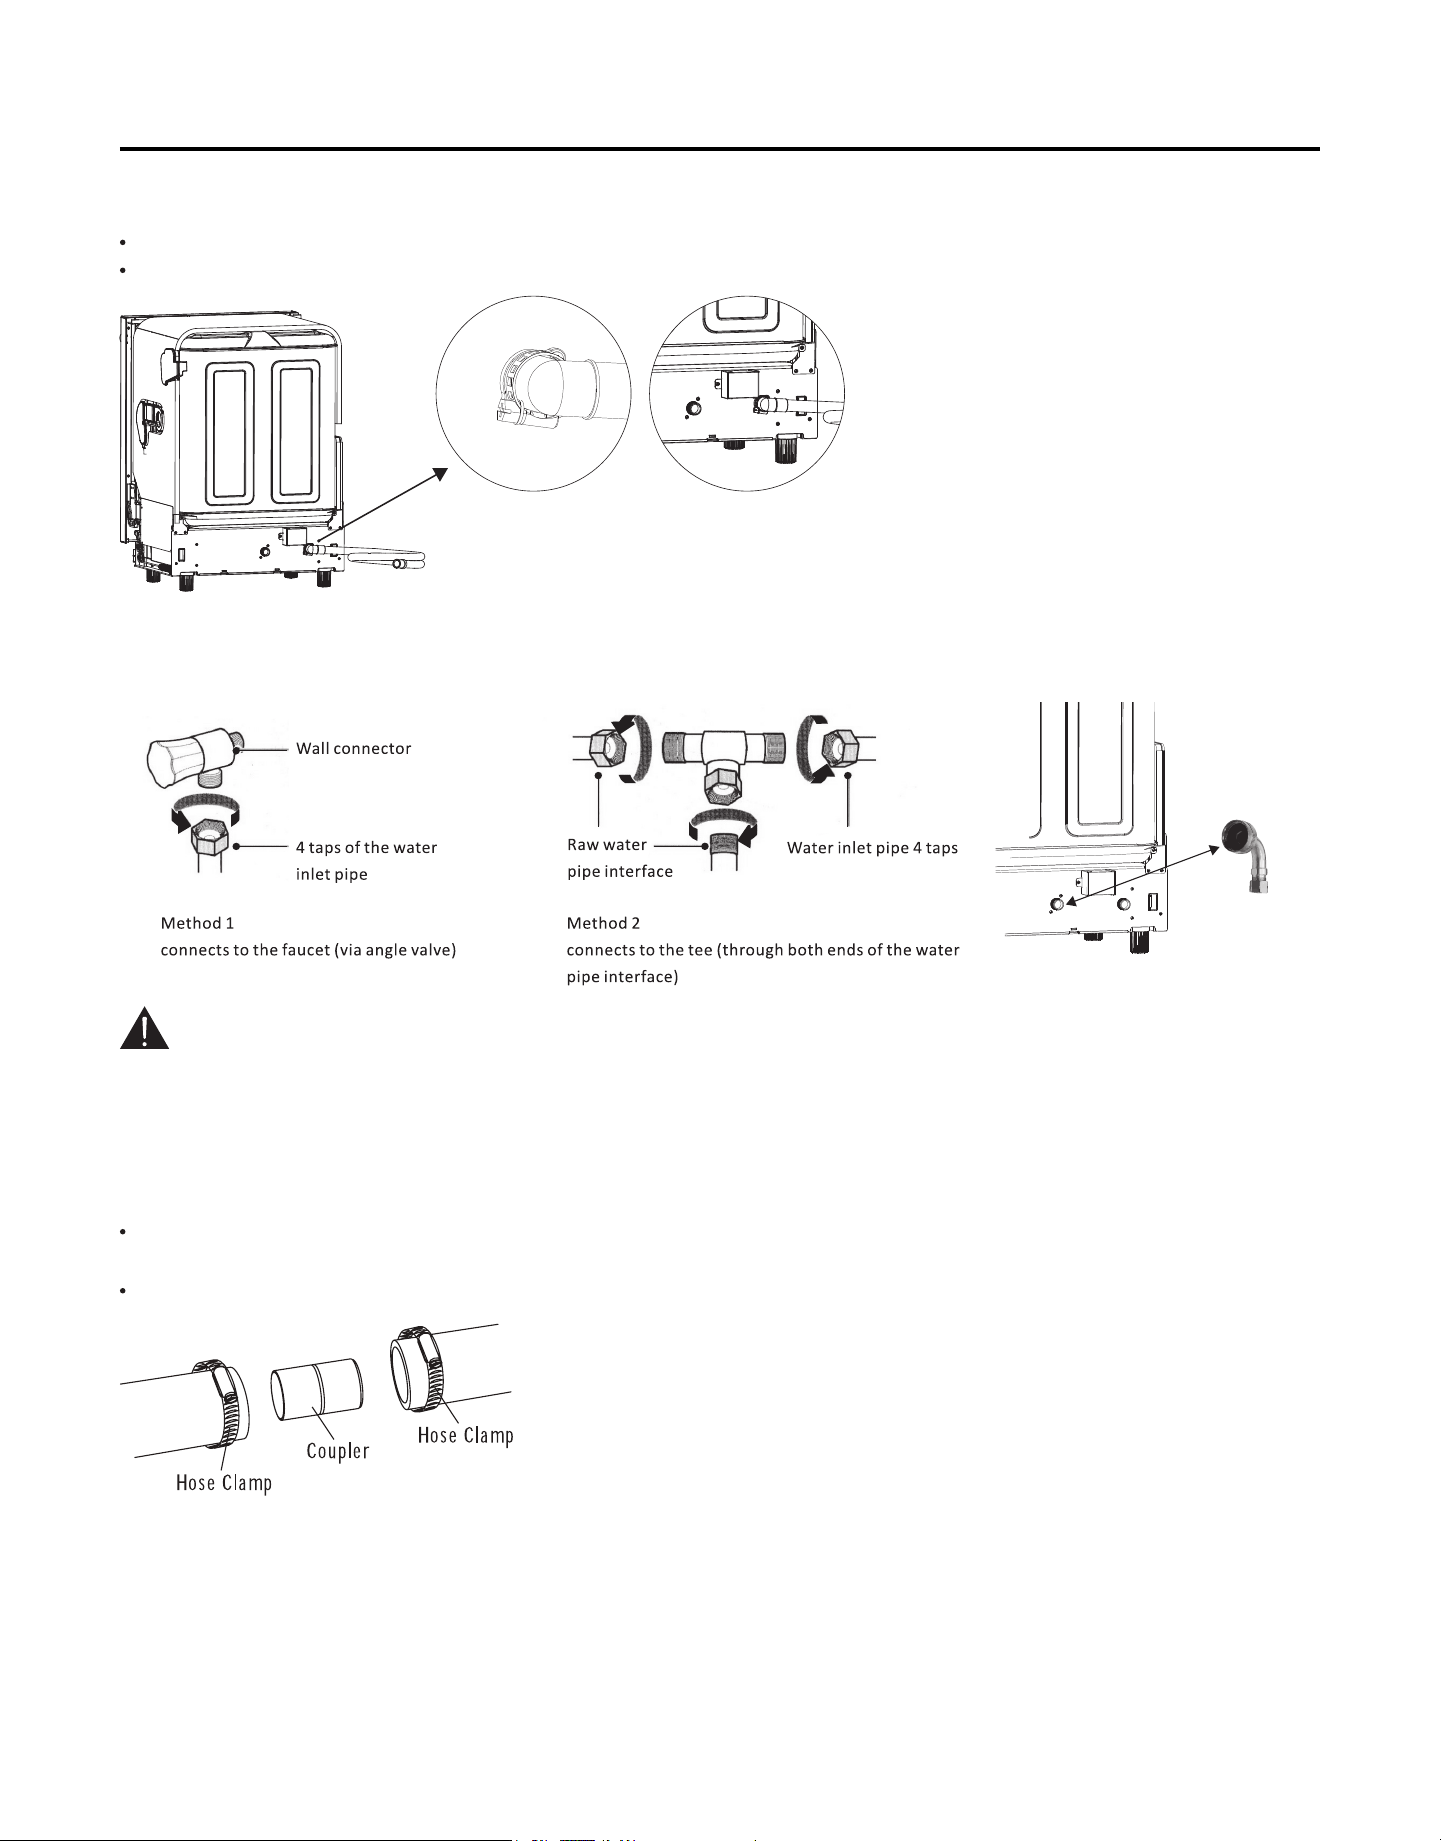
Two connection methods for water inlet pipe
Step 1 Step 2
A new water inlet pipe should be used to connect to the faucet or angle valve. It is strictly forbidden to use an aging or
damaged water inlet pipe.
STEP 6 INSTALL DRAIN HOSE
STEP 7 CONNECT WATER SUPPLY
STEP 8 CONNECT DRAIN LINE
Step 1: Put the hose clamp to drain hose 90° elbow end, do not tighten the clamp.
Step 2: Insert the drain hose 90° elbow to dishwasher drain end, tighten the hose clamp.
If a longer drain hose is required, add up to length for a total of 10 ft. to the factory installed hose. Use 5/8"or 7/8"
inside diameter hose and a coupler to connect the two hose ends.
Secure the drain hose to the air gap, waste tee or disposer with clamps.
WARNING
Note: use 3/4” 90° elbow connect to dishwasher
water inlet end
3/4” 90° elbow
Installation Procedure (continued)
16
When connecting drain line to disposer, check to be sure that drain plug has been removed.
DISHWASHER WILL NOT DRAIN IF PLUG IS LEFT IN PLACE.
STEP 9 INSERT DRAIN HOSE
Upright the dishwasher and position in front of the opening. Insert drain hose into cabinet wall hole.If a power cord is
used, guide the end through a separate hole.
STEP 10 SLIDE DISHWASHER PARTIALLY INTO CABINET
Slide dishwasher into the opening a few inches at a time. Do Not
Push Against,Front Door Panel With Knee. Damage to The Door
Panel Will Occur.
As you proceed, pull the drain hose through the openingunder the
sink. Stop pushing when the dishwasher is a few inches forward
of adjacent cabinetry.
Make sure drain hose is not kinked under the dishwasher and
there is no interference with the water line and wiring
or any other component.
Position water line and house wiring on the floor to avoid interference with base of dishwasher.
DRAIN LINE INSTALLATION
Connect drain line to air gap, waste tee or disposer using either previously determined method.
DO NOT PUSH AGAINST FRONT PANEL WITH KNEES. DAMAGE WILL OCCUR.
WARNING
CAUTION
Method 1 - Air Gap with Waste Tee or Disposer Method 2 - High Drain with Waste Tee or Disposer
Fasten to underside
of countertop
Fasten to underside
of countertop
Waste Tee Installation
Disposer Installation
Waste Tee Installation
Disposer Installation
23.6
23.6
Remove
Hopper
Plug
Max.
Max.
Installation Procedure (continued)
17
STEP 11 POSITION DISHWASHER UNDER COUNTERTOP
Check to be sure that wires are secure under the dishwasher and not pinched or in contact with door springs or other
dishwasher components.
STEP 12 SECURE DISHWASHER TO CABINET
Open the door remove the tub cap on both sides of the tub. Install screws through the dishwasher side hols to
the wall of cabinet, re-install tub cap.
STEP 13 INSTALL KICKPALTE
Place 1 piece toekick screw against the legs of the dishwasher. The slots should align with toekick bracket screw
holes, allow the kickplate to touch the floor, install the toekick screws.
STEP 14 PRE-TEST CHECKLIST
Check to be sure power is OFF.
Open door and remove all foam and paper packaging.
Locate the Owner's Manual in the literature package.
Read the Owner's Manual for operating instructions.
Check door alignment with tub. If door hits tub, level dishwasher. See Step 4.
Check door alignment with cabinet. If door hits cabinet, re-position or re-level dishwasher. See Step 4,11.
Check door opening and closing. If door does not open and close freely or tends to fall, check spring adjustments.
See Step 1.
Check to be sure that wiring is secure under the dishwasher, not pinched or in contact with door springs or other
components. See Step 5.
Pull lower rack out, about half way. Check to be sure it does not roll back or forward on the door.If the rack moves,
adjust leveling legs. See Step 4.
Verify water supply and drain lines are not kinked or in contact with other components. Contact with motor or
dishwasher frame could cause noise. See Step 6,7,8.
Turn on the water faucet and verity water temperature. Incoming water temperature must be between 50°F to 140°F.
A minimum of 50F temperature is required for best wash performance. See "Prepare Water Line".
Push dishwasher into cabinet. The front corners of the dishwasher door should be flush with cabinet doors.Be careful
not to dent font panel with knees or damage counter-top or cabinets with dishwasher parts.
TIP: Check tub insulation blanket, if equipped. It should be positioned so it is not bunched up or interfering with door
springs. Check by opening and closing the door.
Make sure screws inject straight and flush.
Protruding screw heads will scratch the top of control panel and will interfere with door closing
CAUTION
Installation Procedure (continued)
18
STEP 15 DISHWASHER WET TEST
The dishwasher offers multiple cycle options appliacable for different washing serves. pls refer the cycle table to choose
the appropriate cycle.
Turn on power supply (or plug power cord into outlet, if equipped).
Turn on your dishwasher (please refer to the Owner's Manual for instructions).
Close door, select “30MINUTES” cycle and press
START/CANCEL .
Check to be sure that water enters the dishwasher.If water does not enter the dishwasher, check to be sure that
water and power are turned on.
Check for leaks under the dishwasher. If a leak is found, turn power supply off, then tighten connections. Restore
power after leak is corrected.
Check for leaks around the door. A leak around the door could be caused by door rubbing or hitting against adjacent
cabinetry. Re-position the dishwasher if necessary. See Step 11.
When the dishwasher is draining, check the drain lines. If leaks are found, turn power off at the breaker and correct
plumbing as necessary. Restore power after corrections are made.
Open dishwasher door and make sure most of the water has drained. If not, check that disposer plug has been
removed and/or air gap is not plugged. See Step 6,7,8 Also check drain line for kinking.
Run the dishwasher through another fill and drain cycle. Check for leaks and correct if required.
Add 2 liters of water to the bottom of the dish-washer to lubricate the pump seal.
Turn on water supply. Check for leaks. Tighten connections if needed.
Remove protective film if present from the control panel and door.
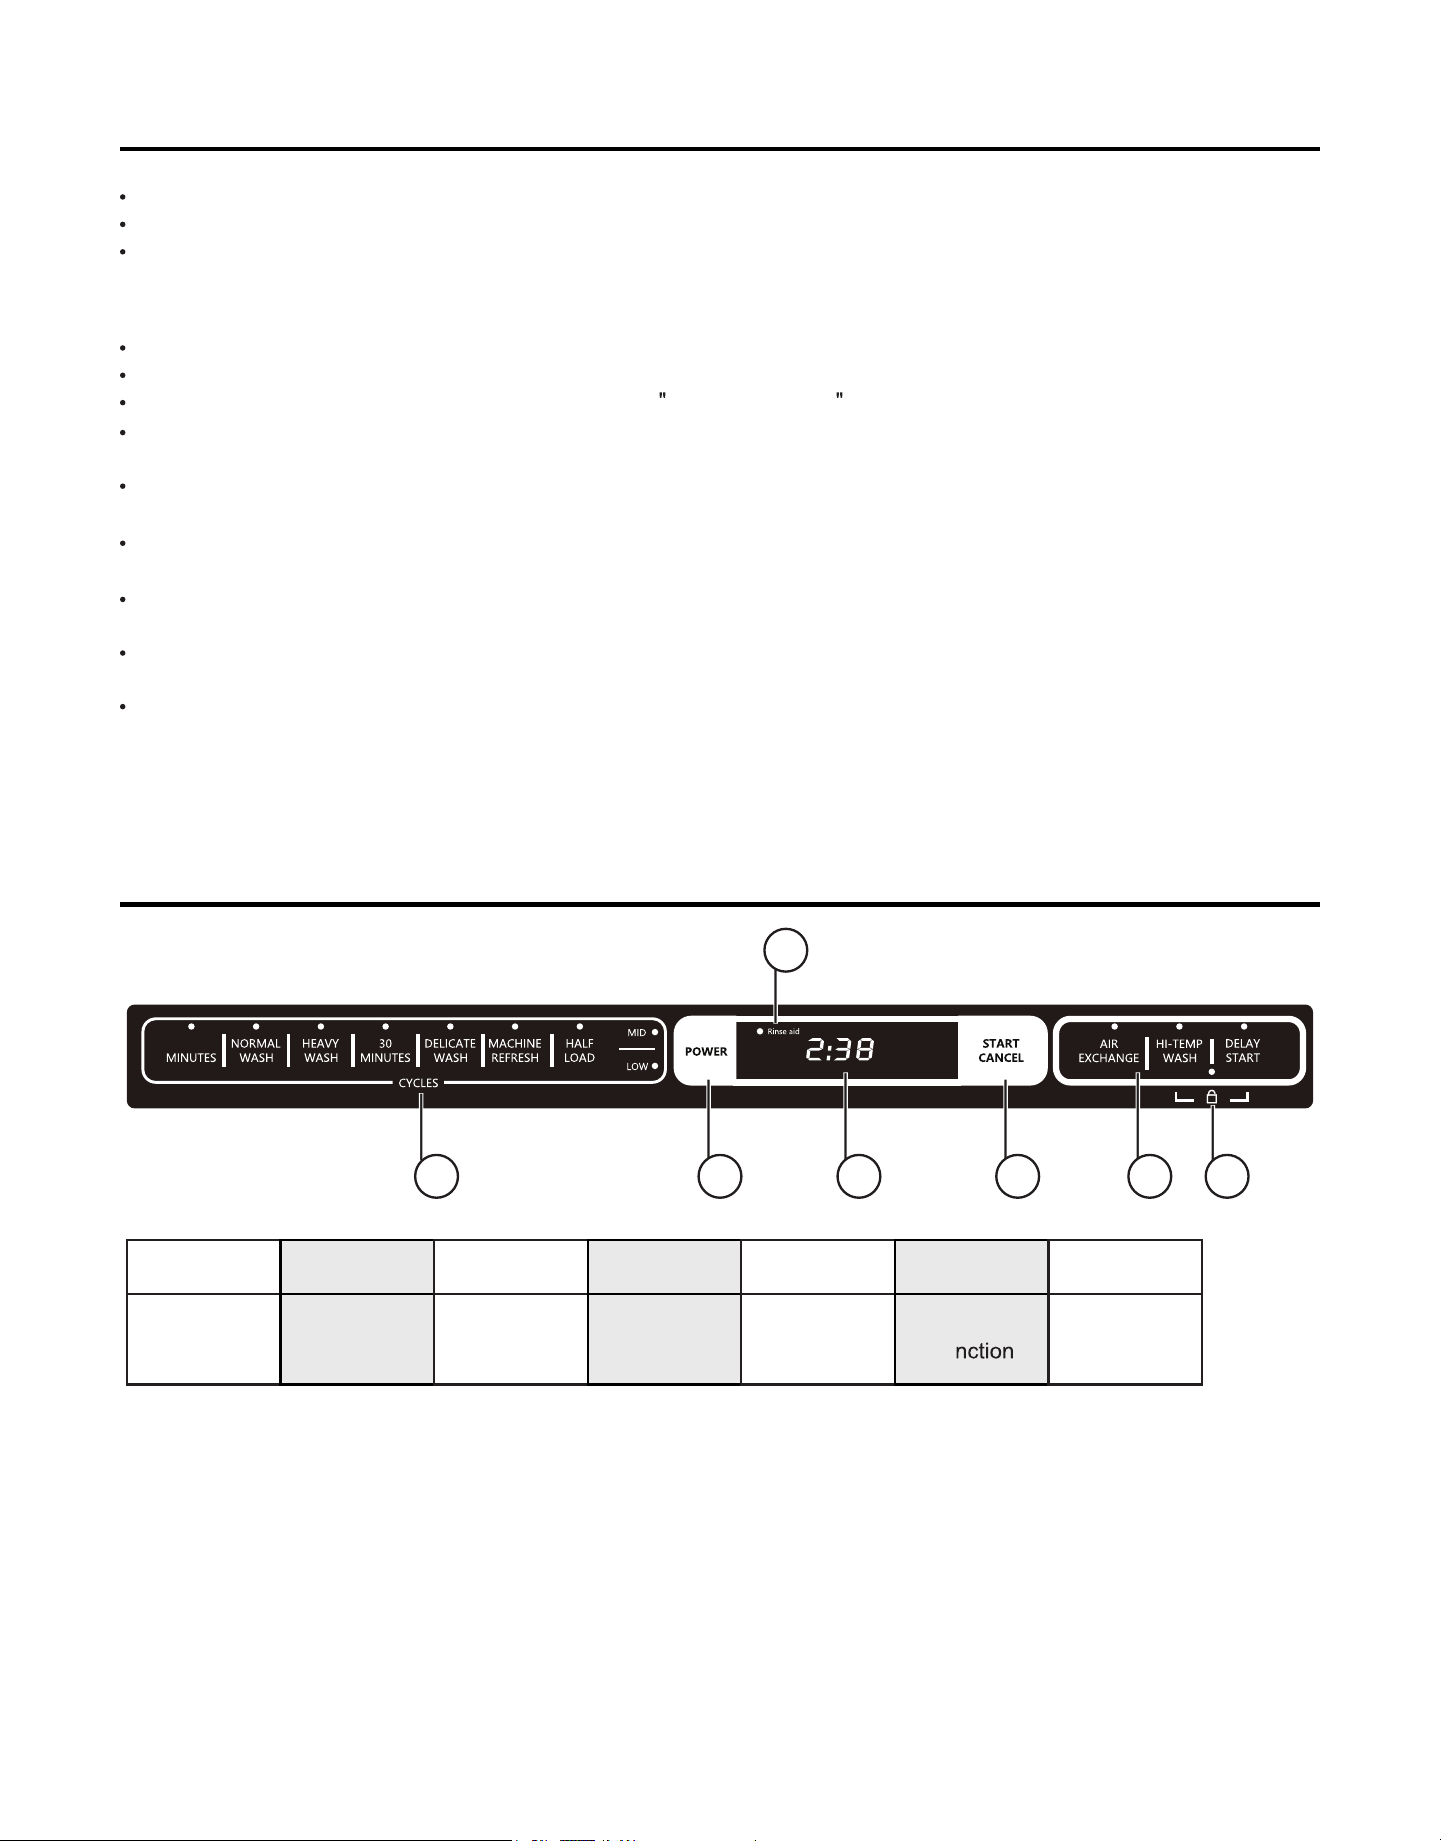
Operating Instruction
Washing
Cycles
Washing Cycles
1
CONTROL PANEL
90
1
3
2 4 5 6 7
2 3 4 5 6 7
Power
Button
Rinse Aid
Indicator
Display
window
Start/Cancel
Button
Extra
Fu
Child Lock
Operating Instruction (continued)
19
Use “HEAVY WASH” program for hard sticking stains on the surface of the dinner plate.
Stains that are difficult to clean by hand, such as steamed eggs, the cleaning performance may not good as wishes.
The time, energy consumption, and water consumption values provided in the table are for reference only. There will
be differences due to environmental temperature, tap water temperature, pressure, and tableware In actual use.
When you pressed “START/CANCEL” button but want to change a cycle, please press and hold the “START/CANCEL”
button for 5seconds the original started cycle will be cancelled. Select desired cycle and start again.
Note: Close the door within 4seconds after pressed the “START/CANCEL” button. otherwise the dishwasher will enter
pause mode, you will need to press “START/CANCEL” again then close the door.
Change a cycle after cycle started
Cycle combine work with extra function
Following table shows the extra function can or can not combine work with washing cycles:
Half Load
Wash for middle rack or lower rack individually. Load the tableware at correct position when using this cycle.
Operation: Operate under standby status, press the “HALF LOAD” button, the MID light on means wash the middle rack
only, press “HALF LOAD” again the “LOW” light on means wash the lower rack only.
Note: Operation guide for unique cyle or special situation
Note: “Y” means the function and cycle can combine work, “N” means the function and cycle can not work together.
CAUTION
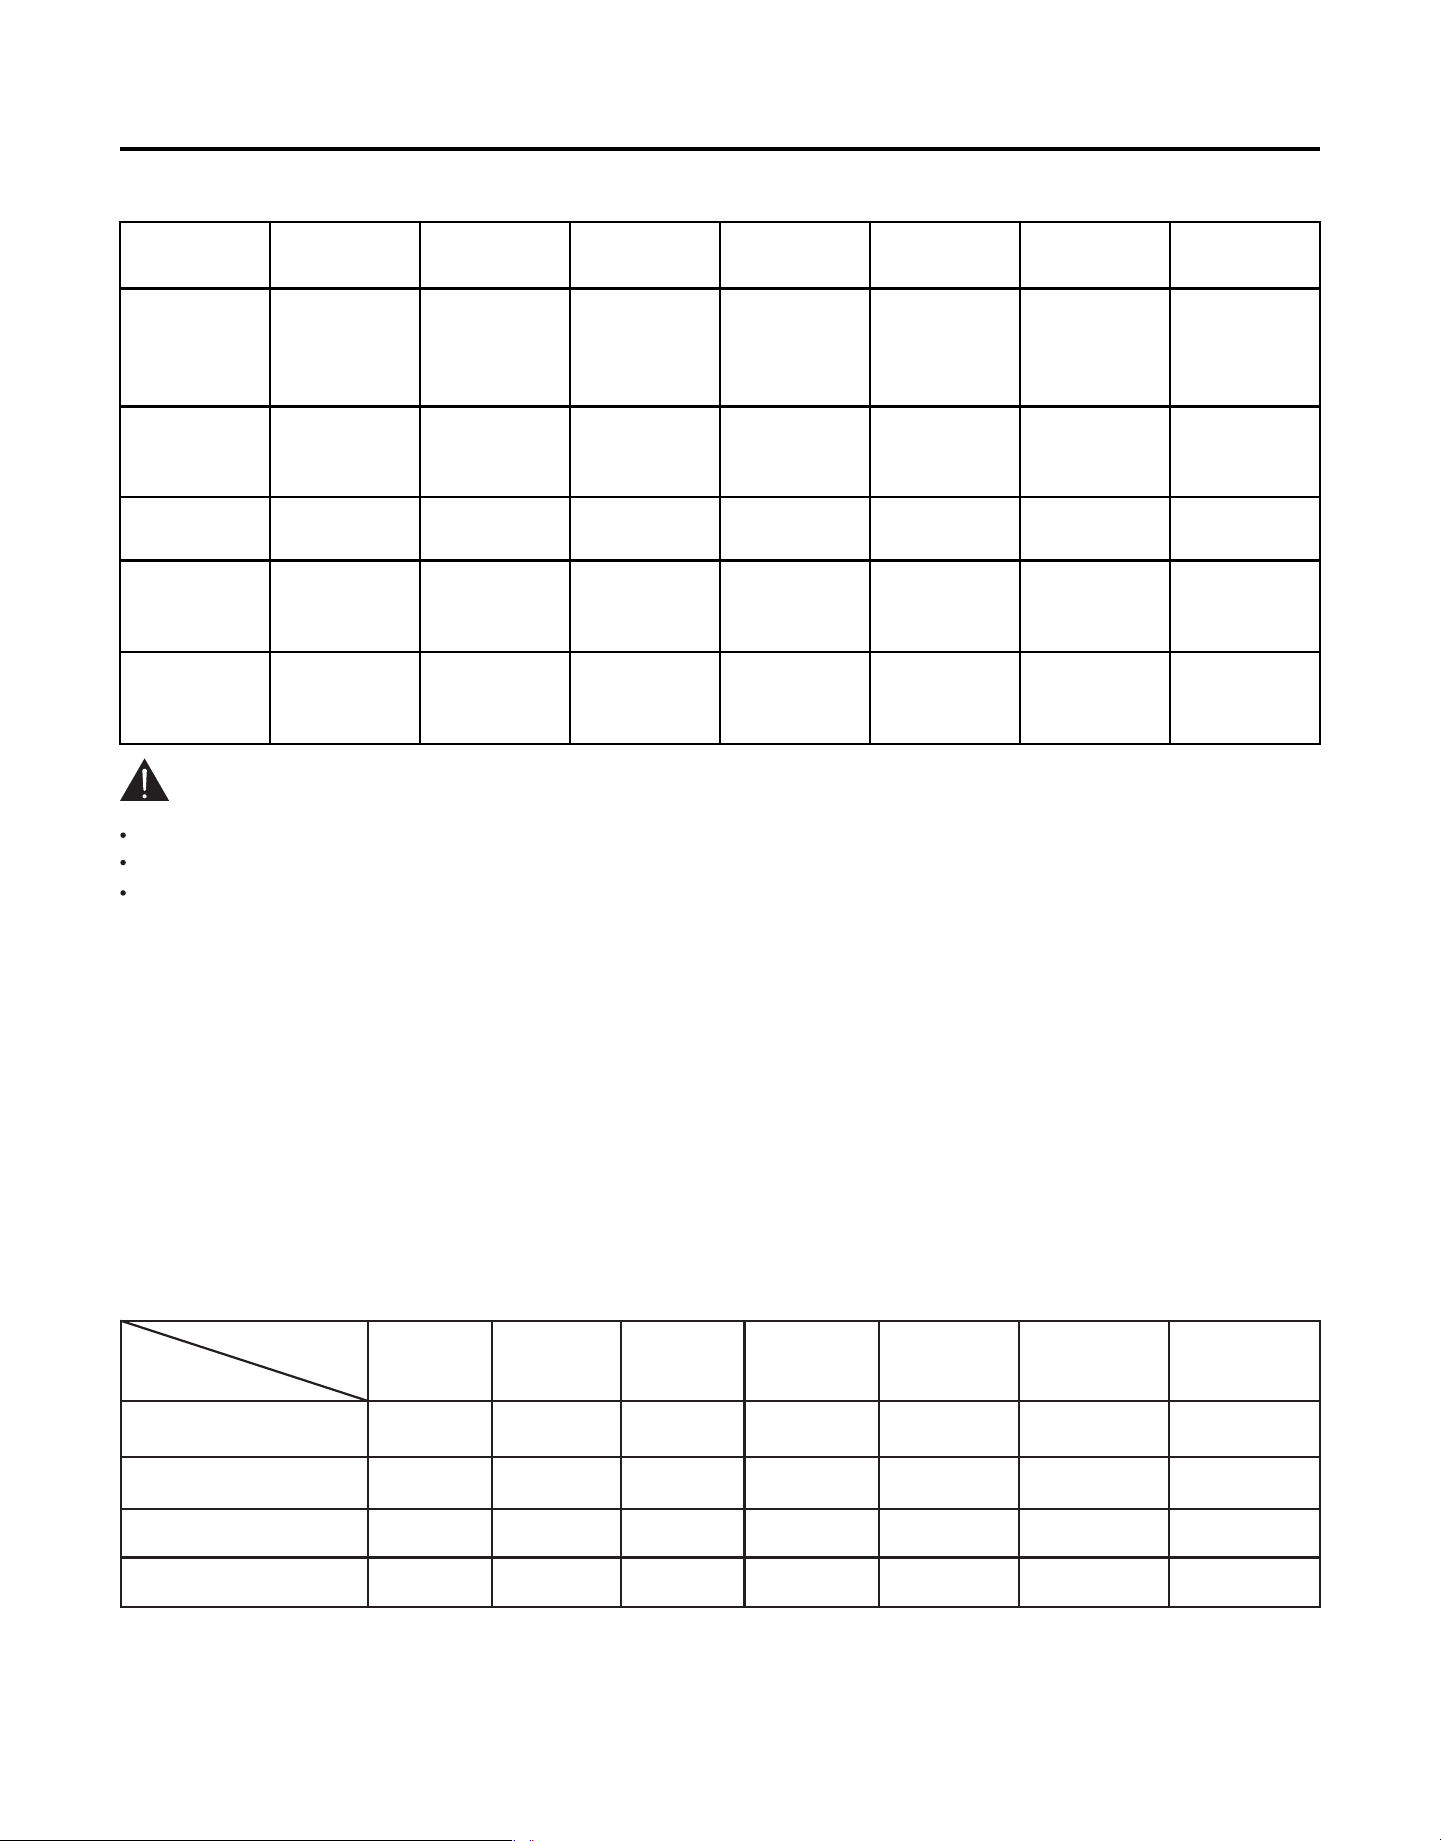
Cycle Table
Cycles
Application
29.50
90
1.20
13.2
31.50
181
0.90
10.70
29.50
124
1.40
19.60
15.00
28
0.50
9.80
29.50
52
0.60
13.00
15.00
73
0.95
9.60
20.00
96
1.00
12.20
Detergent
Consumption
(gram)
Electricity
Consumption
(kWh)
Water
Consumption
(Litre)
Cycle Time
(Minutes)
90
MINUTES
30
MINUTES
NORMAL
WASH
HEAVY
WASH
DELICATE
WASH
MACHINE
REFRESH
HALF LOAD
90
MINUTES
Cycle
Function
AIR EXCHANGE
HI-TEMP WASH
DELAY START
CHILD LOCK
30
MINUTES
NORMAL
WASH
HEAVY
WASH
DELICATE
WASH
MACHINE
REFRESH
HALF LOAD
Family daily
meals
Low water
and electricity
consumption
Heavy stains
or large load
amounts
Slight wash
in short time
Exquisite
glassware
Regular
maintenance
Less or small
amount of
loading
Y Y Y Y Y Y Y
Y Y Y Y Y N Y
Y Y Y Y Y Y Y
Y Y Y Y Y Y Y
Set before cycle starts: After set desired cycles, press the “AIR EXCHANGE” button and the button indicator on and
display window show 48H, press the button again display window show 72H, press once more cancel the function. After
48H or 72H set, press the “START/CANCEL” button and immediately close the door to start washing process. The
Air exchange funtion will automatically start after washing cycle finished.
Close the door within 4seconds when everytime pressed the “START/CANCEL” button. If failure to do so, the
dishwasher will enter pause status, you will need to press the “START/CANCEL” button again then close the door.
The display window will show flash “:” when everytime pressed the “START/CANCEL” button. Recognize by this
signal to learn whether you have pressed the “START/CANCEL” button .
Set during washing process: Slowly open the door be careful of HOT STEAM, press the “AIR EXCHANGE” button and the
button indicator on and display window show 48H, press the button again display window shows 72H, press once more
cancel the function. After 48H or 72H set, press the “START/CANCEL” button and immediately close door to recover
the washing process. The Air exchange funtion will automatically start after washing cycle finished.
Set after cycle finished: At power on status, press and hold the “AIR EXCHANGE” button for 3seconds and the button
indicator will turn on and display window show 48H, press the button again display window shows 72H, press once more
cancel the function. After 48H or 72H set, press the “START/CANCEL” button the display window show “F:on”,
immediately close the door to enable air exchange function.
DELAY START
The dishwasher allows to start at desired future time. Operate as below:
After washing cycle set, press the “DELAY START” button the light indicator will turn on, and display window show “H:01”,
press this button again the display window show “H:02”, each single touch the number will incease 1hour till to
“H:24”. When desired hour set, close door and the dishwasher starts to countdown.
To cancel this function, open the door and press the “DELAY START” button adjust to “H:00” or press and hold the
“POWER” button for 5 seconds to shut off.
HI-TEMP WASH
This function increase the washing temperature that enhance performance of bacteria elimination. Operate as below:
After washing cycle set, press " HI-TEMP WASH" button the ligth indicator will turn on, then press the "START CANCEL"
button and immediately close the door to enable this function.
Note: This function can not combine working with “MACHINE REFRESH” cycle, and it is unable to cancel once function
enabled.
Power Button
Press and hold this button for 3seconds power on, the display window default show the time of “NORMAL WASH” cycle.
At door opening status, press and hold this button for 5seconds to power off.
Rinse Aid light Indicator
This indicator will automatically ligthing-on when the dishwasher lack of rinse aid.
Display Window
The display window shows cy
le s remaining time, error codes, “F:on”(air exchange function), Hours of delay start.
Start/Cancel Button
After cycles or function set, press the “START/CANCEL” button and immediately close the door to start washing process.
The washing process will be interrupted when open the door during working.
CAUTION
Everytime
Extra Function
The Dishwasher offers following extra function:
AIR EXCHANGE
This function make air circulate intermittently within 48 or 72 hours to keep the tub in a dry and fresh condition to
reduce the growth of bacteria and odor. Operat as below:
Operating Instruction (continued)
20
Operating Instruction (continued)
21
Dish Preparation
Getting Started
Washing process indicator
The washing process indicator located at outside of door plate, and the indicator change its color to show progress of the
washing process.
A washing process come with washing and drying stage, the indicator distinguish each stage according to color below:
Interior light
Note: The washing process
or press “START/CANCEL”
indicator solid on during washing process. It goes flash when opening the door during washing
button but did not close the door within 4 seconds.
Interior light provide a better view for the tub, so user load and unable tableware easier.
This light automatically light on when open the door. Close the door or the door open for 8 minutes it will close.
Preparing and loading dishes
Load dishwasher (See preparing and loading dishes).
Add detergent (See Fill detergent to the dispenser).
Add rinse aid, if needed (See Fill rinse aid to the dispenser).
Select desired cycle (See cycle table).
Select desired extra function (See extra function instruction).
To start, press “START/CANCEL” button, and close door to latch within 4seconds.
If pressed “START/CANCEL” but did not close door within 4seconds, you will need to press “START/CANCEL” again
then close door.
Scrape away large pieces of food, bones, pits, toothpicks, etc. The filtered wash system will remove the remaining
food particles. Burned-on foods should be loosened before loading. Empty liquids from glasses and cups.
Foods such as mustard, mayonnaise, vinegar, lemon juice and tomato based products may cause discoloration of
stainless steel and plastics. it is best to remove these food soils unless the dishwasher is to be operated at once.
If the dishwasher drains into a food disposer, be sure disposer is completely empty before starting dishwasher.
Child lock help to avoid children’s danger from the running operation. Operate as below:
Operate under open door and power on, press and hold the “HI-TEMP WASH” and “DELAY START” button at same
time for 3seconds, the button light on and function enable .
Press and hold the “HI-TEMP WASH” and “DELAY START” button at same time for 3seconds again to cancel this
function.
CHILD LOCK
Stage Washing
White Red Blue
Drying Finished
Color of indicator
Interior light
Washing process indicator
Operating Instruction (continued)
22
Loading Dishes
Place the stained surface facing downwards
Placement of racks
Adjustable middle rack
The middle Rack can be raised or lowered to accommodate loading taller dishes in either rack. The Middle Rack clear-
ance height H1 goes from 5.3"to 7.3". The lower Rack clearance height H2 is 9.6" to 11.6".
Adjust the height of middle
ack according to method below:
Note: Height should be adjusted without tableware in the rack.
All tableware is recommended to be placed at an angle, which can improve the washing area and washing quality. If
it is placed in the wrong direction, the cleaning effect may not be satisfactory.
In order to fully clean the stained surface with the jet of water, place the stained surface obliquely to the inside.
Knives and other sharp tools must be placed in the rack and the tip is facing down or placed horizontally.
The tableware put in must not protrude from the bottom of the rack to avoid blocking the spray arm. The height of the
tableware in the lower rack is 29.5cm, so as not to block the spray arm of the upper rack.
CAUTION
Upper Rack Middle Rack Lower Rack
H1
H1
H2
H2
Middle Rack
Hands hold the left and right side of rack frame, lift upwards
to raising the rack.
Hands hold the left and right side handle, push downwards
to put back to the original position.
Operating Instruction (continued)
23
Dishwasher detergent dosage
Depending on the degree of contamination of the tableware, if the tableware has more stains, put more, on the contrary,
add less. Please refer to the "Cycle Table" dosage or the dosage recommended on the packaging bag of the dishwasher
detergent manufacturer.
Fill detergent to the dispenser
Steps to add dishwasher detergent
Add or remove items after cycle starts
Open door slightly and wait a few seconds until wash action stops before opening.
Add or Remove the item.
Press
S / C and close door firmly to latch within 4 seconds, the cycle will automatically resume.
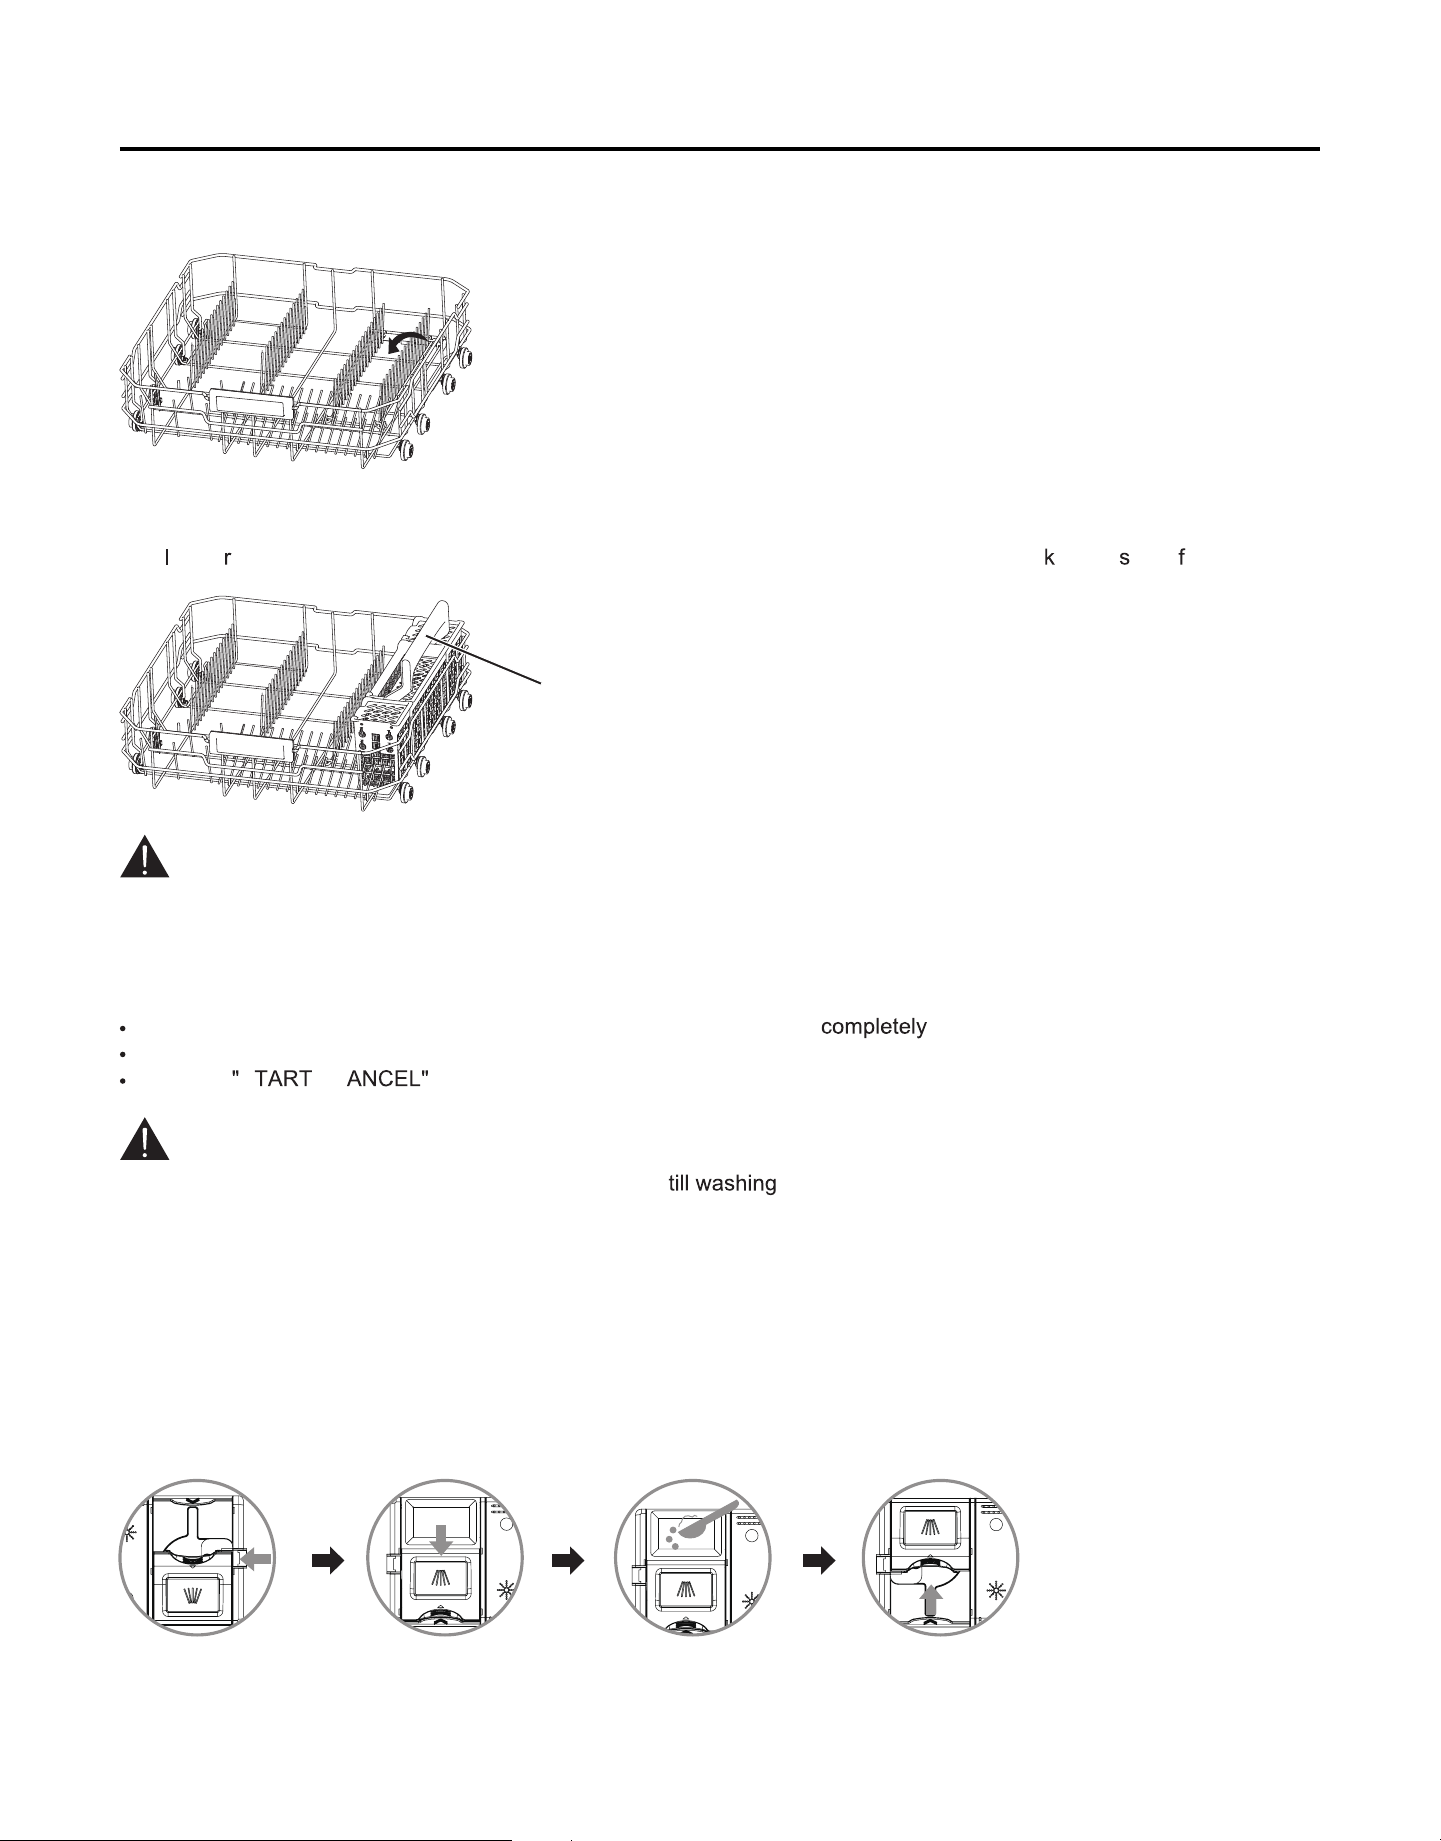
Silverware Basket
The
ower ack have a silverware basket accommodate loading small or medium size scoops, nives, alad orks.
Foldable Tines
The lower rack have foldable tine design which allows to put the loads large&irregular in shape.
Do not let any item extend through bottom. Be sure nothing protrudes through bottom of the basket or rack to block the
lower washing arm.
WARNING
CAUTION
TO AVOID BURN INJURY: Slightly open door and wait
arms and wash action stop. Hot water may splash
out of dishwasher.Failure to do so may result in injury.
Silverware Basket
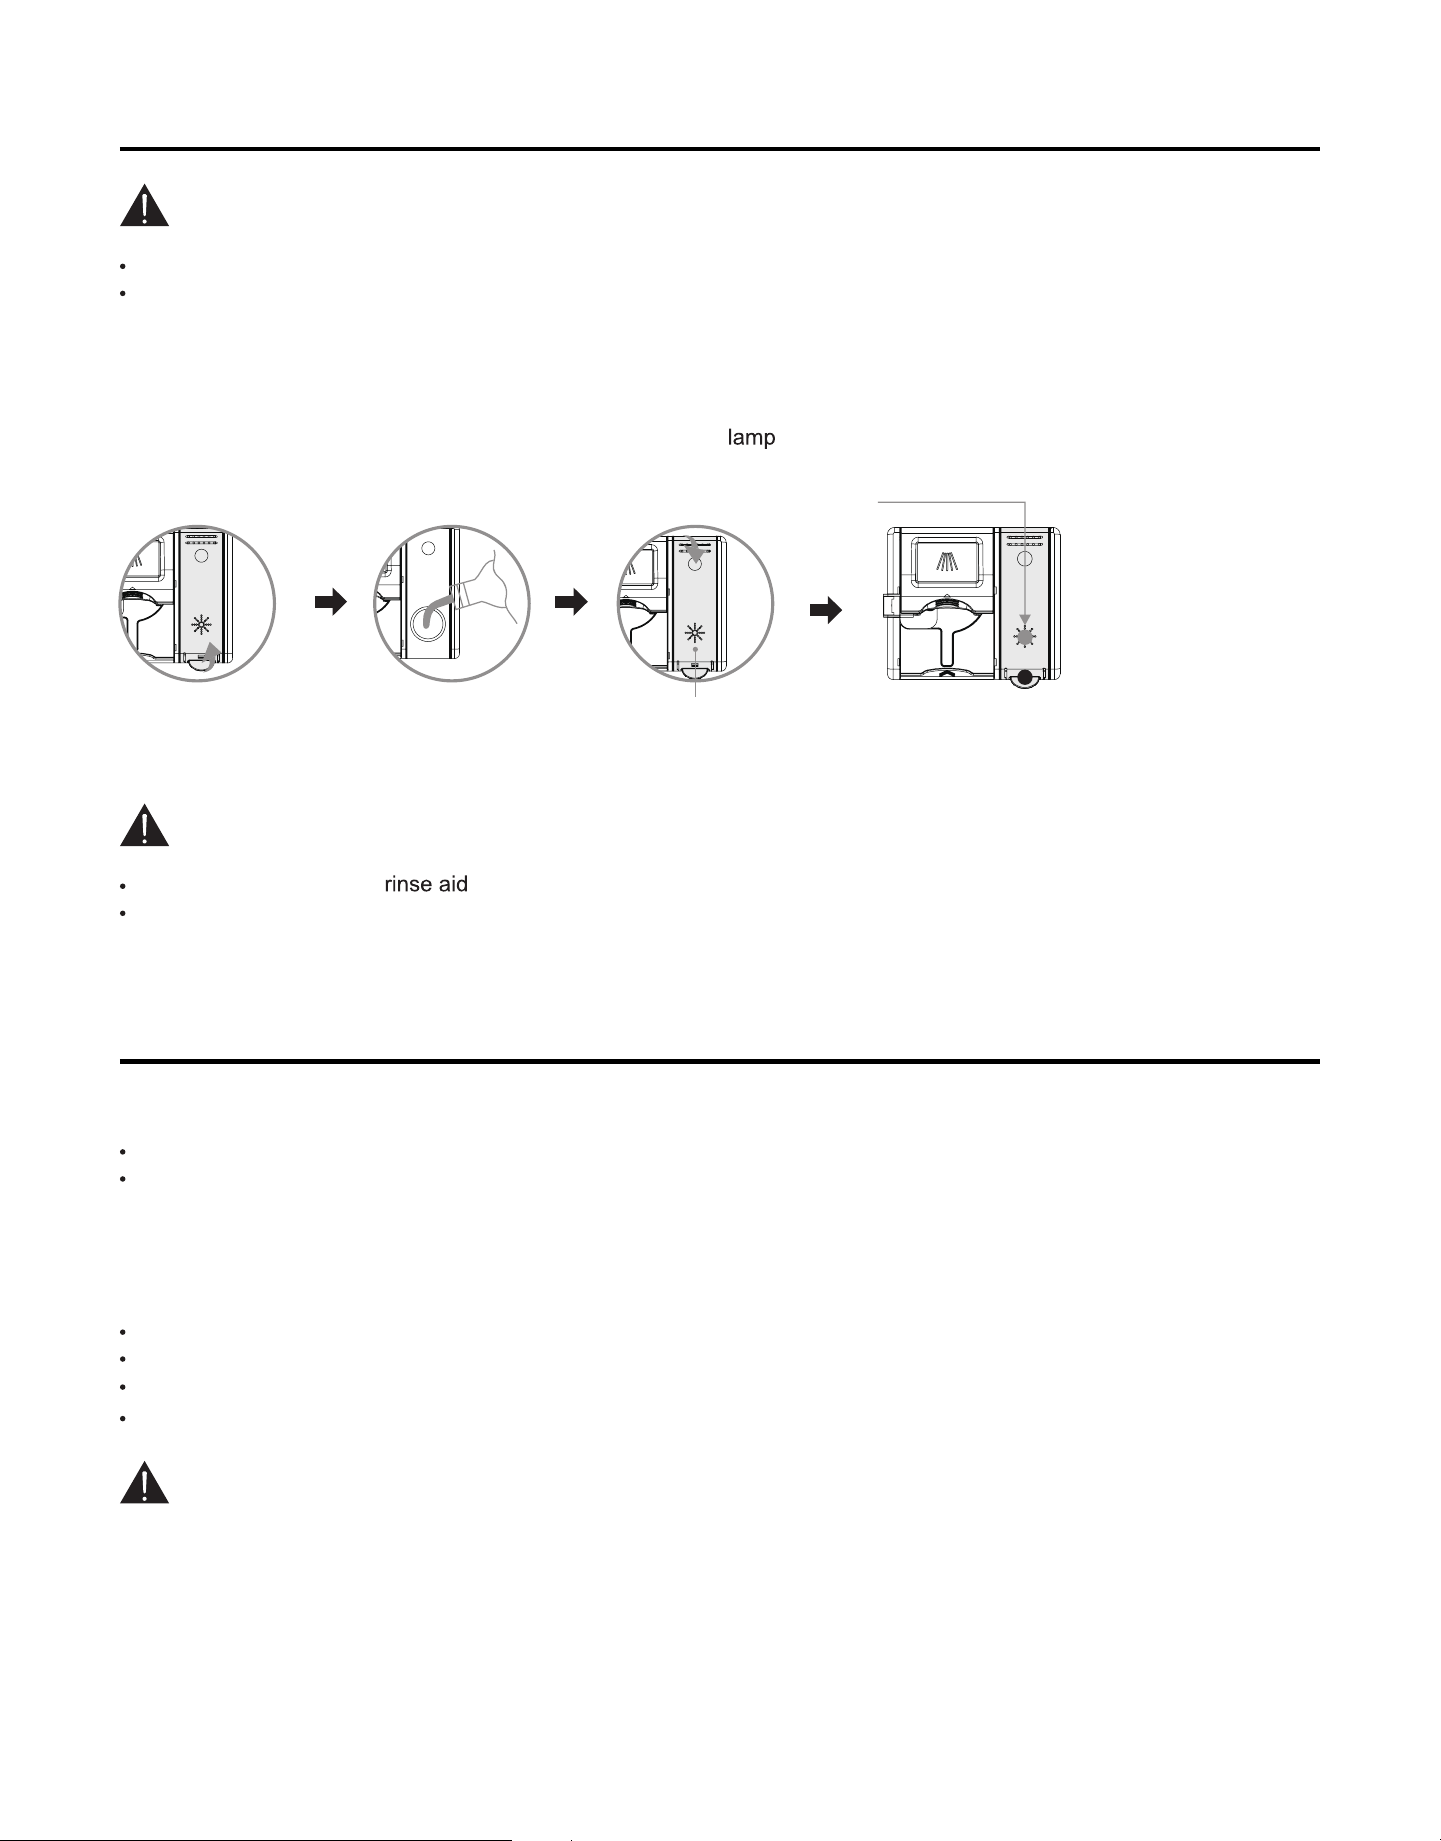
Press the dispenser
button
The lid of detergent box
will open automatically
Add detergent Close the lid of
detergent box
Operating Instruction (continued)
24
Exterior Door
Fill rinse aid to the dispenser
The Rinse Aid must be added when using the dishwasher for the first time. Rinse Aid is a consumable that is
added once and used many times. When the lack of rinse aid
is on, it means that rinse aid needs to be
added.
Steps to add Rinse Aid
Dishwasher detergent for dishwashers must be used, and detergents etc. cannot be substituted.
Please do not add the detergent if do not attend to use dishwasher. Otherwise, the dishwasher detergent may
become damp, and the oil will not be fully decomposed during the next using.
WARNING
Clean the stainless steel door and handle regularly to remove the debris with cleaning soft cloth.
Control Panel
Clean the control panel with a lightly dampened cloth, clean it gently.
Leave some time let tub cool down before cleaning the interior, failure to do so can result in burns.
Do not use appliance wax, polish, bleach or products containing chlorine to clean the stainless steel door.
The tub is made of Stainless Steel, it will not rust or corrode whatever the dishwasher scratched or dented
Clean the spots on the steel inner door and tub with a damp nonabrasive cloth.
Clean the door gasket with a damp cloth to remove food particles regularly.
Use “MACHINE REFRESH” cycle to clean the dishwasher inside water lines.
WARNING
Dishwasher specified
must be used.
When the rinse aid indicator light up, please refill rinse aid in time.
WARNING
Open the lid of the
rinse aid box by
arrow direction
Add rinse aid Press here to
close the lid
press the arrow indicated
dot to close the lid.
Do not press black dot area
Cleaning the exterior door and control panel
Cleaning the Inner door and tub
Care & Maintenance
Care & Maintenance (continued)
25
Pulling out the lower rack, remove the lower washing arm by pull it upwards.
Unplug the dishwasher from outlet.
Turn off the water supply.
Place a bucket under the inlet valve. Disconnect water line from inlet valve and drain into pan.
Disconnect drain line from pump and drain water into bucket.
Hold the middle washing arm, rotate the fixing ring clockwise to remove it from the rack.
Clean the spray hole with a sharp object, and flush with water through the hole.
Install arms back by the contrary direction of removal
Turn the filter
cylinder by arrow
indicated direction
When filter cylinder
got loose, pull it out
in upwards
Clean under running
water or use a soft brush.
Do not use iron brushes
Put filter back and tighten it.
Cylinder align to triangle
before turn it clockwise.
(The filter cylinder should be
aligned with the small triangle
on the filter mesh)
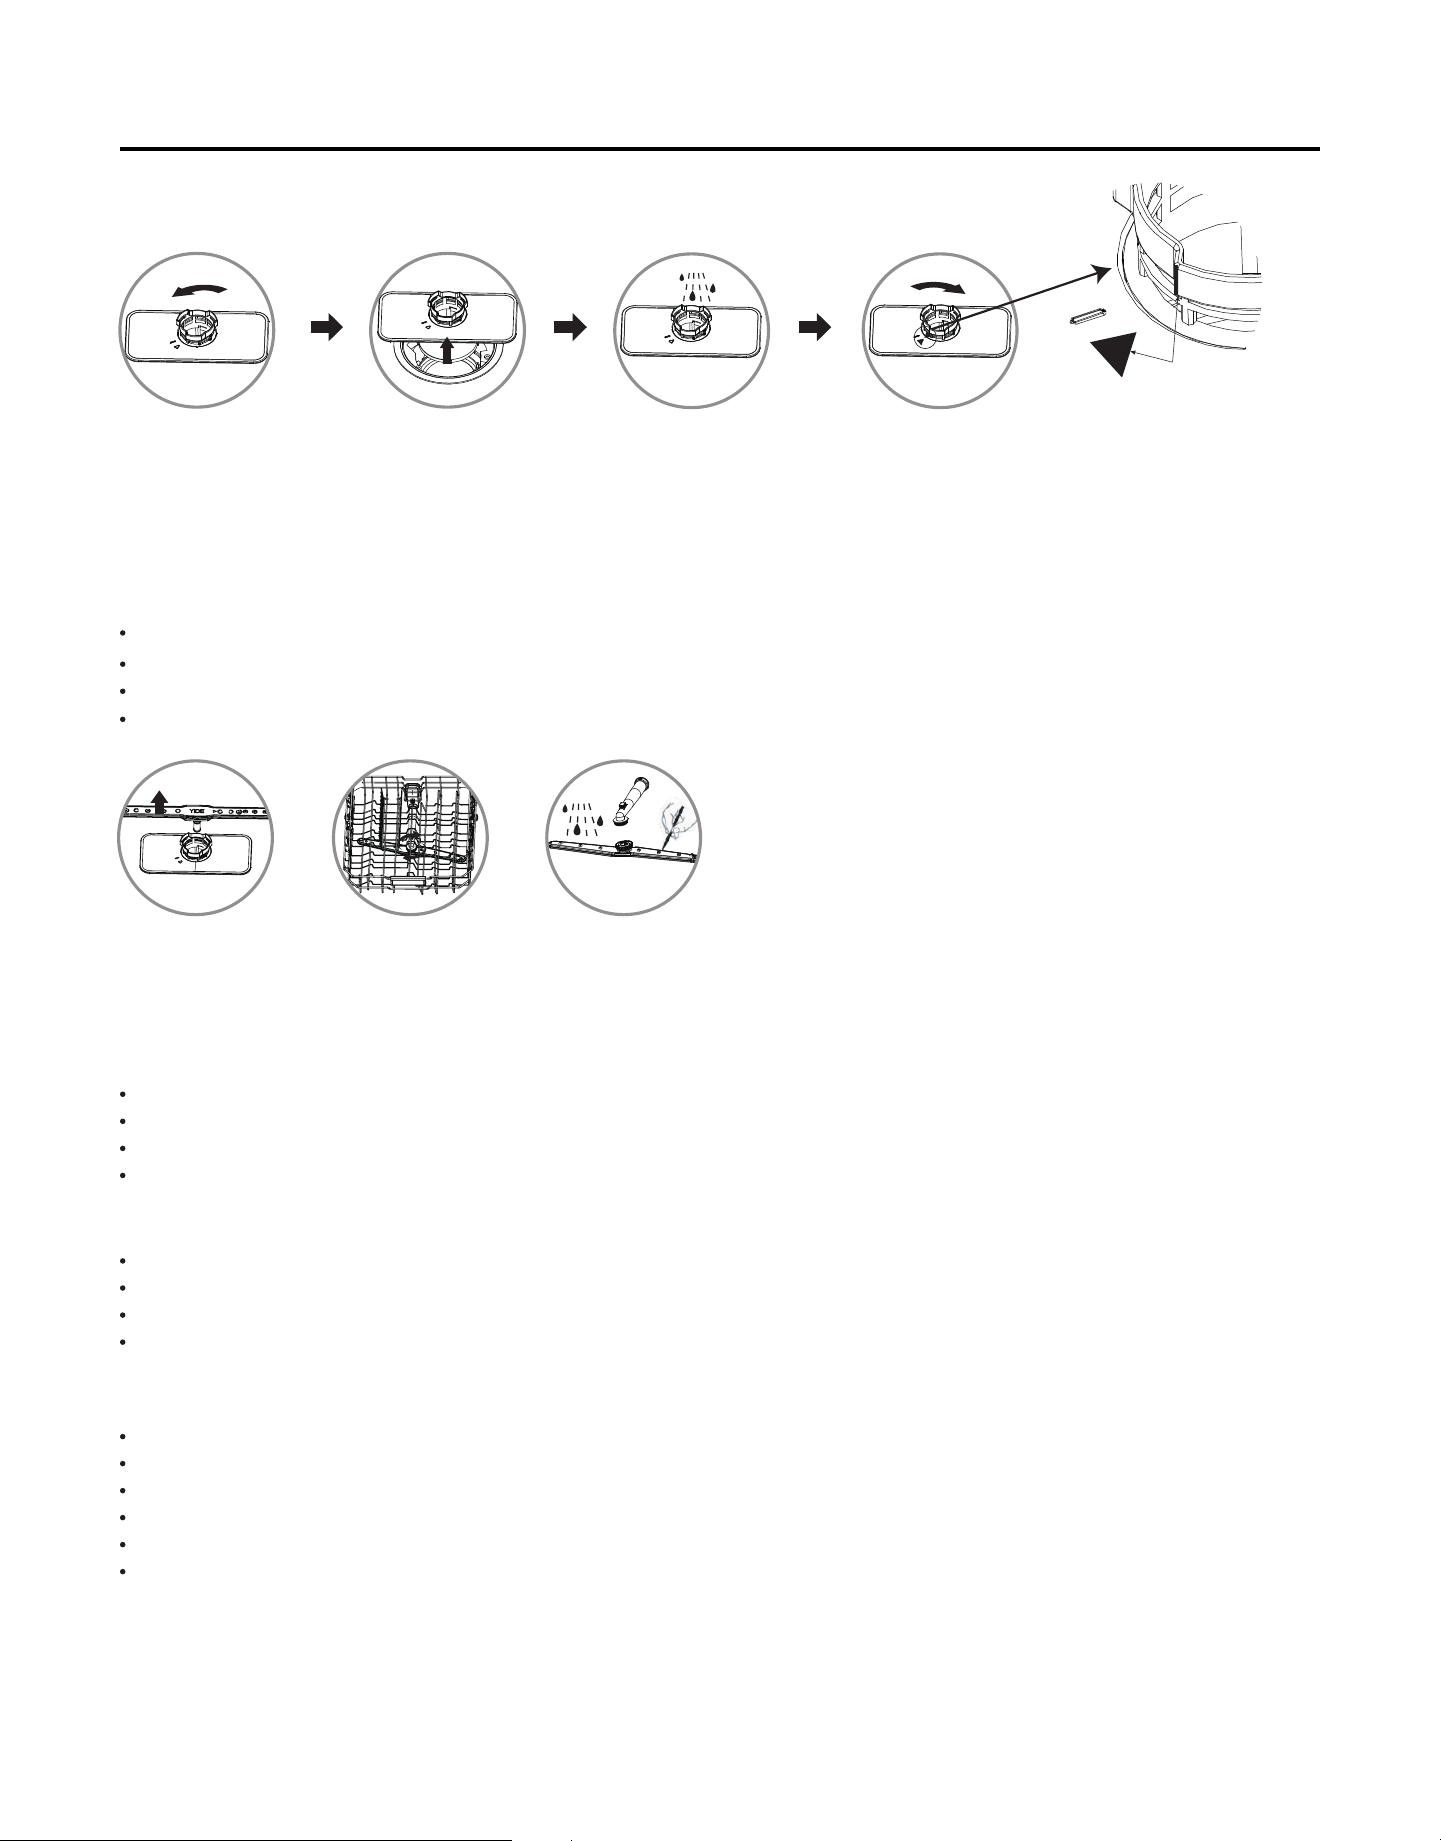
Steps to clean the filter
Clean the filter
Steps to clean the washing arm
Have a qualified person do the following:
To clear all error codes, press and hold the “POWER” button to power off, and wait at least 30seconds then power on, the
error code will disappear. if the code still appears, please contact consumer care for further trouble shooting.
Note: Everytime the display window show error code, the dishwasher will start to drain for 2minutes.
To Disconnect Service:
Reconnect the water supply, drain hose and connect to power outlet.
E3: The heating element failure.
E4: Overflow occurs.
E6: Temperature sensor open circuit failure.
E7: Temperature sensor short circuit failure.
E8: Water separator failure.
E9: Water inlet failure.
Turn on water and powering on the dishwasher.
Fill detergent and run dishwasher in a cycle except self-clean.
Check connections to make sure no leakage.
To Restore Service:
Clean the washing arm
Protect against freezing
ERROR CODES
Troubleshooting
26
There is dirt in the groove of the inner door which increases the resistance of opening the door.
Opening the door requires a lot of force
If display window show nothing, may not plugged in or house power is shut off.
If display window show contents, may child lock enabled.
Oil or water on control panel or hands which cause touch failure.
Pressing and hold the power button less than 3seconds.
Pressing the power button no reaction
Oil or water on control panel or hands which cause touch failure.
If display window show contents, may child lock enabled.
Pressing the other buttons no reaction
The tableware blocks washing arm.
Knocking sound during washing process
The tableware is loading or placing improperly.
Washing cycle do not match degree of soiling.
Detergent not enough, or added in the wrong place, or did not use a specified dishwasher detergent.
The filter is not installed in place, causing food residues entered into water circulation system.
The spraying holes in the washing arm is blocked.
The washing arm is stucked.
Did not follow dish preparation guide to remove hard or dry stains before loading dishes.
Power interruption during washing process.
The tableware is not clean after cycle finished
There is no rinse aid in the dispenser or it is added in wrong place.
The tableware is loading or placing improperly.
The washing cycles is not finish.
Selected cycle do not match.
The tableware is not dry after washing cycle finished
The spraying holes in the washing arm is blocked.
Adding too much detergent.
Did not use specified dishwasher detergent.
Residue of detergent
Did not use specified dishwasher detergent.
Adding too much detergent.
Rinse aid box lid did not closing.
Bubbles foam in the tub
The drain hose did not correctly installed.
The drain hose is knotted, blocked or pressed by heavy objects.
Drain pump failure.
When the dishwasher leave no use, but a large amount of water is found in the dishwasher
The Air Exchange function is
.
A "wheezing" sound appears, and the display window show “F:on”
27
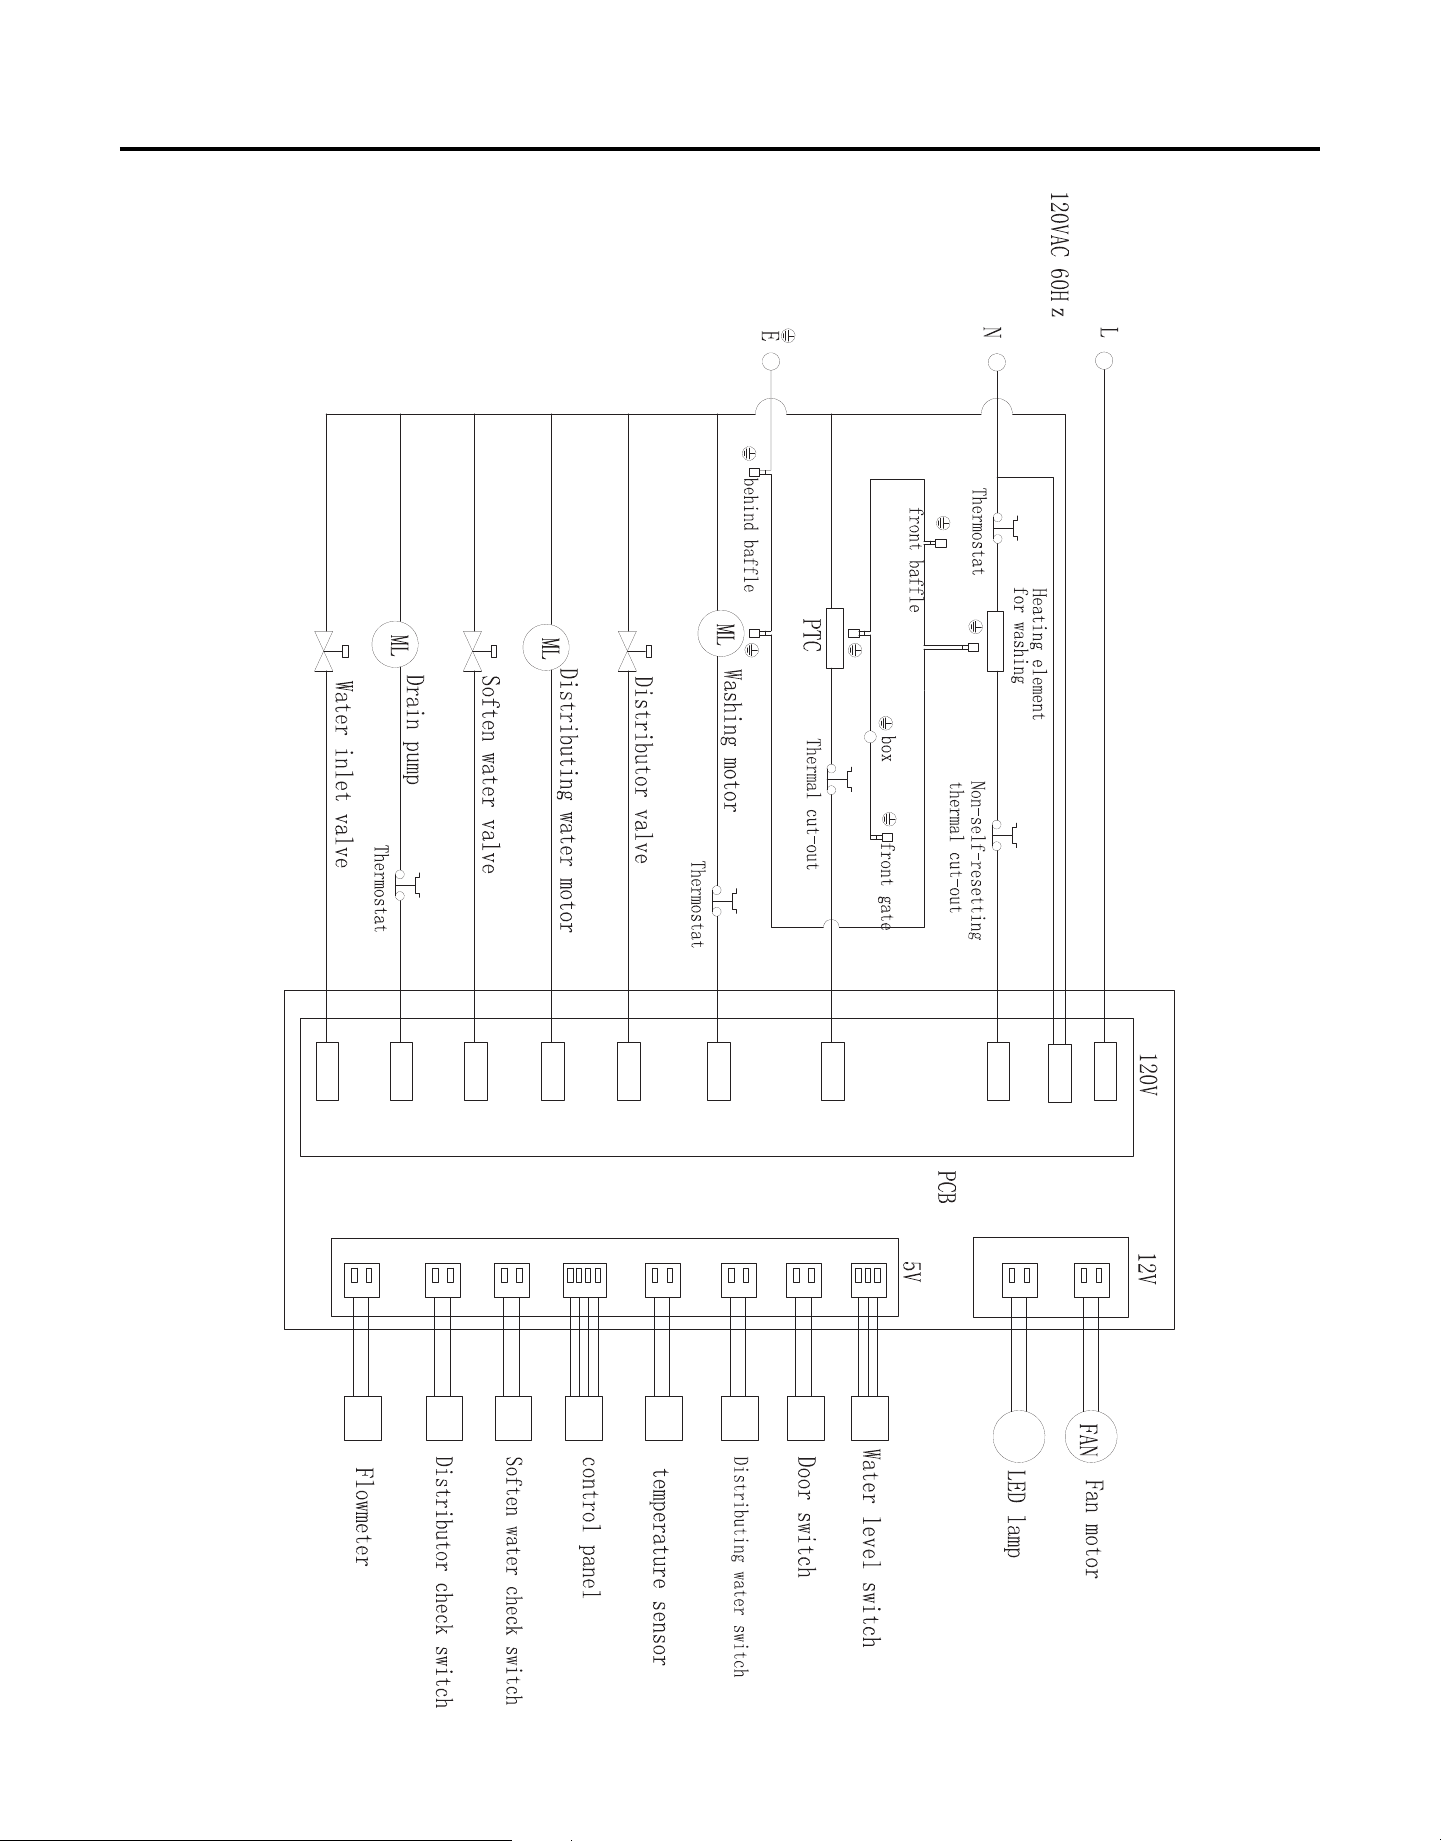
Wire Diagram

28
Warranty
What this limited warranty covers:
The Warranty coverage provided by Forno Appliances in
this statement applies exclusively to the original Forno
appliance (“Product”) sold to the consumer (“Purchaser”) by
an authorized Forno dealer/distributor/retailer, purchased
and installed in the United States or Canada, and which has
always remained within the original country of purchase (the
United States or Canada). Warranty coverage is activated
on the date of the Product’s original retail purchase and has
a duration of t
wo (2) years.
Warranty coverage is non-transferable. In the event
of replacement of parts or of the entire product, the
replacement Product (or parts) shall assume the remaining
original Warranty activated with the original retail purchase
document. This Warranty shall not be extended with respect
to such replacement. Forno Appliances will repair or replace
any component/part which fails or proves defective due to
materials and/or workmanship within 2 years of the date of
the original retail
purchase and under conditions of ordinary
residential, non-commercial use. Repair or replacement
will be free of charge, including labor at standard rates and
shipping expenses. Purchaser is responsible for making the
Product reasonably accessible for service. Repair service
must be performed by a Forno Authorized Service company
during normal working hours.
Important
Retain proof of original purchase to establish warranty period.
Forno’s liability on any claim of any kind, with r
espect to the
goods and/or services provided, shall in no event exceed the
value of the goods or service or part there of which has given
rise to the claim.
30-Day Cosmetic Warranty
The Purchaser must inspect the product at the time of
delivery. Forno warrants that the Product is free from
manufacturing defects in materials and workmanship for
a period of thirty (30) days from date of the original retail
purchase of the Product.
This coverage includes:
• Paint blemishes
• Chips
• Macroscopic finish defects
Cosmetic warranty does NOT cover:
• Issues resulting from incorrect transport, handling and/or
installa
tion (e.g.: dents, broken, warped or deformed
structures or components, cracked or otherwise damaged
glass components);
• Slight color variations on painted/enameled components;
• Differences caused by natural or artificial
lighting, location or other analogous factors; >
stains/corrosion/discoloration caused by external
substances and/or environmental factors; > labor costs,
display, floor, B-stock, out- of-box,“as is” appliances and
demo units.
How to receive service
To receive warranty services, the Purchaser must contact the
Forno Support department in or
der to determine the problem
and the required service procedures. Troubleshooting with
a customer service representative will be necessary before
moving forward with the service. Model number, serial number
and date of original retail purchase will be requested.
Warranty Exclusions: What Is Not Covered.
• Use of the Product in any non-residential, commercial
application.
• Use of the Product for anything other than its intended
purpose.
• Repair services provided by anyone other than a Forno
Authorized Service agency.
• Damages or repair services to correct services provided
by unauthorized parties or the use of unauthorized parts.
• Installation not in accordance with local/state/city/county
fire codes, electrical codes, gas codes, plumbing codes,
building codes, laws or regulations.
• Defects or damage due to improper storage of the
Product.
• Defects, damage or missing parts on products sold out of
the original factory packaging or from displays. > Service
calls or repairs to correct an incorrect installation of the
Product and/or related accessories.
• Replacement of parts/service calls to connect, convert
or otherwise repair the electrical wiring and/or gas line in
order to properly use the product.
• Replac
ement of parts/service calls to provide instructions
and information on the use of the Product.
• Replacement of parts/service calls to correct issues
arising from the product being used in a manner other
than what is normal and customary for residential use.
• Replacement of parts/service calls due to wear and tear
of components such as seals, knobs, pan supports,
shelving, cutlery baskets, buttons, touch displays,
scratched or broken ceramic-glass tops.
• Replacement of parts
/service calls for lack of/improper
maintenance, including but not limited to: build up of
residues, stains, scratches, discoloration, corrosion.
• Defects and damages arising from accidents, alteration,
misuse, abuse or improper installation.
• Defects and damages arising from Product transport,
logistics and handling. Inspection of the product must be
made at time of delivery. Following receipt and inspection,
the selling dealer/delivery company must be notified of
any issues arisin
g from handling, transport and logistics.
• Defects and damages arising from external forces beyond
the control of Forno Appliances, including but not limited
to wind, rain, sand, fires, floods, mudslides, freezing
temperatures, excessive moisture or extended exposure
to humidity, power surges,
• Lightning, structural failures surrounding the appliance
and other acts of God.
• Products whose serial number has been
altered/damaged/tampered with. In no case shall Forno
be held liable or responsible f
or damage to surrounding
property, including furniture, cabinetry, flooring, panels,
and other structures surrounding the Product. Forno is
neither liable nor responsible for the Product if it is located
in a remote area or an area where certified trained
technicians are not reasonably available. Purchaser must
bear any transportation and delivery costs of the Product
to the nearest Authorized Service Center or the additional
travel expenses of a certified trained technician

29
Warranty
THERE ARE NO EXPRESS WARRANTIES OTHER THAN THOSE LISTED AND DESCRIBED ABOVE, AND NO WARRANTIES, EITHER EXPRESS OR IMPLIED,
INCLUDING, BUT NOT LIMITED TO, ANY IMPLIED WARRANTIES OF MERCHANTABILITY OR FITNESS FOR A PARTICULAR PURPOSE THAT SHALL APPLY
AFTER THE EXPRESS WARRANTY PERIODS STATED ABOVE, AND NO OTHER EXPRESS WARRANTY OR GUARANTEE GIVEN BY ANY PERSON, FIRM
OR CORPORATION WITH RESPECT TO THIS PRODUCT SHALL BE BINDING ON FORNO. FORNO SHALL NOT
BE LIABLE FOR LOSS OF REVENUE OR
PROFITS, FAILURE TO REALIZE SAVINGS OR OTHER BENEFITS, TIME AWAY FROM WORK, MEALS, LOSS OF FOOD OR BEVERAGES, TRAVELING OR
HOTEL EXPENSES, EXPENSES TO RENT OR PURCHASE APPLIANCES, REMODELING/CONSTRUCTION EXPENSES IN EXCESS OF DIRECT DAMAGES
WHICH ARE UNDENIABLY CAUSED EXCLUSIVELY BY FORNO OR ANY OTHER SPECIAL, INCIDENTAL OR CONSEQUENTIAL DAMAGES CAUSED BY THE
USE, MISUSE OR INABILITY TO USE THIS PRODUCT, REGARDLESS OF THE LEGAL
THEORY ON WHICH THE CLAIM IS BASED, AND EVEN IF FORNO
HAS BEEN ADVISED OF THE POSSIBILITY OF SUCH DAMAGES. NOR SHALL RECOVERY OF ANY KIND AGAINST FORNO BE GREATER IN AMOUNT
THAN THE PURCHASE PRICE OF THE PRODUCT SOLD BY FORNO AND CAUSING THE ALLEGED DAMAGE. WITHOUT PREJUDICE TO THE FOREGOING,
PURCHASER ASSUMES ALL RISK AND LIABILITY FOR LOSS, DAMAGE OR INJURY TO PURCHASER AND PURCHASER’S PROPERTY AND TO OTHERS
AND THEIR PROPERTY ARISING FROM THE USE,
MISUSE, OR INABILITY TO USE THIS PRODUCT SOLD BY FORNO THAT IS NOT A DIRECT RESULT OF
NEGLIGENCE ON THE PART OF FORNO THIS LIMITED WARRANTY SHALL NOT EXTEND TO ANYONE OTHER THAN THE ORIGINAL PURCHASER OF THIS
PRODUCT, IS NON-TRANSFERABLE, AND STATES YOUR EXCLUSIVE REMEDY.
Correct Disposal of this product:
This marking indicates that this appliance should not be disposed with
other household wastes. To prevent possible harm to the environment
or human health from uncontrolled waste disposal, recycle it responsibly
to promote the sustainable reuse of material resources.

Customer Support: Call 1-866-231-8893 or email: [email protected]