User’s Guide
M00123506 EN

Contents
Before use
Manuals for is Product.................... 4
Downloading the Latest Version............. 4
Symbols Used in is Guide................ 5
About Models of this Product................. 6
How to Identify the Model by the Model
Number............................... 6
How the Models are Described in this Manual. . . 6
Auto Cutter Model....................... 6
Peeler Model............................ 8
Gloss Black Ink/Matte Black Ink
(CW-C6000/C6500 Series). . . . . . . . . . . . . . . . . 9
Product and Driver Versions................. 10
How to Check the Product Version.......... 10
How to Check the Printer Driver Version. . . . . . 10
Screens in
is
Manual..................... 11
Product Illustrations....................... 11
Safety Precautions......................... 12
Cautions on Installation.................. 12
Cautions on Handling.................... 12
Cautions on Power Supply................. 13
Cautions on Ink Cartridges................ 15
Cautions on the Maintenance Box........... 17
Caution Label.......................... 18
Supported paper.......................... 19
Paper Shape/Form/Size................... 19
Paper Type............................ 22
Paper at Cannot Be Used................ 23
Part Names and Functions................... 24
Front................................ 24
Rear................................. 25
Inside................................ 26
Spindle and Flange...................... 27
Operation Panel........................ 28
Basic Operation
Turning On or O......................... 30
Turning the Power On.................... 30
Turning the Power O.................... 30
Opening the Paper Cover................... 31
Opening the Cover using the Lever in the Front. 31
Opening the Cover using the Lever in the Back. . 31
Checking the Printer Status.................. 32
Checking the Paper Information............ 32
Checking the Status of Consumables......... 33
Printing Nozzle Check Patterns............. 33
Printing Status Sheet..................... 34
Checking Network Connection and Settings. . . . 34
Replacing the Ink Cartridges................. 35
Checking Amount of Ink Remaining......... 35
How to Replace the Ink Cartridges........... 35
Replacing the Maintenance Box............... 38
Checking the Amount of Empty Space in the
Maintenance Box....................... 38
How to Replace the Maintenance Box......... 38
Printer Driver Settings...................... 41
Media Denition........................ 42
Media Name........................... 42
Label width............................ 42
Label Length........................... 42
Gap between labels...................... 43
Le
& Right gap........................ 43
Media Form........................... 43
Media Saving.......................... 43
Media Coating Type..................... 44
Print Quality........................... 44
Color Correction........................ 45
Spot Color Setting....................... 45
Settings For Paper Handling Aer Print....... 46
Notication
........................... 46
Pause................................ 47
Media Detection…...................... 47
Loading and Replacing Paper................. 48
How to Load Paper (Auto Cutter Model -
Supply from Inside)...................... 50
How to Load Paper (Auto Cutter Model -
Supply from Outside).................... 55
How to Load Paper (Peeler Model - Supply
from Inside)........................... 60
How to Remove Paper (For the Auto Cutter
Model)............................... 67
How to Remove Paper (For the Peeler Model). . . 69
How to Eject Paper at Paper End (For the
Auto Cutter Model)...................... 71
How to Eject Paper at Paper End (For the
Peeler Model).......................... 72
Maintenance
Cleaning the Exterior...................... 74
Cleaning the Auto Cutter (Auto Cutter Model
Only).................................. 75
Cleaning the Peeler (Peeler Model Only). . . . . . . . 77
CW-C6000 Series/CW-C6500 Series/CW-D6000 Series/CW-D6500 Series User's Guide
Contents
2

Cleaning the Edge Guides................... 78
Cleaning the Platen........................ 79
Cleaning the Paper Feed Roller. . . . . . . . . . . . . . . 80
Cleaning the Paper Pressure Roller............. 82
Cleaning the Print Head.................... 84
Printing Nozzle Check Patterns............. 84
Head Cleaning......................... 85
Troubleshooting
A Message is Displayed on the Operation Panel. . . 86
Problems with Print Quality................. 90
Horizontal White Banding................. 90
Vertical White Spots (Auto Cutter Model). . . . . 90
White or Black Banding................... 90
Printed Colors Are Wrong................. 90
Print Position Shis...................... 91
Paper is Smeared or Smudged with Ink........ 91
Paper is Fed and Ejected, and an Error Occurs. . 91
Printing is Impossible or Becomes Suddenly
Impossible.............................. 92
Print Data is Sent, But Does Not Print (Peeler
Model)............................... 92
Printing from a computer is impossible or
becomes suddenly impossible................ 92
Checking Whether the Printer Driver Is
Installed.............................. 92
e
printer does not turn on............... 92
Print Job is Canceled on PC but “Printing”
Message on Printer Does Not Disappear....... 92
Paper is jammed.......................... 94
For the Auto Cutter Model................. 94
For the Peeler Model..................... 97
Specications
CW-C6000 Series. . . . . . . . . . . . . . . . . . . . . . . . 100
Product Specications................... 100
Electrical
Specications
.................. 101
Overall Dimensions..................... 101
CW-C6500 Series. . . . . . . . . . . . . . . . . . . . . . . . 102
Product Specications................... 102
Electrical
Specications
.................. 103
Overall Dimensions..................... 103
CW-D6000 Series. . . . . . . . . . . . . . . . . . . . . . . . 104
Product Specications................... 104
Electrical Specications.................. 105
Overall Dimensions..................... 105
CW-D6500 Series. . . . . . . . . . . . . . . . . . . . . . . . 106
Product Specications................... 106
Electrical Specications.................. 107
Overall Dimensions..................... 107
Environmental Specications................ 108
Paper
Specications
....................... 109
CW-C6000/C6500 Series. . . . . . . . . . . . . . . . . 109
CW-D6000/D6500 Series. . . . . . . . . . . . . . . . . 109
Ink Cartridge........................... 110
Maintenance Box........................ 111
Appendix
Consumables and Options.................. 112
Ink Cartridge......................... 112
Maintenance Box...................... 113
Roll Paper Holder...................... 114
Restriction of Use........................ 115
Notes................................. 116
Trademarks............................. 116
CW-C6000 Series/CW-C6500 Series/CW-D6000 Series/CW-D6500 Series User's Guide
Contents
3
Before use
is chapter describes information you should know before using the product.
Manuals for This Product
Paper manual
Start Here
Guides you through basic setup steps from unpacking to loading paper.
Manual viewable
with PC
User’s Guide (This Manual)
Describes details about the functions and operating procedures of the product, maintenance
information, and troubleshooting.
Manual viewable
with PC
CW-C6000 Series/CW-C6500 Series Technical Reference Guide
CW-D6000 Series/CW-D6500 Series Technical Reference Guide
Provides information necessary for installing the product, performing daily tasks, and developing a
system using the product.
This document can be found at the following URL.
<https://epson.sn>
Manual viewable
with PC
Online Video Manual
Provides videos that show you operating procedures and troubleshooting information. The videos can
be found at the following URL.
❏ CW-C6000/C6500 Series:
<https://support.epson.net/p_doc/790/>
❏ CW-D6000/D6500 Series:
<https://support.epson.net/p_doc/ab6/>
The contents of videos are subject to change without notice.
Downloading the Latest Version
e latest versions of the printer driver, utilities, and manuals can be downloaded from the following URL.
For customers in North America, go to the following web site:
<https://www.epson.com/support/>
For customers in other countries and regions, go to the following web site:
<https://epson.sn>
CW-C6000 Series/CW-C6500 Series/CW-D6000 Series/CW-D6500 Series User's Guide
Before use
4
Symbols Used in This Guide
e following symbols are used in this guide to indicate important information.
Symbols for Safety
e
symbols shown below are used in this manual in order to ensure safety and proper use of this product and to
prevent danger to you and other persons, and property damage. Be sure that you completely understand their
meanings before reading this manual.
!
War ning
Handling the product improperly by ignoring this symbol can lead to death or serious injury.
!
Caution
Handling the product improperly by ignoring this symbol can lead to injury and property
damage.
Symbols for General Information
c
Important
Indicates information with which you must comply when using the product. Mishandling
due to ignoring this information may cause the product to fail or malfunction.
Note
Indicates supplementary explanations and information you should know.
U
Indicates a reference page containing related information.
CW-C6000 Series/CW-C6500 Series/CW-D6000 Series/CW-D6500 Series User's Guide
Before use
5

About Models of this Product
is manual is for the CW-C6000 Series, CW-C6500 Series, CW-D6000 Series*, and CW-D6500 Series*.
You can check which model your printer is by the model number on the front of the printer.
* May not be available in some countries or regions.
How to Identify the Model by the Model Number
CW-C6000Au
(1) (2) (3)
(1) e pigment ink model is "C" and the dye ink model is "D".
(2)
e
4-inch model is “0” and the 8-inch model is “5”.
(3) e auto cut model is “A” and the peeler model is “P”.
How the Models are Described in this Manual
In this manual, information specic to one or more particular models is presented as follows.
❏ Example 1) When the information is common to both CW-C6000 Series and CW-C6500 Series
Gloss Black Ink/Matte Black Ink (CW-C6000/C6500 Series)
❏ Example 2) When the information applies only to the auto cutter model
Gloss Black Ink/Matte Black Ink (Auto cutter model only)
Auto Cutter Model
❏ Features
Equipped with an auto cutter. e paper can be cut either according to the application settings, or with the
help of the Cut button on the operation panel.
❏ Ink Types
Compatible ink types vary depending on the printer model number.
❏ CW-C Series: Uses pigment ink and supports two types of black ink. U “Gloss Black Ink/Matte Black
Ink (CW-C6000/C6500 Series)” on page 9
❏ CW-D Series: Uses dye ink and supports one type of black ink.
❏ Model number
CW-C6000 Series/CW-C6500 Series/CW-D6000 Series/CW-D6500 Series User's Guide
Before use
6
Model number Model numbers used in the
manuals
Ink Types Remarks
ColorWorks C6000Au CW-C6000Au pigment ink 4-inch model
ColorWorks C6000Ae CW-C6000Ae pigment ink 4-inch model
ColorWorks C6010A CW-C6010A pigment ink 4-inch model
ColorWorks C6020A CW-C6020A pigment ink 4-inch model
ColorWorks C6030A CW-C6030A pigment ink 4-inch model
ColorWorks C6040A CW-C6040A pigment ink 4-inch model
ColorWorks C6050A CW-C6050A pigment ink 4-inch model
ColorWorks C6500Au CW-C6500Au pigment ink 8-inch model
ColorWorks C6500Ae CW-C6500Ae pigment ink 8-inch model
ColorWorks C6510A CW-C6510A pigment ink 8-inch model
ColorWorks C6520A CW-C6520A pigment ink 8-inch model
ColorWorks C6530A CW-C6530A pigment ink 8-inch model
ColorWorks C6540A CW-C6540A pigment ink 8-inch model
ColorWorks C6550A CW-C6550A pigment ink 8-inch model
ColorWorks D6000Ae CW-D6000Ae dye ink 4-inch model
ColorWorks D6500Ae CW-D6500Ae dye ink 8-inch model
CW-C6000 Series/CW-C6500 Series/CW-D6000 Series/CW-D6500 Series User's Guide
Before use
7
Peeler Model
❏ Features
Equipped with a peeler mechanism. By passing a backing paper through the peeler, labels are printed being
peeled from the backing paper.
❏ Ink Types
Compatible ink types vary depending on the printer model number.
❏ CW-C Series: Uses pigment ink and supports two types of black ink. U “Gloss Black Ink/Matte Black
Ink (CW-C6000/C6500 Series)” on page 9
❏ CW-D Series: Uses dye ink and supports one type of black ink.
❏ Model number
Model number Model numbers used in the
manuals
Ink Types Remarks
ColorWorks C6000Pu CW-C6000Pu pigment ink 4-inch model
ColorWorks C6000Pe CW-C6000Pe pigment ink 4-inch model
ColorWorks C6010P CW-C6010P pigment ink 4-inch model
ColorWorks C6020P CW-C6020P pigment ink 4-inch model
ColorWorks C6030P CW-C6030P pigment ink 4-inch model
ColorWorks C6040P CW-C6040P pigment ink 4-inch model
ColorWorks C6050P CW-C6050P pigment ink 4-inch model
ColorWorks C6500Pu CW-C6500Pu pigment ink 8-inch model
ColorWorks C6500Pe CW-C6500Pe pigment ink 8-inch model
ColorWorks C6510P CW-C6510P pigment ink 8-inch model
ColorWorks C6520P CW-C6520P pigment ink 8-inch model
ColorWorks C6530P CW-C6530P pigment ink 8-inch model
ColorWorks C6540P CW-C6540P pigment ink 8-inch model
ColorWorks C6550P CW-C6550P pigment ink 8-inch model
ColorWorks D6000Pe CW-D6000Pe dye ink 4-inch model
CW-C6000 Series/CW-C6500 Series/CW-D6000 Series/CW-D6500 Series User's Guide
Before use
8
Model number Model numbers used in the
manuals
Ink Types Remarks
ColorWorks D6500Pe CW-D6500Pe dye ink 8-inch model
Gloss Black Ink/Matte Black Ink (CW-C6000/C6500 Series)
You can select which type of black ink to use from gloss black (BK) and matte black (MK). e printer prompts
you to select it when you turn on the printer for the rst time.
Supported paper types vary by the black ink type. See “Paper Specications” on page 109.
c
Important
You cannot change the black ink type once you select the black ink type and let the printer charge the
ink.
CW-C6000 Series/CW-C6500 Series/CW-D6000 Series/CW-D6500 Series User's Guide
Before use
9
Product and Driver Versions
Use the product with a combination of latest versions of the product rmware, printer driver, and utility.
Note
For users of CW-C6000/C6500 Series
If the rmware version is one of the following versions, download the latest version of the rmware
and update the printer using the latest one.
TS05JC, TS06JC, TS26JC, TS19K2, TS25K3, TS21K5
U “Downloading the Latest Version” on page 4
How to Check the Product Version
You can check the version of your product rmware by printing the status sheet. Check the results of status sheet
printing. U “Printing Status Sheet” on page 34
You can also check the version on the operation panel.
Menu - Printer Status/Print - Firmware Version
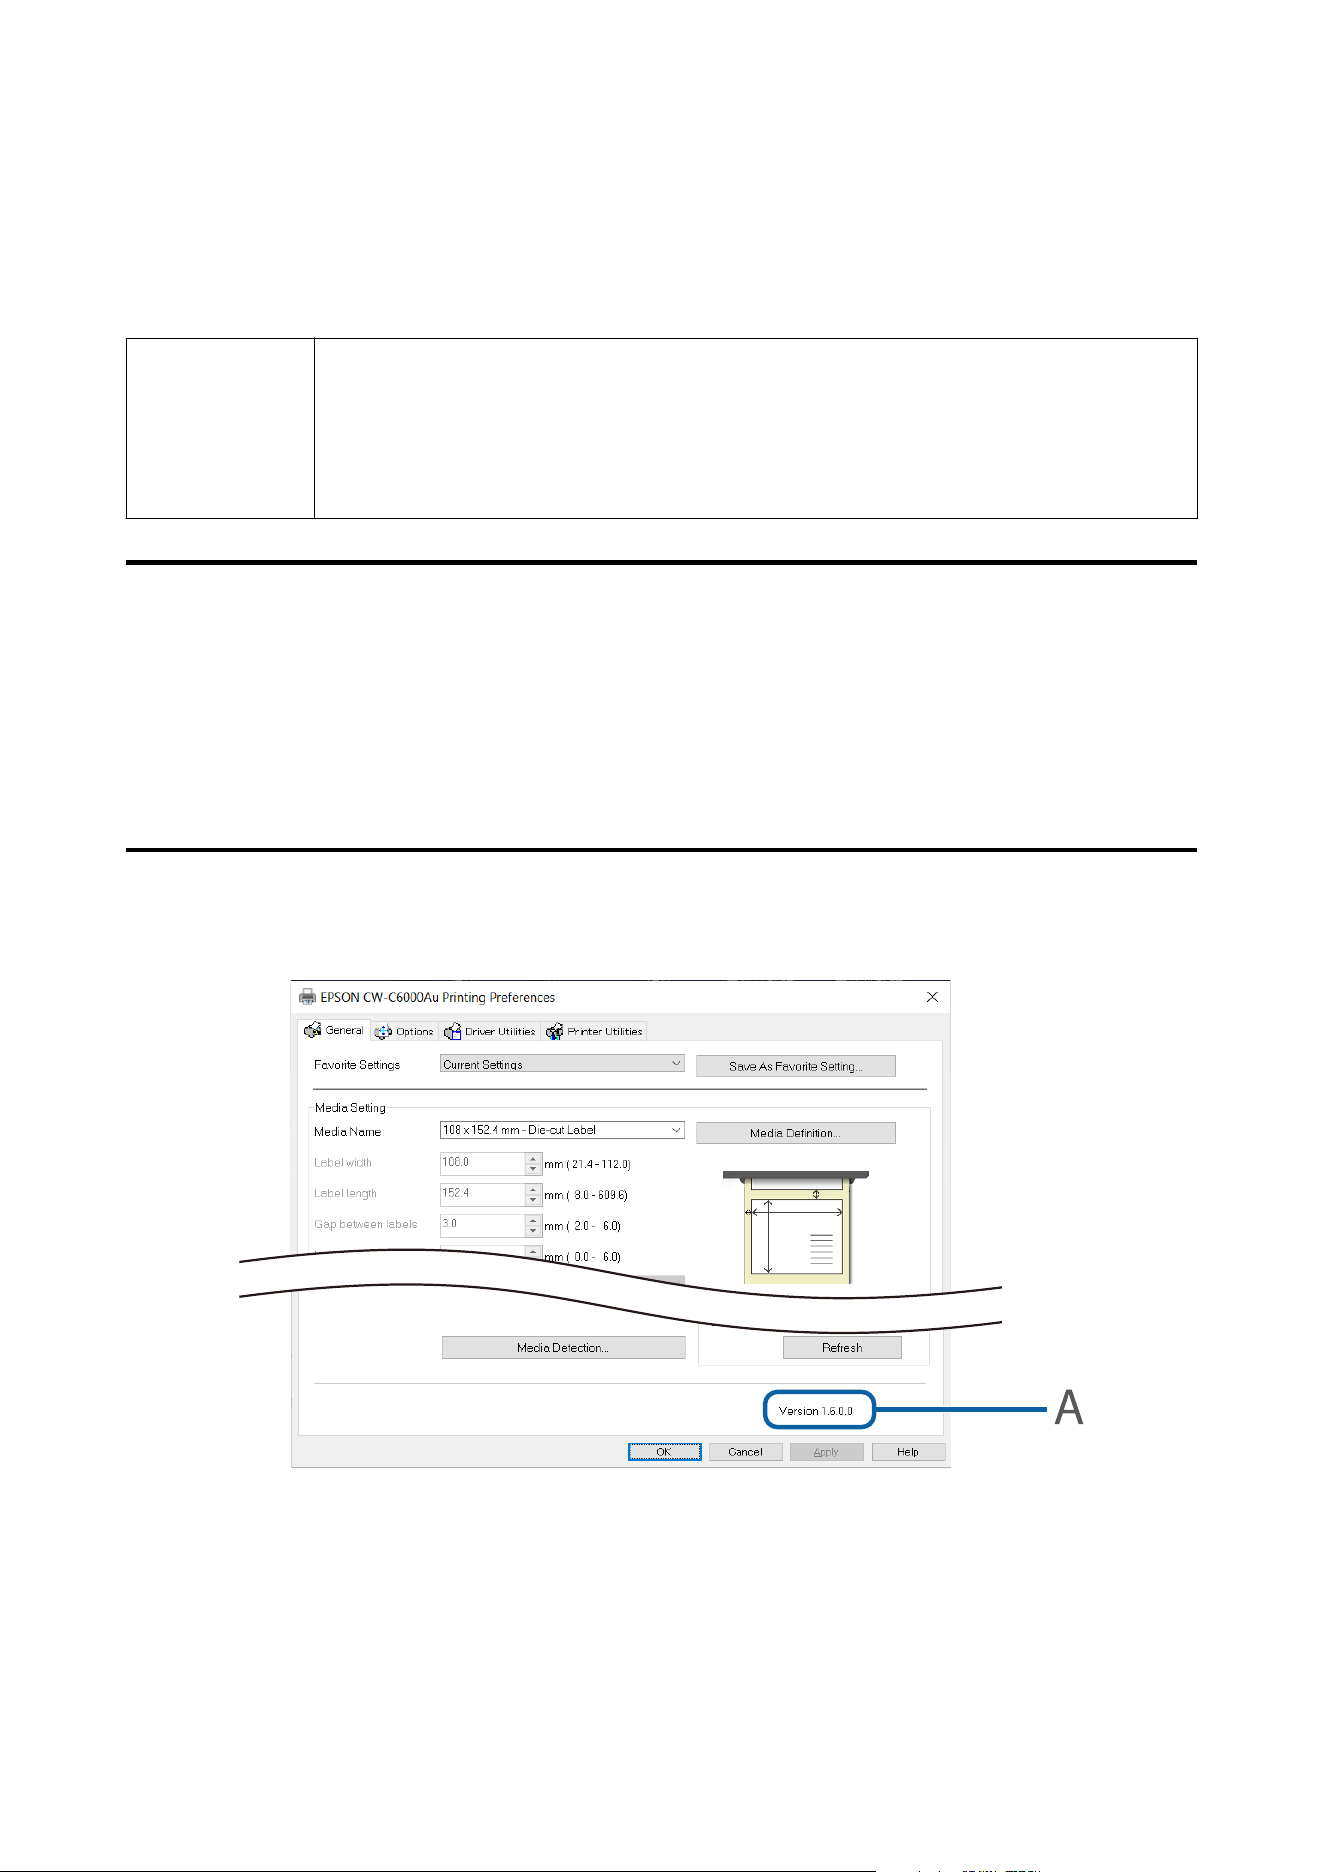
How to Check the Printer Driver Version
You can check the version in the printer driver screen.
A: Printer driver version
CW-C6000 Series/CW-C6500 Series/CW-D6000 Series/CW-D6500 Series User's Guide
Before use
10

Screens in This Manual
e screens in this manual and the screens actually displayed in Windows may dier depending on the product
used and operating system. Unless otherwise specied, the screens in this manual are those when using
Windows 10.
Product Illustrations
e
product illustrations used throughout this manual may slightly
dier
from the product you are using. Unless
otherwise stated, illustrations of CW-C6000Au are used.
CW-C6000 Series/CW-C6500 Series/CW-D6000 Series/CW-D6500 Series User's Guide
Before use
11

Safety Precautions
To ensure safe use of the product, be sure to read this manual and the other instruction manuals supplied with the
product before use. Store this manual in a safe place so that you can resolve any unclear points regarding the
product at any time.
Cautions on Installation
!
Warning
Do not block the air vents of the product.
Doing so can result in heat accumulated in the product causing a re. Do not cover the product with a cloth or
install it in a poorly-ventilated location. Furthermore, ensure there is the installation space specied in the manual.
U “Rear” on page 25
!
Caution
❏ Do not install/store the product in an unstable location or in a location subject to vibration from other devices.
Equipment may fall or collapse, causing breakage and possible injury.
❏ Do not install the product in a location exposed to oily smoke or dust, or in a humid location. Doing so may
cause electric shock or re.
❏ When liing the product, perform the work with the correct posture. Liing the product with an
inappropriate posture may cause injury.
❏ Because the product is heavy, do not attempt to carry the product by one person. When unpacking or moving
the product, make sure to carry the product by at least two persons. For information on the weight of this
product, see below.
U
“Specications
” on page 100
❏ Do not install this product at a location exposed to strong light such as direct sun rays. Doing so may cause the
detector to malfunction and the printer may not print properly.
Cautions on Handling
!
Warning
❏ Do not use the product in a location with volatile substances such as alcohol or paint thinner present, or near
re.
Doing so may cause electric shock or
re.
❏ Shut down the product immediately if it produces smoke, a strange odor, or unusual noise. Doing so may
cause electric shock or re. If an abnormality occurs, immediately turn o the power and remove the plug
from the outlet, and then contact qualied service personnel for advice.
CW-C6000 Series/CW-C6500 Series/CW-D6000 Series/CW-D6500 Series User's Guide
Before use
12

❏ Shut down the product immediately if a foreign object or water or other liquid gets inside the product. Doing
so may cause electric shock or
re.
Immediately turn
o
the power and remove the plug from the outlet, and
then contact
qualied
service personnel for advice.
❏ Do not disassemble the areas other than those mentioned in this manual.
❏ Never repair the product yourself as doing so is dangerous.
❏ Do not use the product in a location where inammable gas, explosive gas, etc. is present in the atmosphere.
Furthermore, do not use aerosol sprayers containing ammable gas inside or around the product. Doing so
may cause re.
❏ Do not connect cables in ways other than those mentioned in this manual. Doing so may cause re. It may
also damage the other connected devices.
❏ Do not touch the areas inside the product other than those mentioned in this manual. Doing so may cause
electric shock or burns.
❏ Do not insert metal or ammable materials, or allow them to fall into the product. Doing so may cause electric
shock or re.
❏ If the screen of the printer is damaged, handle the liquid crystal inside it very carefully. Should any of the
following situations arise, take emergency measures.
❏ When any part gets onto your skin, wipe o the deposit, and wash the area properly with soap and
water.
❏ When any part gets into your eyes, ush them with clean water for at least 15 minutes, and thereaer,
consult with a doctor.
❏ When a part gets into your mouth, immediately consult with a doctor.
!
Caution
❏ Do not allow anyone to stand or place heavy objects on top of the product. In particular, be careful in the case
of a household with children. Equipment may fall or collapse, causing breakage and possible injury.
❏ Install the cables and optional products in the proper direction according to the proper procedures. Doing so
may cause re or injury. Follow the instructions in this manual to install them properly.
❏ Before moving the product, shut down and unplug the product, and make sure that all the cables are
disconnected. Failure to do so may damage a cable, causing electric shock or re.
❏ Do not store or transport the product while it is tilted, standing, or upside down. Doing so may cause the ink
to leak.
❏ Do not use the printer with the paper cover removed. Doing so will cause the printer to malfunction.
Cautions on Power Supply
!
Warning
CW-C6000 Series/CW-C6500 Series/CW-D6000 Series/CW-D6500 Series User's Guide
Before use
13

❏ Do not allow dust or other foreign material to adhere to the power plug. Doing so may cause electric shock or
re.
❏ Do not use a power cord other than that supplied with the product. In addition, do not use the supplied power
cord with another device. Doing so may cause electric shock or re.
❏ Do not use a damaged power cord. Doing so may cause electric shock or re. Contact qualied service
personnel for advice if the power cord is damaged. Furthermore, observe the following points so as not to
damage the power cord.
❏ Do not modify the power cord.
❏ Do not place heavy objects on the power cord.
❏ Do not forcibly bend, twist, or pull the power cord.
❏ Do not lay the power cord near a heating appliance.
❏ Do not insert or remove the power plug with a wet hand. Doing so may cause electric shock.
❏ Do not connect many power cords to one outlet. Doing so may cause re. Supply power directly from a power
outlet.
❏ Regularly disconnect the power plug from the outlet and clean the base of the prongs and between the prongs.
Leaving the power plug connected to the outlet for a long period of time may cause dust to accumulate on the
base of the power plug prongs, resulting in a short and re.
❏ Hold the plug and do not pull the cord when disconnecting the power plug from the outlet. Pulling the cord
may damage the cord or deform the plug, causing electric shock or re.
!
Caution
To ensure safety, unplug the product before leaving it unused for an extended period.
CW-C6000 Series/CW-C6500 Series/CW-D6000 Series/CW-D6500 Series User's Guide
Before use
14

Cautions on Ink Cartridges
!
Caution
❏ e ink cartridges that can be used dier depending on the model number of the product. Use ink cartridges
suitable for the model number of your printer.
U “Ink Cartridge” on page 110
❏ Do not touch the IC chip on an ink cartridge. Doing so may result in normal operation and printing becoming
no longer possible.
❏ e product uses ink cartridges equipped with IC chips to manage the amount of ink used and other
information so ink cartridges are usable even if they are removed and reinstalled. However, if an ink cartridge
with not much ink remaining is removed and reinstalled, it may not be usable. Some ink is consumed each
time cartridges are installed because the product automatically checks their reliability.
❏ When replacing the black ink cartridge, make sure to replace with a cartridge of the same type of black ink.
e printer does not work if you install a cartridge of dierent type of black ink. (CW-C6000/C6500 Series)
❏ Install ink cartridges of all colors. Printing is not possible if even only one ink cartridge is missing.
❏ Since ink cartridges are designed to stop the operation before ink runs out completely to maintain the quality
of the print head, some ink remains in the used ink cartridges.
❏ All the ink colors are consumed also for the maintenance operations when an ink cartridge is replaced and for
print head cleaning.
❏ Do not turn o the power or open the ink cartridge cover during ink charging (while the
(power) LED
lamp is ashing). Opening the cover may cause the ink to be recharged, resulting in more ink being consumed.
Also, it may result in normal printing becoming no longer possible.
❏ Even for monochrome printing, all the ink colors are used in an operation designed to maintain the printing
and print head quality.
❏ Do not disassemble an ink cartridge. Doing so may cause ink to get into eyes or onto skin.
❏ Do not disassemble or modify an ink cartridge. Doing so may cause printing malfunction.
❏ Use of old ink cartridges may result in reduced print quality. Use ink cartridges up within six months aer
opening the packages.
e
usage period for ink cartridges is printed on the packaging of the individual ink
cartridges.
❏ If ink contacts your skin, eyes, or mouth, take the following actions.
❏ When ink gets onto your skin, immediately wash the area with soap and water.
❏ When ink gets into your eyes, immediately ush them with water. Leaving the ink as is may result in
bloodshot eyes or mild inammation. If something is wrong, immediately consult with a doctor.
❏ When ink gets into your mouth, immediately spit it out and consult with a doctor.
❏ ere may be some ink around the ink supply port on a removed ink cartridge. Take care so that it does not
stain the desk or other surface.
CW-C6000 Series/CW-C6500 Series/CW-D6000 Series/CW-D6500 Series User's Guide
Before use
15

❏ Do not open an ink cartridge package until you are ready to install the ink cartridge in the product.
❏ Do not shake an ink cartridge too hard.
e
ink cartridge may leak if you shake it around too much or push
the sides strongly.
❏ Do not allow foreign objects to fall into the cartridge installation section. Doing so may result in normal
printing becoming no longer possible. Remove any object that falls into the installation section, taking care not
to damage the section.
❏ When ink is charged the rst time (right aer purchase), ink is consumed for lling the print head nozzles (ink
discharge holes) to get ready for printing. erefore, the number of the sheets that can be printed may be fewer
than for cartridges installed later.
❏ When the printer is powered o with the
(power) button, the print head is automatically capped to prevent
the ink from drying. When you will not use the printer aer installing the ink cartridges, be sure to turn the
power o with the
(power) button. Do not pull out the power plug or turn o the breaker while the power
is on.
❏ Printing on water-repellent paper such as art paper, which is slow-drying, may cause print stains. Also, if you
print on glossy paper, ngerprints may get on the paper or ink may adhere to your ngers when you touch the
print surface. Select and use paper that will not cause print stains.
❏ Store the ink cartridges in a place out of reach of children.
❏ Epson recommends storing ink cartridges in a cool and dark place.
❏ If you wish to use ink cartridges that have been stored in a cold place for a long period of time, leave them for
at least 3 hours in a place that is at room temperature before use.
❏ Do not remove the ink cartridges from the product when storing or transporting the product.
CW-C6000 Series/CW-C6500 Series/CW-D6000 Series/CW-D6500 Series User's Guide
Before use
16

Cautions on the Maintenance Box
!
Caution
❏ Store in a place out of reach of children. Do not drink any adhered ink.
❏ Do not disassemble or modify the maintenance box. Doing so may cause ink to get into eyes or onto skin.
❏ Do not touch the IC chip on the maintenance box.
❏ If a maintenance box that can still be used has been removed and le detached for a long period of time, do
not reuse it.
❏ Do not peel o the lm from the top surface of the maintenance box.
❏ If ink contacts your skin, eyes, or mouth, take the following actions.
❏ When ink gets onto your skin, immediately wash the area with soap and water.
❏ When ink gets into your eyes, immediately ush them with water. Leaving the ink as is may result in
bloodshot eyes or mild inammation. If something is wrong, immediately consult with a doctor.
❏ When ink gets into your mouth, immediately spit it out and consult with a doctor.
❏ Do not shake a used maintenance box too hard.
e
ink may leak from the maintenance box if you swing or
shake it too hard.
❏ Avoid storing the maintenance box under high temperatures or in a frozen state.
❏ Keep it away from direct sunlight.
CW-C6000 Series/CW-C6500 Series/CW-D6000 Series/CW-D6500 Series User's Guide
Before use
17
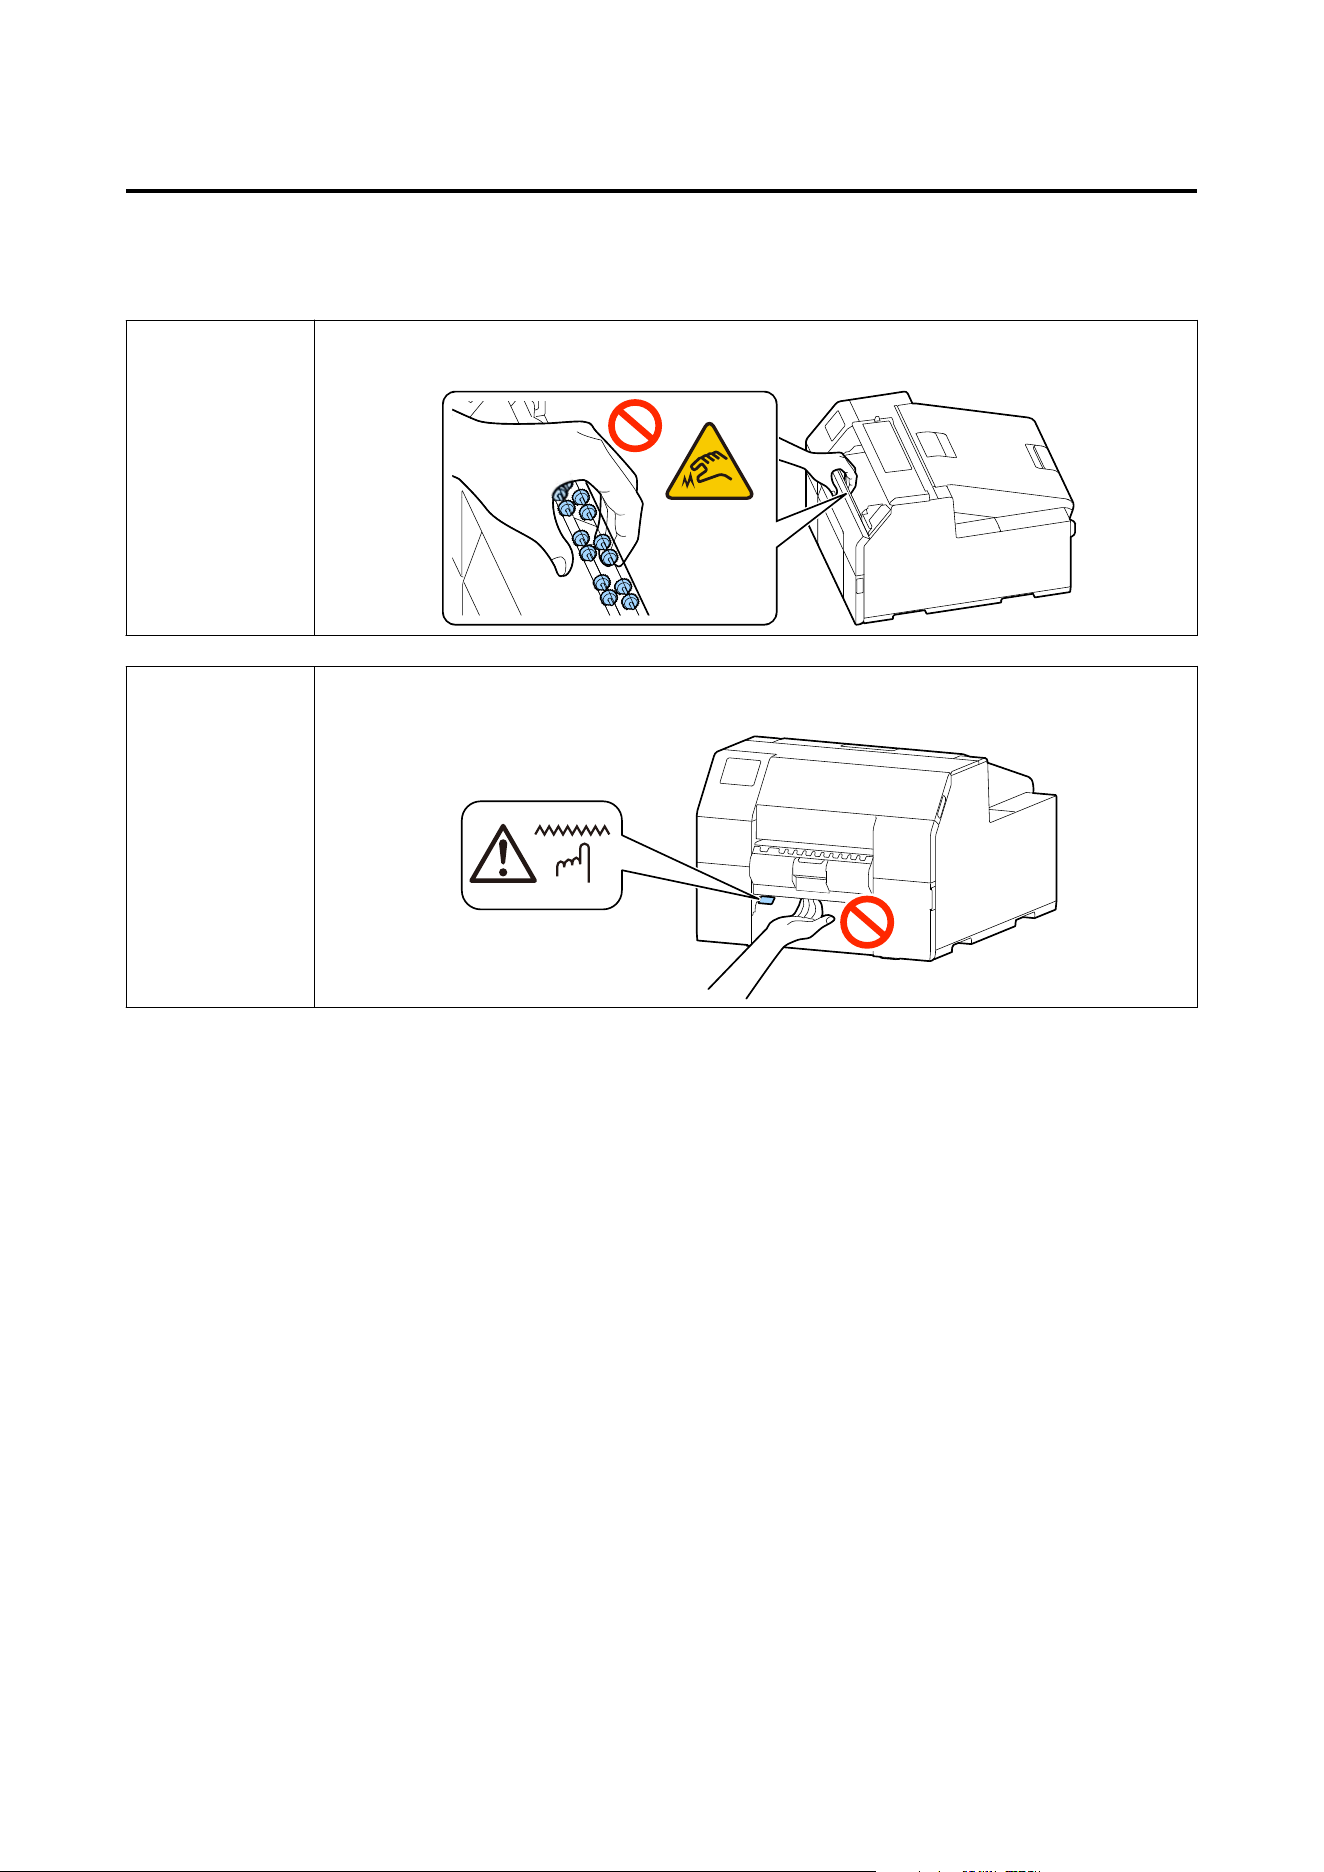
Caution Label
e labels axed to the product indicate the following cautions.
!
Warning
Do not touch the roller at the bottom of the paper holder unit with your hand. Doing so may cause
injury.
!
Caution
Do not touch the manual cutter at the bottom of the peeler cover with your hand. Doing so may cause
injury.
CW-C6000 Series/CW-C6500 Series/CW-D6000 Series/CW-D6500 Series User's Guide
Before use
18
Supported paper
is section describes about shape, form, size and type of paper that can be used by this printer, and paper that
cannot be used. For more details, see the Technical Reference Guide.
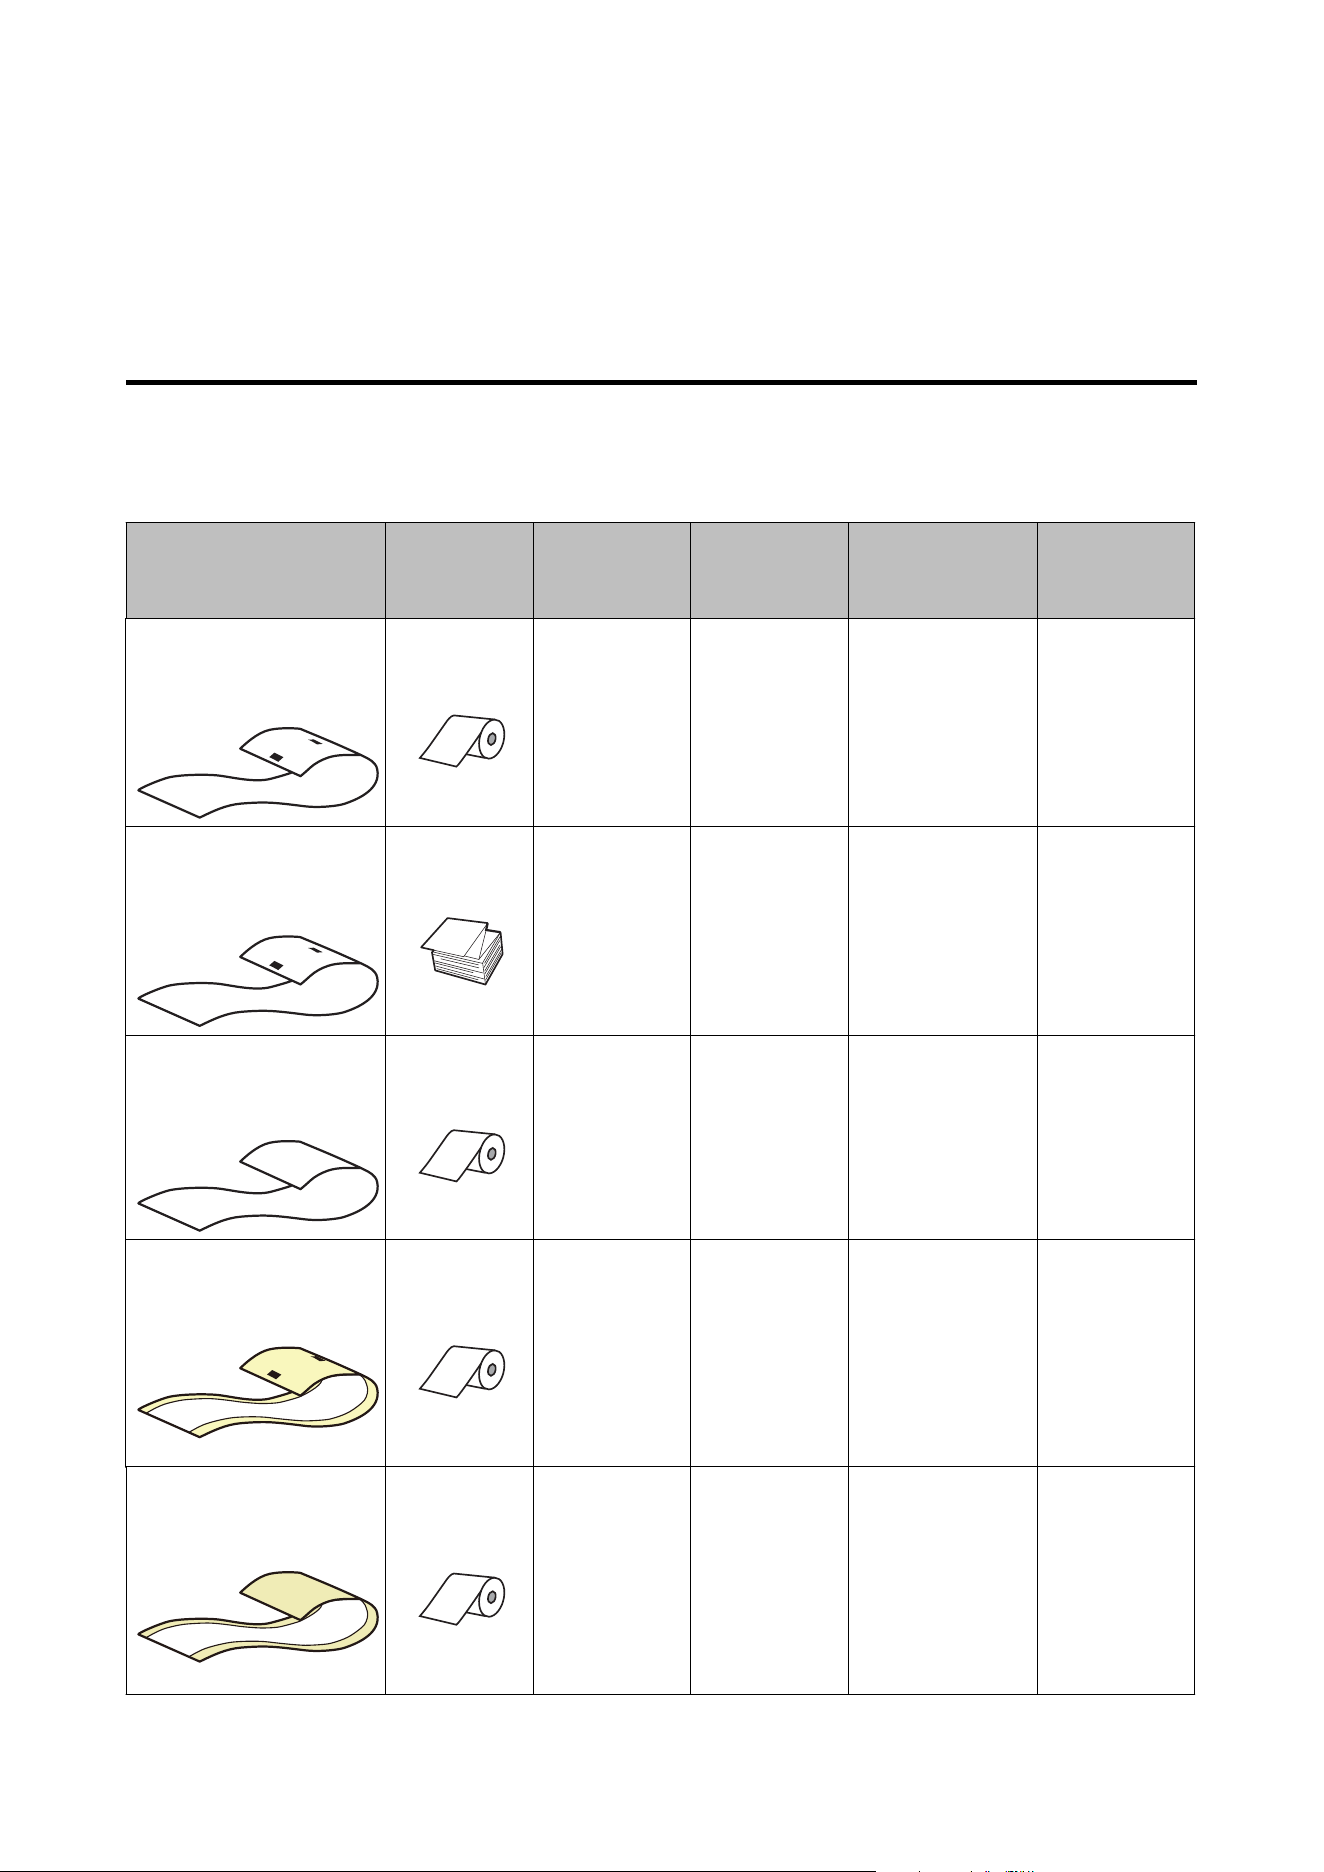
Paper Shape/Form/Size
CW-C6000/D6000 Series
Forms of paper Paper
Shapes
Paper width
(mm {inch})
Backing
paper width
(mm {inch})
Label width
(mm {inch})
Gap between
Labels
(mm {inch})
Continuous paper without
adhesive
(With black marks
*1
)
Roll paper
25.4 to 112
{1.00 to 4.41}
--- --- ---
Continuous paper without
adhesive
(With black marks
*1
)
Fanfold paper
25.4 to 112
{1.00 to 4.41}
--- --- ---
Continuous paper without
adhesive
(Without black marks)
Roll paper
25.4 to 112
{1.00 to 4.41}
--- --- ---
Full-page label
(With black marks
*1
)
Roll paper
---
25.4 to 112
{1.00 to 4.41}
Without waste
parts:
21.4 to 108
{0.84 to 4.25}
With waste parts:
25.4 to 108
{1.00 to 4.25}
---
Full-page label
(Without black marks)
Roll paper
---
25.4 to 112
{1.00 to 4.41}
Without waste
parts:
21.4 to 108
{0.84 to 4.25}
With waste parts:
25.4 to 108
{1.00 to 4.25}
---
CW-C6000 Series/CW-C6500 Series/CW-D6000 Series/CW-D6500 Series User's Guide
Before use
19
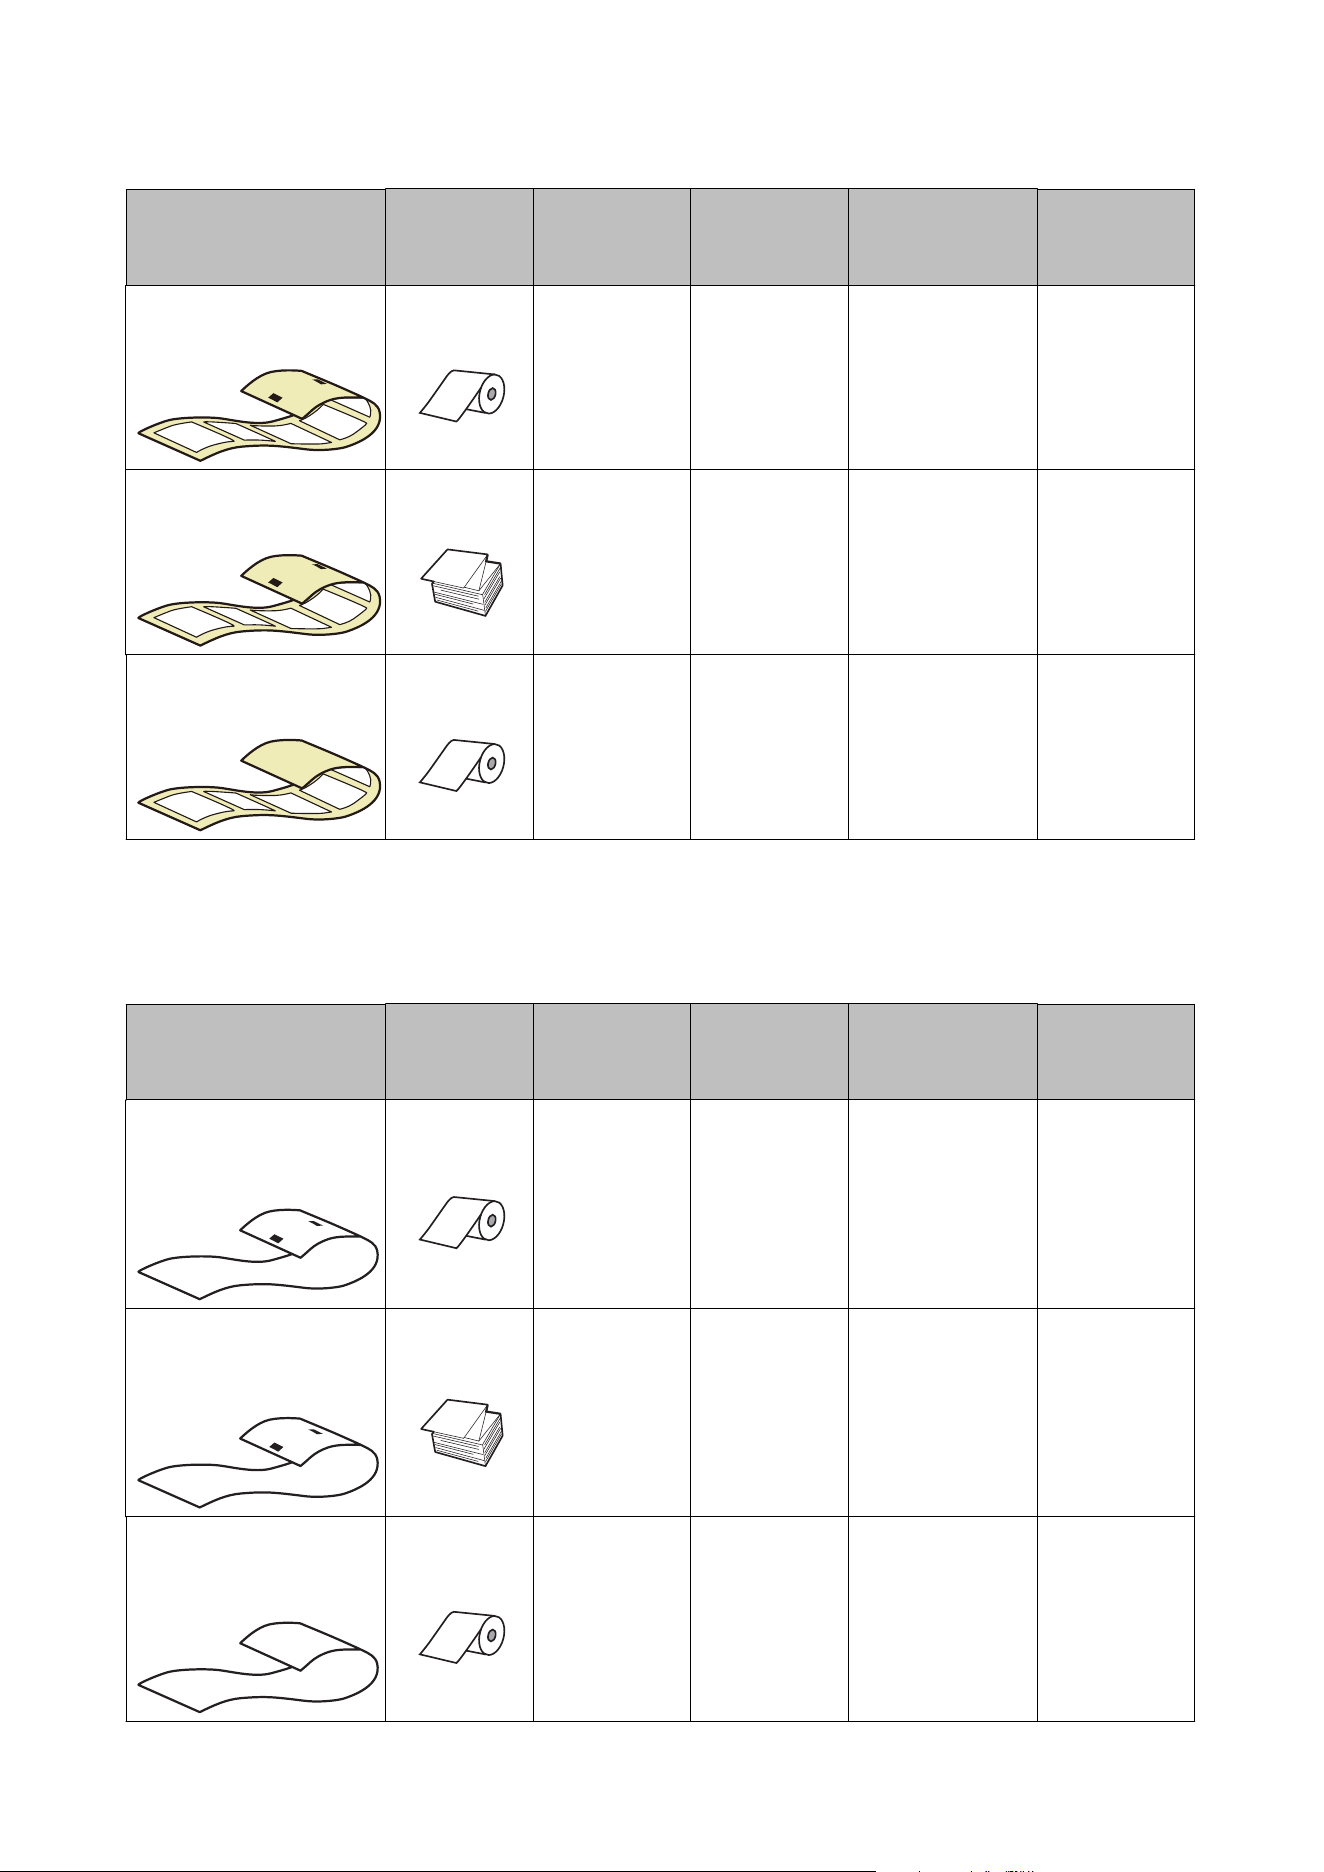
Forms of paper Paper
Shapes
Paper width
(mm {inch})
Backing
paper width
(mm {inch})
Label width
(mm {inch})
Gap between
Labels
(mm {inch})
Die-cut label
(With black marks
*1
)
Roll paper
---
25.4 to 112
{1.00 to 4.41}
21.4 to 108
{0.84 to 4.25}
2.0 to 6.0
{0.08 to 0.24}
Die-cut label
(With black marks
*1
)
Fanfold paper
---
25.4 to 112
{1.00 to 4.41}
21.4 to 108
{0.84 to 4.25}
2.0 to 6.0
{0.08 to 0.24}
Die-cut label
(Gap
*2
)
Roll paper
---
25.4 to 112
{1.00 to 4.41}
21.4 to 108
{0.84 to 4.25}
2.0 to 6.0
{0.08 to 0.24}
*1: The print position is detected based on the black marks printed on the back of the paper.
*2: The print position is detected based on the gaps between labels.
CW-C6500/D6500 Series
Forms of paper Paper
Shapes
Paper width
(mm {inch})
Backing
paper width
(mm {inch})
Label width
(mm {inch})
Gap between
Labels
(mm {inch})
Continuous paper without
adhesive
(With black marks
*1
)
Roll paper
25.4 to 215.9
{1.00 to 8.50}
--- --- ---
Continuous paper without
adhesive
(With black marks
*1
)
Fanfold paper
25.4 to 215.9
{1.00 to 8.50}
--- --- ---
Continuous paper without
adhesive
(Without black marks)
Roll paper
25.4 to 215.9
{1.00 to 8.50}
--- --- ---
CW-C6000 Series/CW-C6500 Series/CW-D6000 Series/CW-D6500 Series User's Guide
Before use
20
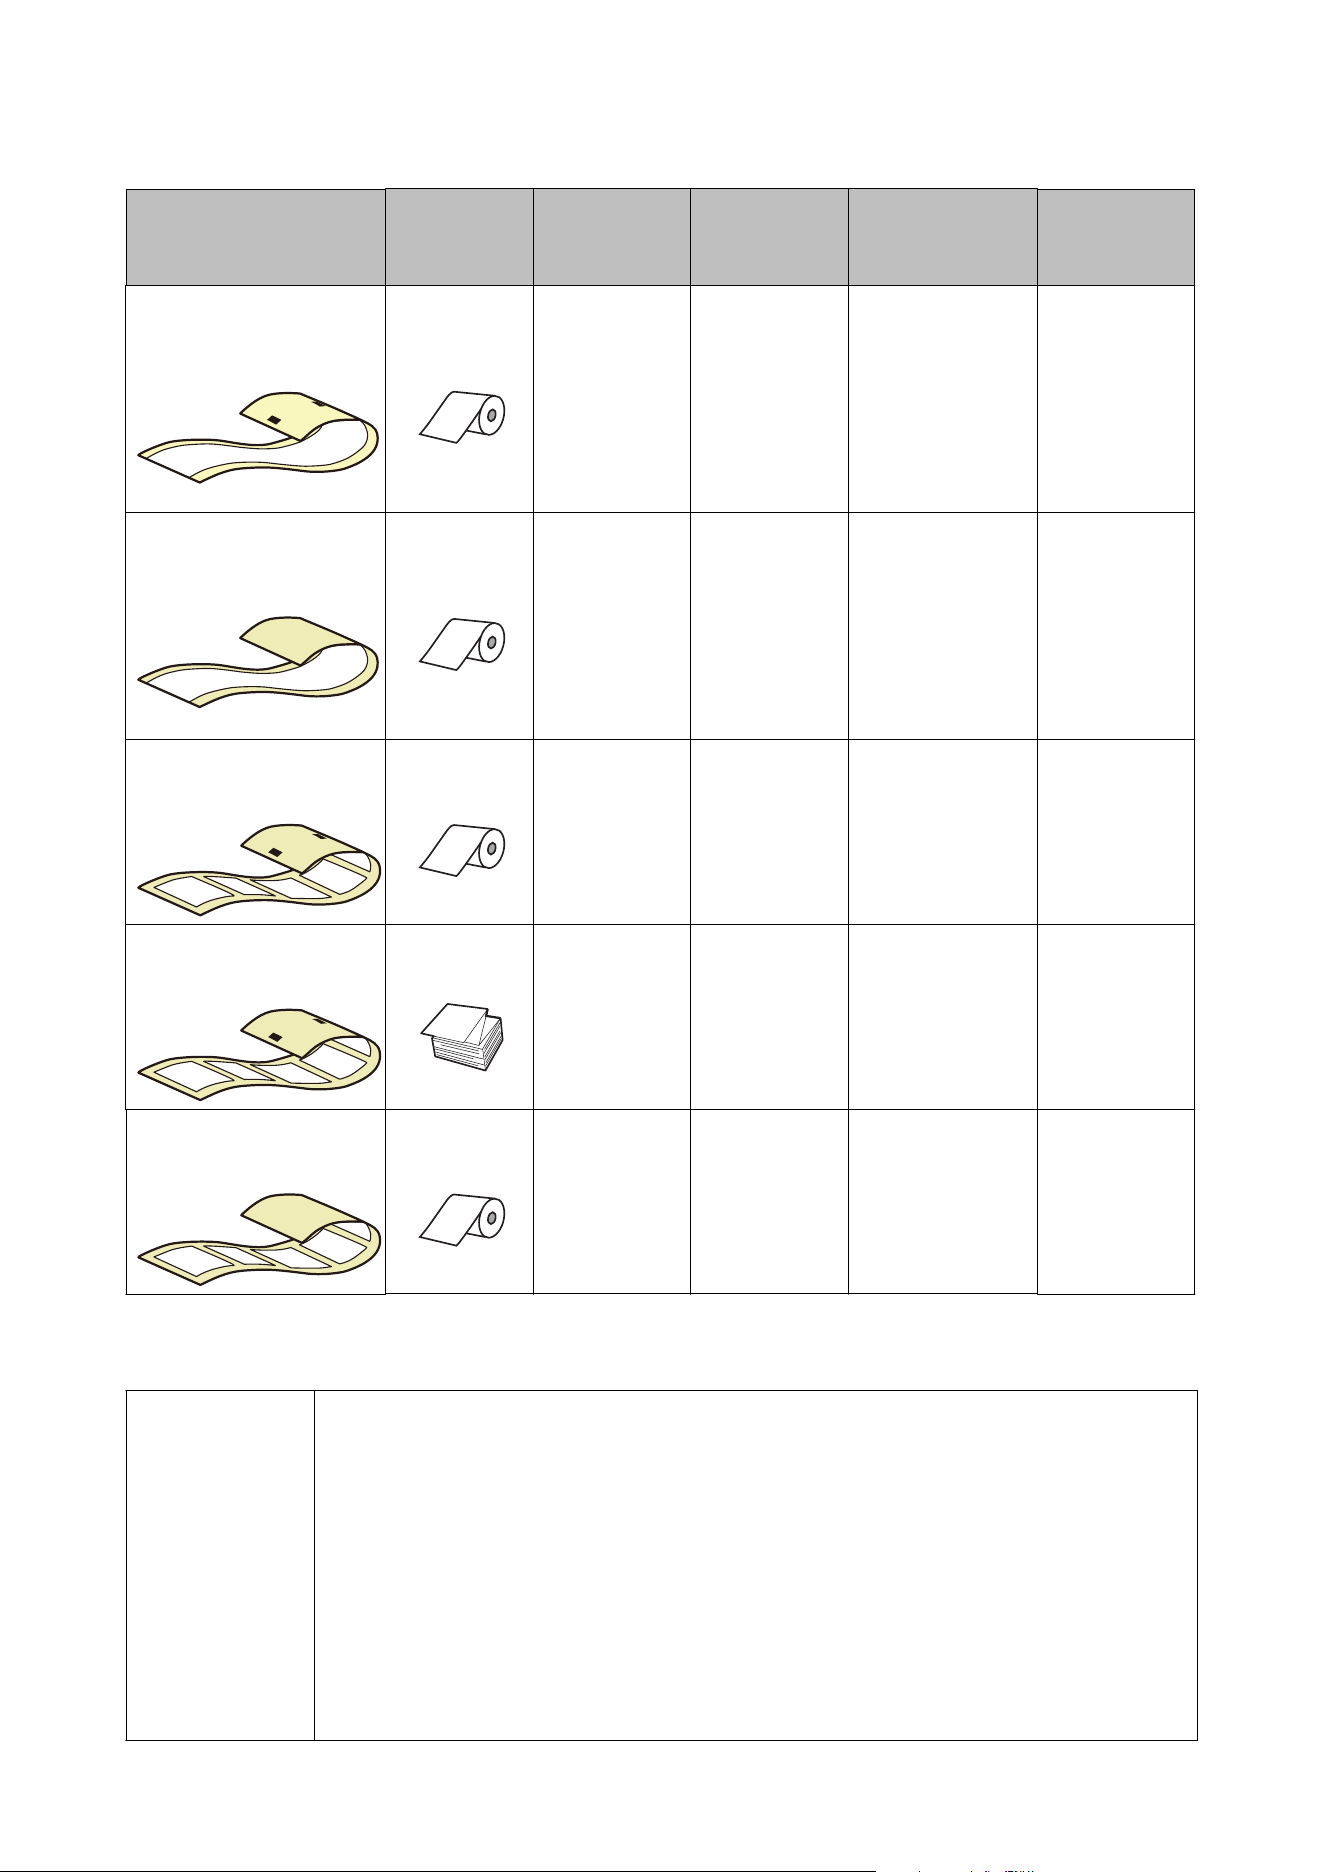
Forms of paper Paper
Shapes
Paper width
(mm {inch})
Backing
paper width
(mm {inch})
Label width
(mm {inch})
Gap between
Labels
(mm {inch})
Full-page label
(With black marks
*1
)
Roll paper
---
25.4 to 215.9
{1.00 to 8.50}
Without waste
parts:
21.4 to 211.9
{0.84 to 8.34}
With waste parts:
25.4 to 215.9
{1.00 to 8.50}
---
Full-page label
(Without black marks)
Roll paper
---
25.4 to 215.9
{1.00 to 8.50}
Without waste
parts:
21.4 to 211.9
{0.84 to 8.34}
With waste parts:
25.4 to 215.9
{1.00 to 8.50}
---
Die-cut label
(With black marks
*1
)
Roll paper
---
25.4 to 215.9
{1.00 to 8.50}
21.4 to 211.9
{0.84 to 8.34}
2.0 to 6.0
{0.08 to 0.24}
Die-cut label
(With black marks
*1
)
Fanfold paper
---
25.4 to 215.9
{1.00 to 8.50}
21.4 to 211.9
{0.84 to 8.34}
2.0 to 6.0
{0.08 to 0.24}
Die-cut label
(Gap
*2
)
Roll paper
---
25.4 to 215.9
{1.00 to 8.50}
21.4 to 211.9
{0.84 to 8.34}
2.0 to 6.0
{0.08 to 0.24}
*1: The print position is detected based on the black marks printed on the back of the paper.
*2: The print position is detected based on the gaps between labels.
Note
Cautions on printing the continuous label by using the auto cutter model
❏ Remove the printed labels that are remaining in the paper ejection slot. If you continue with
printing while the labels are still remaining in the paper ejection slot, the printed labels may be
cut in double, or the paper may be jammed.
❏ The label adhesive may adhere to the cutter, and deteriorate its cutting ability. If it becomes
dicult to cut the paper, it is recommended to clean the auto cutter.
U “Cleaning the Auto Cutter (Auto Cutter Model Only)” on page 75
Cautions on using a die-cut label
Depending on the shape of die-cut labels, the labels may peel o their backing paper inside the
printer. In such a case, it is necessary to operate gap detectors. For details on how to operate the
detectors, refer to the Technical Reference Guide.
CW-C6000 Series/CW-C6500 Series/CW-D6000 Series/CW-D6500 Series User's Guide
Before use
21
Paper Type
Supported paper types vary depending on the type of black ink as shown below.
Paper Type
CW-C6000/C6500 Series CW-D6000/D6500 Series
When using Matte Ink When using Gloss Ink Dye Ink
Plain Paper
✓
--
Matte Paper
✓✓✓
Synthetic
✓✓✓
Texture Paper
✓
--
Glossy Paper -
✓✓
Glossy Film -
✓✓
High Glossy Paper -
✓✓
Note
Since the CW-D6000/D6500 Series has only one type of black ink, there are no paper restrictions based
on the type of black ink.
U “Paper Specications” on page 109
CW-C6000 Series/CW-C6500 Series/CW-D6000 Series/CW-D6500 Series User's Guide
Before use
22

Paper That Cannot Be Used
Do not load paper like the following. Such paper will cause paper jams and print stains.
❏ ermal paper
❏ Paper joined together by tape, etc.
❏ Paper of A size, B size, etc.
❏ Paper with transparent backing paper
CW-C6000 Series/CW-C6500 Series/CW-D6000 Series/CW-D6500 Series User's Guide
Before use
23
Part Names and Functions
is section describes the main operation parts.
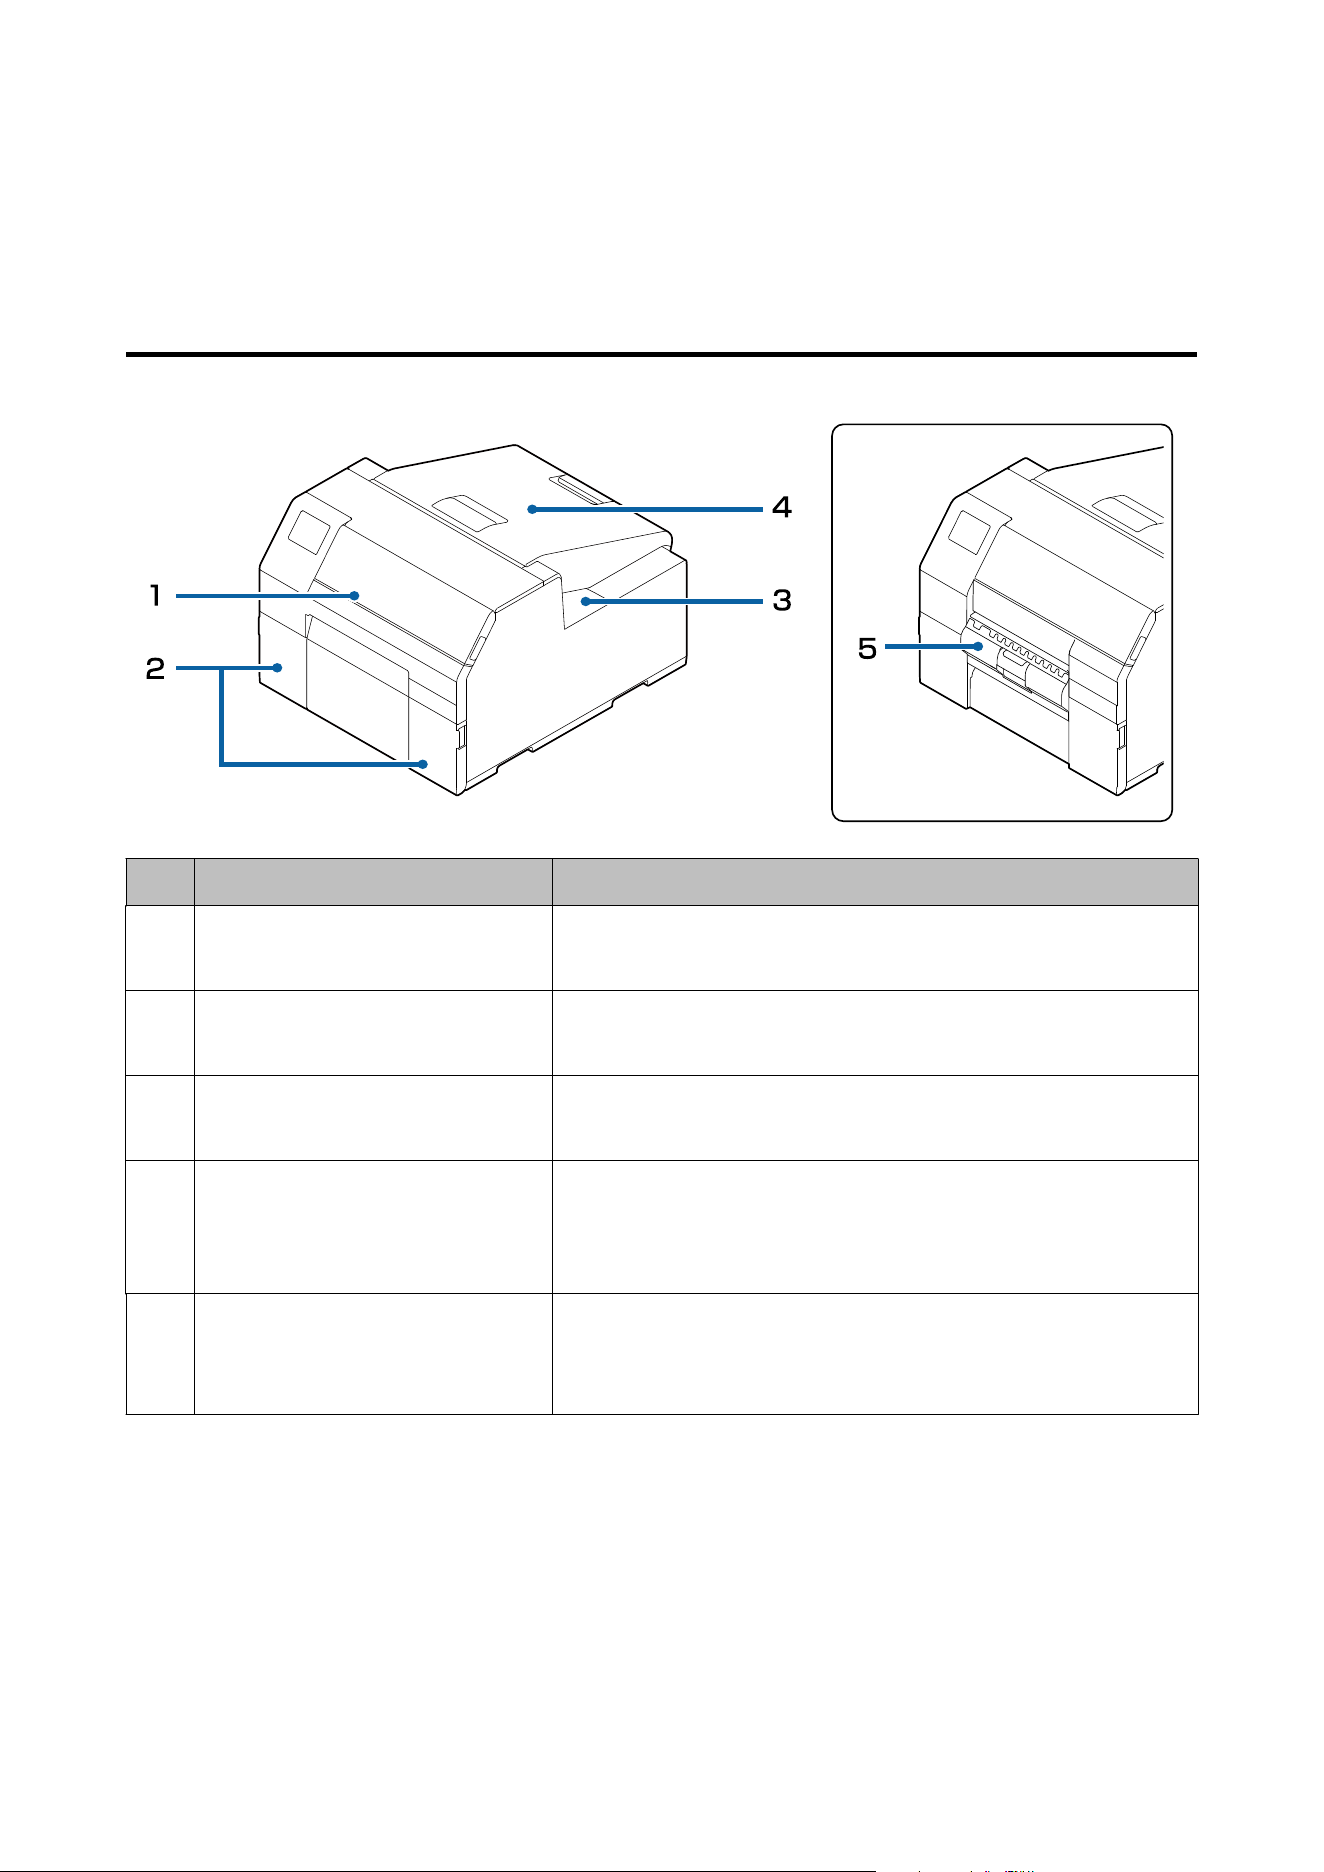
Front
No. Name Description
1
Front cover Open this cover to remove paper if it is jammed.
U “Paper is jammed” on page 94
2
Ink cartridge cover Open this cover to install/replace the ink cartridge.
U “Replacing the Ink Cartridges” on page 35
3
Maintenance box cover Open this cover to install/replace the maintenance box.
U “Replacing the Maintenance Box” on page 38
4
Paper cover Open this cover to load or replace paper. How to open the paper cover
diers depending on whether the paper is to be supplied from the inside
or the outside.
U “Opening the Paper Cover” on page 31
5
Peeler cover (Peeler model only) Open this cover to load paper. By passing a backing paper through the
peeler, labels are printed being peeled from the backing paper. The cover
is equipped with a label peeling detector, which detects whether a
peeled label is remaining at the paper ejection slot or not.
CW-C6000 Series/CW-C6500 Series/CW-D6000 Series/CW-D6500 Series User's Guide
Before use
24
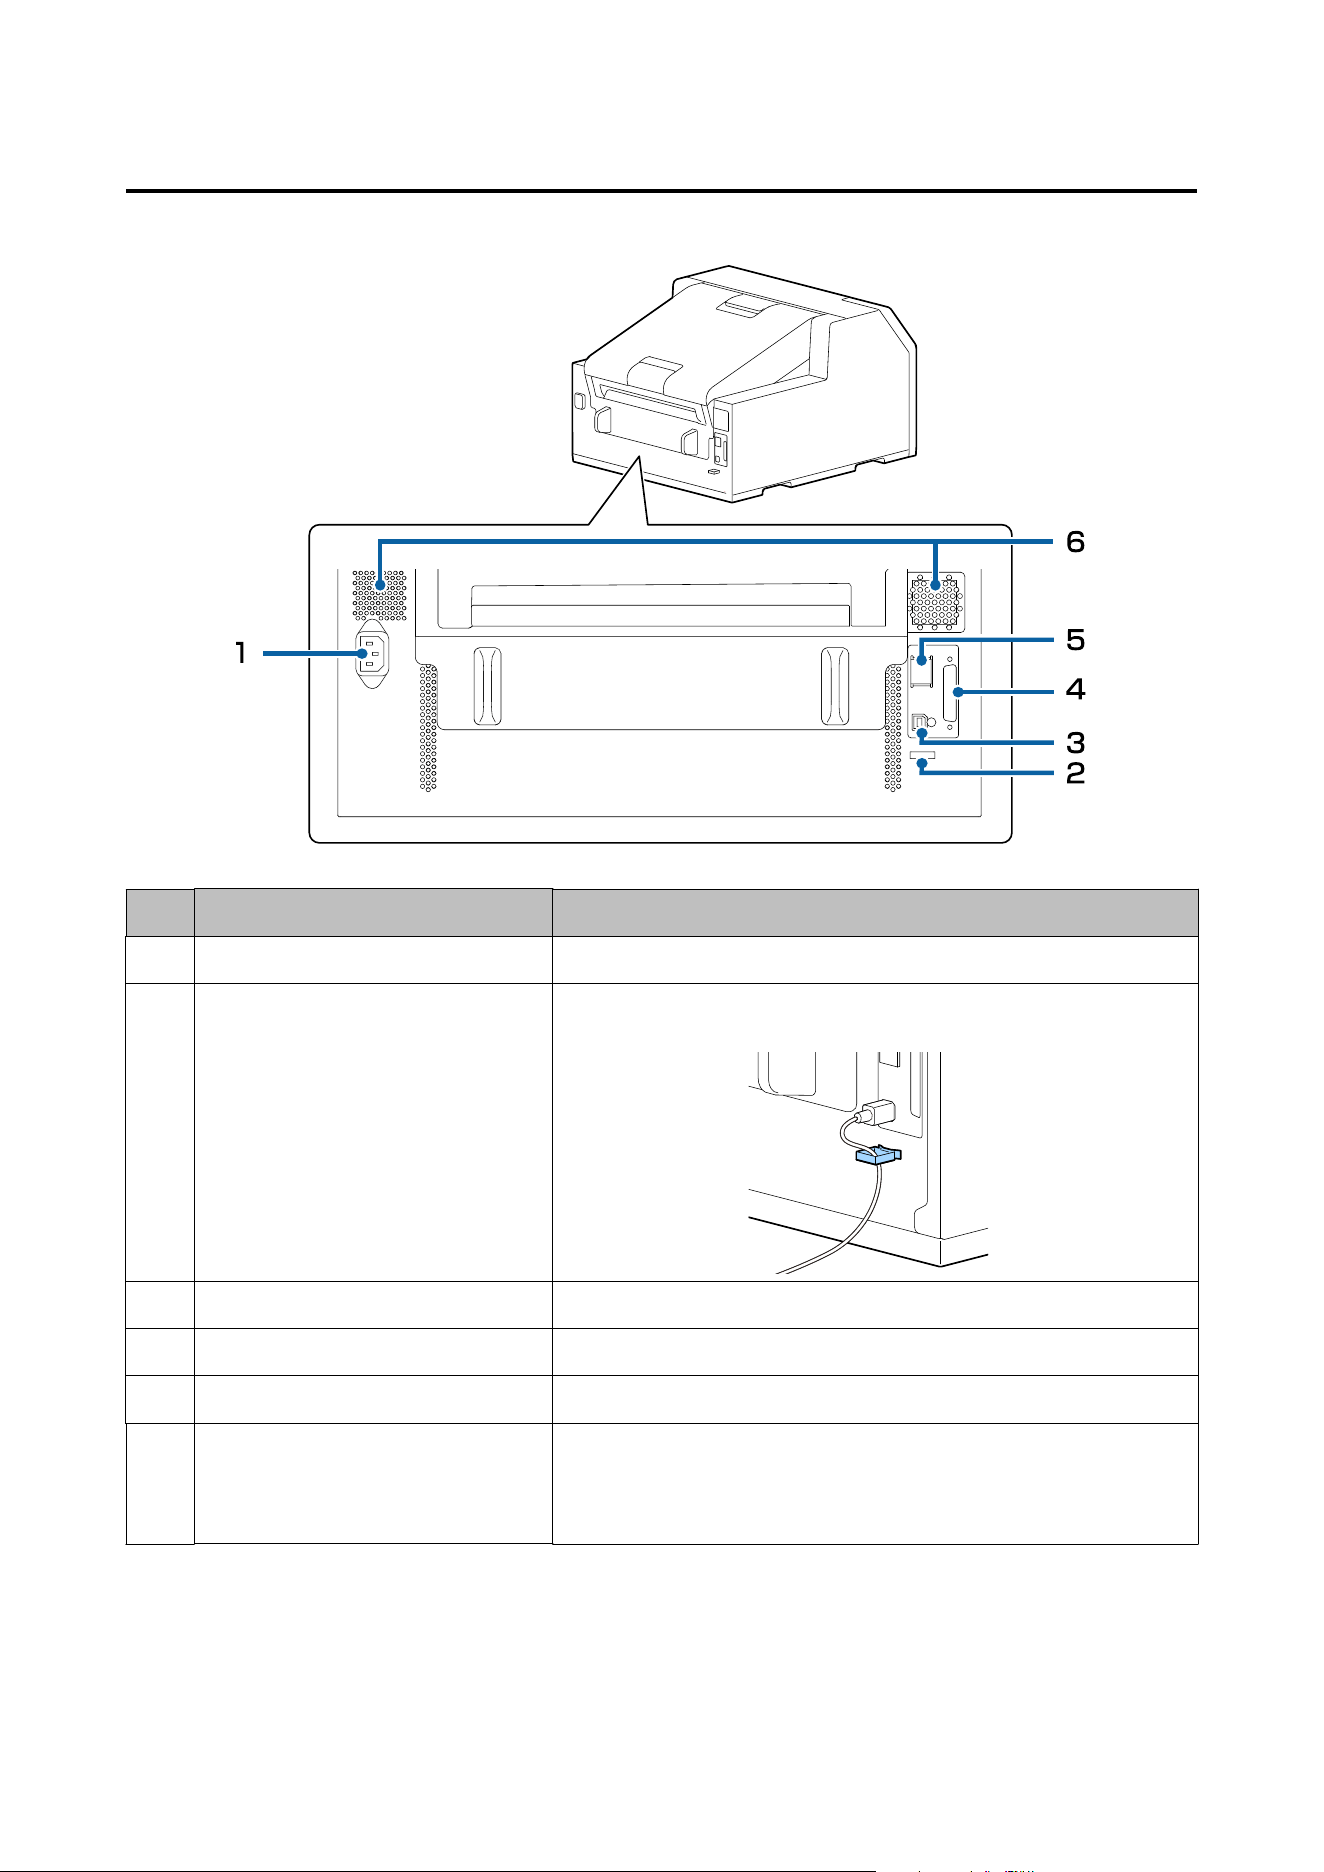
Rear
No. Name Description
1 AC inlet Connect the power cable.
2
Wire saddle Pass the USB cable through this saddle to prevent disconnection of the
cable.
3 USB port Connect a USB cable.
4 EXT.I/F This port is used only by specic users to control external devices.
5 LAN port Connect a LAN cable.
6
Air vent Exhausts heat generated in the printer to prevent the temperature inside
the printer from rising. Provide a clearance of 10 cm {3.94 in.} or more
from the area around the air vent to ensure ventilation when installing
the printer.
CW-C6000 Series/CW-C6500 Series/CW-D6000 Series/CW-D6500 Series User's Guide
Before use
25
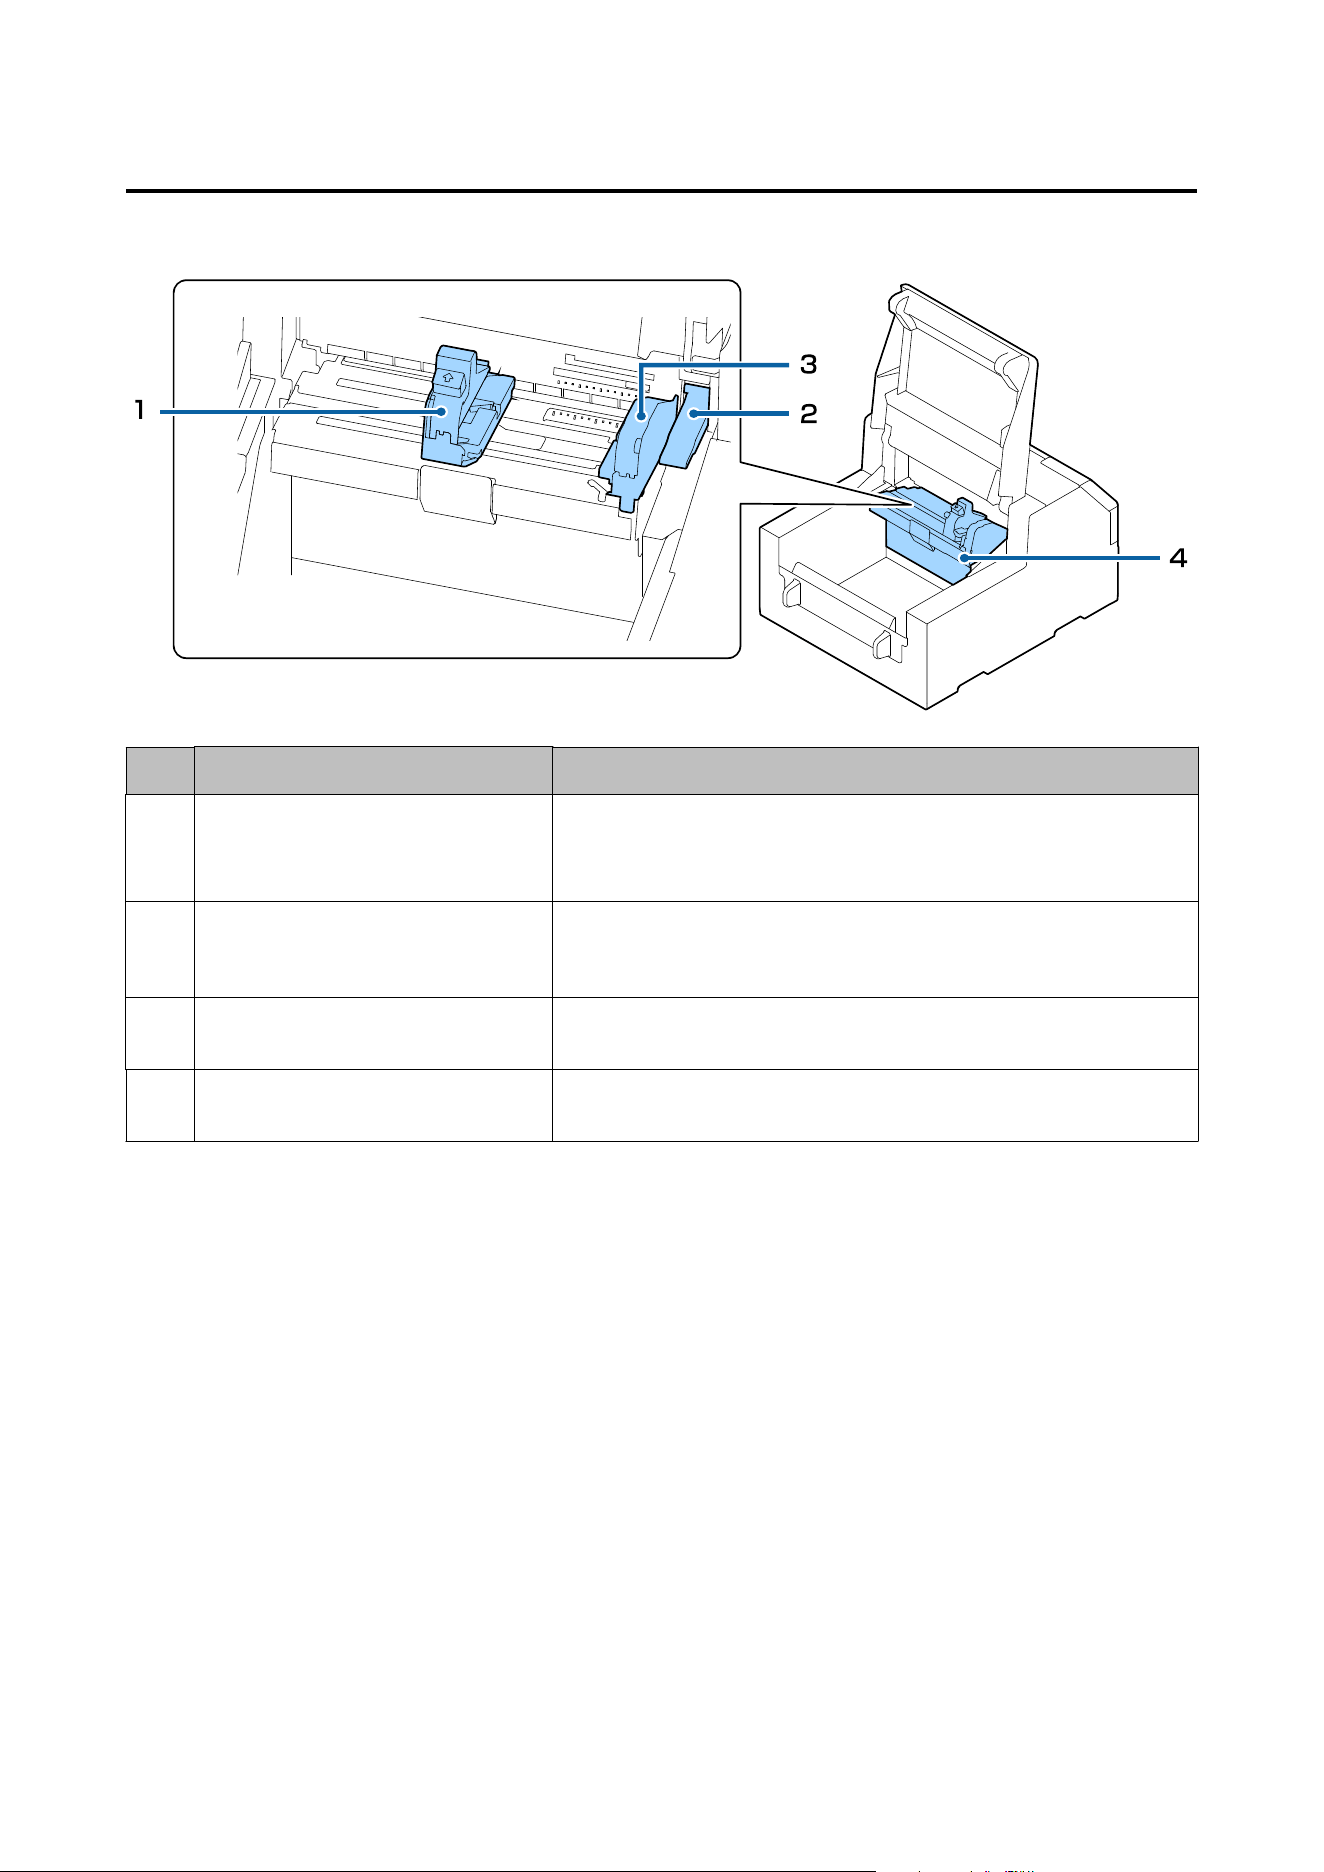
Inside
No. Name Description
1
Movable edge guide Supports paper at the paper width position while the paper is fed into the
printer. Squeeze the blue lever to move the guide, and position the guide
so that it touches the paper edge.
2
Release lever Use this lever when removing a jammed paper. By moving the lever up,
the paper pressure rollers are unlocked and you can remove paper
jammed inside the front cover.
3
Edge guide Supports paper while the paper is fed into the printer. When loading
paper, load the paper along this guide.
4
Paper guide unit Move this unit when cleaning the paper feed roller. If you pull the blue
lever, the entire unit moves, and you can check the paper feed roller.
CW-C6000 Series/CW-C6500 Series/CW-D6000 Series/CW-D6500 Series User's Guide
Before use
26
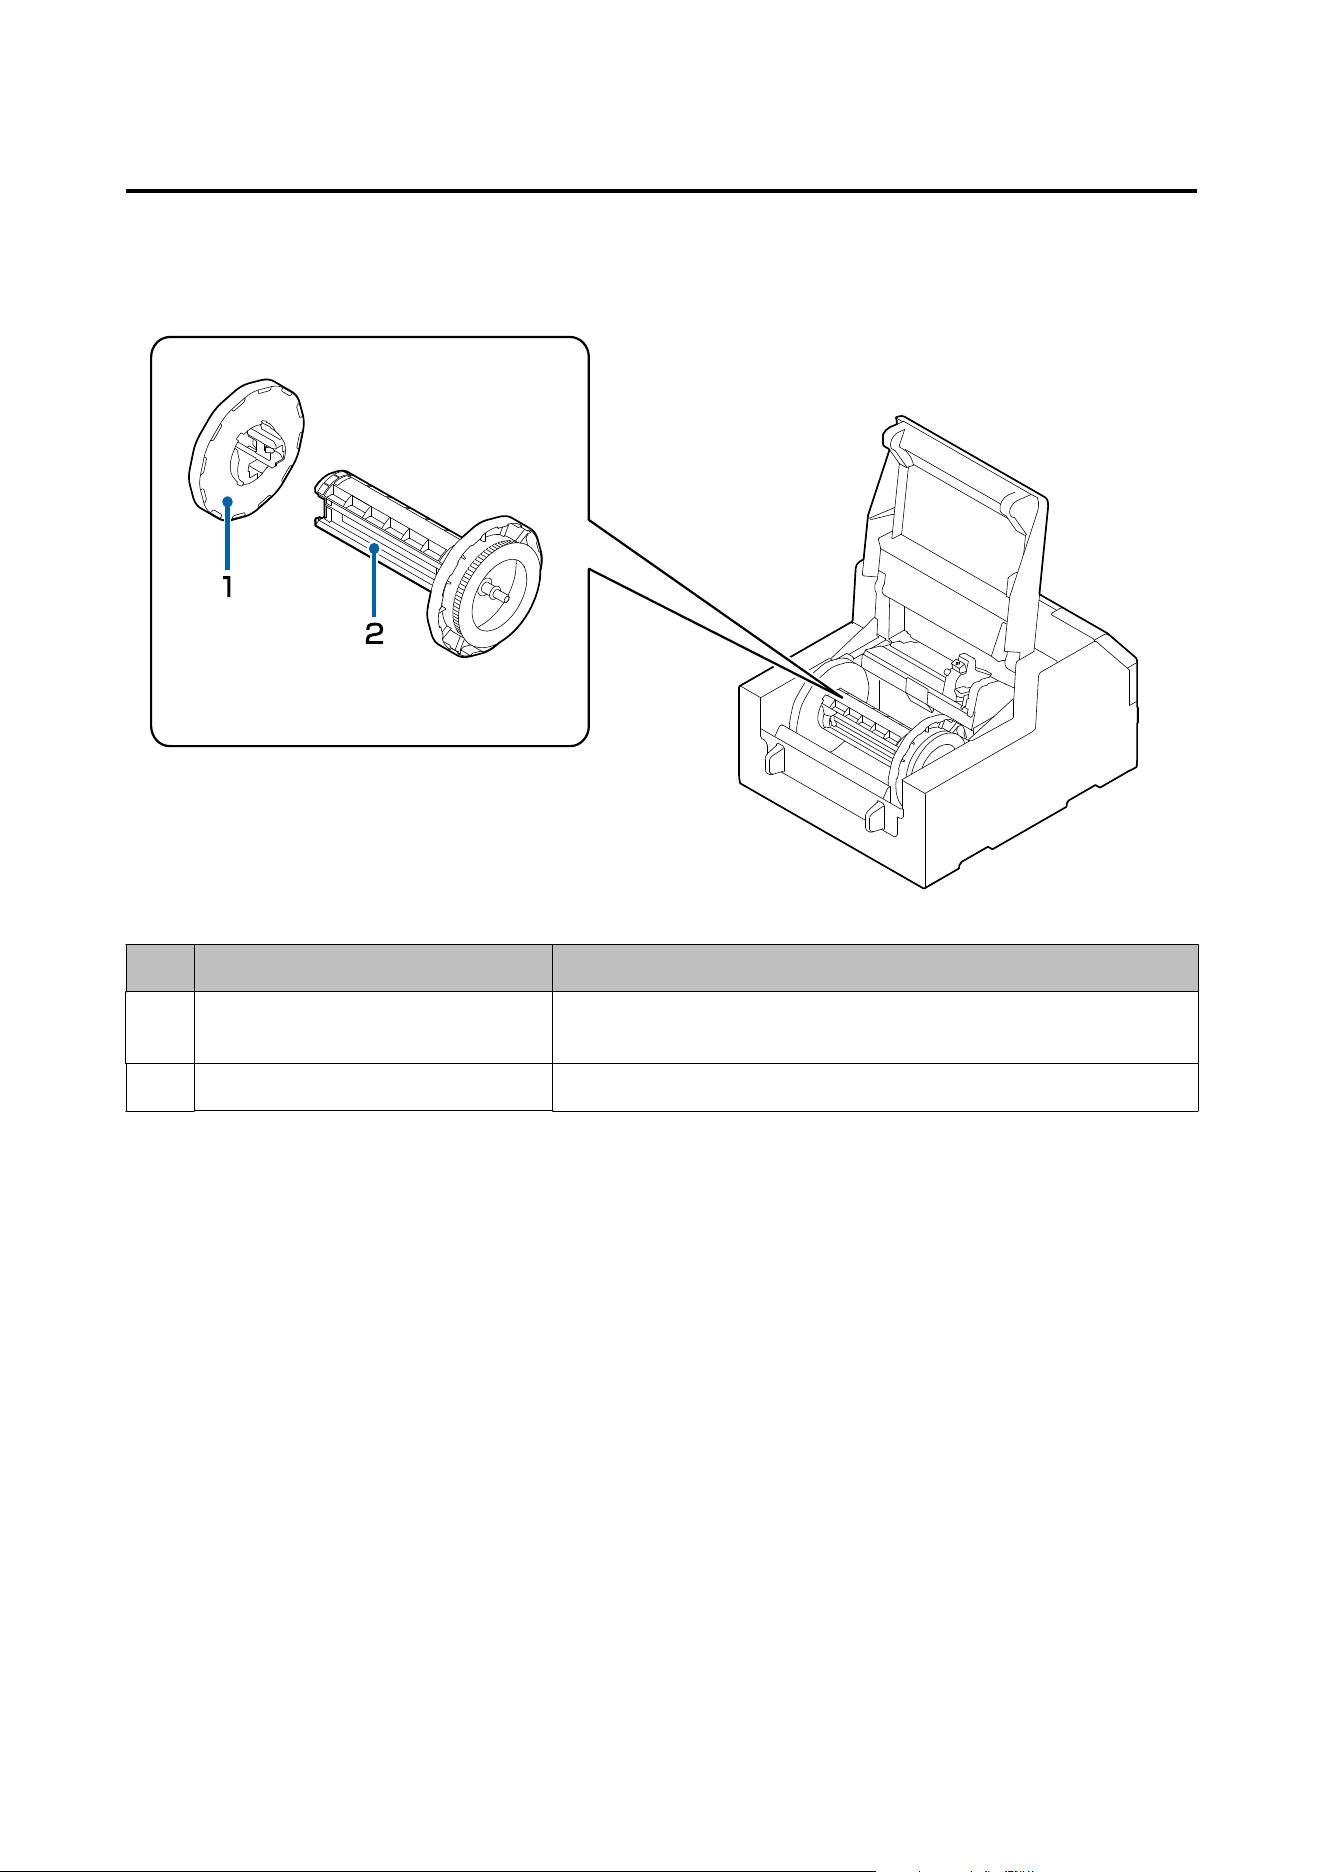
Spindle and Flange
Used to supply the paper from the inside.
No. Name Description
1
Flange Attach this to the spindle to x the roll paper loaded on the spindle.
Squeeze the blue lever to attach or remove to/from the spindle.
2 Spindle Load roll paper on this spindle.
CW-C6000 Series/CW-C6500 Series/CW-D6000 Series/CW-D6500 Series User's Guide
Before use
27

Operation Panel
A
B
A: Peeler model
B: Auto cutter model
No. Name Description
1
LED The status of the printer can be checked from the ashing of the LEDs.
This allows you to know the cause of an error and how to resolve the
problem.
For more details, see the Technical Reference Guide.
❏
(power) LED
Stays on while the printer is on. Flashes during printing or charging
ink.
❏ Status LED
Stays on or
ashes
while an error or problem is occurring.
❏ Pause LED
Stays on or ashes while the printer is paused.
2
(power) button Turns on/o the printer.
3
(home) button Displays the Home screen.
4
(back) button Use to return to the previous screen.
5
(arrows) buttons and OK
button
Use the buttons to select a menu item, and then press the
OK button to activate the selected menu or setting.
CW-C6000 Series/CW-C6500 Series/CW-D6000 Series/CW-D6500 Series User's Guide
Before use
28
No. Name Description
6
Cancel button Use this to cancel printing.
Press the Cancel button while the printer is paused, and select Next label
format or All label formats on the Cancel Selection screen to cancel
printing.
7 Cut button (Auto cutter model only) Use to cut paper. The paper cannot be cut twice at the same position.
8
Peeler Reset button (Peeler model
only)
Press this button if printing of the next data does not start even after
removing printed labels.
U “Printing is Impossible or Becomes Suddenly Impossible” on
page 92
9
Feed button Press this briey to feed paper by one page.
Hold down to feed paper continuously.
10
Back Feed button Use to replace paper. Hold down this button to feed the paper backward
until you can pull the paper out of the printer.
11
Pause button ❏ If pressed while printing is in progress
When the printer
nishes
printing the page being printed, it pauses
and the Pause LED lights up. Press again to resume printing and the
Pause LED will turn o.
❏ If pressed while the printer is ready to print
The printer goes into a pause state and the Pause LED lights up. Press
again to return the printer to the standby state and the Pause LED
will turn o.
❏ If pressed while the printer is paused due to an error
The printer is released from pause and the Pause LED turns
o.
12 Screen Status of the printer, menus, and error messages are displayed.
CW-C6000 Series/CW-C6500 Series/CW-D6000 Series/CW-D6500 Series User's Guide
Before use
29
Basic Operation
is chapter describes the basic operating procedures of the printer.
Turning On or
O
Turning the Power On
Hold down the (power) button until the (power) LED lights up.
Turning the Power O
Hold down the (power) button until a power-o conrmation message is displayed. en select Ye s on the
conrmation
screen.
e
(power) LED goes out and the printer is turned
o.
CW-C6000 Series/CW-C6500 Series/CW-D6000 Series/CW-D6500 Series User's Guide
Basic Operation
30
Opening the Paper Cover
is section describes how to open the paper cover.
!
Caution
Do not use the printer with the paper cover removed. Doing so will cause the printer to malfunction.
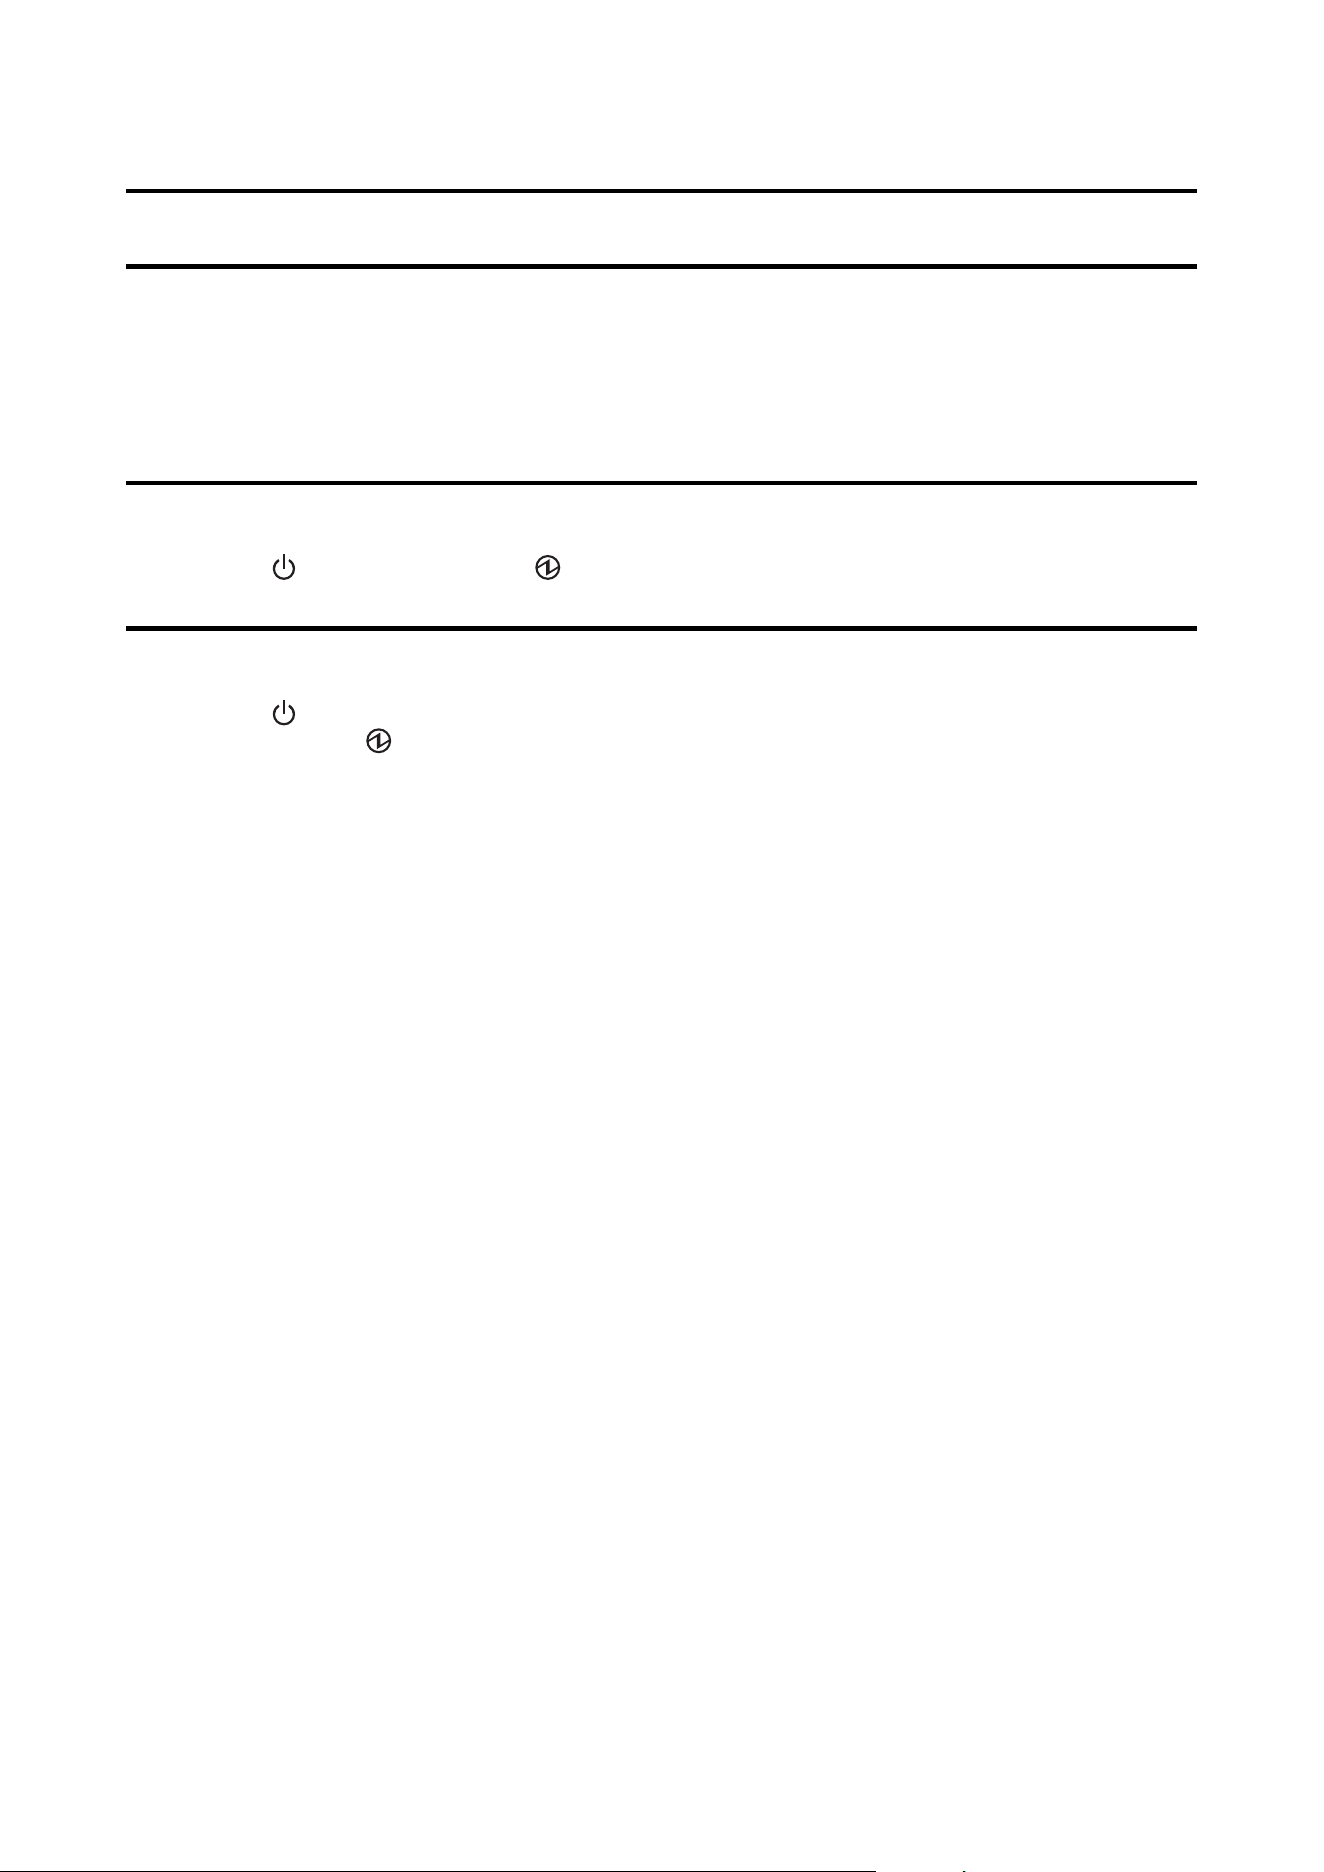
Opening the Cover using the Lever in the Front
Open the paper cover as shown above for the following purposes.
❏ To load roll paper inside the printer, or to remove it.
❏ To replace the maintenance box.
❏ To clean inside t he printer.
❏ To remove paper jammed inside the printer.
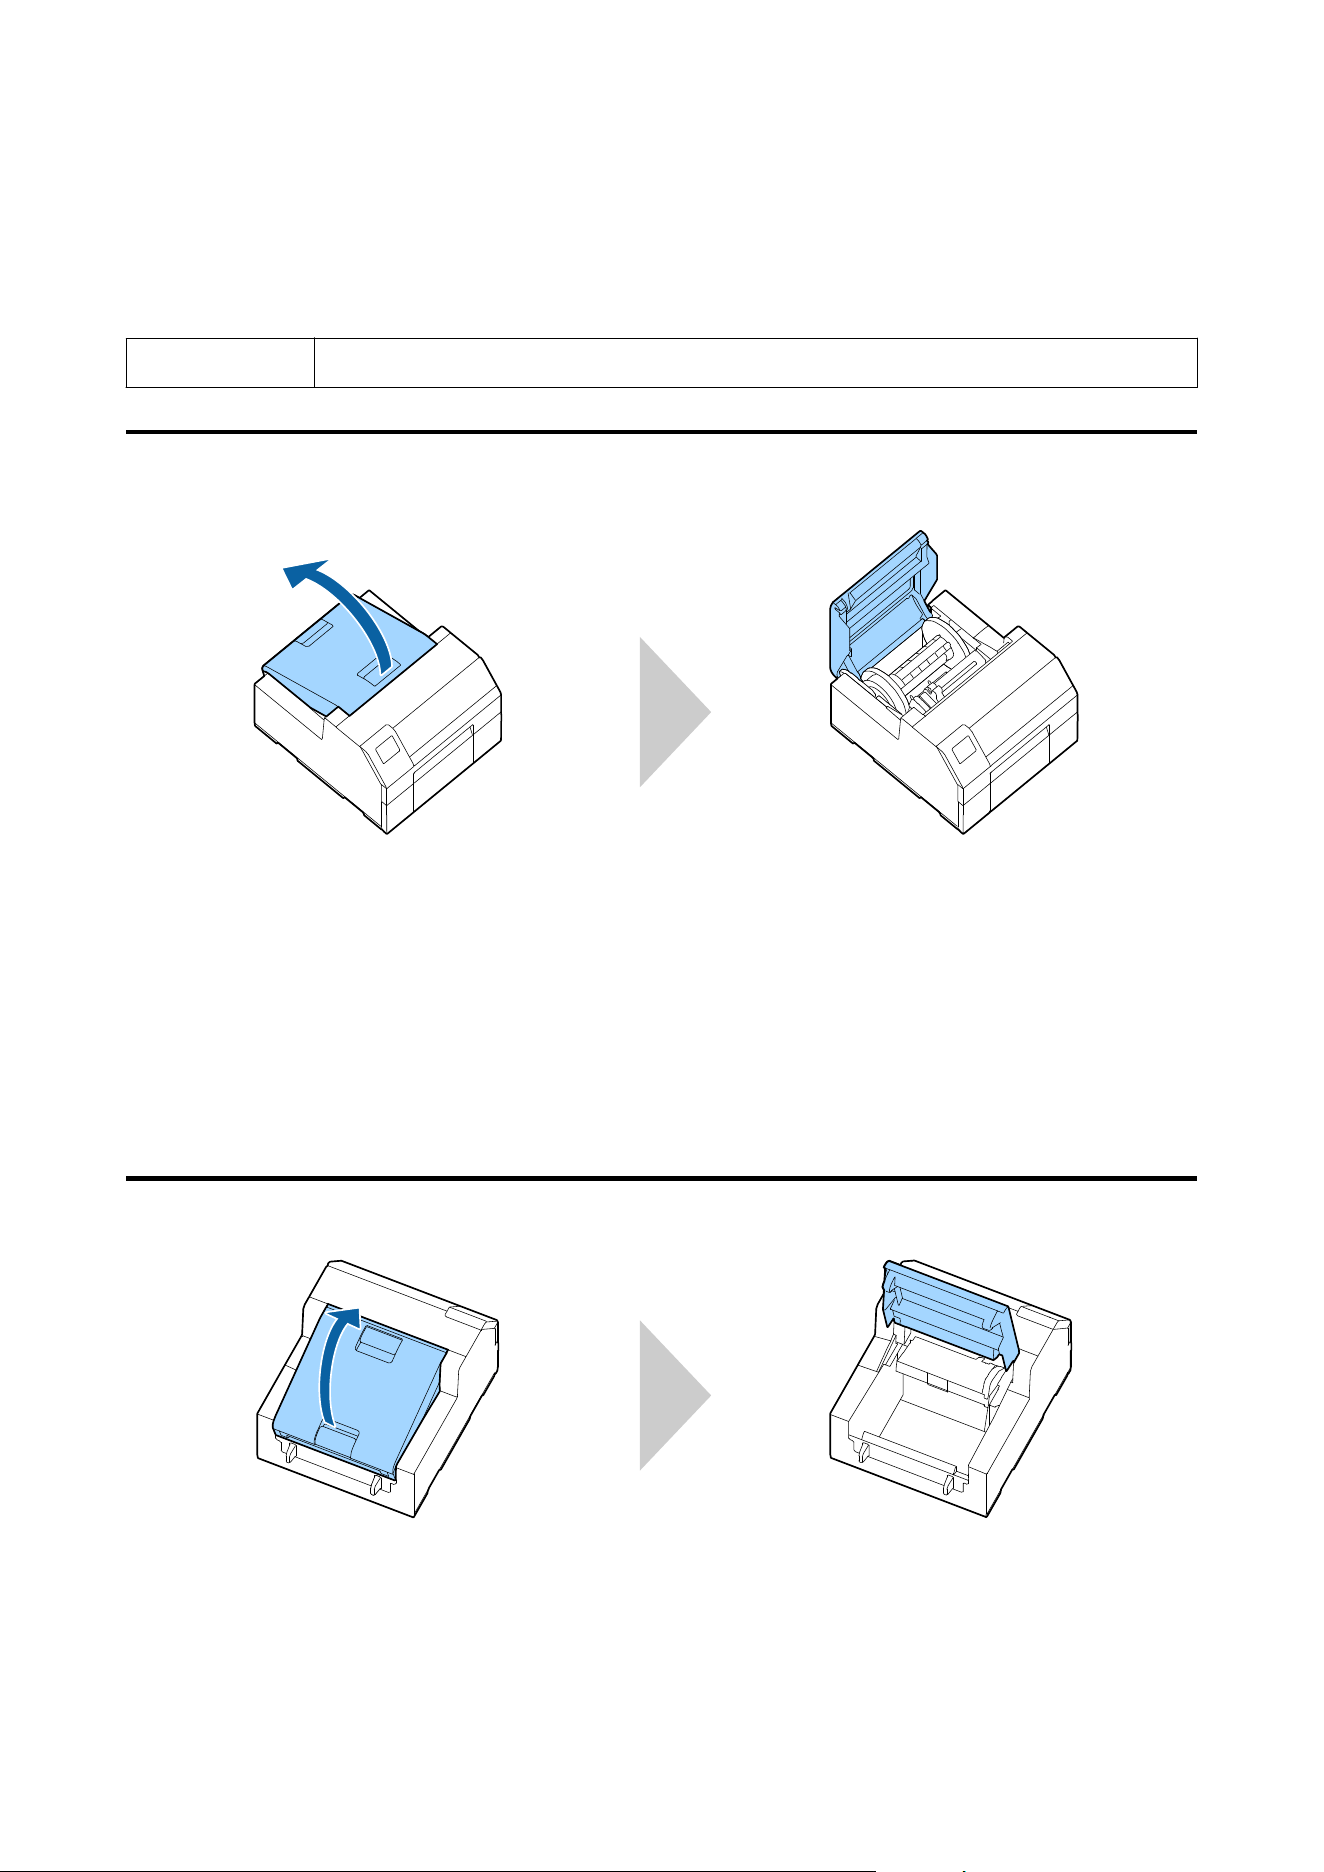
Opening the Cover using the Lever in the Back
Open the paper cover as shown above for the following purposes.
❏ To set paper so that it is supplied from outside the printer, or to remove the paper.
CW-C6000 Series/CW-C6500 Series/CW-D6000 Series/CW-D6500 Series User's Guide
Basic Operation
31
Checking the Printer Status
e status of the printer can be checked from the lighting/ashing of the LEDs, and from the printer screen.
Also, by printing the status sheet, you can check the printer settings and condition of the nozzles.
U “Printing Status Sheet” on page 34
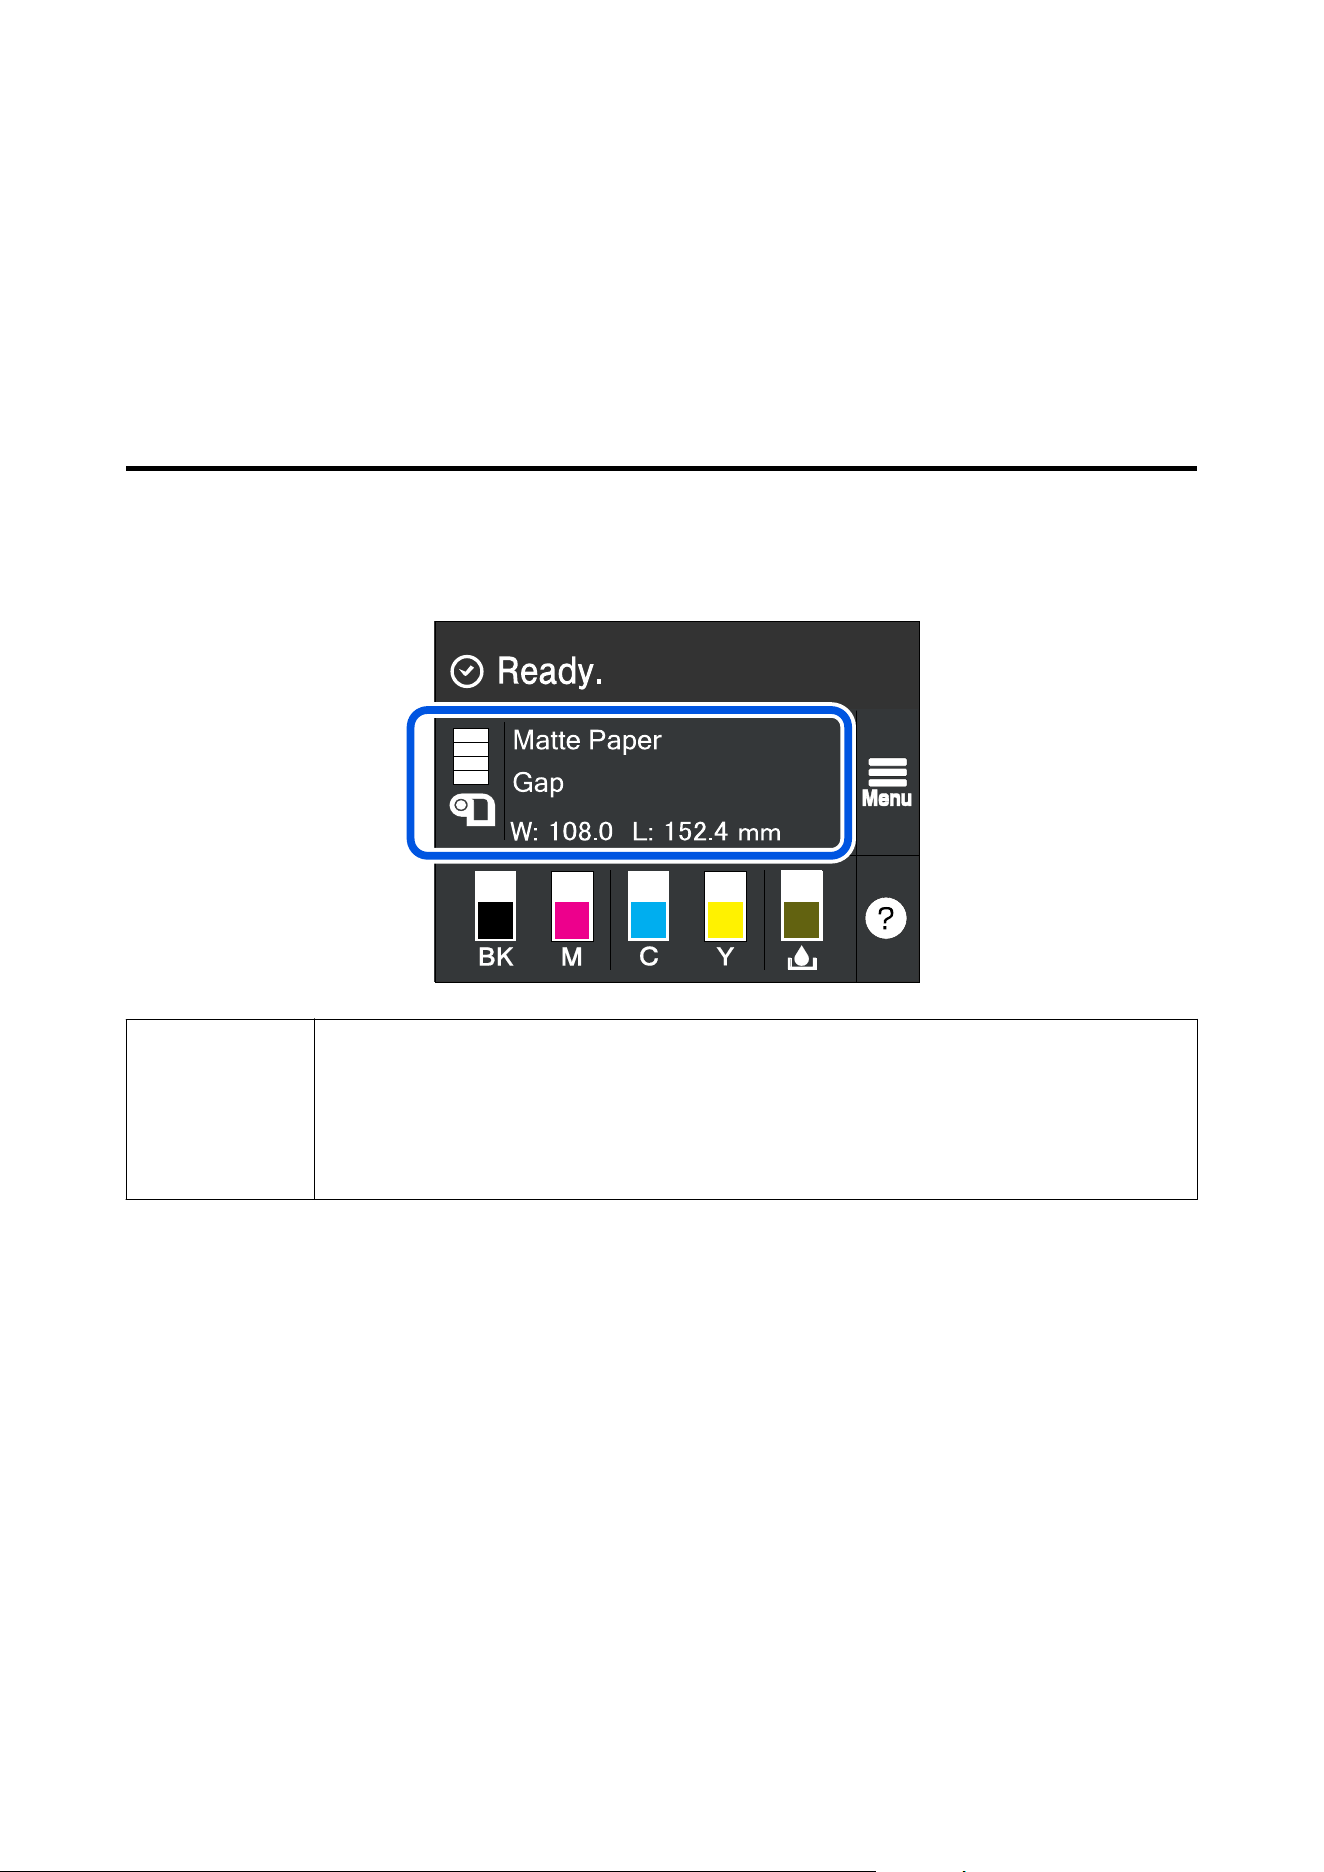
Checking the Paper Information
Information of currently loaded paper; paper type, paper source setting, and remaining amount of roll paper, is
displayed on the home screen.
Note
Select this area to directly access the Paper Settings menus.
You can also make the paper settings using the printer driver.
U “Printer Driver Settings” on page 41
If the settings
dier
between the operation panel and the printer driver, the settings of the printer
driver are applied.
CW-C6000 Series/CW-C6500 Series/CW-D6000 Series/CW-D6500 Series User's Guide
Basic Operation
32
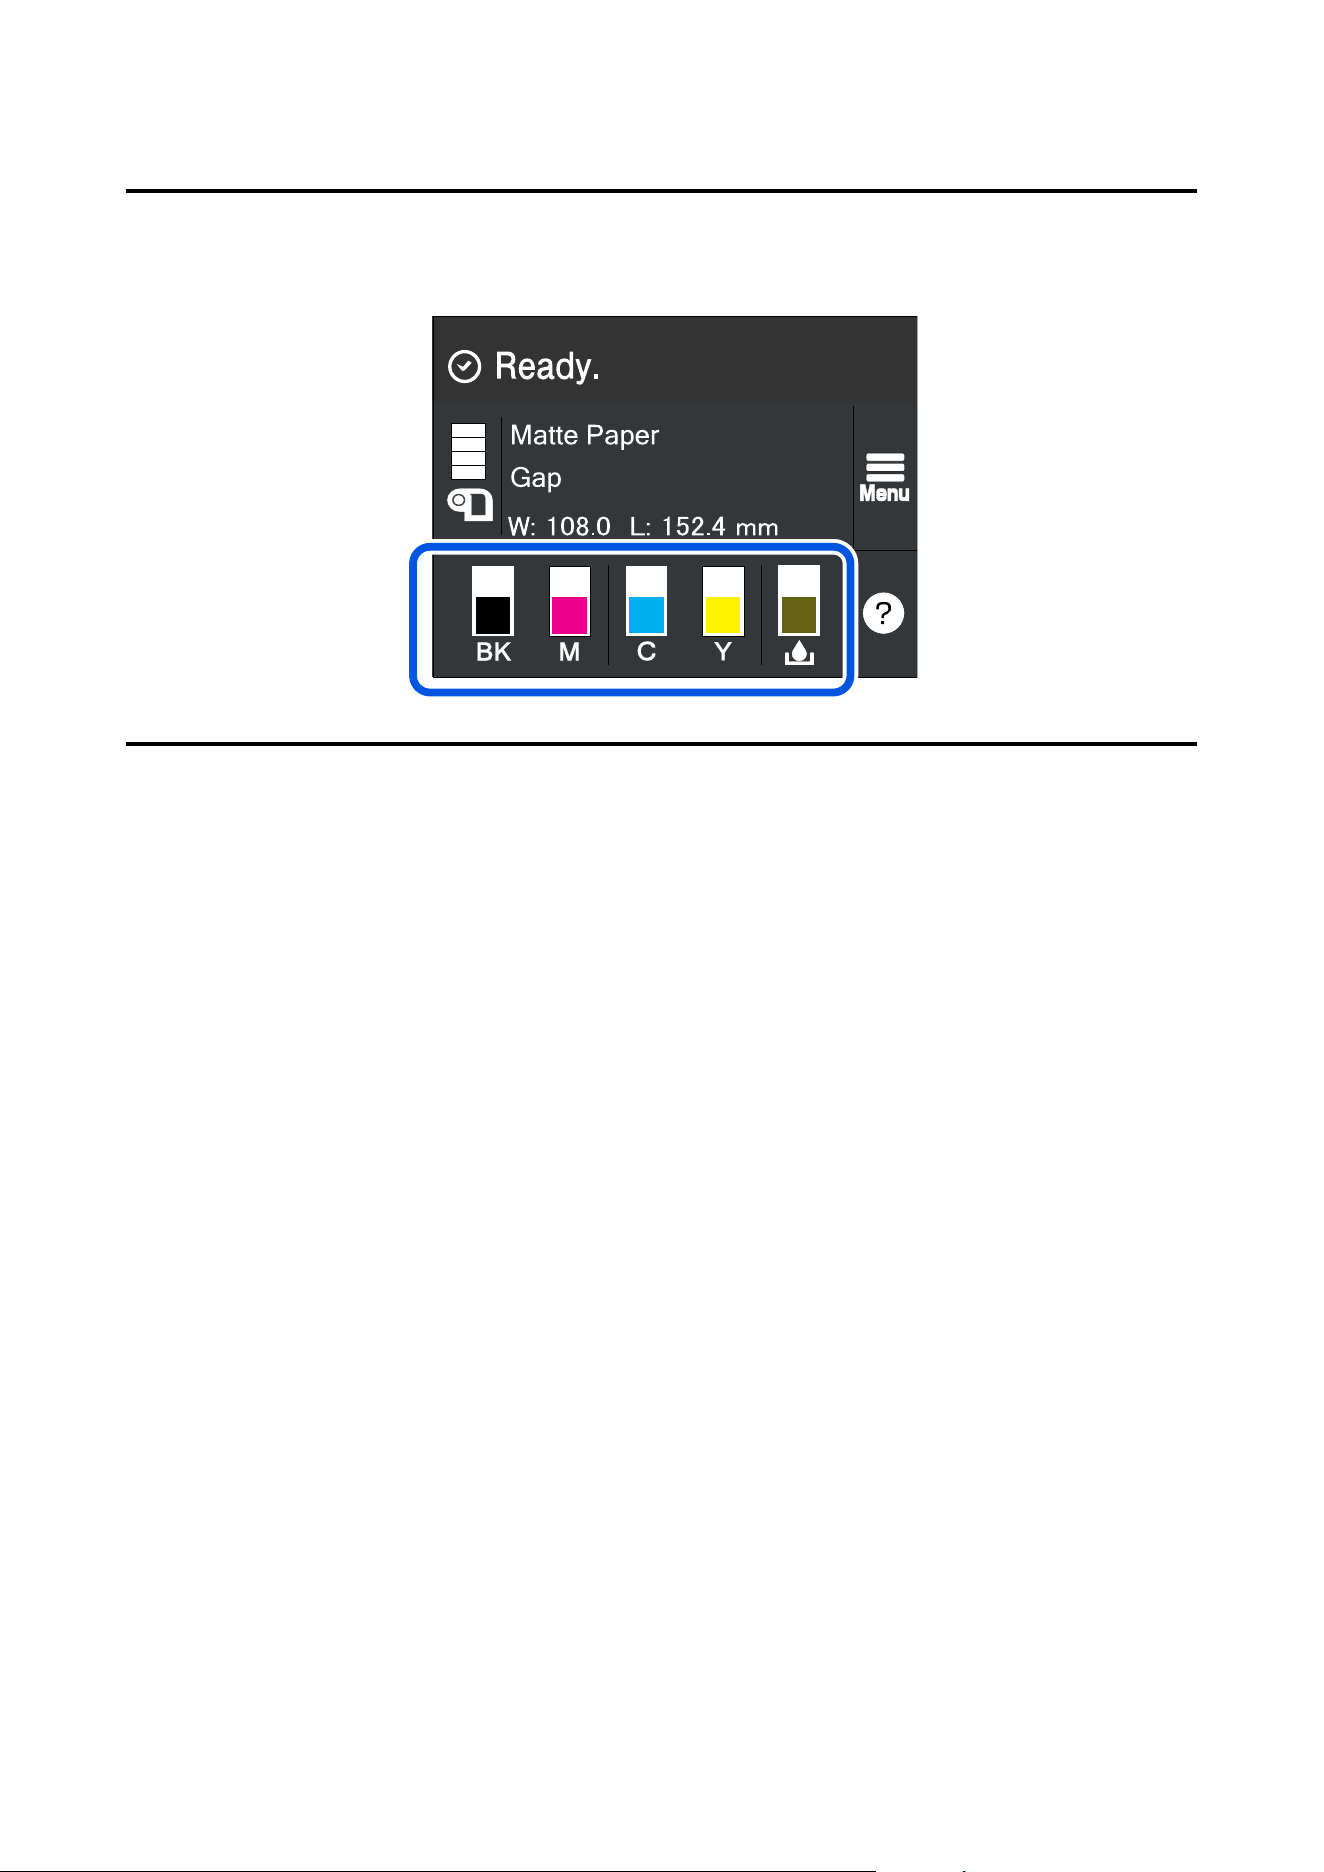
Checking the Status of Consumables
e status of the ink cartridges and the maintenance box can be checked on the screen.
Printing Nozzle Check Patterns
By printing the nozzle check patterns, you can check the print head nozzles for clogging.
U “Printing Nozzle Check Patterns” on page 84
CW-C6000 Series/CW-C6500 Series/CW-D6000 Series/CW-D6500 Series User's Guide
Basic Operation
33
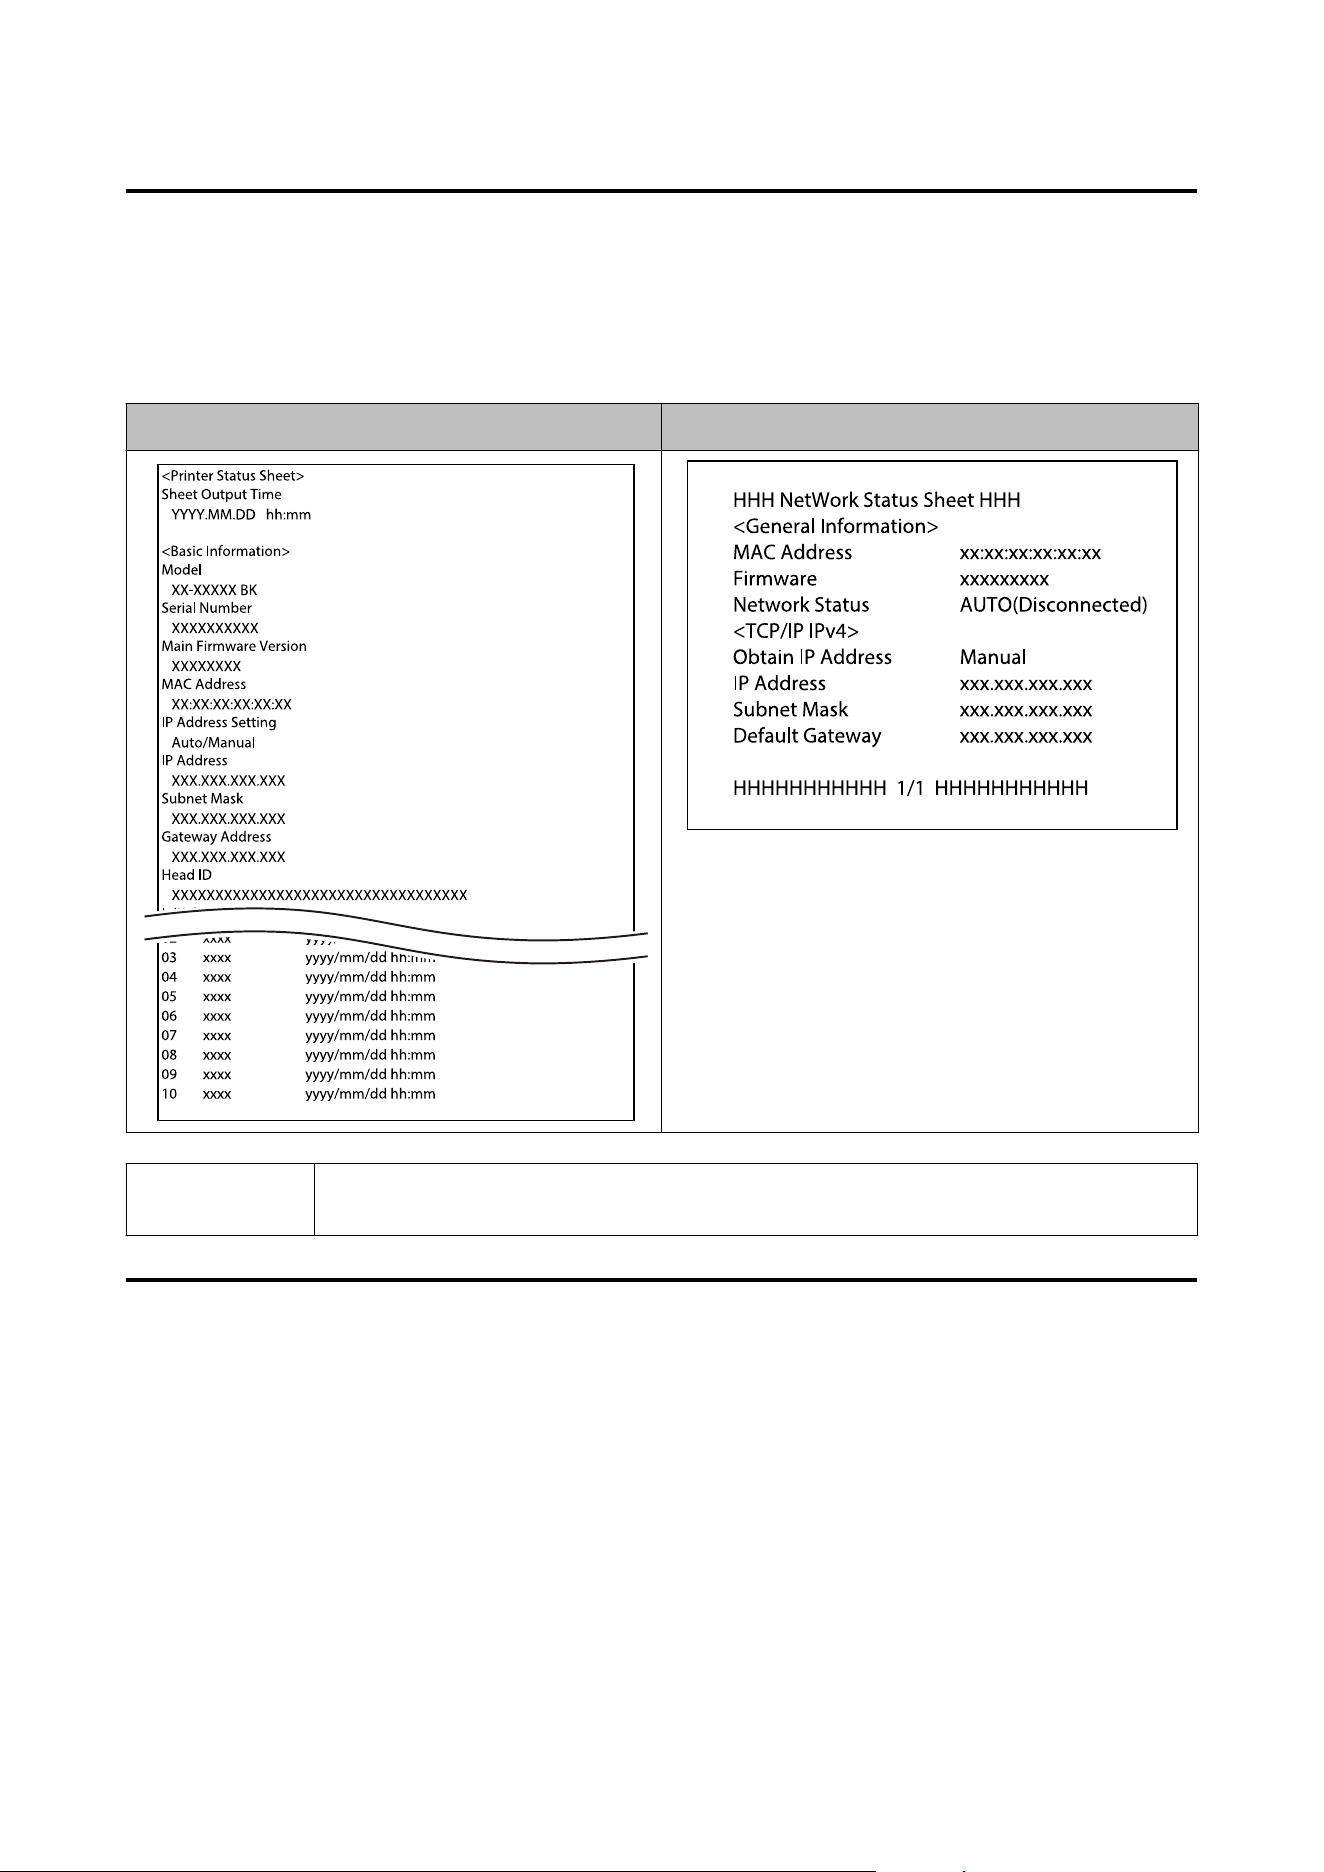
Printing Status Sheet
By printing the status sheet, you can check the rmware version and printer settings such as the print mode and
media detection settings. e following types of status sheets can be printed from the operation panel.
Menu - Printer Status/Print - Print Status Sheet
Status sheet print sample Status sheet (network settings) print sample
Note
You can also print a list of the fonts and bar codes that are already registered in the printer, or the
newly registered images and templates.
Checking Network Connection and Settings
You can check the network connection status and settings by printing a network connection check report.
For more details, see the Technical Reference Guide.
CW-C6000 Series/CW-C6500 Series/CW-D6000 Series/CW-D6500 Series User's Guide
Basic Operation
34
Replacing the Ink Cartridges
is section describes how to replace the ink cartridges.
!
Caution
Carefully read the cautions on handling before installing the ink cartridges.
U “Cautions on Ink Cartridges” on page 15
Checking Amount of Ink Remaining
You can check ink level of each color ink cartridge on the home or an error message screen of the operation panel.
Message Description
You need to replace the following ink cartridge(s). To maintain the quality of the print head, the printer stops
printing before ink cartridges are completely expended.
Replace the ink cartridge.
How to Replace the Ink Cartridges
e
procedure below is for replacing the BK cartridge. Follow the same procedure for replacing the other color
cartridges.
c
Important
For users of CW-C6000/C6500 Series
When replacing the black ink cartridge, make sure to replace with a cartridge of the same type of black
ink. The printer does not work if you install a cartridge of dierent type of black ink.
A
Open the
le
ink cartridge cover.
Note
For replacing cyan or yellow cartridge, open the right ink cartridge cover.
CW-C6000 Series/CW-C6500 Series/CW-D6000 Series/CW-D6500 Series User's Guide
Basic Operation
35
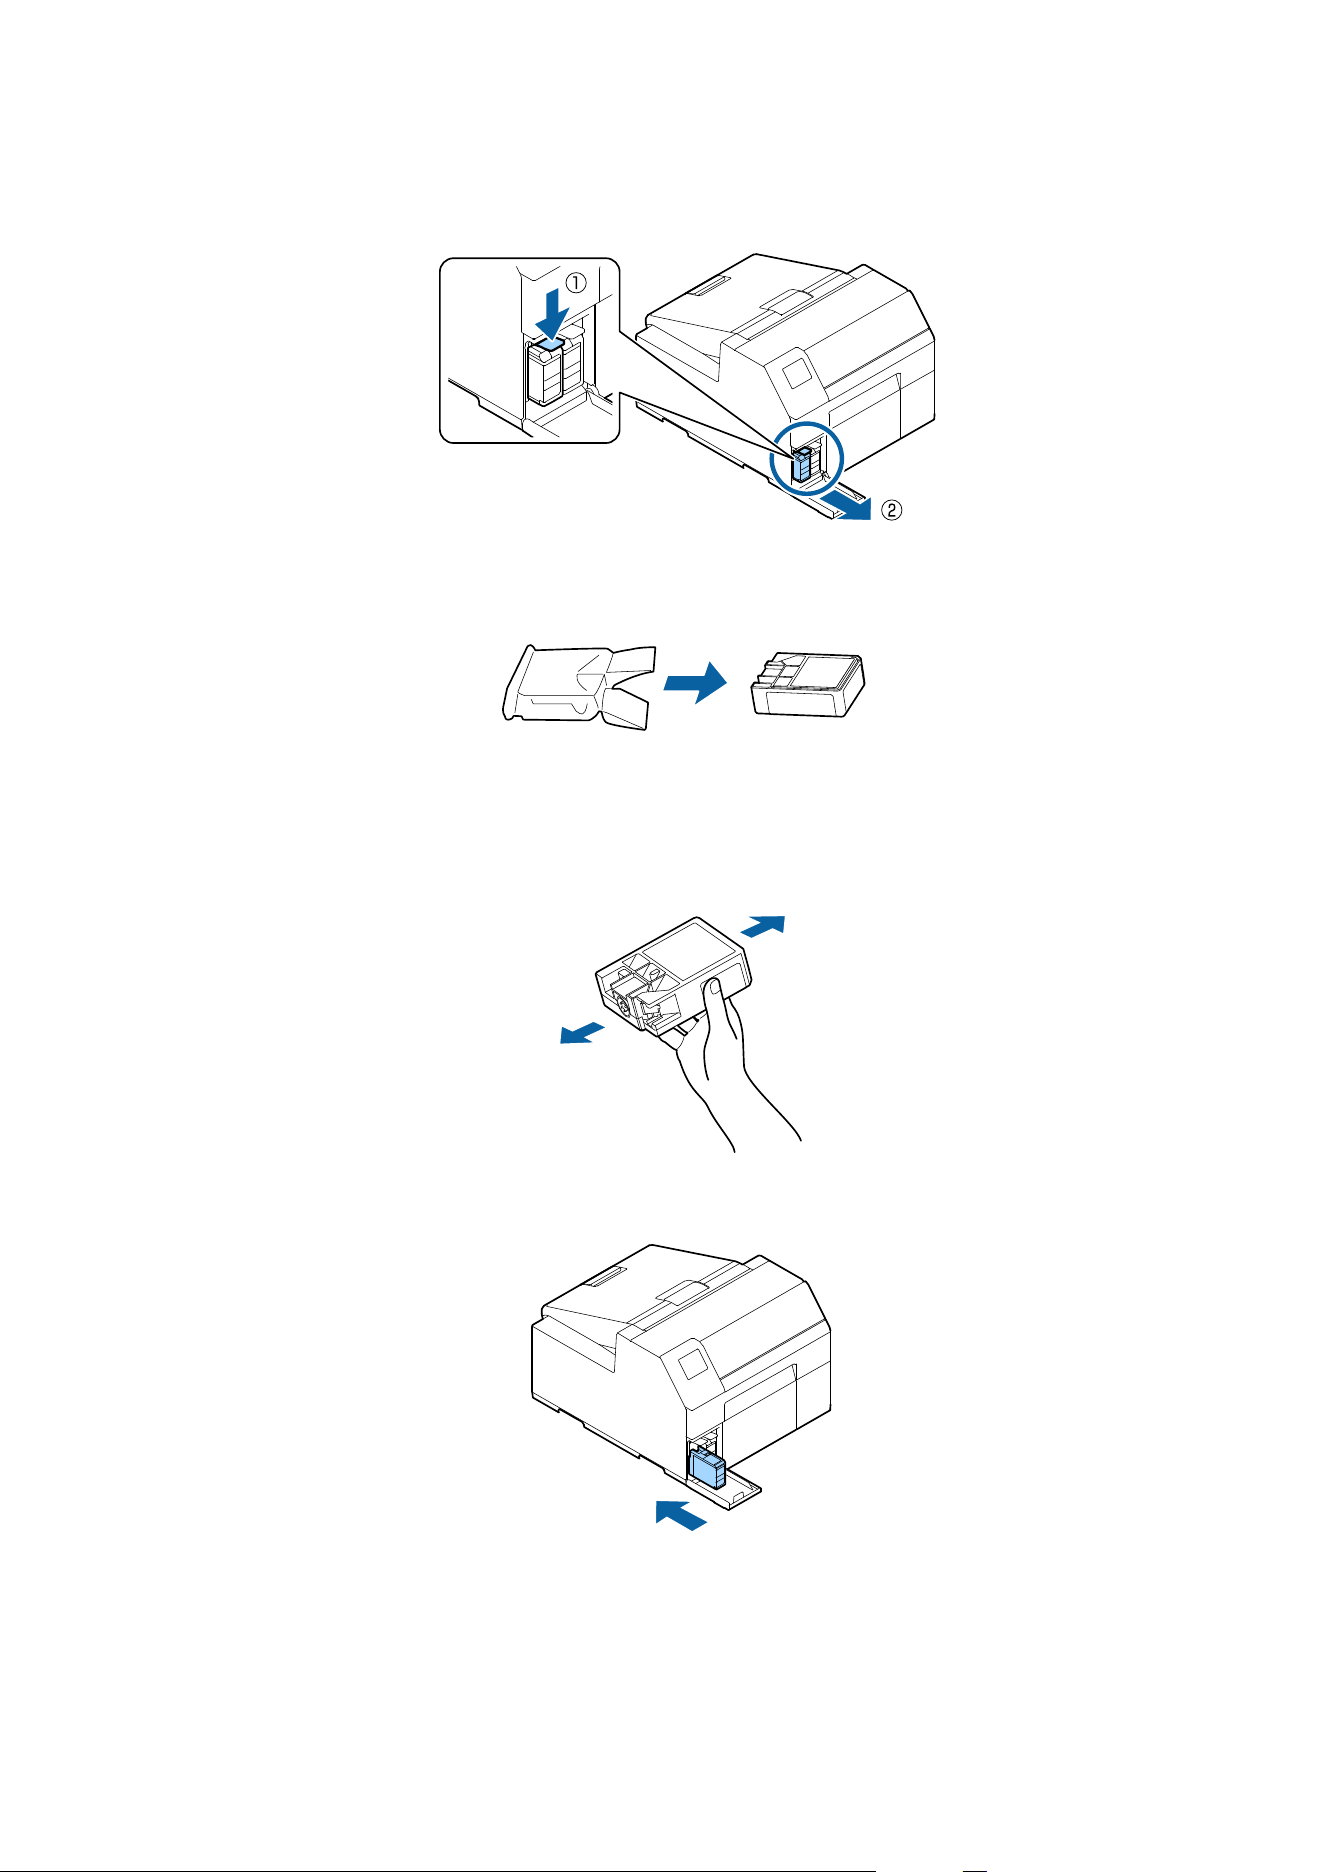
B
Press the lever down to remove the used ink cartridge.
C
Open the bag and take out the new ink cartridge.
D
Shake the ink cartridge.
As shown in the
gure
below, shake the cartridge horizontally. Move the cartridge by about 5 cm to both
directions, and repeat it about 15 times for about 5 seconds.
E
Install the ink cartridge in the slot.
CW-C6000 Series/CW-C6500 Series/CW-D6000 Series/CW-D6500 Series User's Guide
Basic Operation
36

F
Close the ink cartridge cover.
CW-C6000 Series/CW-C6500 Series/CW-D6000 Series/CW-D6500 Series User's Guide
Basic Operation
37
Replacing the Maintenance Box
is section describes how to replace the maintenance box.
!
Caution
Carefully read the cautions on handling before setting the maintenance box.
U “Cautions on the Maintenance Box” on page 17
Checking the Amount of Empty Space in the Maintenance Box
You can check the remaining capacity of the maintenance box on the home or an error message screen of the
operation panel.
Message Description
The Maintenance Box is at the end of its service life.
You need to replace it.
Replace the maintenance box with a new one.
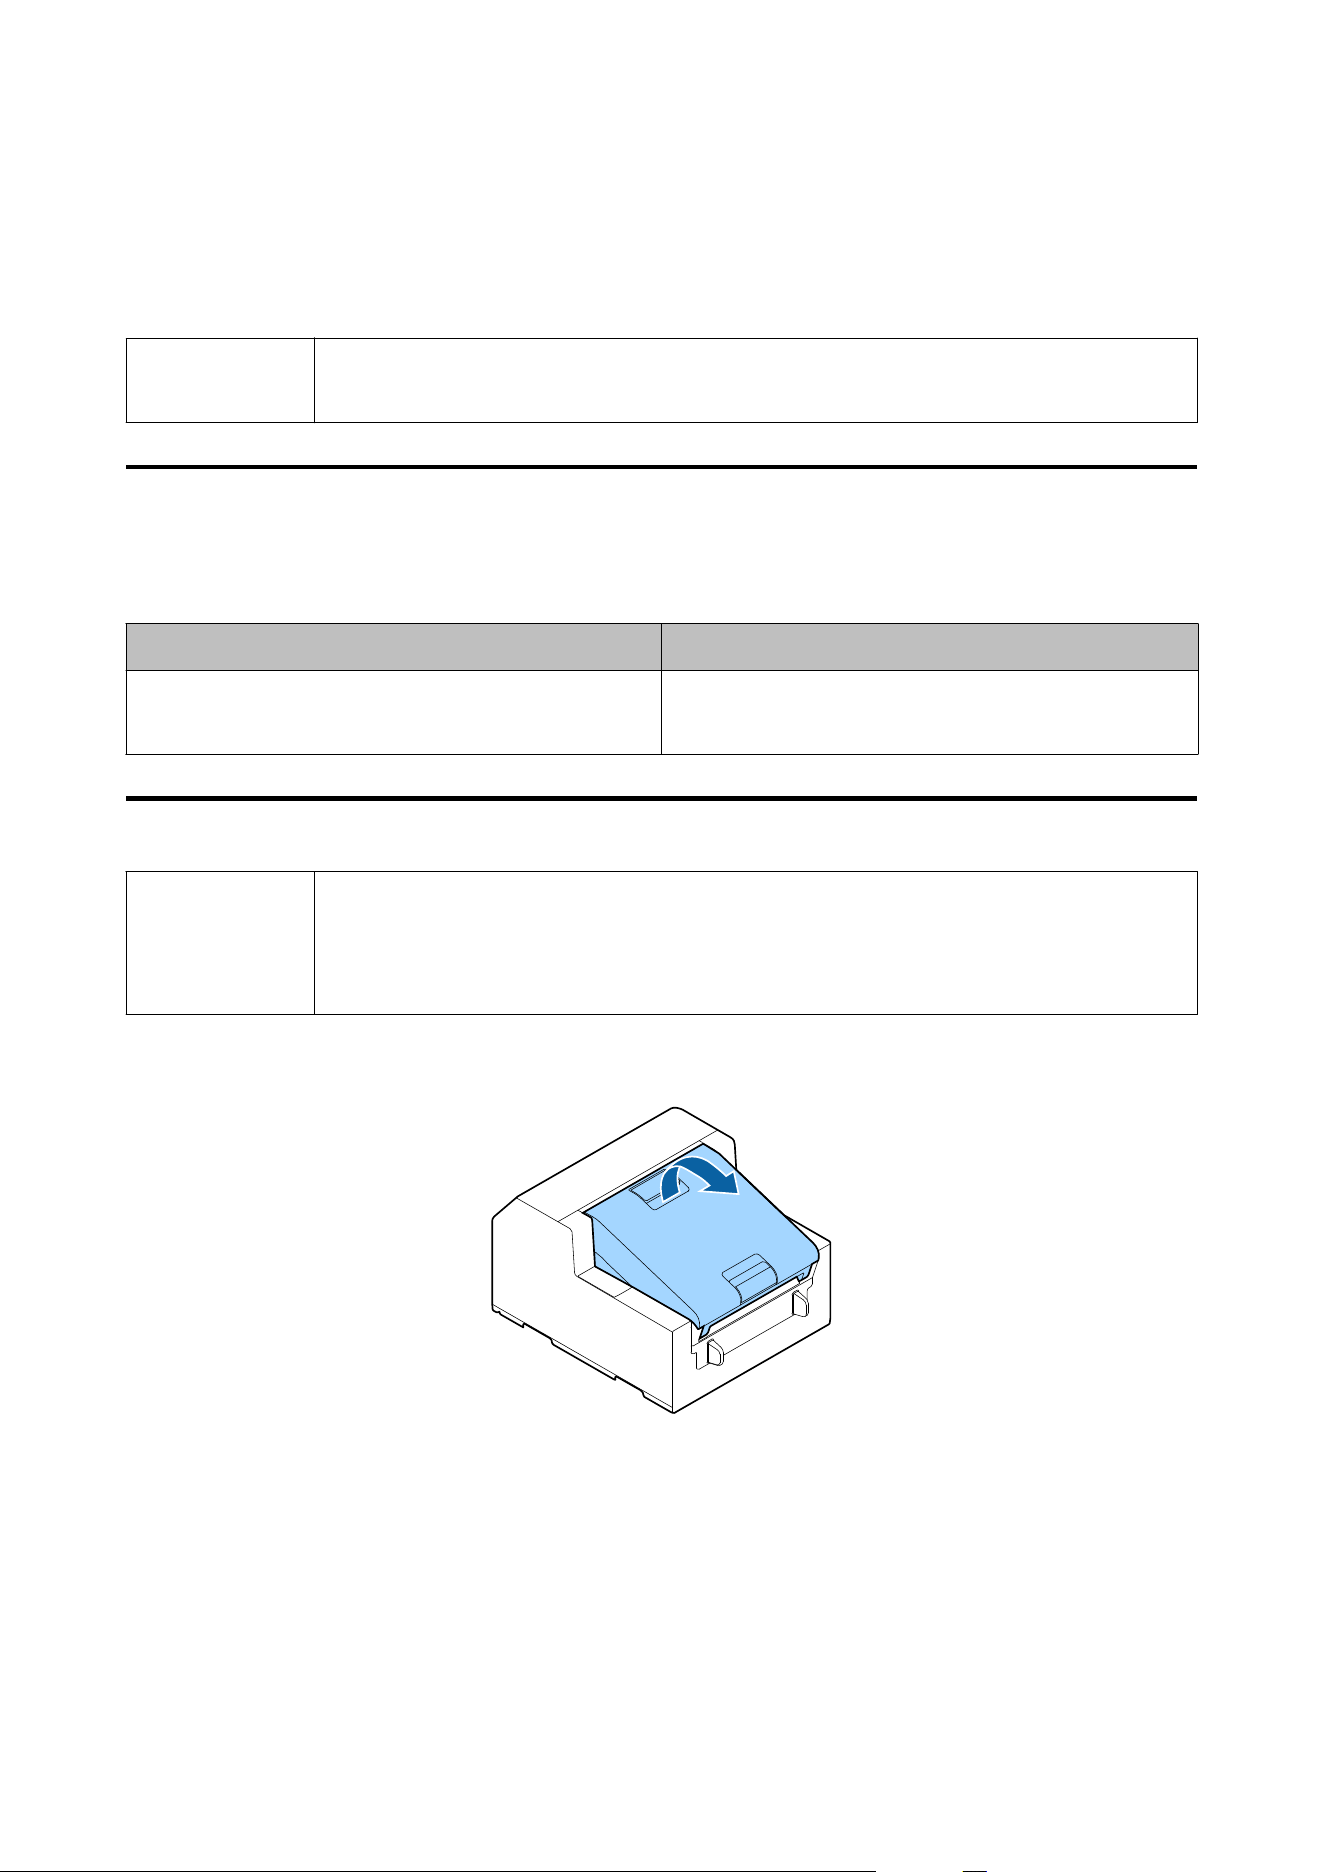
How to Replace the Maintenance Box
Note
The maintenance box is the same for the CW-C6000/C6500 Series and the CW-D6000/D6500 Series.
You can install a new maintenance box to either series.
However, do not install it to a printer of a dierent series midway through use. Doing so may hamper
the maintenance box functions.
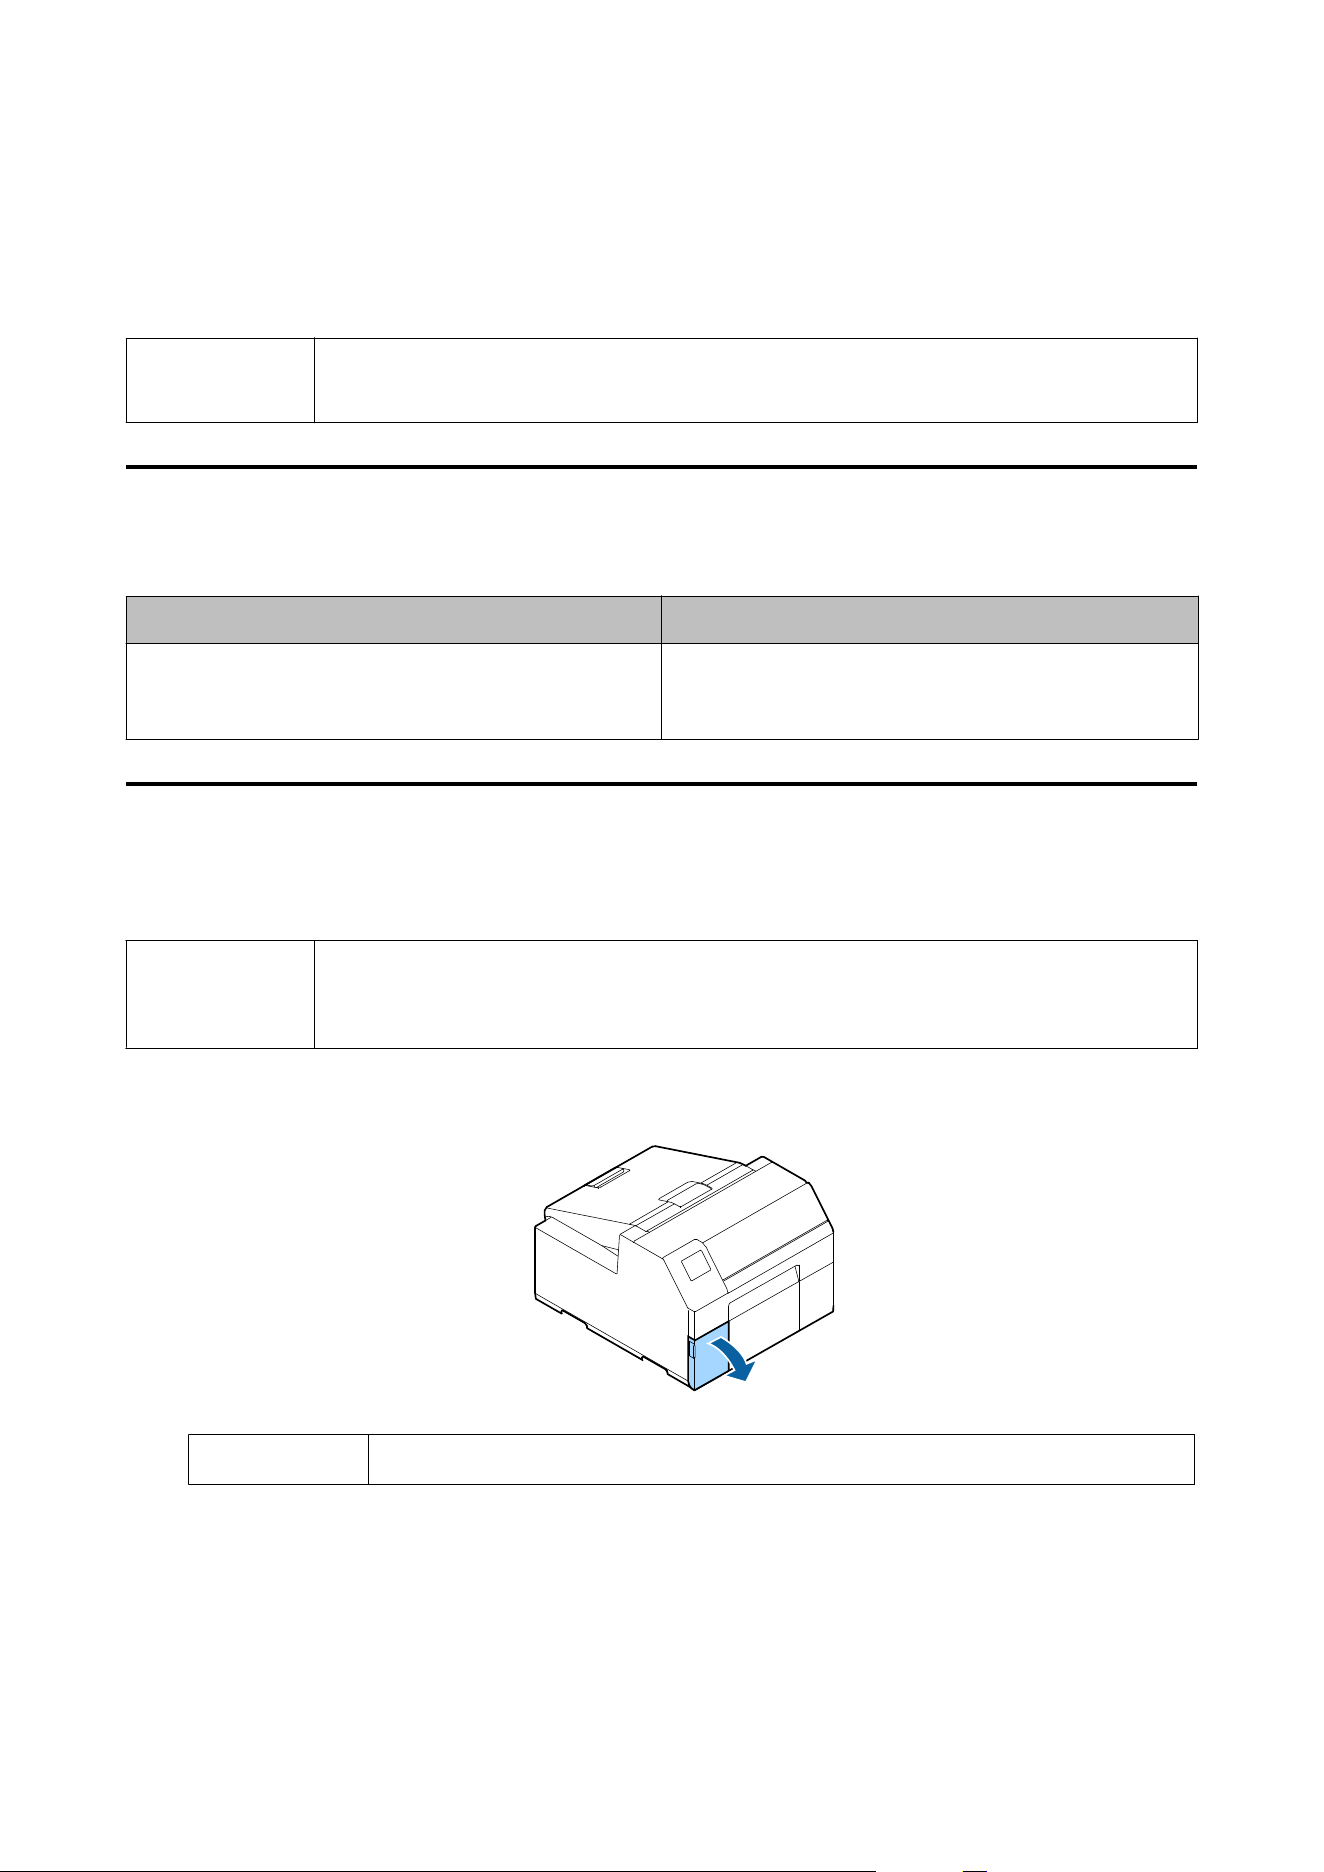
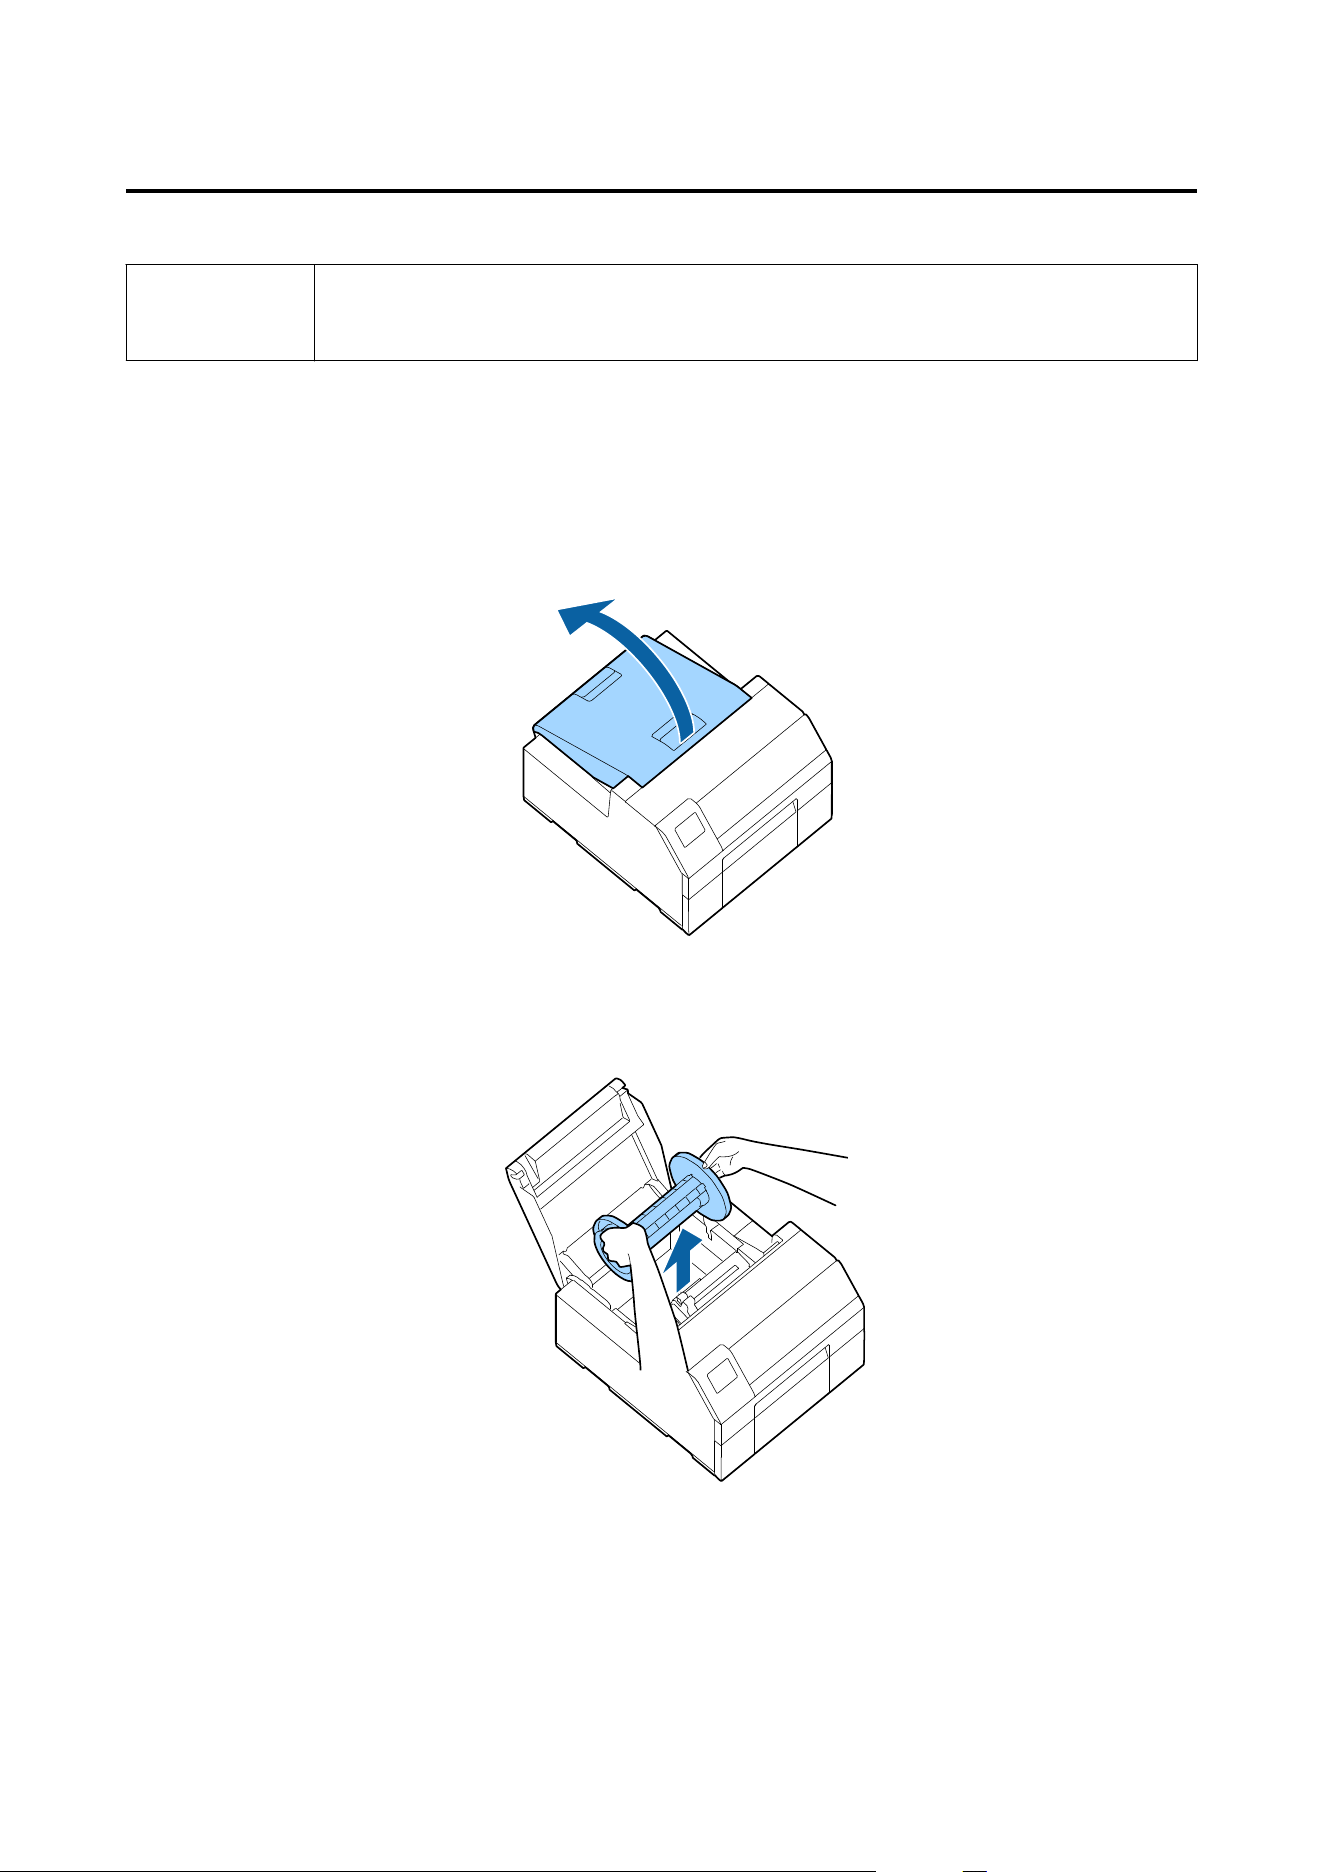
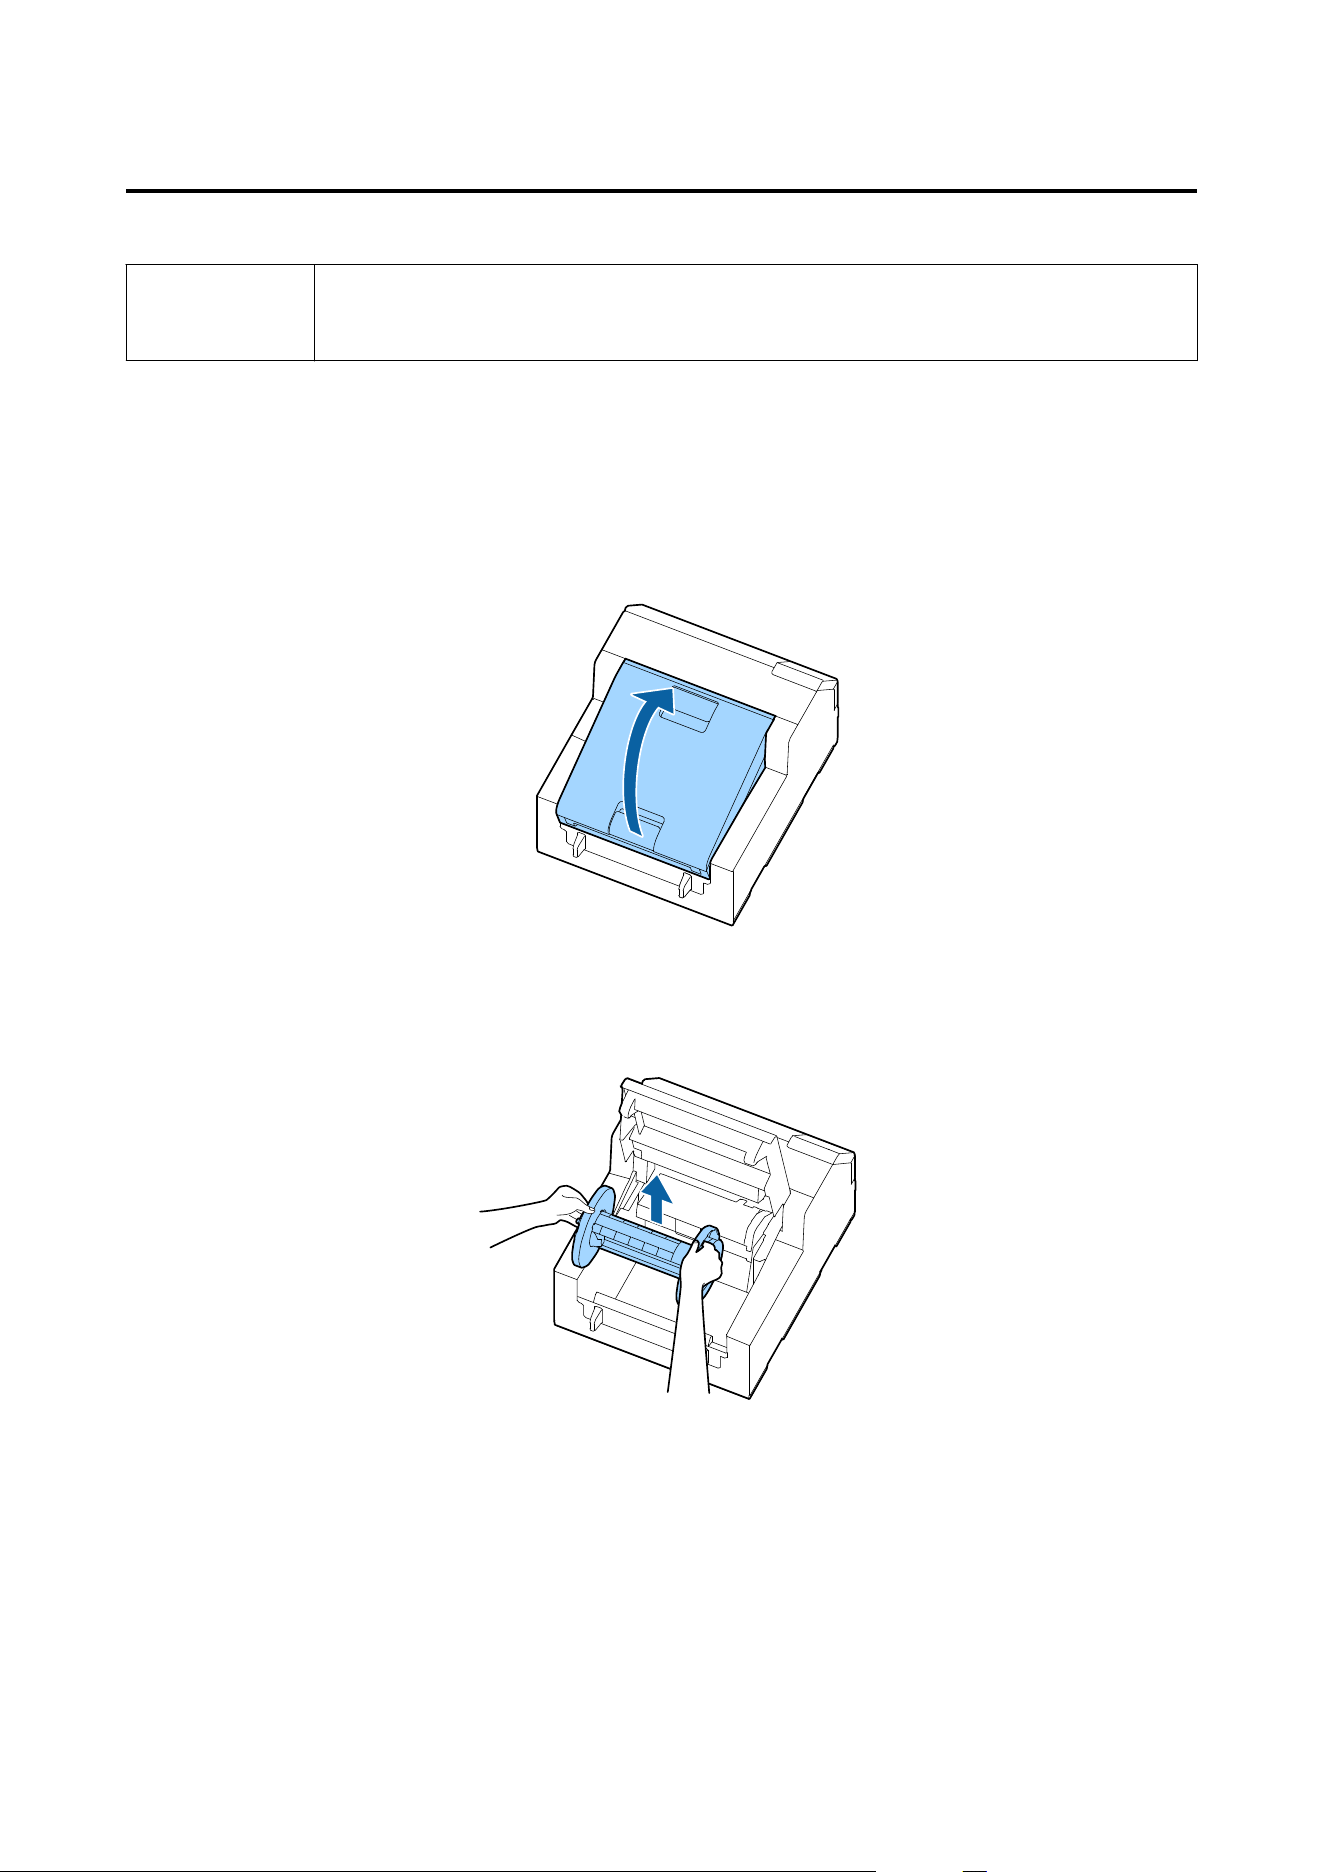
A
Open the paper cover.
CW-C6000 Series/CW-C6500 Series/CW-D6000 Series/CW-D6500 Series User's Guide
Basic Operation
38
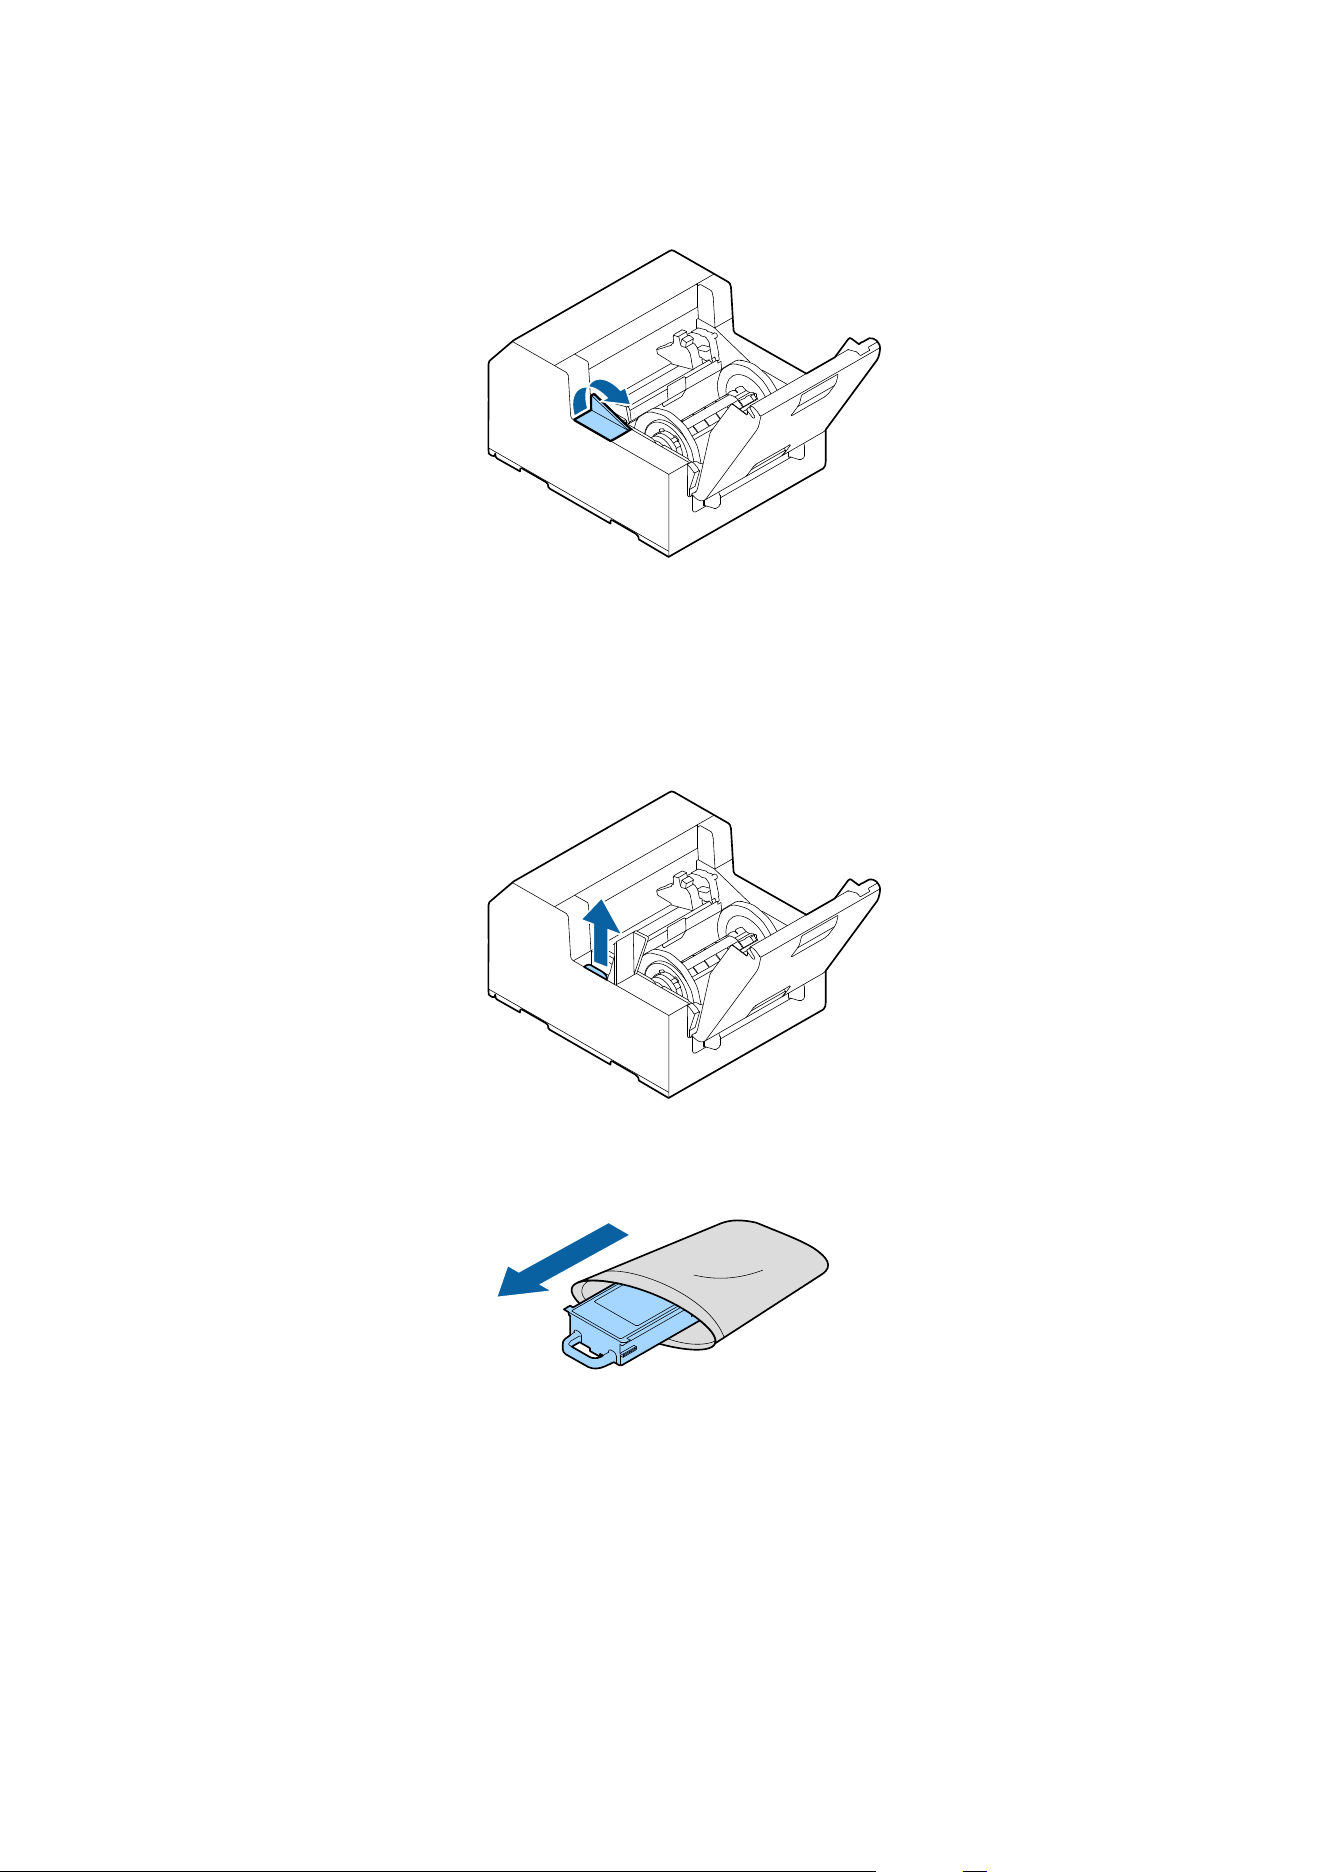
B
Open the maintenance box cover.
C
Take out the maintenance box.
When disposing of the used maintenance box, put it in a plastic bag that came with the new maintenance
box.
U “Disposal of Maintenance Box” on page 113
D
Take out a new maintenance box from the bag.
CW-C6000 Series/CW-C6500 Series/CW-D6000 Series/CW-D6500 Series User's Guide
Basic Operation
39
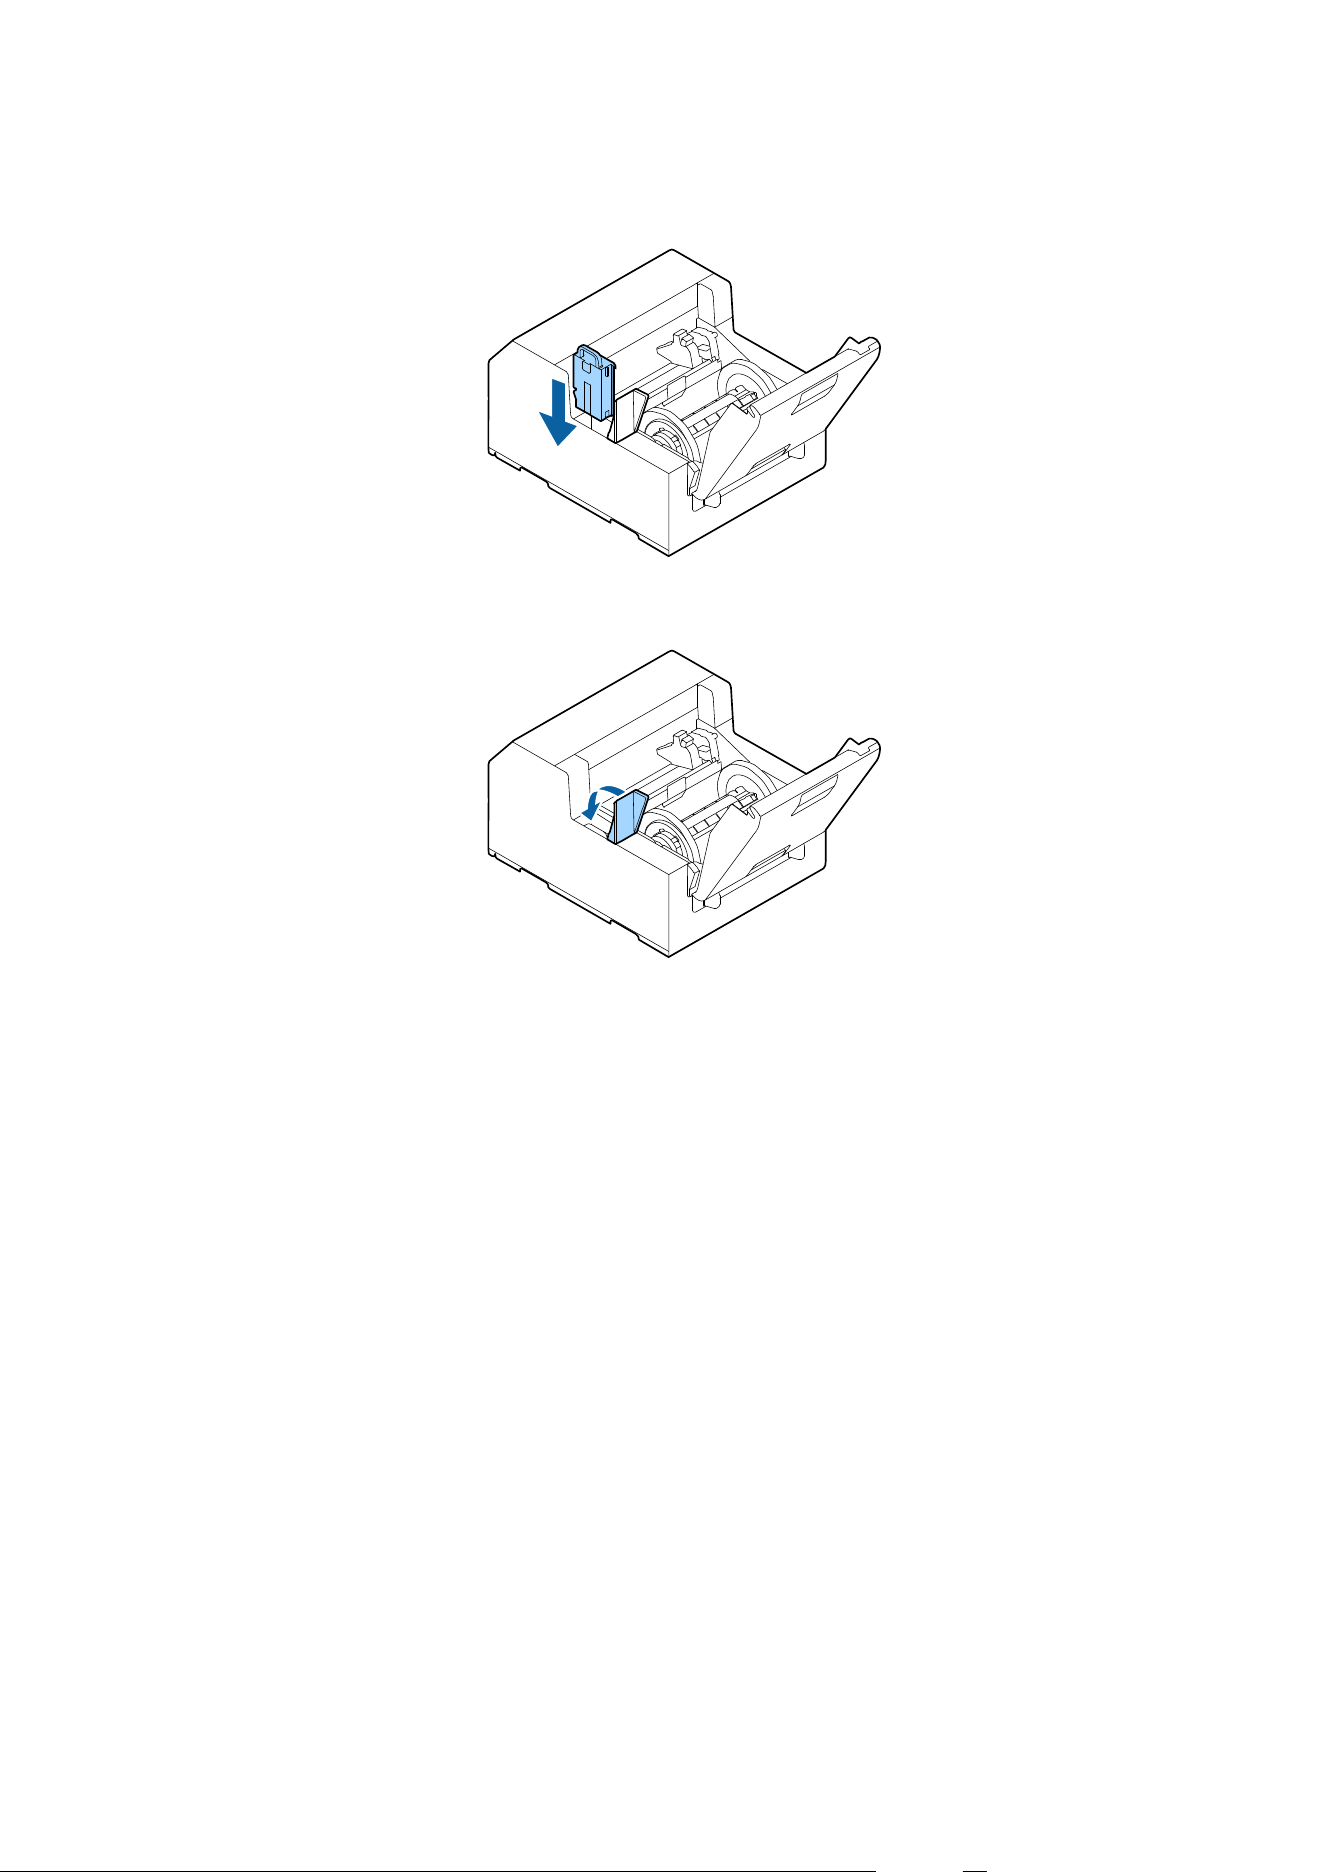
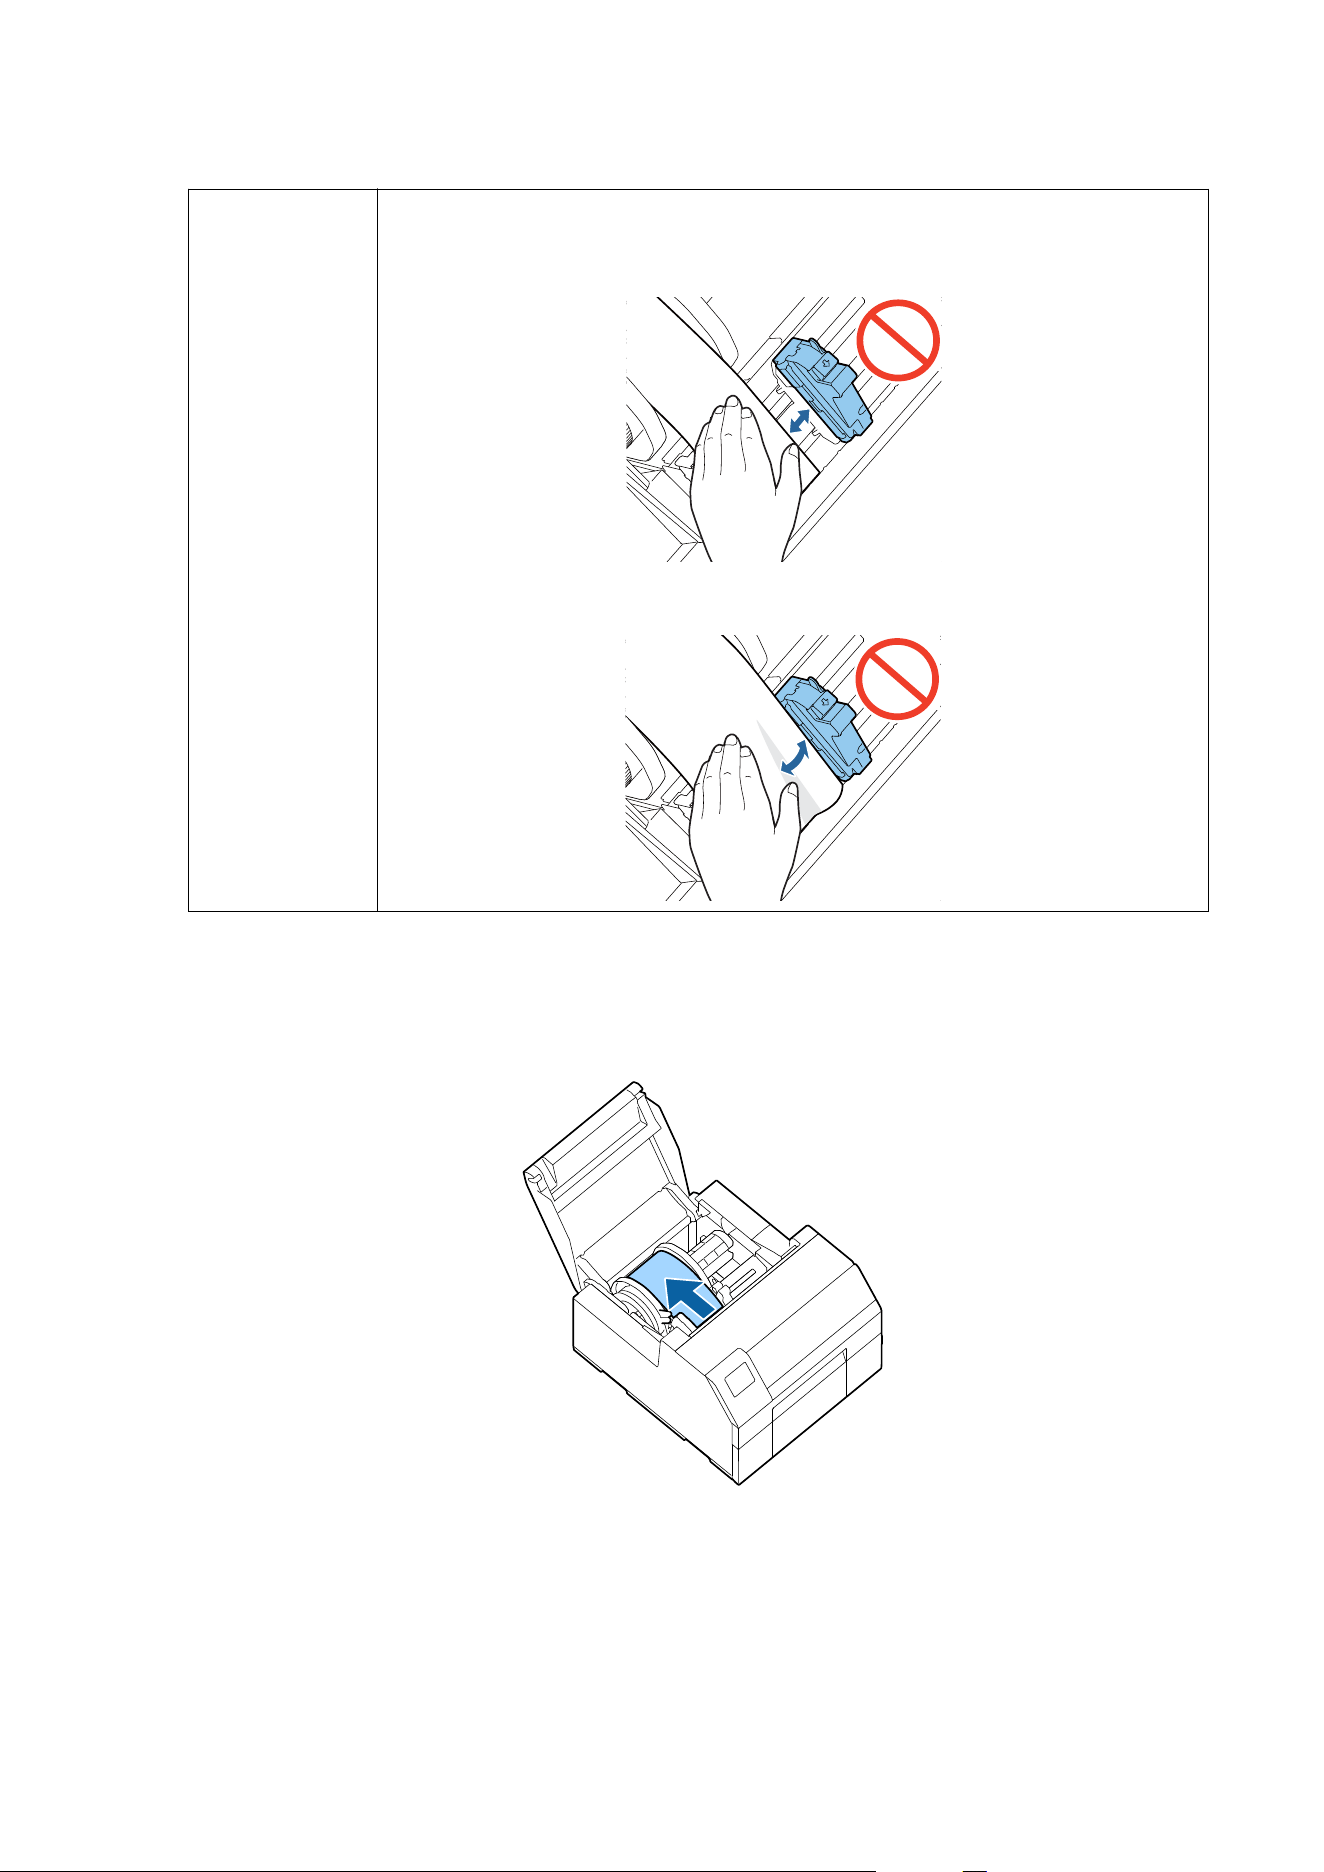
E
Install the new maintenance box.
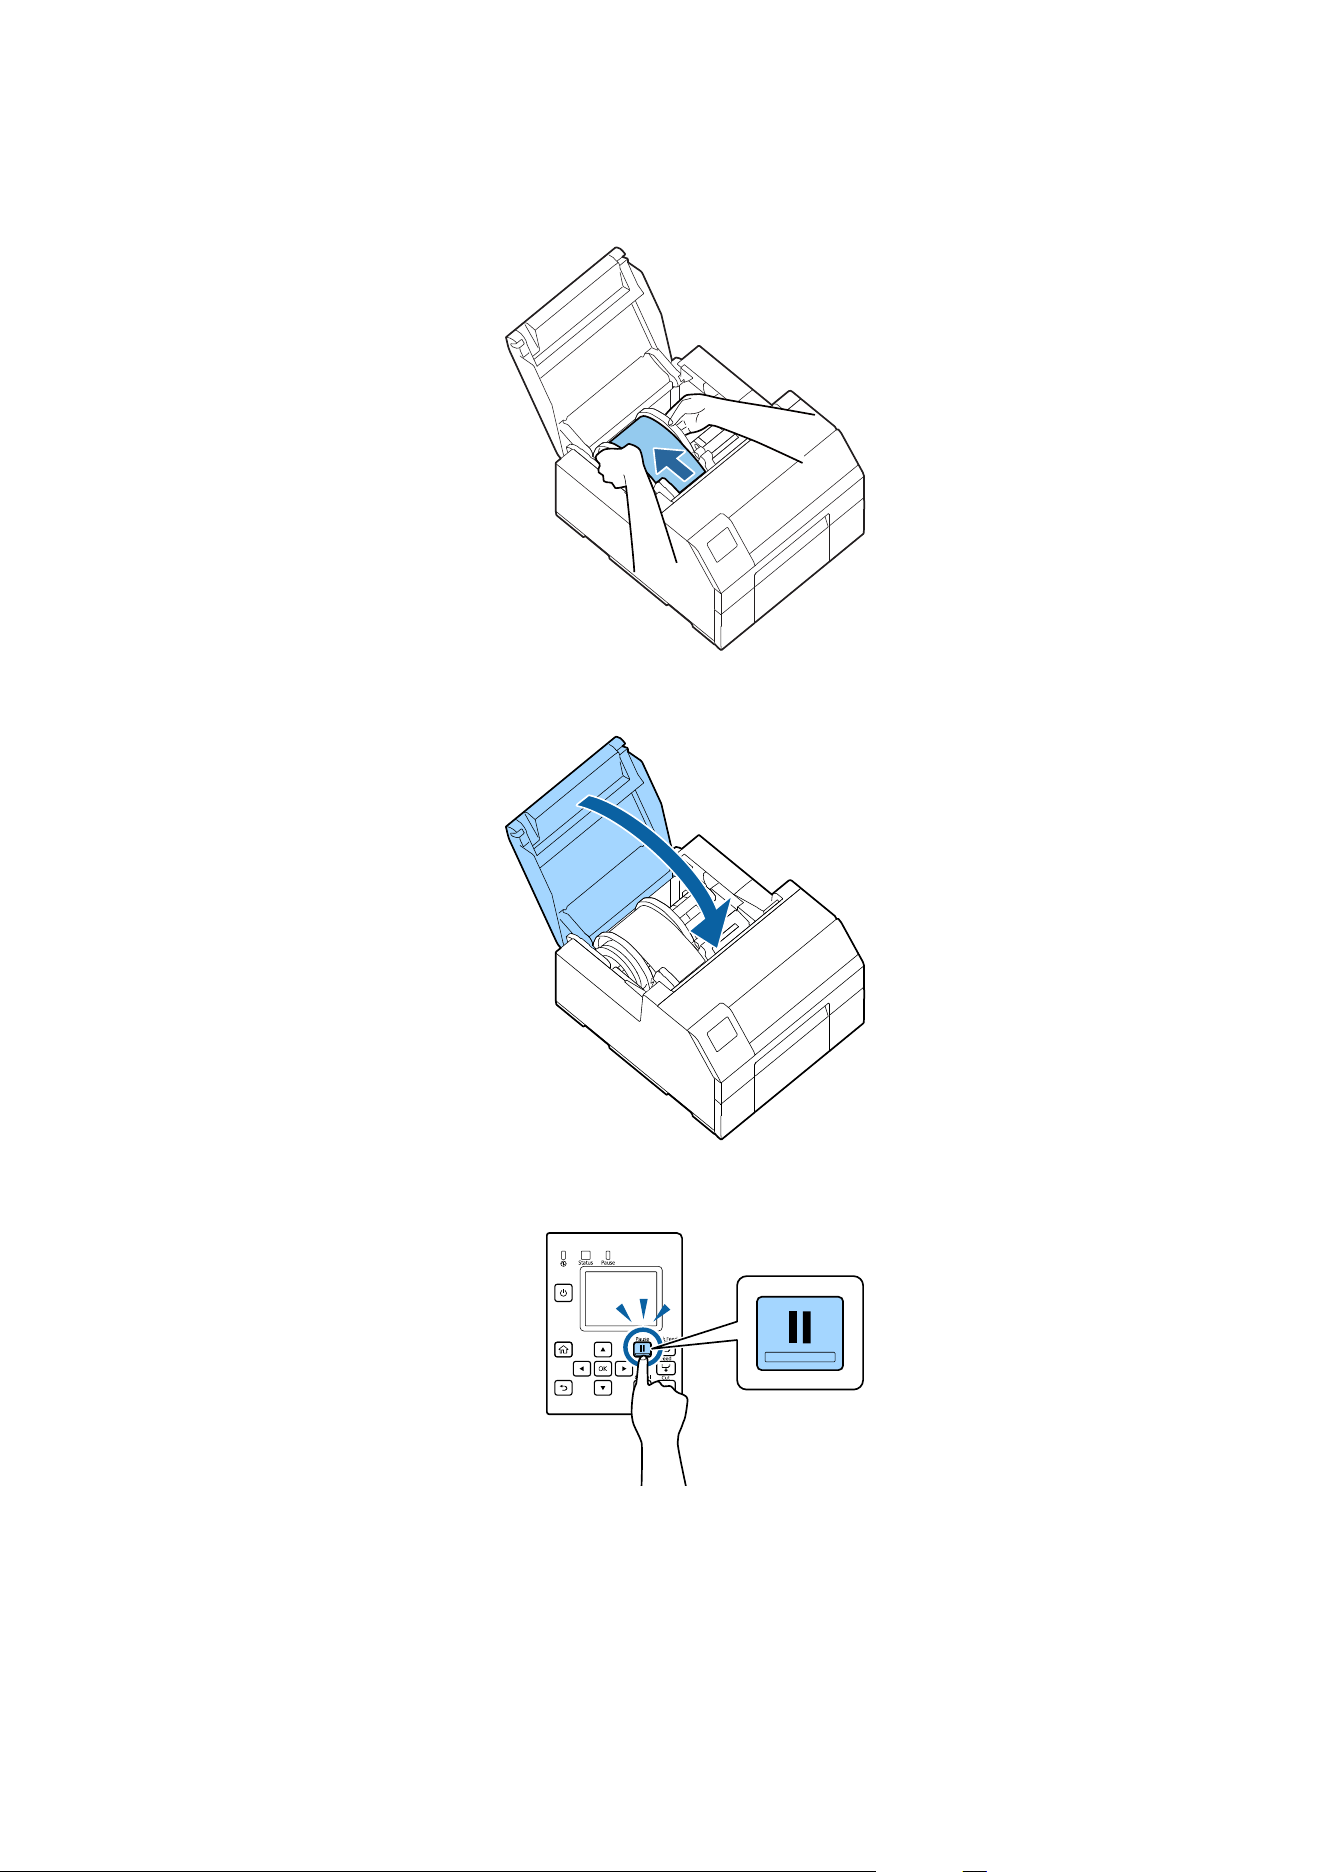
F
Close the maintenance box cover.
CW-C6000 Series/CW-C6500 Series/CW-D6000 Series/CW-D6500 Series User's Guide
Basic Operation
40

Printer Driver Settings
Set the basic items required for printing such as the size and form of media.
e printer driver is equipped with a help function. Right-click an item and then click Help to display an
explanation on the item.
You can also learn how to congure the printer driver with videos. Access the videos from the following URL.
❏ CW-C6000/C6500 Series:
<https://support.epson.net/p_doc/790/>
❏ CW-D6000/D6500 Series:
<https://support.epson.net/p_doc/ab6/>
Note
If the settings on the printer (settable using the operation panel, PrinterSettings, or Web Cong) dier
from the printer driver settings, printing is performed by applying the printer driver settings.
CW-C6000 Series/CW-C6500 Series/CW-D6000 Series/CW-D6500 Series User's Guide
Basic Operation
41

Media
Denition
e size, form, type, and other settings of frequently used paper can be registered as a media denition. e set
media denition can be selected from the Media Name pull-down menu. is is convenient because you will not
need to set the paper settings of the driver when printing from an application if you register a media denition in
advance.
If you wish to set the paper size and other settings every time without registering a media denition, select Custom
from the Media Name pull-down menu on the General tab.
e
various settings on the General tab will become
available so that you can set the paper size and other settings.
Media Name
❏ 108 × 152.4 mm {4.25 × 6.00 in.} - Die-cut Label* (Initial setting)
❏ Custom
*: is setting is suitable for printing the roll paper included with the product.
Label width
For CW-C6000/D6000 Series
Can be specied from 21.4 to 112.0 mm {0.84 to 4.41 in.}
Initial setting: 108.0 mm {4.25 in.}
For CW-C6500/D6500 Series
Can be specied from 21.4 to 215.9 mm {0.84 to 8.50 in.}
Initial setting: 108.0 mm {4.25 in.}
Label Length
For the auto cutter model
Can be specied from 8 to 609.6 mm {0.31 to 24 in.}
Initial setting: 152.4 mm {6.00 in.}
Note
If the interval for cutting the paper is less than 15.0 mm {0.59 in.}, auto cutting is not possible because
a paper jam may occur. If you want to use auto cutting for labels less than 15.0 mm {0.59 in.}, set the
interval for cutting the paper to 15.0 mm {0.59 in.} or more in the settings for paper handling after
print.
U “Settings For Paper Handling After Print” on page 46
CW-C6000 Series/CW-C6500 Series/CW-D6000 Series/CW-D6500 Series User's Guide
Basic Operation
42

For the peeler model
Can be specied from 12.7 to 609.6 mm {0.50 to 24 in.}
Initial setting: 152.4 mm {6.00 in.}
Gap between labels
When detecting paper with black marks or gaps
2 to 6 mm {0.08 to 0.24 in.}
Initial setting: 3 mm {0.12 in.}
When not detecting paper
0 to 6 mm {0 to 0.24 in.}
Initial setting: 3 mm {0.12 in.}
Left & Right gap
Can be set in a range of 0 to 6 mm {0 to 0.24 in.} (normally 2 mm {0.08 in.})
Initial setting: 2 mm {0.08 in.}
Note
If they are set larger than 2 mm {0.08 in.}, problems such as paper jams may occur.
Media Form
❏ Die-cut Label (Gap) (Initial setting)
❏ Die-cut Label (BlackMark)
❏ Continuous Label (BlackMark)
❏ Continuous Label
❏ Continuous paper (BlackMark)
❏ Continuous paper
Media Saving
Enabled only when [Full-page Label] is selected as the [Media Form].
❏ Eliminate Lower Margin
❏ Eliminate Lower And Upper Margin
CW-C6000 Series/CW-C6500 Series/CW-D6000 Series/CW-D6500 Series User's Guide
Basic Operation
43

❏ No Saving (Initial setting)
Media Coating Type
CW-C6000/C6500 Series
❏ Plain Paper
❏ Matte Paper (Initial setting)
❏ Synthetic
❏ Texture Paper
❏ Glossy Paper
❏ Glossy Film
❏ High Glossy Paper
CW-D6000/D6500 Series
❏ Matte Paper
❏ Synthetic
❏ Glossy Paper (Initial setting)
❏ Glossy Film
❏ High Glossy Paper
Print Quality
Note
If you change the Media Coating Type, the Print Quality will be automatically set to the initial setting
suitable for the selected paper type.
CW-C6000/C6500 Series
When [Media Coating Type] is [Plain Paper]
❏ Max Speed
❏ Speed (Initial setting)
❏ Normal
❏ Quality
When [Media Coating Type] is [Matte Paper], [Synthetic], or [Texture Paper]
❏ Max Speed
CW-C6000 Series/CW-C6500 Series/CW-D6000 Series/CW-D6500 Series User's Guide
Basic Operation
44

❏ Speed
❏ Normal (Initial setting)
❏ Quality
When [Media Coating Type] is [Glossy Paper], [Glossy Film], or [High Glossy Paper]
❏ Normal
❏ Quality (Initial setting)
❏ Max Quality
CW-D6000/D6500 Series
When [Media Coating Type] is [Matte Paper] or [Synthetic]
❏ Max Speed
❏ Speed
❏ Normal (Initial setting)
❏ Quality
When [Media Coating Type] is [Glossy Paper], [Glossy Film], or [High Glossy Paper]
❏ Normal
❏ Quality (Initial setting)
❏ Max Quality
Color Correction
❏ Epson Vivid Color
❏ Epson Preferred Color (Initial setting)
❏ ICM
❏ None
Spot Color Setting
No Spot Color (Initial setting)
CW-C6000 Series/CW-C6500 Series/CW-D6000 Series/CW-D6500 Series User's Guide
Basic Operation
45

Settings For Paper Handling After Print
For the auto cutter model
❏ Cut (aer printing last label)
❏ Cut (at specied label)
❏ Cut (aer last page of collate page)
❏ Do not cut (stop at peel position)
❏ Do not cut (stop at cut position) (Initial setting)
❏ Do not cut (stop at the print end position)
Note
Cautions for when Label Length is set to a value less than 15.0 mm {0.59 in.}
❏ Auto cutting is not possible because a paper jam may occur.
❏ You can still select all the following three Cut options in Settings For Paper Handling After
Print.
❏ Cut (after printing last label)
❏ Cut (at specied label)
❏ Cut (after last page of collate page)
❏ When Settings For Paper Handling After Print - Cut (at specied label) - Cut Interval is set to
"1", it is automatically changed to "2" to ensure that the label is longer than the minimum label
length that can be cut (15.0 mm {0.59 in.}).
Also, to ensure that the label length does not become less than the minimum label length that
can be cut (15.0 mm {0.59 in.}), "1" can no longer be set for Cut Interval.
For the peeler model
❏ Manual apply (Initial setting)
❏ Auto apply
❏ Rewind
Notication
For the auto cutter model
❏ None (Initial setting)
❏ Beep at Cut
❏ Beep at Job End
❏ Beep at Collate End
CW-C6000 Series/CW-C6500 Series/CW-D6000 Series/CW-D6500 Series User's Guide
Basic Operation
46

For the peeler model
❏ None (Initial setting)
❏ Beep at Job End
❏ Beep at Collate End
Pause
For the auto cutter model
❏ None (Initial setting)
❏ Pause at Cut
❏ Pause at Job End
❏ Pause at Collate End
For the peeler model
❏ None (Initial setting)
❏ Pause at Job End
❏ Pause at Collate End
Media Detection…
Media Source
❏ Internal roll (Initial setting)
❏ External feed
Media Detection
❏ Gap detection (Initial setting)
❏ Black mark detection
❏ No detection
CW-C6000 Series/CW-C6500 Series/CW-D6000 Series/CW-D6500 Series User's Guide
Basic Operation
47
Loading and Replacing Paper
is section describes how to load and replace paper. As shown below, the procedure of replacing paper diers
depending on the size and whether paper has been/is going to be supplied from inside or outside. Videos that show
the procedure are also available.
Access the videos from the following URL.
❏ CW-C6000/C6500 Series:
<https://support.epson.net/p_doc/790/>
❏ CW-D6000/D6500 Series:
<https://support.epson.net/p_doc/ab6/>
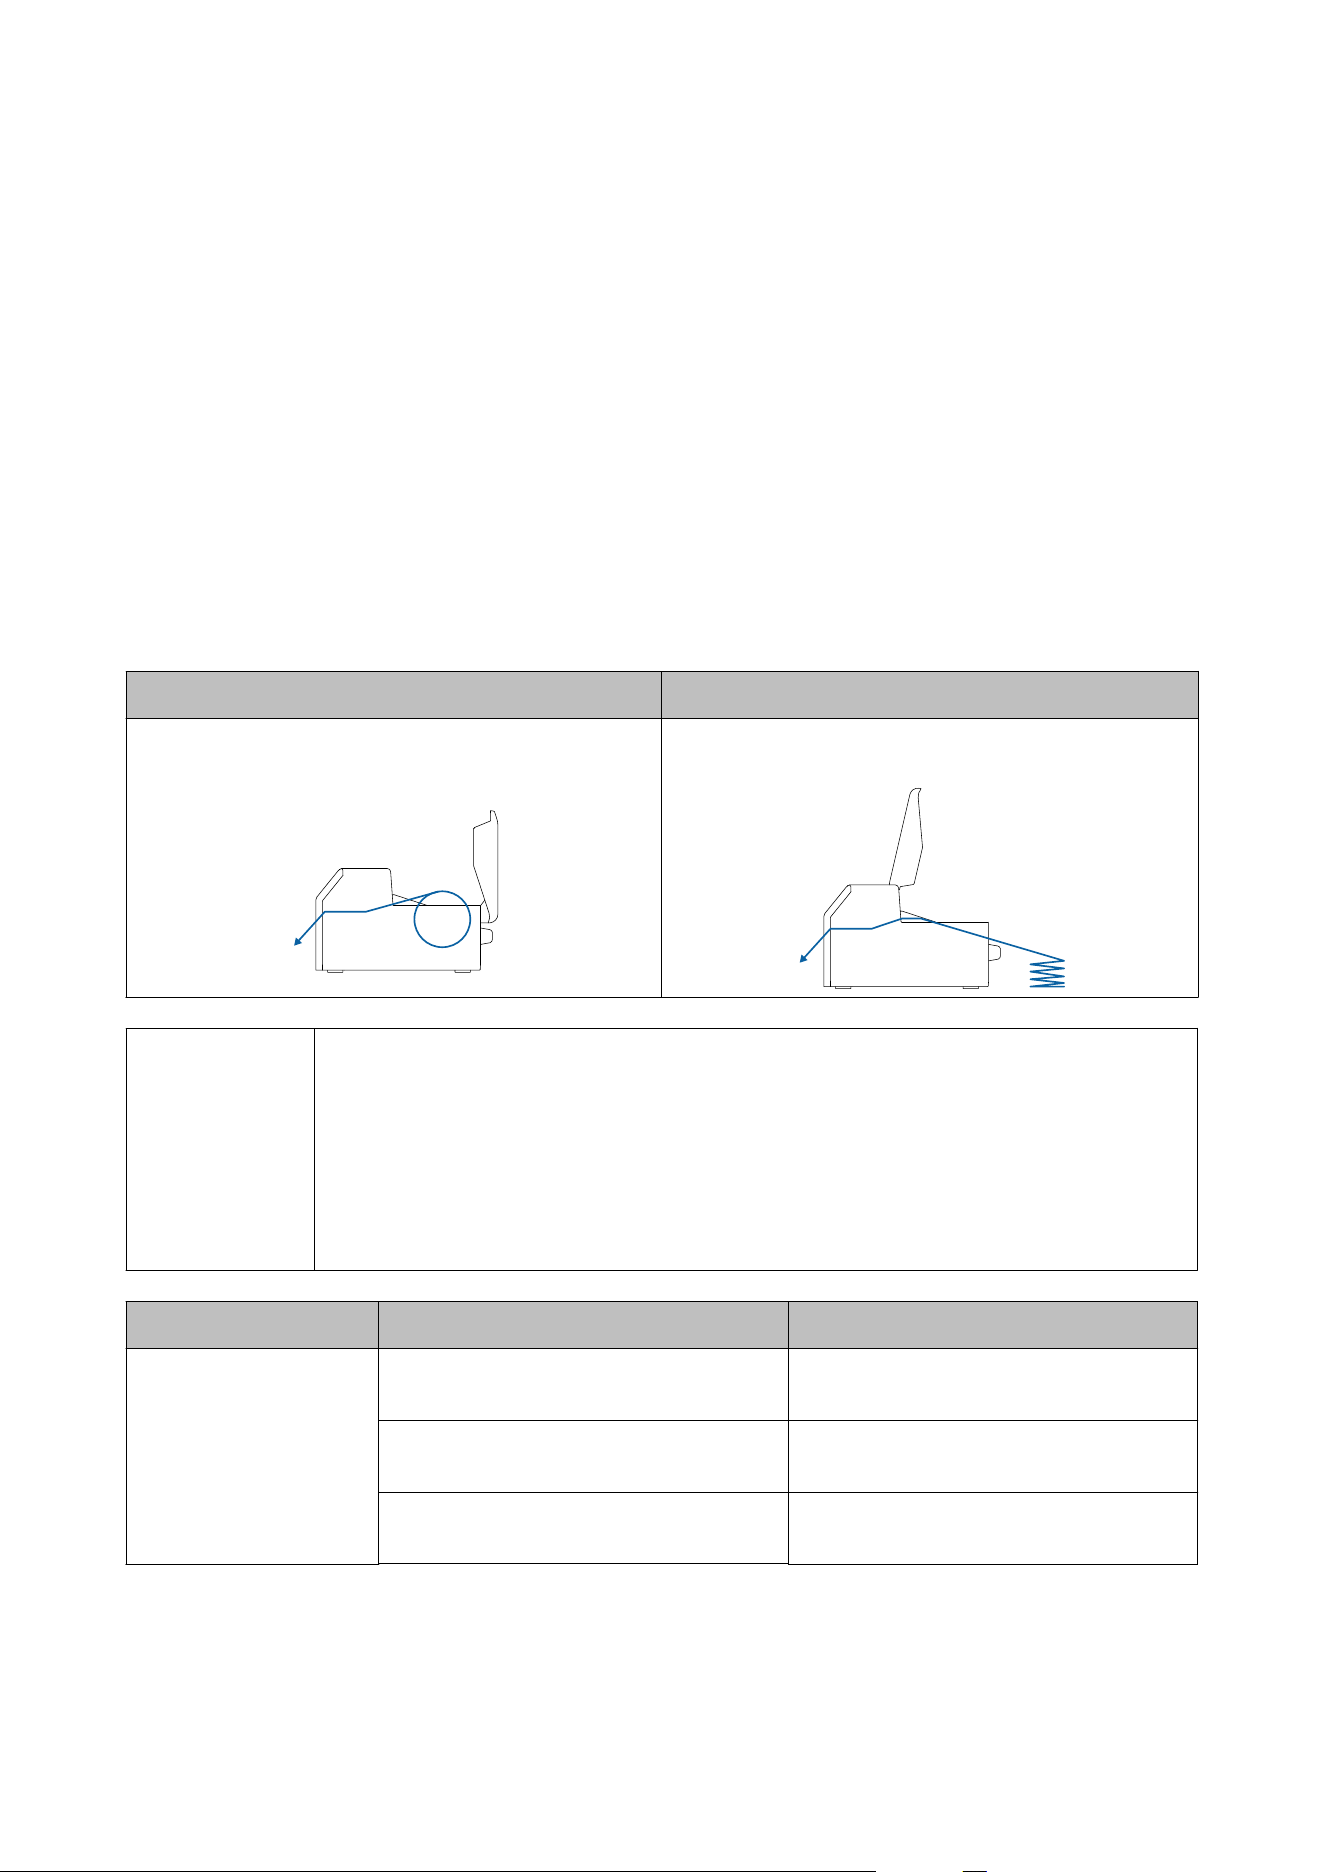
Supply from Inside (Internal) Supply from Outside (Rear Feed)
Paper is supplied from inside the printer. Set roll paper
attached to the spindle into the printer.
Paper is supplied from outside the printer. Place fanfold
paper behind the printer. (Auto cutter model only)
c
Important
❏ To supply roll paper from outside the printer, prepare an external paper feeder and paper
rewinder by yourself. For more details, see the Technical Reference Guide.
❏ With the peeler model, you can not supply fanfold paper from outside the printer.
❏ When replacing paper with a dierent shape, form, or type of paper, change the paper settings
either from the operation panel or on the printer driver before loading the paper.
U “Checking the Paper Information” on page 32
U “Printer Driver Settings” on page 41
How to supply paper Procedures for auto cutter model Procedures for peeler model
Supply from Inside
(Internal)
“How to Load Paper (Auto Cutter Model -
Supply from Inside)” on page 50
“How to Load Paper (Peeler Model - Supply
from Inside)” on page 60
“How to Remove Paper (For the Auto Cutter
Model)” on page 67
“How to Remove Paper (For the Peeler
Model)” on page 69
“How to Eject Paper at Paper End (For the
Auto Cutter Model)” on page 71
“How to Eject Paper at Paper End (For the
Peeler Model)” on page 72
CW-C6000 Series/CW-C6500 Series/CW-D6000 Series/CW-D6500 Series User's Guide
Basic Operation
48

How to supply paper Procedures for auto cutter model Procedures for peeler model
Supply from Outside (Rear
Feed)
“How to Load Paper (Auto Cutter Model -
Supply from Outside)” on page 55
---
“How to Remove Paper (For the Auto Cutter
Model)” on page 67
“How to Eject Paper at Paper End (For the
Auto Cutter Model)” on page 71
CW-C6000 Series/CW-C6500 Series/CW-D6000 Series/CW-D6500 Series User's Guide
Basic Operation
49
How to Load Paper (Auto Cutter Model - Supply from Inside)
!
Caution
After turning on the printer, wait until the home screen is displayed, and then open the paper cover. If
you open the cover before the home screen is displayed, the printer may fail to load the paper
correctly.
A
Turn on the printer, and then check that Internal is selected as the Media Source setting on the operation
panel.
U “Checking the Paper Information” on page 32
B
Open the paper cover.
C
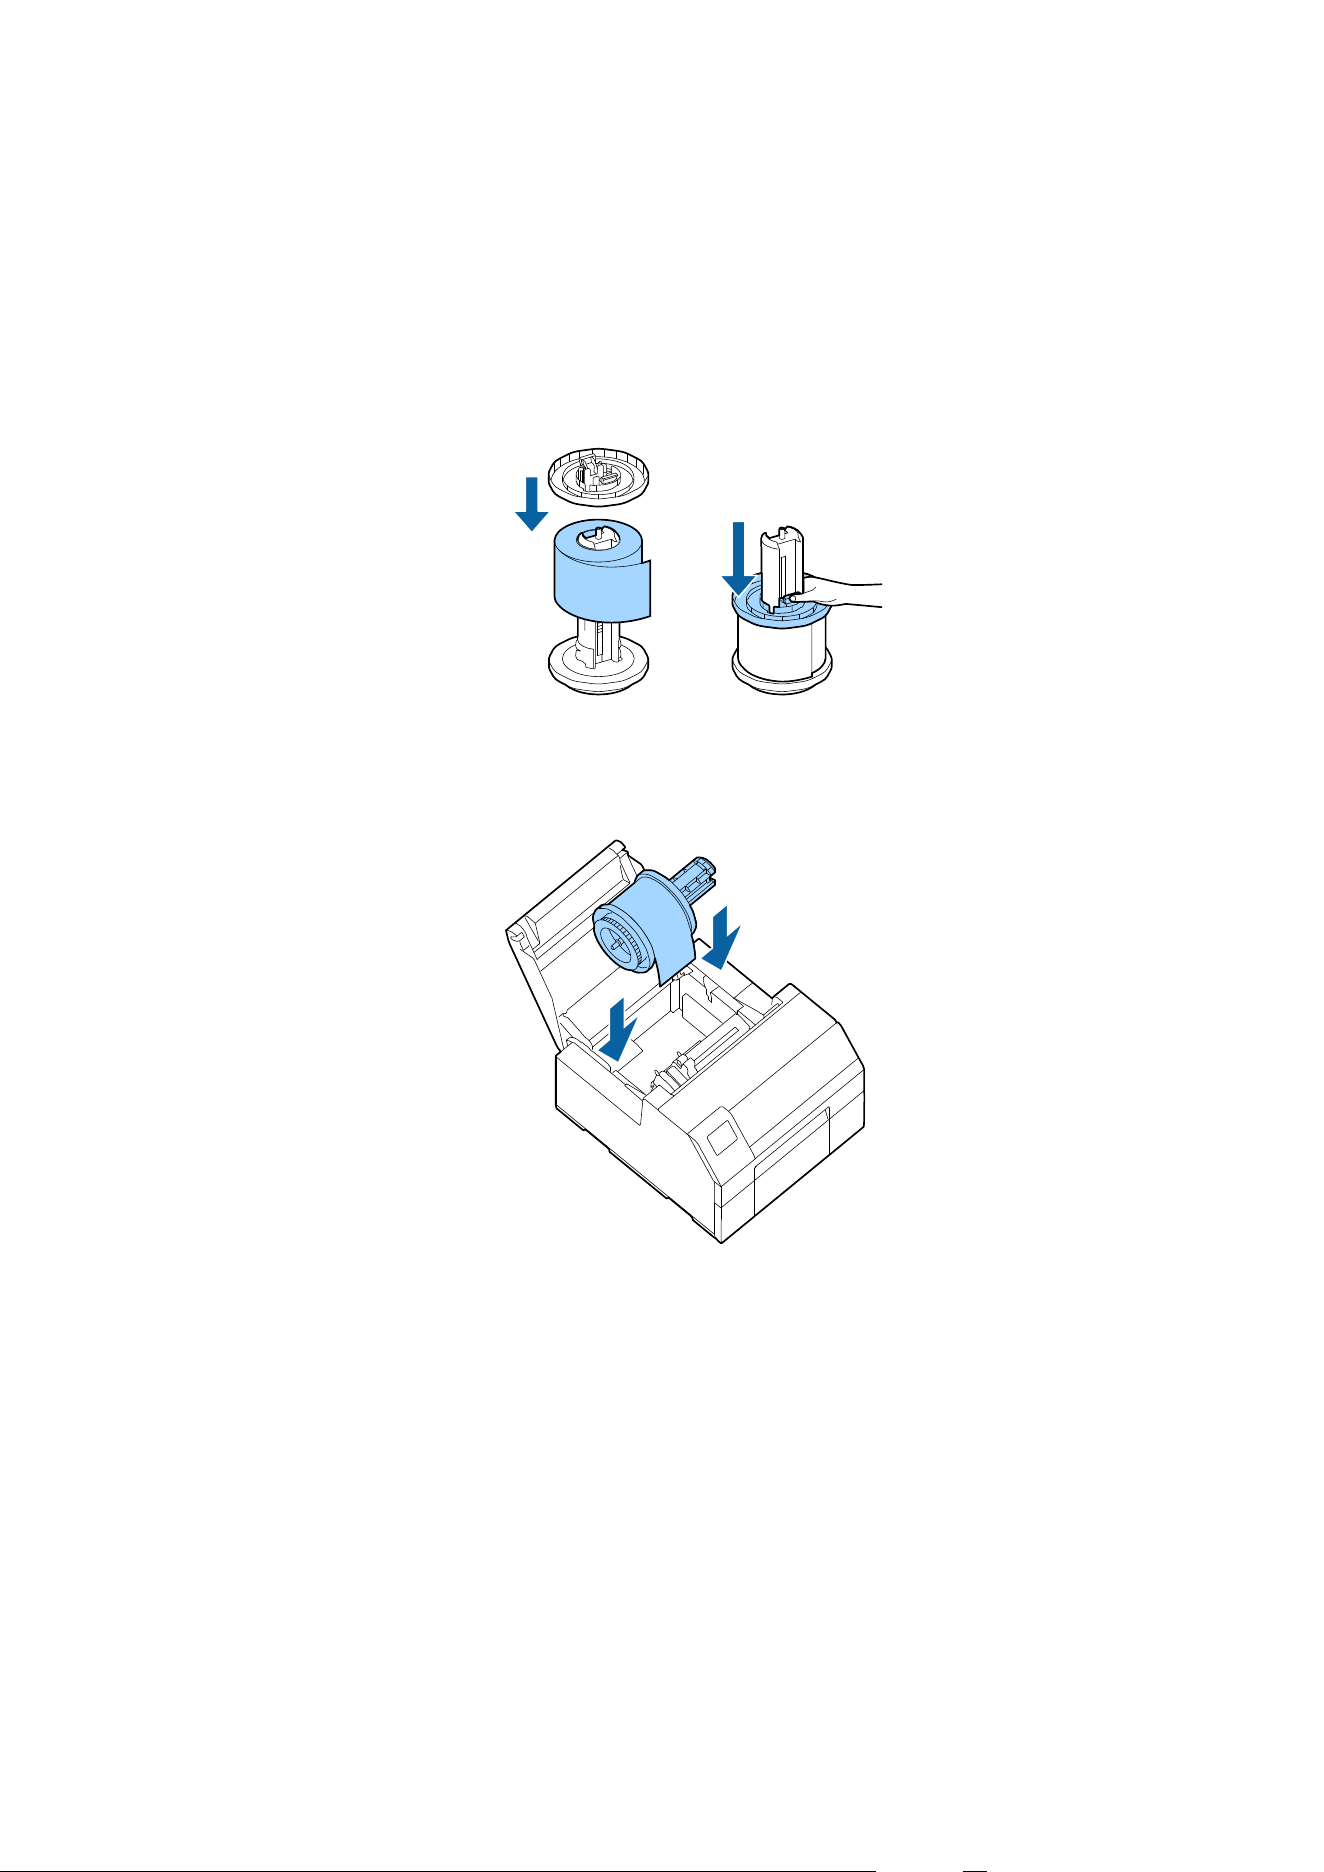
Remove the spindle from the printer.
As shown in the gure, hold the spindle and ange with both hands, and remove them.
CW-C6000 Series/CW-C6500 Series/CW-D6000 Series/CW-D6500 Series User's Guide
Basic Operation
50

D
Load the roll paper on the spindle and
x
it with the
ange.
❏ To move the
ange,
squeeze the two levers.
❏ When loading the roll paper on the spindle, take note of the winding direction. e correct winding
direction is marked on the spindle.
❏ Fix the ange and roll paper so that there is no gap in between.
E
Hold the spindle with both hands, and set it in the printer.
Install the spindle so that both ends of the spindle t into the holders inside the printer.
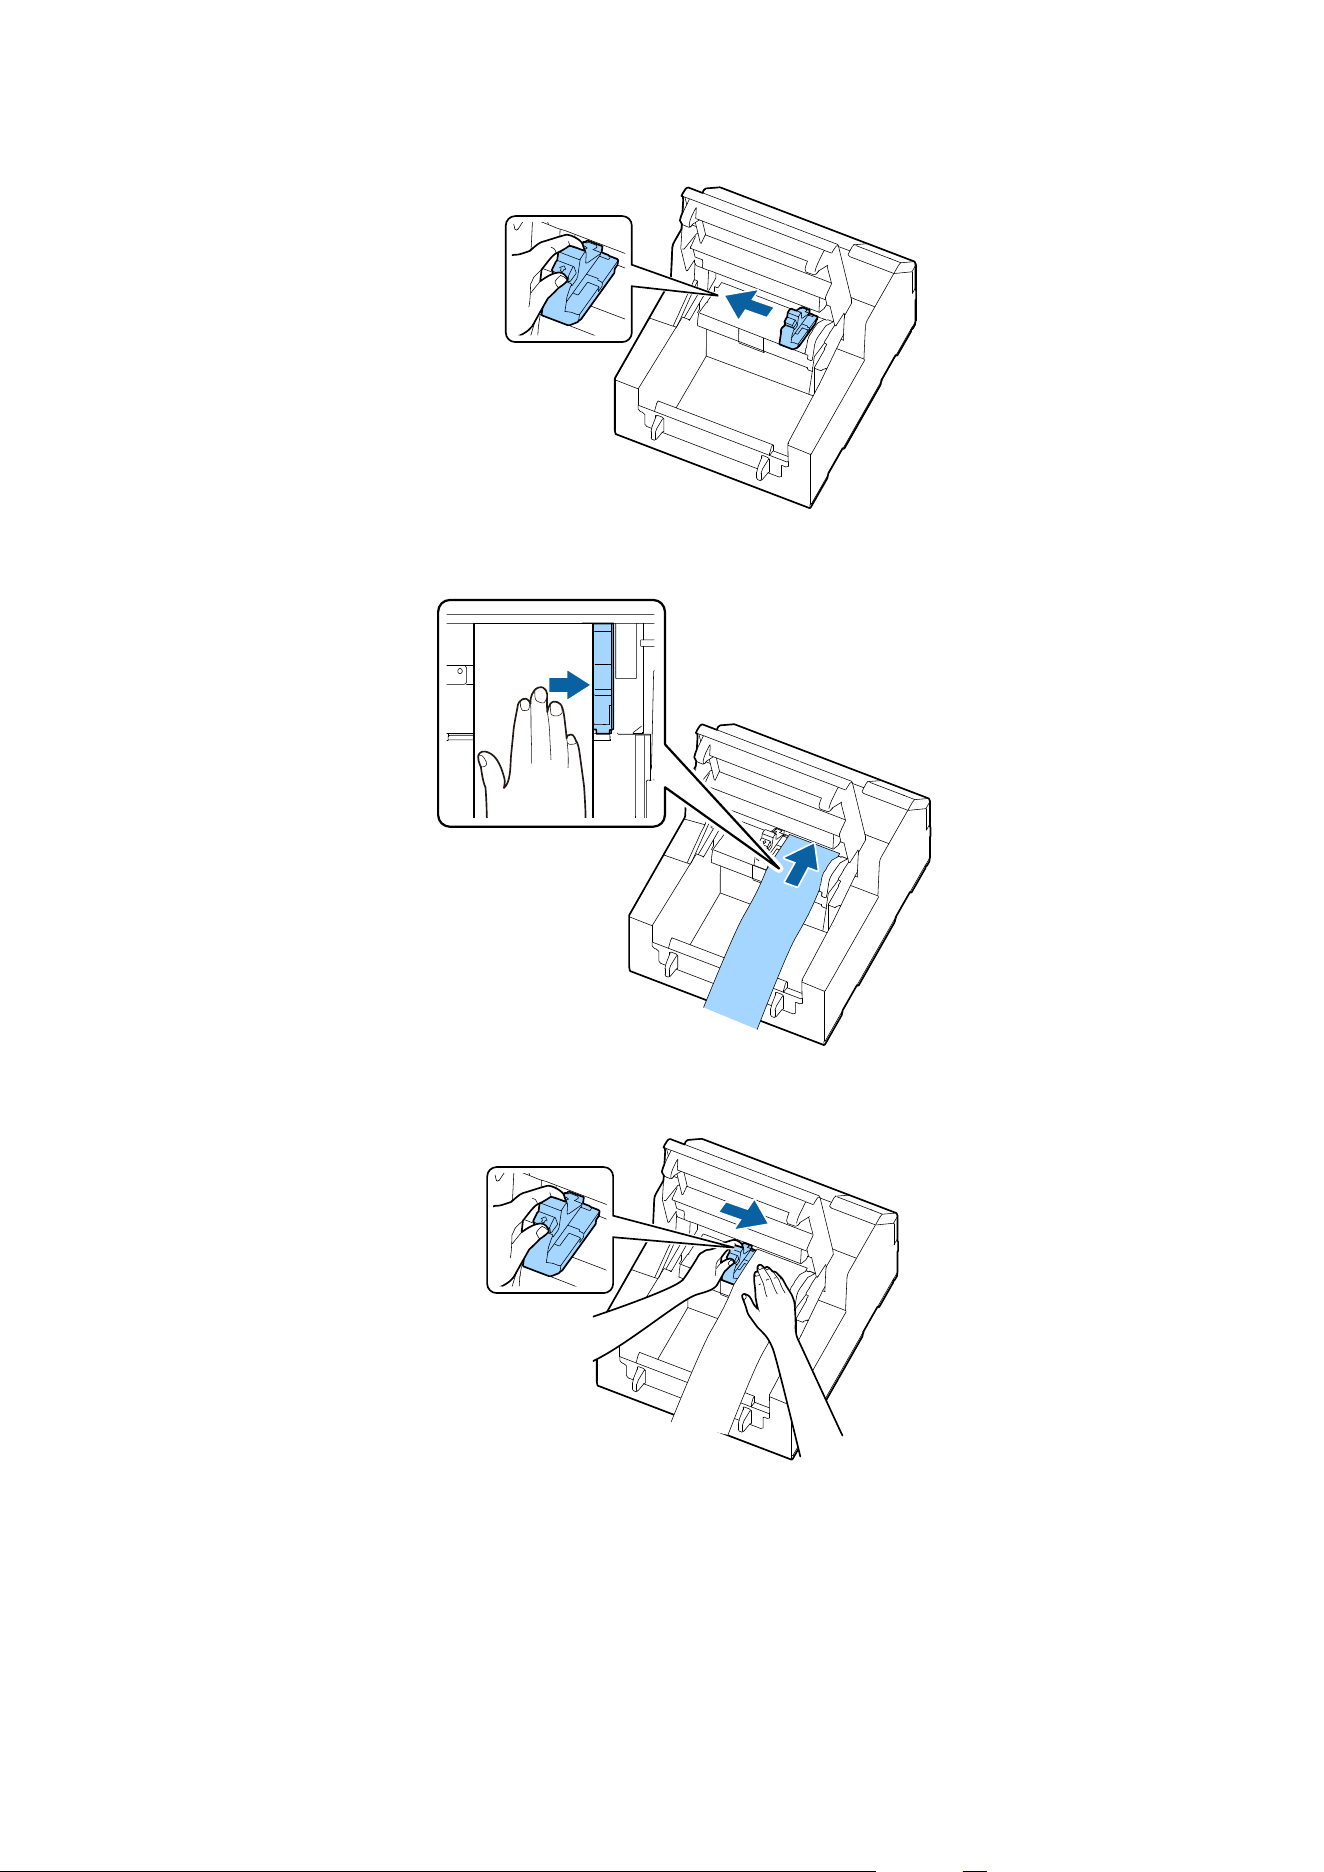
F
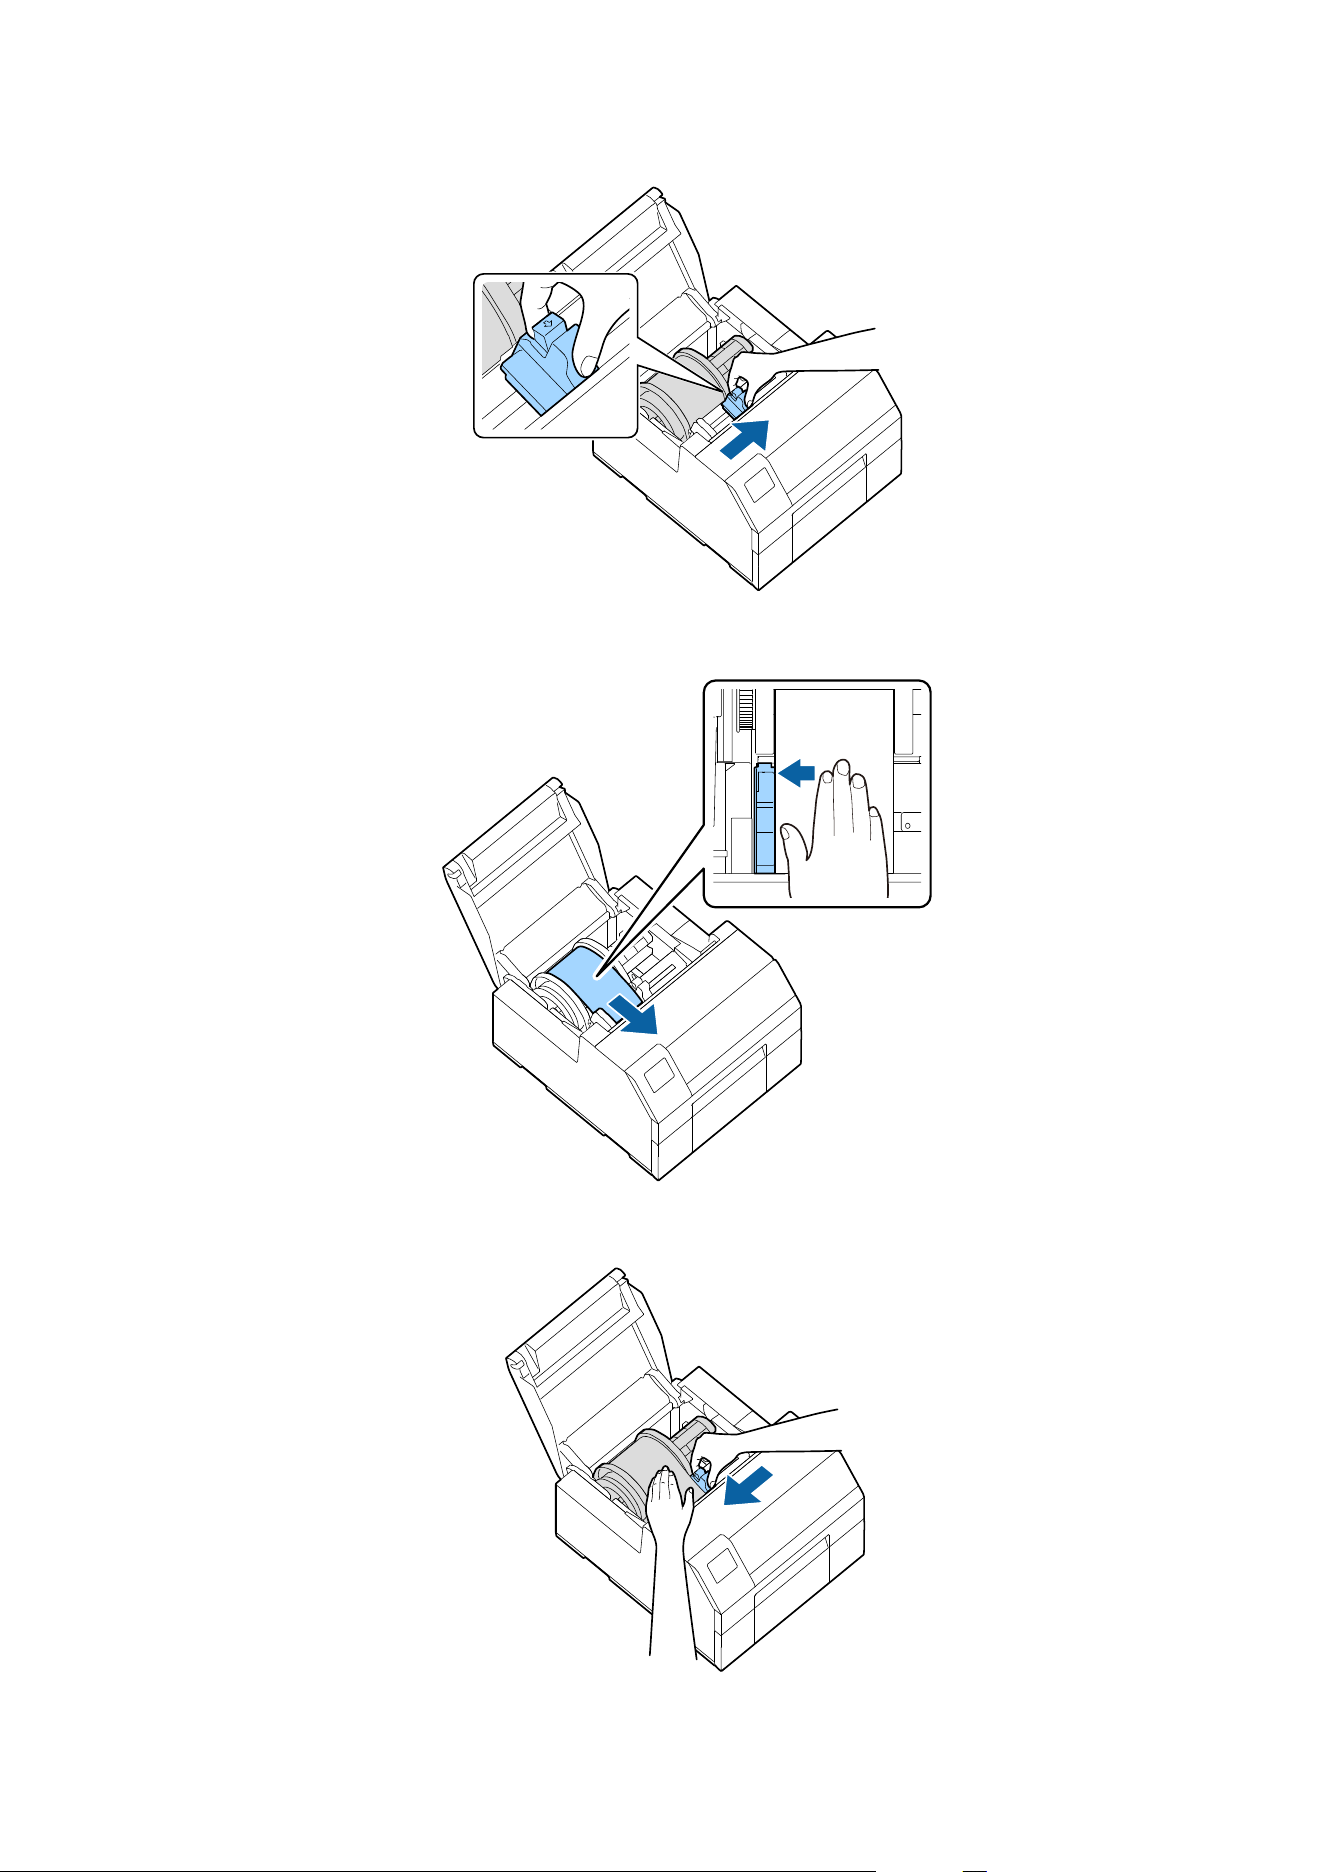
Slide the movable edge guide to the right side.
Squeeze the blue lever to move the edge guide.
CW-C6000 Series/CW-C6500 Series/CW-D6000 Series/CW-D6500 Series User's Guide
Basic Operation
51

G
Pull the paper along the
le
edge guide.
H
Place your hand on the paper to atten it, and slide the movable edge guide against the paper.
CW-C6000 Series/CW-C6500 Series/CW-D6000 Series/CW-D6500 Series User's Guide
Basic Operation
52
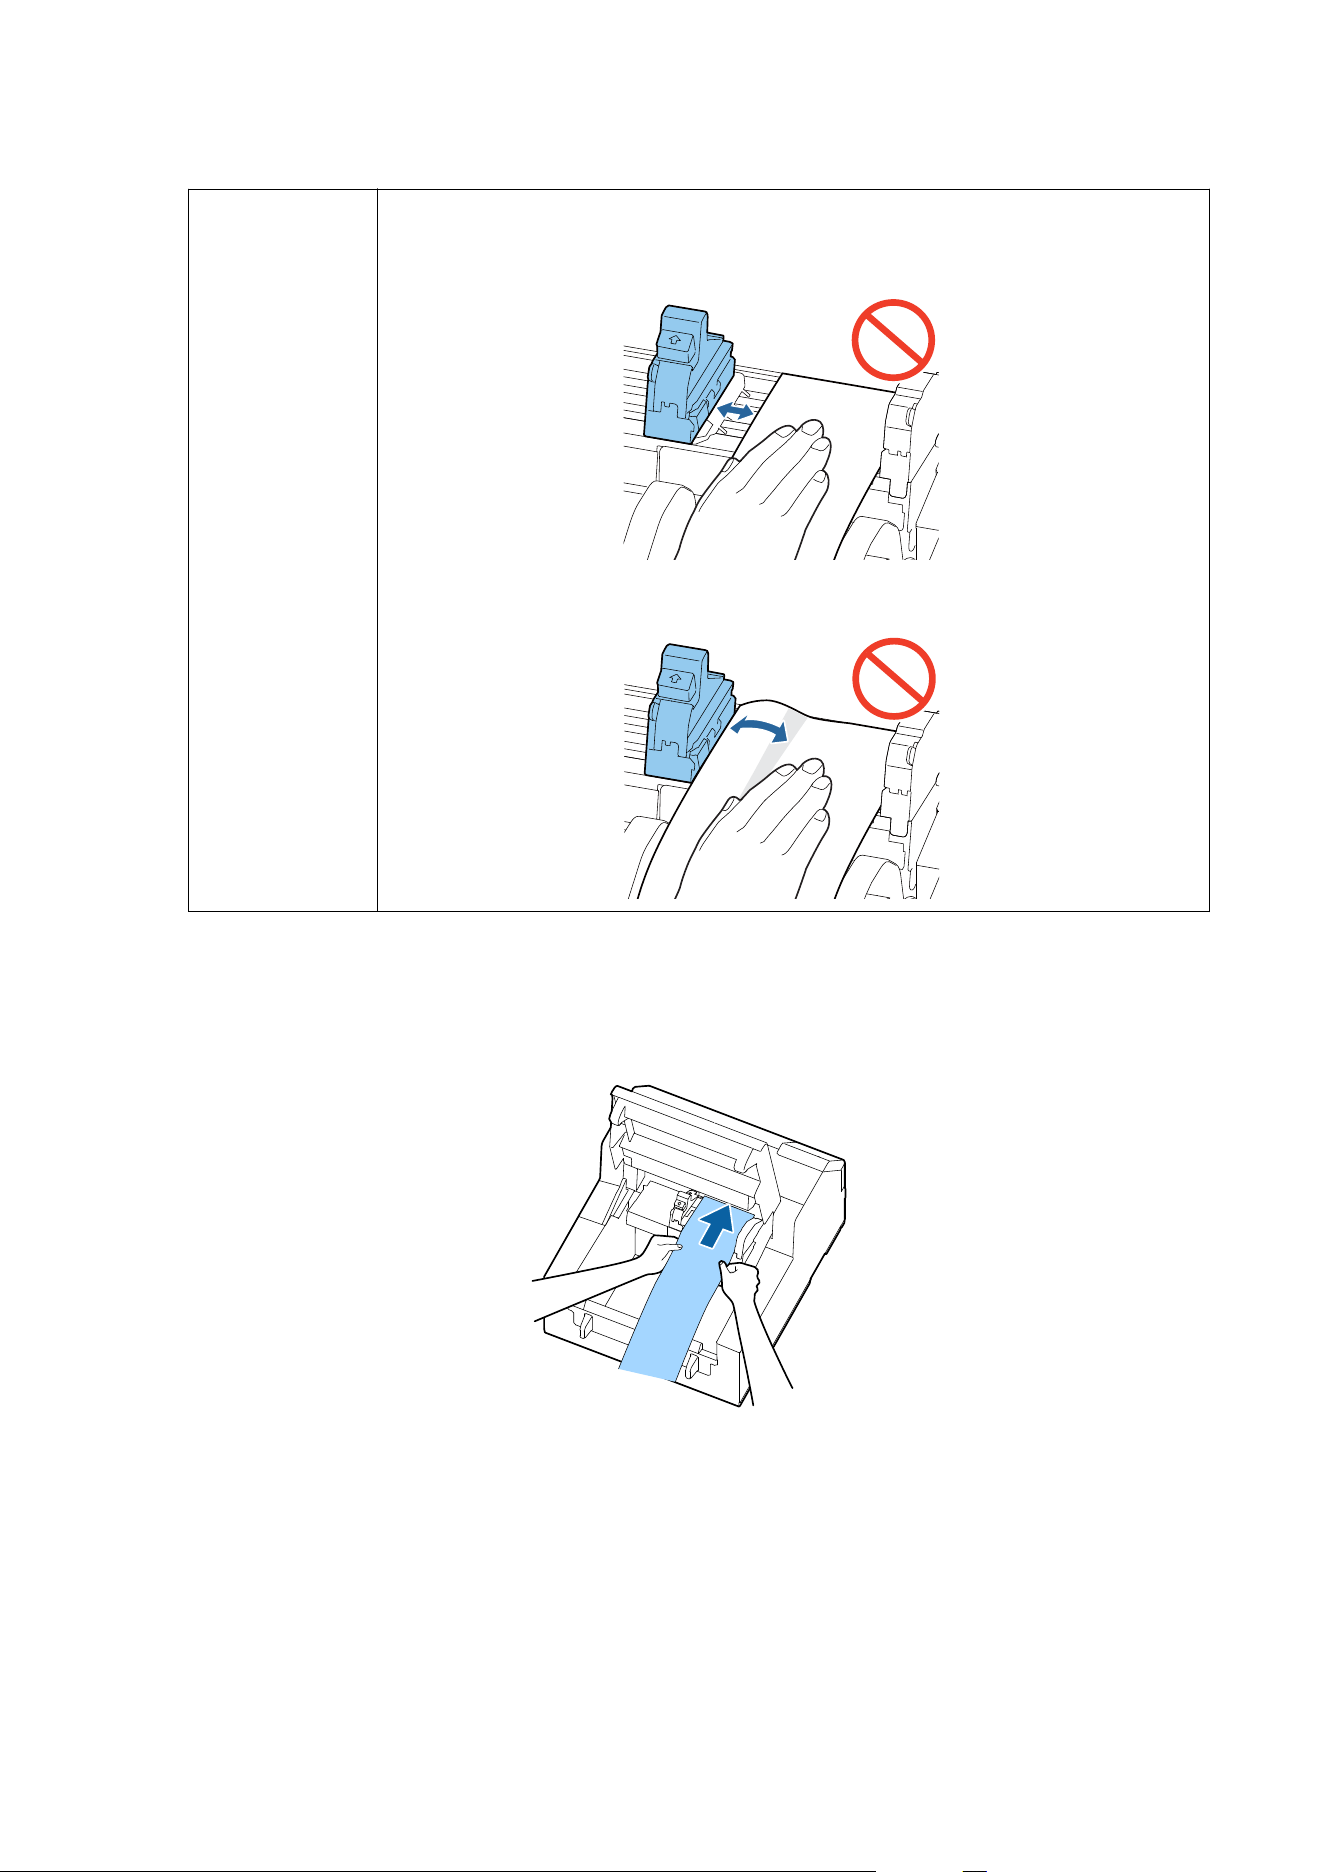
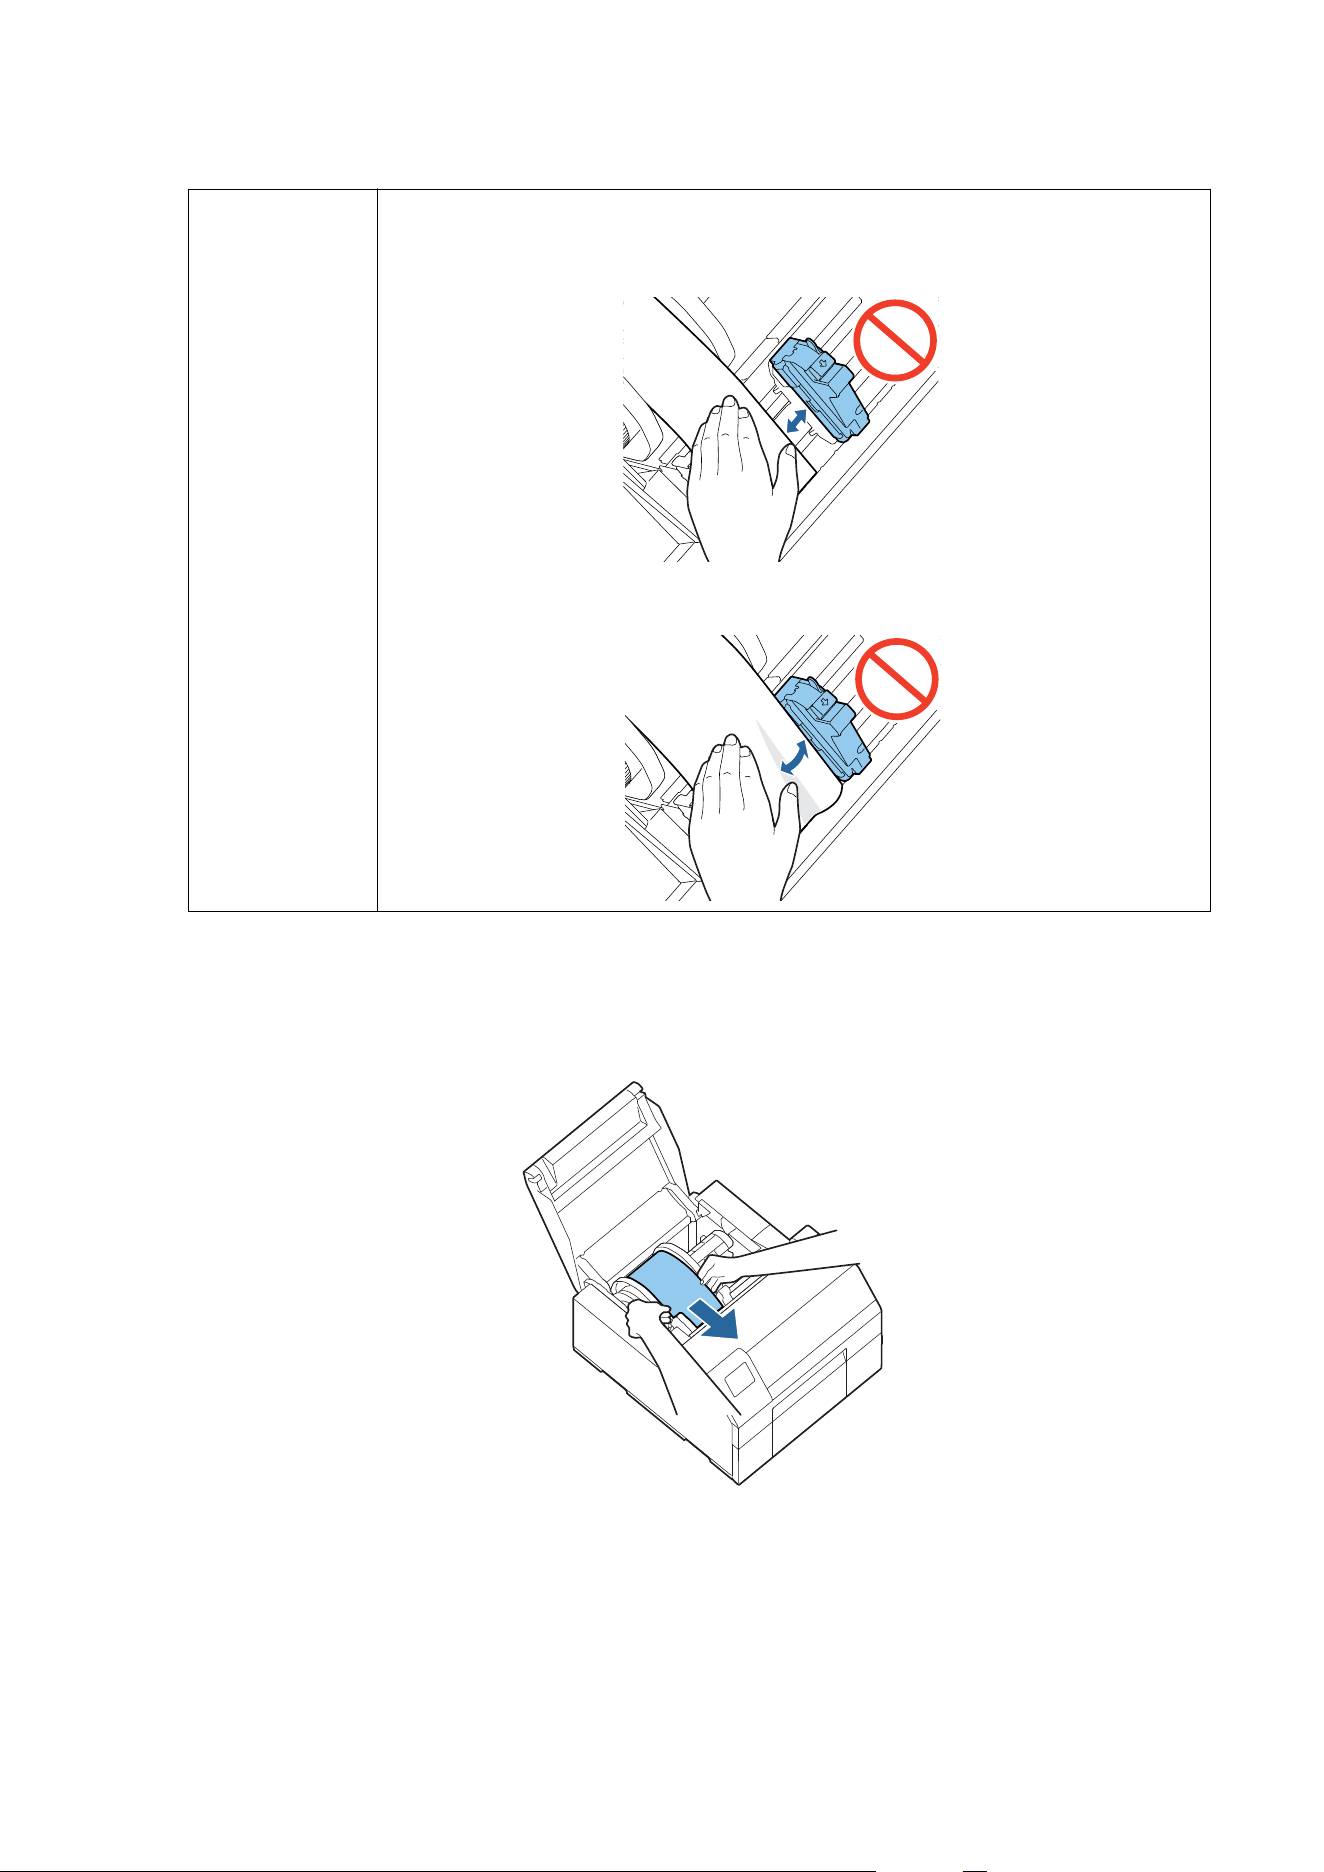
!
Caution
If the movable edge guide is not properly slided against the paper, print position may become
incorrect or a paper jam may occur. Make sure to follow the guidelines below.
❏ There should be no gap between the guide and the paper edge.
❏ Do not slide the guide against the paper too tightly.
I
Insert the paper into the paper feed slot until paper feeding starts automatically.
Do not load backing paper that has no labels on it. e paper may not be detected and not be fed
automatically.
CW-C6000 Series/CW-C6500 Series/CW-D6000 Series/CW-D6500 Series User's Guide
Basic Operation
53
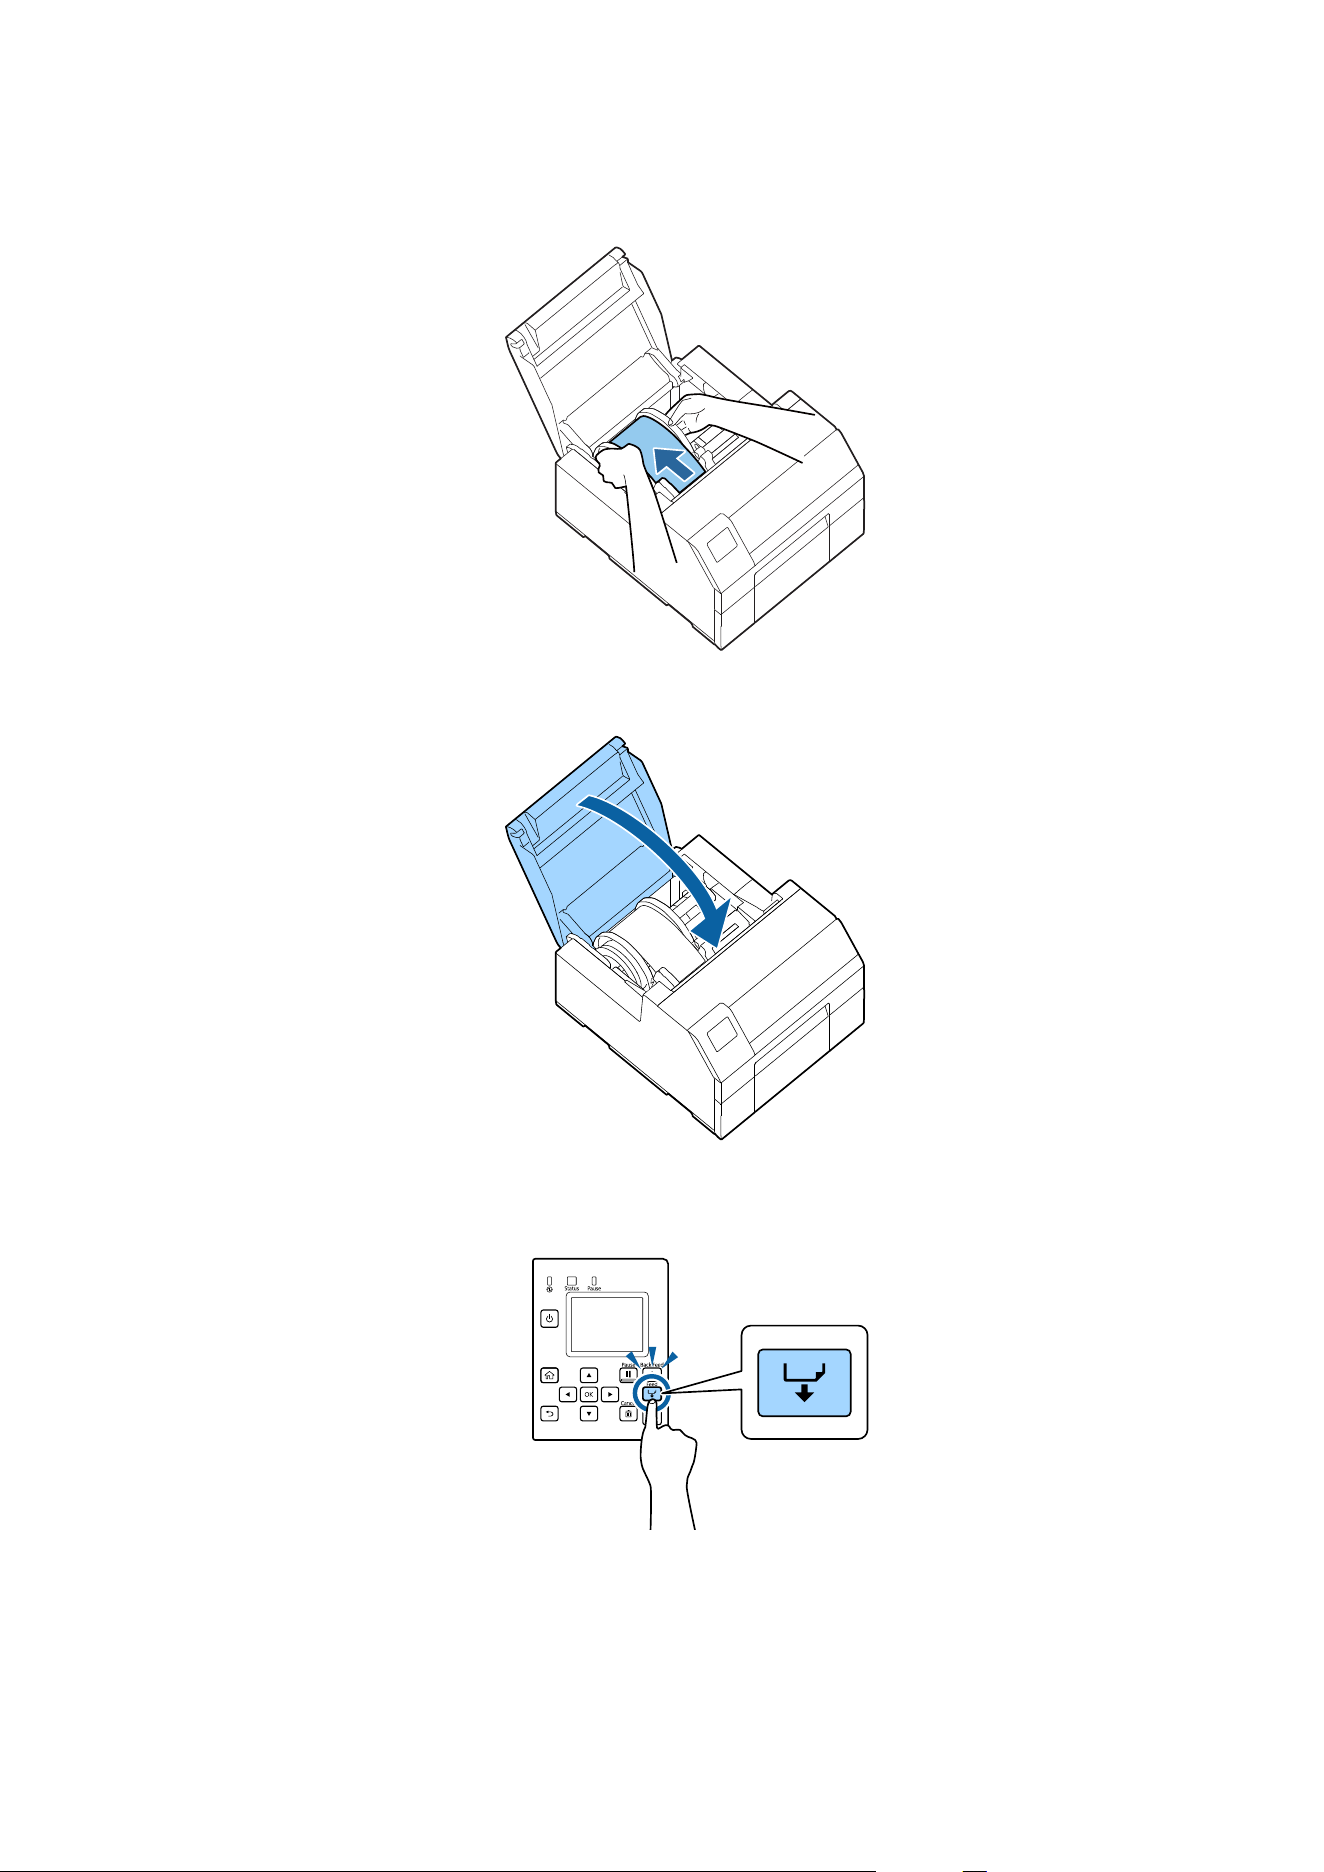
J
Rotate the spindle to remove looseness in the paper.
K
Close the paper cover.
L
Press the Pause button.
Loading paper (auto cutter model - supply from inside) is now completed.
CW-C6000 Series/CW-C6500 Series/CW-D6000 Series/CW-D6500 Series User's Guide
Basic Operation
54
How to Load Paper (Auto Cutter Model - Supply from Outside)
!
Caution
After turning on the printer, wait until the home screen is displayed, and then open the paper cover. If
you open the cover before the home screen is displayed, the printer may fail to load the paper
correctly.
A
Turn on the printer, and then check that Rear Feed is selected as the Media Source setting on the operation
panel.
U “Checking the Paper Information” on page 32
B
Open the paper cover.
C
Remove the spindle, if present.
As shown in the gure, hold the spindle and ange with both hands, and remove them.
CW-C6000 Series/CW-C6500 Series/CW-D6000 Series/CW-D6500 Series User's Guide
Basic Operation
55
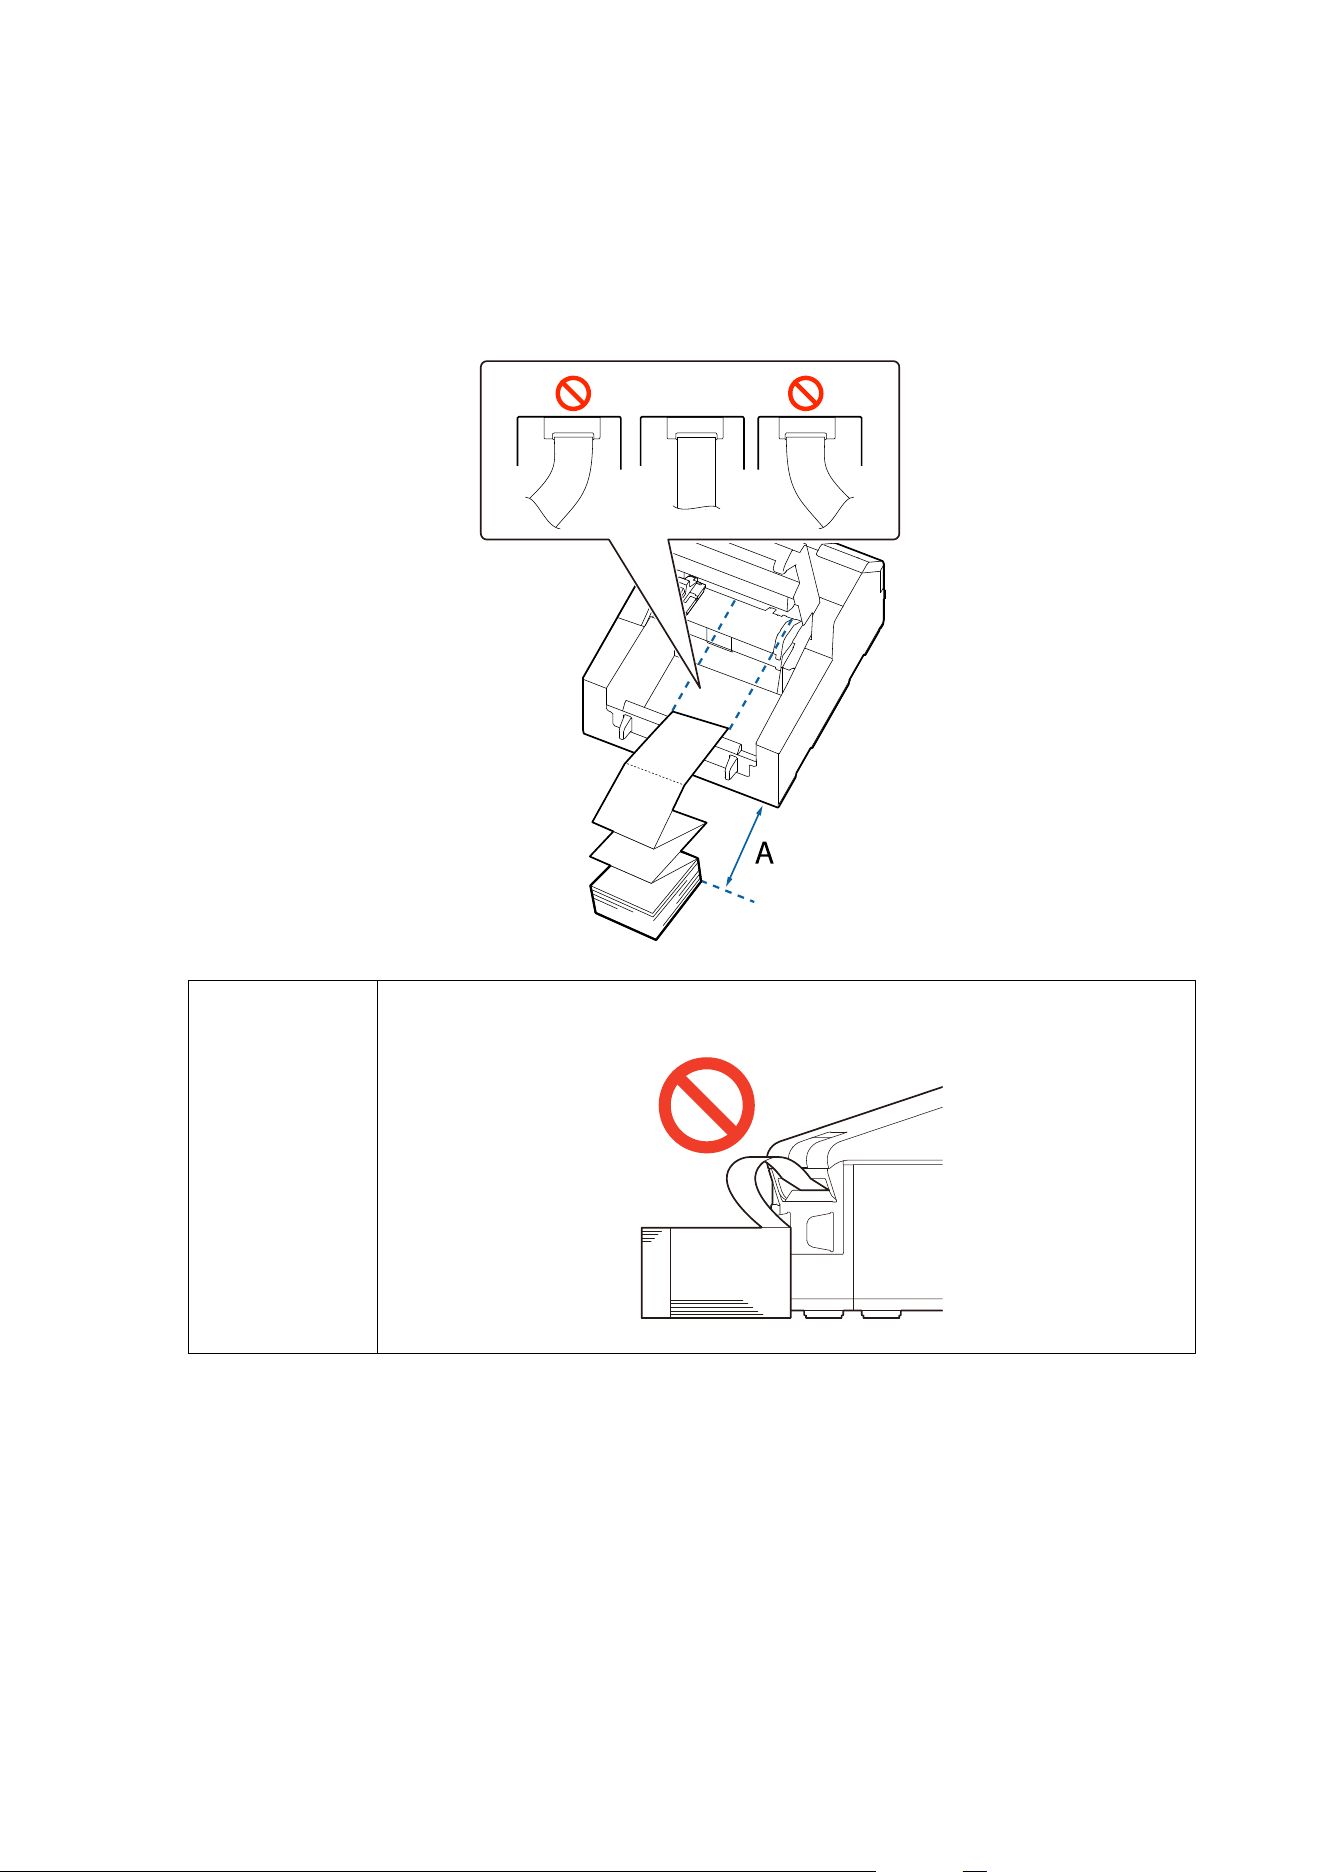
D
Place the fanfold paper behind the printer.
❏ Place the fanfold paper at least 100 mm {3.94 in.} (A in the
gure)
away from the printer.
❏ Make sure the paper is vertical in relation to the paper feed slot.
!
Caution
Make sure not to let the fanfold paper to curl near the printer. Doing so will deform the paper
resulting in a paper jam or a print quality problem.
E
Slide the movable edge guide to the
le
side.
Squeeze the blue lever to move the edge guide.
CW-C6000 Series/CW-C6500 Series/CW-D6000 Series/CW-D6500 Series User's Guide
Basic Operation
56
F
Pull the paper along the right edge guide.
G
Place your hand on the paper to
atten
it, and slide the movable edge guide against the paper.
CW-C6000 Series/CW-C6500 Series/CW-D6000 Series/CW-D6500 Series User's Guide
Basic Operation
57
!
Caution
If the movable edge guide is not properly slided against the paper, print position may become
incorrect or a paper jam may occur. Make sure to follow the guidelines below.
❏ There should be no gap between the guide and the paper edge.
❏ Do not slide the guide against the paper too tightly.
H
Insert the paper into the paper feed slot until paper feeding starts automatically.
Do not load backing paper that has no labels on it. e paper may not be detected and not be fed
automatically.
CW-C6000 Series/CW-C6500 Series/CW-D6000 Series/CW-D6500 Series User's Guide
Basic Operation
58

I
Close the paper cover.
J
Press the Pause button.
Loading paper (auto cutter model - supply from outside) is now completed.
CW-C6000 Series/CW-C6500 Series/CW-D6000 Series/CW-D6500 Series User's Guide
Basic Operation
59

How to Load Paper (Peeler Model - Supply from Inside)
!
Caution
After turning on the printer, wait until the home screen is displayed, and then open the paper cover. If
you open the cover before the home screen is displayed, the printer may fail to load the paper
correctly.
A
Turn on the printer, and then check that Internal is selected as the Media Source setting on the operation
panel.
U “Checking the Paper Information” on page 32
B
Open the paper cover.
C
Remove the spindle from the printer.
As shown in the gure, hold the spindle and ange with both hands, and remove them.
CW-C6000 Series/CW-C6500 Series/CW-D6000 Series/CW-D6500 Series User's Guide
Basic Operation
60
D
Load the roll paper on the spindle and
x
it with the
ange.
❏ To move the
ange,
squeeze the two levers.
❏ When loading the roll paper on the spindle, take note of the winding direction. e correct winding
direction is marked on the spindle.
❏ Fix the ange and roll paper so that there is no gap in between.
E
Hold the spindle with both hands, and set it in the printer.
Install the spindle so that both ends of the spindle t into the holders inside the printer.
F
Slide the movable edge guide to the right side.
Squeeze the blue lever to move the edge guide.
CW-C6000 Series/CW-C6500 Series/CW-D6000 Series/CW-D6500 Series User's Guide
Basic Operation
61
G
Pull the paper along the
le
edge guide.
H
Place your hand on the paper to atten it, and slide the movable edge guide against the paper.
CW-C6000 Series/CW-C6500 Series/CW-D6000 Series/CW-D6500 Series User's Guide
Basic Operation
62
!
Caution
If the movable edge guide is not properly slided against the paper, print position may become
incorrect or a paper jam may occur. Make sure to follow the guidelines below.
❏ There should be no gap between the guide and the paper edge.
❏ Do not slide the guide against the paper too tightly.
I
Insert the paper into the paper feed slot until paper feeding starts automatically.
Do not load backing paper that has no labels on it. e paper may not be detected and not be fed
automatically.
CW-C6000 Series/CW-C6500 Series/CW-D6000 Series/CW-D6500 Series User's Guide
Basic Operation
63
J
Rotate the spindle to remove looseness in the paper.
K
Close the paper cover.
L
Hold down the Feed button until the leading edge of paper touches the table on which the printer is
installed.
CW-C6000 Series/CW-C6500 Series/CW-D6000 Series/CW-D6500 Series User's Guide
Basic Operation
64
M
Remove labels from the ejected paper.
N
Open the peeler cover.
O
Pass the paper through the peeler slot (A).
P
Before closing the peeler cover, load the paper along the protrusion A.
CW-C6000 Series/CW-C6500 Series/CW-D6000 Series/CW-D6500 Series User's Guide
Basic Operation
65
!
Caution
Make sure the paper is perfectly aligned with protrusion A.
Q
Close the peeler cover.
If the paper is loose, pull the leading edge of paper to remove the looseness and then close the peeler cover.
R
Press the Pause button.
Loading paper (peeler model - supply from inside) is now completed.
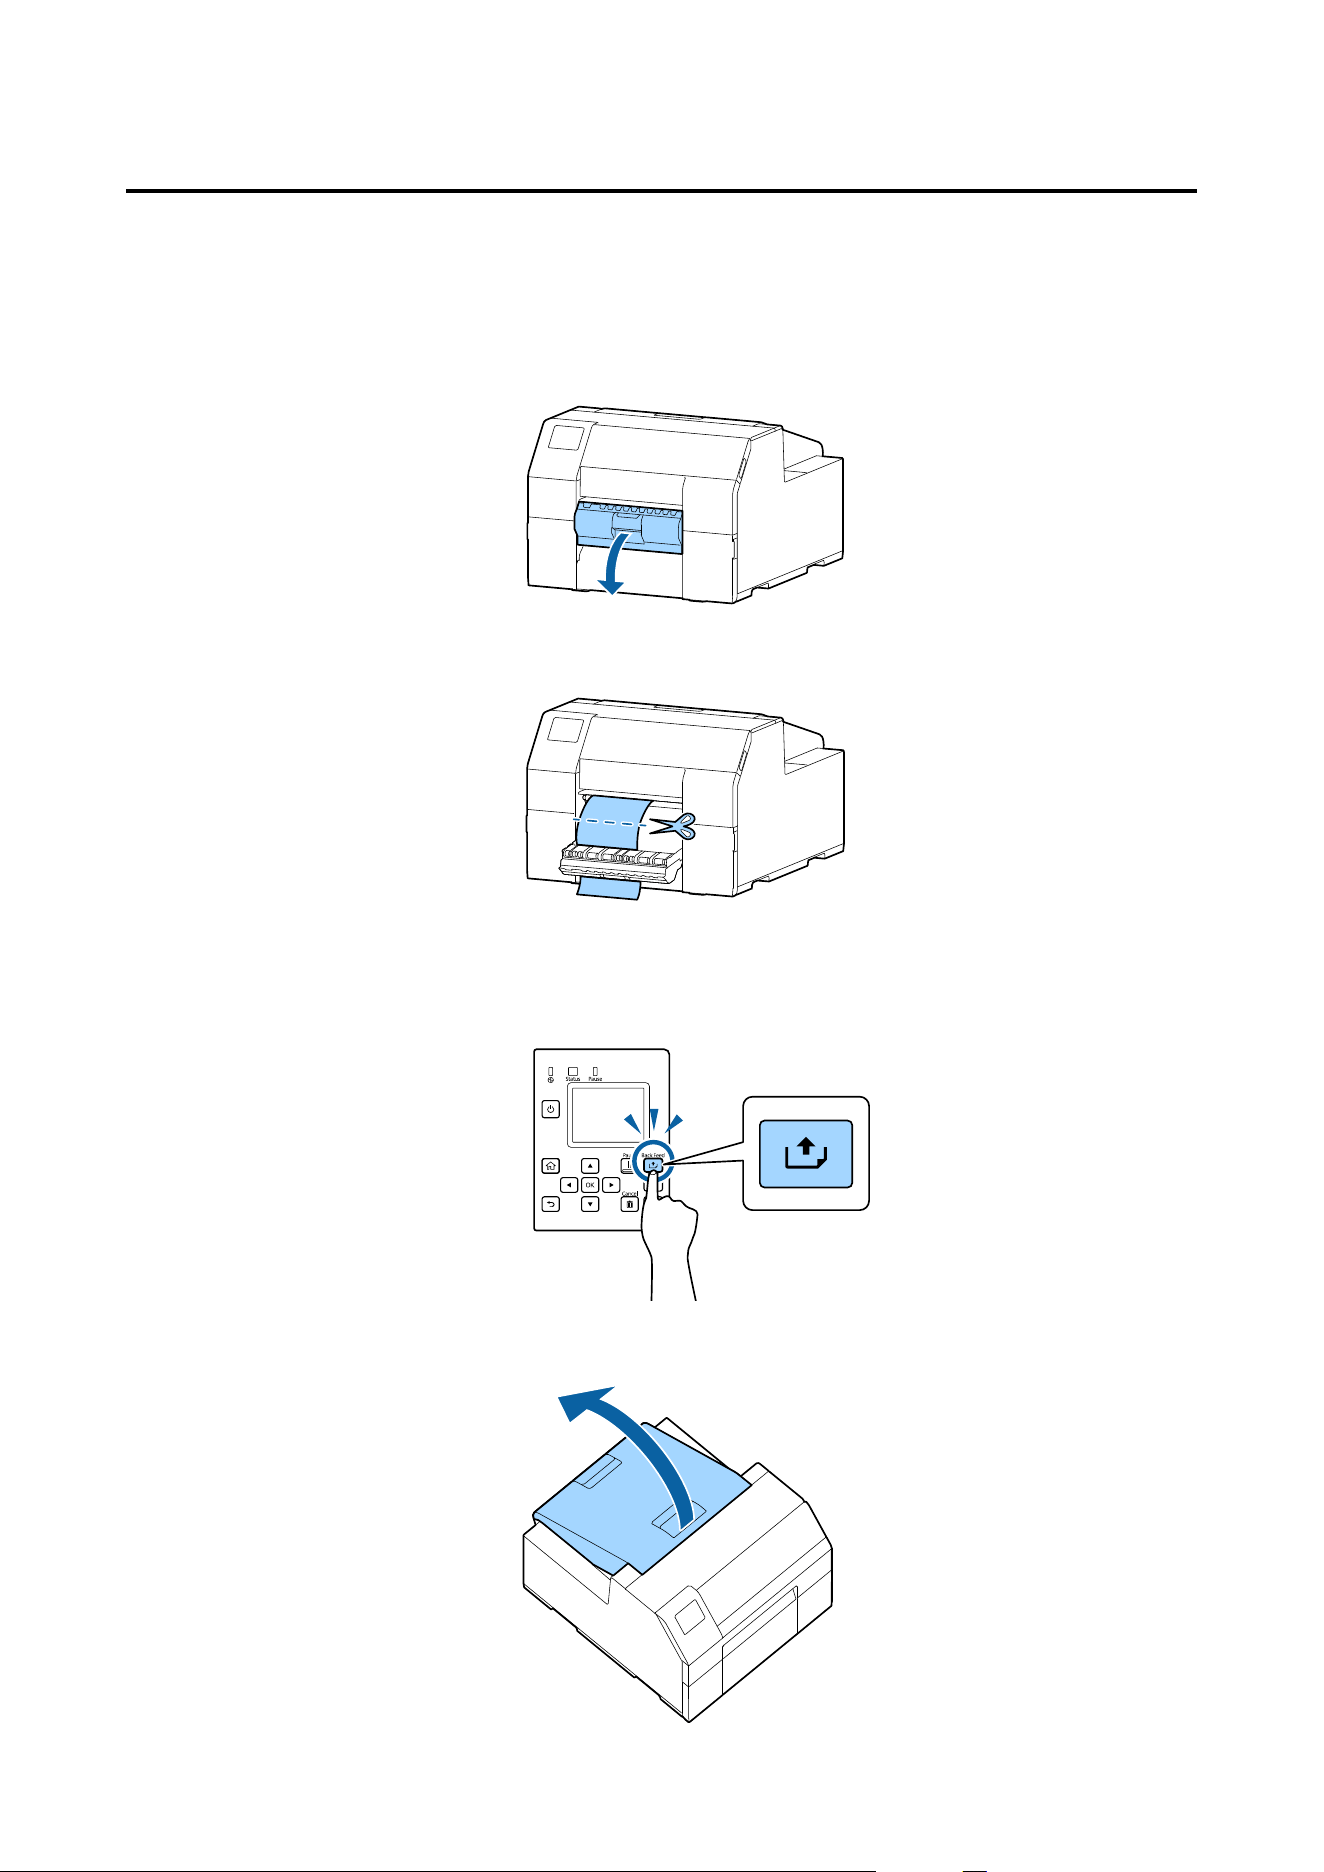
CW-C6000 Series/CW-C6500 Series/CW-D6000 Series/CW-D6500 Series User's Guide
Basic Operation
66
How to Remove Paper (For the Auto Cutter Model)
A
Check that the printer has been turned on.
B
Press the Cut button, and cut
o
the ejected labels.
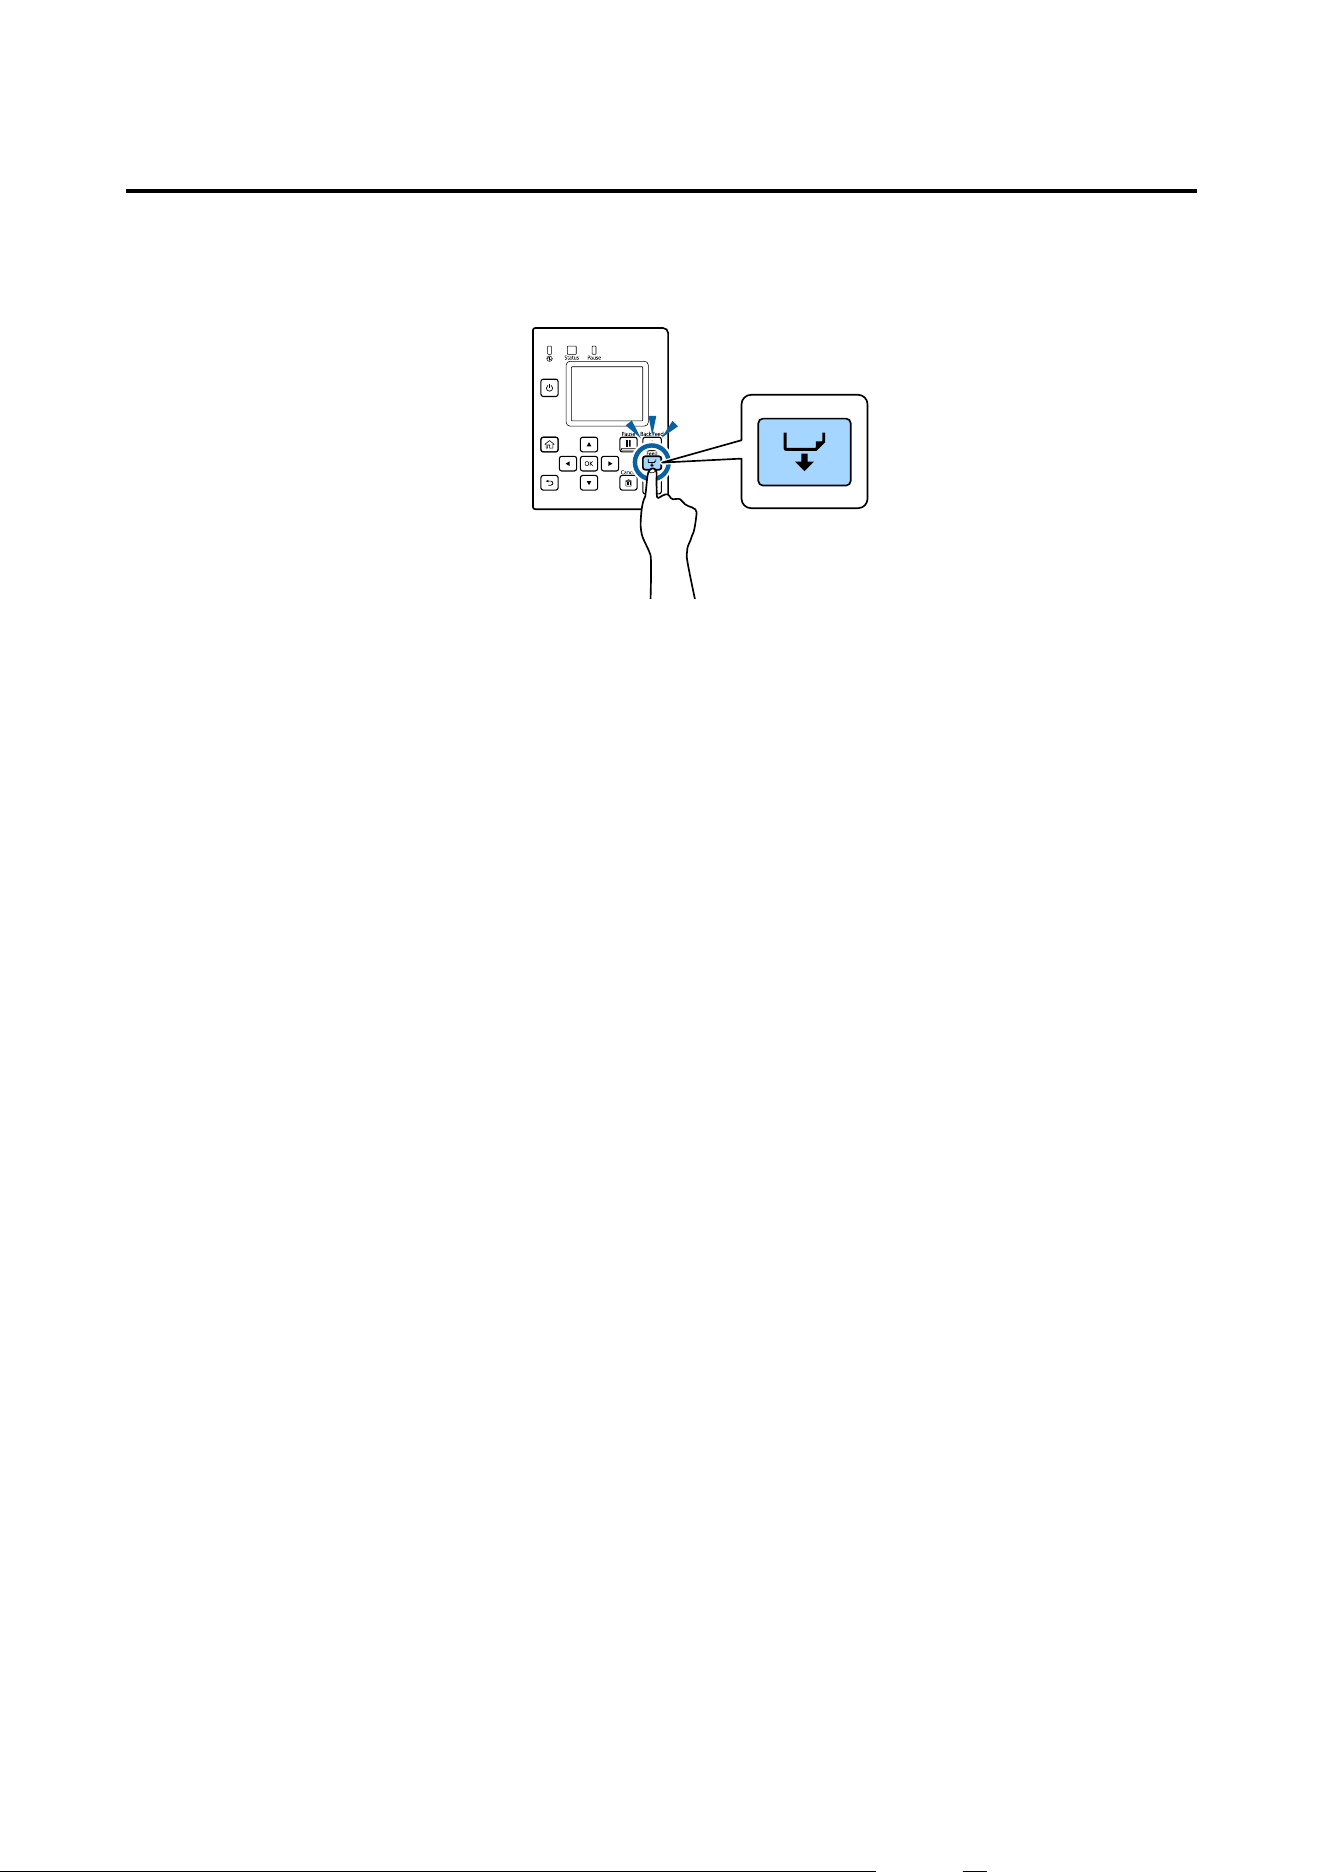
C
Press the Back Feed button to feed the paper backward.
e
paper can now be pulled out from inside the printer.
D
Open the paper cover.
CW-C6000 Series/CW-C6500 Series/CW-D6000 Series/CW-D6500 Series User's Guide
Basic Operation
67
E
Slide the movable edge guide away from the paper, and remove the paper.
F
Close the paper cover.
G
Press the Pause button.
Removing the paper is now completed.
To load paper, see “How to Load Paper (Auto Cutter Model - Supply from Inside)” on page 50 or “How to Load
Paper (Auto Cutter Model - Supply from Outside)” on page 55.
CW-C6000 Series/CW-C6500 Series/CW-D6000 Series/CW-D6500 Series User's Guide
Basic Operation
68
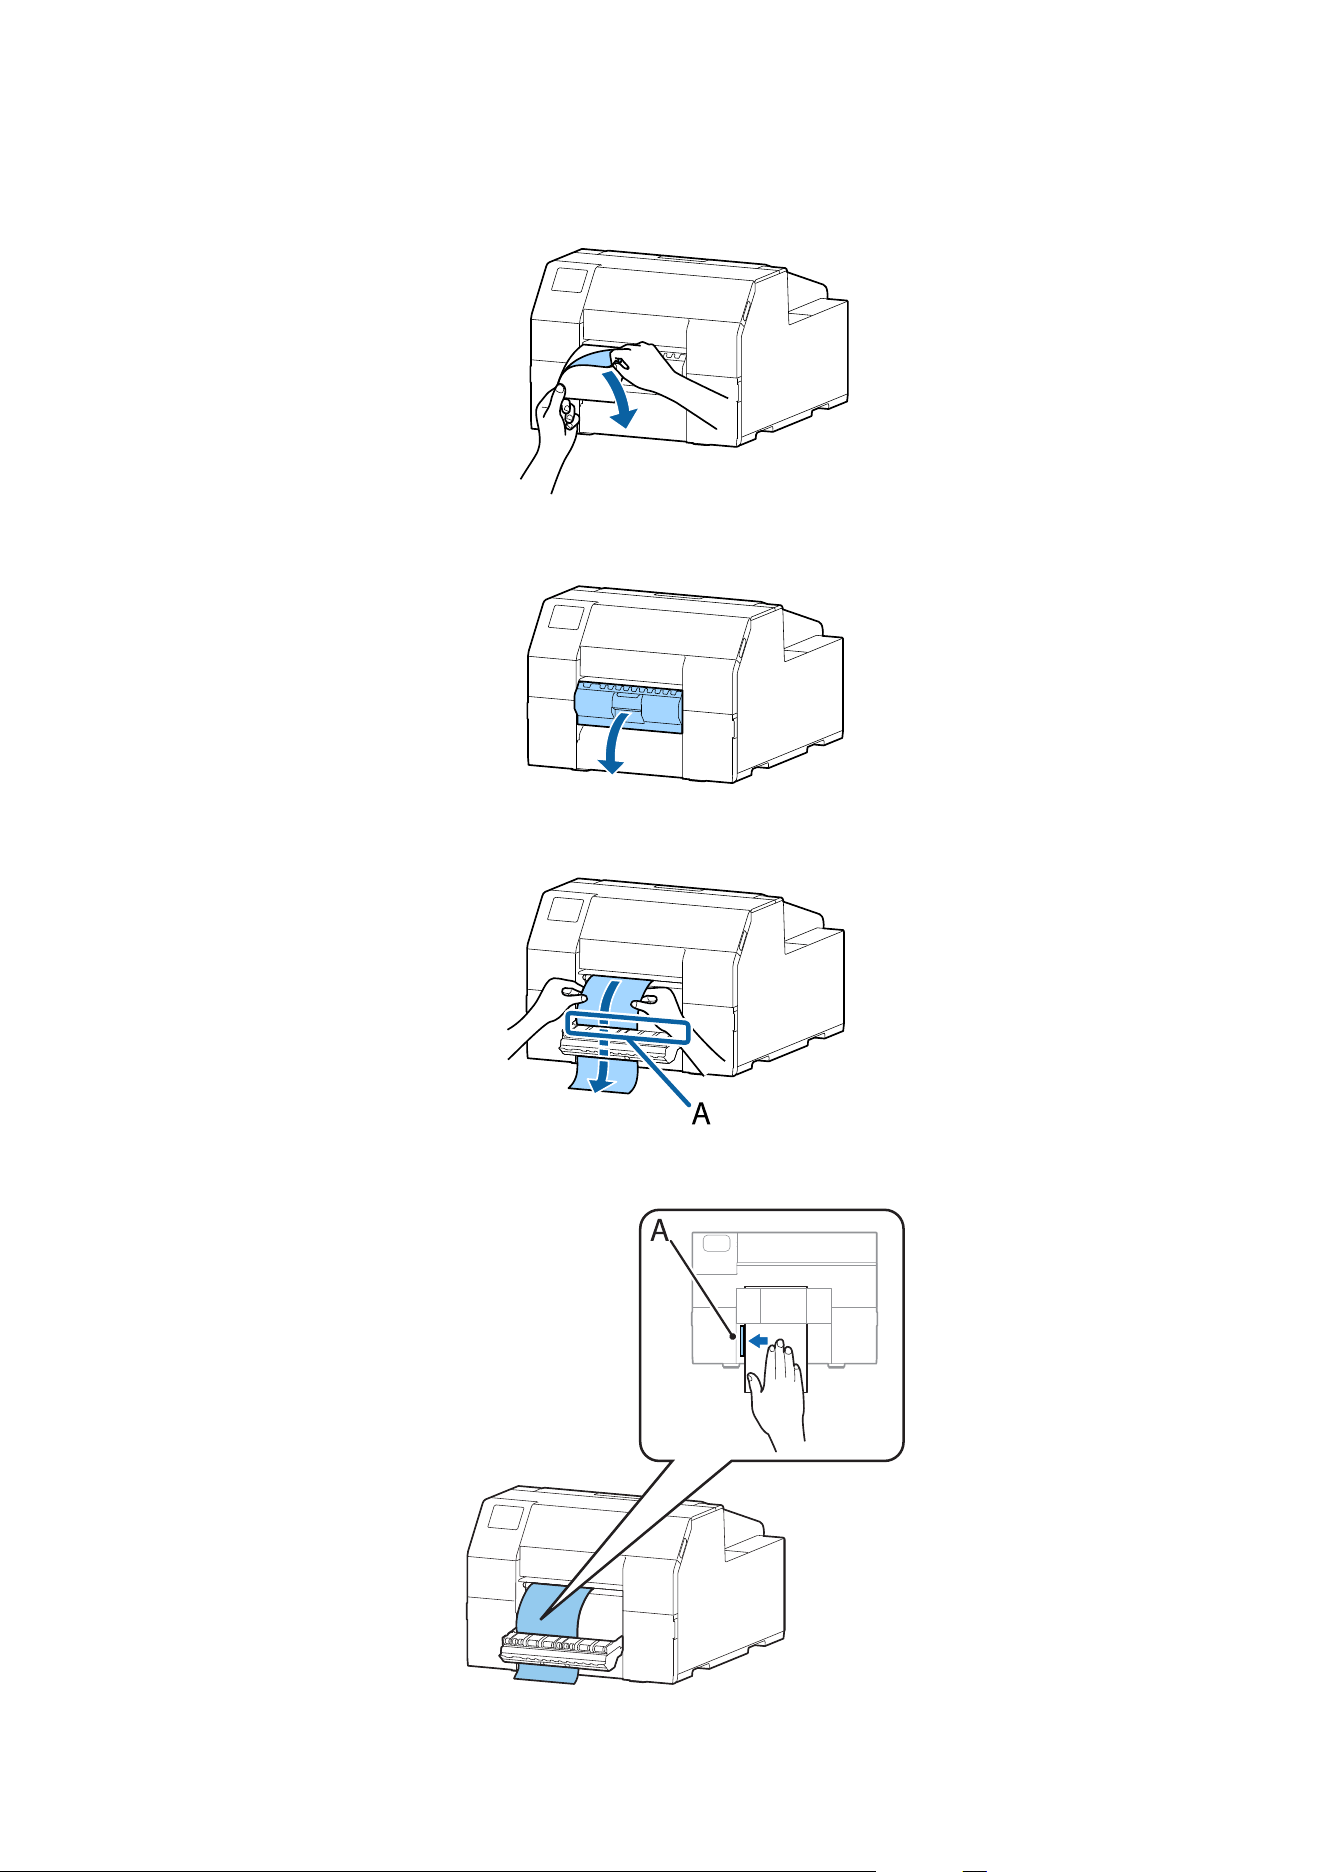
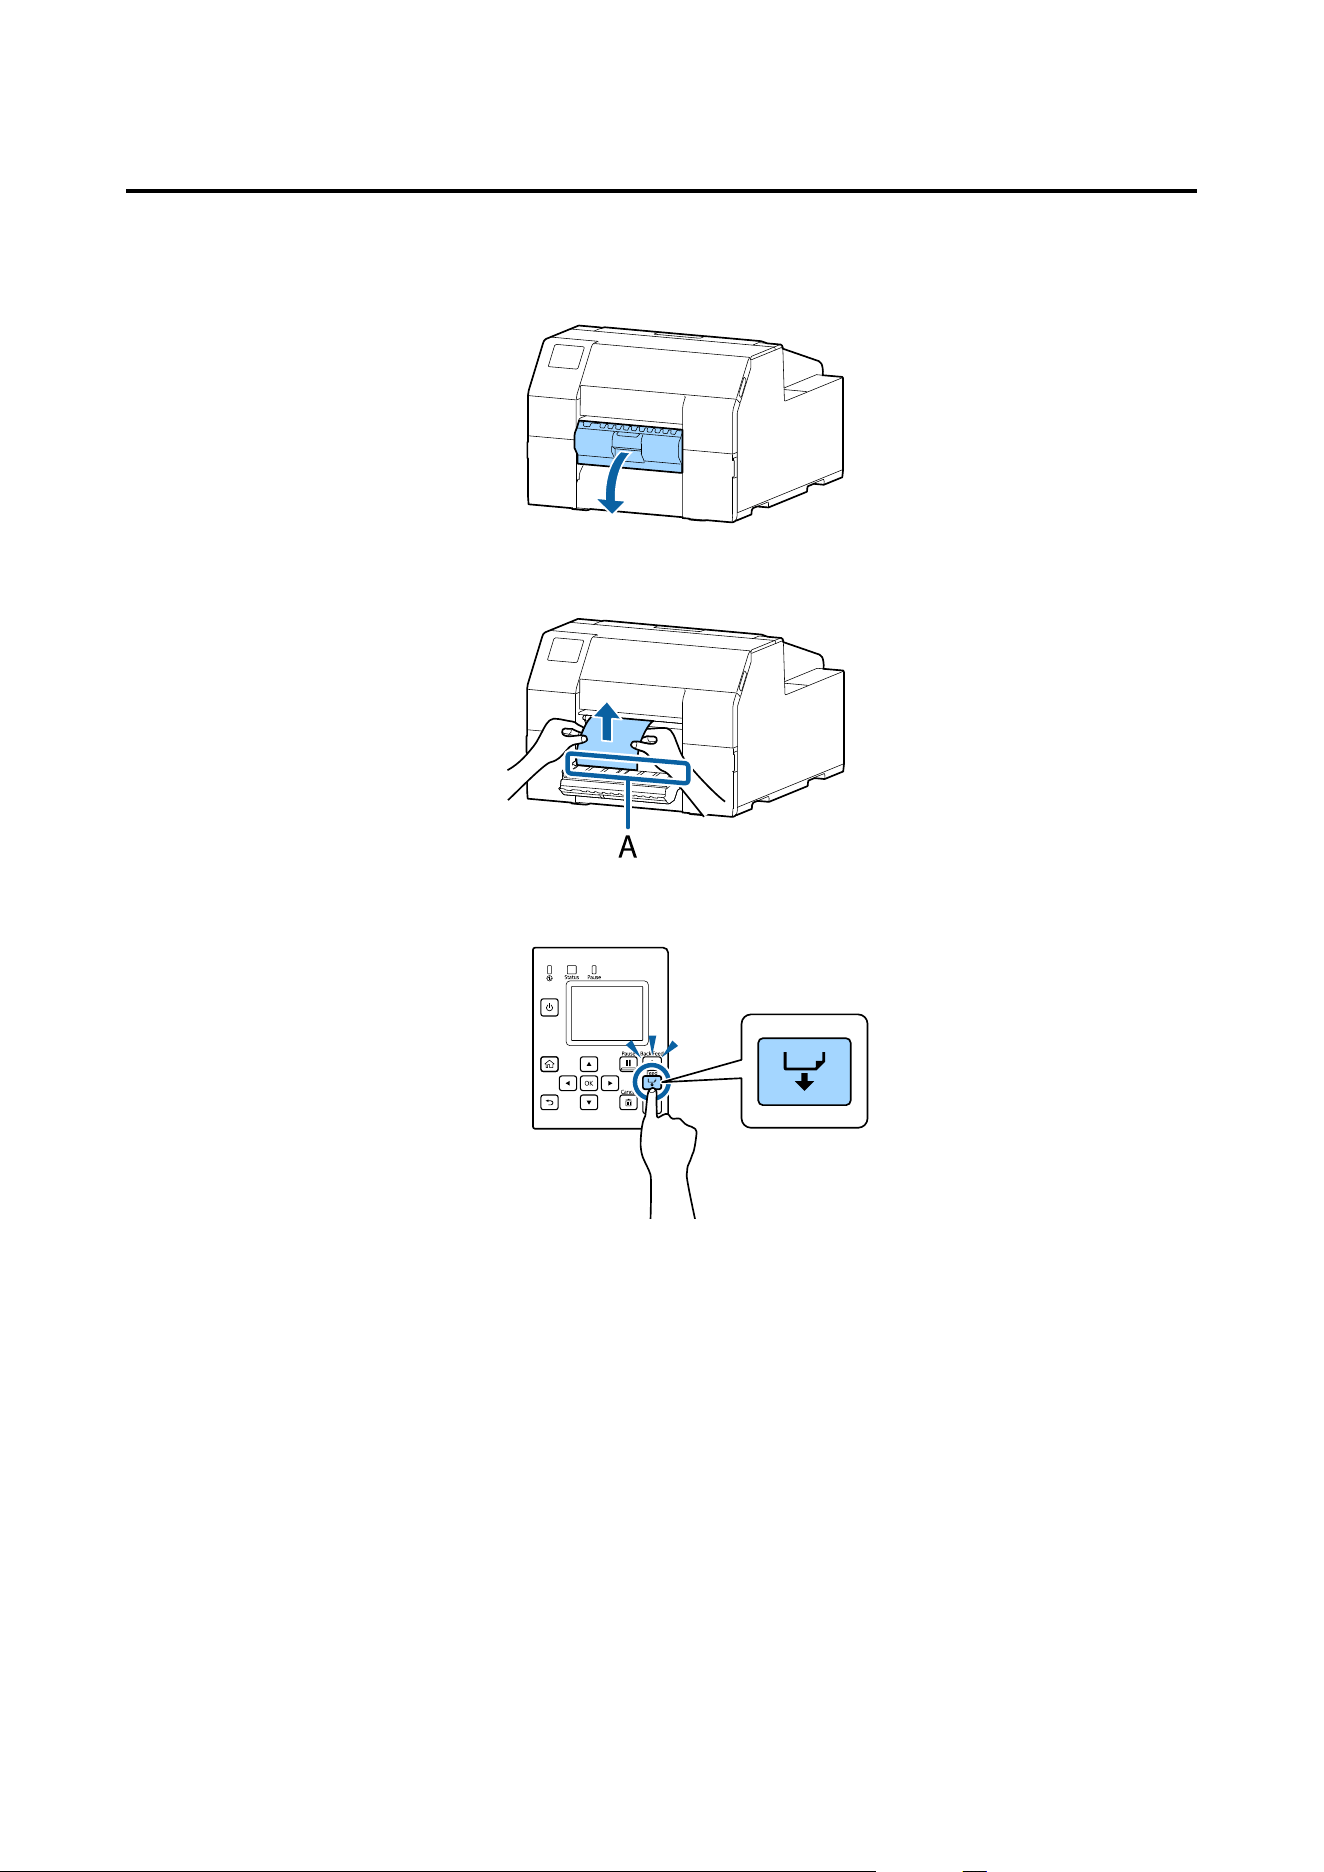
How to Remove Paper (For the Peeler Model)
A
Check that the printer has been turned on.
B
Open the peeler cover.
C
Cut the backing paper near the paper ejection slot.
D
Press the Back Feed button to feed the paper backward.
e
paper can now be pulled out from inside the printer.
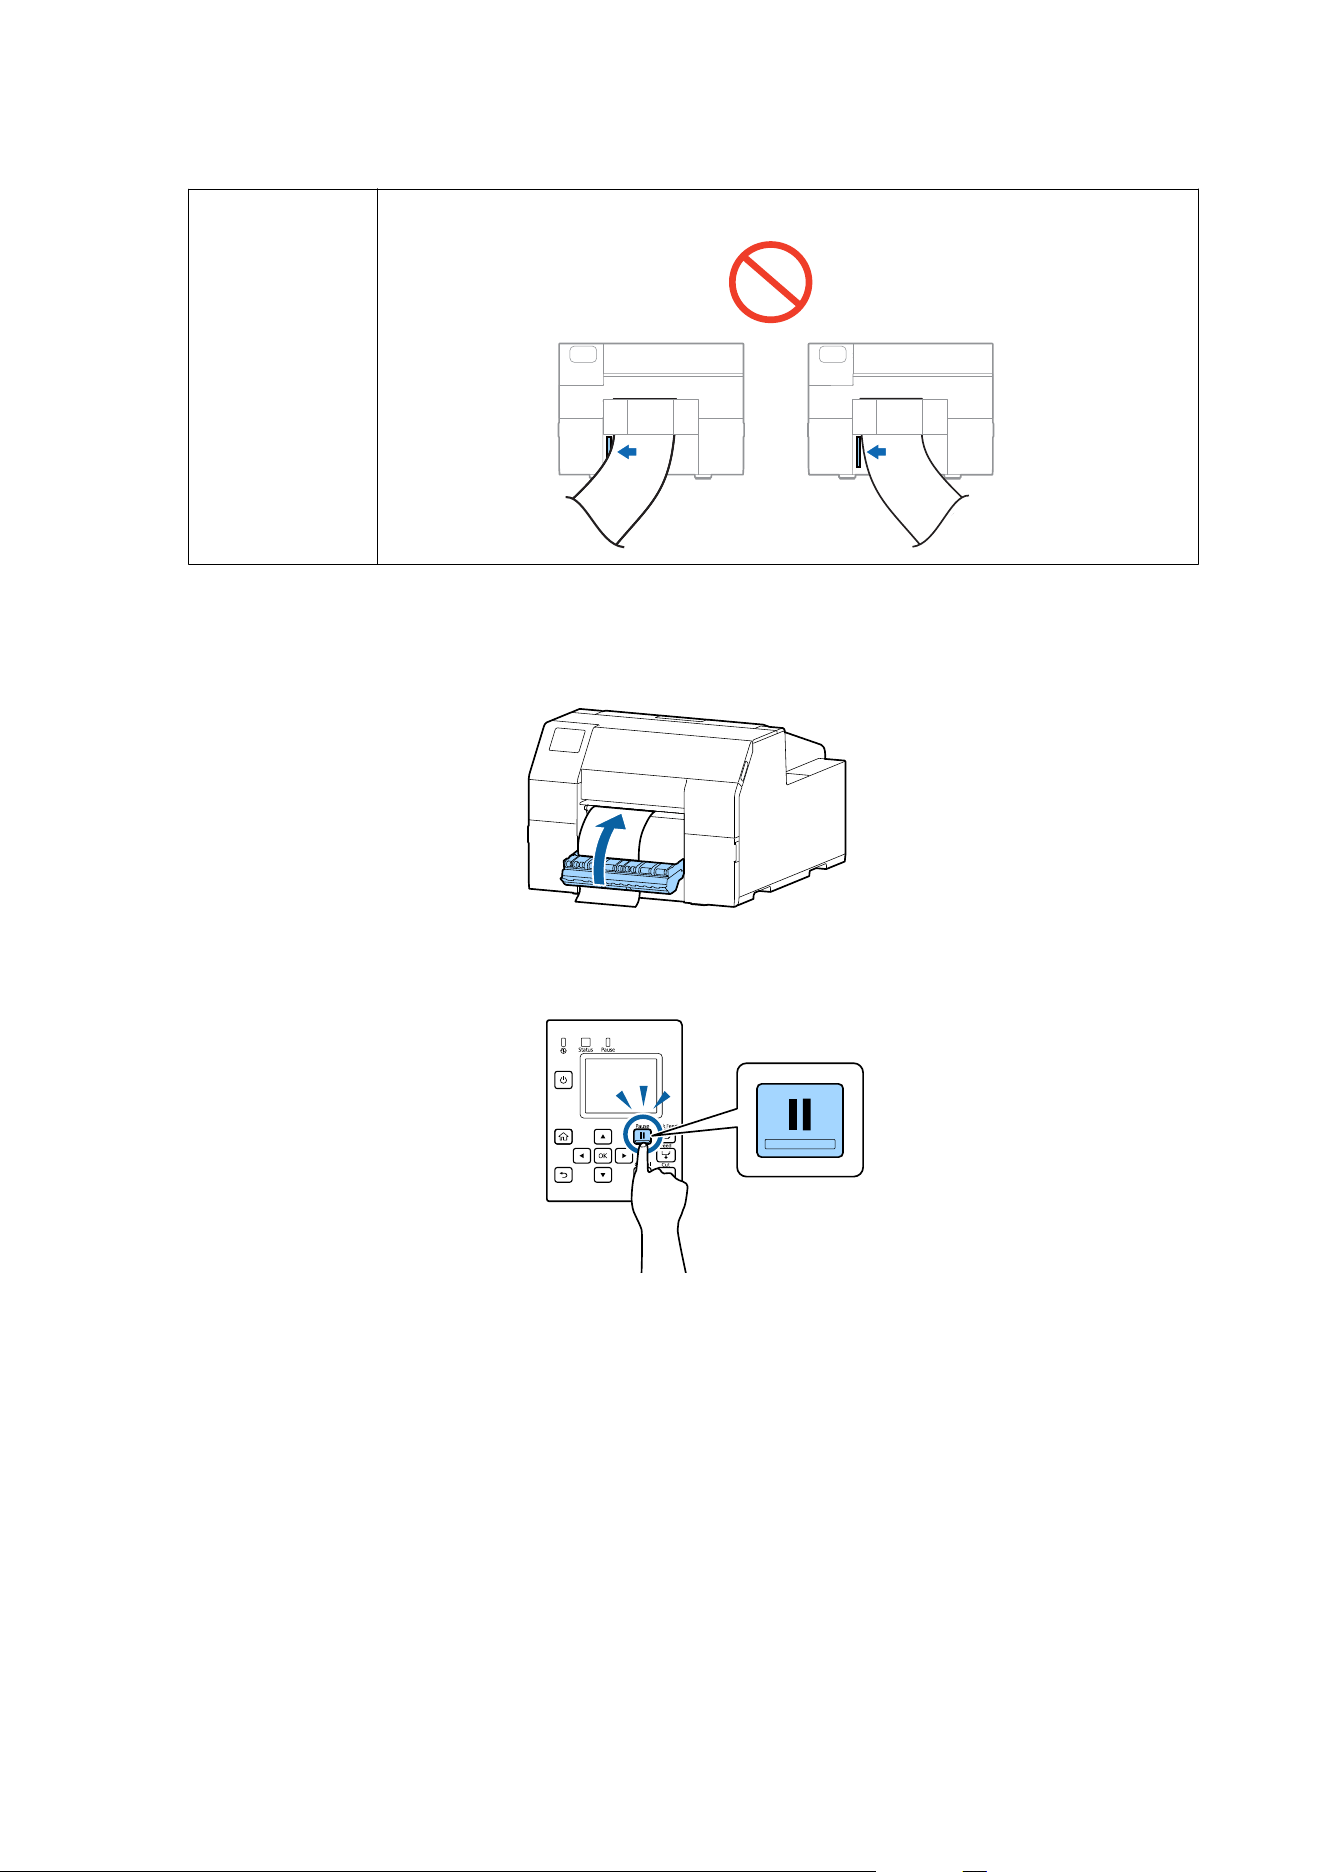
E
Open the paper cover.
CW-C6000 Series/CW-C6500 Series/CW-D6000 Series/CW-D6500 Series User's Guide
Basic Operation
69

F
Slide the movable edge guide away from the paper, and remove the paper.
G
Close the paper cover.
H
Press the Pause button.
Removing the paper is now completed.
To load paper, see “How to Load Paper (Peeler Model - Supply from Inside)” on page 60.
CW-C6000 Series/CW-C6500 Series/CW-D6000 Series/CW-D6500 Series User's Guide
Basic Operation
70
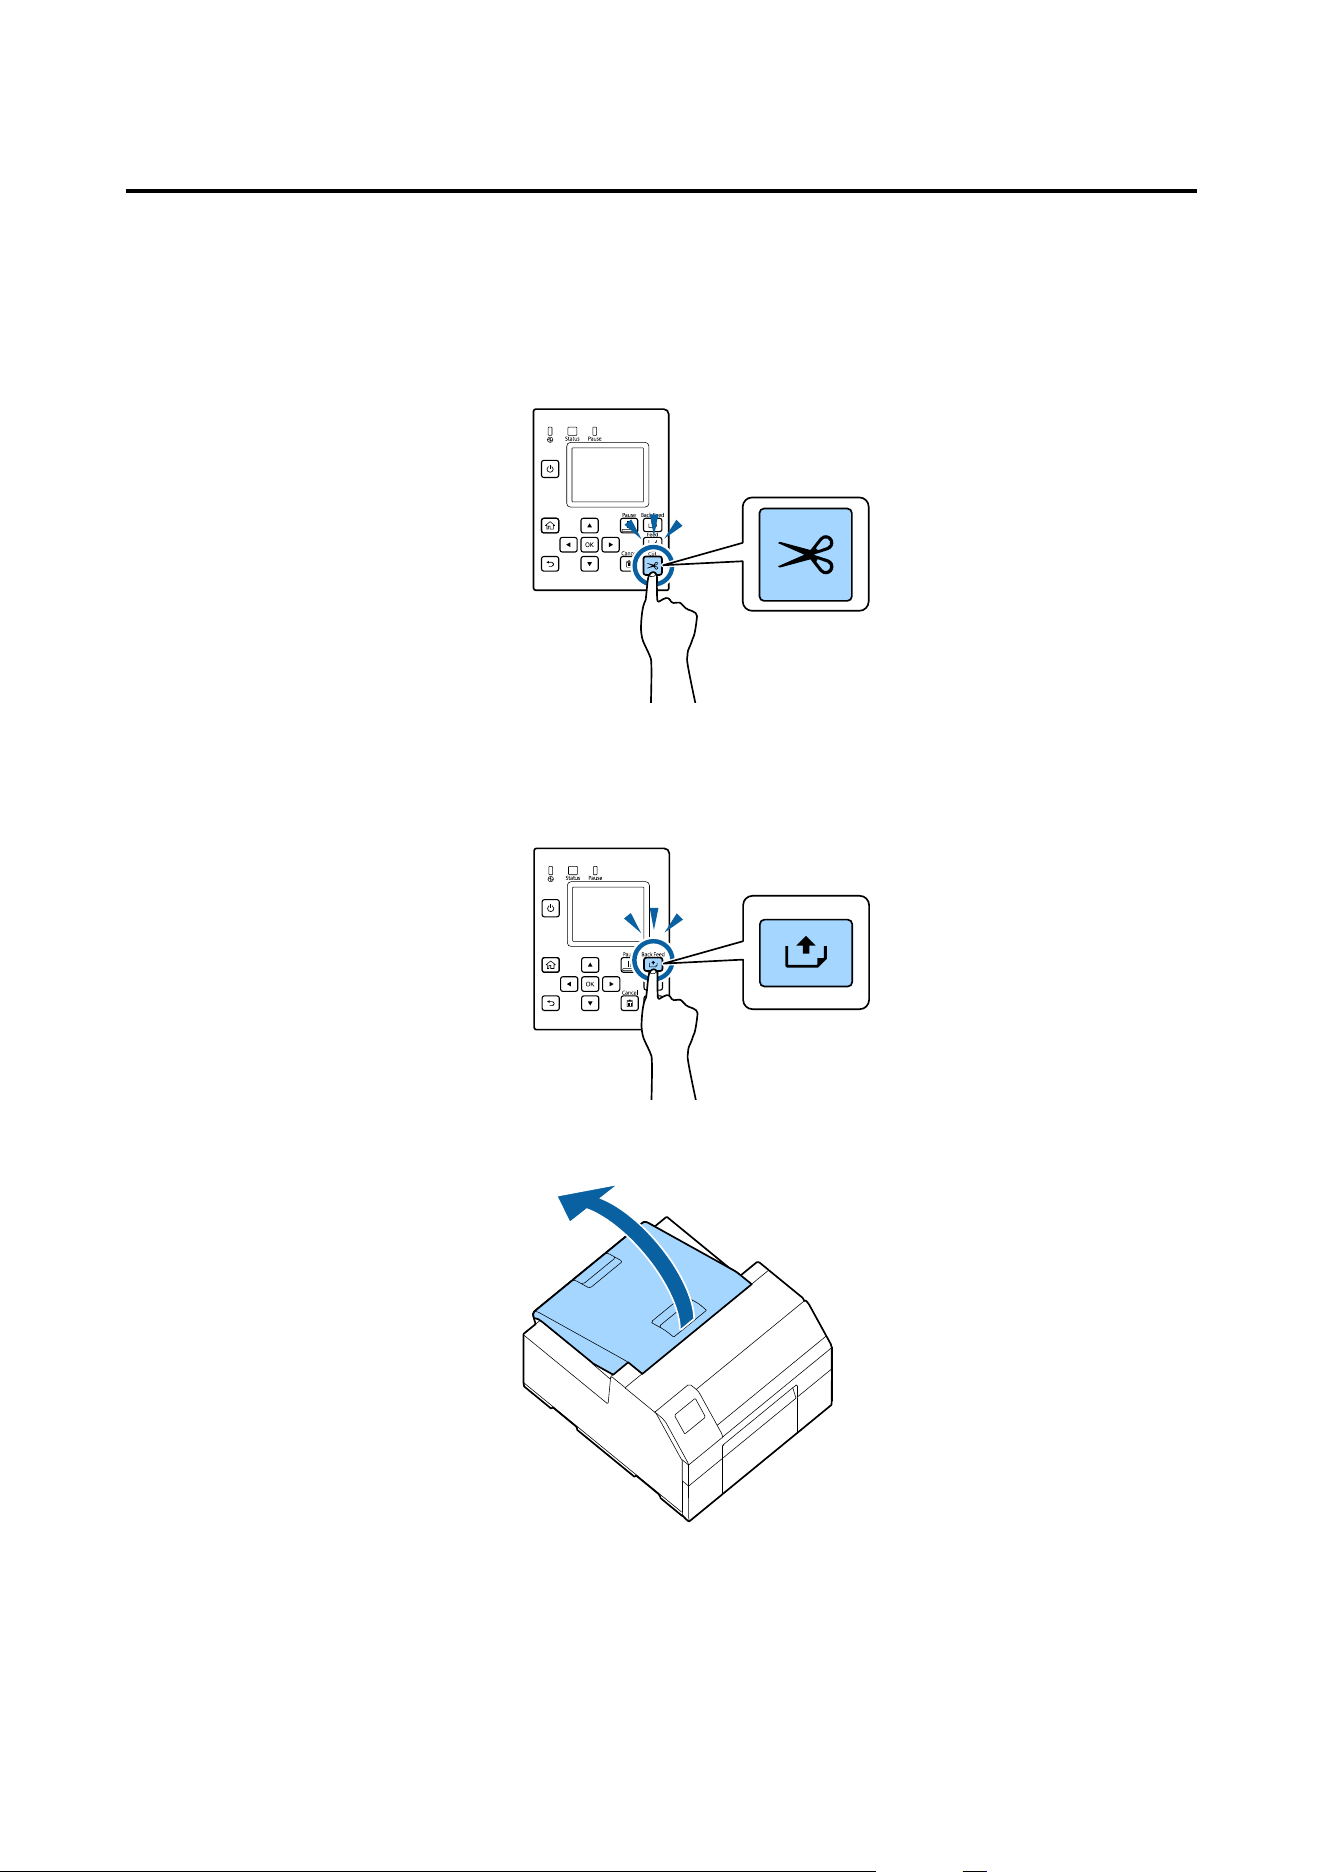
How to Eject Paper at Paper End (For the Auto Cutter Model)
A
Hold down the Feed button until the paper is completely ejected.
Ejecting paper at paper end is now completed.
To load paper, see “How to Load Paper (Auto Cutter Model - Supply from Inside)” on page 50 or “How to Load
Paper (Auto Cutter Model - Supply from Outside)” on page 55.
CW-C6000 Series/CW-C6500 Series/CW-D6000 Series/CW-D6500 Series User's Guide
Basic Operation
71
How to Eject Paper at Paper End (For the Peeler Model)
A
Open the peeler cover.
B
Remove the paper from the peeler slot (A).
C
Hold down the Feed button until the paper is completely ejected.
Ejecting paper at paper end is now completed.
To load paper, see “How to Load Paper (Peeler Model - Supply from Inside)” on page 60.
CW-C6000 Series/CW-C6500 Series/CW-D6000 Series/CW-D6500 Series User's Guide
Basic Operation
72
Maintenance
is chapter describes how to carry out maintenance of the printer.
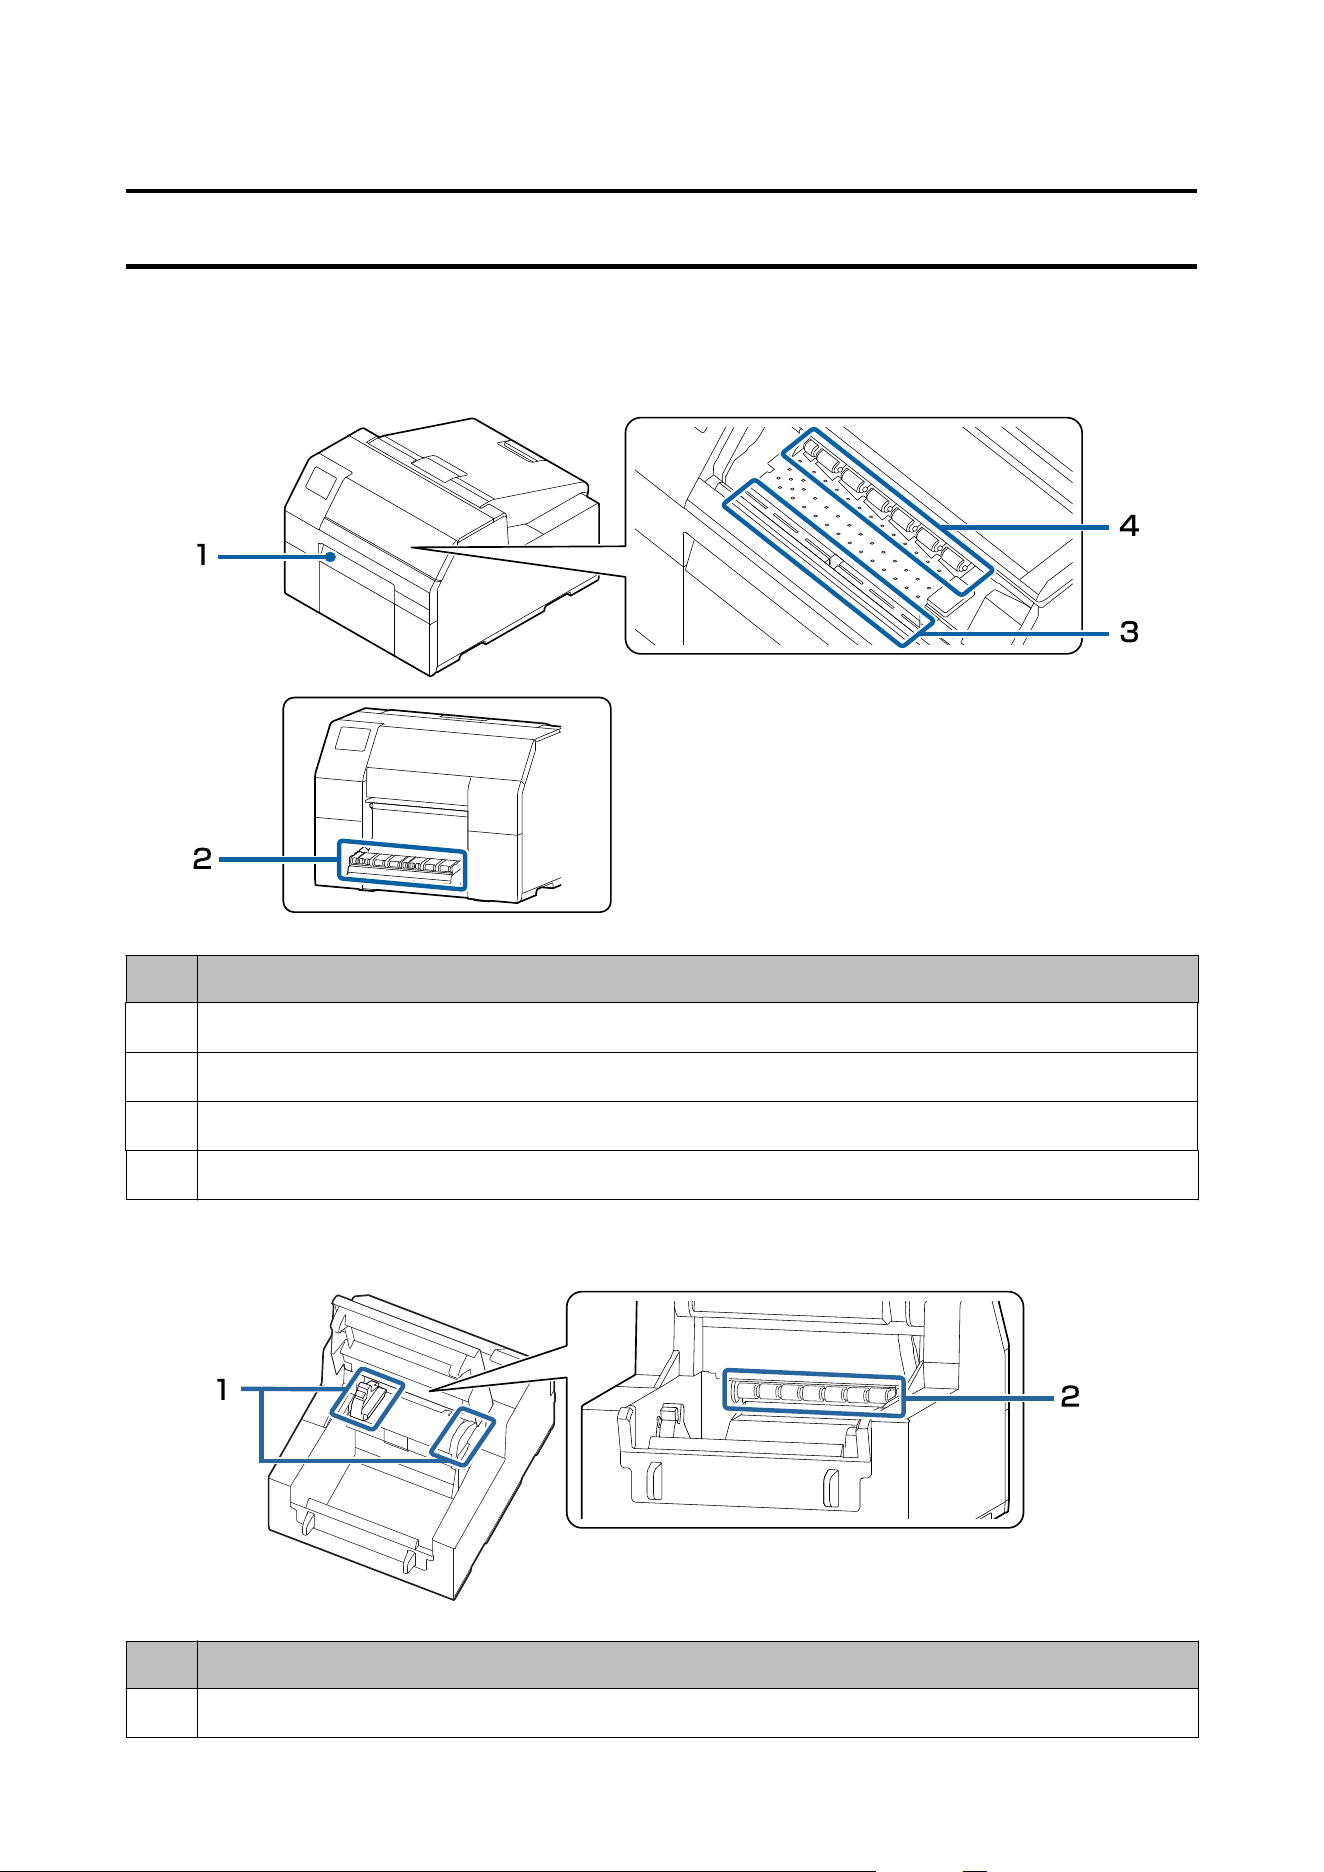
Front
No. Refer to:
1
U “Cleaning the Auto Cutter (Auto Cutter Model Only)” on page 75
2
U “Cleaning the Peeler (Peeler Model Only)” on page 77
3
U “Cleaning the Platen” on page 79
4
U “Cleaning the Paper Feed Roller” on page 80
Rear
No. Refer to:
1
U “Cleaning the Edge Guides” on page 78
CW-C6000 Series/CW-C6500 Series/CW-D6000 Series/CW-D6500 Series User's Guide
Maintenance
73

No. Refer to:
2
U “Cleaning the Paper Feed Roller” on page 80
Cleaning the Exterior
!
Caution
Do not use alcohol, benzine, thinner, trichloroethylene, or ketone based solvent to clean the exterior of
the printer. Doing so may deform or damage the plastic and rubber parts.
A
Turn the printer
o
and then disconnect the power cable from the outlet.
B
Wipe
o
any dirt with a dry cloth or cloth that has been slightly dampened.
CW-C6000 Series/CW-C6500 Series/CW-D6000 Series/CW-D6500 Series User's Guide
Maintenance
74
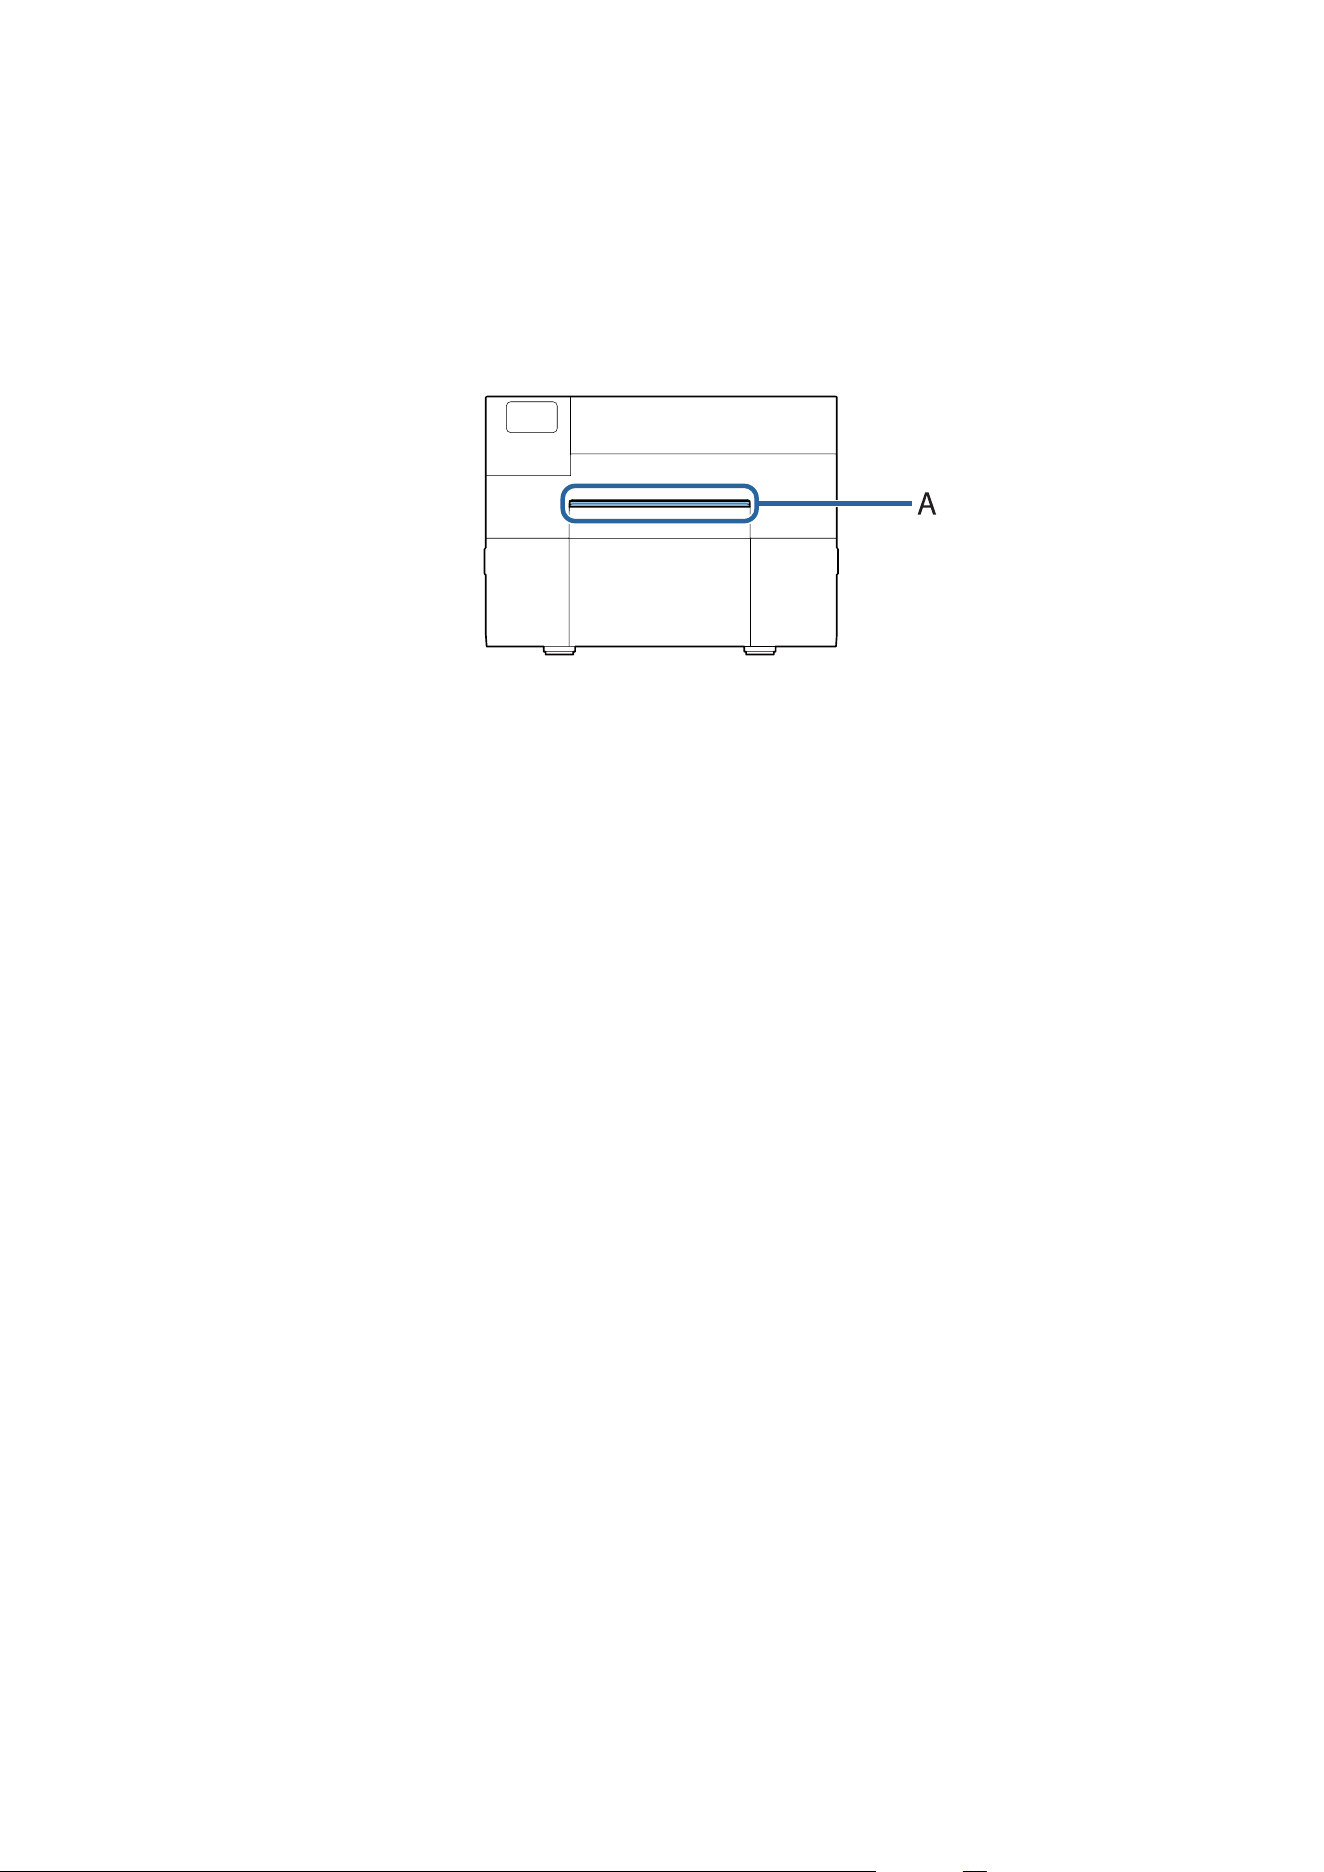
Cleaning the Auto Cutter (Auto Cutter Model Only)
If labels, paper dust, or adhesive has adhered to the xed blade (A) of the auto cutter, the blade may become dull.
Perform cleaning by following the steps below.
A
If paper has been loaded, remove it.
U “How to Remove Paper (For the Auto Cutter Model)” on page 67
B
Turn the printer
o
and then disconnect the power cable from the outlet.
CW-C6000 Series/CW-C6500 Series/CW-D6000 Series/CW-D6500 Series User's Guide
Maintenance
75
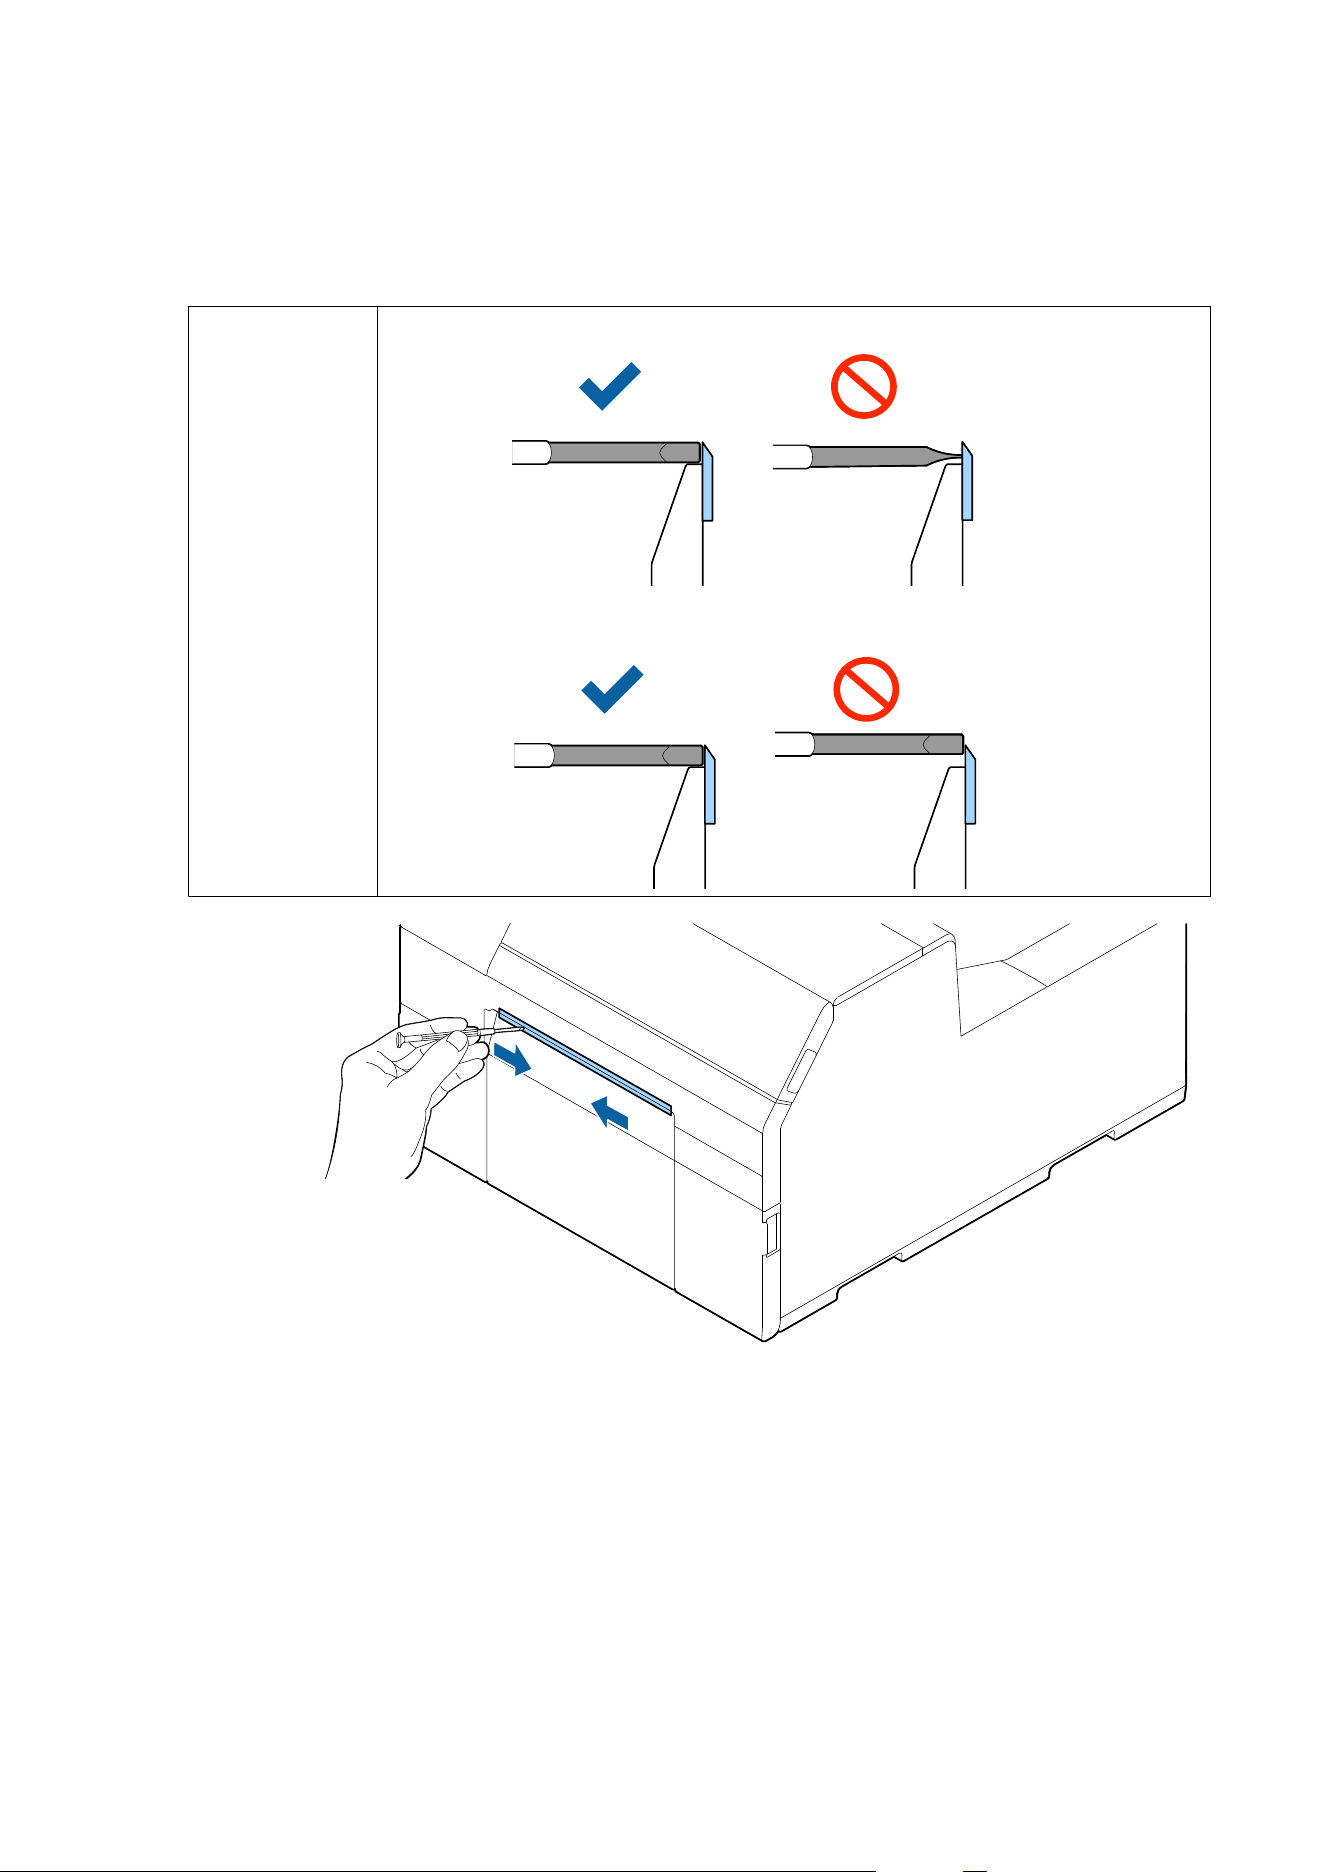
C
As shown in the
gure
below, scrape
o
adhered materials stuck to the
xed
blade using a
at-blade
screwdriver (blade width: 1.8 mm to 3.0 mm {0.07 to 0.12 in.}). Start scraping from each end toward the
center.
!
Caution
❏ Keep the blade upright while cleaning the auto cutter.
❏ Keep the blade in contact with the bottom of the paper ejection slot.
CW-C6000 Series/CW-C6500 Series/CW-D6000 Series/CW-D6500 Series User's Guide
Maintenance
76
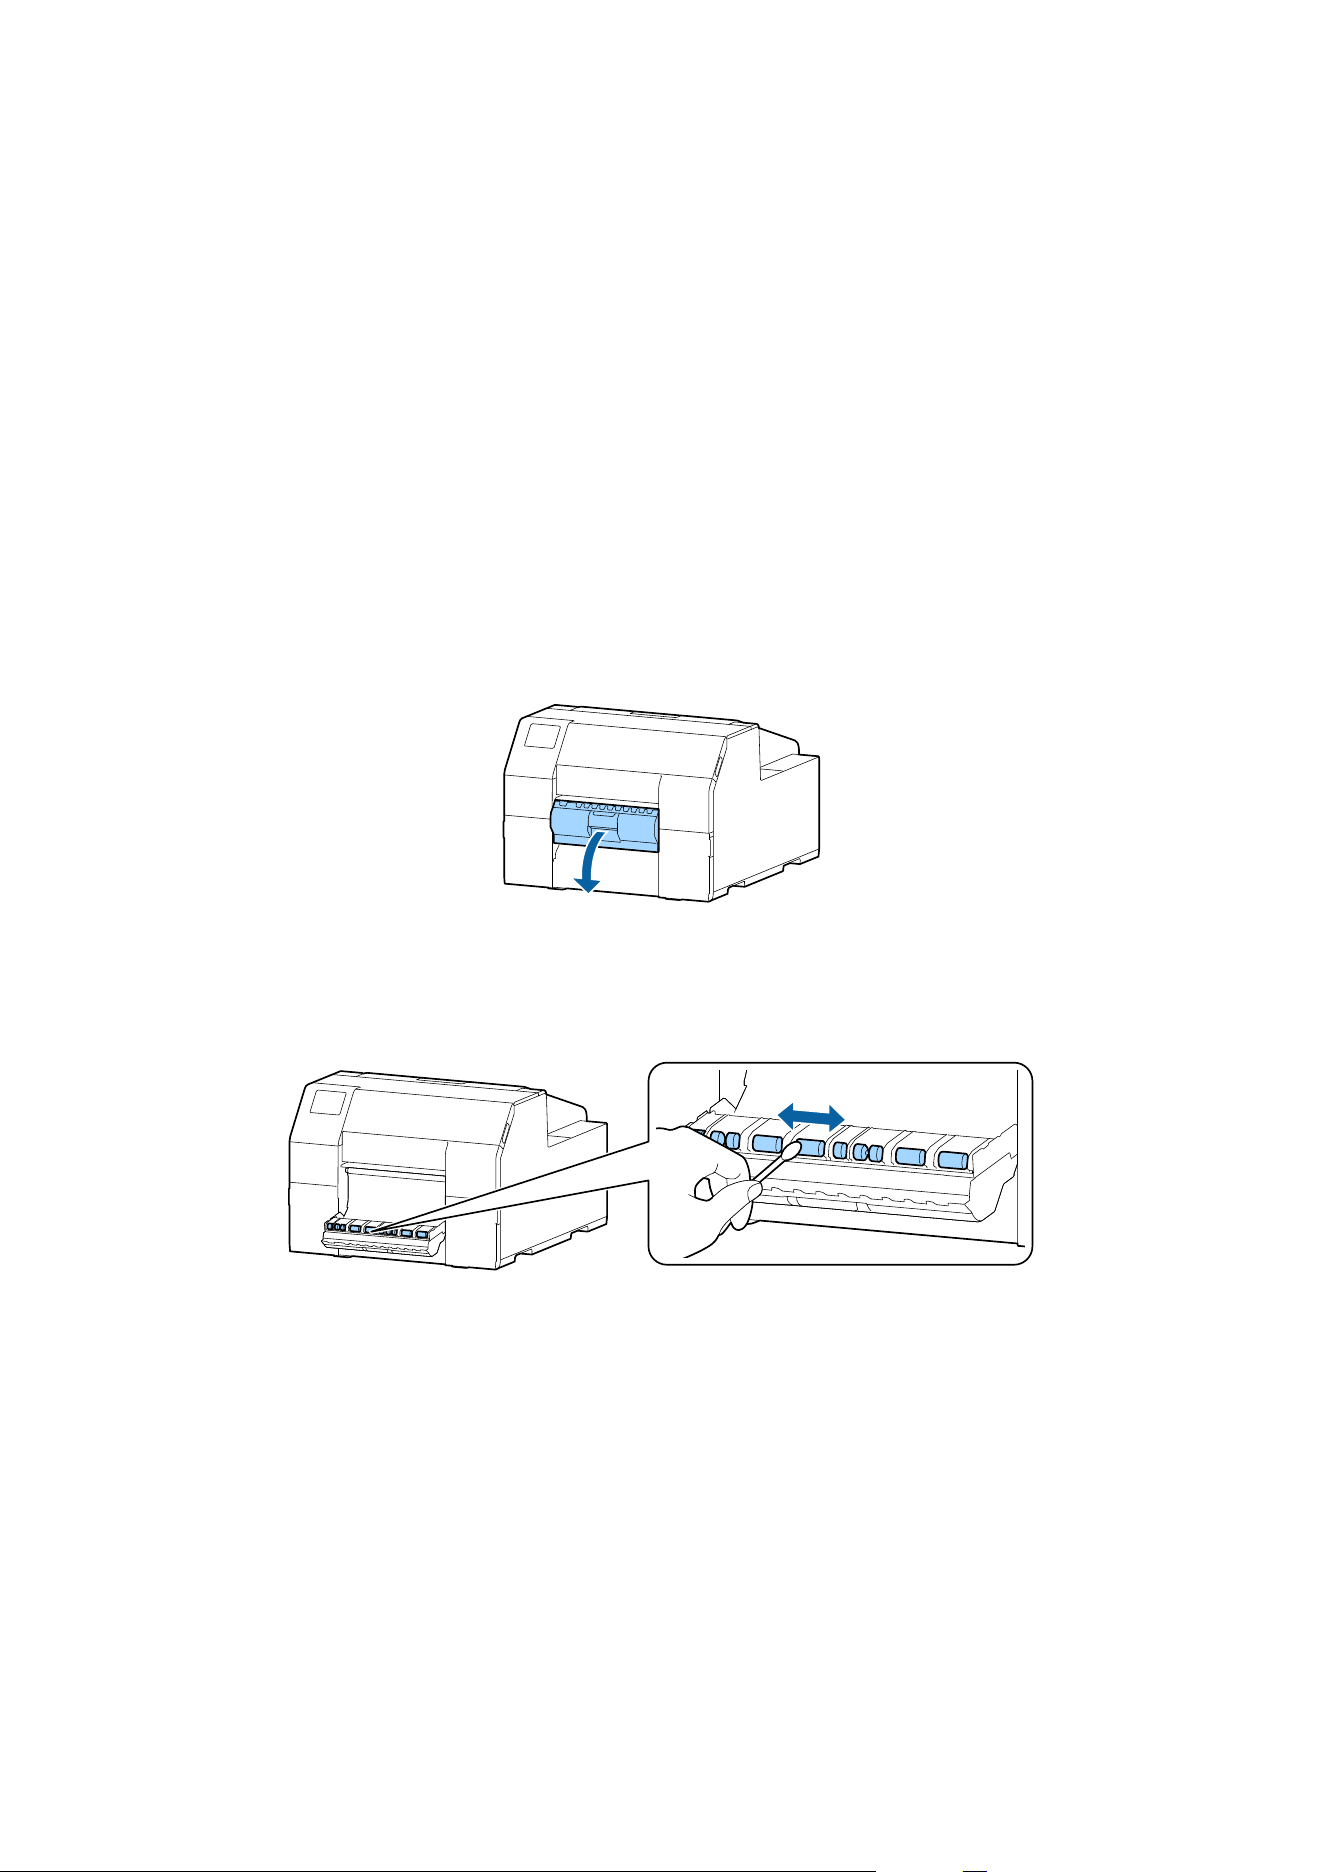
Cleaning the Peeler (Peeler Model Only)
If labels, paper dust, or adhesive has adhered to the peeler, the print quality may decline.
To maintain good print quality, it is recommended to clean the peeler every day.
Perform cleaning by following the steps below.
A
Check that the printer has been turned
o.
B
Open the peeler cover.
If paper has been loaded, remove it.
U “How to Remove Paper (For the Peeler Model)” on page 69
C
Clean the roller using a cotton swab moistened with alcohol.
Completely remove dirt from the roller.
CW-C6000 Series/CW-C6500 Series/CW-D6000 Series/CW-D6500 Series User's Guide
Maintenance
77
Cleaning the Edge Guides
If labels, paper dust, or adhesive has adhered to the edge guides, paper may get jammed, or printing position may
become incorrect.
Perform cleaning by following the steps below.
A
Check that the printer has been turned
o.
B
Open the paper cover.
If paper has been loaded, remove it.
U “How to Remove Paper (For the Auto Cutter Model)” on page 67
U “How to Remove Paper (For the Peeler Model)” on page 69
C
Clean the edge guides using a cotton swab moistened with alcohol.
CW-C6000 Series/CW-C6500 Series/CW-D6000 Series/CW-D6500 Series User's Guide
Maintenance
78
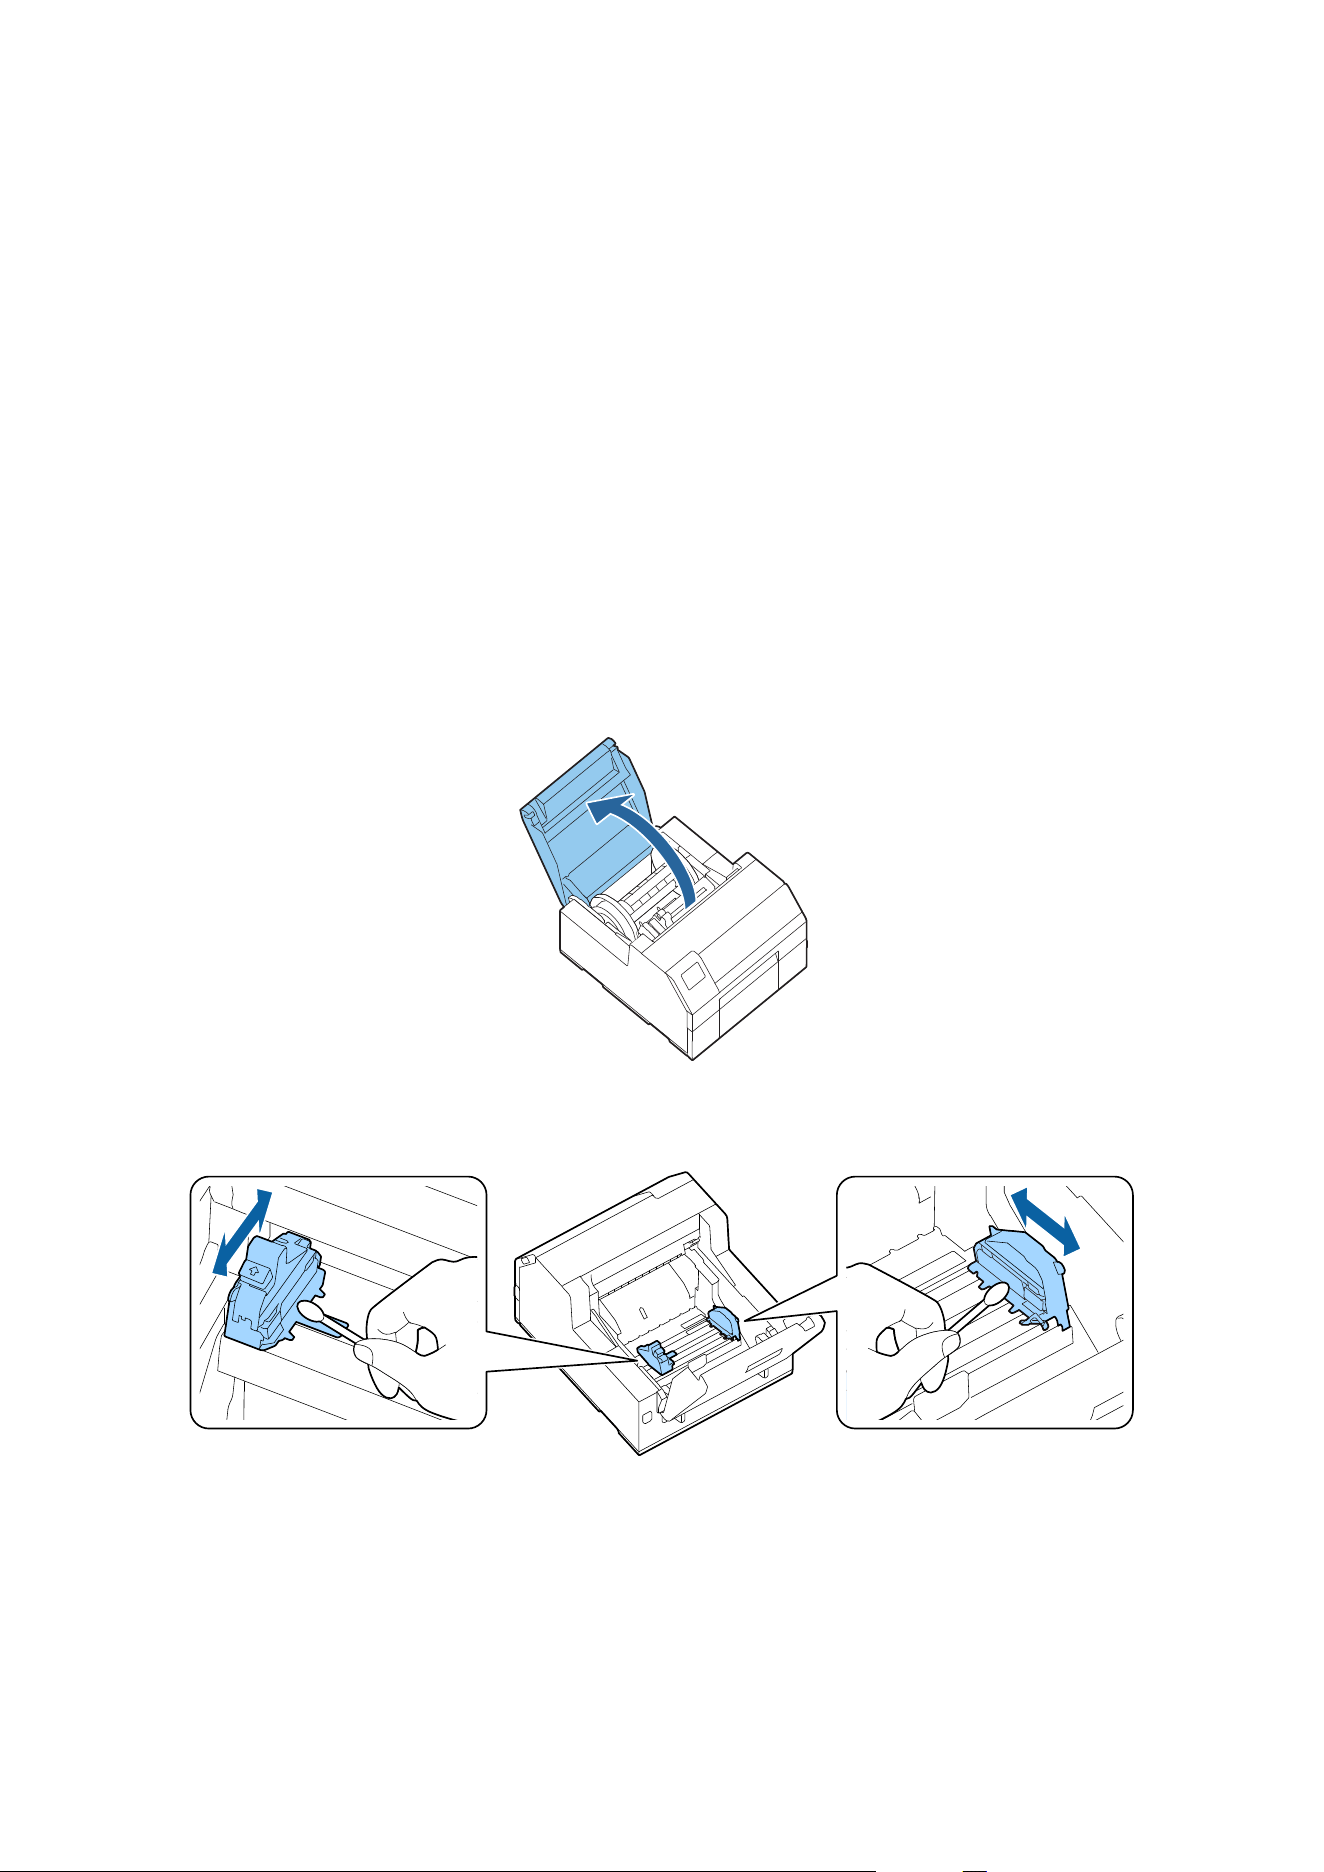
Cleaning the Platen
If labels, paper dust, or adhesive has adhered to the platen, paper may get jammed, or printing position may
become incorrect.
Perform cleaning by following the steps below.
A
Check that the printer has been turned
o.
B
If paper has been loaded, remove it.
U “How to Remove Paper (For the Auto Cutter Model)” on page 67
U “How to Remove Paper (For the Peeler Model)” on page 69
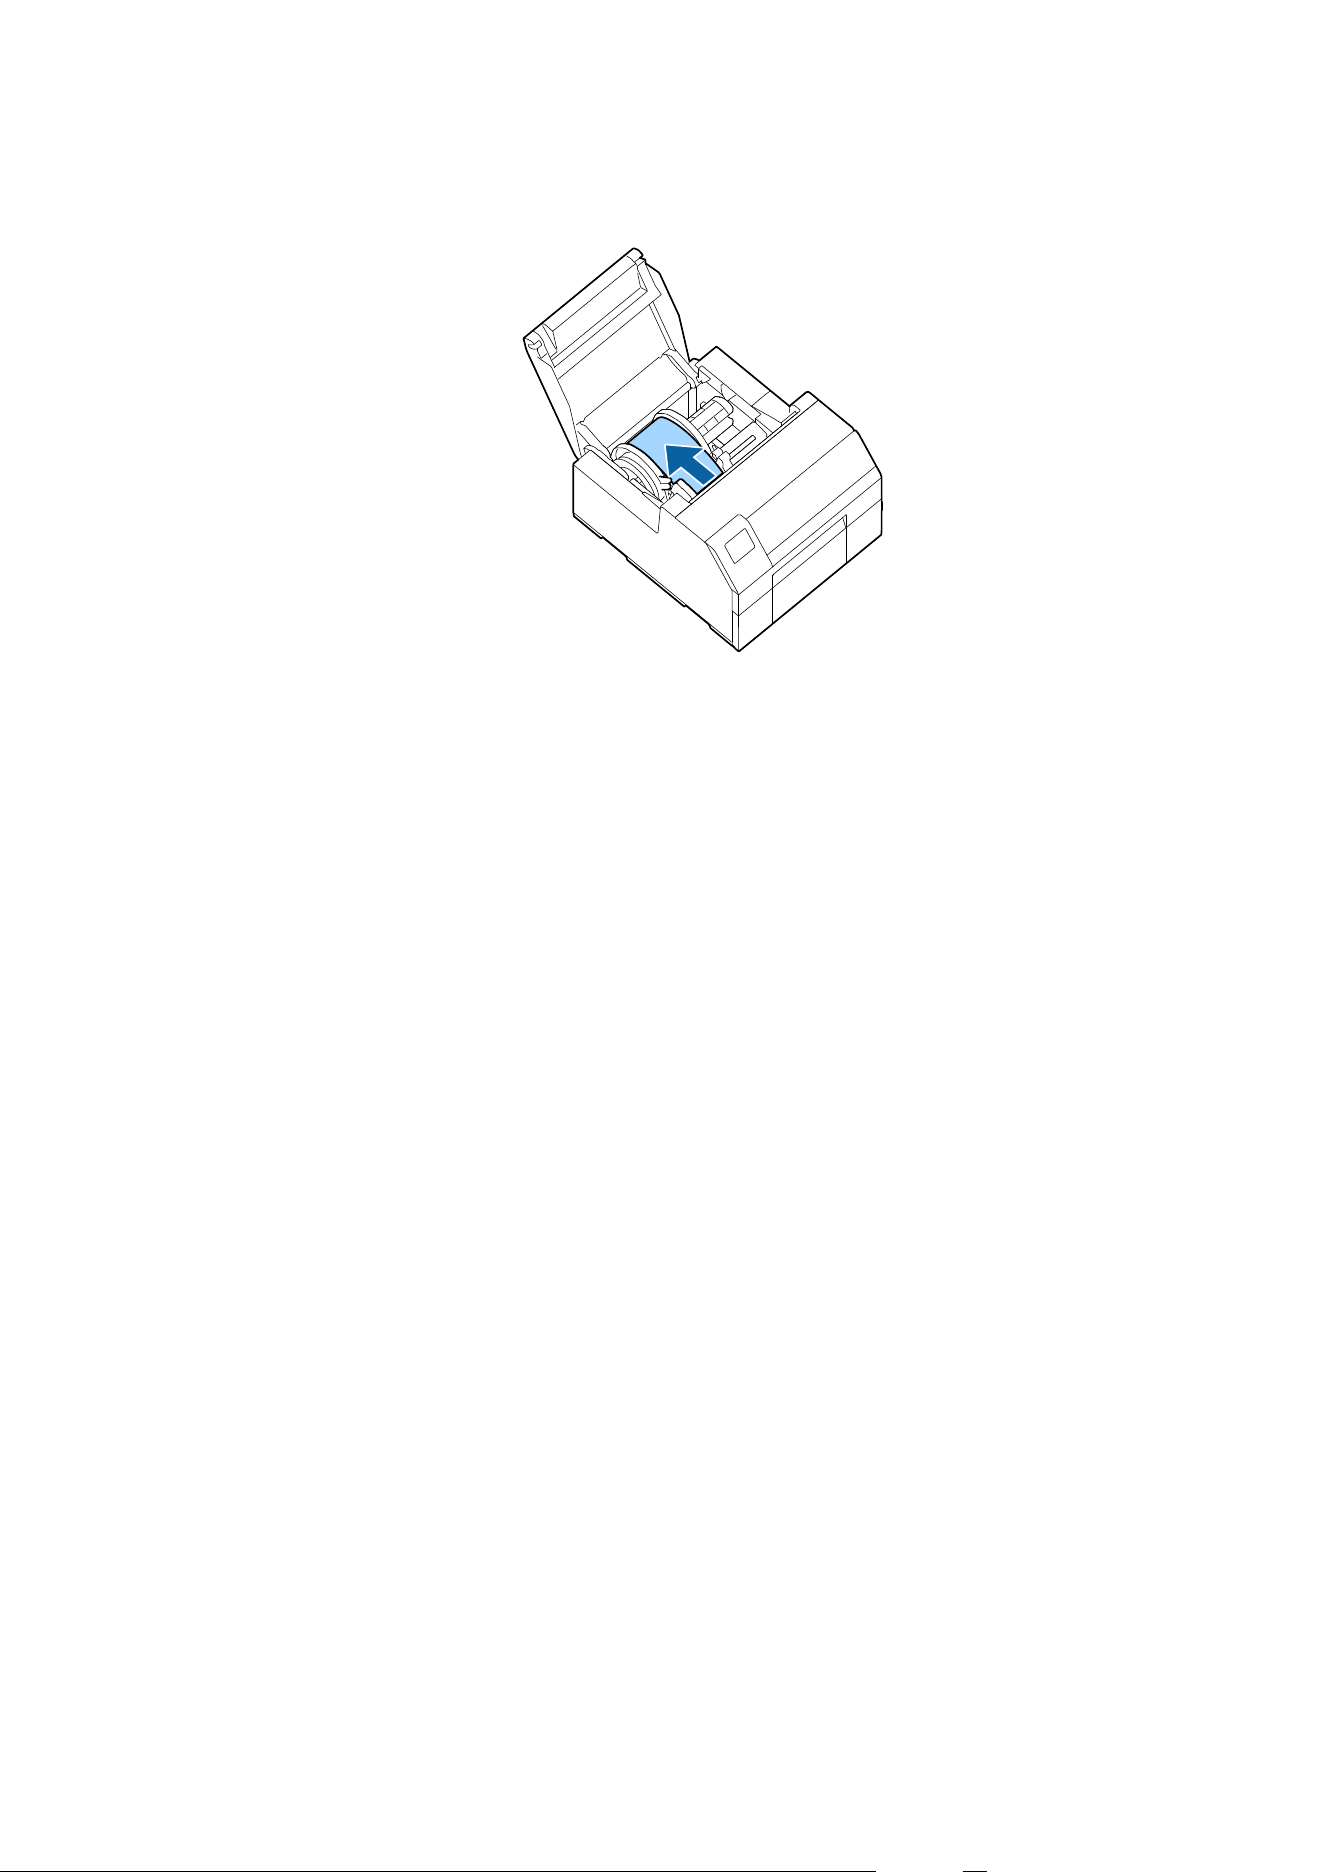
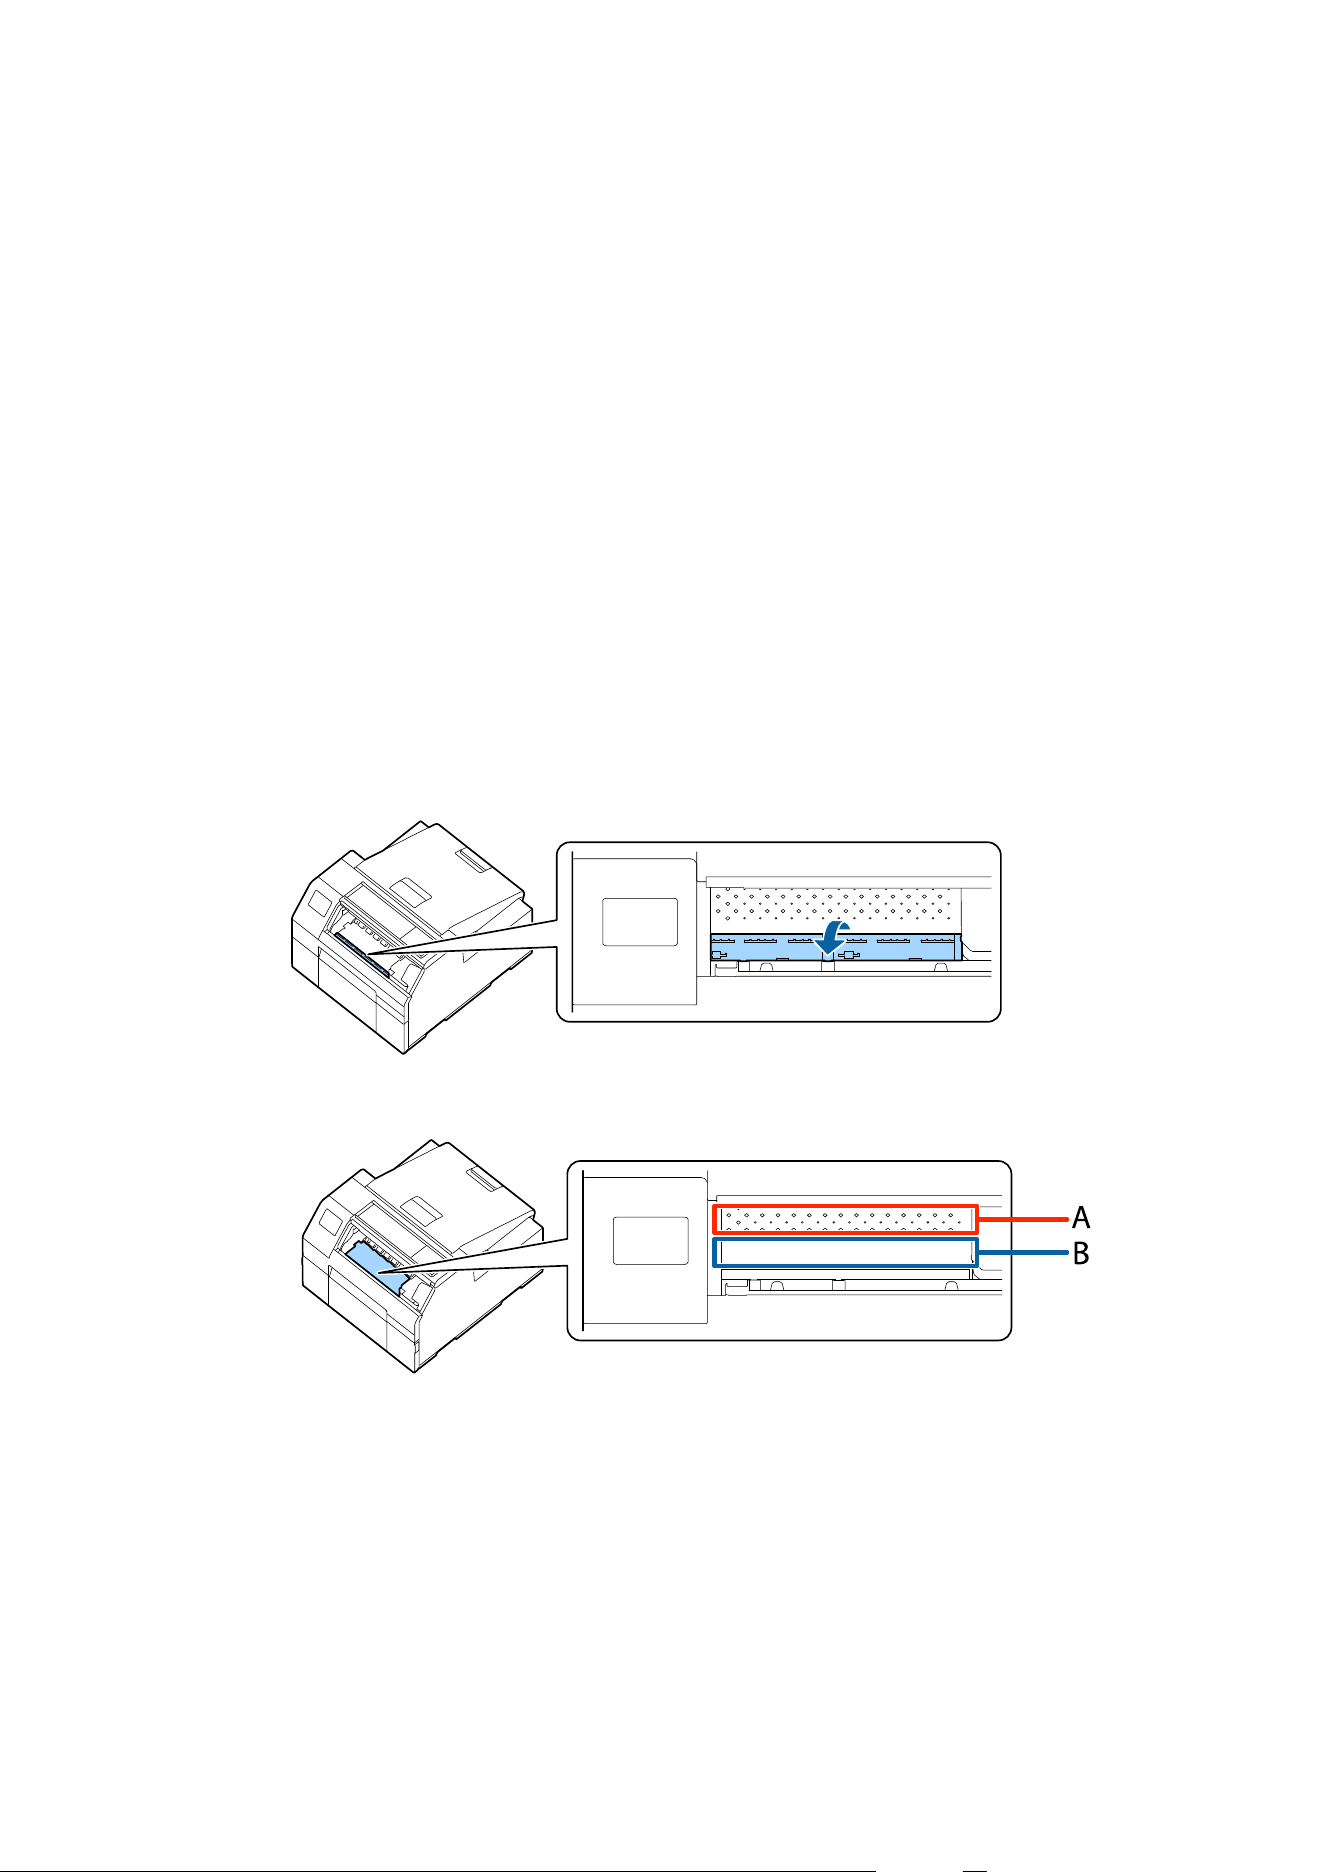
C
Open the front cover.
D
Raise the paper holder unit.
E
Use a cloth or cotton swab to remove adhesive adhered to the platen.
❏ A: Do not clean this area
❏ B: Clean this area
F
Lower the paper holder unit.
CW-C6000 Series/CW-C6500 Series/CW-D6000 Series/CW-D6500 Series User's Guide
Maintenance
79
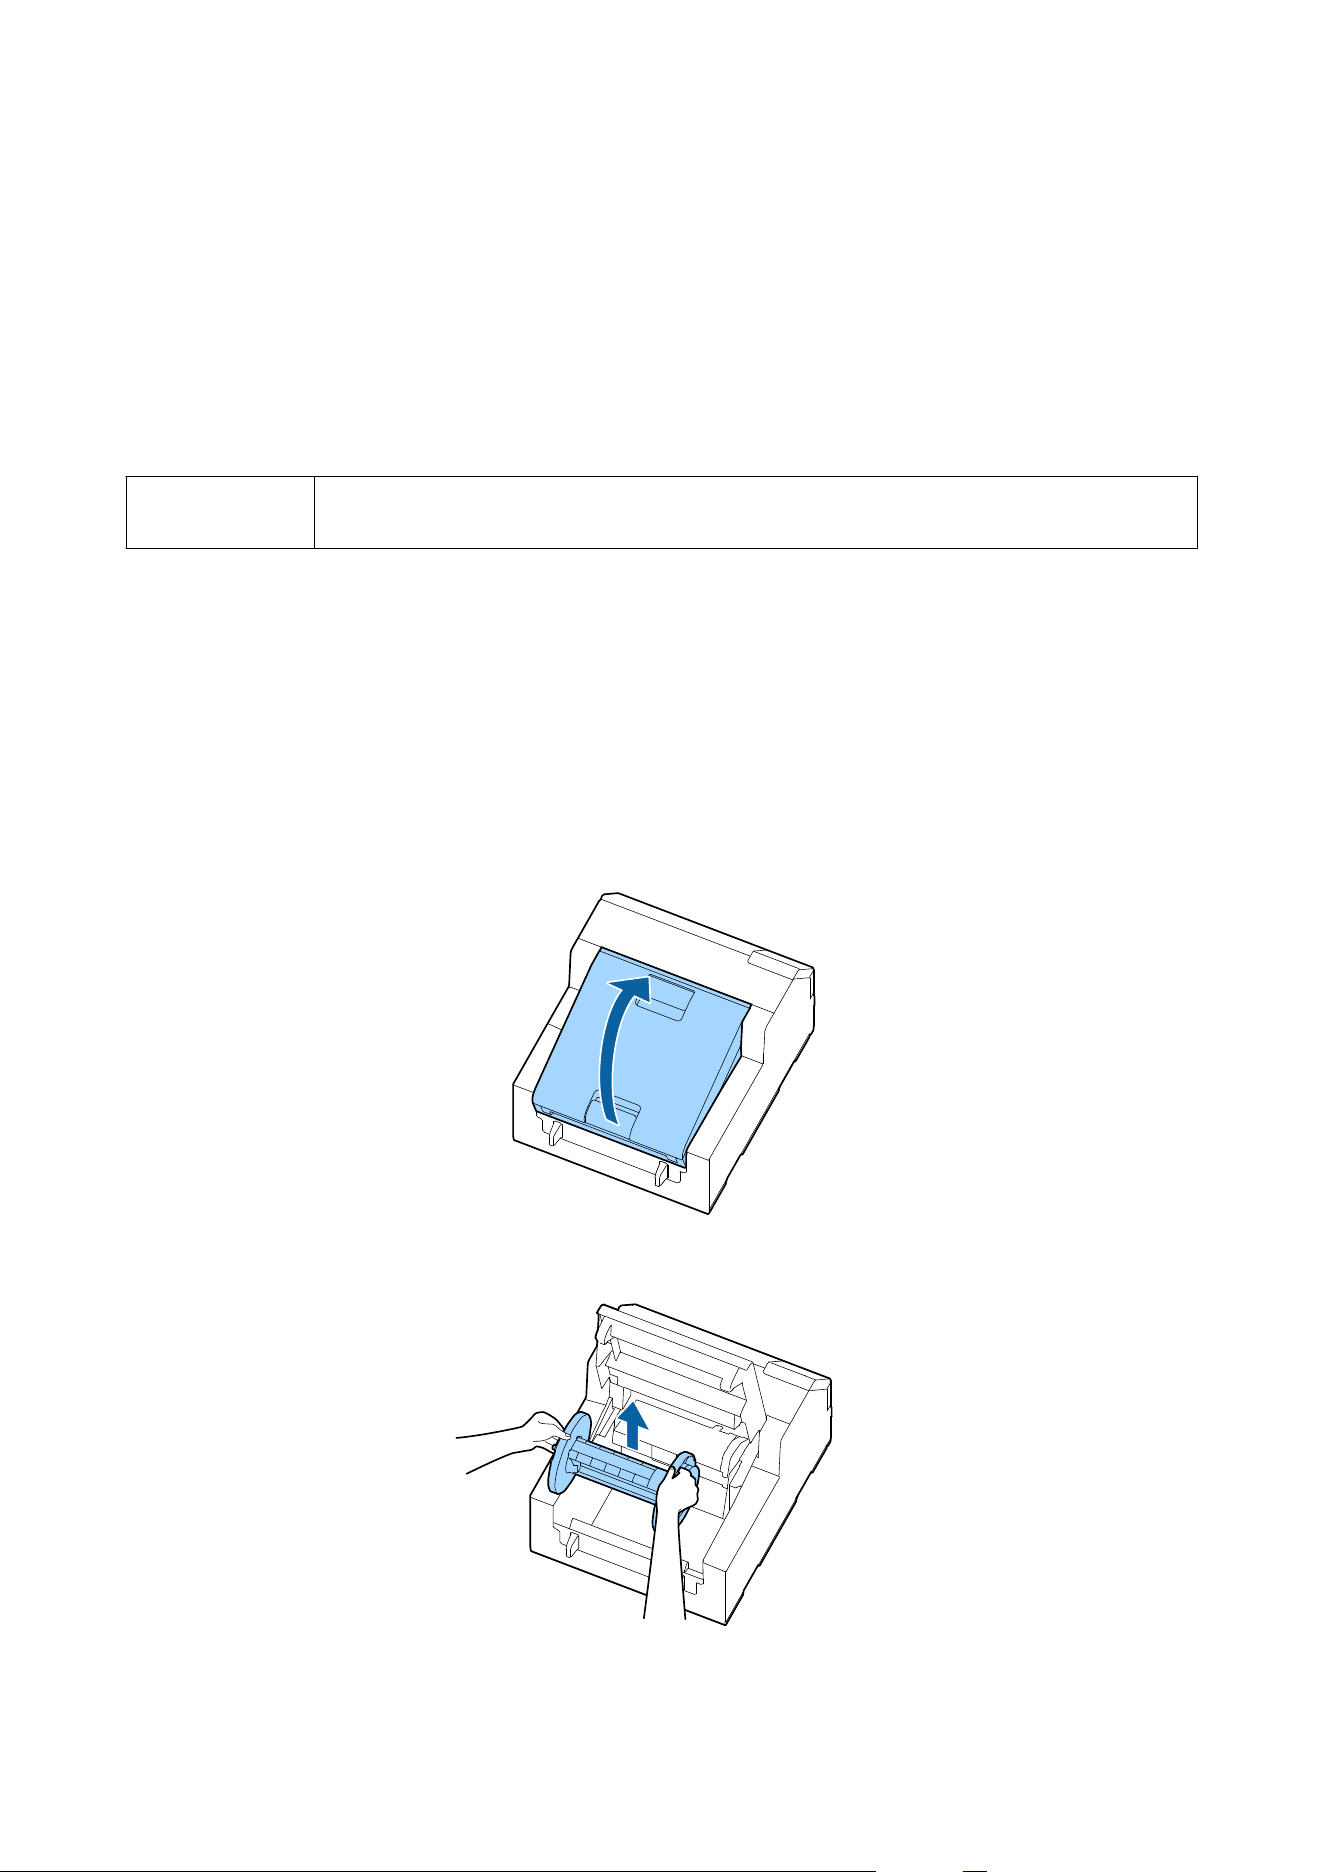
Cleaning the Paper Feed Roller
If paper dust or adhesive has adhered to the paper feed roller, paper may get jammed, or faint or blurred image
may be printed.
To maintain good print quality, it is recommended that the rollers are cleaned once a week.
Perform cleaning by following the steps below.
!
Caution
When cleaning the paper feed roller, do not use a material other than labels. Doing so may damage
the roller resulting in paper jam, or faint or blurred printout.
A
Check that the printer has been turned
o.
B
Open the paper cover.
If paper has been loaded, remove it.
U “How to Remove Paper (For the Auto Cutter Model)” on page 67
U “How to Remove Paper (For the Peeler Model)” on page 69
C
Remove the spindle.
CW-C6000 Series/CW-C6500 Series/CW-D6000 Series/CW-D6500 Series User's Guide
Maintenance
80
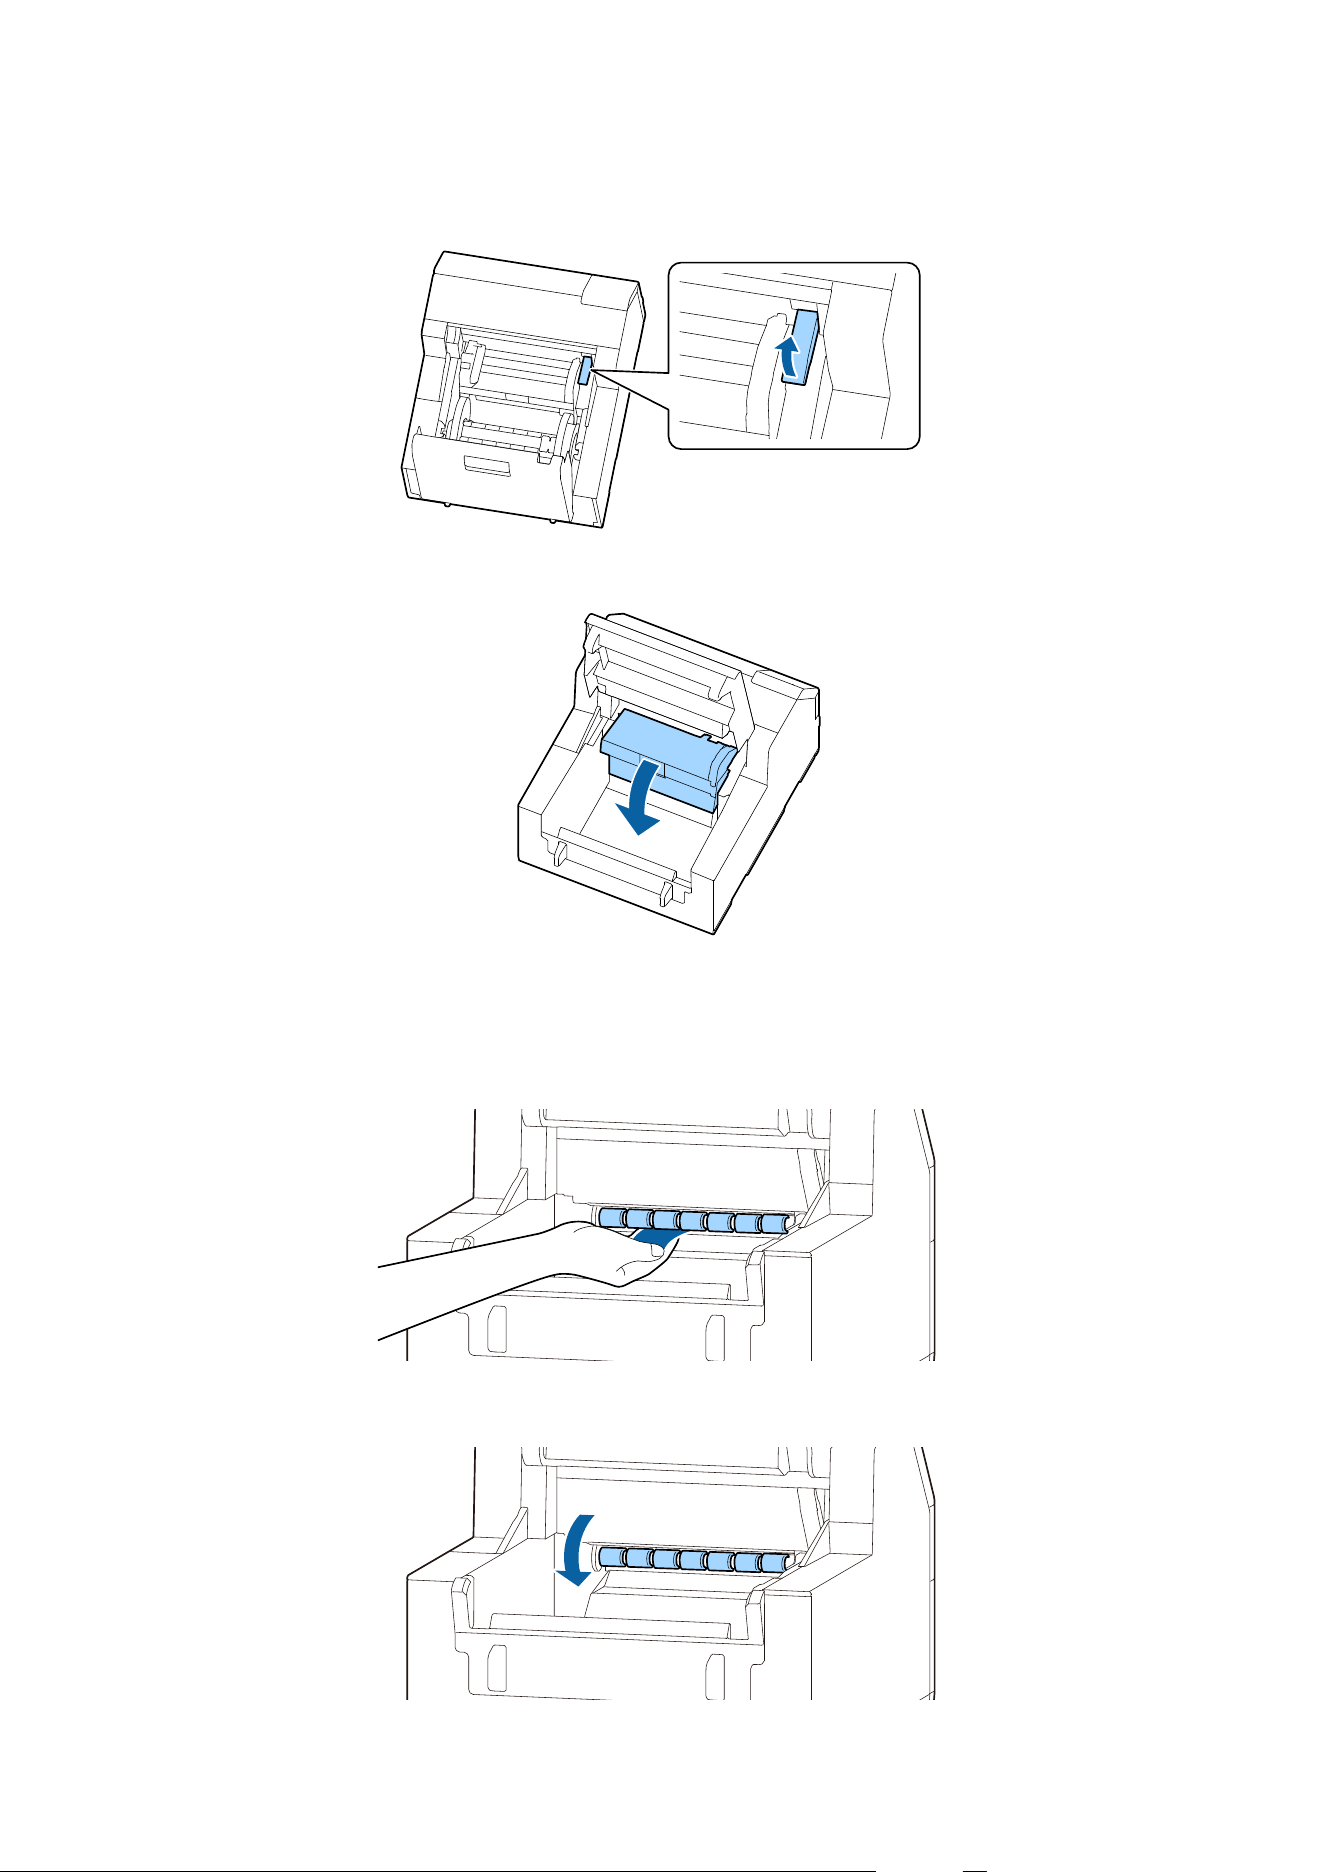
D
Raise the release lever.
E
Open the paper guide unit.
F
Attach adhesive side of a label to the roller, and peel it
o
slowly. Repeat this action until paper dust or
adhesive is completely removed from side to side of the roller.
If some labels have stuck on the roller, carefully remove them as they can cause a paper jam.
G
Rotate the roller by hand to remove paper dust and adhesive from the entire surface of the roller.
CW-C6000 Series/CW-C6500 Series/CW-D6000 Series/CW-D6500 Series User's Guide
Maintenance
81

Cleaning the Paper Pressure Roller
If paper dust or adhesive has adhered to the paper pressure roller, paper may get jammed, or faint or blurred image
may be printed.
Perform cleaning by following the steps below.
!
Caution
When cleaning the paper pressure roller, do not use a material other than labels. Doing so may
damage the roller resulting in paper jam, or faint or blurred printout.
A
Check that the printer has been turned
o.
B
Open the paper cover.
If paper has been loaded, remove it.
U “How to Remove Paper (For the Auto Cutter Model)” on page 67
U “How to Remove Paper (For the Peeler Model)” on page 69
C
Remove the spindle.
CW-C6000 Series/CW-C6500 Series/CW-D6000 Series/CW-D6500 Series User's Guide
Maintenance
82
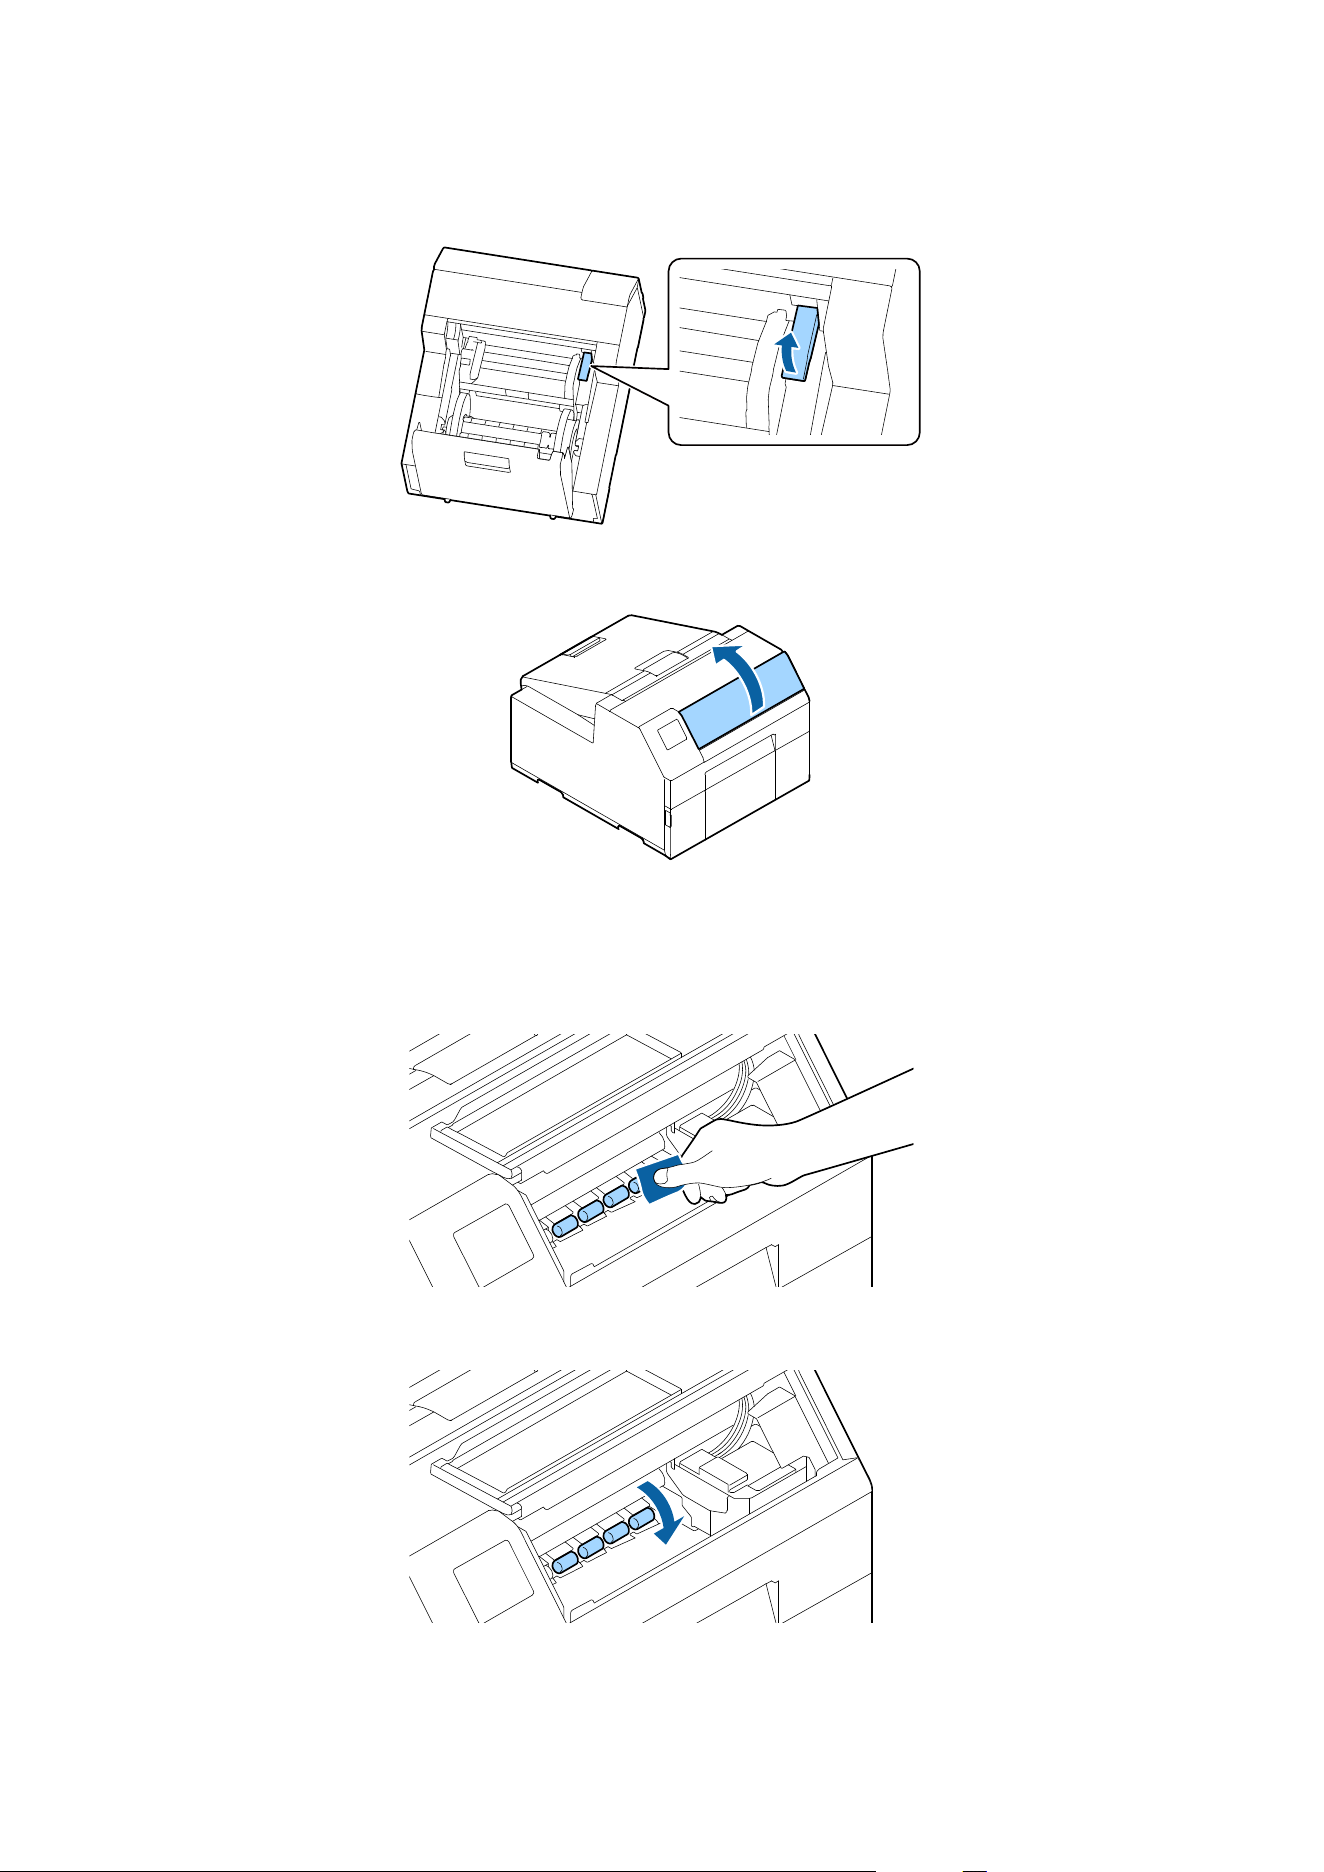
D
Raise the release lever.
E
Open the front cover.
F
Attach adhesive side of a label to the roller, and peel it
o
slowly. Repeat this action until paper dust or
adhesive is completely removed from side to side of the roller.
If some labels have stuck on the roller, carefully remove them as they can cause a paper jam.
G
Rotate the roller by hand to remove paper dust and adhesive from the entire surface of the roller.
CW-C6000 Series/CW-C6500 Series/CW-D6000 Series/CW-D6500 Series User's Guide
Maintenance
83
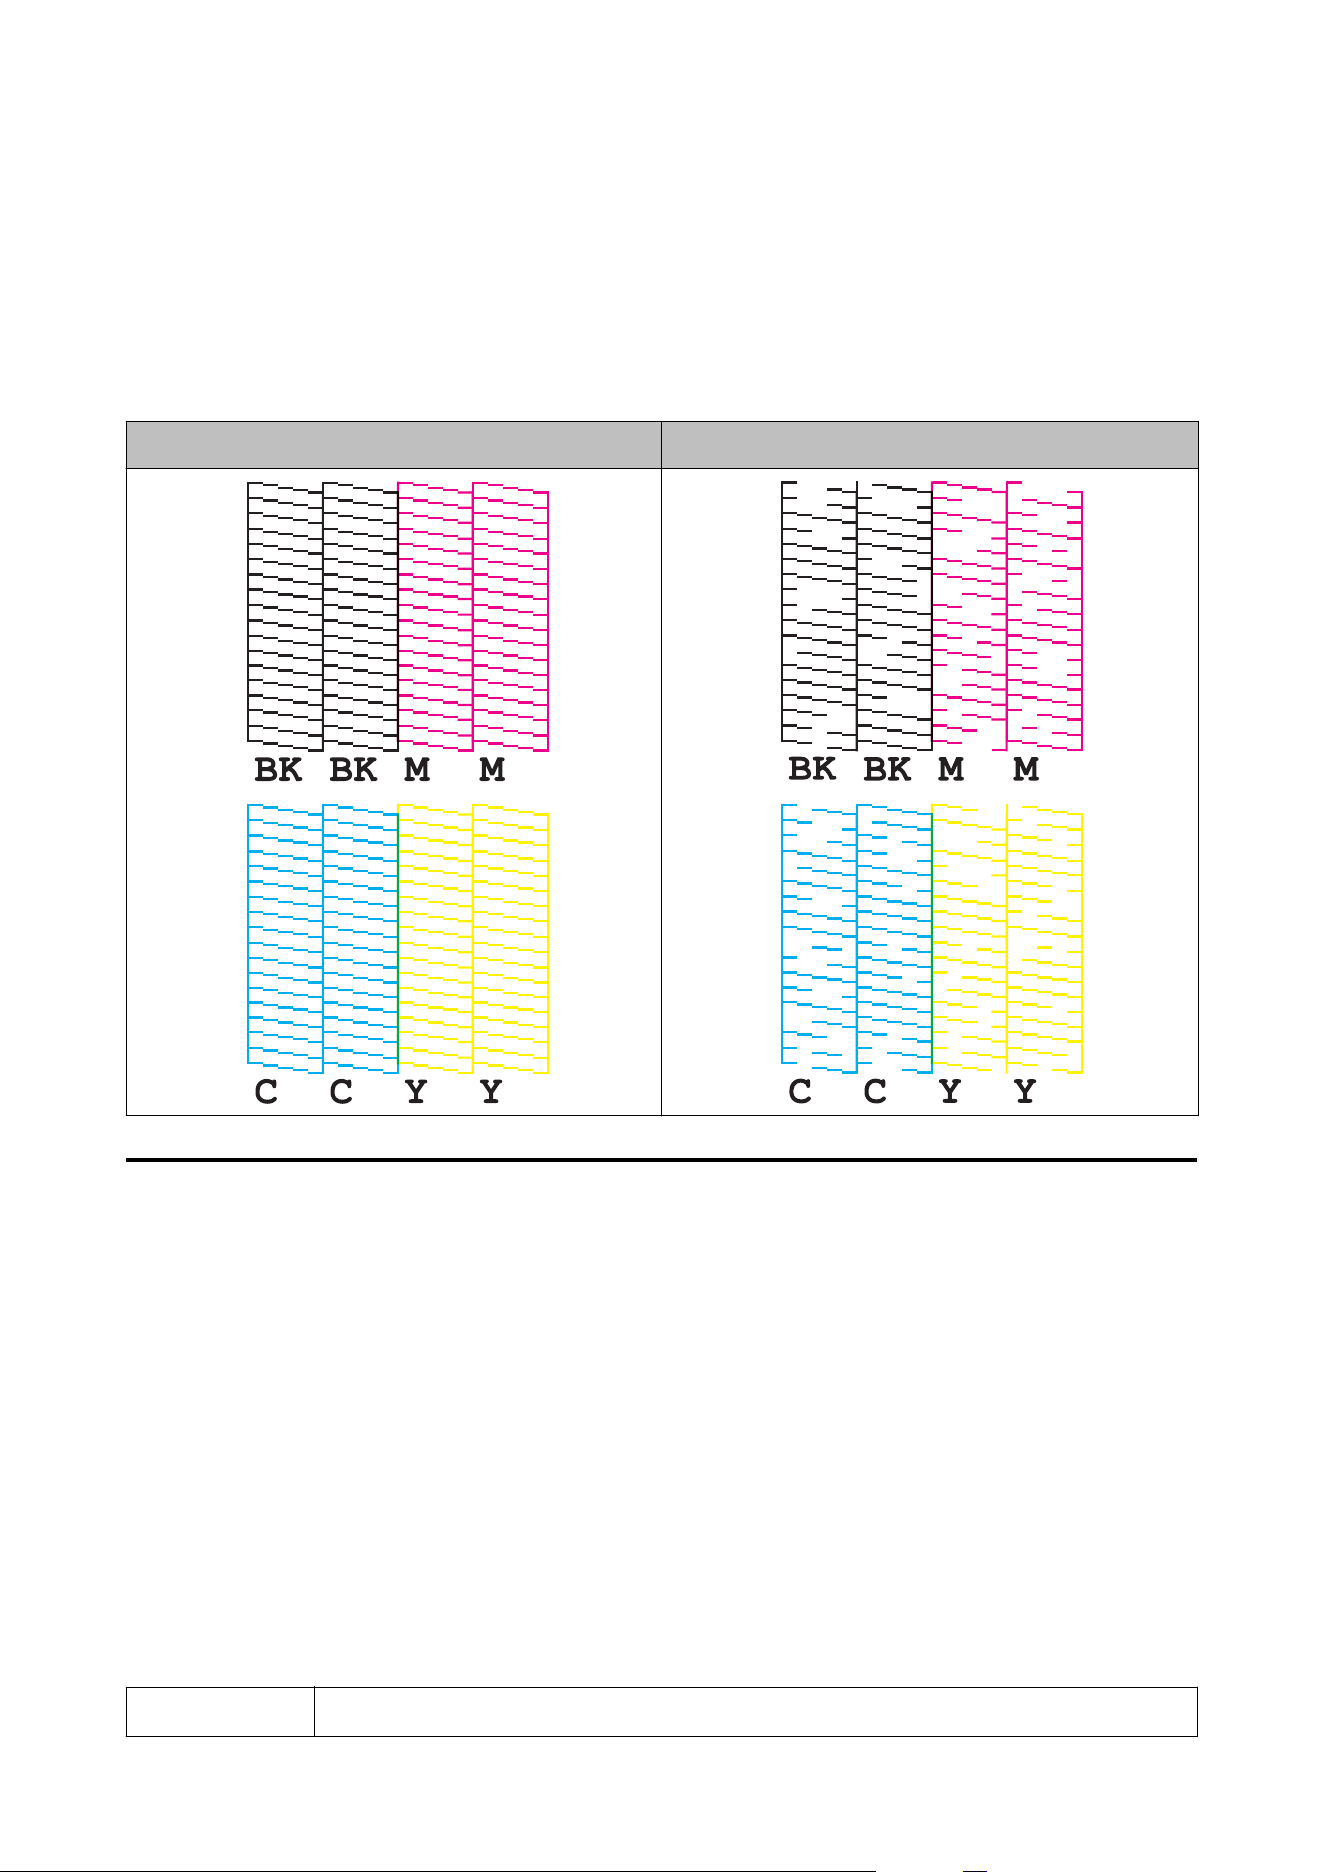
Cleaning the Print Head
If the nozzles are clogged, faint colors, banding, or unintended colors appear on printouts. When such print quality
problems occur, print nozzle check patterns and check for nozzle clogging.
Example of the nozzle check patterns.
Normal Clogging
Printing Nozzle Check Patterns
Clogged nozzles cause blurred or streaky printing or printing in unintended colors. If you are experiencing print
quality problems, print a nozzle check pattern to see if the nozzles are clogged.
Using the Operation Panel
Menu - Maintenance - Print Head Nozzle Check
Using the Printer Driver
Click Nozzle Check on the Printer Utilities tab.
Using the Web Cong
Select Print Nozzle Check Pattern on the Maintenance window, and then click Start.
Note
For information about Web Cong, see the Technical Reference Guide.
CW-C6000 Series/CW-C6500 Series/CW-D6000 Series/CW-D6500 Series User's Guide
Maintenance
84
Head Cleaning
If nozzles are clogged, run a Print Head Cleaning. Run Power Cleaning only when nozzle clog is not cleared by
running Print Head Cleaning.
To run a Print Head Cleaning, select the menu as described below.
c
Important
❏ The Power Cleaning consumes ink more than Print Head Cleaning.
❏ Do not turn
o
the power or open the covers during head cleaning. Doing so may cause printing
malfunction.
❏ Do not run the head cleaning more than necessary. Ink is consumed because ink is discharged
from the head to clean it.
❏ If there is not much ink remaining, head cleaning may not be possible. Replace the ink cartridges
and then try again.
U “Replacing the Ink Cartridges” on page 35
Using the Operation Panel
Menu - Maintenance - Print Head Cleaning
Menu - Maintenance - Power Cleaning
Using the Printer Driver
Click Print Head Cleaning or Power Cleaning on the Printer Utilities window.
Using the Web Cong
Select Print Head Cleaning on the Maintenance window. en select the cleaning type from Auto or Power
Cleaning, and then click Start.
Note
When logging in to Web Cong, you need to enter your user name and password. The initial values are
as follows.
User name: Blank or a freely selected character string
Password: The value for PASSWORD on the label axed to the rear of the product
CW-C6000 Series/CW-C6500 Series/CW-D6000 Series/CW-D6500 Series User's Guide
Maintenance
85
Troubleshooting
is chapter describes how to resolve problems. For troubleshooting information that is not described here, see the
Technical Reference Guide.
A Message is Displayed on the Operation Panel
Message Solution and Reference
Information
Paper feed error.
Load the paper or change the media
source setting.
Use paper that matches the Media Source and Media Form settings. Or
change the Media Source and Media Form settings to match them with the
loaded paper.
U “Printer Driver Settings” on page 41
Information
Cannot detect the roll paper.
Reload the paper or change the media
detection setting.
Use paper that matches the Media Detect settings. Or change the Media
Detect settings to match them with the loaded paper.
U “Printer Driver Settings” on page 41
Information
Cannot detect the fanfold paper.
Reload the paper or change the media
detection setting.
Use paper that matches the Media Detect settings. Or change the Media
Detect settings to match them with the loaded paper.
U “Printer Driver Settings” on page 41
(On the home screen)
Load paper.
Load paper.
U “Loading and Replacing Paper” on page 48
Information
The paper size set in the printer may
dier
from the print setting.
Load media that matches the print area size. Or change the print area to match
it with the media size.
U “Loading and Replacing Paper” on page 48
Information
The roll paper is not loaded.
Load roll paper.
U “Loading and Replacing Paper” on page 48
Information
The fanfold paper is not loaded.
Load fanfold paper.
U “Loading and Replacing Paper” on page 48
Information
Paper jam.
Remove the jammed paper and then load paper.
U “Paper is jammed” on page 94
CW-C6000 Series/CW-C6500 Series/CW-D6000 Series/CW-D6500 Series User's Guide
Troubleshooting
86
Message Solution and Reference
Information
The paper is not loaded correctly.
Remove the paper from the top of the
paper guide, close the paper cover, and
then press the Pause button.
Remove the paper, and then load the paper again.
U “How to Remove Paper (For the Auto Cutter Model)” on page 67
U “How to Remove Paper (For the Peeler Model)” on page 69
U “Loading and Replacing Paper” on page 48
If this error occurs when loading paper
Reload the paper following the procedure below.
Open the paper cover, remove the paper from the top of the paper guide, close
the paper cover, and then press the Pause button.
When the home screen appears on the operation panel, open the cover and
load paper.
U “Loading and Replacing Paper” on page 48
If the above step does not clear the error, check the position of the gap
detector. For details on how to operate the detectors, refer to the Technical
Reference Guide.
Information
Calibration failed.
Press the OK button. Then reload or
replace the paper.
Make sure that the paper loaded in the printer matches the paper detection
method (gap or black mark), and reset the paper.
U “Loading and Replacing Paper” on page 48
If the error still occurs, the detector cannot handle the paper. Replace the paper.
Information
The paper has already been cut and
cannot be cut.
This error occurs when you press the Cut button at the position where the
paper is already cut.
Feed the paper by printing or pressing the Feed button to enable the Cut
button.
Maintenance Error
The ink cartridge is not installed correctly.
Install an ink cartridge with a sucient amount of ink remaining.
U “How to Replace the Ink Cartridges” on page 35
(On the home screen, an exclamation
mark on the ink levels)
Prepare a new ink cartridge to be replaced with the low-ink-level cartridge.
If you continue to use the low-ink-level cartridge, you may be required to
replace it during printing.
If you replace the cartridge during printing, you may see a dierence in color
between colors printed by the old cartridge and colors printed by the new one
due to a dierence in ink drying status.
If it is not acceptable for you, replace the ink cartridge with a new one before
starting printing.
U “How to Replace the Ink Cartridges” on page 35
The removed ink cartridge can be installed again and used until you are
prompted to replace it.
Information
You need to replace the following ink
cartridge(s).
Install an ink cartridge with a sucient amount of ink remaining.
U “How to Replace the Ink Cartridges” on page 35
Maintenance Error
Cannot recognize the ink cartridge.
Select “Next” to clear the error.
Reinstall the ink cartridge.
If the error reoccurs, replace the ink cartridge with a new one.
U “How to Replace the Ink Cartridges” on page 35
CW-C6000 Series/CW-C6500 Series/CW-D6000 Series/CW-D6500 Series User's Guide
Troubleshooting
87
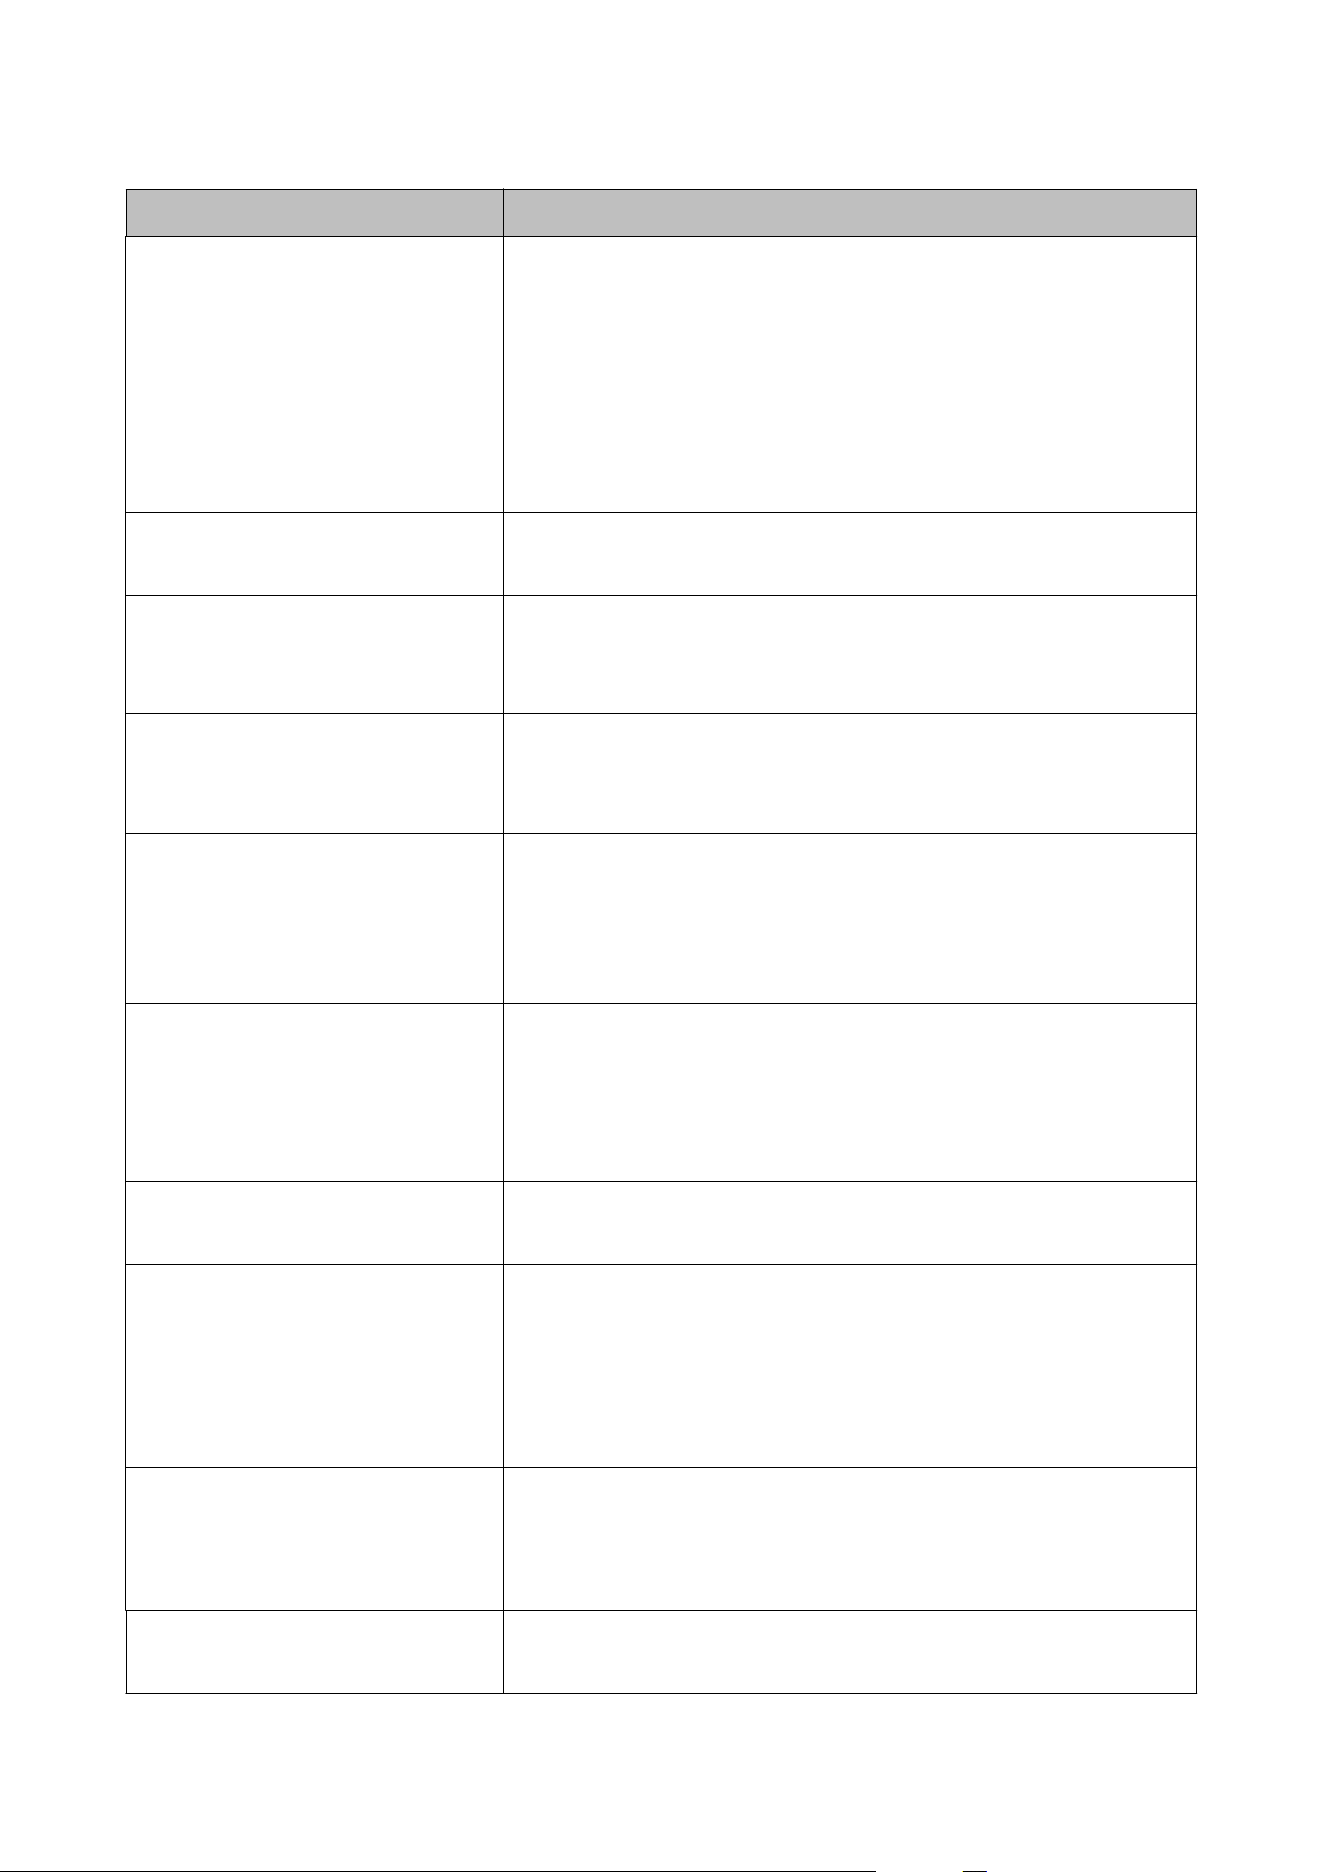
Message Solution and Reference
Information
You have not installed genuine Epson ink
cartridges.
For the best performance of the printer, it is recommended to use genuine
Epson ink cartridges.
Use of non-genuine Epson ink cartridges can adversely aect the printer and
print quality and prevent the printer from realizing its maximum performance.
Epson cannot guarantee the quality and reliability of non-genuine Epson
products.
Repairs for any damage or breakdown of this product due to the use of
non-genuine Epson products will not be free of charge even if the warranty
period is still valid.
Information
These ink cartridges are not compatible.
Because the installed ink cartridges are not the ones for this printer, an error
such as a cartridge detection error may occur.
Maintenance Error
Maintenance Box not installed.
Model number: SJMB6000/6500
Install a new maintenance box.
U “How to Replace the Maintenance Box” on page 38
Maintenance Error
Cannot recognize the Maintenance Box.
Model number: SJMB6000/6500
Reinstall the maintenance box.
If the error still occurs, replace the maintenance box with a new one.
U “How to Replace the Maintenance Box” on page 38
(On the home screen)
The Maintenance Box is nearing end of its
service life.
Prepare a new maintenance box to be replaced with the near-full maintenance
box.
When a message saying “The Maintenance Box is at the end of its service life.
You need to replace it.” is displayed, replace the maintenance box.
U “How to Replace the Maintenance Box” on page 38
Maintenance Error
The Maintenance Box is at the end of its
service life.
You need to replace it.
Model number: SJMB6000/6500
Replace the maintenance box with a new one.
U “How to Replace the Maintenance Box” on page 38
Information
Memory Full. Document was not printed.
Delete unnecessary les.
Printer Error
Turn on the printer again.
See your documentation for more details.
XXXXXX
1. Turn o the printer.
2. Check that there is no paper jam or foreign materials near the ejection slot.
3. Turn the printer on.
If the printer error still occurs, contact
qualied
service personnel for advice.
When contacting, tell the person the “XXXXXXXX” (a 6- or 8-digit alphanumeric
code).
Information
Cannot start cleaning because ink is low.
Printer features except cleaning are
available.
When running the cleaning, install ink cartridges with a sucient amount of ink
remaining.
U “How to Replace the Ink Cartridges” on page 35
Information
Remove the label.
Remove the labels from the peeler.
If the error is not cleared, press the Peeler Reset button.
CW-C6000 Series/CW-C6500 Series/CW-D6000 Series/CW-D6500 Series User's Guide
Troubleshooting
88

Message Solution and Reference
Information
Paused
The print quality may decrease because
the nozzles are clogged.
The print quality may decrease because the nozzles are clogged. If it is not
acceptable, run a print head cleaning.
U “Cleaning the Print Head” on page 84
Information
Open the front cover, and then close the
paper holder unit.
Open the front cover, and then close the paper holder unit. When the paper
holder unit is opened, a paper jam error may occur. If the paper jam error is not
cleared, try the solutions in the links below.
Auto cutter model:
U “For the Auto Cutter Model” on page 94
Peeler model:
U “For the Peeler Model” on page 97
The printer can’t connect to cloud
service.
Please check the connection status and
settings with the cloud service.
Please contact your administrator for
details.
The printer is failing to connect to the Loftware Cloud.
Contact your system administrator for more information.
CW-C6000 Series/CW-C6500 Series/CW-D6000 Series/CW-D6500 Series User's Guide
Troubleshooting
89
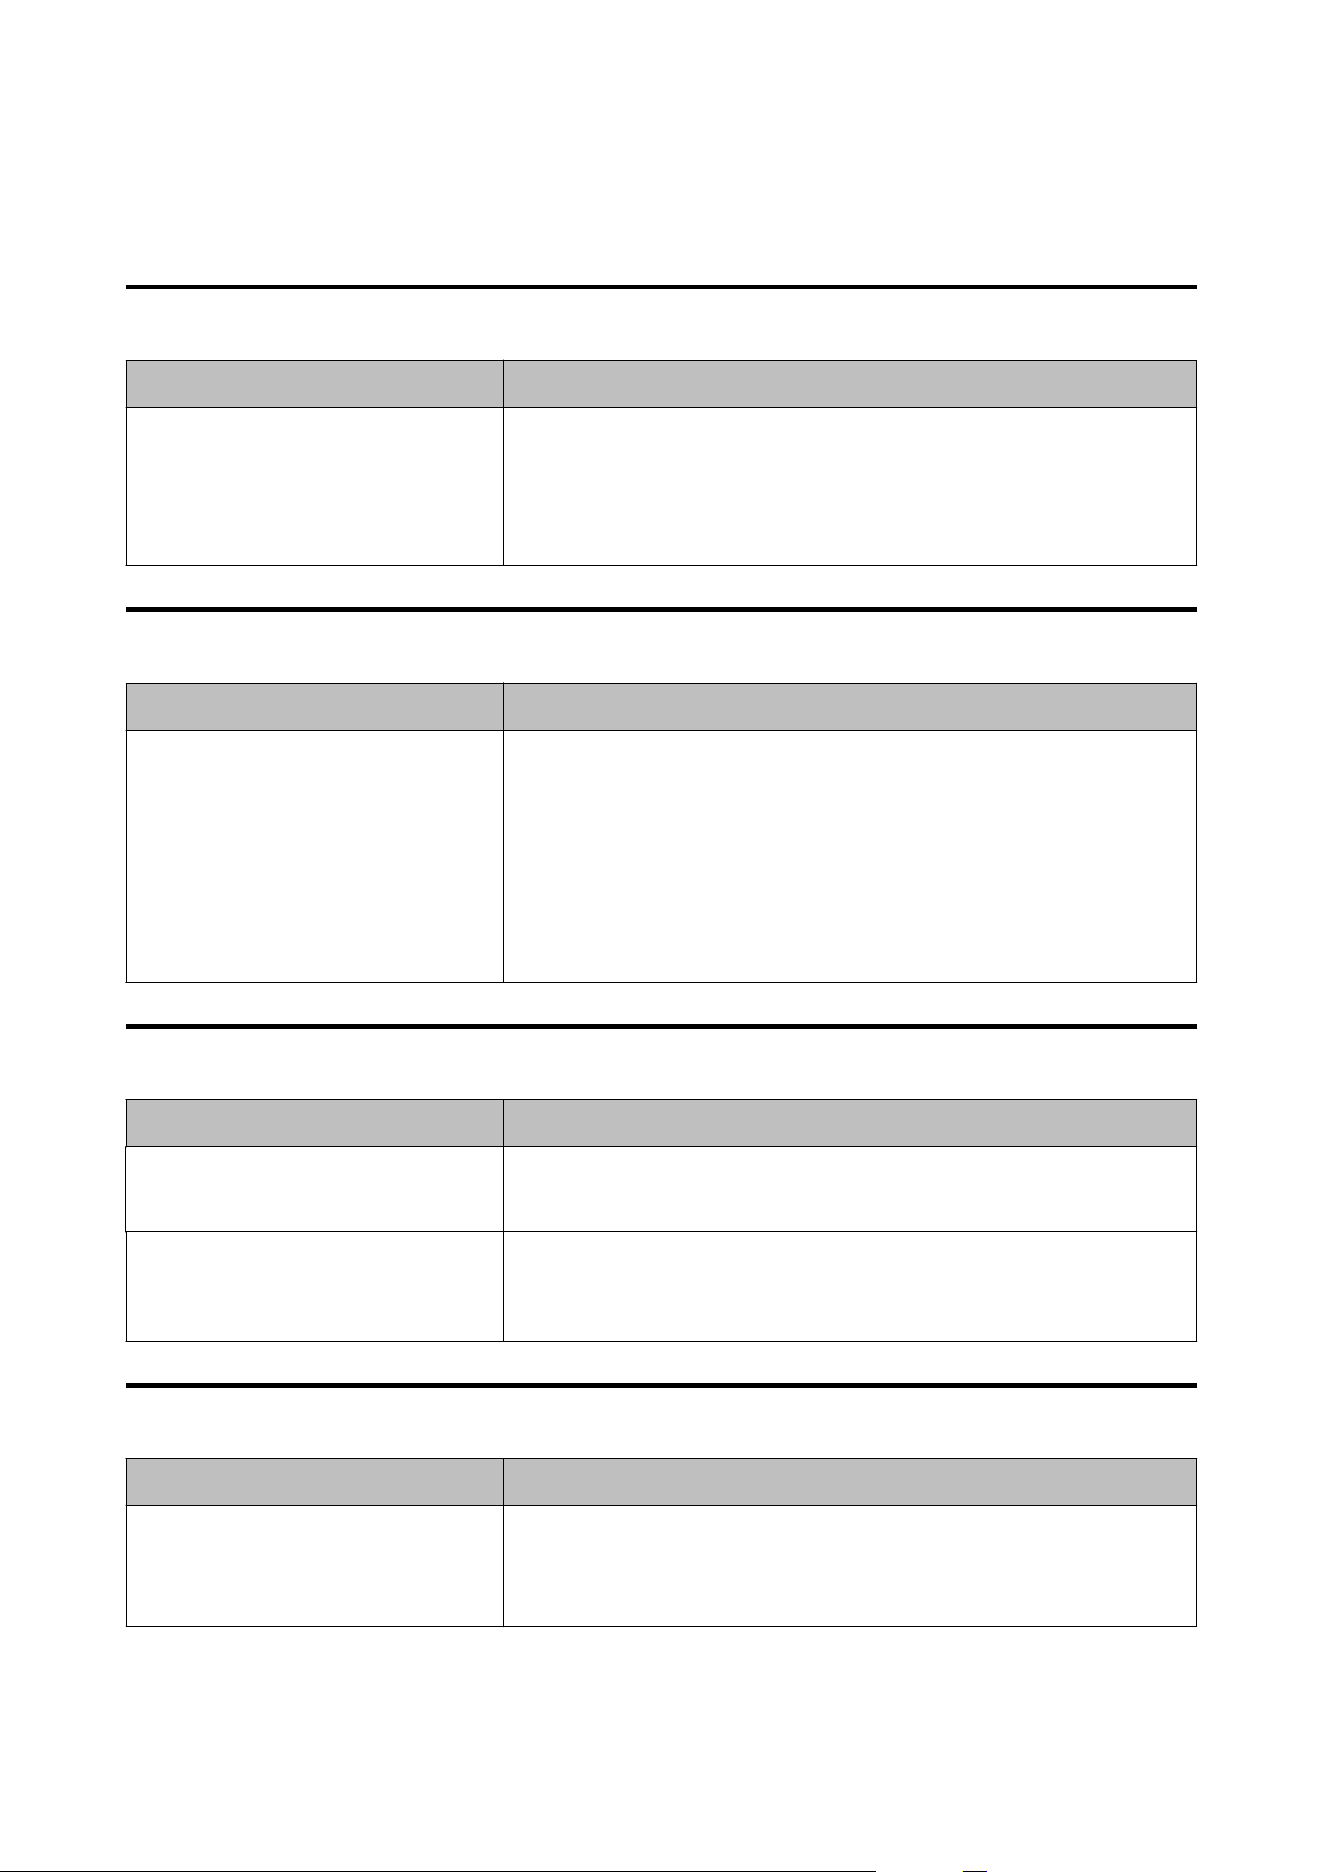
Problems with Print Quality
Horizontal White Banding
Cause Solution and Reference
The nozzles are clogging. Print the nozzle check patterns to check the nozzles for clogging.
U “Printing Nozzle Check Patterns” on page 84
If the nozzles are clogging, run a print head cleaning.
U “Cleaning the Print Head” on page 84
Vertical White Spots (Auto Cutter Model)
Cause Solution and Reference
The printed label has been back-fed. If printed labels are fed backward, the printed surface is damaged by the rollers
located under the paper pressure unit.
This can occur when the print mode is set to Stop at Cut Position or Stop at
Peel-O Position, and printed labels have not been removed after each print
job is nished.
Select a print mode option other than Stop at Cut Position or Stop at Peel-O
Position, or remove printed labels after each print job is
nished.
For details on the print modes, refer to the Technical Reference Guide.
White or Black Banding
Cause Solution and Reference
The paper is not loaded correctly. Reload the paper.
U “Loading and Replacing Paper” on page 48
The paper being used and the Media
Coating Type setting dier.
Check the paper being used and the Media Coating Type setting of the printer
driver.
U “Printer Driver Settings” on page 41
Printed Colors Are Wrong
Cause Solution and Reference
If the printer is moved after initial
charging, the specied colors may not be
output (colors may be mixed) due to
vibrations and impacts.
Run a head cleaning and check that colors are no longer mixed.
U “Cleaning the Print Head” on page 84
CW-C6000 Series/CW-C6500 Series/CW-D6000 Series/CW-D6500 Series User's Guide
Troubleshooting
90
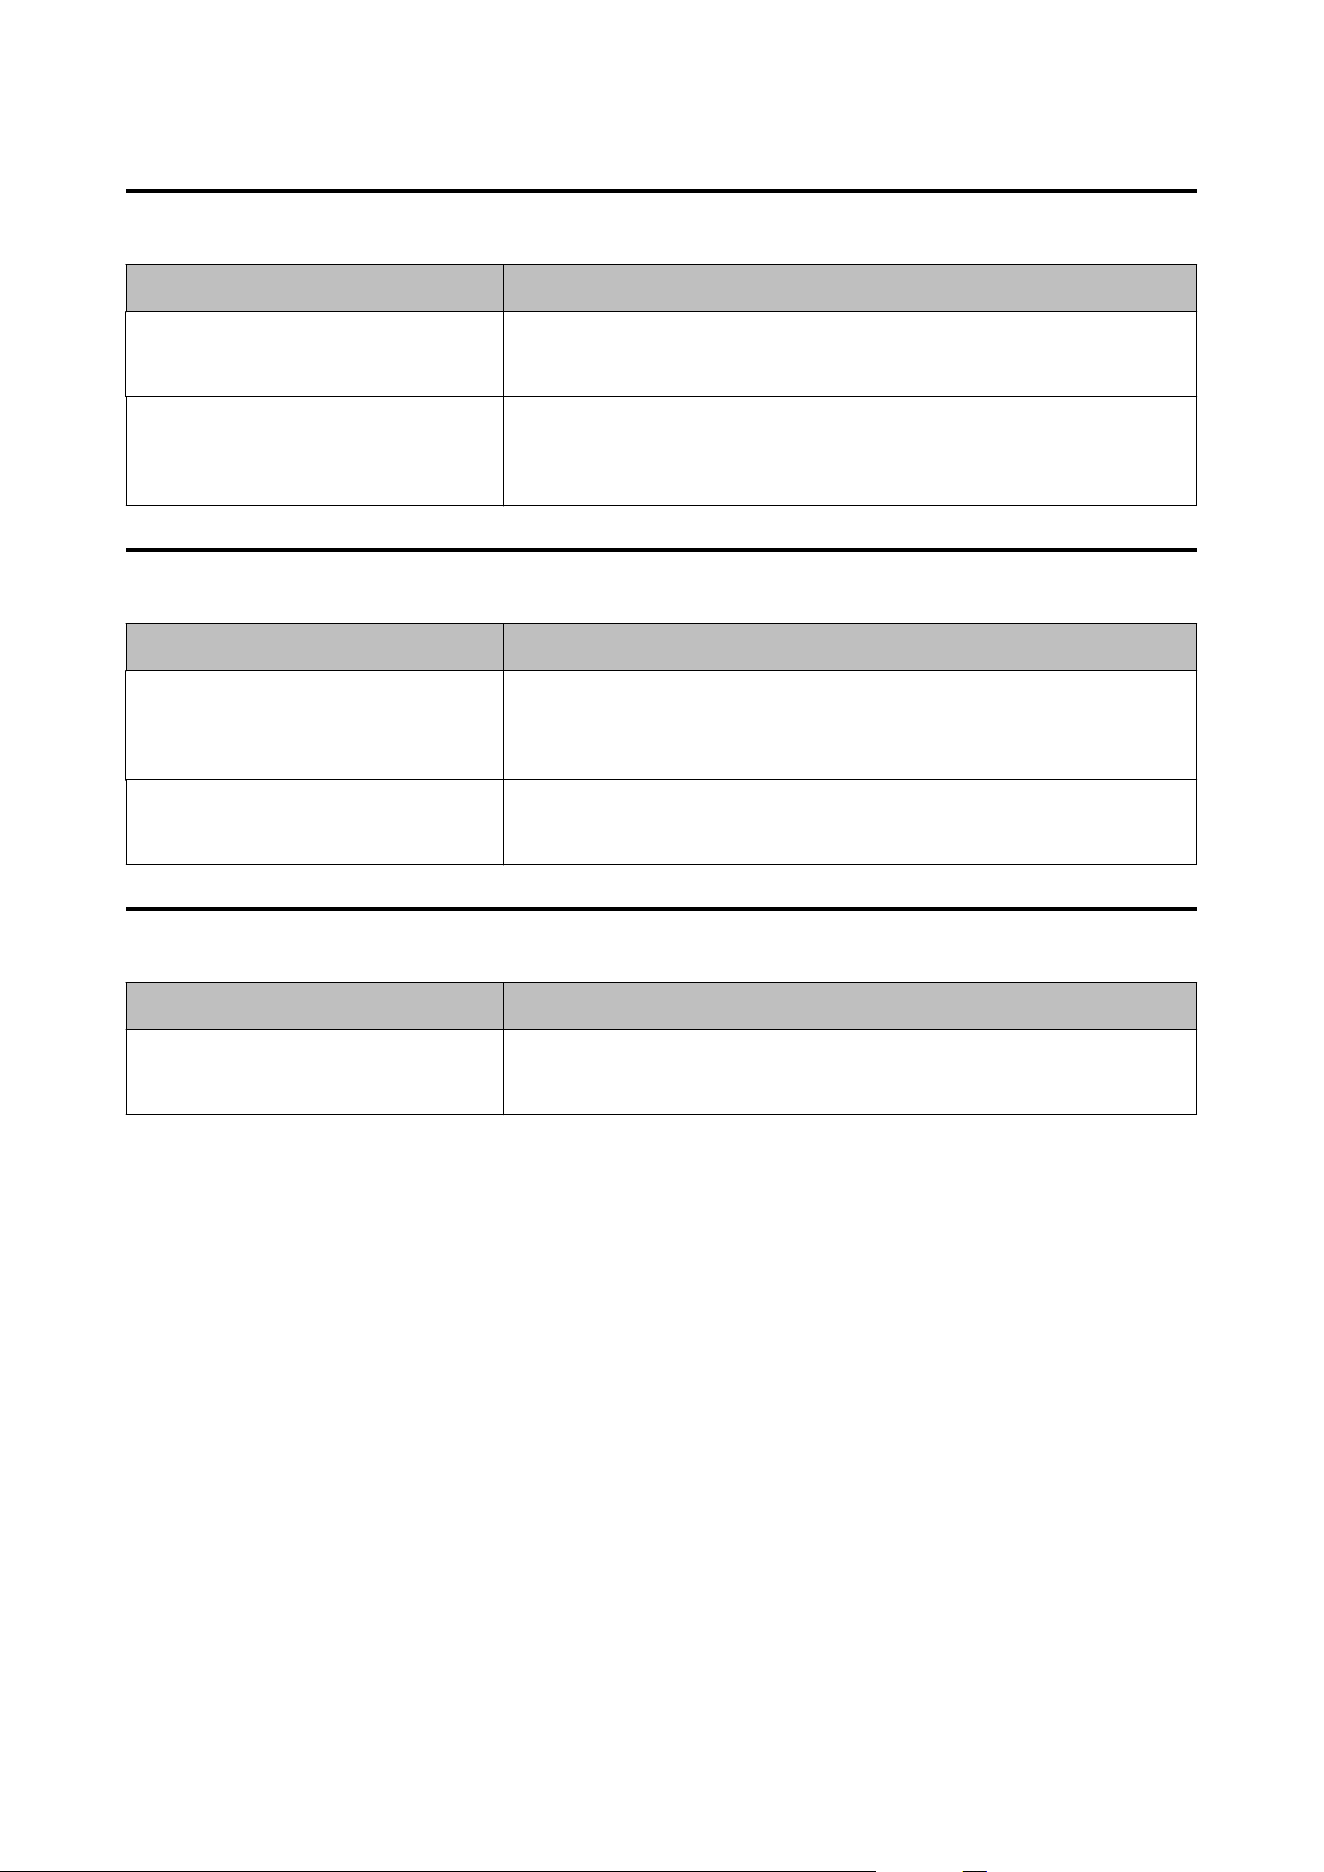
Print Position Shifts
Cause Solution and Reference
The edge guide is not set along the paper
edge.
Check that the edge guide is properly set at the paper width position.
U “Loading and Replacing Paper” on page 48
The paper you are using is set at an angle.
(Peeler model)
Make sure that the edge of the paper is aligned with the protrusion below the
peeler cover.
U “Loading and Replacing Paper” on page 48
Paper is Smeared or Smudged with Ink
Cause Solution and Reference
The paper being used and the Media
Coating Type setting dier.
Check the paper being used and the Media Coating Type setting of the printer
driver.
U “Printer Driver Settings” on page 41
If foreign matter is adhered to the head,
the paper may be smeared with ink.
Run a print head cleaning.
U “Cleaning the Print Head” on page 84
Paper is Fed and Ejected, and an Error Occurs
Cause Solution and Reference
The paper being used diers from that of
Media detection settings.
Check the paper being used and Media detection settings of the printer.
U “Printer Driver Settings” on page 41
CW-C6000 Series/CW-C6500 Series/CW-D6000 Series/CW-D6500 Series User's Guide
Troubleshooting
91

Printing is Impossible or Becomes Suddenly
Impossible
Print Data is Sent, But Does Not Print (Peeler Model)
Cause Solution and Reference
The label peeling detector is
malfunctioning.
If printing is performed at a location exposed to strong light such as direct sun
rays, etc., the label peeling detector may not work properly, making it
impossible to perform printing.
Press the Peeler Reset button to cancel the non-printing state.
Printing from a computer is impossible or becomes
suddenly impossible
Checking Whether the Printer Driver Is Installed
Check whether or not the required soware and applications are installed on the computer.
To print with this printer, a printer driver is required. Check whether or not the printer driver is installed by
following the steps below.
A
Display Devices and Printers on the computer.
B
Check that the printer name is displayed.
If not, the printer driver is not installed.
C
Install the printer driver.
U “Downloading the Latest Version” on page 4
The printer does not turn on
Check that the power cable is connected to the printer and outlet properly.
U “Rear” on page 25
Print Job is Canceled on PC but “Printing” Message on Printer Does
Not Disappear
If you cancel printing in printer queue on the computer, it may cause the print data to break up and “Printing” may
be kept displayed on the operation panel of the printer.
CW-C6000 Series/CW-C6500 Series/CW-D6000 Series/CW-D6500 Series User's Guide
Troubleshooting
92

To cancel the status, press the Cancel button on the operation panel, and then select All label formats.
CW-C6000 Series/CW-C6500 Series/CW-D6000 Series/CW-D6500 Series User's Guide
Troubleshooting
93
Paper is jammed
is section describes how to resolve the problem when the paper is jammed. is section is also explained with
the help of a video. You can see the video from the link below.
❏ CW-C6000/C6500 Series:
<https://support.epson.net/p_doc/790/>
❏ CW-D6000/D6500 Series:
<https://support.epson.net/p_doc/ab6/>
For the Auto Cutter Model
A
Cut the paper near the paper ejection slot.
B
Open the front cover.
C
If there are ripped pieces of paper on the platen, remove them.
CW-C6000 Series/CW-C6500 Series/CW-D6000 Series/CW-D6500 Series User's Guide
Troubleshooting
94
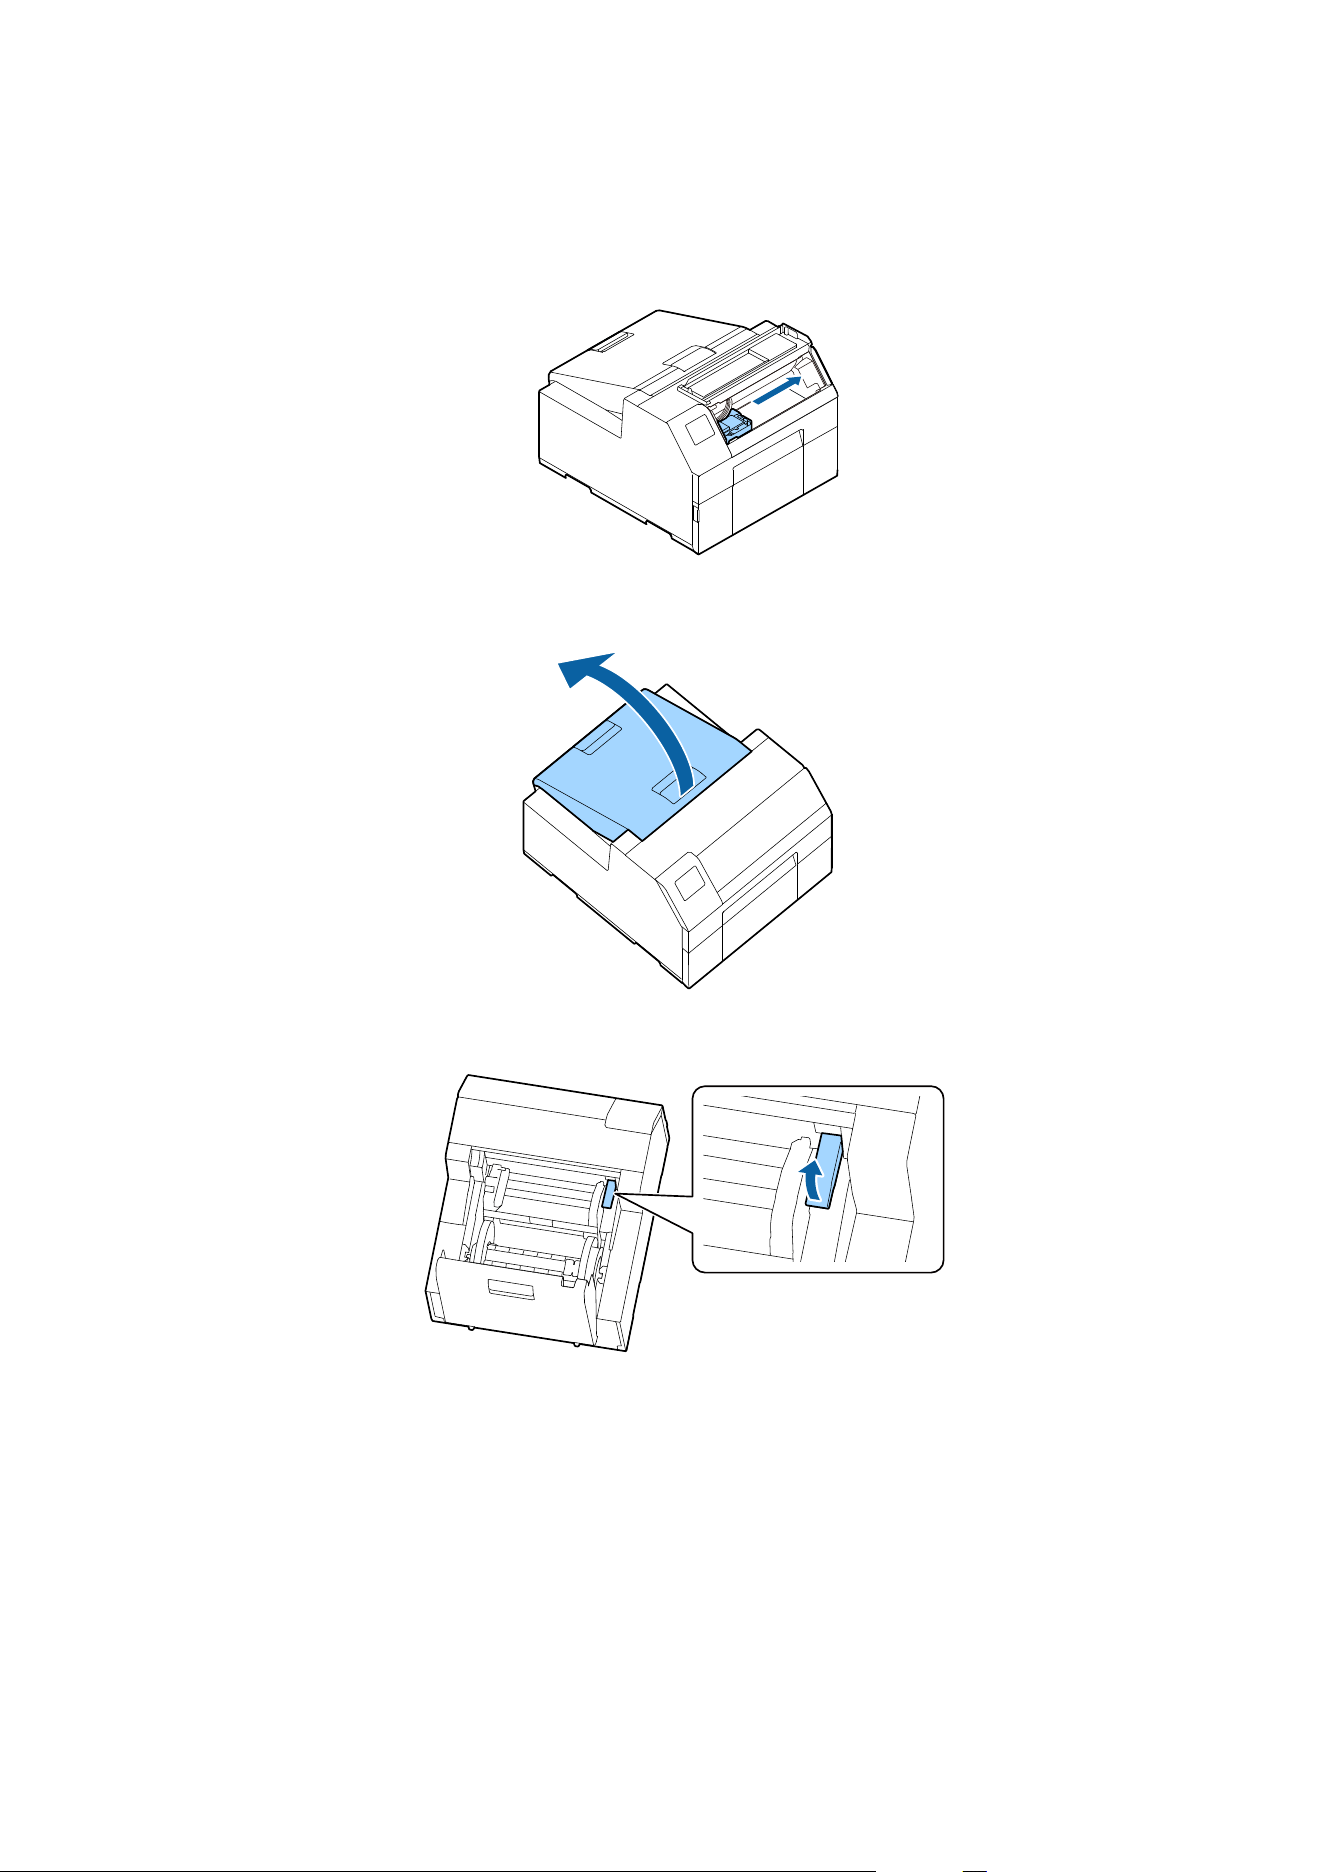
D
If the print head is not on the far right, hold it down and move it to the far right.
If there is jammed paper, remove it.
E
Open the paper cover.
F
Raise the release lever.
CW-C6000 Series/CW-C6500 Series/CW-D6000 Series/CW-D6500 Series User's Guide
Troubleshooting
95
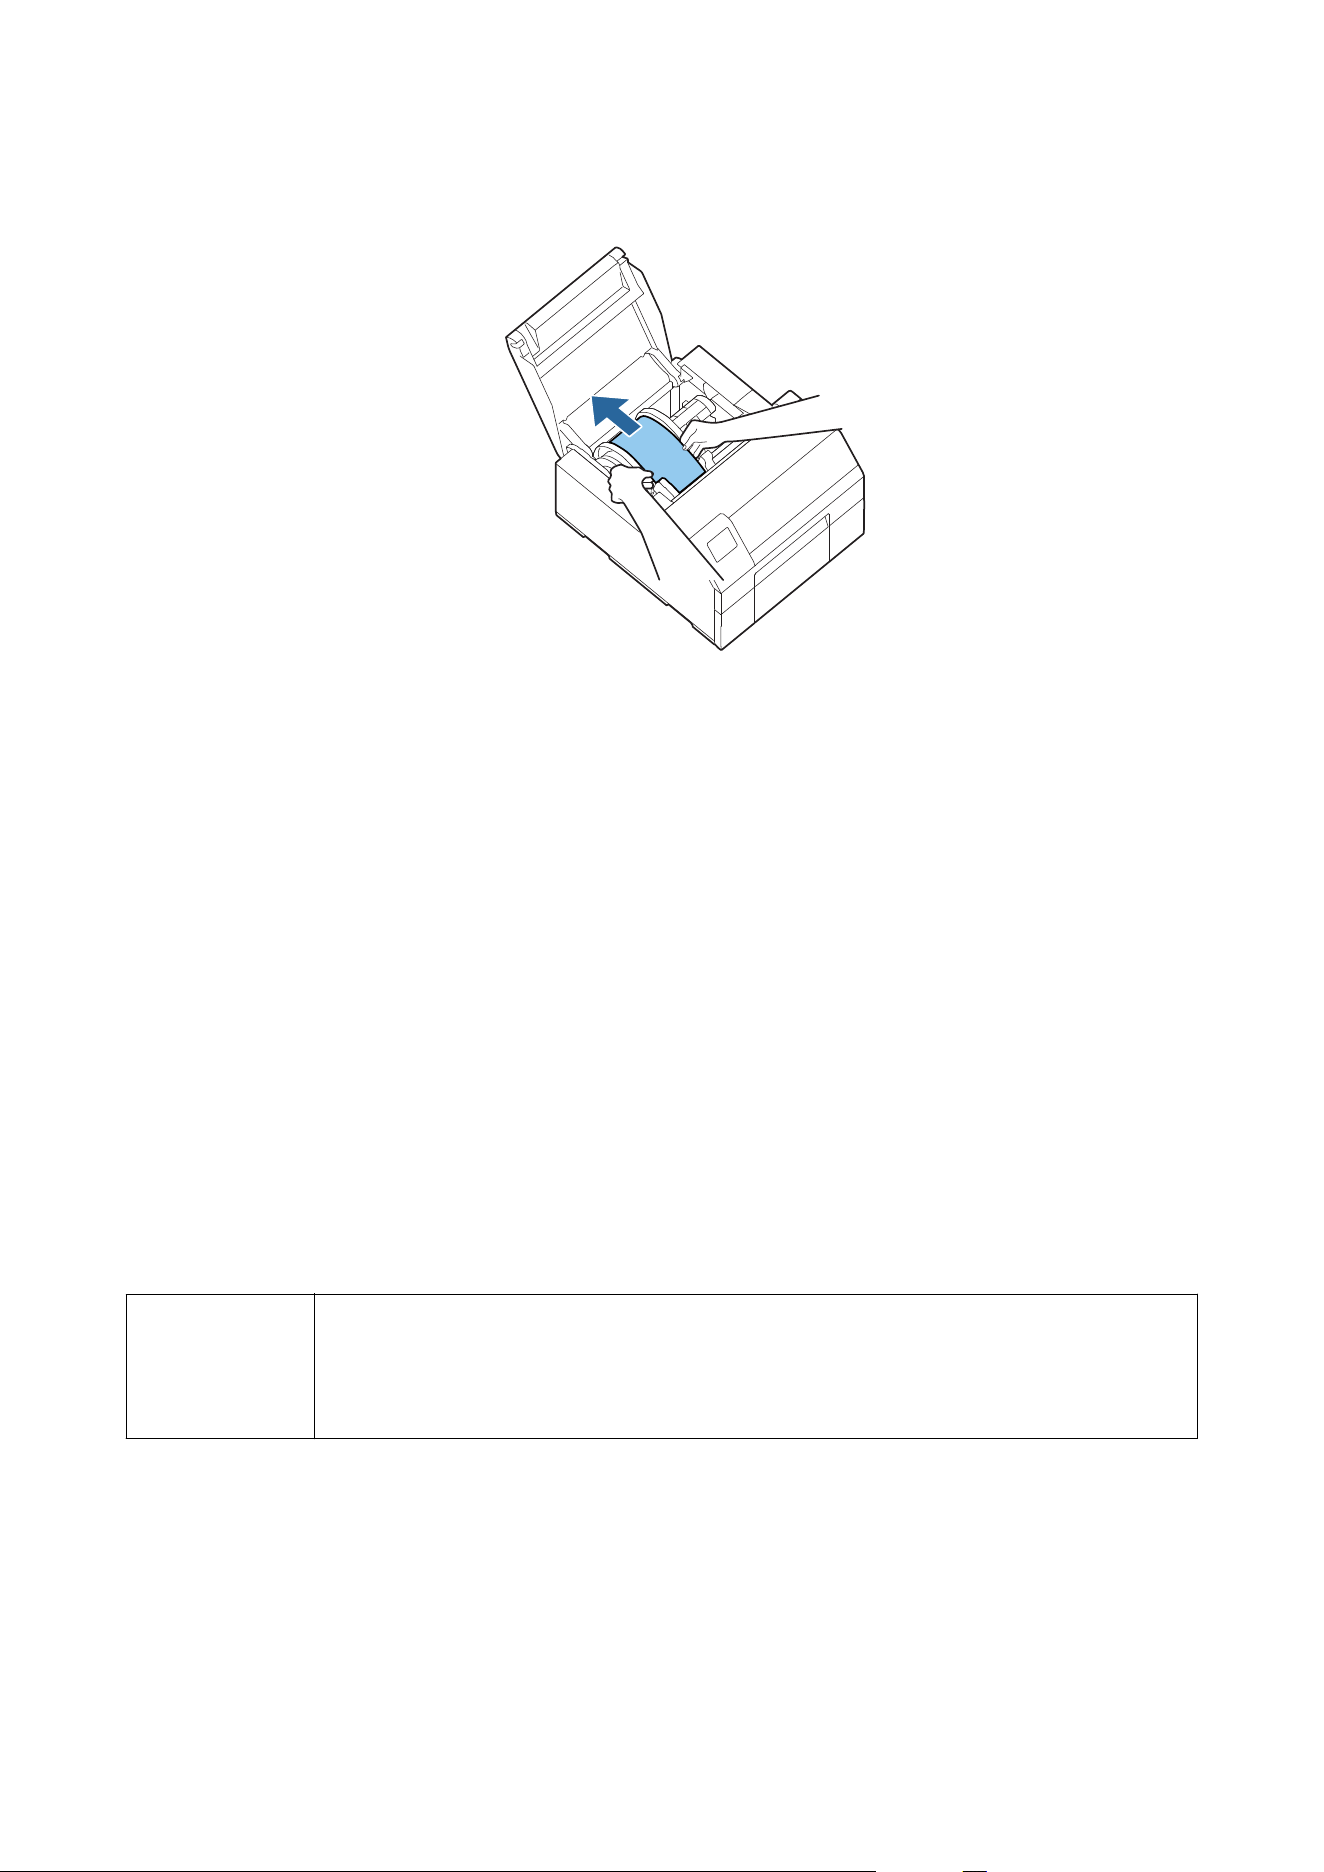
G
Pull the paper out from the paper feed slot.
H
Lower the release lever.
I
Close the paper cover.
J
Close the front cover.
K
Press the Pause button.
e paper jam error will be cleared.
To resume printing, load the paper again.
U “How to Load Paper (Auto Cutter Model - Supply from Inside)” on page 50
U “How to Load Paper (Auto Cutter Model - Supply from Outside)” on page 55
If the problem of paper jam cannot be resolved even aer following the steps above, refer to the Technical Reference
Guide.
Note
After removing jammed paper, make sure that there is no labels or adhesive left inside the printer.
If you use the printer without removing them, it leads to frequent paper jams, or may cause poor print
quality. If paper jam occurs frequently, clean the inside of the printer.
U “Maintenance” on page 73
CW-C6000 Series/CW-C6500 Series/CW-D6000 Series/CW-D6500 Series User's Guide
Troubleshooting
96
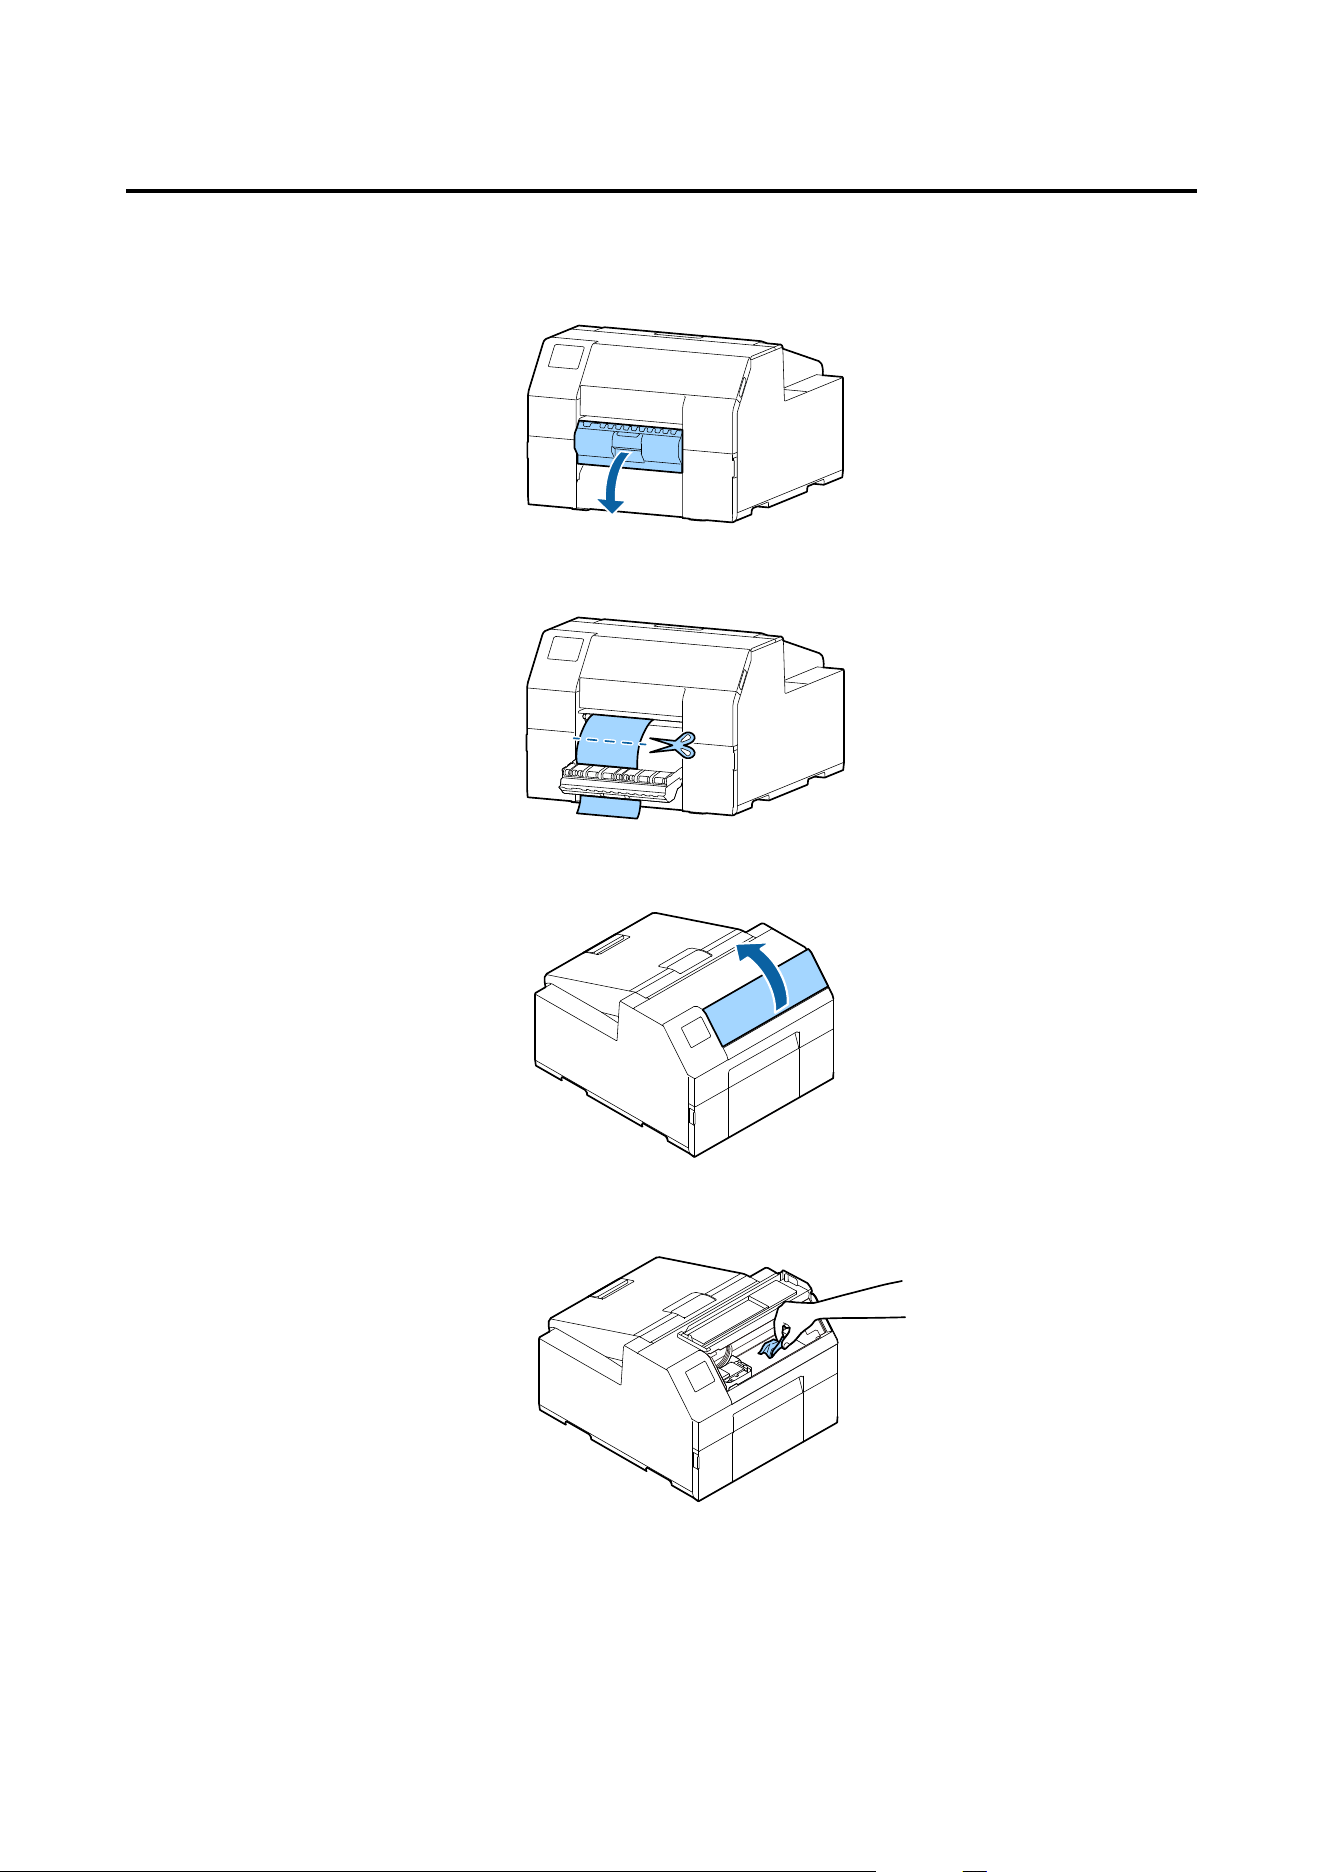
For the Peeler Model
A
Open the peeler cover.
B
Cut the paper near the paper ejection slot.
C
Open the front cover.
D
If there are ripped pieces of paper on the platen, remove them.
CW-C6000 Series/CW-C6500 Series/CW-D6000 Series/CW-D6500 Series User's Guide
Troubleshooting
97

E
If the print head is not on the far right, hold it down and move it to the far right.
If there is jammed paper, remove it.
F
Open the paper cover.
G
Raise the release lever.
CW-C6000 Series/CW-C6500 Series/CW-D6000 Series/CW-D6500 Series User's Guide
Troubleshooting
98
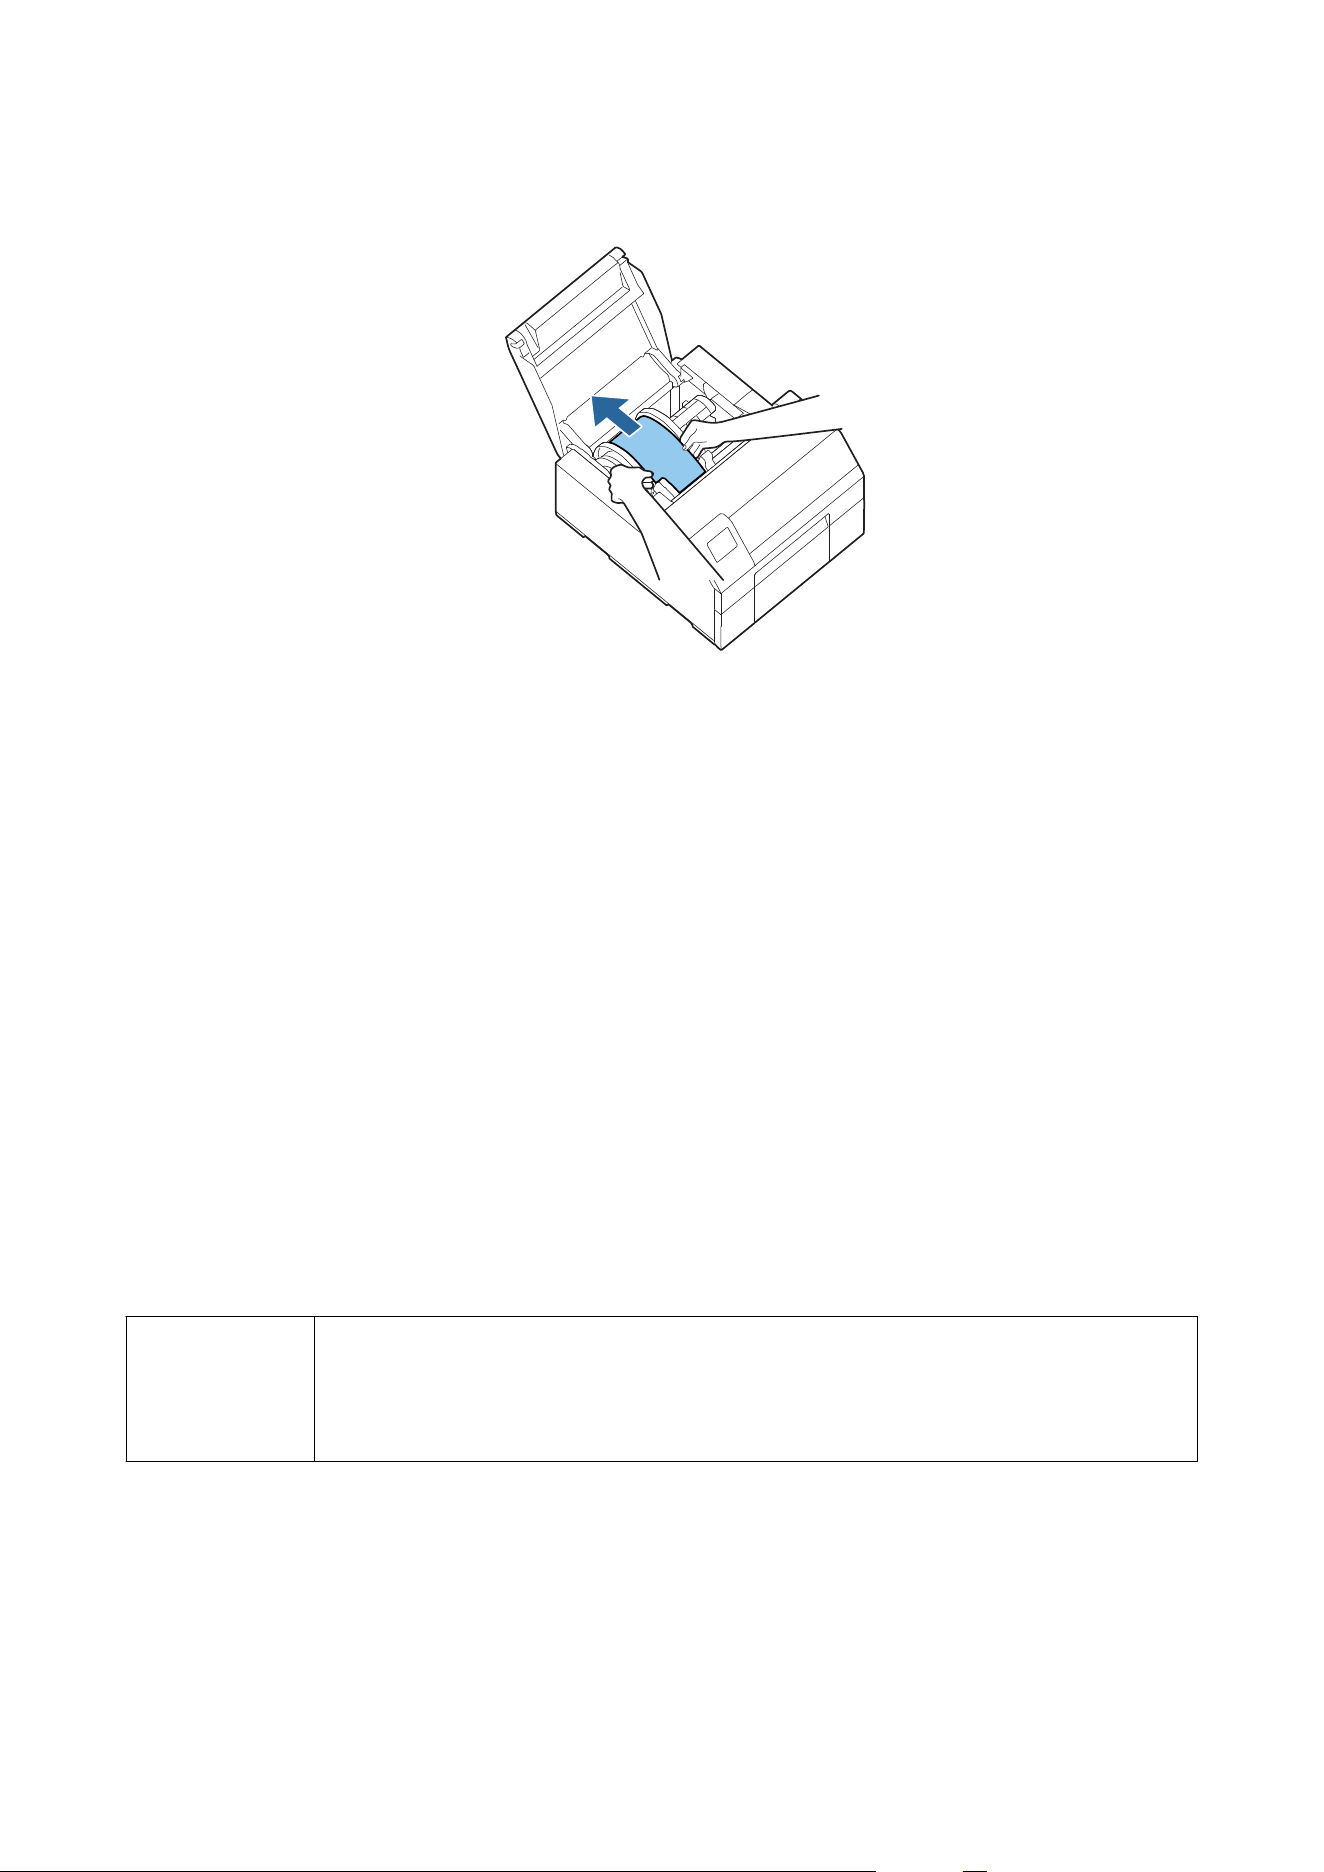
H
Pull the paper out from the paper feed slot.
I
Lower the release lever.
J
Close the paper cover.
K
Close the front cover.
L
Close the peeler cover.
M
Press the Pause button.
e
paper jam error will be cleared.
To resume printing, load the paper again.
U “How to Load Paper (Peeler Model - Supply from Inside)” on page 60
If the problem of paper jam cannot be resolved even aer following the steps above, refer to the Technical Reference
Guide.
Note
After removing jammed paper, make sure that there is no labels or adhesive left inside the printer.
If you use the printer without removing them, it leads to frequent paper jams, or may cause poor print
quality. If paper jam occurs frequently, clean the inside of the printer.
U “Maintenance” on page 73
CW-C6000 Series/CW-C6500 Series/CW-D6000 Series/CW-D6500 Series User's Guide
Troubleshooting
99
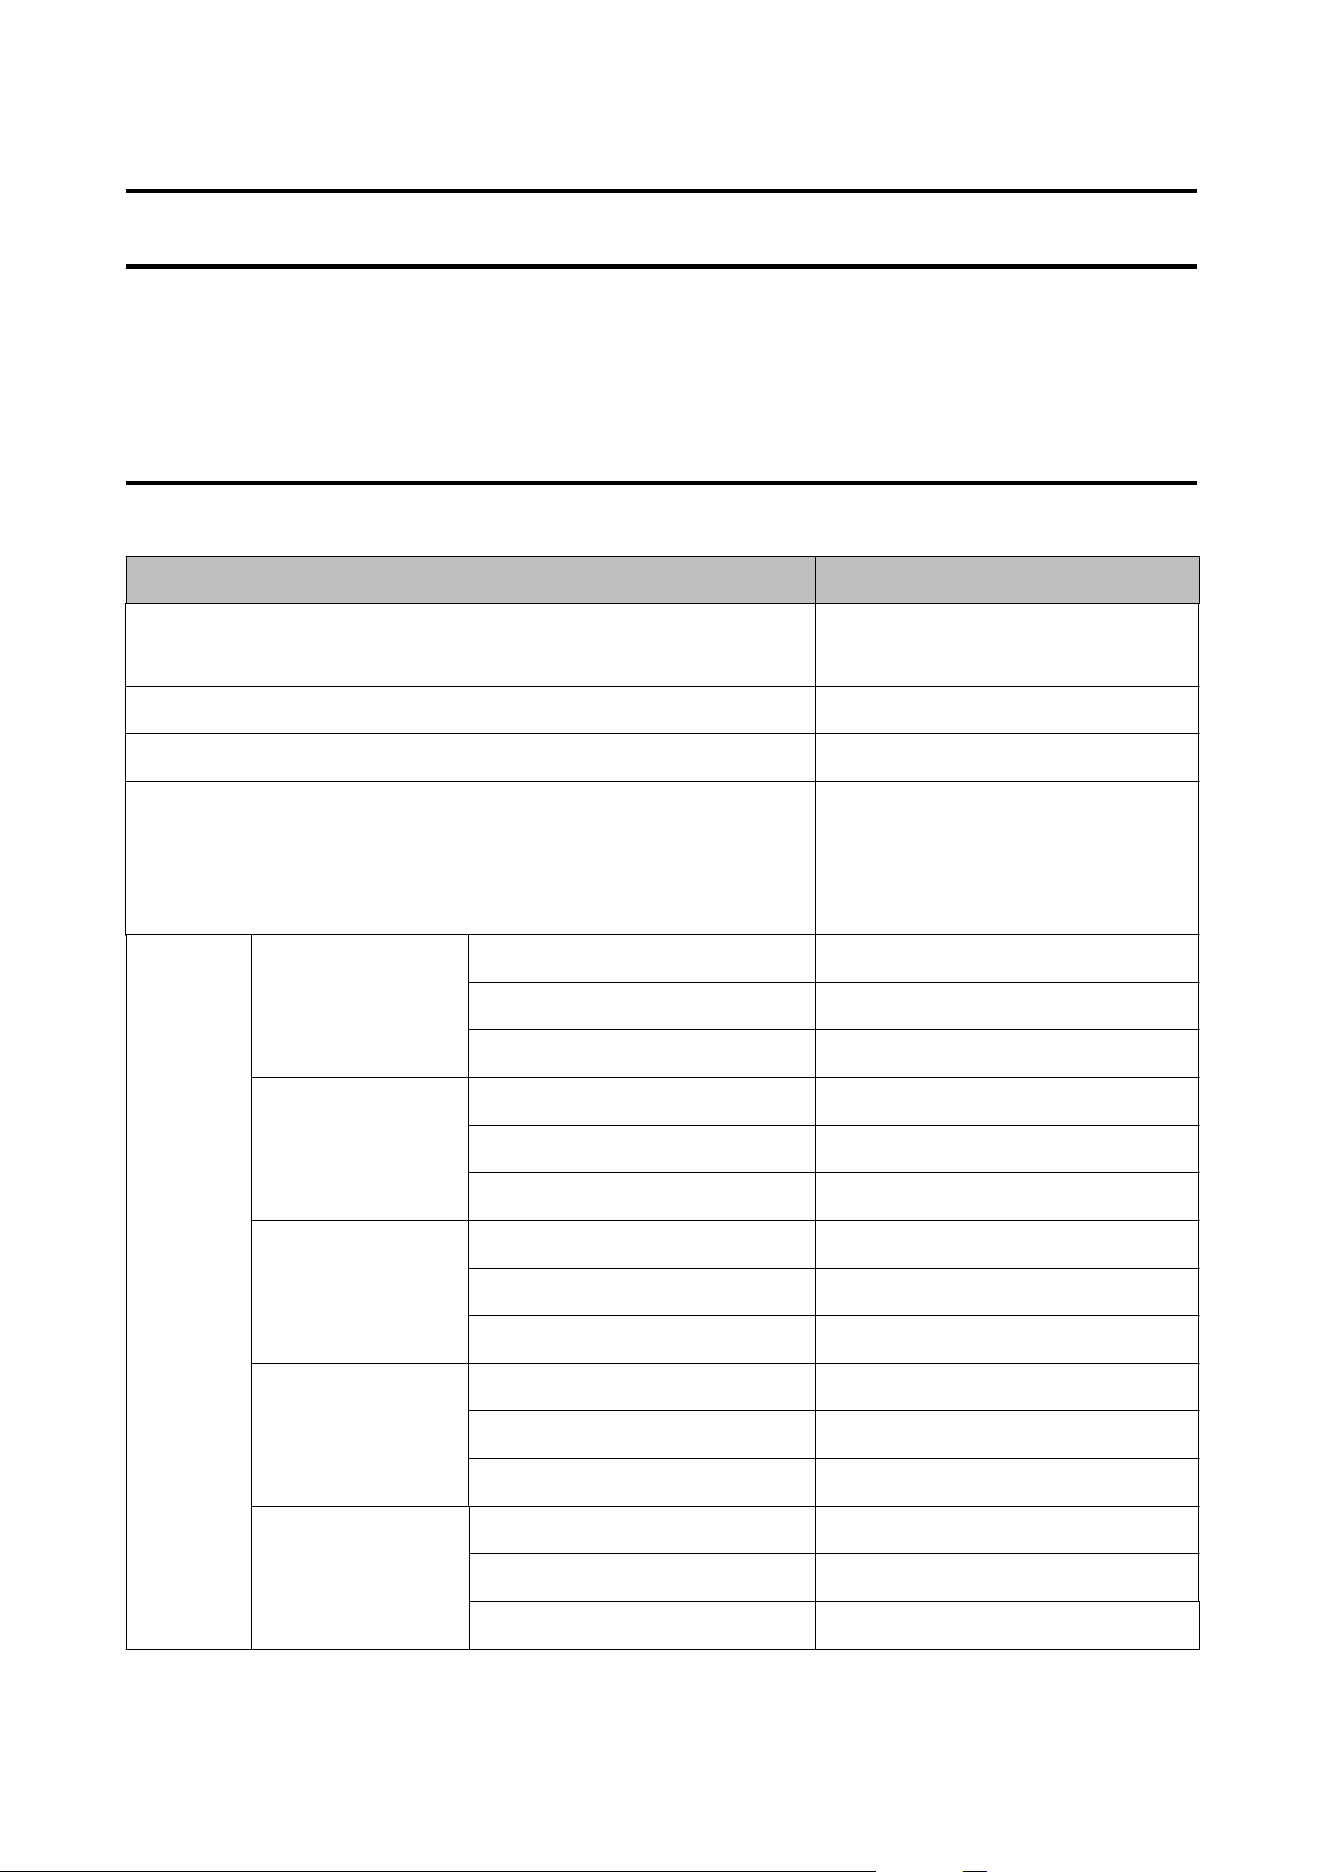
Specications
is chapter describes the specications of the printer.
CW-C6000 Series
Product Specications
Item Specications
Printing method Serial inkjet, dot matrix method
Four-color printing
Paper feed method Forward and reverse friction feed
Cutting type of the auto cutter (Auto cutter model only) Full cut (cuts paper completely)
Print resolution 300 × 600 dpi
600 × 600 dpi
600 × 1200 dpi
1200 × 1200 dpi
Print speed Print quality setting:
Max Speed
300 × 600 dpi
(width × height)
Printing width: 25.4 mm {1.00 in.} 156 mm/s {6.14 in/s}
Printing width: 101.6 mm {4.00 in.} 119 mm/s {4.69 in/s}
Printing width: 203.2 mm {8.00 in.} -
Print quality setting:
Speed
600 × 600 dpi
(width × height)
Printing width: 25.4 mm {1.00 in.} 125 mm/s {4.92 in/s}
Printing width: 101.6 mm {4.00 in.} 75 mm/s {2.95 in/s}
Printing width: 203.2 mm {8.00 in.} -
Print quality setting:
Normal
600 × 600 dpi
(width × height)
Printing width: 25.4 mm {1.00 in.} 63 mm/s {2.48 in/s}
Printing width: 101.6 mm {4.00 in.} 48 mm/s {1.89 in/s}
Printing width: 203.2 mm {8.00 in.} -
Print quality setting:
Quality
600 × 1200 dpi
(width × height)
Printing width: 25.4 mm {1.00 in.} 27 mm/s {1.06 in/s}
Printing width: 101.6 mm {4.00 in.} 18 mm/s {0.71 in/s}
Printing width: 203.2 mm {8.00 in.} -
Print quality setting:
Max Quality
1200 × 1200 dpi
(width × height)
Printing width: 25.4 mm {1.00 in.} 11 mm/s {0.43 in/s}
Printing width: 101.6 mm {4.00 in.} 8 mm/s {0.31 in/s}
Printing width: 203.2 mm {8.00 in.} -
CW-C6000 Series/CW-C6500 Series/CW-D6000 Series/CW-D6500 Series User's Guide
Specications
100
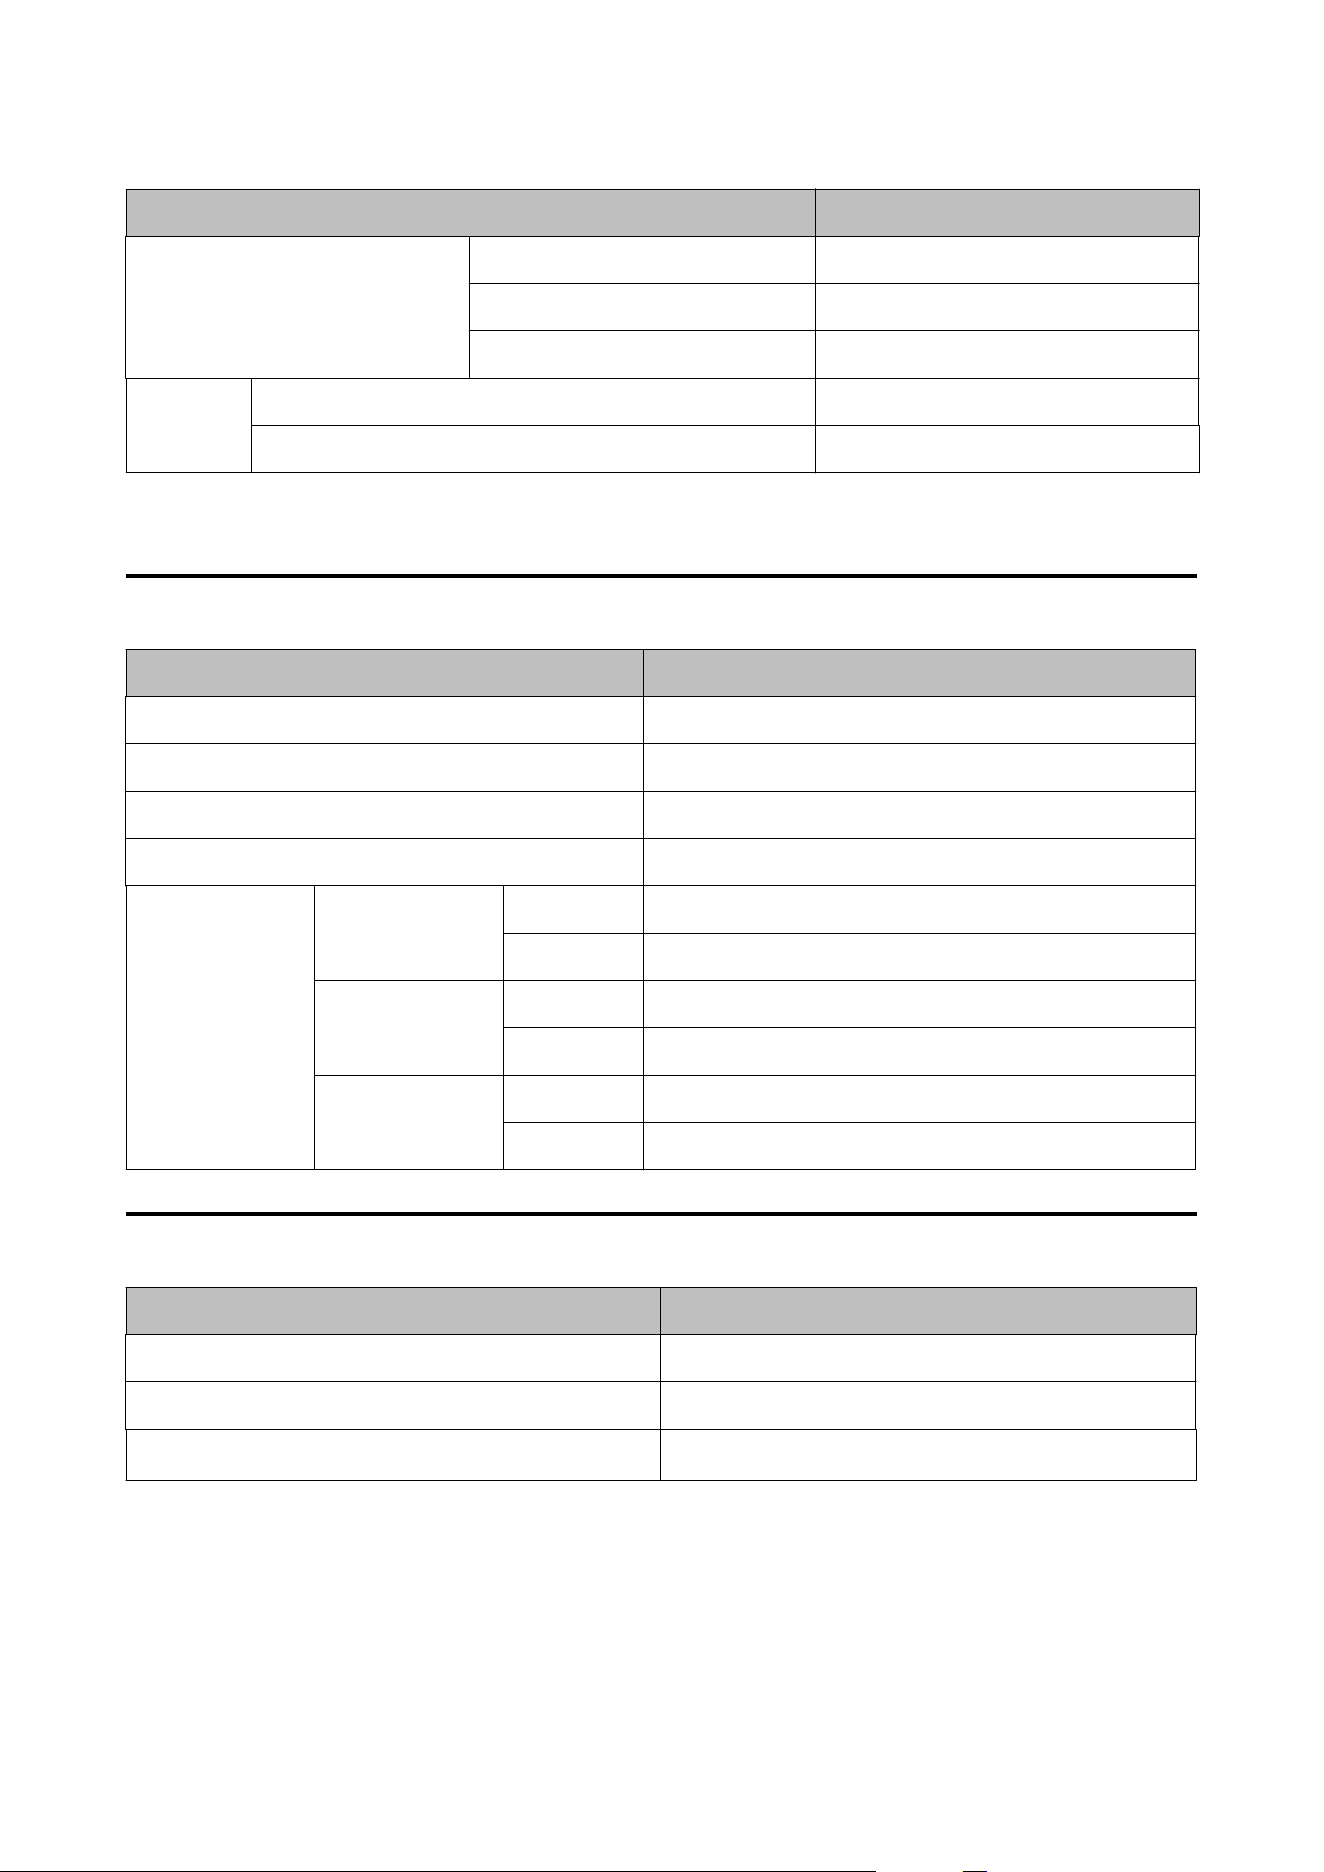
Item Specications
Interface Wired LAN* 1000BASE-T/100BASE-TX /10BASE-T
USB USB2.0 High-Speed
External input/output interface D-sub25
Weight Auto cutter model Approx. 22.5 kg {49.6 lb}
Peeler model Approx. 22.8 kg {50.26 lb}
*Use a shielded twisted-pair cable.
Electrical Specications
Item Specications
Power supply Power supply through a power connector
Rated voltage 100 to 240 V
Frequency 50 to 60 Hz
Rated current 0.9 A
Power
consumption
Operating 100 V Approx. 39.4 W on average
230 V Approx. 38.6 W on average
Standby 100 V Approx. 7.51 W on average
230 V Approx. 5.82 W on average
Power o 100 V Approx. 0.08 W on average
230 V Approx. 0.24 W on average
Overall Dimensions
Item Specications
Height 326 mm {12.83 in.}
Width 340 mm {13.39 in.}
Depth
565 mm {22.24 in.}
*
* Excludes the protrusion
CW-C6000 Series/CW-C6500 Series/CW-D6000 Series/CW-D6500 Series User's Guide
Specications
101
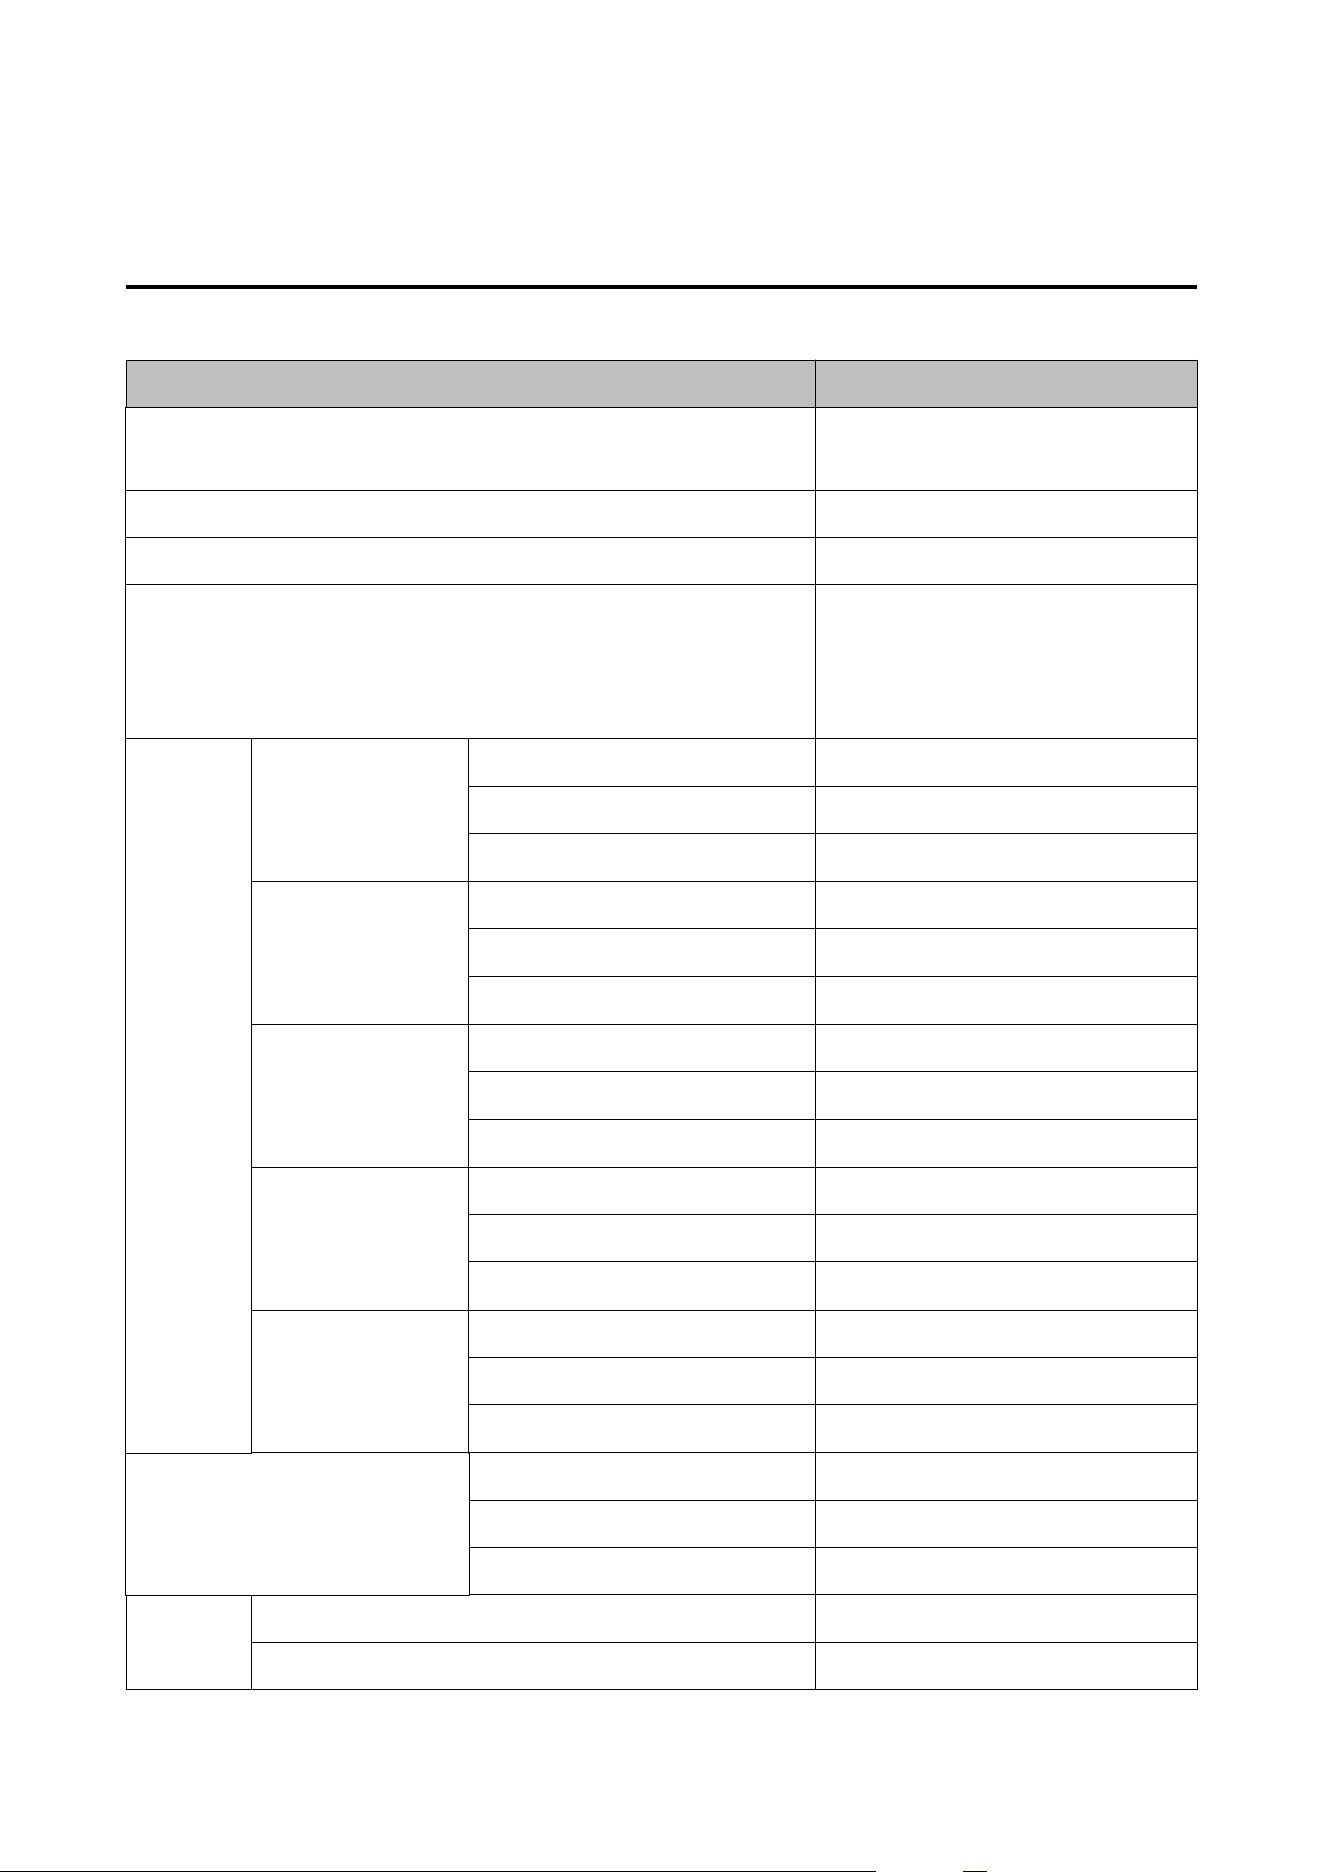
CW-C6500 Series
Product Specications
Item Specications
Printing method Serial inkjet, dot matrix method
Four-color printing
Paper feed method Forward and reverse friction feed
Cutting type of the auto cutter (Auto cutter model only) Full cut (cuts paper completely)
Print resolution 300 × 600 dpi
600 × 600 dpi
600 × 1200 dpi
1200 × 1200 dpi
Print speed Print quality setting:
Max Speed
300 × 600 dpi
(width × height)
Printing width: 25.4 mm {1.00 in.} 156 mm/s {6.14 in/s}
Printing width: 101.6 mm {4.00 in.} 119 mm/s {4.69 in/s}
Printing width: 203.2 mm {8.00 in.} 85 mm/s {3.35 in/s}
Print quality setting:
Speed
600 × 600 dpi
(width × height)
Printing width: 25.4 mm {1.00 in.} 125 mm/s {4.92 in/s}
Printing width: 101.6 mm {4.00 in.} 75 mm/s {2.95 in/s}
Printing width: 203.2 mm {8.00 in.} 49 mm/s {1.93 in/s}
Print quality setting:
Normal
600 × 600 dpi
(width × height)
Printing width: 25.4 mm {1.00 in.} 63 mm/s {2.48 in/s}
Printing width: 101.6 mm {4.00 in.} 48 mm/s {1.89 in/s}
Printing width: 203.2 mm {8.00 in.} 34 mm/s {1.34 in/s}
Print quality setting:
Quality
600 × 1200 dpi
(width × height)
Printing width: 25.4 mm {1.00 in.} 27 mm/s {1.06 in/s}
Printing width: 101.6 mm {4.00 in.} 18 mm/s {0.71 in/s}
Printing width: 203.2 mm {8.00 in.} 13 mm/s {0.51 in/s}
Print quality setting:
Max Quality
1200 × 1200 dpi
(width × height)
Printing width: 25.4 mm {1.00 in.} 11 mm/s {0.43 in/s}
Printing width: 101.6 mm {4.00 in.} 8 mm/s {0.31 in/s}
Printing width: 203.2 mm {8.00 in.} 6 mm/s {0.24 in/s}
Interface Wired LAN* 1000BASE-T/100BASE-TX /10BASE-T
USB USB2.0 High-Speed
External input/output interface D-sub25
Weight Auto cutter model Approx. 25.5 kg {49.6 lb}
Peeler model Approx. 26.3 kg {57.98 lb}
CW-C6000 Series/CW-C6500 Series/CW-D6000 Series/CW-D6500 Series User's Guide
Specications
102

*Use a shielded twisted-pair cable.
Electrical Specications
Item Specications
Power supply Power supply through a power connector
Rated voltage 100 to 240 V
Frequency 50 to 60 Hz
Rated current 0.9 A
Power
consumption
Operating 100 V Approx. 39.5 W on average
230 V Approx. 38.7 W on average
Standby 100 V Approx. 7.51 W on average
230 V Approx. 5.82 W on average
Power o 100 V Approx. 0.08 W on average
230 V Approx. 0.24 W on average
Overall Dimensions
Item Specications
Height 326 mm {12.83 in.}
Width 444 mm {17.48 in.}
Depth
515 mm {20.28 in.}
*
* Excludes the protrusion
CW-C6000 Series/CW-C6500 Series/CW-D6000 Series/CW-D6500 Series User's Guide
Specications
103

CW-D6000 Series
Product Specications
Item Specications
Printing method Serial inkjet, dot matrix method
Four-color printing
Paper feed method Forward and reverse friction feed
Cutting type of the auto cutter (Auto cutter model only) Full cut (cuts paper completely)
Print resolution 300 × 600 dpi (only for matte and
synthetic paper)
600 × 600 dpi
600 × 1200 dpi
1200 × 1200 dpi (only for Glossy Paper,
Glossy Film, and High Glossy Paper)
Print speed Print quality setting:
Max Speed
300 × 600 dpi
(width × height)
Printing width: 25.4 mm {1.00 in.} 156 mm/s {6.14 in/s}
Printing width: 101.6 mm {4.00 in.} 119 mm/s {4.69 in/s}
Printing width: 203.2 mm {8.00 in.} -
Print quality setting:
Speed
600 × 600 dpi
(width × height)
Printing width: 25.4 mm {1.00 in.} 125 mm/s {4.92 in/s}
Printing width: 101.6 mm {4.00 in.} 75 mm/s {2.95 in/s}
Printing width: 203.2 mm {8.00 in.} -
Print quality setting:
Normal
600 × 600 dpi
(width × height)
Printing width: 25.4 mm {1.00 in.} 63 mm/s {2.48 in/s}
Printing width: 101.6 mm {4.00 in.} 48 mm/s {1.89 in/s}
Printing width: 203.2 mm {8.00 in.} -
Print quality setting:
Quality
600 × 1200 dpi
(width × height)
Printing width: 25.4 mm {1.00 in.} 27 mm/s {1.06 in/s}
Printing width: 101.6 mm {4.00 in.} 18 mm/s {0.71 in/s}
Printing width: 203.2 mm {8.00 in.} -
Print quality setting:
Max Quality
1200 × 1200 dpi
(width × height)
Printing width: 25.4 mm {1.00 in.} 11 mm/s {0.43 in/s}
Printing width: 101.6 mm {4.00 in.} 8 mm/s {0.31 in/s}
Printing width: 203.2 mm {8.00 in.} -
Interface Wired LAN* 1000BASE-T/100BASE-TX /10BASE-T
USB USB2.0 High-Speed
External input/output interface D-sub25
Weight Auto cutter model Approx. 22.5 kg {49.6 lb}
Peeler model Approx. 22.8 kg {50.26 lb}
CW-C6000 Series/CW-C6500 Series/CW-D6000 Series/CW-D6500 Series User's Guide
Specications
104

*Use a shielded twisted-pair cable.
Electrical Specications
Item Specications
Power supply Power supply through a power connector
Rated voltage 100 to 240 V
Frequency 50 to 60 Hz
Rated current 0.9 A
Power
consumption
Operating 100 V Approx. 39.4 W on average
230 V Approx. 38.6 W on average
Standby 100 V Approx. 7.51 W on average
230 V Approx. 5.82 W on average
Power o 100 V Approx. 0.08 W on average
230 V Approx. 0.24 W on average
Overall Dimensions
Item Specications
Height 326 mm {12.83 in.}
Width 340 mm {13.39 in.}
Depth
565 mm {22.24 in.}
*
* Excludes the protrusion
CW-C6000 Series/CW-C6500 Series/CW-D6000 Series/CW-D6500 Series User's Guide
Specications
105
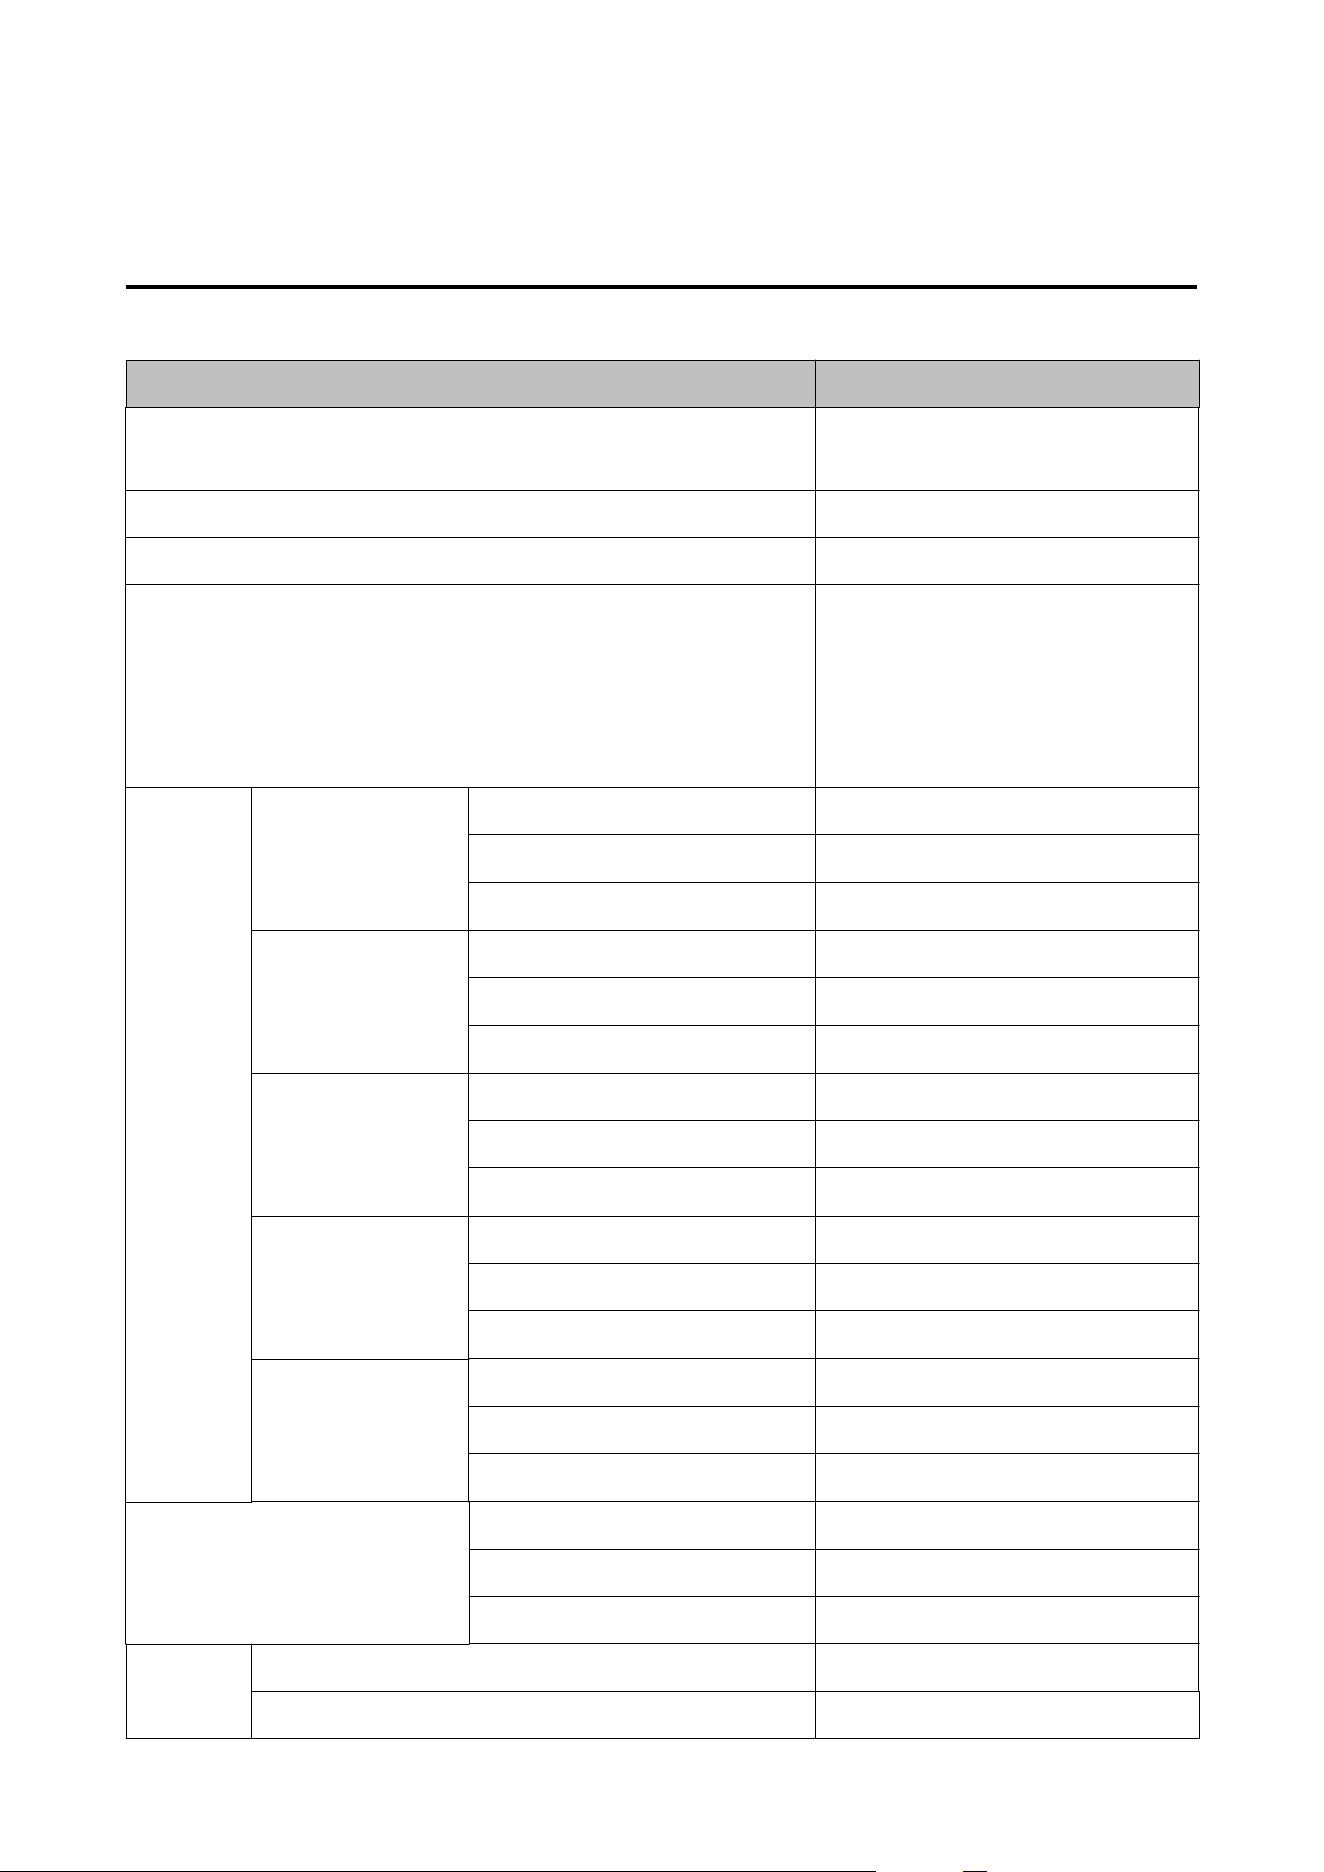
CW-D6500 Series
Product Specications
Item Specications
Printing method Serial inkjet, dot matrix method
Four-color printing
Paper feed method Forward and reverse friction feed
Cutting type of the auto cutter (Auto cutter model only) Full cut (cuts paper completely)
Print resolution 300 × 600 dpi (only for matte and
synthetic paper)
600 × 600 dpi
600 × 1200 dpi
1200 × 1200 dpi (only for Glossy Paper,
Glossy Film, and High Glossy Paper)
Print speed Print quality setting:
Max Speed
300 × 600 dpi
(width × height)
Printing width: 25.4 mm {1.00 in.} 156 mm/s {6.14 in/s}
Printing width: 101.6 mm {4.00 in.} 119 mm/s {4.69 in/s}
Printing width: 203.2 mm {8.00 in.} 85 mm/s {3.35 in/s}
Print quality setting:
Speed
600 × 600 dpi
(width × height)
Printing width: 25.4 mm {1.00 in.} 125 mm/s {4.92 in/s}
Printing width: 101.6 mm {4.00 in.} 75 mm/s {2.95 in/s}
Printing width: 203.2 mm {8.00 in.} 49 mm/s {1.93 in/s}
Print quality setting:
Normal
600 × 600 dpi
(width × height)
Printing width: 25.4 mm {1.00 in.} 63 mm/s {2.48 in/s}
Printing width: 101.6 mm {4.00 in.} 48 mm/s {1.89 in/s}
Printing width: 203.2 mm {8.00 in.} 34 mm/s {1.34 in/s}
Print quality setting:
Quality
600 × 1200 dpi
(width × height)
Printing width: 25.4 mm {1.00 in.} 27 mm/s {1.06 in/s}
Printing width: 101.6 mm {4.00 in.} 18 mm/s {0.71 in/s}
Printing width: 203.2 mm {8.00 in.} 13 mm/s {0.51 in/s}
Print quality setting:
Max Quality
1200 × 1200 dpi
(width × height)
Printing width: 25.4 mm {1.00 in.} 11 mm/s {0.43 in/s}
Printing width: 101.6 mm {4.00 in.} 8 mm/s {0.31 in/s}
Printing width: 203.2 mm {8.00 in.} 6 mm/s {0.24 in/s}
Interface Wired LAN* 1000BASE-T/100BASE-TX /10BASE-T
USB USB2.0 High-Speed
External input/output interface D-sub25
Weight Auto cutter model Approx. 25.5kg {49.6 lb}
Peeler model Approx. 26.3kg {57.98 lb}
CW-C6000 Series/CW-C6500 Series/CW-D6000 Series/CW-D6500 Series User's Guide
Specications
106
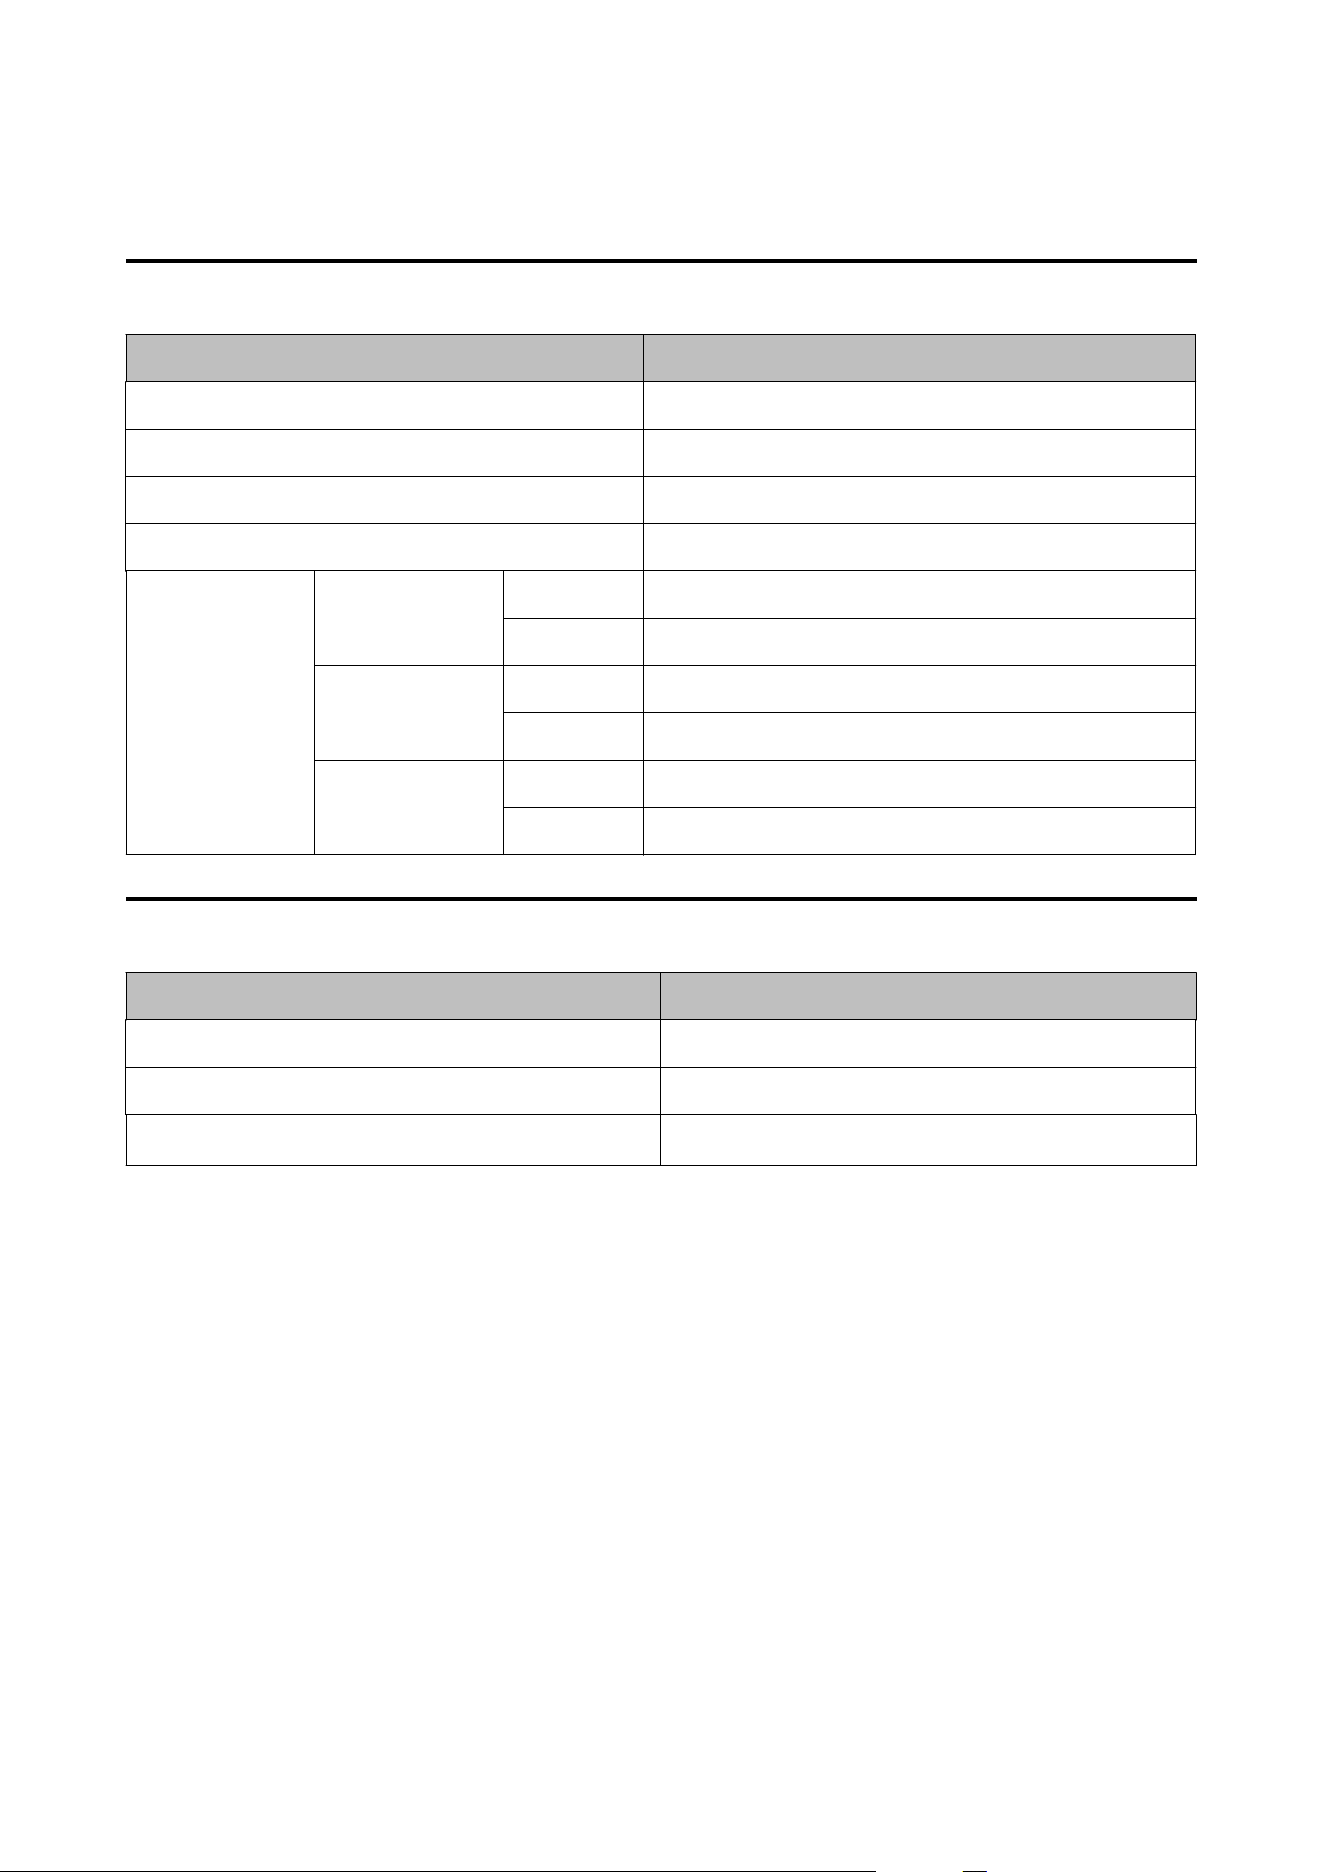
*Use a shielded twisted-pair cable.
Electrical Specications
Item Specications
Power supply Power supply through a power connector
Rated voltage 100 to 240 V
Frequency 50 to 60 Hz
Rated current 0.9 A
Power
consumption
Operating 100 V Approx. 39.5 W on average
230 V Approx. 38.7 W on average
Standby 100 V Approx. 7.51 W on average
230 V Approx. 5.82 W on average
Power o 100 V Approx. 0.08 W on average
230 V Approx. 0.24 W on average
Overall Dimensions
Item Specications
Height 326 mm {12.83 in.}
Width 444 mm {17.48 in.}
Depth
515 mm {20.28 in.}
*
* Excludes the protrusion
CW-C6000 Series/CW-C6500 Series/CW-D6000 Series/CW-D6500 Series User's Guide
Specications
107
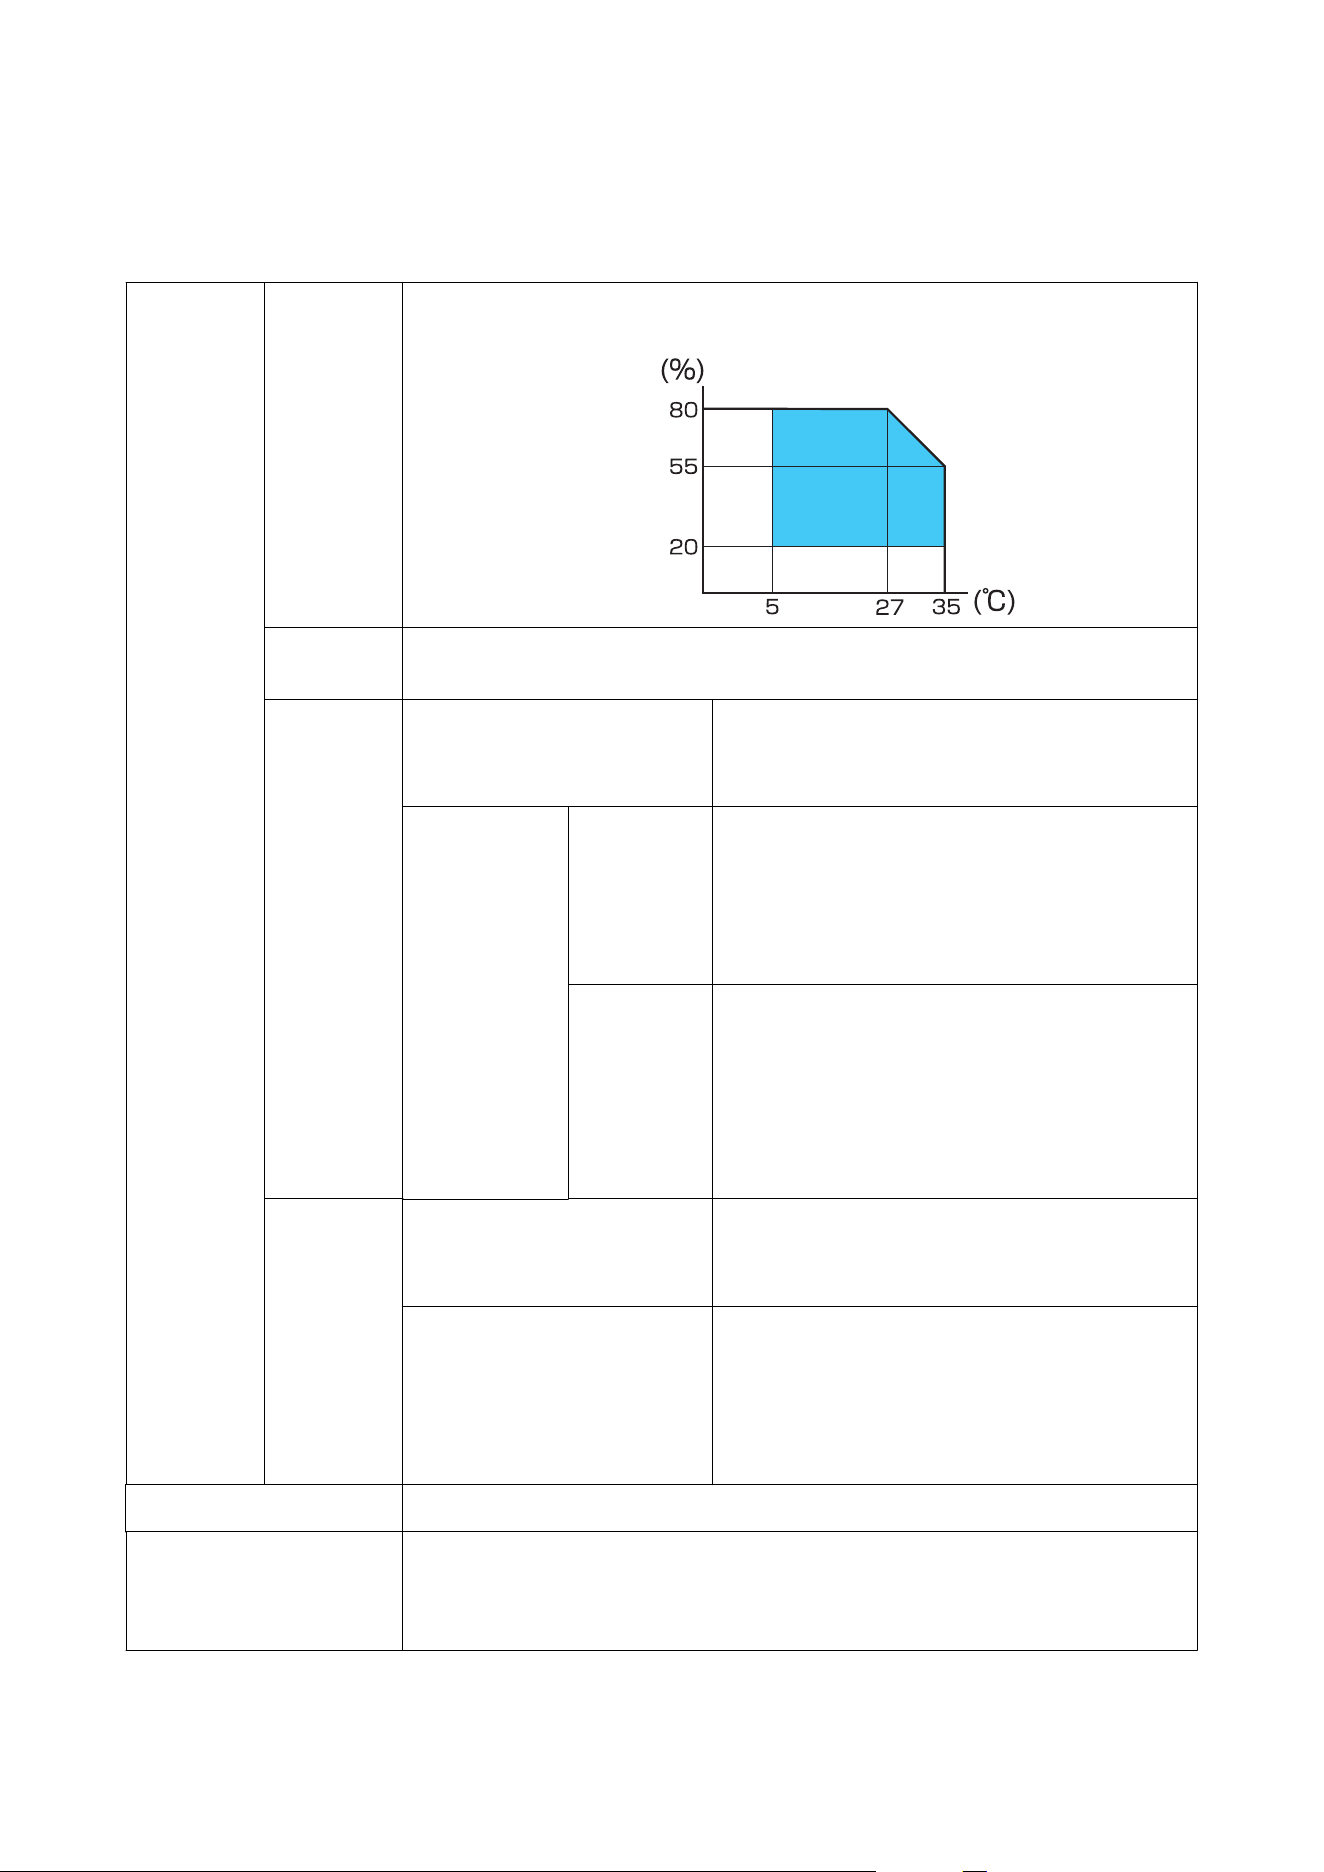
Environmental
Specications
Temperature
/humidity
Printing 5 to 35°C {41 to 95°F}, 20 to 80% RH without condensation (the blue-colored range in the
graph)
Barcode
printing
15 to 35°C {59 to 95°F}, 20 to 80% RH without condensation
Storage
(CW-C6000/
C6500
Series)
When packed
(Ink not charged)
-20 to 60°C {-4 to 140°F}, 5 to 85% RH without
condensation
(Within 120 hours at -20°C {-4°F} or 60°C {140°F})
With ink
charged
Gloss black
ink
-15 to 40°C {5 to 104°F}, 20 to 85% RH without
condensation
(Within 120 hours at -15°C {5°F})
(Within 6 months at 0 to 25°C {32 to 77°F})
(Within 1 month at 40°C {104°F})
Matte black
ink
-10 to 40°C {14 to 104°F}, 20 to 85% RH without
condensation
(Within 120 hours at -10°C {14°F})
(Within 6 months at 0 to 25°C {32 to 77°F})
(Within 1 month at 40°C {104°F})
Can be stored at -20°C {-4°F} with ink discharged
Storage
(CW-D6000/
D6500
Series)
When packed (Ink not charged) -20 to 60°C {-4 to 140°F}, 5 to 85% RH without
condensation
(Within 120 hours at -20°C {-4°F} or 60°C {140°F})
With ink charged -10 to 40°C {14 to 104°F}, 20 to 85% RH without
condensation
(Within 120 hours at -10°C {14°F})
(Within 6 months at 0 to 25°C {32 to 77°F})
(Within 1 month at 40°C {104°F})
Elevation 3000 m or less
Noise Auto cutter model: Approx. 55 dB
Peeler model: Approx. 60 dB
Based on Epson evaluation conditions.
CW-C6000 Series/CW-C6500 Series/CW-D6000 Series/CW-D6500 Series User's Guide
Specications
108

Paper
Specications
e following types of paper can be used with the printer.
CW-C6000/C6500 Series
When using Gloss black ink
❏ Matte Paper
❏ Synthetic
❏ Glossy Paper
❏ Glossy Film
❏ High Glossy Paper
When using Matte black ink
❏ Plain Paper
❏ Matte Paper
❏ Synthetic
❏ Texture Paper
CW-D6000/D6500 Series
❏ Matte Paper
❏ Synthetic
❏ Glossy Paper
❏ Glossy Film
❏ High Glossy Paper
CW-C6000 Series/CW-C6500 Series/CW-D6000 Series/CW-D6500 Series User's Guide
Specications
109

Ink Cartridge
Model number CW-C6000Au, CW-C6000Pu,
CW-C6500Au, CW-C6500Pu
SJIC35P-BK, SJIC35P-MK, SJIC35P-C, SJIC35P-M, SJIC35P-Y
CW-C6000Ae, CW-C6000Pe,
CW-C6500Ae, CW-C6500Pe
SJIC36P-BK, SJIC36P-MK, SJIC36P-C, SJIC36P-M, SJIC36P-Y
CW-C6010A, CW-C6010P,
CW-C6510A, CW-C6510P
SJIC36P-BK, SJIC36P-MK, SJIC36P-C, SJIC36P-M, SJIC36P-Y
CW-C6020A, CW-C6020P,
CW-C6520A, CW-C6520P
SJIC37P-BK, SJIC37P-MK, SJIC37P-C, SJIC37P-M, SJIC37P-Y
CW-C6030A, CW-C6030P,
CW-C6530A, CW-C6530P
SJIC38P-BK, SJIC38P-MK, SJIC38P-C, SJIC38P-M, SJIC38P-Y
CW-C6040A, CW-C6040P,
CW-C6540A, CW-C6540P
SJIC39P-BK, SJIC39P-MK, SJIC39P-C, SJIC39P-M, SJIC39P-Y
CW-C6050A, CW-C6050P,
CW-C6550A, CW-C6550P
SJIC40P-BK, SJIC40P-MK, SJIC40P-C, SJIC40P-M, SJIC40P-Y
CW-D6000Ae, CW-D6000Pe,
CW-D6500Ae, CW-D6500Pe
SJIC55P-BK, SJIC55P-C, SJIC55P-M, SJIC55P-Y
Type 4 individual color cartridges
Ink colors CW-C6000/C6500 Series Black (gloss black (BK), matte black (MK)), cyan (C), magenta (M),
yellow (Y)
CW-D6000/D6500 Series Black (BK), cyan (C), magenta (M), yellow (Y)
Ink type CW-C6000/C6500 Series Pigment ink
CW-D6000/D6500 Series Dye ink
Expiration date 6 months after installation in the printer, 3 years after
manufacture including the period of use
Storage
temperature
Transporting (without unpacking) -20 to 60°C {-4 to 140°F} (within 4 days at -20°C {-4°F}, within 1
month at 40°C {104°F}, within 5 days at 60°C {140°F})
Storage (without unpacking) -20 to 40°C {-4 to 104°F} (within 4 days at -20°C {-4°F}, within 1
month at 40°C {104°F})
Installed -20 to 40°C {-4 to 104°F} (within 4 days at -20°C {-4°F}, within 1
month at 40°C {104°F})
CW-C6000 Series/CW-C6500 Series/CW-D6000 Series/CW-D6500 Series User's Guide
Specications
110

Maintenance Box
Model number SJMB6000/6500
Type Maintenance box with integrated waste ink absorbing material
Storage
temperature
Transporting (without unpacking) -20 to 60°C {-4 to 140°F} (within 5 days at 60°C {140°F})
Storage (without unpacking) -20 to 40°C {-4 to 104°F} (within 1 month at 40°C {104°F})
Installed -20 to 40°C {-4 to 104°F} (within 1 month at 40°C {104°F})
CW-C6000 Series/CW-C6500 Series/CW-D6000 Series/CW-D6500 Series User's Guide
Specications
111

Appendix
Consumables and Options
Consumables and options for this product are available. ey can be purchased from sales representatives.
Ink Cartridge
Four ink cartridge colors are used. Black ink can be selected from gloss black and matte black.
*
For the ink cartridges that can be used with this product, refer to “Ink Cartridge” on page 110.
Replace the ink cartridge(s) when you are prompted to do so.
U “Replacing the Ink Cartridges” on page 35
* Some models of the printer cannot use matte black ink.
Genuine Ink Cartridges Recommended
❏ For the best performance of the printer, it is recommended to use genuine Epson ink cartridges. Use of
non-genuine Epson ink cartridges can adversely aect the printer and print quality and prevent the printer
from realizing its maximum performance. Epson cannot guarantee the quality and reliability of non-genuine
Epson products. Repairs for any damage or breakdown of this product due to the use of non-genuine Epson
products will not be free of charge even if the warranty period is still valid.
❏ Color adjustment of the product is based on the use of genuine Epson ink cartridges. Use of non-genuine ink
cartridges may result in reduced print quality. Epson recommends the use of genuine Epson ink cartridges.
Disposal of Ink Cartridges
Dispose the ink cartridges properly following the law or regulations of your country and area.
CW-C6000 Series/CW-C6500 Series/CW-D6000 Series/CW-D6500 Series User's Guide
Appendix
112

Maintenance Box
e maintenance box is a box used to collect waste ink. e maintenance box available for this product is:
Model number: SJMB6000/6500
Replace the maintenance box when you are prompted to do so.
U “Replacing the Maintenance Box” on page 38
Genuine Maintenance Box Recommended
For the best performance of the printer, it is recommended to use a genuine Epson maintenance box. Use of a
non-genuine Epson maintenance box can adversely aect the printer and prevent the printer from realizing its
maximum performance. Repairs for any damage or breakdown of this product due to the use of non-genuine
Epson products will not be free of charge even if the warranty period is still valid. Epson cannot guarantee the
quality and reliability of non-genuine Epson products.
Disposal of Maintenance Box
Dispose the ink maintenance box properly following the law or regulations of your country and area.
CW-C6000 Series/CW-C6500 Series/CW-D6000 Series/CW-D6500 Series User's Guide
Appendix
113
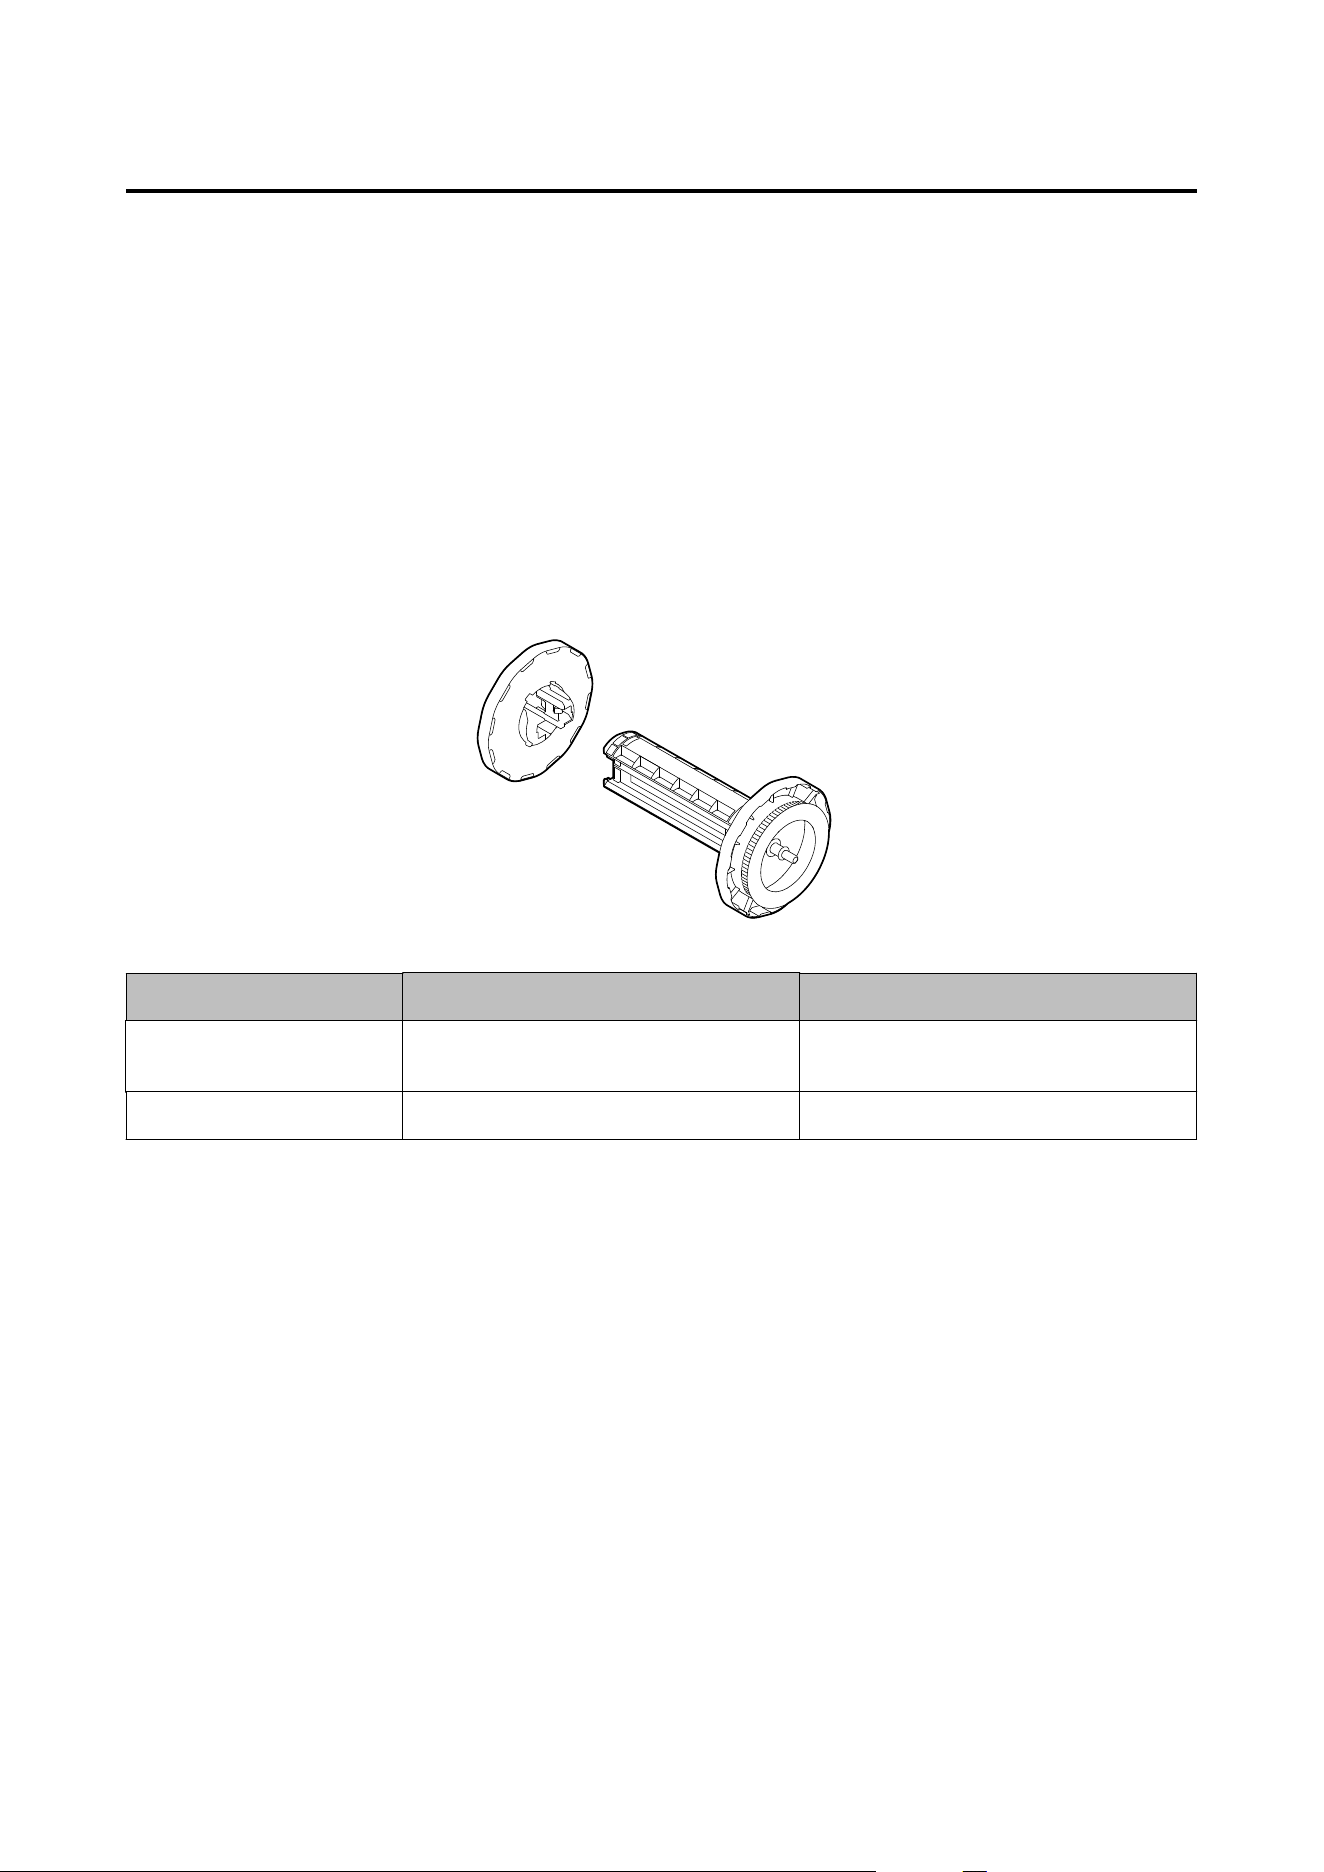
Roll Paper Holder
A spare roll paper holder is provided as an option. In the following cases, replacement of the roll paper can be
performed quickly by loading paper beforehand in the spare roll paper holder.
❏ When you want to use paper of a
dierent
size or frequently change the label material
❏ When you want to reduce the down time as a result of roll paper replacement
Model number:
❏ Paper Holder C6000 (for CW-C6000/D6000 Series)
❏ Paper Holder C6500 (for CW-C6500/D6500 Series)
Item Paper Holder C6000 Paper Holder C6500
External dimensions
(H × W × D)
220 × 206 × 220 mm
{8.66 x 8.11 x 8.66 in.}
175 × 310 × 175 mm
{6.89 x 12.20 x 6.89 in.}
Weight 0.65 kg {1.43 lb} 0.65 kg {1.43 lb}
CW-C6000 Series/CW-C6500 Series/CW-D6000 Series/CW-D6500 Series User's Guide
Appendix
114

Restriction of Use
When this product is used for applications requiring high reliability/safety such as transportation devices related to
aviation, rail, marine, automotive etc.; disaster prevention devices; various safety devices etc.; or functional/
precision devices etc., you should use this product only aer giving consideration to including fail-safes and
redundancies into your design to maintain safety and total system reliability. is product is not intended for use
in applications requiring an extremely high level of reliability and safety, such as in aerospace instruments, main
communication equipment, nuclear power control equipment, or medical equipment, etc. Please make your own
judgment on this product’s suitability aer a full evaluation.
CW-C6000 Series/CW-C6500 Series/CW-D6000 Series/CW-D6500 Series User's Guide
Appendix
115

Notes
(1) All rights reserved. No part of this publication may be reproduced, stored in a retrieval system, or
transmitted in any form or by any means, electronic, mechanical, photocopying, recording, or otherwise,
without the prior written permission of Seiko Epson Corporation.
(2) e content of this manual is subject to change without notice.
(3) While every precaution has been taken in the preparation of this manual, Seiko Epson Corporation assumes
no responsibility for errors or omissions.
(4) Neither is any liability assumed for damages resulting from the use of the information contained herein.
(5) Neither Seiko Epson Corporation nor its aliates shall be liable to the purchaser of this product or third
parties for damages, losses, costs, or expenses incurred by purchaser or third parties as a result of: accident,
misuse, or abuse of this product or unauthorized
modications,
repairs, or alterations to this product, or
(excluding the U.S.) failure to strictly comply with Seiko Epson Corporation’s operating and maintenance
instructions.
(6) Seiko Epson Corporation shall not be liable for any damages or problems arising from the use of any options
or any consumable products other than those designated as Genuine Epson Products or Epson Approved
Products by Seiko Epson Corporation.
Trademarks
Microso, Windows are trademarks of the Microso group of companies.
All other trademarks are the property of their respective owners and used for identication purpose only.
©Seiko Epson Corporation 2019–2025
CW-C6000 Series/CW-C6500 Series/CW-D6000 Series/CW-D6500 Series User's Guide
Appendix
116
