

1
AS21001
80 V POLE HEDGE TRIMMER
ITEM # 2139154/2139153/3650165
MODEL # KPH 3580-06/KPH 2080-06
Español p. 19
Questions, problems, missing parts? Before returning to your retailer, call our customer
service department at 1-888-3KOBALT (1-888-356-2258), 8 a.m. - 8 p.m., EST, Monday -
ATTACH YOUR RECEIPT HERE
Serial Number Purchase Date
You could also contact us at [email protected] or visit www.lowespartsplus.com.Sunday.


2
TABLE OF CONTENTS
.......................................................................................................... 2
Package Contents ................................................................................................................ 3
Hardware Contents ............................................................................................................... 4
Symbols ................................................................................................................................ 5
Safety Information ................................................................................................................. 7
Preparation ......................................................................................................................... 10
Know Your Pole Hedge Trimmer .......................................................................................... 11
Assembly Instructions ......................................................................................................... 12
Operating Instructions ......................................................................................................... 14
Care and Maintenance ....................................................................................................... 16
Troubleshooting .................................................................................................................. 17
Warranty ............................................................................................................................. 18
Replacement Parts List ....................................................................................................... 19
PRODUCT SPECIFICATIONS
COMPONENTS SPECIFICATIONS
Type Cordless, battery-operated
Blade length 20 in.
Cutting capacity 30 mm
Reciprocating speed 3,200 (±10%) SPM
Weight (without battery) 3.7 kg
3
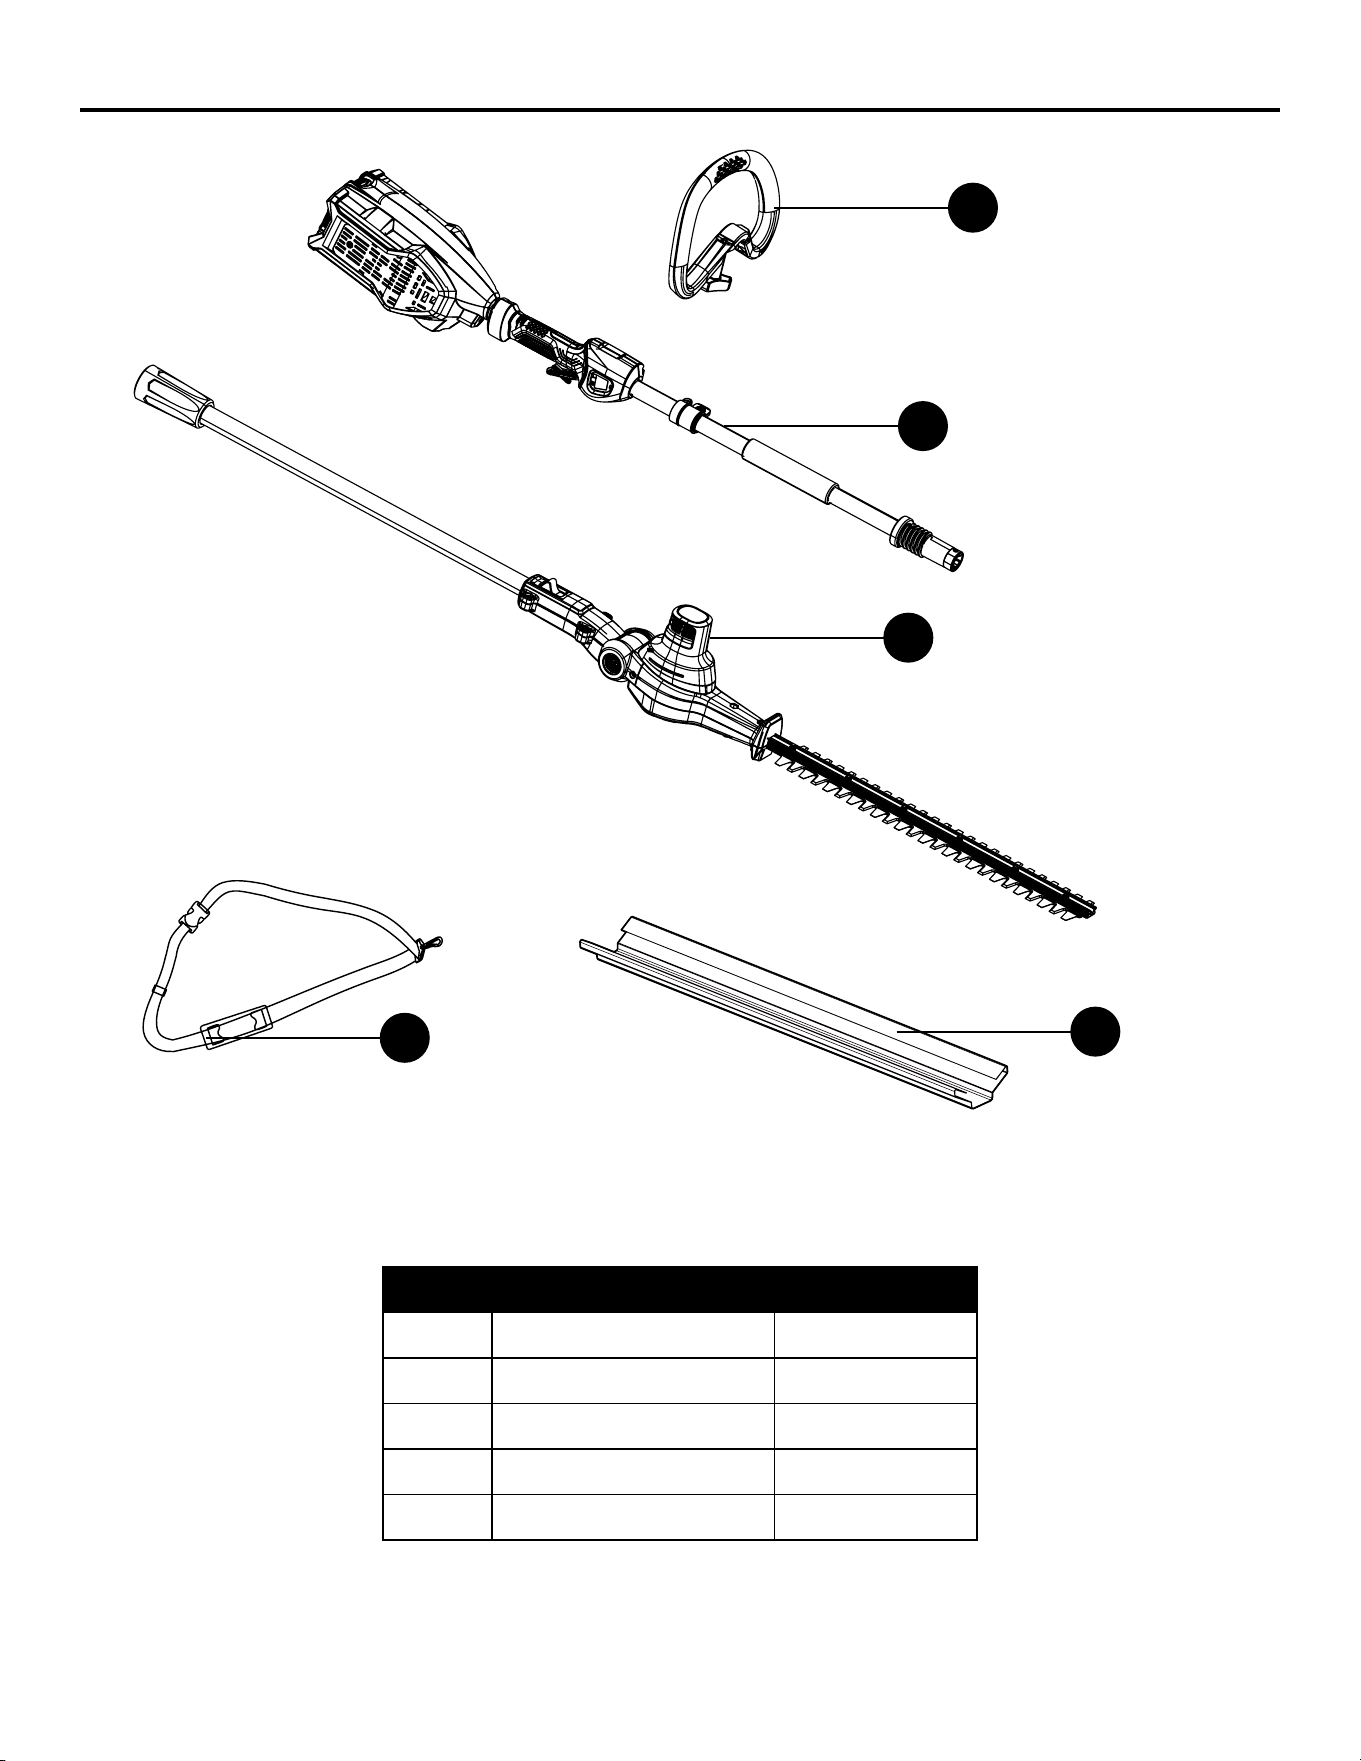
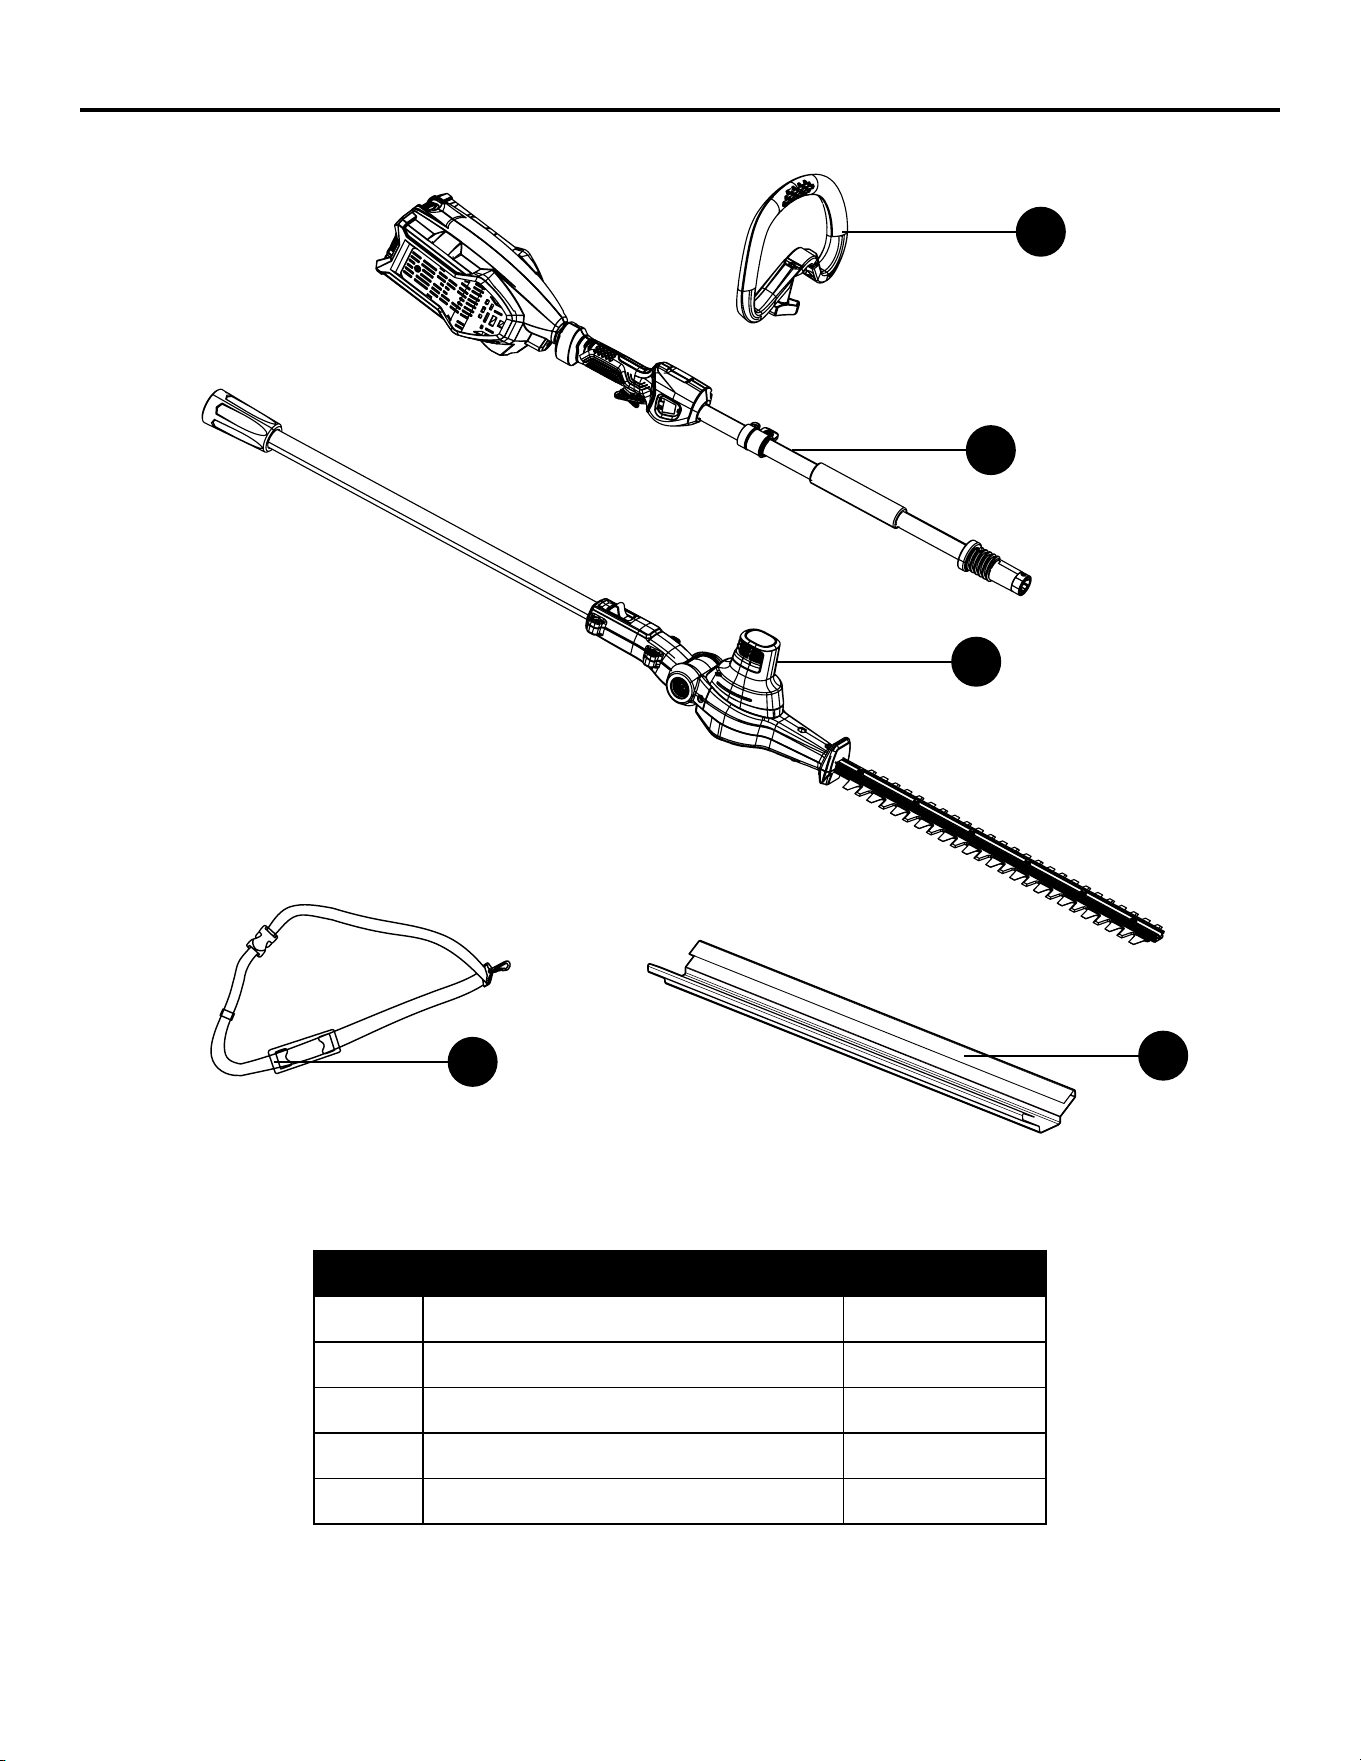
PACKAGE CONTENTS
PART DESCRIPTION QUANTITY
A Front/Auxiliary Handle 1
B Handle Pole 1
C Hedge Trimmer Head 1
D Blade Cover 1
Q Strap 1
A
B
C
D
Q
4
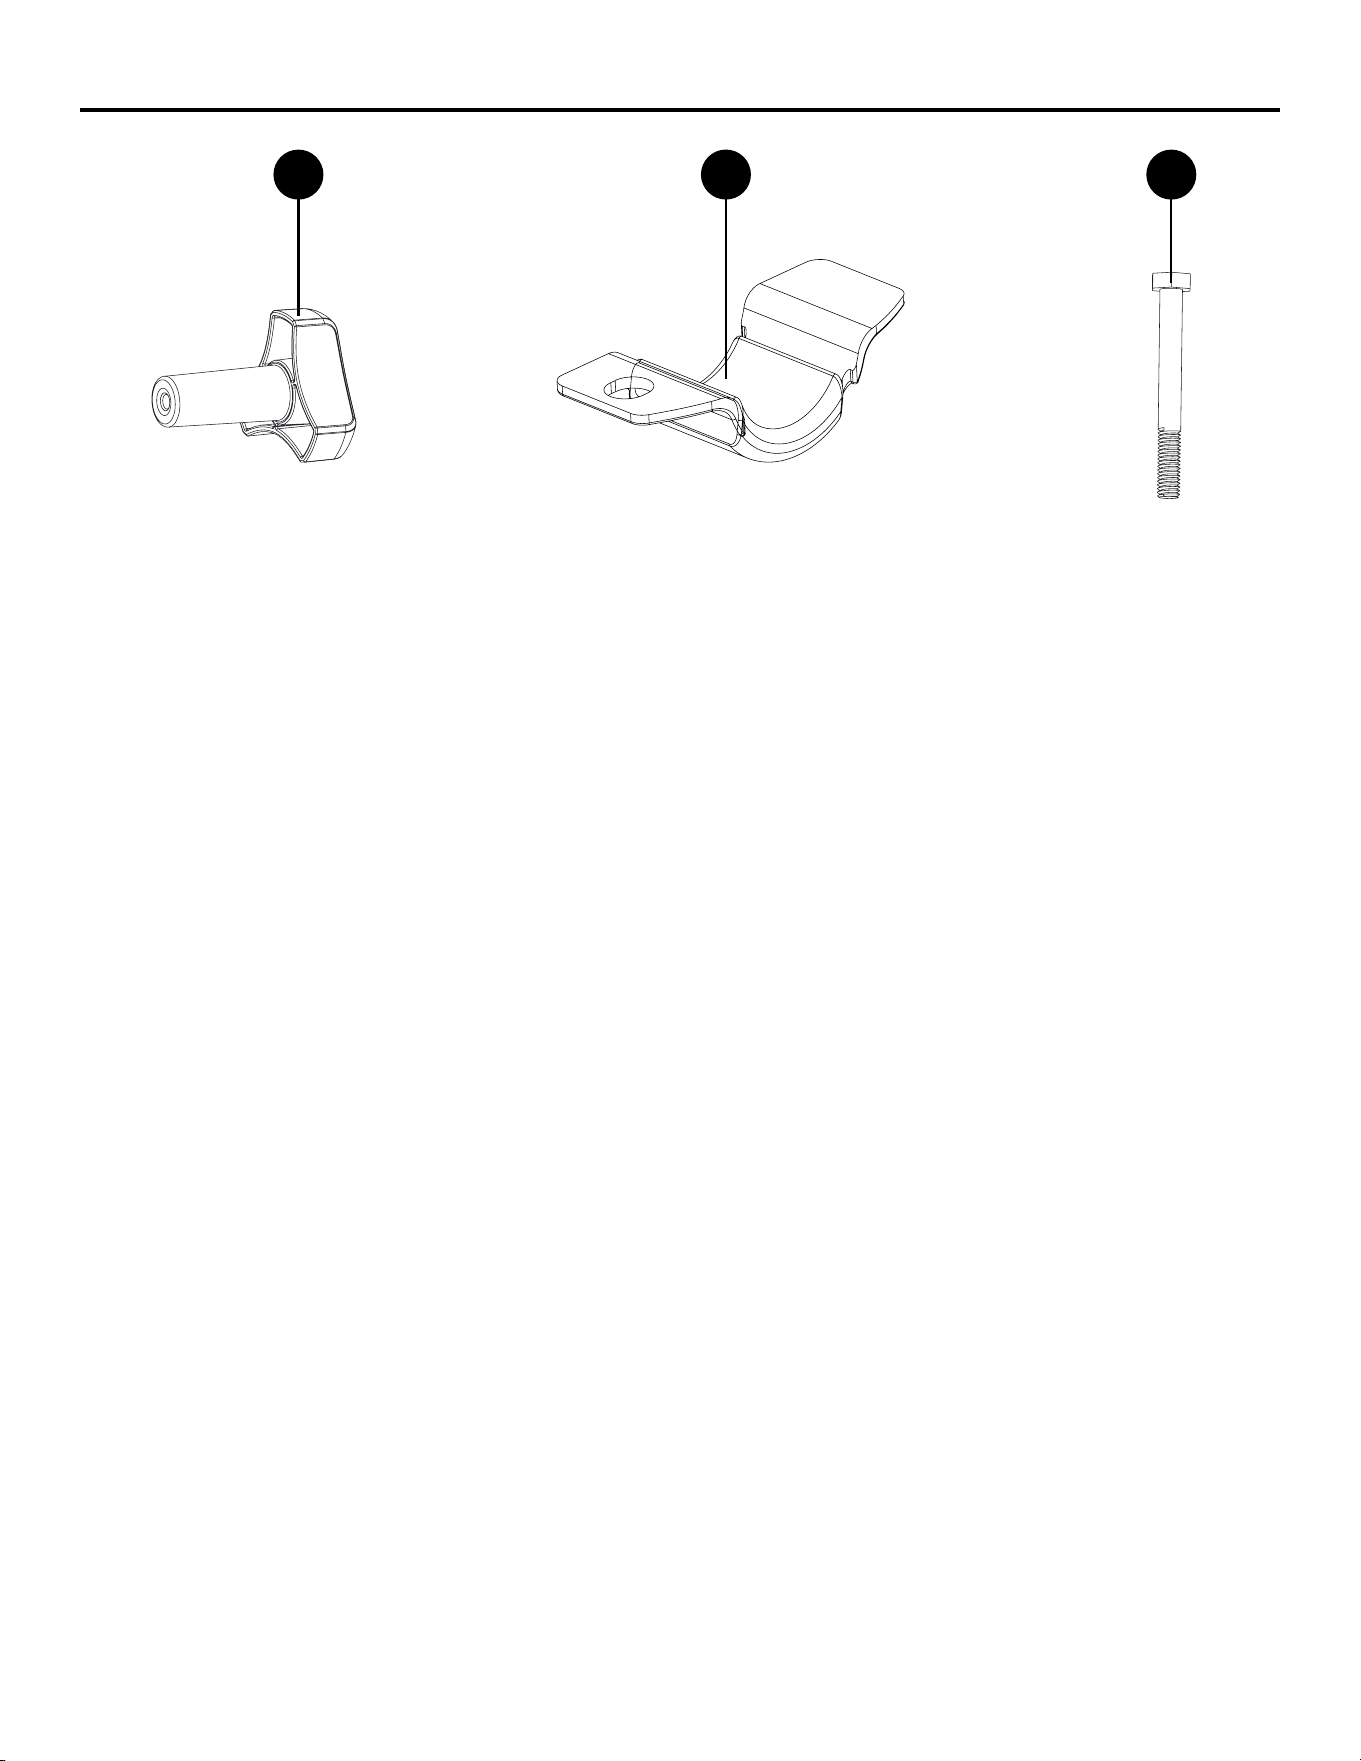
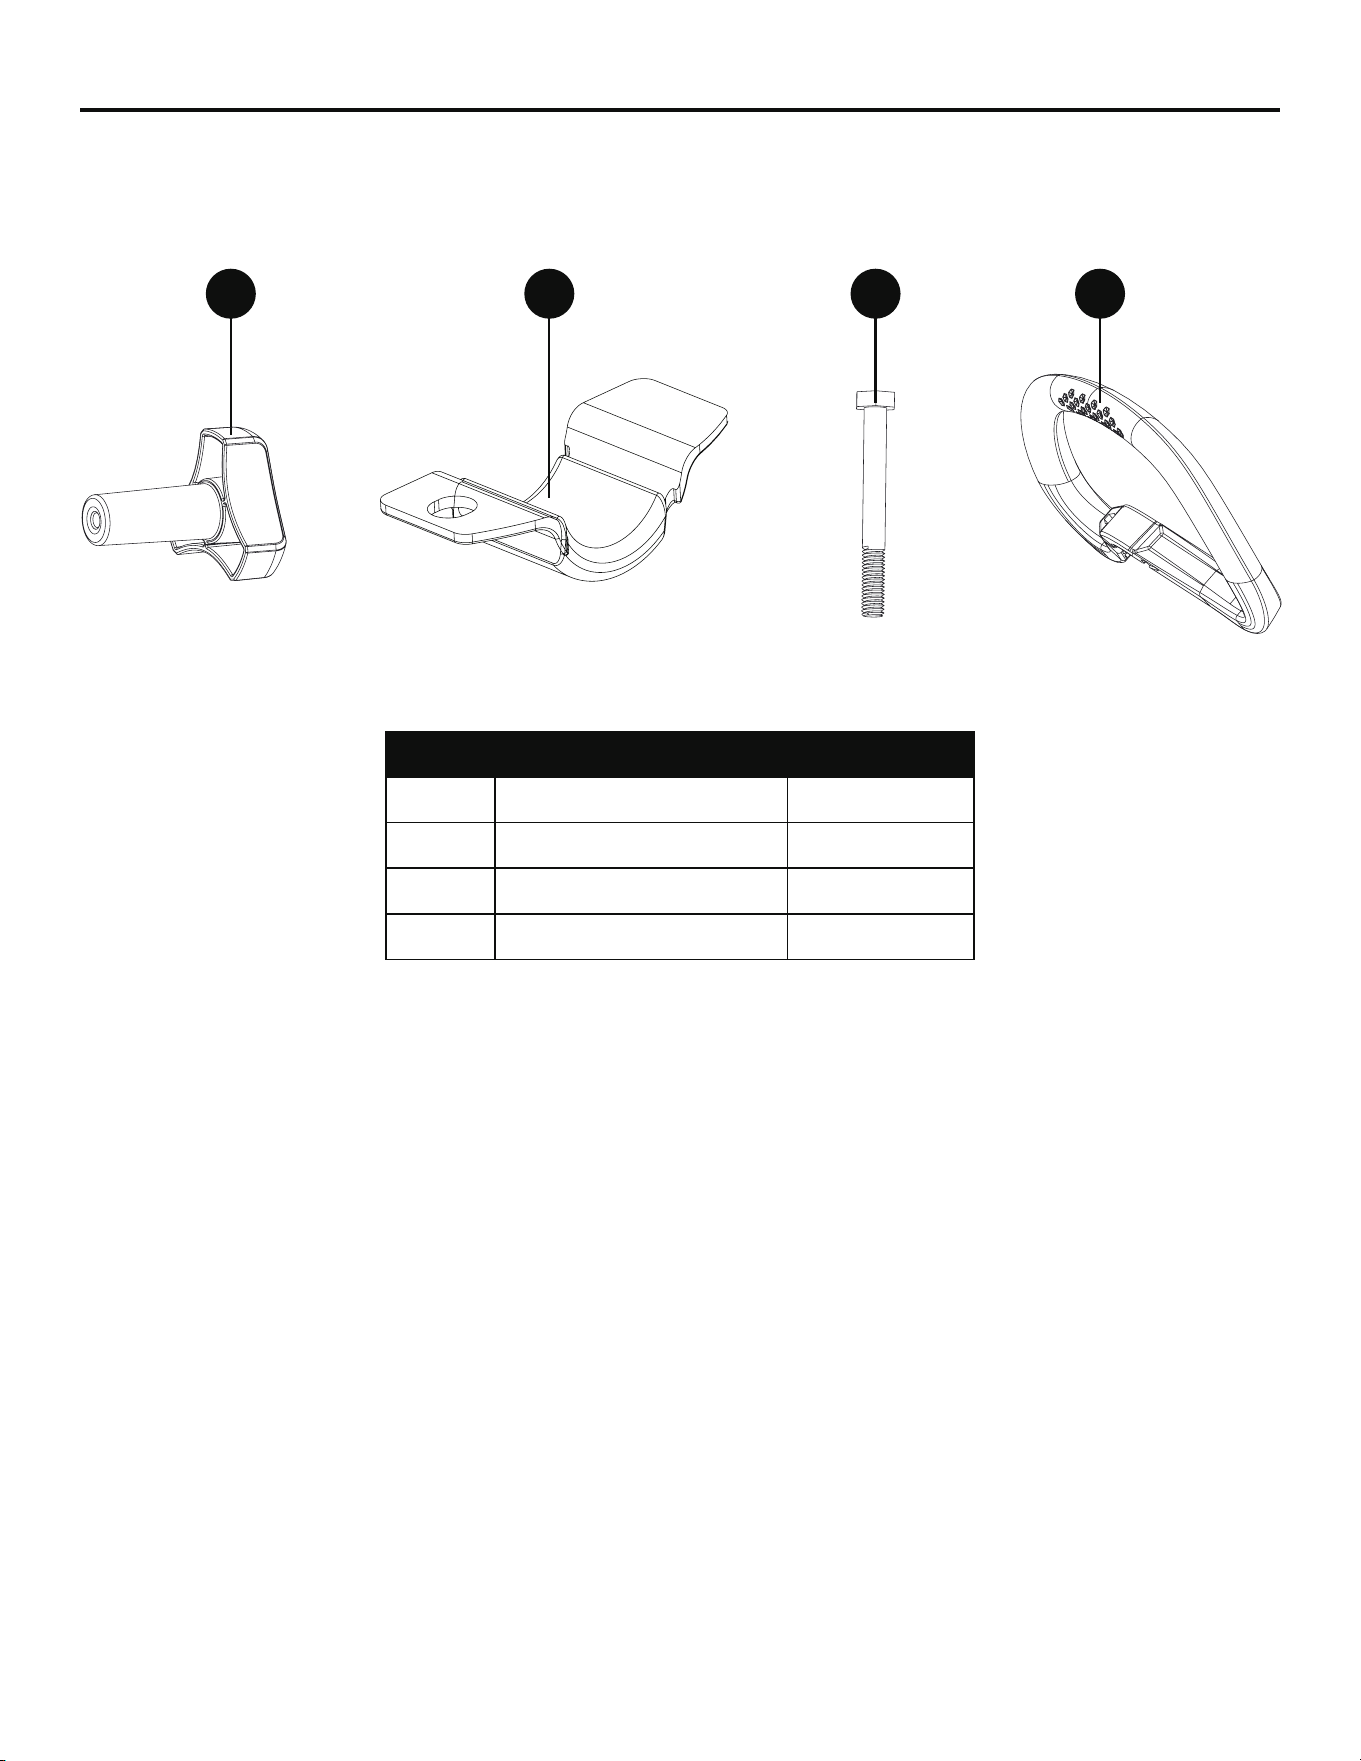
HARDWARE CONTENTS (not shown actual size)
AA
Fastening Knob
Qty. 1
CC
Bolt
Qty. 1
BB
Bracket
Qty. 1
5
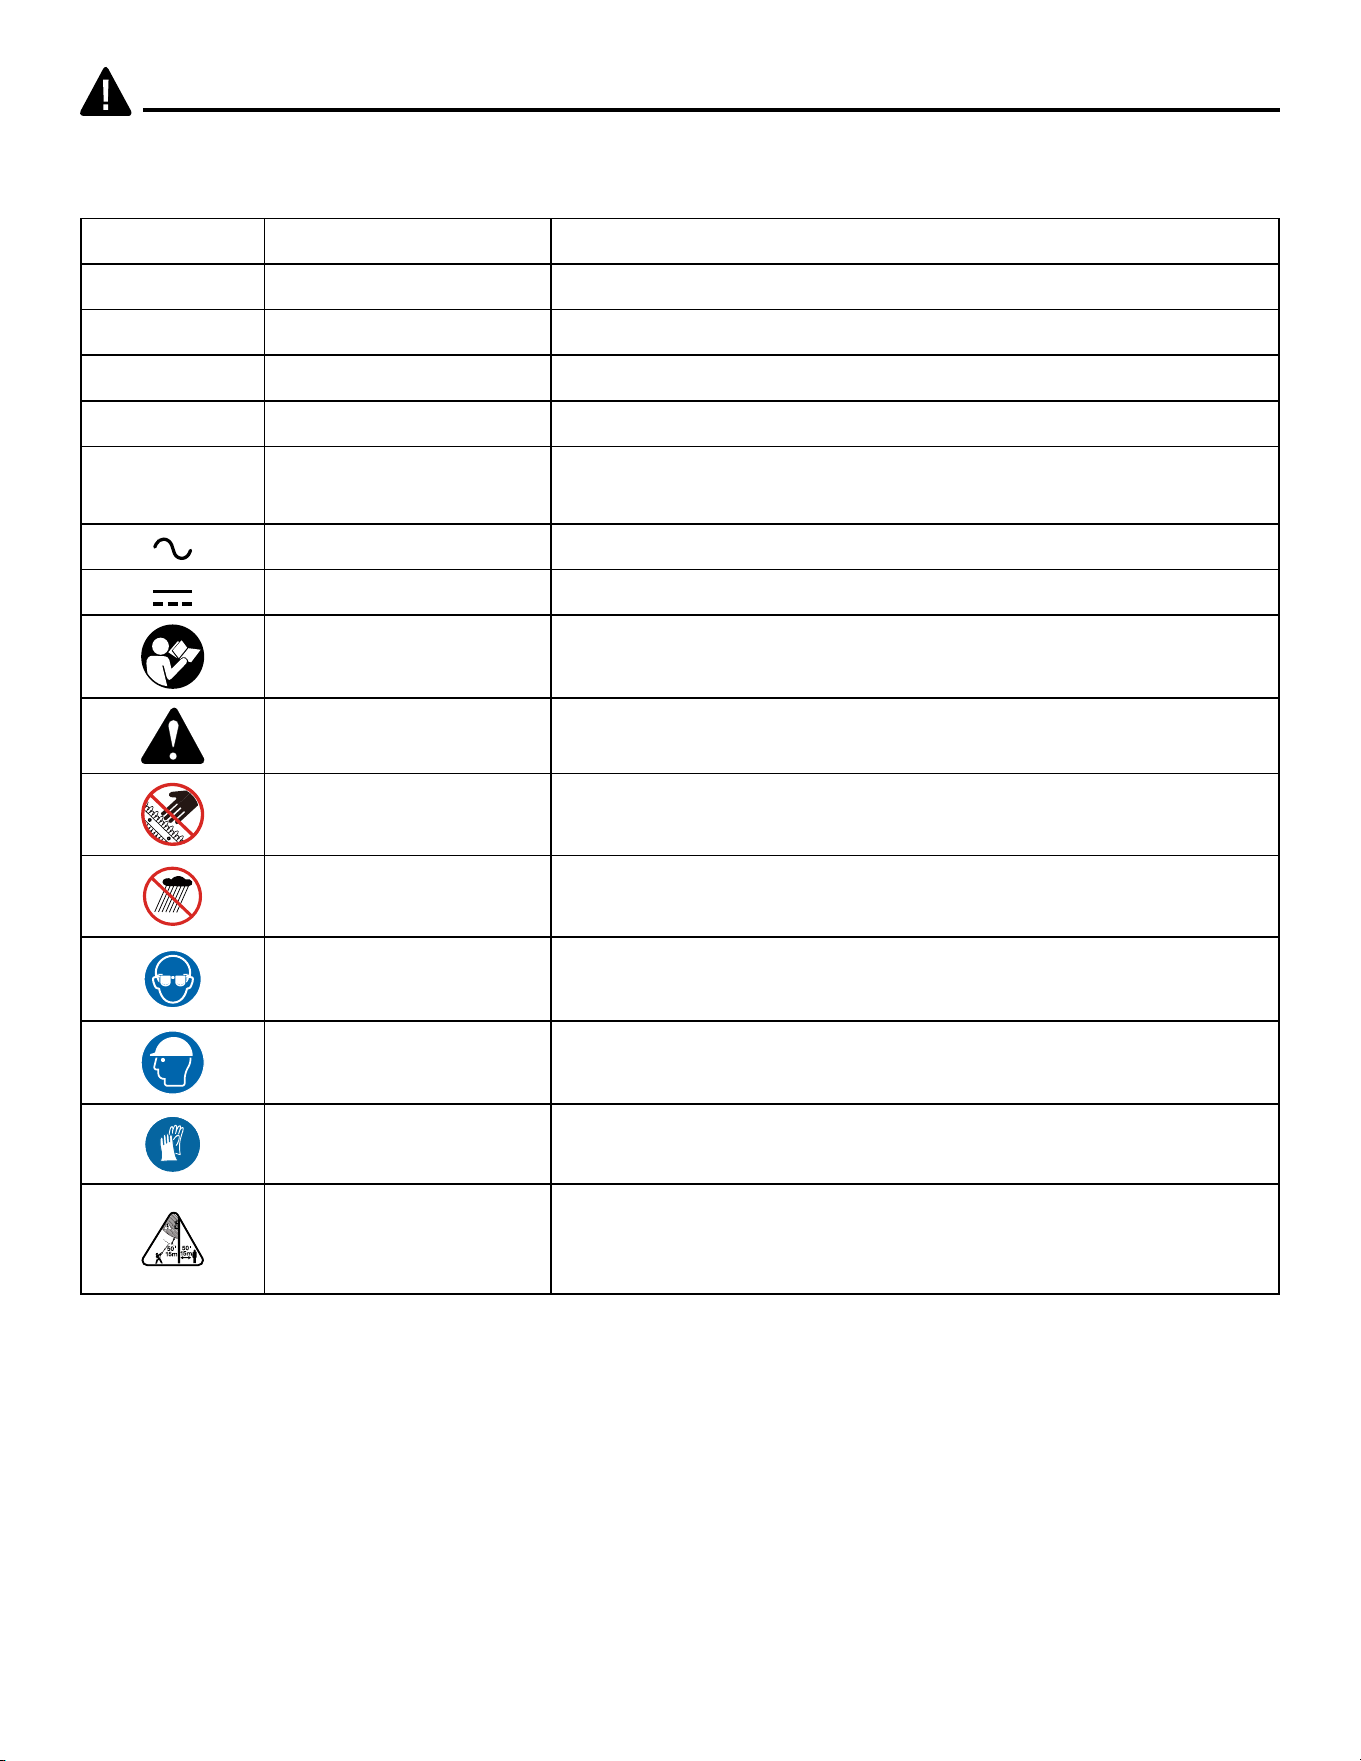
SYMBOLS
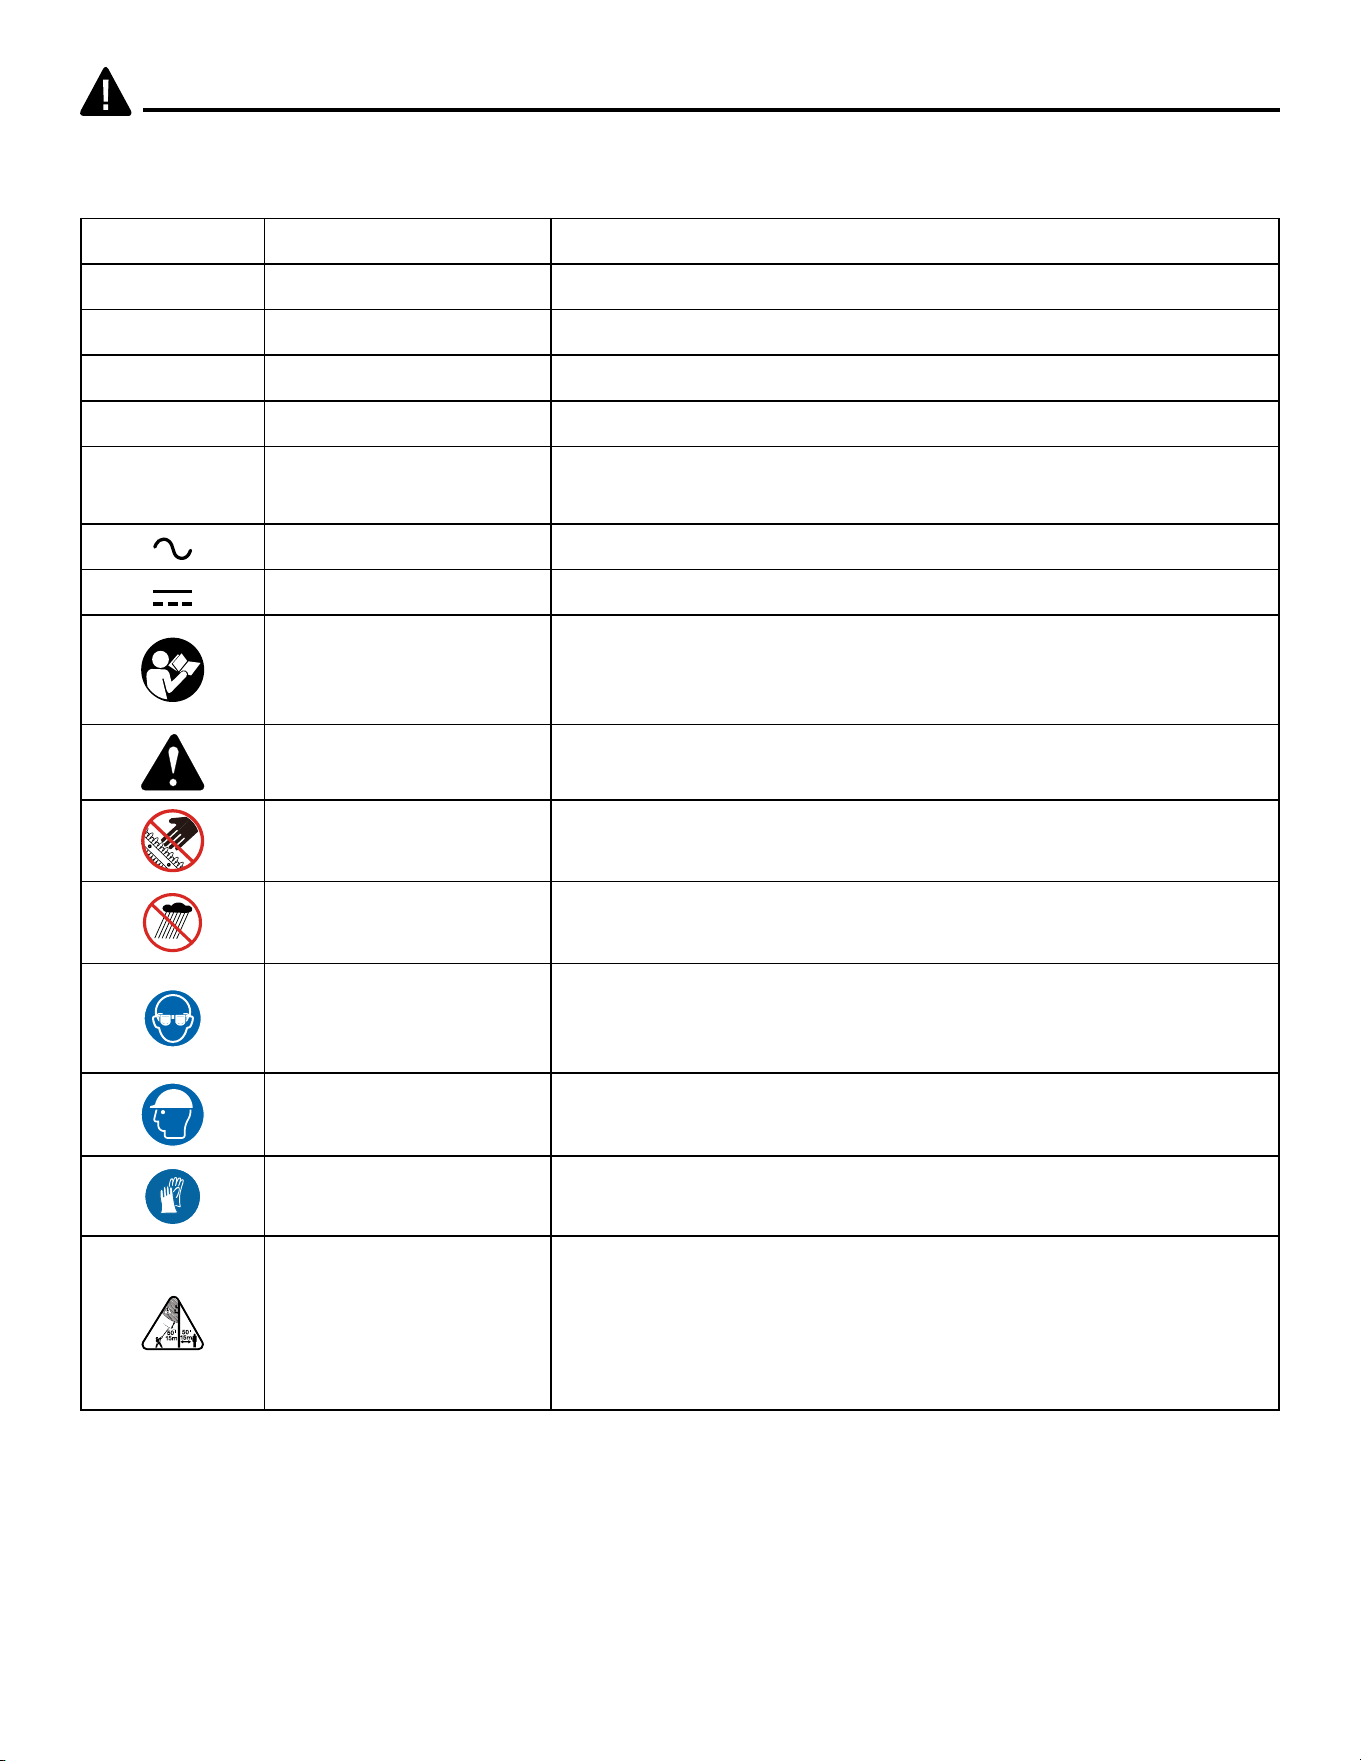
Some of the following symbols may be used on this product. Please study them and learn their
meaning. Proper interpretation of these symbols will allow you to operate the product better and safer.
SYMBOL DESIGNATION EXPLANATION
V Volts Voltage
A Amperes Current
Hz Hertz Frequency (cycles per second)
W Watt Power
SPM Strokes per minute
The number of back-and-forth strokes the blade makes per
minute
Alternating Current Type of current
Direct Current Type or a characteristic of current
Read the Operator’s
Manual
To reduce the risk of injury, user must read and understand
operator’s manual before using this product.
Safety Alert Precautions that involve your safety.
Sharp Blade Keep hands away from sharp, moving blades.
Wet Conditions Alert Do not expose to rain or use in damp locations
Wear eye protection
Wear eye protection with side shields that are marked to
comply with ANSI Z87.1 when operating this equipment.
Wear Head Protection Wear an approved safety hard hat to protect your head.
Gloves Wear non-slip, heavy duty gloves.
Keep Tool Away from
Electrical Lines/Keep
Bystanders Away
DANGER! Risk of electrocution! Keep tool 50 ft. away from
electrical lines. Keep all bystanders at least 50 ft. away.
6
SYMBOLS
Save these Instructions
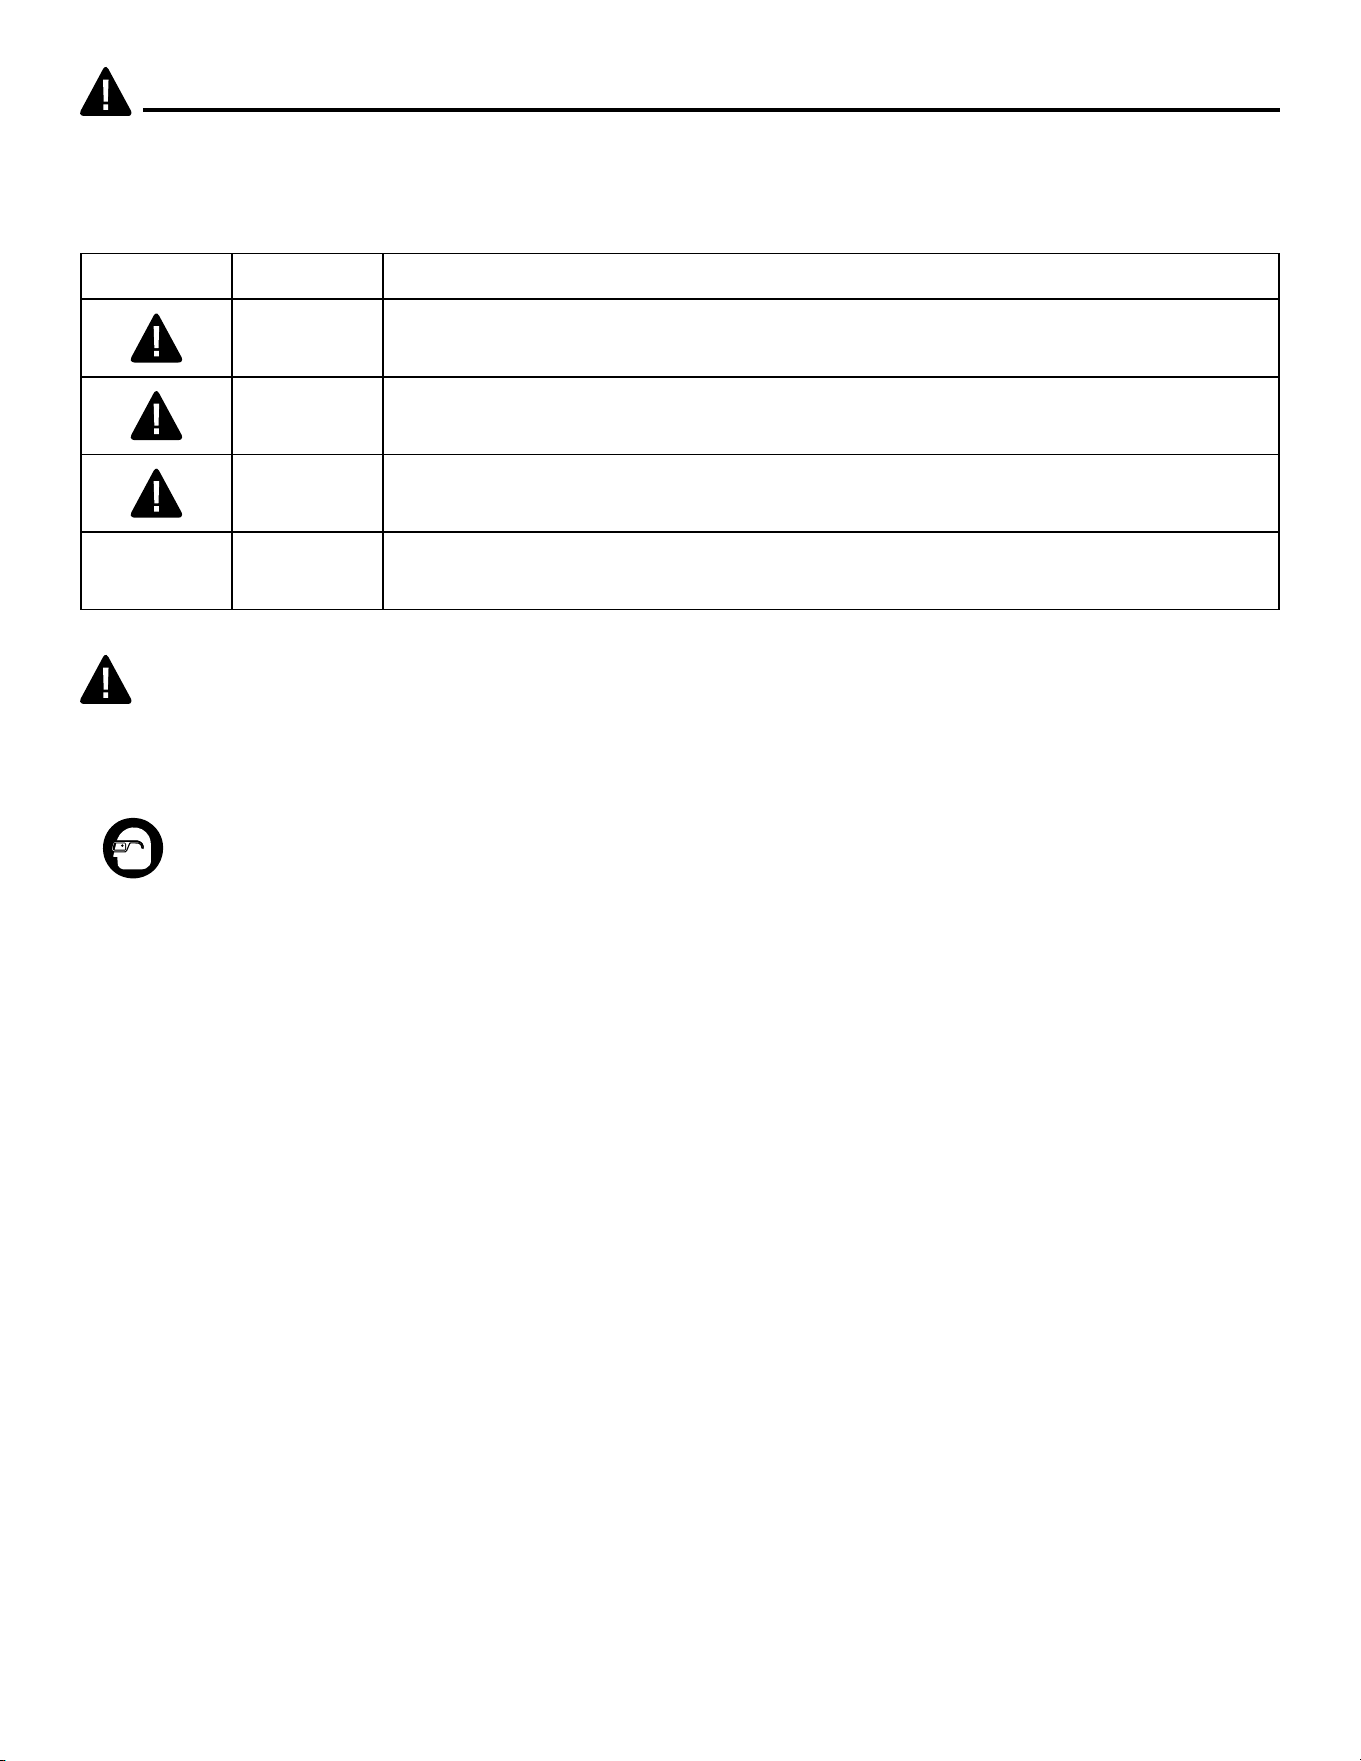
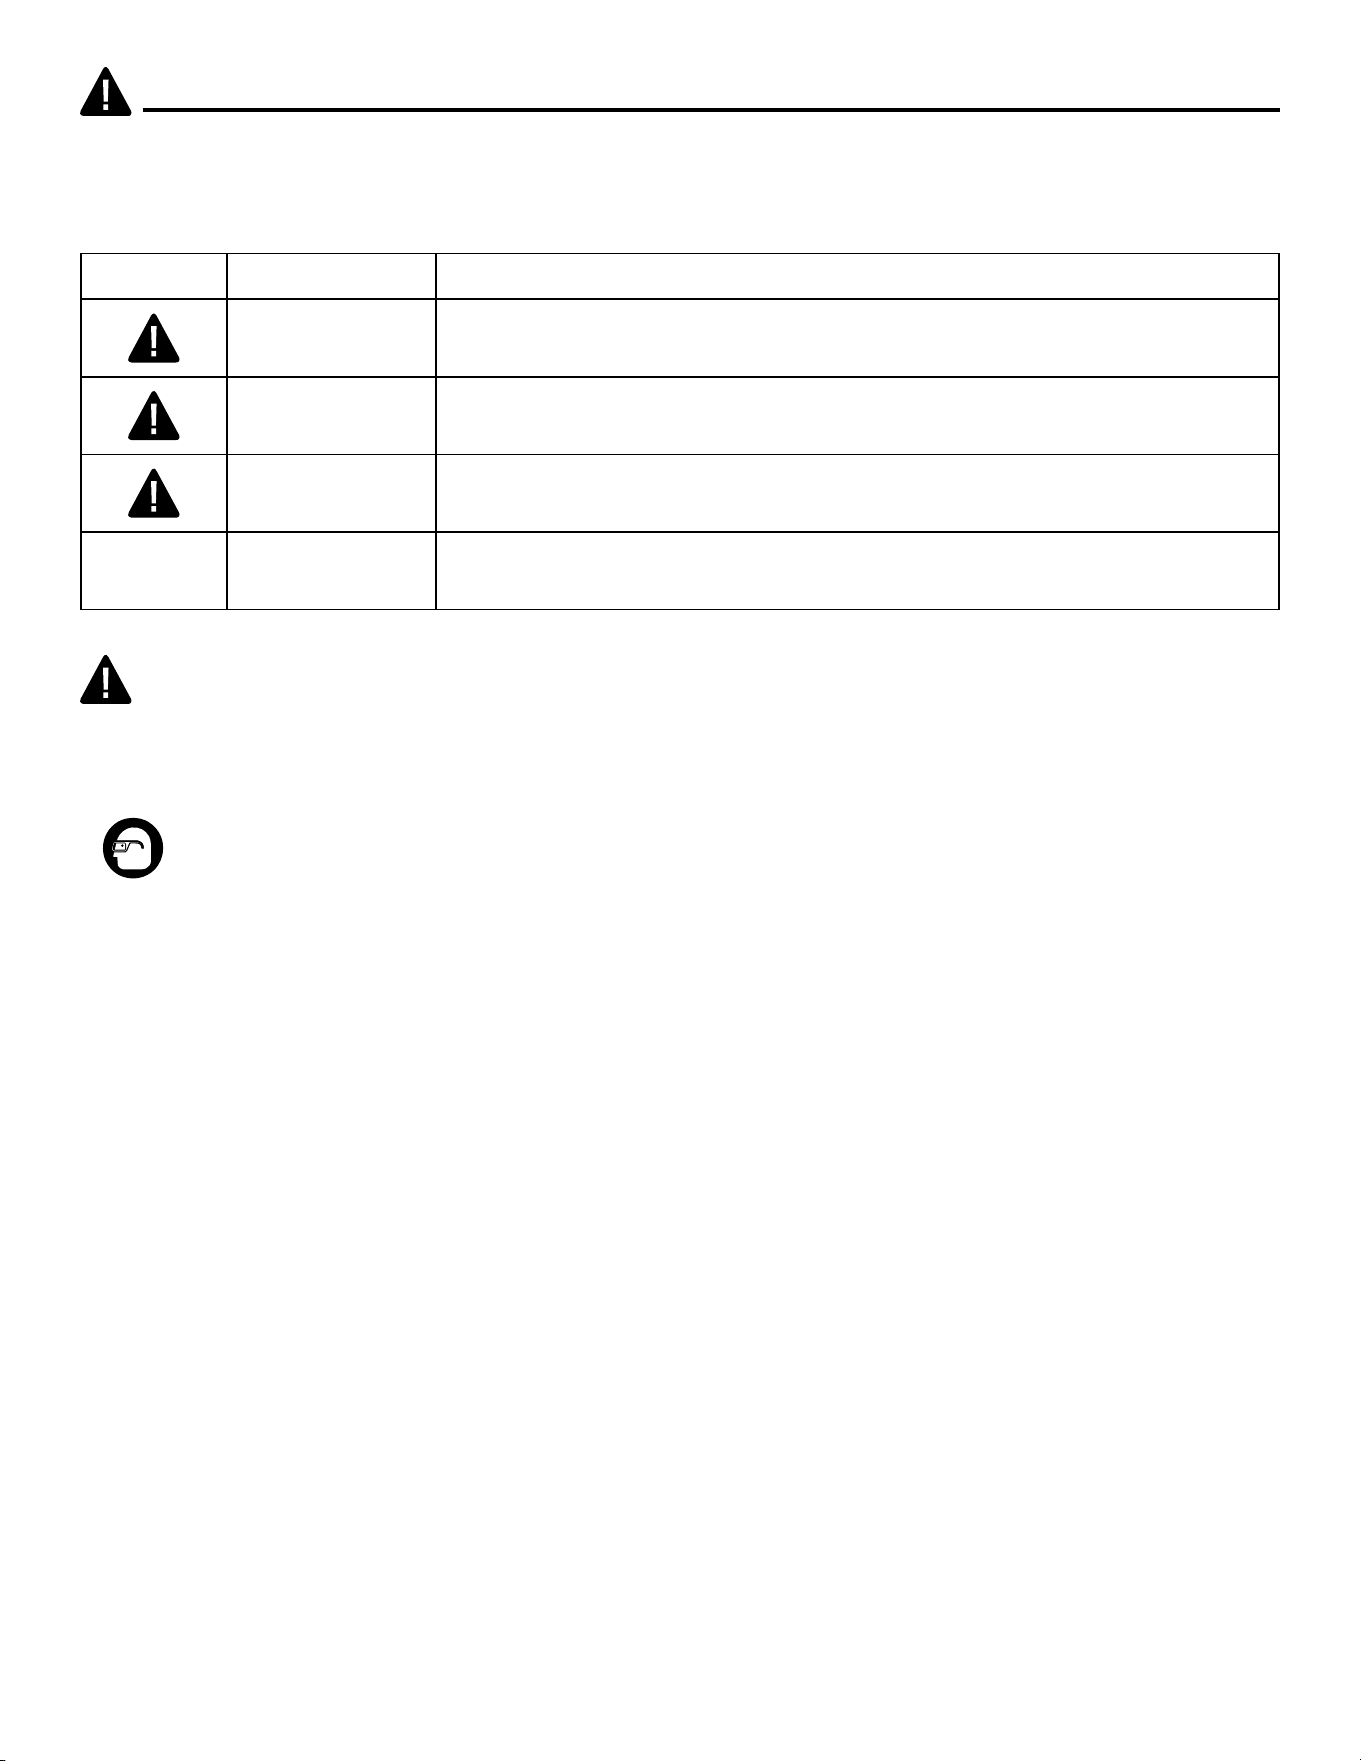
The following signal words and meanings are intended to explain the levels of risk associated with this
product.
SYMBOL SIGNAL MEANING
DANGER
Indicates an imminently hazardous situation, which, if not avoided, will
result in death or serious injury.
WARNING
Indicates a potentially hazardous situation, which, if not avoided, could
result in death or serious injury.
CAUTION
Indicates a potentially hazardous situation, which, if not avoided, may
result in minor or moderate injury.
CAUTION
(Without Safety Alert Symbol) Indicates a situation that may result in
property damage.
WARNING
• To avoid serious personal injury, do not attempt to use this product until you have read this Owner’s
Manual thoroughly and understand it completely. If you do not understand the warnings and
instructions in this Owner’s Manual, do not use this product. Call 1-888-356-2258 for assistance.
• The operation of any power tool can result in foreign objects being thrown into your eyes,
which can result in severe eye damage. Before beginning power tool operation, always wear
safety goggles or safety glasses with side shields and, when needed, a full face shield. We
recommend a wide vision safety mask for use over eyeglasses or standard safety glasses with
side shields. Always use eye protection which is marked to comply with ANSI Z87.1.
7
SAFETY INFORMATION
WARNING
Read all safety warnings and all instructions. Failure to follow the warnings and instructions may
Save all warnings and instructions for future reference.
The term “power tool” in all of the warnings listed below refers to your mains-operated (corded) power
tool or battery-operated (cordless) power tool.
WORK AREA SAFETY
• Keep work area clean and well lit. Cluttered or dark areas invite accidents.
•
liquids, gases or dust. Power tools create sparks which may ignite the dust or fumes.
• Keep children and bystanders away while operating a power tool. Distractions can cause you to
lose control.
ELECTRICAL SAFETY
• A battery-operated tool with integral batteries or a separate battery pack must be recharged
A charger that may be suitable for one type of
• Avoid body contact with earthed or grounded surfaces such as pipes, radiators, ranges and
refrigerators. There is an increased risk of electric shock if your body is earthed or grounded.
• Do not expose power tools to rain or wet conditions. Water entering a power tool will increase
the risk of electric shock.
•
Use of any other batteries may
• If operating a power tool in a damp location is unavoidable, use a residual current device
(RCD) protected supply. Use of an RCD reduces the risk of electric shock.
• Use only Kobalt 80-volt batteries. (KB 280-06, KB 2580-06, KB 380-06, KB 280C-06, KB 2580C-06,
KB 380C-06)
• Use only Kobalt 80-volt chargers. (KRC 30-06, KRC 80-06,KRC 0280-06)
PERSONAL SAFETY
• Stay alert, watch what you are doing and use common sense when operating a power tool.
medication. A moment of inattention while operating power tools may result in serious personal
injury.
• Use personal protective equipment. Always wear eye protection. Protective equipment such as
a dust mask, non-skid safety shoes, a hard hat, or hearing protection used for appropriate conditions
will reduce personal injuries.
• Prevent unintentional starting. Ensure the switch is in the off-position before connecting to
power source and/or battery pack, picking up or carrying the tool. Carrying power tools with
• Remove any adjusting key or wrench before turning the power tool on. A wrench or a key left
attached to a rotating part of the power tool may result in personal injury.
• Do not overreach. Keep proper footing and balance at all times. This enables better control of
the power tool in unexpected situations.
• Dress properly. Do not wear loose clothing or jewelry. Keep your hair, clothing and gloves
away from moving parts. Loose clothes, jewelry, or long hair can be caught in moving parts.
• If devices are provided for the connection of dust extraction and collect
ion facilities, ensure
these are connected and properly used. Use of these devices can reduce dust-related hazards.

8
SAFETY INFORMATION
POWER TOOL USE AND CARE
• Do not force the power tool. Use the correct power tool for your application. The correct power
tool will do the job better and safer at the rate for which it was designed.
• Do not use the power tool if the switch does not turn it on and off. Any power tool that cannot
be controlled with the switch is dangerous and must be repaired.
• Disconnect the battery pack from the power tool before making any adjustments, changing
accessories, or storing power tools. Such preventive safety measures reduce the risk of starting
the power tool accidentally.
• Store idle power tools out of the reach of children and do not allow persons unfamiliar with
the power tool or these instructions to operate the power tool. Power tools are dangerous in the
hands of untrained users.
• Maintain power tools. Check for misalignment or binding of moving parts, breakage of parts
and any other condition that may affect the power tools operation. If damaged, have the
power tool repaired before use. Many accidents are caused by poorly maintained power tools.
• Keep cutting tools sharp and clean. Properly maintained cutting tools with sharp cutting edges are
less likely to bind and are easier to control.
• Use the power tool, accessories and tool bits, etc., in accordance with these instructions,
taking into account the working conditions and the work to be performed. Use of the power
tool for operations different from those intended could result in a hazardous situation.
BATTERY TOOL USE AND CARE
• Ensure the switch is in the off position before inserting battery pack. Inserting the battery pack
into power tools that have the switch on invites accidents.
• 5HFKDUJHRQO\ZLWKWKHFKDUJHUVSHFL¿HGE\WKHPDQXIDFWXUHU A charger that is suitable for one
W\SHRIEDWWHU\SDFNPD\FUHDWHDULVNRI¿UHZKHQXVHGZLWKDQRWKHUEDWWHU\SDFN
• 8VHSRZHUWRROVRQO\ZLWKVSHFL¿FDOO\GHVLJQDWHGEDWWHU\SDFNV Use of any other battery packs
PD\FUHDWHDULVNRILQMXU\DQG¿UH
• When battery pack is not in use, keep it away from other metal objects, like paper clips,
coins, keys, nails, screws, or other small metal objects that can make a connection from one
terminal to another.6KRUWLQJWKHEDWWHU\WHUPLQDOVWRJHWKHUPD\FDXVHEXUQVRUD¿UH
• Under abusive conditions, liquid may be ejected from the battery; avoid contact. If contact
DFFLGHQWDOO\RFFXUVÀXVKZLWKZDWHU,IOLTXLGFRQWDFWVH\HVDGGLWLRQDOO\VHHNPHGLFDOKHOS/LTXLG
ejected from the battery may cause irritation or burns.
SERVICE
• +DYH\RXUSRZHUWRROVHUYLFHGE\DTXDOL¿HGUHSDLUSHUVRQXVLQJRQO\LGHQWLFDOUHSODFHPHQW
parts. This will ensure that the safety of the power tool is maintained.
Always wear eye protection. A hedge trimmer can throw foreign objects into your eyes
which could cause permanent eye damage. Always wear safety goggles with side
shields that are marked to comply with ANSI Z87.1. Ordinary eyeglasses have only
impact-resistant lenses; they are not safety goggles.

9
HEDGE TRIMMER SAFETY WARNINGS
• Use both hands when operating the hedge trimmer. Using one hand could cause loss of
control and result in serious personal injury.
• Keep all parts of the body away from the cutter blade. Do not remove cut material or hold
material to be cut when blades are moving. Make sure the switch is off when clearing
jammed material. Blades coast after turning off. A moment of inattention while operating the
hedge trimmer may result in serious personal injury.
• Carry the hedge trimmer by the handle with the cutter blade stopped. Proper handling of the
hedge trimmer will reduce possible personal injury from the cutter blades.
• Hold the power tool by insulated gripping surfaces only, because the cutter blade may
contact hidden wiring or its own cord. Cutter blades contacting a “live” wire may make exposed
metal parts of the power tool “live” and could give the operator an electric shock.
• DANGER – Keep hands away from blade. Contact with blade will result in serious personal injury.
• Keep cable away from cutting area. During operation the cable may be hidden in shrubs and can
be accidentally cut by the blade.
EXTENDED-REACH HEDGE TRIMMER SAFETY WARNINGS
• Do not use the extended-reach hedge trimmer in bad weather conditions, especially when
there is a risk of lightning. This decreases the risk of being struck by lightning.
• To reduce the risk of electrocution, never use near any electrical power lines. Contact with or
use near power lines may cause serious injury or electric shock resulting in death.
• Always use two hands when operating the extended-reach hedge trimmer. Hold the
extended-reach hedge trimmer with both hands to avoid loss of control.
• Always use head protection when operating the extended-reach hedge trimmer overhead.
Falling debris can result in serious personal injury.
WARNING
Only use with handle and guard properly assembled to hedge trimmer. Use of the hedge
trimmer without the proper guard or handle provided may result in serious personal injury.
WARNING (PROPOSITION 65)
Some dust created by power sanding, sawing, grinding, drilling, and other construction activities
contains chemicals known to cause cancer, birth defects or other reproductive harm. Some examples
of these chemicals are:
• Lead from lead-based paints
• Crystalline silica from bricks and cement and other masonry products, and
• Arsenic and chromium from chemically treated lumber.
Your risk of exposure to these chemicals varies depending on how often you do this type of work.
To reduce your exposure to these chemicals, work in a well-ventilated area, and work with approved
VDIHW\HTXLSPHQWVXFKDVGXVWPDVNVWKDWDUHVSHFLDOO\GHVLJQHGWR¿OWHURXWPLFURVFRSLFSDUWLFOHV
SAFETY INFORMATION

10
PREPARATION
Before beginning assembly of product, make sure all parts are present. Compare parts with package
contents list and hardware contents list. If any part is missing or damaged, do not attempt to assemble
the product.
Estimated Assembly Time: 3 minutes
UNPACKING
• This product has been shipped unassembled.
• Carefully remove the product and any accessories from the box. Make sure that all items listed in the
Package Contents list are included.
• Inspect the product carefully to make sure no breakage or dama
ge occurred during shipping.
• Do not discard the packing material until you have carefully inspected and satisfactorily operated the
product.
• If any parts are damaged or missing, please call 1-888-3KOBALT (1-888-356-2258) for assistance.
WARNING
• If any parts are damaged or missing, do not operate this product until the parts are replaced. Failure
to heed this warning could result in serious personal injury.
• Do not attempt to modify this product or create accessories not recommended for use with this
leading to possible serious personal injury.
• Do not install the battery until assembly is complete. Failure to comply could result in accidental
starting and possible serious personal injury.
You could also contact us at [email protected] or visit www.lowespartsplus.com.
11
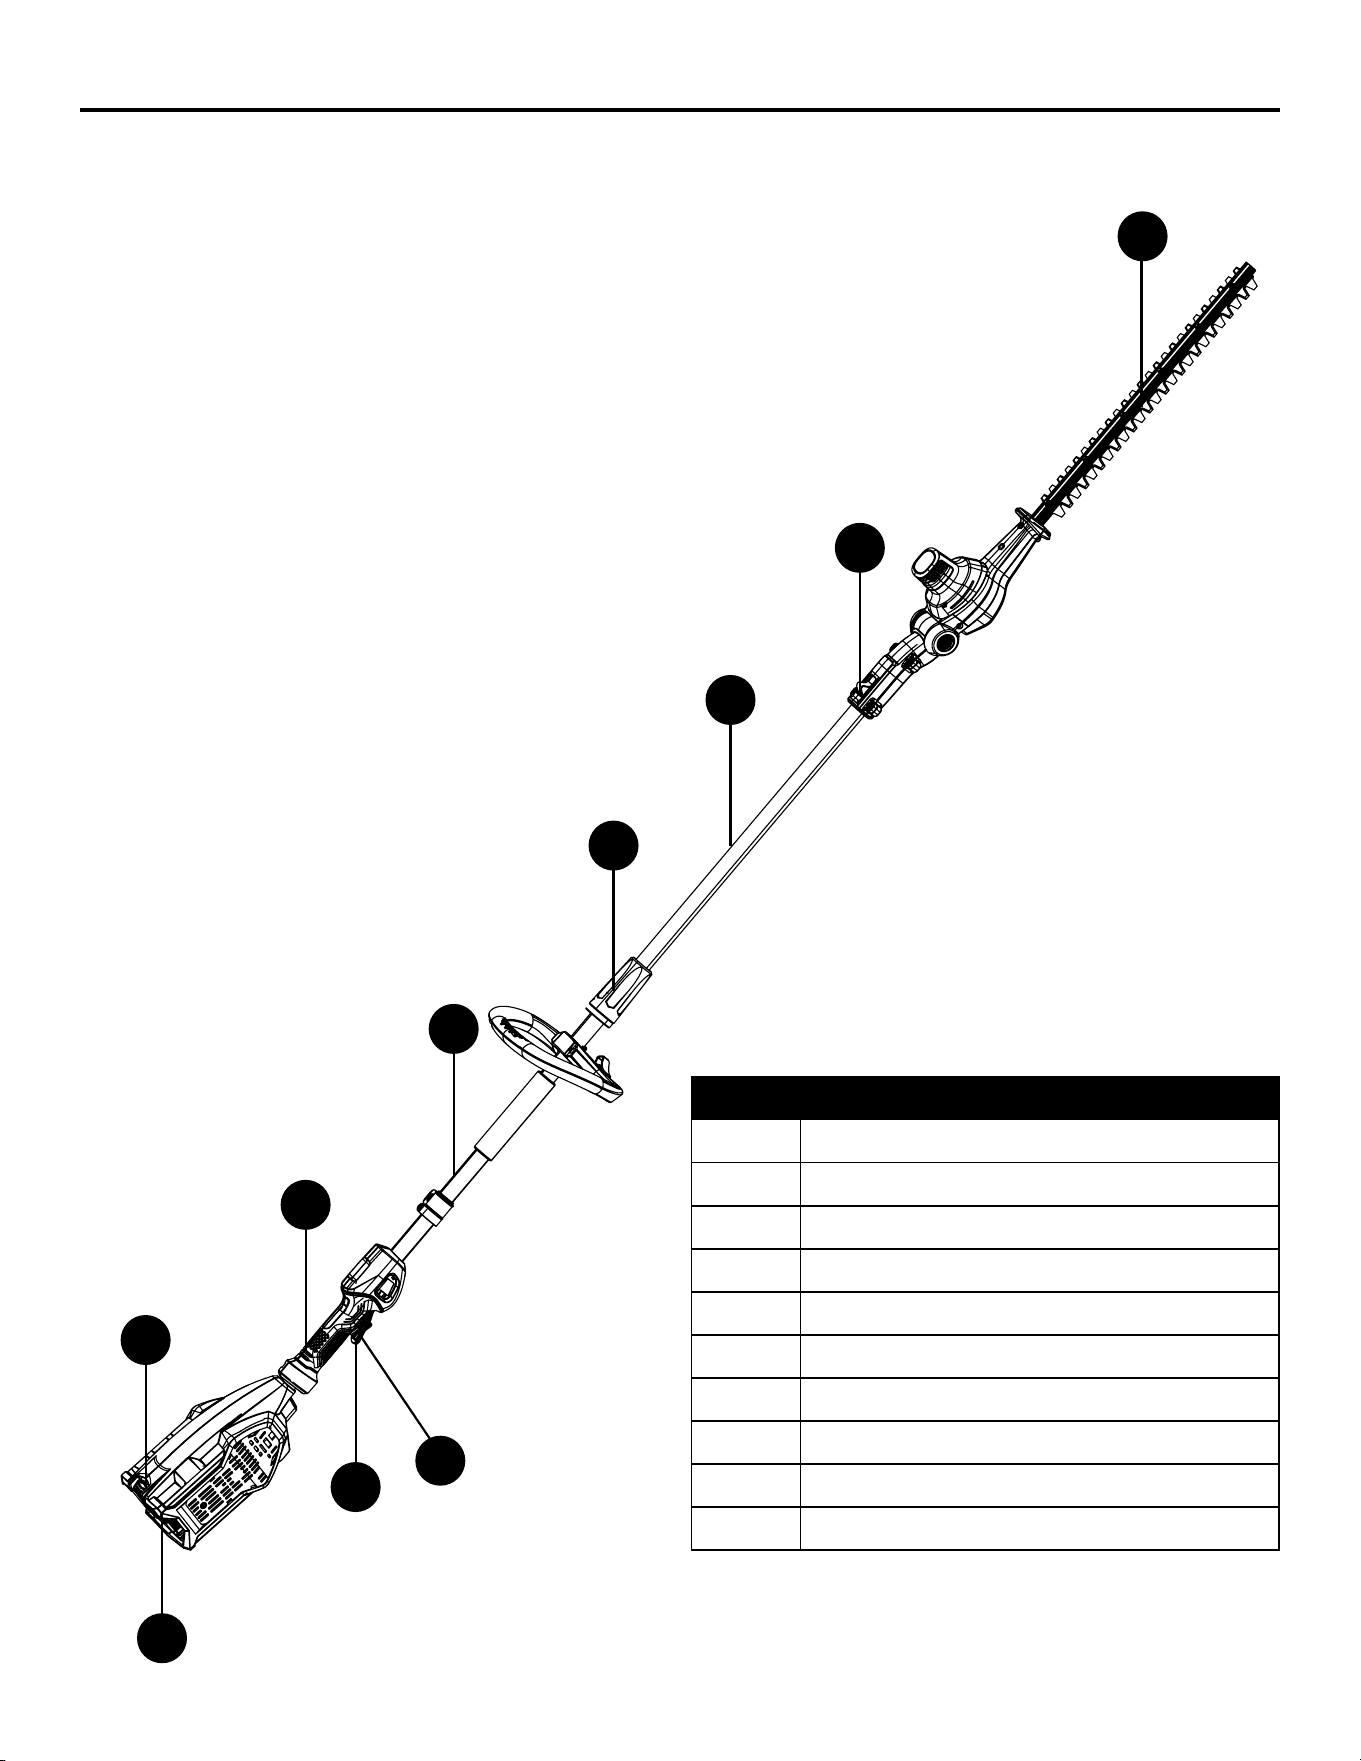
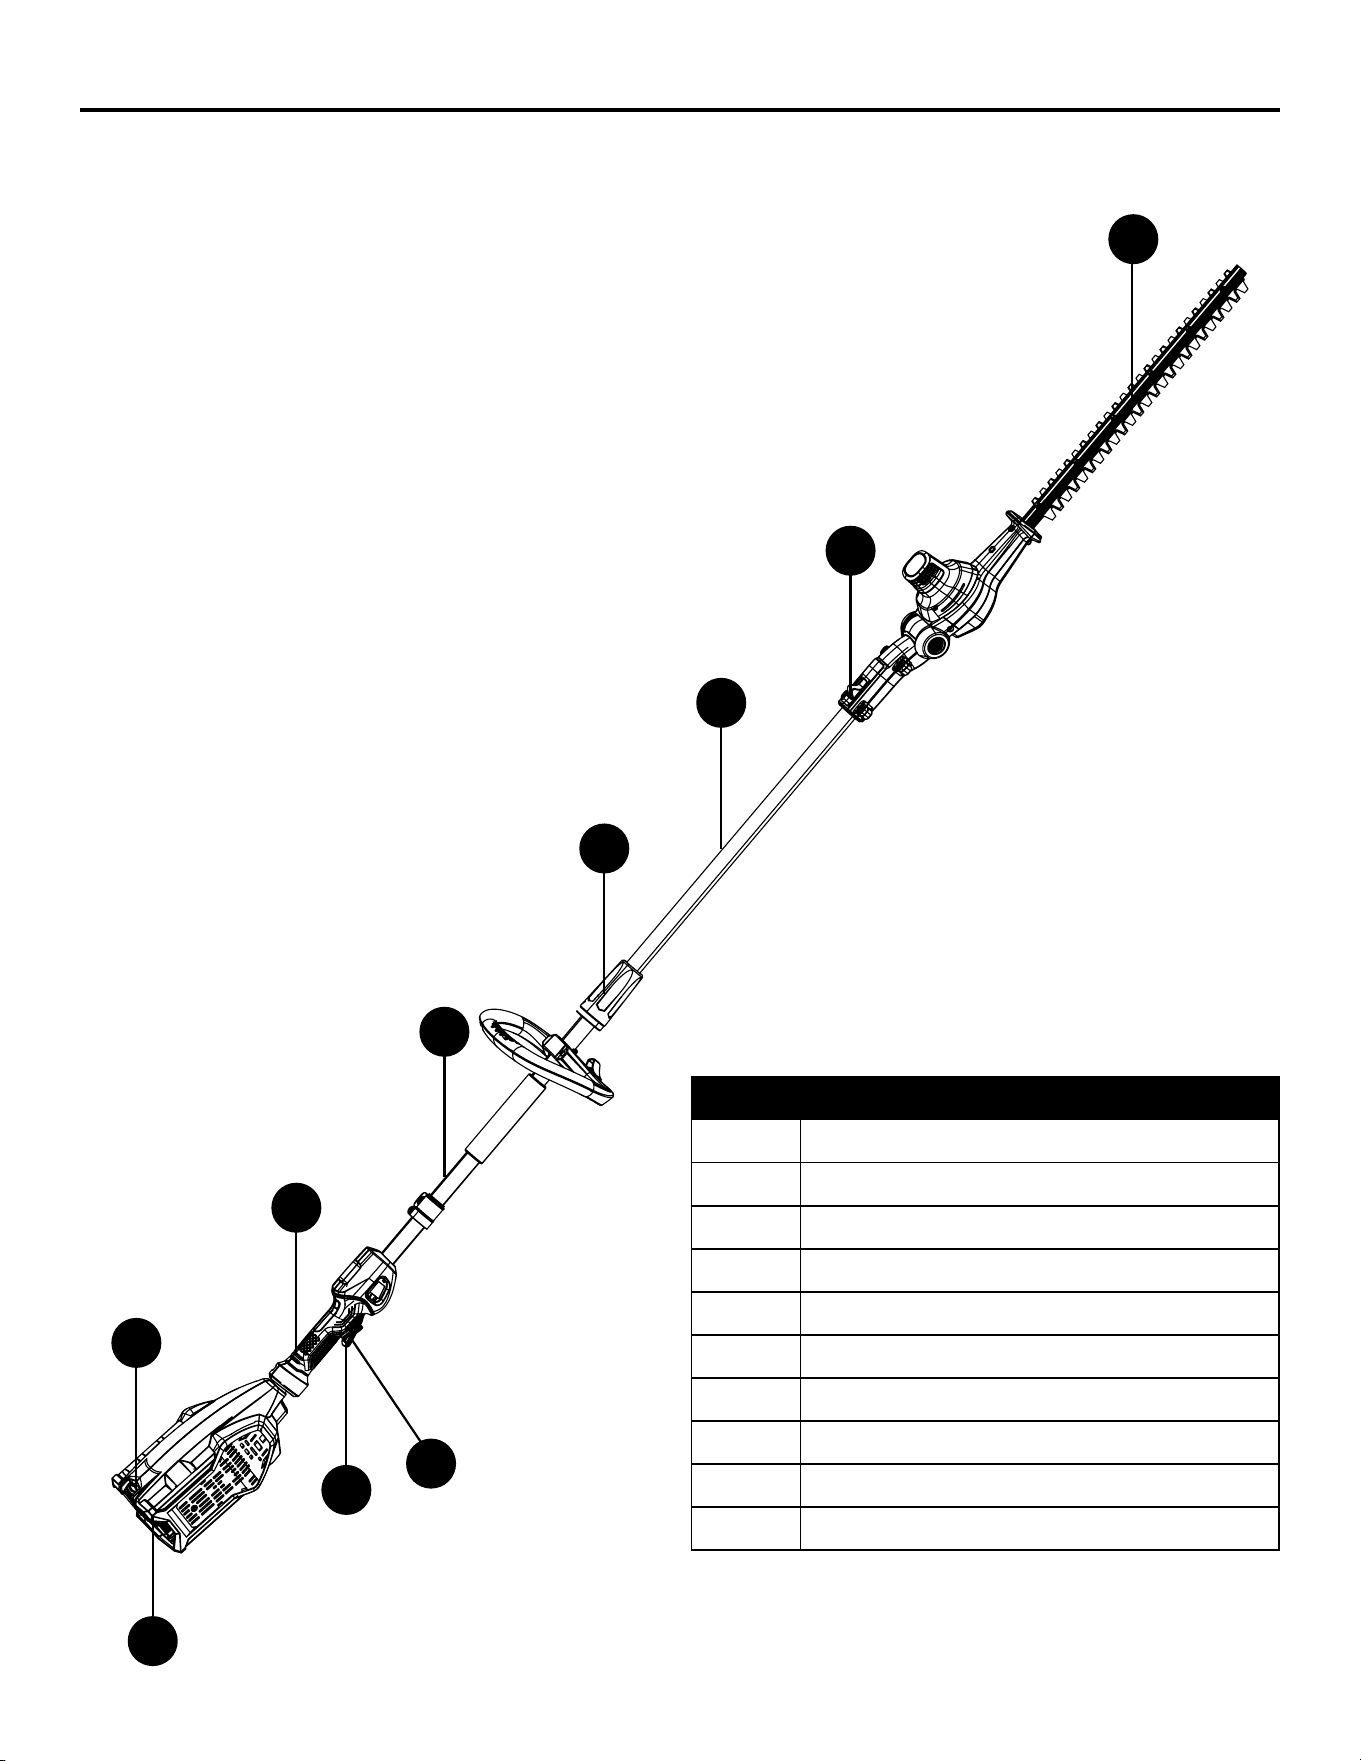
KNOW YOUR POLE HEDGE TRIMMER
G
J
L
N
R
S
PART DESCRIPTION
G Battery Release Button
H Rear Handle
J Safety Lock Button
K Lower Tube
L Collar
M Upper Tube
N Pivot Button
P Blade
R Trigger Switch
S Battery Compartment
P
K
M
H
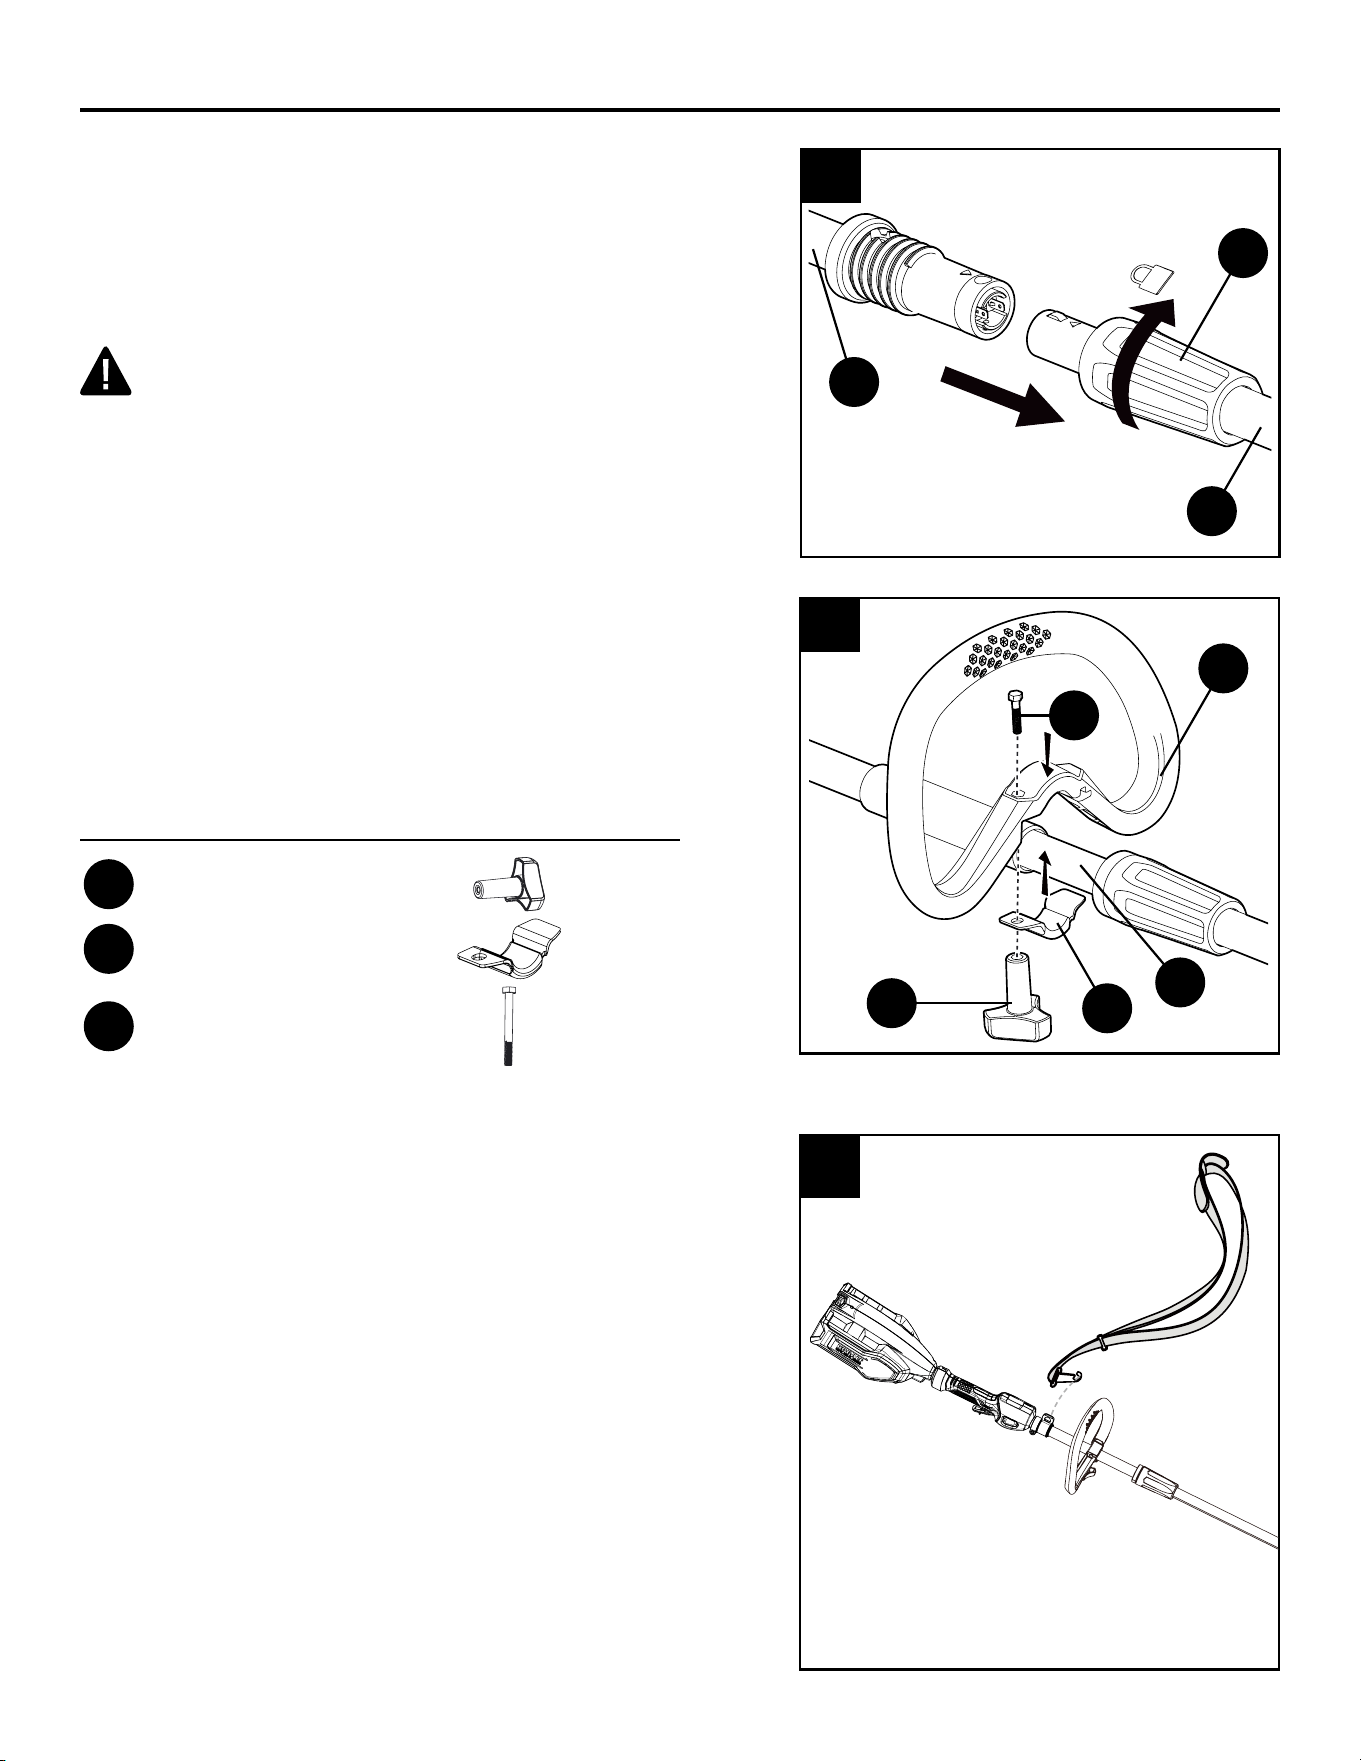
12
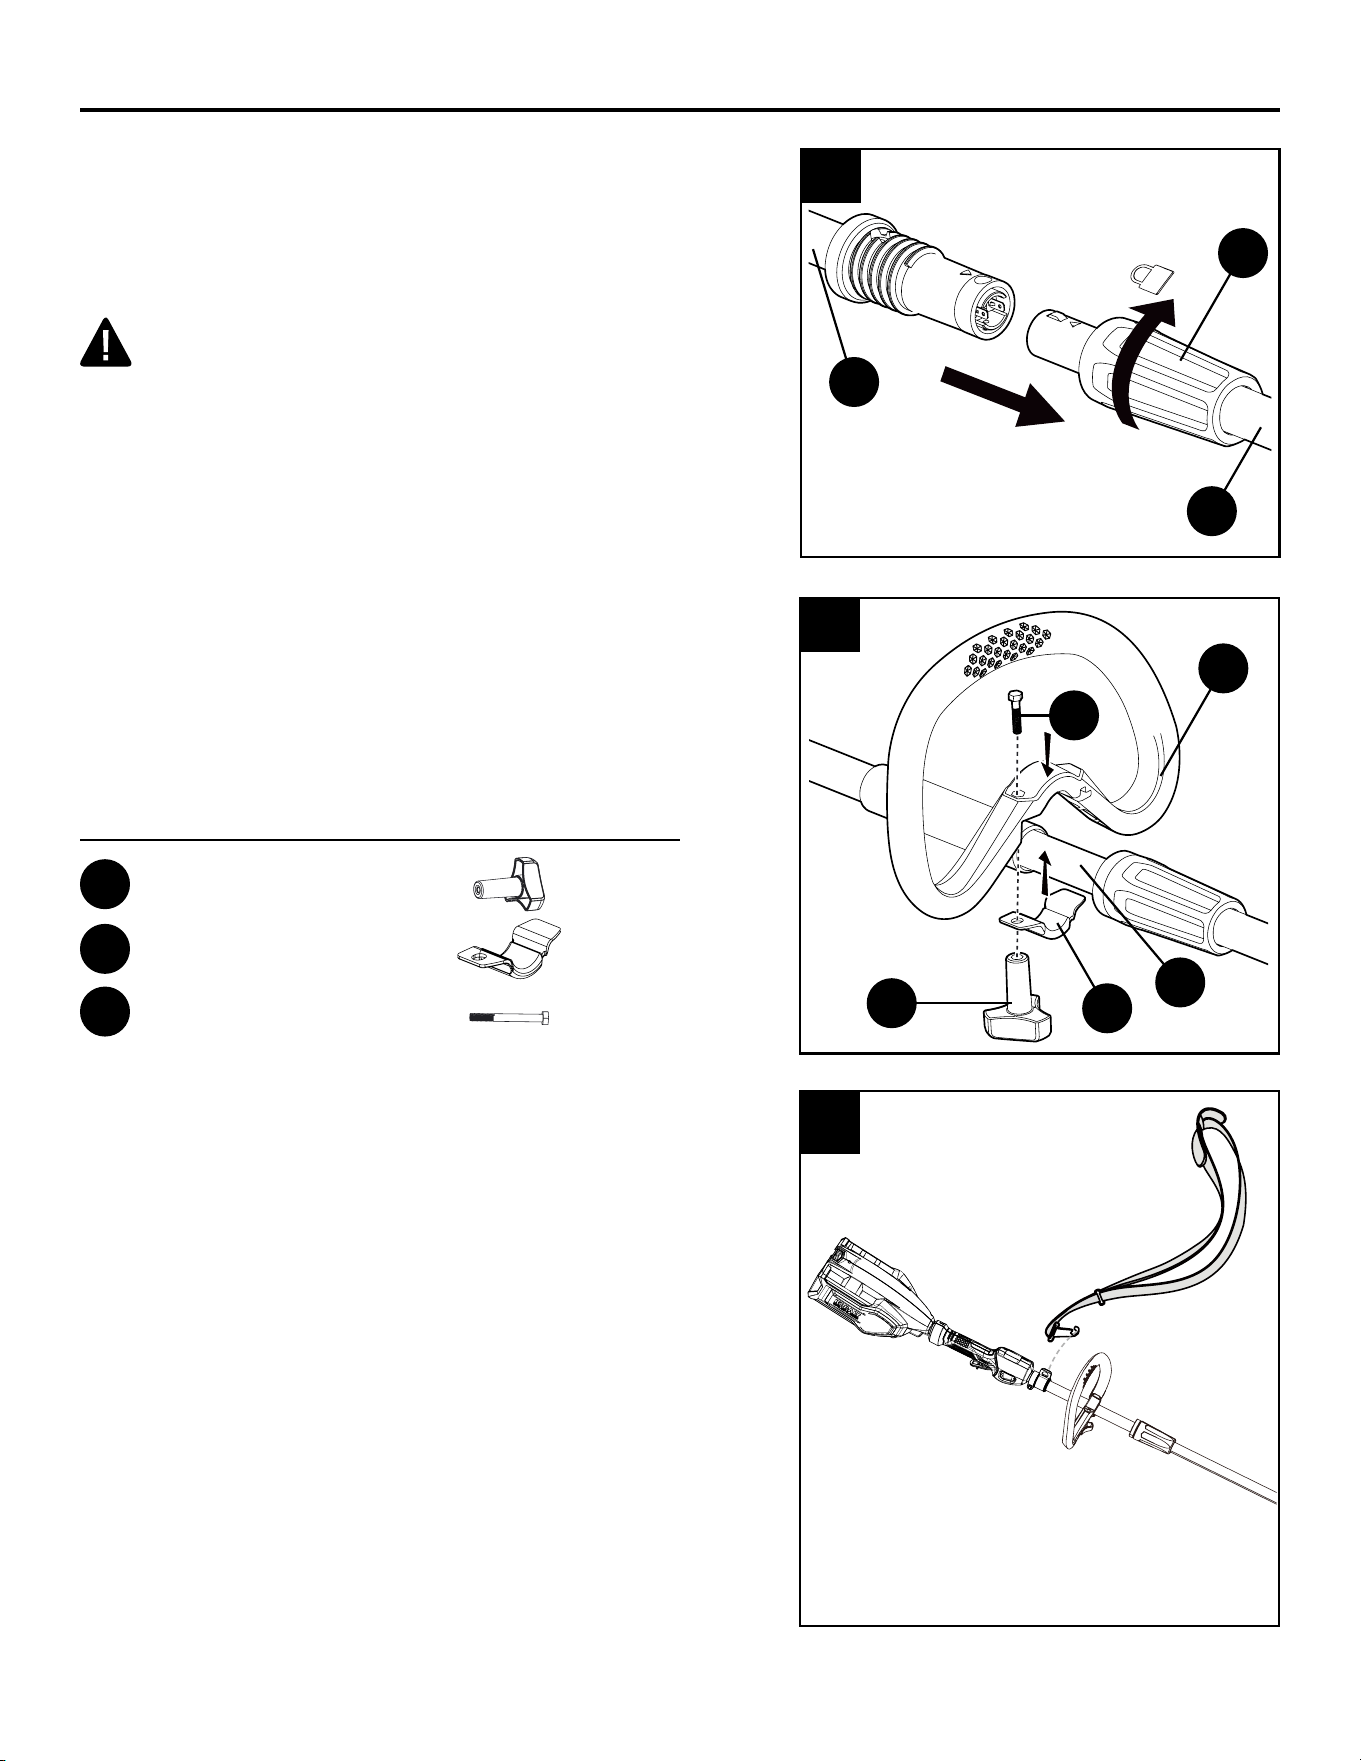
1. Connect the upper tube and the lower tube
a. Align the arrow on the end of the lower tube (K) with
the arrow on the upper tube (M). Connect both tubes
together.
b. Rotate the collar (L) toward the locked symbol to secure
the tubes together.
WARNING
Periodically check the connections to ensure that they are
tightened securely.
2. Attach the auxiliary handle
a. Position the front/auxiliary handle (A) onto the lower
portion of the trimmer section by sliding over the lower
tube (K).
b. Once the front handle is in the desired position, align
the hole on the handle with the hole on the bracket (BB),
then slide the bolt (CC) through the top of the handle and
secure with the fastening knob (AA). Tighten until there is
no movement in the handle.
c. The front handle can be adjusted to a suitable position.
Hardware Used
AA Fastening knob
x 1
BB Bracket
x 1
CC Bolt
x 1
3. Strap
a. Rotate the strap harness to the upward position.
b. Hook the strap to the strap connection.
ASSEMBLY INSTRUCTIONS
1
L
M
K
2
A
BB
CC
AA
K
3

13
ASSEMBLY INSTRUCTIONS
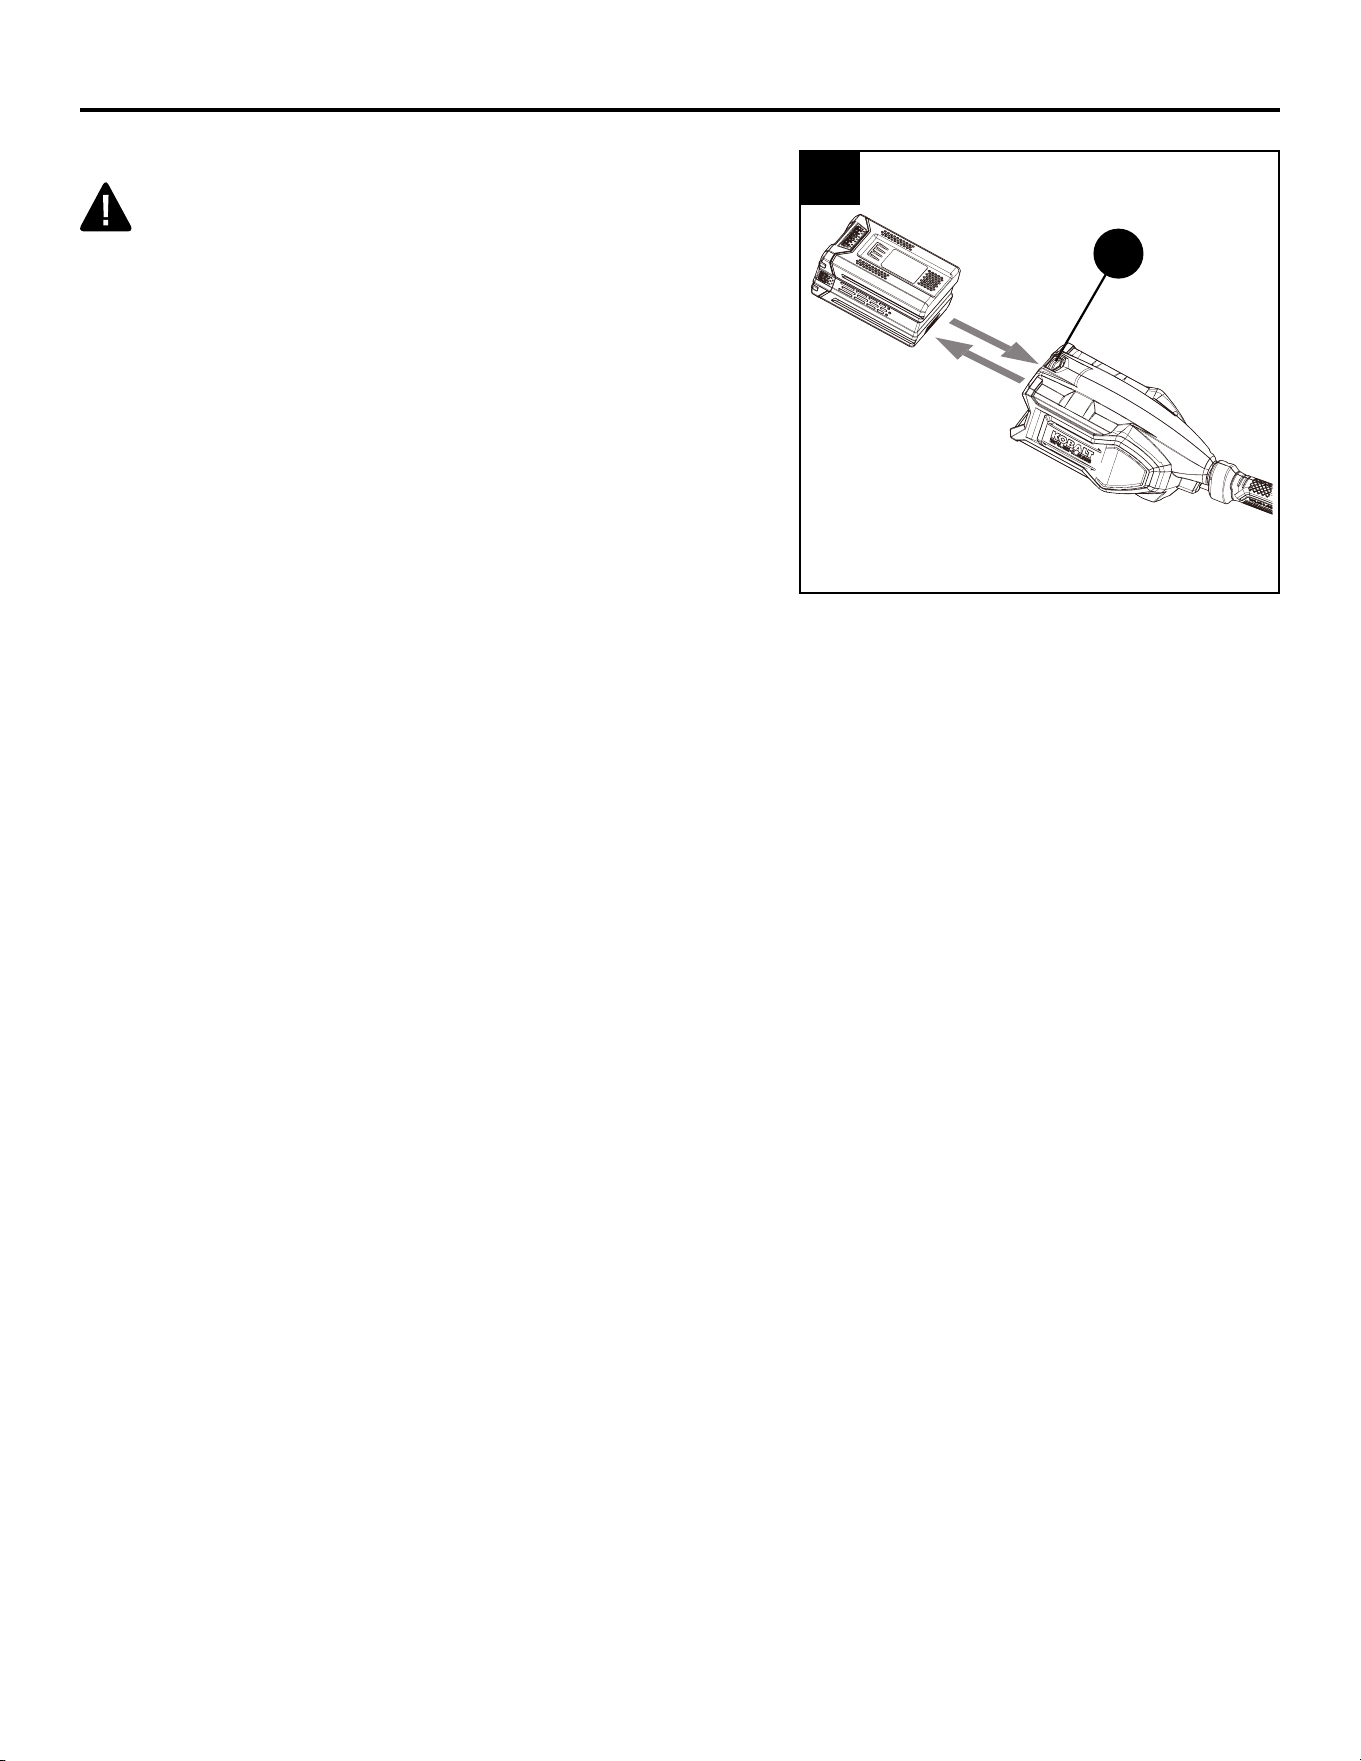
4.Battery
IMPORTANT: The battery may not be fully charged
when purchased. Before using the pole hedge trimmer for
WKH¿UVWWLPHSODFHWKHEDWWHU\LQWKHEDWWHU\FKDUJHUDQG
charge. Make sure to read all safety precautions and follow
the instructions in the battery and charger manuals.
4a. To install the battery:
a. Align the battery with the battery compartment.
b. Insert battery into the battery compartment until battery
release button (G) locks into place. You should hear a
“click” once it is installed.
4b. To remove the battery:
a. Press the battery release button (G) on the battery
compartment.
This will cause the battery to raise out of the tool slightly.
b. *UDVSWKHSROHKHGJHWULPPHU¿UPO\DQGSXOOWKHEDWWHU\
out of the tool.
G
4
14
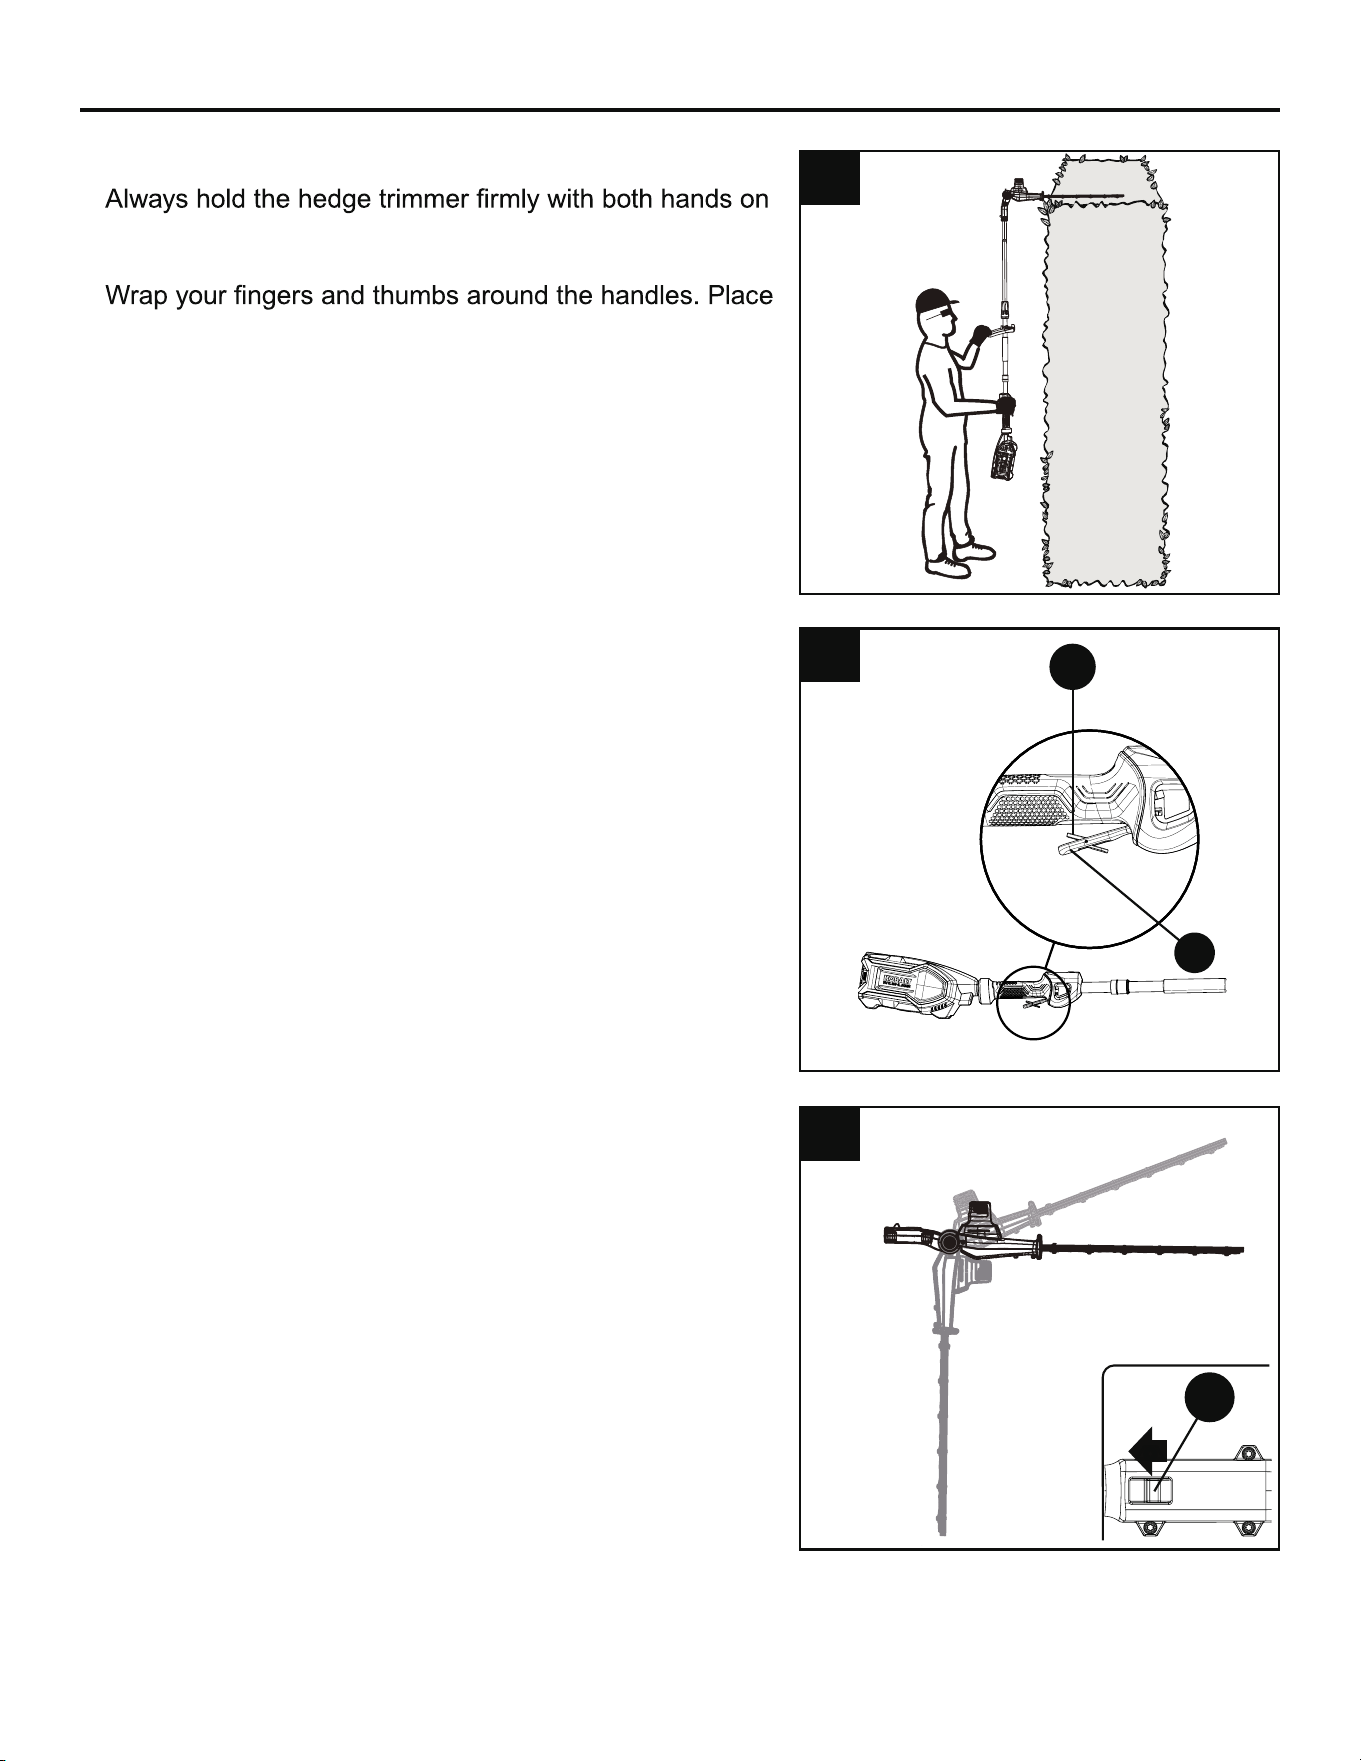
OPERATING INSTRUCTIONS
1. Holding and controlling the pole hedge trimmer
•
the handles. Make sure you always have good balance
and secure footing.
•
one hand on the front/auxiliary handle and the other on
the rear handle.
2. Starting and stopping the pole hedge trimmer
• Push forward on the safety lock button (J), making sure it
is in the unlocked position.
• Squeeze the trigger switch (R) to start.
• Release the trigger switch (R) to stop.
3. Adjusting the trimmer head angle
The trimmer head pivots 135° and can be locked into 7
positions within that range.
a. Pull back on the pivot button (N).
b. While pulling the pivot button, move the head f
orward or
backward.
c. Release the pivot button once the trimmer head is in the
desired position.
d. The trimmer head should lock securely in place.
N
2
3
1
J
R
15
OPERATING INSTRUCTIONS
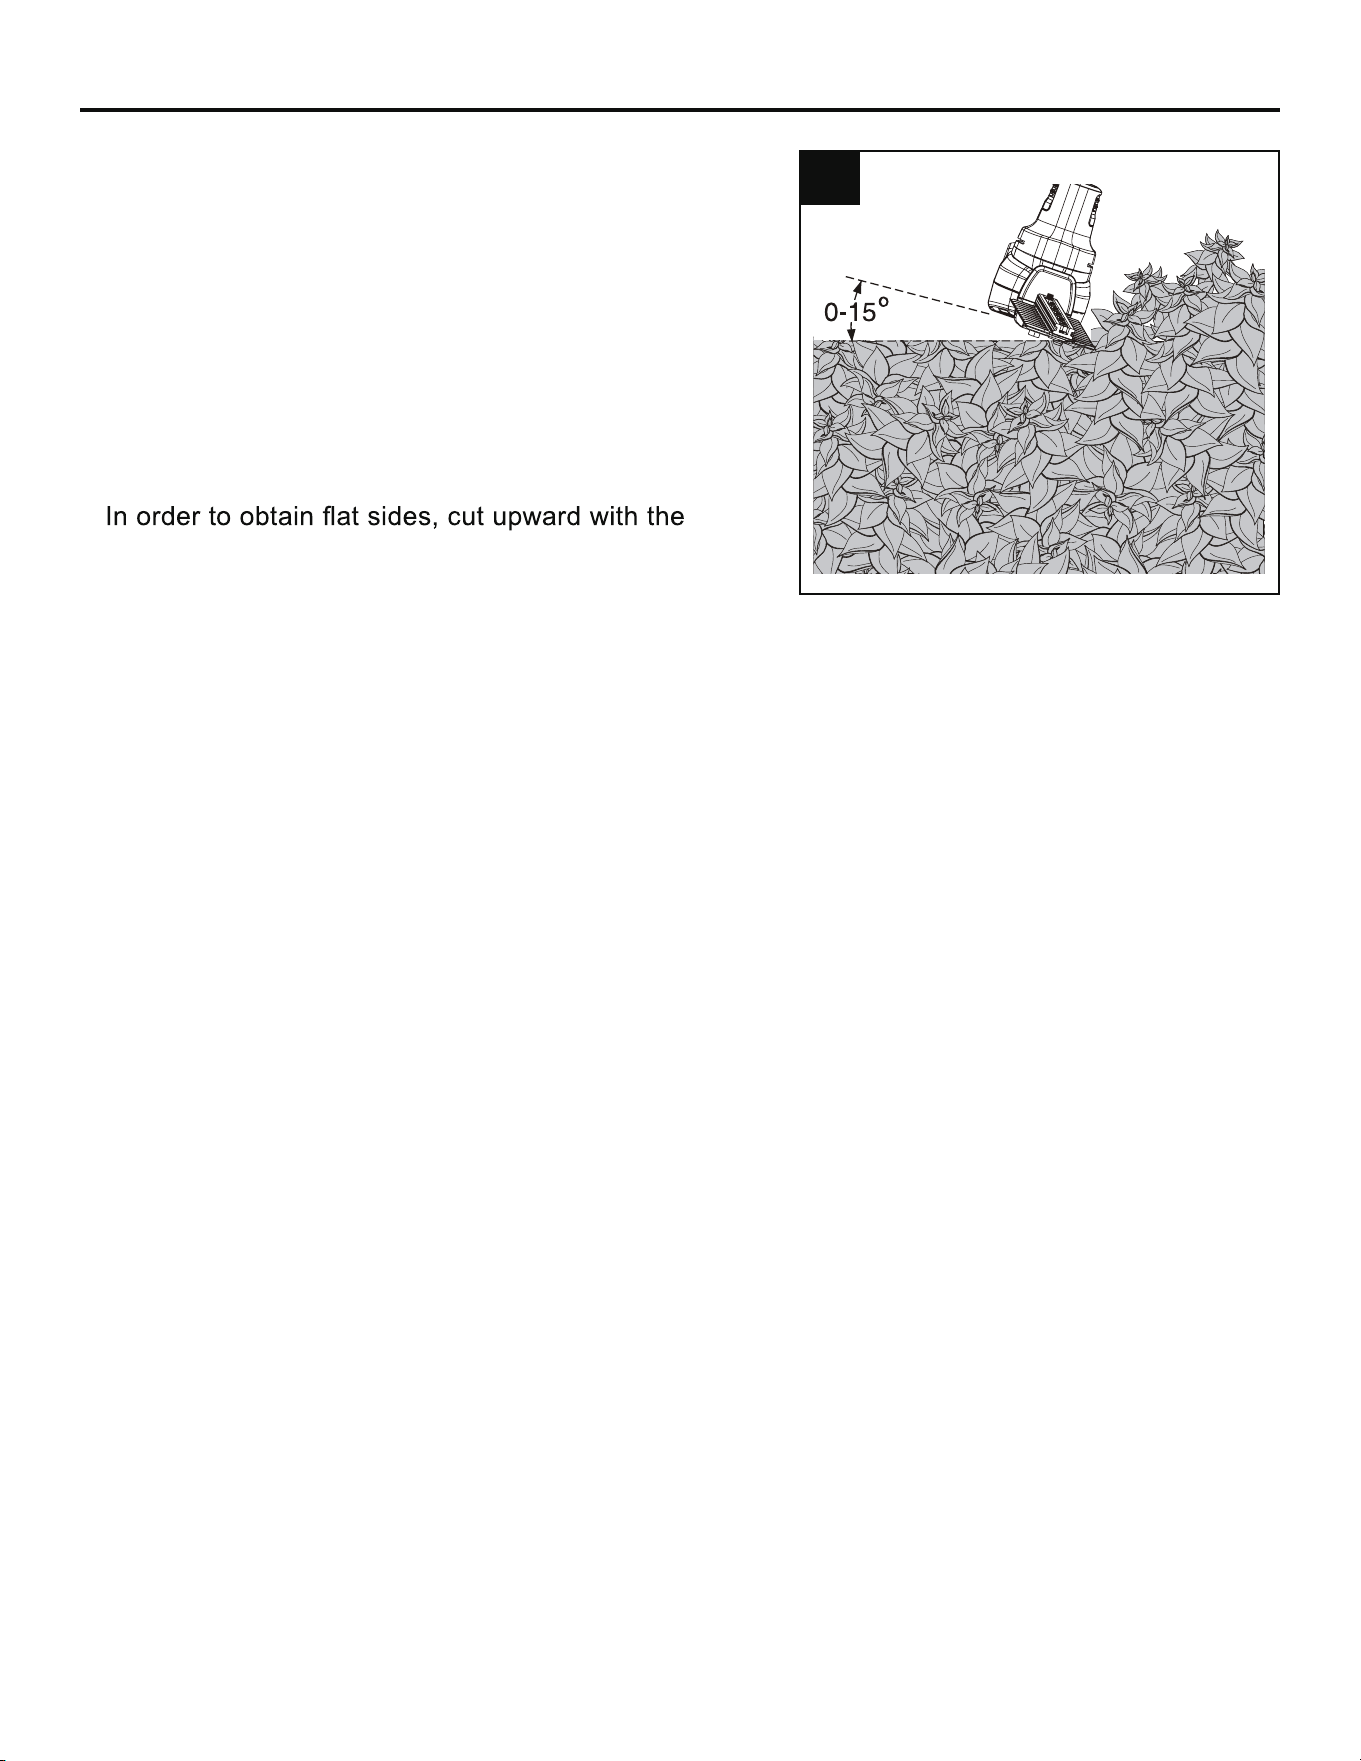
4. Tips for optimum use
• Start by trimming the top of the hedge. Slightly tilt the tool
(up to 15° relative to the line of cut) so that the blade tips
point slightly toward the hedge. This will cause the blades
to cut more effectively. Hold the tool at the desired angle
and move it steadily along the line of cut. The double-sided
blade allows you to cut in either direction.
• In order to obtain a very straight cut, stretch a piece
of string along the length of the h
edge at the desired
height. Use the string as a guideline, cutting just above
it.
•
growth. Younger stems move outward when the blade
cuts downward, causing shallow patches in the hedge.
• Take care to avoid any foreign objects. Especially
avoid hard objects such as metal wire and railings, as
these could damage the blades.
• Regularly oil the blades.
4
16
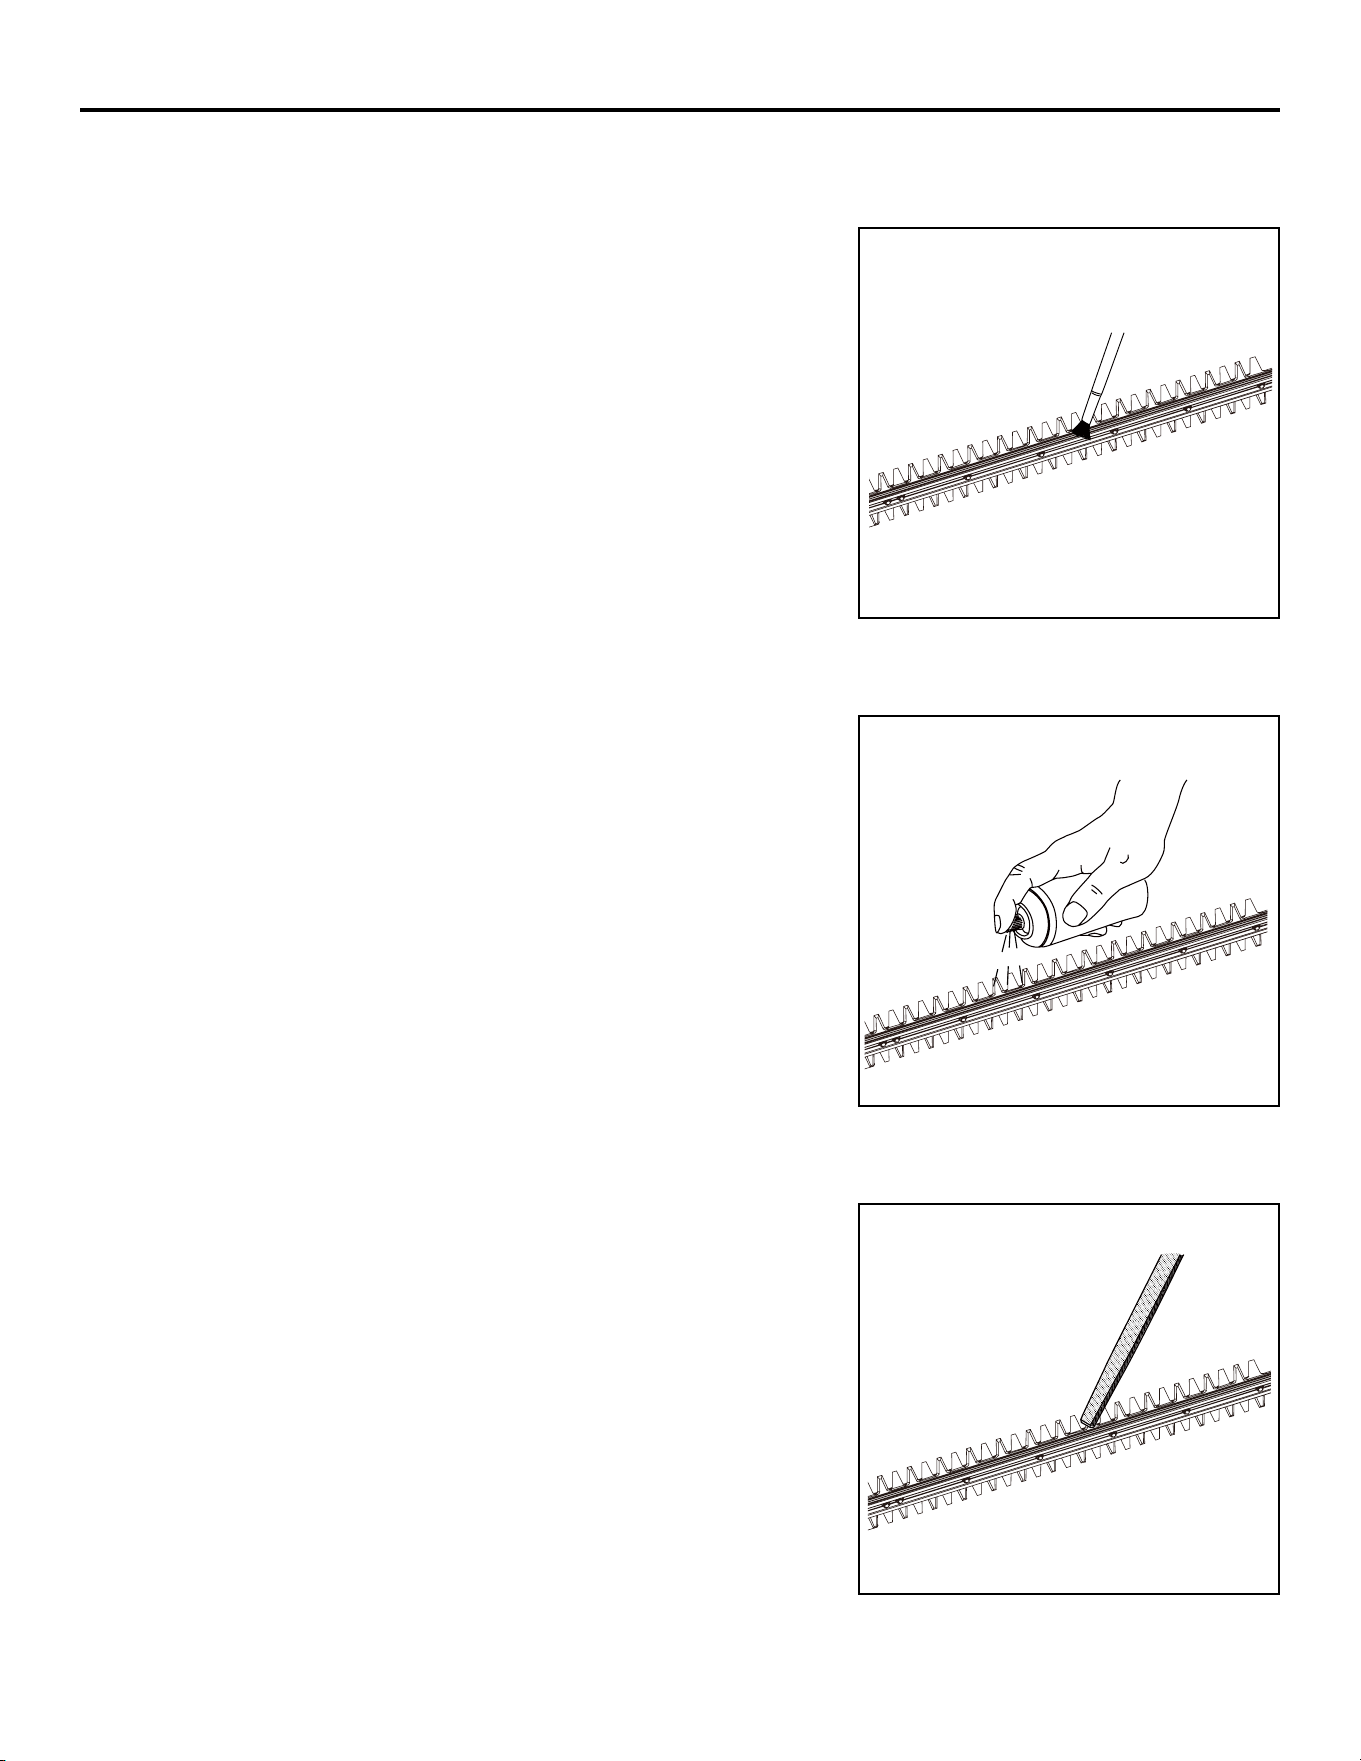
Pole Hedge Trimmer Blade Maintenance
Note: Before performing maintenance, remove the battery from the hedge trimmer.
1. Remove dirt and debris from blades using a small dry
paint brush or equivalent (not included).
2. Clean blades by spraying an appropriate degreaser (not
included) on the blades and cutting bar.
3. After heavy use, it is recommended to thoroughly check
your blades for deformation or imperfections and, if
UHTXLUHG¿OHHGJHVWRSURYLGHDVKDUSHUFXW,IQHFHVVDU\
LWLVUHFRPPHQGHGWRWDNHLWWRDTXDOL¿HGWHFKQLFLDQ
WRKHOSVKDUSHQEODGHV$OZD\VXVHDPHWDO¿OHQRW
included).
CARE AND MAINTENANCE

17
CARE AND MAINTENANCE
4. After each blade is sharpened, it is required to apply a
light machine oil or lithium-based spray-on grease (not
included) to the blades.
Transporting and storing
• Always place the blade cover on the blade before storing or transporting the pole hedge trimmer. Use
caution to avoid the sharp teeth of the blade.
• Clean the pole hedge trimmer thoroughly before storing. Store the pole hedge trimmer indoors,
in a dry place that is inaccessible to children. Keep away from corrosive agents such as garden
chemicals and de-icing salts.
TROUBLESHOOTING
If you still have questions or an unresolved issue after going through this troubleshooting guide,
or just want to speak to a Kobalt product expert, please call our customer service department at
1-888-3KOBALT (1-888-356-2258), 8 a.m. - 8 p.m., EST, Monday – Sunday.
PROBLEM POSSIBLE CAUSE CORRECTIVE ACTION
Motor fails to start
when trigger switch is
depressed.
1. Battery is not secure. 1. To secure the battery, make sure
the latch on the top of the battery
compartment snaps into place.
2. Battery is not charged. 2. Charge the battery according to
the instructions included with your
model.
Motor runs, but cutting
blades do not move.
Pole hedge trimmer damaged. Do not use the pole hedge trimmer.
Call 1-888-3KOBALT (1-888-356-
2258) for technical service.
Pole hedge trimmer
smokes during
operation.
Pole hedge trimmer damaged. Do not use the pole hedge trimmer.
Call 1-888-3KOBALT (1-888-356-
2258) for technical service.
Motor hums, blades do
not move.
Debris or other may be jamming
the blades.
Remove battery, clear debris blockage
from blades.

18
WARRANTY
5-YEAR LIMITED WARRANTY
This Kobalt 80 V Pole Hedge Trimmer is warranted to the original purchaser from the original purchase
GDWHIRU¿YH\HDUVVXEMHFWWRWKHZDUUDQW\FRYHUDJHGHVFULEHGKHUHLQ
This Kobalt 80 V Pole Hedge Trimmer is warranted for the original user to be free from defects in
material and workmanship.
,I\RXEHOLHYHWKDWWKH.REDOW93ROH+HGJH7ULPPHULVGHIHFWLYHDWDQ\WLPHGXULQJWKHVSHFL¿HG
warranty period, simply return the 80 V Pole Hedge Trimmer along with proof of purchase to the place
of purchase for a free replacement or refund, or call 1-888-3KOBALT (1-888-356-2258) for warranty
service.
This warranty is void if: defects in materials or workmanship or damages result from repairs or
alterations which have been made or attempted by others or the unauthorized use of nonconforming
parts; the damage is due to normal wear, damage is due to abuse (including overloading of the tool
beyond capacity), improper maintenance, neglect or accident; or the damage is due to the use of the
tool after partial failure or use with improper accessories or unauthorized repair or alteration.
7KLVZDUUDQW\JLYHV\RXVSHFL¿FOHJDOULJKWVDQG\RXPD\DOVRKDYHRWKHUULJKWVWKDWYDU\IURPVWDWHWR
state.
19
REPLACEMENT PARTS LIST
For replacement parts, call our customer service department at 1-888-3KOBALT (1-888-356-2258),
8 a.m. - 8 p.m., EST, Monday - Sunday.
PART DESCRIPTION PART #
AA Fastening Knob 341201444
BB Bracket 33304877B
CC Bolt 322051444
A Front/Auxiliary Handle 311201444A
AA CC ABB
You could also contact us at partsplus@lowes.com or visit
www.lowespartsplus.com.

CORTADORA DE ORILLAS DE BASTÓN DE 80 V
MODELO #KPH 3580-06/KPH 2080-06
ARTÍCULO #2139154/2139153/3650165
¿Tiene preguntas, problemas, piezas faltantes? Antes de regresar a la tienda, llame a
nuestro Departamento de Servicio al Cliente al 1-888-3KOBALT (1-888-356-2258) de lunes
a domingo, de 8 a.m. a 8 p.m., hora estándar del Este.
ADJUNTE SU RECIBO AQUÍ
Número de serie Fecha de compra
También puede ponerse en contacto con
nosotros en [email protected] o visitar www.lowespartsplus.com.

20
TABLA DE CONTENIDO
ESPECIFICACIONES DEL PRODUCTO
COMPONENTES ESPECIFICACIONES
Tipo Inalámbrica y accionada por batería
Largo de la hoja 510 cm
Capacidad de corte 30 mm
Velocidad recíproca 3200 (±10%) SPM
Peso (sin la batería) 3
,
7 kg
............................................................................................ 20
Contenido del paquete ........................................................................................................ 21
Aditamentos ........................................................................................................................ 22
Símbolos ............................................................................................................................. 23
Información para la seguridad ............................................................................................ 25
Preparación ........................................................................................................................ 28
Conozca su cortadora de orillas de bastón ........................................................................ 2 9
Instrucciones de ensamblaje .............................................................................................. 30
Instrucciones de uso ........................................................................................................... 31
Cuidado y mantenimiento ................................................................................................... 33
Detección de problemas ..................................................................................................... 34
Garantía .............................................................................................................................. 35
Lista de repuestos .............................................................................................................. 36
21
CONTENIDO DEL PAQUETE
PIEZA DESCRIPCIÓN CANTIDAD
A Mango auxiliar/frontal 1
B Bastón con manija 1
C Cabezal de la cortadora de orillas 1
D Funda 1
Q Correa 1
A
B
C
D
Q

22
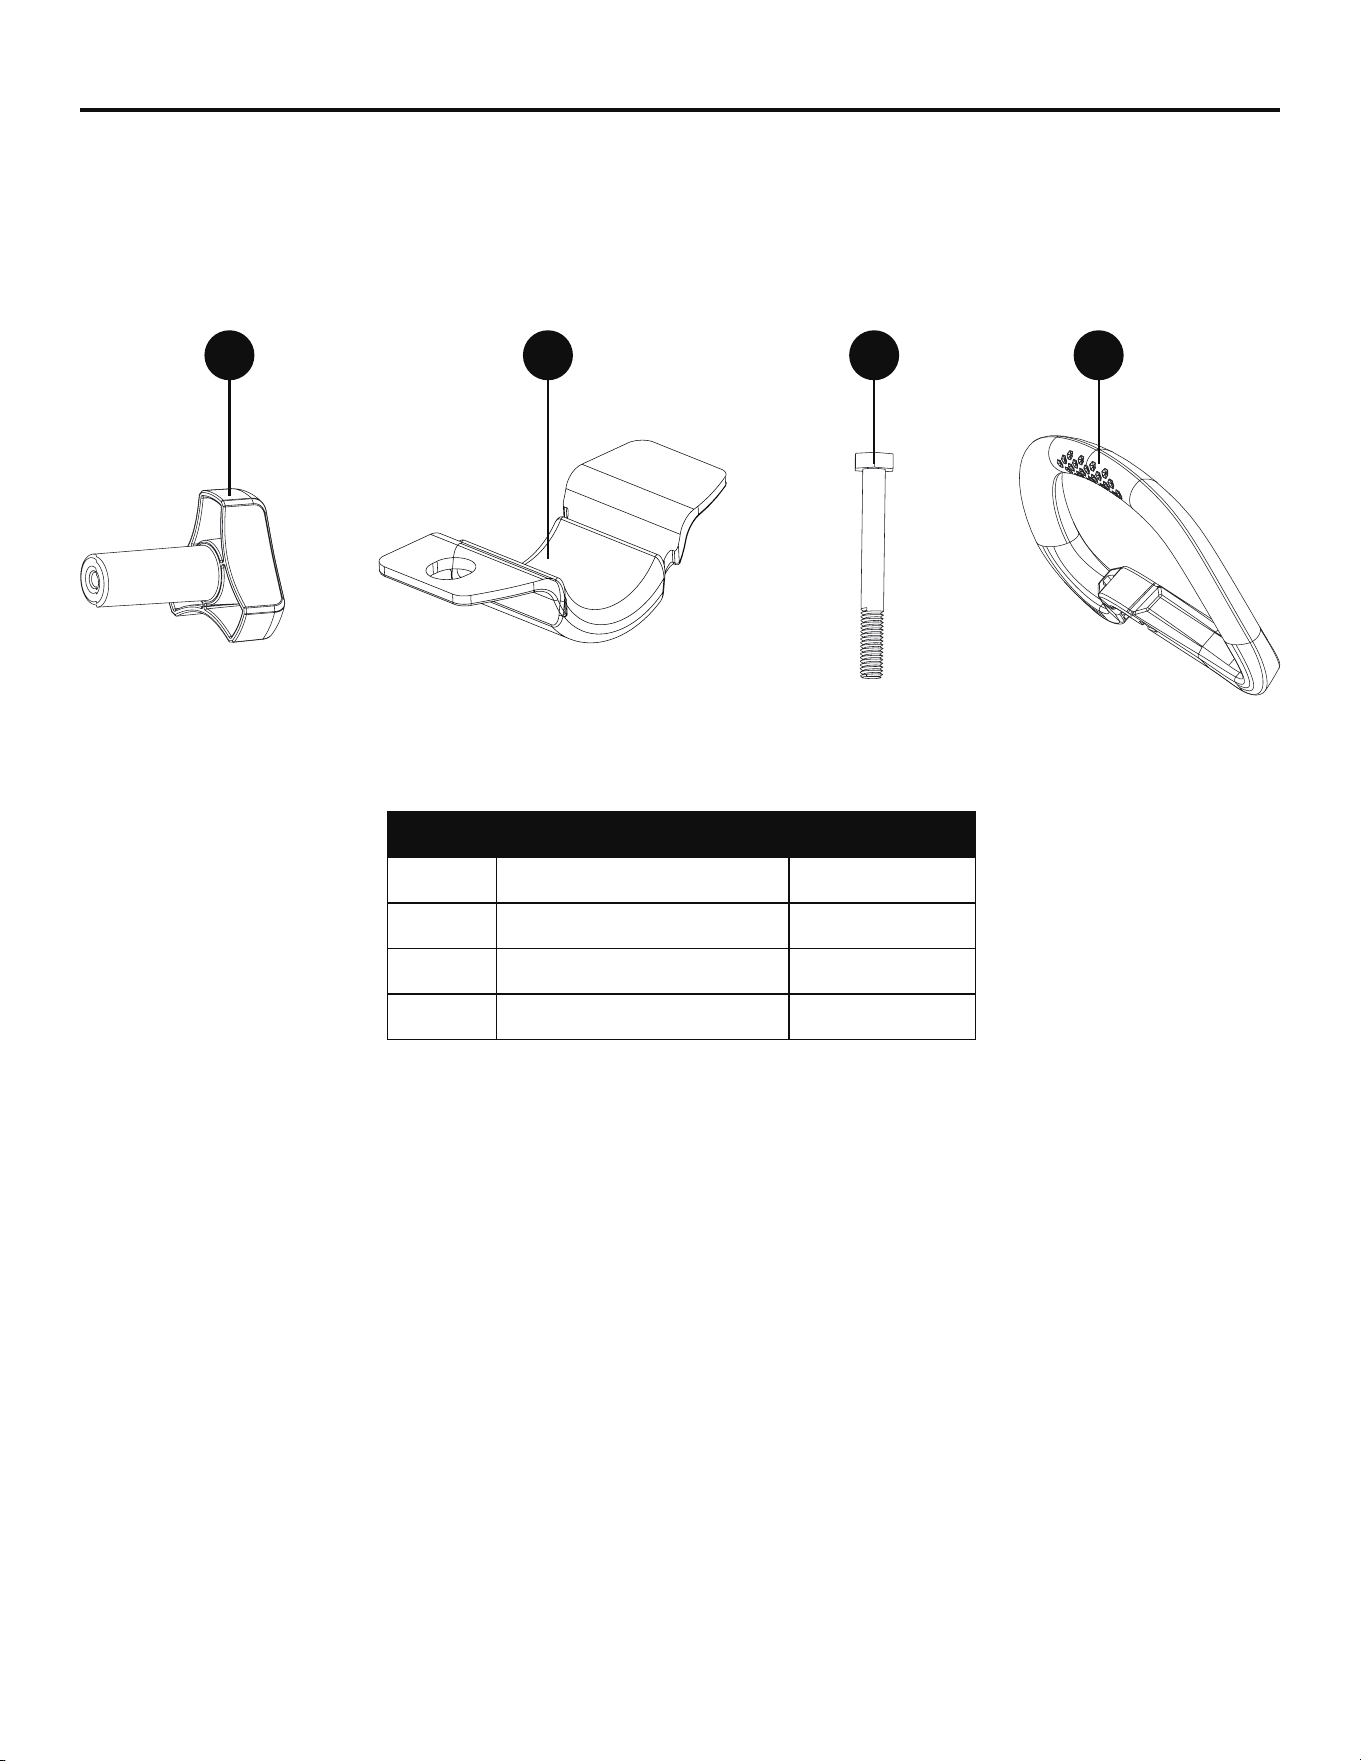
ADITAMIENTOS (no se muestran en el tamaño real)
AA
Perilla de ajuste
Cantidad: 1
CC
Perno
Cantidad: 1
BB
Abrazadera
Cantidad: 1
23
SÍMBOLOS
Algunos de estos símbolos pueden ser usados en este producto. Por favor, léalos y aprenda su
VLJQL¿FDGR/DLQWHUSUHWDFLyQFRUUHFWDGHHVWRVVtPERORVSHUPLWHXQDRSHUDFLyQPHMRU\PiVVHJXUD
SÍMBOLO DESIGNACIÓN EXPLICACIÓN
V Voltios Voltaje
A Amperios Corriente
Hz Hercios Frecuencia (ciclos por segundo)
W Vatios Potencia
SPM Golpes por minuto
El número de movimientos de vaivén que la lámina realiza
por minuto
Corriente alterna Tipo de corriente
Corriente directa Tipo o característica de la corriente
Lea el manual del
operario
Para reducir el riesgo de lesiones, el usuario debe leer
y comprender el manual del operario antes de usar este
producto.
Alerta de seguridad Precauciones para su seguridad.
+RMDD¿ODGD
0DQWHQJDODVPDQRVDOHMDGDVGHODVKRMDVD¿ODGDVHQ
movimiento.
Alerta sobre el uso en
áreas mojadas
No exponga el producto a la lluvia ni lo use en áreas
húmedas.
Protección para los
ojos
Cuando use este equipo, use protección para los ojos con
cobertura lateral que cumpla con los requisitos de la ANSI
Z87.1.
Utilice protección para
la cabeza
Utilice una gorra de material duro aprobada para la
seguridad y la protección de la cabeza.
Guantes Guantes antideslizantes para trabajo pesado.
Mantenga la
herramienta alejada
de las líneas
eléctricas/Evite la
cercanía de personas
¡PELIGRO! ¡Riesgo de electrocución! Mantenga la
herramienta a unos 15,24 m de distancia de las líneas
eléctricas. Mantenga una distancia mínima de 15,24 m de
otras personas.
24
SÍMBOLOS
Guarde estas instrucciones
/DVLPERORJtD\ORVVLJQL¿FDGRVVLJXLHQWHVIXHURQGLVHxDGRVSDUDH[SOLFDUORVQLYHOHVGHULHVJR
asociados con este producto.
SÍMBOLO SEÑAL SIGNIFICADO
PELIGRO
Indica una situación de peligro inminente que, si no se evita, causará
la muerte o lesiones severas.
ADVERTENCIA
Indica una situación de peligro potencial que, si no se evita, podría
causar la muerte o lesiones severas.
PRECAUCIÓN
Indica una situación de peligro potencial que, si no se evita, puede
causar lesiones menores o moderadas.
PRECAUCIÓN
(Sin el símbolo de alerta de seguridad) Indica una situación que
puede causar daños materiales.
ADVERTENCIA
• Para evitar lesiones severas, no intente usar este producto sin haber leído y entendido
completamente este manual del propietario. Si usted no entiende las advertencias e instrucciones en
este manual del propietario, no use este producto. Llame al 1-888-356-2258 para recibir asistencia.
• El funcionamiento de cualquier herramienta eléctrica puede causar que objetos sean lanzados
hacia sus ojos, lo que puede ocasionar lesiones severas en los ojos. Antes de comenzar a
usar herramientas eléctricas, use siempre gafas protectoras o anteojos de seguridad con
protectores laterales y, si fuera necesario, una máscara protectora total. Recomendamos
una máscara de seguridad de visión amplia para usar sobre anteojos o gafas de seguridad
estándar con protectores laterales. Use siempre protección para los ojos que cumpla con la
ANSI Z87.1.
25
INFORMACIÓN DE SEGURIDAD
ADVERTENCIA
Lea todas las advertencias de seguridad y todas las instrucciones. El incumplimiento de las
advertencias y las instrucciones podría provocar descargas eléctricas, incendios o lesiones graves.
Guarde todas las advertencias e instrucciones para referencia futura.
a la herramienta eléctrica conectada a la línea principal (con cable) o a la herramienta eléctrica
funcionando a batería (inalámbrica).
SEGURIDAD EN EL ÁREA DE TRABAJO
• Mantenga el área de trabajo limpia y bien iluminada. Las áreas desordenadas u oscuras
aumentan las posibilidades de accidentes.
• No opere herramientas eléctricas en ambientes explosivos tales como en la presencia de
Las herramientas eléctricas crean chispas que pueden
encender el polvo o los gases.
• Mantenga a los niños y espectadores alejados durante la operación de una herramienta
eléctrica. Las distracciones pueden hacerle perder el control.
SEGURIDAD ELÉCTRICA
• Una herramienta que funcione a batería con baterías integrales o una batería separada se
Un cargador que sea adecuado
para un tipo de batería puede crear un riesgo de incendio cuando se use con una batería diferente.
•
extractores o refrigeradores. Existe un gran riesgo de descarga eléctrica si su cuerpo tiene
conexión a tierra.
• No exponga las herramientas eléctricas a la lluvia ni a condiciones de humedad. Si ingresa
agua en una herramienta eléctrica, aumentará el riesgo de descarga eléctrica.
•
El uso de otras
baterías puede crear un riesgo de incendio.
• Si es inevitable utilizar una herramienta eléctrica en un lugar húmedo, use un suministro
protegido con un interruptor diferencial residual (RCD, por sus siglas en inglés). El uso de un
RCD disminuye el riesgo de descargas eléctricas.
• Use solo baterías Kobalt de 80 voltios. (KB 280-06, KB 2580-06, KB 380-06, KB 280C-06,
KB 2580C-06, KB 380C-06)
• Use solo cargadores Kobalt. (KRC 30-06, KRC 80-06,KRC 0280-06)
SEGURIDAD PERSONAL
• Manténgase alerta, fíjese en lo que está haciendo y utilice el sentido común c
uando opere
drogas o medicamentos. Un descuido mientras se operan herramientas eléctricas puede
ocasionar lesiones severas.
• Use un equipo de protección personal. Use siempre lentes de protección. Los equipos de
protección, como mascarillas antipolvo, zapatos de seguridad antideslizantes, cascos protectores o
protección auditiva, utilizados para condiciones adecuadas, disminuyen las lesiones personales.
• Evite un arranque accidental. Asegúrese de que el interruptor esté en la posición
de apagado
antes de conectar la herramienta a la fuente de electricidad o la batería, o antes de levantarla
o transportarla. Transportar herramientas eléctricas con el dedo en el interruptor o enchufar
herramientas eléctricas que tienen el interruptor encendido aumenta las posibilidades de accidentes.
• Retire todas las llaves de ajuste o llaves inglesas antes de encender la herramienta eléctrica.
Si se deja una llave inglesa o una llave conectada a una pieza giratoria de la herramienta eléctrica,
se pueden producir les
iones personales.
• No se incline demasiado. Mantenga una postura y un equilibrio adecuados en todo momento.
Esto permite un mejor control de la herramienta eléctrica en situaciones inesperadas.
• Vístase apropiadamente. No vista ropa holgada ni joyas. Recójase el cabello largo. Mantenga
el cabello, la ropa y los guantes lejos de las piezas en movimiento. Las ropas holgadas, las
joyas o el cabello largo pueden quedar atrapados en las piezas en movimiento.

26
INFORMACIÓN DE SEGURIDAD
• Si se proporcionan dispositivos para la conexión de instalaciones de extracción y
recolección de polvo, asegúrese de que se conecten y se usen debidamente. El uso de estos
dispositivos puede disminuir los peligros relacionados con el polvo.
USO Y CUIDADO DE LAS HERRAMIENTAS ELÉCTRICAS
• No fuerce la herramienta eléctrica. Utilice la herramienta eléctrica adecuada para su
aplicación. La herramienta eléctrica adecuada realizará un trabajo más seguro y de mejor calidad
al ritmo para el que se la diseñó.
• No utilice la herramienta eléctrica si el interruptor no la enciende o apaga. Cualquier
herramienta eléctrica que no pueda controlarse con el interruptor es peligrosa y debe repararse.
• Desconecte el paquete de baterías de la herramienta eléctrica antes de realizar cualquier
ajuste, cambiar accesorios o almacenar herramientas eléctricas. Este tipo de medidas de
seguridad preventivas reduce el riesgo de arranques accidentales de la herramienta eléctrica.
• Almacene las herramientas eléctricas que no estén en uso fuera del alcance de los niños
y no permita que personas no familiarizadas con la herramienta o estas instrucciones la
operen. Las herramientas eléctricas son peligrosas en manos de usuarios sin capacitación.
• Realice mantenimiento a las herramientas eléctricas. Revise si hay desalineación o
agarrotamiento de piezas móviles o si estas están rotas, así como cualquier otra condición
que pueda afectar la operación de las herramientas eléctricas. Si la herramienta eléctrica
se daña, hágala reparar antes de usarla. Muchos accidentes son producto del mantenimiento
incorrecto de las herramientas eléctricas.
• 0DQWHQJDODVKHUUDPLHQWDVGHFRUWHD¿ODGDV\OLPSLDV Las herramientas de corte que se
PDQWLHQHQDGHFXDGDPHQWHFRQVXVERUGHVGHFRUWHD¿ODGRVVRQPHQRVSURSHQVDVDWUDEDUVH\
son más fáciles de controlar.
• Use la herramienta eléctrica, los accesorios y las brocas de acuerdo con estas instrucciones,
considerando las condiciones de trabajo y el trabajo que desea realizar. El uso de la
herramienta eléctrica en operaciones distintas para las que fue diseñada podría crear una situación
de peligro.
USO Y CUIDADO DE LA HERRAMIENTA A BATERÍA
• Asegúrese de que el interruptor esté en la posición “OFF” (APAGADO) antes de insertar
el paquete de baterías. Insertar el paquete de baterías en herramientas eléctricas que tienen el
interruptor encendido aumenta las posibilidades de accidentes.
• 5HFDUJXHVRORFRQHOFDUJDGRUHVSHFL¿FDGRSRUHOIDEULFDQWH Un cargador adecuado para un
tipo de paquete de baterías puede crear un riesgo de incendio cuando se usa con otro paquete de
baterías.
• 8VHKHUUDPLHQWDVHOpFWULFDVVRORFRQSDTXHWHVGHEDWHUtDVGHVLJQDGRVHVSHFt¿FDPHQWH El
uso de cualquier otro paquete de baterías puede crear un riesgo de lesión e incendio.
• Cuando el paquete de baterías no esté en uso, aléjelo de objetos metálicos, como
sujetapapeles, monedas, llaves, clavos, tornillos u otros objetos metálicos pequeños
que puedan crear una conexión entre los terminales. Es posible que una conexión entre los
terminales produzca quemaduras o un incendio.
• En condiciones de maltrato, es posible que salga líquido de la batería. Evite el contacto.
Si se produce un contacto accidental, enjuague con agua. Si el líquido entra en contacto con los
ojos, también solicite atención médica. El líquido que sale de la batería puede provocar irritación o
quemaduras.
Use siempre protección para los ojos. Una podadora de arbustos puede lanzar
objetos a sus ojos y ocasionar daños permanentes a los ojos. Use siempre gafas
de seguridad con protectores laterales que cumplan con los requisitos de la ANSI
Z87.1. Las gafas comunes solo tienen lentes resistentes a golpes, NO son gafas de
seguridad.

27
SERVICIO
• Permita que solo una persona capacitada repare la herramienta eléctrica, mediante el uso
solo de piezas de repuesto idénticas. Esto mantendrá la seguridad de la herramienta eléctrica.
ADVERTENCIAS DE SEGURIDAD SOBRE LA CORTADORA DE ORILLAS
• Utilice ambas manos cuando opere la cortadora de orillas. El uso de una sola mano podría
provocar la pérdida de control y causar lesiones graves.
• Mantenga todas las partes del cuerpo alejadas de la hoja para cortador. No retire el material
cortado ni sostenga el material que debe cortar cuando las hojas estén en movimiento.
Asegúrese de que el interruptor esté apagado cuando limpie material atascado. Las hojas
siguen girando después de apagar la herramienta. Un momento de desatención mientras opera
la cortadora de orillas puede provocar lesiones personales graves.
• Transporte la cortadora de orillas de la manija con la hoja para cortador detenida. El manejo
adecuado de la cortadora de orillas reducirá las posibles lesiones personales que puedan producirse
con las hojas para cortador.
• Sostenga la herramienta eléctrica solo por las áreas de agarre, porque la hoja puede entrar
en contacto con cableado oculto o con su propio cable. Las hojas que entren en contacto
con un cable "energizado” pueden exponer las partes metálicas "energizadas" de la herramienta
eléctrica y podrían provocarle una descarga eléctrica al operador.
• PELIGRO: mantenga las manos alejadas de la hoja. El contacto con la hoja podría provocar
lesiones personales graves.
• Mantenga el cable alejado del área de corte. Durante la operación, el cable puede esconderse en
arbustos y la hoja puede cortarlo por accidente.
ADVERTENCIAS PARA LAS CORTADORAS DE ORILLAS DE ALCANCE EXTENDIDO
• No utilice la cortadora de orillas de alcance extendido en condiciones climáticas adversas, en
especial cuando hay riesgo de que hayan rayos. Esto disminuirá el riesgo de que le caiga un rayo.
• Para reducir el riesgo de electrocución, nunca la utilice cerca de las líneas de suministro. El
contacto o la utilización cerca de las líneas de suministro pueden ocasionar lesiones graves
que ocasionen la muerte.
• Sostenga siempre la cortadora de orillas de alcance extendido con ambas manos cuando la
utilice. Sostenga la cortadora de orillas de alcance extendido con ambas manos para evitar
la pérdida de control.
• Siempre utilice protección para la cabeza al utilizar la cortadora de orillas de alcance
extendido por encima de la cabeza. Los desechos que caen pueden provocar lesiones
personales graves.
ADVERTENCIA
Utilice la herramienta solo con la manija y la protección correctamente ensambladas a la
cortadora de orillas. El uso de la cortadora de orillas sin la protección o la manija apropiadas
puede provocar lesiones personales graves.
ADVERTENCIA (PROPUESTA 65)
Parte del polvo creado al lijar, aserrar, esmerilar, taladrar y otras actividades de construcción contiene
sustancias químicas reconocidas como causantes de cáncer, defectos congénitos y otros daños al
sistema reproductivo. Algunos ejemplos de estas sustancias químicas son:
• El plomo de las pinturas a base de plomo
• La sílice cristalina de los ladrillos, el cemento y otros productos de mampostería
• El arsénico y el cromo de la madera tratada químicamente.
El riesgo derivado de estas exposiciones varía según la frecuencia con la que se realice este tipo de
trabajo. Para reducir la exposición a estas sustancias químicas, trabaje en un área bien ventilada y
XWLOLFHHTXLSRGHVHJXULGDGDSUREDGRFRPRPDVFDULOODVDQWLSROYRGLVHxDGDVHVSHFLDOPHQWHSDUD¿OWUDU
las partículas microscópicas.
INFORMACIÓN DE SEGURIDAD
28
PREPARACIÓN
Antes de empezar a ensamblar el producto, asegúrese de tener todas las piezas. Compare las piezas
con la lista del contenido del paquete y la lista de aditamentos. Si hubiera alguna pieza faltante o
dañada, no trate de ensamblar el producto.
Tiempo aproximado para el ensamblaje: 3 minutos
DESEMBALAJE
• Este producto ha sido enviado sin ensamblar.
• Con cuidado, saque el producto y cualquier accesorio de la caja. Asegúrese de que incluya todos
los artículos mencionados en la lista del contenido
del paquete.
• Inspeccione el producto cuidadosamente para asegurarse de que no se haya quebrado o dañado
durante el envío.
• No tire el material de empaque hasta que no haya inspeccionado con cuidado y operado
satisfactoriamente el producto.
• Si hubiera piezas dañadas o faltantes, llame al 1-888-3KOBALT (1-888-356-2258) para recibir
ayuda.
ADVERTENCIA
• Si hay piezas dañadas o faltantes, no utilice el producto hasta que las haya reemplazado. No seguir
esta advertencia podría provocar graves lesiones personales.
•
condición peligrosa que podría producir lesiones personales graves.
• No instale la batería hasta haber completado el ensamblaje. De lo contrario, puede producirse un
arranque accidental de la herramienta, lo que puede provocar lesiones graves.
También puede ponerse en contacto con nosotros en [email protected] o visitar
www.lowespartsplus.com.
29
CONOZCA SU CORTADORA DE ORILLAS DE BASTÓN
PIEZA DESCRIPCIÓN
G Botón de liberación de la batería
H Manija posterior
J Botón de seguridad
K Tubo inferior
L Ajuste
M Tubo superior
N Botón de giro
P Hoja de corte
R Interruptor de gatillo
S Compartimiento para baterías
G
J
L
N
R
S
P
K
M
H
30
1. Conecte el tubo superior y el tubo inferior
a. $OLQHHODÀHFKDHQHOH[WUHPRGHOWXERLQIHULRU.FRQOD
ÀHFKDHQWXERVXSHULRU0&RQHFWHDPERVWXERVMXQWRV
b. Gire el anillo (L) hacia el símbolo de bloqueo para
asegurar los tubos.
ADVERTENCIA
Revise periódicamente todas las conexiones para asegurar
TXHHVWpQ¿UPHV\VHJXUDV
2. Fije el mango auxiliar
a. Coloque la manija delantera/auxiliar (A) en la porción
inferior de la sección de la orilladora deslizándola sobre
el tubo inferior (K).
b. Una vez que la manija frontal esté en la posición
GHVHDGDDOLQHHHORUL¿FLRHQODPDQLMDFRQHORUL¿FLRHQ
la abrazadera (BB), luego deslice el perno (CC) a través
de la parte superior de la manija y asegúrelo con la
perilla de sujeción (AA). Apriete hasta que el mango no
se mueva.
c. El mango frontal se puede ajustar a una posición adecuada.
Herramientas usadas
AA Perilla de ajuste
x 1
BB Abrazadera
x 1
CC Perno
x 1
3. Correa
a. Gire el arnés con correa hasta la posición hacia arriba.
b.Enganche la correa (no se incluye) a la conexión de la
correa.
INSTRUCCIONES DE ENSAMBLAJE
1
L
M
K
2
A
BB
CC
AA
K
3
31
INSTRUCCIONES DE ENSAMBLAJE
4.Batería
IMPORTANTE: la batería no viene cargada cuando la
compra. Antes de usar la podadora por primera vez, coloque
la batería en el cargador de batería y cárguela. Asegúrese
de leer todas las precauciones de seguridad y de seguir las
instrucciones en los manuales de la batería y el cargador.
4a. Para instalar la batería:
a. Alinee la batería con el compartimento de baterías.
b. Coloque la batería en el compartimiento de las baterías
hasta que el botón de liberación (G) se instale por completo.
Deberá escuchar un "clic" una vez que esté instalada.
4b. Para quitar la batería:
a. Coloque el botón de liberación de la batería (G) en el
compartimiento de las baterías.
Esto hará que la batería se levante y se separe
ligeramente de la herramienta.
b. 6RVWHQJDODFRUWDGRUDGHRULOODVGHEDVWyQFRQ¿UPH]D\
saque la batería de la herramienta.
G
4
32
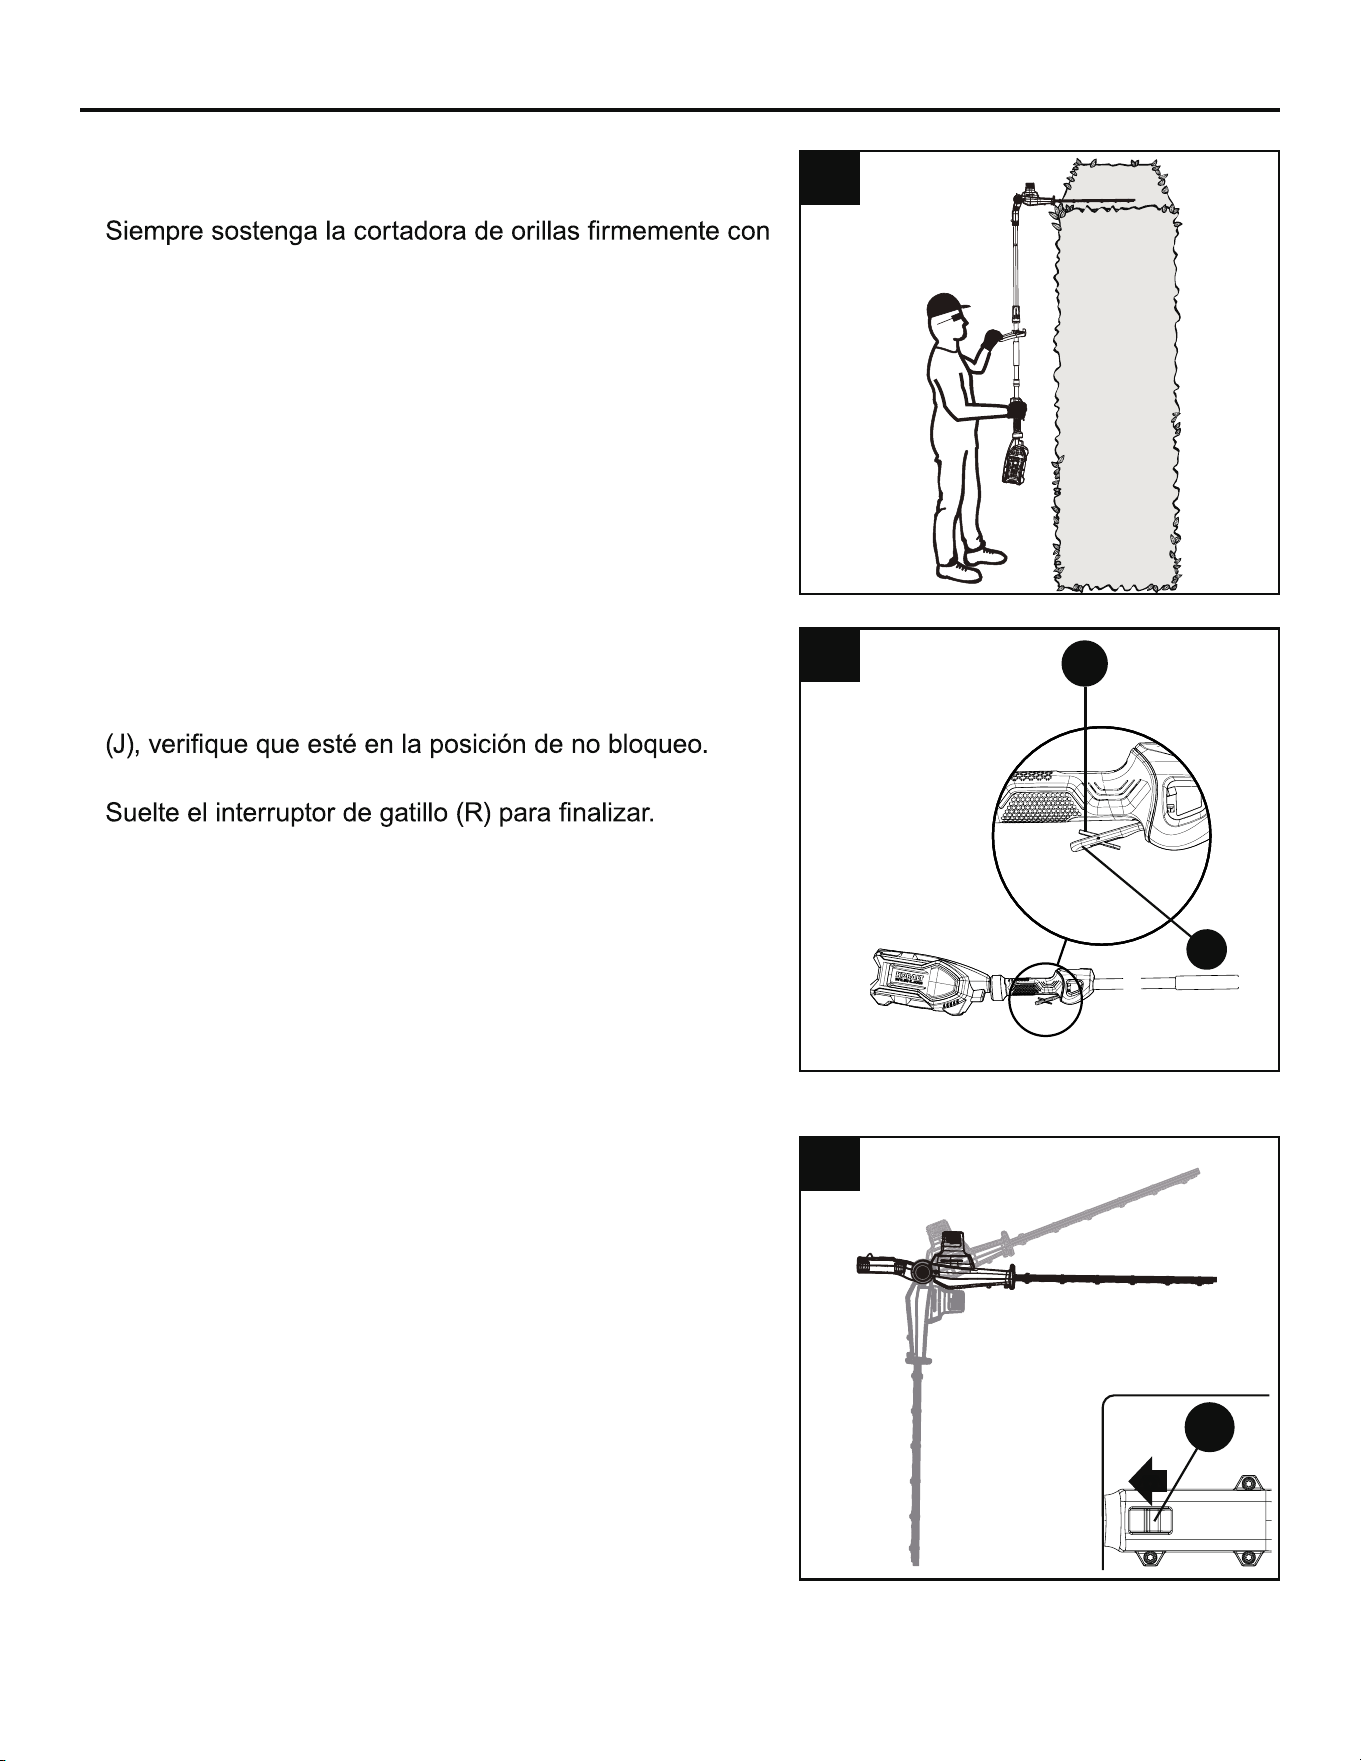
INSTRUCCIONES DE USO
1. Para sostener y controlar la cortadora de orillas de
bastón
•
ambas manos en las manijas. Asegúrese siempre de
estar en una posición segura y equilibrada.
• Rodee las manijas con los dedos y los pulgares. Coloque
una mano en la manija delantera/auxiliar y la otra en la
manija de lectura.
2. Para iniciar y detener la cortadora de orillas de
bastón
• Presione hacia delante el botón de bloqueo de seguridad
• Apriete el interruptor de gatillo (R) para comenzar.
•
3. Ajuste del ángulo del cabezal de la cortadora de
orillas
El cabezal de la cortadora de orillas gira 135° y puede
bloquearse en 7 posiciones dentro del rango.
a. Jale el botón de giro (N).
b. Al jalar el botón de giro, mueva el cabezal hacia delante
o hacia atrás.
c. Libere el botón de giro una vez que el cabezal de la
cortadora de orillas esté en la posición deseada.
d. El cabezal de la cortadora de orillas debe bloquearse en
su lugar en forma segura.
1
2
N
3
J
R
33
INSTRUCCIONES DE USO
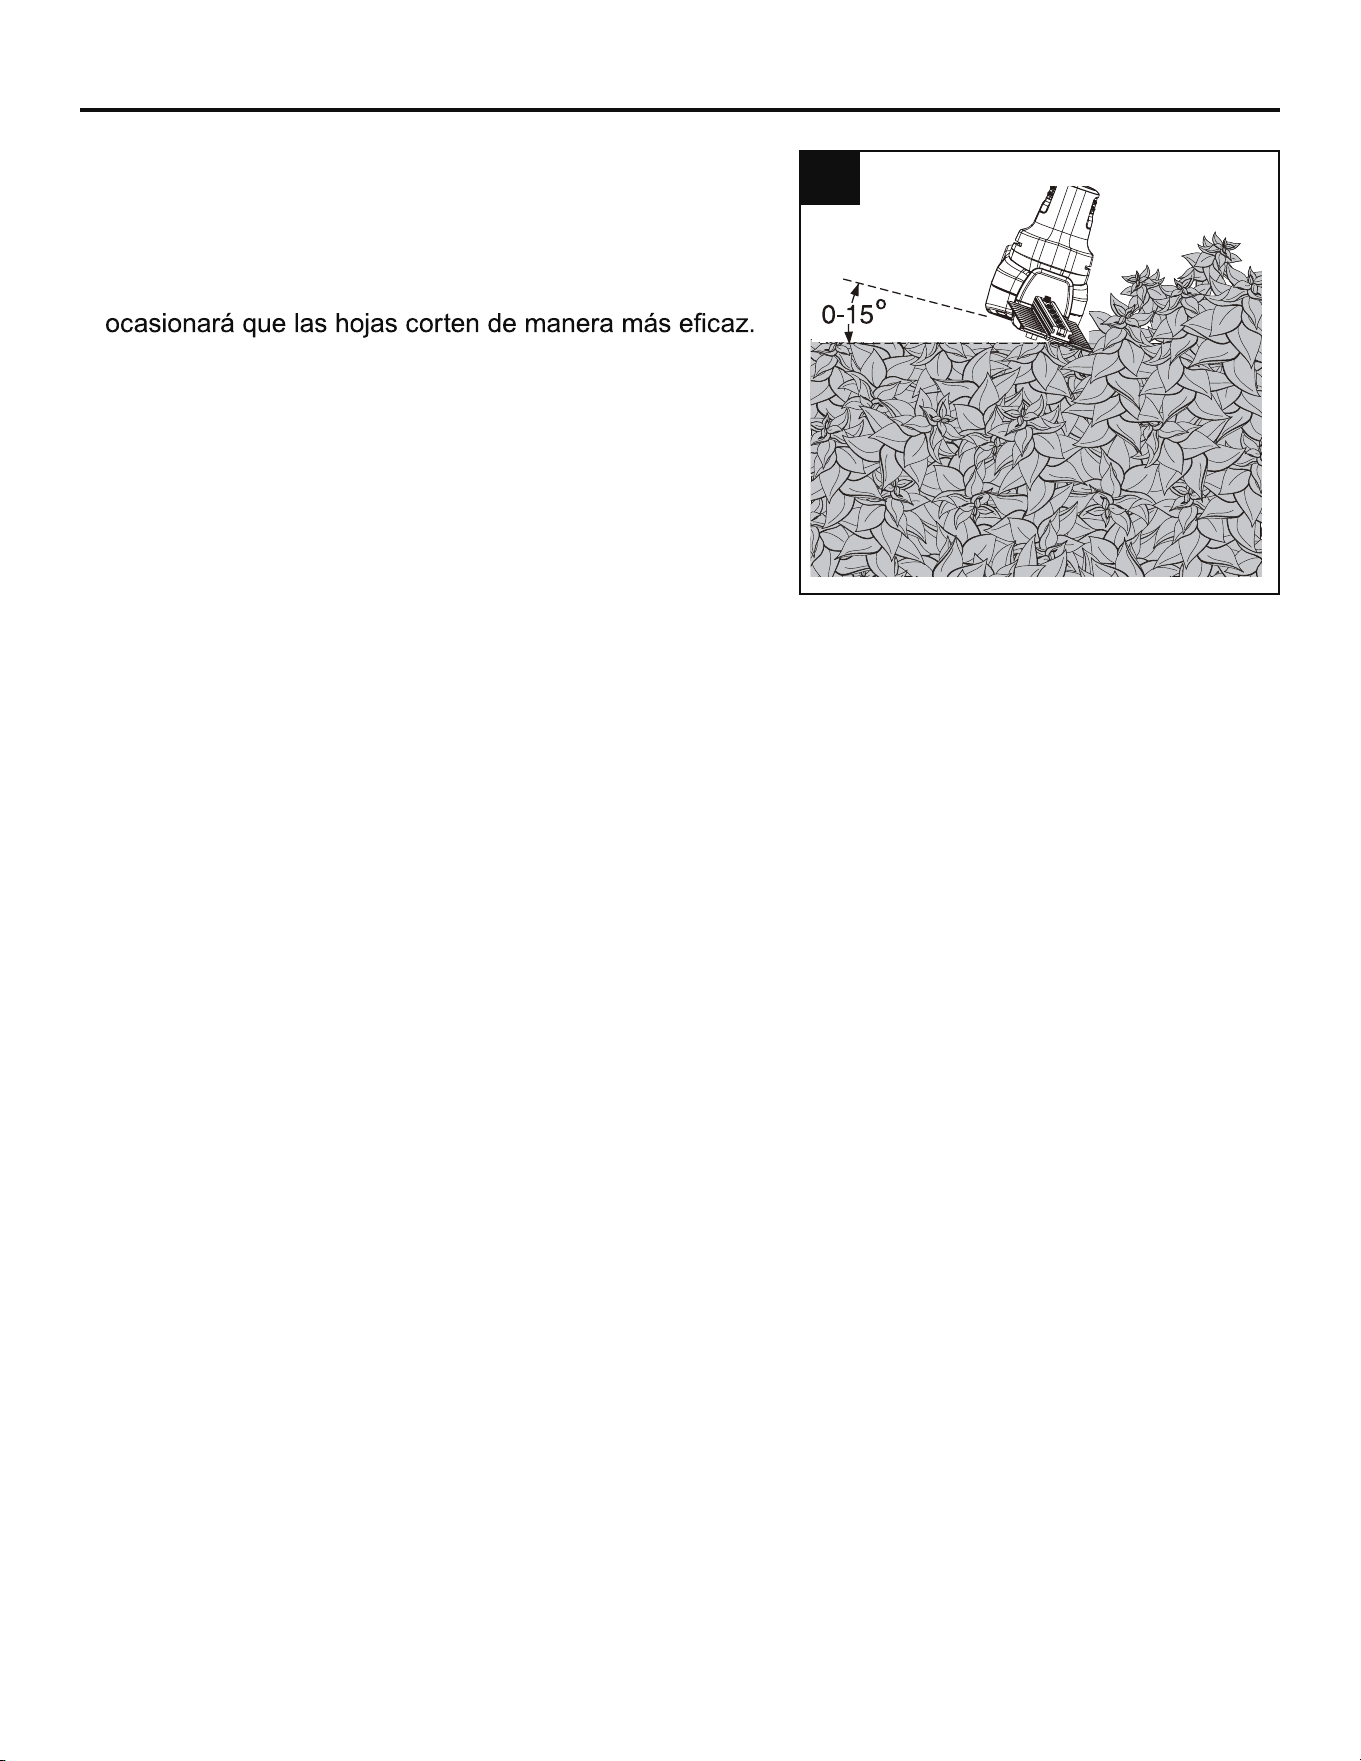
4. Consejos para un uso óptimo
• Empiece por cortar la parte superior del seto. Incline
ligeramente la herramienta (hasta unos 15° con relación
a la línea de corte) de manera que las puntas de las
hojas estén ligeramente por encima del seto. Esto
Sostenga la herramienta en el ángulo deseado y muévala
de manera continua a lo largo de la línea de corte. La
hoja de dos lados le permite cortar en cualquier dirección.
• Para obtener un corte muy recto, estire un trozo de la
cuerda a lo largo del seto a la altura deseada. Utilice
la cuerda como guía, corte justo sobre la línea de
pauta de la cuerda.
• Para obtener lados planos, corte hacia arriba
siguiendo el sentido del crecimiento. Los tallos más
jóvenes se mueven hacia afuera cuando la hoja corta
hacia abajo, lo cual ocasiona áreas poco profundas en
el seto.
• Tenga cuidado para evitar cualquier objeto extraño.
Evite especialmente objetos duros como el cable
de metal y los rieles, puesto que pueden dañar las
cuchillas.
• Aceite las hojas regularmente.
4

34
Mantenimiento de las hojas de su cortadora de orillas de bastón
Nota: antes de dar mantenimiento, quite la batería de la podadora de arbustos.
1. Retire la suciedad y los escombros de las hojas usando
una brocha (no se incluye).
2. Limpie las hojas rociándolas con un lubricante o
desengrasante adecuado (no se incluye) sobre las hojas
y la barra de corte.
3. 'HVSXpVGHOXVRSHVDGRVHUHFRPLHQGDYHUL¿FDU
completamente sus hojas para ver si hay deformaciones
o imperfecciones y, si es necesario, limar los bordes
para lograr un corte más uniforme. Si es necesario, se
UHFRPLHQGDOOHYDUODDXQWpFQLFRFDOL¿FDGRSDUDD\XGDU
DD¿ODUODVKRMDV8VHVLHPSUHXQDOLPDGHPHWDOQRVH
incluye).
CUIDADO Y MANTENIMIENTO
35
CUIDADO Y MANTENIMIENTO
4. 'HVSXpVGHD¿ODUFDGDKRMDVHUHTXLHUHDSOLFDUXQD
capa ligera de aceite para máquina o rociarlas con grasa
a base de litio (no se incluyen).
Almacenaje y transporte
• Coloque siempre la cubierta de la hoja en la hoja antes de almacenar o transportar la cortadora de
RULOODVGHEDVWyQ6HDSUHFDYLGRSDUDHYLWDUORVGLHQWHVD¿ODGRVGHODKRMD
• Limpie completamente la cortadora de orillas de bastón antes de almacenarla. Almacene la
cortadora de orillas de bastón en interiores en un lugar seco que no sea accesible para los
niños. Mantenga alejado de agentes corrosivos, como productos químicos para jardín y sales
descongelantes.
DETECCIÓN DE PROBLEMAS
Si todavía tiene alguna pregunta o alguna cuestión no solucionada después de leer este guía de
solución de problemas, o si desea hablar con un experto de productos Kobalt, llame a nuestro
Departamento de Servicio al Cliente al 1-888-3KOBALT (1-888-356-2258), de lunes a viernes de 8 a.m.
a 8 p.m., hora estándar del Este.
PROBLEMA CAUSA POSIBLE SOLUCIÓN
El motor no enciende
cuando se oprime el
interruptor de gatillo.
1. La batería no está bien
colocada.
1. 3DUD¿MDUODEDWHUía, asegúrese de
que el pestillo en la parte superior
del compartimiento de la batería
trabe en su lugar.
2. La batería no está cargada. 2. Cargue la batería de acuerdo con
las instrucciones incluidas con su
modelo.
El motor enciende, pero
las hojas de corte no se
mueven.
Si la cortadora de orillas de bastón
está dañada.
No use la cortadora de orillas de bastón.
Llame al 1-888-3KOBALT (1-888-356-
2258) para obtener asistencia técnica.
La cortadora de orillas
de bastón humea
durante la operación.
Si la cortadora de orillas de bastón
está dañada.
No use la cortadora de orillas de bastón.
Llame al 1-888-3KOBALT (1-888-356-
2258) para obtener asistencia técnica.
El motor suena,
pero las hojas no se
mueven.
Puede que haya escombros u
otros objetos atascados en las
hojas.
Quite la batería y limpie los escombros
que bloquean las hojas.

36
GARANTÍA
5 AÑOS DE GARANTÍA LIMITADA
Esta podadora de arbustos de bastón de 80 V de Kobalt está garantizada para el comprador original
desde la fecha de compra original durante cinco (5) años y está sujeto a la cobertura de garantía que
se describe en el presente.
Esta podadora de arbustos de bastón de 80 V de Kobalt tiene una garantía para el usuario original
contra defectos en los materiales y la mano de obra.
Si cree que la podadora de arbustos de bastón de 80 V de Kobalt presenta fallas en cualquier
PRPHQWRGXUDQWHHOSHUtRGRGHJDUDQWtDHVSHFL¿FDGRVLPSOHPHQWHGHYXHOYDHVWDSRGDGRUDGH
arbustos de bastón de 80 V, junto con un comprobante de compra, al lugar donde la compró para
obtener un reemplazo o reembolso sin cargo, o llame al 1-888-3KOBALT (1-888-356-2258) para
obtener el servicio de garantía.
Esta garantía es nula si: los daños o defectos de fabricación o materiales se derivan de las
reparaciones o alteraciones realizadas o intentadas por otras personas o el uso no autorizado de
piezas que no cumplen con las normas del fabricante, si el daño se debe al desgaste normal, al
abuso (incluyendo la sobrecarga de la herramienta por encima de su capacidad), al mantenimiento
inadecuado, negligencias, accidentes o daños debidos al uso de la herramienta después de un fallo
parcial o el uso con accesorios incorrectos o la reparación o alteración no autorizadas.
(VWDJDUDQWtDOHFRQFHGHGHUHFKRVOHJDOHVHVSHFt¿FRV\XVWHGSXGLHUDWHQHUDGHPiVRWURVGHUHFKRV
que varían de un estado a otro.
37
LISTA DE REPUESTOS
Para encargar piezas de repuesto, llame a nuestro Departamento de Servicio al Cliente al
1-888-3KOBALT (1-888-356-2258) de lunes a domingo de 8 a.m. a 8 p.m., hora estándar del Este.
PIEZA DESCRIPCIÓN # DE PIEZA
AA Perilla de ajuste 341201444
BB Abrazadera 33304877B
CC Perno 322051444
A Mango auxiliar/frontal 341191444A
AA CC ABB
También puede ponerse en contacto con nosotros en partsplus@lowes.com o visitar
www.lowespartsplus.com.

