OWNER’S MANUAL
Water Powered
Backup Sump Pump
SKU #: 691-3326
Model#: BP3000
2
PERFORMANCE
SKU
Model
Inlet water
pressure
GPH of Water @ Total Feet of Lift
0 ft.
5 ft.
10 ft.
15 ft.
691-3326
BP3000
40PSI
573
495
420
340
60PSI
702
630
545
465
SAFETY INSTRUCTIONS
1. Do not pump flammable or explosive liquids such as oil, gasoline, kerosene, ethanol, etc. Do not use in the
presence of flammable or explosive vapors. Using this pump with or near flammable liquids can cause an
explosion or fire, resulting in property damage, serious personal injury, and/or death.
2. Disconnect power (unplug) the primary sump pump before installing, working on, or servicing the backup sump
pump.
3. The backup sump pump requires a city water source with a minimum pressure of 40PSI. The inlet pipe should be
at least 3/4” in diameter.
4. Clean the backup sump pump regularly.
5. Release all pressure and drain all water from the system before servicing any component.
6. Secure the discharge line before starting the pump. An unsecured discharge line will whip, possibly causing
personal injury, and/or property damage.
7. Wear safety goggles at all times when working with pumps.
8. Failure to comply with the instruction and designed operation of this unit may void the warranty. ATTEMPTING TO
USE A DAMAGED PUMP can result in property damage, serious personal injury, and/or death.
9. Know the pump and its applications, limitations, and potential hazards.
10. Periodically inspect the pump and system components to ensure the pump suction screen is free of mud, sand,
and debris
11. Follow all local electrical and safety codes, along with the National Electrical Code (NEC). In addition, all
Occupational Safety and Health Administration (OSHA) guidelines must be followed.
PRE-INSTALLATION
APPLICATION
The backup sump pump is designed for as an auxiliary back-up sump pump for private residences in case of
primary sump pump failure or a power outage. It is not designed for and should not be used as a primary sump
pump.
TOOLS REQUIRED
Flathead
Screwdriver
Phillips
Screwdriver
Channel
Locks
Pipe
wrench
Hacksaw
Cable
Ties
Safety
goggles
Tape
Measure
Knife
3
MATERIALS REQUIRED (NOT INCLUDED)
NOTE: Parts shown below not to scale.
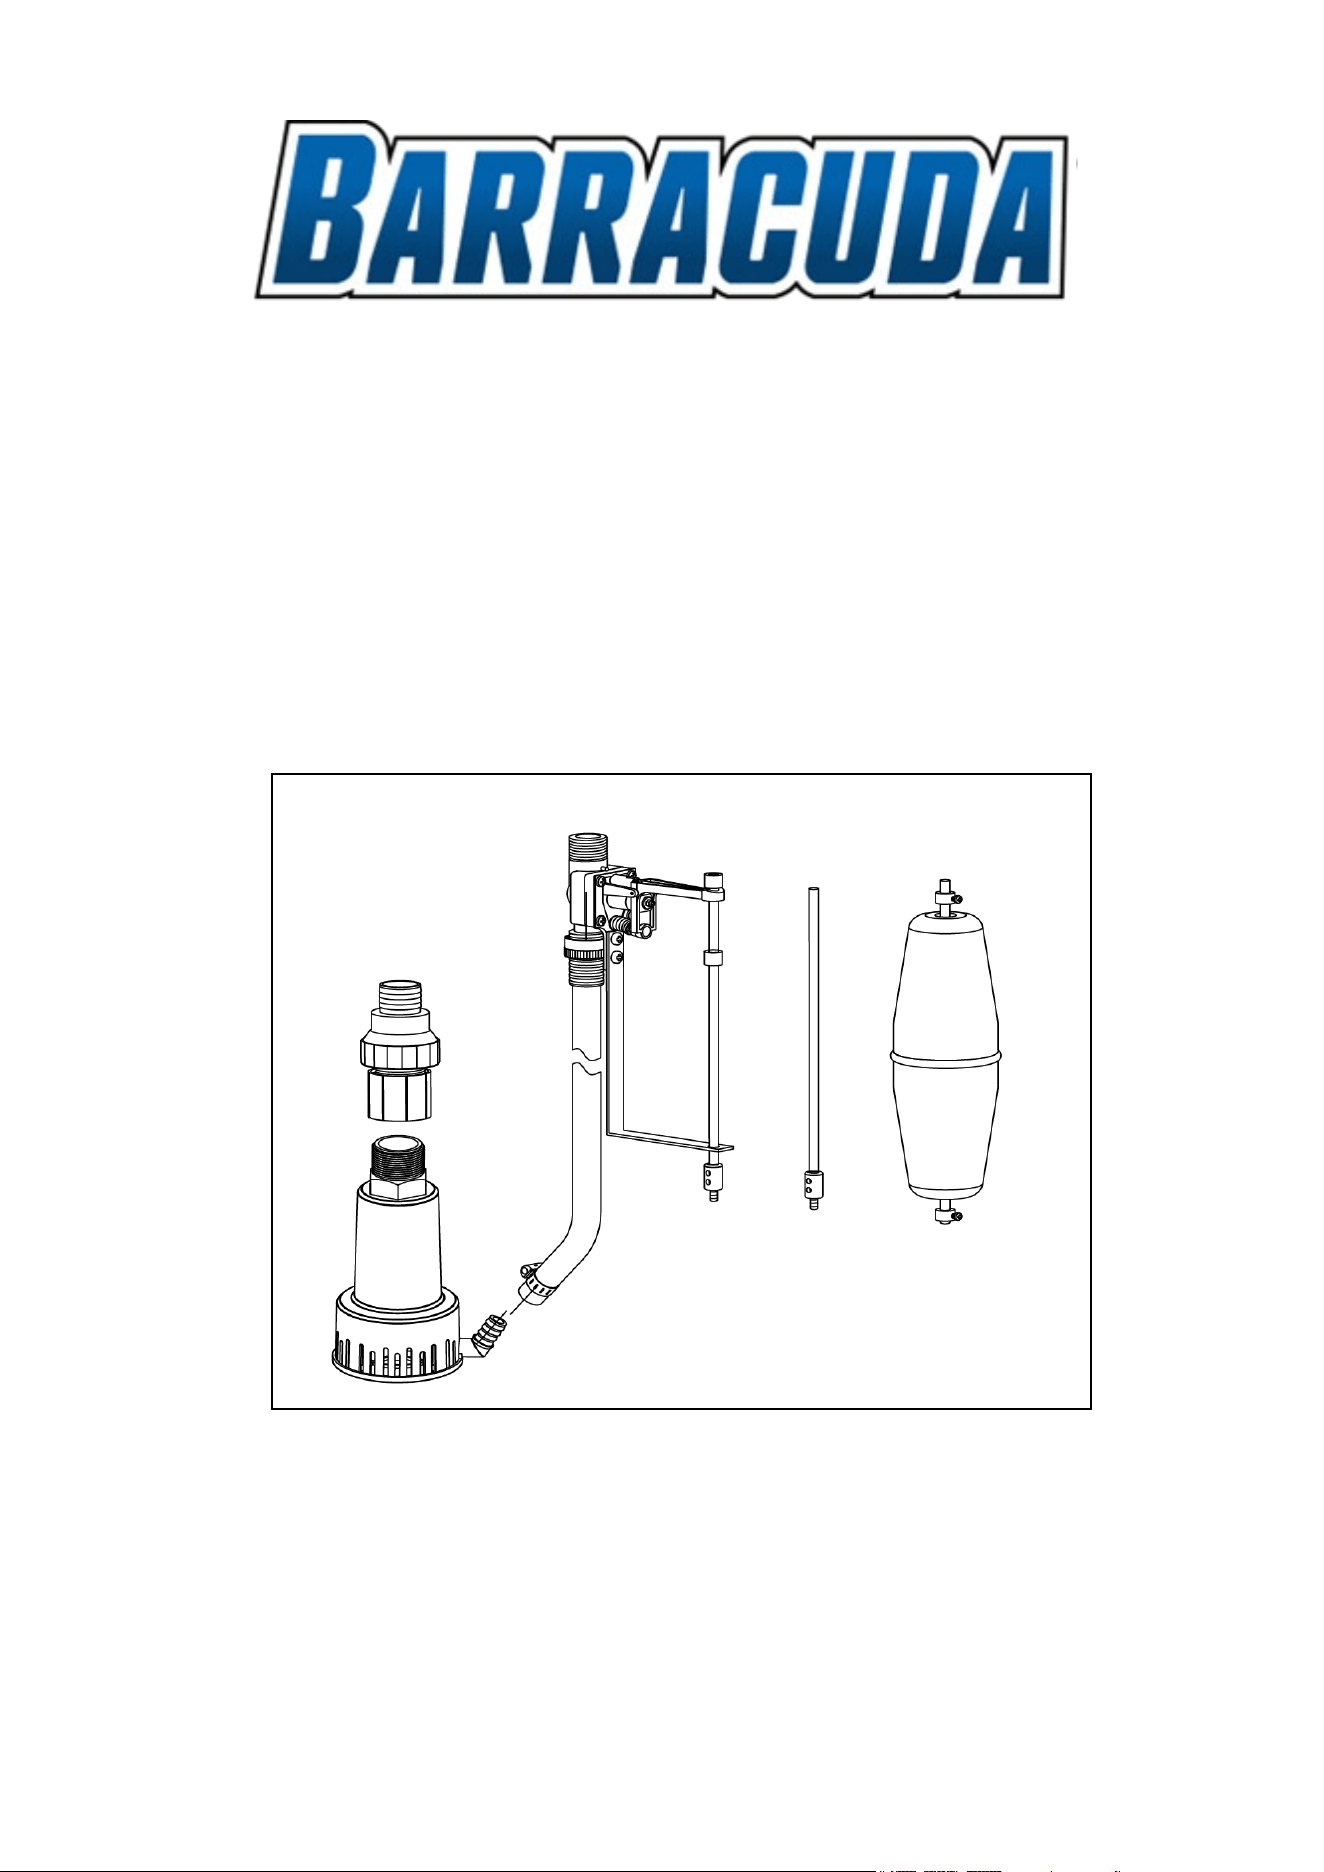
Threaded
Adapter
(Pipe to Pump)
ABS or PVC Pipe
Thread Tape
1-1/4” or 1-1/2”
“Y” PIPE
ABS or PVC
Cement (to match
the pipe)
Elbow
Gate valve
Tee
SPECIFICATIONS
Liquid temp. range 32 to 95°F (0- 35°C)
INSTALLATION
1. NOTE: Install the emergency sump pump when the primary sump
pump isn’t needed. Read the instruction and prepare all suppliers
before starting.
Verify that the existing primary sump pump is in good working
order. If the primary pump is questionable, replace with the
same or a higher HP pump. The primary pump is better to have
a vertical float switch or electrical switch. Tethered float switch
takes more sump pit space and might interfere with the
emergency pump.
Manually operate your primary sump pump and pump out the
water in your sump pit. Do not let the pump run dry. This will
damage the pump.
Disconnect the primary sump pump power source before
attempting to install. Never handle a pump with wet hands or
when standing on wet or damp surface or in water. Fatal
electrical shock could occur.
Remove any silt or accumulated debris from the sump pit and surrounding area.
Close the inlet valve of the city water and open the tap to discharge water. Cut the city water pipe at a
proper position.
4
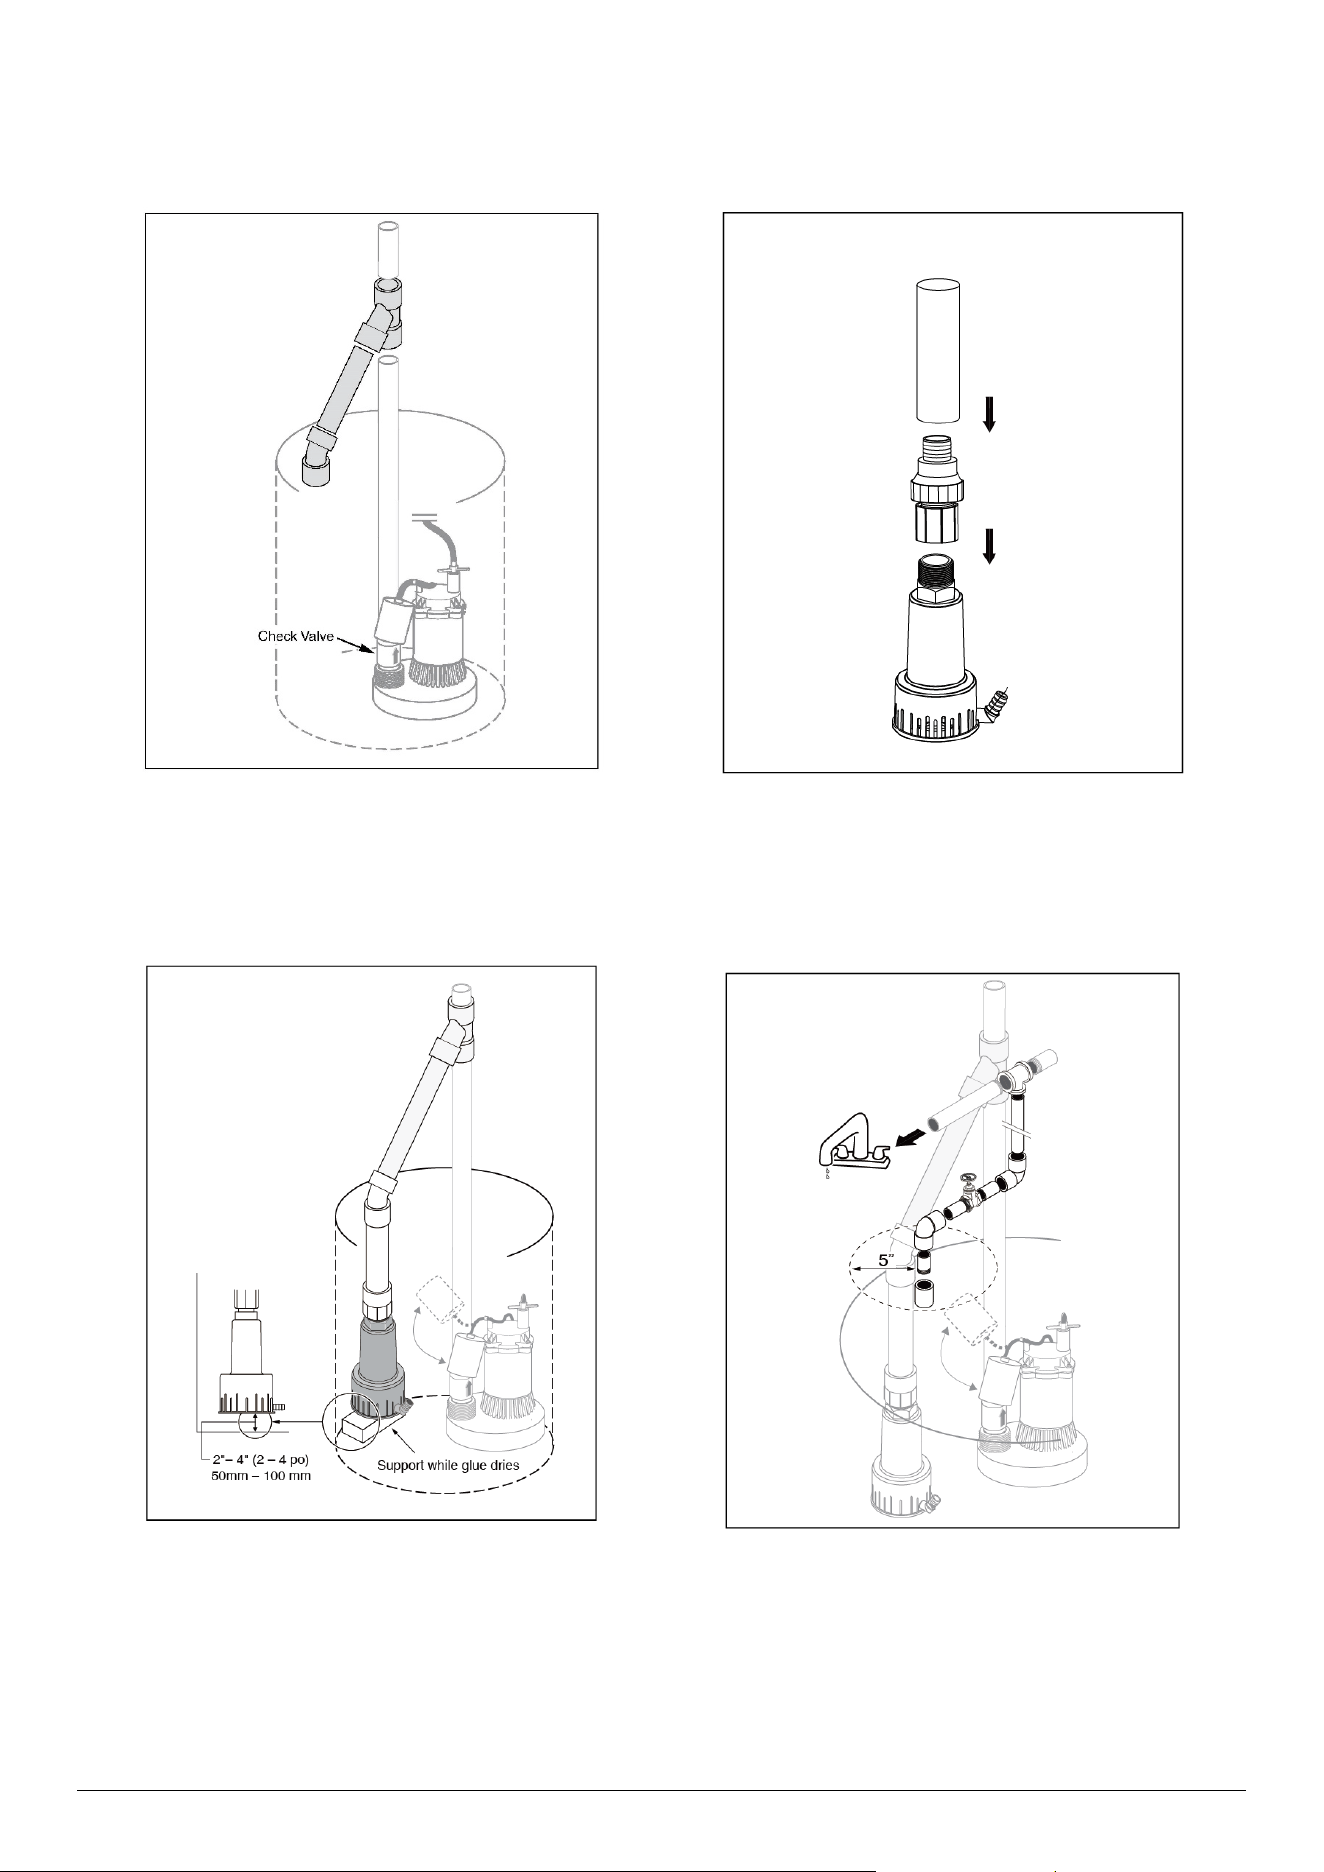
2. Install a Y pipe in the primary sump pump discharge
pipe.
If necessary adjust the PVC pipe length so that
nothing interferes with the primary pump and
switches.
3. Install a check valve in the emergency pump
discharge. Install the pipe on the check valve.
4. Connect the emergency pump discharge pipe to the
Y shape pipe.
Note: Adjust the height for the emergency pump and
keep 2”-4” to the bottom.
5. Install a Tee pipe in the system. One end connects
to the tap and another end connects to the
emergency pump.
Ensure that the pipe around 5" in diameter.
Use clamp to fix city water inlet pipe and discharge
pipe.
5
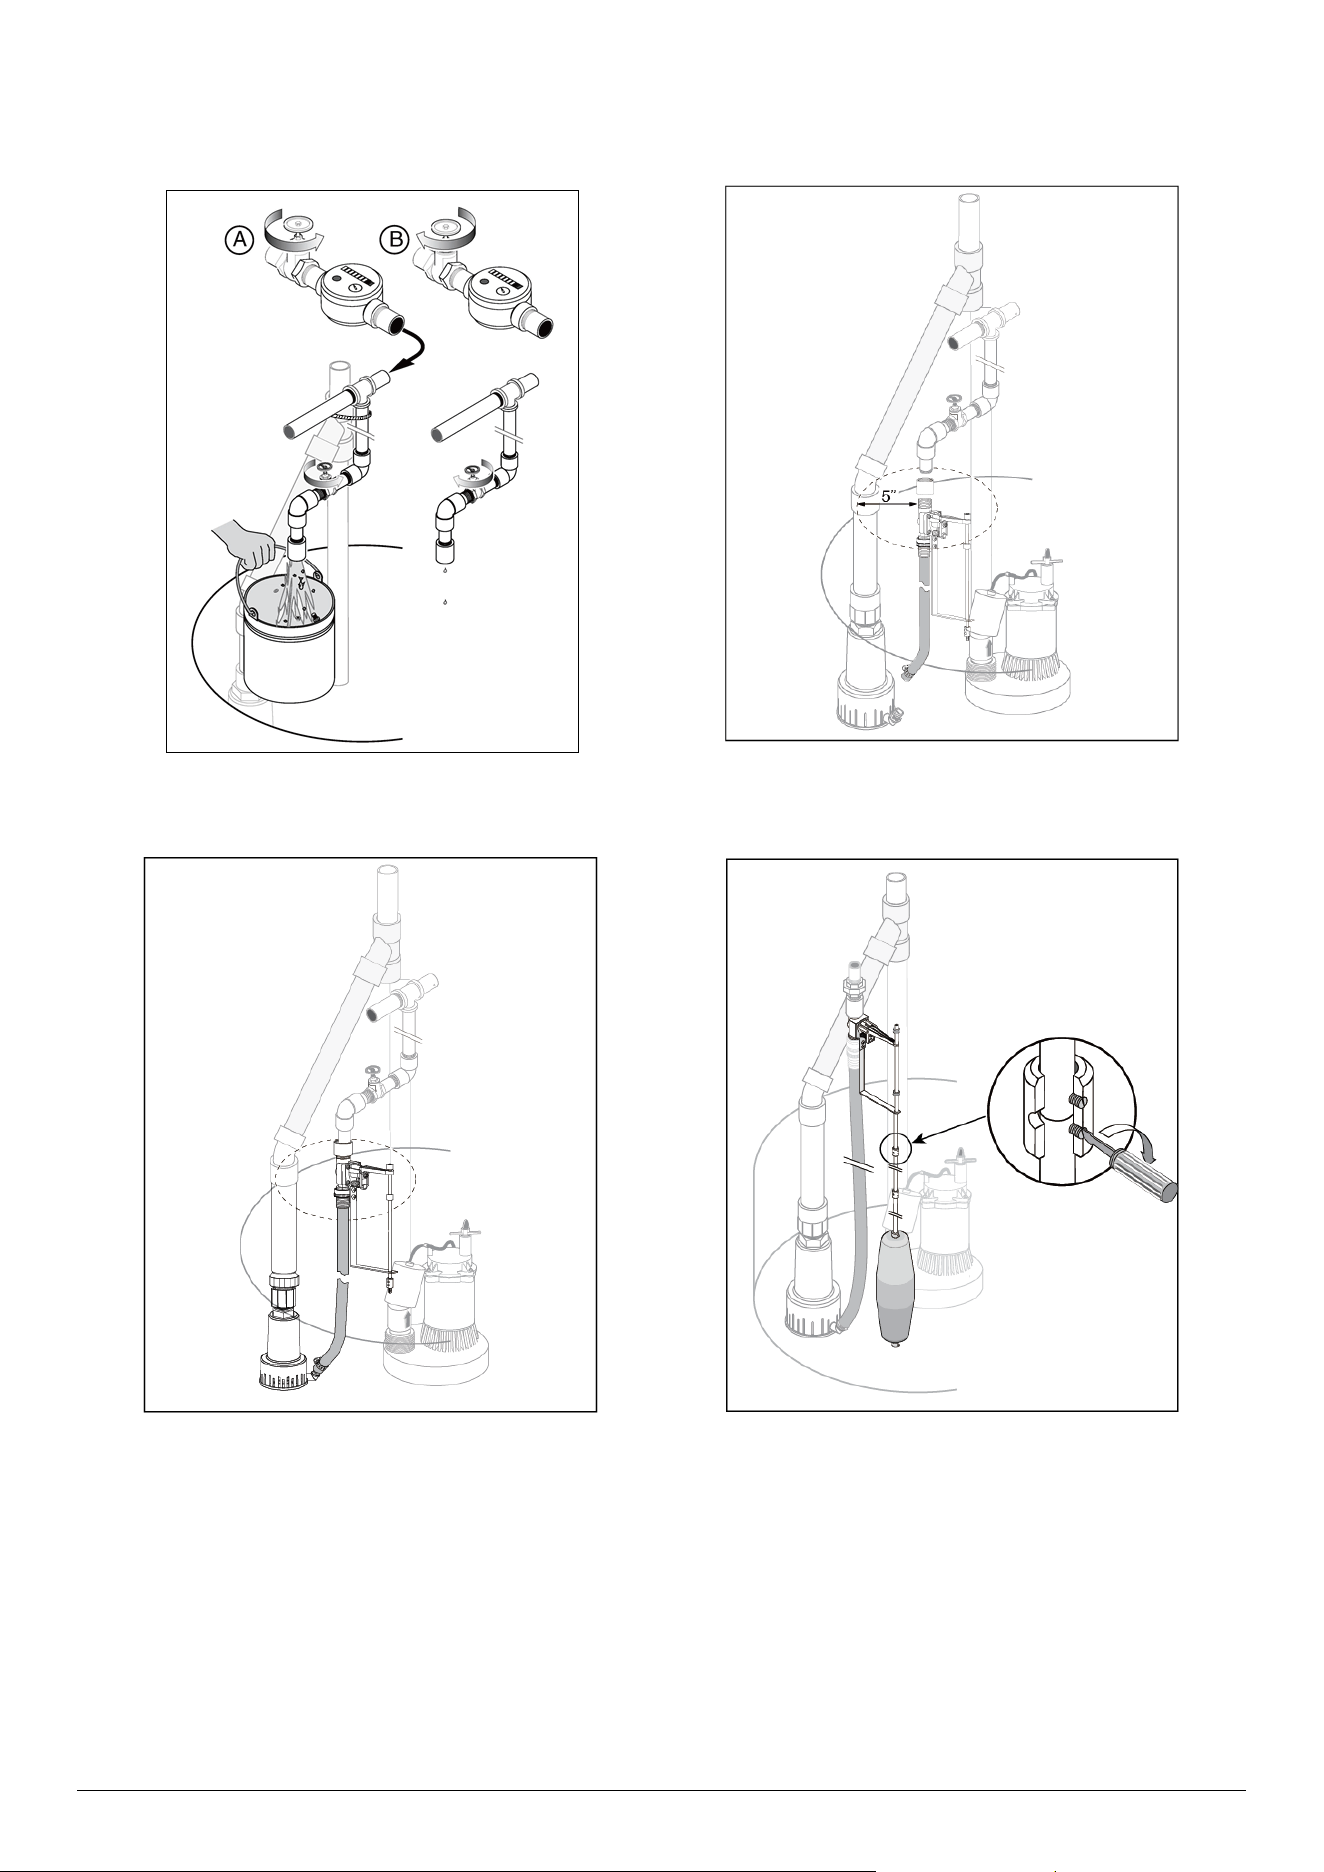
6. Open the city water inlet valve to clean the pipe
assembled. After that close the inlet valve.
7. Install the control valve to the tap water pipe ,
ensure the pump and float switch keep
nonintervention.
8. Connect the hose to the inlet and lock with clamp.
9. Connect the float rods with connection nuts. After
connecting the 3 float rods, fix metal ring at the
connection nuts.

6
Dimension
Complete Installation
7
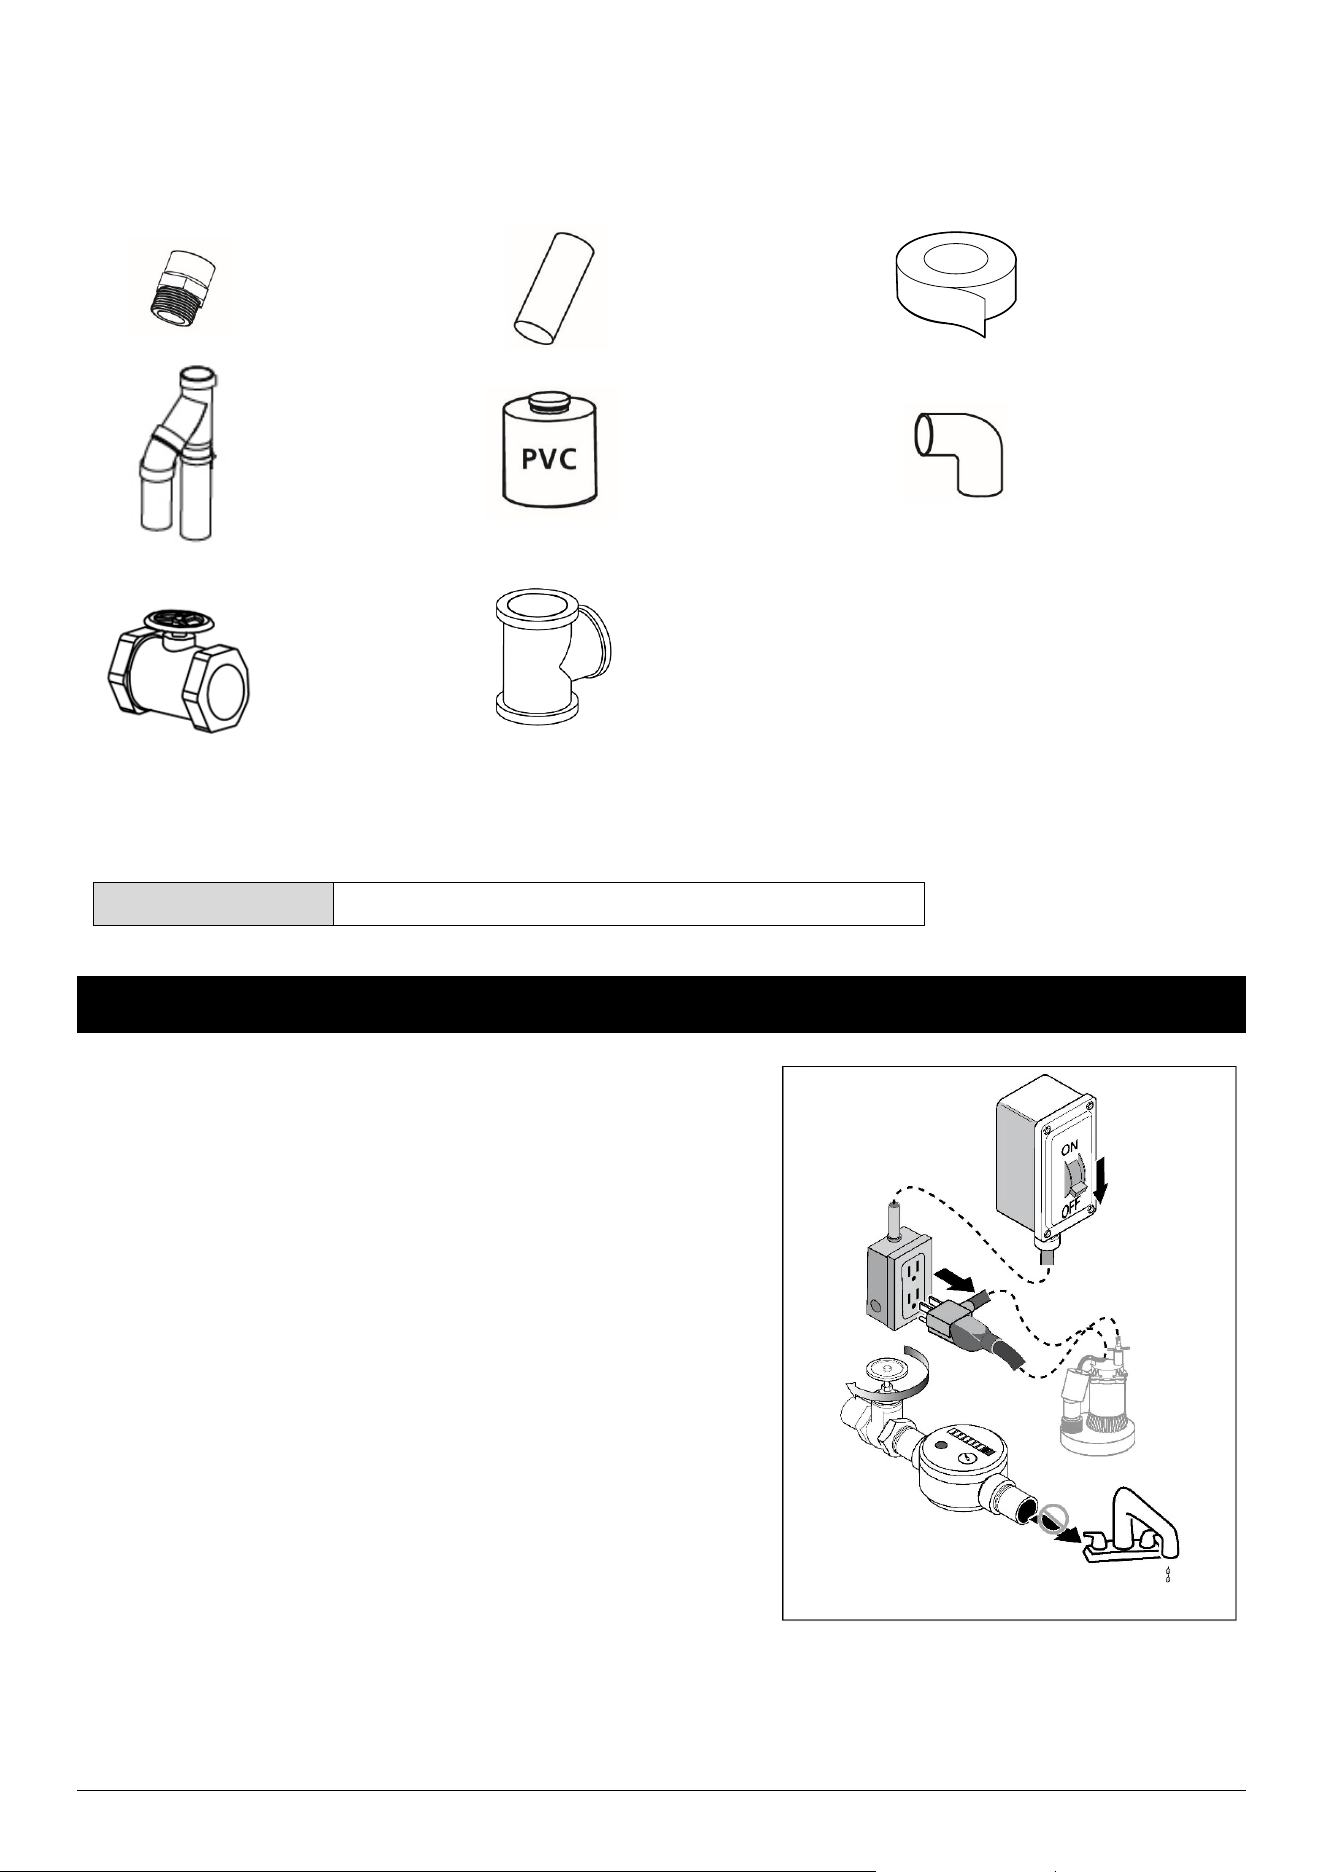
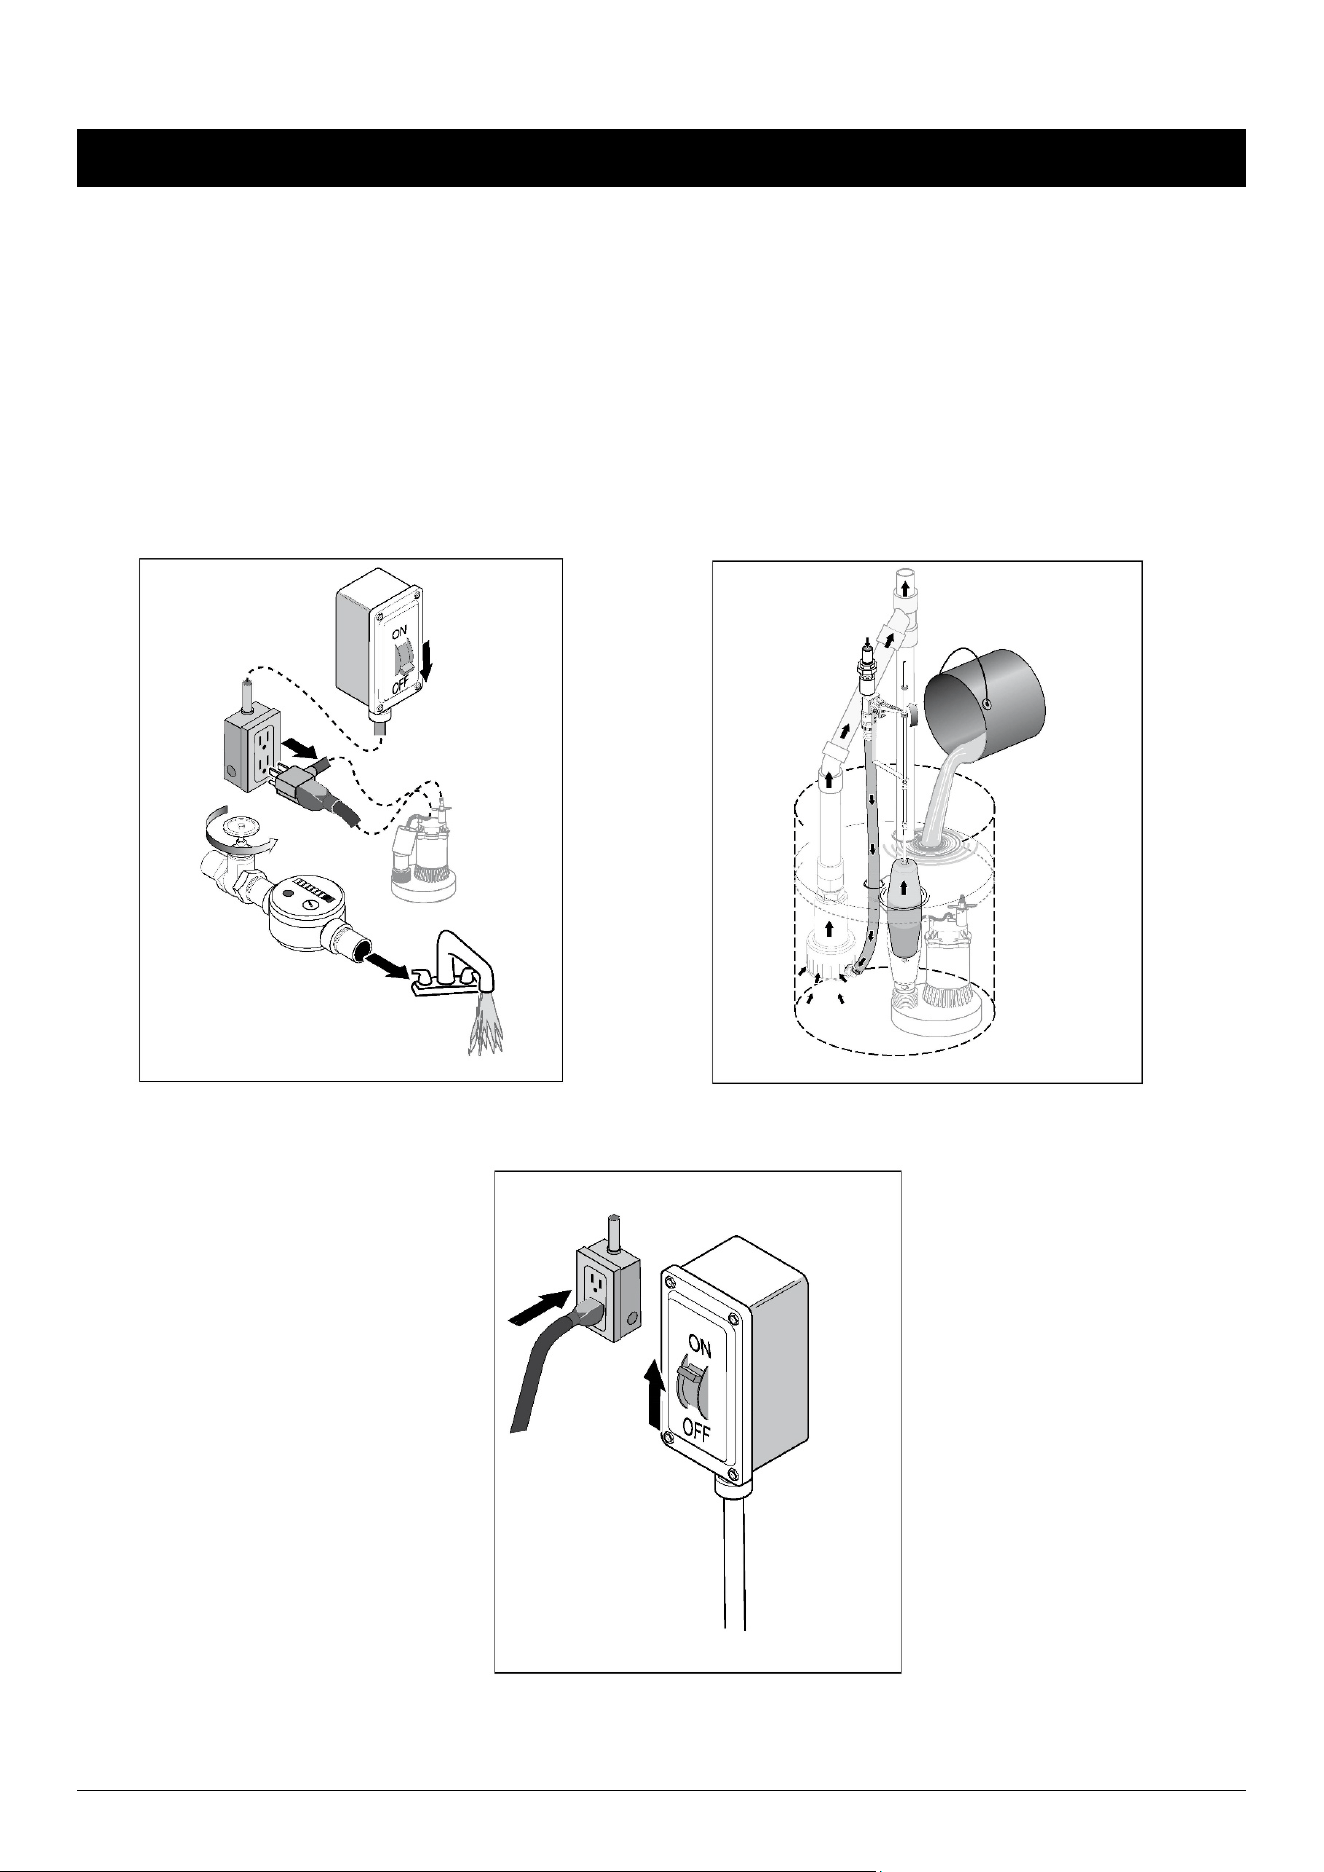
OPERATION
1. Plug the pump plug into piggyback plug and
then plug it to GFCI plug, open the main
valve.
2. Pour water and test if the emergency pump can work
normally.
Verify primary pump operation. Fill the sump pit with
enough water. The primary sump pump will start and
pump out the water then stop.
Unplug the primary pump power cord plug from the
power supplier outlet.
Verify emergency pump operation. Refill the sump pit
with water until the emergency pump float switch
moves to the upper end. The emergency pump should
start and pump out the water. If not, please check all
the pipe connections and adjust the position of the 2
rubber rings on the float rod.
3. Plug the primary sump pump after testing and be sure the power supply is on.
8
CARE AND CLEANING
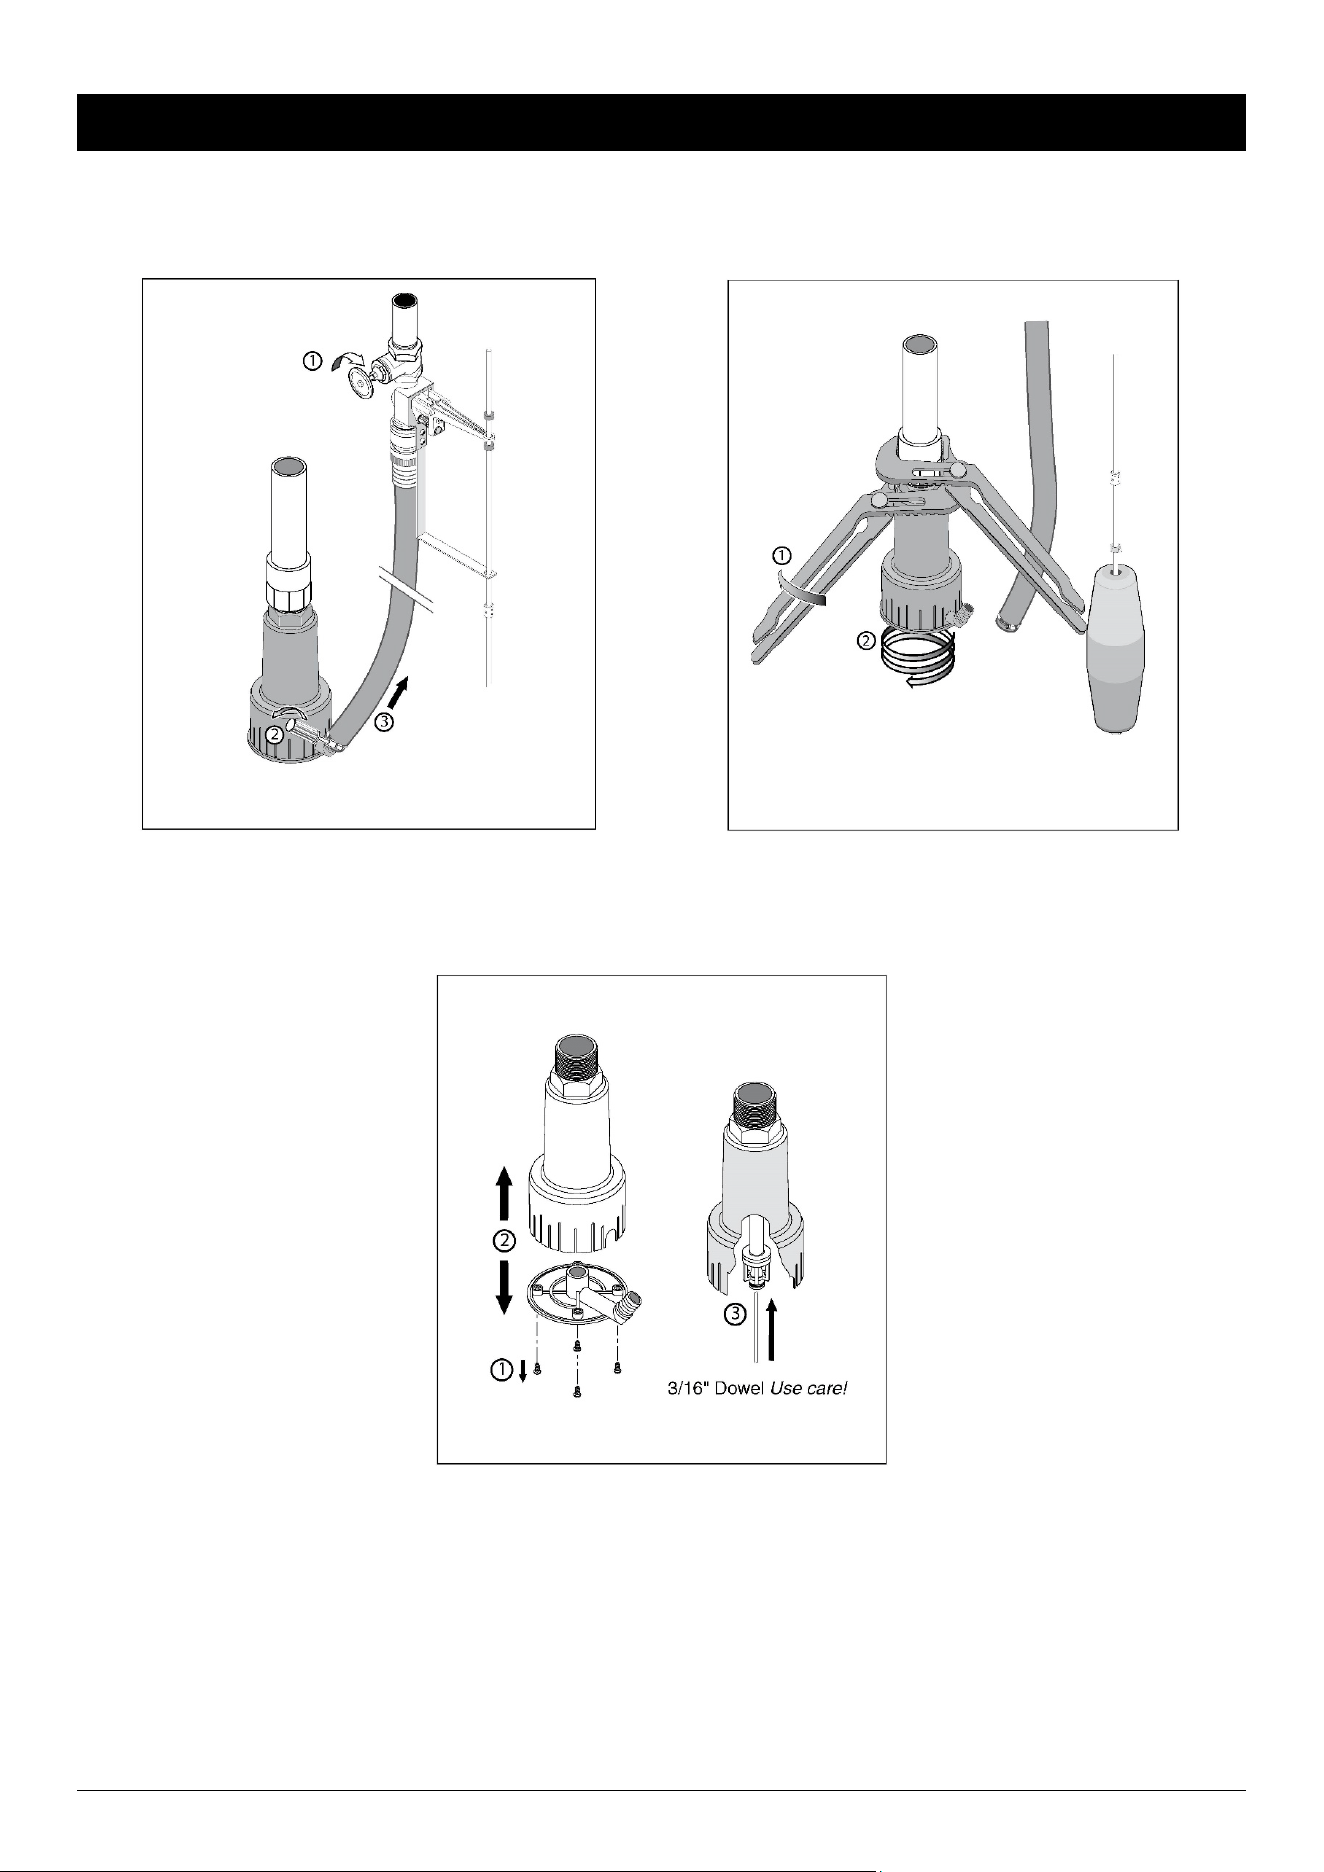
1. Turn off the tap water valve and loosen the clamp.
And then pull out the hose.
2. Clamp the inlet hose of backup pump with channel
Locks and then pull out the backup pump.
3. Loosen the screw and remove the bottom board, clean the nozzle and venturi with 3/16” Dowel. Re-install after
cleaning

9
TROUBLESHOOTING
Problem
Possible Cause
Corrective Action
No water is pumped
1. No supply water
2. Automatic Valve doesn’t open
3. Float sunk or stuck
4. Ejector is plugged
5. Inlet screen is plugged
6. Water level has dropped below
inlet screen level
7. Primary sump pump check
8. Discharge line plugged
9. Pump is trying to exceed rated lift
10. Water supply is below 40 PSI
11. Water Supply is a well system
1. Open supply valve
2. Check valve operation
manually, replace valve
3. Check float for free action,
obstructions
4. Clean ejector
5. Clean inlet screen
6. Adjust the float rod stops to
shut off pump before water has
dropped below screen level.
7. Install or clean check valve in
primary pump discharge
8. Inspect and clean all pipes in
system
9. Reduce height of discharge
(see “Performance Chart” page
2). DO NOT try to exceed lift
heights shown
10. Install a larger pipe (3/4” or 1”)
from city water supply
11. Pump requires continuous
pressure to operate - it will not
operate if supply is from a well
pump
Pump operates at less than
full capacity
1. Supply water flow is restricted
2. Pump suction or pump’s ejector
partially plugged
3. No primary pump check valve
4. Primary pump’s check valve leaks
5. Discharge line partly plugged
1. Open supply valve completely,
make sure automatic valve is fully
open and operating correctly
2. Clean as needed
3. Install a check valve in primary
pump’s discharge
4. Replace primary pump’s check
valve
5. Clean out pipe
Pump operates continuously
doesn’t shut off.
1. Automatic valve sticking open
2. Float is stuck in “ON” position
3. Rod stops are incorrectly set
1. Manually check operation of
automatic valve
2. Clear obstructions
3. Adjust position of rod stops on
the float rod to allow correct
valve operation.

10
BARRACUDA® LIMITED WARRANTY
WHAT THIS WARRANTY COVERS
Barracuda warrants to the original consumer purchaser (You) that its products are free from original defects
in material and workmanship for one year (warranty varies depending on model; see box or BARRACUDA
website for specific warranty informa�on) from the date of purchase (the Warranty Period). Repair parts
and accessories are warranted for 90 days from the date of purchase. During the Warranty Period,
BARRACUDA will repair or replace, at no cost to you, products that have been examined by BARRACUDA
and found to be defec�ve in materials or workmanship.
WHAT THIS WARRANTY DOES NOT COVER
This Warranty does not cover use of the product in a non-residen�al applica�on, improper installa�on
and/or maintenance of the product, damage due to misuse, acts of God, nature, vandalism, or other acts
beyond control of BARRACUDA, owner’s acts or omissions, use outside the country in which the product
was ini�ally purchased and resale of the product by the original owner. This warranty does not cover pick-
up, delivery, transporta�on, or house calls. However, if you mail your product to a BARRACUDA Sales and
Service Center for warranty service, cost of shipping will be paid one way. This warranty does not apply to
products purchased outside the United States, including its territories and possessions, outside of U.S.
Military Exchange and outside of Canada. This warranty does not cover products purchased from a party
that is not an authorized retailer, dealer, or distributor of BARRACUDA products.
OTHER IMPORTANT TERMS
This warranty is not transferable and may not be assigned. This Warranty shall be governed and construed
under laws of the state of Michigan. The Warranty Period will not be extended by any replacement or
repair performed under this Warranty. THIS WARRANTY IS THE EXCLUSIVE WARRANTY AND REMEDY
PROVIDED BY BARRACUDA. ALL OTHER WARRANTIES, EXPRESSED OR IMPLIED, INCLUDING WARRANTIES OR
MERCHANTABILITY OR FITNESS FOR PARTICULAR PURPOSE, ARE DISCLAIMED. IN NO EVENT WILL
BARRACUDA BE LIABLE FOR ANY SPECIAL, INDIRECT, INCIDENTAL, OR CONSEQUENTIAL DAMAGES OF ANY
KIND OR NATURE TO OWNER OR ANY PARTY CLAIMING THROUGH OWNER WHETHER BASED IN CONTRACT,
NEGLIGENCE, TORT, OR STRICT PRODUCTS LIABLITY OR ARISING FROM ANY CAUSE WHATSOEVER. Some
states do not allow for the exclusion of consequen�al damages, so the above exclusion may not apply to
you. This warranty gives you specific rights. You may also have other rights that vary from state to state.
For technical support and parts, call Customer Service at 844-242-2475.
