
Greenkeeper
Bewässerungssystem
Irrigation System
Sistema de riego
Système d’irrigation
Sistema d’irrigazione
10031357


3
DE
Sehr geehrter Kunde,
wir gratulieren Ihnen zum Erwerb Ihres Gerätes.
Lesen Sie die folgenden Hinweise sorgfältig durch und
befolgen Sie diese, um möglichen Schäden vorzubeugen.
Für Schäden, die durch Missachtung der Hinweise und
unsachgemäßen Gebrauch entstehen, übernehmen wir
keine Haftung. Scannen Sie den folgenden QR-Code,
um Zugriff auf die aktuellste Bedienungsanleitung und
weitere Informationen rund um das Produkt zu erhalten:
INHALTSVERZEICHNIS
Lieferumfang 4
Aufbau 6
Steuergerät 8
Fehlerbehebung 10
Hinweise zur Entsorgung 10
Spezielle Entsorgungshinweise für Verbraucher in Deutschland 11
HERSTELLER & IMPORTEUR (UK)
Hersteller:
Chal-Tec GmbH, Wallstraße 16, 10179 Berlin, Deutschland.
Importeur für Großbritannien:
Berlin Brands Group UK Limited
PO Box 42
272 Kensington High Street
London, W8 6ND
United Kingdom
English 13
Español 21
Français 29
Italiano 37
4
DE
LIEFERUMFANG
Bild Teil Anzahl
Steuergerät 1
Wasserpumpe 1
Netzgerät 1
Anti-Siphon-Set 1
Vierer-Kupplung 1
5
DE
Bild Teil Anzahl
Dreier-Kupplung
30
Schlauch pfropfen
10
Tropfer
60
Schlauch (7/9 mm x 18m)
1
Schlauch (4/6 mm x 12 m)
1

6
DE
AUFBAU
1. Schlauch (7/9 mm)
2. Schlauch (4/6 mm)
3. Großer Vier-Anschluss-Verbinder
4. Vier-Anschluss Verbinder
5. Tropfer
6. Schlauch und Pfropfen
7. Netzgerät
8. Steuergerät
9. Pumpe
10. Geruchsverschluss-System
Steuergerät
Pumpe
7
DE
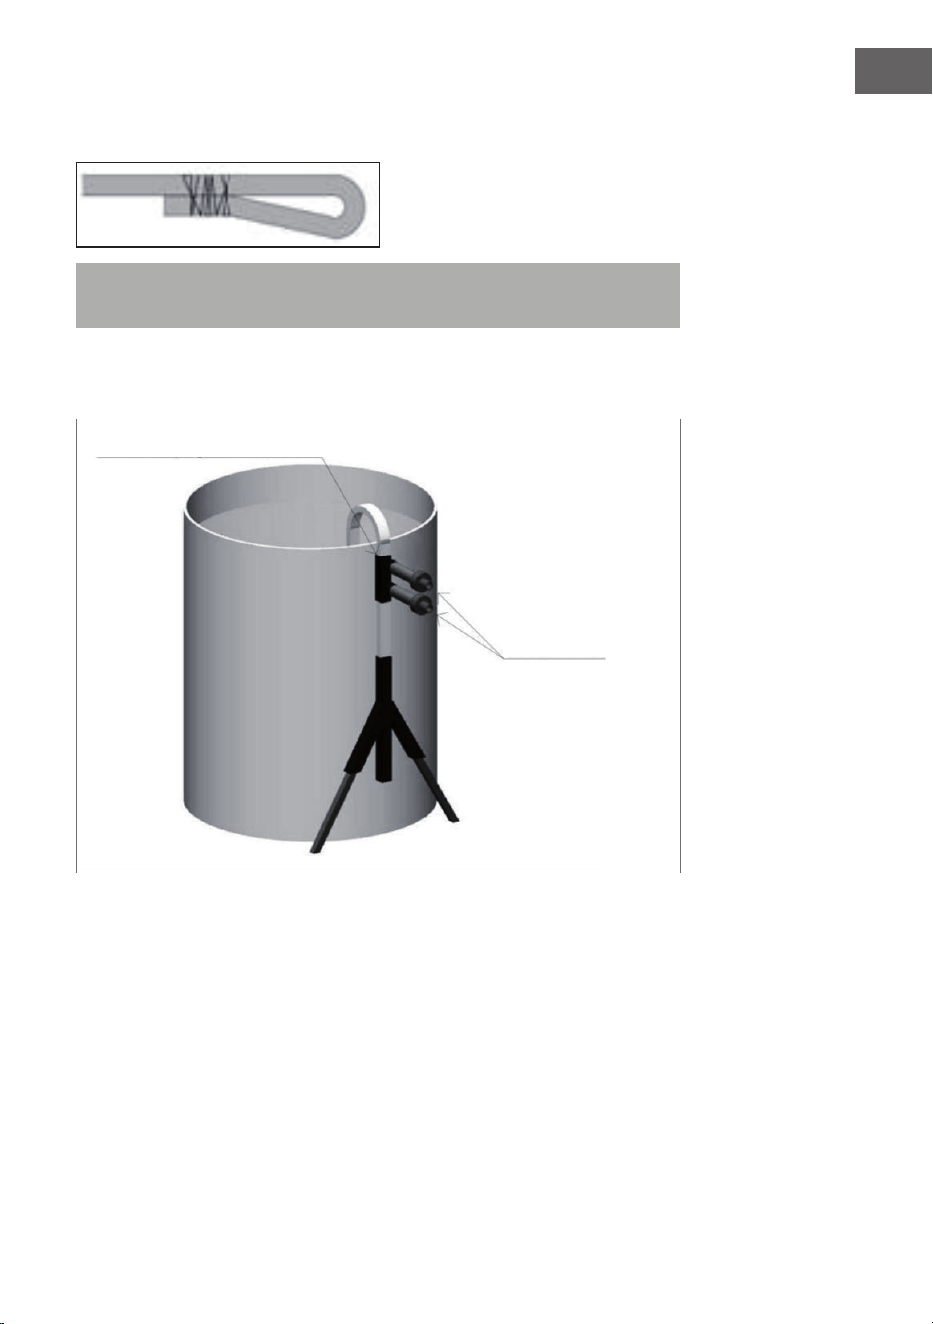
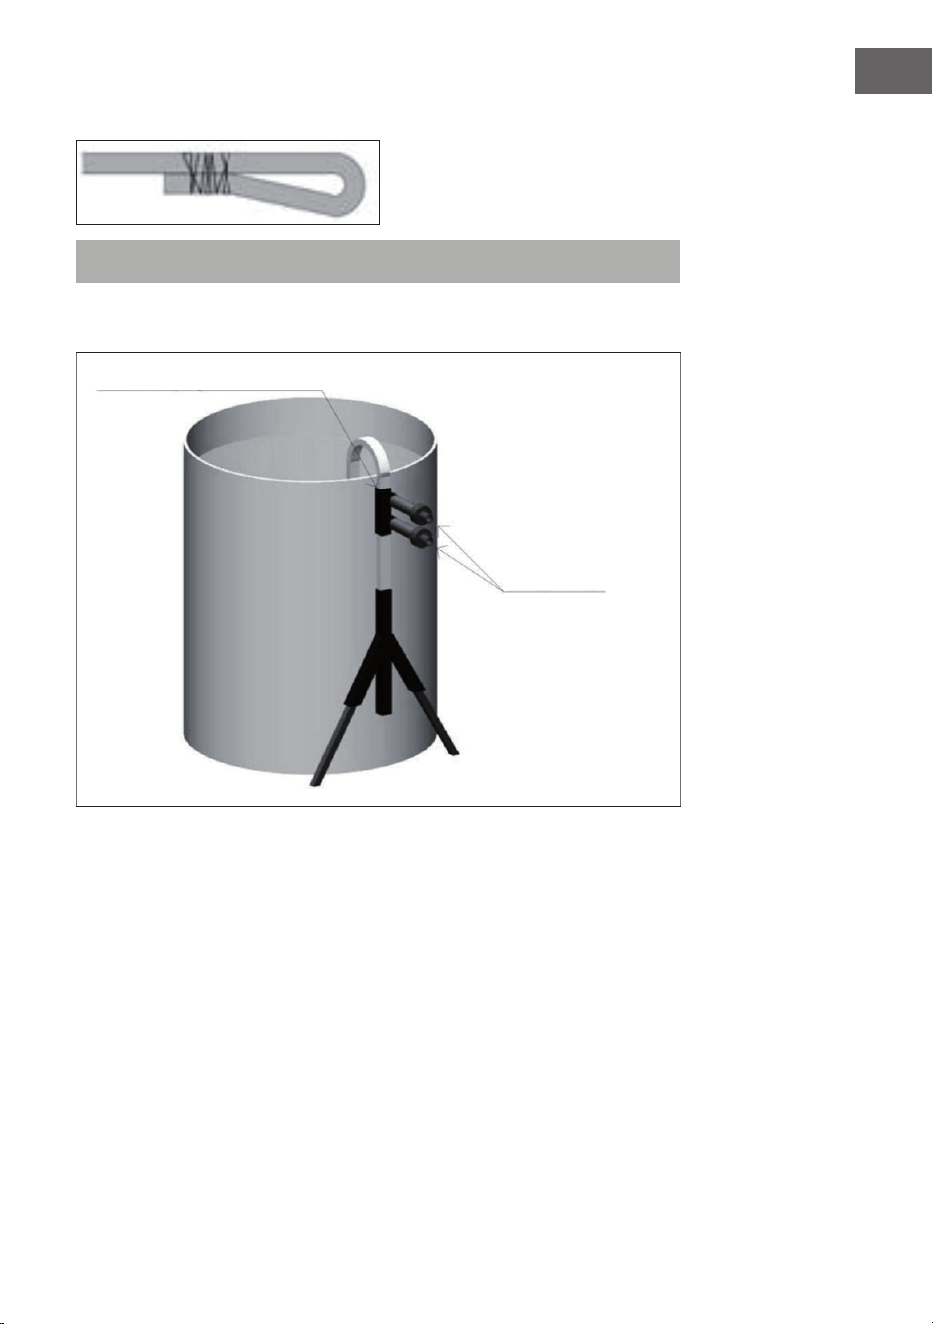
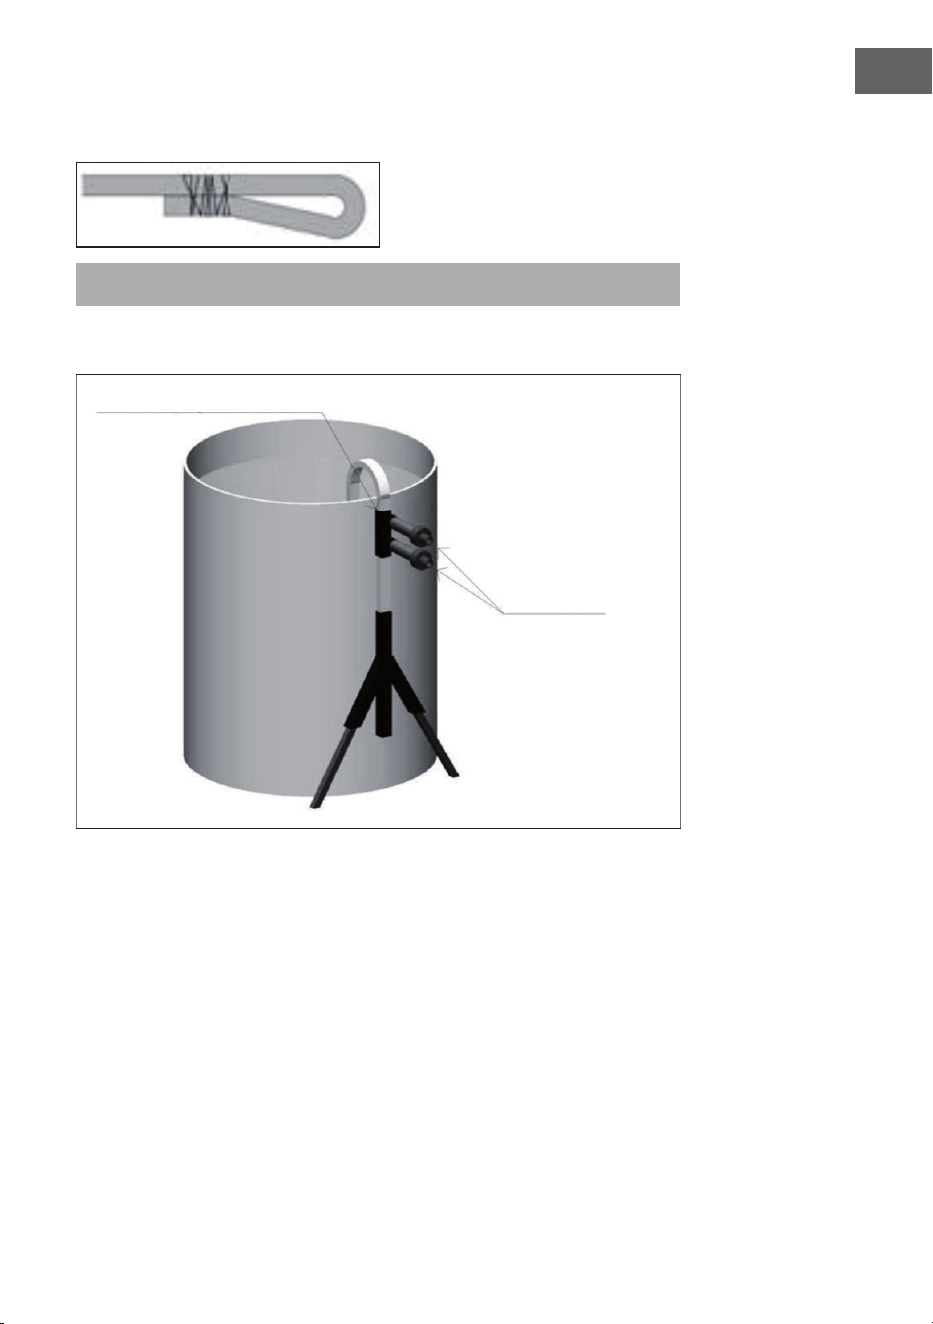
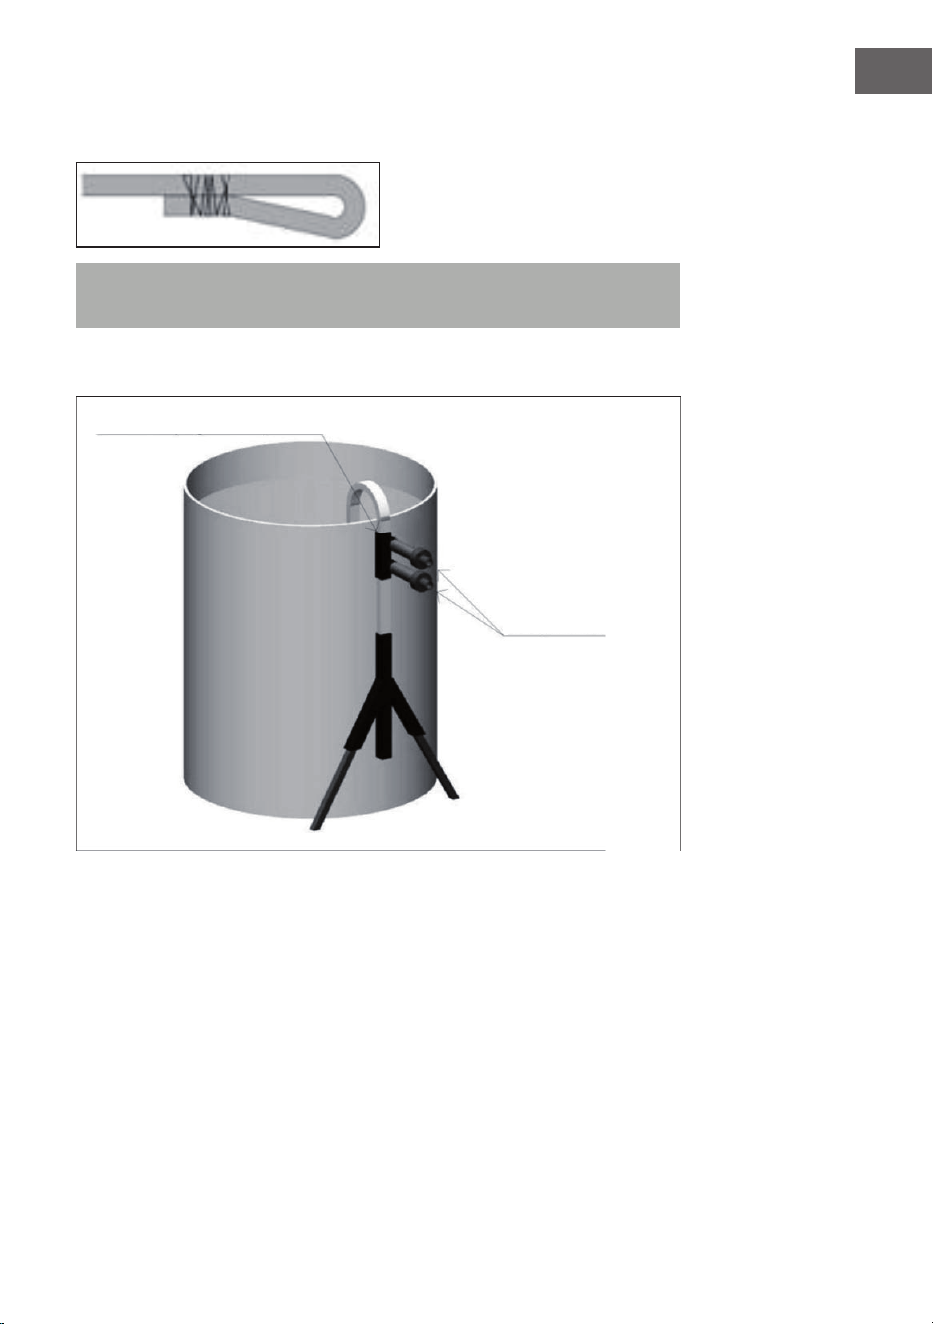
Binden Sie das Ende des Kabels mit einem Bindfaden oder Gummiband fest
(nicht im Lieferumfang enthalten).
Hinweis: Das Steuergerät ist nur für die Benutzung in Innenräumen
vorgesehen.
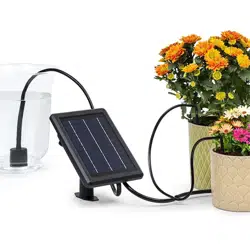
Bedenken Sie, dass Sie ein Wasserreservoir benötigen, dass Sie mit Wasser
füllen.
Die Rück usssperre oben am Behälter anbringen.
Rück uss-/
Ablaufsperre
8
DE
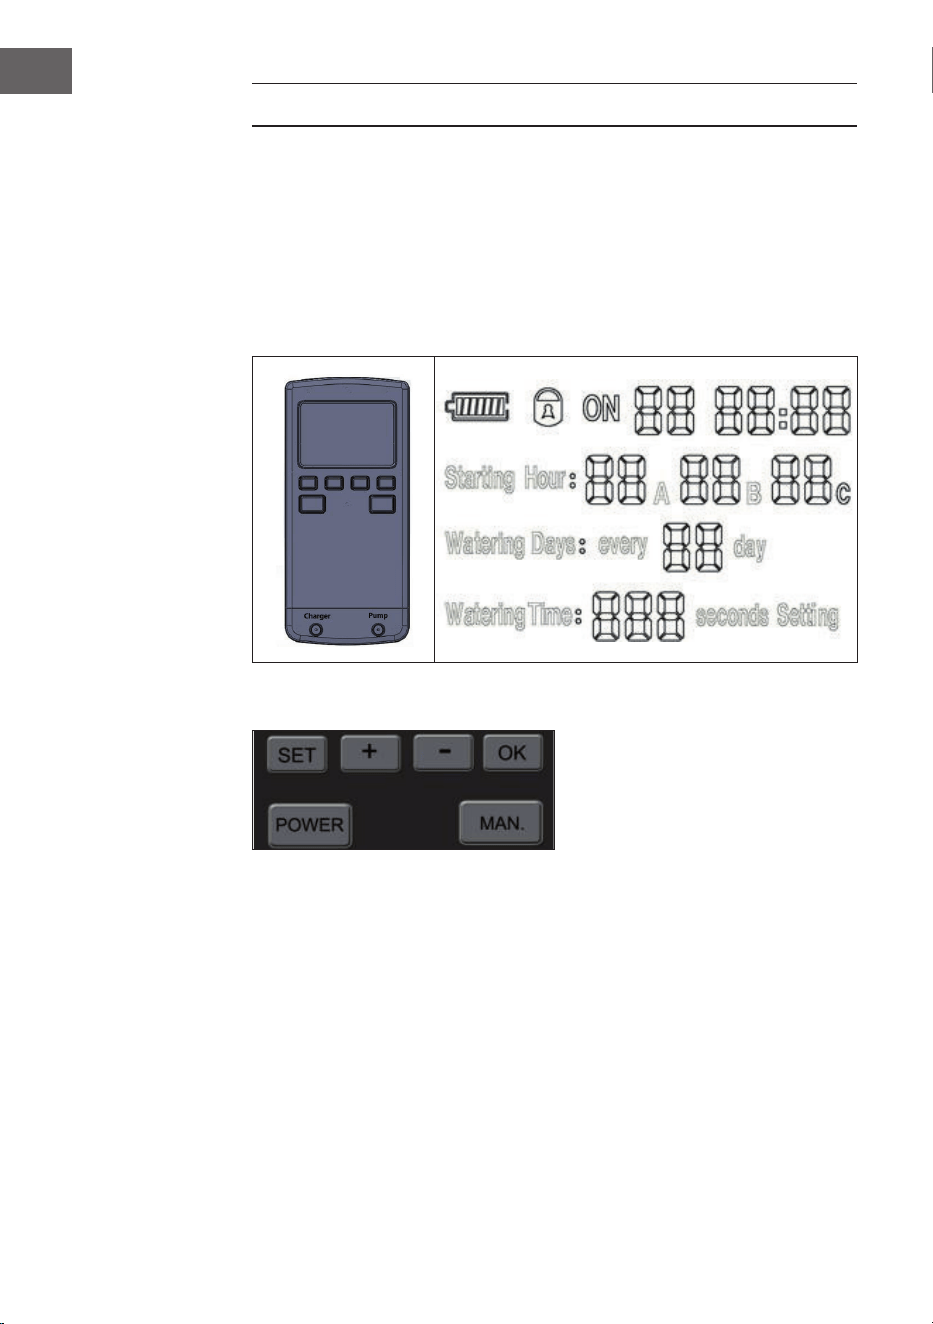
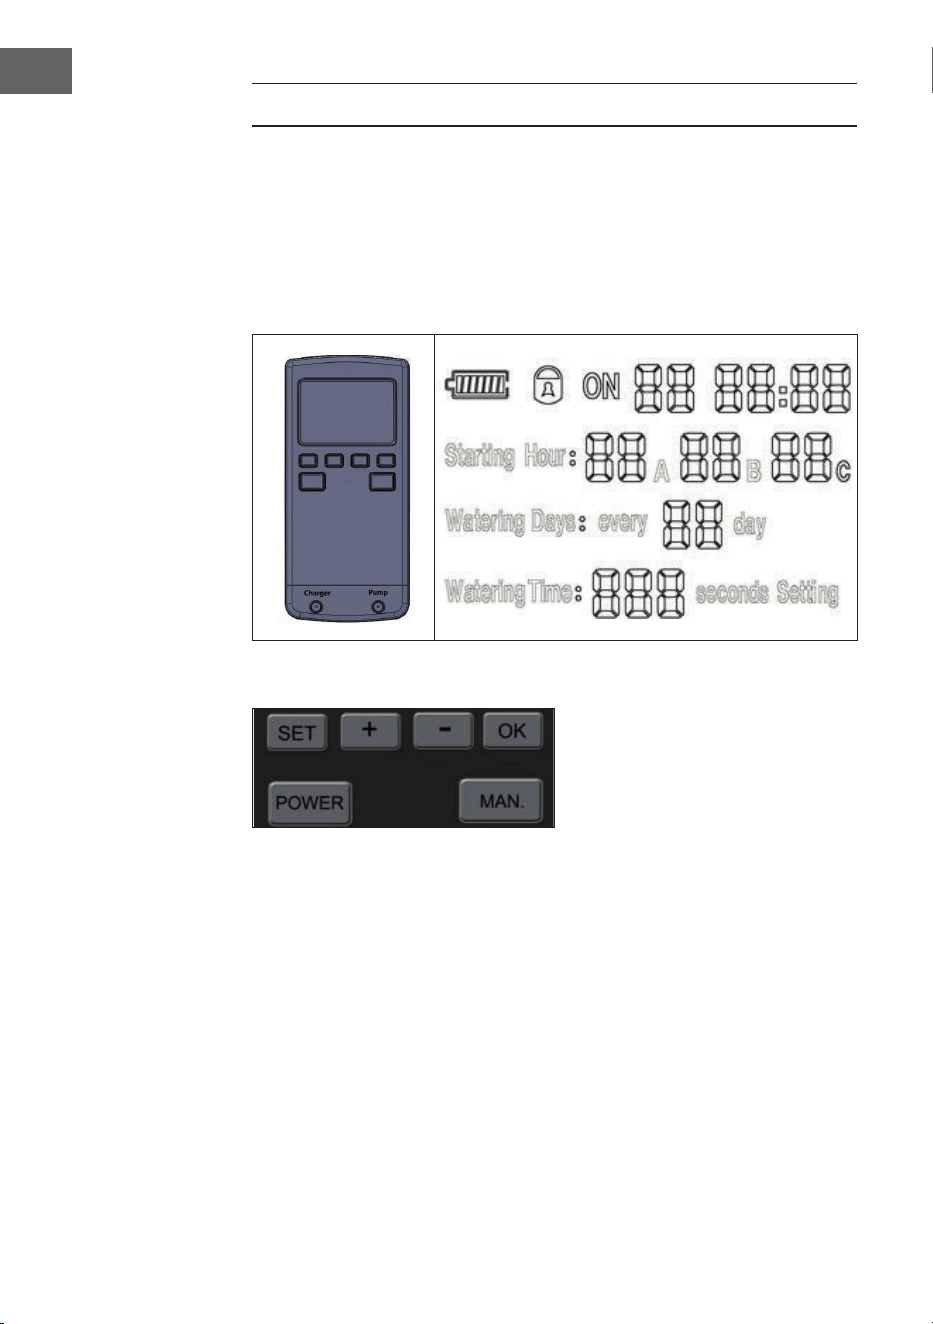
STEUERGERÄT
Drücken und halten Sie den Ein/Aus-Schalter 5 Sekunden lang, um die
Steuerung ein- oder auszuschalten.
Mit dem Steuergerät können Sie die Bewässerung am Morgen oder am
Abend einstellen, wenn das Wasser am wenigsten verdunstet. Das System
bewässert Ihren Garten oder Ihre hängenden Kübel völlig automatisch, je
nach gewähltem Programm. Die Bewässerung wird während Ihres Urlaubs
fortgeführt.
Es gibt zwei Methoden, die Bewässerung zu steuern:
1. Manuelle Steuerung: Die Taste MAN drücken und halten, um die Pumpe
per Hand ein- oder ausschalten.
2. Automatischer Modus: Die Steuerung wässert bis zu drei Mal am Tag zu
einer vorprogrammierten Zeit. „Starting Hour“: Einstellung der Startzeit
des Pumpenbetriebs. Sie können drei Zeiten einstellen. Wenn Sie z. B. 08 A
12 B 18 C eingestellt haben, beginnt der Pumpenbetrieb um 8 Uhr, 12 Uhr
und 18 Uhr. (Wenn Sie nur ein oder zwei Mal am Tag bewässern wollen,
stellen Sie B, C oder beide gleichzeitig auf „00“.

9
DE
3. „Watering Days“: Einstellung der Pumpe an einzelnen Tagen. Wenn
die Einstellung auf „01“ steht, läuft die Pumpe an jedem Tag. Wenn die
Einstellung auf „06“ steht, läuft die Pumpe in einem Intervall von 6 Tagen.
Der am längsten einstellbare Intervall ist 30 Tage.
4. „Watering Time“: Länge der Betriebsdauer der Pumpe. Wenn die
Einstellung „015“ an- zeigt, läuft die Pumpe 15 Sekunden lang. Die
maximale Einstellung ist 600 Sekunden.
Bedientasten
1. Taste SET: Individuelle Einstellungen der Steuerung (Zeit, Datum usw.).
Nach dem Drücken von SET blinkt die jeweilige Funktion im Display und ist
bereit programmiert zu werden. Mit einem weiteren Druck auf SET gehen
Sie zur nächsten Einstellung über und die nächsten Werte einstellen.
2. Taste +: eine Zahl hoch gehen
3. Taste -: eine Zahl runter gehen
4. Taste OK: Einstellungen beenden.
5. Taste POWER: Die Steuerung ein- oder ausschalten. Halten Sie die Taste 5
Sekunden lang gedrückt.
6. Taste MAN: Manuelles Einschalten und Ausschalten der Pumpe. Bei
einmaligem Drücken der Taste startet die Pumpe. Bei erneutem Druck auf
MAN stellt die Pumpe die Arbeit wieder ein. Bei gedrückter MAN-Taste
und gleichzeitigem Drücken der Tasten + und - können Sie die Dauer des
Pumpbetriebs einstellen.
7. Sperrung des Bedienfelds: Halten Sie die + und - gleichzeitig gedrückt.
Damit sind die Tasten gesperrt. Die Tasten + und - gleichzeitig drücken, um
die Tasten wieder zu entsperren.
8. Die Taste SET und die Tasten + und - drücken, um die Zeit zu stellen.

10
DE
FEHLERBEHEBUNG
1. Wenn die Pumpe läuft, aber kein Wasser herauskommt, kann es zu einem
Lufteinschluss im Schlauch gekommen sein. Ziehen Sie den Pfropfen
heraus und nehmen die Pumpe manuell in Betrieb, bis das Wasser ießt,
und stecken den Pfropfen wieder rauf.
2. Die Fernbedienung schaltet sich nicht ein: Schließen Sie das Netzgerät an,
um die Fernbedienung auädt.
3. Überprüfen Sie in regelmäßigen Abständen den Wasserstand und nehmen
Sie das Gehäuse der Pumpe auseinander. Reinigen Sie den Filter innen, um
Verstopfungen zu lösen.
HINWEISE ZUR ENTSORGUNG
Wenn es in Ihrem Land eine gesetzliche Regelung
zur Entsorgung von elektrischen und elektronischen
Geräten gibt, weist dieses Symbol auf dem Produkt
oder auf der Verpackung darauf hin, dass dieses
Produkt nicht im Hausmüll entsorgt werden darf.
Stattdessen muss es zu einer Sammelstelle für das
Recycling von elektrischen und elektronischen Geräten
gebracht werden. Durch regelkonforme Entsorgung
schützen Sie die Umwelt und die Gesundheit
Ihrer Mitmenschen vor negativen Konsequenzen.
Informationen zum Recycling und zur Entsorgung
dieses Produkts, erhalten Sie von Ihrer örtlichen
Verwaltung oder Ihrem Hausmüllentsorgungsdienst.
Dieses Produkt enthält Batterien. Wenn es in Ihrem
Land eine gesetzliche Regelung zur Entsorgung von
Batterien gibt, dürfen die Batterien nicht im Hausmüll
entsorgt werden. Informieren Sie sich über die
örtlichen Bestimmungen zur Entsorgung von Batterien.
Durch regelkonforme Entsorgung schützen Sie die
Umwelt und die Gesundheit Ihrer Mitmenschen vor
negativen Konsequenzen.

11
DE
SPEZIELLE ENTSORGUNGSHINWEISE FÜR
VERBRAUCHER IN DEUTSCHLAND
Entsorgen Sie Ihre Altgeräte fachgerecht. Dadurch wird gewährleistet, dass
die Altgeräte umweltgerecht verwertet und negative Auswirkungen auf die
Umwelt und menschliche Gesundheit vermieden werden. Bei der Entsorgung
sind folgende Regeln zu beachten:
• Jeder Verbraucher ist gesetzlich verpichtet, Elektro- und
Elektronikaltgeräte (Altgeräte) sowie Batterien und Akkus
getrennt vom Hausmüll zu entsorgen. Sie erkennen die
entsprechenden Altgeräte durch folgendes Symbol der
durchgestrichene Mülltonne (WEEE Symbol).
• Sie haben Altbatterien und Altakkumulatoren, die nicht vom Altgerät
umschlossen sind, sowie Lampen, die zerstörungsfrei aus dem Altgerät
entnommen werden können, vor der Abgabe an einer Entsorgungsstelle
vom Altgerät zerstörungsfrei zu trennen.
• Bestimmte Lampen und Leuchtmittel fallen ebenso unter das Elektro- und
Elektronikgesetz und sind dementsprechend wie Altgeräte zu behandeln.
Ausgenommen sind Glühbirnen und Halogenlampen. Entsorgen Sie
Glühbirnen und Halogenlampen bitte über den Hausmüll, sofern Sie nicht
das WEEE Symbol tragen.
• Jeder Verbraucher ist für das Löschen von personenbezogenen Daten auf
dem Elektro- bzw. Elektronikgerät selbst verantwortlich.
Rücknahmepicht der Vertreiber
Vertreiber mit einer Verkaufsäche für Elektro- und Elektronikgeräte von
mindestens 400 Quadratmetern sowie Vertreiber von Lebensmitteln mit einer
Gesamtverkaufäche von mindestens 800 Quadratmetern, die mehrmals im
Kalenderjahr oder dauerhaft Elektro- und Elektronikgeräte anbieten und auf
dem Markt bereitstellen, sind verpichtet,
1 bei der Abgabe eines neuen Elektro- oder Elektronikgerätes an einen
Endnutzer ein Altgerät des Endnutzers der gleichen Geräteart, das
im Wesentlichen die gleichen Funktionen wie das neue Gerät erfüllt,
am Ort der Abgabe oder in unmittelbarer Nähe hierzu unentgeltlich
zurückzunehmen und
2 auf Verlangen des Endnutzers Altgeräte, die in keiner äußeren
Abmessung größer als 25 Zentimeter sind, im Einzelhandelsgeschäft
oder in unmittelbarer Nähe hierzu unentgeltlich zurückzunehmen; die
Rücknahme darf nicht an den Kauf eines Elektro- oder Elektronikgerätes
geknüpft werden und ist auf drei Altgeräte pro Geräteart beschränkt.

12
DE
• Bei einem Vertrieb unter Verwendung von Fernkommunikationsmitteln
ist die unentgeltliche Abholung am Ort der Abgabe auf Elektro- und
Elektronikgeräte der Kategorien 1, 2 und 4 gemäß § 2 Abs. 1 ElektroG,
nämlich „Wärmeüberträger“, „Bildschirmgeräte“ (Oberäche von mehr
als 100 cm²) oder „Großgeräte“ (letztere mit mindestens einer äußeren
Abmessung über 50Zentimeter) beschränkt. Für andere Elektro- und
Elektronikgeräte (Kategorien 3, 5, 6) ist eine Rückgabemöglichkeit in
zumutbarer Entfernung zum jeweiligen Endnutzer zu gewährleisten.
• Altgeräte dürfen kostenlos auf dem lokalen Wertstoffhof oder in
folgenden Sammelstellen in Ihrer Nähe abgegeben werden: www.take-e-
back.de
• Für Elektro- und Elektronikgeräte der Kategorien 1, 2 und 4 an bieten
wir auch die Möglichkeit einer unentgeltlichen Abholung am Ort der
Abgabe. Beim Kauf eines Neugeräts haben sie die Möglichkeit eine
Altgerätabholung über die Webseite auszuwählen.
• Batterien können überall dort kostenfrei zurückgegeben werden, wo sie
verkauft werden (z. B. Super-, Bau-, Drogeriemarkt). Auch Wertstoff- und
Recyclinghöfe nehmen Batterien zurück. Sie können Batterien auch per
Post an uns zurücksenden. Altbatterien in haushaltsüblichen Mengen
können Sie direkt bei uns von Montag bis Freitag zwischen 08:00 und
16:00 Uhr unter der folgenden Adresse unentgeltlich zurückgeben:
Chal-Tec Fulllment GmbH
Norddeutschlandstr. 3
47475 Kamp-Lintfort
• Wichtig zu beachten ist, dass Lithiumbatterien aus Sicherheitsgründen
vor der Rückgabe gegen Kurzschluss gesichert werden müssen (z. B. durch
Abkleben der Pole).
• Finden sich unter der durchgestrichenen Mülltonne auf der Batterie
zusätzlich die Zeichen Cd, Hg oder Pb ist das ein Hinweis darauf, dass die
Batterie gefährliche Schadstoffe enthält. (»Cd« steht für Cadmium, »Pb«
für Blei und »Hg« für Quecksilber).
Hinweis zur Abfallvermeidung
Indem Sie die Lebensdauer Ihrer Altgeräte verlängern, tragen Sie dazu
bei, Ressourcen efzient zu nutzen und zusätzlichen Müll zu vermeiden.
Die Lebensdauer Ihrer Altgeräte können Sie verlängern indem Sie defekte
Altgeräte reparieren lassen. Wenn sich Ihr Altgerät in gutem Zustand bendet,
könnten Sie es spenden, verschenken oder verkaufen.

13
EN
Dear customer,
Congratulations on the purchase of your appliance.
Please read the following instructions carefully and
follow them to prevent potential damage. We accept
no liability for damage caused by disregarding the
instructions or improper use. Please scan the QR code to
access the latest operating instructions and for further
information about the product.
CONTENTS
Package contents: 14
Construction 16
control unit 18
Troubleshooting 20
Disposal instructions 20
MANUFACTURER & IMPORTER (UK)
Manufacturer:
Chal-Tec GmbH, Wallstraße 16, 10179 Berlin, Germany.
Importer for Great Britain:
Berlin Brands Group UK Limited
PO Box 42
272 Kensington High Street
London, W8 6ND
United Kingdom

14
EN
PACKAGE CONTENTS:
Picture Part Quantity
control unit 1
water pump 1
power supply unit 1
Anti-siphon set 1
Four-way clutch 1

15
EN
Picture Part Quantity
three-way clutch 30
Graft tube 10
Drip 60
Hose (7/9 mm x 18 m) 1
Hose (4/6 mm x 12 m) 1

16
EN
CONSTRUCTION
1. Hose (7/9)
2. Hose (4/6 mm)
3. Large four-port connector
4. Four-port connector
5. Drip
6. Hose and plug
7. power supply unit
8. control unit
9. Pump
10. Odour trap system
control unit
Pump
17
EN
Tie the end of the cable with a string or rubber band (not included).
Note: The control unit is intended for indoor use only.
Remember that you need a water reservoir that you ll with water.
Attach the non-return valve to the top of the tank.
Back ow-/
Drain lock

18
EN
CONTROL UNIT
Press and hold the on/off switch for 5 seconds to switch the control on or off.
With the control unit you can set the irrigation in the morning or in the
evening when the water evaporates the least. The system will water your
garden or hanging tubs completely automatically, depending on the selected
programmes. Watering continues during your holiday.
There are two methods to control the watering:
1. Manual control: Press and hold the MAN button to switch the pump on or
off manually.
2. Automatic mode: The water control unit waters up to three times a day at
a pre-programmed time. "Starting Hour": Setting the starting time of the
pump operation. You can set three times. For example, if you set 08 A 12 B
18 C, pump operation starts at 8 am, 12 pm and 6 pm. (If you only want to
water once or twice a day, set B, C or both to "00" at the same time.

19
EN
3. "Watering Days": Setting the pump on individual days. If the setting is
"01", the pump runs every day. If the setting is "06", the pump runs at an
interval of 6 days. The longest interval that can be set is 30 days.
4. "Watering Time": Length of the operating time of the pump. When the
setting shows "015", the pump runs for 15 seconds. The maximum setting
is 600 seconds.
Operating keys
1. SET key: Individual settings of the control (time, date, etc.). After pressing
SET, the respective function ashes in the display and is ready to be
programmed. Press SET again to move to the next setting and set the next
values.
2. Key +: go up one number
3. Key -: go down one number
4. OK button: Exit settings.
5. POWER key: Switch the control unit on or off. Press and hold the key for 5
seconds.
6. MAN key: Manual switching on and off of the pump. Press the key once
to start the pump. When MAN is pressed again, the pump stops working
again. By pressing the MAN button and simultaneously pressing the + and
- buttons, you can set the duration of pump operation.
7. Locking the control panel: Press and hold the + and - simultaneously. This
locks the keys. Press the + and - keys simultaneously to unlock the keys
again.
8. Press the SET key and the + and - keys to set the time.
20
EN
TROUBLESHOOTING
1. If the pump is running but no water will come out, there may have been an
air pocket in the hose. Pull out the plug and start the pump manually until
the water ows and then put the plug back on.
2. The remote control does not switch on: Connect the power supply unit to
charge the remote control.
3. Check the water level at regular intervals and disassemble the pump
housing. Clean the inside of the lter to loosen blockages.
DISPOSAL INSTRUCTIONS
If there is a legal regulation in your country regarding
the disposal of electrical and electronic equipment,
this symbol on the product or on the packaging
indicates that this product must not be disposed of
with household waste. Instead, it must be taken to
a collection point for the recycling of electrical and
electronic equipment. By disposing of this product in
accordance with the regulations, you are protecting
the environment and the health of those around you
from negative consequences. For information on
recycling and disposal of this product, contact your
local government or household waste disposal service.
This product contains batteries. If there is a legal
regulation in your country regarding the disposal of
batteries, the batteries must not be disposed of in
household waste. Consult your local regulations for
the disposal of batteries. By disposing of this product
in accordance with the regulations, you are protecting
the environment and the health of those around you
from negative consequences.

21
ES
Estimado cliente:
Le felicitamos por la adquisición de este producto. Lea
atentamente el siguiente manual y siga cuidadosamente
las instrucciones de uso con el n de evitar posibles
daños. La empresa no se responsabiliza de los daños
ocasionados por un uso indebido del producto o por
haber desatendido las indicaciones de seguridad.
Escanee el siguiente código QR para obtener acceso al
manual de usuario más reciente y otra información sobre
el producto.
ÍNDICE
Contenido del envío 22
Montaje 24
Controlador 26
Reparación de anomalías 28
Indicaciones para la retirada del aparato 28
FABRICANTE E IMPORTADOR (RU)
IMPORTADOR:
Chal-Tec GmbH, Wallstraße 16, 10179 Berlín, Alemania.
Importador para el Reino Unido:
Berlin Brands Group UK Limited
PO Box 42
272 Kensington High Street
London, W8 6ND
United Kingdom

22
ES
CONTENIDO DEL ENVÍO
Imagen Piezas Cantidad
Controlador 1
Bomba de agua 1
Fuente de alimentación 1
Set antisifón 1
Acople cuádruple 1

23
ES
Imagen Pieza Cantidad
Acople triple 30
Tapón de manguera 10
Sistema de goteo 60
Manguera (7/9 mm x 18m) 1
Manguera (4/6 mm x 12 m) 1

24
ES
MONTAJE
1. Manguera (7/9 mm)
2. Manguera (4/6 mm)
3. Conector grande para cuadro conexiones
4. Conector para cuatro conexiones
5. Sistema de goteo
6. Manguera y tapón
7. Fuente de alimentación
8. Controlador
9. Bomba
10 Sistema de trampa de drenaje
Controlador
Bomba
25
ES
Apriete un extremo del cable con un cordel o una goma elástica (no incluidos
en el envío).
Nota: el controlador solo está previsto para el uso en espacios interiores.
Piense que necesitará un depósito de agua que debe llenar.
Instale en la parte superior del recipiente la válvula de retención.
Válvula de
retención / tapón
de drenaje
26
ES
CONTROLADOR
Mantenga presionado el interruptor on/off durante 5 segundos para encender
o apagar el controlador.
Con el controlador puede congurar el riego para las mañanas o las noches,
momentos en los que el agua se evapora en menor medida. El sistema riega su
jardín o sus macetas de manera automática según el programa seleccionado. El
riego continúa en su ausencia por vacaciones.
Existen dos métodos de controlar el riego.
1. Control manual: mantenga presionada la tecla MAN para activar o
desactivar la bomba a mano.
2. Modo automático: el control riega hasta tres veces al día a una hora
precongurada. "Starting Hour": conguración de la hora de inicio del
funcionamiento de la bomba. Puede establecer tres horas diferentes. Si,
por ejemplo, ha elegido 08 A 12 B 18 C, la bomba comienza a funcionar a
las 8:00, a las 12:00 y a las 18:00. (Si solo desea regar una o dos veces al
día, ajuste B, C o ambos valores a "00").

27
ES
3. "Watering Days": conguración de la bomba en días concretos. Si el ajuste
se sitúa en "01", la bomba funcionará cada día. Si el ajuste se sitúa en "06",
la bomba funcionará en intervalos de 6 días. El intervalo más largo para
congurar es de 30 días.
4. "Watering Time": periodo de funcionamiento de la bomba. Si en la
conguración aparece "015", la bomba funcionará durante 15 segundos. El
ajuste máximo son 600 segundos.
Teclas de control
1. Tecla SET: ajustes individuales del control (hora, fecha, etc.) Después de
presionar SET, la función correspondiente parpadea en pantalla y estará
lista para ser programada. Pulsando de nuevo SET accederá al siguiente
ajuste para congurar el siguiente valor.
2. Tecla +: aumentar un valor
3. Tecla -: reducir un valor
4. Tecla OK: nalizar ajustes
5. Tecla POWER: activar o desactivar el control. Mantenga la tecla
presionada durante 5 segundos.
6. Tecla MAN: activación y desactivación manual de la bomba. Al tocar una
vez la tecla se inicia la bomba. Pulsando de nuevo MAN, la bomba detiene
su actividad. Manteniendo pulsada la tecla MAN al mismo tiempo que + y -,
puede congurar la duración del funcionamiento de la bomba.
7. Bloqueo del panel de control: mantenga presionadas las teclas + y -
simultáneamente. De este modo, las teclas están bloqueadas. Presione
simultáneamente las teclas + y - para volver a desbloquearlas.
8. Presione la tecla SET y + y - para seleccionar la hora.
28
ES
REPARACIÓN DE ANOMALÍAS
1. Si la bomba está en funcionamiento pero no sale agua, puede deberse a
la presencia de aire en la manguera. Para ello, retire los tapones y ponga
la bomba en funcionamiento manual hasta que el agua uya para volver a
encajar de nuevo los tapones.
2. El mando a distancia no se enciende: conecte la fuente de alimentación
para cargar el mando a distancia.
3. Compruebe en intervalos periódicos el nivel del agua y desmonte la
carcasa de la bomba. Limpie el ltro interior para retirar las obstrucciones.
INDICACIONES PARA LA RETIRADA DEL
APARATO
Si en su país existe una disposición legal relativa a la
eliminación de aparatos eléctricos y electrónicos, este
símbolo estampado en el producto o en el embalaje
advierte de que no debe eliminarse como residuo
doméstico. En lugar de ello, debe depositarse en un
punto de recogida de reciclaje de aparatos eléctricos y
electrónicos. Una gestión adecuada de estos residuos
previene consecuencias potencialmente negativas
para el medio ambiente y la salud de las personas.
Para obtener información más detallada sobre el
reciclaje de este producto, póngase en contacto con
su ayuntamiento o con el servicio de eliminación de
residuos domésticos.
Este producto contiene pilas. Si en su país existe
una normativa para la eliminación de baterías, estas
no deben ser arrojadas al cubo de la basura común.
Infórmese sobre la legislación de su país que regula la
retirada y eliminación de las pilas y baterías. Al eliminar
los residuos de acuerdo con las normas, proteges el
medio ambiente y la salud de tus semejantes de las
consecuencias negativas.

29
FR
Cher client, chère cliente,
Toutes nos félicitations pour l’acquisition de ce nouvel
appareil. Lisez attentivement les indications suivantes
et suivez-les pour éviter d'éventuels dommages. Nous
ne saurions être tenus pour responsables des dommages
dus au non-respect des consignes et à la mauvaise
utilisation de l’appareil. Scannez le QR-Code pour
obtenir la dernière version du mode d'emploi ainsi que
d'autres informations concernant le produit :
SOMMAIRE
Contenu de l‘emballage 30
Installation 32
Unité de commande 34
Résolution des problèmes 36
Informations sur le recyclage 36
FABRICANT ET IMPORTATEUR (GB)
Fabricant :
Chal-Tec GmbH, Wallstraße 16, 10179 Berlin, Allemagne.
Importateur pour la Grande Bretagne:
Berlin Brands Group UK Limited
PO Box 42
272 Kensington High Street
London, W8 6ND
United Kingdom

30
FR
CONTENU DE L'EMBALLAGE
Illustration Pièce Nombre
Unité de commande 1
Pompe à eau 1
Adaptateur secteur 1
Ensemble anti siphon 1
Quadruple raccordement 1

31
FR
Illustration Pièce Nombre
Triple raccordement 30
Bouchez le tuyau 10
Compte-gouttes 60
Tuyau (7/9 mm x 18 m) 1
Tuyau (4/6 mm x 12 m) 1

32
FR
INSTALLATION
1. Tuyau (7/9 mm)
2. Tuyau (4/6 mm)
3. Grand raccordement à 4 branchements
4. Raccordement à 4 branchements
5. Compte-gouttes
6. Tuyau et bouchon
7. Adaptateur secteur
8. Unité de commande
9. Pompe
10. Système de piège à odeurs
Unité de commande
Pompe
33
FR
Attachez l'extrémité du câble avec un morceau de celle ou un élastique (non
inclus).
Remarque : L'unité de commande est uniquement destinée à une utilisation
en intérieur.
N'oubliez pas que vous avez besoin d'un réservoir d'eau à remplir.
Fixez le clapet anti-retour au sommet du récipient.
Retour de ux /
Bouchon de
vidange

34
FR
UNITÉ DE COMMANDE
Appuyez sur le bouton d'alimentation et maintenez-le pendant 5 secondes
pour allumer ou éteindre l'unité de commande.
Le contrôleur permet d'arrêter l'arrosage le matin ou le soir, lorsque l'eau
s'évapore le moins. Le système irrigue votre jardin ou vos jardinières
suspendues de manière entièrement automatique, selon le programme
sélectionné. L'irrigation se poursuivra pendant vos vacances.
Il existe deux méthodes de contrôle de l'arrosage :
1. Contrôle manuel : Appuyez sur la touche MAN et maintenez-la pour
allumer ou éteindre manuellement la pompe.
2. Mode automatique : Le contrôleur arrose jusqu'à trois fois par jour à une
heure préprogrammée. "Starting Hour" : réglage de l'heure de démarrage
de la pompe. Vous pouvez régler trois horaires. Par exemple, si vous avez
réglé 08 A 12 B 18 C, la pompe démarrera à 8h, 12h et 18h. (Si vous ne
souhaitez arroser qu'une ou deux fois par jour, réglez B, C ou les deux sur
"00" en même temps.

35
FR
3. "Watering Days" : réglage de la pompe certains jours seulement. Lorsque
le réglage est sur "01", la pompe fonctionne tous les jours. Lorsque le
réglage est sur "06", la pompe fonctionne tous les 6 jours. L'intervalle le
plus long réglable est de 30 jours.
4. "Watering Time": durée de fonctionnement de la pompe. Lorsque le
réglage afche "015", la pompe fonctionne pendant 15 secondes. La durée
maximale de fonctionnement est de 600 secondes.
Touches de commande
1. Touche SET: Paramètres de contrôle individuels (heure, date, etc.). Après
avoir appuyé sur SET, la fonction correspondante clignote à l'écran et est
prête à être programmée. Appuyez à nouveau sur SET pour passer au
paramètre suivant et dénir les valeurs suivantes.
2. Touche +: augmenter d'un nombre
3. Touche -: diminuer d'un nombre
4. Touche OK: pour terminer les réglages
5. Touche POWER: allumez ou éteignez le contrôleur. Maintenez la touche 5
secondes.
6. Touche MAN: pour allumer et éteindre la pompe manuellement. Appuyez
une fois pour allumer la pompe. Appuyez une nouvelle fois sur MAN pour
éteindre la pompe. Maintenez la touche MAN et appuyez simultanément
sur les touches + et - pour régler la durée de fonctionnement de la pompe.
7. Verrouillage du panneau de commande : maintenez simultanément +
et -. Les touches sont alors verrouillées. Appuyez simultanément sur les
touches + et - pour déverrouiller à nouveau.
8. Appuyez sur la touche SET et sur les touches + et - pour régler l'heure.

36
FR
RÉSOLUTION DES PROBLÈMES
1. Si la pompe fonctionne mais que l'eau ne sort pas, il peut y avoir de l'air
dans le tuyau. Retirez le bouchon et actionnez manuellement la pompe
jusqu'à ce que l'eau s'écoule, puis remettez le bouchon en place.
2. La télécommande ne s'allume pas : connectez l'adaptateur secteur pour
charger la télécommande.
3. Vériez régulièrement le niveau d'eau et démontez le carter de la pompe.
Nettoyez l'intérieur du ltre pour éliminer les blocages.
INFORMATIONS SUR LE RECYCLAGE
Si l'élimination des appareils électriques et
électroniques est réglementée dans votre pays, ce
symbole sur le produit ou sur l'emballage indique
qu'il ne doit pas être mis au rebut avec les ordures
ménagères. Vous devez l'acheminer vers un point de
collecte pour le recyclage des appareils électriques et
électroniques. En respectant des règles de recyclage,
vous protégez l'environnement et la santé de vos
semblables des conséquences négatives. Pour plus
d'informations sur le recyclage et l'élimination de
ce produit, contactez votre autorité locale ou votre
service d'élimination des déchets ménagers.
Ce produit contient des piles. S'il existe une
réglementation légale pour la mise au rebut des piles
dans votre pays, ne les jetez pas avec les ordures
ménagères Renseignez-vous sur les réglementations
locales concernant la mise au rebut des piles. En
respectant des règles de recyclage, vous protégez
l'environnement et la santé de vos semblables des
conséquences négatives.

37
IT
Gentile cliente,
la ringraziamo per l'acquisto del dispositivo. La
preghiamo di leggere attentamente le seguenti istruzioni
per l’uso e di seguirle per evitare possibili danni. Non ci
assumiamo alcuna responsabilità per danni scaturiti da
una mancata osservazione delle avvertenze di sicurezza
e da un uso improprio del dispositivo. Scansionare il
codice QR seguente per accedere al manuale d'uso più
attuale e per ricevere informazioni sul prodotto.
INDICE
Volume di consegna 38
Montaggio 40
Dispositivo di controllo 42
Correzione degli errori 44
Avviso di smaltimento 44
PRODUTTORE E IMPORTATORE (UK)
Produttore:
Chal-Tec GmbH, Wallstraße 16, 10179 Berlino, Germania.
Importatore per la Gran Bretagna:
Berlin Brands Group UK Limited
PO Box 42
272 Kensington High Street
London, W8 6ND
United Kingdom

38
IT
VOLUME DI CONSEGNA
Immagine Componente Quantità
Dispositivo di controllo 1
Pompa dell'acqua 1
Alimentatore 1
Set antisifone 1
Connettore a quattro punti 1

39
IT
Immagine Componente Quantità
Connettore a tre punti 30
Innesto tubo essibile 10
Gocciolatore 60
Tubo essibile (7/9 mm x 18 m) 1
Tubo essibile (4/6 mm x 12 m) 1

40
IT
MONTAGGIO
1. Tubo essibile (7/9 mm)
2. Tubo essibile (4/6 mm)
3. Grande connettore a quattro punti
4. Connettore a quattro punti
5. Gocciolatore
6. Tubo e innesto
7. Alimentatore
8. Dispositivo di controllo
9. Pompa
10. Impianto del sifone
Dispositivo di
controllo
Pompa

41
IT
Legare saldamente l'estremità del cavo con uno spago o una fascetta in gomma
(non inclusi in consegna).
Nota: il dispositivo di controllo è progettato solo per l'uso in locali chiusi.
Tenere presente che è necessario un serbatoio pieno d'acqua.
Montare il blocco di ri usso nella parte alta del contenitore.
Blocco di ri usso /
scarico

42
IT
DISPOSITIVO DI CONTROLLO
Tenere premuto on/off per 5 secondi per accendere o spegnere il dispositivo di
controllo.
Con il dispositivo di controllo è possibile impostare l'irrigazione per il mattino
o la sera, quando l'acqua evapora meno. L'impianto irriga il giardino o i vasi
pensili automaticamente in base al programma selezionato. L'irrigazione viene
portata avanti anche mentre si è in vacanza.
Ci sono due metodi per gestire l'irrigazione:
1. Controllo manuale: tenere premuto MAN per accendere o spegnere
manualmente la pompa.
2. Modalità automatica: il dispositivo di controllo irriga no a tre volte al
giorno in base all'ora programmata. "Starting Hour": impostare l'avvio
della pompa. Possono essere impostate tre orari. Se si imposta ad es. 08 A
B 18 C, la pompa si avvia alle ore 8, 12 e 18. (Se si vuole irrigare solo una
o due volte al giorno, impostare B, C o entrambi contemporaneamente su
"00").

43
IT
3. "Watering Days": impostazione della pompa per giorni singoli. Se
l'impostazione si trova su "01", la pompa funziona tutti i giorni. Se
l'impostazione si trova su "06", la pompa funziona in un intervallo di 6
giorni. L'intervallo impostabile più lungo è di 30 giorni.
4. "Watering Time": durata di funzionamento della pompa. Se l'impostazione
mostra "015", la pompa funziona per 15 secondi. L'impostazione massima è
di 600 secondi.
Tasti di controllo
1. SET: impostazioni di controllo individuali (ora, data, ecc.). Dopo aver
premuto SET, lampeggia la funzione corrispondente sul display e si può
procedere alla programmazione. Premendo SET un'altra volta, si passa
all'impostazione successiva e si regolano i valori seguenti.
2. +: incrementare di una cifra
3. -: diminuire di una cifra
4. OK: terminare le impostazioni.
5. POWER: accendere o spegnere il dispositivo di controllo. Tenerlo premuto
per 5 secondi.
6. MAN: accensione e spegnimento manuale della pompa. Premendolo una
volta si avvia la pompa. Premendolo di nuovo si arresta la pompa. Se si
preme MAN e + o - contemporaneamente, è possibile impostare la durata
di funzionamento della pompa.
7. Blocco del pannello di controllo: tenere premuti contemporaneamente +
e -. I tasti sono bloccati. Premere di nuovo + e - contemporaneamente per
sbloccarli.
8. Premere SET e + o - per impostare la durata.

44
IT
CORREZIONE DEGLI ERRORI
1. Se la pompa è in funzione ma non esce acqua, può esserci aria intrappolata
all'interno del tubo. Togliere l'innesto e avviare manualmente la pompa
no a quando l'acqua scorre. Riposizionare l'innesto.
2. Il telecomando non si accende: accendere l'alimentatore in modo da
caricare il telecomando.
3. Controllare il livello dell'acqua a intervalli regolari e disassemblare
l'alloggiamento della pompa. Pulire il ltro all'interno per rimuovere
otturazioni.
AVVISO DI SMALTIMENTO
Se nel vostro Paese sono vigenti regolamenti
legislativi relativi allo smaltimento di dispositivi
elettrici ed elettronici, questo simbolo sul prodotto o
sull'imballaggio indica che non è consentito smaltire
questo prodotto nei riuti casalinghi. Il dispositivo
deve invece essere portato in un centro di raccolta
per il riciclaggio di dispositivi elettrici ed elettronici.
Lo smaltimento conforme tutela l'ambiente e
salvaguarda la salute del prossimo da conseguenze
negative. Informazioni riguardanti il riciclaggio e lo
smaltimento di questo prodotto sono disponibili presso
l'amministrazione locale o il servizio di smaltimento dei
riuti.
Questo prodotto contiene batterie. Se nel vostro
Paese sono presenti regolamenti legislativi per lo
smaltimento di batterie, queste non possono essere
smaltite nei riuti casalinghi. Informarsi in relazione
alle normative locali sullo smaltimento di batterie. Lo
smaltimento conforme tutela l'ambiente e salvaguarda
la salute del prossimo da conseguenze negative.