
Greenkeeper Solar
Bewässerungssystem
Irrigation System
Sistema de riego
Système d‘irrigation
Sistema di irrigazione
100034626


3
DE
Sehr geehrter Kunde,
wir gratulieren Ihnen zum Erwerb Ihres Gerätes.
Lesen Sie die folgenden Hinweise sorgfältig durch und
befolgen Sie diese, um möglichen Schäden vorzubeugen.
Für Schäden, die durch Missachtung der Hinweise und
unsachgemäßen Gebrauch entstehen, übernehmen wir
keine Haftung. Scannen Sie den folgenden QR-Code,
um Zugriff auf die aktuellste Bedienungsanleitung und
weitere Informationen rund um das Produkt zu erhalten:
INHALTSVERZEICHNIS
Lieferumfang 4
Installation 4
Bedienung des Steuergerätes 6
Spezielle Entsorgungshinweise für Verbraucher in Deutschland 8
Hinweise zur Entsorgung 10
Hersteller & Importeur (UK) 10
TECHNISCHE DATEN
Artikelnummer 10034626
Stromversorgung Lithium-Akku
English 11
Español 17
Français 23
Italiano 29
4
DE
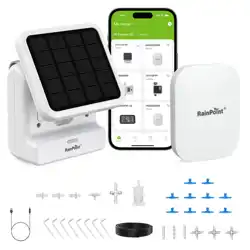
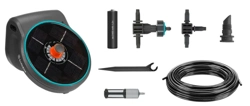
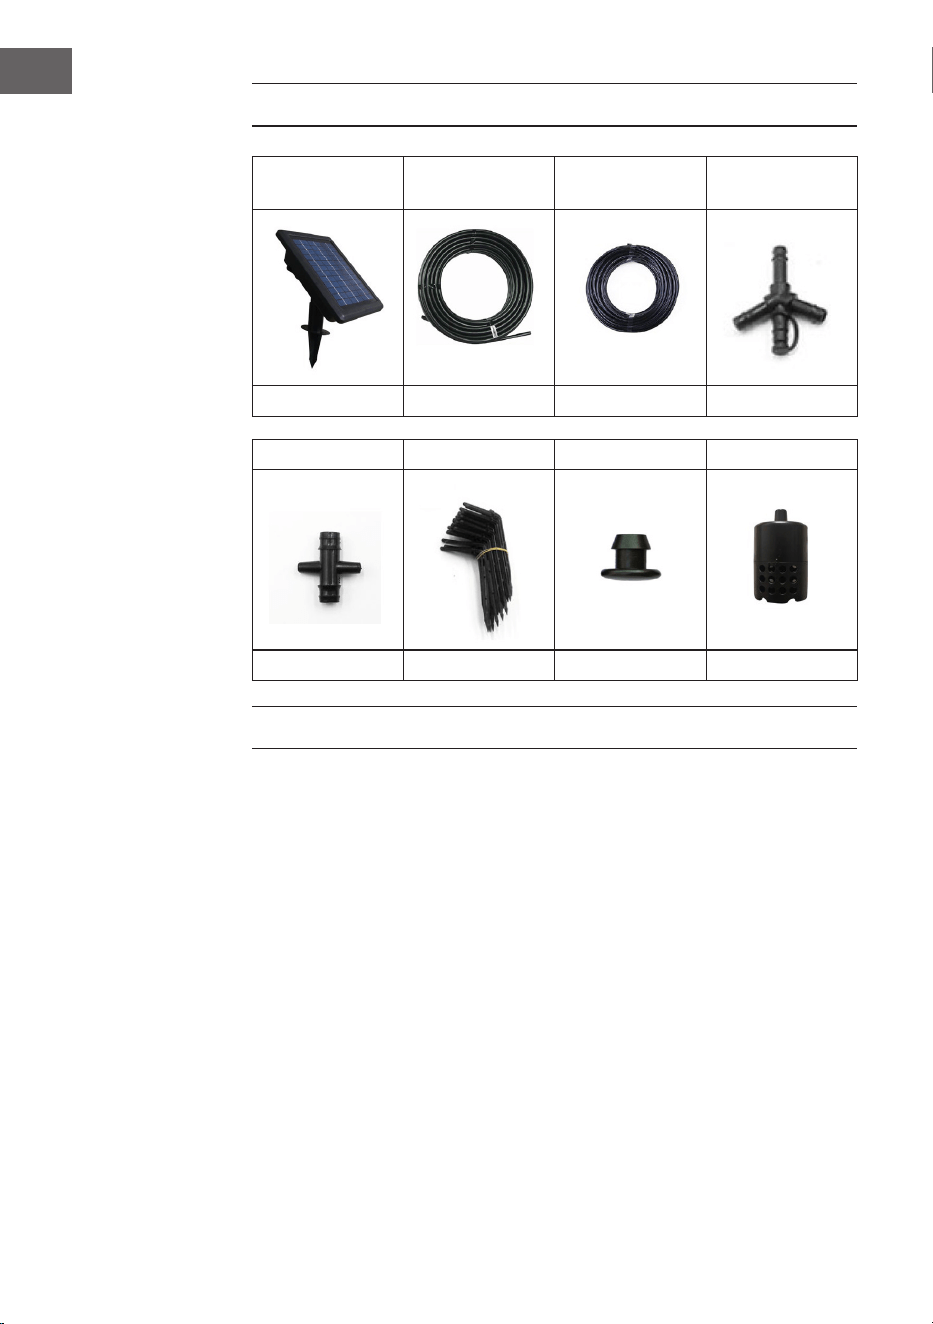
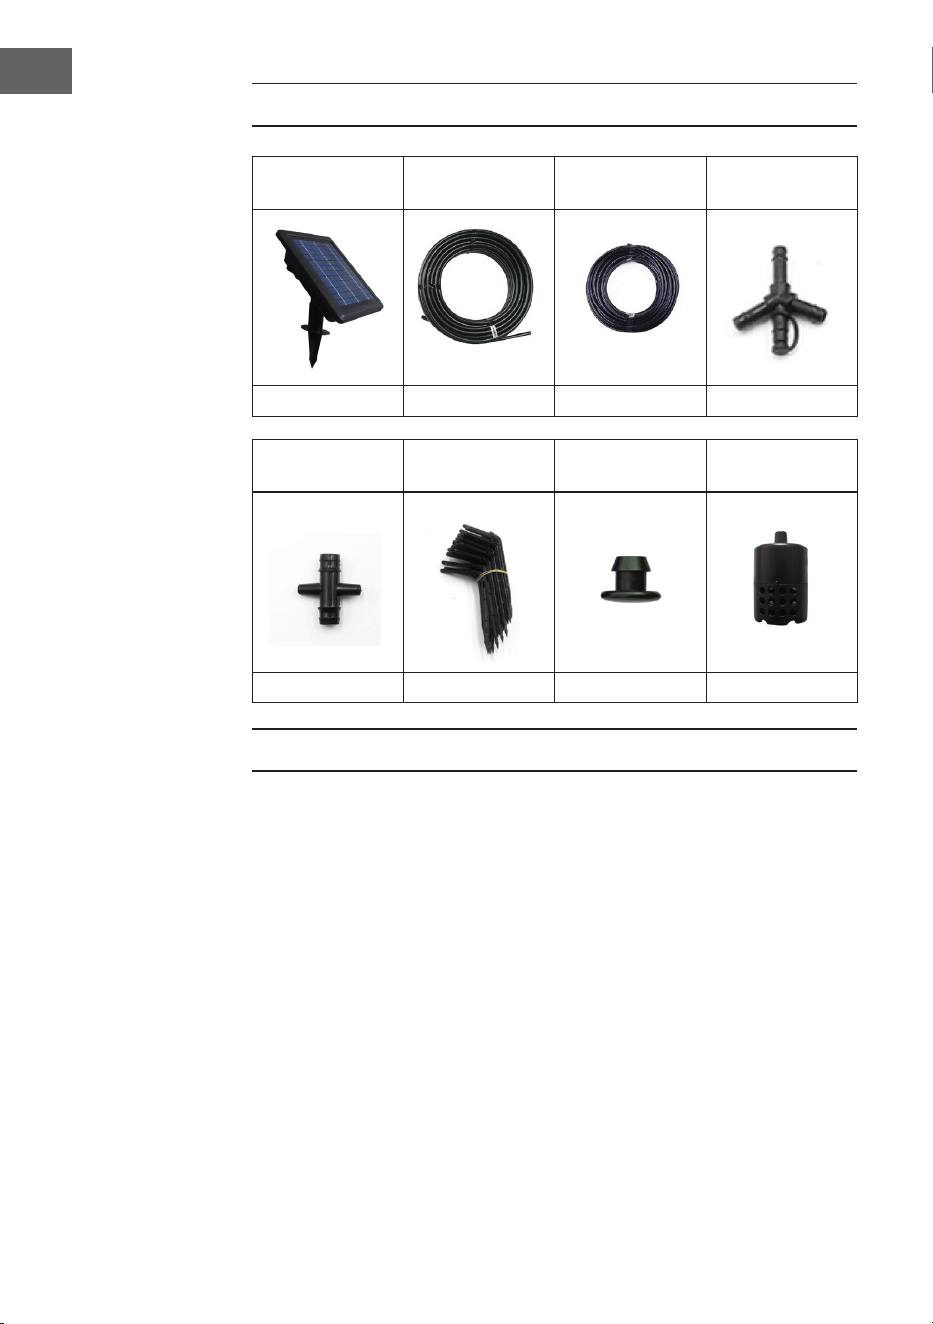
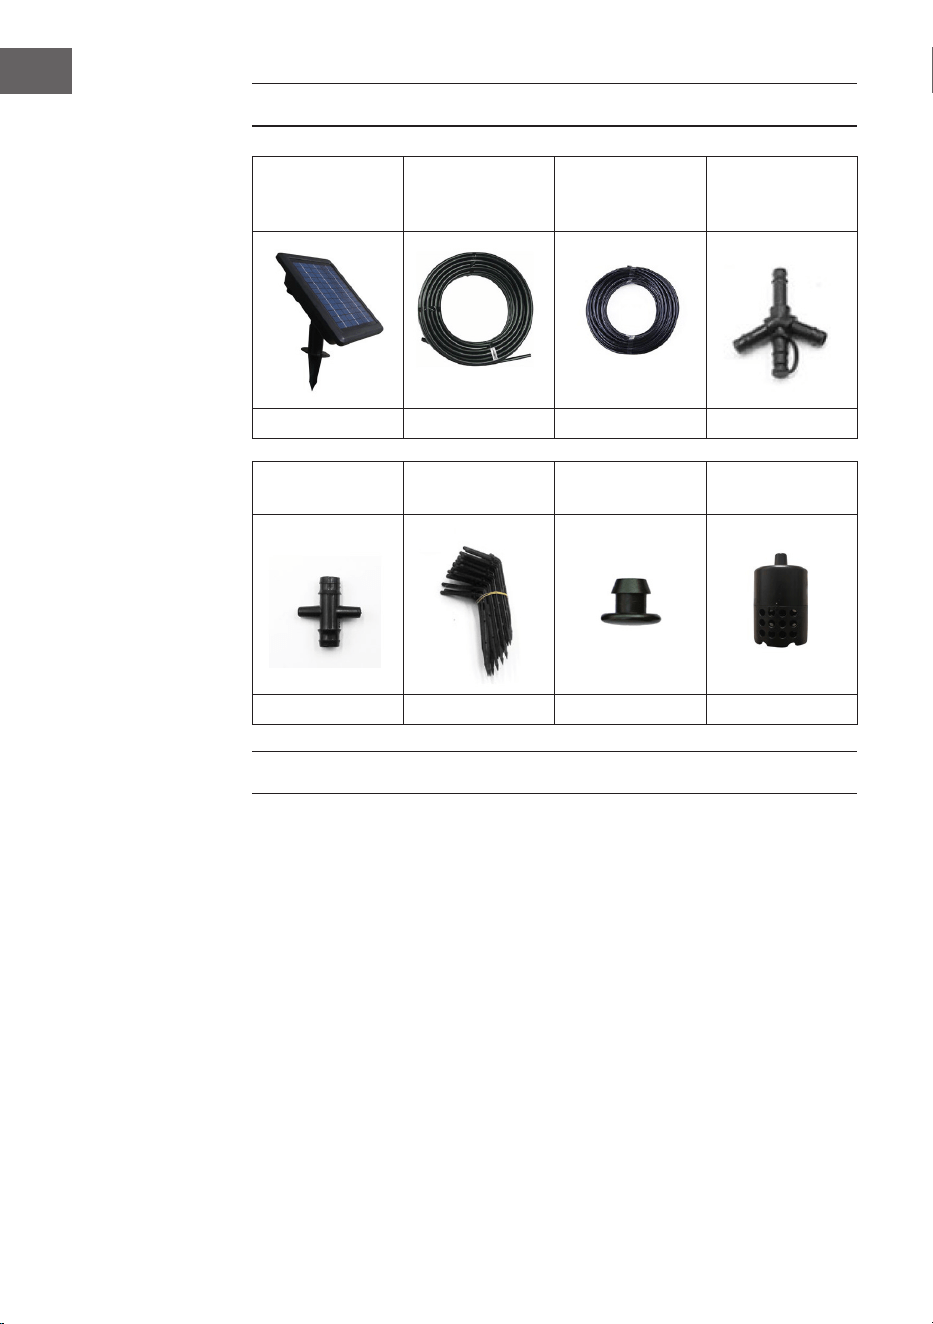
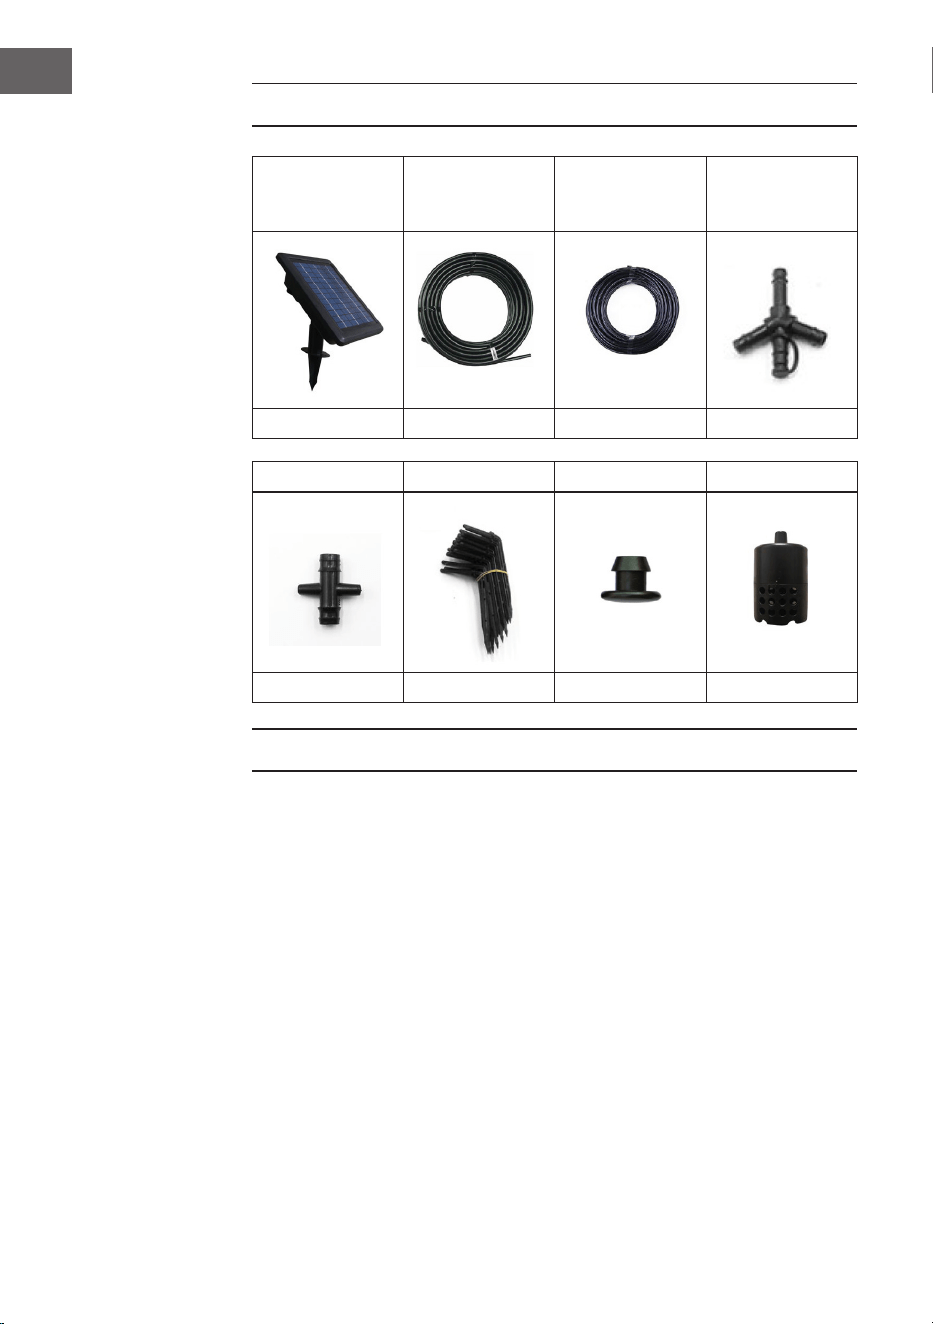
LIEFERUMFANG
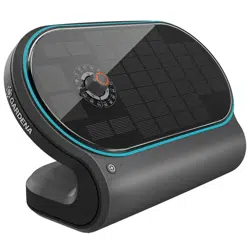
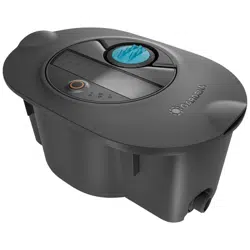
Solarpanel und
Steuergerät
Schlauch (7/9) Schlauch (4/6) Y-förmige
Viererkupplung
1x 18 m 12 m 1x
Viererkupplung Tropfer Schlauch-Stopfen Filter
20x 40x 3x 1x
INSTALLATION
1 Schneiden Sie den dicken Schlauch entsprechend der Tiefe des Wasser-
Behälters zu und setzen Sie den Filter in den Schlauch ein.
2 Stecken Sie das andere Ende des Schlauches in den Eingang des
Steuergerätes.
3 Schneiden Sie ein weiteres Stück dicken Schlauch entsprechend des
Abstandes zwischen Steuergerät und den erstem Panzen zu. Befestigen
Sie die Y-förmige Viererkupplung am Ende des Schlauchs.
4 Schneiden Sie dann den dicken und den dünnen Schlauch entsprechend
der Abstände zwischen den Panzen zu. Verwenden Sie die
Schlauchanschlüsse, um alle Topfpanzen zu verbinden. Verbinden Sie
eines der Schlauchende mit einem Tropfer und stecken Sie den Tropfer in
die Blumenerde. Wenn die Panze sehr groß ist, verwenden Sie mehr als
einen Tropfer, um genügend Wasser zu erhalten.
5 Stecken Sie zum Schluss die Schlauch-Stopfen in die offenen
Schlauchenden.
5
DE
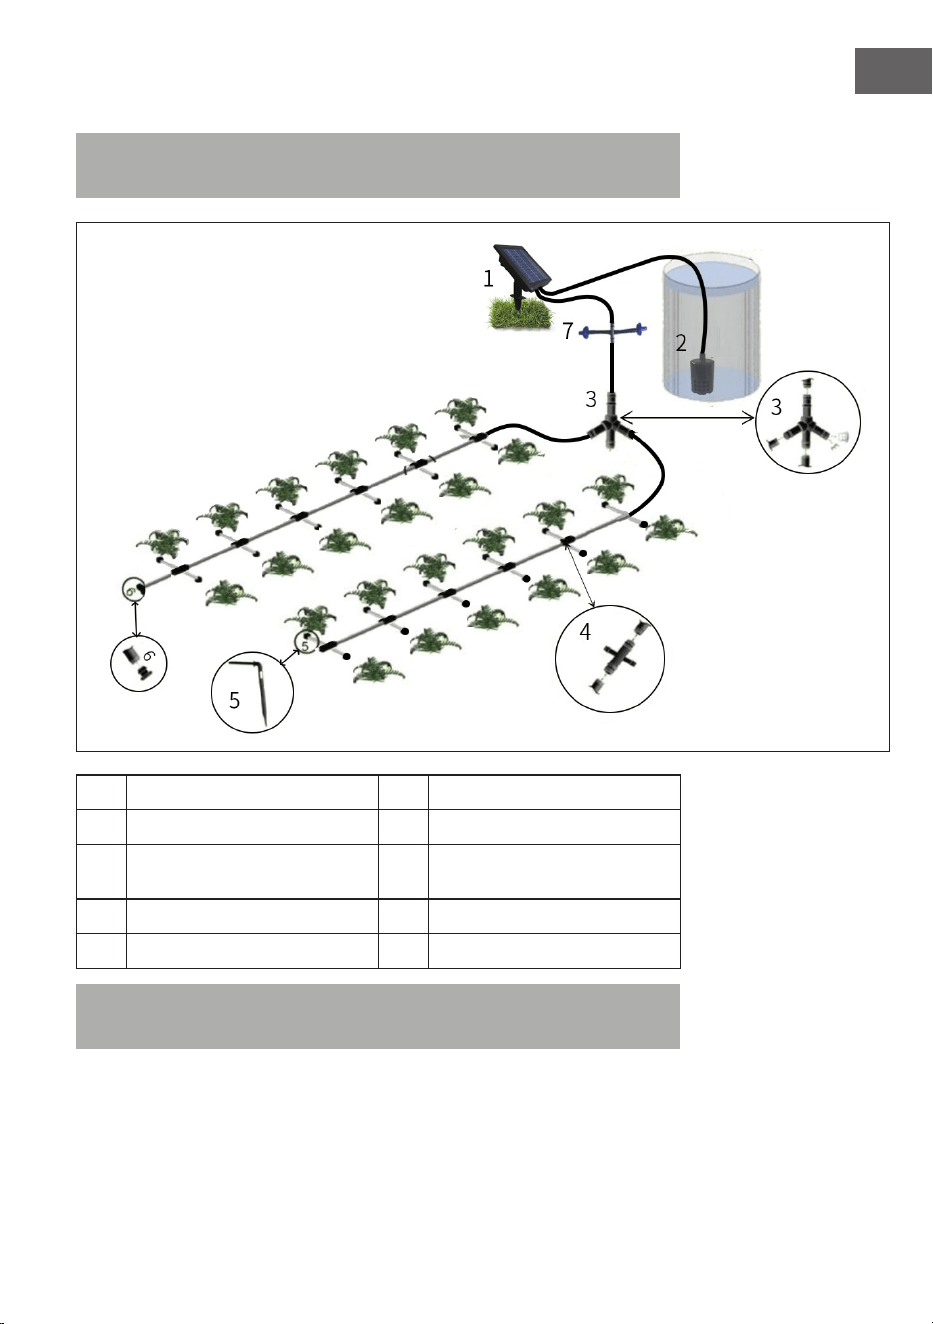
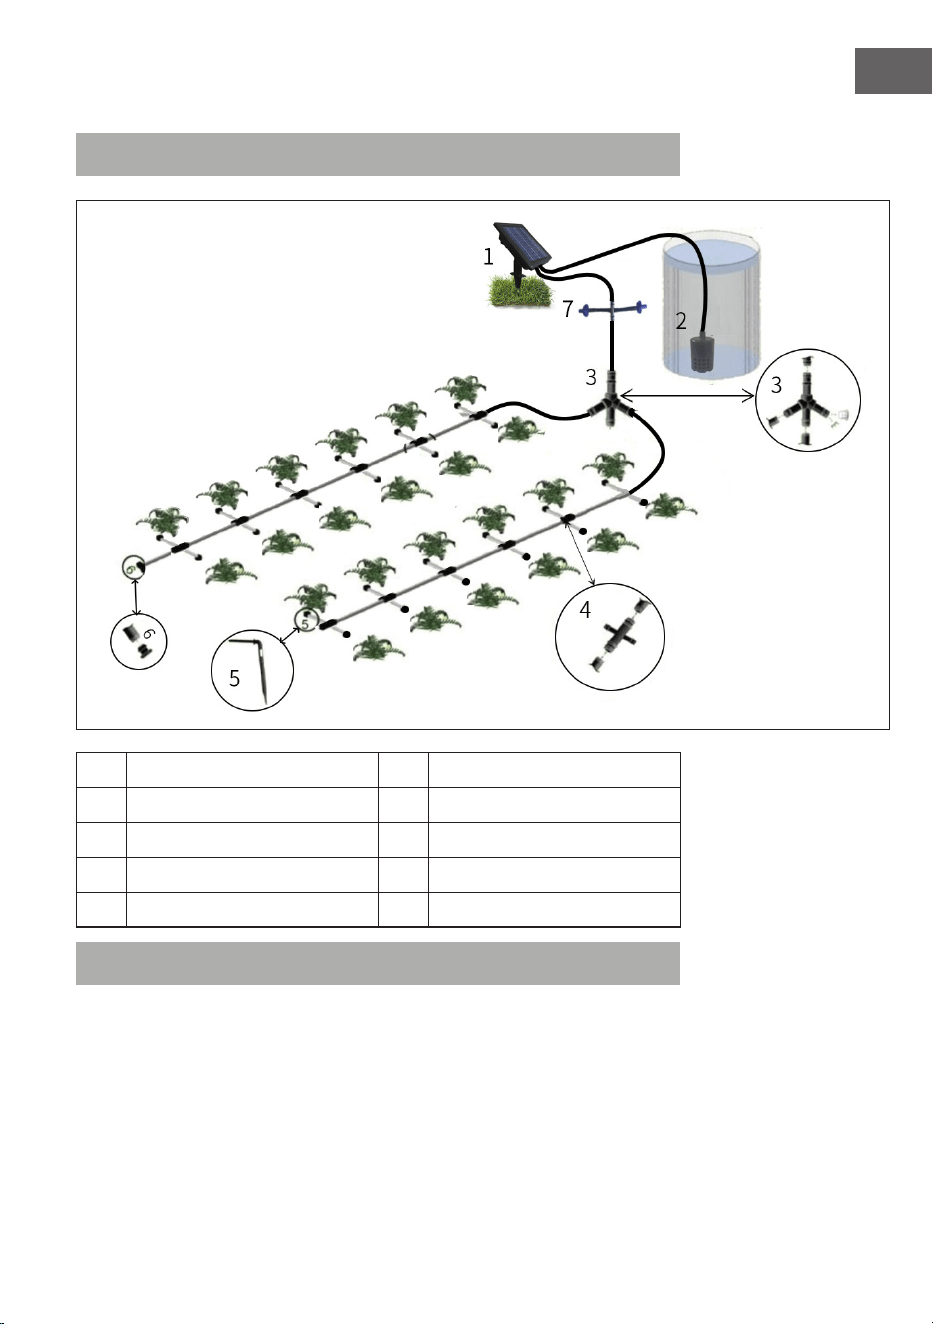
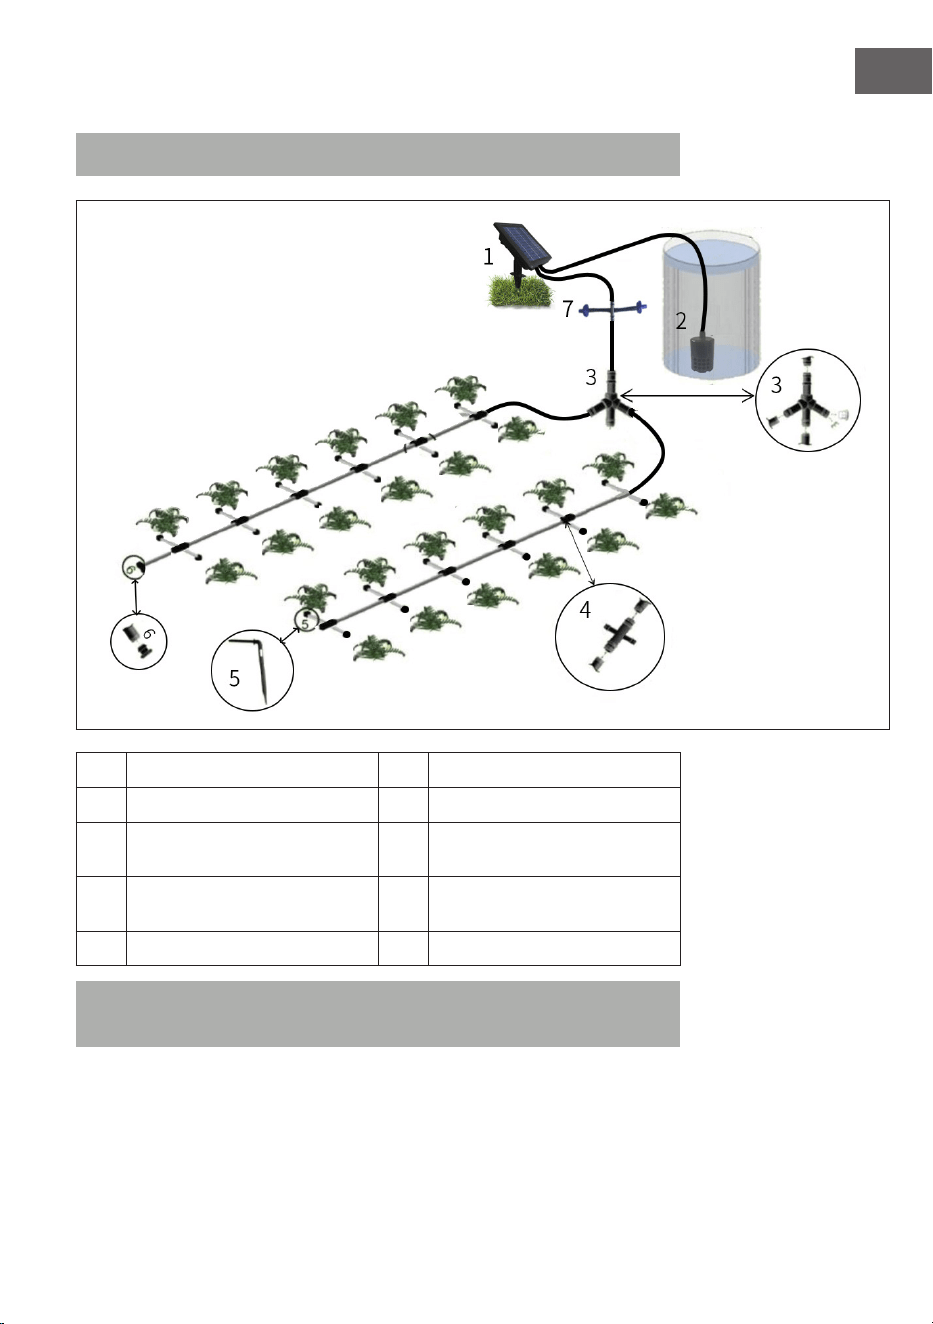
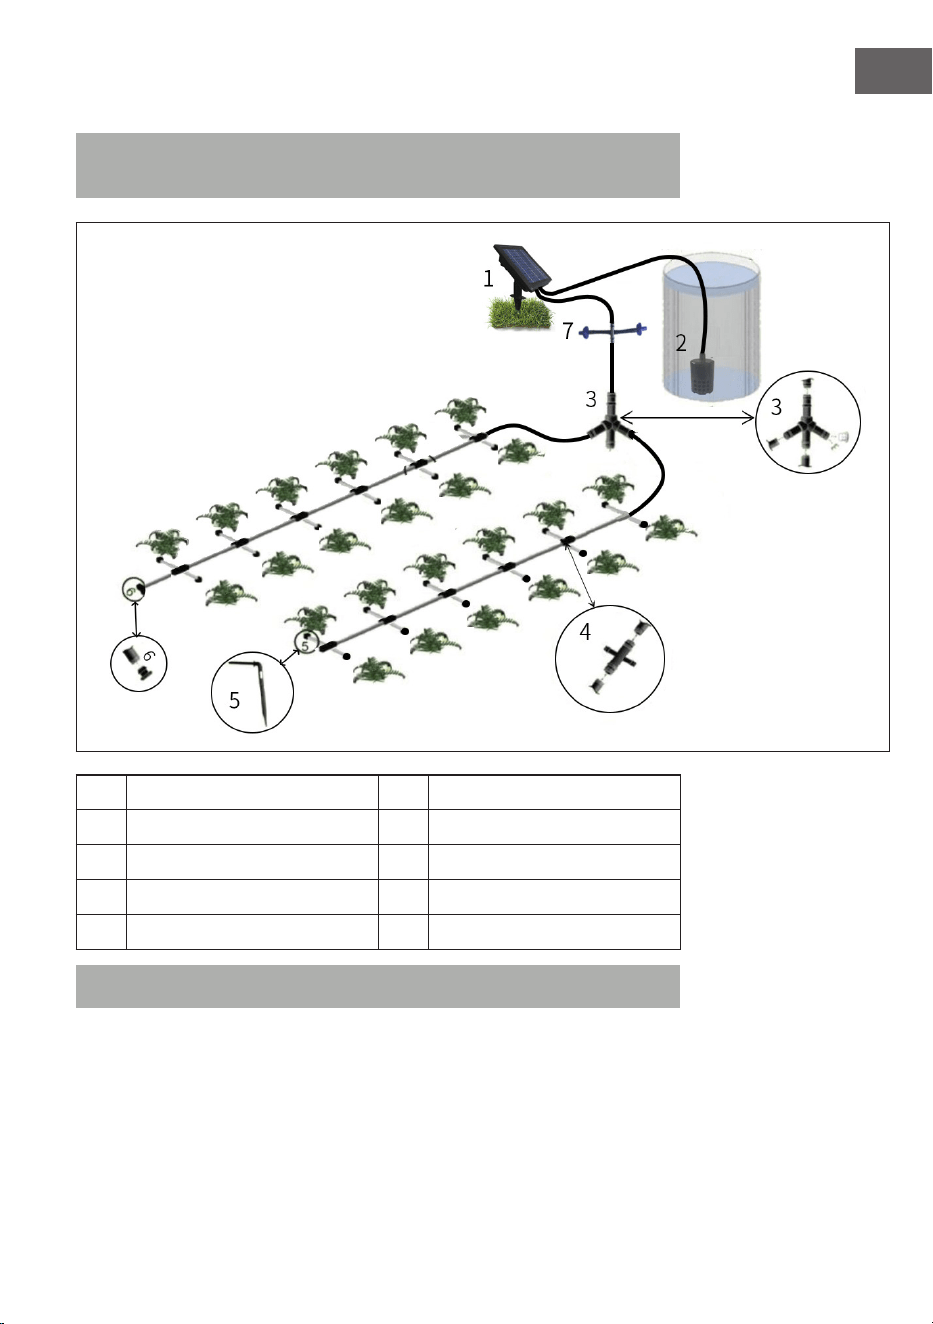
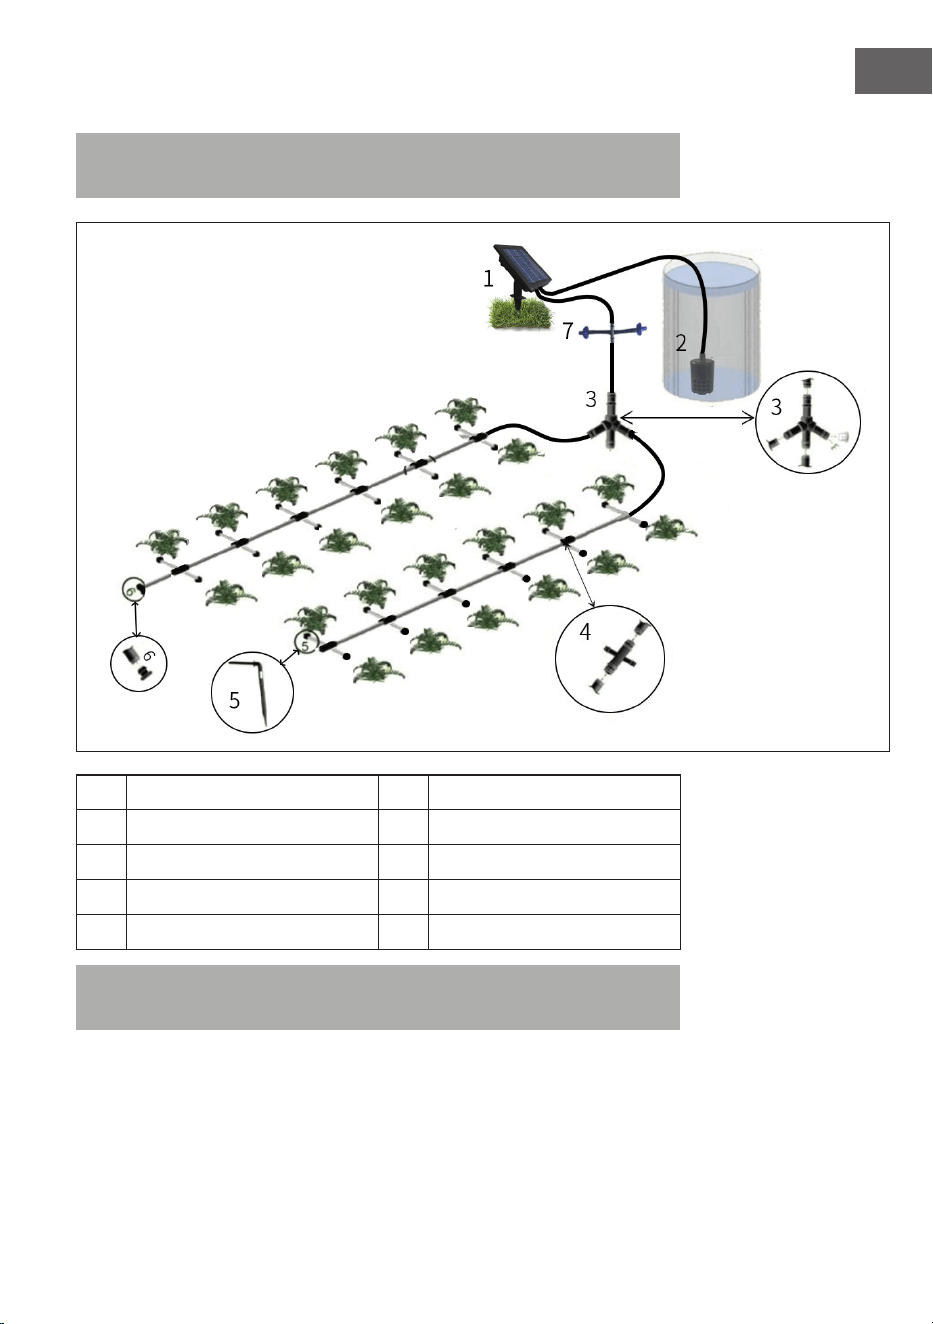
Installationsschema
Hinweis: Die abgebildeten Teile können vom tatsächlichen Lieferumfang
abweichen.
1
Solarbewässerungssystem
6
Schlauchstopfen
2
Filter
7
Anti-Siphon
3
Y-förmige vierteilige
Kupplung
8
Schlauch (7/9 mm)
4
Vierteilige Kupplung
9
Schlauch (4/6 mm)
5
Tropfer
Wichtig: Platzieren Sie den Anti-Siphon an einer Stelle, die höher ist, als das
Wasserfass.
6
DE
BEDIENUNG DES STEUERGERÄTES
Hinweis: Das Steuergerät ist für den Außeneinsatz in Gärten und auf
Balkonen vorgesehen. Es kann an der Wand montiert oder in den Boden
gesteckt werden.
Funktionsweise
Sie können das Steuergerät so einstellen, dass es Ihre Blumen und Panzen
früh am Morgen oder spät in der Nacht bewässert und befeuchtet, wenn das
Wasser am wenigsten verdunstet. Das Steuergerät bewässert Ihren Garten
und Ihre Blumenkästen vollautomatisch nach dem von Ihnen eingestellten
Programm. So können Sie sicherstellen, dass Ihre Panzen auch dann
bewässert werden, wenn Sie im Urlaub sind.
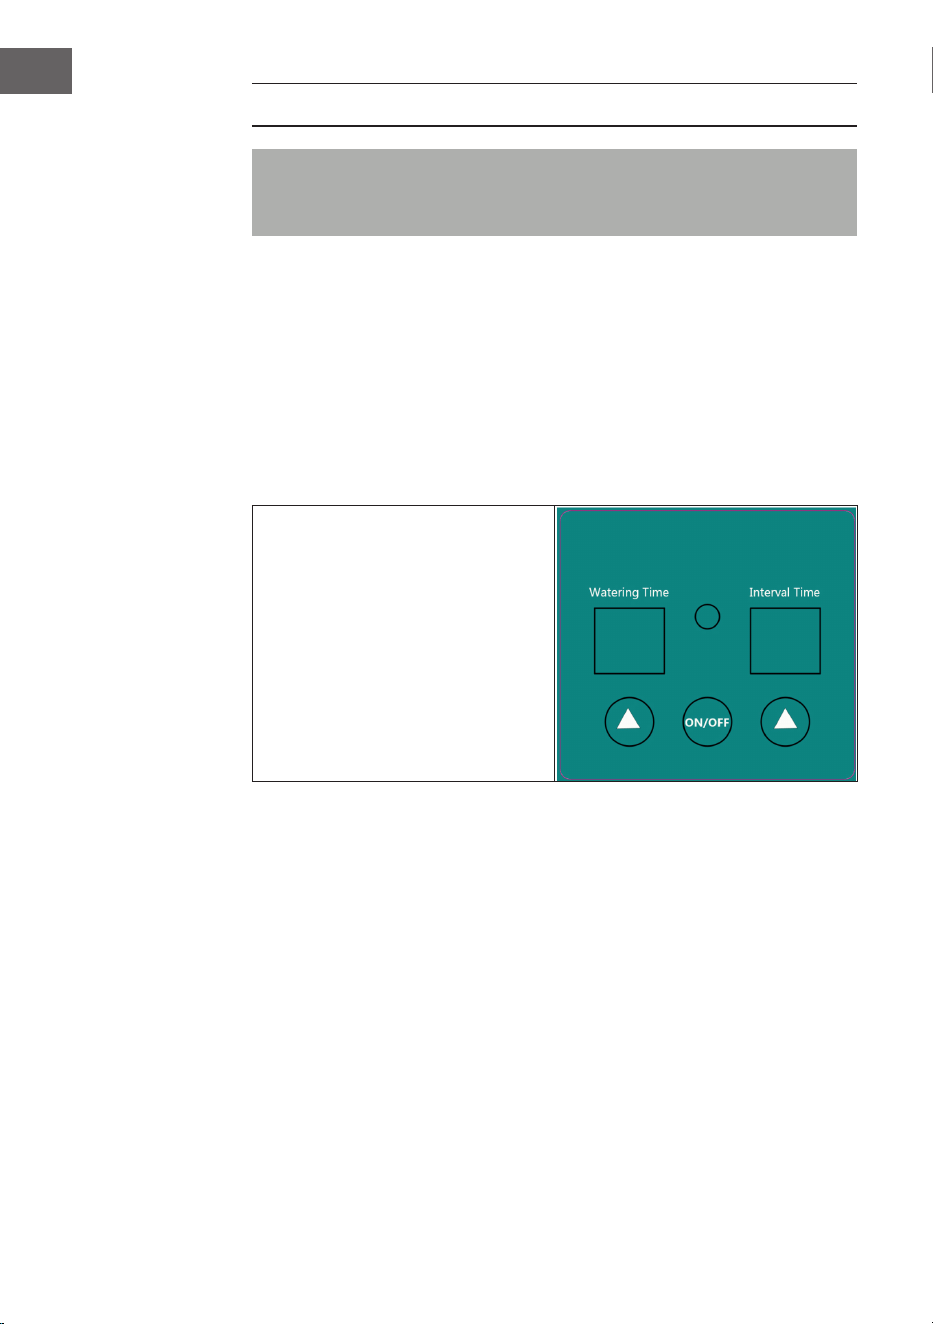
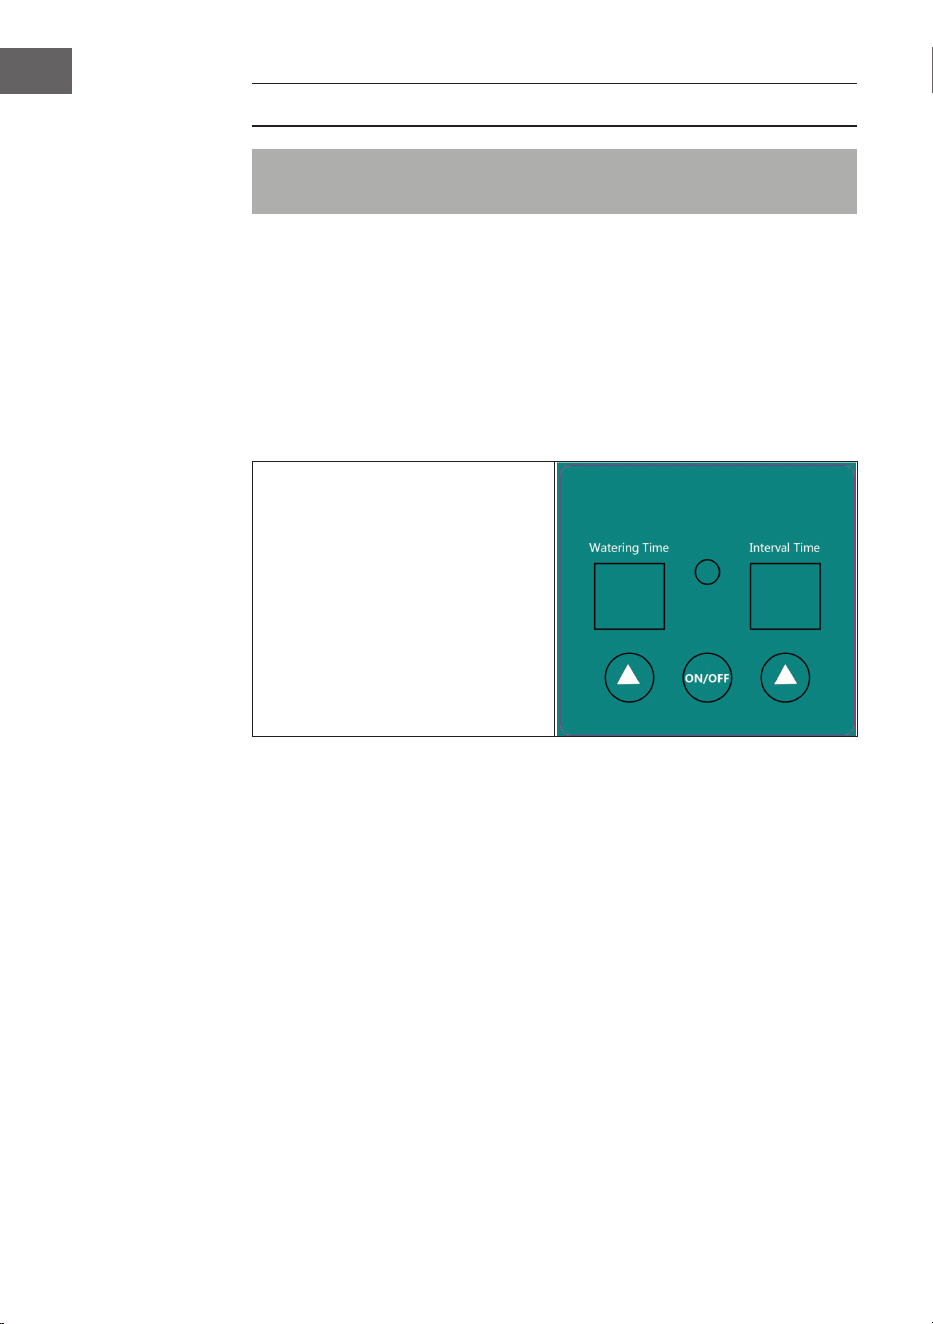
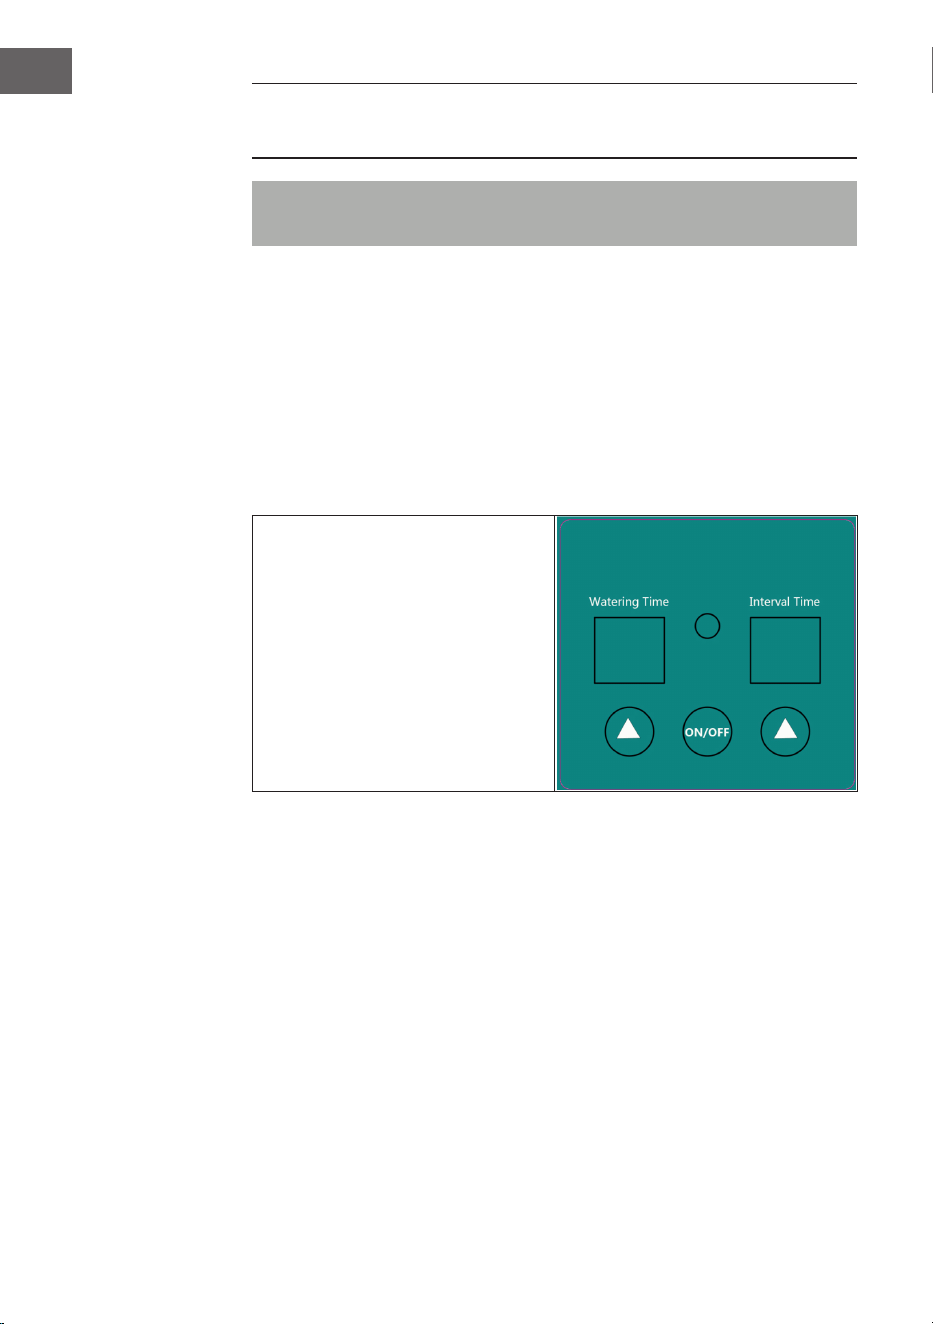
Anzeigen
• Das Fenster [Watering Time]
zeigt an, wie lange die Pumpe
arbeitet. Die Zahlen 10-50
stehen für 10-50 Sekunden. H1-
H9 für 1-9 Minuten.
• Das Fenster [Interval Time]
zeigt die Zeitintervalle an. HH
bedeutet alle 12 Stunden, die
Zahlen 1-15 stehen für alle 1-15
Tage.
Zustände der Kontroll-Leuchte auf dem Steuergerät
• Die Kontroll-Leuchte blinkt langsam (alle 10 Sekunden): Das Steuergerät
wurde programmiert.
• Die Kontroll-Leuchte blinkt schnell: Die Pumpe arbeitet.
• Die Kontroll-Leuchte leuchtet durchgängig: Das Steuergerät wartet auf
die Programmierung.
• Die Kontroll-Leuchte leuchtet rot: Die Batterie ist leer. Die Pumpe stoppt
und wartet, bis die Batterien wieder aufgeladen wurden. Sobald die
Batterien aufgeladen sind, leuchtet die Kontroll-Leuchte grün.

7
DE
So benutzen Sie die Tasten
• Drücken Sie auf die Taste ON/OFF, um das Pumpe manuell ein- und
auszuschalten.
• Drücken Sie während der Programmierung auf die Taste ON/OFF, um die
Bewässerungszeit (Watering Time) und die Zeitintervalle (Interval Time)
zu erhöhen oder zu verringern.
• Drücken Sie auf die Pfeiltaste, um die Zeit einzustellen.
• Drücken Sie beide Pfeiltasten gleichzeitig, um alle Tasten zu blockieren
oder wieder freizuschalten.
Hinweis: Wenn sich zu wenig Wasser im Wasser-Behälter bendet, ertönt
ein Alarm. Drücken Sie auf eine beliebige Taste, um den Alarm zu beenden.
Programmierbeispiel
Drücken Sie eine der Tasten. Das Licht geht an und das Steuergerät ist bereit
für die Programmierung.
Beispiel: Sie möchten, dass Ihre Panzen jeden Morgen um 9 Uhr für 50
Sekunden bewässert werden.
• Beginnen Sie die Programmierung um 9 Uhr.
• Drücken Sie die linke Pfeiltaste und stellen sie die Bewässerungszeit
(Watering Time) auf 50 (= 50 Sekunden).
• Drücken Sie die rechte Pfeiltaste und stellen Sie das Zeitintervall
(Interval Time) auf 1 (= täglich)
• Warten Sie dann 5 Sekunden, bis die Einstellung automatisch gespeichert
wird. Die Bewässerung beginnt und ihre Panzen werden 50 Sekunden
lang bewässert. Die nächste Bewässerung erfolgt um 9 uhr am nächsten
und den drauf folgenden Tagen.

8
DE
SPEZIELLE ENTSORGUNGSHINWEISE FÜR
VERBRAUCHER IN DEUTSCHLAND
Entsorgen Sie Ihre Altgeräte fachgerecht. Dadurch wird gewährleistet, dass
die Altgeräte umweltgerecht verwertet und negative Auswirkungen auf die
Umwelt und menschliche Gesundheit vermieden werden. Bei der Entsorgung
sind folgende Regeln zu beachten:
• Jeder Verbraucher ist gesetzlich verpichtet, Elektro- und
Elektronikaltgeräte (Altgeräte) sowie Batterien und Akkus
getrennt vom Hausmüll zu entsorgen. Sie erkennen die
entsprechenden Altgeräte durch folgendes Symbol der
durchgestrichene Mülltonne (WEEE Symbol).
• Sie haben Altbatterien und Altakkumulatoren, die nicht vom Altgerät
umschlossen sind, sowie Lampen, die zerstörungsfrei aus dem Altgerät
entnommen werden können, vor der Abgabe an einer Entsorgungsstelle
vom Altgerät zerstörungsfrei zu trennen.
• Bestimmte Lampen und Leuchtmittel fallen ebenso unter das Elektro- und
Elektronikgesetz und sind dementsprechend wie Altgeräte zu behandeln.
Ausgenommen sind Glühbirnen und Halogenlampen. Entsorgen Sie
Glühbirnen und Halogenlampen bitte über den Hausmüll, sofern Sie nicht
das WEEE Symbol tragen.
• Jeder Verbraucher ist für das Löschen von personenbezogenen Daten auf
dem Elektro- bzw. Elektronikgerät selbst verantwortlich.
Rücknahmepicht der Vertreiber
Vertreiber mit einer Verkaufsäche für Elektro- und Elektronikgeräte von
mindestens 400 Quadratmetern sowie Vertreiber von Lebensmitteln mit einer
Gesamtverkaufäche von mindestens 800 Quadratmetern, die mehrmals im
Kalenderjahr oder dauerhaft Elektro- und Elektronikgeräte anbieten und auf
dem Markt bereitstellen, sind verpichtet,
1 bei der Abgabe eines neuen Elektro- oder Elektronikgerätes an einen
Endnutzer ein Altgerät des Endnutzers der gleichen Geräteart, das
im Wesentlichen die gleichen Funktionen wie das neue Gerät erfüllt,
am Ort der Abgabe oder in unmittelbarer Nähe hierzu unentgeltlich
zurückzunehmen und
2 auf Verlangen des Endnutzers Altgeräte, die in keiner äußeren
Abmessung größer als 25 Zentimeter sind, im Einzelhandelsgeschäft
oder in unmittelbarer Nähe hierzu unentgeltlich zurückzunehmen; die
Rücknahme darf nicht an den Kauf eines Elektro- oder Elektronikgerätes
geknüpft werden und ist auf drei Altgeräte pro Geräteart beschränkt.

9
DE
• Bei einem Vertrieb unter Verwendung von Fernkommunikationsmitteln
ist die unentgeltliche Abholung am Ort der Abgabe auf Elektro- und
Elektronikgeräte der Kategorien 1, 2 und 4 gemäß § 2 Abs. 1 ElektroG,
nämlich „Wärmeüberträger“, „Bildschirmgeräte“ (Oberäche von mehr
als 100 cm²) oder „Großgeräte“ (letztere mit mindestens einer äußeren
Abmessung über 50Zentimeter) beschränkt. Für andere Elektro- und
Elektronikgeräte (Kategorien 3, 5, 6) ist eine Rückgabemöglichkeit in
zumutbarer Entfernung zum jeweiligen Endnutzer zu gewährleisten.
• Altgeräte dürfen kostenlos auf dem lokalen Wertstoffhof oder in
folgenden Sammelstellen in Ihrer Nähe abgegeben werden: www.take-e-
back.de
• Für Elektro- und Elektronikgeräte der Kategorien 1, 2 und 4 an bieten
wir auch die Möglichkeit einer unentgeltlichen Abholung am Ort der
Abgabe. Beim Kauf eines Neugeräts haben sie die Möglichkeit eine
Altgerätabholung über die Webseite auszuwählen.
• Batterien können überall dort kostenfrei zurückgegeben werden, wo sie
verkauft werden (z. B. Super-, Bau-, Drogeriemarkt). Auch Wertstoff- und
Recyclinghöfe nehmen Batterien zurück. Sie können Batterien auch per
Post an uns zurücksenden. Altbatterien in haushaltsüblichen Mengen
können Sie direkt bei uns von Montag bis Freitag zwischen 08:00 und
16:00 Uhr unter der folgenden Adresse unentgeltlich zurückgeben:
Chal-Tec Fulllment GmbH
Norddeutschlandstr. 3
47475 Kamp-Lintfort
• Wichtig zu beachten ist, dass Lithiumbatterien aus Sicherheitsgründen
vor der Rückgabe gegen Kurzschluss gesichert werden müssen (z. B. durch
Abkleben der Pole).
• Finden sich unter der durchgestrichenen Mülltonne auf der Batterie
zusätzlich die Zeichen Cd, Hg oder Pb ist das ein Hinweis darauf, dass die
Batterie gefährliche Schadstoffe enthält. (»Cd« steht für Cadmium, »Pb«
für Blei und »Hg« für Quecksilber).
Hinweis zur Abfallvermeidung
Indem Sie die Lebensdauer Ihrer Altgeräte verlängern, tragen Sie dazu
bei, Ressourcen efzient zu nutzen und zusätzlichen Müll zu vermeiden.
Die Lebensdauer Ihrer Altgeräte können Sie verlängern indem Sie defekte
Altgeräte reparieren lassen. Wenn sich Ihr Altgerät in gutem Zustand bendet,
könnten Sie es spenden, verschenken oder verkaufen.

10
DE
HINWEISE ZUR ENTSORGUNG
Wenn es in Ihrem Land eine gesetzliche Regelung
zur Entsorgung von elektrischen und elektronischen
Geräten gibt, weist dieses Symbol auf dem Produkt
oder auf der Verpackung darauf hin, dass dieses
Produkt nicht im Hausmüll entsorgt werden darf.
Stattdessen muss es zu einer Sammelstelle für das
Recycling von elektrischen und elektronischen Geräten
gebracht werden. Durch regelkonforme Entsorgung
schützen Sie die Umwelt und die Gesundheit
Ihrer Mitmenschen vor negativen Konsequenzen.
Informationen zum Recycling und zur Entsorgung
dieses Produkts, erhalten Sie von Ihrer örtlichen
Verwaltung oder Ihrem Hausmüllentsorgungsdienst.
Dieses Produkt enthält Batterien. Wenn es in Ihrem
Land eine gesetzliche Regelung zur Entsorgung von
Batterien gibt, dürfen die Batterien nicht im Hausmüll
entsorgt werden. Informieren Sie sich über die
örtlichen Bestimmungen zur Entsorgung von Batterien.
Durch regelkonforme Entsorgung schützen Sie die
Umwelt und die Gesundheit Ihrer Mitmenschen vor
negativen Konsequenzen.
HERSTELLER & IMPORTEUR (UK)
Hersteller:
Chal-Tec GmbH, Wallstraße 16, 10179 Berlin, Deutschland.
Importeur für Großbritannien:
Berlin Brands Group UK Limited
PO Box 42
272 Kensington High Street
London, W8 6ND
United Kingdom

11
EN
Dear Customer,
Congratulations on purchasing this device. Please read
the following instructions carefully and follow them to
prevent possible damages. We assume no liability for
damage caused by disregard of the instructions and
improper use. Scan the QR code to get access to the
latest user manual and more product information.
CONTENTS
Scope of Delivery 12
Installation 12
Operation of the Control Unit 14
Disposal Considerations 16
Manufacturer & Importer (UK) 16
TECHNICAL DATA
Item number 10034626
Power supply Lithium battery
12
EN
SCOPE OF DELIVERY
Solar panel and
control unit
Hose (7/9) Hose (4/6) Y-shaped four-
piece coupling
1x 18 m 12 m 1x
Four-piece
coupling
Dropper Hose plug Filter
20x 40x 3x 1x
INSTALLATION
1 Cut the thick hose according to the depth of the water container and
insert the lter into the hose.
2 Insert the other end of the hose into the inlet of the control unit.
3 Cut another piece of thick hose according to the distance between the
control unit and the rst plant. Attach the Y-shaped four-piece coupling to
the end of the hose.
4 Then cut the thick and thin tubes according to the distances between the
plants. Use the hose connections to connect all the potted plants. Connect
one end of the tube to a drip and insert the drip into the potting soil. If the
plant is very large, use more than one dripper to get enough water.
5 Finally, insert the hose plugs into the open hose ends.
13
EN
Installation diagram
Note: The parts shown may differ from the actual scope of delivery.
1
Solar Irrigation System
6
Hose plug
2
Filter
7
Anti-siphon
3
Y-shaped four-piece coupling
8
Hose (7/9 mm)
4
Four-piece coupling
9
Hose (4/6 mm)
5
Dropper
Important: Place the Anti-Siphon in a place higher than the water barrel.
14
EN
OPERATION OF THE CONTROL UNIT
Note: The control unit is intended for outdoor use in gardens and on
balconies. It can be mounted on the wall or plugged into the oor.
How it works
You can set the controller to water and humidify your owers and plants early
in the morning or late at night when the water evaporates least. The control
unit will water your garden and ower boxes fully automatically according to
the program you set. This way you can ensure that your plants are watered
even when you are on holiday.
Display
• The [Watering Time] window
displays how long the pump is
running. The numbers 10-50
stand for 10-50 seconds. H1-H9
for 1-9 minutes.
• The [Interval Time] window
displays the time intervals.
HH means every 12 hours, the
numbers 1-15 stand for every
1-15 days.
Status of the control lamp on the control unit
• The indicator light ashes slowly (every 10 seconds): The control unit has
been programmed.
• The indicator light ashes quickly: The pump is working.
• The indicator light lights up continuously: The control unit is waiting for
programming.
• The indicator light illuminates red: The battery is empty. The pump stops
and waits until the batteries are recharged. As soon as the batteries are
charged, the indicator light illuminates green.

15
EN
How to use the keys
• Press the ON/OFF button to manually turn the pump on and off.
• During programming, press the ON/OFF button to increase or decrease
the Watering Time and Interval Time.
• Press the arrow key to set the time.
• Press both arrow keys simultaneously to lock or unlock all keys.
Note: If there is too little water in the water tank, an alarm sounds. Press any
button to stop the alarm.
Programming example
Press one of the buttons. The light turns on and the control unit is ready for
programming.
Example: You want your plants to be watered every morning at 9 am for 50
seconds.
• Start programming at 9 am.
• Press the left arrow key and set the Watering Time to 50 (= 50 seconds).
• Press the right arrow key and set the watering time to 50 (= 50 seconds).
• (Interval Time) to 1 (= daily)
• Wait 5 seconds for the setting to be saved automatically. Watering will
start and your plants will be watered for 50 seconds. The next watering
will take place at 9 a.m. next day and the following days.

16
EN
DISPOSAL CONSIDERATIONS
If there is a legal regulation for the disposal of electrical
and electronic devices in your country, this symbol
on the product or on the packaging indicates that this
product must not be disposed of with household waste.
Instead, it must be taken to a collection point for the
recycling of electrical and electronic equipment. By
disposing of it in accordance with the rules, you are
protecting the environment and the health of your
fellow human beings from negative consequences. For
information about the recycling and disposal of this
product, please contact your local authority or your
household waste disposal service.
This product contains batteries. If there is a legal
regulation for the disposal of batteries in your country,
the batteries must not be disposed of with household
waste. Find out about local regulations for disposing
of batteries. By disposing of them in accordance with
the rules, you are protecting the environment and
the health of your fellow human beings from negative
consequences.
MANUFACTURER & IMPORTER (UK)
Manufacturer:
Chal-Tec GmbH, Wallstrasse 16, 10179 Berlin, Germany.
Importer for Great Britain:
Berlin Brands Group UK Limited
PO Box 42
272 Kensington High Street
London, W8 6ND
United Kingdom
17
ES
Estimado cliente,
Le felicitamos por la adquisición de este producto.
Lea atentamente las siguientes instrucciones y sígalas
para evitar posibles daños. No asumimos ninguna
responsabilidad por los daños causados por el
incumplimiento de las instrucciones y el uso inadecuado.
Escanee el siguiente código QR para obtener acceso
a la última guía del usuario y más información sobre el
producto.
ÍNDICE
Alcance de suministro 18
Instalacón 18
Funcionamiento de la unidad de control 20
Indicaciones sobre la retirada del aparato 22
Fabricante e importador (Reino Unido) 22
DATOS TÉCNICOS
Número de artículo
10034626
Fuente de alimentación
Batería de litio
18
ES
ALCANCE DE SUMINISTRO
Panel solar y
unidad de control
Tubo Tubo Acoplamiento de
cuatro en forma
de Y
1x 18 m 12 m 1x
Acoplamiento de
cuatro
Goteo Tapón del tubo Filtro
20x 40x 3x 1x
INSTALACÓN
1 Corte la manguera gruesa según la profundidad del contenedor de agua e
inserte el ltro en la manguera.
2 Inserte el otro extremo de la manguera en la entrada de la unidad de
control.
3 Corta otro trozo de manguera gruesa según la distancia entre la unidad
de control y las primeras plantas. Conecta el acoplamiento cuádruple en
forma de Y al nal de la manguera.
4 Luego corta la manguera gruesa y na de acuerdo a la distancia entre
las plantas. Utiliza los conectores de manguera para conectar todas las
plantas en maceta. Conecta un extremo de la manguera a un gotero e
inserta el gotero en la tierra de la maceta. Si la planta es muy grande, use
más de un gotero para obtener suciente agua.
5 Finalmente, inserte los tapones del tubo en los extremos del tubo abierto.
19
ES
Esquema de instalación
Nota: Las piezas mostradas pueden diferir del alcance real de la entrega.
1
Sistema de irrigación solar
6
Tapón del tubo
2
Filtro
7
Anti-Sifón
3
Acoplamiento de cuatro
partes en forma de Y
8
Tubo (7/9 mm)
4
Acoplamiento de cuatro
partes
9
Tubo (4/6 mm)
5
Goteo
Importante: Coloca el antisifón en una posición más alta que el barril de
agua.
20
ES
FUNCIONAMIENTO DE LA UNIDAD DE
CONTROL
Nota: La unidad de control está destinada al uso en exteriores, en jardines y
balcones. Puede ser montado en la pared o enchufado en el suelo.
Funcionalidad
Puede congurar la unidad de control para que riegue y humedezca sus
ores y plantas temprano en la mañana o tarde en la noche cuando el agua se
evapora menos. La unidad de control riega tu jardín y tus jardineras de forma
totalmente automática según el programa que hayas establecido. De esta
manera puedes asegurarte de que tus plantas sean regadas incluso cuando
estás de vacaciones.
Pantalla
• La ventana [Tiempo de riego]
muestra cuánto tiempo
funcionará la bomba. Los
números 10-50 se mantienen
durante 10-50 segundos. H1-H9
durante 1-9 minutos.
• La ventana [Intervalo de
tiempo] muestra los intervalos
de tiempo. HH signica cada
12 horas, los números 1-15
representan cada 1-15 días.
Estado de la luz indicadora de la unidad de control
• La luz de control parpadea lentamente (cada 10 segundos): la unidad de
control ha sido programada.
• La luz de control parpadea rápidamente: La bomba está funcionando.
• La lámpara de control está encendida continuamente: La unidad de control
está esperando la programación.
• La lámpara de control se ilumina en rojo: La batería está agotada. La
bomba se detiene y espera hasta que las baterías se hayan recargado.
Tan pronto como las baterías se han recargado, la lámpara de control se
enciende en verde.

21
ES
Así se usan las teclas
• Presione el botón ON/OFF para encender y apagar la bomba
manualmente.
• Durante la programación, pulse el botón ON/OFF para aumentar o
disminuir el tiempo de riego y el tiempo de intervalo.
• Presione el botón de la echa para ajustar la hora.
• Presione ambas teclas de echa simultáneamente para bloquear o
desbloquear todas las teclas.
Nota: Si hay muy poca agua en el tanque de agua, sonará una alarma.
Presione cualquier botón para detener la alarma.
Ejemplo de programación
Presiona uno de los botones. La luz se enciende y la unidad de control está lista
para la programación.
Ejemplo: Quieres que tus plantas sean regadas todas las mañanas a las 9 am
por 50 segundos.
• Empieza a programar a las 9 en punto.
• Presione la tecla de echa izquierda y ajuste el tiempo de riego
a 50 (= 50 segundos).
• Presione la tecla de echa derecha y ajuste el tiempo de intervalo
a 1 (= diario)
• Entonces espera 5 segundos hasta que el ajuste se guarde
automáticamente. El riego comienza y sus plantas son regadas durante 50
segundos. El siguiente riego es a las 9 en punto del día siguiente y los días
siguientes.
22
ES
INDICACIONES SOBRE LA RETIRADA DEL
APARATO
Si en su país existe una disposición legal relativa a la
eliminación de aparatos eléctricos y electrónicos, este
símbolo estampado en el producto o en el embalaje
advierte que no debe eliminarse como residuo
doméstico. En lugar de ello, debe depositarse en un
punto de recogida de reciclaje de aparatos eléctricos y
electrónicos. Una gestión adecuada de estos residuos
previene consecuencias potencialmente negativas
para el medio ambiente y la salud de las personas.
Puede consultar más información sobre el reciclaje y
la eliminación de este producto contactando con su
administración local o con su servicio de recogida de
residuos.
Este producto contiene baterías. Si en su país existe
una disposición legal relativa a la eliminación de
baterías, estas no deben eliminarse como residuo
doméstico. Infórmese sobre la normativa vigente
relacionada con la eliminación de baterías. Una gestión
adecuada de estos residuos previene consecuencias
potencialmente negativas para el medio ambiente y la
salud de las personas.
FABRICANTE E IMPORTADOR (REINO UNIDO)
Fabricante:
Chal-Tec GmbH, Wallstraße 16, 10179 Berlín, Alemania.
Importador para Gran Bretaña:
Berlin Brands Group UK Limited
PO Box 42
272 Kensington High Street
London, W8 6ND
United Kingdom

23
FR
Chère cliente, cher client,
Toutes nos félicitations pour l’acquisition de ce nouvel
appareil. Veuillez lire attentivement et respecter les
instructions de ce mode d’emploi an d’éviter d’éventuels
dommages. Nous ne saurions être tenus pour responsables
des dommages dus au non-respect des consignes et à la
mauvaise utilisation de l’appareil. Scannez le QR-Code
pour obtenir la dernière version du mode d‘emploi et des
informations supplémentaires concernant le produit.
SOMMAIRE
Contenu de l‘emballage 24
Installation 24
Utilisation du module de commande 26
Conseils pour le recyclage 28
Fabricant et importateur (UK) 28
FICHE TECHNIQUE
Numéro d'article 10034626
Alimentation Batterie au lithium
24
FR
CONTENU DE L‘EMBALLAGE
Panneau solaire
et module de
commande
Tuyau (7/9) Tuyau (4/6) Raccordement à
quatre voies en Y
1x 18 m 12 m 1x
Raccord à 4 voies Compte-gouttes Bouchon de tuyau Filtre
20x 40x 3x 1x
INSTALLATION
1 Coupez le tuyau épais jusqu‘à la profondeur du réservoir d‘eau et insérez
le ltre dans le tuyau.
2 Insérez l‘autre extrémité du tuyau dans l‘entrée du module de commande.
3 Coupez un autre morceau du tuyau épais en fonction de la distance entre
le module de commande et les premières plantes. Fixez le raccord à quatre
voies en forme de Y à l‘extrémité du tuyau.
4 Coupez ensuite les tubes épais et ns en fonction des distances entre les
plantes. Utilisez les raccords de tuyaux pour connecter toutes les plantes
en pot. Connectez l‘une des extrémités du tuyau à un compte-gouttes et
enfoncez-le dans la terre. Si la plante est très grande, utilisez plus d‘un
compte-gouttes pour obtenir sufsamment d‘eau.
5 Enn, insérez les bouchons de tuyau dans les extrémités ouvertes du
tuyau.
25
FR
Schéma d‘installation
Remarque : Les pièces des illustrations peuvent différer du contenu réel de
la livraison.
1
Système d'arrosage solaire
6
Bouchon de tuyau
2
Filtre
7
Anti-Siphon
3
Raccord à 4 voies en Y
8
Tuyau (7/9 mm)
4
Raccord à 4 voies
9
Tuyau (4/6 mm)
5
Compte-goutte
Important : Placez l‘anti-siphon plus haut que le baril d‘eau.

26
FR
UTILISATION DU MODULE DE COMMANDE
Remarque : Le module de contrôle est conçu pour une utilisation en
extérieur dans les jardins et sur les balcons. Il peut être monté au mur ou
enfoncé dans le sol.
Principe de fonctionnement
Vous pouvez régler le module de commande pour arroser et humidier vos
eurs et plantes tôt le matin ou tard le soir lorsque l‘eau s‘évapore le moins.
Le module de contrôle irrigue votre jardin et vos bacs à eurs de manière
entièrement automatique selon le programme que vous avez déni. De cette
façon, vous êtes certain que vos plantes sont arrosées même lorsque vous êtes
en vacances.
Voyants
• La fenêtre [Watering
Time] indique la durée
de fonctionnement de la
pompe. Les nombres 10-50
représentent 10-50 secondes.
H1H9 pendant 1-9 minutes.
• La fenêtre [Interval Time] afche
les intervalles de temps. HH
signie toutes les 12 heures, les
nombres 1-15 représentent tous
les 1-15 jours.
États du voyant sur le module de commande
• Le témoin de contrôle clignote lentement (toutes les 10 secondes) : le
module de contrôle a été programmée.
• Le témoin de contrôle clignote rapidement : la pompe fonctionne.
• Le voyant est allumé en continu : la centrale attend la programmation.
• Le voyant s‘allume en rouge : la batterie est vide. La pompe s‘arrête et
attend que les batteries soient rechargées. Dès que les batteries sont
chargées, le témoin lumineux s‘allume en vert.

27
FR
Utilisation des touches
• Appuyez sur la touche ON / OFF pour allumer et éteindre la pompe
manuellement.
• Pendant la programmation, appuyez sur la touche ON / OFF pour
augmenter ou diminuer le temps d‘arrosage et le temps d‘intervalle.
• Appuyez sur la touche échée pour régler l‘heure.
• Appuyez sur les deux touches échées en même temps pour bloquer ou
déverrouiller tous les touches.
Remarque : S‘il y a trop peu d‘eau dans le réservoir d‘eau, une alarme
retentit. Appuyez sur n‘importe quelle touche pour arrêter l‘alarme.
Exemple de programme
Appuyez sur l‘une des touches. Le voyant s‘allume et le module de commande
est prêt pour la programmation.
Exemple : vous voulez que vos plantes soient arrosées pendant 50 secondes
tous les matins à 9 h.
• Commencez la programmation à 9 h.
• Appuyez sur la touche échée gauche et réglez le temps d‘arrosage sur 50
(= 50 secondes).
• Appuyez sur la touche échée droite et dénissez l‘intervalle de temps
(durée d‘intervalle) à 1 (= tous les jours)
• Attendez ensuite 5 secondes pour que le paramètre soit enregistré
automatiquement. L‘arrosage commence et vos plantes sont arrosées
pendant 50 secondes. Le prochain arrosage se fera à 9 heures le lendemain
et les jours suivants.
28
FR
CONSEILS POUR LE RECYCLAGE
S‘il existe une réglementation pour l‘élimination ou le
recyclage des appareils électriques et électroniques
dans votre pays, ce symbole sur le produit ou sur
l‘emballage indique que cet appareil ne doit pas
être jeté avec les ordures ménagères. Vous devez le
déposer dans un point de collecte pour le recyclage des
équipements électriques et électroniques. La mise au
rebut conforme aux règles protège l‘environnement
et la santé de vos semblables des conséquences
négatives. Pour plus d‘informations sur le recyclage
et l‘élimination de ce produit, veuillez contacter votre
autorité locale ou votre service de recyclage des
déchets ménagers.
Ce produit contient des piles. S‘il existe une
réglementation pour l‘élimination ou le recyclage
des piles dans votre pays, vous ne devez pas les jeter
avec les ordures ménagères. Renseignez-vous sur les
dispositions locales relatives à la collecte des piles
usagées. La mise au rebut conforme aux règles protège
l‘environnement et la santé de vos semblables des
conséquences négatives.
FABRICANT ET IMPORTATEUR (UK)
Fabricant :
Chal-Tec GmbH, Wallstraße 16, 10179 Berlin, Allemagne.
Importateur pour la Grande Bretagne :
Berlin Brands Group UK Limited
PO Box 42
272 Kensington High Street
London, W8 6ND
United Kingdom

29
IT
Gentile cliente,
La ringraziamo per aver acquistato il dispositivo. La
preghiamo di leggere attentamente le seguenti istruzioni
per l’uso e di seguirle per evitare possibili danni. Non ci
assumiamo alcuna responsabilità per danni scaturiti da
una mancata osservazione delle avvertenze di sicurezza
e da un uso improprio del dispositivo. Scansionare il
codice QR seguente, per accedere al manuale d’uso più
attuale e per ricevere informazioni sul prodotto.
INDICE
Fornitura 30
Installazione 30
Utilizzo dell’apparecchio di comando 32
Avviso di smaltimento 34
Produttore e importatore (UK) 34
DATI TECNICI
Codice articolo 10034626
Alimentazione Batteria al litio

30
IT
FORNITURA
Pannello solare
e apparecchio di
comando
Tubo (7/9) Tubo (4/6) Accoppiamento
quadruplo a y
1x 18 m 12 m 1x
Accoppiamento
quadruplo
Contagocce Tampone Filtro
20x 40x 3x 1x
INSTALLAZIONE
1 Tagliare il tubo grosso in base alla profondità del contenitore e inserire il
ltro nel tubo.
2 Inserire l’altra estremità del tubo nell’ingresso dell’apparecchio di
comando.
3 Tagliare un ulteriore pezzo di tubo grosso in base alla distanza tra
l’apparecchio di comando e le prime piante. Fissare l’accoppiamento
quadruplo a Y all’estremità del tubo.
4 Tagliare poi il tubo grosso e quello sottile in base alla distanza tra le
piante. Utilizzare gli attacchi del tubo per unire tutte le piante da vaso.
Collegare un’estremità del tubo al contagocce e inserirlo nel terriccio. Se la
pianta è molto grande, utilizzare più di un contagocce per ottenere acqua
sufciente.
5 Tappare inne le estremità del tubo con i tamponi.
31
IT
Schema d’installazione
Avvertenza: i pezzi rappresentati possono non corrispondere a quelli
elencati nella fornitura.
1
Sistema di irrigazione solare
6
Tampone
2
Filtro
7
Antisifone
3
Accoppiamento quadruplo a Y
8
Tubo (7/9 mm)
4
Accoppiamento quadruplo
9
Tubo (4/6 mm)
5
Contagocce
Importante: sistemare l’antisifone in modo tale che sia più in alto rispetto al
barile dell’acqua.

32
IT
UTILIZZO DELL’APPARECCHIO DI COMANDO
Nota: l’apparecchio di comando è da utilizzare in ambienti esterni come
giardini e balconi. Lo si può montare alla parete o inserire nel terreno.
Funzionamento
E’ possibile regolare l’apparecchio di comando in modo tale da irrigare e
inumidire ori e piante di mattino presto o di sera tardi, quando c’è meno
evaporazione dell’acqua. L’apparecchio di comando irriga automaticamente il
giardino e le oriere secondo il programma impostato. In questo modo si può
star certi che le piante verranno irrigate anche quando si è in vacanza.
Avvisi
• La nestrella [Watering Time]
indica da quanto tempo lavora la
pompa. I numeri 10-50 indicano
10-50 secondi. H1-H9 indicano
1-9 minuti.
• La nestrella [Interval Time]
indica gli intervalli di tempo. HH
signica ogni 12 ore, mentre i
numeri 1-15 ogni 1-15 giorni.
Stato della spia sull’apparecchio di comando
• La spia lampeggia lentamente (ogni 10 secondi): l’apparecchio di comando
è stato programmato.
• La spia lampeggia velocemente: la pompa lavora.
• La spia lampeggia normalmente: l’apparecchio di comando aspetta di
essere programmato.
• La spia lampeggia di rosso: la batteria è scarica. La pompa si ferma e
attende la ricarica delle batterie. Quando sono state ricaricate, la spia
lampeggia di verde.

33
IT
Come utilizzare i tasti
• Premere il tasto ON/OFF per accendere e spegnere manualmente la
pompa.
• Durante la programmazione premere il tasto ON/OFF per aumentare o
ridurre la durata di irrigazione (Watering Time) e gli intervalli di tempo.
• Premere il tasto freccia per impostare il tempo.
• Premere contemporaneamente entrambi i tasti freccia per bloccare tutti i
tasti o riattivarli.
Nota: se nel contenitore si trova poca acqua suona l’allarme. Premere
qualsiasi tasto per terminare l’allarme.
Esempio di programmazione
Premere un tasto. La luce si accende e l’apparecchio di comando è pronto per
la programmazione.
Esempio: cosa fare se si desidera irrigare le proprie piante tutte le mattine alle
9 per 50 secondi.
• Iniziare la programmazione alle 9.
• Premere il tasto freccia a sinistra e impostare la durata di irrigazione
(Watering Time) su 50 (= 50 secondi).
• Premere il tasto freccia a destra e impostare l’intervallo di tempo (Interval
Time) su 1 (=giornalmente).
• Attendere 5 secondi nché l’impostazione viene salvata automaticamente.
Inizia l’irrigazione e le piante vengono irrigate per 50 secondi. La prossima
irrigazione inizierà alle 9 del giorno seguente e del giorno dopo ancora.

34
IT
AVVISO DI SMALTIMENTO
Se nel proprio paese si applicano le regolamentazioni
inerenti lo smaltimento di dispositivi elettrici ed
elettronici, questo simbolo sul prodotto o sulla
confezione segnala che questi prodotti non possono
essere smaltiti con i riuti normali e devono essere
portati a un punto di raccolta di dispositivi elettrici ed
elettronici. Grazie al corretto smaltimento dei vecchi
dispositivi si tutela il pianeta e la salute delle persone
da possibili conseguenze negative. Informazioni
riguardanti il riciclo e lo smaltimento di questi prodotti
si ottengono presso l’amministrazione locale oppure il
servizio di gestione dei riuti domestici.
Il prodotto contiene batterie. Se nel proprio paese si
applicano le regolamentazioni inerenti lo smaltimento
di batterie, non possono essere smaltite con i normali
riuti domestici. Preghiamo di informarvi sulle
regolamentazioni vigenti sullo smaltimento delle
batterie. Grazie al corretto smaltimento dei vecchi
dispositivi si tutela l’ambiente e la salute delle persone
da conseguenze negative.
PRODUTTORE E IMPORTATORE (UK)
Produttore:
Chal-Tec GmbH, Wallstraße 16, 10179 Berlino, Germania.
Importatore per la Gran Bretagna:
Berlin Brands Group UK Limited
PO Box 42
272 Kensington High Street
London, W8 6ND
United Kingdom