

Wireless UHF 2D Area-imaging
Barcode Scanner
Model: HW0016
Ver.01.1.01
Updated & Multilingual User Manual online:
https://www.tera-digital.com

Please do not hesitate to contact us if you
have any questions.
Customer Service
Email Address: [email protected]
Phone Number: +1 (626) 438 - 1404
Note:
When contacting the Tera support, please have
the following information available:
Serial number of the unit (found on manufacturing label)
Model number (found on manufacturing label)
Follow us:
Instagram: tera_digital
Youtube: Tera Digital
Twitter: Tera Digital
Facebook: Tera
User manuals are available in Spanish, French, Italian, and
German and can be downloaded from our website. You can
visit our official website via the link below or by scanning the
provided QR code:
https://www.tera-digital.com

Charging Instructions
Please Read Before Charging
Power Requirements :
This scanner charges by sitting on the charging station. The
charging station should only be connected to a 5V/1A power
source. It is essential to use a power source that provides a
stable 5V/1A output. Using a power source with higher
voltage or amperage may damage the device and void the
warranty.
Charging with the Charging Station :
1.Connect the charging station to a known working USB 3.0
port on your computer using the provided USB cable.
2.Place the scanner on the charging station to begin
charging.
Avoid using charging sources that do not meet these
specifications, as this could lead to slow or insufficient
charging, or potentially damage the device.
Charging Safety :
Do not modify or tamper with the USB cable or charging
port on the charging station.
Ensure the charging station is securely connected to the
power source.
If using a USB wall adapter, ensure it is from a reputable
brand and meets the required 5V/1A output.
Keep the charging area well-ventilated and free from
flammable materials.
Always unplug the USB cable from the power source when
the scanner is not in use.
Failure to follow these guidelines could damage the device
and void the warranty. Our company is not responsible for any
damages caused by the use of incompatible power sources.

Connect the Device
Connect with Charging Station
About the UHF Module
1. Press the button to turn on the scanner.
2. Connect the charging station to the computer by plugging
the USB cable into the charging station first, then connecting
the other end to a USB 3.0 port on the computer.
(If the scanner emits five beeps after scanning a barcode and
nothing appears on the computer screen, please have the
scanner seated in the charging station and leave it charging
for 2 hours. If the scanner emits three beeps after scanning a
barcode and nothing appears on the computer screen, please
follow the instructions in the “Pair the Scanner with its
Charging Station” section to re-establish the connection.)
Once connected, the computer’s operating system will
automatically install the necessary drivers. If you are using a
Windows PC, you can verify this by checking if the scanner
appears under "Keyboard" in the Device Manager as a
keyboard icon. The device is plug-and-play and can be tested
immediately in any text document application (e.g., Notepad,
Microsoft Word, Excel).
To scan UHF labels, the scanner must be in UHF scan mode,
with the UHF indicator showing a solid green light. To scan a
RFID label, please press the trigger. The acquired data is
transmitted to the location of the cursor. To receive the data,
an active text field must be available on the host device.
Need Support?
+1 (626) 438 - 1404
https://www.tera-digital.com

Contents
Factory Reset .........................................................................
Software Version ...................................................................
Beeper Volume ......................................................................
Battery Level ..........................................................................
Vibration .................................................................................
Power Timeout Timer ............................................................
Keyboard Country Layout ......................................................
Operation Modes ...................................................................
Pairing the Scanner with its Charging Station .....................
Pairing the Scanner with Bluetooth Devices ........................
USB-COM/Virtual Serial Port ................................................
Case Conversion ....................................................................
Enter/Tab Suffix .....................................................................
Timestamp .............................................................................
Removal of Characters ..........................................................
Scan Modes ...........................................................................
01
01
01
01
02
02
03
03
04
05
05
05
06
06
06
08
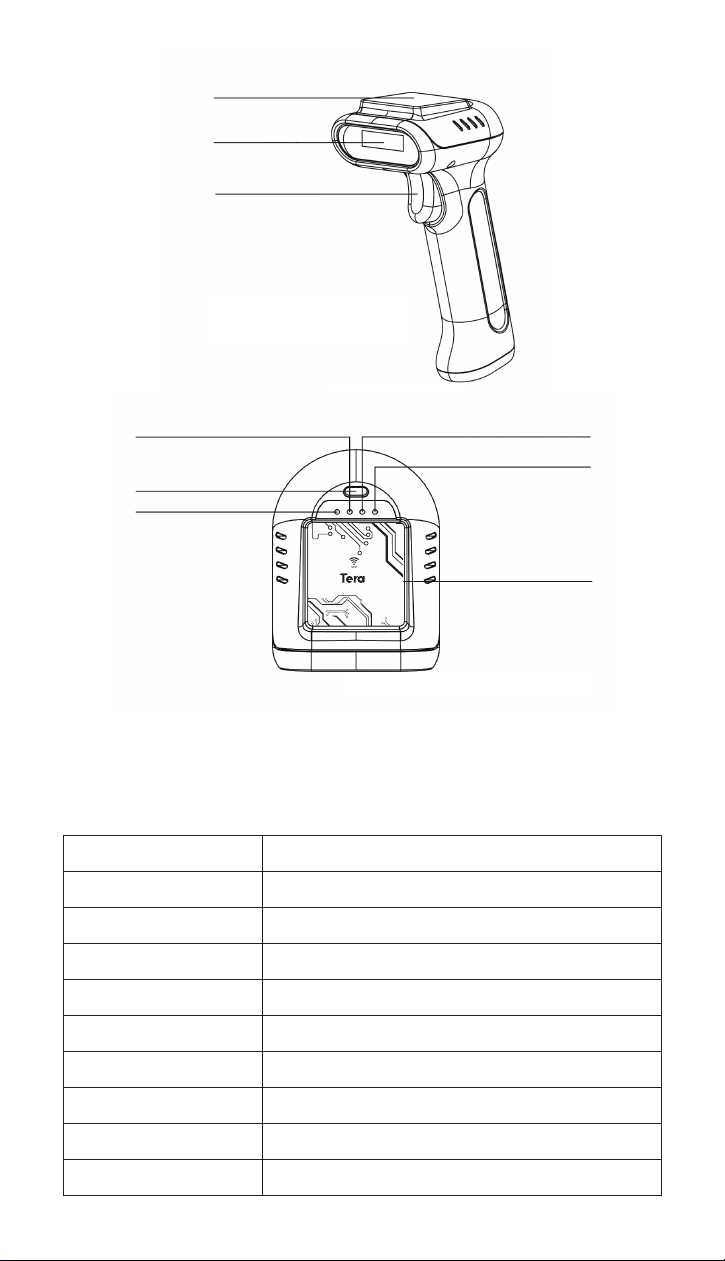
LED Sequences and Meaning
The scanner has 4 LEDs on the top of the unit that indicate
the linking status, scan engine state, UHF module state and
battery condition.
UHF Antenna
Scan Window
Trigger
USB Receiver
Push Button (To enable/
disable scan engine and/
or UHF module)
Charging Indicator
LED Indication
Charging Indicator is solid red
Charging Indicator is off
Linking Indicator is blinking
Linking Indicator is solid blue
Linking Indicator flashes once
Scan Indicator is solid blue
Scan Indicator is off
UHF Indicator is solid green
UHF Indicator is off
Cause
The battery is charging.
The battery is not charging.
The scanner is in pairing state.
The scanner is connected to the host device.
Successful Scan
The scan engine is enabled.
The scan engine is disabled.
The UHF module is enabled.
The UHF module is disabled.
Linking Indicator
Scan Indicator
UHF Antenna
UHF Indicator
Features
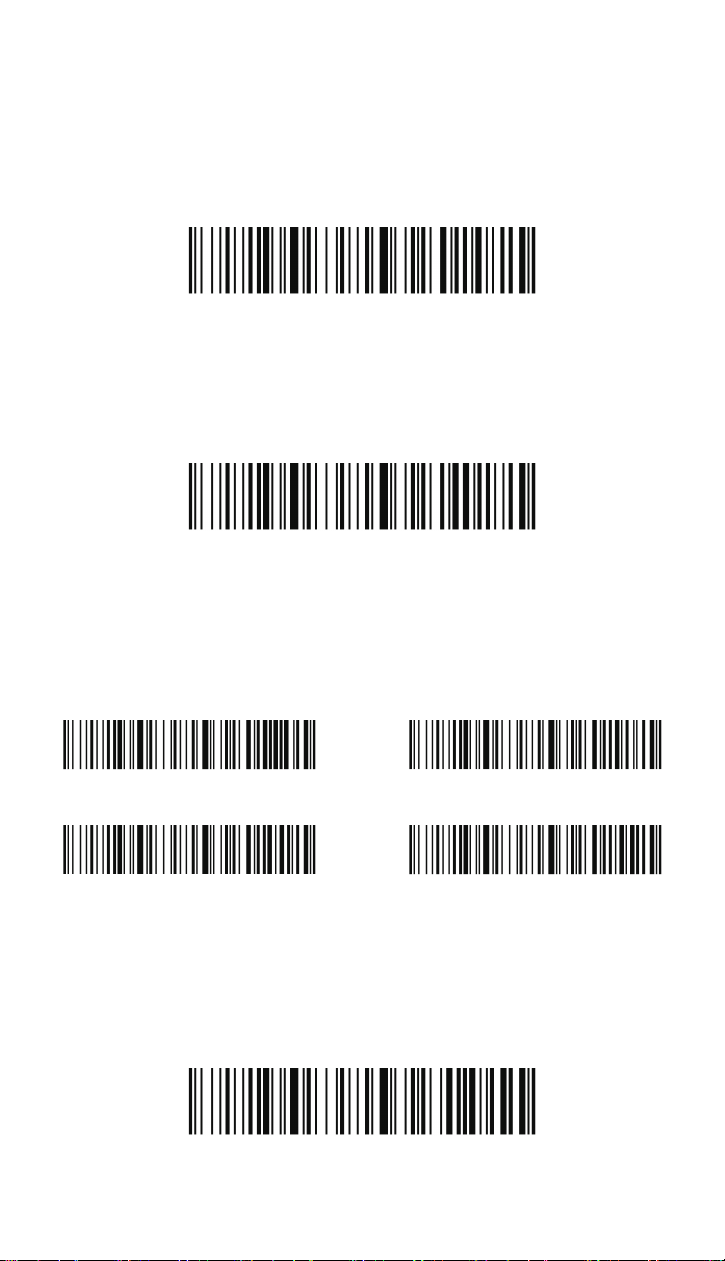
Factory Reset
Software Version
Beeper Volume
If you aren't sure what programming options are in your
scanner, or you have changed some options and want to
restore the scanner to factory default settings, scan the
barcode below.
Scan the bar code below to output the current software
version of the scanner.
The beeper volume codes modify the volume of the beep the
scanner emits on agood read. Default = Medium.
Battery Level
To check the remaining battery level, please scan the follow-
ing barcode. Ensure your cursor is in a text field when scan-
ning.
Restore Defaults
Show Software Version
Show Battery Level
High Medium*
Low Mute
1
Vibration
The scanner vibrates once when a barcode is successfully
read. If you don't want the scanner to vibrate, please scan the
“Vibration Off” barcode.
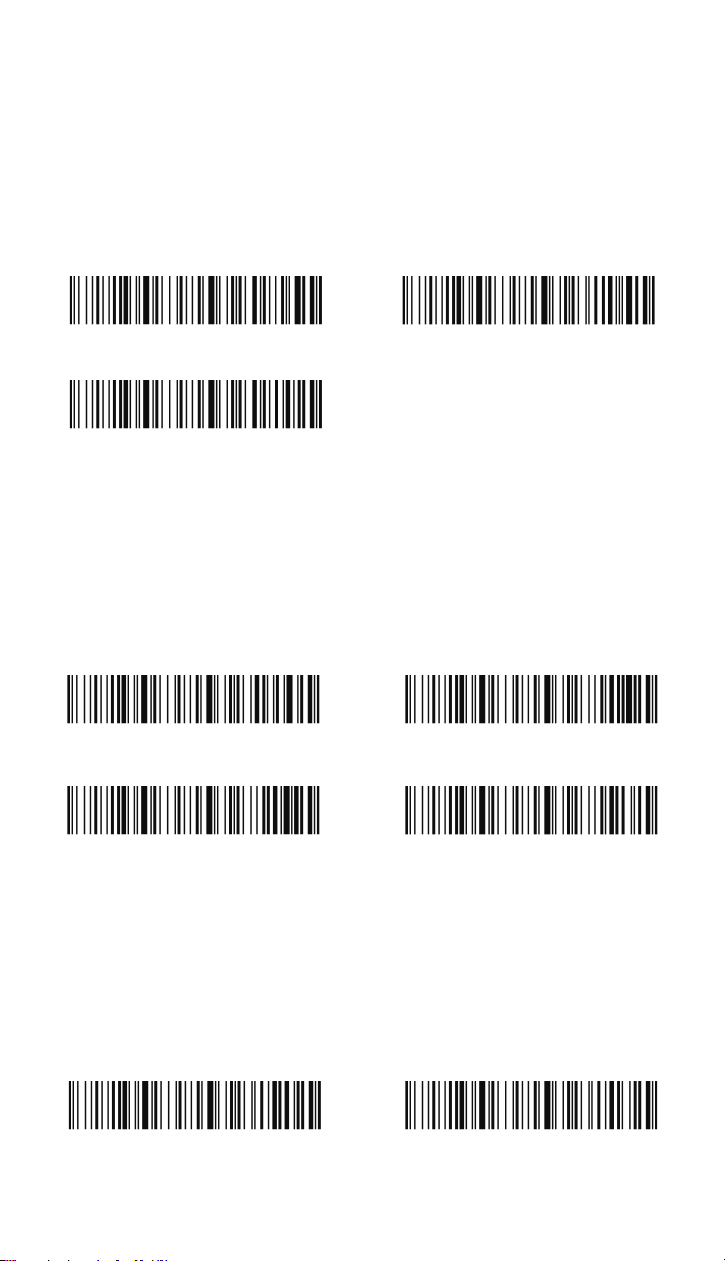
Power Timeout Timer (Sleep Timer)
When there is no activity within a specified time period, the
scanner turns off. Scan the appropriate power timeout
barcode to change the timeout duration (in seconds).
Note: If there are no trigger pulls during the timer interval, the
scanner turns off. Whenever the trigger is pressed, the timer
is reset.
Vibration On* Vibration Off
30s 60s
120s 300s*
600s 1800s
Never Turn Off Turn Off Immediately
2
Keyboard Country Layout
Your keyboard layout default is a US keyboard. To change this
layout, scan the appropriate Keyboard Country barcode
below.
(Please note that if your keyboard layout doesn't match your
computer's, the outputs may be incorrect. )
Operation Modes
Real Time Mode
By default, the barcode scanner operates in real time mode,
transmitting scanned data immediately to the host device.
Storage Mode
Storage mode is used to store barcode data when a scanner
is out of range of its receiver or when performing inventory.
The data is stored in the memory so it won’t get lost when the
barcode scanner is turned off. When the scanner's buffer
space is full, any barcodes scanned generate an error tone. In
order to clear the scanner's buffer, you must scan Clear All
Codes.
United States* Germany
France Spain
Italy United Kingdom
Real Time Mode*
Storage Mode
3

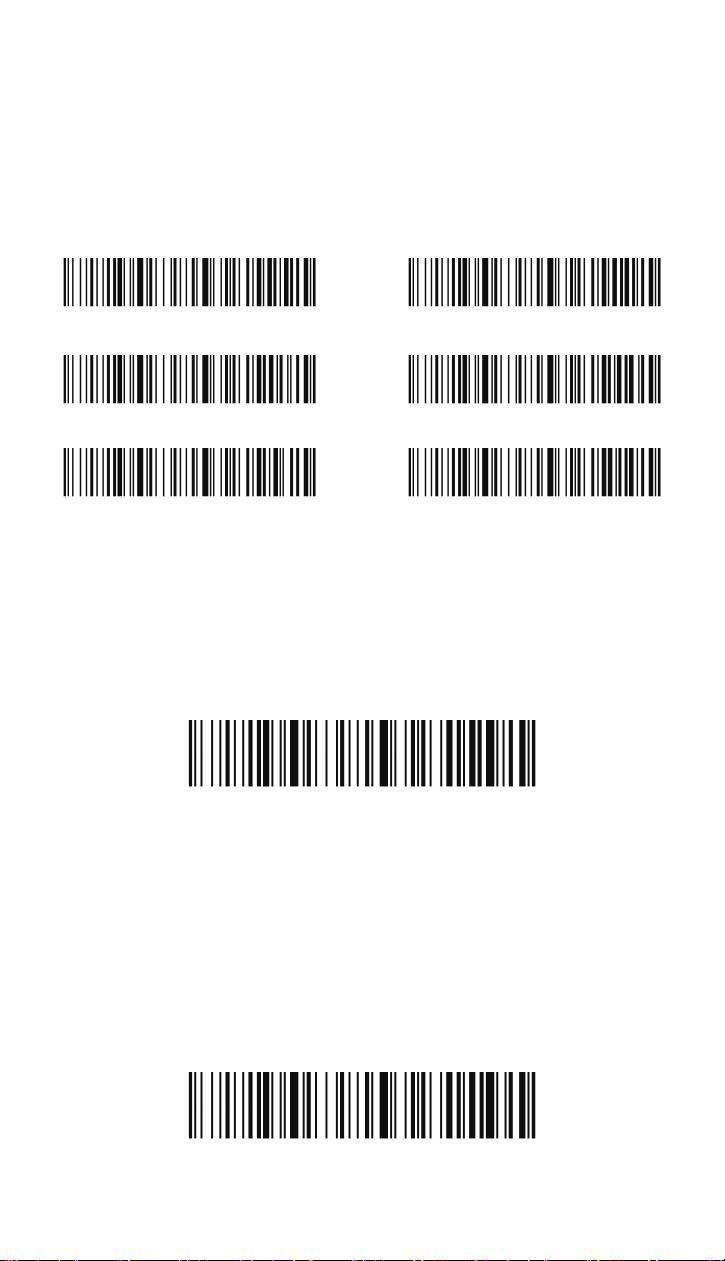
Upload All Stored Codes
In storage mode, the scanner won't transmit the data to the
host device even when it's back in range. Users need to scan
the following code to instruct the scanner to transmit the
stored data.
Total Records
If you wish to output the total number of barcodes scanned
when in storage mode, scan Total Records.
Clear All Stored Codes
If you want to clear the scanner's buffer of all data
accumulated in storage mode, scan Clear All Stored Codes.
Pairing the Scanner with its Charging Station
If the scanner doesn't connect to the charging station
automatically, please follow these steps to re-establish the
connection:
Step 1: Unplug the station (If the station is not plugged in,
please disregard this step).
Step 2: Scan the "2.4GHz Mode" barcode.
Step 3: Scan the "Pairing" barcode.
Step 4: Plug the station into a known working USB 3.0 port
on the computer using the original USB cable.
Upload All Stored Codes
Total Records
Clear All Stored Codes
2.4GHz Mode Pairing
4

Pairing the Scanner with Bluetooth Devices
The scanner can be paired with Bluetooth devices such as
personal computers, laptops, and tablets.
Step 1: Scan the “Bluetooth HID” barcode and the “Pairing”
barcode below to establish one-way communication with the
scanner.
USB-COM/Virtual Serial Port
Scan the following code to program the scanner to emulate a
regular RS232-based COM Port. No extra configuration is
necessary. To exit USB-COM mode, please scan the 2.4GHz
Mode barcode.
Case Conversion
Alphabetic keyboard characters can be forced to be all upper
case or all lowercase. So if you have the following barcode:
"AZErty", you can make the output "AZERTY" by scanning
Convert All Characters to Upper Case, or to "azerty" by
Convert All Characters to Lower Case.
Step 2: Set your personal computer, laptop, or tablet so it
searches for other Bluetooth devices.
Step 3: Once your personal computer, laptop, or tablet has
located the scanner, select the scanner name. They will
automatically pair with the scanner.
Bluetooth HID Mode
USB-COM Mode
Conversion Off*
Convert All Characters to Lower Case
Convert All Characters to Upper Case
Pairing
5
Enter/Tab Suffix
By default, the scanner adds a carriage return suffix to all
symbologies, which functions the same as pressing the Enter
key on a keyboard. If you don't want the scanner to "press" the
Enter key after each scan, please scan the "None" barcode
below. If you'd like the scanner to "press" the Tab key after
each scan, please scan the "Horizontal Tab" barcode below.
Timestamp
If you want to record the time and date for every scan, scan
either Time & Date Prefix or Time & Date Suffix. If the time and
date stamp doesn’t match your computer’s, contact Tera
customer service for the Time Sync Tool software.
Removal of Characters
If you need to remove leading and/or trailing characters from
scanned bar codes, please follow these steps:
1. Scan the “Remove characters from the start” barcode or
the “Remove characters from the end” barcode
Carriage Return*
None
Horizontal Tab
Show Current Time & Date Time & Date Prefix
Time & Date Suffix Clear Timestamp
Remove characters from the start Remove characters from the end
6

2. Scan the appropriate code from the following digit codes:
1 digit 2 digits
3 digits 4 digits
5 digits 6 digits
7 digits 8 digits
9 digits 10 digits
11 digits 12 digits
13 digits 14 digits
15 digits 16 digits
7

Scan Modes
Manual Trigger Mode
Continuous Scan Mode
A scan mode for reading barcodes by pulling the trigger.
A scan mode that continuously keeps scanning barcodes.
Sensor-activated Mode
For sensor-activated mode, when the scanner is idle it has no
illumination, and uses predominantly ambient light to detect
if an object is moving in front of the scanner. The scanner is
expected to reside in a fixed position. Whenever it detects
activity in the field of view it will turn on the illumination and
attempt to read a barcode. After reading the barcode the
illumination will be default remain on for defined period,
before it returns to idle state again.
Note: Both Continuous Scan Mode and Sensor-activated
Mode are referred to as “Hands free Modes. If the scanner's
trigger is pulled when using a hands free mode, the scanner
changes to manual trigger mode. Once the time-out value is
reached, (if there have been no further trigger pulls) the
scanner reverts to the original hands free mode.
Manual Trigger Mode*
Continuous Scan Mode
Sensor-activated Mode
8
