

Model No.: 9100
User Manual
1D/2D Wired Desktop Barcode Scanner
TR-UM9100
Ver.01.1.01

Contents
Chapter 1 General.............................................
Factory Default..................................................
Firmware Version...............................................
Beeper...............................................................
Power Up Beeper..............................................
Lights.................................................................
Data Format.......................................................
Inverse Barcode Reading..................................
Chapter 2 Communications...............................
Keyboard Country Layout..................................
Control Character (Function Key) Output..........
Case Conversion...............................................
Inter-character Delay..........................................
USB-COM/Virtual Serial Port.............................
Chapter 3 Scan Modes......................................
Continuous Scan Mode......................................
Sensor-activated Mode......................................
Chapter 4 Data Edit...........................................
Code ID..............................................................
Add Prefix...........................................................
Add Suffix...........................................................
Hide Characters.................................................
Insert Characters...............................................
Replacement of Characters...............................
01
01
01
01
02
03
04
04
05
05
08
10
11
12
12
12
13
15
15
16
16
17
20
21

Terminators........................................................
Chapter 5 Symbologies.....................................
Chapter 6 Appendix...........................................
Appendix – Programming Chart........................
Appendix – Enter/Exit Programming Mode.......
Appendix – Examples of Customizing Settings
...........................................................................
Appendix – Code ID & AIM ID...........................
Appendix – Control Character...........................
Appendix – ASCII Character Chart....................
Appendix – Special Characters Output..............
21
23
52
52
53
54
61
64
67
76

01
Chapter 1 General
Factory Default
Firmware Version
Beeper
All Sounds
01
Reset to Factory Defaults
Show Firmware Version
On*
Off

The beeper may be programmed On or Off in response
to a good read for configuration codes. Turning this
option off only turns off the beeper response to a good
read indication for configuration codes. All error and
normal beeps are still audible.
Power Up Beeper
Configuration Codes – Good Read
On*
Off
Off
On*
02

Beeper – Good Read (Beeps when decoding
normal codes correctly)
Lights
Illumination Lights
On*
On*
Off
High Volume*
Low Volume
03

To output European Special Characters, please refer to
Appendix - Special Characters Output, scan ALT Mode
barcode, then Single-byte Character barcode.
Data Format
Encoding Format
Inverse Barcode Reading
Overall Settings
Off
Codepage (MS Notepad, Excel)*
Unicode (Word)
All 1D Symbologies Inverse On
All 1D Symbologies Inverse Off*
04

Chapter 2 Communications
Keyboard Country Layout
All 2D Symbologies Inverse On
All 2D Symbologies Inverse Off *
United States*
Japan
Netherlands
05

Spain
Switzerland (German)
Brazil(Portuguese)
Ukrainian
United Kingdom
Italy
06

France
Germany
Hungary
Sweden
Slovakia
Portugal
07

Control Character (Function Key) Ouput
Romania
Belgium(French)
Turkey-F
Turkey-Q
Poland
Function key: Replace control characters with custom
function keys. Refer to “Appendix – Control Character
Chart” for details.
Ctrl + X Mode (Only works with Prefix and Suffix): Use
08

Function Key*
Ctrl+X Mode
ALT Mode
Enter & Down Arrow Only
Ctrl + X combination to replace control characters.
Refer to “Appendix – Control Character Chart”for
details.
ALT Mode: Ouput control characters in the form of ALT
+ numeric key. Refer to “Appendix – ASCII Character
Chart”for details.
Enter & DownArrow Only: In this mode, the scanner will
only output two control characters, Enter and DownAr-
row.
09

Virtual Keyboard Ouput
Case Conversion
Off*
On
Conversion Off*
Convert All Characters to Upper Case
Convert All Characters to Lower Case
When virtual keyboard is activated, the scanner will
output character whose entry is between 0x20~0xFF
in the way the virtual keyboard does.
10

Inter-character Delay
Invert Case of All Characters
Normal*
Low
Ultra Low
Note: This feature is only available when the scanner is
in USB-KWB mode or it inputs control characters with
keyboard emulation.
Some terminals drop information (characters) if data
comes through too quickly. Inter-character delay slows
the transmission of data, increasing data integrity.
11

USB-COM/Virtual Serial Port
Continuous Scan Mode
Reread Delay – Continuous Scan Mode
USB-COM
Continuous Scan Mode
No Delay
This sets the time period before the scanner can read
the same barcode a second time. Setting a reread
delay protects against accidental rereads of the same
barcode. Only when timeout is triggered or the scanner
gets restarted can it read the same barcode a second
time. Reread delay only works when in Continuous
Scan Mode. Default = 500ms
Chapter 3 Scan Modes
12
To enable this feature, you will need to contact Customer
service for a driver.

Sensor-activated Mode
No Timeout
200ms
500ms*
1200ms
2000ms
Sensor-activated Mode
13

Image Stabilization Timer – Sensor-activated
Mode
200ms
300ms
400ms
500ms*
In sensor-activated mode, the scanner will be in a state
of detecting changes around the environment after it
has read a barcode. It won’t read the next barcode until
the stabilization timeout is reached.
14

Sensitivity – Sensor-activated Mode
Code ID
High*
Medium
Low
Off*
On
Chapter 4 Data Edit
15

Add a Prefix
How to add a prefix
Add a Suffix
How to add a suffix
Clear Prefixes
Add Prefix
Clear Prefixes
Add Suffix
The maximum size of a prefix configuration is 10
characters.
Refer to “Appendix – Examples of customizing
settings”for details.
The maximum size of a prefix configuration is 10
characters.
Refer to “Appendix – Examples of customizing
settings”for details.
16

Clear Suffixes
Hide Characters
Hide the first Characters
Set the number of digits to be hidden
Clear Suffixes
On
Off*
Digits to Be Hidden
Refer to “Appendix – Examples of customizing
settings”for details.
17

Hide the middle characters
Hide characters from the X digit
On
Off*
Start with the X character
If you wish to hide characters from an uncertain digit,
this selection might help. First, set up the digit from
which the hiding characters command starts; then the
number of digits to be hidden. Note: If the start digit is
beyond the message length, the scanner won’t hide any
digits; if the number of digits to be hidden is larger than
that of the rest digits, the scanner will hide all the rest
digits behind the start digit.
This command defines from which digit the scanner
should hide characters. For example, to hide characters
from the 3th character, you should scan “0”, “0”, “3” from
the programming chart.
Note: the X number should be between 1 and 255.
Refer to ”Appendix – Examples of customizing settings”
18

Set the number of digits to be hidden
Hide the last Characters
Set the number of digits to be hidden
On
Off*
Digits to be hidden – The last characters
Digits to be hidden
The number of digits to be hidden shall be between 1
and 255. If you wish to hide 6 characters, scan “0”,“0”,
“6” from the programming chart.
Refer to “Appendix – Examples of customizing
settings”for details.
19

Insert Characters
Insert Characters from the X digit.
On
Off*
Insert Characters from the X Digit
Insert characters at certain points in barcode data as it
is scanned. The maximum size of this configuration is
10 characters.
This programming code sets up the position where the
command takes effect. Inputted numbers should be
between 1 and 255. For example, if you need to insert
characters from the 16th digit, scan “0”,”1”, “6”. If you
scan “0”, “0”, “0”, the inserted characters will appear at
the beginning of the barcode data; if the number of digts
inputted is beyond barcode length, the inserted
characters will appear at the end of the barcode data.
Refer to “Appendix – Examples of customizing settings”
20

Custom Characters
Terminators
Replacement of Characters
Carriage Return <CR>(0x0D)*
Custom Characters
Characters to be replaced
Target Characters
Refer to “Appendix – Examples of customizing settings”
This selection allows the scanner to replace any
characters in a barcode with desired characters.
Refer to “Appendix – Example of customizing
settings”for details.
Note: If you wish to clear the settings, scan the
Characters to be replaced, then “0”,”0”,”0”from the
programming chart.
21

None
Line Feed <LF>(0x0A)
<CR>&<LF> (0x0D,0x0A)
Horizontal Tab <HT>(0x09)
<CR><CR>(0x0D,0x0D)
<CR><LF><CR><LF>(0x0D ,
0x0A, 0x0D ,0x0A)
22

Symbologies - Overview
All 2D Symbologies Off
All Symbologies On
All Symbologies Off
All 1D Symbologies On
All 1D Symbologies Off
All 2D Symbologies On
Note: When all the Symbologies Off code is scanned,
the scanner is still able to scan configuration codes.
Chapter 5 Symbologies
23

UPC-A
Number System Digit
On*
Off
Transmit Check Digit
Don’t Transmit Check digit
Transmit
Don’t Transmit
24

UPC-A Converted to EAN-13
UPC-E
On
Off*
UPC-E0 On*
UPC-E0 Off
UPC-E1 On
UPC-E1 Off*
25

Check Digit
UPC-E Addenda
Transmit*
Don’t Transmit
2 digit Addenda On
2 digit Addenda Off*
5 digit Addenda On
5 digit Addenda Off*
26

Addenda Required
Addenda Separator
On
On*
Off
Off*
When On is scanned, the scanner will only read
barcodes that have addenda.
When this feature is On, there is a space between the
data from the barcode and the data from the addenda.
When turned off, there is no space. Default=On.
27

Number System Digit
UPC-E Converted to UPC-A
EAN/JAN 8
Transmit*
Don’t Transmit
On
Off*
On*
28

Check Digit
EAN-8 Converted to EAN-13
Off
Transmit*
Don’t Transmit
On
Off*
29

EAN/JAN 13
Check Digit
ISBN Translate
On*
On
Transmit*
Don’t Transmit
Off
When On is scanned, EAN-13 Bookland symbols are
translated into their equivalent ISBN number format.
Default = Off.
30

Check Digit - ISBN
Converted to ISSN
Off*
Transmit
Don’t Transmit*
On
Off*
31

ISSN
Check Digit
UPC -A/EAN 8/EAN 13 Addenda
Addenda
On
Off*
Don’t Transmit*
2-digit Addenda On
Transmit
32

2-digit Addenda Off*
5-digit Addenda On
5-digit Addenda Off*
On
Off*
When On is scanned, the scanner will only read
barcodes that have addenda.
33

On*
Off
On*
On*
Off
Addenda Separator
Code 128
GS1-128(UCC/EAN 128)
When this feature is On, there is a space between the
data from the barcode and the data from the addenda.
When turned off, there is no space. Default=On.
34

On*
Mod 43 Validate
No Check Digit*
Transmit
Off
Off
Code 39
Check Digit
35

Start/Stop Characters
Full ASCII
On
Off*
Don’t Transmit*
Transmit
Don’t Transmit*
There is an * at each end of Code 39 barcode as start
and stop characters. This selection determines whether
to transmit the start/stop characters.
36

Code 32 Pharmaceutical(PARAF)
Check Digit
Add Prefix A to Code 32
On
Off*
Transmit
Don’t Transmit
On
37

Code 32 Not Good Read
Code 93
Off*
On*
Off
On*
Note: The scanner outputs error when scanning Code
32 with Code 32 not enabled. With Code 32 Not Good
Read is on, the scanner won’t read Code 32 when Code
32 is disabled and it won’t scan Code 39 as well.
38

Code 11
Check Digit
Off
On
Off*
1 check digit*
2 check digits
39

Codabar(NW-7)
Check Digit
Off
No Check Digit*
Mod 16 Validate
Transmit Check Digit
on*
40

Don’t Transmit Check Digit*
Don’t Transmit*
ABCD/ABCD**
ABCD/TN*E
Transmit
Start/Stop Characters
Start and Stop Characters
Start character for Codabar can be any of“A”, “B”, “C”,
“D”and stop character can be any of additional four
characters: “T”, “N”, “*”, “E”.
41

On*
Off
Mod 10 Validate
Transmit Check Digit
Don’t Transmit Check Digit*
No Check Digit*
Interleaved 2 of 5
Check Digit
42

On*
Off
On*
On
Off
Matrix 2 of 5
Industrial 2 of 5
Standard 2 of 5 (IATA 2 of 5)
43

MSI Plessey
Telepen
On
Off*
Off*
On
Off*
44

Telepen Output
GS1 DataBar 14(RSS-14)
GS1 DataBar Limited(RSS-Limited)
Numeric
Alphanumeric*
*On
*On
Off
Note: GS1 Databar 14 is also known as GS1 Databar
Omnidirectional, RSS-14.
45

GS1 DataBar Expanded (RSS-Expanded)
QR Code
*On
On*
Off
Off
Off
46

QR Code - Inverse
Micro QR Code
Micro QR Code - Inverse
Regular Only*
Both Regular and Inverse
On*
Off
Regular Only*
47

On*
On
Off*
Off
Both Regular and Inverse
Data Matrix
Data Matrix - Rectangular
48

Regular Only*
Both Regular and Inverse
On*
On
Off
Data Matrix - Inverse
PDF417
Micro PDF417
49

On
Off*
Off*
On
Off*
MaxiCode
Aztec Code
50

Chinese Sensible (Han Xin) Code
China Post (Hong Kong 2 of 5)
GS1 Composite Code
On
Off*
On
On
Off*
51
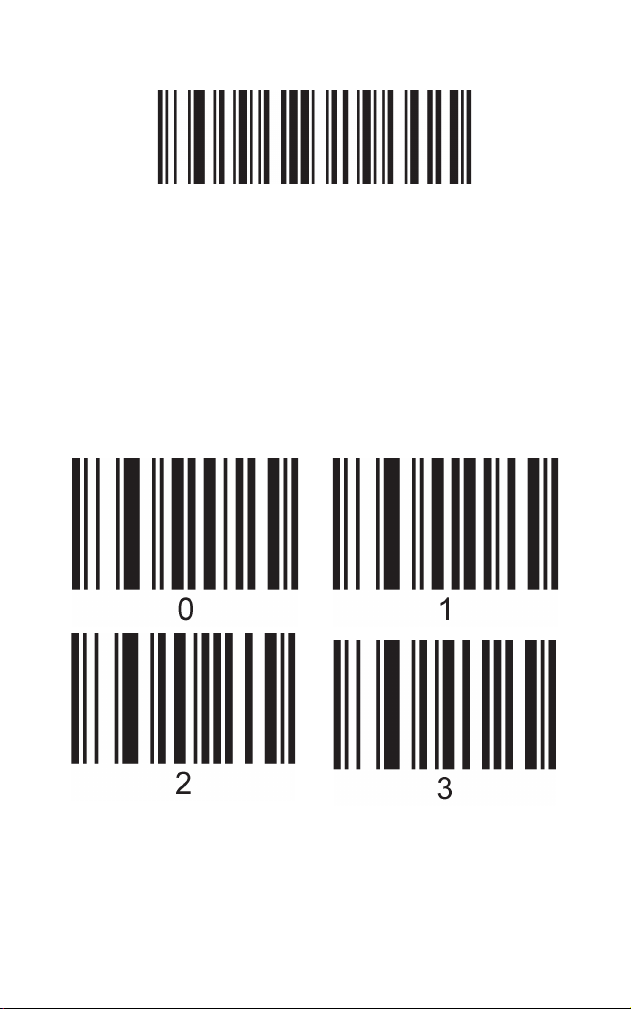
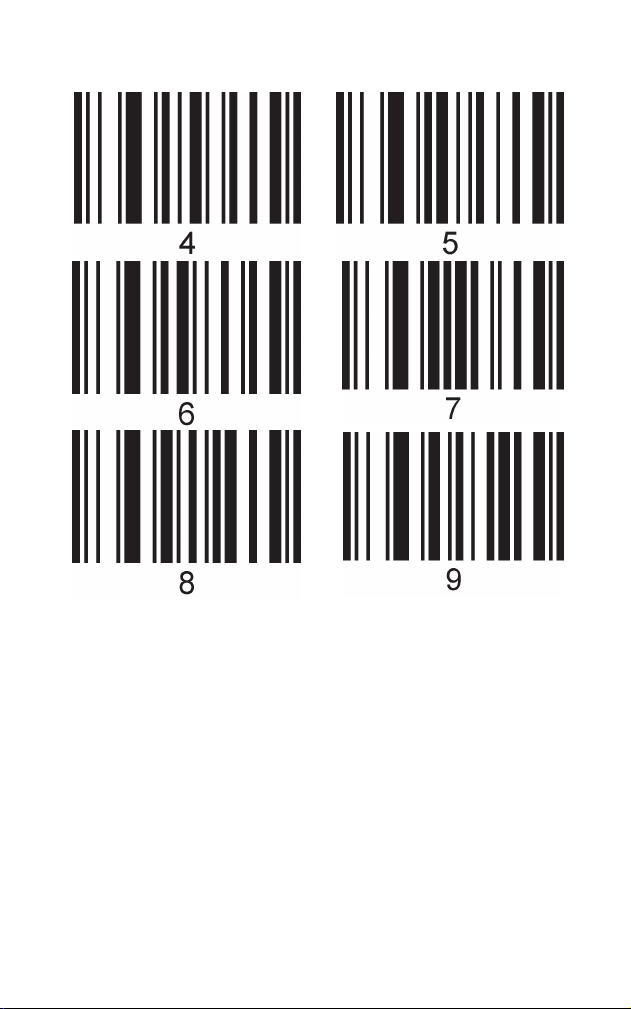
Appendix – Programming Chart
Off*
This chart is used to configure prefix and suffix,
message length and other settings with variable values.
Be sure to scan Enter/Exit Programming Mode code
before scanning numeric codes below and scan
Enter/Exit Programming Mode after scanning all the
numeric codes needed.
Chapter 6 Appendix
52
Appendix – Enter/Exit Programming Mode
To configure viable parameters like prefix and suffix,
message length, you should first scan Enter/Exit
Programming Mode, then the desired selections, finally
the Enter/Exit Programming Mode again. If you have
scanned the Enter/Exit Programming mode and wish to
modify other non-variable settings, you need to exit the
programming mode and then scan other configuration
codes.
53

Appendix – Examples of customizing settings
Enter/Exit Programming Mode
Enter/Exit Programming Mode
Add Prefix
First, refer to ASCII Chart and find that the DEC values
of X and Y are 088 and 089.
Step 1: Scan the Enter/Exit Programming Mode,
scanner beeping 3 times.
Step 3: Scan “0”,”8”, “8”from the programming chart
respectively. (Every 3 numbers are regarded as a group
and the beeper will beep once, twice, and 3 times on
each scan)
Step 2: Scan the Add Prefix symbol
How to add a prefix/suffix
Fox example: add XY as a prefix to all symbologies
54
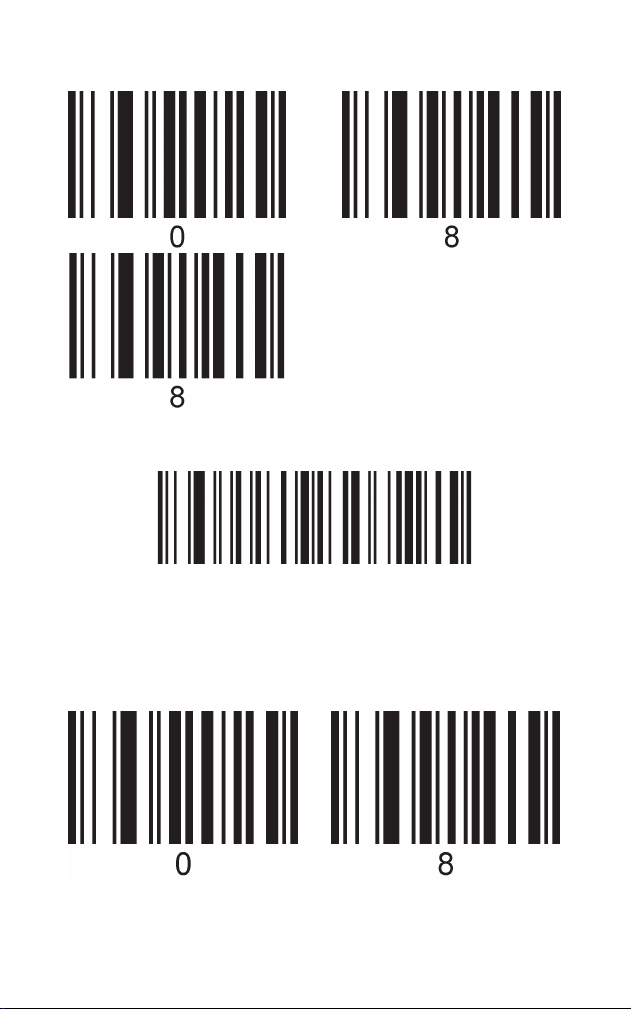
Add Prefix
Step 4: Scan the Add Prefix symbol
Step 5: Scan “0”,”8”, “9”from the programming chart
respectively.(Every 3 numbers are regarded as a group
and the beeper will beep once, twice, and 3 times on
each scan
55

Enter/Exit Programming Mode
How to hide/drop characters
For example: hide the first 3 characters of
barcode data.
Step 6: Scan the Enter/Exit Programming Mode to save
the settings, with scanner emitting 3 beeps.
Note: The maximum size of a prefix or suffix
configuration is 10 characters.
After dropping the first 3 characters, we get 6abcd.
Step 1: Scan the Enter/Exit Programming Mode, beeper
emitting 3 beeps.
Sample Code 128: 1616abcd
56

Enter/Exit Programming Mode
Digits to be hidden – The first Characters
Step 2: Scan the Digits to Be Hidden symbol
Step 3: Scan “0”,”0”, “3”from the programming chart
respectively.(Every 3 numbers are regarded as a group
and the beeper will beep once, twice, and 3 times on
each scan)
57

How to replace characters
For example: Replace 6 in the sample code
with letter X.
Enter/Exit Programming Mode
On
Step 4: Scan the Enter/Exit Programming Mode to save
the settings, beeper emitting 3 beeps.
Step 5: Scan the On code in the Hide the first
Characters section
First, refer to “Appendix – ASCII Chart”for the DEC
values of “6” and “X”. We can easily notice that the DEC
value for “6” is 054 and the value for “X” is 088.
Step 1: Scan the Enter/Exit Programming Mode, beeper
emitting 3 beeps.
The original data of the sample is 1616abcd. After
finishing the setting, we get 1X1Xabce.
58

Enter/Exit Programming Mode
Characters to be replaced
Target Character
Step 2: Scan the Characters to be replaced
Step 3: Scan “0”,”5”, “4”from the programming chart
respectively.(Every 3 numbers are regarded as a group
and the beeper will beep once, twice, and 3 times on
each scan)
Step 4: Scan the Target Character symbol
59

Enter/Exit Programming Mode
Step 5: Scan “0”,”8”, “8”from the programming chart
respectively.(Every 3 numbers are regarded as a group
and the beeper will beep once, twice, and 3 times on
each scan)
Step 6: Scan the Enter/Exit Programming Mode to save
the settings, beeper emitting 3 beeps.
60

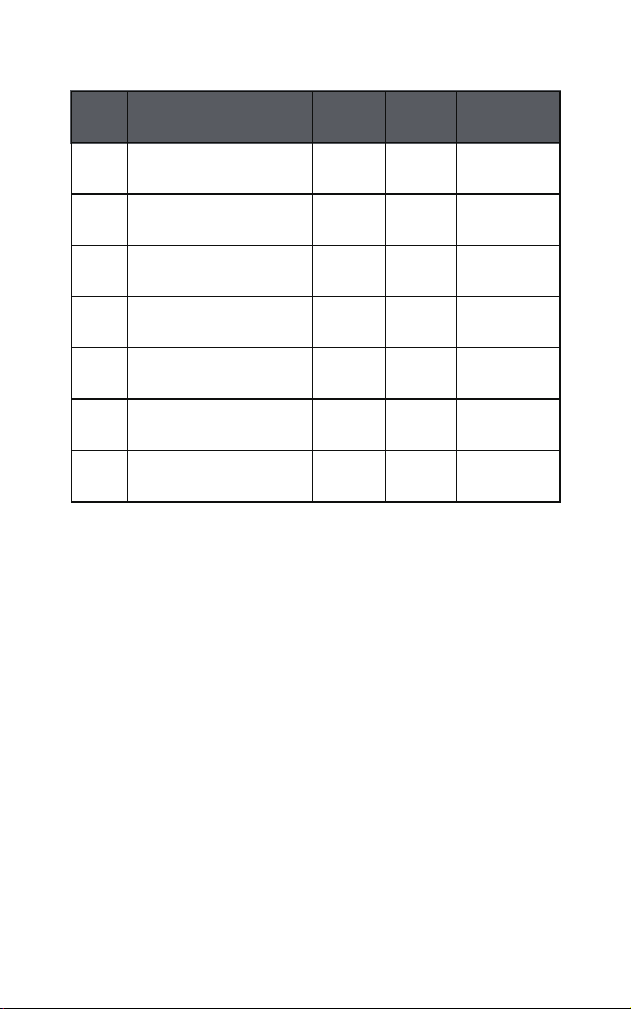
Appendix - Code ID & AIM ID
Num Symbology Code ID AIM ID Description
1
2
3
4
5
6
7
8
9
10
11
12
13
14
Code 128
GS1 128
EAN-8
EAN-8 with Add-on
EAN-13
EAN-13 with Add-on
UPC-E
UPC-E with Add-on
UPC-A
UPC-A with Add-on
UPC-E1
ISBN
Code11
Code39 Base32
A
B
C
C
D
D
E
E
F
F
E
d
1
f
]C0
]C1
]E4
]E3
]E0
]E3
]E0
]E3
]E0
]E3
]X0
]E0
]Hm
]X0
m: 0,1,3
61

Num Symbology Code ID AIM ID Description
15
16
17
18
19
20
21
22
23
24
25
26
27
28
29
G
h
H
I
J
K
L
M
[
]
P
Q
N
O
S
]Im
]S0
]R0
]Am
]Fm
]Mm
]G0
]e0
]e0
]e0
]X9
]X0
]Lm
]Lm
]XH
m: 0,1,2
Interleaved 2 of 5
Industrial 2 of 5
Standard 2 of 5
Code 39
Codabar
MSI Plessey
Code 93
Matrix 2 of 5
PDF417
Micro PDF417
Hanxin
GS1 Databar
Omnidirectional
GS1 Databar
Limited
GS1 Databar
Expanded
HongKong 2 of 5
(China Post)
m: 0,1,2,
3,5,6,7
m: 0,1,2,
3,4,5
m: 0,1,3
m: 0,1,
3,4,5,7
m: 0,2,4
62
Num Symbology Code ID AIM ID Description
30
31
32
33
34
35
36
]zm
]Qm
]Qm
]dm
]Um
]e0
]Bm
T
U
U
V
W
M / [ / ] / …
8
m: 0-9,A-C
m: 0-6
m: 0-6
m: 0-6
m: 0-3
m: 0,1,2,4
AztecCode
QR code
Micro QR
Data Matrix
Maxi Code
Telepen
GS1 Composite
Code
Note: The code identifier for GS1 Composite Code
depends on the type of composite codes.
63

Note: In keyboard applications, ASCII Control
Characters can be represented in 3 different ways. The
CTRL+X function is OS and application dependent.The
appendix charts apply to US style keyboards. Certain
characters may differ depending on your Country
Code/PC regional settings.
00
01
02
03
04
05
06
07
08
09
0A
00
01
02
03
04
05
06
07
08
09
10
Null
Keypad Enter
Caps lock
Right Arrow
Up Arrow
Null
Null
Enter
Left Arrow
Horizontal Tab
Down Arrow
Ctrl+2
Ctrl+A
Ctrl+B
Ctrl+C
Ctrl+D
Ctrl+E
Ctrl+F
Ctrl+G
Ctrl+H
Ctrl+I
Ctrl+J
Appendix – Control Character
HEx
ASCII
(DEC)
Function Keys
Ctrl + X Mode
64

0B
0C
0D
0E
0F
10
11
12
13
14
15
16
17
18
19
11
12
13
14
15
16
17
18
19
20
21
22
23
24
25
Vertical Tab
Backspace
Enter
Insert
Esc
F11
Home
Print Screen
Delete
tab+shift
F12
F1
F2
F3
F4
Ctrl+K
Ctrl+L
Ctrl+M
Ctrl+N
Ctrl+O
Ctrl+P
Ctrl+Q
Ctrl+R
Ctrl+S
Ctrl+T
Ctrl+U
Ctrl+V
Ctrl+W
Ctrl+X
Ctrl+Y
HEx
ASCII
(DEC)
Function Keys
Ctrl + X Mode
65
1A
1B
1C
1D
1E
1F
26
27
28
29
30
31
F5
F6
F7
F8
F9
F10
Ctrl+Z
Ctrl+[
Ctrl+\
Ctrl+]
Ctrl+6
Ctrl+-
HEx
ASCII
(DEC)
Function Keys
Ctrl + X Mode
66

00
01
02
03
04
05
06
07
08
09
0A
0B
0C
0D
00
01
02
03
04
05
06
07
08
09
10
11
12
13
NUL (Null char.)
SOH (Start of Header)
STX (Start of Text)
ETX (End of Text)
EOT (End of Transmission)
ENQ (Enquiry)
ACK (Acknowledgment)
BEL (Bell)
BS (Backspace)
HT (Horizontal Tab)
LF (Line Feed)
VT (Vertical Tab)
FF (Form Feed)
CR (Carriage Return)
Appendix – ASCII Character Chart
ASCII
(DEC)
Character
HEX
67

0E
0F
10
11
12
13
14
15
16
17
18
19
1A
1B
1C
14
15
16
17
18
19
20
21
22
23
24
25
26
27
28
SO (Shift Out)
SI (Shift In)
DLE (Data Link Escape)
DC1 (XON) (Device Control 1)(XON)
DC2 (Device Control 2)
DC3 (XOFF) (Device Control 3)(XOFF)
DC4 (Device Control 4)
NAK (Negative Acknowledgment)
SYN (Synchronous Idle)
ETB (End of Trans. Block)
CAN (Cancel)
EM (End of Medium)
SUB (Substitute)
ESC (Escape)
FS (File Separator)
ASCII
(DEC)
Character
HEX
68

1D
1E
1F
20
21
22
23
24
25
26
27
28
29
2A
2B
29
30
31
32
33
34
35
36
37
38
39
40
41
42
43
GS (Group Separator)
RS (Request to Send)
US (Unit Separator)
SP (Space)
! (Exclamation Mark)
" (Double Quote)
# (Number Sign)
$ (Dollar Sign)
% (Percent)
& (Ampersand)
` (Single Quote)
( (Right / Closing Parenthesis)
) (Right / Closing Parenthesis)
* (Asterisk)
+ (Plus)
ASCII
(DEC)
Character
HEX
69

2C
2D
2E
2F
30
31
32
33
34
35
36
37
38
39
3A
44
45
46
47
48
49
50
51
52
53
54
55
56
57
58
, (Comma)
- (Minus / Dash)
. (Dot)
/ (Forward Slash)
0
1
2
3
4
5
6
7
8
9
: (Colon)
ASCII
(DEC)
Character
HEX
70

3B
3C
3D
3E
3F
40
41
42
43
44
45
46
47
48
49
59
60
61
62
63
64
65
66
67
68
69
70
71
72
73
; (Semi-colon)
< (Less Than)
= (Equal Sign)
> (Greater Than)
? (Question Mark)
@ (AT Symbol)
A
B
C
D
E
F
G
H
I
ASCII
(DEC)
Character
HEX
71

4A
4B
4C
4D
4E
4F
50
51
52
53
54
55
56
57
58
74
75
76
77
78
79
80
81
82
83
84
85
86
87
88
J
K
L
M
N
O
P
Q
R
S
T
U
V
W
X
ASCII
(DEC)
Character
HEX
72

59
5A
5B
5C
5D
5E
5F
60
61
62
63
64
65
66
67
89
90
91
92
93
94
95
96
97
98
99
100
101
102
103
Y
Z
[ (Left / Opening Bracket)
\ (Back Slash)
] (Right / Closing Bracket)
^ (Caret / Circumflex)
_ (Underscore)
' (Grave Accent)
a
b
c
d
e
f
ASCII
(DEC)
Character
HEX
73

67
68
69
6A
6B
6C
6D
6E
6F
70
71
72
73
74
75
103
104
105
106
107
108
109
110
111
112
113
114
115
116
117
g
h
i
j
k
l
m
n
o
p
q
r
s
t
u
ASCII
(DEC)
Character
HEX
74

76
77
78
79
7A
7B
7C
7D
7E
7F
118
119
120
121
122
123
124
125
126
127
v
w
x
y
z
{ (Left/ Opening Brace)
| (Vertical Bar)
} (Right/Closing Brace)
~ (Tilde)
DEL (Delete)
ASCII
(DEC)
Character
HEX
75

76
Appendix – Special Characters Output
ALT Mode
Single-byte Character
Raw Data
Single-byte Character

77
If you need any product support, please contact our
customer service.
Please attach your Amazon Order Number and Product
Model Number in the email.
If you want to learn more about our brand or need a
digital user manual of the latest version, please visit our
officialwebsite via the links below or by scanning the
given QR code:
https://tera-digital.com/
https://tera-digital.com/pages/user-manual
Email Addresses:
service-us@ tera-digital.com
service-eu@ tera-digital.com
service-uk@ tera-digital.com
Cell/WhatsApp (service in English): +86 13382526580
Important Notice:
Official Customer Service