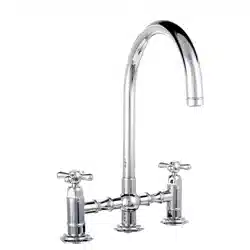

Kitchen Faucets
Installation Guide
and Users Manual

Inspired by the clear, serene waters of the stunning Lake Tahoe, ZLINE
Kitchen Faucets provide the ultimate luxury experience at the center of
your home. Designed to seamlessly match every kitchen, ZLINE Faucets
are offered in a wide selection of contemporary styles and designer
finishes. With ergonomic control in mind, these faucets offer the perfect
amount of aerated water pressure at 1.8 gal/min, allowing for an eco-
friendly and efficient washing experience.
Each faucet is precision tested, as they undergo over 50,000 unit tests - a
step above the industry standard of 15,000 tests. Have peace of mind
knowing ZLINE Faucets are cUPC Certified, ensuring the materials used
are durable and lead-free. Discover what makes Attainable Luxury® the
core essence of ZLINE Kitchen with these designer kitchen faucets.

SAFETY INSTRUCTIONS 1
Prior to Installation
Safety Tips
Installation Preparation
Care and Maintenance
Notes
SPRING FAUCETS 2
Parts
Tools
Assembly
PULL DOWN FAUCETS 6
Parts
Tools
Assembly
DA VINCI (DAV-KF-BN) PULL DOWN FAUCET 11
Parts
Tools
Dimensions
Assembly
SINGLE HANDLE FAUCETS 16
Parts
Tools
Assembly
DOUBLE HANDLE FAUCETS 21
Parts
Tools
Assembly
TROUBLESHOOTING 26
TABLE OF CONTENTS
1
Prior to Installation
Make sure that the cold and hot water lines are turned off.
Wrap all threaded connections with plumber’s tape. Always wrap in a clockwise
direction.
Cover your drain to avoid losing parts.
Do not disassemble the main faucet body, as it has been installed and commissioned
correctly and precisely before delivery to the factory.
To keep the faucet from jamming, flush the water pipe before installation.
Operating conditions: Working pressure at 0.05-1.0 MPa (including cold and hot
water pressure) with applicable water temperature: 39.2°F - 194°F.
Water supply line length: 22.25”
Sprayer length: 35.75”
Installation Preparation
1. Shut off the water and let the water in the current faucet drain.
2. Assemble needed tools. The tools needed for each installation are included at the
beginning of each section.
3. Loosen the hardware that keeps the current faucet in place. Remove faucet.
Care and Maintenance
To keep the product clean and shining, follow the steps below:
1. Rinse clean with water and dry with a soft cloth.
2. Do not clean with soaps, acid, polish, abrasives, or harsh cleaners.
3. Do not use cloth with a coarse surface.
4. Unscrew the aerator and clean when necessary.
Safety Instructions
If soldering the water connections when installing the faucet, remove the O-rings,
cartridges, and washers before applying any heat.
Protect your eyes when cutting or soldering.
Do not over tighten screws/nuts. Finger tighten, then use a wrench/Philips-head
screwdriver to tighten the fixing screw/nut until snug.

2
Spring Faucet
3
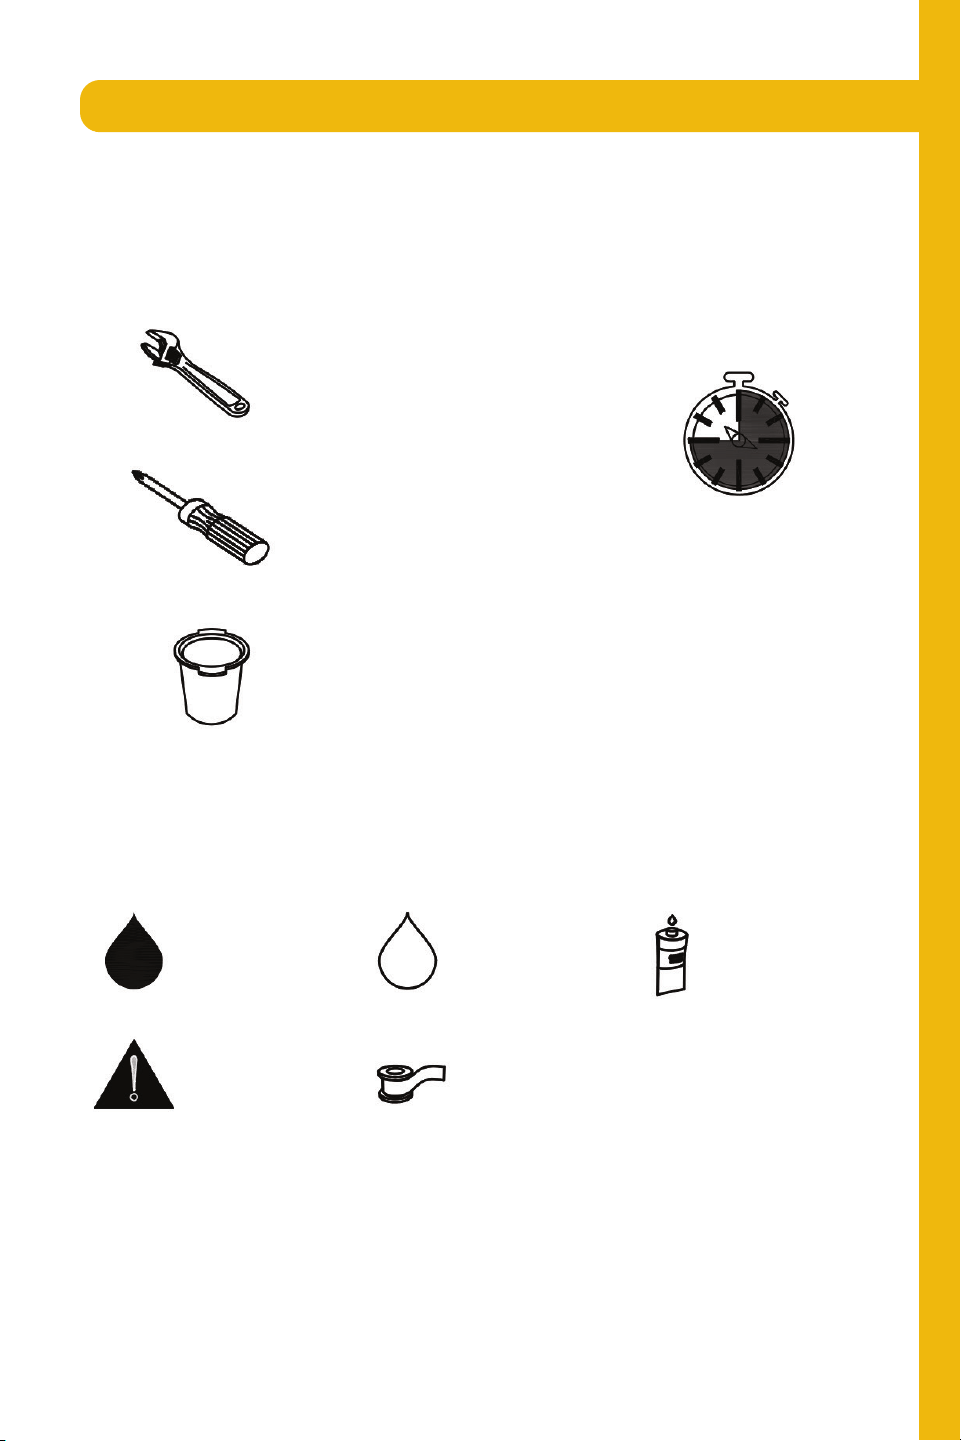
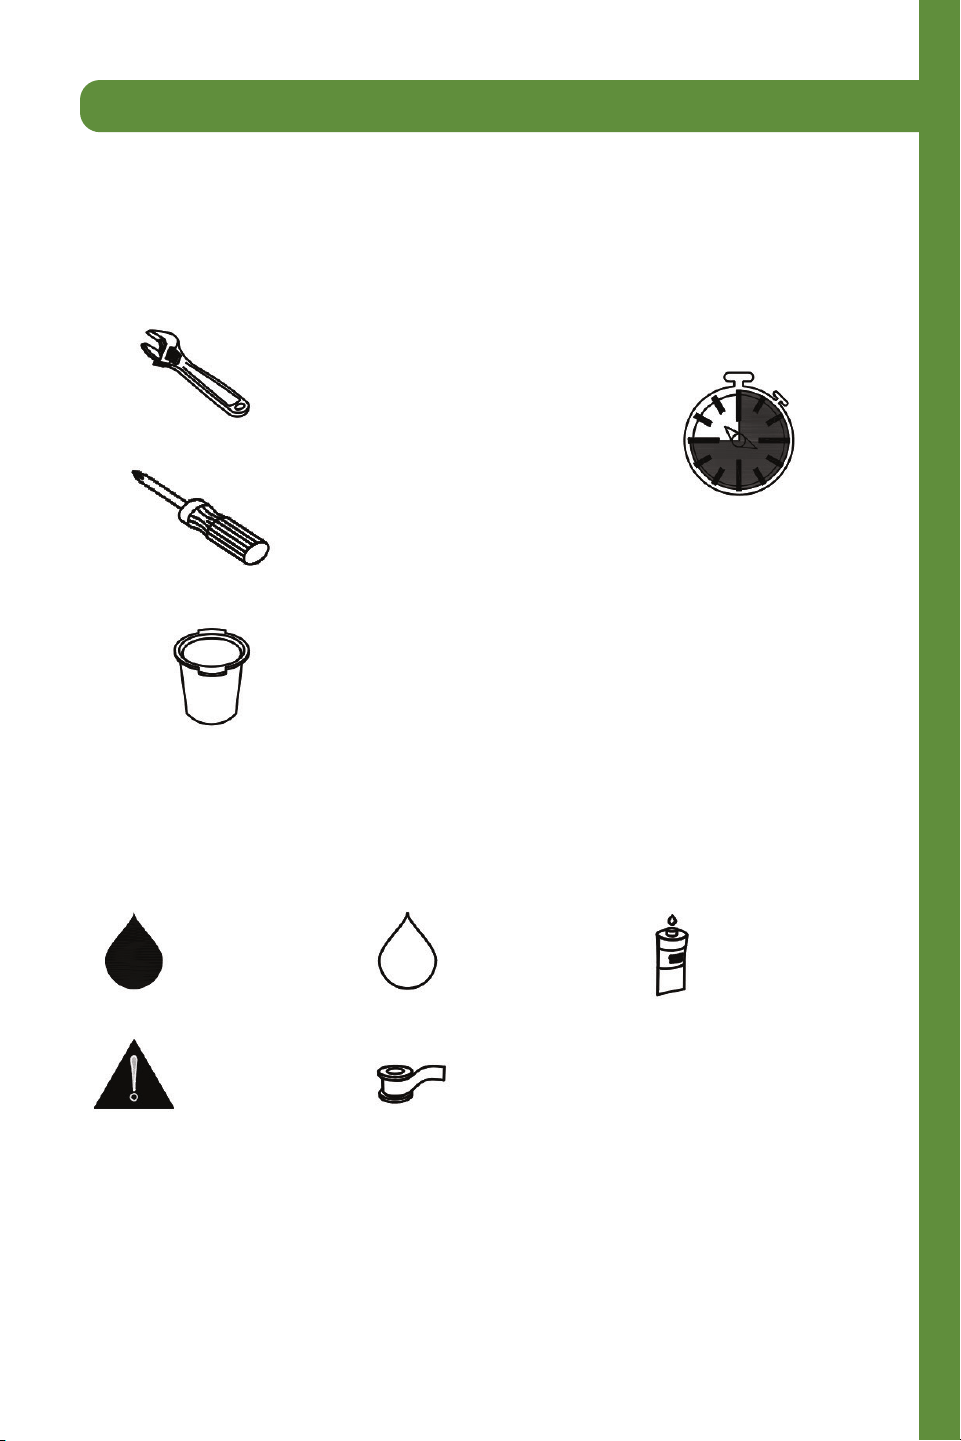
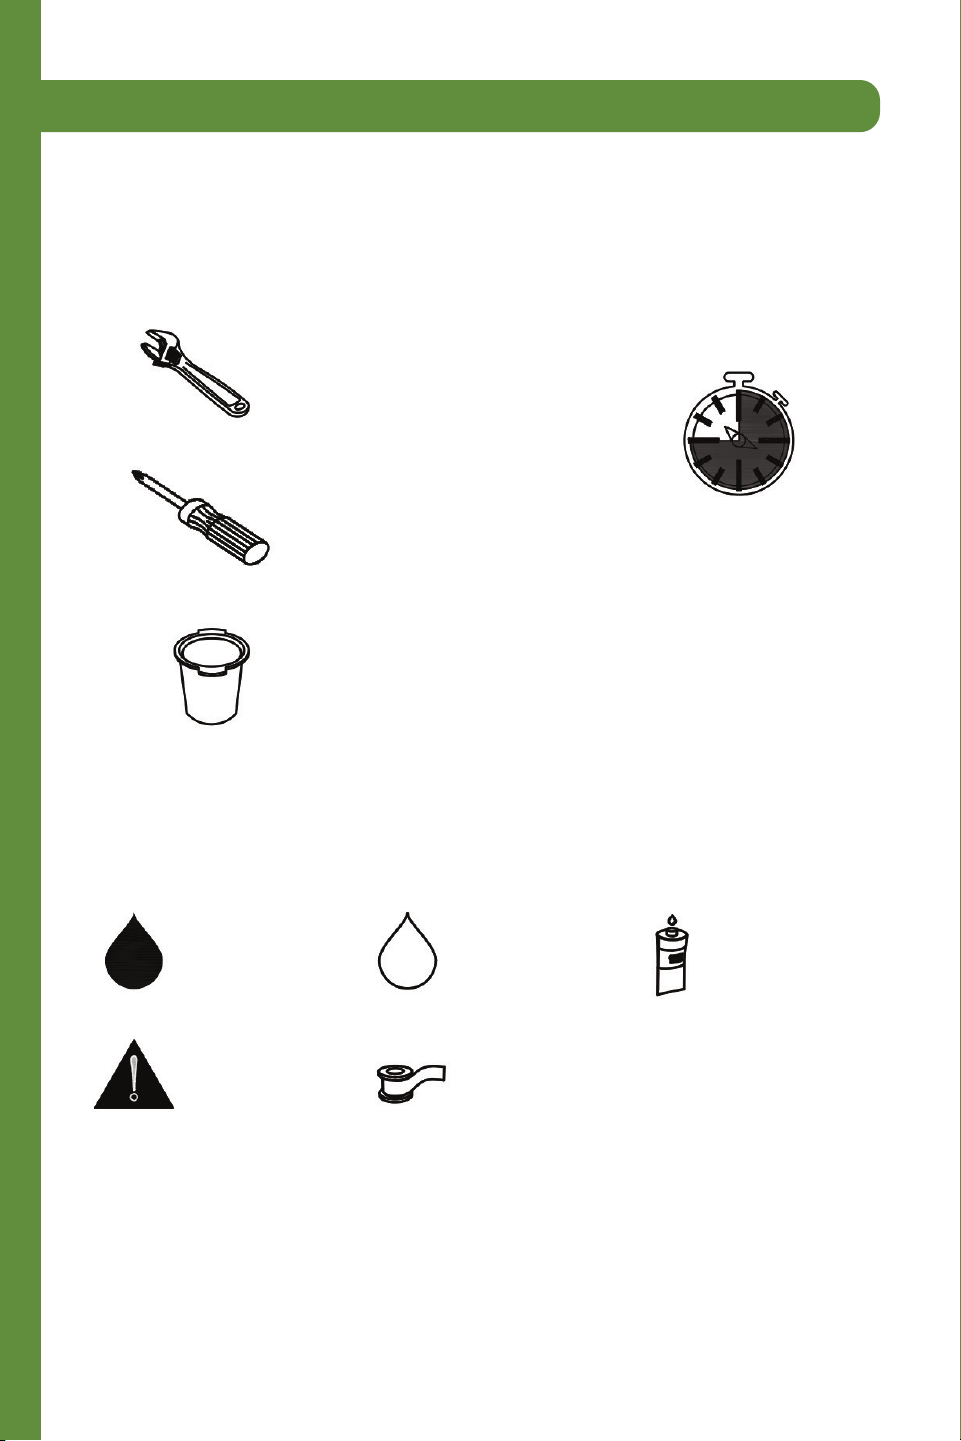
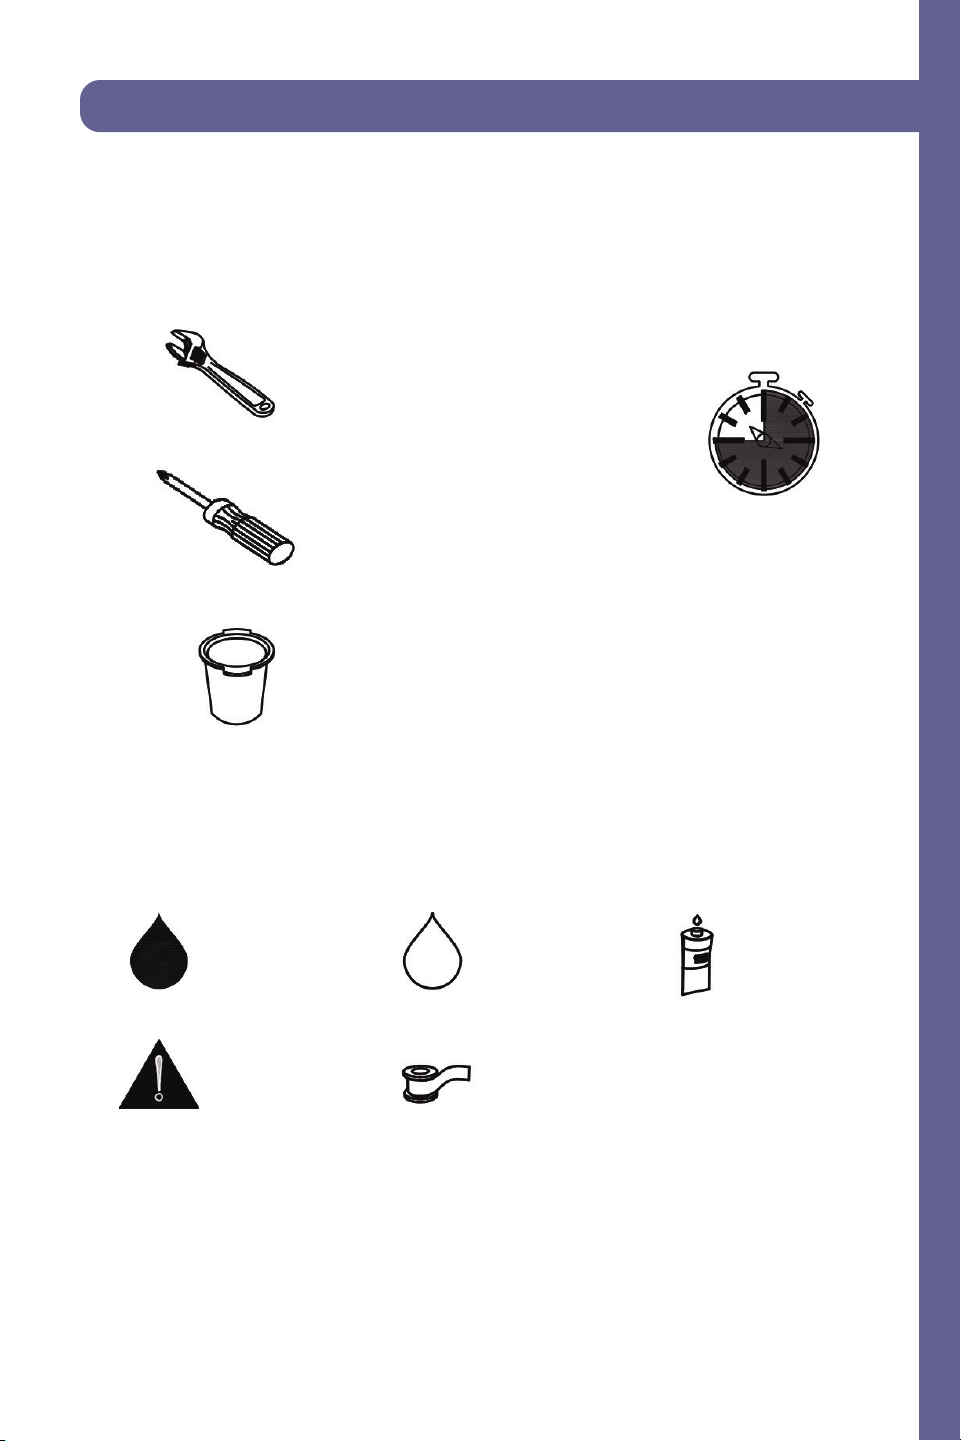
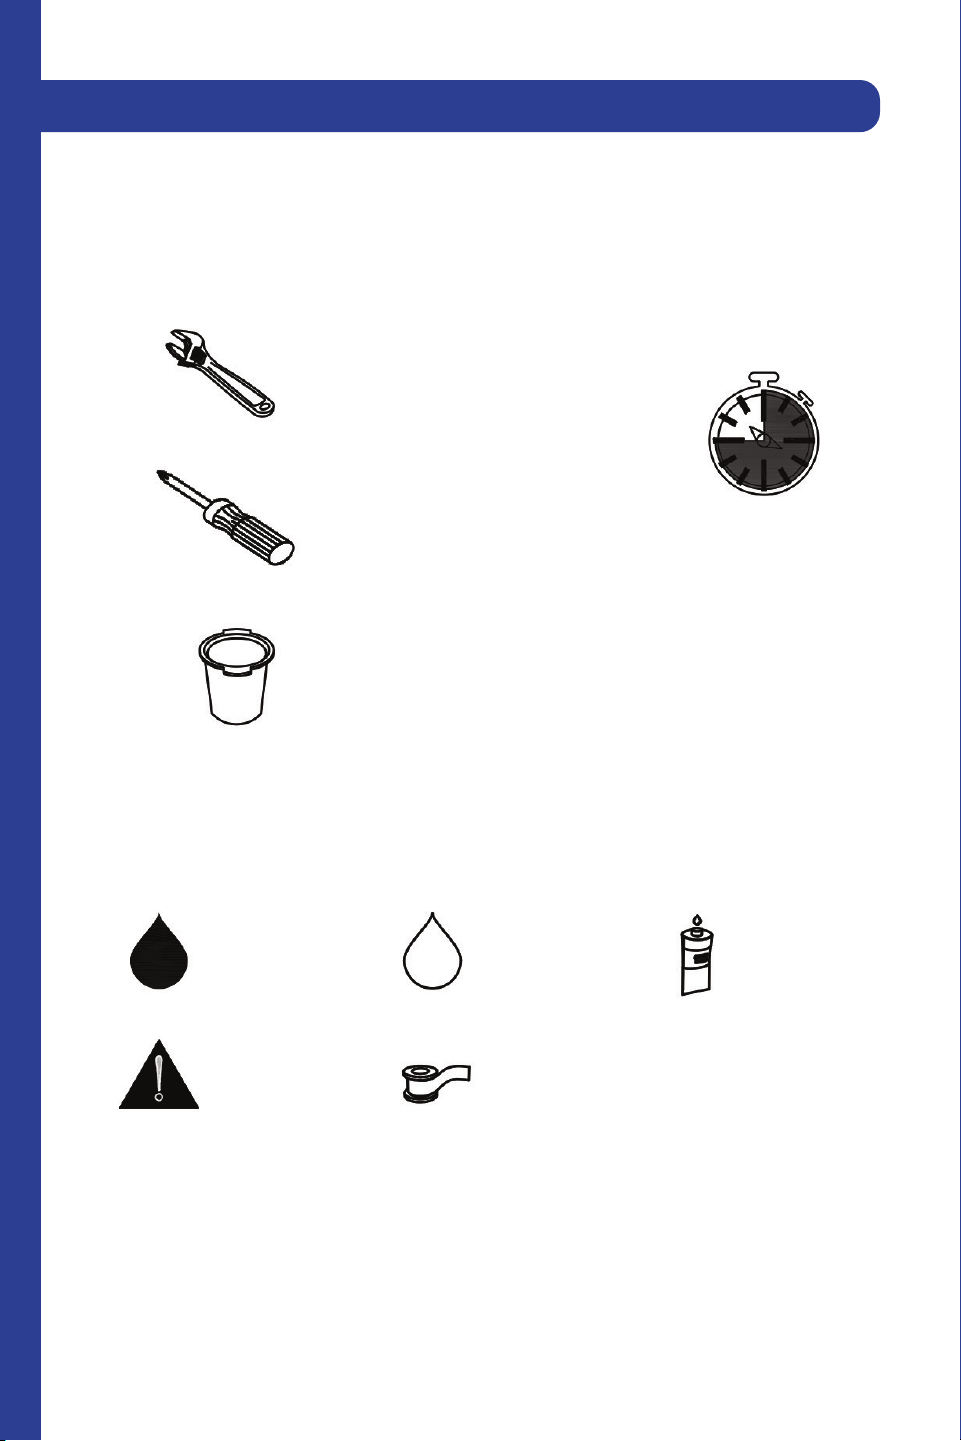
Tools:
Time required:
+/- 45 minutes
Wrench
Legend:
Hot Water
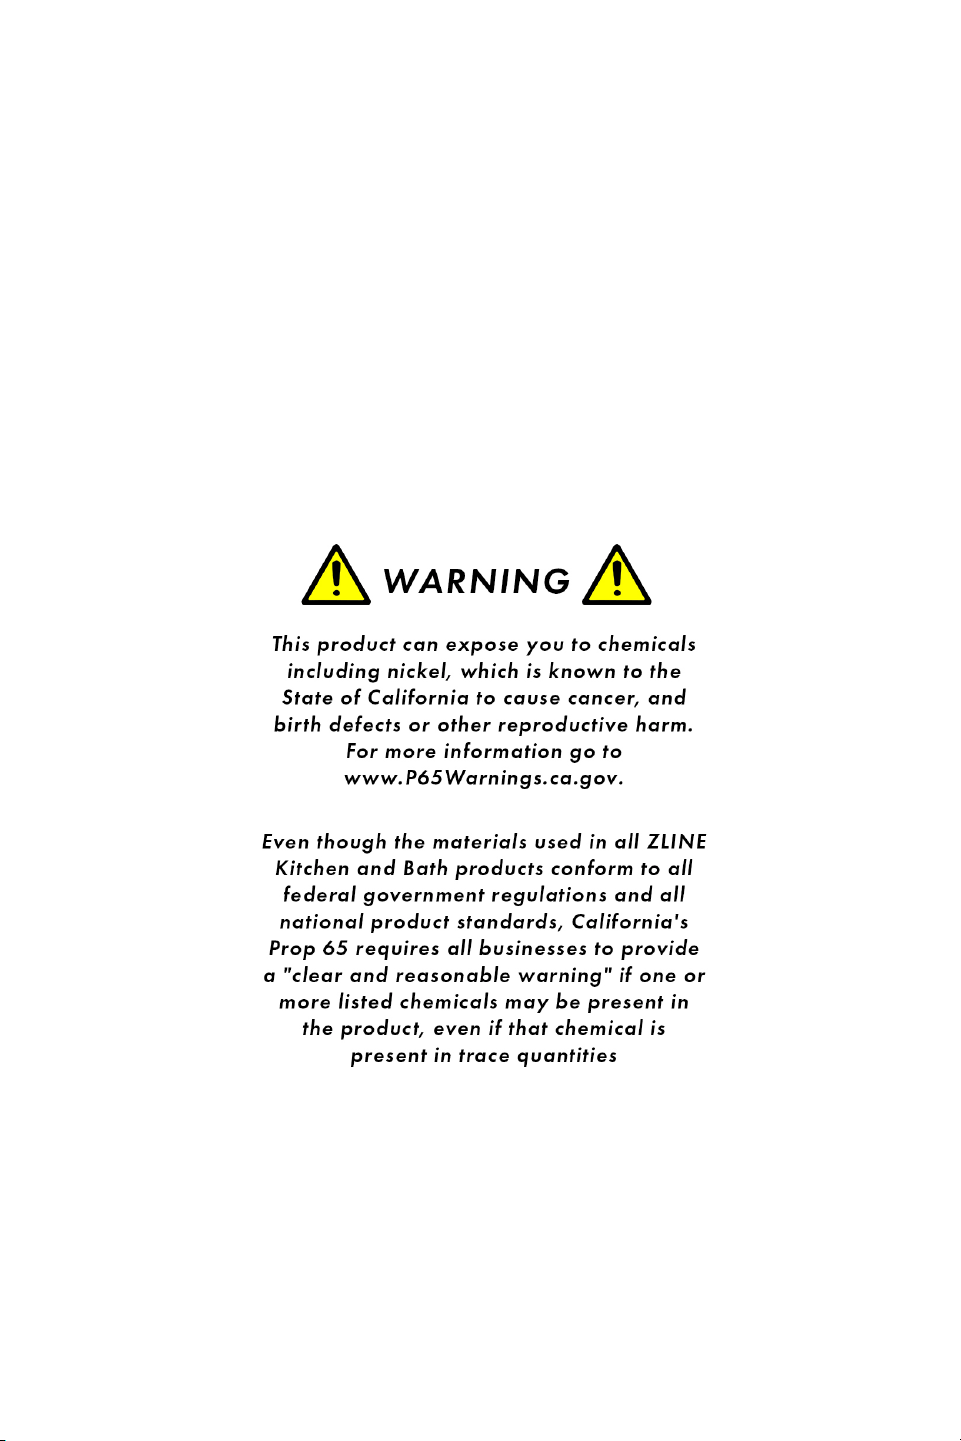
Warning
Cold Water
Plumber’s Tape-
Used for a watertight seal on
threaded pipe joints.
Grease
Phillips-head screwdriver
Bucket
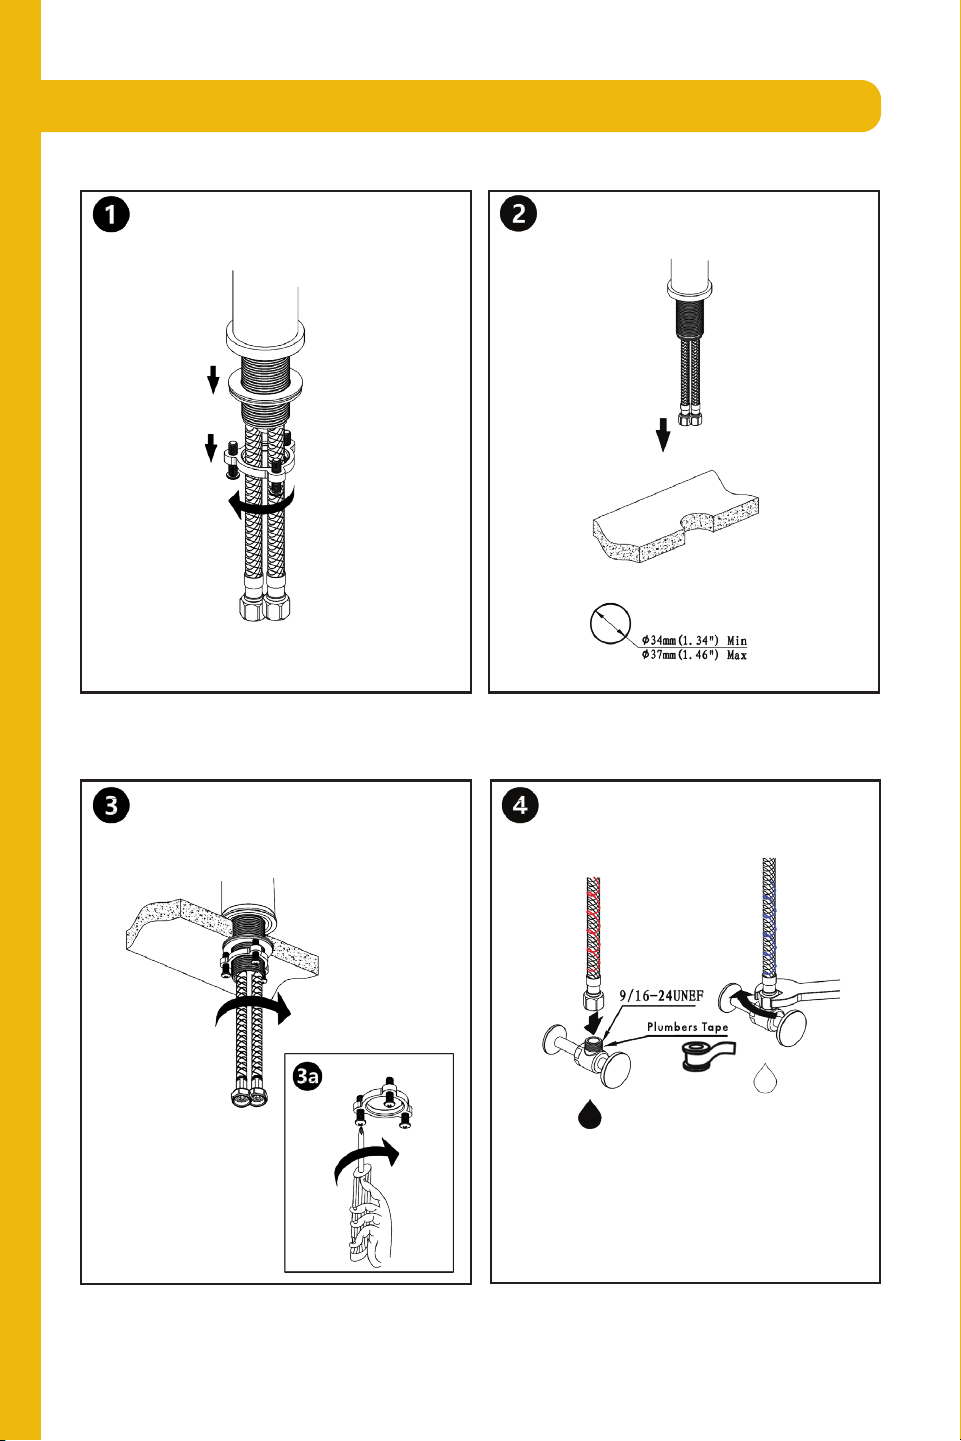
Spring Faucet
4
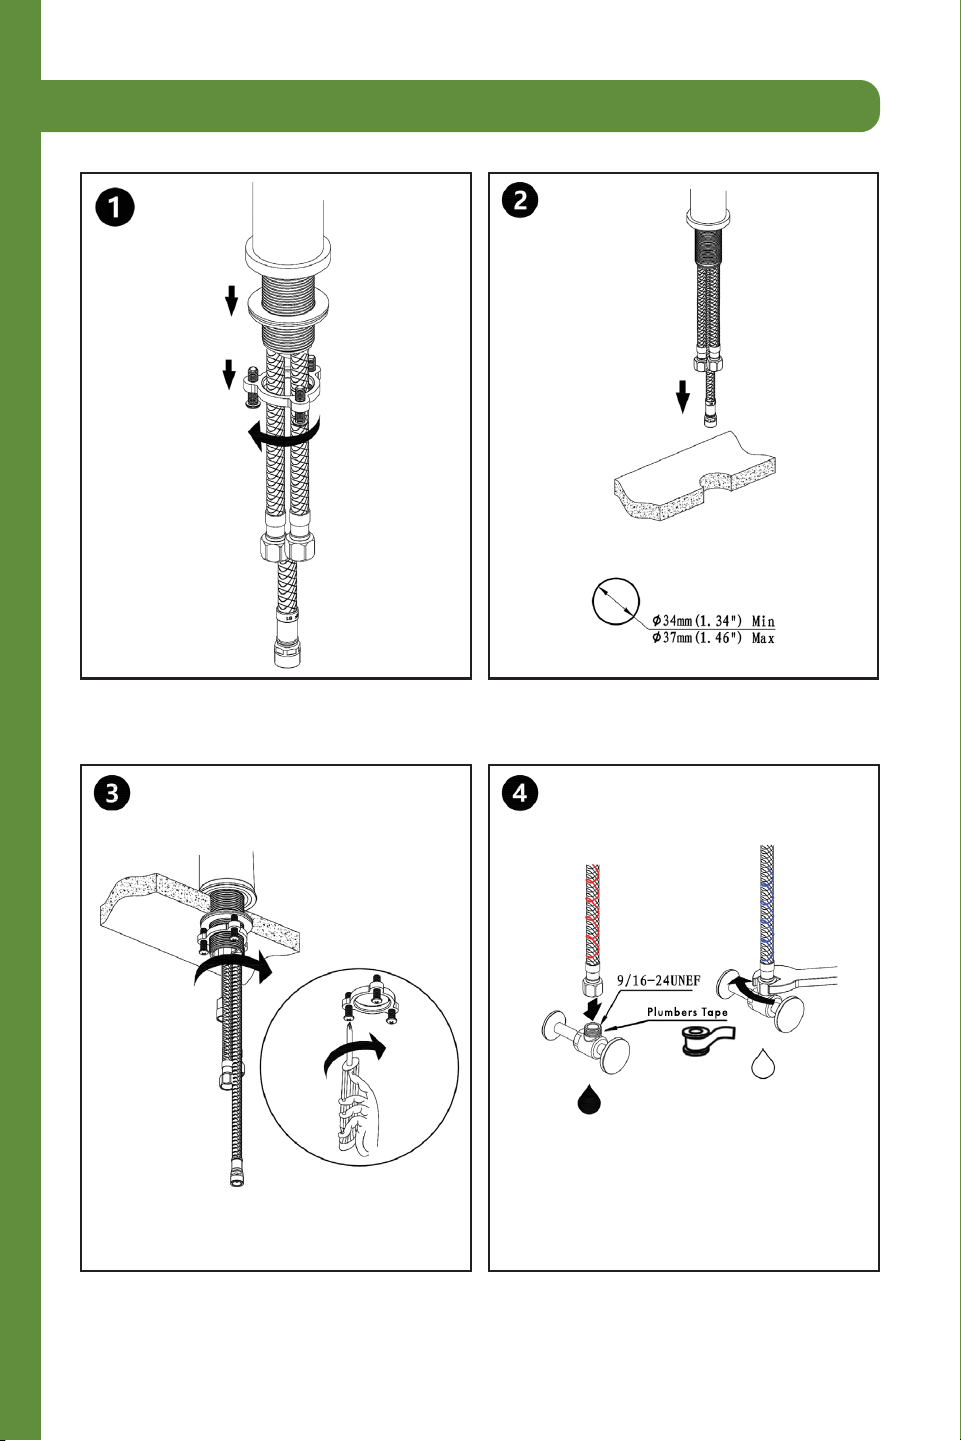
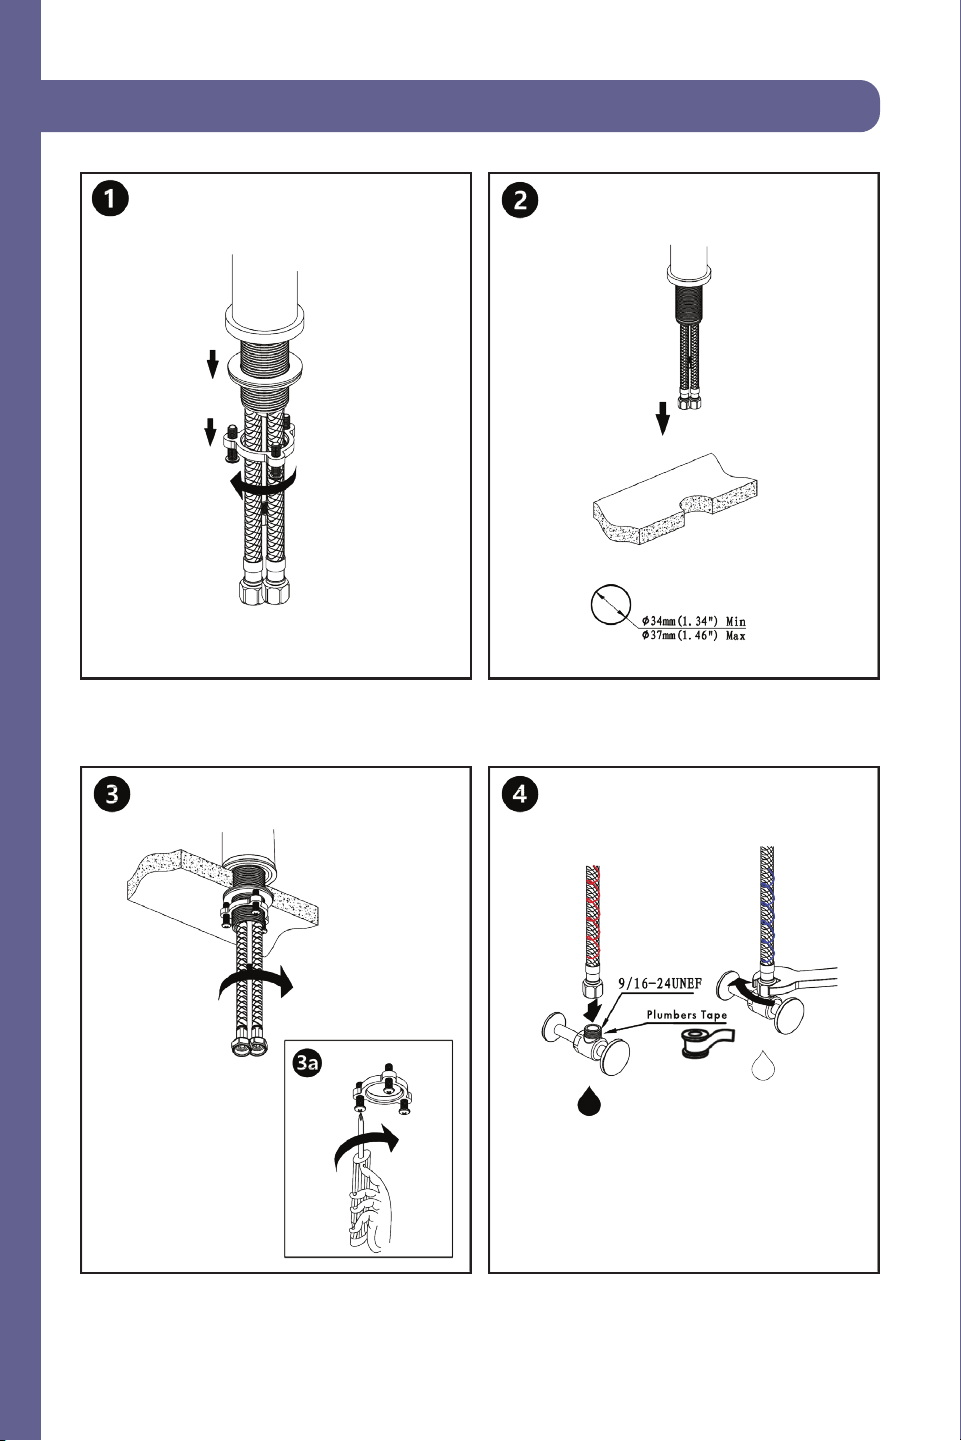
Spring Faucet
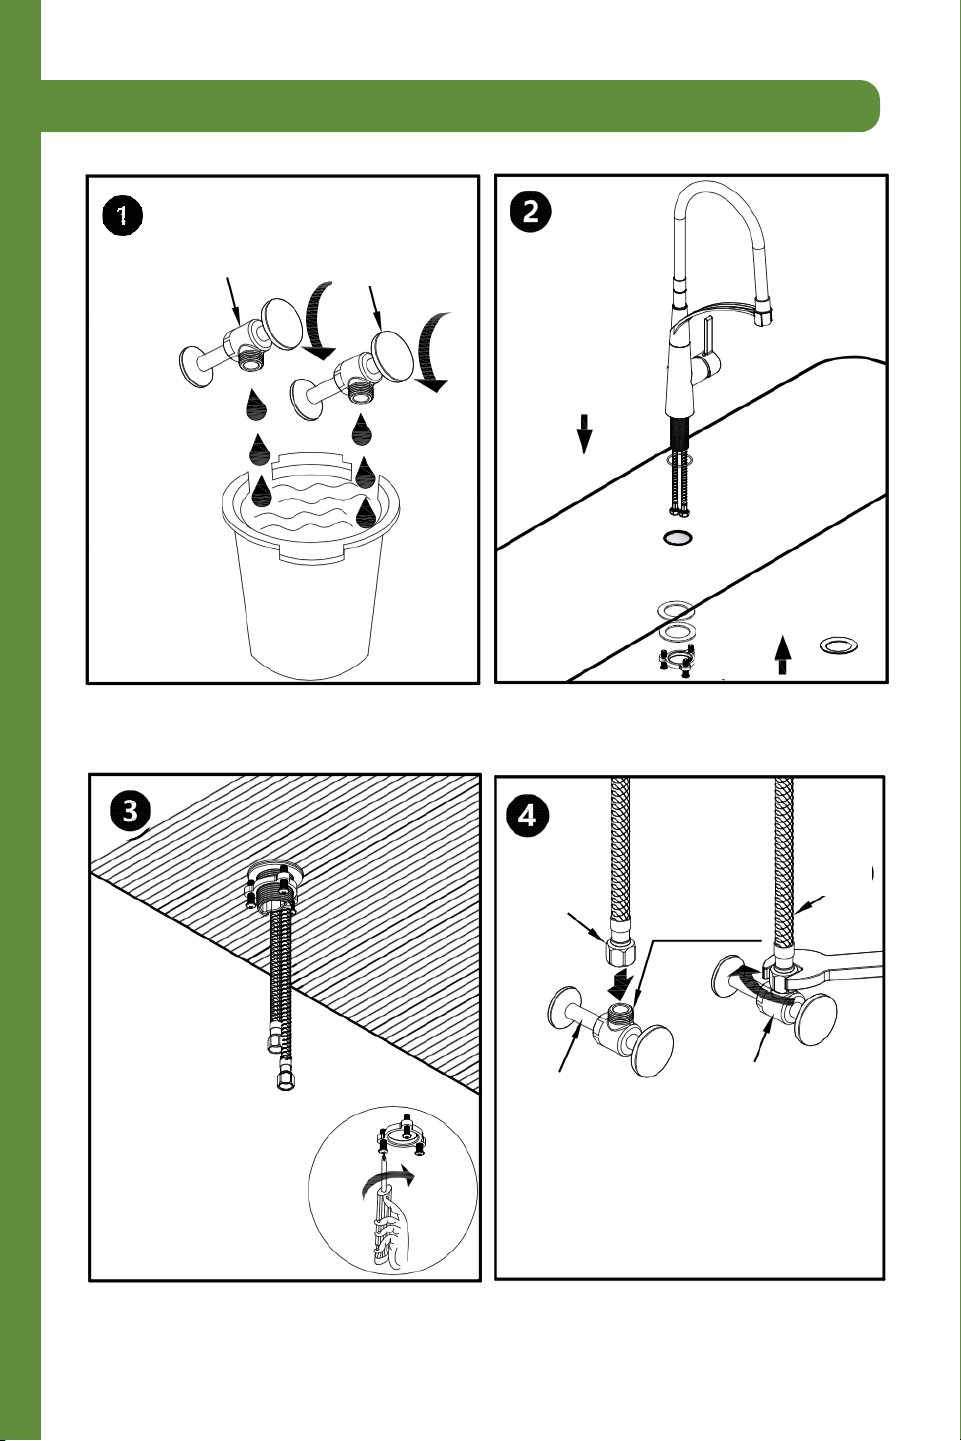
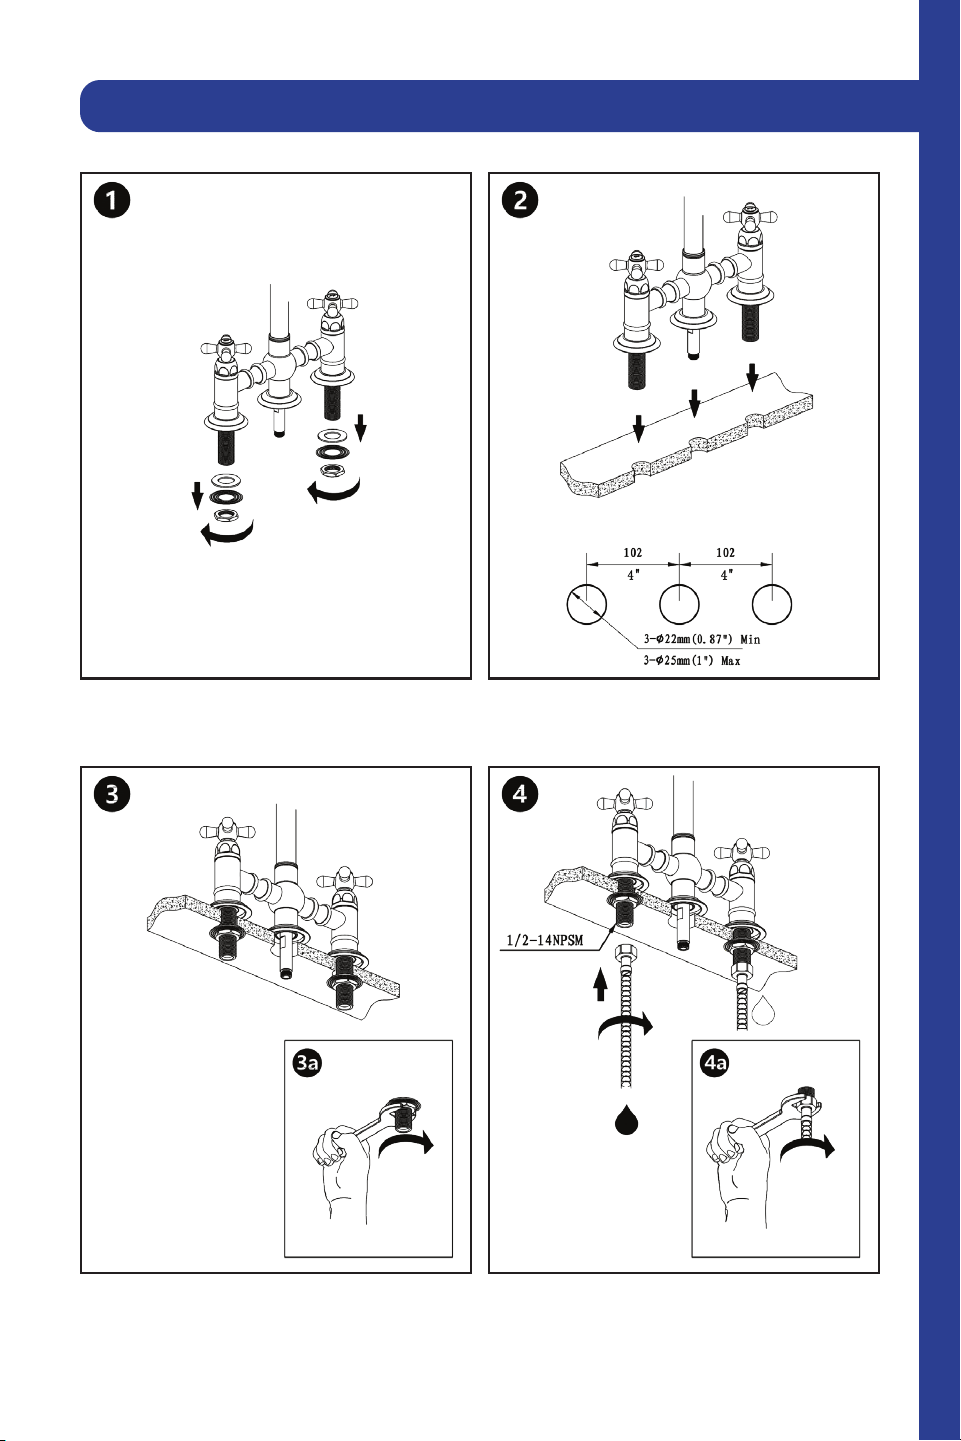
Plumbers Tape
Loosen the fixing nut and screws and
put aside.
Secure the hardware into place with
the Base O-ring, nuts, and screws.
Mount faucet to counter top.
Secure the hoses to the hot (red) and
cold (blue) lines appropriately.
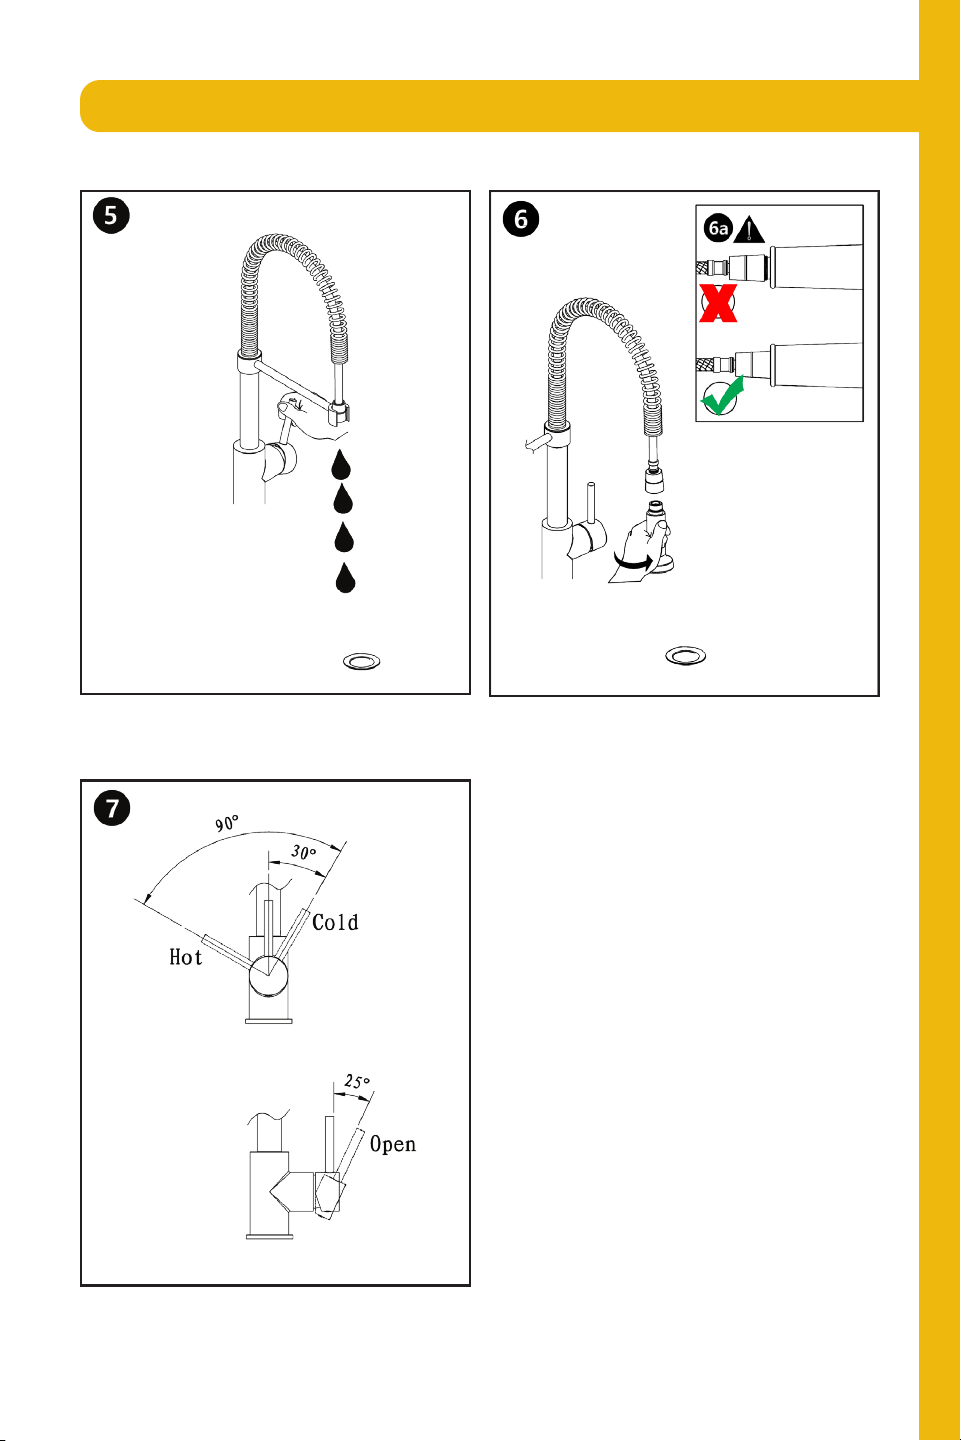
5
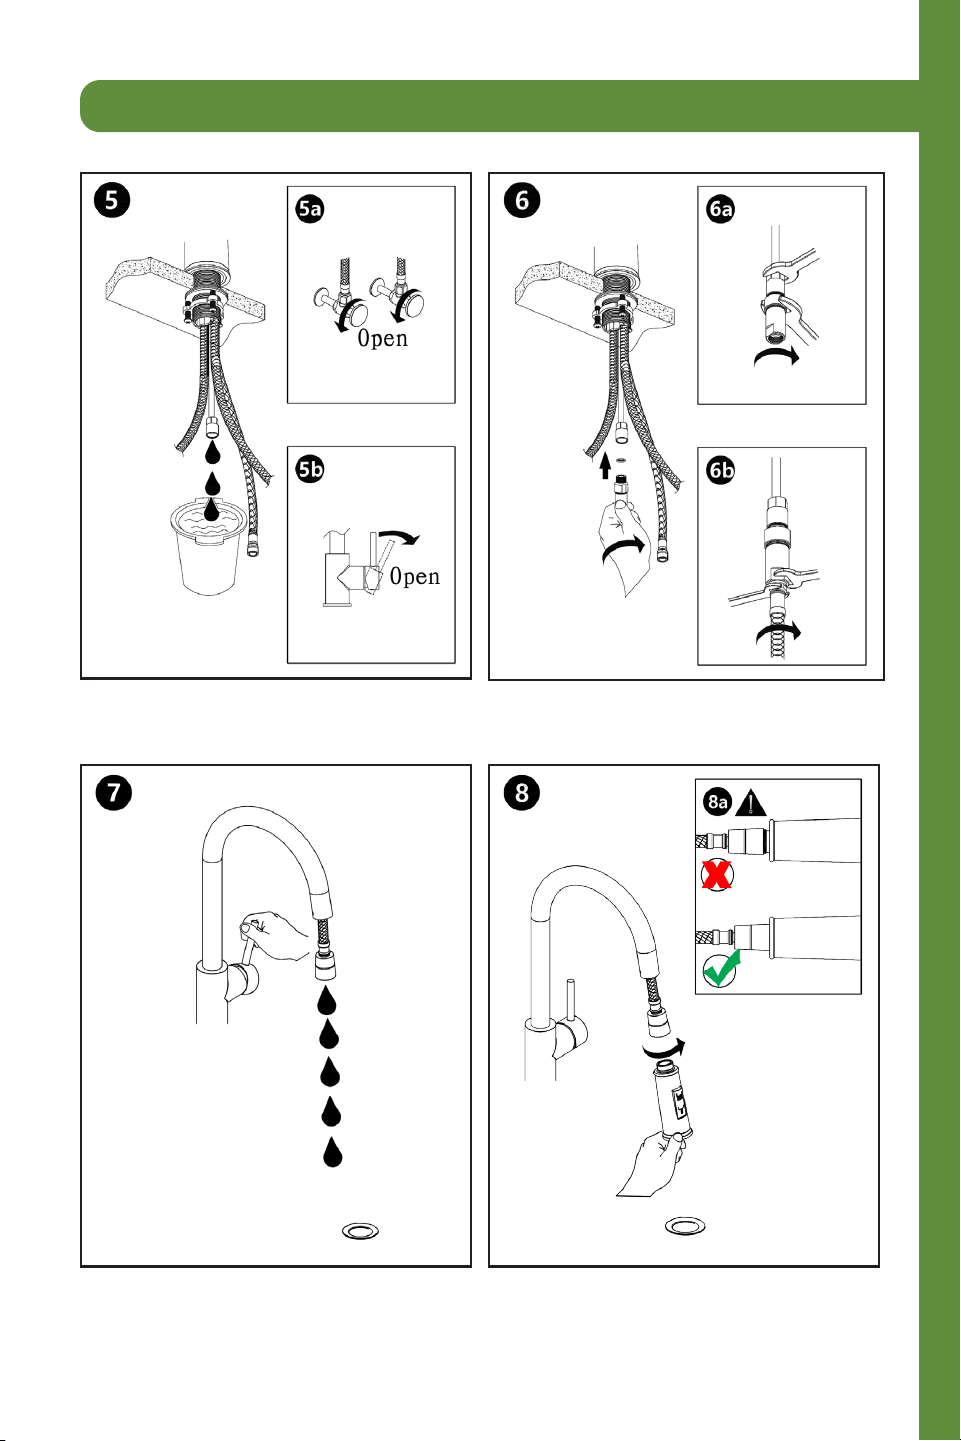
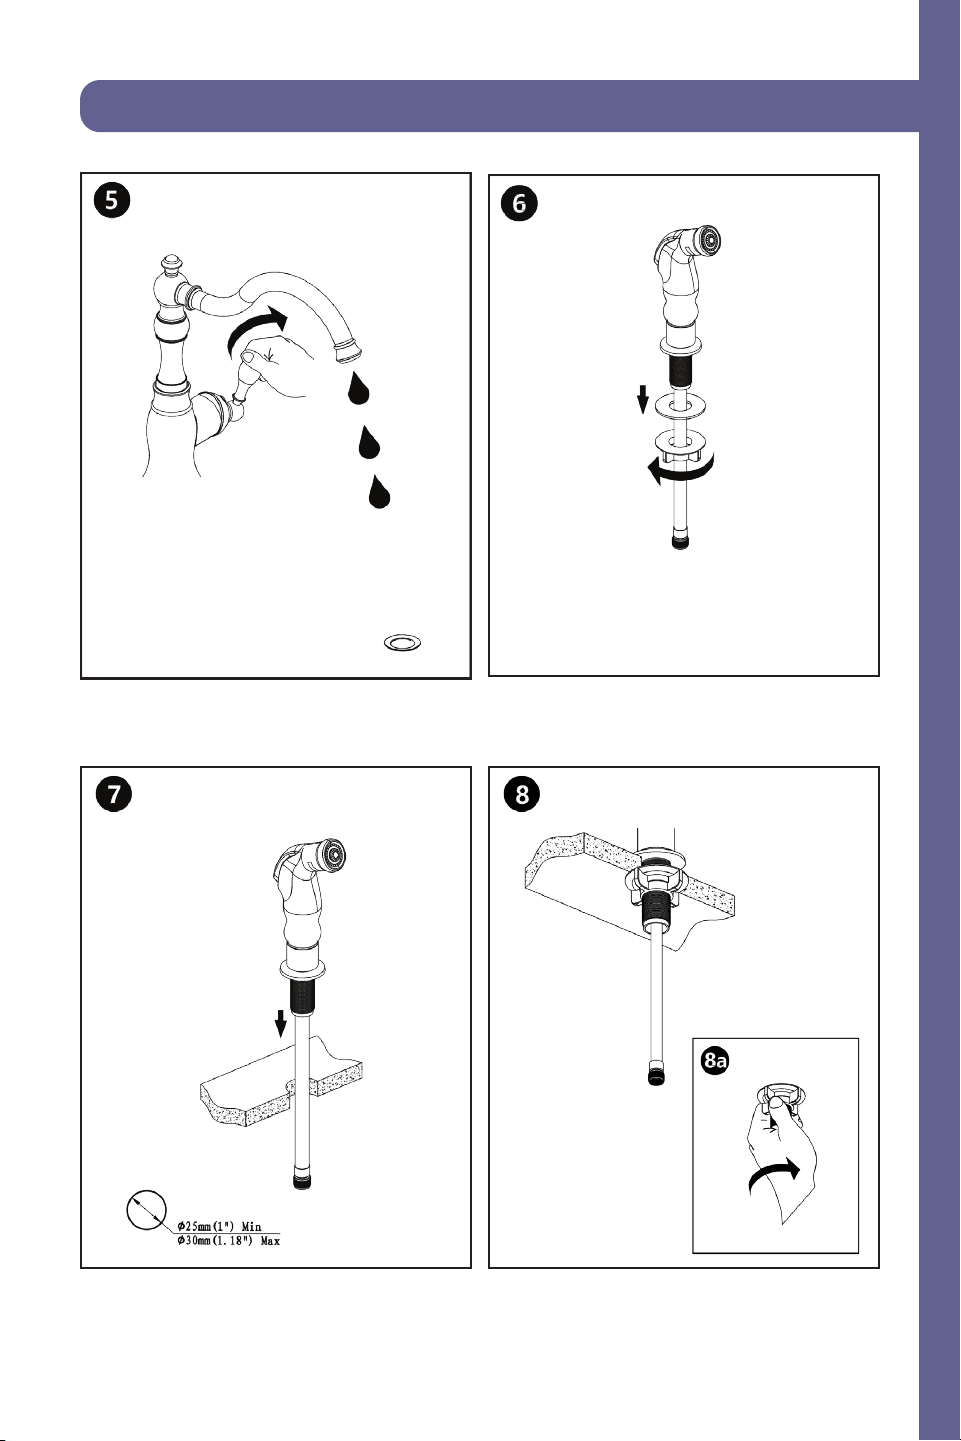
Spring Faucet
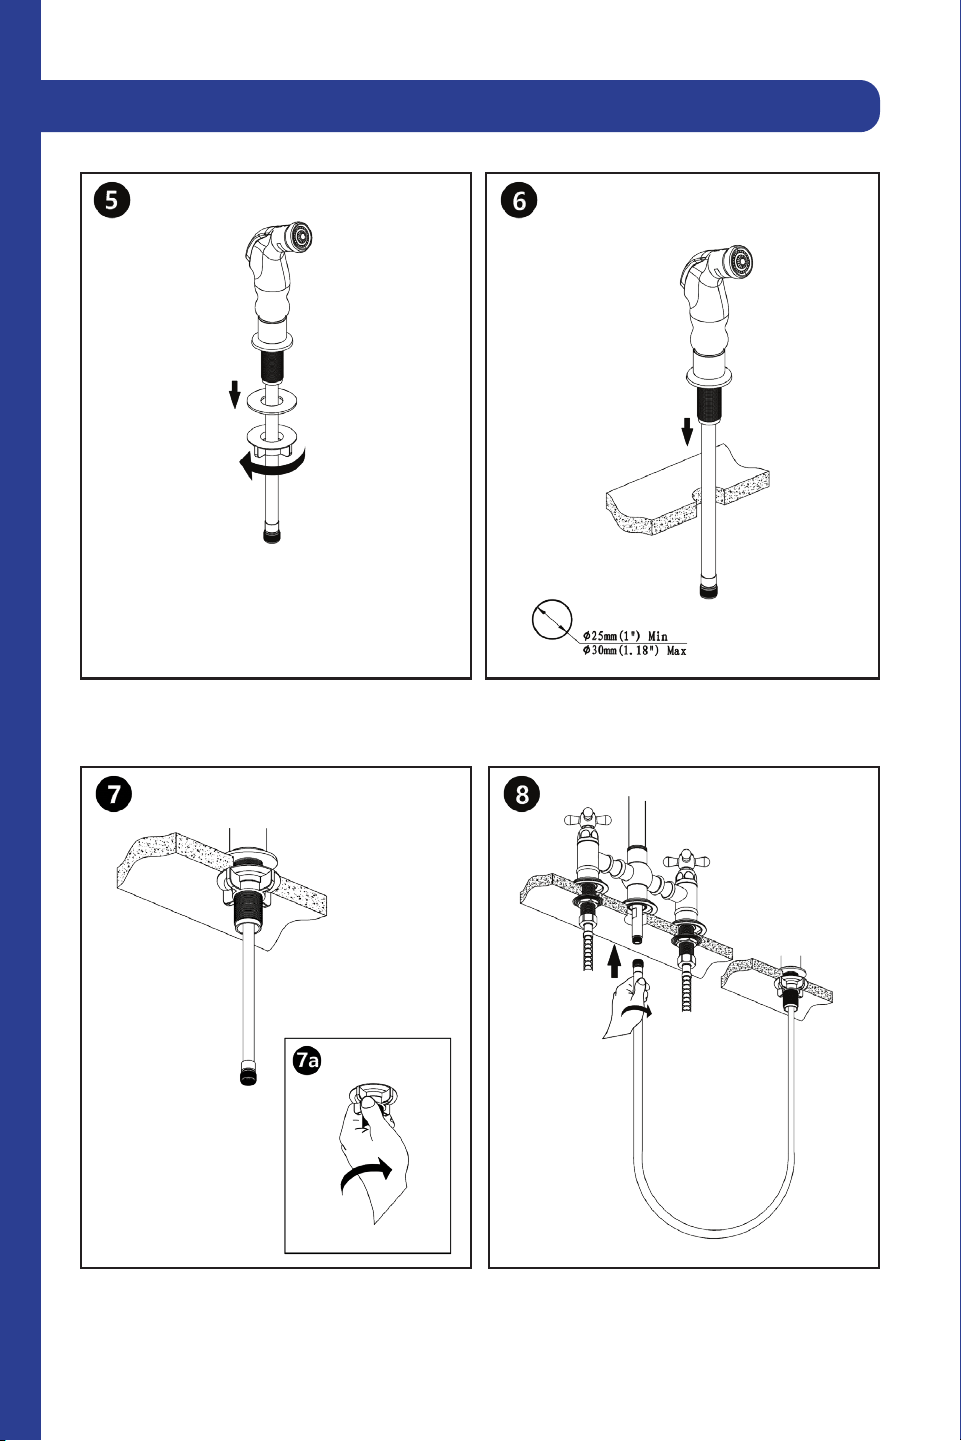
Test the faucet.
spray head
spray head
Make sure that the spray head is
properly secured.
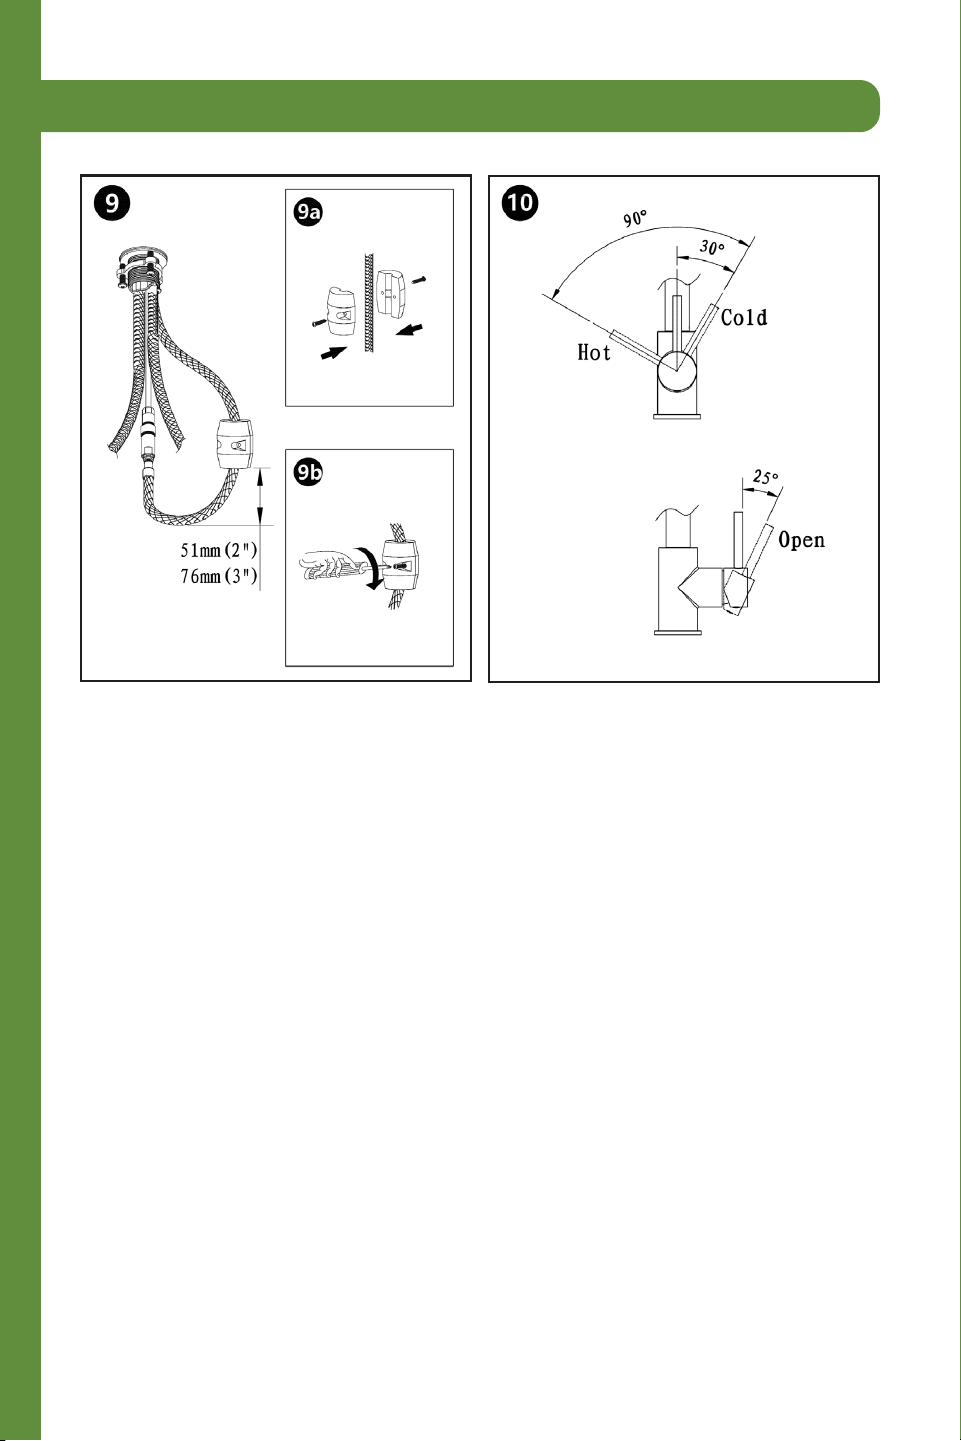
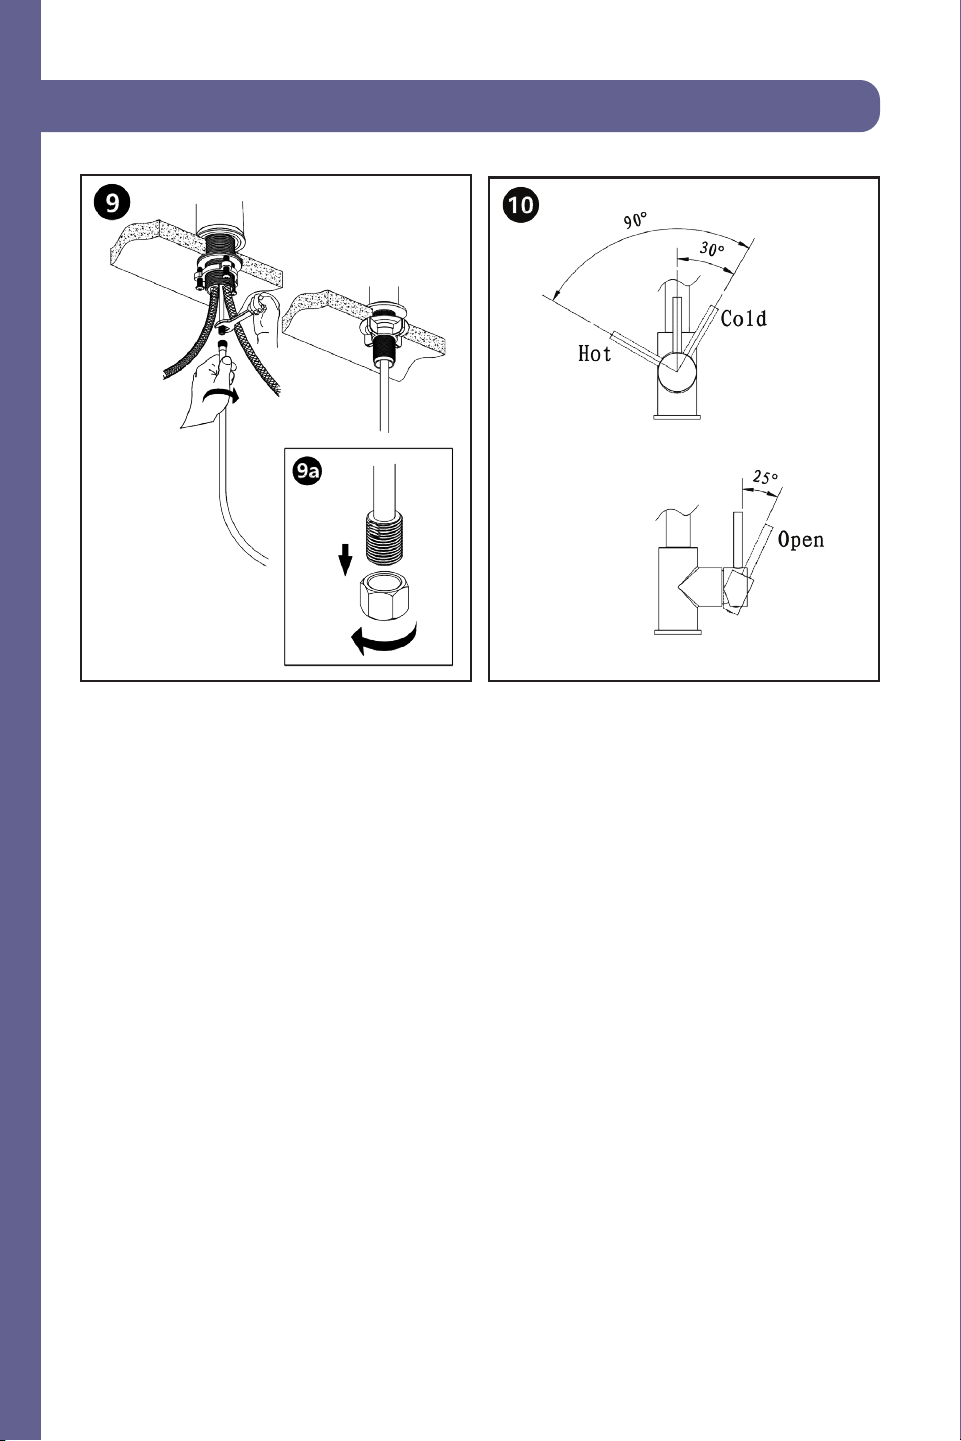
Review the diagram to understand the
hot, cold, and open settings.
6
Pull Down Faucets
7
Tools:
Time required:
+/- 45 minutes
Wrench
Legend:
Hot Water
Warning
Cold Water
Plumber’s Tape-
Used for a watertight seal
on threaded pipe joints.
Grease
Phillips-head screwdriver
Bucket
Pull Down Faucets
8
Pull Down Faucets
Plumbers Tape
Loosen the fixing nut and screws and
put aside.
Secure the hardware into place with
the Base O-ring, nuts, and screws.
Mount faucet to counter top.
Secure the hoses to the hot and cold
lines appropriately.
9
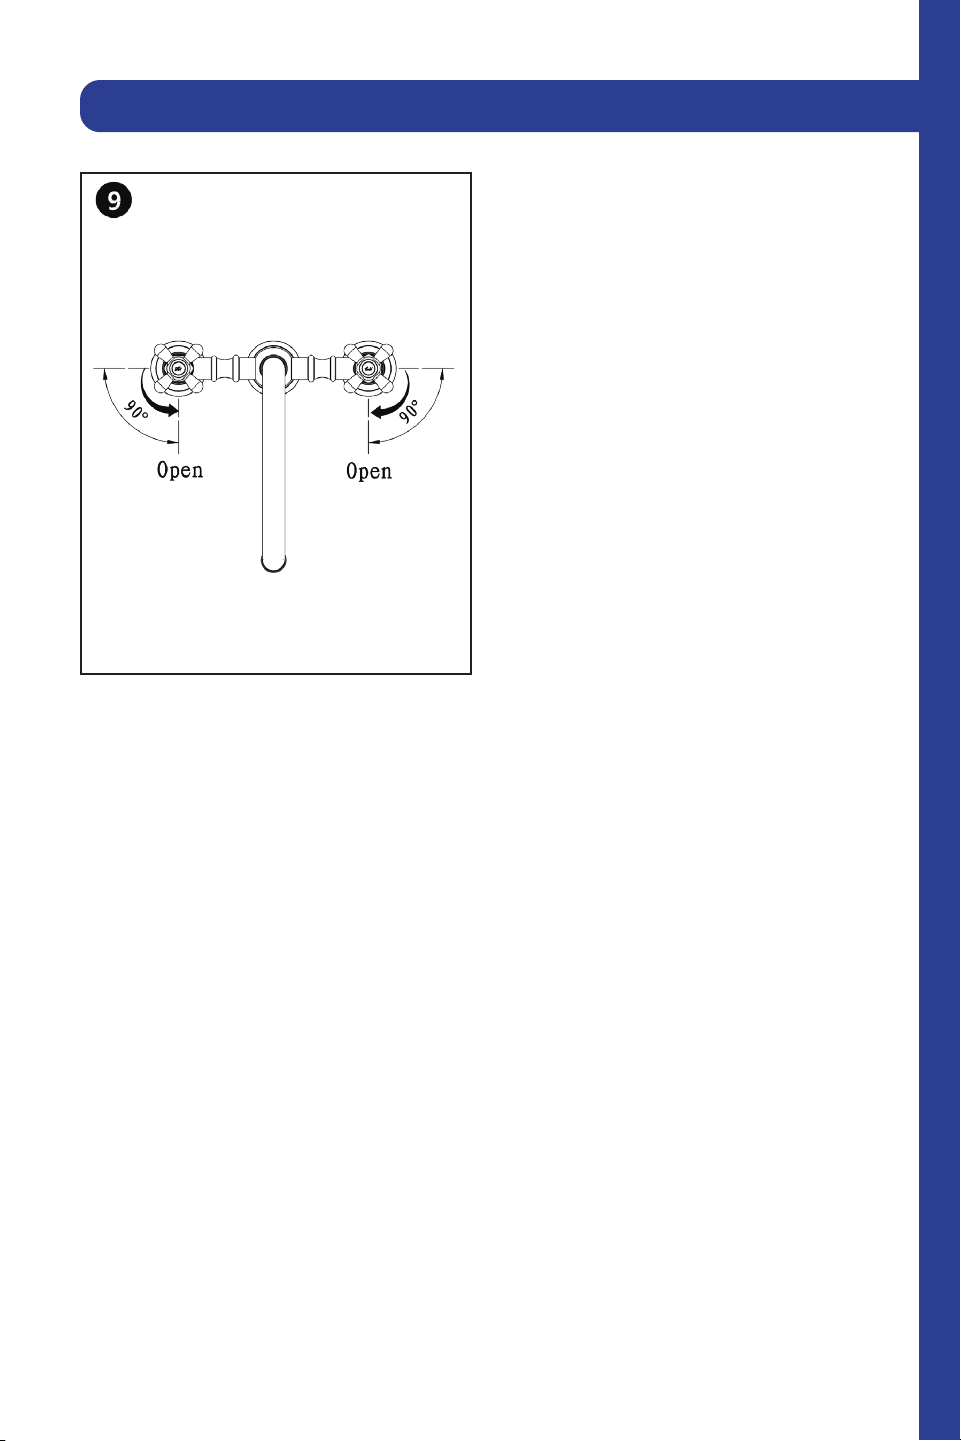
Pull Down Faucets
Drain the valve.
Tighten the hardware.Drain the valve.
Secure the hardware into place.
Test the faucet. Make sure that the spray head is
properly secured.
spray head
spray head
10
Pull Down Faucets
Review the diagram to understand the
hot, cold, and open settings.
Apply the weight to the center of the
hose for even distribution.
11
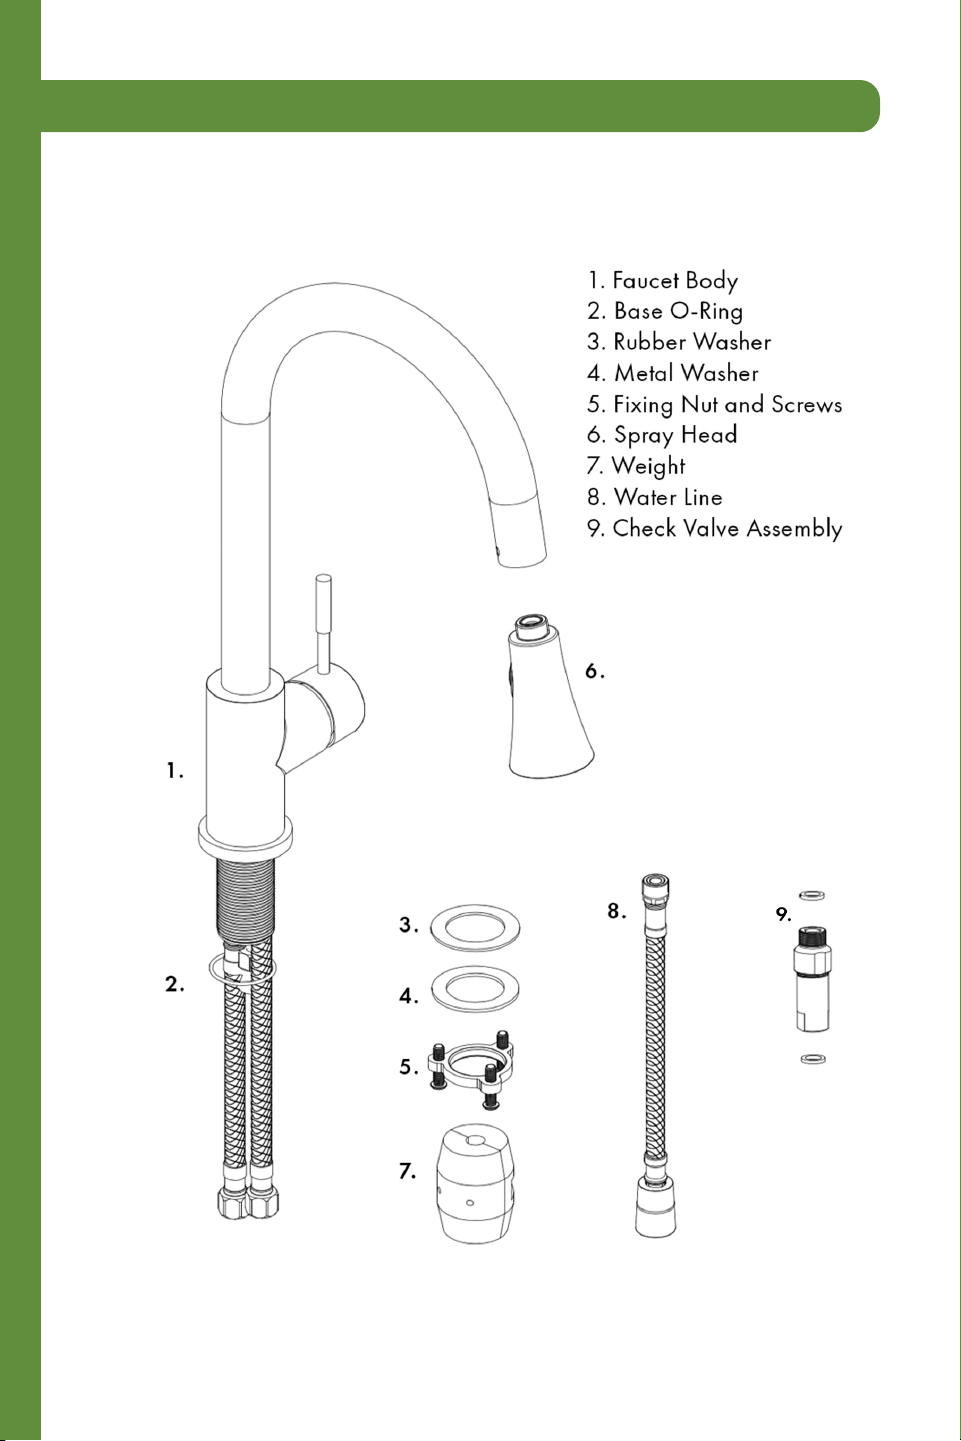
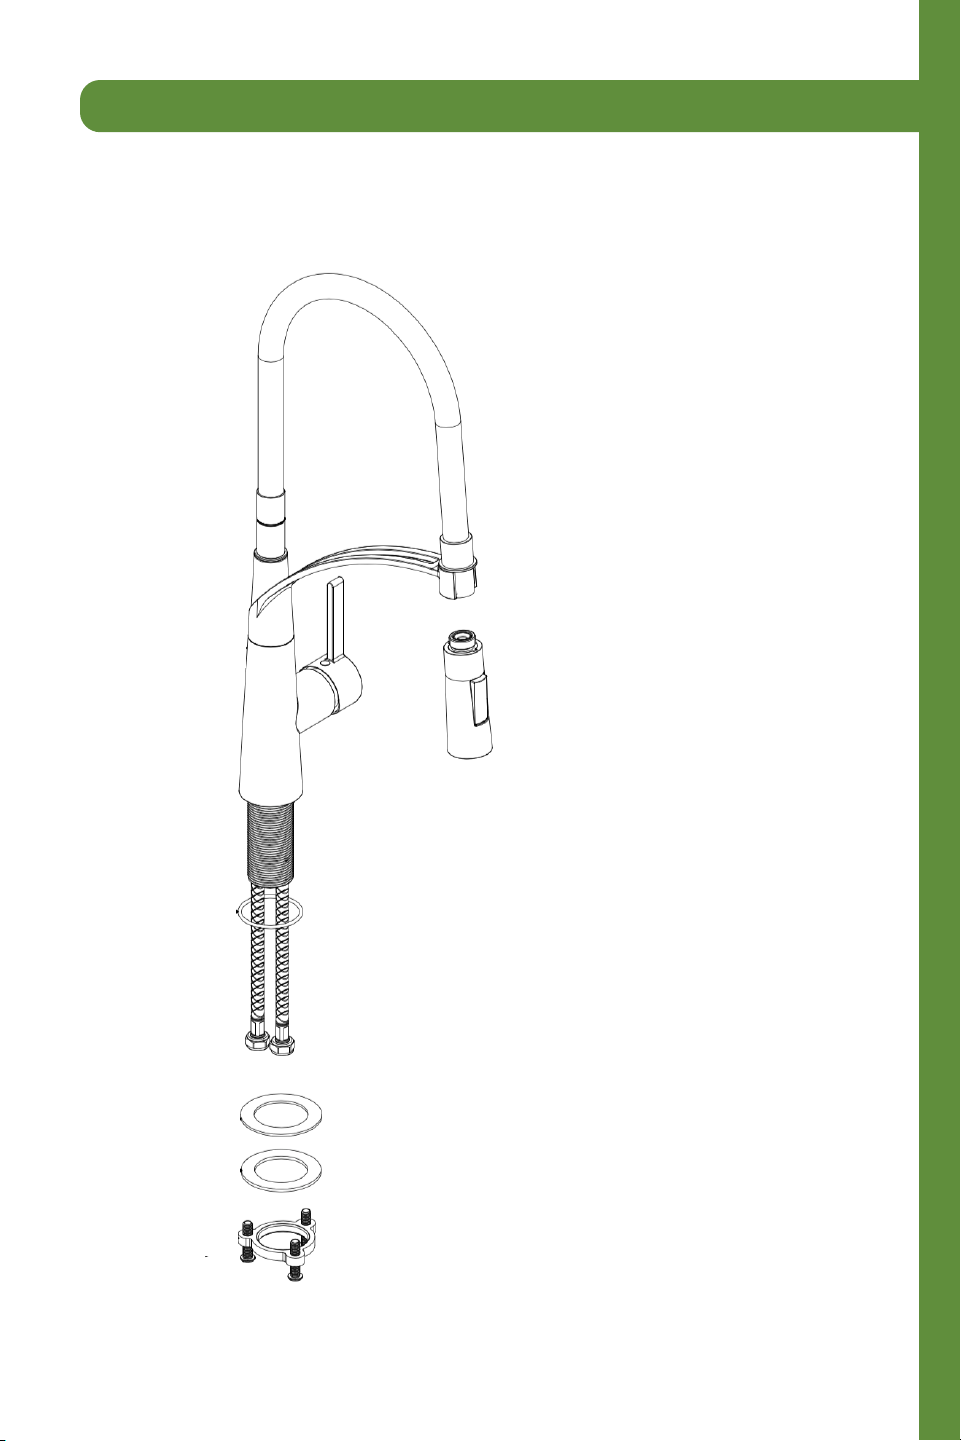
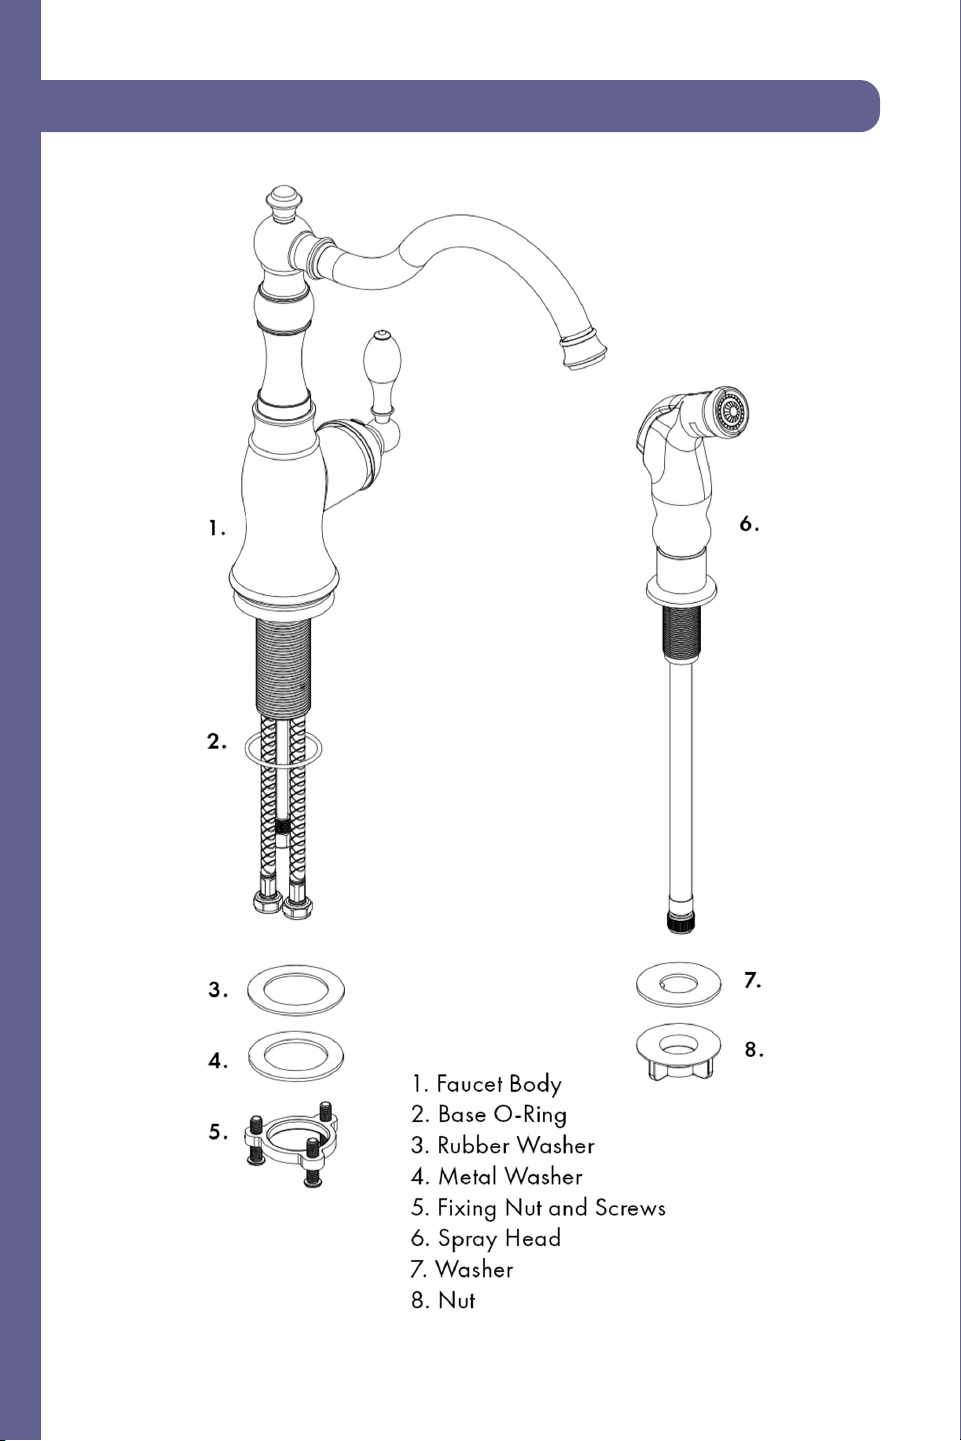
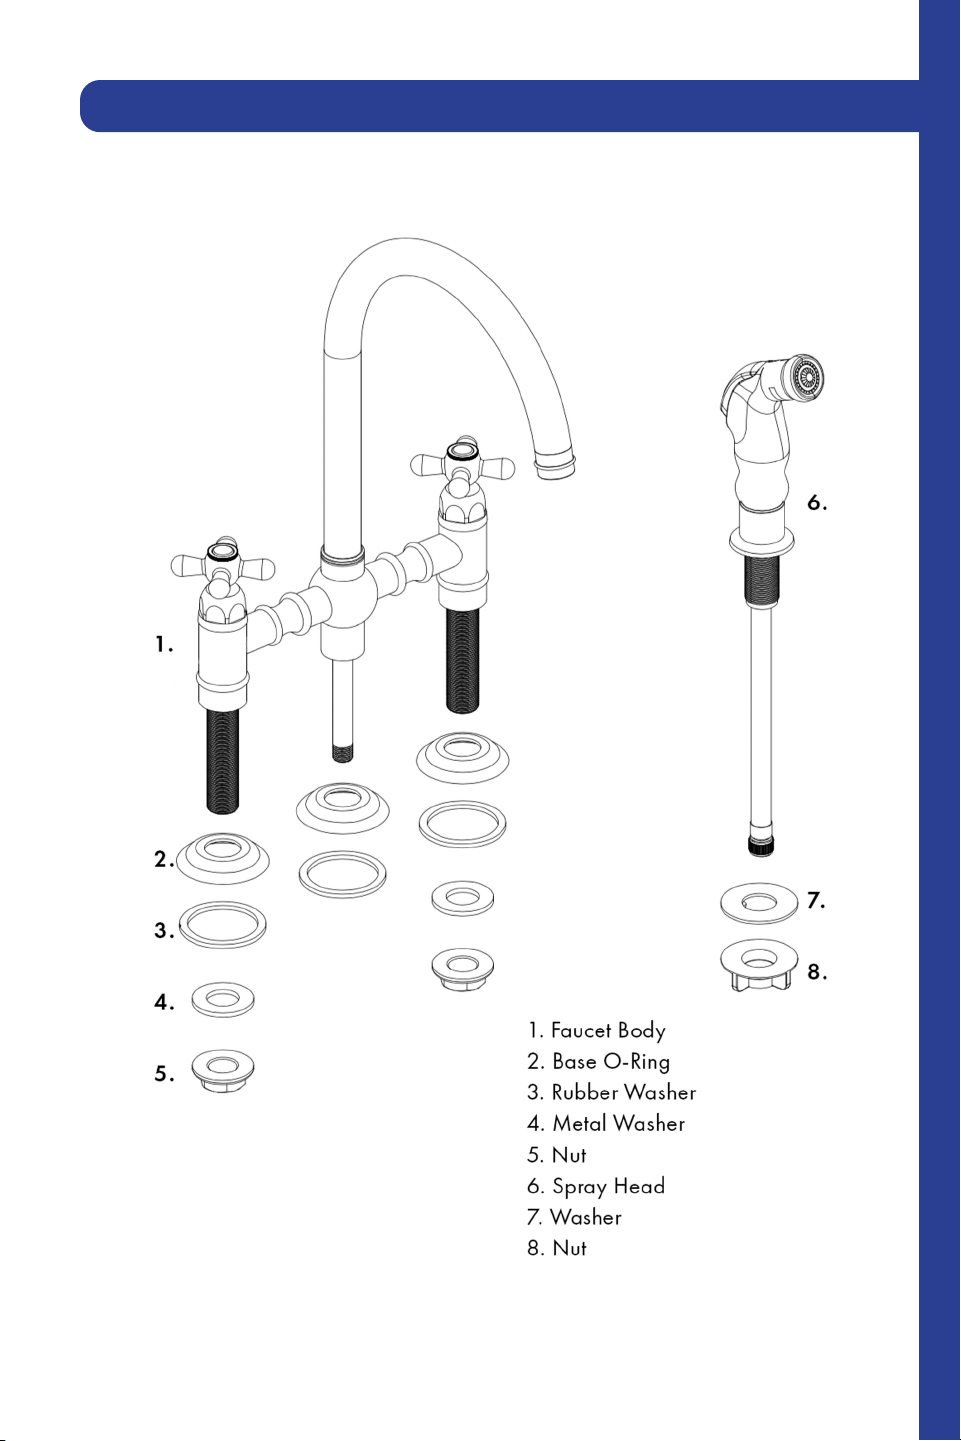
1. Faucet Body
2. Base O-Ring
3. Rubber Washer
4. Metal Washer
5. Fixing Nut and Screws
6. Spray Head
1
2
3
4
5
6
Da Vinci Pull Down Faucet (DAV-KF-BN)
12
Tools:
Time required:
+/- 45 minutes
Wrench
Legend:
Hot Water
Warning
Cold Water
Plumber’s Tape-
Used for a watertight
seal on threaded pipe
joints.
Grease
Phillips-head screwdriver
Bucket
Da Vinci Pull Down Faucet (DAV-KF-BN)
13
Time required:
+/- 45 minutes
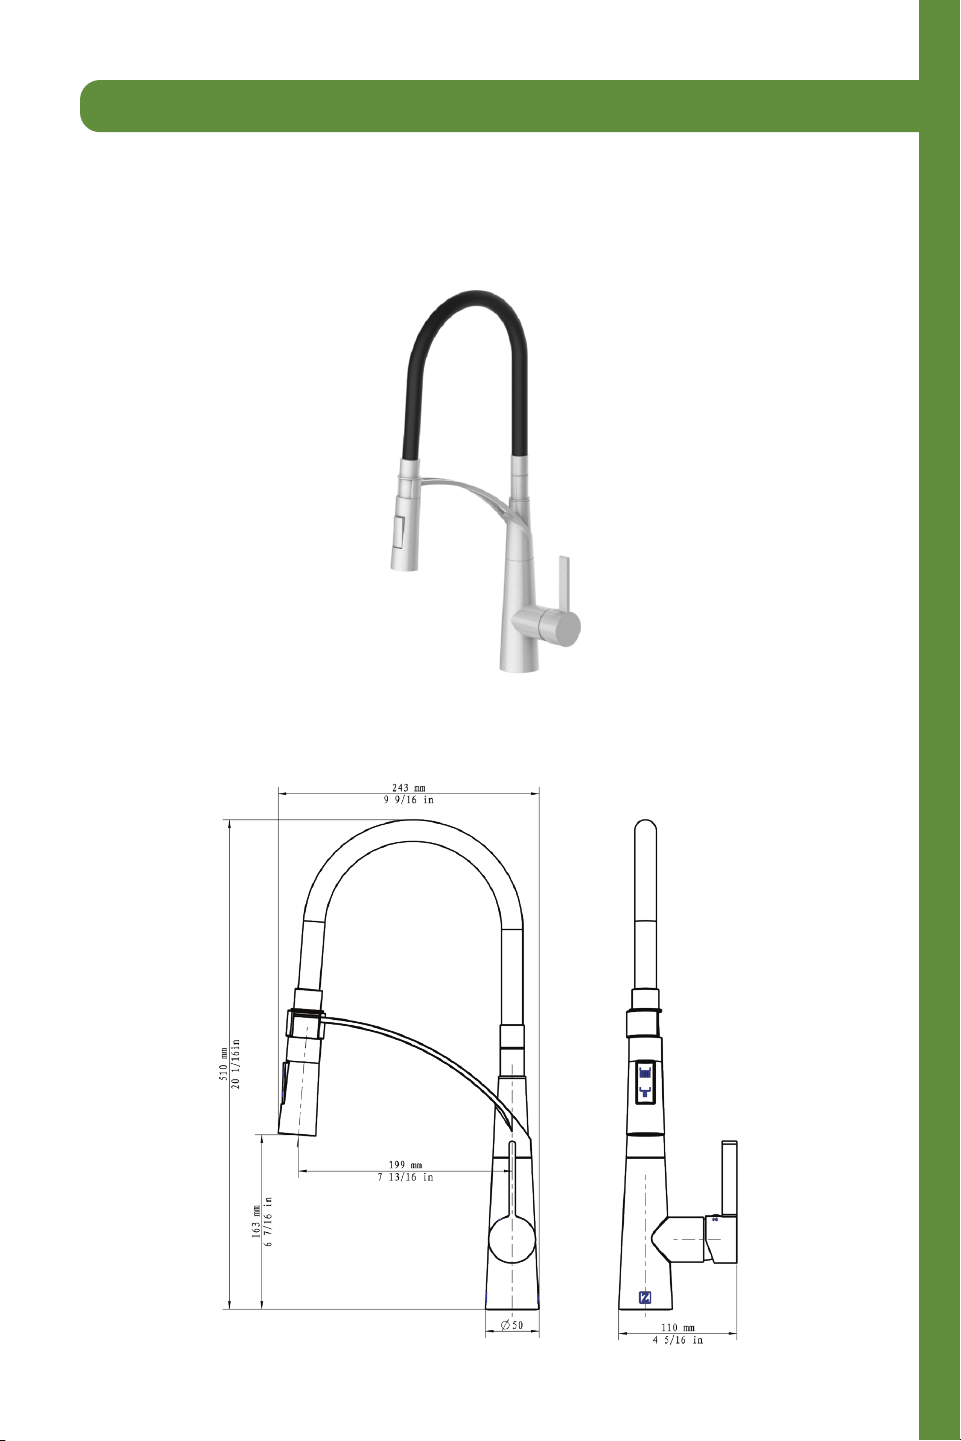
Pull Down Kitchen Faucet Model
Da Vinci Series (DAV-KF-BN)
Da Vinci Pull Down Faucet (DAV-KF-BN)
14
Da Vinci Pull Down Faucet (DAV-KF-BN)
Hot
(Red)
Cold
(Blue)
Hot
Cold
9/16-24 UNEF
Hot
Cold
Secure the hardware into place with
the Base O-ring, nuts, and screws.
Mount the faucet to the counter top.Turn off the water valves and place a
bucket beneath, in case of dripping.
Attach the hot and cold lines to the
valves appropriately.

15
Test the faucet before installing the
spray head.
Make sure that the spray head is
properly secured.
Test the faucet. Press the button to switch from stream
to spray.
spray head
spray head
Da Vinci Pull Down Faucet (DAV-KF-BN)
16
SINGLE HANDLE FAUCETS
17
Tools:
Time required:
+/- 45 minutes
Wrench
Hot Water
Warning
Cold Water
Plumber’s Tape-
Used for a watertight
seal on threaded pipe
joints.
Grease
Phillips-head screwdriver
Bucket
Legend:
SINGLE HANDLE FAUCETS
18
SINGLE HANDLE FAUCETS
Plumbers Tape
Loosen the fixing nut and screws and
put aside.
Mount faucet to counter top.
Secure the hoses to the hot and cold
lines appropriately.
Secure the hardware into place with
the Base O-ring, nuts, and screws.
19
SINGLE HANDLE FAUCETS
Test the faucet. Loosen the washer on the spray head.
Mount spray head to counter top. Secure the hardware into place with
nuts and screws.
20
SINGLE HANDLE FAUCETS
Review the diagram to understand the
hot, cold, and open settings.
Tighten the hardware.
21
DOUBLE HANDLE FAUCETS
22
Tools:
Time required:
+/- 45 minutes
Wrench
Hot Water
Warning
Cold Water
Plumber’s Tape-
Used for a watertight
seal on threaded pipe
joints.
Grease
Phillips-head screwdriver
Bucket
Legend:
DOUBLE HANDLE FAUCETS
23
Time required:
+/- 45 minutes
DOUBLE HANDLE FAUCETS
Loosen the fixing nut and washers
and put aside.
Mount faucet to counter top.
Secure the hardware into place with
the Base O-ring, nuts, and screws.
Secure the hoses to the hot and cold
lines appropriately.
24
DOUBLE HANDLE FAUCETS
Loosen the washer on the spray head.
Secure the hardware into place with
nuts and screws.
Mount spray head to counter top.
Use the hose to connect the spray
head and main faucet head.
25
DOUBLE HANDLE FAUCETS
Review the diagram to understand the
hot, cold, and open settings.
26
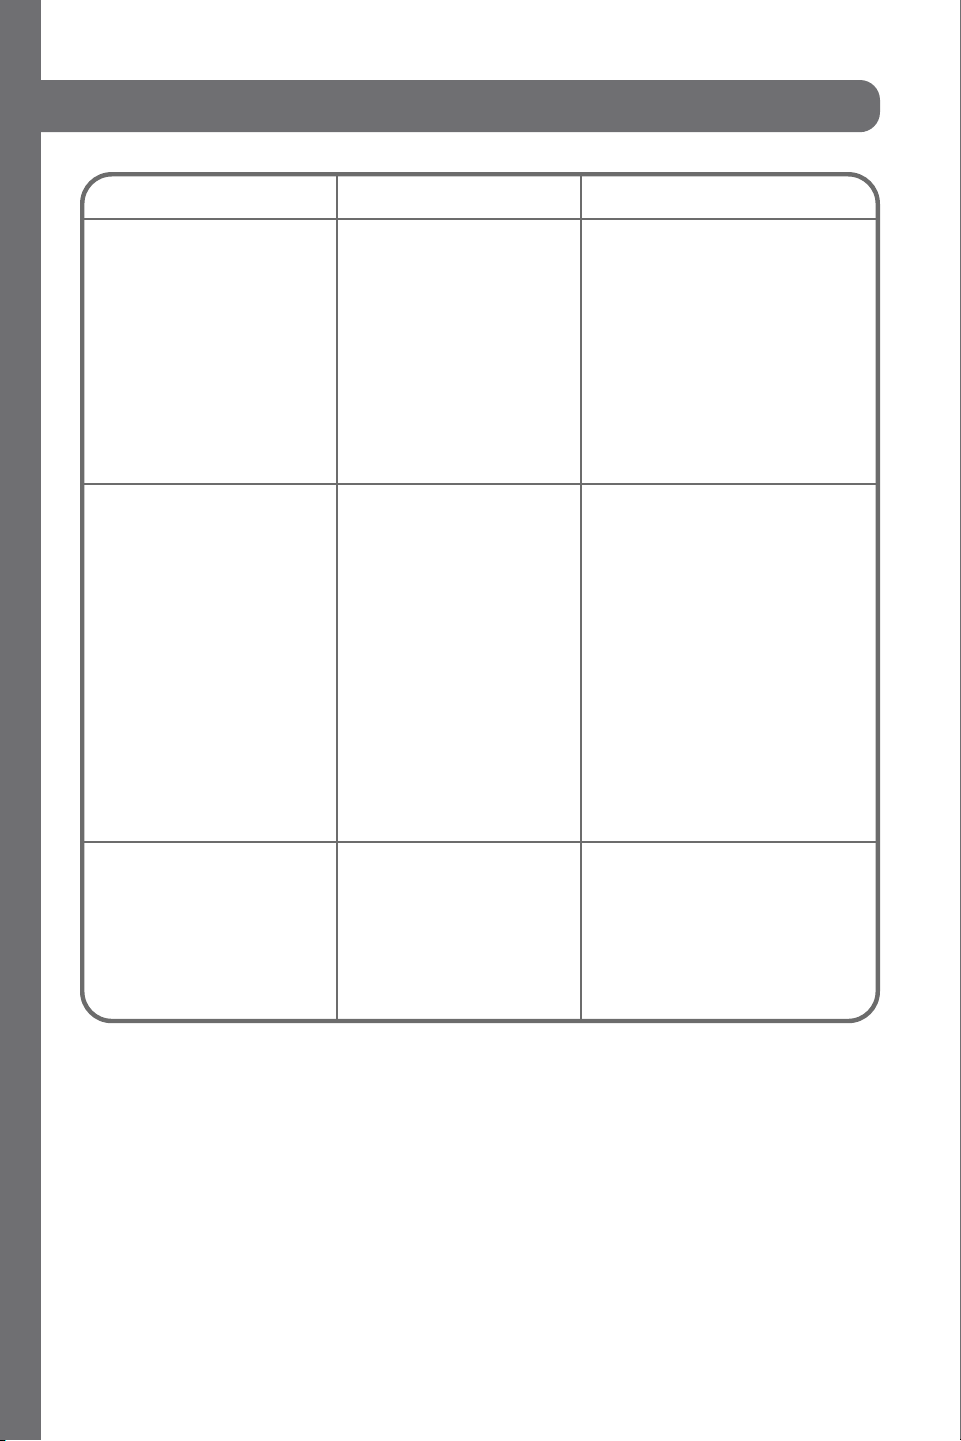
Problem
There is leakage under the
handle.
Water will not shut off
completely.
There is a leak between the
spray head and the hose.
The locking nut has
come loose.
Cartridge may be
defective.
The spray head may be
loose or the washer is
not seated correctly in
the hose connection.
Unscrew the lever on the
handle by hand. Loosen set
screw with a hex wrench.
Remove the handle and
unscrew trim cap by hand.
Tighten locking nut with an
adjustable wrench.
Unscrew the level on the
handle by hand. Loosen set
screw with a hex wrench.
Remove the handle and
unscrew trim cap by hand.
Unscrew the locking nut with
an adjustable wrench. Remove
ceramic disc cartridge. Check
for cracks.
Tighten the spray head by
hand until snug. Make sure the
washer is seated correctly.
Possible Cause
Solution
Troubleshooting

Kitchen and Bath
Three Locations:
350 Parr Circle
Reno, NV 89512
916 Delaware Avenue
Marysville, OH 43040
427 Rowland Mill Road
Bruceton, TN 38317
www.zlinekitchen.com
1-614-777-5004
1.0.1
