
Online Manual
PosterArtist Guide
English

Contents
Symbols Used in This Document. . . . . . . . . . . . . . . . . . . . . . . . . . . . . . . . . . . . . 7
Trademarks. . . . . . . . . . . . . . . . . . . . . . . . . . . . . . . . . . . . . . . . . . . . . . . . . . . . . . 8
Licenses. . . . . . . . . . . . . . . . . . . . . . . . . . . . . . . . . . . . . . . . . . . . . . . . . . . . . . . . 9
Cautions, Limitations, and Restrictions (PosterArtist). . . . . . . . . . . . . . . . . . . . . . . . . . . . . 35
License Authentication. . . . . . . . . . . . . . . . . . . . . . . . . . . . . . . . . . . . . . . . . . . . . . . . . . . . 40
What Is PosterArtist?. . . . . . . . . . . . . . . . . . . . . . . . . . . . . . . . . . . . . . . . . . . . . . . . . . . . . 46
What You Can Do with PosterArtist. . . . . . . . . . . . . . . . . . . . . . . . . . . . . . . . . . . . . . . . . . . . . . . . . . . . . 47
Starting PosterArtist. . . . . . . . . . . . . . . . . . . . . . . . . . . . . . . . . . . . . . . . . . . . . . . . . . . . . . . . . . . . . . . . . 53
Creating and Printing Posters. . . . . . . . . . . . . . . . . . . . . . . . . . . . . . . . . . . . . . . . . . . . . . . 54
Creating and Printing Enlarged Copies of Photos and Documents. . . . . . . . . . . . . . . . . . 56
PosterArtist QuickCopy Screen. . . . . . . . . . . . . . . . . . . . . . . . . . . . . . . . . . . . . . . . . . . . . . . . . . . . . . . . 59
Various Functions for Creating Posters. . . . . . . . . . . . . . . . . . . . . . . . . . . . . . . . . . . . . . . 63
Templates. . . . . . . . . . . . . . . . . . . . . . . . . . . . . . . . . . . . . . . . . . . . . . . . . . . . . . . . . . . . . . . . . . . . . . . . 64
Selecting Templates. . . . . . . . . . . . . . . . . . . . . . . . . . . . . . . . . . . . . . . . . . . . . . . . . . . . . . . . . . . . 65
Displaying All Templates. . . . . . . . . . . . . . . . . . . . . . . . . . . . . . . . . . . . . . . . . . . . . . . . . . . . . . . . . 66
Searching Templates. . . . . . . . . . . . . . . . . . . . . . . . . . . . . . . . . . . . . . . . . . . . . . . . . . . . . . . . . . . . 67
Using Existing Posters. . . . . . . . . . . . . . . . . . . . . . . . . . . . . . . . . . . . . . . . . . . . . . . . . . . . . . . . . . . 68
Downloading Templates. . . . . . . . . . . . . . . . . . . . . . . . . . . . . . . . . . . . . . . . . . . . . . . . . . . . . . . . . 69
Performing a Design Check. . . . . . . . . . . . . . . . . . . . . . . . . . . . . . . . . . . . . . . . . . . . . . . . . . . . . . . 70
Freely Designing. . . . . . . . . . . . . . . . . . . . . . . . . . . . . . . . . . . . . . . . . . . . . . . . . . . . . . . . . . . . . . . . . . . 71
Using Auto Design. . . . . . . . . . . . . . . . . . . . . . . . . . . . . . . . . . . . . . . . . . . . . . . . . . . . . . . . . . . . . . 72
Adjusting Designs. . . . . . . . . . . . . . . . . . . . . . . . . . . . . . . . . . . . . . . . . . . . . . . . . . . . . . . . . . . . . . 75
Specifying Size and Paper. . . . . . . . . . . . . . . . . . . . . . . . . . . . . . . . . . . . . . . . . . . . . . . . . . . . . . . . . . . . 77
When Printing on Roll Paper. . . . . . . . . . . . . . . . . . . . . . . . . . . . . . . . . . . . . . . . . . . . . . . . . . . . . . 78
When Printing on Cut Sheets. . . . . . . . . . . . . . . . . . . . . . . . . . . . . . . . . . . . . . . . . . . . . . . . . . . . . 85
When Printing to Scale. . . . . . . . . . . . . . . . . . . . . . . . . . . . . . . . . . . . . . . . . . . . . . . . . . . . . . . . . . 87
When Printing Entire Poster Within Printable Area. . . . . . . . . . . . . . . . . . . . . . . . . . . . . . . . . . . . . 89
Adding Crop Marks. . . . . . . . . . . . . . . . . . . . . . . . . . . . . . . . . . . . . . . . . . . . . . . . . . . . . . . . . . . . . 91
Specifying Non-Standard Page Sizes. . . . . . . . . . . . . . . . . . . . . . . . . . . . . . . . . . . . . . . . . . . . . . . 92
Inserting Images and Materials. . . . . . . . . . . . . . . . . . . . . . . . . . . . . . . . . . . . . . . . . . . . . . . . . . . . . . . . 93
Inserting Images in Posters. . . . . . . . . . . . . . . . . . . . . . . . . . . . . . . . . . . . . . . . . . . . . . . . . . . . . . . 94
Adding QR Codes. . . . . . . . . . . . . . . . . . . . . . . . . . . . . . . . . . . . . . . . . . . . . . . . . . . . . . . . . . . . . . 97

Editing Photos. . . . . . . . . . . . . . . . . . . . . . . . . . . . . . . . . . . . . . . . . . . . . . . . . . . . . . . . . . . . . . . . . . . . . 98
Adding, Replacing and Removing Photos. . . . . . . . . . . . . . . . . . . . . . . . . . . . . . . . . . . . . . . . . . . . 99
Using Temporary Tray when Editing Photos. . . . . . . . . . . . . . . . . . . . . . . . . . . . . . . . . . . . . 101
Trimming Photos. . . . . . . . . . . . . . . . . . . . . . . . . . . . . . . . . . . . . . . . . . . . . . . . . . . . . . . . . . . . . . 103
Applying Gradation to Photos. . . . . . . . . . . . . . . . . . . . . . . . . . . . . . . . . . . . . . . . . . . . . . . . . . . . 105
Applying Transparency to Photos (Opacity). . . . . . . . . . . . . . . . . . . . . . . . . . . . . . . . . . . . . . . . . 107
Correcting Slant. . . . . . . . . . . . . . . . . . . . . . . . . . . . . . . . . . . . . . . . . . . . . . . . . . . . . . . . . . . . . . . 108
Applying Frames to Photos. . . . . . . . . . . . . . . . . . . . . . . . . . . . . . . . . . . . . . . . . . . . . . . . . . . . . . 110
Editing Clipart. . . . . . . . . . . . . . . . . . . . . . . . . . . . . . . . . . . . . . . . . . . . . . . . . . . . . . . . . . . . . . . . . . . . . 111
Adding, Replacing and Removing Clipart. . . . . . . . . . . . . . . . . . . . . . . . . . . . . . . . . . . . . . . . . . . 112
Using Temporary Tray when Editing Clipart. . . . . . . . . . . . . . . . . . . . . . . . . . . . . . . . . . . . . 113
Changing Clipart Colors. . . . . . . . . . . . . . . . . . . . . . . . . . . . . . . . . . . . . . . . . . . . . . . . . . . . . . . . . 115
Retouching Images. . . . . . . . . . . . . . . . . . . . . . . . . . . . . . . . . . . . . . . . . . . . . . . . . . . . . . . . . . . . . . . . 116
Auto Color Correction. . . . . . . . . . . . . . . . . . . . . . . . . . . . . . . . . . . . . . . . . . . . . . . . . . . . . . . . . . 117
Color Adjustment. . . . . . . . . . . . . . . . . . . . . . . . . . . . . . . . . . . . . . . . . . . . . . . . . . . . . . . . . . . . . . 118
Color Point Correction. . . . . . . . . . . . . . . . . . . . . . . . . . . . . . . . . . . . . . . . . . . . . . . . . . . . . . . . . . 119
Backlight Correction. . . . . . . . . . . . . . . . . . . . . . . . . . . . . . . . . . . . . . . . . . . . . . . . . . . . . . . . . . . . 120
Sharpness. . . . . . . . . . . . . . . . . . . . . . . . . . . . . . . . . . . . . . . . . . . . . . . . . . . . . . . . . . . . . . . . . . . 121
Soft Focus. . . . . . . . . . . . . . . . . . . . . . . . . . . . . . . . . . . . . . . . . . . . . . . . . . . . . . . . . . . . . . . . . . . 122
Monochrome/Sepia. . . . . . . . . . . . . . . . . . . . . . . . . . . . . . . . . . . . . . . . . . . . . . . . . . . . . . . . . . . . 123
Logo Color Adjustment. . . . . . . . . . . . . . . . . . . . . . . . . . . . . . . . . . . . . . . . . . . . . . . . . . . . . . . . . 124
Cut Out. . . . . . . . . . . . . . . . . . . . . . . . . . . . . . . . . . . . . . . . . . . . . . . . . . . . . . . . . . . . . . . . . . . . . 125
Editing Shapes. . . . . . . . . . . . . . . . . . . . . . . . . . . . . . . . . . . . . . . . . . . . . . . . . . . . . . . . . . . . . . . . . . . . 127
Adding and Removing Shapes. . . . . . . . . . . . . . . . . . . . . . . . . . . . . . . . . . . . . . . . . . . . . . . . . . . 128
Changing Shape Styles. . . . . . . . . . . . . . . . . . . . . . . . . . . . . . . . . . . . . . . . . . . . . . . . . . . . . . . . . 130
Editing Text. . . . . . . . . . . . . . . . . . . . . . . . . . . . . . . . . . . . . . . . . . . . . . . . . . . . . . . . . . . . . . . . . . . . . . 136
Adding, Changing, and Removing Text. . . . . . . . . . . . . . . . . . . . . . . . . . . . . . . . . . . . . . . . . . . . . 137
Changing the Text Format. . . . . . . . . . . . . . . . . . . . . . . . . . . . . . . . . . . . . . . . . . . . . . . . . . . . . . . 139
Applying Text Graphics. . . . . . . . . . . . . . . . . . . . . . . . . . . . . . . . . . . . . . . . . . . . . . . . . . . . . . . . . 147
Editing Backgrounds. . . . . . . . . . . . . . . . . . . . . . . . . . . . . . . . . . . . . . . . . . . . . . . . . . . . . . . . . . . . . . . 148
Adding Backgrounds. . . . . . . . . . . . . . . . . . . . . . . . . . . . . . . . . . . . . . . . . . . . . . . . . . . . . . . . . . . 149
Setting Background Image. . . . . . . . . . . . . . . . . . . . . . . . . . . . . . . . . . . . . . . . . . . . . . . . . . . . . . 150
Specifying Background Margins. . . . . . . . . . . . . . . . . . . . . . . . . . . . . . . . . . . . . . . . . . . . . . . . . . 151
Working with Objects. . . . . . . . . . . . . . . . . . . . . . . . . . . . . . . . . . . . . . . . . . . . . . . . . . . . . . . . . . . . . . . 152

Selecting Objects. . . . . . . . . . . . . . . . . . . . . . . . . . . . . . . . . . . . . . . . . . . . . . . . . . . . . . . . . . . . . . 153
Cutting, Copying, and Pasting Objects. . . . . . . . . . . . . . . . . . . . . . . . . . . . . . . . . . . . . . . . . . . . . 154
Moving, Enlarging, Reducing, and Rotating Objects. . . . . . . . . . . . . . . . . . . . . . . . . . . . . . . . . . . 155
Specifying Size, Position, or Orientation Numerically. . . . . . . . . . . . . . . . . . . . . . . . . . . . . . . . . . 160
Locking Object Positions. . . . . . . . . . . . . . . . . . . . . . . . . . . . . . . . . . . . . . . . . . . . . . . . . . . . . . . . 162
Aligning Objects. . . . . . . . . . . . . . . . . . . . . . . . . . . . . . . . . . . . . . . . . . . . . . . . . . . . . . . . . . . . . . . 164
Making Multiple Objects the Same Size. . . . . . . . . . . . . . . . . . . . . . . . . . . . . . . . . . . . . . . . . . . . 167
Grouping Objects. . . . . . . . . . . . . . . . . . . . . . . . . . . . . . . . . . . . . . . . . . . . . . . . . . . . . . . . . . . . . . 168
Reordering Objects. . . . . . . . . . . . . . . . . . . . . . . . . . . . . . . . . . . . . . . . . . . . . . . . . . . . . . . . . . . . 169
Printing Posters. . . . . . . . . . . . . . . . . . . . . . . . . . . . . . . . . . . . . . . . . . . . . . . . . . . . . . . . . . . . . . . . . . . 170
Printing Posters. . . . . . . . . . . . . . . . . . . . . . . . . . . . . . . . . . . . . . . . . . . . . . . . . . . . . . . . . . . . . . . 171
Test Printing. . . . . . . . . . . . . . . . . . . . . . . . . . . . . . . . . . . . . . . . . . . . . . . . . . . . . . . . . . . . . . . . . . 172
Ambient Light Setting. . . . . . . . . . . . . . . . . . . . . . . . . . . . . . . . . . . . . . . . . . . . . . . . . . . . . . . . . . . 173
Saving. . . . . . . . . . . . . . . . . . . . . . . . . . . . . . . . . . . . . . . . . . . . . . . . . . . . . . . . . . . . . . . . . . . . . . . . . . 180
Saving in a PosterArtist File Format. . . . . . . . . . . . . . . . . . . . . . . . . . . . . . . . . . . . . . . . . . . . . . . 181
Saving in JPEG Format. . . . . . . . . . . . . . . . . . . . . . . . . . . . . . . . . . . . . . . . . . . . . . . . . . . . . . . . . 182
Using Variable Printing. . . . . . . . . . . . . . . . . . . . . . . . . . . . . . . . . . . . . . . . . . . . . . . . . . . . . . . . . . . . . 183
Preparing Data. . . . . . . . . . . . . . . . . . . . . . . . . . . . . . . . . . . . . . . . . . . . . . . . . . . . . . . . . . . . . . . . 184
Starting Variable Printing. . . . . . . . . . . . . . . . . . . . . . . . . . . . . . . . . . . . . . . . . . . . . . . . . . . . . . . . 186
Managing Artwork. . . . . . . . . . . . . . . . . . . . . . . . . . . . . . . . . . . . . . . . . . . . . . . . . . . . . . . . . . . . . . . . . 189
Adding Artwork to Library. . . . . . . . . . . . . . . . . . . . . . . . . . . . . . . . . . . . . . . . . . . . . . . . . . . . . . . 190
Importing and Exporting. . . . . . . . . . . . . . . . . . . . . . . . . . . . . . . . . . . . . . . . . . . . . . . . . . . . . . . . . 192
Organizing Artwork in Library. . . . . . . . . . . . . . . . . . . . . . . . . . . . . . . . . . . . . . . . . . . . . . . . . . . . 196
Downloading Artwork at Once. . . . . . . . . . . . . . . . . . . . . . . . . . . . . . . . . . . . . . . . . . . . . . . . . . . . 199
Preparing the Same Artwork Environment on Other Computers. . . . . . . . . . . . . . . . . . . . . . . . . . 200
Using Cloud. . . . . . . . . . . . . . . . . . . . . . . . . . . . . . . . . . . . . . . . . . . . . . . . . . . . . . . . . . . . . . . . . . . . . . 201
Downloading Posters and Materials from Cloud. . . . . . . . . . . . . . . . . . . . . . . . . . . . . . . . . . . . . . 202
Uploading Current Poster to Cloud. . . . . . . . . . . . . . . . . . . . . . . . . . . . . . . . . . . . . . . . . . . . . . . . 204
Uploading Export Files to Cloud. . . . . . . . . . . . . . . . . . . . . . . . . . . . . . . . . . . . . . . . . . . . . . . . . . 206
Using Translation Templates. . . . . . . . . . . . . . . . . . . . . . . . . . . . . . . . . . . . . . . . . . . . . . . . . . . . . . . . . 209
Exporting Posters for Use in Easy-PhotoPrint Editor. . . . . . . . . . . . . . . . . . . . . . . . . . . . . . . . . . . . . . . 211
Creating Vivid Posters Using Fluorescent Colors. . . . . . . . . . . . . . . . . . . . . . . . . . . . . . . . . . . . . . . . . 212
Making the Entire Poster More Vibrant (Vivid mode). . . . . . . . . . . . . . . . . . . . . . . . . . . . . . . . . . . 213
Making Colors of Specific Areas Vivid (Spot mode). . . . . . . . . . . . . . . . . . . . . . . . . . . . . . . . . . . 214
Specifying Fluorescent Colors for Specified Areas. . . . . . . . . . . . . . . . . . . . . . . . . . . . . . . . 216

PosterArtist Screens. . . . . . . . . . . . . . . . . . . . . . . . . . . . . . . . . . . . . . . . . . . . . . . . . . . . . 219
Main Screen. . . . . . . . . . . . . . . . . . . . . . . . . . . . . . . . . . . . . . . . . . . . . . . . . . . . . . . . . . . . . . . . . . . . . . 221
Select Template Screen. . . . . . . . . . . . . . . . . . . . . . . . . . . . . . . . . . . . . . . . . . . . . . . . . . . . . . . . . . . . . 224
Auto Design Screen. . . . . . . . . . . . . . . . . . . . . . . . . . . . . . . . . . . . . . . . . . . . . . . . . . . . . . . . . . . . . . . . 226
View All Templates Dialog Box. . . . . . . . . . . . . . . . . . . . . . . . . . . . . . . . . . . . . . . . . . . . . . . . . . . . . . . 230
Find Template Dialog Box. . . . . . . . . . . . . . . . . . . . . . . . . . . . . . . . . . . . . . . . . . . . . . . . . . . . . . . . . . . 231
Saving Artwork Dialog Box (Templates). . . . . . . . . . . . . . . . . . . . . . . . . . . . . . . . . . . . . . . . . . . . . . . . 232
Design Assist Dialog Box. . . . . . . . . . . . . . . . . . . . . . . . . . . . . . . . . . . . . . . . . . . . . . . . . . . . . . . . . . . . 234
Paper Options Screen. . . . . . . . . . . . . . . . . . . . . . . . . . . . . . . . . . . . . . . . . . . . . . . . . . . . . . . . . . . . . . 235
Set Custom Size Dialog Box. . . . . . . . . . . . . . . . . . . . . . . . . . . . . . . . . . . . . . . . . . . . . . . . . . . . . . . . . 238
Edit Screen (Photos). . . . . . . . . . . . . . . . . . . . . . . . . . . . . . . . . . . . . . . . . . . . . . . . . . . . . . . . . . . . . . . 240
Edit Screen (Clipart). . . . . . . . . . . . . . . . . . . . . . . . . . . . . . . . . . . . . . . . . . . . . . . . . . . . . . . . . . . . . . . . 243
Edit Screen (Text). . . . . . . . . . . . . . . . . . . . . . . . . . . . . . . . . . . . . . . . . . . . . . . . . . . . . . . . . . . . . . . . . 245
Edit Screen (Shapes). . . . . . . . . . . . . . . . . . . . . . . . . . . . . . . . . . . . . . . . . . . . . . . . . . . . . . . . . . . . . . . 248
Edit Screen (Backgrounds). . . . . . . . . . . . . . . . . . . . . . . . . . . . . . . . . . . . . . . . . . . . . . . . . . . . . . . . . . 252
Edit Screen (Variable Data). . . . . . . . . . . . . . . . . . . . . . . . . . . . . . . . . . . . . . . . . . . . . . . . . . . . . . . . . . 254
Saving Artwork Dialog Box (Images). . . . . . . . . . . . . . . . . . . . . . . . . . . . . . . . . . . . . . . . . . . . . . . . . . . 256
Cut Out Dialog Box. . . . . . . . . . . . . . . . . . . . . . . . . . . . . . . . . . . . . . . . . . . . . . . . . . . . . . . . . . . . . . . . 258
Fill Dialog Box. . . . . . . . . . . . . . . . . . . . . . . . . . . . . . . . . . . . . . . . . . . . . . . . . . . . . . . . . . . . . . . . . . . . 262
Edit Image Dialog Box (Trim). . . . . . . . . . . . . . . . . . . . . . . . . . . . . . . . . . . . . . . . . . . . . . . . . . . . . . . . . 265
Edit Image Dialog Box (Gradation). . . . . . . . . . . . . . . . . . . . . . . . . . . . . . . . . . . . . . . . . . . . . . . . . . . . 268
Edit Image Dialog Box (Slant Correction). . . . . . . . . . . . . . . . . . . . . . . . . . . . . . . . . . . . . . . . . . . . . . . 271
Retouch Image Dialog Box. . . . . . . . . . . . . . . . . . . . . . . . . . . . . . . . . . . . . . . . . . . . . . . . . . . . . . . . . . 273
Color Adjustment Dialog Box. . . . . . . . . . . . . . . . . . . . . . . . . . . . . . . . . . . . . . . . . . . . . . . . . . . . . . . . . 275
Color Point Correction Dialog Box. . . . . . . . . . . . . . . . . . . . . . . . . . . . . . . . . . . . . . . . . . . . . . . . . . . . . 277
Backlight Correction Dialog Box. . . . . . . . . . . . . . . . . . . . . . . . . . . . . . . . . . . . . . . . . . . . . . . . . . . . . . 279
Sharpness Dialog Box. . . . . . . . . . . . . . . . . . . . . . . . . . . . . . . . . . . . . . . . . . . . . . . . . . . . . . . . . . . . . . 281
Soft Focus Dialog Box. . . . . . . . . . . . . . . . . . . . . . . . . . . . . . . . . . . . . . . . . . . . . . . . . . . . . . . . . . . . . . 282
Logo Color Adjustment Dialog Box. . . . . . . . . . . . . . . . . . . . . . . . . . . . . . . . . . . . . . . . . . . . . . . . . . . . 283
Fill and Stroke Dialog Box. . . . . . . . . . . . . . . . . . . . . . . . . . . . . . . . . . . . . . . . . . . . . . . . . . . . . . . . . . . 285
Set Shaded Text Dialog Box. . . . . . . . . . . . . . . . . . . . . . . . . . . . . . . . . . . . . . . . . . . . . . . . . . . . . . . . . 287
Set Shadow Dialog Box. . . . . . . . . . . . . . . . . . . . . . . . . . . . . . . . . . . . . . . . . . . . . . . . . . . . . . . . . . . . . 289
Print Screen. . . . . . . . . . . . . . . . . . . . . . . . . . . . . . . . . . . . . . . . . . . . . . . . . . . . . . . . . . . . . . . . . . . . . . 291
Ambient Light Setting Dialog Box. . . . . . . . . . . . . . . . . . . . . . . . . . . . . . . . . . . . . . . . . . . . . . . . . . . . . 293
Managing Ambient Light Settings Dialog Box. . . . . . . . . . . . . . . . . . . . . . . . . . . . . . . . . . . . . . . . . . . . 296
Export Dialog Box. . . . . . . . . . . . . . . . . . . . . . . . . . . . . . . . . . . . . . . . . . . . . . . . . . . . . . . . . . . . . . . . . 298
Set Grid and Guide Dialog Box. . . . . . . . . . . . . . . . . . . . . . . . . . . . . . . . . . . . . . . . . . . . . . . . . . . . . . . 300

Preferences Dialog Box. . . . . . . . . . . . . . . . . . . . . . . . . . . . . . . . . . . . . . . . . . . . . . . . . . . . . . . . . . . . . 301
Properties Dialog Box. . . . . . . . . . . . . . . . . . . . . . . . . . . . . . . . . . . . . . . . . . . . . . . . . . . . . . . . . . . . . . 303
Customize Toolbar Dialog Box. . . . . . . . . . . . . . . . . . . . . . . . . . . . . . . . . . . . . . . . . . . . . . . . . . . . . . . 306
Artwork Manager Dialog Box. . . . . . . . . . . . . . . . . . . . . . . . . . . . . . . . . . . . . . . . . . . . . . . . . . . . . . . . . 307
Align and Distribute Objects Dialog Box. . . . . . . . . . . . . . . . . . . . . . . . . . . . . . . . . . . . . . . . . . . . . . . . 310
Guide Position Dialog Box. . . . . . . . . . . . . . . . . . . . . . . . . . . . . . . . . . . . . . . . . . . . . . . . . . . . . . . . . . . 313
QR code Dialog Box. . . . . . . . . . . . . . . . . . . . . . . . . . . . . . . . . . . . . . . . . . . . . . . . . . . . . . . . . . . . . . . 314
Commands. . . . . . . . . . . . . . . . . . . . . . . . . . . . . . . . . . . . . . . . . . . . . . . . . . . . . . . . . . . . 315
FAQ. . . . . . . . . . . . . . . . . . . . . . . . . . . . . . . . . . . . . . . . . . . . . . . . . . . . . . . . . . . . . . . . . 331

Symbols Used in This Document
Warning
Instructions that, if ignored, could result in death, serious personal injury, or property damage caused by
incorrect operation of the equipment. These must be observed for safe operation.
Caution
Instructions that, if ignored, could result in personal injury or property damage caused by incorrect
operation of the equipment. These must be observed for safe operation.
Important
Instructions including important information that must be observed to avoid damage and injury or
improper use of the product. Be sure to read these instructions.
Note
Instructions including notes for operation and additional explanations.
Basics
Instructions explaining basic operations of your product.
Note
• Icons may vary depending on your product.
7

Trademarks
Microsoft, Excel, Internet Explorer, Microsoft Edge, Microsoft Store, OneDrive, PowerPoint, Windows and
Windows Vista are trademarks of the Microsoft group of companies.
Mac, Mac OS, macOS, OS X, AirPort, App Store, AirPrint, the AirPrint logo, Safari, Bonjour, iPad, iPad Air,
iPad mini, iPadOS, iPhone and iPod touch are trademarks of Apple Inc., registered in the U.S. and other
countries.
The Mopria® word mark and the Mopria® Logo are registered and/or unregistered trademarks of Mopria
Alliance, Inc. in the United States and other countries. Unauthorized use is strictly prohibited.
IOS is a trademark or registered trademark of Cisco in the U.S. and other countries and is used under
license.
Google Cloud Print, Google Chrome, Chrome OS, Chromebook, Android, Google Drive, Google Apps and
Google Analytics are either registered trademarks or trademarks of Google LLC.
Google Play and Google Play Logo are trademarks of Google LLC.
Adobe, Acrobat, Flash, Photoshop, Illustrator, Adobe RGB and Adobe RGB (1998) are either registered
trademarks or trademarks of Adobe Systems Incorporated in the United States and/or other countries.
Adobe, Acrobat, Flash, Photoshop, Photoshop Elements, Lightroom, Adobe RGB and Adobe RGB (1998)
are either registered trademarks or trademarks of Adobe Systems Incorporated in the United States and/or
other countries.
USB Type-C™ is a trademark of USB Implementers Forum.
Amazon, Echo and Alexa are trademarks of Amazon.com, Inc. or its affiliates.
Google, Google Home, and YouTube are trademarks of Google LLC.
LINE is a registered trademark or trademark of LY Corporation.
LINE Clova is a registered trademark of LY Corporation.
Google Docs, and Google Drive are trademarks of Google LLC.
App Store is a trademark of Apple Inc., registered in the U.S. and other countries.
AOSS™ is a trademark of BUFFALO INC.
Autodesk and AutoCAD are registered trademarks or trademarks of Autodesk, Inc., and/or its subsidiaries
and/or affiliates in the USA and/or other countries.
QR Code is a registered trademark of DENSO WAVE INCORPORATED in Japan and in other countries.
HP-GL and HP-GL/2 are either registered trademarks or trademarks of HP Inc. in the United States and/or
other countries.
Mozilla Firefox is a trademark or registered trademark of Mozilla Foundation in the U.S. and/or other
countries.
Wi-Fi, WPA, WPA2 and WPA3 are either registered trademarks or trademarks of Wi-Fi Alliance.
All other company names and products mentioned in this guide may be registered trademarks or trademarks
of their respective companies.
8

Licenses
Copyright (c) 2003-2015 Apple Inc. All rights reserved.
Redistribution and use in source and binary forms, with or without modification, are permitted provided
that the following conditions are met:
1. Redistributions of source code must retain the above copyright notice, this list of conditions and the
following disclaimer.
2. Redistributions in binary form must reproduce the above copyright notice, this list of conditions and
the following disclaimer in the documentation and/or other materials provided with the distribution.
3. Neither the name of Apple Inc. ("Apple") nor the names of its contributors may be used to endorse or
promote products derived from this software without specific prior written permission.
THIS SOFTWARE IS PROVIDED BY APPLE AND ITS CONTRIBUTORS "AS IS" AND ANY EXPRESS
OR IMPLIED WARRANTIES, INCLUDING, BUT NOT LIMITED TO, THE IMPLIED WARRANTIES
OF MERCHANTABILITY AND FITNESS FOR A PARTICULAR PURPOSE ARE DISCLAIMED. IN
NO EVENT SHALL APPLE OR ITS CONTRIBUTORS BE LIABLE FOR ANY DIRECT, INDIRECT,
INCIDENTAL, SPECIAL, EXEMPLARY, OR CONSEQUENTIAL DAMAGES (INCLUDING, BUT NOT
LIMITED TO, PROCUREMENT OF SUBSTITUTE GOODS OR SERVICES; LOSS OF USE, DATA,
OR PROFITS; OR BUSINESS INTERRUPTION) HOWEVER CAUSED AND ON ANY THEORY OF
LIABILITY, WHETHER IN CONTRACT, STRICT LIABILITY, OR TORT (INCLUDING NEGLIGENCE OR
OTHERWISE) ARISING IN ANY WAY OUT OF THE USE OF THIS SOFTWARE, EVEN IF ADVISED OF
THE POSSIBILITY OF SUCH DAMAGE.
Apache License
Version 2.0, January 2004
http://www.apache.org/licenses/
TERMS AND CONDITIONS FOR USE, REPRODUCTION, AND DISTRIBUTION
1. Definitions.1.
"License" shall mean the terms and conditions for use, reproduction, and distribution as defined by
Sections 1 through 9 of this document.
"Licensor" shall mean the copyright owner or entity authorized by the copyright owner that is granting
the License.
"Legal Entity" shall mean the union of the acting entity and all other entities that control, are controlled
by, or are under common control with that entity. For the purposes of this definition, "control" means
(i) the power, direct or indirect, to cause the direction or management of such entity, whether by
contract or otherwise, or (ii) ownership of fifty percent (50%) or more of the outstanding shares, or (iii)
beneficial ownership of such entity.
"You" (or "Your") shall mean an individual or Legal Entity exercising permissions granted by this
License.
"Source" form shall mean the preferred form for making modifications, including but not limited to
software source code, documentation source, and configuration files.
9

"Object" form shall mean any form resulting from mechanical transformation or translation of a Source
form, including but not limited to compiled object code, generated documentation, and conversions to
other media types.
"Work" shall mean the work of authorship, whether in Source or Object form, made available under
the License, as indicated by a copyright notice that is included in or attached to the work (an example
is provided in the Appendix below).
"Derivative Works" shall mean any work, whether in Source or Object form, that is based on (or
derived from) the Work and for which the editorial revisions, annotations, elaborations, or other
modifications represent, as a whole, an original work of authorship. For the purposes of this License,
Derivative Works shall not include works that remain separable from, or merely link (or bind by name)
to the interfaces of, the Work and Derivative Works thereof.
"Contribution" shall mean any work of authorship, including the original version of the Work
and any modifications or additions to that Work or Derivative Works thereof, that is intentionally
submitted to Licensor for inclusion in the Work by the copyright owner or by an individual or
Legal Entity authorized to submit on behalf of the copyright owner. For the purposes of this
definition, "submitted" means any form of electronic, verbal, or written communication sent to the
Licensor or its representatives, including but not limited to communication on electronic mailing lists,
source code control systems, and issue tracking systems that are managed by, or on behalf of,
the Licensor for the purpose of discussing and improving the Work, but excluding communication
that is conspicuously marked or otherwise designated in writing by the copyright owner as "Not a
Contribution."
"Contributor" shall mean Licensor and any individual or Legal Entity on behalf of whom a Contribution
has been received by Licensor and subsequently incorporated within the Work.
2. Grant of Copyright License. Subject to the terms and conditions of this License, each Contributor
hereby grants to You a perpetual, worldwide, non-exclusive, no-charge, royalty-free, irrevocable
copyright license to reproduce, prepare Derivative Works of, publicly display, publicly perform,
sublicense, and distribute the Work and such Derivative Works in Source or Object form.
3. Grant of Patent License. Subject to the terms and conditions of this License, each Contributor hereby
grants to You a perpetual, worldwide, non-exclusive, no-charge, royalty-free, irrevocable (except
as stated in this section) patent license to make, have made, use, offer to sell, sell, import, and
otherwise transfer the Work, where such license applies only to those patent claims licensable by
such Contributor that are necessarily infringed by their Contribution(s) alone or by combination of
their Contribution(s) with the Work to which such Contribution(s) was submitted. If You institute
patent litigation against any entity (including a cross-claim or counterclaim in a lawsuit) alleging that
the Work or a Contribution incorporated within the Work constitutes direct or contributory patent
infringement, then any patent licenses granted to You under this License for that Work shall terminate
as of the date such litigation is filed.
4. Redistribution. You may reproduce and distribute copies of the Work or Derivative Works thereof in4.
any medium, with or without modifications, and in Source or Object form, provided that You meet the
following conditions:
1. You must give any other recipients of the Work or Derivative Works a copy of this License; and
2. You must cause any modified files to carry prominent notices stating that You changed the files;
and
10

3. You must retain, in the Source form of any Derivative Works that You distribute, all copyright,
patent, trademark, and attribution notices from the Source form of the Work, excluding those
notices that do not pertain to any part of the Derivative Works; and
4. If the Work includes a "NOTICE" text file as part of its distribution, then any Derivative Works4.
that You distribute must include a readable copy of the attribution notices contained within such
NOTICE file, excluding those notices that do not pertain to any part of the Derivative Works, in
at least one of the following places: within a NOTICE text file distributed as part of the Derivative
Works; within the Source form or documentation, if provided along with the Derivative Works;
or, within a display generated by the Derivative Works, if and wherever such third-party notices
normally appear. The contents of the NOTICE file are for informational purposes only and do not
modify the License. You may add Your own attribution notices within Derivative Works that You
distribute, alongside or as an addendum to the NOTICE text from the Work, provided that such
additional attribution notices cannot be construed as modifying the License.
You may add Your own copyright statement to Your modifications and may provide additional or
different license terms and conditions for use, reproduction, or distribution of Your modifications,
or for any such Derivative Works as a whole, provided Your use, reproduction, and distribution of
the Work otherwise complies with the conditions stated in this License.
5. Submission of Contributions. Unless You explicitly state otherwise, any Contribution intentionally
submitted for inclusion in the Work by You to the Licensor shall be under the terms and conditions
of this License, without any additional terms or conditions. Notwithstanding the above, nothing herein
shall supersede or modify the terms of any separate license agreement you may have executed with
Licensor regarding such Contributions.
6. Trademarks. This License does not grant permission to use the trade names, trademarks, service
marks, or product names of the Licensor, except as required for reasonable and customary use in
describing the origin of the Work and reproducing the content of the NOTICE file.
7. Disclaimer of Warranty. Unless required by applicable law or agreed to in writing, Licensor provides
the Work (and each Contributor provides its Contributions) on an "AS IS" BASIS, WITHOUT
WARRANTIES OR CONDITIONS OF ANY KIND, either express or implied, including, without
limitation, any warranties or conditions of TITLE, NON-INFRINGEMENT, MERCHANTABILITY,
or FITNESS FOR A PARTICULAR PURPOSE. You are solely responsible for determining the
appropriateness of using or redistributing the Work and assume any risks associated with Your
exercise of permissions under this License.
8. Limitation of Liability. In no event and under no legal theory, whether in tort (including negligence),
contract, or otherwise, unless required by applicable law (such as deliberate and grossly negligent
acts) or agreed to in writing, shall any Contributor be liable to You for damages, including any direct,
indirect, special, incidental, or consequential damages of any character arising as a result of this
License or out of the use or inability to use the Work (including but not limited to damages for loss of
goodwill, work stoppage, computer failure or malfunction, or any and all other commercial damages
or losses), even if such Contributor has been advised of the possibility of such damages.
9. Accepting Warranty or Additional Liability. While redistributing the Work or Derivative Works thereof,
You may choose to offer, and charge a fee for, acceptance of support, warranty, indemnity, or other
liability obligations and/or rights consistent with this License. However, in accepting such obligations,
You may act only on Your own behalf and on Your sole responsibility, not on behalf of any other
Contributor, and only if You agree to indemnify, defend, and hold each Contributor harmless for any
liability incurred by, or claims asserted against, such Contributor by reason of your accepting any
11

such warranty or additional liability.
END OF TERMS AND CONDITIONS
---- Part 1: CMU/UCD copyright notice: (BSD like) -----
Copyright 1989, 1991, 1992 by Carnegie Mellon University
Derivative Work - 1996, 1998-2000
Copyright 1996, 1998-2000 The Regents of the University of California
All Rights Reserved
Permission to use, copy, modify and distribute this software and its documentation for any purpose and
without fee is hereby granted, provided that the above copyright notice appears in all copies and that both
that copyright notice and this permission notice appear in supporting documentation, and that the name of
CMU and The Regents of the University of California not be used in advertising or publicity pertaining to
distribution of the software without specific written permission.
CMU AND THE REGENTS OF THE UNIVERSITY OF CALIFORNIA DISCLAIM ALL WARRANTIES
WITH REGARD TO THIS SOFTWARE, INCLUDING ALL IMPLIED WARRANTIES OF
MERCHANTABILITY AND FITNESS. IN NO EVENT SHALL CMU OR THE REGENTS OF THE
UNIVERSITY OF CALIFORNIA BE LIABLE FOR ANY SPECIAL, INDIRECT OR CONSEQUENTIAL
DAMAGES OR ANY DAMAGES WHATSOEVER RESULTING FROM THE LOSS OF USE, DATA OR
PROFITS, WHETHER IN AN ACTION OF CONTRACT, NEGLIGENCE OR OTHER TORTIOUS ACTION,
ARISING OUT OF OR IN CONNECTION WITH THE USE OR PERFORMANCE OF THIS SOFTWARE.
---- Part 2: Networks Associates Technology, Inc copyright notice (BSD) -----
Copyright (c) 2001-2003, Networks Associates Technology, Inc
All rights reserved.
Redistribution and use in source and binary forms, with or without modification, are permitted provided
that the following conditions are met:
* Redistributions of source code must retain the above copyright notice, this list of conditions and the
following disclaimer.
* Redistributions in binary form must reproduce the above copyright notice, this list of conditions and the
following disclaimer in the documentation and/or other materials provided with the distribution.
* Neither the name of the Networks Associates Technology, Inc nor the names of its contributors may be
used to endorse or promote products derived from this software without specific prior written permission.
THIS SOFTWARE IS PROVIDED BY THE COPYRIGHT HOLDERS AND CONTRIBUTORS ``AS
IS'' AND ANY EXPRESS OR IMPLIED WARRANTIES, INCLUDING, BUT NOT LIMITED TO, THE
IMPLIED WARRANTIES OF MERCHANTABILITY AND FITNESS FOR A PARTICULAR PURPOSE
ARE DISCLAIMED. IN NO EVENT SHALL THE COPYRIGHT HOLDERS OR CONTRIBUTORS BE
LIABLE FOR ANY DIRECT, INDIRECT, INCIDENTAL, SPECIAL, EXEMPLARY, OR CONSEQUENTIAL
DAMAGES (INCLUDING, BUT NOT LIMITED TO, PROCUREMENT OF SUBSTITUTE GOODS OR
SERVICES; LOSS OF USE, DATA, OR PROFITS; OR BUSINESS INTERRUPTION) HOWEVER
CAUSED AND ON ANY THEORY OF LIABILITY, WHETHER IN CONTRACT, STRICT LIABILITY, OR
TORT (INCLUDING NEGLIGENCE OR OTHERWISE) ARISING IN ANY WAY OUT OF THE USE OF
THIS SOFTWARE, EVEN IF ADVISED OF THE POSSIBILITY OF SUCH DAMAGE.
12

---- Part 3: Cambridge Broadband Ltd. copyright notice (BSD) -----
Portions of this code are copyright (c) 2001-2003, Cambridge Broadband Ltd.
All rights reserved.
Redistribution and use in source and binary forms, with or without modification, are permitted provided
that the following conditions are met:
* Redistributions of source code must retain the above copyright notice, this list of conditions and the
following disclaimer.
* Redistributions in binary form must reproduce the above copyright notice, this list of conditions and the
following disclaimer in the documentation and/or other materials provided with the distribution.
* The name of Cambridge Broadband Ltd. may not be used to endorse or promote products derived from
this software without specific prior written permission.
THIS SOFTWARE IS PROVIDED BY THE COPYRIGHT HOLDER ``AS IS'' AND ANY EXPRESS
OR IMPLIED WARRANTIES, INCLUDING, BUT NOT LIMITED TO, THE IMPLIED WARRANTIES OF
MERCHANTABILITY AND FITNESS FOR A PARTICULAR PURPOSE ARE DISCLAIMED. IN NO
EVENT SHALL THE COPYRIGHT HOLDER BE LIABLE FOR ANY DIRECT, INDIRECT, INCIDENTAL,
SPECIAL, EXEMPLARY, OR CONSEQUENTIAL DAMAGES (INCLUDING, BUT NOT LIMITED TO,
PROCUREMENT OF SUBSTITUTE GOODS OR SERVICES; LOSS OF USE, DATA, OR PROFITS; OR
BUSINESS INTERRUPTION) HOWEVER CAUSED AND ON ANY THEORY OF LIABILITY, WHETHER
IN CONTRACT, STRICT LIABILITY, OR TORT (INCLUDING NEGLIGENCE OR OTHERWISE) ARISING
IN ANY WAY OUT OF THE USE OF THIS SOFTWARE, EVEN IF ADVISED OF THE POSSIBILITY OF
SUCH DAMAGE.
---- Part 4: Sun Microsystems, Inc. copyright notice (BSD) -----
Copyright c 2003 Sun Microsystems, Inc., 4150 Network Circle, Santa Clara, California 95054, U.S.A. All
rights reserved.
Use is subject to license terms below.
This distribution may include materials developed by third parties.
Sun, Sun Microsystems, the Sun logo and Solaris are trademarks or registered trademarks of Sun
Microsystems, Inc. in the U.S. and other countries.
Redistribution and use in source and binary forms, with or without modification, are permitted provided
that the following conditions are met:
* Redistributions of source code must retain the above copyright notice, this list of conditions and the
following disclaimer.
* Redistributions in binary form must reproduce the above copyright notice, this list of conditions and the
following disclaimer in the documentation and/or other materials provided with the distribution.
* Neither the name of the Sun Microsystems, Inc. nor the names of its contributors may be used to
endorse or promote products derived from this software without specific prior written permission.
THIS SOFTWARE IS PROVIDED BY THE COPYRIGHT HOLDERS AND CONTRIBUTORS ``AS
IS'' AND ANY EXPRESS OR IMPLIED WARRANTIES, INCLUDING, BUT NOT LIMITED TO, THE
IMPLIED WARRANTIES OF MERCHANTABILITY AND FITNESS FOR A PARTICULAR PURPOSE
ARE DISCLAIMED. IN NO EVENT SHALL THE COPYRIGHT HOLDERS OR CONTRIBUTORS BE
LIABLE FOR ANY DIRECT, INDIRECT, INCIDENTAL, SPECIAL, EXEMPLARY, OR CONSEQUENTIAL
DAMAGES (INCLUDING, BUT NOT LIMITED TO, PROCUREMENT OF SUBSTITUTE GOODS OR
13

SERVICES; LOSS OF USE, DATA, OR PROFITS; OR BUSINESS INTERRUPTION) HOWEVER
CAUSED AND ON ANY THEORY OF LIABILITY, WHETHER IN CONTRACT, STRICT LIABILITY, OR
TORT (INCLUDING NEGLIGENCE OR OTHERWISE) ARISING IN ANY WAY OUT OF THE USE OF
THIS SOFTWARE, EVEN IF ADVISED OF THE POSSIBILITY OF SUCH DAMAGE.
---- Part 5: Sparta, Inc copyright notice (BSD) -----
Copyright (c) 2003-2012, Sparta, Inc
All rights reserved.
Redistribution and use in source and binary forms, with or without modification, are permitted provided
that the following conditions are met:
* Redistributions of source code must retain the above copyright notice, this list of conditions and the
following disclaimer.
* Redistributions in binary form must reproduce the above copyright notice, this list of conditions and the
following disclaimer in the documentation and/or other materials provided with the distribution.
* Neither the name of Sparta, Inc nor the names of its contributors may be used to endorse or promote
products derived from this software without specific prior written permission.
THIS SOFTWARE IS PROVIDED BY THE COPYRIGHT HOLDERS AND CONTRIBUTORS ``AS
IS'' AND ANY EXPRESS OR IMPLIED WARRANTIES, INCLUDING, BUT NOT LIMITED TO, THE
IMPLIED WARRANTIES OF MERCHANTABILITY AND FITNESS FOR A PARTICULAR PURPOSE
ARE DISCLAIMED. IN NO EVENT SHALL THE COPYRIGHT HOLDERS OR CONTRIBUTORS BE
LIABLE FOR ANY DIRECT, INDIRECT, INCIDENTAL, SPECIAL, EXEMPLARY, OR CONSEQUENTIAL
DAMAGES (INCLUDING, BUT NOT LIMITED TO, PROCUREMENT OF SUBSTITUTE GOODS OR
SERVICES; LOSS OF USE, DATA, OR PROFITS; OR BUSINESS INTERRUPTION) HOWEVER
CAUSED AND ON ANY THEORY OF LIABILITY, WHETHER IN CONTRACT, STRICT LIABILITY, OR
TORT (INCLUDING NEGLIGENCE OR OTHERWISE) ARISING IN ANY WAY OUT OF THE USE OF
THIS SOFTWARE, EVEN IF ADVISED OF THE POSSIBILITY OF SUCH DAMAGE.
---- Part 6: Cisco/BUPTNIC copyright notice (BSD) -----
Copyright (c) 2004, Cisco, Inc and Information Network Center of Beijing University of Posts and
Telecommunications.
All rights reserved.
Redistribution and use in source and binary forms, with or without modification, are permitted provided
that the following conditions are met:
* Redistributions of source code must retain the above copyright notice, this list of conditions and the
following disclaimer.
* Redistributions in binary form must reproduce the above copyright notice, this list of conditions and the
following disclaimer in the documentation and/or other materials provided with the distribution.
* Neither the name of Cisco, Inc, Beijing University of Posts and Telecommunications, nor the names of
their contributors may be used to endorse or promote products derived from this software without specific
prior written permission.
THIS SOFTWARE IS PROVIDED BY THE COPYRIGHT HOLDERS AND CONTRIBUTORS ``AS
IS'' AND ANY EXPRESS OR IMPLIED WARRANTIES, INCLUDING, BUT NOT LIMITED TO, THE
IMPLIED WARRANTIES OF MERCHANTABILITY AND FITNESS FOR A PARTICULAR PURPOSE
14

ARE DISCLAIMED. IN NO EVENT SHALL THE COPYRIGHT HOLDERS OR CONTRIBUTORS BE
LIABLE FOR ANY DIRECT, INDIRECT, INCIDENTAL, SPECIAL, EXEMPLARY, OR CONSEQUENTIAL
DAMAGES (INCLUDING, BUT NOT LIMITED TO, PROCUREMENT OF SUBSTITUTE GOODS OR
SERVICES; LOSS OF USE, DATA, OR PROFITS; OR BUSINESS INTERRUPTION) HOWEVER
CAUSED AND ON ANY THEORY OF LIABILITY, WHETHER IN CONTRACT, STRICT LIABILITY, OR
TORT (INCLUDING NEGLIGENCE OR OTHERWISE) ARISING IN ANY WAY OUT OF THE USE OF
THIS SOFTWARE, EVEN IF ADVISED OF THE POSSIBILITY OF SUCH DAMAGE.
---- Part 7: Fabasoft R&D Software GmbH & Co KG copyright notice (BSD) -----
Copyright (c) Fabasoft R&D Software GmbH & Co KG, 2003 [email protected]
Author: Bernhard Penz <[email protected]>
Redistribution and use in source and binary forms, with or without modification, are permitted provided
that the following conditions are met:
* Redistributions of source code must retain the above copyright notice, this list of conditions and the
following disclaimer.
* Redistributions in binary form must reproduce the above copyright notice, this list of conditions and the
following disclaimer in the documentation and/or other materials provided with the distribution.
* The name of Fabasoft R&D Software GmbH & Co KG or any of its subsidiaries, brand or product names
may not be used to endorse or promote products derived from this software without specific prior written
permission.
THIS SOFTWARE IS PROVIDED BY THE COPYRIGHT HOLDER ``AS IS'' AND ANY EXPRESS
OR IMPLIED WARRANTIES, INCLUDING, BUT NOT LIMITED TO, THE IMPLIED WARRANTIES OF
MERCHANTABILITY AND FITNESS FOR A PARTICULAR PURPOSE ARE DISCLAIMED. IN NO
EVENT SHALL THE COPYRIGHT HOLDER BE LIABLE FOR ANY DIRECT, INDIRECT, INCIDENTAL,
SPECIAL, EXEMPLARY, OR CONSEQUENTIAL DAMAGES (INCLUDING, BUT NOT LIMITED TO,
PROCUREMENT OF SUBSTITUTE GOODS OR SERVICES; LOSS OF USE, DATA, OR PROFITS; OR
BUSINESS INTERRUPTION) HOWEVER CAUSED AND ON ANY THEORY OF LIABILITY, WHETHER
IN CONTRACT, STRICT LIABILITY, OR TORT (INCLUDING NEGLIGENCE OR OTHERWISE) ARISING
IN ANY WAY OUT OF THE USE OF THIS SOFTWARE, EVEN IF ADVISED OF THE POSSIBILITY OF
SUCH DAMAGE.
---- Part 8: Apple Inc. copyright notice (BSD) -----
Copyright (c) 2007 Apple Inc. All rights reserved.
Redistribution and use in source and binary forms, with or without modification, are permitted provided
that the following conditions are met:
1. Redistributions of source code must retain the above copyright notice, this list of conditions and the
following disclaimer.
2. Redistributions in binary form must reproduce the above copyright notice, this list of conditions and
the following disclaimer in the documentation and/or other materials provided with the distribution.
3. Neither the name of Apple Inc. ("Apple") nor the names of its contributors may be used to endorse or
promote products derived from this software without specific prior written permission.
THIS SOFTWARE IS PROVIDED BY APPLE AND ITS CONTRIBUTORS "AS IS" AND ANY EXPRESS
OR IMPLIED WARRANTIES, INCLUDING, BUT NOT LIMITED TO, THE IMPLIED WARRANTIES
15

OF MERCHANTABILITY AND FITNESS FOR A PARTICULAR PURPOSE ARE DISCLAIMED. IN
NO EVENT SHALL APPLE OR ITS CONTRIBUTORS BE LIABLE FOR ANY DIRECT, INDIRECT,
INCIDENTAL, SPECIAL, EXEMPLARY, OR CONSEQUENTIAL DAMAGES (INCLUDING, BUT NOT
LIMITED TO, PROCUREMENT OF SUBSTITUTE GOODS OR SERVICES; LOSS OF USE, DATA,
OR PROFITS; OR BUSINESS INTERRUPTION) HOWEVER CAUSED AND ON ANY THEORY OF
LIABILITY, WHETHER IN CONTRACT, STRICT LIABILITY, OR TORT (INCLUDING NEGLIGENCE OR
OTHERWISE) ARISING IN ANY WAY OUT OF THE USE OF THIS SOFTWARE, EVEN IF ADVISED OF
THE POSSIBILITY OF SUCH DAMAGE.
---- Part 9: ScienceLogic, LLC copyright notice (BSD) -----
Copyright (c) 2009, ScienceLogic, LLC
All rights reserved.
Redistribution and use in source and binary forms, with or without modification, are permitted provided
that the following conditions are met:
* Redistributions of source code must retain the above copyright notice, this list of conditions and the
following disclaimer.
* Redistributions in binary form must reproduce the above copyright notice, this list of conditions and the
following disclaimer in the documentation and/or other materials provided with the distribution.
* Neither the name of ScienceLogic, LLC nor the names of its contributors may be used to endorse or
promote products derived from this software without specific prior written permission.
THIS SOFTWARE IS PROVIDED BY THE COPYRIGHT HOLDERS AND CONTRIBUTORS "AS
IS" AND ANY EXPRESS OR IMPLIED WARRANTIES, INCLUDING, BUT NOT LIMITED TO, THE
IMPLIED WARRANTIES OF MERCHANTABILITY AND FITNESS FOR A PARTICULAR PURPOSE
ARE DISCLAIMED. IN NO EVENT SHALL THE COPYRIGHT HOLDERS OR CONTRIBUTORS BE
LIABLE FOR ANY DIRECT, INDIRECT, INCIDENTAL, SPECIAL, EXEMPLARY, OR CONSEQUENTIAL
DAMAGES (INCLUDING, BUT NOT LIMITED TO, PROCUREMENT OF SUBSTITUTE GOODS OR
SERVICES; LOSS OF USE, DATA, OR PROFITS; OR BUSINESS INTERRUPTION) HOWEVER
CAUSED AND ON ANY THEORY OF LIABILITY, WHETHER IN CONTRACT, STRICT LIABILITY, OR
TORT (INCLUDING NEGLIGENCE OR OTHERWISE) ARISING IN ANY WAY OUT OF THE USE OF
THIS SOFTWARE, EVEN IF ADVISED OF THE POSSIBILITY OF SUCH DAMAGE.
---- Part 10: Lennart Poettering copyright notice (BSD-like) -----
Copyright 2010 Lennart Poettering
Permission is hereby granted, free of charge, to any person
obtaining a copy of this software and associated documentation files
(the "Software"), to deal in the Software without restriction,
including without limitation the rights to use, copy, modify, merge,
publish, distribute, sublicense, and/or sell copies of the Software,
and to permit persons to whom the Software is furnished to do so,
subject to the following conditions:
16

The above copyright notice and this permission notice shall be
included in all copies or substantial portions of the Software.
THE SOFTWARE IS PROVIDED "AS IS", WITHOUT WARRANTY OF ANY KIND,
EXPRESS OR IMPLIED, INCLUDING BUT NOT LIMITED TO THE WARRANTIES OF
MERCHANTABILITY, FITNESS FOR A PARTICULAR PURPOSE AND
NONINFRINGEMENT. IN NO EVENT SHALL THE AUTHORS OR COPYRIGHT HOLDERS
BE LIABLE FOR ANY CLAIM, DAMAGES OR OTHER LIABILITY, WHETHER IN AN
ACTION OF CONTRACT, TORT OR OTHERWISE, ARISING FROM, OUT OF OR IN
CONNECTION WITH THE SOFTWARE OR THE USE OR OTHER DEALINGS IN THE
SOFTWARE.
---- Part 11: IETF copyright notice (BSD) -----
Copyright (c) 2013 IETF Trust and the persons identified as authors of
the code. All rights reserved.
Redistribution and use in source and binary forms, with or without
modification, are permitted provided that the following conditions are
met:
* Redistributions of source code must retain the above copyright notice,
this list of conditions and the following disclaimer.
* Redistributions in binary form must reproduce the above copyright
notice, this list of conditions and the following disclaimer in the
documentation and/or other materials provided with the distribution.
* Neither the name of Internet Society, IETF or IETF Trust, nor the
names of specific contributors, may be used to endorse or promote
products derived from this software without specific prior written
permission.
THIS SOFTWARE IS PROVIDED BY THE COPYRIGHT HOLDERS AND CONTRIBUTORS "AS
IS" AND ANY EXPRESS OR IMPLIED WARRANTIES, INCLUDING, BUT NOT LIMITED
TO, THE IMPLIED WARRANTIES OF MERCHANTABILITY AND FITNESS FOR A
PARTICULAR PURPOSE ARE DISCLAIMED. IN NO EVENT SHALL THE COPYRIGHT OWNER
OR CONTRIBUTORS BE LIABLE FOR ANY DIRECT, INDIRECT, INCIDENTAL, SPECIAL,
EXEMPLARY, OR CONSEQUENTIAL DAMAGES (INCLUDING, BUT NOT LIMITED TO,
PROCUREMENT OF SUBSTITUTE GOODS OR SERVICES; LOSS OF USE, DATA, OR
PROFITS; OR BUSINESS INTERRUPTION) HOWEVER CAUSED AND ON ANY THEORY OF
LIABILITY, WHETHER IN CONTRACT, STRICT LIABILITY, OR TORT (INCLUDING
NEGLIGENCE OR OTHERWISE) ARISING IN ANY WAY OUT OF THE USE OF THIS
SOFTWARE, EVEN IF ADVISED OF THE POSSIBILITY OF SUCH DAMAGE.
17

---- Part 12: Arista Networks copyright notice (BSD) ----
Copyright (c) 2013, Arista Networks, Inc.
All rights reserved.
Redistribution and use in source and binary forms, with or without
modification, are permitted provided that the following conditions are
met:
* Redistributions of source code must retain the above copyright notice,
this list of conditions and the following disclaimer.
* Redistributions in binary form must reproduce the above copyright
notice, this list of conditions and the following disclaimer in the
documentation and/or other materials provided with the distribution.
* Neither the name of Arista Networks, Inc. nor the names of its
contributors may be used to endorse or promote products derived
from this software without specific prior written permission.
THIS SOFTWARE IS PROVIDED BY THE COPYRIGHT HOLDERS AND CONTRIBUTORS
"AS IS" AND ANY EXPRESS OR IMPLIED WARRANTIES, INCLUDING, BUT NOT
LIMITED TO, THE IMPLIED WARRANTIES OF MERCHANTABILITY AND FITNESS FOR
A PARTICULAR PURPOSE ARE DISCLAIMED. IN NO EVENT SHALL THE COPYRIGHT
HOLDERS OR CONTRIBUTORS BE LIABLE FOR ANY DIRECT, INDIRECT,
INCIDENTAL, SPECIAL, EXEMPLARY, OR CONSEQUENTIAL DAMAGES (INCLUDING,
BUT NOT LIMITED TO, PROCUREMENT OF SUBSTITUTE GOODS OR SERVICES; LOSS
OF USE, DATA, OR PROFITS; OR BUSINESS INTERRUPTION) HOWEVER CAUSED AND
ON ANY THEORY OF LIABILITY, WHETHER IN CONTRACT, STRICT LIABILITY, OR
TORT (INCLUDING NEGLIGENCE OR OTHERWISE) ARISING IN ANY WAY OUT OF THE
USE OF THIS SOFTWARE, EVEN IF ADVISED OF THE POSSIBILITY OF SUCH
DAMAGE.
---- Part 13: VMware, Inc. copyright notice (BSD) -----
Copyright (c) 2016, VMware, Inc.
All rights reserved.
Redistribution and use in source and binary forms, with or without
modification, are permitted provided that the following conditions are met:
* Redistributions of source code must retain the above copyright notice,
this list of conditions and the following disclaimer.
18

* Redistributions in binary form must reproduce the above copyright
notice, this list of conditions and the following disclaimer in the
documentation and/or other materials provided with the distribution.
* Neither the name of VMware, Inc. nor the names of its contributors
may be used to endorse or promote products derived from this software
without specific prior written permission.
THIS SOFTWARE IS PROVIDED BY THE COPYRIGHT HOLDERS AND CONTRIBUTORS "AS
IS" AND ANY EXPRESS OR IMPLIED WARRANTIES, INCLUDING, BUT NOT LIMITED TO,
THE IMPLIED WARRANTIES OF MERCHANTABILITY AND FITNESS FOR A PARTICULAR
PURPOSE ARE DISCLAIMED. IN NO EVENT SHALL THE COPYRIGHT HOLDERS OR
CONTRIBUTORS BE LIABLE FOR ANY DIRECT, INDIRECT, INCIDENTAL, SPECIAL,
EXEMPLARY, OR CONSEQUENTIAL DAMAGES (INCLUDING, BUT NOT LIMITED TO,
PROCUREMENT OF SUBSTITUTE GOODS OR SERVICES; LOSS OF USE, DATA, OR PROFITS;
OR BUSINESS INTERRUPTION) HOWEVER CAUSED AND ON ANY THEORY OF LIABILITY,
WHETHER IN CONTRACT, STRICT LIABILITY, OR TORT (INCLUDING NEGLIGENCE OR
OTHERWISE) ARISING IN ANY WAY OUT OF THE USE OF THIS SOFTWARE, EVEN IF
ADVISED OF THE POSSIBILITY OF SUCH DAMAGE.
---- Part 14: USC/Information Sciences Institute copyright notice (BSD) -----
Copyright (c) 2017-2018, Information Sciences Institute
All rights reserved.
Redistribution and use in source and binary forms, with or without
modification, are permitted provided that the following conditions are met:
* Redistributions of source code must retain the above copyright notice,
this list of conditions and the following disclaimer.
* Redistributions in binary form must reproduce the above copyright
notice, this list of conditions and the following disclaimer in the
documentation and/or other materials provided with the distribution.
* Neither the name of Information Sciences Institue nor the names of its
contributors may be used to endorse or promote products derived from
this software without specific prior written permission.
THIS SOFTWARE IS PROVIDED BY THE COPYRIGHT HOLDERS AND CONTRIBUTORS "AS
IS" AND ANY EXPRESS OR IMPLIED WARRANTIES, INCLUDING, BUT NOT LIMITED TO,
THE IMPLIED WARRANTIES OF MERCHANTABILITY AND FITNESS FOR A PARTICULAR
PURPOSE ARE DISCLAIMED. IN NO EVENT SHALL THE COPYRIGHT HOLDERS OR
CONTRIBUTORS BE LIABLE FOR ANY DIRECT, INDIRECT, INCIDENTAL, SPECIAL,
EXEMPLARY, OR CONSEQUENTIAL DAMAGES (INCLUDING, BUT NOT LIMITED TO,
19

PROCUREMENT OF SUBSTITUTE GOODS OR SERVICES; LOSS OF USE, DATA, OR PROFITS;
OR BUSINESS INTERRUPTION) HOWEVER CAUSED AND ON ANY THEORY OF LIABILITY,
WHETHER IN CONTRACT, STRICT LIABILITY, OR TORT (INCLUDING NEGLIGENCE OR
OTHERWISE) ARISING IN ANY WAY OUT OF THE USE OF THIS SOFTWARE, EVEN IF
ADVISED OF THE POSSIBILITY OF SUCH DAMAGE.
MIT License
Copyright (c) 1998, 1999, 2000 Thai Open Source Software Center Ltd
Permission is hereby granted, free of charge, to any person obtaining a copy of this software and
associated documentation files (the "Software"), to deal in the Software without restriction, including
without limitation the rights to use, copy, modify, merge, publish, distribute, sublicense, and/or sell copies
of the Software, and to permit persons to whom the Software is furnished to do so, subject to the following
conditions:
The above copyright notice and this permission notice shall be included in all copies or substantial
portions of the Software.
THE SOFTWARE IS PROVIDED "AS IS", WITHOUT WARRANTY OF ANY KIND, EXPRESS OR
IMPLIED, INCLUDING BUT NOT LIMITED TO THE WARRANTIES OF MERCHANTABILITY, FITNESS
FOR A PARTICULAR PURPOSE AND NONINFRINGEMENT. IN NO EVENT SHALL THE AUTHORS
OR COPYRIGHT HOLDERS BE LIABLE FOR ANY CLAIM, DAMAGES OR OTHER LIABILITY,
WHETHER IN AN ACTION OF CONTRACT, TORT OR OTHERWISE, ARISING FROM, OUT OF OR
IN CONNECTION WITH THE SOFTWARE OR THE USE OR OTHER DEALINGS IN THE SOFTWARE.
Copyright 2000 Computing Research Labs, New Mexico State University
Copyright 2001-2015 Francesco Zappa Nardelli
Permission is hereby granted, free of charge, to any person obtaining a copy of this software and
associated documentation files (the "Software"), to deal in the Software without restriction, including
without limitation the rights to use, copy, modify, merge, publish, distribute, sublicense, and/or sell copies
of the Software, and to permit persons to whom the Software is furnished to do so, subject to the following
conditions:
The above copyright notice and this permission notice shall be included in all copies or substantial
portions of the Software.
THE SOFTWARE IS PROVIDED "AS IS", WITHOUT WARRANTY OF ANY KIND, EXPRESS OR
IMPLIED, INCLUDING BUT NOT LIMITED TO THE WARRANTIES OF MERCHANTABILITY, FITNESS
FOR A PARTICULAR PURPOSE AND NONINFRINGEMENT. IN NO EVENT SHALL THE COMPUTING
RESEARCH LAB OR NEW MEXICO STATE UNIVERSITY BE LIABLE FOR ANY CLAIM, DAMAGES
OR OTHER LIABILITY, WHETHER IN AN ACTION OF CONTRACT, TORT OR OTHERWISE, ARISING
FROM, OUT OF OR IN CONNECTION WITH THE SOFTWARE OR THE USE OR OTHER DEALINGS IN
THE SOFTWARE.
Written by Joel Sherrill <[email protected]>.
COPYRIGHT (c) 1989-2000.
On-Line Applications Research Corporation (OAR).
20

Permission to use, copy, modify, and distribute this software for any purpose without fee is hereby
granted, provided that this entire notice is included in all copies of any software which is or includes a
copy or modification of this software.
THIS SOFTWARE IS BEING PROVIDED "AS IS", WITHOUT ANY EXPRESS OR IMPLIED WARRANTY.
IN PARTICULAR, THE AUTHOR MAKES NO REPRESENTATION OR WARRANTY OF ANY KIND
CONCERNING THE MERCHANTABILITY OF THIS SOFTWARE OR ITS FITNESS FOR ANY
PARTICULAR PURPOSE.
(1) Red Hat Incorporated
Copyright (c) 1994-2009 Red Hat, Inc. All rights reserved.
This copyrighted material is made available to anyone wishing to use, modify, copy, or redistribute it
subject to the terms and conditions of the BSD License. This program is distributed in the hope that it
will be useful, but WITHOUT ANY WARRANTY expressed or implied, including the implied warranties of
MERCHANTABILITY or FITNESS FOR A PARTICULAR PURPOSE. A copy of this license is available at
http://www.opensource.org/licenses. Any Red Hat trademarks that are incorporated in the source code or
documentation are not subject to the BSD License and may only be used or replicated with the express
permission of Red Hat, Inc.
(2) University of California, Berkeley
Copyright (c) 1981-2000 The Regents of the University of California.
All rights reserved.
Redistribution and use in source and binary forms, with or without modification, are permitted provided
that the following conditions are met:
* Redistributions of source code must retain the above copyright notice, this list of conditions and the
following disclaimer.
* Redistributions in binary form must reproduce the above copyright notice, this list of conditions and the
following disclaimer in the documentation and/or other materials provided with the distribution.
* Neither the name of the University nor the names of its contributors may be used to endorse or promote
products derived from this software without specific prior written permission.
THIS SOFTWARE IS PROVIDED BY THE COPYRIGHT HOLDERS AND CONTRIBUTORS "AS
IS" AND ANY EXPRESS OR IMPLIED WARRANTIES, INCLUDING, BUT NOT LIMITED TO, THE
IMPLIED WARRANTIES OF MERCHANTABILITY AND FITNESS FOR A PARTICULAR PURPOSE ARE
DISCLAIMED. IN NO EVENT SHALL THE COPYRIGHT OWNER OR CONTRIBUTORS BE LIABLE FOR
ANY DIRECT, INDIRECT, INCIDENTAL, SPECIAL, EXEMPLARY, OR CONSEQUENTIAL DAMAGES
(INCLUDING, BUT NOT LIMITED TO, PROCUREMENT OF SUBSTITUTE GOODS OR SERVICES;
LOSS OF USE, DATA, OR PROFITS; OR BUSINESS INTERRUPTION) HOWEVER CAUSED AND ON
ANY THEORY OF LIABILITY, WHETHER IN CONTRACT, STRICT LIABILITY, OR TORT (INCLUDING
NEGLIGENCE OR OTHERWISE) ARISING IN ANY WAY OUT OF THE USE OF THIS SOFTWARE,
EVEN IF ADVISED OF THE POSSIBILITY OF SUCH DAMAGE.
The FreeType Project LICENSE
----------------------------
2006-Jan-27
Copyright 1996-2002, 2006 by
21

David Turner, Robert Wilhelm, and Werner Lemberg
Introduction
============
The FreeType Project is distributed in several archive packages; some of them may contain, in addition to
the FreeType font engine, various tools and contributions which rely on, or relate to, the FreeType Project.
This license applies to all files found in such packages, and which do not fall under their own explicit
license. The license affects thus the FreeType font engine, the test programs, documentation and
makefiles, at the very least.
This license was inspired by the BSD, Artistic, and IJG (Independent JPEG Group) licenses, which
all encourage inclusion and use of free software in commercial and freeware products alike. As a
consequence, its main points are that:
o We don't promise that this software works. However, we will be interested in any kind of bug reports.
(`as is' distribution)
o You can use this software for whatever you want, in parts or full form, without having to pay us.
(`royalty-free' usage)
o You may not pretend that you wrote this software. If you use it, or only parts of it, in a program, you
must acknowledge somewhere in your documentation that you have used the FreeType code. (`credits')
We specifically permit and encourage the inclusion of this software, with or without modifications, in
commercial products.
We disclaim all warranties covering The FreeType Project and assume no liability related to The FreeType
Project.
Finally, many people asked us for a preferred form for a credit/disclaimer to use in compliance with this
license. We thus encourage you to use the following text:
"""
Portions of this software are copyright © <year> The FreeType
Project (www.freetype.org). All rights reserved.
"""
Please replace <year> with the value from the FreeType version you actually use.
Legal Terms
===========
0. Definitions
--------------
Throughout this license, the terms `package', `FreeType Project', and `FreeType archive' refer to the set
of files originally distributed by the authors (David Turner, Robert Wilhelm, and Werner Lemberg) as the
`FreeType Project', be they named as alpha, beta or final release.
`You' refers to the licensee, or person using the project, where `using' is a generic term including
compiling the project's source code as well as linking it to form a `program' or `executable'.
This program is referred to as `a program using the FreeType engine'.
22

This license applies to all files distributed in the original FreeType Project, including all source code,
binaries and documentation, unless otherwise stated in the file in its original, unmodified form as
distributed in the original archive.
If you are unsure whether or not a particular file is covered by this license, you must contact us to verify
this.
The FreeType Project is copyright (C) 1996-2000 by David Turner, Robert Wilhelm, and Werner Lemberg.
All rights reserved except as specified below.
1. No Warranty
--------------
THE FREETYPE PROJECT IS PROVIDED `AS IS' WITHOUT WARRANTY OF ANY KIND, EITHER
EXPRESS OR IMPLIED, INCLUDING, BUT NOT LIMITED TO, WARRANTIES OF MERCHANTABILITY
AND FITNESS FOR A PARTICULAR PURPOSE. IN NO EVENT WILL ANY OF THE AUTHORS OR
COPYRIGHT HOLDERS BE LIABLE FOR ANY DAMAGES CAUSED BY THE USE OR THE INABILITY
TO USE, OF THE FREETYPE PROJECT.
2. Redistribution
-----------------
This license grants a worldwide, royalty-free, perpetual and irrevocable right and license to use, execute,
perform, compile, display, copy, create derivative works of, distribute and sublicense the FreeType Project
(in both source and object code forms) and derivative works thereof for any purpose; and to authorize
others to exercise some or all of the rights granted herein, subject to the following conditions:
o Redistribution of source code must retain this license file (`FTL.TXT') unaltered; any additions, deletions
or changes to the original files must be clearly indicated in accompanying documentation. The copyright
notices of the unaltered, original files must be preserved in all copies of source files.
o Redistribution in binary form must provide a disclaimer that states that the software is based in part of
the work of the FreeType Team, in the distribution documentation. We also encourage you to put an URL
to the FreeType web page in your documentation, though this isn't mandatory.
These conditions apply to any software derived from or based on the FreeType Project, not just the
unmodified files. If you use our work, you must acknowledge us. However, no fee need be paid to us.
3. Advertising
--------------
Neither the FreeType authors and contributors nor you shall use the name of the other for commercial,
advertising, or promotional purposes without specific prior written permission.
We suggest, but do not require, that you use one or more of the following phrases to refer to this software
in your documentation or advertising materials: `FreeType Project', `FreeType Engine', `FreeType library',
or `FreeType Distribution'.
As you have not signed this license, you are not required to accept it. However, as the FreeType Project
is copyrighted material, only this license, or another one contracted with the authors, grants you the right
to use, distribute, and modify it.
Therefore, by using, distributing, or modifying the FreeType Project, you indicate that you understand and
accept all the terms of this license.
4. Contacts
23

-----------
There are two mailing lists related to FreeType:
Discusses general use and applications of FreeType, as well as future and wanted additions to the library
and distribution.
If you are looking for support, start in this list if you haven't found anything to help you in the
documentation.
Discusses bugs, as well as engine internals, design issues, specific licenses, porting, etc.
Our home page can be found at
http://www.freetype.org
--- end of FTL.TXT ---
The TWAIN Toolkit is distributed as is. The developer and distributors of the TWAIN Toolkit expressly
disclaim all implied, express or statutory warranties including, without limitation, the implied warranties
of merchantability, noninfringement of third party rights and fitness for a particular purpose. Neither the
developers nor the distributors will be liable for damages, whether direct, indirect, special, incidental, or
consequential, as a result of the reproduction, modification, distribution or other use of the TWAIN Toolkit.
JSON for Modern C++
Copyright (c) 2013-2017 Niels Lohmann
Permission is hereby granted, free of charge, to any person obtaining a copy of this software and
associated documentation files (the "Software"), to deal in the Software without restriction, including
without limitation the rights to use, copy, modify, merge, publish, distribute, sublicense, and/or sell copies
of the Software, and to permit persons to whom the Software is furnished to do so, subject to the following
conditions:
The above copyright notice and this permission notice shall be included in all copies or substantial
portions of the Software.
THE SOFTWARE IS PROVIDED "AS IS", WITHOUT WARRANTY OF ANY KIND, EXPRESS OR
IMPLIED, INCLUDING BUT NOT LIMITED TO THE WARRANTIES OF MERCHANTABILITY, FITNESS
FOR A PARTICULAR PURPOSE AND NONINFRINGEMENT. IN NO EVENT SHALL THE AUTHORS
OR COPYRIGHT HOLDERS BE LIABLE FOR ANY CLAIM, DAMAGES OR OTHER LIABILITY,
WHETHER IN AN ACTION OF CONTRACT, TORT OR OTHERWISE, ARISING FROM, OUT OF OR
IN CONNECTION WITH THE SOFTWARE OR THE USE OR OTHER DEALINGS IN THE SOFTWARE.
Copyright (c) 2011 - 2015 ARM LIMITED
All rights reserved.
Redistribution and use in source and binary forms, with or without modification, are permitted provided
that the following conditions are met:
- Redistributions of source code must retain the above copyright notice, this list of conditions and the
following disclaimer.
24

- Redistributions in binary form must reproduce the above copyright notice, this list of conditions and the
following disclaimer in the documentation and/or other materials provided with the distribution.
- Neither the name of ARM nor the names of its contributors may be used to endorse or promote products
derived from this software without specific prior written permission.
THIS SOFTWARE IS PROVIDED BY THE COPYRIGHT HOLDERS AND CONTRIBUTORS "AS
IS" AND ANY EXPRESS OR IMPLIED WARRANTIES, INCLUDING, BUT NOT LIMITED TO, THE
IMPLIED WARRANTIES OF MERCHANTABILITY AND FITNESS FOR A PARTICULAR PURPOSE ARE
DISCLAIMED. IN NO EVENT SHALL COPYRIGHT HOLDERS AND CONTRIBUTORS BE LIABLE FOR
ANY DIRECT, INDIRECT, INCIDENTAL, SPECIAL, EXEMPLARY, OR CONSEQUENTIAL DAMAGES
(INCLUDING, BUT NOT LIMITED TO, PROCUREMENT OF SUBSTITUTE GOODS OR SERVICES;
LOSS OF USE, DATA, OR PROFITS; OR BUSINESS INTERRUPTION) HOWEVER CAUSED AND ON
ANY THEORY OF LIABILITY, WHETHER IN CONTRACT, STRICT LIABILITY, OR TORT (INCLUDING
NEGLIGENCE OR OTHERWISE) ARISING IN ANY WAY OUT OF THE USE OF THIS SOFTWARE,
EVEN IF ADVISED OF THE POSSIBILITY OF SUCH DAMAGE.
Copyright (c) 2014, Kenneth MacKay
All rights reserved.
Redistribution and use in source and binary forms, with or without modification, are permitted provided
that the following conditions are met:
* Redistributions of source code must retain the above copyright notice, this list of conditions and the
following disclaimer.
* Redistributions in binary form must reproduce the above copyright notice, this list of conditions and the
following disclaimer in the documentation and/or other materials provided with the distribution.
THIS SOFTWARE IS PROVIDED BY THE COPYRIGHT HOLDERS AND CONTRIBUTORS "AS
IS" AND ANY EXPRESS OR IMPLIED WARRANTIES, INCLUDING, BUT NOT LIMITED TO, THE
IMPLIED WARRANTIES OF MERCHANTABILITY AND FITNESS FOR A PARTICULAR PURPOSE
ARE DISCLAIMED. IN NO EVENT SHALL THE COPYRIGHT HOLDER OR CONTRIBUTORS BE
LIABLE FOR ANY DIRECT, INDIRECT, INCIDENTAL, SPECIAL, EXEMPLARY, OR CONSEQUENTIAL
DAMAGES (INCLUDING, BUT NOT LIMITED TO, PROCUREMENT OF SUBSTITUTE GOODS OR
SERVICES; LOSS OF USE, DATA, OR PROFITS; OR BUSINESS INTERRUPTION) HOWEVER
CAUSED AND ON ANY THEORY OF LIABILITY, WHETHER IN CONTRACT, STRICT LIABILITY, OR
TORT (INCLUDING NEGLIGENCE OR OTHERWISE) ARISING IN ANY WAY OUT OF THE USE OF
THIS SOFTWARE, EVEN IF ADVISED OF THE POSSIBILITY OF SUCH DAMAGE.
Copyright (c) 2006, CRYPTOGAMS by <[email protected]> All rights reserved.
Redistribution and use in source and binary forms, with or without modification, are permitted provided
that the following conditions are met:
* Redistributions of source code must retain copyright notices, this list of conditions and the following
disclaimer.
* Redistributions in binary form must reproduce the above copyright notice, this list of conditions and the
following disclaimer in the documentation and/or other materials provided with the distribution.
* Neither the name of the CRYPTOGAMS nor the names of its copyright holder and contributors may be
used to endorse or promote products derived from this software without specific prior written permission.
25

ALTERNATIVELY, provided that this notice is retained in full, this product may be distributed under the
terms of the GNU General Public License (GPL), in which case the provisions of the GPL apply INSTEAD
OF those given above.
THIS SOFTWARE IS PROVIDED BY THE COPYRIGHT HOLDER AND CONTRIBUTORS "AS IS"
AND ANY EXPRESS OR IMPLIED WARRANTIES, INCLUDING, BUT NOT LIMITED TO, THE
IMPLIED WARRANTIES OF MERCHANTABILITY AND FITNESS FOR A PARTICULAR PURPOSE ARE
DISCLAIMED. IN NO EVENT SHALL THE COPYRIGHT OWNER OR CONTRIBUTORS BE LIABLE FOR
ANY DIRECT, INDIRECT, INCIDENTAL, SPECIAL, EXEMPLARY, OR CONSEQUENTIAL DAMAGES
(INCLUDING, BUT NOT LIMITED TO, PROCUREMENT OF SUBSTITUTE GOODS OR SERVICES;
LOSS OF USE, DATA, OR PROFITS; OR BUSINESS INTERRUPTION) HOWEVER CAUSED AND ON
ANY THEORY OF LIABILITY, WHETHER IN CONTRACT, STRICT LIABILITY, OR TORT (INCLUDING
NEGLIGENCE OR OTHERWISE) ARISING IN ANY WAY OUT OF THE USE OF THIS SOFTWARE,
EVEN IF ADVISED OF THE POSSIBILITY OF SUCH DAMAGE.
ISC License
Copyright (c) 2013-2017
Frank Denis <j at pureftpd dot org>
Permission to use, copy, modify, and/or distribute this software for any purpose with or without fee is
hereby granted, provided that the above copyright notice and this permission notice appear in all copies.
THE SOFTWARE IS PROVIDED "AS IS" AND THE AUTHOR DISCLAIMS ALL WARRANTIES WITH
REGARD TO THIS SOFTWARE INCLUDING ALL IMPLIED WARRANTIES OF MERCHANTABILITY
AND FITNESS. IN NO EVENT SHALL THE AUTHOR BE LIABLE FOR ANY SPECIAL, DIRECT,
INDIRECT, OR CONSEQUENTIAL DAMAGES OR ANY DAMAGES WHATSOEVER RESULTING FROM
LOSS OF USE, DATA OR PROFITS, WHETHER IN AN ACTION OF CONTRACT, NEGLIGENCE
OR OTHER TORTIOUS ACTION, ARISING OUT OF OR IN CONNECTION WITH THE USE OR
PERFORMANCE OF THIS SOFTWARE.
Copyright (c) 2008 The NetBSD Foundation, Inc.
All rights reserved.
This code is derived from software contributed to The NetBSD Foundation
by Lennart Augustsson ([email protected]) at
Carlstedt Research & Technology.
Redistribution and use in source and binary forms, with or without
modification, are permitted provided that the following conditions
are met:
1. Redistributions of source code must retain the above copyright
notice, this list of conditions and the following disclaimer.
2. Redistributions in binary form must reproduce the above copyright
notice, this list of conditions and the following disclaimer in the
documentation and/or other materials provided with the distribution.
THIS SOFTWARE IS PROVIDED BY THE NETBSD FOUNDATION, INC. AND CONTRIBUTORS
"AS IS" AND ANY EXPRESS OR IMPLIED WARRANTIES, INCLUDING, BUT NOT LIMITED
TO, THE IMPLIED WARRANTIES OF MERCHANTABILITY AND FITNESS FOR A PARTICULAR
26

PURPOSE ARE DISCLAIMED. IN NO EVENT SHALL THE FOUNDATION OR CONTRIBUTORS
BE LIABLE FOR ANY DIRECT, INDIRECT, INCIDENTAL, SPECIAL, EXEMPLARY, OR
CONSEQUENTIAL DAMAGES (INCLUDING, BUT NOT LIMITED TO, PROCUREMENT OF
SUBSTITUTE GOODS OR SERVICES; LOSS OF USE, DATA, OR PROFITS; OR BUSINESS
INTERRUPTION) HOWEVER CAUSED AND ON ANY THEORY OF LIABILITY, WHETHER IN
CONTRACT, STRICT LIABILITY, OR TORT (INCLUDING NEGLIGENCE OR OTHERWISE)
ARISING IN ANY WAY OUT OF THE USE OF THIS SOFTWARE, EVEN IF ADVISED OF THE
POSSIBILITY OF SUCH DAMAGE.
Copyright (c) 2000 Intel Corporation
All rights reserved.
Redistribution and use in source and binary forms, with or without
modification, are permitted provided that the following conditions are met:
* Redistributions of source code must retain the above copyright notice,
this list of conditions and the following disclaimer.
* Redistributions in binary form must reproduce the above copyright notice,
this list of conditions and the following disclaimer in the documentation
and/or other materials provided with the distribution.
* Neither name of Intel Corporation nor the names of its contributors
may be used to endorse or promote products derived from this software
without specific prior written permission.
THIS SOFTWARE IS PROVIDED BY THE COPYRIGHT HOLDERS AND CONTRIBUTORS
"AS IS" AND ANY EXPRESS OR IMPLIED WARRANTIES, INCLUDING, BUT NOT
LIMITED TO, THE IMPLIED WARRANTIES OF MERCHANTABILITY AND FITNESS FOR
A PARTICULAR PURPOSE ARE DISCLAIMED. IN NO EVENT SHALL INTEL OR
CONTRIBUTORS BE LIABLE FOR ANY DIRECT, INDIRECT, INCIDENTAL, SPECIAL,
EXEMPLARY, OR CONSEQUENTIAL DAMAGES (INCLUDING, BUT NOT LIMITED TO,
PROCUREMENT OF SUBSTITUTE GOODS OR SERVICES; LOSS OF USE, DATA, OR
PROFITS; OR BUSINESS INTERRUPTION) HOWEVER CAUSED AND ON ANY THEORY
OF LIABILITY, WHETHER IN CONTRACT, STRICT LIABILITY, OR TORT (INCLUDING
NEGLIGENCE OR OTHERWISE) ARISING IN ANY WAY OUT OF THE USE OF THIS
SOFTWARE, EVEN IF ADVISED OF THE POSSIBILITY OF SUCH DAMAGE.
Lua
Copyright © 1994–2014 Lua.org, PUC-Rio.
Permission is hereby granted, free of charge, to any person obtaining a copy of this software and
associated
documentation files (the "Software"), to deal in the Software without restriction, including without limitation
the
rights to use, copy, modify, merge, publish, distribute, sublicense, and/or sell copies of the Software, and
to
permit persons to whom the Software is furnished to do so, subject to the following conditions:
27

The above copyright notice and this permission notice shall be included in all copies or substantial
portions of
the Software.
THE SOFTWARE IS PROVIDED "AS IS", WITHOUT WARRANTY OF ANY KIND, EXPRESS OR
IMPLIED,
INCLUDING BUT NOT LIMITED TO THE WARRANTIES OF MERCHANTABILITY, FITNESS FOR A
PARTICULAR PURPOSE AND NONINFRINGEMENT. IN NO EVENT SHALL THE AUTHORS OR
COPYRIGHT HOLDERS BE LIABLE FOR ANY CLAIM, DAMAGES OR OTHER LIABILITY, WHETHER
IN AN
ACTION OF CONTRACT, TORT OR OTHERWISE, ARISING FROM, OUT OF OR IN CONNECTION
WITH
THE SOFTWARE OR THE USE OR OTHER DEALINGS IN THE SOFTWARE.
LuaSocket
LuaSocket 2.0.2 license
Copyright © 2004-2007 Diego Nehab
Permission is hereby granted, free of charge, to any person obtaining a
copy of this software and associated documentation files (the "Software"),
to deal in the Software without restriction, including without limitation
the rights to use, copy, modify, merge, publish, distribute, sublicense,
and/or sell copies of the Software, and to permit persons to whom the
Software is furnished to do so, subject to the following conditions:
The above copyright notice and this permission notice shall be included in
all copies or substantial portions of the Software.
THE SOFTWARE IS PROVIDED "AS IS", WITHOUT WARRANTY OF ANY KIND, EXPRESS OR
IMPLIED, INCLUDING BUT NOT LIMITED TO THE WARRANTIES OF MERCHANTABILITY,
FITNESS FOR A PARTICULAR PURPOSE AND NONINFRINGEMENT. IN NO EVENT SHALL THE
AUTHORS OR COPYRIGHT HOLDERS BE LIABLE FOR ANY CLAIM, DAMAGES OR OTHER
LIABILITY, WHETHER IN AN ACTION OF CONTRACT, TORT OR OTHERWISE, ARISING
FROM, OUT OF OR IN CONNECTION WITH THE SOFTWARE OR THE USE OR OTHER
DEALINGS IN THE SOFTWARE.
LuneScript
Copyright (c) 2018 ifritJP
Permission is hereby granted, free of charge, to any person obtaining a copy
of this software and associated documentation files (the "Software"), to deal
in the Software without restriction, including without limitation the rights
to use, copy, modify, merge, publish, distribute, sublicense, and/or sell
copies of the Software, and to permit persons to whom the Software is
furnished to do so, subject to the following conditions:
The above copyright notice and this permission notice shall be included in all
copies or substantial portions of the Software.
28

THE SOFTWARE IS PROVIDED "AS IS", WITHOUT WARRANTY OF ANY KIND, EXPRESS OR
IMPLIED, INCLUDING BUT NOT LIMITED TO THE WARRANTIES OF MERCHANTABILITY,
FITNESS FOR A PARTICULAR PURPOSE AND NONINFRINGEMENT. IN NO EVENT SHALL THE
AUTHORS OR COPYRIGHT HOLDERS BE LIABLE FOR ANY CLAIM, DAMAGES OR OTHER
LIABILITY, WHETHER IN AN ACTION OF CONTRACT, TORT OR OTHERWISE, ARISING FROM,
OUT OF OR IN CONNECTION WITH THE SOFTWARE OR THE USE OR OTHER DEALINGS IN THE
SOFTWARE.
Copyright (c) 2002-2019, Jouni Malinen <[email protected]> and contributors
All Rights Reserved.
This software may be distributed, used, and modified under the terms of
BSD license:
Redistribution and use in source and binary forms, with or without
modification, are permitted provided that the following conditions are
met:
1. Redistributions of source code must retain the above copyright
notice, this list of conditions and the following disclaimer.
2. Redistributions in binary form must reproduce the above copyright
notice, this list of conditions and the following disclaimer in the
documentation and/or other materials provided with the distribution.
3. Neither the name(s) of the above-listed copyright holder(s) nor the
names of its contributors may be used to endorse or promote products
derived from this software without specific prior written permission.
THIS SOFTWARE IS PROVIDED BY THE COPYRIGHT HOLDERS AND CONTRIBUTORS
"AS IS" AND ANY EXPRESS OR IMPLIED WARRANTIES, INCLUDING, BUT NOT
LIMITED TO, THE IMPLIED WARRANTIES OF MERCHANTABILITY AND FITNESS FOR
A PARTICULAR PURPOSE ARE DISCLAIMED. IN NO EVENT SHALL THE COPYRIGHT
OWNER OR CONTRIBUTORS BE LIABLE FOR ANY DIRECT, INDIRECT, INCIDENTAL,
SPECIAL, EXEMPLARY, OR CONSEQUENTIAL DAMAGES (INCLUDING, BUT NOT
LIMITED TO, PROCUREMENT OF SUBSTITUTE GOODS OR SERVICES; LOSS OF USE,
DATA, OR PROFITS; OR BUSINESS INTERRUPTION) HOWEVER CAUSED AND ON ANY
THEORY OF LIABILITY, WHETHER IN CONTRACT, STRICT LIABILITY, OR TORT
(INCLUDING NEGLIGENCE OR OTHERWISE) ARISING IN ANY WAY OUT OF THE USE
OF THIS SOFTWARE, EVEN IF ADVISED OF THE POSSIBILITY OF SUCH DAMAGE.
Copyright (C) 2019, Broadcom Corporation. All Rights Reserved.
Permission to use, copy, modify, and/or distribute this software for any
purpose with or without fee is hereby granted, provided that the above
copyright notice and this permission notice appear in all copies.
29

THE SOFTWARE IS PROVIDED "AS IS" AND THE AUTHOR DISCLAIMS ALL WARRANTIES
WITH REGARD TO THIS SOFTWARE INCLUDING ALL IMPLIED WARRANTIES OF
MERCHANTABILITY AND FITNESS. IN NO EVENT SHALL THE AUTHOR BE LIABLE FOR ANY
SPECIAL, DIRECT, INDIRECT, OR CONSEQUENTIAL DAMAGES OR ANY DAMAGES
WHATSOEVER RESULTING FROM LOSS OF USE, DATA OR PROFITS, WHETHER IN AN ACTION
OF CONTRACT, NEGLIGENCE OR OTHER TORTIOUS ACTION, ARISING OUT OF OR IN
CONNECTION WITH THE USE OR PERFORMANCE OF THIS SOFTWARE.
The certificate files "Amazon Root CA 1", "Amazon Root CA 2", "Amazon Root CA 4" are licensed under a
Creative Commons Attribution-NoDerivatives 4.0 International License.
This software is licensed under the MIT License.
Copyright Fedor Indutny, 2018.
Permission is hereby granted, free of charge, to any person obtaining a
copy of this software and associated documentation files (the
"Software"), to deal in the Software without restriction, including
without limitation the rights to use, copy, modify, merge, publish,
distribute, sublicense, and/or sell copies of the Software, and to permit
persons to whom the Software is furnished to do so, subject to the
following conditions:
The above copyright notice and this permission notice shall be included
in all copies or substantial portions of the Software.
THE SOFTWARE IS PROVIDED "AS IS", WITHOUT WARRANTY OF ANY KIND, EXPRESS
OR IMPLIED, INCLUDING BUT NOT LIMITED TO THE WARRANTIES OF
MERCHANTABILITY, FITNESS FOR A PARTICULAR PURPOSE AND NONINFRINGEMENT. IN
NO EVENT SHALL THE AUTHORS OR COPYRIGHT HOLDERS BE LIABLE FOR ANY CLAIM,
DAMAGES OR OTHER LIABILITY, WHETHER IN AN ACTION OF CONTRACT, TORT OR
OTHERWISE, ARISING FROM, OUT OF OR IN CONNECTION WITH THE SOFTWARE OR THE
USE OR OTHER DEALINGS IN THE SOFTWARE.
The following applies only to products supporting Wi-Fi.
(c) 2009-2013 by Jeff Mott. All rights reserved.
Redistribution and use in source and binary forms, with or without modification, are permitted provided
that the following conditions are met:
* Redistributions of source code must retain the above copyright notice, this list of conditions, and the
following disclaimer.
* Redistributions in binary form must reproduce the above copyright notice, this list of conditions, and the
following disclaimer in the documentation or other materials provided with the distribution.
* Neither the name CryptoJS nor the names of its contributors may be used to endorse or promote
products derived from this software without specific prior written permission.
THIS SOFTWARE IS PROVIDED BY THE COPYRIGHT HOLDERS AND CONTRIBUTORS "AS
IS," AND ANY EXPRESS OR IMPLIED WARRANTIES, INCLUDING, BUT NOT LIMITED TO, THE
IMPLIED WARRANTIES OF MERCHANTABILITY AND FITNESS FOR A PARTICULAR PURPOSE,
30

ARE DISCLAIMED. IN NO EVENT SHALL THE COPYRIGHT HOLDER OR CONTRIBUTORS BE
LIABLE FOR ANY DIRECT, INDIRECT, INCIDENTAL, SPECIAL, EXEMPLARY, OR CONSEQUENTIAL
DAMAGES (INCLUDING, BUT NOT LIMITED TO, PROCUREMENT OF SUBSTITUTE GOODS OR
SERVICES; LOSS OF USE, DATA, OR PROFITS; OR BUSINESS INTERRUPTION) HOWEVER
CAUSED AND ON ANY THEORY OF LIABILITY, WHETHER IN CONTRACT, STRICT LIABILITY, OR
TORT (INCLUDING NEGLIGENCE OR OTHERWISE) ARISING IN ANY WAY OUT OF THE USE OF
THIS SOFTWARE, EVEN IF ADVISED OF THE POSSIBILITY OF SUCH DAMAGE.
Copyright 2008, Google Inc.
All rights reserved.
Redistribution and use in source and binary forms, with or without
modification, are permitted provided that the following conditions are
met:
* Redistributions of source code must retain the above copyright
notice, this list of conditions and the following disclaimer.
* Redistributions in binary form must reproduce the above
copyright notice, this list of conditions and the following disclaimer
in the documentation and/or other materials provided with the
distribution.
* Neither the name of Google Inc. nor the names of its
contributors may be used to endorse or promote products derived from
this software without specific prior written permission.
THIS SOFTWARE IS PROVIDED BY THE COPYRIGHT HOLDERS AND CONTRIBUTORS
AS IS AND ANY EXPRESS OR IMPLIED WARRANTIES, INCLUDING, BUT NOT
LIMITED TO, THE IMPLIED WARRANTIES OF MERCHANTABILITY AND FITNESS FOR
A PARTICULAR PURPOSE ARE DISCLAIMED. IN NO EVENT SHALL THE COPYRIGHT
OWNER OR CONTRIBUTORS BE LIABLE FOR ANY DIRECT, INDIRECT, INCIDENTAL,
SPECIAL, EXEMPLARY, OR CONSEQUENTIAL DAMAGES (INCLUDING, BUT NOT
LIMITED TO, PROCUREMENT OF SUBSTITUTE GOODS OR SERVICES; LOSS OF USE,
DATA, OR PROFITS; OR BUSINESS INTERRUPTION) HOWEVER CAUSED AND ON ANY
THEORY OF LIABILITY, WHETHER IN CONTRACT, STRICT LIABILITY, OR TORT
(INCLUDING NEGLIGENCE OR OTHERWISE) ARISING IN ANY WAY OUT OF THE USE
OF THIS SOFTWARE, EVEN IF ADVISED OF THE POSSIBILITY OF SUCH DAMAGE.
Copyright (c) 1998-2010, Brian Gladman, Worcester, UK. All rights reserved.
The redistribution and use of this software (with or without changes)
is allowed without the payment of fees or royalties provided that:
source code distributions include the above copyright notice, this
list of conditions and the following disclaimer;
binary distributions include the above copyright notice, this list
of conditions and the following disclaimer in their documentation.
This software is provided 'as is' with no explicit or implied warranties
in respect of its operation, including, but not limited to, correctness
and fitness for purpose.
31

Disclaimer: IMPORTANT: This Apple software is supplied to you, by Apple Inc. ("Apple"), in your
capacity as a current, and in good standing, Licensee in the MFi Licensing Program. Use of this
Apple software is governed by and subject to the terms and conditions of your MFi License,
including, but not limited to, the restrictions specified in the provision entitled "Public
Software", and is further subject to your agreement to the following additional terms, and your
agreement that the use, installation, modification or redistribution of this Apple software
constitutes acceptance of these additional terms. If you do not agree with these additional terms,
please do not use, install, modify or redistribute this Apple software.
Subject to all of these terms and in consideration of your agreement to abide by them, Apple grants
you, for as long as you are a current and in good-standing MFi Licensee, a personal, non-exclusive
license, under Apple's copyrights in this original Apple software (the "Apple Software"), to use,
reproduce, and modify the Apple Software in source form, and to use, reproduce, modify, and
redistribute the Apple Software, with or without modifications, in binary form. While you may not
redistribute the Apple Software in source form, should you redistribute the Apple Software in binary
form, you must retain this notice and the following text and disclaimers in all such redistributions
of the Apple Software. Neither the name, trademarks, service marks, or logos of Apple Inc. may be
used to endorse or promote products derived from the Apple Software without specific prior written
permission from Apple. Except as expressly stated in this notice, no other rights or licenses,
express or implied, are granted by Apple herein, including but not limited to any patent rights that
may be infringed by your derivative works or by other works in which the Apple Software may be
incorporated.
Unless you explicitly state otherwise, if you provide any ideas, suggestions, recommendations, bug
fixes or enhancements to Apple in connection with this software ("Feedback"), you hereby grant to
Apple a non-exclusive, fully paid-up, perpetual, irrevocable, worldwide license to make, use,
reproduce, incorporate, modify, display, perform, sell, make or have made derivative works of,
distribute (directly or indirectly) and sublicense, such Feedback in connection with Apple products
and services. Providing this Feedback is voluntary, but if you do provide Feedback to Apple, you
acknowledge and agree that Apple may exercise the license granted above without the payment of
royalties or further consideration to Participant.
The Apple Software is provided by Apple on an "AS IS" basis. APPLE MAKES NO WARRANTIES,
EXPRESS OR
IMPLIED, INCLUDING WITHOUT LIMITATION THE IMPLIED WARRANTIES OF NON-INFRINGEMENT,
MERCHANTABILITY
AND FITNESS FOR A PARTICULAR PURPOSE, REGARDING THE APPLE SOFTWARE OR ITS USE
AND OPERATION ALONE OR
IN COMBINATION WITH YOUR PRODUCTS.
IN NO EVENT SHALL APPLE BE LIABLE FOR ANY SPECIAL, INDIRECT, INCIDENTAL OR
CONSEQUENTIAL DAMAGES
(INCLUDING, BUT NOT LIMITED TO, PROCUREMENT OF SUBSTITUTE GOODS OR SERVICES;
LOSS OF USE, DATA, OR
PROFITS; OR BUSINESS INTERRUPTION) ARISING IN ANY WAY OUT OF THE USE,
REPRODUCTION, MODIFICATION
AND/OR DISTRIBUTION OF THE APPLE SOFTWARE, HOWEVER CAUSED AND WHETHER UNDER
THEORY OF CONTRACT, TORT
(INCLUDING NEGLIGENCE), STRICT LIABILITY OR OTHERWISE, EVEN IF APPLE HAS BEEN
32

ADVISED OF THE
POSSIBILITY OF SUCH DAMAGE.
Copyright (C) 2009 Apple Inc. All Rights Reserved.
Copyright (c) 2012-2013 Apple Inc. All rights reserved.
Copyright (C) 2013 Apple Inc. All Rights Reserved.
The following applies only to products supporting the cloud service (formerly known as PIXUS Cloud Link,
PIXMA Cloud Link, or MAXIFY Cloud Link).
THE BASIC LIBRARY FUNCTIONS
---------------------------
Written by: Philip Hazel
Email local part: ph10
Email domain: cam.ac.uk
University of Cambridge Computing Service, Cambridge, England.
Copyright (c) 1997-2012 University of Cambridge
All rights reserved.
PCRE JUST-IN-TIME COMPILATION SUPPORT
-------------------------------------
Written by: Zoltan Herczeg
Email local part: hzmester
Emain domain: freemail.hu
Copyright(c) 2010-2012 Zoltan Herczeg
All rights reserved.
STACK-LESS JUST-IN-TIME COMPILER
--------------------------------
Written by: Zoltan Herczeg
Email local part: hzmester
Emain domain: freemail.hu
Copyright(c) 2009-2012 Zoltan Herczeg
All rights reserved.
THE C++ WRAPPER FUNCTIONS
-------------------------
Contributed by: Google Inc.
Copyright (c) 2007-2012, Google Inc.
All rights reserved.
THE "BSD" LICENCE
33

-----------------Redistribution and use in source and binary forms, with or without modification, are permitted
provided that the following conditions are met:
* Redistributions of source code must retain the above copyright notice,
this list of conditions and the following disclaimer.
* Redistributions in binary form must reproduce the above copyright
notice, this list of conditions and the following disclaimer in the
documentation and/or other materials provided with the distribution.
* Neither the name of the University of Cambridge nor the name of Google
Inc. nor the names of their contributors may be used to endorse or
promote products derived from this software without specific prior
written permission.
THIS SOFTWARE IS PROVIDED BY THE COPYRIGHT HOLDERS AND CONTRIBUTORS "AS IS"
AND ANY EXPRESS OR IMPLIED WARRANTIES, INCLUDING, BUT NOT LIMITED TO, THE
IMPLIED WARRANTIES OF MERCHANTABILITY AND FITNESS FOR A PARTICULAR PURPOSE
ARE DISCLAIMED. IN NO EVENT SHALL THE COPYRIGHT OWNER OR CONTRIBUTORS BE
LIABLE FOR ANY DIRECT, INDIRECT, INCIDENTAL, SPECIAL, EXEMPLARY, OR
CONSEQUENTIAL DAMAGES (INCLUDING, BUT NOT LIMITED TO, PROCUREMENT OF
SUBSTITUTE GOODS OR SERVICES; LOSS OF USE, DATA, OR PROFITS; OR BUSINESS
INTERRUPTION) HOWEVER CAUSED AND ON ANY THEORY OF LIABILITY, WHETHER IN
CONTRACT, STRICT LIABILITY, OR TORT (INCLUDING NEGLIGENCE OR OTHERWISE)
ARISING IN ANY WAY OUT OF THE USE OF THIS SOFTWARE, EVEN IF ADVISED OF THE
POSSIBILITY OF SUCH DAMAGE.
This software is based in part on the work of the Independent JPEG Group.
34

Cautions, Limitations, and Restrictions (PosterArtist)
PosterArtist is subject to the following restrictions. Keep these points in mind.
System Requirements
Access our website for products supporting PosterArtist.
The functions that can be used and the items that can be configured vary depending on your scanner or
printer.
This guide primarily refers to the Windows 10 operating system (hereafter, Windows 10) interface.
Apply the latest Windows Update.
Restrictions on Using PosterArtist Lite
PosterArtist Lite has the following limitations compared to PosterArtist (Production Version).
The following functions are not available.
◦ Auto Design
◦ Guide, Grid, and Ruler
◦ Variable Print
◦ Some functions of Retouch Image
◦ Artwork Security Settings (settings for usage period and editing restrictions)
◦ Ambient Light Correction
◦ Design Check
◦ Design Assist
◦ Quick Exchange
◦ Saving and updating of Artwork Snapshots
PosterArtist Lite contains fewer pieces of artwork than PosterArtist (Production Version).
This guide describes how to use PosterArtist (Production Version).
Usage Restrictions
You must log on to Windows as an administrator before the installation.
Please check the following points before installing this software.
1. Shut down all other open applications.
2. If a document is currently being printed out, then cancel printing or wait until printing ends.
3. Check that the printer driver required by the target printer has been installed.
If the installer screen is not displayed, double-click the CD-ROM icon in Computer, and then double-click
"presetup.exe".
Colors are preset in clipart, photo frames, and text graphics. If a color cannot be changed, then the control
for changing that color is disabled.
Resizing clipart in the horizontal or vertical direction using (Resize handle) may cause partial
deformation of the clipart.
35

The printed result may differ from the monitor display if you select a square paper format created with the
Custom Paper Size function of the printer driver and then print in cut sheet mode. In such cases, resize
one of the sides by 0.1 mm or more to form a rectangle, and then try printing again.
In some cases, it may take some time to import posters created in PosterArtist 1.x.
In some cases, layout of posters created in PosterArtist 1.x may not appear correctly when importing the
file.
In some cases, the italicized and bold fonts of posters created in PosterArtist 1.x may not appear correctly
when the data is imported.
With some fonts, the effect of italics may not be apparent.
Vertical text in certain fonts may be truncated or misaligned. (For example, in the case of DynaFont of
DFG.)
Depending on the selected font type, text may be displayed outside the text box.
Depending on the selected font type, outlined text may not be displayed correctly.
In variable data print, if double-byte text is inserted to a text object created with single-byte text on a
poster, the result may not appear as expected. In that case, change the font type to one that will correctly
display the text.
Printing cannot be performed via a print server.
If you delete artwork on the Artwork Manager screen while an installer for other software is running, the
artwork may not be deleted correctly. Thus, before deleting artwork, make sure no installers for other
software are running.
Artwork can be copied from the Artwork Manager dialog box; however, copies of artwork with a lock icon
cannot be deleted.
Administrator rights are needed in order to delete artwork in Artwork Manager.
When importing poster data that has been created using PosterArtist, a warning message will appear for
data containing library images that are not provided with PosterArtist Lite. The images will not appear on
the poster.
Some of the templates on the PosterArtist template download page use content (images) that is not
included in PosterArtist Lite. If you download any of these templates, a warning message will appear and
its content (images) will not appear on the template.
When importing poster data that has been created using PosterArtist, poster data for which a variable
data print has been specified will be handled as normal poster data. When you save the poster data, the
link to the variable data will be lost.
Data for large size paper may fail to print. If this occurs, try printing after performing the following.
Exit PosterArtist, and then open the properties for the printer you want to use.
Open the Layout tab, and then click the Special Settings button.
Deselect the Fast Graphic Process checkbox. After that, restart PosterArtist, and then try printing again.
When printing is finished, select the Fast Graphic Process checkbox again.
For some models, Minimal Margin Printing is displayed instead of Borderless Printing. When Minimal
Margin Printing is displayed, printouts will have slight margins on the left and right sides.
With Design Assist, created designs may include multiple copies of the same design depending on the
specified images and selected area.
Unicode supplementary characters (surrogate pairs) are not supported. If a Unicode supplementary
character is entered, "?" appears instead.
In a 64-bit version OS environment, some functions may not be available.
36

Poster files created with or exported from PosterArtist version 3.0 or later cannot be opened in earlier
versions of PosterArtist.
If a message prompting you to update the root certificate appears at startup of an application, connect to
the Internet, and then restart the application.
In an environment where you cannot connect to the Internet, obtain and apply an "Update for Root
Certificates" of Microsoft.
In environments where the 64-bit version of Microsoft Office 2007 or later is installed on a 64-bit version
OS, you may not be able to use xlsx or other formats as database files for variable printing.
In that case, the files can be used by converting them to xls format or CSV format.
Supported File Formats
Supported file formats are as follows.
JPEG
TIFF (without LZW compression)
BMP
PNG
SVG
WMF/EMF
JPEG and TIFF images are inserted as images in the sRGB color space. TIFF and PNG images are
processed as 8-bit images. SVG images do not appear correctly depending on the embedded commands.
Trademarks and Copyrights
© CANON INC. 2016
Canon, the Canon logo, imagePROGRAF, and PosterArtist are trademarks or registered trademarks of
Canon Inc.
Microsoft is a registered trademark of Microsoft Corporation.
Windows is a registered trademark or trademark of Microsoft Corporation in the U.S. and/or other
countries.
Excel and Internet Explorer are registered trademarks or trademarks of Microsoft Corporation, in the U.S.
and other countries.
Third party acknowledgments:
This software is based in part on the work of the Independent JPEG Group.
PosterArtist and PosterArtist Lite contain third party software licensed under the following terms:
TIFF:
Copyright © 1988-1997 Sam Leffler
Copyright © 1991-1997 Silicon Graphics, Inc.
Permission to use, copy, modify, distribute, and sell this software and its documentation for any purpose
is hereby granted without fee, provided that: (i) the above copyright notices and this permission notice
appear in all copies of the software and related documentation; and (ii) the names of Sam Leffler and
Silicon Graphics may not be used in any advertising or publicity relating to the software without the
specific, prior written permission of Sam Leffler and Silicon Graphics.
37

THE SOFTWARE IS PROVIDED "AS-IS" AND WITHOUT WARRANTY OF ANY KIND,
EXPRESS, IMPLIED OR OTHERWISE, INCLUDING WITHOUT LIMITATION, ANY WARRANTY OF
MERCHANTABILITY OR FITNESS FOR A PARTICULAR PURPOSE.
IN NO EVENT SHALL SAM LEFFLER OR SILICON GRAPHICS BE LIABLE FOR ANY SPECIAL,
INCIDENTAL, INDIRECT OR CONSEQUENTIAL DAMAGES OF ANY KIND, OR ANY DAMAGES
WHATSOEVER RESULTING FROM LOSS OF USE, DATA OR PROFITS, WHETHER OR NOT
ADVISED OF THE POSSIBILITY OF DAMAGE, AND ON ANY THEORY OF LIABILITY, ARISING OUT
OF OR IN CONNECTION WITH THE USE OR PERFORMANCE OF THIS SOFTWARE.
ICC:
Copyright (c) 1994-1996 SunSoft, Inc.
Rights Reserved
Permission is hereby granted, free of charge, to any person obtaining a copy of this software and
associated documentation files (the "Software"), to deal in the Software without restriction, including
without limitation the rights to use, copy, modify, merge, publish distribute, sublicense, and/or sell copies
of the Software, and to permit persons to whom the Software is furnished to do so, subject to the following
conditions:
The above copyright notice and this permission notice shall be included in all copies or substantial
portions of the Software.
THE SOFTWARE IS PROVIDED "AS IS", WITHOUT WARRANTY OF ANY KIND, EXPRESS OR
IMPLIED, INCLUDING BUT NOT LIMITED TO THE WARRANTIES OF MERCHANTABILITY, FITNESS
FOR A PARTICULAR PURPOSE AND NON-INFRINGEMENT. IN NO EVENT SHALL SUNSOFT,
INC. OR ITS PARENT COMPANY BE LIABLE FOR ANY CLAIM, DAMAGES OR OTHER LIABILITY,
WHETHER IN AN ACTION OF CONTRACT, TORT OR OTHERWISE, ARISING FROM, OUT OF OR IN
CONNECTION WITH THE SOFTWARE OR THE USE OR OTHER DEALINGS IN THE SOFTWARE.
Except as contained in this notice, the name of SunSoft, Inc. shall not be used in advertising or otherwise
to promote the sale, use or other dealings in this Software without written authorization from SunSoft Inc.
JSON for Modern C++
Copyright (c) 2013-2017 Niels Lohmann
Permission is hereby granted, free of charge, to any person obtaining a copy of this software and
associated documentation files (the "Software"), to deal in the Software without restriction, including
without limitation the rights to use, copy, modify, merge, publish, distribute, sublicense, and/or sell copies
of the Software, and to permit persons to whom the Software is furnished to do so, subject to the following
conditions:
The above copyright notice and this permission notice shall be included in all copies or substantial
portions of the Software.
THE SOFTWARE IS PROVIDED "AS IS", WITHOUT WARRANTY OF ANY KIND, EXPRESS OR
IMPLIED, INCLUDING BUT NOT LIMITED TO THE WARRANTIES OF MERCHANTABILITY, FITNESS
FOR A PARTICULAR PURPOSE AND NONINFRINGEMENT. IN NO EVENT SHALL THE AUTHORS
OR COPYRIGHT HOLDERS BE LIABLE FOR ANY CLAIM, DAMAGES OR OTHER LIABILITY,
WHETHER IN AN ACTION OF CONTRACT, TORT OR OTHERWISE, ARISING FROM, OUT OF OR
IN CONNECTION WITH THE SOFTWARE OR THE USE OR OTHER DEALINGS IN THE SOFTWARE.
38

Images and templates in this software are subject to copyright as follows:
The copyright of some of the templates and images included in PosterArtist and PosterArtist Lite is owned
by Design Exchange Co., Ltd. and the creators and suppliers of those templates and images.
Third party services
If you use third-party services through PosterArtist or PosterArtist Lite, use of the services are subject to
the conditions below.
When you access and/or obtain some third party content (such as text, images, videos, audios, or
software) through PosterArtist or PosterArtist Lite, except as expressly permitted by the content owner or
by applicable law, you may not
◦ (a) scrape, build databases or otherwise create permanent copies of such content, or keep cached copies
longer than permitted by the cache header;
◦ (b) copy, translate, modify, create a derivative work of, sell, lease, lend, convey, distribute, publicly display
or sublicense to any third party;
◦ (c) misrepresent the source or ownership;
◦ and (d) remove, obscure, or alter any copyright, trademark or other proprietary rights notices, falsify or
delete any author attributions, legal notices or other labels of the origin or source of material.
39

License Authentication
When starting PosterArtist for the first time, enter the License Access Number. PosterArtist cannot be used
unless you authenticate the license. You will be required to reauthenticate the license when replacing your
computer or hard disk.
To reauthenticate the license, follow either of the procedures below.
Transfer your license to the destination computer and reauthenticate it.
Transferring the License
Return your license to the server temporarily and reauthenticate it on the destination computer.
Returning the License
Important
• To transfer or return the license, Internet connection and Internet Explorer 6 or later are required. For
details, refer to the License Authentication Guide supplied with PosterArtist.
Transferring the License
Before transferring the license, install PosterArtist on the destination computer. Then, create the request
data file in the License Authentication screen of PosterArtist. For instructions on creating the request
data file, see Creating Request Data.
1.
Select License Information Management as follows.
1.
Windows 10:
From the Start menu, select (All apps >) Canon LMS > License Information Management.
Windows 8.1/Windows 8:
From the Search charm, search for Canon LMS, and then select License Information Management.
Windows 7/Windows Vista:
From the Start menu, select All Programs > Canon LMS > License Information Management.
2.
In the License Information Management screen, click Transfer.
2.
3.
Specify the request data file of the destination computer, and then click Next.
3.
40

4.
Click Close.
4.
5.
Reauthenticate the license on the destination computer.
5.
Note
•
For how to authenticate the license, refer to the License Authentication Guide supplied with
PosterArtist.
Creating Request Data
1.
Select License Information Management as follows.
1.
41

Windows 10:
From the Start menu, select (All apps >) Canon LMS > License Information Management.
Windows 8.1/Windows 8:
From the Search charm, search for Canon LMS, and then select License Information Management.
Windows 7/Windows Vista:
From the Start menu, select All Programs > Canon LMS > License Information Management.
2.
In the License Authentication Wizard screen, select the Offline Authentication and
2.
Create Request Data checkboxes, and then click Next.
3.
Enter the License Access Number of your PosterArtist, and then click Next.
3.
Note
• Enter the License Access Number using 16 single-byte letters and/or numbers (four characters in
four fields).
4.
Specify the location to save the request data file, and then click Next.
4.
42

5.
Check the displayed message, and then click Exit.
5.
Returning the License
1.
Select License Information Management as follows.
1.
Windows 10:
From the Start menu, select (All apps >) Canon LMS > License Information Management.
Windows 8.1/Windows 8:
From the Search charm, search for Canon LMS, and then select License Information Management.
43
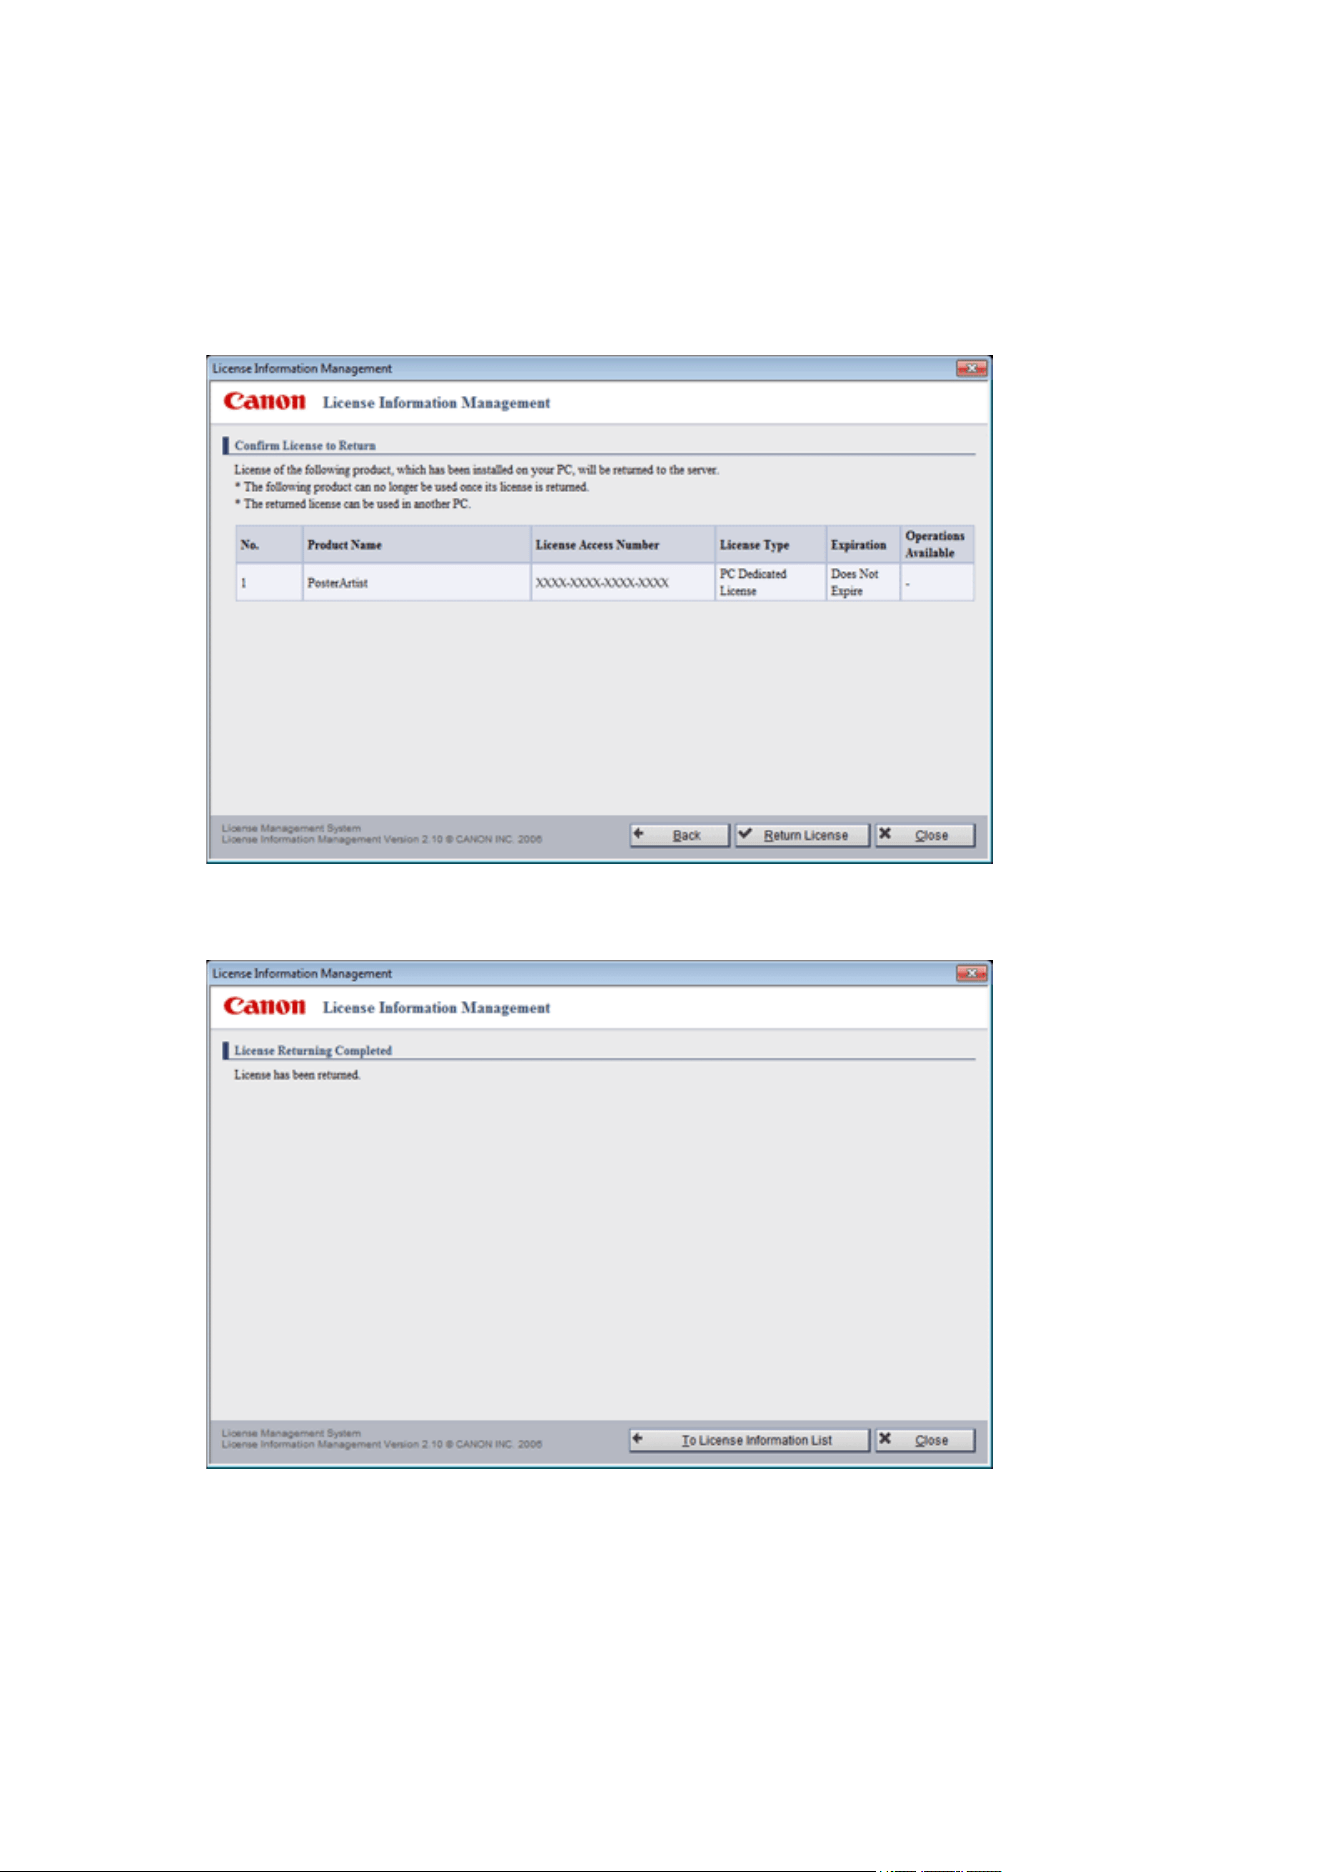
Windows 7/Windows Vista:
From the Start menu, select All Programs > Canon LMS > License Information Management.
2. In the License Information Management screen, click Return.2.
3. Check the displayed message, and then click Return License.3.
4. Click Close.4.
5.
Reauthenticate the license on another computer as needed.
5.
44

Note
• For how to authenticate the license, refer to the License Authentication Guide supplied with
PosterArtist.
45

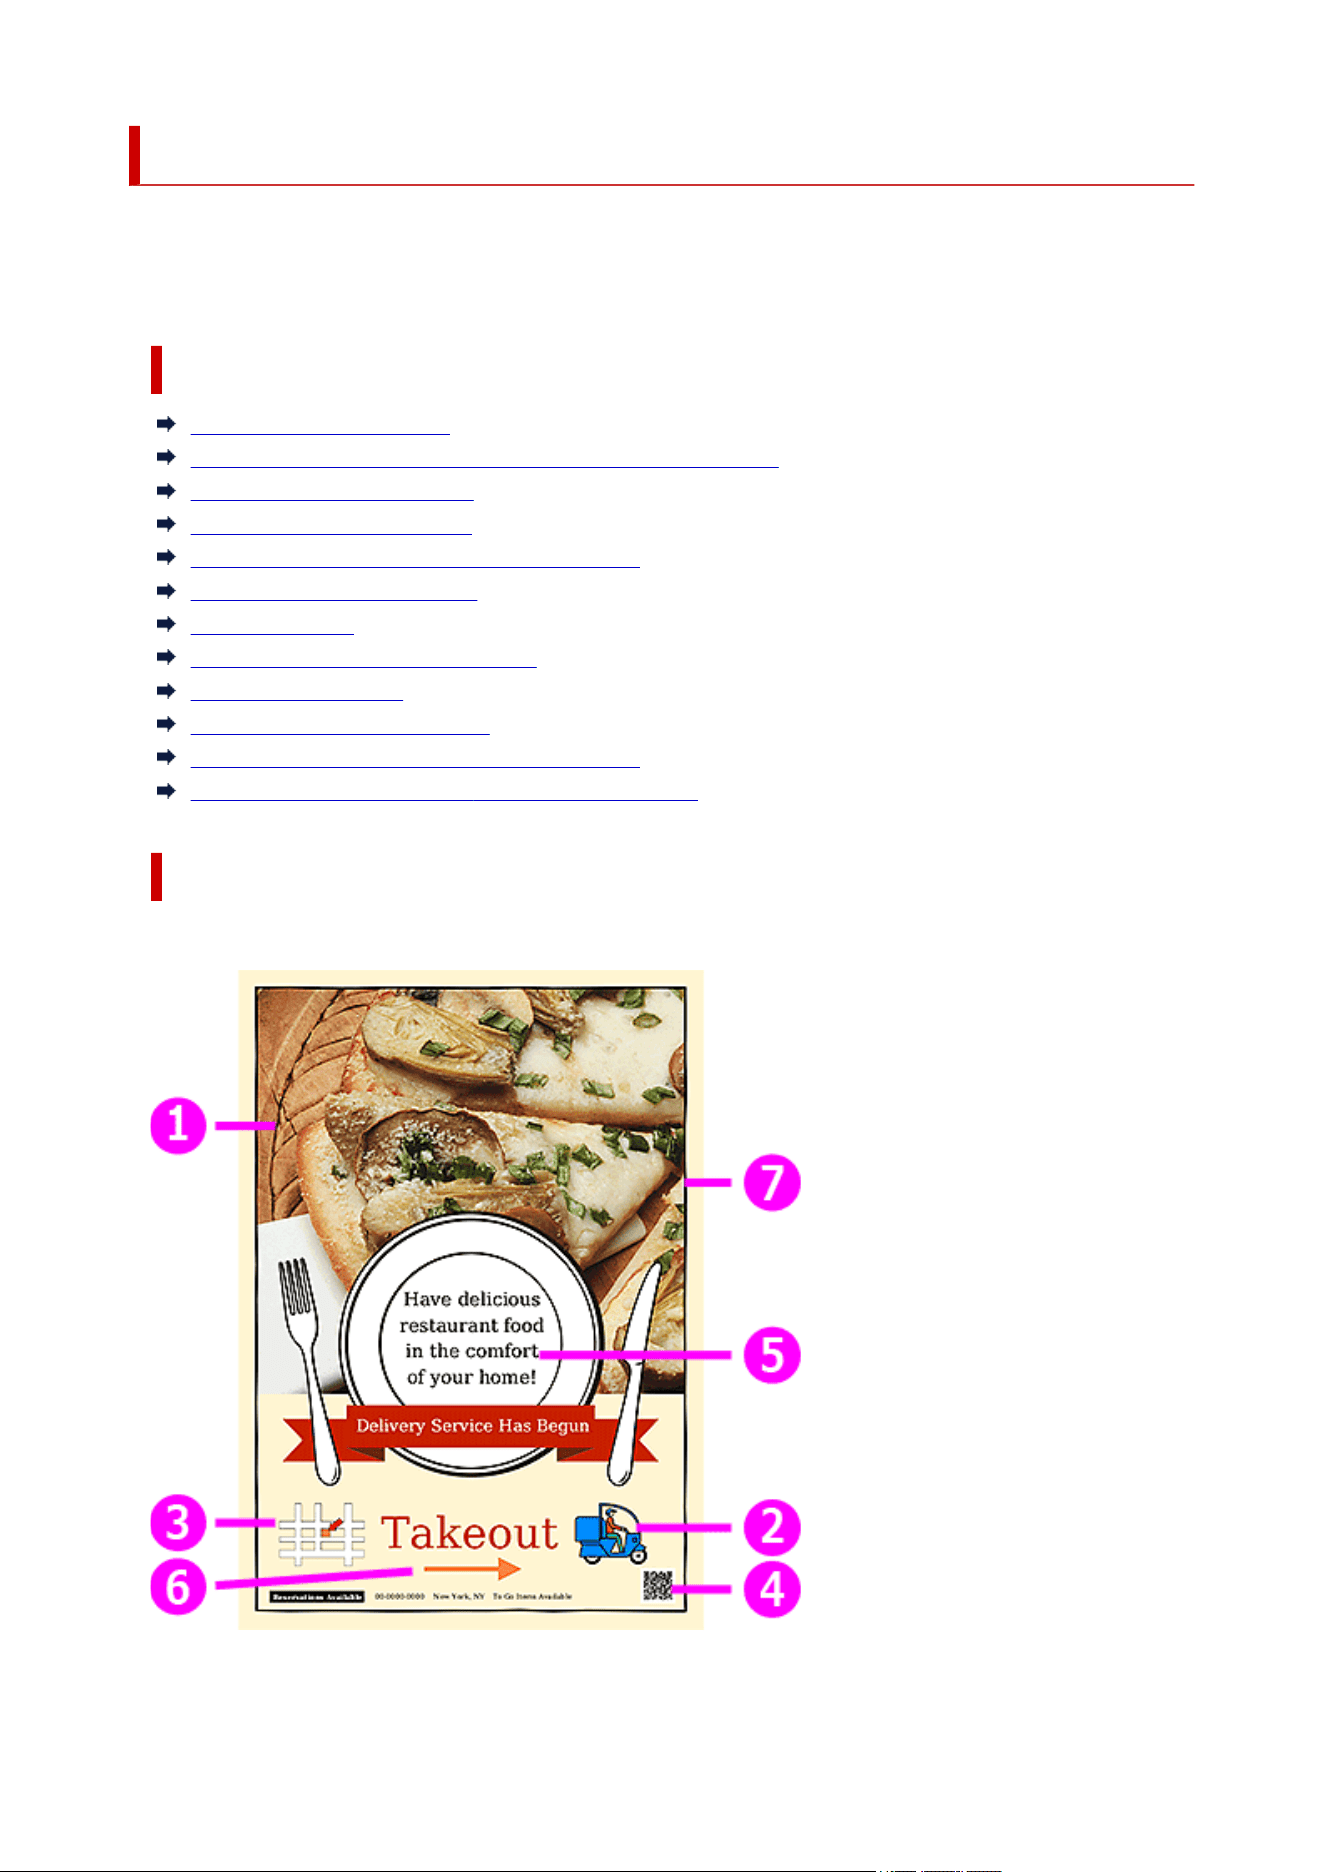
What You Can Do with PosterArtist
PosterArtist is an application for creating professional-looking posters even without professional knowledge
or experience. Simply select a design from a variety of templates and then insert and edit text, photos,
clipart, and other materials.
Features at a Glance
Poster Elements (Objects)
Printing Posters Using a Variety of Templates and Materials
Creating Multilingual Posters
Adding Items to Your Library
Creating Enlarged Copies for Printing Posters
Inserting Your Own Materials
Variable Printing
Importing and Exporting Templates
Using Cloud Services
Retouching Images Effectively
Creating and Adjusting Designs Automatically
Exporting Posters for Use in Easy-PhotoPrint Editor
Poster Elements (Objects)
The following objects can be inserted in posters you create with PosterArtist.
1. Photos
47
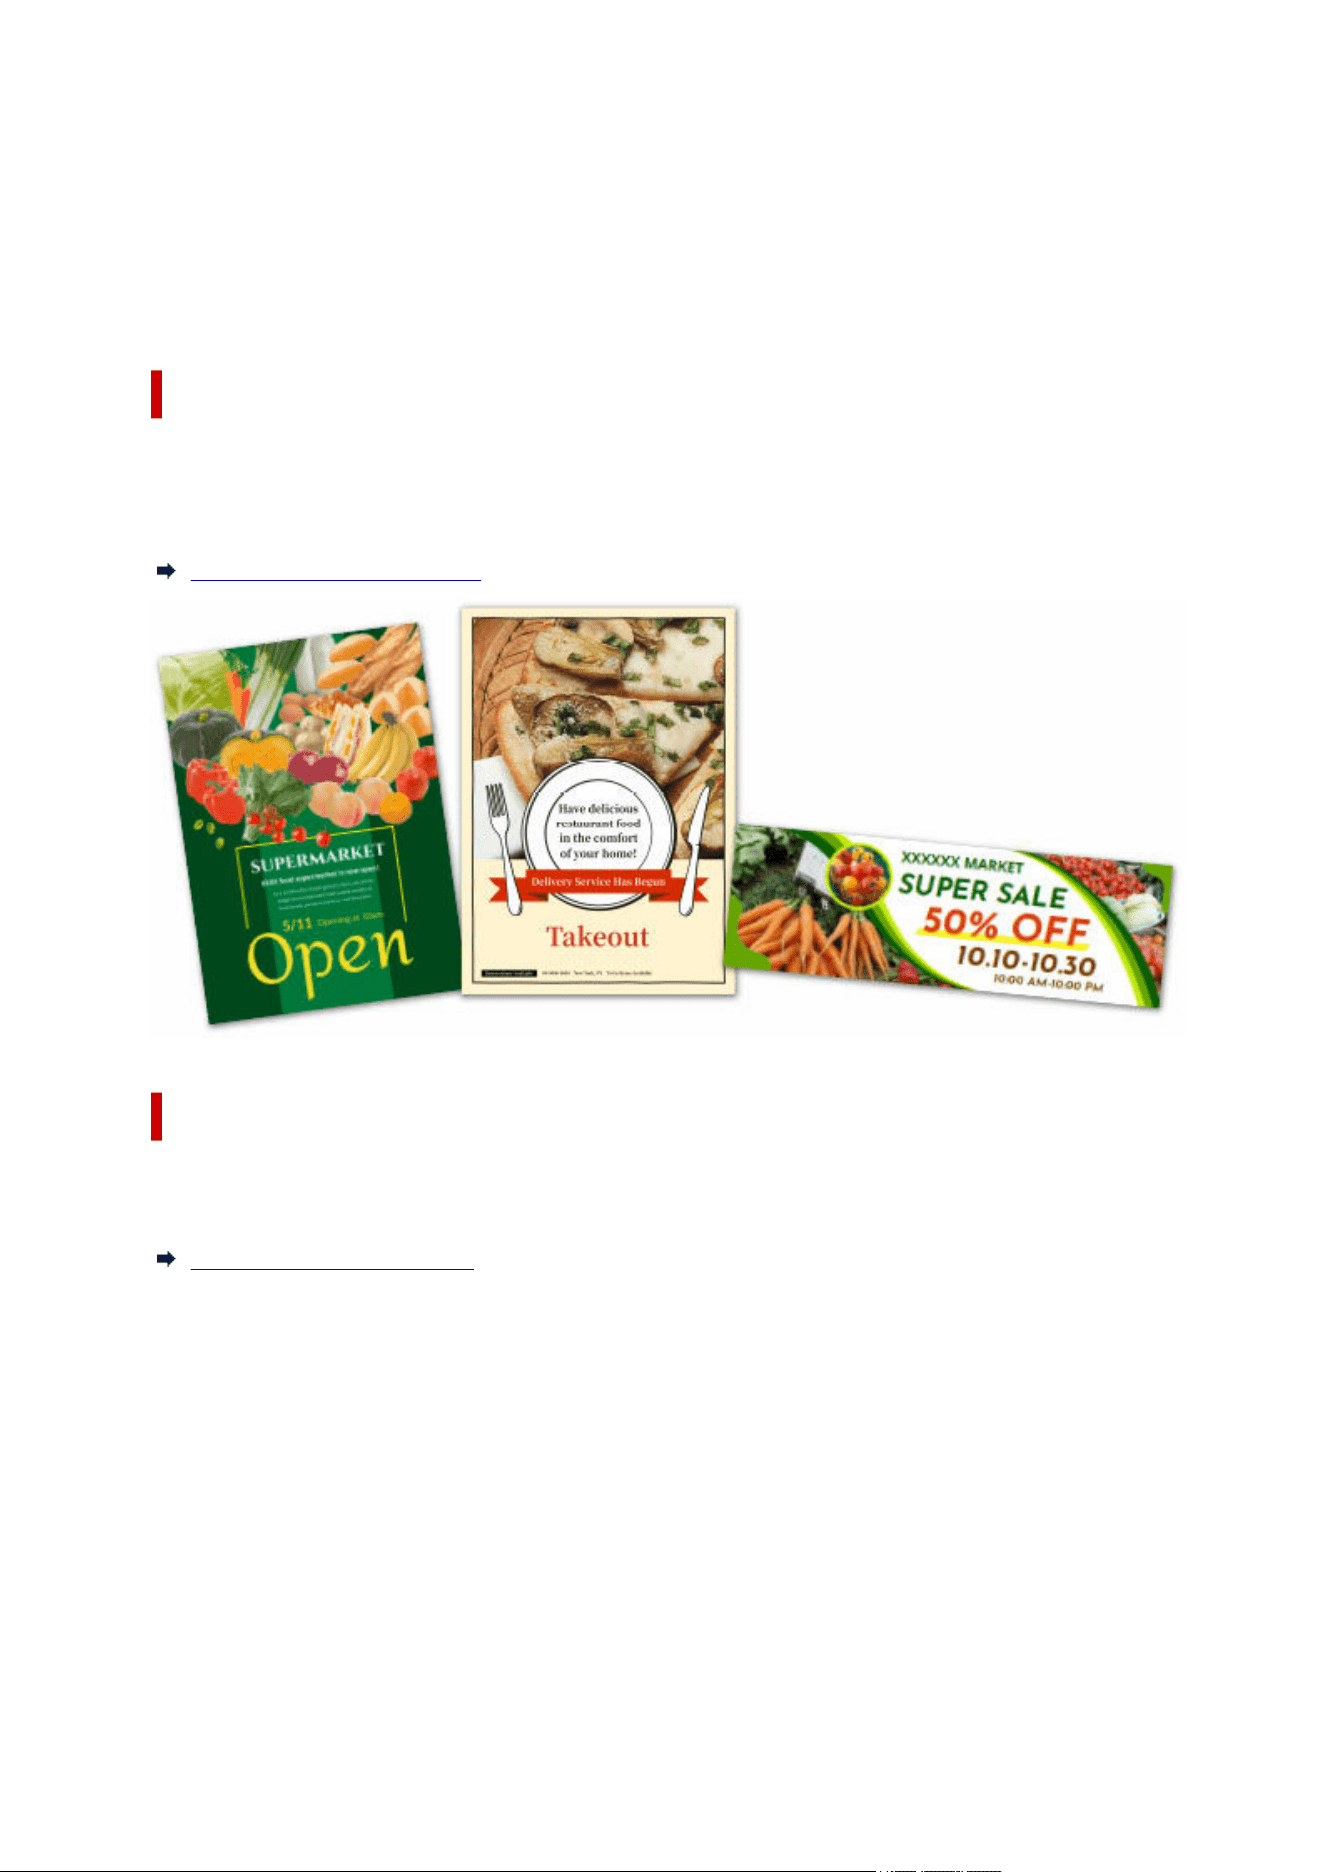
2. Clipart
3. Vector based images (WMF, EMF)
4. QR Code
5. Text
6. Shapes
7. Backgrounds
Printing Posters Using a Variety of Templates and Materials
PosterArtist provides templates covering many categories and business field, as well as a wide range of
clipart, photos, and other materials. Create and print unique posters easily from templates by changing
the clipart and photos or inserting text.
Creating and Printing Posters
Creating Multilingual Posters
Use multilingual templates and translations provided with PosterArtist to quickly create a multilingual
poster.
Using Translation Templates
48

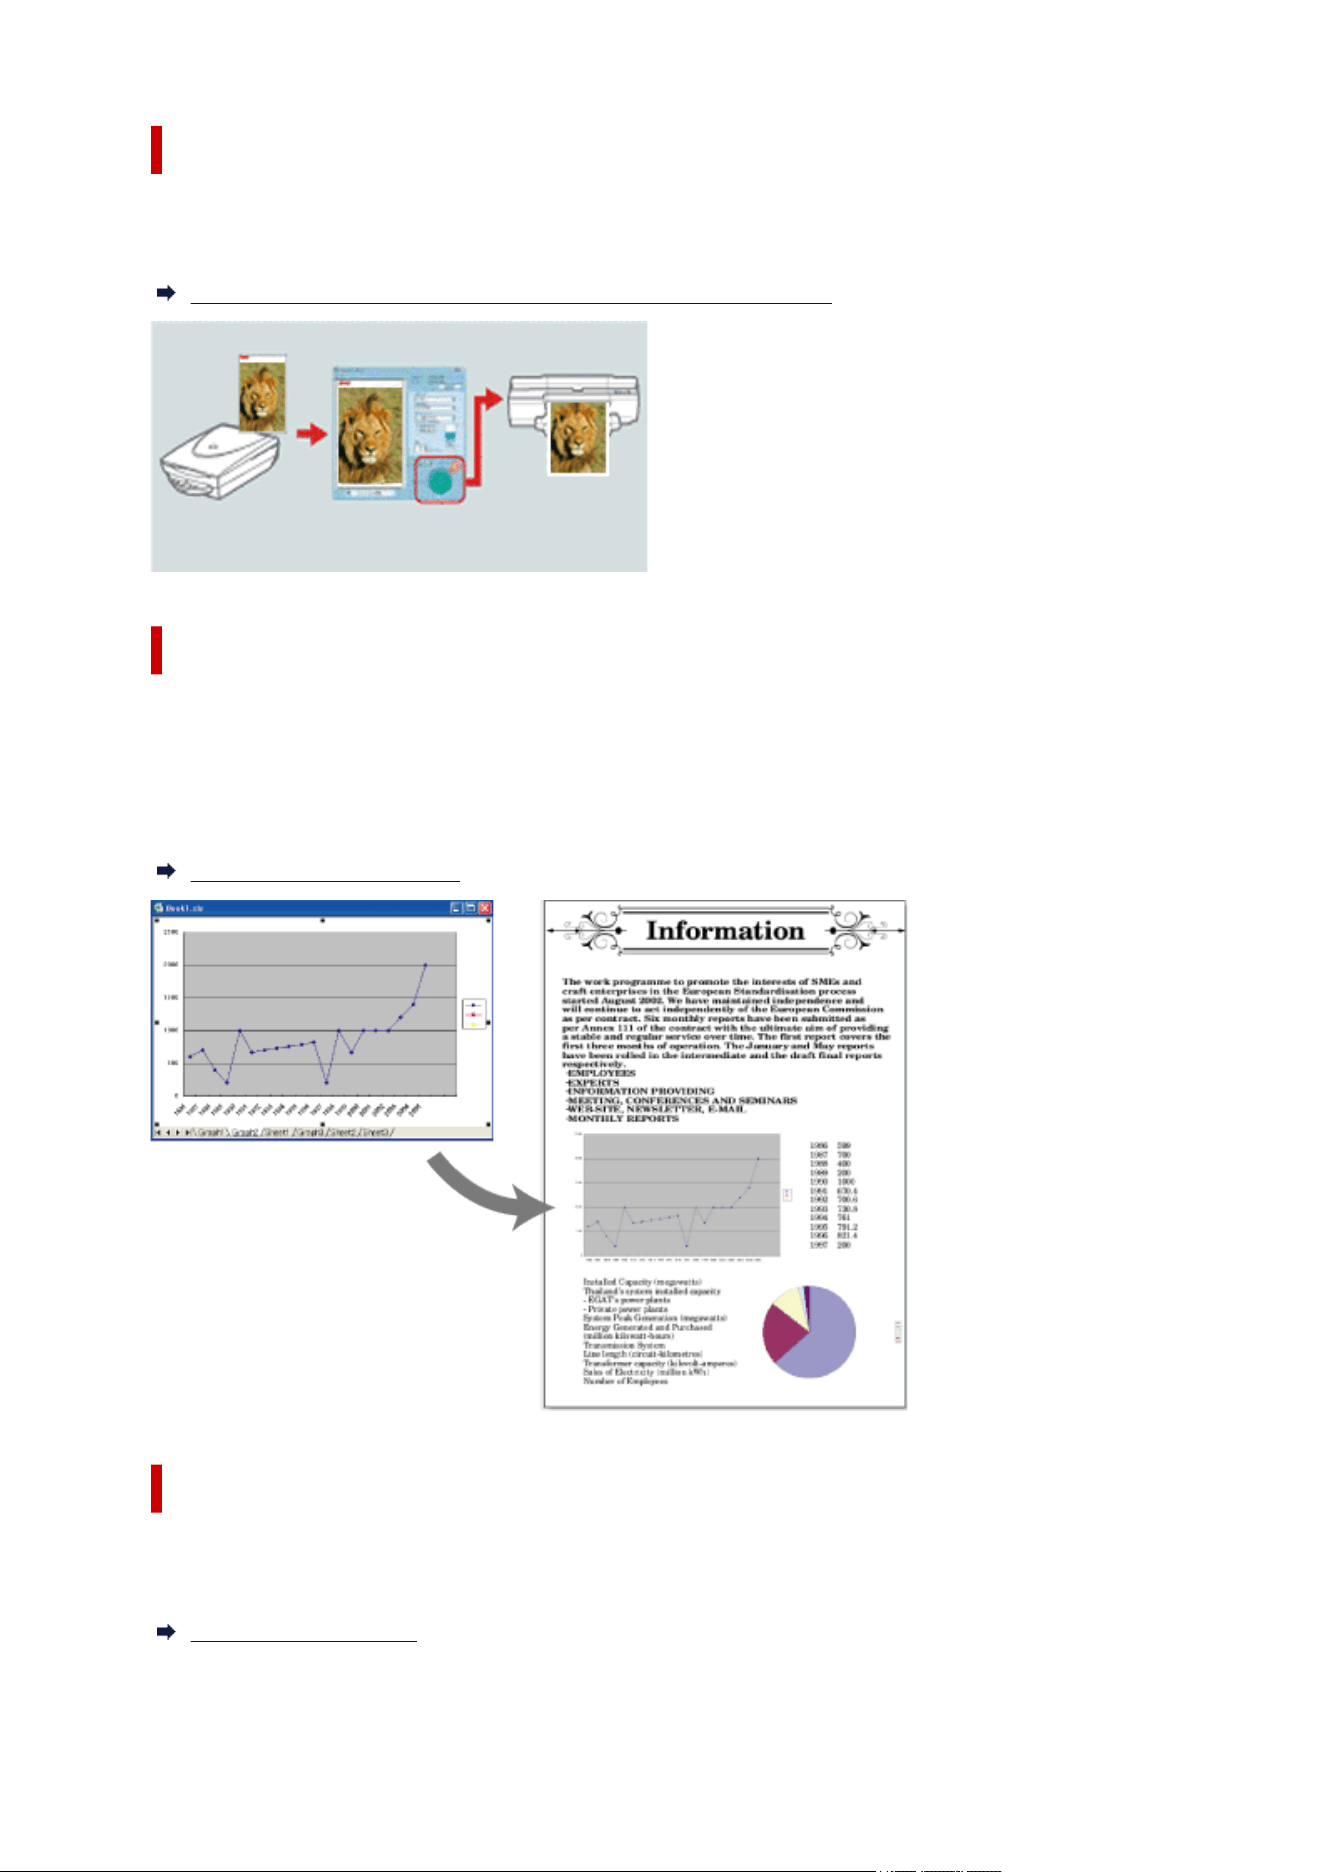
Creating Enlarged Copies for Printing Posters
Use PosterArtist QuickCopy to scan photos and documents and then print enlarged copies of them at
poster sizes.
Creating and Printing Enlarged Copies of Photos and Documents
Inserting Your Own Materials
In addition to the materials provided in the library, images on your computer such as those from digital
cameras or scanners can be directly inserted in posters.
Documents, tables, and graphs created with Microsoft Word, Microsoft PowerPoint, or Microsoft Excel can
also be inserted in posters by importing them to PosterArtist via the printer driver.
Inserting Images in Posters
Variable Printing
Automatically substitute text on the poster when printing by using tabular format data. This can also be
used to substitute images automatically.
Using Variable Printing
50
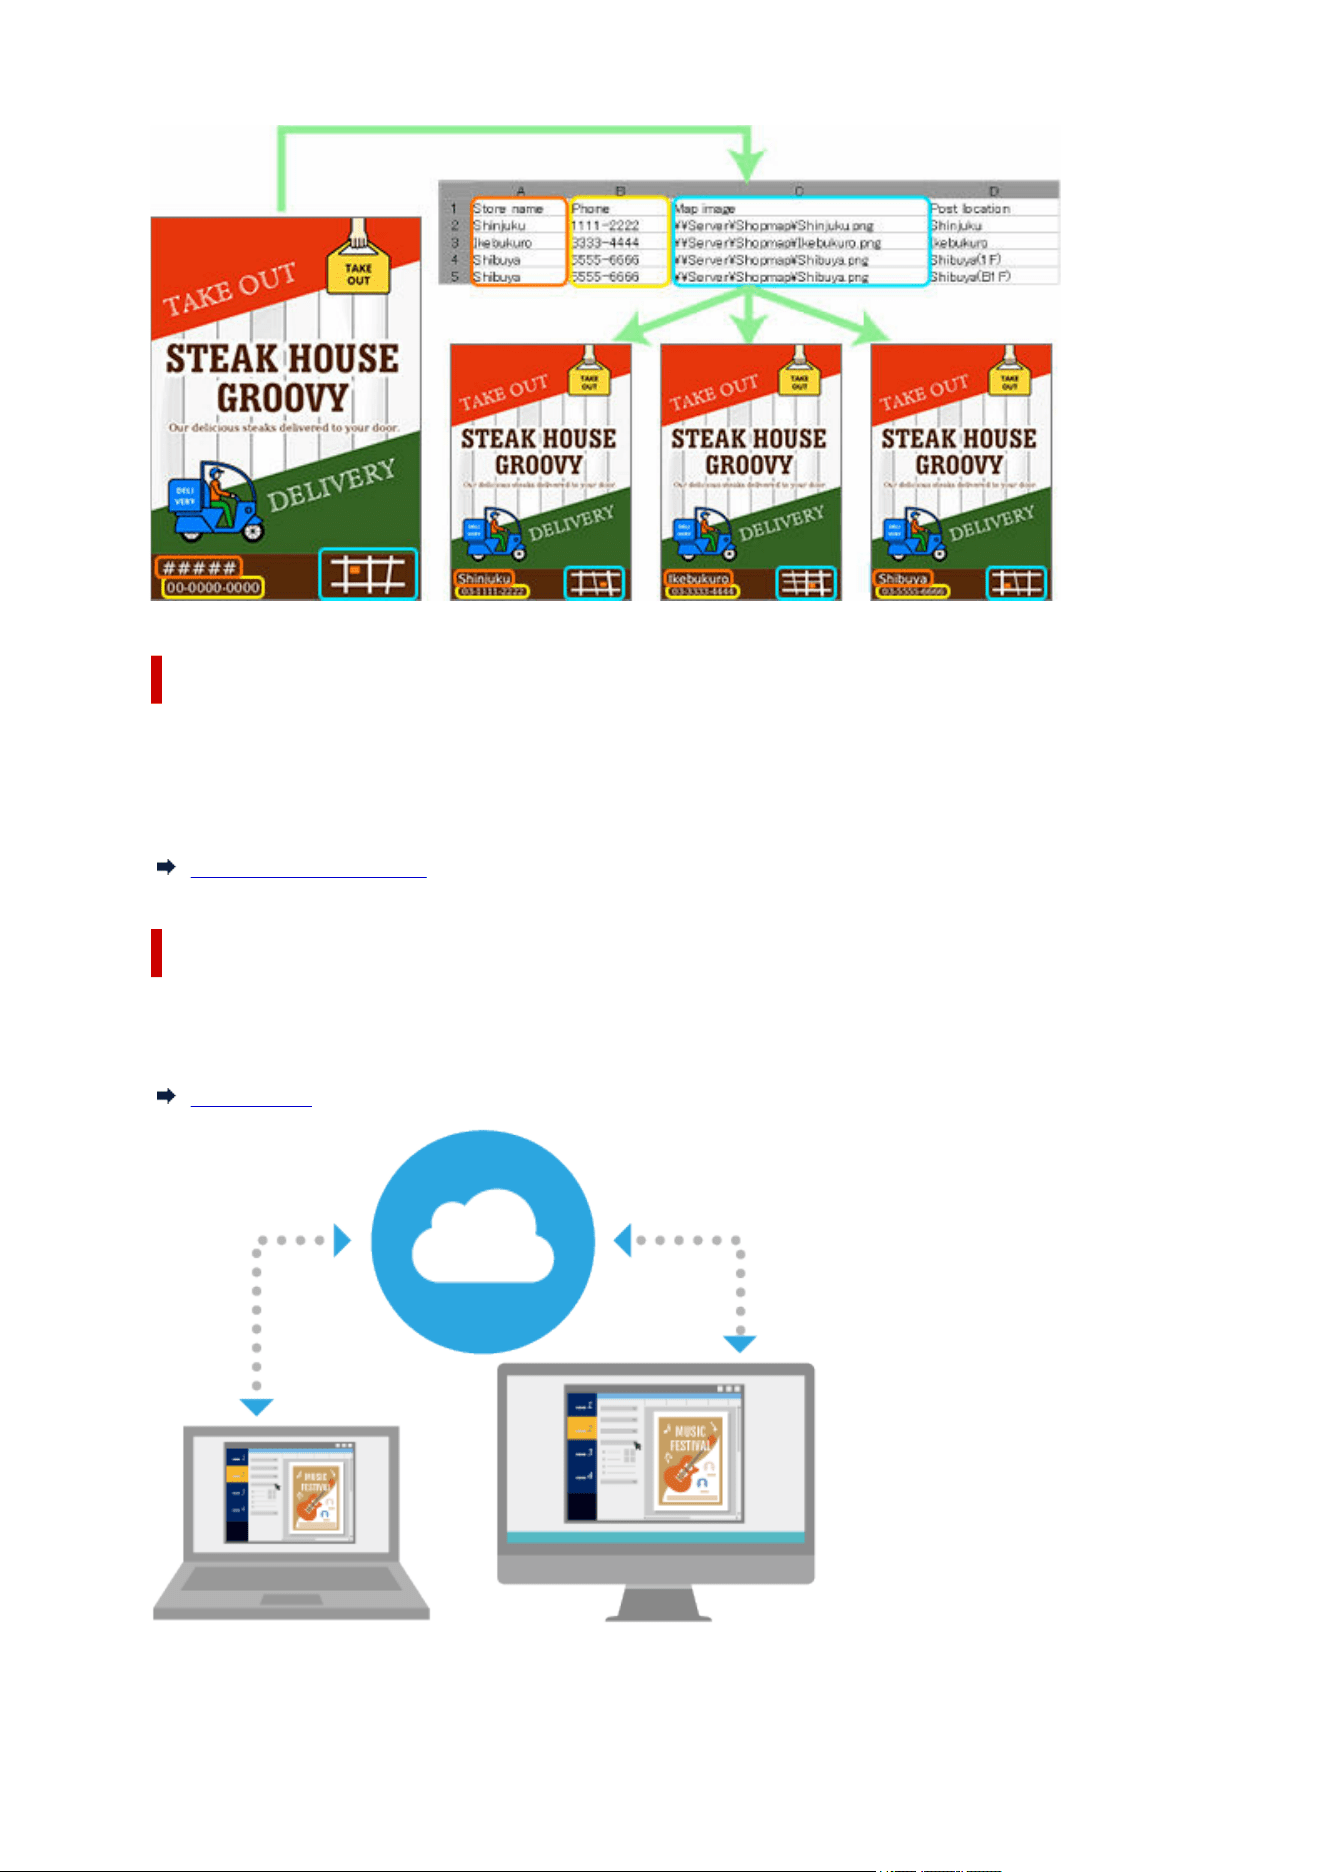
Importing and Exporting Templates
Export custom poster templates along with the contained images as a single file. Other users can import
the templates to their computers.
Artwork other than templates can also be imported or exported.
Importing and Exporting
Using Cloud Services
Share created poster files, image files, and artwork export data with other computers and users by
uploading them to or downloading them from cloud services.
Using Cloud
51
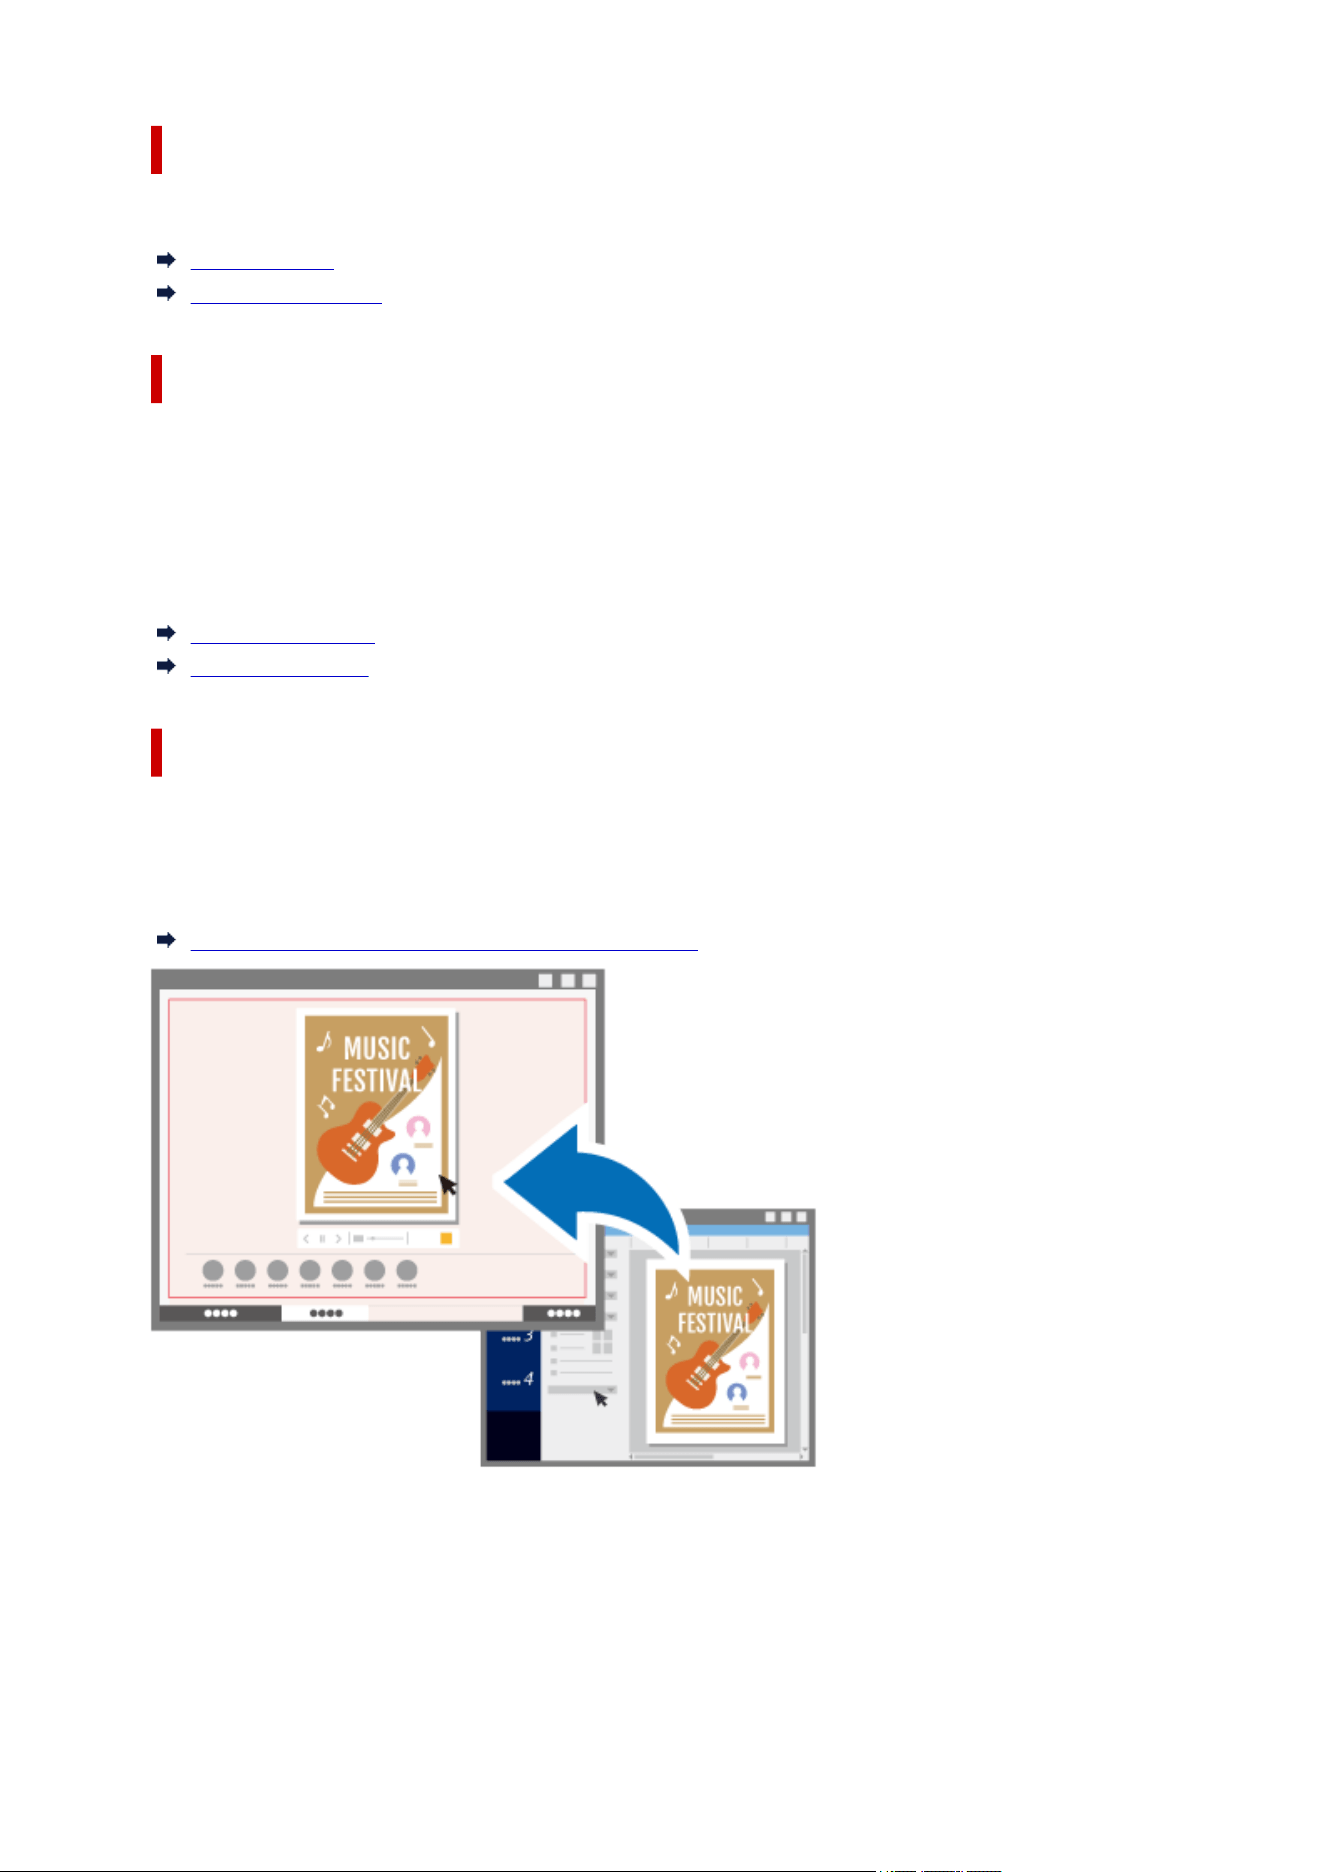
Retouching Images Effectively
Correct image color levels, trim photos, or apply a gradation to match the poster's mood.
Editing Photos
Retouching Images
Creating and Adjusting Designs Automatically
Use the Auto Design function to automatically create designs by simply entering titles and text, and then
selecting your favorite images.
Even if you are not an experienced designer, you can create highly original posters by using the Design
Assist function for automatically adjusting poster layout, and the Quick Exchange function for easily
swapping the positions of images and text.
Using Auto Design
Adjusting Designs
Exporting Posters for Use in Easy-PhotoPrint Editor
Export poster data for editing and printing with Easy-PhotoPrint Editor.
Use Easy-PhotoPrint Editor to print the same posters even from computers and smartphones on which
PosterArtist is not installed.
Exporting Posters for Use in Easy-PhotoPrint Editor
52
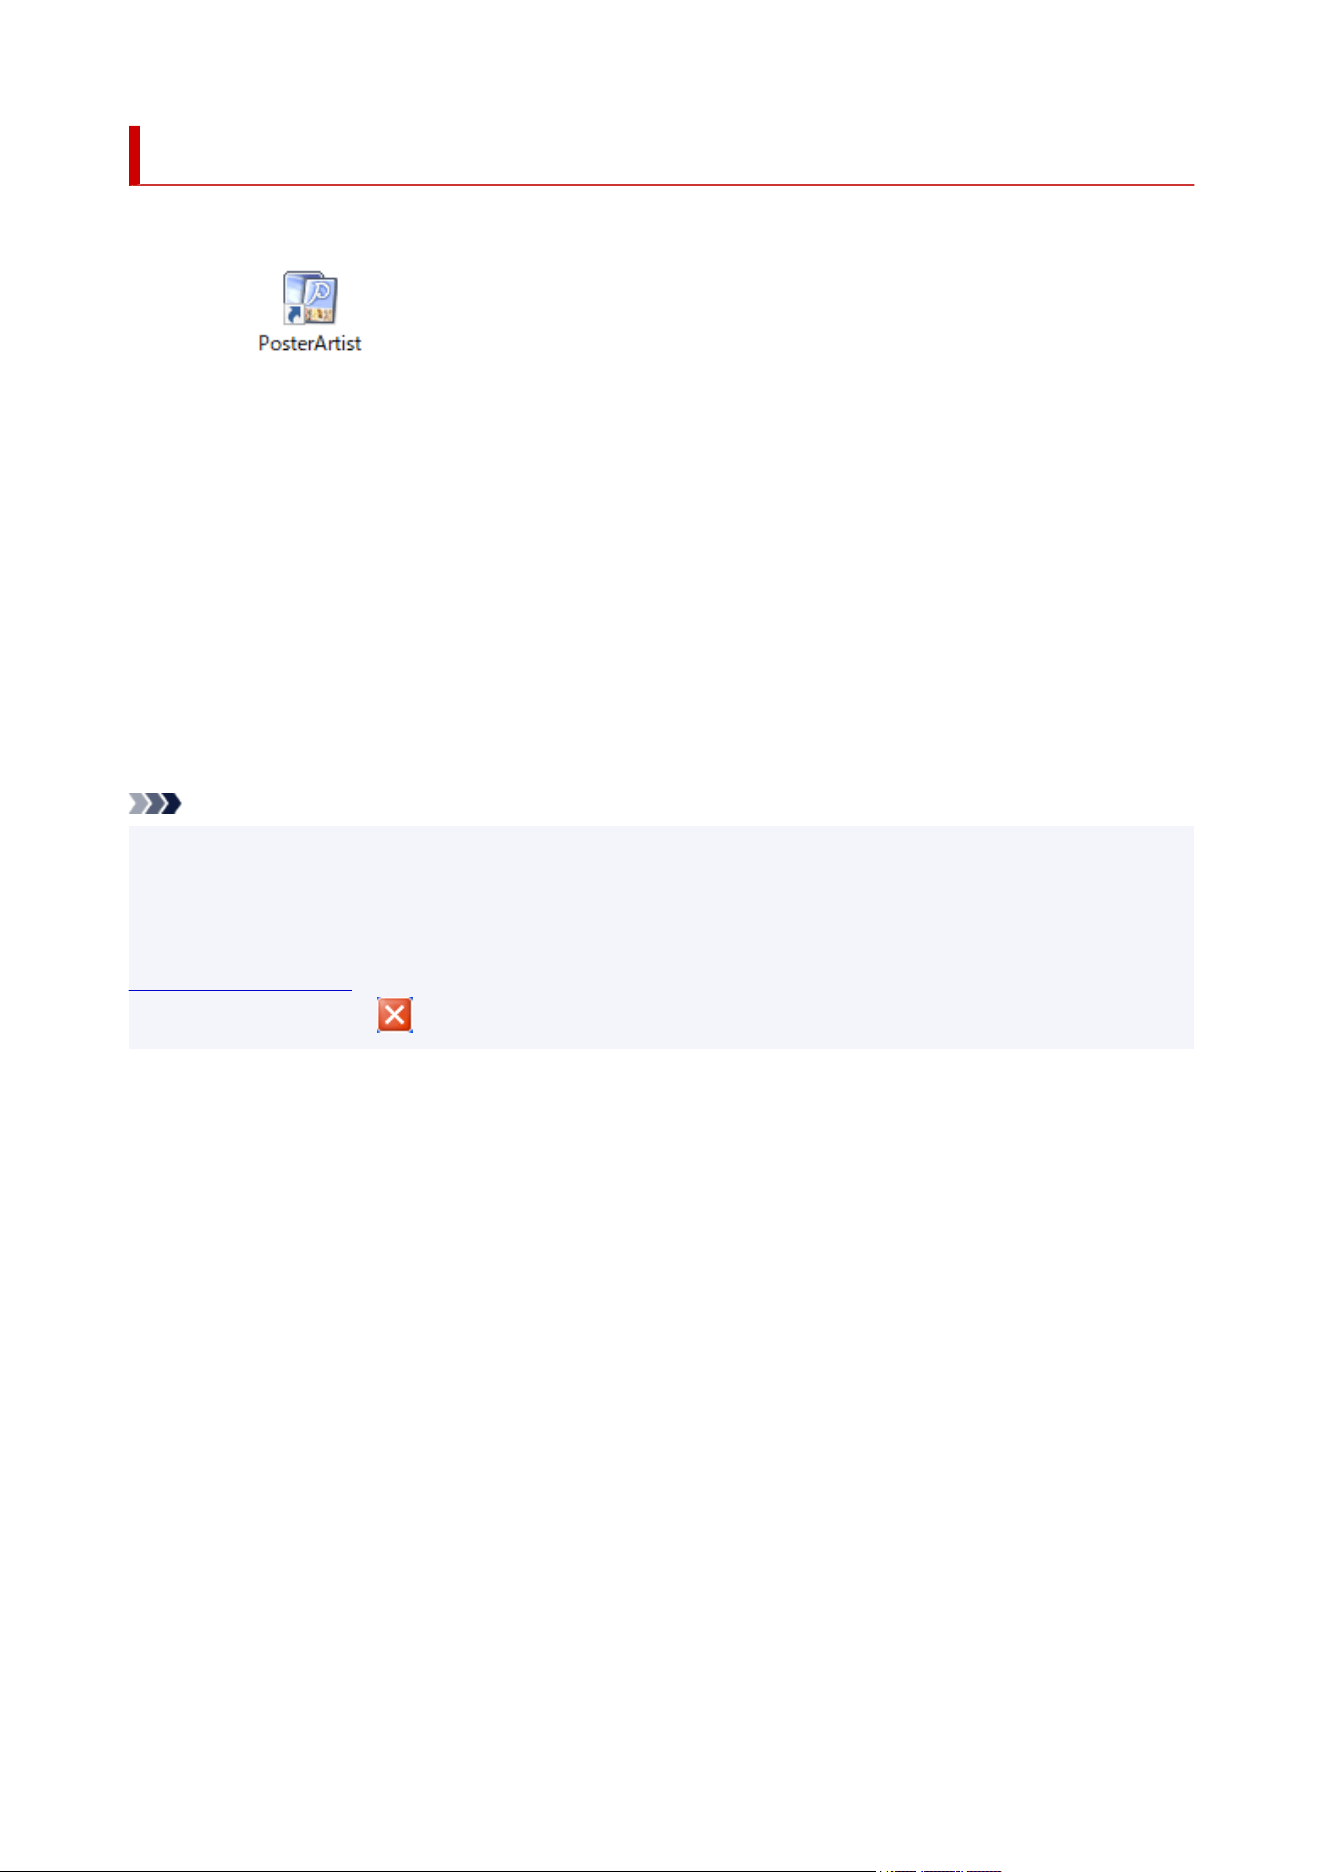
Starting PosterArtist
PosterArtist can be started as follows.
Double-click PosterArtist on the desktop
Start from the Programs folder
Windows 10:
From the Start menu, select (All apps >) Canon Utilities > PosterArtist.
Windows 8.1:
Select PosterArtist on the Start screen to start PosterArtist.
If PosterArtist is not displayed on the Start screen, select the Search charm, and then search for
"PosterArtist."
Windows 7:
From the Start menu, select All Programs > Canon PosterArtist > PosterArtist.
Note
• Multiple instances of PosterArtist can run simultaneously, and materials can be copied and pasted between
these windows. When multiple instances of PosterArtist are running, you cannot use Artwork Manager,
import and save artwork, or open files.
• When starting PosterArtist for the first time, the License Access Number must be entered. For details, see
License Authentication.
• To exit PosterArtist, click (Close) in the upper right of the window, or select Exit from the File menu.
53

Creating and Printing Posters
Create posters easily from the templates provided with PosterArtist and print them directly.
1. Starting PosterArtist.1.
2.
In the task area, click Select Template.
2.
Note
• For details on the Select Template screen, see Select Template Screen.
3.
In Category, select the category of poster you want to create.
3.
4.
Select a template from the thumbnails, and then double-click it.
4.
Note
•
You can also select a template by dragging and dropping it from Category to the poster design area.
• If the (Download) icon is displayed on the thumbnail of a template, click the icon to download the
template.
•
For instructions on selecting templates, see Templates.
• To design posters freely without using a template, see Freely Designing.
5. In the task area, click Paper Options.5.
The view switches to the Paper Options screen.
6.
Specify Page Size, Poster Orientation, the printer to use, and other settings.
6.
Note
•
Available settings vary depending on the selected printer.
• For paper settings, see Specifying Size and Paper.
7. In the task area, click Edit.7.
The view switches to the Edit screen.
Note
•
For details on the Edit screen, see the following.
•
Edit Screen (Photos)
Edit Screen (Clipart)
Edit Screen (Text)
Edit Screen (Shapes)
Edit Screen (Backgrounds)
Edit Screen (Variable Data)
8.
Edit photos and text as needed.
8.
54

Note
• For details on editing photos and text, see the following.•
Editing Photos
Retouching Images
Editing Clipart
Editing Text
Editing Shapes
Editing Backgrounds
9.
In the task area, click Print.
9.
The view switches to the Print screen.
10.
Specify Print Quality, Matching Method, Copies, and other settings.
10.
Note
•
Available settings vary depending on the selected printer.
• To test print your poster on A4 or Letter size paper, click Test Print. For details, see Test Printing.
11.
Click Print.
11.
Printing starts.
Note
• For printing, see Printing Posters.
• You can also save posters you have created. For details, see Saving.
55
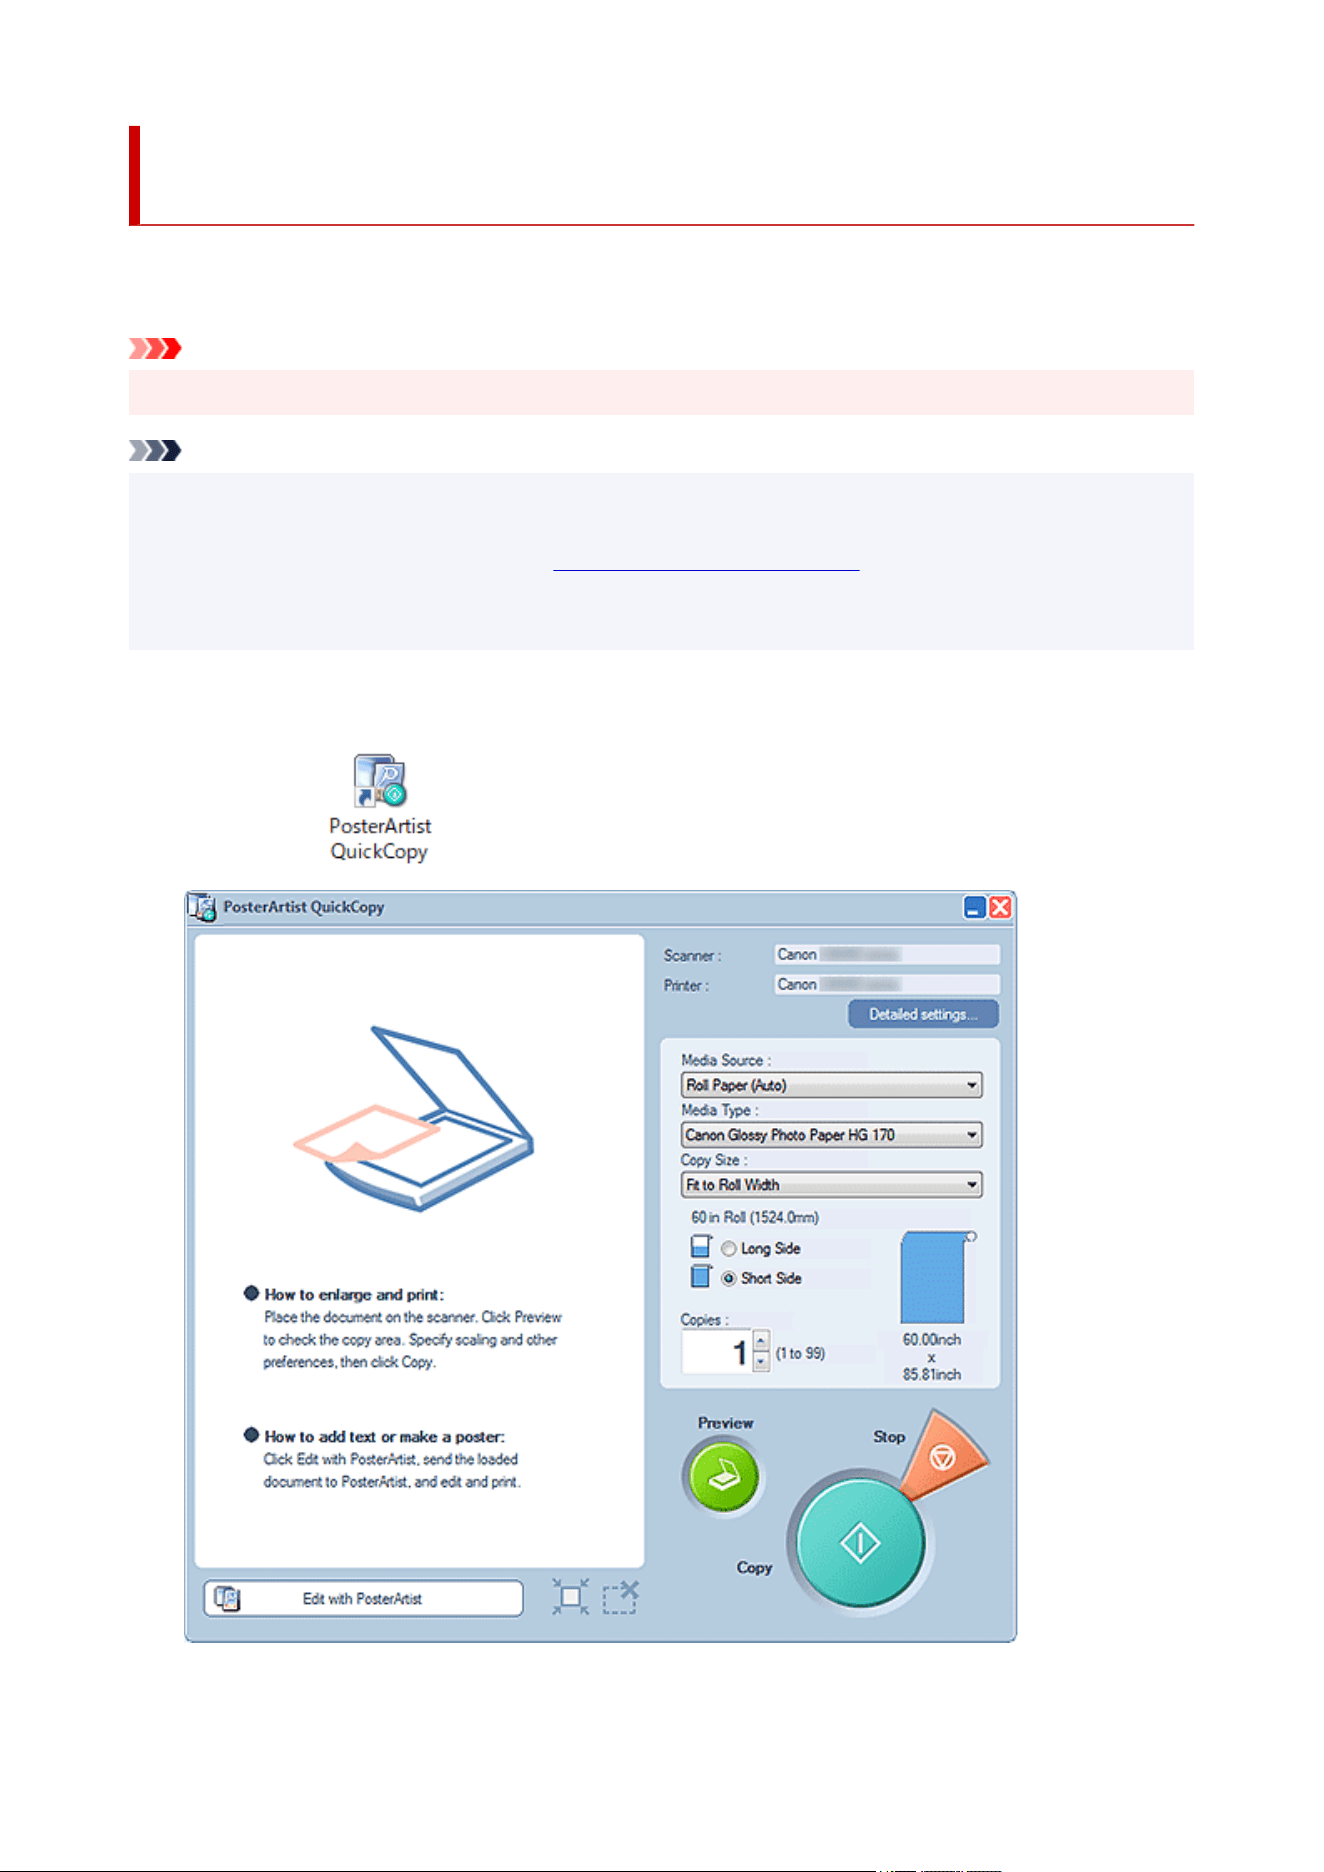
Creating and Printing Enlarged Copies of Photos and
Documents
Use PosterArtist QuickCopy to print posters by enlarging scanned photos and documents. Scanned items
can also be inserted as objects in posters.
Important
• The scanner's calibration function cannot be used.
Note
• PosterArtist QuickCopy is installed automatically when PosterArtist is installed.
• Access our website for information on scanners and All-In-One printers supporting PosterArtist QuickCopy.
• For details on PosterArtist QuickCopy, see PosterArtist QuickCopy Screen.
• If you plan to edit the scanned item, using a TWAIN device will allow you to make more detailed settings for
importing images than with PosterArtist QuickCopy.
1.
Connect computer and scanner.
1.
2. Double-click PosterArtist QuickCopy on the desktop.2.
56

Note
• You can also start PosterArtist QuickCopy in the following ways.•
Windows 10:
From the Start menu, select (All apps >) Canon Utilities > PosterArtist QuickCopy.
Windows 8.1:
Select PosterArtist QuickCopy on the Start screen to start PosterArtist QuickCopy.
If PosterArtist QuickCopy is not displayed on the Start screen, select the Search charm, and then
search for "PosterArtist QuickCopy."
Windows 7:
From the Start menu, select All Programs > Canon PosterArtist > PosterArtist QuickCopy.
3.
Click Detailed settings..., and then in the displayed screen, specify the scanner and printer
3.
to use.
Note
• Images can be retouched as needed when scanning them. For details, see Detailed settings... in
PosterArtist QuickCopy Screen.
4.
Specify Media Source, Media Type, Copies, and other settings.
4.
Note
•
The displayed paper types vary depending on the selected printer.
• For borderless printing, specify the settings as follows.•
Media Source: Roll Paper
Media Type: Paper that supports borderless printing
Copy Size: Fit to Roll Width
Long Side and Short Side: Select either checkbox
5.
Place the original.
5.
6.
Click Preview.
6.
The image appears in the preview area. The scan area is indicated by a dashed outline.
Change the scan area as needed.
Note
•
Preview can be skipped.
7.
Click Copy.
7.
Scanning starts. When scanning is completed, printing starts automatically.
57

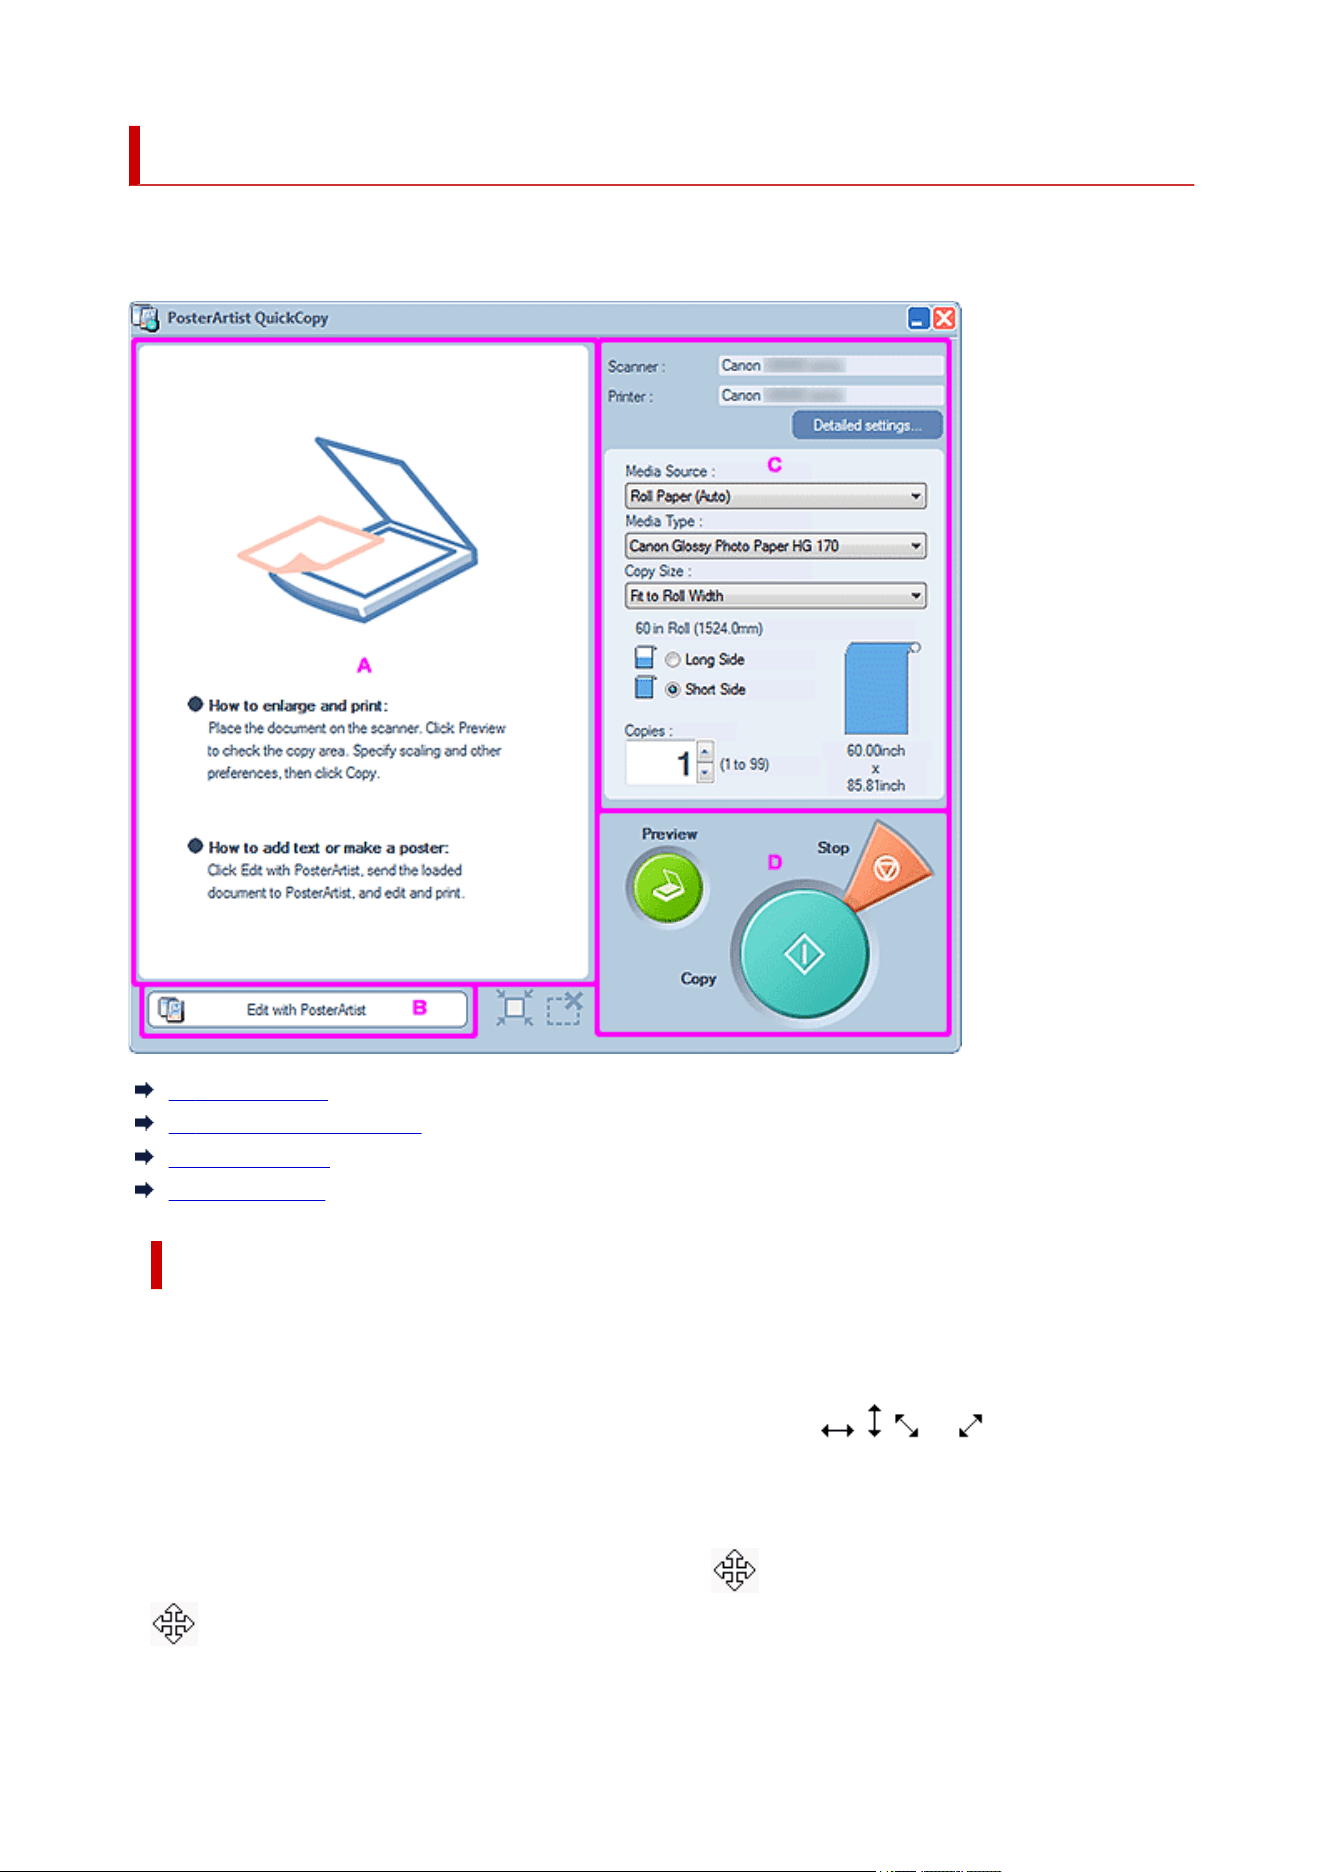
PosterArtist QuickCopy Screen
This is PosterArtist QuickCopy's main screen for selecting the scanner and printer to use, specifying the
printing method, and more.
A: Preview Area
B: Edit with PosterArtist
C: Settings Area
D: Buttons Area
A: Preview Area
Displays a preview of the scanned image. The scan area is indicated by an outline and can be adjusted.
Resizing the scan area
Point to the outline of the scan area to display one of these cursors: , , , or . Drag the cursor to
adjust the scan area.
Moving the scan area
Move the pointer inside the outlined scan area to display (Move pointer). Drag the outlined area with
(Move pointer) to move the scan area.
59
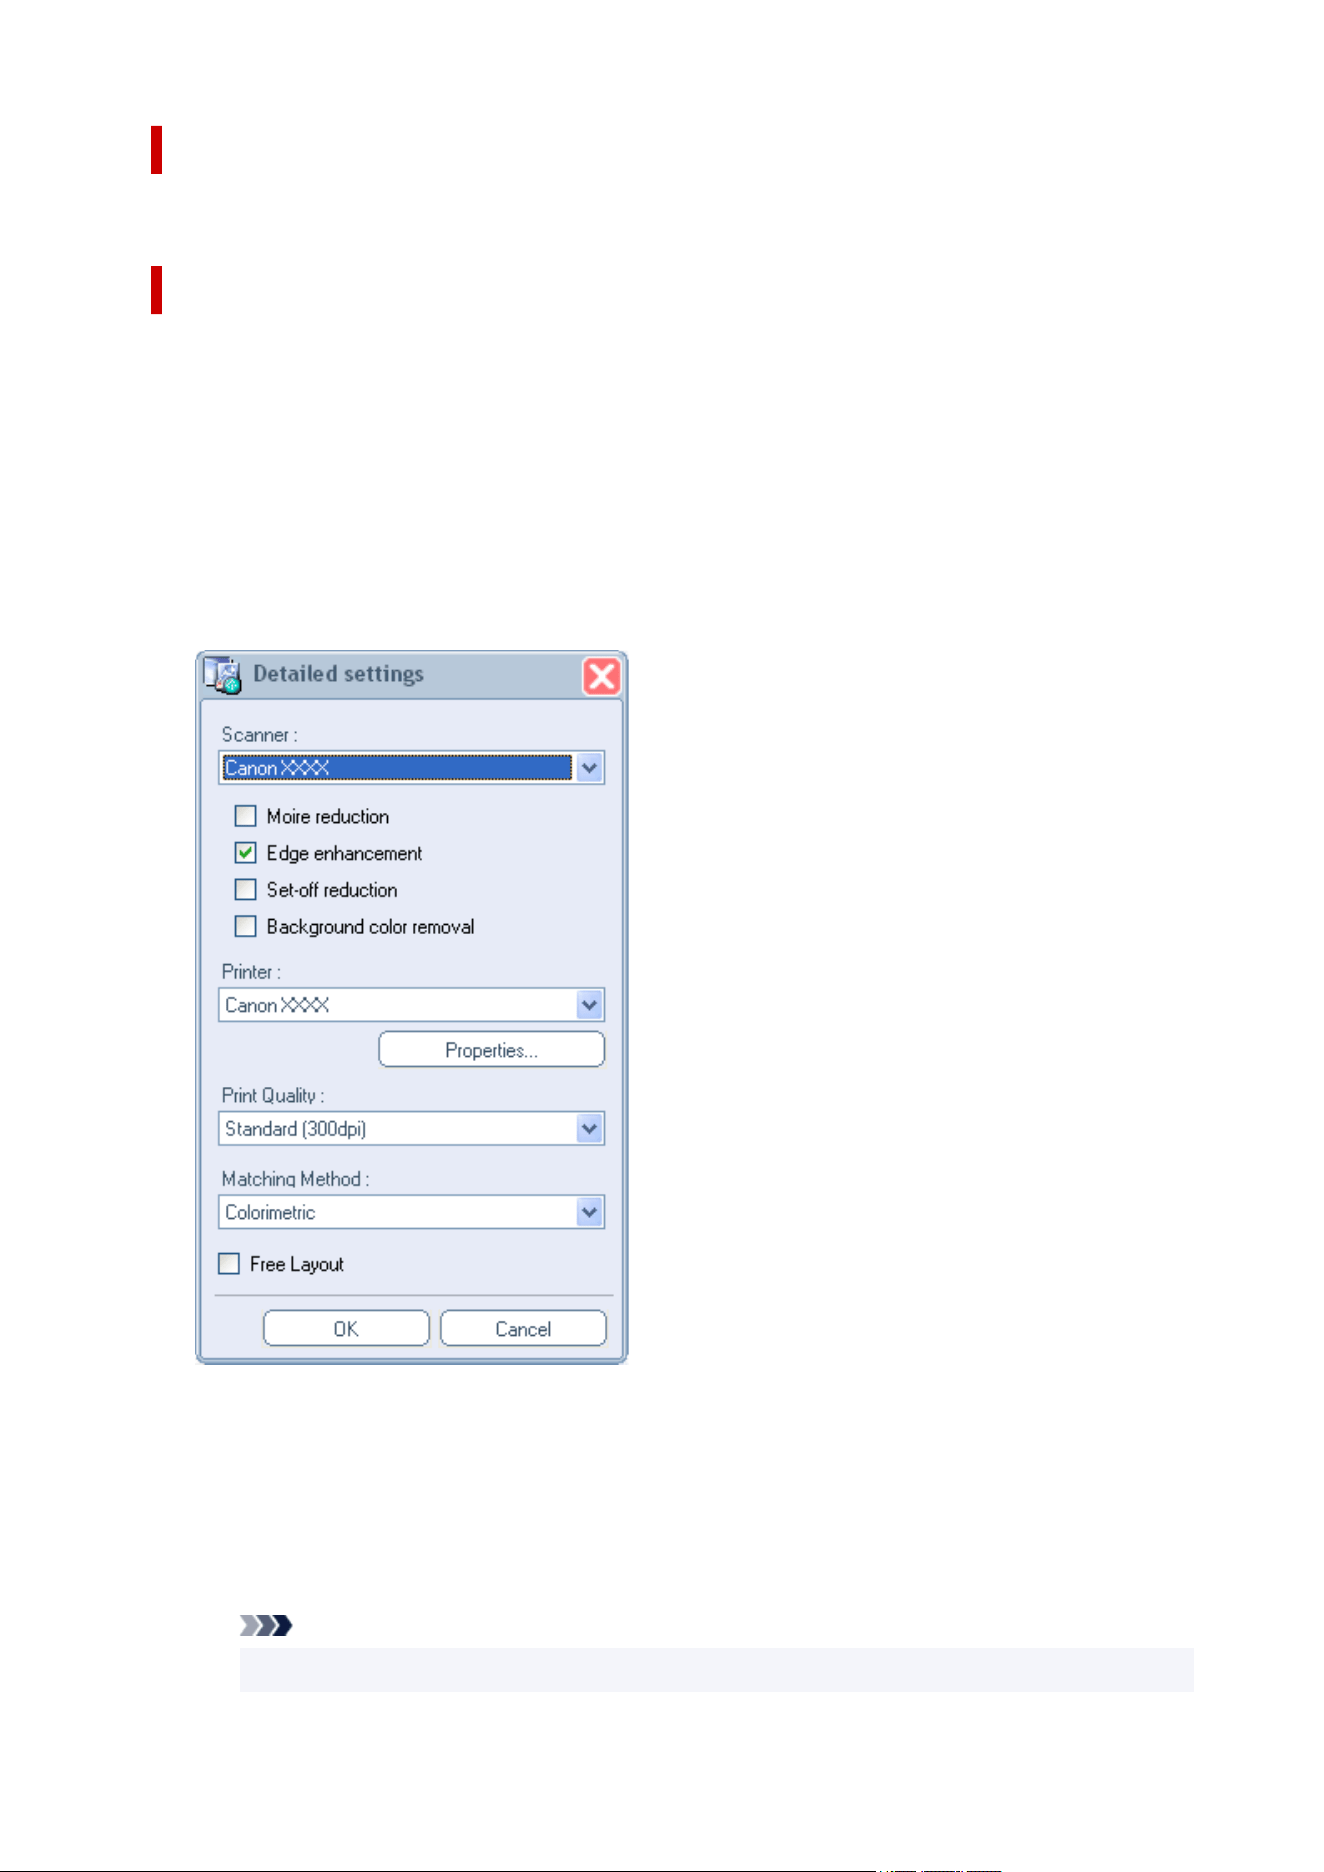
B: Edit with PosterArtist
Opens the scanned image in PosterArtist for editing.
C: Settings Area
Specify the printer and scanner to use, paper source, paper type, size, and other settings for printing.
Scanner
Displays the scanner to be used.
Printer
Displays the printer to be used.
Detailed settings...
Displays the Detailed settings dialog box for changing the scanner and printer to use and for making
advanced settings for scanning.
Scanner
Select the scanner to use. The list displays only scanners supporting PosterArtist QuickCopy
among scanners installed on your computer.
Moire reduction
Moire is image distortion (uneven, lighter areas or striped patterns) that may occur when
scanning photos or pictures. Select this checkbox to reduce moire.
Note
• Some moire effects may remain when the Edge enhancement checkbox is selected.
60

Edge enhancement
Select this checkbox to enhance the outline and increase sharpness.
Set-off reduction
When the original is double-sided, images or text on the reverse side may be scanned
inadvertently. Select this checkbox to reduce this show-through effect.
Background color removal
When paper of the original is light-colored, select this checkbox to correct the base color and
make it white.
Note
• Correction may not be applied if the original is dark-colored or includes many photos.
• Background color removal cannot be set when Set-off reduction is set.
Printer
Select the printer to use. The list displays only printers supporting PosterArtist among printers
installed on your computer.
Properties...
Displays the selected printer's Properties dialog box for specifying the print settings.
Print Quality
Select the print quality. Available options vary depending on the selected paper type.
Matching Method
Select a rendering intent.
Auto
Print in natural color tones.
Perceptual / Perceptual (Photo)
Print with natural color tones and gradations. Suitable for photos.
Colorimetric
Reduces color differences between the original document and the print result.
Saturation / Saturation (Poster)
Performs color matching while emphasizing vividness.
Free Layout
Select this checkbox to enable the Free Layout function of the printer driver.
Media Source
Select the paper source.
Media Type
Select the type of paper you want to use.
Copy Size
Select the size for the enlarged copy.
Long Side
Select this to print by enlarging the original so that the length of the poster's long side will be the
same as the paper width.
61

Short Side
Select this to print by enlarging the original so that the length of the poster's short side will be the
same as the paper width.
Copies
Set the number of copies to print.
D: Buttons Area
Preview
Scans the original to display the print area.
Copy
Scans the original to print an enlarged copy.
Stop
Cancels printing.
62

Various Functions for Creating Posters
Templates
Freely Designing
Specifying Size and Paper
Inserting Images and Materials
Editing Photos
Editing Clipart
Retouching Images
Editing Shapes
Editing Text
Editing Backgrounds
Working with Objects
Printing Posters
Saving
Using Variable Printing
Managing Artwork
Using Cloud
Using Translation Templates
Exporting Posters for Use in Easy-PhotoPrint Editor
Creating Vivid Posters Using Fluorescent Colors
63

Templates
PosterArtist provides a spectrum of poster templates to support many business fields and operations, and
new templates will be distributed in the future. Since the templates are categorized by different subjects, it is
easy to find templates of the design that suits your particular needs.
Templates can also be searched by specifying the search criteria such as poster orientation or the number
of photos that can be inserted.
Templates come complete with sample photos, text, backgrounds clipart, etc., which can be replaced or
edited to create your own design.
Selecting Templates
Displaying All Templates
Searching Templates
Using Existing Posters
Downloading Templates
Performing a Design Check
Note
• You can also create completely original posters without using a template. For details, see Using Auto
Design.
• Created posters can be added to the library as templates. For details, see Adding Artwork to Library.
64

Selecting Templates
1. In the task area, click Select Template.1.
Note
•
For details on the Select Template screen, see Select Template Screen.
2.
In Category, select a template category.
2.
Note
•
To view all templates, click View All Templates.... For details, see Displaying All Templates.
•
Templates can be searched by poster orientation or the number of photos that can be inserted. For
details, see Searching Templates.
3.
Select a template from the thumbnails, and then double-click it.
3.
The template appears in the poster design area.
Note
• If the (Download) icon is displayed on the thumbnail of a template, click the icon to download the
template.
• To try out different templates, you can place other templates in the temporary tray.
65

Displaying All Templates
1. In the task area, click Select Template.1.
Note
•
For details on the Select Template screen, see Select Template Screen.
2.
Click View All Templates....
2.
The View All Templates dialog box appears.
3.
In Category, select a template category.
3.
Note
•
To download new templates to the library at once, click Download.
4.
Select the template you want to use and click OK.
4.
The template appears in the poster design area.
Note
• To view all provided templates, photos, clipart, photo frames, text graphics, and backgrounds, refer to•
Template Guide.
• To add the selected template to the temporary tray, click Add to Temporary Tray.
66

Searching Templates
Templates can be searched by poster orientation or the number of photos that can be inserted.
1. In the task area, click Select Template.1.
Note
•
For details on the Select Template screen, see Select Template Screen.
2.
Click Find Template....
2.
The Find Template dialog box appears.
3.
Select search criteria.
3.
To search by poster orientation:
In Orientation, select Vertical or Horizontal.
To include all target templates, select Vertical and Horizontal.
To search by number of photos that can be inserted:
Select a number in No. of Photos.
To include all target templates, select All.
Note
• Orientation and No. of Photos can be specified at the same time.
• To download new templates to the library at once, click Download.
4.
Select the template you want to use and click OK.
4.
The template appears in the poster design area.
Note
• To add the selected template to the temporary tray, click Add to Temporary Tray.
67

Using Existing Posters
Create a new poster using a poster you have created and saved.
1. In the task area, click Select Template.1.
Note
•
For details on the Select Template screen, see Select Template Screen.
2.
Click Open Poster....
2.
The Open Poster dialog box appears.
Note
•
In the Open Poster dialog box, PosterArtist files (with a ".cpf,".cpfx,".cpfx2," or ".cpfx3" file extension)
are displayed.
3.
Specify the location of the poster file you want to use.
3.
4. Select a poster file, and then click Open.4.
The poster appears in the poster design area.
68

Downloading Templates
Download templates from our website.
1. In the task area, click Download Contents.1.
Our website appears.
2.
From the PosterArtist download page, download a template file (*.cpt file or *.cptx file).
2.
3.
Import the downloaded template file.
3.
Note
•
For instructions on importing template files, see Importing Artwork.
69
Performing a Design Check
Automatically check the font, superimposed objects, etc. for created posters.
A warning will appear if there is a problem or if there is a high chance that the print result will be
unsatisfactory.
Follow the message in the warning to correct and improve the poster.
Important
• A warning may appear even for intentional designs.
1.
On the toolbar, click (Design Check).
1.
A (Warning) symbol appears where there is a problem or where there is a high chance that the print
result will be unsatisfactory.
2.
On the poster, click the (Warning) symbol.
2.
The reason for the warning and a preventive method for the problem appear.
3.
On the toolbar, click (Design Check) again.
3.
Design Check ends.
70

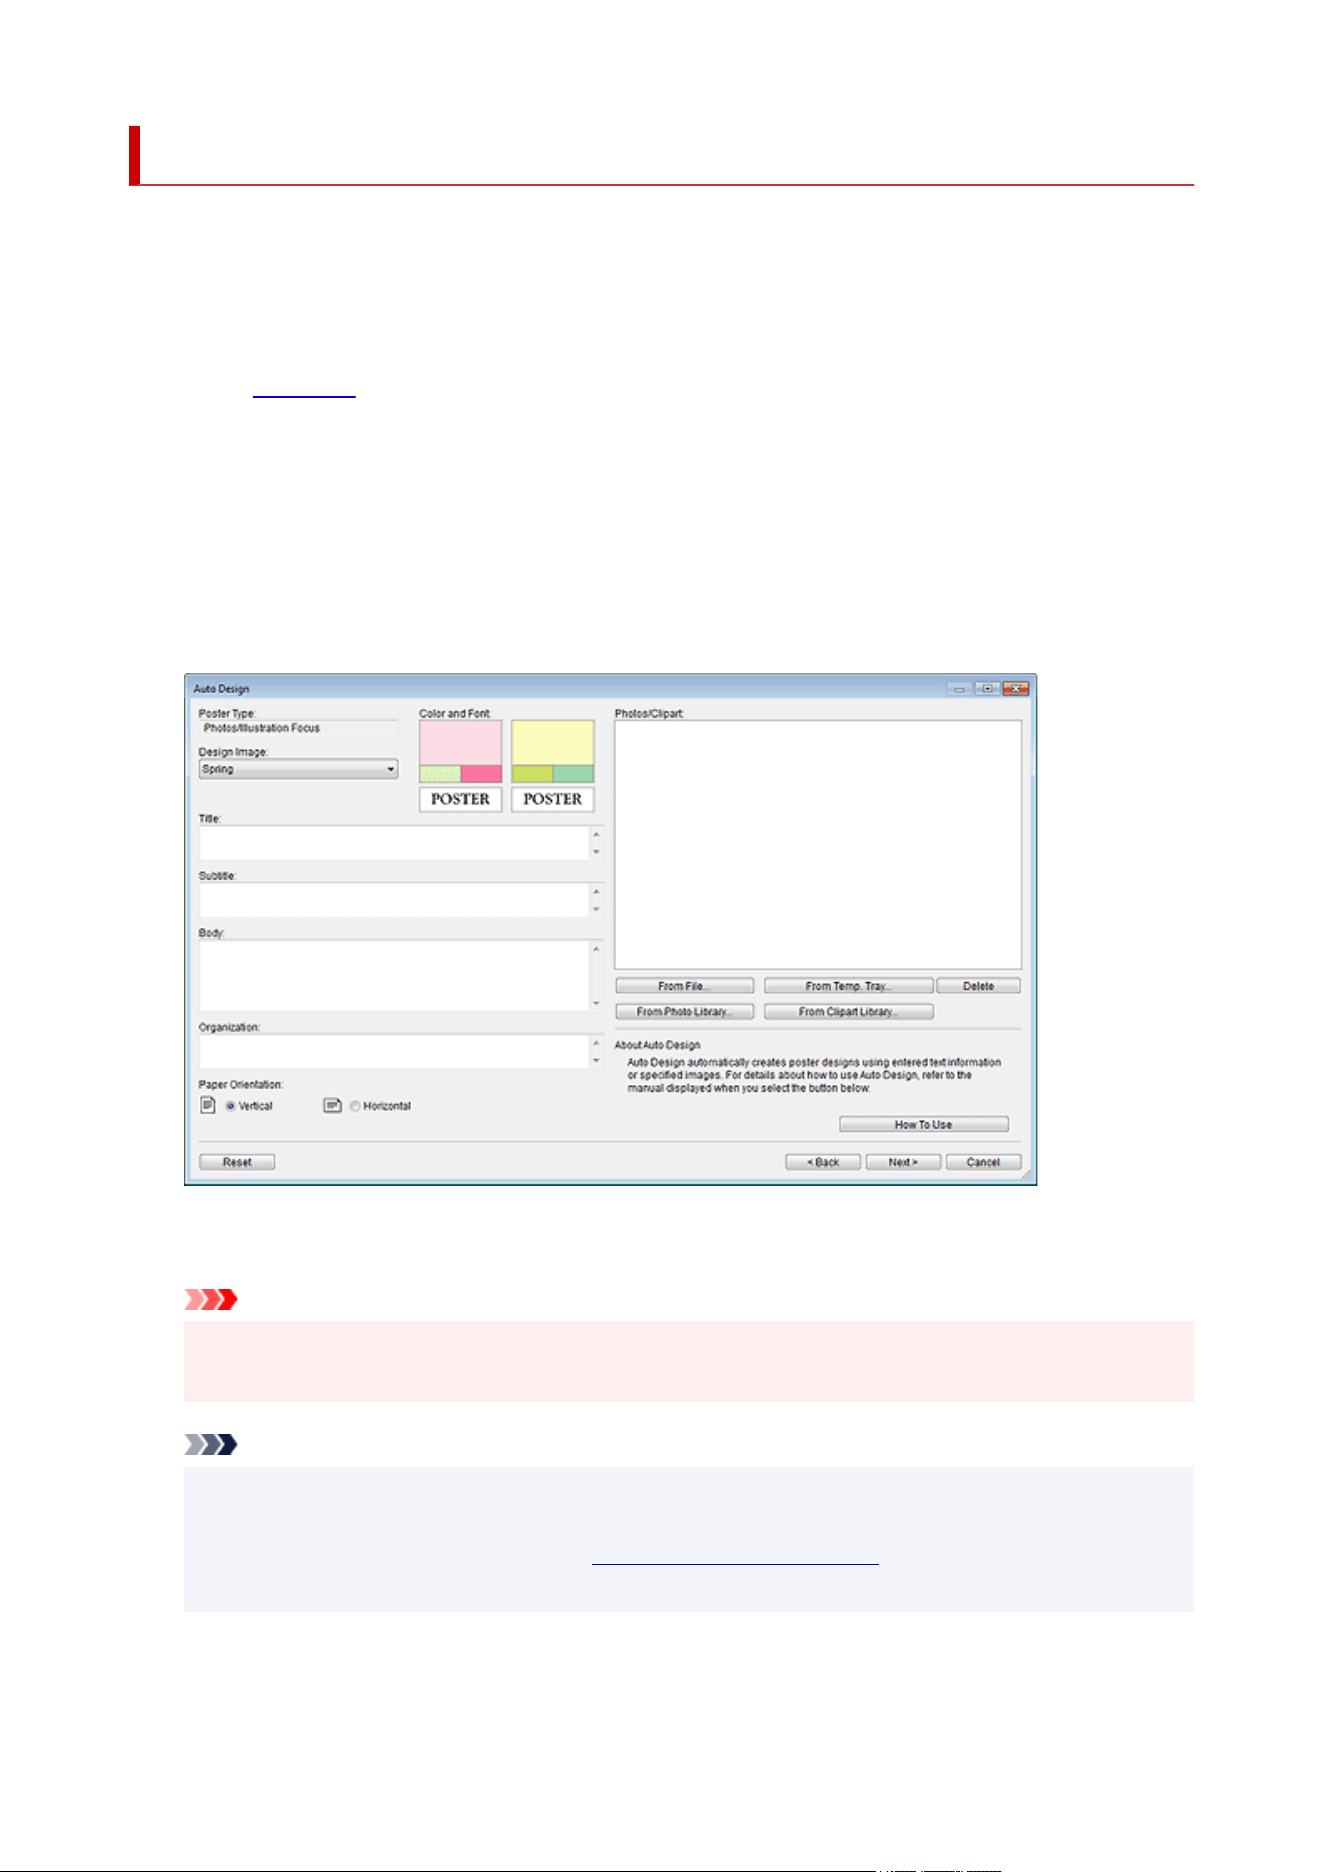
Using Auto Design
Auto Design is a function to automatically design posters by simply entering titles and text, and then
selecting your favorite images.
From created designs, select the one you like.
1. In the task area, click Select Template.1.
2.
Click Auto Design....
2.
The Auto Design screen appears.
3.
Select the type of poster you want to create, and then click Next.
3.
4.
In Design Image, select a design theme.
4.
5.
Enter the Title, Subtitle, Body, and Organization.
5.
Important
•
If Long/Horizontal Banners is selected in poster type, the Body cannot be entered.
•
Advanced Settings... may not be displayed depending on your language.
Note
•
Enter up to 60 characters for Title, Subtitle, and Organization.
•
Enter up to 200 characters for Body.
•
Click Advanced Settings... to display the Advanced Settings dialog box for setting a monospaced font
for the title, body, and other text.
6.
Select the Paper Orientation.
6.
72

7. Select the images you want to use in the poster as follows.7.
To use images saved on computer:
Click From File... to display the Insert Image dialog box, and then select image(s).
Note
• To select multiple files, hold down the Ctrl or Shift key as you click the thumbnails.
• Image files can also be added by dragging and dropping them from Windows Explorer.
• For supported file formats, see Supported File Formats.
To use photos or clipart in temporary tray:
Click From Temp. Tray... to display the Show Images in the Temporary Tray dialog box, and then
select image(s).
Note
•
To select multiple files, hold down the Ctrl or Shift key as you click the thumbnails.
To use photos in library:
Click From Photo Library... to display the View All Photos dialog box, and then select image(s).
Note
• To select multiple files, hold down the Ctrl or Shift key as you click the thumbnails.
To use clipart in library:
Click From Clipart Library... to display the View All Clipart dialog box, and then select image(s).
Note
• To select multiple files, hold down the Ctrl or Shift key as you click the thumbnails.
Note
• When Photos/Illustration Focus is selected in poster type, specify up to eight photos or up to two
clipart items.
When a poster type other than Photos/Illustration Focus is selected, specify up to two photos or two
clipart items.
•
To delete images from the image list, select one and click Delete.
•
To use a selected image multiple times, select it again.
8.
Click Next.
8.
Designs are created automatically and their thumbnails appear.
Note
•
The number of designs to be created varies depending on the number of selected images, paper
orientation, and design theme.
•
Changing the order of thumbnails in Photos/Clipart by dragging and dropping them recreates the
design. To select multiple files and change the order, hold down the Ctrl or Shift key as you click the
thumbnails.
9.
In Color Patterns, select color.
9.
73

Note
• Choices in Color Patterns are determined by the selected design theme.
10. In Text Color, select color.10.
11. Select your favorite design from the thumbnails, and then click OK.11.
The design is inserted in the poster area.
Note
•
Add designs to the temporary tray when you are not sure which design to use. Click Add to Temporary
Tray to use them as replacements even after ending Auto Design.
Note
• For details on the Auto Design screen, see Auto Design Screen.
74

Adjusting Designs
Use the Design Assist and Quick Exchange functions to produce even higher quality designs from a created
design.
Design Assist (Rearranging Objects)
Quick Exchange (Swapping Objects)
Design Assist (Rearranging Objects)
Design Assist is a function to adjust poster layouts by automatically rearranging objects in the selected
area.
From created design patterns, select the one you like.
1.
On the toolbar, click (Design Assist Area Set Mode).
1.
Design Assist Area Set mode is activated.
2.
Click and drag to select the area you want to change.
2.
A selection box (framed in orange) appears around each object in the dragged area.
Note
• The number of objects that can be selected at one time is as follows.•
A total of eight photos and clipart items
Four text items
3. Click Generate Design displayed in the lower right of the selected area.3.
Designs are created automatically and their thumbnails appear.
Note
• The number of designs created varies depending on the size of the selected area and the number of
objects.
•
Changing the order of thumbnails in Photos/Clipart by dragging and dropping them recreates the
design. To select multiple files and change the order, hold down the Ctrl or Shift key as you click the
thumbnails.
•
Add designs to the temporary tray when you are not sure which design to use. Click Add to
Temporary Tray to use them as replacements even after ending Design Assist.
4.
Select your favorite design, and then click OK.
4.
The selected design appears in the poster design area.
Note
•
Use the Design Check function to automatically check the font, superimposed objects, etc. for created
posters. For details, see Performing a Design Check.
•
For details on the Design Assist dialog box, see Design Assist Dialog Box.
75
Quick Exchange (Swapping Objects)
Quick Exchange is a function for easily swapping the positions of objects.
This function is useful when you want to create an improved poster design from a created design.
1.
On the toolbar, click (Quick Exchange).
1.
Quick Exchange mode is activated.
2.
Select one or more objects.
2.
A selection box (framed in orange) appears around the selected object.
3.
Move the pointer inside the selection box, and then use (Hand Tool) on the toolbar to
3.
drag the object over the object you want to swap positions with.
The objects are swapped.
Important
• When the (Hand and Arrow) pointer is displayed, the object can be swapped with the one
below the pointer.
•
When the (Hand and X) pointer is displayed, the object cannot be swapped with the one below
the pointer.
Note
• To move an object vertically or horizontally, drag it while holding down the Shift key.
4. When finished swapping, click (Quick Exchange) again on the toolbar.4.
Quick Exchange mode is canceled.
Note
• Use the Design Check function to automatically check the font, superimposed objects, etc. for created
posters. For details, see Performing a Design Check.
76

Specifying Size and Paper
Print created posters on paper of various sizes and types.
Print to scale or without borders as needed.
Note
• Available settings vary depending on the selected printer.
• Since the poster paper size and orientation are already set in templates, if you change the paper size or
orientation, the objects may be resized. Adjust the size and position of objects as needed.
When Printing on Roll Paper
Roll Paper Settings
Printing Borderless Posters Filling the Entire Roll Paper Width
Printing Bordered Posters Filling the Entire Roll Paper Width
Printing Without Borders on Three Sides
Large-Format Printing
Printing Larger than Roll Paper Size
When Printing on Cut Sheets
When Printing to Scale
When Printing Entire Poster Within Printable Area
Adding Crop Marks
Specifying Non-Standard Page Sizes
77

When Printing on Roll Paper
When printing on roll paper, you can print at non-standard sizes such as for horizontal or vertical banners.
Borderless printing is also available.
For instructions on printing on roll paper, see the following.
Roll Paper Settings
Printing Borderless Posters Filling the Entire Roll Paper Width
Printing Bordered Posters Filling the Entire Roll Paper Width
Printing Without Borders on Three Sides
Large-Format Printing
Printing Larger than Roll Paper Size
Important
• Roll paper printing is available only on printers that support roll paper.
• Supported paper sizes and roll paper widths vary depending on your model. For details, click Home to
return to the top page of the Online Manual for your model and search for "Paper Sizes."
Note
• For some models, Minimal Margin Printing is displayed instead of Borderless Printing. When Minimal
Margin Printing is displayed, printouts will have slight margins on the left and right sides.
Roll Paper Settings
When printing on roll paper, complete the following settings first.
1.
In the task area, click Paper Options.
1.
The view switches to the Paper Options screen.
78
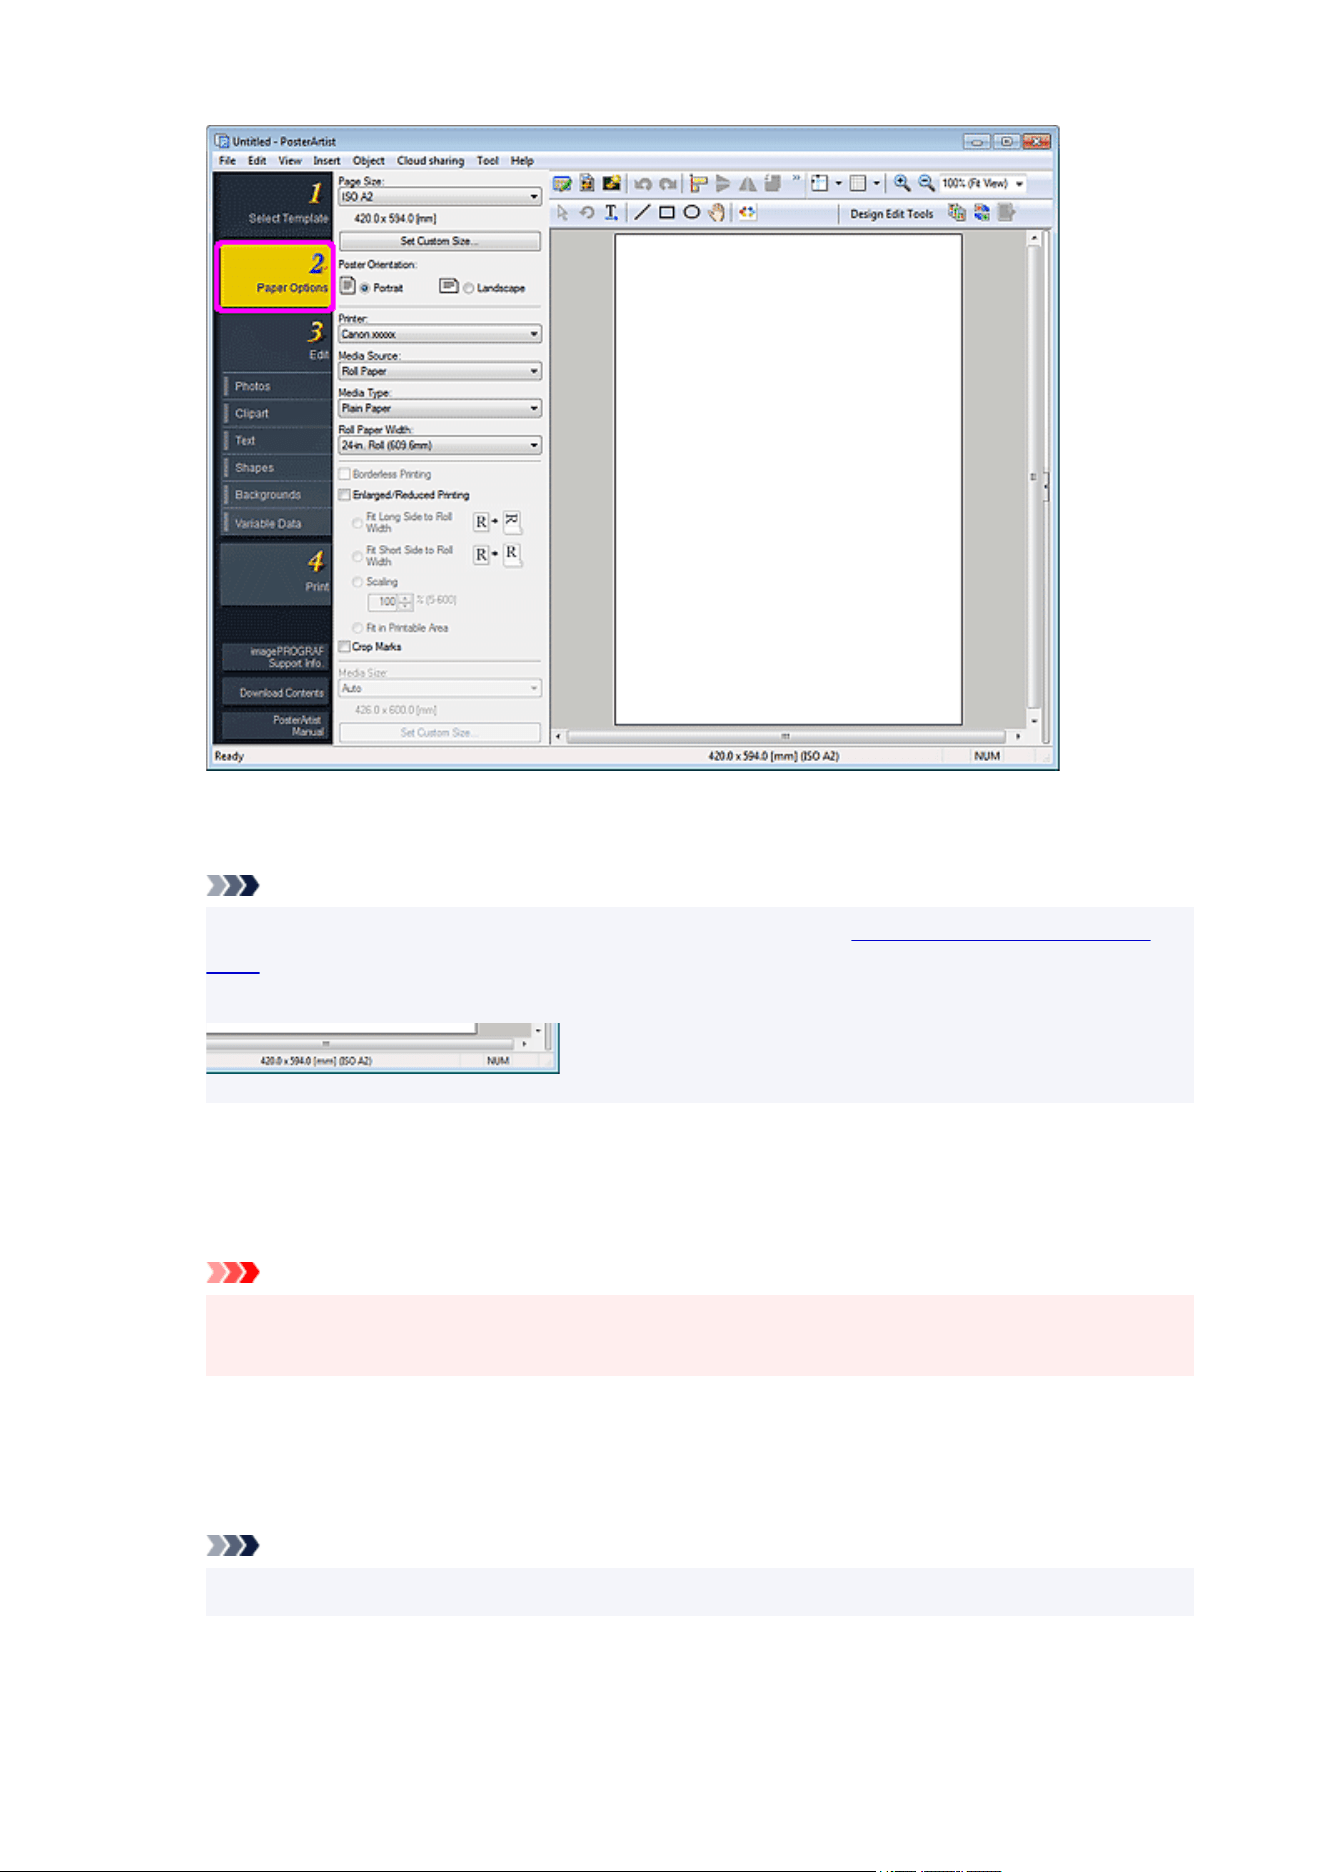
2.
In Page Size, select the page size of the poster.
2.
Note
•
Non-standard page sizes can be specified as well. For details, see Specifying Non-Standard Page
Sizes.
• The poster page size is displayed in the status bar.•
3. In Poster Orientation, select Portrait or Landscape.3.
4. In Printer, select the printer to use.4.
Important
•
Only printers compatible with PosterArtist are displayed in the list.
•
Settings in Paper Options are automatically reflected in the printer driver.
5.
In Media Source, select roll paper.
5.
6.
In Media Type, select the paper type for printing.
6.
Note
•
Supported paper types vary depending on your model.
7.
In Roll Paper Width, select the width of roll paper loaded in printer.
7.
79
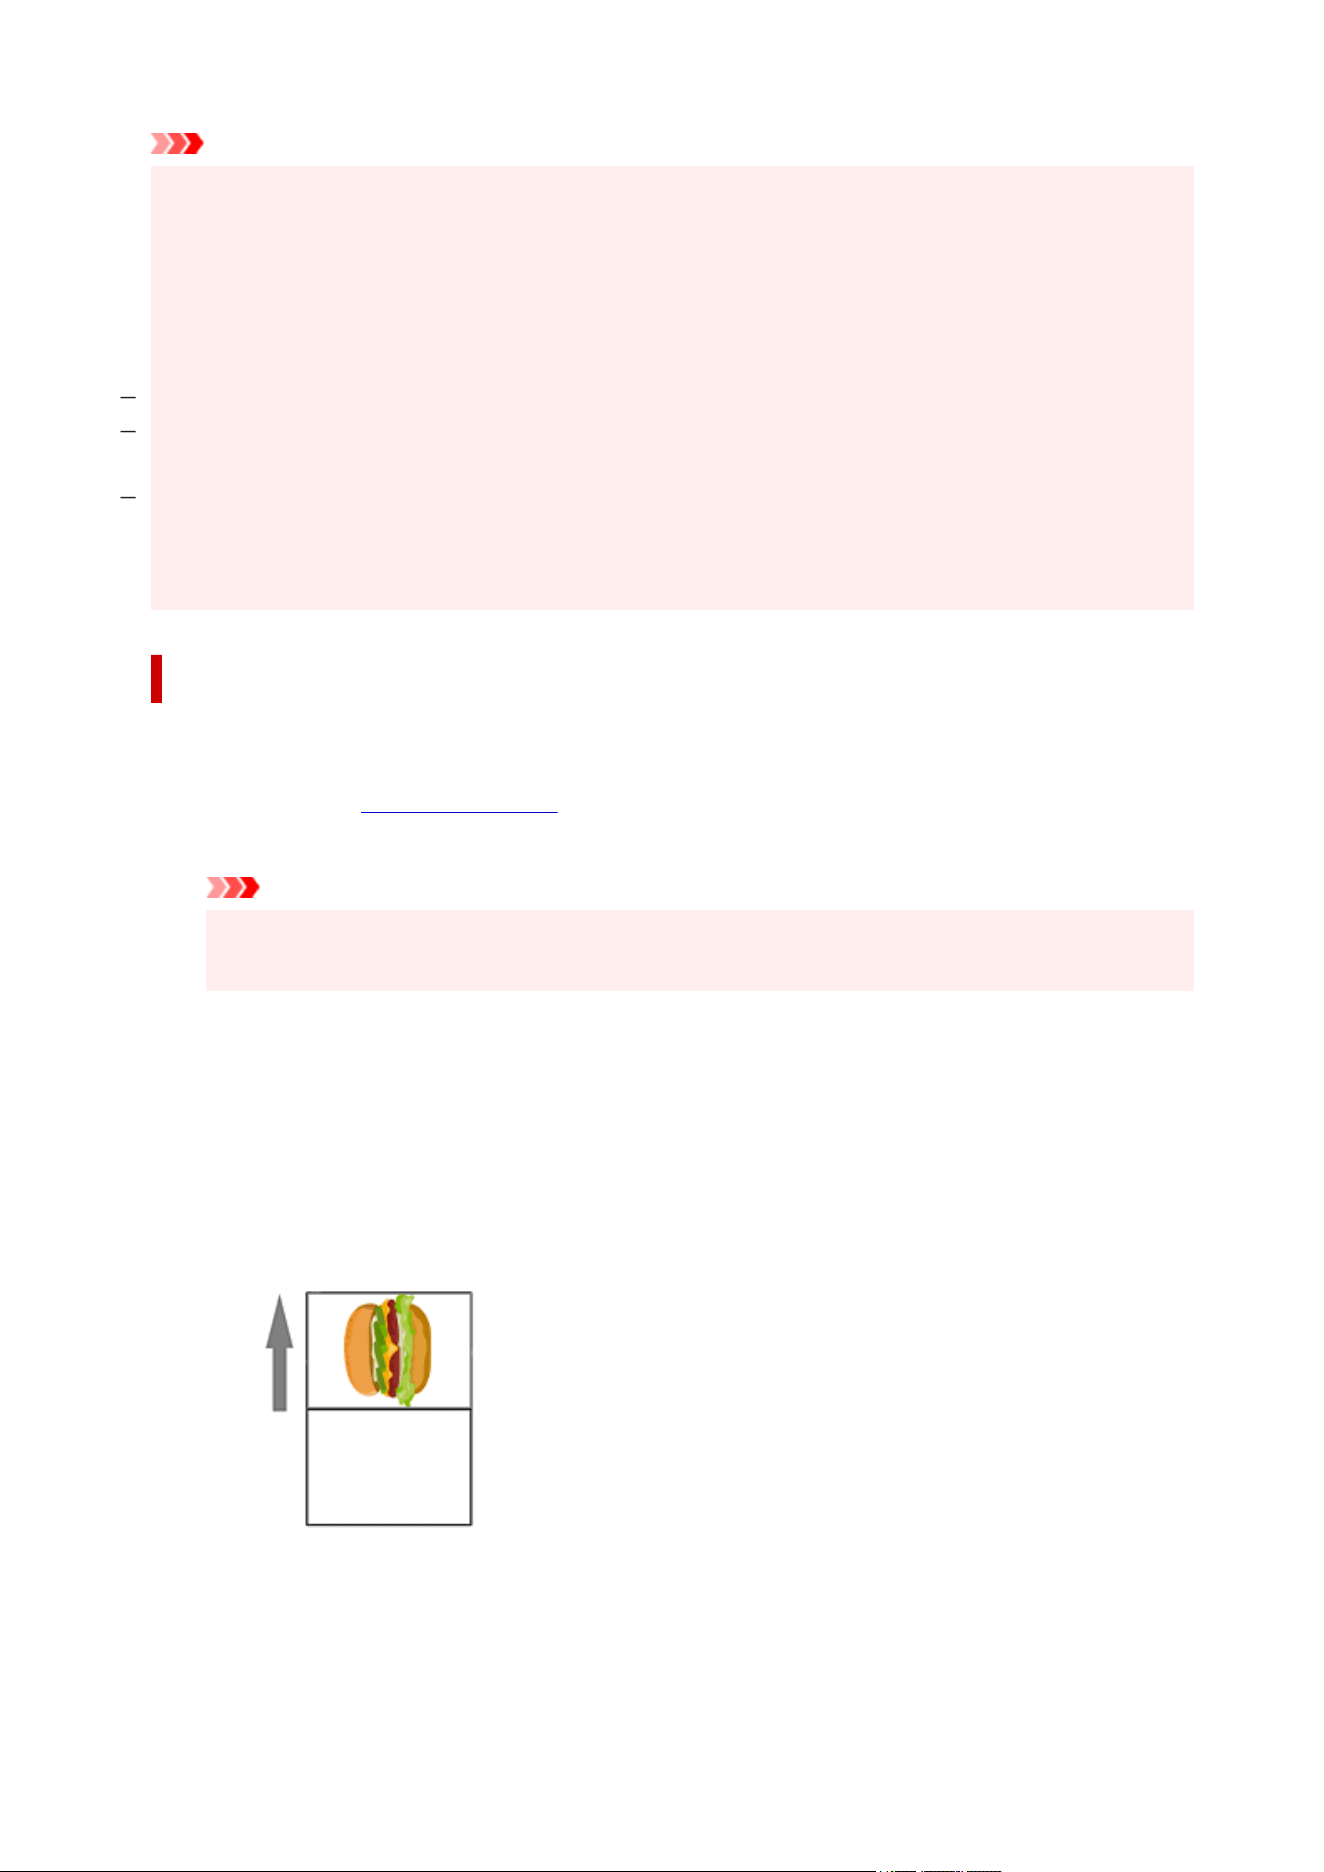
Important
• If the Roll Paper Width is different from the length of the long side or short side of the page, margins
may be created. Printing is not possible if the settings would results in a portion of the image being cut
off.
• When roll paper is selected, the poster design being edited is printed with margins to prevent it from•
being cut off.
In the following cases, margins are not added to printouts.
When printing without borders
When printing without scaling, and the length of the long side or short side of the page matches the Roll
Paper Width
When printing to scale with Fit Long Side to Roll Width or Fit Short Side to Roll Width selected
If the media size is larger than the selected roll paper width, a warning message appears before printing
starts.
Printing Borderless Posters Filling the Entire Roll Paper Width
Print borderless posters filling the entire roll paper width.
1.
Complete the roll paper settings, and then select the Borderless Printing (or Minimal
1.
Margin Printing) checkbox.
Important
• Depending on your model, you will need to prepare roll paper whose width and paper type support
borderless printing.
2.
Select the Enlarged/Reduced Printing checkbox.
2.
3.
Select whether to fit the long side or short side of the page size to the roll paper width.
3.
Fit Long Side to Roll Width:
The poster will be printed to scale so that the length of its long side will be the same as the width
of the roll paper loaded in the printer. If the poster is in portrait orientation, the poster height will
match the roll paper width.
Fit Short Side to Roll Width:
The poster will be printed to scale so that the length of its short side will be the same as the width
of the roll paper loaded in the printer. If the poster is in portrait orientation, the poster width will
match the roll paper width.
80
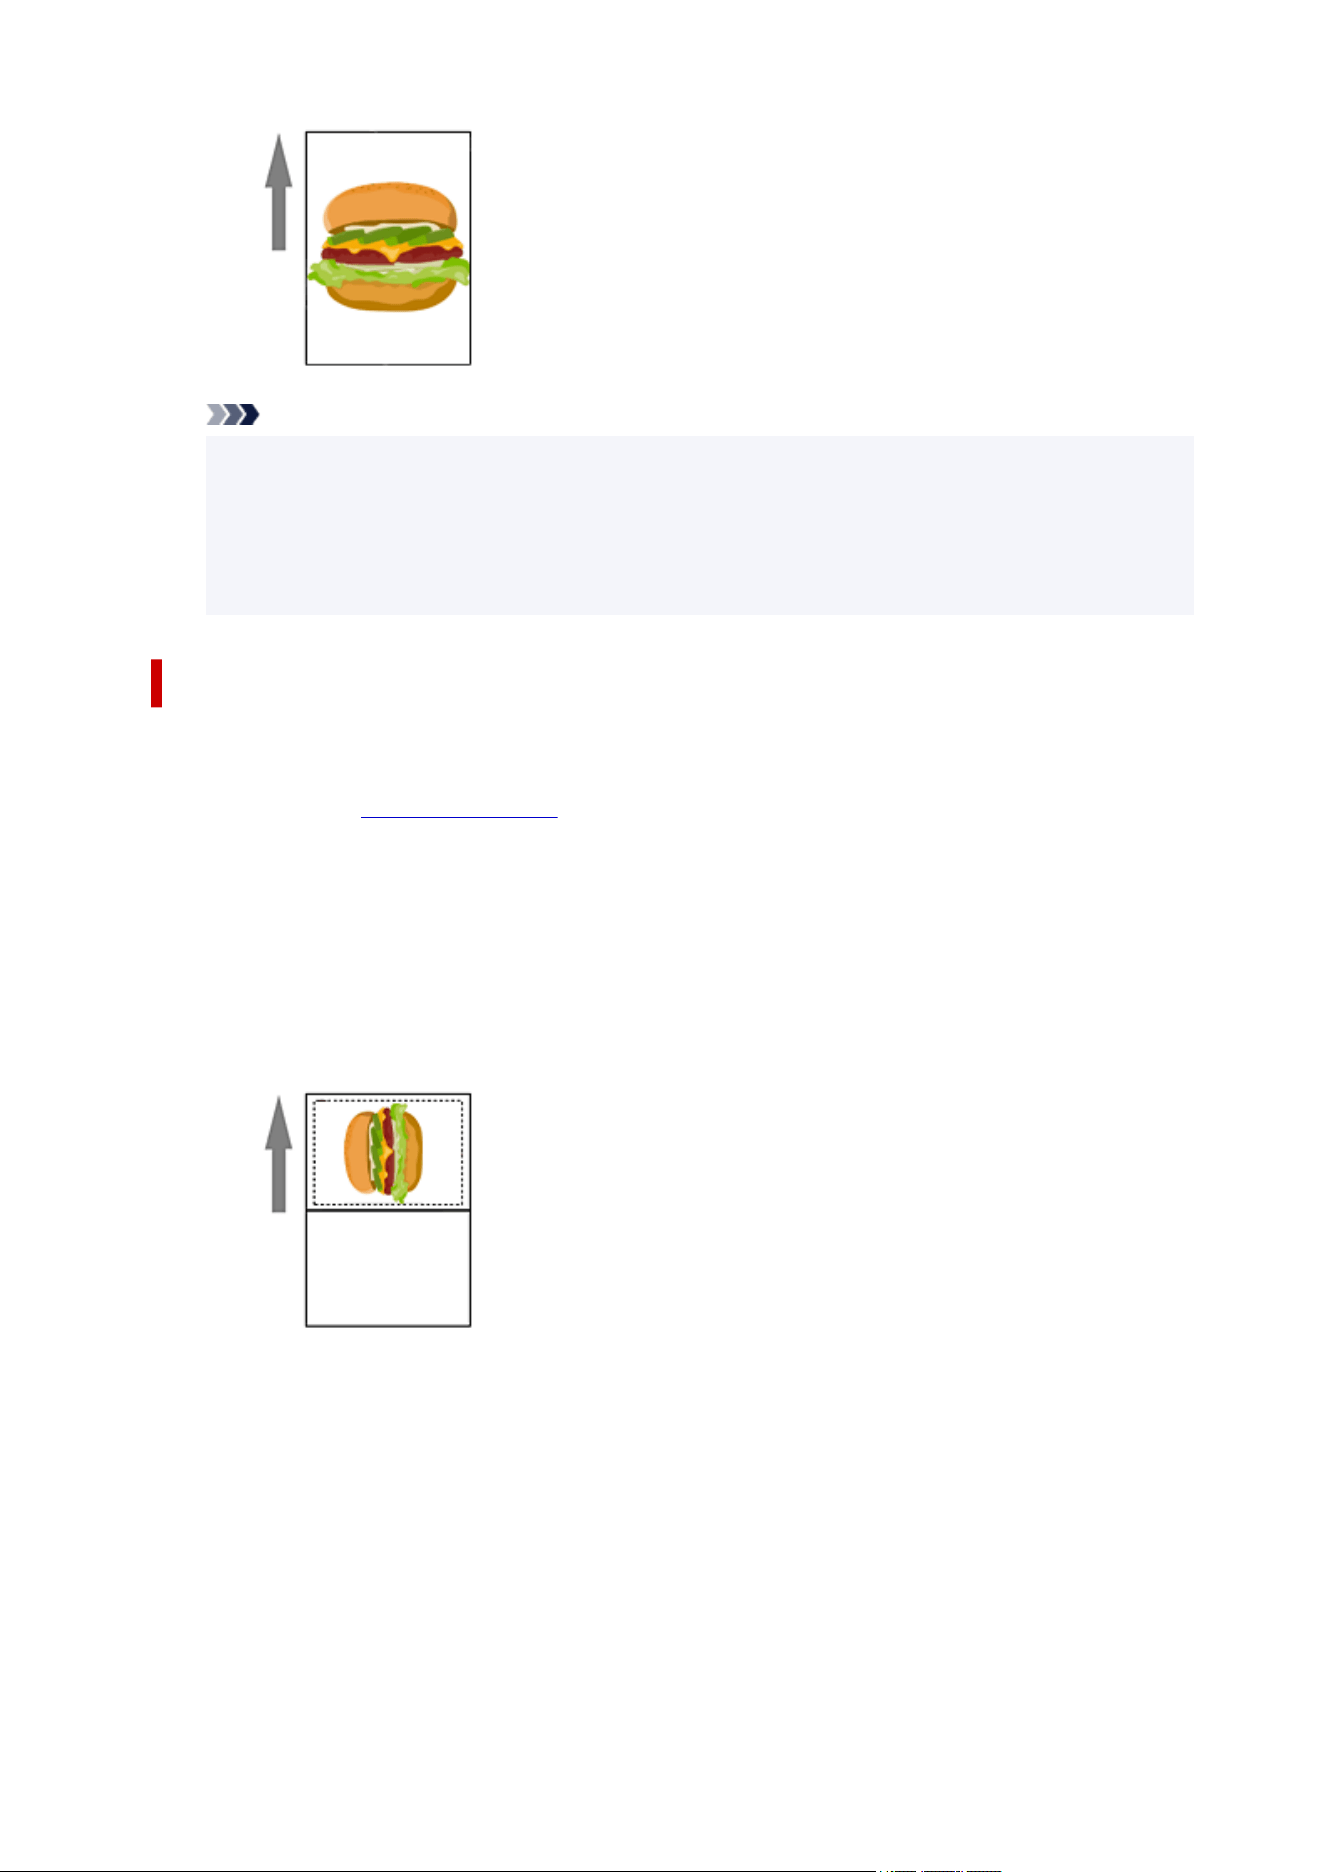
Note
• When Borderless Printing (or Minimal Margin Printing) is selected and the roll paper width
matches the length of the page size's long side or short side, you do not need to perform steps 2
and 3. The poster is printed filling the entire roll width automatically. To change the printing orientation
relative to the roll paper width, select the Enlarged/Reduced Printing checkbox, and then select Fit
Long Side to Roll Width or Fit Short Side to Roll Width.
Printing Bordered Posters Filling the Entire Roll Paper Width
Print bordered posters filling the entire roll paper width.
1. Complete the roll paper settings, and then select the Enlarged/Reduced Printing1.
checkbox.
2. Select whether to fit the long side or short side of the page size to the roll paper width.2.
Fit Long Side to Roll Width:
The poster will be printed to scale so that the length of its long side will be the same as the width
of the roll paper loaded in the printer. If the poster is in portrait orientation, the poster height will
match the roll paper width.
Fit Short Side to Roll Width:
The poster will be printed to scale so that the length of its short side will be the same as the width
of the roll paper loaded in the printer. If the poster is in portrait orientation, the poster width will
match the roll paper width.
81
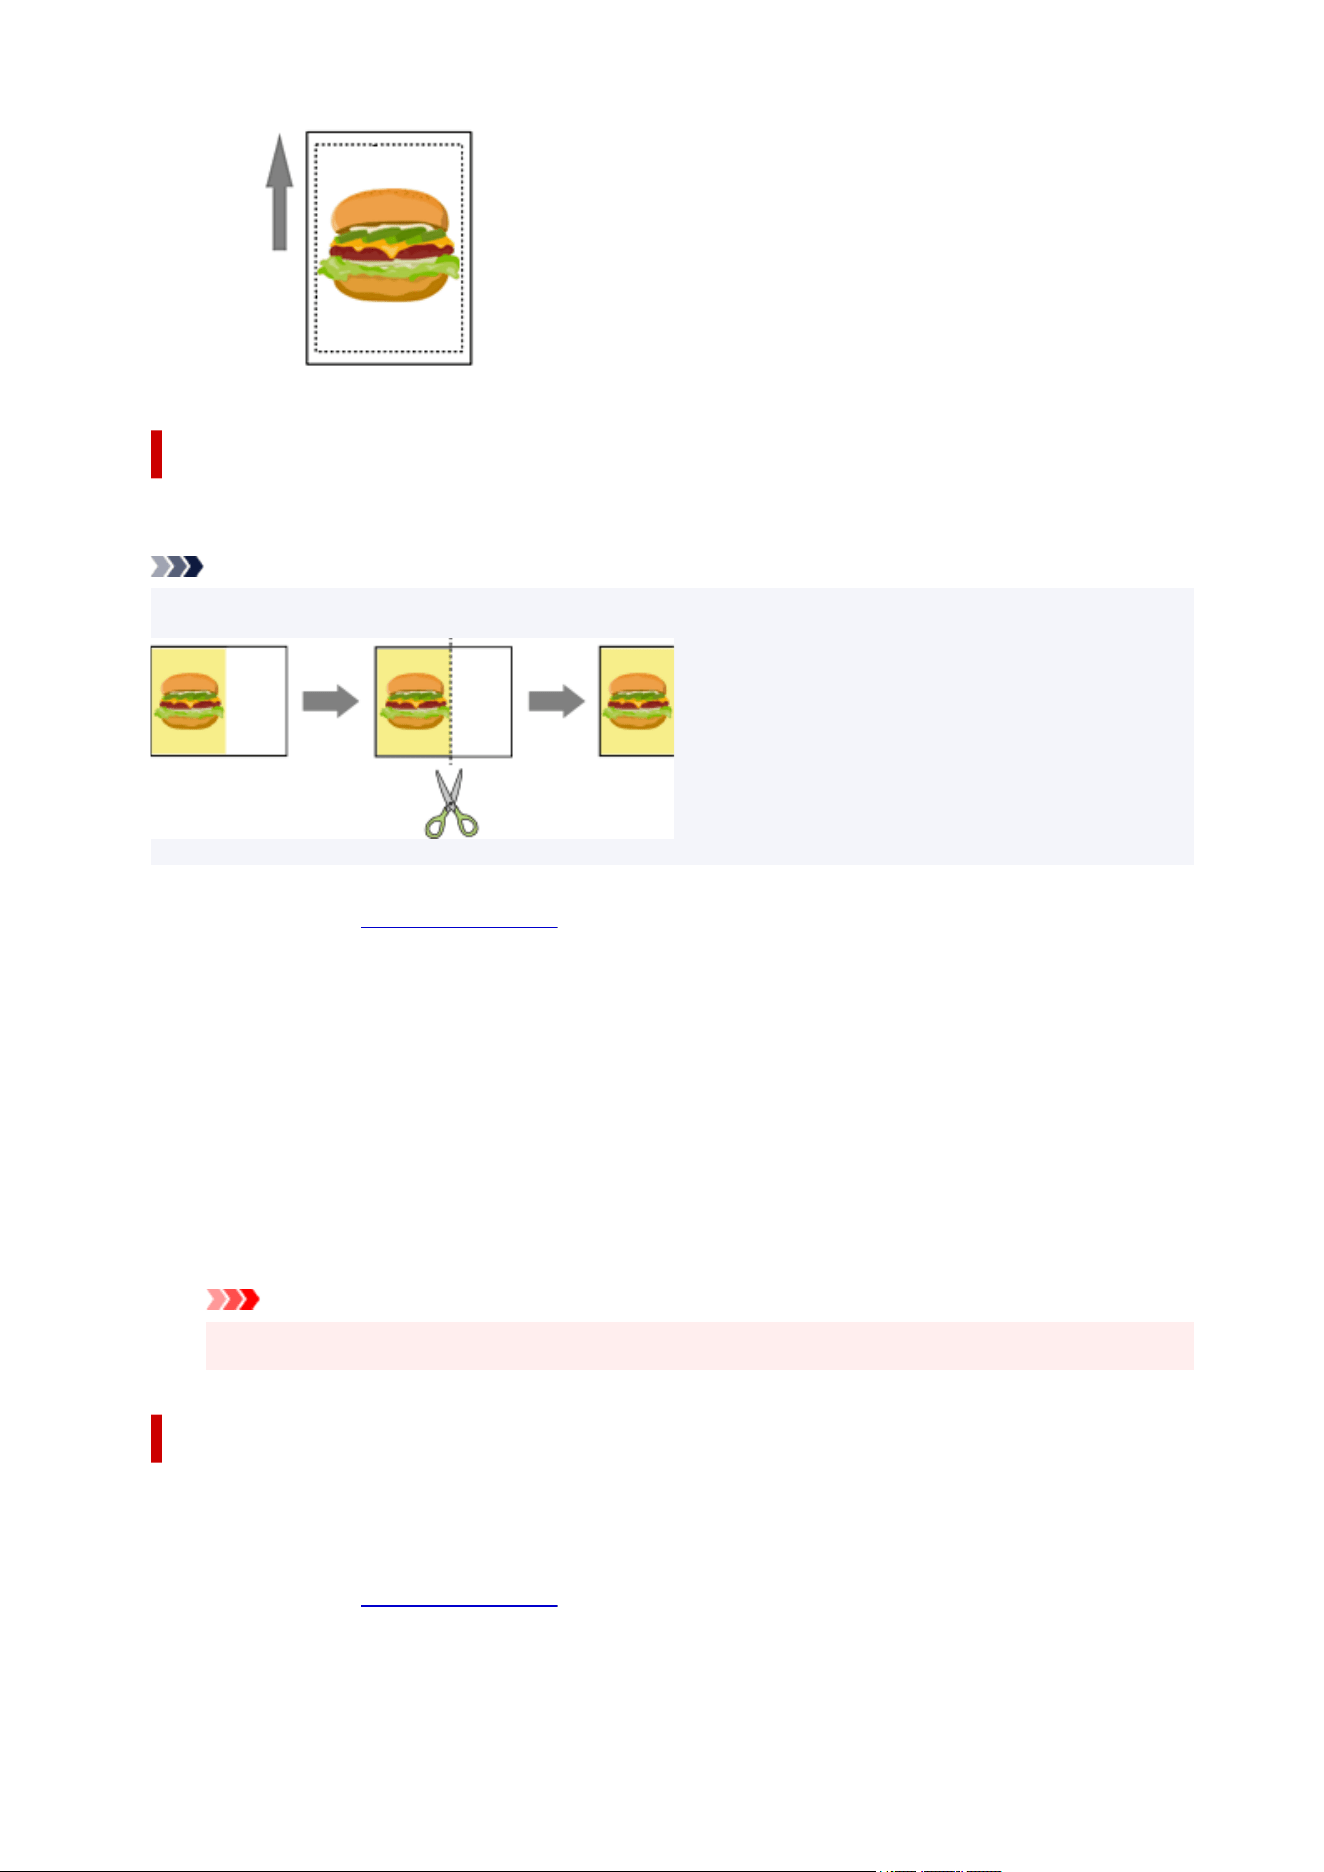
Printing Without Borders on Three Sides
Print posters disregarding the roll paper width, without borders on three sides of the paper.
Note
• After printing, trim the right edge of the paper.•
1. Complete the roll paper settings, and then select the Borderless Printing (or Minimal1.
Margin Printing) checkbox.
2.
Specify as follows according to the preferred output size.
2.
To print at page size:
Deselect the Enlarged/Reduced Printing checkbox.
To scale to media size:
Select the Enlarged/Reduced Printing checkbox, select Fit in Printable Area, and then specify
Media Size.
Important
•
Printing without borders on three sides may not be available depending on your model.
Large-Format Printing
Print non-standard size posters such as horizontal or vertical banners filling the entire roll paper width
without borders.
1.
Complete the roll paper settings, and then select the Borderless Printing (or Minimal
1.
Margin Printing) checkbox.
82
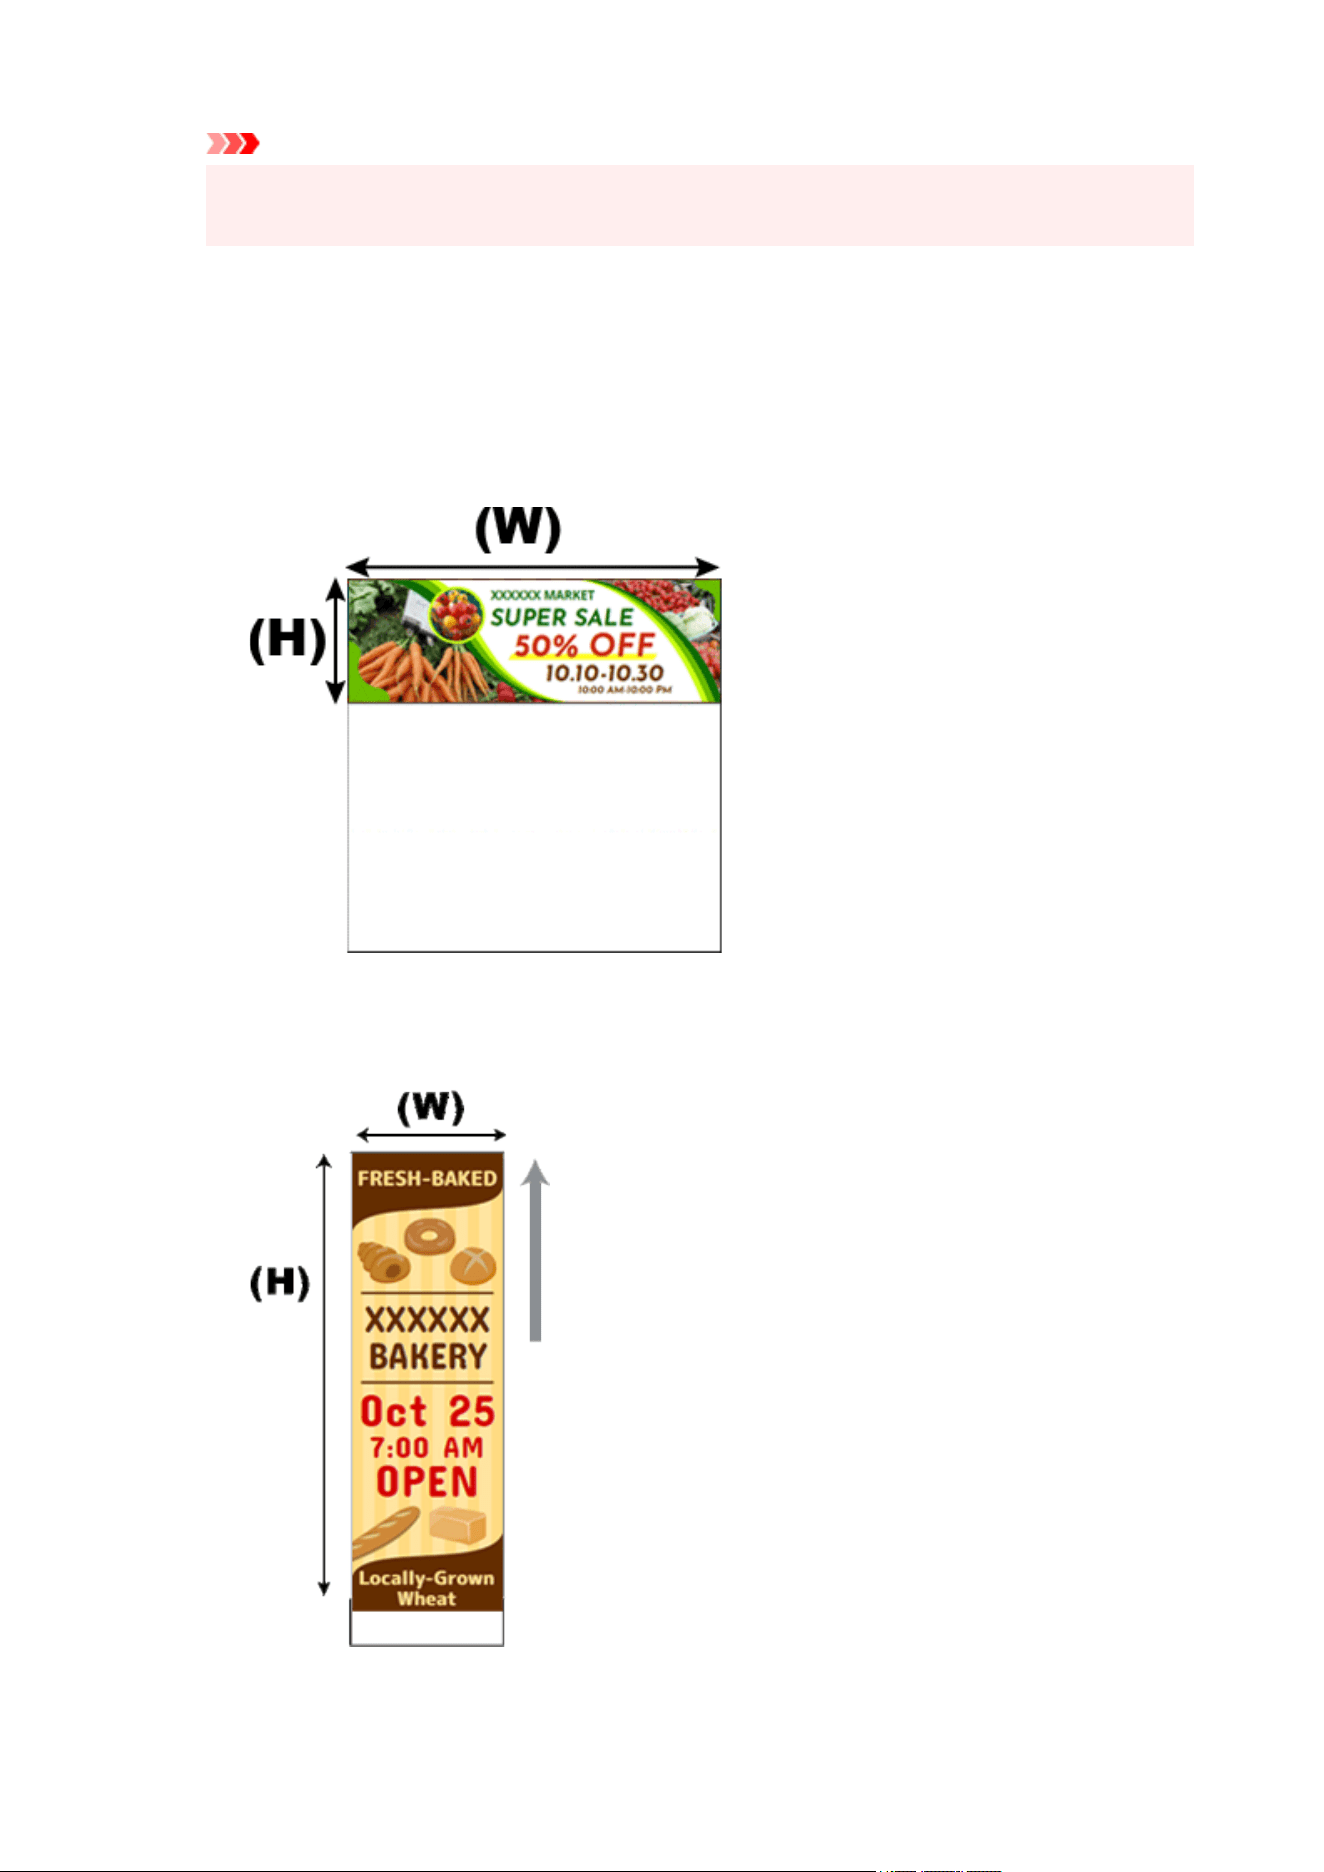
Important
• Depending on your model, you will need to prepare roll paper whose width and paper type support
borderless printing.
2. Select the Enlarged/Reduced Printing checkbox.2.
3. Select whether to fit the long side or short side of the page size to the roll paper width.3.
Fit Long Side to Roll Width:
The poster size is scaled so that the width (indicated by W in the figure) fills the width of the roll
paper.
Fit Short Side to Roll Width:
The poster size is scaled so that the width (indicated by W in the figure) fills the width of the roll
paper.
83
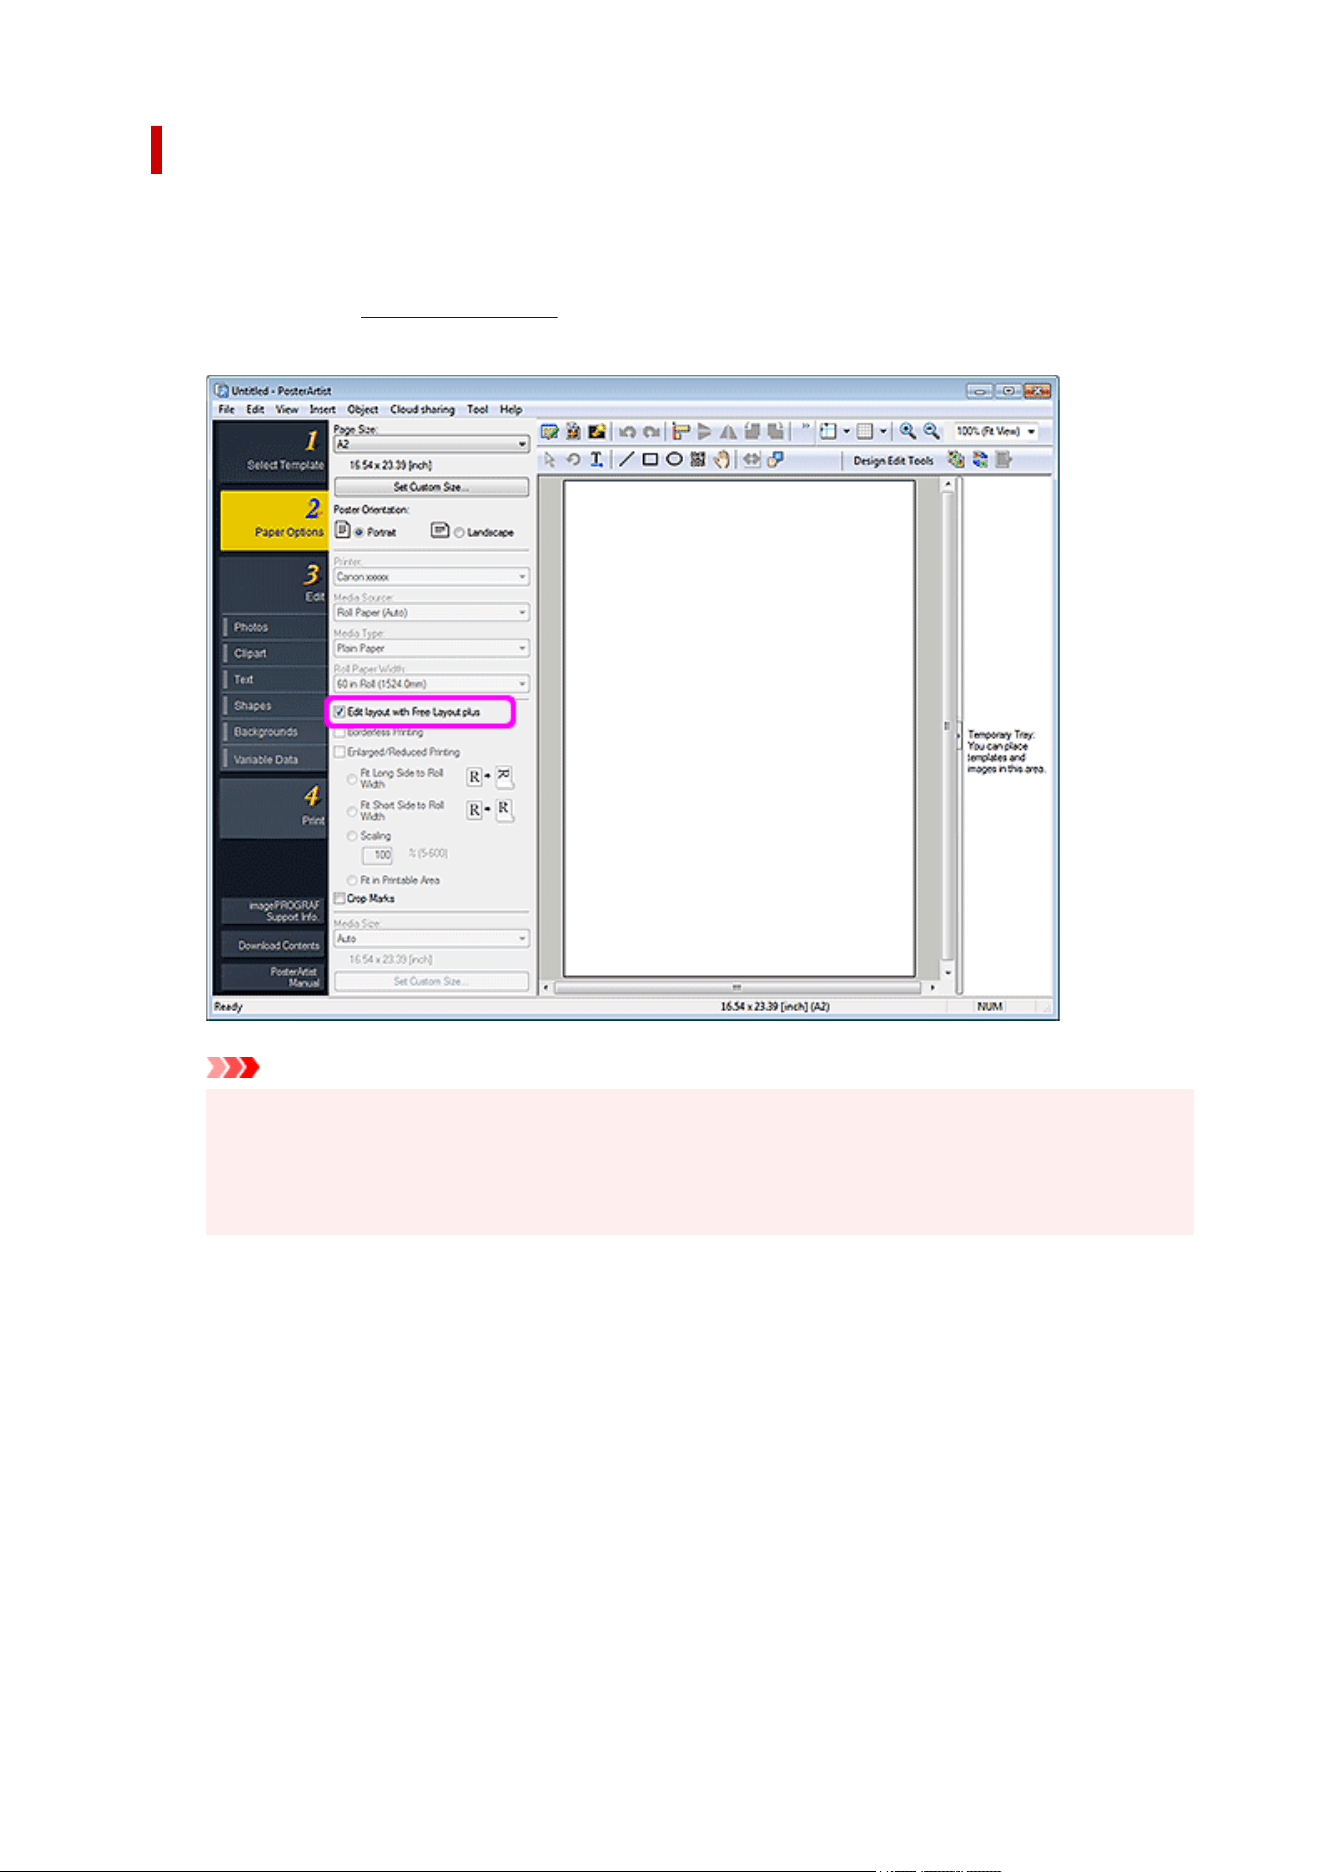
Printing Larger than Roll Paper Size
To print in a larger size than the roll paper, use Free Layout plus and freely adjust the layout before
printing.
1.
Complete the roll paper settings, and then select the Edit layout with Free Layout plus
1.
checkbox.
Important
• This function may not be available depending on your model.
• This function is available only when the Free Layout plus application is installed.
• When you use this function, you cannot configure output media in PosterArtist. Specify the media size
in Free Layout plus.
84
When Printing on Cut Sheets
1. In the task area, click Paper Options.1.
The view switches to the Paper Options screen.
2. In Page Size, select the page size of the poster.2.
Note
•
Non-standard page sizes can be specified as well. For details, see Specifying Non-Standard Page
Sizes.
•
The poster page size is displayed in the status bar.
•
3.
In Poster Orientation, select Portrait or Landscape.
3.
4. In Printer, select the printer to use.4.
Important
• Only printers compatible with PosterArtist are displayed in the list.
• Settings in Paper Options are automatically reflected in the printer driver.
5.
In Media Source, select source other than roll paper.
5.
Note
• Supported paper sources vary depending on your model.
6.
In Media Type, select the paper type for printing.
6.
Note
• Supported paper types vary depending on your model.
7.
To print on cut sheets that are different in size from the page size, in Media Size, select the
7.
size of the paper to load in the printer.
Note
•
Supported paper sizes vary depending on your model.
•
For non-standard size posters, click Set Custom Size.... For details, see Specifying Non-Standard
Page Sizes.
Important
• If the Page Size is larger than the Media Size, the poster may not be printed because portions around its
edges will be cut off if printed. In that case, select the Enlarged/Reduced Printing checkbox, and then set
85

When Printing to Scale
Print created posters in an enlarged or reduced scale.
1. In the task area, click Paper Options.1.
The view switches to the Paper Options screen.
2.
In Page Size, select the page size of the poster.
2.
Note
•
Non-standard page sizes can be specified as well. For details, see Specifying Non-Standard Page
Sizes.
•
The poster page size is displayed in the status bar.
•
3. In Poster Orientation, select Portrait or Landscape.3.
4. In Printer, select the printer to use.4.
Important
• Only printers compatible with PosterArtist are displayed in the list.
• Settings in Paper Options are automatically reflected in the printer driver.
5.
In Media Source, select paper source.
5.
6. In Media Type, select the paper type for printing.6.
Note
• Supported paper types vary depending on your model.
7. If Roll Paper is selected in Media Source, select the width of the roll paper loaded in the7.
printer in Roll Paper Width.
Note
•
Supported roll paper types vary depending on your model.
8.
If Roll Paper is selected in Media Source, deselect the Borderless Printing (or Minimal
8.
Margin Printing) checkbox.
9.
Select the Enlarged/Reduced Printing checkbox.
9.
10.
Click Scaling, and then specify scale for printing.
10.
87

11. If Cut Sheet is selected in Media Source, select the size of the paper to load in the printer11.
in Media Size.
Note
•
Supported paper sizes vary depending on your model.
• For non-standard size posters, click Set Custom Size.... For details, see Specifying Non-Standard
Page Sizes.
• For some models, Minimal Margin Printing is displayed instead of Borderless Printing. When
Minimal Margin Printing is displayed, printouts will have slight margins on the left and right sides.
88

When Printing Entire Poster Within Printable Area
When the page size is larger than the size of the paper loaded in the printer, reduce the scale to print the
entire poster on the paper.
1. In the task area, click Paper Options.1.
The view switches to the Paper Options screen.
2.
In Page Size, select the page size of the poster.
2.
Note
•
Non-standard page sizes can be specified as well. For details, see Specifying Non-Standard Page
Sizes.
•
The poster page size is displayed in the status bar.
•
3. In Poster Orientation, select Portrait or Landscape.3.
4. In Printer, select the printer to use.4.
Important
• Only printers compatible with PosterArtist are displayed in the list.
• Settings in Paper Options are automatically reflected in the printer driver.
5.
In Media Source, select paper source.
5.
6. In Media Type, select the paper type for printing.6.
Note
• Supported paper types vary depending on your model.
7.
Select the Enlarged/Reduced Printing checkbox.
7.
8.
Click Fit in Printable Area.
8.
9.
In Media Size, select the size of the paper to load in the printer.
9.
Note
•
Supported paper sizes vary depending on your model.
•
For non-standard size posters, click Set Custom Size.... For details, see Specifying Non-Standard
Page Sizes.
Note
• The poster will be printed in an appropriate orientation so that margins will be smaller.•
89
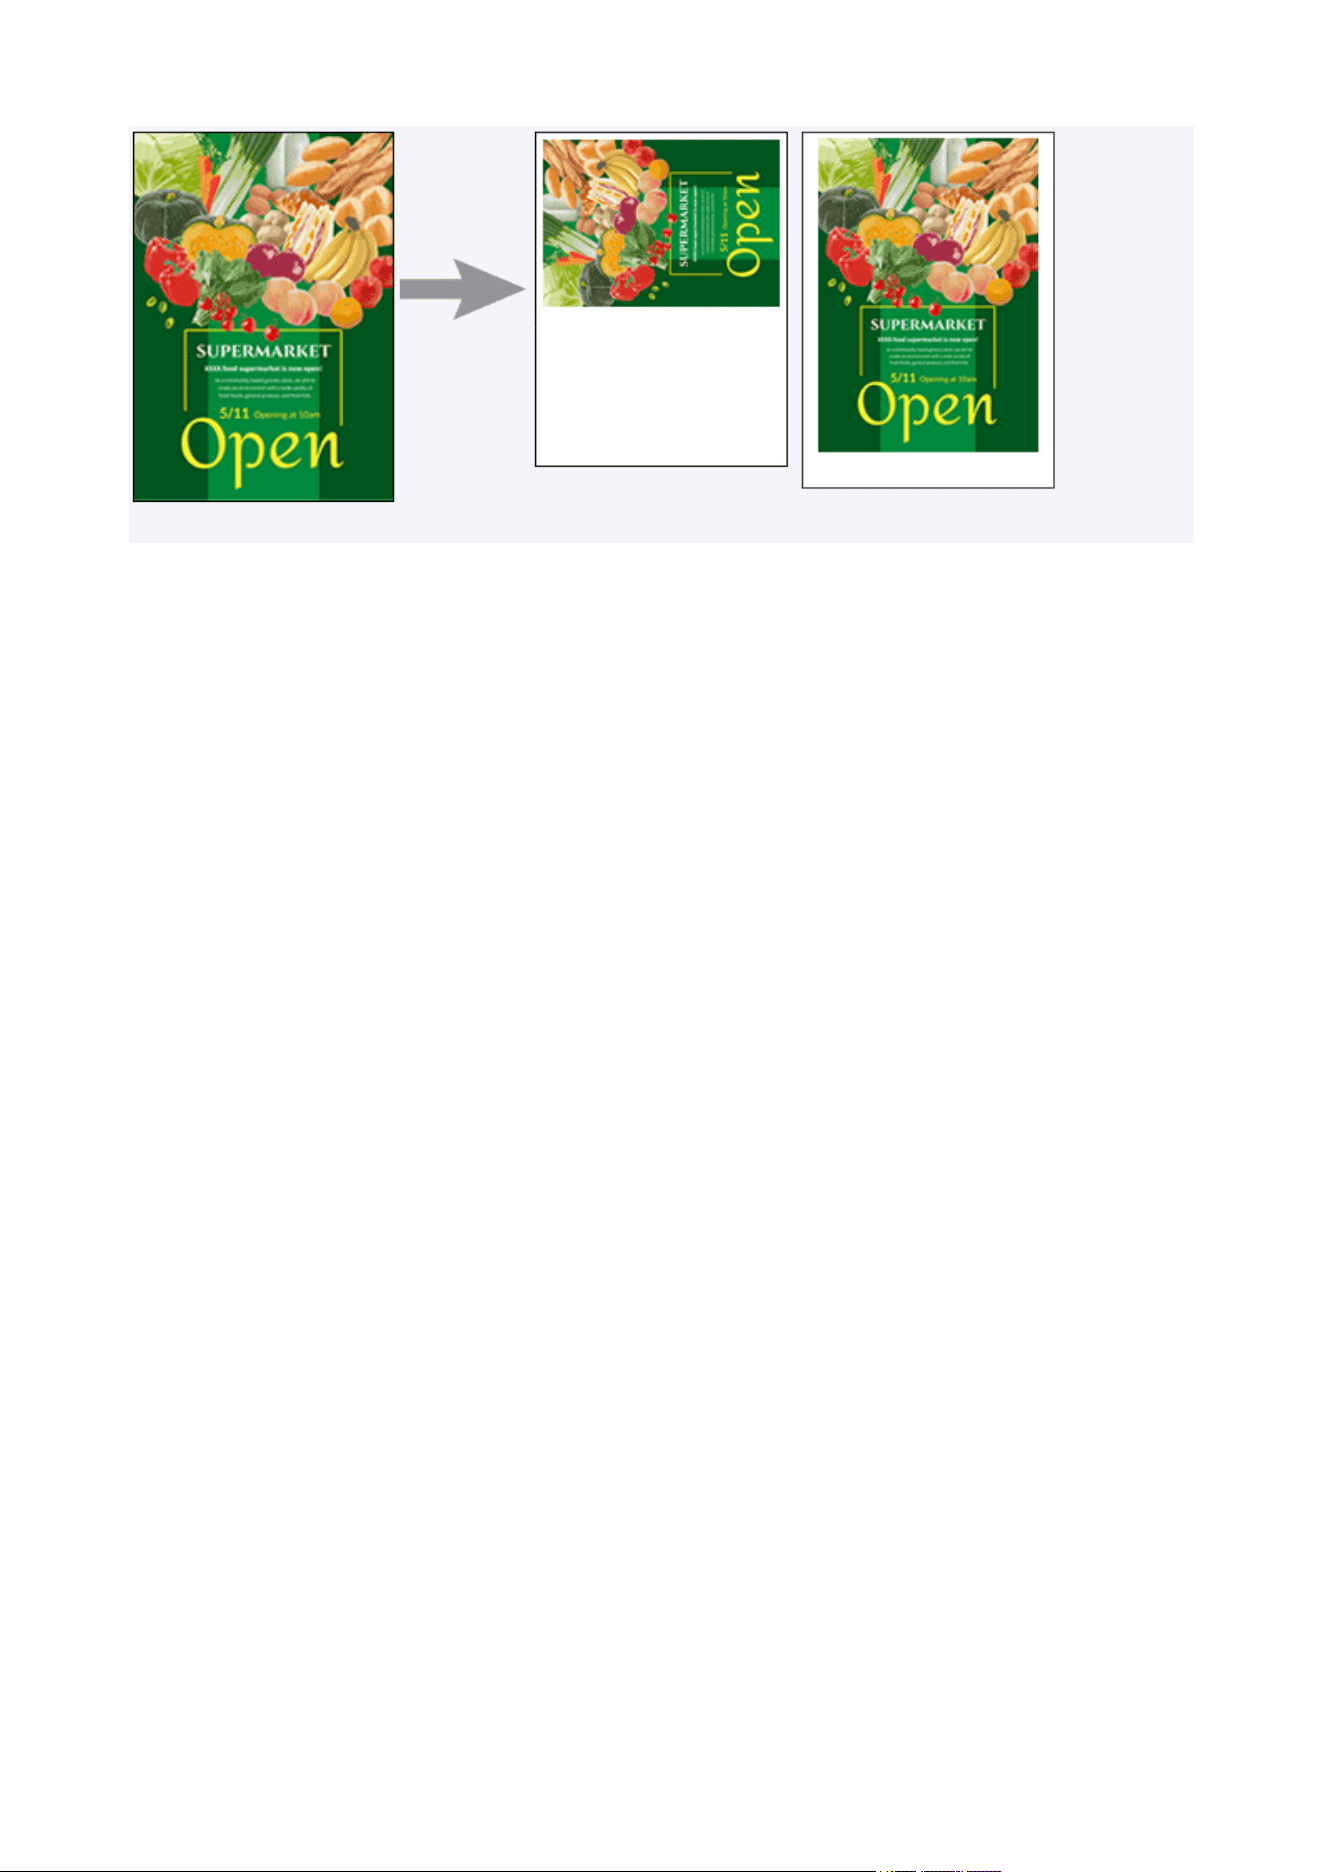
90

Adding Crop Marks
Print crop marks in the margins of posters to indicate the cutting positions.
1. In the task area, click Paper Options.1.
The view switches to the Paper Options screen.
2.
Specify Page Size, Poster Orientation, Printer, Media Source, Media Type, and other
2.
settings.
3.
Select the Crop Marks checkbox.
3.
Important
• Crop marks cannot be printed in the following cases.•
When performing borderless printing (or minimal margin printing)
When printing on cut sheets without scaling with the same paper size set in Page Size and Media Size
When printing on roll paper without scaling with the same size set in Page Size and Roll Paper Width
91
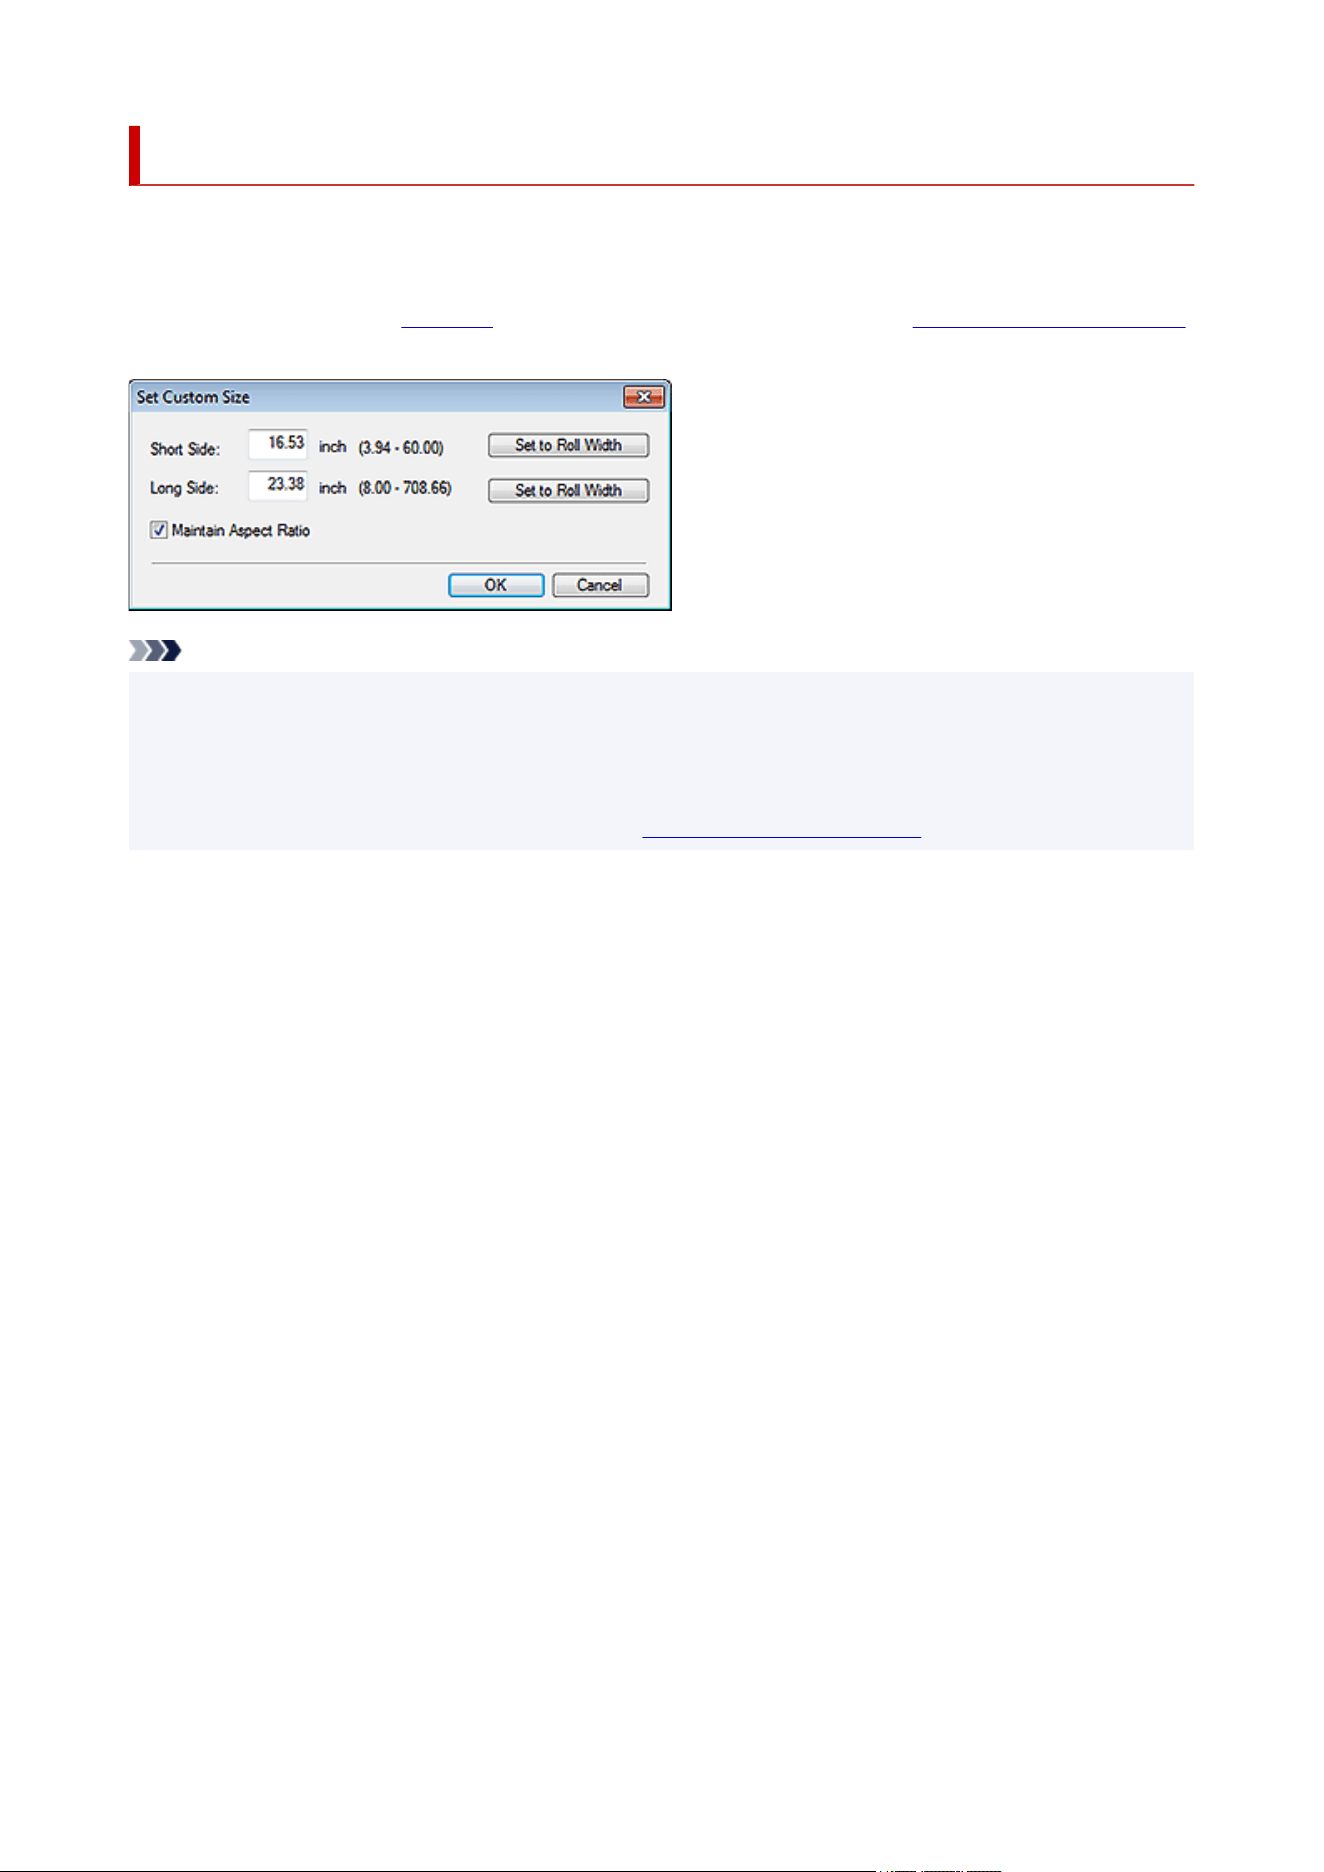
Specifying Non-Standard Page Sizes
Create non-standard size posters such as horizontal or vertical banners by specifying a page size of your
choice.
Click Paper Options in the task area, click Set Custom Size..., and then in the Set Custom Size dialog box,
enter the values in Short Side and Long Side.
Note
• To set the same length for the poster's short side or long side as the roll paper width, click Set to Roll
Width.
• When Short Side or Long Side is set, the value for the other is set automatically to maintain the aspect
ratio. To change the aspect ratio, deselect the Maintain Aspect Ratio checkbox.
• For details on the Set Custom Size dialog box, see Set Custom Size Dialog Box.
92

Inserting Images and Materials
In PosterArtist, various photos, clipart and templates are available. These materials are referred to as
"library."
Combine materials in the library as desired to create posters.
In addition, images saved on your computer or CD-ROMs as well as images from digital cameras or
scanners can be directly inserted in posters.
You can also save inserted images to the library.
Inserting Images in Posters
Adding QR Codes
Note
• Once images are inserted, modifying them in PosterArtist does not alter the original images.
• For supported image formats, see Supported File Formats.
93

Inserting Images in Posters
In addition to photos and clipart provided in the PosterArtist library, you can also insert your favorite images
in posters.
Note
• Inserted images can be resized, rotated, moved, etc. as desired. For details, see Working with Objects.
Inserting from PosterArtist Library
Inserting from Computers or CD-ROMs
Inserting from Scanners and Other TWAIN Devices
Inserting from Scanners Using PosterArtist QuickCopy
Inserting from Digital Photo Front-Access
Inserting Print Images from Other Applications
Copying and Pasting from Other Applications
Inserting from PosterArtist Library
Insert templates and images from the PosterArtist library.
Note
• For instructions on inserting templates and images in posters, see the following.•
Selecting Templates
Adding, Replacing and Removing Photos
Adding, Replacing and Removing Clipart
Inserting from Computers or CD-ROMs
1. Click Edit in the task area, and then click Photos.1.
The view switches to the Edit screen (Photos).
2.
Click Add / Replace....
2.
The Insert Image dialog box appears.
Note
•
In the Insert Image dialog box, only files in formats supported by PosterArtist are displayed. For
supported file formats, see Supported File Formats.
3.
Select the image you want to add, and then click Open.
3.
The image is inserted in the poster.
Note
•
You can also select multiple files at one time.
•
To replace images, right-click an image on the poster, and then select Replace Image > From File....
94

Inserting from Scanners and Other TWAIN Devices
Use a TWAIN device to insert images directly in posters.
Important
• Before acquiring images, check that the TWAIN device is connected correctly.
• For details on TWAIN device connection, driver installation, and screen operations, see the manual for
the TWAIN device.
1.
From the Insert menu, select Add / Replace Image > Read from (Device Name)....
1.
The screen for the TWAIN device appears.
2.
Follow the instructions on the screen for the TWAIN device to acquire the image.
2.
The acquired image is inserted in the poster.
Note
•
Images can also be acquired from a TWAIN device when you right-click an image on the poster, and
then select Replace Image > Read from (Device Name)....
Inserting from Scanners Using PosterArtist QuickCopy
PosterArtist QuickCopy is an application to print enlarged copies of photos, documents, and other
originals scanned with a scanner connected to a computer.
You can also send photos and documents scanned with a scanner to PosterArtist. Sent data is inserted in
posters as a single image, and can be edited in the same way as other images.
Note
• For details on PosterArtist QuickCopy, see Creating and Printing Enlarged Copies of Photos and
Documents.
Inserting from Digital Photo Front-Access
Use Digital Photo Front-Access to easily link photos from Canon digital cameras and other images on
your computer with other applications.
Send images from Digital Photo Front-Access to PosterArtist as follows.
1.
In Digital Photo Front-Access, select an image.
1.
2.
Select the menu to start PosterArtist or drag and drop the image to the PosterArtist icon.
2.
The image is placed in PosterArtist's temporary tray.
Inserting Print Images from Other Applications
Send documents and graphs created with Microsoft Office or other applications from the printer driver to
PosterArtist to insert them in posters.
95

Important
• Requires installation of imagePROGRAF Printer Driver Ver. 3.50 or later.
1. In application's menu, click Print.1.
2.
In the displayed dialog box, select printer, and then select Properties.
2.
The printer driver's Properties dialog box appears.
3.
Click the Layout tab.
3.
4.
On the Layout tab, select the Page Layout checkbox, and then in the list, click Edit
4.
Using PosterArtist.
5.
In the Properties dialog box, click OK.
5.
6.
In the Print dialog box, click OK.
6.
The Page Capture window appears, showing thumbnails of the print image.
Note
•
PosterArtist starts automatically even if it was not running.
7.
Select the page to send to PosterArtist, and then click Load.
7.
Note
•
To send all pages, click Select All.
You can also select multiple pages at one time.
The print image is sent to PosterArtist and inserted in the poster.
Copying and Pasting from Other Applications
Copy data (tables, graphs, etc.) created in other applications to paste into posters.
1.
In application, right-click object, and then click Copy.
1.
2.
Right-click anywhere in the poster design area, and then click Paste.
2.
The object is pasted onto the center of the poster; move it as needed.
© CANON INC. 2024
96
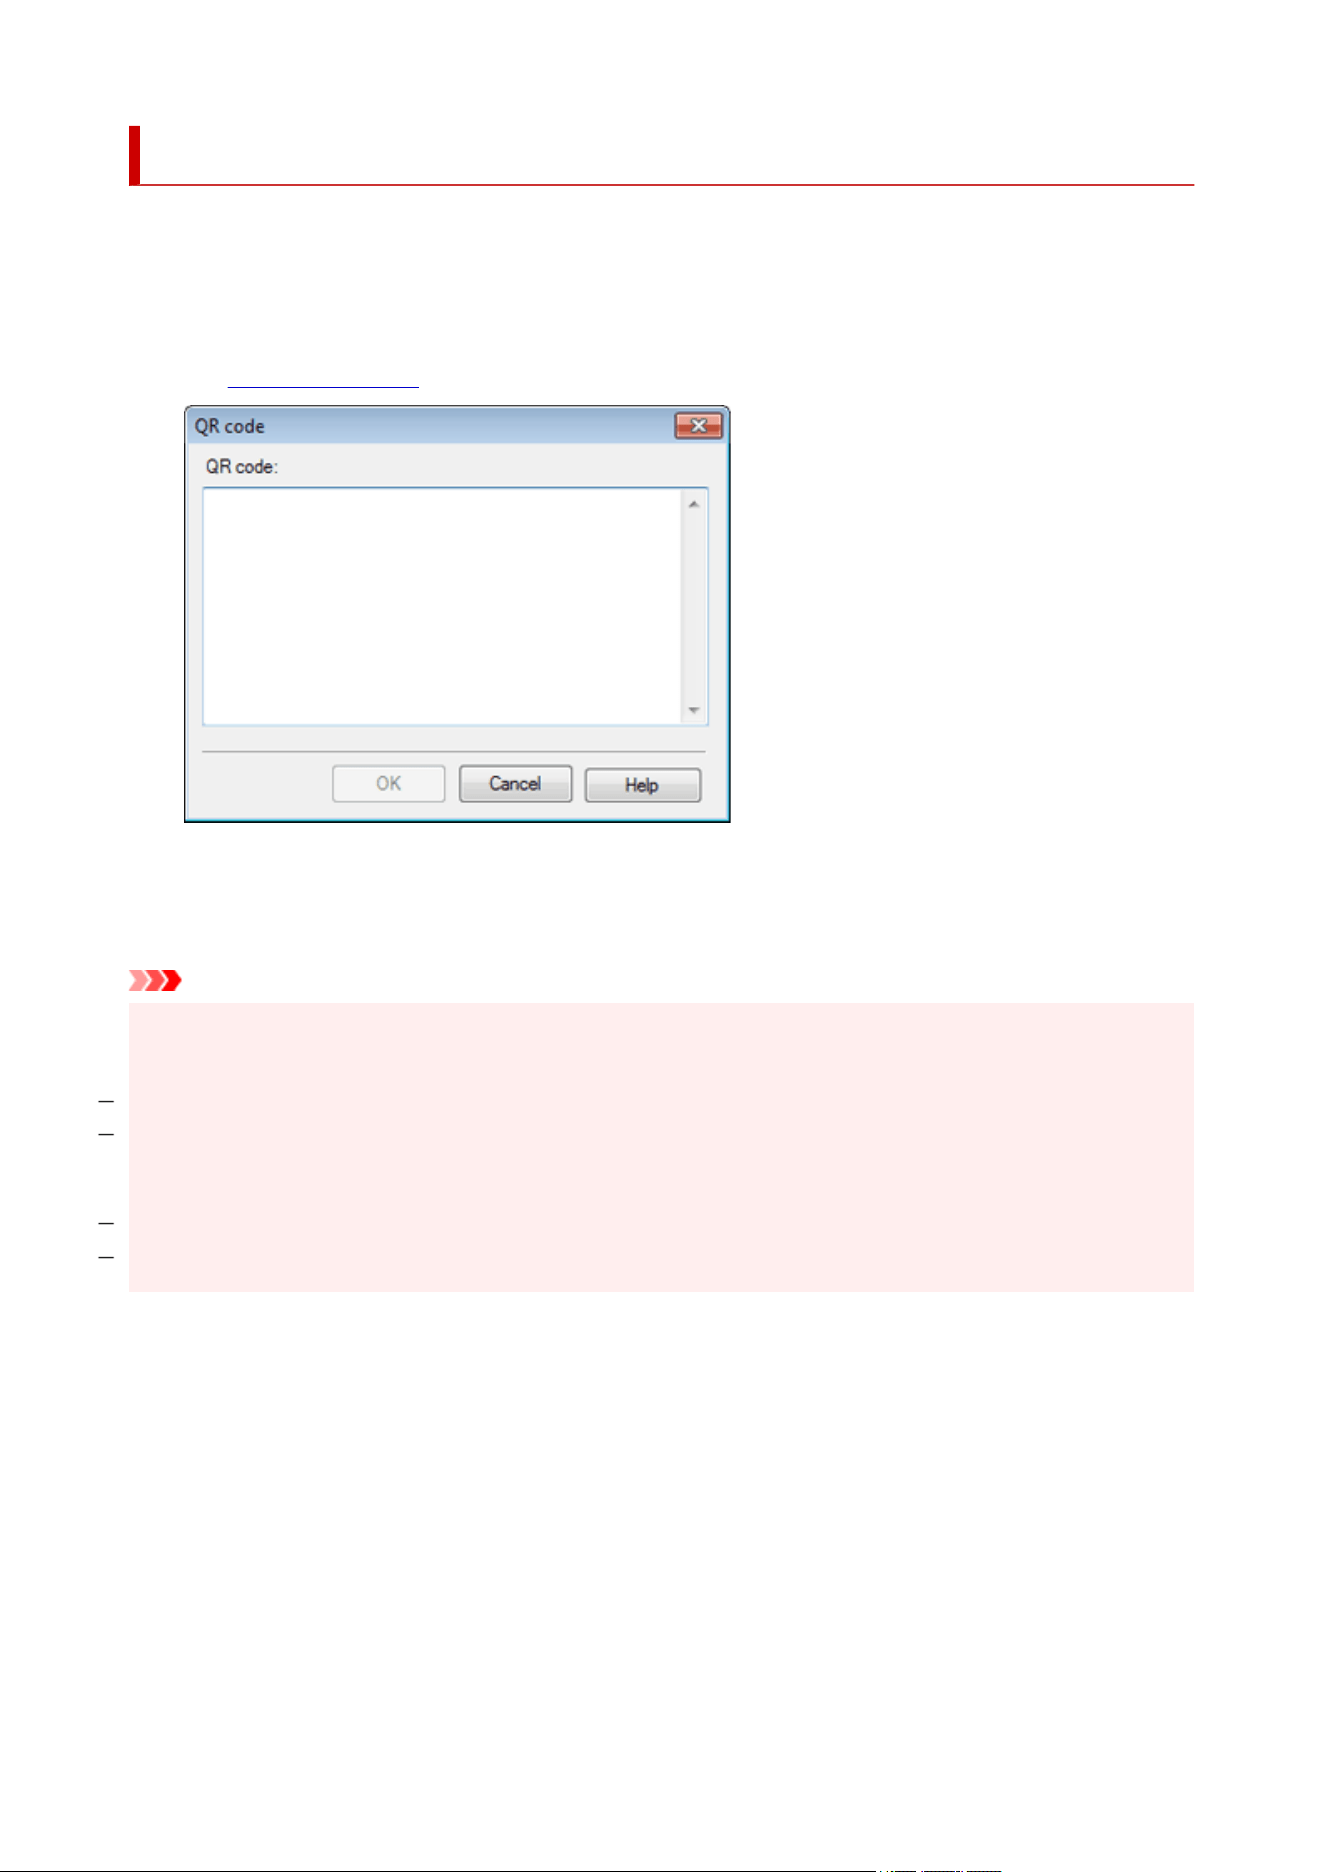
Adding QR Codes
Add QR codes to posters.
Add QR codes to convey additional information that cannot be conveyed by a poster alone.
1. From the Insert menu, select Add / Replace Image > QR Code....1.
The QR code dialog box appears.
2.
In QR code, enter text such as email address and URL, and then click OK.
2.
The QR code is added to the poster. It can be placed as desired in the same way as other objects.
Important
• If a large number of characters is entered, a warning message may appear depending on the scanning•
device used. The approximate number of characters that can be entered in QR code is as follows.
Numbers only: 513 characters or less
Letters and numbers: 311 characters or less
• The number of characters that can be entered in a single QR code is as follows.•
Numbers only: 7089 characters or less
Letters and numbers: 4296 characters or less
97


Adding, Replacing and Removing Photos
Add photos from the library to your poster or replace a photo on your poster with another photo.
Adding Photos
Replacing Photos
Removing Photos
Use the temporary tray to add or replace photos easily.
Using Temporary Tray when Editing Photos
Adding Photos
1.
Click Edit in the task area, and then click Photos.
1.
The view switches to the Edit screen (Photos).
2.
Click the Photos tab.
2.
3. In Category, select a photo category.3.
4. Select a photo from the thumbnails, and then double-click it.4.
The selected photo is added to the poster.
Note
• Selected photos can also be added by dragging and dropping them to the poster design area.
• Alternatively, right-click a photo in the thumbnails, and then click Insert to Poster to add it.
• Added images can be resized, rotated, moved, etc. as desired. For details, see Working with Objects.
Replacing Photos
1.
On the poster, click the photo you want to replace.
1.
2.
Click the Photos tab.
2.
3.
Select a photo from the thumbnails, and then double-click it.
3.
The photo on the poster is replaced with the new one.
Note
•
Alternatively, right-click a photo in the thumbnails, and then click Replace to replace the photo on the
poster with the new photo.
•
Photos can also be replaced with other photos, for example from folders on your computer or from a
scanner. For details, see Inserting Images in Posters.
99

Removing Photos
1. On the poster, click the photo you want to remove.1.
2.
Press the Delete key.
2.
The selected photo is removed from the poster.
Note
•
Even after removing photos from the poster, the original photos remain on your computer.
100

Using Temporary Tray when Editing Photos
Place photos you are not sure whether to use or frequently used photos in the temporary tray.
Adding Photos to Temporary Tray from Thumbnails
Adding Photos to Temporary Tray from View All Photos Dialog Box
Adding Photos to Posters from Temporary Tray
Adding Photos to Temporary Tray from Thumbnails
1.
Click Edit in the task area, and then click Photos.
1.
The view switches to the Edit screen (Photos).
2.
Click the Photos tab.
2.
3.
In Category, select a photo category.
3.
4. Select the photo you want to add from the thumbnails, and then drag and drop it to the4.
temporary tray.
The selected photo is added to the temporary tray.
Note
• Alternatively, right-click a photo in the thumbnails, and then click Add to Temporary Tray to add it.
Adding Photos to Temporary Tray from View All Photos Dialog Box
1. Click Edit in the task area, and then click Photos.1.
The view switches to the Edit screen (Photos).
2.
Click the Photos tab.
2.
3.
Click (View All Photos).
3.
The View All Photos dialog box appears.
4.
In Category, select a photo category.
4.
5.
Select the photo you want to add from the thumbnails, and then click Add to Temporary
5.
Tray.
The selected photo is added to the temporary tray.
101

Note
• To show or hide the temporary tray, click (Arrow) on the right (or at the bottom if the poster is in
landscape orientation).
• Photos can also be added directly to the temporary tray by dragging and dropping them from folders on
your computer. For supported file formats, see Supported File Formats.
• To remove photos from the temporary tray, select one and press the Delete key. Even after removing
photos from the temporary tray, the original photos remain on your computer.
Adding Photos to Posters from Temporary Tray
1.
Drag and drop a photo from the temporary tray to the poster.
1.
The photo is added to the poster.
Note
• To replace a photo on the poster with another photo in the temporary tray, select the photo on the poster,
and then drag and drop a photo from the temporary tray to the photo on the poster.
102
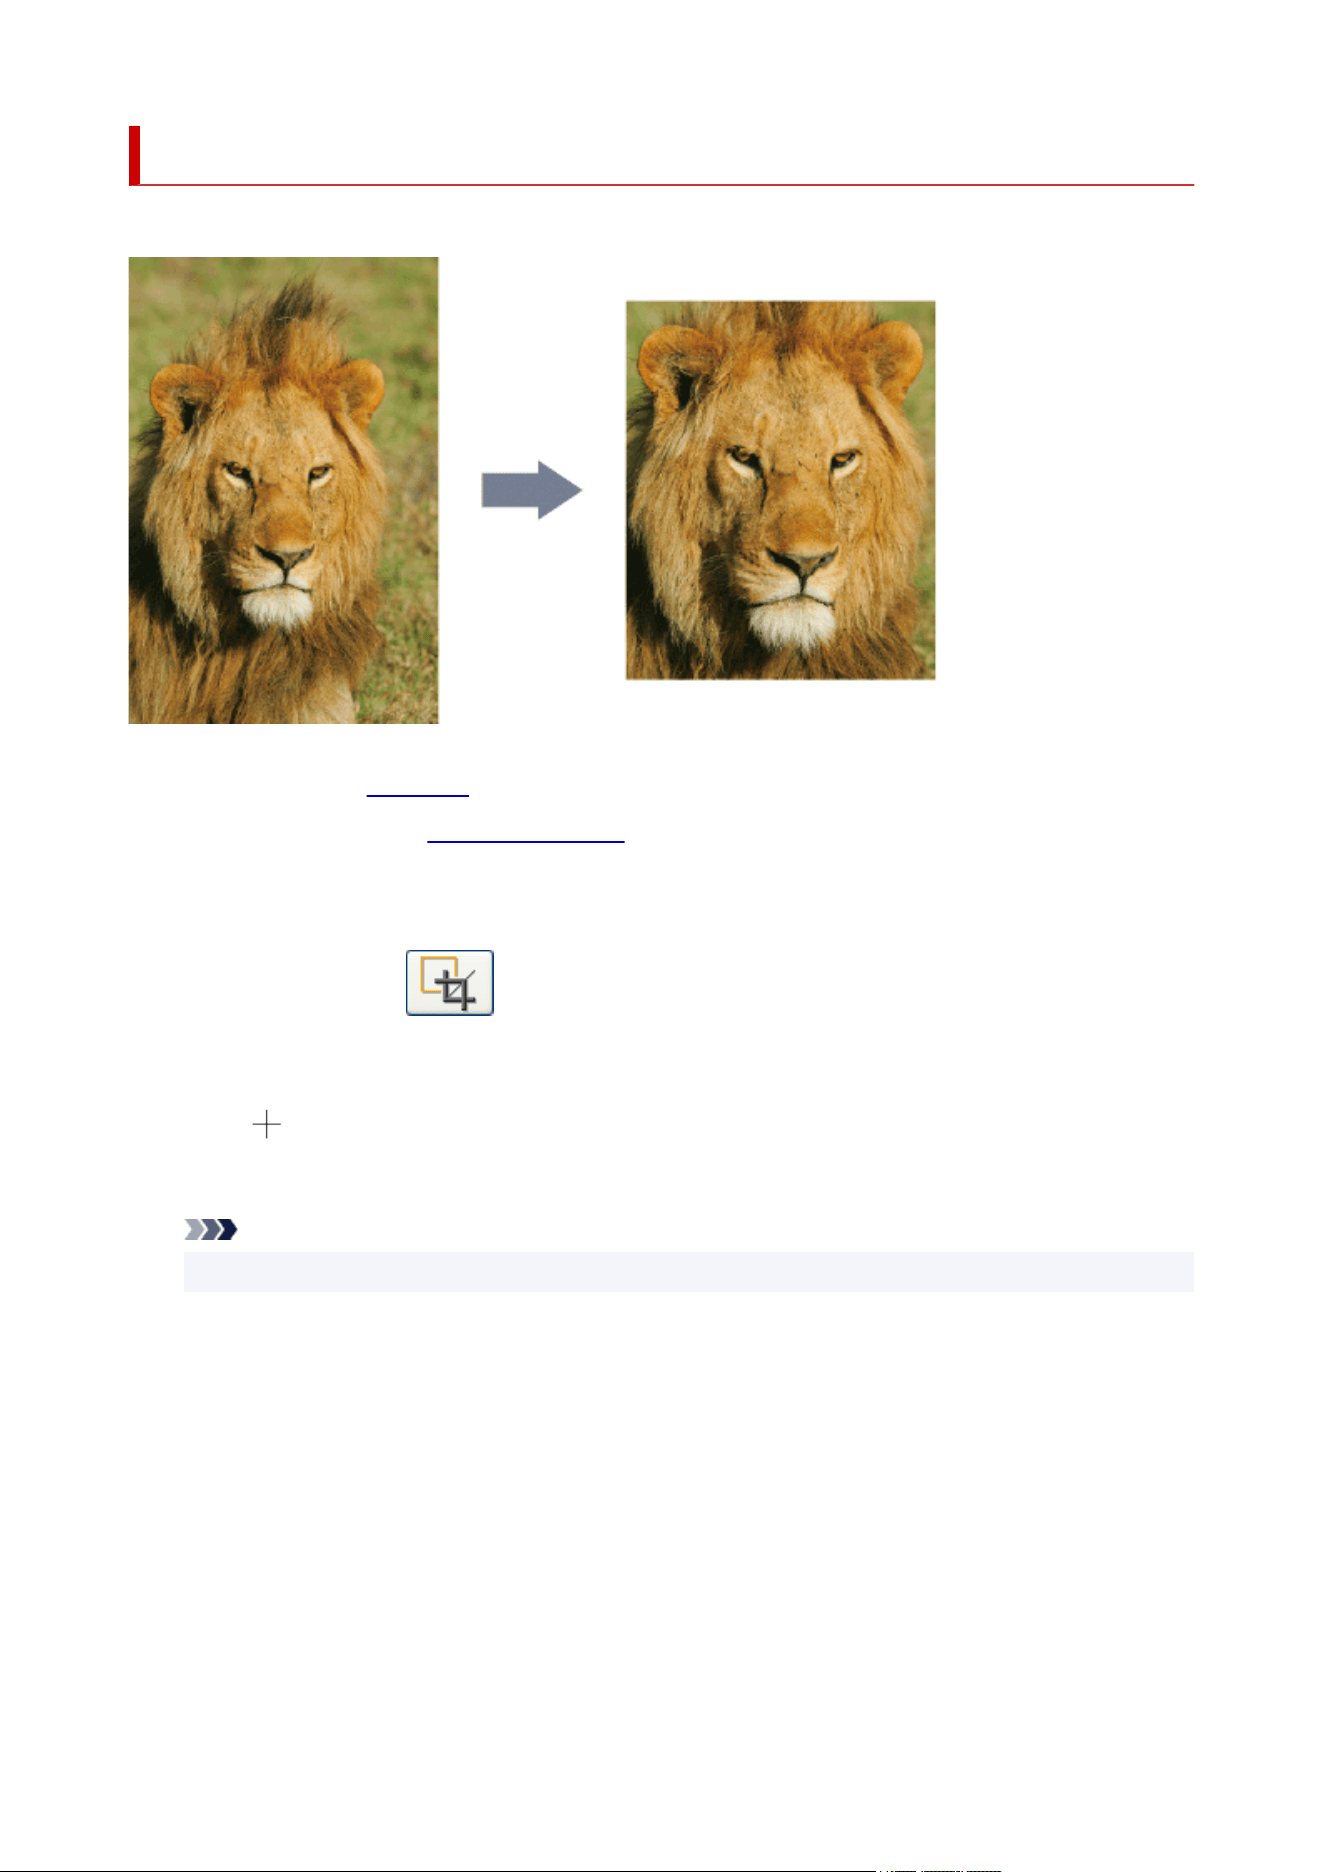
Trimming Photos
Select the area you want to keep in a photo and discard the rest.
1. Click Edit in the task area, and then click Photos.1.
The view switches to the Edit screen (Photos).
2.
On the poster, click the photo you want to trim.
2.
3. In Edit Image, click (Trim).3.
The Edit Image dialog box and preview panel appear.
4. Drag (Crosshair pointer) across the portion you want to keep.4.
The portion inside the orange frame will be retained, and the portion outside will be hidden.
Note
•
To remove trimming, in the Edit Image dialog box, click Reset Trim.
•
103
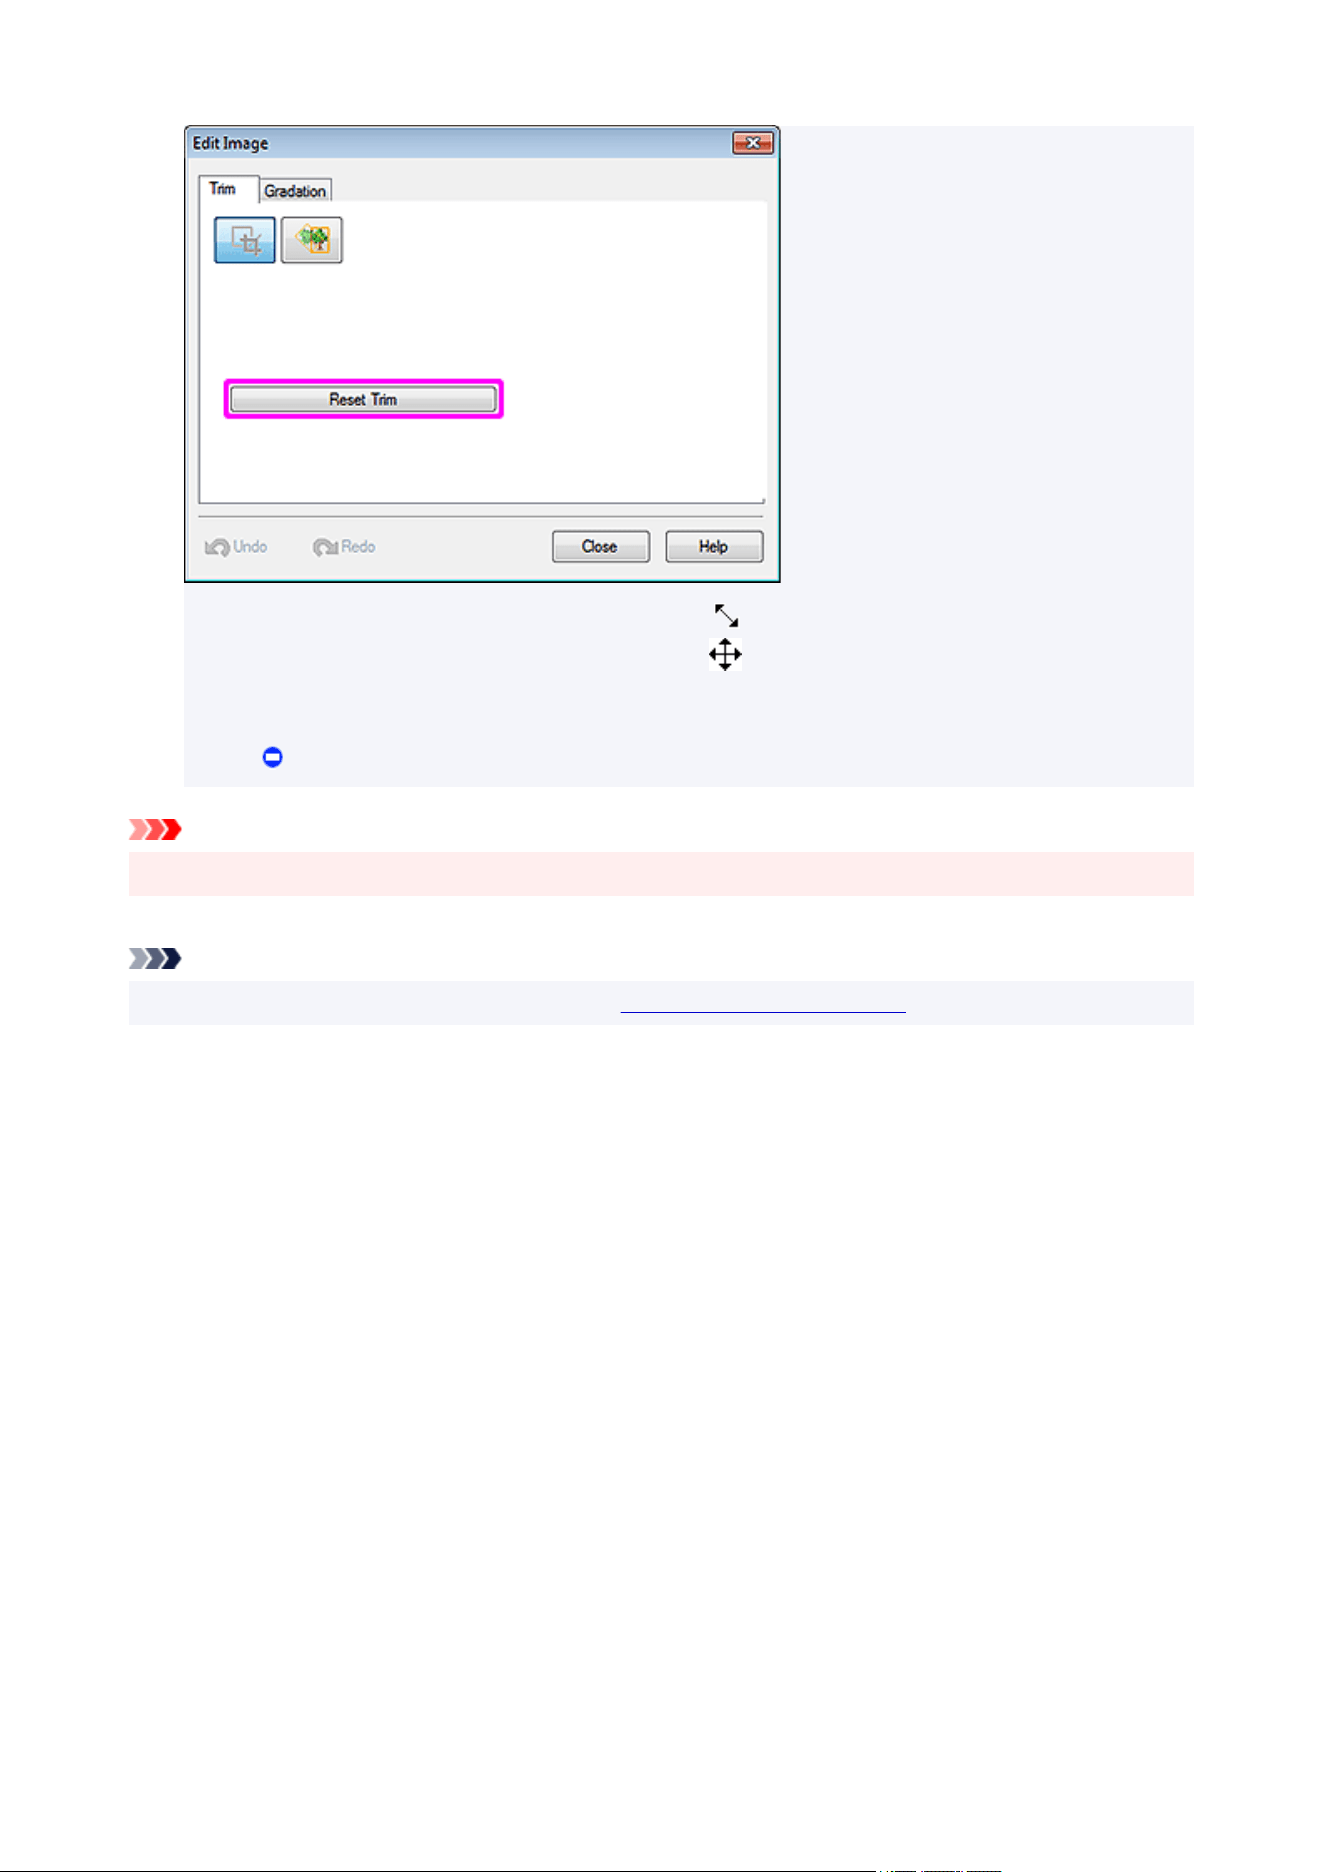
• To resize the orange frame for the trimming area, drag (Resize handle) in the corners.
•
To move the orange frame for the trimming area, drag (Move pointer) that appears when you point
inside the frame.
• To change the frame orientation from portrait to landscape and vice versa, rotate the orange frame by
clicking (Rotation handle).
Important
• Trimming is canceled if the photo is replaced with another photo.
Note
• For details on the Edit Image dialog box, see Edit Image Dialog Box (Trim).
104
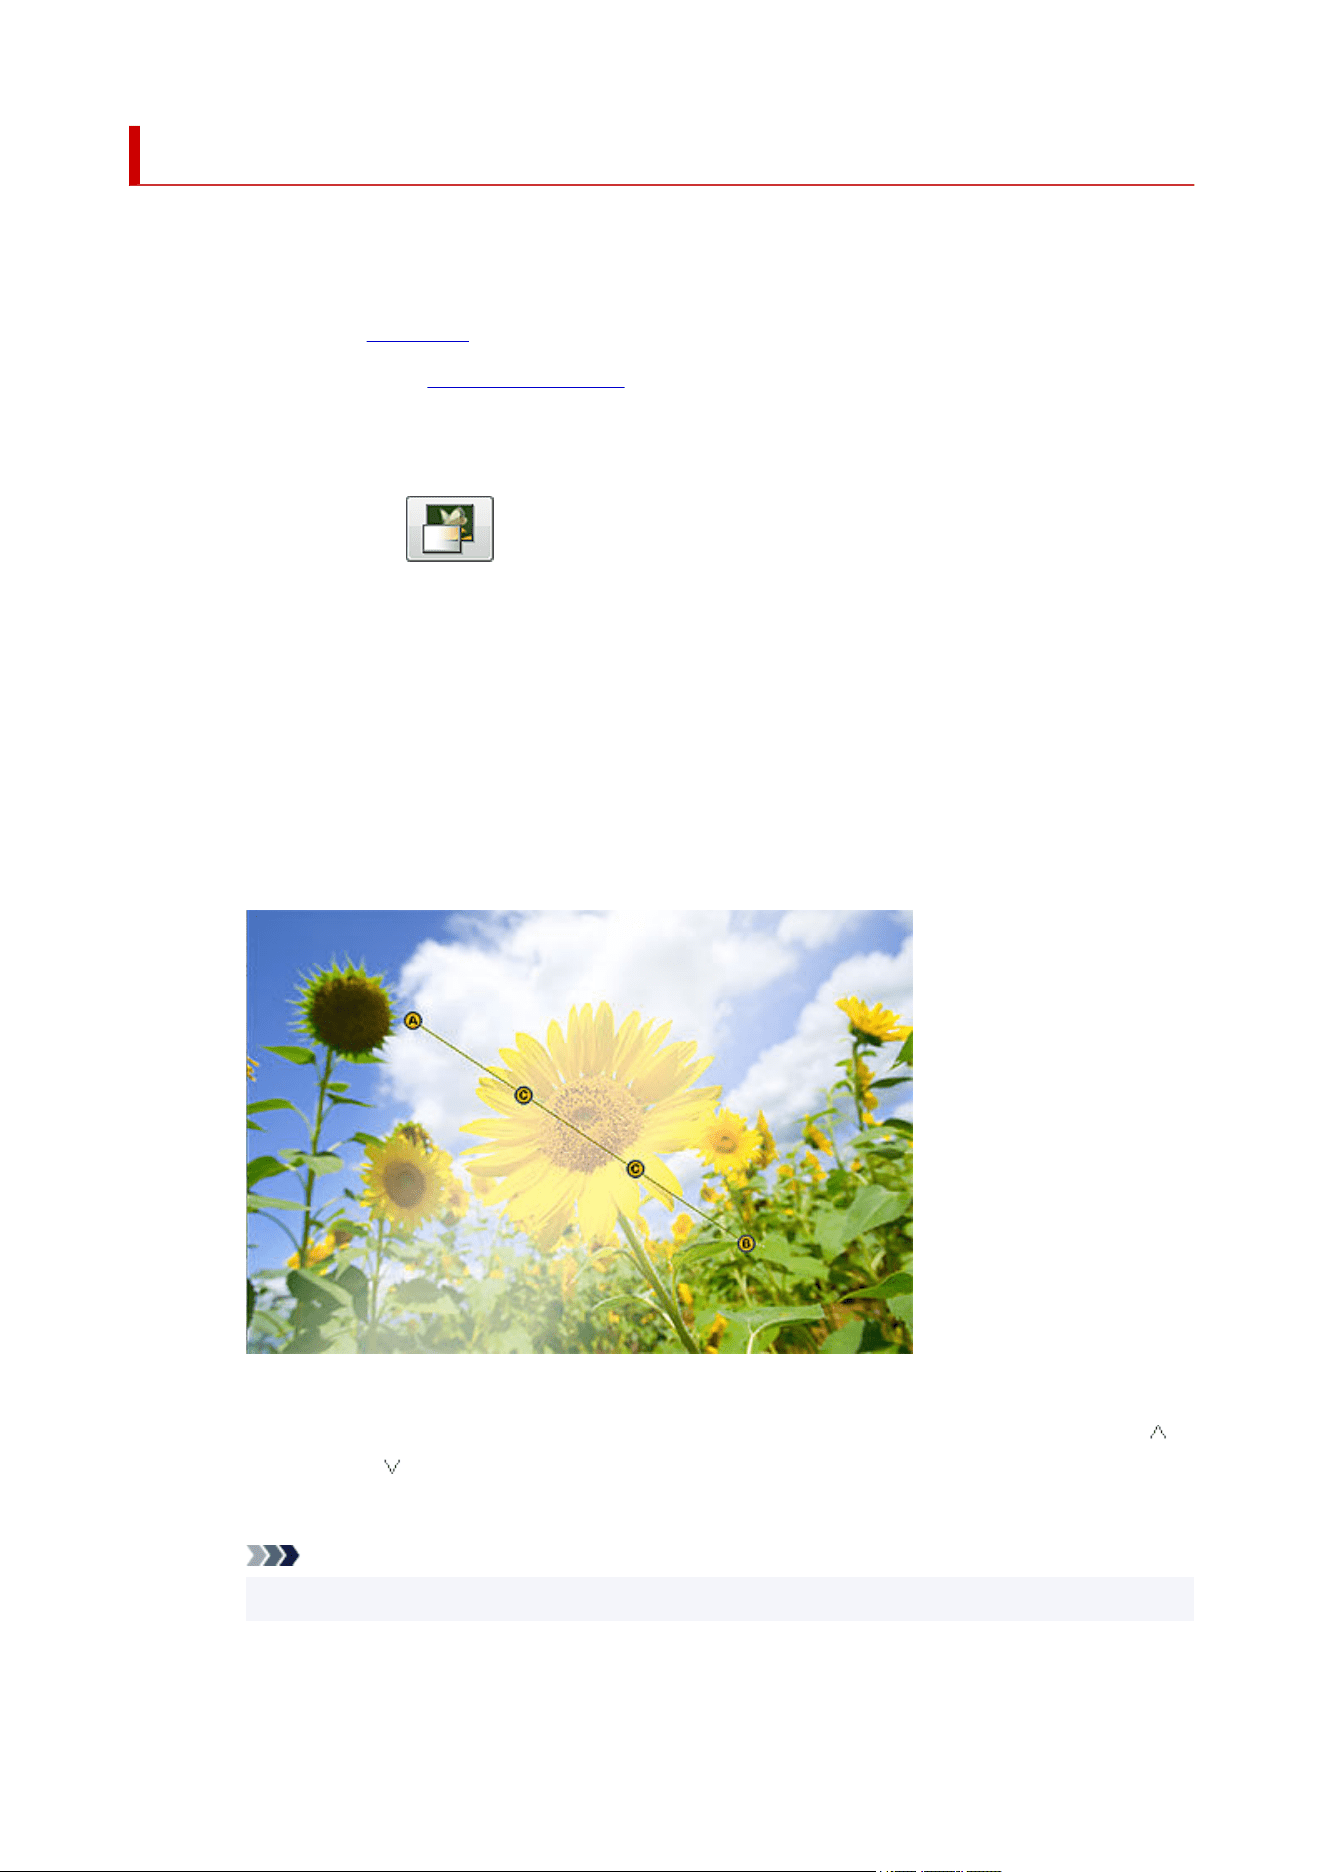
Applying Gradation to Photos
Apply a gradation to photos. Specify the direction of the gradation, opacity of the starting point and ending
point, etc. as desired.
1. Click Edit in the task area, and then click Photos.1.
The view switches to the Edit screen (Photos).
2.
On the poster, click the photo to which you want to apply a gradation.
2.
3.
In Edit Image, click (Gradation).
3.
The Edit Image dialog box and preview panel appear.
4.
In Gradation Orientation, select the direction of the gradation.
4.
5. In the preview panel, select the starting point and ending point of the gradation.5.
Applying gradation with midpoints:
Gradations can be more variable by using midpoints.
1. In Number of Points in Gradation, click Three Points.1.
In the preview, midpoints (C1 and C2) appear between the starting point (A) and ending point (B).
2.
For Point A Opacity, Point B Opacity, and Point C Opacity, enter the value directly or click
2.
(Up Arrow) or (Down Arrow) on the right to increase or decrease the value.
The gradation level is set.
Note
•
Increase the value to increase opacity and decrease the value to increase transparency.
3.
In the preview, drag the starting point (A), ending point (B), and midpoints (C1 and C2).
3.
105
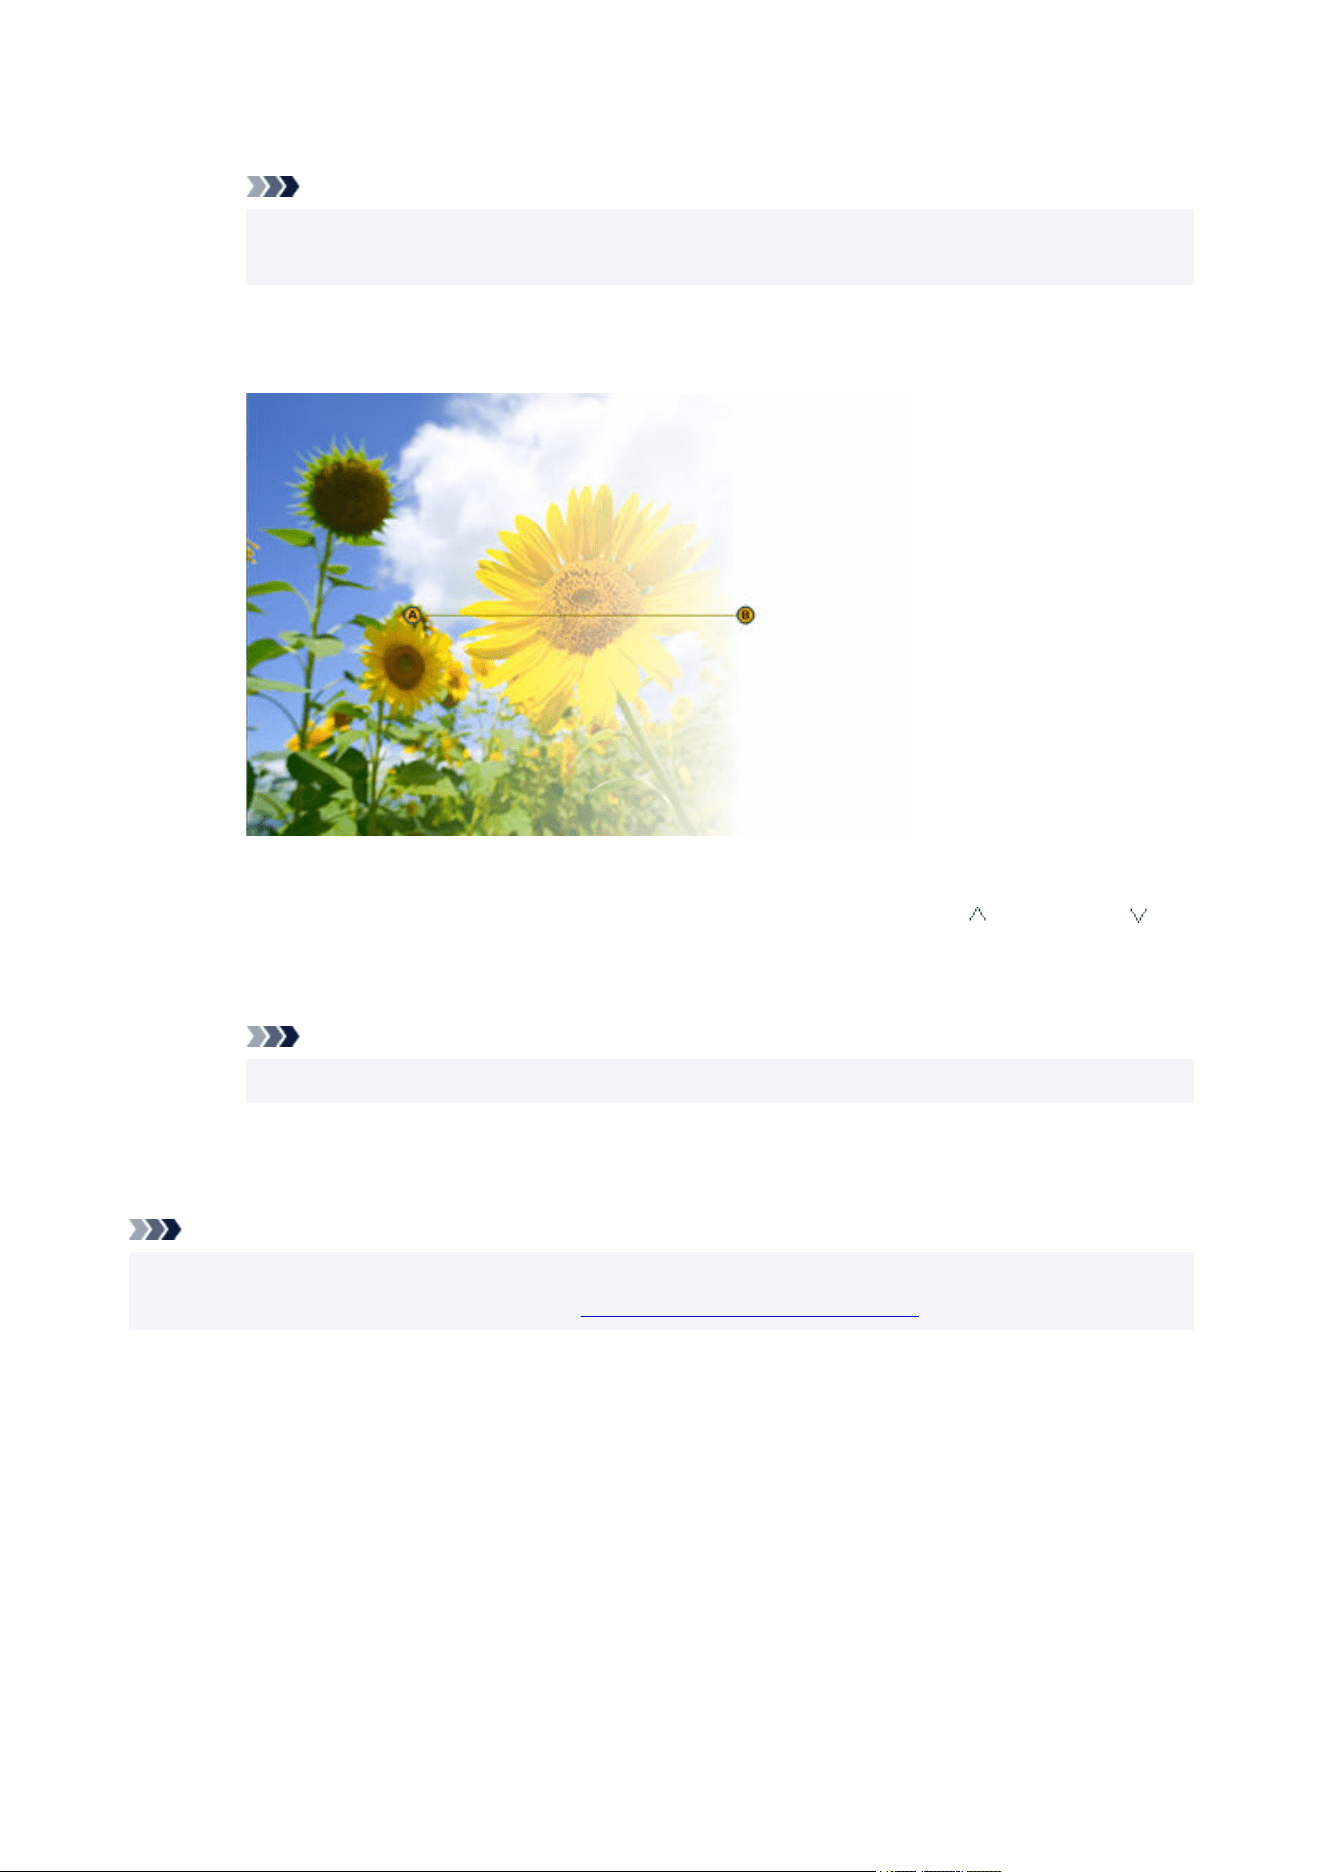
This will set the direction of the gradation.
Note
• To adjust the spacing, move the midpoints (C1 and C2) on the line connecting the starting point
(A) and ending point (B).
Applying gradation without midpoints:
1.
In Number of Points in Gradation, click Two Points.
1.
In the preview, the starting point (A) and ending point (B) appear.
2. For Point A Opacity and Point B Opacity, enter the value directly or click (Up Arrow) or 2.
(Down Arrow) on the right to increase or decrease the value.
The gradation level is set.
Note
• Increase the value to increase opacity and decrease the value to increase transparency.
3. In the preview, drag the starting point (A) and ending point (B).3.
This will set the direction of the gradation.
Note
• To remove the gradation, in the Edit Image dialog box, click the selected Gradation Orientation again.
• For details on the Edit Image dialog box, see Edit Image Dialog Box (Gradation).
106
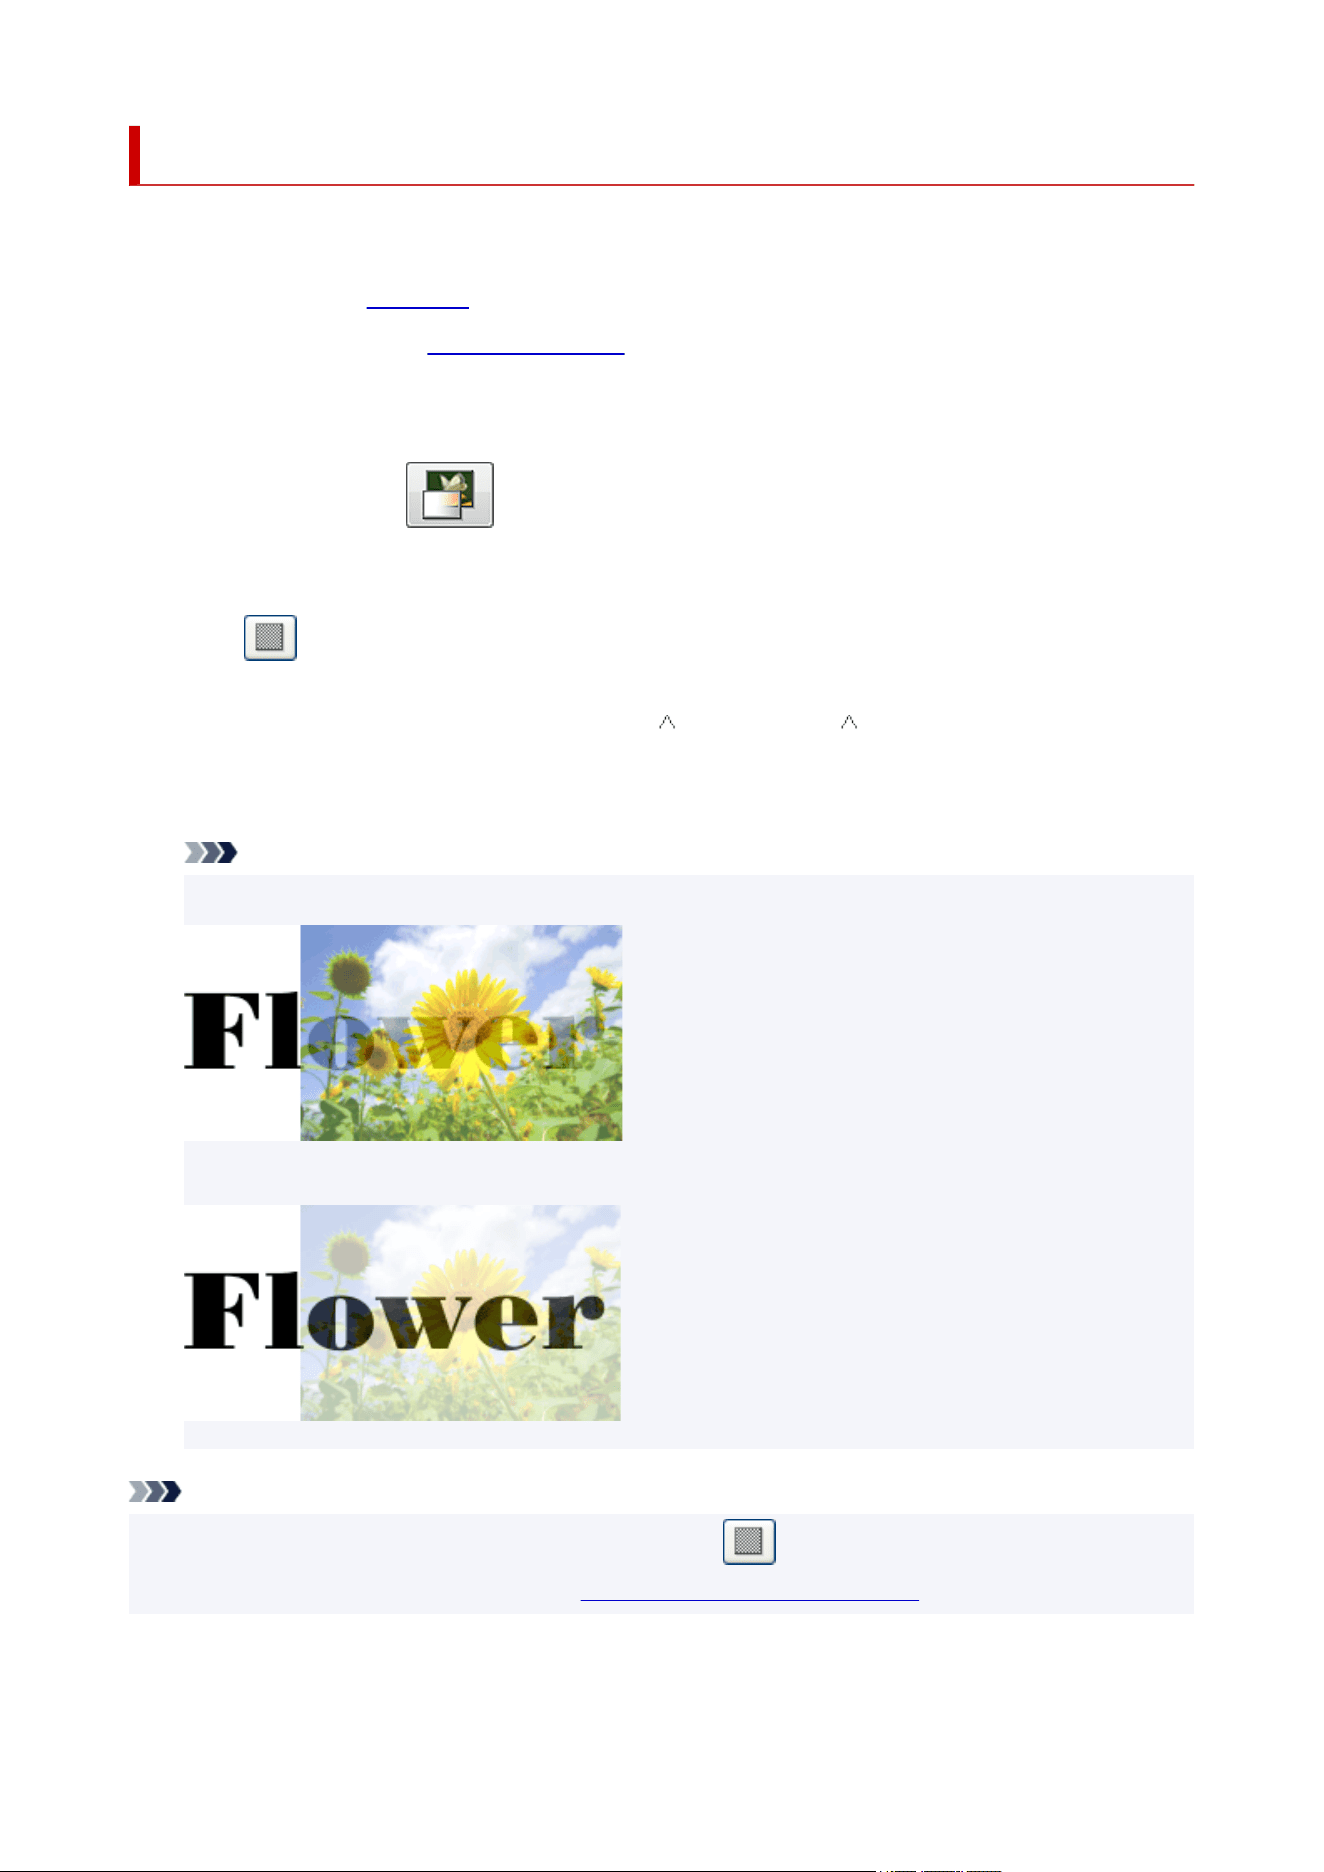
Applying Transparency to Photos (Opacity)
Apply transparency to make photos translucent.
1. Click Edit in the task area, and then click Photos.1.
The view switches to the Edit screen (Photos).
2.
On the poster, click the photo to which you want to apply transparency.
2.
3.
In Edit Image, click (Gradation).
3.
The Edit Image dialog box and preview panel appear.
4.
Click (Set Opacity to Background).
4.
5.
In Opacity, enter the value directly or click (Up Arrow) or (Down Arrow) on the right to
5.
increase or decrease the value.
The opacity is set for the photo.
Note
• To increase opacity, increase the value.•
• To increase transparency, decrease the value.•
Note
• To remove transparency, in the Edit Image dialog box, click (Set Opacity to Background) again.
• For details on the Edit Image dialog box, see Edit Image Dialog Box (Gradation).
107
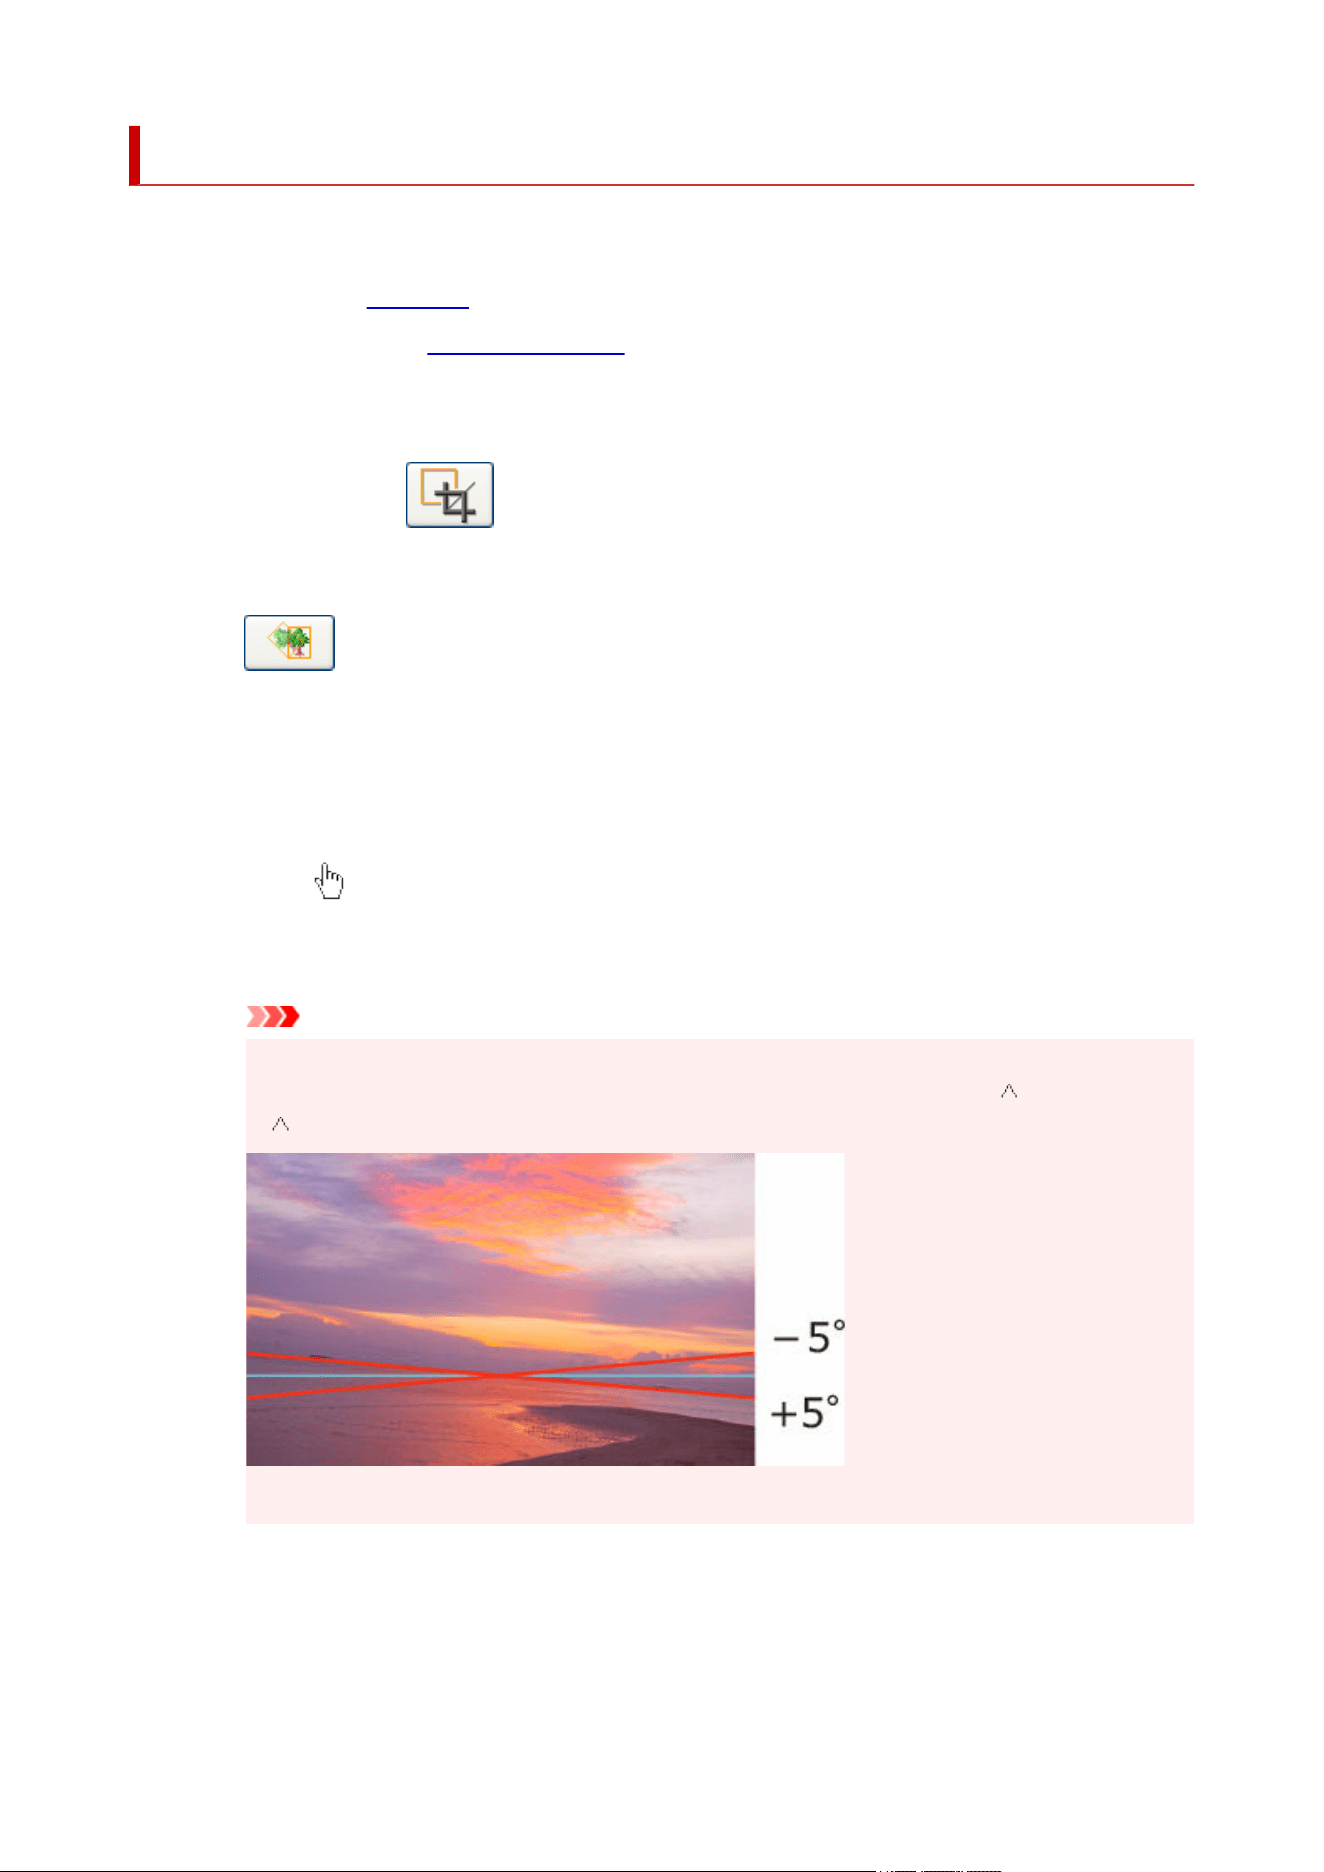
Correcting Slant
Correct slant of photos automatically, manually, or by specifying an angle.
1. Click Edit in the task area, and then click Photos.1.
The view switches to the Edit screen (Photos).
2.
On the poster, click the photo for which you want to correct slant.
2.
3.
In Edit Image, click (Trim).
3.
The Edit Image dialog box and preview panel appear.
4.
Click (Slant Correction).
4.
5.
Select a correction method.
5.
Correcting automatically:
1. In Slant Correction Method, click Auto.1.
2.
Using (Slant Correction pointer), click the line (horizon, pillar, etc.) you want to make
2.
horizontal or vertical.
A green line appears, and the slant is corrected so that the line is horizontal or vertical.
Important
• To correct slant more than 5 degrees in either direction, select Specify Angle in Slant•
Correction Method, and then enter the value directly in Offset Angle or click (Up Arrow)
or (Down Arrow) on the right to increase or decrease the value.
•
Slant cannot be corrected unless a line is detected.
Correcting manually:
1.
In Slant Correction Method, click Manual.
1.
2.
Drag the photo in the preview to adjust slant.
2.
108

Correcting by specifying an angle:
1. In Slant Correction Method, click Specify Angle.1.
2.
In Offset Angle, enter a value between -45.0 and 45.0 or click (Up Arrow) or (Down Arrow)
2.
on the right to increase or decrease the value.
Important
• When slant is corrected, trimming is performed automatically according to the specified angle.
• Slant correction is canceled if the photo is replaced with another photo.
Note
• To cancel slant correction, in the Edit Image dialog box, click Reset Slant Correction.
• For details on the Edit Image dialog box, see Edit Image Dialog Box (Slant Correction).
109

Applying Frames to Photos
1. Click Edit in the task area, and then click Photos.1.
The view switches to the Edit screen (Photos).
2. Click the Frames tab.2.
3.
On the poster, click the photo to which you want to apply a frame.
3.
4.
In Category, select a frame category.
4.
5.
Select a frame from the thumbnails, and then double-click it.
5.
The frame is applied to the photo.
Changing frame colors:
1.
On the poster, click a photo to which a frame is applied.
1.
2. In Frame Color, select the color you want to use.2.
Important
• Some frame colors cannot be changed, depending on the frame design. Frame colors can only
be changed when Frame Color is selectable.
•
The new color may only be applied to some portions of the frame, depending on the frame
design.
Note
•
In Frame Color, the current frame color and basic colors are displayed. To use other colors, click
Custom..., and then select a color in the displayed dialog box.
Removing photo frames:
1.
On the poster, click a photo to which a frame is applied.
1.
2. Select No Frame from the thumbnails, and then double-click it.2.
The frame is removed from the photo.
Important
• Frames cannot be applied to clipart.
110


Adding, Replacing and Removing Clipart
Add clipart from the library to your poster or replace clipart on your poster with other clipart.
Adding Clipart
Replacing Clipart
Removing Clipart
Use the temporary tray to add or replace clipart easily.
Using Temporary Tray when Editing Clipart
Adding Clipart
1.
Click Edit in the task area, and then click Clipart.
1.
The view switches to the Edit screen (Clipart).
2.
In Category, select a clipart category.
2.
3. Select clipart from the thumbnails, and then double-click it.3.
The selected clipart is added to the poster.
Note
•
The selected clipart can also be added by dragging and dropping it to the poster design area.
• Alternatively, right-click clipart in the thumbnails, and then click Insert to Poster to add it.
• Added clipart can be resized, rotated, moved, etc. as desired. For details, see Working with Objects.
Replacing Clipart
1. On the poster, click the clipart you want to replace.1.
2.
Select clipart from the thumbnails, and then double-click it.
2.
The clipart on the poster is replaced with the new one.
Note
•
Alternatively, right-click clipart in the thumbnails, and then click Replace to replace the clipart on the
poster with the new clipart.
Removing Clipart
1.
On the poster, click the clipart you want to remove.
1.
2.
Press the Delete key.
2.
The selected clipart is removed from the poster.
112
Using Temporary Tray when Editing Clipart
Place clipart you are not sure whether to use or frequently used clipart in the temporary tray.
Adding Clipart to Temporary Tray from Thumbnails
Adding Clipart to Temporary Tray from View All Clipart Dialog Box
Adding Clipart to Posters from Temporary Tray
Adding Clipart to Temporary Tray from Thumbnails
1.
Click Edit in the task area, and then click Clipart.
1.
The view switches to the Edit screen (Clipart).
2.
In Category, select a clipart category.
2.
3.
Select the clipart you want to add from the thumbnails, and then drag and drop it to the
3.
temporary tray.
The selected clipart is added to the temporary tray.
Note
• Alternatively, right-click clipart in the thumbnails, and then click Add to Temporary Tray to add it.
Adding Clipart to Temporary Tray from View All Clipart Dialog Box
1. Click Edit in the task area, and then click Clipart.1.
The view switches to the Edit screen (Clipart).
2. Click (View All Clipart).2.
The View All Clipart dialog box appears.
3.
In Category, select a clipart category.
3.
4.
Select the clipart you want to add from the thumbnails, and then click Add to Temporary
4.
Tray.
The selected clipart is added to the temporary tray.
Note
•
To show or hide the temporary tray, click (Arrow) on the right (or at the bottom if the poster is in
landscape orientation).
•
Clipart can also be added directly to the temporary tray by dragging and dropping it from folders on your
computer. For supported file formats, see
Supported File Formats.
113

• To remove clipart from the temporary tray, select clipart and press the Delete key. Even after removing
clipart from the temporary tray, the original clipart remains on your computer.
Adding Clipart to Posters from Temporary Tray
1. Drag and drop clipart from the temporary tray to the poster.1.
The clipart is added to the poster.
Note
•
To replace clipart on the poster with another clipart in the temporary tray, select the clipart on the
poster, and then drag and drop clipart from the temporary tray to the clipart on the poster.
114

Changing Clipart Colors
1. Click Edit in the task area, and then click Clipart.1.
The view switches to the Edit screen (Clipart).
2. On the poster, click the clipart you want to replace.2.
3.
In Clipart Color, select the color you want to use, and then double-click it.
3.
The selected color is applied to the clipart on the poster.
Important
•
Clipart colors can only be changed when Clipart Color is selectable.
•
The new color may only be applied to some portions of the clipart, depending on the clipart design.
•
For clipart, Trim, Gradation, Slant Correction, Opacity and Retouch Image are not available.
Note
• In Clipart Color, the current clipart color and basic colors are displayed. To use other colors, click
Custom..., and then select a color in the displayed dialog box.
• Elements of clipart in the Stamps category are grouped. To change the color or shape of such clipart,
right-click it in the poster design area, and then select Group > Ungroup to ungroup.
115
Retouching Images
Correct photo color levels. Apply effects to create a particular mood in photos. Adjust the colors, and use
other retouching features to enhance your posters.
Note
• The following images are supported.
Images in the photo library (except those with transparent backgrounds)
Uncompressed TIFF, JPEG, or BMP images you have added to the poster, with the long side measuring
7200 pixels or less and the aspect ratio less than or equal to 64:1
1.
Click Edit in the task area, and then click Photos.
1.
The view switches to the Edit screen (Photos).
2.
On the poster, click the photo you want to retouch.
2.
3. In Edit Image, click (Retouch Image).3.
The Retouch Image dialog box appears.
4.
Select the type of retouching required.
4.
For details, see the corresponding page.
If you click the following buttons, images are retouched instantly and you can check the retouched
image.
Auto Color Correction
Monochrome/Sepia
If you click the following buttons, a dialog box appears for making manual adjustments. After applying
the adjustments, you can check the retouched image.
Color Adjustment
Color Point Correction
Backlight Correction
Sharpness
Soft Focus
Logo Color Adjustment
Cut Out
5.
Click OK.
5.
The image is retouched.
Important
• Even if you retouch an image, the original image itself is not retouched.
• Clipart cannot be retouched.
116

Auto Color Correction
Automatically retouch image color levels.
1. In the Retouch Image dialog box, click Auto Color Correction.1.
The colors are automatically retouched.
Note
•
If Auto Color Correction does not produce the desired results, in the Retouch Image dialog box, click
Color Point Correction, and then adjust the colors. For details, see Color Point Correction.
117
Color Adjustment
Manually retouch image color levels.
1. In the Retouch Image dialog box, click Color Adjustment.1.
The Color Adjustment dialog box appears.
Under Original Image, the original image is displayed and under Touched Up Image, the retouched
image is displayed.
2.
Adjust the Quality and Color Settings as you check the image.
2.
Note
•
To enlarge or reduce the view magnification, click (Zoom In) or (Zoom Out). You can also
specify the magnification in the drop-down list.
•
To restore the original image, click Reset.
3. Click OK.3.
Your changes are confirmed.
118
Color Point Correction
Adjust the overall brightness based on the brightest point in the image (white point), the point of intermediate
brightness (gray point), or the darkest point (black point).
1. In the Retouch Image dialog box, click Color Point Correction.1.
The Color Point Correction dialog box appears.
Under Original Image, the original image is displayed and under Touched Up Image, the retouched
image is displayed.
2.
Click the desired brightness for White Point, Gray Point, and Black Point.
2.
Note
•
Click Auto to produce the same results as Auto Color Correction in the Retouch Image dialog box.
•
To enlarge or reduce the view magnification, click (Zoom In) or (Zoom Out). You can also
specify the magnification in the drop-down list.
• To restore the original image, click Reset.
3. Click OK.3.
Your changes are confirmed.
119
Backlight Correction
Correct backlight scenes in which the image is too dark or the background is too bright.
1. In the Retouch Image dialog box, click Backlight Correction.1.
The Backlight Correction dialog box appears.
Under Original Image, the original image is displayed and under Touched Up Image, the retouched
image is displayed.
2.
Adjust the Level as you check the image.
2.
Note
•
If the photo includes people, click Auto Adjust For Faces for automatic adjustment.
•
To enlarge or reduce the view magnification, click (Zoom In) or (Zoom Out). You can also
specify the magnification in the drop-down list.
•
To restore the original image, click Reset.
3. Click OK.3.
Your changes are confirmed.
120

Sharpness
Sharpen image edges.
1. In the Retouch Image dialog box, click Sharpness.1.
The Sharpness dialog box appears.
Under Original Image, the original image is displayed and under Touched Up Image, the retouched
image is displayed.
2.
Adjust the Level as you check the image.
2.
Note
•
To enlarge or reduce the view magnification, click (Zoom In) or (Zoom Out). You can also
specify the magnification in the drop-down list.
•
To restore the original image, click Reset.
3. Click OK.3.
Your changes are confirmed.
121
Soft Focus
Blur images to create a softer effect.
1. In the Retouch Image dialog box, click Soft Focus.1.
The Soft Focus dialog box appears.
Under Original Image, the original image is displayed and under Touched Up Image, the retouched
image is displayed.
2.
Adjust the Level as you check the image.
2.
Note
•
To enlarge or reduce the view magnification, click (Zoom In) or (Zoom Out). You can also
specify the magnification in the drop-down list.
•
To restore the original image, click Reset.
3. Click OK.3.
Your changes are confirmed.
122

Logo Color Adjustment
Adjust a portion of the logo image colors.
1. In the Retouch Image dialog box, click Logo Color Adjustment.1.
The Logo Color Adjustment dialog box appears.
Under Original Image, the original image is displayed and under Touched Up Image, the retouched
image is displayed.
2.
Under Color Table or Original Image, click the color you want to adjust.
2.
3.
Adjust the levels in Color Settings, Hue, Saturation, and Luminance as you check the
3.
image in Touched Up Image.
Note
•
To enlarge or reduce the view magnification, click (Zoom In) or (Zoom Out). You can also
specify the magnification in the drop-down list.
•
To restore the original image, click Reset.
4. Click OK.4.
The logo is adjusted.
124
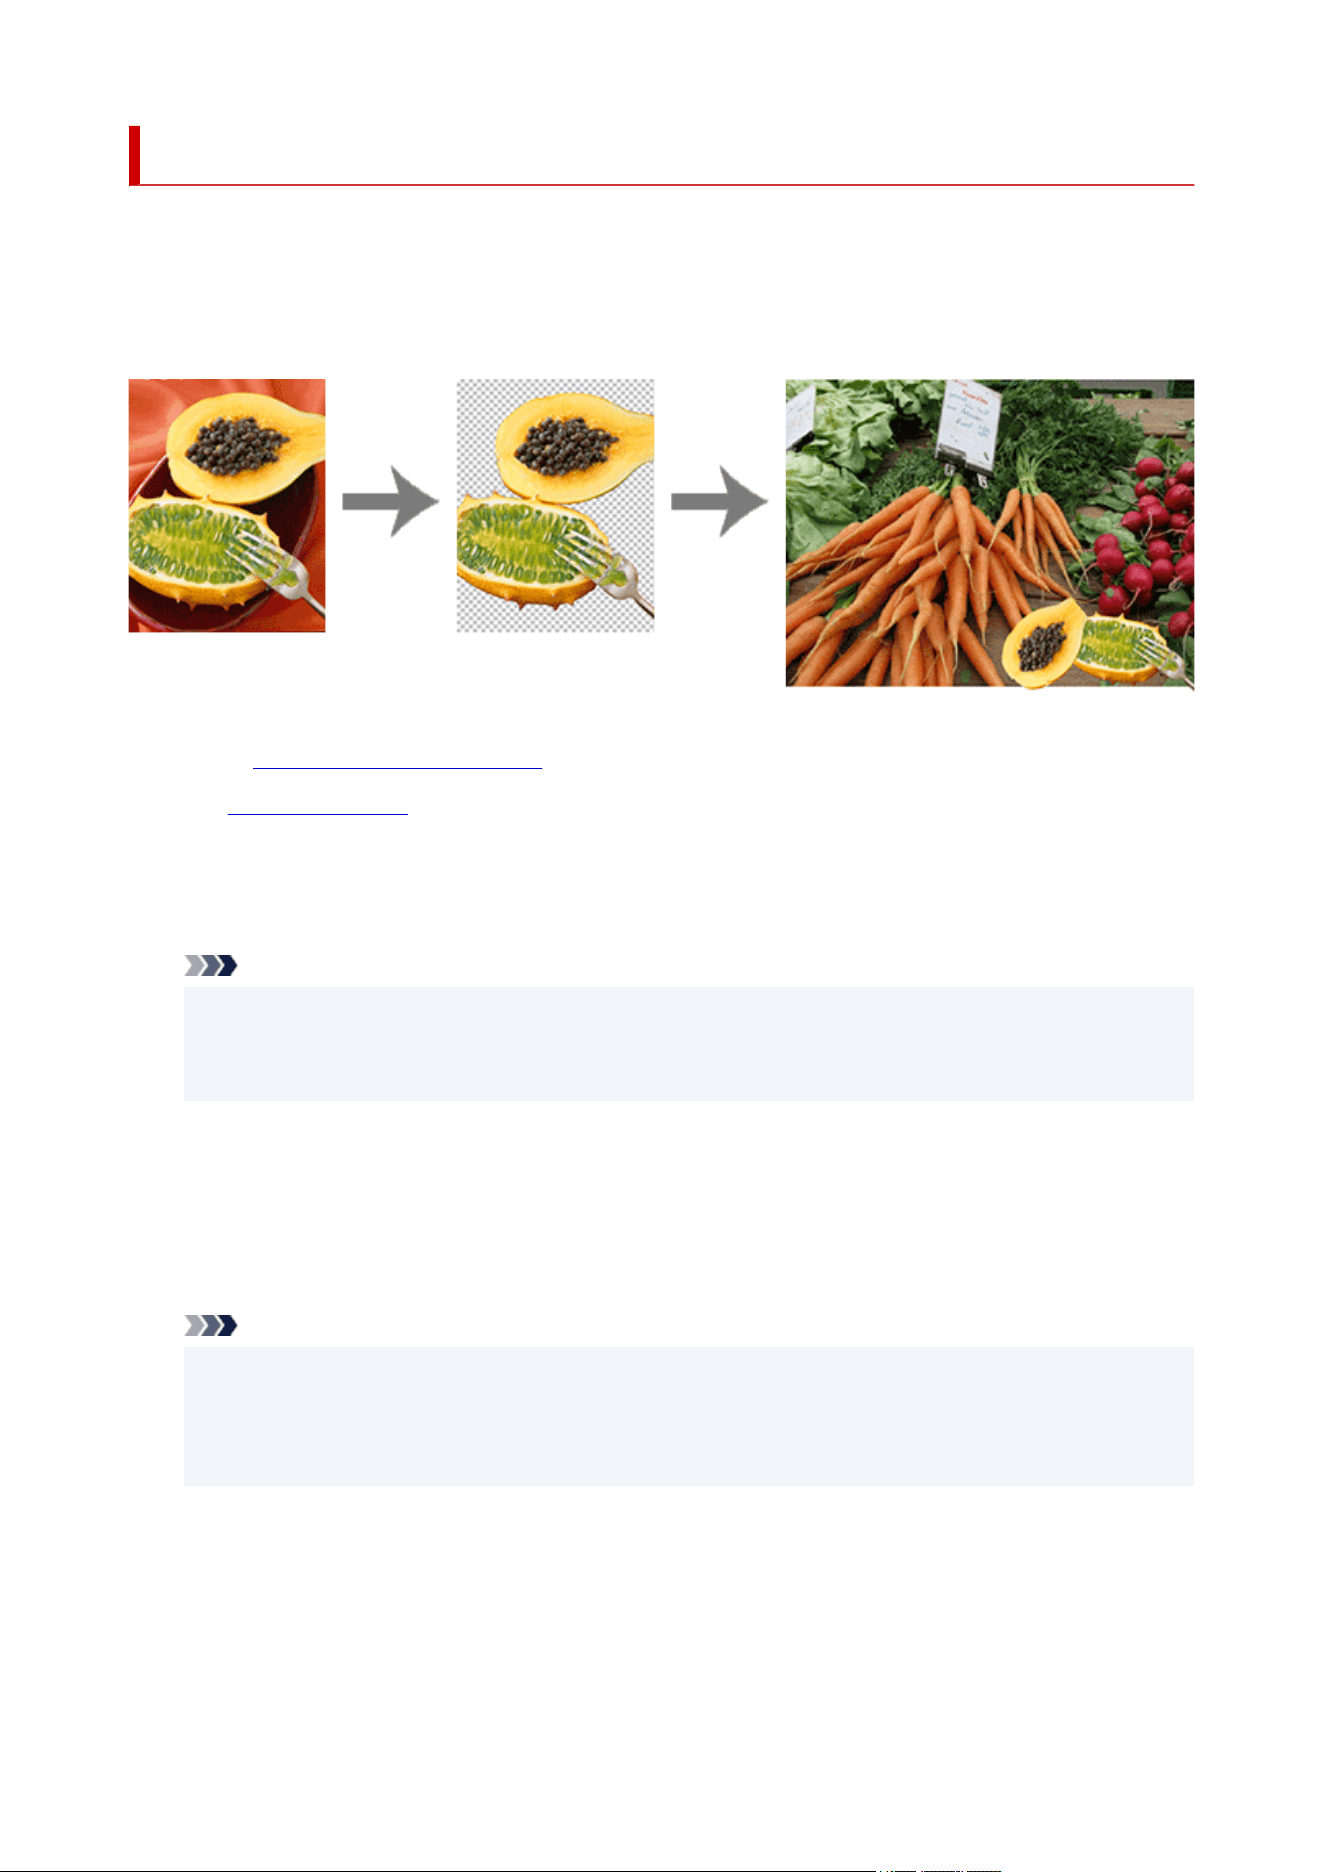
Cut Out
Use the Cut Out function to isolate the area you want to keep in a photo and discard the rest such as the
background.
You can cut out images automatically or manually. Even though the results of automatic cut-outs are
sufficiently attractive, you can also manually specify the exact details of what you want to cut out.
1.
In the Retouch Image dialog box, click Cut Out.
1.
The Cut Out dialog box appears.
2. On the Auto tab, click Auto.2.
The background is automatically erased.
Note
• Alternatively, move the mouse pointer over the image to display a crosshair pointer, and then drag the
cursor around the area to retain.
• To blur the edges of cut out portions, select the Blur edge checkbox.
3. To adjust the extent of the area to retain, change the value in Tolerance, and then click3.
Auto again.
To erase a larger area, select a smaller value (because fewer colors are judged similar).
To retain a larger area, select a larger value (because more colors are judged similar).
Note
•
To view the original image that has not been cut out, click Preview. Preview is canceled and the
•
area to be cut out is shaded in the color displayed in color of area remain (indicated in blue in the
figure below). Adjust the settings as you compare the original image and the cut out image by clicking
Preview.
125
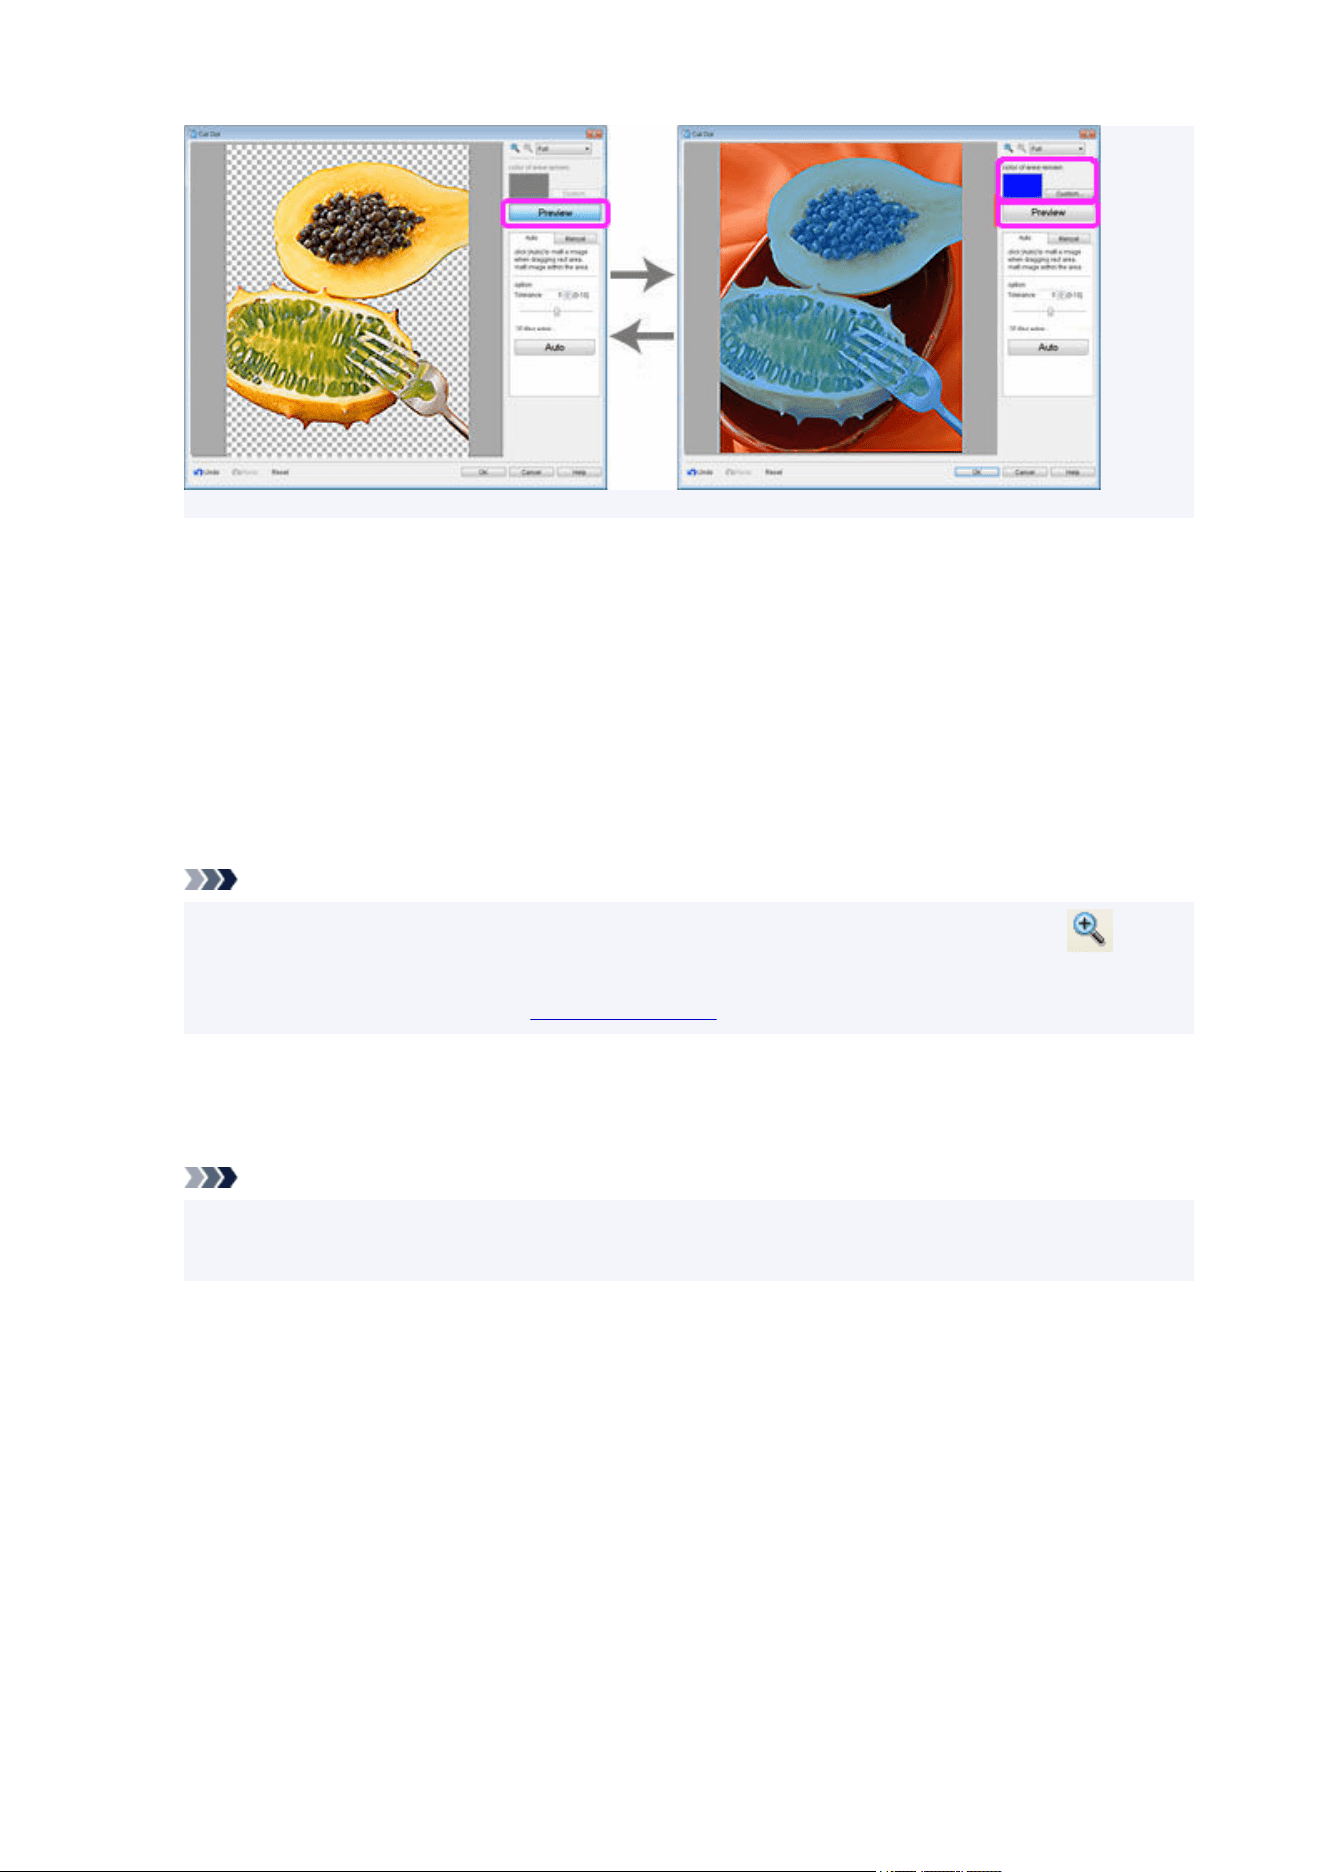
4.
Repeat step 3 to specify the area to retain, and then click OK.
4.
The image is cut out.
If automatic cut-out is unsatisfactory - if unneeded portions remain in the cut out image or if too much is
erased - try using the tools on the Manual tab.
5. Click the Manual tab.5.
6. Use the cut-out tools to specify the area to retain and the area to erase in great detail.6.
Note
• It may be easier to work with the tools on the Manual tab if you enlarge the view by clicking (Zoom
In).
•
For details on the cut-out tools, see Cut Out Dialog Box.
7. Click OK.7.
The image is cut out.
Note
• If it is easier to specify the area to erase than to specify the area to retain, specify the area to erase
instead. On the Manual tab, click Invert Selection to switch the area to erase and area to retain.
126

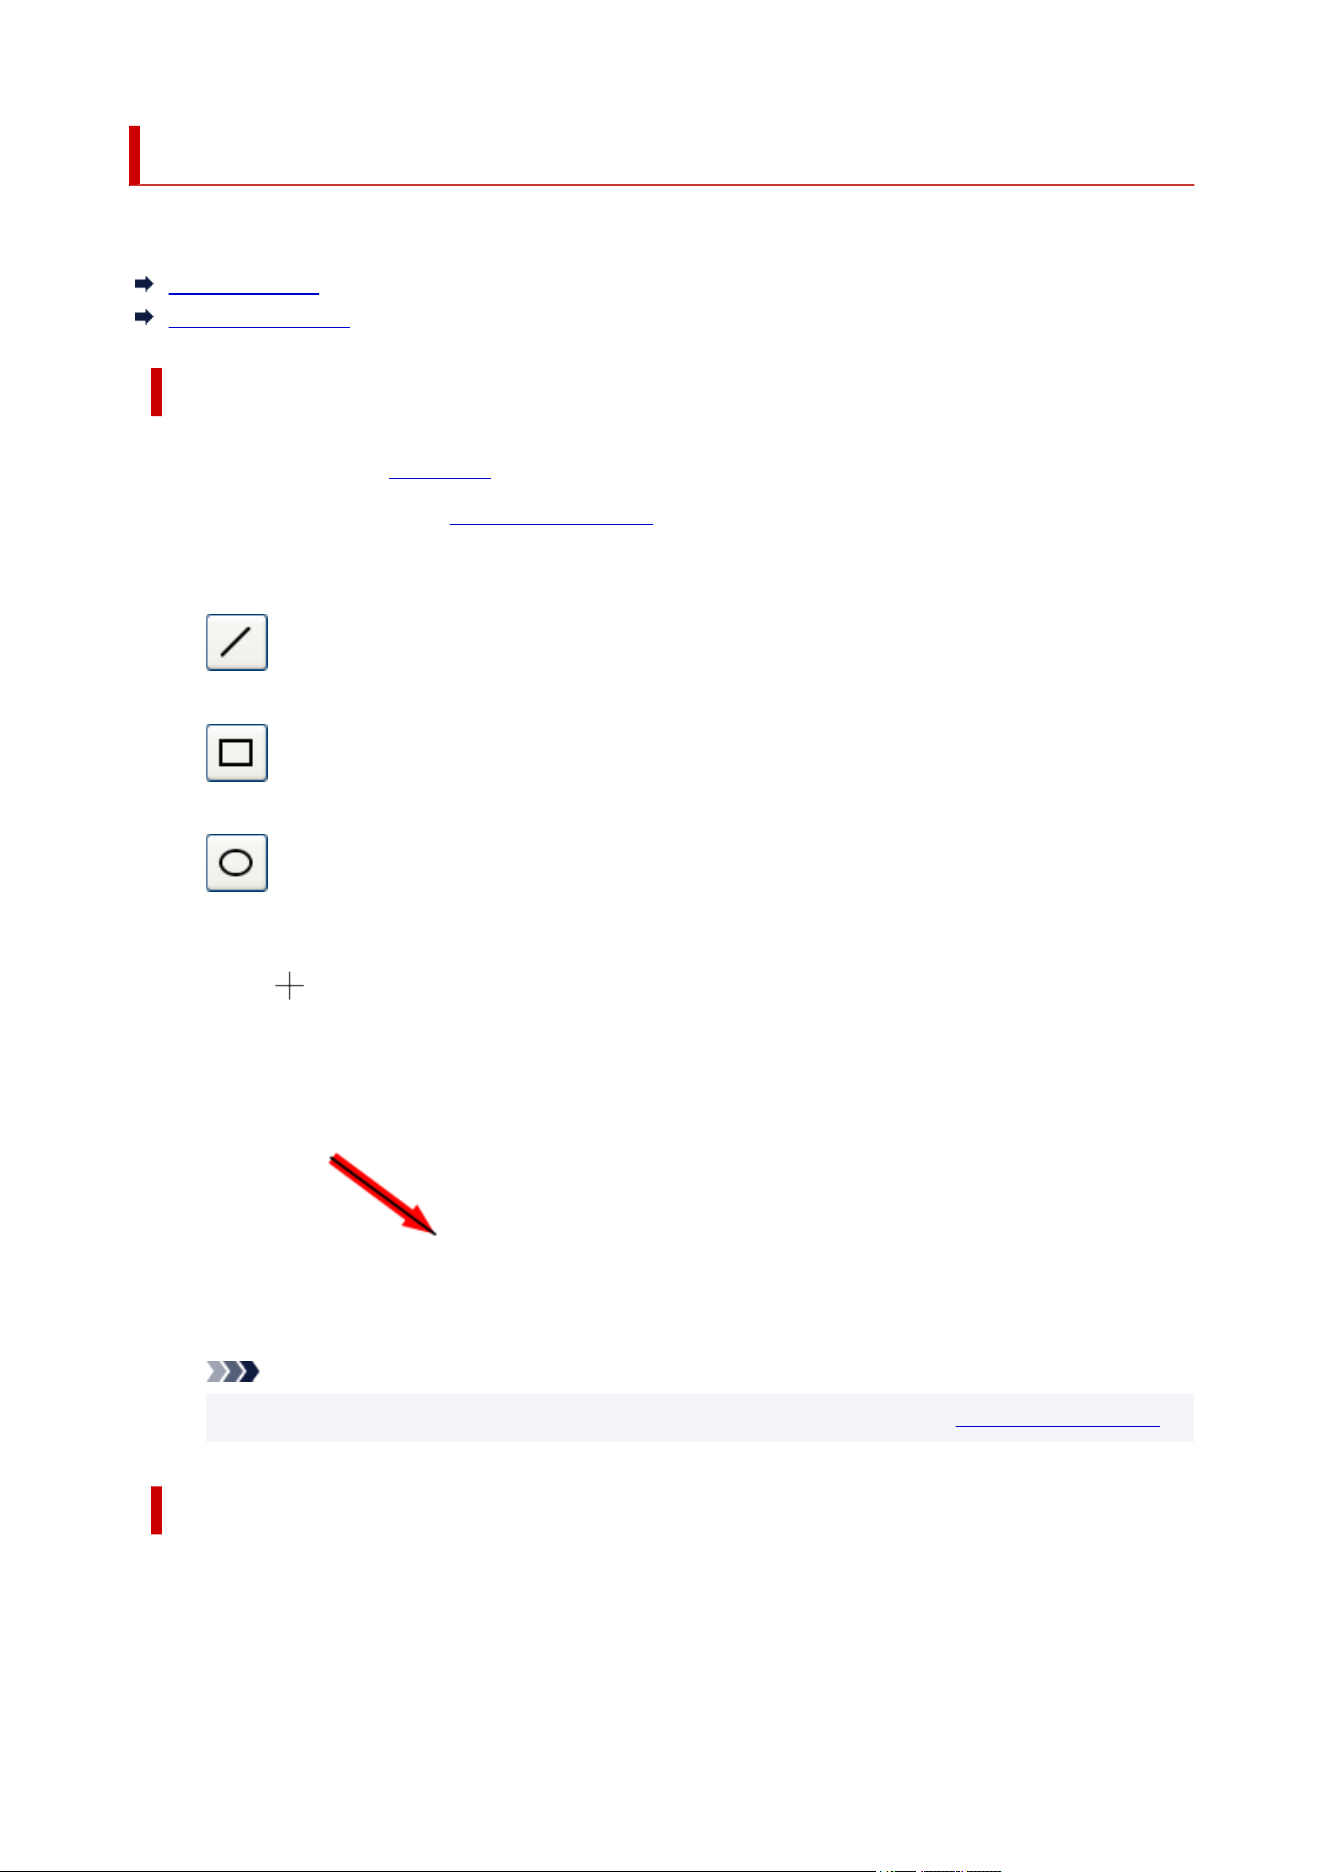
Adding and Removing Shapes
Add straight lines, rectangles, circles, ellipses, and other shapes to posters.
Adding Shapes
Removing Shapes
Adding Shapes
1.
Click Edit in the task area, and then click Shapes.
1.
The view switches to the Edit screen (Shapes).
2.
Click one of the following buttons to select a shape.
2.
Line:
Add lines or arrows.
Rectangle:
Add rectangles.
Ellipse:
Add circles or ellipses.
3.
Drag (Crosshair pointer) to specify the size of the shape you want to add.
3.
The shape is added in the specified size.
Note
•
You can freely resize, rotate, or move the shapes you added. For details, see Working with Objects.
Removing Shapes
1.
On the poster, click the shape you want to remove.
1.
2.
Press the Delete key.
2.
128

The selected shape is removed from the poster.
129

Changing Shape Styles
Change the style of shapes added to your poster.
Important
• Fluorescent spot colors cannot be used depending on your model or paper type.
• Fluorescent spot colors cannot be used when the Edit layout with Free Layout plus checkbox is selected
in the Paper Options screen.
Resizing Shapes
Changing Line Thickness
Applying Transparency to Shapes
Changing Line Types
Changing Line Colors
Specifying Drop Shadows for Shapes
Specifying Shape Colors
Changing Rectangle Corner Shapes
Changing Types of Line Ends
Resizing Arrows
Resizing Shapes
Change the size of shapes.
1.
Click Edit in the task area, and then click Shapes.
1.
The view switches to the Edit screen (Shapes).
2. Click a shape on poster.2.
(Resize handle) appears on the selected shape.
3. Drag (Resize handle).3.
Note
•
You can resize lines without changing their angles and center points. You can also resize rectangles
without changing their aspect ratios and center points. For details, see Moving, Enlarging, Reducing,
and Rotating Objects.
Changing Line Thickness
Change the line thickness of shapes.
1.
Click Edit in the task area, and then click Shapes.
1.
The view switches to the Edit screen (Shapes).
2.
Click a shape on poster.
2.
130

3. In Line Thickness, specify thickness (pt).3.
Note
• Enter a value (1.00 to 500.00) directly in Line Thickness. Alternatively, click (Up Arrow) or
(Down Arrow) on the right to increase or decrease the value.
Applying Transparency to Shapes
Adjust the opacity to apply transparency to shapes.
1.
Click Edit in the task area, and then click Shapes.
1.
The view switches to the Edit screen (Shapes).
2.
Click a shape on poster.
2.
3.
In Opacity, specify the opacity (%) of the shape.
3.
Note
• Enter a value (100 to 0) directly in Opacity. Alternatively, click (Up Arrow) or (Down Arrow) on•
the right to increase or decrease the value.
To decrease opacity (increase transparency), decrease the value.
To increase opacity (decrease transparency), increase the value.
Changing Line Types
Change the shape line to a dashed or dotted line.
1.
Click Edit in the task area, and then click Shapes.
1.
The view switches to the Edit screen (Shapes).
2. Click a shape on poster.2.
3.
In Line Type, select line type.
3.
Changing Line Colors
Change the line color of shapes.
1.
Click Edit in the task area, and then click Shapes.
1.
The view switches to the Edit screen (Shapes).
2.
Click a shape on poster.
2.
3.
When a rectangle, circle, or ellipse is selected, select the Line Color checkbox.
3.
131
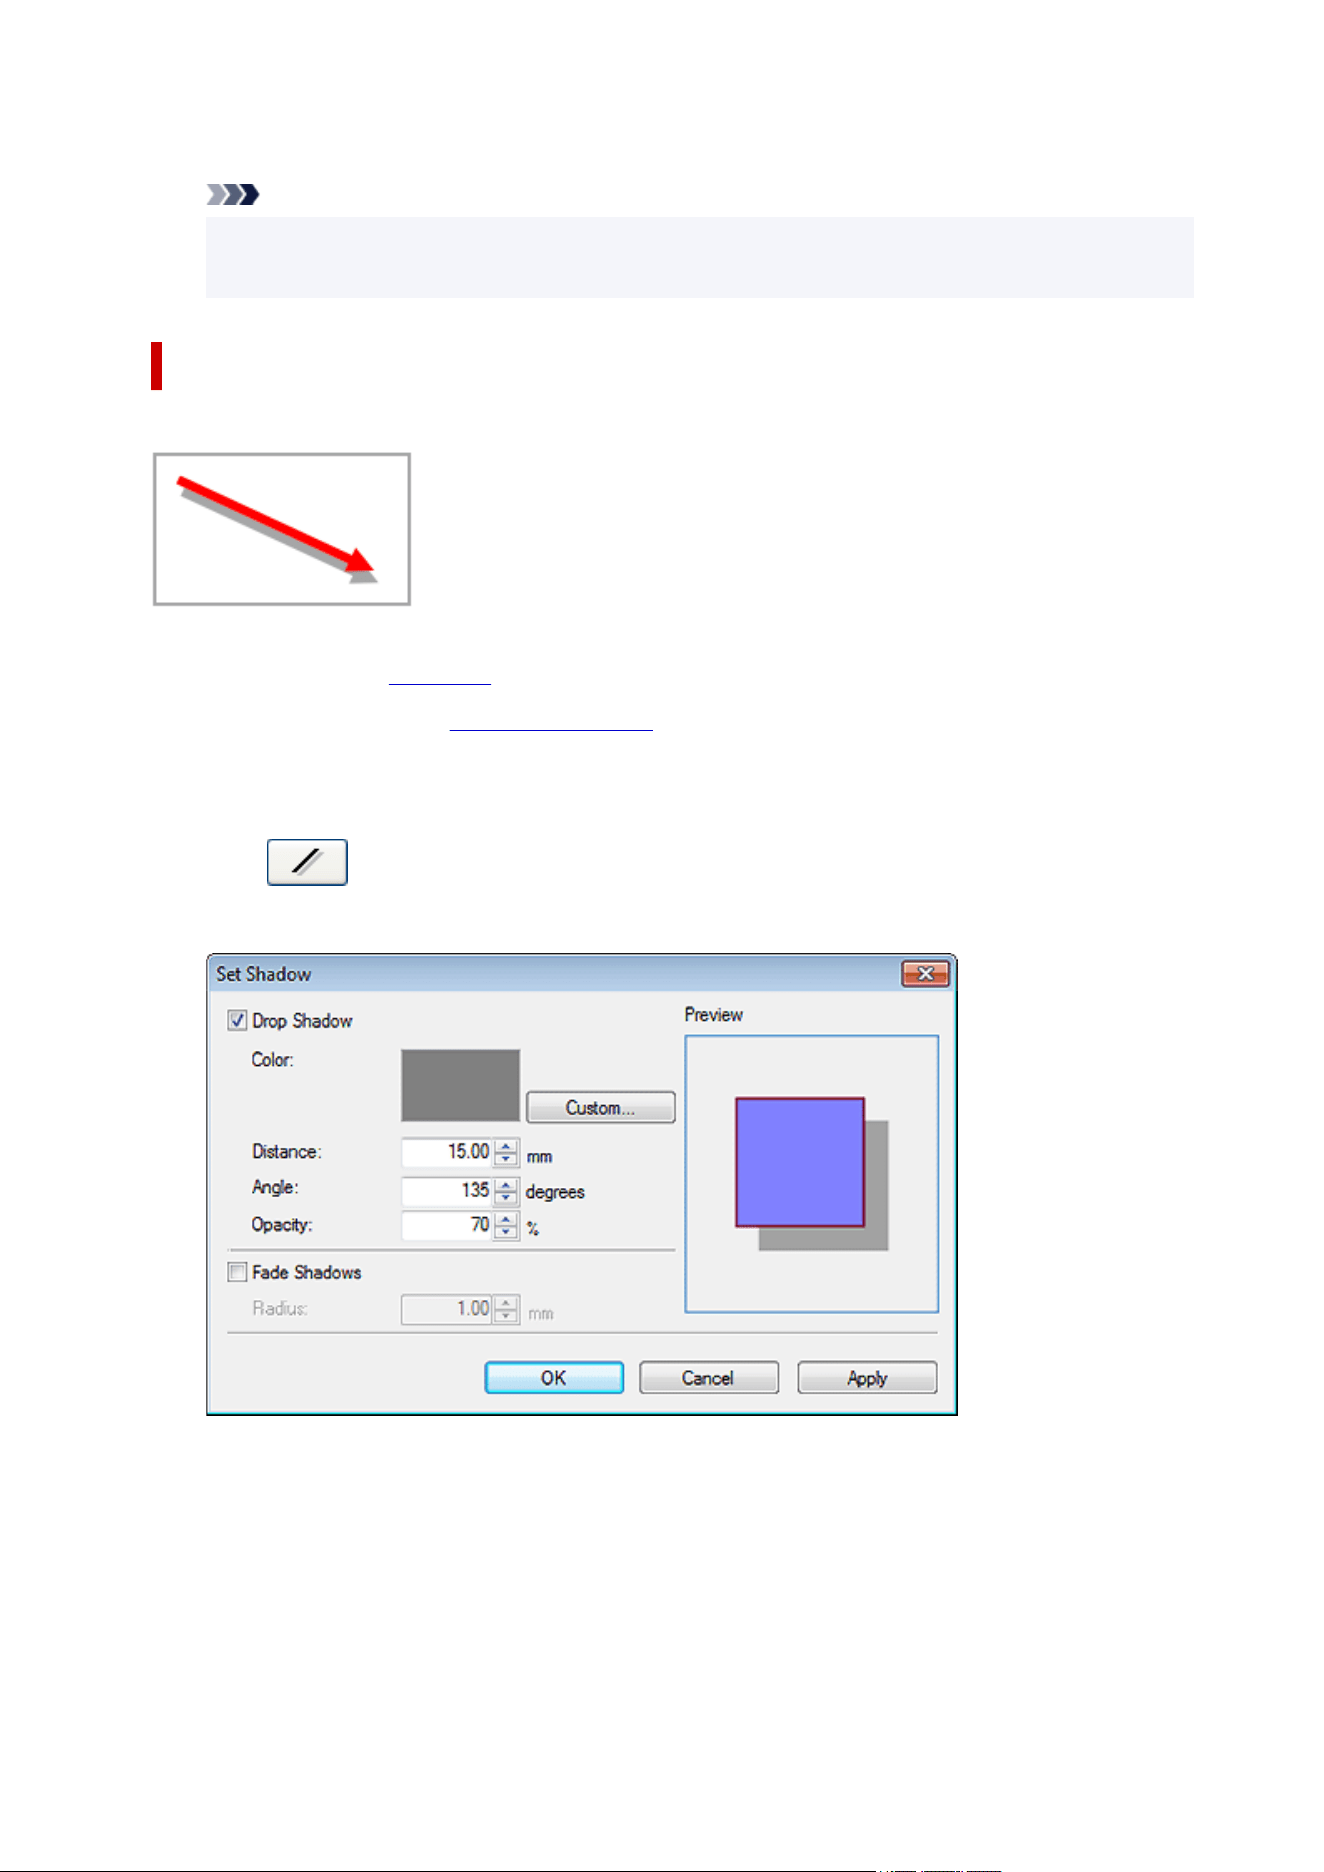
4. In Line Color, click on a color.4.
Note
• In Line Color, the current color and basic colors are displayed. To use other colors, click Custom...,
and then select a color in the displayed dialog box.
Specifying Drop Shadows for Shapes
Add drop shadows of several types to shapes.
1.
Click Edit in the task area, and then click Shapes.
1.
The view switches to the Edit screen (Shapes).
2.
Click a shape on poster.
2.
3.
Click (Drop Shadow).
3.
The Set Shadow dialog box appears.
4.
Select the Drop Shadow checkbox.
4.
5.
To change the shadow color, click Custom..., Change to Spot Color..., or Change to
5.
Regular Color... in Color, and then select a color in the displayed dialog box.
6.
Specify Distance, Angle, and Opacity.
6.
132
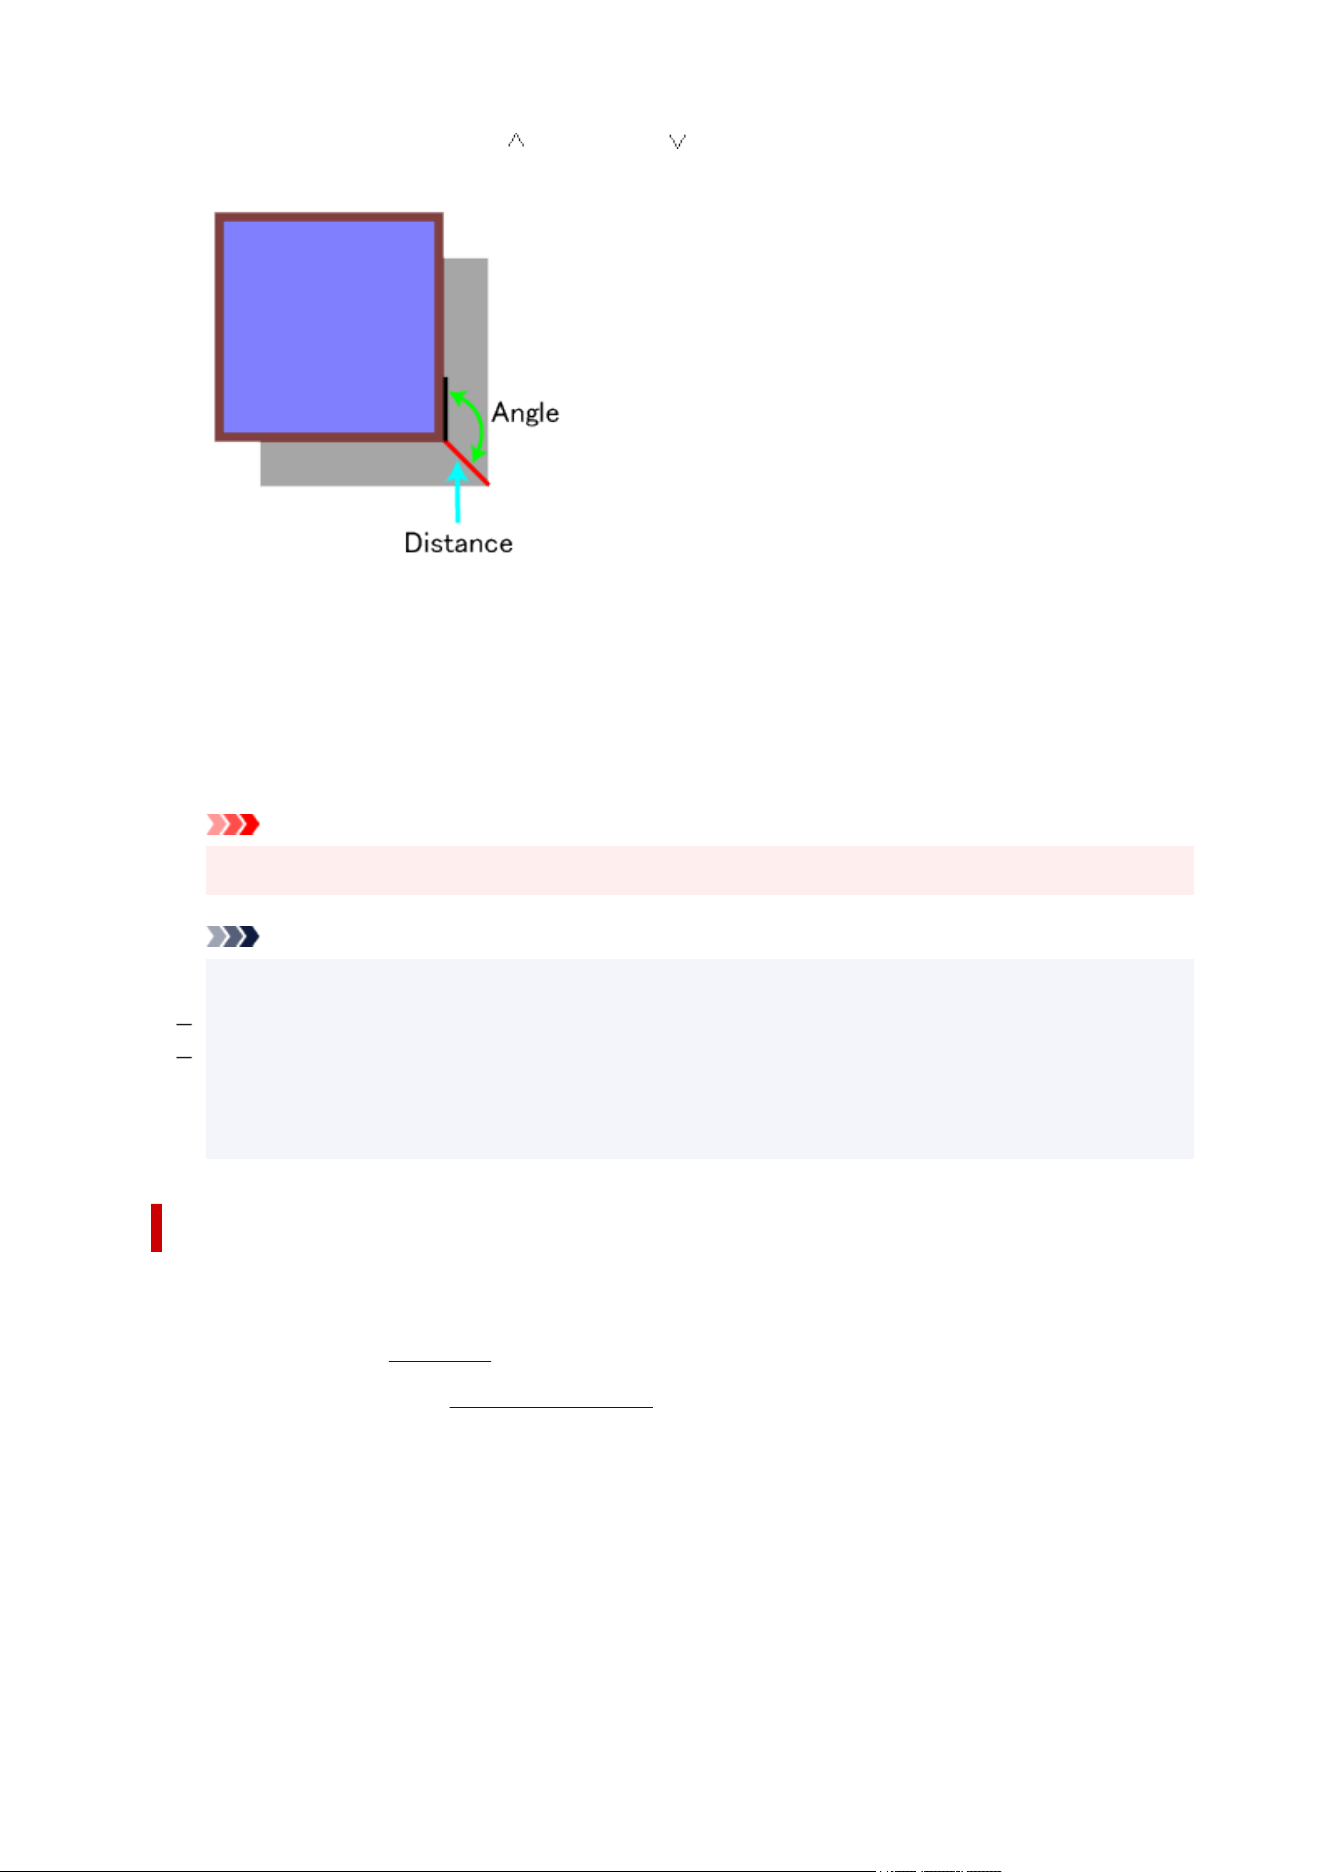
Enter the value directly or click (Up Arrow) or (Down Arrow) on the right to increase or decrease
the value.
7.
Click Apply.
7.
The drop shadow is applied to the shape on the poster. Continue adjusting the settings and clicking
Apply until the drop shadow appears as desired.
8. Click OK.8.
Important
• Shadows cannot be softened when a fluorescent spot color is specified for the drop shadow color.
Note
• To soften the shadow, select the Fade Shadows checkbox, and then specify the Radius.•
To soften shadows more, increase the value.
To emphasize shadows, decrease the value.
•
The effect can be checked in Preview.
• To remove the shadow, deselect the Drop Shadow checkbox.
Specifying Shape Colors
Fill shapes with colors or change the colors.
1.
Click Edit in the task area, and then click Shapes.
1.
The view switches to the Edit screen (Shapes).
2.
Click a rectangle, circle, or ellipse on poster.
2.
3.
Select the Fill-in Color checkbox.
3.
4.
In Fill-in Color, select color.
4.
133

Note
• In Fill-in Color, the current color and basic colors are displayed. To use other colors, click Custom...,
and then select a color in the displayed dialog box.
Changing Rectangle Corner Shapes
Change the rectangle corner shape to a round or square shape.
1.
Click Edit in the task area, and then click Shapes.
1.
The view switches to the Edit screen (Shapes).
2.
Click a rectangle on poster.
2.
3.
In Corner Shape, select corner shape.
3.
Note
• When the round shape is selected, enter a value directly in Radius to adjust the roundness.•
Alternatively, click (Up Arrow) or (Down Arrow) on the right to increase or decrease the value.
To increase roundness, increase the value.
To decrease roundness, decrease the value.
•
The range of values that can be specified in Radius varies depending on the rectangle size.
Changing Types of Line Ends
Turn lines into arrows or vice versa by changing the shapes of the starting and ending points of lines.
Arrowheads can also be changed to circles or rectangles.
1. Click Edit in the task area, and then click Shapes.1.
The view switches to the Edit screen (Shapes).
2. Click a line (or arrow) on poster.2.
3.
In Start Point Shape, select the starting point shape.
3.
4.
In End Point Shape, select the ending point shape.
4.
Resizing Arrows
Change the size of arrowheads.
1.
Click Edit in the task area, and then click Shapes.
1.
The view switches to the Edit screen (Shapes).
134

2. Click an arrow on poster.2.
3. In Size for the starting point, select Small, Medium, or Large.3.
4. In Size for the ending point, select Small, Medium, or Large.4.
135
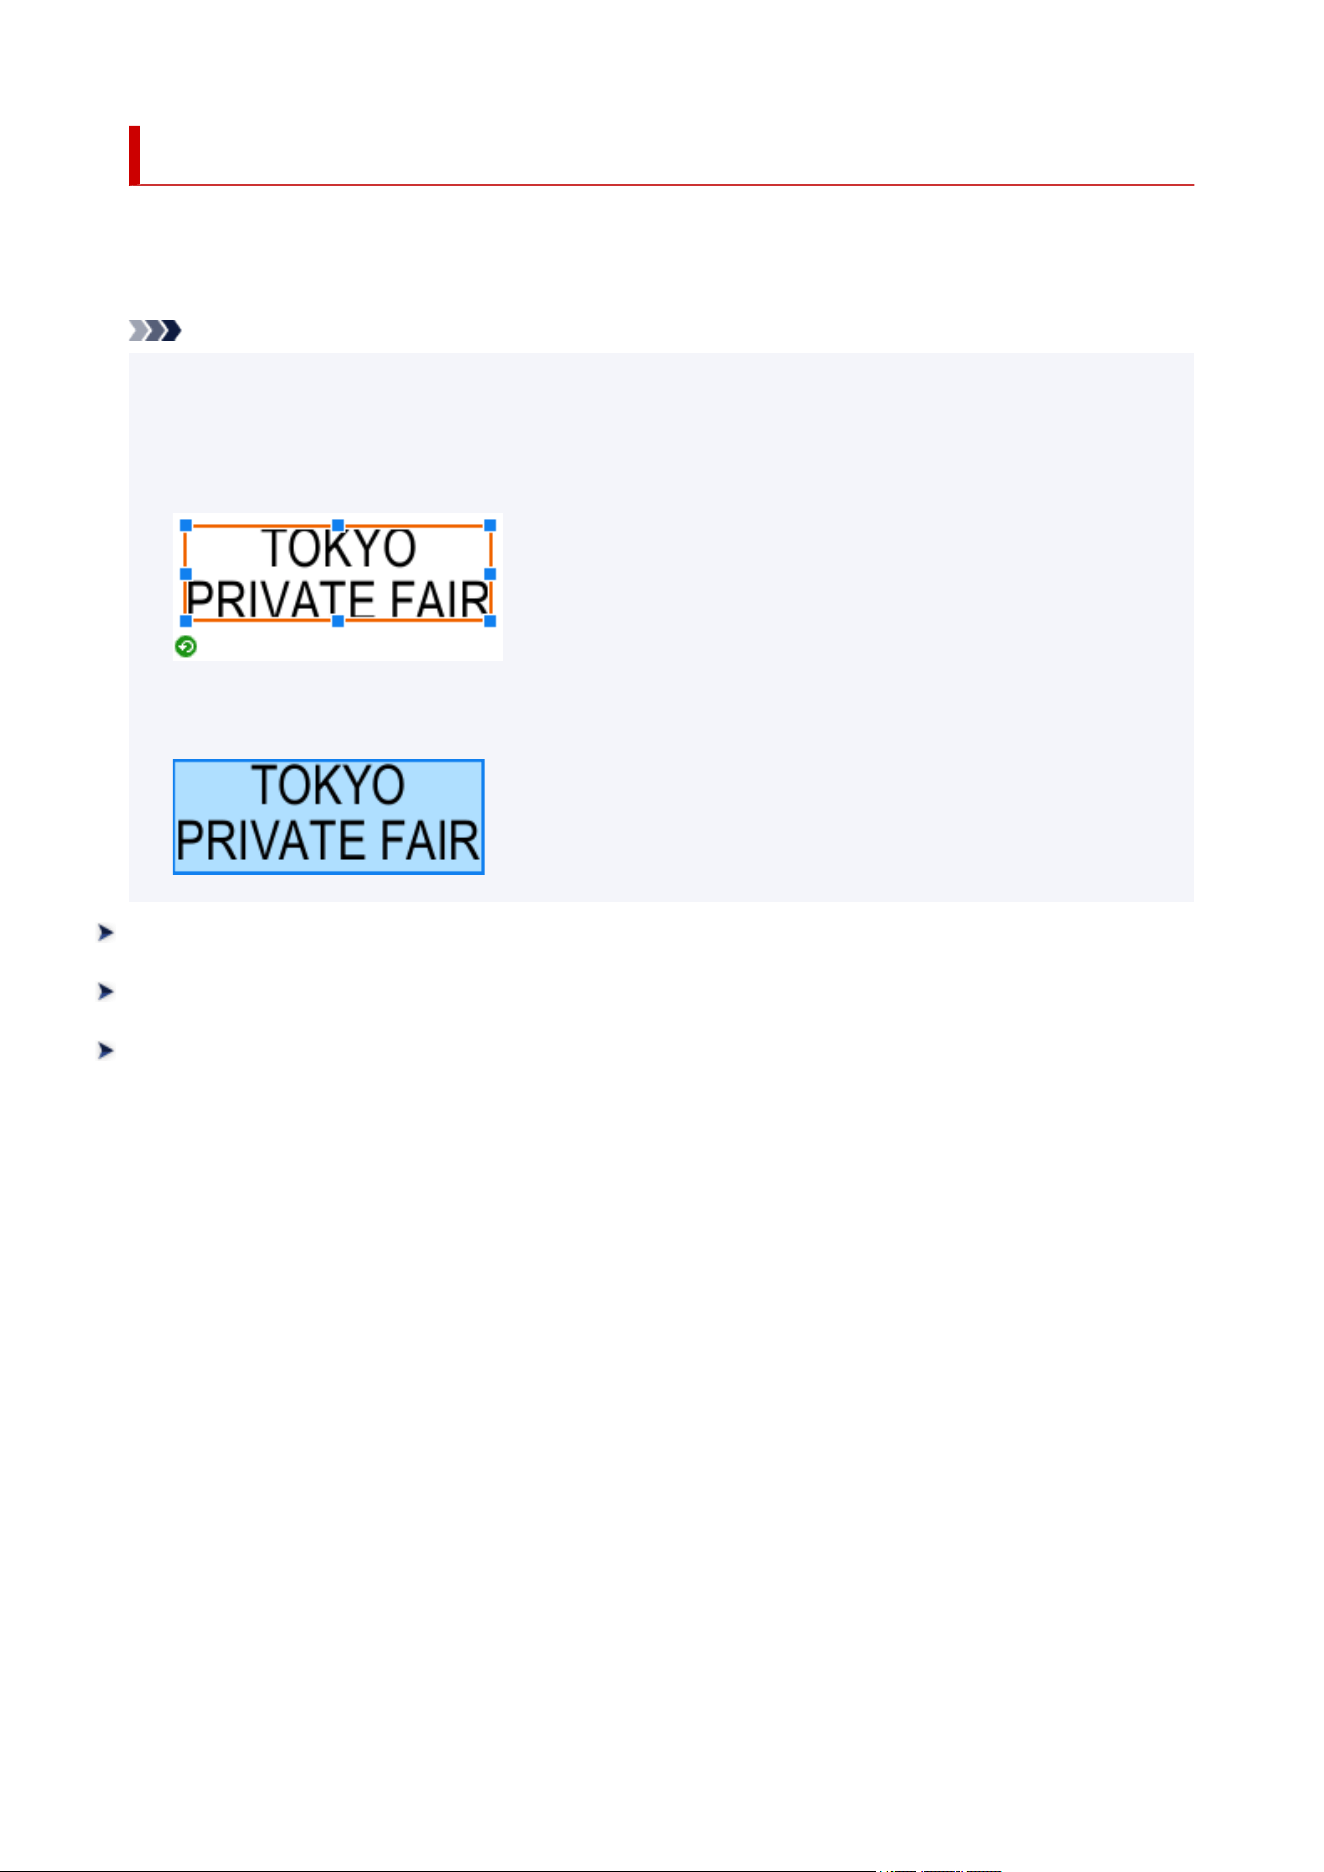
Editing Text
Add text to posters or edit text on posters.
Decorate text by applying a drop shadow or text graphic.
Note
• Use text boxes or editing boxes.•
Text box (framed in orange):
When you click text on a poster, an orange frame appears around the text. Change the text format
(font, text style, etc.) here.
Editing box (framed in blue):
When you double-click text on a poster, a blue frame appears around the text. Add text here.
Adding, Changing, and Removing Text
Changing the Text Format
Applying Text Graphics
136

Adding, Changing, and Removing Text
Add or change text on posters.
Adding Text
Changing Text
Removing Text
Adding Text
1.
Click Edit in the task area, and then click Text.
1.
The view switches to the Edit screen (Text).
2.
Click (Horizontal Text) or (Vertical Text) to select the text orientation.
2.
Important
• Vertical text may not be available for your language.
3.
On the poster, drag to select the area where you want to add text.
3.
An editing box appears.
4. Enter text in the editing box.4.
You can also insert line breaks.
5.
Click outside the editing box.
5.
Check the appearance and position of the text on the poster.
Note
•
The font type, font size, font color, etc. can be changed as desired. For details, see Changing the
Text Format.
•
To wrap text at the end of a line automatically, select the Word Wrap checkbox.
•
To add multilingual text, click (Add Translation Template) on the toolbar or right-click an editing
box and select Add Translation Template. For details, see Using Translation Templates.
Changing Text
1.
Click Edit in the task area, and then click Text.
1.
The view switches to the Edit screen (Text).
137

2. Right-click text on poster, and then click Edit.2.
An editing box appears.
Note
• Alternatively, double-click the text to display the editing box.
3. Change text in the editing box.3.
4.
Click outside the editing box.
4.
Check the changed text on the poster.
Removing Text
1.
Click Edit in the task area, and then click Text.
1.
The view switches to the Edit screen (Text).
2.
Right-click text on poster, and then click Delete.
2.
The text is removed.
Note
• Alternatively, click the text and press the Delete key to remove it.
138

Changing the Text Format
Change the format of text entered on your poster.
Important
• Fluorescent spot colors cannot be used depending on your model or paper type.
• Fluorescent spot colors cannot be used when the Edit layout with Free Layout plus checkbox is selected
in the Paper Options screen.
Changing the Font
Resizing Text
Aligning Text to the Left, Center, or Right
Justifying Text
Changing Kerning and Line Spacing
Changing the Text Color
Specifying the Text Style
Outlining Text
Specifying Drop Shadows for Text
Outlining and Drop Shadow Examples
Changing the Font
Change the font (typeface).
1.
Click Edit in the task area, and then click Text.
1.
The view switches to the Edit screen (Text).
2. Click text on poster.2.
3. In Font, select font.3.
Note
• Font names in the Font list are displayed in the actual font.
•
To change the font of a single character or text block, right-click text on the poster and click Edit,
or double-click text to display an editing box, and then drag the character or text block you want to
change to specify the font.
Resizing Text
Change the size of text.
1.
Click Edit in the task area, and then click Text.
1.
The view switches to the Edit screen (Text).
2.
Click text on poster.
2.
139
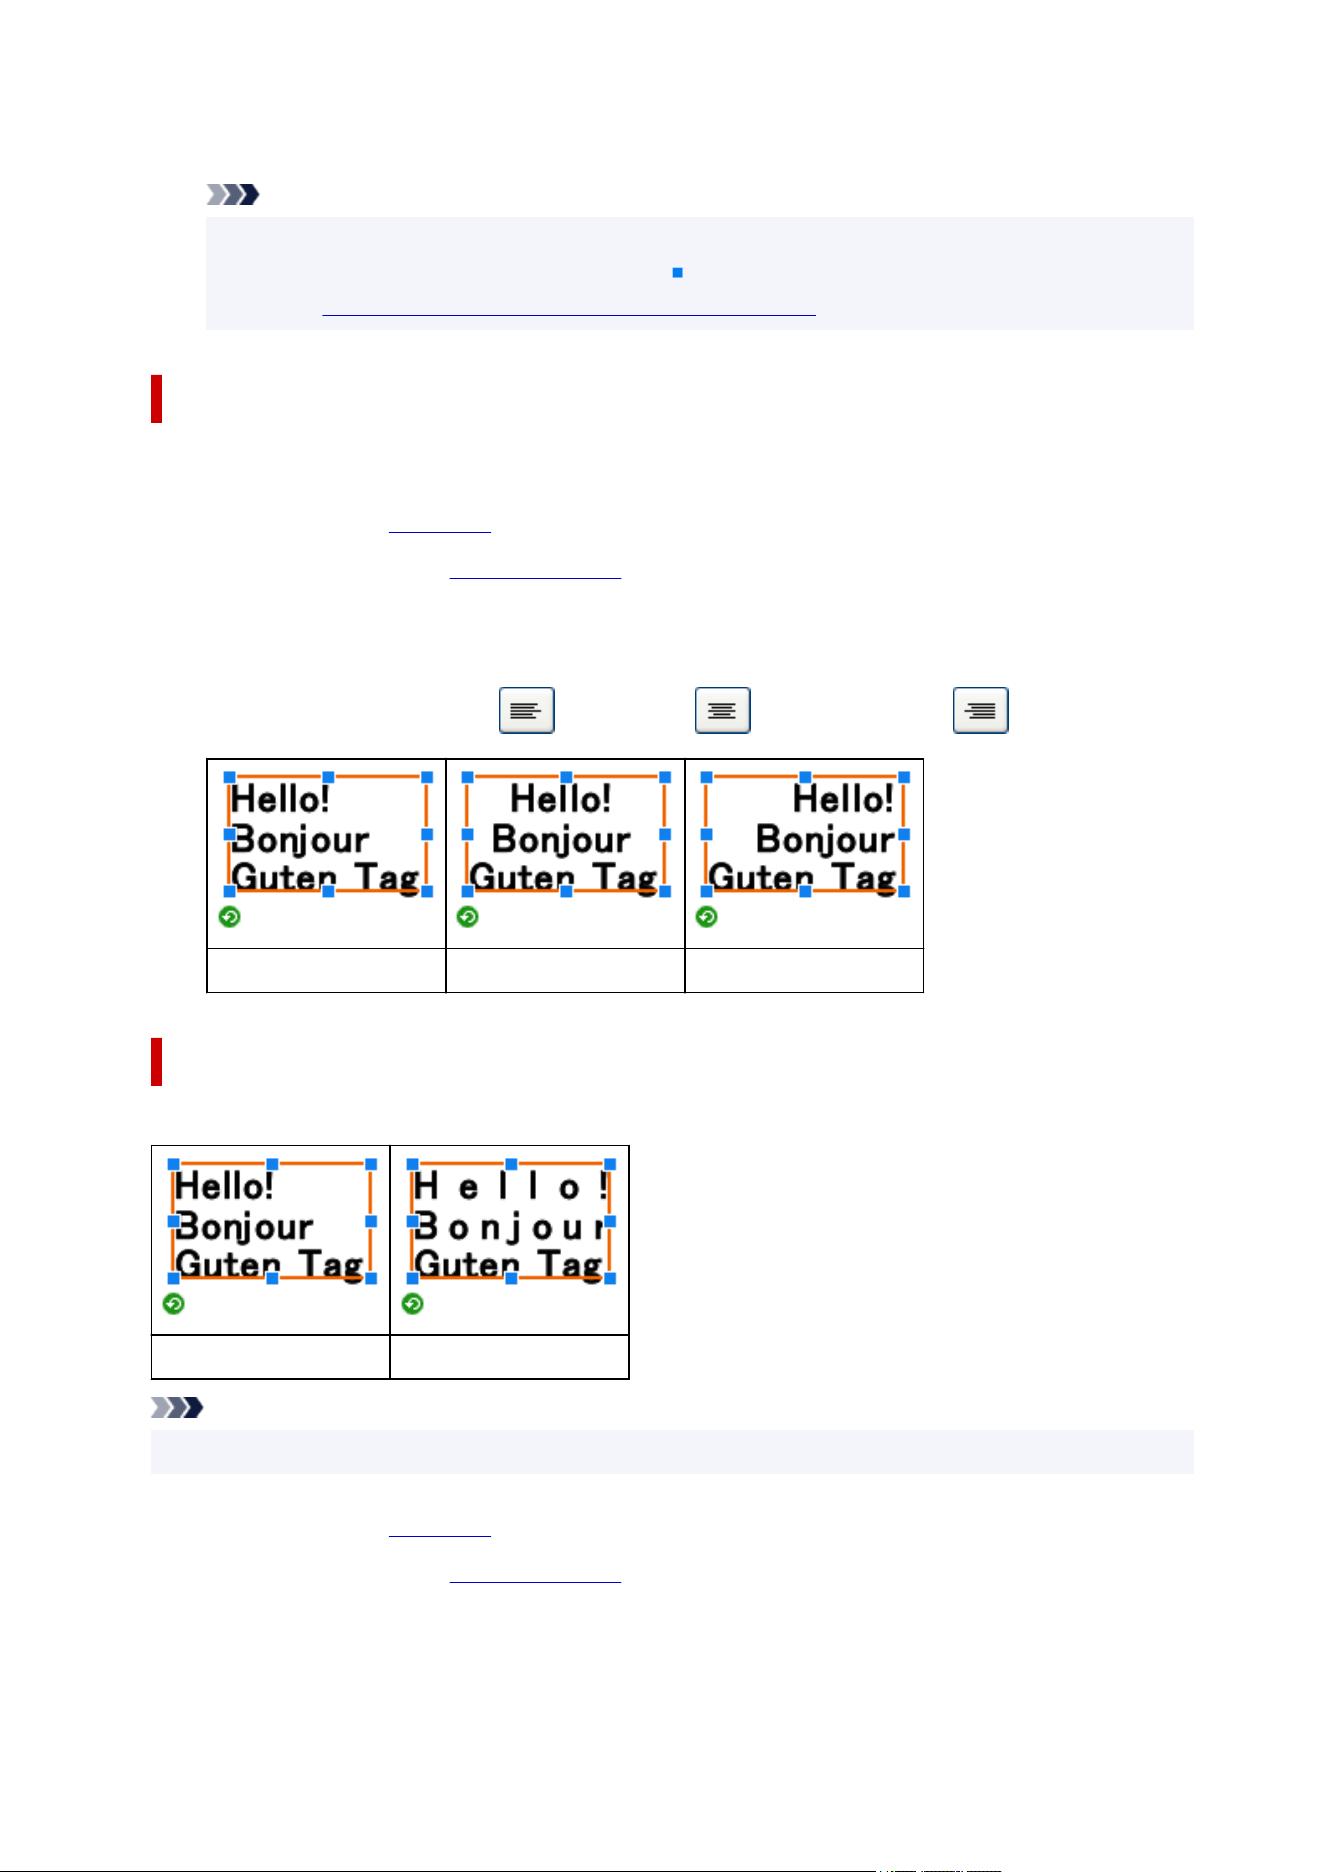
3. In Font Size, select font size.3.
Note
• You can also enter a value (6 to 5000) directly in Font Size.
•
Another way to enlarge or reduce text is to drag (Resize handle) displayed on the text box. For
details, see
Moving, Enlarging, Reducing, and Rotating Objects.
Aligning Text to the Left, Center, or Right
Specify how to align text.
1.
Click Edit in the task area, and then click Text.
1.
The view switches to the Edit screen (Text).
2.
Click text on poster.
2.
3. In Text Alignment, select (Left Align), (Center Align), or (Right Align).3.
Left Align Center Align Right Align
Justifying Text
Position the text evenly across the text box so that all rows are as long as the longest row.
Left Align Justify
Note
• Justification can be set only when a text box (framed in orange) is displayed.
1.
Click Edit in the task area, and then click Text.
1.
The view switches to the Edit screen (Text).
2.
Click text on poster.
2.
140

3. Under Text Alignment, click (Justify).3.
Changing Kerning and Line Spacing
Widen or narrow the space between characters or between lines.
1. Click Edit in the task area, and then click Text.1.
The view switches to the Edit screen (Text).
2.
Click text on poster.
2.
3.
In Line Spacing, select line spacing.
3.
4.
In Character Spacing, set character spacing.
4.
Note
• Enter a value (-1000.00 to 1000.00) directly in Character Spacing. Alternatively, click (Up Arrow)
or (Down Arrow) on the right to increase or decrease the value.
Changing the Text Color
Change the text color.
1. Click Edit in the task area, and then click Text.1.
The view switches to the Edit screen (Text).
2. Click text on poster.2.
3.
In Text Color, click on a color.
3.
Note
•
In Text Color, the current color and basic colors are displayed. To use other colors, click Custom...,
and then select a color in the displayed dialog box.
•
To change the color of a single character or text block, right-click text on the poster and click Edit,
or double-click text to display an editing box, and then drag the character or text block you want to
change to specify the color.
Specifying the Text Style
Specify the text style (bold, italic, or underline).
1.
Click Edit in the task area, and then click Text.
1.
The view switches to the Edit screen (Text).
141
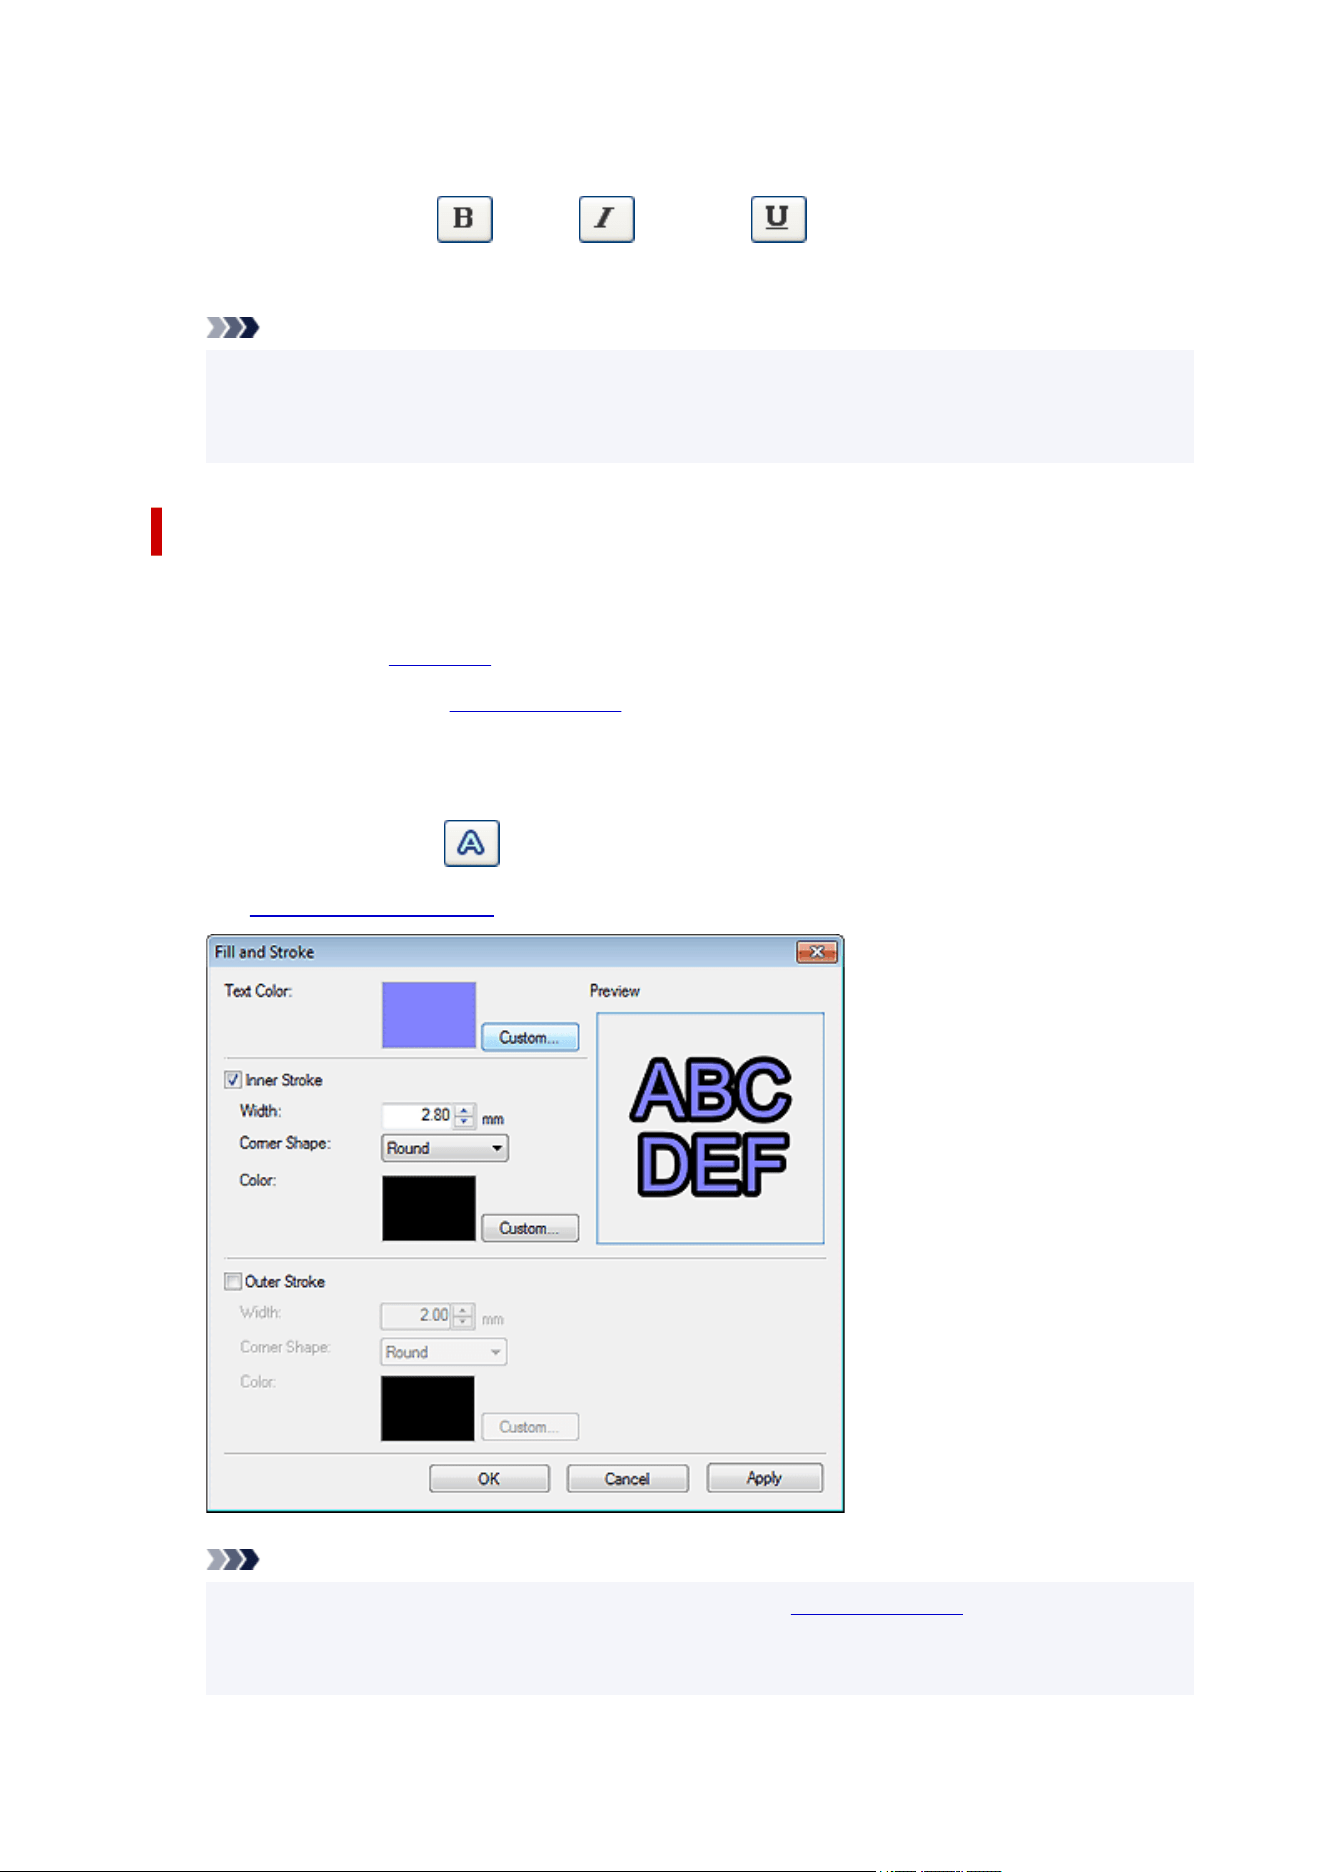
2. Click text on poster.2.
3. In Text Style, select (Bold), (Italic), or (Underline).3.
Multiple styles can be specified to the text.
Note
•
To change the style of a single character or text block, right-click text on the poster and click Edit,
or double-click text to display an editing box, and then drag the character or text block you want to
change to specify the style.
Outlining Text
Outline the text. The text will be enhanced on the poster.
1.
Click Edit in the task area, and then click Text.
1.
The view switches to the Edit screen (Text).
2.
Click text on poster.
2.
3.
In Text Effects, click (Fill and Stroke).
3.
The Fill and Stroke dialog box appears.
Note
•
In Text Color, the color specified in the settings panel in the Edit screen (Text) is reflected. To
change the text color, click Custom..., Change to Spot Color..., or Change to Regular Color..., and
then select a color in the displayed dialog box.
142

4. Select the Inner Stroke checkbox.4.
5. In Width, specify the width of the outline.5.
Note
• Enter a value (0.10 to 100.00) directly. Alternatively, click (Up Arrow) or (Down Arrow) on the
right to increase or decrease the value.
6.
In Corner Shape, select Round, Square, or Bevel.
6.
7.
Specify Color of the outline.
7.
8.
Click Apply.
8.
The text on the poster is outlined. Continue adjusting the settings and clicking Apply until the outlined
text appears as desired.
9.
Click OK.
9.
Note
•
To apply a double outline, select the Outer Stroke checkbox and repeat steps 5-7.
• The effect can be checked in Preview.
• To remove the outline, deselect the Inner Stroke or Outer Stroke checkbox.
• To outline a single character or text block, right-click text on the poster and click Edit, or double-click
text to display an editing box, and then drag the character or text block you want to outline.
Specifying Drop Shadows for Text
Add drop shadows of several types to text. The text will appear as if it is floating over the poster.
1. Click Edit in the task area, and then click Text.1.
The view switches to the Edit screen (Text).
2.
Click text on poster.
2.
3.
In Text Effects, click (Shaded Text).
3.
The Set Shaded Text dialog box appears.
143
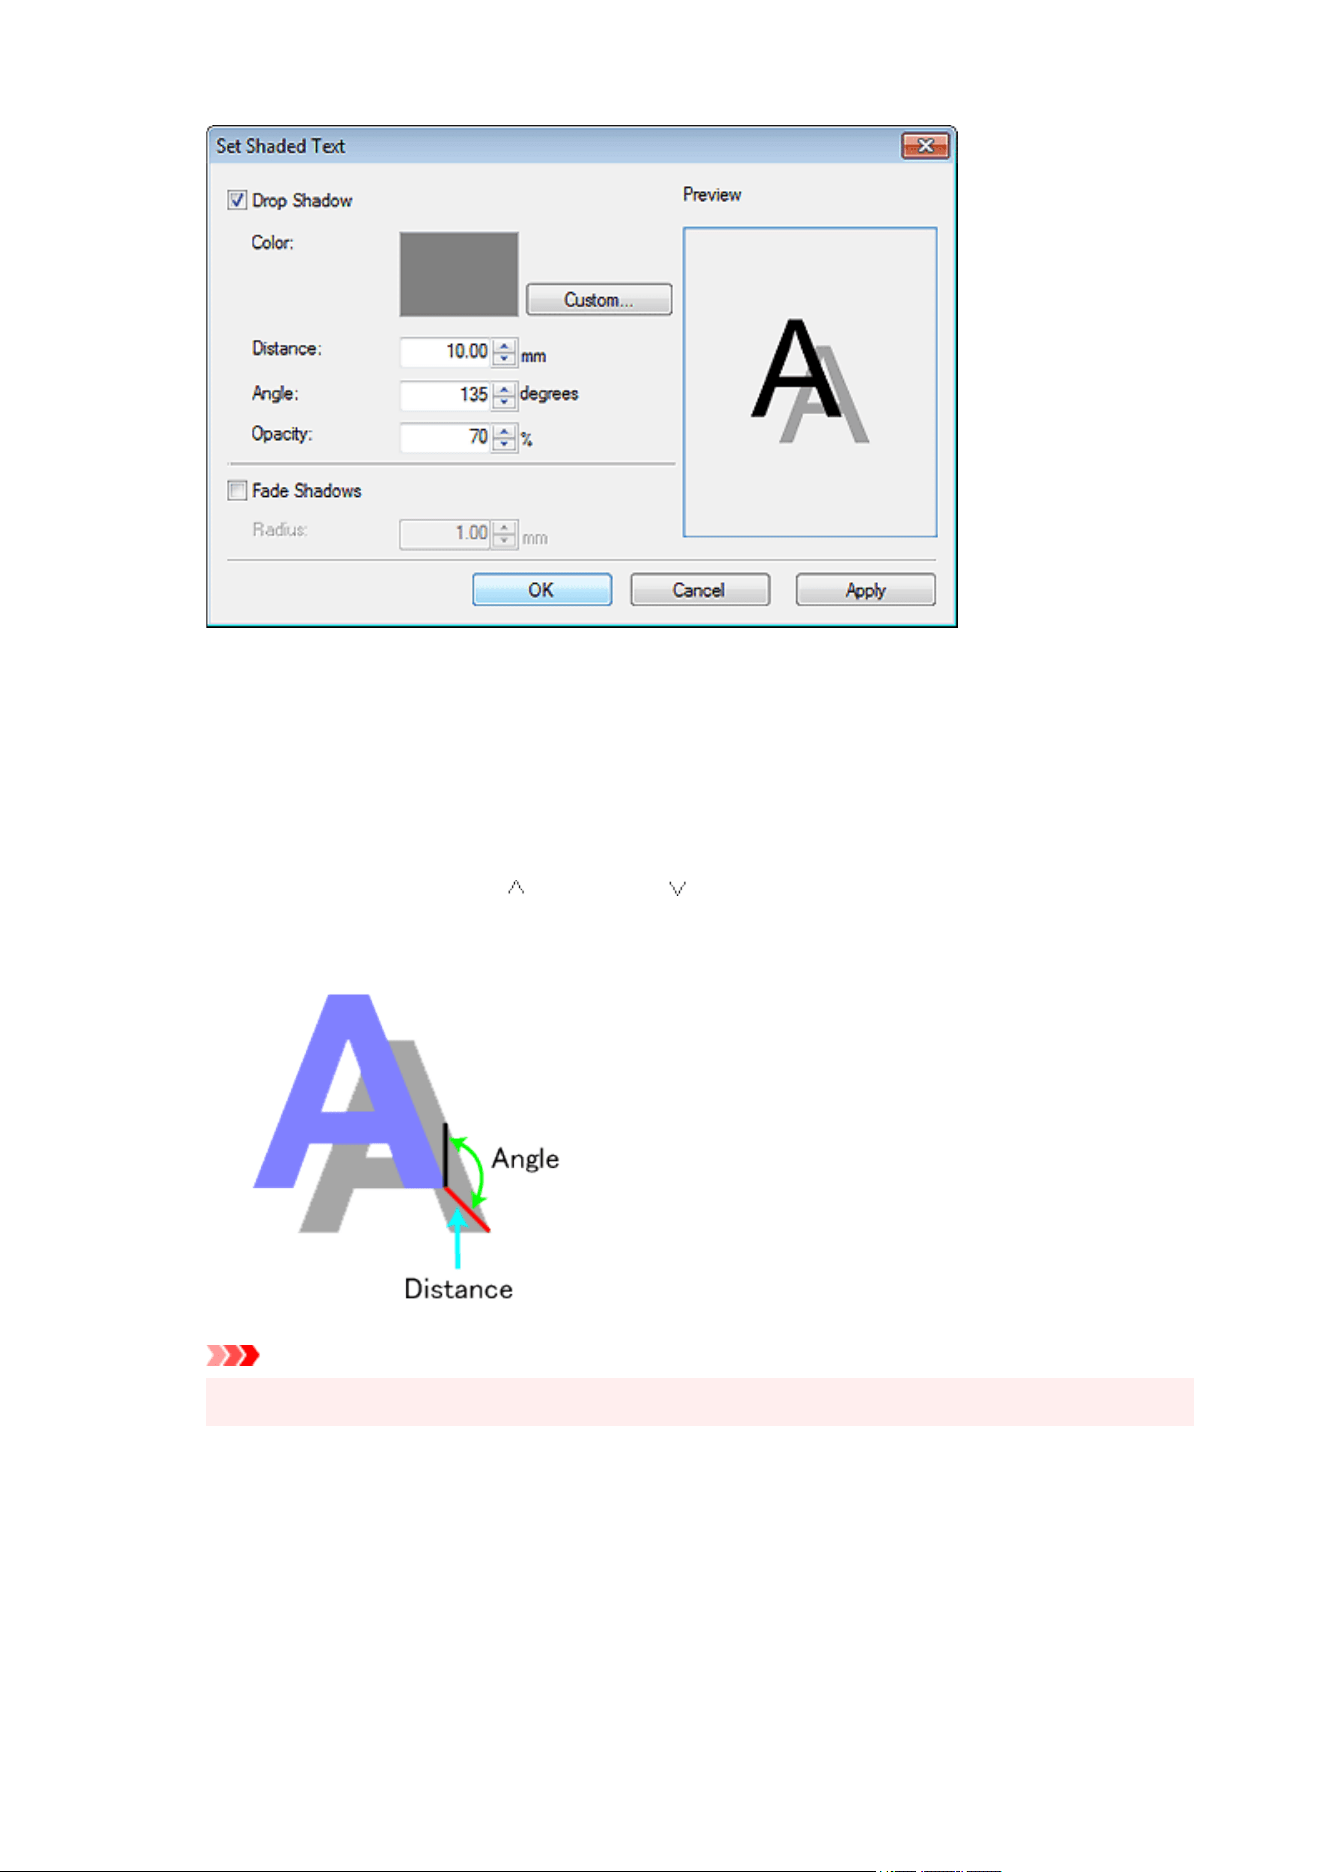
4.
Select the Drop Shadow checkbox.
4.
To change the shadow color, click Custom..., Change to Spot Color..., or Change to Regular
Color... in Color, and then select a color in the displayed dialog box.
5.
Specify Distance, Angle, and Opacity.
5.
Enter the value directly or click (Up Arrow) or (Down Arrow) on the right to increase or decrease
the value.
Important
•
Opacity cannot be set when a fluorescent spot color is specified for the drop shadow color.
6.
Click Apply.
6.
The drop shadow is applied to the text on the poster. Continue adjusting the settings and clicking
Apply until the drop shadow appears as desired.
7.
Click OK.
7.
144
Important
• Shadows cannot be softened when a fluorescent spot color is specified for the drop shadow color.
Note
•
To soften the shadow, select the Fade Shadows checkbox, and then specify the Radius.
•
To soften shadows more, increase the value.
To emphasize shadows, decrease the value.
•
The effect can be checked in Preview.
•
To remove the shadow, deselect the Drop Shadow checkbox.
•
To apply a drop shadow to a single character or text block, right-click text on the poster and click
Edit, or double-click text to display an editing box, and then drag the character or text block to which
you want to apply a drop shadow.
Outlining and Drop Shadow Examples
Use outlining and drop shadows to decorate text in various ways.
Example of outlined text
Example of settings in the Fill and Stroke dialog box
Text Color
Color Black
Inner Stroke
Width 6 mm (0.25 in.)
Corner Shape Round
Color White
Outer Stroke
Width 6 mm (0.25 in.)
Corner Shape Round
Color Black
145
Example of drop shadow
Example of settings in the Set Shaded Text dialog box
Drop Shadow
Color Black
Distance 21 mm (0.8 in.)
Angle 90 degrees
Opacity 10%
Example of outlining combined with drop shadow
Example of settings in the Fill and Stroke and Set Shaded Text dialog boxes
Text Color
Color White
Inner Stroke
Width 2 mm (0.07 in.)
Corner Shape Round
Color Black
Drop Shadow
Color Gray
Distance 3 mm (0.10 in.)
Angle 135 degrees
Opacity 50%
146
Applying Text Graphics
Decorate text with floral illustrations, apply graphics to transform text into tags or speech callouts, and more,
and customize text graphic colors.
1. Click Edit in the task area, and then click Text.1.
The view switches to the Edit screen (Text).
2.
Click text in the poster design area.
2.
3.
Click Text Graphics.
3.
4.
In Category, select a text graphic category.
4.
5.
Select a text graphic from the thumbnails, and then double-click it.
5.
Note
• To view all text graphics, click (View All Text Graphics) for displaying the View All Text Graphics
dialog box.
• Change text graphic colors from Text Graphic Color or Custom... as needed.
• To remove the text graphic, select a blank thumbnail and double-click it.
147


Adding Backgrounds
Select a single image in the library to set it as the background.
1. Click Edit in the task area, and then click Backgrounds.1.
The view switches to the Edit screen (Backgrounds).
2.
In Category, select a background category.
2.
3.
Select a background from the thumbnails, and then double-click it.
3.
The selected background is inserted in the poster.
4.
To change the background color, click a color in Background Color.
4.
Note
•
To remove the background, select No Background in Category, and then double-click the No
Background thumbnail.
•
To use colors other than those displayed in Background Color, click Custom..., and then select a color
in the displayed dialog box. Some colors cannot be changed, or the new color may only be applied to
some portions of the background, depending on the design.
• To use a single color for the background, select Simple in Category, and then double-click a single-
color background. Change the color in Background Color.
149

Setting Background Image
Set the background by filling the poster with an inserted image.
1. Right-click an image on poster, and then click Fit to background (Background setting).1.
The image is moved to the very back to fill the entire poster area.
Note
•
For instructions on inserting images in posters, see Inserting Images in Posters.
•
Fit to background (Background setting) can only be applied to the following images.
•
Images in the photo library
Images you have added to the poster
Images copied and pasted from other applications
•
If background margins have been specified, the image is arranged within those margins. For
instructions on specifying background margins, see
Specifying Background Margins.
• If the image has a different aspect ratio than the poster, the image is trimmed to match the poster's
aspect ratio. To adjust the trimming area, see Trimming Photos.
150
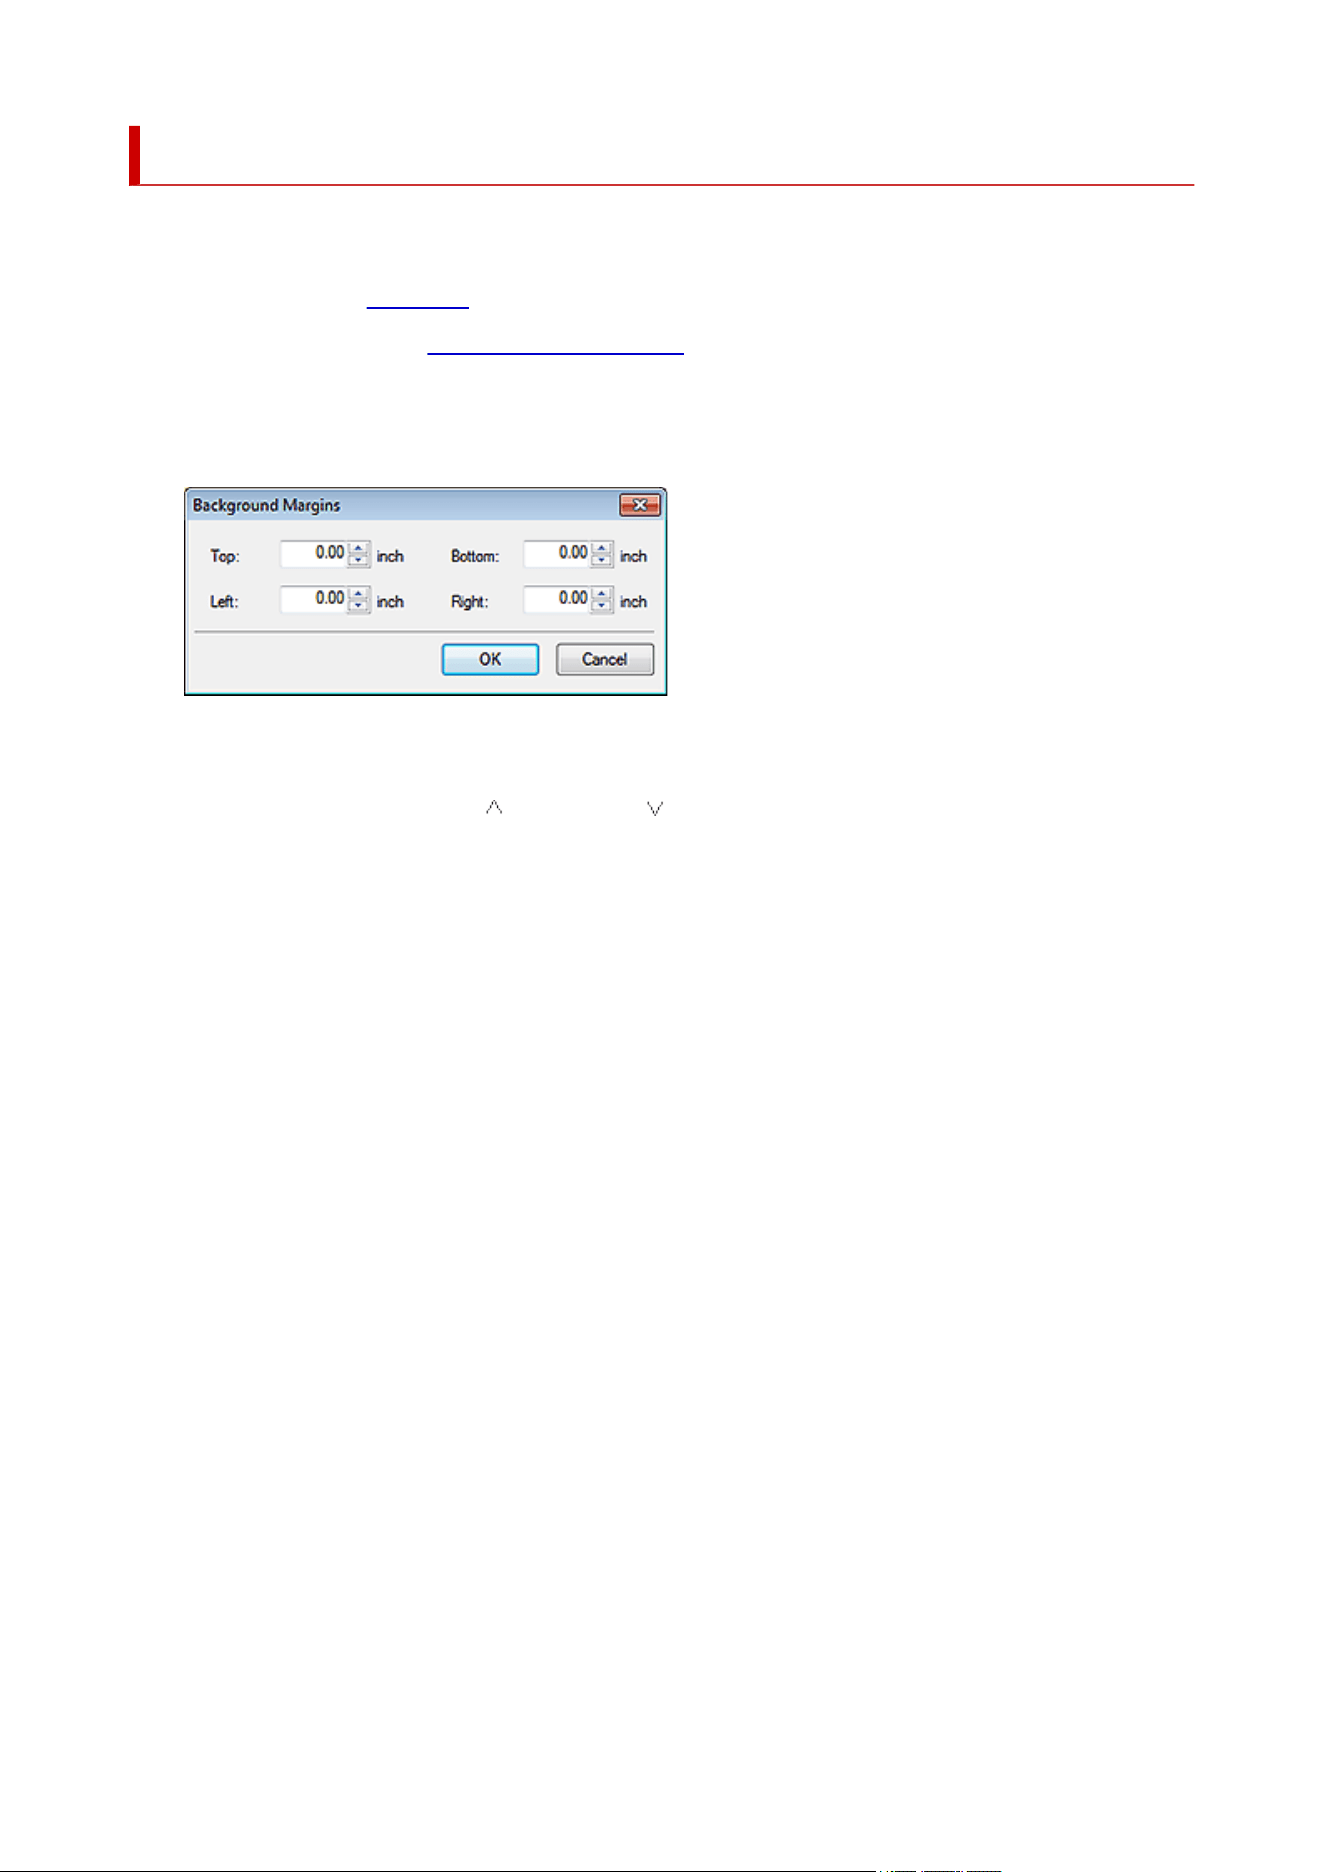
Specifying Background Margins
Specify background margins.
1. Click Edit in the task area, and then click Backgrounds.1.
The view switches to the Edit screen (Backgrounds).
2.
Click Set Margins....
2.
The Background Margins dialog box appears.
3. Specify the top, bottom, left, and right margins.3.
Enter the value directly or click (Up Arrow) or (Down Arrow) on the right to increase or decrease the
value.
4. Click OK.4.
151

Working with Objects
Photos, clipart, text, and other elements you can work with in posters are collectively called "objects."
This section describes various ways of working with objects.
Selecting Objects
Cutting, Copying, and Pasting Objects
Moving, Enlarging, Reducing, and Rotating Objects
Specifying Size, Position, or Orientation Numerically
Locking Object Positions
Aligning Objects
Making Multiple Objects the Same Size
Grouping Objects
Reordering Objects
152
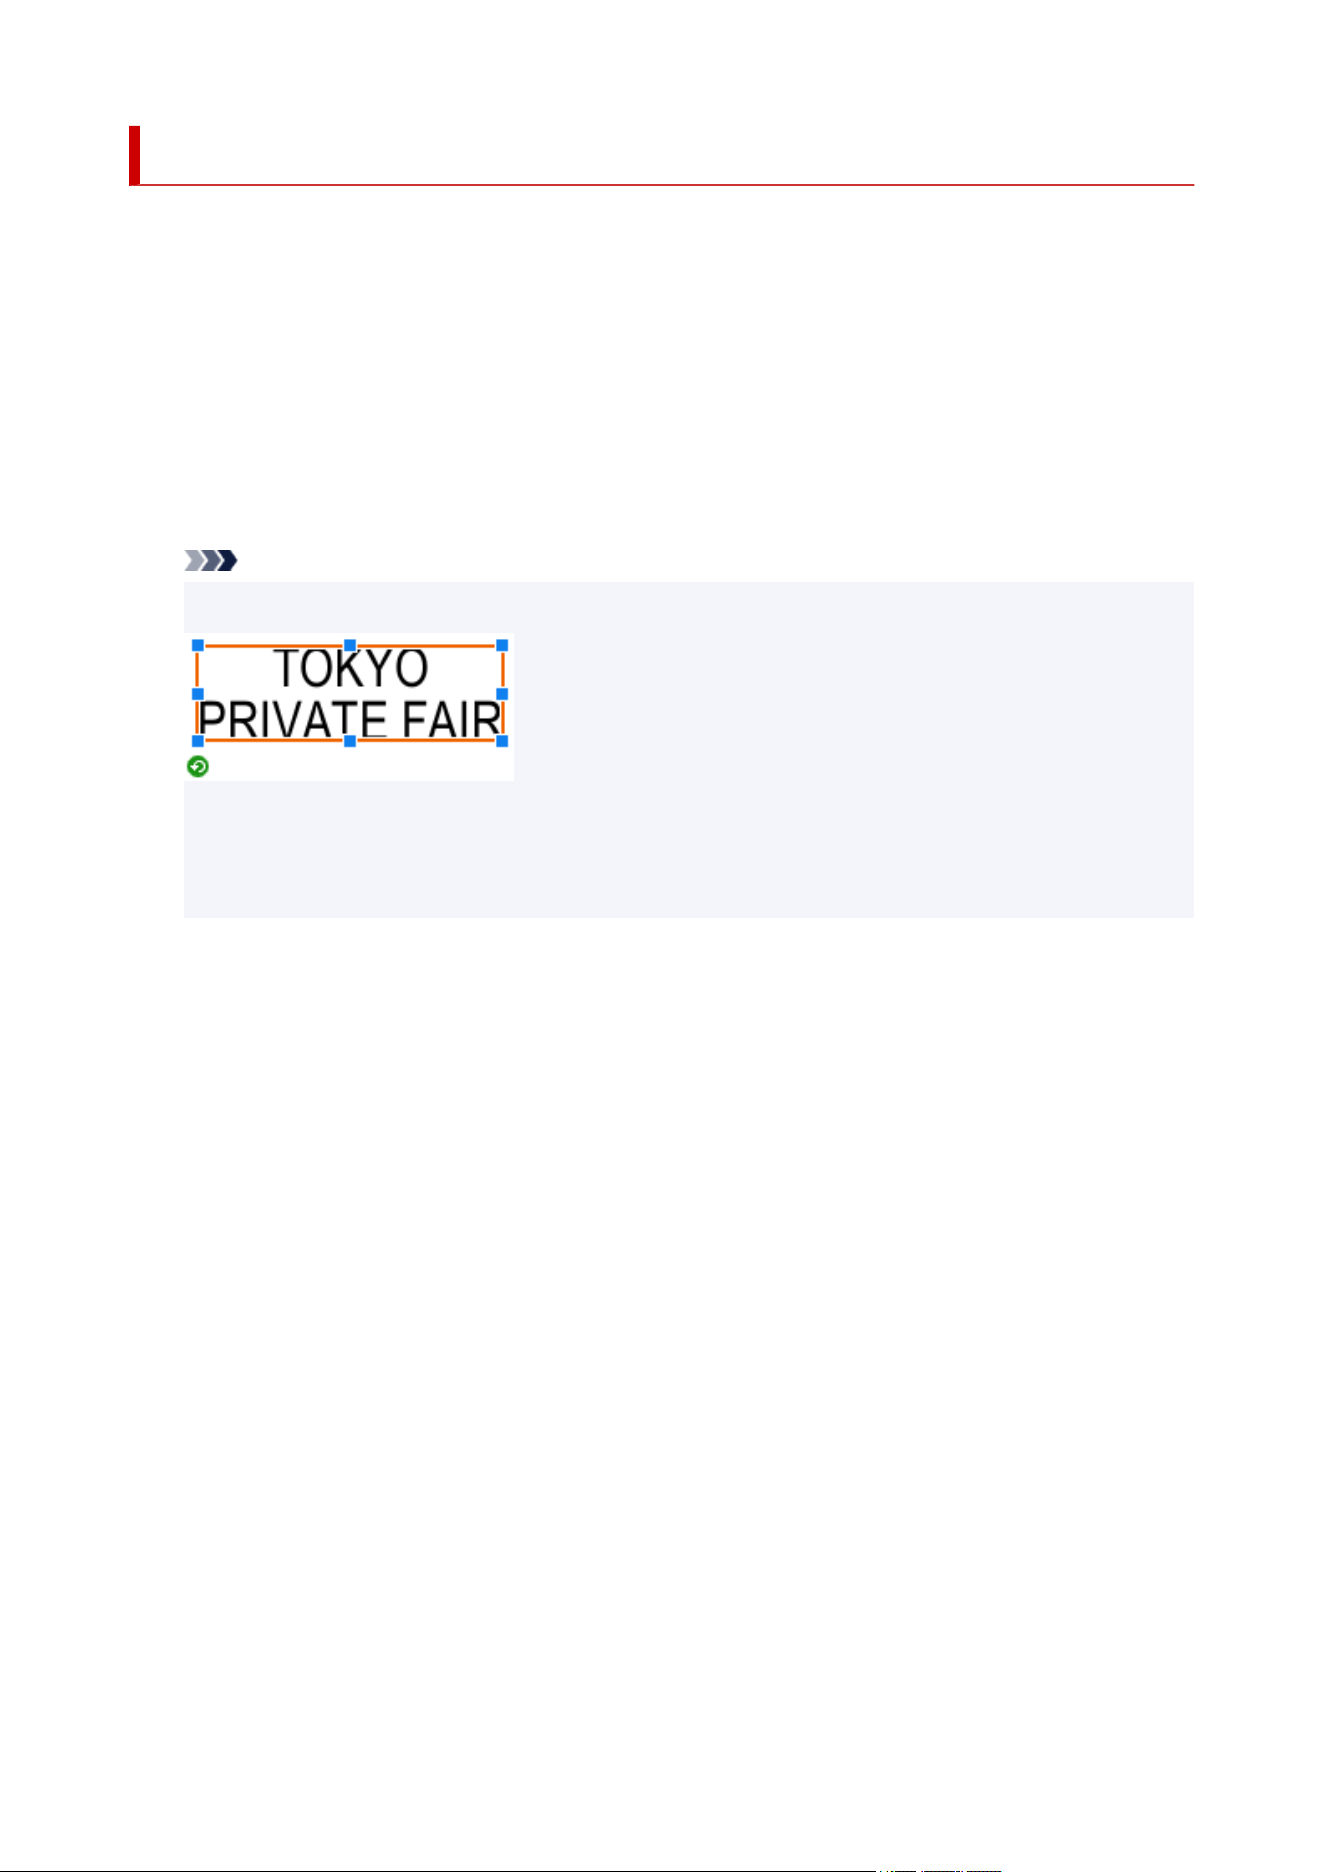
Selecting Objects
To work with objects, you must select the target object.
You can select multiple objects at once.
1. Click an object on the poster.1.
An orange frame appears around the object, and the object is selected.
2.
To select multiple objects, hold down the Ctrl or Shift key as you click the objects.
2.
An orange frame appears around each of the clicked objects, and the objects are selected.
Note
•
The orange frame that appears around text is called a text box.
•
In a text box, you can change the text format (font color, text style, etc.). However, you cannot edit the
text.
• You can also select multiple objects by dragging across the objects as if drawing a box around them.
153

Cutting, Copying, and Pasting Objects
Cut an object and paste it anywhere on the poster.
Objects can be copied as well.
Cutting Objects
Copying Objects
Pasting Objects from Clipboard
Cutting Objects
1.
Select one or more objects, right-click any of them, and then click Cut.
1.
The selected object(s) are copied to the clipboard and deleted from the poster.
Note
•
Alternatively, select an object, and then press Ctrl+X to cut.
Copying Objects
1. Select one or more objects, right-click any of them, and then click Copy.1.
The selected object(s) are copied to the clipboard.
Note
• Alternatively, select an object, and then press Ctrl+C to copy.
•
When you drag an object while holding down the Ctrl key, the object is copied where it is dragged.
• When multiple instances of PosterArtist are running simultaneously, objects can be copied and
pasted between these windows.
Pasting Objects from Clipboard
1.
Right-click anywhere on poster, and then click Paste.
1.
The object is pasted from the clipboard onto the center of the poster.
2.
Move object as needed.
2.
Note
•
Alternatively, select an object, and then press Ctrl+V to paste.
•
When you drag an object while holding down the Ctrl key, the object is copied where it is dragged.
•
When multiple instances of PosterArtist are running simultaneously, objects can be copied and
pasted between these windows.
154
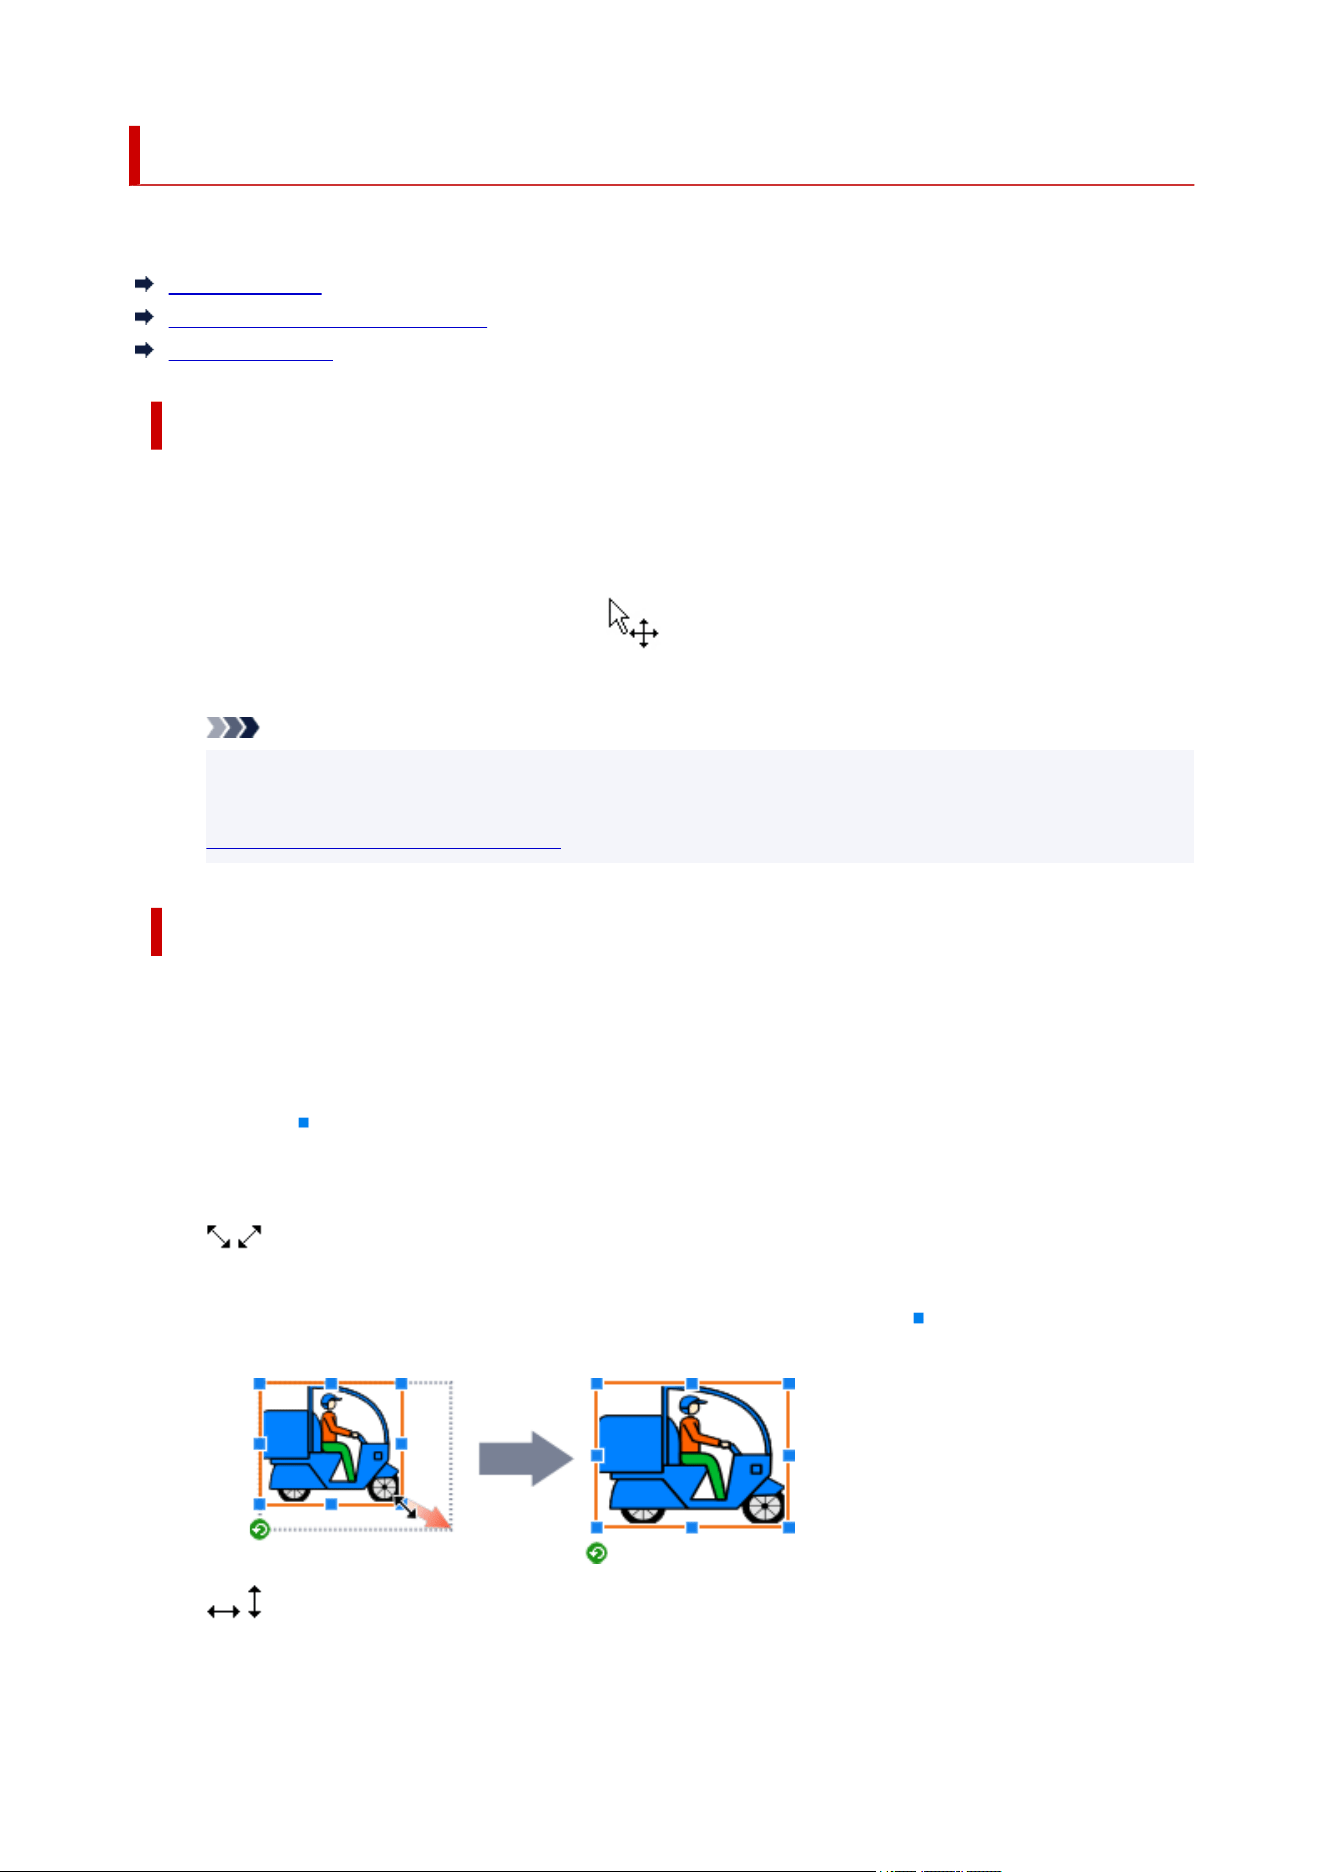
Moving, Enlarging, Reducing, and Rotating Objects
Adjust the position, size, and orientation of objects with a mouse.
Moving Objects
Enlarging and Reducing Objects
Rotating Objects
Moving Objects
1.
Select one or more objects.
1.
The object(s) are framed in orange.
2.
Drag and move the object using the (Move pointer) that appears inside the orange
2.
frame.
Note
• To move an object horizontally or vertically, drag it while holding down the Shift key.
• Use the Quick Exchange function to easily swap the positions of multiple objects. For details, see
Quick Exchange (Swapping Objects).
Enlarging and Reducing Objects
1.
Select one or more objects.
1.
The object(s) are framed in orange.
2. Point to (Resize handle) on the frame.2.
3. Drag the pointer to resize the object.3.
One of these pointers appears when you point to a corner of a frame.
Drag the pointer to resize the object without changing the position of
(Resize handle) in the
diagonally opposite corner.
One of these pointers appears when you point to a side of a frame.
Drag the pointer to adjust the height and width of the object freely.
155
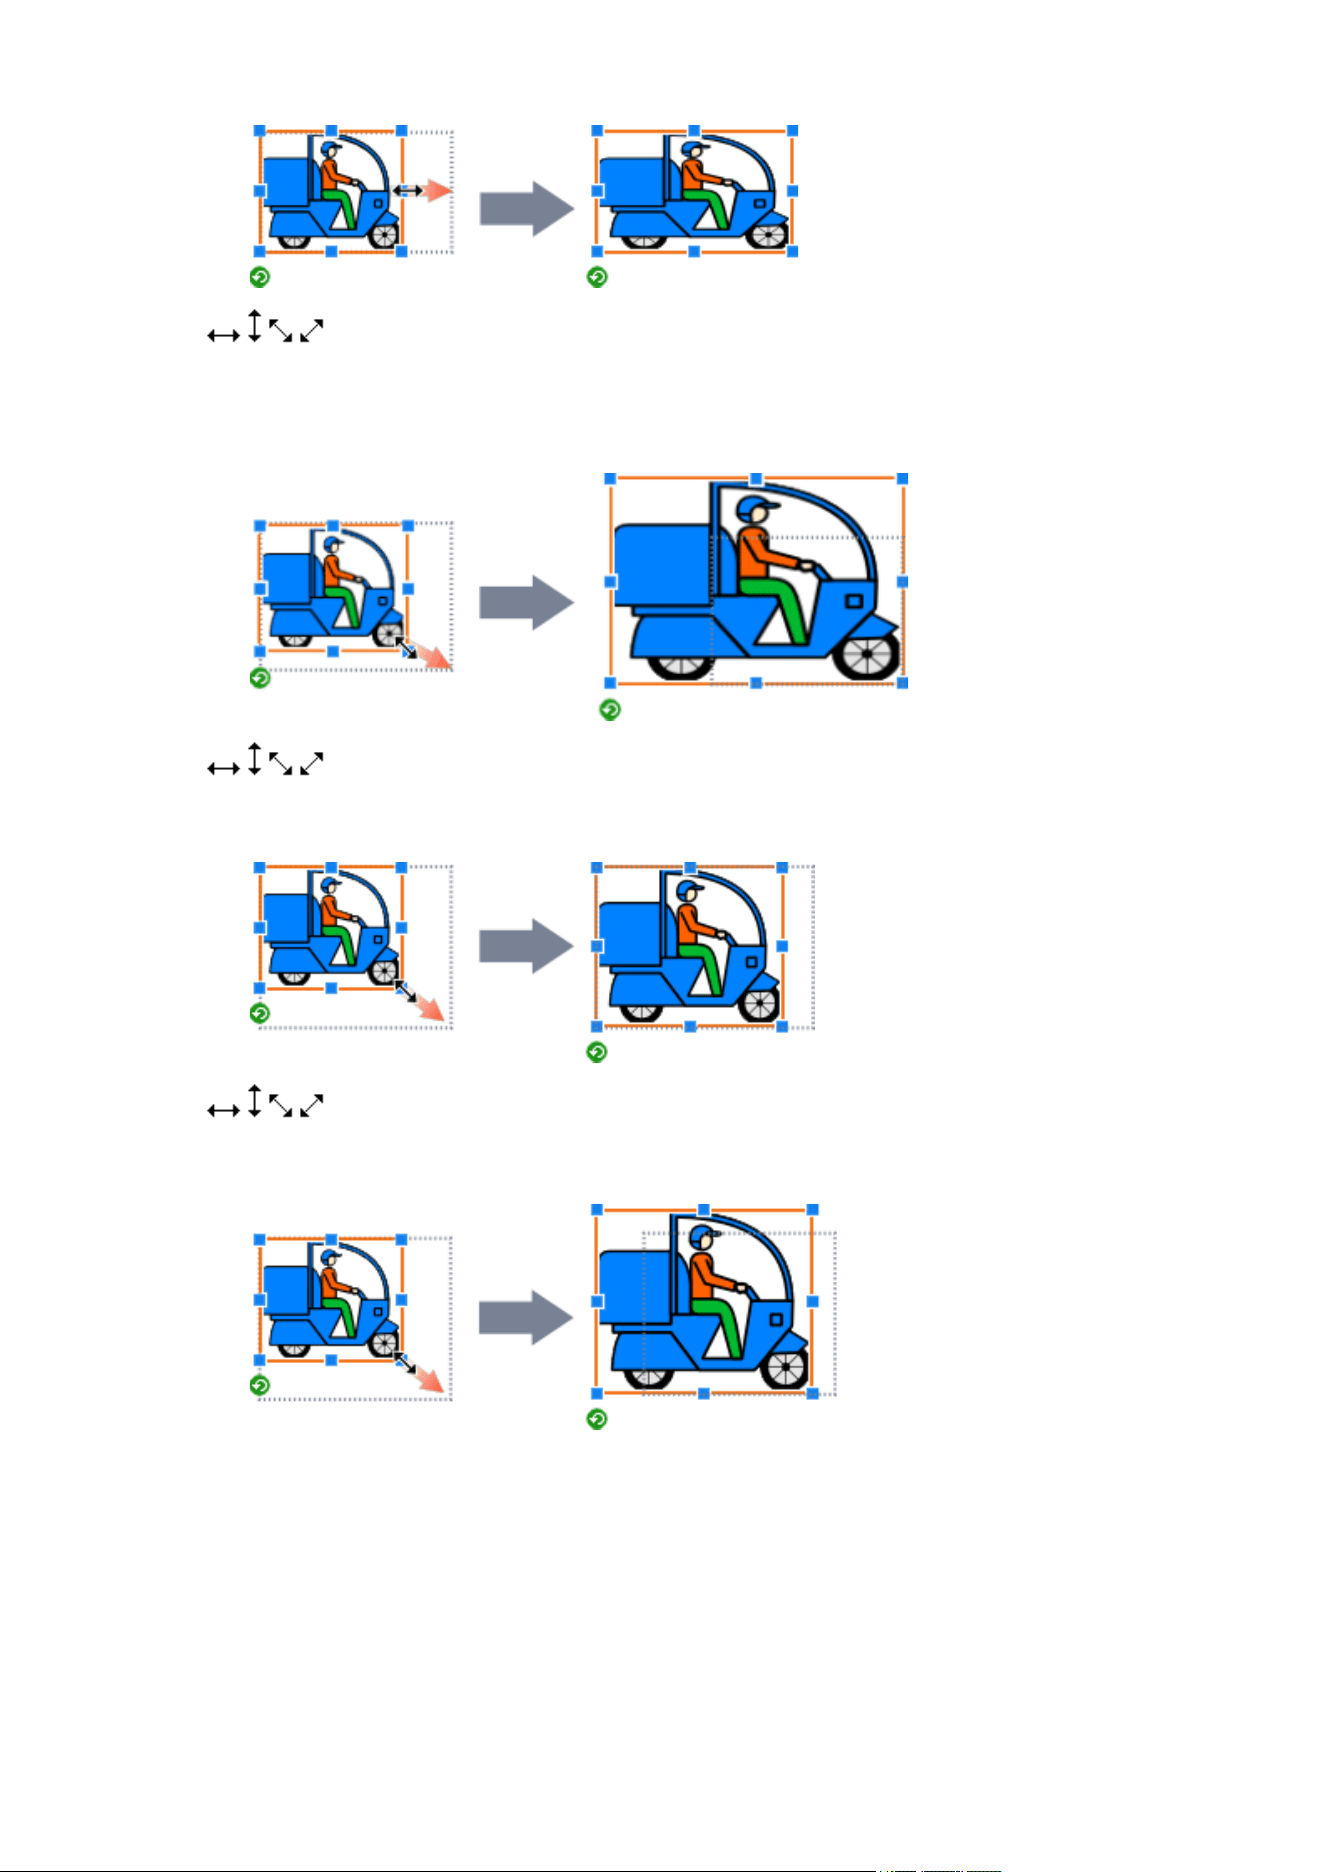
+ the Ctrl key
To resize an object without changing its center point, hold down the Ctrl key as you drag the
pointer.
When resizing clipart, the line thickness is also maintained.
+ the Shift key
To resize an object without changing its aspect ratio, hold down the Shift key as you drag the
pointer.
+ the Ctrl key + the Shift key
To resize an object without changing its aspect ratio and center point, hold down the Ctrl and Shift
keys as you drag the pointer.
Crosshair pointer
A crosshair pointer appears when you point to either end of a line or arrow.
Drag the pointer to adjust the line or arrow length.
156
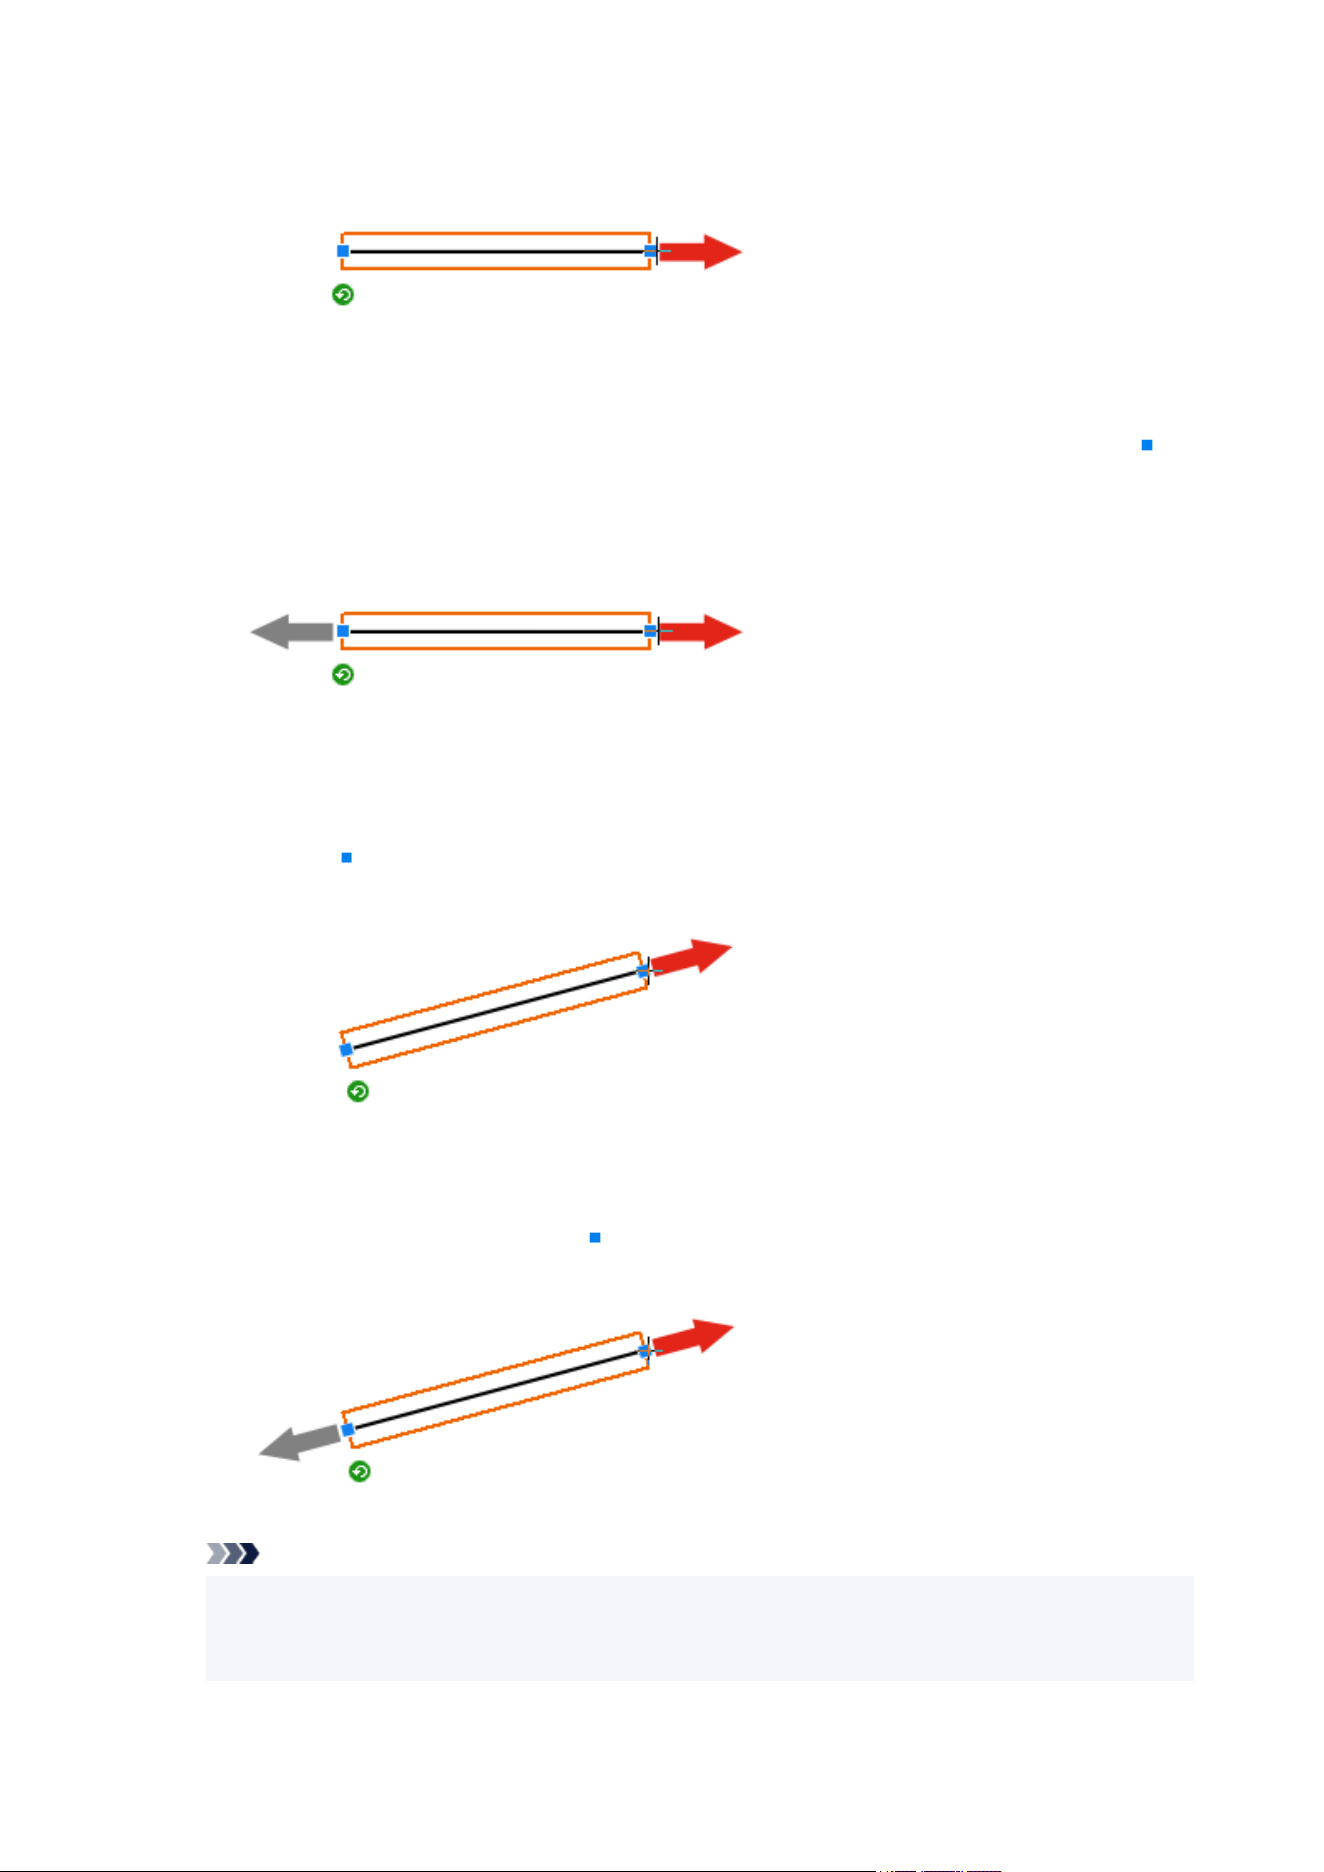
Crosshair pointer + the Ctrl key
To extend or retract both ends of a line or arrow at once, hold down the Ctrl key as you drag
(Resize handle).
Crosshair pointer + the Shift key
To extend or retract a line or arrow without changing its orientation, hold down the Shift key as
you drag
(Resize handle).
Crosshair pointer + the Ctrl key + the Shift key
To extend or retract a line or arrow without changing its center point and orientation, hold down
the Ctrl and Shift keys as you drag
(Resize handle).
Note
•
When a text box is resized, text in the text box is resized accordingly. However, if the Word Wrap
checkbox is selected in the Edit screen (Text), the text will not be resized even when the text box is
resized.
157
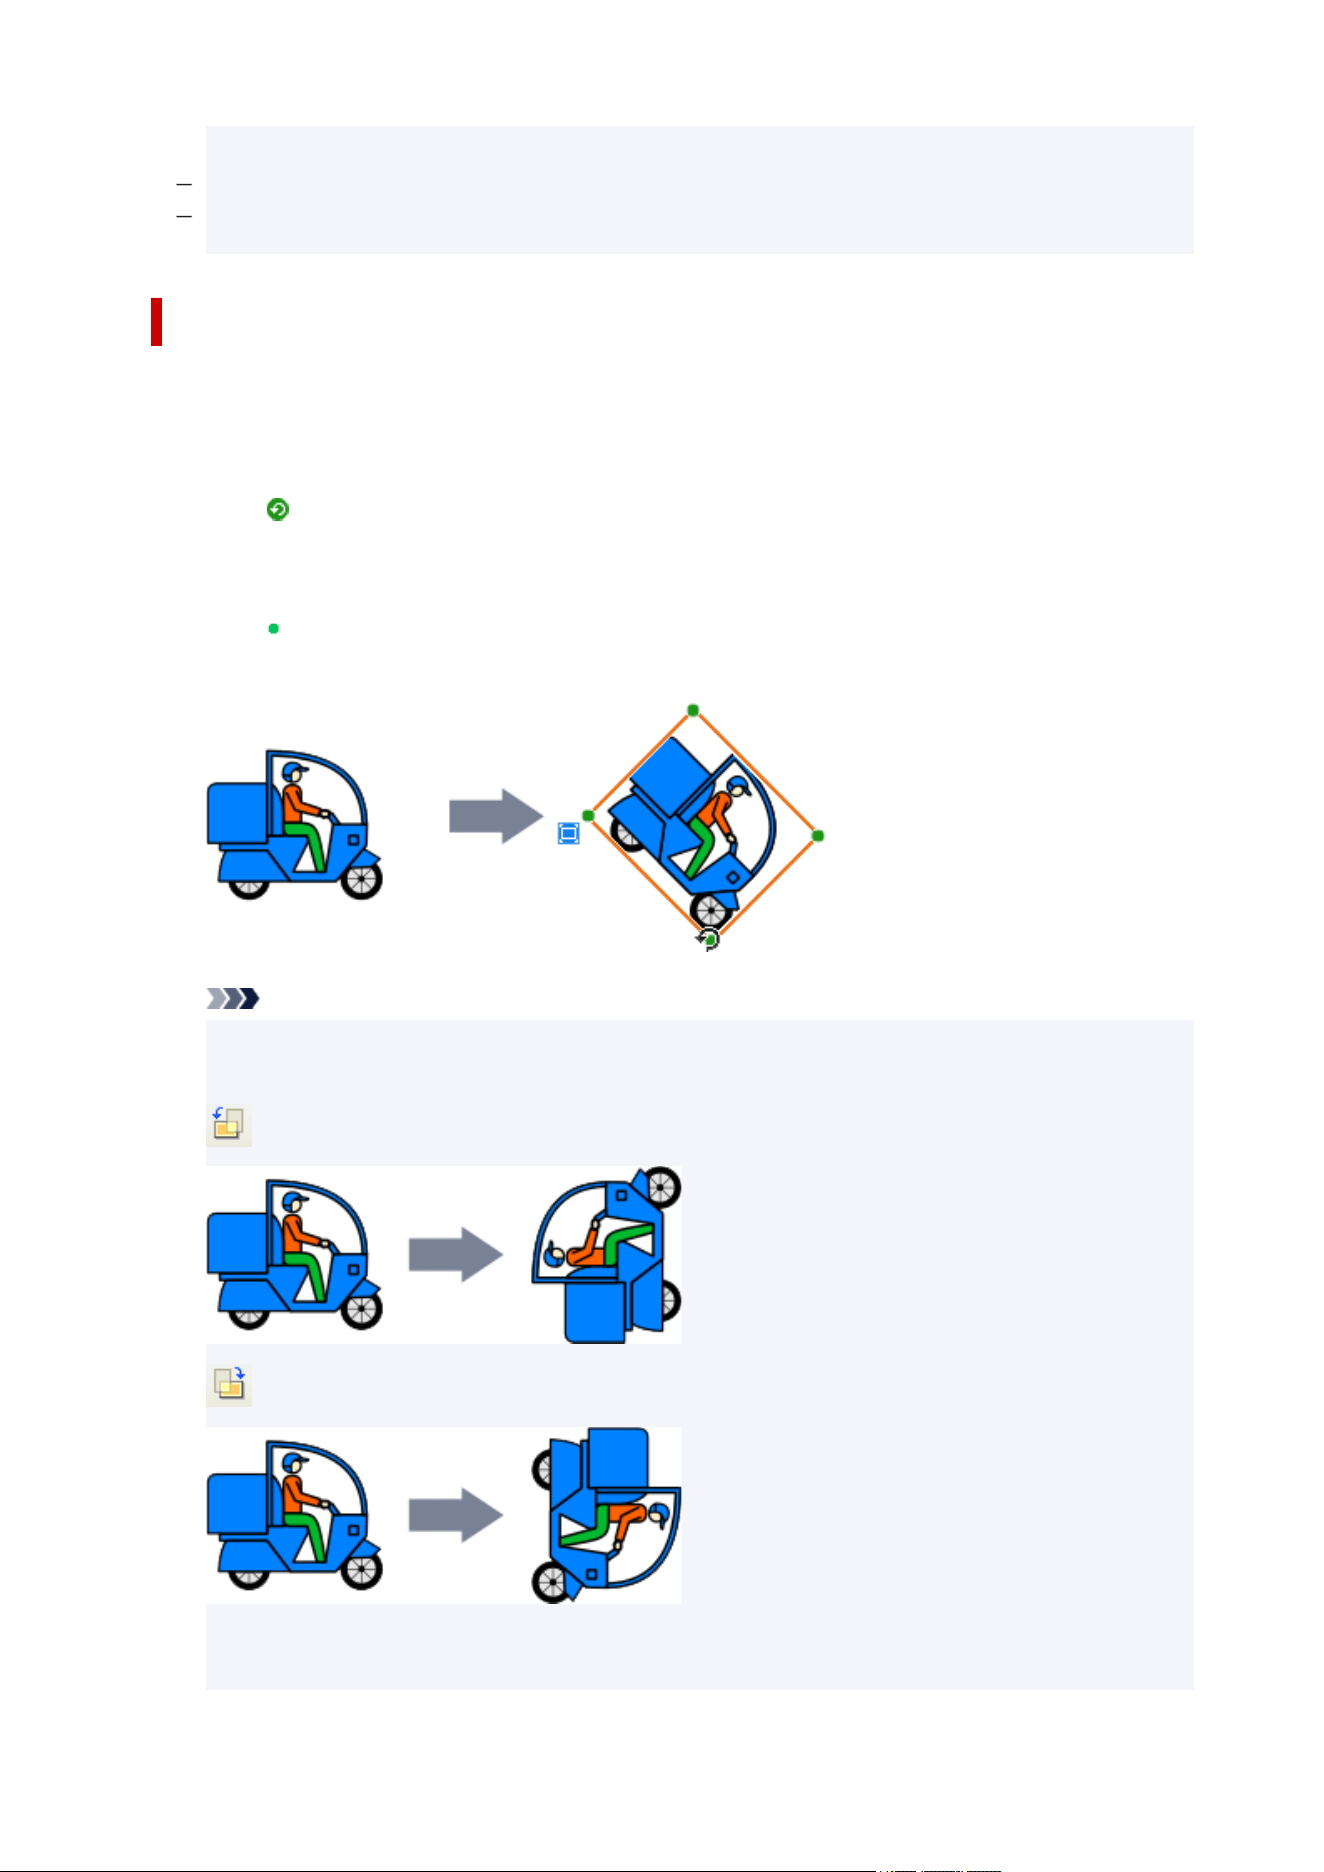
• When objects are resized, the following are resized accordingly.•
Photo frames of objects with photo frames
Text graphics of objects with text graphics
Rotating Objects
1.
Select one or more objects.
1.
The object(s) are framed in orange.
2.
Click (Rotation).
2.
The object switches to Rotation mode.
3.
Drag (Rotation handle).
3.
The object rotates.
Note
•
To rotate objects 90 degrees, click either of the following buttons on the toolbar to select the rotation
•
direction. The rotation direction can also be selected from Rotate or Flip by right-clicking an object.
(Rotate Left 90 degrees): Rotates objects 90 degrees to the left (counter-clockwise).
(Rotate Right 90 degrees): Rotates objects 90 degrees to the right (clockwise).
•
To invert objects, click either of the following buttons on the toolbar to select the direction of inversion.
•
The direction of inversion can also be selected from Rotate or Flip by right-clicking an object.
158
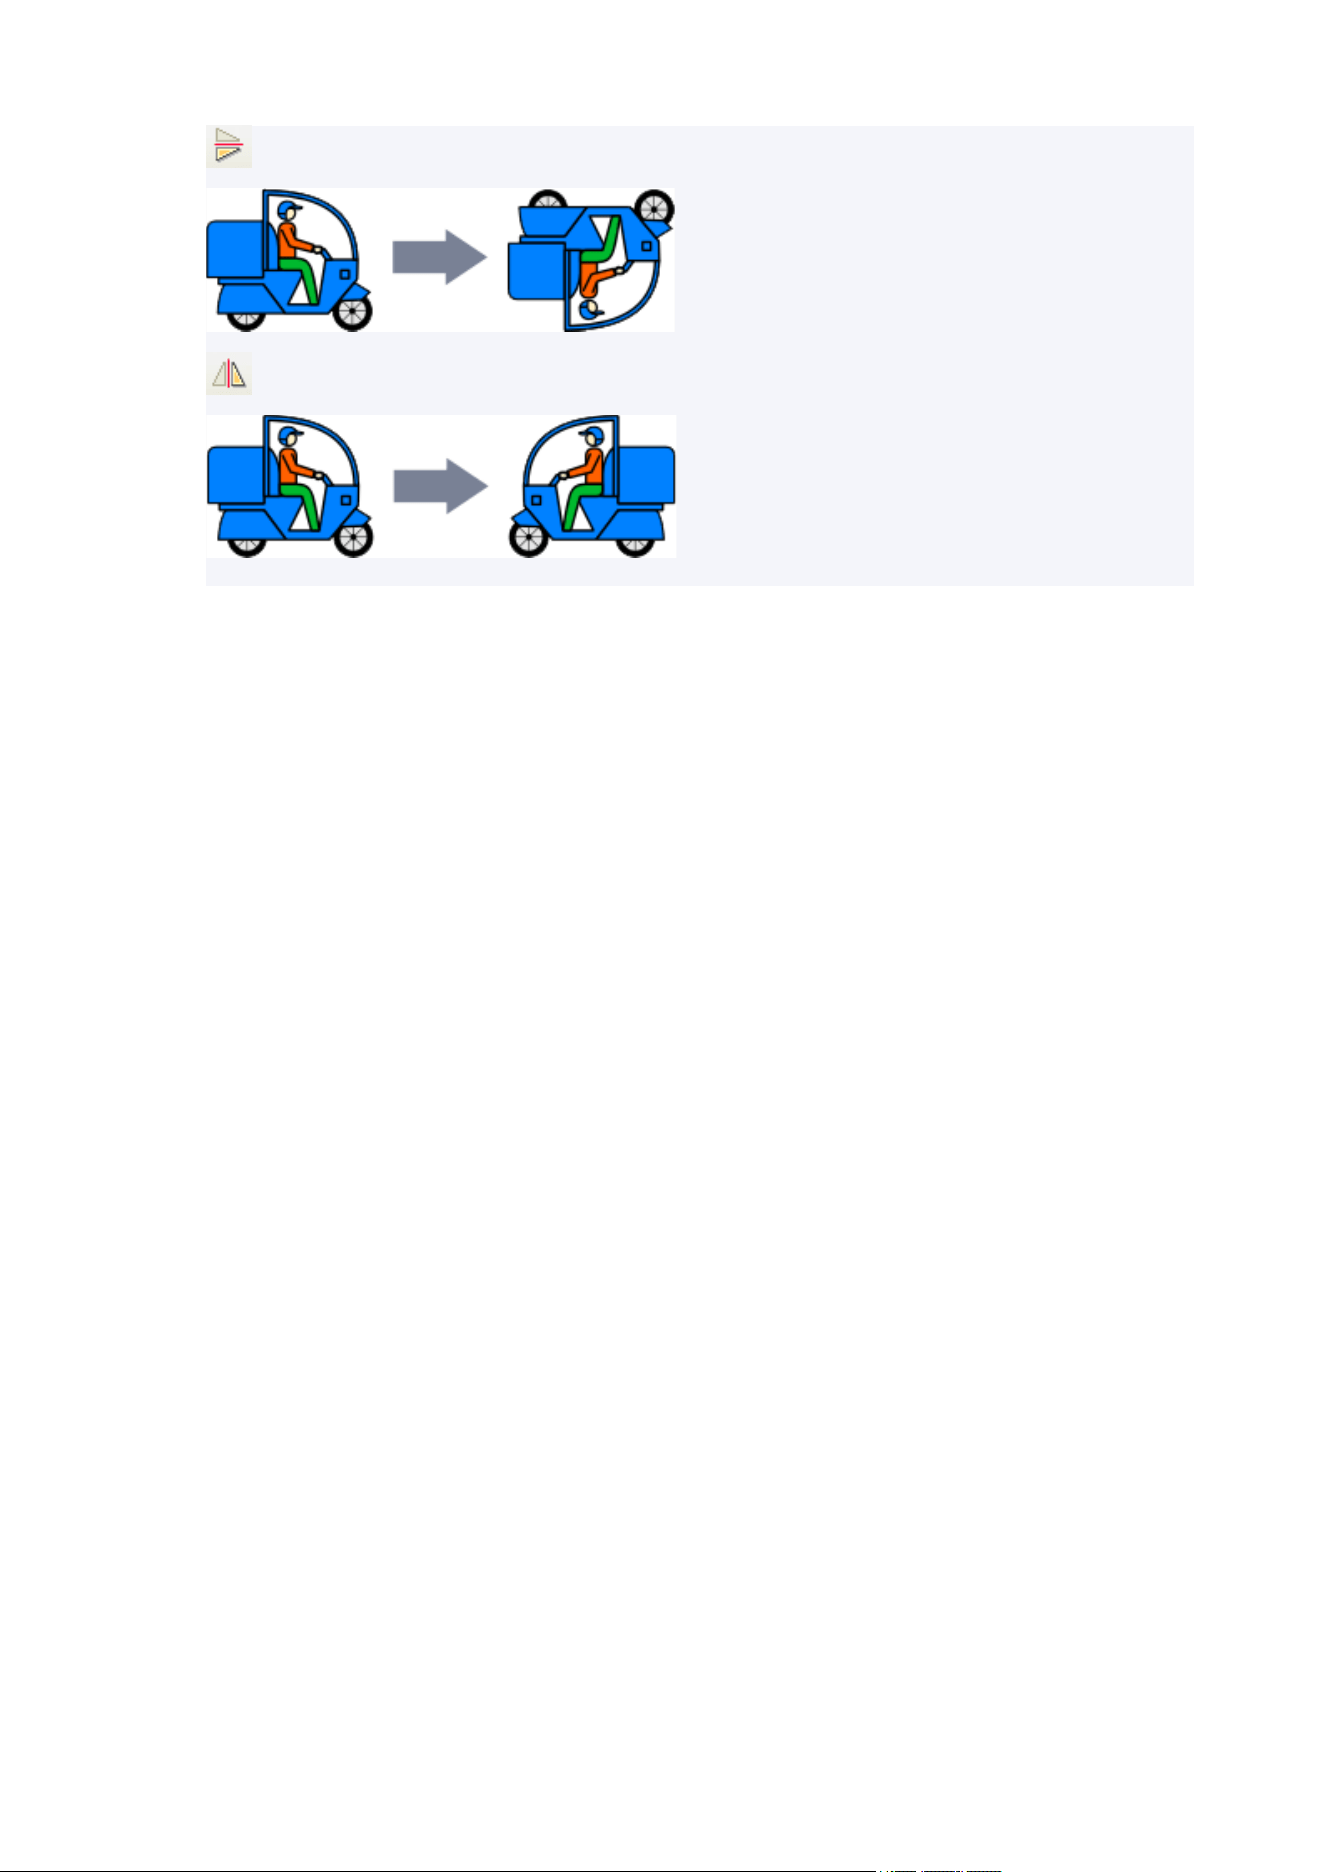
(Flip Vertical): Inverts images so that the top portion is on the bottom and vice versa.
(Flip Horizontal): Inverts images so that the left side is on the right and vice versa.
159
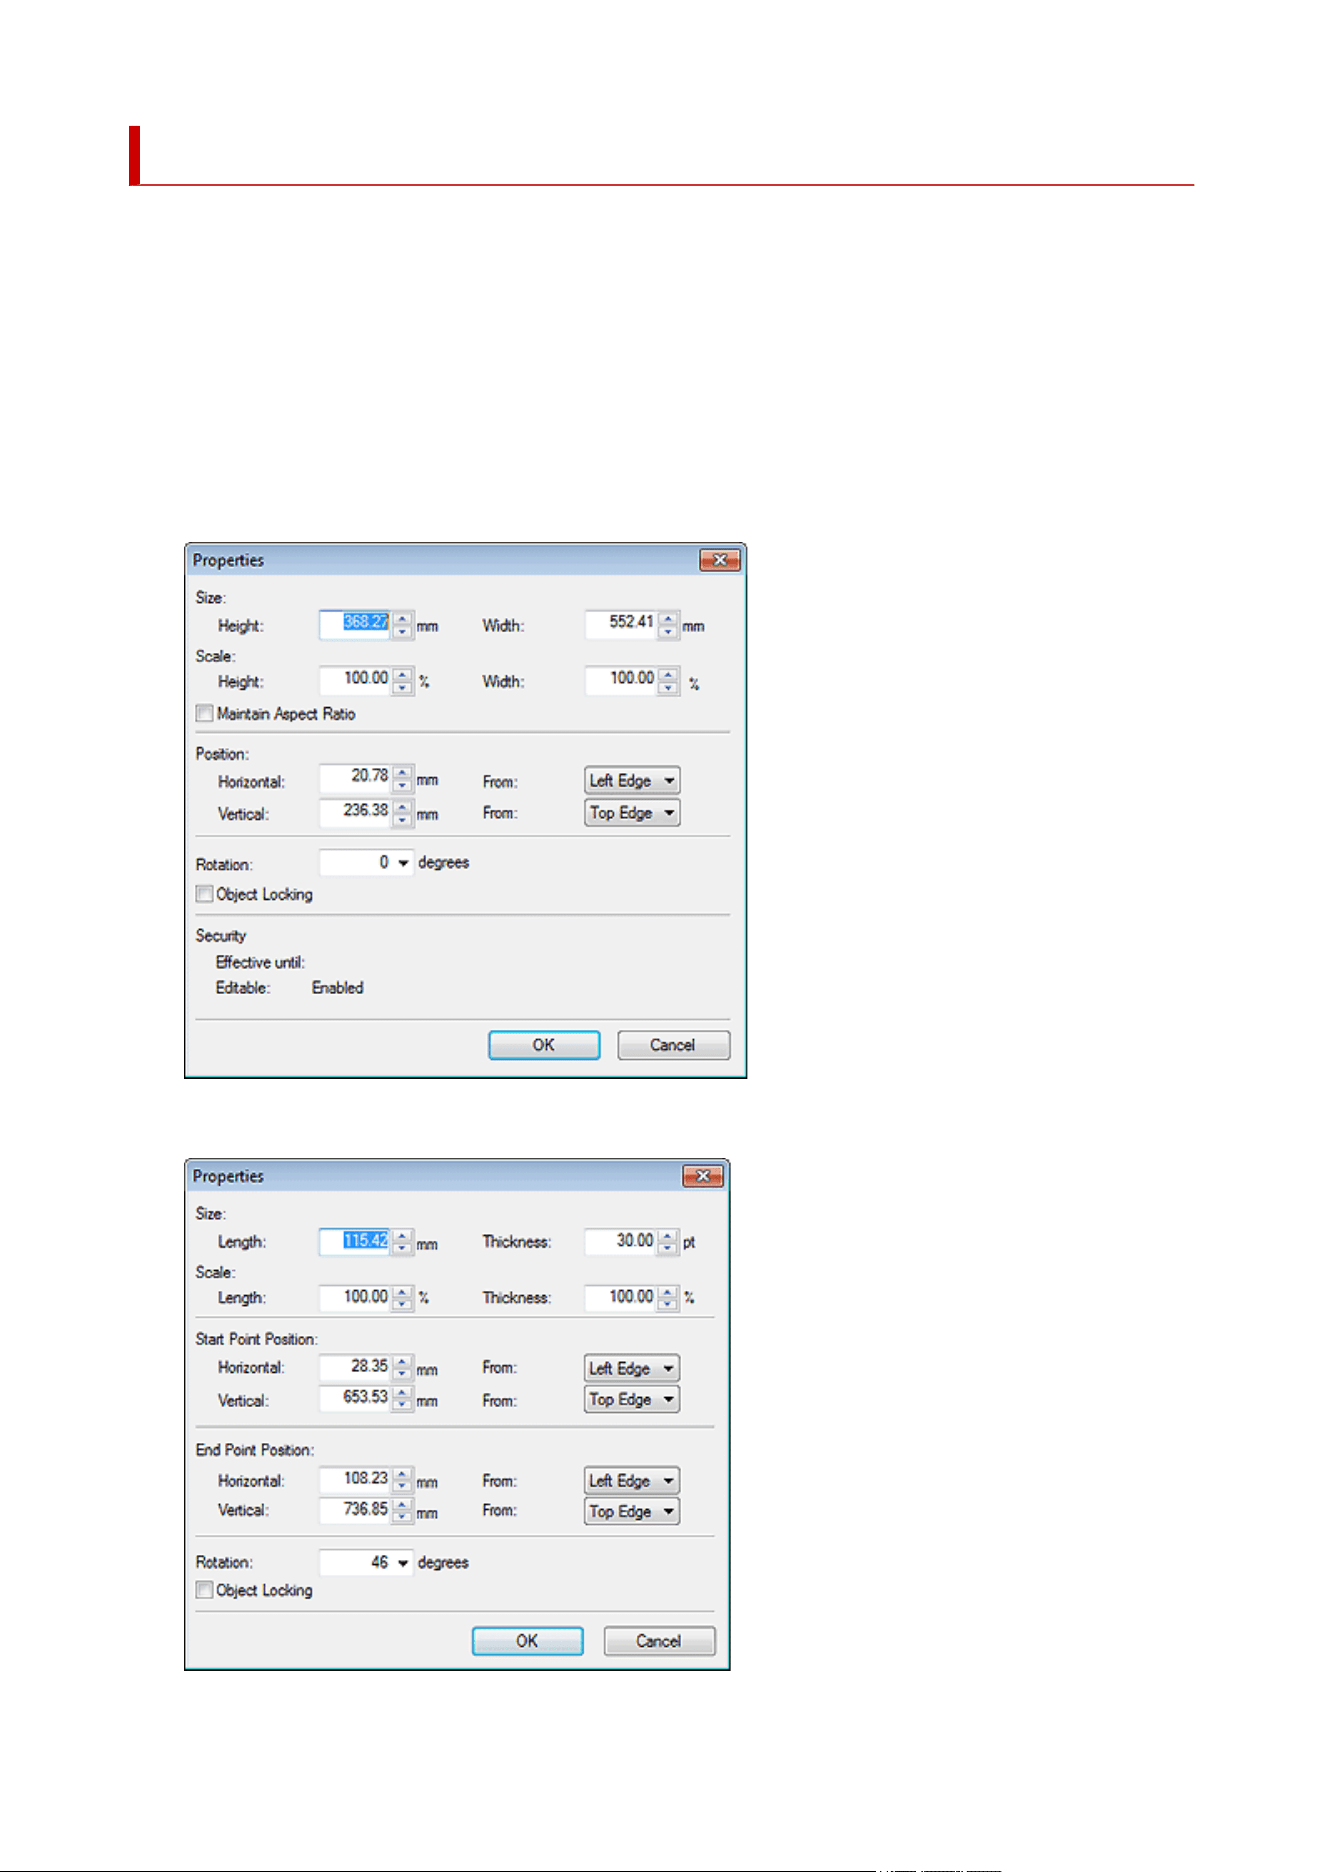
Specifying Size, Position, or Orientation Numerically
Specify the size, position, or angle of objects by entering a value.
1. Select one or more objects.1.
The object(s) are framed in orange.
2.
Right-click the selected object, and then select Size and Position... or Properties....
2.
The Properties dialog box appears.
For objects other than lines (or arrows):
For lines (or arrows):
160

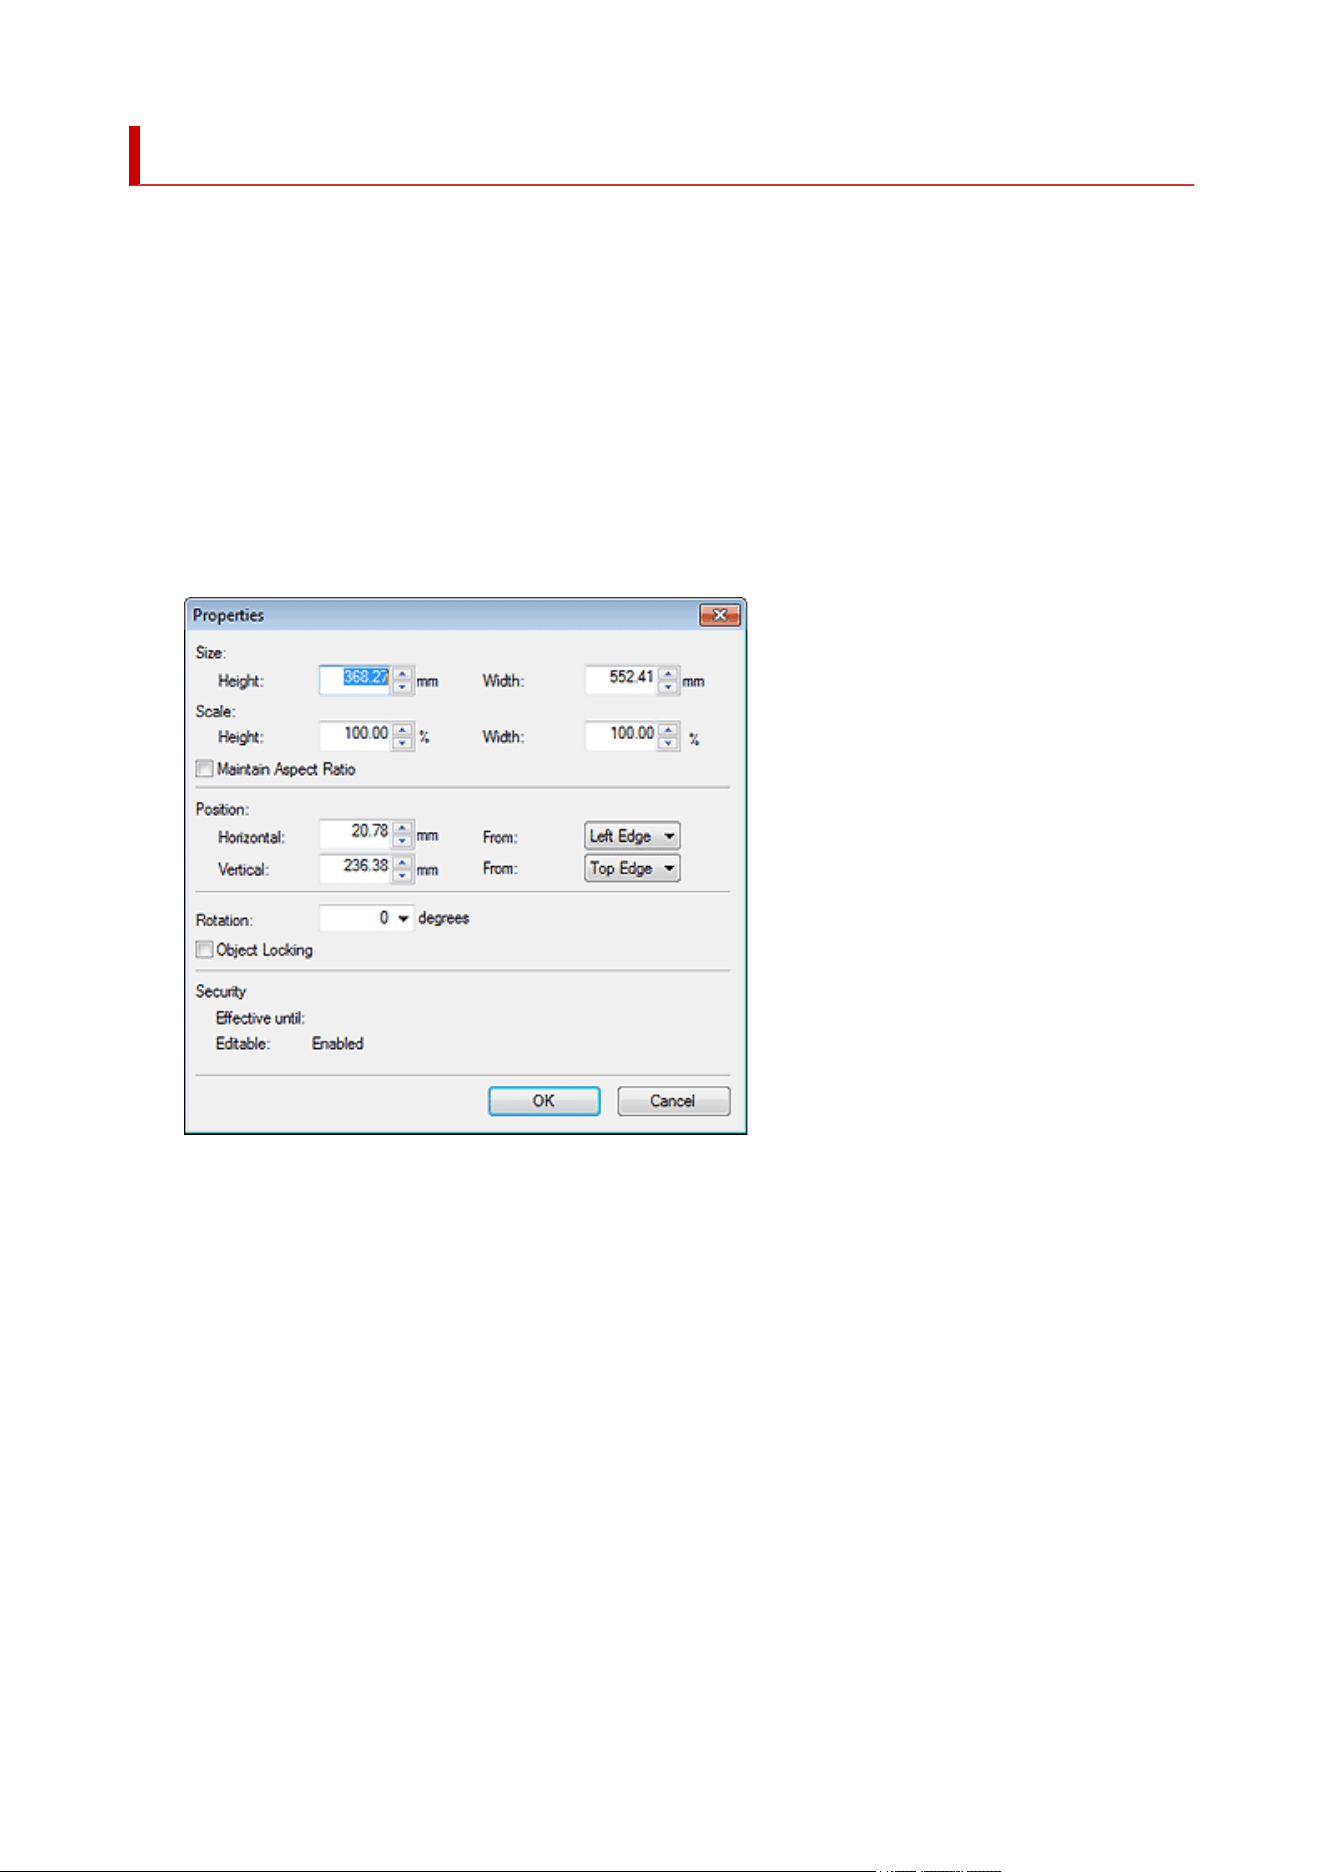
Locking Object Positions
Lock objects in position.
Lock an object to prevent it from being accidentally moved when moving another object or other items.
1. Select one or more objects.1.
The object(s) are framed in orange.
2.
Right-click the selected object, and then click Properties....
2.
The Properties dialog box appears.
For objects other than lines (or arrows):
162
For lines (or arrows):
3. Select the Object Locking checkbox.3.
4. Click OK.4.
The object is locked.
Note
•
Locked objects are outlined in red when you point to them.
• Objects that have been set up for variable printing cannot be locked.
163
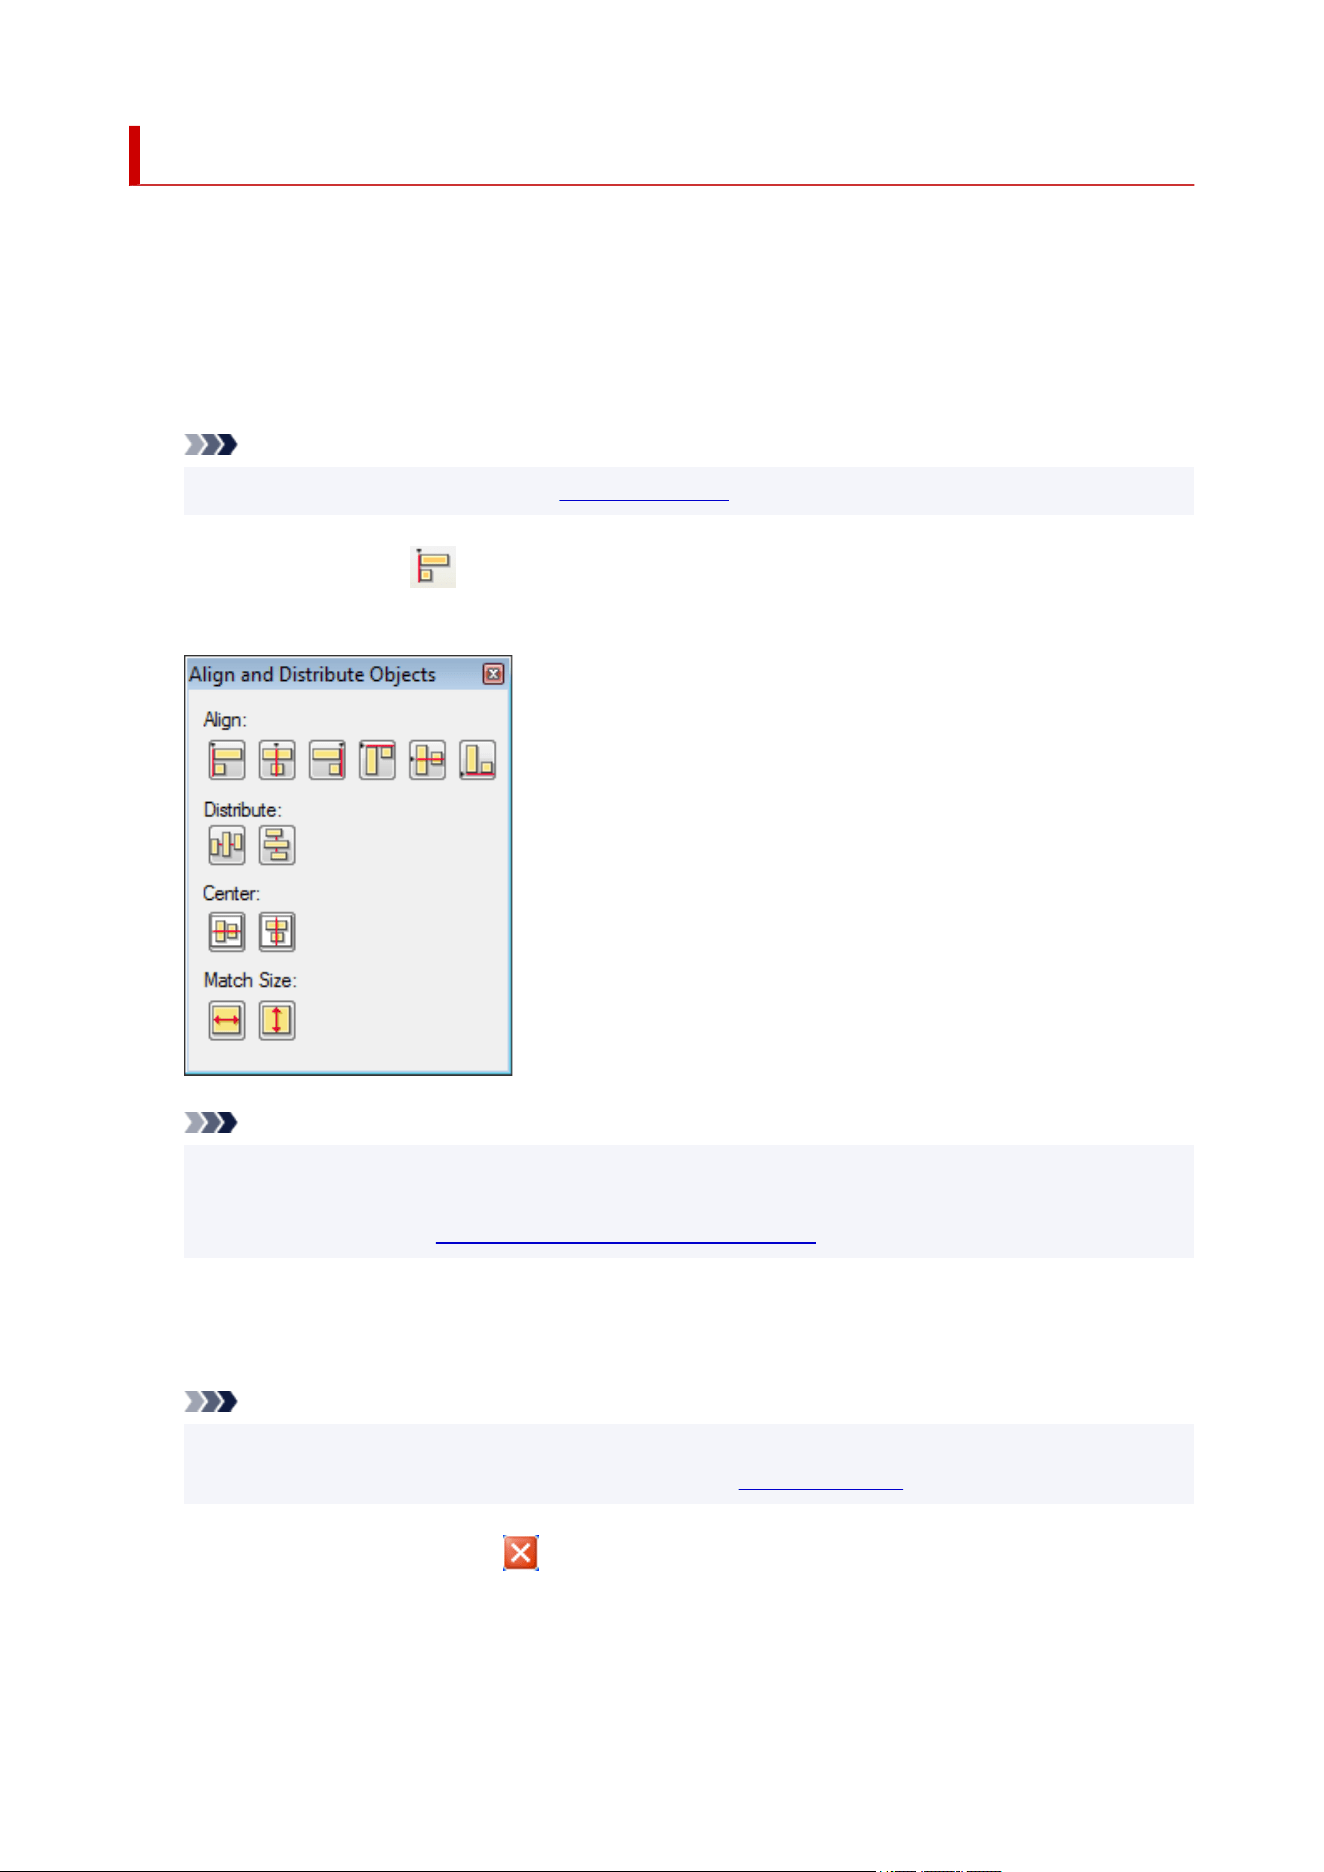
Aligning Objects
Align multiple objects on the poster.
Align objects relative to their positions or with the guide or grid.
1. Select multiple objects.1.
The selected objects are framed in orange.
Note
•
For how to select multiple objects, see Selecting Objects.
2.
On the toolbar, click (Align and Distribute Objects Dialog).
2.
The Align and Distribute Objects dialog box appears.
Note
• The Align and Distribute Objects dialog box can also be displayed when you right-click any of the
selected objects, and then select Align and Distribute Objects > Align and Distribute Objects
Dialog.... For details, see Align and Distribute Objects Dialog Box.
3.
From the Align, Distribute, and Center buttons, click the one you want to apply.
3.
The objects are aligned accordingly.
Note
•
The objects are aligned based on their orange frames. For images with margins, trim the margins
beforehand to align the depicted images. For details, see Trimming Photos.
4.
When finished aligning, click (Close).
4.
164
Using the Guide
1. On the toolbar, click (Guide).1.
The guide appears on the poster.
Note
•
The guide can also be displayed when you right-click outside the poster, and then select Grid and
Guide > Guide.
2.
Drag the guide to the position where you want to adjust an object.
2.
3.
On the toolbar, click (Down Arrow) to the right of (Guide), and then select to
3.
place a checkmark beside Snap to Guide.
Note
•
Alternatively, right-click outside the poster, select Grid and Guide, and then select to place a
checkmark beside Snap to Guide.
4. Drag the object to the position where you want to adjust it.4.
The object is snapped to the guide when brought closer to it.
Note
• If you prefer not to snap the object to the guide, on the toolbar, click (Down Arrow) to the right of
(Guide), and then select to remove the checkmark beside Snap to Guide.
• If you press the Alt key when bringing the object closer to the guide, the Snap to Guide setting will be
switched while holding down the Alt key.
• To specify the guide position numerically, on the toolbar, click (Down Arrow) to the right of
(Guide), and then select Enter Guide Position... to display the Guide Position. For details, see
Guide Position Dialog Box.
•
The ruler can be displayed at the top edge and left edge of the poster design area. To display the
ruler, select Ruler from the View menu.
Using the Grid
1.
On the toolbar, click (Grid).
1.
The grid appears on the poster.
Note
•
The grid can also be displayed when you right-click outside the poster, and then select Grid and
Guide > Grid.
165
2. On the toolbar, click (Down Arrow) to the right of (Grid), and then select to place2.
a checkmark beside Snap to Grid.
Note
•
Alternatively, right-click outside the poster, select Grid and Guide, and then select to place a
checkmark beside Snap to Grid.
3.
Drag the object to the position where you want to adjust it.
3.
The object is snapped to the grid when brought closer to it.
Note
•
If you prefer not to snap the object to the grid, on the toolbar, click (Down Arrow) to the right of
(Grid), and then select to remove the checkmark beside Snap to Grid.
•
If you press the Alt key when bringing the object closer to the grid, the Snap to Grid setting will be
switched while holding down the Alt key.
166
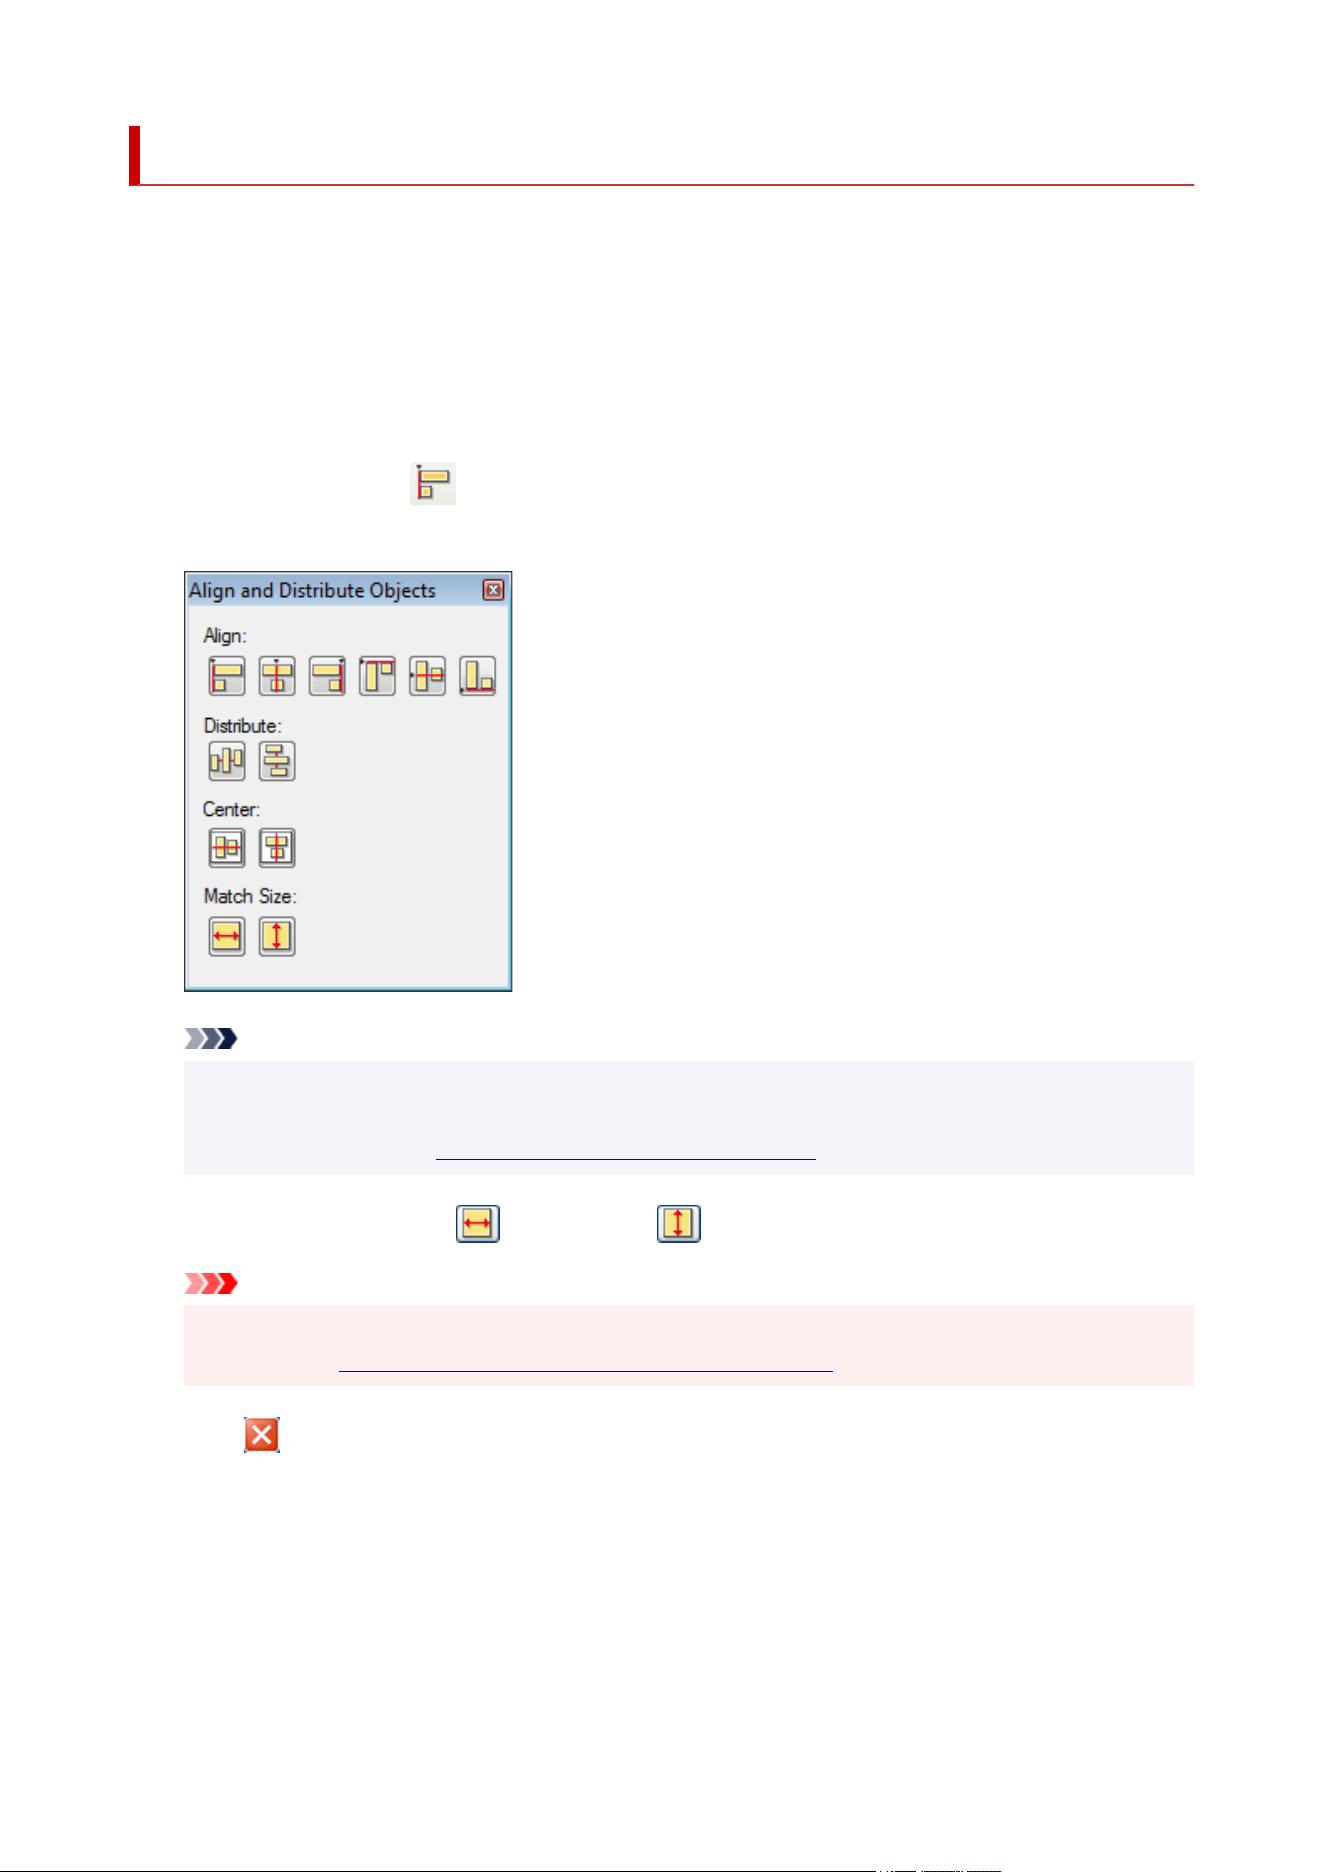
Making Multiple Objects the Same Size
Make multiple objects on the poster the same height or width.
1. Click the object of the target size.1.
2.
Click multiple objects while holding down the Ctrl or Shift key.
2.
The selected objects are framed in orange.
3.
On the toolbar, click (Align and Distribute Objects Dialog).
3.
The Align and Distribute Objects dialog box appears.
Note
• The Align and Distribute Objects dialog box can also be displayed when you right-click any of the
selected objects, and then select Align and Distribute Objects > Align and Distribute Objects
Dialog.... For details, see Align and Distribute Objects Dialog Box.
4. Under Match Size, click (Fit Width) or (Fit Height).4.
Important
•
The objects' aspect ratios are not maintained. To maintain the aspect ratios, resize objects one by one.
For details, see Moving, Enlarging, Reducing, and Rotating Objects.
5.
Click (Close).
5.
167

Grouping Objects
Group multiple objects on the poster to work with the group as if it were a single object. This can help make
selecting and moving objects more smoothly.
1. Click multiple objects while holding down the Ctrl or Shift key.1.
The selected objects are framed in orange.
2.
Right-click any of the selected objects, and then click Group > Group.
2.
The objects are grouped.
Note
•
To ungroup the objects, right-click the group, and then select Group > Ungroup.
•
Locked objects cannot be grouped.
168

Reordering Objects
When you add new objects, they are arranged in front of existing objects. Change the order of overlapping
objects as needed.
1. Click object.1.
The selected object is framed in orange.
2.
Right-click the selected object, and then in Order, select one of the following menu items.
2.
The object is reordered.
Bring to Front
Moves the selected object to the front.
Send to Back
Moves the selected object to the back.
Bring Forward
Moves the selected object one position forward.
Send Backward
Moves the selected object one position back.
Note
• If the background has been specified in the Edit screen (Backgrounds), objects cannot be moved
behind the background.
169


Printing Posters
1. In the task area, click Print.1.
The view switches to the Print screen.
Note
•
Before printing your poster you can run a test print on A4 or Letter sized paper. For details, see Test
Printing.
2.
Check print settings.
2.
Note
•
Specify the printer to use, Media Type, Media Source, and other settings in Paper Options screen.
For details, see
Specifying Size and Paper.
3.
Select the Print Quality and Matching Method.
3.
4. Specify the number of Copies to print.4.
5. Click Print.5.
The Print Progress dialog box appears.
Note
• To start imagePROGRAF Preview and check the print result in the preview, select the Check Print
Preview Before Printing checkbox, and then click Print. This is recommended when printing on roll
paper.
• To check the settings and print result, click Print Preview... in the File menu.
• To import print data from various applications and adjust the layout before printing, select the Use Free
Layout checkbox.
• To cancel printing, click Cancel Printing in the Print Progress dialog box.
171

Test Printing
Perform test printing on A4 or Letter size paper to check the print image before printing on the actual paper.
1. In the task area, click Print.1.
The view switches to the Print screen.
2.
Click Test Print.
2.
The Print Progress dialog box appears. To cancel printing, click Cancel Printing.
Important
•
In test printing, the printer's printing features such as borderless printing (or minimal margin printing)
and print quality setting are not available.
•
Ambient light settings do not apply.
Note
• You can specify the printer and paper size to use for test printing. For details, see Preferences Dialog
Box.
• To print all records in the tabular data by using the variable printing function, deselect the Current
Record Only checkbox.
172

Ambient Light Setting
Ambient light color and brightness vary by environmental factors such as location (indoors or outdoors) or
lighting (fluorescent or incandescent). Therefore the same poster may appear different depending on where
it is displayed.
Use the ambient light setting functions to adjust colors automatically according to the environment to visually
enhance the poster's color tones.
Important
• This function cannot be used depending on your printer or paper type.
Printing the Ambient Light Correction Chart
Printing by Selecting a Chart Number
Printing by Specifying Light Source and Color Temperature
Printing by Adjusting Monitor and Print Colors
Managing Ambient Light Settings
Printing the Ambient Light Correction Chart
Print samples of four prepared ambient light settings (chart printing).
Important
• This function requires the Light Source Check Tool. Download the Light Source Check Tool from our
website and install it.
• The Light Source Check Tool may not be available depending on your environment.
1.
In the Tool menu, click Print Ambient Light Correction Chart....
1.
The Print Chart dialog box appears.
2. Specify the printer to use, Media Type, Paper Source, and other settings.2.
3. Click Print.3.
The ambient light correction chart is printed.
Printing by Selecting a Chart Number
From the four samples of the ambient light settings (chart printing), select the number of the sample
whose color tone matches the environment where the poster is displayed.
1.
Print the chart of ambient light settings.
1.
Note
•
For chart printing, see Printing the Ambient Light Correction Chart.
2.
In the task area, click Print.
2.
173

The view switches to the Print screen.
3. In Print Quality, select High or Highest.3.
4.
Specify the number of Copies.
4.
5.
Select the Use Ambient Light Setting checkbox.
5.
6.
Check the printed charts, and then select the number of the chart on which colors of four
6.
pictures look favorable.
Note
•
Check charts in the environment where the poster is displayed.
7.
In ambient light settings, specify the selected chart number.
7.
8.
Click Print.
8.
Printing is performed according to the selected ambient light setting.
Printing by Specifying Light Source and Color Temperature
Print posters by specifying the light source and color temperature.
Important
• This function requires the "i1" light meter and the Light Source Measure Tool. Download the "i1" light
meter or the Light Source Measure Tool from our website, and then install it on the computer used for
measuring ambient light.
1. Measure the light source type and color temperature using the "i1" light meter and the1.
Light Source Measure Tool.
Note
•
For instructions on measuring the light source type and color temperature, refer to
"LightSourceMeasureTool_English.pdf" supplied with the Light Source Measure Tool.
2.
In the task area, click Print.
2.
The view switches to the Print screen.
3.
In Print Quality, select High or Highest.
3.
4.
Specify the number of Copies.
4.
5.
Select the Use Ambient Light Setting checkbox.
5.
6.
In ambient light settings, click Custom Settings.
6.
174
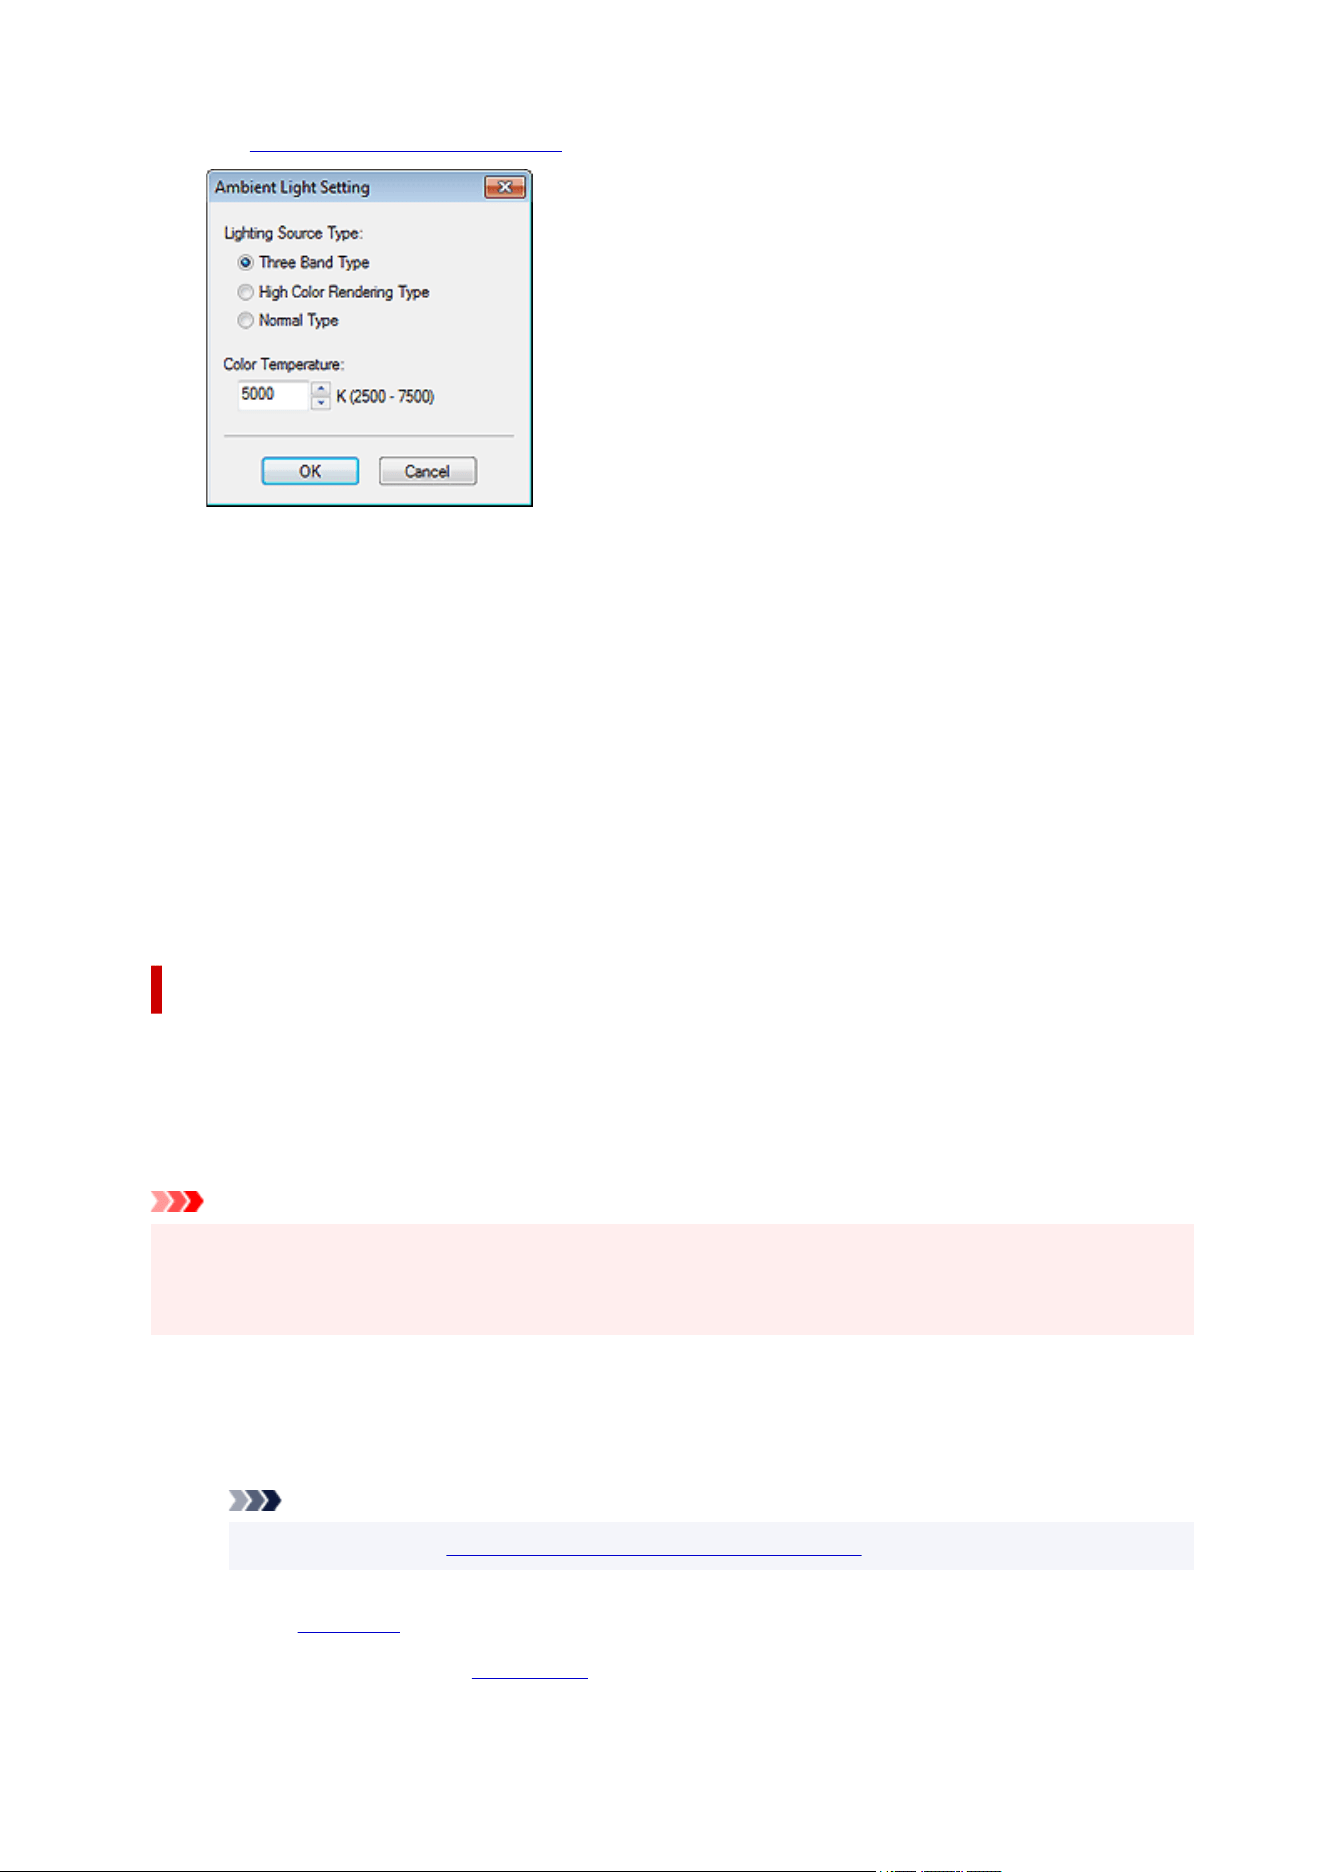
The Ambient Light Setting dialog box appears.
7.
In Lighting Source Type, select the light source type measured with the Light Source
7.
Measure Tool.
8.
In Color Temperature, specify the color temperature measured with the Light Source
8.
Measure Tool.
9.
Click OK.
9.
10. Click Print.10.
Printing is performed according to the selected ambient light setting.
Printing by Adjusting Monitor and Print Colors
Making adjustments so that the colors match between the monitor and print result is called monitor
matching.
Use the ambient light settings to make adjustments to print posters with colors that match the monitor
colors.
Important
• Monitor matching requires monitor calibration.
• Your monitor may not support monitor matching, or you may not be able to configure settings or make
adjustments.
Printing by Selecting a Chart Number
1.
Print samples of ambient light settings.
1.
Note
•
For chart printing, see Printing the Ambient Light Correction Chart.
2.
In the task area, click Print.
2.
The view switches to the Print screen.
175
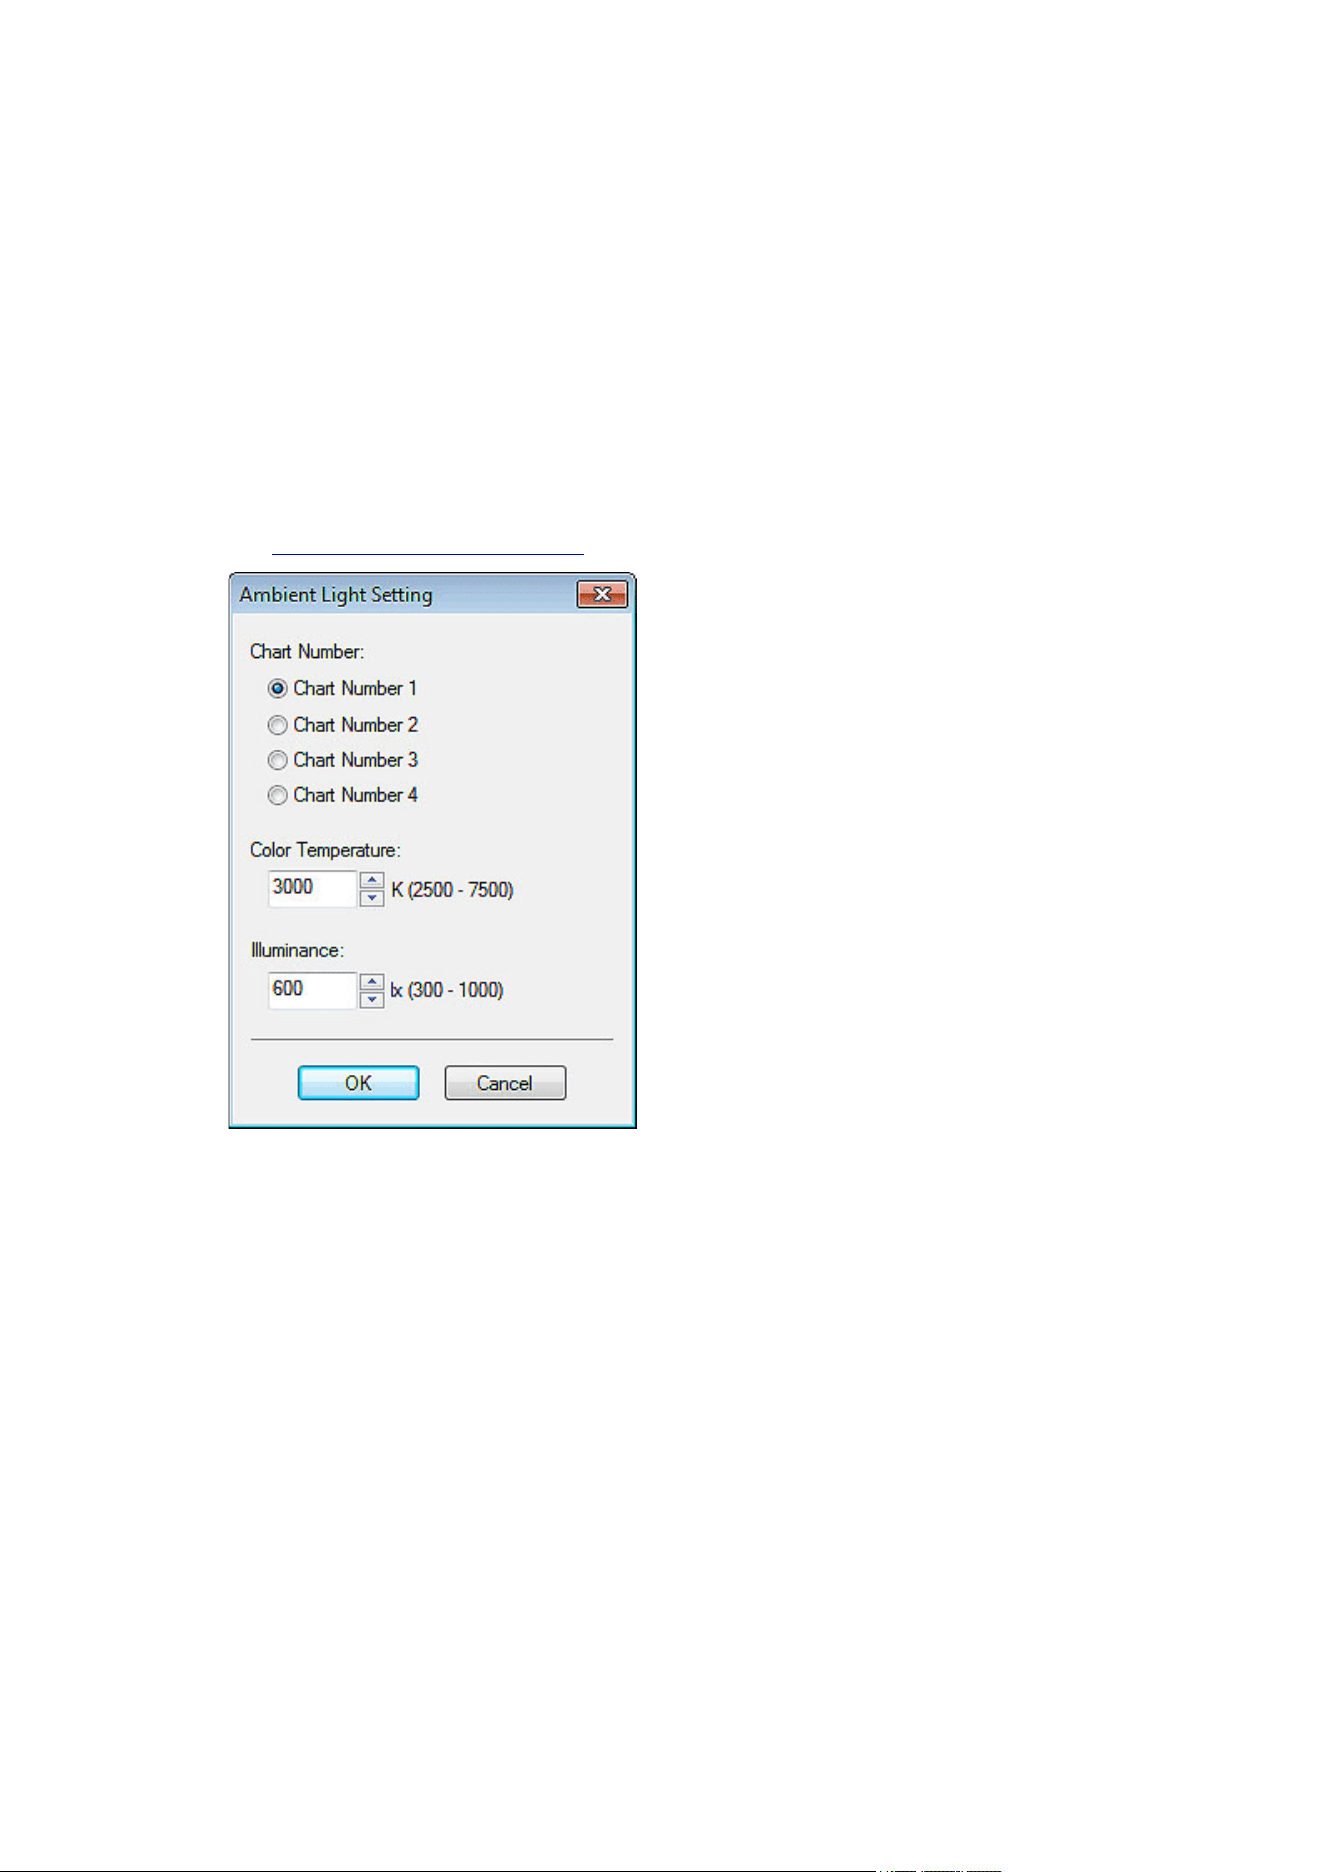
3. In Print Quality, select High or Highest.3.
4. In Matching Method, click Monitor Matching.4.
5. Under Monitor White Point, select the color temperature set on the monitor.5.
6. Specify the number of Copies.6.
7.
Select the Use Ambient Light Setting checkbox.
7.
8.
In ambient light settings, click By selecting a chart number.
8.
The Ambient Light Setting dialog box appears.
9.
Check the printed charts, and then select the number of the chart on which colors of
9.
four pictures look favorable.
10.
In Color Temperature, specify the color temperature measured at monitor calibration.
10.
11.
In Illuminance, specify the illuminance measured at monitor calibration.
11.
12.
Click OK.
12.
13.
Click Print.
13.
Printing is performed according to the selected ambient light setting.
176
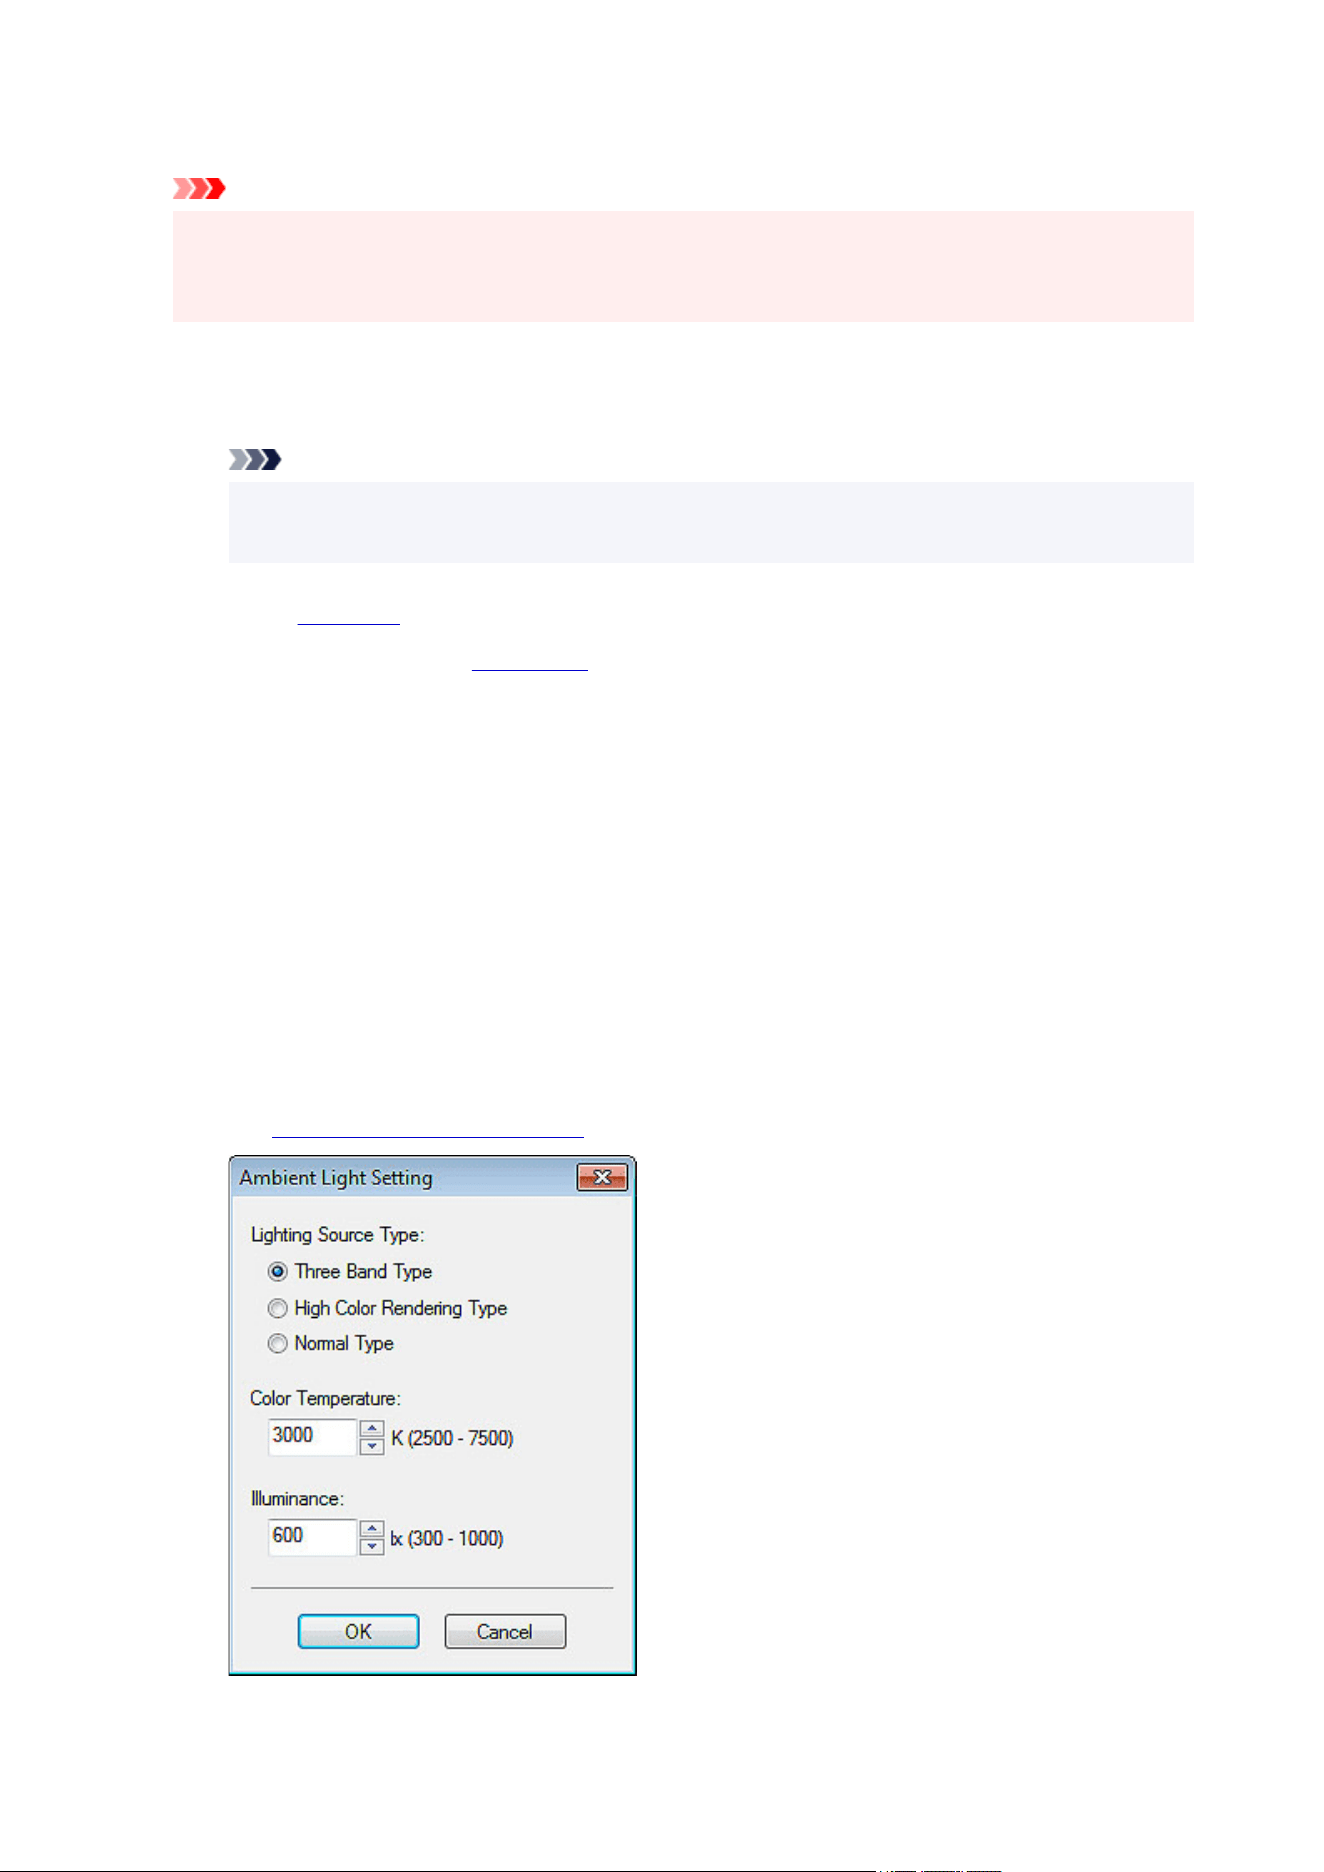
Printing by Specifying the Light Source, Color Temperature, and Illuminance
Important
• This function requires the "i1" light meter and the Light Source Measure Tool. Download the Light
Source Measure Tool from our website, and then install it on the computer used for measuring ambient
light.
1. Measure the light source type and color temperature using the "i1" light meter and the1.
Light Source Measure Tool.
Note
•
For instructions on measuring the light source type and color temperature, refer to
"LightSourceMeasureTool_English.pdf" supplied with the Light Source Measure Tool.
2.
In the task area, click Print.
2.
The view switches to the Print screen.
3. In Print Quality, select High or Highest.3.
4. In Matching Method, click Monitor Matching.4.
5. Under Monitor White Point, select the color temperature set on the monitor.5.
6.
Specify the number of Copies.
6.
7.
Select the Use Ambient Light Setting checkbox.
7.
8. In ambient light settings, click By entering values directly.8.
The Ambient Light Setting dialog box appears.
177
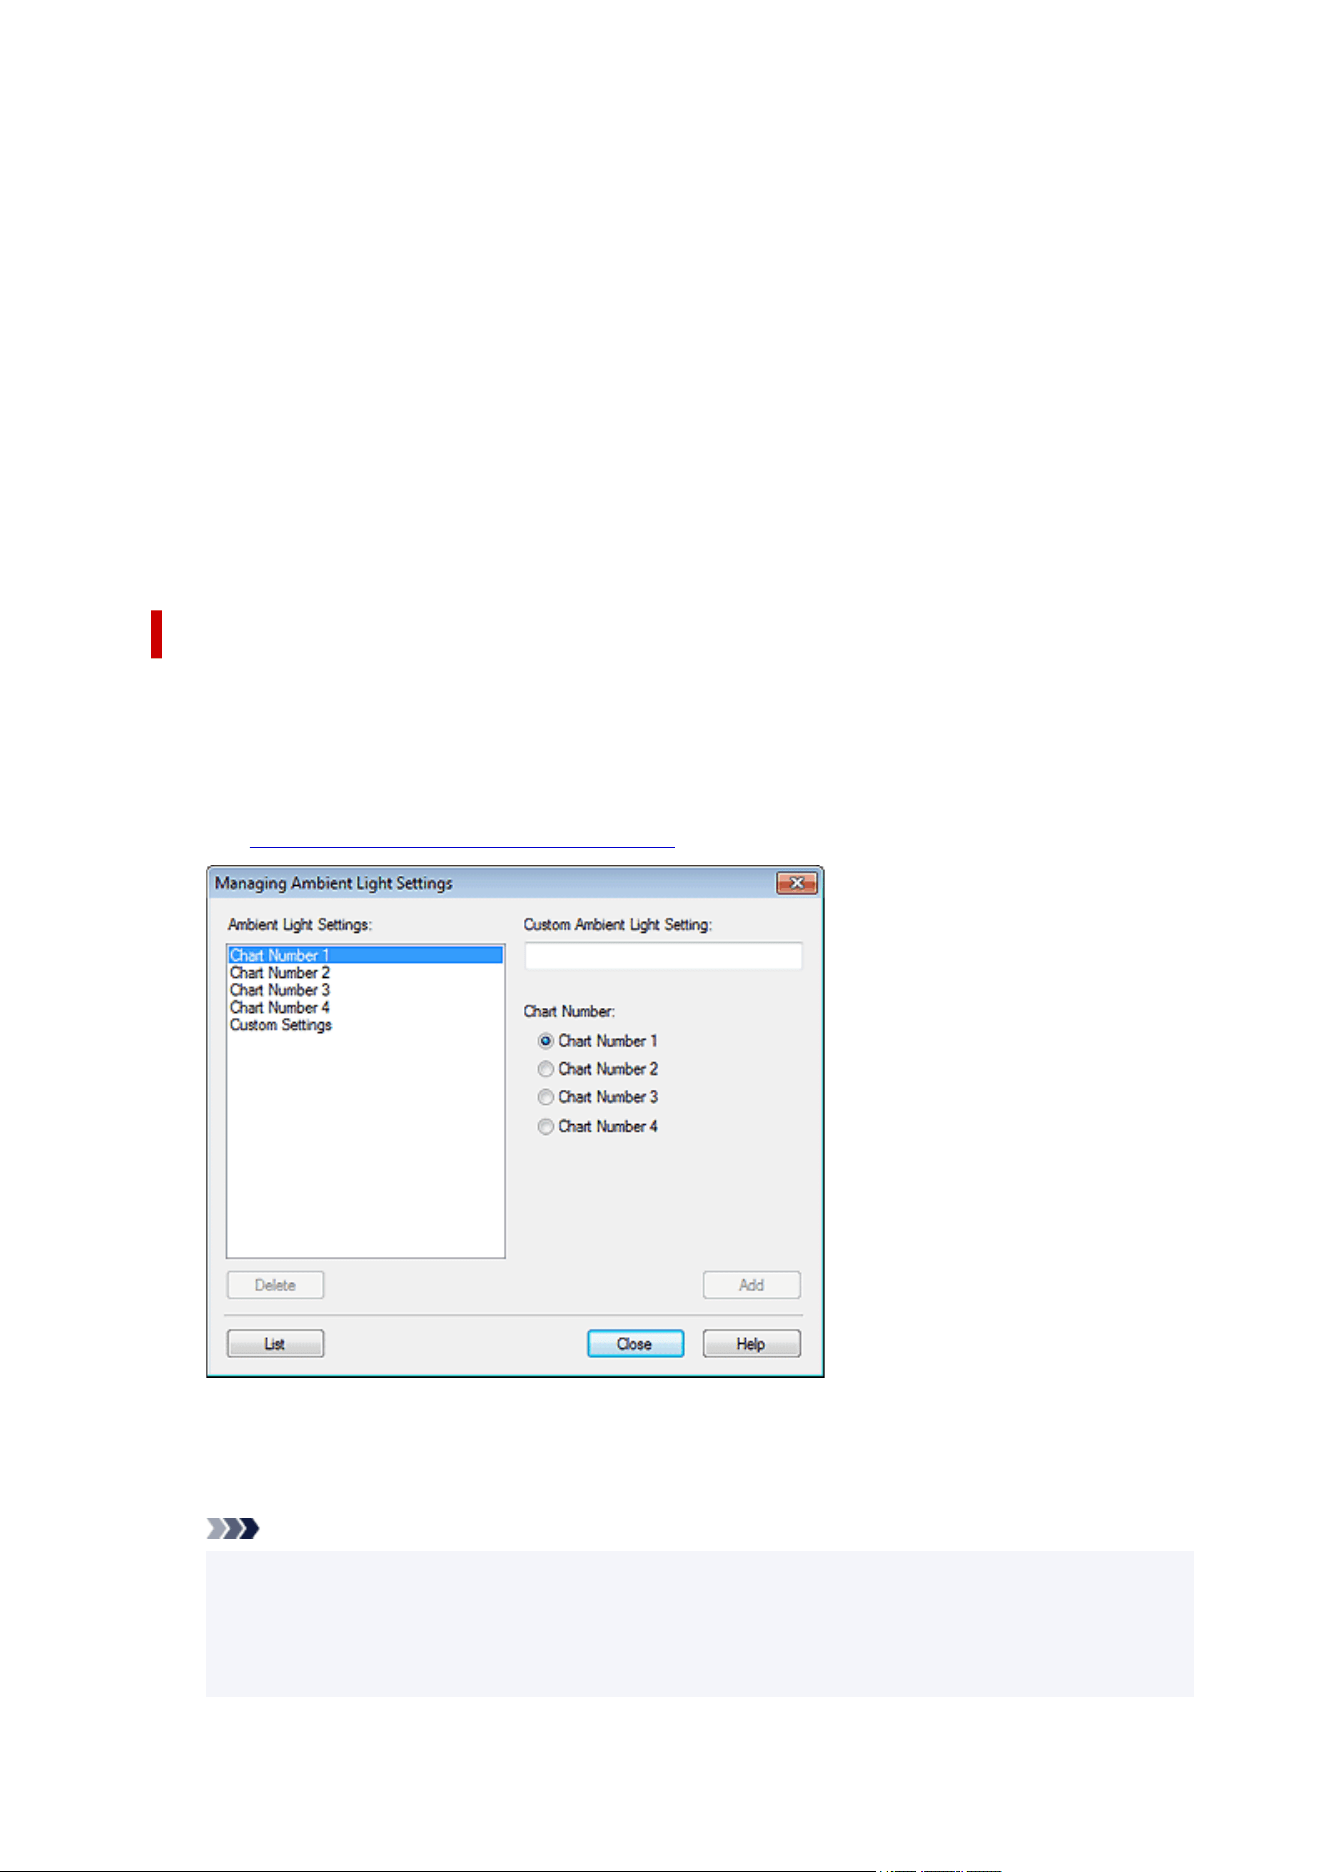
9. In Lighting Source Type, select the light source type measured with the Light Source9.
Measure Tool.
10. In Color Temperature, specify the color temperature measured with the Light Source10.
Measure Tool.
11. In Illuminance, specify the illuminance measured with the Light Source Measure Tool.11.
12.
Click OK.
12.
13.
Click Print.
13.
Printing is performed according to the selected ambient light setting.
Managing Ambient Light Settings
Save your ambient light settings. Save frequently used ambient light settings to quickly print posters
according to the environment where they are displayed.
1. In the Tool menu, click Managing Ambient Light Settings....1.
The Managing Ambient Light Settings dialog box appears.
2.
In Ambient Light Settings, select Custom Settings, and then specify the light source
2.
and color temperature.
Note
•
You can also save the default ambient light settings with a new name. In that case, in Chart Number,
select from Chart Number 1 to Chart Number 4.
•
For instructions on measuring the light source type and color temperature, refer to
"LightSourceMeasureTool_English.pdf" supplied with the Light Source Measure Tool.
178

3. In Custom Ambient Light Setting, enter a name.3.
4. Click Add.4.
The ambient light setting is added with the specified settings.
Note
•
Saved ambient light settings can be selected from Use Ambient Light Setting in the Print screen.
• To delete registered ambient light settings, select the ambient light setting you want to delete, and
then click Delete.
•
Chart Number 1 to Chart Number 4 and Custom Settings cannot be deleted.
•
To check the setting list, click List for displaying the Ambient Light Setting List dialog box.
179


Saving in a PosterArtist File Format
Save created posters as ".cpfx2" files, the proprietary PosterArtist format.
1. In the File menu, click Save As....1.
The Save As dialog box appears.
Note
•
To overwrite a saved file, select Save. The Save dialog box appears.
2.
Specify the save location.
2.
3.
In File name, enter the file name.
3.
4.
Click Save As.
4.
The poster is saved as a file exclusively for use with PosterArtist (file extension ".cpfx2").
Note
• Photos, clipart, and other materials in the temporary tray are saved with the poster.
Important
• Templates in the temporary tray are not saved.
181

Saving in JPEG Format
Save created posters as image files in JPEG format.
1. In the File menu, click Save As JPEG....1.
The Save As JPEG dialog box appears.
2.
Specify the save location.
2.
3.
In Size, select the size at which you want to save the poster.
3.
Select Small, Medium, or Large for A5, A4, or A3, respectively; each size is saved at 72 dpi.
Note
•
Image files are saved with the poster's long side enlarged/reduced to the paper size specified in Size.
The short side's length is adjusted to maintain the aspect ratio.
4. In File name, enter the file name.4.
5. Click Save As.5.
The poster is saved in JPEG format.
When saved, the application associated with JPEG files starts and the saved JPEG image appears.
182
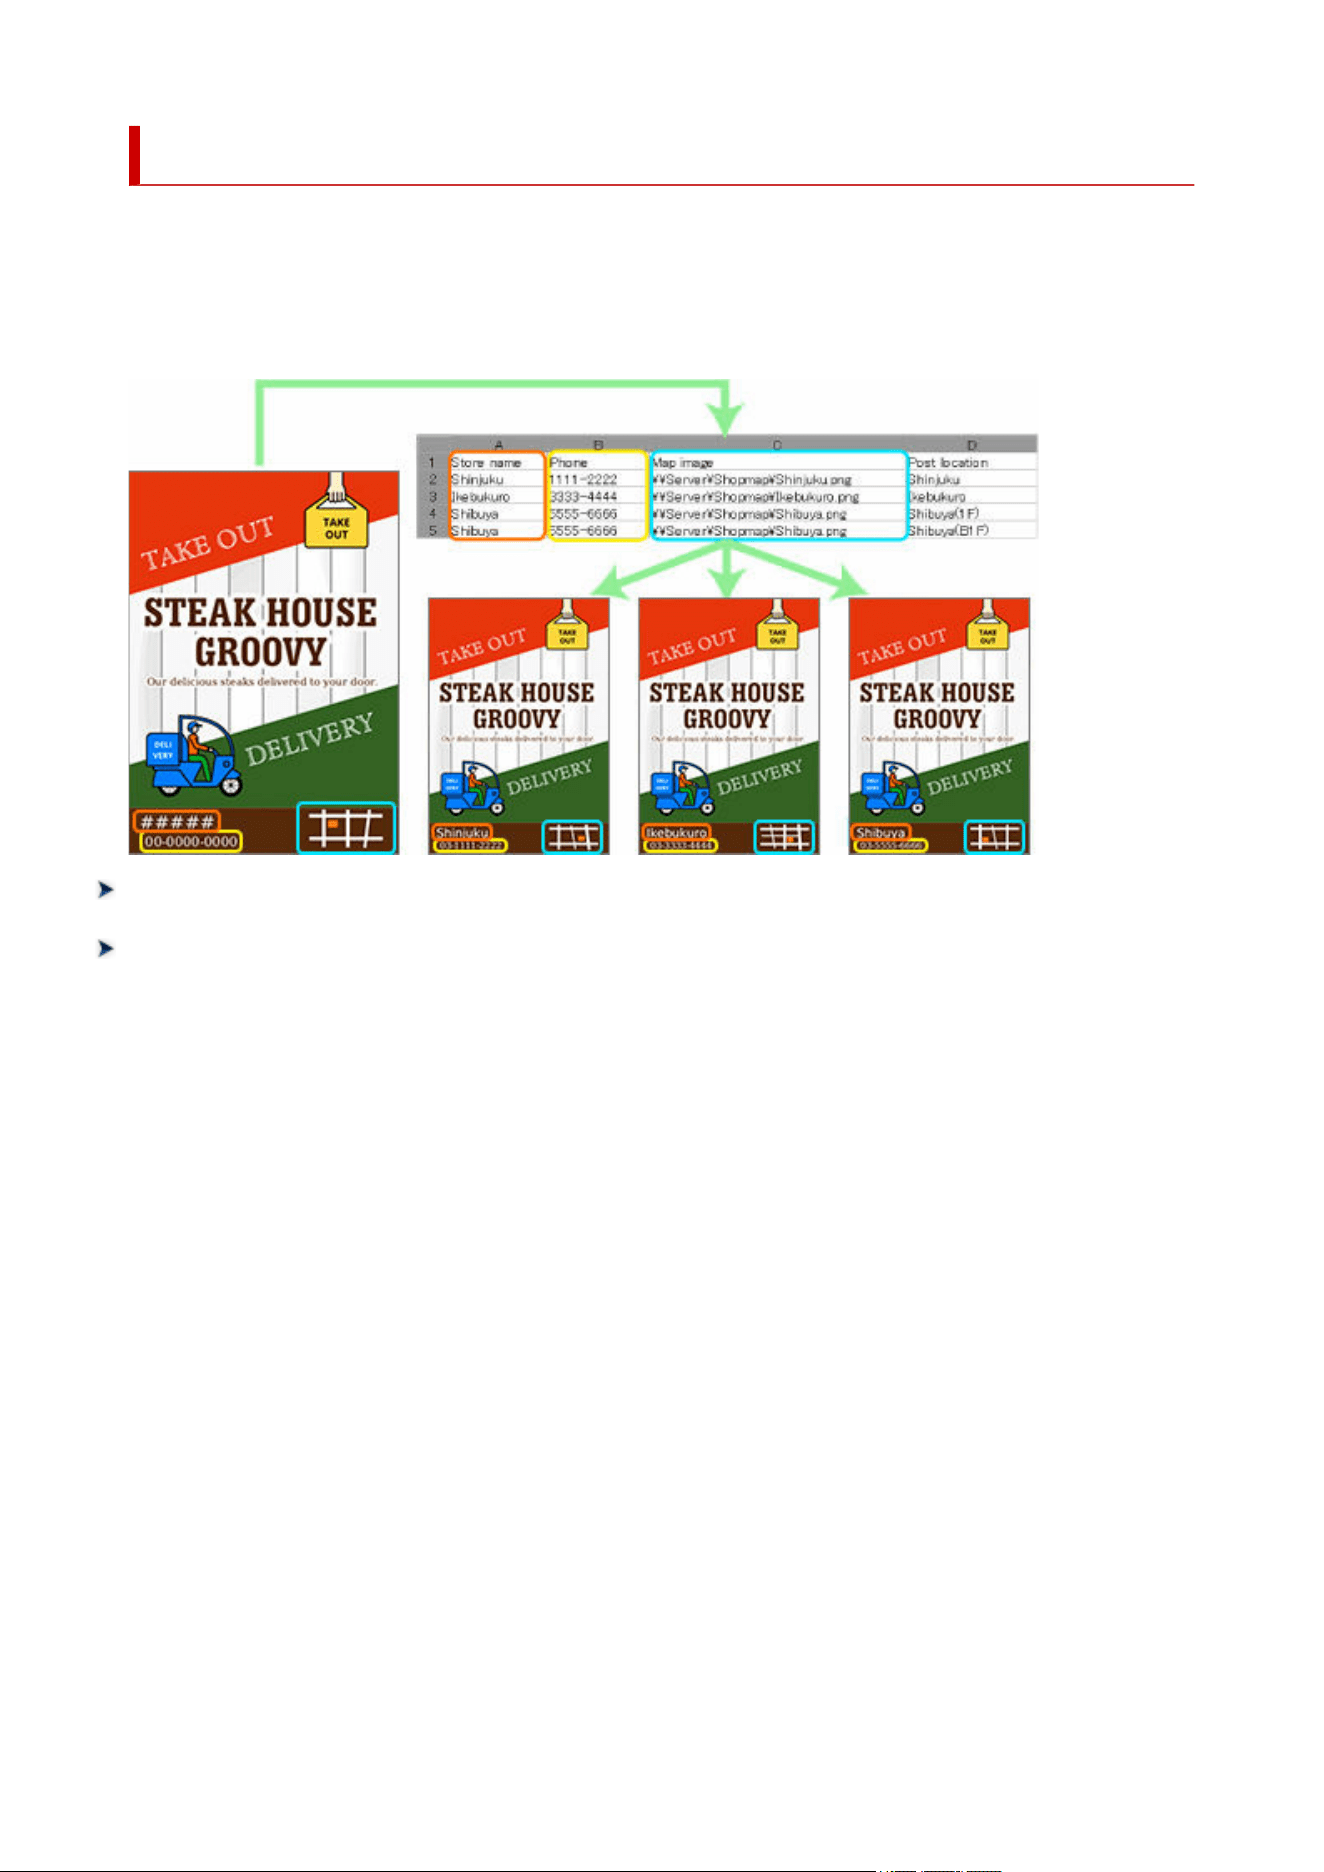
Using Variable Printing
Automatically substitute text, images and other content on the poster for printing by using tabular format
data.
A set of posters each suitable for the environment of the place where the poster is posted can also be
created automatically for printing according to the tabular data.
Preparing Data
Starting Variable Printing
183
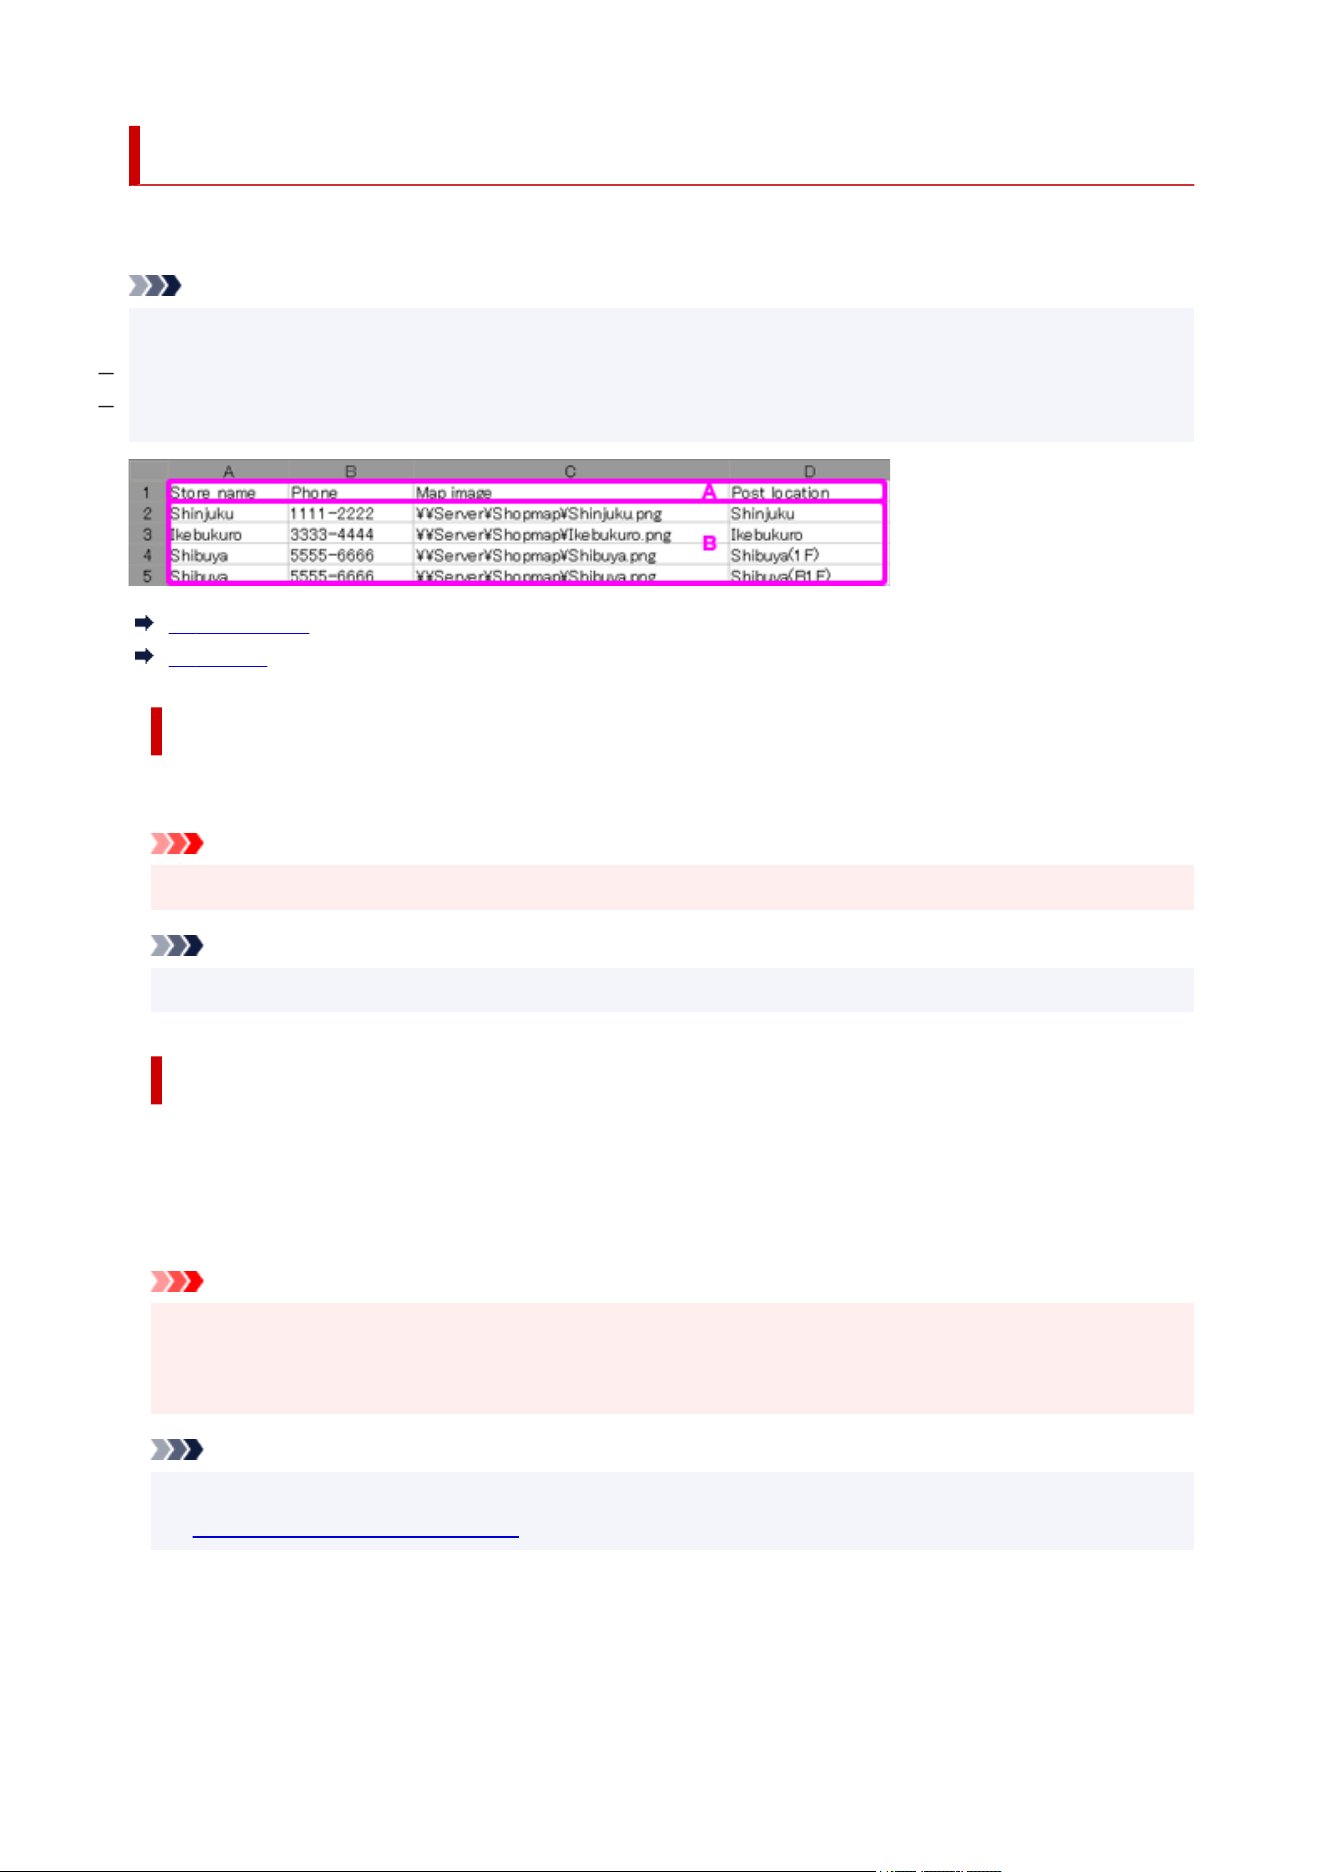
Preparing Data
This section describes tabular data available for variable printing.
Note
• Use the following files for variable printing.•
Excel format files (.xls, .xlsx, .xlsm, and .xlsb)
CSV format files (.csv)
A: Field Name
B: Record
A: Field Name
In the first row of the tabular data, enter a field name to indicate the data type.
Important
• If the field name is blank, an entry in an unintended cell may be recognized as the field name.
Note
• Enter up to 32 characters for the field name.
B: Record
In the second and subsequent rows, enter alternative text data.
To substitute images, enter absolute paths to alternative image files.
To change ambient light setting, enter ambient light setting names.
Important
• In PosterArtist, records of up to 500 rows can be entered. Records in and after the 501st row are not
applied.
• Do not use Excel format data with merged rows or columns. Substitution will not work correctly.
Note
• Ambient light setting names can be checked in the Ambient Light Setting List dialog box. For details,
see Managing Ambient Light Settings.
184

Starting Variable Printing
Use the prepared tabular data to set up and start variable printing.
1. Click Edit in the task area, and then click Variable Data.1.
The view switches to the Edit screen (Variable Data).
2.
Click Connect to....
2.
The Open Data Source dialog box appears.
3.
Select the tabular data file to use, and then click Open.
3.
The field names in the read tabular data are added to the Connected Data list.
4.
On the poster, select the text you want to substitute.
4.
Note
• To substitute images, select an image on the poster.
5. In Connected Data, select the field name of the text string you want to substitute.5.
The text string is linked to the tabular data, and (Connect) appears.
Note
• To cancel the link, in Connected Data, select Unselected.
• To substitute images, select the field name of the file paths to the target images. If the image is not
found in the path, the selected image is replaced with (Invalid Link).
6.
In Text alignment, specify the text position.
6.
The substituted text will be printed in the specified position.
Note
•
To format the text, enter as follows in Text format.
•
%[1][2][3][4]
[1] (Optional)
- : Text is aligned to the left.
+ : + is added if the value is 0 or more. Example) 500 > +500
, : The thousands separator is used. Example) 1600 > 1,600
[2] (Optional)
0 or more and 100 or less: Specify the minimum number of characters to be output.
For instance, if this is set to "10," the minimum number of characters output is for 10 characters whether
the text is "abc" (3 characters) or "abcdefghij" (10 characters).
186
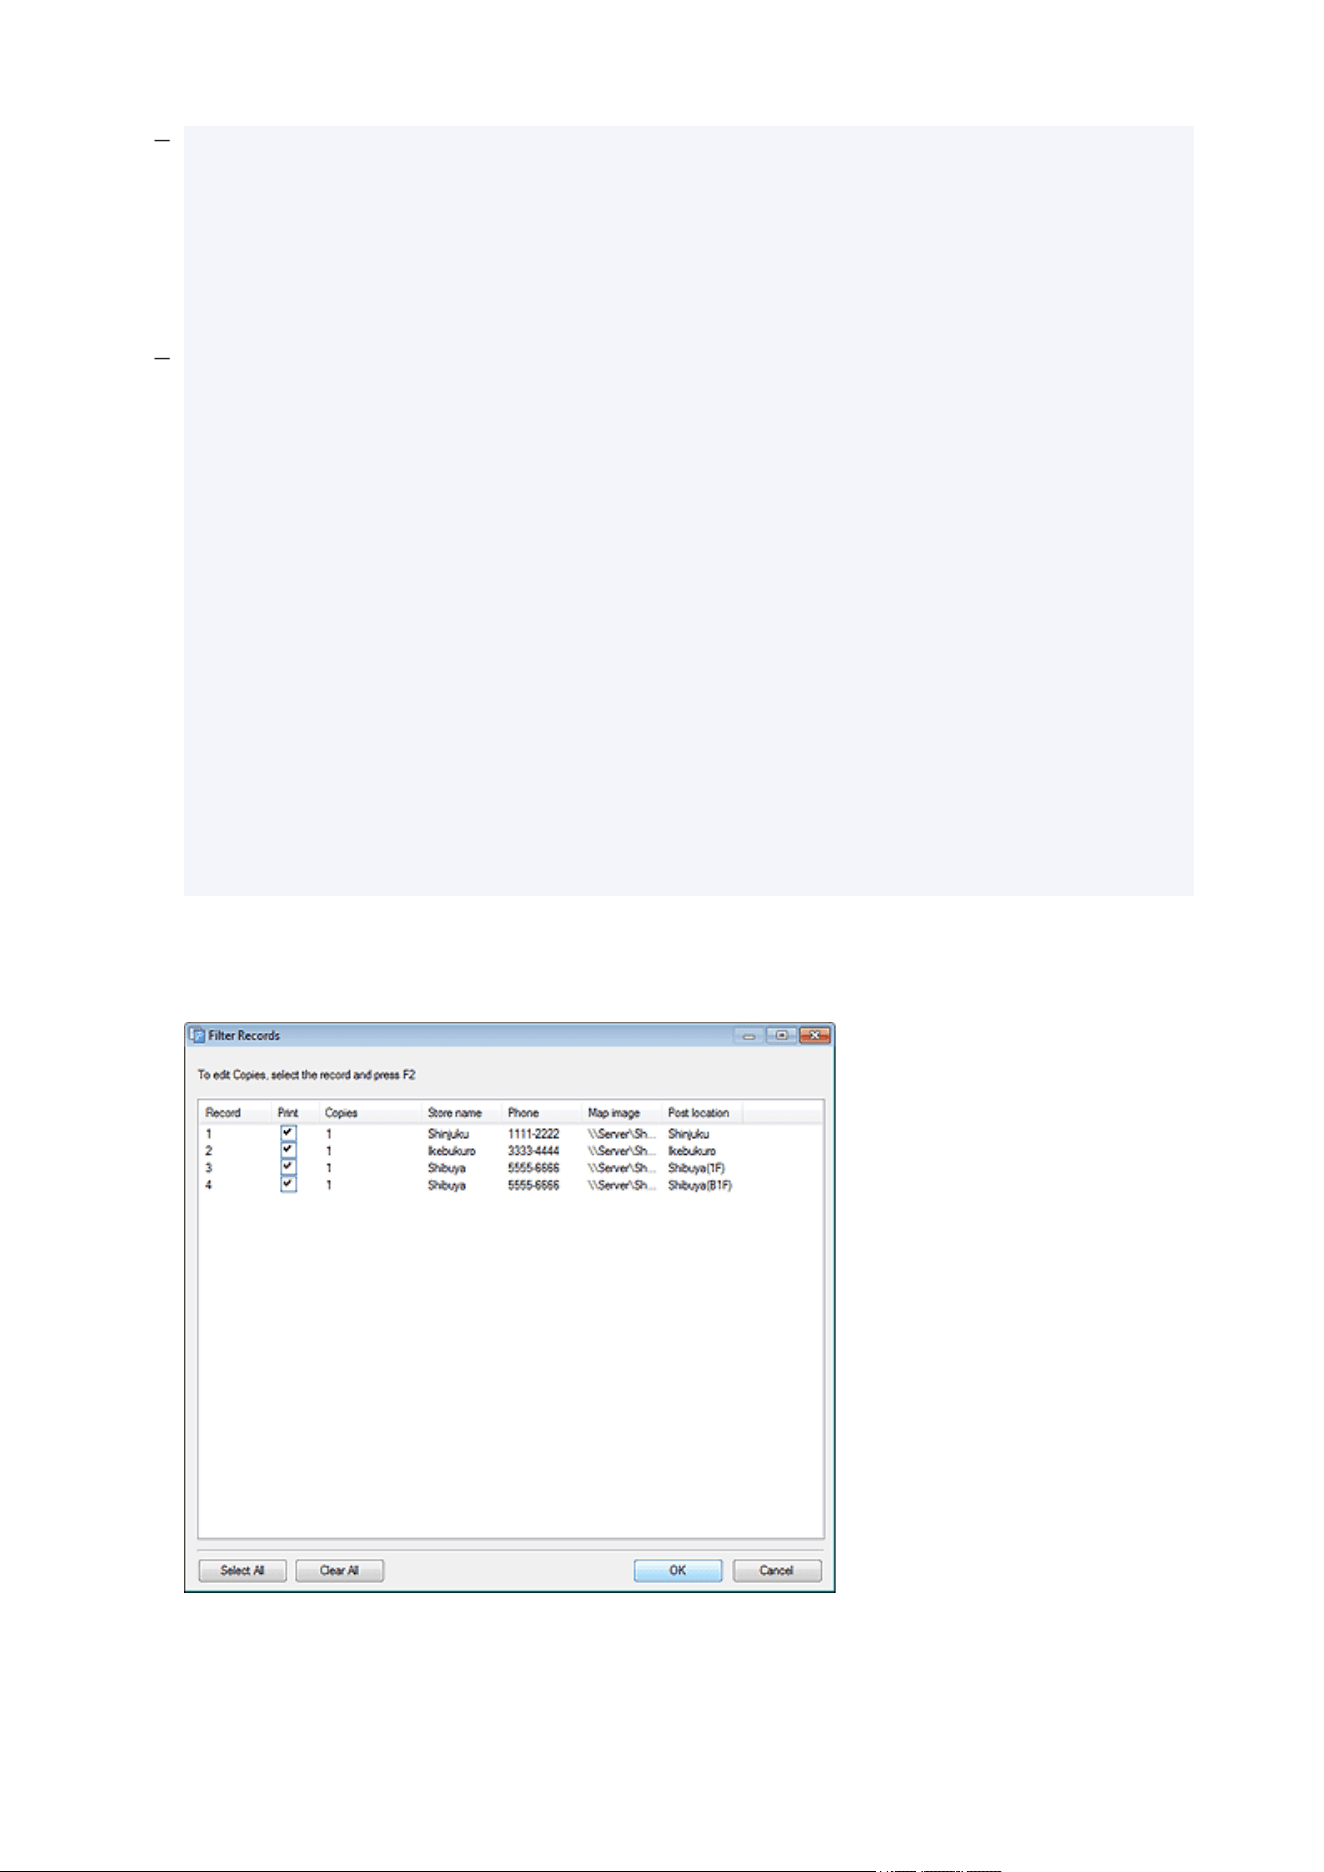
[3] (Optional)
0 or more and 100 or less: If [4] is an integer value (d), the minimum number of digits is specified.
If [4] is a real number (f), the number of digits after the decimal point is specified.
Be sure to enter a value with "." (period), such as ".2".
Example) If ".3" is specified: 5 > 005 (integer value), 500 > 500.000 (real number)
[4]
s: The content is treated as text.
d: The content is treated as an integer value.
f: The content is treated as a real number.
Example) If "%+.2f" is specified
Tabular data > Substitute to
500 > +500.00
Any text can also be added before or after "%[1][2][3][4]".
Example) If "¥%,d" is specified
Tabular data > Substitute to
1600 > ¥1,600
•
To change the ambient light setting, select the Ambient Light Settings checkbox, and then in Ambient
Light Field, select the field name.
7. To select the data to be used or specify the number of copies, click Filter Records.7.
The Filter Records dialog box appears.
To exclude data from the data to be printed:
Deselect the Print checkbox.
187

To specify the number of prints:
Double-click the number of copies of the record, and then enter the number directly or click (Up Arrow)
or (Down Arrow) on the right to increase or decrease the number.
8. Click OK.8.
9.
In Record Number, click (Previous) or (Next) to check that the text string or
9.
image is replaced with each record.
Note
•
Even when text is replaced, settings such as the font and text color are not changed.
•
A text string is replaced in the style of the first character of the text string on the poster.
10.
In the task area, click Print.
10.
The view switches to the Print screen.
Note
• When the ambient light setting is enabled, in Print Quality, select High or Highest.
11. Click Print Records.11.
The Print Progress dialog box appears.
Note
• To print the currently displayed data only, select the Current Record Only checkbox.
•
To cancel printing, click Cancel Printing in the Print Progress dialog box.
• Posters can also be printed with crop marks or without borders. For details, see Specifying Size and
Paper.
Note
•
To cancel the variable printing settings, click Disconnect Data. The link to the database will be canceled
and the variable printing settings will be disabled.
188

Managing Artwork
Photos, clipart, templates, and other materials used in PosterArtist are referred to as "artwork." PosterArtist
provides a wide range of artwork that is categorized and stored in the library.
You can add posters you have created and images on your computer to the library as well. In the library,
you can rename categories, change display order, delete unneeded categories and artwork, or add them to
the library again.
Adding Artwork to Library
Importing and Exporting
Organizing Artwork in Library
Downloading Artwork at Once
Preparing the Same Artwork Environment on Other Computers
189

Adding Artwork to Library
Add photos, clipart, or created posters to the library to use in PosterArtist.
Adding Posters to Template Library
Adding Images to Library
Adding Posters to Template Library
Created posters can be added to the library as templates.
1.
In the File menu, click Add to Templates....
1.
The Artwork Manager dialog box appears.
Note
•
Alternatively, add from Add to Templates... in Select Template screen.
2. In Category, select a category.2.
Note
• To add a new category, click Add new category.... Enter the name in Name, and then click OK to
add the category to the bottom of the Category list.
•
You can protect the poster from being edited, or set a time limit for its use as a template. For details,
see
Saving Artwork Dialog Box (Templates).
3. Click OK.3.
The displayed poster is added to the library.
Note
•
The poster and the images used in it are saved in the folder specified in the Preferences dialog box.
Adding Images to Library
Add photos, clipart, and other images to the library.
1.
Right-click an image in the poster design area, and then click Add to Photos / Clipart....
1.
The Artwork Manager dialog box appears.
Note
•
Alternatively, to display the Saving Artwork dialog box, select an image in the poster design area,
display the Edit screen (Photos) or Edit screen (Clipart), and then click Add to Photos / Clipart... or
Add to Clipart....
2.
In Artwork type, select Photos or Clipart.
2.
190

Note
• Select the Artwork type according to the image.•
Photos: Photos
Clipart: Photos, clipart, shapes, text, and QR codes
3.
In Category, select a category.
3.
Note
•
To add a new category, click Add new category.... Enter the name in Name, and then click OK to
add the category to the bottom of the Category list.
•
You can protect the image from being edited, or set a time limit for its use. For details, see Saving
Artwork Dialog Box (Images).
4.
Click OK.
4.
The image is added to the library.
191

Importing and Exporting
Import image files such as JPEG images to the library. Imported image files can be used as photos or
clipart.
Artwork added to the library can be saved (exported) as a single file. By importing exported artwork to the
library on other computers, the created artwork can be shared with other users.
Importing Image Files
Importing Artwork
Exporting Artwork
Importing Image Files
Import image files such as JPEG images to the library to use as photos or clipart.
1.
In the File menu, click Import....
1.
The Import dialog box appears.
Note
• File formats of images that can be imported are as follows.•
JPEG (.jpg, .jpeg)
TIFF (.tif, .tiff)
PNG (.png)
BMP (.bmp)
MF (.?mf)
SVG (.svg)
2. Specify the location of the file.2.
3.
Select the file to import.
3.
4.
Click Open.
4.
The Saving Artwork dialog box (Images) appears.
192
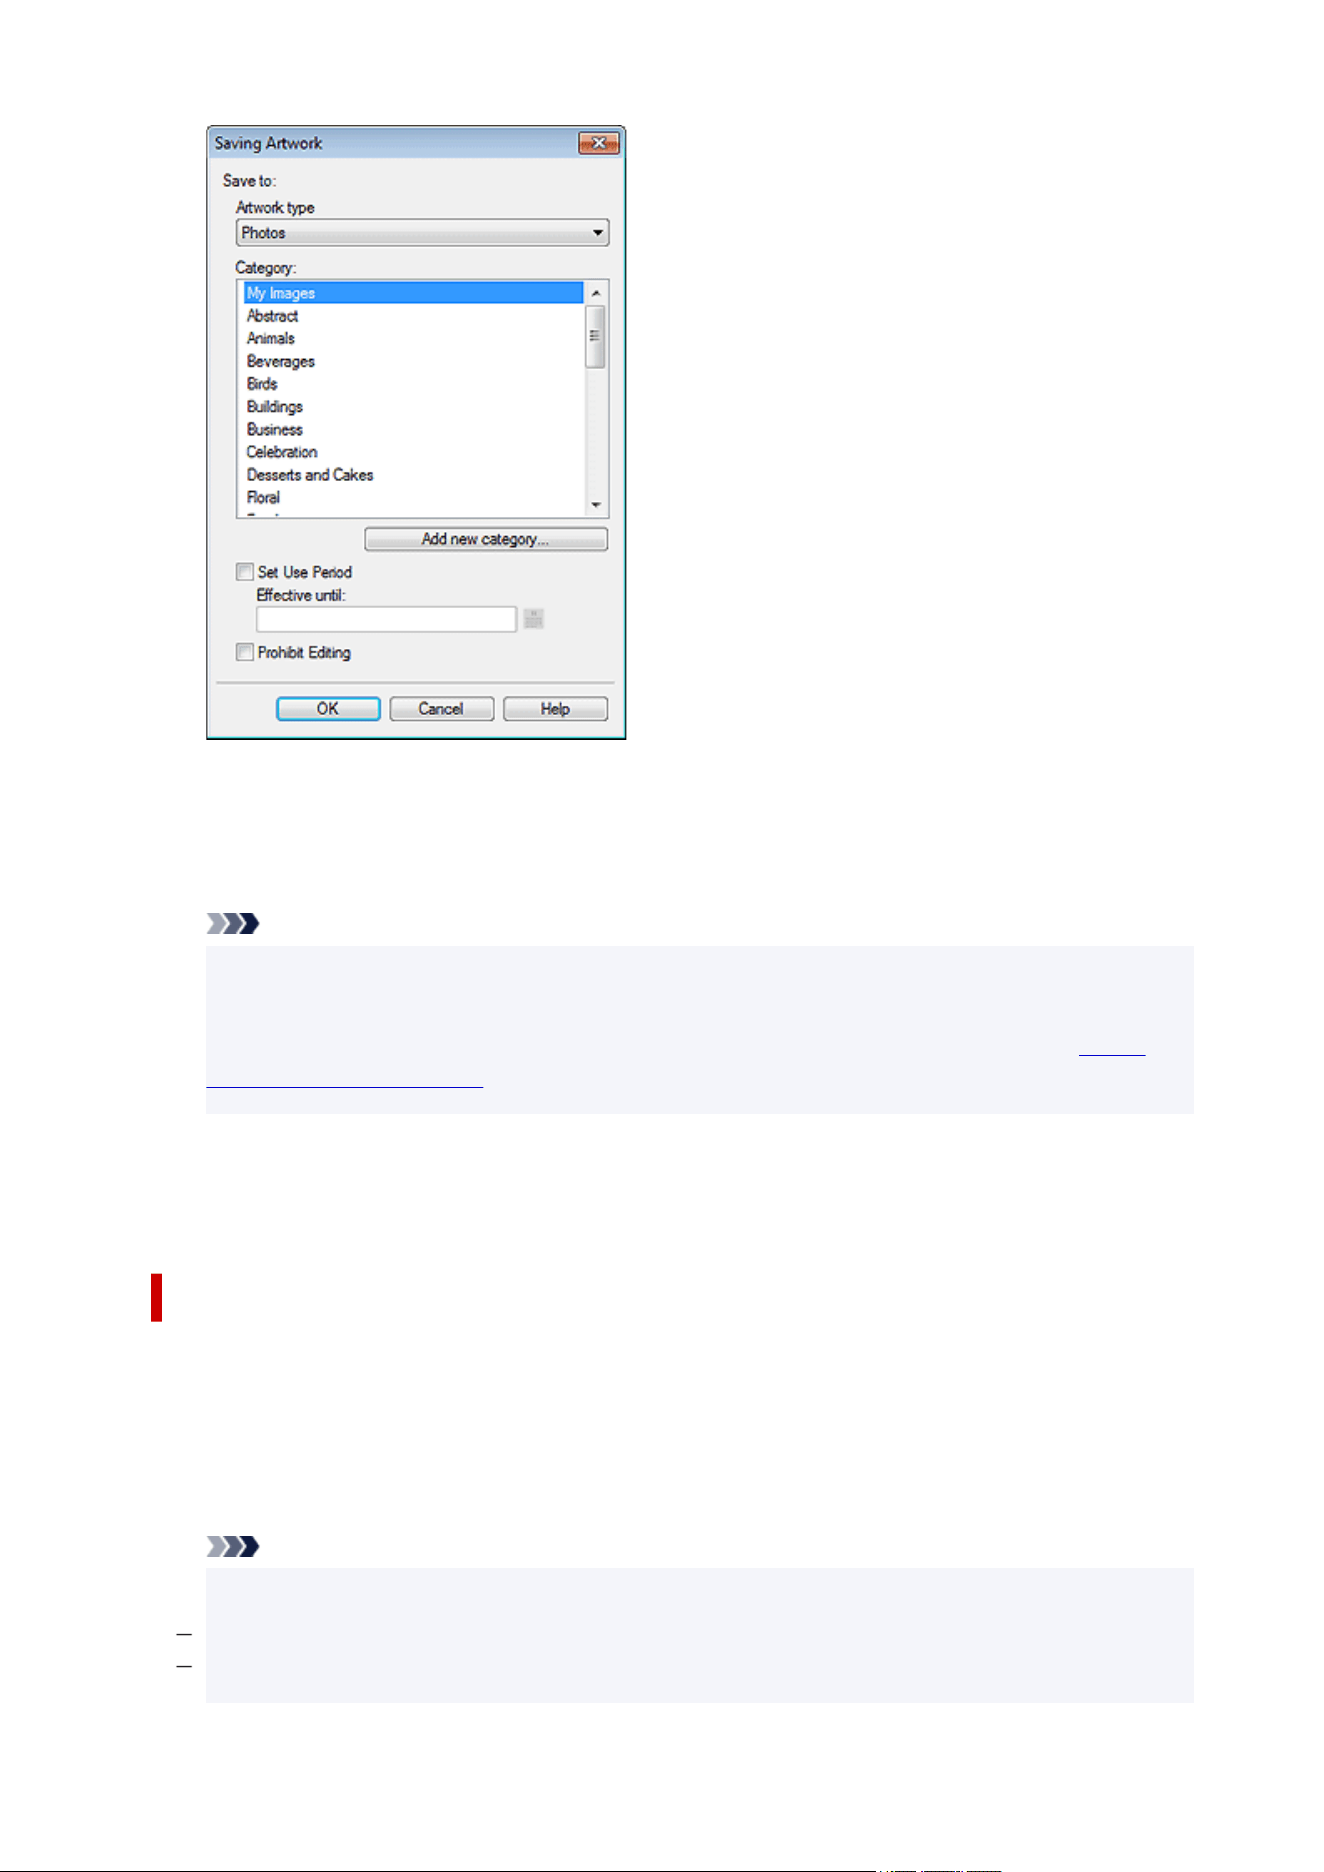
5.
In Artwork type, select Photos or Clipart.
5.
6.
In Category, select a category to import the image to.
6.
Note
• To add a new category, click Add new category.... Enter the name in Name, and then click OK to•
add the category to the bottom of the Category list.
You can protect the image from being edited, or set a time limit for its use. For details, see Saving
Artwork Dialog Box (Images).
7. Click OK.7.
The image is imported to the library.
Importing Artwork
Import PosterArtist files exported from other computers. The artwork is added to the category specified at
the time of export and can be used in the same way as other artwork.
1.
In the File menu, click Import....
1.
The Import dialog box appears.
Note
•
When importing PosterArtist files exported from other computers, select the following files.
•
.cpt
.cptx
193
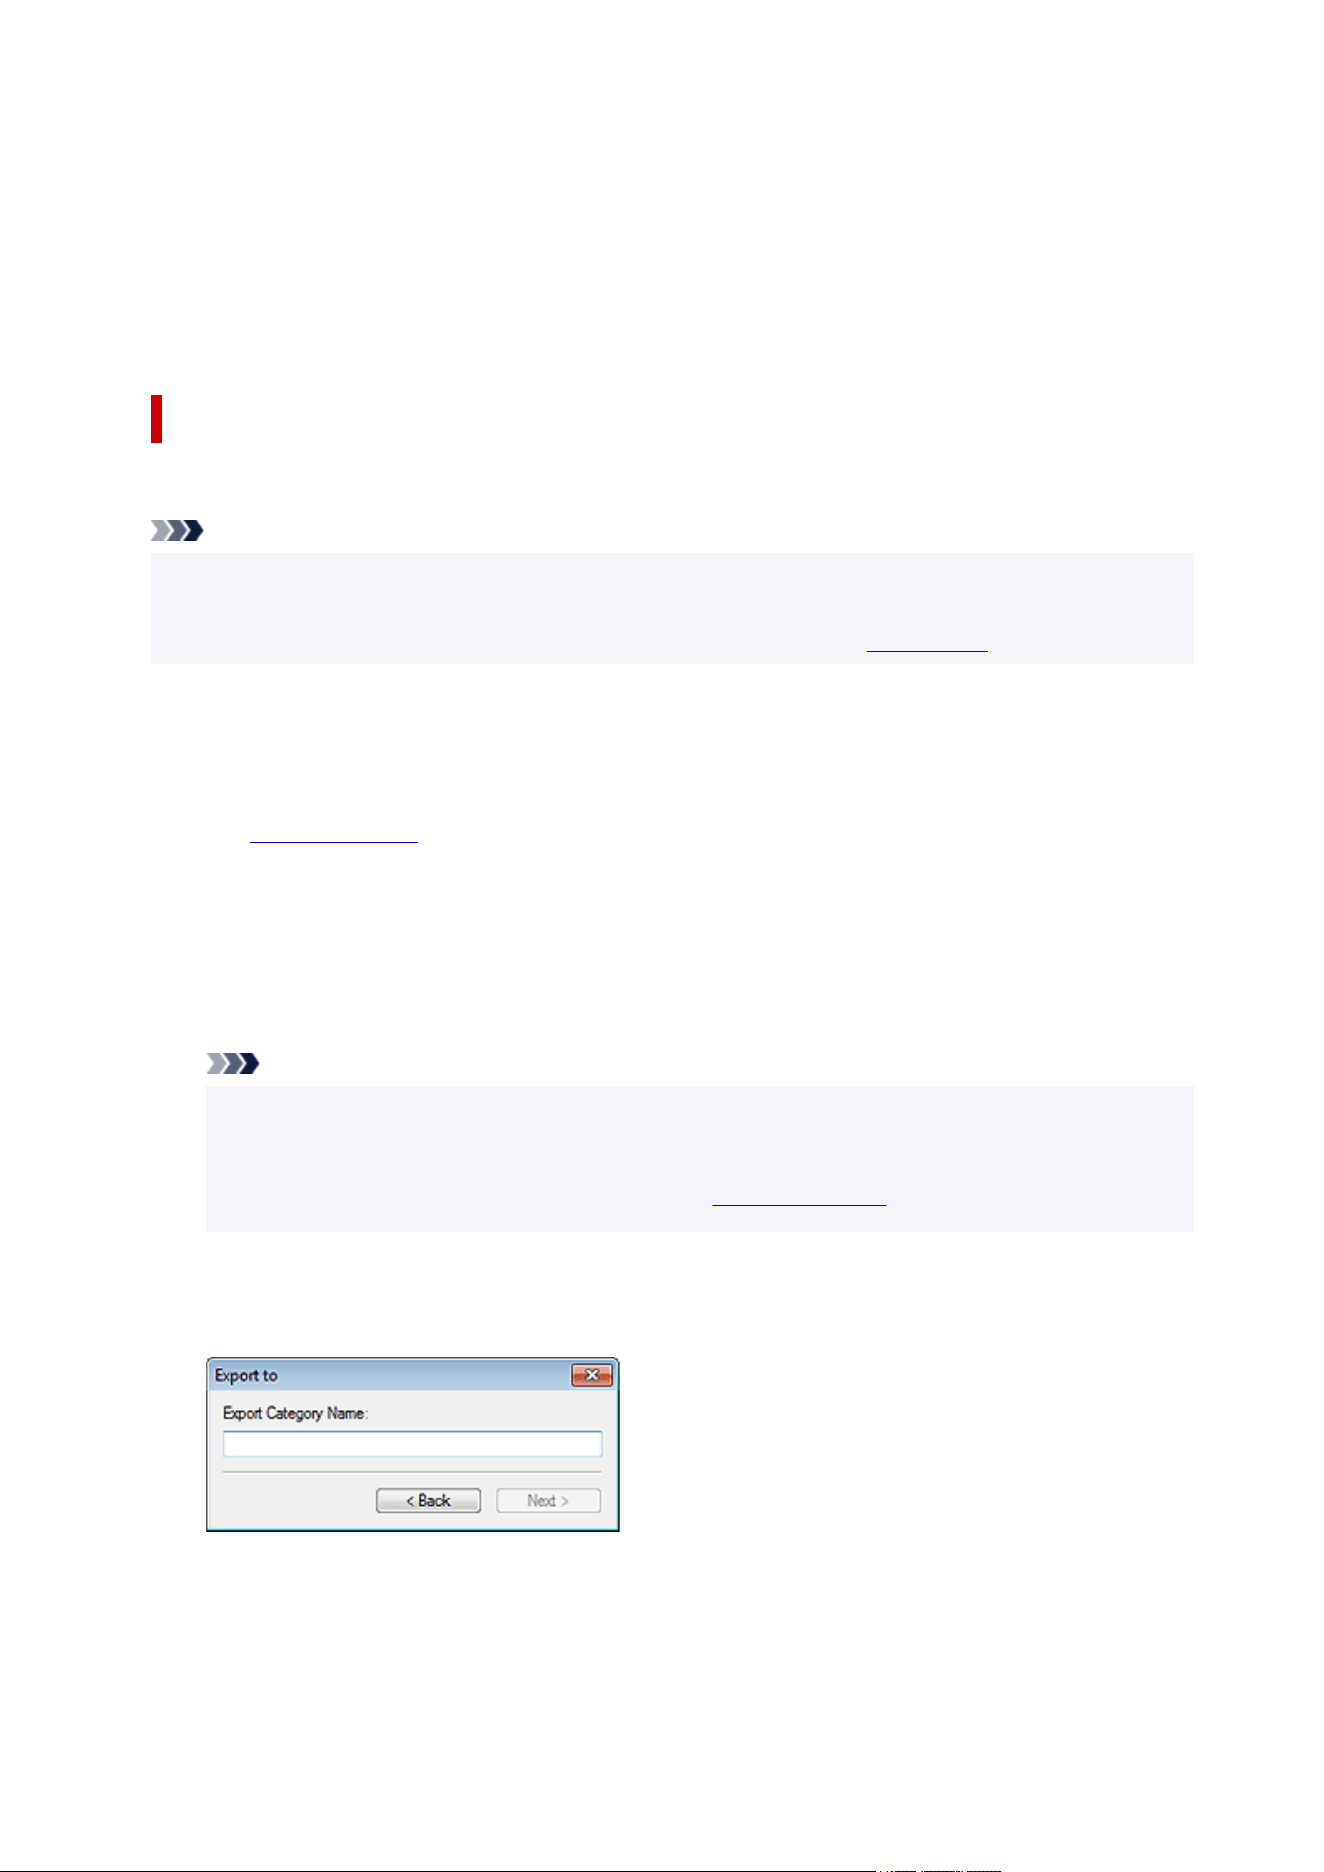
2. Specify the location of the file.2.
3. Select the file to import.3.
4. Click Open.4.
The artwork is imported.
Exporting Artwork
Export artwork as a single file.
Note
• An export file can include templates in the library, images used in templates, as well as photos, clipart,
and backgrounds in the library.
• Artwork can be exported and uploaded to cloud storage. For details, see Using Cloud.
1. Add created artwork to the library.1.
2. In the File menu, click Export....2.
The Export dialog box appears.
3. Click the tab of the library containing the artwork you want to export.3.
4. Select the artwork you want to export, and then click Add.4.
The selected artwork is added to Item to be exported.
Note
• Up to 200 artwork items can be selected from multiple libraries.•
• Multiple artwork items are exported as a single file.•
• You can change the thumbnail size. For details, see Export Dialog Box.•
5.
Click Next.
5.
The Export to dialog box appears.
6.
Enter the destination category name.
6.
194

Note
• Even if artwork is selected from multiple libraries, only one category name can be entered. A category•
of the same name is created in the corresponding libraries at the destination.
7.
Click Next.
7.
The Save As dialog box appears.
8.
Specify the save location.
8.
9.
In File name, enter the file name.
9.
10.
Click Save As.
10.
A PosterArtist export file (file extension ".cptx") is saved.
Note
•
For templates, images inserted by users, image retouching information, etc. are also exported.
•
Important
• Files exported from PosterArtist V3.0 or later cannot be imported in earlier versions of PosterArtist.
195

Organizing Artwork in Library
Organize libraries and artwork to make them easier to use by adding categories, renaming categories, or
rearranging in descending order of frequency. You can also delete unneeded artwork.
Organizing Library Categories
Organizing Artwork in Categories
Restoring Removed Artwork
Organizing Library Categories
1.
On the toolbar, click (Artwork Manager Dialog).
1.
The Artwork Manager dialog box appears.
2.
Click the tab of the library whose categories you want to organize.
2.
3. Organize the categories in the list.3.
To add new categories:
1.
Click New Category.
1.
2. Enter a name for the category.2.
To rename categories:
1. In the category list, select a category, and then click Rename.1.
2. Enter a name for the category.2.
To change the display order:
1. Select the category you want to move.1.
2. Drag the category to the target location.2.
To delete categories:
1.
In the category list, select the category you want to delete.
1.
2.
Click Delete.
2.
3.
Click OK.
3.
Important
•
Categories with a (Lock) icon cannot be deleted.
4.
Click OK.
4.
Note
• For details on the Artwork Manager dialog box, see Artwork Manager Dialog Box.
196
Organizing Artwork in Categories
1. On the toolbar, click (Artwork Manager Dialog).1.
The Artwork Manager dialog box appears.
2.
Click the tab of the library whose artwork you want to organize.
2.
3.
Click the category of the artwork you want to organize.
3.
4.
Organize artwork.
4.
To move artwork to another category:
1.
Select the artwork.
1.
2.
Click Move.
2.
The Move Artwork dialog box appears.
3. In Category, select the destination category, and then click OK.3.
To change the display order:
1. Select the artwork you want to move.1.
2.
Drag the artwork to the target location.
2.
To copy artwork from one category to another:
1. Select the artwork.1.
2. Click Copy.2.
3. Select the category where you want to paste the copied artwork.3.
4. Click Paste.4.
Important
•
Artwork you copied can only be pasted within the same library.
To remove artwork from a category:
1.
Select the artwork you want to remove.
1.
2.
Click Delete.
2.
3.
Click OK.
3.
Important
•
Artwork with a (Lock) icon cannot be deleted.
5.
Click OK.
5.
Note
• For details on the Artwork Manager dialog box, see Artwork Manager Dialog Box.
197

Restoring Removed Artwork
1. On the toolbar, click (Artwork Manager Dialog).1.
The Artwork Manager dialog box appears.
2.
In Category, click Deleted content.
2.
Thumbnails of removed artwork appear.
3.
Select the artwork you want to restore, and then click Restore.
3.
The restored artwork is added to the library.
198

Downloading Artwork at Once
Download new artwork to the library at once.
1. On the toolbar, click (Artwork Manager Dialog).1.
The Artwork Manager dialog box appears.
2.
Click Download.
2.
The downloaded artwork is added to the corresponding library.
199

Preparing the Same Artwork Environment on Other Computers
Artwork can be freely added, removed, and sorted. Create an installer file and install it on other computers
to use the organized artwork environment in the same state on other computers.
Creating the Artwork Installer File
Installing Artwork
Creating the Artwork Installer File
Create an installer file on the source computer.
1.
In the Tool menu, click Artwork Snapshot....
1.
The Artwork Snapshot dialog box appears.
2.
Specify the save location.
2.
3. Click Start Snapshot.3.
PASnapshot.exe is saved.
Important
• You must be logged on with administrative rights to create an installer file.
Installing Artwork
Install artwork to the computer to which you want to apply the same artwork environment.
1. Check that the same version of PosterArtist that was used to create the installer file is1.
installed.
2. Double-click the created PASnapshot.exe.2.
Important
• You must be logged on with administrative rights to execute an installer file.
200

Using Cloud
Share created poster files, image files, and artwork export data with other computers and users by
uploading them to or downloading them from cloud services.
Downloading Posters and Materials from Cloud
Uploading Current Poster to Cloud
Uploading Export Files to Cloud
Important
• To use this function, imagePROGRAF Direct Print & Share (hereinafter "Direct Print & Share") V2.0.0
or later must be installed. The latest version can be downloaded from our website. For the operation
procedure and supported cloud services, refer to Help of Direct Print & Share.
• When Direct Print & Share is running, PosterArtist cannot be operated.
• To use a cloud service, you must create an account for the cloud service beforehand.
201
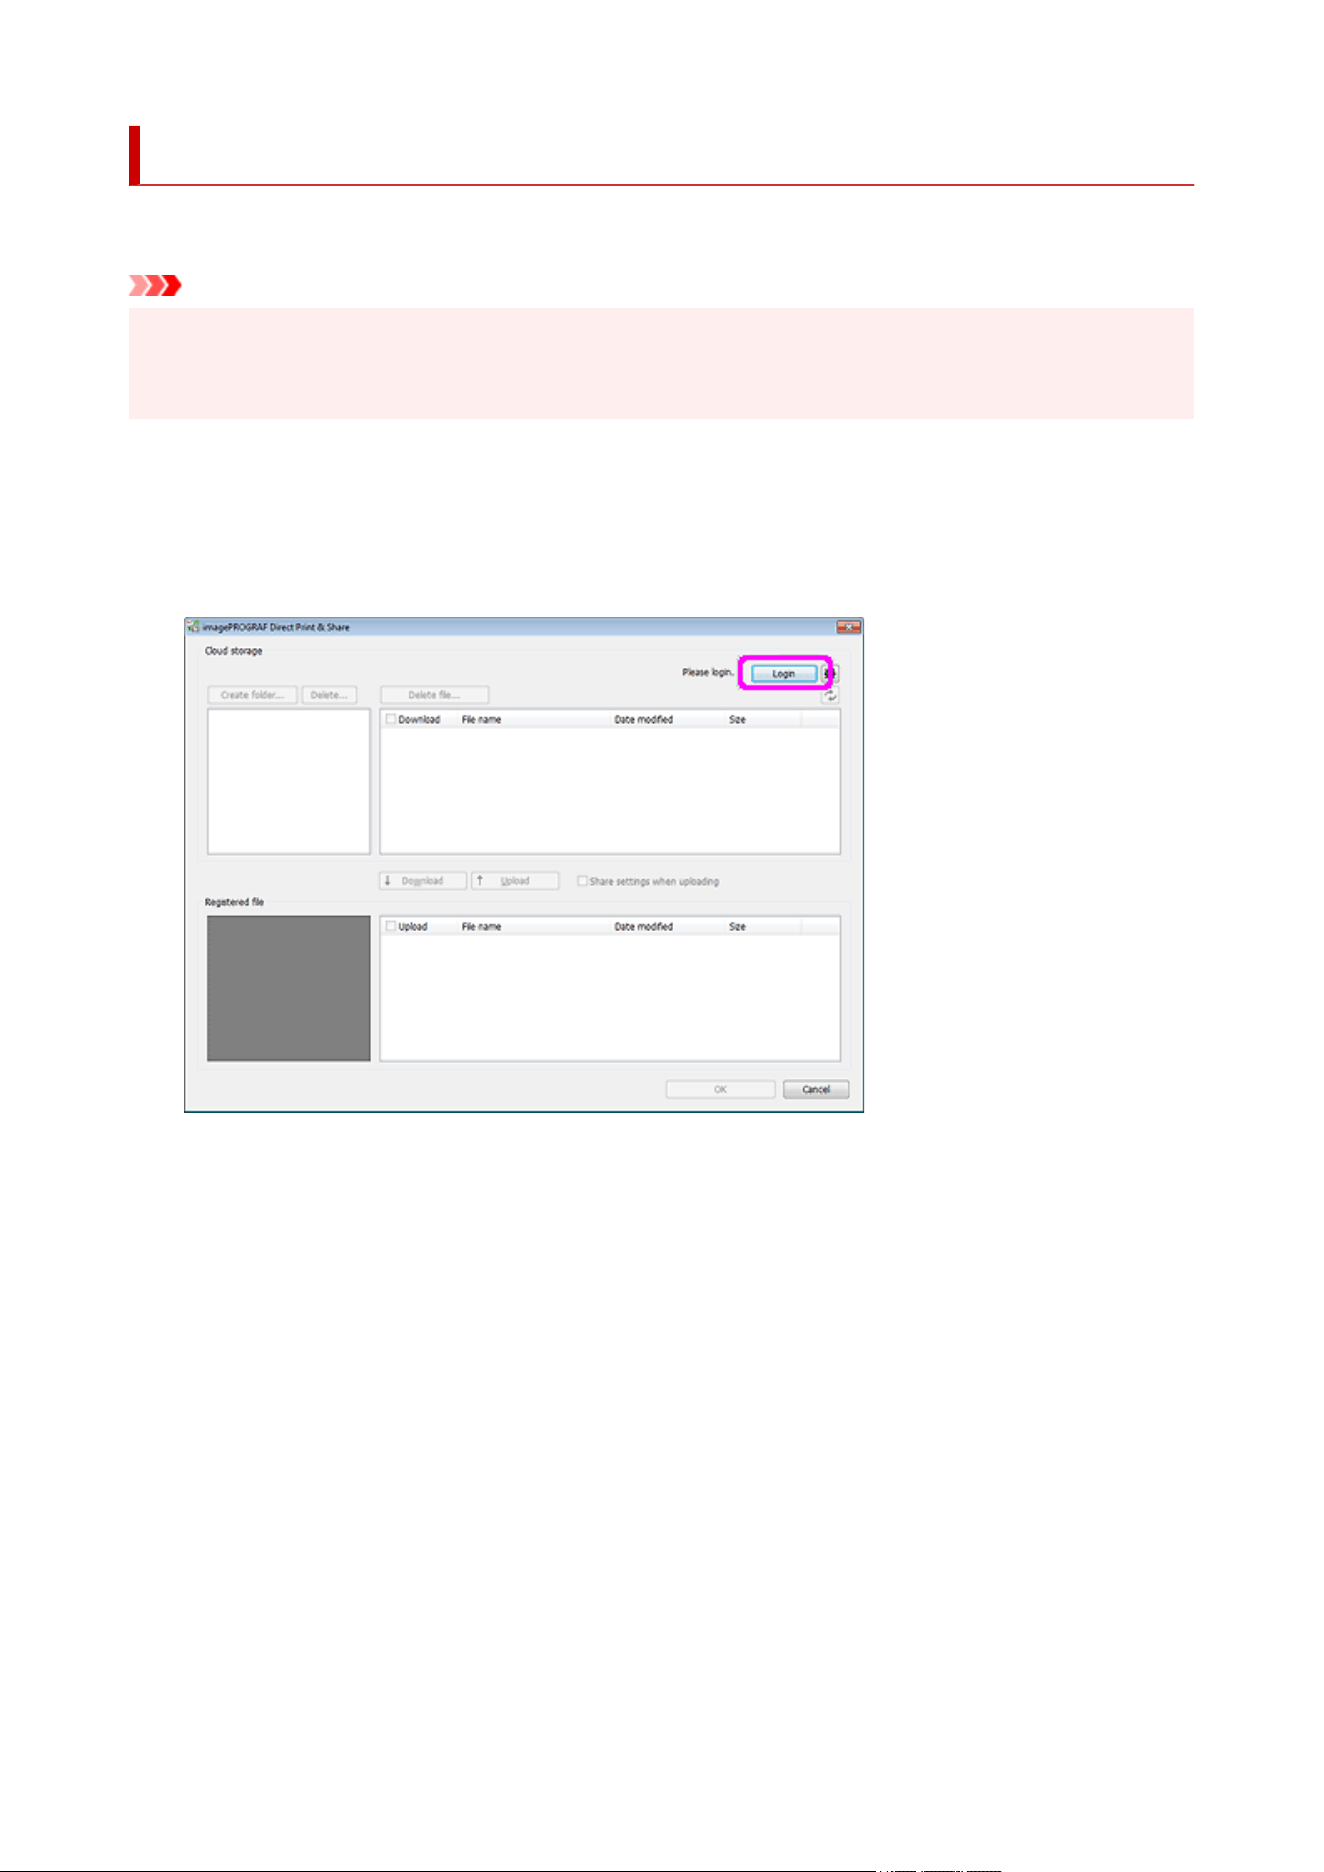
Downloading Posters and Materials from Cloud
Download poster files and image files from cloud storage.
Important
• To use this function, imagePROGRAF Direct Print & Share (hereinafter "Direct Print & Share") V2.0.0 or
later must be installed. For the Direct Print & Share operation procedure and supported cloud services, see
Help of Direct Print & Share.
1.
In the Cloud sharing menu, click Download poster/material....
1.
The Direct Print & Share screen appears.
2.
Click Login, and then select your cloud storage.
2.
3. In Cloud storage, select the checkbox of the file you want to download.3.
4.
Click Download.
4.
202
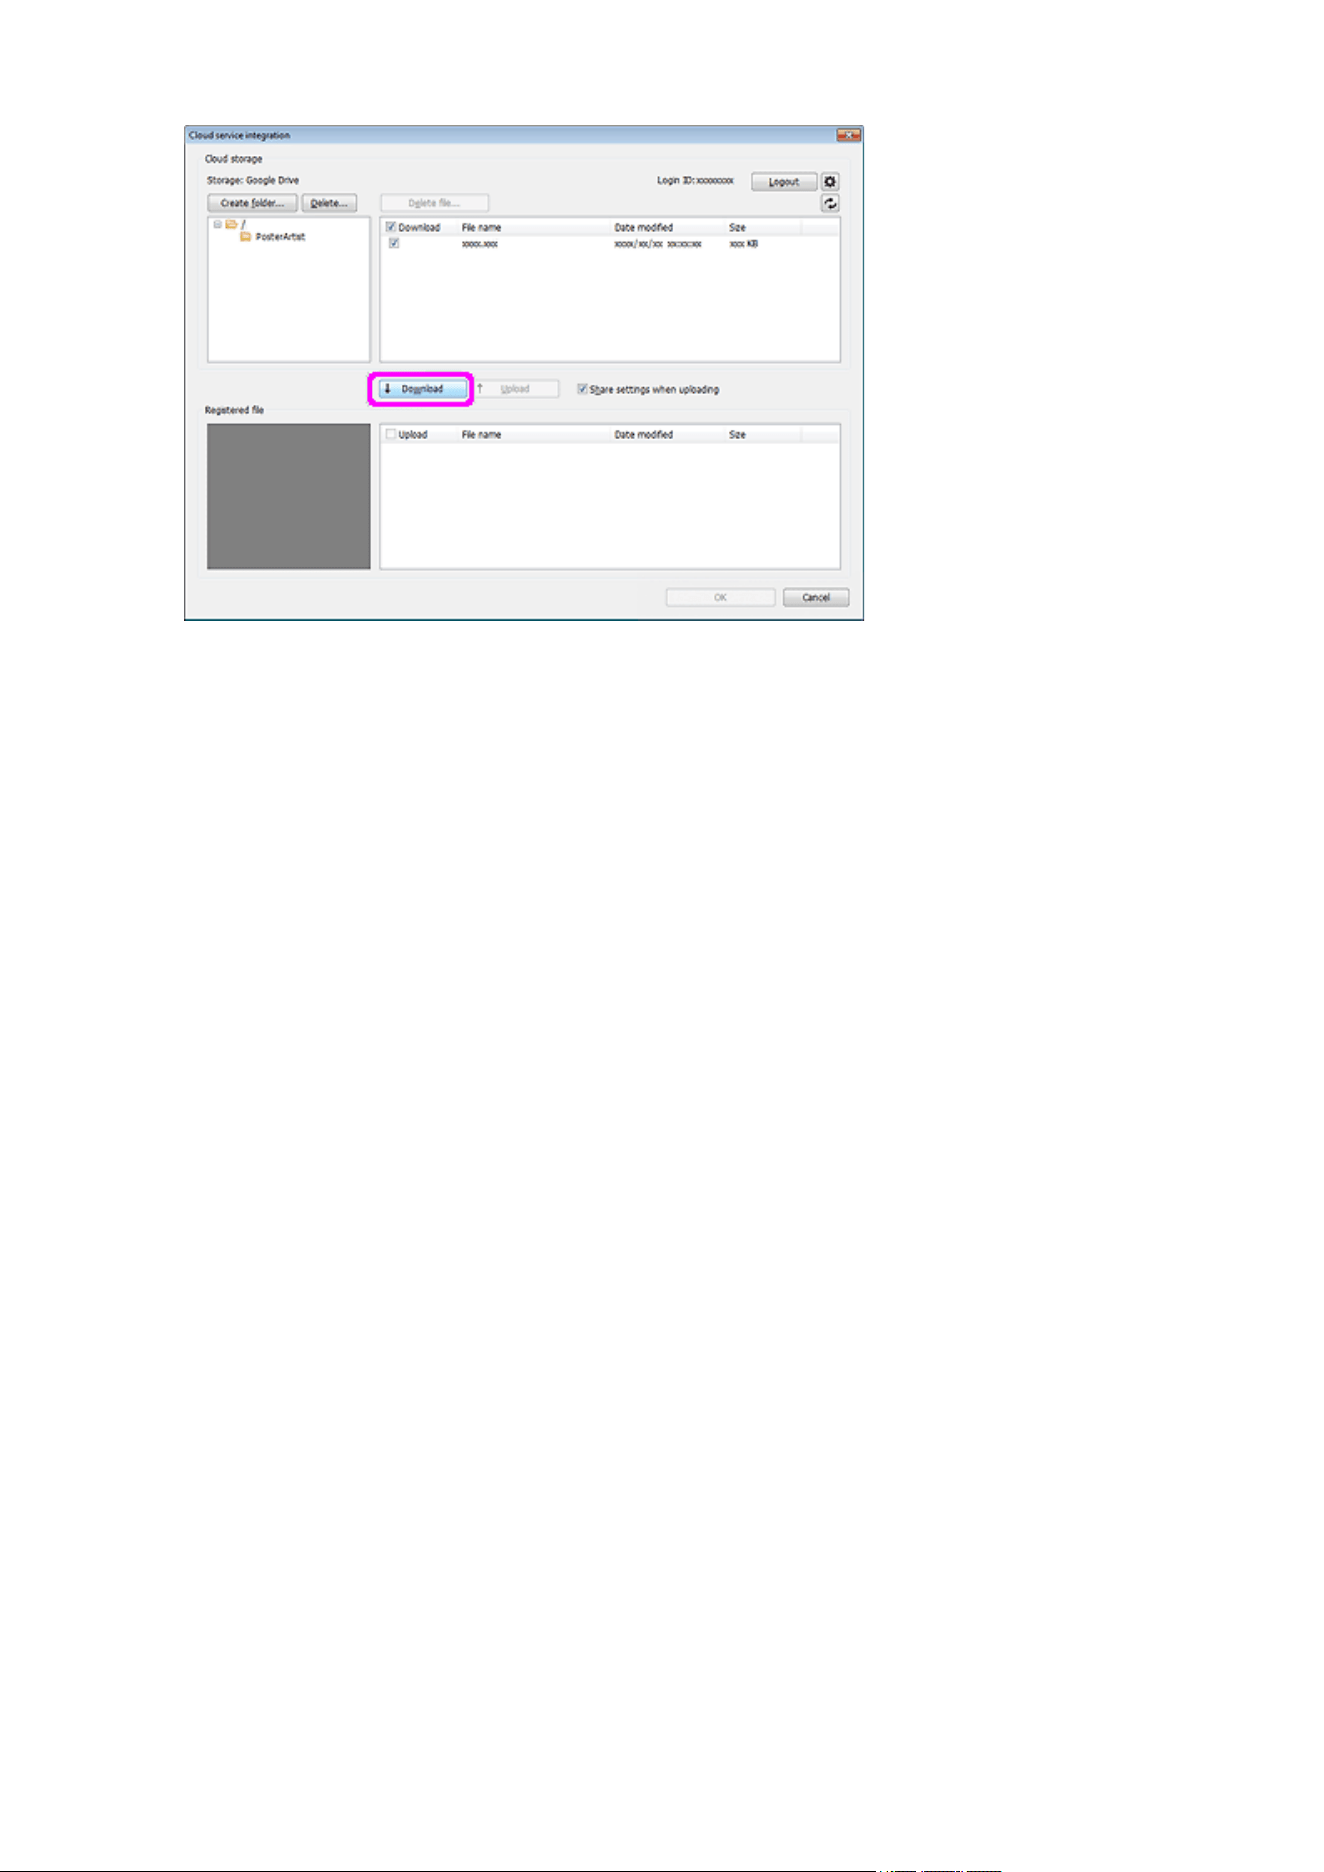
5.
Click OK.
5.
203
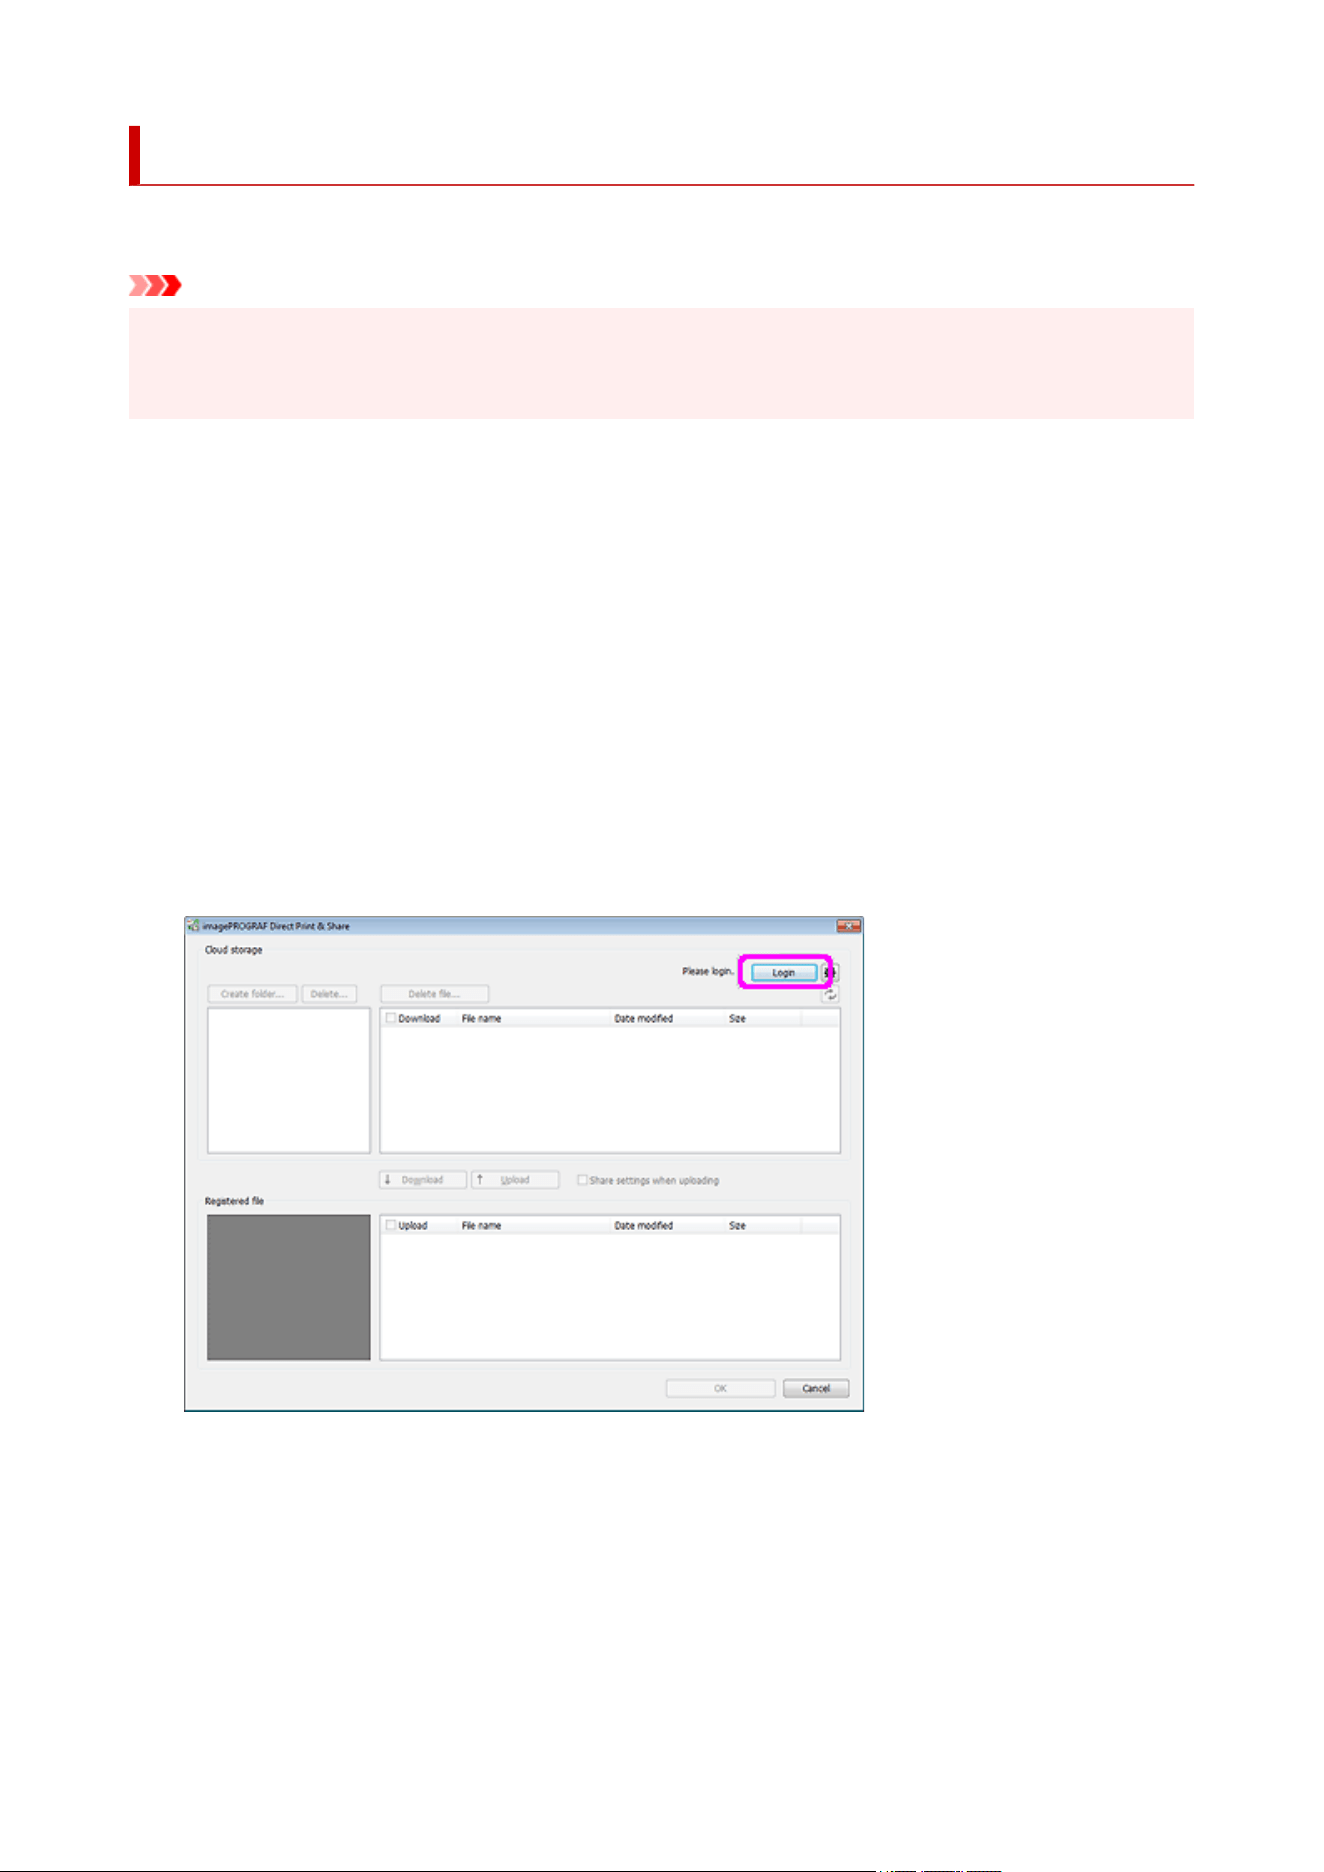
Uploading Current Poster to Cloud
Save the current poster and upload it to cloud storage.
Important
• To use this function, imagePROGRAF Direct Print & Share (hereinafter "Direct Print & Share") V2.0.0 or
later must be installed. For the Direct Print & Share operation procedure and supported cloud services, see
Help of Direct Print & Share.
1.
In the Cloud sharing menu, click Upload currently open poster....
1.
The Save As dialog box appears.
2.
Specify the save location.
2.
3.
In File name, enter the file name.
3.
4. Click Save As.4.
The created poster is saved as a file exclusively for use with PosterArtist.
The Direct Print & Share screen appears.
5.
Click Login, and then select your cloud storage.
5.
6.
In Registered file, select the checkbox of the file you want to upload.
6.
7.
Click Upload.
7.
204
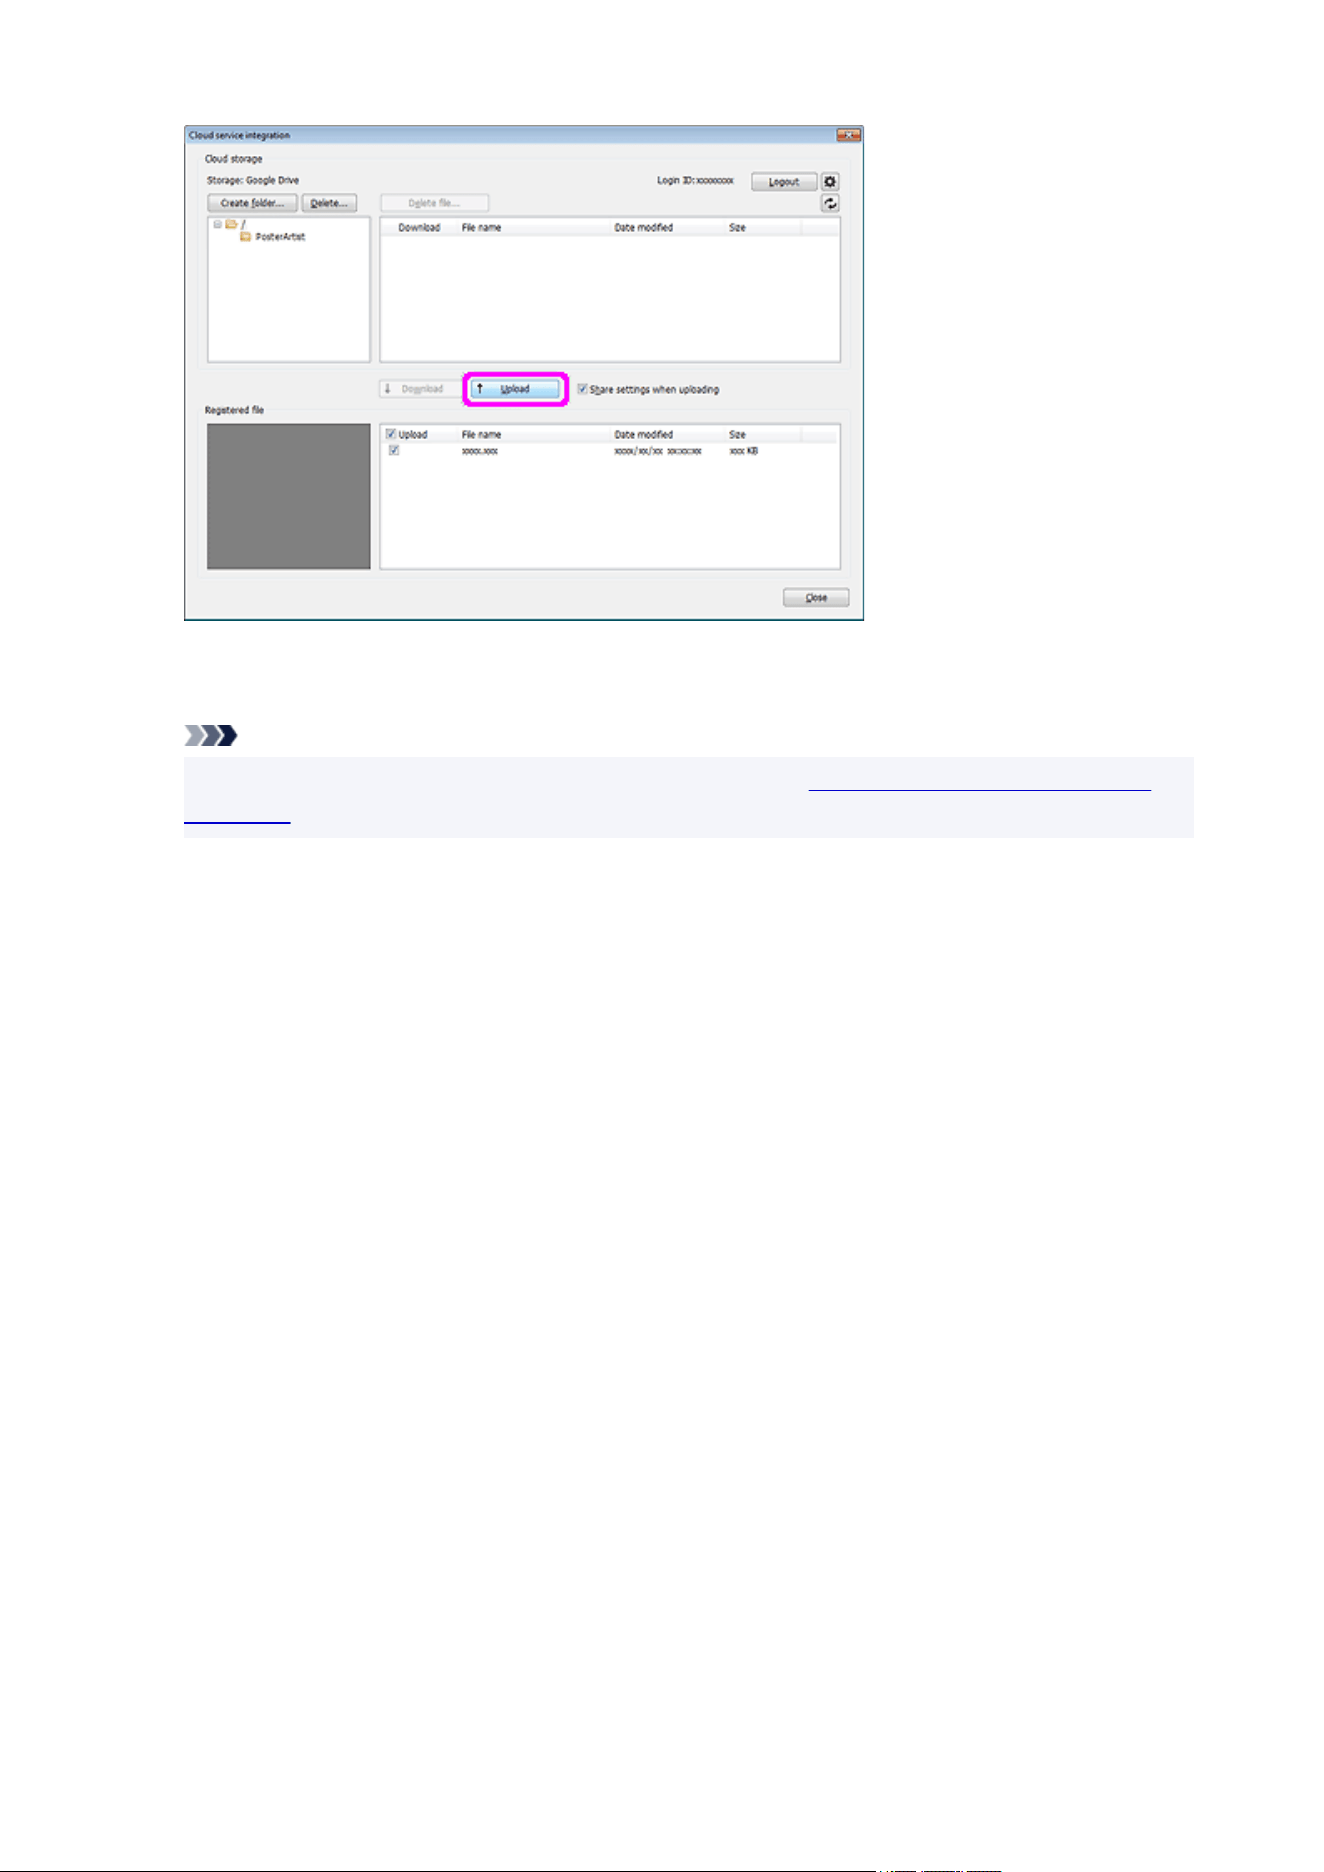
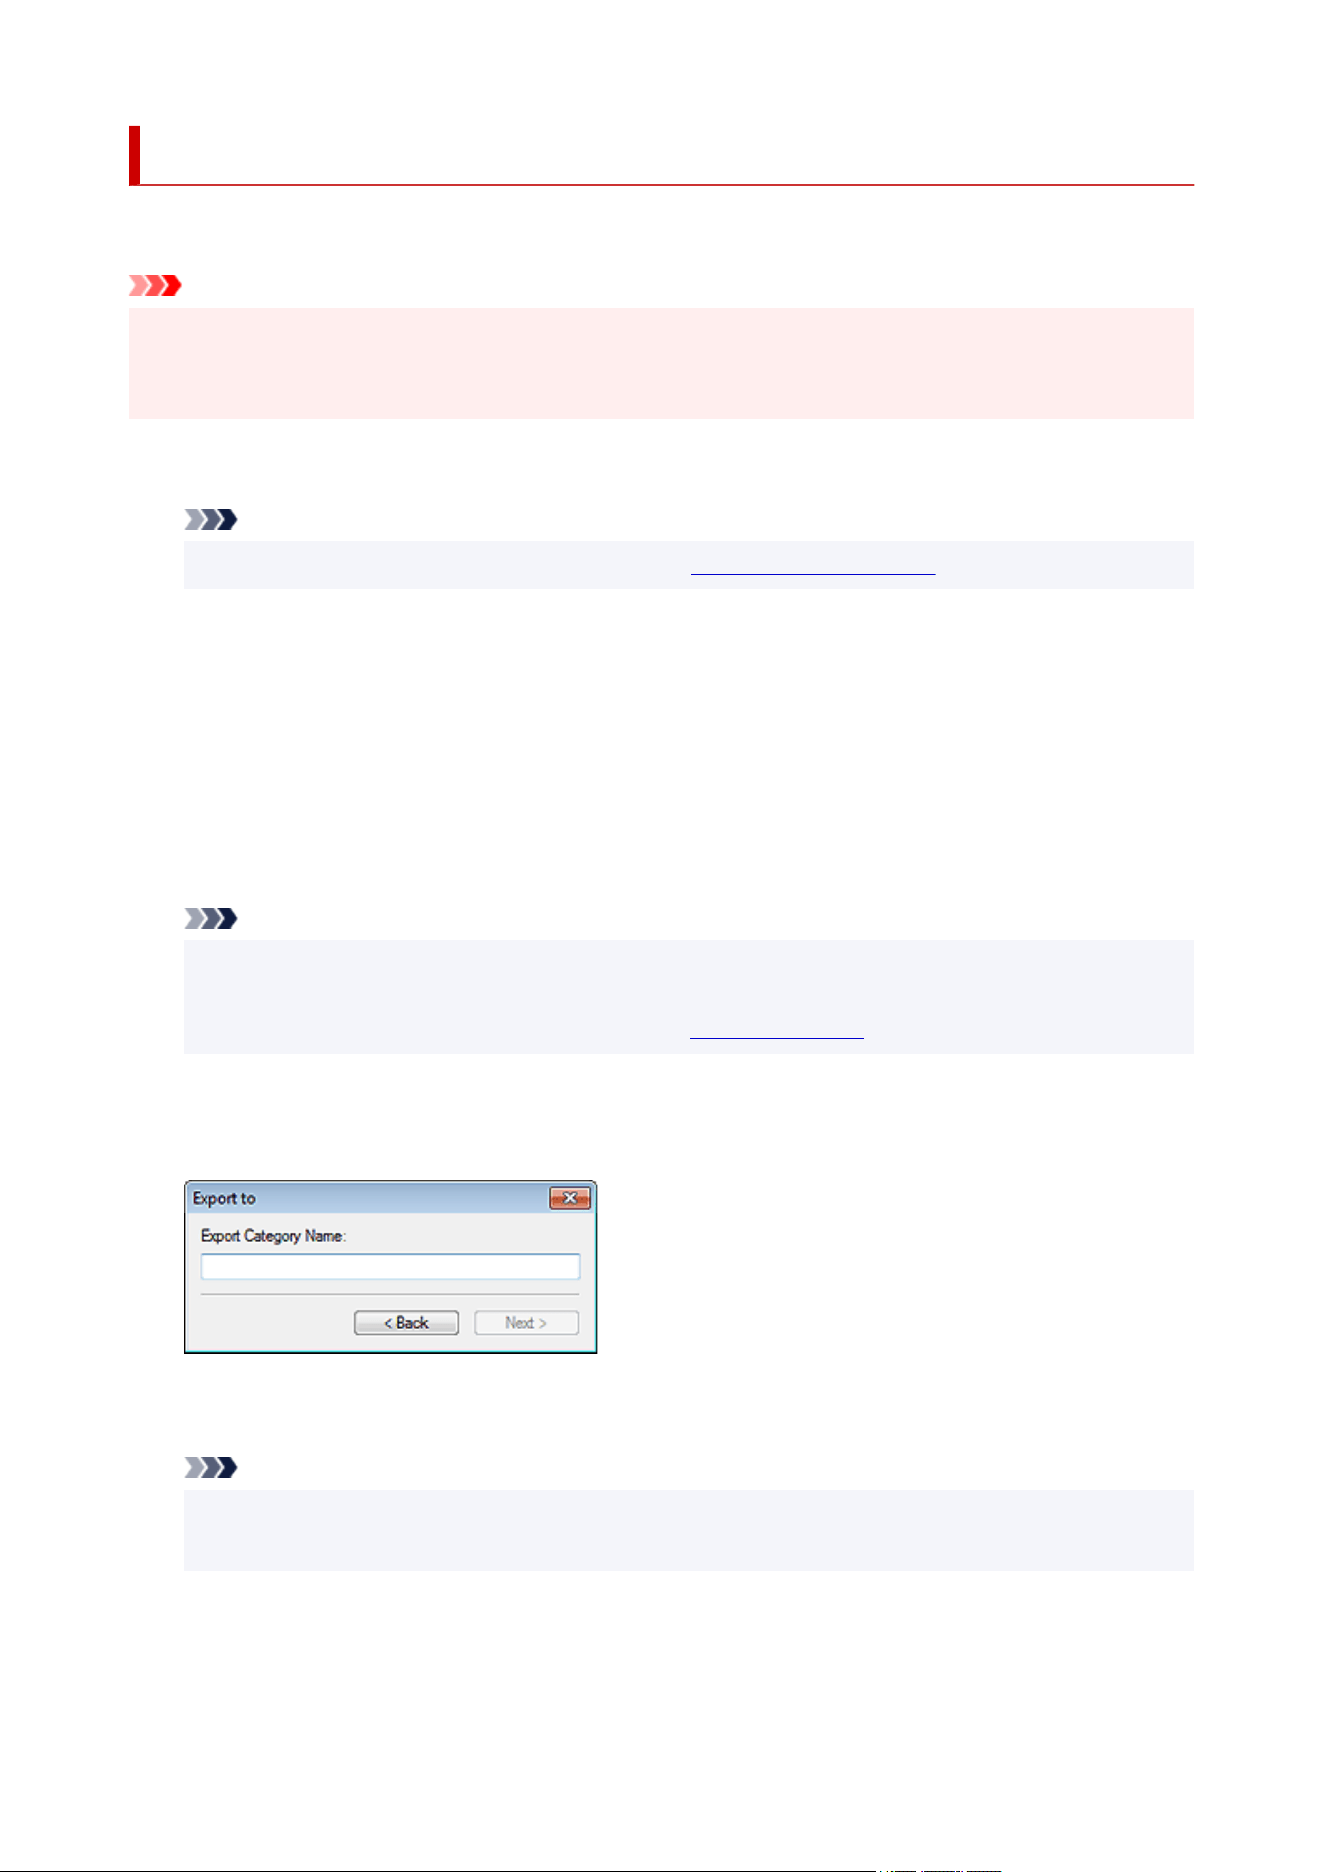
Uploading Export Files to Cloud
Export and upload artwork to cloud storage.
Important
• To use this function, imagePROGRAF Direct Print & Share (hereinafter "Direct Print & Share") V2.0.0 or
later must be installed. For the Direct Print & Share operation procedure and supported cloud services, see
Help of Direct Print & Share.
1.
Add created artwork to the library.
1.
Note
•
For instructions on adding artwork to the library, see Adding Artwork to Library.
2.
In the Cloud sharing menu, click Upload export file....
2.
The Export dialog box appears.
3. Click the tab of the library containing the artwork you want to export.3.
4.
Select the artwork you want to export, and then click Add.
4.
The selected artwork is added to Item to be exported.
Note
• Up to 200 artwork items can be selected from multiple libraries.
• Multiple artwork items are exported as a single file.
•
You can change the thumbnail size. For details, see Export Dialog Box.
5. Click Next.5.
The Export to dialog box appears.
6.
Enter the destination category name.
6.
Note
•
Even if artwork is selected from multiple libraries, only one category name can be entered. A category of
the same name is created in the corresponding libraries at the destination.
7.
Click Next.
7.
The Save As dialog box appears.
206
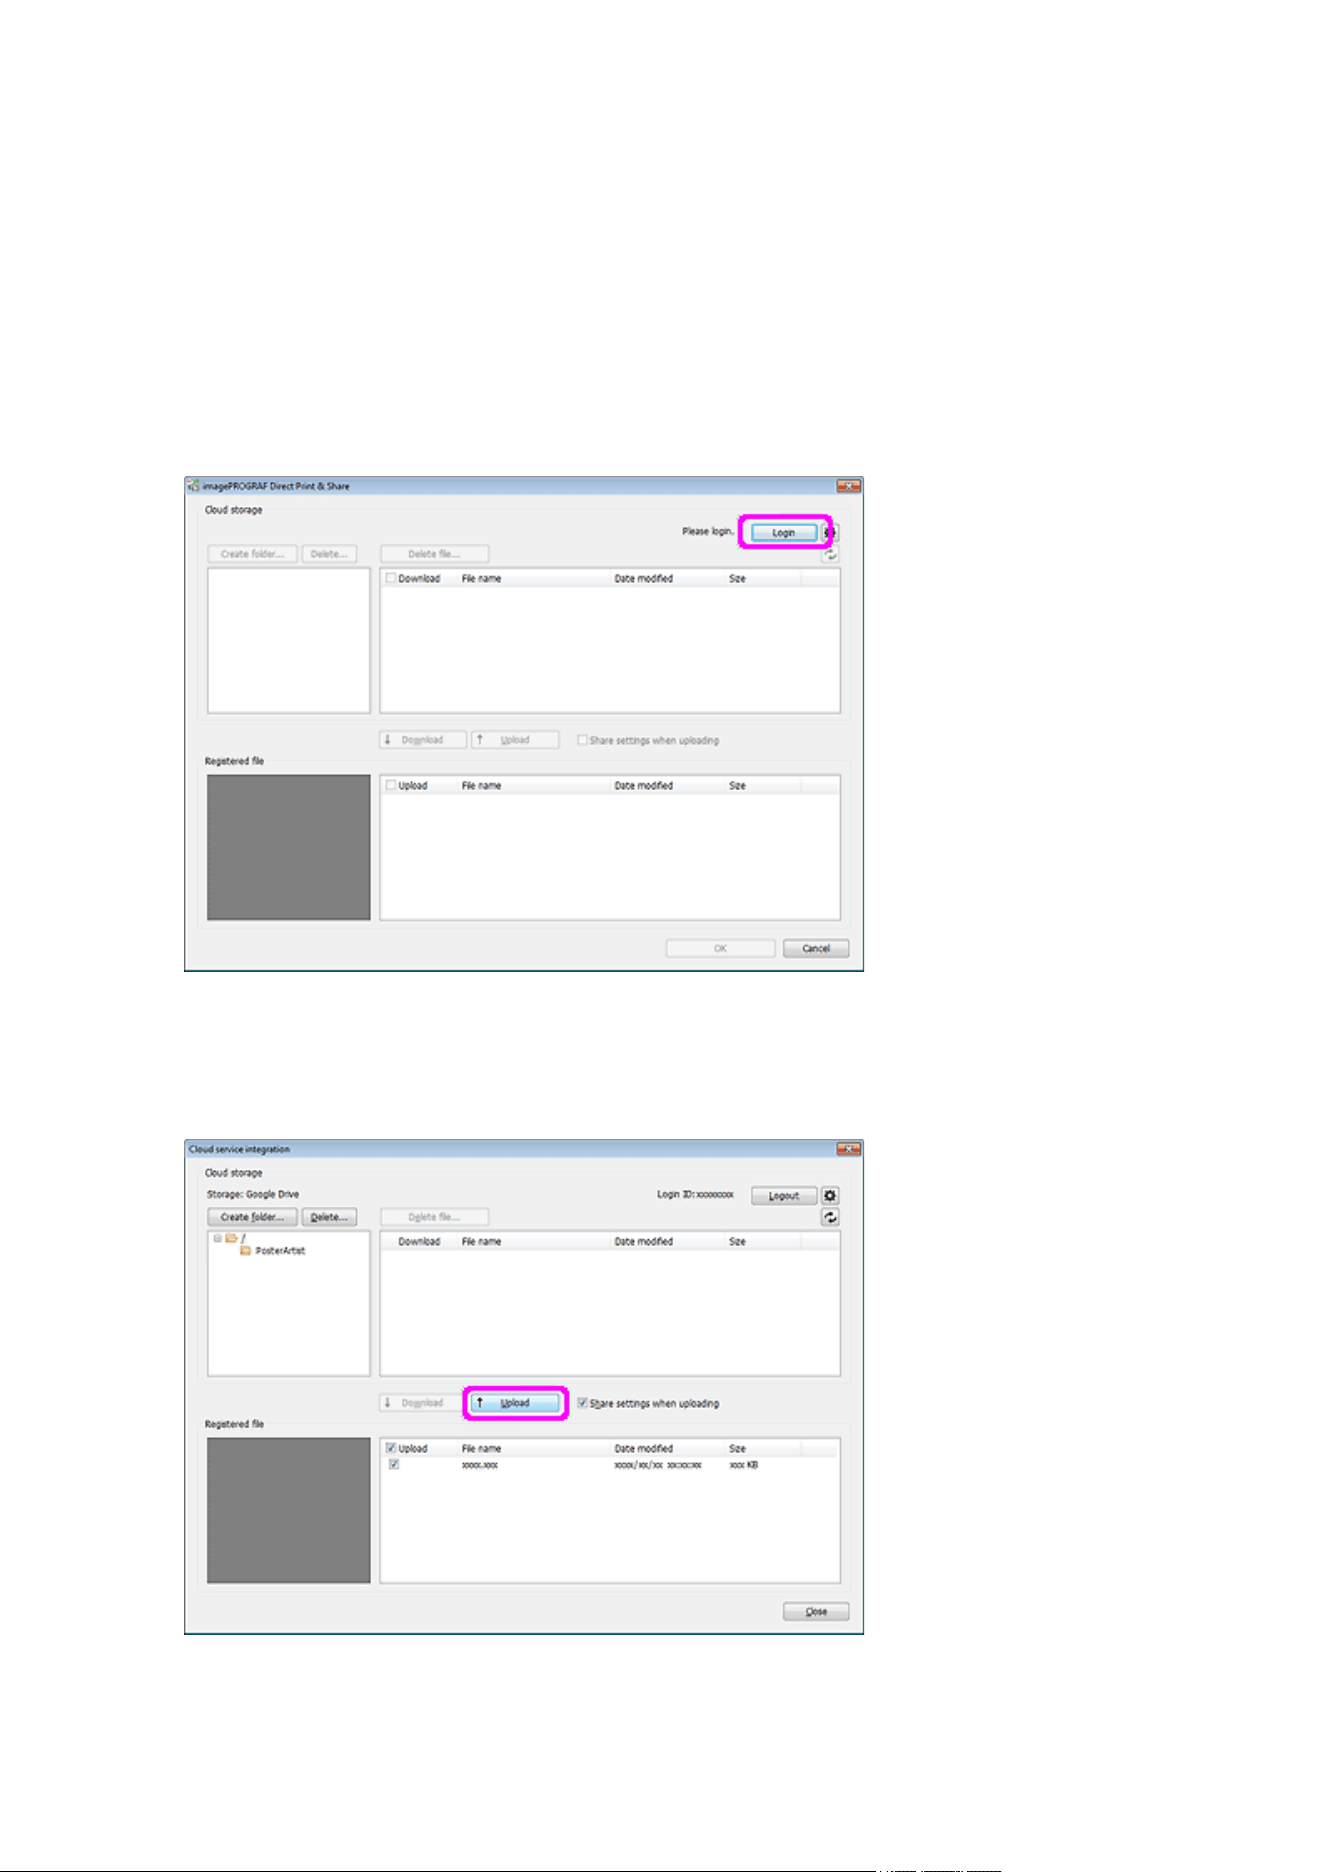
8. Specify the save location.8.
9. In File name, enter the file name.9.
10. Click Save As.10.
A PosterArtist export file (file extension ".cptx") is saved.
The Direct Print & Share screen appears.
11.
Click Login, and then select your cloud storage.
11.
12. In Registered file, select the checkbox of the file you want to upload.12.
13. Click Upload.13.
207

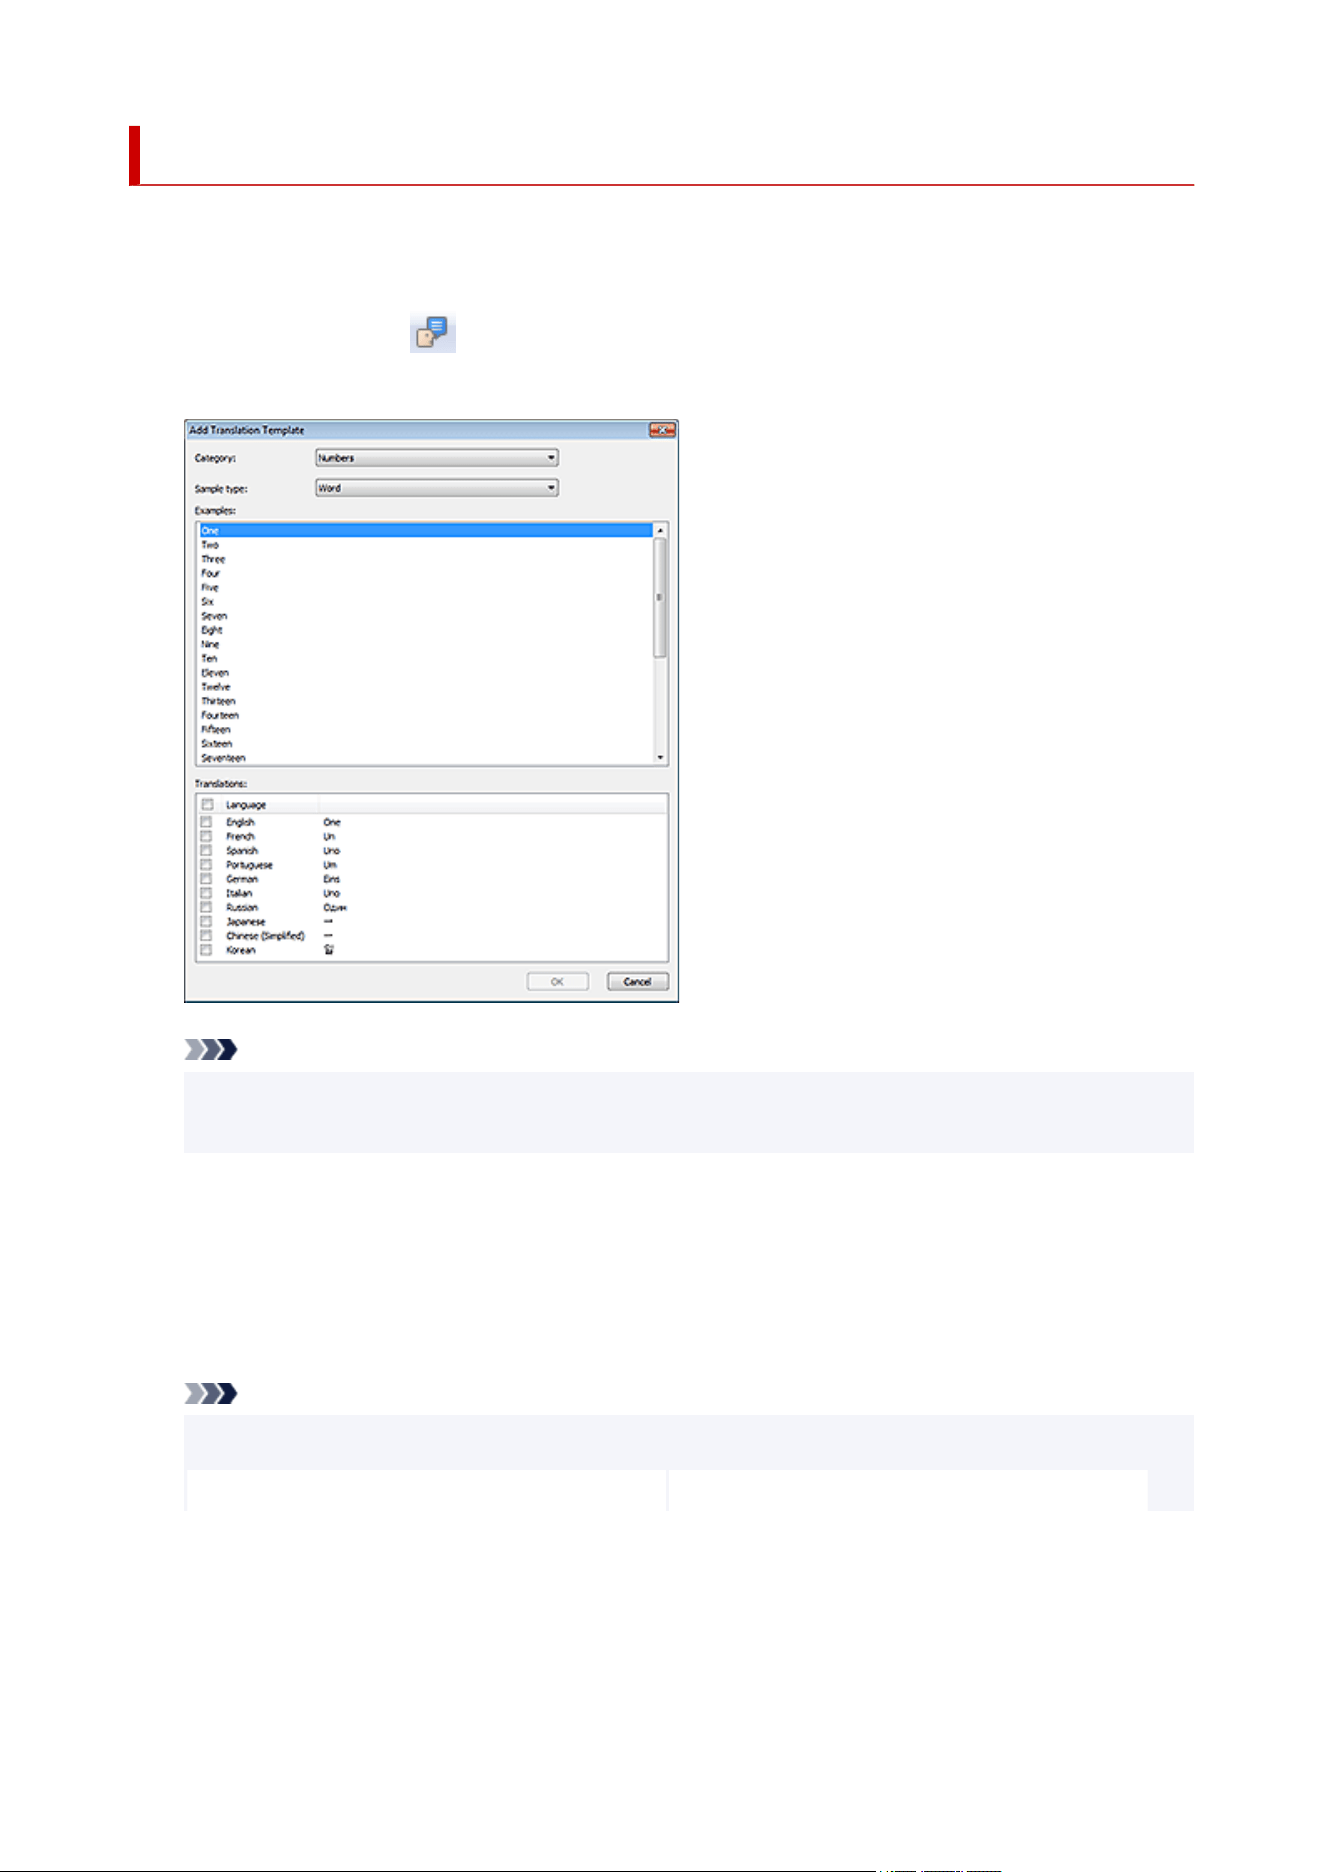
Using Translation Templates
Create posters with multilingual translations just by selecting the text you want to use from the provided
samples, and then specifying the language(s) to be used.
1. On the toolbar, click (Add Translation Template).1.
The Add Translation Template dialog box appears.
Note
• The Add Translation Template dialog box can also be displayed when you right-click a text box on the
poster, and then select Add Translation Template.
2. In Category, select a template category.2.
3.
In Sample type, select a text type.
3.
4.
In the list, select sample text.
4.
Note
•
Click the top of the list to switch the sort order (ascending/descending).
•
Ascending Descending
209
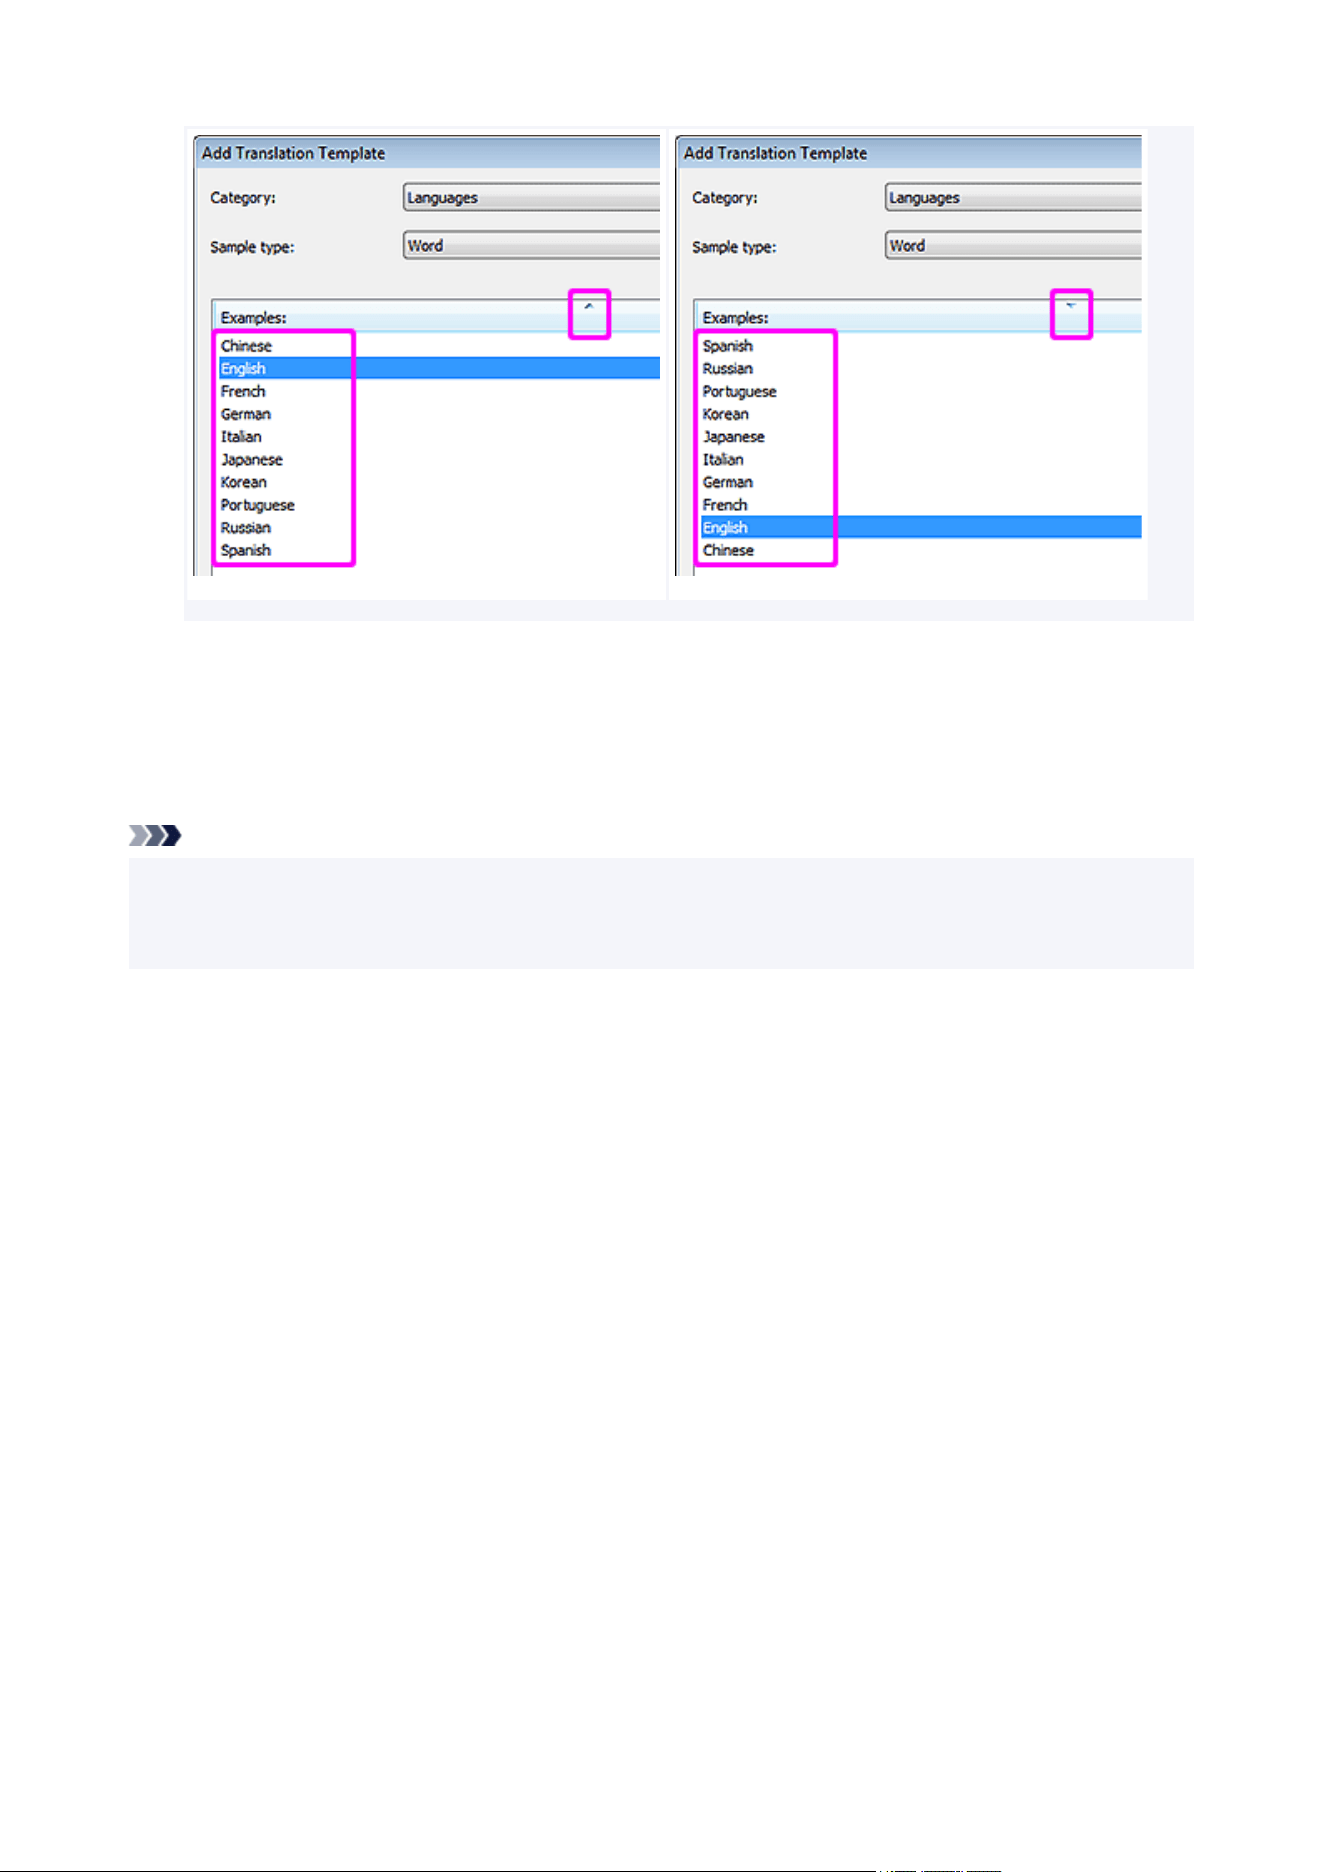
5.
In Translations, select the checkbox(es) of the language(s) you want to use.
5.
6. Click OK.6.
The text in the selected language(s) appears on the poster.
Note
• Samples translated into multiple languages are provided: Japanese, US English, French, Italian, German,
Spanish, Simplified Chinese, Korean, Russian, and Portuguese.
• Templates that support multilingual display are also provided.
210

Exporting Posters for Use in Easy-PhotoPrint Editor
Export posters into files that can be edited and printed with Easy-PhotoPrint Editor.
Easy-PhotoPrint Editor can be used from your computer or smartphone.
Important
• PosterArtist export data can be imported in Easy-PhotoPrint Editor V1.3.0 or later.
1.
In the File menu, click Export (for Easy-PhotoPrint Editor).
1.
The Export (for Easy-PhotoPrint Editor) dialog box appears.
2.
Specify the save location.
2.
3.
In File name, enter the file name.
3.
4.
Click Save As.
4.
The file is saved in EPPA format.
Important
• Files exported for Easy-PhotoPrint Editor from PosterArtist can be imported only in Easy-PhotoPrint Editor.
Note
• For instructions on using Easy-PhotoPrint Editor, see the Online Manual for your model.
211
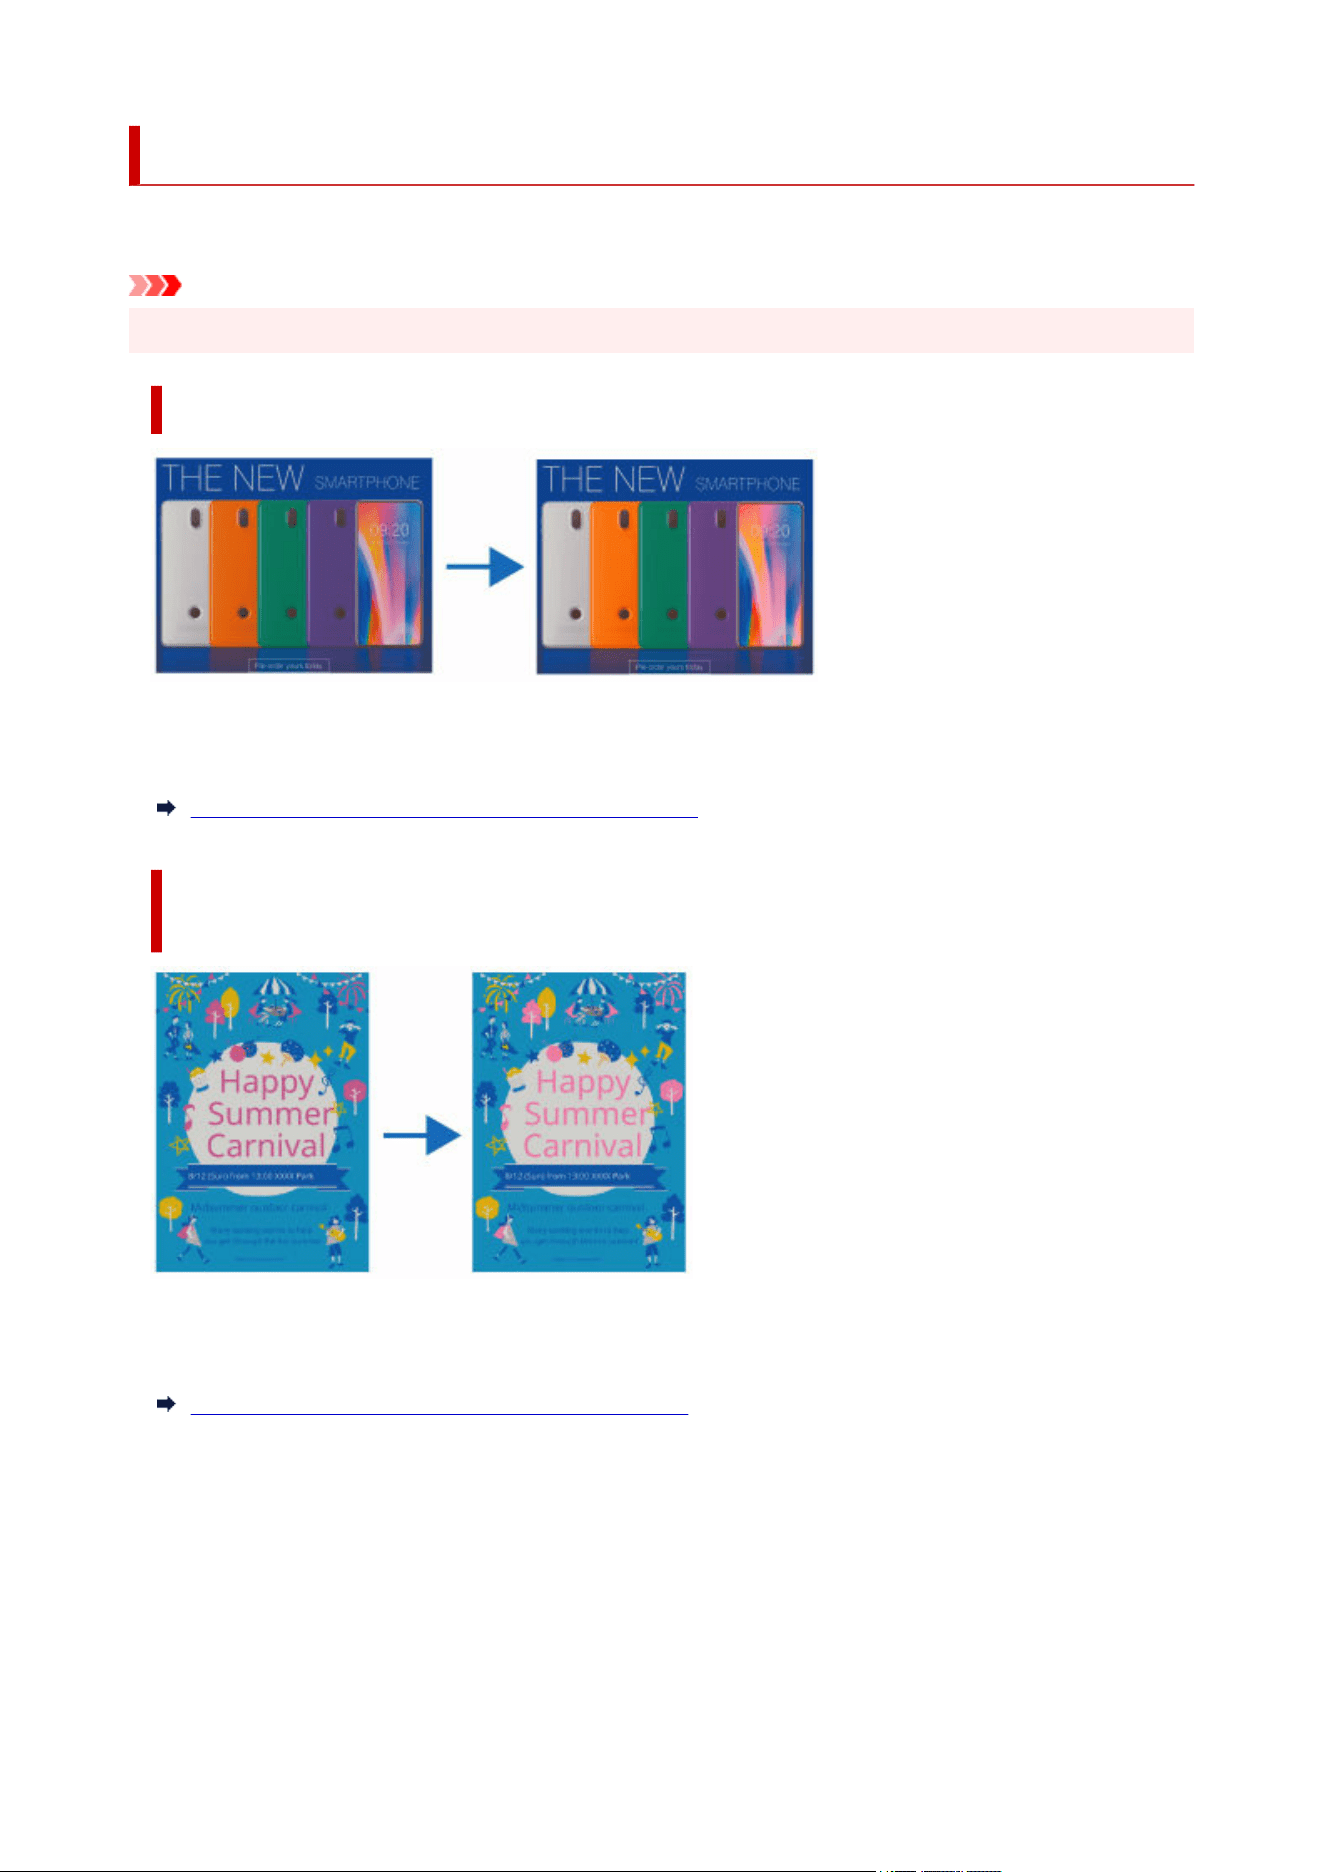
Creating Vivid Posters Using Fluorescent Colors
Create vivid and eye-catching posters using fluorescent ink.
Important
• This function is unavailable depending on your model or paper type.
Making the Entire Poster Vivid (Vivid mode)
Make the entire poster bright and vivid using warm fluorescent ink.
This is recommended when a photo or illustration contains multiple warm colors such as pink and orange.
Making the Entire Poster More Vibrant (Vivid mode)
Making Specific Portions Vivid by Specifying the Colors and Areas
(Spot mode)
Make specific colors bright and vivid using pink or orange fluorescent ink.
This is recommended when you want to enhance text or shapes.
Making Colors of Specific Areas Vivid (Spot mode)
212

Making the Entire Poster More Vibrant (Vivid mode)
Make the entire poster bright and vivid using fluorescent ink.
Important
• This function is unavailable depending on your model or paper type.
• This function is unavailable when the Edit layout with Free Layout plus checkbox is selected in the Paper
Options screen.
Note
• You can even import posters and other items created in an application other than PosterArtist into
PosterArtist as images and edit them to make the entire item bright and vivid.
1.
In the task area, click Print.
1.
The view switches to the Print screen.
2.
Check print settings.
2.
Note
•
Specify the printer to use, Media Type, Media Source, and other settings in Paper Options screen.
For details, see
Specifying Size and Paper.
3. In Print Quality, select the Use fluorescent ink checkbox, and then select Vivid mode.3.
Important
• When printing the poster on water resistant media for outdoor display, deselect the Use fluorescent
ink checkbox.
213
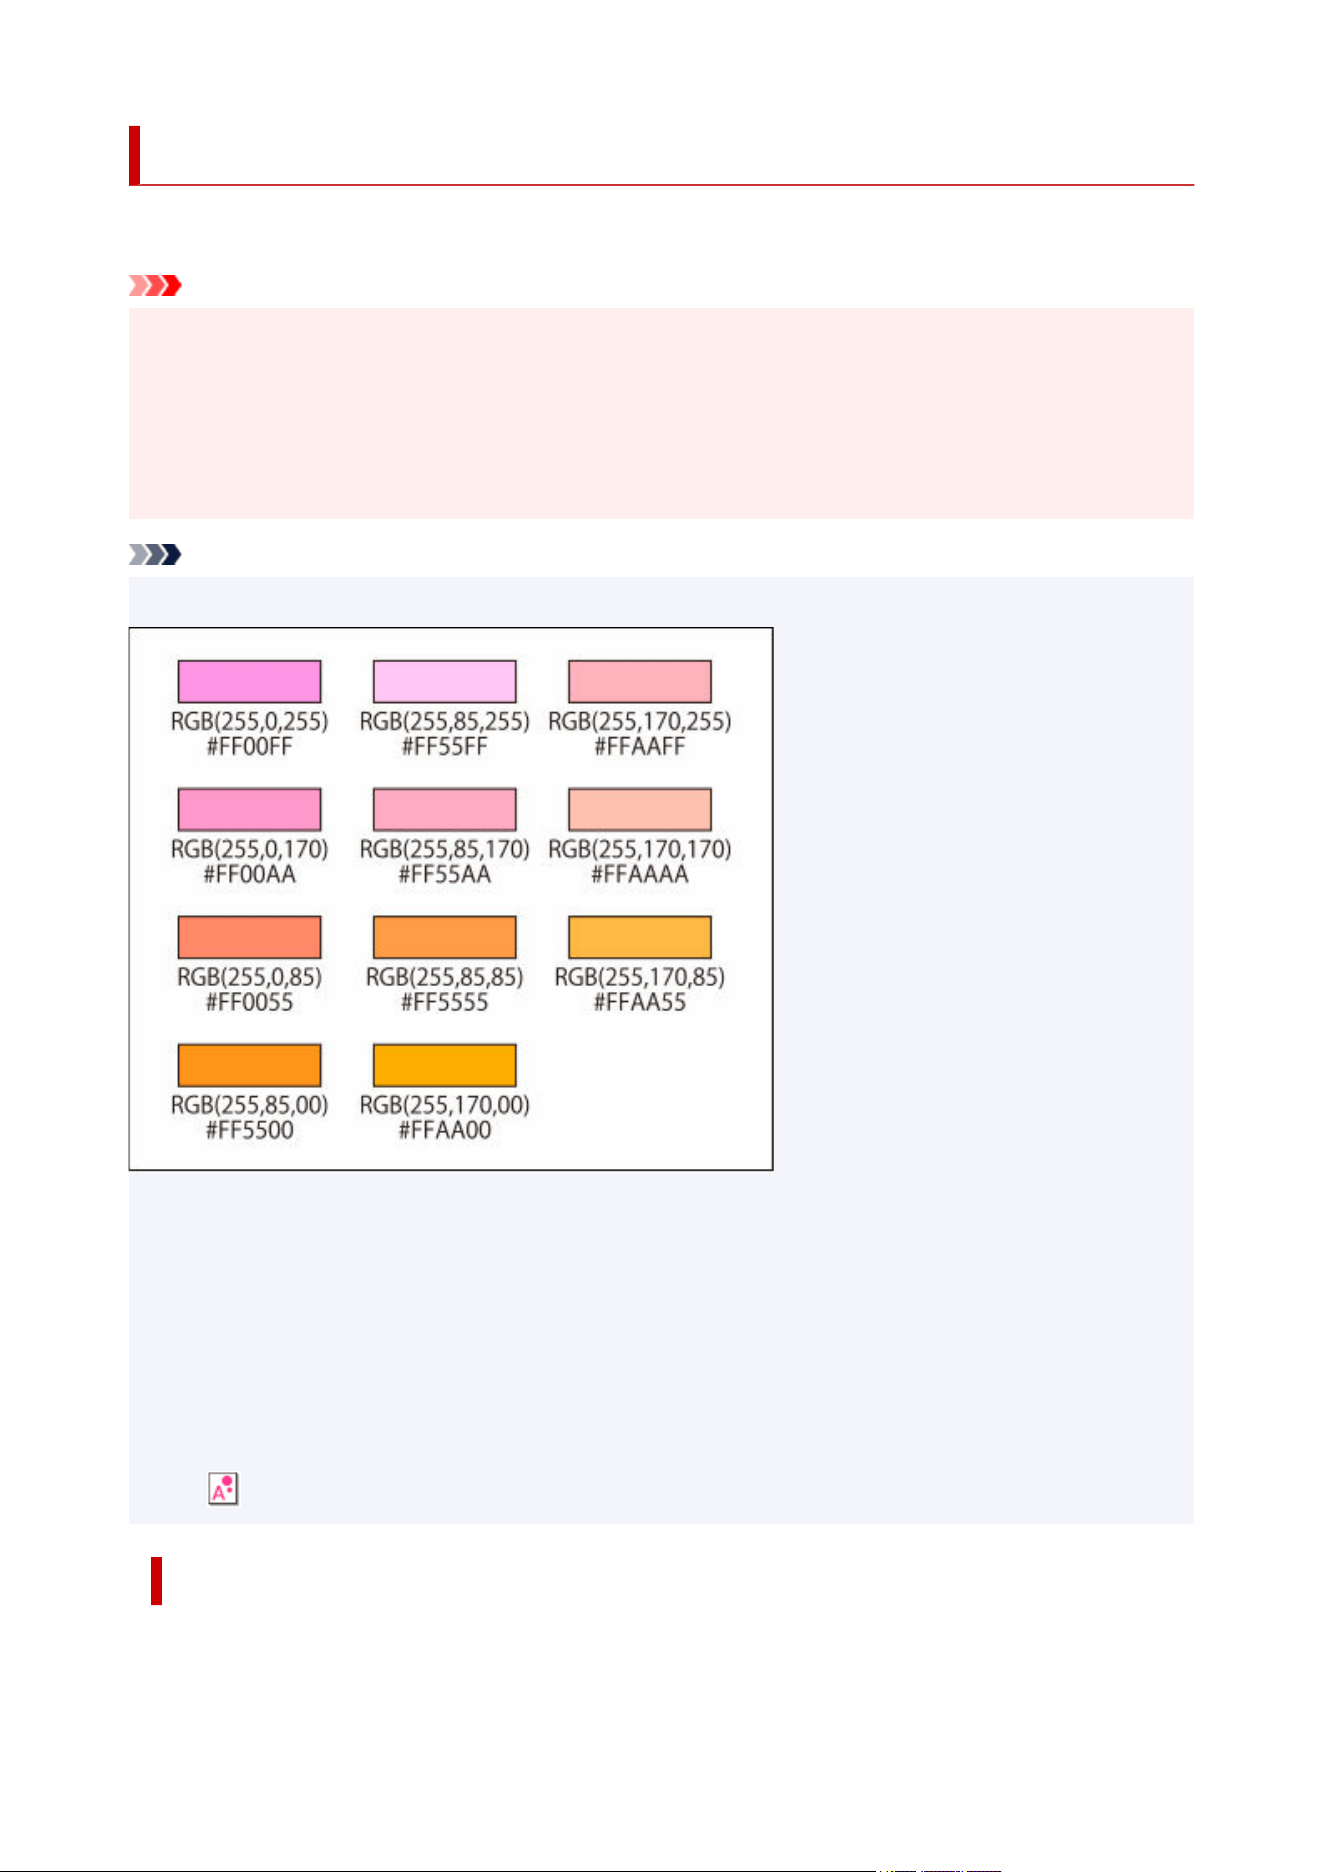
Making Colors of Specific Areas Vivid (Spot mode)
Make specific colors bright and vivid using warm fluorescent ink.
Important
• This function is unavailable depending on your model or paper type.
• This function is unavailable when the Edit layout with Free Layout plus checkbox is selected in the Paper
Options screen.
• Colors similar to the specified color may also be printed using fluorescent ink.
• When printing the poster on water resistant media for outdoor display, deselect the Use fluorescent ink
checkbox.
Note
• The following 11 fluorescent colors can be specified.•
Fluorescent colors not displayed in the Spot color palette can be specified in the Other Fluorescent Spot
Colors dialog box displayed by clicking Custom....
• Print and check the fluorescent color list as needed. For the printing procedure, click Home to return to the
top page of the Online Manual for your model and search for "Test print."
• You can even specify the area to fill with a fluorescent color in images, photos, and other objects created in
an application other than PosterArtist by importing them into PosterArtist as images.
• Areas for which a fluorescent color is specified are printed with fluorescent ink. However, colors similar to
the specified color may also be printed with fluorescent ink; we recommend that you preview the areas by
clicking (Spot Color Area Preview) on the toolbar before printing.
Specifying Fluorescent Colors for Objects and Backgrounds
Enhance specific portions with vivid colors by specifying fluorescent colors for objects (such as clipart,
text, and shapes), backgrounds, and drop shadows of objects.
214

Specify a color in Spot color for the object or background you want to enhance.
Important
• When Opacity of an object or background is set to a value other than 100%, a fluorescent spot color
cannot be specified for the object's drop shadow color.
• When a fluorescent spot color is specified for an object's color, Opacity and Fade Shadows cannot be
set.
Note
• To create a gradation with fluorescent spot colors, use Vivid mode.
Changing Clipart Colors
Changing the Text Format
Changing Shape Styles
Adding Backgrounds
Specifying Fluorescent Colors for Specified Areas
Fill selected areas with fluorescent colors; select an area based on the color of the position you have
clicked on an image or by using Freehand or Shape.
Specifying Fluorescent Colors for Specified Areas
Note
• To change the colors that appear in the Spot color palette, click Edit Palette... to display the Edit Spot
Color Palette dialog box, and then edit.
• When saving created posters or other items as .cpfx2 files that are exclusively for use with PosterArtist,
information of the used fluorescent spot colors will also be saved.
215
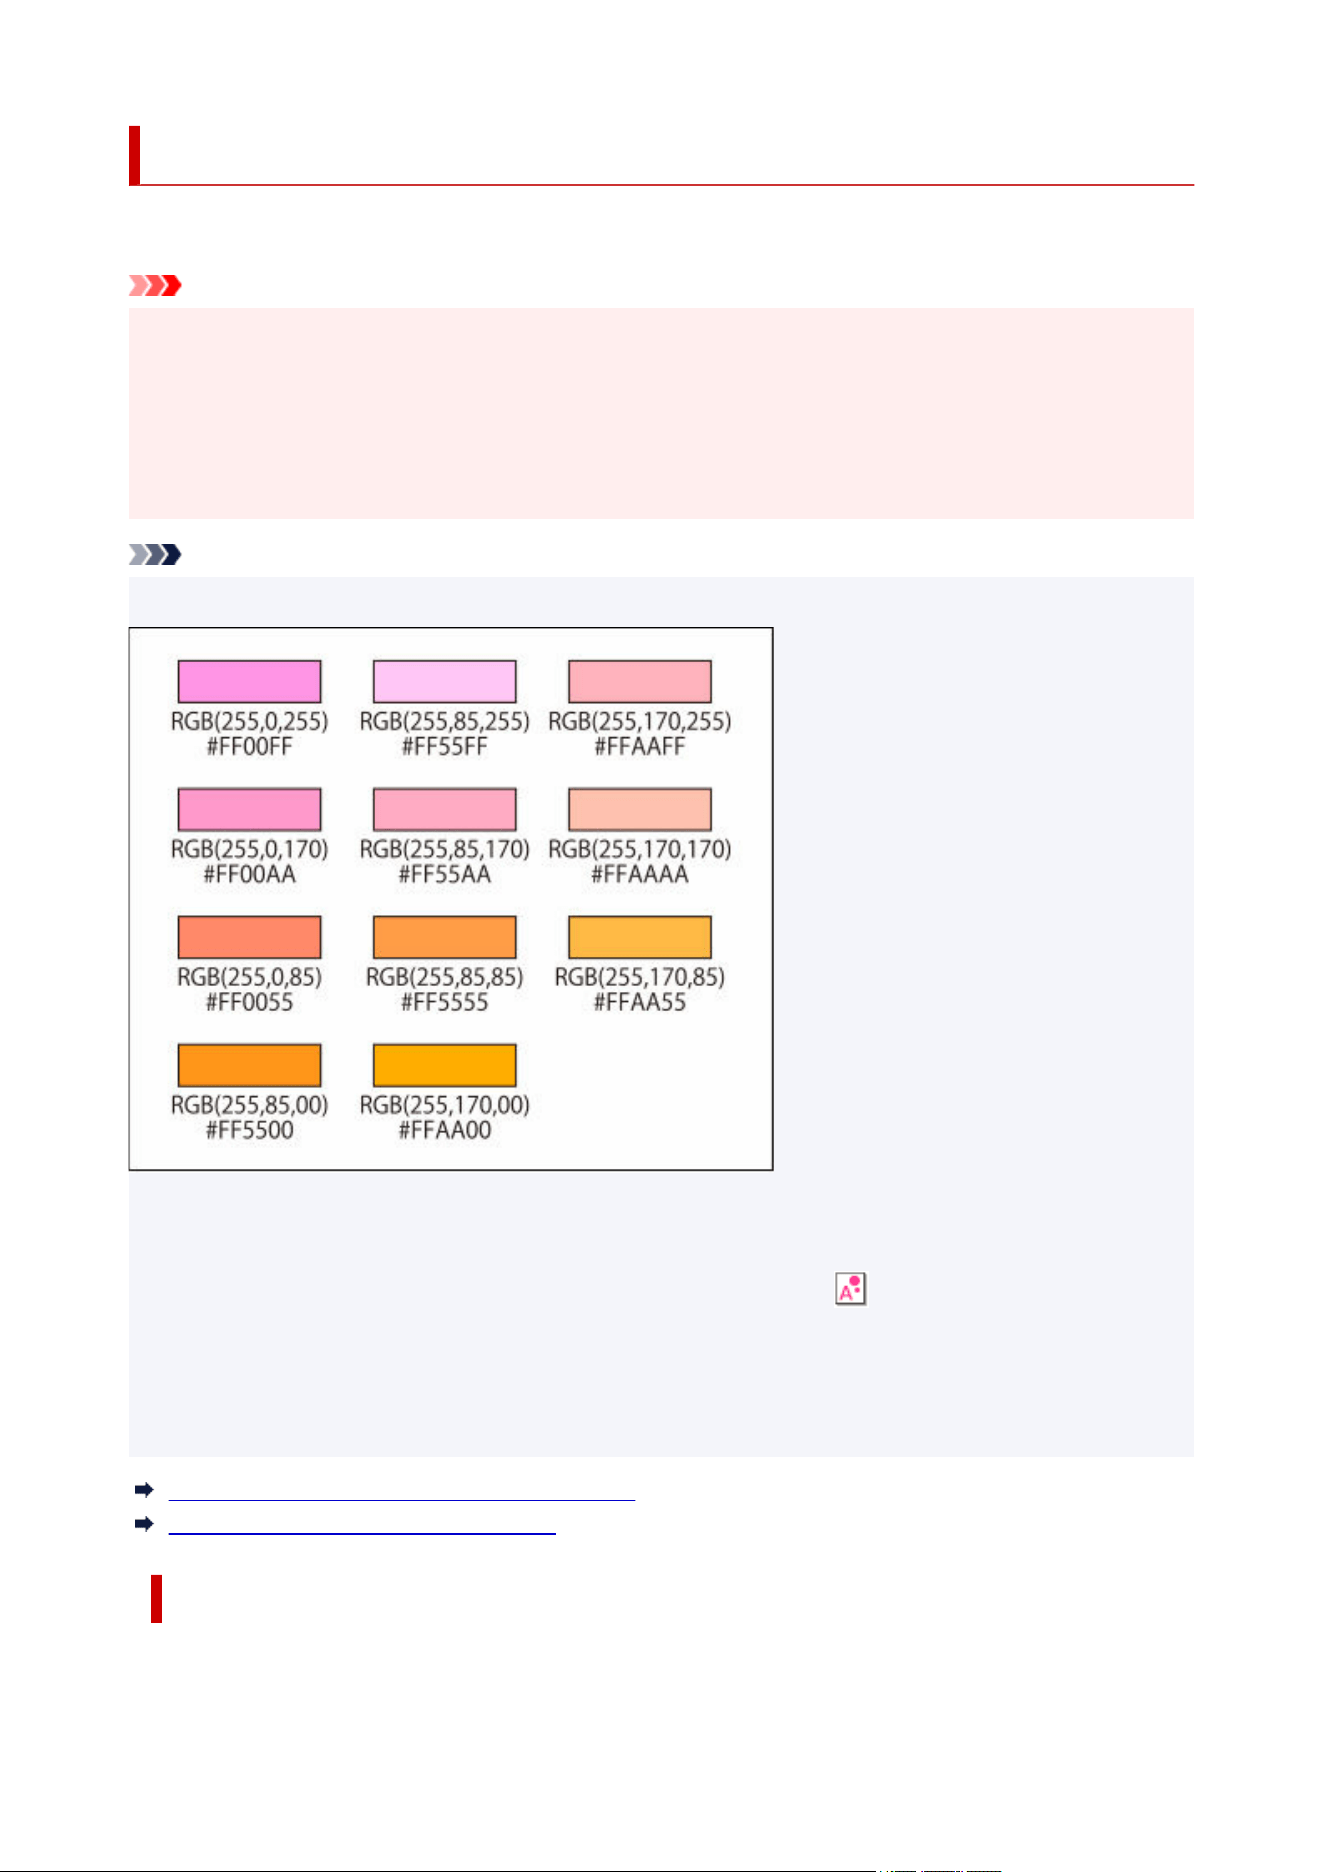
Specifying Fluorescent Colors for Specified Areas
Change the color of the specified area into a fluorescent color.
Important
• This function is unavailable depending on your model or paper type.
• This function is unavailable when the Edit layout with Free Layout plus checkbox is selected in the Paper
Options screen.
• Colors similar to the specified color may also be printed using fluorescent ink.
• When printing the poster on water resistant media for outdoor display, deselect the Use fluorescent ink
checkbox.
Note
• The following 11 fluorescent colors can be specified.•
Fluorescent colors not displayed in the Spot color palette can be specified in the Other Fluorescent Spot
Colors dialog box displayed by clicking Custom....
• To check the areas for which fluorescent spot colors are specified, click (Spot Color Area Preview) on
the toolbar. Colors similar to the specified color may also be printed with fluorescent ink; we recommend
that you preview the areas before printing.
• When saving created posters or other items as .cpfx2 files that are exclusively for use with PosterArtist,
information of the used fluorescent spot colors will also be saved.
Changing Colors Based on the Clicked Position
Changing Colors by Specifying an Area
Changing Colors Based on the Clicked Position
Change the color by automatically selecting an area whose color is similar to the color specified on the
image.
216

1. Open the Fill dialog box by one of the following operations.1.
Click Edit in the task area, click Photos, select the image you want to edit (such as a photo) on the
poster, click (Retouch Image) in Edit Image, and then click (Fill) in the displayed
Retouch Image dialog box.
Right-click the image you want to edit (such as a photo) on the poster, and then click Retouch
Image... > Fill.
Click Edit in the task area, click Clipart, select the clipart you want to edit on the poster, and then click
Convert to bitmap and edit....
Right-click the clipart you want to edit on the poster, and then click Retouch Image....
Note
•
You can even change the color of posters or other items created in an application other than
PosterArtist by importing them into PosterArtist as images.
2.
Select the fluorescent color you want to set from Fluorescent spot color in Select color.
2.
3. Select (Auto Select Based on Clicked Color), and then set Tolerance.3.
Important
• If the area cannot be set as expected, see Changing Colors by Specifying an Area and specify the
area using Freehand or Shape.
Note
• Tolerance is set to 15. Set a value between 0 and 100.
• Increase the value in Tolerance to expand the range of colors to be selected.
4.
Click the position for which you want to use the fluorescent color.
4.
An area is selected based on the clicked position and the color changes into the fluorescent color.
Changing Colors by Specifying an Area
Change the color of the area you outline freehand or by drawing a polygon.
1.
Open the Fill dialog box by one of the following operations.
1.
Click Edit in the task area, click Photos, select the image you want to edit (such as a photo) on the
poster, click
(Retouch Image) in Edit Image, and then click (Fill) in the displayed
Retouch Image dialog box.
Right-click the image you want to edit (such as a photo) on the poster, and then click Retouch
Image... > Fill.
Click Edit in the task area, click Clipart, select the clipart you want to edit on the poster, and then click
Convert to bitmap and edit....
Right-click the clipart you want to edit on the poster, and then click Retouch Image....
217

Note
• You can even change the color of posters or other items created in an application other than
PosterArtist by importing them into PosterArtist as images.
2. Select the fluorescent color you want to set from Fluorescent spot color in Select color.2.
3.
Click (Select Area Manually), and then select a drawing mode in Mode.
3.
Note
•
In Mode, select Freehand or Shape.
4.
Outline the area for which you want to change the color into a fluorescent color.
4.
Drag on the image to outline the area, or click to specify the vertices of the polygon and double-click
when you have finished drawing.
The color of the outlined area is changed.
218

PosterArtist Screens
Main Screen
Select Template Screen
Select Template Screen
Auto Design Screen
View All Templates Dialog Box
Find Template Dialog Box
Saving Artwork Dialog Box (Templates)
Design Assist Dialog Box
Paper Options Screen
Paper Options Screen
Set Custom Size Dialog Box
Edit Screen
Edit Screen (Photos)
Edit Screen (Clipart)
Edit Screen (Text)
Edit Screen (Shapes)
Edit Screen (Backgrounds)
Edit Screen (Variable Data)
Saving Artwork Dialog Box (Images)
Cut Out Dialog Box
Fill Dialog Box
Edit Image Dialog Box (Trim)
Edit Image Dialog Box (Gradation)
Edit Image Dialog Box (Slant Correction)
Retouch Image Dialog Box
219
Color Adjustment Dialog Box
Color Point Correction Dialog Box
Backlight Correction Dialog Box
Sharpness Dialog Box
Soft Focus Dialog Box
Logo Color Adjustment Dialog Box
Fill and Stroke Dialog Box
Set Shaded Text Dialog Box
Set Shadow Dialog Box
Print Screen
Print Screen
Ambient Light Setting Dialog Box
Managing Ambient Light Settings Dialog Box
Menu
Export Dialog Box
Set Grid and Guide Dialog Box
Preferences Dialog Box
Properties Dialog Box
Customize Toolbar Dialog Box
Toolbar Buttons
Artwork Manager Dialog Box
Align and Distribute Objects Dialog Box
Guide Position Dialog Box
QR code Dialog Box
220
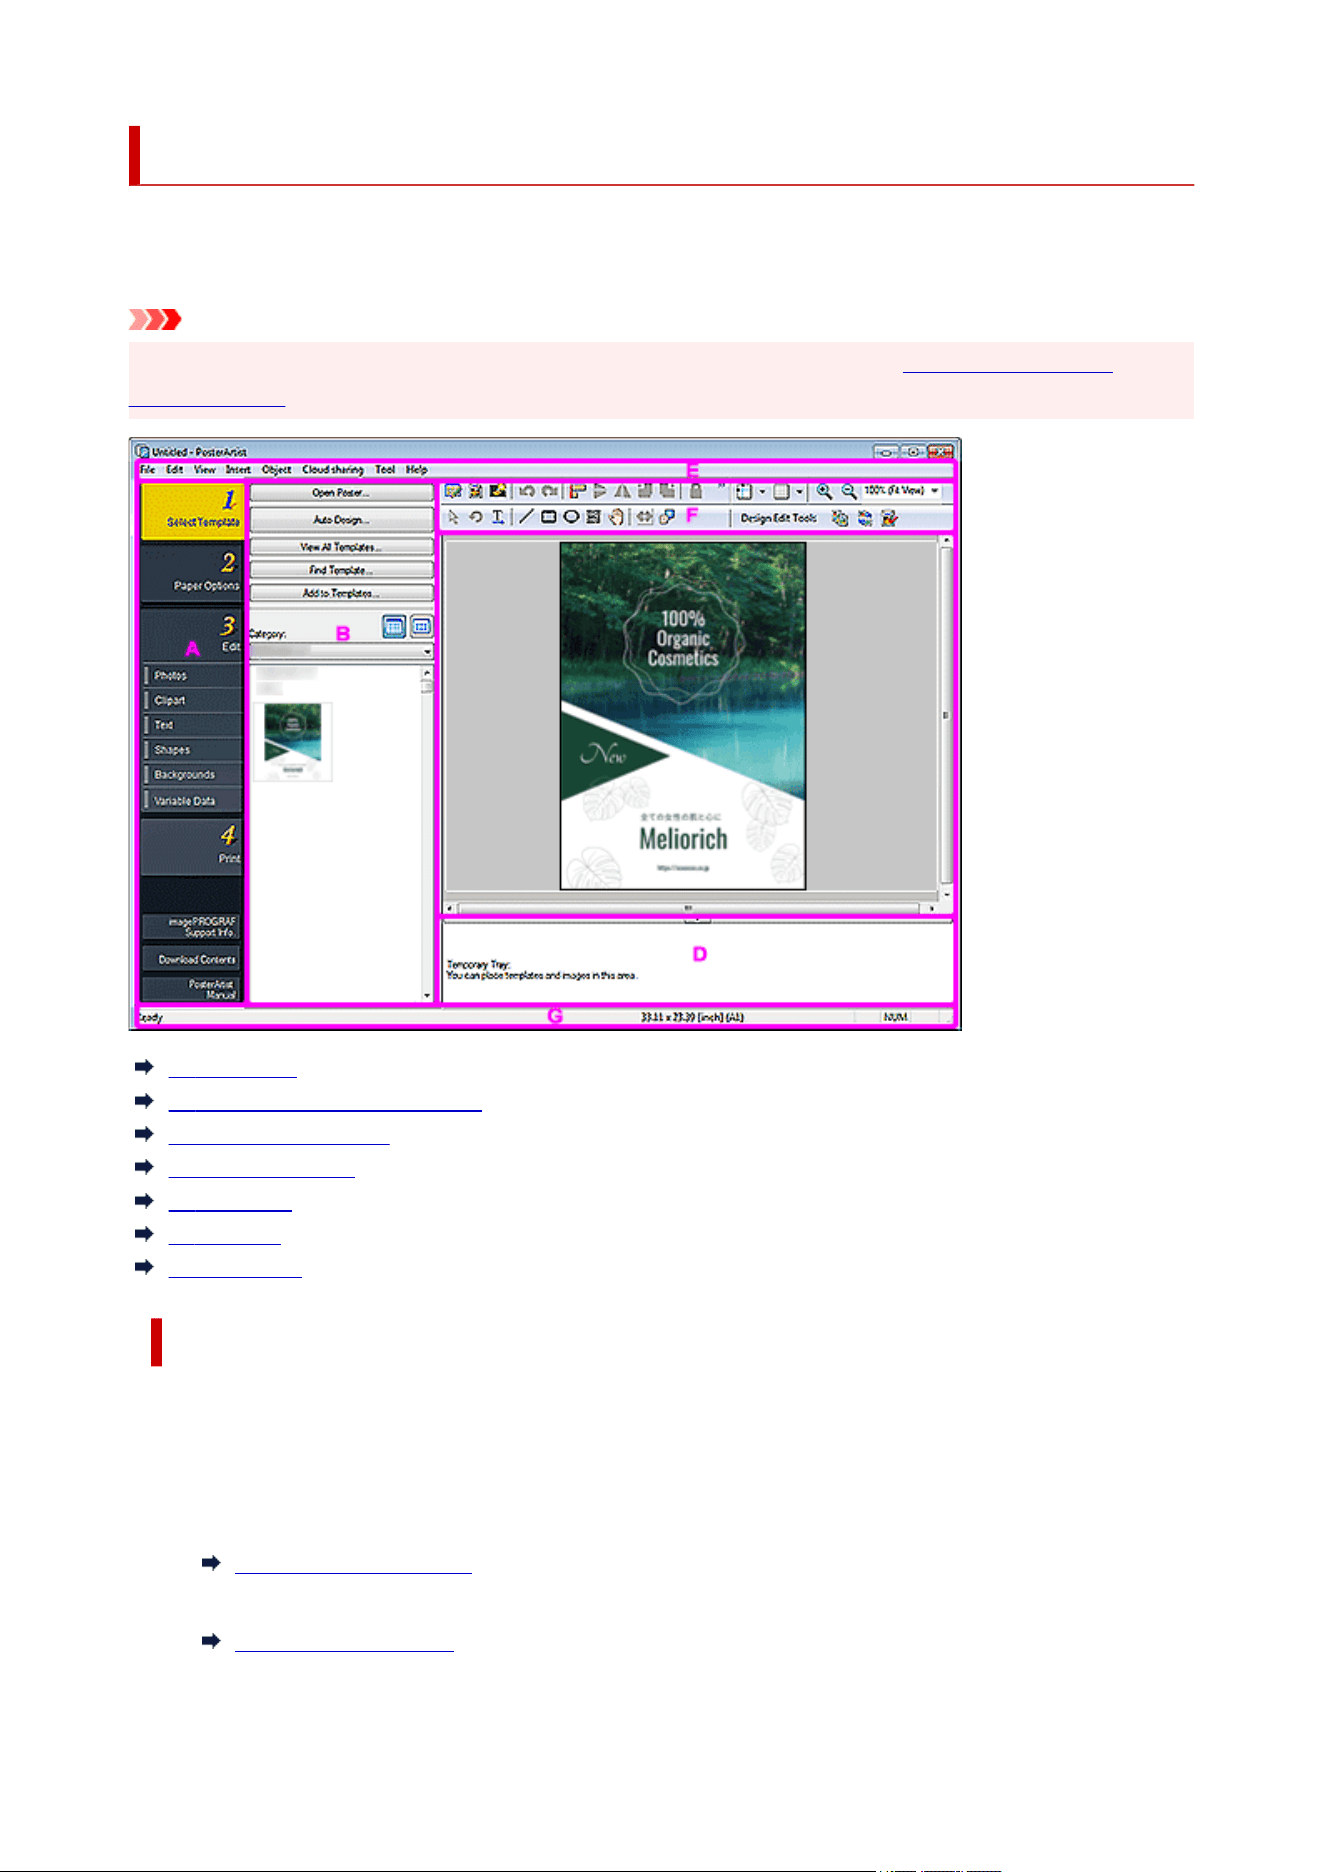
Main Screen
This is the main screen of PosterArtist. Use various functions in each area to edit posters, print them, and
more.
Important
• Some functions are not available when using PosterArtist Lite. For details, see Restrictions on Using
PosterArtist Lite.
A: Task Area
B: Settings Panel for Each Task
C: Poster Design Area
D: Temporary Tray
E: Menu Bar
F: Toolbars
G: Status Bar
A: Task Area
The task area contains four separate tasks. Posters can be created easily by completing each task in
order.
In addition, view support information and download content from the lower part.
Select Template
Select Template Screen
Paper Options
Paper Options Screen
221

Edit
Edit Screen (Photos)
Edit Screen (Clipart)
Edit Screen (Text)
Edit Screen (Shapes)
Edit Screen (Backgrounds)
Edit Screen (Variable Data)
Print
Print Screen
imagePROGRAF Support Info.
Displays our website for viewing the latest information for imagePROGRAF printers. Tips on poster
creation are also available.
The button may not be displayed depending on the version of the printer driver.
Download Contents
Displays the website for downloading templates.
PosterArtist Manual
Opens this guide.
B: Settings Panel for Each Task
Click each task to switch the settings panel.
Select templates and images, or specify advanced print settings such as the print method and paper to
use.
C: Poster Design Area
Displays the layout of the poster you are creating.
Design your poster here by arranging text, images, and other objects. You can also display the guide and
ruler.
D: Temporary Tray
Templates and photos that you plan to use can be placed in the temporary tray.
This saves the trouble of searching through thumbnails.
E: Menu Bar
Displays the menu.
For details, see
Menus and Commands.
Context menus are also available for efficient editing.
For more information, see Context Menus.
222

F: Toolbars
Displays buttons for frequently used functions. The toolbar is separated into two sections.
Main toolbar (upper):
Displays toolbar buttons for functions such as Artwork Manager Dialog, Print Preview, Use Image
File, Align and Distribute Objects Dialog, and Show / Hide Guide and Grid.
Sub toolbar (lower):
Displays toolbar buttons for functions such as Resize Selection Tool, Rotation Selection Tool,
Horizontal Text, Vertical Text, Line, QR Code, and Design Check.
For details, see Main Screen Toolbar.
Important
• The toolbar button for vertical text may not be available for your language.
G: Status Bar
Displays the following.
General status
Displays general information about the status of the application, menus, toolbar buttons, and objects.
Paper size
Displays the paper size for the poster displayed in the poster design area.
Keyboard status
Displays the status of the Caps Lock, Num Lock, and Scroll Lock keys on the keyboard.
223
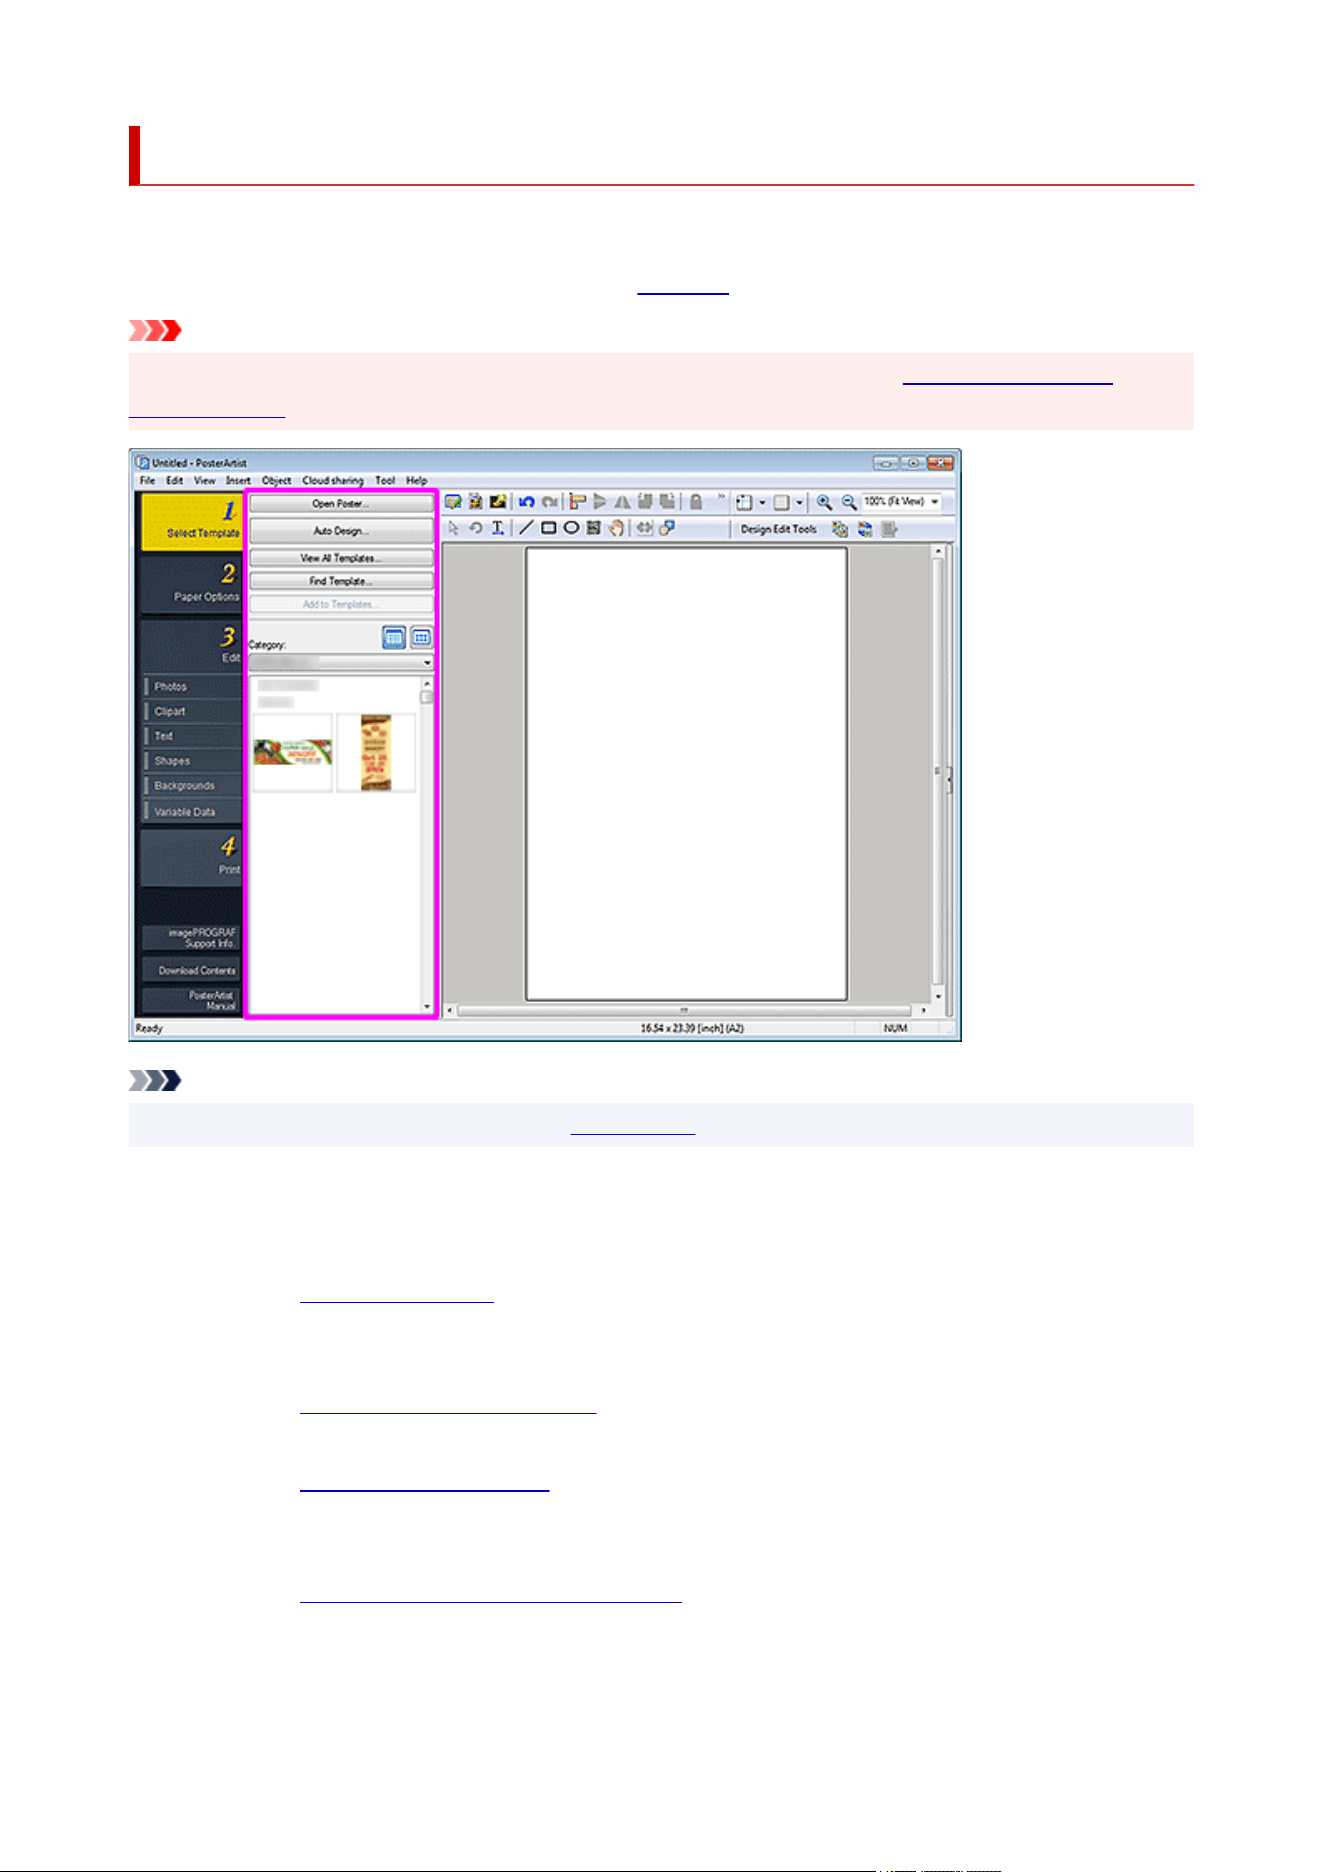
Select Template Screen
This is the screen for selecting a template to create your own posters.
To display the screen, click Select Template in the task area.
Important
• Some functions are not available when using PosterArtist Lite. For details, see Restrictions on Using
PosterArtist Lite.
Note
• For details on other areas of the screen, see Main Screen.
Open Poster...
Displays the Open Poster dialog box for opening posters you have created or you want to edit.
Auto Design...
Displays the Auto Design screen for creating designs automatically by simply entering titles and text,
and then selecting your favorite images.
View All Templates...
Displays the View All Templates dialog box for viewing all the thumbnails in all templates by category.
Find Template...
Displays the Find Template dialog box for searching for templates by poster orientation or the number
of photos that can be inserted.
Add to Templates...
Displays the Saving Artwork dialog box (Templates) for adding the displayed poster to the template
library.
224

(Small Size / Medium Size)
Changes the display size of thumbnails displayed in Category.
Category
Displays categories in which templates are saved as well as the thumbnails. Select a category to
display the thumbnails.
225
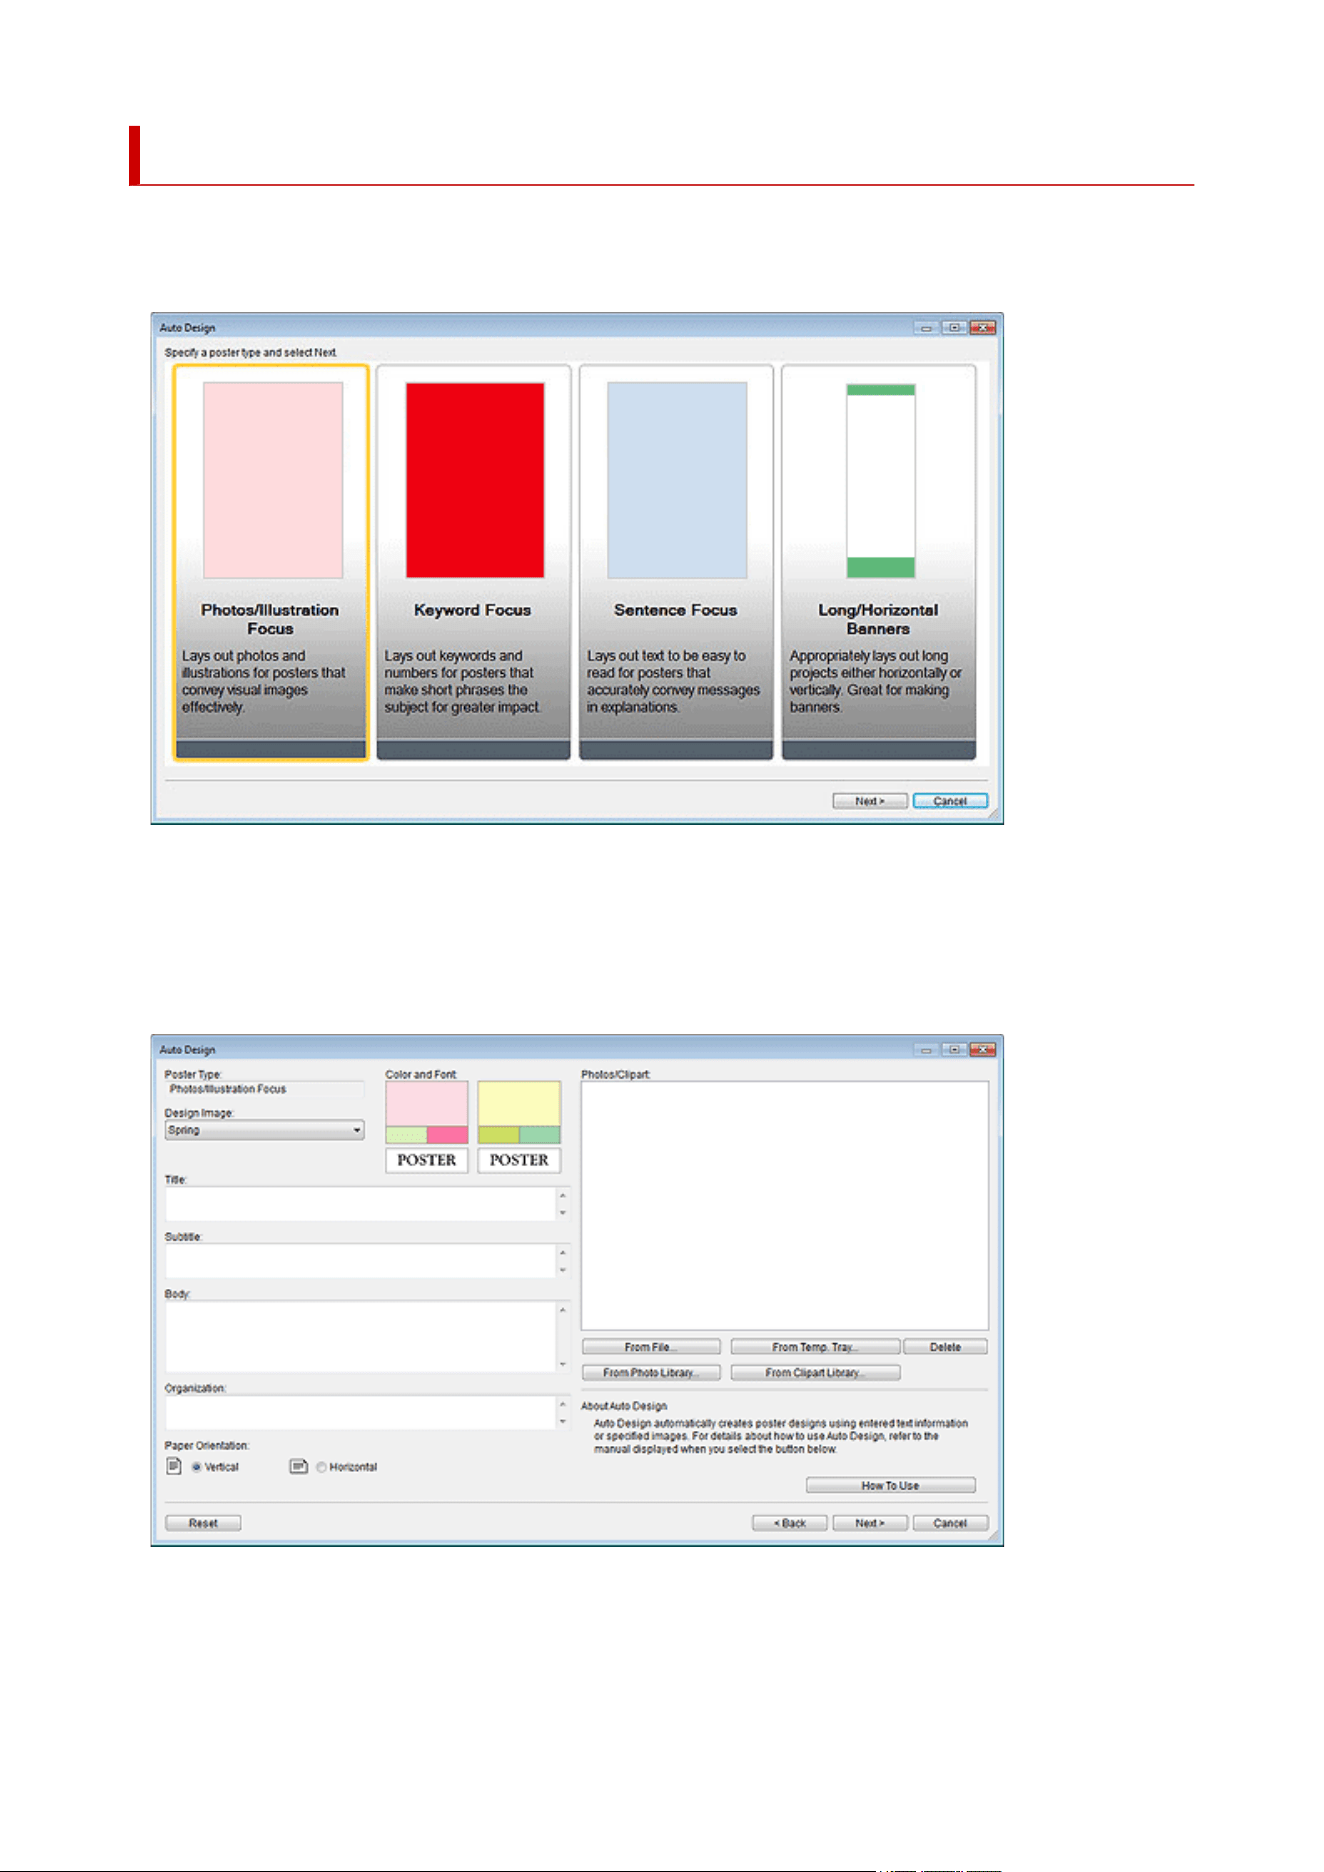
Auto Design Screen
To display the screen, click Auto Design... in the Select Template screen. The screen switches three times
as you proceed with the poster creation process.
Poster types
Select the type of poster you want to create from four patterns.
Next
Proceeds to the next screen.
Poster Type
Displays the poster type selected in the previous screen.
226
Design Image
Select the design you want to use from the list. Samples of the design theme appear under Color
and Font.
Note
• Selectable items vary depending on the poster type.
Title
Enter the poster title (up to 60 characters).
Subtitle
Enter the poster subtitle (up to 60 characters).
Body
Enter text (up to 200 characters).
Note
• If Long/Horizontal Banners is selected in poster type, text cannot be entered.
Organization
Enter the organization name (up to 60 characters).
Paper Orientation
Select Vertical or Horizontal.
Photos/Clipart
Displays the selected photos and clipart.
From File...
Displays the Insert Image dialog box. Select from images and clipart on your computer. To select
multiple files, hold down the Ctrl or Shift key as you click them.
Note
• For supported file formats, see Inserting Images and Materials.
In the Insert Image dialog box, only supported files are displayed.
From Temp. Tray...
Displays the Show Images in the Temporary Tray dialog box. Select the image(s) and clipart you
want to use from the temporary tray. To select multiple files, hold down the Ctrl or Shift key as you
click the thumbnails.
(Small Size / Medium Size / Large Size)
Changes the display size of thumbnails.
Note
• For instructions on using the temporary tray, see Using Temporary Tray when Editing Photos or
Using Temporary Tray when Editing Clipart.
From Photo Library...
Displays the View All Photos dialog box. Select the photo(s) you want to use. To select multiple files,
hold down the Ctrl or Shift key as you click the thumbnails.
227
(Small Size / Medium Size / Large Size)
Changes the display size of thumbnails.
Download
Downloads photos that have not been downloaded, at once.
Add to Temporary Tray
Adds the selected photo(s) to the temporary tray. By placing photos in the temporary tray, you
can use them as replacements easily. Multiple photos can be added to the temporary tray.
From Clipart Library...
Displays the View All Clipart dialog box. Select the clipart you want to use. To select multiple files,
hold down the Ctrl or Shift key as you click the thumbnails.
(Small Size / Medium Size / Large Size)
Changes the display size of thumbnails.
Download
Downloads clipart that has not been downloaded, at once.
Add to Temporary Tray
Adds the selected clipart to the temporary tray. By placing clipart items in the temporary tray, you
can use them as replacements easily. Multiple clipart items can be added to the temporary tray.
Delete
Deletes the image(s) selected from the Photos/Clipart list.
How To Use
Opens the guide that describes how to use the Auto Design function.
Reset
Resets all settings.
Advanced Settings...
Displays the Advanced setting dialog box.
Use fixed width font
From Title, Subtitle, Body, and Organization name, select the checkbox(es) of item(s) for
which you want to fix the character width. Fixing the character width may improve the readability
since single-byte and double-byte characters are aligned even over multiple lines.
return to a standard
Restores the state where only the Body checkbox is selected.
Important
• This may not be displayed depending on your language.
Back
Returns to the previous screen.
Next
Proceeds to the next screen.
Cancel
Cancels Auto Design and closes the Auto Design screen.
228

Design Image
Displays design themes automatically based on the settings specified in the previous screens.
The thumbnails of design patterns are displayed.
Color Patterns
Select the color pattern you like.
Text Color
Select the text color from the list.
(Small Size / Medium Size / Large Size)
Changes the display size of thumbnails.
Open the image replacement window / Close the image replacement window
Shows or hides the Photos/Clipart list.
Photos/Clipart
Displays a list of photos and clipart used in the poster.
Changing the order of thumbnails by dragging and dropping them recreates the design.
To select multiple files and change the order, hold down the Ctrl or Shift key as you click the
thumbnails.
Reset
Resets all settings.
Add to Temporary Tray
Adds the selected design(s) to the temporary tray. By placing designs in the temporary tray, you
can use them as replacements even after ending Auto Design. Multiple designs can be added to the
temporary tray.
Back
Returns to the previous screen.
OK
Displays the selected design in the poster design area of the main screen. (Auto Design ends.)
Cancel
Cancels Auto Design and closes the Auto Design screen.
229
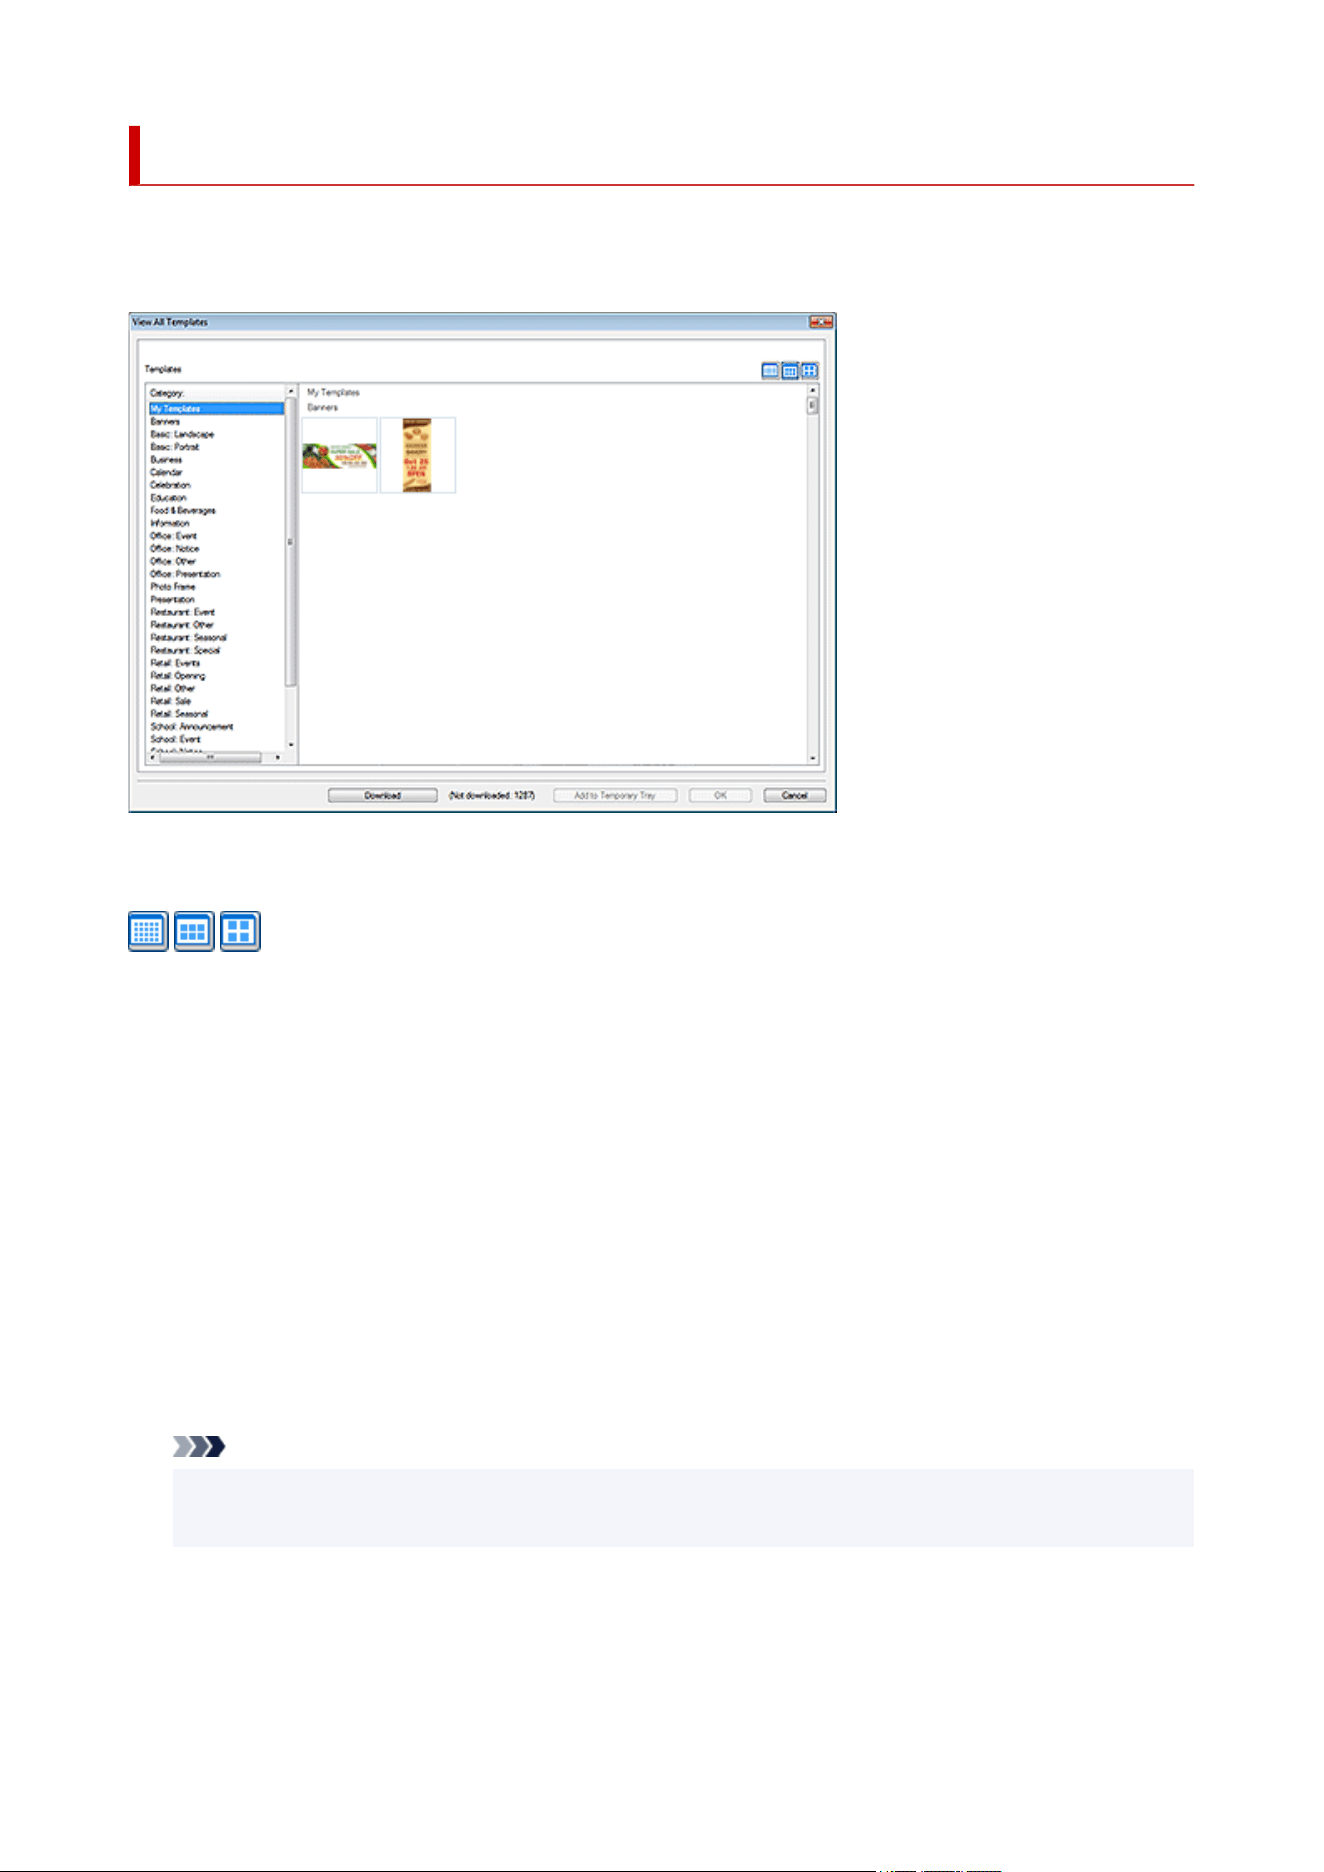
View All Templates Dialog Box
View a list of templates sorted by category.
To display the dialog box, click View All Templates... in the Select Template screen.
Templates
Displays the thumbnails of templates.
(Small Size / Medium Size / Large Size)
Changes the display size of thumbnails.
Category
A list of categories. Click a category to display its thumbnails at the top.
Download
Downloads templates that have not been downloaded, at once.
Add to Temporary Tray
Adds the selected template(s) to the temporary tray. By placing templates in the temporary tray, you
can use them as replacements easily. Multiple templates can be added to the temporary tray.
OK
Displays the selected template in the poster design area of the main screen.
Cancel
Closes the View All Templates dialog box.
Note
• To view all provided templates, photos, clipart, photo frames, text graphics, and backgrounds, refer to
Template Guide.
230

Find Template Dialog Box
Search templates by specifying the search criteria.
To display the dialog box, click Find Template in the Select Template screen.
Orientation
From the list, select the poster orientation to search for.
No. of Photos
From the list, select the number of photos that can be inserted in posters.
(Small Size / Medium Size / Large Size)
Changes the display size of thumbnails.
Thumbnail list
Displays the thumbnails of templates that match the search criteria.
Download
Downloads templates that have not been downloaded, at once.
Add to Temporary Tray
Adds the selected template(s) to the temporary tray. By placing templates in the temporary tray, you
can use them as replacements easily. Multiple templates can be added to the temporary tray.
OK
Displays the selected template in the poster design area of the main screen.
Cancel
Closes the Find Template dialog box.
231
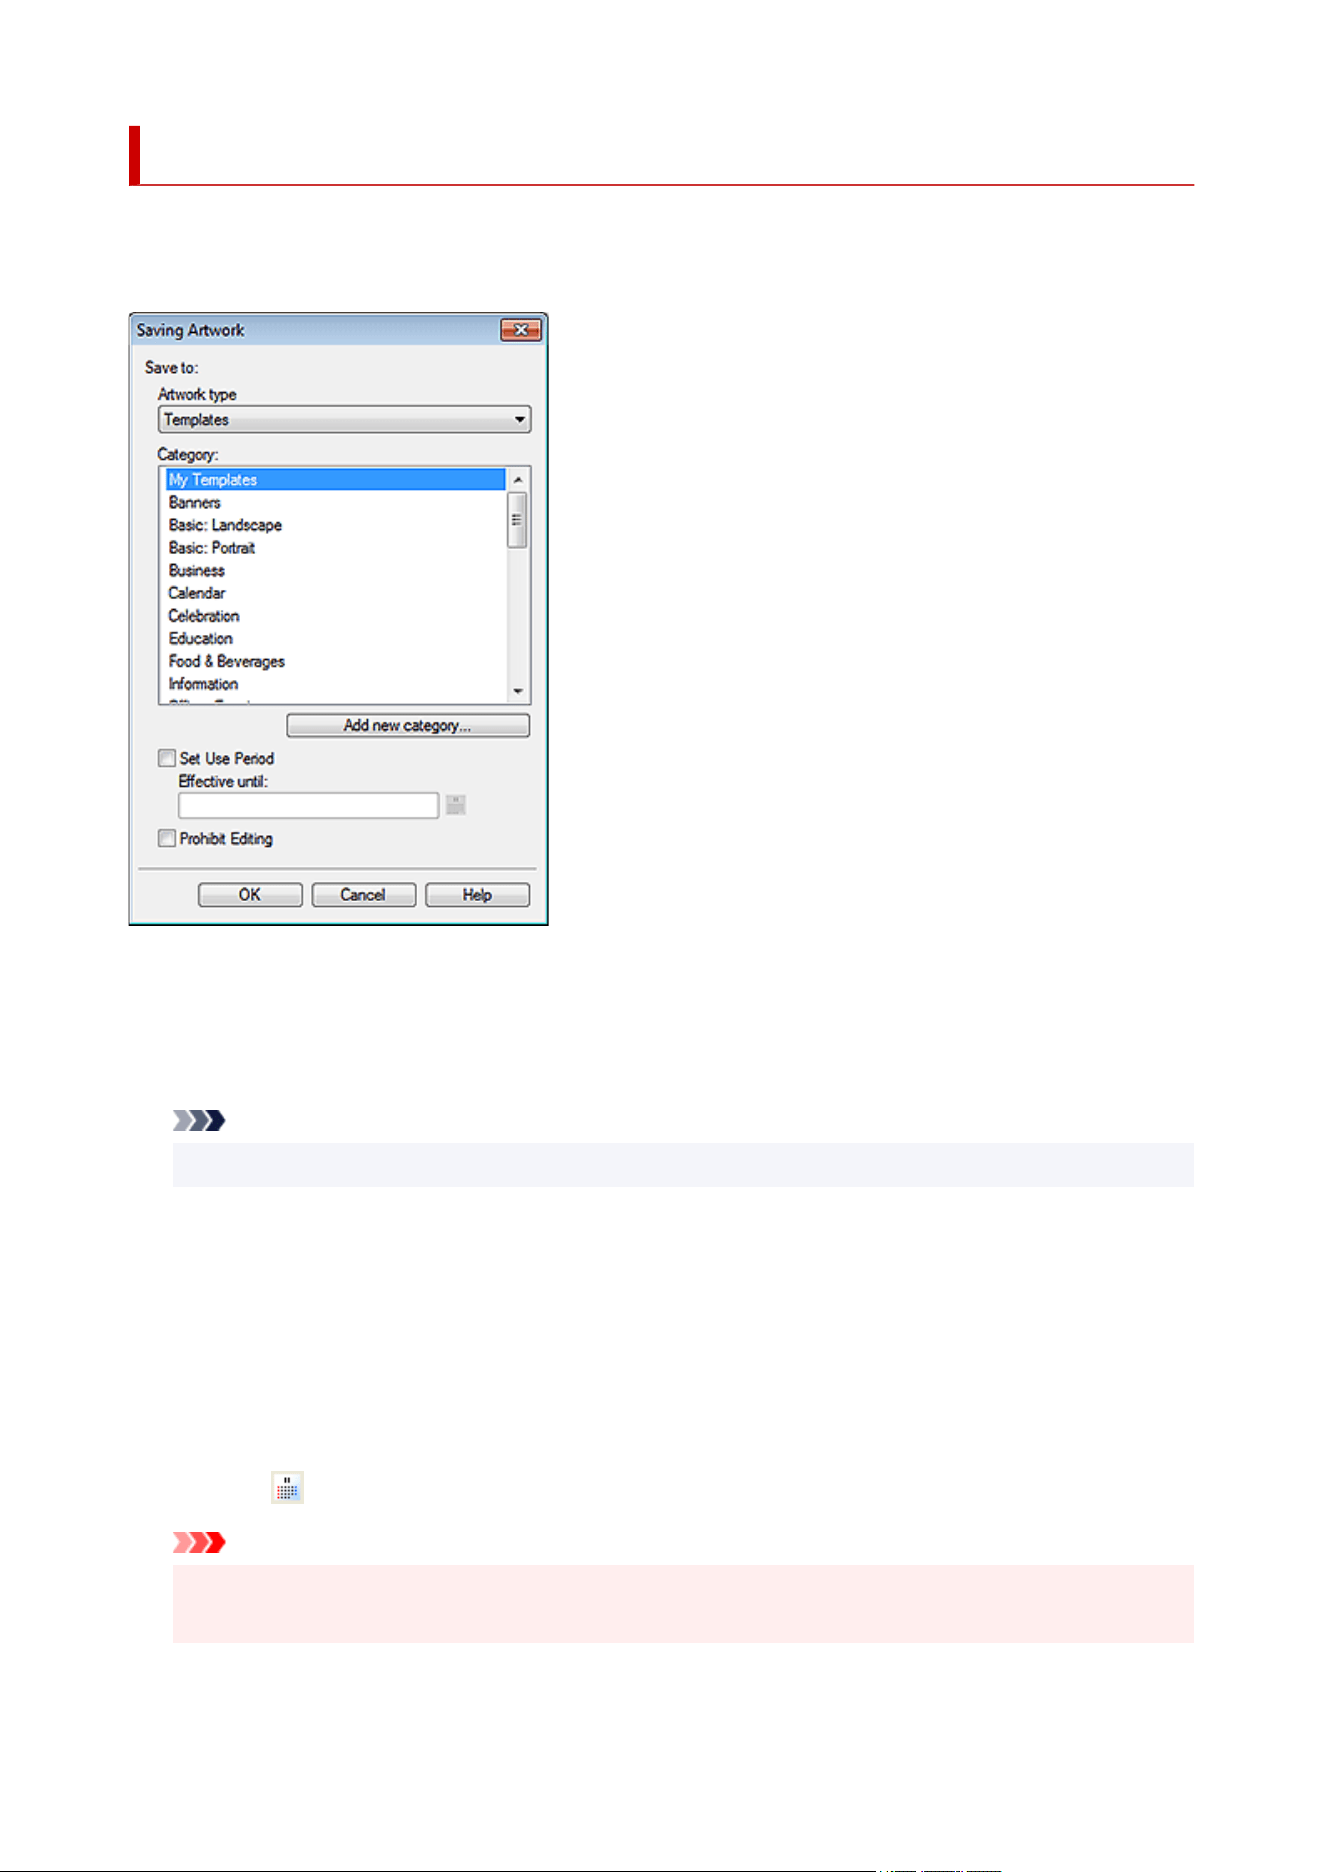
Saving Artwork Dialog Box (Templates)
Add created posters as templates.
To display the dialog box, click Add to Templates... in the Select Template screen.
Artwork type
Displays Templates.
Category
From the list, select the category for the template to be added.
Note
• My Templates is provided as the category exclusively for users.
Add new category...
Add new categories.
Enter the category name in the displayed dialog box. The category will be added to the bottom of the
list.
Set Use Period
Set the usage period for the template to be added.
Effective until
Click (Calendar) to display the Calendar dialog box for specifying the usage period.
Important
• Once set, the usage period for added templates cannot be changed or canceled. To change or cancel
the usage period, add the template again.
232

Note
• The (Calendar) icon is displayed for the thumbnails of templates whose usage period is set.
Prohibit Editing
Protect the template from being edited.
Important
• Once set, edit protection cannot be canceled. To edit, add the template again.
Note
• The (Not editable) icon is displayed for the thumbnails of templates protected from editing.
• Once the template is added, its thumbnail appears in the list; right-click the thumbnail to check the•
settings.
Restrictions Information...:
Selectable when the image is protected from being edited or when the usage period or a QR code
is set.
Artwork Properties...:
Displays the Artwork Properties dialog box for checking the template information. Templates
added by the user are displayed as User Artwork.
233
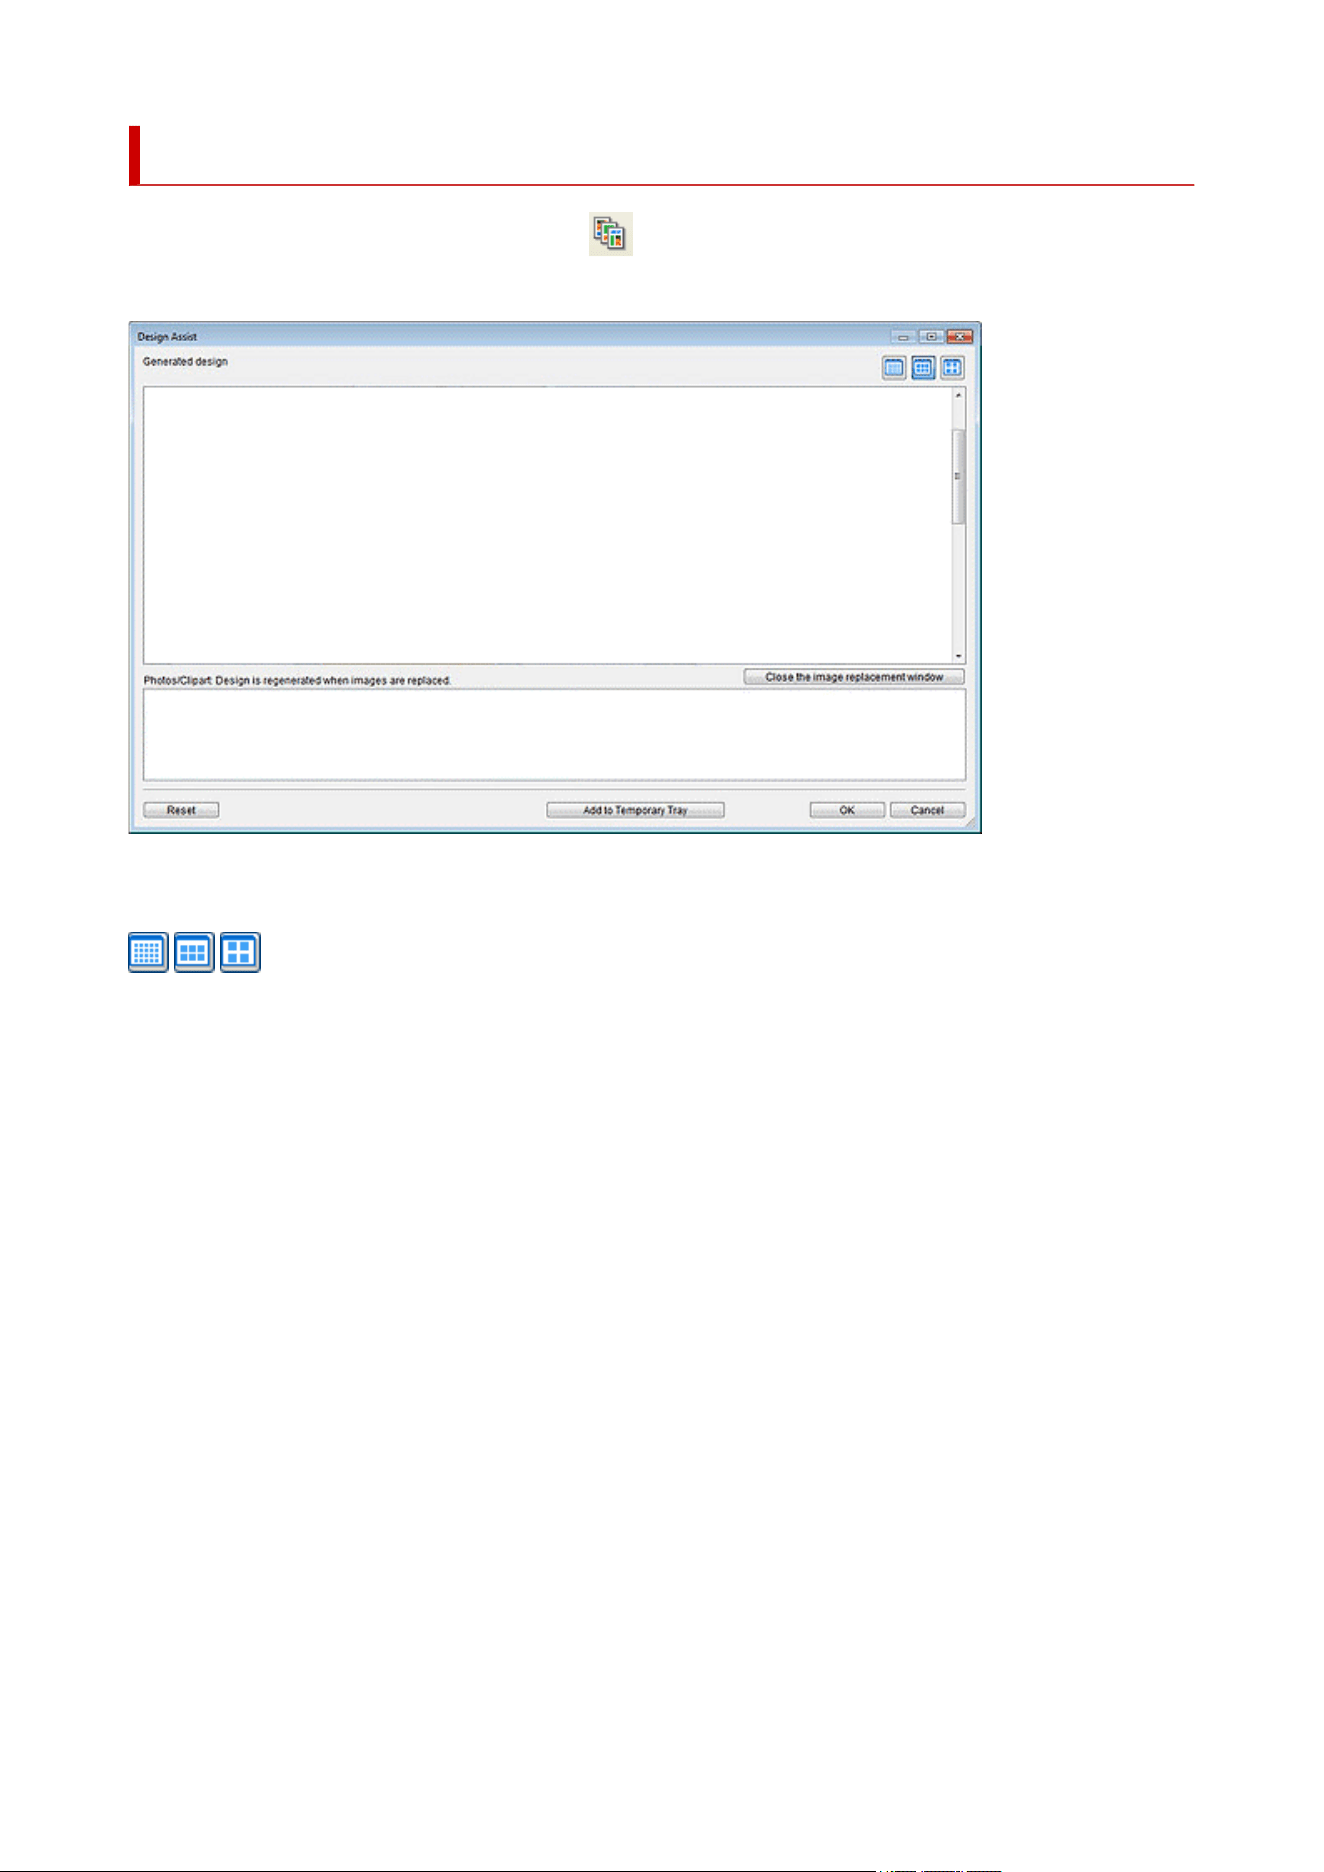
Design Assist Dialog Box
To display the Design Assist dialog box, click (Design Assist Area Set Mode) on the toolbar, and then
select the area for which you want to adjust the layout in the poster design area.
Generated design
Displays the thumbnails of designs.
(Small Size / Medium Size / Large Size)
Changes the display size of thumbnails.
Open the image replacement window / Close the image replacement window
Shows or hides the Photos/Clipart list.
Photos/Clipart
Displays a list of photos and clipart used in the poster.
Changing the order of thumbnails by dragging and dropping them recreates the design.
To select multiple files and change the order, hold down the Ctrl or Shift key as you click the
thumbnails.
Reset
Resets all settings.
Add to Temporary Tray
Adds the selected design(s) to the temporary tray. By placing designs in the temporary tray, you can
use them as replacements even after ending Design Assist. Multiple designs can be added to the
temporary tray.
OK
Displays the selected design in the poster design area of the main screen. (Design Assist ends.)
Cancel
Cancels Design Assist and closes the Design Assist dialog box.
234
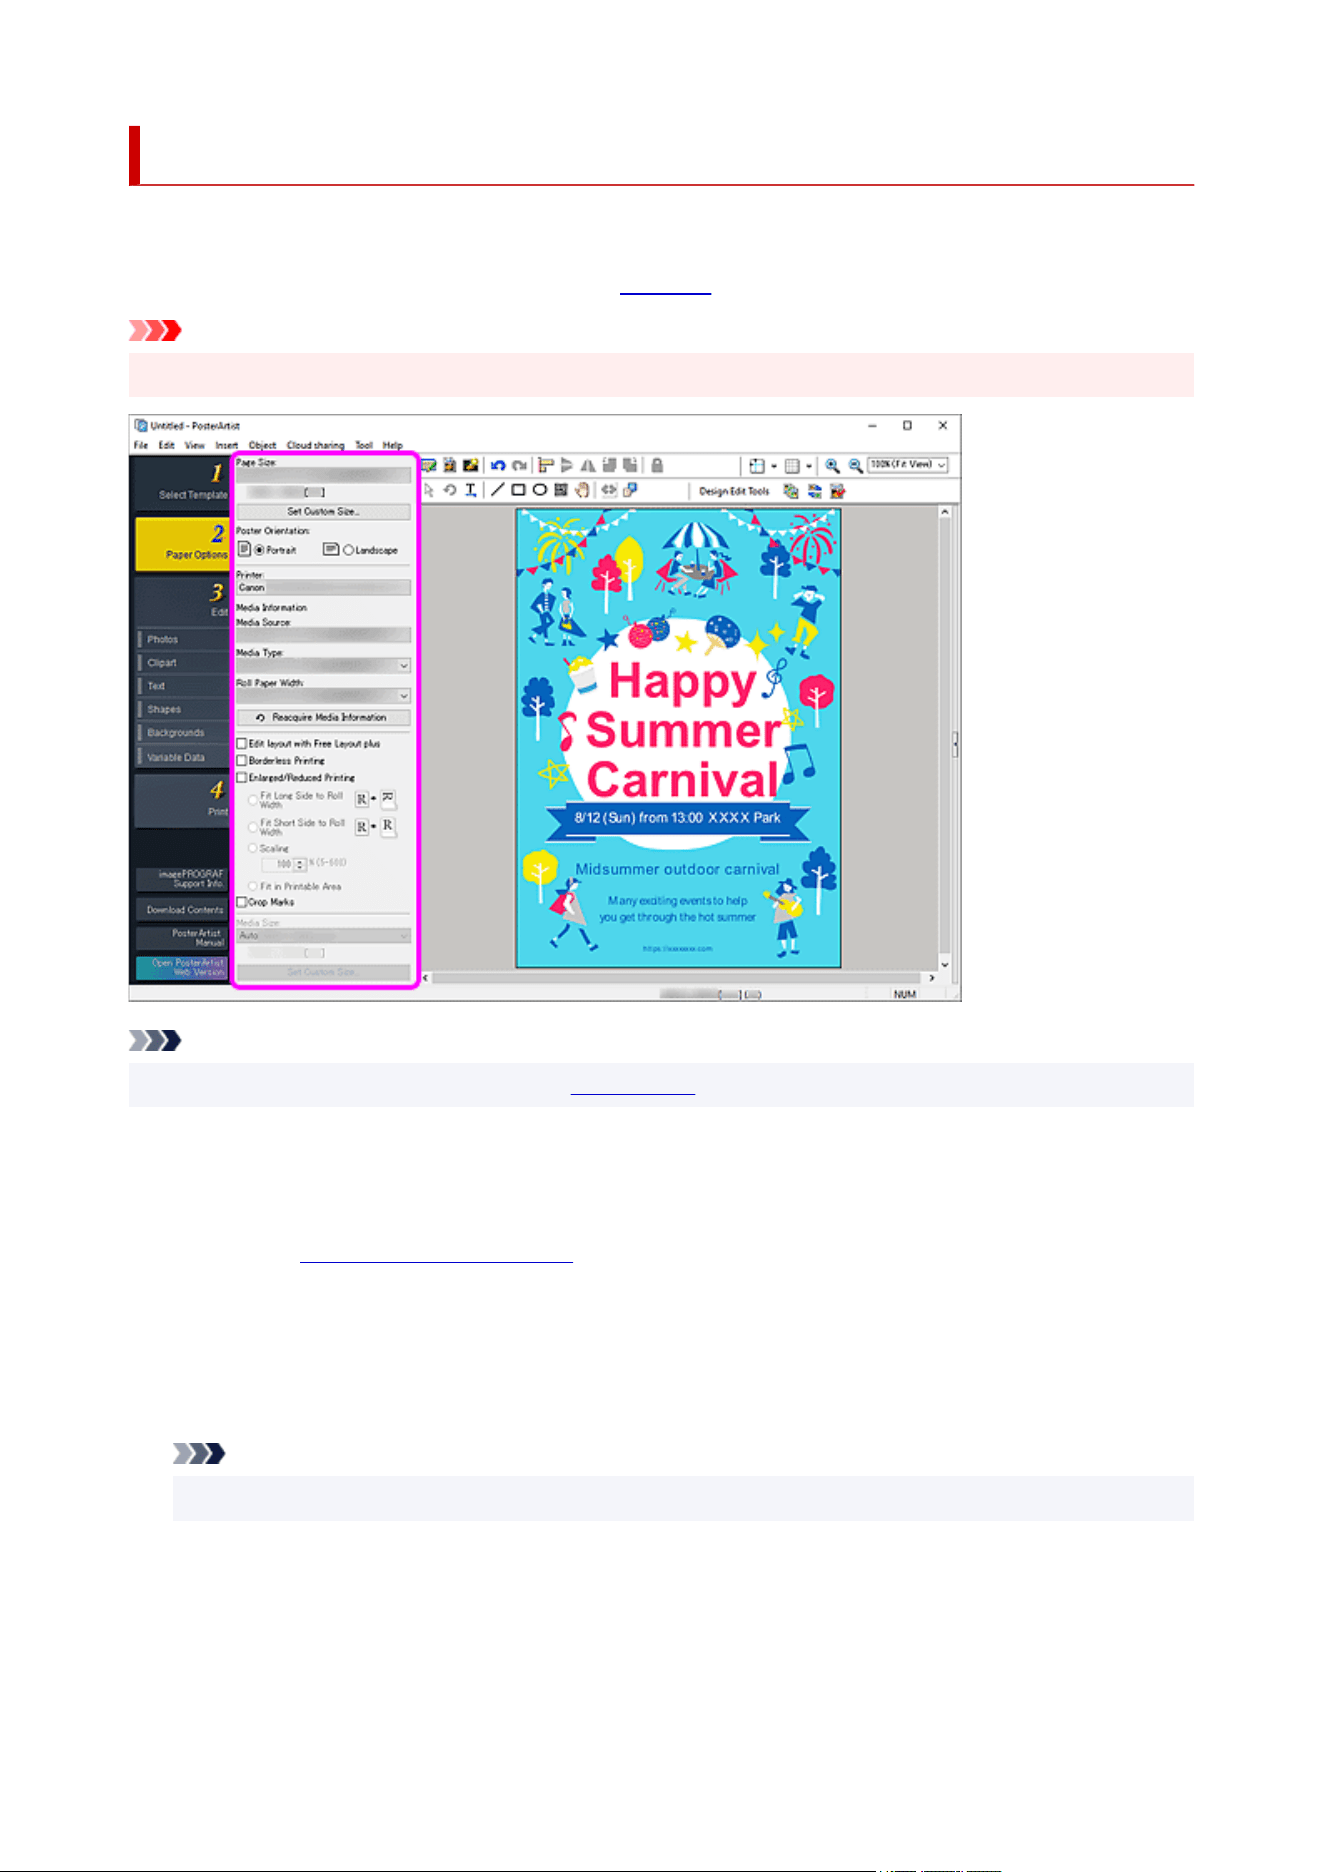
Paper Options Screen
This is the screen for specifying the paper to print the poster on.
To display the screen, click Paper Options in the task area.
Important
• Available functions and settings vary depending on your model.
Note
• For details on other areas of the screen, see Main Screen.
Page Size
Select the page size of the poster.
Set Custom Size...
Displays the Set Custom Size dialog box for specifying non-standard page sizes.
Poster Orientation
Select Portrait or Landscape.
Printer
Select the printer to use.
Note
• Only printers installed on your computer which are compatible with PosterArtist are displayed.
Media Source
Select the paper source from the list.
Media Type
Select the paper type from the list. Supported paper types vary depending on the printer.
235

Roll Paper Width
Select the width of roll paper loaded in the printer from the list. Selectable roll paper widths vary
depending on the printer.
Reacquire Media Information
Sets Media Type and Roll Paper Width or Media Size based on the media information acquired from
the printer driver.
Note
• When Roll Paper is selected in Media Source, Roll Paper Width will be set, and when Cut Sheet is
selected, Media Size will be set automatically.
Edit layout with Free Layout plus
Select this checkbox when printing at a larger size than roll paper.
Free Layout plus starts when printing. You can adjust the layout.
Note
• This function is available only when the Free Layout plus application is installed. For details, refer to the
Free Layout plus manual.
• When the checkbox is selected, the media size cannot be specified in PosterArtist.
Borderless Printing / Minimal Margin Printing
Select this checkbox when printing without borders.
Note
• For some models, Minimal Margin Printing is displayed instead of Borderless Printing. When
Minimal Margin Printing is displayed, printouts will have slight margins on the left and right sides.
• For borderless printing, select a roll paper width and paper type that support borderless printing. For
the types of paper supporting borderless printing, refer to the manual of your printer.
Enlarged/Reduced Printing
Select this checkbox to scale the page size for printing.
Use the following settings for scaling.
Fit Long Side to Roll Width
The poster will be printed to scale so that the length of its long side will be the same as the width of
the roll paper loaded in the printer.
If the poster is in portrait orientation, the poster height will match the roll paper width.
Fit Short Side to Roll Width
The poster will be printed to scale so that the length of its short side will be the same as the width
of the roll paper loaded in the printer.
If the poster is in portrait orientation, the poster width will match the roll paper width.
Scaling
Specify the scale by entering a value or clicking (Up Arrow) or (Down Arrow).
Fit in Printable Area
Prints the poster by reducing the size of the poster to fit within the printable area of the paper.
Crop Marks
Prints crop marks in the poster's margins to indicate cutting positions.
236

Note
• Crop marks cannot be printed when there are no margins on the paper to print on.
Media Size
Select the media size in the following cases.
When Cut Sheet is selected in Media Source
When Fit in Printable Area is selected for Enlarged/Reduced Printing
Note
• Apart from the above, the default Media Size is set to Auto. The media size is set automatically
according to the current settings.
Set Custom Size...
Displays the Set Custom Size dialog box for specifying non-standard media sizes.
237
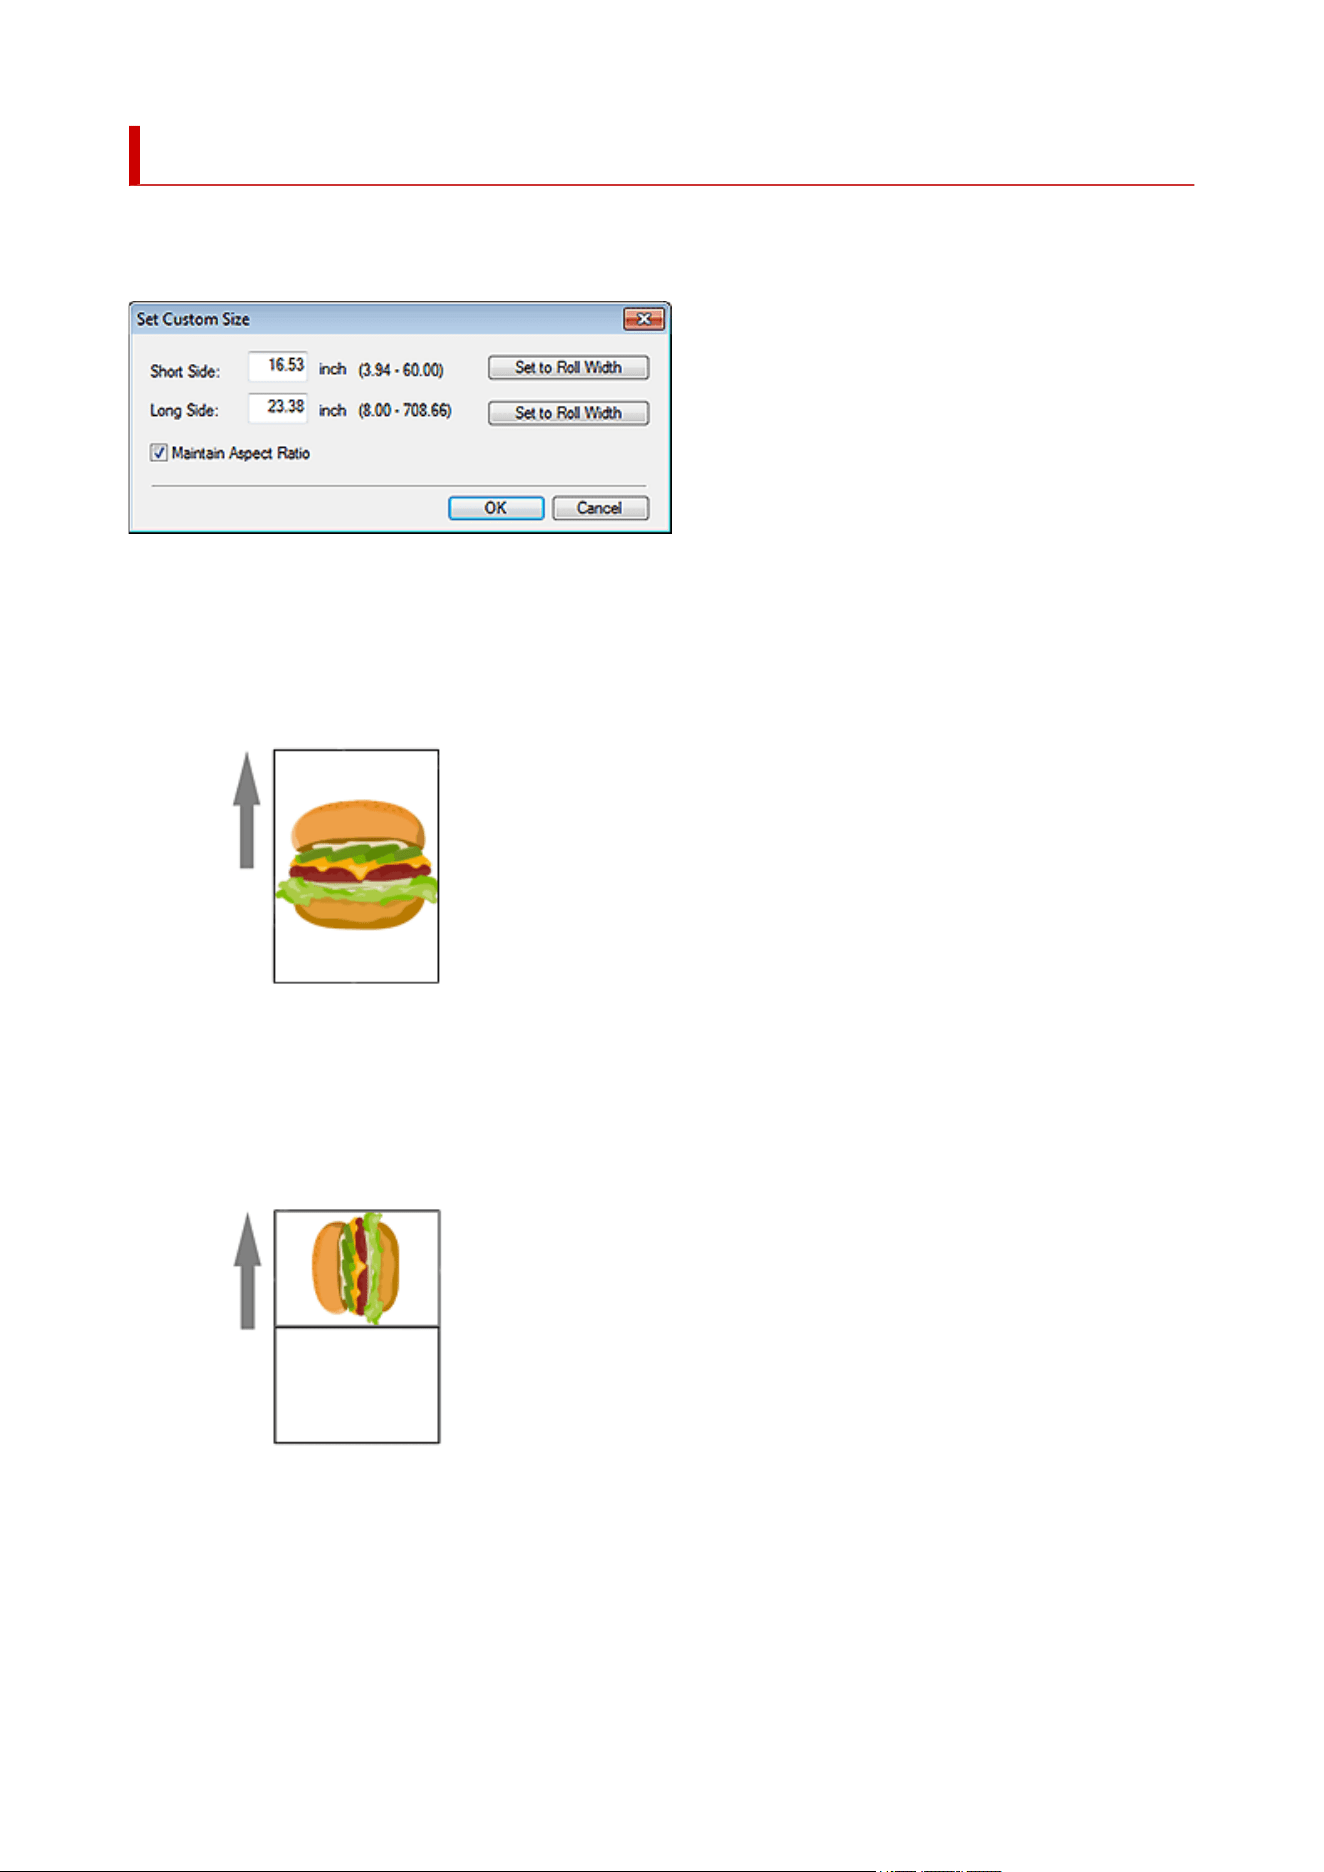
Set Custom Size Dialog Box
When printing the poster at non-standard paper sizes, specify the page size or media size. To display the
dialog box, click Set Custom Size... in the Paper Options screen.
Short Side
Specify the length of the poster's short side.
Set to Roll Width
The length of the poster's short side will be the same as the width of the roll paper loaded in the
printer. If the poster is in portrait orientation, the poster width will match the roll paper width.
Long Side
Specify the length of the poster's long side.
Set to Roll Width
The length of the poster's long side will be the same as the width of the roll paper loaded in the
printer. If the poster is in portrait orientation, the poster height will match the roll paper width.
Maintain Aspect Ratio
Select this checkbox to maintain the poster's aspect ratio. When Short Side or Long Side is set, the
value for the other is set automatically.
To set each aspect ratio manually, deselect the checkbox.
238

Note
• To specify the largest size for the selected roll paper, enter the maximum value shown in the range in
both Short Side and Long Side.
239
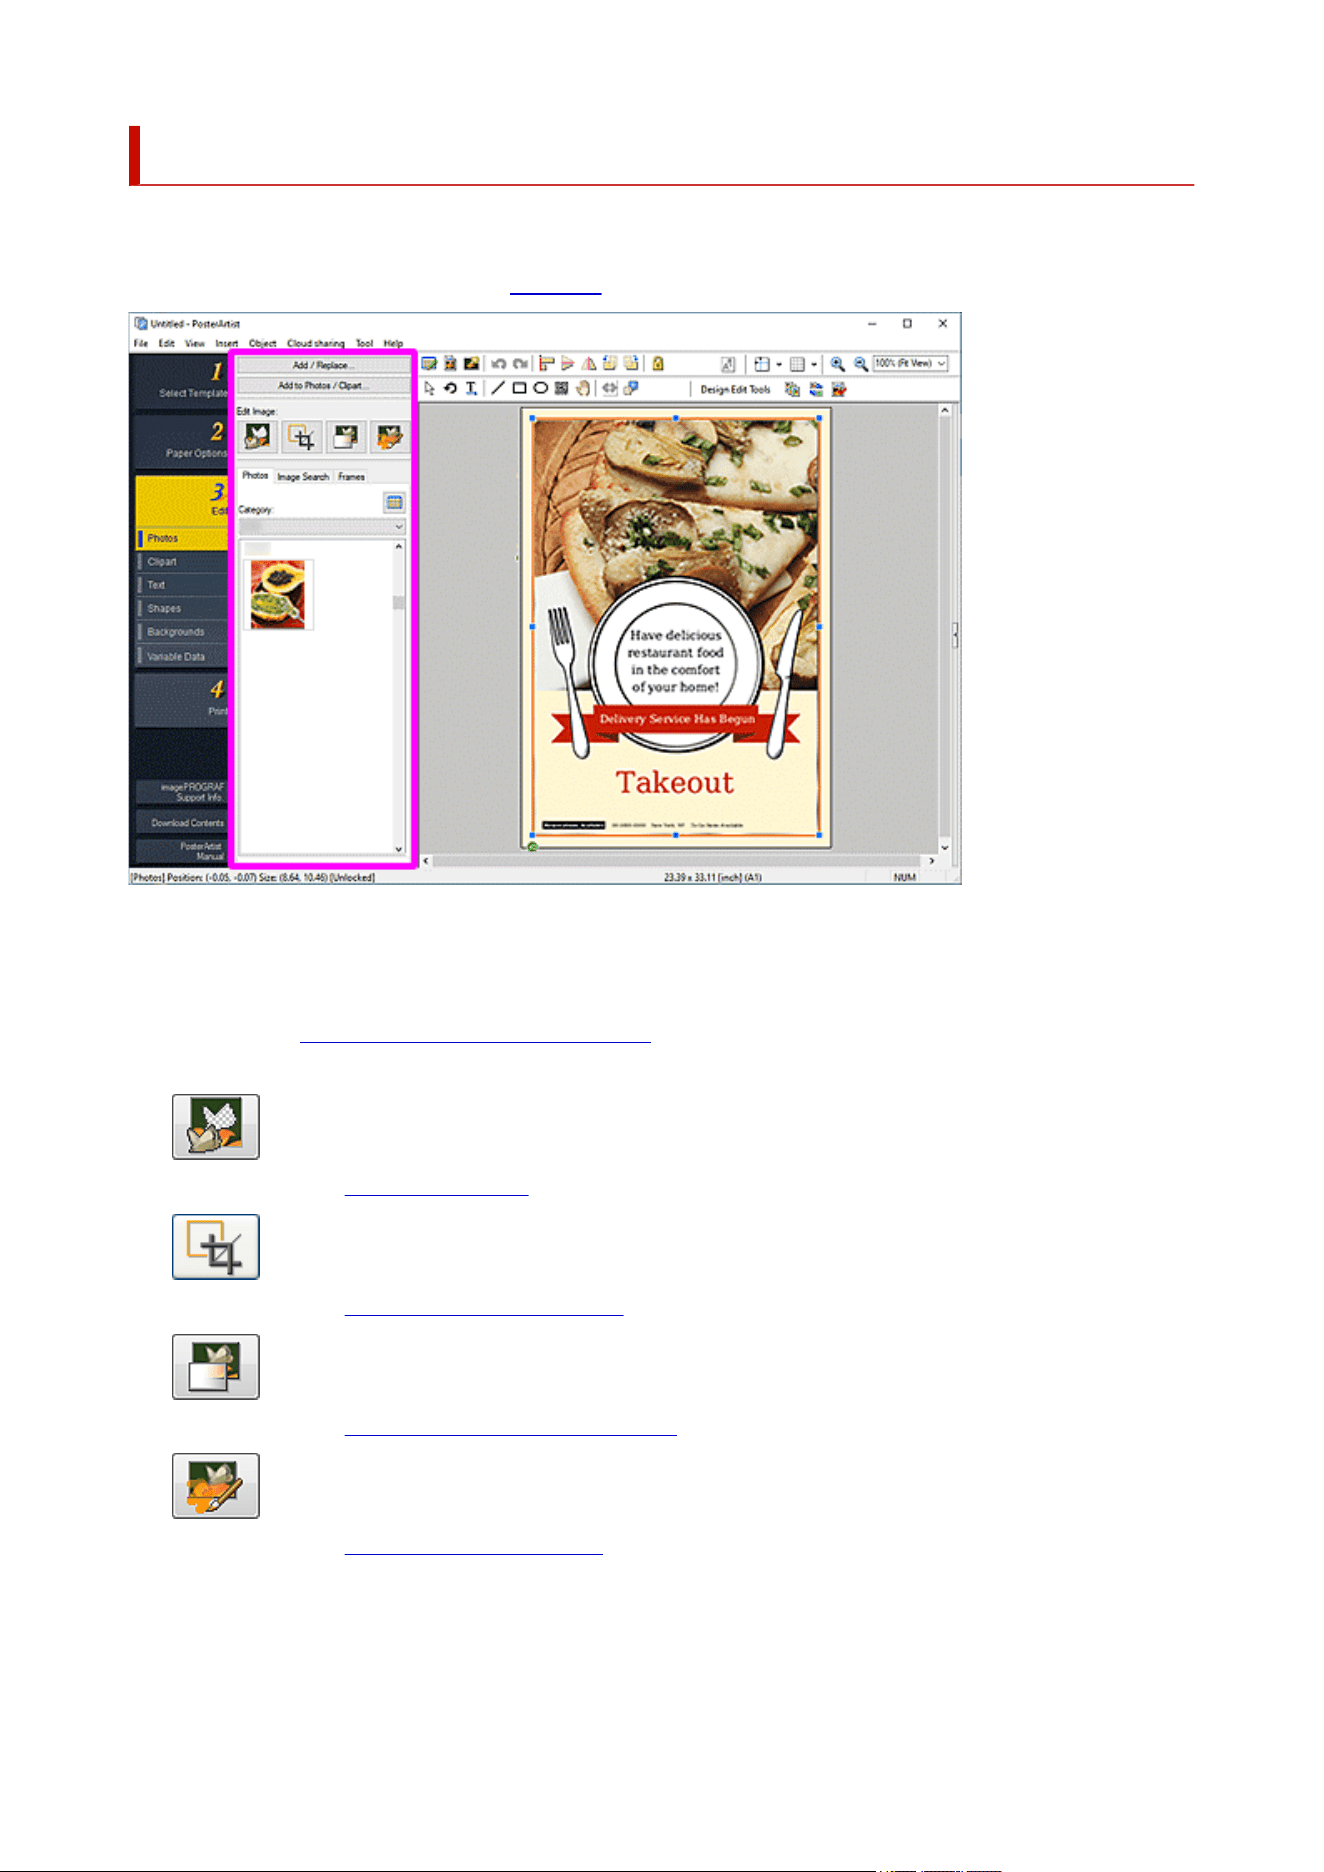
Edit Screen (Photos)
Edit, add, or replace photos.
To display the screen, click Edit in the task area, and then click Photos.
Add / Replace...
Displays the Insert Image dialog box for adding or replacing photos.
Add to Photos / Clipart...
Displays the Saving Artwork dialog box (Images) for adding photos or clipart to the library.
Edit Image
(Cut Out)
Displays the Cut Out dialog box for cutting out images.
(Trim)
Displays the Edit Image dialog box (Trim) for trimming images.
(Gradation)
Displays the Edit Image dialog box (Gradation) for applying gradation to images.
(Retouch Image)
Displays the Retouch Image dialog box for correcting image color levels.
Photos tab
Category
Select a photo category from the list. The thumbnails of templates in the selected category appear.
240
(View All Photos)
Displays the View All Photos dialog box for viewing all photos.
Image Search tab
Search Site
From the pull-down menu, select the stock photo service you want to use.
When you select a stock photo service name, the service logo appears.
Click a service logo to start a Web browser and display the home screen of the stock photo service
site.
Important
• When using a stock photo service for the first time, you must read the license and privacy policy.
To use the stock photo service, agree to them by clicking I understand.
(Search)
Enter a keyword for the image you want to search for, and then click (Search) to display the
thumbnails of the images related to the keyword.
Important
• Image search supports JPEG and PNG images.
Note
• When you click (Search) with the search window empty, images recommended by the service
site appear.
• When you place the cursor over a thumbnail in the search results and click (Image
Information), a Web browser starts and the image information appears.
• When you switch the stock photo service with the search results displayed, a new image search
will be performed based on the keyword that was entered into the search window before switching
the service, and then new search results will appear.
Frames tab
Category
Select a frame category from the list. The thumbnails of templates in the selected category appear.
(View All Frames)
Displays the View All Frames dialog box for viewing all frames.
Frame Color
Displays the current frame color and basic colors. To use other colors, click Custom..., and then
select a color in the displayed dialog box.
Regular color
Displays the current color or basic colors in the four-color palette.
Spot color
Displays available fluorescent colors in the four-color palette.
Important
• Fluorescent spot colors cannot be used depending on your model or paper type.
241
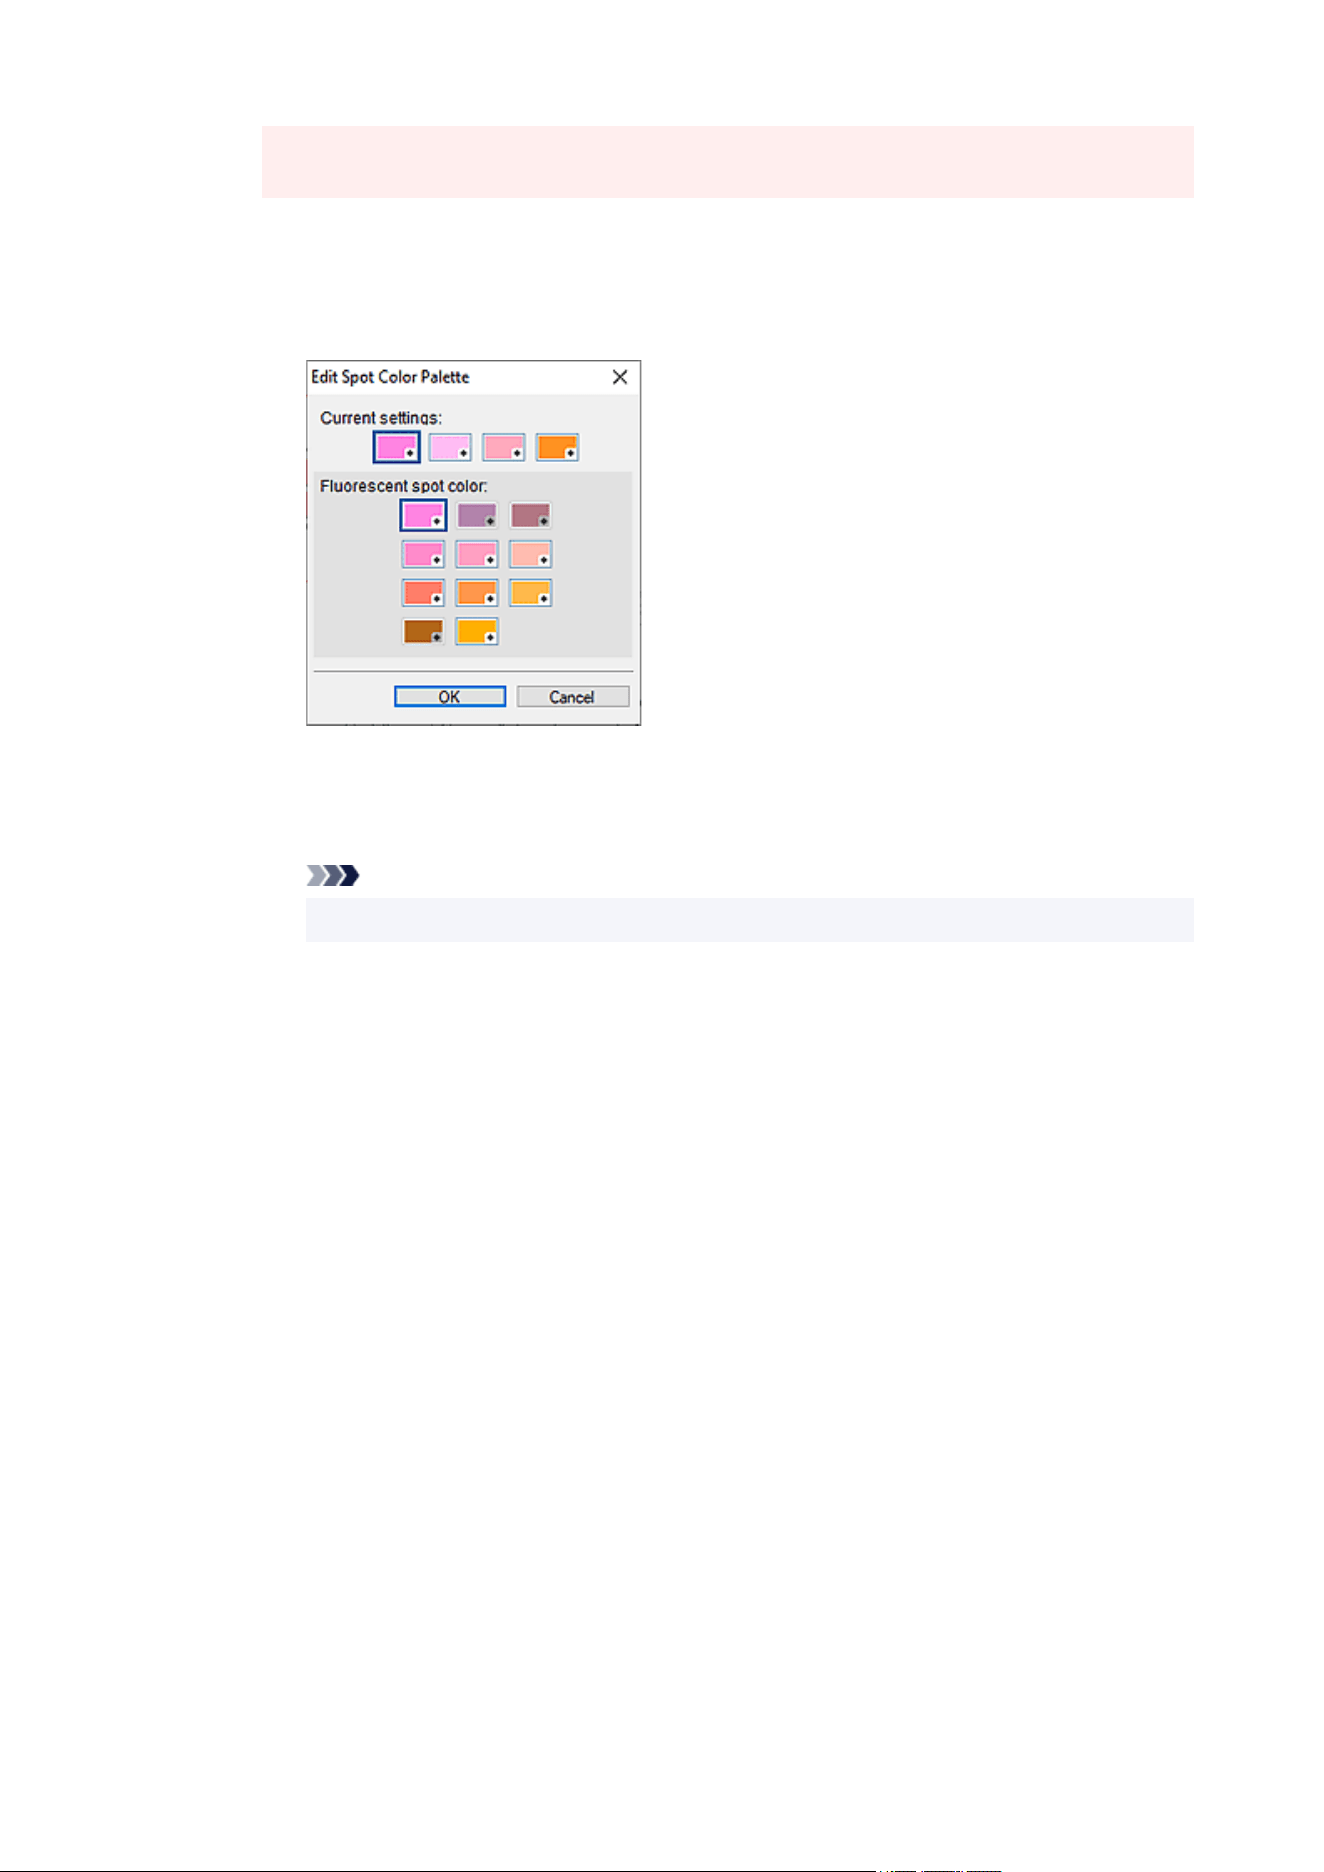
• Fluorescent spot colors cannot be used when the Edit layout with Free Layout plus
checkbox is selected in the Paper Options screen.
Edit Palette...
Click to display the Edit Spot Color Palette dialog box for editing the colors that appear in the
palette.
Edit Spot Color Palette dialog box
Select the four colors you want to display in the Spot color palette.
Select the color you want to edit in the palette under Current settings, and then select
the color you want to display in the palette from Fluorescent spot color.
Note
• The four colors that appear in the Spot color palette are retained on the printer.
242
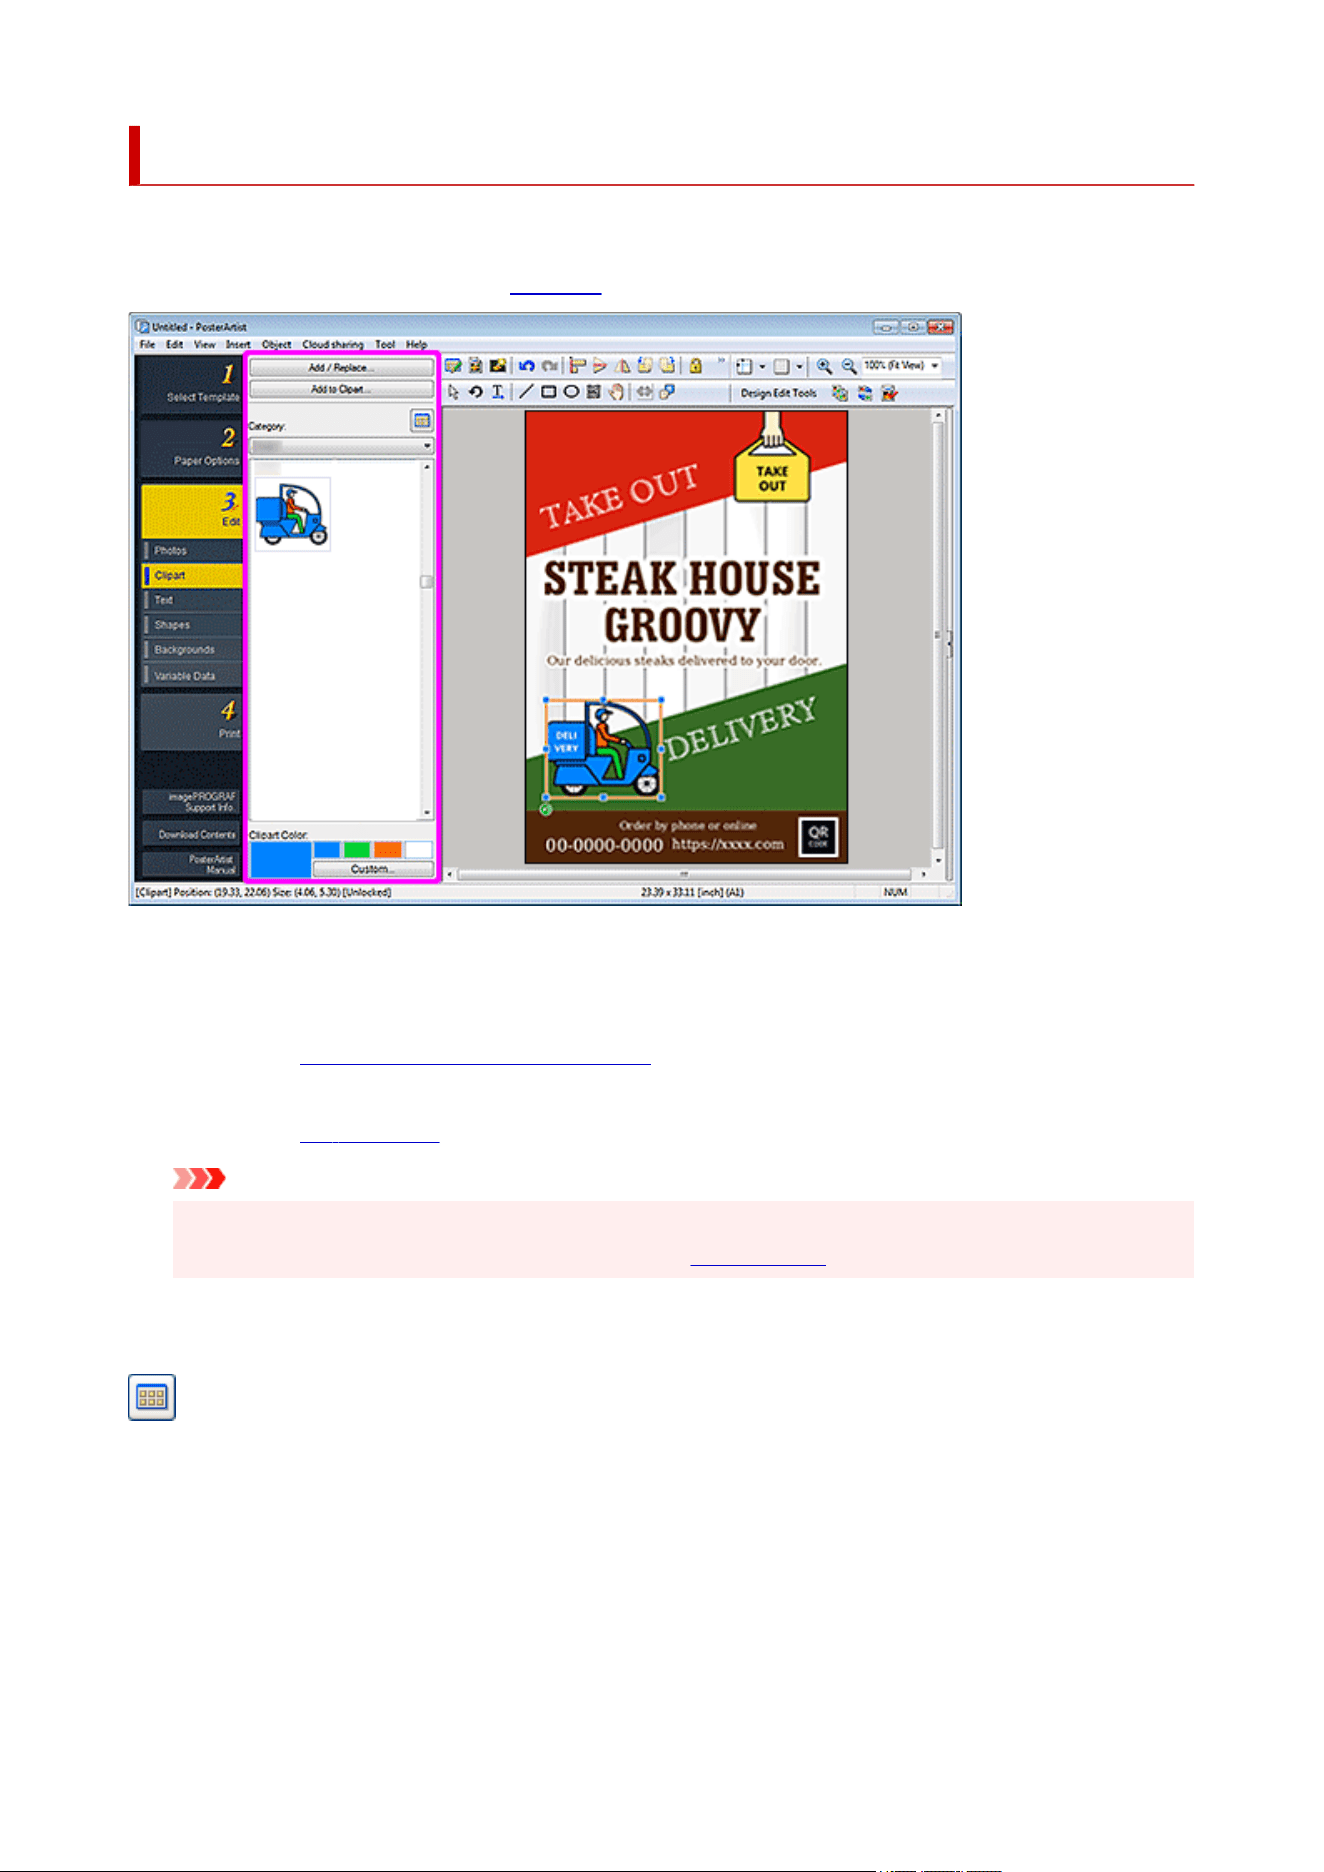
Edit Screen (Clipart)
Add clipart to the poster or replace the added clipart.
To display the screen, click Edit in the task area, and then click Clipart.
Add / Replace...
Displays the Insert Image dialog box for adding or replacing clipart.
Add to Clipart...
Displays the Saving Artwork dialog box (Images) for adding clipart to the library.
Convert to bitmap and edit...
Displays the Fill dialog box for filling specified areas with colors.
Important
• If you edit clipart by clicking Convert to bitmap and edit..., you cannot change the color of the clipart
with Clipart Color. To edit the color again, open the Fill dialog box and change the color.
Category
Select a clipart category from the list. The thumbnails of templates in the selected category appear.
(View All Clipart)
Displays the View All Clipart dialog box for viewing all clipart.
Clipart Color
Displays the current clipart color and basic colors. To use other colors, click Custom..., and then select
a color in the displayed dialog box.
Regular color
Displays the current color or basic colors in the four-color palette.
243
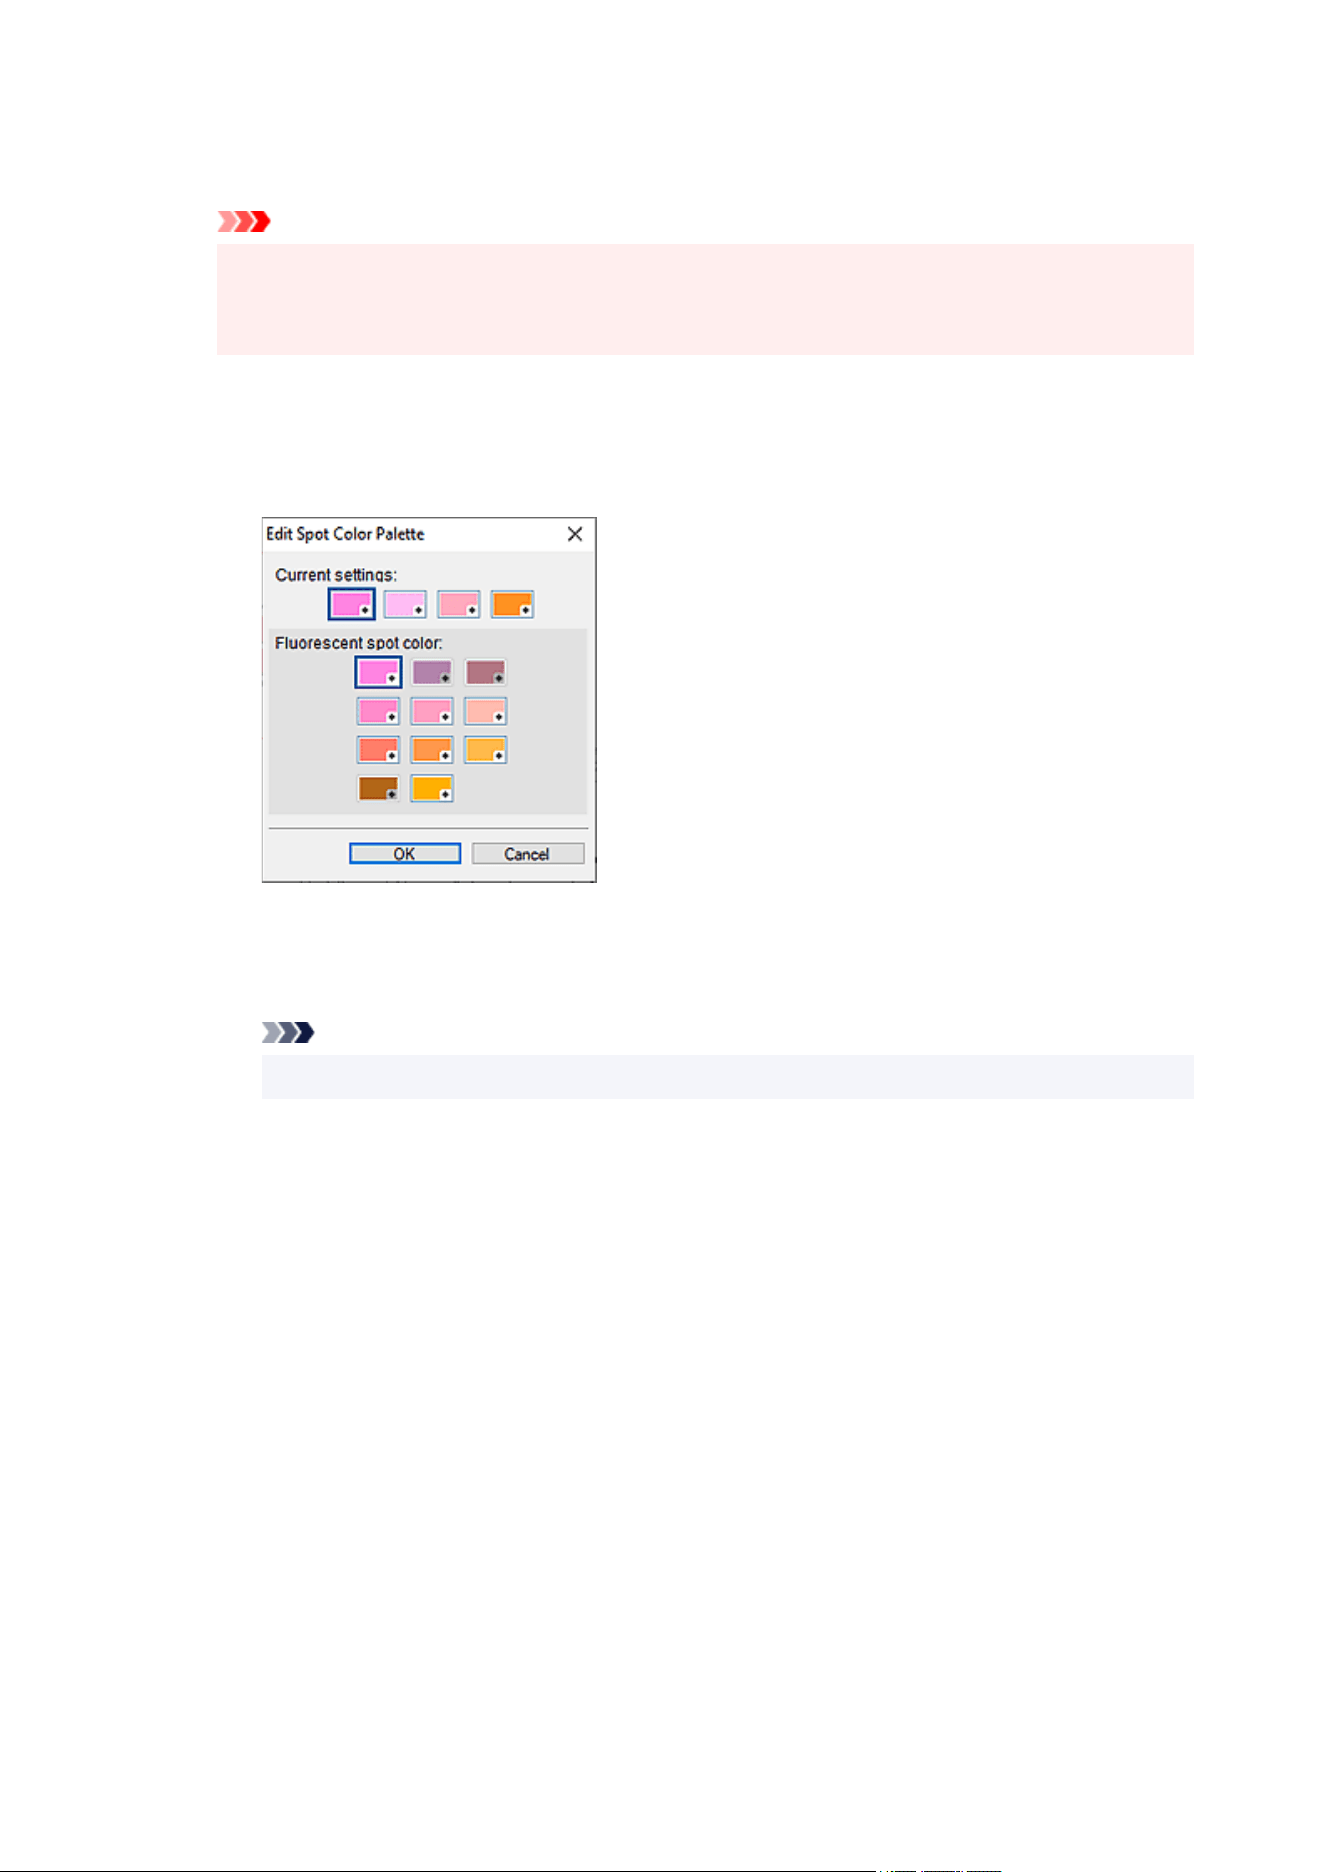
Spot color
Displays available fluorescent colors in the four-color palette.
Important
• Fluorescent spot colors cannot be used depending on your model or paper type.
• Fluorescent spot colors cannot be used when the Edit layout with Free Layout plus checkbox is
selected in the Paper Options screen.
Edit Palette...
Click to display the Edit Spot Color Palette dialog box for editing the colors that appear in the
palette.
Edit Spot Color Palette dialog box
Select the four colors you want to display in the Spot color palette.
Select the color you want to edit in the palette under Current settings, and then select the
color you want to display in the palette from Fluorescent spot color.
Note
• The four colors that appear in the Spot color palette are retained on the printer.
244
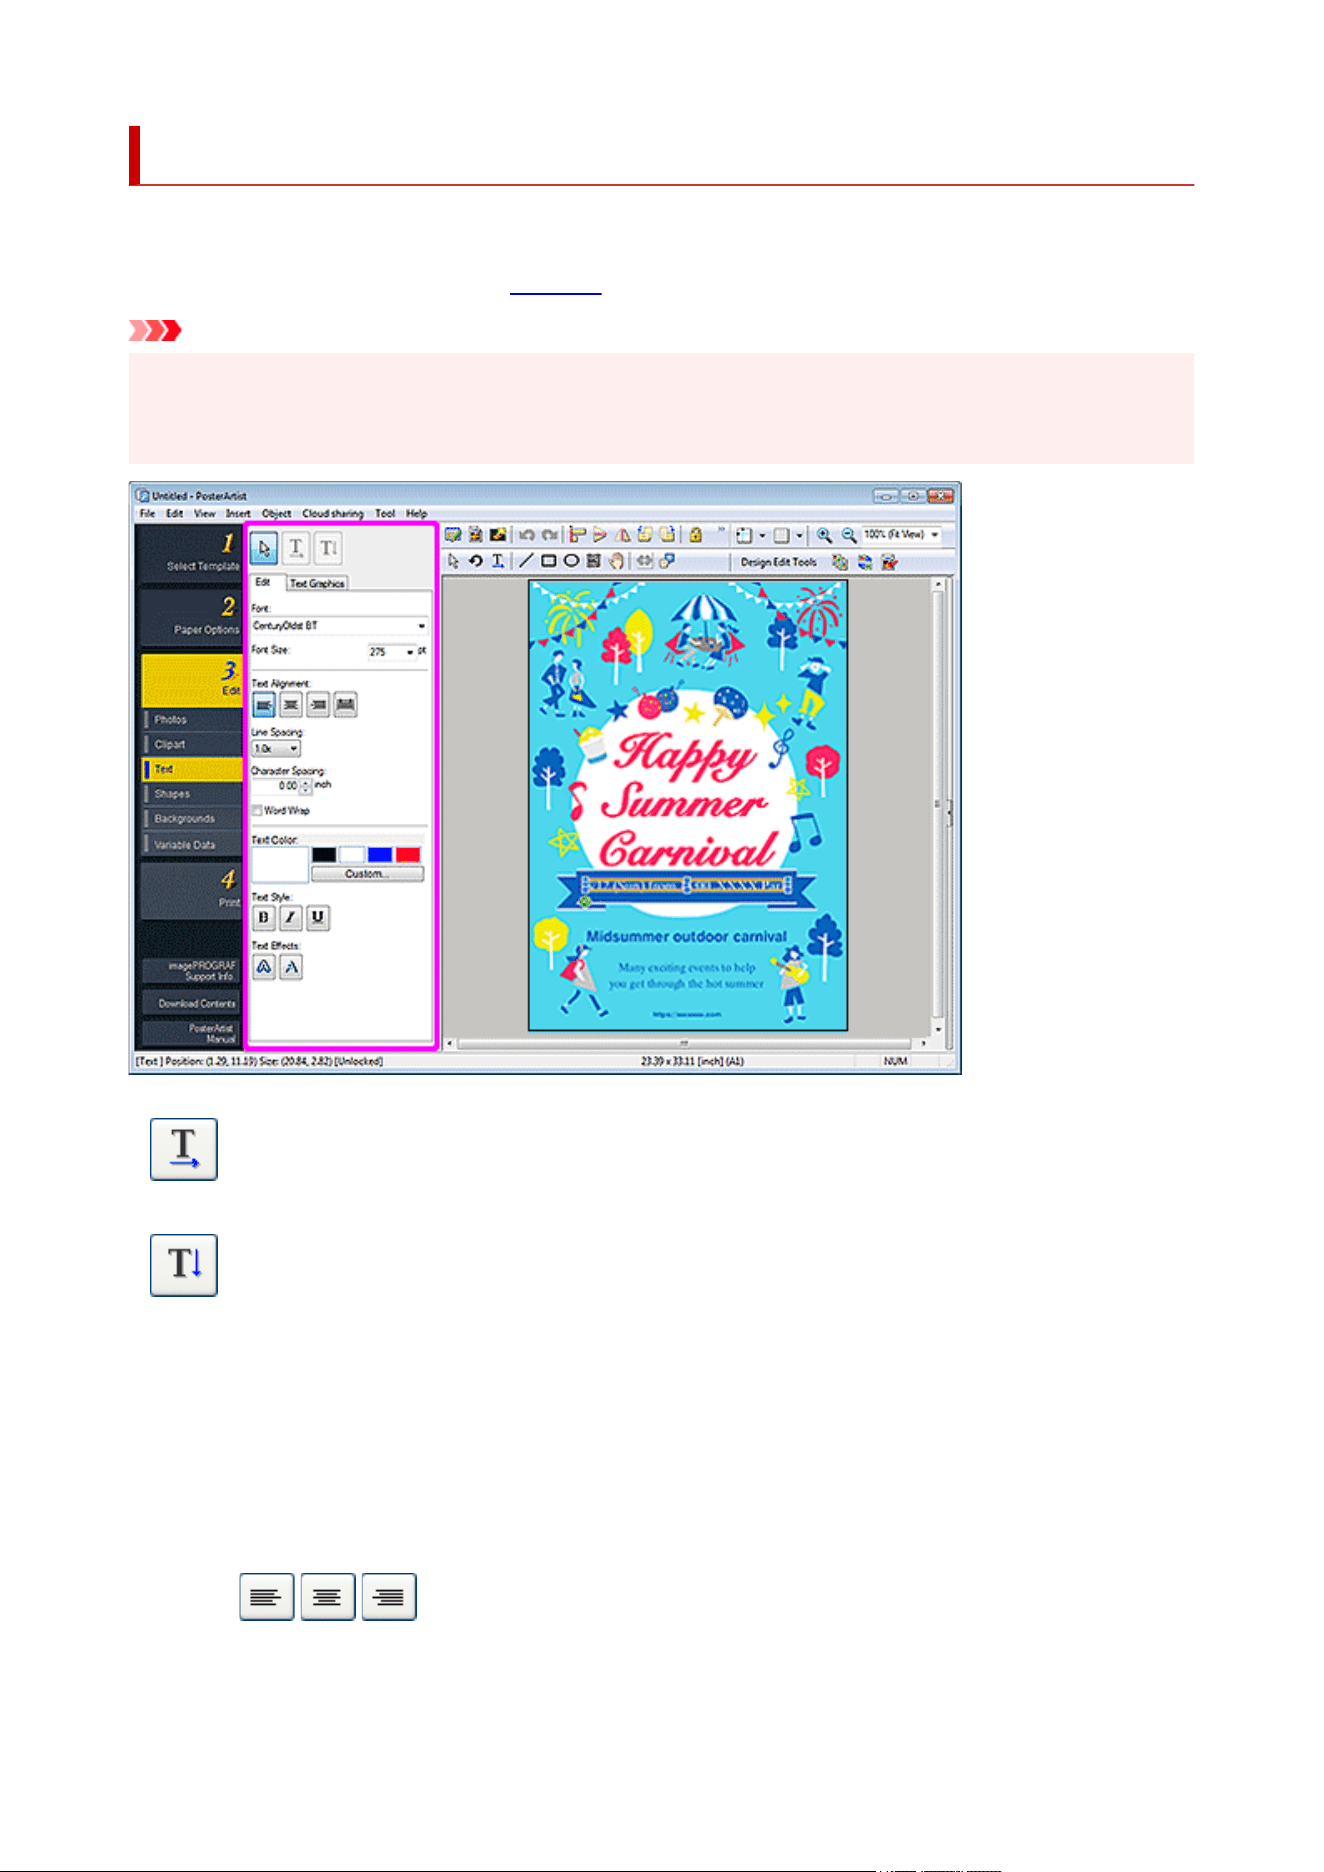
Edit Screen (Text)
Add text to posters. Decorate the added text as needed.
To display the screen, click Edit in the task area, and then click Text.
Important
• Fluorescent spot colors cannot be used depending on your model or paper type.
• Fluorescent spot colors cannot be used when the Edit layout with Free Layout plus checkbox is selected
in the Paper Options screen.
(Horizontal Text)
Add horizontal text.
(Vertical Text)
Add vertical text.
Edit tab
Font
Select the font type.
Font Size
Select the font size. You can also set by entering a value directly.
Text Alignment
(Left Align / Center Align / Right Align)
Specify how you want to align text.
245

(Justify)
Position the text evenly across the text box.
Line Spacing
Select the line spacing.
Increase the value to widen the space between lines and decrease the value to narrow it.
Character Spacing
Specify the character spacing.
Increase the value to widen the space between characters and decrease the value to narrow it.
Word Wrap
Wrap text at the end of a line automatically.
Text Color
Displays the current text color and basic colors. To use other colors, click Custom..., and then
select a color in the displayed dialog box.
Regular color
Displays the current color or basic colors in the four-color palette.
Spot color
Displays available fluorescent colors in the four-color palette.
Edit Palette...
Click to display the Edit Spot Color Palette dialog box for editing the colors that appear in
the palette.
Edit Spot Color Palette dialog box
Select the four colors you want to display in the Spot color palette.
Select the color you want to edit in the palette under Current settings, and then select
the color you want to display in the palette from Fluorescent spot color.
Note
• The four colors that appear in the Spot color palette are retained on the printer.
Text Style
(Bold / Italic / Underline)
Make the text italic or bold. Underline the text as needed.
246
Text Effects
(Fill and Stroke)
Displays the Fill and Stroke dialog box for applying a single or double outline to the text and
specifying the width, shape, and color of the outline.
(Shaded Text)
Displays the Set Shaded Text dialog box for specifying the drop shadow settings such as
color, distance, angle, opacity, and softening.
Text Graphics tab
Category
Select a text graphic category from the list. The thumbnails of templates in the selected category
appear.
(View All Text Graphics)
Displays the View All Text Graphics dialog box for viewing all text graphics.
Text Graphic Color
Displays the current text graphic color and basic colors. To use other colors, click Custom..., and
then select a color in the displayed dialog box.
Note
• Regular color, Spot color, and Edit Palette... can be specified in the same way as Text Color.
247
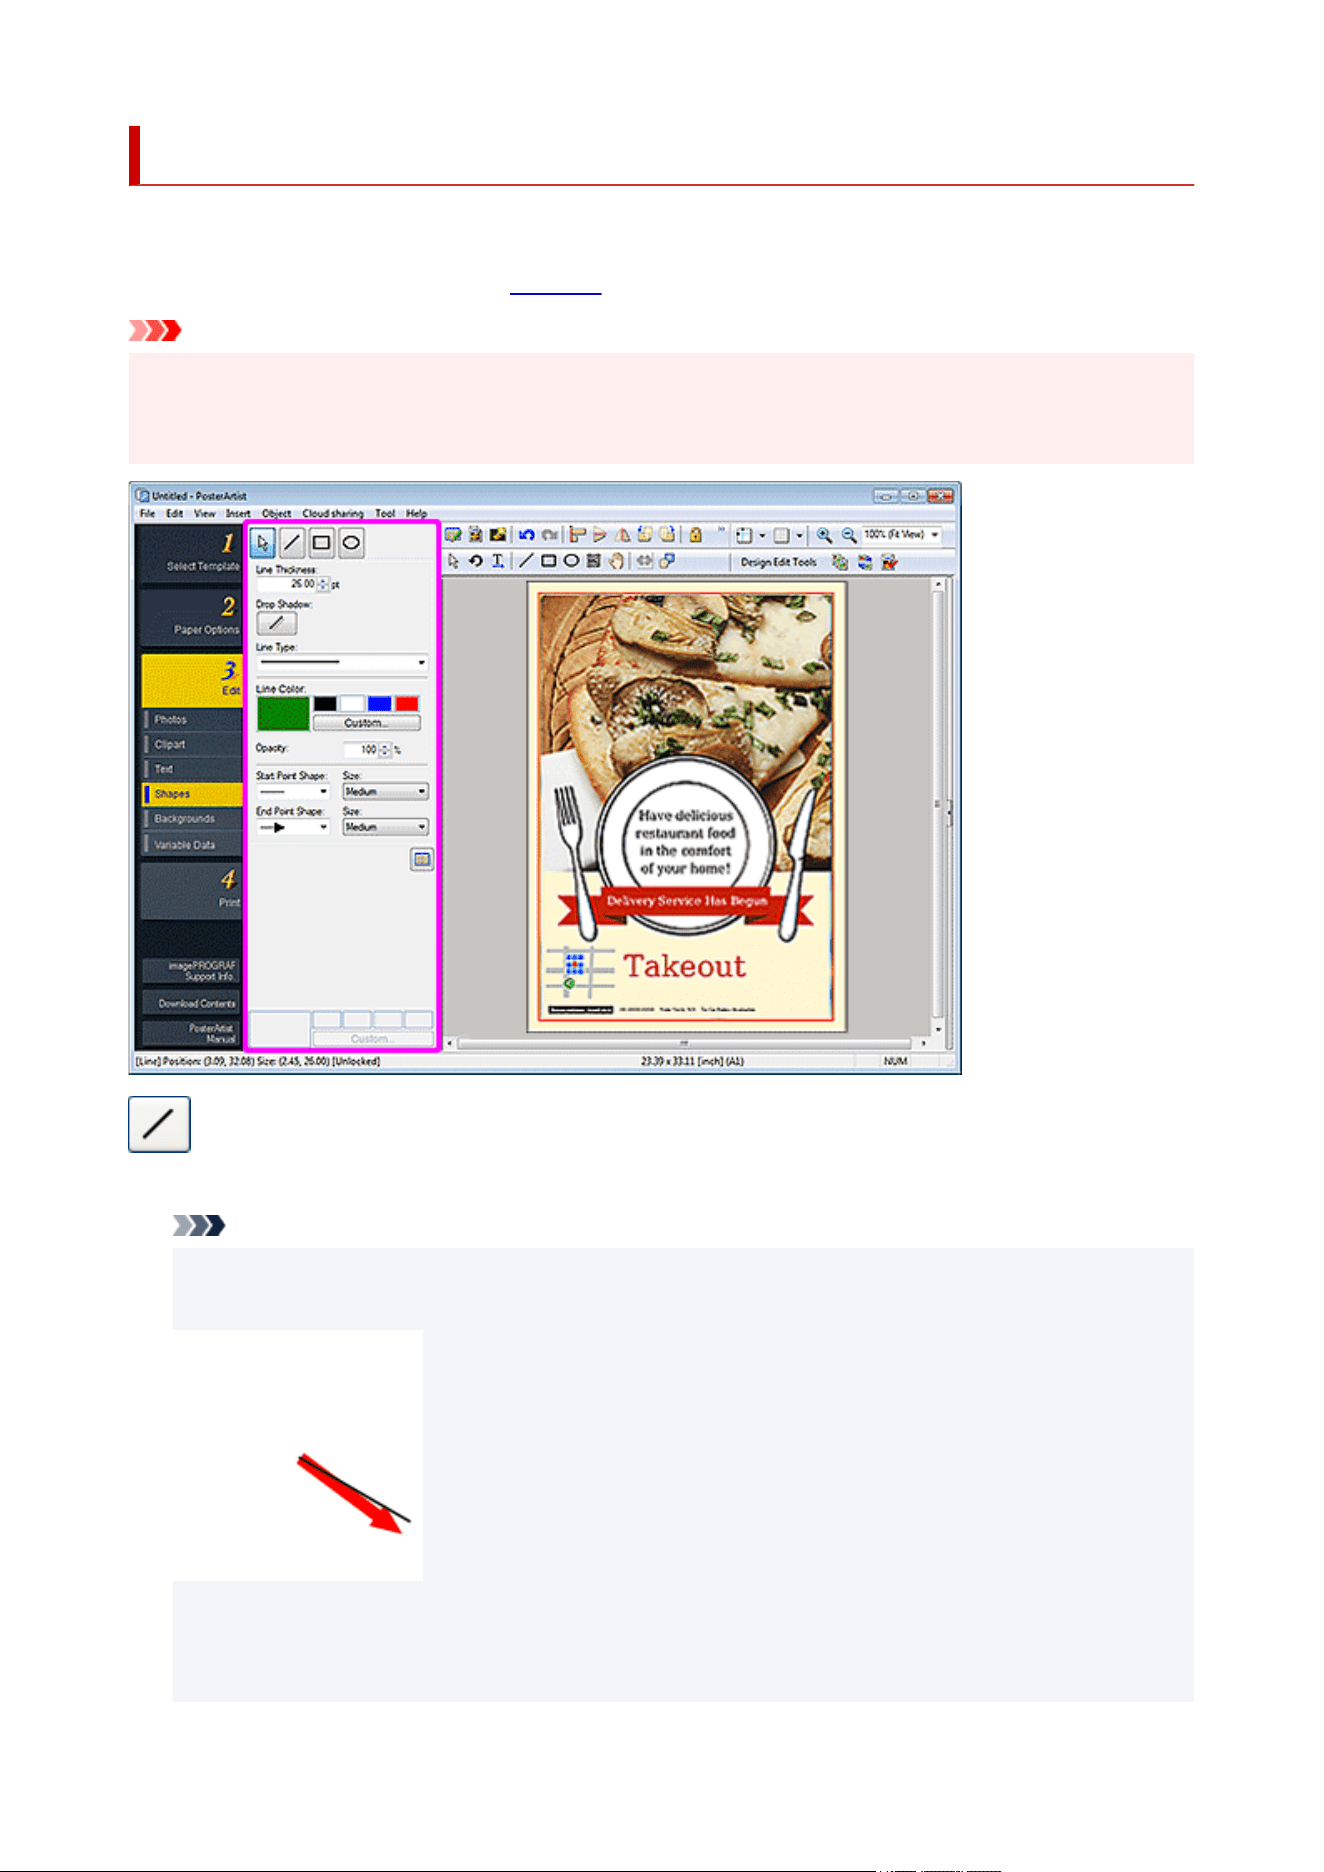
Edit Screen (Shapes)
Add straight lines, circles, rectangles, arrows, and other shapes to posters.
To display the screen, click Edit in the task area, and then click Shapes.
Important
• Fluorescent spot colors cannot be used depending on your model or paper type.
• Fluorescent spot colors cannot be used when the Edit layout with Free Layout plus checkbox is selected
in the Paper Options screen.
(Line)
Drag the crosshair pointer to add a line or arrow.
Note
• To draw a horizontal line, vertical line, or a line angled at a multiple of 15 degrees, hold down the Shift•
key as you drag the pointer.
• To set the clicked point as the center point, hold down the Ctrl key as you drag the pointer.
• To draw a horizontal line, vertical line, or a line angled at a multiple of 15 degrees with the clicked point•
set as its center point, hold down the Shift and Ctrl keys as you drag the pointer.
248
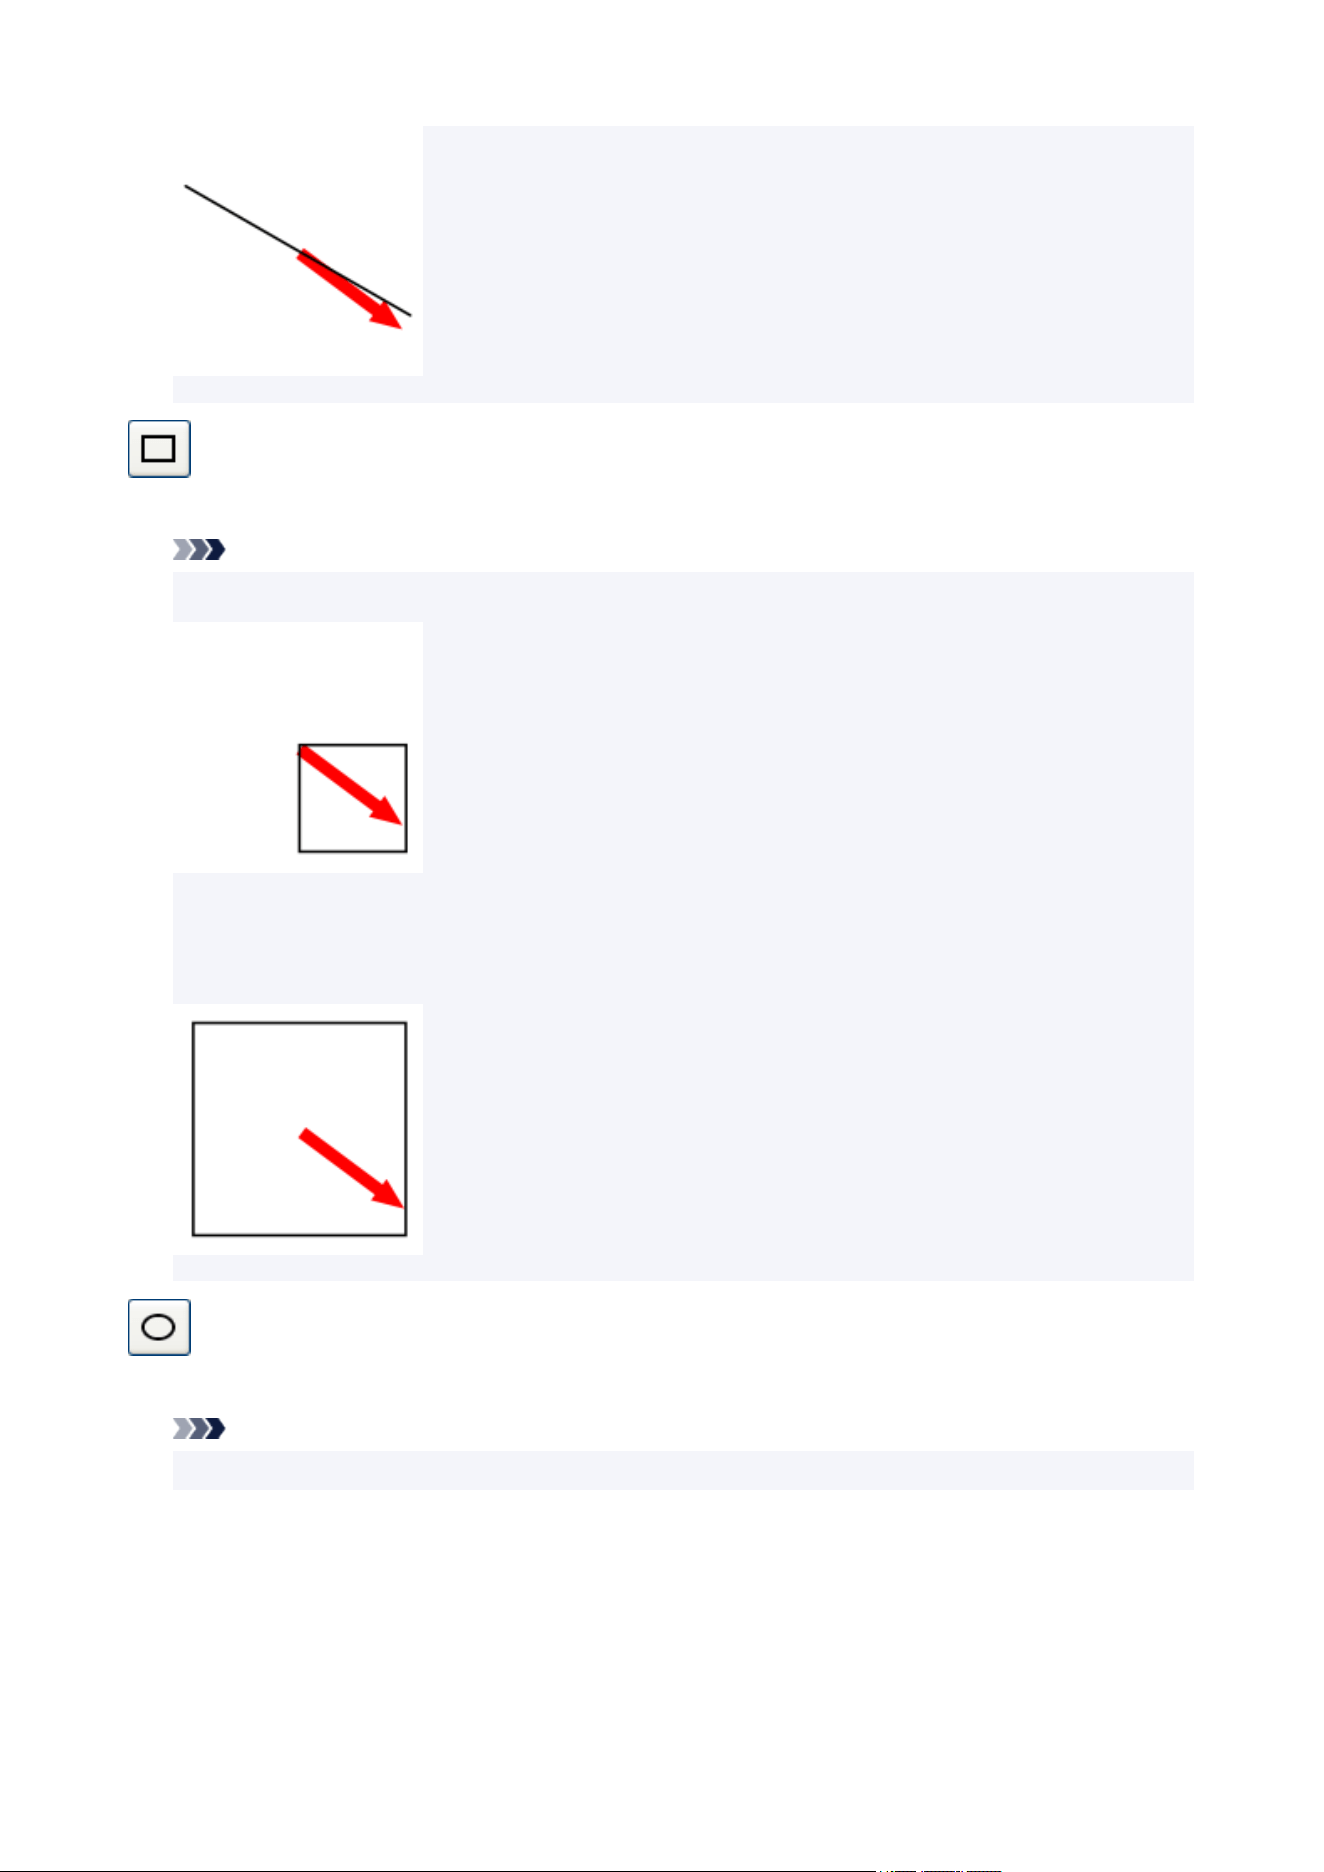
(Rectangle)
Drag the crosshair pointer to add a rectangle.
Note
• To draw a square, hold down the Shift key as you drag the pointer.•
• To set the clicked point as the center point, hold down the Ctrl key as you drag the pointer.
• To draw a square with the clicked point set as its center point, hold down the Shift and Ctrl keys as you•
drag the pointer.
(Ellipse)
Drag the crosshair pointer to add a circle or ellipse.
Note
• To draw a circle, hold down the Shift key as you drag the pointer.•
249
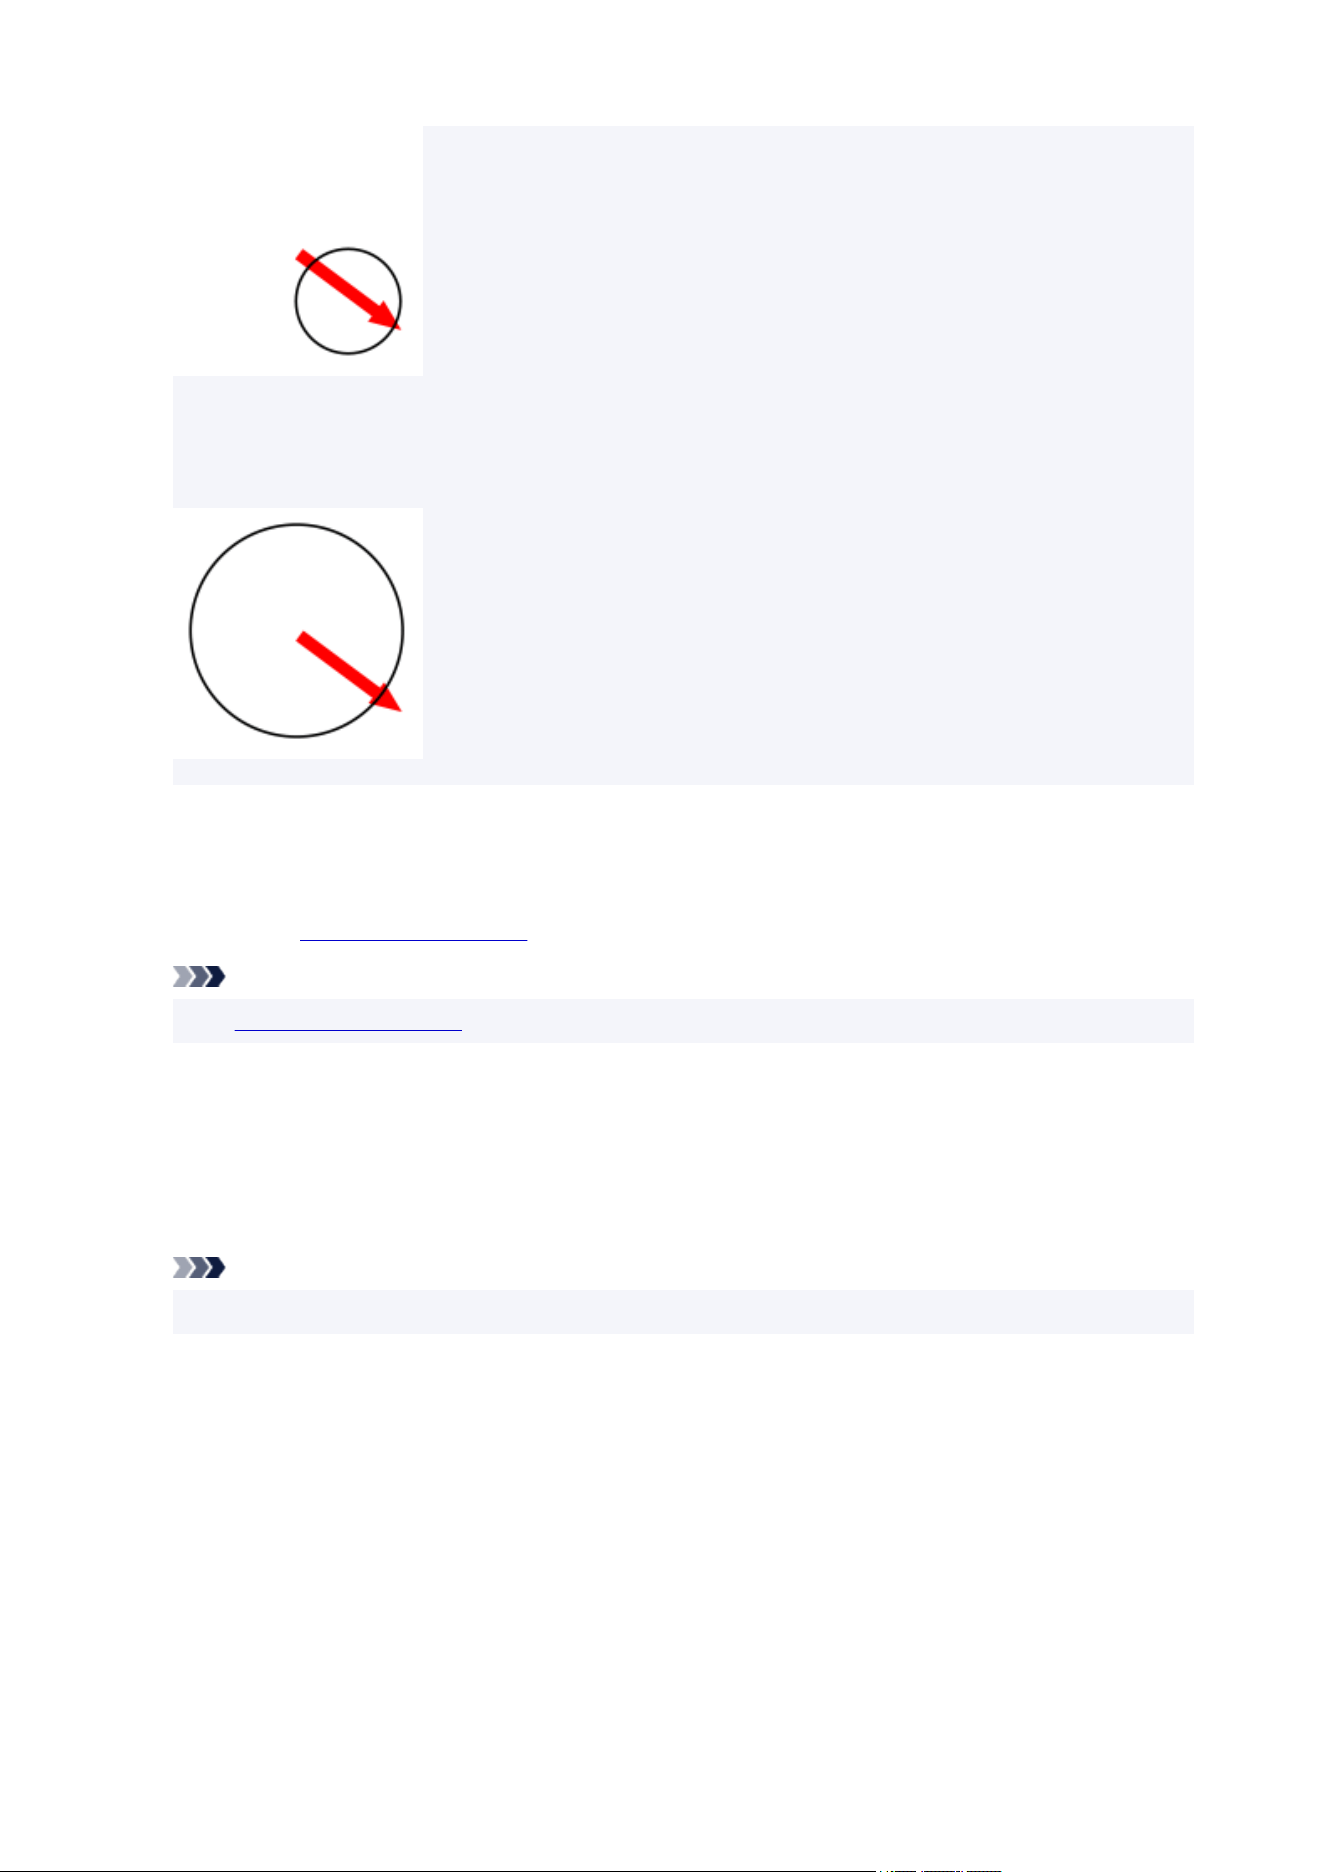
• To set the clicked point as the center point, hold down the Ctrl key as you drag the pointer.
• To draw a circle with the clicked point set as its center point, hold down the Shift and Ctrl keys as you•
drag the pointer.
Line Thickness
Specify the line thickness. Enter the value directly.
Drop Shadow
Displays the Set Shadow dialog box for adding a drop shadow to the shape.
Note
• In the Set Shadow dialog box, you can specify a fluorescent spot color for the drop shadow color.
Line Type
Select the line type from the list.
Line Color / Fill-in Color
Displays the current line or fill color and basic colors. To use other colors, click Custom..., and then
select a color in the displayed dialog box.
Note
• Fill-in Color appears when a rectangle or ellipse is selected.
Regular color
Displays the current color or basic colors in the four-color palette.
Spot color
Displays available fluorescent colors in the four-color palette.
Edit Palette...
Click to display the Edit Spot Color Palette dialog box for editing the colors that appear in the
palette.
250
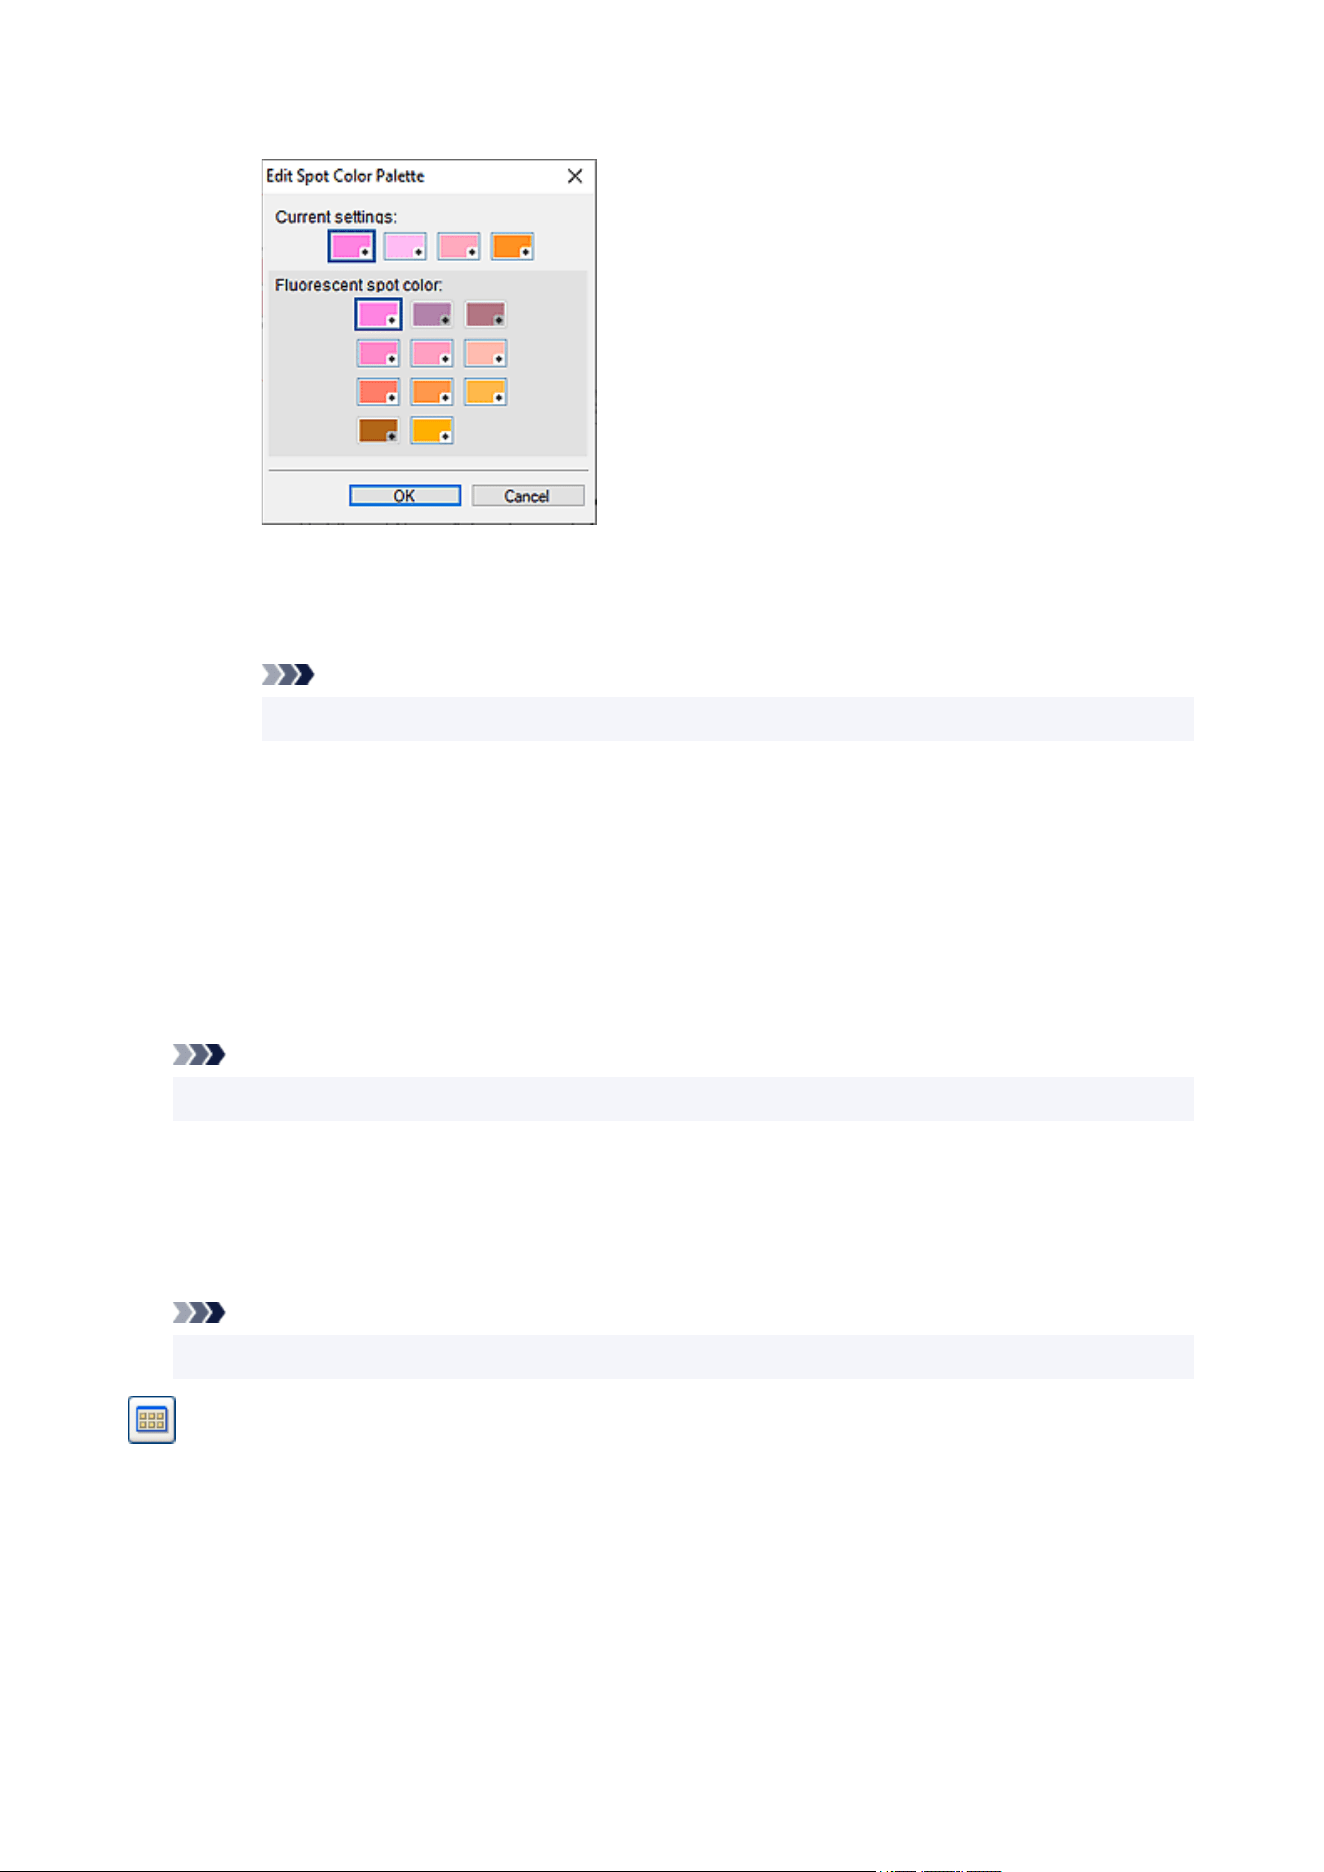
Edit Spot Color Palette dialog box
Select the four colors you want to display in the Spot color palette.
Select the color you want to edit in the palette under Current settings, and then select the
color you want to display in the palette from Fluorescent spot color.
Note
• The four colors that appear in the Spot color palette are retained on the printer.
Opacity
Specify the opacity of Fill-in Color.
Increase the value to increase opacity and decrease the value to increase transparency.
Start Point Shape / End Point Shape
Select the shape of the starting point or ending point.
Size
Select the size of the starting point or ending point from Small, Medium, and Large.
Note
• Appears when a line is selected.
Corner Shape
Select the corner shape.
Radius
When the round shape is selected for Corner Shape, specify the roundness as needed.
Note
• Appears when a rectangle is selected.
(All Map Symbols)
Displays a dialog box for viewing all map symbols.
251
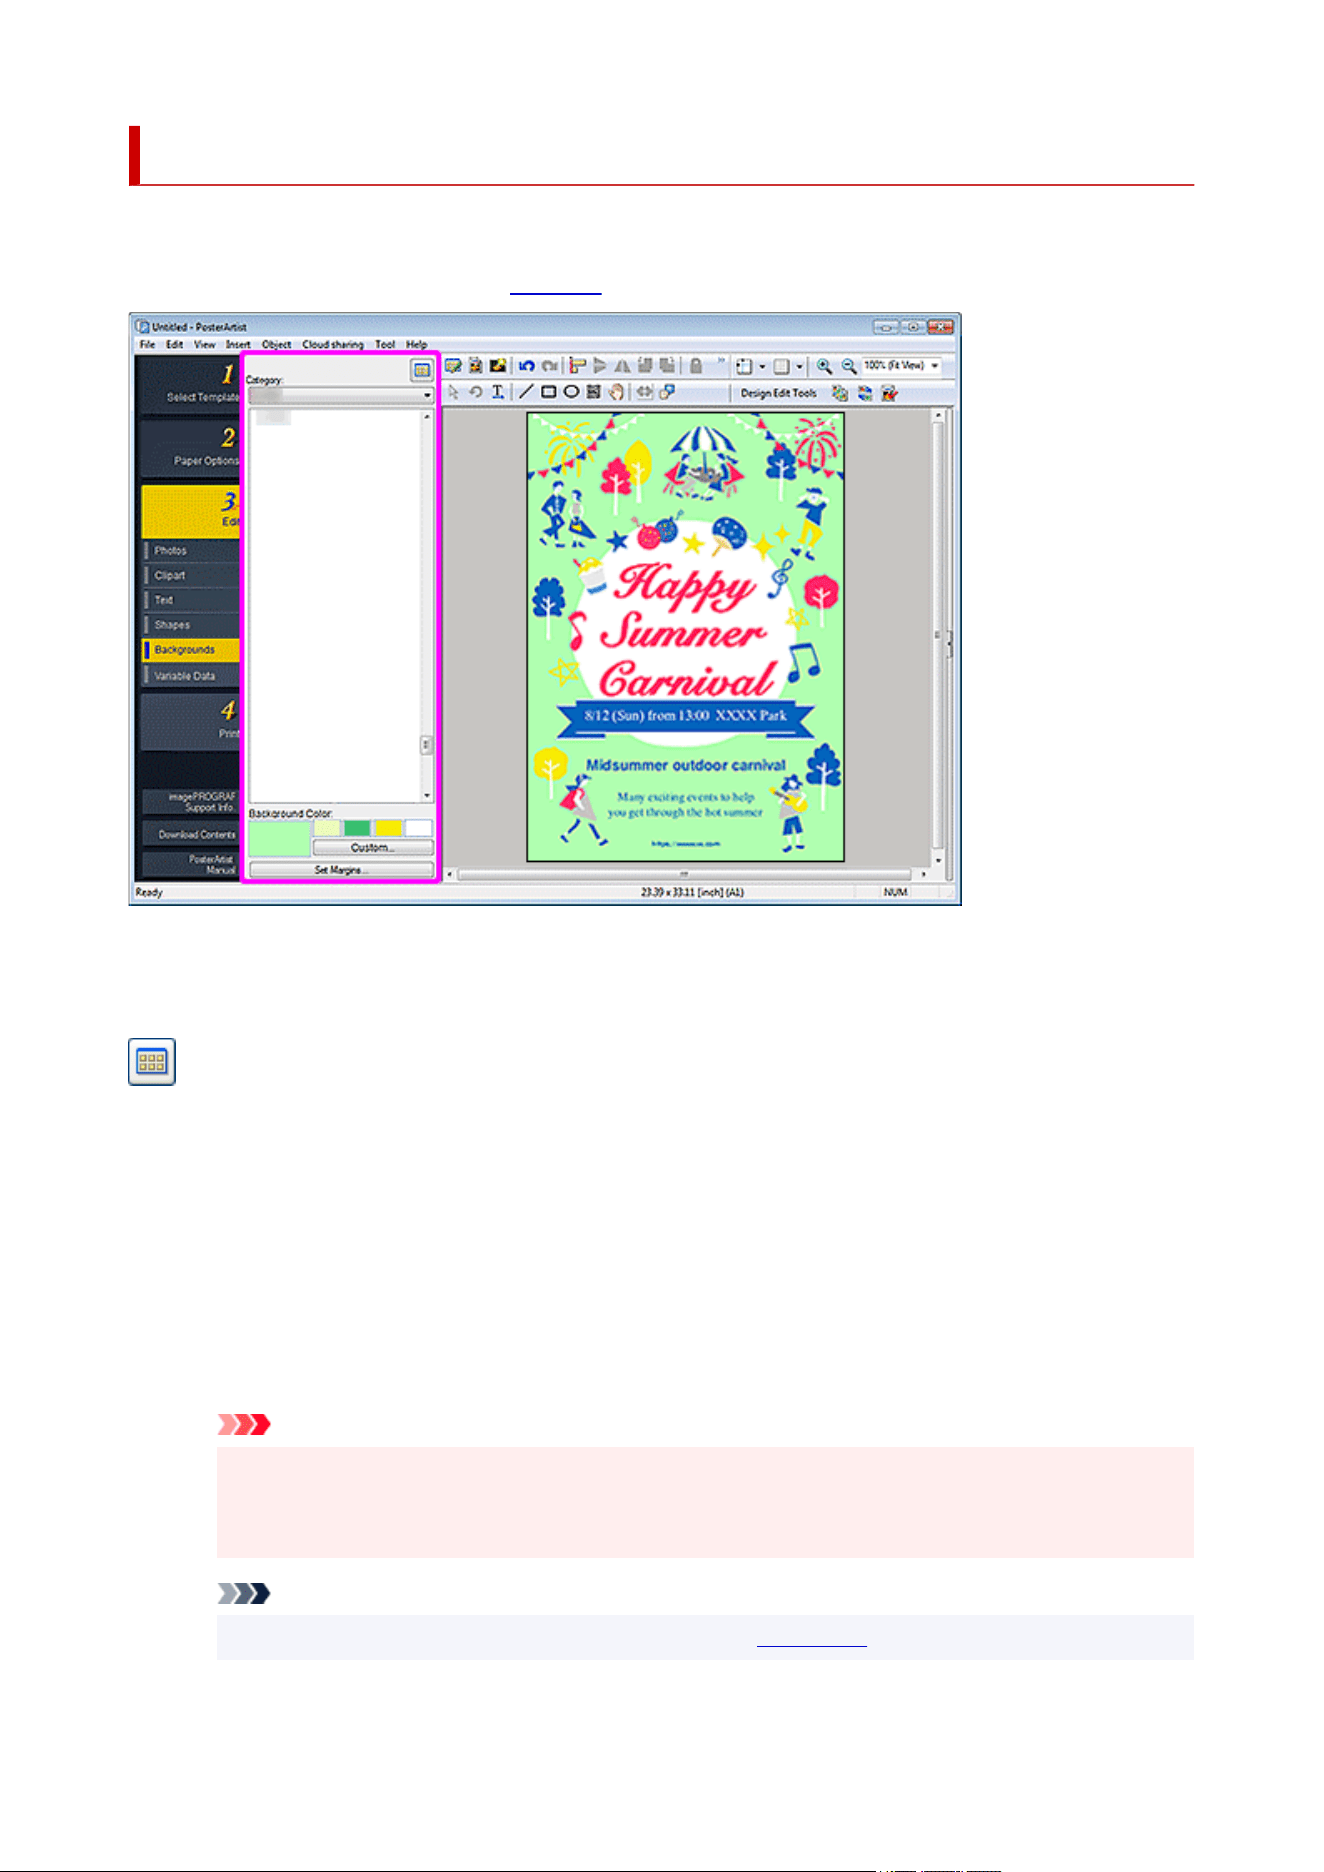
Edit Screen (Backgrounds)
Set the poster background.
To display the screen, click Edit in the task area, and then click Backgrounds.
Category
Select a background category from the list. The thumbnails of backgrounds in the selected category
appear.
(View All Backgrounds)
Displays the View All Backgrounds dialog box for viewing all backgrounds.
Background Color
Displays the current background color and basic colors. To use other colors, click Custom..., and then
select a color in the displayed dialog box.
Regular color
Displays the current color or basic colors in the four-color palette.
Spot color
Displays available fluorescent colors in the four-color palette.
Important
• Fluorescent spot colors cannot be used depending on your model or paper type.
• Fluorescent spot colors cannot be used when the Edit layout with Free Layout plus checkbox is
selected in the Paper Options screen.
Note
• To create a gradation with fluorescent spot colors, use Vivid mode.
252
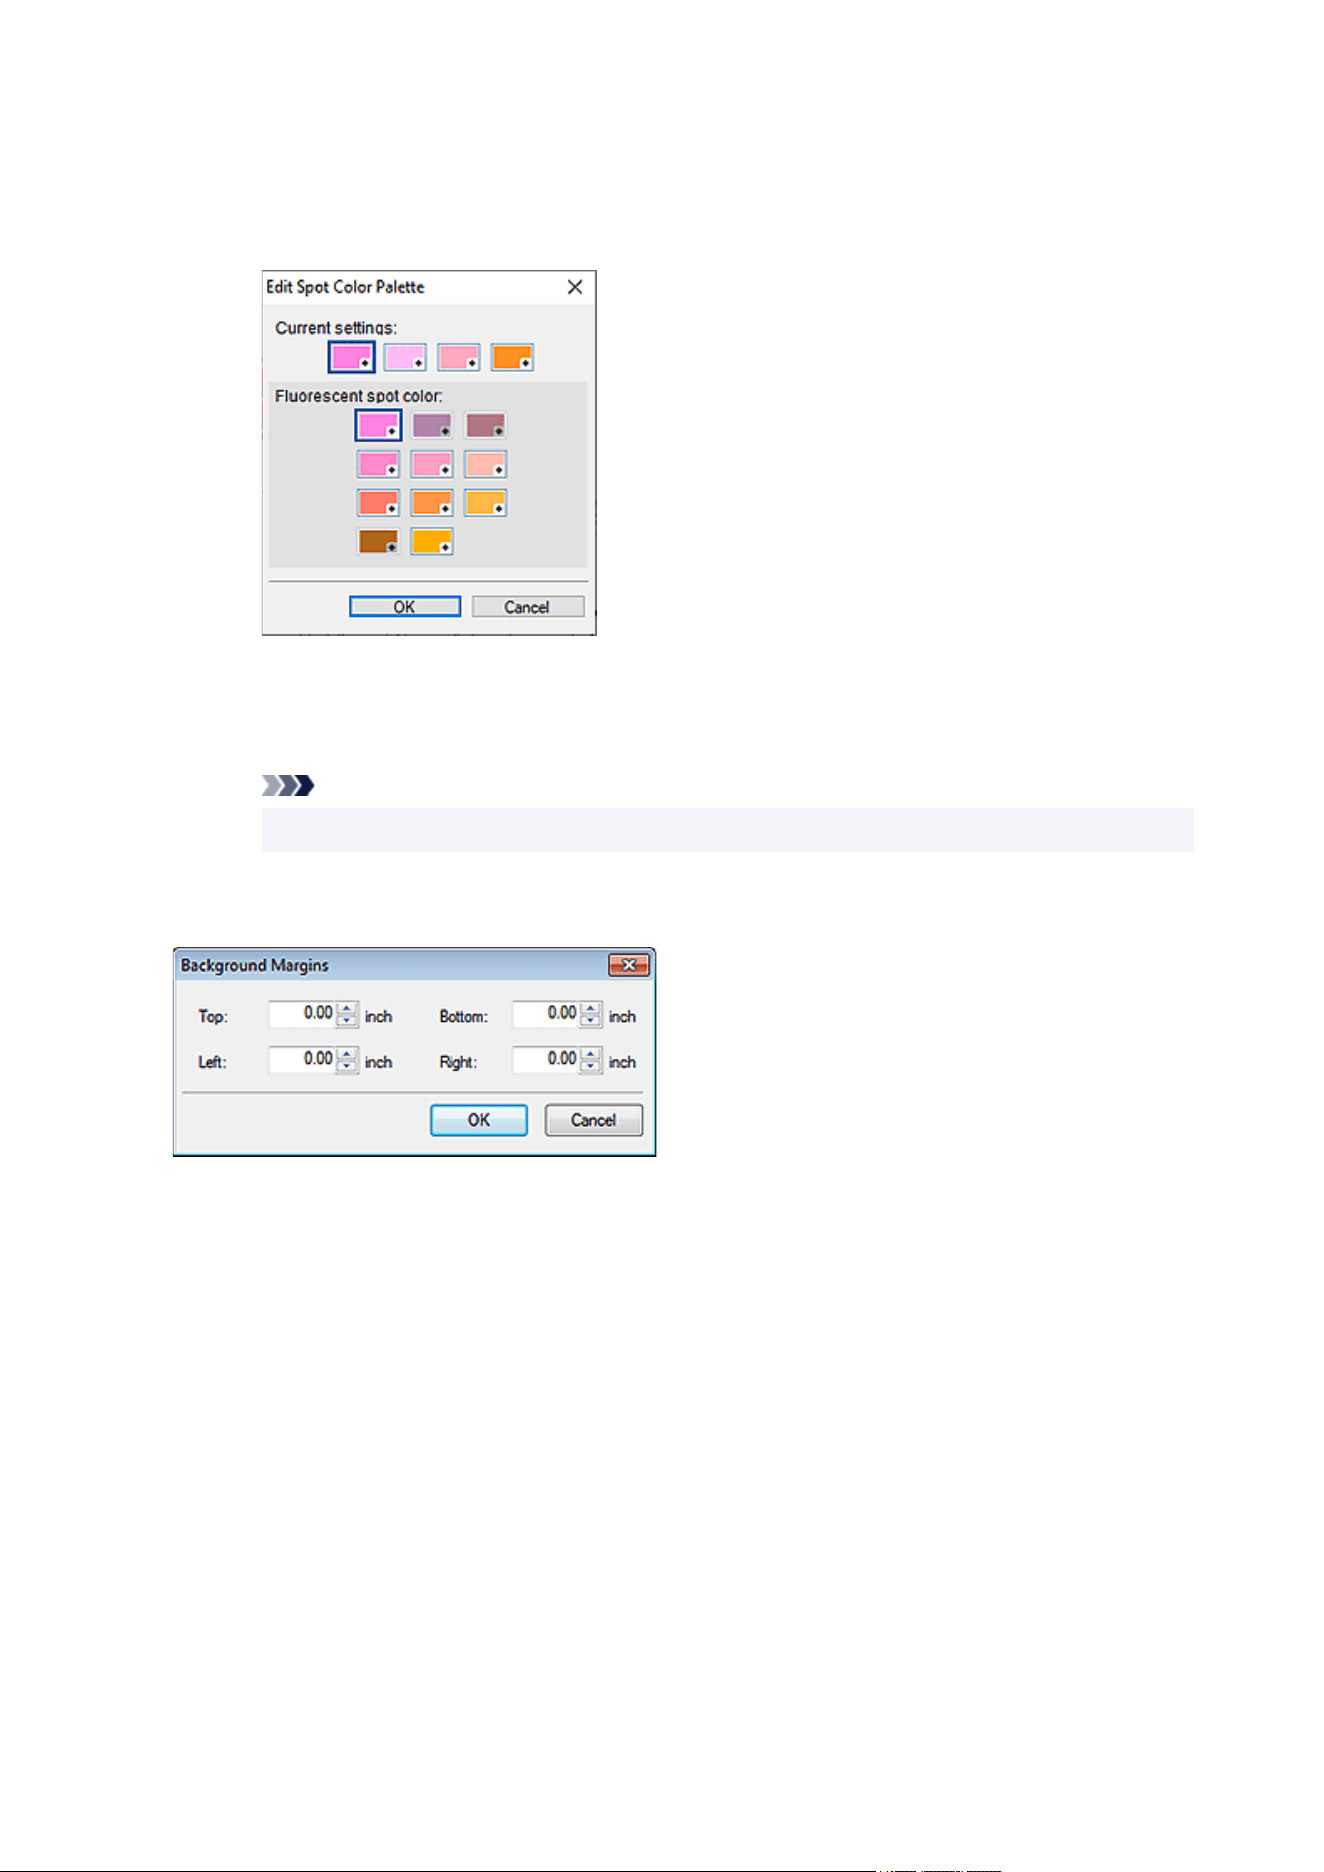
Edit Palette...
Click to display the Edit Spot Color Palette dialog box for editing the colors that appear in the
palette.
Edit Spot Color Palette dialog box
Select the four colors you want to display in the Spot color palette.
Select the color you want to edit in the palette under Current settings, and then select the
color you want to display in the palette from Fluorescent spot color.
Note
• The four colors that appear in the Spot color palette are retained on the printer.
Set Margins...
Displays the Background Margins dialog box for specifying the top, bottom, left, and right margins.
253
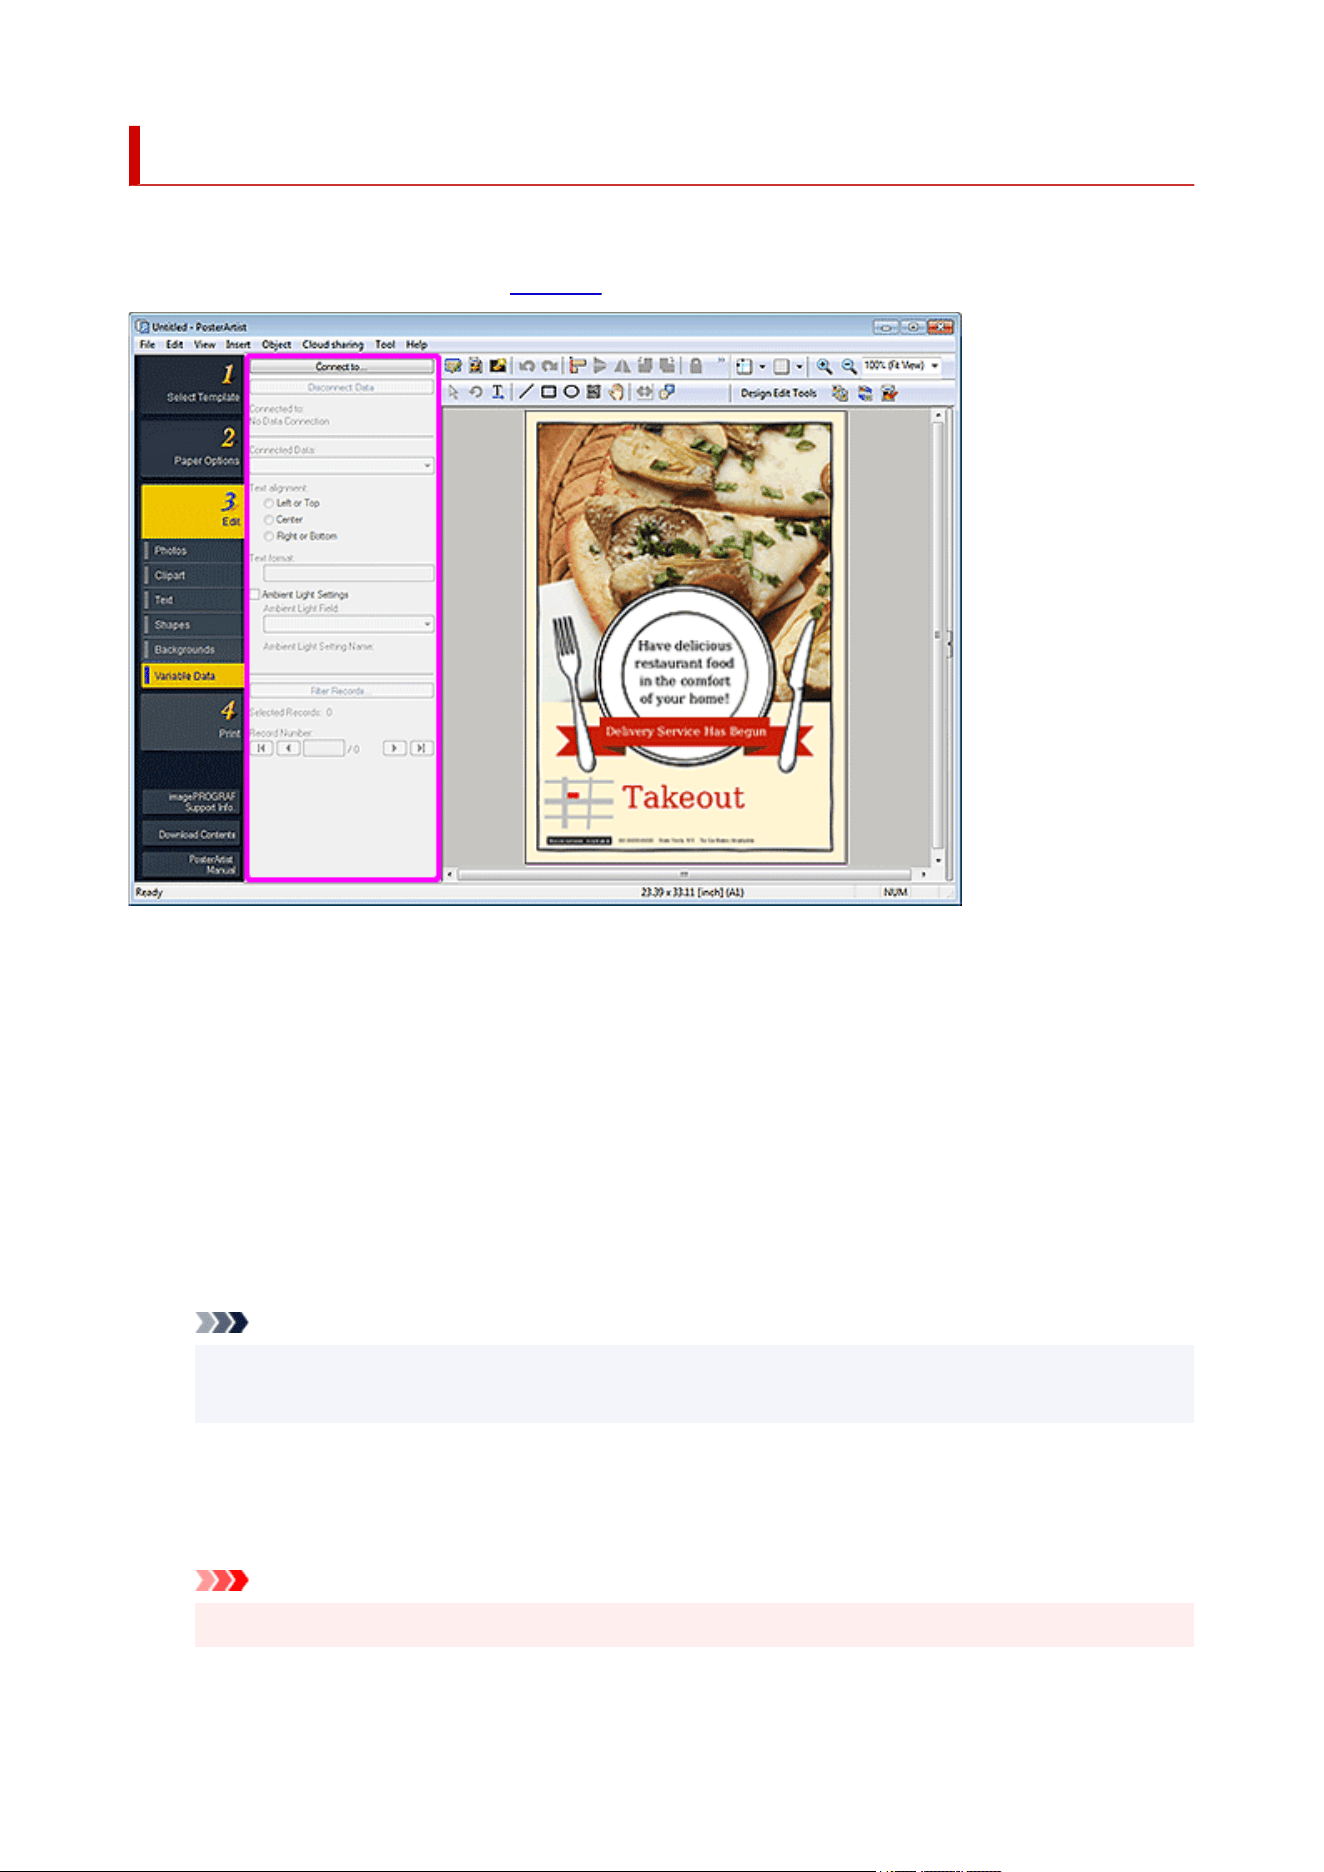
Edit Screen (Variable Data)
Automatically substitute text and images on the poster by using tabular data.
To display the screen, click Edit in the task area, and then click Variable Data.
Connect to...
Displays the Open Data Source dialog box for specifying the location to save the tabular data.
Disconnect Data
Cancels the link to the tabular data and disables the variable printing settings.
Connected to
Displays the name of the linked tabular data file.
Connected Data
Displays the field names that indicate the data type of the read tabular data.
Select a field name to link the selected text string or image to the corresponding record.
Note
• To cancel the link, select Unselected.
• To substitute images, select the field name of the file paths to the target images.
Text alignment
Align the text of each record.
For horizontal text, select left, center, or right. For vertical text, select top, center, or bottom.
Important
• Settings for vertical text are not available depending on your language.
254
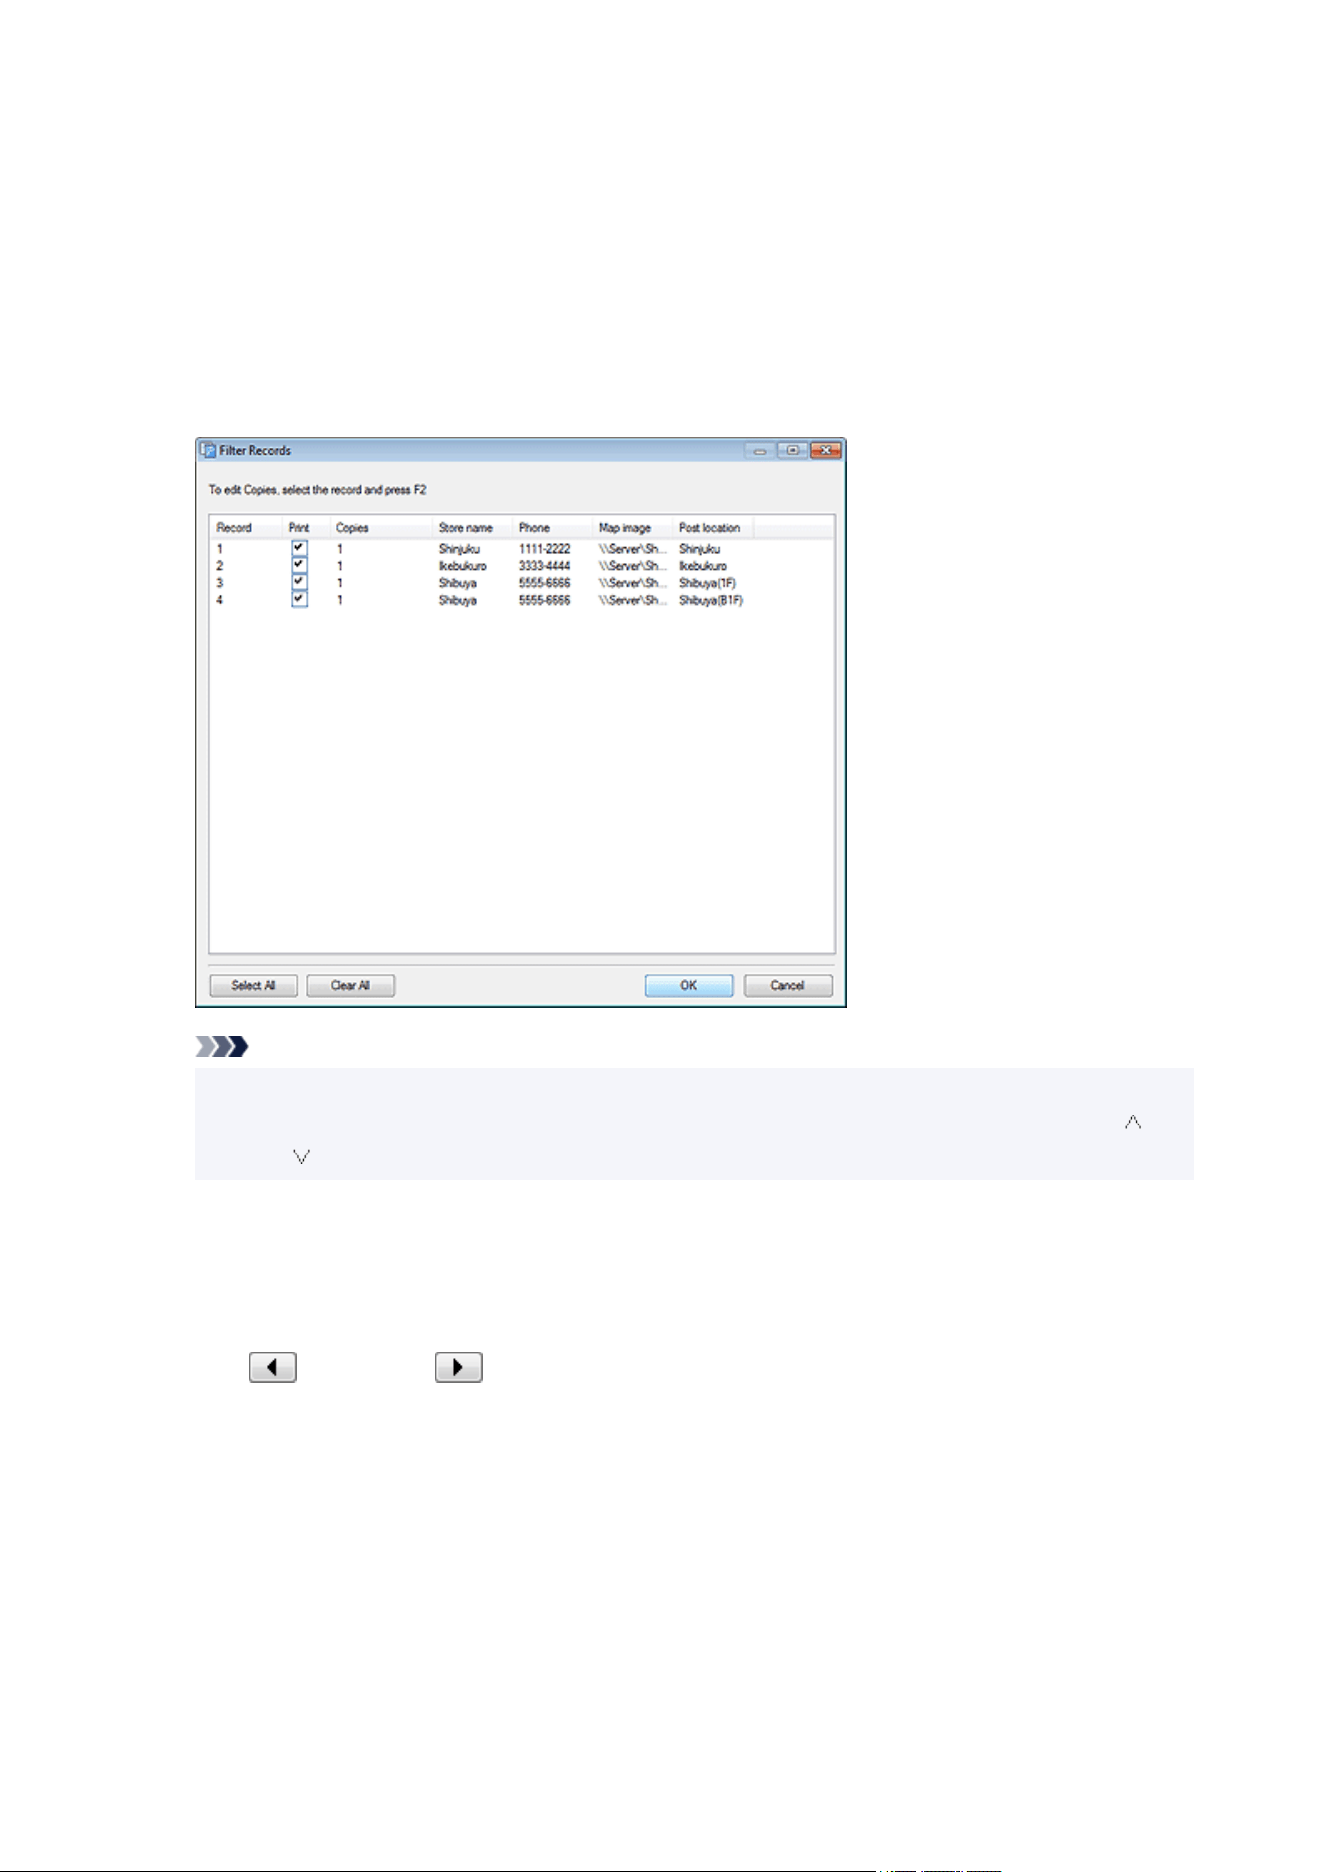
Text format
Format the text of each record.
Ambient Light Settings
Change the ambient light setting.
Ambient Light Field
Select the field name for which you want to change the ambient light setting.
Filter Records...
Displays the Filter Records dialog box for setting the number of copies to print.
Note
• To exclude from the data to be printed, deselect the Print checkbox.
• To change the number of prints, double-click Copies, and then enter the value directly or click (Up
Arrow) or (Down Arrow) on the right to increase or decrease the number.
Selected Records
Displays the number of records to be printed.
Record Number
Displays the number of the record displayed in the poster design area.
Click (Previous) or (Next) to check that the text string or image is replaced with each
record.
255
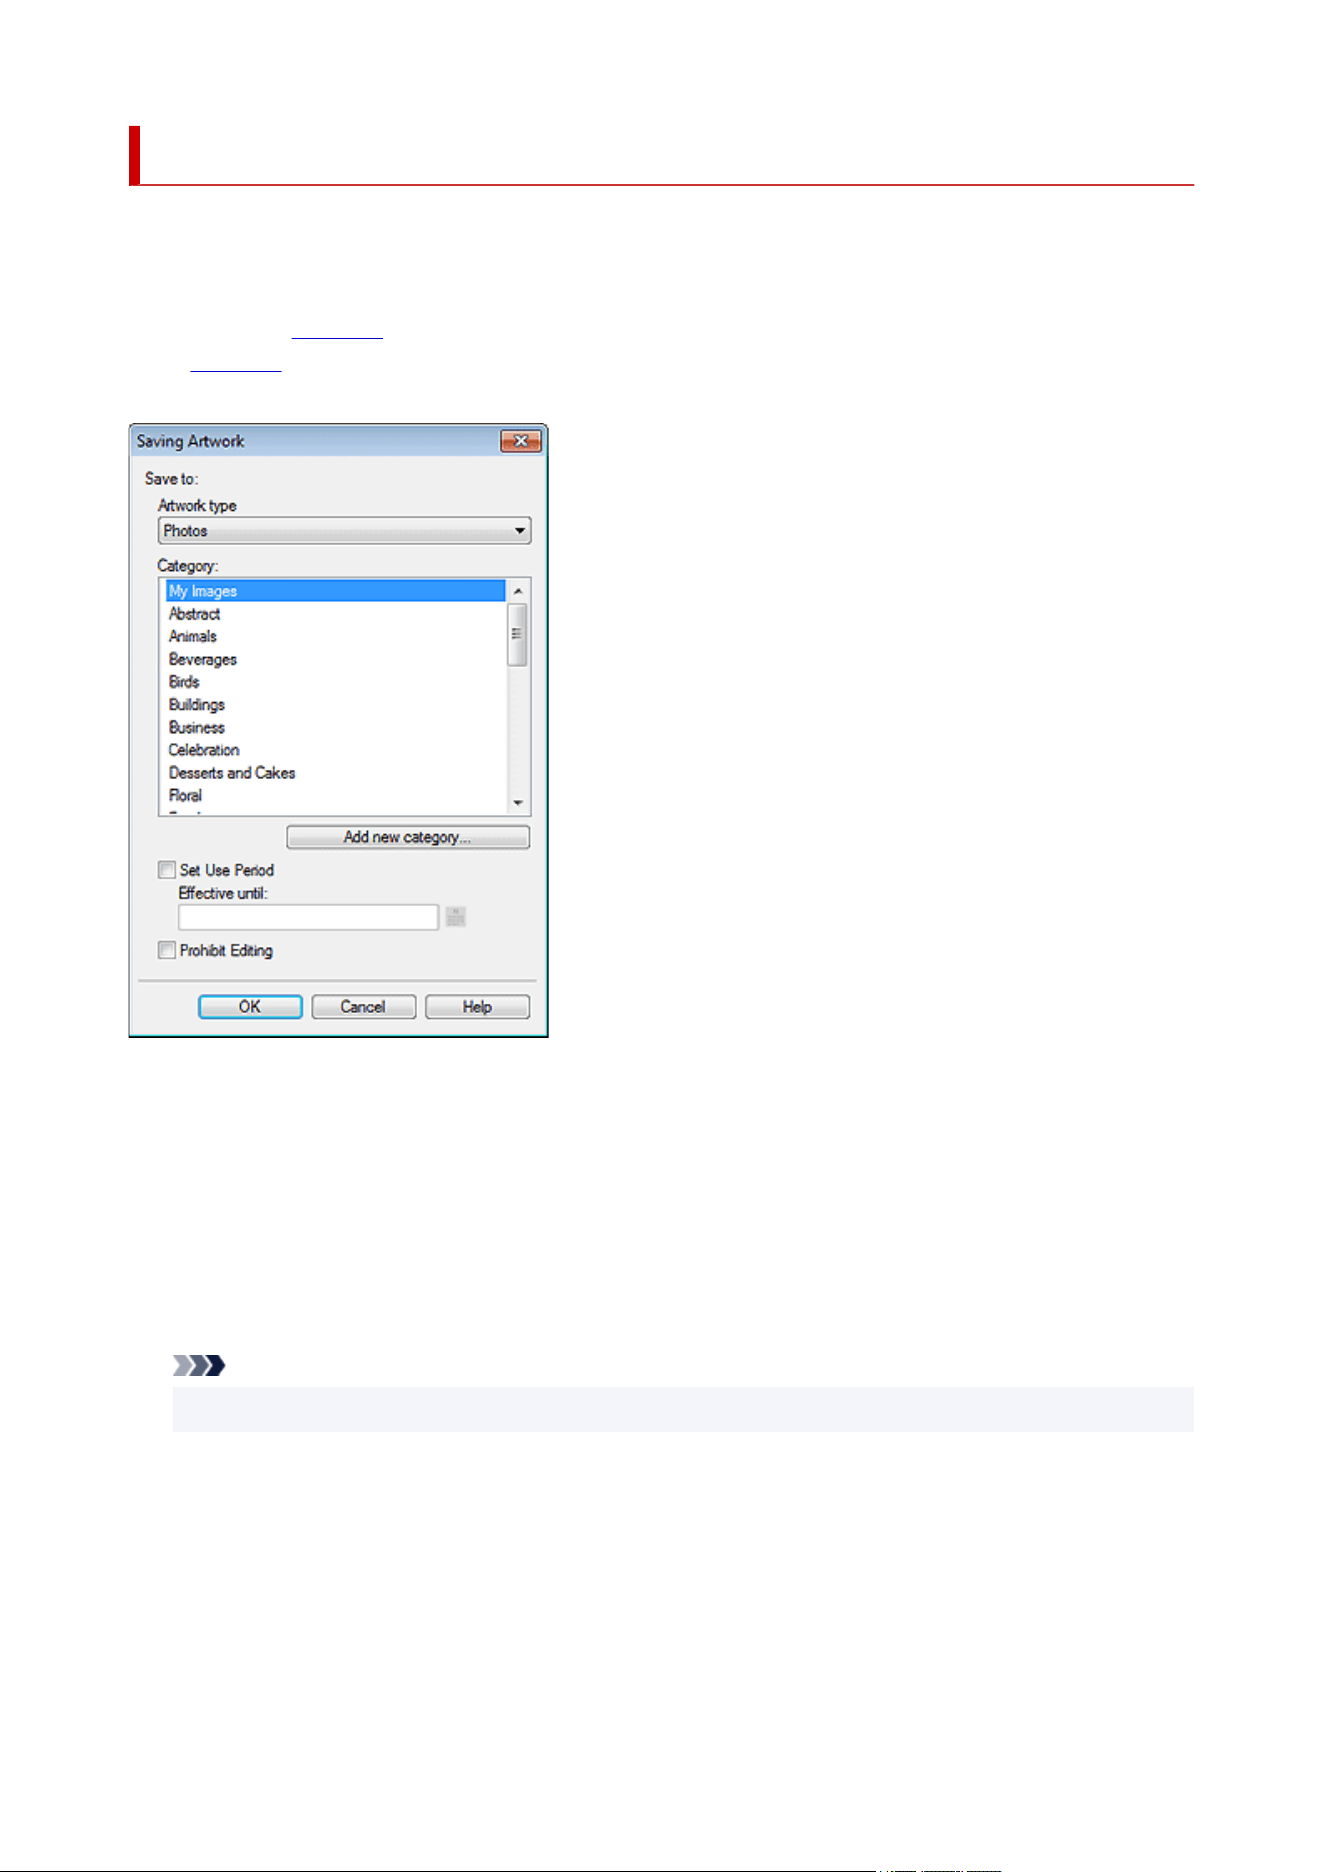
Saving Artwork Dialog Box (Images)
Add photos, clipart, shapes, and other objects.
Display the Saving Artwork dialog box by one of the following operations.
Click Edit in the task area, select Photos, and then click Add to Photos / Clipart....
In the task area, select Clipart in Edit, and then click Add to Clipart....
Right-click an image in the poster design area, and then click Add to Photos / Clipart....
Artwork type
Select the artwork type.
Select Photos or Clipart according to the content of artwork to be added.
Photos: Photos
Clipart: Clipart, shapes, text, and QR codes
Category
From the list, select the category for the artwork to be added.
Note
• My Images and My Clipart are provided as the categories exclusively for users.
Add new category...
Add new categories.
Enter the category name in the displayed dialog box. The category will be added to the bottom of the
list.
Set Use Period
Set the usage period for the artwork to be added.
256

Effective until
Click (Calendar) to display the Calendar dialog box for specifying the usage period.
Important
• Once set, the usage period for added artwork cannot be changed or canceled. To change or cancel the
usage period, add the template again.
Prohibit Editing
Protect the artwork from being edited.
Important
• Once set, edit protection cannot be canceled. To edit, add the template again.
Note
• Once the artwork is added, its thumbnail appears in the list; right-click the thumbnail to check the•
settings.
Restrictions Information...:
Selectable when the image is protected from being edited or when the usage period or a QR code
is set.
Artwork Properties...:
Displays the Artwork Properties dialog box for checking the artwork information. Artwork added
by the user is displayed as User Artwork.
257
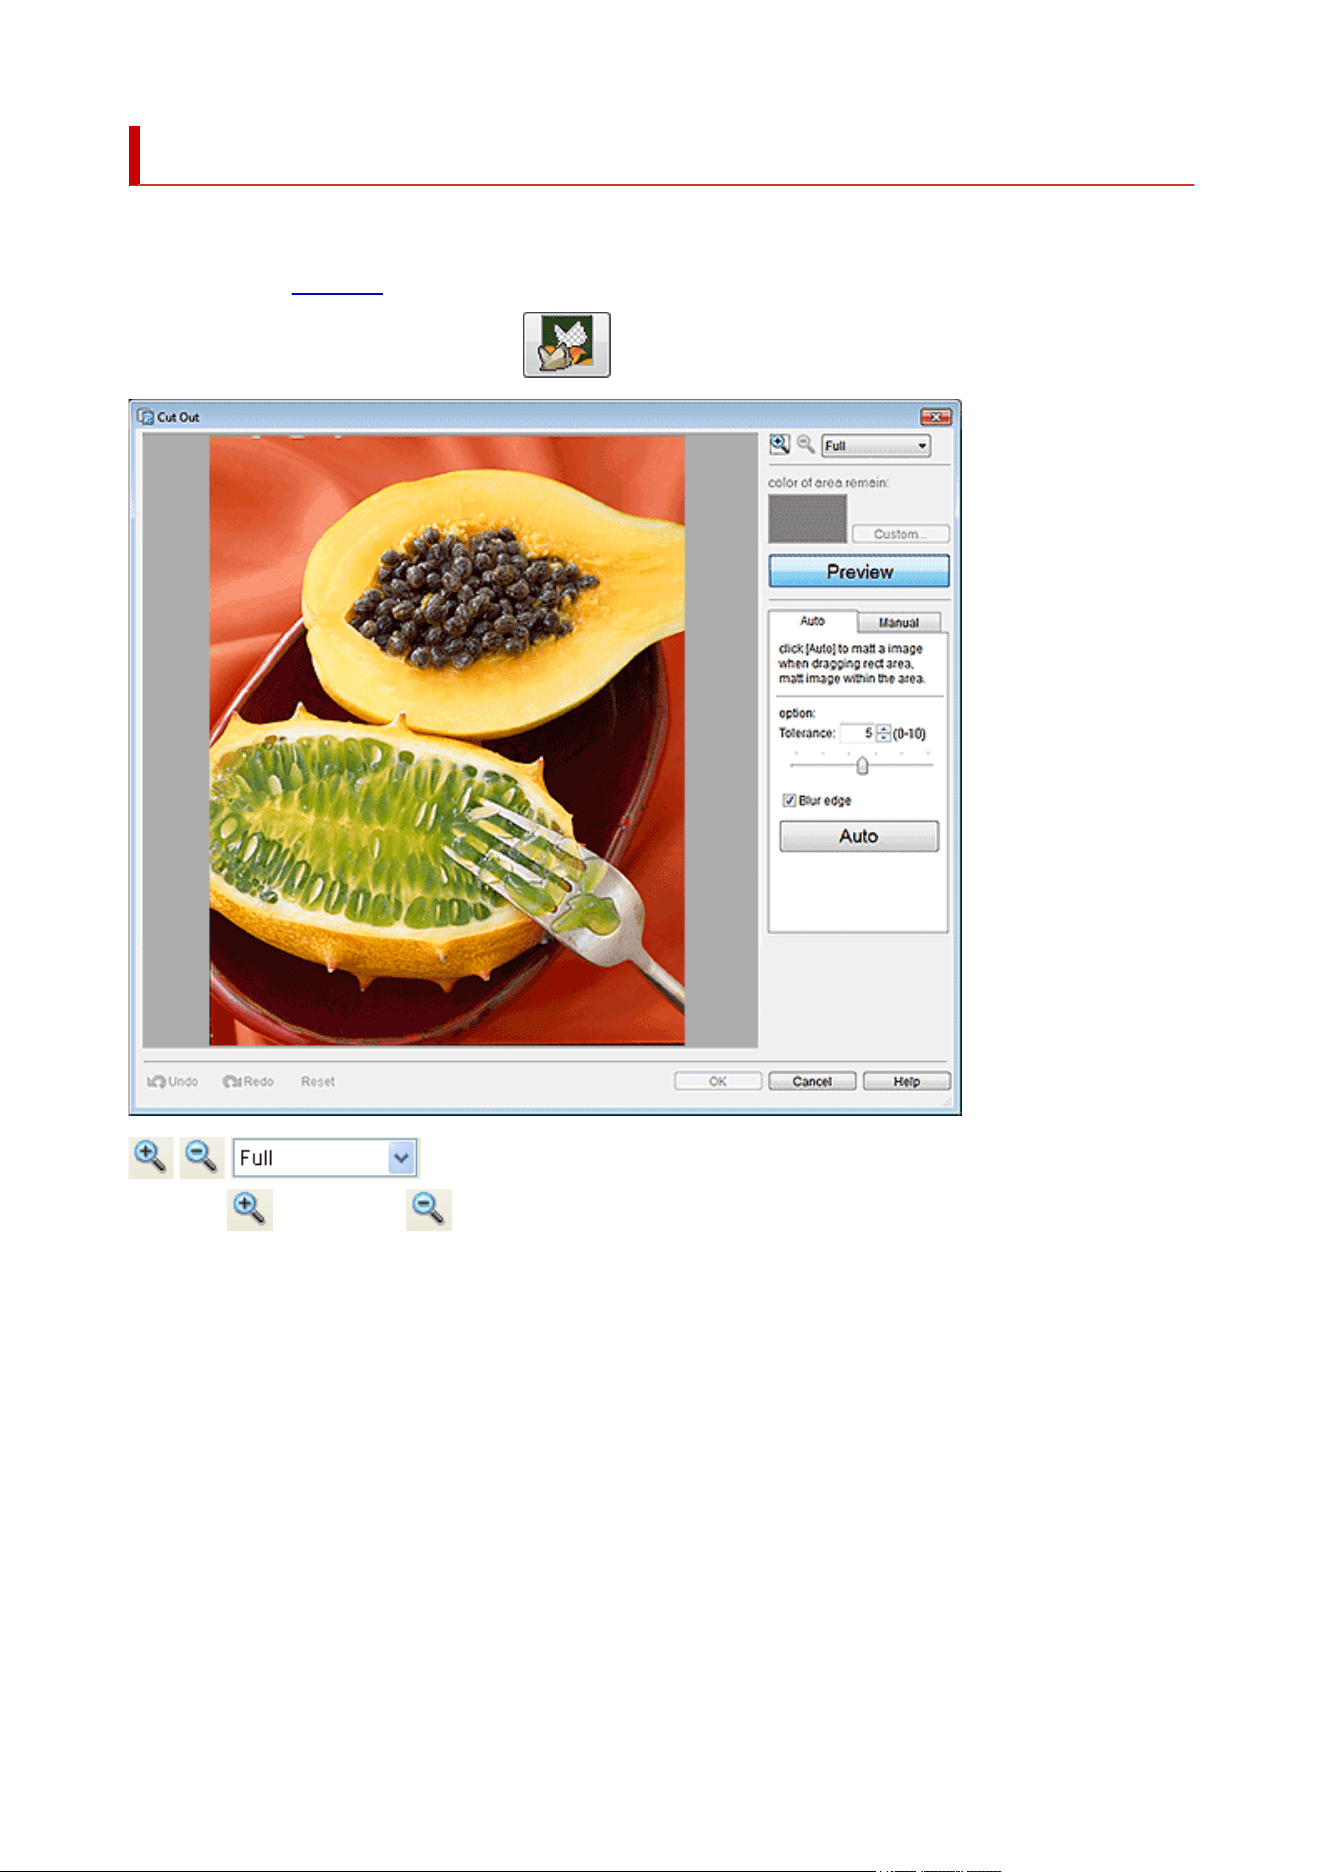
Cut Out Dialog Box
Isolate the area you want to keep in a photo and discard the rest such as the background.
Click Edit in the task area, click Photos, and then select the image you want to edit on the poster.
To display the Cut Out dialog box, click (Cut Out) in Edit Image.
(Zoom In / Zoom Out)
Click (Zoom In) or (Zoom Out) to enlarge or reduce the display size. You can also enlarge or
reduce the display size by specifying the scale.
color of area remain
Specify the color to fill the area to cut out when the original image that has not been cut out is displayed
in the preview. The color can be changed in the Color dialog box displayed by clicking Custom....
Preview
Switch the preview between the original image that has not been cut out and the cut out image. When
the button is off, the original image is displayed; when on, the cut out image is displayed.
Auto tab
Tolerance
Adjust the extent of the area to retain.
To retain a larger area, move the slider to the right (because more colors are judged similar).
To erase a larger area, move the slider to the left (because fewer colors are judged similar).
258
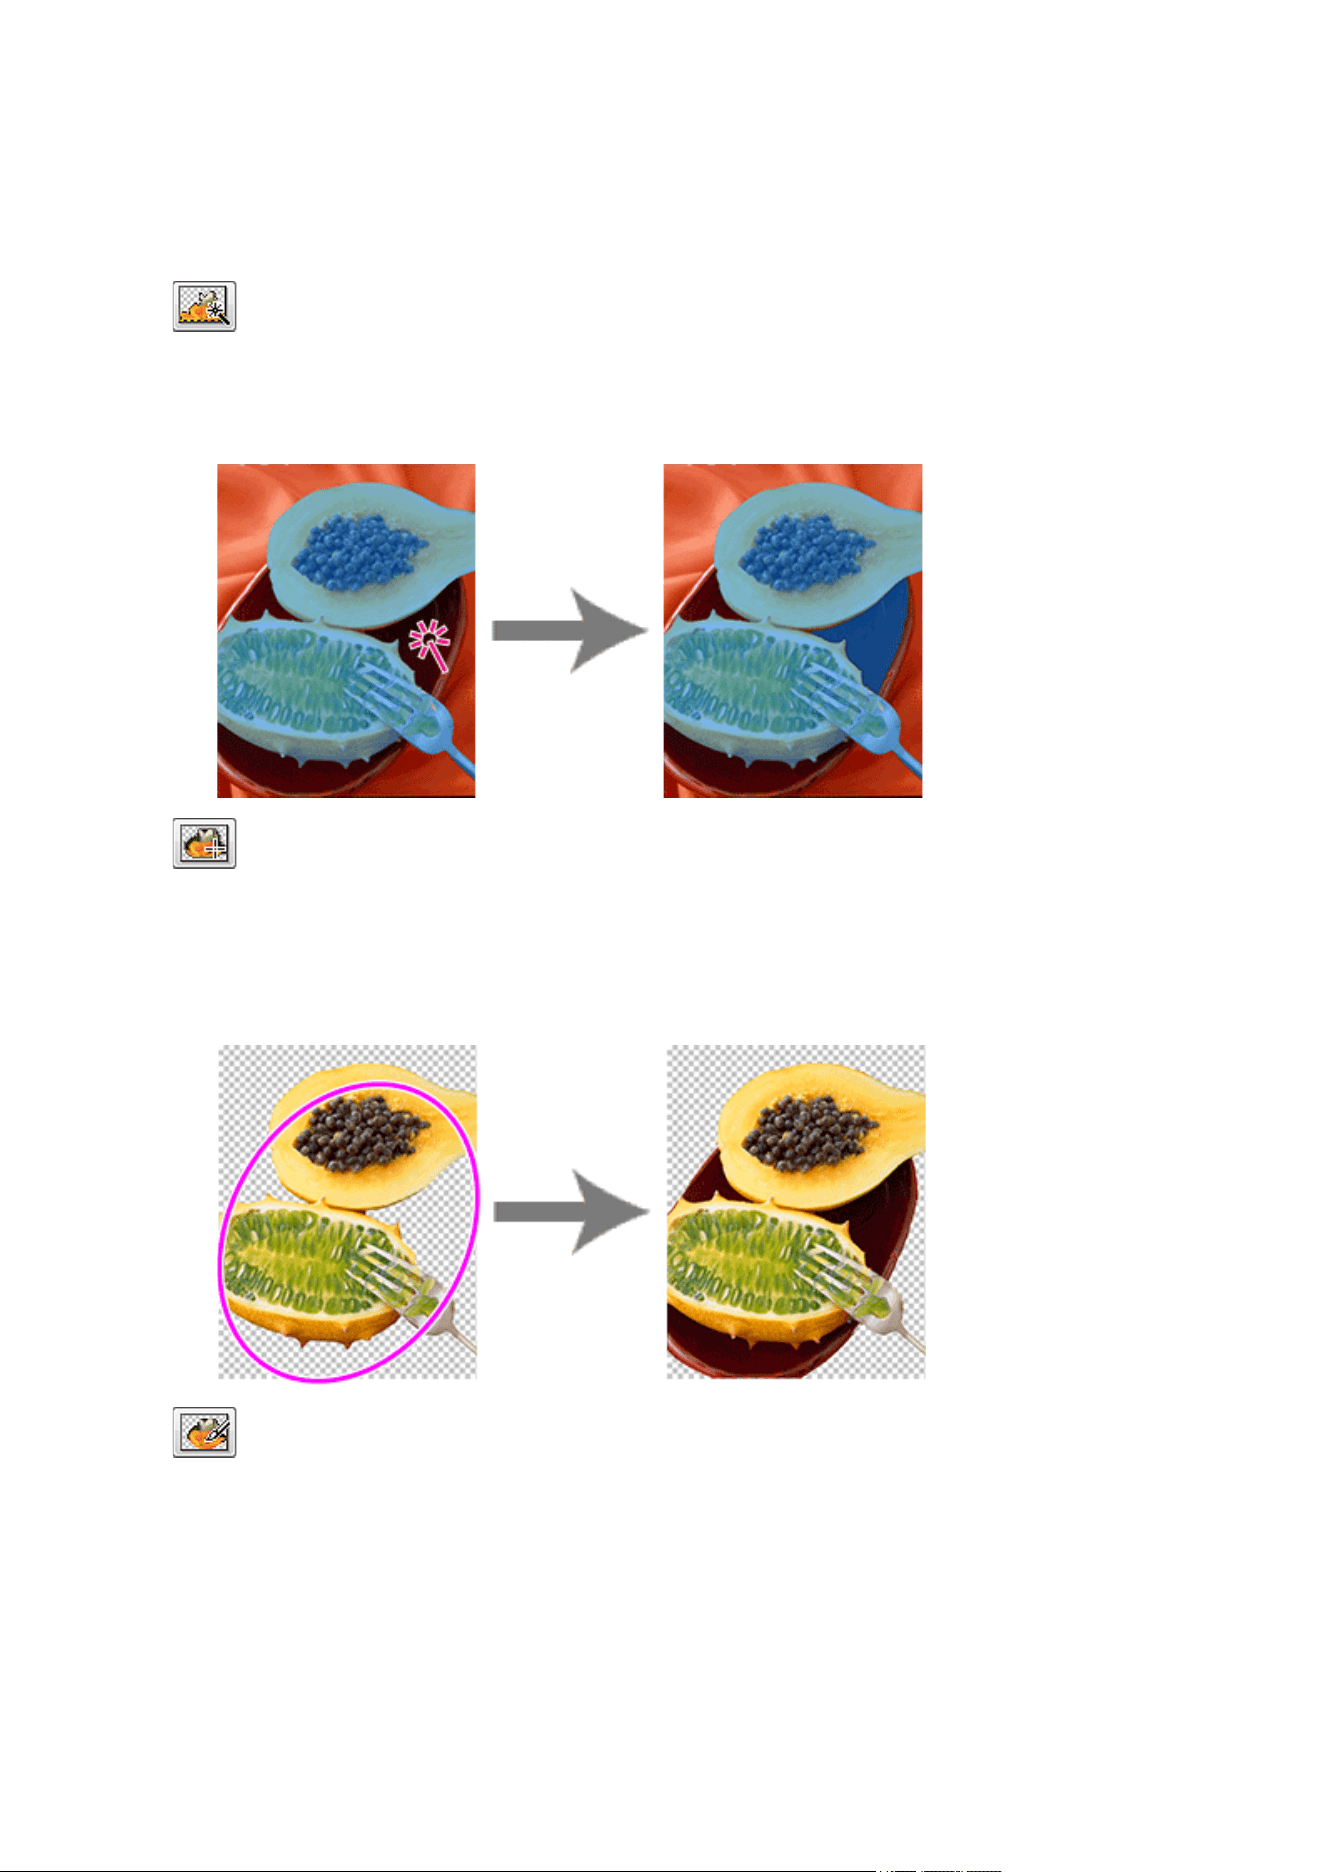
You can also set by entering a value directly.
Blur edge
Blurs the edges of cut out portions.
Manual tab
(Specify by color and cut)
Retains the area whose color is similar to the color specified on the image.
In Tolerance, set a larger value to retain a larger area and set a smaller value to erase a larger
area.
(Specify by area and cut)
Retains the area you outline freehand or by drawing a polygon.
Select Freehand or Shape in Mode, and then outline the area you want to retain.
Drag on the image to outline the area, or click to specify the vertices of the polygon and double-
click when you have finished drawing.
(Specify by line and cut)
Retains the area you trace freehand or by drawing a polyline.
Select Brush or Line in Mode, and then trace the area you want to retain.
The thickness of the brush and polyline can be specified in Size.
Drag on the image to trace the area, or click to specify the vertices of the polyline and double-click
when you have finished drawing.
259
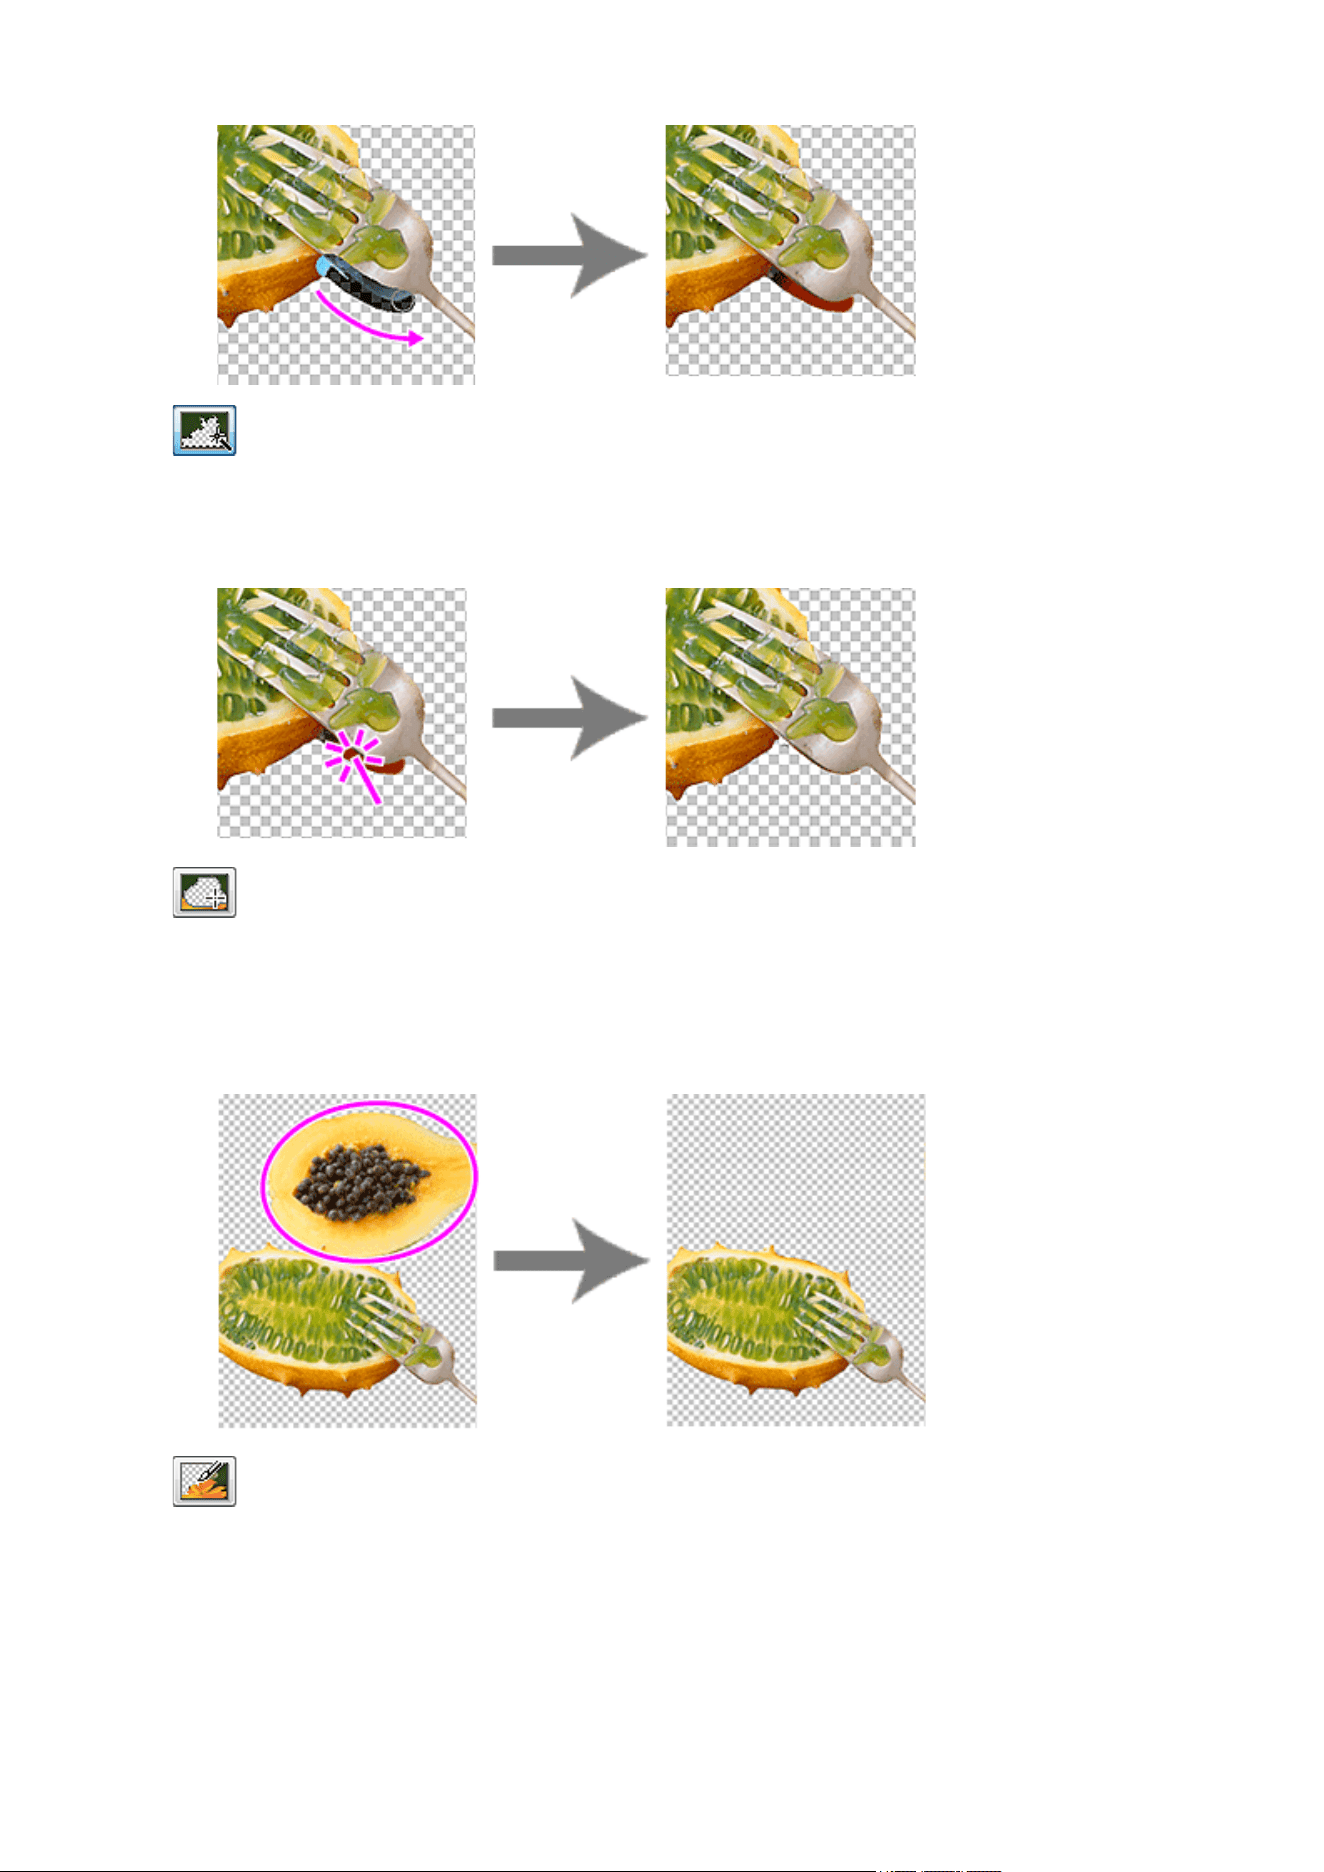
(Specify by color and clear)
Erases the area whose color is similar to the color specified on the image.
In Tolerance, set a larger value to erase a larger area and set a smaller value to retain a larger
area.
(Specify by area and clear)
Erases the area you outline freehand or by drawing a polygon.
Select Freehand or Shape in Mode, and then outline the area you want to erase.
Drag on the image to outline the area, or click to specify the vertices of the polygon and double-
click when you have finished drawing.
(Specify by line and clear)
Erases the area you trace freehand or by drawing a polyline.
Select Brush or Line in Mode, and then trace the area you want to erase.
The thickness of the brush and polyline can be specified in Size.
260
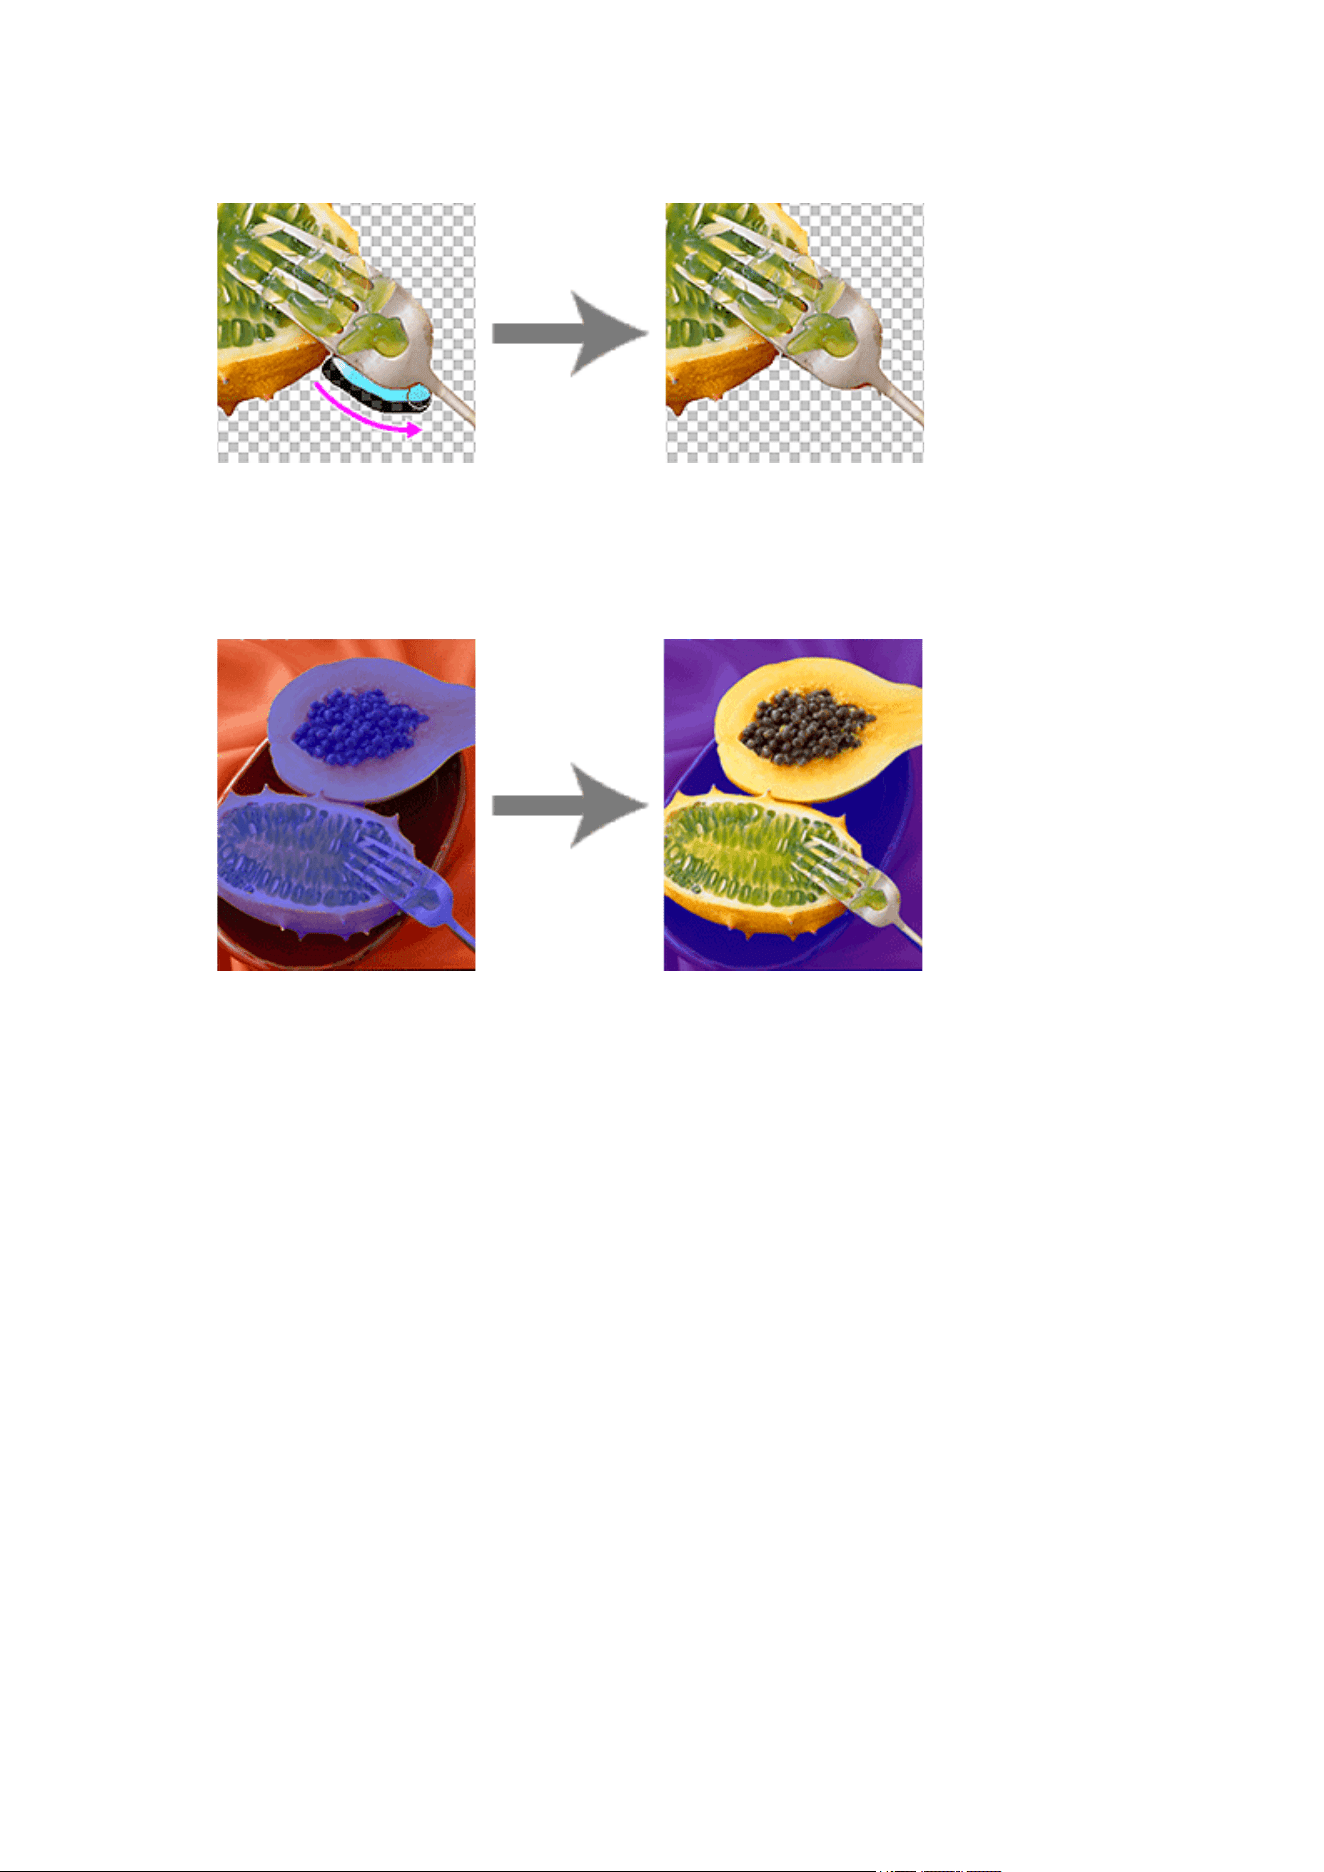
Drag on the image to trace the area, or click to specify the vertices of the polyline and double-click
when you have finished drawing.
Blur edge
Blurs the edges of cut out portions.
Invert Selection
Switches the area to erase and area to retain.
Undo
Undoes the last operation.
Redo
Redoes the last undone correction.
Reset
Cancels the cut out effect.
Help
Opens this guide.
261
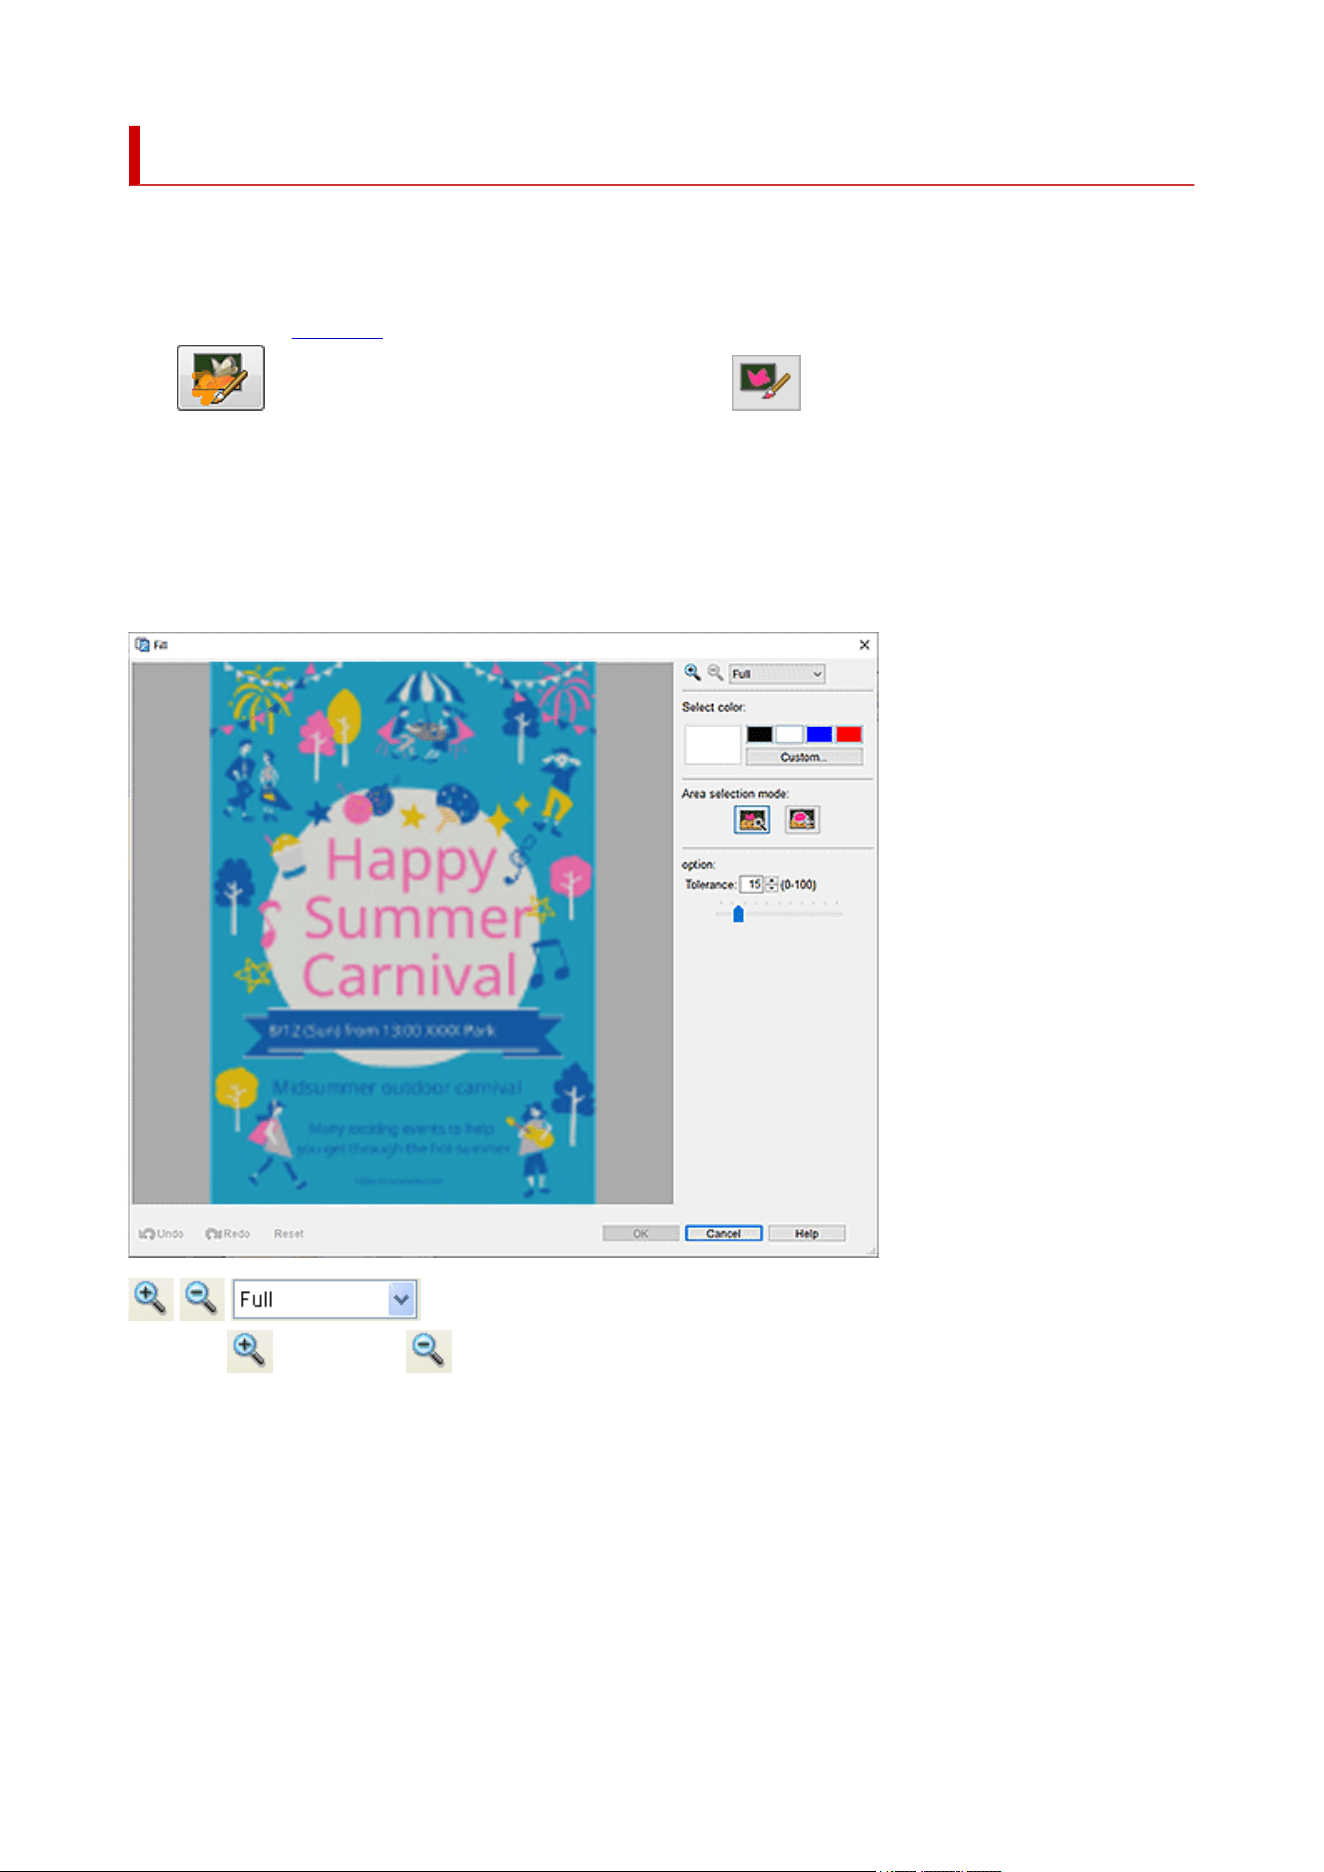
Fill Dialog Box
Change the color of a specified area of an object or image.
Display the Fill dialog box by one of the following operations.
Click Edit in the task area, click Photos, select the image you want to edit (such as a photo) on the poster,
click (Retouch Image) in Edit Image, and then click (Fill) in the displayed Retouch Image
dialog box.
Right-click the image you want to edit (such as a photo) on the poster, and then click Retouch Image... >
Fill.
Click Edit in the task area, click Clipart, select the clipart you want to edit on the poster, and then click
Convert to bitmap and edit....
Right-click the clipart you want to edit on the poster, and then click Retouch Image....
(Zoom In / Zoom Out)
Click (Zoom In) or (Zoom Out) to enlarge or reduce the display size. You can also enlarge or
reduce the display size by specifying the scale.
Select color
Displays the current object or image color and basic colors. To use other colors, click Custom..., and
then select a color in the displayed dialog box.
Regular color
Displays the current color or basic colors in the four-color palette.
Spot color
Displays available fluorescent colors in the four-color palette.
262
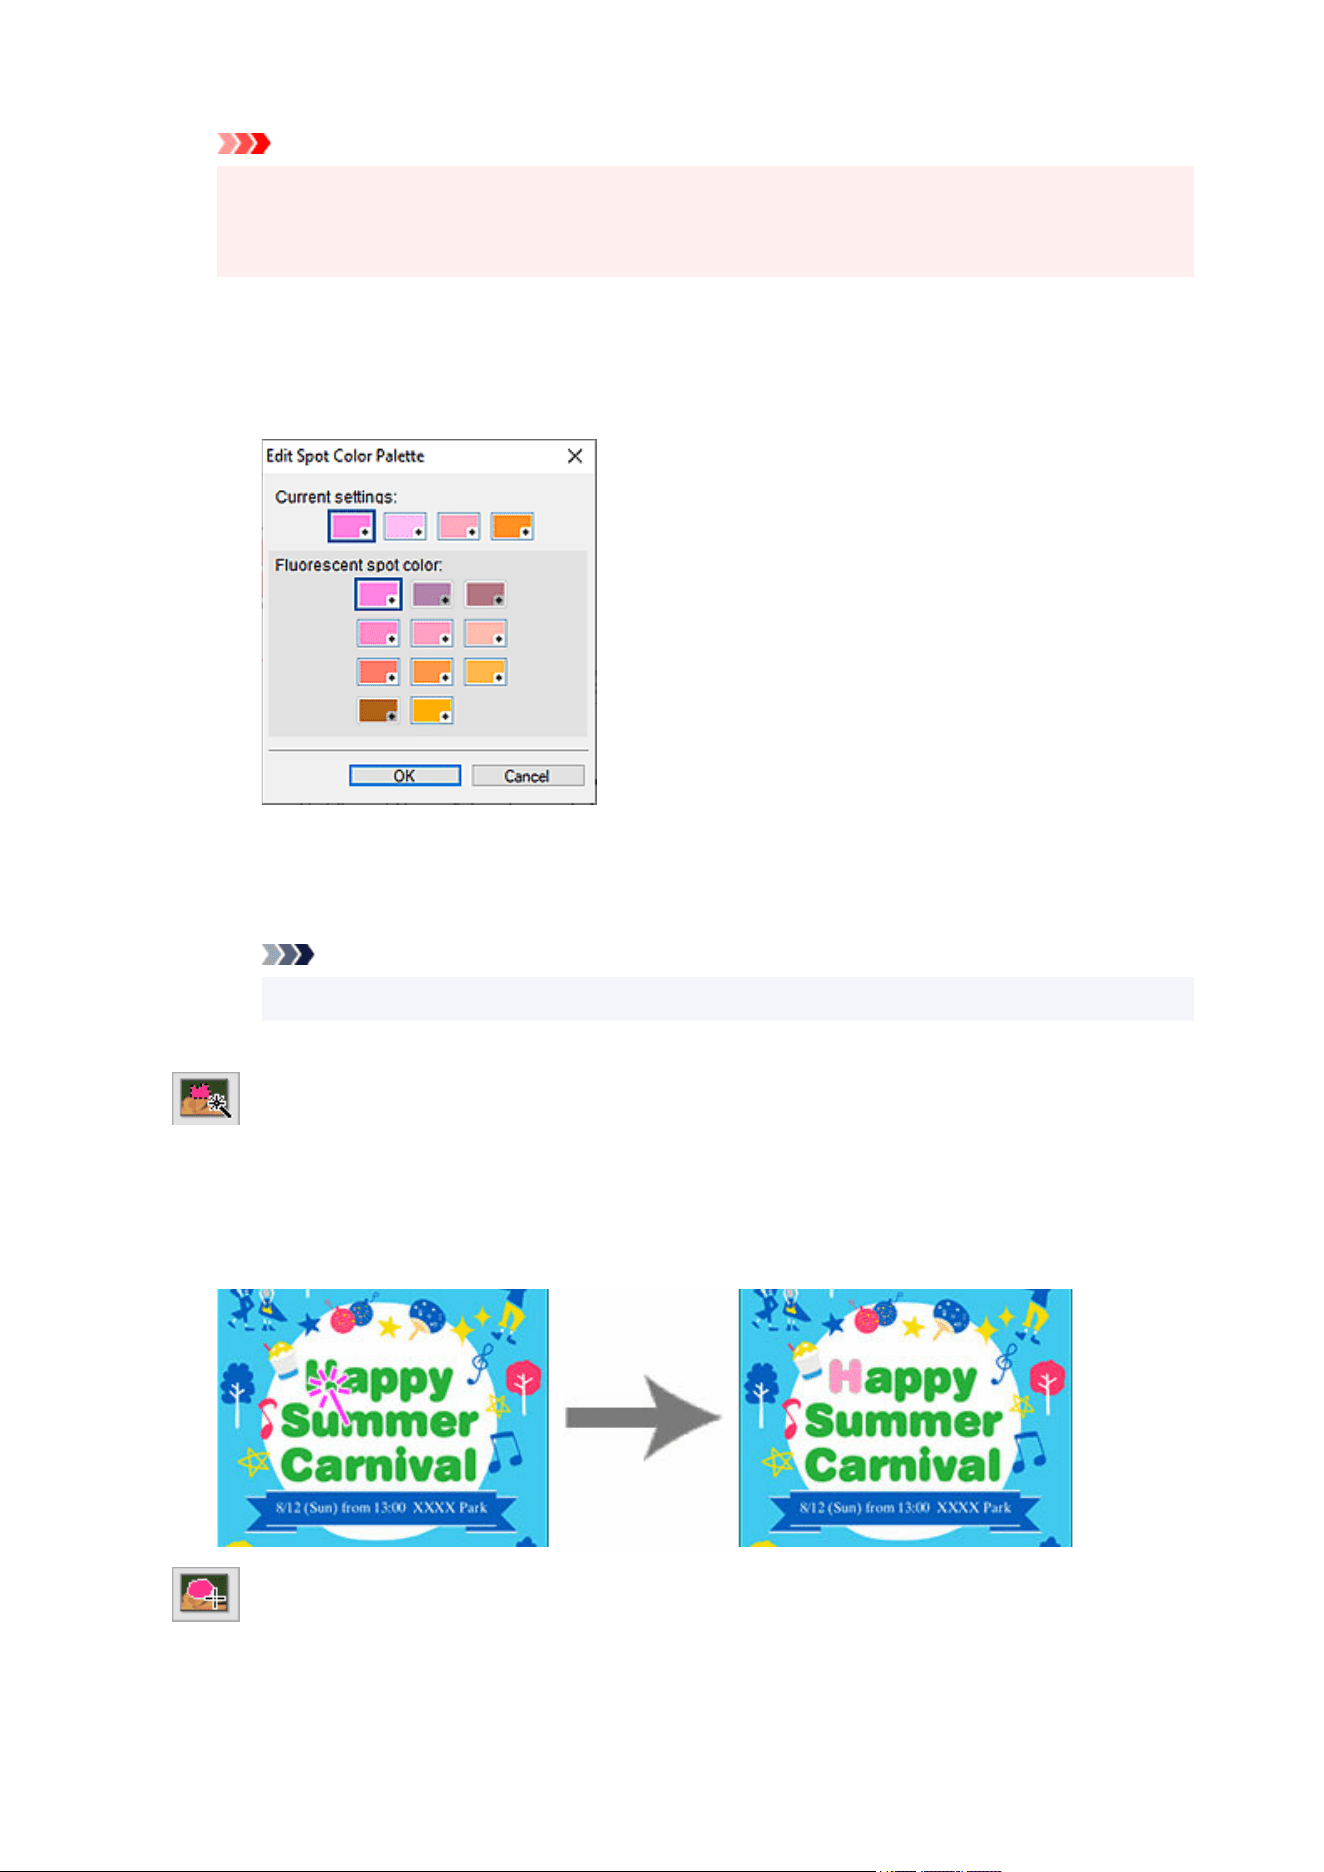
Important
• Fluorescent spot colors cannot be used depending on your model or paper type.
• Fluorescent spot colors cannot be used when the Edit layout with Free Layout plus checkbox is
selected in the Paper Options screen.
Edit Palette...
Click to display the Edit Spot Color Palette dialog box for editing the colors that appear in the
palette.
Edit Spot Color Palette dialog box
Select the four colors you want to display in the Spot color palette.
Select the color you want to edit in the palette under Current settings, and then select the
color you want to display in the palette from Fluorescent spot color.
Note
• The four colors that appear in the Spot color palette are retained on the printer.
Area selection mode
(Auto Select Based on Clicked Color)
Change the color by automatically selecting an area whose color is similar to the color specified on
the image.
In Tolerance, increase the value to change a larger area and decrease the value to narrow the
area.
(Select Area Manually)
Change the color of the area you outline freehand or by drawing a polygon.
Select Freehand or Shape in Mode, and then outline the area whose color you want to change.
263

Drag on the image to outline the area, or click to specify the vertices of the polygon and double-
click when you have finished drawing.
Undo
Undoes the last operation.
Redo
Redoes the last undone correction.
Reset
Restores the original state (the state before changing the colors).
Help
Opens this guide.
264

Edit Image Dialog Box (Trim)
Select and display the area you want to keep in an image.
Important
• Trimming photos does not edit the original photos.
• Trimming is canceled if the photo is replaced with another photo.
Click Edit in the task area, click Photos, and then select the image you want to edit on the poster.
To display the Edit Image dialog box and preview panel, click (Trim) in Edit Image.
265
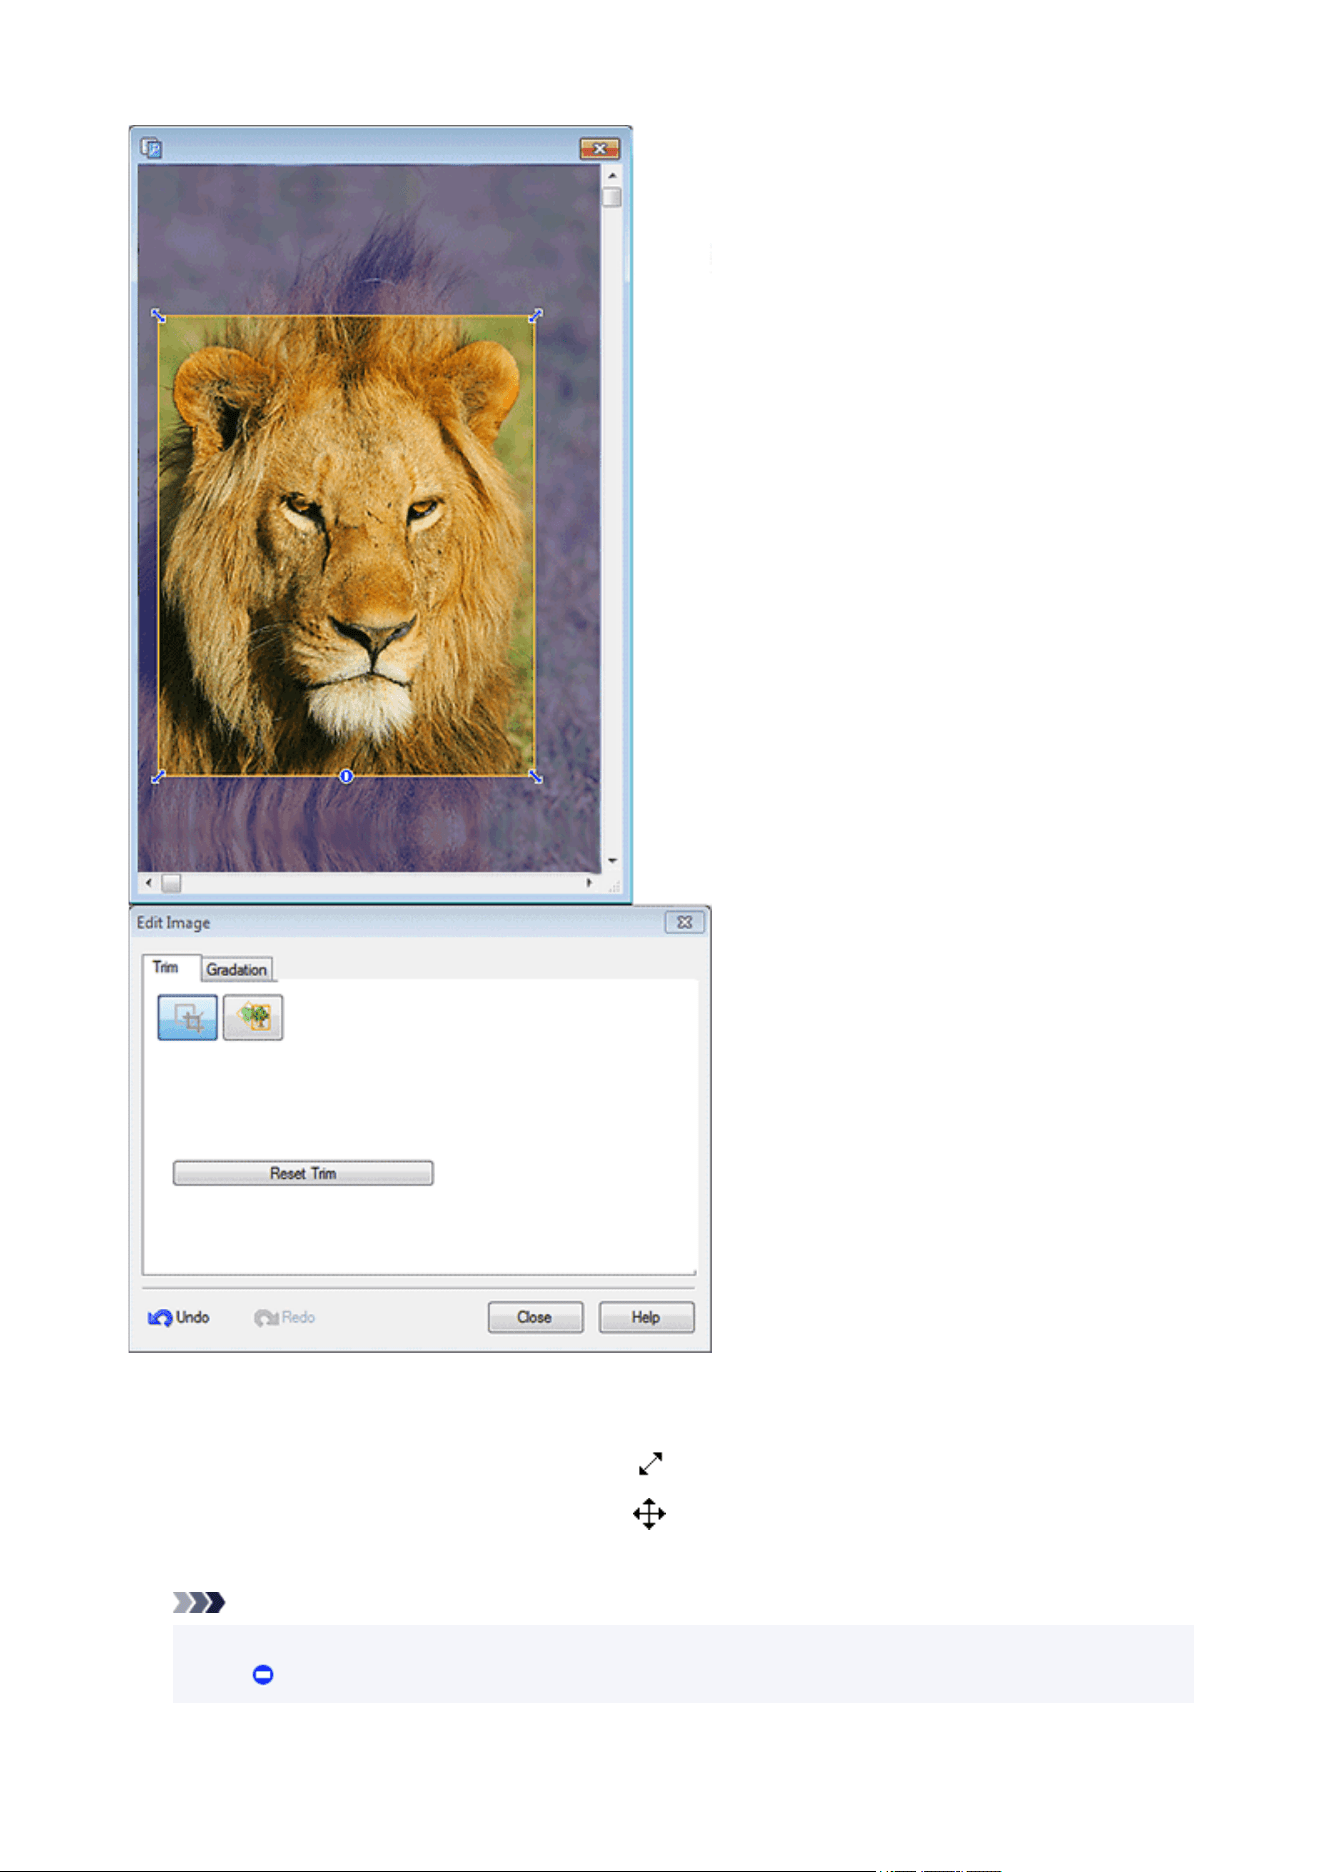
Orange frame (trimming area)
Represents the trimming area.
To resize the frame for the trimming area, drag (Arrow) in the corners.
To move the frame for the trimming area, drag (Crosshair) that appears when you point inside the
frame.
Note
• To change the frame orientation from portrait to landscape and vice versa, rotate the orange frame by
clicking (Rotation).
266

Reset Trim
Resets the trimming area.
Undo
Undoes the last operation.
Redo
Redoes the last undone correction.
Help
Opens this guide.
267
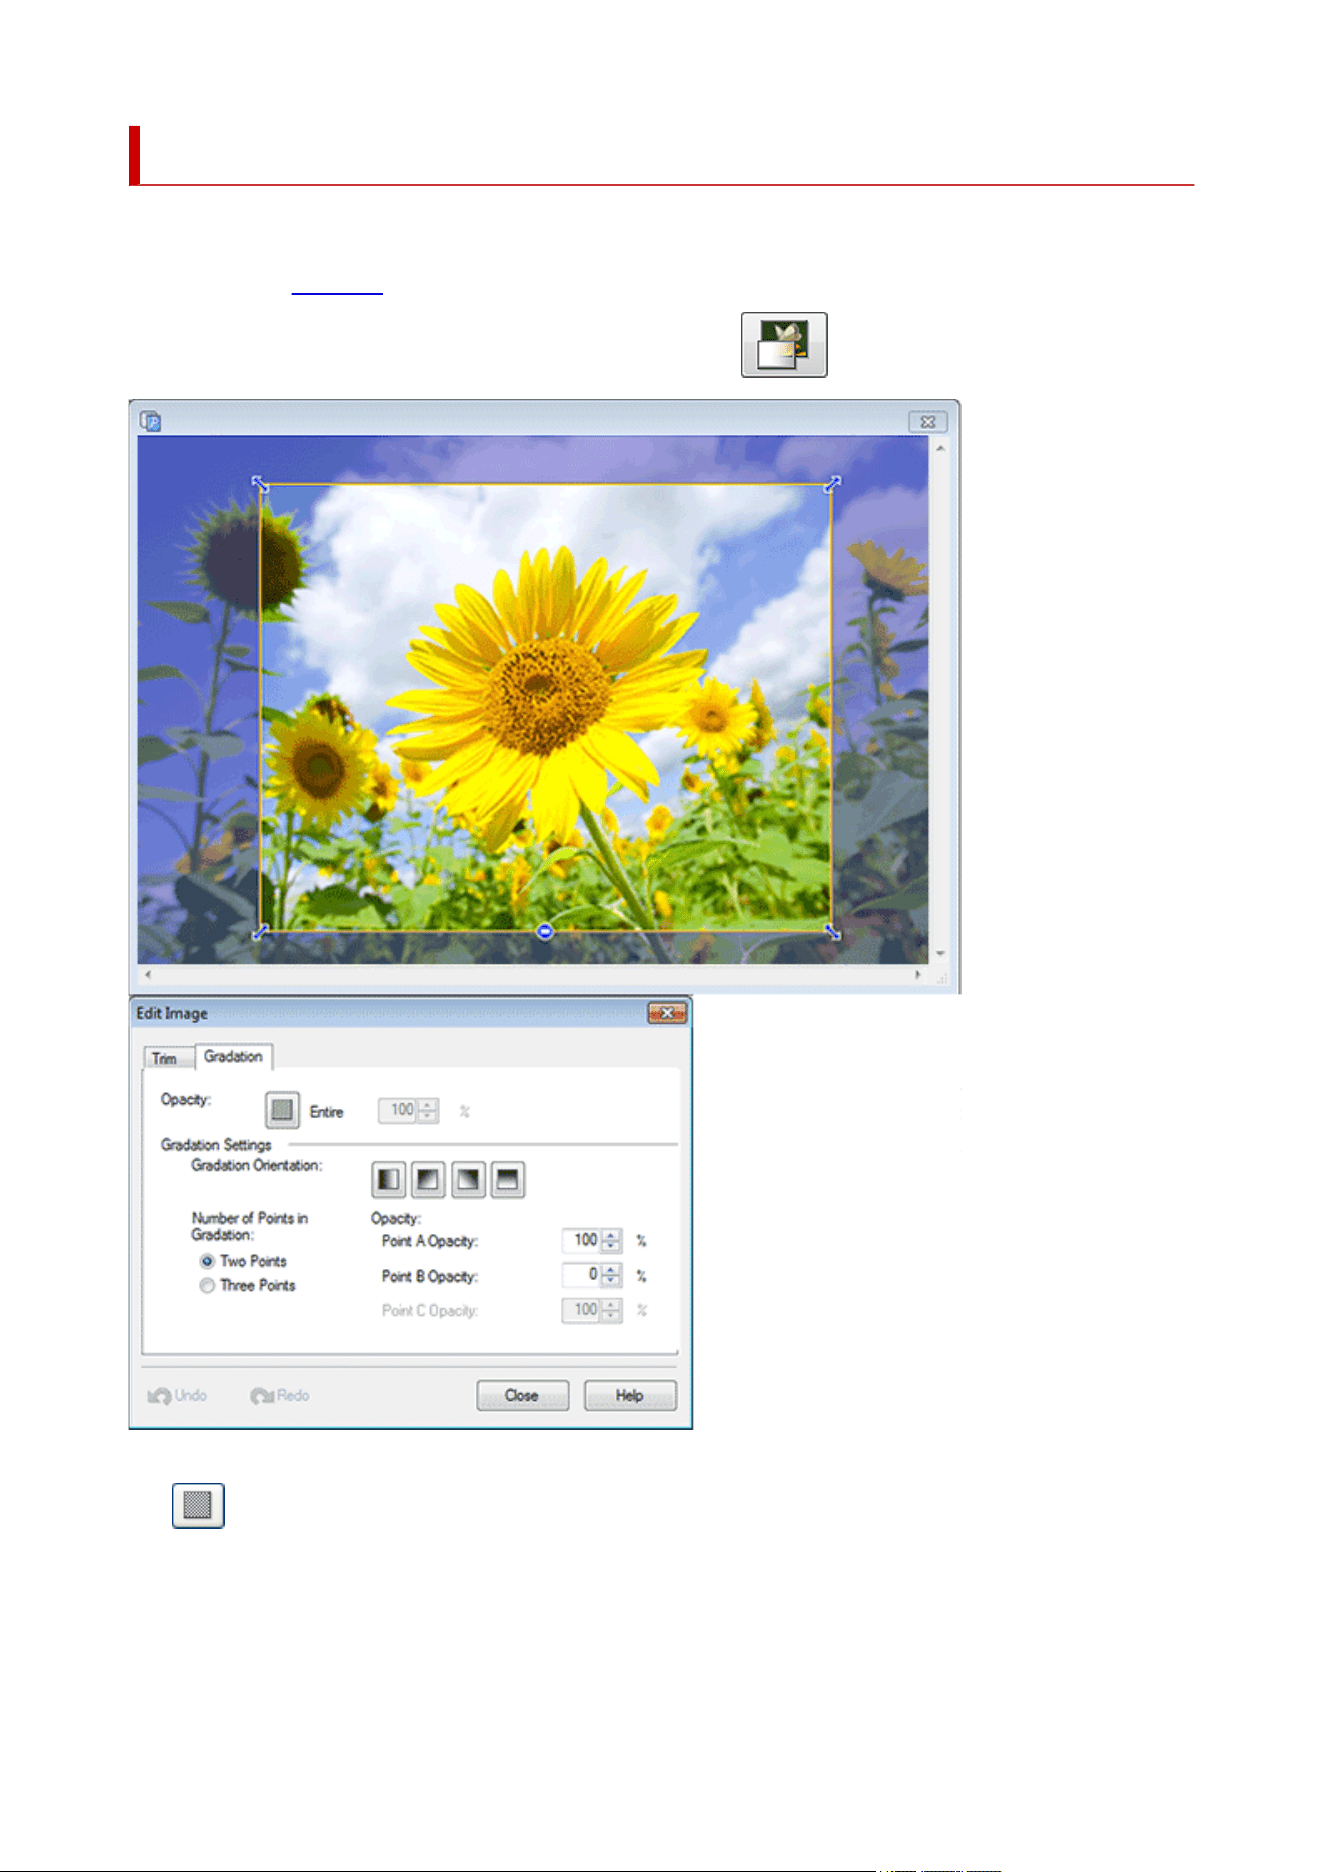
Edit Image Dialog Box (Gradation)
Apply a gradation to photos.
Click Edit in the task area, click Photos, and then select the image you want to edit on the poster.
To display the Edit Image dialog box and preview panel, click (Gradation) in Edit Image.
Opacity
(Set Opacity to Background)
Apply transparency to the entire photo by specifying the opacity.
Increase the value to increase opacity and decrease the value to increase transparency.
Gradation Orientation
Specify the direction of the gradation.
268
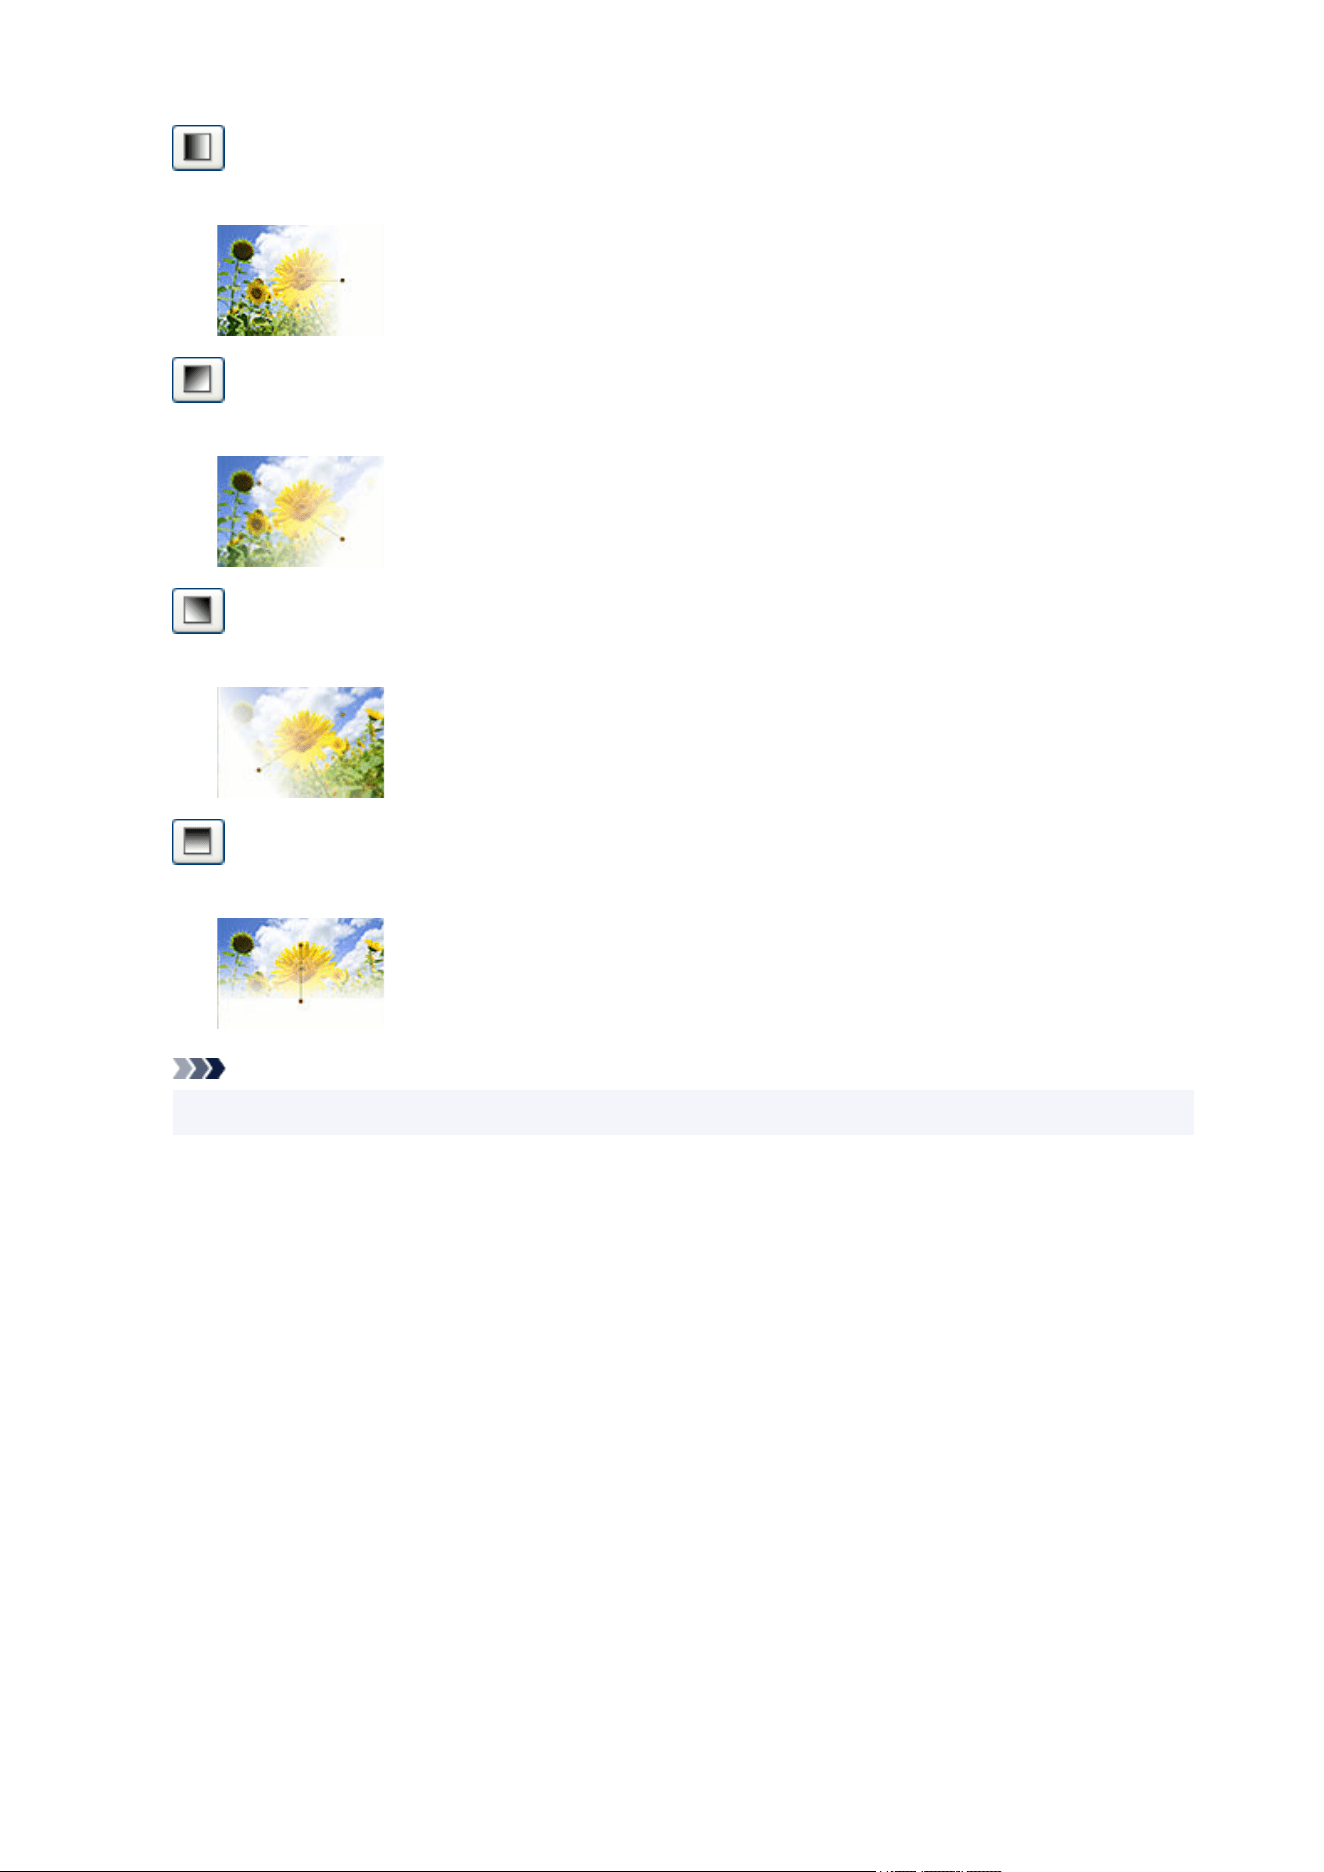
(Left to Right)
Colors fade from left to right.
(Upper Left to Lower Right)
Colors fade from the upper left to the lower right.
(Upper Right to Lower Left)
Colors fade from the upper right to the lower left.
(Top to Bottom)
Colors fade from the top to the bottom.
Note
•
To remove the gradation, click the selected Gradation Orientation again.
Number of Points in Gradation
Select whether to apply a gradation with midpoints.
To use midpoints, select Three Points. Midpoints (C1 and C2) appear in the preview; use them to
make the gradation more variable.
Point A Opacity
Specify the opacity of starting point.
Increase the value to increase opacity and decrease the value to increase transparency.
Point B Opacity
Specify the opacity of ending point.
Increase the value to increase opacity and decrease the value to increase transparency.
Point C Opacity
Specify the opacity of midpoints.
Increase the value to increase opacity and decrease the value to increase transparency.
269

Note
• Selectable when Three Points is selected for Number of Points in Gradation.
Undo
Undoes the last operation.
Redo
Redoes the last undone correction.
Help
Opens this guide.
270
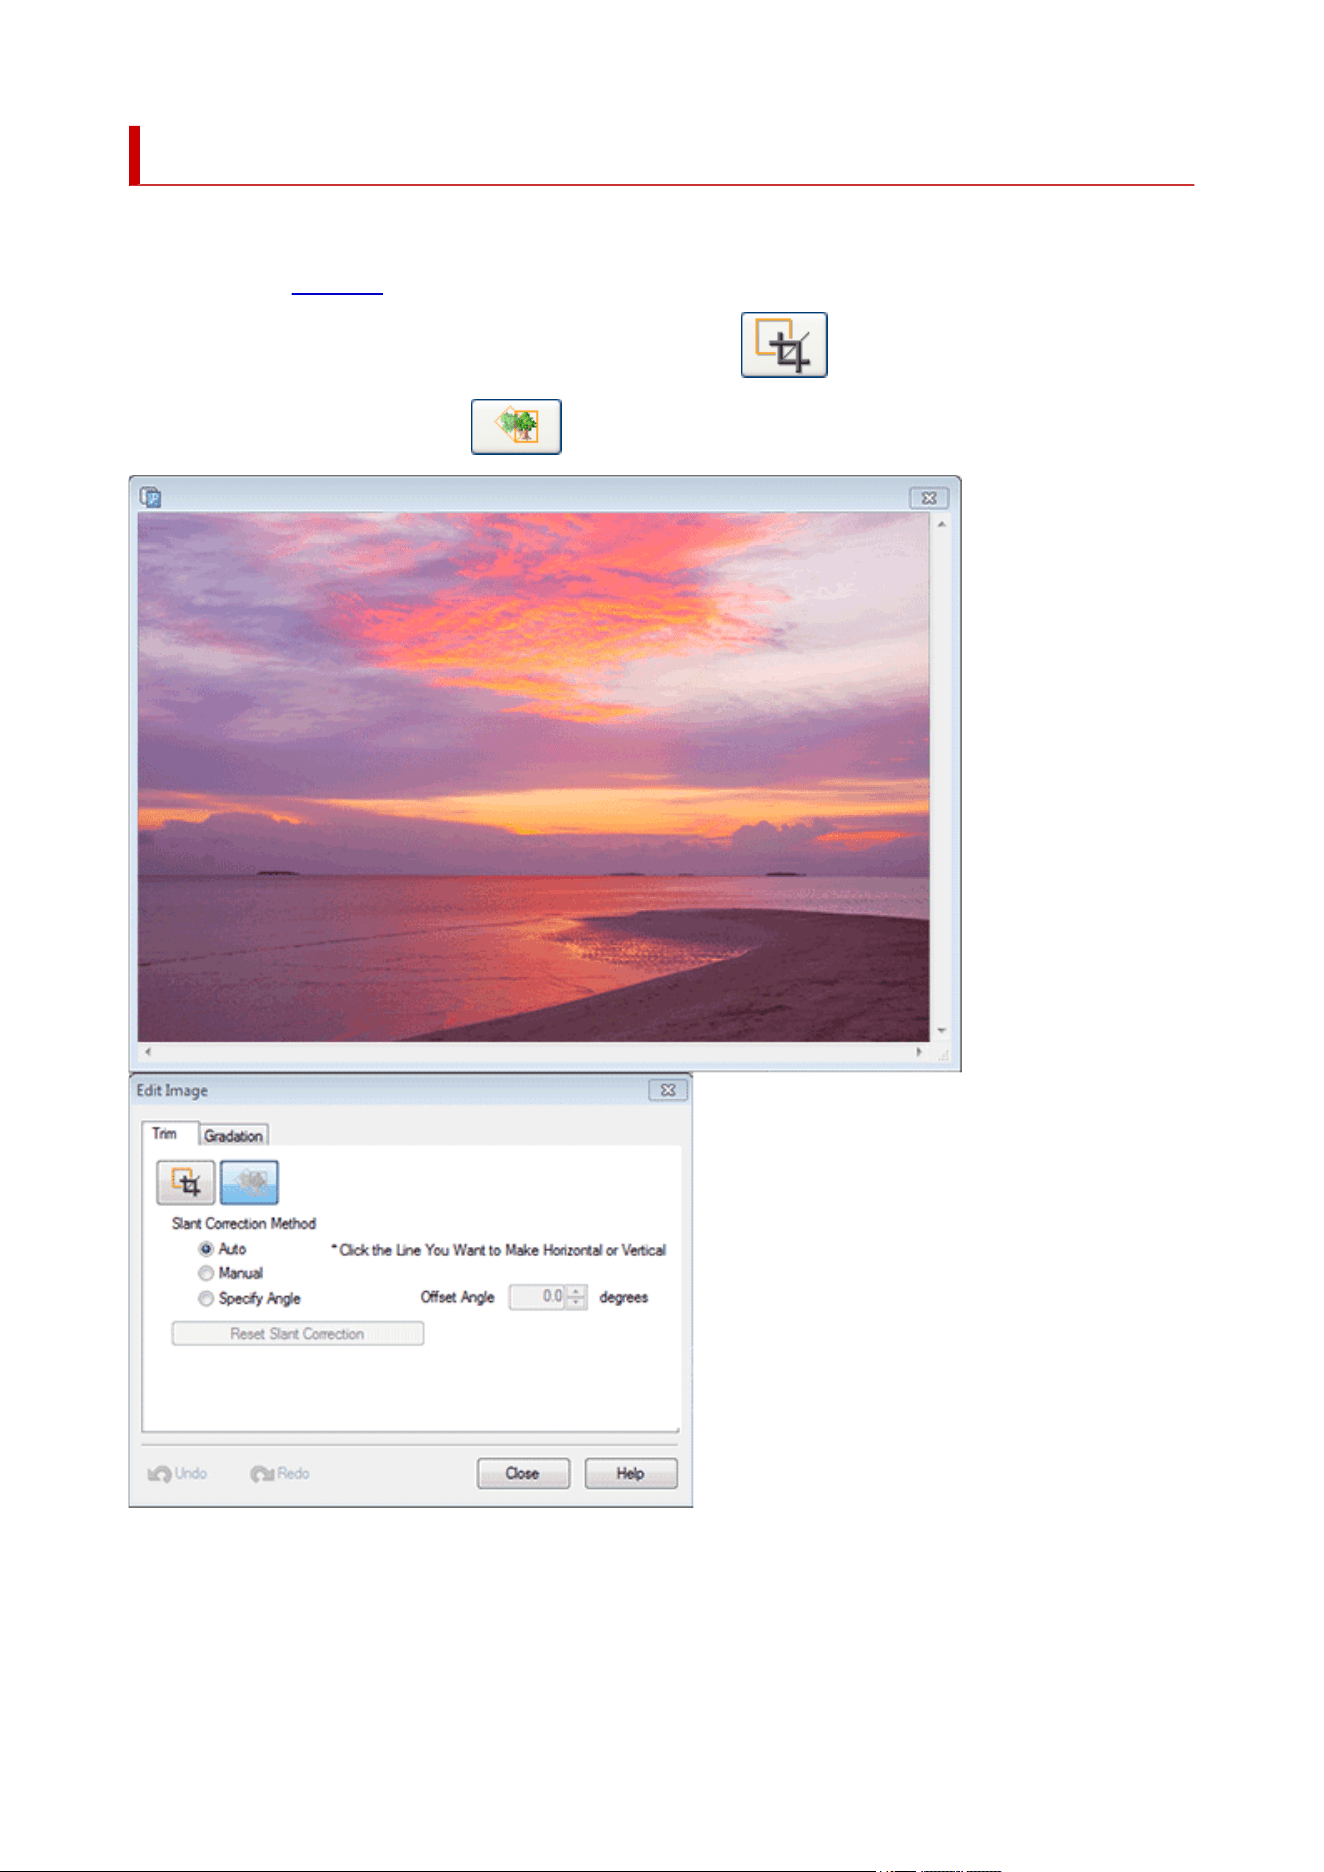
Edit Image Dialog Box (Slant Correction)
Correct slant of images.
Click Edit in the task area, click Photos, and then select the image you want to retouch on the poster.
To display the Edit Image dialog box and preview panel, click (Trim) in Edit Image.
In the Edit Image dialog box, click (Slant Correction).
Slant Correction Method
Correct slant of images.
Select from Auto, Manual, and Specify Angle.
271

Offset Angle
To specify an angle, select Specify Angle.
Reset Slant Correction
Cancels slant correction.
Undo
Undoes the last operation.
Redo
Redoes the last undone correction.
Help
Opens this guide.
272
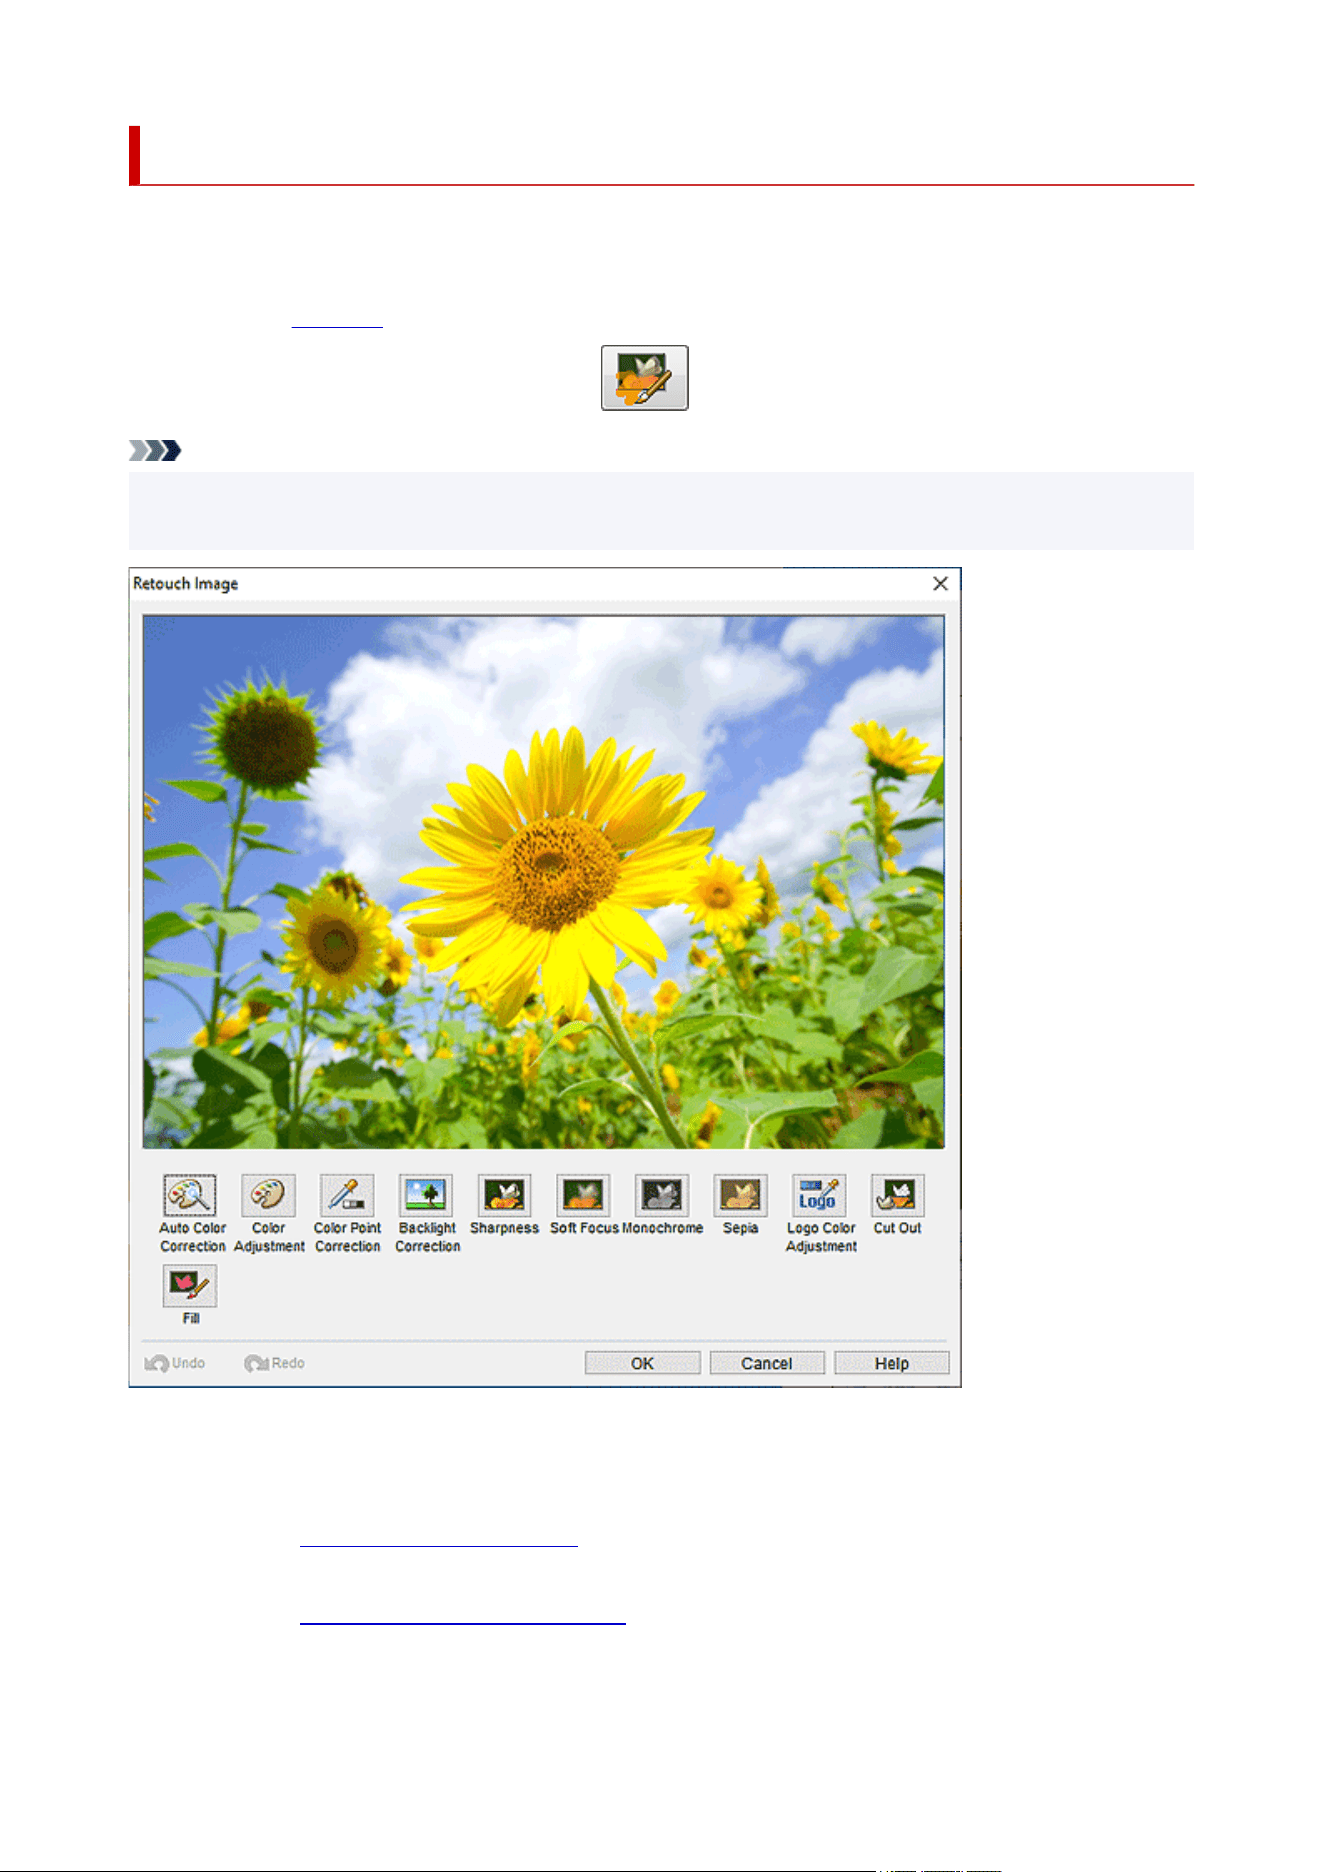
Retouch Image Dialog Box
Correct photos, apply effects to photos to create a particular mood in photos, adjust the colors, and use
other retouching features to enhance your posters.
Click Edit in the task area, click Photos, and then select the image you want to retouch on the poster.
To display the Retouch Image dialog box, click (Retouch Image) in Edit Image.
Note
• Alternatively, right-click the image you want to edit (such as a photo) on the poster, and then click Retouch
Image... to display the Retouch Image dialog box.
Auto Color Correction
Automatically retouch image color levels.
Color Adjustment
Displays the Color Adjustment dialog box for retouching image color levels manually.
Color Point Correction
Displays the Color Point Correction dialog box for adjusting the brightness based on the brightest point
in the image (white point), the point of intermediate brightness (gray point), or the darkest point (black
point).
273

Backlight Correction
Displays the Backlight Correction dialog box for correcting backlit images or blown-out highlights in
images.
Sharpness
Displays the Sharpness dialog box for sharpening image edges.
Soft Focus
Displays the Soft Focus dialog box for blurring images to create a softer effect.
Monochrome
Converts images to monochrome.
Sepia
Converts images to sepia.
Logo Color Adjustment
Displays the Logo Color Adjustment dialog box for adjusting a portion of the logo image colors.
Cut Out
Displays the Cut Out dialog box for discarding the unwanted areas such as the background.
Fill
Displays the Fill dialog box for changing the colors of the specified areas of the object or image.
Undo
Undoes the last operation.
Redo
Redoes the last undone correction.
Help
Opens this guide.
274
Color Adjustment Dialog Box
Correct image color levels.
Click Edit in the task area, click Photos, and then select the image you want to retouch on the poster.
To display the Retouch Image dialog box, click (Retouch Image) in Edit Image. To display the
Color Adjustment dialog box, click Color Adjustment.
Original Image
Displays the original image.
Touched Up Image
Displays the retouched image.
(Zoom In / Zoom Out)
Click (Zoom In) or (Zoom Out) to enlarge or reduce the display size. You can also enlarge or
reduce the display size by specifying the scale.
Quality
Brightness
Adjust the overall image brightness.
Adjust within the range of -100 to 100; move the slider to the right to brighten and left to darken.
You can also set by entering a value directly.
Contrast
Adjust the overall image contrast.
Adjust within the range of -100 to 100; move the slider to the right to increase and left to decrease
the contrast. You can also set by entering a value directly.
275

Saturation
Adjust the overall image vividness.
Adjust within the range of -100 to 100; move the slider to the right to increase and left to decrease
the vividness. You can also set by entering a value directly.
Color Settings
Increase Red / Increase Cyan
Adjust the balance of red and cyan. Adjust within the range of -100 to 100; move the slider to the
right to increase cyan and left to increase red. You can also set by entering a value directly.
Increase Green / Increase Magenta
Adjust the balance of green and magenta. Adjust within the range of -100 to 100; move the slider
to the right to increase magenta and left to increase green. You can also set by entering a value
directly.
Increase Blue / Increase Yellow
Adjust the balance of blue and yellow. Adjust within the range of -100 to 100; move the slider to the
right to increase yellow and left to increase blue. You can also set by entering a value directly.
Reset
Restores the original image.
Help
Opens this guide.
276

Color Point Correction Dialog Box
Adjust the overall brightness based on the brightest point in the image (white point), the point of intermediate
brightness (gray point), or the darkest point (black point).
Click Edit in the task area, click Photos, and then select the image you want to retouch on the poster.
To display the Retouch Image dialog box, click (Retouch Image) in Edit Image. To display the
Color Point Correction dialog box, click Color Point Correction.
Original Image
Displays the original image.
Touched Up Image
Displays the retouched image.
(Zoom In / Zoom Out)
Click (Zoom In) or (Zoom Out) to enlarge or reduce the display size. You can also enlarge or
reduce the display size by specifying the scale.
Auto
Automatically adjust the image brightness.
Note
• Click Auto to produce the same results as Auto Color Correction in the Retouch Image dialog box.
White Point
Adjusts the brightness based on the brightest point in the image under Original Image.
Gray Point
Adjusts the brightness based on the point of intermediate brightness in the image under Original
Image.
277

Black Point
Adjusts the brightness based on the darkest point in the image under Original Image.
Reset
Restores the original image.
Help
Opens this guide.
278
Backlight Correction Dialog Box
Correct backlit images.
Click Edit in the task area, click Photos, and then select the image you want to retouch on the poster.
To display the Retouch Image dialog box, click (Retouch Image) in Edit Image. To display the
Backlight Correction dialog box, click Backlight Correction.
Original Image
Displays the original image.
Touched Up Image
Displays the retouched image.
(Zoom In / Zoom Out)
Click (Zoom In) or (Zoom Out) to enlarge or reduce the display size. You can also enlarge or
reduce the display size by specifying the scale.
Auto Adjust For Faces
Automatically adjust the brightness based on people's faces.
Level
Over / Backlight
Move the slider toward Backlight to brighten areas that are dark.
Move the slider toward Over to darken areas that are too bright.
You can also set by entering a value directly.
Reset
Restores the original image.
279

Help
Opens this guide.
280
Sharpness Dialog Box
Sharpen image edges.
Click Edit in the task area, click Photos, and then select the image you want to retouch on the poster.
To display the Retouch Image dialog box, click (Retouch Image) in Edit Image. To display the
Sharpness dialog box, click Sharpness.
Original Image
Displays the original image.
Touched Up Image
Displays the retouched image.
(Zoom In / Zoom Out)
Click (Zoom In) or (Zoom Out) to enlarge or reduce the display size. You can also enlarge or
reduce the display size by specifying the scale.
Level
Adjust the level of image edge sharpness.
Adjust within the range of 0 to 100; move the slider to the right to increase sharpness. You can also set
by entering a value directly.
Reset
Restores the original image.
Help
Opens this guide.
281

Soft Focus Dialog Box
Blur images to create a softer effect.
Click Edit in the task area, click Photos, and then select the image you want to retouch on the poster.
To display the Retouch Image dialog box, click (Retouch Image) in Edit Image. To display the
Soft Focus dialog box, click Soft Focus.
Original Image
Displays the original image.
Touched Up Image
Displays the retouched image.
(Zoom In / Zoom Out)
Click (Zoom In) or (Zoom Out) to enlarge or reduce the display size. You can also enlarge or
reduce the display size by specifying the scale.
Level
Adjust the level of blur.
Adjust within the range of 0 to 100; move the slider to the right to increase blur and left to reduce it. You
can also set by entering a value directly.
Reset
Restores the original image.
Help
Opens this guide.
282
Logo Color Adjustment Dialog Box
Adjust a portion of the logo image colors.
Click Edit in the task area, click Photos, and then select the image you want to retouch on the poster.
To display the Retouch Image dialog box, click (Retouch Image) in Edit Image. To display the
Logo Color Adjustment dialog box, click Logo Color Adjustment.
Original Image
Displays the original image.
The color of a portion you click on the image will be adjusted.
Touched Up Image
Displays the retouched image.
(Zoom In / Zoom Out)
Click (Zoom In) or (Zoom Out) to enlarge or reduce the display size. You can also enlarge or
reduce the display size by specifying the scale.
Color Table
Displays a list of colors used in the logo.
Color Settings
Adjust the color intensity of the image.
Adjust within the range of -100 to 100; move the slider to adjust the color intensity. You can also adjust
by entering a value directly.
283

Hue
Adjust the image's overall color tone.
Adjust within the range of -100 to 100; move the slider to the right to emphasize and left to weaken the
color tone. You can also set by entering a value directly.
Saturation
Adjust the overall image vividness.
Set within the range of -100 to 100; move the slider to the right to increase and left to decrease the
vividness. You can also set by entering a value directly.
Luminance
Adjust the overall image brightness.
Set within the range of -100 to 100; move the slider to the right to brighten and left to darken. You can
also set by entering a value directly.
Reset
Restores the original image.
Help
Opens this guide.
284
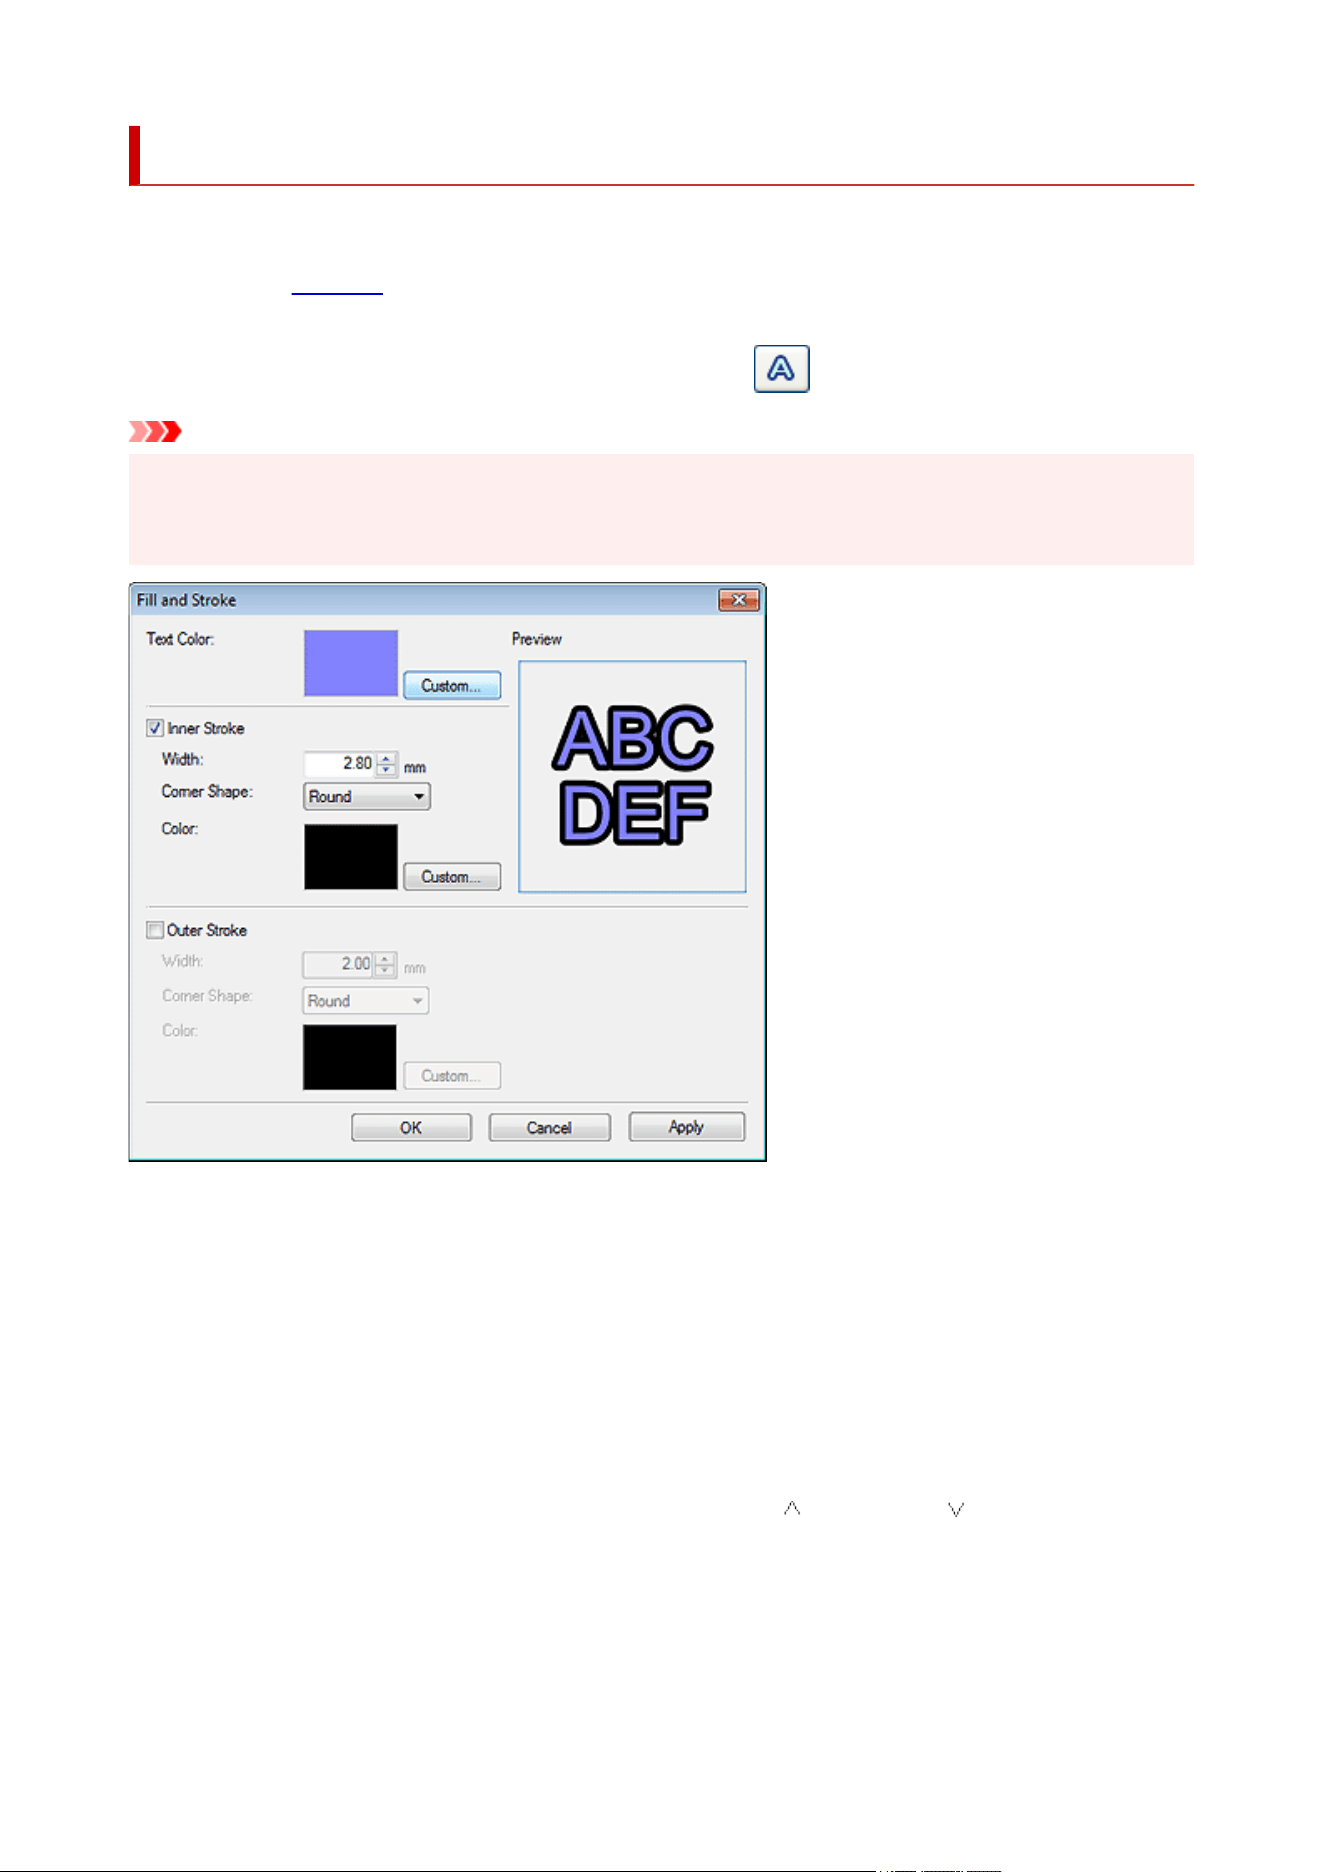
Fill and Stroke Dialog Box
Outline text.
Click Edit in the task area, click Text, and then select the text (or text box of the text) you want to outline on
the poster.
To display the Fill and Stroke dialog box, on the Edit tab, click (Fill and Stroke) in Text Effects.
Important
• Fluorescent spot colors cannot be used depending on your model or paper type.
• Fluorescent spot colors cannot be used when the Edit layout with Free Layout plus checkbox is selected
in the Paper Options screen.
Text Color
The color specified in the settings panel in the Edit screen (Text) is reflected.
To change the text color, click Custom..., Change to Spot Color..., or Change to Regular Color...,
and then select a color in the displayed dialog box.
Inner Stroke / Outer Stroke
Apply a single or double outline to the text.
Width
Specify the outline width.
Enter a value (0.10 to 100.00) directly. Alternatively, click (Up Arrow) or (Down Arrow) on the
right to increase or decrease the value.
Corner Shape
Specify the outline shape.
Select from Round, Square, and Bevel.
285
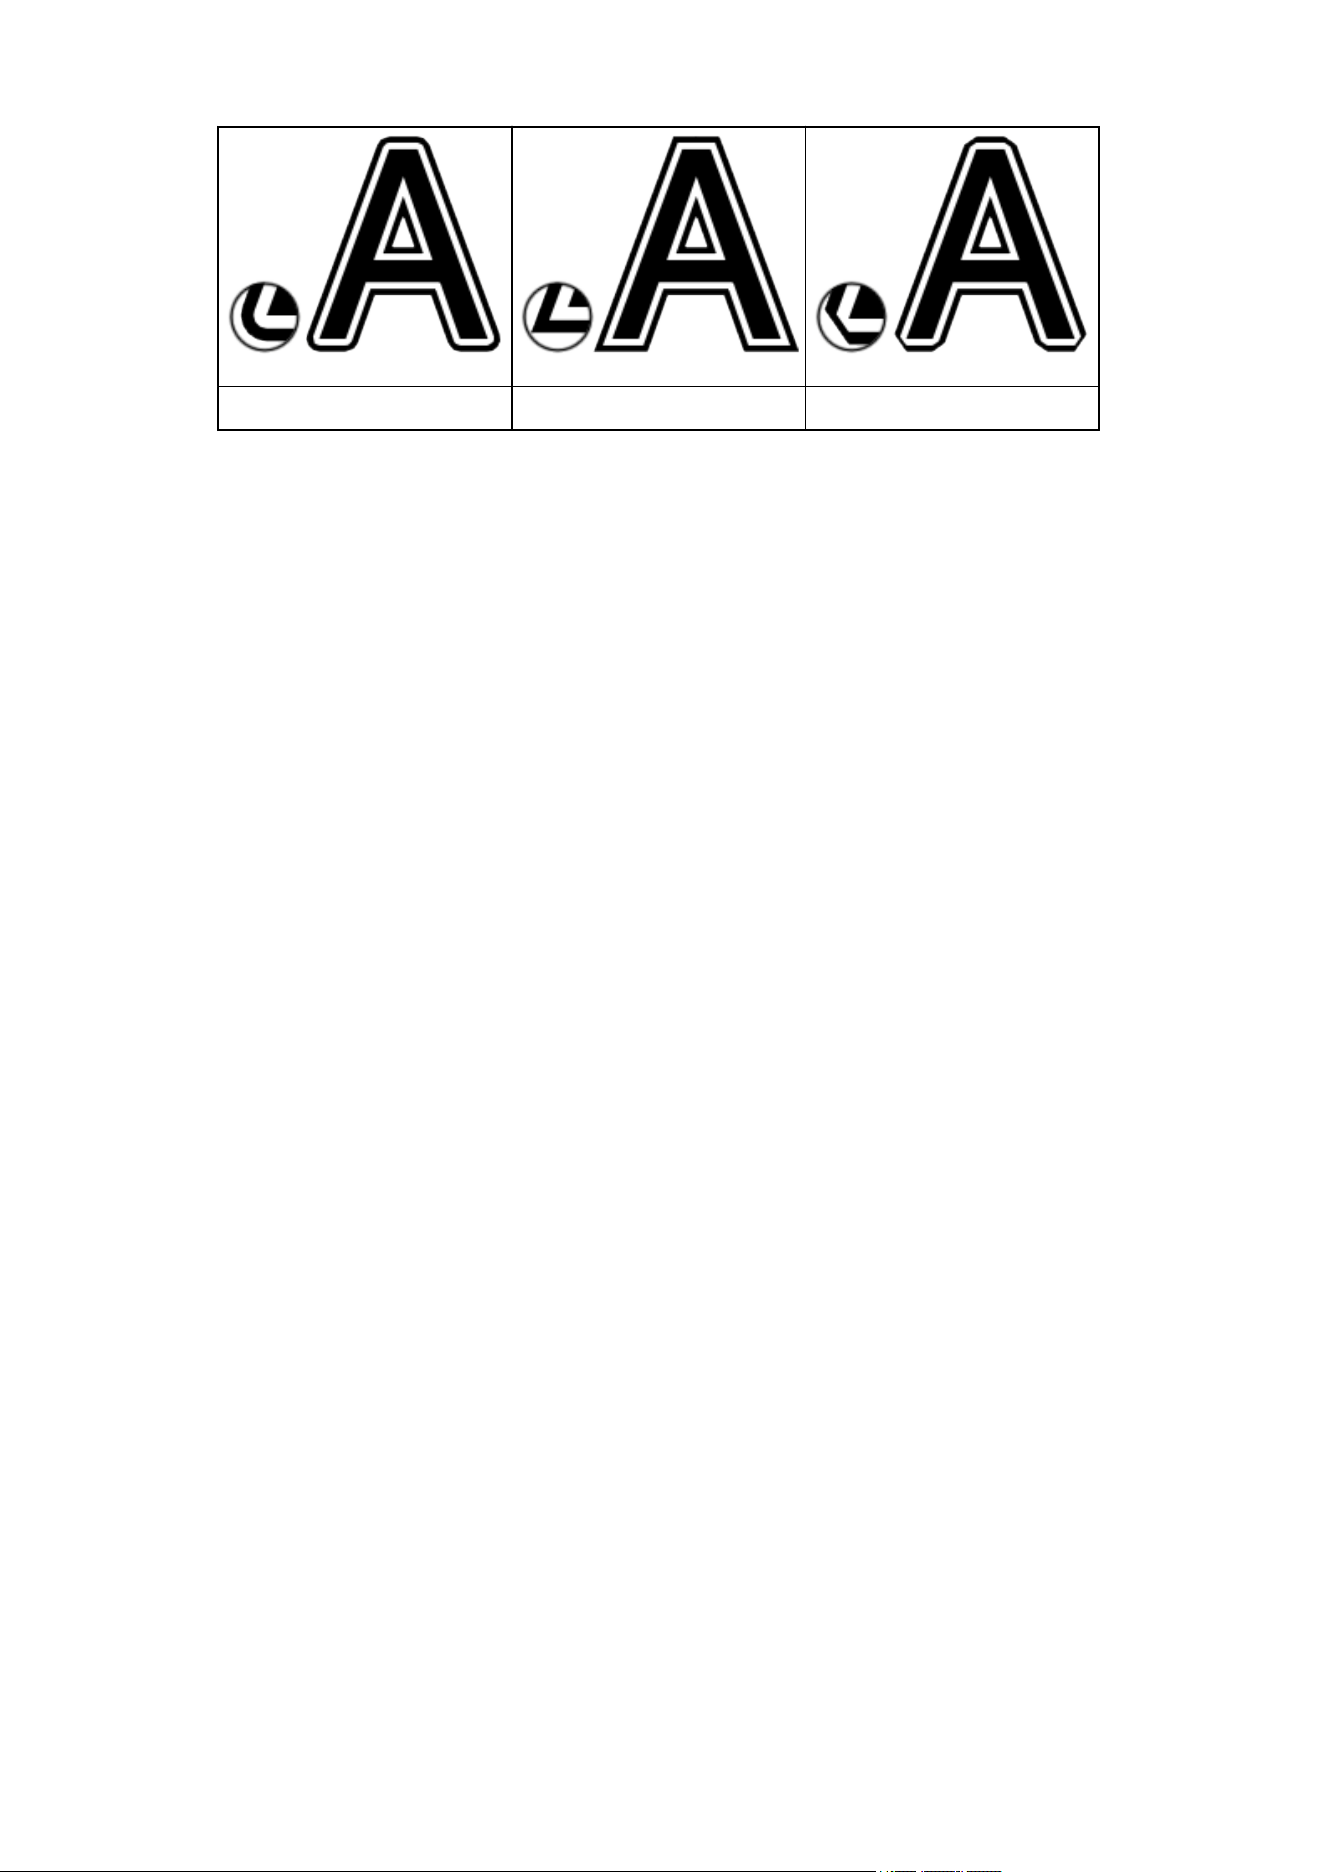
Round Square Bevel
Color
Specify the outline color.
Click Custom..., Change to Spot Color..., or Change to Regular Color..., and then select a color
in the displayed dialog box.
286
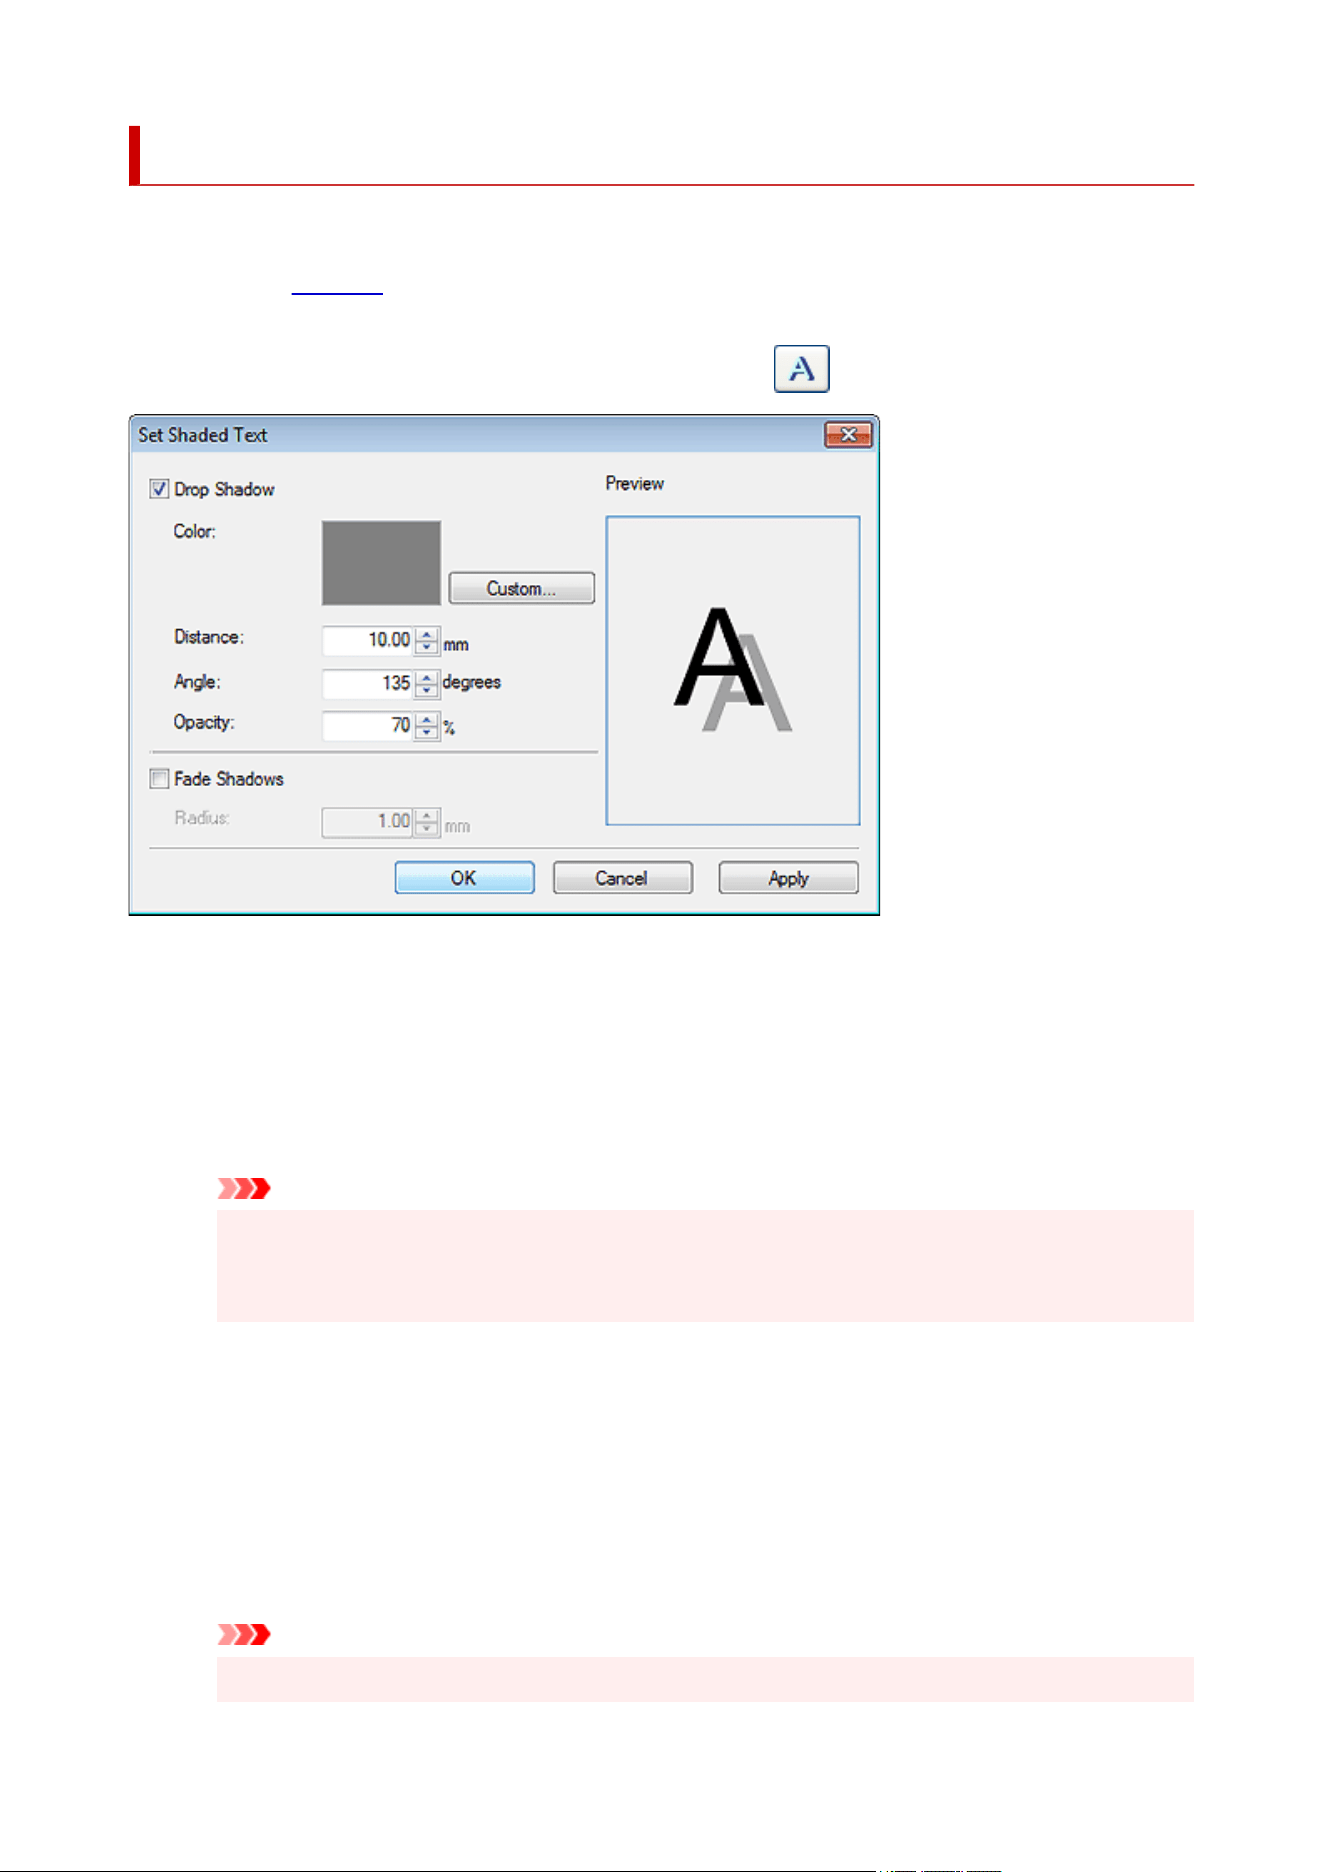
Set Shaded Text Dialog Box
Add a drop shadow to text.
Click Edit in the task area, click Text, and then select the text (or text box of the text) you want to add a
shadow to on the poster.
To display the Set Shaded Text dialog box, on the Edit tab, click (Shaded Text) in Text Effects.
Drop Shadow
Add a drop shadow to text.
Color
Specify the shadow color.
Click Custom..., Change to Spot Color..., or Change to Regular Color..., and then select a color
in the displayed dialog box.
Important
• Fluorescent spot colors cannot be used depending on your model or paper type.
• Fluorescent spot colors cannot be used when the Edit layout with Free Layout plus checkbox is
selected in the Paper Options screen.
Distance
Specify the distance between the text and shadow.
Angle
Specify the shadow angle.
Opacity
Specify the shadow opacity.
Increase the value to make shadows darker and decrease the value to make shadows lighter.
Important
• Opacity cannot be set when a fluorescent spot color is specified for the drop shadow color.
287

Fade Shadows
Softens the shadow.
Important
• Shadows cannot be softened when a fluorescent spot color is specified for the drop shadow color.
Radius
Specify the degree of shadow softening.
Increase the value to soften shadows more and decrease the value to emphasize shadows.
288
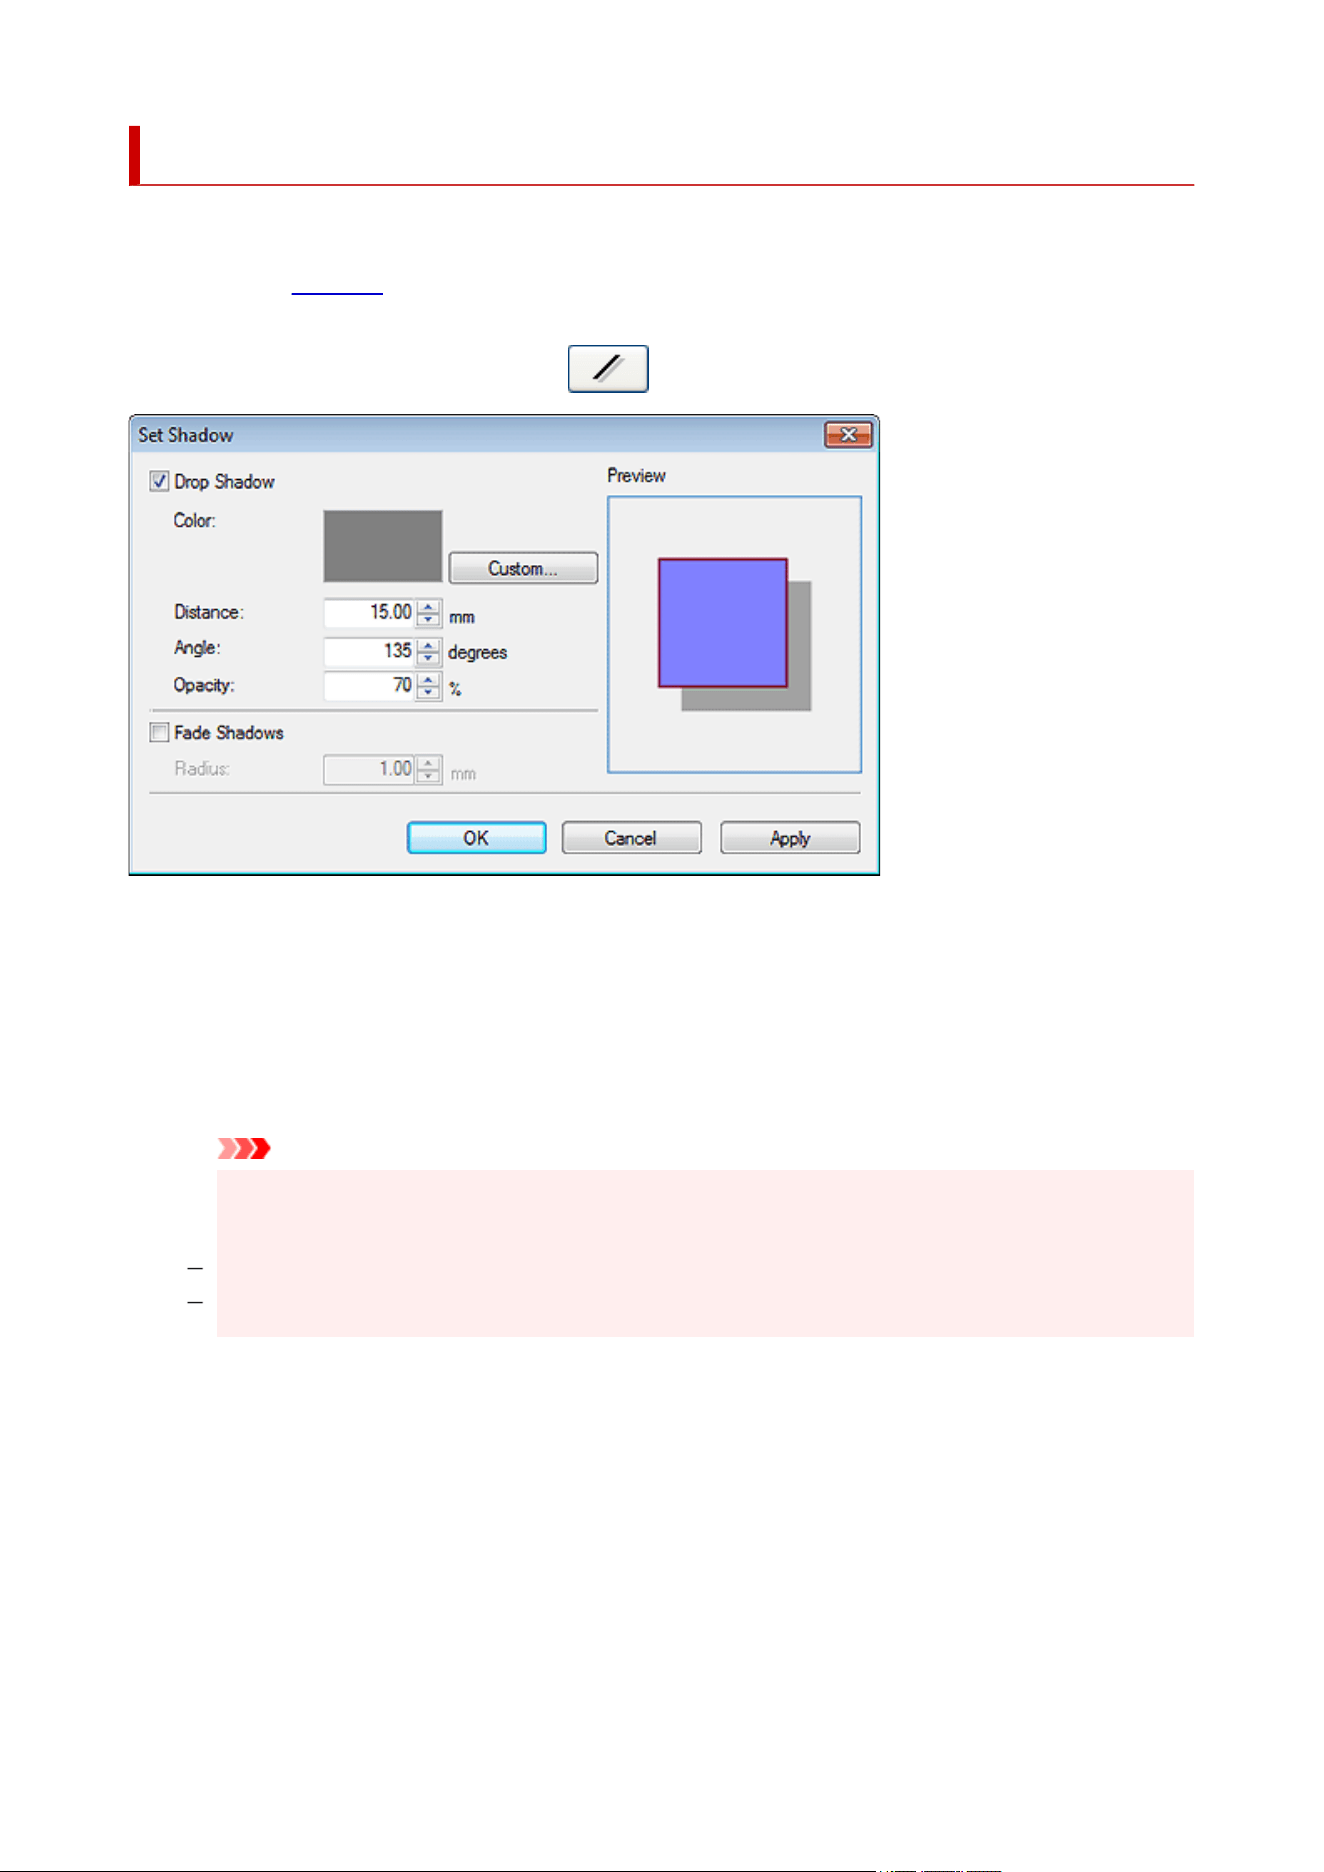
Set Shadow Dialog Box
Add a drop shadow to shapes.
Click Edit in the task area, click Shapes, and then select the shape you want to add a shadow to on the
poster.
To display the Set Shadow dialog box, click (Drop Shadow) in Dropshadow.
Drop Shadow
Add a drop shadow to the shape.
Color
Specify the shadow color.
Click Custom..., Change to Spot Color..., or Change to Regular Color..., and then select a color
in the displayed dialog box.
Important
• Fluorescent spot colors cannot be used depending on your model or paper type. In addition,•
fluorescent spot colors cannot be used in the following cases.
Opacity is set for Fill-in Color of the object.
The Edit layout with Free Layout plus checkbox is selected in the Paper Options screen.
Distance
Specify the distance between the shape and shadow.
Angle
Specify the shadow angle.
Opacity
Specify the shadow opacity.
Increase the value to make shadows darker and decrease the value to make shadows lighter.
289

Important
• Opacity cannot be set when a fluorescent spot color is specified for the drop shadow color.
Fade Shadows
Softens the shadow.
Radius
Specify the degree of shadow softening.
Increase the value to soften shadows more and decrease the value to emphasize shadows.
Important
• Shadows cannot be softened when a fluorescent spot color is specified for the drop shadow color.
290
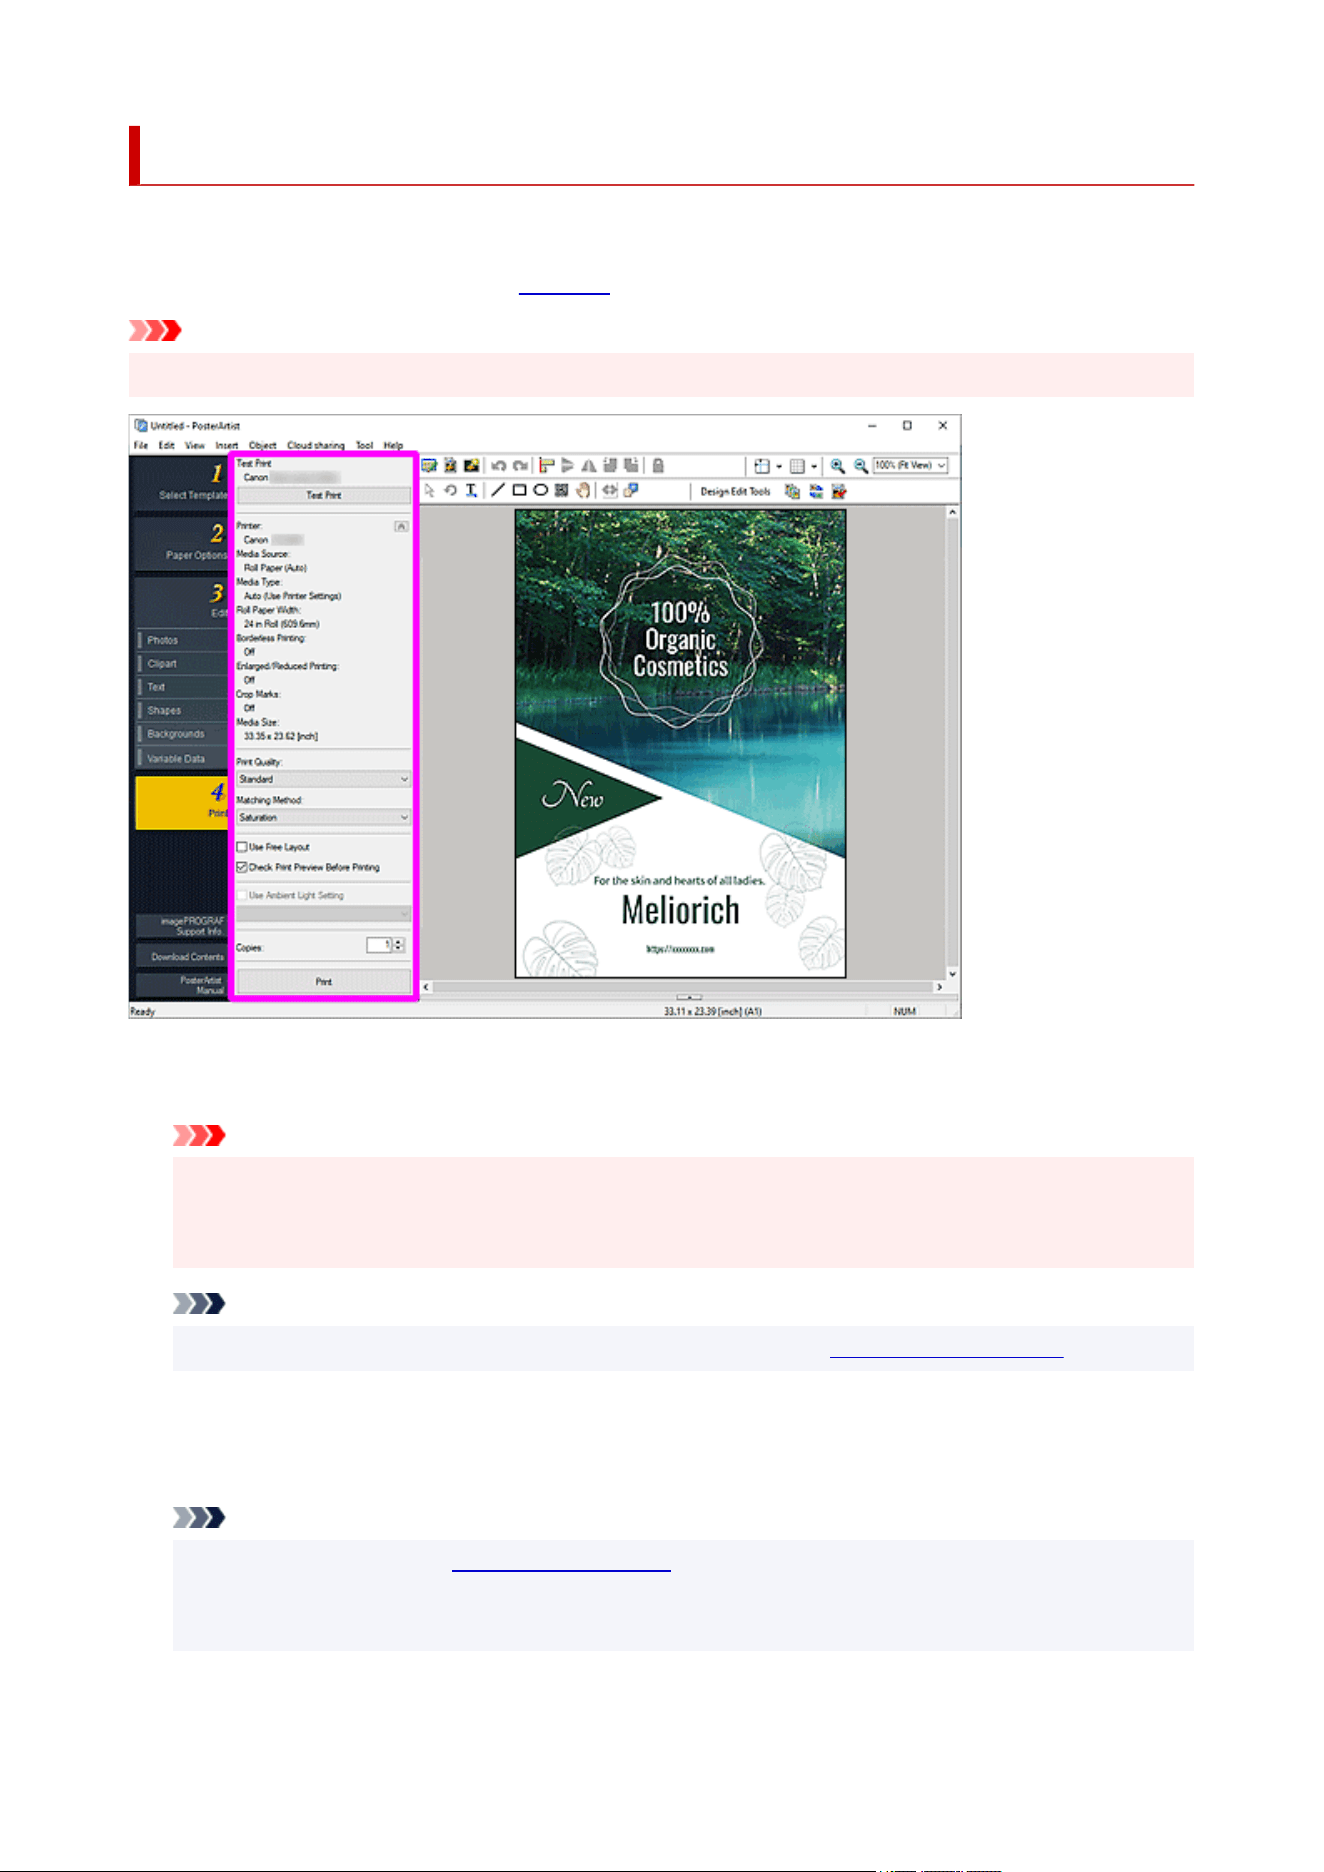
Print Screen
Specify or check print settings before printing.
To display the screen, click Print in the task area.
Important
• Available functions and settings vary depending on your model or paper type.
Test Print
Before printing at the actual size, test print your poster on A4 or Letter size paper.
Important
• Some printer features, such as borderless printing (or minimal margin printing) and print quality are not
available when test printing.
• Ambient light settings are not applied.
Note
• For instructions on selecting the printer to use for test printing, see Preferences Dialog Box.
Printer / Media Source / Media Type / Roll Paper Width / Borderless Printing / Minimal Margin
Printing / Enlarged/Reduced Printing / Crop Marks / Media Size
Settings made in the Paper Options screen are displayed.
Note
• To change the settings, see Paper Options Screen.
• For some models, Minimal Margin Printing is displayed instead of Borderless Printing. When
Minimal Margin Printing is displayed, printouts will have slight margins on the left and right sides.
291

Print Quality
Select the print quality.
Matching Method
Select a rendering intent.
Perceptual (Photo)
Select this when you want to print with an impression close to that on the monitor since the
characteristics of the data displayed on the monitor will be reflected correctly.
Saturation (Poster)
Select this when you want to print posters, business documents, and other items that require
attractiveness or reader-friendly graphs.
Use fluorescent ink
Vivid mode
Prints the entire image in vivid color tones using fluorescent ink.
Spot mode
Print after specifying areas (text, shapes, or other objects) in which to use fluorescent ink.
Use Free Layout
Use the Free Layout function. Import print data from various applications and move, align, enlarge/
reduce, or rotate each data to adjust the layout before printing.
Note
• This does not appear when the Edit layout with Free Layout plus checkbox is selected in the Paper
Options screen, or depending on your printer driver.
• For details on the Free Layout function, refer to the Online Manual for your model.
Check Print Preview Before Printing
imagePROGRAF Preview starts and you can check the print result in the preview before printing.
Note
• For details on imagePROGRAF Preview, refer to the Online Manual for your model.
Use Ambient Light Setting
Adjust colors according to the environment to visually enhance the poster's color tones.
Important
• This function is unavailable depending on the type of your paper.
Copies
Set the number of copies to print.
Print
Starts printing after the Print Progress dialog box appears.
Note
• When the Edit layout with Free Layout plus checkbox is selected in the Paper Options screen, Print
(Start Free Layout plus) is displayed instead of the Print button; click to start Free Layout plus. For
details on Free Layout plus, refer to the Online Manual for your model.
292
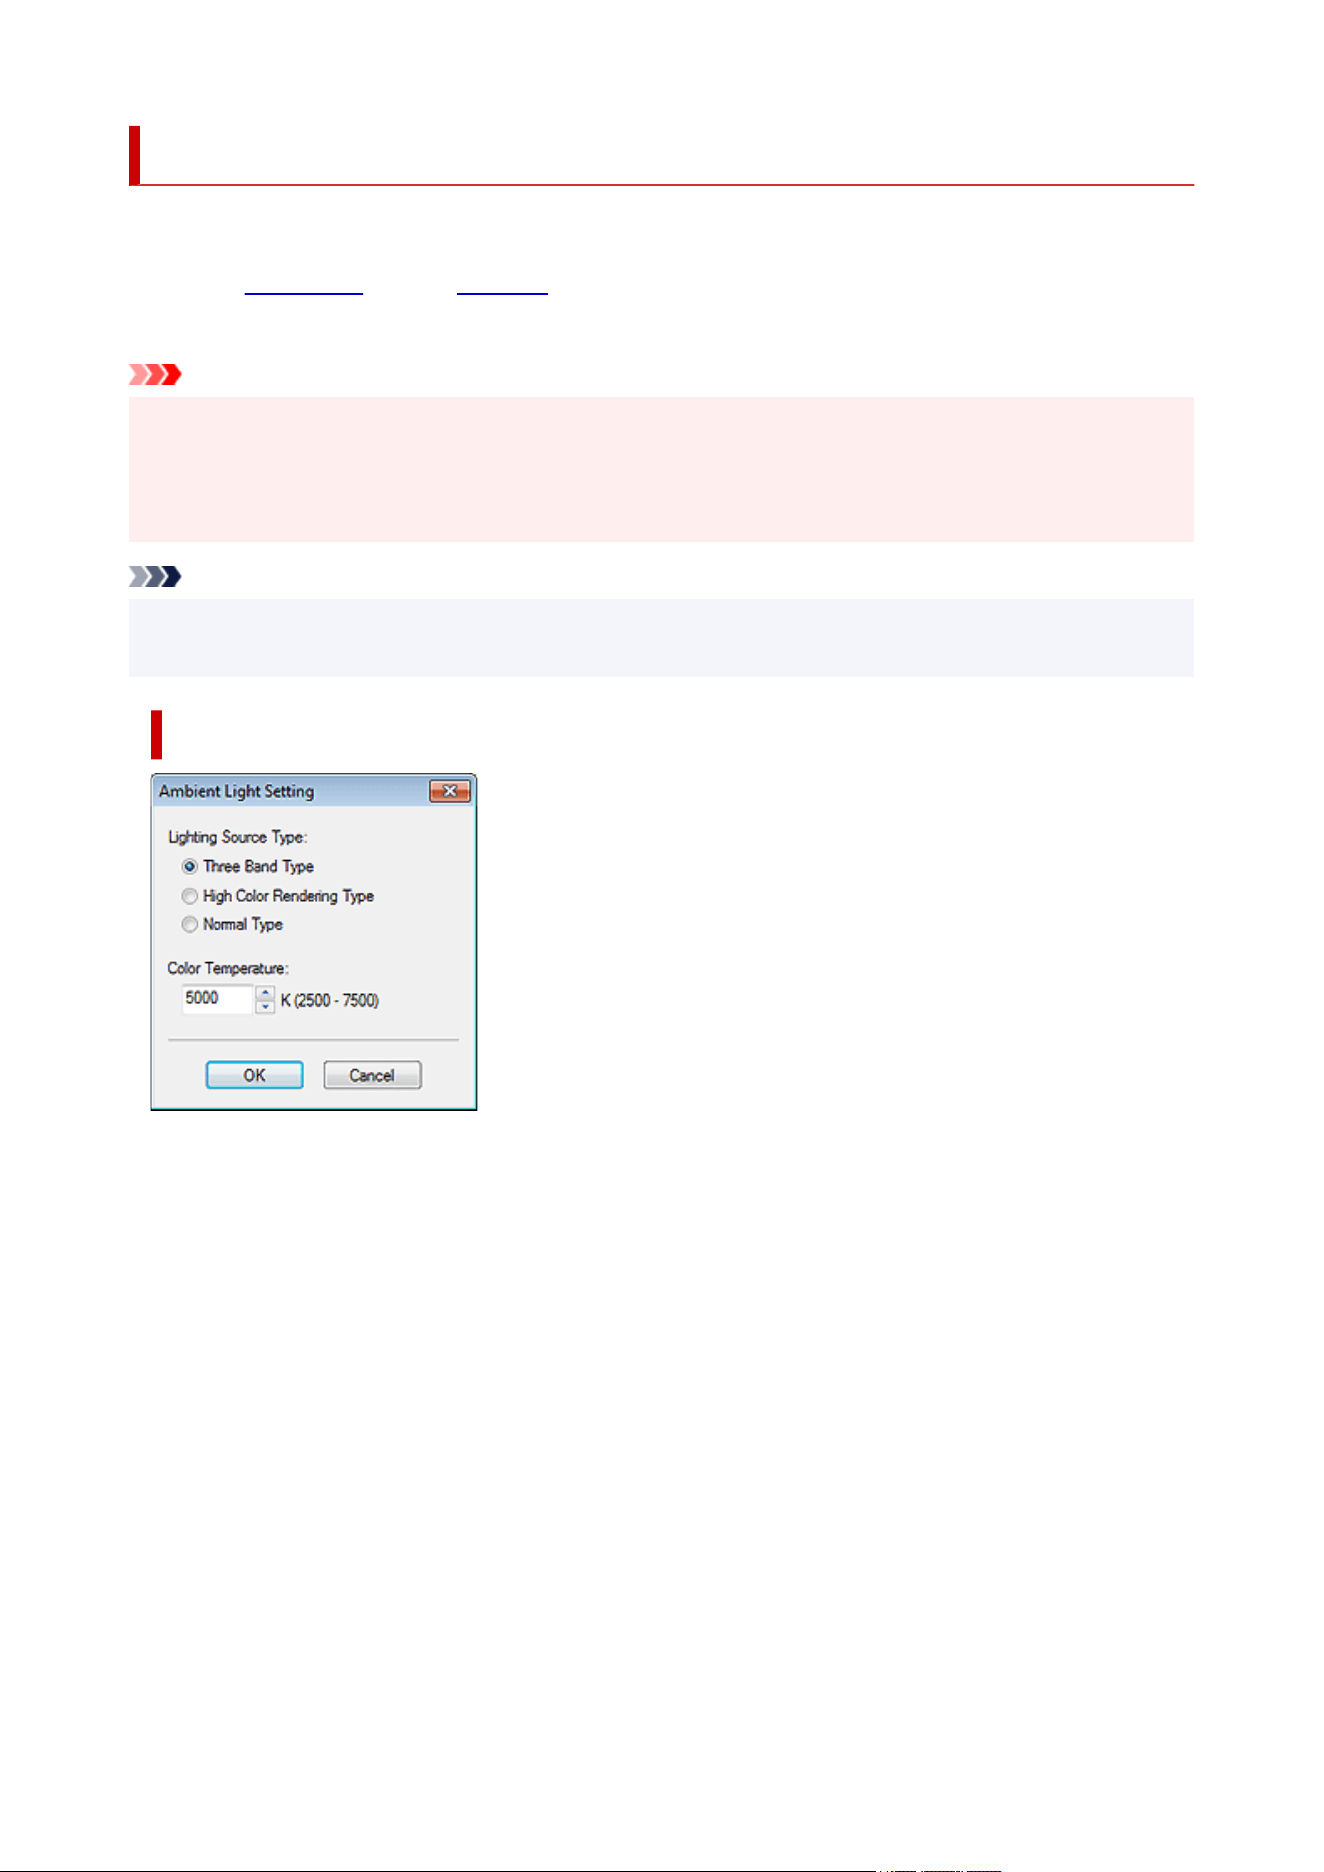
Ambient Light Setting Dialog Box
Automatically adjust colors according to the environment to visually enhance the poster's color tones.
Display the Print screen from the task area, and then select the Use Ambient Light Setting checkbox.
The displayed screen varies depending on the item selected in the ambient light setting list.
Important
• This function cannot be used depending on your printer or paper type.
• This function requires the "i1" light meter and the Light Source Measure Tool. Download the "i1" light meter
or the Light Source Measure Tool from our website, and then install it on the computer used for measuring
ambient light.
Note
• For instructions on measuring the light source type and color temperature, refer to
"LightSourceMeasureTool_English.pdf" supplied with the Light Source Measure Tool.
When Custom Settings Is Selected
Lighting Source Type
Select the light source type measured with the Light Source Measure Tool.
Color Temperature
Specify the color temperature measured with the Light Source Measure Tool.
293
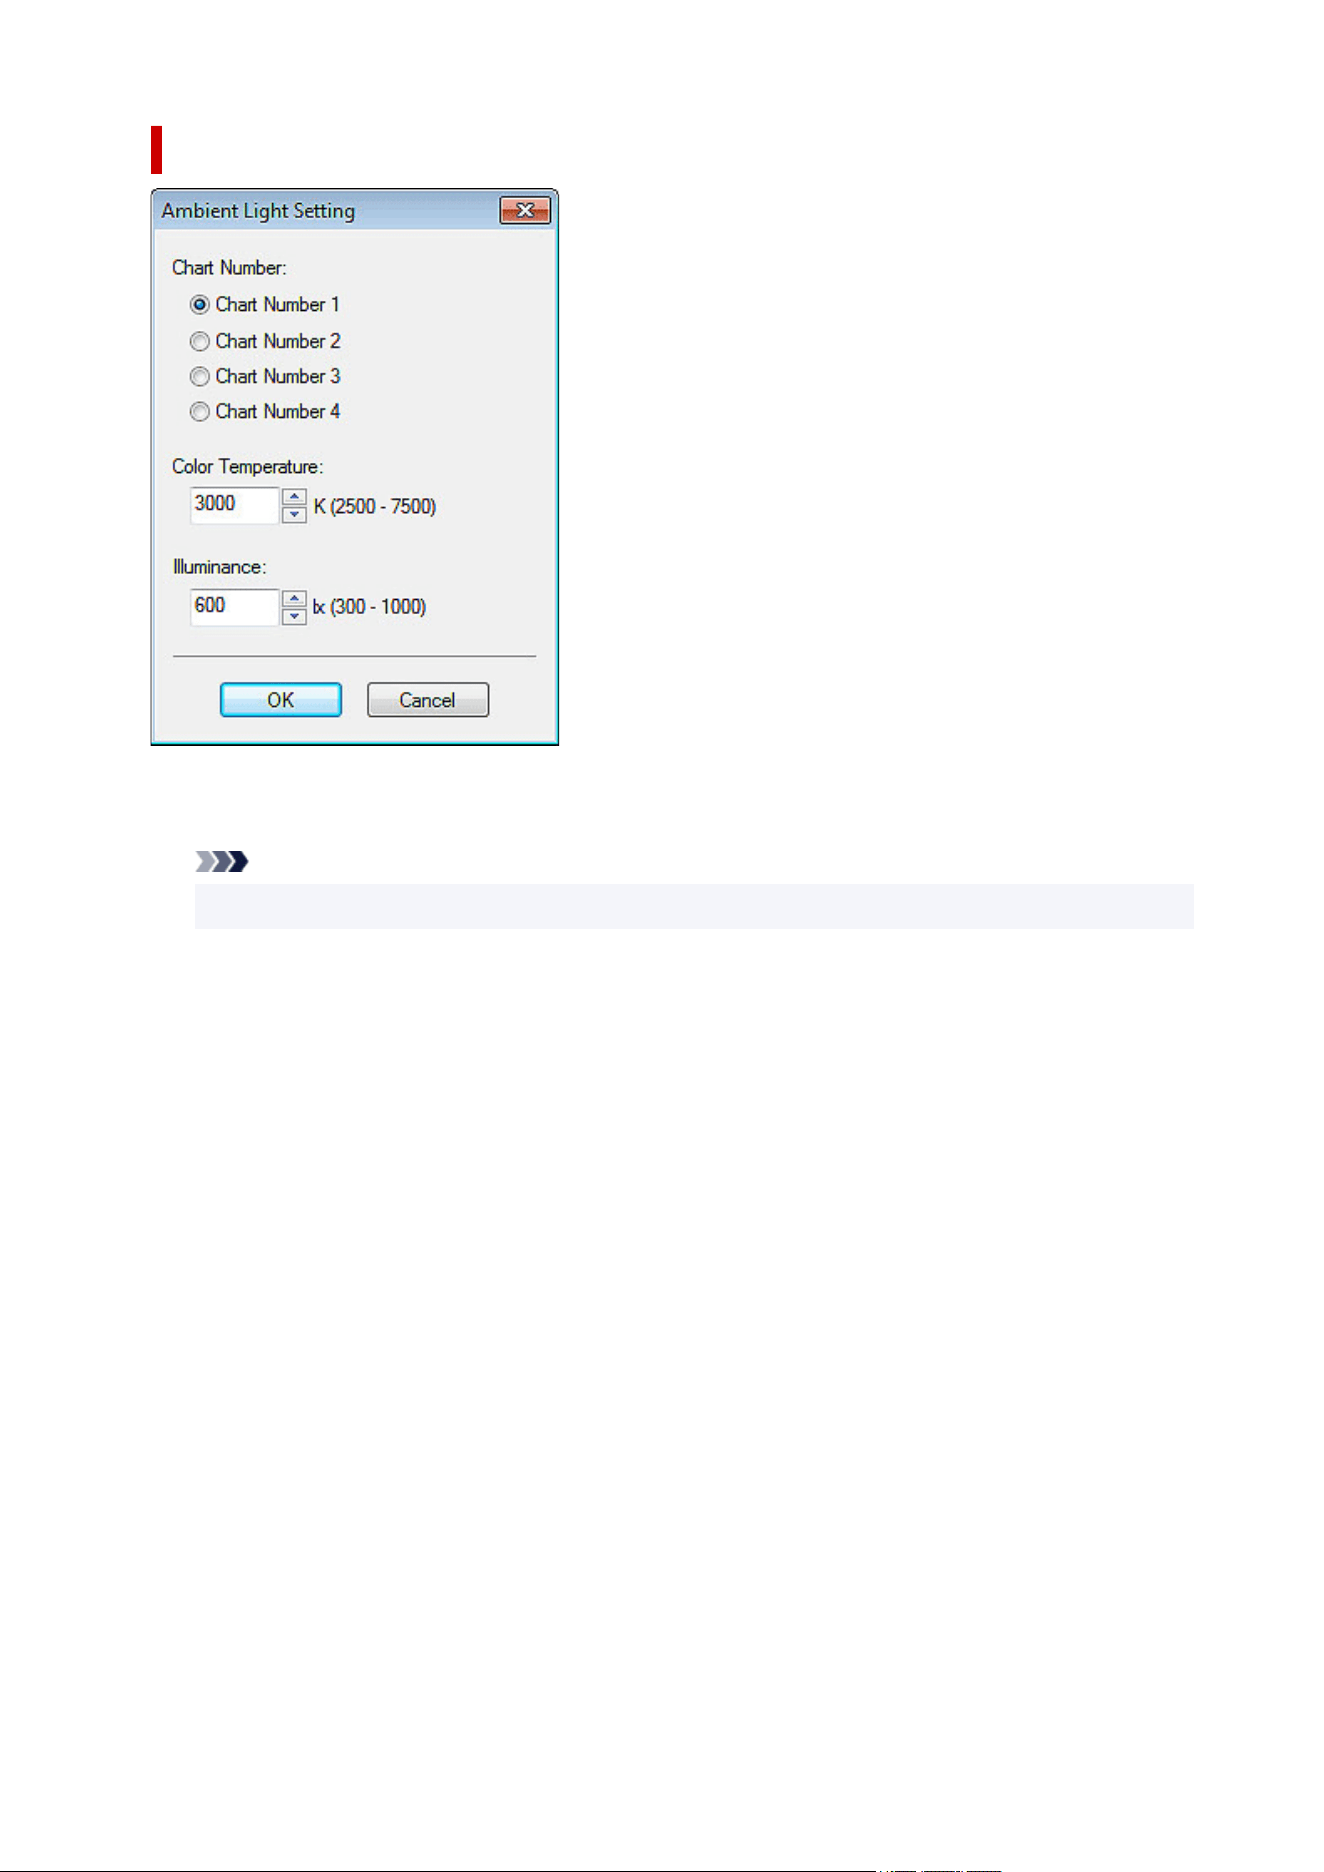
When By selecting a chart number Is Selected
Chart Number
Check printed charts and select the desired chart number.
Note
• Check printed charts in the environment where the poster is displayed.
Color Temperature
Specify the color temperature measured at monitor calibration.
Illuminance
Specify the illuminance measured at monitor calibration.
294
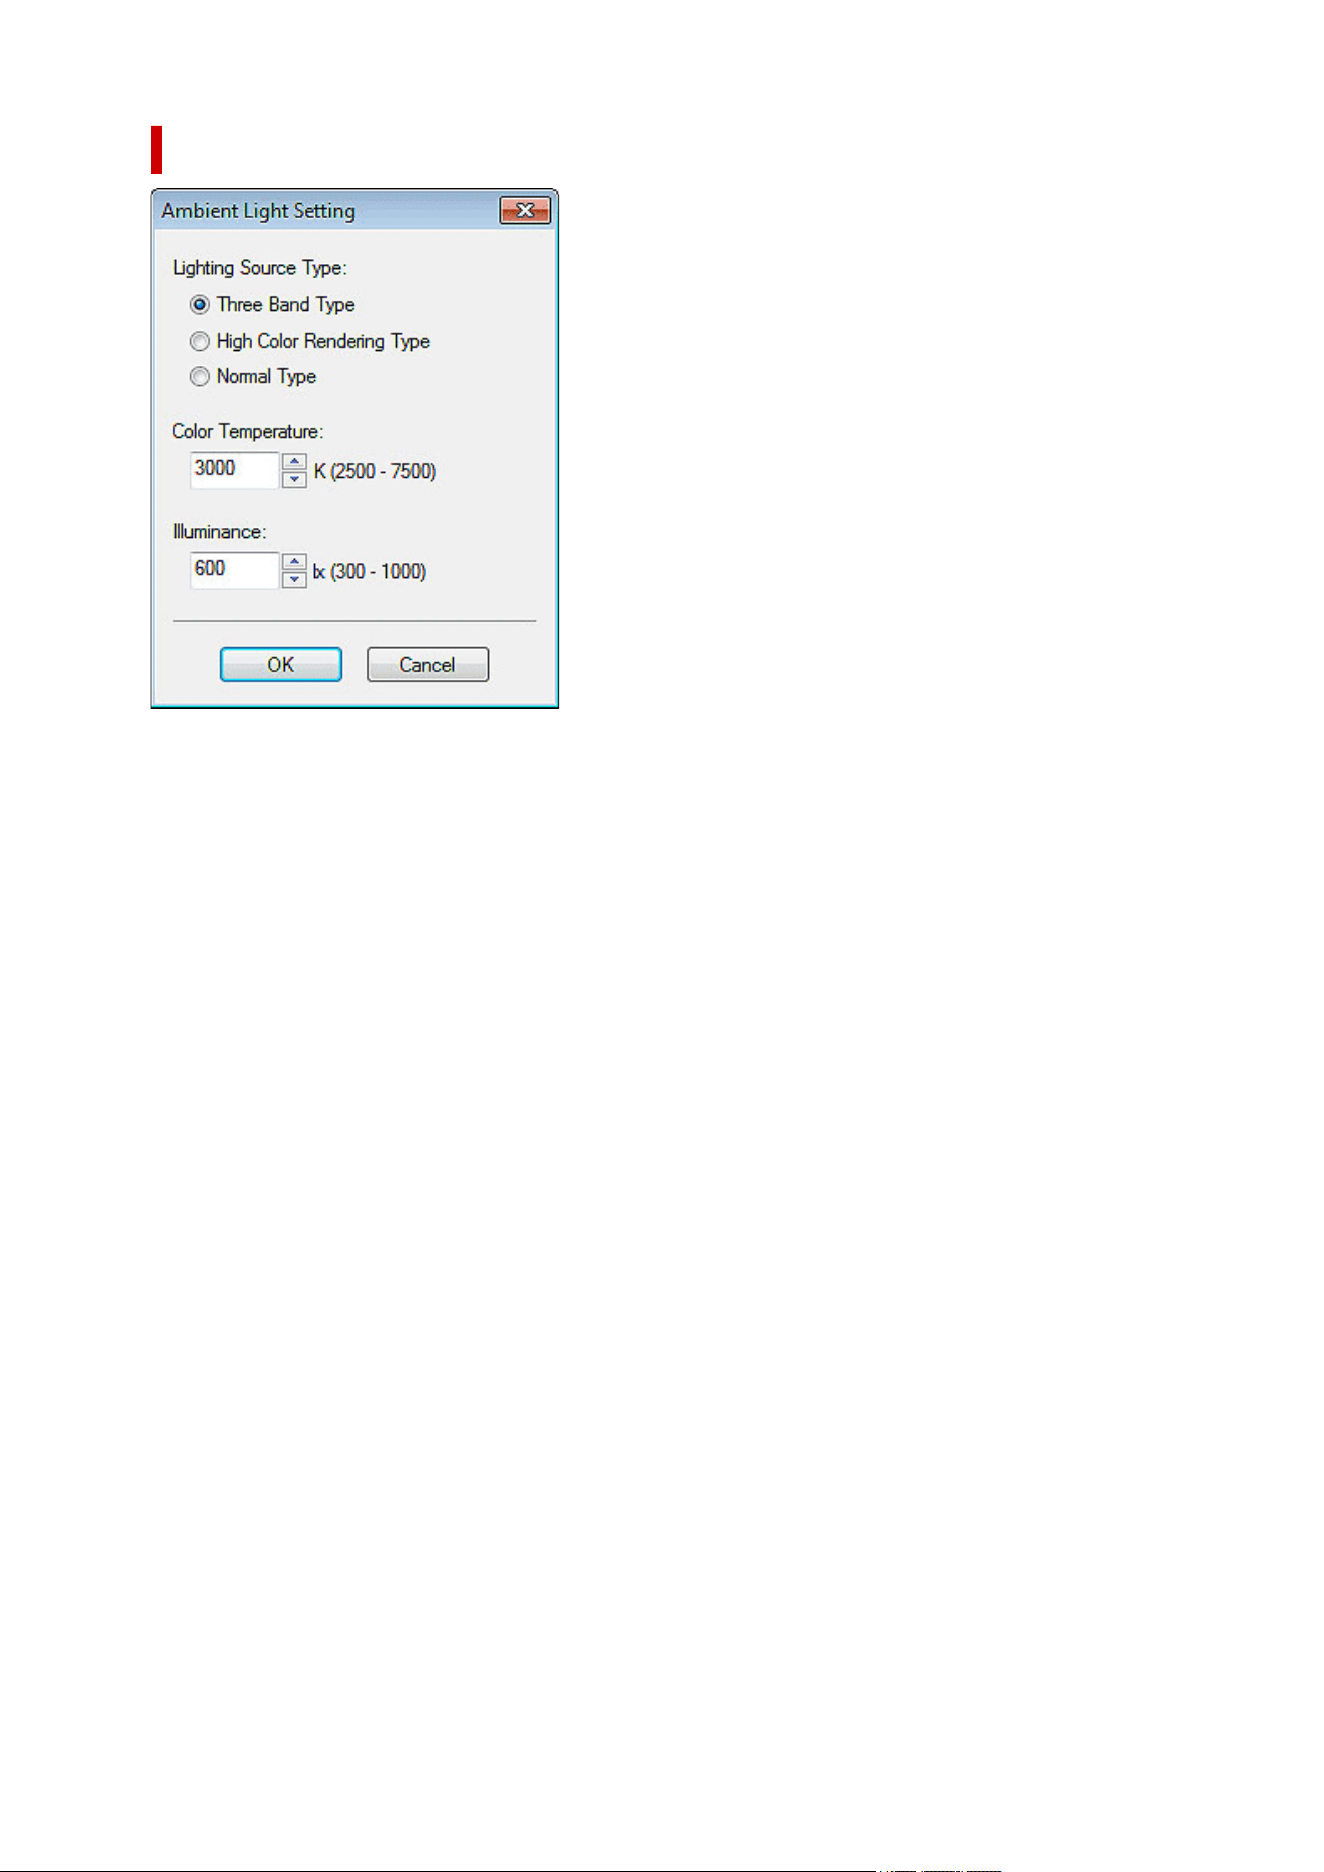
When By entering values directly Is Selected
Lighting Source Type
Select the light source type measured with the Light Source Measure Tool.
Color Temperature
Specify the color temperature measured with the Light Source Measure Tool.
Illuminance
Specify the illuminance measured with the Light Source Measure Tool.
295
Managing Ambient Light Settings Dialog Box
Add ambient light settings under a name of your choice. By adding ambient light settings, you can quickly
print posters according to the environment where they are displayed.
To display the Managing Ambient Light Settings dialog box, click Managing Ambient Light Settings... in
the Tool menu.
Ambient Light Settings
Displays a list of ambient light settings.
Custom Ambient Light Setting
Set the name of the ambient light setting.
Chart Number
Select a chart number.
Delete
Deletes the selected ambient light setting.
Note
• Chart Number 1 to Chart Number 4 and Custom Settings cannot be deleted.
• When multiple instances of PosterArtist are running, ambient light settings cannot be deleted.
Add
Add the ambient light setting with the specified settings. Once added, the setting appears under
Ambient Light Setting.
Note
• Added ambient light settings appear in the ambient light setting list in the Print screen.
List
Displays the Ambient Light Setting List dialog box for viewing ambient light settings.
296

Help
Opens this guide.
297
Export Dialog Box
Export artwork added to the library as a single file (with a .cptx extension).
To display the Export dialog box, click Export... in the File menu.
Library tabs
Switch between the Templates, Photos, Clipart, and Backgrounds tabs.
Category
Displays a list of categories in the library.
Show
Change the type of displayed artwork.
All Artwork
Displays all artwork.
User Artwork
Displays artwork added by the user.
Library Artwork
Displays the pre-installed artwork.
Artwork with Expiration Date
Displays artwork whose usage period is set.
Artwork with Edit Restriction
Displays artwork whose edit restrictions are set.
(Small Size / Medium Size / Large Size)
Changes the display size of thumbnails.
Artwork
Displays the thumbnails of artwork in the library.
Add
Select the artwork you want to export, and then click Add to add it to Item to be exported.
298

Note
• Up to 200 artwork items can be selected from multiple libraries.
• Multiple artwork items are exported as a single file.
Item to be exported
Artwork displayed in Item to be exported will be exported.
Back
Closes the Export dialog box.
Next
Displays the Export to dialog box; enter the destination category name, and then specify the
destination folder to save the export file.
299
Set Grid and Guide Dialog Box
Specify the color and line type of the grid and guide.
To display the Set Grid and Guide dialog box, right-click the poster's background or outside it, and then
click Grid and Guide > Set Grid and Guide....
Grid
Color
Displays the current color. To change the color, click Custom... to display the Color dialog box,
and then select a color.
Style
Select the grid line type from the list.
Guide
Color
Displays the current color. To change the color, click Custom... to display the Color dialog box,
and then select a color.
Style
Select the guide line type from the list.
Note
• For instructions on using the guide, see Using the Guide.
300
Preferences Dialog Box
Specify the location to save artwork, printer to use for test printing, and more.
To display the Preferences dialog box, click Preferences... in the Edit menu.
User Artwork
Specify the location to save templates, images, and other artwork created using PosterArtist. Click
Browse..., and then specify the destination folder.
Test Printer
Select the printer to use for test printing.
Media Size
Select the paper size for test printing from A4 and Letter.
Measurement Units
Select the unit of length for PosterArtist from mm and inch.
Nudge Distance
Specify the distance objects move each time a keyboard arrow key is pressed, within the following
ranges.
When Measurement Units is mm: 0.01 to 10,000 mm
When Measurement Units is inch: 0.01 to 393.70 in.
Note
• Press the arrow key while holding down the Ctrl key to move objects by one tenth of the value set in
Nudge Distance.
Default poster size
Set the default size of templates and new posters. It can also be changed at a later time.
301
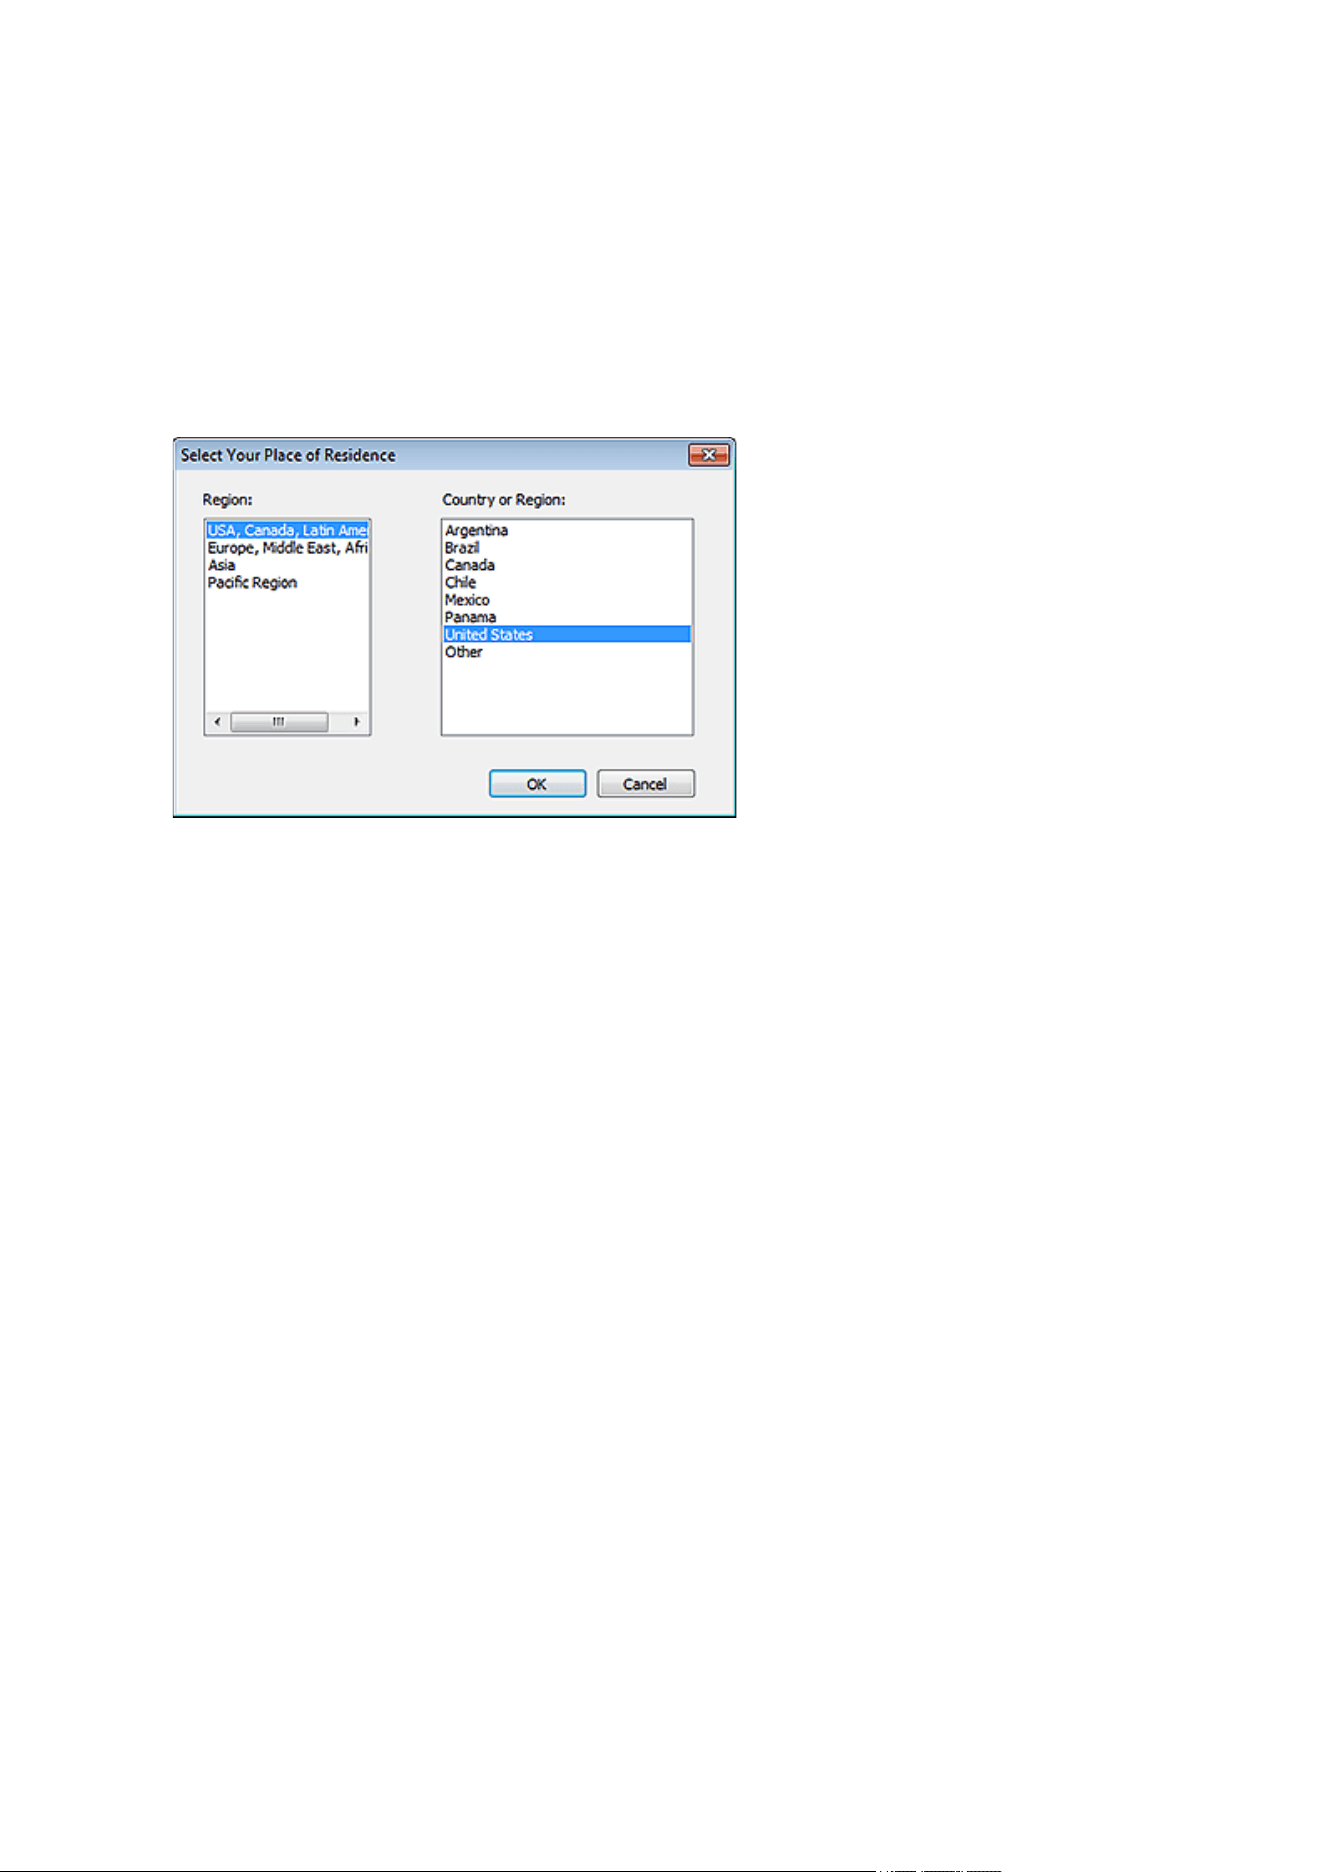
Proxy Server Settings
Set the proxy server. If you are not using a proxy server, leave those fields blank.
User Name
Enter the user name.
Password
Enter the password.
Select Your Place of Residence...
Displays the Select Your Place of Residence dialog box; select Region or Country and Region.
Display all messages
If you deselect this checkbox, messages displayed while using PosterArtist will no longer appear.
Check for new version at startup
When the latest version of PosterArtist is released, an update notification message will appear, allowing
you to download the latest version.
302
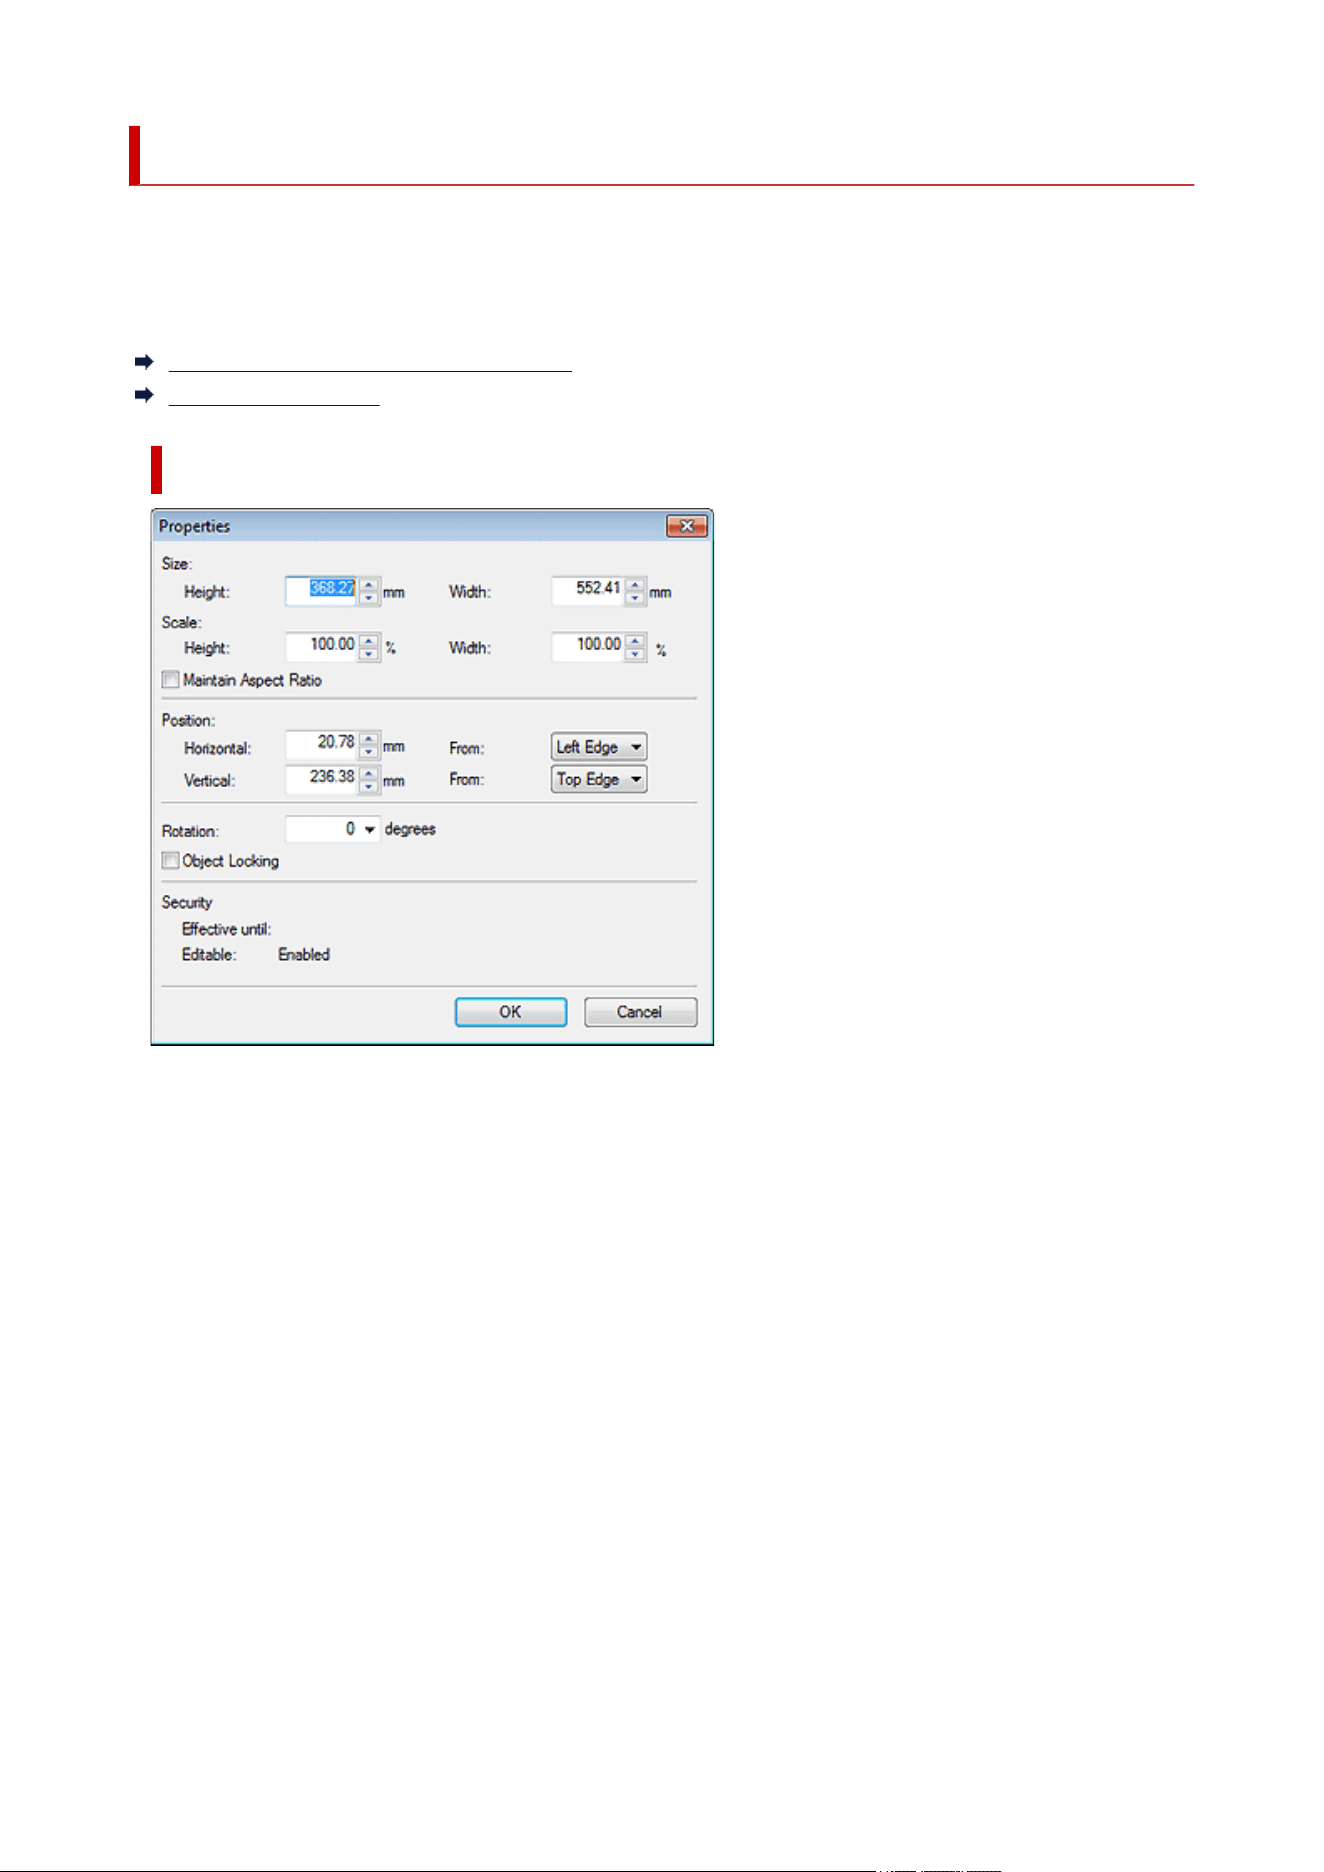
Properties Dialog Box
Specify the size, position, or rotation angle of objects by entering a value.
To display the Properties dialog box, select the target object on the poster, and then click Properties... in
the Object menu.
For Objects Other than Lines and Arrows
For Lines and Arrows
For Objects Other than Lines and Arrows
Size
Height
Specify the height of the object.
Width
Specify the width of the object.
Scale
Height
Specify the height of the object by changing the scale.
Width
Specify the width of the object by changing the scale.
Maintain Aspect Ratio
Maintains the aspect ratio of the object. When this checkbox is selected and you change Height or
Width, the other is changed automatically to maintain the aspect ratio.
Position
Horizontal
Specify the horizontal position relative to the left or right edge of the page.
303

From
Select the reference position from Left Edge and Right Edge.
Vertical
Specify the vertical position relative to the top or bottom edge of the page.
From
Select the reference position from Top Edge and Bottom Edge.
Rotation
Specify the clockwise rotation angle.
Note
• To rotate objects counter-clockwise, enter a negative value.
Object Locking
Select this checkbox to lock the position of the object.
Important
• Objects that have been set up for variable printing cannot be locked.
Note
• Locked objects are outlined in red when you point to them.
Security
Effective until
Displays the usage period of the object when the Set Use Period checkbox is selected in the
Saving Artwork dialog box.
Editable
Displays whether Prohibit Editing in the Saving Artwork dialog box is enabled or disabled.
Note
• Appears only when a photo or clipart is selected.
• For details on the Saving Artwork dialog box, see Saving Artwork Dialog Box (Images).
304
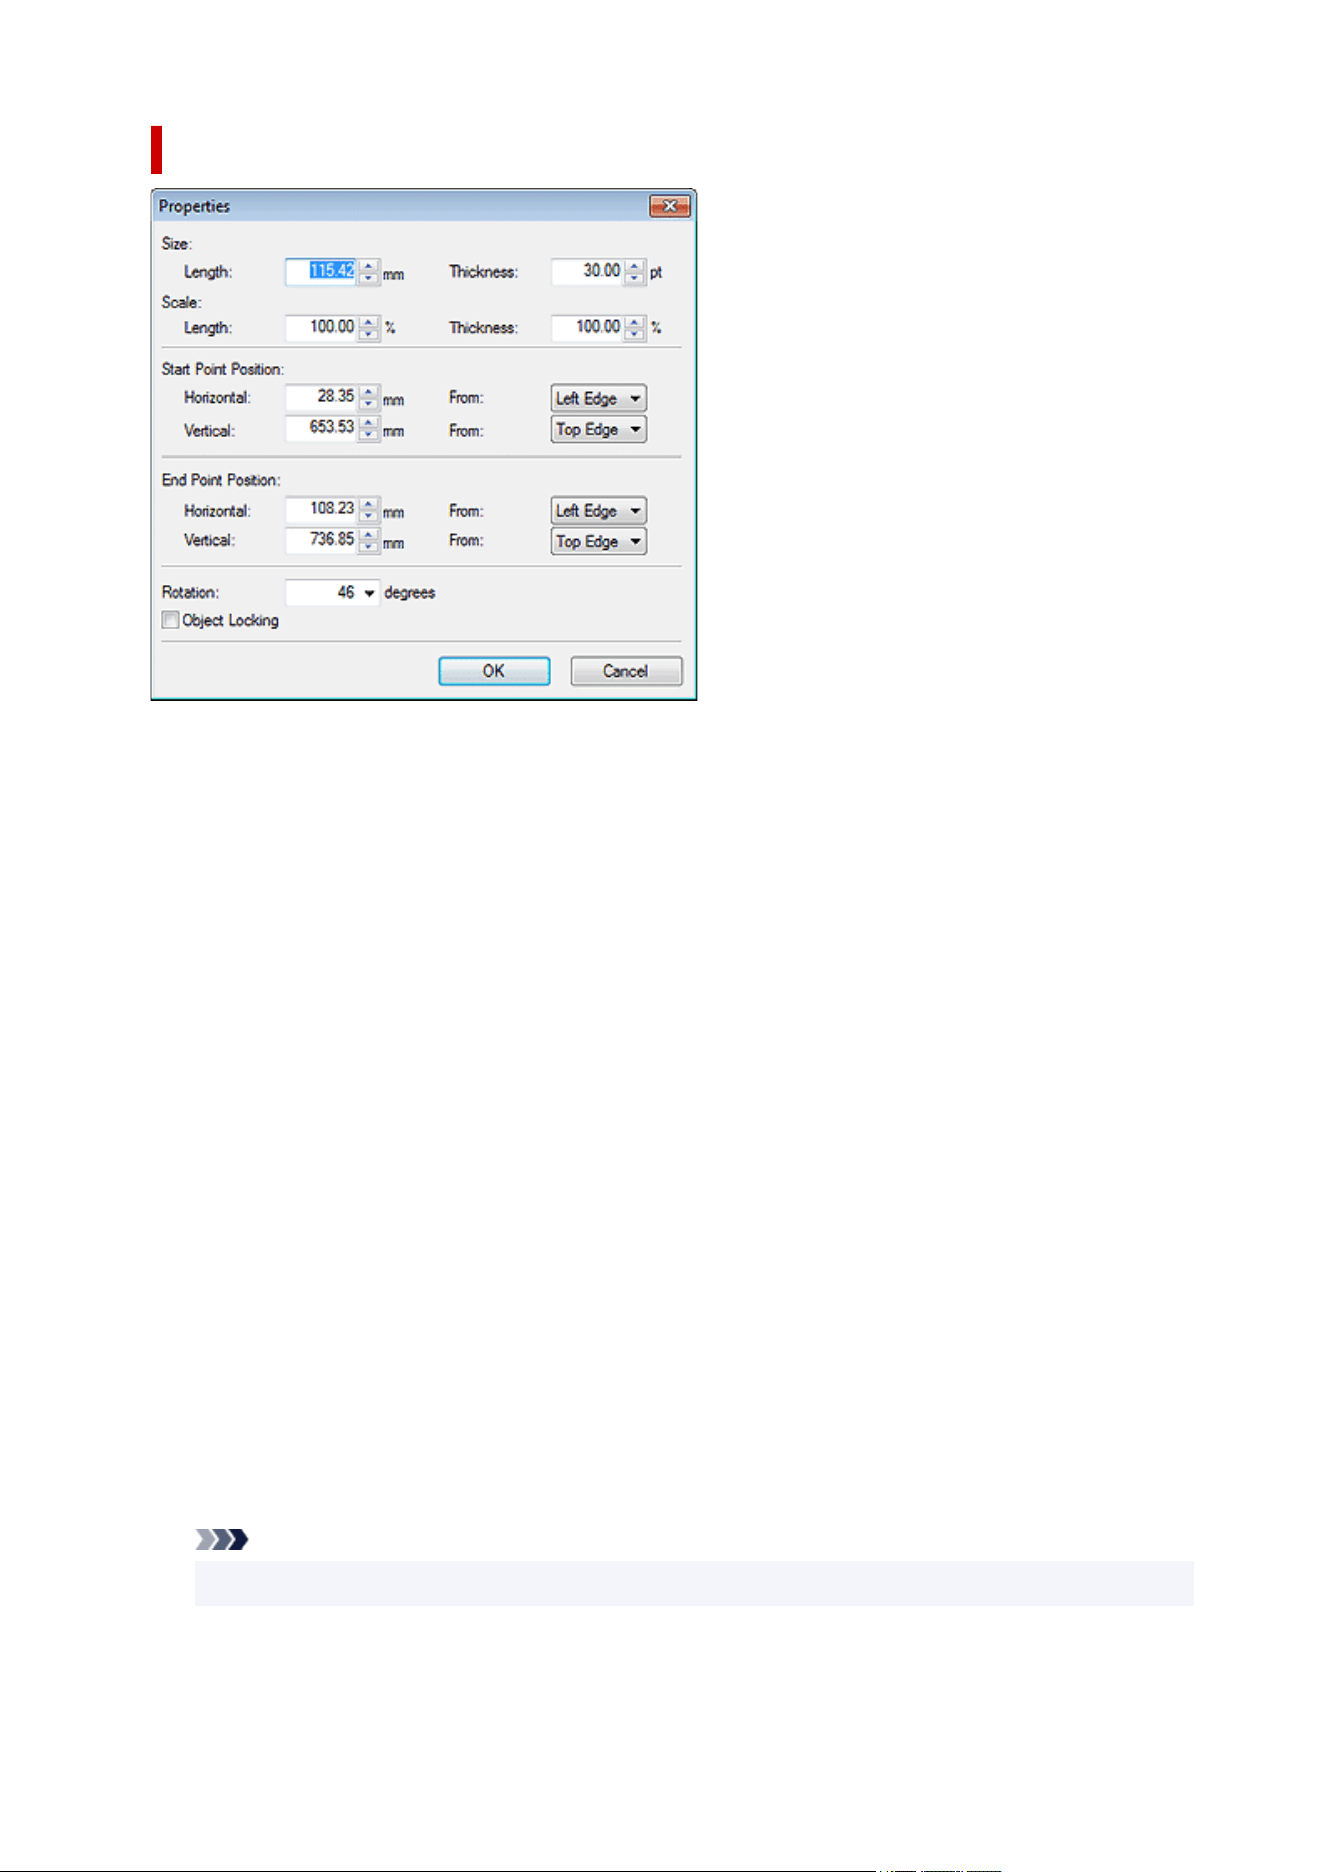
For Lines and Arrows
Size
Length
Specify the line or arrow length.
Thickness
Specify the line or arrow thickness.
Scale
Length
Specify the line or arrow length by changing the scale.
Thickness
Specify the line or arrow thickness by changing the scale.
Start Point Position / End Point Position
Horizontal
Specify the horizontal position relative to the left or right edge of the page.
From
Select the reference position from Left Edge and Right Edge.
Vertical
Specify the vertical position relative to the top or bottom edge of the page.
From
Select the reference position from Top Edge and Bottom Edge.
Rotation
Specify the clockwise rotation angle.
Note
• To rotate objects counter-clockwise, enter a negative value.
305
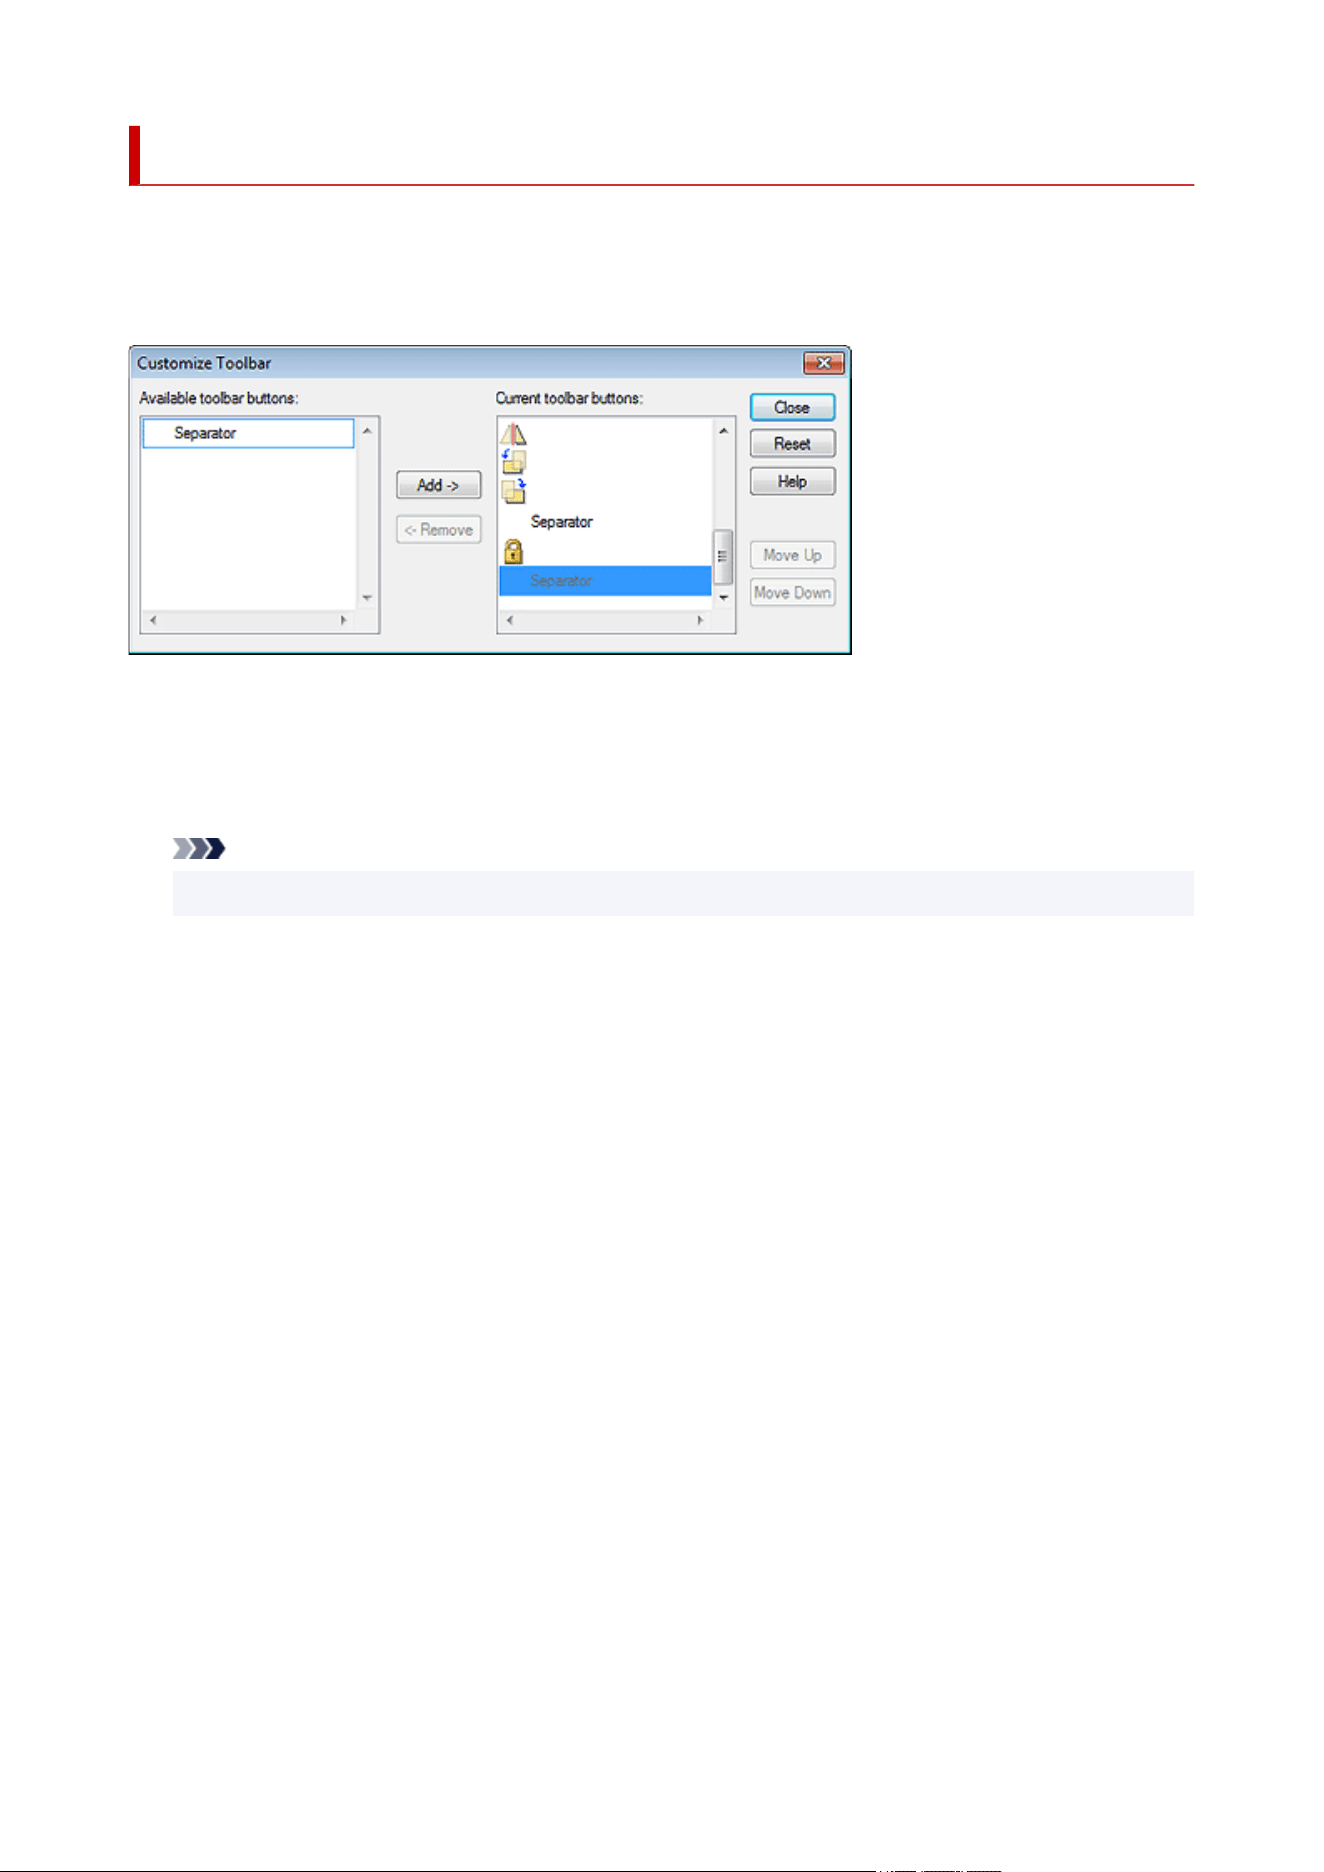
Customize Toolbar Dialog Box
Customize toolbars by rearranging the buttons, showing only frequently used buttons, and more.
To display the Customize Toolbar dialog box, from the Tool menu, select Custom, and then click Main
Toolbar... or Sub Toolbar....
Available toolbar buttons
Displays buttons not shown on the toolbar.
Add
Adds the button or Separator selected under Available toolbar buttons.
Note
• Add Separator to insert a separator line between buttons on the toolbar.
Remove
Deletes the button selected under Current toolbar buttons.
Current toolbar buttons
Displays the buttons shown on the toolbar.
Reset
Restores the original state.
Help
Opens this guide.
Move Up
Moves the button selected under Current toolbar buttons up one position at a time.
Move Down
Moves the button selected under Current toolbar buttons down one position at a time.
306
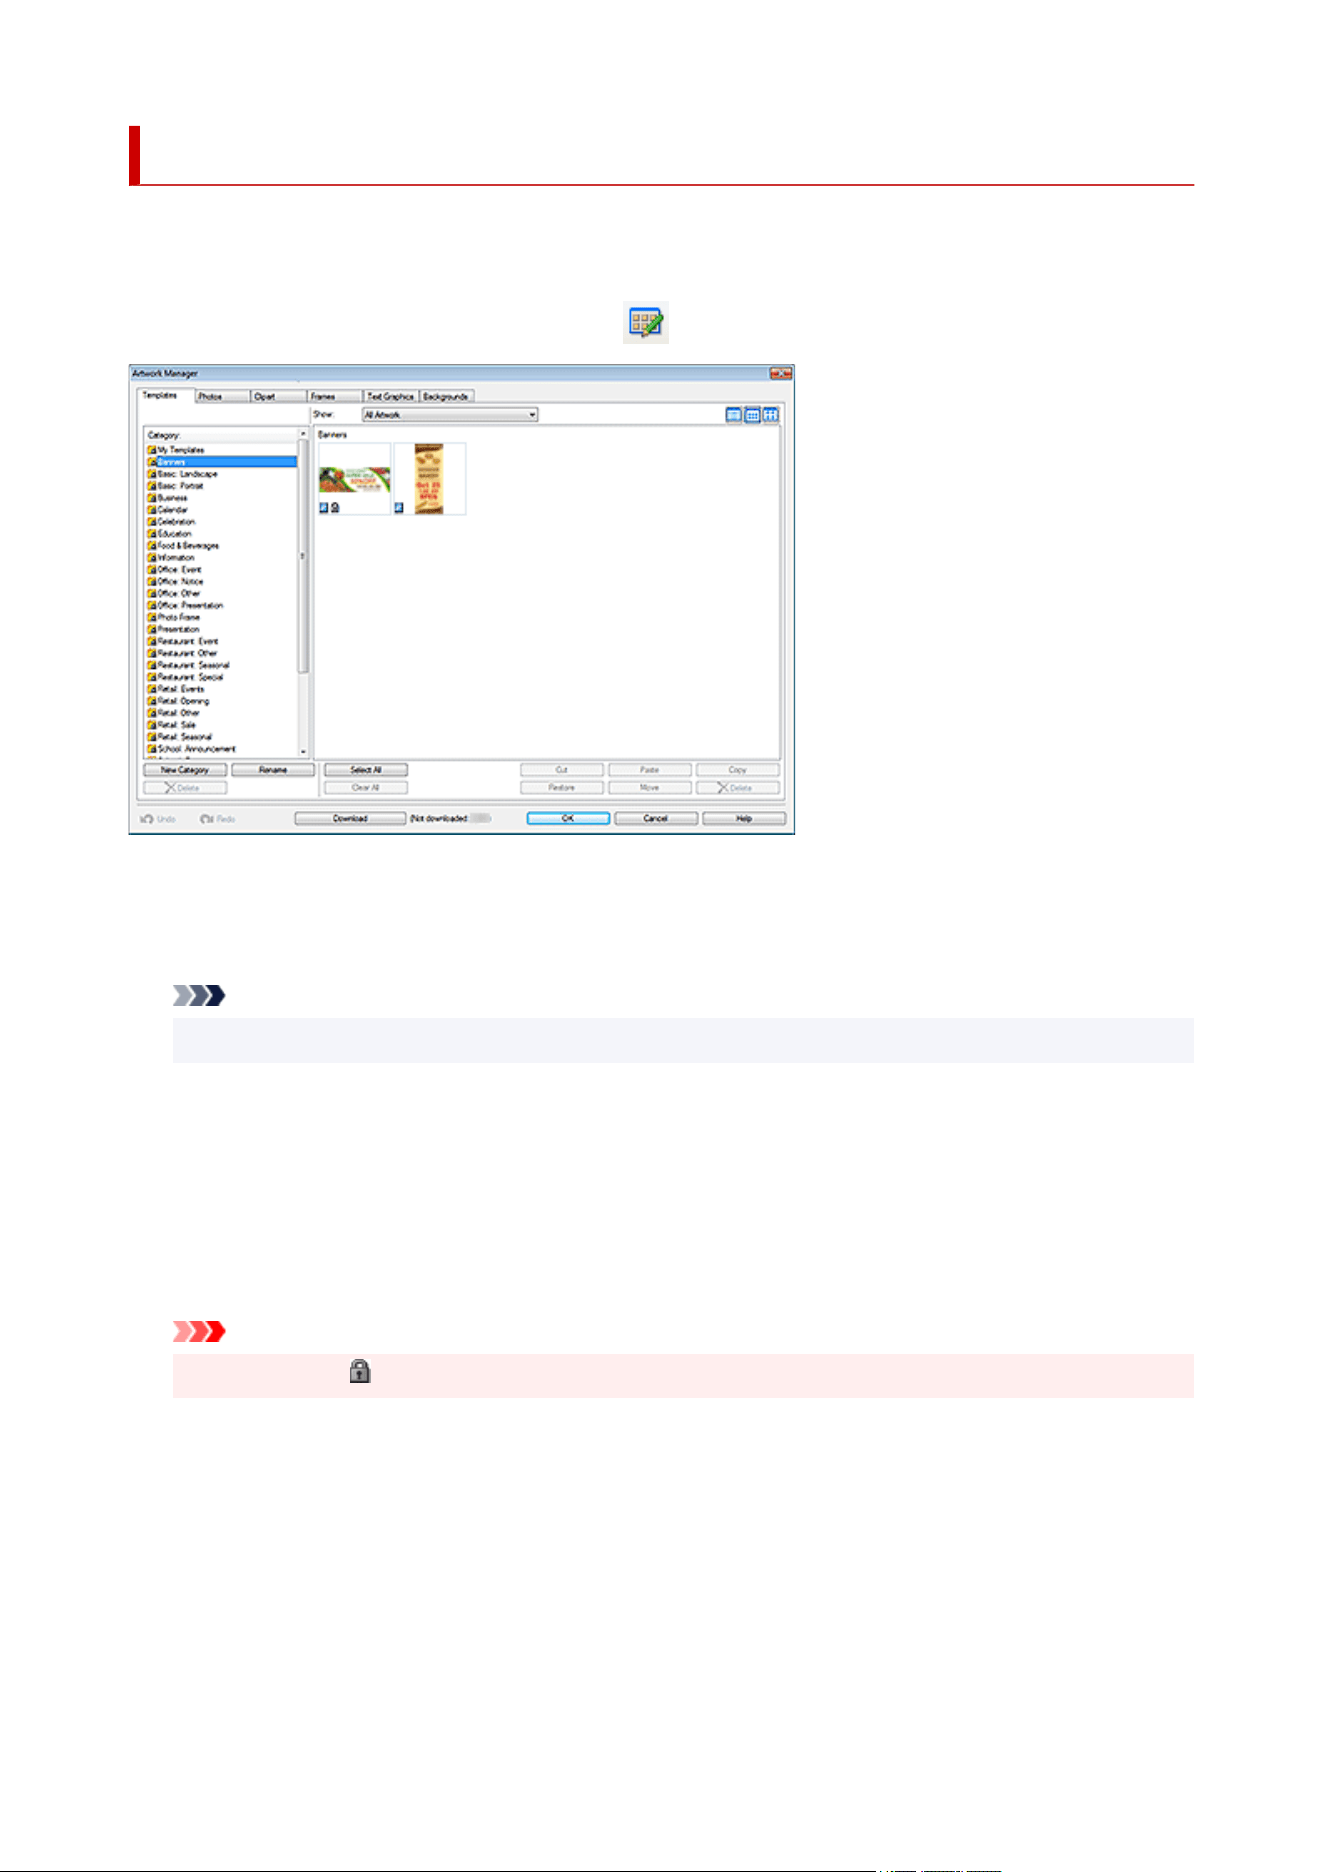
Artwork Manager Dialog Box
Add new categories, rename categories, or delete unnecessary categories. In addition, rearrange categories
and artwork, for example in descending order of frequency.
To display the Artwork Manager dialog box, click (Artwork Manager Dialog) on the toolbar.
Category
Displays a list of categories in the library.
Categories can be rearranged by dragging them.
Note
• No Frame, No Text Graphic, and No Background are not displayed.
New Category
Add new categories. Newly created categories are added to the bottom of the category list.
Rename
Rename categories.
Delete
Delete categories.
Important
• Categories with a (Lock) icon cannot be deleted.
Show
Change the type of displayed artwork.
All Artwork
Displays all artwork.
User Artwork
Displays only the artwork added by the user.
307
Library Artwork
Displays only the pre-installed artwork.
(Small Size / Medium Size / Large Size)
Changes the display size of thumbnails.
Artwork
Displays the thumbnails of artwork in the library.
Note
• (P) icon indicates the pre-installed artwork.
• (Lock) icon indicates that the artwork is used in templates.
Select All
Selects all displayed artwork.
Clear All
Cancels the selection of artwork.
Cut
Cuts artwork.
Paste
Pastes the copied or cut artwork.
Important
• Copied artwork can be pasted within the same library. It cannot be pasted into other libraries.
Copy
Copies artwork.
Restore
Adds artwork deleted from the library to the library again.
Click Deleted content in Category, and then from the deleted artwork, select the artwork you want to
add again.
Move
Displays the Move Artwork dialog box for moving the selected artwork to a different category.
Delete
Deletes the selected artwork.
Important
• Artwork with a (Lock) icon cannot be deleted.
Undo
Undoes the last operation.
Redo
Redoes the last undone correction.
Download
Downloads artwork that has not been downloaded, at once.
308

Help
Opens this guide.
309
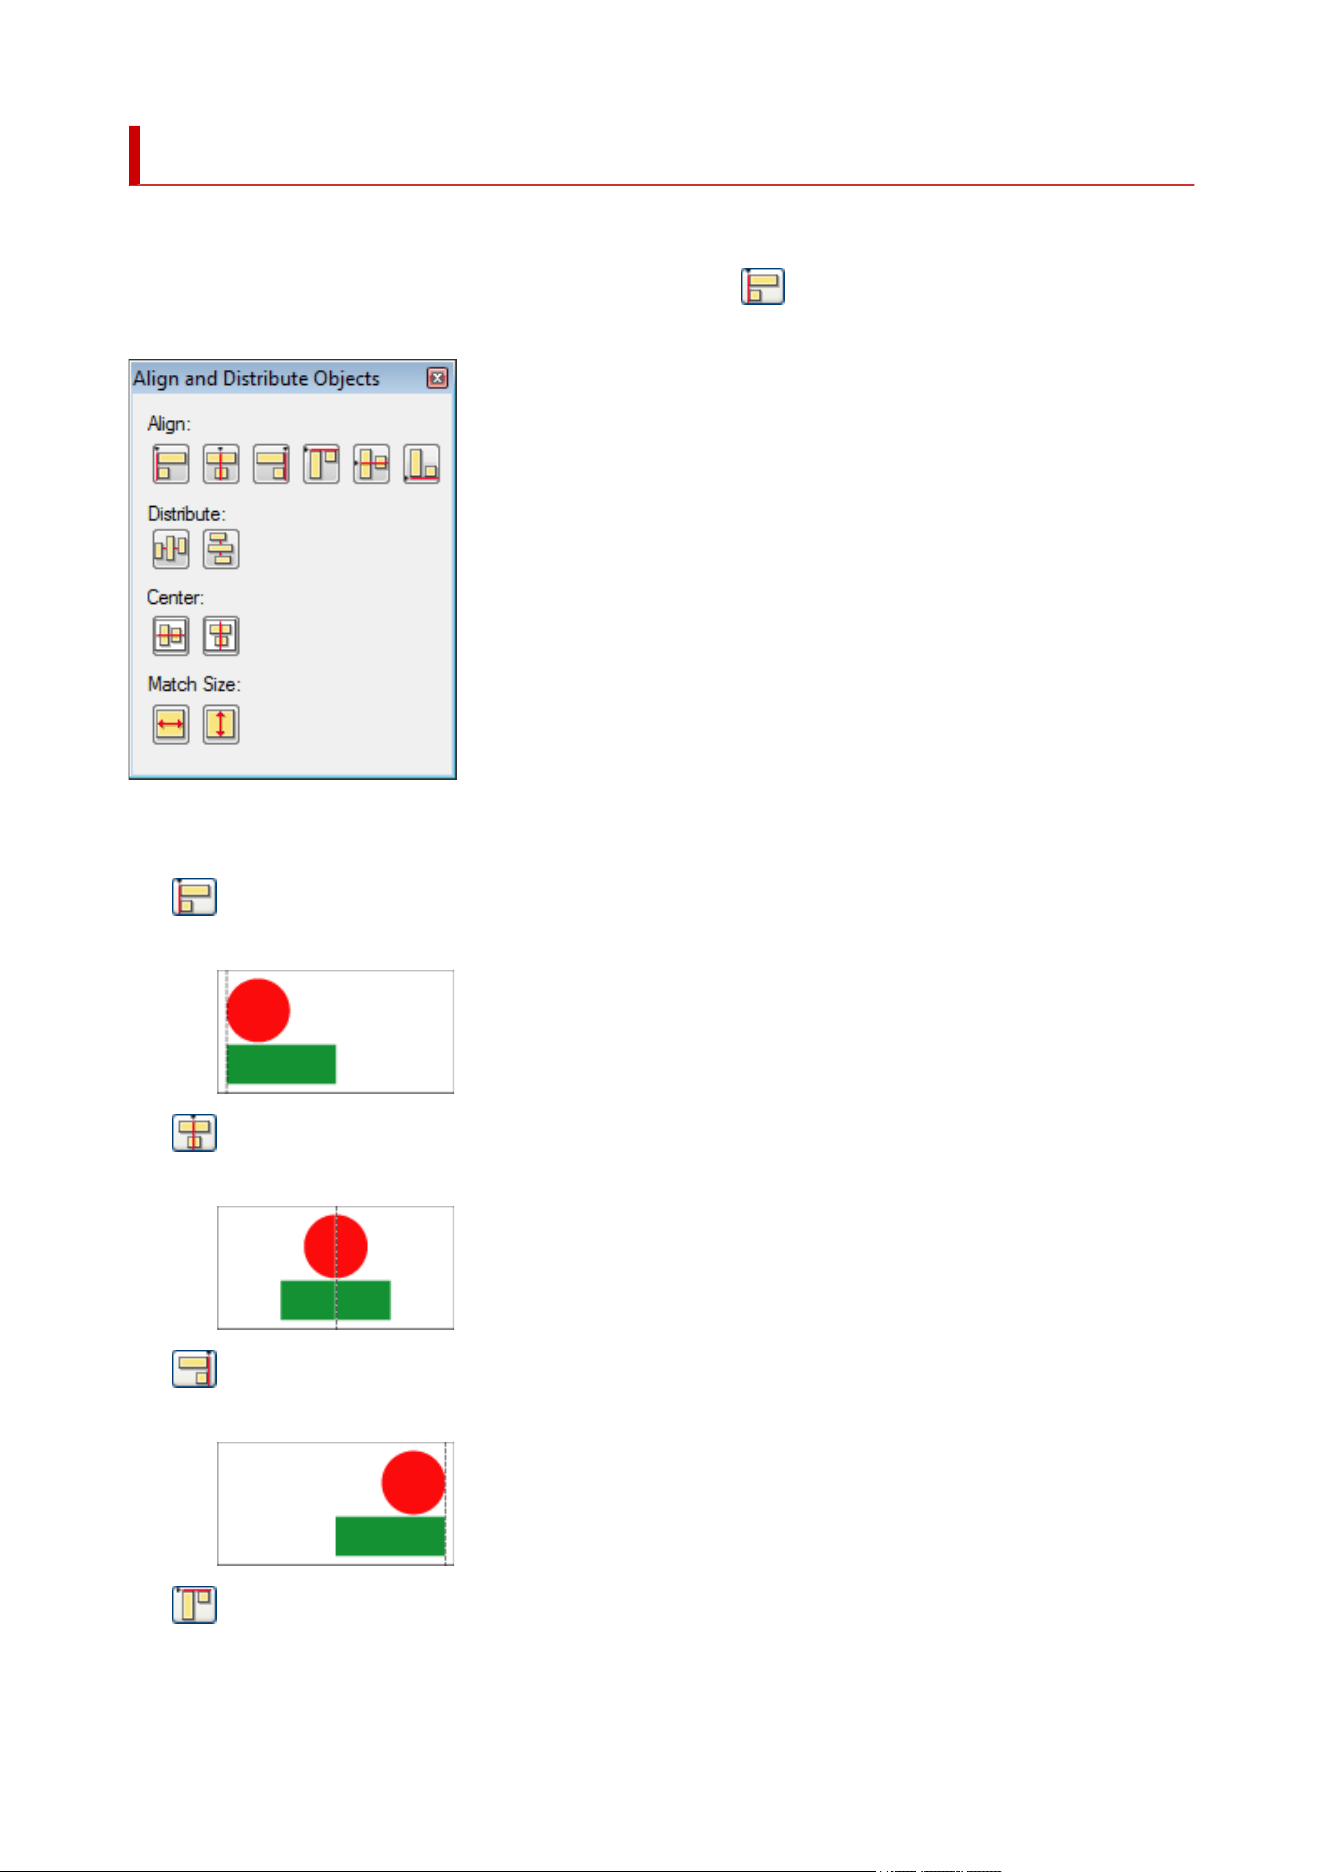
Align and Distribute Objects Dialog Box
Align multiple objects (photos, clipart, etc.) on the poster.
To display the Align and Distribute Objects dialog box, click (Align and Distribute Objects Dialog) on
the toolbar.
Align
Aligns objects.
(Left Align)
Objects are aligned to the left edge of the leftmost object.
(Center Horizontally)
Objects are centered horizontally between the leftmost and rightmost objects.
(Right Align)
Objects are aligned to the right edge of the rightmost object.
(Top Align)
Objects are aligned to the top edge of the top object.
310
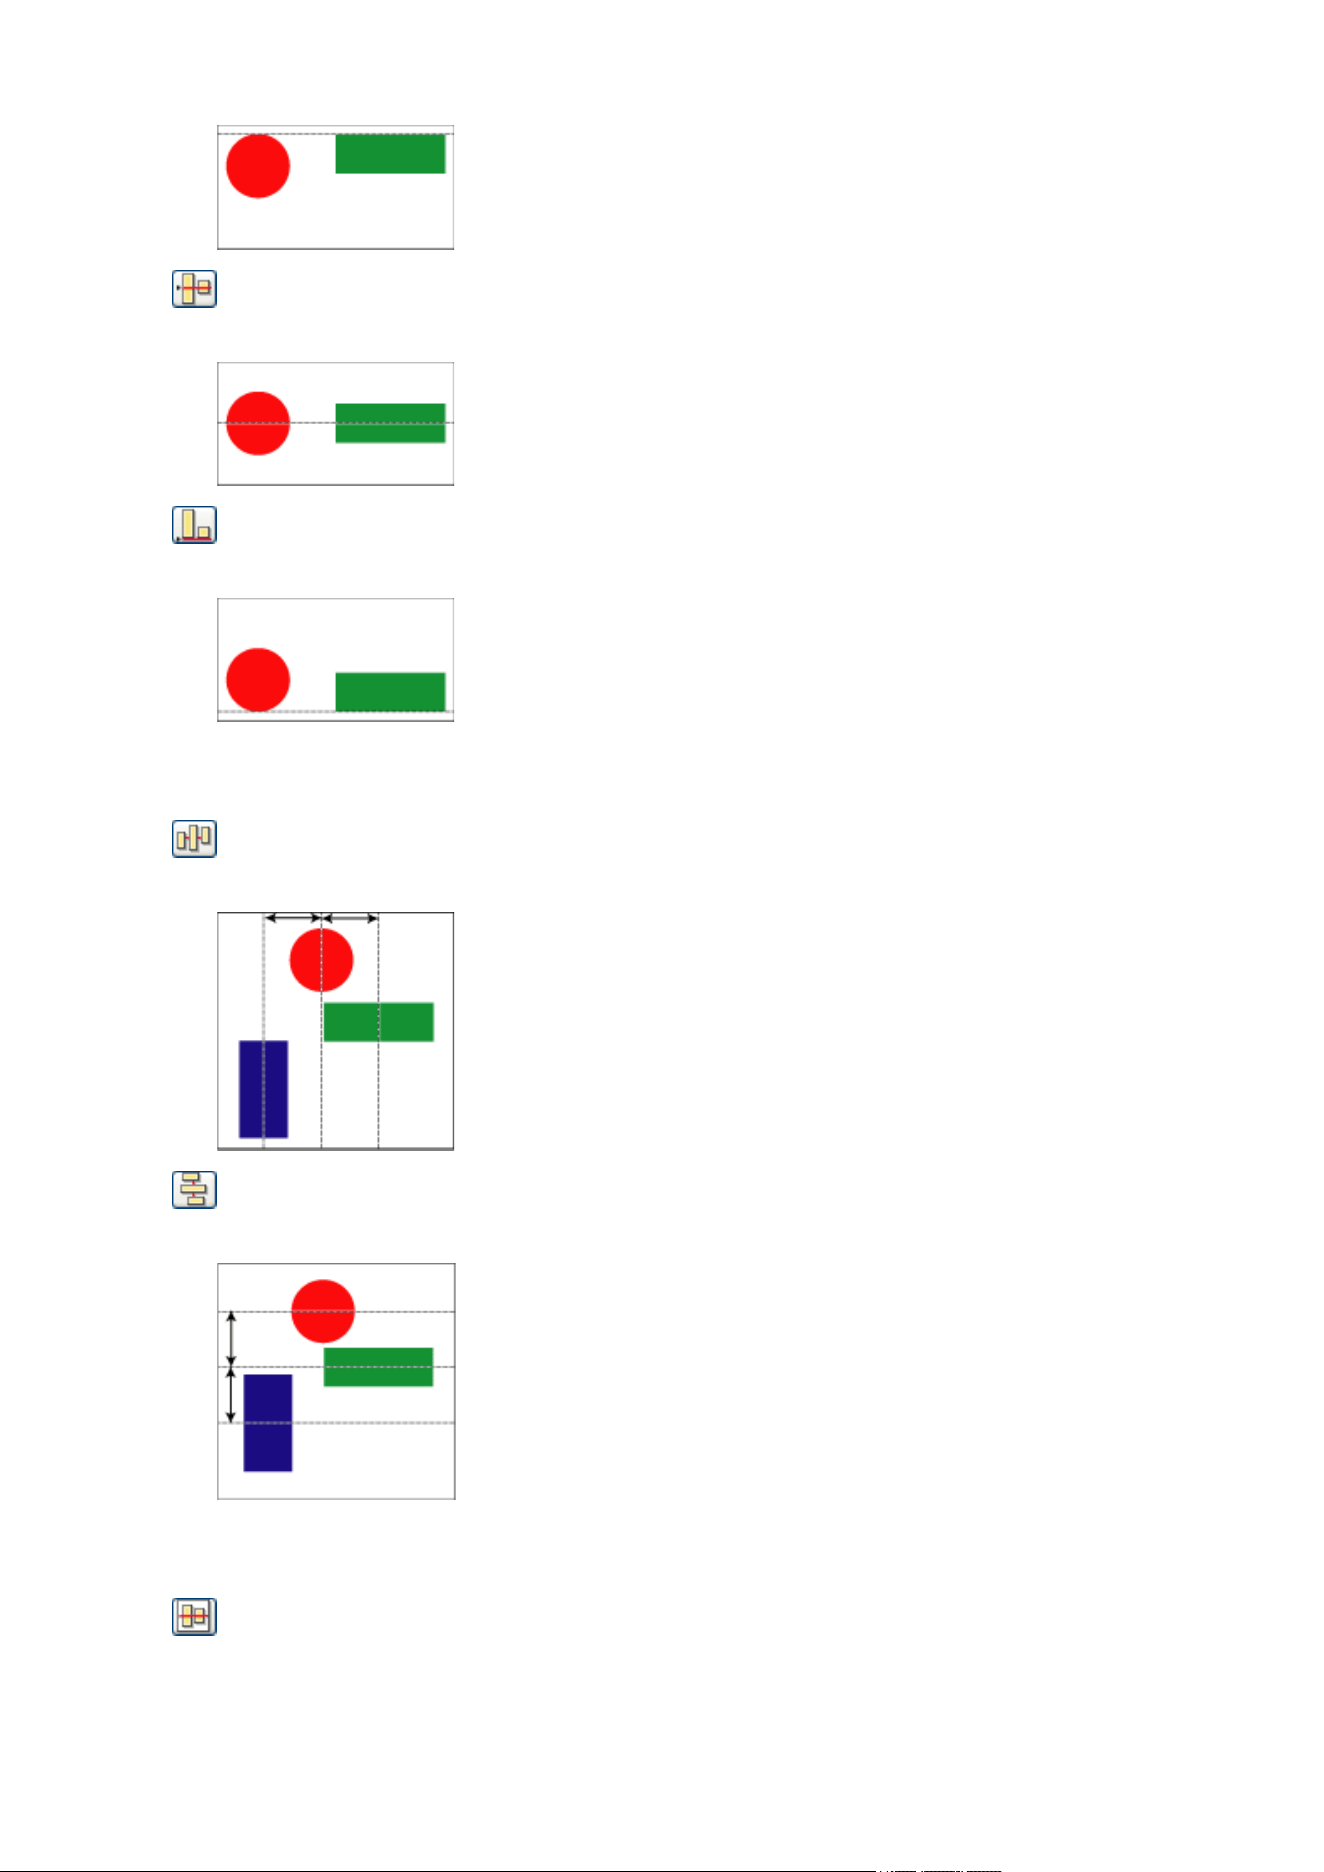
(Center Vertically)
Objects are centered vertically between the top and bottom objects.
(Bottom Align)
Objects are aligned to the bottom edge of the bottom object.
Distribute
Arranges objects at equal distances from each other.
(Even Horizontal Spacing)
Objects are arranged horizontally at equal distances from each other.
(Even Vertical Spacing)
Objects are arranged vertically at equal distances from each other.
Center
Centers objects in the middle of the page.
(Center Vertically on Page)
Objects are centered vertically in the middle of the page.
311
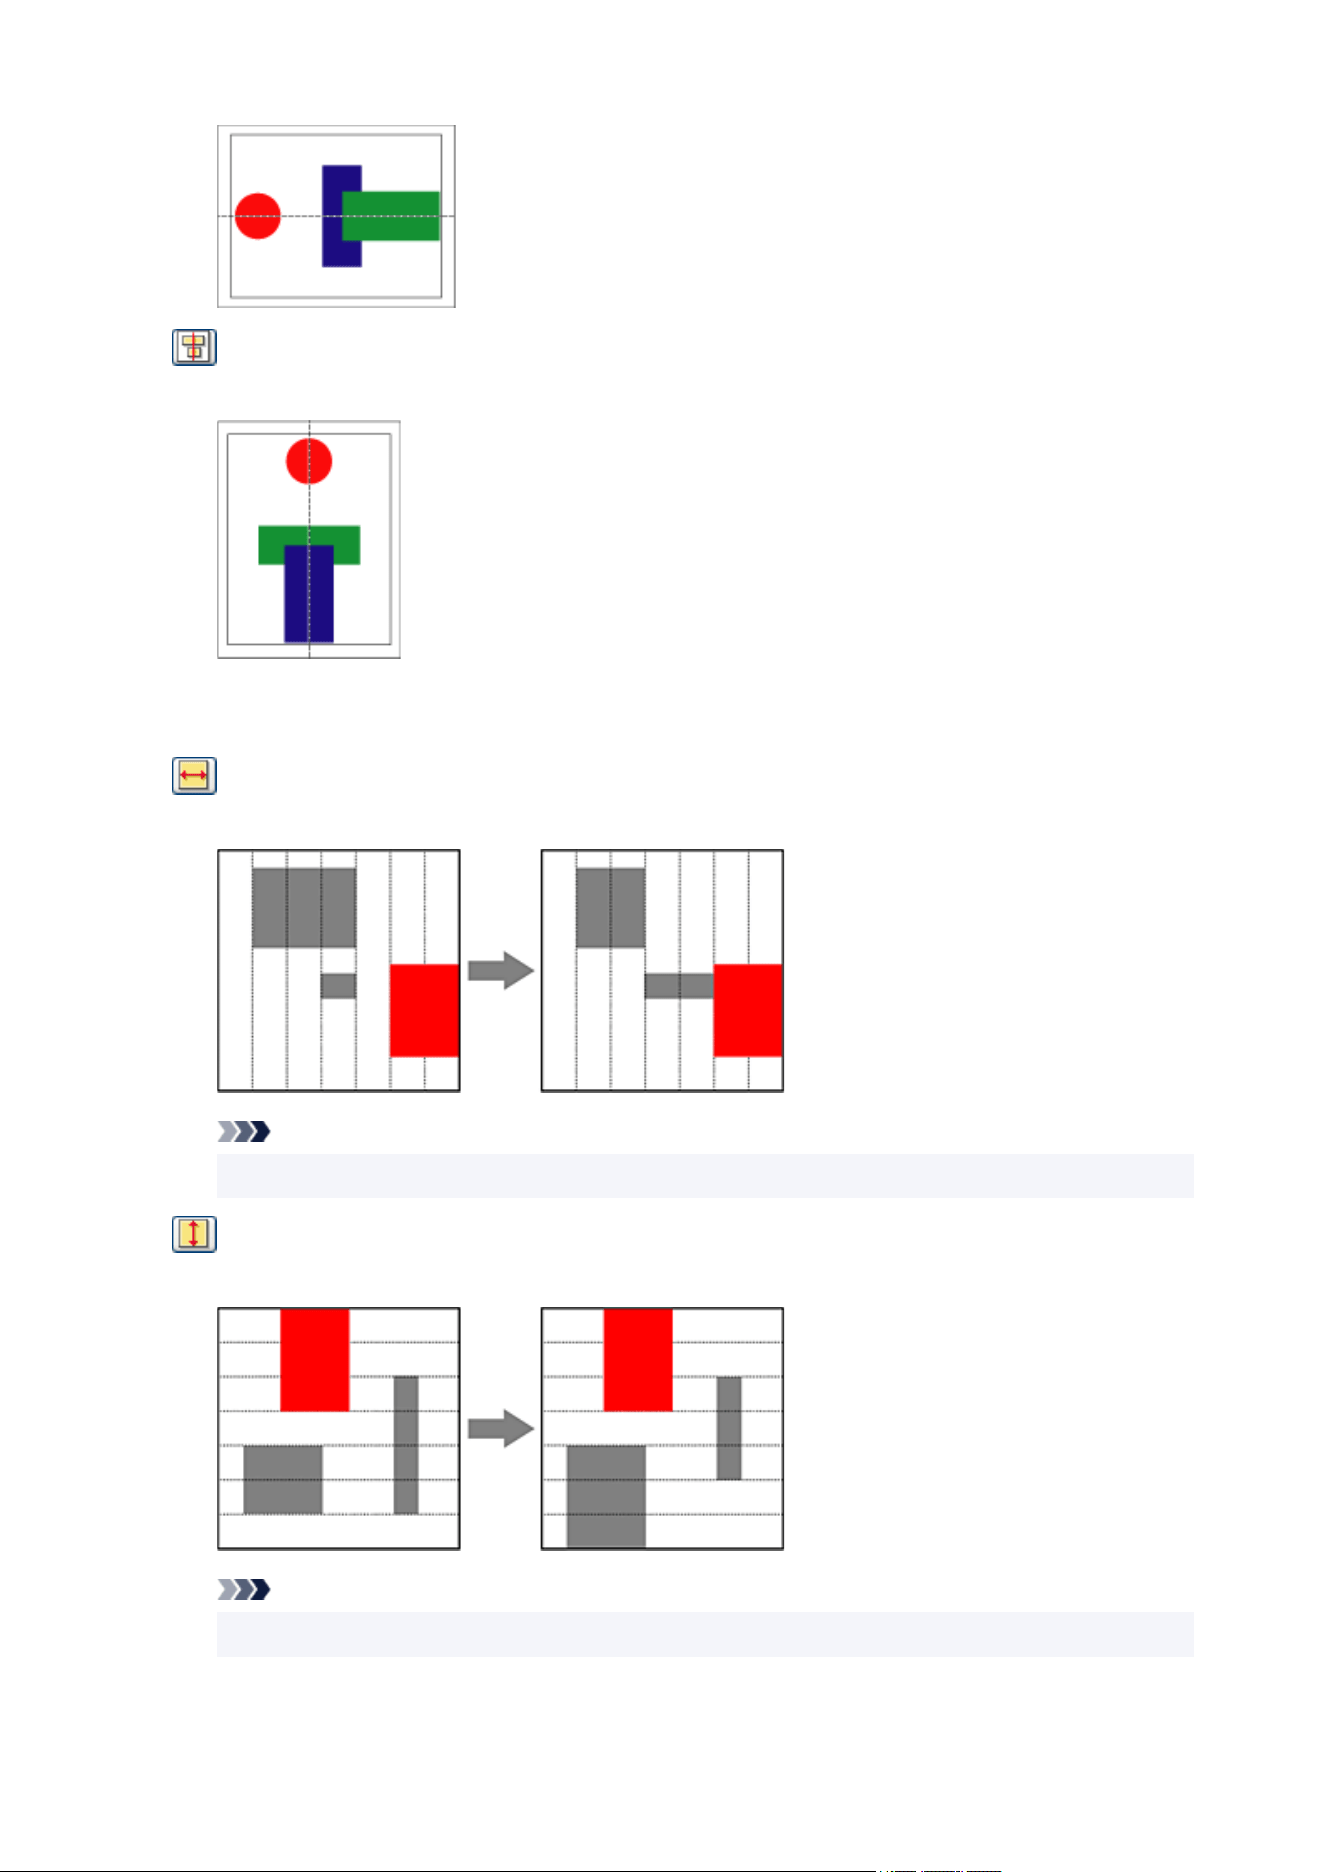
(Center Horizontally on Page)
Objects are centered horizontally in the middle of the page.
Match Size
Makes objects the same size.
(Fit Width)
Each object is resized to match the width of the first selected object.
Note
• The objects' aspect ratios are not maintained.
(Fit Height)
Each object is resized to match the height of the first selected object.
Note
• The objects' aspect ratios are not maintained.
312
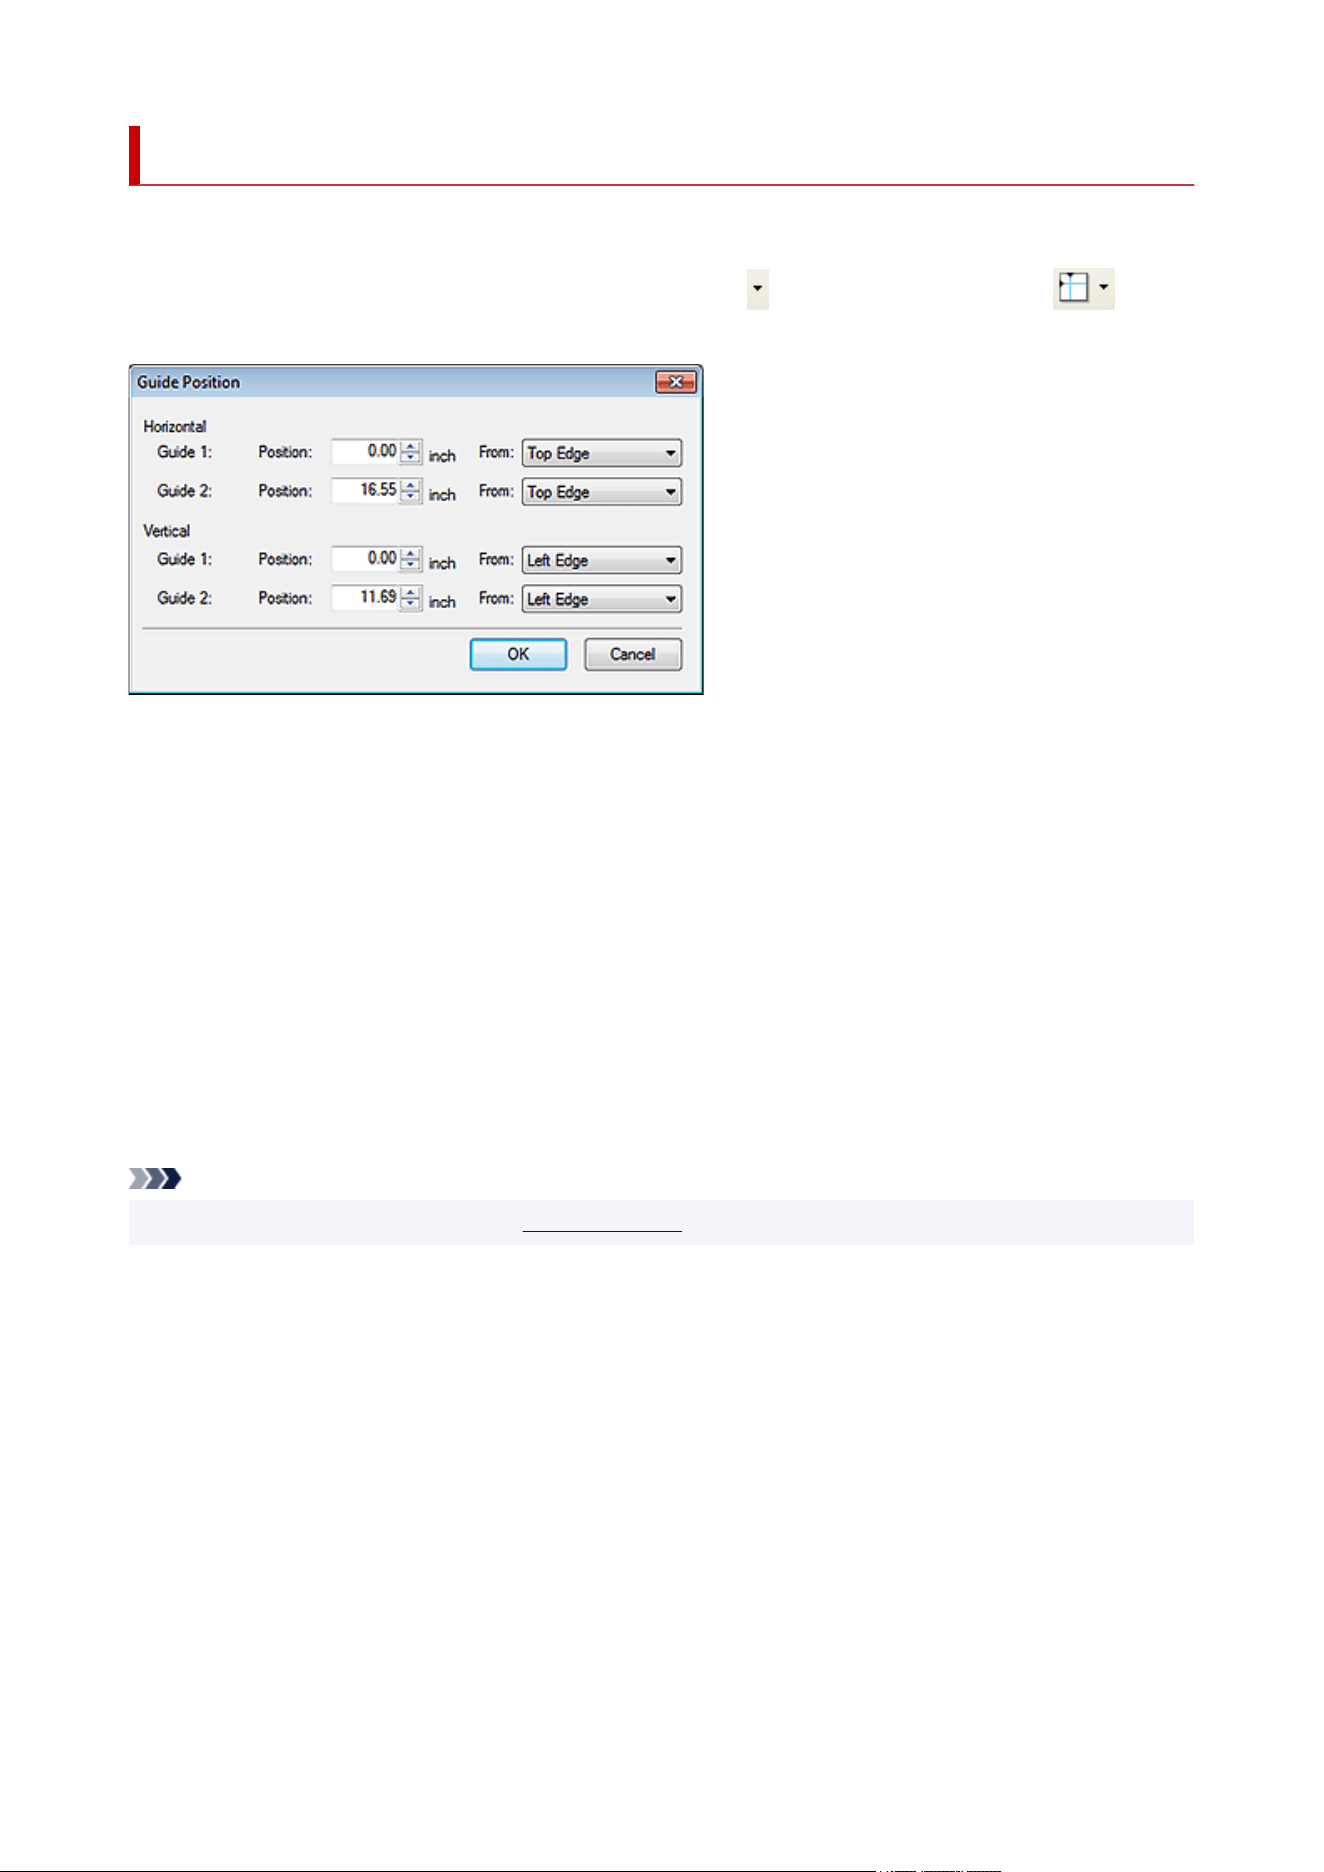
Guide Position Dialog Box
Specify the guide position numerically.
To display the Guide Position dialog box, on the toolbar, click (Down Arrow) to the right of
(Guide), and then select Enter Guide Position....
Horizontal
Guide 1 / Guide 2
Position
Specify the horizontal guide positions relative to the top or bottom edge of the page.
From
Select the reference position from Top Edge and Bottom Edge.
Vertical
Guide 1 / Guide 2
Position
Specify the vertical guide positions relative to the left or right edge of the page.
From
Select the reference position from Left Edge and Right Edge.
Note
• For instructions on using the guide, see Using the Guide.
313
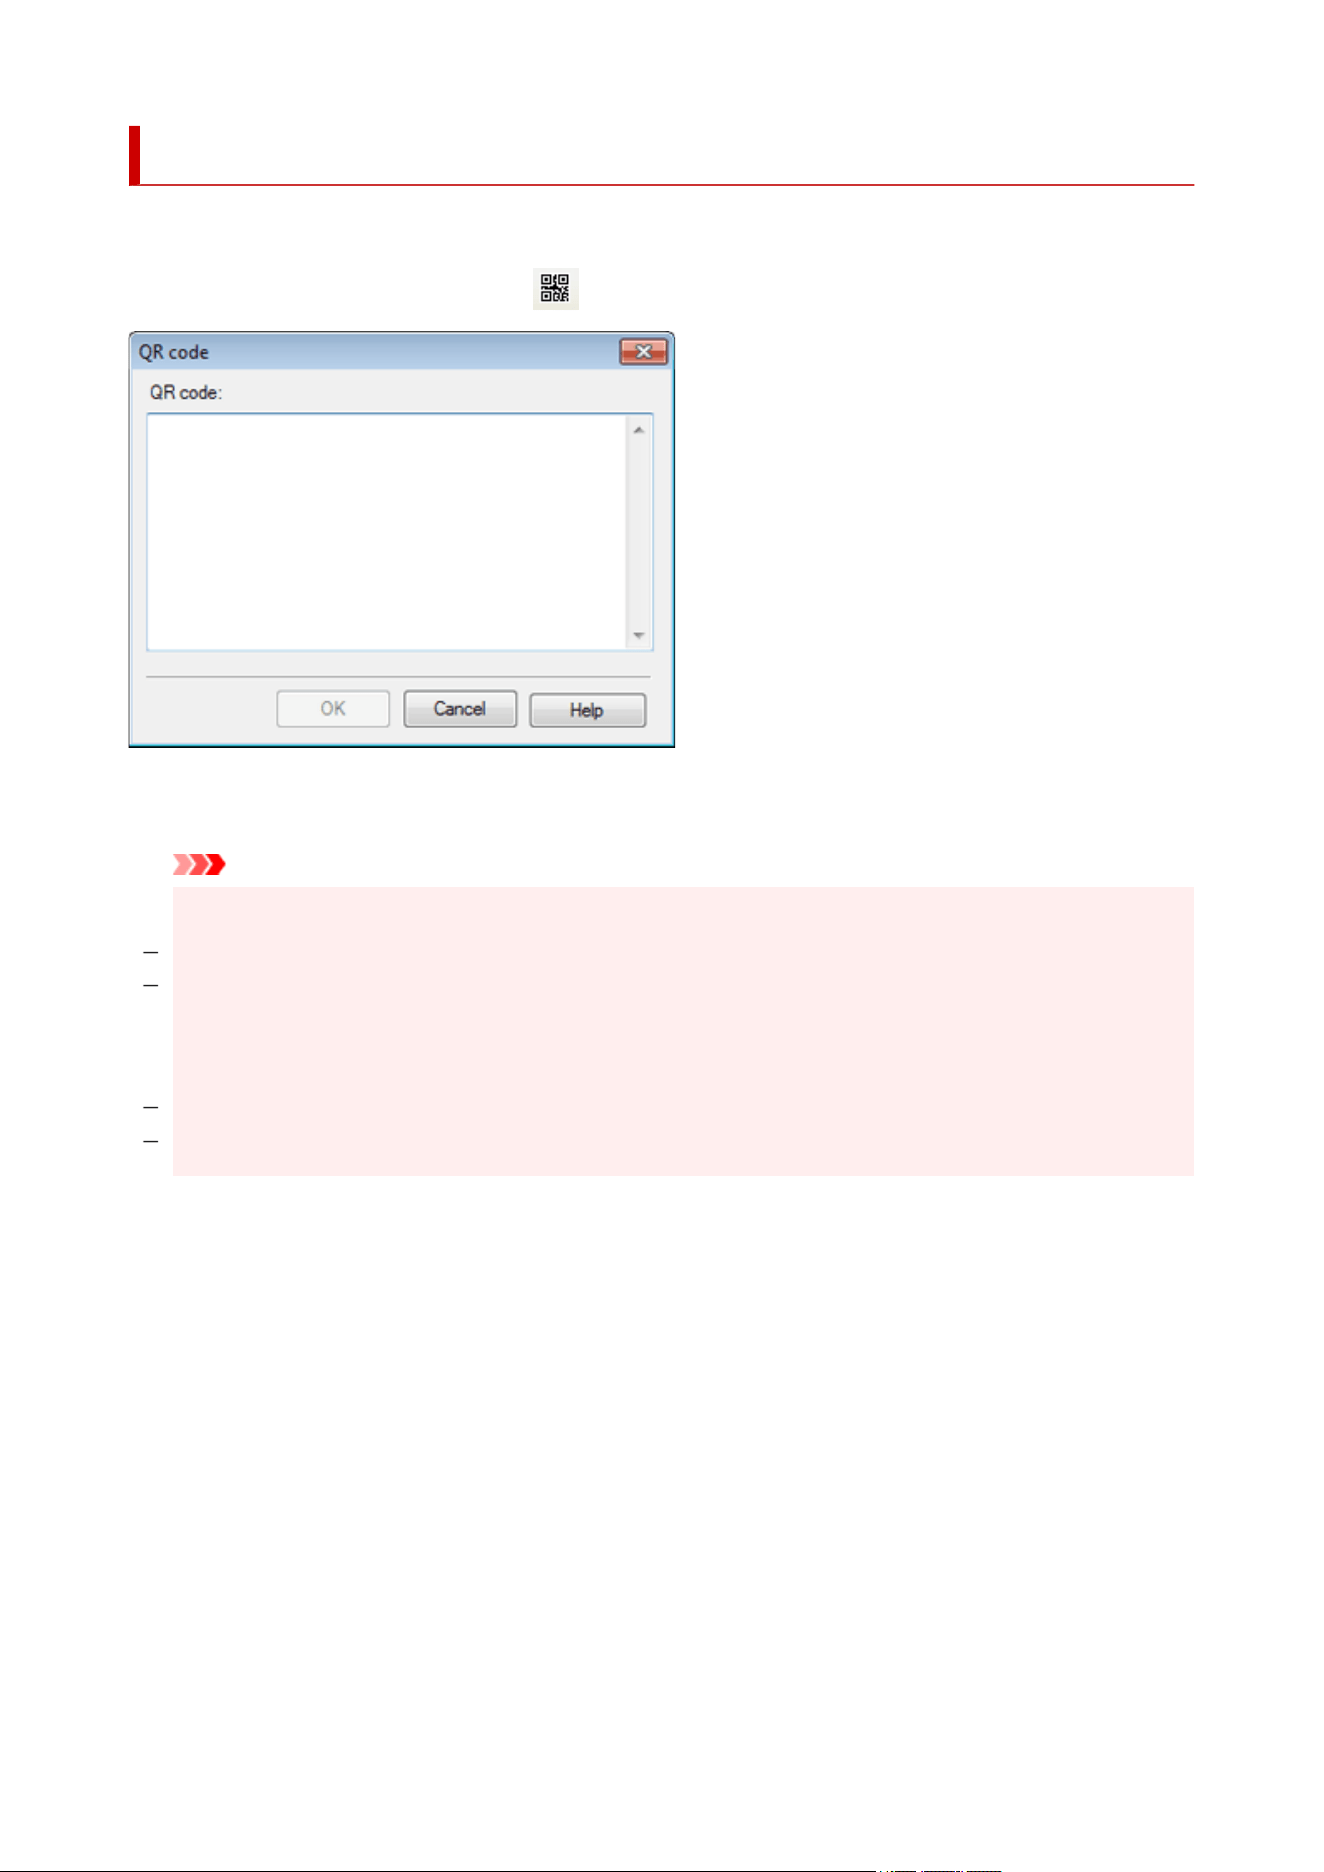
QR code Dialog Box
Add QR codes to posters.
To display the QR code dialog box, click (QR Code) on the toolbar.
QR code
Enter text such as email address and URL.
Important
• The number of characters that can be entered in a single QR code is as follows.•
Numbers only: 7089 characters or less
Letters and numbers: 4296 characters or less
• If a large number of characters is entered, scanning may fail depending on your device. We•
recommend that you limit the number of characters as follows.
Numbers only: 513 characters or less
Letters and numbers: 311 characters or less
314
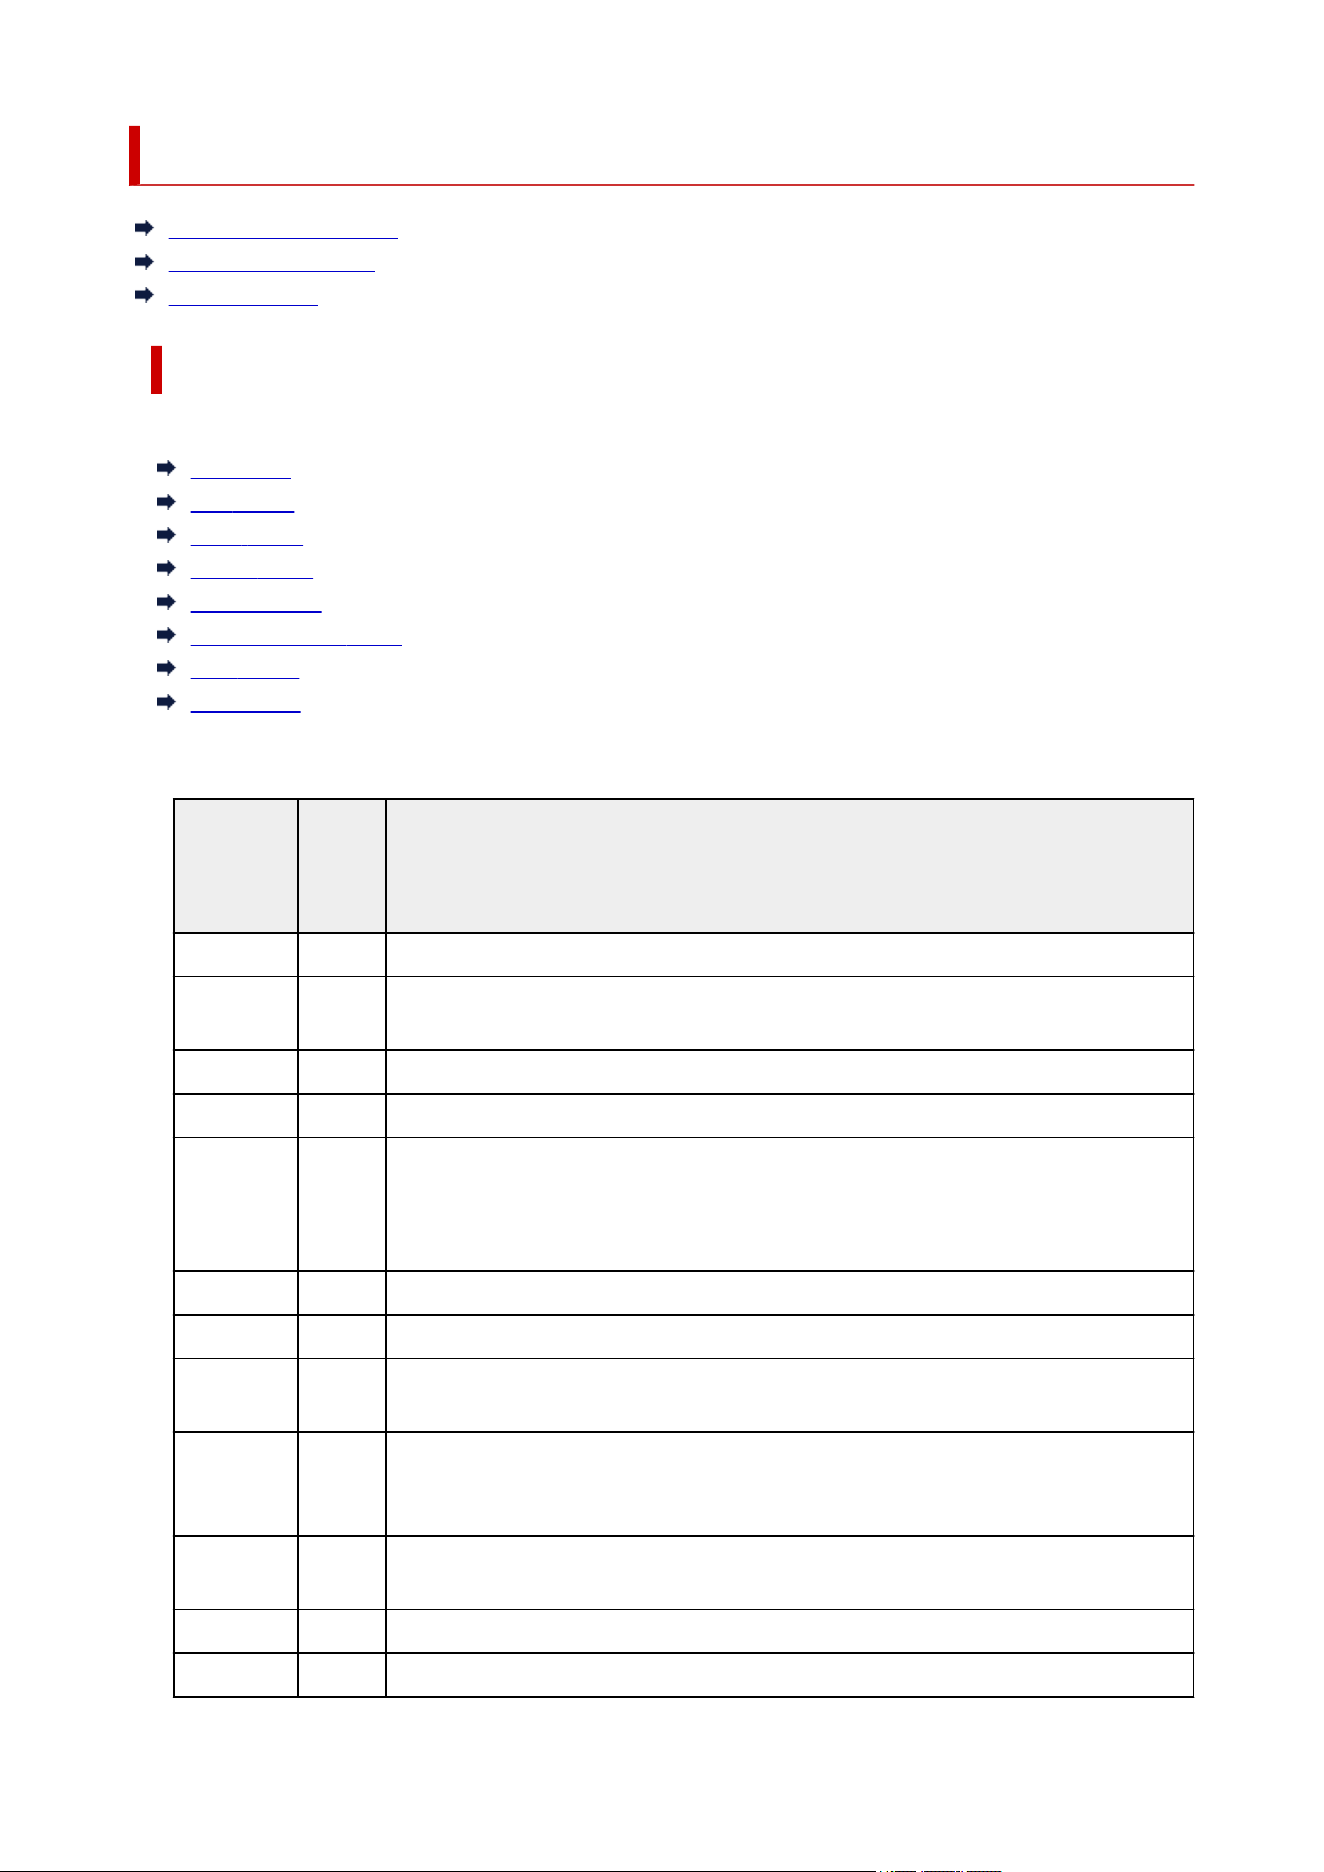
Commands
Menus and Commands
Main Screen Toolbar
Context Menus
Menus and Commands
The PosterArtist menu bar includes the following menus.
File Menu
Edit Menu
View Menu
Insert Menu
Object Menu
Cloud sharing Menu
Tool Menu
Help Menu
File Menu
Command Key-
board
Short-
cut
Description
New Poster Ctrl+N Closes the current poster to create a new, blank poster.
Open Post-
er...
Ctrl+O Displays previously printed or saved posters. Select a poster to edit it.
Import... Displays the Import dialog box for importing posters or images.
Export... Displays the Export dialog box for exporting poster templates.
Export (for
Easy-Pho-
toPrint Edi-
tor)
Displays the Export (for Easy-PhotoPrint Editor) dialog box for exporting poster data
for use in Easy-PhotoPrint Editor.
Save Ctrl+S Saves the current poster.
Save As... Displays the Save As dialog box for saving the poster with a new name.
Save As
JPEG...
Displays the Save As JPEG dialog box for saving a copy of the poster as a JPEG image
file.
Add to
Tem-
plates...
Adds the current poster to the library as a poster template.
Print Pre-
view...
Displays the Print Preview dialog box for checking the print result.
Print Ctrl+P Displays the Print screen.
Recent File Displays a list of recently used posters.
315
Exit Exits PosterArtist.
Edit Menu
Com-
mand
Sub
Com-
mand
Key-
board
Short-
cut
Description
Undo Ctrl+Z Undoes the last operation.
Redo Ctrl+Y Redoes the last undone correction.
Cut Ctrl+X Copies the selected object to the clipboard, removing it from the poster.*
Copy Ctrl+C Copies the selected object to the clipboard.*
Paste Ctrl+V Pastes the object from the clipboard.
Paste as Text Extracts text from WMF/EMF data on the clipboard to paste it.
Delete Del Deletes the selected object from the poster.*
Select All Ctrl+A Selects all objects on the poster.
Snap to Grid Selects whether to snap an object to the grid when they come close to each
other.
Snap to Guide Selects whether to snap an object to the guide when they come close to each
other.
Set Grid and
Guide...
Displays the Set Grid and Guide dialog box for specifying the color and line
type of the grid and guide.
Enter Guide Posi-
tion...
Displays the Guide Position dialog box for specifying the guide position.
Change
Back-
ground
From
Back-
ground
Library...
Displays the Edit screen (Backgrounds) for selecting a poster background.
Background Mar-
gins...
Displays the Background Margins dialog box for specifying page margins.
Preferences... Displays the Preferences dialog box.
* Multiple objects can be selected.
View Menu
Com-
mand
Sub Com-
mand
Key-
board
Short-
cut
Description
Toolbar Shows or hides the toolbars.
Main Tool-
bar
Shows or hides the main toolbar.
316
Sub Tool-
bar
Shows or hides the sub toolbar.
Status Bar Shows or hides the status bar.
Temporary Tray Ctrl+T Shows or hides the temporary tray.
Select Template Ctrl+1 Displays the Select Template screen.
Paper Options Ctrl+2 Displays the Paper Options screen.
Edit Ctrl+3
Photos Displays the Edit screen (Photos).
Clipart Displays the Edit screen (Clipart).
Text Displays the Edit screen (Text).
Shapes Displays the Edit screen (Shapes).
Back-
grounds
Displays the Edit screen (Backgrounds).
Variable
Data
Displays the Edit screen (Variable Data).
Print Ctrl+4 Displays the Print screen.
Zoom 100% (Fit
View)
Displays the entire poster in the poster preview.
Fit Width Displays the poster to fit to the width of the poster preview.
Fit Height Displays the poster to fit to the height of the poster preview.
Set
Zoom...
Displays the Enlarged/Reduced dialog box for selecting a scale or enlargement
method for posters.
Ruler Shows or hides the ruler.
Grid Shows or hides the grid.
Guide Shows or hides the guide.
Insert Menu
Com-
mand
Sub Command Description
Add / Re-
place Im-
age
From File... Displays the Insert Image dialog box for adding or replacing images to the
poster.
From Im-
age Li-
brary...
Pho-
tos
Displays the Edit screen (Photos).
Clipart Displays the Edit screen (Clipart).
QR Code... Displays the QR code dialog box for adding QR codes to the poster.
Read from (De-
vice Name)...
Acquire images from available TWAIN devices.
Add Text Text Changes the pointer to that for adding a horizontal text box.
Vertical Changes the pointer to that for adding a vertical text box.*
317
Add
Shape
Line Changes the pointer to that for adding lines or arrows.
Rectangle Changes the pointer to that for adding rectangles.*
Ellipse Changes the pointer to that for adding ellipses or circles.*
* May not be displayed depending on your language.
Object Menu
Command Sub Com-
mand
Description
Edit Makes the selected object editable. The action varies depending on the selected object.
For text, an editing box appears. For QR codes, the QR code dialog box appears.
Show Settings Panel Displays the settings panel corresponding to the selected object.
Size and Position... Displays the Properties dialog box for resizing, moving, and rotating objects.* 1
Rotate or
Flip
Rotates or inverts the selected object by a predetermined or user-specified amount.* 1
Flip Verti-
cal
Inverts the selected object vertically.* 1
Flip Hori-
zontal
Inverts the selected object horizontally.* 1
Rotate
Left 90
degrees
Rotates the selected object 90 degrees to the left.* 1
Rotate
Right 90
degrees
Rotates the selected object 90 degrees to the right.* 1
Rotate
180 de-
grees
Rotates the selected object 180 degrees.* 1
Specify
Rotation...
Displays the Properties dialog box for specifying the rotation angle of the selected
object.* 1
Align and
Distribute
Objects
Left Align Aligns the selected objects to the left edge of the leftmost object.* 3
Center
Horizon-
tally
Centers the selected objects horizontally between the leftmost and rightmost objects.* 3
Right
Align
Aligns the selected objects to the right edge of the rightmost object.* 3
Top Align Aligns the selected objects to the top edge of the top object.* 3
Center
Vertically
Centers the selected objects vertically between the top and bottom objects.* 3
Bottom
Align
Aligns the selected objects to the bottom edge of the bottom object.* 3
318
Even Hor-
izontal
Spacing
Arranges the selected objects horizontally at equal distances from each other.* 3
Even Ver-
tical
Spacing
Arranges the selected objects vertically at equal distances from each other.* 3
Center
Horizon-
tally on
Page
Centers the selected objects horizontally in the middle of the page.* 3
Center
Vertically
on Page
Centers the selected objects vertically in the middle of the page.* 3
Fit Height Resizes all objects to match the height of the first selected object. The objects' aspect
ratios are not maintained.* 3
Fit Width Resizes all objects to match the width of the first selected object. The objects' aspect
ratios are not maintained.* 3
Align and
Distribute
Objects
Dialog...
Displays the Align and Distribute Objects dialog box for aligning or arranging multiple
objects.* 3
Fit to background
(Background setting)
Scales the image to the full poster size and locks it at the very back.
Group Groups or ungroups multiple objects.
Group Groups multiple objects to work with the group as if it were a single object.* 3
Ungroup Ungroups objects.* 3
Order Moves the selected object forward or backward.* 1
Bring to
Front
Moves the selected object to the front.* 1
Send to
Back
Moves the selected object to the back.* 1
Bring For-
ward
Moves the selected object one position forward.* 1
Send
Backward
Moves the selected object one position back.* 1
Lock Locks or unlocks the selected object.* 1
Trim / Gradation set-
tings...
Displays the Edit Image dialog box and preview panel for editing images.* 2
Retouch Image... Displays the Retouch Image dialog box for retouching images.* 2
Add to Photos / Clip-
art...
Displays the Saving Artwork dialog box for adding objects to the library.
Properties... Displays the Properties dialog box for resizing, moving, and rotating objects.* 1
319
*1 Multiple objects can be selected.
*2 Available when photos are selected.
*3 Available when multiple objects are selected.
Cloud sharing Menu
Command Description
Download poster/material... Download poster files and image files from cloud storage.
Upload currently open poster... Upload the current poster to cloud storage.
Upload export file... Export and upload artwork to cloud storage.
Tool Menu
Command Sub Com-
mand
Description
Artwork Manager Dia-
log...
Displays the Artwork Manager dialog box for organizing artwork in the library.
Artwork Snapshot... Displays the Artwork Snapshot dialog box for creating the artwork environment
installer file.
Design Check Performs Design Check. Select again to end Design Check.
Custom Main Tool-
bar...
Displays the Customize Toolbar dialog box for customizing the main toolbar.
Sub Tool-
bar...
Displays the Customize Toolbar dialog box for customizing the sub toolbar.
Print Ambient Light
Correction Chart...
Displays the Print Chart dialog box.
Managing Ambient
Light Settings...
Displays the Managing Ambient Light Settings dialog box.
Design Assist - Area
Set
Activates Area Set mode to start Design Assist.
Design Assist - Gener-
ate Design
Starts Design Assist for the specified area to create designs.
Quick Exchange Activates Quick Exchange mode.
Help Menu
Command Keyboard
Shortcut
Description
Manual F1 Opens this guide.
View the Readme
File...
Displays the PosterArtist readme file.
About PosterArtist... Displays information about PosterArtist.
320
Main Screen Toolbar
The main screen toolbar displays toolbar buttons for frequently used functions. Two toolbars are
available. Some toolbar buttons may not be displayed if the PosterArtist window is too small. Click
to display the hidden buttons.
Main Toolbar
Sub Toolbar
Main Toolbar
Command Name Description
Artwork Manag-
er Dialog
Displays the Artwork Manager dialog box for organizing artwork in the
library.
Print Preview Displays the Print Preview dialog box for checking the print result.
Use Image File Displays the Insert Image dialog box for adding or replacing images to the
poster.
Undo Undoes the last operation.
Redo Redoes the last undone correction.
Align and Dis-
tribute Objects
Dialog
Displays the Align and Distribute Objects dialog box for aligning or
arranging multiple objects.* 1
Flip Vertical Inverts the selected object vertically.* 1
Flip Horizontal Inverts the selected object horizontally.* 1
Rotate Left 90
degrees
Rotates the selected object 90 degrees to the left.* 1
Rotate Right 90
degrees
Rotates the selected object 90 degrees to the right.* 1
Set Locked Sta-
tus
Locks or unlocks the selected object.
Guide Shows or hides the guide.
Snap
to
Guide
Selects whether to snap an object to the guide when they come close to
each other.
Enter
Guide
Posi-
tion...
Displays the Guide Position dialog box.
Grid Shows or hides the grid.
Snap
to Grid
Selects whether to snap an object to the grid when they come close to
each other.
321
Enlarge Enlarges the poster view.
Reduce Reduces the poster view.
Select Scale Select a scale or enlargement method for posters.* 2
*1 Multiple objects can be selected.
*2 This function enlarges or reduces the poster preview. It does not enlarge or reduce the poster itself.
Sub Toolbar
Com-
mand
Name Description
Resize Se-
lection Tool
Switches the selected object to Resize mode.* 1
Rotation Se-
lection Tool
Switches the selected object to Rotation mode.* 1
Horizontal
Text
Changes the pointer to that for adding a horizontal text box.
Vertical Text Changes the pointer to that for adding a vertical text box.* 2
Line Changes the pointer to that for adding lines or arrows.
Rectangle Changes the pointer to that for adding rectangles.
Ellipse Changes the pointer to that for adding ellipses or circles.
QR Code Displays the QR code dialog box for adding QR codes to the poster or replacing the
added QR codes.
Hand Tool When the poster is displayed in enlarged view, drag anywhere on the poster to scroll.
Print Ambi-
ent Light
Correction
Chart
Prints the ambient light correction chart.
Add Transla-
tion Tem-
plate
Displays the Add Translation Template dialog box for entering multilingual translations
in the poster.
Design As-
sist Area Set
Mode
Activates Area Set mode to start Design Assist.
Quick Ex-
change
Activates Quick Exchange mode.
Design
Check
Switches Design Check mode on or off.
*1 Multiple objects can be selected.
322
*2 May not be displayed depending on your language.
Context Menus
PosterArtist offers many context menus for instant access to required commands. Right-click an object
on the poster to display these menus.
Context Menus Common to All Objects
Photo Context Menu
Clipart Context Menu
Shape Context Menu
WMF/EMF Context Menu
Text Context Menu
QR Code Context Menu
The following menus appear by right-clicking the corresponding area (other than objects) in the poster
design area.
Background Context Menu
Context Menu Outside the Background
Guide Context Menu
Context Menus Common to All Objects
This section describes context menus common to all objects. For the context menu unique to each
object, refer to the context menu of the corresponding object.
Com-
mand
Sub
Com-
mand
Key-
board
Short-
cut
Description
Cut Ctrl+X Copies the selected object to the clipboard, removing it from the poster.* 1
Copy Ctrl+C Copies the selected object to the clipboard.* 1
Paste Ctrl+V Pastes the object from the clipboard.
Delete Del Deletes the selected object from the poster.* 1
Size and Position... Displays the Properties dialog box for resizing, moving, and rotating objects.* 1
Rotate or
Flip
Rotates or inverts the selected object by a predetermined or user-specified
amount.* 1
Flip Ver-
tical
Inverts the selected object vertically.* 1
Flip Hor-
izontal
Inverts the selected object horizontally.* 1
Rotate
Left 90
degrees
Rotates the selected object 90 degrees to the left.* 1
323
Rotate
Right 90
degrees
Rotates the selected object 90 degrees to the right.* 1
Rotate
180 de-
grees
Rotates the selected object 180 degrees.* 1
Specify
Rota-
tion...
Displays the Properties dialog box for the selected object.* 1
Align
and Dis-
tribute
Objects
Left
Align
Aligns the selected objects to the left edge of the leftmost object.
Center
Horizon-
tally
Centers the selected objects horizontally between the leftmost and rightmost
objects.* 2
Right
Align
Aligns the selected objects to the right edge of the rightmost object.* 2
Top
Align
Aligns the selected objects to the top edge of the top object.* 2
Center
Vertical-
ly
Centers the selected objects vertically between the top and bottom objects.* 2
Bottom
Align
Aligns the selected objects to the bottom edge of the bottom object.* 2
Even
Horizon-
tal Spac-
ing
Arranges the selected objects horizontally at equal distances from each other.* 2
Even
Vertical
Spacing
Arranges the selected objects vertically at equal distances from each other.* 2
Center
Horizon-
tally on
Page
Centers the selected objects horizontally in the middle of the page.* 1
Center
Vertical-
ly on
Page
Centers the selected objects vertically in the middle of the page.* 1
Fit
Height
Resizes all the selected objects to match the height of the first selected object.
The objects' aspect ratios are not maintained.* 2
Fit Width Resizes all the selected objects to match the width of the first selected object. The
objects' aspect ratios are not maintained.* 2
Align
and Dis-
tribute
Displays the Align and Distribute Objects dialog box for aligning or arranging
multiple objects.* 1
324
Objects
Dialog...
Group Groups or ungroups multiple objects.
Group Groups multiple objects to work with the group as if it were a single object.* 2
Ungroup Ungroups objects.
Order Moves the selected object forward or backward.* 1
Bring to
Front
Moves the selected object to the front.* 1
Send to
Back
Moves the selected object to the back.* 1
Bring
Forward
Moves the selected object one position forward.* 1
Send
Back-
ward
Moves the selected object one position back.* 1
Add to Photos /
Clipart...
Displays the Saving Artwork dialog box for adding objects to the library.* 1
Properties... Displays the Properties dialog box for resizing, moving, and rotating objects.* 1
*1 Multiple objects can be selected.
*2 Available when multiple objects are selected.
Photo Context Menu
This section describes the context menu commands unique to photo objects. For other commands, see
Context Menus Common to All Objects.
Command Sub Com-
mand
Description
Replace
Image
From File... Displays the Insert Image dialog box for replacing the selected image with another
image.*
From Photo
Library
Displays the Edit screen (Photos).*
Read from
(Device
Name)...
Acquire images from available TWAIN devices.*
Show Settings Panel Displays the Edit screen (Photos).
Fit to background (Back-
ground setting)
Scales the image to the full poster size and locks it at the very back.*
Trim / Gradation set-
tings...
Displays the Edit Image dialog box and preview panel for editing images.*
Retouch Image... Displays the Retouch Image dialog box for retouching images.*
* Available when a photo is selected.
325
Clipart Context Menu
This section describes the context menu commands unique to clipart objects. For other commands, see
Context Menus Common to All Objects.
Command Sub Com-
mand
Description
Replace
Image
From
File...
Displays the Insert Image dialog box for replacing the selected image with another
image.*
From Clip-
art Library
Displays the Edit screen (Clipart).*
Show Settings Panel Displays the Edit screen (Clipart).
* Available when a clipart item is selected.
Shape Context Menu
This section describes the context menu command unique to shape objects. For other commands, see
Context Menus Common to All Objects.
Command Description
Show Settings Panel Displays the Edit screen (Shapes).
WMF/EMF Context Menu
This section describes the context menu commands unique to WMF/EMF objects. For other commands,
see
Context Menus Common to All Objects.
Command Sub Com-
mand
Description
Replace
Image
From File... Displays the Insert Image dialog box for replacing the selected image with another
image.*
From Photo
Library
Displays the Edit screen (Photos).*
Read from
(Device
Name)...
Acquire images from available TWAIN devices.*
Show Settings Panel Displays the Edit screen (Photos).
Fit to background (Back-
ground setting)
Scales the image to the full poster size and locks it at the very back.*
* Available when a WMF/EMF image is selected.
Text Context Menu
This section describes the context menu commands unique to text objects. For other commands, see
Context Menus Common to All Objects.
326
Command Key-
board
Short-
cut
Description
Cut Ctrl+X Copies the selected text to the clipboard, deleting it from the poster.*
Copy Ctrl+C Copies the selected text to the clipboard.*
Paste Ctrl+V Pastes the text from the clipboard.*
Edit Displays the text in an editing box.
Show Set-
tings Pan-
el
Displays the Edit screen (Text).
Add
Transla-
tion Tem-
plate
Ctrl+V Displays the Add Translation Template dialog box for entering multilingual translations
of fixed phrases in the poster.*
* Available when an editing box is displayed.
QR Code Context Menu
This section describes the context menu command unique to QR code objects. For other commands,
see Context Menus Common to All Objects.
Command Description
Edit Displays the QR code dialog box for editing the QR code.
Background Context Menu
Com-
mand
Sub Command Key-
board
Short-
cut
Description
Paste Ctrl+V Pastes the object from the clipboard.
Paste as Text Extracts text from WMF/EMF data on the clipboard to paste it.
Select All Ctrl+A Selects all objects on the poster.
Add Im-
age
From File... Displays the Insert Image dialog box for adding images to the poster.
From
Image
Li-
brary...
Pho-
tos
Displays the Edit screen (Photos).
Clip-
art
Displays the Edit screen (Clipart).
QR Code... Displays the QR code dialog box for adding QR codes to the poster.
Read from (De-
vice Name)...
Acquire images from available TWAIN devices.
Add
Text
Text Changes the pointer to that for adding a horizontal text box.
327
Vertical Changes the pointer to that for adding a vertical text box.*
Add
Shape
Line Changes the pointer to that for adding lines or arrows.
Rectangle Changes the pointer to that for adding rectangles.
Ellipse Changes the pointer to that for adding ellipses or circles.
Zoom 100% (Fit View) Displays the entire poster in the poster preview.
Fit Width Displays the poster to fit to the width of the poster preview.
Fit Height Displays the poster to fit to the height of the poster preview.
Set Zoom... Displays the Enlarged/Reduced dialog box for selecting a scale or en-
largement method for posters.
Grid and
Guide
Ruler Shows or hides the ruler.
Grid Shows or hides the grid.
Snap to Grid Selects whether to snap an object to the grid when they come close to
each other.
Guide Shows or hides the guide.
Snap to Guide Selects whether to snap an object to the guide when they come close to
each other.
Set Grid and
Guide...
Displays the Set Grid and Guide dialog box for specifying the color and
line type of the grid and guide.
Enter Guide
Position...
Displays the Guide Position dialog box for specifying the guide position.
Change
Back-
ground
From Back-
ground Li-
brary...
Displays the Edit screen (Backgrounds) for selecting a poster background.
Background Margins... Displays the Background Margins dialog box for specifying page margins.
Add to Templates... Adds the current poster to the library as a poster template.
Design Check Performs Design Check.
Quick Exchange Activates Quick Exchange mode.
Design Assist - Area Set Activates Area Set mode to start Design Assist.
Design Assist - Generate
Design
Starts Design Assist to create designs.
Preferences... Displays the Preferences dialog box.
* May not be displayed depending on your language.
Context Menu Outside the Background
Com-
mand
Sub Com-
mand
Key-
board
Short-
cut
Description
Temporary Tray Ctrl+T Shows or hides the temporary tray.
328
Zoom 100% (Fit
View)
Displays the entire poster in the poster preview.
Fit Width Displays the poster to fit to the width of the poster preview.
Fit Height Displays the poster to fit to the height of the poster preview.
Set
Zoom...
Displays the Enlarged/Reduced dialog box for selecting a scale or enlargement
method for posters.
Grid
and
Guide
Ruler Shows or hides the ruler.
Grid Shows or hides the grid.
Snap to
Grid
Selects whether to snap an object to the grid when they come close to each
other.
Guide Shows or hides the guide.
Snap to
Guide
Selects whether to snap an object to the guide when they come close to each
other.
Set Grid
and
Guide...
Displays the Set Grid and Guide dialog box for specifying the color and line type
of the grid and guide.
Enter
Guide Po-
sition...
Displays the Guide Position dialog box for specifying the guide position.
Artwork Manager
Dialog...
Displays the Artwork Manager dialog box for organizing artwork in the library.
Artwork Snap-
shot...
Displays the Artwork Snapshot dialog box for creating the artwork environment
installer file.
Custom Main
Toolbar...
Displays the Customize Toolbar dialog box for customizing the main toolbar.
Sub Tool-
bar...
Displays the Customize Toolbar dialog box for customizing the sub toolbar.
Preferences... Displays the Preferences dialog box.
Manual F1 Opens this guide.
About PosterArt-
ist...
Displays information about PosterArtist.
Guide Context Menu
Com-
mand
Sub Com-
mand
Description
Zoom 100% (Fit
View)
Displays the entire poster in the poster preview.
Fit Width Displays the poster to fit to the width of the poster preview.
Fit Height Displays the poster to fit to the height of the poster preview.
Set
Zoom...
Displays the Enlarged/Reduced dialog box for selecting a scale or enlargement method
for posters.
329
Grid and
Guide
Ruler Shows or hides the ruler.
Grid Shows or hides the grid.
Snap to
Grid
Selects whether to snap an object to the grid when they come close to each other.
Guide Shows or hides the guide.
Snap to
Guide
Selects whether to snap an object to the guide when they come close to each other.
Set Grid
and
Guide...
Displays the Set Grid and Guide dialog box for specifying the color and line type of the
grid and guide.
Enter
Guide Po-
sition...
Displays the Guide Position dialog box for specifying the guide position.
330

FAQ
What Is PosterArtist QuickCopy?
It is an application to print enlarged copies of scanned photos and documents. Simply click the Copy
button in PosterArtist QuickCopy to create posters from enlarged copies of originals in your scanner.
Scanned items can also be inserted in posters as PosterArtist materials.
Creating and Printing Enlarged Copies of Photos and Documents
Which Scanners Support PosterArtist QuickCopy?
A CanoScan series scanner or PIXMA Inkjet All-In-One printer is required. Access our website for
information on scanners compatible with PosterArtist QuickCopy.
Creating and Printing Enlarged Copies of Photos and Documents
How Can I Perform Large-Format Printing?
For details, see Large-Format Printing.
How Can I Print Without Borders?
The following two methods are available for borderless printing.
Printing Borderless Posters Filling the Entire Roll Paper Width
Printing Without Borders on Three Sides
Depending on your model, you will need to prepare roll paper whose width and paper type support
borderless printing. For information on paper that supports borderless printing, click Home to return to the
top page of the Online Manual for your model and search for "Paper Sizes." Borderless printing is not
available for cut sheets.
Note
• For some models, Minimal Margin Printing is displayed instead of Borderless Printing. When Minimal
Margin Printing is displayed, printouts will have slight margins on the left and right sides.
How Can I Use the Variable Printing Function?
To use the variable printing function, prepare tabular data in Excel format (.xls, .xlsx, .xlsm, or .xlsb) or in
CSV format (.csv).
For details, see Using Variable Printing.
How Can I Print by Rotating Posters 90 Degrees?
To print filling the entire roll paper width, in the
Paper Options screen, select Fit Long Side to Roll Width
(for vertical posters) or Fit Short Side to Roll Width (for horizontal posters).
331

If the width or length is different from the roll paper width, it is not possible to print by rotating posters 90
degrees in the original scale.
Specifying Size and Paper
How Can I Specify Paper Size of My Choice?
The paper size of your choice can be specified in Set Custom Size... in the Paper Options screen.
Specifying Non-Standard Page Sizes
How Can I Insert Data from Other Software?
Data created with Microsoft Office applications can be inserted. Other data such as PDF files cannot be
inserted.
Inserting Images in Posters
Which Printers Can I Use?
Posters can be printed only on Canon printers and Océ printers that support PosterArtist.
The printer to use for test printing can be specified in the Preferences dialog box.
Important
• Available functions and settings vary depending on your model.
How Can I Print on a Cut Sheet Without the Image Being Cut Off?
In the
Paper Options screen, select the Enlarged/Reduced Printing checkbox, select Fit in Printable
Area, and then print.
When Printing Entire Poster Within Printable Area
What Is the Ambient Light Setting?
Ambient light color and brightness vary by environmental factors such as location (indoors or outdoors)
or lighting (fluorescent or incandescent). Therefore the same poster may appear different depending on
where it is displayed.
Use the ambient light setting functions to adjust colors automatically according to the environment to
visually enhance the poster's color tones.
Ambient Light Setting
What Should I Do when I Replace My Computer or Hard Disk?
When replacing your computer or hard disk,
license authentication will be required again.
332
