

OPERATOR'S MANUAL
Please read this manual before operating this equipment.
After you finish reading this manual,
store it in a safe place for future reference.
170
FT5-0096 (000) © CANON INC. 2006 PRINTED IN CHINA
The A4-size standard original is on the inside of the back cover.
To view, simply unfold this page.
CANON INC.
30-2, Shimomaruko 3-chome, Ohta-ku, Tokyo 146-8501, Japan
CANON U.S.A., INC.
One Canon Plaza, Lake Success, NY 11042, U.S.A.
CANON CANADA INC.
6390 Dixie Road Mississauga, Ontario L5T 1P7, Canada
CANON EUROPA N.V.
Bovenkerkerweg 59-61 1185 XB Amstelveen, The Netherlands
CANON FRANCE S.A.S.
17, quai du Président Paul Doumer 92414 Courbevoie Cedex, France
CANON (U.K.) LTD.
Woodhatch, Reigate, Surrey, RH2 8BF, United Kingdom
CANON DEUTSCHLAND GmbH
Europark Fichtenhain A10, 47807 Krefeld, Germany
CANON ITALIA S.p.A.
Via Milano, 8 20097 San Donato Milanese (MI) Italy
CANON LATIN AMERICA, INC.
703 Waterford Way Suite 400 Miami, Florida 33126 U.S.A.
CANON AUSTRALIA PTY. LTD
1 Thomas Holt Drive, North Ryde, Sydney, N.S.W. 2113, Australia
CANON CHINA CO., LTD
15F Jinbao Building No.89 Jinbao Street, Dongcheng District, Beijing, 100005, China
CANON SINGAPORE PTE. LTD.
1 HarbourFront Avenue #04-01 Keppel Bay Tower, Singapore 098632
CANON HONGKONG CO., LTD
19/F., The Metropolis Tower, 10 Metropolis Drive, Hunghom, Kowloon, Hong Kong

Preface
Thank you for purchasing this Canon copier. This Operator’s Manual describes this copier, its functions, and its
method of use. It also describes the precautions to be taken to ensure safe operation. Please read this manual
thoroughly before operating this copier, in order to familiarize yourself with its capabilities, and to make the
most of its many functions. After you finish reading this manual, store it in a safe place for future reference.
CAUTION:
In this manual, CAUTION MESSAGES with this symbol indicate that neglecting the suggested procedure
or practice could result in personal injury.

1
■ Symbols Used in This Operator’s Manual
WARNING:
Indicates a warning concerning operations that
may lead to death or injury to persons if not
performed correctly. In order to use the
machines safely, it is imperative to pay attention
to these warnings.
CAUTION:
Indicates a caution concerning operations that
may lead to injury to persons or damage to
property if not performed correctly. In order to
use the machine safely, always pay attention
to these cautions.
REQUEST:
Indicates important items or prohibited actions
that should always be followed when operating
the machine. These should always be read to
avoid damage to the machine or injury to
persons.
NOTICE:
Indicates operational warnings. Be certain to
read these items so that you operate the copier
correctly.
MEMO:
Indicates notes for operation or additional
explanations. Reading these is recommended.
Important Safety Instructions
Read all of these instructions.
• Save these instructions for later use.
• Follow all warnings and instructions marked on the product.
• Unplug this product from the wall outlet before cleaning. Do not use liquid cleaners or aerosol cleaners. Use a
damp cloth for cleaning.
• Do not use this product near water.
• Do not place this product on an unstable cart, stand, or table. The product may fall, causing serious damage to
the product.
• Slots and openings in the cabinet and the back or bottom are provided for ventilation; to ensure reliable operation
of the product and to protect it from overheating, these openings must not be blocked or covered. The openings
should never be blocked by placing the product on a bed, sofa, rug, or other similar surface. This product
should never be placed near or over a radiator or heat register. This product should not be placed in a built-in
installation unless proper ventilation is provided.
• This product should be operated from the type of power source indicated on the marking label. If you are not
sure of the type of power available, consult your dealer or local power company.
• This product is equipped with a 3-wire grounding type plug — a plug having a third (grounding) pin. This plug
will only fit into a grounding-type power outlet. This is a safety feature. If you are unable to insert the plug into
the outlet, contact your electrician to replace your obsolete outlet. Do not defeat the purpose of the grounding-
type plug.
• Do not allow anything to rest on the power cord. Do not locate this product where persons will walk on the cord.
• If an extension cord is used with this product, make sure that the total of the ampere ratings on the products
plugged into the extension cord does not exceed the extension cord ampere rating. Also, make sure that the
total of all products plugged into the wall outlet does not exceed 15 amperes.
• Never push objects of any kind into this product through cabinet slots as they may touch dangerous voltage
points or short out parts that could result in a risk of fire or electric shock. Never spill liquid of any kind on the
product.
• Do not attempt to service this product yourself, as opening or removing covers may expose you to dangerous
voltage points or other risks. Refer all servicing to properly trained and qualified service personnel.
• Unplug this product from the wall outlet and refer servicing to qualified service personnel under the following
conditions:
A.When the power cord or plug is damaged or frayed.
B.If liquid has been spilled into the product.
C.If the product has been exposed to rain or water.
D.If the product does not operate normally when the operating instructions are followed. Adjust only those controls
that are covered by the operating instructions since improper adjustment of other controls may result in damage
and will often require extensive work by a qualified technician to restore the product to normal operation.
E.If the product has been dropped or the cabinet has been damaged.
F. If the product exhibits a distinct change in performance, indicating a need for service.
01_PC170-USA 06.5.15, 18:261

2
Note:
This equipment has been tested and found to comply with the limits for a Class B digital device,
pursuant to Part 15 of the FCC Rules. These limits are designed to provide reasonable protection
against harmful interference in a residential installation. This equipment generates, uses, and can
radiate radio frequency energy and, if not installed and used in accordance with the instructions, may
cause harmful interference to radio communications. However, there is no guarantee that
interference will not occur in a particular installation. If this equipment does cause harmful
interference to radio or television reception, which can be determined by turning the equipment off
and on, the user is encouraged to try to correct the interference by one or more of the following
measures:
• Reorient or relocate the receiving antenna.
• Increase the separation between the equipment and receiver.
• Connect the equipment into an outlet on a circuit different from that to which the receiver is
connected.
• Consult the dealer or an experienced radio/TV technician for help.
Do not make any changes or modifications to the equipment unless otherwise specified in the
manual. If such changes or modifications should made, you could be required to stop operation of the
equipment.
As an ENERGY STAR
®
Partner, CANON USA, Inc.
has determined that this
copier model meets the
ENERGY STAR
®
Program for
energy efficiency.
The International ENERGY STAR
®
Office
Equipment Program is an international program
that promotes energy saving through the use of
computers and other office equipment. The
program backs the development and
dissemination of products with functions that
effectively reduce energy consumption. It is an
open system in which business proprietors can
participate voluntarily. The targeted products
are office equipment such as computers,
displays, printers, facsimiles, and copiers. Their
standards and logos are uniform among
participating nations.
01_PC170-USA 06.5.15, 18:262

3
Table of ContentsTable of Contents
2. Operating Procedure
Normal Copying ....................................... 30
Making 10 or more Continuous Copies
(The F Mode) ..................................... 31
Positioning Originals .............................. 32
Adjusting the Copy Exposure ................ 32
About Copy Stock .................................. 34
Various Ways to Copy ............................. 35
Postcards, Transparencies
and Other Stock ................................. 35
Making Two-sided Copies ..................... 36
Copying Thick Books or
Large Originals .................................. 37
Making Two-color Copies ...................... 38
3. Troubleshooting
When Error Indicators Appear ............... 42
When
Flashes .................................. 42
When Letters or Numbers Light Up /
Flash .................................................. 43
Clearing Paper Jams
(When
Flashes) ............................ 44
Cleaning the Paper Roller
(When the Error Indicator flashes)... 46
What to Do If You Suspect
There is a Malfunction ........................ 48
Copy Image Problems............................. 50
If Light Bands / White Streaks
Appear on Copies .............................. 50
If Dark Bands / Black Streaks
Appear on Copies .............................. 50
4. Appendix
Cleaning the Copier ................................ 54
Routine Cleaning ................................... 55
Specifications .......................................... 56
Index.......................................................... 57
Telephone Assistance / Supplies &
Accessories ............................................ 4
1. Getting Started
Safety Considerations ......................... 6
Handling Precautions ............................. 10
Installation Precautions.......................... 11
Transporting the Copier ......................... 12
Carrying the Copier
by the Carrying Handle ...................... 12
Carrying the Copier by the Sides .......... 13
Transporting the Copier by Car ............. 14
Parts and Their Functions ...................... 15
Main Unit ................................................ 15
Control Panel ......................................... 17
Installing the Copier ................................ 18
Checking the Package Contents ........... 18
Installation Procedure ............................ 18
Replacing and Storing Cartridges ......... 19
About the Cartridge ............................... 19
When to Replace the cartridge.............. 20
Replacing Cartridges ............................. 21
Cartridge Handling Precautions ............ 23
Cartridge Storing Precautions ............... 24
The Clean Earth Campaign .................... 25
01_PC170-USA 06.5.15, 18:263

4
Telephone Assistance (USA)
If you need help with set-up, service or
operation, call 1-800-828-4040.
Canon Information Center in
Canada
Should service be necessary please call the
following number for information regarding
Personal Copier
Authorized Service Facilities.
Canon Canada Inc. 6390 Dixie Road,
Missisauga, Ontario L5T 1P7
Call 1-800-263-1121
Supplies & Accessories
Call or visit your local retailer/dealer for genuine Canon supplies. You can also order genuine
supplies and accessories for your PC Copier from Canon. Call us at:
1-800-828-4040 Canon USA Consumer Information Center
1-800-263-1121 Canon Canada Information Center
Please have your credit card ready. Local sales tax, shipping and handling charges are
added to each order. Express shipments are available.
Toner Cartridges Trays
E 20 Black E Green Copy Receiving Tray
E Blue E Red
E Brown
Transparencies Power Cord
Canon Type E
*
All items subject to availability.
Note: Accessories are also available for other Canon
consumer products.
01_PC170-USA 06.5.15, 18:264

Getting Started
5
1
1
Getting StartedGetting Started
Safety Considerations ......................... 6
Handling Precautions ............................. 10
Installation Precautions .......................... 11
Transporting the Copier ......................... 12
Carrying the Copier
by the Carrying Handle ...................... 12
Carrying the Copier by the Sides .......... 13
Transporting the Copier by Car ............. 14
Parts and Their Functions ...................... 15
Main Unit ................................................ 15
Control Panel ......................................... 17
Installing the Copier ................................ 18
Checking the Package Contents ........... 18
Installation Procedure ............................ 18
Replacing and Storing Cartridges ......... 19
About the Cartridge ............................... 19
When to Replace the cartridge.............. 20
Replacing Cartridges ............................. 21
Cartridge Handling Precautions ............ 23
Cartridge Storing Precautions ............... 24
The Clean Earth Campaign .................... 25
01_PC170-USA 06.5.15, 18:265

Getting Started
6
1
Safety Considerations
SafetySafety
ConsiderationsConsiderations
● Do not install the copier so that the
ventilation ports are blocked by objects. If
the ventilation ports are blocked, heat will
build up inside the copier and may result
in a fire.
● Do not place the following items on the
copier. If these items come into contact
with a high-voltage area inside the copier,
this may result in a fire or electrical shock.
• Necklaces and other metal objects
• Cups, vases, flowerpots and other
containers filled with water or liquids.
If these items are dropped or spilled
inside the copier, immediately turn OFF
the power switch and unplug the power
plug from the socket. Then, contact your
service representative.
● Do not place heavy objects on the copier,
as they may tip over or fall resulting in
personal injury.
● Do not install the copier in the following
locations.
•A damp or dusty location
•A location which is exposed to direct
sunlight
•A location with high temperatures
•A location that is subject to open flames
Installation
WARNING
● Do not install the copier near alcohol,
paint thinner or other inflammable
substances. If inflammable substances
come into contact with electrical parts
inside the copier, this may result in a fire
or electrical shock.
CAUTION
● Do not install the copier in unstable
locations such as on unsteady platforms
or in tilted places, or in locations which are
subject to excessive vibrations, as this
may cause the copier to fall or tip over,
resulting in personal injury.
Power Supply
WARNING
● Do not damage or modify the power cord.
Also, do not place heavy objects on the
power cord, or pull on or excessively bend
it, as this could cause electrical damage
and result in a fire or electrical shock.
● Do not insert or unplug the power plug
with wet hands, as this may result in
electrical shock.
● Do not plug the copier into a multi-plug
power strip, as this may cause fire or
electrical shock.
01_PC170-USA 06.5.15, 18:266
Getting Started
7
1
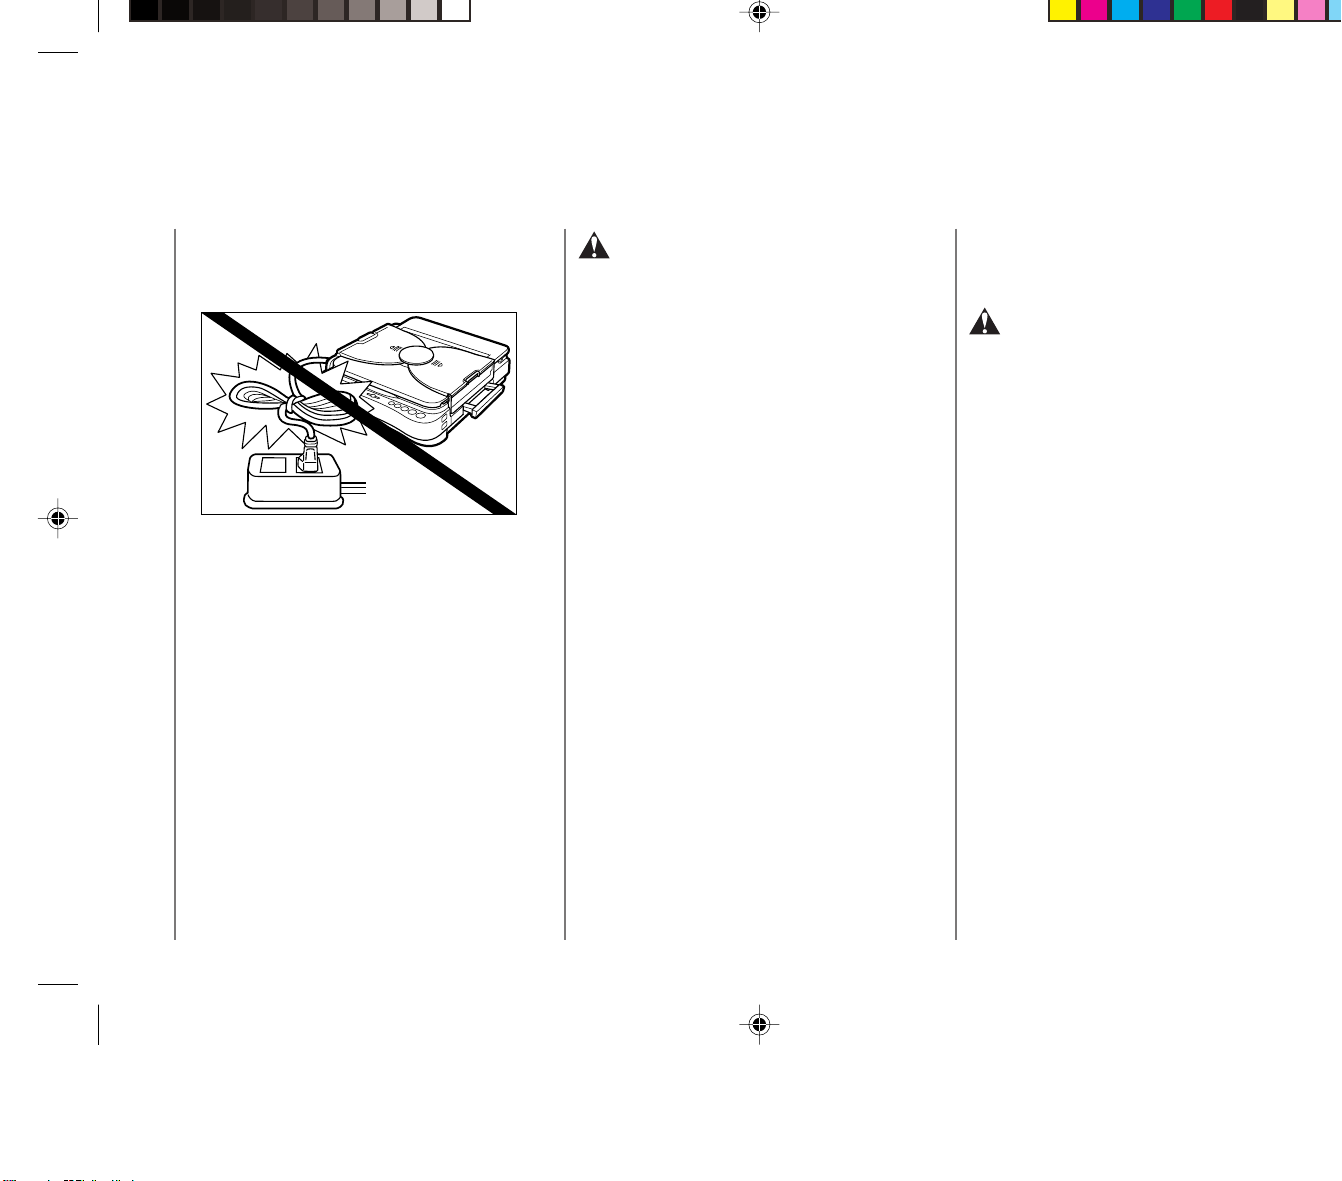
● Do not bundle up or tie the power cord in a
knot, as this may result in a fire or
electrical shock.
● Insert the power plug completely into the
socket, as failure to do so may result in a
fire or electrical shock.
● Do not use power cords other than the
provided power cord, as this may result in
a fire or electrical shock.
● As a general rule, do not use extension
cords.
Using an extension cord may result in a
fire or electrical shock. If an extension
cord must be used, however, untie the
cord binding and insert the power plug
completely into the extension cord socket
to ensure a firm connection between the
power and extension cords.
CAUTION
● Do not use power supplies with voltages
other than 115V AC, as this may result in a
fire or electrical shock.
● Always grasp the plug portion when
unplugging the power plug. Pulling on the
power cord may expose or snap the core
wire, or otherwise damage the power cord.
If the cord is damaged, this could cause
an electricity leak and result in a fire or
electrical shock.
● Leave sufficient space around the power
plug so that it can be unplugged easily. If
objects are placed around the power plug,
you will be unable to unplug it in an
emergency.
Handling
WARNING
● Do not attempt to disassemble or modify
the copier. There are high temperature
and high voltage components inside the
copier which may result in a fire or
electrical shock.
● If the copier makes strange noises, or
emits smoke, heat or unusual smells,
immediately turn OFF the power switch
and unplug the power plug from the
socket. Then, contact your service
representative. Continued use of the
copier in this condition may result in a fire
or electrical shock.
Safety Considerations
01_PC170-USA 06.5.15, 18:267

Getting Started
7
1
● Do not bundle up or tie the power cord in a
knot, as this may result in a fire or
electrical shock.
● Insert the power plug completely into the
socket, as failure to do so may result in a
fire or electrical shock.
● Do not use power cords other than the
provided power cord, as this may result in
a fire or electrical shock.
● As a general rule, do not use extension
cords.
Using an extension cord may result in a
fire or electrical shock. If an extension
cord must be used, however, untie the
cord binding and insert the power plug
completely into the extension cord socket
to ensure a firm connection between the
power and extension cords.
CAUTION
● Do not use power supplies with voltages
other than 115V AC, as this may result in a
fire or electrical shock.
● Always grasp the plug portion when
unplugging the power plug. Pulling on the
power cord may expose or snap the core
wire, or otherwise damage the power cord.
If the cord is damaged, this could cause
an electricity leak and result in a fire or
electrical shock.
● Leave sufficient space around the power
plug so that it can be unplugged easily. If
objects are placed around the power plug,
you will be unable to unplug it in an
emergency.
Handling
WARNING
● Do not attempt to disassemble or modify
the copier. There are high temperature
and high voltage components inside the
copier which may result in a fire or
electrical shock.
● If the copier makes strange noises, or
emits smoke, heat or unusual smells,
immediately turn OFF the power switch
and unplug the power plug from the
socket. Then, contact your service
representative. Continued use of the
copier in this condition may result in a fire
or electrical shock.
Safety Considerations
01_PC170-USA 06.5.15, 18:267
Getting Started
8
1
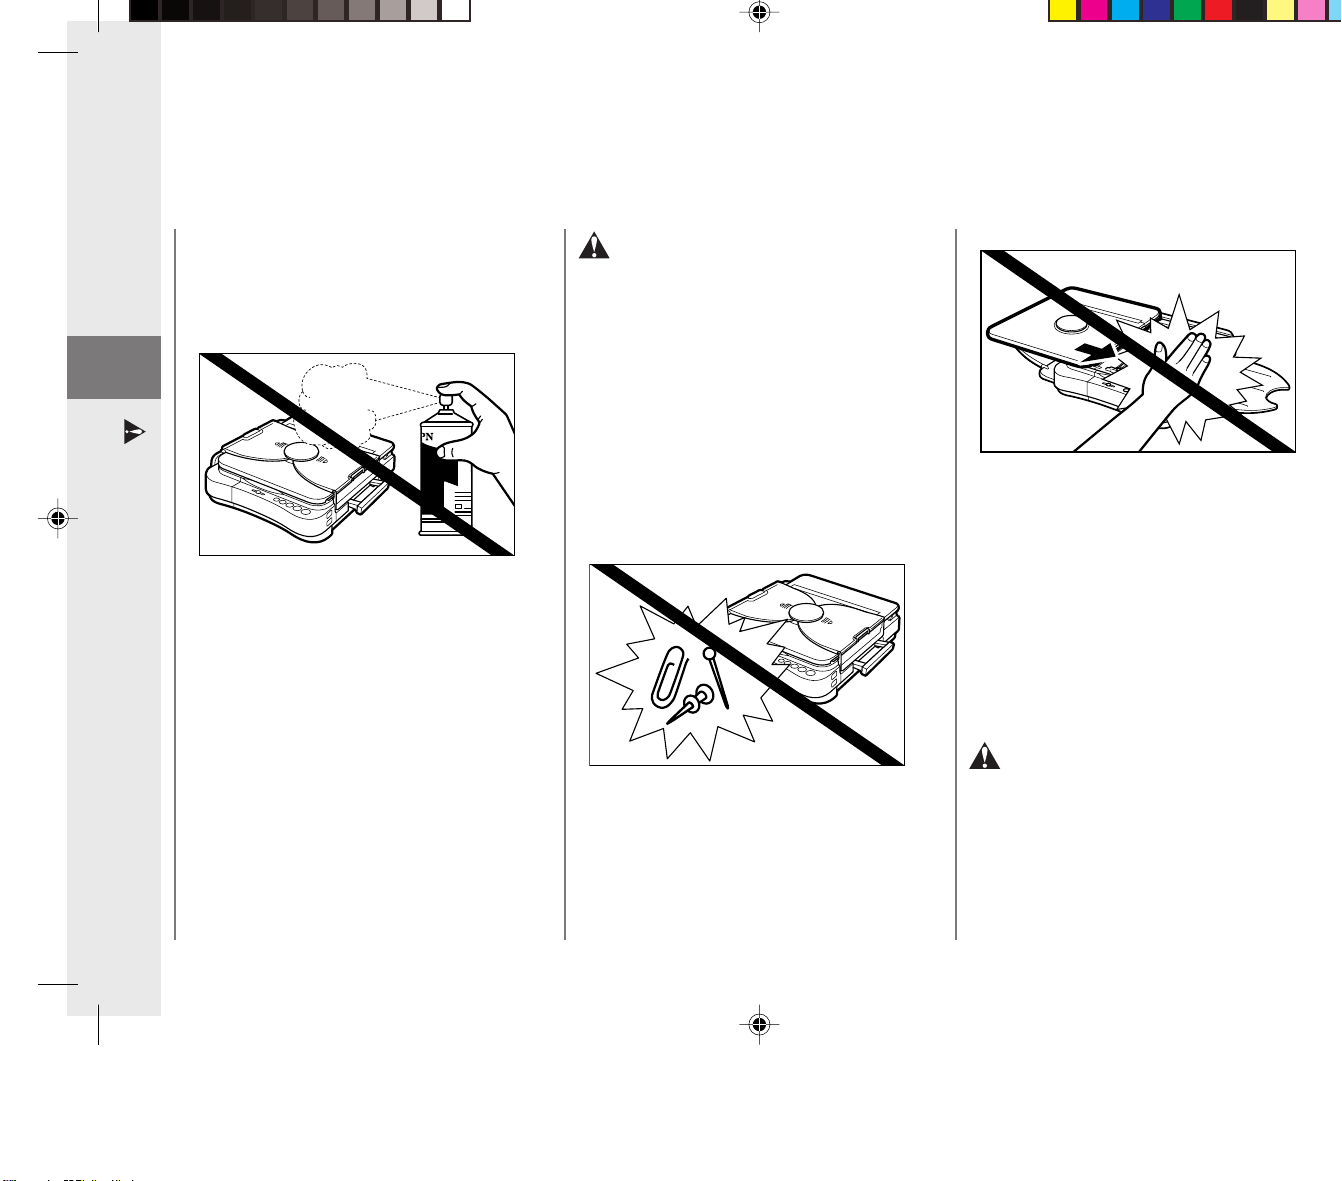
● Do not use highly flammable sprays near
the copier. If gas from these sprays comes
into contact with the electrical components
inside the copier, this may result in a fire
or electrical shock.
CAUTION
● Do not drop paper clips, staples or other
metal objects inside the copier. Also, do
not spill water, liquids or flammable
substances (alcohol, benzene, paint
thinner, etc.) inside the copier. If these
items come into contact with a high-
voltage area inside the copier, this may
result in a fire or electrical shock.
If these items are dropped or spilled inside
the copier, immediately turn OFF the
power switch and unplug the power plug
from the socket. Then, contact your
service representative.
● If copying paper larger than the platen,
pay attention to the portion of the paper
that runs off the edge. If this is caught in
the copier, it may be damaged.
● Do not touch the platen area during
copying as your hand may be injured if
caught by the moving parts.
Safety Considerations
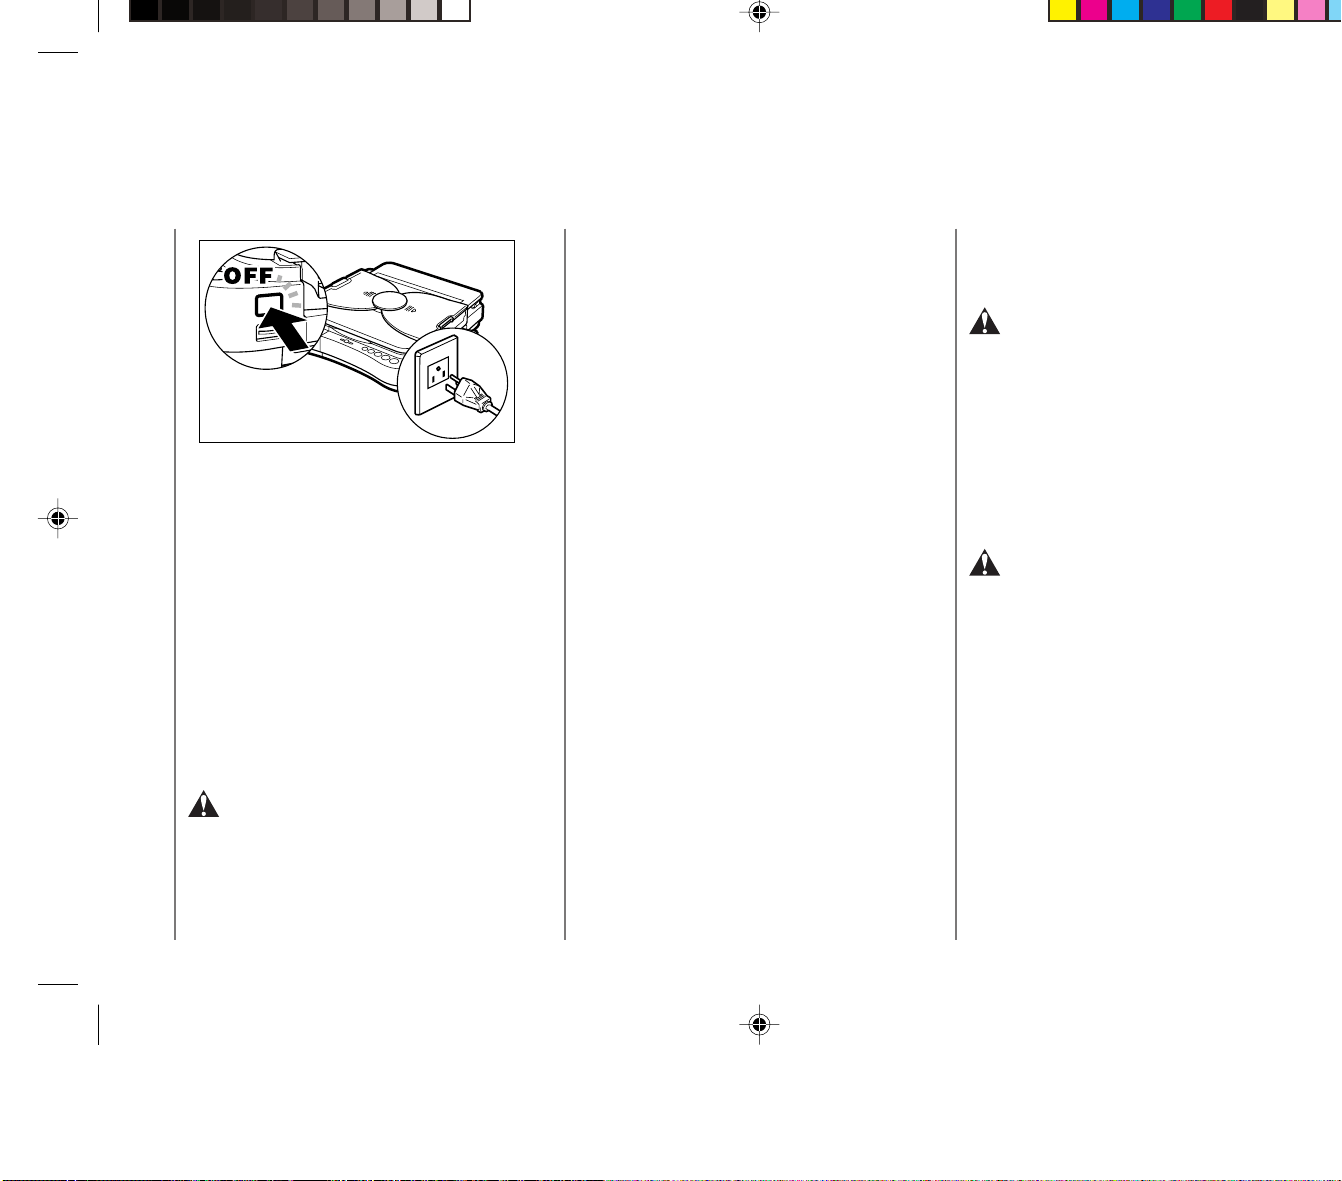
● Turn OFF the power switch for safety
when the copier will not be used for a long
period of time such as at night. Also,
unplug the power plug for safety when the
copier will not be used for an even longer
period of time such as during consecutive
holidays.
Maintenance and Inspection
WARNING
● When cleaning the copier, first turn OFF
the power switch and unplug the power
plug. Failure to observe these items may
result in a fire or electrical shock.
01_PC170-USA 06.5.15, 18:268

Getting Started
8
1
● Do not use highly flammable sprays near
the copier. If gas from these sprays comes
into contact with the electrical components
inside the copier, this may result in a fire
or electrical shock.
CAUTION
● Do not drop paper clips, staples or other
metal objects inside the copier. Also, do
not spill water, liquids or flammable
substances (alcohol, benzene, paint
thinner, etc.) inside the copier. If these
items come into contact with a high-
voltage area inside the copier, this may
result in a fire or electrical shock.
If these items are dropped or spilled inside
the copier, immediately turn OFF the
power switch and unplug the power plug
from the socket. Then, contact your
service representative.
● If copying paper larger than the platen,
pay attention to the portion of the paper
that runs off the edge. If this is caught in
the copier, it may be damaged.
● Do not touch the platen area during
copying as your hand may be injured if
caught by the moving parts.
Safety Considerations
● Turn OFF the power switch for safety
when the copier will not be used for a long
period of time such as at night. Also,
unplug the power plug for safety when the
copier will not be used for an even longer
period of time such as during consecutive
holidays.
Maintenance and Inspection
WARNING
● When cleaning the copier, first turn OFF
the power switch and unplug the power
plug. Failure to observe these items may
result in a fire or electrical shock.
01_PC170-USA 06.5.15, 18:268
Getting Started
9
1
● Clean the copier using a firmly wrung-out
cloth dampened with a mild cleansing
detergent. Do not use alcohol, benzene,
paint thinner or other flammable
substances. If flammable substances
come into contact with a high-voltage area
inside the copier, this may result in a fire
or electrical shock.
● Do not throw used cartridges into open
flames, as this may ignite the toner
remaining inside the cartridges and result
in burns or a fire.
CAUTION
● There are some areas inside the copier
which are subject to high voltages and high
temperatures. Take adequate precaution
when performing internal inspections, to
avoid burns or electrical shock.
● When removing jammed paper or when
inspecting the inside of the copier, do not
allow necklaces, bracelets or other metal
objects to touch the inside of the copier, as
this may result in burns or electrical shock.
● When removing copy paper which has
become jammed from inside the copier, take
care not to allow the toner on the jammed
copy paper to come into contact with your
hands or clothing, as this will dirty your
hands or clothing. If they become dirty, wash
them immediately with cold water. Washing
with warm water will set the toner and make
it impossible to remove the toner stains.
● When removing copy paper which has
become jammed from inside the copier,
remove the jammed copy paper gently to
prevent the toner on the paper from
scattering and entering your eyes or mouth.
If toner enters your eyes or mouth, wash
immediately with cold water and consult a
physician.
● When loading copy paper or removing
jammed originals or copy paper, take care
not to cut your hands on the edges of the
original or copy paper.
Consumables
WARNING
● Do not throw cartridges into open flames,
as this may cause the toner to ignite and
result in burns or a fire.
● Do not store cartridges or copy paper in
places exposed to open flames, as this
may cause the cartridges or copy paper to
ignite and result in burns or a fire.
CAUTION
● Keep cartridges and other consumables
out of the reach of small children. If these
items are ingested, consult a physician
immediately.
Safety Considerations
01_PC170-USA 06.5.15, 18:269

Getting Started
10
1
Handling Precautions
Platen
• Do not stack objects onto, or press down
forcefully upon, the platen.
• The maximum allowable load that can be
placed on the cover is 4.4 lb.
Main Unit
• Do not let paper clips, staples, or other
foreign objects fall into the copier.
Also be careful not to spill any liquids or
flammable substances (such as paint
thinner, benzene or rubbing alcohol) on
the copier. If a foreign object or liquid
comes into contact with a dangerous
voltage point inside the copier
malfunction, fire or electrical shock could
occur.
• Do not lubricate any part of the copier.
• Do not use any extremely flammable
substances, such as aerosols, etc., near
the copier as such a substance may
ignite.
HandlingHandling
PrecautionsPrecautions
When not Using the Copier
• If you have to open the main unit to
replace the cartridge or remove jammed
paper, close the top cover immediately
after performing the necessary operation.
Also be sure to slide the platen back to its
original position.
• If a cover is to be placed over the copier,
be sure to turn OFF the power and allow
the copier to cool down beforehand.
• Should the copier not be operated for a
long period of time, unplug it from its
power source.
When Storing the Copier
Upright
• If the copier is to be stored upright with the
carrying handle on top, press the power
switch to OFF and let the copier cool down
beforehand. Stand the copier upright on a
flat, level surface so that it does not fall
over.
• If the copier has been stored upright,
move the platen all the way to the right
and then back to the center position by
hand before operating the copier.
Condensation
If the copier is brought from the cold
outdoors into a warm room, or if the room is
rapidly heated, condensation may form inside
the copier. This can adversely affect the
quality of your copy images (e.g., blacked-
out copies). When the copier is exposed to
such conditions, allow at least two hours for
the copier to fully adjust to room temperature
before attempting to use it.
WARNING:
• If there is an unusual noise, smoke, or anything
else which causes concern, immediately turn
the power switch OFF and unplug the copier.
Then consult your service representative.
01_PC170-USA 06.5.15, 18:2610

Getting Started
11
1
Installation Precautions
Avoid direct sunlight and
place in a cool location.
Do not install the copier in front of a window
that receives direct sunlight.
Do not install the copier in a high
temperature, high humidity location such as
in front of a heater or humidifier.
Avoid abrupt changes in temperature and
humidity, such as those caused by proximity
to a heater.
■ Recommended Conditions:
Temperature of 59°C to 81°F
Relative Humidity of 25% to 75%
Image quality may be affected by low
temperatures if the copier has been left in
a cold location, be sure to allow more than
two hours for the copier to fully reach
room temperature before using it.
InstallationInstallation
PrecautionsPrecautions
Copier performance is affected by
environmental conditions. Please
observe the following precautions
when selecting a site to install the
copier.
Provide adequate
installation space.
It is necessary to provide adequate space
surrounding the copier to allow full
movement of the platen during copying.
■ The minimum necessary operating
space:
32
1
/
8
" (width) ✕ 17
3
/
8
" (depth)
Provide proper ventilation.
Avoid dusty locations or locations where
ammonia gas is emitted.
Place on a flat, level surface.
Do not install the copier on an incline or
uneven surface.
Do not install near
televisions or radios.
Do not place the copier near televisions,
radios or other similar electronic equipment.
The copier might interfere with reception.
Plug the copier into a separate power outlet
and maintain as much separation as
possible.
Power Supply
• This copier is designed only for use with
the power source shown on the marking
label on the back of the copier. If you are
unsure if your power source meets these
needs, check with your local power
company.
• Do not plug this copier into a multi-plug
power strip.
• Do not allow anything to sit on top of the
power cord.
WARNING:
• If there is any unusual noise, smoke or anything
else which causes concern, immediately press
the power switch to OFF and unplug the copier
from its power source. Consult your service
representative.
Allow enough space in front of the power outlet
so that you can easily unplug the copier.
01_PC170-USA 06.5.15, 18:2611
Getting Started
12
1
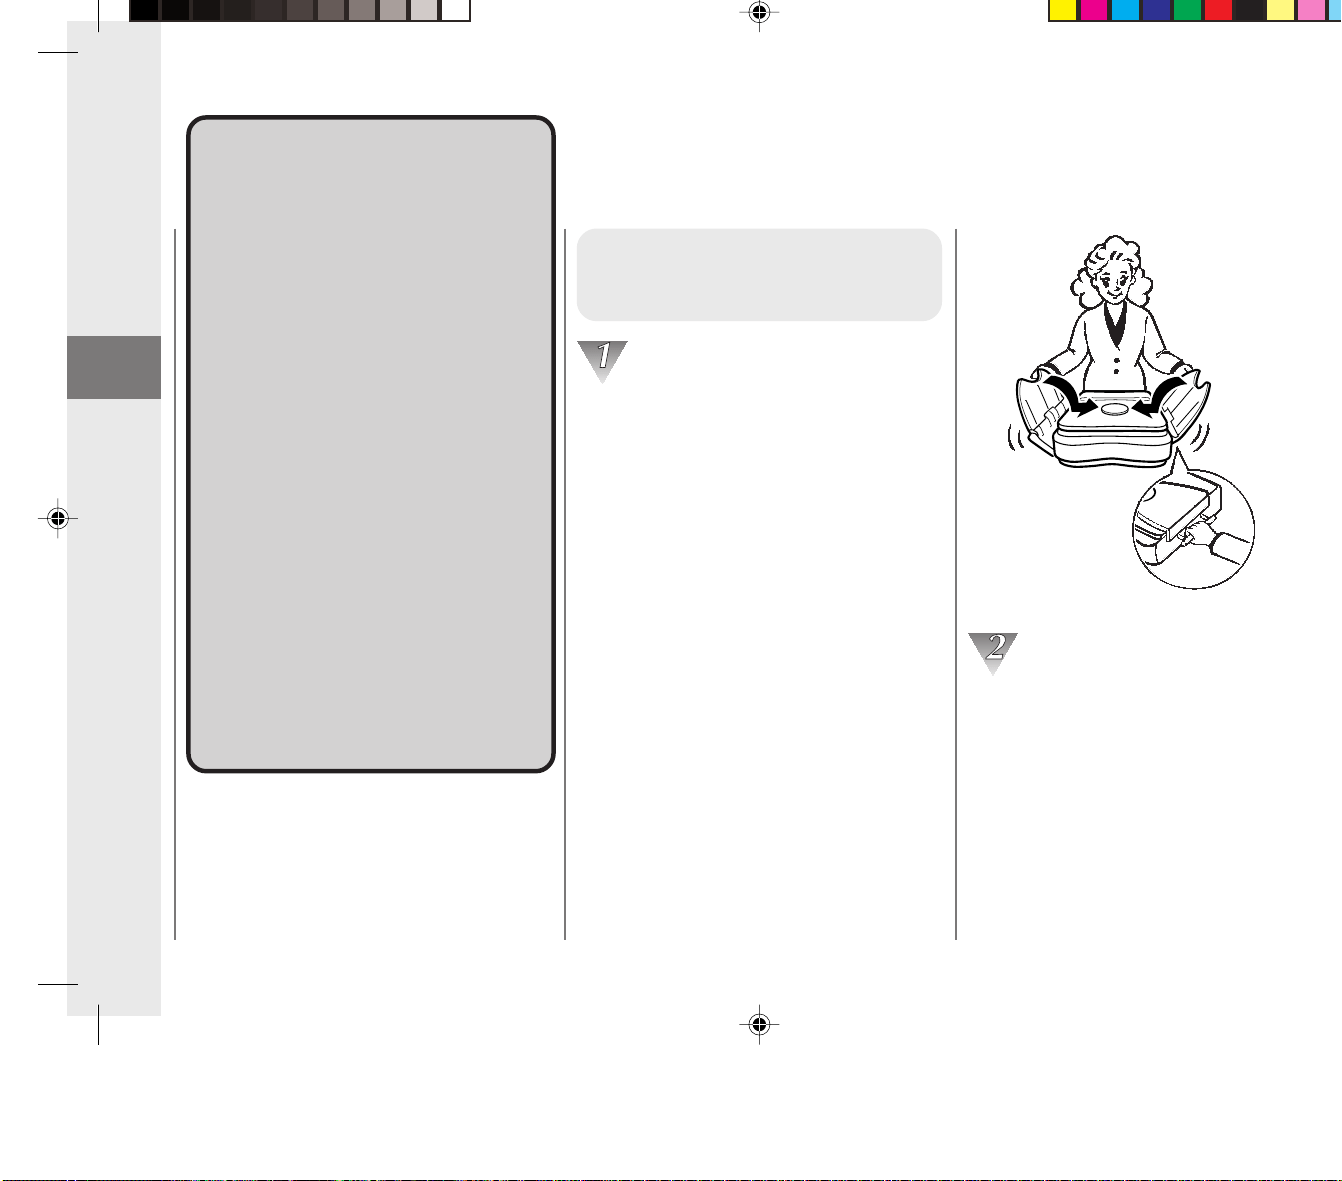
Carrying the Copier by
the Carrying Handle
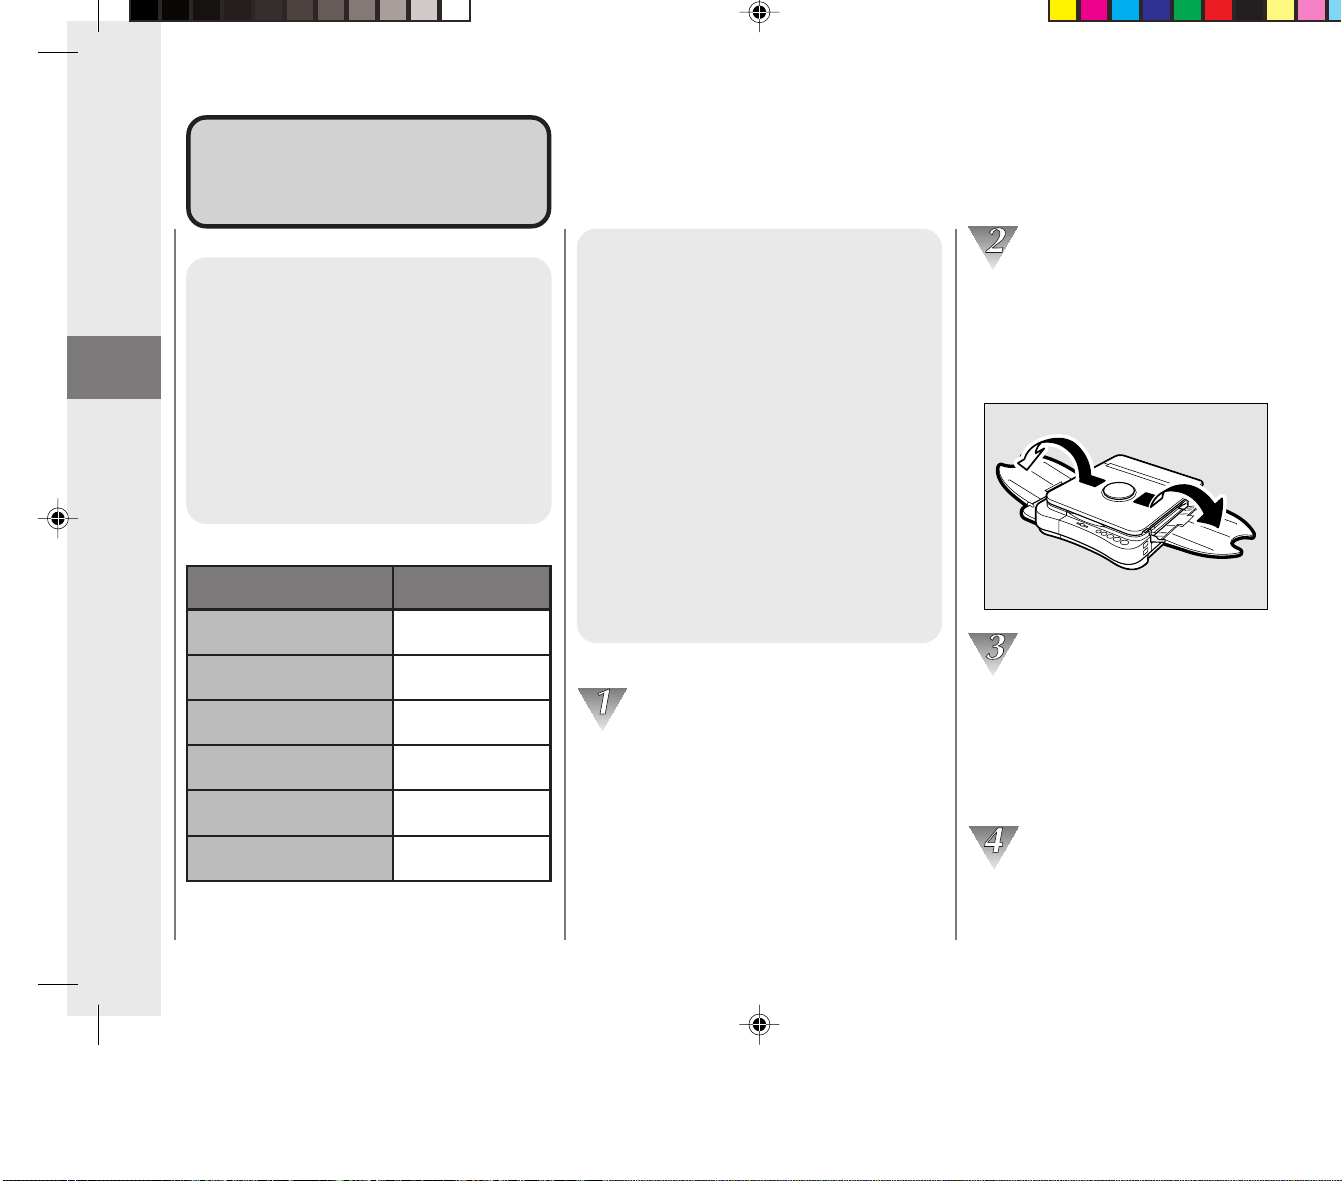
Fold the trays up as shown in the
illustration, and insert the trays into the
opening between the disc and the platen
cover. Then pull out the carrying handle.
(See “Parts and Their Functions”,
on p. 15.)
TransportingTransporting
the Copierthe Copier
Please observe the following
precautions when transporting
this copier.
• Before moving the copier, always
turn the power OFF and unplug
the copier from its power source.
• Before moving the copier, be sure
to disconnect the power cord
from the copier.
• If the copier will be subjected to
any vibrations (e.g., when
transporting long distances),
remove the cartridge from the
copier.
• Before operating the copier again
after it has been moved, slide the
platen all the way to the right and
then back to the center position
by hand.
Firmly grip the carrying handle. Slowly tilt
the copier upward. Then lift the copier.
When the unit is tilted the platen will
automatically lock into place.
Transporting the Copier
01_PC170-USA 06.5.15, 18:2612

Getting Started
12
1
Carrying the Copier by
the Carrying Handle
Fold the trays up as shown in the
illustration, and insert the trays into the
opening between the disc and the platen
cover. Then pull out the carrying handle.
(See “Parts and Their Functions”,
on p. 15.)
TransportingTransporting
the Copierthe Copier
Please observe the following
precautions when transporting
this copier.
• Before moving the copier, always
turn the power OFF and unplug
the copier from its power source.
• Before moving the copier, be sure
to disconnect the power cord
from the copier.
• If the copier will be subjected to
any vibrations (e.g., when
transporting long distances),
remove the cartridge from the
copier.
• Before operating the copier again
after it has been moved, slide the
platen all the way to the right and
then back to the center position
by hand.
Firmly grip the carrying handle. Slowly tilt
the copier upward. Then lift the copier.
When the unit is tilted the platen will
automatically lock into place.
Transporting the Copier
01_PC170-USA 06.5.15, 18:2612
Getting Started
13
1
Transporting the Copier
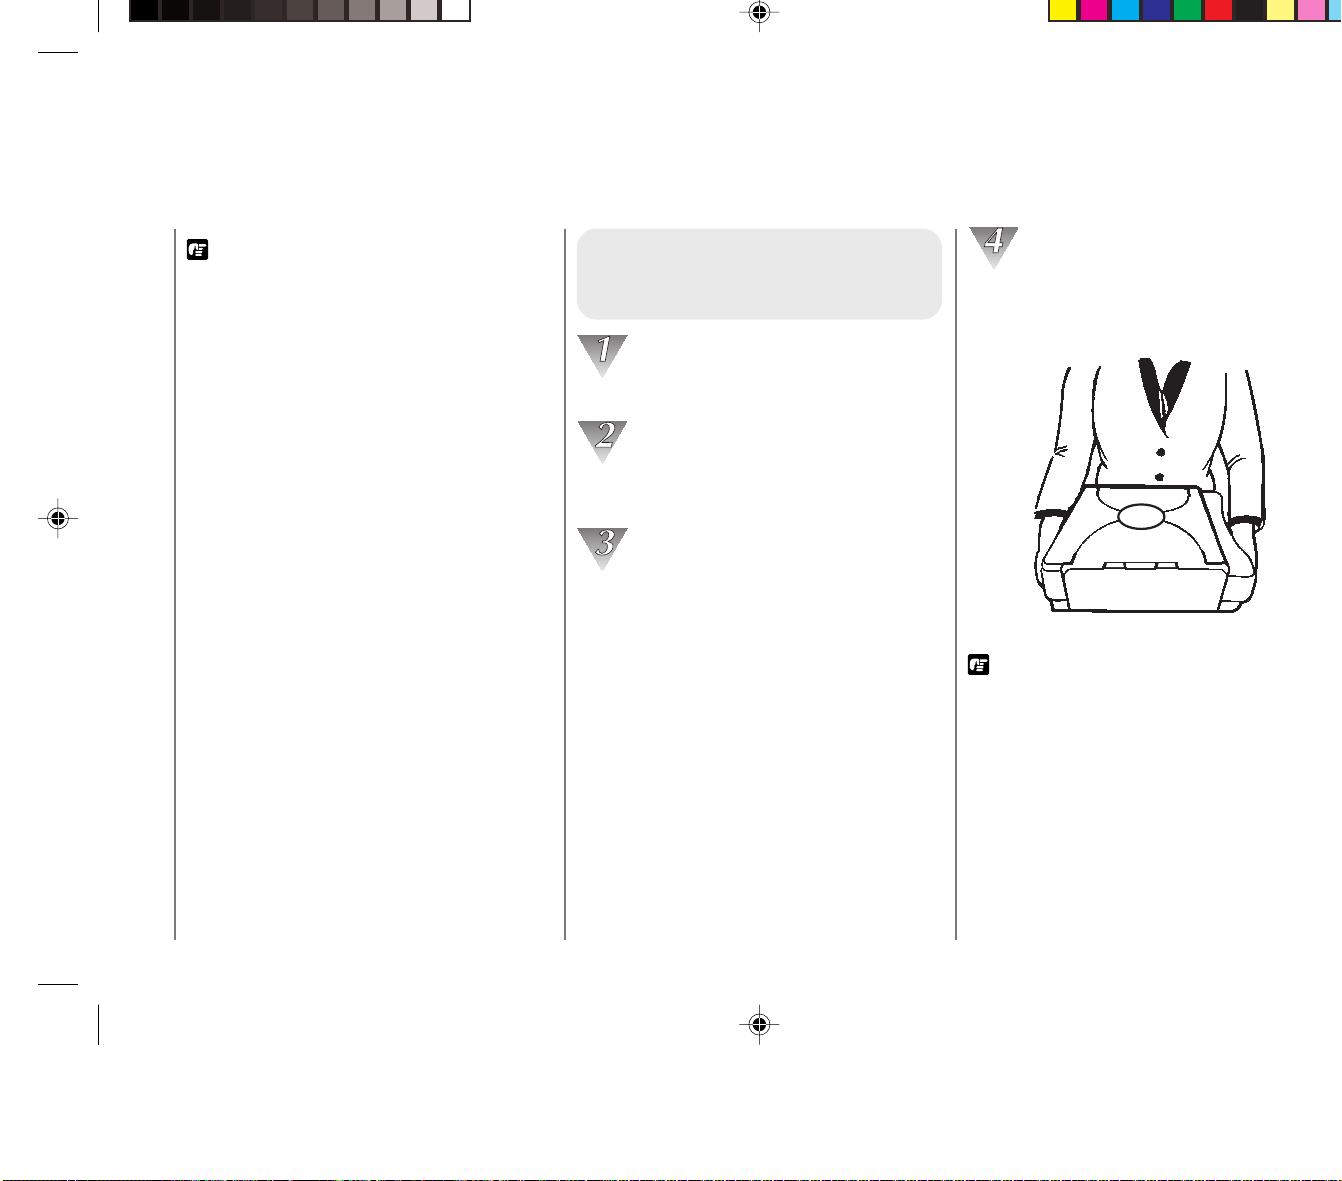
Carrying the Copier by
the Sides
Secure the platen with packing tape.
Push in the carrying handle. Then fold up
the trays.
Insert the trays into the opening between
the disc and the platen cover.
Standing behind the copier as shown in
the illustration, firmly grasp the front and
rear sides of the copier and lift.
REQUEST:
• Do not attempt to use the paper feeding slot,
exit slot, multi-stack tray or the copy tray as
handles. Attempting to carry the copier by
holding one of these may cause it to break off,
and thus cause the handler to drop and damage
the copier.
REQUEST:
• Make sure that the trays are set correctly under
the disc on the platen cover.
• Double check to make sure the trays are set
correctly under the disc on the platen cover.
• If transporting the copier over a long distance
secure the platen cover with packing tape and
remove the cartridge. (See p.14.)
• When transporting the copier take extra care not
to subject it to vibrations or shock.
• If you need to set the copier down for a while,
place it upright on a flat level surface with the
carrying handle on top.
• When lowering the copier to a horizontal
position (installation position), do so slowly.
01_PC170-USA 06.5.15, 18:2613

Getting Started
13
1
Transporting the Copier
Carrying the Copier by
the Sides
Secure the platen with packing tape.
Push in the carrying handle. Then fold up
the trays.
Insert the trays into the opening between
the disc and the platen cover.
Standing behind the copier as shown in
the illustration, firmly grasp the front and
rear sides of the copier and lift.
REQUEST:
• Do not attempt to use the paper feeding slot,
exit slot, multi-stack tray or the copy tray as
handles. Attempting to carry the copier by
holding one of these may cause it to break off,
and thus cause the handler to drop and damage
the copier.
REQUEST:
• Make sure that the trays are set correctly under
the disc on the platen cover.
• Double check to make sure the trays are set
correctly under the disc on the platen cover.
• If transporting the copier over a long distance
secure the platen cover with packing tape and
remove the cartridge. (See p.14.)
• When transporting the copier take extra care not
to subject it to vibrations or shock.
• If you need to set the copier down for a while,
place it upright on a flat level surface with the
carrying handle on top.
• When lowering the copier to a horizontal
position (installation position), do so slowly.
01_PC170-USA 06.5.15, 18:2613

Getting Started
14
1
Transporting the
Copier by Car
Place the copier on a stable
surface (i.e., on the seat) inside
the car.
REQUEST:
• Remove the cartridge from the copier and place
it in its original shipping box. Then secure the
platen with packing tape. Finally place the
copier in its original shipping box.
• Do not leave the copier inside a car for long
periods of time; the temperature inside a car can
exceed the recommended extremes.
•Avoid rough roads; excessive vibrations may
damage the copier.
• Do not place the copier in direct sunlight. Use a
cover if necessary.
Transporting the Copier
01_PC170-USA 06.5.15, 18:2614
Getting Started
15
1
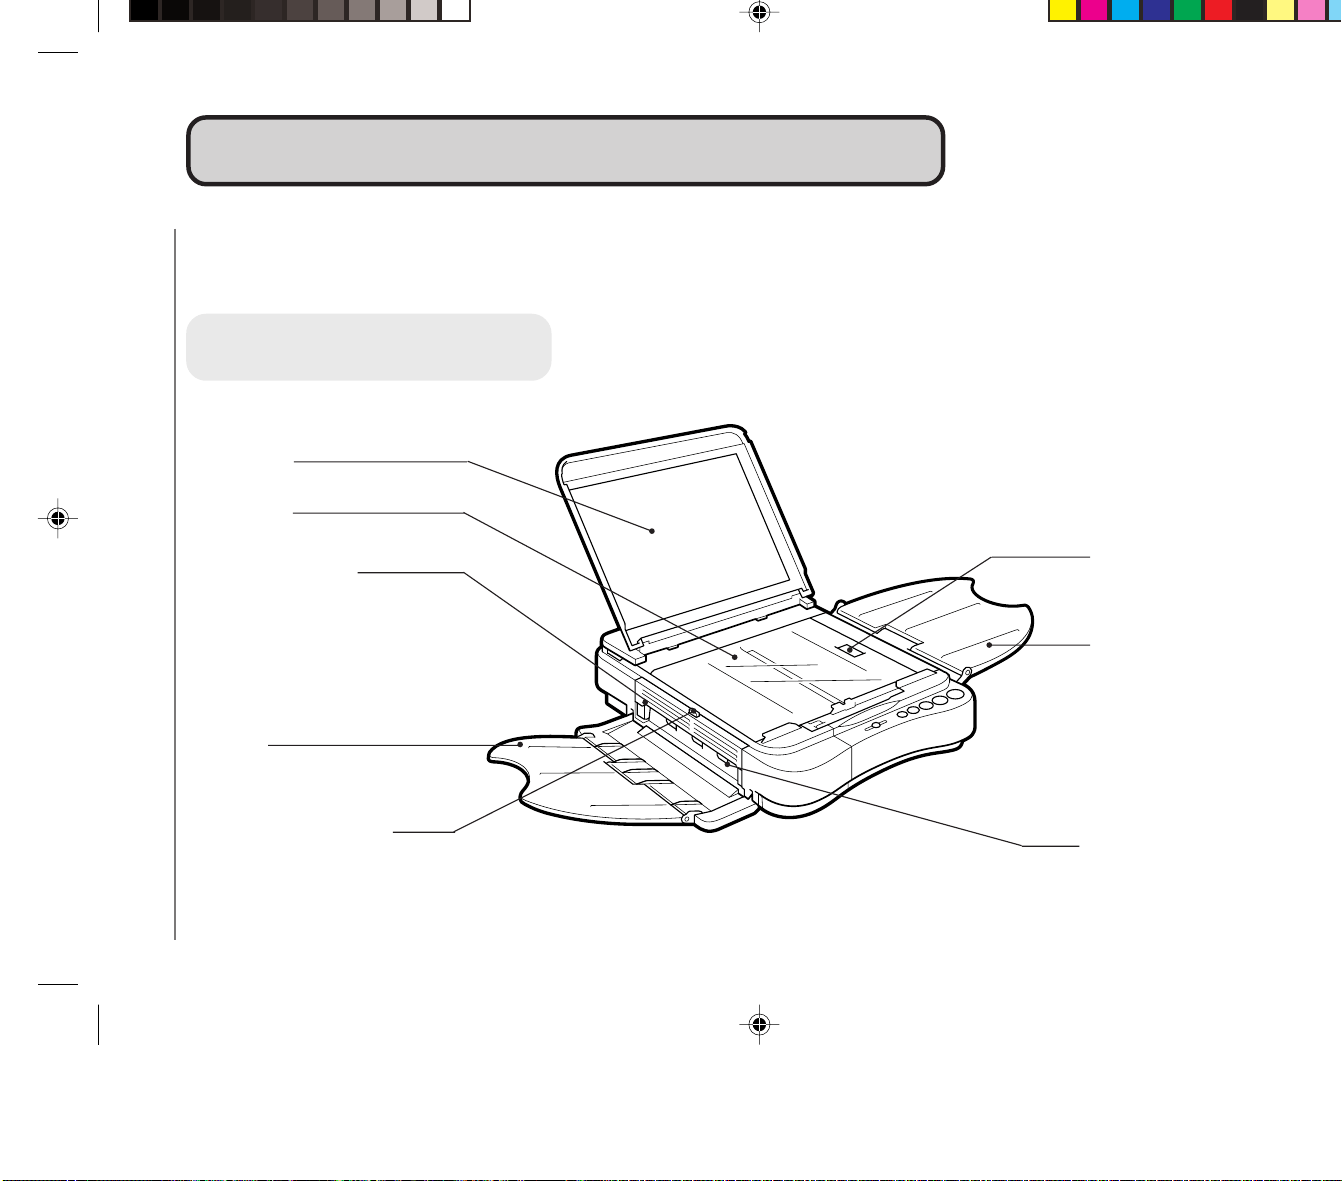
Parts and Their FunctionsParts and Their Functions
Main Unit
Platen Cover
Top Cover Release Button
(See pp. 22, 44 and 46.)
Press to open the top cover.
Parts and Their Functions
Platen Glass
Left Cover (See p.45.)
Open when removing jammed
paper from the output area.
Copy Tray
Multi-stack Tray
Exit Slot
Up to 50 sheets of copy paper can be loaded in the multi-stack tray at a time.
Left Cover Release Button
(See p. 45.)
Press to open the left cover.
01_PC170-USA 06.5.15, 18:2615

Getting Started
15
1
Parts and Their FunctionsParts and Their Functions
Main Unit
Platen Cover
Top Cover Release Button
(See pp. 22, 44 and 46.)
Press to open the top cover.
Parts and Their Functions
Platen Glass
Left Cover (See p.45.)
Open when removing jammed
paper from the output area.
Copy Tray
Multi-stack Tray
Exit Slot
Up to 50 sheets of copy paper can be loaded in the multi-stack tray at a time.
Left Cover Release Button
(See p. 45.)
Press to open the left cover.
01_PC170-USA 06.5.15, 18:2615
Getting Started
16
1
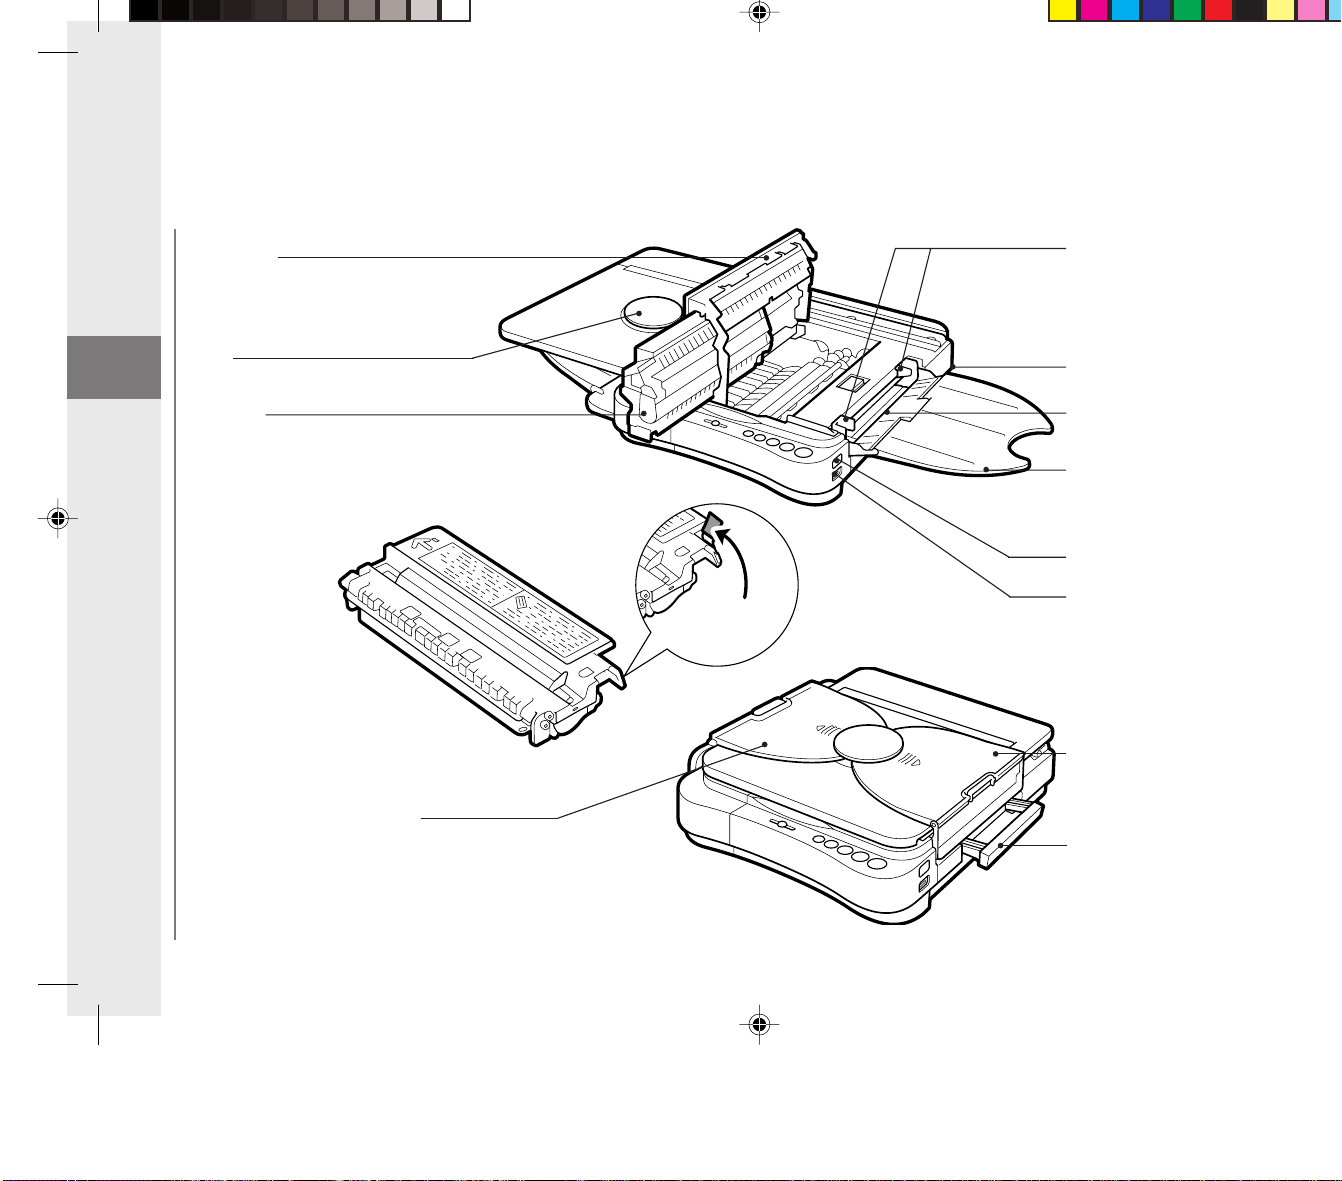
Sealing
Tape Grip
Top Cover
Open when changing the
cartridge, clearing paper jams
or cleaning the roller.
Paper Feed Guides
Adjust to fit paper size.
Parts and Their Functions
Cartridge
Carrying Handle
Pull out to use when transporting
the copier.
Multi-stack Tray
Exposure Recalibration Switch
Slide up or down to adjust the copy
exposure to one of three steps to
accommodate dark, normal or light
originals.
Power Switch
Multi-stack Tray
Paper Feeding Slot
Power Cord Connector
(rear right)
Copy Tray
Disc
01_PC170-USA 06.5.15, 18:2616

Getting Started
16
1
Sealing
Tape Grip
Top Cover
Open when changing the
cartridge, clearing paper jams
or cleaning the roller.
Paper Feed Guides
Adjust to fit paper size.
Parts and Their Functions
Cartridge
Carrying Handle
Pull out to use when transporting
the copier.
Multi-stack Tray
Exposure Recalibration Switch
Slide up or down to adjust the copy
exposure to one of three steps to
accommodate dark, normal or light
originals.
Power Switch
Multi-stack Tray
Paper Feeding Slot
Power Cord Connector
(rear right)
Copy Tray
Disc
01_PC170-USA 06.5.15, 18:2616
Getting Started
17
1
C
A
AE
: Misfeed error / Load paper
: Paper jam
: Error
: Error
: Error
then
then
then
Error indications
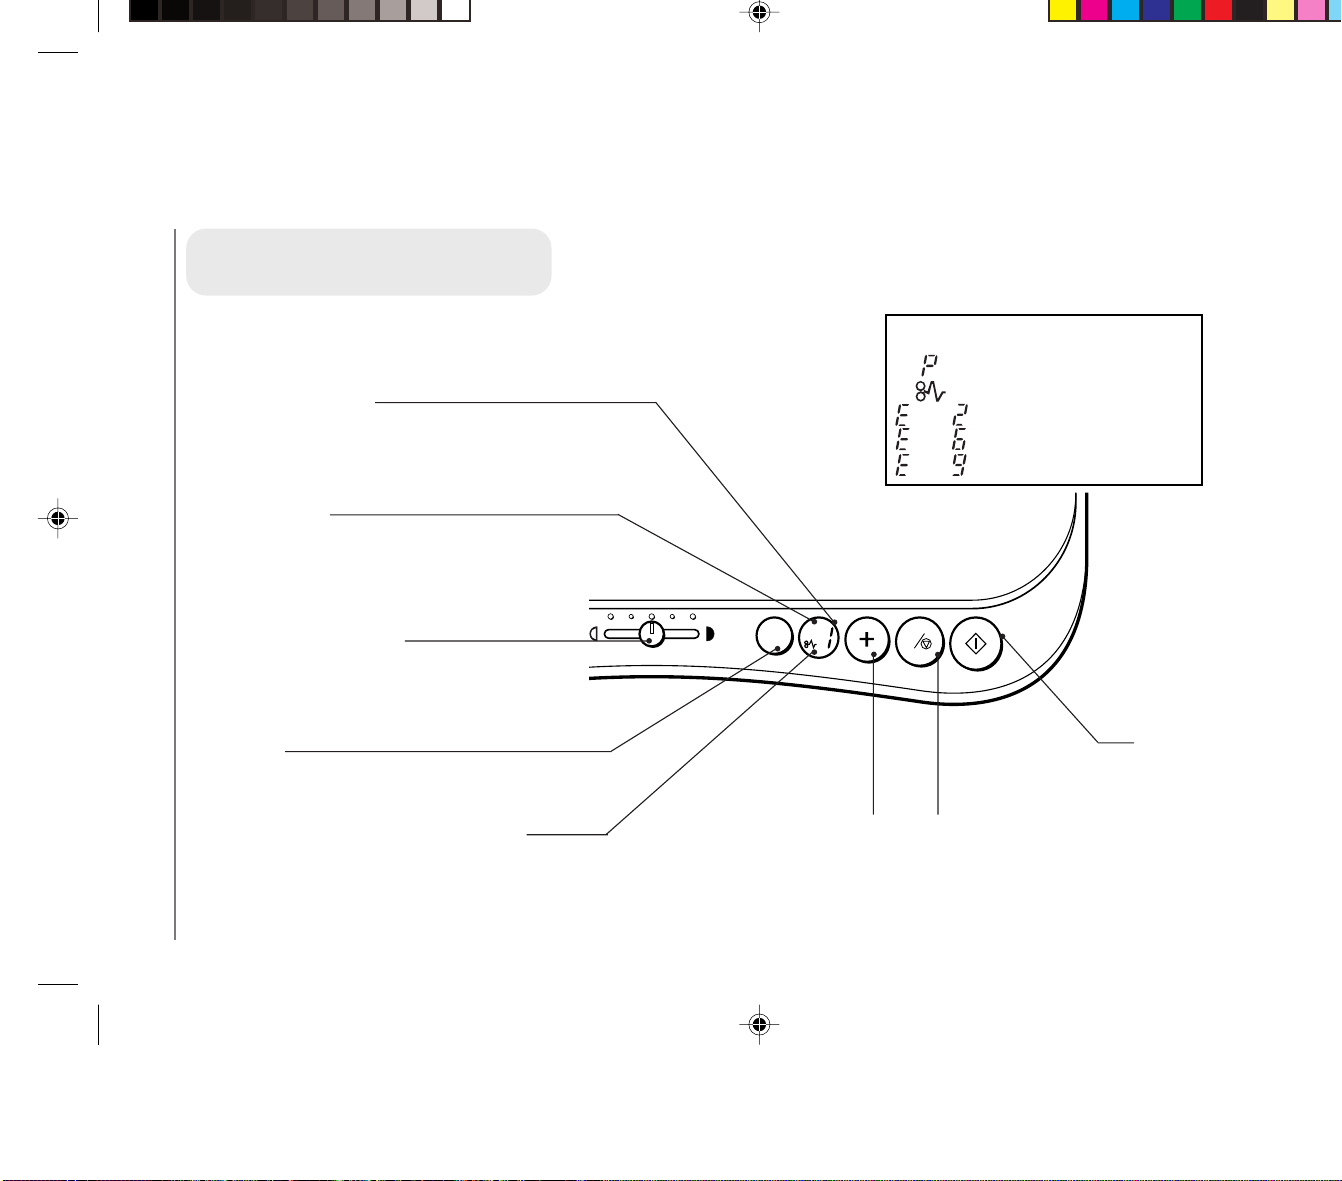
Parts and Their Functions
Control Panel
Number of Copies/Error
Message Indicator
Shows the number of copies
selected or any error messages.
A (Auto) Indicator
Lights up when the Auto
Exposure Control is selected.
Exposure Adjustment Lever
Slide to manually adjust the copy
exposure setting (lightness/
darkness).
The AE Key
Press to select or cancel the
Auto Exposure Control.
Paper Jam Indicator
Flashes when copy paper is
jammed inside the copier.
Number of Copies Key
Press to select the desired
number of copies.
Clear/Stop Key
Press to return the number of
copies to one, or to stop the
copier while copying.
Start Key
Press to start copying.
01_PC170-USA 06.5.15, 18:2617

Getting Started
17
1
C
A
AE
: Misfeed error / Load paper
: Paper jam
: Error
: Error
: Error
then
then
then
Error indications
Parts and Their Functions
Control Panel
Number of Copies/Error
Message Indicator
Shows the number of copies
selected or any error messages.
A (Auto) Indicator
Lights up when the Auto
Exposure Control is selected.
Exposure Adjustment Lever
Slide to manually adjust the copy
exposure setting (lightness/
darkness).
The AE Key
Press to select or cancel the
Auto Exposure Control.
Paper Jam Indicator
Flashes when copy paper is
jammed inside the copier.
Number of Copies Key
Press to select the desired
number of copies.
Clear/Stop Key
Press to return the number of
copies to one, or to stop the
copier while copying.
Start Key
Press to start copying.
01_PC170-USA 06.5.15, 18:2617
Getting Started
18
1
Installing theInstalling the
CopierCopier
Checking the Package
Contents
Remove the copier and the
accessories from the shipping
box. Use the following checklist
to make sure you have received
all the necessary accessories
included with your copier.
Registration Card 1
Power Cord 1
Operator’s Manual 1
Cartridge 1
Muliti-stack tray 1
Copy tray 1
Item Quantity
Installation Procedure
Before installing the copier be
sure to check the safety of the
power source. Then proceed with
the following procedure.
Although the starter cartridge
comes already installed in the
main unit, it is necessary to
remove the sealing tape from the
cartridge before use.
The cartridge cannot be used if
the seal is not removed.
(See “Installation Precautions”,
on p. 11 and “Replacing and
Storing Cartridges”, on p. 19.)
Remove the copier from its shipping bag
and gently remove all the packing tape
attached to the copier.
Slightly slide the copy tray and the multi-
stack tray out from the opening between
the disc and the platen cover, and then
open the trays fully.
Slide the platen to the left, press the top
cover release button and lift open the top
cover. Grip the end of the cartridge, and
pull it out of the copier.
(See “Replacing and Storing Cartridges”,
on p. 19.)
Hold the cartridge level so that the side
with the written instructions is facing
upward.
Installing the Copier
01_PC170-USA 06.5.15, 18:2618
Getting Started
19
1
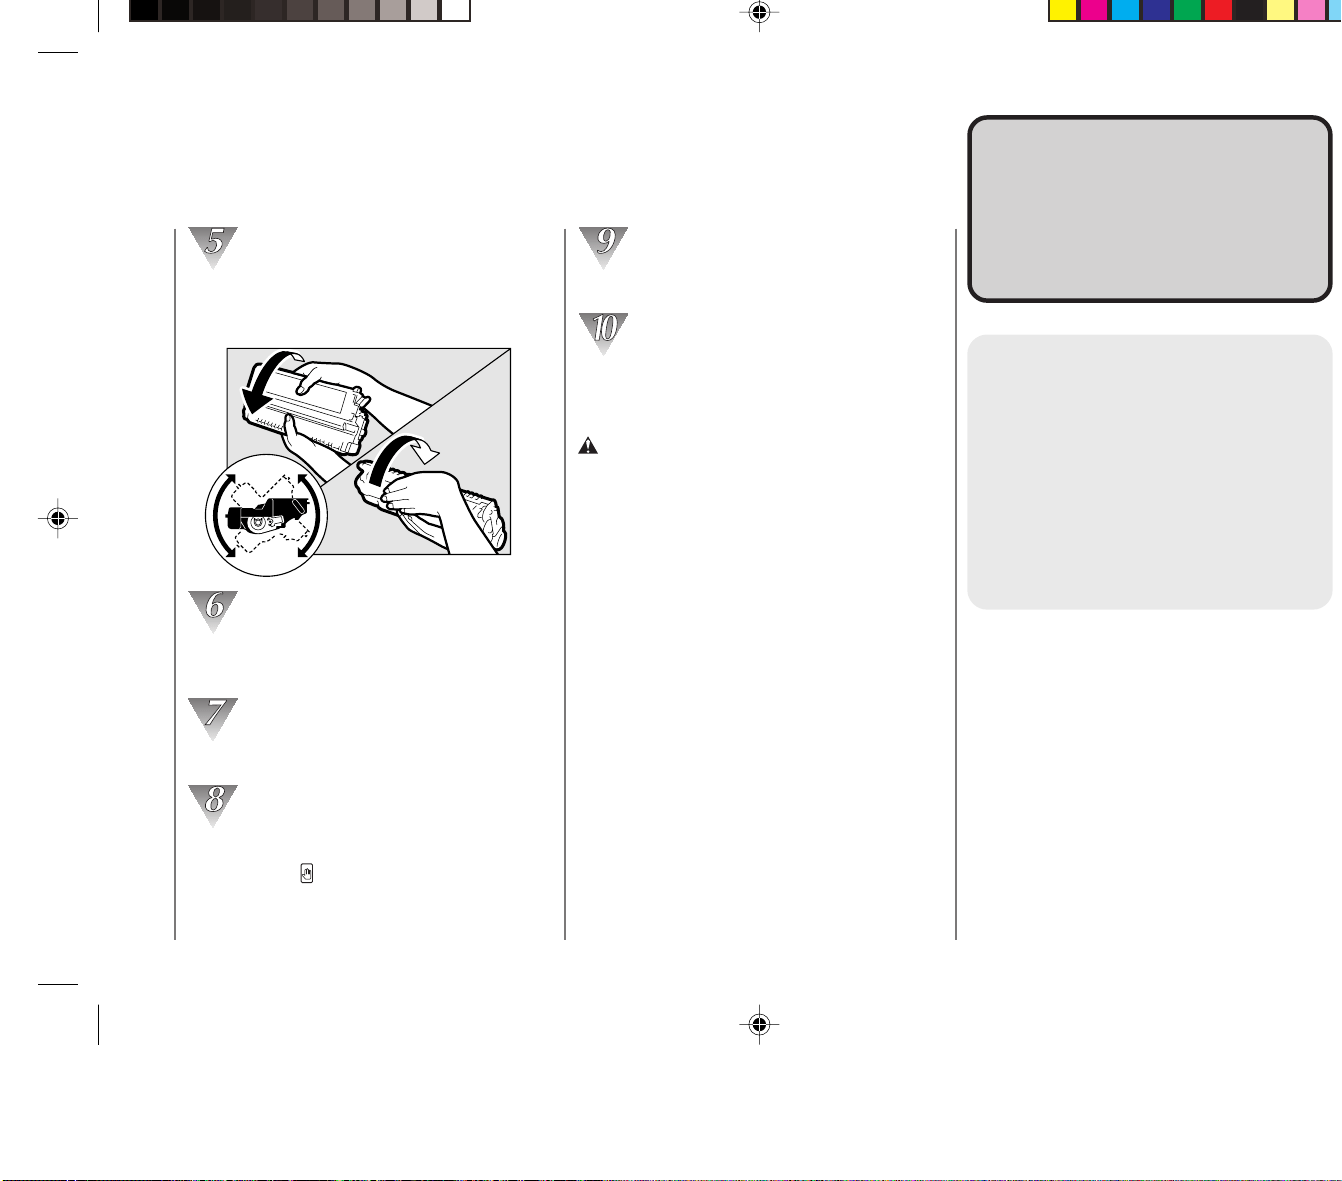
Rock the cartridge several times to the
right and left at a 90° to evenly distribute
the toner within the cartridge.
Remove the cartridge sealing tape.
(See “Replacing Cartridges”, on p. 21.)
Insert the cartridge into the copier.
Close the top cover by pressing down
firmly on the button.
Return the platen to the center position.
Plug the power cord into an electrical
outlet.
WARNING:
• This copier is only designed for use with the
power source shown on the marking label
located on the back of the copier. If you are
unsure of the power source, check with your
local power company.
NOTICE:
• If the copier is brought in from a cold place to a
warm one, or if the location of the copier should
be rapidly heated, condensation will form inside
the copier. This may adversely affect the quality
of the copy images (e.g., blacked-out copies).
When the copier is exposed to such conditions,
allow at least two hours for the copier to adjust
to room temperature before attempting to
operate it.
Replacing andReplacing and
StoringStoring
CartridgesCartridges
About the Cartridge
The cartridges for use in this
copier are the Canon Cartridge
E20 (Black) or the Canon
Cartridge E (in Red, Blue, Green
or Sepia) is also available. Each
cartridge is a consumable item
and should be replaced when the
toner runs out.
Replacing and Storing Cartridges
01_PC170-USA 06.5.15, 18:2619

Getting Started
19
1
Rock the cartridge several times to the
right and left at a 90° to evenly distribute
the toner within the cartridge.
Remove the cartridge sealing tape.
(See “Replacing Cartridges”, on p. 21.)
Insert the cartridge into the copier.
Close the top cover by pressing down
firmly on the button.
Return the platen to the center position.
Plug the power cord into an electrical
outlet.
WARNING:
• This copier is only designed for use with the
power source shown on the marking label
located on the back of the copier. If you are
unsure of the power source, check with your
local power company.
NOTICE:
• If the copier is brought in from a cold place to a
warm one, or if the location of the copier should
be rapidly heated, condensation will form inside
the copier. This may adversely affect the quality
of the copy images (e.g., blacked-out copies).
When the copier is exposed to such conditions,
allow at least two hours for the copier to adjust
to room temperature before attempting to
operate it.
Replacing andReplacing and
StoringStoring
CartridgesCartridges
About the Cartridge
The cartridges for use in this
copier are the Canon Cartridge
E20 (Black) or the Canon
Cartridge E (in Red, Blue, Green
or Sepia) is also available. Each
cartridge is a consumable item
and should be replaced when the
toner runs out.
Replacing and Storing Cartridges
01_PC170-USA 06.5.15, 18:2619
Getting Started
20
1
Test your cartridge before
replacing it.
When your toner starts to run low, perform
the following procedure to make sure all the
toner is used. After performing this test, if
the resulting copy does not improve in
quality then replace the cartridge with a new
one.
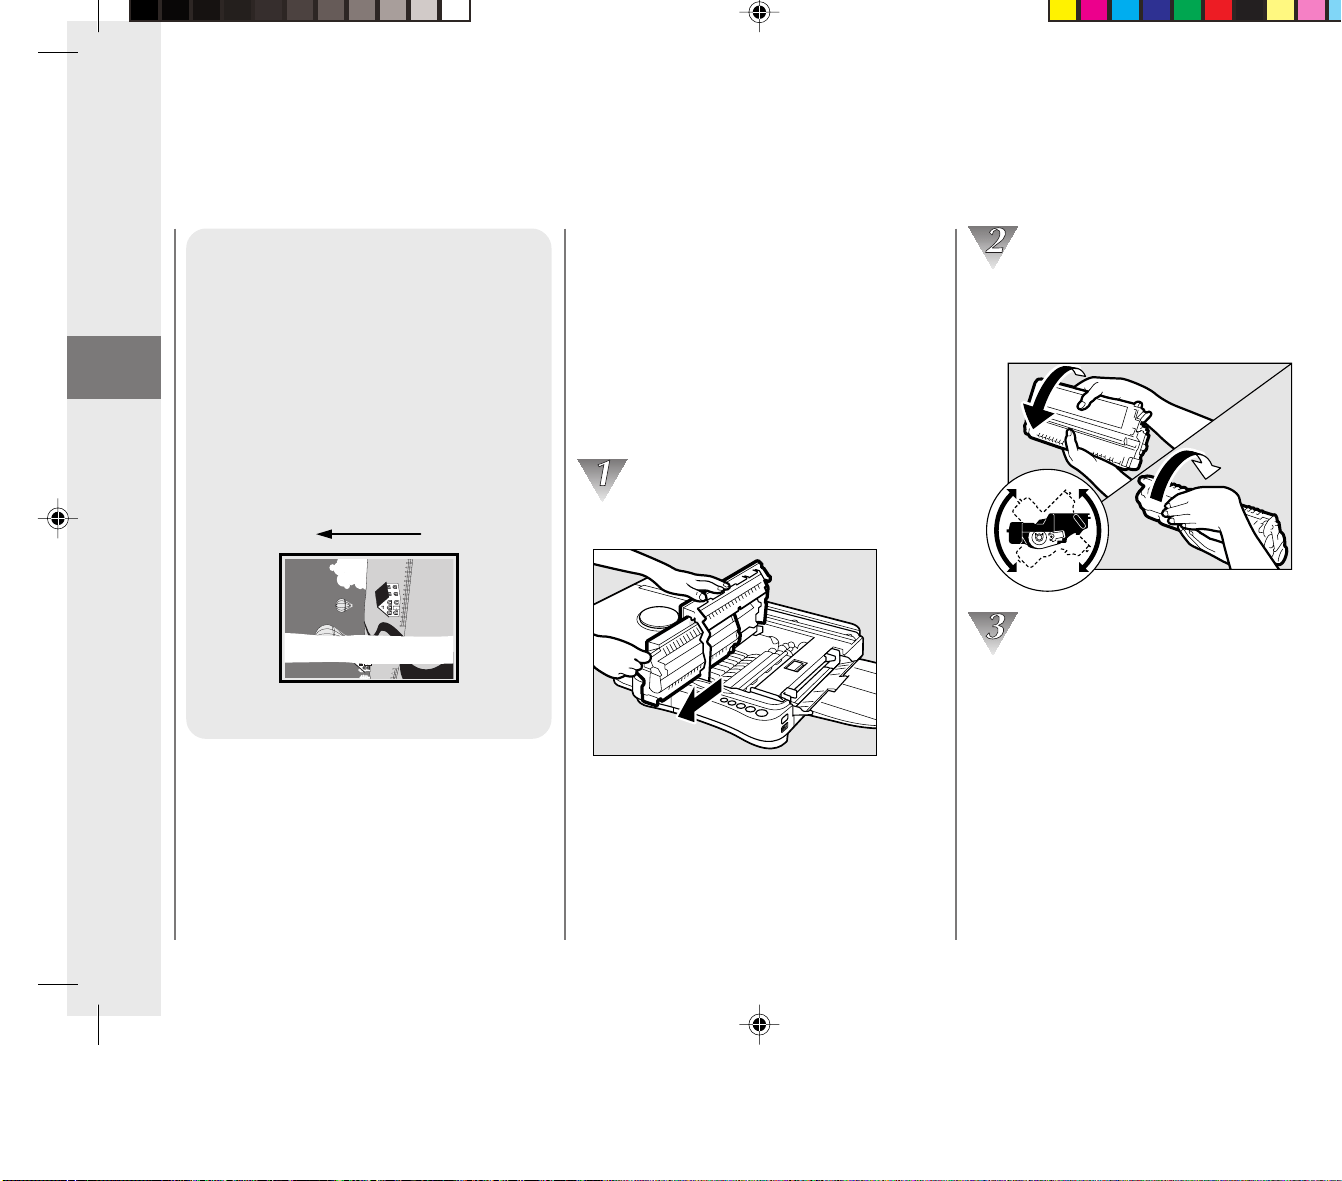
Remove the cartridge from the copier.
When to Replace the
Cartridge
When light bands or white streaks
appear on copies, then the toner
in the cartridge has run low.
Before it runs out completely be
sure to purchase a replacement
cartridge.
Paper feeding
direction
While holding the cartridge level, rock it
several times to the left and right at a 90°
angle.
Reinstall the cartridge in the copier and
make a test copy.
Replacing and Storing Cartridges
01_PC170-USA 06.5.15, 18:2620

Getting Started
20
1
Test your cartridge before
replacing it.
When your toner starts to run low, perform
the following procedure to make sure all the
toner is used. After performing this test, if
the resulting copy does not improve in
quality then replace the cartridge with a new
one.
Remove the cartridge from the copier.
When to Replace the
Cartridge
When light bands or white streaks
appear on copies, then the toner
in the cartridge has run low.
Before it runs out completely be
sure to purchase a replacement
cartridge.
Paper feeding
direction
While holding the cartridge level, rock it
several times to the left and right at a 90°
angle.
Reinstall the cartridge in the copier and
make a test copy.
Replacing and Storing Cartridges
01_PC170-USA 06.5.15, 18:2620
Getting Started
21
1
Canon E20 Cartridge:
approx. 2,000 copies of an A4-size, standard original
The term A4 denotes an original; on which the area covered with ink is 5% of the total area of
an A4 sized sheet of paper. See the inside of the back cover of this manual for an example of
an A4 sized page with 5% ink coverage.
MEMO:
• The actual number of copies that can be made per cartridge depends in part on the copy exposure
settings, room temperature and humidity.
Approximate copy yield
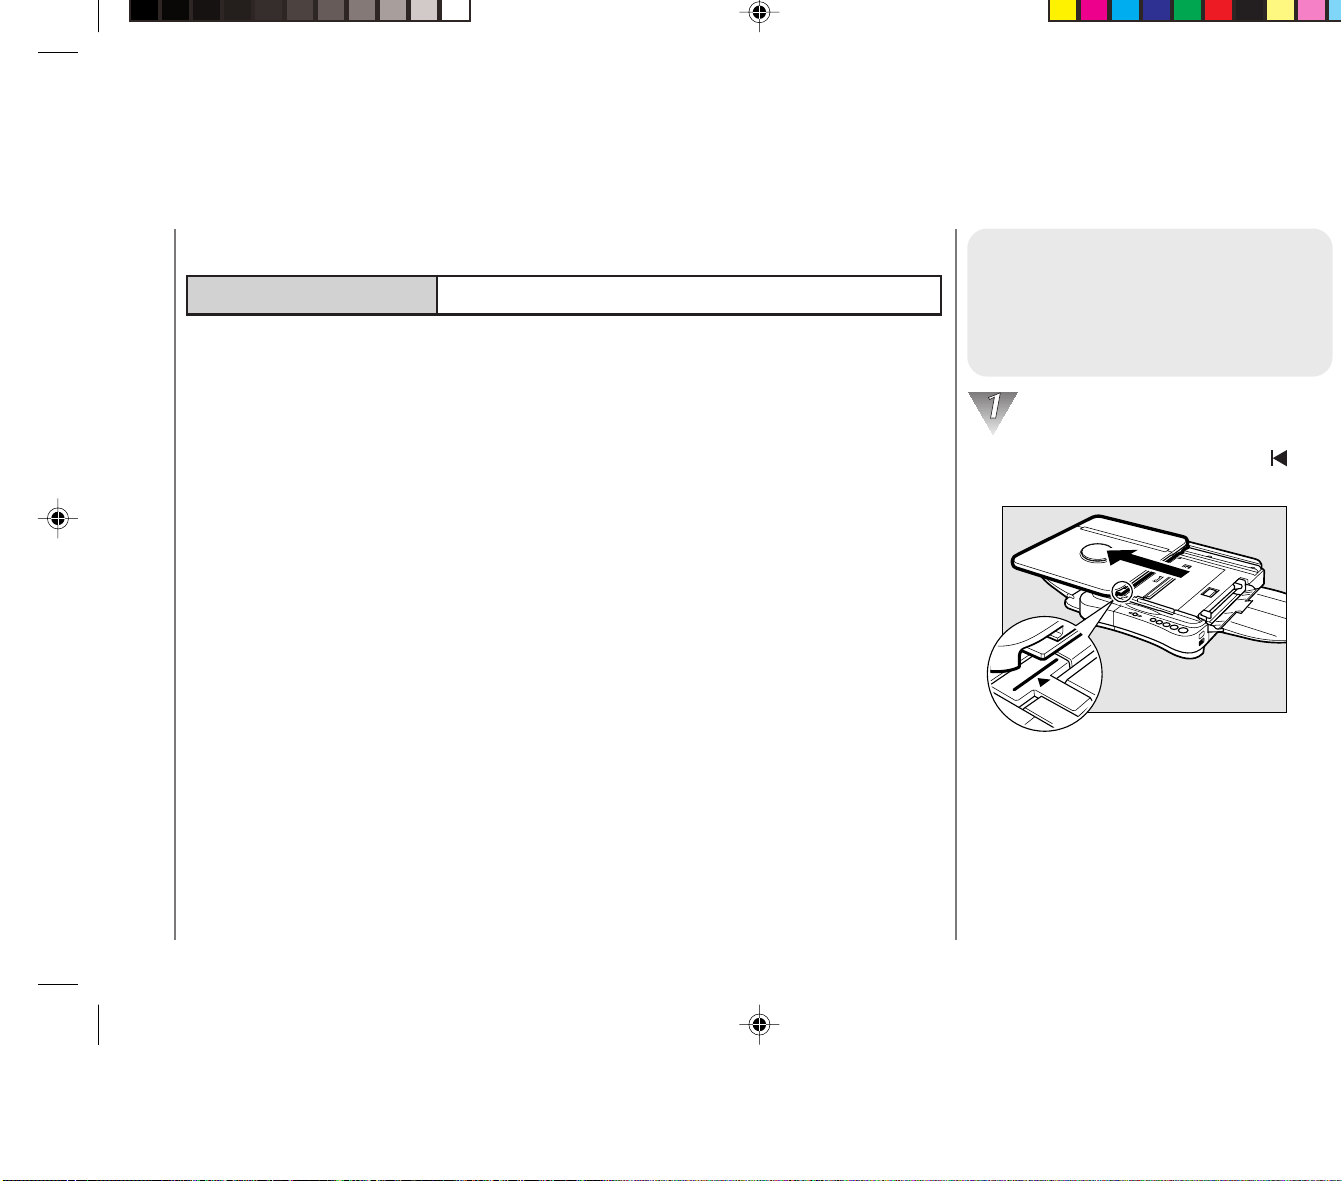
Replacing Cartridges
Before removing the cartridge be
sure to turn the power switch
OFF.
Slide the platen to the left until the
mark is exposed.
Replacing and Storing Cartridges
01_PC170-USA 06.5.15, 18:2621

Getting Started
21
1
Canon E20 Cartridge:
approx. 2,000 copies of an A4-size, standard original
The term A4 denotes an original; on which the area covered with ink is 5% of the total area of
an A4 sized sheet of paper. See the inside of the back cover of this manual for an example of
an A4 sized page with 5% ink coverage.
MEMO:
• The actual number of copies that can be made per cartridge depends in part on the copy exposure
settings, room temperature and humidity.
Approximate copy yield
Replacing Cartridges
Before removing the cartridge be
sure to turn the power switch
OFF.
Slide the platen to the left until the
mark is exposed.
Replacing and Storing Cartridges
01_PC170-USA 06.5.15, 18:2621
Getting Started
22
1
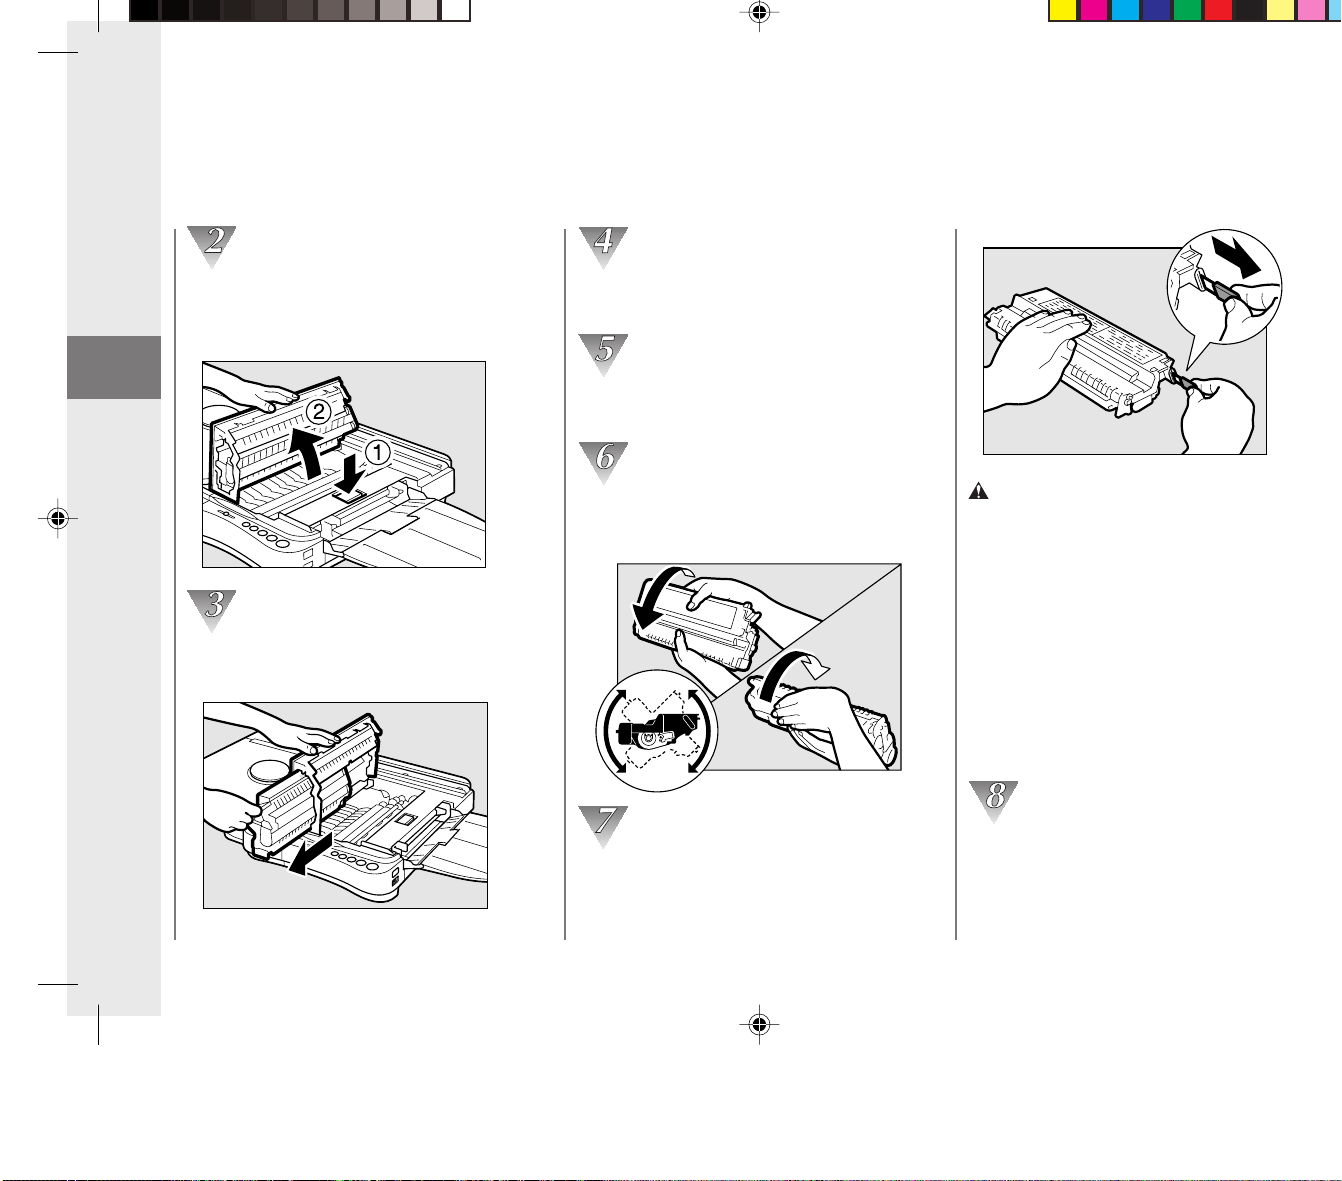
Press the top cover release button to
open the top cover so that it stands
upright as shown.
Grip the end of the used cartridge and
pull it out from the copier.
Remove the new cartridge from its
shipping bag.
Hold the cartridge level so that the side with
the written instructions is facing upward.
Rock the cartridge several times 90° to
the right and left to evenly distribute the
toner throughout the cartridge.
Peel the sealing tape grip from the end of
the cartridge. Grasp the grip and pull the
sealing tape out in the direction of the
arrow mark away from the cartridge.
CAUTION:
When removing the sealing tape, take care not
to allow the toner on the sealing tape to come
into contact with your hands or clothing. If you
get toner on either your hands or clothing, wash
immediately with cold water. Washing with warm
water will set the toner and make it impossible
to remove.
MEMO:
The sealing tape is approximately 20” long. Be
sure to pull the sealing tape completely out of
the cartridge.
Hold the cartridge so that the side with
the written instructions is facing to the
left. Then, carefully insert the cartridge
into the copier as far as it will go.
Replacing and Storing Cartridges
01_PC170-USA 06.5.15, 18:2622

Getting Started
22
1
Press the top cover release button to
open the top cover so that it stands
upright as shown.
Grip the end of the used cartridge and
pull it out from the copier.
Remove the new cartridge from its
shipping bag.
Hold the cartridge level so that the side with
the written instructions is facing upward.
Rock the cartridge several times 90° to
the right and left to evenly distribute the
toner throughout the cartridge.
Peel the sealing tape grip from the end of
the cartridge. Grasp the grip and pull the
sealing tape out in the direction of the
arrow mark away from the cartridge.
CAUTION:
When removing the sealing tape, take care not
to allow the toner on the sealing tape to come
into contact with your hands or clothing. If you
get toner on either your hands or clothing, wash
immediately with cold water. Washing with warm
water will set the toner and make it impossible
to remove.
MEMO:
The sealing tape is approximately 20” long. Be
sure to pull the sealing tape completely out of
the cartridge.
Hold the cartridge so that the side with
the written instructions is facing to the
left. Then, carefully insert the cartridge
into the copier as far as it will go.
Replacing and Storing Cartridges
01_PC170-USA 06.5.15, 18:2622
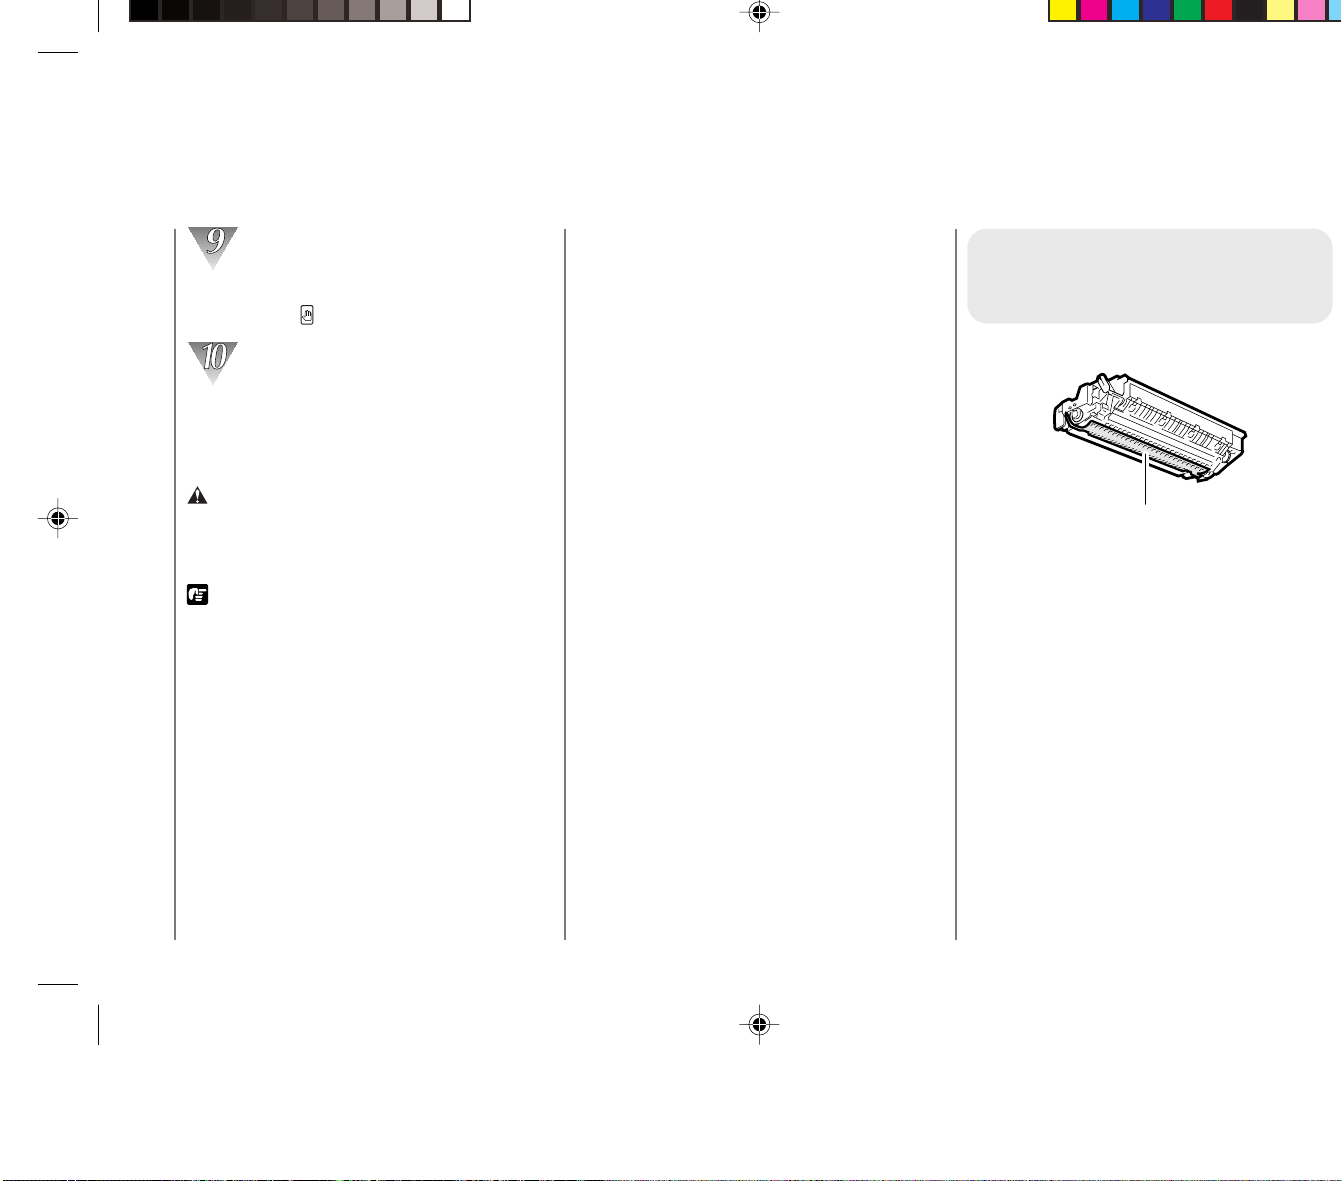
Getting Started
23
1
Close the top cover by pressing down
firmly on the
button.
Return the platen to the center position.
Before resuming copy operation turn the
power switch ON.
WARNING:
• Never throw a used cartridge into a fire; doing
so can result in an explosion.
REQUEST:
• The sealing tape is approximately 20” long so
be sure to pull all of the sealing tape out from
the cartridge.
• Do not pull the sealing tape out from the
cartridge at an angle. If the sealing tape breaks
before being pulled out fully, the cartridge is no
longer able to be used in the copier.
MEMO:
• While replacing the cartridge, all current copy
settings will be canceled. Be sure to reprogram
the settings before resuming copying.
• The sealing tape grip is affixed to the end of the
cartridge. Before pulling out the tape, be sure to
peel it from the end of the cartridge. Then, pull
the tape out slowly from the cartridge.
• When replacement of the cartridge is finished be
sure the cover is closed all the way. If not, the
power may turn OFF when the copier is
operated.
• When packing the cartridge, insert it in the bag
so that the side with the written instructions is
facing upwards. Then place the cartridge into its
box.
Cartridge Handling
Precautions
Drum’s protective shutter
• Always hold the cartridge as shown so
that the side with the written instructions is
facing upwards. Do not forcefully move or
push the protective shutter of the drum in
any way.
• Never attempt to disassemble the
cartridge or open the protective cover of
the drum.
• If the copier is brought from the cold
outdoors into a warm room, or if the room
is rapidly heated, condensation may form
inside the copier. This can adversely effect
the quality of your copy images (e.g.,
blacked-out copies). When the copier is
exposed to such conditions, allow at least
two hours for the copier to adjust to room
temperature before attempting to use it.
Replacing and Storing Cartridges
01_PC170-USA 06.5.15, 18:2623

Getting Started
24
1
Recycling used cartridges
Canon has instituted a worldwide recycling
program for toner cartridges called “The
Clean Earth Campaign”. This program
preserves precious natural resources by
utilizing a variety of materials found in the
used cartridges that are of no further use, to
remanufacture new cartridges which, at the
same time, keeps the environment cleaner
by reducing landfill waste. Complete details
concerning this program are enclosed in
each PC Cartridge Box, and mentioned in
this manual.
Cartridge Storing Precautions
Store all unused cartridges according to the following guidelines.
• Place the cartridge in the shipping bag so that the side with the written
instructions is facing upwards. Then place the cartridge into its shipping
box. Store the unused cartridges out of direct sunlight.
• If you do not have the shipping bag and box, be sure to store the cartridge
in a dark location. Make sure that the side with the written instructions is
always facing upwards.
• Do not stand the cartridge on end or turn it upside down.
• Store the cartridges out of reach of small children.
• Never place the cartridges near heaters or humidifiers, etc. Always store
at 104°F or less.
• The recommended storage conditions are as follows:
Temperature 68°F to 77°F
Relative Humidity 40% to 70%
Replacing and Storing Cartridges
01_PC170-USA 06.5.15, 18:2624
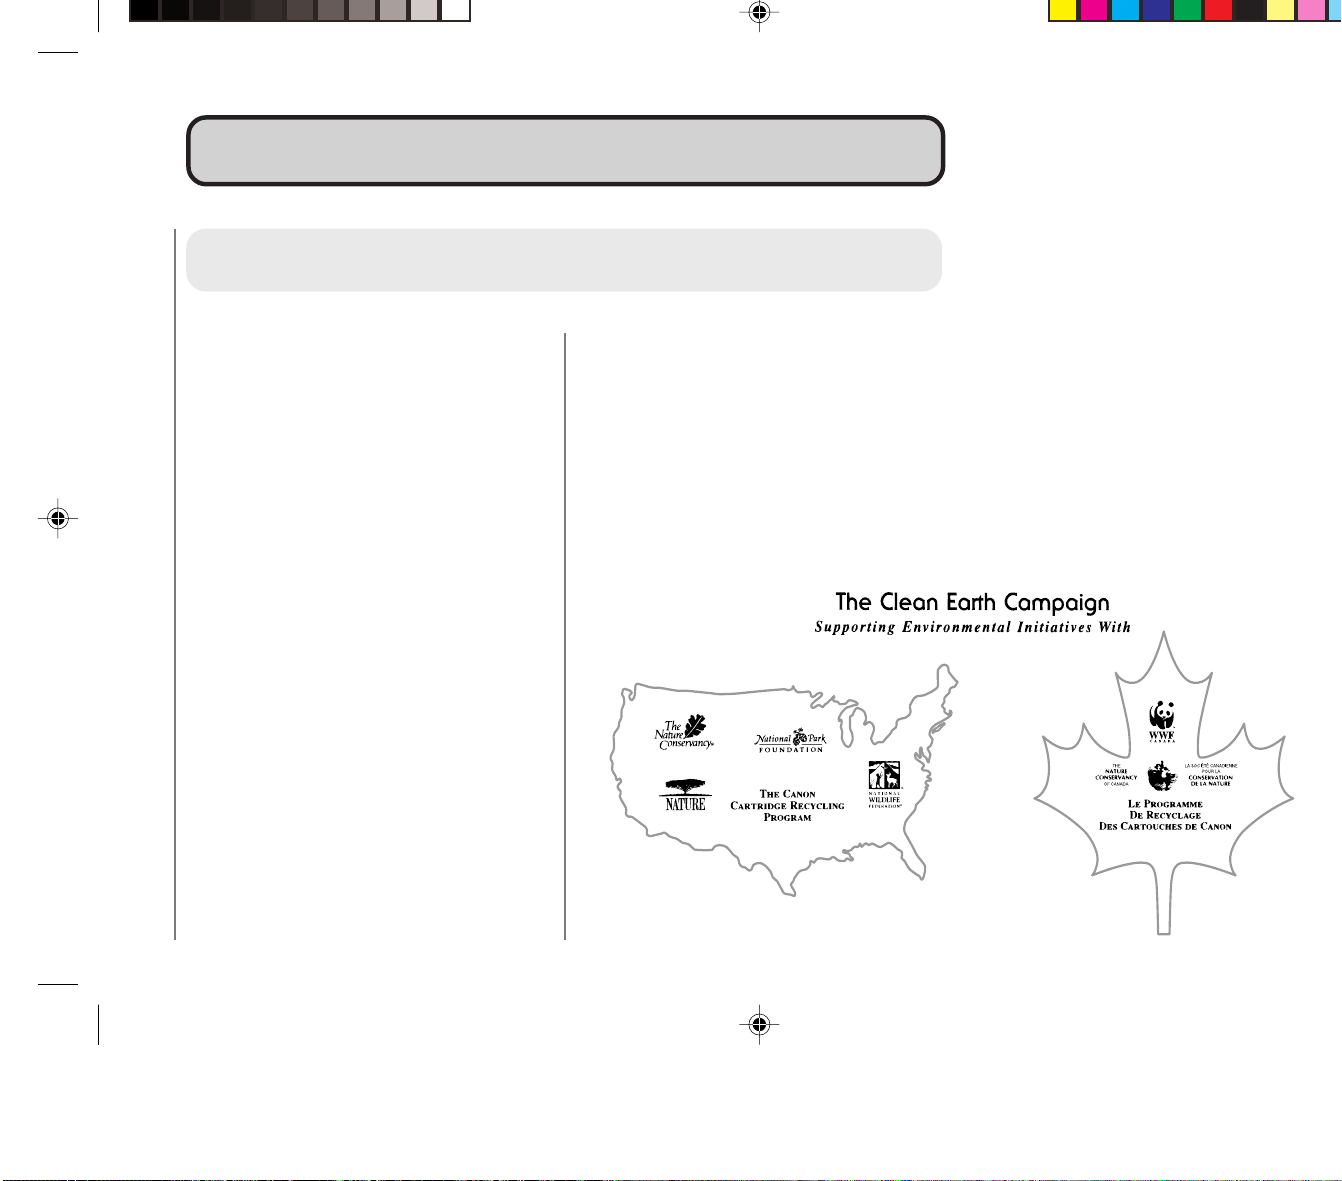
Getting Started
25
1
The Clean Earth CampaignThe Clean Earth Campaign
THE CANON CARTRIDGE RECYCLING PROGRAM
The Canon Cartridge Recycling Program
fulfills the first initiative of Canon’s Clean
Earth Campaign, which supports four critical
environmental areas:
• Recycling in the Workplace
• Conserving Environmental Resources
• Scientific Research and Education
• Encouraging Outdoors Appreciation
The remaining “Clean Earth” initiatives are
supported in the U.S. through sponsorships
of the National Park Foundation, the National
Wildlife Federation, and The Nature
Conservancy and in Canada through
donations to the World Wildlife Fund Canada
and The Nature Conservancy of Canada.
Since its inception, The Canon Cartridge
Recycling Program has collected millions of
cartridges that otherwise would have been
discarded into landfills or similar facilities.
Instead, this rapidly growing program returns
used cartridges to the manufacturing
process, thus conserving an array of
resources.
Becoming a part of this worthwhile program
is easy. When your cartridge is of no further
use, simply follow the instructions detailed for
U.S. or Canadian residents.
We appreciate your support of The Canon
Cartridge Recycling Program.
Working together we can make a significant
contribution to a cleaner planet.
• Cartridges collected through this program
are not refilled.
•You are not entitled to a tax deduction or
rebate for the return of empty toner
cartridges.
• This program may be modified or
discontinued without notice.
The Clean Earth Campaign
01_PC170-USA 06.5.15, 18:2625
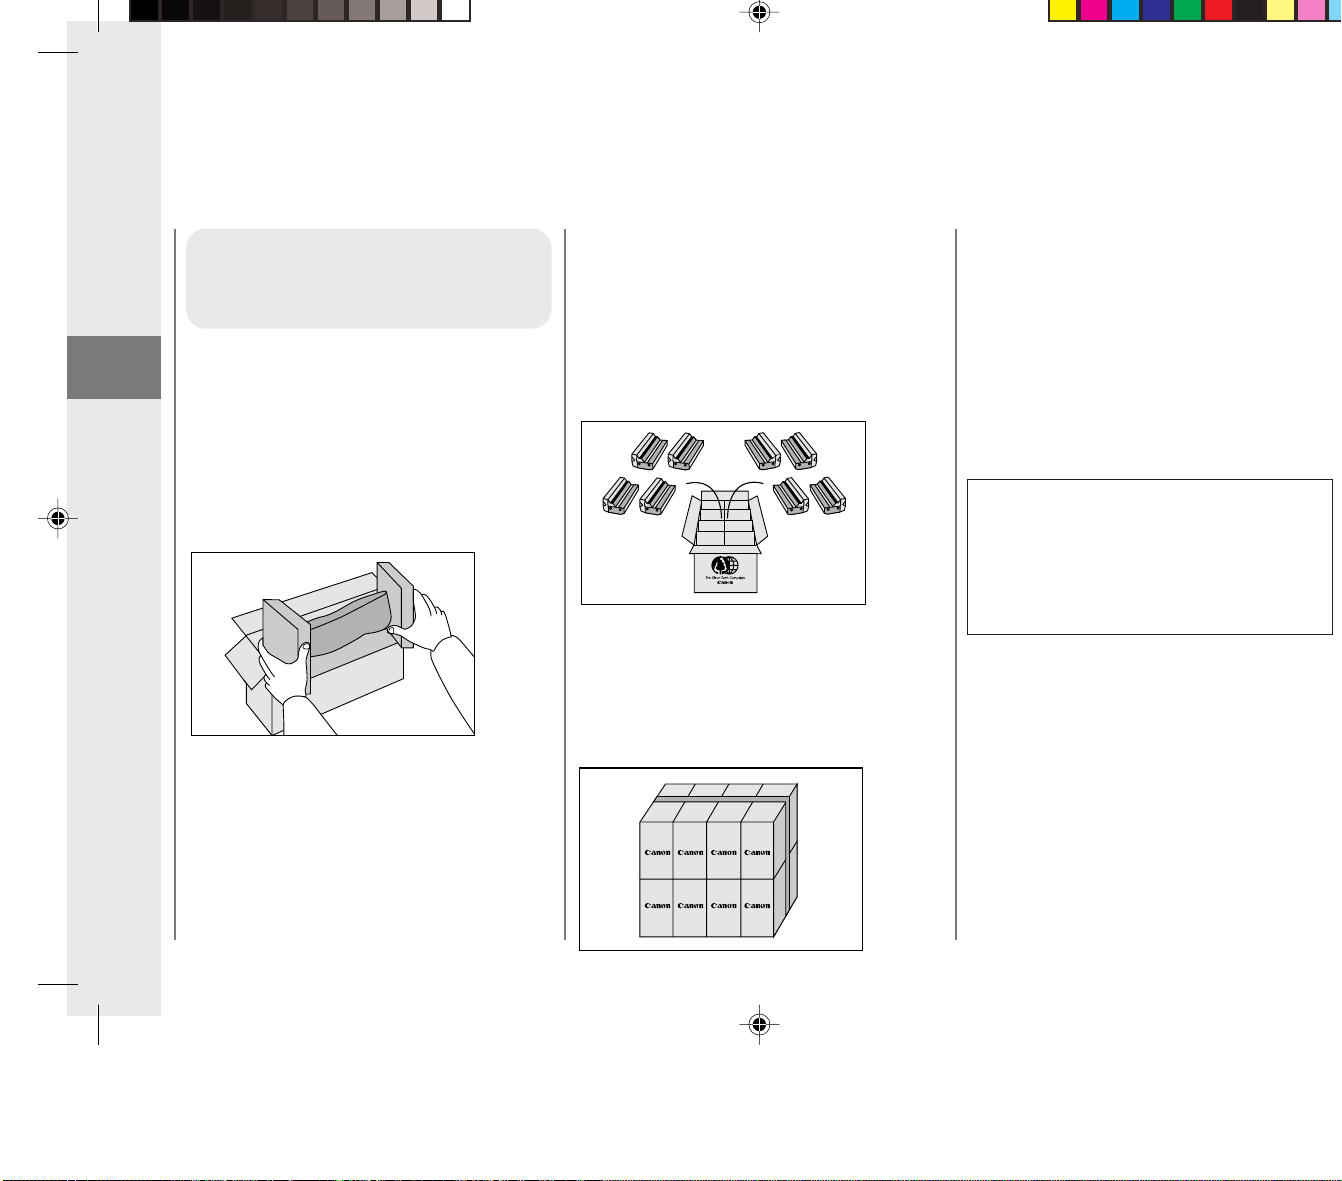
Getting Started
26
1
Option B: Volume Box Return
We encourage you to use this option as a
more efficient way to ship cartridges.
• Place as many cartridges as possible into
one box.
Carefully seal the box with tape;
or
• Call 1-800-OK-CANON to receive your
free eight cartridge collection box.
Option C: Multiple Box Return
We encourage you to use this option as a
more efficient way to ship cartridges.
• Complete Option A.
• Bundle multiple cartridge boxes together
securely with tape.
Please be sure that the shipment does not
exceed UPS specifications.
Maximum weight = 70 pounds Maximum
length = 108 inches
Maximum girth (length + 2 x width + 2 x
height) = 130 inches
If your shipment exceeds the above limits,
please call 1-800-OK-CANON for special
shipping information.
Please Note:
Do not send defective cartridges for
replacement.
Defective cartridges under warranty should be
exchanged by an authorized dealer or service
facility as provided in the warranty.
U.S.A. CARTRIDGE
RECYCLING PROGRAM
PACKAGING
Option A: Single Box Return
• Repackage the empty toner cartridge
utilizing the wrapper and pulp mold end-
blocks from the new cartridge’s box.
• Place the empty toner cartridge in the box
from your new toner cartridge. Seal the
box.
The Clean Earth Campaign
01_PC170-USA 06.5.15, 18:2626
Getting Started
27
1
Option B: UPS Drop off
Take the shipment to participating UPS
Center.
By using either of the above methods of
shipment, your used cartridge(s) will be
forwarded to the Canon Cartridge
Collection Center at no charge to you.
For further information about the Clean Earth
Campaign in the United States, please call:
1-800-OK-CANON
SHIPPING
Affix UPS authorized return label provided in
this brochure.
Residents of Alaska and Hawaii:
Do not use UPS authorized return label. For
Alaska and Hawaii Canon set up alternative
mail service with the U.S. Postal Service.
Please call 1-800-OK-CANON to receive
U.S. Postal Service merchandise return
label.
Option A: UPS Pick-up
• Give the shipment to your UPS driver
when you receive your next regular
delivery;
or
•Take the shipment to your local UPS
receiving point.
The Clean Earth Campaign
01_PC170-USA 06.5.15, 18:2627
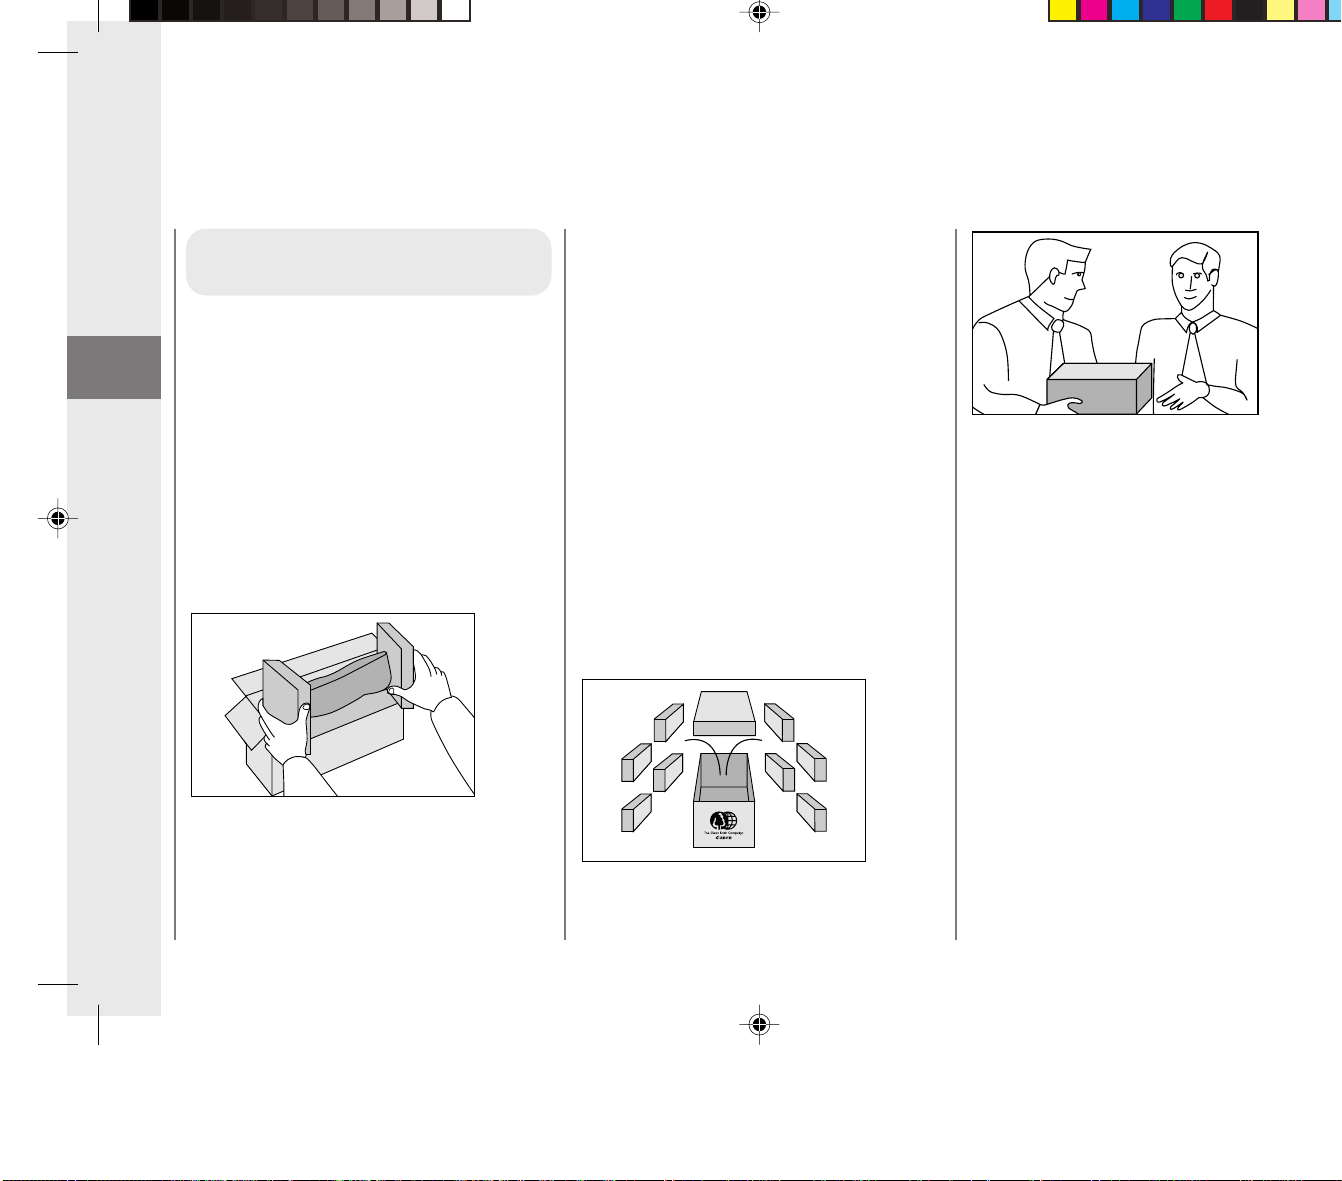
Getting Started
28
1
CANADA PROGRAM
Option A: Single Box Return
• Repackage the empty toner cartridge
utilizing the wrapper and pulp mould end-
blocks from the new cartridge’s box.
• Place the empty toner cartridge in the box
from your new toner cartridge.
Seal the box.
• Apply the Canon Canada Inc./Canada
Post label provided in this brochure.
Canon’s labels are specially marked so
that Canon pays the postage.
• Deposit your empty toner cartridge in any
full size street mailbox or take it to your
local Canada Post outlet or franchise.
Option B: Volume Box Return (8 or more
cartridges)
We encourage you to use this option as a
more efficient way
to ship cartridges.
• Call 1-800-667-2666 to receive your free
Canon collection box kit.
The collection box can accommodate
eight individual cartridge boxes.
• Place your eight individually packaged
boxes of empty toner cartridges into the
Canon collection box. Seal the box.
• Apply the Canon Canada Inc./Canada
Post label provided in this brochure.
Canon’s labels are specially marked so
that Canon pays the postage.
• Deliver to any local Canada Post outlet or
franchise. Customers who hold a
Commercial pick-up agreement with
Canada Post may have their collection
box picked up.
Working to preserve endangered species is a
long-standing Canon interest.
To this end, for every cartridge collected,
Canon Canada donates $1, shared equally
between World Wildlife Fund Canada and the
Nature Conservancy of Canada. This
donation is utilized in Canada.
For further information about The Clean
Earth Campaign in Canada, please call or
write to Canon.
1-800-667-2666
Canon Canada Inc.
Corporate Customer Relations
6390 Dixie Road
Mississauga, ON L5T 1P7
The Clean Earth Campaign
01_PC170-USA 06.5.15, 18:2628

Operating Procedure
29
2
Normal Copying ....................................... 30
Making 10 or more Continuous Copies
(The F Mode) ..................................... 31
Positioning Originals .............................. 32
Adjusting the Copy Exposure ................ 32
About Copy Stock .................................. 34
Various Ways to Copy ............................. 35
Postcards, Transparencies
and Other Stock ................................. 35
Making Two-sided Copies ..................... 36
Copying Thick Books or
Large Originals .................................. 37
Making Two-color Copies ...................... 38
Operating ProcedureOperating Procedure
2
02_PC170-USA 06.5.15, 18:2729
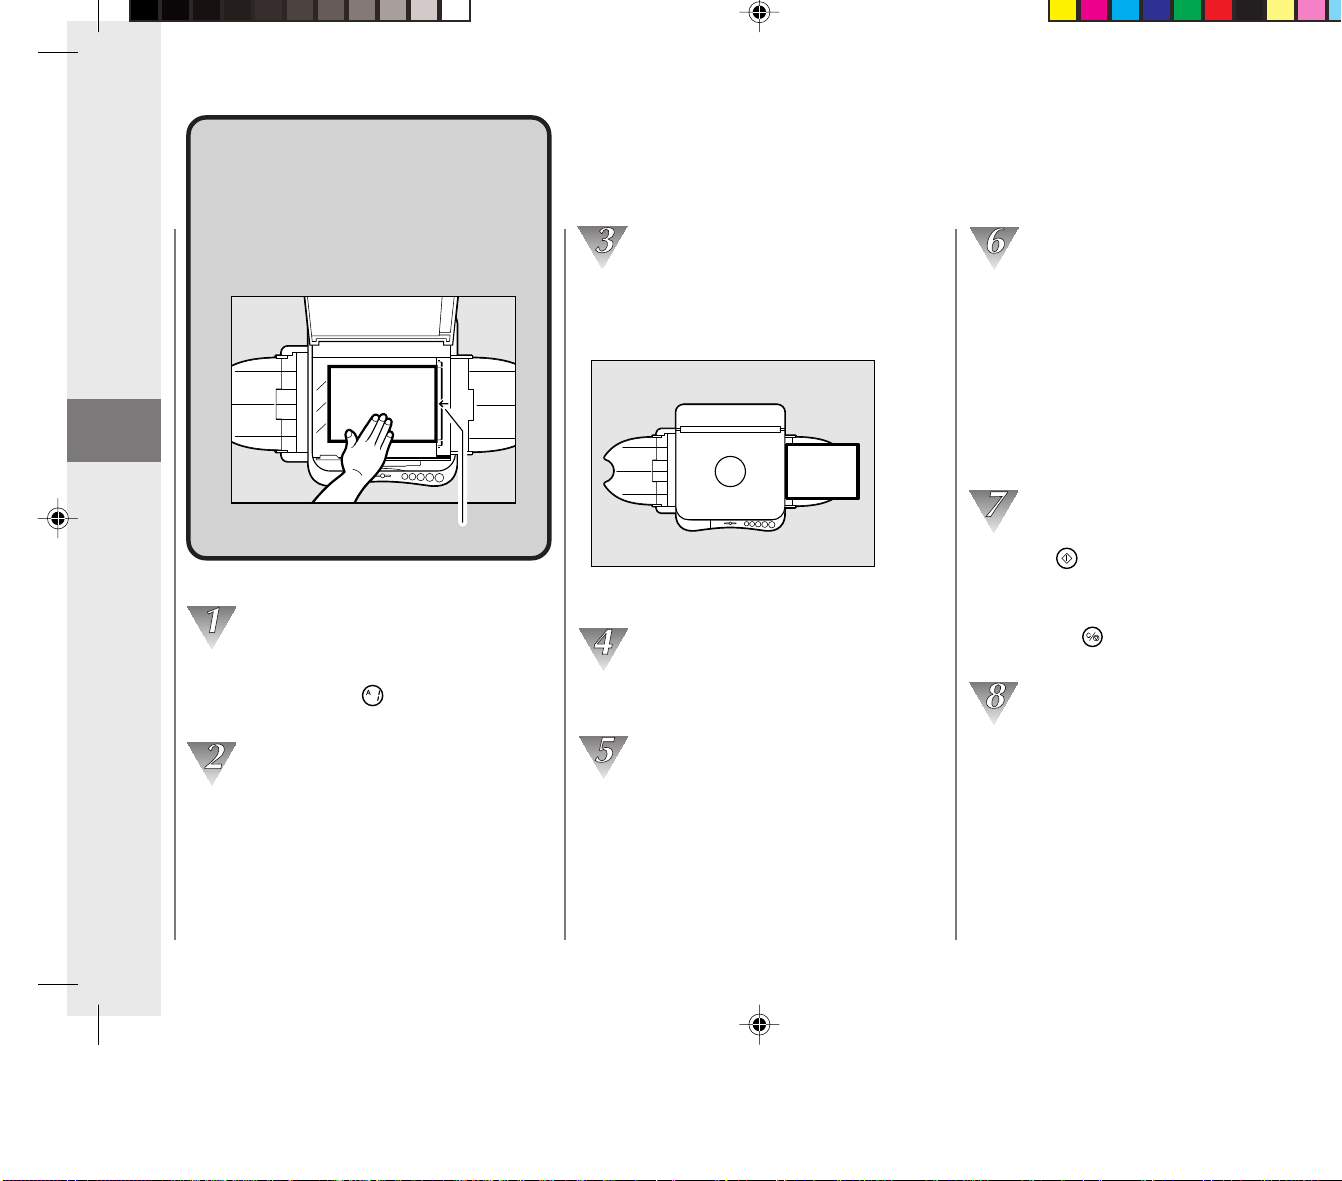
Operating Procedure
30
2
NormalNormal
CopyingCopying
Use the following procedure
when making normal copies.
Paper size marks on the guide plate
Turn the copier’s power switch ON.
On the control panel will light up in the
Number of Copies Indicator.
Adjust the paper guides to fit the size of
the copy paper.
Place the copy paper into the multi-stack
tray .
(See “Setting copy paper” on p. 34.)
Even out the edges of the copy paper before
placing it into the multi-stack tray.
Place the material to be copied face down
on the platen glass.
Gently close the platen cover.
Normal Copying
When copying anything out of the
standard mode, be sure to set the copy
exposure and number of copies.
The following is the standard mode:
• Copy number = 1
(See “Making 10 or more Continuous
Copies (The F Mode)” on p. 31.)
• Copy exposure = automatic (See
“Adjusting the Copy Exposure” on p. 32.)
Press the key.
The platen begins moving and copying
begins.
Press the
key in order to stop or
cancel the copy job.
When you have finished copying, remove
the original and turn the power switch
OFF.
02_PC170-USA 06.5.15, 18:2730

Operating Procedure
31
2
REQUEST:
• If the copier will not be used for a long period of
time, unplug the copier from its power source.
NOTICE:
• If the copier has not been used for a long period
of time, before operation move the platen by
hand to the right, left and back to the center.
• Paper jams are most often caused by wrinkled
or curled copy paper usage or by turning the
power switch OFF while the copier is copying.
MEMO:
• Always turn on the power switch slowly.
• If the copier is not operated for a period of
longer than 5 minutes after copying finishes, the
power turns OFF automatically. (This is the Auto
Power-Off Feature.)
• Do not copy with the platen cover left open,
doing so will result in excessive toner
consumption.
•A stack of copy paper 5 mm high (1/5 in. or up
to 50 sheets of 20lb-bound copy paper) can be
inserted into the multi-stack tray at one time.
Fan and even out the edges of the copy paper
before placing it into the multi-stack tray.
• Every time the
key is pressed the number of
copies to be made increases by one. This can
be repeated up to nine copies.
(See “Making 10 or more Continuous Copies” on
p. 31.)
• Press the
key to clear the copy quantity to
one.
• When you have finished copying, do not leave
unused copy paper in the multi-stack tray.
Normal Copying
Making 10 or more
Continuous Copies
(The F Mode)
After pressing the key nine
times,
appears in the number of
copies indicator. This is called the
F mode. When operating in the F
mode you can copy continuously
until the multi-stack tray is empty.
NOTICE:
• When the number of completed copies in the
copy tray reaches 10, remove them. Also, do not
attempt to load copy paper into the paper feed
tray while copying is in progress. Doing so will
cause a paper jam.
02_PC170-USA 06.5.15, 18:2731
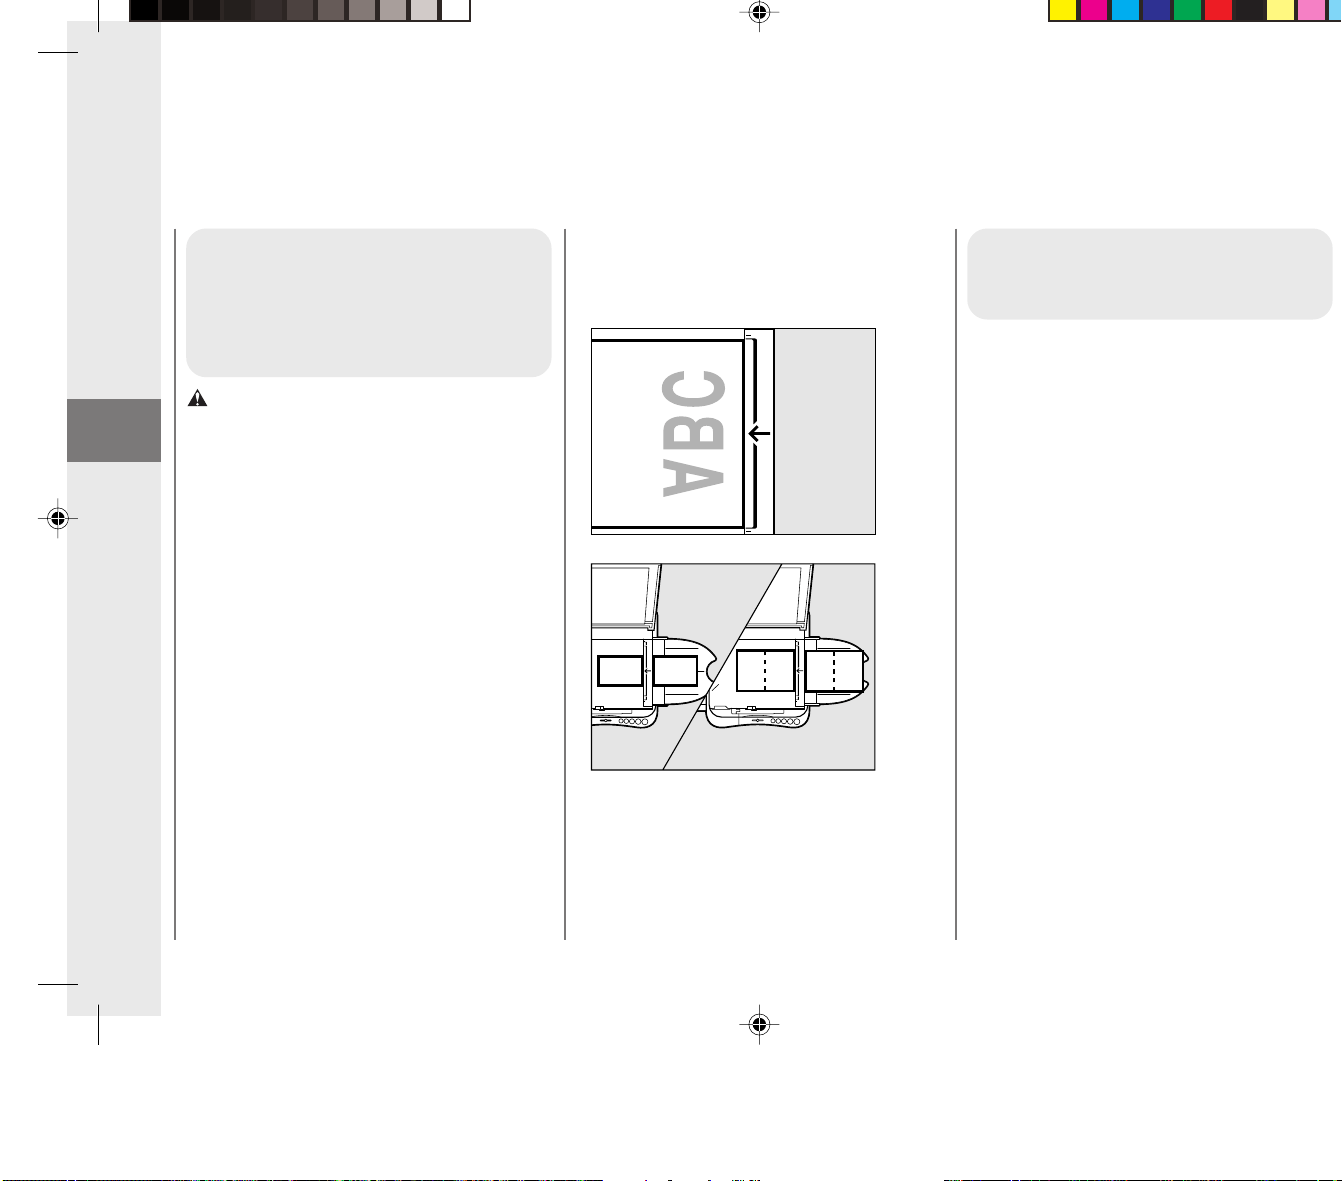
Operating Procedure
32
2
Positioning Originals
To position originals accurately,
use the guide plate located on
the right side of the platen glass.
CAUTION:
Close the platen cover gently to avoid catching
your hand, as this may result in personal injury.
• If your original conforms to a standard
paper size (e.g., STMT or LTR), align
the original between the appropriate
paper size marks on the guide plate.
A4/A5
LTR/STMT
A4/A5
LTR/STMT
ABC
• If you do not know the size of your
original, or if your original does not
match any of the given paper size
marks, align the center of your original
with the ← mark at the center of the
guide plate.
Normal Copying
Adjusting the Copy
Exposure
This copier comes with an automatic
exposure control mode. When this mode is
set the copier pre-scans the original and
automatically adjusts the copy exposure to
the most appropriate level. The auto
exposure control may not produce clear
copies on the following types of originals:
• Originals with a shaded or dark
background (e.g., newspapers).
• Light or faint originals (e.g., pencil written
work).
Adjustment using exposure
recalibration switch
Insert a coin or similar object into the slot in
the exposure recalibration switch. This switch
has three positions.
02_PC170-USA 06.5.15, 18:2732
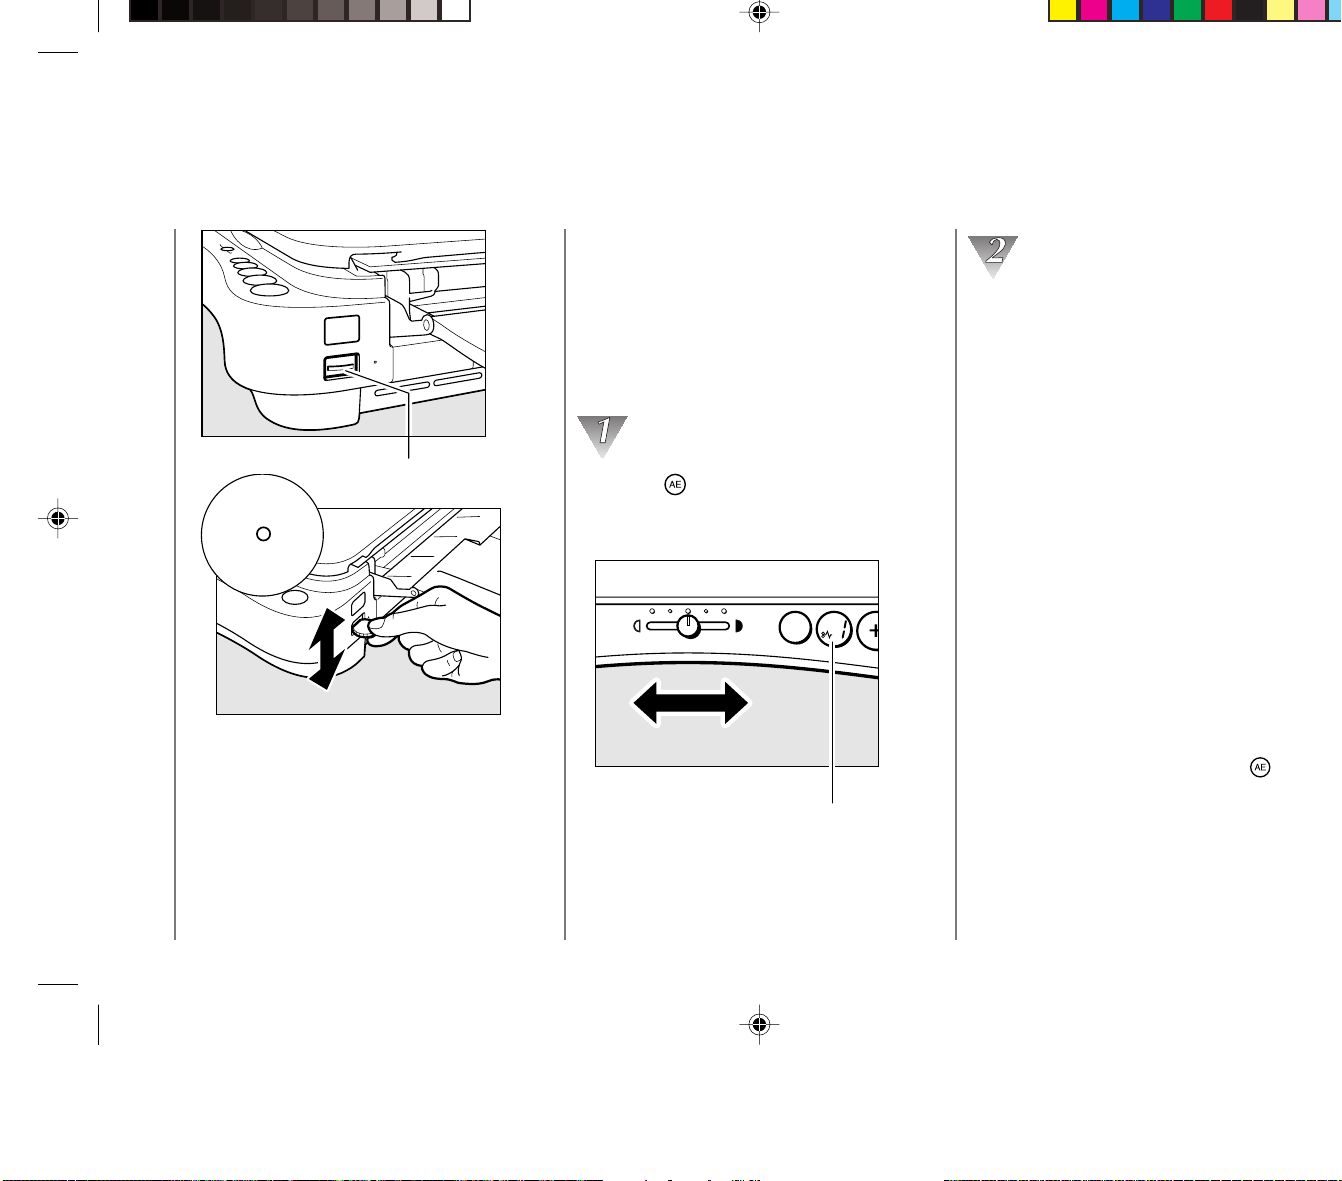
Operating Procedure
33
2
Exposure recalibration switch
Darker
Lighter
Darker
Lighter
To make darker copies, move the switch upward.
To make lighter copies, move the switch downward.
If this does not produce the desired results,
follow the procedure below.
Adjusting the copy
exposure manually
When the auto exposure control mode fails to
produce a clear copy due to an unusual
original type, it may be necessary to adjust
the copy exposure manually depending on
the original.
Press the key to switch to manual
exposure control mode.
The A indicator lamp will no longer be lit.
Make sure the A
indicator goes out.
DarkerLighter
A
AE
Normal Copying
Adjust the exposure level by sliding the
exposure adjustment lever.
To darken the exposure, slide the lever to
the right.
To lighten the exposure, slide the lever to
the left.
■ Guidelines for exposure level
adjustment
Ordinary Originals :Slide the lever to the
center
Originals with a Dark Background :
Lighten the exposure by
sliding the lever to the left
Light Originals : Darken the exposure by
sliding the lever to the
right
NOTICE:
• The exposure adjustment lever can not be used
while the auto exposure control mode is set.
The lever can only be used after the
key has
been pressed and the A Indicator is no longer lit.
• When making color copies, lighten the copy
exposure manually to avoid the dark shading
that appears when color copies are made in the
auto exposure mode.
02_PC170-USA 06.5.15, 18:2733
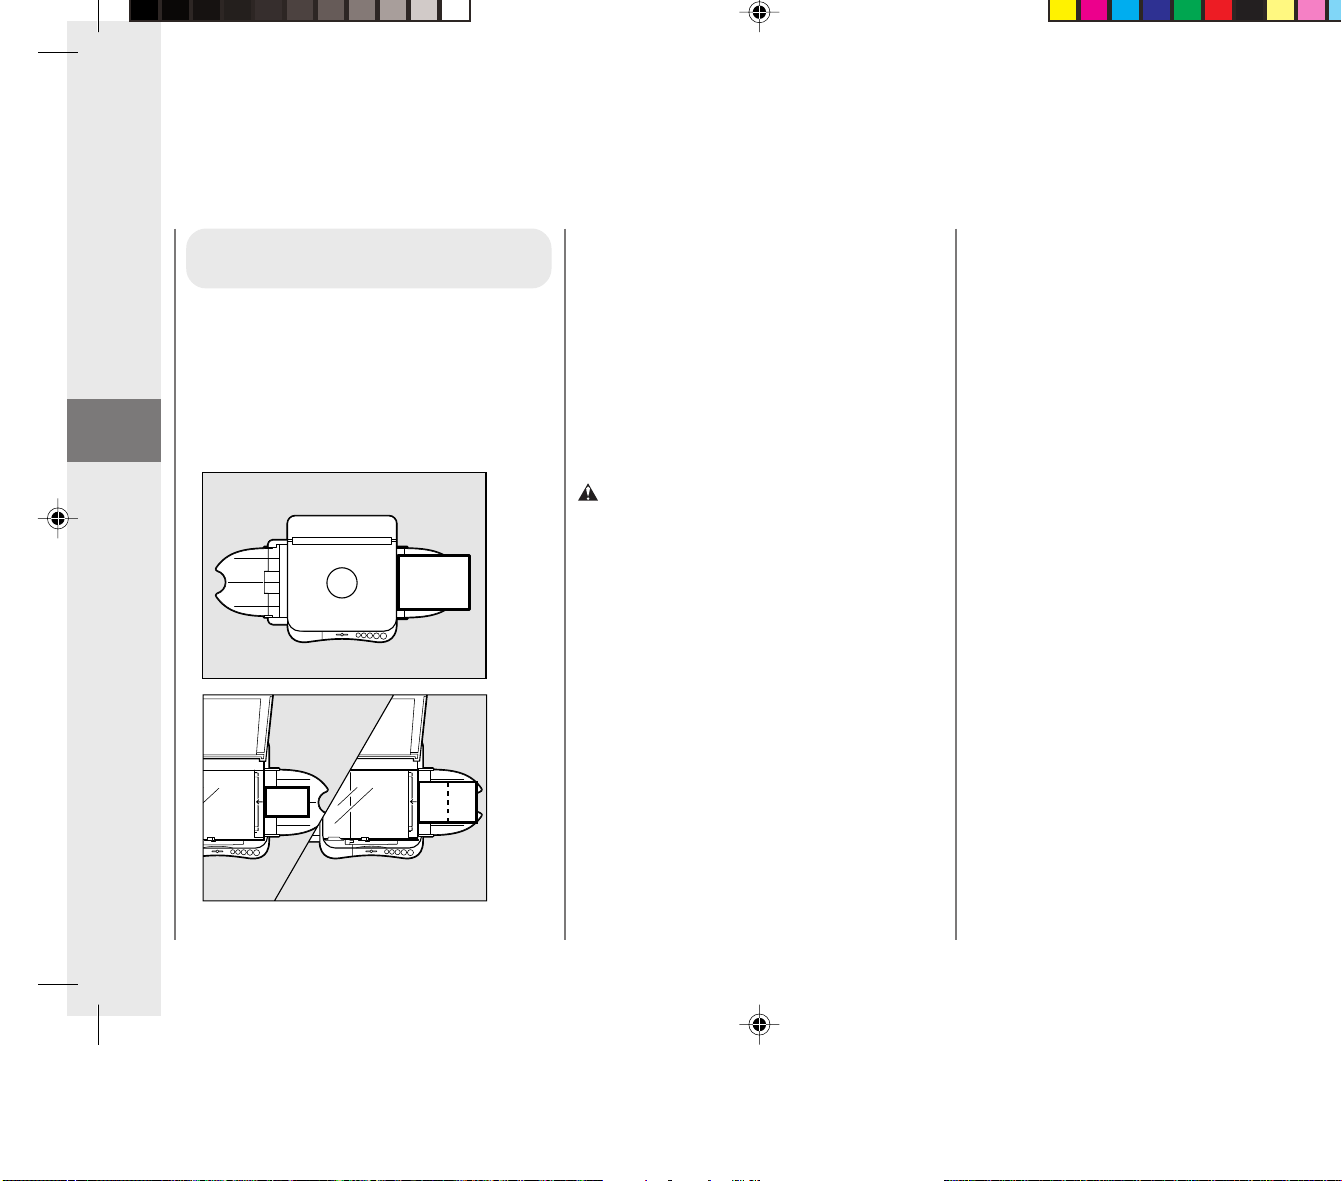
Operating Procedure
34
2
About Copy Stock
Setting copy paper
Place the copy paper into the multi-stack tray
with the side of the paper to be copied facing
upwards. When inserting the paper into the
multi-stack tray, make sure the edges are
even and then slide it into the copier as far
as it will go.
Normal Copying
Suitable copy stock
This copier can make copies onto copy
paper, postcards, transparencies. For best
copying results, always use the paper and
transparencies recommended by Canon.
Some types of paper available at an office
supply or stationary store may not be
suitable for this copier. If you have any
questions concerning paper, contact your
dealer or Canon Customer Relations.
CAUTION:
When loading copy paper, take care not to cut
your hands on the edges of the copy paper.
Unsuitable copy stock
Do not attempt to make copies on any of the
following copy stock. Doing so may cause a
paper jam, poor print quality, or other
problems.
• Severely curled or wrinkled paper
•Transparencies for digital full-color copiers
• Paper which has been copied on using a
color copier (do not copy onto the reverse
side).
• Paper which has been printed on using a
thermal transfer printer (do not copy onto
the reverse side).
• Paper which has been output using a
different copier or a printer (do not copy
onto the reverse side).
Storage of copy stock
Observe the following guidelines for proper
storage of copy stock:
•To prevent moisture buildup, store any
remaining copy paper wrapped tightly in
its original package. Store copy paper in a
dry location, out of direct sunlight.
•To prevent the paper from curling, always
store the paper flat and never upright.
• Never leave spare paper in the multi-stack
tray after copying is completed. Remove it
and store as directed above.
02_PC170-USA 06.5.15, 18:2734
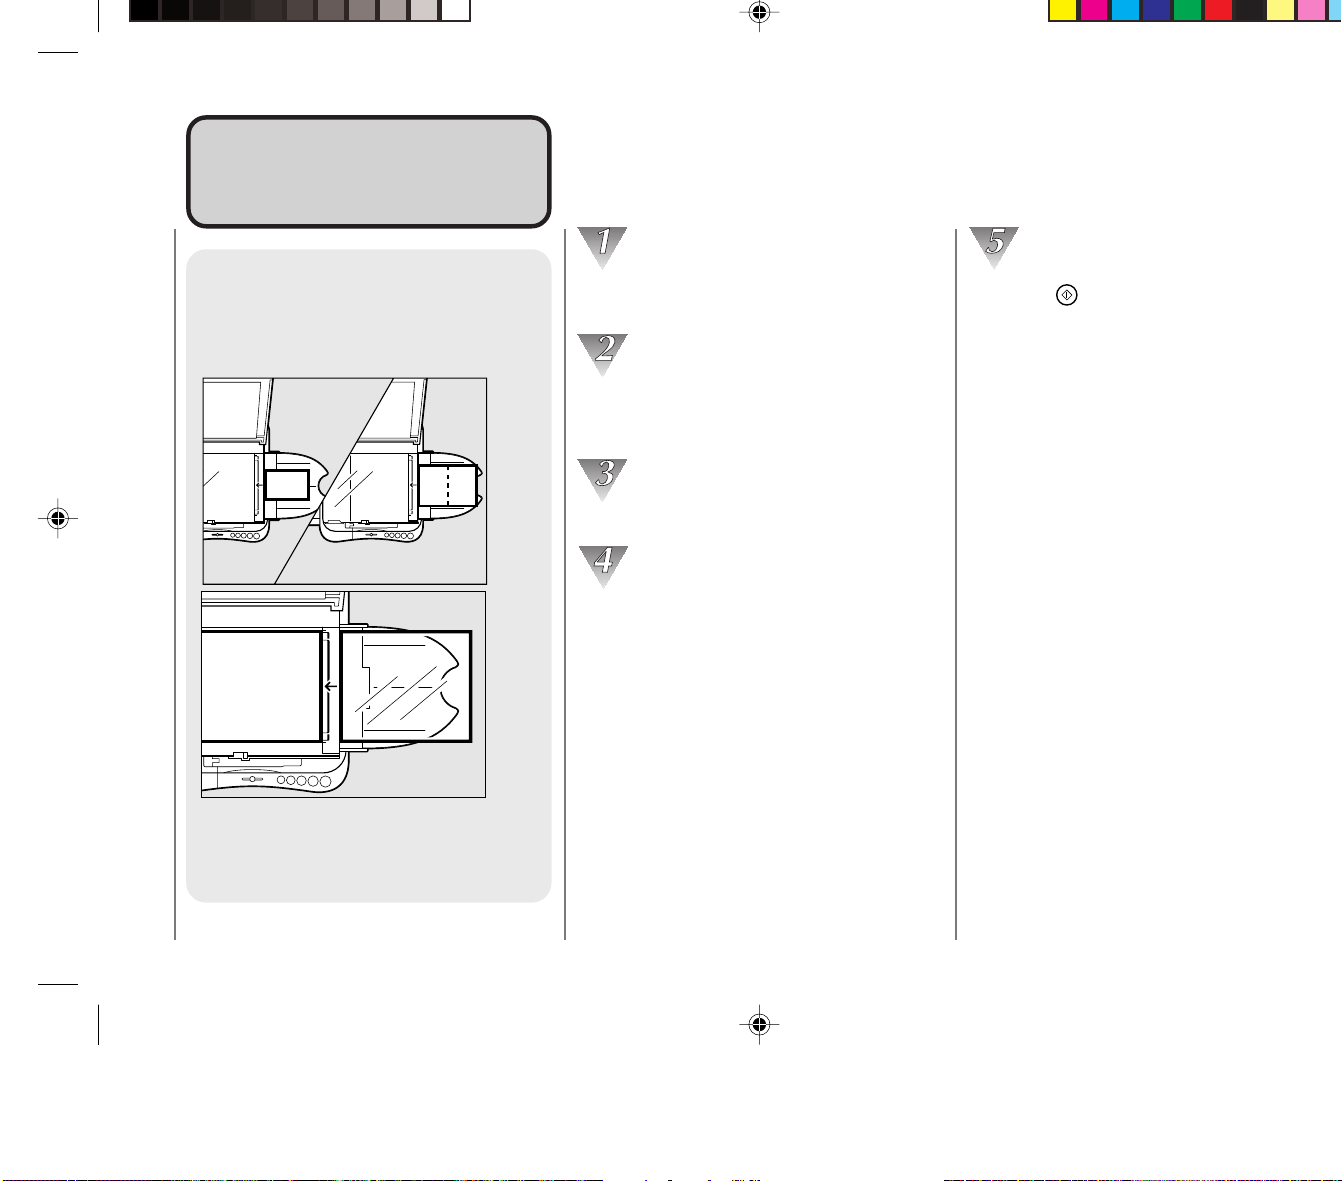
Operating Procedure
35
2
Postcards,
Transparencies* and
Other Stock
It is possible to make copies onto
postcards, transparencies and a
variety of copy stock.
Various WaysVarious Ways
to Copyto Copy
Various Ways to Copy
Adjust the paper feed guides to fit the
width of the copy stock.
Place the original to be copied copy side
down onto the platen glass.
(See “Positioning Originals” on p. 32.)
Gently close the platen cover.
Insert the copy stock into the multi-stack
tray.
When inserting the paper into the multi-
stack tray, make sure the edges are even
and slide it into the copier as far as it will
go.
• Do not load more than a 5 mm high stack
of copy paper (1/5 in. or up to 50 sheets of
20 lb-bond copy paper) into the multi-stack
tray at one time.
• Insert transparencies into the multi-stack
tray and copy one at a time only.
Press the key.
NOTICE:
• When copying onto a folded card, align the
center of the original with the ← mark on the
guide plate and then align the flattened copy
stock to match the ← as well. Finally, align the
paper feeding guides to fit the stock size.
• Copy transparencies one at a time and remove
each transparency from the copy tray as it is
copied to prevent transparencies from sticking.
• Do not make copies with paper which has
already been printed on using a thermal transfer
printer. Copying with this stock may adversely
affect the quality of the copied images or cause
a paper jam. If you want to copy with it first
make a copy of the thermal transfer printed
paper onto standard copy stock.
MEMO:
• When copying on thick stock such as postcards
there is a chance that letters could be blurred.
• Some types of transparencies may blur when
used in this copier. To avoid this, use
transparencies recommended for use with your
copier. For details, contact your dealer or Canon
USA Consumer Information Center.
*Canon type E.
02_PC170-USA 06.5.15, 18:2735

Operating Procedure
36
2
Various Ways to Copy
If transparencies do not feed
smoothly
Sometimes transparencies may not feed
easily into the copier after the
key is
pressed. When this happens, follow the
procedure below.
Place a sheet of standard copy paper
underneath the transparency. Position
this paper so that it extends
approximately 3/8” beyond the leading
edge of the transparency.
3/8"3/8"
Hold the rear end of the two sheets as
shown and insert them into the multi-
stack tray.
While holding the rear edge of the sheets
press the
key.
When the transparency begins to feed
into the copier, let go of the sheets. After
the transparency paper has disappeared
into the copier, remove the copy paper by
pulling it gently out from the paper feed
slot.
Making Two-sided
Copies
This copier can copy on both
sides of copy stock.
Position the first original onto the platen
glass.
ABC
Make a copy of the first original.
(See “Normal Copying” on p. 30.)
02_PC170-USA 06.5.15, 18:2736
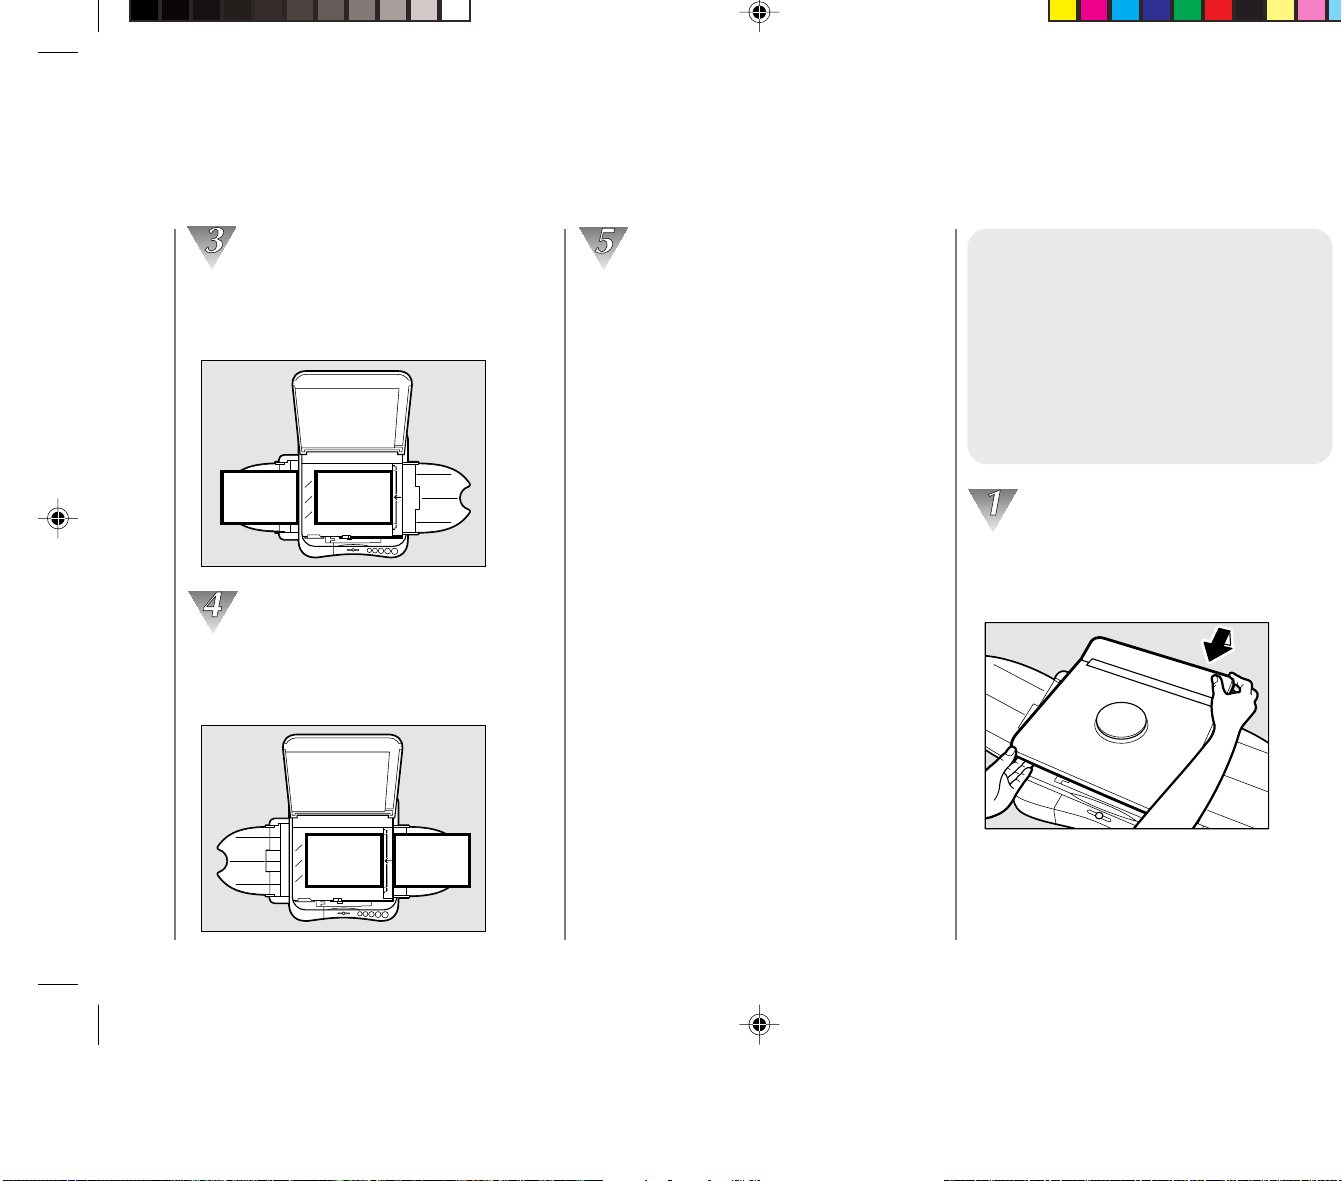
Operating Procedure
37
2
Various Ways to Copy
Position the second original onto the
platen glass so that the top edge is to the
left.
ABC
123
Turn the copy of the first original over as
shown. Then, place it into the multi-stack
tray again.
ABC
123
Make a copy of the second original.
NOTICE:
• 16 to 32-lb bond paper can be used when
making two-sided copies.
• If the copy paper becomes curled during the first
copy pass, smooth it flat before proceeding with
the second copy.
MEMO:
• If several sheets are placed into the multi-stack
tray during two-sided copying, the leading edge
of the back sides of the paper can become
smeared with toner. If this occurs, place the
paper one sheet at a time into the multi-stack
tray.
Copying Thick Books
or Large Originals
When copying thick books, large
originals or three-dimensional
objects, detach the platen cover
as explained below to make it
easier.
Grip the platen cover gently with both
hands, as shown in the illustration, and
lift it about 1/4” upwards.
02_PC170-USA 06.5.15, 18:2737
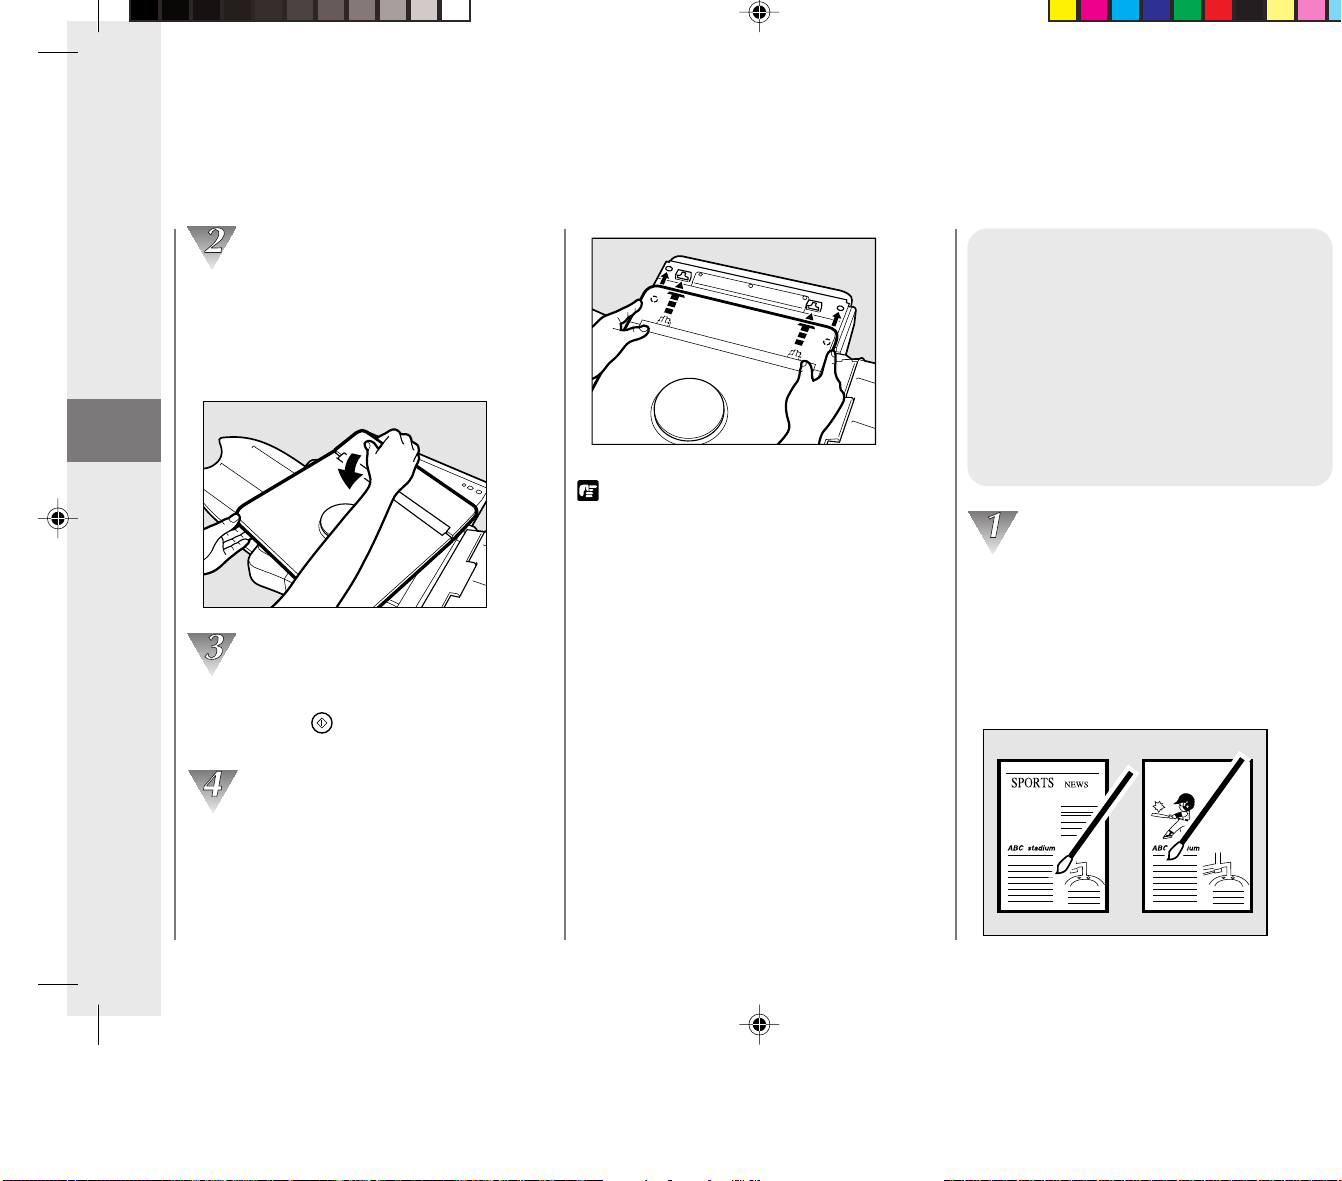
Operating Procedure
38
2
Various Ways to Copy
Holding the platen cover in the open
position with your left hand, slide the top
right corner forward with your right hand.
Repeat for the opposite corner, and lift the
platen cover away.
Position the original on the platen glass
and press the
key.
(See “Normal Copying” on p. 30.)
Align the tabs on the under-side of the
platen cover with the grooves on the main
unit. Slide the platen cover into place.
Then, insert the securing tabs on the
platen cover into the holes on the copier
unit.
REQUEST:
• Do not press down on the original with
excessive force while on the platen glass.
• The maximum allowed weight that can be
placed onto the platen glass is 4.4lb.
• When you are finished copying, be sure to re-
attach and close the platen cover.
NOTICE:
• Place the original on the platen glass so that it
does not cover, or come in contact with, the rail
at the front of the platen glass.
Making Two-color
Copies
Simply by changing the color of
the cartridges, you can make
colorful copies. The following
procedure describes the process
for making a black and blue two-
color copy.
Select the originals to be used for the
two-color copy. In this case, one original
will be used for copying in black and the
other in blue. After making two copies of
the originals, white out unnecessary parts
on each using correction liquid, poster
paint or tape.
02_PC170-USA 06.5.15, 18:2738
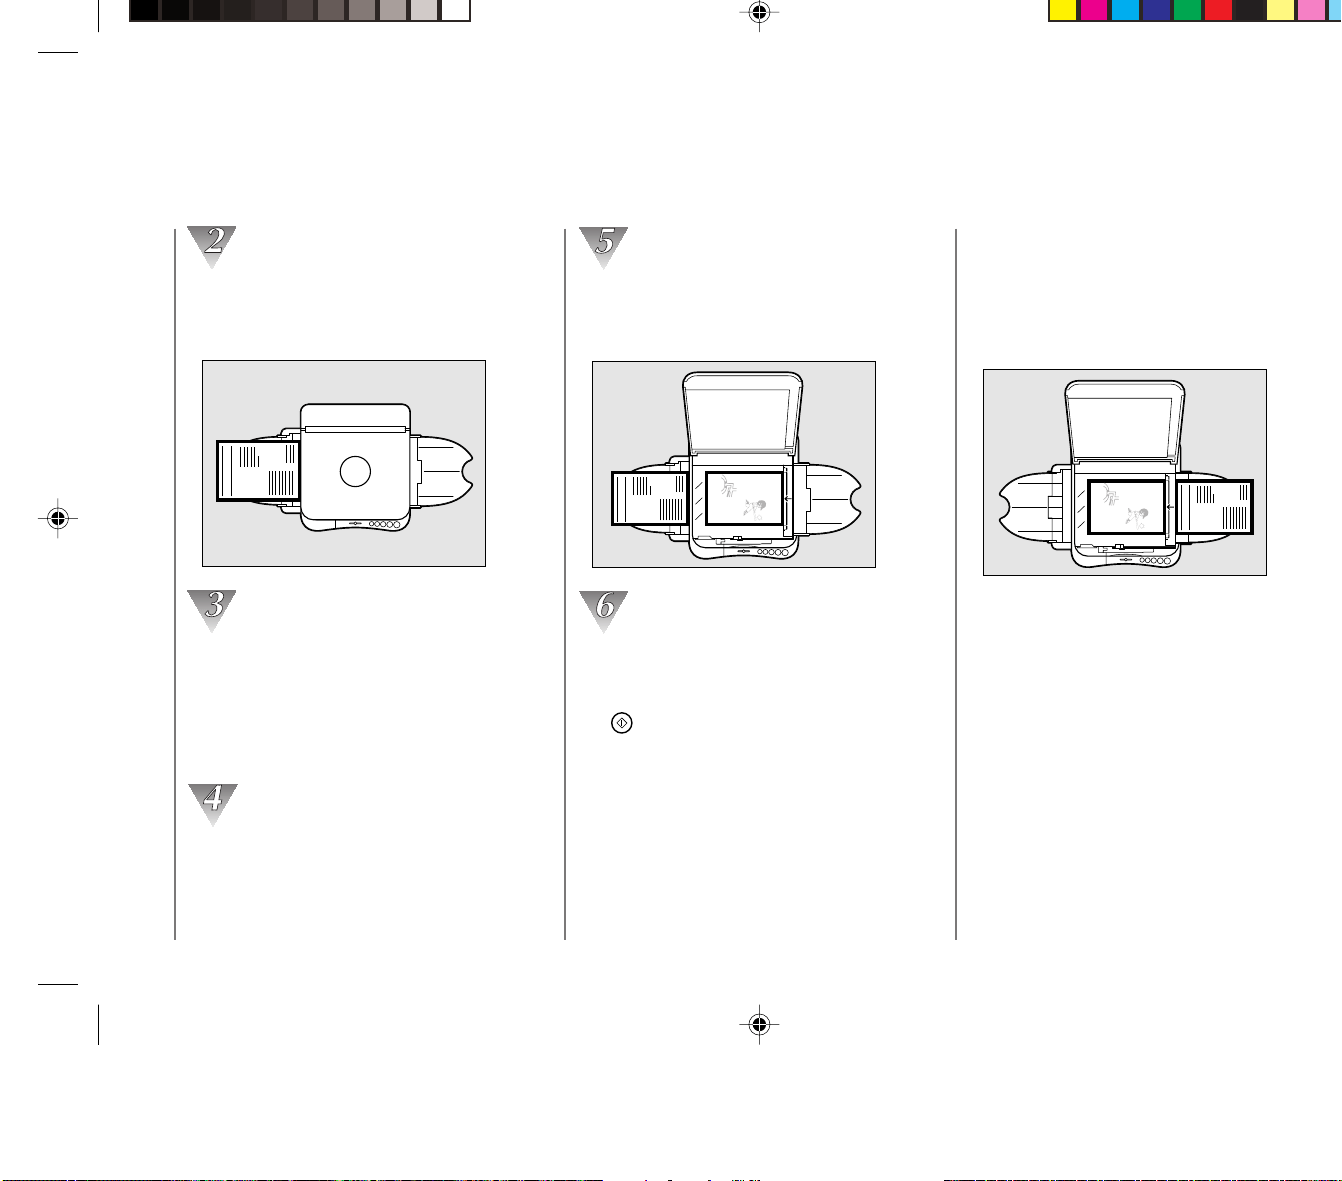
Operating Procedure
39
2
Various Ways to Copy
Position the original to be copied in black
on the platen glass. Then make a copy.
(See “Normal Copying”, on p. 30.)
SPORTS
NEWS
ABC stadium
Remove the black cartridge from the
copier and replace it with the blue one.
(See “Replacing Cartridges”, on p.21.)
When the top cover of the copier is
opened, the power will automatically turn
OFF.
After inserting the blue cartridge, close
the top cover and return the platen to the
center position. Then turn the power
switch ON.
Position the original to be copied in blue
on the platen glass in the same position
that was used to copy the black original.
ABC
SPORTS
NEWS
ABC stadium
Insert the black copy into the multi-stack
tray as shown. Make sure the copy paper
is facing the right direction. Then, press
the
key.
NOTICE:
• When making color copies, lighten the exposure
manually to avoid the dark shading that often
appears when color copies are made in the auto
exposure mode.
ABC
SPORTS
NEWS
ABC stadium
02_PC170-USA 06.5.15, 18:2739

Operating Procedure
40
2
Various Ways to Copy
NOTICE:
• When copying in black and another color,
always be sure to copy in black first.
• When making two-color copies, 16 to 32-lb bond
paper can be used.
• Before inserting the cartridges, always rock
each one left and right to evenly distribute the
toner.
•Take care to smooth out any curls in the copy
paper that may develop while copying and re-
copying.
MEMO:
• Cartridges come in black, red, blue, green and
sepia.
Starter Cartridge (black) is included.
• Adjustment of the copy exposure may be
necessary when using color cartridges.
(See “Adjusting the Copy Exposure”, on p. 32.)
• Multi-colored transparencies will appear black
when projected using an overhead projector.
• When making copies in two or more colors, a
slight over-lapping of colors may occur.
02_PC170-USA 06.5.15, 18:2740

Troubleshooting
41
3
TroubleshootingTroubleshooting
3
When Error Indicators Appear ............... 42
When
Flashes .................................. 42
When Letters or Numbers Light Up /
Flash .................................................. 43
Clearing Paper Jams
(When
Flashes) ............................ 44
Cleaning the Paper Roller (When the
Error Indicator flashes) ...................... 46
What to Do If You Suspect
There is a Malfunction ........................ 48
Copy Image Problems............................. 50
If Light Bands / White Streaks
Appear on Copies .............................. 50
If Dark Bands / Black Streaks
Appear on Copies .............................. 50
03_PC170-USA 06.5.15, 18:2841

Troubleshooting
42
3
When Error Indicators AppearWhen Error Indicators Appear
When something unusual happens to the copier unit, or if there is a
paper jam, an error indicator, letters and/or numbers will light up or flash
in the error message indicator on the control panel.
When Flashes
If flashes. Paper jam.
Error Message
Possible Cause
Possible Remedy
Remove the jammed paper.
(See “Clearing Paper Jams”, on p. 44.)
When Error Indicators Appear
03_PC170-USA 06.5.15, 18:2842
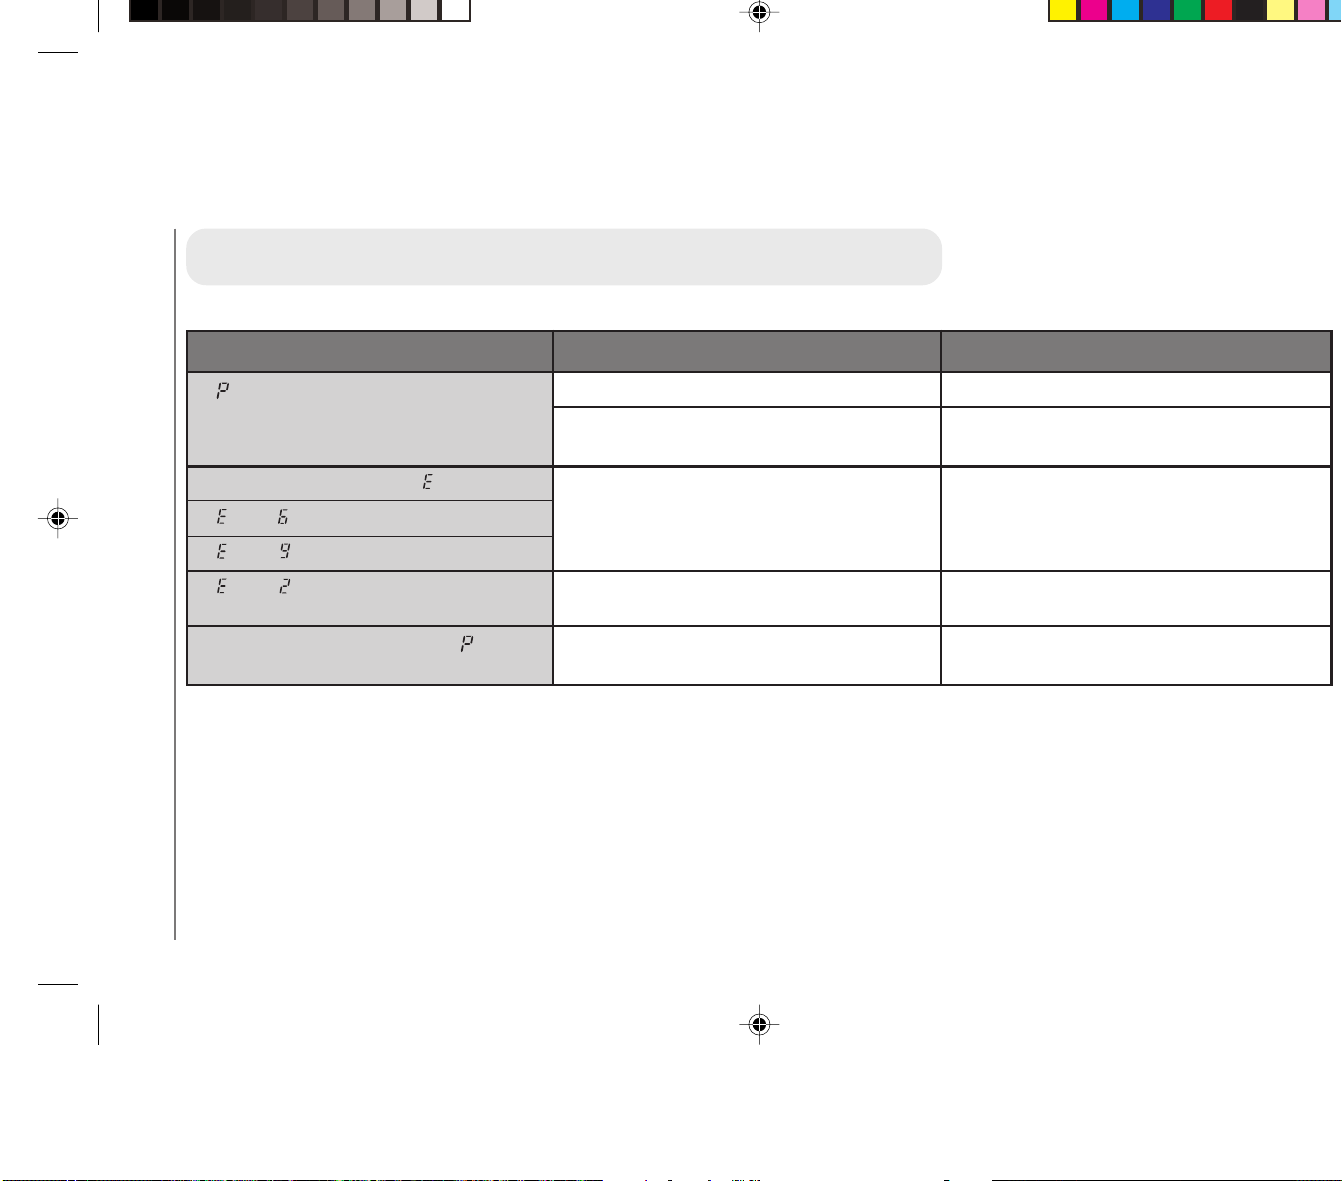
Troubleshooting
43
3
When Letters or Numbers Light Up / Flash
If lights up.
If the power cuts off after
lights up.
If
then flash alternately.
If then flash alternately.
If then flash alternately.
If paper jams occur often or if
lights
up frequently.
Out of paper.
The paper in the multi-stack tray is not
loaded correctly.
Something unusual has happened.
Something unusual has happened.
The feeding roller is dirty.
Indicator
Possible Cause
Possible Remedy
Load the multi-stack tray.
Reload the paper properly.
Unplug the copier and contact your Canon
authorized service representative.
If there is a paper jam remove it, replace the
platen to the center and resume copying.
Follow the procedure for cleaning the
feeding roller.
MEMO:
Should any of the above mentioned remedies
not solve the problem, unplug the copier and
contact your Canon authorized service
representative.
When Error indicators Appear
03_PC170-USA 06.5.15, 18:2843
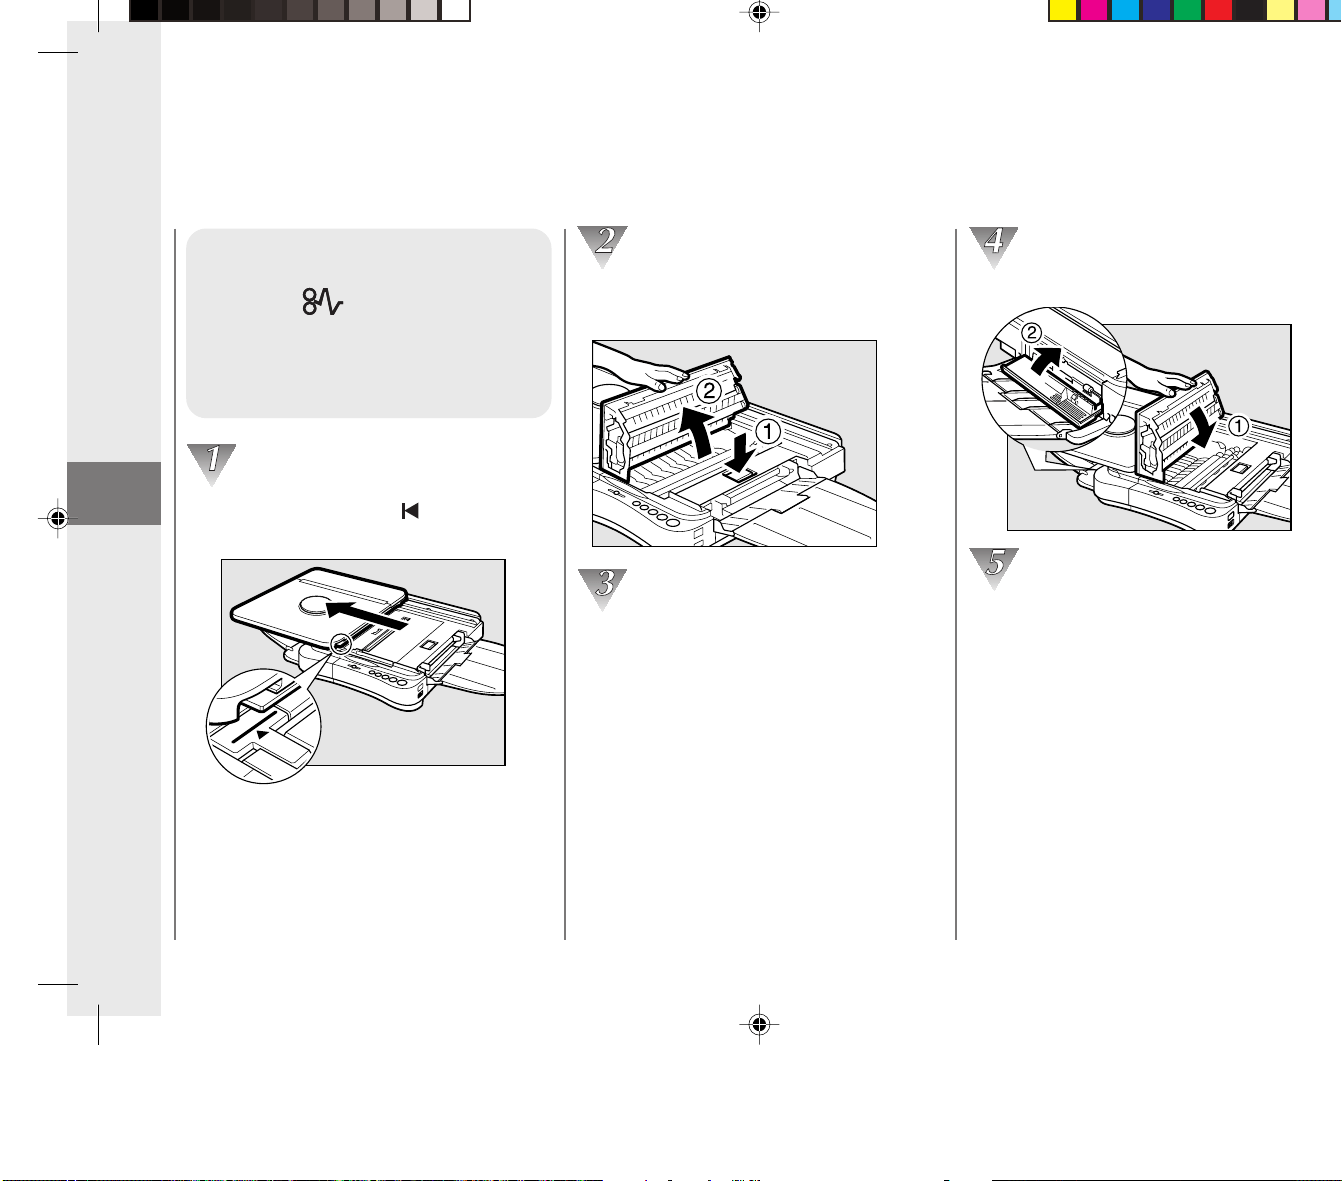
Troubleshooting
44
3
Clearing Paper Jams
(When
Flashes)
When a paper jam occurs, follow
the procedure below to locate and
remove the jam.
Align the platen with the mark by
sliding it to the left.
Press the top cover release button and
open the top cover of the copier.
Check inside the copier for jammed paper.
(See “Removing Jammed Paper”.) Open
the left cover and check there as well, if
necessary.
When Error Indicators Appear
Close the left cover and the top cover.
To resume copying, turn the power switch
ON and select the number of copies to be
made.
03_PC170-USA 06.5.15, 18:2844
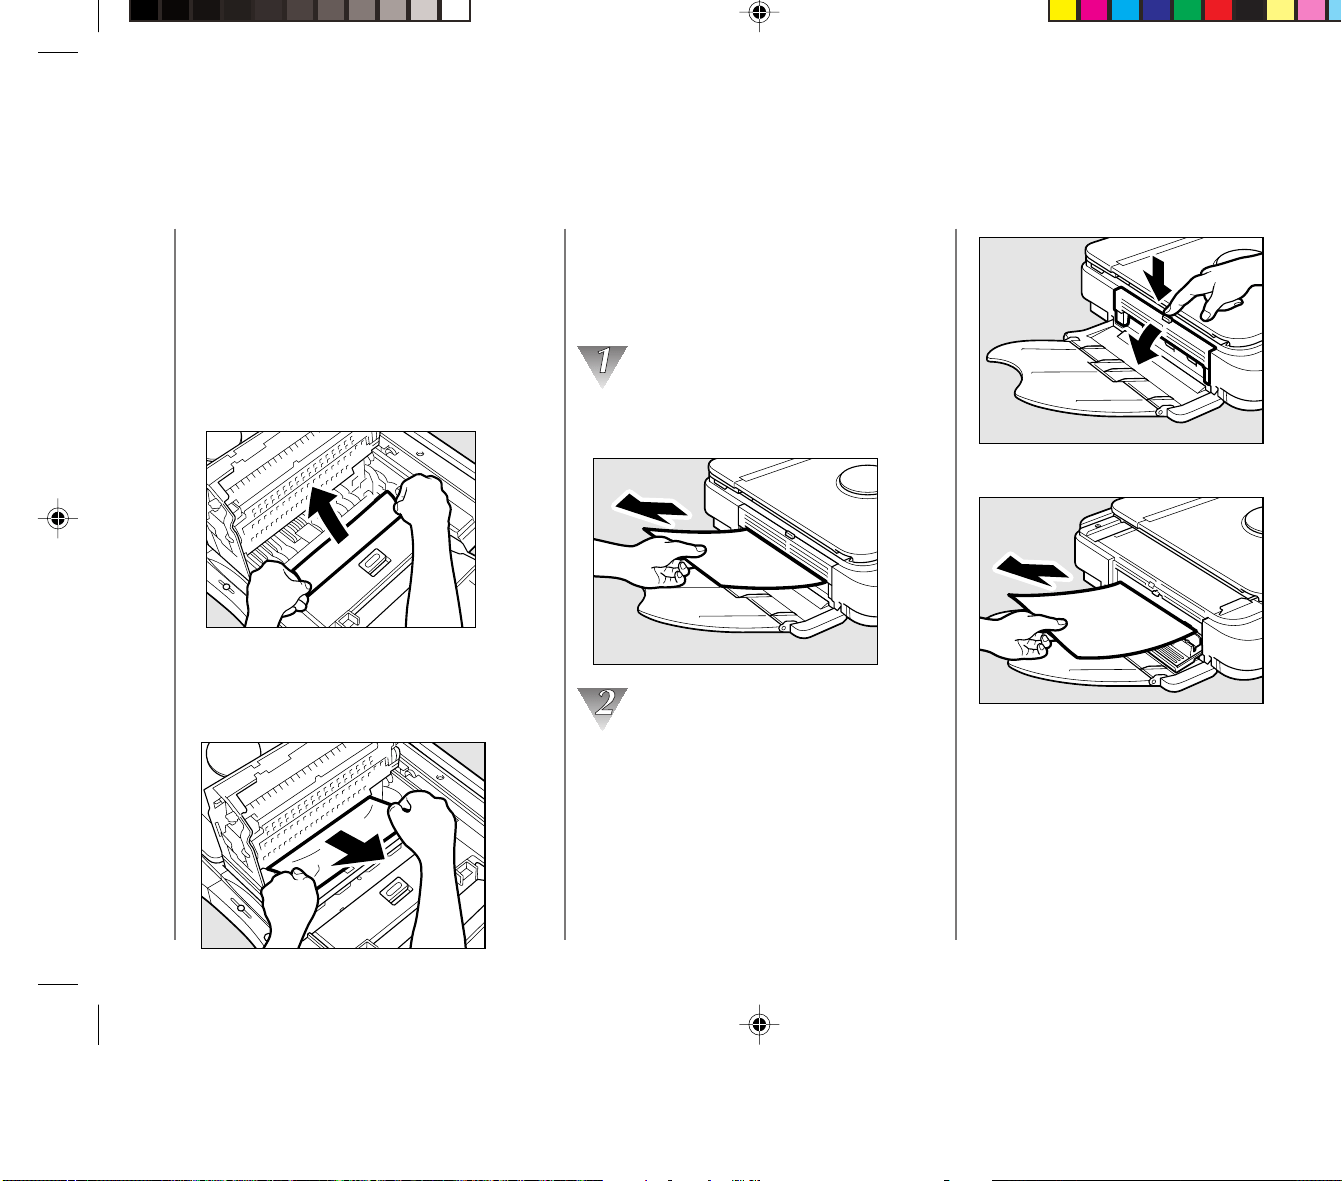
Troubleshooting
45
3
• If neither edge of the jammed paper is
visible, or if the paper is visible but cannot
be reached by hand, close the top cover
and pull the jammed paper free from the
exit slot.
Gently pull the jammed paper from the
exit slot in the output direction.
If the paper is not visible or is difficult to
pull out, press the left cover release
button. Then fully open the left cover and
remove the jammed paper by pulling
gently as shown.
Press the left cover release button.
When Error Indicators Appear
Removing jammed paper
The situation of one paper jam may be
different from that of another, so be sure to
respond to each paper jam differently.
• If the front edge of the jammed paper is
visible inside the main unit, grip the paper
with both hands and pull it gently out of
the copier as shown.
• If the back edge of the jammed paper is
visible, grip the back edge of the paper
with both hands and pull it gently out of
the copier as shown.
03_PC170-USA 06.5.15, 18:2845
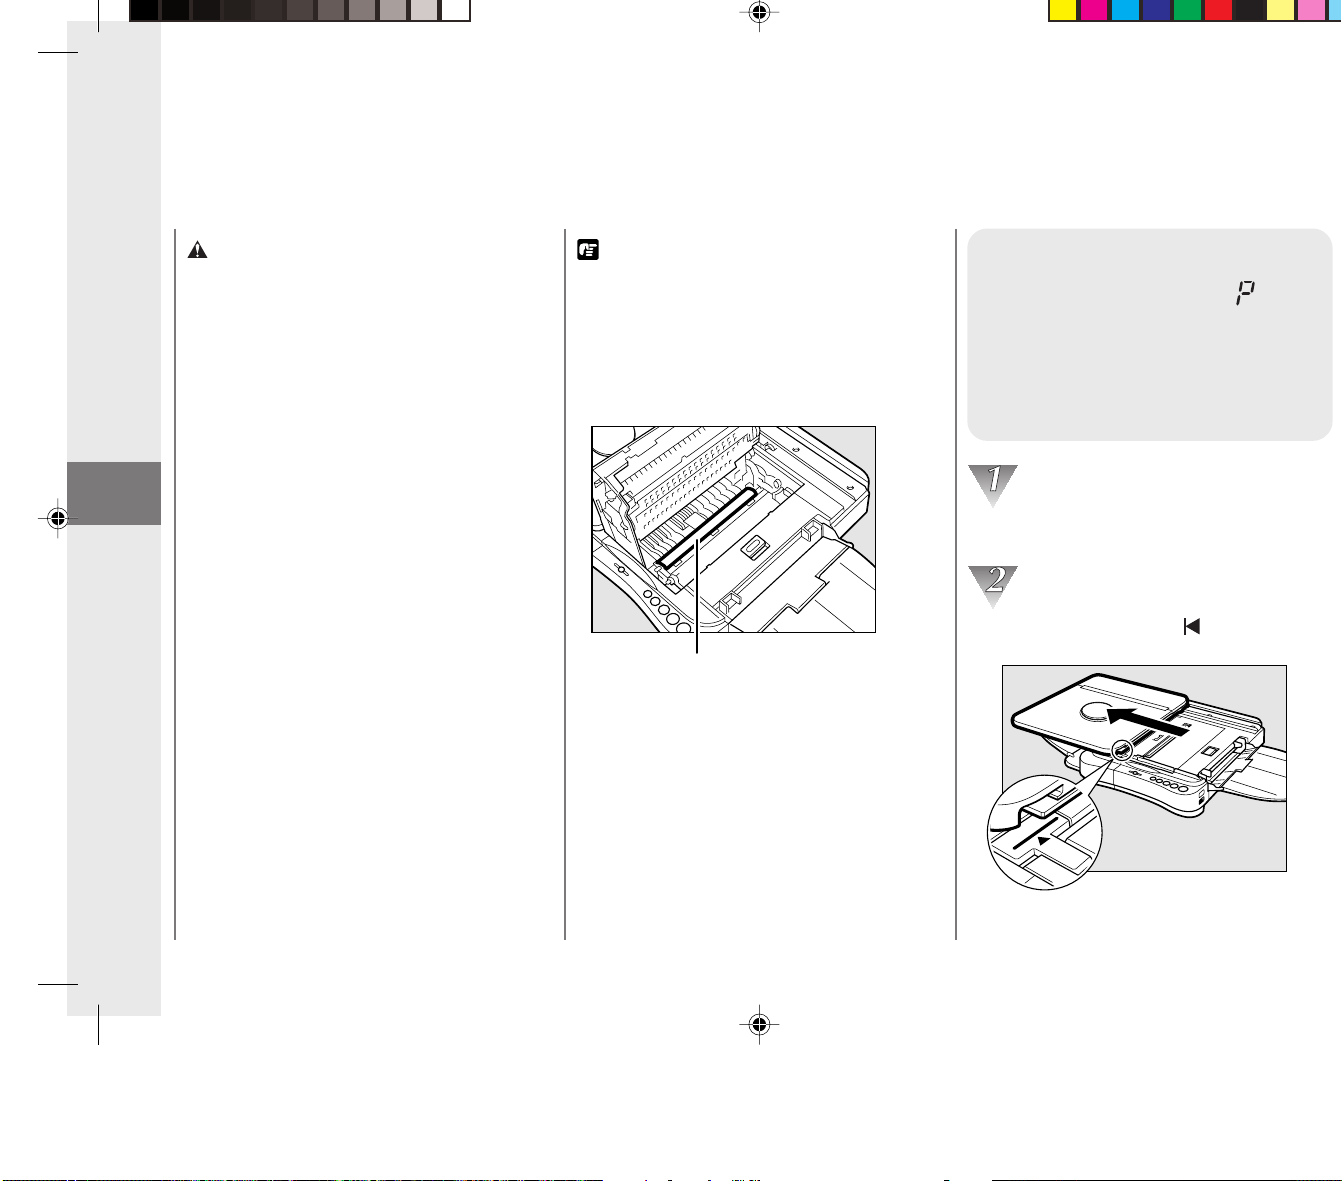
Troubleshooting
46
3
REQUEST:
• Whenever there is a paper jam, even if you can
see the jammed paper from the sides, be sure
to open the top cover and remove the jammed
paper from inside the copier rather than pulling
it out from the sides.
• Do not touch the black roller located inside the
main unit.
Black roller
NOTICE:
• If the jammed paper tears while removing it, be
sure to remove any remaining pieces from
inside the copier.
MEMO:
• When removing jammed paper take care not the
allow the toner on the jammed paper to come
into contact with your hands or clothing.
Cleaning the Paper
Roller (When the
Error Indicator flashes)
If paper jams begin to occur
frequently, follow the procedure
below to clean the feeding roller.
Turn the power switch OFF and unplug
the copier from its power source.
Align the platen with the mark by
sliding it to the left.
When Error Indicators Appear
CAUTION:
• There are some areas inside the copier which
are subject to high voltages and temperatures.
Take adequate precaution when performing
internal inspections, to avoid burns or electrical
shock.
• When removing jammed paper or when
inspecting the inside of the copier, do not allow
necklaces, bracelets or other metal objects to
touch the inside of the copier, as this may result
in burns or electrical shock.
• When removing copy paper which has become
jammed from inside the copier, take care not to
allow the toner on the jammed copy paper to
come into contact with your hands or clothing,
as this will dirty your hands or clothing. If they
become dirty, wash them immediately with cold
water. Washing with warm water will set the
toner and make it impossible to remove the
toner stains.
• When removing copy paper which has become
jammed from inside the copier, remove the
jammed paper gently to prevent the toner on the
paper from scattering and entering your eyes or
mouth. If toner enters your eyes or mouth, wash
immediately with cold water and consult a
physician.
• When loading copy paper or removing originals
or copies, take care not to cut your hands on the
edges of the originals or copy paper.
• Do not use tweezers or other pointed
instruments to remove jammed paper; doing so
may cause damage to internal parts of the
copier.
03_PC170-USA 06.5.15, 18:2846
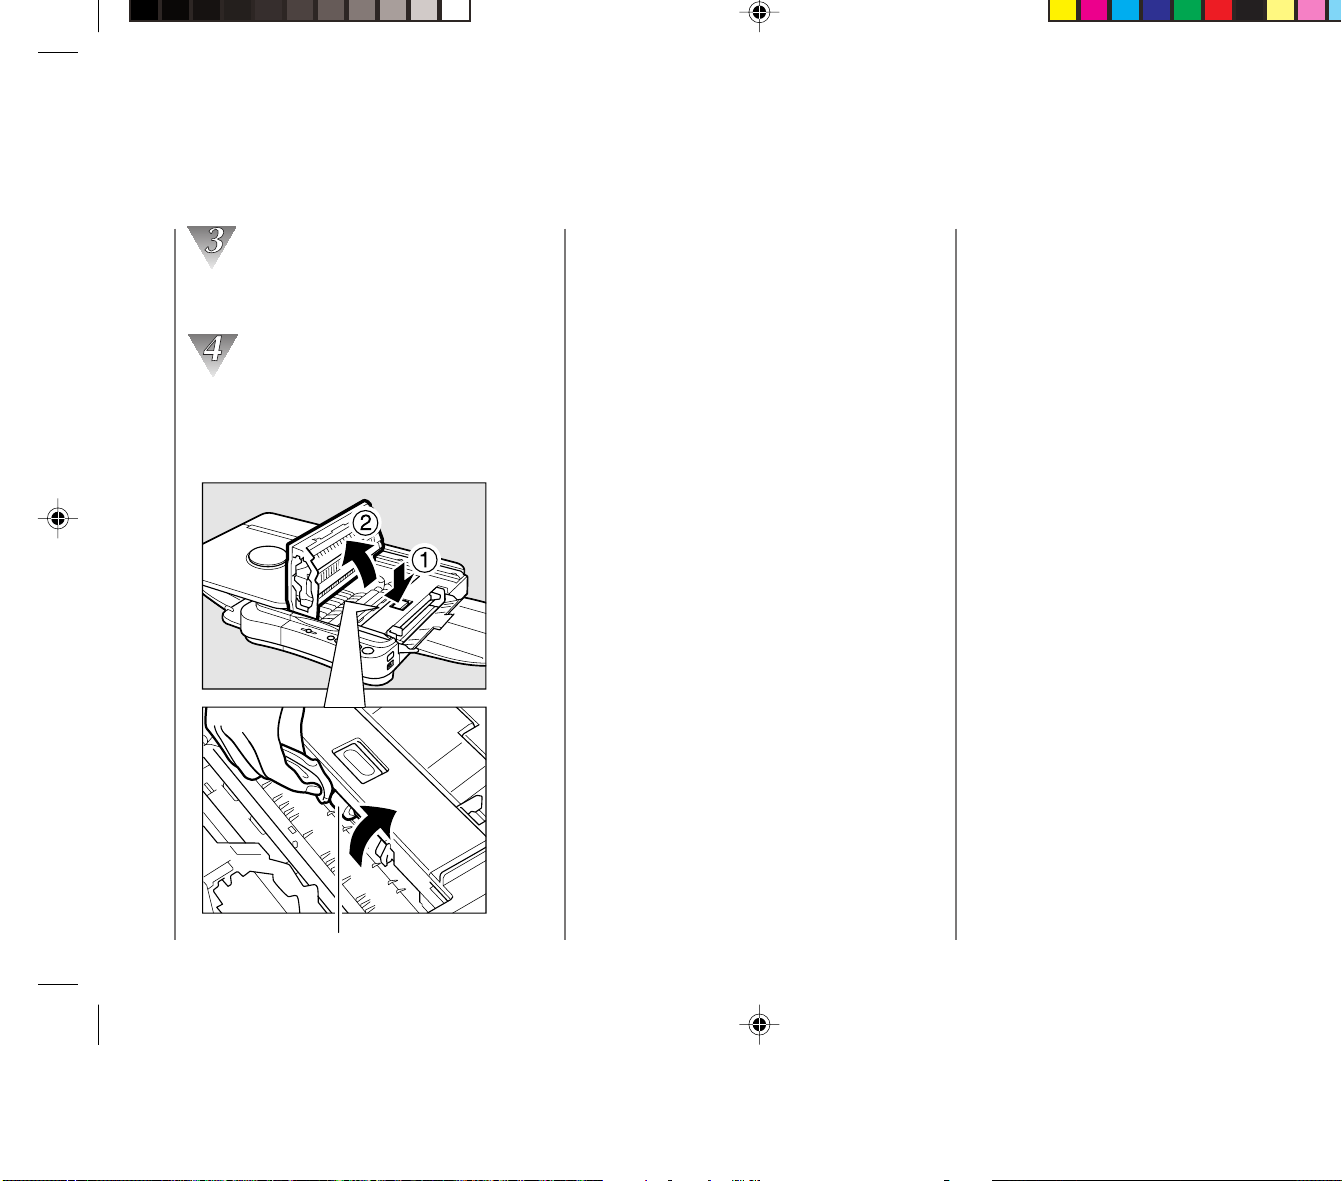
Troubleshooting
47
3
When Error Indicators Appear
NOTICE:
•Wait for the feeding roller to dry completely
before copying.
• Do not use any cleaning sprays to clean the
feeding roller.
Press the top cover release button and
open the cover completely.
Wipe clean the roller while turning it in the
direction indicated by the arrows.
Wipe the roller clean while turning it in
the direction of the arrows.
Feeding roller
03_PC170-USA 06.5.15, 18:2847
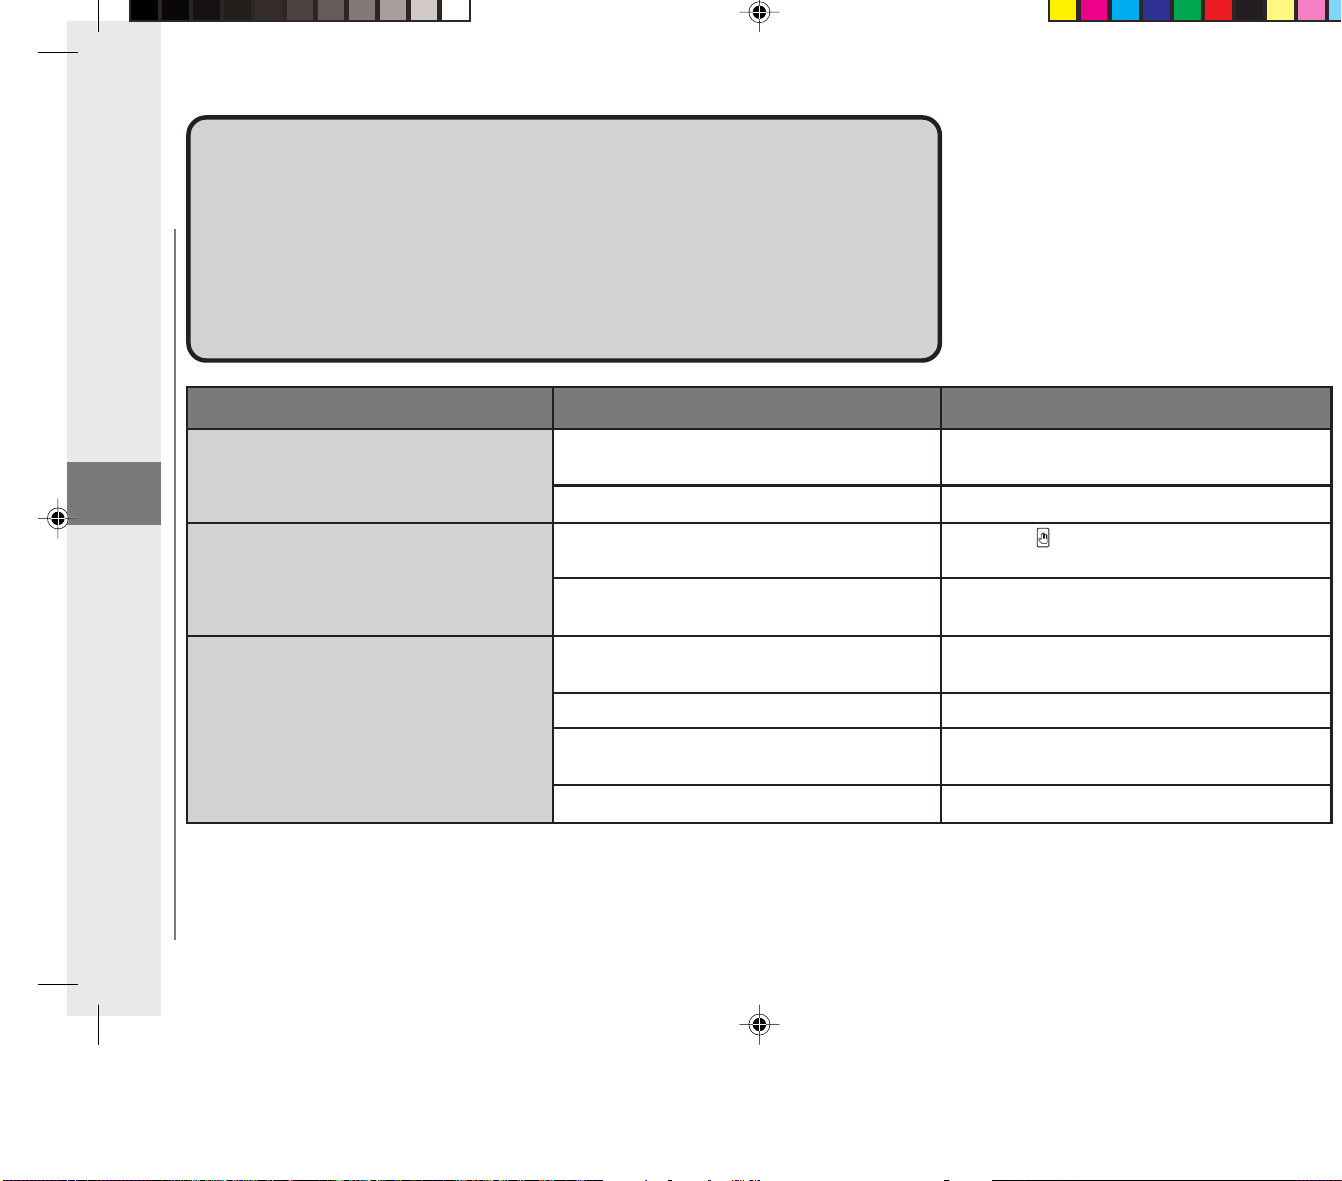
Troubleshooting
48
3
What to Do If You SuspectWhat to Do If You Suspect
There is a MalfunctionThere is a Malfunction
If you suspect there is a malfunction with your copier, before calling a
service representative, check the list below to see if you can solve the
problem yourself.
Copier will not operate.
Power will not turn ON / Power cuts off
during copying.
No copy image appears on copies.
The plug is not connected properly to the
outlet.
The power switch is OFF.
The top cover is open.
The left cover is open.
No original is set on the platen glass.
There is no cartridge installed.
The sealing tape was not removed from the
cartridge.
The copy exposure is not adjusted properly.
Problem
Possible Cause
Possible Remedy
Re-connect the power plug.
Turn the power switch ON.
Press the button and close the top cover
firmly.
Press the middle of the left cover to close it
securely.
Set an original on the platen glass.
(See p.32. )
Install a cartridge (See p.21.)
Remove the sealing tape from the cartridge .
(See p.21.)
Adjust the copy exposure. (See p.32.)
What to Do If You Suspect
There is a Malfunction
03_PC170-USA 06.5.15, 18:2848

Troubleshooting
49
3
Paper jams occur frequently.
White streaks appear on copies.
Black streaks appear on copies.
Copies are completely black.
Copies are too pale.
The copy paper is curled or wrinkled.
Pieces of paper remain jammed in the main
unit.
The feeding roller is dirty.
The toner in the cartridge is not evenly
distributed.
The fiber lens is dirty.
There is condensation in the main unit.
There is condensation in the main unit.
The copier is cold.
Problem
Possible Cause
Possible Remedy
Use flat, unwrinkled copy paper.
Remove the pieces of jammed paper.
Clean the feeding roller. (See p.46.)
Evenly distribute the cartridge toner.
(See p.50.)
Clean the fiber lens. (See p. 50.)
Allow more than two hours for the copier to
fully reach room temperature before using it.
Allow more than two hours for the copier to
fully reach room temperature before using it.
Allow more than two hours for the copier to
fully reach room temperature before using it.
MEMO:
• If the above remedies fail to solve a problem, contact your Canon authorized service representative.
What to Do If You Suspect
There is a Malfunction
03_PC170-USA 06.5.15, 18:2849
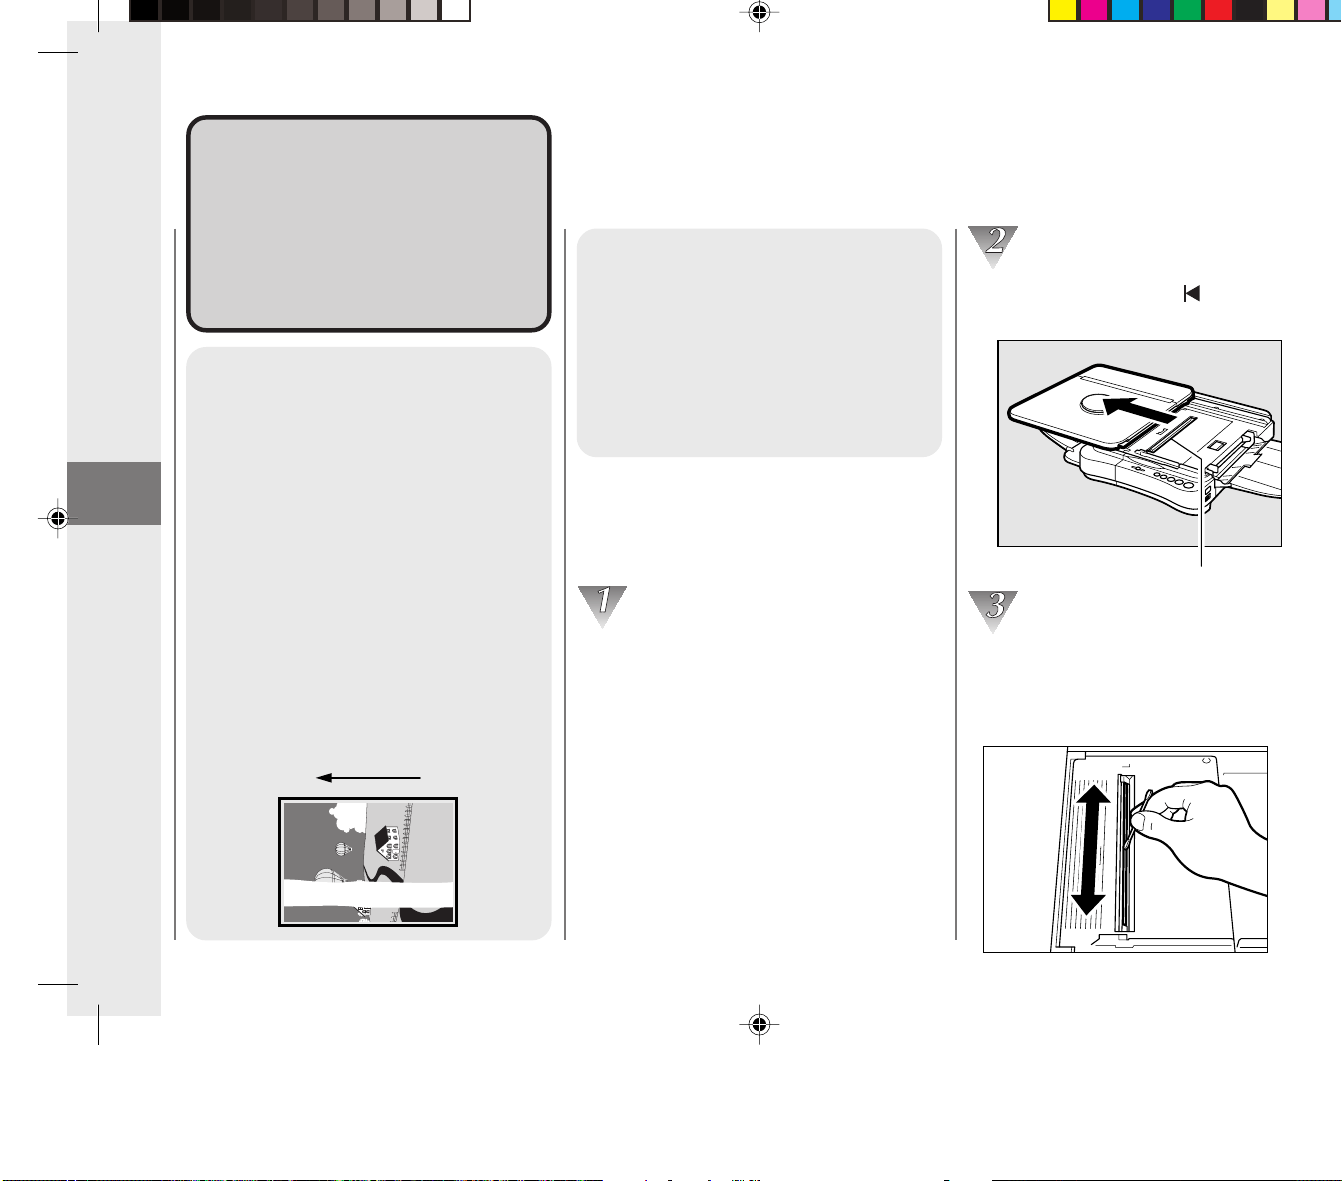
Troubleshooting
50
3
Copy ImageCopy Image
ProblemsProblems
If copies appear either too dark
or too light and you can not get a
clear copy, refer to the guidelines
below.
If Dark Bands/ Black
Streaks Appear on
Copies
When this happens follow the
procedure below to clean the fiber
lens.
If Light Bands/ White
Streaks Appear on
Copies
This most often happens when the
cartridge toner is low or not evenly
distributed in the cartridge. To help
distribute the toner in the cartridge,
remove it from the copier and rock
it several times to the left and right
at a 90˚ angle. If the white streaking
continues then replace the
cartridge with a new one.
(See “Replacing Cartridges”,
on p. 21.)
Paper feeding
direction
Cleaning the fiber lens (top
side)
Turn the power switch OFF and unplug
the copier.
Align the platen with the mark by
sliding it to the left.
Fiber lens (top side)
Clean the top side of the fiber lens. To
clean, run a cotton swab (not included)
over the entire length of the lens several
times.
Copy Image Problems
03_PC170-USA 06.5.15, 18:2850
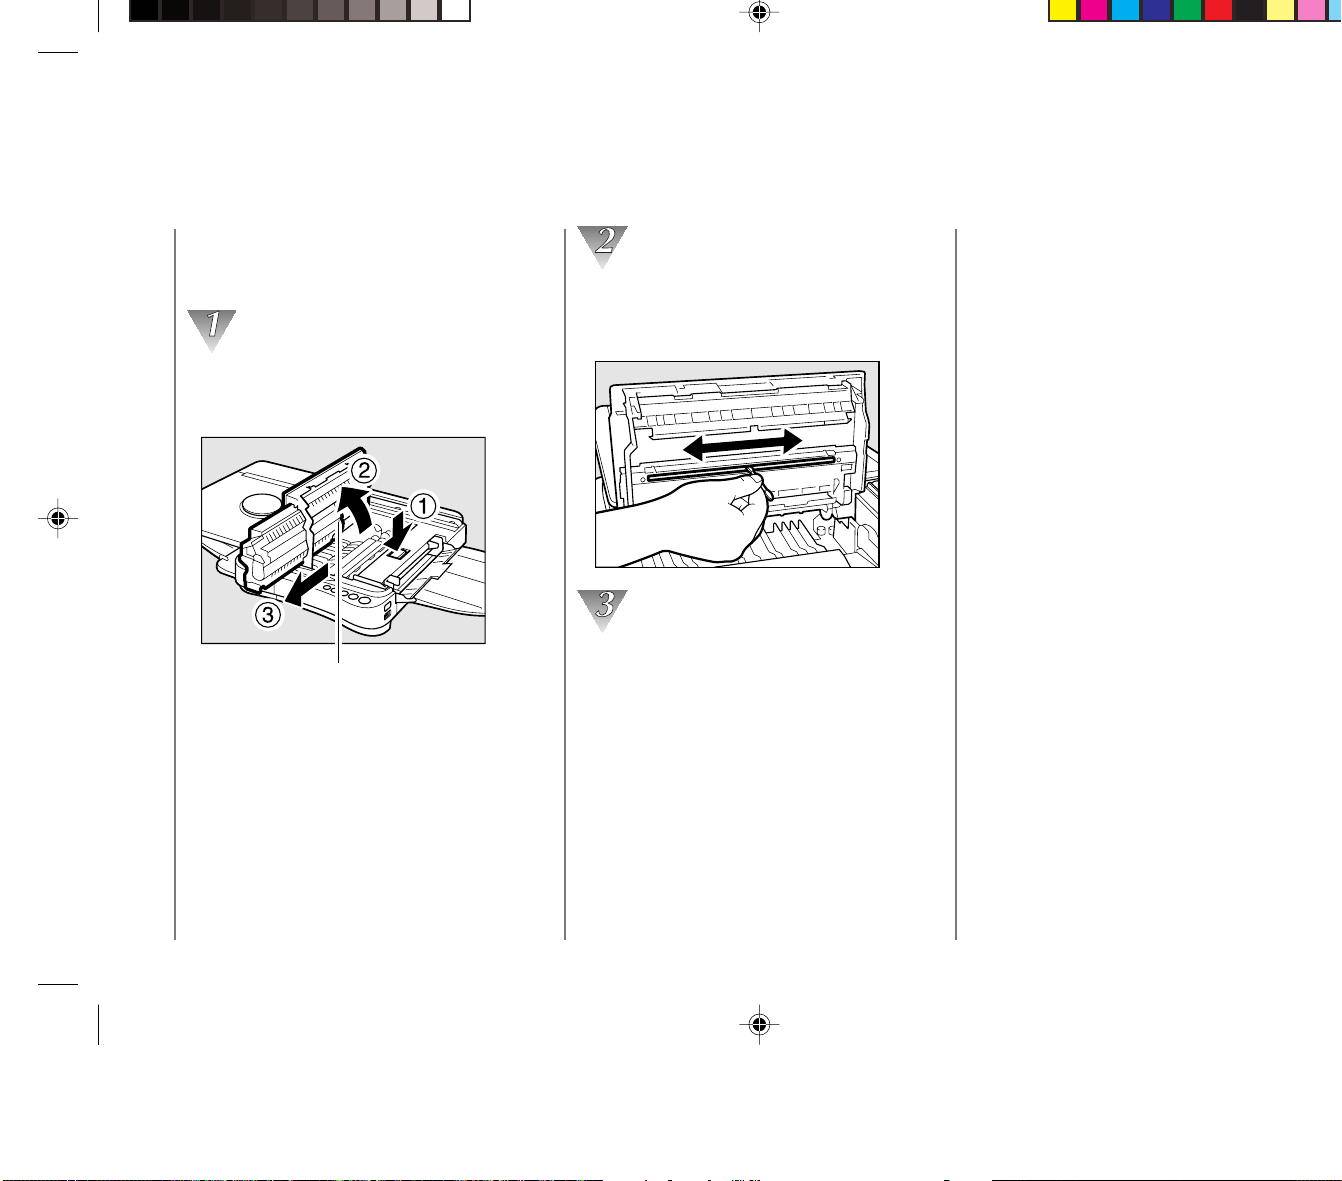
Troubleshooting
51
3
Cleaning the fiber lens
(reverse side)
Open the top cover and remove the
cartridge.
(See “Replacing Cartridges”, on p.21.)
Fiber lens (reverse side)
Clean the reverse side of the fiber lens. To
clean, run a cotton swab lightly over the
entire length of the lens several times.
Once the cleaning is complete replace the
cartridge, close the top cover and slide
the plate back into the center position.
Copy Image Problems
MEMO:
• When cleaning the fiber lens be sure to use the
flat type of cotton swab that is normally used for
cleaning audio equipment. A round cotton swab
will not fit into the groove properly.
• Do not soak the cotton swabs in any type of
cleaning solution or alcohol before using them to
clean the fiber lens. Only use dry cotton swabs.
• If the above procedure fails to remedy the copy
image problems, contact your dealer or service
representative.
03_PC170-USA 06.5.15, 18:2851

Troubleshooting
52
3
03_PC170-USA 06.5.15, 18:2852

Troubleshooting
52
3
03_PC170-USA 06.5.15, 18:2852

Appendix
53
Cleaning the Copier ................................ 54
Routine Cleaning ................................... 55
Specifications .......................................... 56
Index.......................................................... 57
ppendixppendix
A
03_PC170-USA 06.5.15, 18:2853

Appendix
53
Cleaning the Copier ................................ 54
Routine Cleaning ................................... 55
Specifications .......................................... 56
Index.......................................................... 57
ppendixppendix
A
03_PC170-USA 06.5.15, 18:2853
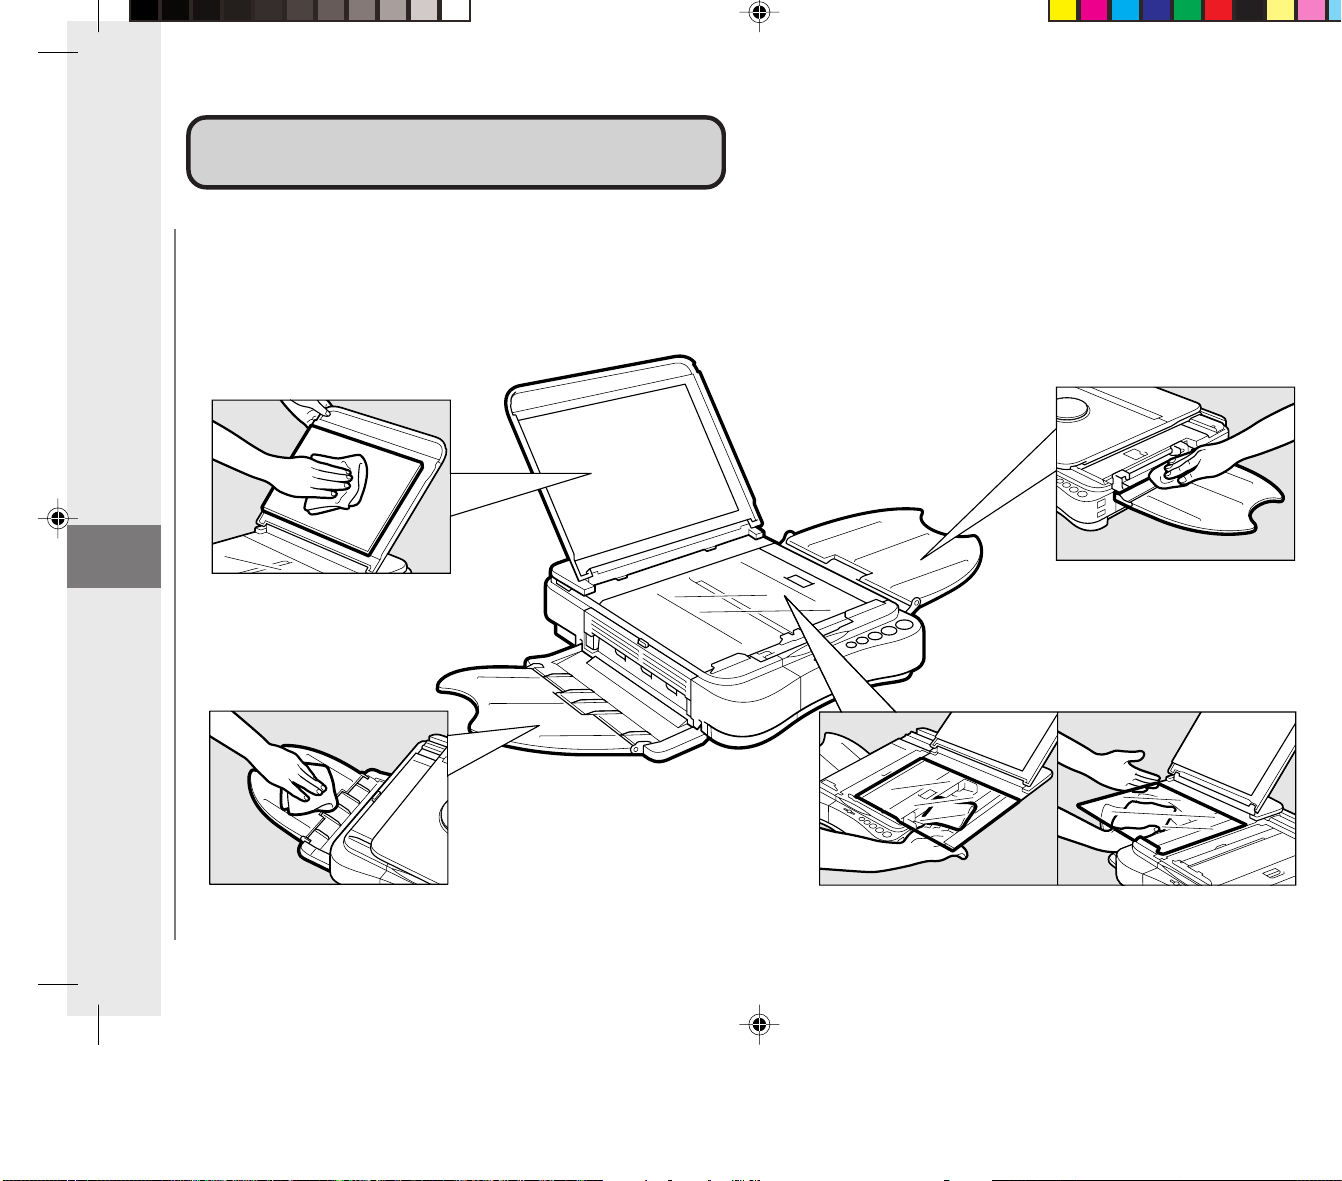
Appendix
54
Cleaning the CopierCleaning the Copier
Cleaning the Copier
Multi-stack Tray
Platen Glass (top and bottom)
Platen Cover
Copy Tray
03_PC170-USA 06.5.15, 18:2854

Appendix
54
Cleaning the CopierCleaning the Copier
Cleaning the Copier
Multi-stack Tray
Platen Glass (top and bottom)
Platen Cover
Copy Tray
03_PC170-USA 06.5.15, 18:2854
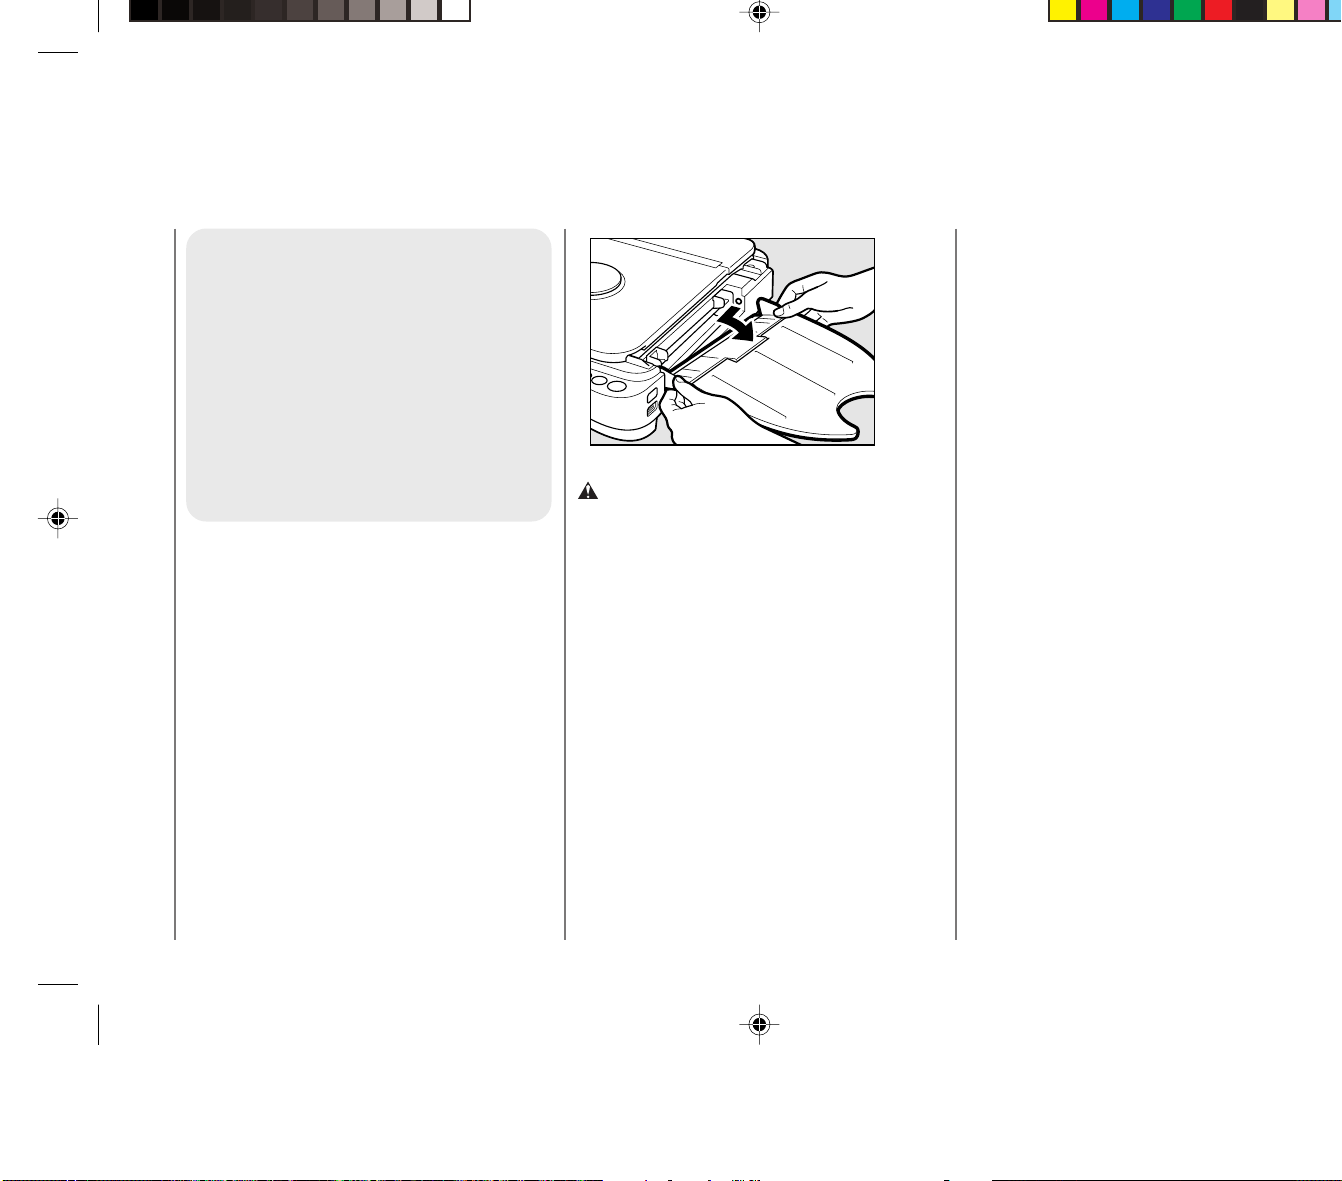
Appendix
55
Routine Cleaning
To ensure optimum copy quality
the platen glass, platen cover,
copy tray and multi-stack tray
should be cleaned on a regular
basis.
To clean these parts, wipe with a
cloth dampened with water or a
mild cleaning agent and then wipe
with a soft dry cloth.
■ Clean the external housing of the
copier in the same way.
■ To clean the underside of the platen
glass, first remove the multi-stack tray
from the main unit. To do so, hold the
corners of the multi-stack tray with
both hands and lightly push inwards on
the two corners to detach the tray.
CAUTION:
• Before cleaning the copier, turn the power
switch OFF and unplug the copier from its
power source. Failure to do so may result in a
fire or electrical shock.
• Clean the copier using a firmly wrung-out cloth
dampened with a mild cleansing detergent. Do
not use alcohol, benzene, paint thinner or other
flammable substances. If flammable substances
come into contact with a high-voltage area
inside the copier, this may result in a fire or
electrical shock.
Cleaning the Copier
03_PC170-USA 06.5.15, 18:2855
Appendix
56
SpecificationsSpecifications
For details concerning features, consult your dealer.
Features are subject to change without notice.
For high-quality copies, use paper and transparencies recommended by Canon. Some types of paper available at office supply stores may not
be suitable for this copier. If you have any questions about paper, consult your dealer or Canon USA Consumer Information Center.
Specifications
Item
Type Personal Desktop / Portable
Platen Moving Platen
Photoconductive Materials
Organic Photosensitive Conductor
Copying System
Indirect Electrostatic Transfer System
Developing System Toner Projection System
Fixing System Canon’s RAPID™ Fusing System
Acceptable Originals Up to letter (8
1
/
2
" ✕ 11"), books and three dimensional objects up to 4.4 lb
Acceptable Copy Stock 15-32-lb bond plain paper, Canon type E transparencies, tracing paper, labels, colored paper,
postcards and card stock up to 32 lb bond
Copy Sizes Letter (8
1
/
2
" ✕ 11") to STMTR (5
1
/
2
" ✕ 8")
Non-image Area
1
/
16
" (2mm) at leading edge
Warm-up Time 0 sec. at room temperature (68˚F)
First Copy Time 22 sec. (LTR size)
Copy Speed 4 cpm (LTR size)
Magnification 1:1 + 1.2%
Paper Feeding System Multi-sheet Feeding
Power Requirements 115 V AC, 60 Hz (Power requirements differ depending on the country of purchase)
Power Consumption 0.7 kW (max.)
Dimensions (W ✕ D ✕ H) 14
1
/
8
" ✕ 17
3
/
8
" ✕ 4
6
/
8
"
Installation Space (W ✕ D) 32
1
/
8
" ✕ 17
3
/
8
"
Weight Approx. 18.0 lb (including cartridge)
Copy Colors Black, Red, Blue, Green and Sepia (cartridge replacement necessary) Canon Type E
%
03_PC170-USA 06.5.15, 18:2856

Appendix
57
Index
IndexIndex
A
A (Auto) Indicator ( ) ...................................... 17, 33
Auto Power-OFF Feature ......................................... 31
Automatic Exposure Control Mode ............................ 32
B
Black Roller .............................................................. 46
C
Carrying Handle ................................................. 12, 16
Cartridges........................................................... 16, 19
Canon E Color Cartridges .............................. 21
Canon E20 Cartridges ................................... 21
Color Cartridges ....................................... 19, 38
Copy Yield...................................................... 21
Drum Protective Shutter................................. 23
Recycling ....................................................... 24
Replacement Indications................................ 20
Sealing Tape ............................................ 16, 22
Storing Precautions........................................ 24
Clear/Stop ( ) Key.......................................... 17, 31
Condensation ..................................................... 10, 23
Copy Stock ............................................................... 34
Copy Tray........................................................... 15, 16
E
E Error Indicator ....................................................... 43
Error Indications ................................................. 17, 43
Exit Slot .................................................................... 15
Exposure Adjustment Lever ............................... 17, 33
Exposure Recalibration Switch .......................... 16, 32
F
F Mode ..................................................................... 31
Fiber Lens .......................................................... 50, 51
G
Guide Plate ........................................................ 30, 32
L
Left Cover........................................................... 15, 45
Left Cover Release Button ................................. 15, 45
M
Manual Exposure Control Mode............................... 32
Multi-stack Tray .................................................. 15, 16
N
Number of Copies ( ) Key .............................. 17, 31
Number of Copies/Error Indicator ...................... 17, 30
03_PC170-USA 06.5.15, 18:2857

Appendix
58
Index
P
P Error Indicator ........................................... 17, 43, 46
Paper Feed Guides ............................................ 16, 30
Paper Feeding Slot .................................................. 16
Paper Jam Indicator ( ) ..................... 17, 18, 42, 44
Paper Roller ............................................................. 46
Platen ....................................................................... 10
Platen Cover ................................................ 15, 37, 54
Platen Glass ....................................................... 15, 36
Postcards ................................................................. 35
Power Switch ........................................................... 16
S
Start ( ) Key ................................................... 17, 30
Supplies and Accessories .......................................... 4
T
Telephone Assistance ................................................ 4
The AE ( ) Key............................................... 17, 33
Top Cover .......................................................... 16, 44
Top Cover Release Button ................................. 15, 44
Transparencies .................................................. 35, 36
03_PC170-USA 06.5.15, 18:2858

OPERATOR'S MANUAL
Please read this manual before operating this equipment.
After you finish reading this manual,
store it in a safe place for future reference.
170
FT5-0096 (000) © CANON INC. 2006 PRINTED IN CHINA
The A4-size standard original is on the inside of the back cover.
To view, simply unfold this page.
CANON INC.
30-2, Shimomaruko 3-chome, Ohta-ku, Tokyo 146-8501, Japan
CANON U.S.A., INC.
One Canon Plaza, Lake Success, NY 11042, U.S.A.
CANON CANADA INC.
6390 Dixie Road Mississauga, Ontario L5T 1P7, Canada
CANON EUROPA N.V.
Bovenkerkerweg 59-61 1185 XB Amstelveen, The Netherlands
CANON FRANCE S.A.S.
17, quai du Président Paul Doumer 92414 Courbevoie Cedex, France
CANON (U.K.) LTD.
Woodhatch, Reigate, Surrey, RH2 8BF, United Kingdom
CANON DEUTSCHLAND GmbH
Europark Fichtenhain A10, 47807 Krefeld, Germany
CANON ITALIA S.p.A.
Via Milano, 8 20097 San Donato Milanese (MI) Italy
CANON LATIN AMERICA, INC.
703 Waterford Way Suite 400 Miami, Florida 33126 U.S.A.
CANON AUSTRALIA PTY. LTD
1 Thomas Holt Drive, North Ryde, Sydney, N.S.W. 2113, Australia
CANON CHINA CO., LTD
15F Jinbao Building No.89 Jinbao Street, Dongcheng District, Beijing, 100005, China
CANON SINGAPORE PTE. LTD.
1 HarbourFront Avenue #04-01 Keppel Bay Tower, Singapore 098632
CANON HONGKONG CO., LTD
19/F., The Metropolis Tower, 10 Metropolis Drive, Hunghom, Kowloon, Hong Kong
