MULTIFUNCTIONAL DIGITAL COLOR SYSTEMS /
MULTIFUNCTIONAL DIGITAL SYSTEMS
Operator’s Manual for the
Latest Functions

©2018 TOSHIBA TEC CORPORATION All rights reserved
Under the copyright laws, this manual cannot be reproduced in any form without prior written permission of TTEC.
Preface 3
Preface
Thank you for purchasing TOSHIBA Multifunctional Digital Systems or Multifunctional Digital Color Systems.
This manual describes the latest functions embedded in this equipment.
Read this manual before using the functions.
How to read this manual
Symbols in this manual
In this manual, some important items are described with the symbols shown below. Be sure to read these items
before using this equipment.
Model and series names in this manual
In this manual, each model name is replaced with a series name as shown below.
Optional equipment
For the available options, refer to the Quick Start Guide.
Screens in this manual
The details on the screens may differ depending on your model and how the equipment is used, such as the status of
the installed options, the OS version and the applications.
About the defaults shown in this manual
The defaults shown in this manual are the values in the standard operating environment. The values may have been
changed from these defaults. The defaults for your model may differ from the defaults shown.
The default for the list item is shown underlined.
Install Disc co-packed with the equipment
In this manual, the discs for installing the software are generically described in “Install Disc”.
Indicates a potentially hazardous situation which, if not avoided, could result in death, serious
injury, or serious damage, or fire in the equipment or surrounding objects.
Indicates a potentially hazardous situation which, if not avoided, may result in minor or
moderate injury, partial damage to the equipment or surrounding objects, or loss of data.
Indicates information to which you should pay attention when operating the equipment.
Describes handy information that is useful to know when operating the equipment.
Pages describing items related to what you are currently doing. See these pages as required.
Model name Series name in this manual
e-STUDIO2000AC/2500AC e-STUDIO5005AC Series
e-STUDIO2505AC/3005AC/3505AC/4505AC/5005AC
e-STUDIO2008A/2508A/3008A/3508A/4508A/5008A e-STUDIO5008A Series
e-STUDIO5506AC/6506AC/7506AC e-STUDIO7506AC Series
e-STUDIO5508A/6508A/7508A/8508A e-STUDIO8508A Series
e-STUDIO3508LP/4508LP/5008LP e-STUDIO5008LP Series

4 Preface
Abbreviations in this manual
In this manual, “Dual Scan Document Feeder” (DSDF) and “Reversing Automatic Document Feeder” (RADF) are
collectively referred to as “Automatic Document Feeder” (ADF).
Trademarks
For trademarks, refer to the Safety Information.

CONTENTS 5
CONTENTS
Chapter 1 Overview
Precautions for the equipment............................................................................................................... 8
Chapter 2 Home Screen
About Home Screen ............................................................................................................................. 10
Registering functions................................................................................................................................................. 10
Names and Functions on the Home Screen ............................................................................................................. 10
Using Simple Scan ..................................................................................................................................................... 11
Simple Scan Settings ................................................................................................................................................. 12
Chapter 3 Scan Functions
Previewing Scans ................................................................................................................................ 14
Precautions for [File] ........................................................................................................................... 15
Specifying E-mail Addresses................................................................................................................. 16
Reducing the ADF scan noise ................................................................................................................ 17
Chapter 4 Fax Functions
Precautions for Fax Functions .............................................................................................................. 20
Displaying the preview before sending a fax .......................................................................................... 21
Displaying the preview of a received fax................................................................................................ 23
Setting up the Cover Sheet................................................................................................................... 25
Chapter 5 Print Functions
USB Direct Printing ............................................................................................................................. 28
Notes on printing ....................................................................................................................................................... 28
Email Direct Printing ........................................................................................................................... 29
Chapter 6 User Functions
User ................................................................................................................................................... 32
Copy............................................................................................................................................................................ 32
Scan ............................................................................................................................................................................ 32
Drawer ........................................................................................................................................................................ 32
Admin ................................................................................................................................................ 33
Managing the option licenses ................................................................................................................................... 33
Creating or installing clone files................................................................................................................................ 44
Printer/e-Filing........................................................................................................................................................... 49
Chapter 7 TopAccess
[Registration] Tab Page ....................................................................................................................... 52
[Inbound FAX routing] Item....................................................................................................................................... 52
[Counter] Tab Page.............................................................................................................................. 54
[Total Counter] screen............................................................................................................................................... 54

6 CONTENTS
[Administration] Tab Page ................................................................................................................... 55
Home Setting ............................................................................................................................................................. 55
NetWork...................................................................................................................................................................... 57
Save as file settings.................................................................................................................................................... 67
Printer settings........................................................................................................................................................... 69
Print Service settings ................................................................................................................................................. 72
Upload Software settings .......................................................................................................................................... 76
Create Clone File settings.......................................................................................................................................... 78
Install Clone File settings........................................................................................................................................... 80
User Paper Type......................................................................................................................................................... 83
Panel View .................................................................................................................................................................. 84
Public Theme Settings............................................................................................................................................... 85
Public Home Settings ................................................................................................................................................ 86
Simple Screen Settings.............................................................................................................................................. 87
Application List .......................................................................................................................................................... 87
License........................................................................................................................................................................ 89
Functional Setups ............................................................................................................................... 91
Setting Multi Station Print......................................................................................................................................... 91
Setting Home Data Synchronization ........................................................................................................................ 93
Chapter 8 Install Disc
Procedure for Installation .................................................................................................................... 96
System requirements ................................................................................................................................................ 96
Installing the printer drivers by using the individual installers................................................................ 97
Raw TCP/LPR printing................................................................................................................................................ 99
When adding another equipment from the results................................................................................................ 102
SMB printing............................................................................................................................................................. 102
Confirm or change the SNMP settings .................................................................................................................... 104
Narrowing Down Search Conditions....................................................................................................................... 105
Chapter 9 Troubleshooting
Troubleshooting for the Hardware.......................................................................................................108
Messages Displayed on the Touch Panel................................................................................................................ 108
Clearing a Paper Misfeed ......................................................................................................................................... 108
Troubleshooting for the Software........................................................................................................112
Faxing Problems ...................................................................................................................................................... 112
Error Codes............................................................................................................................................................... 112
Chapter 10 The Function List
FUNCTION LIST (Administrator)...........................................................................................................116
INDEX .........................................................................................................................................................121

1.Overview

8 Precautions for the equipment
0.Precautions for the equipment
Paper for 1-sided printing is not usable for 2-sided printing.
e-STUDIO5015AC Series, e-STUDIO5018A Series
When paper is loaded, push the drawer straight into this equipment until you hear a click and it comes to a stop.
When you place any special paper other than plain paper or that not used for normal copying, you need to set the
thickness and attribute into this equipment. For acceptable paper type, refer to the Specifications Guide.
If you select a wrong paper type, this could cause a paper misfeed, significant image trouble or an equipment
malfunction.
If small-size paper such as A5-R is used as originals, they are sometimes not detected by the ADF. In that case, align
the side guides to the original length. Then place the originals gently by sliding them from the position of the side
guides. If originals have curled, make them flat before placing on the ADF.
When using the DSDF, the paper feeding tray will automatically move upwards in ten seconds after placing
originals. The timing for moving the paper feeding tray upwards can be changed to the one when the [START]
button is pressed. For details, contact your service representative.
“SSL” which is displayed on the screen of this equipment, the software and the list has been changed to “SSL/TLS”.

2.Home Screen
10 About Home Screen
0.About Home Screen
Registering functions
You can register not only the functions but also the job settings, URL and applications in the Home screen. Moreover,
you can remove the registered functions and perform customization such as a change of the numbers, size and
background of the buttons.
Template Guide (PDF): Chapter 1: REGISTERING JOB SETTINGS ONTO THE HOME SCREEN”
MFP Management Guide (PDF): “Chapter 4: APPENDIX”
TopAccess Guide (PDF): “Chapter 8: [Administration] Tab Page” - “[Registration] ([Administration] tab)
Item List”
P.86 “Public Home Settings”
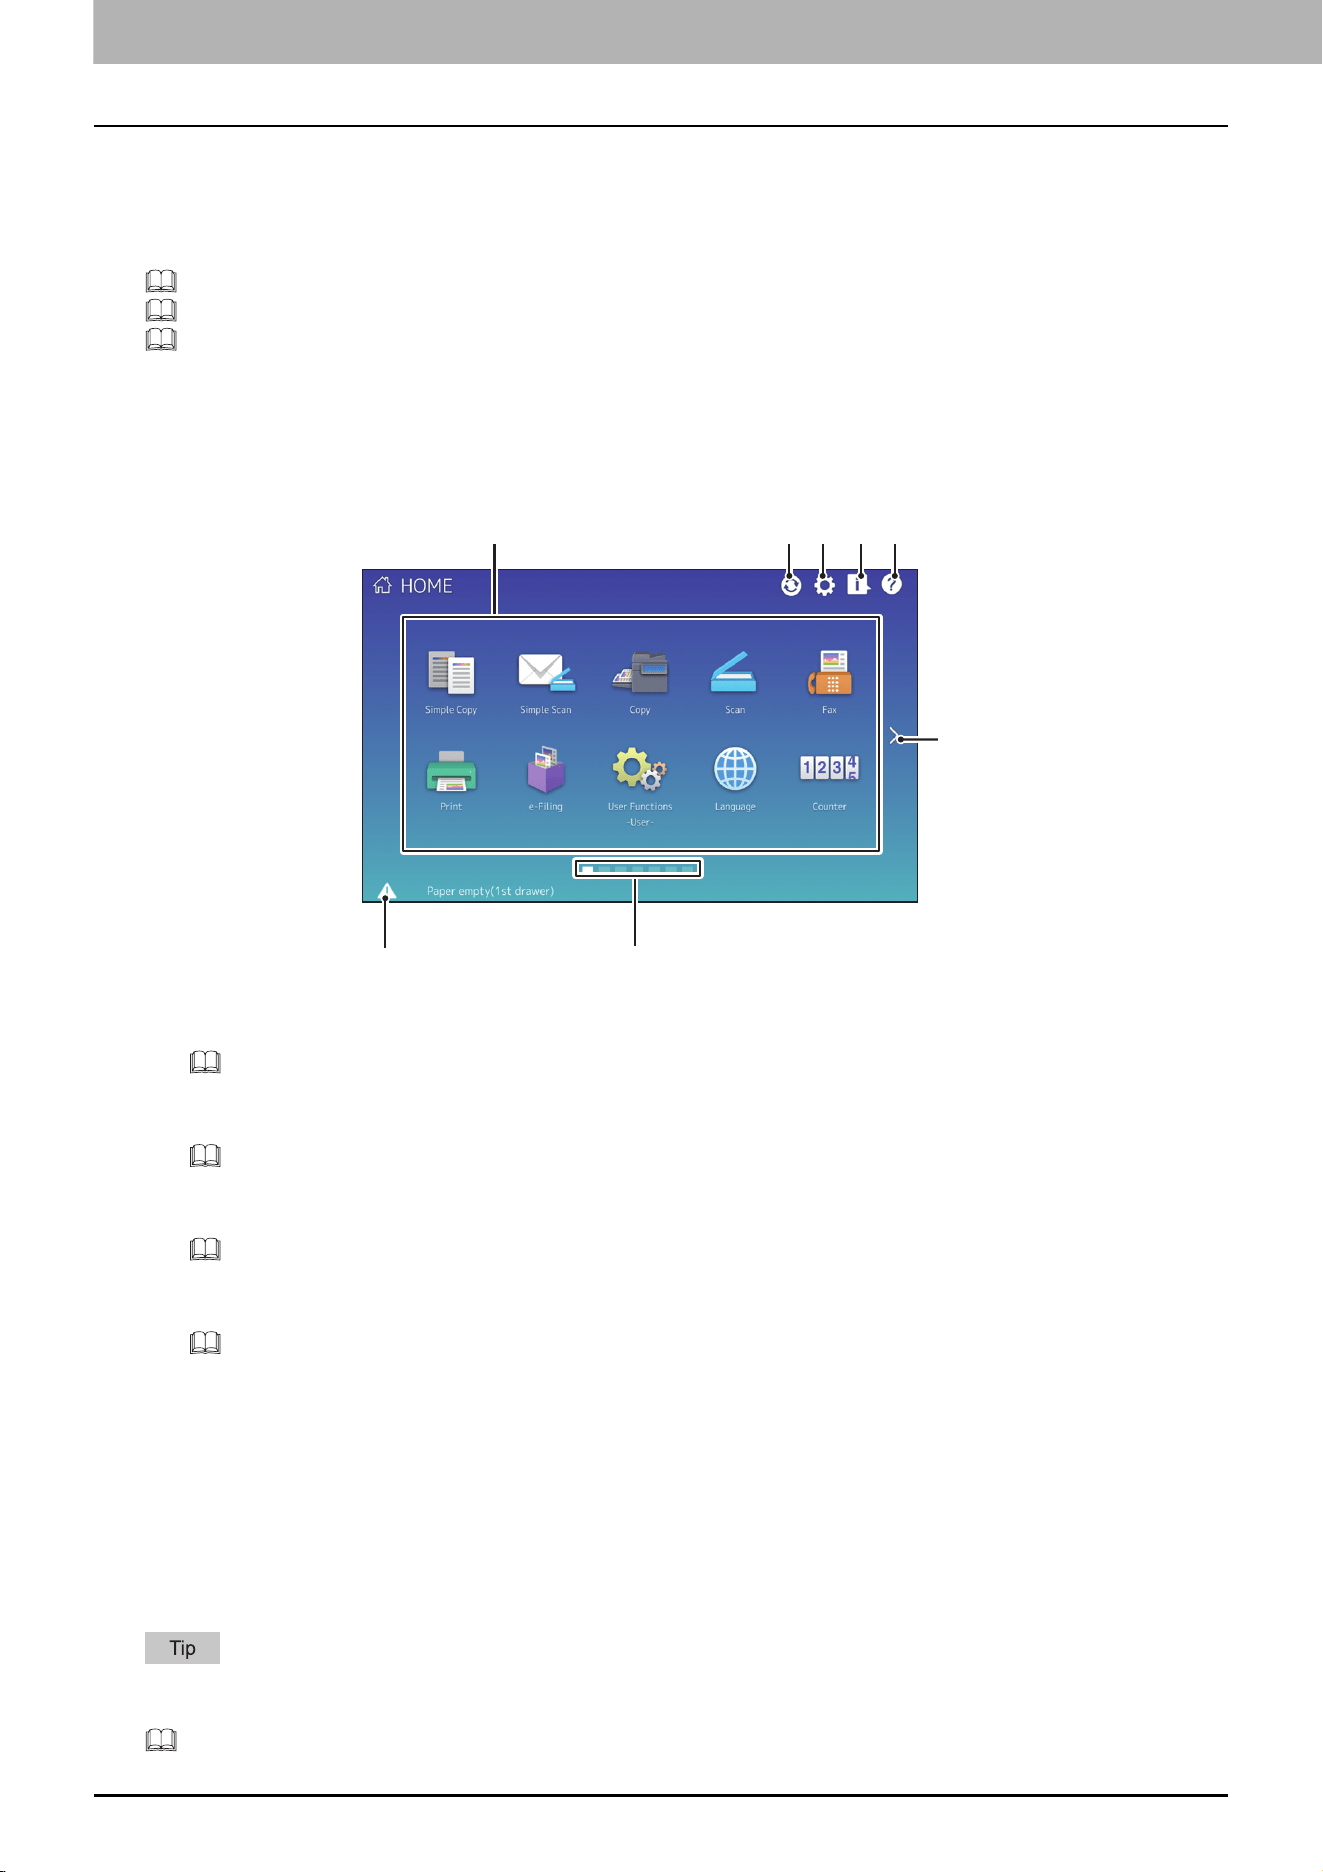
Names and Functions on the Home Screen
Displayed when you turn the equipment on or press the [HOME] button. Displays buttons for various functions.
1. Recall button
Register functions, templates, URLs, etc. and recall them.
MFP Management Guide (PDF): “Chapter 4: APPENDIX”
2. Home Data Sync button
Synchronize the data on the home screen. This button is displayed when the Public Home function is enabled.
TopAccess Guide (PDF): “Chapter 8: [Administration] Tab Page” - “[Setup] Item List”
3. Home Setting button
Modify the home screen settings.
MFP Management Guide (PDF): “Chapter 4: APPENDIX”
4. Job Status button
Check the progress of jobs and the process history.
Software Troubleshooting Guide (PDF): “Chapter 1: CONFIRMING JOB STATUS ON THE TOUCH PANEL”
5. [?] (Help) button
Display information on each function.
6. Next button
Move to the next page.
7. Page Position indicator
Display the current page position.
8. Status button
Displayed when information is available.
You can change the screen displayed when the equipment is turned on to another screen, such as the Copy function
screen. For details, see the following guide:
TopAccess Guide (PDF): “Chapter 8: [Administration] Tab Page” - “[Setup] Item List”
6
4 51
8
7
3
2
2.Home Screen
About Home Screen 11
Home Screen
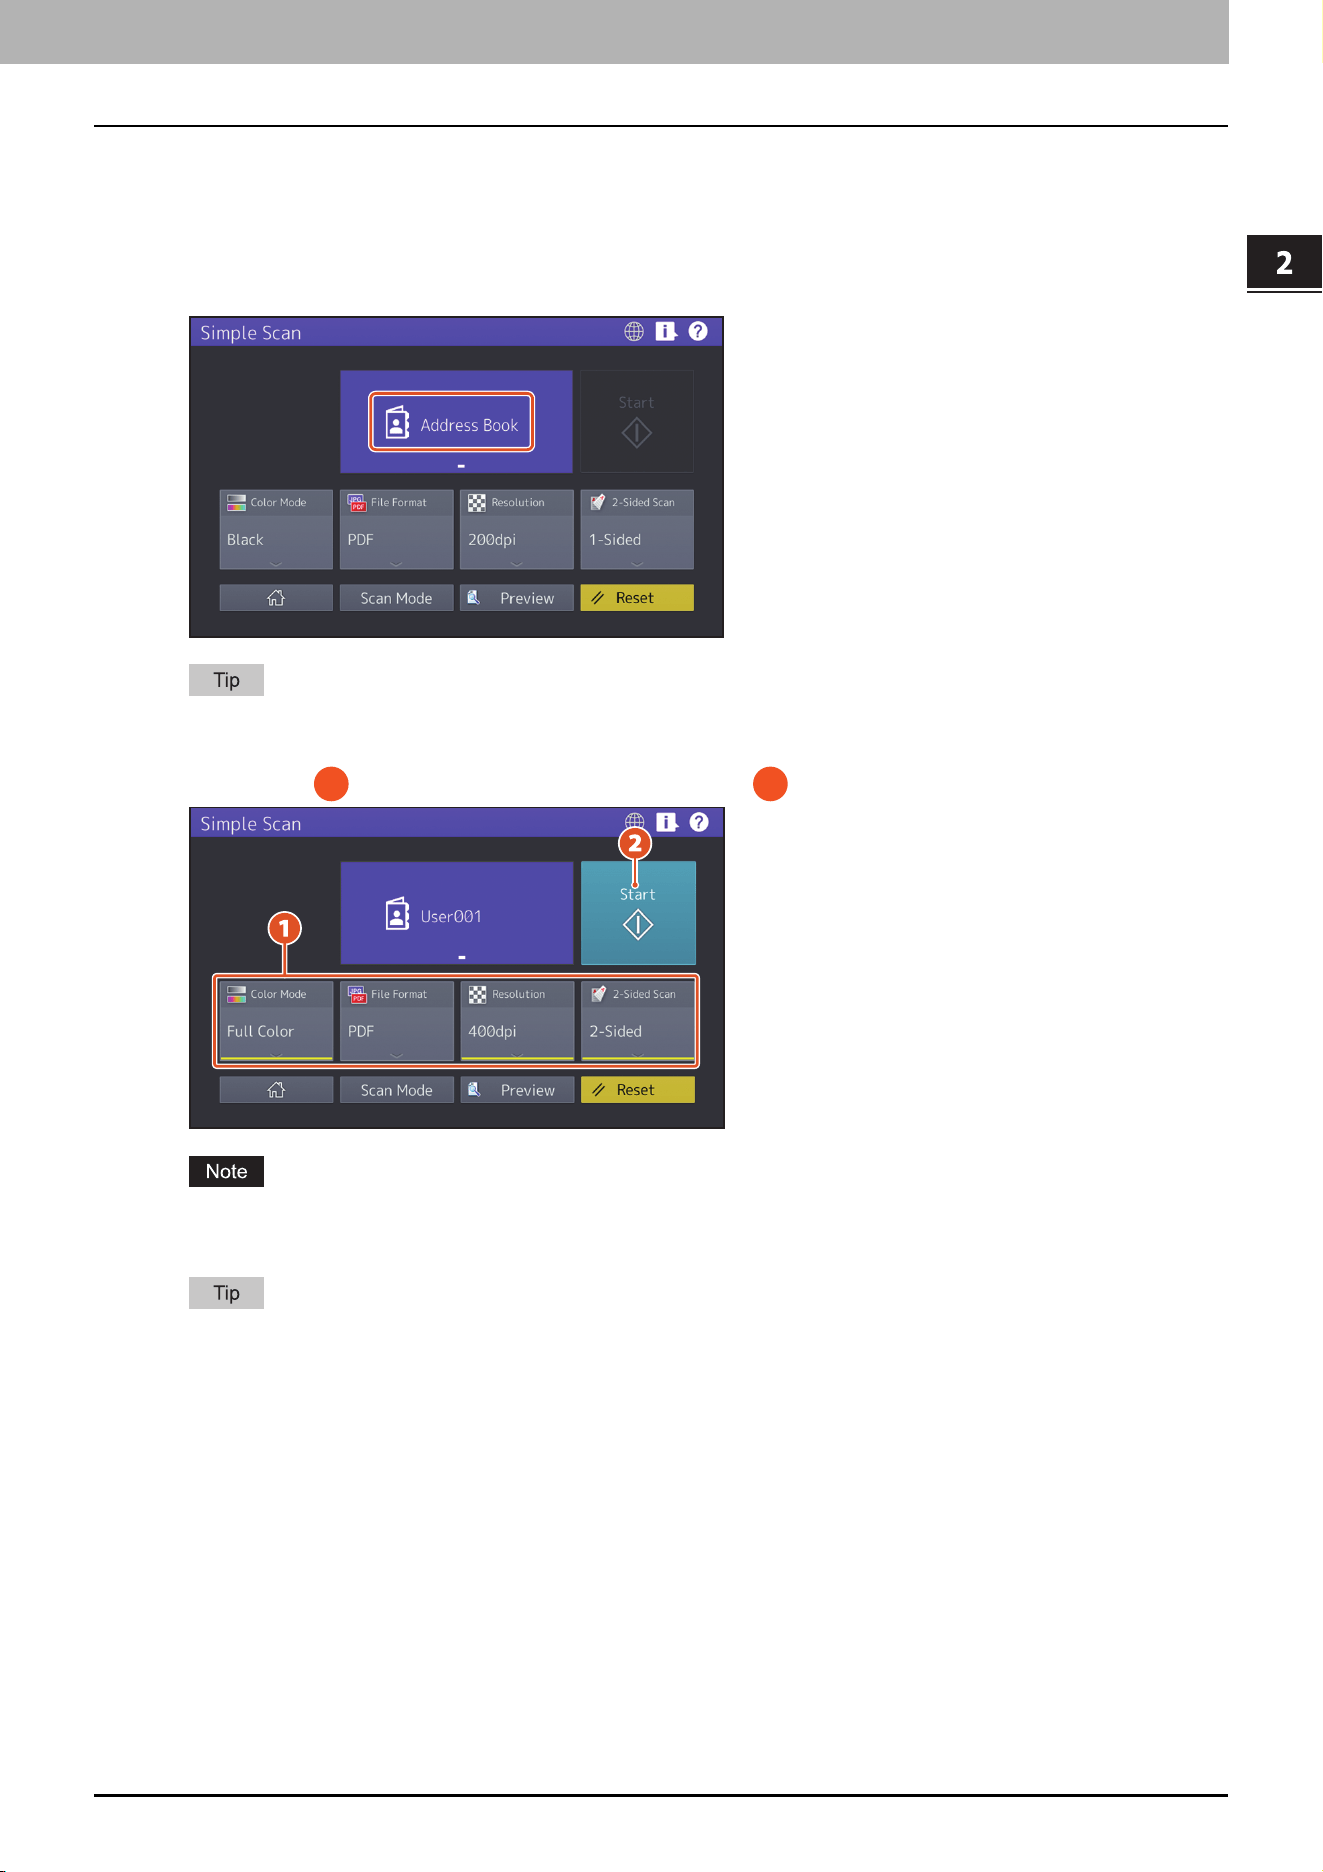
Using Simple Scan
1
Press [Simple Scan].
2
Load the original document.
3
Press [Address Book] and specify the recipient E-mail address.
When you press [Address Book], you can select whether to use a registered E-mail address or enter an E-mail
address directly.
4
Specify the color mode or other items, and press [Start].
Simple Scan sends the scanned data to an E-mail address. An administrator needs to set up the equipment in
advance.
When an original is set on the original glass, press [Job Finish] after all pages are scanned.
1 2
2.Home Screen
12 About Home Screen
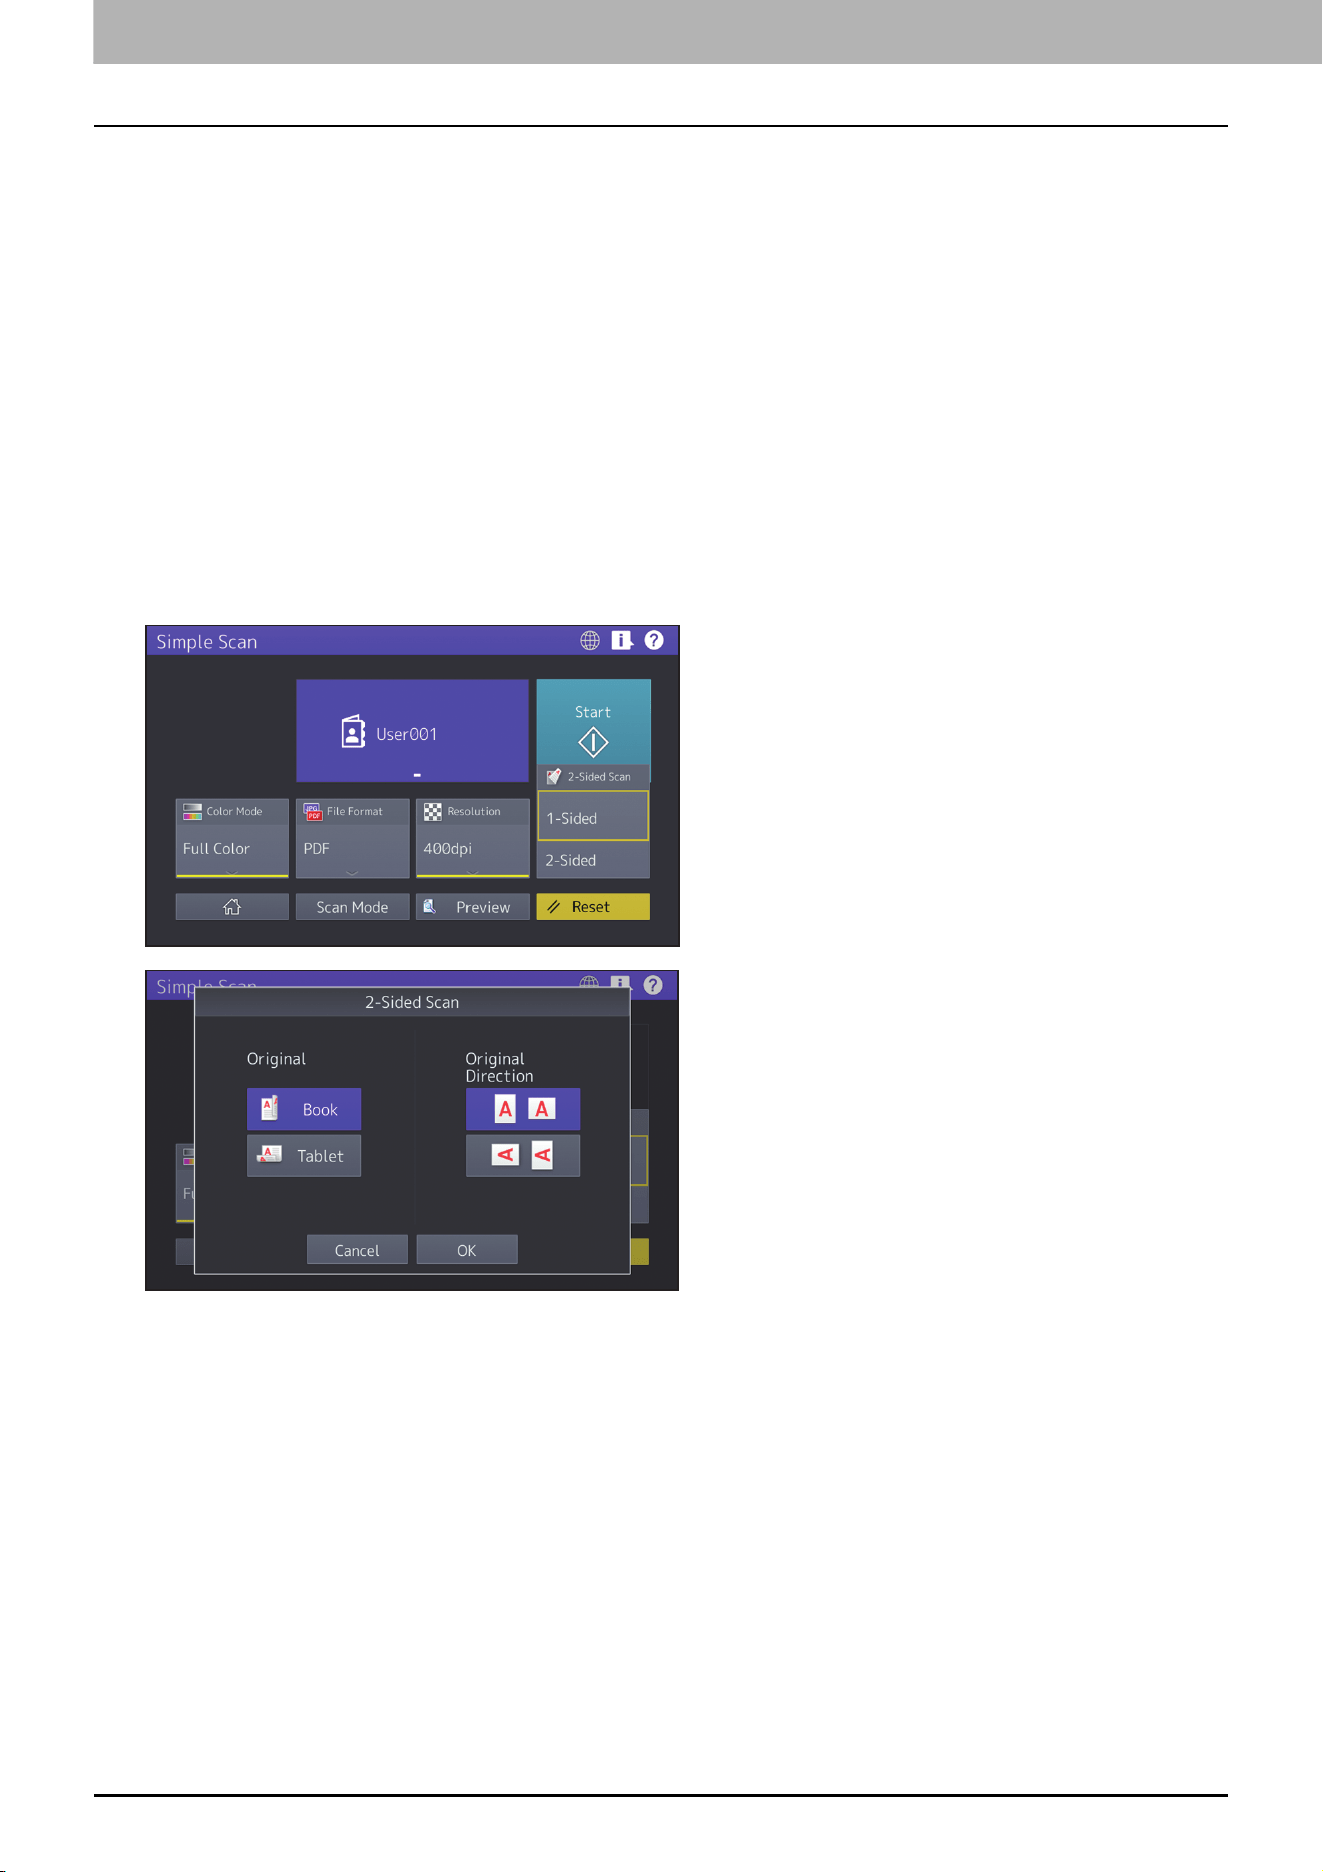
Simple Scan Settings
Color Mode
Specify the color mode.
File Format
Specify the file format.
Resolution
Specify the resolution.
2-Sided Scan
Specify the 2-Sided Scan setting for the original.
Preview
Click this to display the preview of an image scanned after pressing [Start]. When you press [Edit] on the preview
screen, you can change the page order and edit the pages, such as rotating.

3.Scan Functions
14 Previewing Scans
0.Previewing Scans
With the preview feature, you can view your scans on the touch panel before saving or e-mailing them. Follow the
procedure below.
The preview feature is not available with the WS Scan function.
1
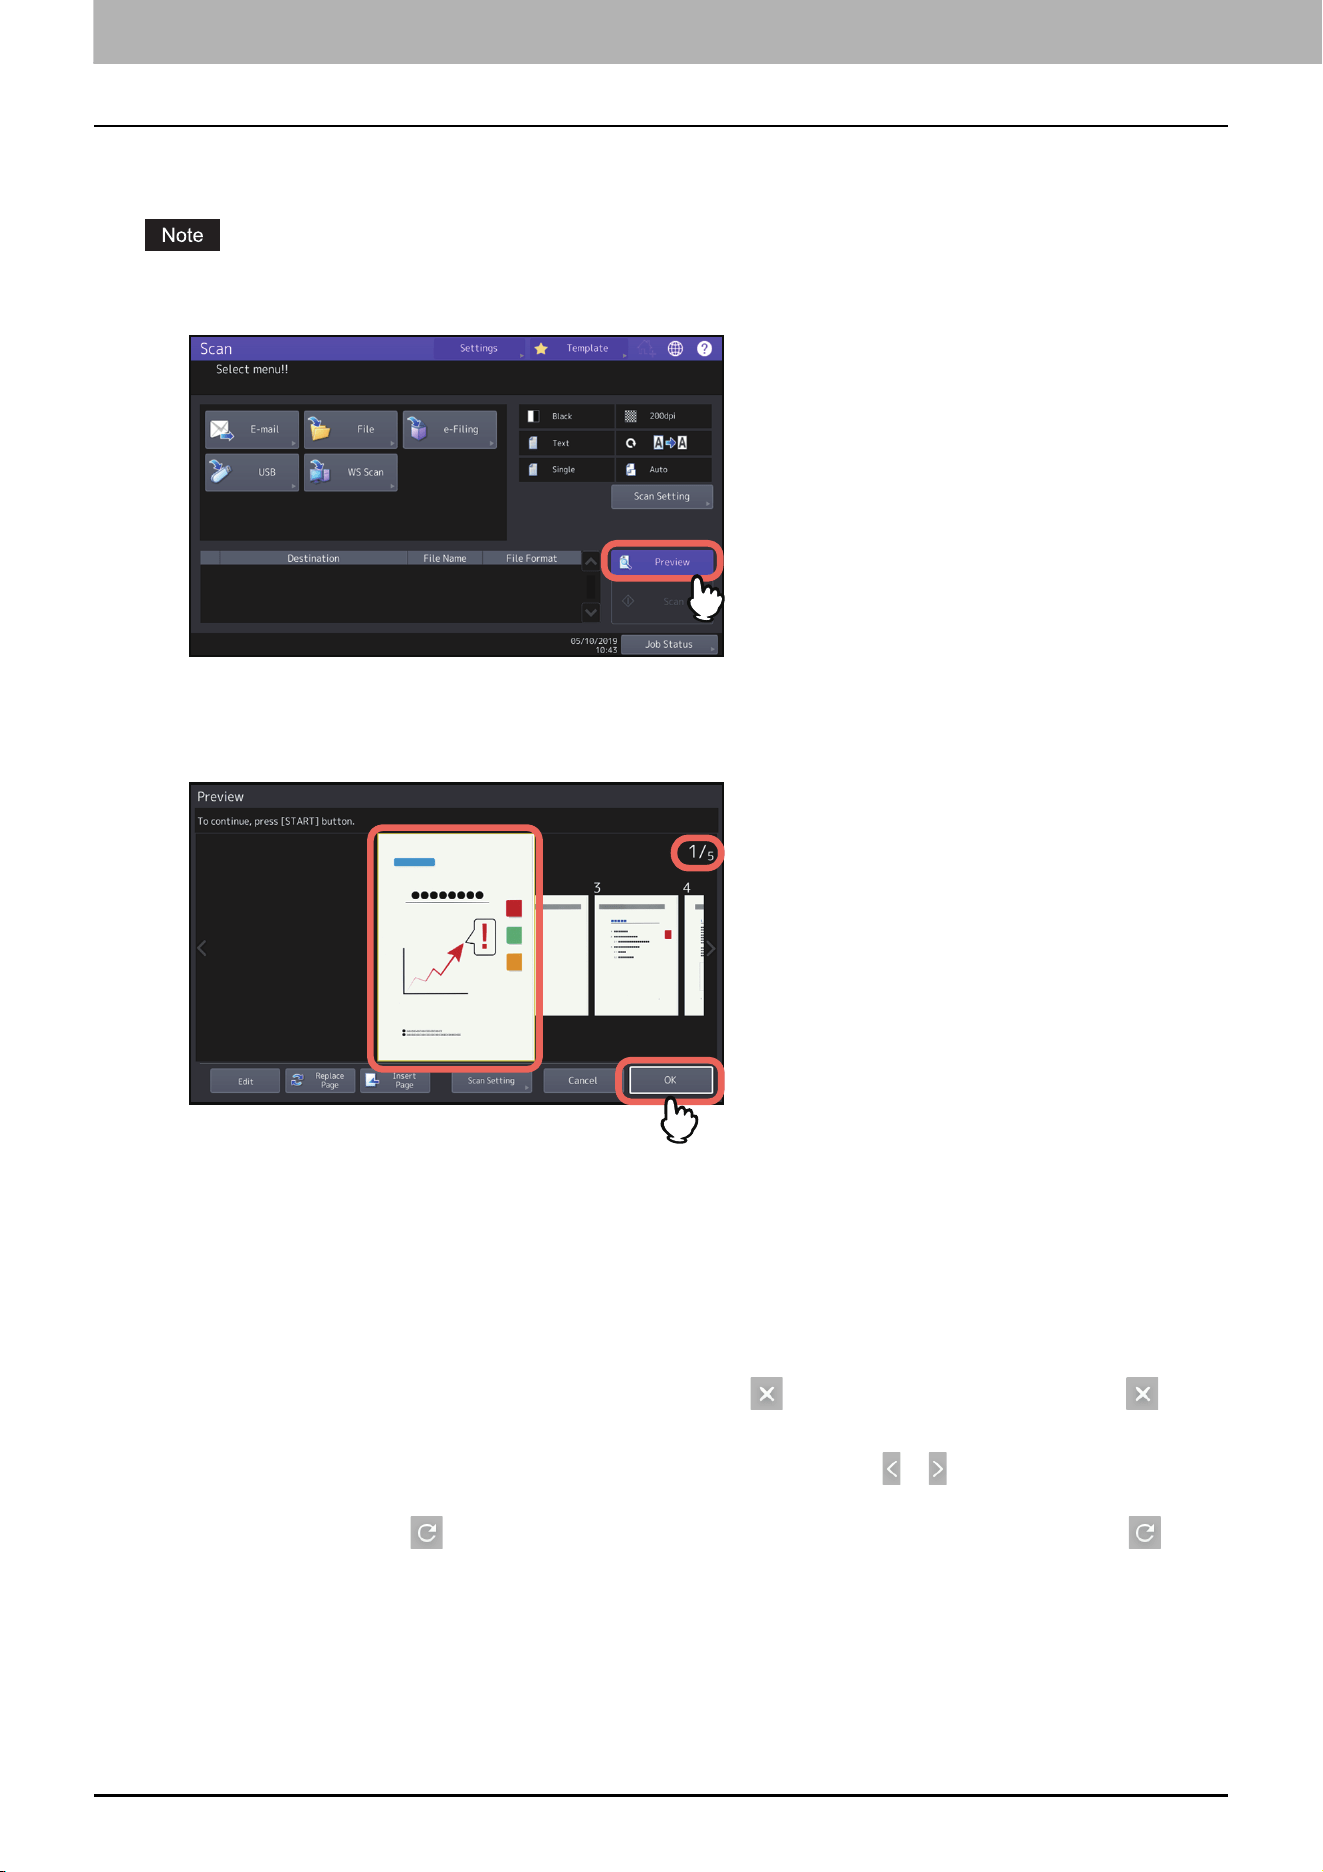
On the Scan menu screen, press [Preview].
2
See the following sections to select the desired function before scanning originals:
3
Carefully check the displayed preview of your scans and the number of pages. To save or e-mail
your scans, press [OK].
The number of pages of your scanned original is displayed in the upper right of the screen.
If you want to scan another original, place it on the original glass or in the ADF, and then press [START] button.
When a page to confirm is selected, it is enlarged and the preview operation, such as the enlargement/
reduction of the display or the replacement/insertion of a page, becomes possible.
To replace the page being previewed with another page, place another original and press [Replace Page].
To insert another scan before the page being previewed, place another original and press [Insert Page].
To delete the page being previewed, press [Edit] and then on the page to be deleted. However, is not
displayed if only one page is being previewed.
To change the order of the pages being previewed, press [Edit] and then or .
When a PDF file is being previewed, its page can be rotated.
Press [Edit] and then on the page to be rotated. The page is rotated by 90 degrees by each time is
pressed.
To change scan settings, press [Scan Setting] on the Scan menu, or press [Option] on the Fax menu.
Scan Functions
Precautions for [File] 15
0.Precautions for [File]
Searching of all folders on network is performed for 5 minutes. Searching is finished if target folders are not found.
When a target folder is not listed in the search result, enter the path of a folder to store the scanned data to
[Network Path].
Searching of all folders on network is performed by using the SMB1.0 protocol. Therefore, servers and client
computers whose SMB1.0 protocol is disabled may not be found.
When you select [SMB] for a protocol, enter the network path, login user name and password then press , so
that you can select the folder.
When you select [SMB] for a protocol, enter the login user name and password then press , so that you can
search all the servers and client computers connected to the equipment.
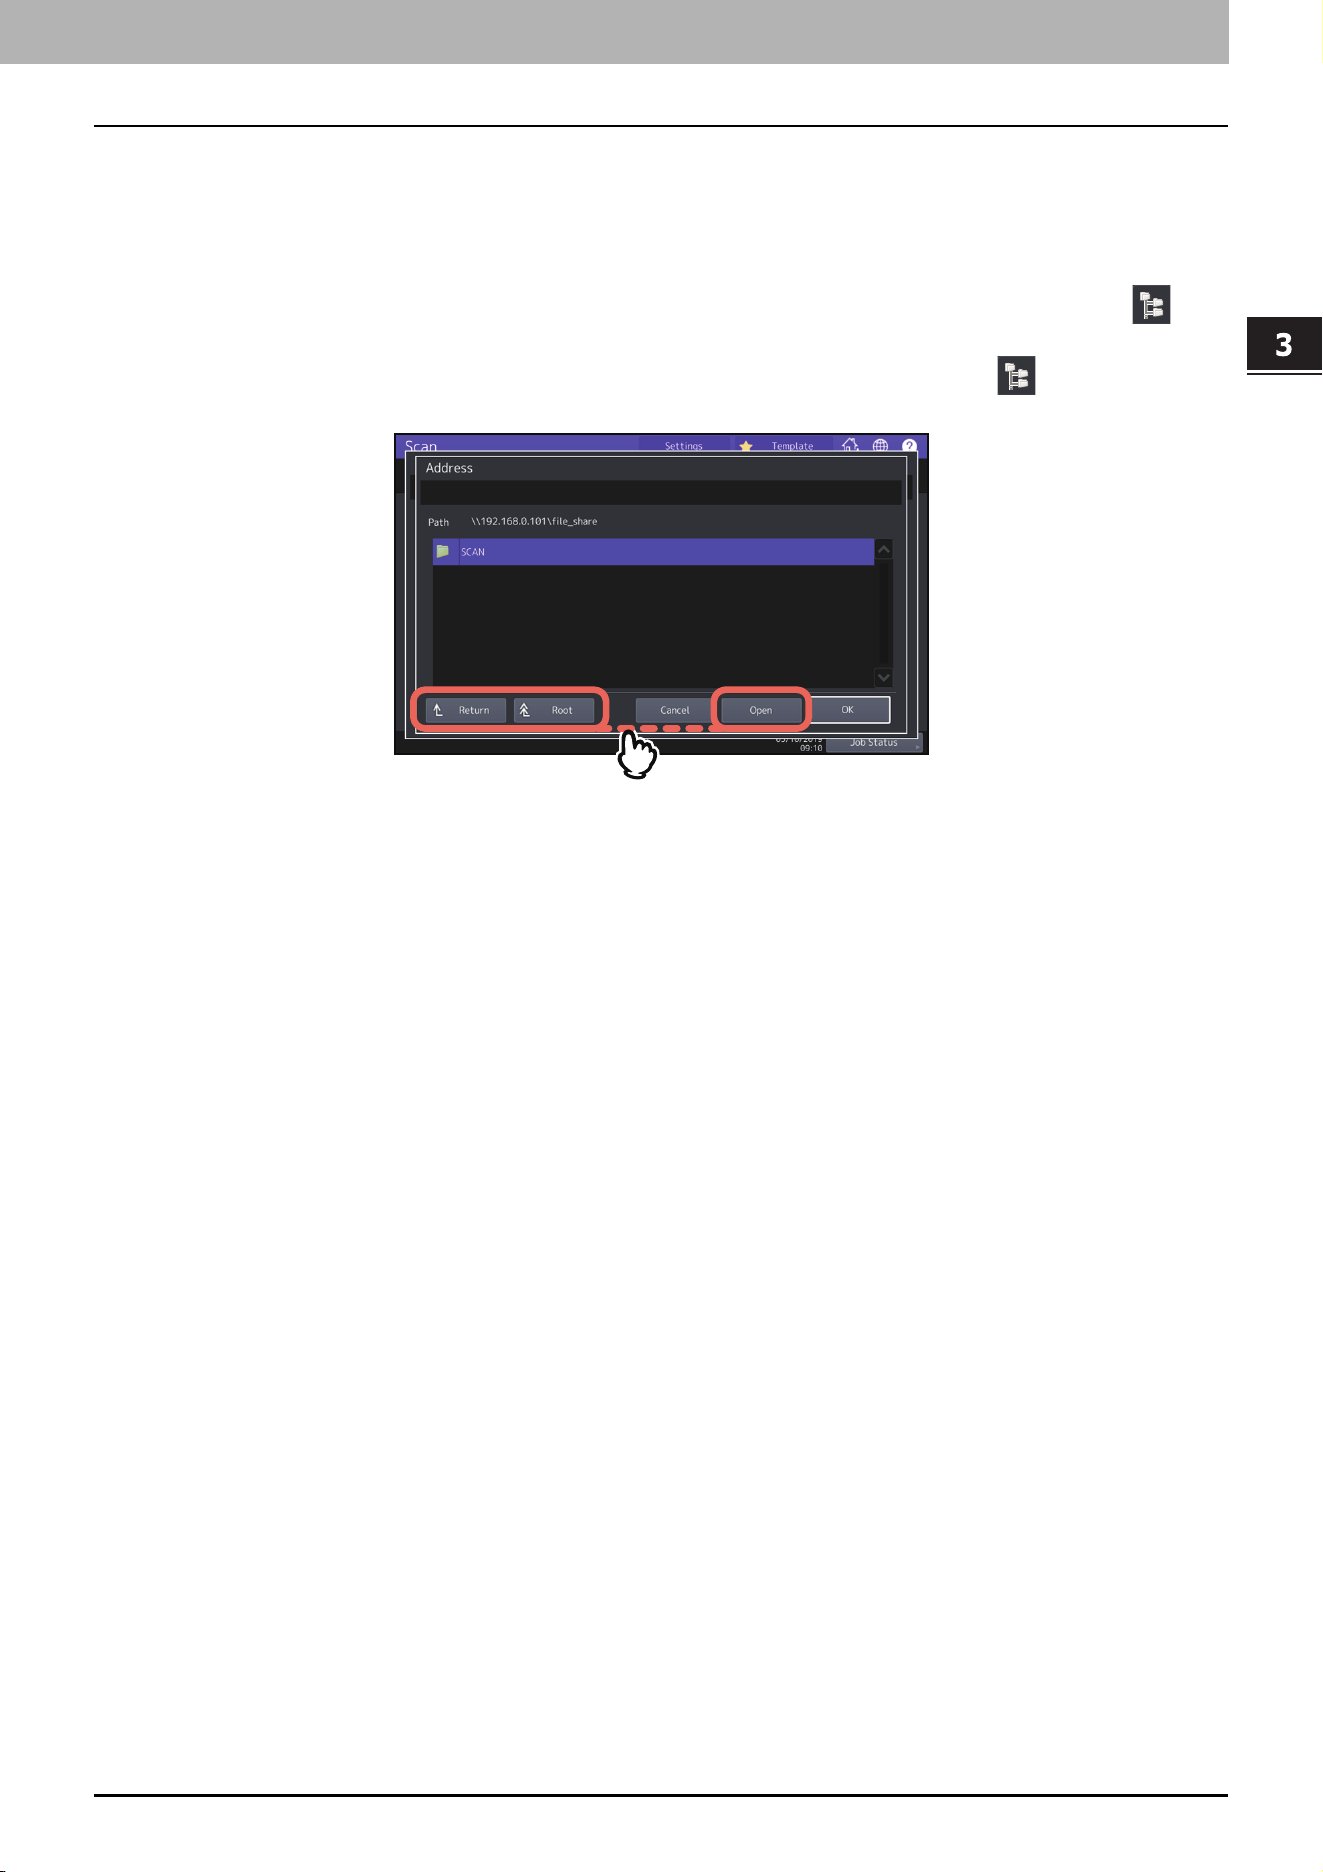
- [Open]: Press this button to expand the selected folder and move down to the next lower layer.
- [Return]: Press this button to move up to the next higher layer.
- [Root]: Press this button to move up to the top of the search result screen of all the servers and client computers
connected to the equipment.

16 Specifying E-mail Addresses
0.Specifying E-mail Addresses
When an individual recipient is selected from the address book, confirm that the selected one is displayed on the
recipient list on the left side of the screen.
Scan Functions
Reducing the ADF scan noise 17
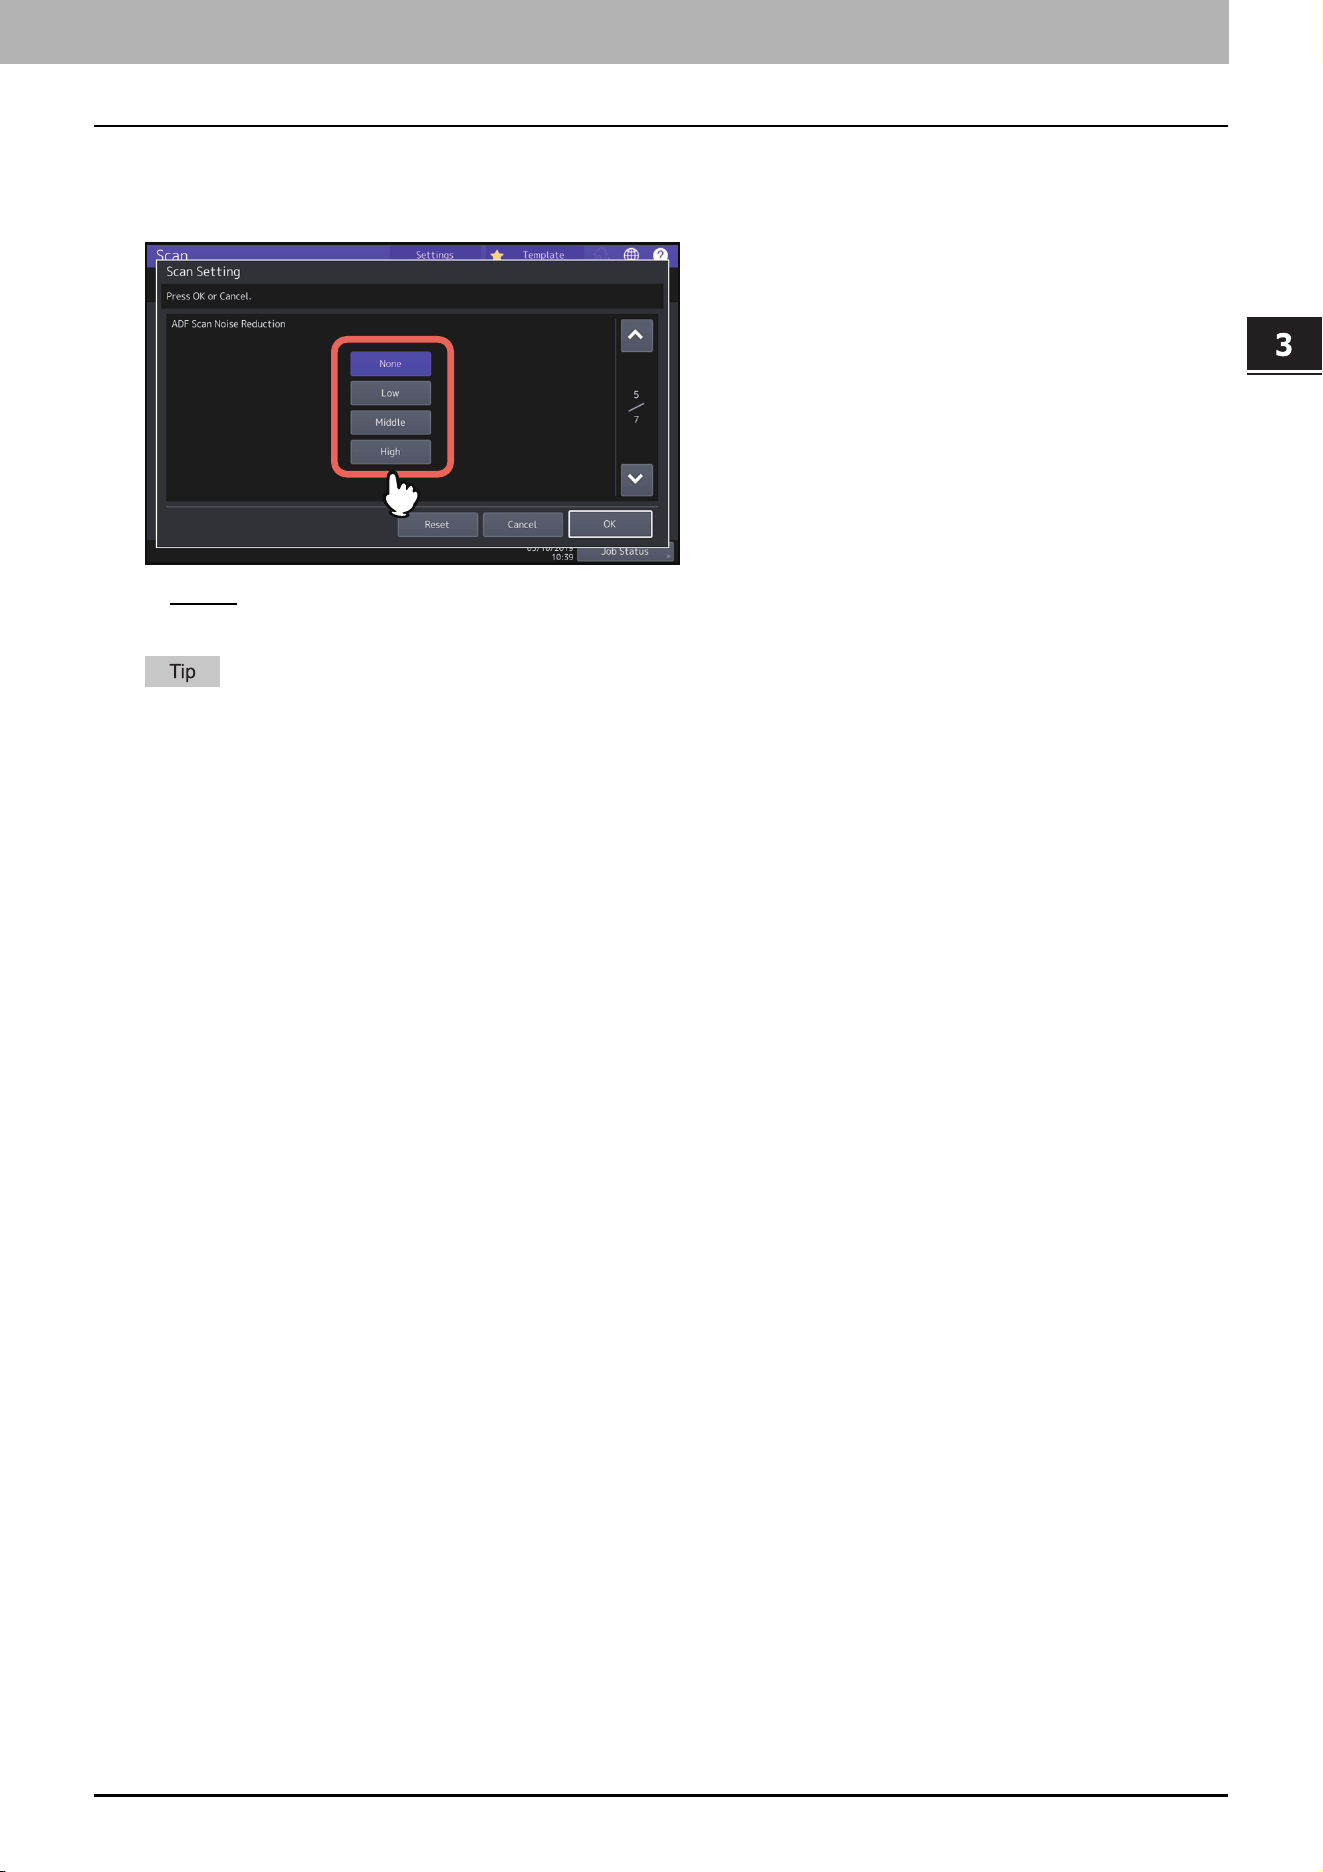
0.Reducing the ADF scan noise
You can set the noise reduction level for scanning originals with the ADF. Press [Scan Setting] and then set the noise
reduction level in [ADF Scan Noise Reduction]. Use this function if scan noise is conspicuous due to fine dust at
scanning.
[None] — Select this option to disable the reduction function.
[Low, Middle, High] — Select this option to use the reduction function.
Fine lines other than scan noise may become faint if you set the scan noise reduction level higher.

3.Scan Functions
18 Reducing the ADF scan noise

4.Fax Functions

20 Precautions for Fax Functions
0.Precautions for Fax Functions
When an individual recipient is selected from the address book, confirm that the selected one is displayed on the
recipient list on the left side of the screen.
Fax Functions
Displaying the preview before sending a fax 21
0.Displaying the preview before sending a fax
Before sending a fax, you can check the image on the touch panel with this preview function.
When dialing on-hook transmission or off-hook transmission, you cannot use the preview function.
1
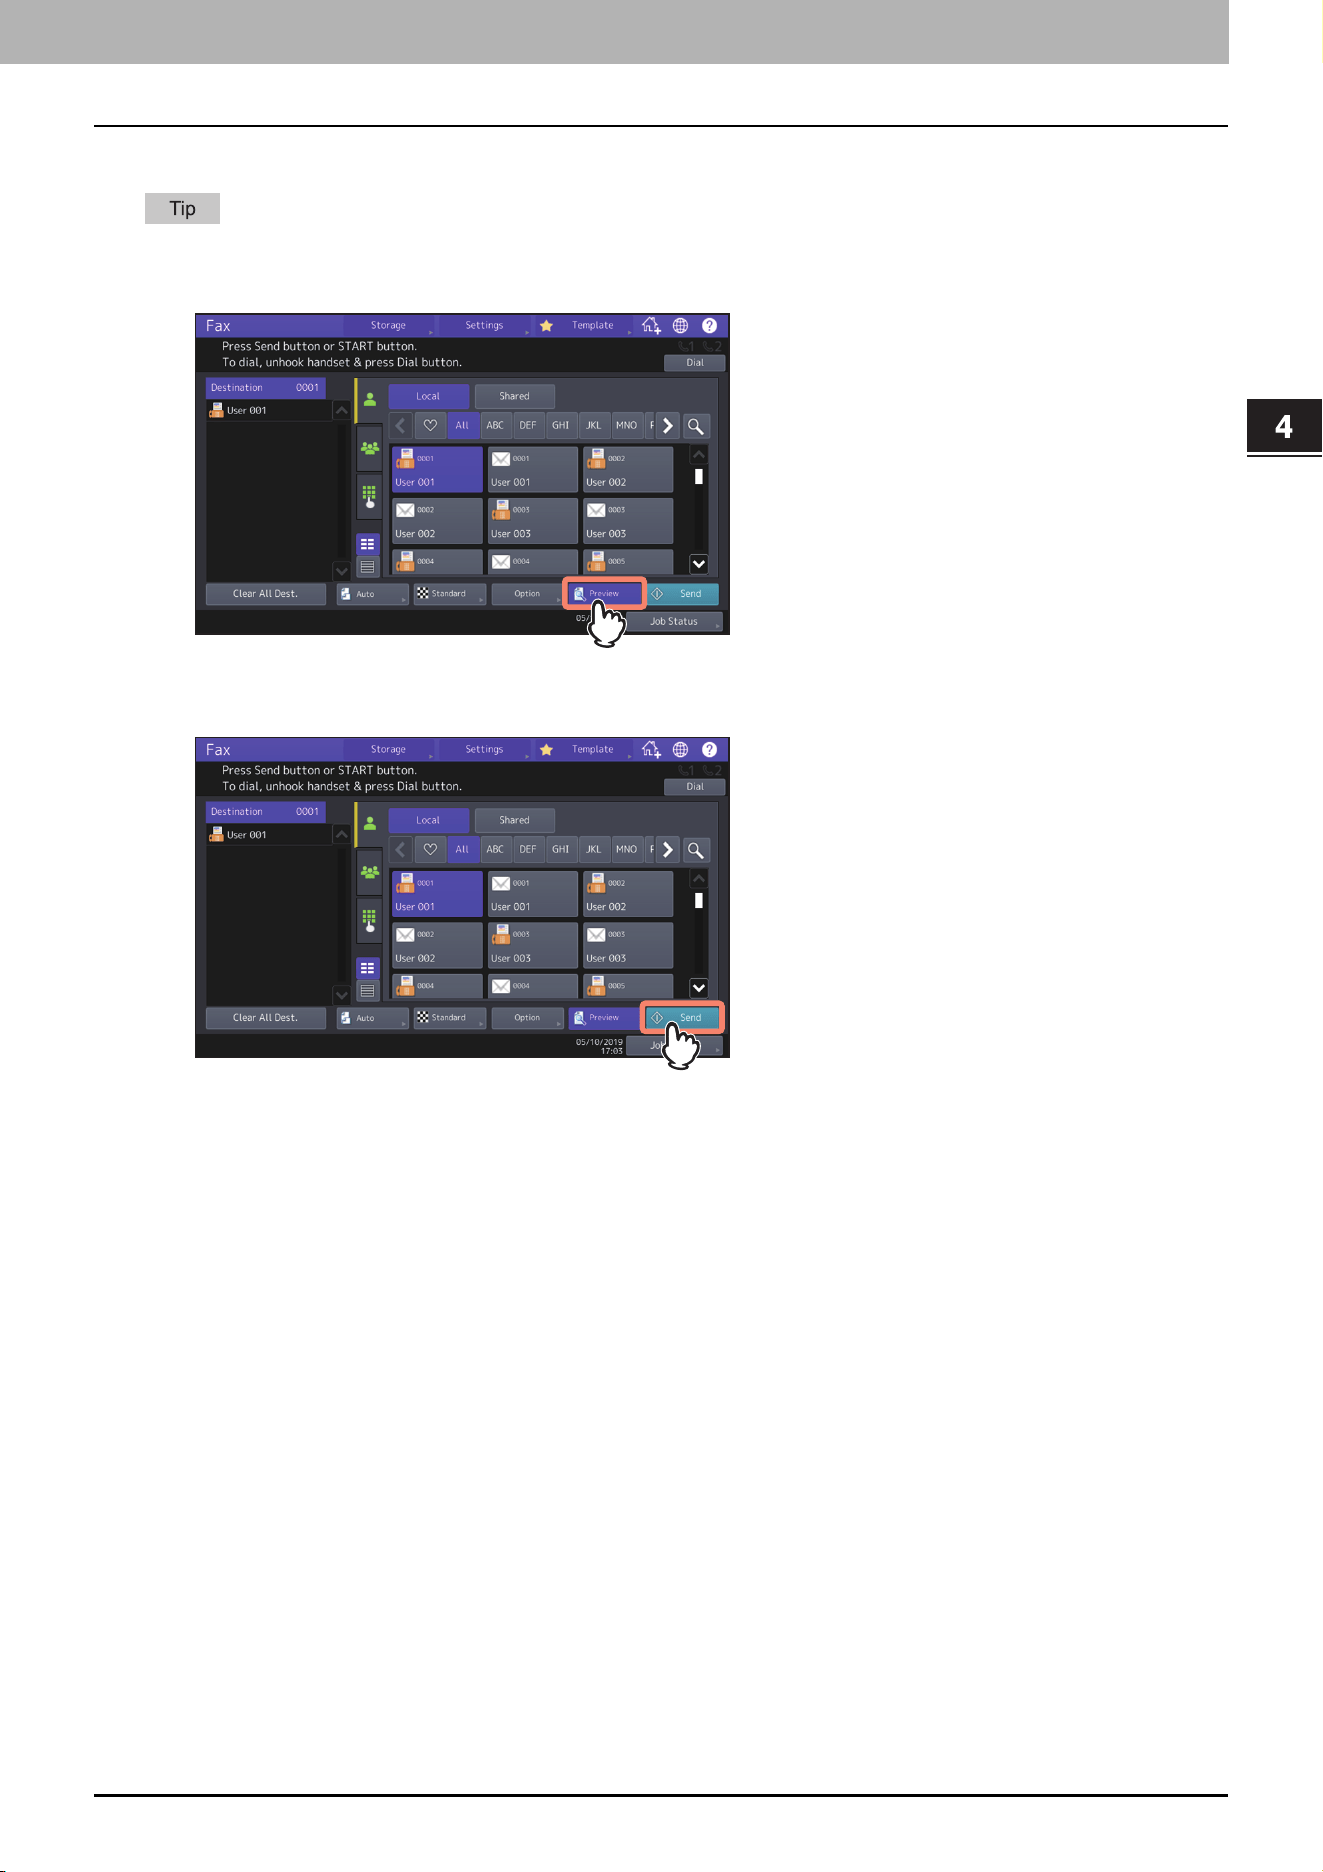
Press [Preview] on the fax menu.
To use the preview function, press [Preview] before pressing [Send].
2
Specify the recipient and set the transmission conditions. Press [Send].
For details about how to specify the recipient and set the transmission conditions, see the following pages.
4.Fax Functions
22 Displaying the preview before sending a fax
3
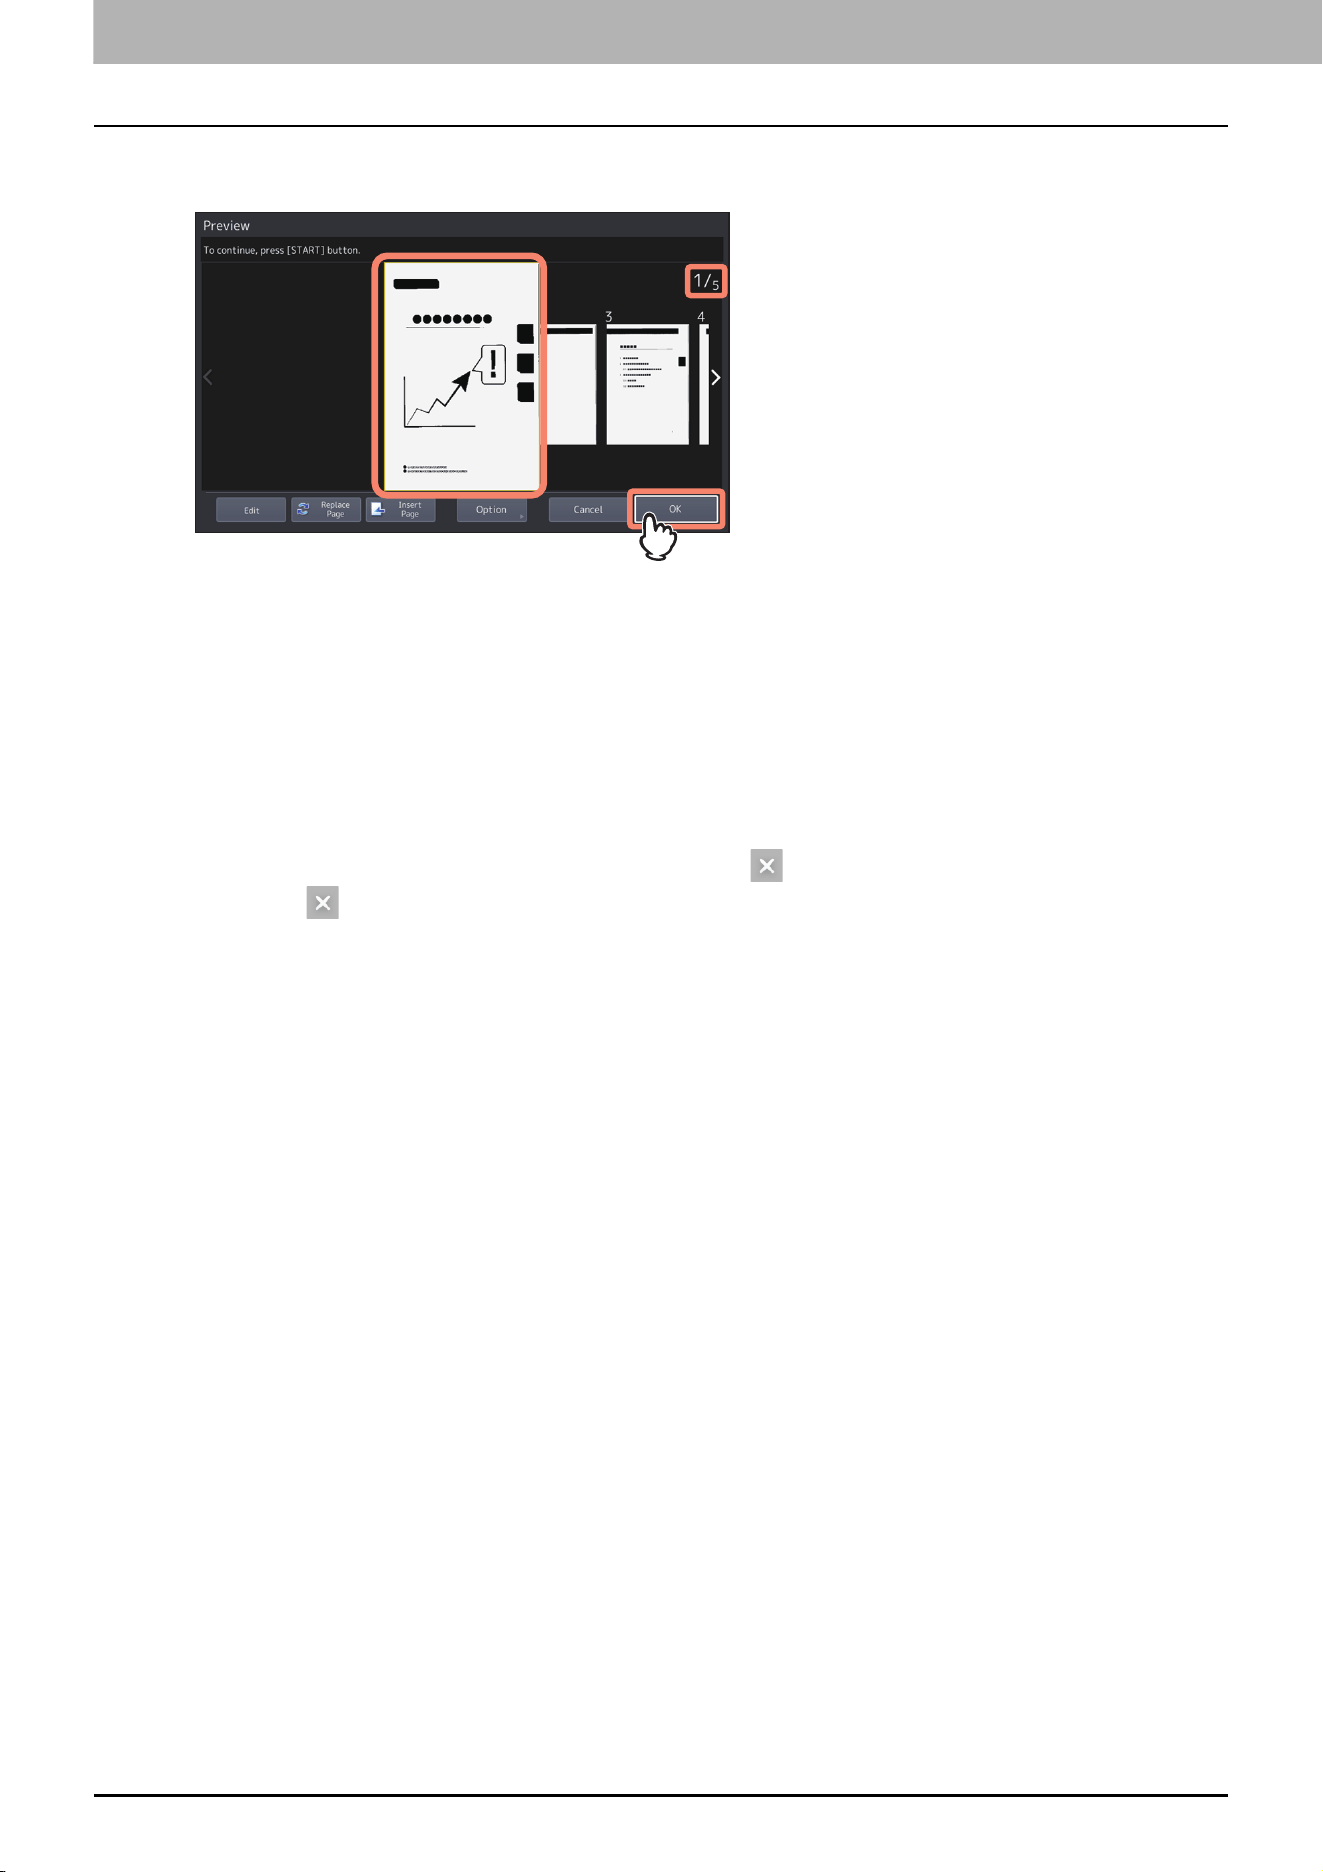
Carefully check the displayed preview of your scans and the number of pages. To save or E-mail
your scans, press [OK].
The number of pages of your scanned original is displayed on the upper right of the screen.
If you want to scan another original continuously, place it on the original glass or in the ADF, and then press
the [START] button.
When the page to confirm is selected, it is enlarged and the preview operation, such as the enlargement/
reduction of the display or the replacement/insertion of a page, becomes possible.
To replace the page being previewed with another page, press [Replace Page], place a new original and press
[OK].
To insert another scan before the page being previewed, press [Insert Page].
To delete the page being previewed, press [Edit] and then on the page to be deleted.
However, is not displayed if only one page is being previewed.
To change the setting, press [Option].
Fax Functions
Displaying the preview of a received fax 23
0.Displaying the preview of a received fax
You can confirm the contents on the touch panel before carrying out the printing of a fax received by means of the
[Hold (Fax)], [Secure Rx (Line 1)] and [Secure Rx (Line 2)] option.
1
Press [Print] on the Home screen.
The print screen is displayed. If you leave the screen unattended for the auto clear setting time (45 sec. by
default), the screen returns to the default one automatically.
2
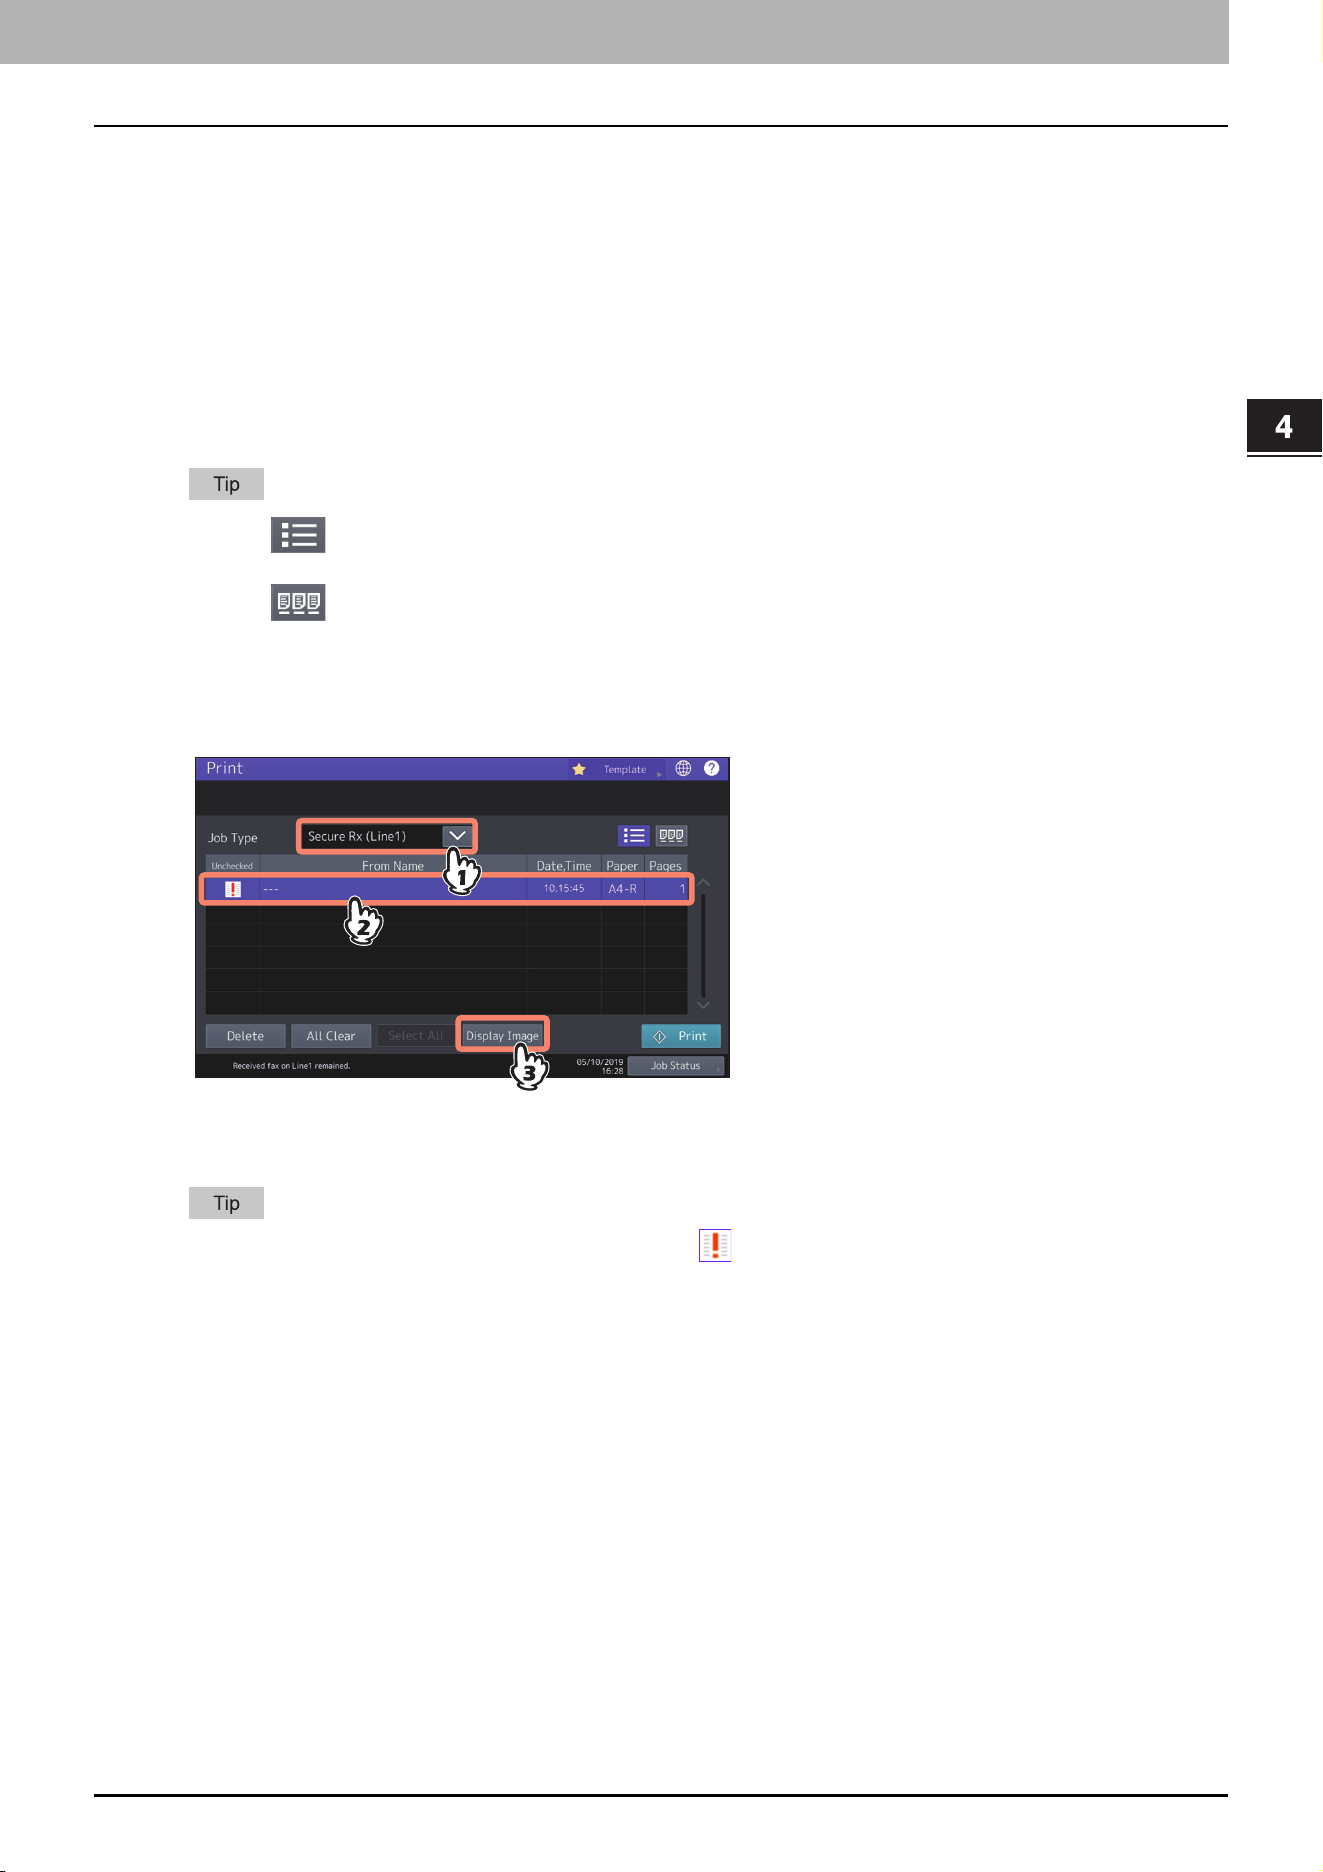
Select [Hold (Fax)], [Secure Rx (Line 1)] or [Secure Rx (Line 2)] for Job Type.
If the equipment is running in the High Security mode, [Secure Rx (Line 1)] and [Secure Rx (Line 2)] are not
displayed.
When is pressed, received fax jobs are displayed in the list.
To delete a received fax from the list, select the received file subject to delete and press [Delete].
When is pressed, received fax jobs are displayed in thumbnail images.
To delete a received fax from the thumbnail, select the thumbnail image subject to delete and press [Delete].
The entry of the password is required at the first operation of any of [Delete], [Print], [Display Image] or the
thumbnail images.
3
Press [Display Image].
4
Enter the password for printing secure receive fax jobs.
After the password is entered and then [OK] is pressed, mark in the Unchecked field disappears. When the
screen is shifted to another one and then is returned to this one, the entry of the password is required when
preview or printing is carried out.
4.Fax Functions
24 Displaying the preview of a received fax
5
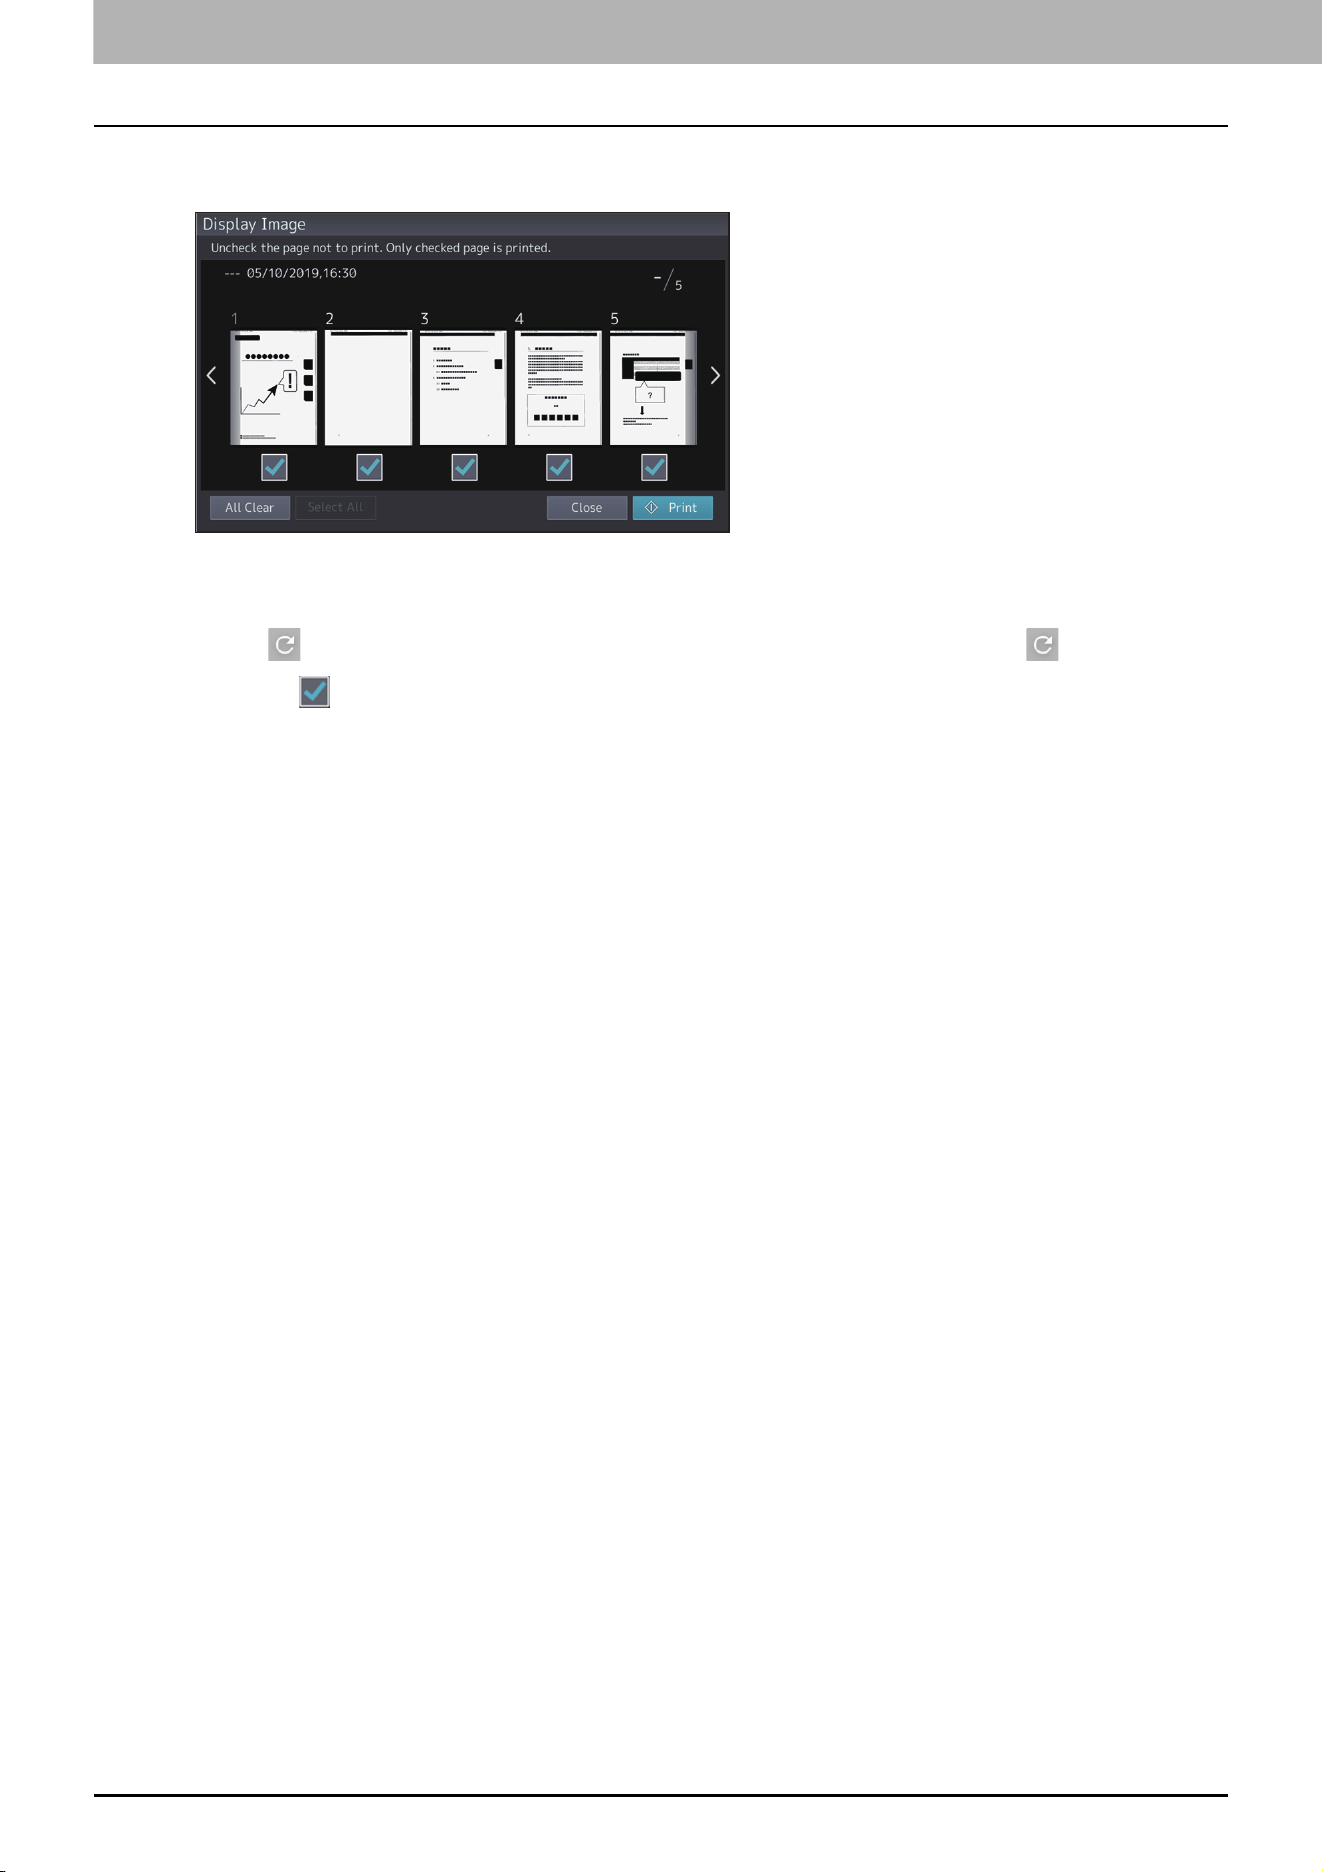
When the preview is displayed, confirm the fax image and the number of pages. To print a
received fax as it is, press [Print]. Printing starts.
When a page to confirm is selected, it is enlarged and the preview operation, such as the enlargement/
reduction of the display or the rotation of the page, becomes possible.
Press on the page to be rotated. The page is rotated by 90 degrees by each one time is pressed.
Uncheck of the pages which will not be printed.
Fax Functions
Setting up the Cover Sheet 25
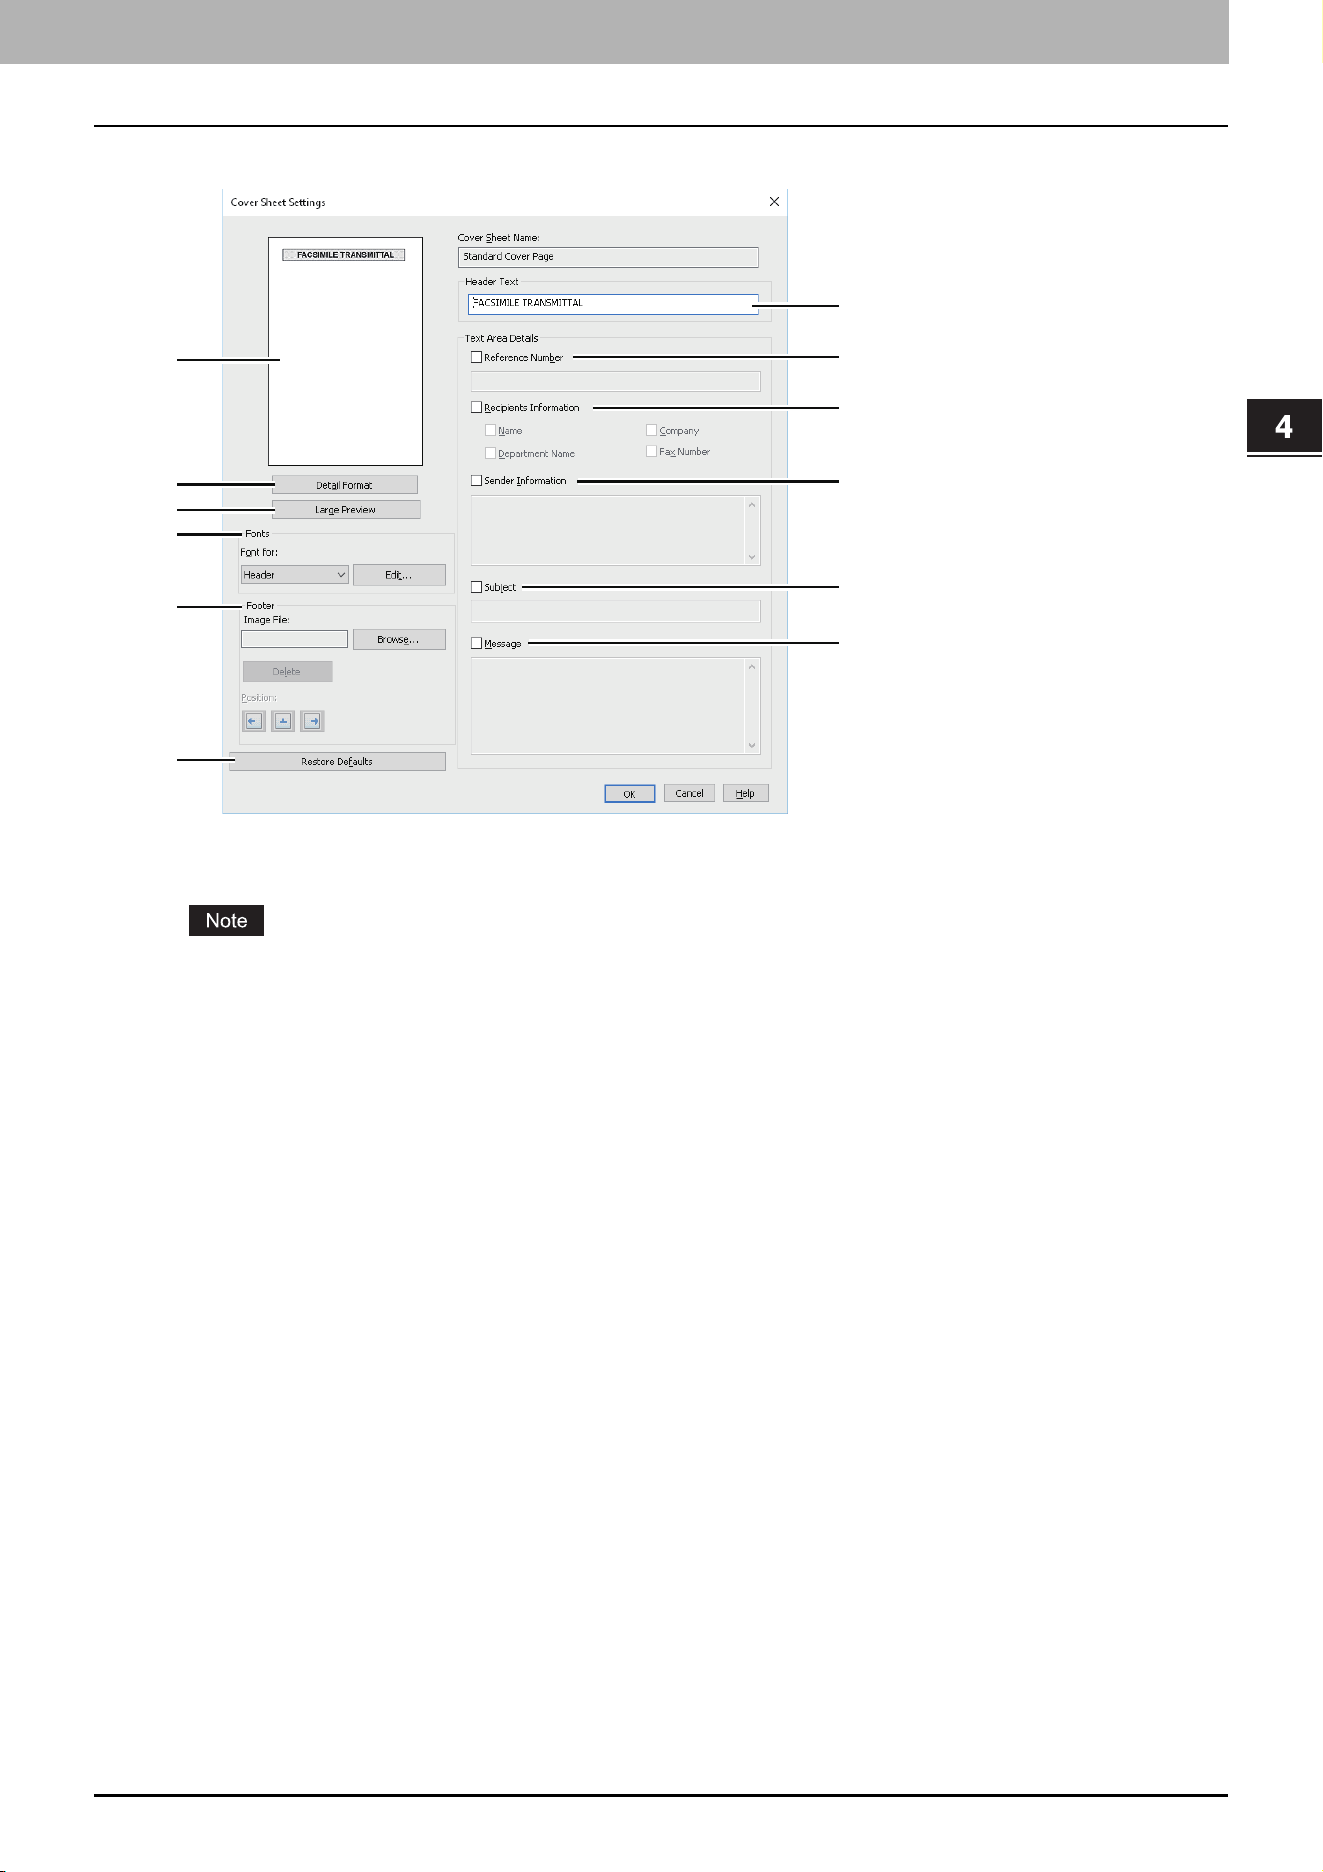
0.Setting up the Cover Sheet
You can set the content of the cover sheet to be attached to a fax.
1. Preview
The image of the cover sheet can be previewed. You can check the layout of the character strings and images.
Depending on the line feed positions, the preview may not duplicate the actual print result of the cover sheet,
but is used for checking its layout.
If the contents are on more than one page, such as the many line feeds included in “Sender Information” or
“Message”, only the first one page is displayed in the preview.
2. [Simple Format]/[Detail Format] switch button
Switch the display format for the description of the sending information on the cover sheet. By selecting [Detail
Format], ruled lines appear. By selecting [Simple Format], no ruled lines appear.
[Simple Format] is set as the default. [Detail Format] is displayed on the button.
3. [Large Preview]
Click this to display the cover sheet on another screen. You can enlarge the preview or display another page when
there are multiple pages.
4. Fonts
Select the font to be used for the cover sheet. Select the section for which the font is used, and then click [Edit] to
select the type, style and size of the font.
- Header — Set the font to be used for the header of the cover sheet.
- Title — Set the font to be used for the title such as Reference Number, Recipients Information, Sender
Information, Subject or Message.
- Body — Set the font to be used for the body of each title.
5. Footer
Select an image file to be attached to the footer of the cover sheet.
- [Browse] — Click this to select an image file to be attached to the footer within 1 MB.
- [Delete] — Click this to delete the attached image file.
- Position — Select the position of the image file from the left, center and right.
6. Header Text
Enter a title to be displayed on the header of the cover sheet; it can be up to 63 characters.
6
7
8
9
10
11
4
1
5
12
2
3

4.Fax Functions
26 Setting up the Cover Sheet
7. Reference Number
Check this to have a reference number identifying the fax to appear on the cover sheet. Enter the reference
number in the text box.
8. Recipient’s Information
Check this to have the recipient’s information appear on the cover sheet. Select the desired information among
the options below.
- Name — Check this to have the recipient name appear on the cover sheet.
- Company — Check this to have the recipient company name appear on the cover sheet.
- Department Name — Check this to have the recipient department name appear on the cover sheet.
- Fax Number — Check this to have the recipient fax number or Email address appear on the cover sheet.
9. Sender Information
Check this to have the sender’s information appear on the cover sheet. You can enter the information in up to 500
characters.
10. Subject
Check this to have a subject appear on the cover sheet. You can enter the subject in up to 40 characters.
11. Message
Check this to have a message appear on the cover sheet. You can enter the message in up to 500 characters.
12. [Restore Defaults]
Click this to restore the settings to make the equipment as it was at the time of factory shipment.

5.Print Functions

28 USB Direct Printing
0.USB Direct Printing
Notes on printing
USB Direct Printing requires the USB Direct Print setting to be enabled on TopAccess. For details, refer to the
TopAccess Guide.
You cannot specify which page(s) of the selected file to print. All pages are to be printed.
USB Direct Printing supports the printing of PDF files whose versions are from 1.3 to 1.7.
If printing of an encrypted PDF file has failed, perform this via a client computer.
USB Direct Printing supports an encrypted PDF file which is created while “40-bit RC4”, “128-bit RC4” or “128-bit
AES” is selected in the encryption level.
While [ON] is set in [PDF Prioritize Original Size], printing of a PDF file is carried out by means of the paper size
specified in the original PDF file. If the size defined in the PDF file is not supported in the equipment, it is printed as
a custom paper size. (If the defined size is outside the supported range, the width and the height are automatically
converted into one within the range.) When you want to print PDF files with paper placed in a drawer, select it on
the touch panel. If the paper size placed in the drawer is smaller than the one defined in the PDF file, a part of
images may not be printed.
For printing the PRN files, the page description languages supported by USB Direct Printing are PostScript 3, PCL5e,
PCL5c, PCL6 and XPS. In the case of a PRN file, the setting of this equipment may take a priority. Check the setting
condition in the printing setting screen before carrying out printing.
Do not turn on the equipment when a USB storage device is connected to the port.
The USB storage device should meet the following requirements:
- FAT16 and FAT32 formats
- Single-partition (USB media with multiple partitions are not supported.)
However, some of the devices may not be used in this equipment, even though these requirements have been met.

Print Functions
Email Direct Printing 29
0.Email Direct Printing
Email direct printing can be used only when [Auto] is set for the Email Direct Print option in this equipment.
You can print a PDF, JPEG or XPS file attached to an email by sending it to this equipment using the email client
software.
For details, refer to the TopAccess Guide.
If no files are attached to the email received via Email direct printing or only a TIFF file is attached, printing will be
performed as Email printing.
If any files other than a PDF, JPEG or XPS one are attached to an email received via Email direct printing, printing is
not performed and then is terminated.
An email with an encrypted PDF file (secure PDF file) attached cannot be printed by Email direct printing.
If an available number of the sheets to output has been set by an administrator and when the number of the
outputted sheets reaches the set one, files received via Email direct printing will be deleted.
For details about the quota setting of TopAccess, ask your administrator.
Printing a file using the email client
This equipment accesses an email server at certain intervals and checks the receiving of newly arriving emails.
When [Auto] is set for Email Reception Setting, newly arriving emails are automatically received and then printed.
Email Reception Setting can be changed via TopAccess.
For details, refer to the TopAccess Guide.
When you send an email message to this equipment to print a file, make sure that it is done in a plain text format. If
you send an email message in an HTML format, this equipment prints the HTML source code of the message.
A header and message body of an email are printed when the Enable Print Header and the Enable Print Message
Body options are set by [Enable].
The procedure below gives an example of printing using the standard email application installed in Windows 10.
1
Open the email application.
2
Select [New mail] from the menu.
3
Enter the email address of the equipment in the To:line.
4
Enter text in the Subject line or leave the Subject line blank.
5
Enter text in the body field.
6
Attach file you want to print.
7
Send the email.
5.Print Functions
30 Email Direct Printing
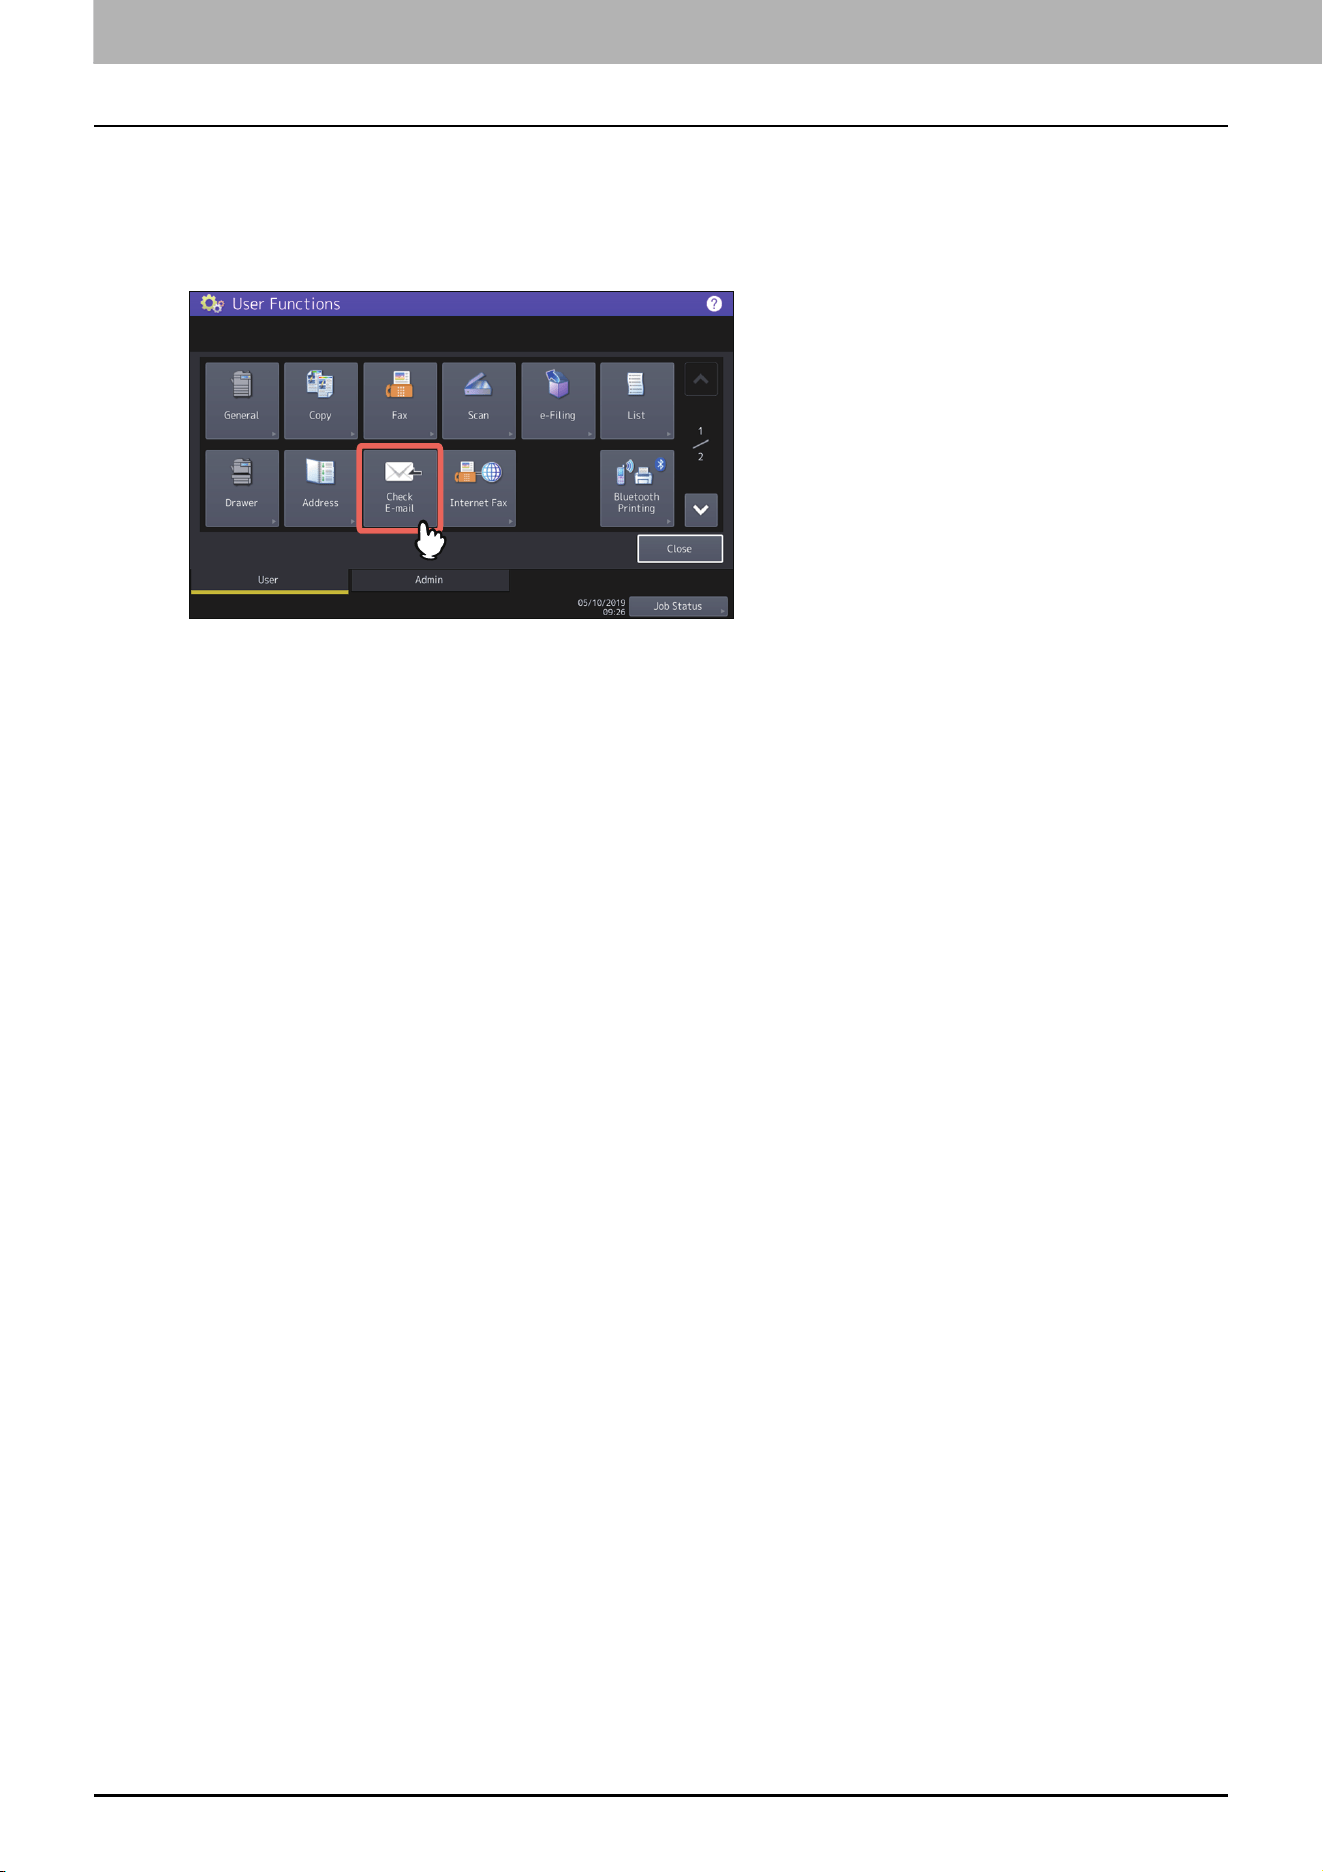
When [Manual] is set for Email Reception Setting
A file sent to this equipment by Email direct printing can be printed by operating from the Home screen.
1
Press [User Functions -User-] on the Home screen on the touch panel.
2
Press [Check E-mail] on the [User] tab.
The confirmation of newly arriving emails starts. When emails sent by Email direct printing are received, “Receiving
E-mail” is displayed on the screen. When “New E-mail Received” is displayed, printing of emails sent by Email direct
printing starts.
When newly arriving emails are not found, “Currently No E-mail” is displayed.

6.User Functions

32 User
0.User
Copy
You can change the initial settings (defaults) for copy jobs.
Scan
You can change the initial settings (defaults) for scan jobs.
Drawer
Setting the paper type
Do not use [Usertype].
Item name Description
Omit Blank Page Press the button of the desired setting for whether or not to omit blank pages.
Item name Description
Omit Blank Page Press the button of the desired setting for whether or not to omit blank pages.

User Functions
Admin 33
0.Admin
Managing the option licenses
You can view product information, such as the license ID for certain options. If necessary, you can install these options
on the equipment and activate licenses required for applications, user interface customization, and system options.
You can also deactivate or export the licenses.
P.33 “Viewing product information”
P.34 “Viewing license information”
P.35 “Installing an option”
P.37 “Activating the license”
P.41 “Deactivating the license”
P.42 “Exporting the license”
For installation and activation, be sure to follow the service technician’s instructions.
Viewing product information
1
On the License Management screen, press [Details] for the option you want to confirm product
information.
The License Details screen is displayed.
2
After you confirm the product information, press [Close].
You will be returned to the License Management screen.
The following information is displayed.
Product name: Option name
License ID: License ID
Date: The date and time of when the option has been installed
Serial No.: Serial number of option
6.User Functions
34 Admin
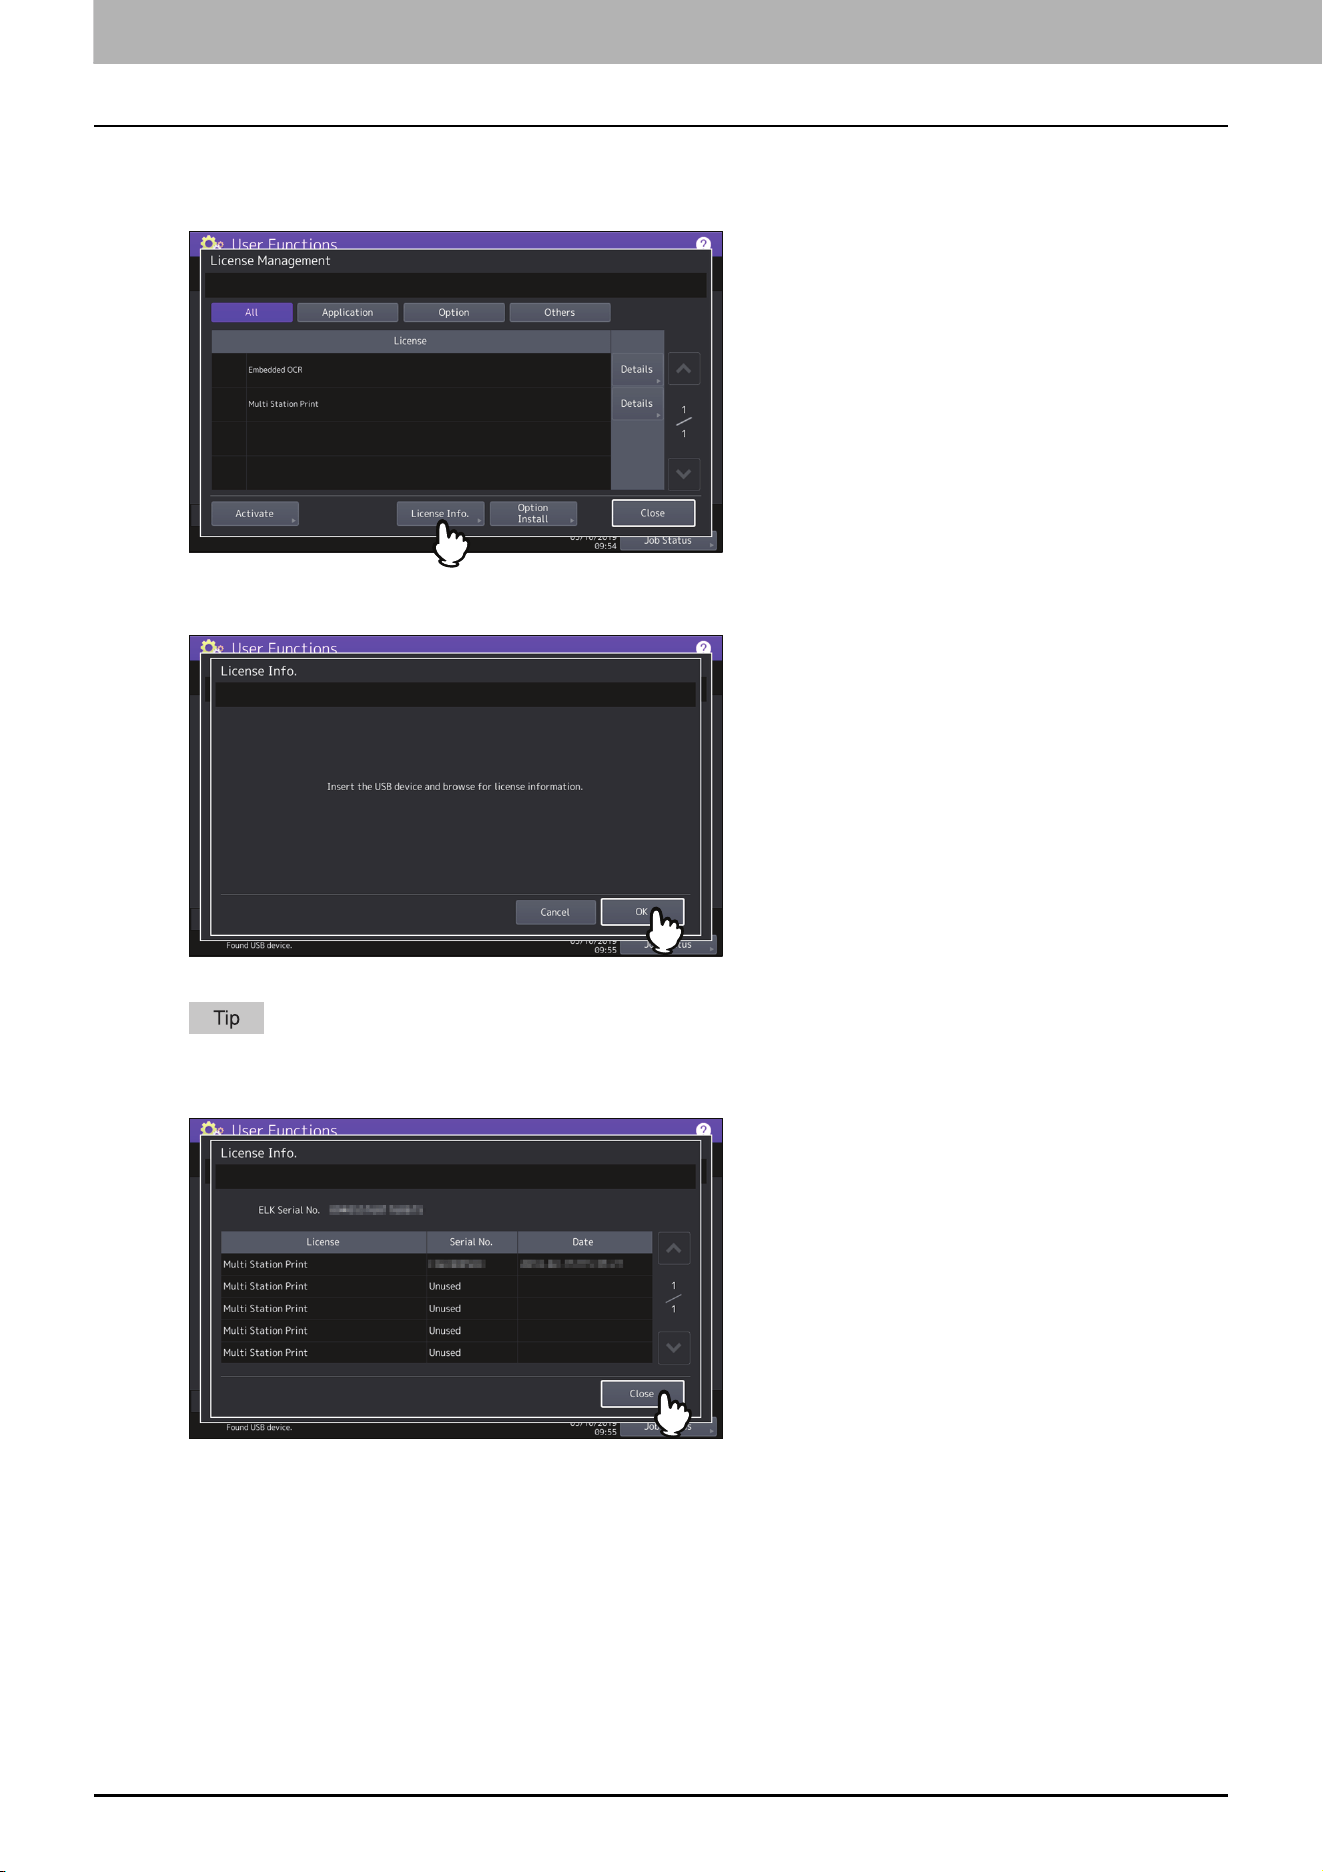
Viewing license information
1
On the License Management screen, press [License Info.].
2
Connect your USB storage device to the USB port on the equipment, and press [OK].
For the location of the USB port on the equipment, refer to the Quick Start Guide “Chapter 1: PREPARATIONS”.
3
After you confirm the license information, press [Close].
6.User Functions
Admin 35
User Functions
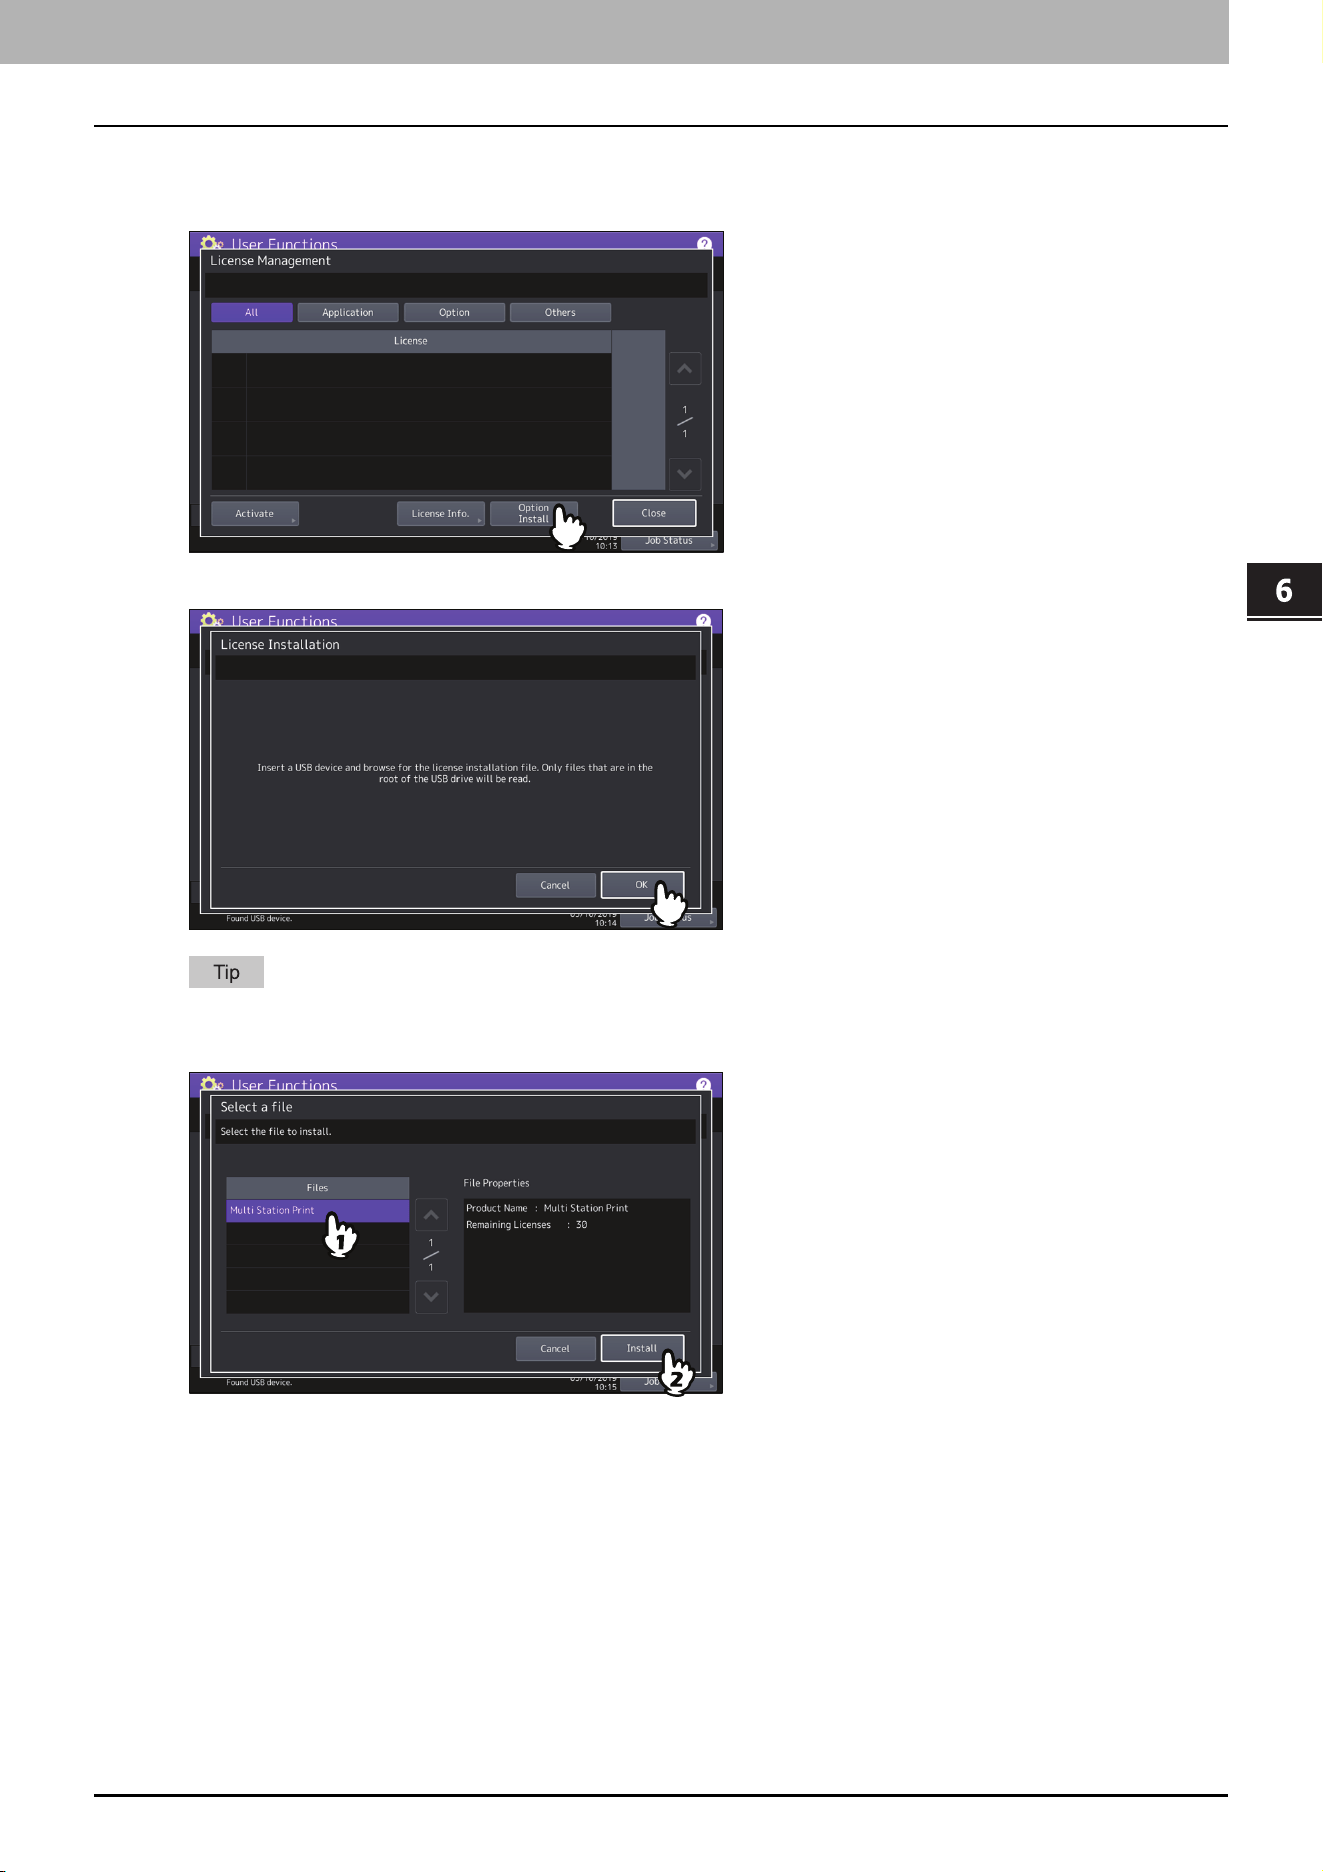
Installing an option
1
On the License Management screen, press [Option Install].
2
Connect your USB storage device to the USB port on the equipment, and press [OK].
For the location of the USB port on the equipment, refer to the Quick Start Guide “Chapter 1: PREPARATIONS”.
3
Select the option that you want to install, and press [Install].

6.User Functions
36 Admin
4
Press [Yes].
Do not remove the USB storage device until the data transfer is complete. Removing the device while data are
being transferred could destroy them or cause a malfunction of the equipment.
5
When the installation is complete, press [OK].
If the installation fails, the message “The installation failed. Do you want to retry?” will be displayed on the
Caution screen. In this case, press [Yes] to perform the installation again.
6
Remove the USB storage device from the USB port on the equipment.
After the installation is complete, it is necessary to reboot the equipment. When the message “Reboot the
machine” is displayed on the touch panel, turn the power of the equipment OFF and then back ON by using the
[POWER] button on the control panel.
6.User Functions
Admin 37
User Functions
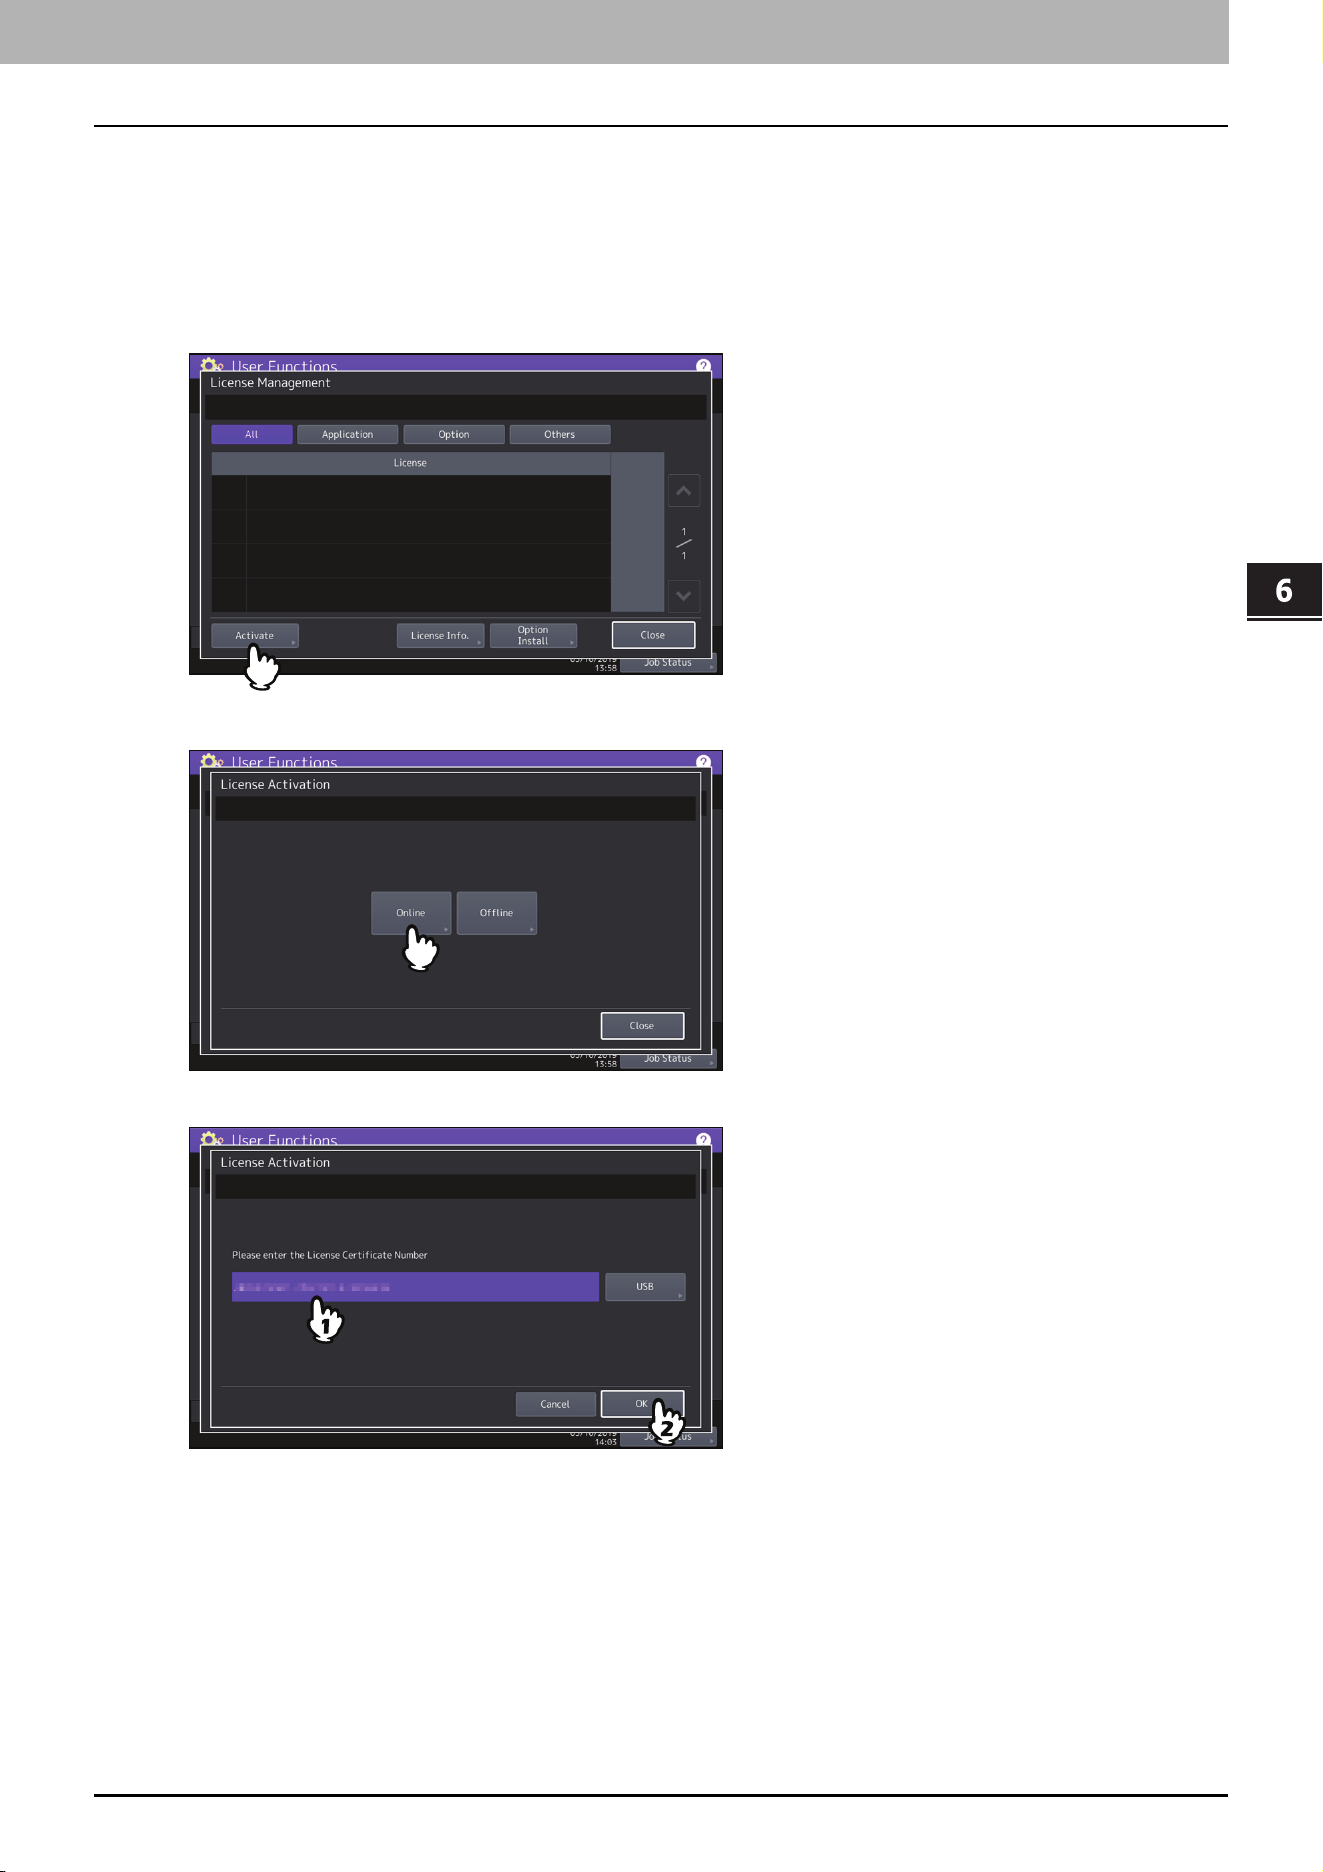
Activating the license
You can activate the license online or offline
Online activation procedure
You need the license certificate number to activate the license online.
1
On the License Management screen, press [Activate].
2
Press [Online].
3
Enter the license certificate number and press [OK].
You can enter the license certificate number in two ways:
6.User Functions
38 Admin
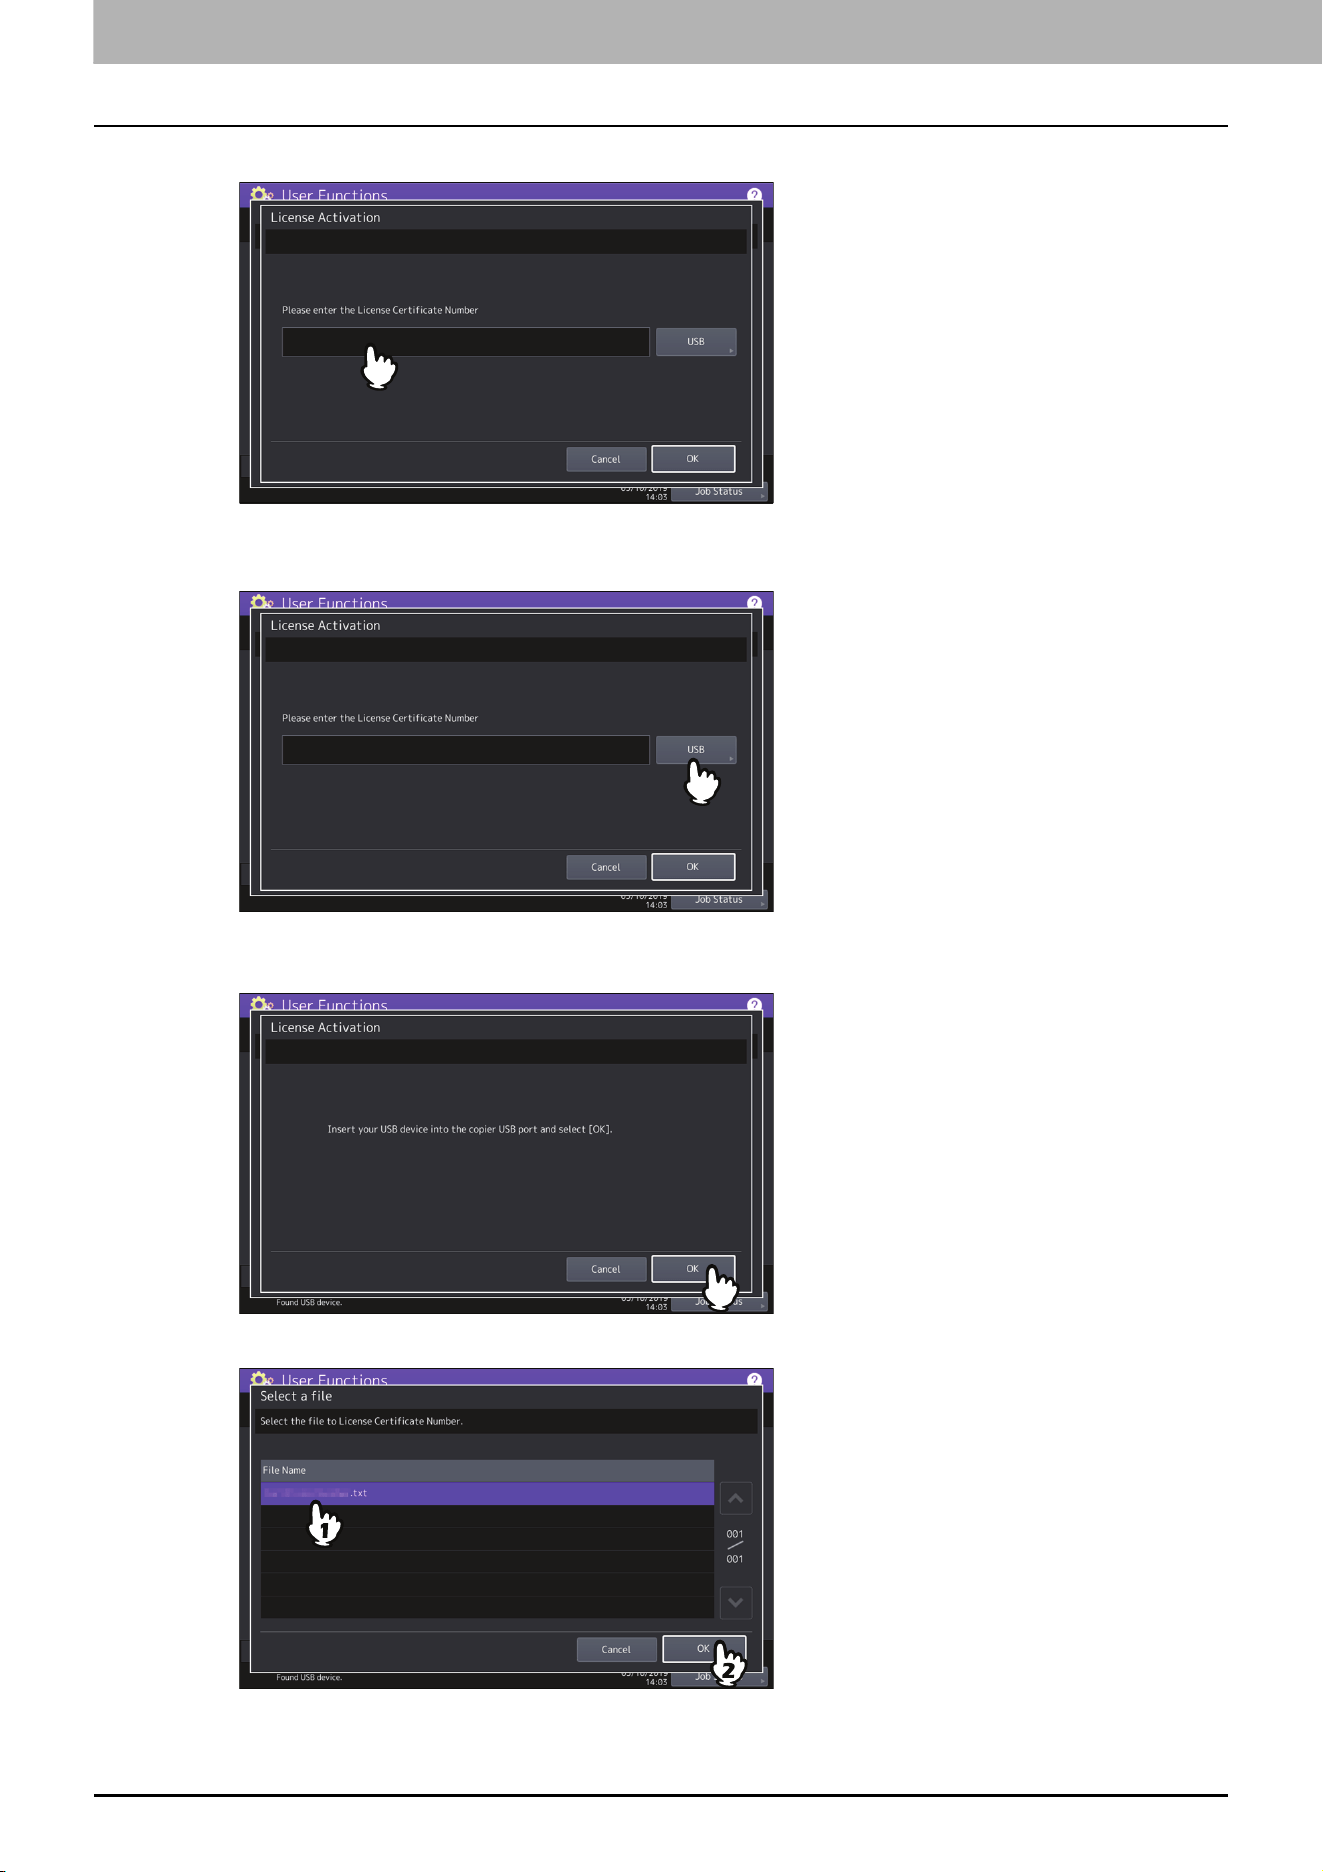
Press the entry field to show the keyboard and enter the license certificate number directly.
Follow the steps below to use the USB media that contains the license certificate number.
- Press [USB].
- Connect your USB media that contains the license information file to the USB port on the equipment and
press [OK].
- Select the file that contains the license certificate number and press [OK].

6.User Functions
Admin 39
User Functions
- Select the license certificate number and press [Set].
4
Press [Yes] on the activation confirmation screen.
5
Press [OK] on the finish confirmation screen.
If necessary, the equipment shuts down and reboots automatically.
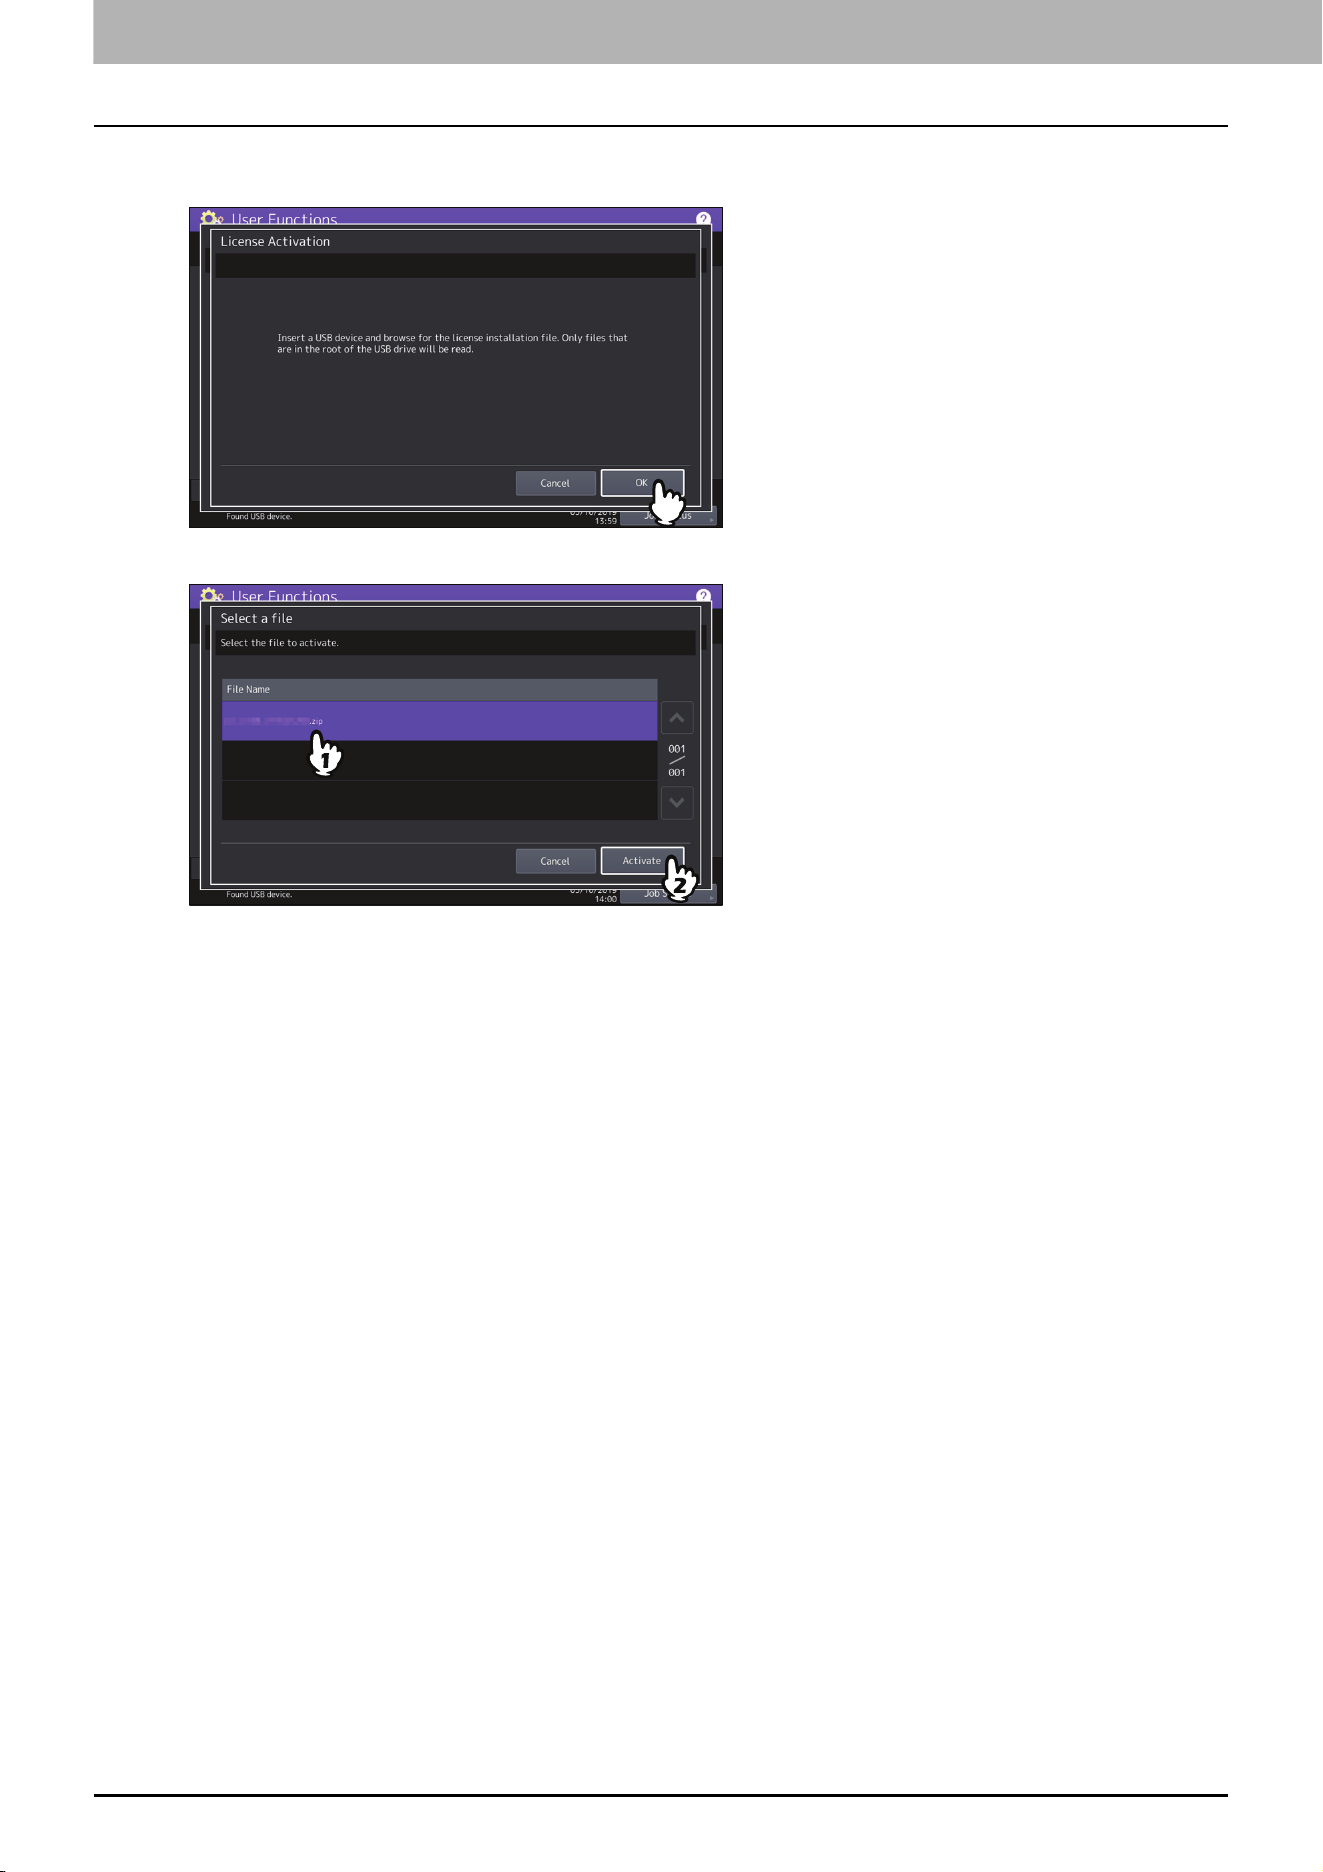
Offline activation procedure
You need the license installation file to activate the license offline.
1
On the License Management screen, press [Activate].
2
Press [Offline].
6.User Functions
40 Admin
3
Connect your USB media that contains the license installation file to the USB port on the
equipment and press [OK].
4
Select the activation file and press [Activate].
5
Press [Yes] on the activation confirmation screen.
6
Press [OK] on the finish confirmation screen.
If necessary, the equipment shuts down and reboots automatically.
6.User Functions
Admin 41
User Functions
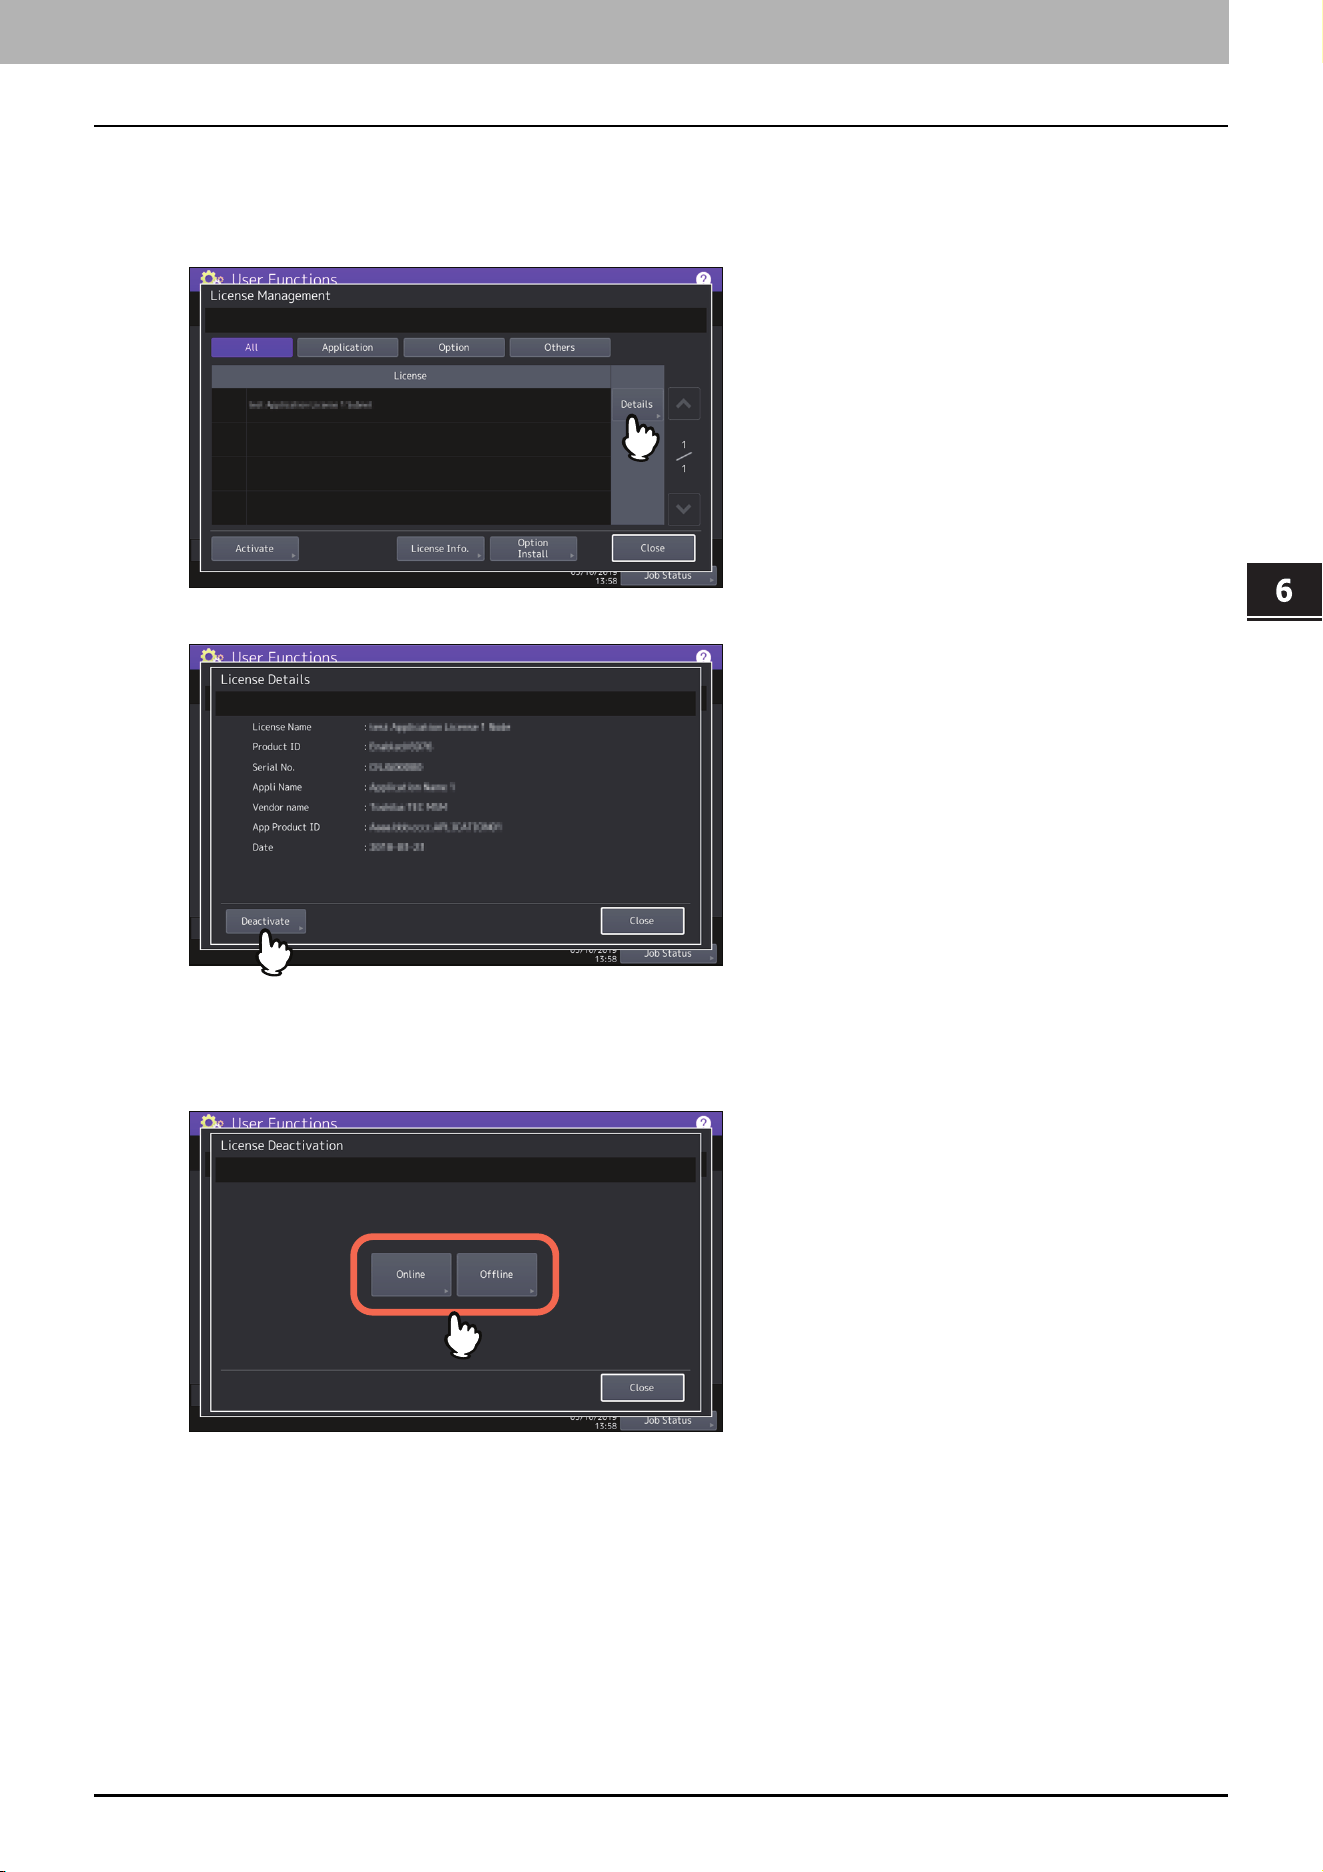
Deactivating the license
You can deactivate the license online or offline.
1
On the License Management screen, press [Details] for the license that you want to deactivate.
2
Press [Deactivate].
3
Press [Online] or [Offline].
If you have pressed [Online], proceed to the step 5.
If you have pressed [Offline], proceed to the step 4.
6.User Functions
42 Admin
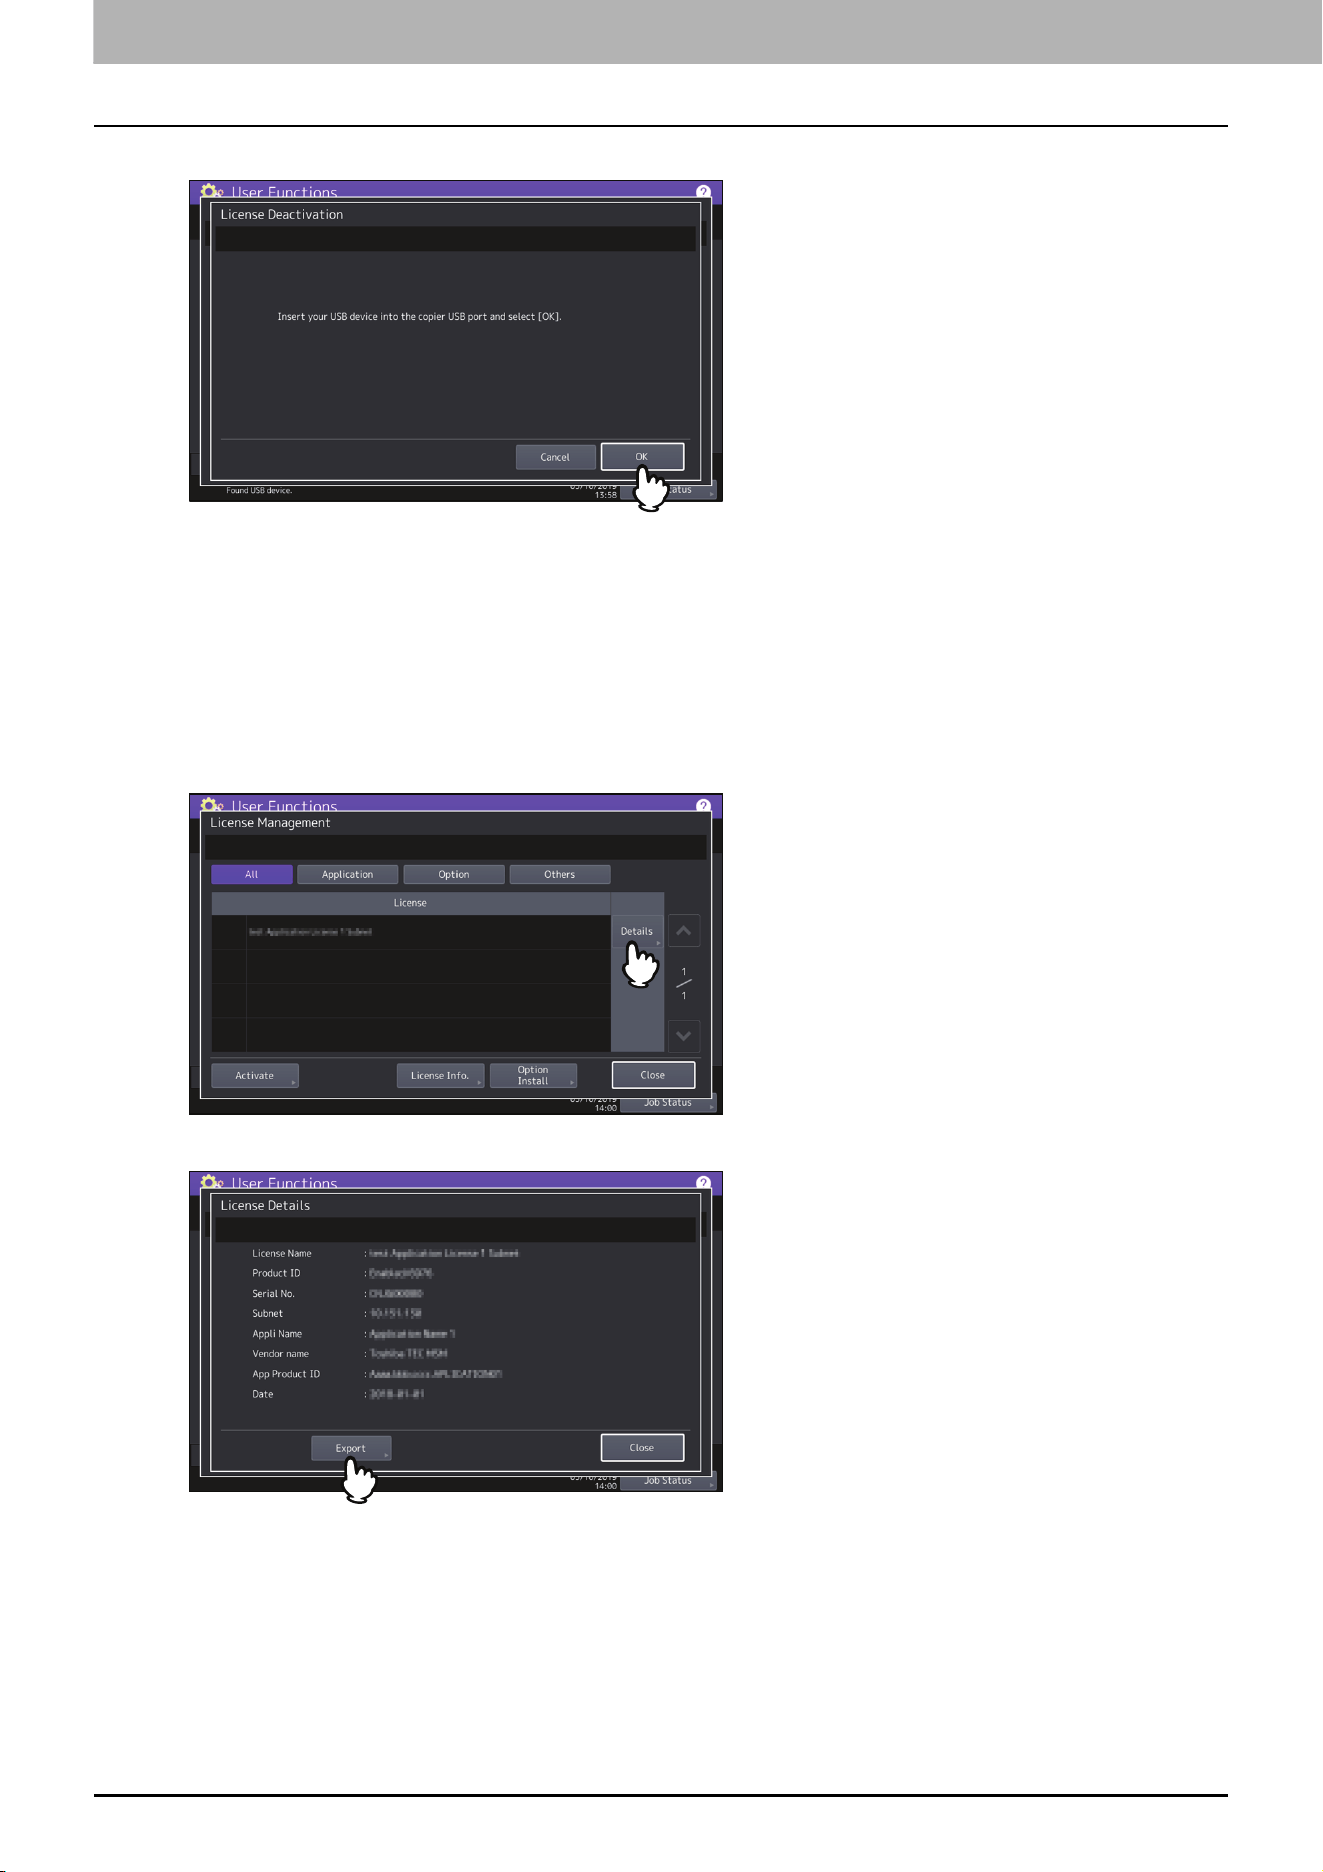
4
Connect your USB media to the USB port on the equipment and press [OK].
5
Press [Yes] on the deactivation confirmation screen.
6
Press [OK] on the finish confirmation screen.
If necessary, the equipment shuts down and reboots automatically.
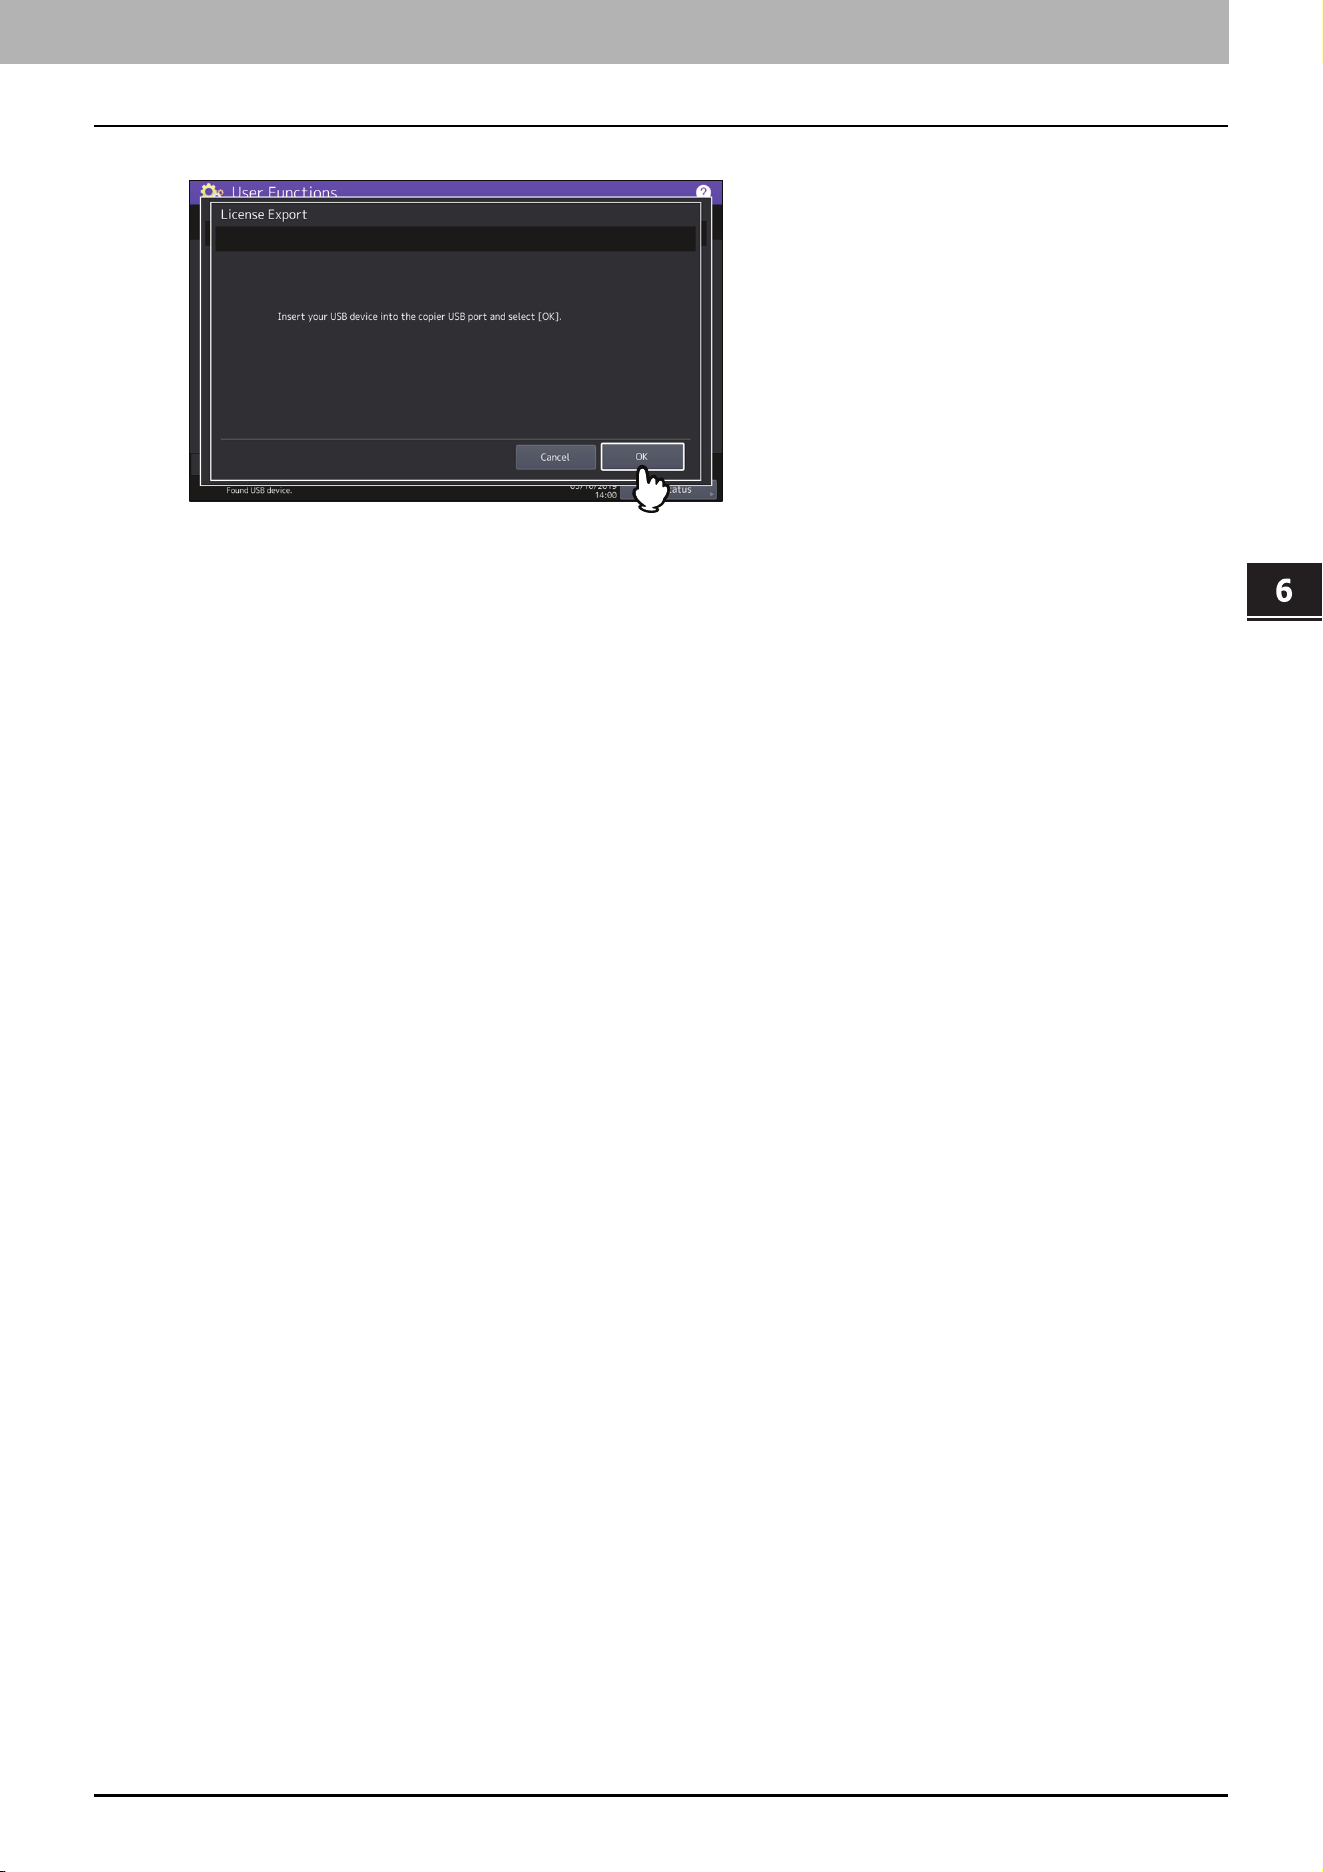
Exporting the license
You can export the license as follows.
1
On the License Management screen, press [Details] for the license that you want to export.
2
Press [Export].
6.User Functions
Admin 43
User Functions
3
Connect your USB media to the USB port on the equipment and press [OK].
4
Press [Yes] on the export confirmation screen.
5
Press [OK] on the finish confirmation screen.
6.User Functions
44 Admin
Creating or installing clone files
You can create clone files of the setting data and user data by using the cloning function. These files can also be
installed in other equipment units. This function is convenient when you want to apply the same settings to multiple
equipment units.
P.44 “Installing the clone data”
P.46 “Creating clone files”
The clone files are compatible with other equipment units. For details about the available models, contact your
service representative.
When an end-user (either an individual or an entity) intends to clone data (font, ICC profile, or any data
downloaded or added by the end-user) stored in TTEC products (copier, MFP), the end-user shall investigate,
review and confirm terms of use for such data and intellectual property rights thereof. The end-user shall perform
such cloning at your own risk and responsibility.
TTEC AND ITS AFFILIATES HEREBY DISCLAIM ANY WARRANTY OF ANY KIND, WHETHER EXPRESS OR IMPLIED,
INCLUDING BUT NOT LIMITED TO, THE WARRANTIES OF QUALITY AND PERFORMANCE OF TTEC PRODUCTS,
FITNESS FOR A PARTICULAR PURPOSE, NON-INFRINGEMENT OF THIRD PARTIES INTELLECTUAL PROPERTY RIGHTS,
IN THE USE OF CLONING BY THE END-USER.
IN NO EVENT WILL TTEC BE LIABLE TO THE END-USER NOR ANY THIRD PARTY FOR ANY DAMAGES, WHETHER IN
CONTRACT, TORT, OR OTHERWISE, INCLUDING WITHOUT LIMITATION ANY LOST PROFITS, LOST DATA OR OTHER
INCIDENTAL, SPECIAL OR CONSEQUENTIAL DAMAGES ARISING OUT OF CLONING BY THE END-USER, TO THE
MAXIMUM EXTENT PERMITTED BY APPLICABLE LAW.
When installing the clone data, store the corresponding files in the root directory of your USB storage device in
advance.
For details of the cloning function, contact your service representative.
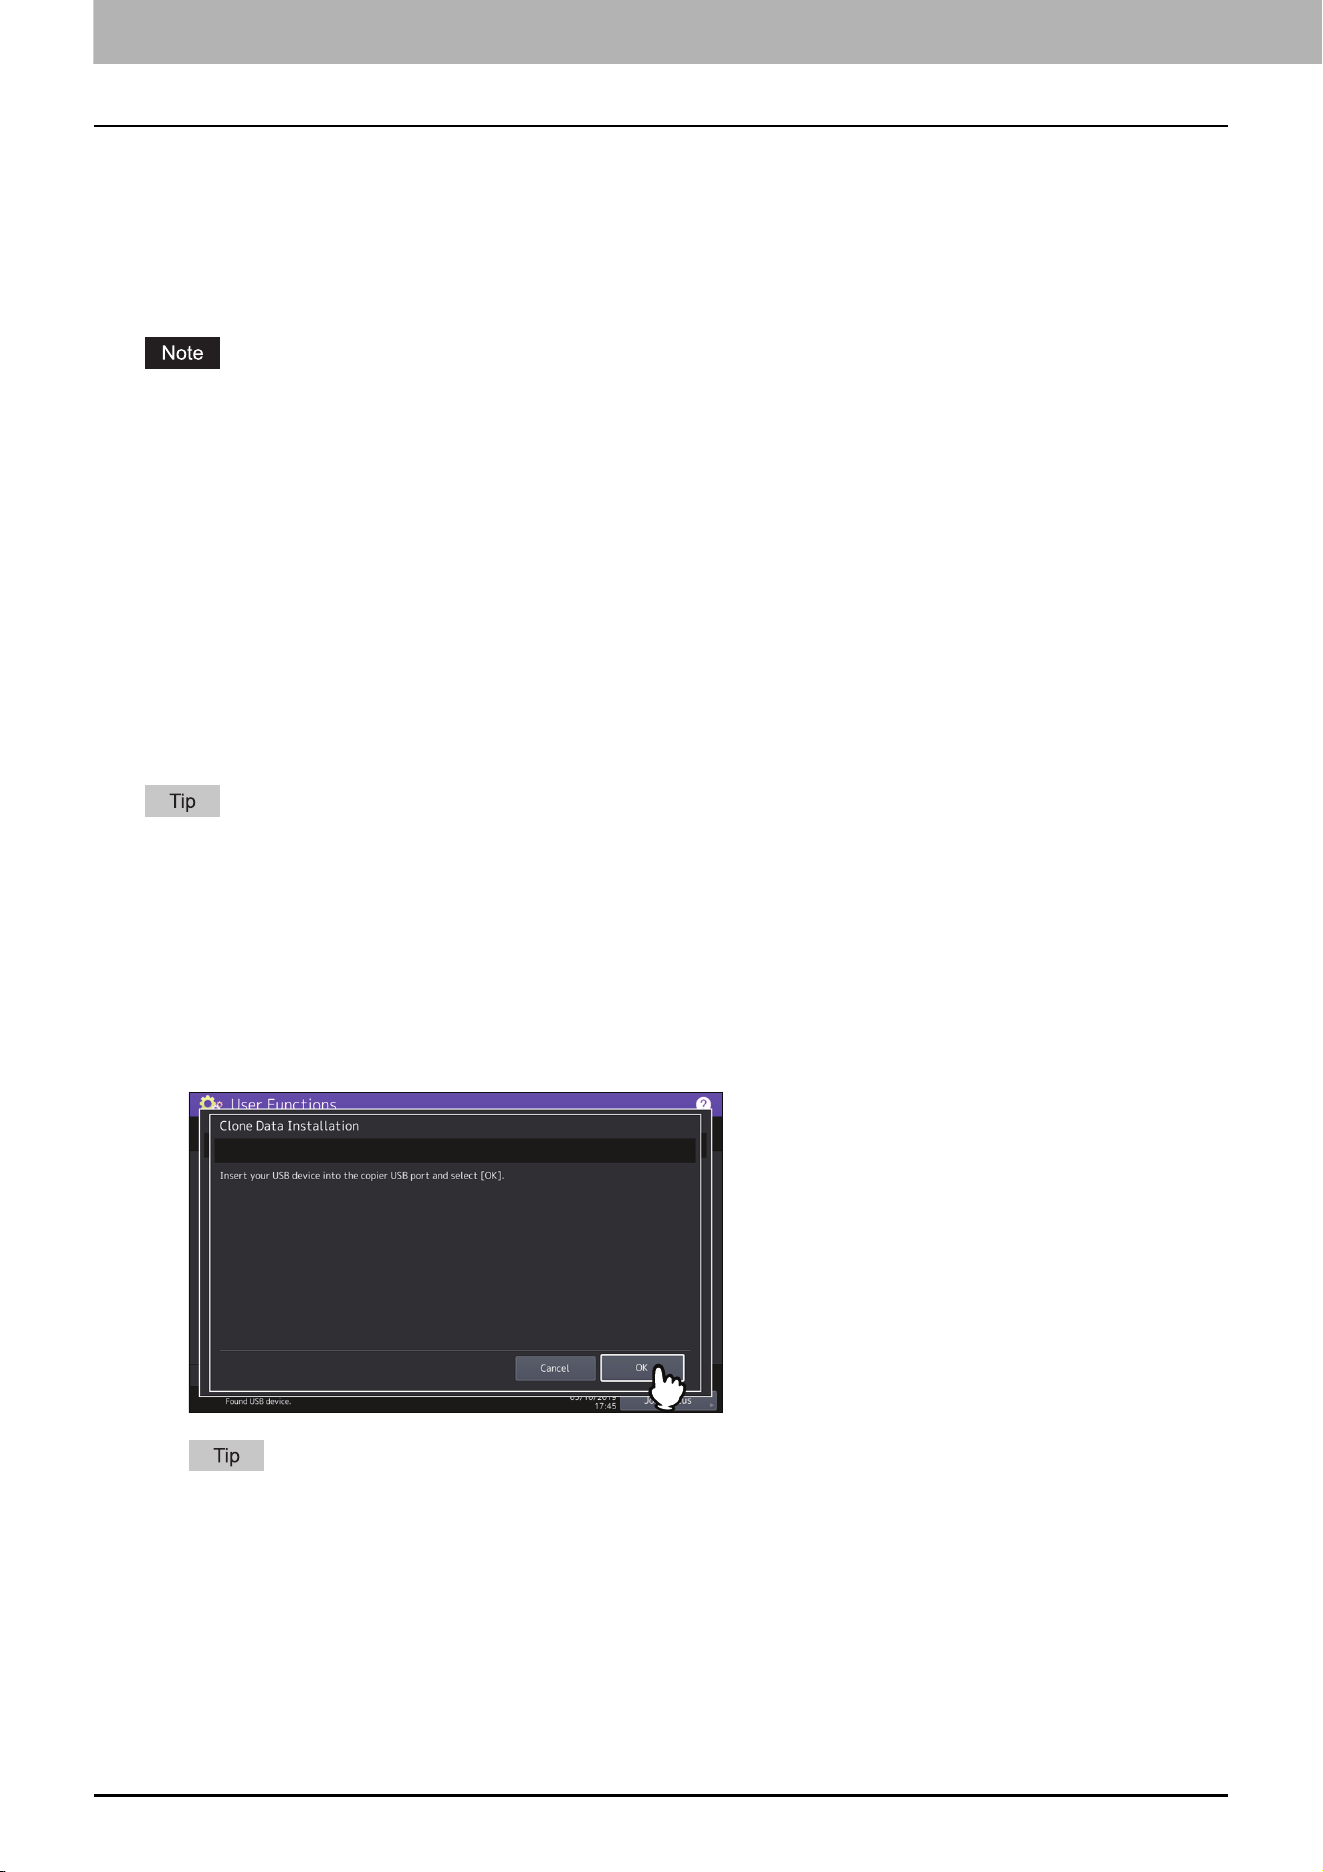
Installing the clone data
1
On the Cloning screen, press [Install Clone Data].
2
Connect your USB storage device in which the clone files are stored to the USB port on the
equipment, and press [OK].
For the location of the USB port on the equipment, refer to the Quick Start Guide “Chapter 1: PREPARATIONS”.
6.User Functions
Admin 45
User Functions
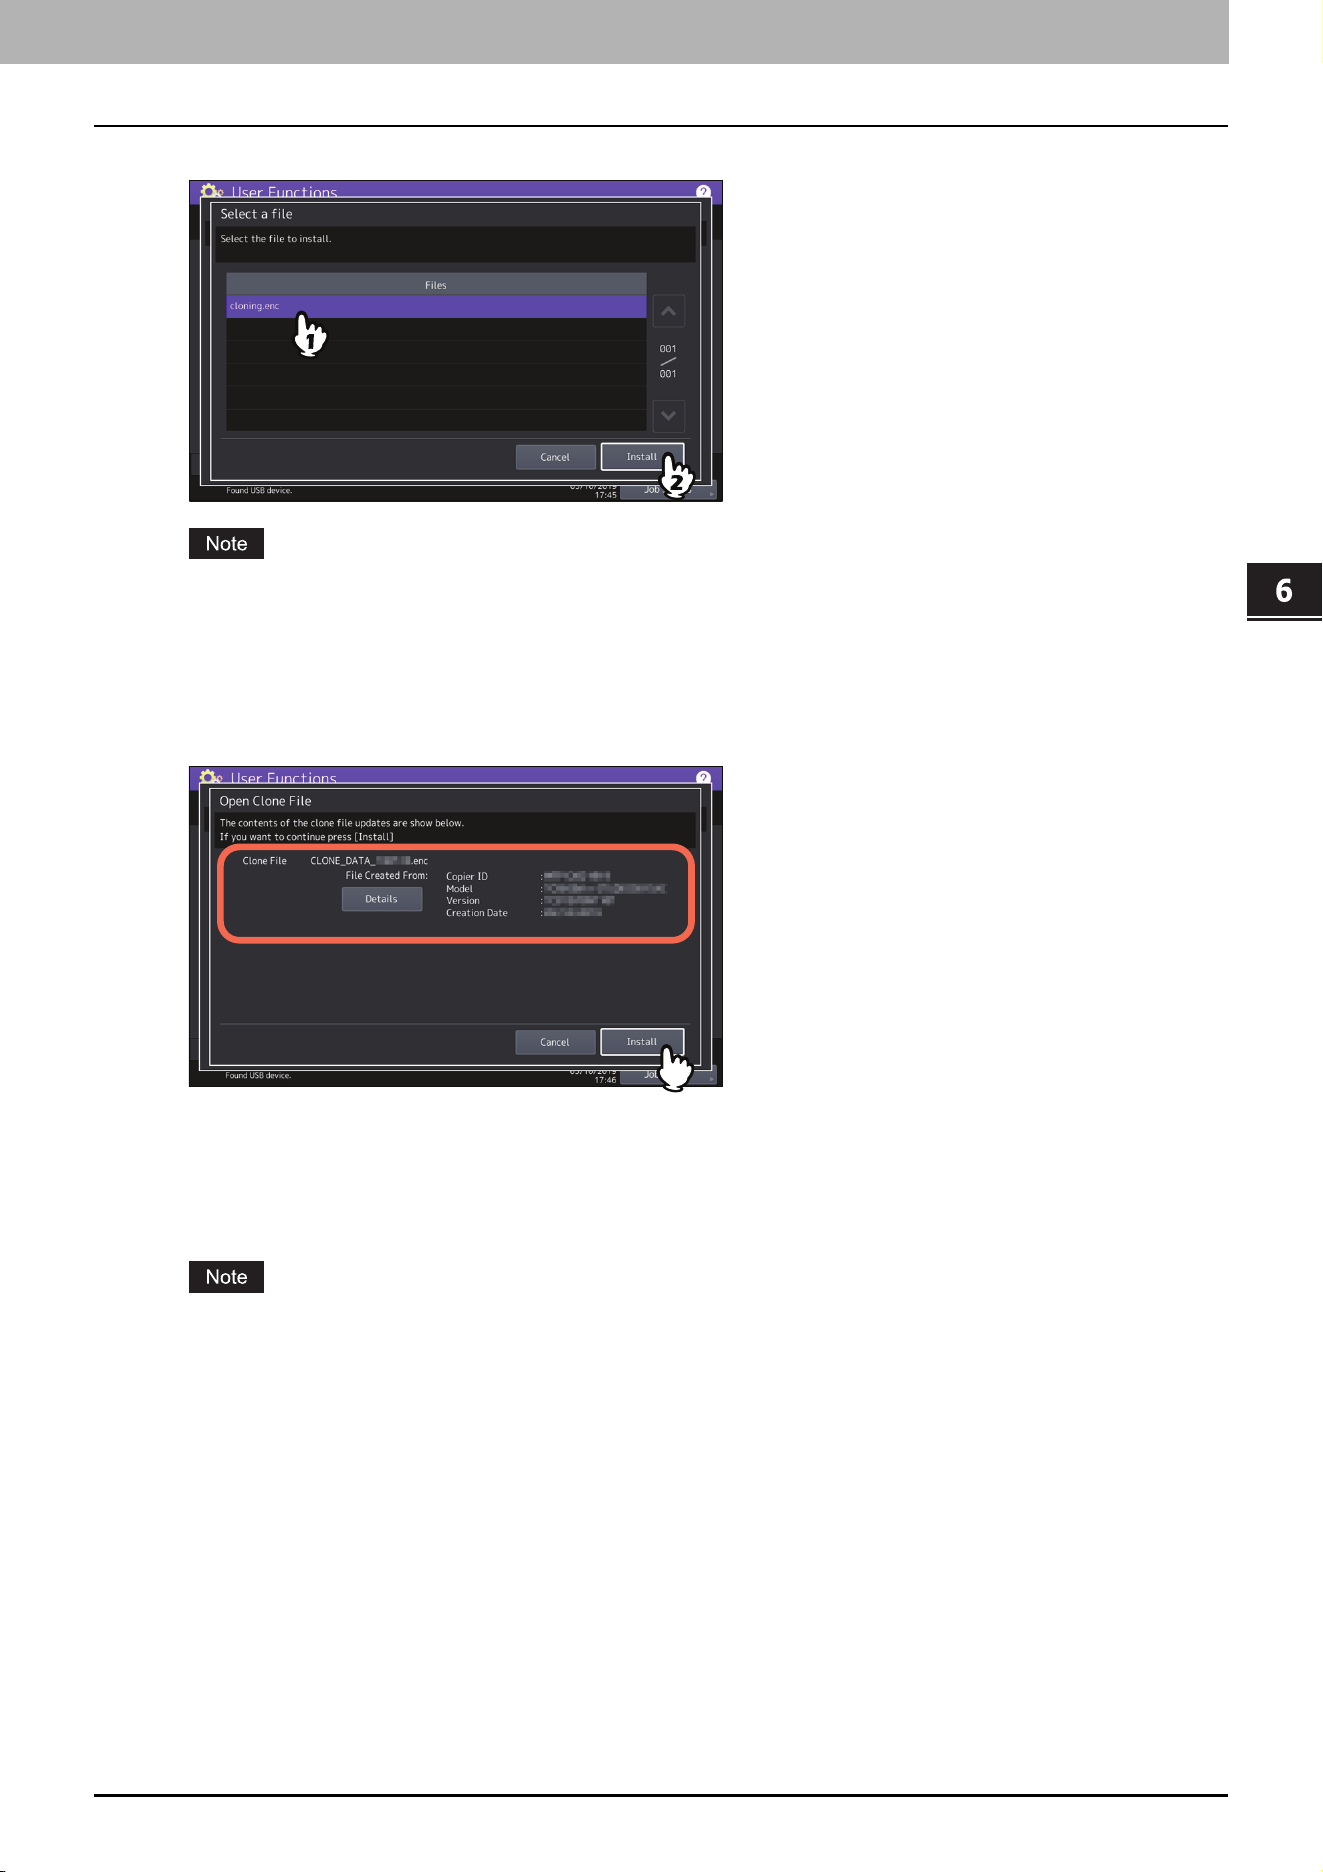
3
Select the file that you want to install, and press [Install].
You can select only one file per operation.
4
When an option which indicates whether or not to include the address book into the data to be
installed is displayed, press [No] not to do so.
5
Confirm the file name and file contents, and press [Install].
Press [Details] to confirm the settings to be cloned on the [Details] screen. After confirmation, press [Close] to
close the screen.
6
Enter the password and press [OK].
You will be returned to the Password Request screen.
7
Press [Yes].
The installation begins.
Do not remove the USB storage device until the data transfer is complete. Removing the device while data are
being transferred could destroy them or cause a malfunction of the equipment.
6.User Functions
46 Admin
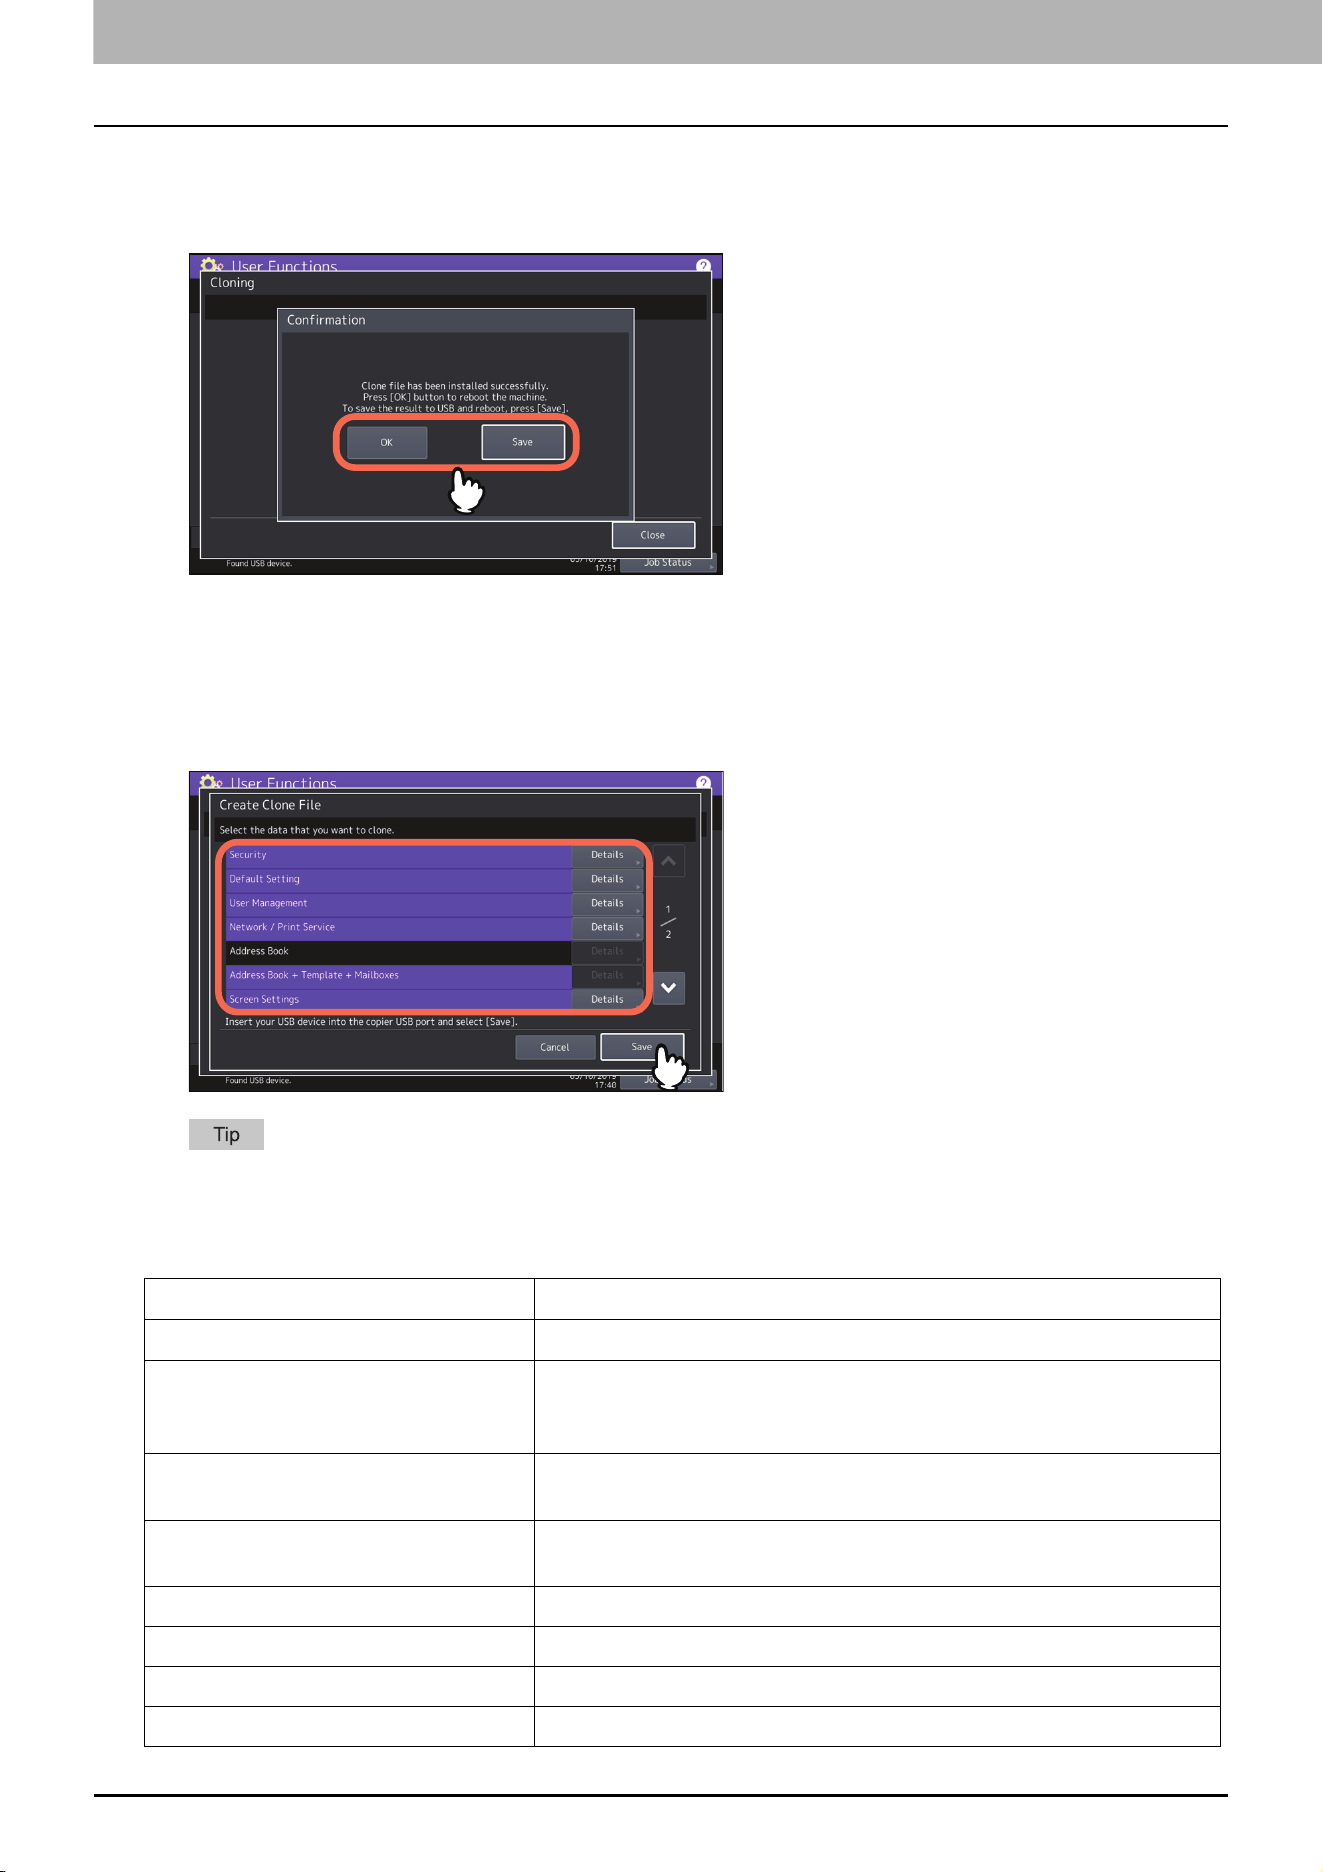
8
When the installation is complete, press [OK] or [Save] to reboot the equipment.
Press [OK] to reboot the equipment immediately.
Press [Save] to save a file that records the result of the installation and reboot the equipment.
Creating clone files
1
On the Cloning screen, press [Create Clone File].
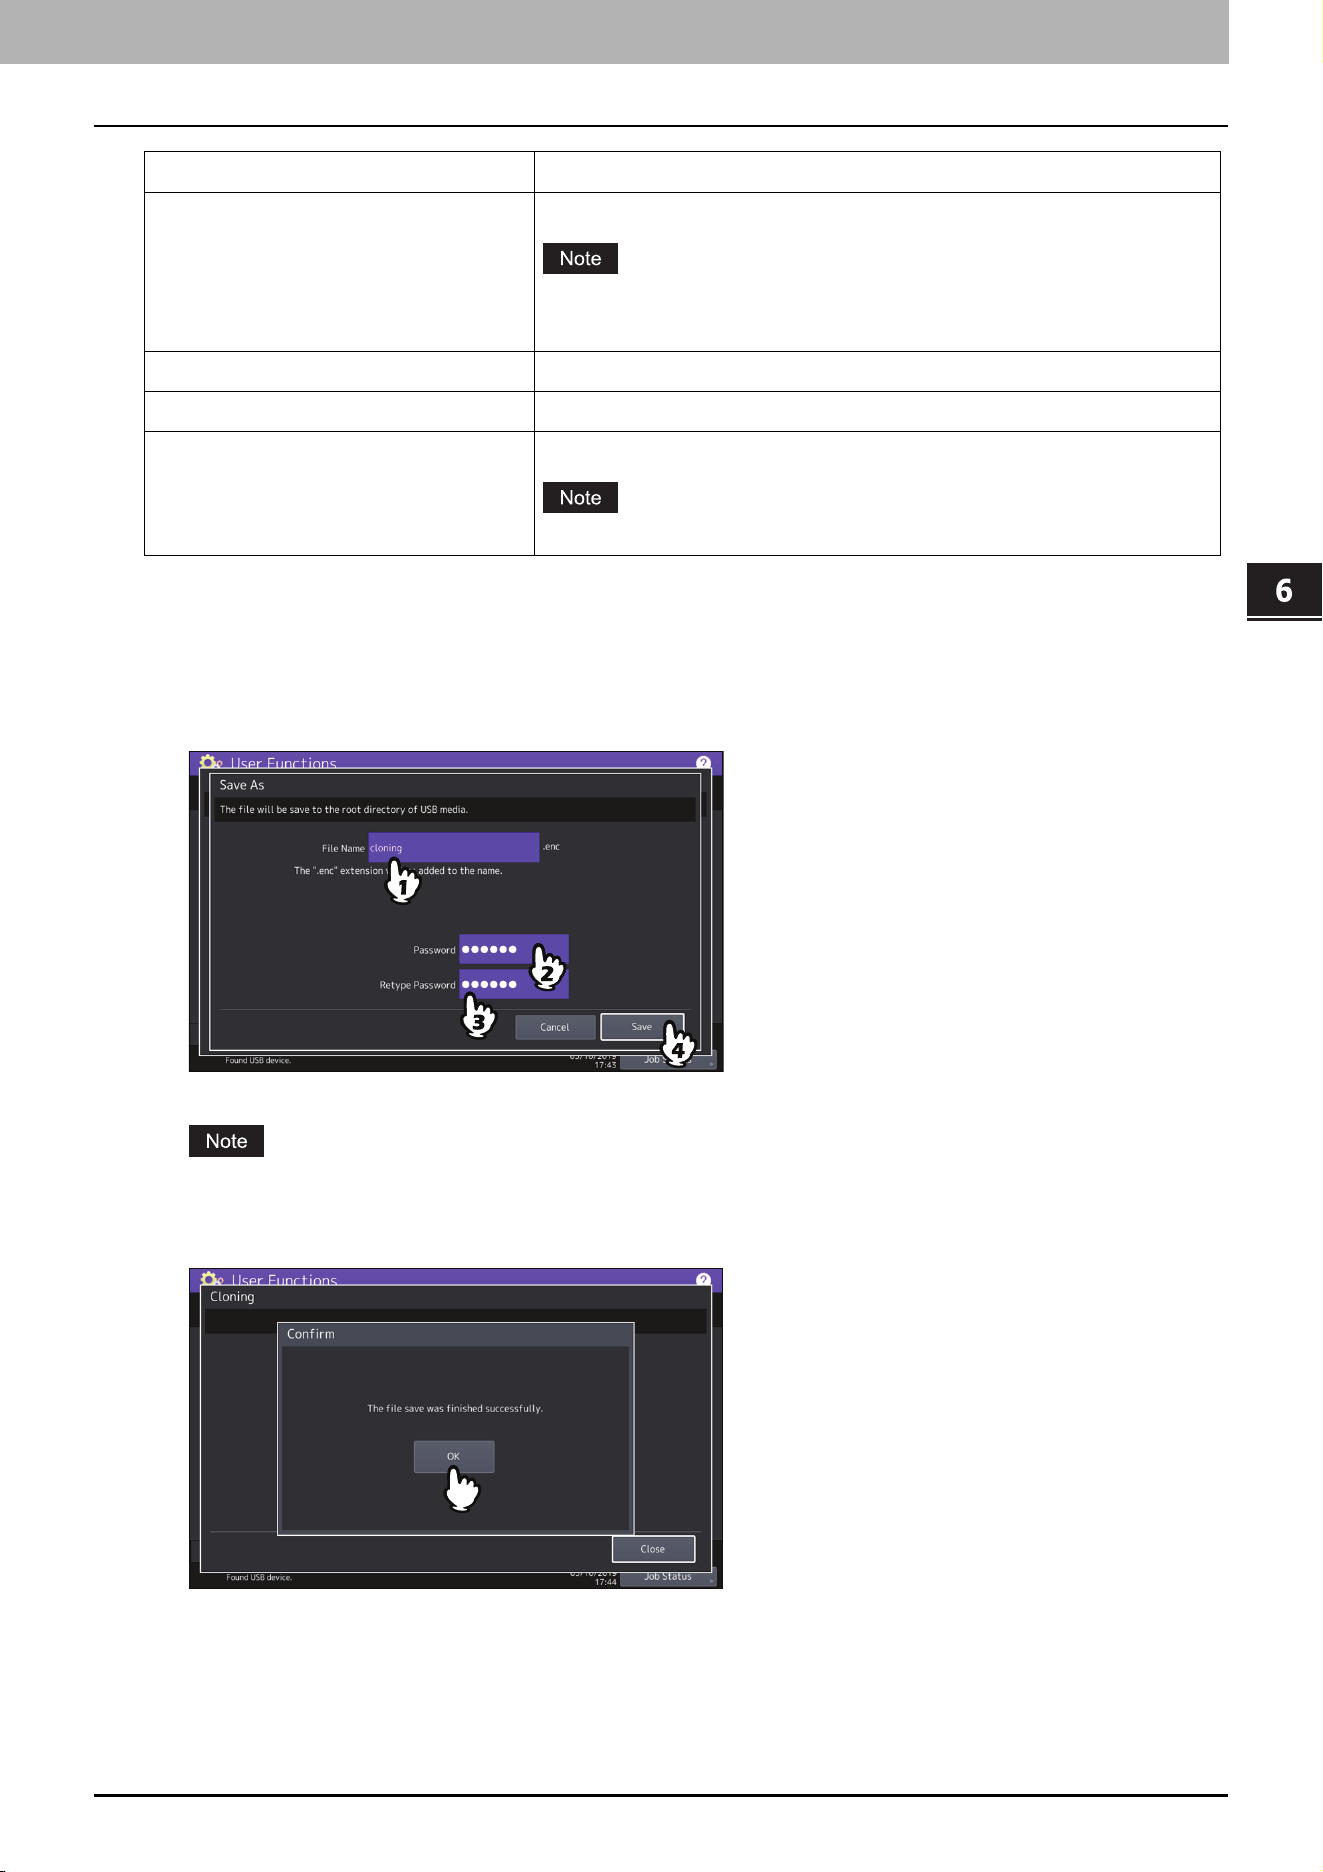
2
Connect your USB storage device, select the data that you want to duplicate, and then press
[Save].
For the location of the USB port on the equipment, refer to the Quick Start Guide “Chapter 1: PREPARATIONS”.
For data you do not need to duplicate, press the data category button(s) to clear the highlight.
Press [Details] to confirm which data are duplicated.
Data category Data to be duplicated
Security Secure Erase, Authentication
Default Setting General, Copy, Scan, Fax, Internet Fax, Fax/Internet Fax Received
Forward, E-mail, Save as File, Printer, Notification, Log Settings, EWB
Settings
User Management User, Group, Role, Quota, Department Code, Home Data with Address
Book, Project Code
Network/Print Service Network settings, Print service, Wireless LAN, Bluetooth, Directory
Service, Driver Customization Packages
Address Book Address Book
Address Book + Template + MailBoxes Address Book, Template, Mailboxes
Screen Settings Common Theme Setting, Icon Non-Indication Setting
Application Application Program, Application Settings (except licenses)
6.User Functions
Admin 47
User Functions
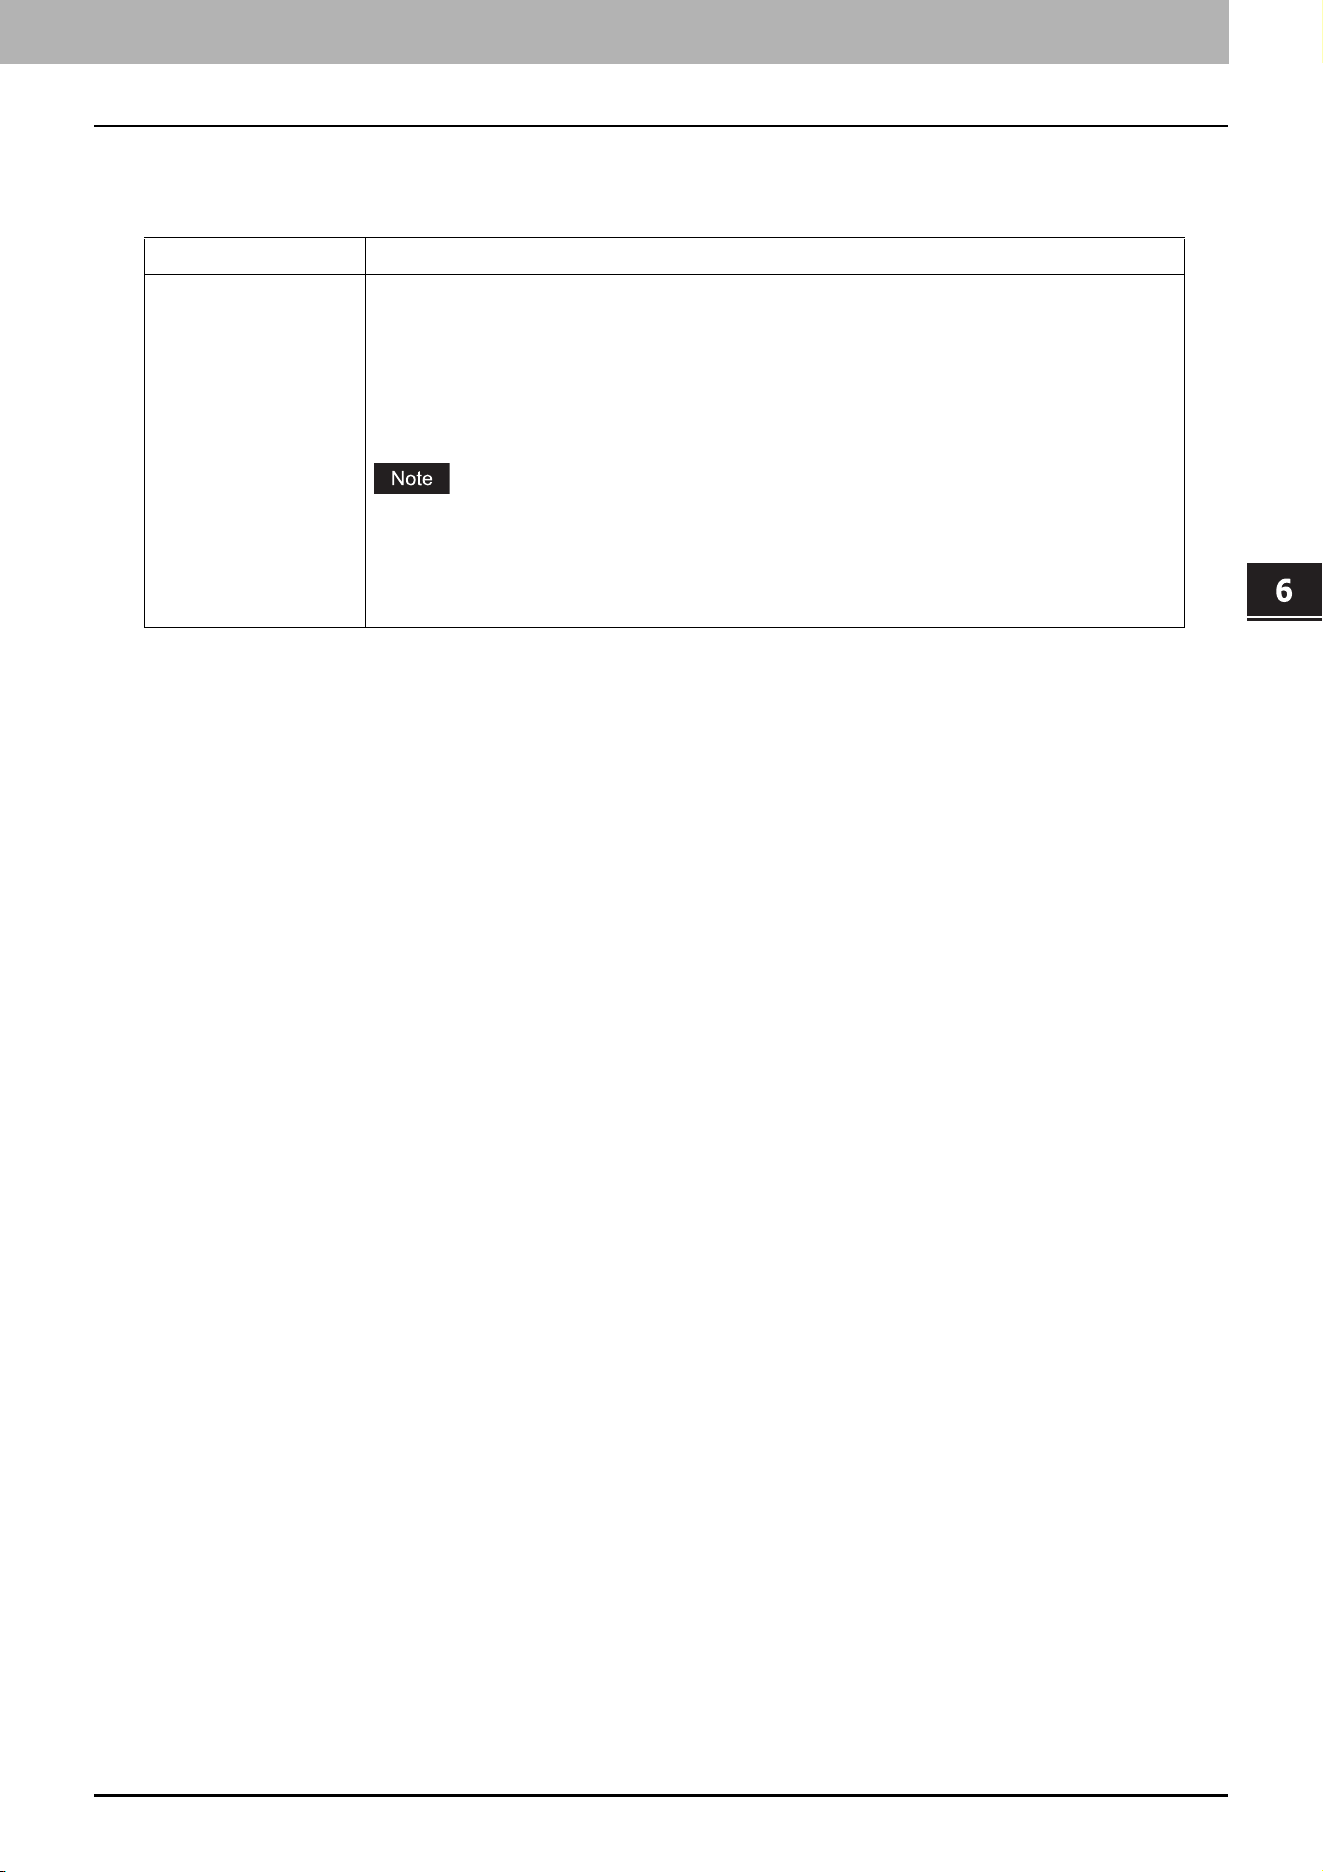
3
Enter the file name, set the password, and then save the file.
1. Enter the file name to [File Name].
Enter a file name of up to 128 alphanumeric characters.
2. Enter a password to [Password].
3. Enter the password again to [Retype Password].
4. Press [Save].
Creating of the clone files begins.
Do not remove the USB storage device until the data transfer is complete. Removing the device while data are
being transferred could destroy them or cause a malfunction of the equipment.
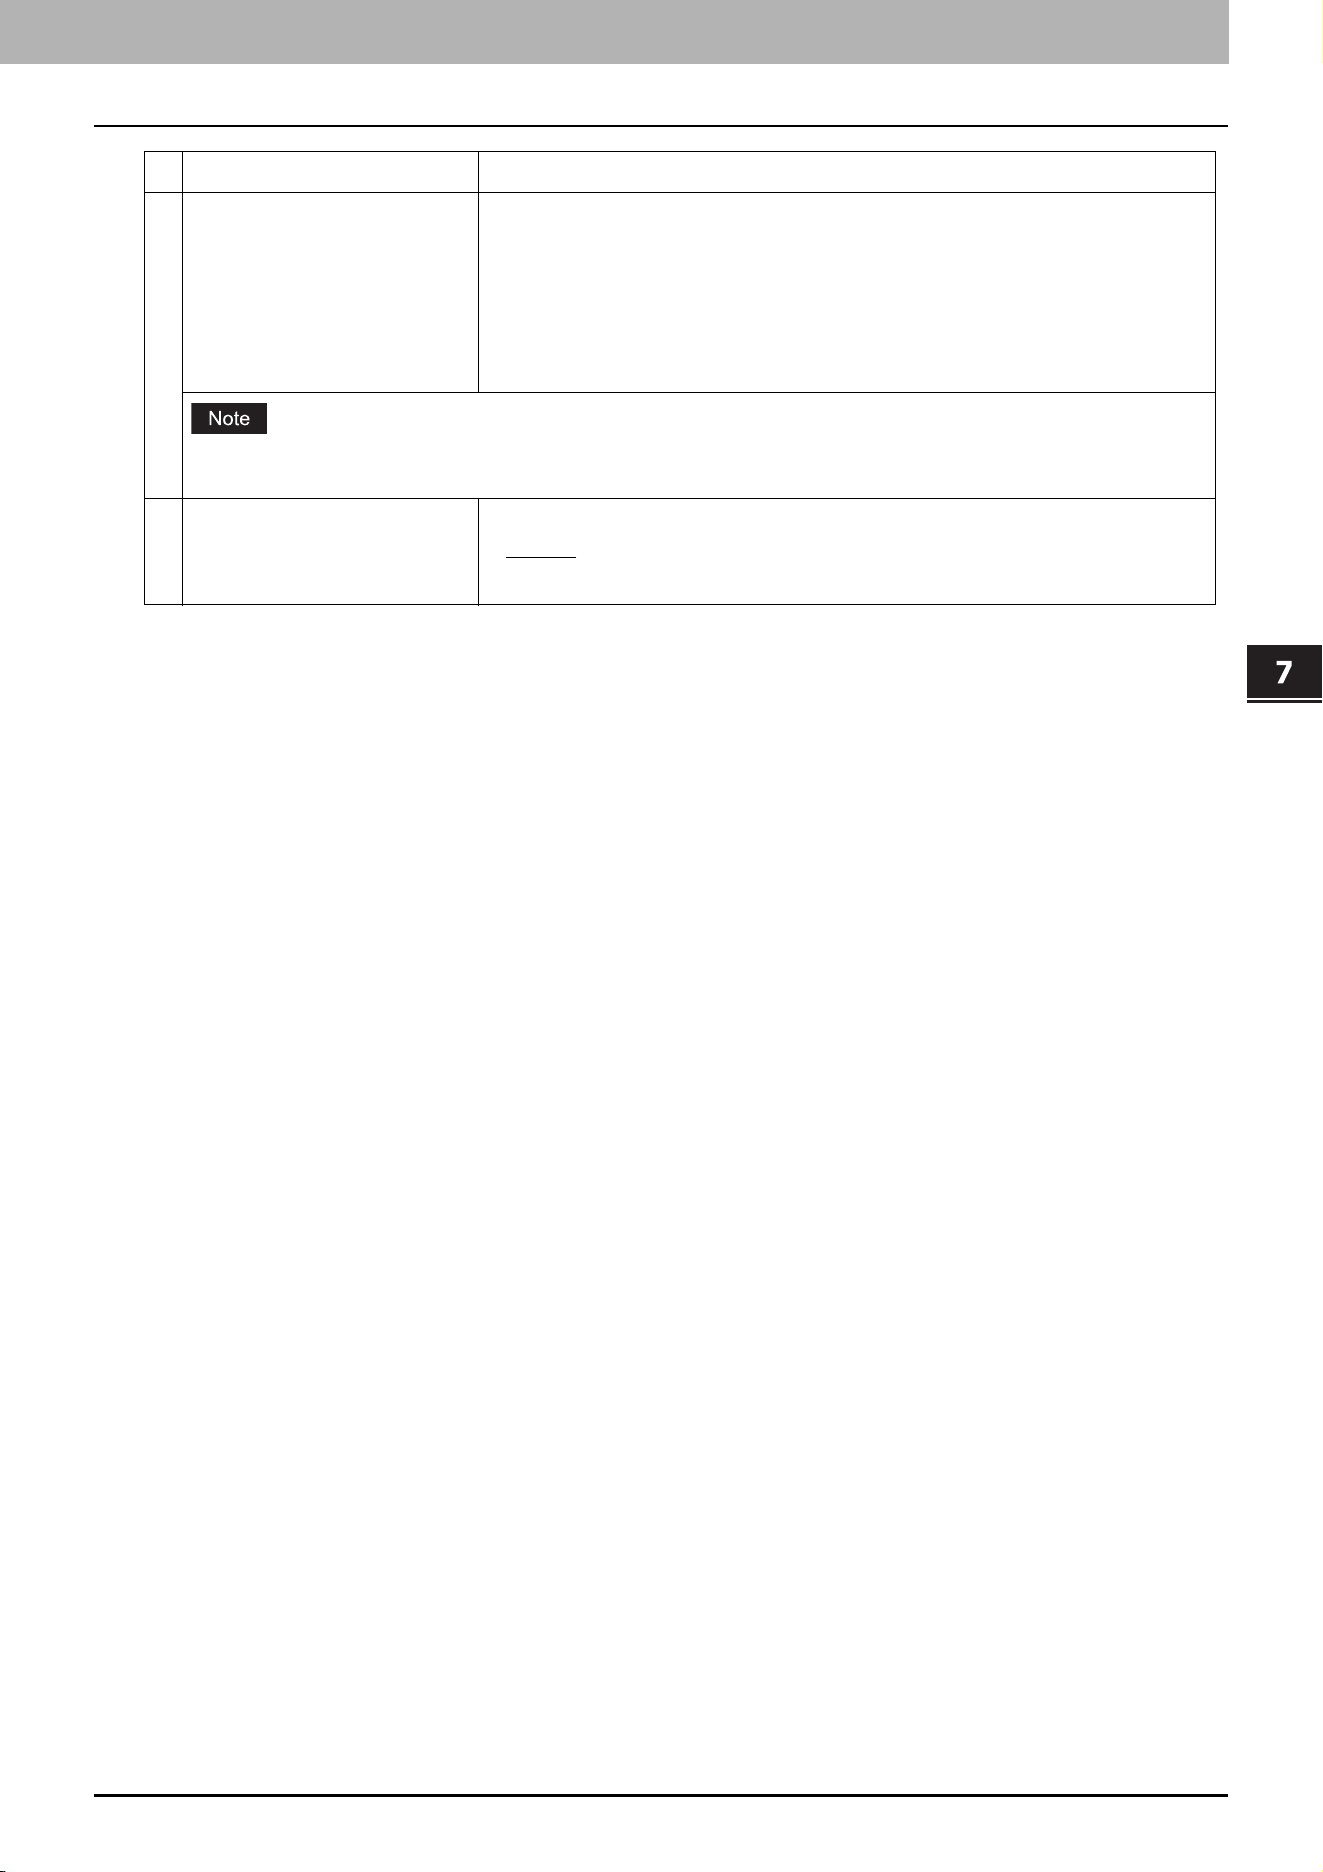
4
When the creating of the clone files is complete, press [OK].
You will be returned to the Cloning screen.
ICC Profile ICC Profiles installed from TopAccess
You can select ICC profiles only for color devices.
You are required to have the license to use some ICC profiles.
Print Data Converter Print Data Converter Settings
Built-in Administrator’s password Password of Built-in Administrator
Fonts Downloaded fonts for print and display
You are required to have the license to use some fonts.
Data category Data to be duplicated

6.User Functions
48 Admin
When creating the cloning files fails, the message “The File Save Failed.” will be displayed on the Caution
screen. In this case, press [Close], and perform the operation again.
When the memory of your USB storage device becomes full while the clone files are being saved, the message
“USB Media is full. Change USB Media.” will be displayed on the Attention screen. In this case, change the USB
storage device to a new one, and perform the operation again.
5
Remove the USB storage device from the USB port on the equipment.
6.User Functions
Admin 49
User Functions
Printer/e-Filing
Printer / e-Filing screen (2/2)
Item name Description
Confirmation of
Bypass Printing
Select whether you confirm to feed the next paper for the bypass printing.
On — Press this button to feed the next paper by pressing the [START] button after
you place it on the bypass tray and confirm it.
Off — Press this button to feed the next paper automatically when placing it on the
bypass tray.
This function works on the network printing, USB direct printing, and e-Filing
printing from TopAccess.
When you select [Off] for this function, you will feed wrong paper without confirming
it and thus paper misfeeding may occur.

6.User Functions
50 Admin

7.TopAccess

52 [Registration] Tab Page
0.[Registration] Tab Page
[Inbound FAX routing] Item
MailBox Setting (Mailbox)
In the MailBox Setting page, specify the general information of the mailbox such as the box number, password, owner,
comment, and notification.
The [Notification] and [Document Print] options are not available when creating the Confidential mailbox or
Bulletin Board mailbox.
Mailbox communication is disabled if the settings on this equipment and information registered for the destination
do not match. Check how the box number and the fax number of the destination are registered on the journal
before entering the box number.
Item name Description
1 Box Number Enter the box number of the mailbox. You can enter up to 20 characters
including numbers, sharp marks (#), and asterisks (*).
You can also specify the sender’s fax number to enable the Inbound Fax
routing when registering a Forward mailbox. If you specify the sender’s fax
number here, the faxes that are received from the specified fax number will be
routed according to the mailbox settings.
The Inbound Fax routing is available only for a Forward mailbox. If you select [Confidential] or [Bulletin
Board] as an agent, you cannot specify the fax number.
When a fax is sent from the specified fax number with a box number (or sub address), the Inbound Fax
routing will not apply to the transmission and it is processed according to the specified box number (or sub
address) settings.
If you create a forward mailbox whose number is the fax number of the sender, you can use the TSI function.
Using this function, this equipment forwards the original sent from the sender whose fax number is set to the
mailbox number, based on the pre-set agent (Save as File / Email / Store to e-Filing).
2 Password Enter the box password if you want to protect the mailbox by the password.
You can enter up to 20 characters including numbers, sharp marks (#), and
asterisks (*).
3 User Name Enter the user name of this mailbox. You can enter up to 30 characters.
4 Comment Enter the comment. You can enter up to 30 characters.
1
2
3
4
5
6
7.TopAccess
[Registration] Tab Page 53
TopAccess
5 Notification This specifies how the notification message will be sent if an error occurs.
Send Email when an error occurs — Transmits a notification message to the
specified E-mail address when an error occurs.
Send Email when job is completed — Transmits a notification message to
the specified E-mail address when a job is completed.
Email Address — Enter the E-mail address for the notification messages. You
can enter up to 192 alphanumerical characters.
When you enable the Notification setting, make sure to set up the E-mail settings in the [Email] submenu of the
[Setup] menu in the TopAccess access policy mode.
6 Document Print Select whether to print a document sent to this mailbox.
Always — Always prints documents sent to this mailbox.
ON ERROR — Prints the document if all specified forwarding has failed.
Item name Description

54 [Counter] Tab Page
0.[Counter] Tab Page
[Total Counter] screen
Because of paper jam and job cancellation, the total counter value might not be equal to the total number of pages
in the print log.
The total counter value might not be equal to the total values of other counters, depending on the counter settings.
TopAccess
[Administration] Tab Page 55
0.[Administration] Tab Page
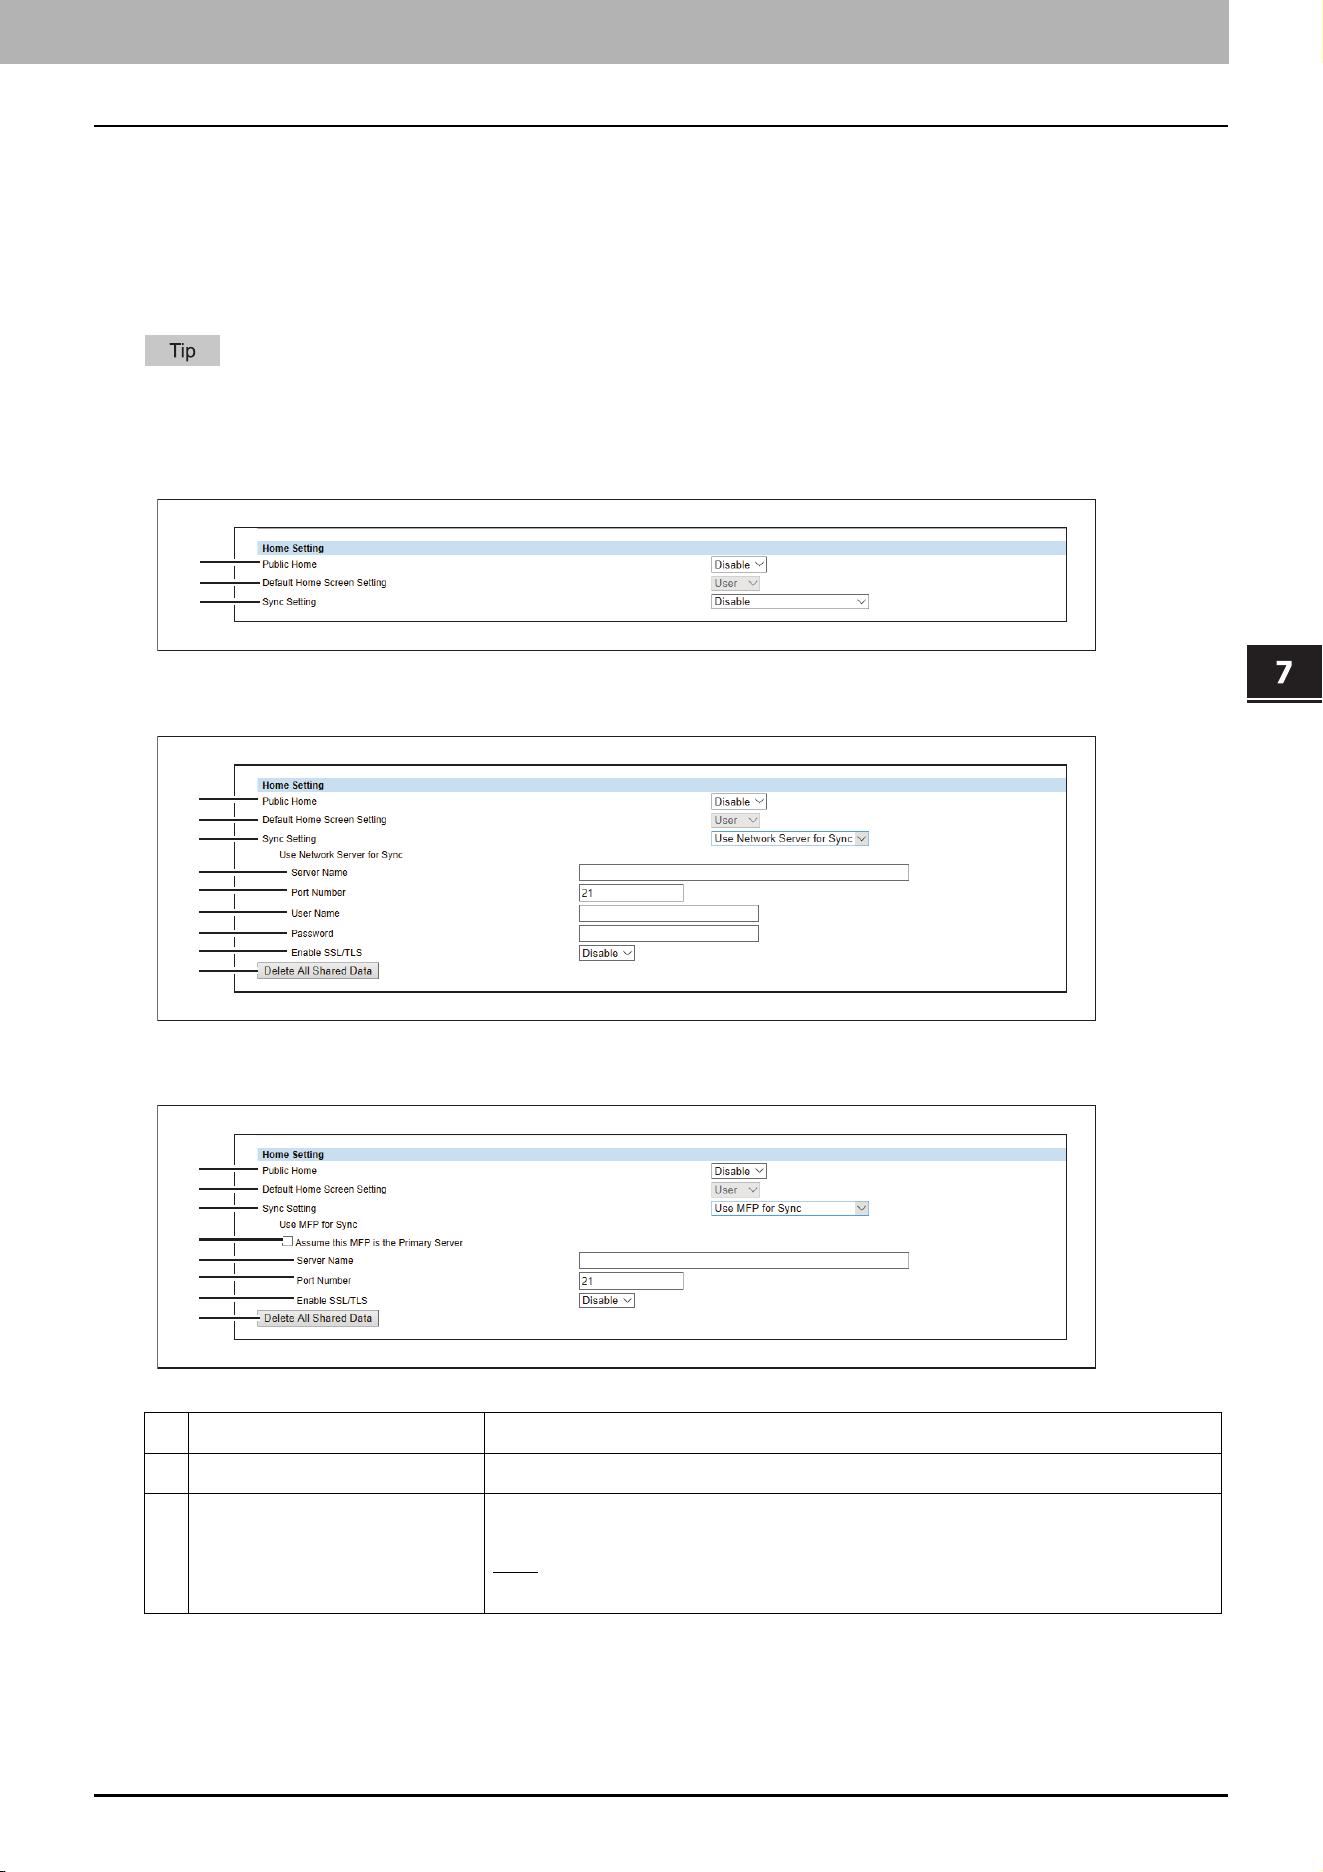
Home Setting
Home Setting
You can set the default screen displayed by pressing the [Home] button on the control panel when user
authentication is enabled. The settings vary, depending on the [Sync Setting] setting.
For the procedure for home data synchronization, refer to the following page.
P.93 “Setting Home Data Synchronization”
When [Disable] is selected from [Sync Setting]
When [Use Network Server for Sync] is selected from [Sync Setting]
When [Use MFP for Sync] is selected from [Sync Setting]
Item name Description
1 Public Home Select whether to enable or disable Public Home.
2 Default Home Screen Setting Select the Home to be displayed as the default screen when you press the
[Home] button.
User
: Select this to the User Home screen.
Public: Select this to display the Public Home screen.
1
2
3
1
2
3
4
5
6
7
8
13
1
2
3
9
10
11
12
13
7.TopAccess
56 [Administration] Tab Page
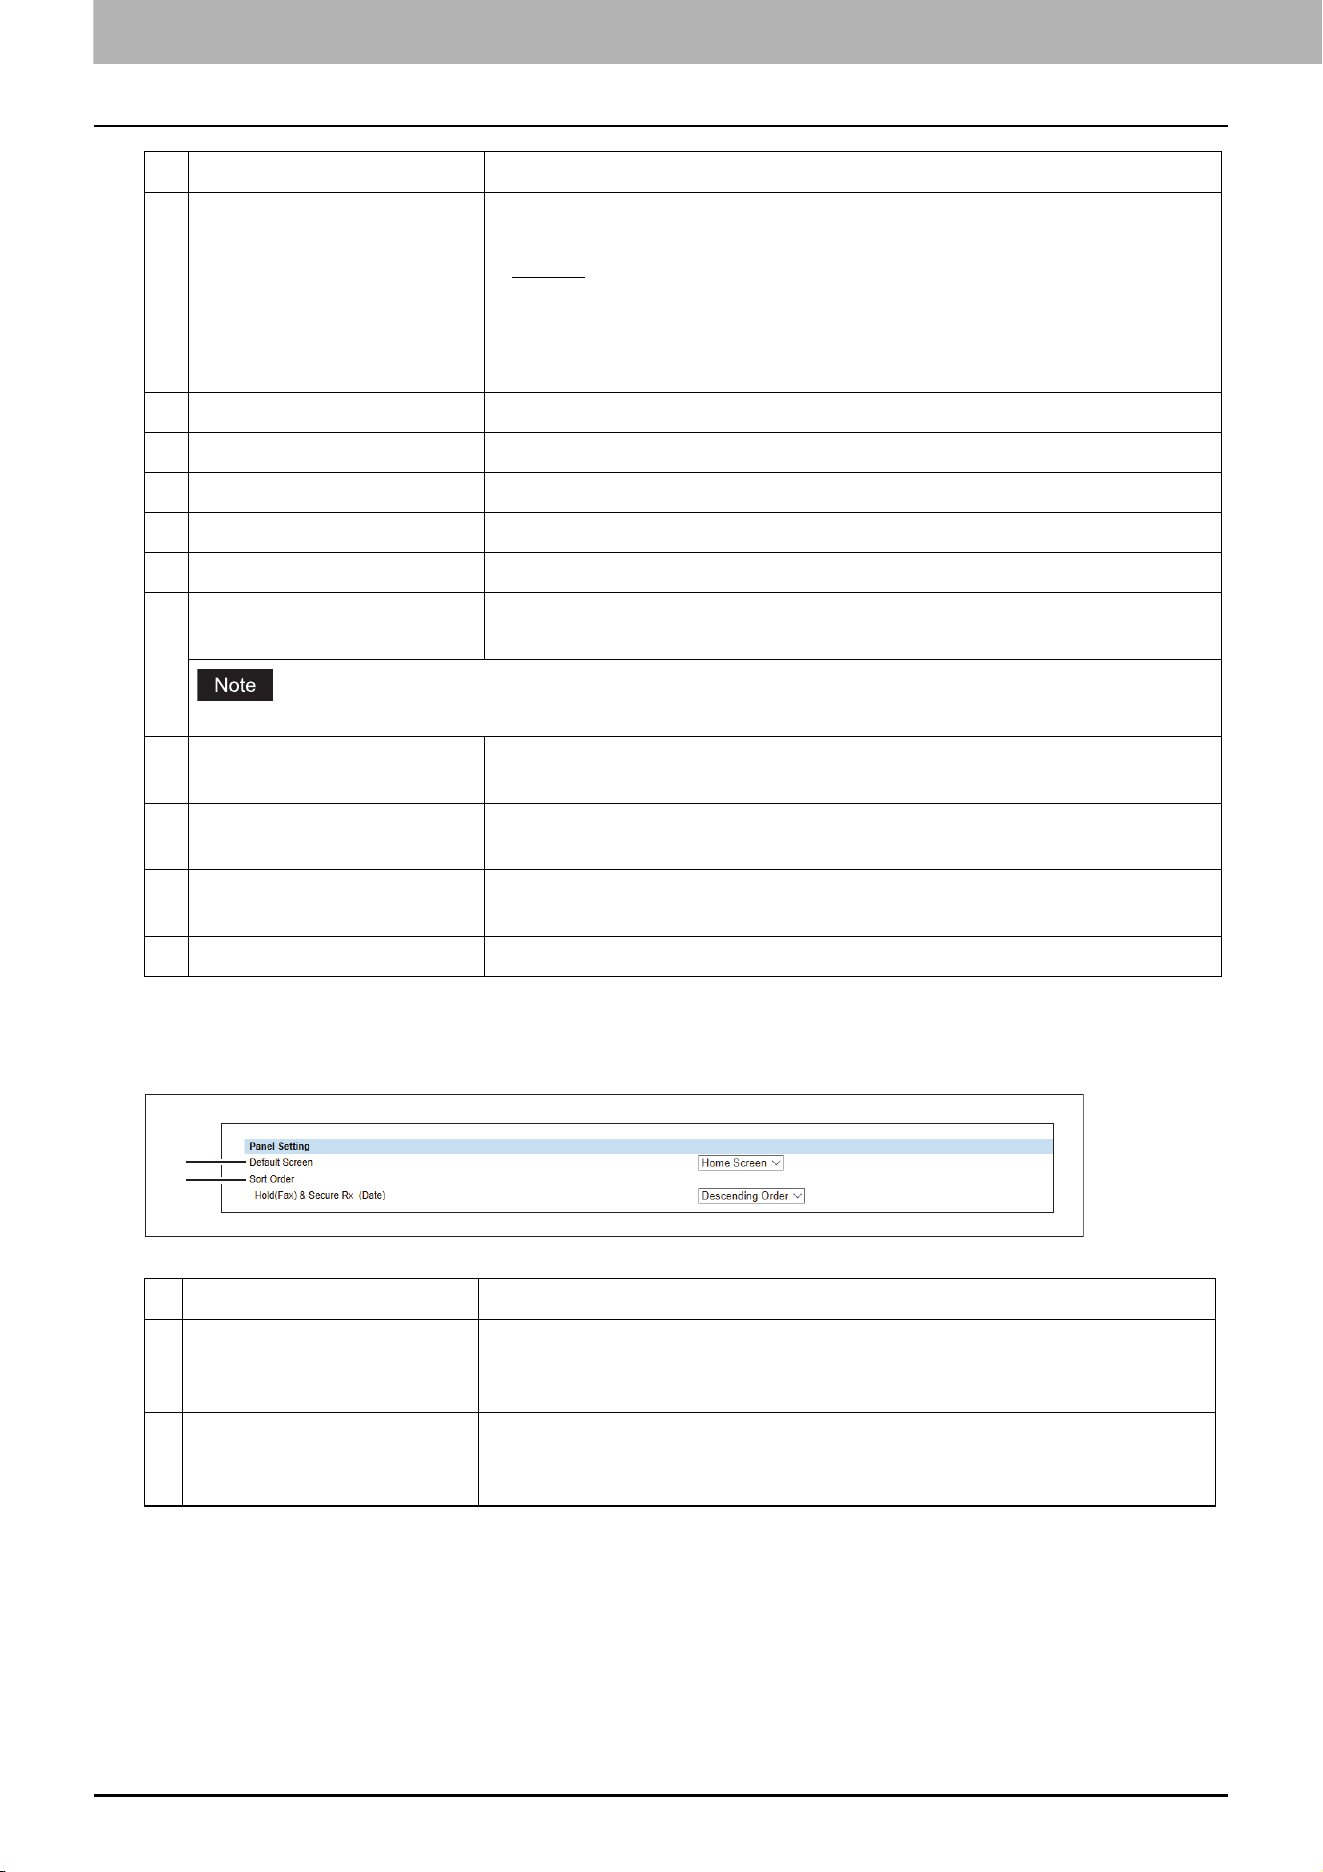
Panel Setting
You can set the default screen on the control panel and the appearance order in the job lists.
3 Sync Setting Specify whether or not to synchronize the HOME screen with the network
server or other MFPs.
Disable
: Disable the Home sync function.
Use Network Server for Sync: Select this to use the network server for
synchronization.
Use MFP for Sync: Select this to use MFP for synchronization.
4 Server Name Enter the name of the network server.
5 Port Number Enter the port number of the network server.
6 User Name Enter the name of the user who accesses the network server.
7 Password Enter the password of the user who accesses the network server.
8 Enable SSL/TLS Select whether SSL/TLS is enabled or disabled.
9 Assume this MFP is the
Primary Server
Select this check box to synchronize this MFP as the primary server. When you
clear this check box, another MFP can synchronize as the primary server.
If the FTP server is disabled, you cannot set this MFP as the primary server.
10 Server Name Enter the name of the primary server when you set another MFP other than
this MFP as the primary server.
11 Port Number Enter the port number of the primary server when you set another MFP other
than this MFP as the primary server.
12 Enable SSL/TLS Select whether SSL/TLS is enabled or disabled when you set another MFP
other than this MFP as the primary server.
13 Delete All Shared Data Delete all the shared data stored in the FTP server.
Item name Description
1 Default Screen Specify the functions to be displayed on the default screen after this
equipment starts up. Select [Embedded Application] and then press
[Assignment] to specify the applications to be set on the default screen.
2 Sort Order Specify the appearance order of hold (fax) and secure Rx jobs in the job list.
Ascending Order — Shows the jobs in the ascending order by day.
Descending Order — Shows the jobs in the descending order by day.
Item name Description
1
2
7.TopAccess
[Administration] Tab Page 57
TopAccess
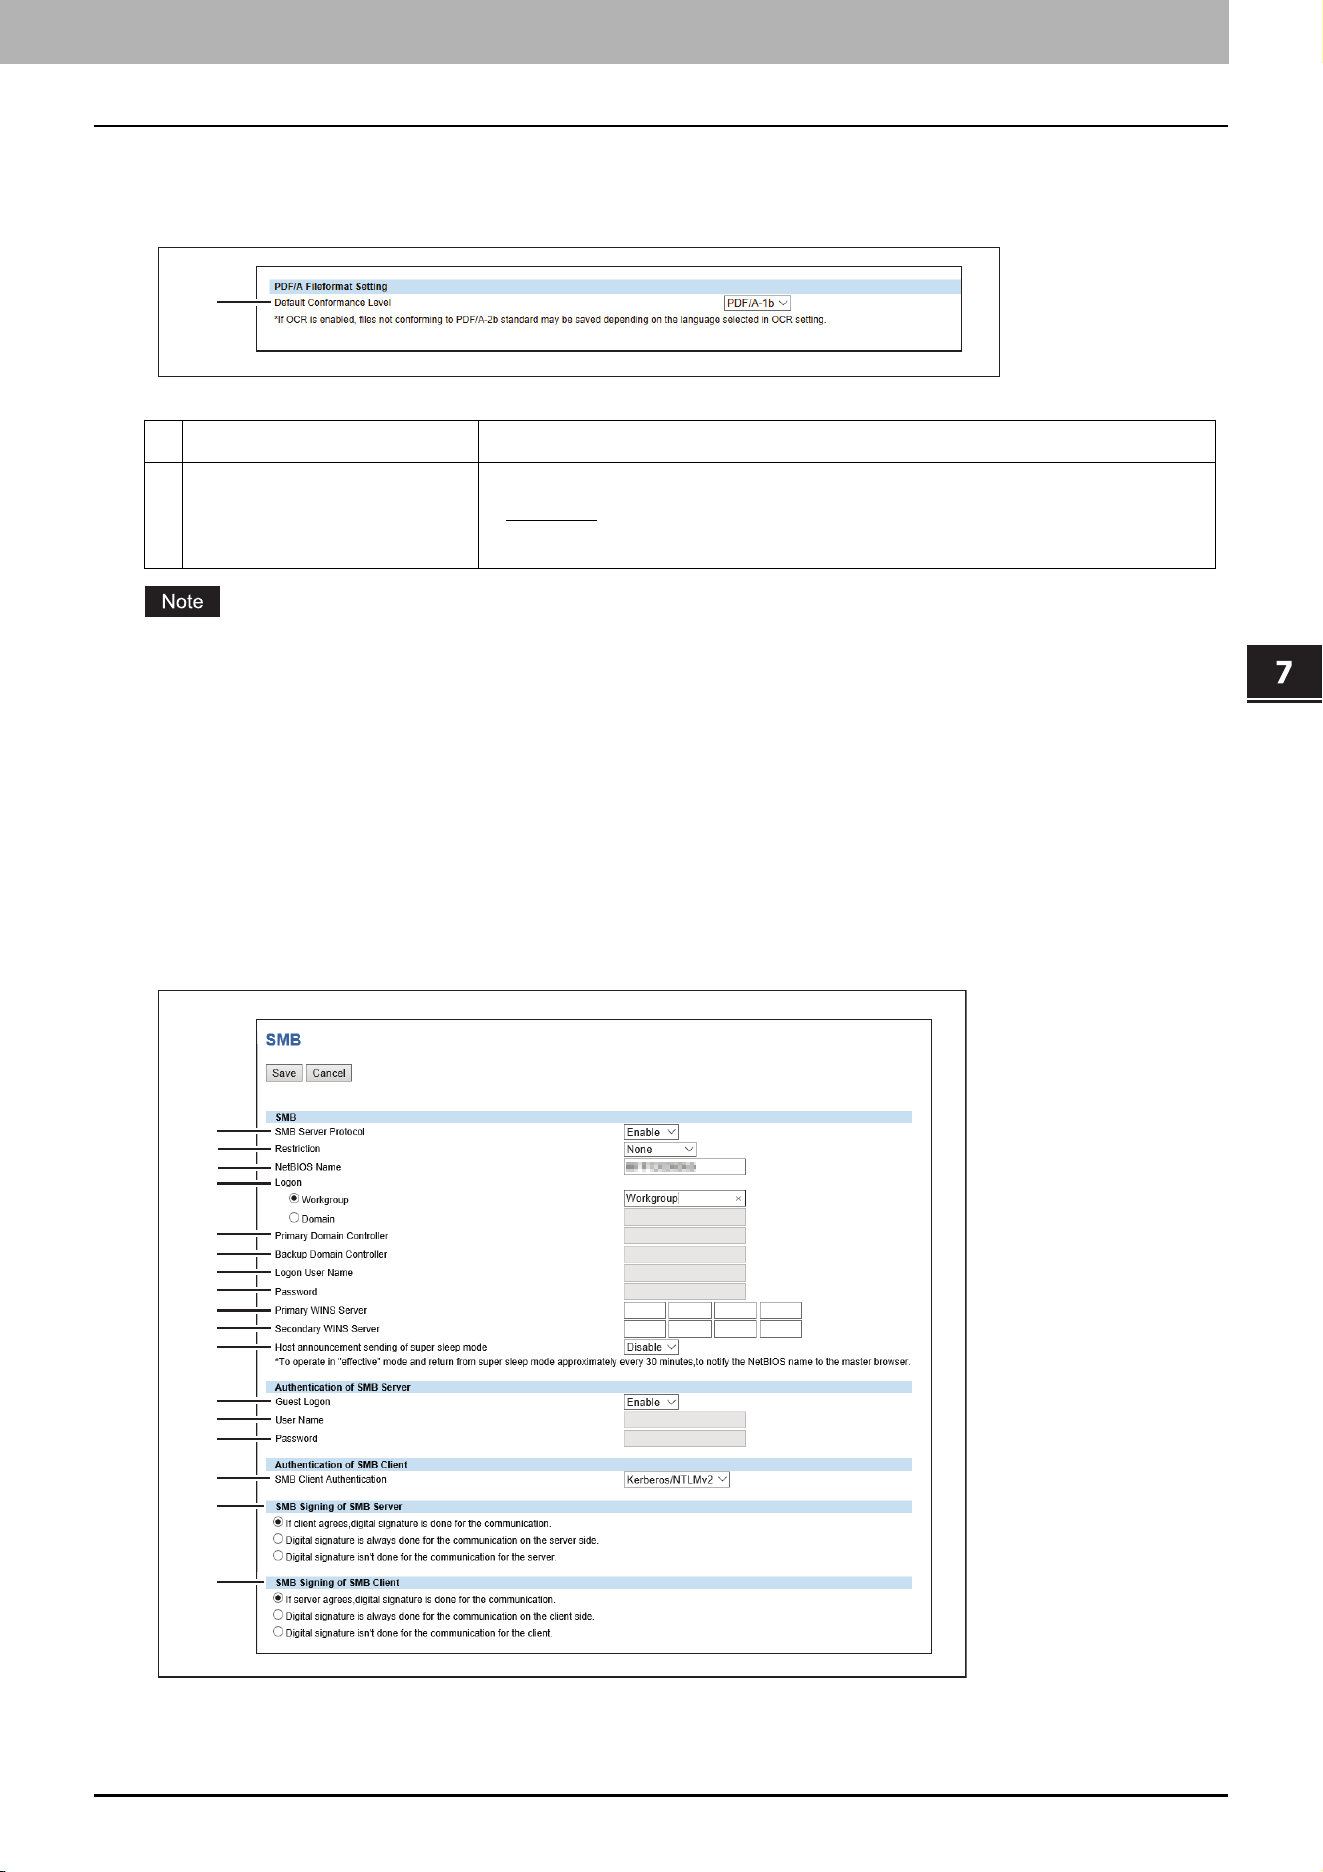
PDF/A Fileformat Setting
You can set the default level of the PDF/A file format.
When you save searchable PDF/A-2b files with the enabled OCR function, they might not conform to the PDF/A-2b
standard, depending on several OCR languages that you select. It is recommended that you select PDF/A-1b to save
searchable PDF/A files with the OCR function.
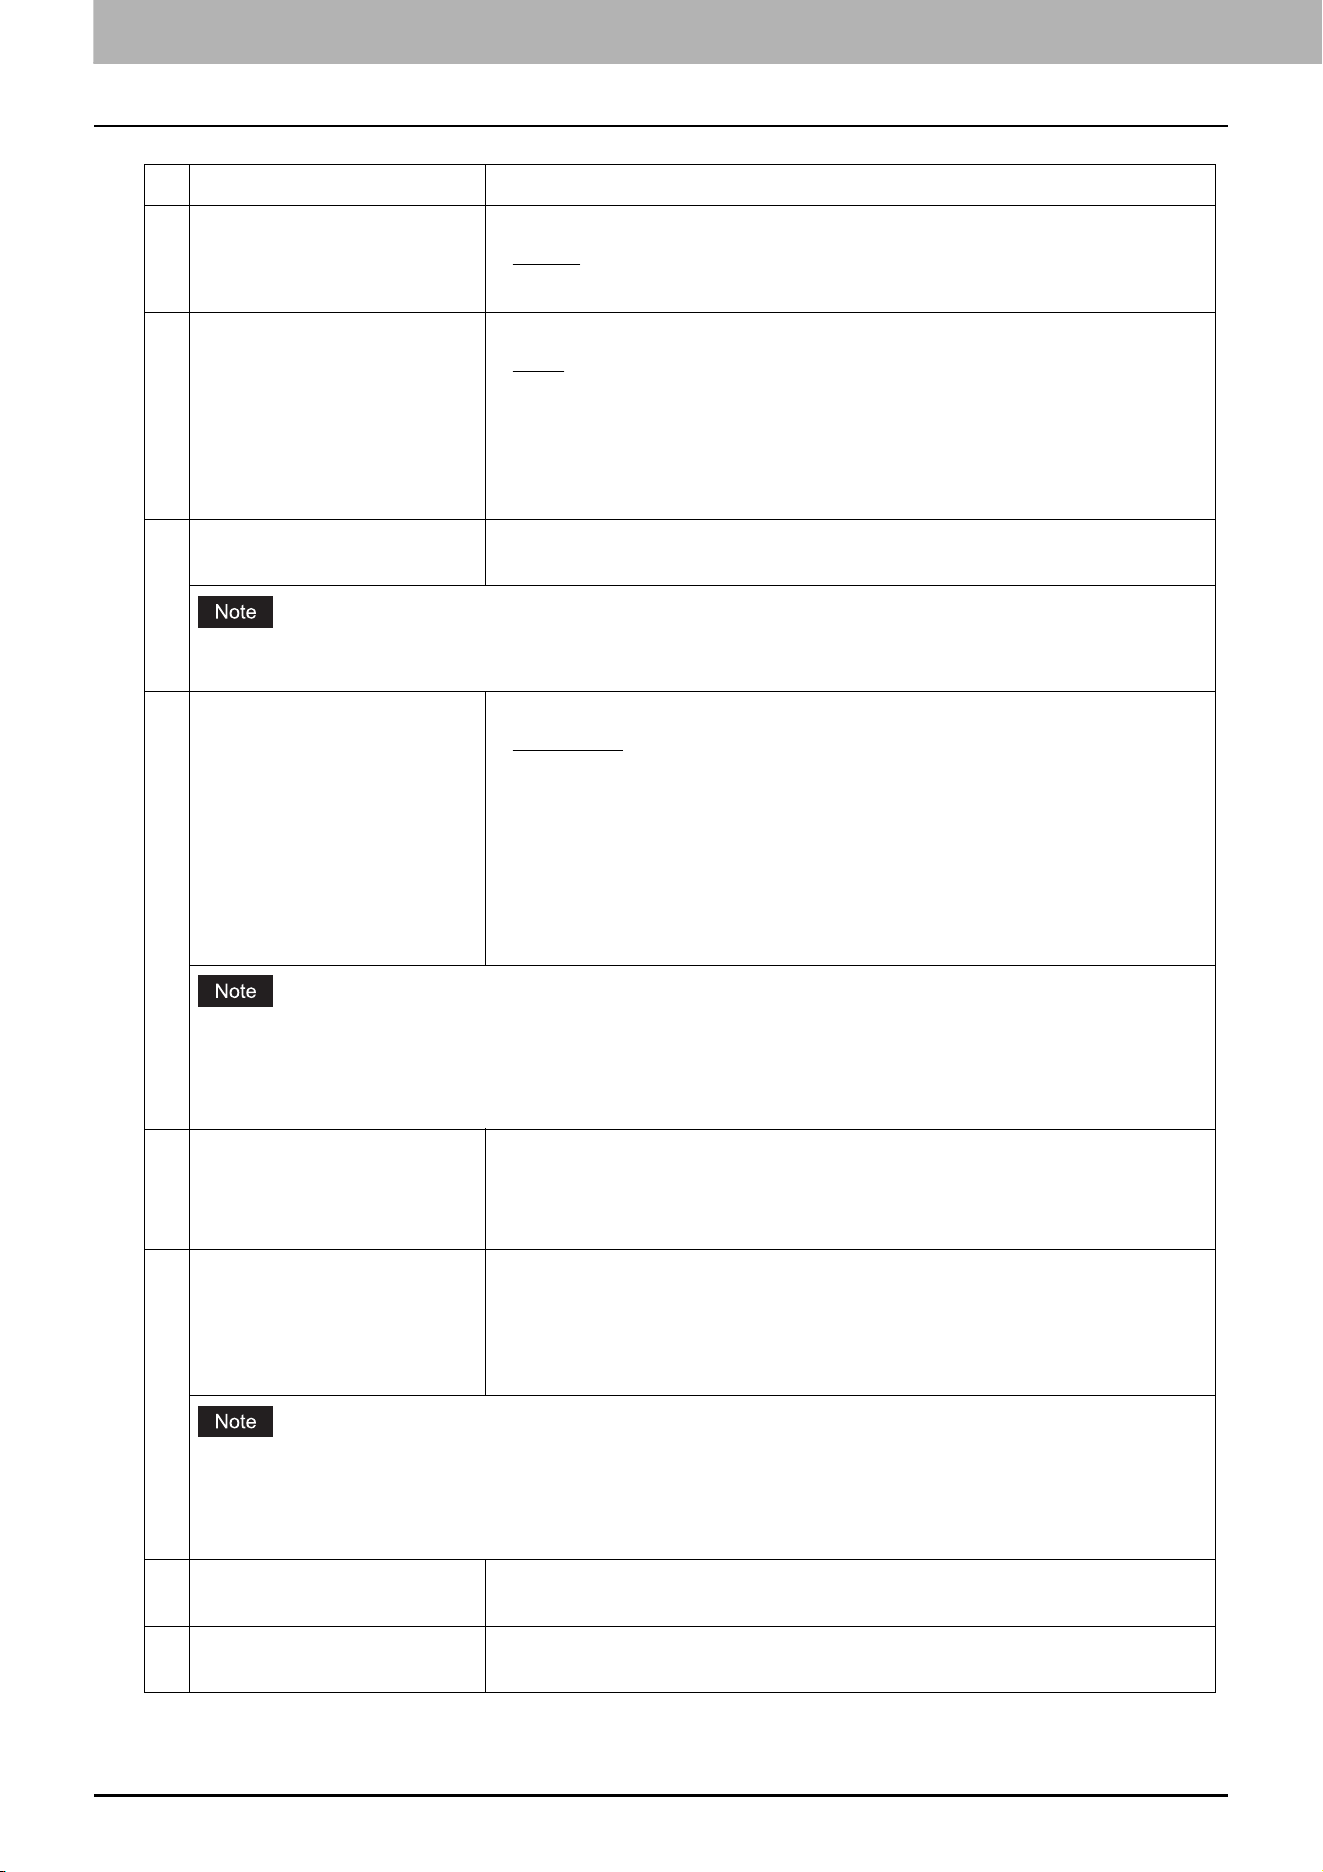
NetWork
Setting up SMB
In SMB, you can specify the SMB network properties to access this equipment through a Microsoft Windows Network
and enable SMB printing. When you enable the SMB, users can also browse the local folder in the equipment. You can
also specify the WINS server when the WINS server is used to enable the Windows print sharing and Windows file
sharing services between the different subnets.
Item name Description
1 Default Conformance Level Select the default conformance level of PDF/A.
PDF/A-1b
— Selects PDF/A-1b as a default setting.
PDF/A-2b — Selects PDF/A-2b as a default setting.
1
3
1
5
6
7
8
9
10
11
12
13
14
15
16
17
4
2
7.TopAccess
58 [Administration] Tab Page
Item name Description
1 SMB Server Protocol Select whether the SMB protocol is enabled or disabled.
Enable — Select this to enable SMB.
Disable — Select this to disable SMB.
2 Restriction Specify restrictions on SMB.
None — Select this to not specify restrictions on SMB.
Print Share — Select this to enable the file sharing service using SMB, but
disable SMB printing.
File Share — Select this to enable SMB printing, but disable the file sharing
service using SMB.
3 NetBIOS Name Enter the NetBIOS name of this equipment. The equipment uses “MFP<NIC
Serial Number>” as the default NetBIOS name.
You can enter only alphanumerical characters and “-” (a hyphen) for NetBIOS names. If you use any other
characters, a warning message will be displayed.
4 Logon Enter the workgroup or domain that this equipment joins.
Workgroup — To include the equipment in the workgroup, enter the
workgroup name. All client computers can access this equipment without a
user name and password.
Domain — Select this and enter the domain name when the equipment will
log on in the domain. Any client computers which are not members of the
domain will need a valid user name and password to access this
equipment. Use this to enhance access security to this equipment.
For workgroup and domain names, you can use only alphanumerical characters and symbols other than the
following:
; : " < > + = \ | ? , * #
If you use any other characters, a warning message will be displayed.
5 Primary Domain Controller Specify the server name or IP address of the primary domain controller when
this equipment will log on the domain network. You can enter up to 128
alphanumerical characters and symbols other than =, ; (semicolon), #, and \
(backslash).
6 Backup Domain Controller Specify the server name or IP address of the backup domain controller when
this equipment will log on the domain network, if required. If the Primary
Domain Controller is unavailable, the Backup Domain Controller will be used
to log on. You can enter up to 128 alphanumerical characters and symbols
other than =, ; (semicolon), #, and \ (backslash).
If the wrong primary or backup domain controller is specified, the NETWORK INITIALIZING message will be
displayed for up to 4 minutes while the equipment searches for the primary or backup domain controller. In
that case, correct the primary or backup domain controller setting after the NETWORK INITIALIZING message
disappears.
7 Logon User Name Enter a valid user name to log on to the specified domain. You can enter up to
128 alphanumerical characters and symbols other than " / \ [ ] : ; | = , + * ? < >.
8 Password Enter the password for the specified log on user name to log on the domain
network. You can enter up to 128 alphanumerical characters.
7.TopAccess
[Administration] Tab Page 59
TopAccess
9 Primary WINS Server Specify the IP address of the primary WINS server when the WINS server is
used to provide the NetBIOS name in your local area network. This option
would be more useful to access this equipment using the NetBIOS Name from
a different subnet.
When the [Obtain a WINS Server Address automatically] option is enabled in the TCP/IP settings, the primary
and secondary WINS server address can be obtained using the DHCP server.
10 Secondary WINS Server Specify the IP address of the secondary WINS server as you require when the
WINS server is used to provide NetBIOS name in your local area network. If
the Primary WINS Server is unavailable, the Secondary WINS Server will be
used.
When the [Obtain a WINS Server Address automatically] option is enabled in the TCP/IP settings, the primary
and secondary WINS server address can be obtained using the DHCP server.
If “0.0.0.0” is entered for the Primary WINS Server and Secondary WINS Server, this equipment will not use the
WINS server.
11 Host announcement sending
of super sleep mode
Specify this to display this equipment’s icon in the “Network” folder on the
Windows computer even in super sleep mode.
Disable
: Disables host announcement sending in super sleep mode.
Enable: Even in super sleep mode, the icon for this printer is displayed in
the “Network” folder on Windows computers.
When the printer’s super sleep mode is set to [Disable], the icon for this printer is displayed in the “Network”
folder on Windows computers regardless of this setting.
12 Guest Logon Select whether a guest user can log on to the SMB server. [Enable] is set as the
default.
13 User Name Enter a name of the user who logs on to the SMB server if [Guest Logon] is set
to [Disable]. You can enter up to 32 alphanumerical characters and symbols
except " / \ [ ] : ; | = , + * ? < >.
If you connect to the SMB server for this equipment before changing the user name, qualification information
on the user name and the password is cached in your Windows computer. Restart your Windows computer to
clear qualification information.
14 Password Enter a password of the specified user if [Guest Logon] is set to [Disable]. You
can enter up to 128 alphanumerical characters and symbols.
If you connect to the SMB server for this equipment before changing the password, qualification information
on the user name and the password is cached in your Windows computer. Restart your Windows computer to
clear qualification information.
Item name Description
7.TopAccess
60 [Administration] Tab Page
15 SMB Client Authentication Specify the authentication method for the SMB clients.
Kerberos/NTLMv2
— Specify this when connecting to an SMB server using
Kerberos/NLTMv2 authentication. NTLMv2 authentication is used if
Kerberos authentication has failed.
Kerberos/NTLMv1 — Specify this when connecting to an SMB server using
Kerberos/NTLMv1 authentication. NTLMv1 authentication is used if
Kerberos authentication has failed.
Kerberos — Specify this when connecting to an SMB server using Kerberos
authentication.
NTLMv2 — Specify this when connecting to an SMB server using NTLMv2
authentication.
NTLMv1 — Specify this when connecting to an SMB server using NTLMv1
authentication.
SMB servers running Mac OS X 10.10 or later do not support NTLMv1 authentication.
16 SMB Signing of SMB Server Select whether SMB Signing is enabled or disabled when a client accesses this
equipment using SMB, such as when a client accesses the shared folder in this
equipment.
If client agrees, digital signature is done for the communication. —
Select this to use the digital signature to secure communication only when
a client accesses this equipment with a digital signature. Even if a client
accesses this equipment without a digital signature, the communication is
allowed without the digital signature.
Digital signature is always done for the communication on the server
side. — Select this to allow the communication only when a client accesses
this equipment with a digital signature. When a client accesses this
equipment without a digital signature, the communication is not allowed.
Digital signature isn’t done for the communication for the server. —
Select this to allow the communication only when a client accesses this
equipment without a digital signature. When a client is set to always access
an SMB server with a digital signature, the communication is not allowed.
If you do not know whether the SMB Signing of SMB Client is enabled or disabled in the client computers, it is
recommended to select [If client agrees, digital signature is done for the communication.]. If this is set
incorrectly, the SMB communication may become unavailable.
Item name Description
7.TopAccess
[Administration] Tab Page 61
TopAccess
17 SMB Signing of SMB Client Select whether SMB Signing is enabled or disabled when this equipment
accesses the clients using SMB, such as when this equipment stores the
scanned data in the network folder using SMB.
If server agrees, digital signature is done for the communication. —
Select this to use the digital signature to secure the communication to an
SMB server only when the SMB Signing of SMB Server that this equipment
accesses is enabled. If the SMB Signing of SMB Server is disabled in an SMB
server, the communication is performed without the digital signature.
Digital signature is always done for the communication on the client
side. — Select this to make this equipment always access an SMB server
with a digital signature. When the SMB Signing of SMB Server is disabled in
an SMB server, the communication is not allowed.
Digital signature isn’ t done for the communication for the client. —
Select this to communicate to an SMB server without the digital signature.
If the SMB Signing of SMB Server is always enabled in an SMB server, the
communication is not allowed.
If you do not know whether the SMB Signing of SMB Server is enabled or disabled in the SMB servers, it is
recommended to select [If server agrees, digital signature is done for the communication.]. If this is set
incorrectly, the SMB communication may become unavailable.
The digital signature is always done for the communication on the server side as the default on Windows
Server 2008 or later. Therefore specify “If server agrees, digital signature is done for the communication.” or
“Digital signature is always done for the communication on the client side.” for SMB communications with
Windows Server 2008 or later.
Item name Description
7.TopAccess
62 [Administration] Tab Page
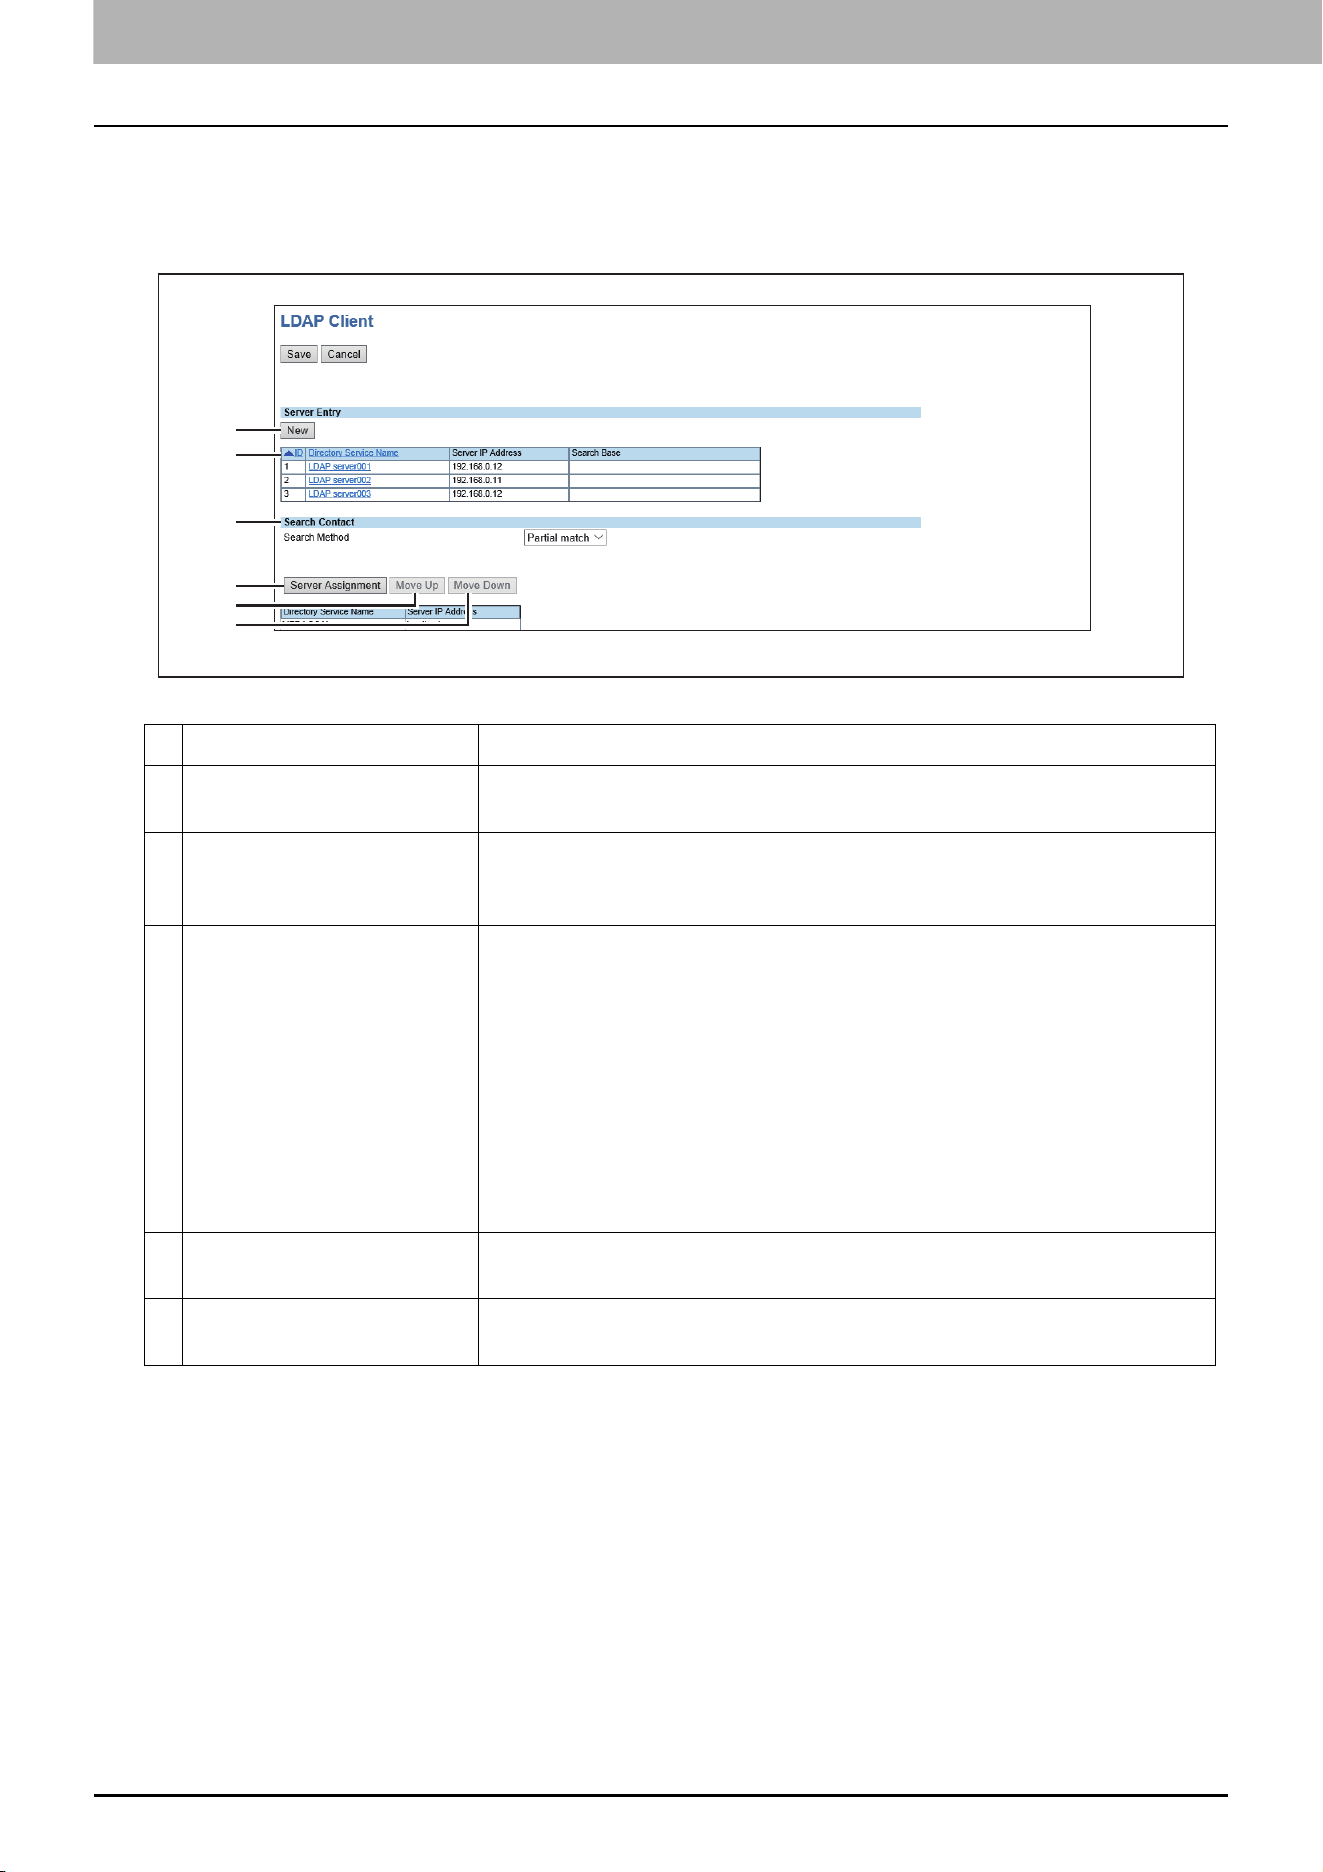
LDAP Client settings
You can register the directory service properties of the LDAP (Lightweight Directory Access Protocol) server. When a
new directory service is added, the users can search destinations using the LDAP server.
Item name Description
1 [New] button Registers the LDAP server that provides a directory service.
P.63 “[Create LDAP Information]/[Edit LDAP Information] screen”
2 Directory Service List Displays a list of registered LDAP servers.
You can edit the registered details by clicking a directory service name.
P.63 “[Create LDAP Information]/[Edit LDAP Information] screen”
3 Search Method Select search conditions for LDAP searching.
Partial match — Select this to search information partially matching the
search conditions.
Prefix match — Select this to search information that starts with contents
matching the search conditions.
Suffix match — Select this to search information that ends with contents
matching the search conditions.
Full match — Select this to search information fully matching the search
conditions.
4 [Server Assignment] button Registers the search target server.
P.65 “[Server Assignment] screen”
5 [Move Up]/[Move Down]
button
Moves up and down in the search list.
1
2
3
4
5
5
7.TopAccess
[Administration] Tab Page 63
TopAccess
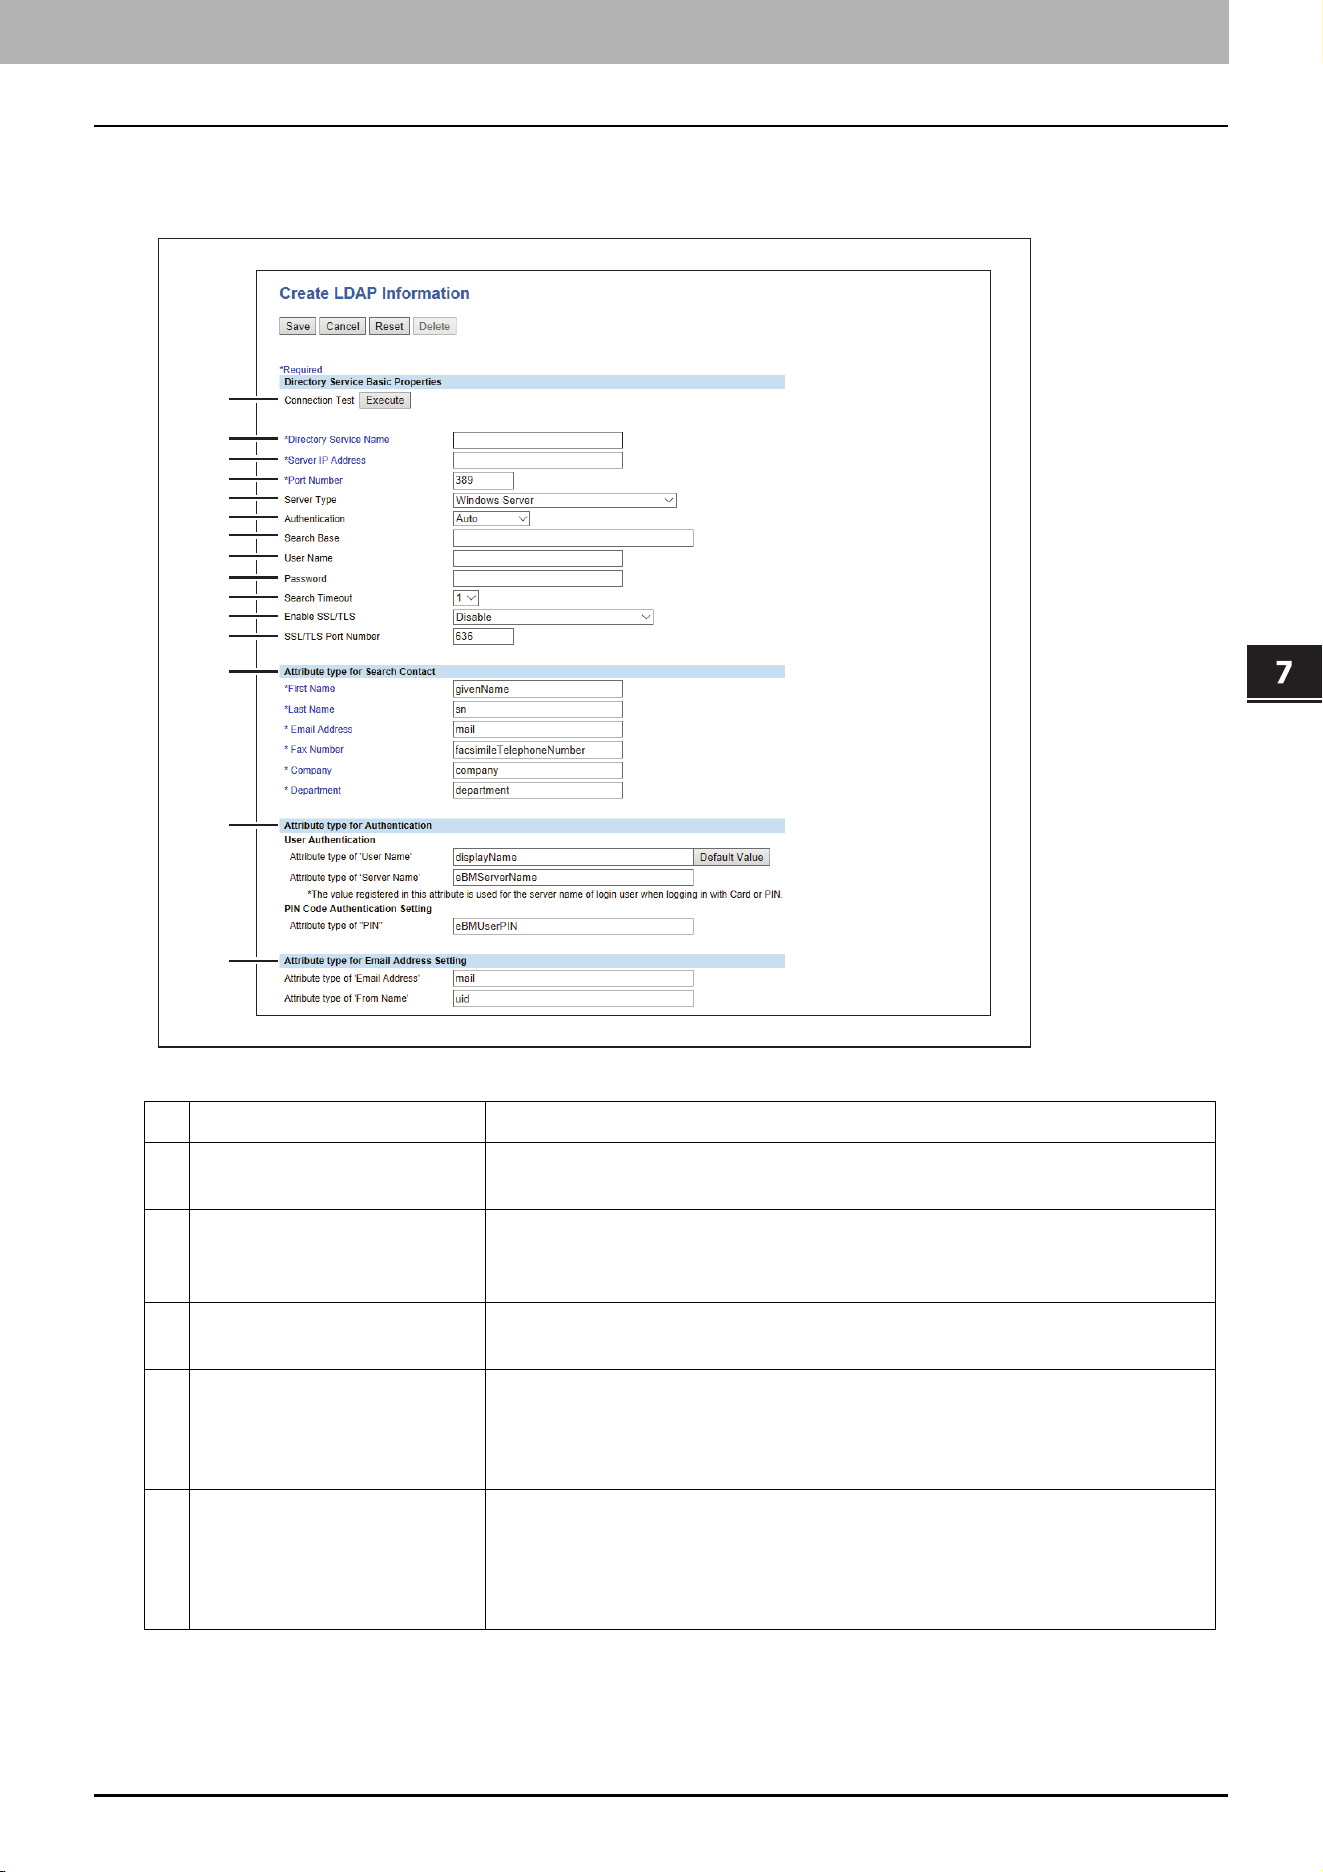
[Create LDAP Information]/[Edit LDAP Information] screen
You can display this screen by clicking a directory service name in the directly service list or the [New] button.
Item name Description
1 [Execute] button Tests the connection using the specified network settings to check if the
communications can be established.
2 Directory Service Name Enter the directory service name to identify the directory service. You can
enter up to 64 alphanumerical characters and symbols other than =, ;
(semicolon), #, and \ (backslash).
3 Server IP Address Enter the IP address or FQDN of the LDAP server. You can enter up to 128
alphanumerical characters and symbols.
4 Port Number Enter the port number to access the LDAP server. You can enter a value in the
range from 1 to 65535. Generally the default value “389” is used to access the
LDAP server without SSL/TLS. When the SSL/TLS is required, generally the
“636” port is used to access the LDAP server.
5 Server Type Select the LDAP server you want to use for LDAP authentication.
Windows Server — Select this when LDAP is running on a Windows server.
LDAP Server (Other than Windows Server) — Select this when the LDAP is
running on a server other than a Windows one.
1
2
3
4
5
11
10
9
8
7
6
12
15
14
13
7.TopAccess
64 [Administration] Tab Page
6 Authentication Select the SASL authentication protocol. If you do not know the
authentication type, select [Auto].
Auto — Select this to access the LDAP server using the appropriate
authentication that this equipment detects.
Kerberos — Select this to access the LDAP server using the Kerberos
authentication.
Digest-MD5 — Select this to access the LDAP server using the Digest-MD5
authentication.
CRAM-MD5 — Select this to access the LDAP server using the CRAM-MD5
authentication.
Login — Select this to access the LDAP server using the login
authentication.
Plain — Select this to access the LDAP server using the plain
authentication.
Simple Bind — Select this to access the LDAP server using the Simple Bind
authentication.
7 Search Base Enter the search base. When you configure the Active Directory in Windows
server, make sure to enter this option. You can enter up to 256
alphanumerical characters and symbols other than ; (semicolon), #, and \
(backslash).
8 User Name Enter the log-in user name if a user name is required to access the directory
service. You can enter up to 256 alphanumerical characters and symbols.
9 Password Enter the password if required to access the directory service. You can enter
up to 32 alphanumerical characters and symbols.
10 Search Timeout Select the timeout period for quitting communication when no response is
received from the LDAP server. Specify within the range from 1 to 5. “1” is set
as the default.
11 Enable SSL/TLS Select whether the SSL (Secure Sockets Layer)/TLS (Transport Layer Security)
is enabled or disabled for communicating the LDAP directory service.
Disable — Select this to disable the SSL/TLS for communicating the LDAP
directory service.
Verify with imported CA certification(s) — Select this to enable the SSL/
TLS using the imported CA certificate.
Accept all certificates without CA — Select this to enable the SSL/TLS
without using imported CA certificate.
When [Verify with imported CA certification(s)] is selected, you must import the CA certificate in this
equipment.
If at least one of the registered LDAP directory services requires the SSL/TLS, you must enable the [Enable
SSL/TLS] option. When the [Enable SSL/TLS] option is enabled, this equipment will connect the registered
LDAP directory services using SSL/TLS first. Then if the connection fails using SSL/TLS, this will connect to
the registered LDAP directory service without using SSL/TLS. Therefore, even if you enable the [Enable SSL/
TLS] option, this equipment can also connect to an LDAP directory service that does not require the SSL/
TLS.
Not all operating systems support SSL/TLS for all protocols.
12 SSL/TLS Port Number Enter the port number to access the LDAP server using SSL/TLS. You can
enter a value in the range from 1 to 65535. Generally the default value “636” is
used.
Item name Description
7.TopAccess
[Administration] Tab Page 65
TopAccess
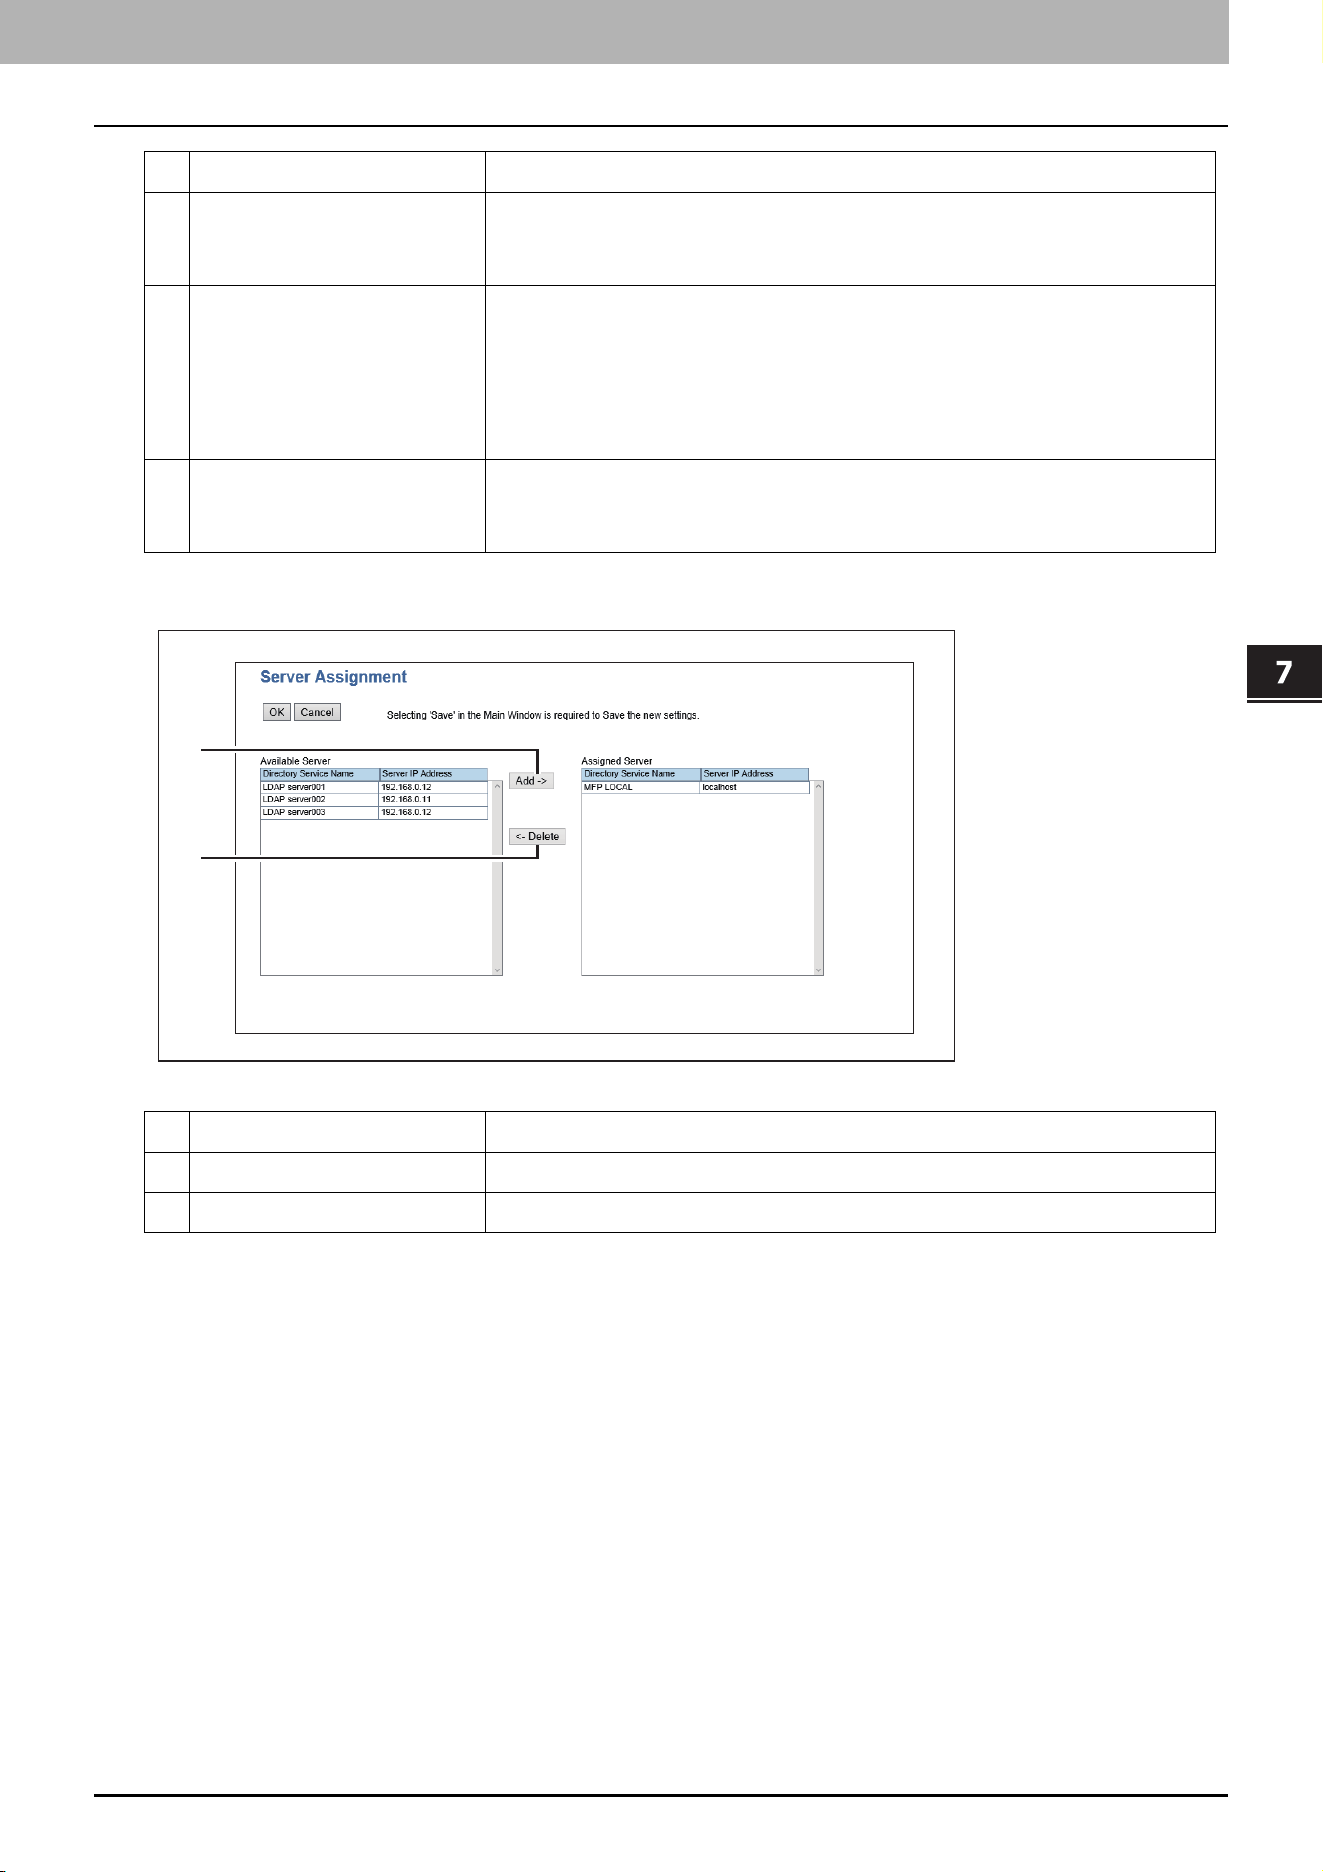
[Server Assignment] screen
13 Attribute type for Search
Contact
Enter the attribute type to be used for searching contacts using the external
LDAP server. You can enter up to 32 alphanumerical characters and symbols
other than =, ; (semicolon), #, and \ (backslash).
14 Attribute type for
Authentication
Specify the attribute name for authentication. Enter [Attribute type of 'User
Name'], [Attribute type of 'Server Name'], and either [Attribute type of 'PIN']
or [Attribute type of 'Card information'] for authentication.
You can enter up to 32 half-width alphanumerical characters and symbols
(excluding = ; # \).
Click the [Default Value] button to display the predetermined value.
15 Attribute type for Email
Address Setting
Specify [Attribute type of 'Email Address'] and [Attribute type of 'From Name']
for authentication. You can enter up to 32 half-width alphanumerical
characters and symbols (excluding = ; # \).
Item name Description
1 [Add] button Adds the server from the server list to the assigned servers.
2 [Delete] button Deletes the server from the assigned servers.
Item name Description
1
2
7.TopAccess
66 [Administration] Tab Page
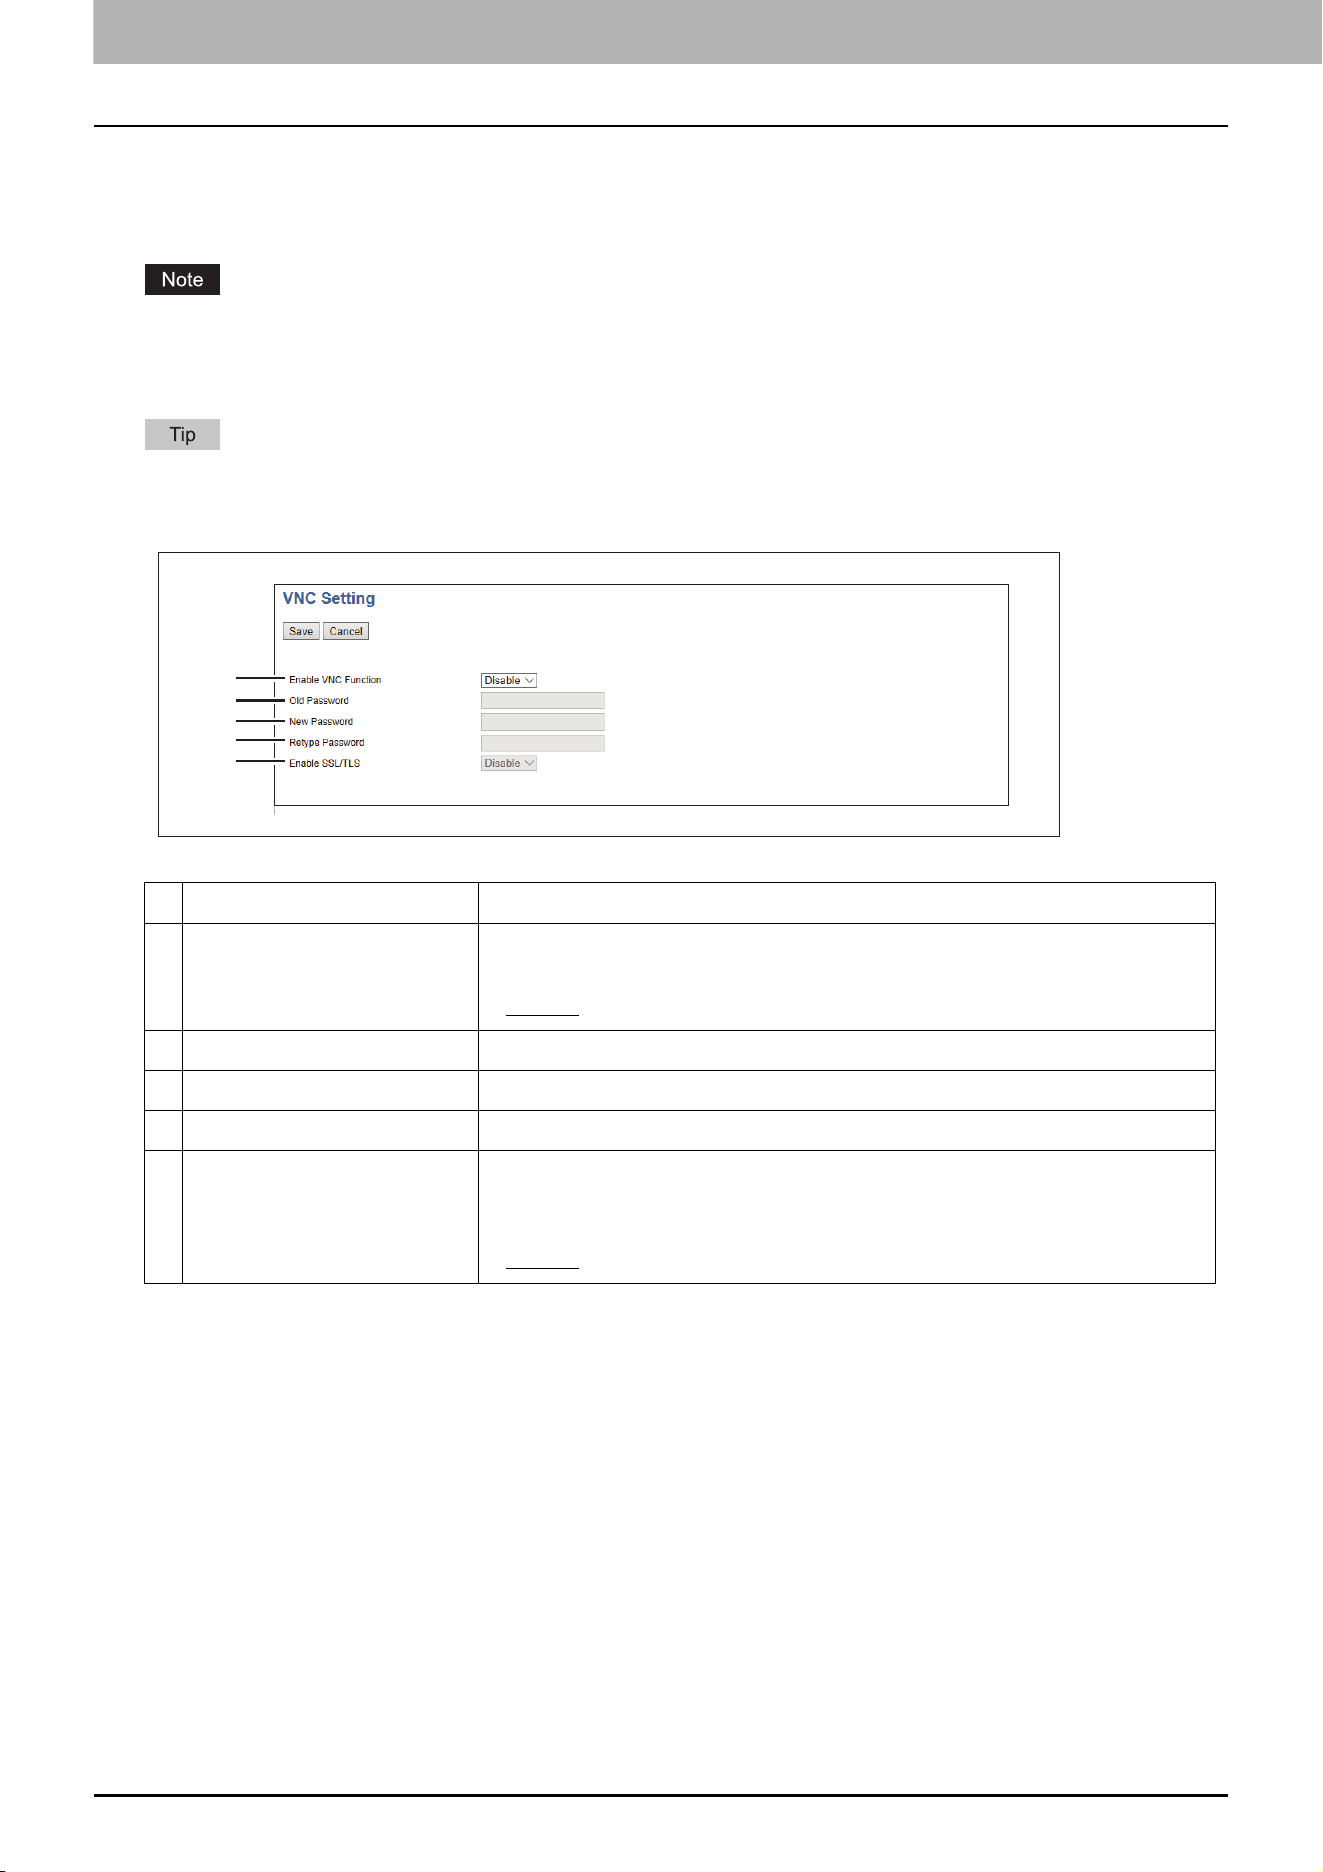
VNC Setting
You can use a computer or a mobile terminal such as a tablet and a smartphone to check and operate the control
panel.
The default password for this VNC function is “d9kvgn”. Be sure to change it before using this function. Specify a
password with six or more and eight or less alphanumeric letters.
You can use only one computer or mobile terminal for the VNC function.
It is recommended that you use UltraVNC (client software) on Windows 8.1 or later for the VNC function.
When this VNC function is enabled, the equipment does not enter the Super Sleep mode.
Item name Description
1 Enable VNC Function Select whether the VNC function is enabled or disabled.
Enable — Enables the VNC function.
Disable — Disables the VNC function.
2 Old Password Enter the old password for the VNC function.
3 New Password Enter a new password for the VNC function.
4 Retype Password Retype the new password for the VNC function.
5 Enable SSL/TLS Select whether the SSL (Secure Sockets Layer)/TLS (Transport Layer Security)
is enabled or disabled for the VNC function.
Enable — Enables the VNC function.
Disable — Disables the VNC function.
1
2
3
4
5
7.TopAccess
[Administration] Tab Page 67
TopAccess
Save as file settings
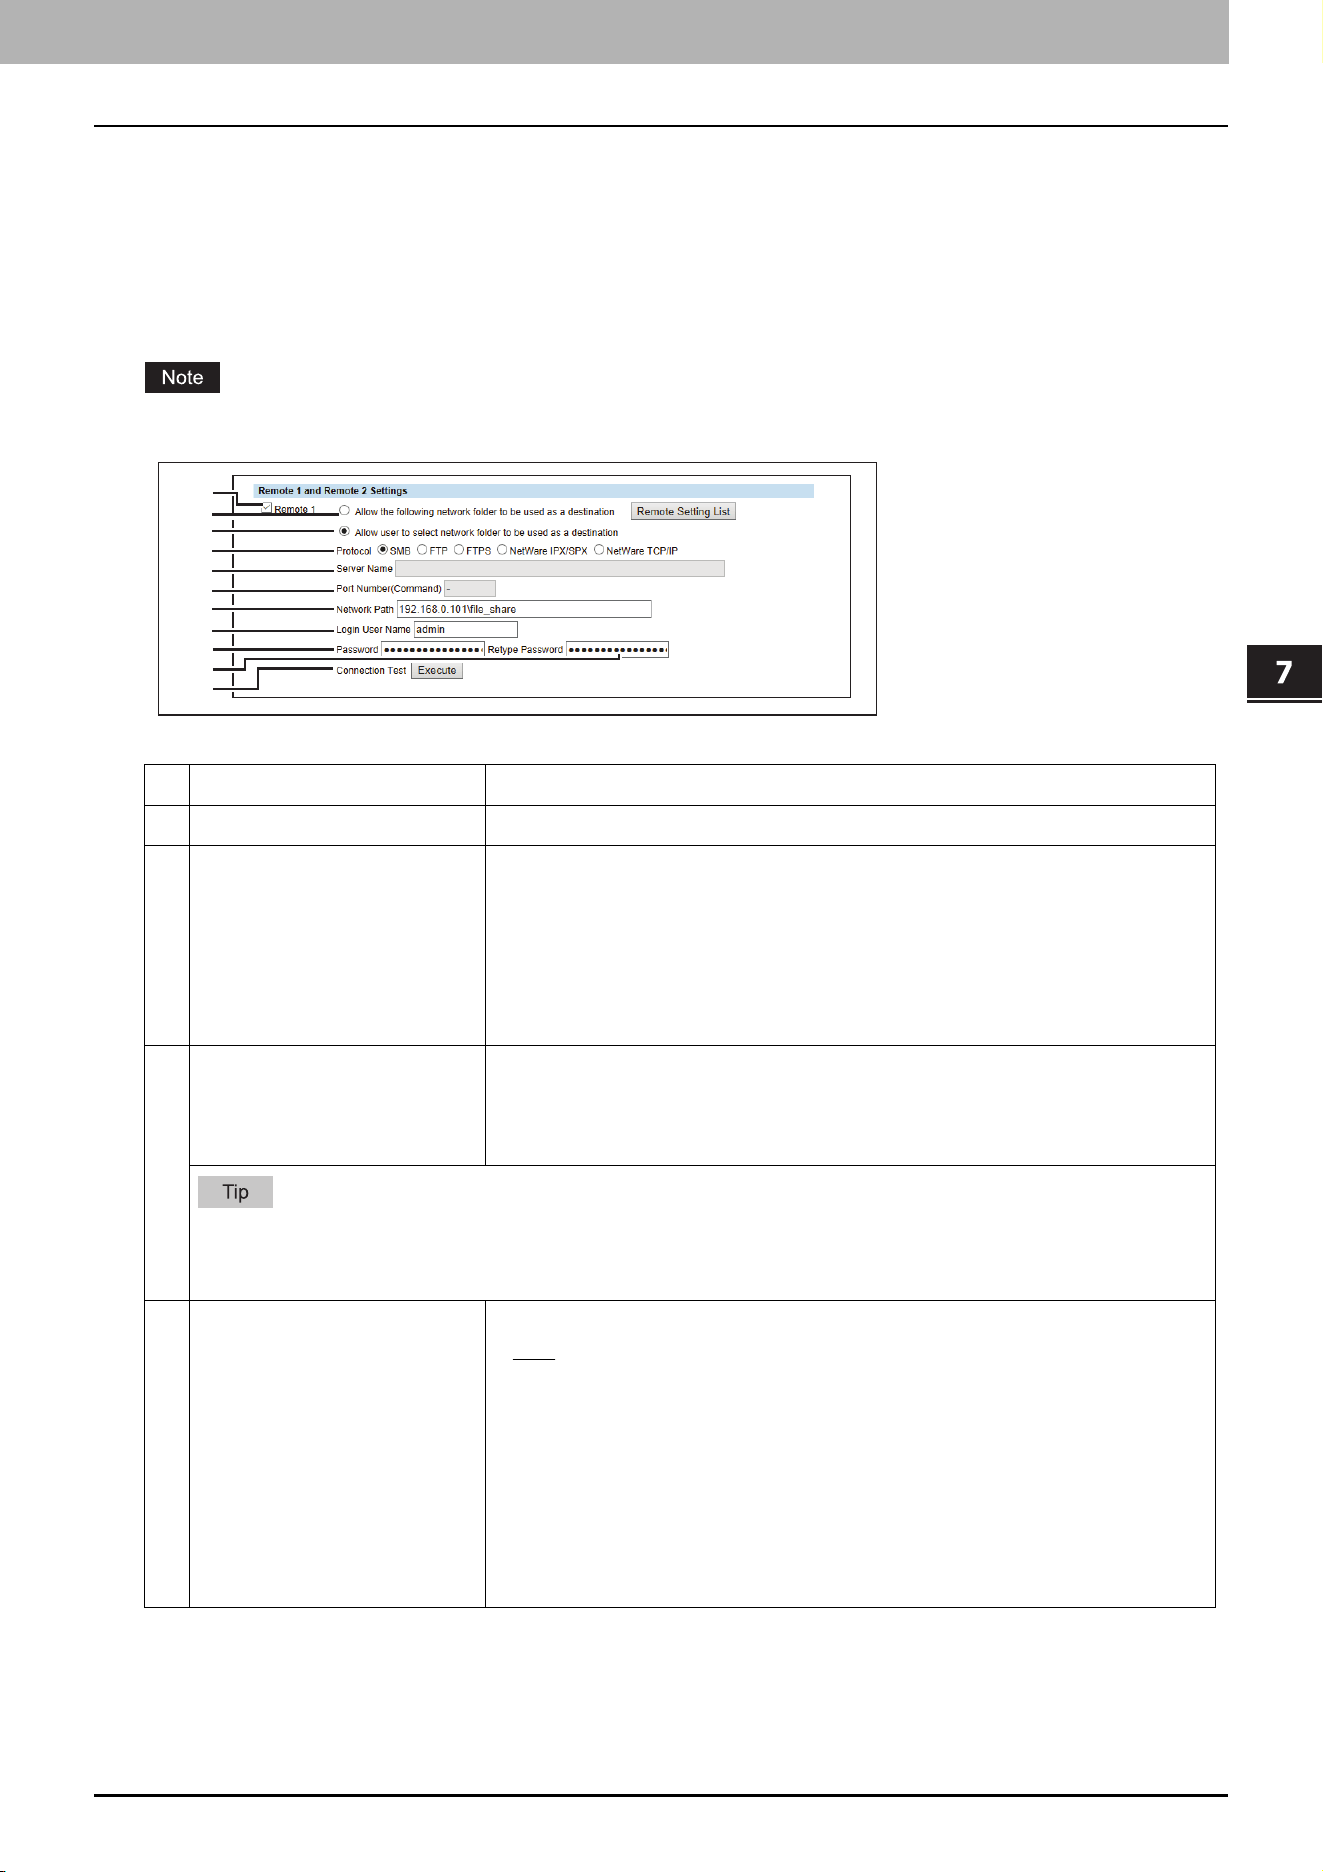
Setting up Remote 1 and Remote 2 Settings
In Remote 1 and Remote 2, you can specify how users can select the network folders for Save as file destination when
you select [Use Network Folder Destination] in the Destination setting. You can specify two network folders; Remote 1
and Remote 2. The setting items are the same for both Remote 1 and Remote 2.
The network folder as a destination must be set to be shared by all users.
Item name Description
1 [Remote 1]/[Remote 2] Select the remote network folder you want to use.
2 Allow the following network
folder to be used as a
destination
Select this to restrict users to select only the network folder that you have
specified. Otherwise, select [Allow user to select network folder to be used as
a destination].
[Remote Setting List] button — Sets a list of network folders for Save as file
destination, which can be selected from Remote 1 and Remote 2. To select
the specified setting list from the touch panel, you must select [Allow user to
select network folder to be used as a destination].
3 Allow user to select network
folder to be used as a
destination
Select this to allow users to specify a network folder as a destination. When
the list of Save as file destinations has been set in [Remote Setting List], you
can select a network folder from the list. Otherwise, select [Allow the
following network folder to be used as a destination].
If you want to allow users to specify either Remote 1 or Remote 2, select the one that is not set for the network
folder as a destination and select [Allow user to select network folder to be used as a destination] of the
selected folder.
4 Protocol Select the protocol to be used for uploading a file to the network folder.
SMB — Select this to send a file to the network folder using the SMB
protocol.
FTP — Select this to send a file to the FTP server.
FTPS — Select this to send a file to the FTP server using FTP over SSL/TLS.
NetWare IPX/SPX — Select this to send a scanned file to the NetWare file
server using the IPX/SPX protocol.
NetWare TCP/IP — Select this to send a scanned file to the NetWare file
server using the TCP/IP protocol.
1
2
3
4
5
6
7
8
9
10
11
7.TopAccess
68 [Administration] Tab Page
5 Server Name When you select [FTP] as the protocol, enter the FTP server name or IP
address where a scanned file will be sent. For example, to send a scanned file
to the “ftp://192.168.1.1/user/scanned” FTP folder in the FTP server, enter
“192.168.1.1” in this box.
When you select [NetWare IPX/SPX] as the protocol, enter the NetWare file
server name or Tree/Context name (when NDS is available).
When you select [NetWare TCP/IP] as the protocol, enter the IP address of the
NetWare file server.
You can enter up to 64 alphanumerical characters and symbols.
6 Port Number(Command) Enter the port number to be used for controls if you select [FTP] as the
protocol. Generally “-” is entered for the control port. When “-” is entered, the
default port number, that is set for FTP Client by an administrator, will be
used. If you do not know the default port number for FTP Client, ask your
administrator and change this option if you want to use another port number.
You can enter a value in the range from 0 to 65535 using numbers and
hyphens (-). “-” is set as the default.
7 Network Path When you select [SMB] as the protocol, enter the network path to the network
folder. For example, to specify the “users\scanned” folder in the computer
named “Client01”, enter “\\Client01\users\scanned”.
When you select [FTP] as the protocol, enter the directory in the specified FTP
server. For example, to specify the “ftp://192.168.1.1/user/scanned” FTP
folder in the FTP server, enter “user/scanned”.
When you select [NetWare IPX/SPX] or [NetWare TCP/IP] as the protocol,
enter the folder path in the NetWare file server. For example, to specify the
“sys\scan” folder in the NetWare file server, enter “\sys\scan”.
You can enter up to 128 alphanumerical characters and symbols.
8 Login User Name Enter the log-in user name to access an SMB server, an FTP server, or a
NetWare file server, if required. When you select [FTP] as the protocol, an
anonymous log-in is assumed if you leave this box blank.
You can enter up to 32 alphanumerical characters and symbols other than <,
>, " (double quotation), : (colon) and ; (semicolon). A user name with only a
single space is not possible.
9 Password Enter the password to access an SMB server, an FTP server, or a NetWare file
server, if required. You can enter up to 32 alphanumerical characters,
symbols, and spaces. A single space only can also be entered.
10 Retype Password Enter the same password again for a confirmation.
11 [Execute] button Tests the connection using the specified network settings to check if the
communications can be established.
Item name Description
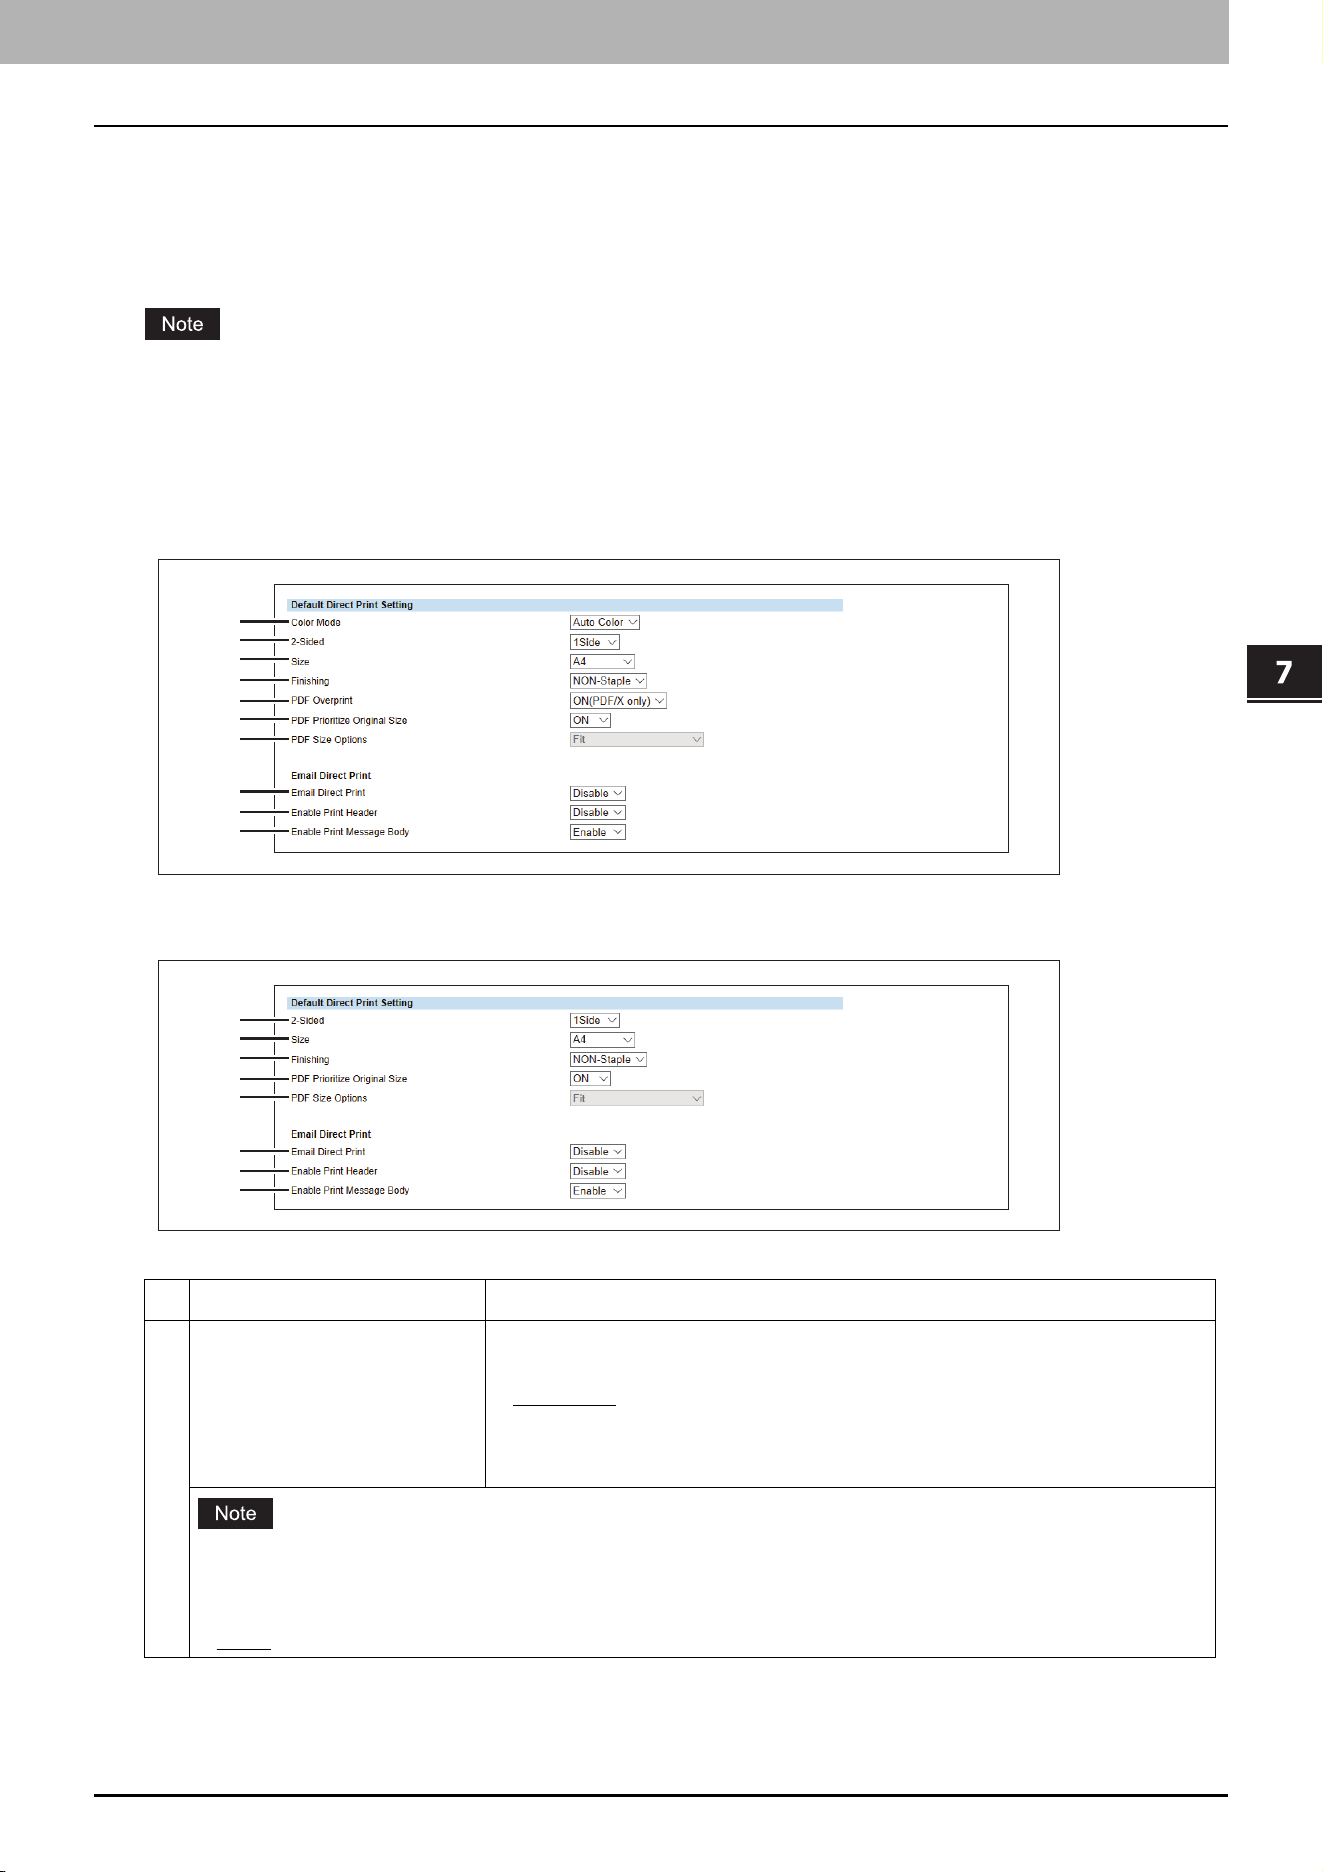
7.TopAccess
[Administration] Tab Page 69
TopAccess
Printer settings
Setting up Default Direct Print Setting
You can set the default settings for USB Direct Print and E-mail Direct Print.
Some print settings do not work on printouts according to file formats.
The [PDF Overprint], [PDF Prioritize Original Size], and [PDF Size Options] settings can work only on PDF printouts.
The [Enable Print Header] and [Enable Print Message Body] settings can work only on the E-mail Direct Print
function.
E-mails with encrypted PDF (secure PDF) files attached cannot be printed by the E-mail Direct Print function.
Color models/e-STUDIO5008LP Series
Monochromatic models
Item name Description
1 Color Mode Select the default color mode setting for direct print. This item is available
only for color models.
Auto Color
— Select this to enable auto color print.
Full Color — Select this to enable full color print.
Black — Select this to enable monochrome print.
[Toner Mode] is displayed in the e-STUDIO5008LP Series. You can select the default toner mode for direct
print.
Erasable Blue - Select this to enable erasable blue print.
Black - Select this to enable monochrome print.
1
2
3
4
5
6
7
8
9
10
2
3
4
6
7
8
9
10
7.TopAccess
70 [Administration] Tab Page
2 2-Sided Select the default setting to print one side or both sides of paper for direct
print. This item is available only when Automatic Document Feeder has been
installed.
1Side
— Select this to enable one-side print.
Book — Select this to enable duplex book print.
Tablet — Select this to enable duplex tablet print.
3 Size Select the default paper size for direct print.
4 Finishing Select the default setting as to whether to staple paper or not.
NON-Staple
— Select this to disable stapling paper.
Upper Left — Select this to staple paper on the upper left corner.
Upper Right — Select this to staple paper on the upper right corner.
5 PDF Overprint Select the default setting as to whether to overprint colors in PDF files or not.
OFF — Select this to disable overprint.
ON — Select this to enable overprint.
ON (PDF/X only)
— Select this to enable overprint only for PDF/X files.
This item is available only for the color models.
6 PDF Prioritize Original Size Select the default setting as to whether to prioritize the PDF original size or
not.
OFF — Select this to prioritize the selected paper size over the original size.
ON
— Select this to prioritize the original size over the selected paper size,
which prints PDF files without enlargement or reduction.
7 PDF Size Options Select the default setting as to how to print PDF files when [PDF Prioritize
Original Size] is set to [OFF].
Fit
— Select this to enlarge or reduce pages by fitting the original size to the
paper size.
Shrink Oversized Pages — Select this to reduce pages if the original size is
larger than the paper size. Pages are printed without enlargement if the
original size is equal to or smaller than the paper size.
8 Email Direct Print Select the default setting as to whether to print E-mails with PDF, JPEG, and
XPS files attached by the Email Direct Print function.
Disable
— Select this to disable Email Direct Print.
Auto — Select this to process Email Direct Print automatically.
9 Enable Print Header Select whether to print the E-mail header when receiving E-mail print jobs.
[Disable] is set as the default.
10 Enable Print Message Body Select whether to print the body message when receiving E-mail print jobs.
[Enable] is set as the default.
Item name Description
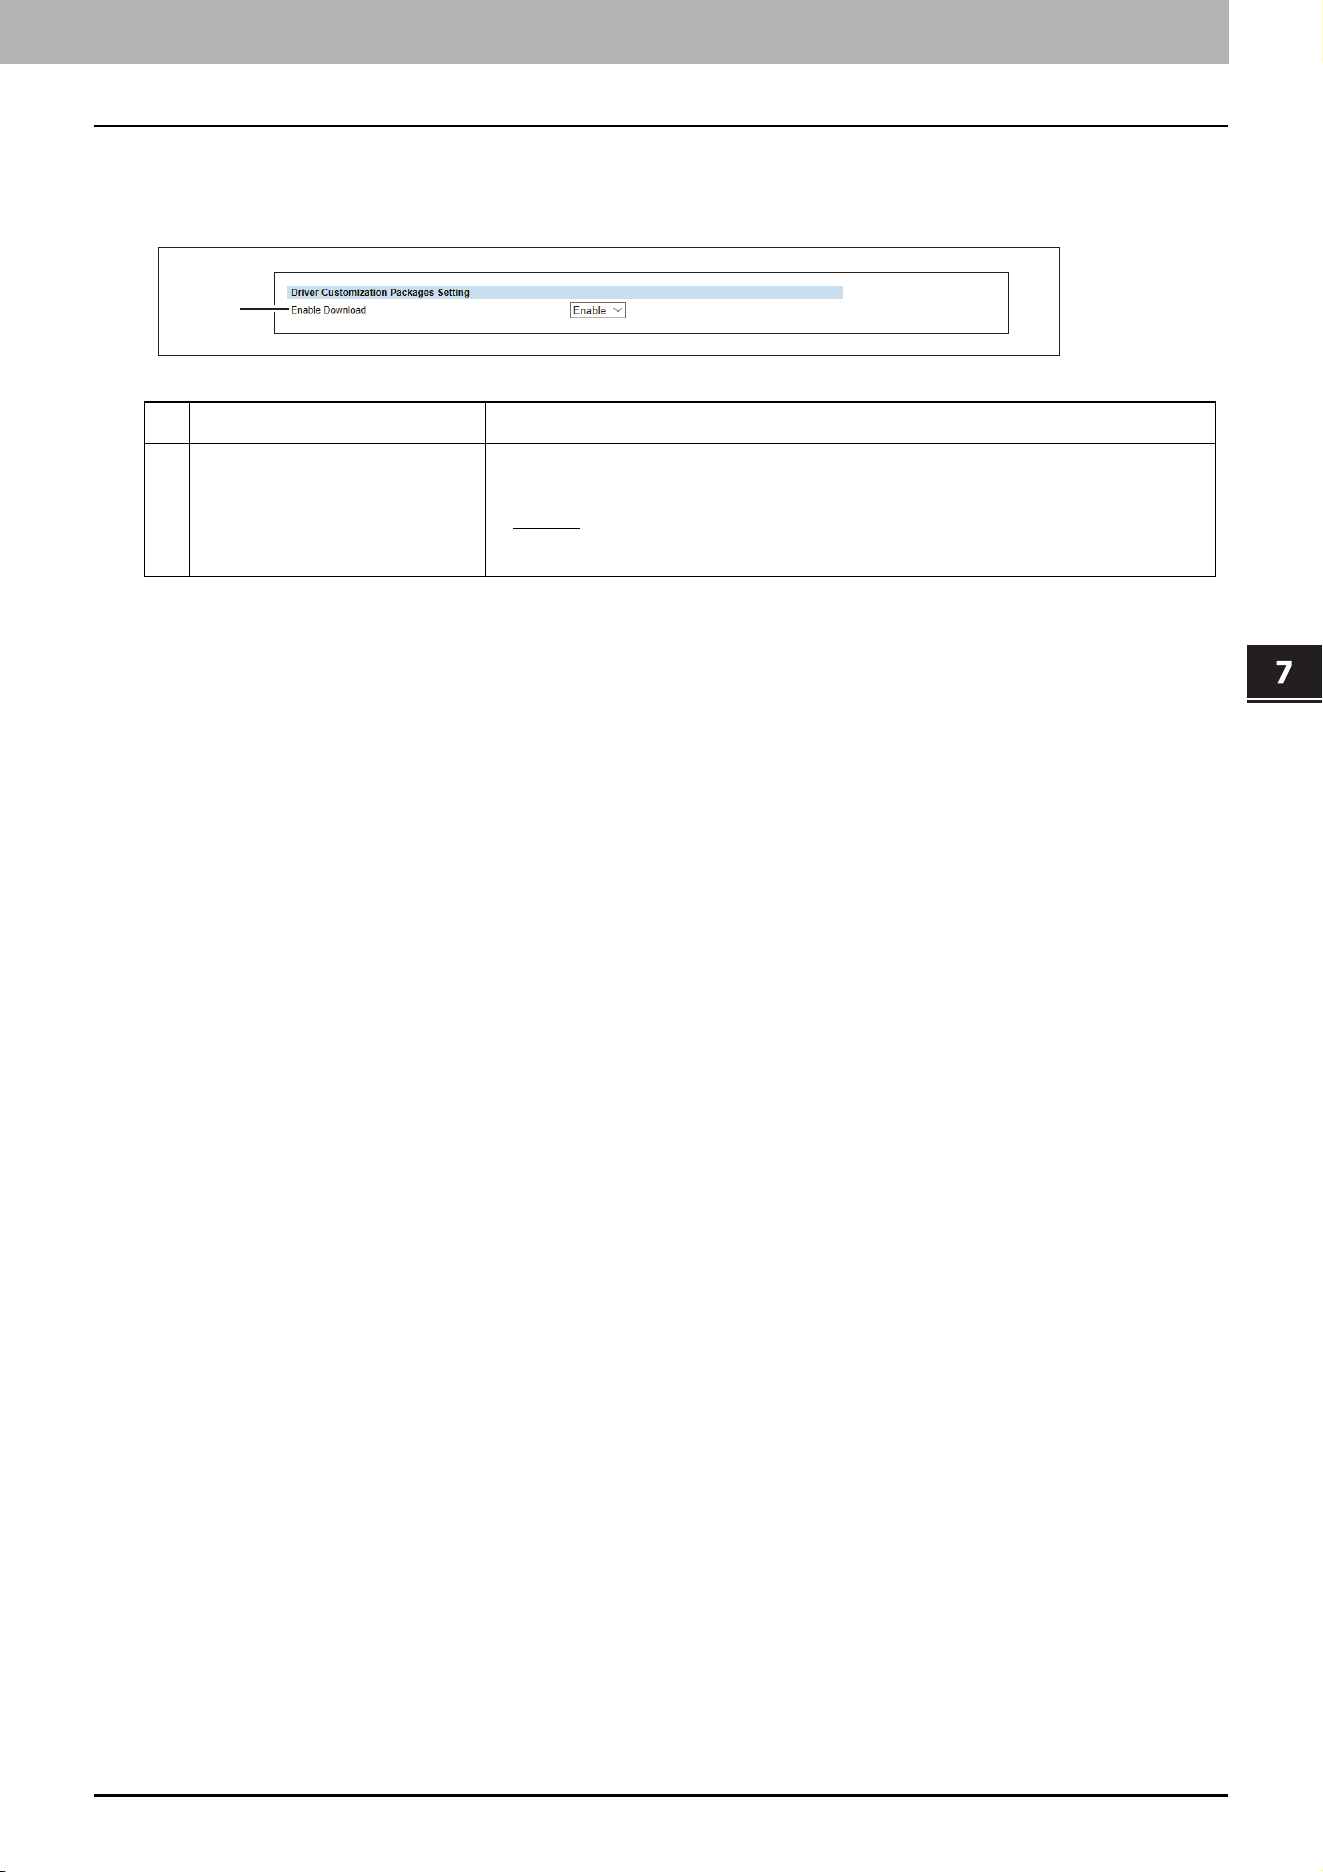
7.TopAccess
[Administration] Tab Page 71
TopAccess
Setting up Driver Customization Packages Setting
You can set the function to download the customization packages for the printer driver.
Item name Description
1 Enable Download Select whether the function is enabled or disabled to download
customization packages for the printer driver.
Enable
— Select this to enable this download function.
Disable — Select this to disable this download function.
1
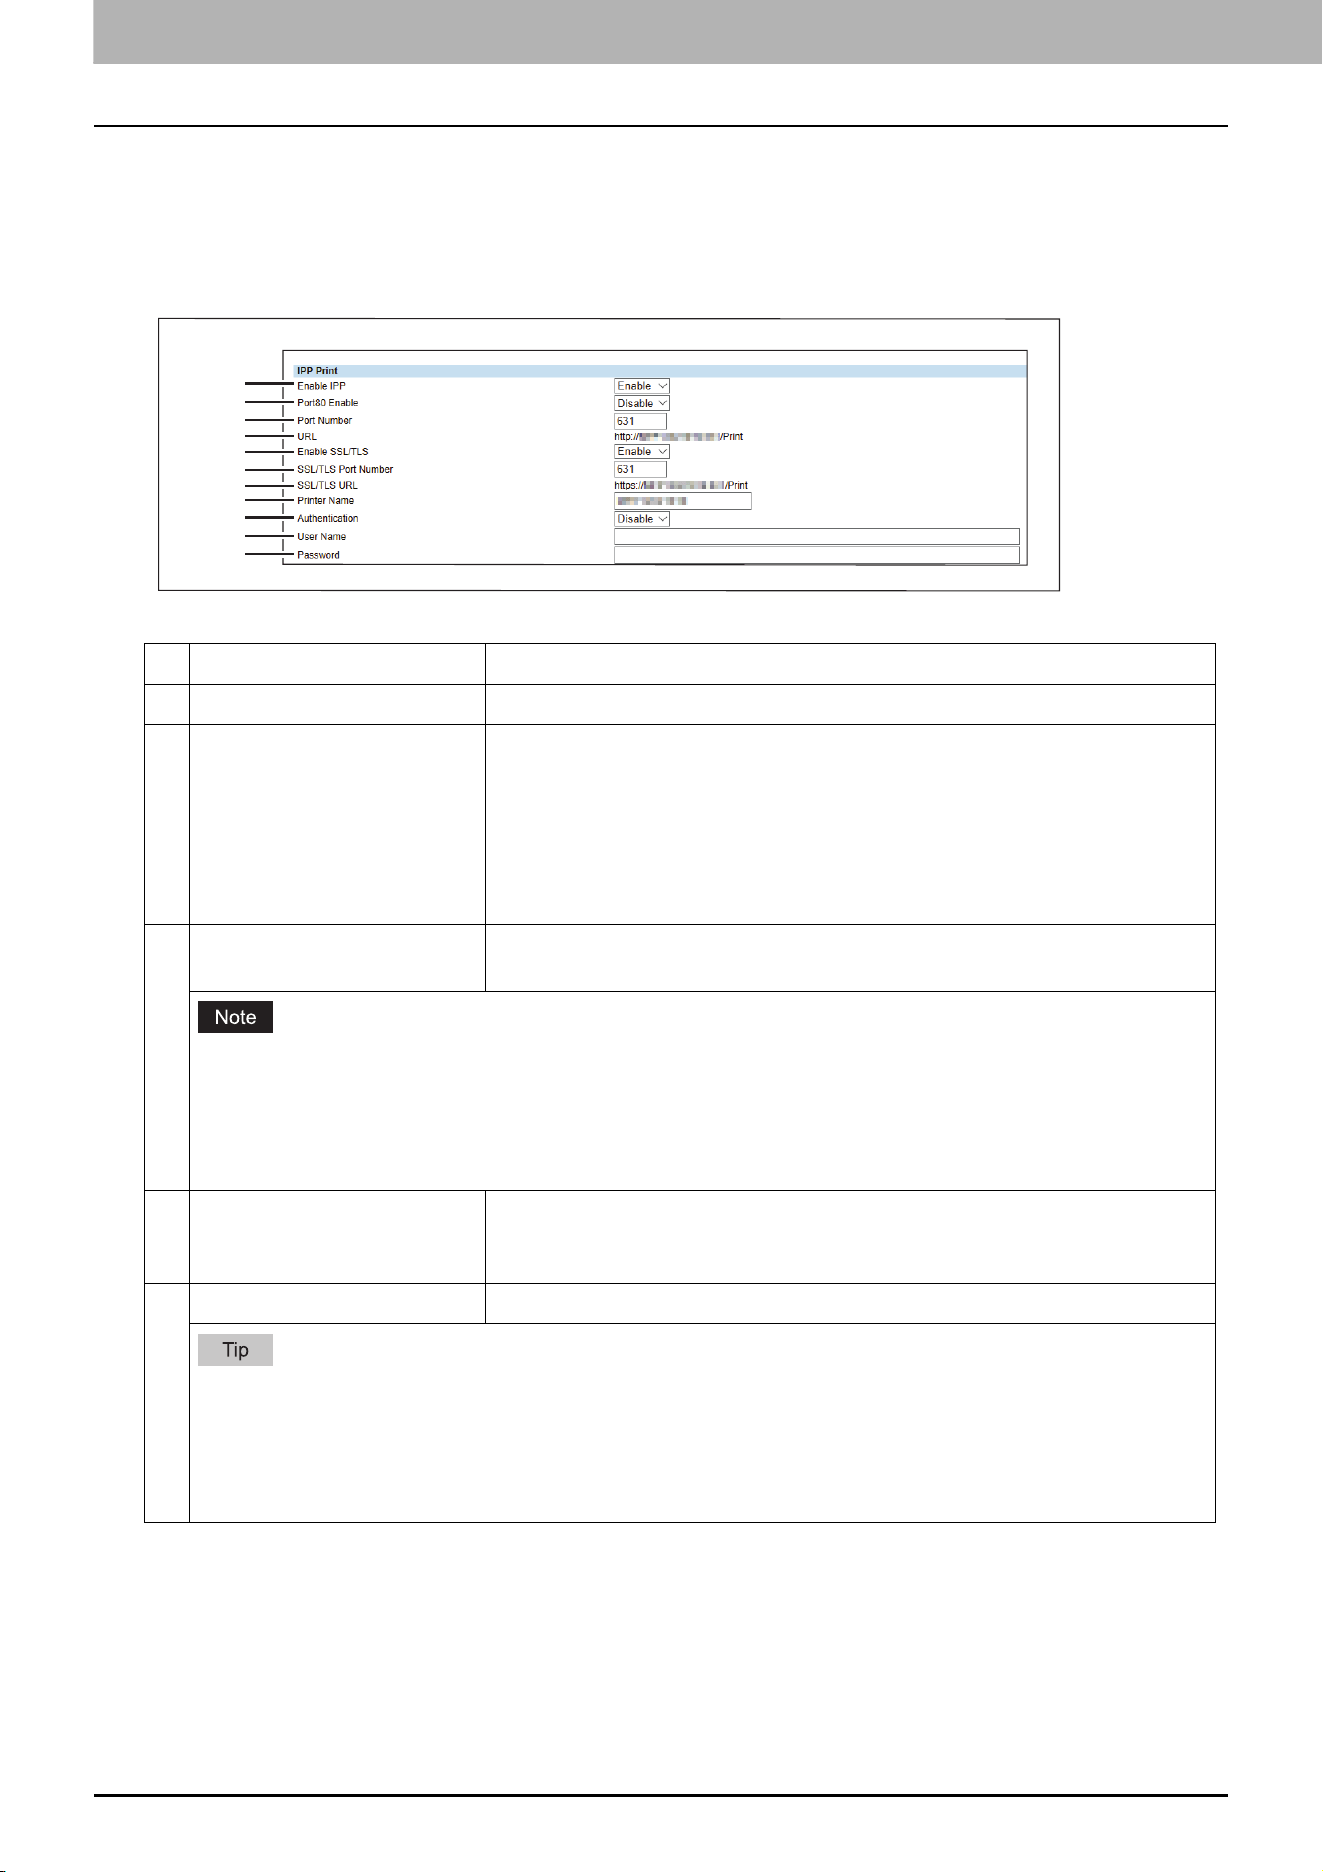
7.TopAccess
72 [Administration] Tab Page
Print Service settings
Setting up IPP Print
In IPP Print, you can set the IPP Print options to enable the IPP print service.
Item name Description
1 Enable IPP Enable or disable the IPP print service. [Enable] is set as the default.
2 Port80 Enable Enable or disable Port80 for IPP printing. Port631 is usually used for IPP
access so users must specify the IPP port to the URL, i.e. “http://<IP address
or DNS name>:631/Print”, for the IPP port. When this is enabled, this
equipment allows IPP access through the Port80, which is the default port for
the HTTP access so users do not have to specify the port number in the IPP
port, i.e. “http://<IP address or DNS name>/Print”. [Disable] is set as the
default.
3 Port Number If enabling the IPP, enter the IPP port number. You can enter a value in the
range from 1 to 65535. Generally the default value “631” is used.
The same port numbers as the ones for the following settings are not usable.
Change the applicable port number before that for the Port Number is set.
HTTP Network Service / Primary Port Number
HTTP Network Service / Secondary Port Number
HTTP Network Service / SSL/TLS Port Number
4 URL Display the URL for IPP printing. You cannot change the URL for IPP printing.
This URL should be set as the print port when users set up the printer driver
for IPP printing.
5 Enable SSL/TLS Enable or disable SSL/TLS for IPP printing. [Disable] is set as the default.
When the SSL/TLS is enabled, users can print to the IPP print port using the SSL/TLS. To print to the IPP
print port using the SSL/TLS, specify the following URL for the IPP print port.
https://<IP Address>:<SSL/TLS Port Number>/Print
Example: https://192.168.53.204:443/Print
Not all operating systems support SSL/TLS for all protocols.
1
2
3
4
5
6
7
8
9
10
11
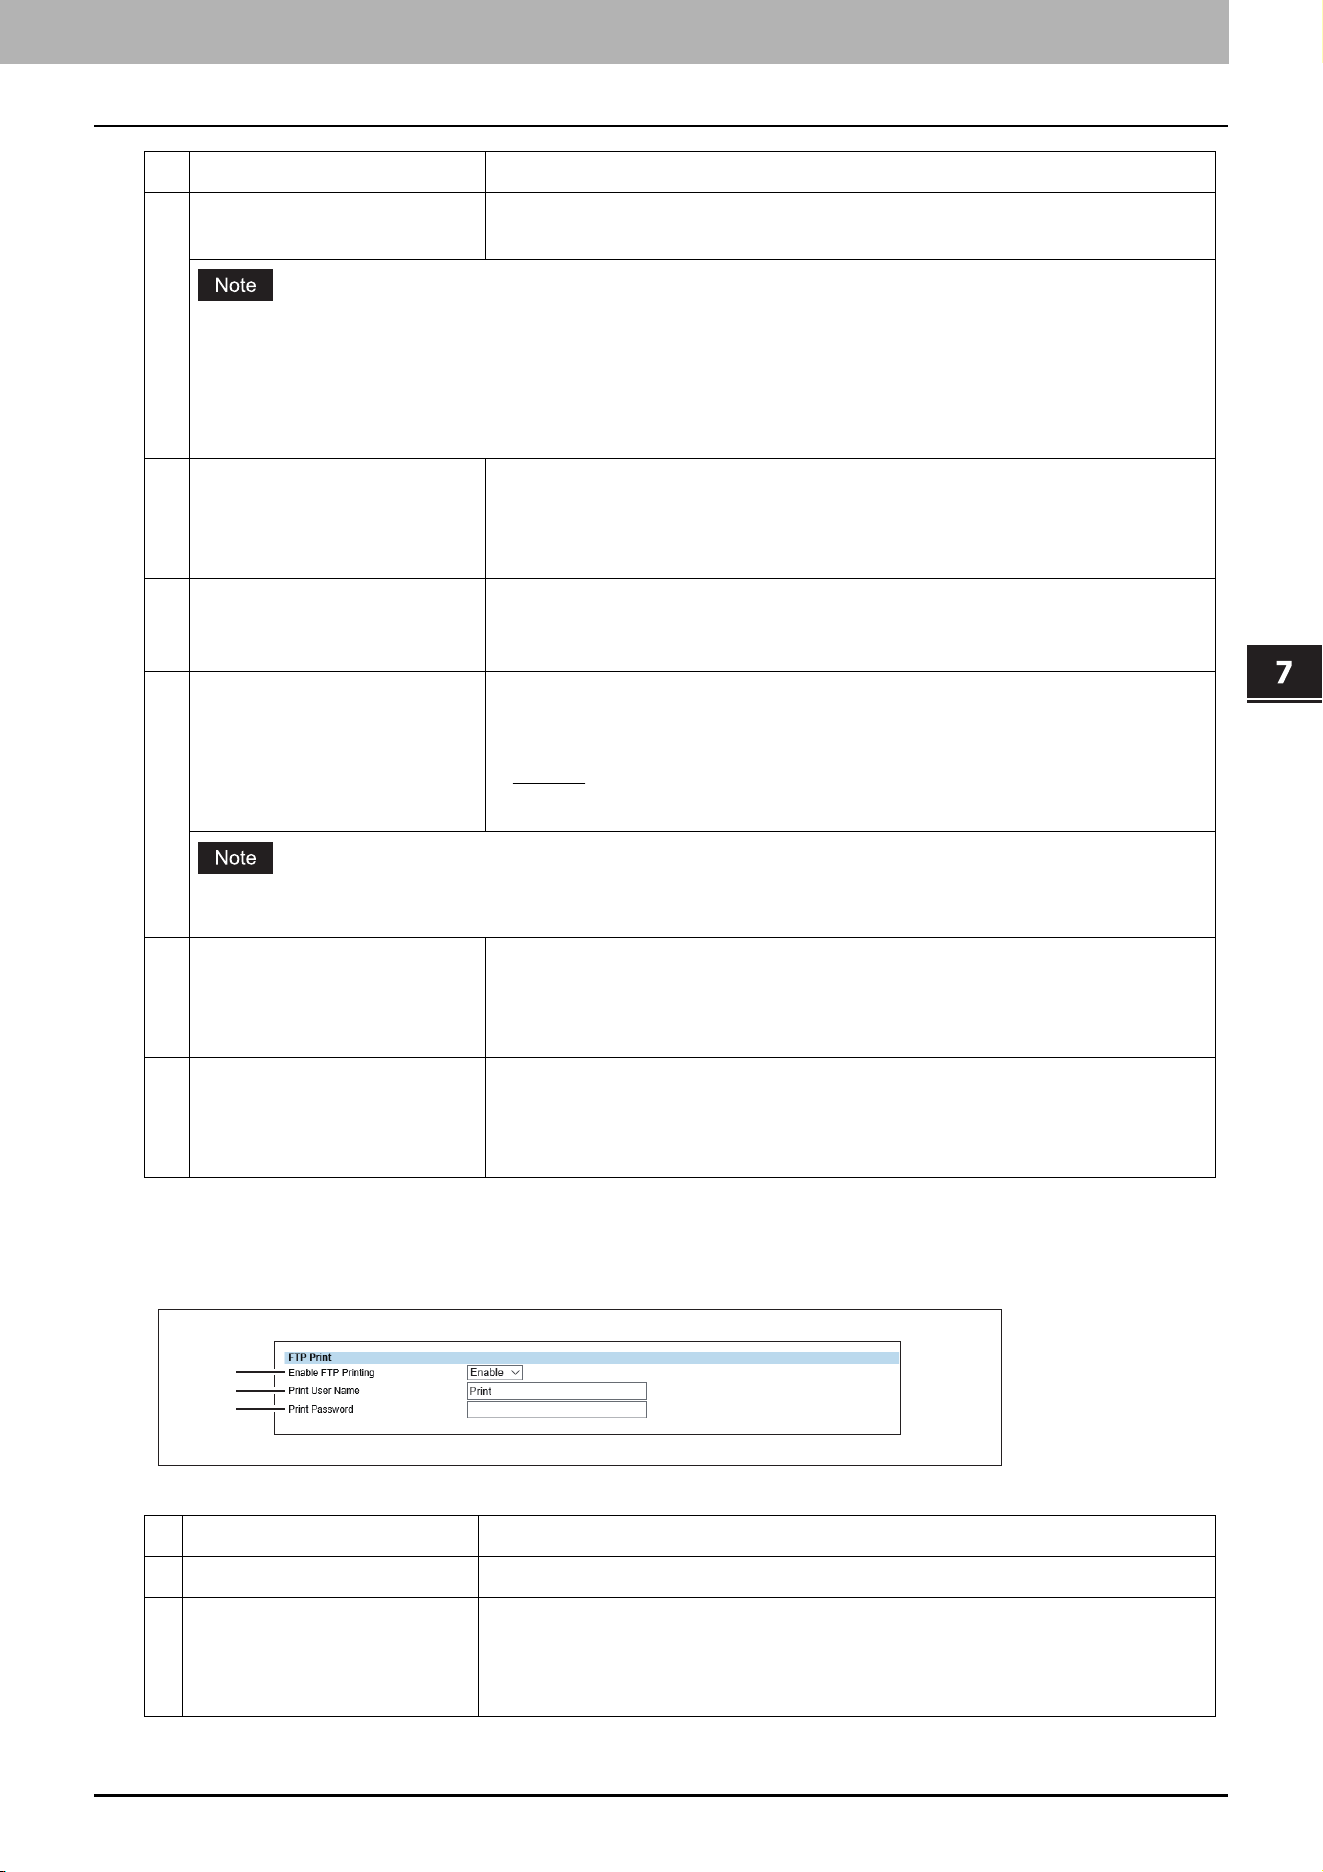
7.TopAccess
[Administration] Tab Page 73
TopAccess
Setting up FTP Print
In FTP Print, you can set the FTP Print options to enable the FTP print service.
6 SSL/TLS Port Number Enter the port number for SSL/TLS. You can enter a value in the range from 1
to 65535. Generally the default value “631” is used.
The same port numbers as the ones for the following settings are not usable.
Change the applicable port number before that for the SSL/TLS Port Number is set.
HTTP Network Service / Primary Port Number
HTTP Network Service / Secondary Port Number
HTTP Network Service / SSL/TLS Port Number
7 SSL/TLS URL Display the SSL/TLS URL for IPP printing. You cannot change the SSL/TLS URL
for IPP printing. This SSL/TLS URL should be set as the print port when users
set up the printer driver for IPP printing if the SSL/TLS for IPP printing is
enabled.
8 Printer Name Enter the printer name for IPP printing. You can enter up to 127
alphanumerical characters and symbols other than =, ; (semicolon), #, and \
(backslash). The MFP name is set as the default.
9 Authentication Enable or disable the authentication for creating the IPP queue on the client
computers. When this is enabled, the dialog box to enter a user name and
password will be displayed when a user creates the IPP print port.
Disable — Select this to disable the authentication.
Basic — Select this to enable the authentication.
When IPP printing is used for printing from the Mac OS printer driver (PPD), do not enable the authentication.
The Mac OS printer driver (PPD) does not support the authentication for IPP printing.
10 User Name Enter the user name when the Authentication option is enabled. Users must
enter this user name to create an IPP queue on the client computers. You can
enter up to 127 alphanumerical characters and symbols other than =, ;
(semicolon), #, @, and \ (backslash).
11 Password Enter the password when the Authentication option is enabled. Users must
enter this password to create an IPP queue on the client computers. You can
enter up to 127 alphanumerical characters and symbols other than =, ;
(semicolon), #, and \ (backslash). “password” is set as the default.
Item name Description
1 Enable FTP Printing Enable or disable FTP print service. [Disable] is set as the default.
2 Print User Name Enter the user name if you want to request the log-in user name from
someone who attempts FTP printing. You can enter up to 31 alphanumerical
characters and symbols other than =, ; (semicolon), #, and \ (backslash). If you
leave this box blank, the default user name “Print” is used.
Item name Description
1
2
3
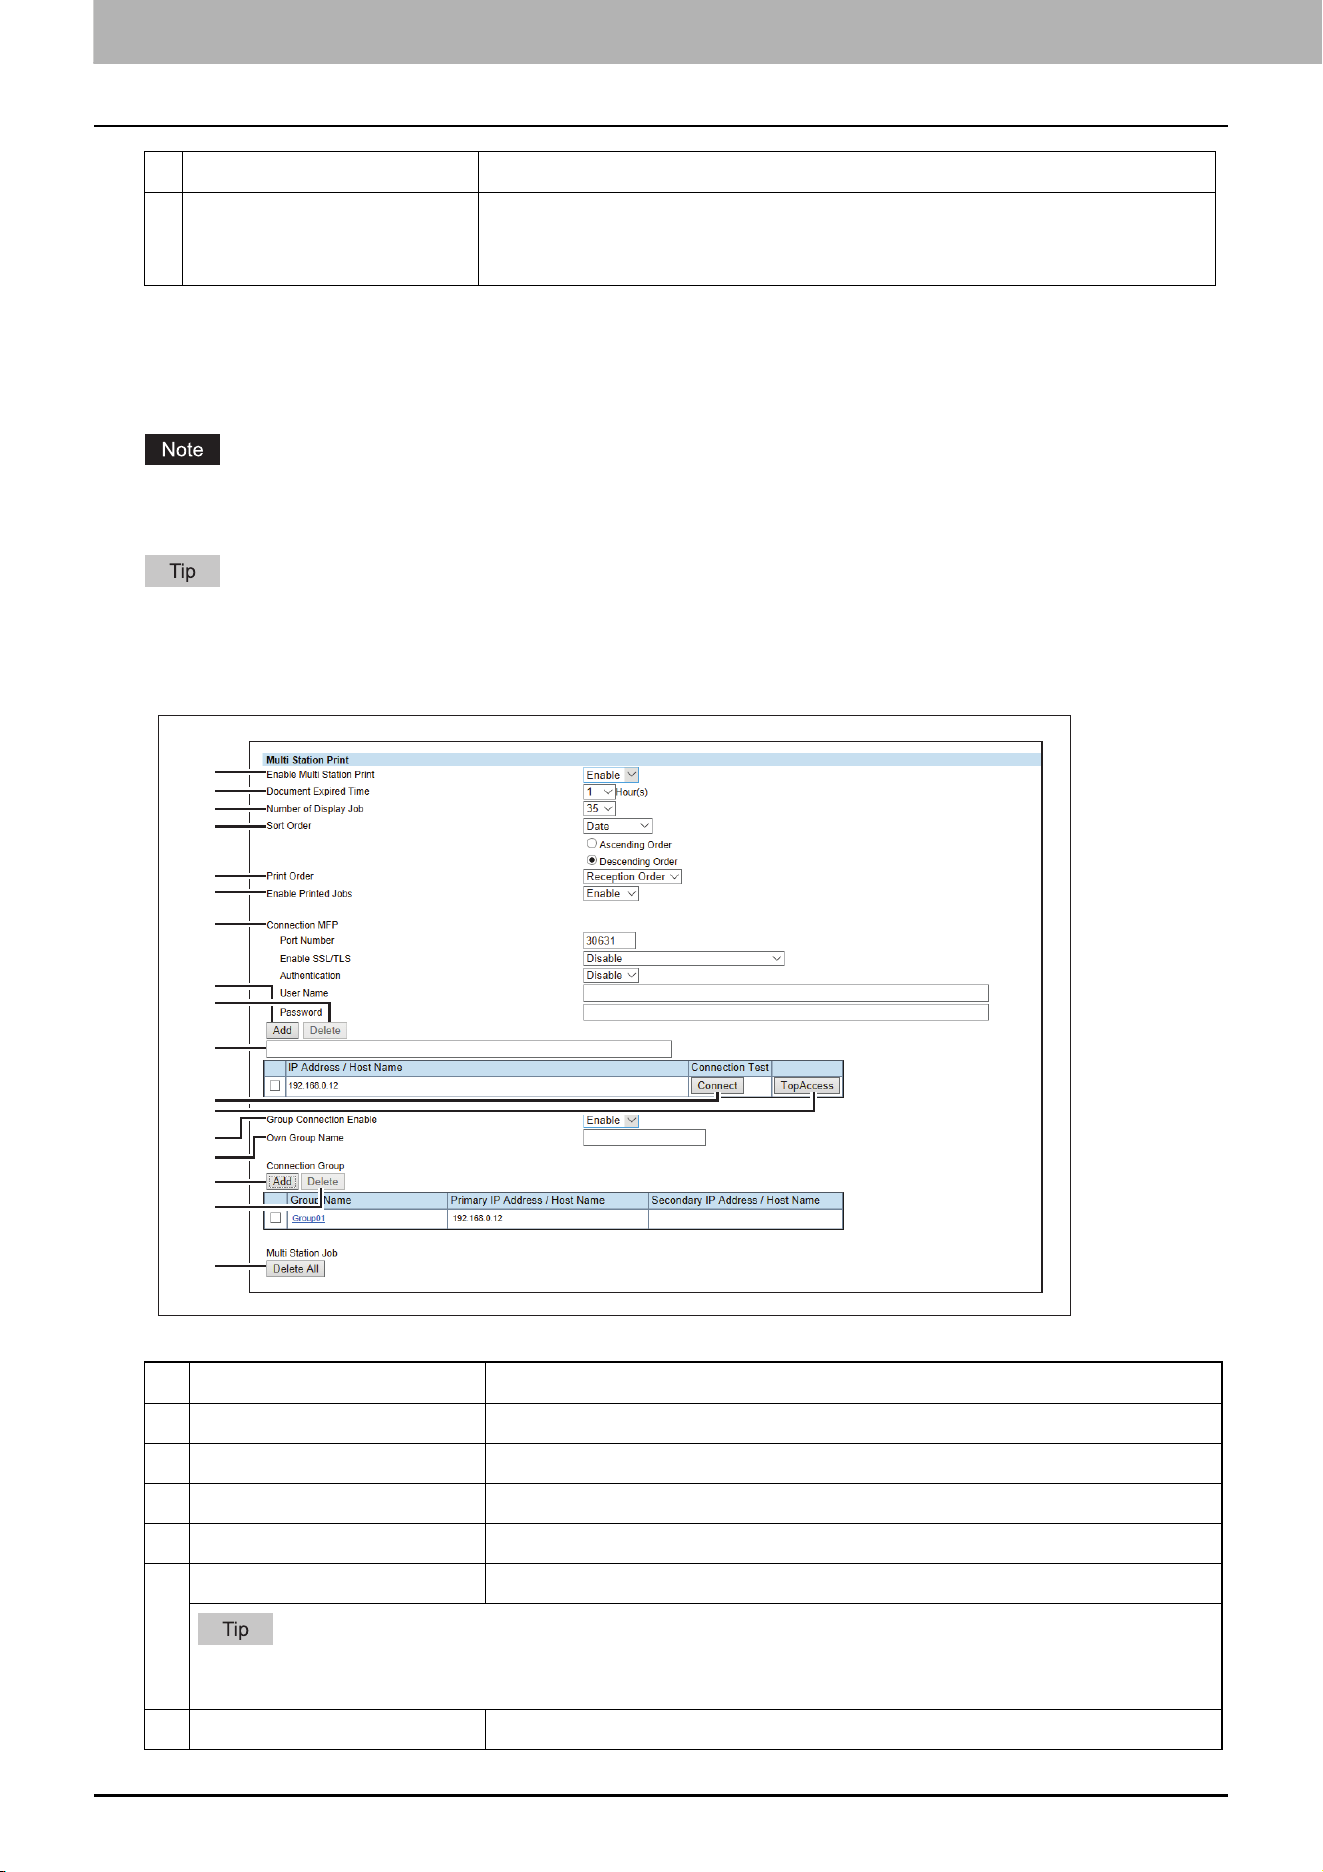
7.TopAccess
74 [Administration] Tab Page
Setting up Multi Station Print
For the operation of the setting, see the following.
P.91 “Setting Multi Station Print”
You need the Multi Station Print Enabler option to use the [Multi Station Print] function. Contact your service
technician for details.
Use this service in an environment where the number of PCs to connect to 1 MFP is 30 or less.
You can connect up to 10 MFPs in a group and connect up to 5 groups including a group to which this MFP belongs:
you can add 4 groups for the connection.
3 Print Password Enter the password if you want to request the log-in password of users who
attempt FTP printing. You can enter up to 31 alphanumerical characters and
symbols other than =, ; (semicolon), #, and \ (backslash).
Item name Description
1 Enable Multi Station Print Specify whether to enable or disable the Multi Station Print service.
2 Document Expired Time Specify the retention period of the printed document.
3 Number of Display Job Specify the number of jobs to be displayed.
4 Sort Order Specify the display order.
5 Print Order Specify the print order.
When you select [Indication Order] from [Print Order], documents are printed according to the [Sort Order]
setting at the item 4.
6 Enable Printed Jobs Specify whether to enable or disable reprinting.
Item name Description
1
2
3
4
5
6
7
8
9
10
11
12
13
14
15
16
17
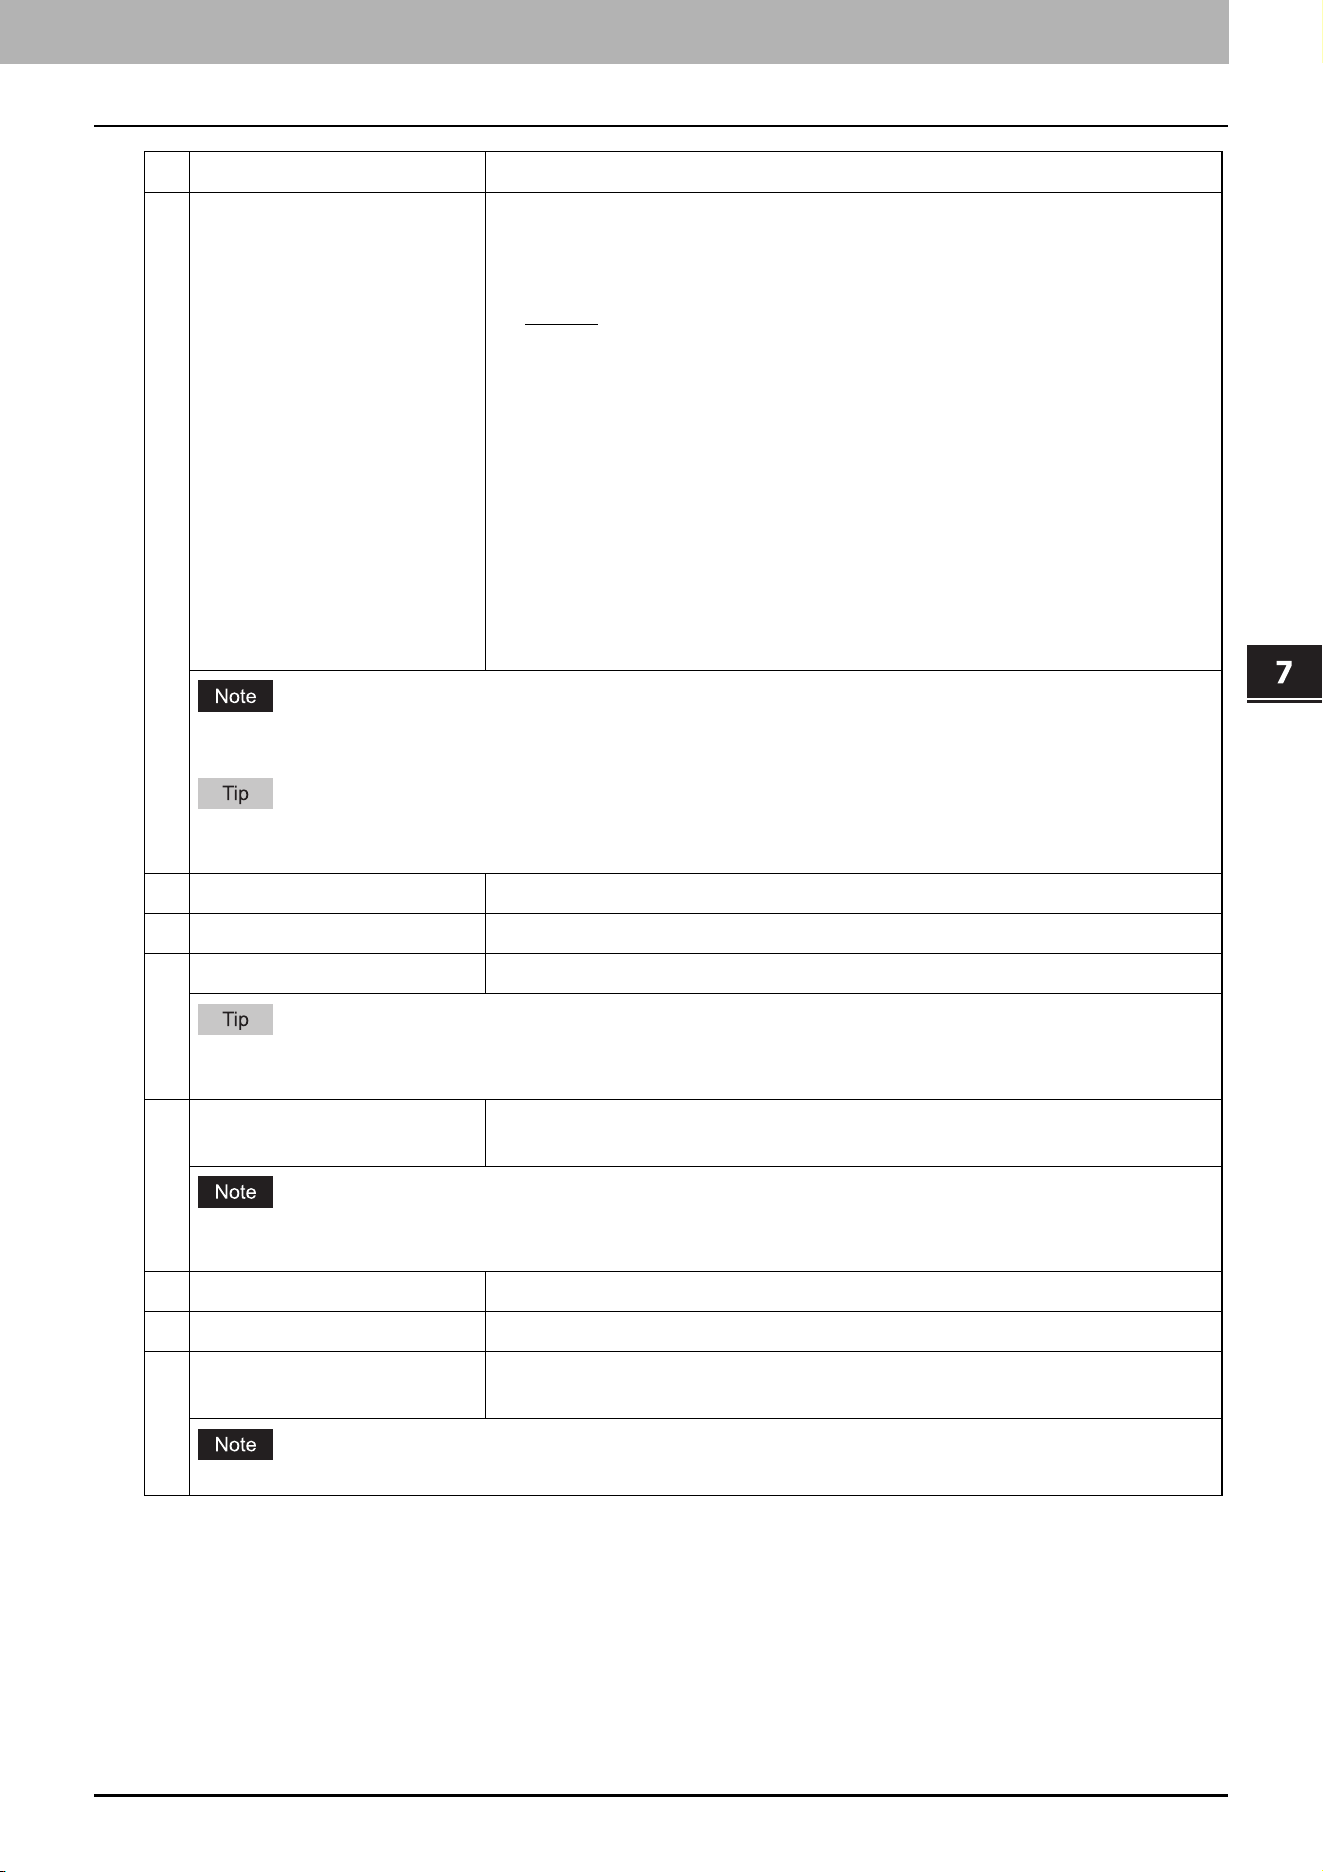
7.TopAccess
[Administration] Tab Page 75
TopAccess
7 Connection MFP Specify the following communication settings for the multi station print.
Port Number — Enter the port number.
Enable SSL/TLS — Select the SSL/TLS setting for the multi station print.
- Disable
— Select this to disable SSL/TLS.
- Verify with imported CA certification(s) — Select this to use CA
certificates for connection. You need to export the certificate from each
MFP and import it into all MFPs.
- Accept all certificates without CA — Select this to accept all certificates
without CA. There is no need to import the certificate of each MFP.
Authentication — Select [Disable] or [Basic] for authentication. [Disable] is
set as the default.
User Name — Enter the user name. You can enter up to 127 alphanumerical
characters and symbols except = ; # @ \.
Password — Enter the password of the user. You can enter up to 127
alphanumerical characters and symbols except = ; # \.
All MFPs should have the same settings for the connection.
Although the multi station print is available even if the user authentication is disabled, this MFP cannot be
connected to other MFPs: the job list is not shared.
8 [Add] button Allows you to add the device to connect.
9 [Delete] button Allows you to delete the selected device.
10 Connection MFP entry field Enter the IP address or host name of the MFP you want to register.
If the user authentication is disabled with more than one address registered in the [Connection MFP] list, the
[Connection MFP] settings are not displayed.
11 [Connect] button Tests the connection with the specified MFP to check if the communications
can be established.
Be sure to save the Multi Station Print settings with the [Save] button before you test the MFP connection with
the [Connect] button.
12 [TopAccess] button Starts TopAccess.
13 Group Connection Enable Select whether to connect the MFP groups. [Disable] is set as the default.
14 Own Group Name Enter a group name to which this MFP belongs. You can enter up to 12
characters.
All groups should share the same name of each group for the connection.
Item name Description
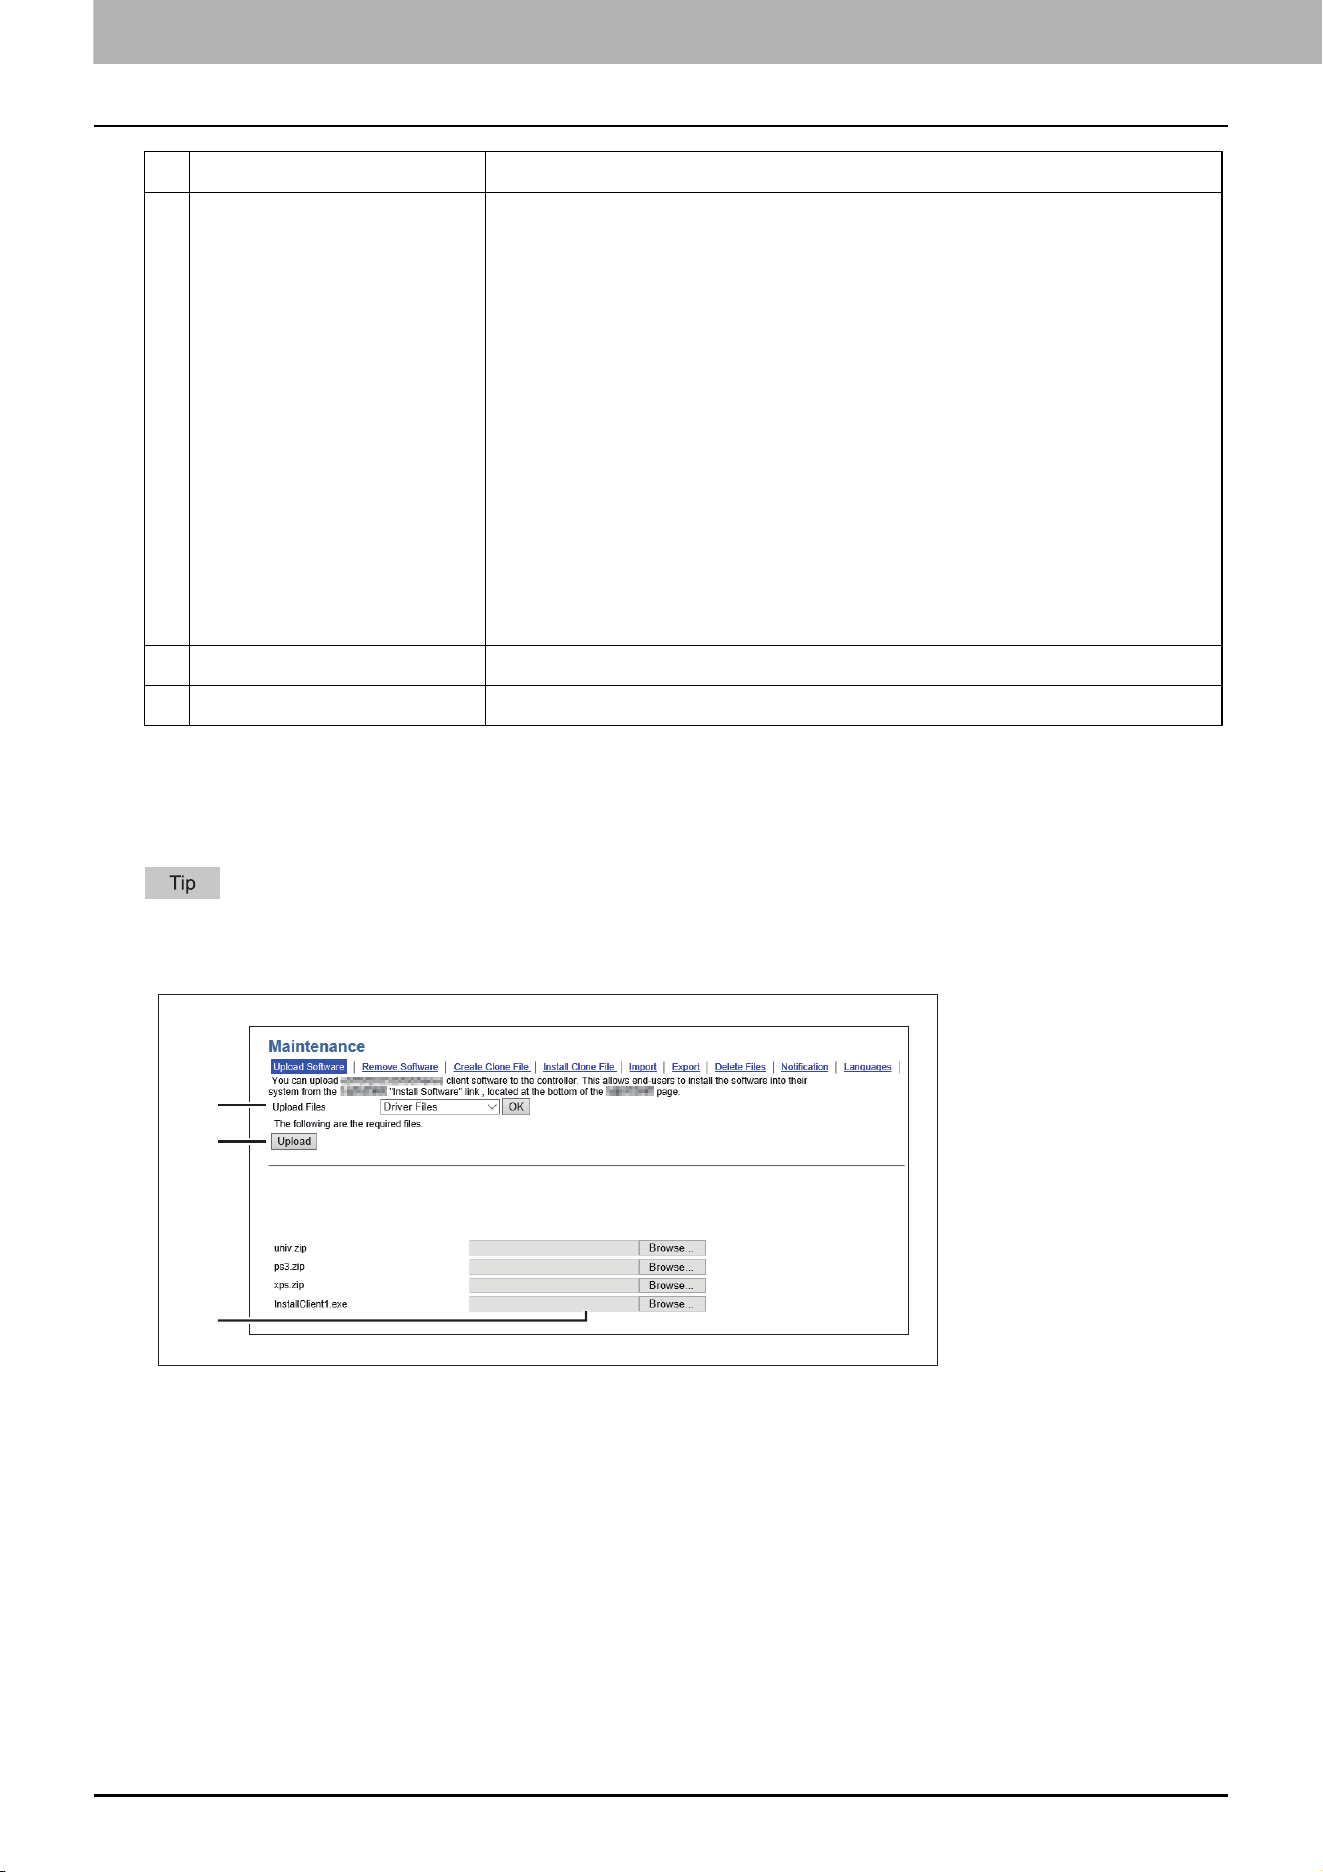
7.TopAccess
76 [Administration] Tab Page
Upload Software settings
You can update client software embedded in your equipment. Users can download client software on their computers
using the TopAccess [Install Software] link.
The [Upload Software] submenu can be accessed from the [Maintenance] menu on the [Administration] tab.
See the following pages for how to access it and information on the [Maintenance] menu:
15 [Add] button Allows you to add a group. Click this button to show the [Add Connection
Group Information] screen. Set the following information and click [Save] to
save the settings. To edit the information, click the name of the group added
in the list.
Group Name — Enter the name of the connection group. You can enter up
to 12 characters.
Primary IP Address / Host Name — Enter the IP address or host name of the
primary device which represents the connection group. You can enter up to
256 characters. This device accesses the specified primary device first to
retrieve the job list.
Secondary IP Address / Host Name — Enter the IP address or host name of
the secondary device which represents the connection group. You can enter
up to 256 characters. If the access to the primary device fails, this device
accesses the specified secondary device next to retrieve the job list.
16 [Delete] button Allows you to delete the selected group.
17 [Delete All] button Deletes all of the multi station print jobs.
Item name Description
1
3
2
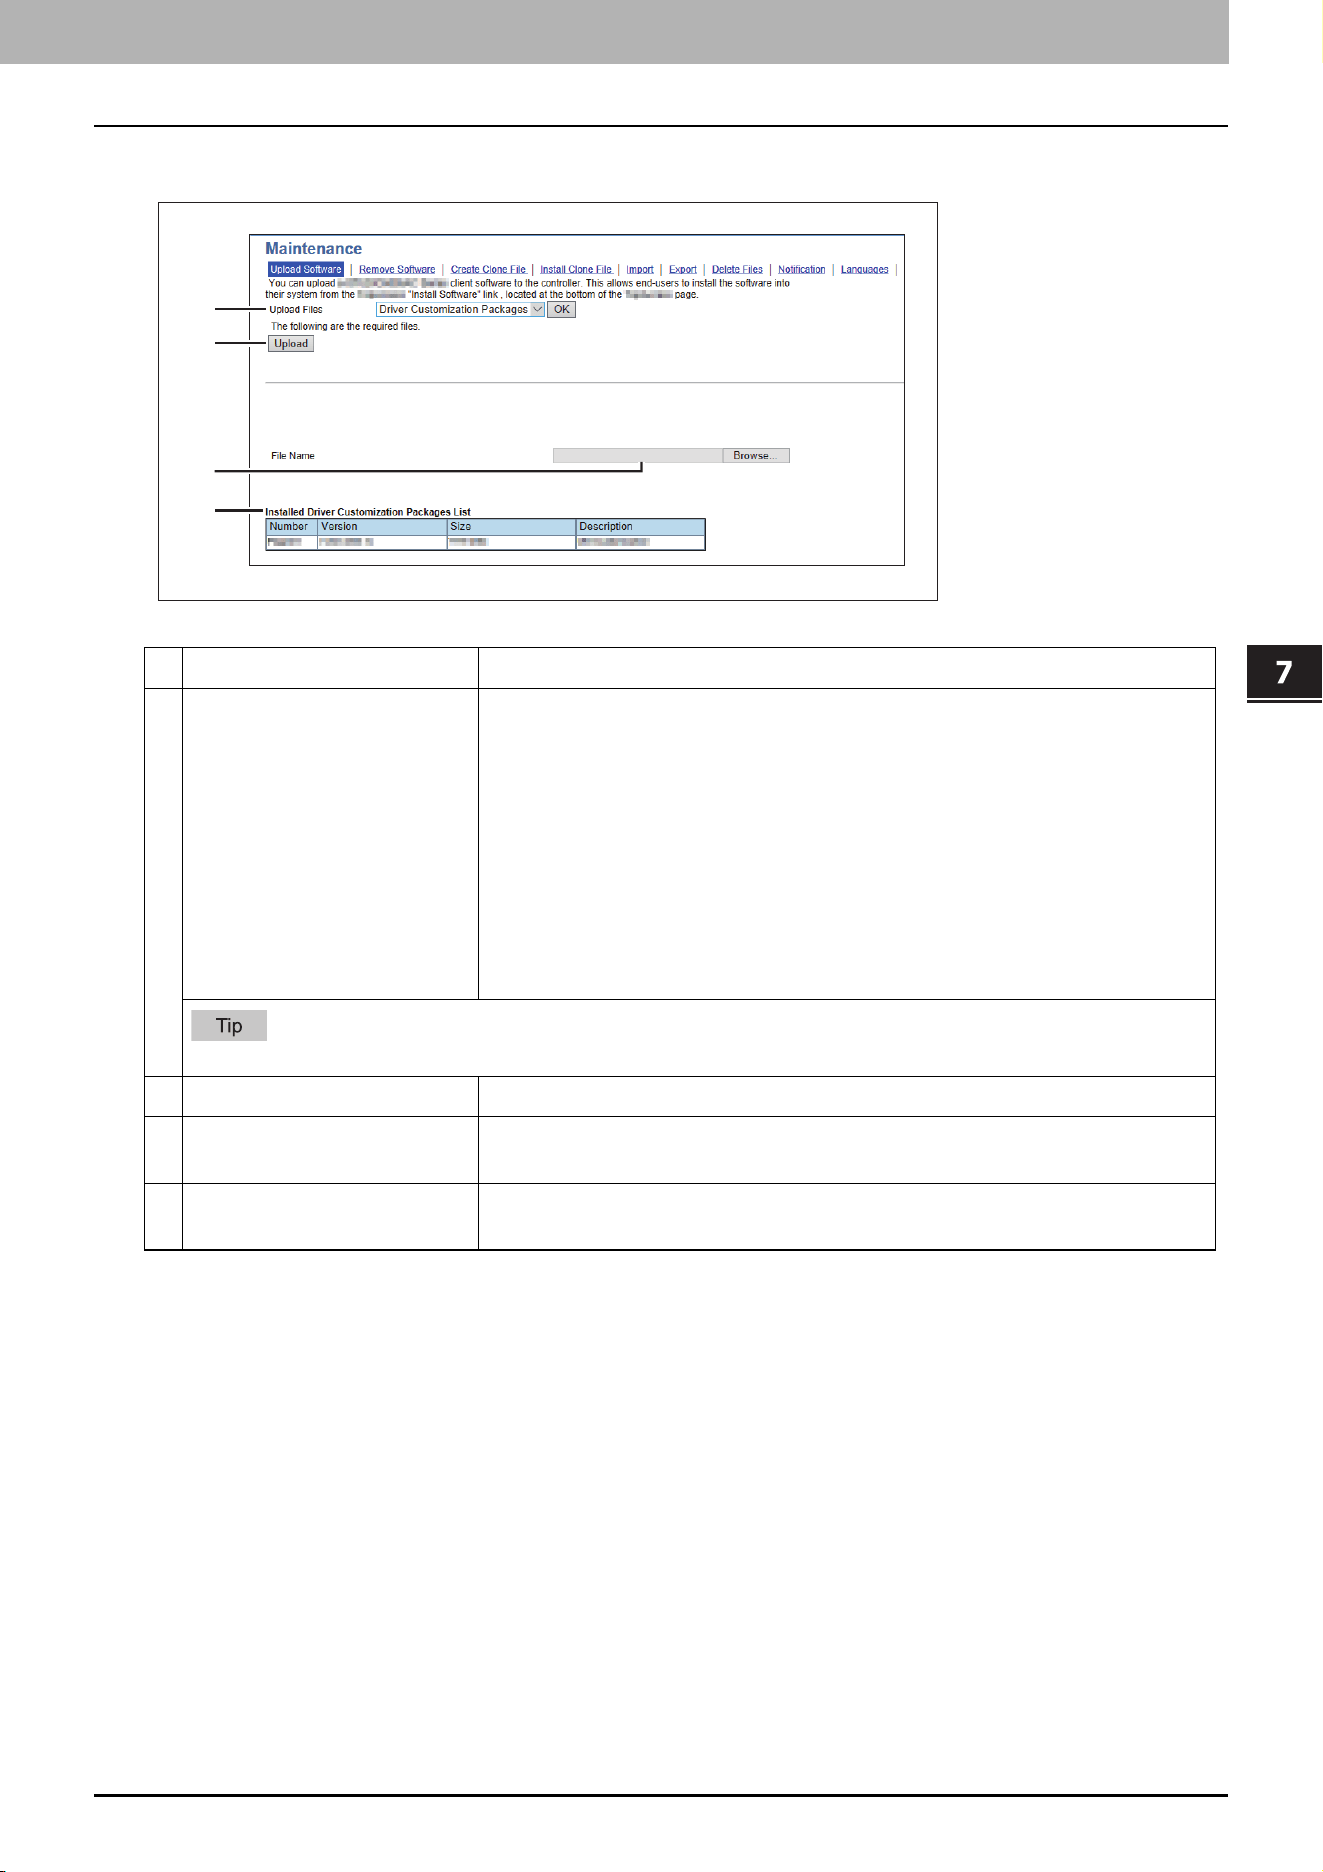
7.TopAccess
[Administration] Tab Page 77
TopAccess
When [Driver Customization Packages] is selected:
Item name Description
1 Upload Files Select the software you want to upload to the equipment.
Driver Files — Select this to upload the setup files.
Macintosh PPD Files — Select this to upload the PPD file which is used by
Mac OS X 10.6 or later.
Unix Filters — Select this to upload the tar files that contain filters for each
UNIX workstation.
Driver Customization Packages — Select this to upload the custom
package file for the printer driver.
[OK] button — Confirms the selected software.
See the following for how to obtain and upload software.
2 [Upload] button Uploads the browsed setting file.
3 Browse box Browses the setting file to be uploaded.
Select the corresponding setting file.
4 Installed Driver
Customization Packages List
Displays a list of installed custom package files.
1
3
2
4
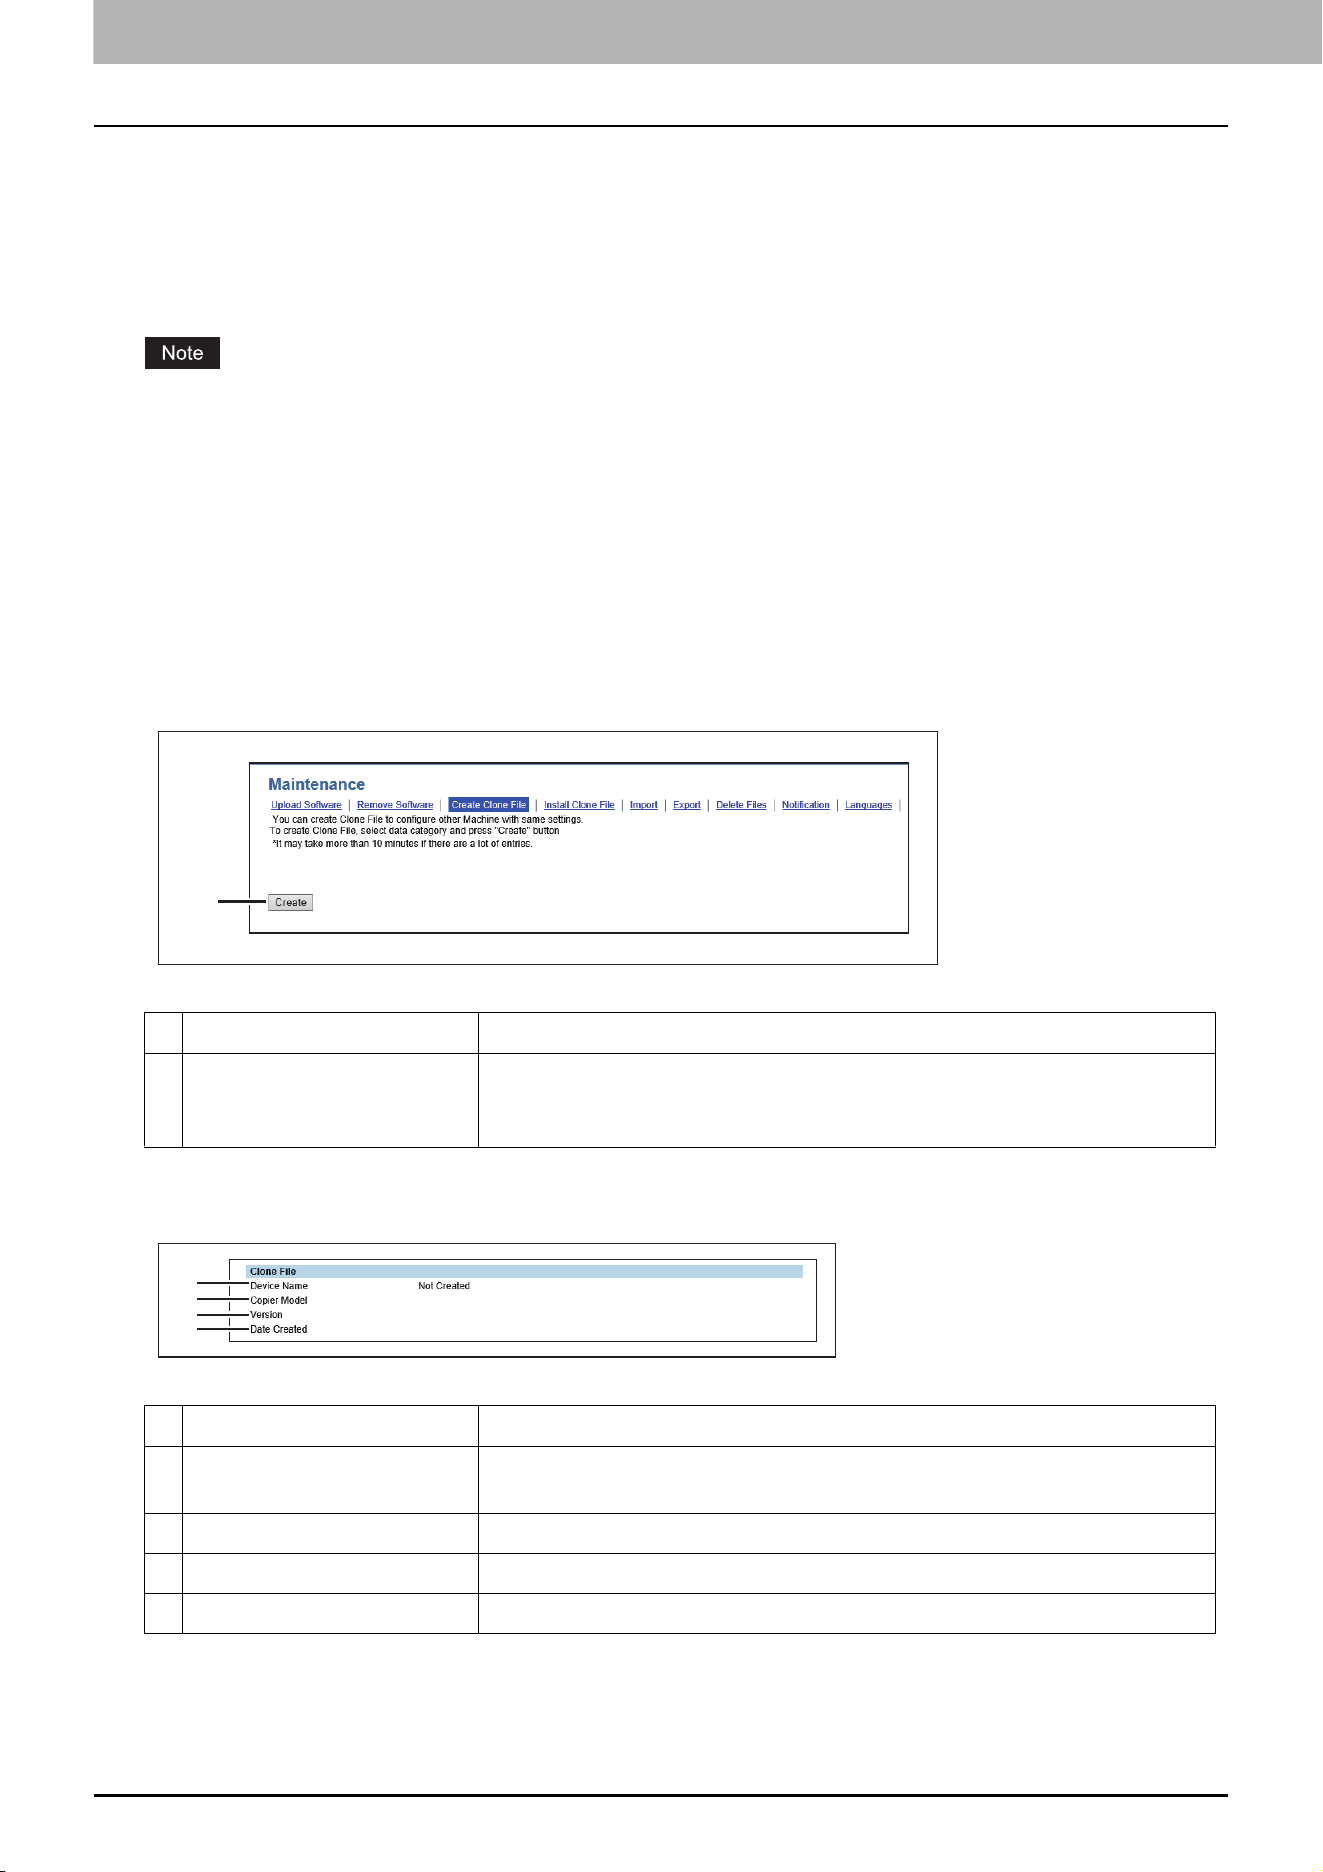
7.TopAccess
78 [Administration] Tab Page
Create Clone File settings
You can create a clone file of the environment on your equipment.
You can implement a cloned environment by installing the created clone file on another equipment.
For the details of the clone file and how to use it, contact your service technician.
P.78 “Setting up Clone File”
P.79 “Setting up Category Setting”
When an end-user (either an individual or an entity) intends to clone data (font, ICC profile, or any data downloaded or
added by the end-user) stored in TTEC products (copier, MFP), the end-user shall investigate, review and confirm
terms of use for such data and intellectual property rights thereof. The end-user shall perform such cloning at your
own risk and responsibility.
TTEC AND ITS AFFILIATES HEREBY DISCLAIM ANY WARRANTY OF ANY KIND, WHETHER EXPRESS OR IMPLIED,
INCLUDING BUT NOT LIMITED TO, THE WARRANTIES OF QUALITY AND PERFORMANCE OF TTEC PRODUCTS, FITNESS
FOR A PARTICULAR PURPOSE, NON-INFRINGEMENT OF THIRD PARTIES INTELLECTUAL PROPERTY RIGHTS, IN THE USE
OF CLONING BY THE END-USER.
IN NO EVENT WILL TTEC BE LIABLE TO THE END-USER NOR ANY THIRD PARTY FOR ANY DAMAGES, WHETHER IN
CONTRACT, TORT, OR OTHERWISE, INCLUDING WITHOUT LIMITATION ANY LOST PROFITS, LOST DATA OR OTHER
INCIDENTAL, SPECIAL OR CONSEQUENTIAL DAMAGES ARISING OUT OF CLONING BY THE END-USER, TO THE MAXIMUM
EXTENT PERMITTED BY APPLICABLE LAW.
Setting up Clone File
Item name Description
1 [Create] button Creates the clone file of the category selected in the category setting.
When you click this button, a screen is displayed to set a password on the
clone file.
Item name Description
1 Device Name Displays the device name of the created clone file.
Click the device name to download the clone file.
2 Copier Model Displays the copier model of the created clone file.
3 Version Displays the system ROM version of the created clone file.
4 Date Created Displays the created date of the clone file.
1
1
2
3
4
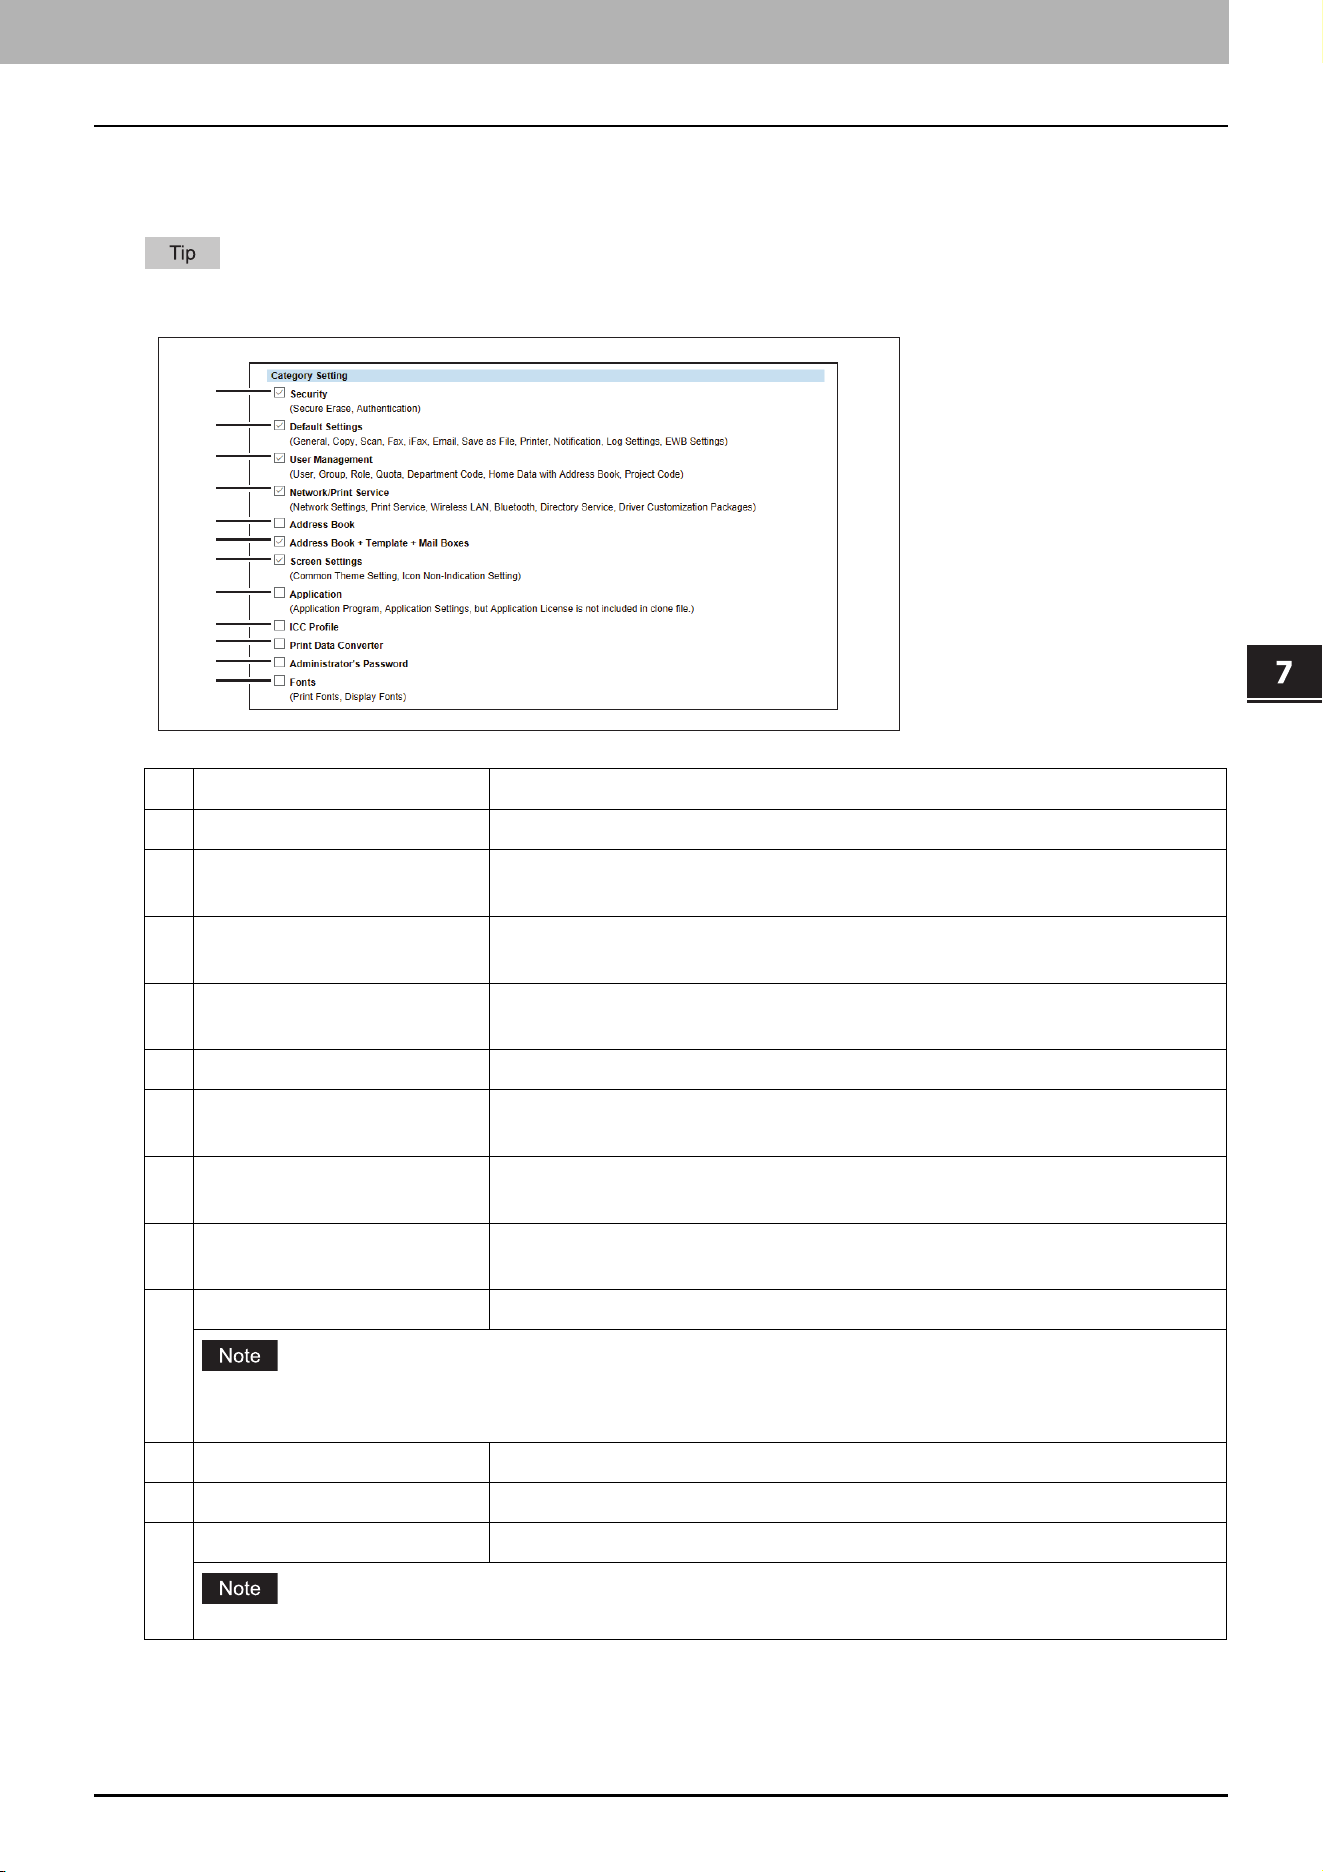
7.TopAccess
[Administration] Tab Page 79
TopAccess
Setting up Category Setting
Select the category for the clone file.
The clone file will include the settings listed in “Description” that make up the category you select.
Item name Description
1 Security Includes secure erase and authentication settings in the clone file.
2 Default Settings Includes the general, copy, scan, fax, ifax, E-mail, save as file, printer,
notification, log settings, and EWB settings in the clone file.
3 User Management Includes the user, group, role, quota, department code, home data with
address book, and project code in the clone file.
4 Network/Print Service Includes network, print service, wireless LAN, Bluetooth, directory service,
and driver customization packages settings in the clone file.
5 Address Book Includes the address book in the clone file.
6 Address Book + Template +
Mail Boxes
Includes the address book, template, and mail boxes in the clone file.
7 Screen Settings Includes the common theme setting and the icon display setting in the clone
file.
8 Application Includes the application program and application setting (except licenses) in
the clone file.
9 ICC Profile Includes ICC profiles installed from TopAccess in the clone file.
You can select ICC profiles only for color models.
You are required to have the license to use some ICC profiles.
10 Print Data Converter Includes print data converter settings in the clone file.
11 Administrator’s Password Includes the password of the default administrator in the clone file.
12 Fonts Includes downloaded fonts for print and display in the clone file.
You are required to have the license to use some fonts.
1
2
3
4
5
6
7
8
9
10
11
12
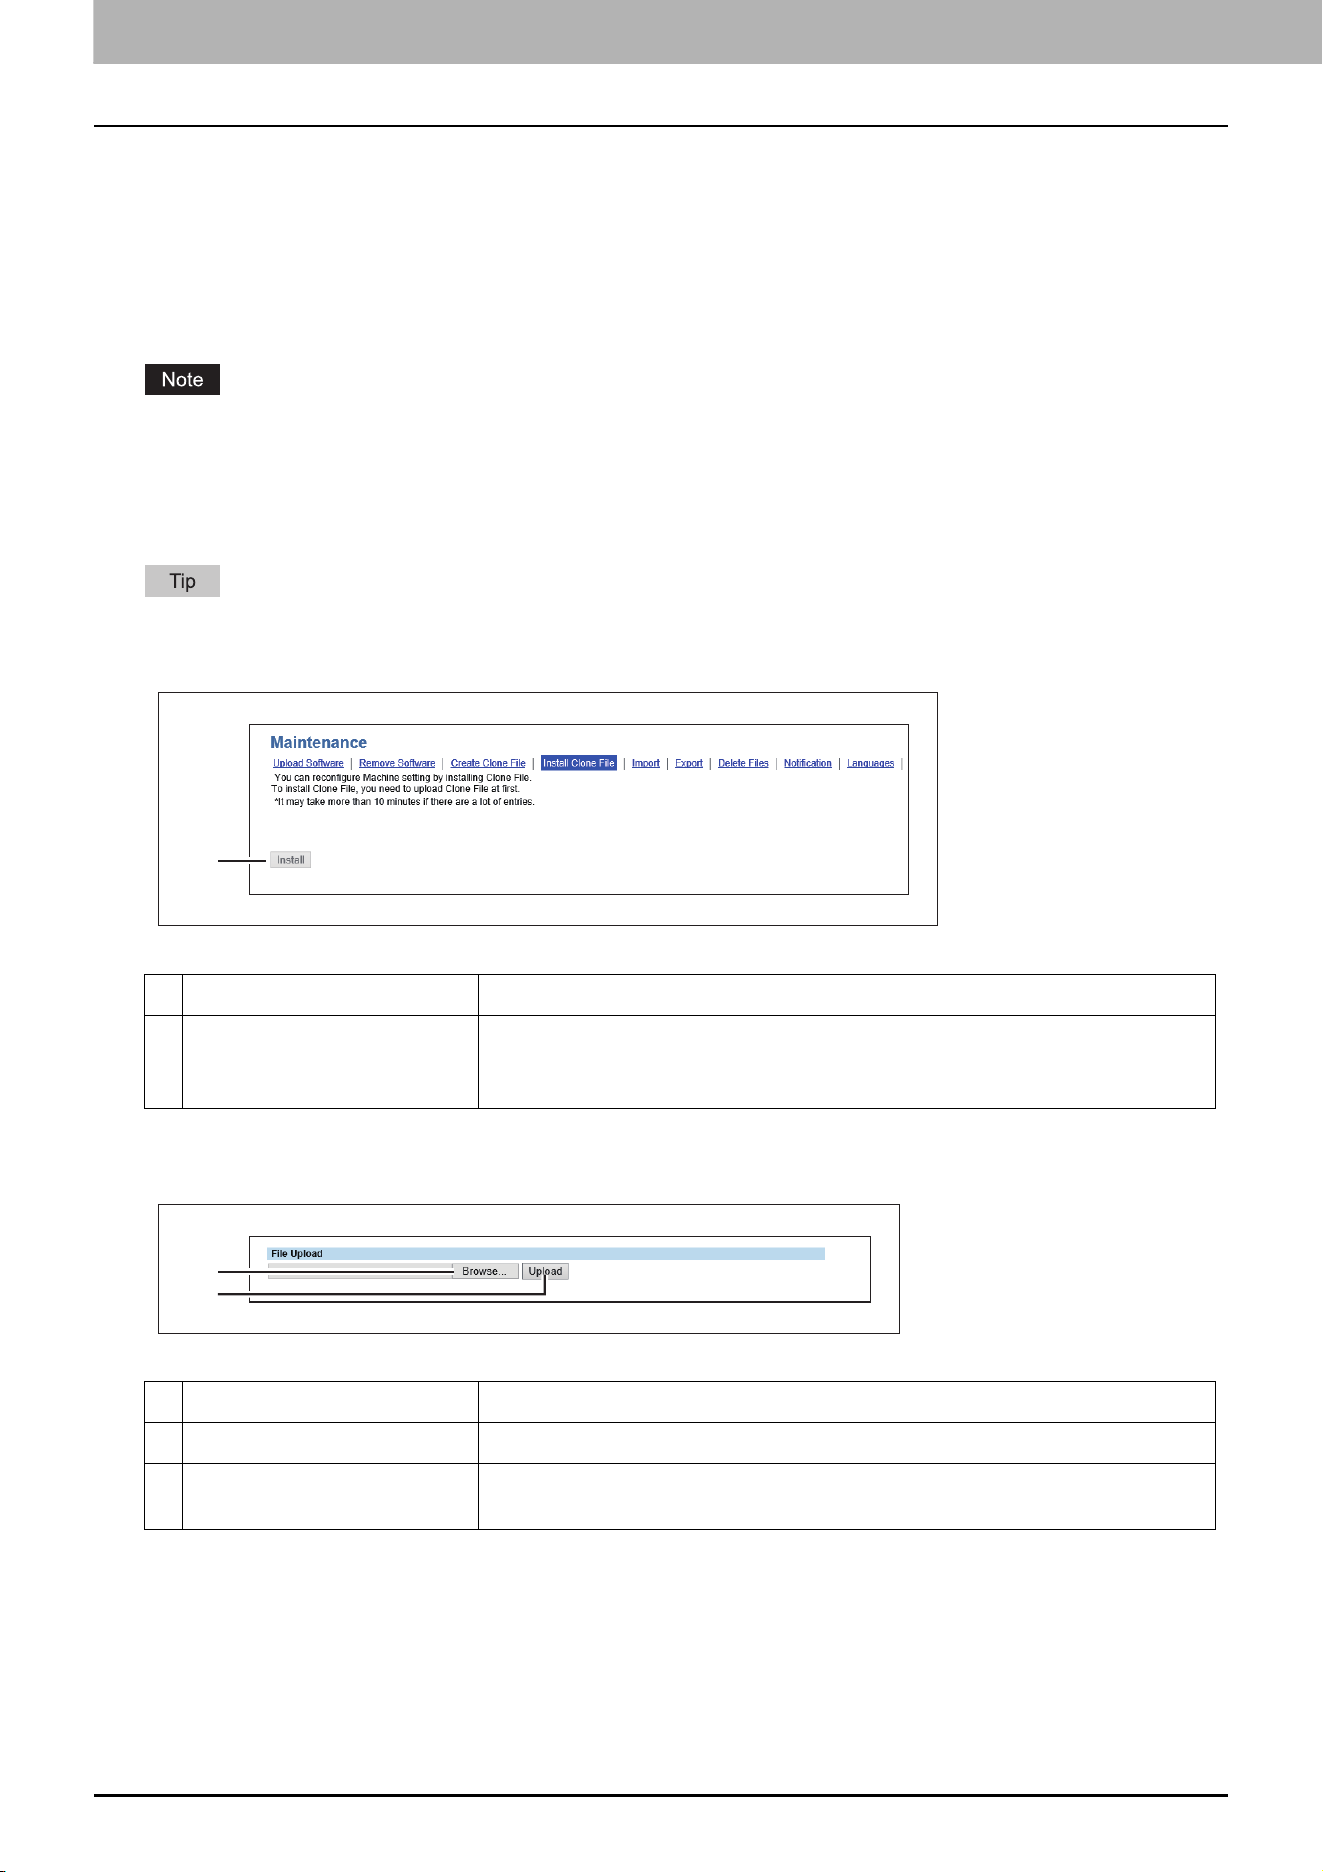
7.TopAccess
80 [Administration] Tab Page
Install Clone File settings
You can install the created clone file.
You can implement a cloned environment by installing the clone file created on another equipment.
P.80 “Setting up File Upload”
P.81 “Setting up Clone File Information”
P.81 “Setting up Setting data included in Clone File”
Before the clone file is installed, confirm that no jobs in progress or under waiting remain by means of the [Job Status]
tab. If any jobs do remain, the installation of the clone files cannot be carried out.
After the clone file has been installed, reboot this equipment in accordance with the guidance. Manually reboot this
equipment if you did not do so by closing the installation execution screen.
See the following pages for the details of the rebooting.
When the installation of the clone file is complete, the screen shows the reference link so that you can click it to
download a file that records the result of the installation.
Setting up File Upload
Item name Description
1 [Install] button Installs the selected clone file.
When you click this button, a dialog box is displayed to prompt you to enter
the password you specified when creating the clone file.
Item name Description
1 [Browse] button Select a clone file.
2 [Upload] button Displays information on the selected clone file and what is included in the
clone file.
1
1
2
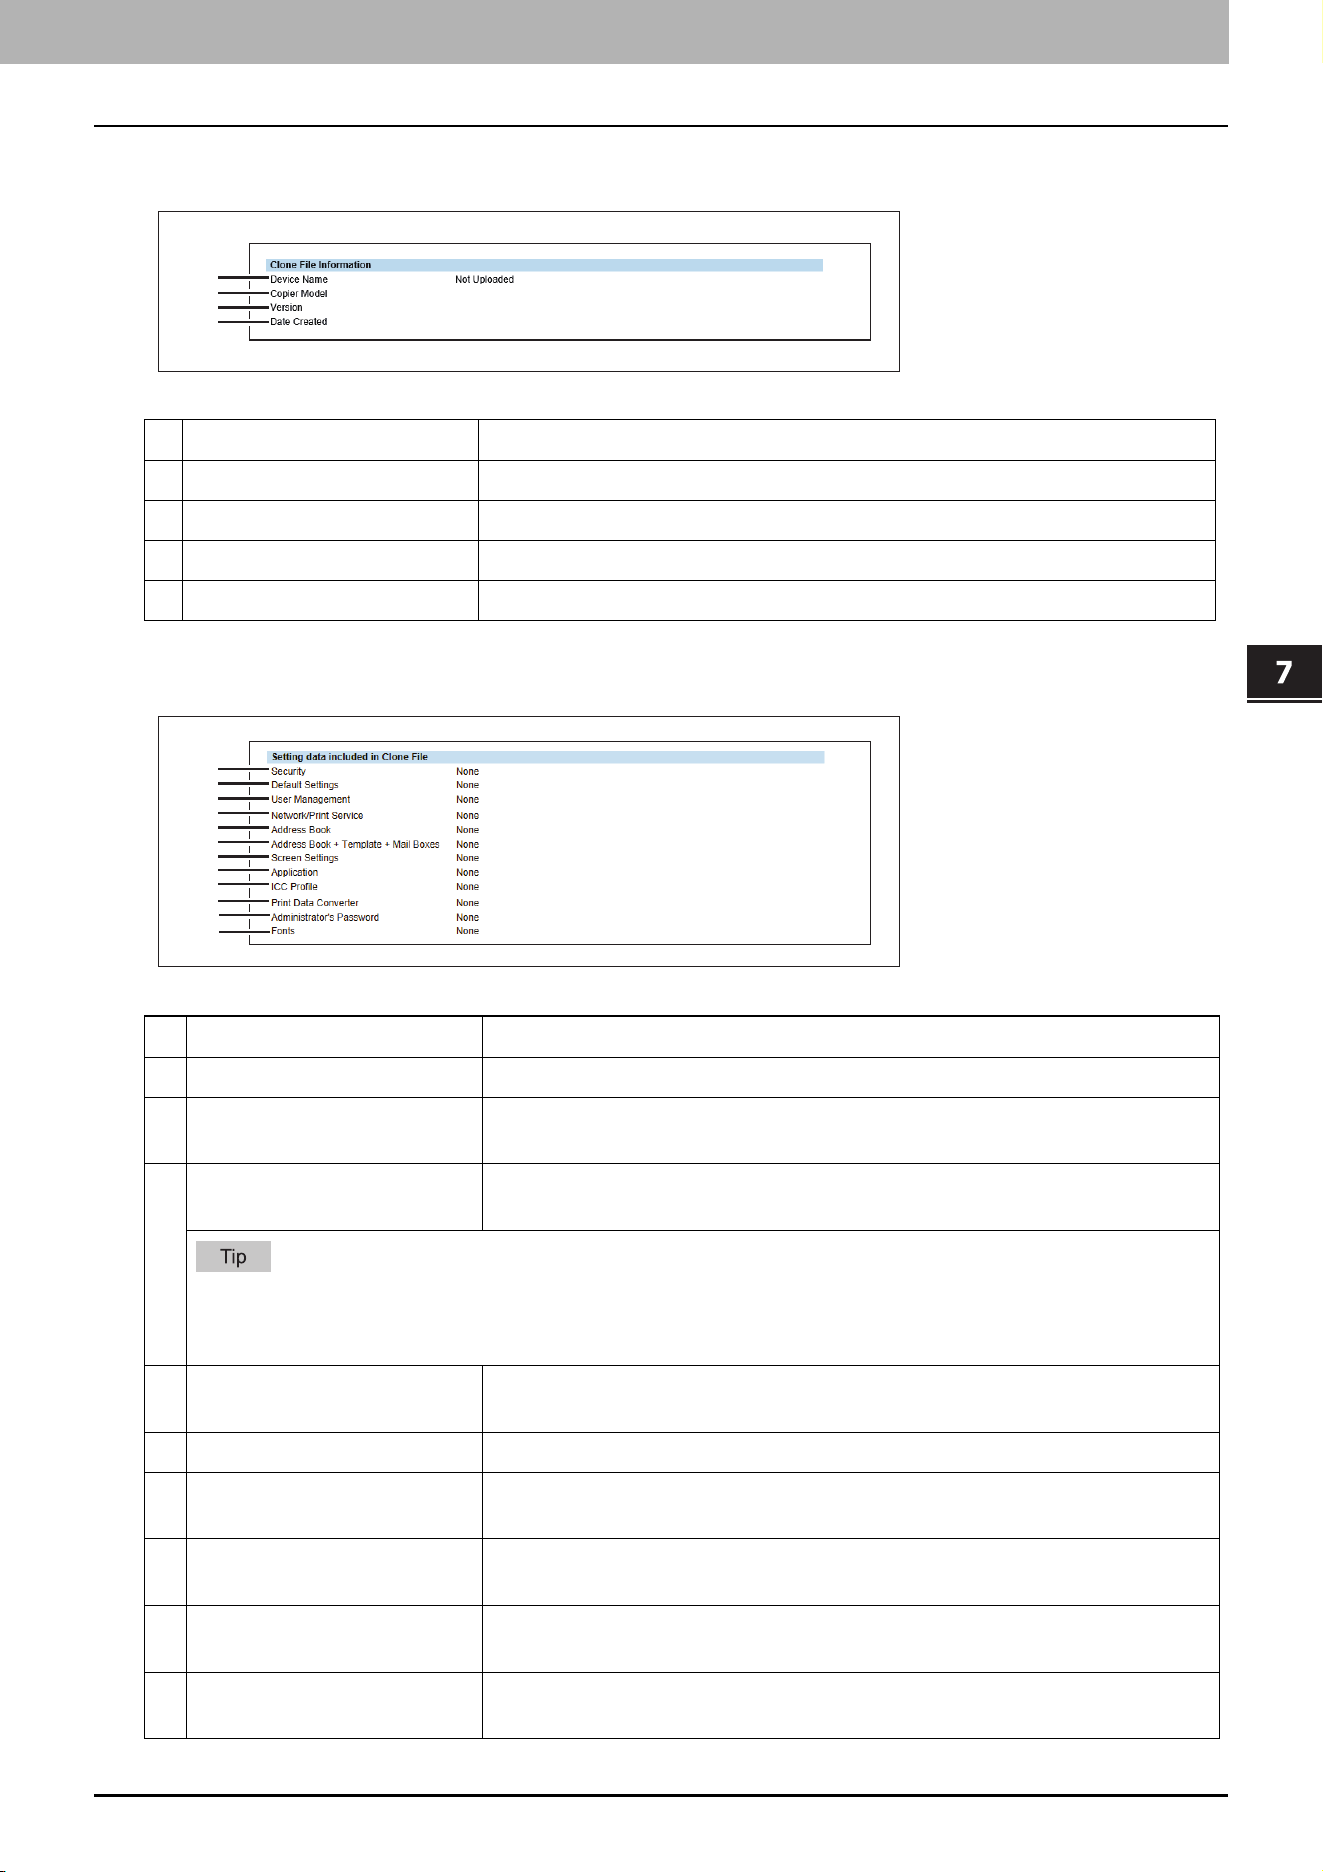
7.TopAccess
[Administration] Tab Page 81
TopAccess
Setting up Clone File Information
Setting up Setting data included in Clone File
Item name Description
1 Device Name Displays the device name of the created clone file.
2 Copier Model Displays the copier model of the created clone file.
3 Version Displays the system ROM version of the created clone file.
4 Date Created Displays the created date of the clone file.
Item name Description
1 Security Displays if secure erase and authentication settings are included.
2 Default Settings Displays if the general, copy, scan, fax, ifax, E-mail, save as file, printer,
notification, log settings, and EWB settings are included.
3 User Management Displays if the user, group, role, quota, department code, home data with
address book, and project code are included.
Select whether or not to include the address book information when user management is included but the
address book is not. When excluding the address book has been selected, it is necessary to input again the
addresses registered from the address book.
4 Network/Print Service Displays if network, print service, wireless LAN, Bluetooth, directory service,
and driver customization packages settings are included.
5 Address Book Displays if the address book is included.
6 Address Book + Template +
Mail Boxes
Displays if the address book, template, and MailBox are included.
7 Screen Settings Displays if the common theme setting and the icon display setting are
included.
8 Application Displays if the application program and application setting (except licenses)
are included.
9 ICC Profile Displays if the ICC profiles installed from TopAccess are included. This item
appears only for color models.
1
2
3
4
1
2
3
4
5
6
7
8
9
10
11
12

7.TopAccess
82 [Administration] Tab Page
10 Print Data Converter Displays if the print data converter settings are included.
11 Administrator’s password Displays if the password of the default administrator is included.
12 Fonts Displays if downloaded fonts for print and display are included.
Item name Description
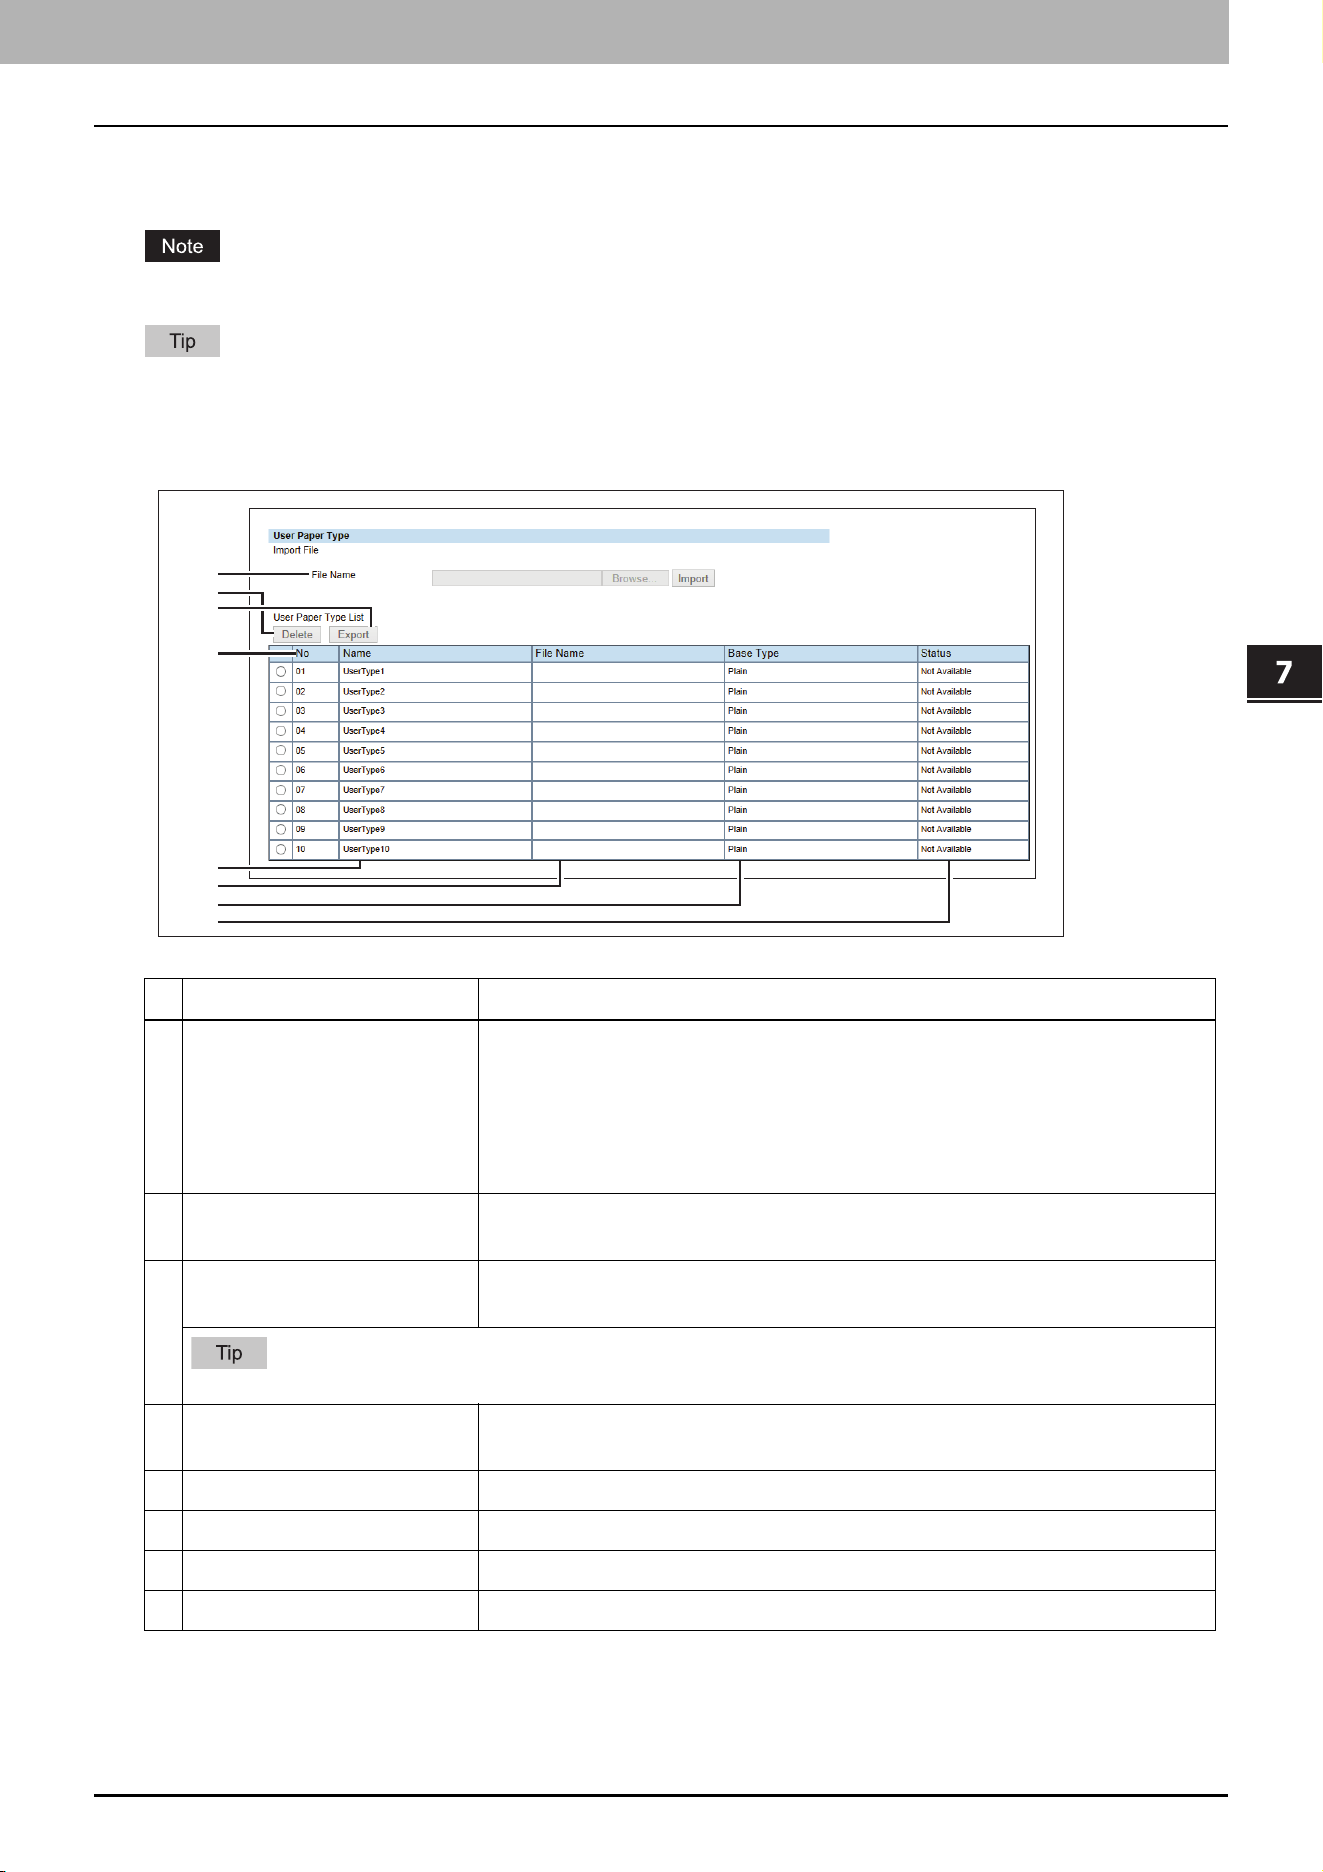
7.TopAccess
[Administration] Tab Page 83
TopAccess
User Paper Type
You can set user paper types.
After you set user paper types, you need to restart the equipment.
For details on the registration of user paper types, consult your service representative.
User Paper Type
Item name Description
1 File Name Select a file to install a user paper type.
[Browse] button — Select a file for the user paper type.
[Import] button — Click this button after you select a user type name in
[User Paper Type List], so that the selected user paper type file is imported
at the selected user type name.
2 [Delete] button Click this button to delete the user paper type selected in [User Paper Type
List].
3 [Export] button Click this button to export the user paper type selected in [User Paper Type
List].
You can export the user paper types that have been imported with the [Import] button.
4 No Indicates the number for the user paper type. You can import up to 10 files for
user paper types.
5 Name Shows the name of the user paper type. Click this to change the name.
6 File Name Shows the file name for the user paper type.
7 Base Type Shows the base paper type for the user paper type.
8 Status Shows the status of the user paper type.
1
2
3
4
5
6
7
8
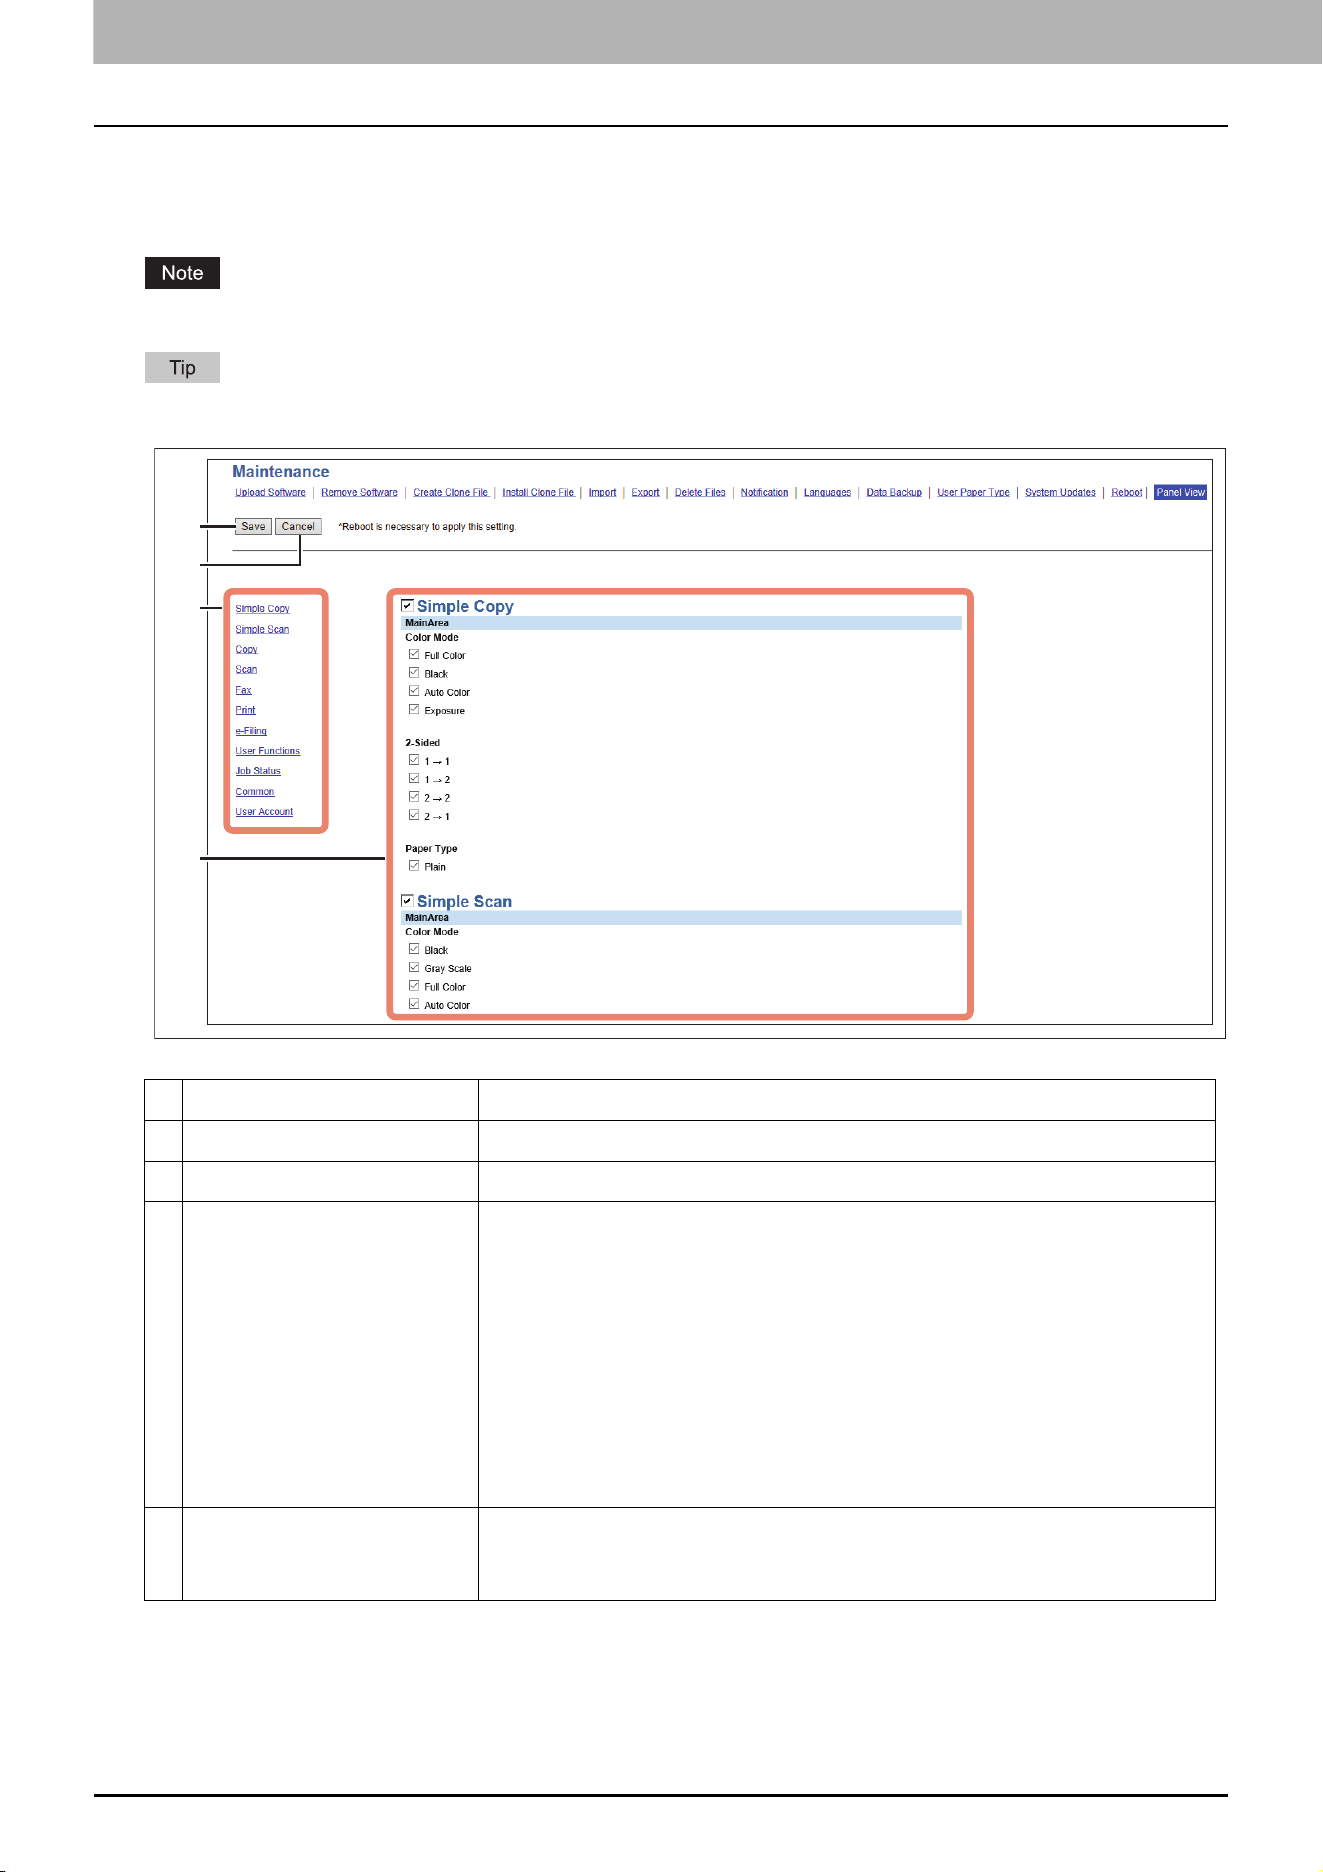
7.TopAccess
84 [Administration] Tab Page
Panel View
You can customize the appearance on the control panel by showing the necessary buttons and lists and hiding the
forbidden buttons and lists.
After you change the settings, you need to restart the equipment.
Hidden functions does not appear but they are not disabled.
Item name Description
1 [Save] button Saves the changed settings.
2 [Cancel] button Cancels the changed settings.
3 Simple Copy
Simple Scan
Copy
Scan
Fax
Print
e-Filing
User Functions
Job Status
Common
User Account
Select the screen of the control panel that you want to customize.
4 Title
Guidance
MainArea
The target items are classified into categories. Select the check box for the
item that you want to show on the selected screen of the control panel and
clear the check box for the item that you want to hide.
1
2
4
3
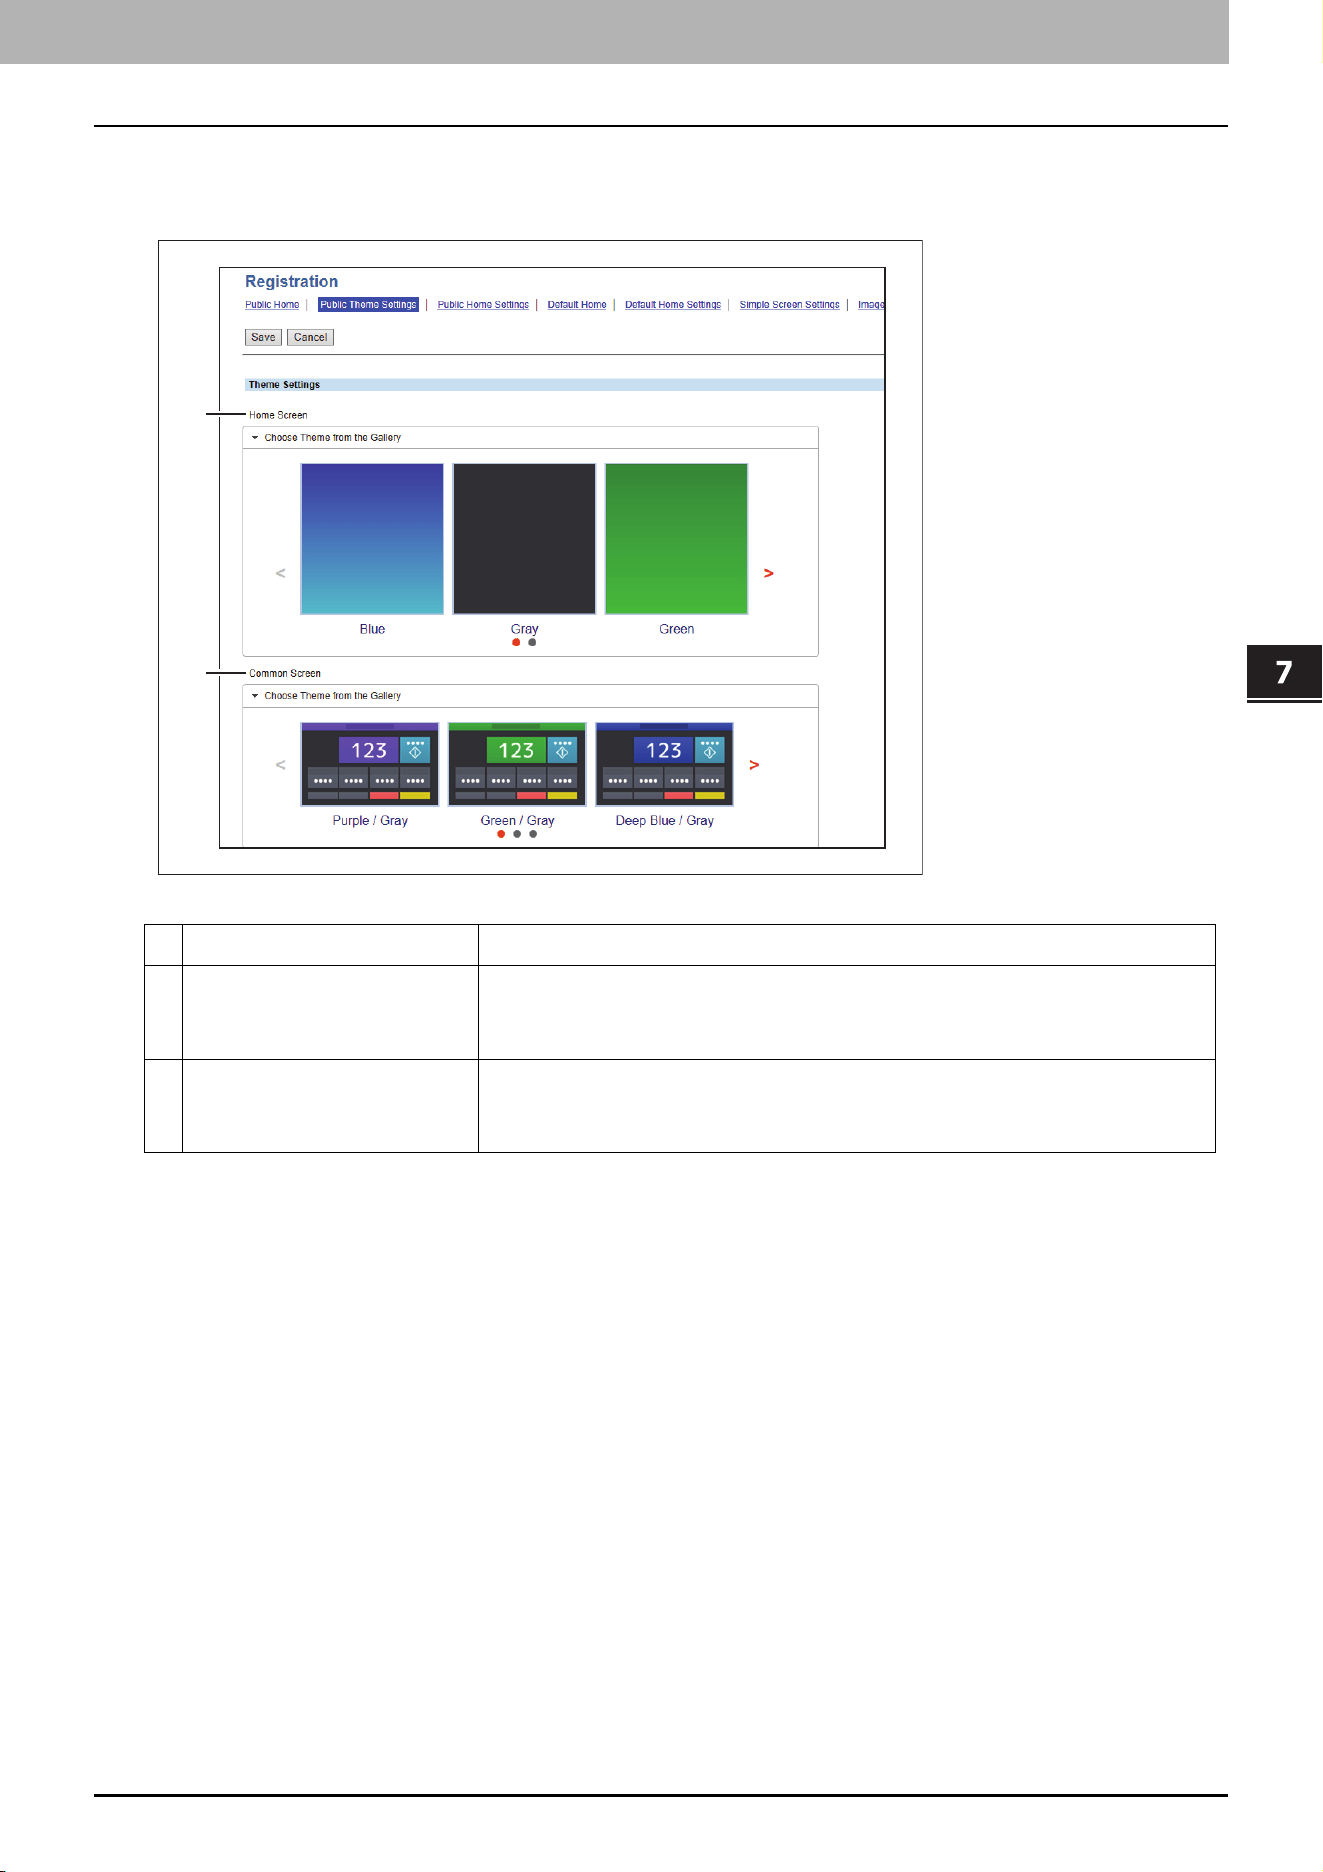
7.TopAccess
[Administration] Tab Page 85
TopAccess
Public Theme Settings
You can specify the theme of the shared home screen.
Item name Description
1 Home Screen Specify the theme for Home screen.
You can select the theme from a list if you select [Choose Theme from the
Gallery].
2 Common Screen Specify the theme for common screens.
You can select the theme from a list if you select [Choose Theme from the
Gallery].
1
2
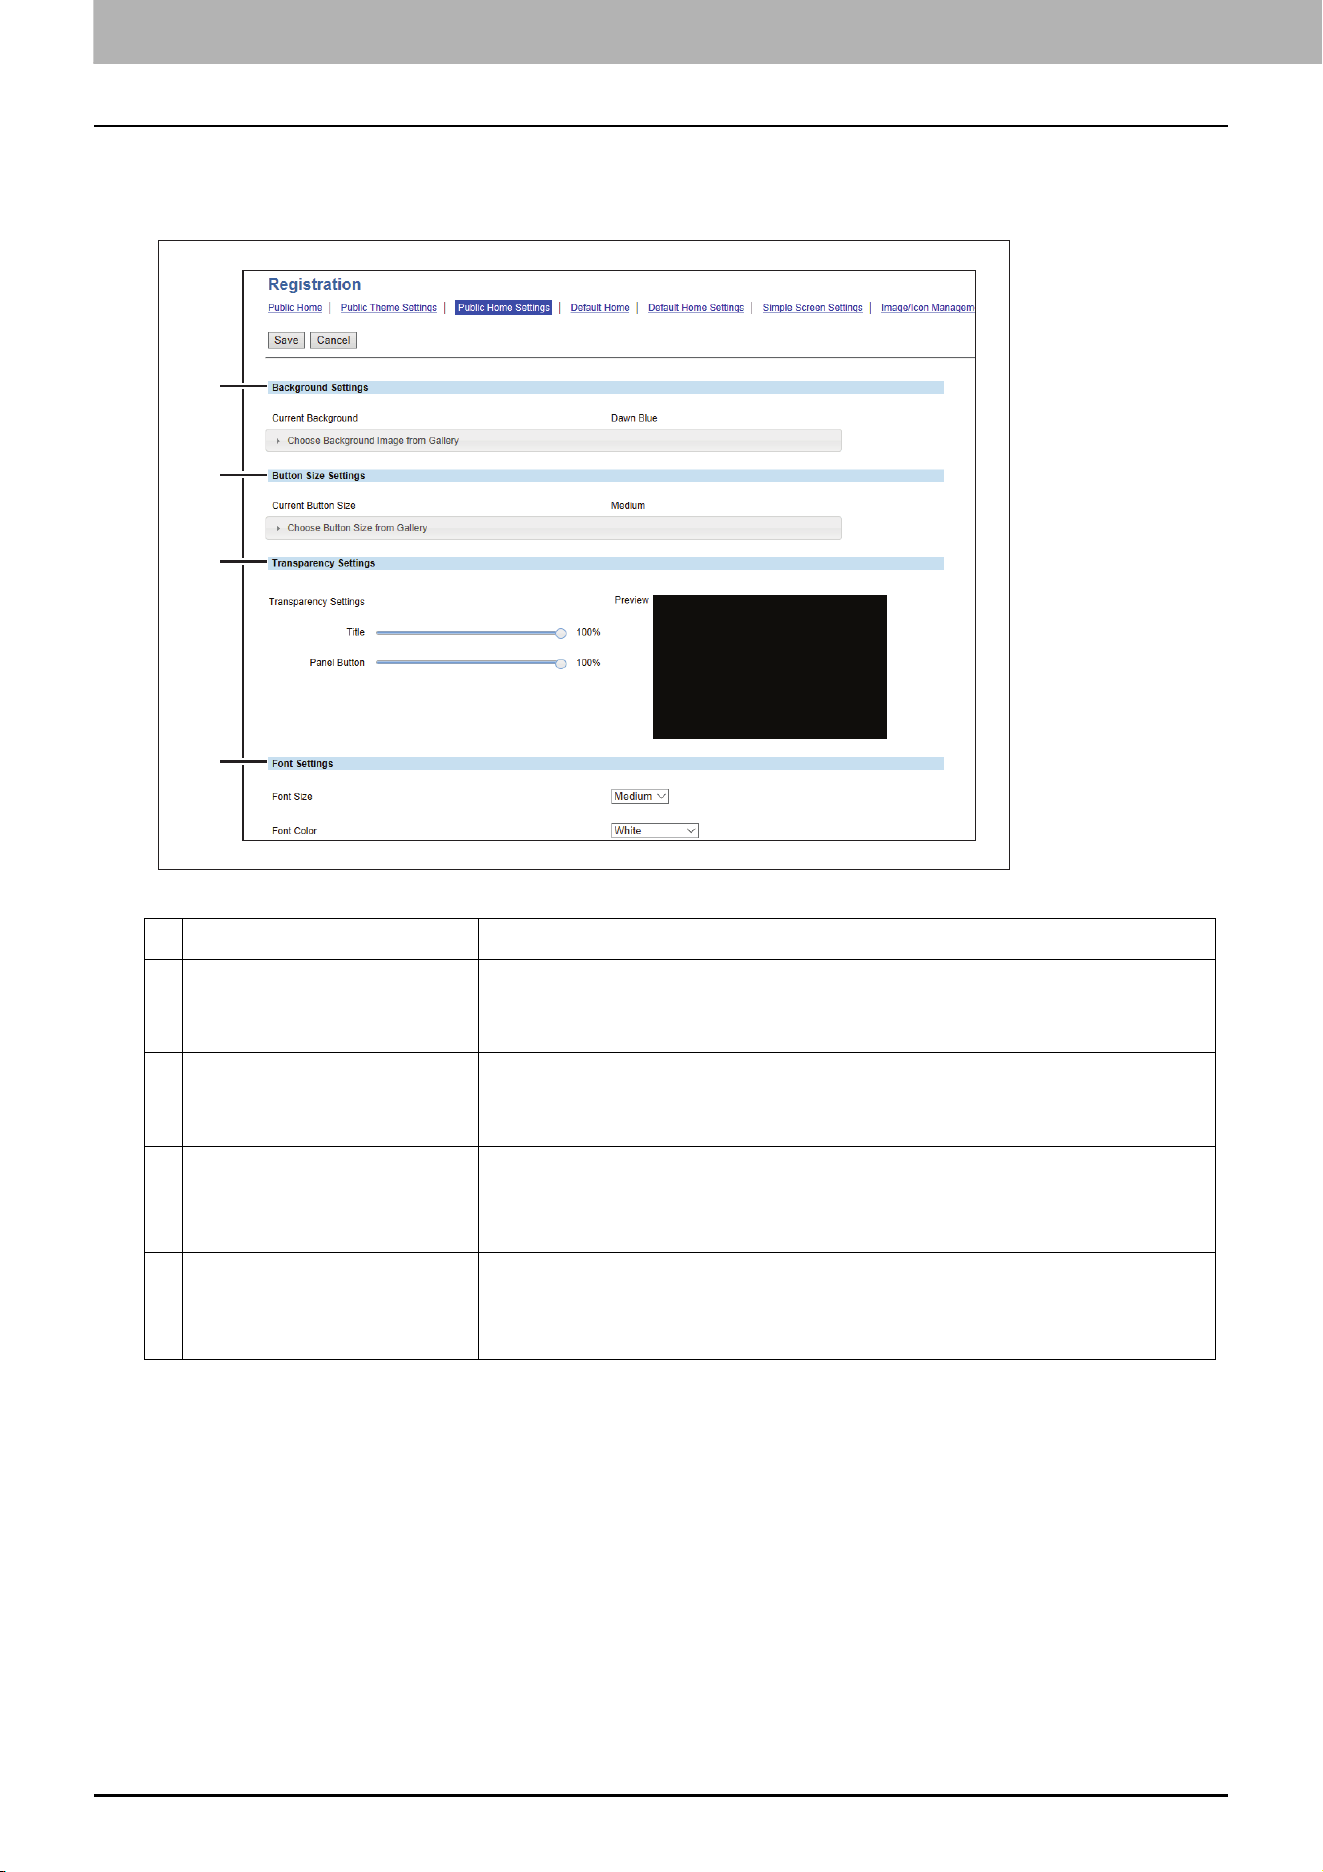
7.TopAccess
86 [Administration] Tab Page
Public Home Settings
You can specify the background, button size, and transparency of the shared home screen.
Item name Description
1 Background Settings Specify the background of the home screen.
You can select the background design from a list if you select [Choose
Background Image from Gallery] at [Current Background].
2 Button Size Settings Specify the button size.
You can select the button size from a list if you select [Choose Button Size
from Gallery] at [Current Button Size].
3 Transparency Settings Specify the transparency of the home screen.
Title — You can specify the transparency of the title bar.
Panel Button — You can specify the transparency of the buttons.
4 Font Settings Specify the font used on the public home screen.
Font Size — You can specify the font size.
Font Color — You can specify the font color.
1
2
3
4
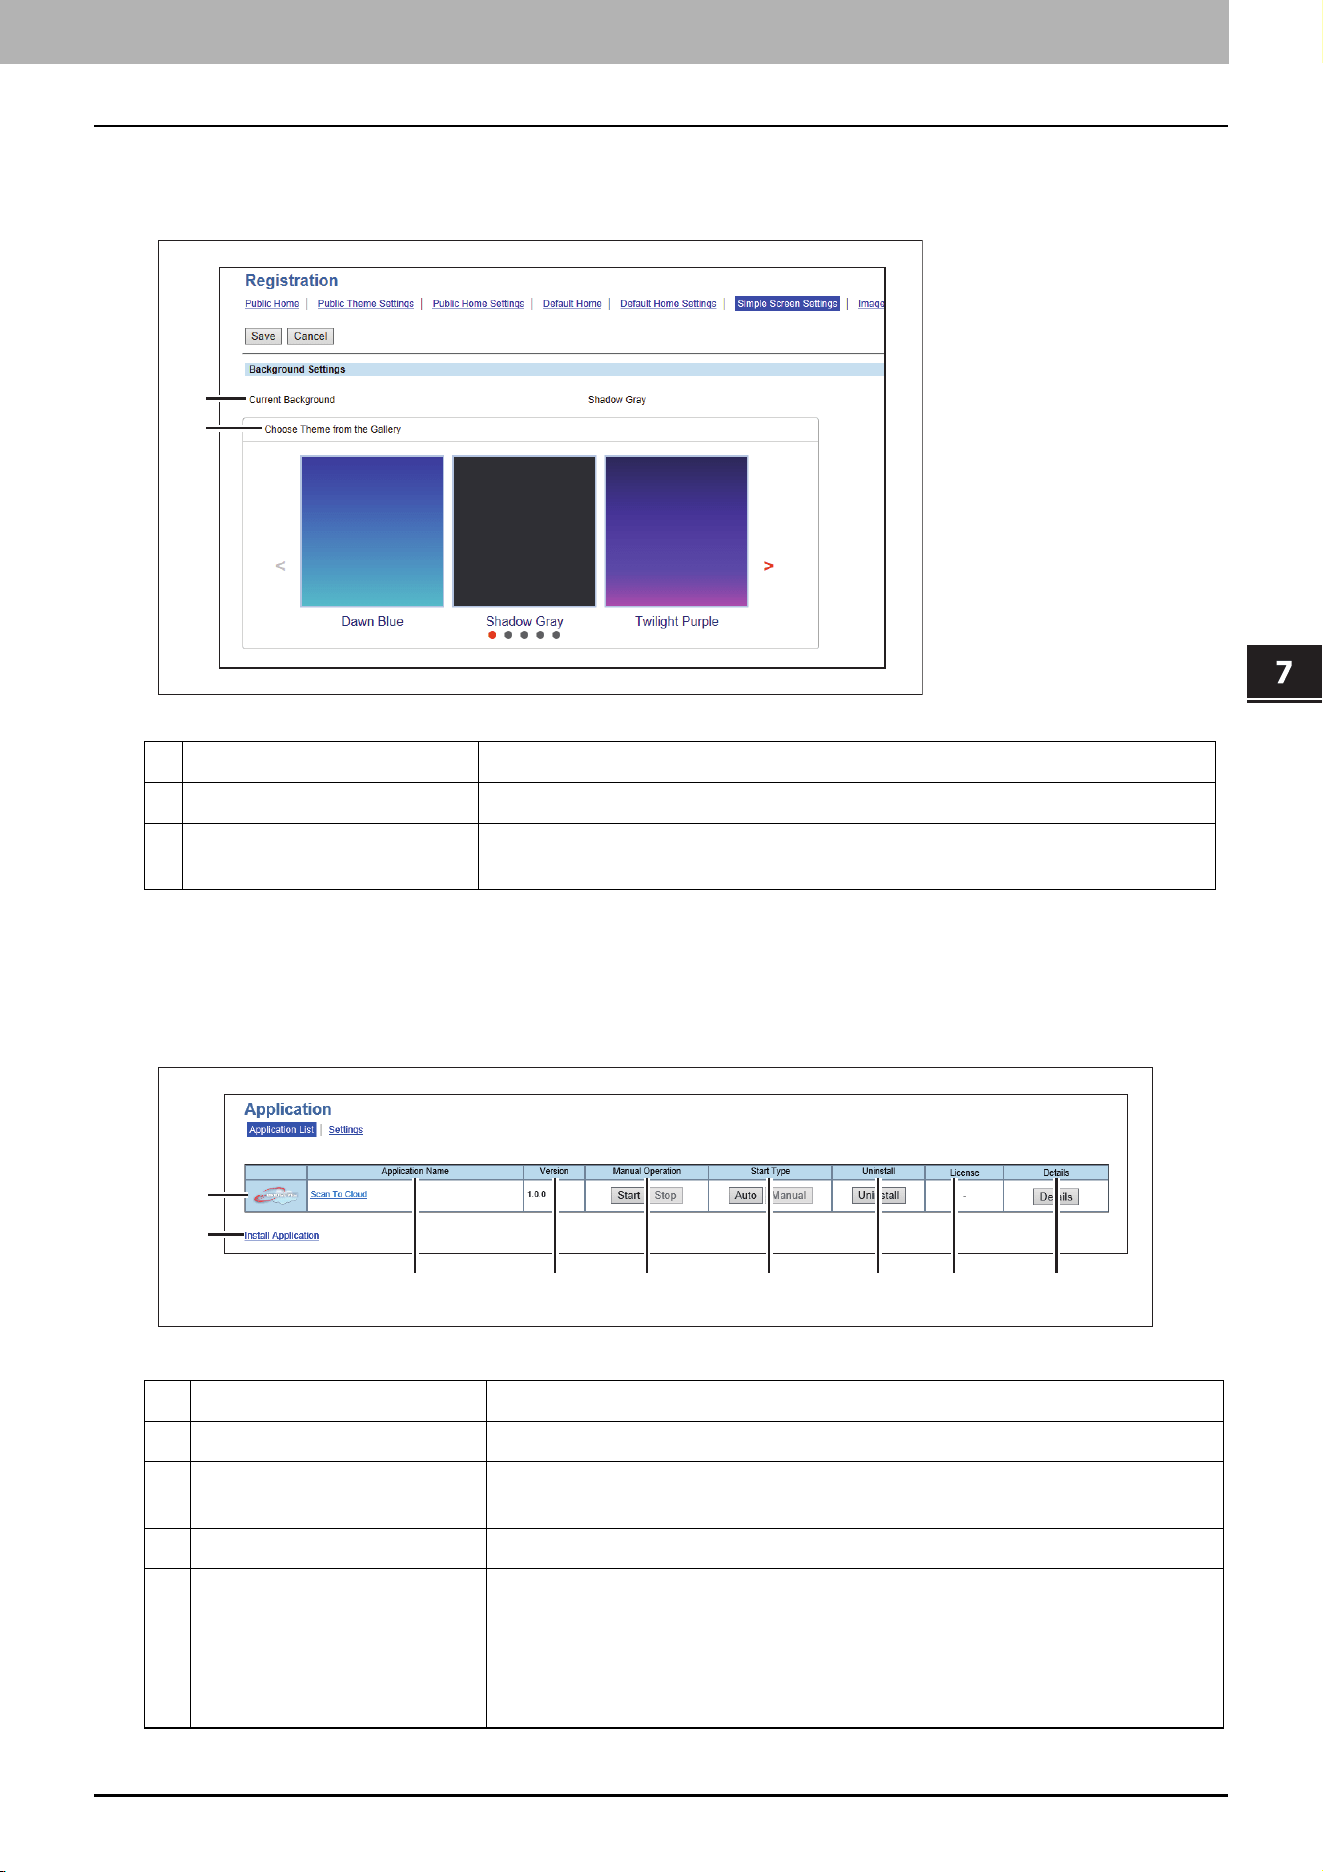
7.TopAccess
[Administration] Tab Page 87
TopAccess
Simple Screen Settings
You can select the background of the simple screen.
Application List
Displays the application list that is already installed.
You can manage operations for each application such as opening/closing, setting the startup method, and
uninstalling/installing.
Item name Description
1 Current Background Shows the name of the current background.
2 Choose Theme from the
Gallery
Click this to show the list, so that you can select the background.
Item name Description
1 Application Icon Displays the application icon.
2 Application Name Displays the application name.
Click the application name to display the application settings page.
3 Version Displays the application version.
4 Manual Operation Allows you to start and stop the application manually.
This is displayed only when the application package includes the background
application.
Start — Select this to start the application.
Stop — Select this to close the application.
1
2
1
9
2 3 4 5 6 7 8
7.TopAccess
88 [Administration] Tab Page
5 Start Type Changes the applications startup method.
This is displayed only when the application package includes the background
application.
Auto — Select this to start the application automatically after it has been
installed or the MFP starts.
Manual — Select this to start the application manually.
6 Uninstall Uninstalls the application.
Click this button to display the uninstallation page for the application.
7 License Displays the installation status of license files to utilize applications.
- — Installation of a license file is not necessary.
Invalid — An application cannot be used since its license file is not installed.
Contact your service technician if you want to use an application with an
invalid license.
Valid — An application can be used since its license file is installed.
8 Details Displays the Application Details screen.
By clicking this button, Name, Version, Framework Version, Application ID,
Product ID, Authentication, License, Status, Summary, Vendor Name, URL,
License Agreement, ReadMe, and Language of an application are displayed.
You can set the department or user authentication at the startup of each
application. Click [Details] to open [Details] screen, select [Enable] at
[Authentication], and click [Save], so that the authentication screen appears
at the startup of the application. Select [Disable] and click [Save] not to show
the authentication screen. Click [Cancel] to cancel the setting. This
[Authentication] setting works at the next startup of the application. It does
not appear for the background application.
To authenticate users at the application startup, enable “User Authentication According To Function”.
You cannot change [Authentication] for applications that require the authentication and applications that
do not have the authentication setting.
The contents of the license agreement are displayed by clicking “Display” in License Agreement.
“Language” is displayed when the application contains the language pack.
9 Install Application Installs the application.
Click this link to display the installation page for the application. You can
specify the file name for the distribution package on this page, and then
install.
Installing or using application(s) constitutes your acceptance of the terms and conditions.
If you do not accept those terms and conditions, uninstall the application(s). Terms and conditions for each
application is available through application details link.
You need to acquire the application’s distribution package in advance.
When installing multiple application packages, install them one at a time.
Item name Description
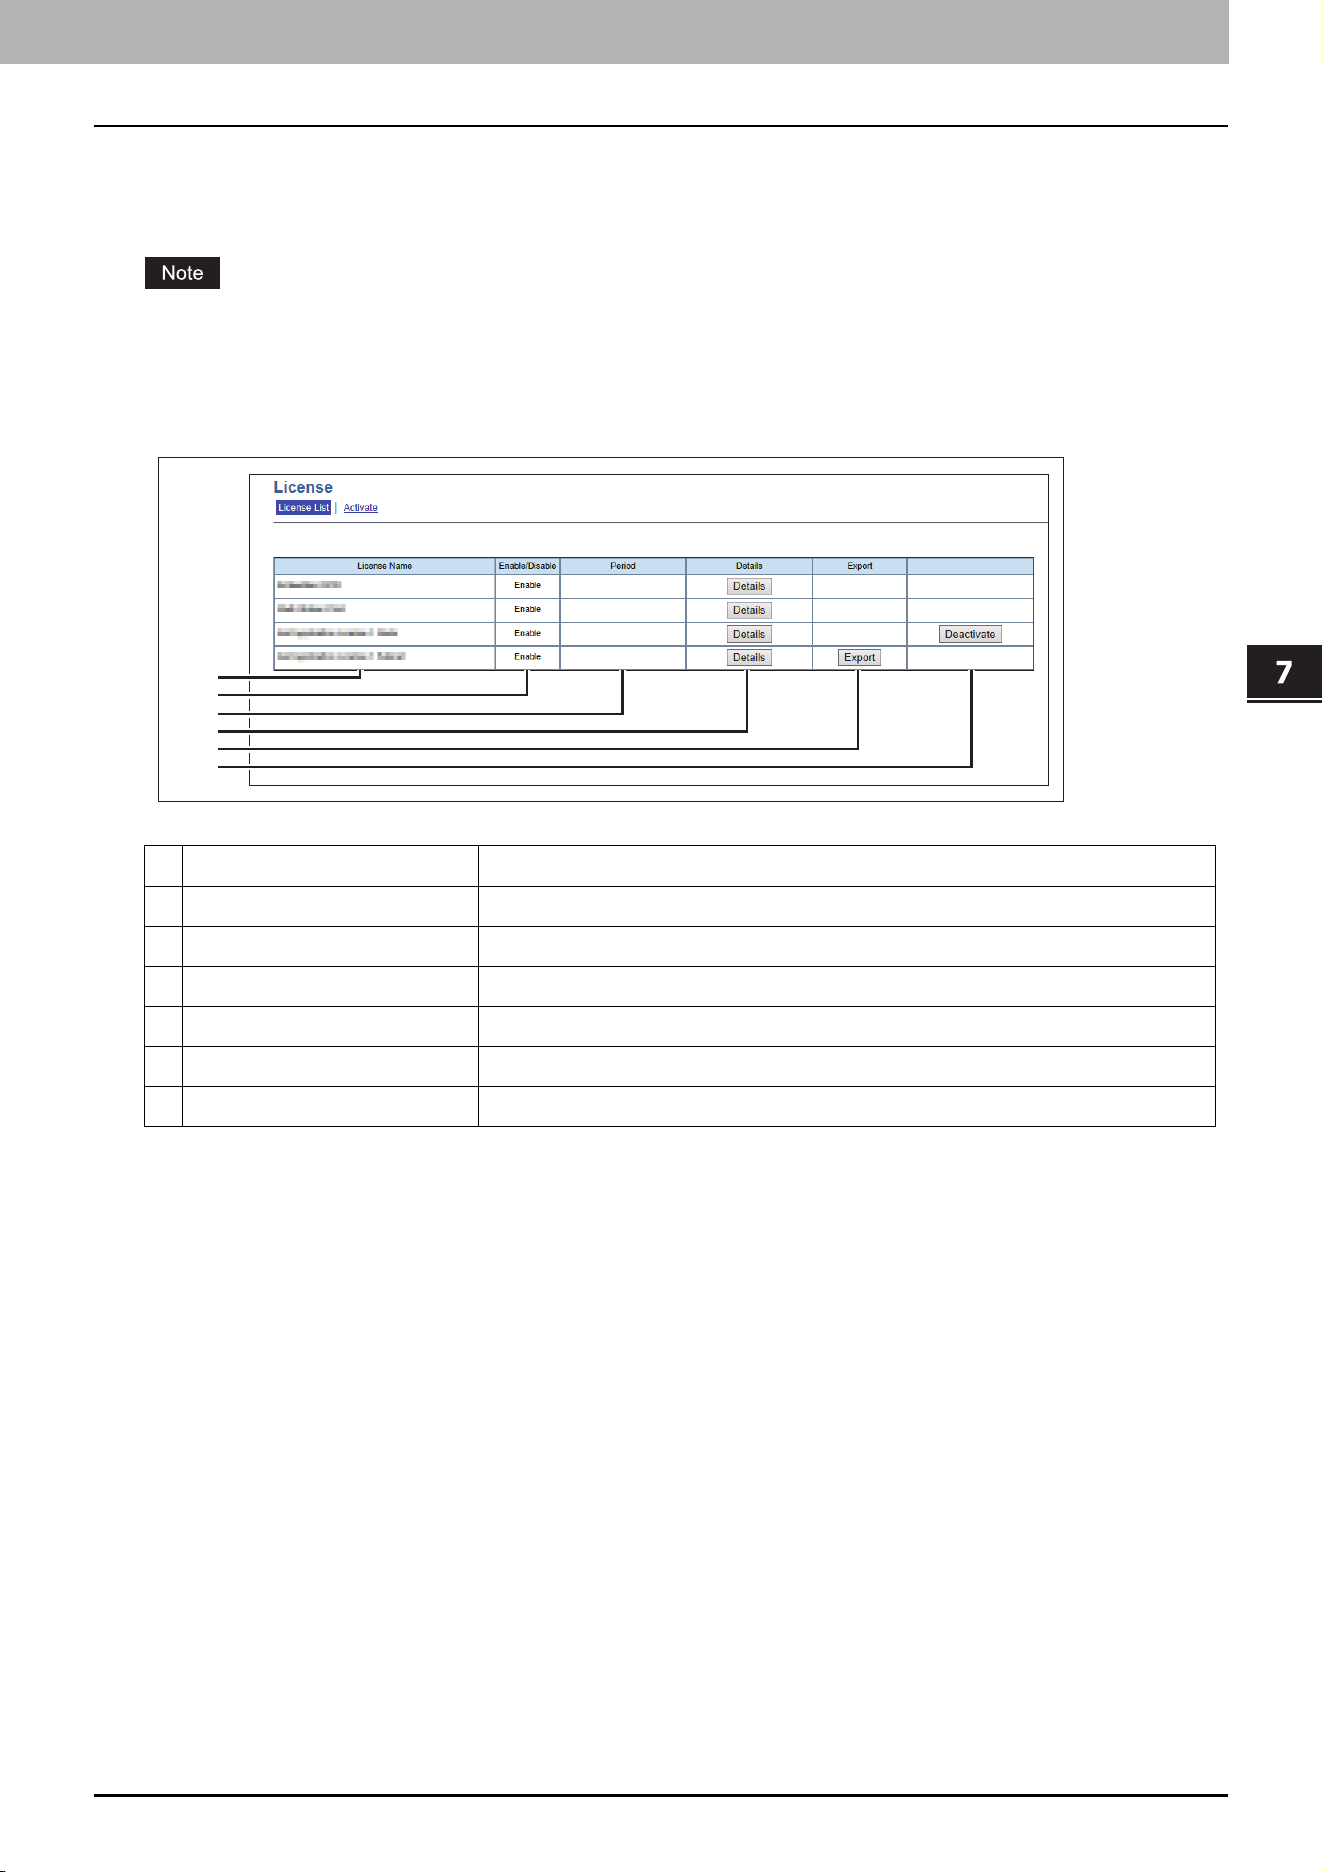
7.TopAccess
[Administration] Tab Page 89
TopAccess
License
P.89 “License List”
P.90 “Activate”
For details on the license and the procedures to activate and deactivate it, consult your service representative.
License List
You can check the list of the installed licenses.
Item name Description
1 License Name Displays the license name.
2 Enable/Disable Displays the status (Enable or Disable) of the license.
3 Period Displays the validation period of the license.
4 Details Displays the details on the license.
5 Export Exports the license file.
6 Deactivate Deactivates the license.
1
2
3
4
5
6
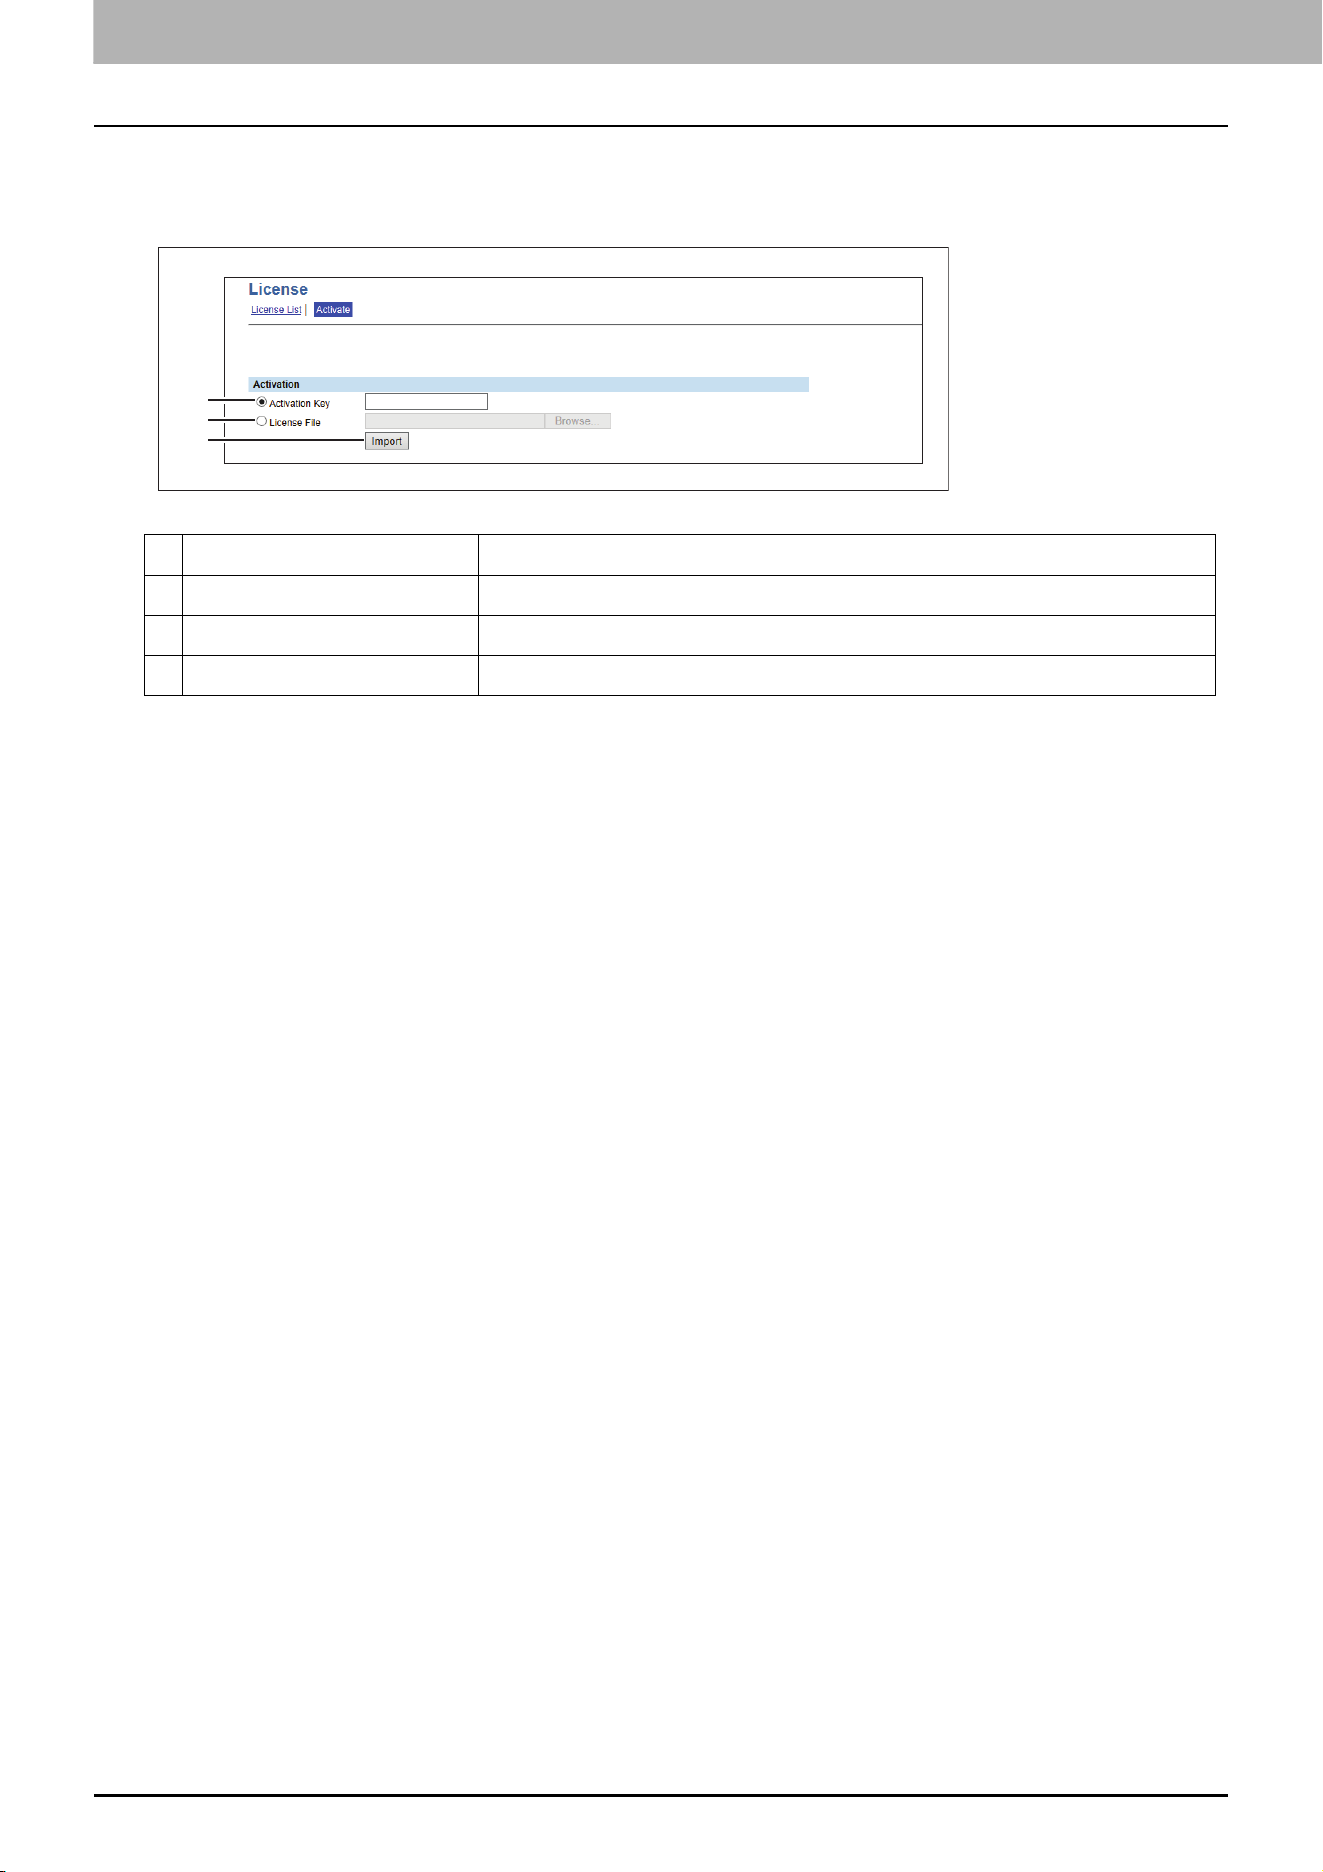
7.TopAccess
90 [Administration] Tab Page
Activate
You can activate the license with the activation key or the license file.
Item name Description
1 Activation Key Enter the acquired activation key to activate the license.
2 License File Click [Browse] and select the license file to activate the license.
3 Import Imports the selected license file.
1
2
3
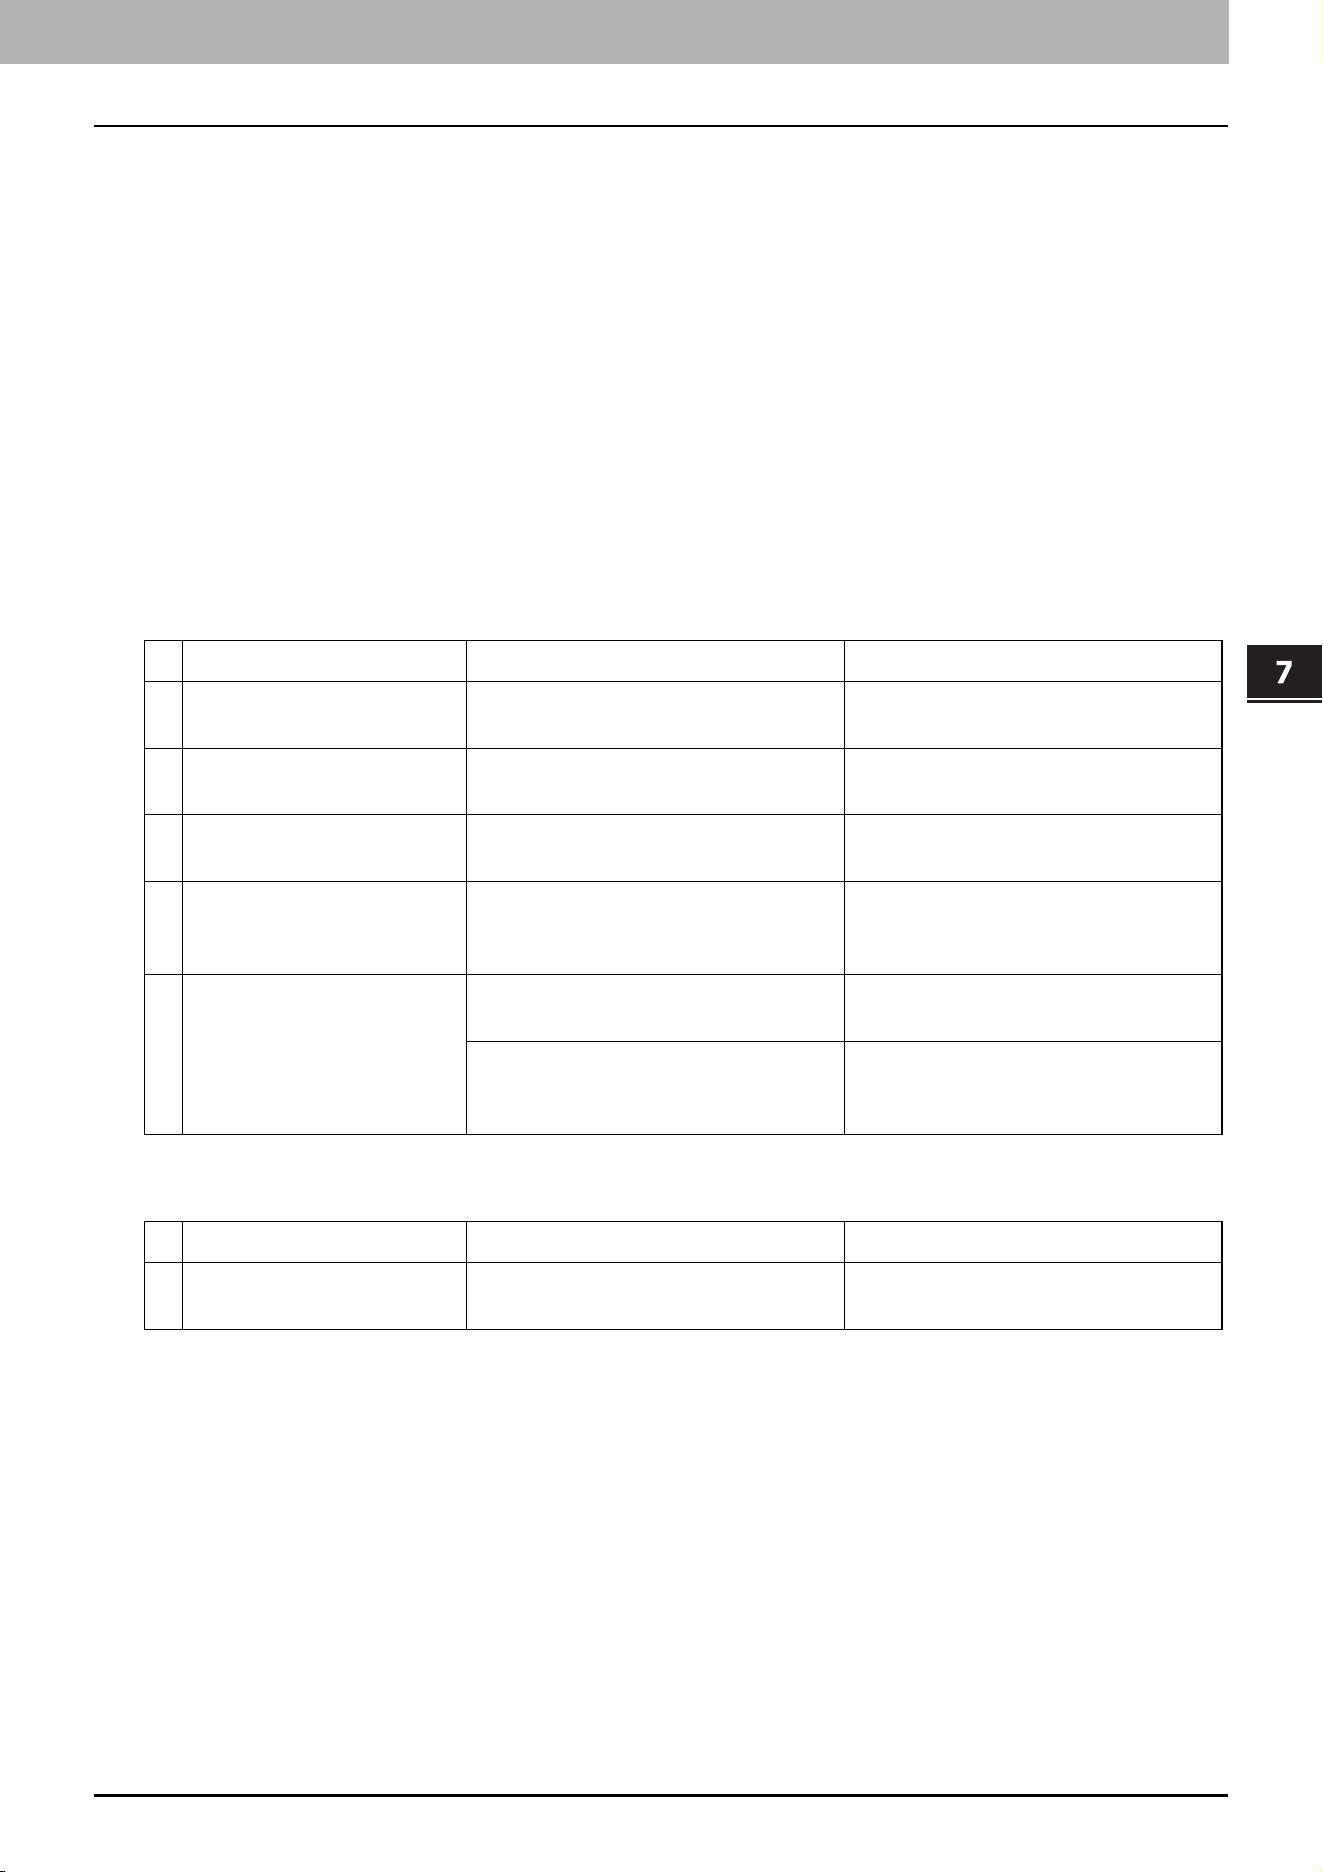
TopAccess
Functional Setups 91
0.Functional Setups
Setting Multi Station Print
Multi Station Print is the function to enable printing from any of the registered MFPs when a job is sent from a client
computer, by adding multiple MFPs as a cooperative device in advance. Up to 10 MFPs can be registered.
Operating with only one equipment unit is possible if the purpose is to use the output setting change function when
printing. You can connect up to 10 MFPs in a group and connect up to 5 groups including a group to which this MFP
belongs: you can add 4 groups for the connection.
P.91 “Procedure for Multi Station Print”
P.92 “Procedure for Multi Station Print (Only in One Equipment Unit)”
P.92 “Checking the Multi Station Print Enabler”
Procedure for Multi Station Print
When the Multi Station Print function is used, it is necessary to set all MFPs to be connected. There are two methods to
set the 2nd or later MFPs to be connected: by manual means and by copying the settings of the 1st MFP using a clone
file.
Setup
Operation
Operation Description Reference
1 Checking the Multi Station
Print Enabler
Check whether the Multi Station Print
Enabler can be used with your MFP.
P.92 “Checking the Multi Station
Print Enabler”
2 Enabling user
authentication
Enable user authentication. TopAccess Guide “Authentication
settings”
3 Enabling the Multi Station
Print function
Enable the Multi Station Print function. P.74 “Setting up Multi Station
Print”
4 Setting the connection MFP
(1st device/no group
connection)
Register the MFP (this equipment)
which is being connected with
TopAccess as the 1st device.
P.74 “Setting up Multi Station
Print”
5 Setting the connection MFP
(2nd or later devices/
groups)
Register the 2nd or later MFPs by
manual means.
P.74 “Setting up Multi Station
Print”
When registering the 2nd or later MFPs
by copying the settings for the 1st MFP,
create a clone file and install it in them.
P.78 “Create Clone File settings”
P.80 “Install Clone File settings”
Operation Description Reference
1 Performing Multi Station
Print
Print a job from the MFP connected by
the network.
Printing Guide “Printing from Another
MFP (Multi Station Print)”

7.TopAccess
92 Functional Setups
Procedure for Multi Station Print (Only in One Equipment Unit)
When an attempt is made to use the Multi Station Print function only in one equipment unit, register only the MFP to
be used since no MFP connection is carried out.
Setup
Operation
Checking the Multi Station Print Enabler
The Multi Station Printer Enabler is required for the use of the Multi Station Print function. For details, contact your
service technician or representative.
The setting of the Multi Station Print Enabler in your MFP can be confirmed as below.
[User Functions -User-] > the [Admin] tab > [General] > [License Management]
If [Multi Station Print] is registered in [License Management], the Multi Station Print function can be used.
Operation Description Reference
1 Checking the Multi Station
Print Enabler
Check whether the Multi Station Print
Enabler can be used with your MFP.
P.92 “Checking the Multi Station
Print Enabler”
2 Enabling the Multi Station
Print function
Enable the Multi Station Print function. P.74 “Setting up Multi Station
Print”
3 Setting the MFP Register the MFP (this equipment)
which is being connected with
TopAccess.
P.74 “Setting up Multi Station
Print”
Operation Description Reference
1 Performing Multi Station
Print
Print a job from the registered MFP. Printing Guide “Printing from Another
MFP (Multi Station Print)”
7.TopAccess
Functional Setups 93
TopAccess
Setting Home Data Synchronization
Once you have registered multiple MFPs for connection, you can use the common HOME screen when you log in to any
one of the registered MFPs that are connected to the network. If MFP is used to synchronize the HOME screens, up to
10 MFPs can be connected.
P.93 “Procedure for Home Data Synchronization”
If you change the default settings on any of the connected MFPs after you start the home data synchronization, you
need to set the same changes for all of the connected MFPs or you need to create a clone file except User Management
and Address Book on the MFP where you have changed the settings and install it into all the other connected MFPs.
Procedure for Home Data Synchronization
The following table explains the procedure to synchronize the HOME screens by means of MFP.
Operation Description Reference
1 Setting the first MFP for
connection
Register this MFP where you currently
log in with TopAccess as the first
device.
Make several settings such as user
information, address book, default
settings for jobs, installation of
applications, EWB function settings,
and others.
TopAccess Guide “[User Management]
Tab Page Overview”
TopAccess Guide “[Address Book] Item
list”
TopAccess Guide “[Application] Item
List”
TopAccess Guide “Embedded Web
Browser settings”
Make sure that [Enable FTP Server] is enabled.
TopAccess Guide “Setting up FTP Server”
2 Creating a clone file Create a clone file to copy the settings
of the first MFP and install it into the
second or later MFPs.
Include the following categories in the
clone file:
Default Settings
User Management
Network/Print Service
Address Book
Application
P.78 “Create Clone File settings”
3 Setting the second or later
MFPs for connection
Install the created clone file into the
second or later MFPs.
P.80 “Install Clone File settings”
Execute [Delete All Shared Data] before you install the clone file.
P.55 “Home Setting”
4 Setting the primary server Select one MFP as the primary server
for connection and configure the
shared user management and the
shared address book.
TopAccess Guide “Setting up User
Authentication Setting”
TopAccess Guide “Shared Setting”
5 Setting the home data
synchronization
Set the home data synchronization on
all MFPs for connection.
P.55 “Home Setting”
To disconnect MFP, select [Disable] from [Public Home] on the MFP
concerned.
Select [Assume this MFP is the Primary Server] on the MFP that you use as the
primary server.

7.TopAccess
94 Functional Setups

8.Install Disc

96 Procedure for Installation
0.Procedure for Installation
System requirements
To install the printer drivers and other client software on a Windows computer, the following is required.
Display resolution
1024 x 768 dots or more
Display color
High Color (16bit) or higher is recommended
CPU
Recommended environment required by OS
Memory
The required memory size for OS.
OS
Windows 7 Service Pack 1 or later
Windows Server 2008 Service Pack 2 or later
Required software
Internet Explorer 9.0 or later
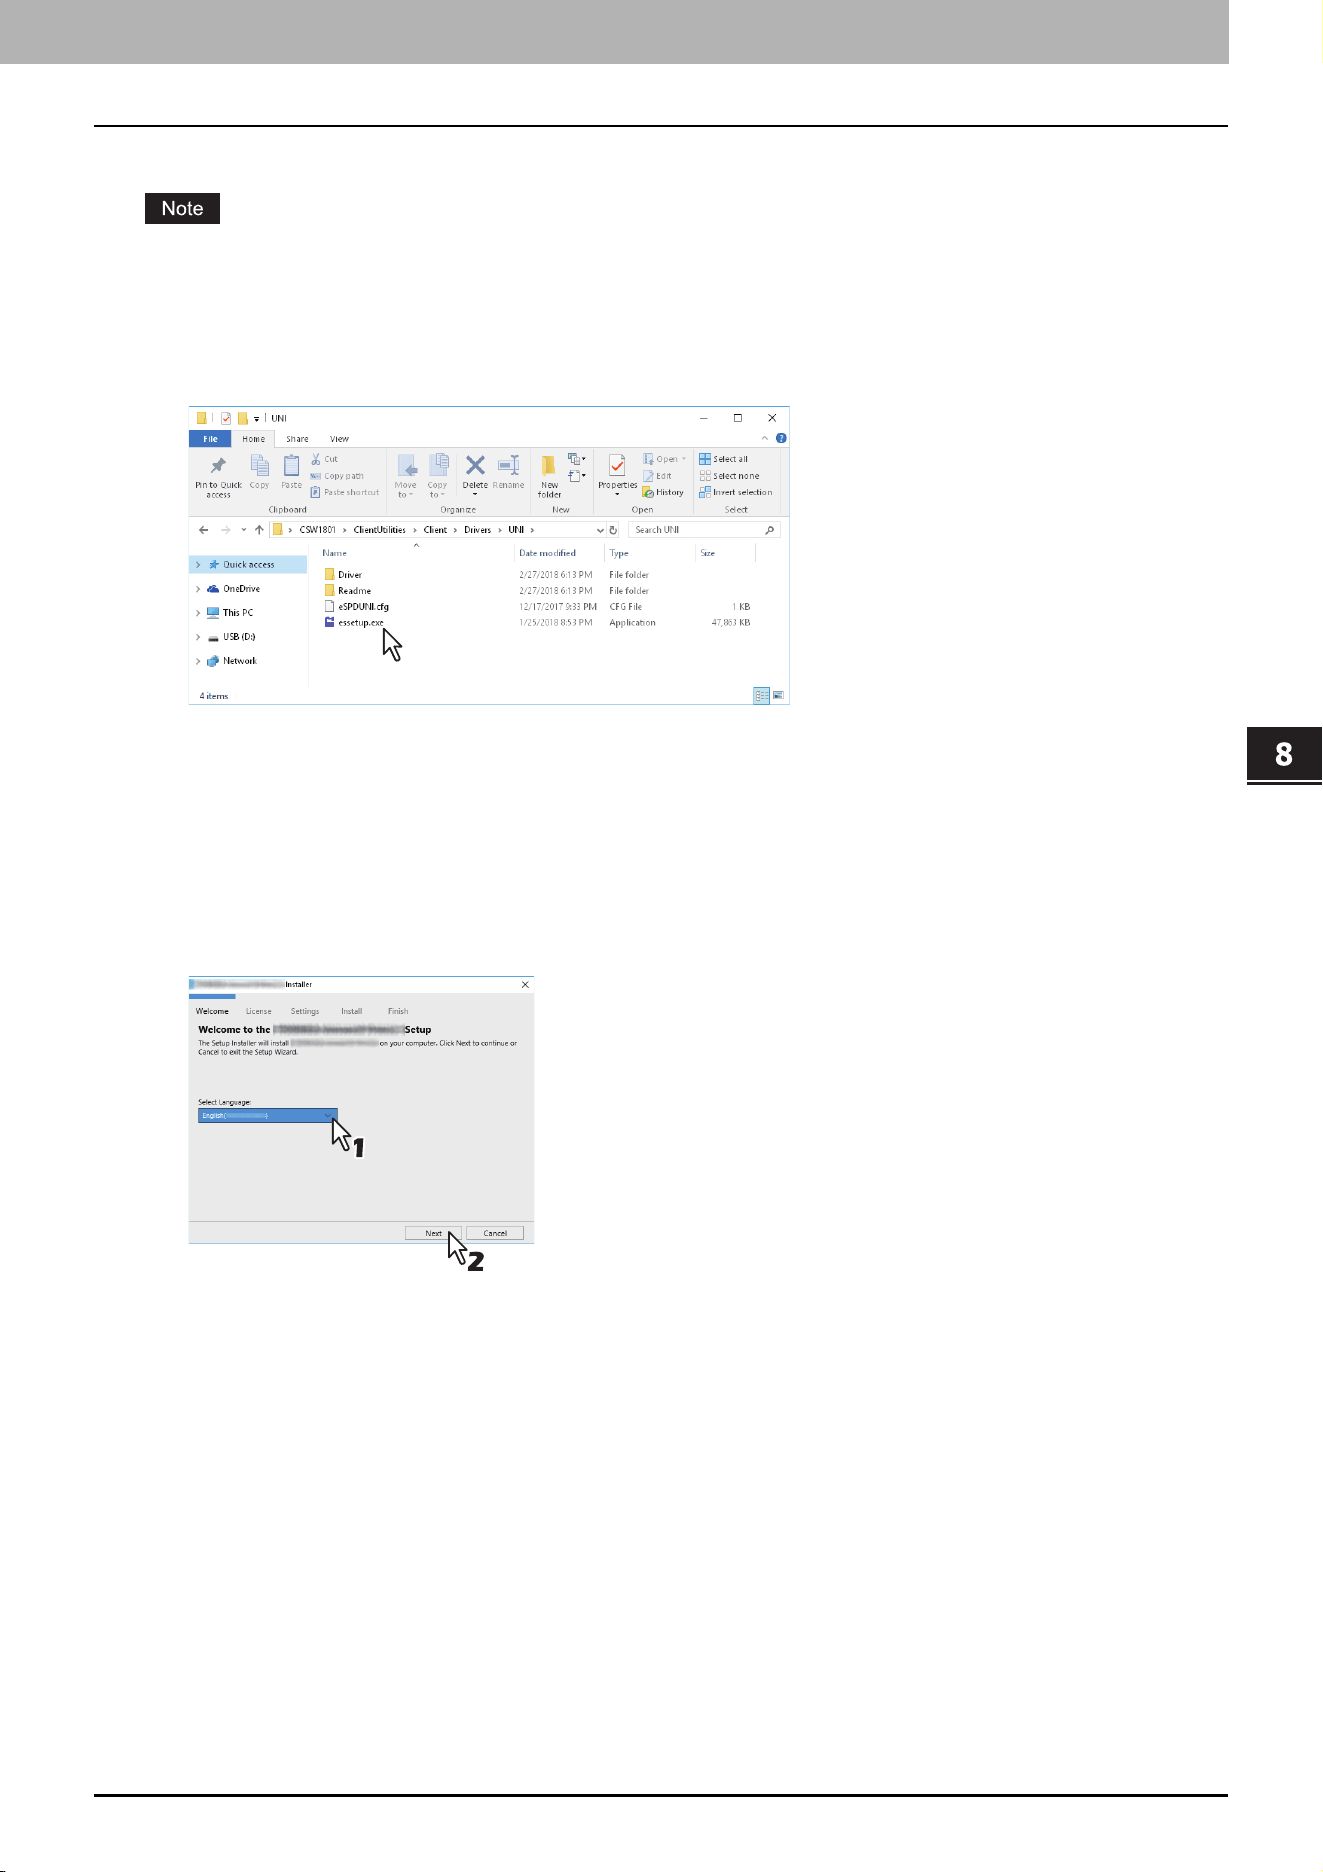
Install Disc
Installing the printer drivers by using the individual installers 97
0.Installing the printer drivers by using the individual installers
Perform installation corresponding to your Windows computer.
To perform installation, you must log onto Windows with the “Administrator” account.
1
Insert the Install Disc into the disc drive.
When you insert the Install Disc into the disc drive, Software Installer may launch automatically. In this case, click
[Exit] to close it and continue the operation.
2
Open the folder containing the set up program, and double-click “essetup.exe”.
The set up programs for installing the printer drivers are contained in the following folders:
Universal Printer 2 driver
[Install Disc]:\Client\Drivers\UNI\
Universal PS3 printer driver
[Install Disc]:\Client\Drivers\PS\
Universal XPS printer driver
[Install Disc]:\Client\Drivers\XPS\
3
Select the desired language, and click [Next].

8.Install Disc
98 Installing the printer drivers by using the individual installers
4
Select [I accept the terms in the License Agreement], and click [Next].
The Settings Port screen is displayed.
5
Configure the printer port.
The procedure for configuring the printer port varies depending on the connection. Go to the steps suited to your
connection.
P.99 “Raw TCP/LPR printing”
P.102 “SMB printing”
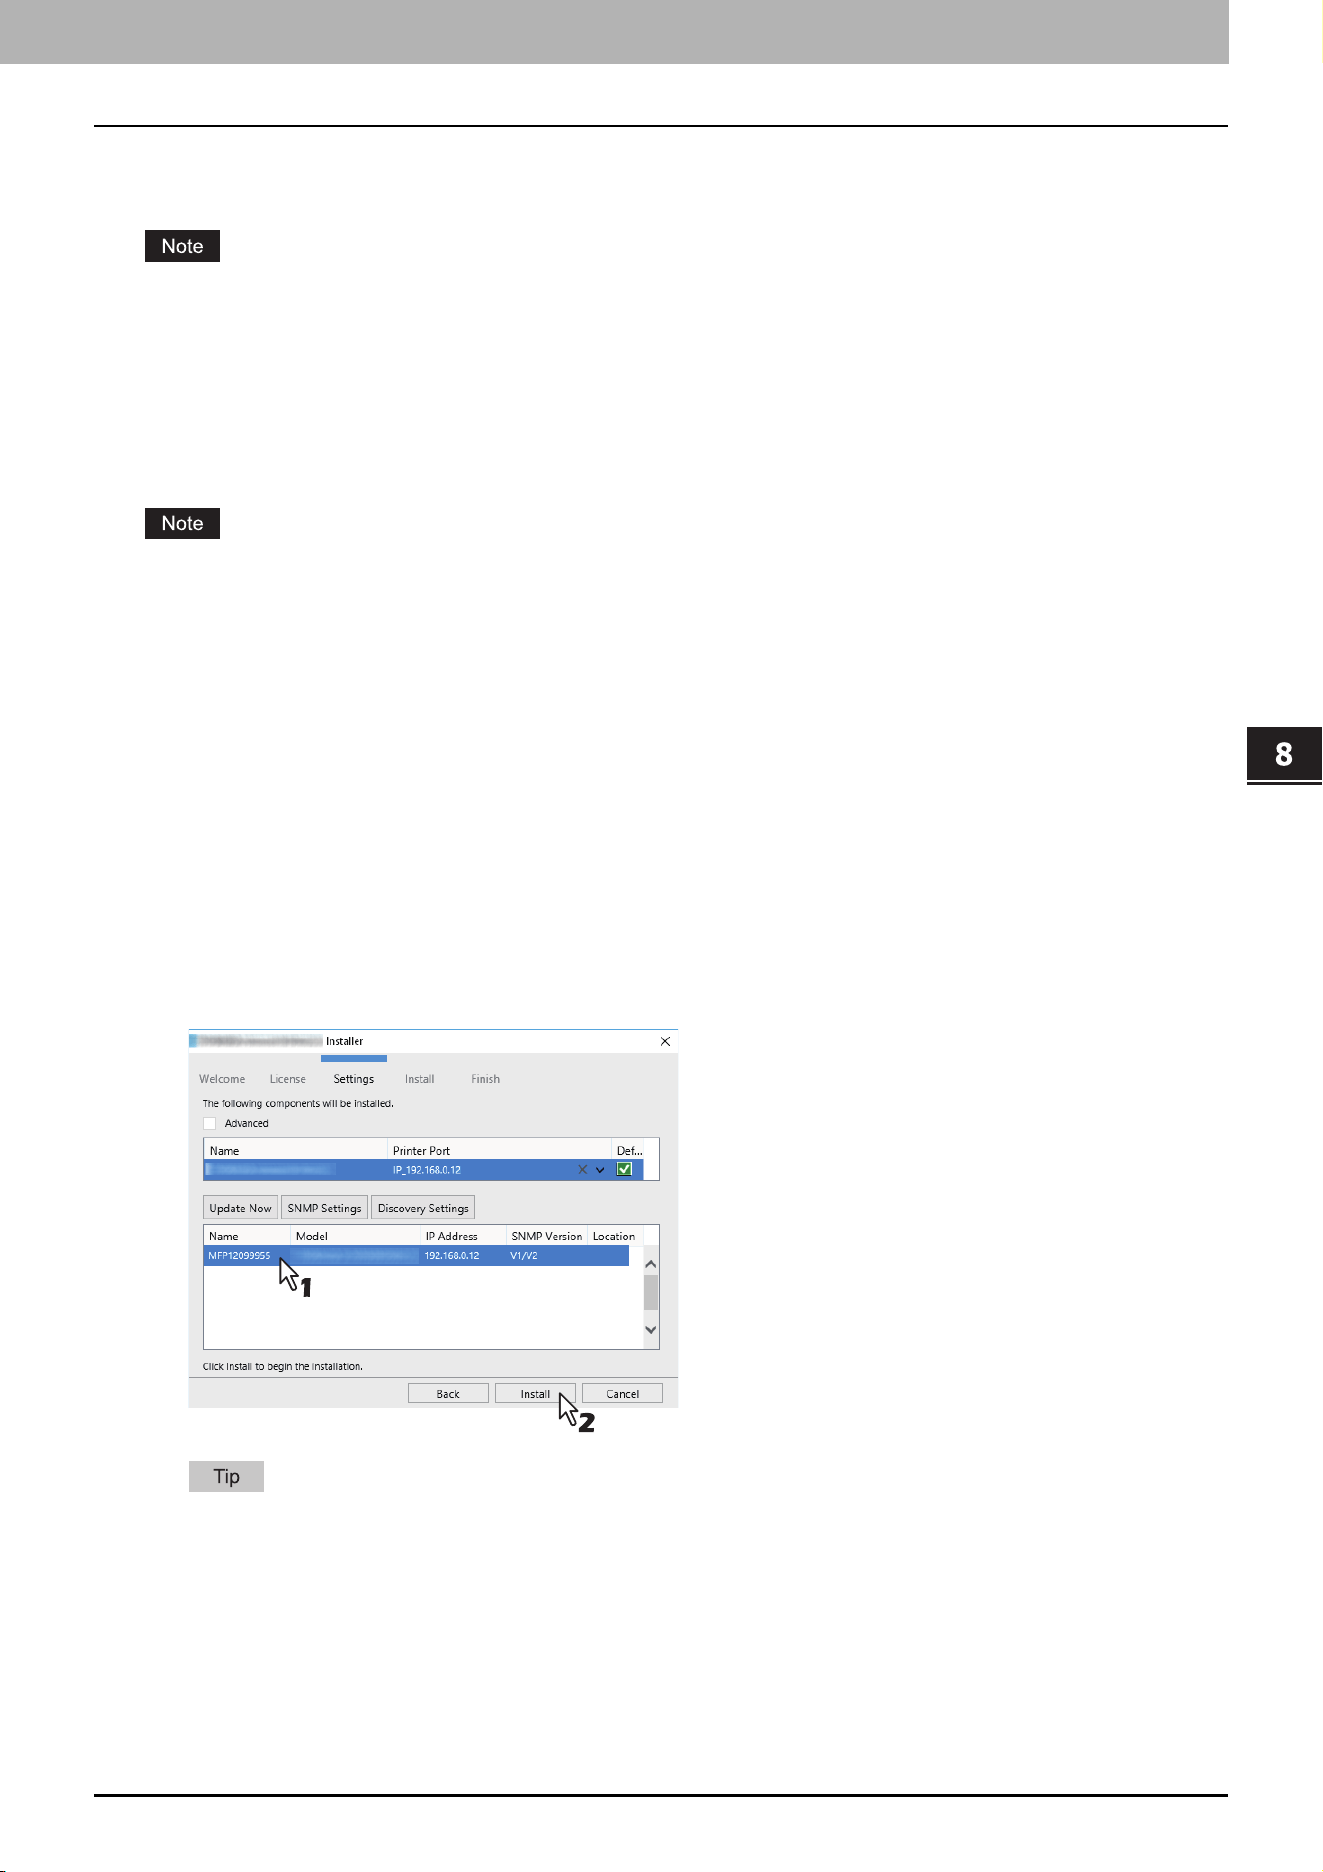
8.Install Disc
Installing the printer drivers by using the individual installers 99
Install Disc
Raw TCP/LPR printing
Configure the Raw TCP/LPR port as described in the following procedure.
Confirm the following before starting the configuration:
This equipment is connected to the network and turned on.
The TCP/IP setting is correct on this equipment and your computer.
Searching your TOSHIBA MFP automatically
This equipment is automatically discovered over the network. Then you can install the printer driver so as to configure
the Raw TCP/LPR port.
If this equipment is not discovered over the network after the installation is started, a dialog box indicating this
appears. Follow the procedure below to continue the configuration.
To search this equipment over the network again, click [Retry].
Click [SNMP Settings] and confirm whether the SNMP settings specified in the [SNMP Settings] dialog box are
correct.
When you confirm or change the SNMP settings in order to find your TOSHIBA MFP, see the following section.
P.104 “Confirm or change the SNMP settings”
When you set the conditions to search the MFPs on the network in the [Manual Selection] dialog box, see the
following section.
P.105 “Narrowing Down Search Conditions”
If your TOSHIBA MFP is not found, refer to the following page:
P.101 “If your TOSHIBA MFP is not found”
If you know the IP address of this equipment, you can specify a printer port with the direct entry from the keyboard.
In step 6, enter a network path shown below in [Printer port].
\\IP_<IP address> or \\<IP address>
6
A list for the discovered printers is displayed. Then select this equipment on the list and then
click [Install].
Searching may take a while depending on the Windows OS or network environment.
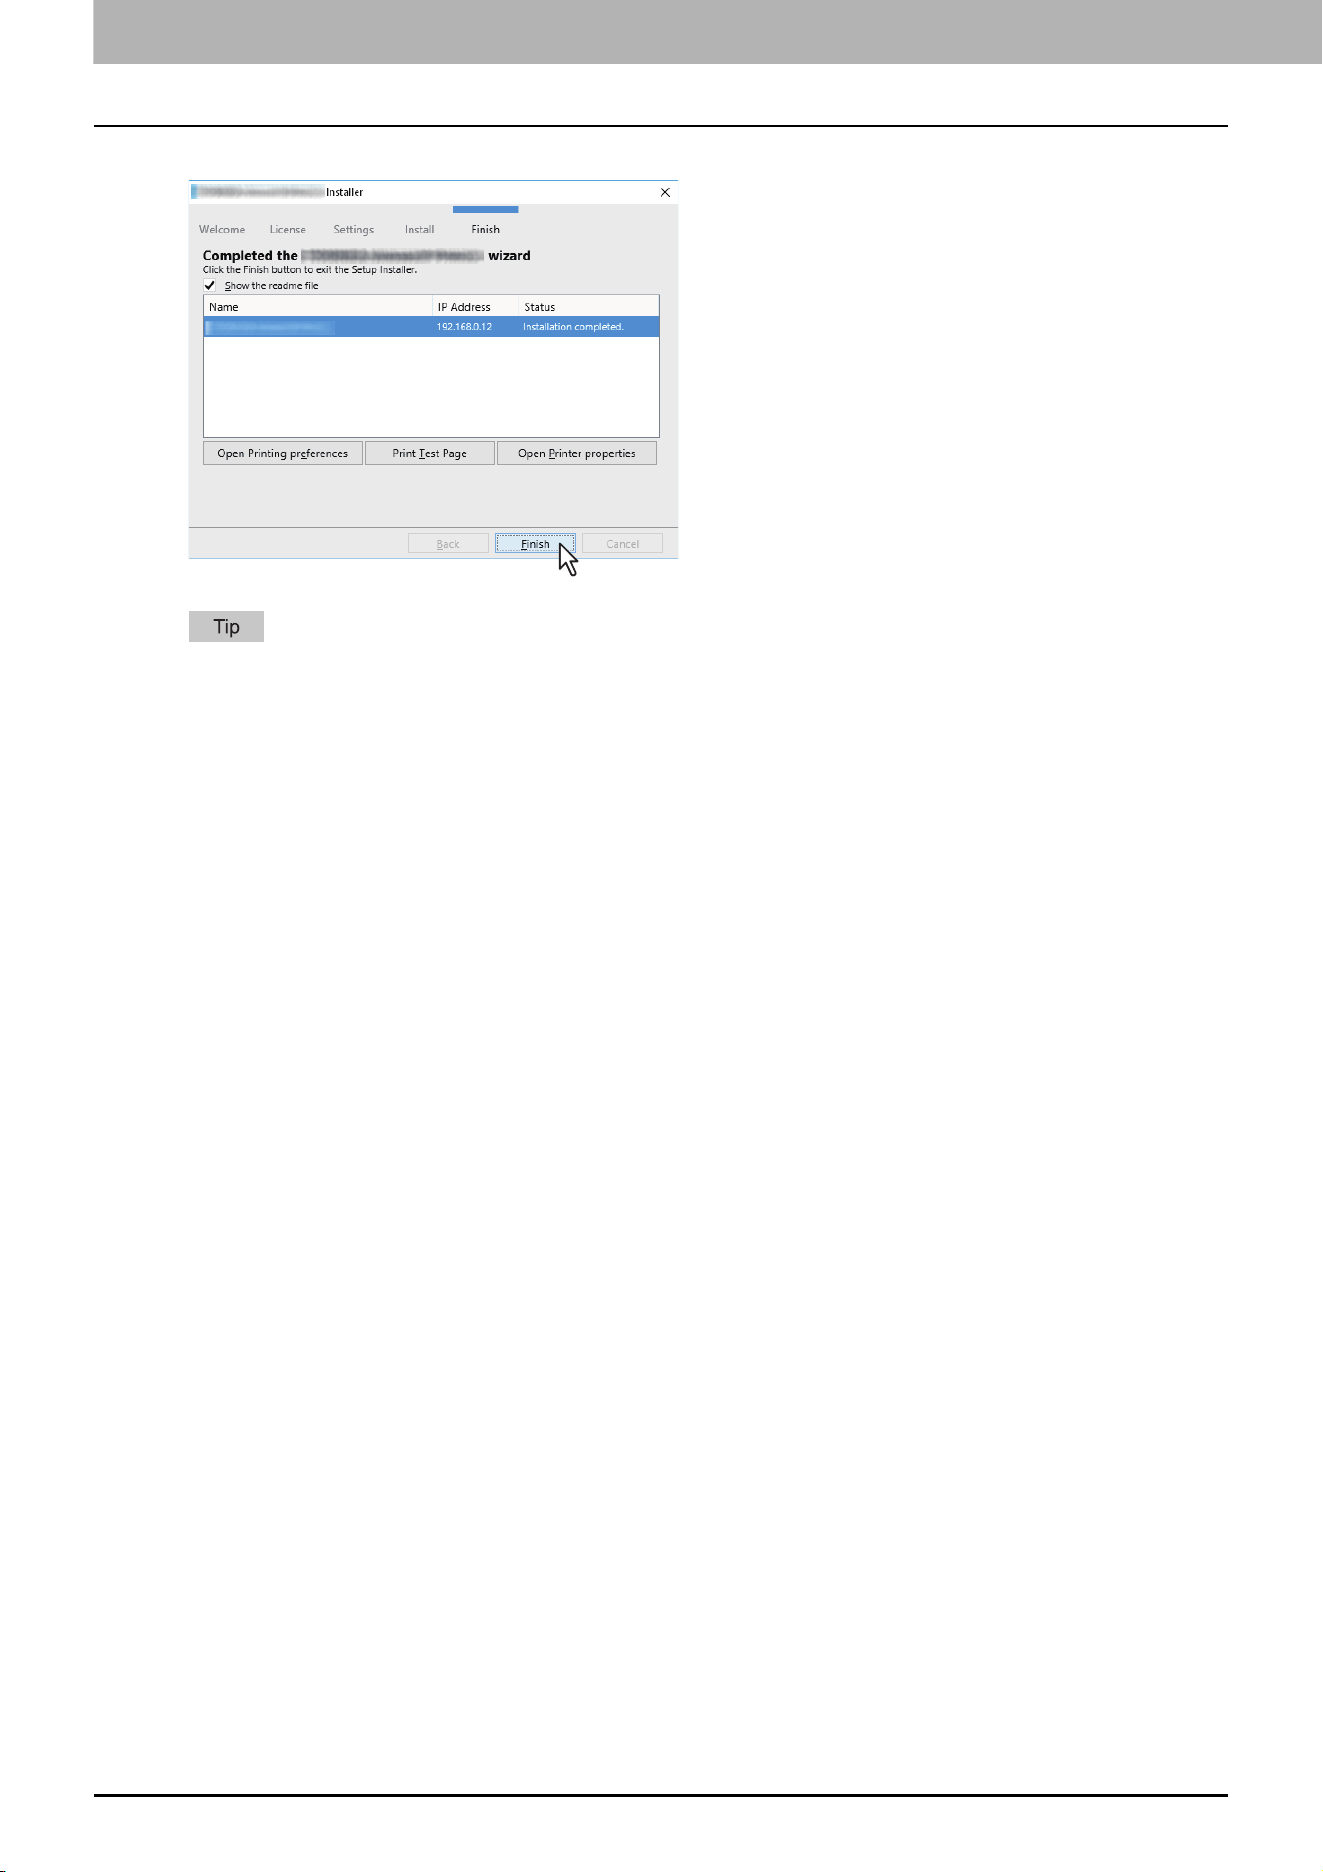
8.Install Disc
100 Installing the printer drivers by using the individual installers
7
Click [Finish].
The Installer may ask you to restart your computer. If it does, select “Yes, I want to restart my computer now.”
and click [Finish] to restart your computer.
You can set the printer driver and print settings which are required in order to perform test page printing or
normal printing from this equipment. Click the buttons shown below to set them as needed. Setting can be
made even after [Finish] has been clicked.
- Show the readme file: When you select this check box, the Readme file is opened after [Finish] is clicked.
- [Open Printer Preferences]: The [Printer Preferences] dialog box of the installed printer driver is
displayed.
For details about the setting, refer to the Printing Guide.
- [Print Test Page]: Print the test page from this equipment.
- [Open Printer Properties]: The [Printer Properties] dialog box is displayed.
For details about the setting, refer to the Printing Guide.
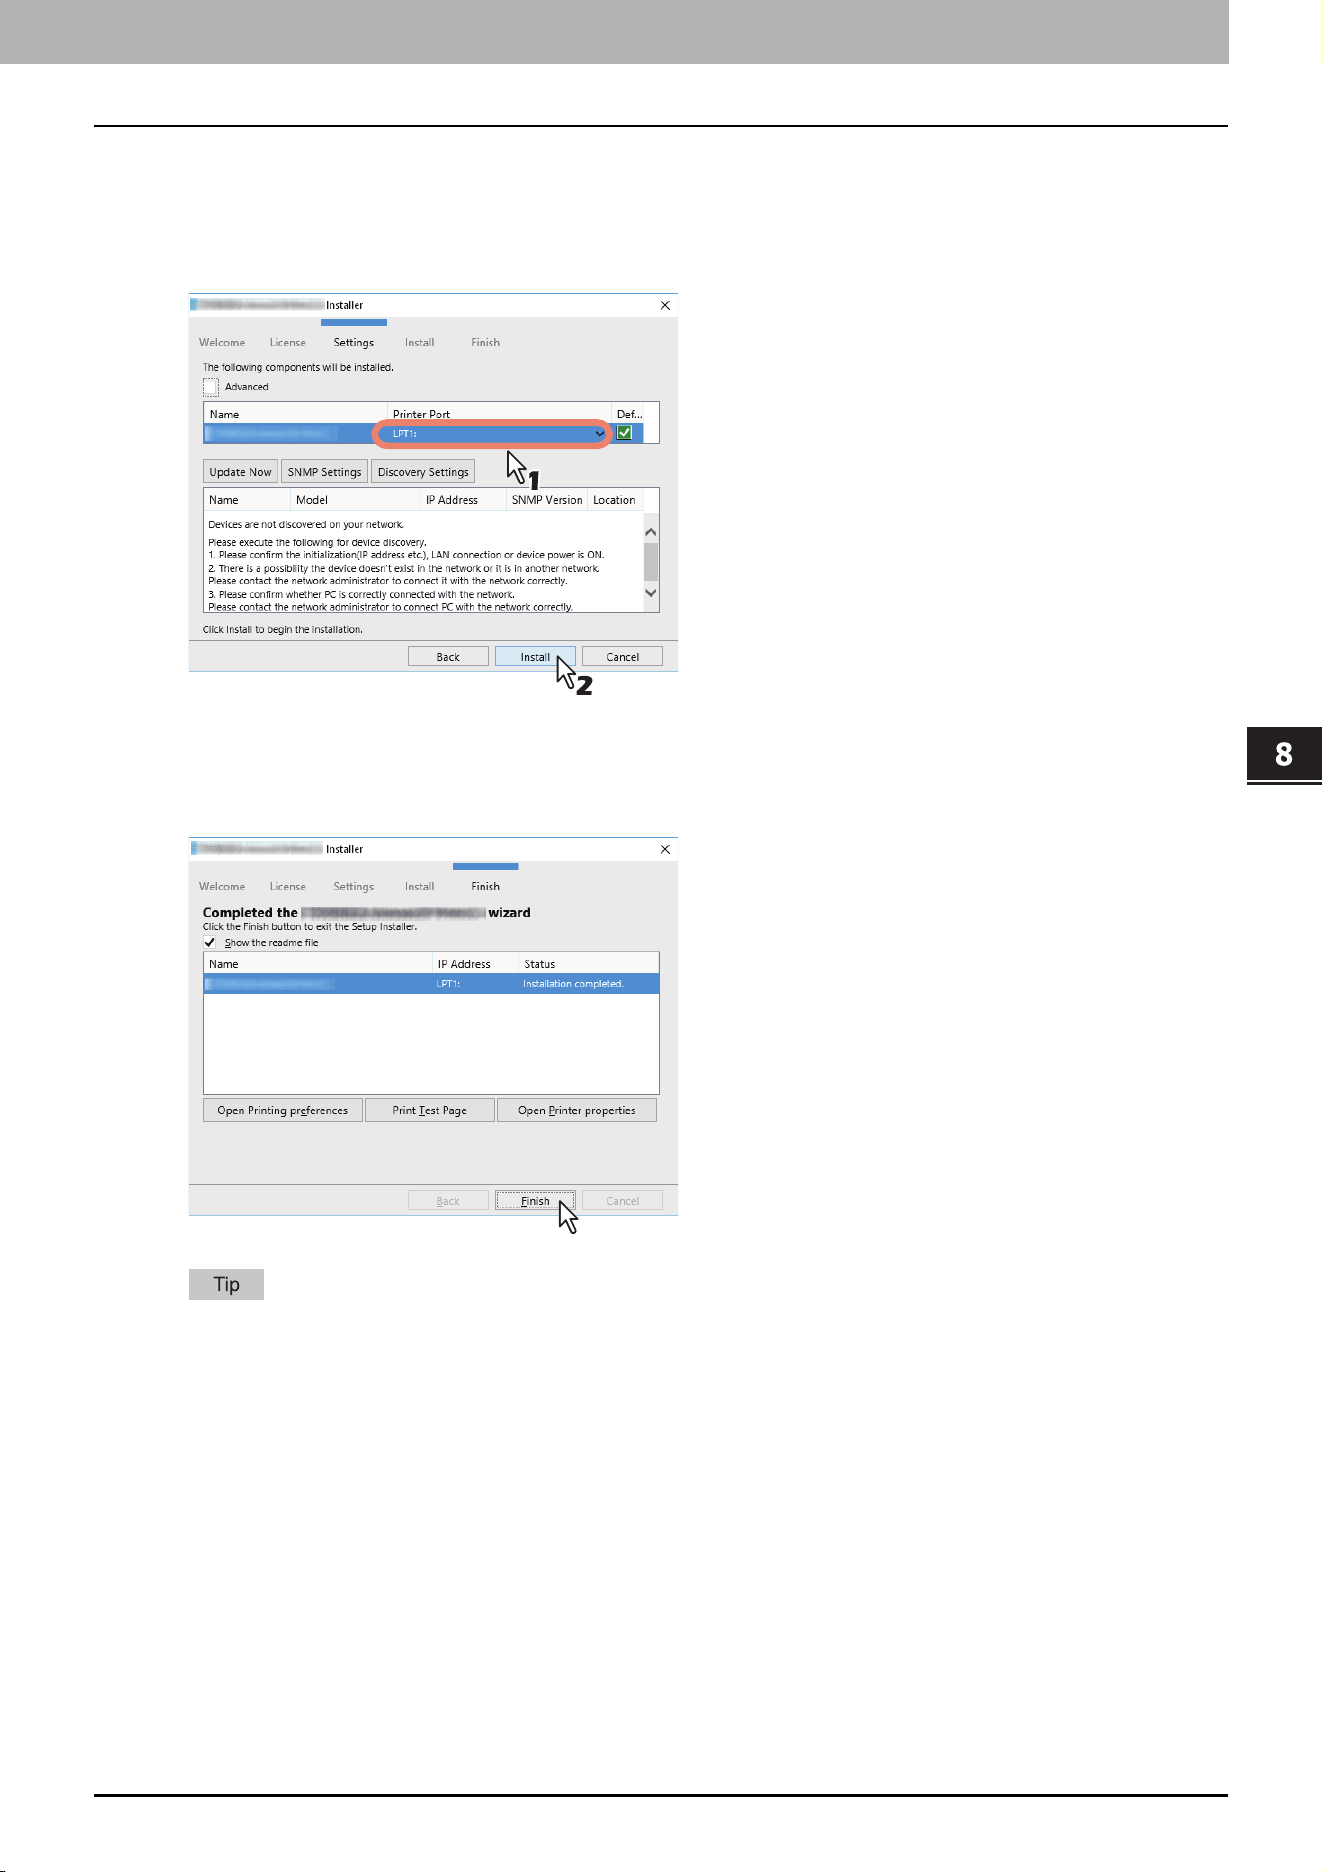
8.Install Disc
Installing the printer drivers by using the individual installers 101
Install Disc
If your TOSHIBA MFP is not found
If your TOSHIBA MFP is not found, you must first install the printer driver by temporarily selecting a local port and then
configuring the Raw TCP/LPR port.
6
Select “LPT1” in [Printer Port] and click [Install].
7
Click [Open Printer properties].
8
For the subsequent steps, refer to the Software Installation Guide.
9
Click [Finish].
The Installer may ask you to restart your computer. If it does, select “Yes, I want to restart my computer now.”
and click [Finish] to restart your computer.
You can set the printer driver and print settings which are required in order to perform test page printing or
normal printing from this equipment. Click the buttons shown below to set them as needed. Setting can be
made even after [Finish] has been clicked.
- Show the readme file: When you select this check box, the Readme file is opened after [Finish] is clicked.
- [Open Printer Preferences]: The [Printer Preferences] dialog box of the installed printer driver is
displayed.
For details about the setting, refer to the Printing Guide.
- [Print Test Page]: Print the test page from this equipment.
- [Open Printer Properties]: The [Printer Properties] dialog box is displayed.
For details about the setting, refer to the Printing Guide.
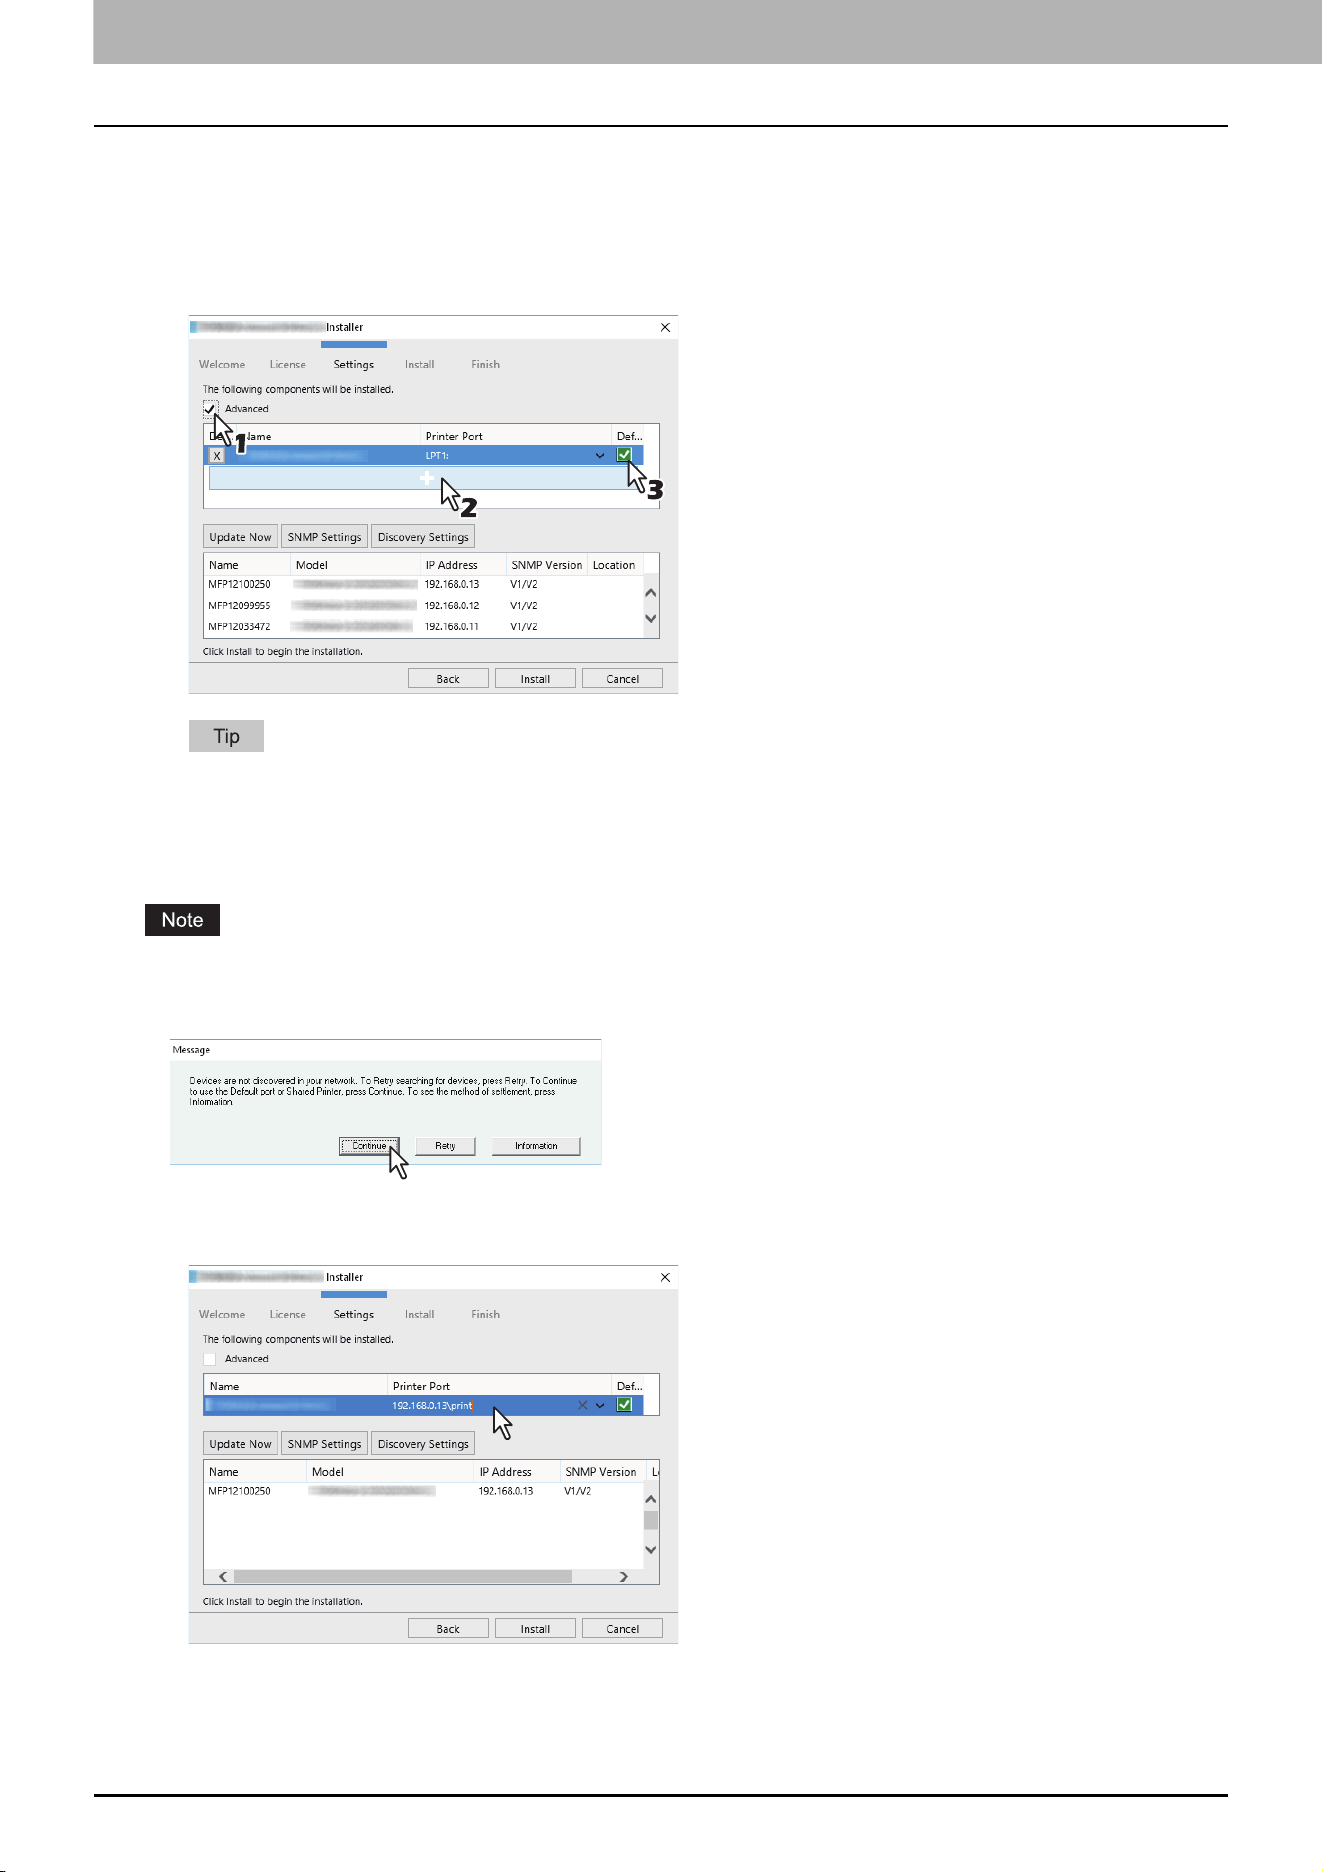
8.Install Disc
102 Installing the printer drivers by using the individual installers
When adding another equipment from the results
1
Select the [Advance] check box.
2
Click the equipment to be added from the results and then [+].
3
Check the [Default] check box of the equipment used as the default printer.
Remove any equipment in which no printer driver is installed by clicking [X].
SMB printing
Install a printer driver by specifying the SMB port manually.
Before starting the configuration, make sure that this equipment is connected to a network and also that its power
is turned ON.
If this equipment is not discovered over the network, a dialog box indicating this appears.
6
Enter a network path shown below in [Printer port].
\\<IP address>\print
7
Click [Install].
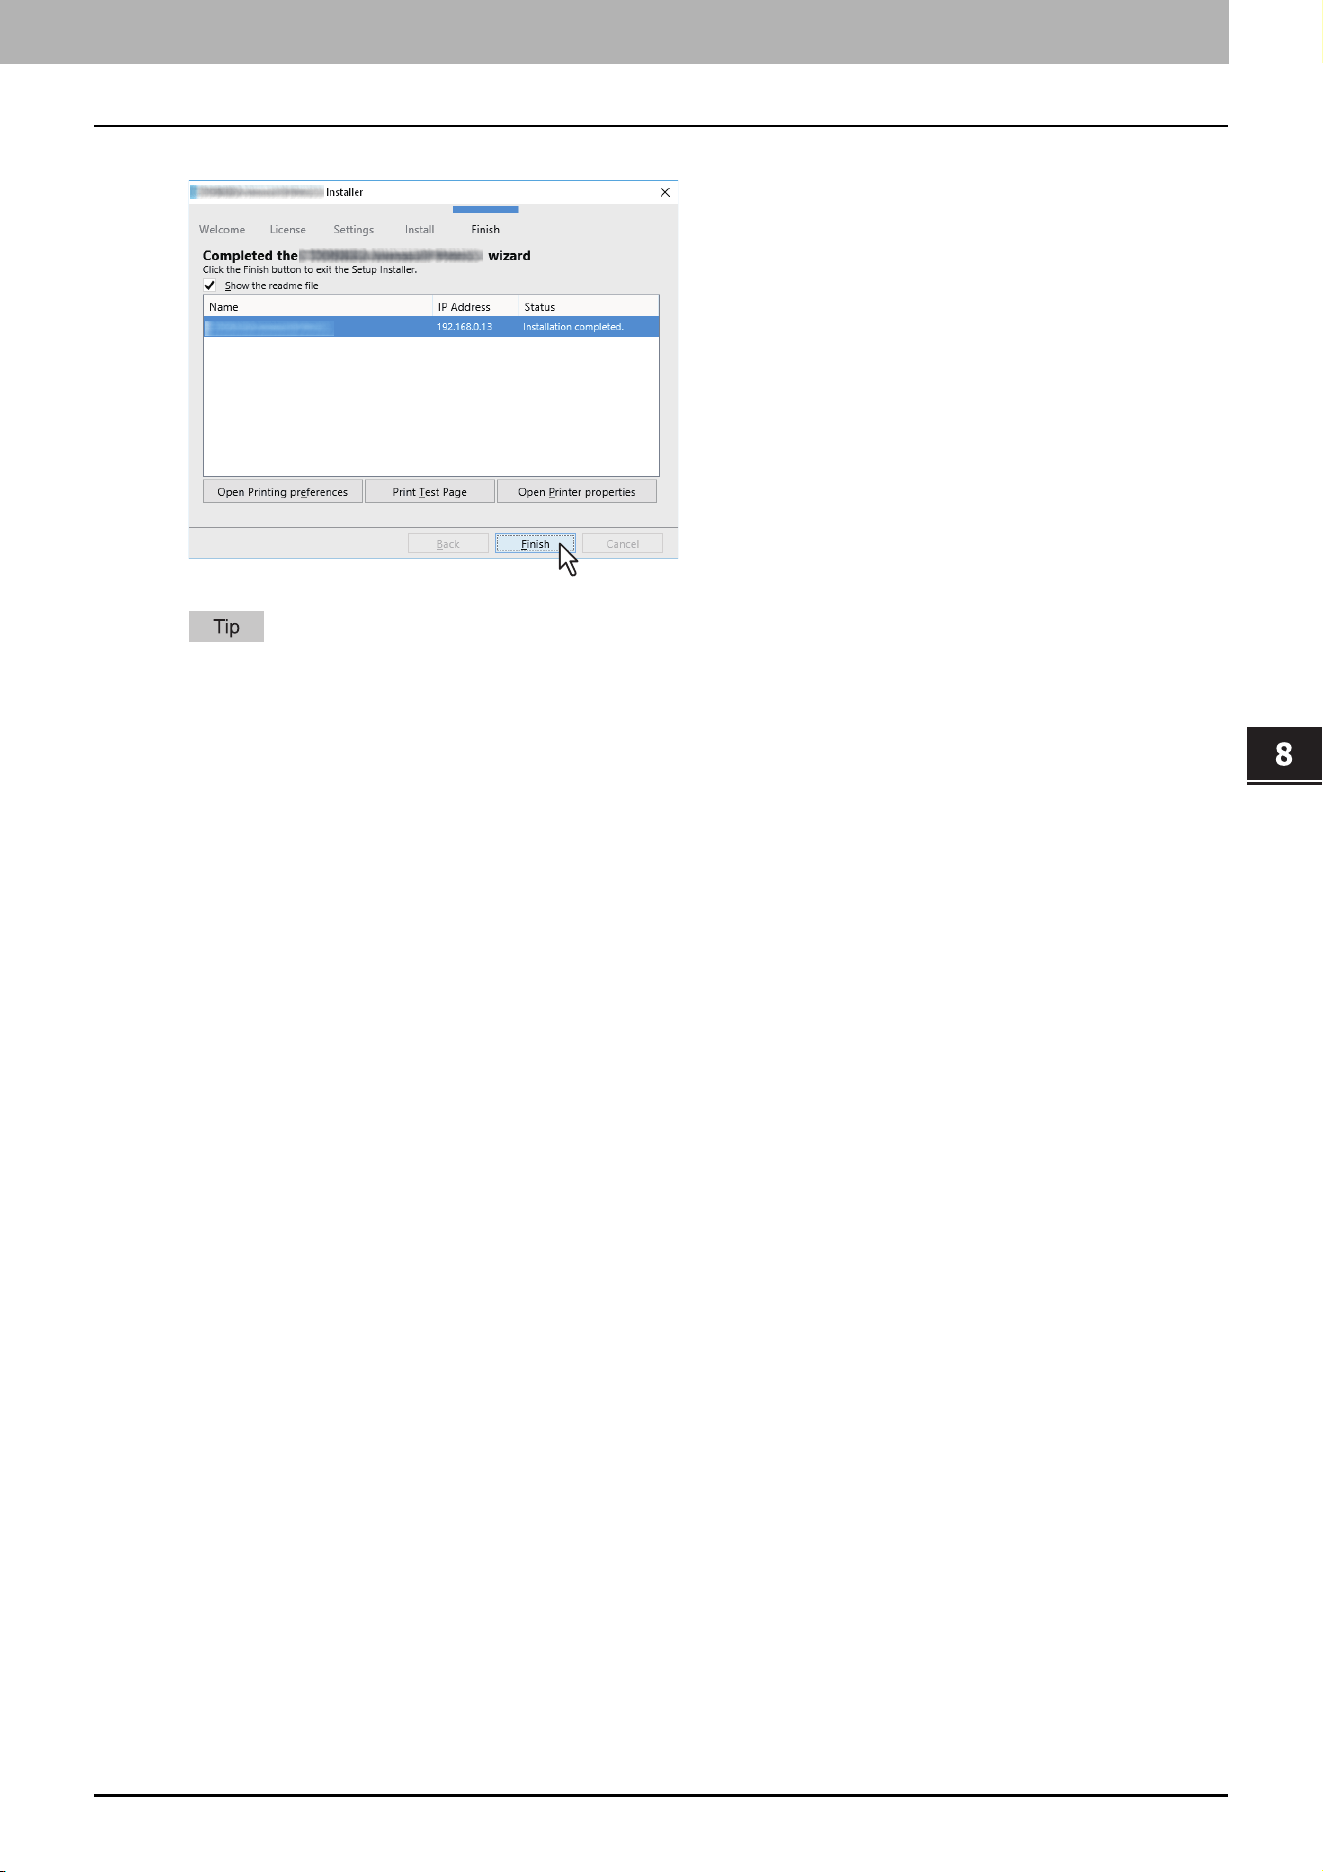
8.Install Disc
Installing the printer drivers by using the individual installers 103
Install Disc
8
Click [Finish].
The Installer may ask you to restart your computer. If it does, select “Yes, I want to restart my computer now.”
and click [Finish] to restart your computer.
You can set the printer driver and print settings which are required in order to perform test page printing or
normal printing from this equipment. Click the buttons shown below to set them as needed. Setting can be
made even after [Finish] has been clicked.
- Show the readme file: When you select this check box, the Readme file is opened after [Finish] is clicked.
- [Open Printer Preferences]: The [Printer Preferences] dialog box of the installed printer driver is
displayed.
For details about the setting, refer to the Printing Guide.
- [Print Test Page]: Print the test page from this equipment.
- [Open Printer Properties]: The [Printer Properties] dialog box is displayed.
For details about the setting, refer to the Printing Guide.
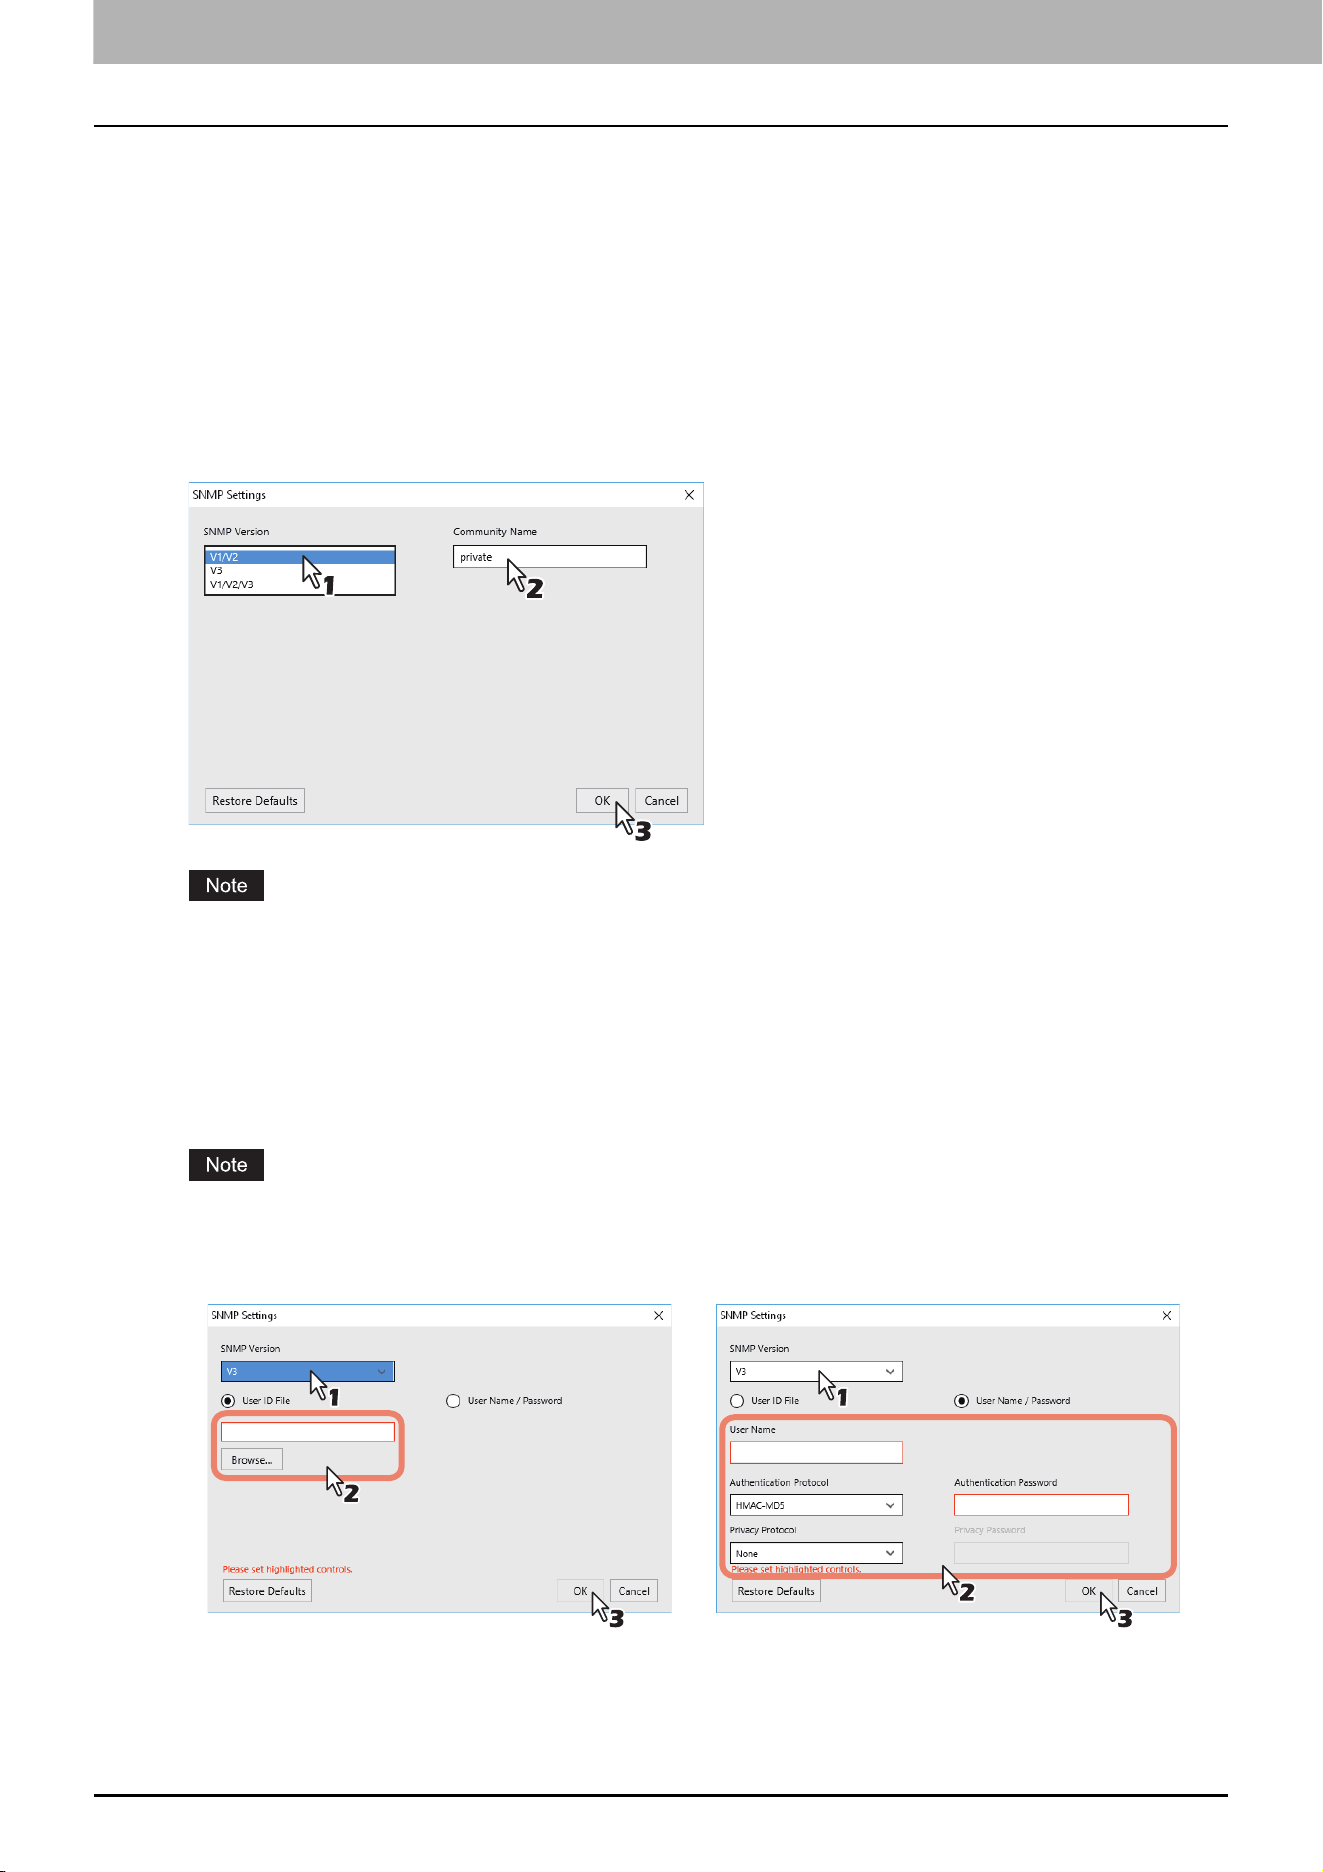
8.Install Disc
104 Installing the printer drivers by using the individual installers
Confirm or change the SNMP settings
[SNMP Settings]
If the SNMP settings are not the same in your TOSHIBA MFP and the [SNMP Settings] dialog box, you cannot find your
TOSHIBA MFP. Verify the correct SNMP settings on the [SNMP Settings] dialog box and change the settings, if needed.
Ask the administrator for details on the SNMP settings configured for your TOSHIBA MFP.
When SNMP V1 and V2 are used
1. Select [V1/V2] if a community name other than “private” (default) is set for the SNMP community name for your
TOSHIBA MFP.
2. Change the SNMP community name.
3. Click [OK].
When you change the SNMP community name, see the following page:
When SNMP V3 is used
1. Select [V3].
2. When a user ID file is used for authentication, click [Browse] to specify the file.
When user authentication information is used for authentication, click [User Name/Password] to enter the
necessary information.
Consult the administrator for preliminary advice on how to authenticate users.
When you change the SNMP settings, see the following page:
3. Click [OK].
* When SNMP V1, V2, and V3 are configured for your TOSHIBA MFP, select [V1/V2/V3] and carry out both of the above settings.
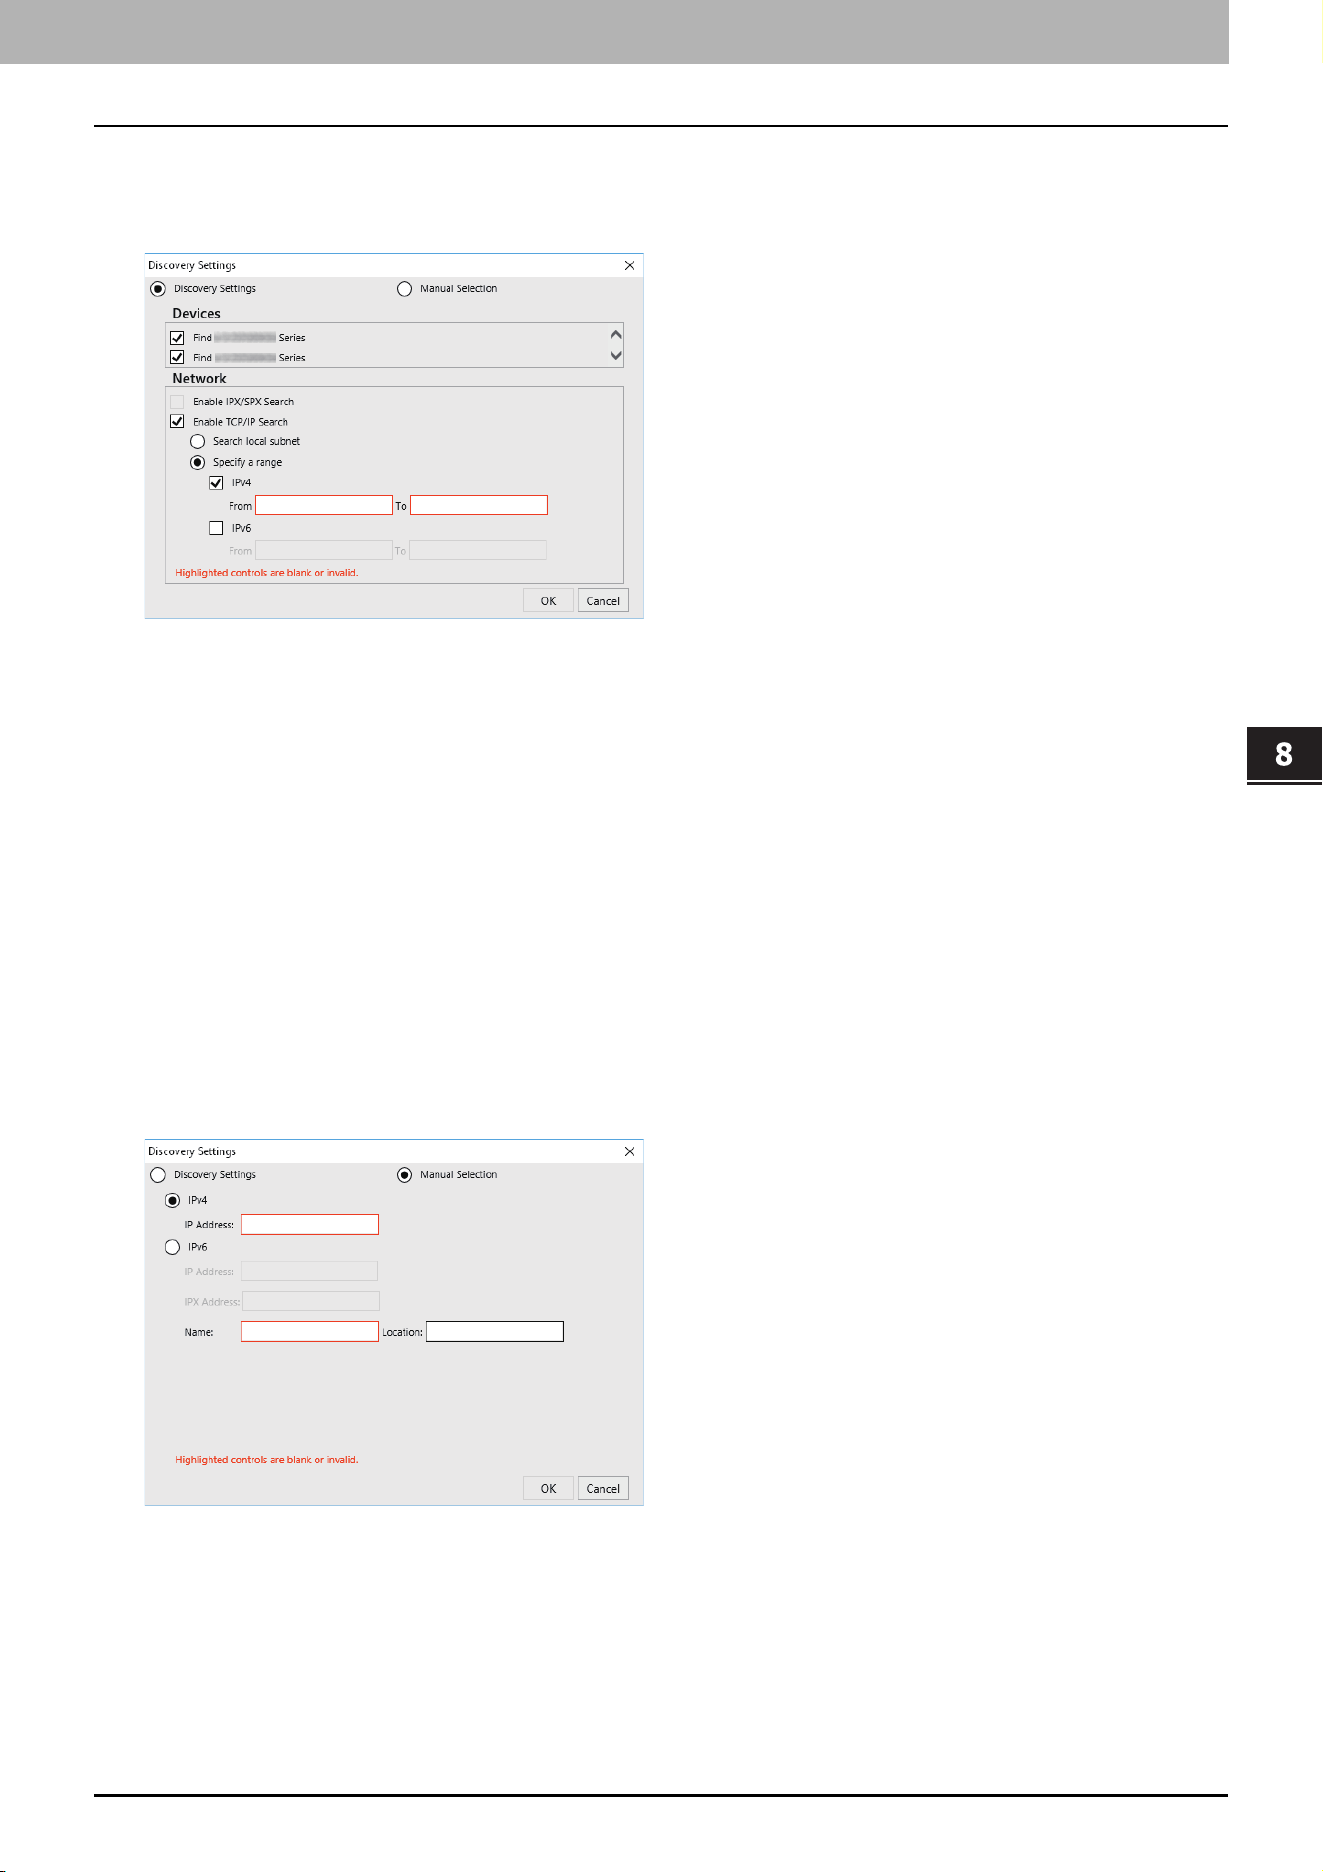
8.Install Disc
Installing the printer drivers by using the individual installers 105
Install Disc
Narrowing Down Search Conditions
If you want to narrow down the search conditions, click [Advanced]. On the [Discovery Settings] dialog box that
appears, make the following settings as required:
1. Devices
Turn on the check box(es) for the MFPs to be searched for.
2. Network
Enable IPX/SPX Search
This function is not available.
Enable TCP/IP Search
Select this option to search for MFPs on your TCP/IP network. This option is available only when the TCP/IP
protocols are installed on your computer. When this option is selected, you need to specify the detailed search
conditions for MFPs on the network.
- Search local subnet—Select this option to search for MFPs in the local subnet. When this option is selected,
select IPv4 or IPv6 check box for specifying the preferred protocol.
- Specify a range — Select this option to search for MFPs in a specific range of IP addresses. When this option is
selected, select IPv4 or IPv6 check box and enter IP addresses in the [From] and [To] boxes to specify the
range.
Manual Selection
Devices in different segments may not be found. If you cannot find your MFP, find it manually from [Manual Selection].
IPv4 IP Address—Select this option to specify the device in the IPv4 address. If this option is selected, enter the IPv4
address of your MFP.
IPv6 IP Address—Select this option to specify the device in the IPv6 address. If this option is selected, enter the IPv6
address of your MFP.
IPX IP Address—Select this option to specify the device in the IPX address. If this option is selected, enter the IPX
address of your MFP.
Name—Enter the name of your MFP.
Location—Enter the location of your MFP.

8.Install Disc
106 Installing the printer drivers by using the individual installers

9.Troubleshooting
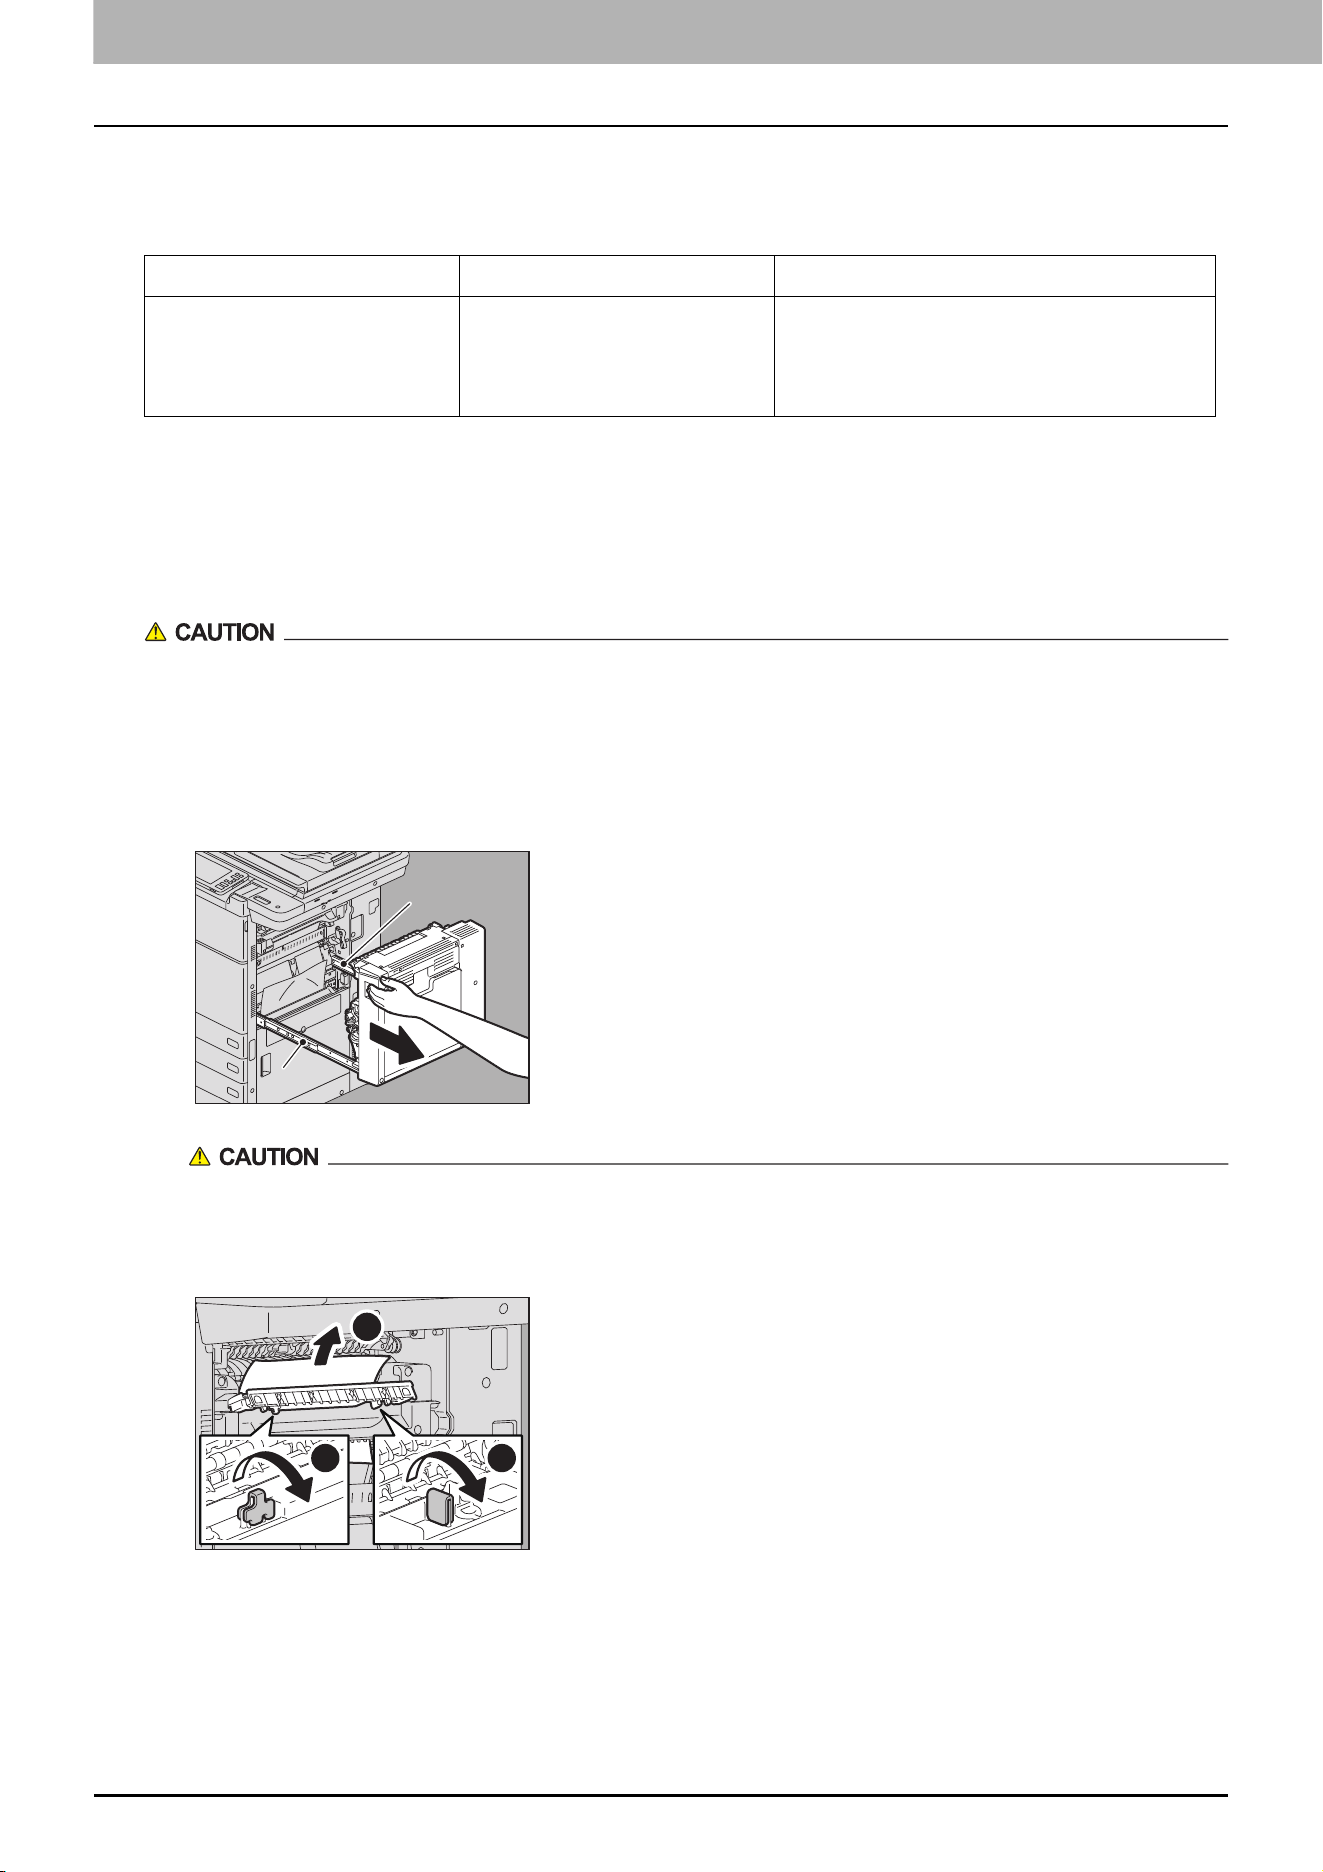
108 Troubleshooting for the Hardware
0.Troubleshooting for the Hardware
Messages Displayed on the Touch Panel
A message appears on the upper part of the screen to notify users of a problem, etc. The major examples of problems
and how to solve them are described in the table below.
Clearing a Paper Misfeed
Right side of the equipment (e-STUDIO7506AC Series, e-STUDIO8508A Series)
Do not touch the fuser unit or the metal portion around it.
Since they are very hot, you could be burned or the shock could cause you to injure your hand in the machine.
Fuser unit
1
Pushing the lock lever, pull out the duplexing unit from the equipment until it stops.
Be careful not to touch the slide rails (A in the figure).
This could injure you.
2
Open the transport guide holding the green knob and then release the misfed paper.
Message Problem Description Corrective Action
Ready (Check Stapler) Staple jam has occurred in the
stapler of the finisher or the
staple sheet has not been fed
sufficiently.
Remove the top staple sheet.
A
A
22
11 11
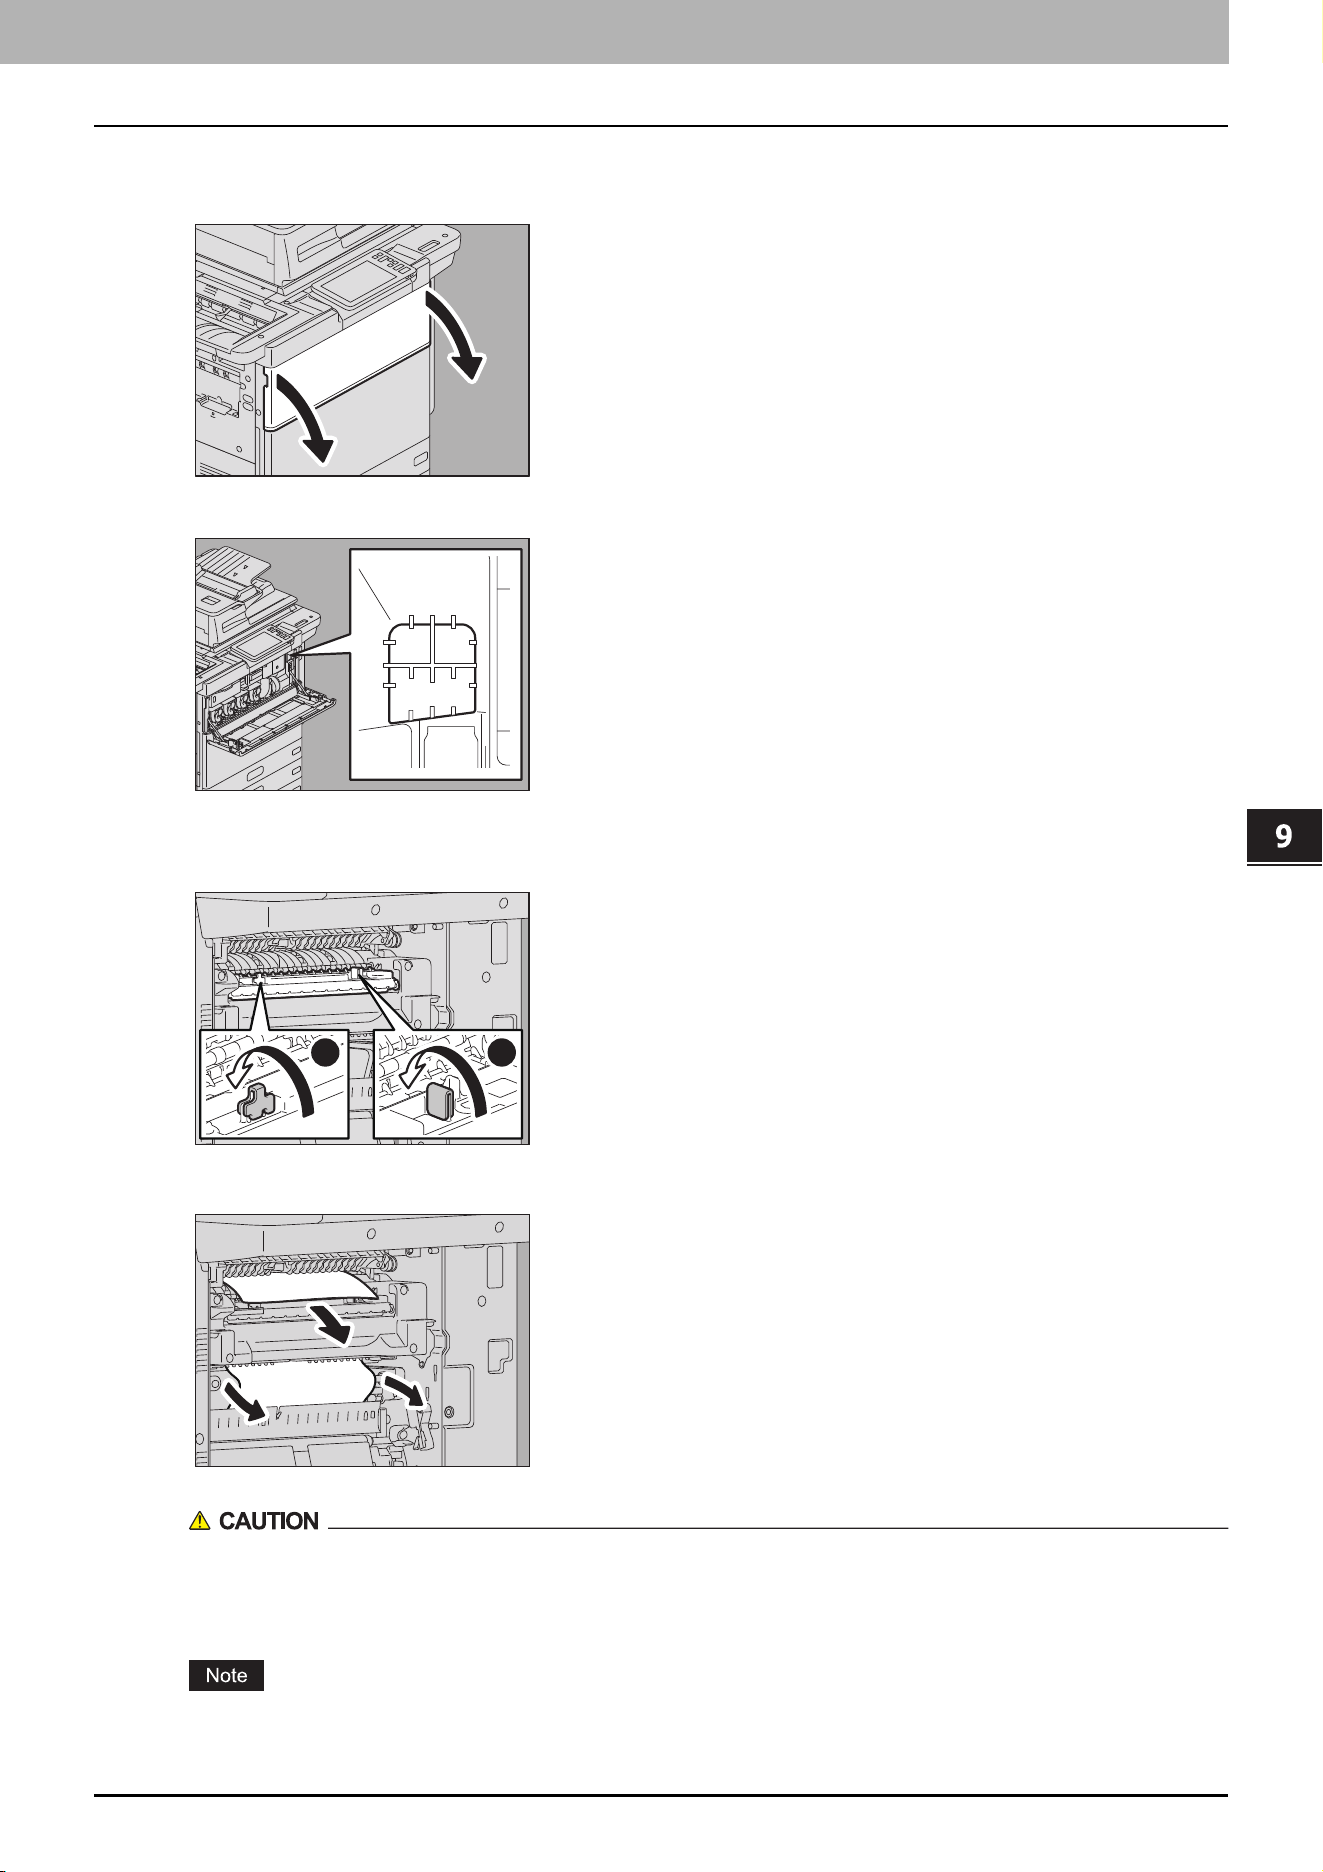
9.Troubleshooting
Troubleshooting for the Hardware 109
Troubleshooting
3
Check the inside of the fuser unit for the hidden misfed paper when you cannot see it.
1. Open the front cover of the equipment.
2. Check if misfed paper remains inside the fuser unit through the window for checking for paper misfeeds.
3. Close the front cover of the equipment.
4
Return the transport guide holding the green knob.
5
Remove any remaining paper from the upper/lower part of the fuser unit.
When you remove paper from the lower part of the fuser unit, grasp its front and rear and carefully pull it
out.
Be careful not to cut yourself on the paper.
Be careful not to touch the transfer belt. This could cause malfunctioning of the equipment or the poor imaging.
11 11
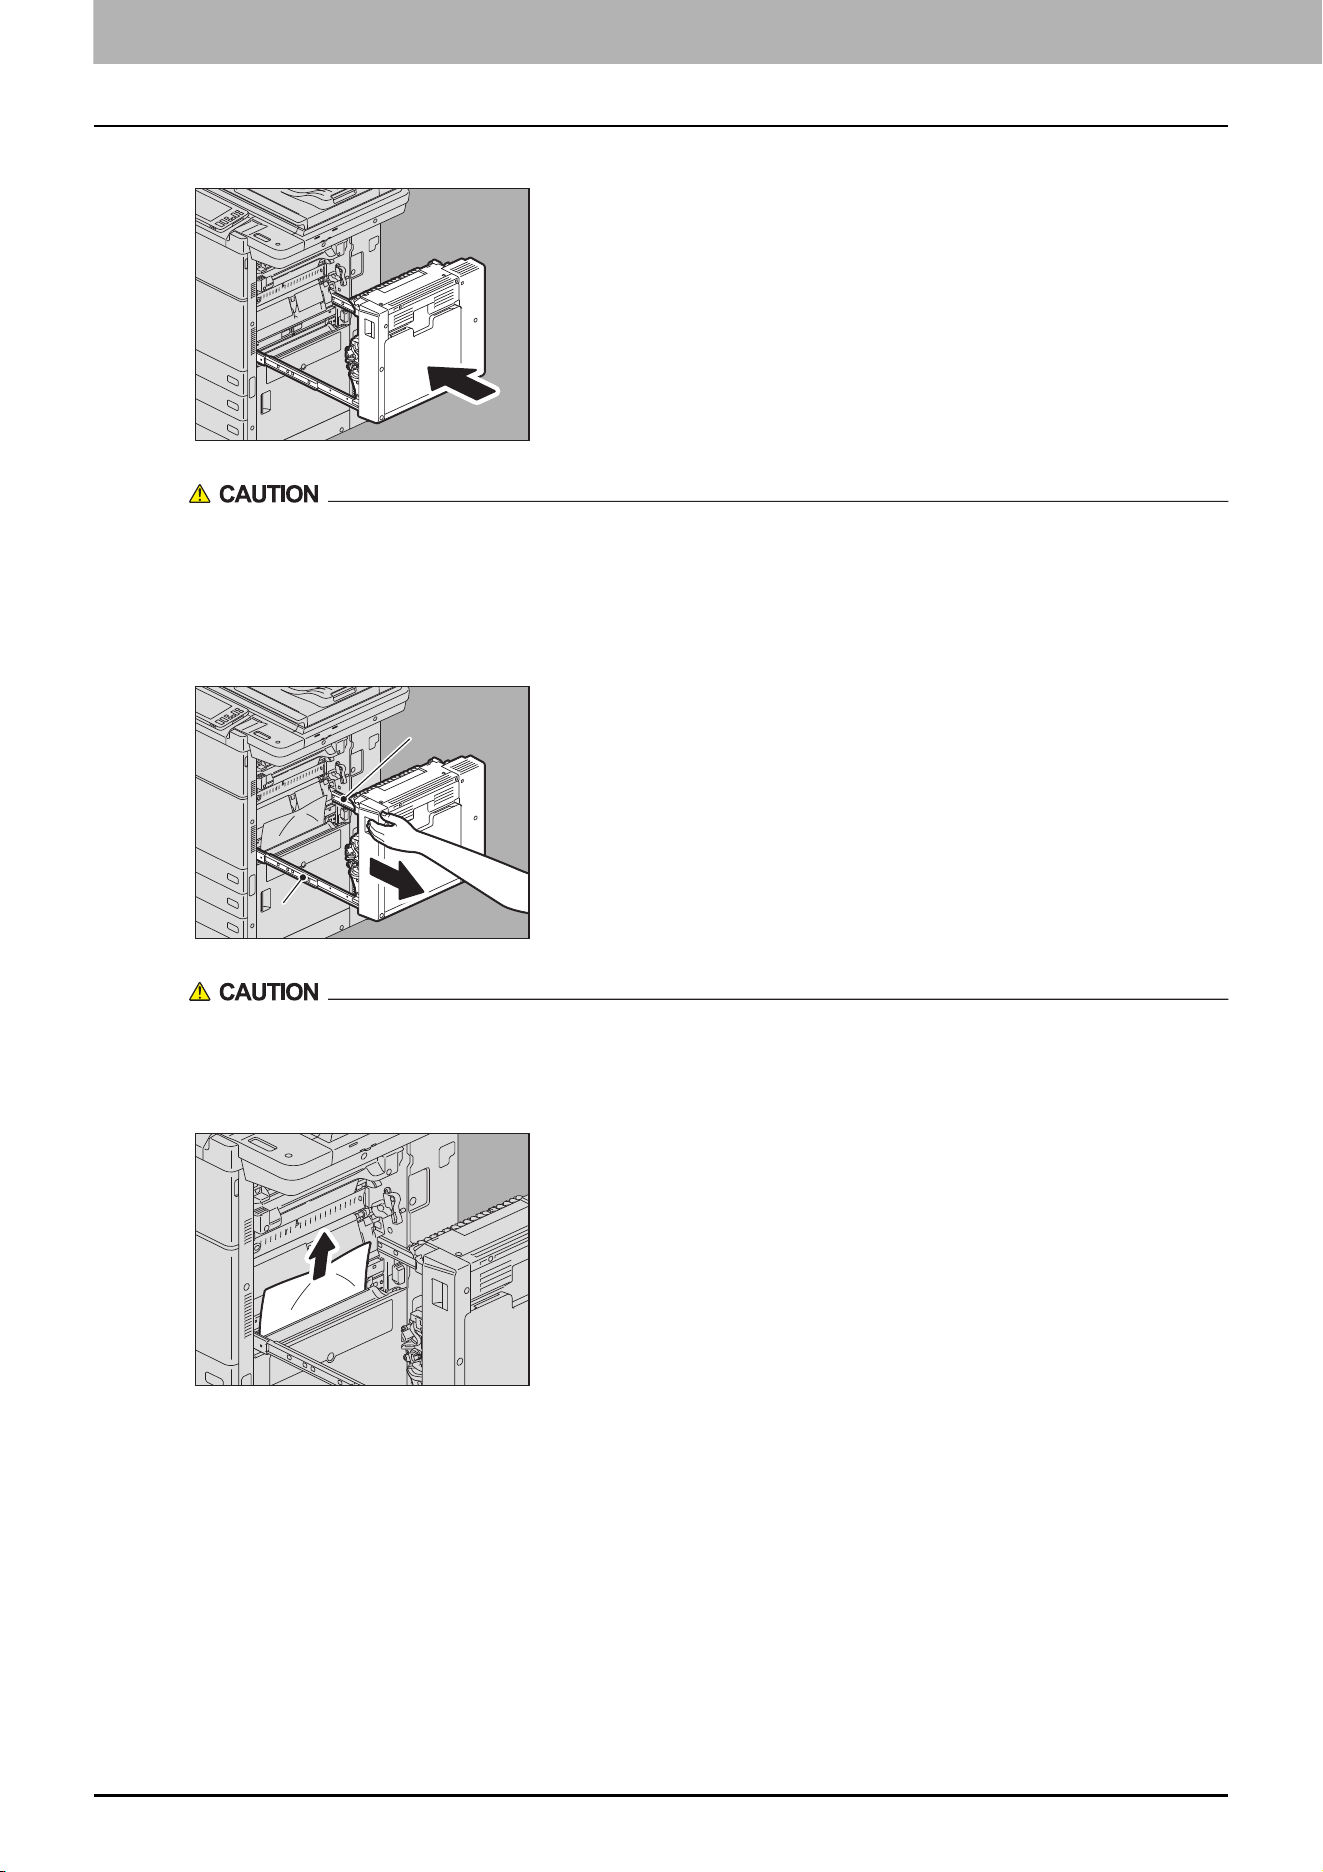
9.Troubleshooting
110 Troubleshooting for the Hardware
6
Close the duplexing unit putting your hands on the position shown in the figure.
Do not put your hand or fingers on the duplexing unit when closing it.
They could be caught and this could injure you.
Transport unit
1
Pushing the lock lever, pull out the duplexing unit from the equipment until it stops.
Be careful not to touch the slide rails (A in the figure).
This could injure you.
2
Remove the misfed paper.
A
A
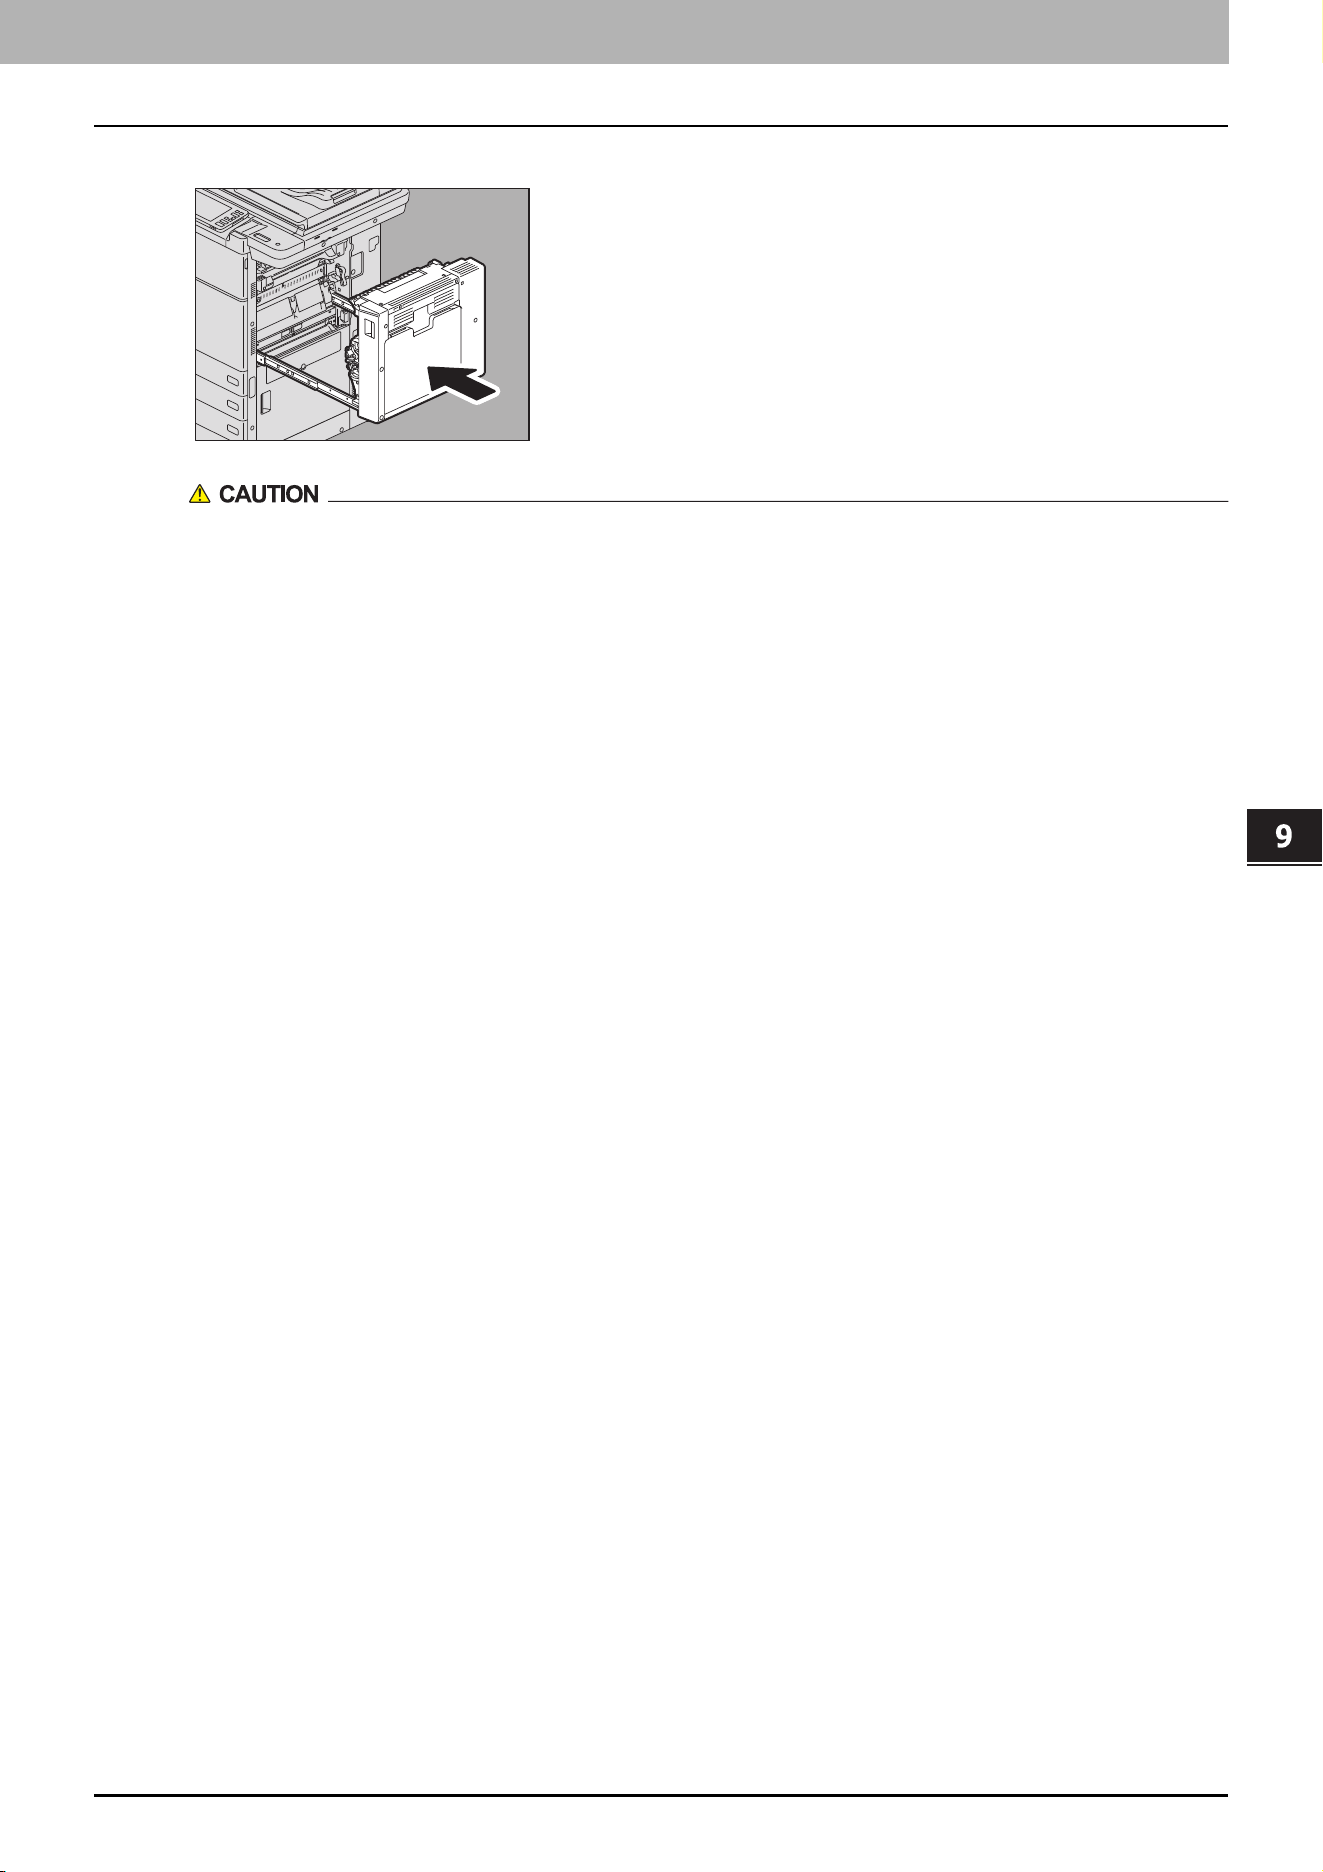
9.Troubleshooting
Troubleshooting for the Hardware 111
Troubleshooting
3
Close the duplexing unit putting your hands on the position shown in the figure.
Do not put your hand or fingers on the duplexing unit when closing it.
They could be caught and this could injure you.

112 Troubleshooting for the Software
0.Troubleshooting for the Software
Faxing Problems
Error messages
Error Codes
Error codes on print jobs
Message Cause Remedy
Fax line1 is out of
order. Reboot the
machine./Fax line2 is
out of order. Reboot
the machine.
An error occurred with the Fax unit. Press the [POWER] button and then [Restart]
on the touch panel. If the error still persists,
contact your service representative.
Error Code Problem Description Corrective Action
4411
Image data generation
failure
Perform printing again or use another printer driver (PS3,
Universal).
In case of Direct printing, check if the file to be printed is broken
(e.g.: The file can be opened on a client PC), or check if the file
format is supported.
4511
Connection timeout Printing might fail since the transmission of the print data stopped
during the communication with a client computer or the
connection from a client PC has not been cut.
Check if the Ethernet cable is connected properly.
In addition, check that the Ethernet settings in the equipment are
the same as those for the hub connected to the equipment. Then
reattempt the communication.
4521
Reach the max number of
connections
Printing has failed since the numbers of the connection have
reached the maximum. Wait for a while and reattempt the
communication. If the error still persists, contact your service
representative.
4522
Registered print job
number reached to limit at
data reception
Since the printing jobs under processing have become full, the job
reception is limited.
1.Wait until the printing of jobs under processing and waiting is
finished and then reattempt the communication.
2.Delete unnecessary private printing jobs and those with no
department codes and then reattempt the communication.
4523
Internal storage device full
at data reception
Since there is not enough space in the internal storage device, the
job reception is limited. Delete unnecessary private printing jobs
and those with no department codes in the internal storage device
and then perform the job.
9.Troubleshooting
Troubleshooting for the Software 113
Troubleshooting
Error codes on transmission and reception
Error codes on scan jobs
Error Code Problem Description Corrective Action
1C10
System access abnormality Turn the power OFF and then back ON. Perform the problem job
again. Check if the SSL/TLS and authentication settings are set
properly in the SMTP Client Setting. For details of the SMTP Client
Setting, refer to the TopAccess Guide.
If the error still persists, contact your service representative.
3B20
Content-Type error Ask the sender to resend the Email with any of the following
conditions.- By attaching only a TIFF-FX format file- By attaching a
PDF, JPEG or XPS format file (multiple files attachment allowed)-
By attaching a file whose format is supported by this equipment.
Error Code Problem Description Corrective Action
Email
2C10, 2C12,
2C13,
2C20-2C22
Wrong Job status A system error has occurred during the sending
of an Email. Try it again. Check if the SSL/TLS
and authentication settings are set properly in
the SMTP Client Setting. For details of the
SMTP Client Setting, refer to the TopAccess
Guide.
If the error still persists, contact your service
representative.
If the error still persists, contact your service
representative.
2C50 Executed Email sending without logging in
being done by a user or department in the
setting which requires authentication
Have a user or a department log in and retry
sending.
Save as File
2D50 Executed [Save as File] without logging in
being done by a user or department in the
setting which requires authentication
Have a user or a department log in and retry
[Save as File].
Store to USB
2E50 Executed [Store to USB] without logging in
being done by a user or department in the
setting which requires authentication
Have a user or a department log in and retry
[Store to USB].
Store to e-Filing
2B51
Failure to process print image Check that the Function List can be outputted
from the Home screen > [User Functions -User-]
> [Admin] tab > [List/Report] > [List] >
[Function]. Try printing again. If the error still
persists, contact your service representative.

9.Troubleshooting
114 Troubleshooting for the Software

10.The Function List
116 FUNCTION LIST (Administrator)
0.FUNCTION LIST (Administrator)
GENERAL
COPY
SCAN
FAX
Function Description User
ENERGY SAVER - ENABLE WEEKLY TIMER Shows whether or not to enable weekly timer. NO
USER INFORMATION CLONING Shows whether the User Information Cloning
function is enabled or disabled.
NO
ADMINISTRATOR’S PASSWORD CLONING Shows whether the Administrator’s Password
Cloning function is enabled or disabled.
NO
HOME SETTING – SYNC SETTING Shows whether or not to synchronize the HOME
screen.
NO
HOME SETTING – USE NETWORK SERVER FOR
SYNC
Shows the network server for synchronization. NO
HOME SETTING – USE MFP FOR SYNC Shows the MFP for synchronization. NO
HOME SETTING – ASSUME THIS MFP IS THE
PRIMARY SERVER
Shows this MFP as the primary server. NO
HOME SETTING – SERVER NAME Shows the name of the server. NO
HOME SETTING – PORT NUMBER Shows the port number of the server. NO
HOME SETTING – USER NAME Shows the name of the user who accesses the
server.
NO
HOME SETTING – ENABLE SSL/TLS Shows whether or not to enable SSL/TLS. NO
Function Description User
OMIT BLANK PAGE Shows whether the Omit Blank Page function is
enabled or disabled.
YES
Function Description User
OMIT BLANK PAGE Shows whether the Omit Blank Page function is
enabled or disabled.
YES
Function Description User
INITIAL SETUP - CALL TIME
*1
Shows the default call time.
NO
INITIAL SETUP - REMOTE RX
*1
Shows whether the Remove RX is enabled or
disabled.
NO
INITIAL SETUP - DIAL IN
*1
Shows whether the Dial In function is enabled or
disabled.
NO
INITIAL SETUP - FAX
*1
Shows the fax number for the Dial In function.
NO
INITIAL SETUP - TEL
*1
Shows the telephone number for the Dial In
function.
NO
INITIAL SETUP - CALLER ID DISPLAY(LINE1) Shows whether the Caller ID Display function is
enabled or disabled for the line 1.
NO
INITIAL SETUP - CALLER ID DISPLAY(LINE2) Shows whether the Caller ID Display function is
enabled or disabled for the line 2.
NO

10.The Function List
FUNCTION LIST (Administrator) 117
The Function List
*1 These are printed only when the FAX Unit is installed.
*2 These are printed only when the FAX Unit and 2nd Line for FAX Unit are installed.
PRINTER/E-FILING
NETWORK SETTING - SESSION - SMB SESSION
Function Description User
CONFIRMATION OF BYPASS PRINTING Shows whether the paper confirmation is required
for the bypass printing.
NO
Function Description User
SMB SERVER PROTOCOL Shows whether the SMB protocol is enabled or
disabled.
NO
RESTRICTION Shows whether or not the print share/file share
functions are restricted.
NO
NETBIOS NAME Shows the NetBIOS name of this equipment. NO
LOGON Shows the log-on setting. NO
WORKGROUP Shows the workgroup of this equipment. NO
DOMAIN Shows the domain name of this equipment. NO
PRIMARY DOMAIN CONTROLLER Shows the primary domain controller address if it
has been set.
NO
BACKUP DOMAIN CONTROLLER Shows the backup domain controller address if it
has been set.
NO
LOGON USER NAME Shows the logon user name of this equipment for
the domain if it has been set.
NO
PRIMARY WINS SERVER Shows the primary WINS server address if it has
been set.
NO
SECONDARY WINS SERVER Shows the secondary WINS server address if it has
been set.
NO
GUEST LOGON Shows whether guests can log on to the SMB
server.
NO
USER NAME Shows the user names of the guests who can log
on to the SMB server.
NO
AUTHENTICATION OF SMB CLIENT Shows the authentication method of SMB client. NO
HOST ANN TX IN SUPER SLEEP MODE Shows whether the host announcement during
super sleep mode is transmitted.
NO
SMB SIGNING OF SMB SERVER Shows the setting of the SMB Signing of SMB
Server.
NO
SMB SIGNING OF SMB CLIENT Shows the setting of the SMB Signing of SMB
Client.
NO
10.The Function List
118 FUNCTION LIST (Administrator)
NETWORK SETTING - NETWORK SERVICE - SYSLOG SETTING
NETWORK SETTING - PRINT SERVICE SETTING - MULTI STATION PRINT
*1
*1 Printed only when the Multi Station option is installed.
Function Description User
ENABLE SYSLOG Shows whether syslog is transmitted. NO
SERVER IP ADDRESS Shows the IP address of syslog server. NO
PORT NUMBER Shows the port number which syslog server uses. NO
PROTOCOL Shows the communication protocol. NO
ENABLE SSL/TLS Shows whether SSL/TLS is used. NO
SEVERITY - ERROR Shows the error in the syslog. NO
SEVERITY - WARNING Shows the warning in the syslog. NO
SEVERITY - INFORMATION Shows the information in the syslog. NO
FACILITY - SECURITY/AUTHORIZATION Shows the security/authorization in the syslog. NO
FACILITY - LOCAL USE0 Shows the local use0 in the syslog. NO
FACILITY - LOCAL USE1 (JOB LOG) Shows the local use1 (job log) in the syslog. NO
Function Description User
ENABLE MULTI STATION PRINT Shows whether multi station print is enabled. NO
DOCUMENT EXPIRED TIME Shows the period for the document is stored. NO
NUMBER OF DISPLAY JOB Shows the number of job displayed. NO
SORT ORDER Shows the order for display. NO
PRINT ORDER Shows the order for printing. NO
ENABLE PRINTED JOBS Shows whether the printing of printed jobs is
enabled.
NO
CONNECTION SETTING - PORT NUMBER Shows the port number for the multi station print. NO
CONNECTION SETTING - ENABLE SSL/TLS Shows whether SSL/TLS is enabled or disabled. NO
CONNECTION SETTING - AUTHENTICATION Shows whether the SSL/TLS authentication is
enabled or disabled.
NO
CONNECTION SETTING - USER NAME Shows the user names for the multi station print. NO
CONNECTION MFP1 to 10 Shows the connected MFP 1 to 10. NO
GROUP CONNECTION ENABLE Shows whether the Group Connection function is
enabled or disabled.
NO
OWN GROUP NAME Shows the name of the group to which the
equipment belongs.
NO
CONNECTION GROUP1 to 9 - GROUP NAME Shows the name of the group 1 - 9. NO
CONNECTION GROUP1 to 9 - PRIMARY IP ADDRESS
/ HOST NAME
Shows the primary address/host name of the
group 1 - 9.
NO
CONNECTION GROUP1 to 9 - SECONDARY IP
ADDRESS / HOST NAME
Shows the secondary address/host name of the
group 1 - 9.
NO
10.The Function List
FUNCTION LIST (Administrator) 119
The Function List
SECURITY SETTING - AUTHENTICATION - DEPARTMENT SETTING
SECURITY SETTING - AUTHENTICATION - USER AUTHENTICATION SETTING
Function Description User
DEPARTMENT CODE Shows whether the department code
management is enabled or disabled.
NO
DEPARTMENT CODE - COPY Shows whether the department code
management (copy) is enabled or disabled.
NO
DEPARTMENT CODE - FAX Shows whether the department code
management (fax) is enabled or disabled.
NO
DEPARTMENT CODE - PRINT Shows whether the department code
management (print) is enabled or disabled.
NO
DEPARTMENT CODE - SCAN Shows whether the department code
management (scan) is enabled or disabled.
NO
DEPARTMENT CODE - LIST Shows whether the department code
management (list) is enabled or disabled.
NO
DEPARTMENT CODE - USER FUNCTIONS Shows whether the department code
management (user function) is enabled or
disabled.
NO
DEPARTMENT CODE - EWB Shows whether the department code
management (EWB) is enabled or disabled.
NO
REQUIRE DEPARTMENT NUMBER IN USER
REGISTRATION
Shows whether the department number is
required or not for user registration.
NO
INVALID DEPARTMENT CODE PRINT JOB Shows the handling method for invalid print jobs. NO
Function Description User
USER AUTHENTICATION Shows whether the user authentication is enabled
or disabled.
NO
USER AUTHENTICATION ACCORDING TO
FUNCTION
Shows whether the user authentication according
to function is enabled or disabled.
NO
USER AUTHENTICATION ACCORDING TO
FUNCTION - COPY
Shows whether the user authentication (copy) is
enabled or disabled.
NO
USER AUTHENTICATION ACCORDING TO
FUNCTION - FAX
Shows whether the user authentication (fax) is
enabled or disabled.
NO
USER AUTHENTICATION ACCORDING TO
FUNCTION - PRINT
Shows whether the user authentication (print) is
enabled or disabled.
NO
USER AUTHENTICATION ACCORDING TO
FUNCTION - SCAN
Shows whether the user authentication (scan) is
enabled or disabled.
NO
USER AUTHENTICATION ACCORDING TO
FUNCTION - LIST
Shows whether the user authentication (list) is
enabled or disabled.
NO
USER AUTHENTICATION ACCORDING TO
FUNCTION - USER FUNCTIONS
Shows whether the user authentication (user
function) is enabled or disabled.
NO
USER AUTHENTICATION ACCORDING TO
FUNCTION - EWB
Shows whether the user authentication (EWB) is
enabled or disabled.
NO
AUTHENTICATION METHOD FOR ADMIN Shows the authentication method for
administrator.
NO
AUTHENTICATION FAILED PRINT JOB Shows the handling method for print jobs of when
the authentication failed.
NO

10.The Function List
120 FUNCTION LIST (Administrator)
AUTO RELEASE ON LOGON Shows whether the Auto Release on Logon
function is enabled or disabled.
NO
PROJECT MANAGEMENT Shows whether the project management is
enabled.
NO
PRINT JOB (WITHOUT PROJECT CODE) Shows how job without project code is processed
when the project management is enabled.
NO
ENABLE GUEST USER Shows whether or not operations by guest users
are accepted.
NO
AUTHENTICATION TYPE Shows the authentication type. NO
Function Description User

INDEX 121
INDEX
Symbols
[?] (Help) button.............................................................. 10
A
Activate............................................................................ 90
Activating the license...................................................... 37
ADF scan noise ................................................................ 17
Application List ............................................................... 87
C
Confirmation of Bypass Printing .................................... 49
Copy................................................................................. 32
Cover Sheet ..................................................................... 25
Create Clone File settings............................................... 78
Create LDAP Information................................................ 63
Creating clone files ......................................................... 46
Creating or installing clone files..................................... 44
D
Deactivating the license ................................................. 41
E
Edit LDAP Information .................................................... 63
Error codes .................................................................... 112
print jobs .................................................................... 112
scan jobs .................................................................... 113
transmission and reception ...................................... 113
Error messages.............................................................. 112
Exporting the license ...................................................... 42
F
Fonts ................................................................................ 25
Footer .............................................................................. 25
FUNCTION LIST
Administrator............................................................. 116
H
Header Text ..................................................................... 25
Home Data Sync button ................................................. 10
Home Setting .................................................................. 55
Home Setting button ...................................................... 10
I
Install Clone File settings................................................ 80
Installing an option......................................................... 35
Installing the clone data ................................................. 44
J
Job Status button ........................................................... 10
L
LDAP Client settings........................................................ 62
License............................................................................. 89
License List ...................................................................... 89
M
MailBox Setting (Mailbox)............................................... 52
Managing the option licenses......................................... 33
Message ........................................................................... 26
N
Next button ..................................................................... 10
O
Omit Blank Page .............................................................. 32
P
Page Position indicator................................................... 10
Panel View........................................................................ 84
Paper misfeed - clearing
Fuser unit.................................................................... 108
Right side of the equipment ...................................... 108
Transport unit ............................................................ 110
PDF/A Fileformat Setting ................................................ 57
[Preview] .......................................................................... 21
Preview ...................................................................... 14, 25
Procedure for Home Data Synchronization................... 93
Public Home Settings...................................................... 86
Public Theme Settings .................................................... 85
R
Recall button ................................................................... 10
Recipient’s Information .................................................. 26
Reference Number .......................................................... 26
Restore Defaults .............................................................. 26
S
Scan.................................................................................. 32
Sender Information......................................................... 26
Server Assignment screen............................................... 65
Setting Home Data Synchronization.............................. 93
Setting up Category Setting............................................ 79
Setting up Clone File ....................................................... 78
Setting up Clone File Information .................................. 81
Setting up Default Direct Print Setting........................... 69
Setting up Driver Customization Packages Setting....... 71
Setting up File Upload..................................................... 80
Setting up FTP Print ........................................................ 73
Setting up IPP Print ......................................................... 72
Setting up Multi Station Print ......................................... 74
Setting up Remote 1 and Remote 2................................ 67
Setting up Setting data included in Clone File .............. 81
Setting up SMB ................................................................ 57
Simple Scan ..................................................................... 11
Simple Screen Settings ................................................... 87
Status button................................................................... 10
Subject ............................................................................. 26
T
Total Count ...................................................................... 54
Troubleshooting for the Hardware............................... 108
U
Upload Software settings ............................................... 76
User Paper Type .............................................................. 83
V
Viewing license information ........................................... 34
Viewing product information.......................................... 33
VNC Setting ...................................................................... 66

122 INDEX

FC-2000AC/2500AC
FC-2505AC/3005AC/3505AC/4505AC/5005AC
DP-2008A/2508A/3008A/3508A/4508A/5008A
FC-5506AC/6506AC/7506AC
DP-5508A/6508A/7508A/8508A
DP-3535/4535/5035
OME18007200

1-11-1, OSAKI, SHINAGAWA-KU, TOKYO, 141-8562, JAPAN
MULTIFUNCTIONAL DIGITAL COLOR SYSTEMS /
MULTIFUNCTIONAL DIGITAL SYSTEMS
Operator’s Manual for the Latest Functions
© 2018 TOSHIBA TEC CORPORATION All rights reserved
Patent; http://www.toshibatec.com/en/patent/
R180620V3200-TTEC
Ver00 F Issued in Aug. 2018